
EE-379 Embedded Systems and Applications (Serial) Buses · UART System block diagram • UARTs are...
40
1 EE-379 Embedded Systems and Applications (Serial) Buses Cristinel Ababei Department of Electrical Engineering, University at Buffalo Spring 2013 Note: This course is offered as EE 459/500 in Spring 2013 Communication systems – the layered view 1) Address information field physical address specifying the destination/source computers logical address specifying the destination/source processes (e.g., users) 2) Synchronization or handshake field Physical synchronization like shared clock, start and stop bits OS synchronization like request connection or acknowledge Process synchronization like semaphores 3) Data field ASCII text (raw or compressed) Binary (raw or compressed) 4) Error detection and correction field Vertical and horizontal parity Checksum Logical redundancy check (LRC) Block correction codes (BCC
Transcript of EE-379 Embedded Systems and Applications (Serial) Buses · UART System block diagram • UARTs are...

1
EE-379 Embedded Systems and Applications (Serial) Buses
Cristinel Ababei Department of Electrical Engineering, University at Buffalo
Spring 2013 Note: This course is offered as EE 459/500 in Spring 2013
Communication systems – the layered view
1) Address information field physical address specifying the destination/source computers
logical address specifying the destination/source processes (e.g., users)
2) Synchronization or handshake field Physical synchronization like shared clock, start and stop bits
OS synchronization like request connection or acknowledge
Process synchronization like semaphores
3) Data field ASCII text (raw or compressed)
Binary (raw or compressed)
4) Error detection and correction field Vertical and horizontal parity
Checksum
Logical redundancy check (LRC)
Block correction codes (BCC

2
Outline
• UART
• CAN
• I2C
• SPI
Basics • The most basic method for communication with an
embedded processor is asynchronous serial. • It is implemented over a symmetric pair of wires
connecting two devices (referred as host and target here, though these terms are arbitrary).
• Whenever the host has data to send to the target, it does so by sending an encoded bit stream over its transmit (TX) wire. This data is received by the target over its receive (RX) wire.
• The communication is similar in the opposite direction.

3
Basics
• This mode of communications is called asynchronous because the host and target share no time reference (no clock signal). Instead, temporal properties are encoded in the bit stream by the transmitter and must be decoded by the receiver.
• A commonly used device for encoding and decoding such asynchronous bit streams is a Universal Asynchronous Receiver/Transmitter (UART).
UART • UART is a circuit that sends parallel data through a
serial line.
• UARTs are frequently used in conjunction with the RS-232 standard (or specification), which specifies the electrical, mechanical, functional, and procedural characteristics of two data communication equipment.
• Other used standards: EIA, RS-422, RS-485
• A UART includes a transmitter and a receiver. – The transmitter is a special shift register that loads data in
parallel and then shifts it out bit by bit at a specific rate.
– The receiver shifts in data bit by bit and reassembles the data.

4
UART
15
Vss
5
4
3
1
2
9
8
7
6
DB9 female
Sin
Sout
U0Rx
U0Tx
Microcontroller
UART89
710
6
0.1 F
2
0.1 F
0.1 F5
4
0.1 F3
1
0.1 F16
+3.3V
MAX3232
+5.5V
-5.5V
TxD
RxD
DB25
Pin
RS232
Name
DB9
Pin
EIA-574
Name
Signal Description True DTE DCE
2 BA 3 103 TxD Transmit Data -5.5V out in
3 BB 2 104 RxD Receive Data -5.5V in out
7 AB 5 102 SG Signal Ground
Level converter
UART System block diagram • UARTs are useful in applications where a lower cost of
connection is desired.
• A UART takes a parallel data stream and funnels it down to a serial data stream at the transceiver end and then returns the data stream to a parallel signal at the receiver end.
• This lowers the cost of connection by – Decreasing the number of transceivers that are necessary.
– Enabling the connecting cable to be less costly and less bulky.
RS-232 RS-485
Serial Signal 8 bit parallel
signal
RS - 232 ( SN75LV4737A) UART
(TL16C550C)
UART
RS-232 RS-485 UART
(TL16C550C) UART
8 bit parallel
signal

5
UART block diagram
Transmitter Operation
• Microcontroller waits until TDRE = '1'
– Loads data into TDR
– Clears TDRE
• UART transfers data from TDR to TSR
– Sets TDRE
• UART outputs start bit ('0') then shifts TSR right eight times followed by a stop bit ('1')

6
Transmitter SM Chart
UART transmission details • The serial line is ‘1’ when it is idle. • The transmission starts with a start-bit, which is ‘0’,
followed by data-bits and an optional parity-bit, and ends with stop-bits, which are ‘1’.
• The number of data-bits can be 6, 7, or 8. • The optional parity bit is used for error detection.
– For odd parity, it is set to ‘0’ when the data bits have an odd number of ‘1’s.
– For even parity, it is set to ‘0’ when the data-bits have an even number of ‘1’s.
• The number of stop-bits can be 1, 1.5, or 2.

7
UART “agreement”
• No clock information is conveyed through the serial line.
• Before the transmission starts, the transmitter and receiver must agree on a set of parameters in advance:
– the baud-rate (i.e., number of bits per second),
– the number of data bits and stop bits
– use of parity bit
Receiver Operation
• UART waits for start bit
– Shifts bits into RSR
• When all data bits and stop bit are received
– RSR loaded into RDR
– Set RDRF
• Microcontroller waits until RDRF is set
– Read RDR
– Clear RDRF
8
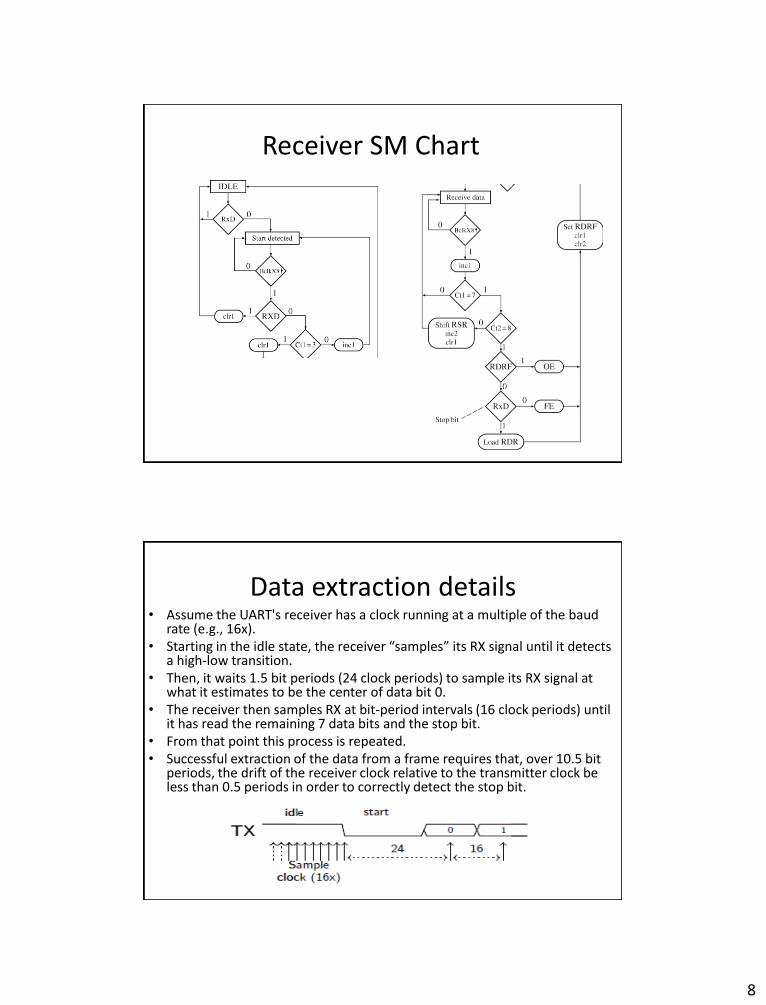
Receiver SM Chart
Data extraction details • Assume the UART's receiver has a clock running at a multiple of the baud
rate (e.g., 16x). • Starting in the idle state, the receiver “samples” its RX signal until it detects
a high-low transition. • Then, it waits 1.5 bit periods (24 clock periods) to sample its RX signal at
what it estimates to be the center of data bit 0. • The receiver then samples RX at bit-period intervals (16 clock periods) until
it has read the remaining 7 data bits and the stop bit. • From that point this process is repeated. • Successful extraction of the data from a frame requires that, over 10.5 bit
periods, the drift of the receiver clock relative to the transmitter clock be less than 0.5 periods in order to correctly detect the stop bit.

9
DCE and DTE • Original purpose of the UART was for PCs to
communicate via the telephone network
• Telephones were for voice communication (analog signals) whereas computers need so exchange discrete data (digital signals)
• Special ‘communication equipment’ was needed for doing the signal conversions (i.e., a modulator/demodulator, or modem)
PC with a modem
computer terminal
modem
serial cable
phone wire
Data Terminal Equipment (DTE)
Data Communications Equipment (DCE)

10
Normal 9-wire serial cable
1
5
6
9
1 6
9
Carrier Detect
Rx data
Tx data
Data Terminal Ready
Signal Ground
Data Set Ready
Request To Send
Clear To Send
Ring Indicator
5
Signal functions • CD: Carrier Detect The modem asserts this signal to
indicate that it successfully made its connection to a remote device
• RI: Ring Indicator The modem asserts this signal to indicate that the phone is ringing at the other end of its connection
• DSR: Data Set Ready Modem to PC
• DTR: Data Terminal Ready PC to Modem
• RTS: Request To Send PC is ready for the modem to relay some received data
• CLS: Clear To Send Modem is ready for the PC to begin transmitting some data

11
9-wire null-modem cable
CD
RxD
TxD
GND
DSR
DTR
RTS
CTS
RI
CD
RxD
TxD
GND
DSR
DTR
RTS
CTS
RI
Data Terminal Equipment
Data Terminal Equipment
no modems
UART use examples • UARTs can be used to interface to a wide variety
of other peripherals – Widely available GSM/GPRS cell phone modems – Bluetooth modems can be interfaced to a
microcontroller UART – GPS receivers frequently support UART interfaces

12
Outline
• UART
• CAN
• I2C
• SPI
CAN • CAN is a multi-master broadcast serial bus
standard for connecting electronic control units (ECUs).
• Each node is able to send and receive messages, but not simultaneously. – A message consists primarily of an ID (identifier),
which represents the priority of the message, and up to eight data bytes.
– It is transmitted serially onto the bus.
• The devices that are connected by a CAN network are typically sensors, actuators, and other control devices. These devices are not connected directly to the bus, but through a host processor and a CAN controller.

13
CAN • The CAN bus (Controller Area Networking) was defined
in the late 1980 by Bosch, initially for use in automotive applications. It has been found to be very useful in a wide variety distributed industrial systems
• Characteristics: – Uses a single terminated twisted pair cable
– Is multi master
– Maximum Signal frequency used is 1 Mbit/sec
– Length is typically 40M at 1Mbit/sec up to 10KM at 5Kbits/sec
– Has high reliability with extensive error checking
– Typical maximum data rate achievable is 40KBytes/sec
– Maximum latency of high priority message <120 μsec at 1Mbit/sec
CAN on LPC17xx
• CAN controller is a sophisticated device
• Nearly all the features of the CAN protocol are automatically handled by the controller with almost no intervention by the host processor
• All you need to do in practice is to configure the controller by writing to its registers, write data to the controller and the controller then does all the housekeeping work to get your message on the bus

14
Before CAN
With CAN

15
CAN is central to automotive networks
CAN terminology
• Entities on the network are called nodes - are not given specific addresses
• Messages themselves that have an identifier which also determines the messages’ priority
• Nodes - depending on their function - transmit specific messages and look for specific message

16
CAN Node Requires: • Host processor
– The host processor decides what received messages mean and which messages it wants to transmit itself.
– Sensors, actuators and control devices can be connected to the host processor.
• CAN controller (hardware with a synchronous clock) – Receiving: the CAN controller stores received bits serially from
the bus until an entire message is available, which can then be fetched by the host processor (usually after the CAN controller has triggered an interrupt).
– Sending: the host processor stores its transmit messages to a CAN controller, which transmits the bits serially onto the bus.
• Transceiver – Receiving: it adapts signal levels from the bus to levels that the
CAN controller expects and has protective circuitry that protects the CAN controller.
– Transmitting: it converts the transmit-bit signal received from the CAN controller into a signal that is sent onto the bus.
CAN1,2 on MCB1700 board
High speed CAN transceiver integrated circuit

17
CAN devices
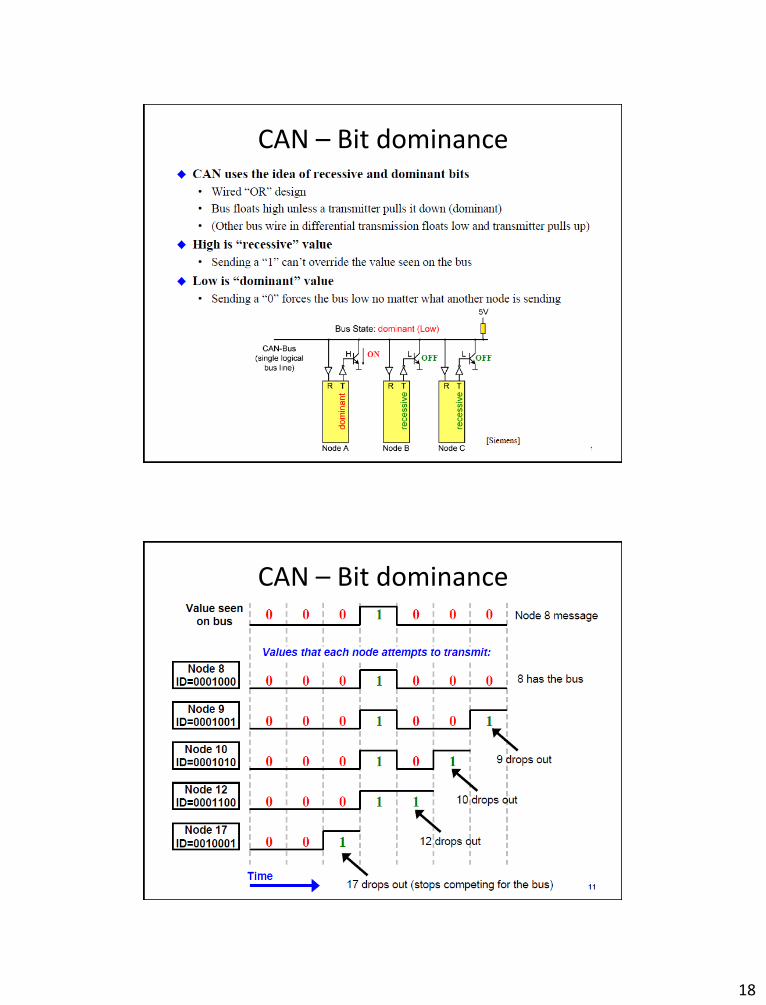
CAN – Bit dominance
18
CAN – Bit dominance
CAN – Bit dominance
19
Signal characteristics • CAN may be implemented over a number of
physical media (most common is a twisted pair of wires) so long as the drivers are open-collector and each node can hear itself and others while transmitting (this is necessary for its message priority and error handling mechanisms)
• The most popular transceiver chips: – Philips 82C251 – TJA1040 (on MCB1700 evaluation board)
• It is necessary to terminate the bus at both ends with 120 Ohms – prevent reflections – unload the open collector transceiver drivers
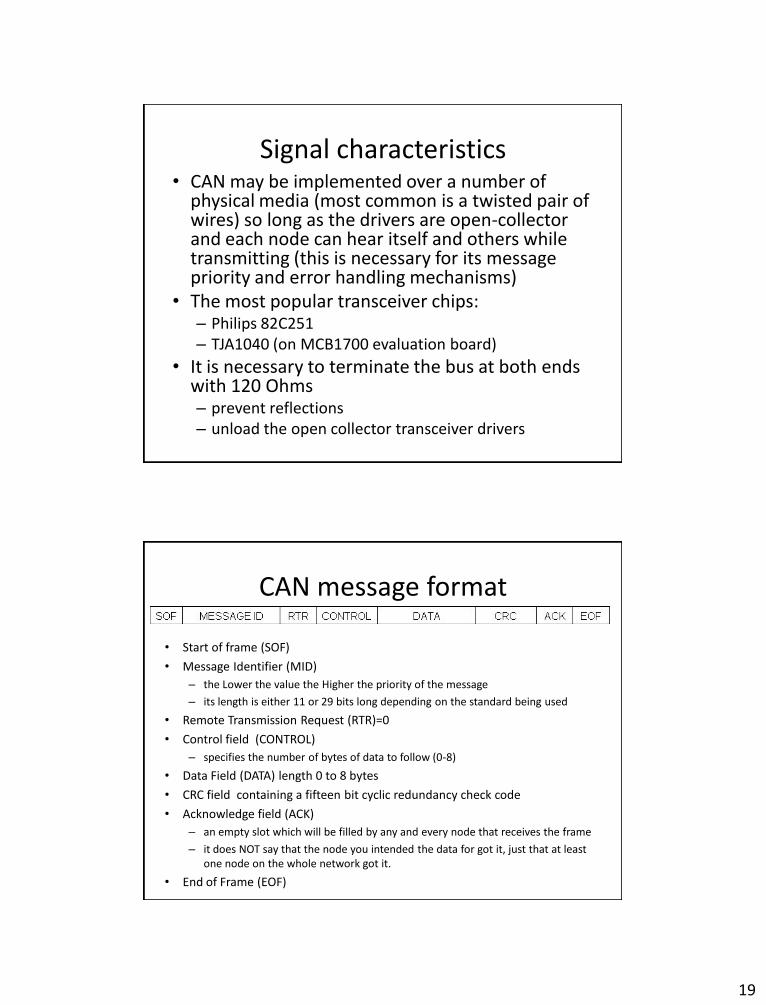
CAN message format
• Start of frame (SOF)
• Message Identifier (MID)
– the Lower the value the Higher the priority of the message
– its length is either 11 or 29 bits long depending on the standard being used
• Remote Transmission Request (RTR)=0
• Control field (CONTROL)
– specifies the number of bytes of data to follow (0-8)
• Data Field (DATA) length 0 to 8 bytes
• CRC field containing a fifteen bit cyclic redundancy check code
• Acknowledge field (ACK)
– an empty slot which will be filled by any and every node that receives the frame
– it does NOT say that the node you intended the data for got it, just that at least one node on the whole network got it.
• End of Frame (EOF)

20
CAN message format
See nice presentation at: http://marco.guardigli.it/2010/10/hacking-your-car.html
Remote frames • Frames that are used to request that a particular message be put on
the network - a node somewhere on the network has to be set up to recognize the request, get the data and put out a Message frame.
• This mechanism is used in polled networks. • The fields are:
– Start of frame (SOF) – Message Identifier (MID) either 11 or 29 bits long depending on the
chosen mode. – Remote Transmission Request (RTR)=1 – Control field (CTRL) this specifies the number of bytes of data expected
to be returned (0-8). – CRC field containing a fifteen bit cyclic redundancy check code. – Acknowledge field (ACK) an empty slot which will be filled by any and
every node that receives the frame it does NOT say that the node you intended the data for got it, just that at least one node on the whole network got it.
– End of Frame (EOF)

21
Error checking • CAN is a very reliable system with multiple error checks • Stuffing error - a transmitting node inserts a high after five
consecutive low bits (and a low after five consecutive high). A receiving node that detects violation will flag a bit stuffing error.
• Bit error - A transmitting node always reads back the message as it is sending. If it detects a different bit value on the bus than the one it sent, and the bit is not part of the arbitration field or in the acknowledgement field, an error is detected.
• Checksum error - each receiving node checks CAN messages for checksum errors.
• Frame error - There are certain predefined bit values that must be transmitted at certain points within any CAN Message Frame. If a receiver detects an invalid bit in one of these positions a Form Error (sometimes also known as a Format Error) will be flagged.
• Acknowledgement Error - If a transmitter determines that a message has not been ACKnowledged then an ACK Error is flagged.
Bit timing • Each node in a CAN network has its own clock, and no
clock is sent during data transmission • Synchronization is done by dividing each bit of the
frame into a number of segments: – Synchronization – Propagation, – Phase 1 and phase 2
• The length of each phase segment can be adjusted based on network and node conditions.
• The sample point falls between phase buffer segment 1 and phase buffer segment 2, which helps facilitate continuous synchronization.
• Continuous synchronization in turn enables the receiver to be able to properly read the messages.

22
Bit timing
http://en.wikipedia.org/wiki/CAN_bus
Abstraction or protocol layers • CAN standardizes only the lower layers • The CAN protocol, like many networking protocols, can be
decomposed into the following abstraction layers:

23
Examples of CAN interfaces
• National Instruments controller area network (CAN) interfaces
• PEAK CAN Controllers – The Peak range of CAN interfaces provides simple and cost
effective connections between PCs and CAN-networks and includes routers, extenders and adapters to the many CAN variants.
Outline
• UART
• CAN
• I2C
• SPI

24
I2C • I2C was created by Philips Semiconductors stands
for Inter-Integrated Circuit (inside TV sets)
• It’s a simple communication protocol
• Allows communication of data between I2C devices over two wires.
• It sends information serially using one line for data (SDA) and one for clock (SCL).
• To communicate, a master drives a clock signal on SCL while driving, or allowing a slave to drive SDA – Therefore, the bit-rate of a transfer is determined by
the master.
LPC1768 on MCB170 board

25
Single or multi master
I2C Physical Protocol • Communication between a master and a slave consists of a
sequence of transactions where the master utilizes the SCL as a clock for serial data driven by the master or a slave on SDA
• When the master wishes to talk to a slave, it begins by issuing a start sequence on the I2C bus. A start sequence is one of two special sequences defined for the I2C bus, the other being the stop sequence. These are also referred to as Start condition (S) and Stop condition (P)

26
I2C Physical Protocol • A transaction consists of a sequence of bytes. • Each byte is sent as a sequence of 8 bits. • The bits of each byte of data are placed on the SDA line
starting with the MSB. The SCL line is then pulsed high, then low.
• For every 8 bits transferred, the device receiving the data sends back an acknowledge bit, so there are actually 9 SCL clock pulses to transfer each 8 bit byte of data.
I2C Physical Protocol • If the receiving device sends back a low ACK bit, then it has received the
data and is ready to accept another byte. • If it sends back a high (Not Acknowledge, NACK) then it is indicating it
cannot accept any further data and the master should terminate the transfer by sending a stop sequence.
27
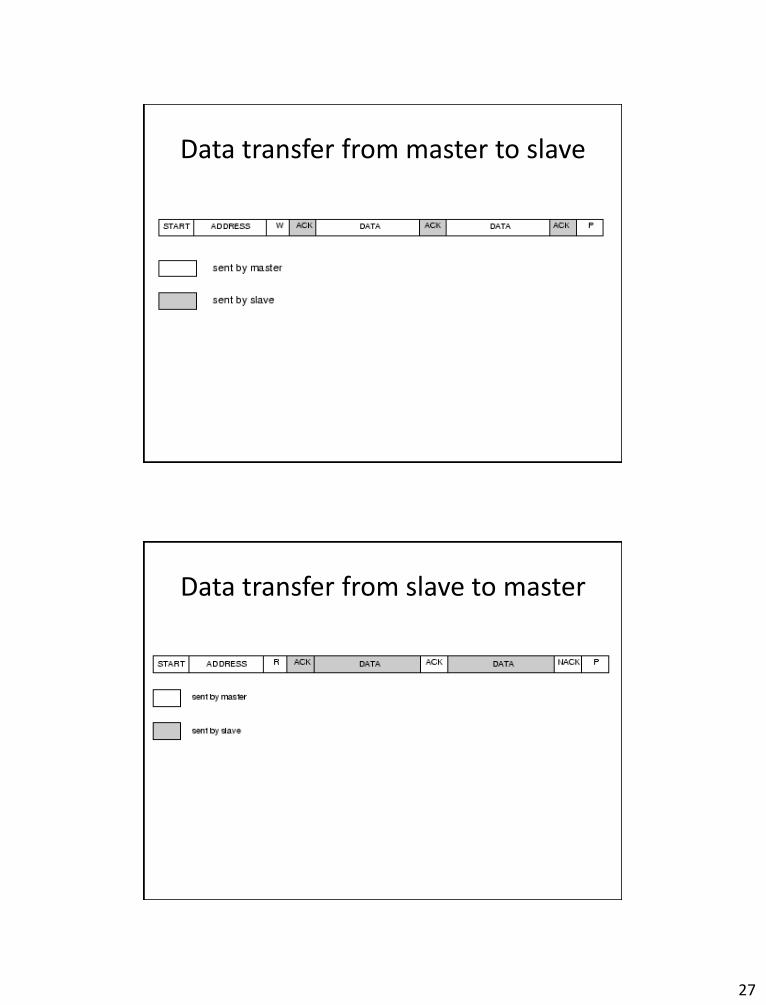
Data transfer from master to slave
Data transfer from slave to master
28
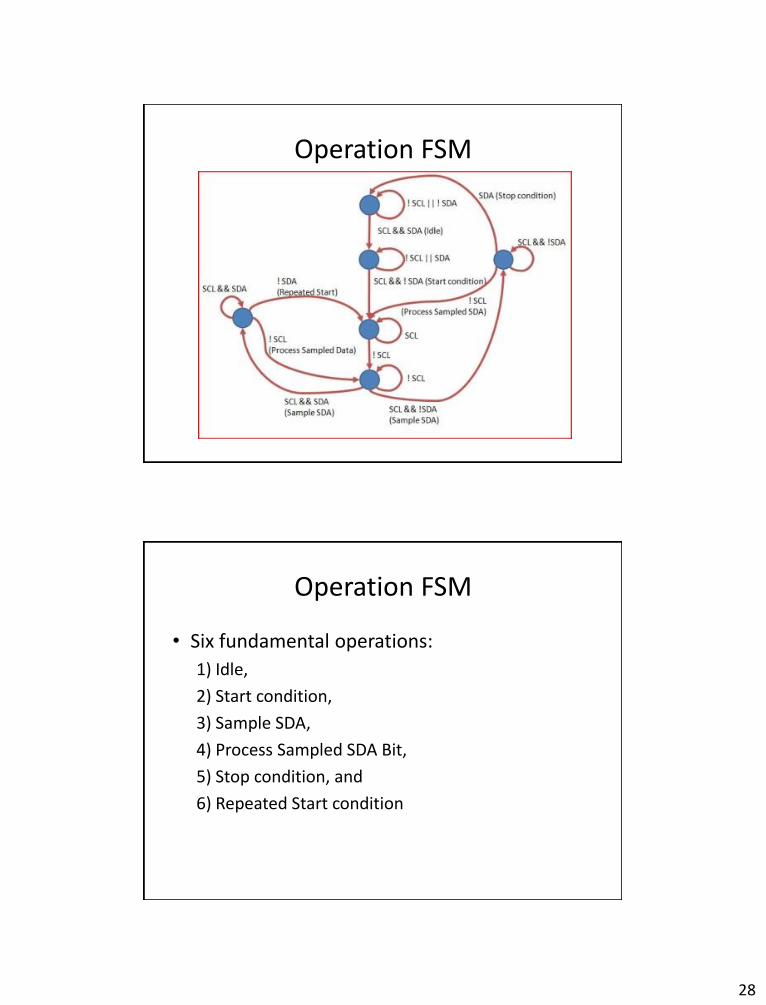
Operation FSM
Operation FSM
• Six fundamental operations:
1) Idle,
2) Start condition,
3) Sample SDA,
4) Process Sampled SDA Bit,
5) Stop condition, and
6) Repeated Start condition

29
Speed
• Standard clock speeds:
– 100kHz
– 10kHz
• However, the standard lets us use clock speeds from zero to 100kHz
• A fast mode is also available (400kHz – Fast mode)
Examples of I2C devices • Sensors: barometric, temperature, acceleration, compass • Real-time clocks, DACs, keyboard • Controllers: Wii NunChuck • Memories • Etc.

30
Wii NunChuck (lab#4)
Wii NunChuck Internals
Function Hardware Circuit board surface and
mounting
C membrane switch daughterboard, through-hole
Z membrane switch daughterboard, through-hole
Joystick X axial potentiometer, 30KΩ through-hole
Joystick Y axial potentiometer, 30KΩ through-hole
Accelerometer ST 8XRJ 3L02AE 820 MLT surface mount, top
Microcontroller FNURVL 405 849KM (48-pin QFP)
surface mount, bottom
http://wiibrew.org/wiki/Nunchuck#Nunchuk

31
Wii NunChuck Internals
• Joystick: axial potentiometer, 30KΩ through-hole
• Accelerometer: ST 8XRJ 3L02AE 820 MLT surface mount, top
• Microcontroller: FNURVL(A)-405 849KM (48-pin QFP) surface mount, bottom
LPC1768

32
LPC1768: I2C serial interface block diagram
Outline
• UART
• CAN
• I2C
• SPI

33
SPI Basics
• Serial Peripheral Interface (SPI) is a simple serial communication method/protocol using 4 wires
– Also known as a 4 wire bus
• Used to communicate across small distances
• Multiple Slaves, Single Master
• Synchronized
SPI • Used to connect devices such as printers,
cameras, scanners, etc. to a desktop computer; but it has largely been replaced by USB
• SPI can still be a useful communication tool for some applications

34
SPI • Fast, Easy to use, Simple
• Everyone supports it
• Has some advantages over I2C
– SPI can communicate at much higher data rates than I2C.
– Also, when multiple slaves are present, SPI requires no addressing to differentiate between these slaves.
Capabilities of SPI
• Always Full Duplex
– Communicating in two directions at the same time
– Transmission need not be meaningful
• Multiple Mbps transmission speed
• Transfers data in 4 to 16 bit characters
• Multiple slaves
– Daisy-chaining possible

35
Communication method
• SPI runs using a master/slave set-up and can run in full duplex mode (i.e., signals can be transmitted between the master and the slave simultaneously).
Master and multiple independent slaves

36
Master and multiple daisy-chained slaves
Protocol
• Wires: – Master Out Slave In (MOSI) – Master In Slave Out (MISO) – System Clock (SCLK) – Slave Select 1…N
• Master Set Slave Select low • Master Generates Clock • Shift registers shift in and out data

37
Wires in detail
• MOSI – Carries data out of Master to Slave
• MISO – Carries data from Slave to Master
– Both signals happen for every transmission
• SS_BAR – Unique line to select a slave
• SCLK – Master produced clock to synchronize data transfer
Shifting detail

38
Clock phase (advanced)
• Two phases and two polarities of clock
• Four modes
• Master and selected slave must be in same mode
• Master must change polarity and phase to communicate with slaves of different numbers
Pros and Cons
• Pros: – Fast and easy
• Fast for point-to-point connections • Easily allows streaming/Constant data inflow • No addressing/Simple to implement
– Everyone supports it
• Cons: – SS makes multiple slaves very complicated – No acknowledgement ability – No inherent arbitration – No flow control

39
SPI block diagram on LPC1768
Summary Comm. method
Shares clock
Num. of wires
Speed Dist Pros Cons
UART No 2 115Kbits/sec max
Medium, long
Simple; Widely supported; Large range of physical standard interfaces (TTL, RS-232, RS-422, RS-485);
It’s asynchronous; Requires reasonable clock accuracy at both ends;
CAN No 3 1 Mbits/sec Long: 40m (1Mbit/sec) up to 10km (5Kbits/sec)
Highly reliable; Reduces amount of wiring; Multi-master capability;
Complex;
I2C Yes 2 100Kbits/sec 400Kbits/sec fast mode
Short, medium (< 6”)
Simple; Multi-master capability; Only 2 wires to support multiple devices; Robust in noisy or power-up/down situations;
More complex protocol than SPI; Harder to level-shift or optoisolate due to bidirectional lines; Need for pull-up resistors can reduce power efficiency in some cases;
SPI Yes 4 10-20Mbits/sec Short Fast, easy, simple; A lot of support; Self clocking; Flexible data word sizes;
Multiple devices need multiple select lines; No acknowledgement ability; No inherent arbitration ; No flow control; Single master only;

40
Credits, References
• http://www.ece.cmu.edu/~ece649/lectures/11_can.pdf
• http://marco.guardigli.it/2010/10/hacking-your-car.html
• http://www.esd-electronics-usa.com/Controller-Area-Network-CAN-Introduction.html
• http://www.ni.com/white-paper/2732/en
• http://www.best-microcontroller-projects.com/i2c-tutorial.html
• http://www.robot-electronics.co.uk/acatalog/I2C_Tutorial.html
• http://www.ee.nmt.edu/~teare/ee308l/datasheets/S12SPIV3.pdf
• http://www.eecs.umich.edu/courses/eecs373/refs.html
• Jonathan W. Valvano, Embedded Systems: Introduction to Arm Cortex-M3 Microcontrollers, 2012. (Chapter 8)


![[PPT]UART and UART Driver - University at Buffalobina/cse321/fall2009/UARTDriver.ppt · Web viewUART and UART Driver B. Ramamurthy * UART UART: Universal Asynchronous Receiver/Transmitter](https://static.fdocuments.in/doc/165x107/5b2ab3637f8b9a55068b752f/pptuart-and-uart-driver-university-at-binacse321fall2009uartdriverppt.jpg)


