EdjPro Lifting Anchor Installation · Installation of EdjPro Lifting Anchors Installation of the...
8
EdjPro Lifting Anchor Installation EdjPro Lifting System Components Ancon EdjPro Lifting Anchors are installed using EdjPro Recess Formers and lifted with EdjPro Clutches. The following table shows the correlation between the Lifting Anchor, Recess Formers and Clutches. Recess Former Cleaning Installation of the EdjPro Anchor in the Recess Former 1 2 WLL EdjPro Lifting Anchor EdjPro Recess Former (colour) EdjPro Clutch 4.0 EPA04 EPRF04 (red) EPLC05 10.0 EPNA10 EPNRF10 (green) EPNLC10 Before use, always inspect recess formers and remove all adhering concrete inside and out. Apply mould release agent to facilitate removal from the hardened concrete. Carefully bend open the recess former and place the EdjPro Anchor with its yellow rubber crossbar into the recess former cavity. Close the recess former completely to prevent the entry of concrete around the anchor head.
Transcript of EdjPro Lifting Anchor Installation · Installation of EdjPro Lifting Anchors Installation of the...
EdjPro Lifting Anchor Installation
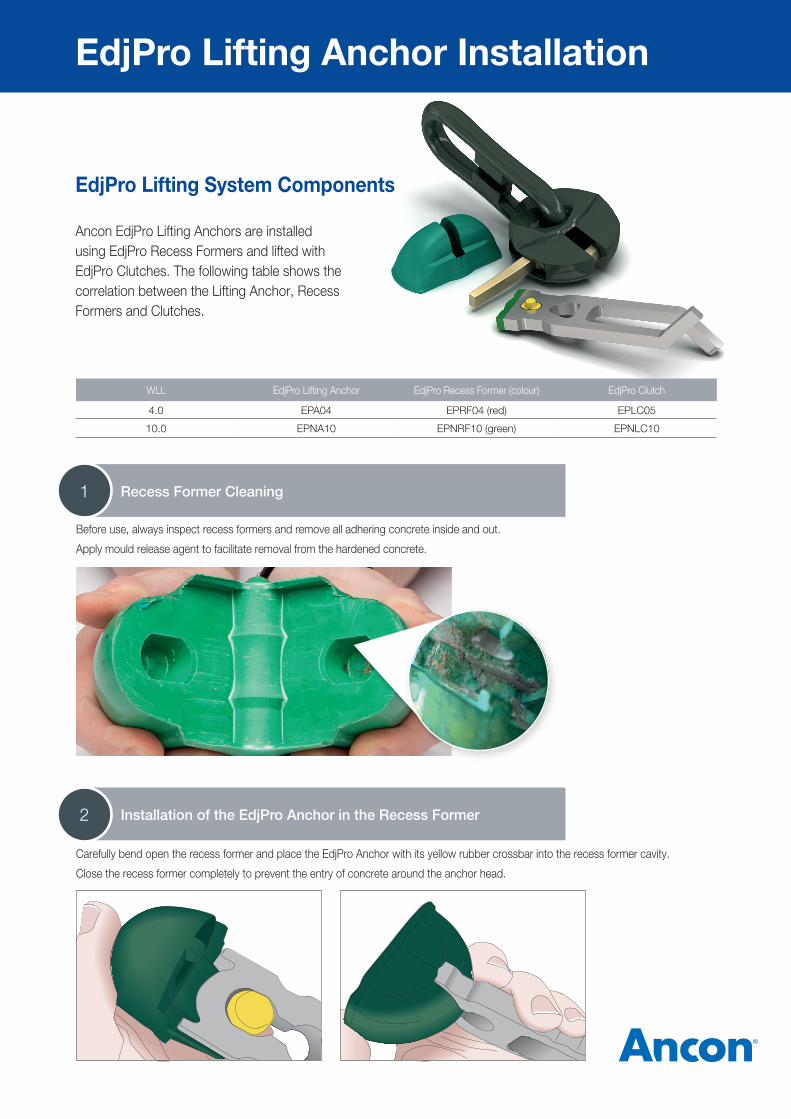
EdjPro Lifting System Components
Ancon EdjPro Lifting Anchors are installed using EdjPro Recess Formers and lifted with EdjPro Clutches. The following table shows the correlation between the Lifting Anchor, Recess Formers and Clutches.
Recess Former Cleaning
Installation of the EdjPro Anchor in the Recess Former
1
2
WLL EdjPro Lifting Anchor EdjPro Recess Former (colour) EdjPro Clutch
4.0 EPA04 EPRF04 (red) EPLC05
10.0 EPNA10 EPNRF10 (green) EPNLC10
Before use, always inspect recess formers and remove all adhering concrete inside and out.
Apply mould release agent to facilitate removal from the hardened concrete.
Carefully bend open the recess former and place the EdjPro Anchor with its yellow rubber crossbar into the recess former cavity.
Close the recess former completely to prevent the entry of concrete around the anchor head.

Installation of EdjPro Lifting Anchors
Installation of the EdjPro Anchor and Recess Former into the Mould
Install the EdjPro Anchor and its closed recess former at the location specified by the engineer. Make sure that the flat side of the recess former sits firmly against the formwork and that the former is completely closed to avoid concrete entering the recess around the anchor head.
The back of the recess former has brass threaded inserts which may be used for rigidly fixing the former to the side form using metric bolts. This requires holes to be drilled in the side forms.
EdjPro Anchor installed with its tension bar. One easy method to ensure the recess and anchor are located hard against the formwork is to push the anchor/recess/tension bar against the sideform and tie the tension bar to the surrounding reinforcement. Fix the reinforcement against the opposite side form to prevent it moving.
A handy method of fixing the reinforcement to prevent it moving, is to use a bar chair propped against the side-form opposite the anchor.
3
2
To prevent the entry of concrete into the recess former, the head of the EdjPro Anchor must be completely enclosed within the recess former.
Where recess formers are fixed to the side form, ensure that the EdjPro Anchor, tension bar and component reinforcement are not rigidly attached to the main reinforcement otherwise movement during pouring and vibration can cause the anchor to be displaced from the recess former.
Recess Former Metric bolt
EPRF04 M8
EPNRF10 M10

Installation of EdjPro Lifting Anchors
Tension Bar and Component Reinforcement Installation
Install the tension bar (also called a hanger bar) through the hole in the lifting anchor according to the engineer’s specification. “Standard” tension bars have an open U-shape with an opening angle of 30° – 35°. Parallel leg or cogged bars may be specified for complex panel geometries and configurations.
Install additional component reinforcement as specified by the engineer. Perimeter bars are advisable for flexural crack control and in some high load cases, shear bars may also be required.
For Ancon EdjPro EPA04 Anchors optional W-bars EPSB4-7-150G are available to increase the shear capacity of the anchor in thin concrete members. If the W-bar is specified, please install the bars as shown in the image below.
Minimum bending diameters in accordance with AS 3600:
4
3
The capacity of EdjPro Anchor depends on the correct installation of a tension bar as specified by the Design Engineer.
The engineer should specify the tension bar diameter, length, shape and fitting instructions, according to the capacity required and concrete element geometry.
Bar Minimum Diameter of the Bending Pin (mm)
N12 48
N16 64
N20 80EDJPRO WLL
≈30°
Bending Pin
Shear load direction!
Edge perimeter bar
Shear bar

4
Installation of EdjPro Lifting Anchors
Concrete Pouring and Vibration
Extra care should be taken to compact the concrete near the EdjPro Anchors because their capacity depends on thorough concrete compaction.
5
The picture above shows the correct installation of an EdjPro Anchor. The recess former is fully closed, preventing the ingress of concrete. EdjPro Anchors have a groove for the location of perimeter and shear bars for optimum concrete cover, edge capacity and crack control.
Reinforcement Groove

5
Installation of EdjPro Lifting Anchors
Recess Former Removal
As the concrete shrinks during the hardening process, it normally separates from the recess former. Remove the former by opening both halves one after another using a blunt-ended tool or a small reinforcing bar inserted into the holes in the back of the former.
After removal, inspect and clean the recess formers, removing all adhered concrete inside and out. Damaged recess formers should be replaced.
EdjPro Recess Formers should be thoroughly coated with mould release agent prior to use. This makes removal easy and keeps the recesses clean. The synthetic rubber of Edjpro Recess Formers is resistant to attack by mould release agents.
Many users have found that the best way to maintain EdjPro Recess Formers is to store them in a metal basket, soak them overnight in release agent and drain to remove excess prior to use.
6
Soaking in mould oil Drain and re-use
Opening the first half Opening the second half
6
Installation of EdjPro Lifting Anchors
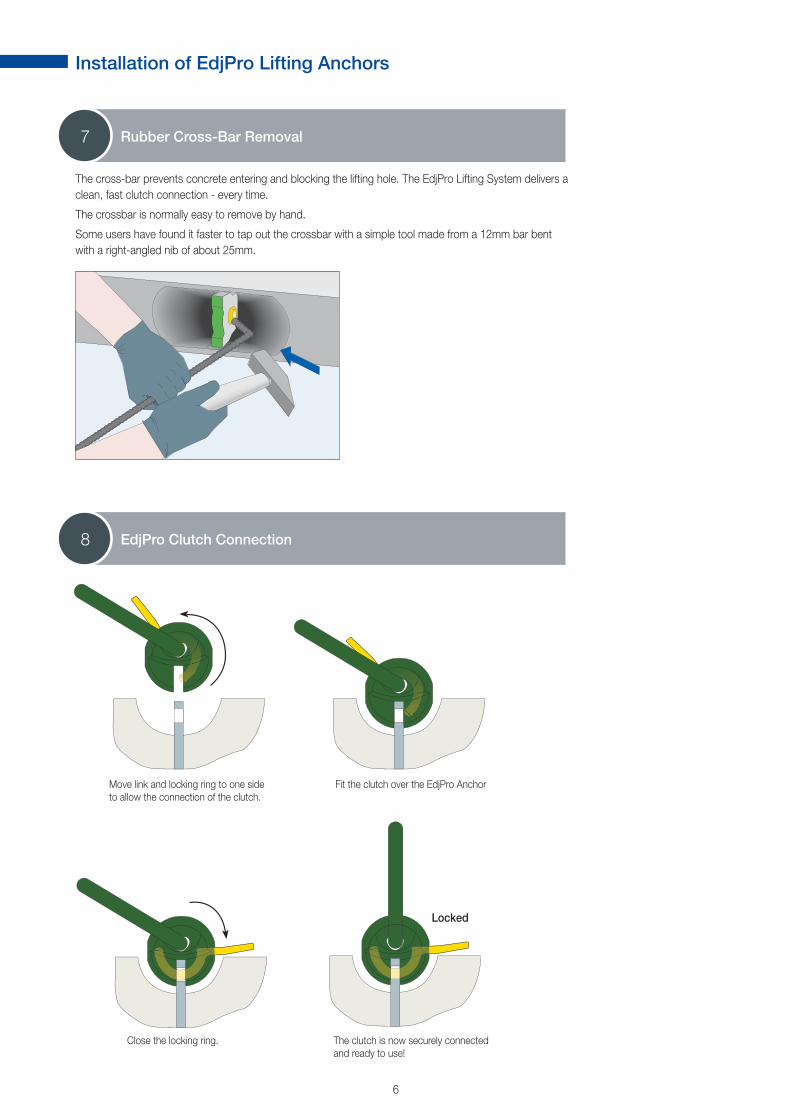
Rubber Cross-Bar Removal
EdjPro Clutch Connection
The cross-bar prevents concrete entering and blocking the lifting hole. The EdjPro Lifting System delivers a clean, fast clutch connection - every time.
The crossbar is normally easy to remove by hand.
Some users have found it faster to tap out the crossbar with a simple tool made from a 12mm bar bent with a right-angled nib of about 25mm.
7
8
Locked
Move link and locking ring to one side to allow the connection of the clutch.
The clutch is now securely connected and ready to use!
Close the locking ring.
Fit the clutch over the EdjPro Anchor

7
Installation of EdjPro Lifting Anchors
EdjPro Lifting
To lift the concrete member use the rigging configuration as specified by the engineer responsible for the lifting procedure. Different rigging arrangements can be specified for various lifting procedures during manufacture, transport and erection. Make sure the correct configuration is used for each handling process. Every modification to the rigging needs to be approved by the engineer.
9
It is critical to use the specified rigging to ensure that the lifting anchors, clutches and the concrete element itself are not overloaded.
Ensure that the sling angle a does not exceed the sling angle specified by the designer!
Do not lift unless the concrete has reached the minimum specified concrete strength!
a

Head Office, Sydney 98 Kurrajong Avenue Mount Druitt Sydney NSW 2770 Australia Tel: 1300 304 320 Fax: +61 (0) 2 9675 3390
Brisbane 4/15 Terrace PlaceMurarrieBrisbaneQLD 4172Australia Tel: 1300 304 320 Fax: +61 (0) 7 3395 6693
International Enquiries: +61 (0) 2 8808 1111Email: [email protected]: www.ancon.com.au
Email: [email protected]: www.ancon.co.nz
Perth 18 Tennant StreetWelshpoolPerthWA 6106Australia Tel: 1300 304 320 Fax: +61 (0) 8 9361 1262
Christchurch 2/19 Nuttal DriveHillsboroughChristchurch 8022New Zealand Tel: +64 (0) 3 376 5205 Fax: +64 (0) 3 376 5206
Melbourne9/63-69 Pipe Road Laverton NorthMelbourneVIC 3020Australia Tel: 1300 304 320 Fax: +61 (0) 3 9311 1777
AUSTRALIA
NEW ZEALAND
Auckland 246D James Fletcher DriveOtahuhuAuckland 2024New Zealand Tel: +64 (0) 9 276 2236 Fax: +64 (0) 9 276 2237