Editor Software Owner's Manual - KAWAI About the VPC Editor Software The “VPC Editor Software”...
19
Editor Software Owner's Manual
Transcript of Editor Software Owner's Manual - KAWAI About the VPC Editor Software The “VPC Editor Software”...
E d i t o r S o f t w a r e O w n e r ' s M a n u a l

2
About the VPC Editor Software
The “VPC Editor Software” (VPC Editor) is an application that allows the user to configure the touch curves, the velocity offset for each key, and
the MIDI-related settings for the VPC1 Virtual Piano controller. The VPC Editor has the following features:
Touch Curve and MIDI settings Management
You can customize the touch curve and MIDI settings for up to 5 different virtual instru-ment or MIDI sound sources then store these settings as presets. Presets can be selected within the VPC editor or directly from the VPC1 Virtual Piano Controller itself for quick ac-cess to the optimal setting for each MIDI sound source.
Graphical User InterfaceYou can view touch curve settings using a graph display. You can change the settings by modifying the touch curve shape and visually verify the change visually, in order to make precise modifications.
VPC Monitoring
You can check the configuration status in real time, as the VPC Editor is always synchro-nized with the VPC1 Virtual Piano Controller. In addition to checking the configuration sta-tus, the VPC editor also displays useful key stroke information such as key numbers as they are transmitted from the VPC1 Virtual Piano Controller to further assist you when making precise modifications to the touch curves
Touch Curve Learn Function
The Touch Curve Learn function is a unique feature similar to the User touch curve feature implemented in many KAWAI digital pianos. By playing some keys on the VPC1 Virtual Pi-ano Controller, you can create a touch curve automatically depending on the strength of each key stroke.
Many user touch curvesYou can create as many touch curves as you like. You can also easily select any of the touch curves that you have created.
Software Version Management
You can check/update the software version for the VPC editor and other VPC-related pro-
grams using the VPC editor. In addition to the VPC Editor software itself, you can check the
version information of other VPC1 Virtual Piano Controller programs and Kawai USB drivers.
Whenever new software update has been released, you will be notified automatically.
What You Can Do with the VPC Editor Software
With the VPC Editor you can
Select a Touch Curve (Page 8)1.
Create your own touch curves (Page 9)2.
Adjust the velocity offset for each key, selected groups of keys, or all keys at once (Page 13)3.
Configure the MIDI transmit channel, Pedal CC# assignments and Output settings (Page 14)4.
Check for updates and latest software versions (Page 16)5.

3
Preparation
To use the VPC Editor, you will need to connect the VPC1 Virtual Piano Controller to your computer. For information on how to connect the VPC1
Virtual Piano Controller to the computer, please refer to the Owner’s Manual provided with the VPC1 Virtual Piano Controller.
If the VPC1 Virtual Piano Controller is not properly connected to the computer, the VPC Editor will not work. The VPC Editor is designed to always be synchronized with the VPC1 Virtual Piano Controller.
Launching the VPC Editor Software (Retrieving the VPC1 Virtual Piano Controller settings)
When you connect the VPC1 Virtual Piano Controller to your computer and start the VPC Editor, the VPC editor automatically retrieves the VPC1
Virtual Piano Controller settings and synchronizes the VPC editor with the VPC1 Virtual Piano Controller. Once the synchronization is completed
successfully you will be able to configure the VPC1 Virtual Piano Controller settings using the VPC Editor.
When the VPC connection is not detected
If the VPC Editor is not able to recognize the connection between the VPC1 Virtual Piano Controller and the computer, the pop up message in
figure below will be displayed. Check the connection again and left click on the SYNC button.

4
Inter face
The VPC Editor is composed of the following screens:
Touch Curve Selection Screen1.
Touch Curve Edit Screen2.
Offset Edit Screen 3.
MIDI Setup Screen4.
Version Information Screen 5.
Touch Curve Selection Screen
On this screen, you can select the touch curve for the VPC1 Virtual Piano Controller. By modifying the touch curve, you can change the volume
and tone character of a MIDI sound source according to the strength (velocity) with which you play the keys on the VPC1 Virtual Piano Controller.
You can configure the touch curve so a louder sound is produced with a soft key stroke or a softer sound is produced with a stronger key stroke,
depending on the player’s finger strength or the characteristics of the sound source.
The Touch Curve Selection Screen is composed of the following items.
A Menu Selects the Touch Curve Selection Screen, the Offset Edit Screen and the MIDI Setup screen.
B Toolbar Provides tools for copying, deleting, and editing the touch curves.
C Touch Curve List You can select any touch curve by left clicking on the desired touch curve’s graph icon on the screen.
D Preset Bar Selects the presets and sets the auto power off time.
E KAWAI Logo Left clicking on this logo displays the Version Information screen.
A
E
B
C
D
5
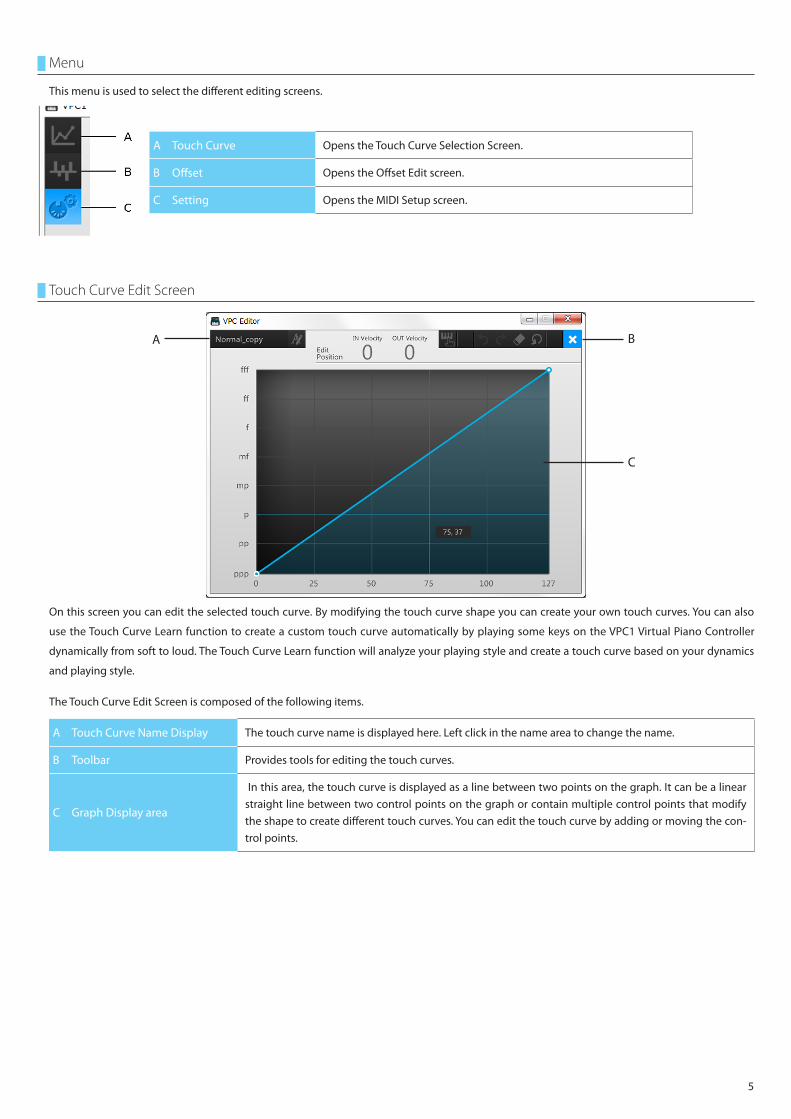
Menu
This menu is used to select the different editing screens.
A Touch Curve Opens the Touch Curve Selection Screen.
B Offset Opens the Offset Edit screen.
C Setting Opens the MIDI Setup screen.
Touch Curve Edit Screen
On this screen you can edit the selected touch curve. By modifying the touch curve shape you can create your own touch curves. You can also
use the Touch Curve Learn function to create a custom touch curve automatically by playing some keys on the VPC1 Virtual Piano Controller
dynamically from soft to loud. The Touch Curve Learn function will analyze your playing style and create a touch curve based on your dynamics
and playing style.
The Touch Curve Edit Screen is composed of the following items.
A Touch Curve Name Display The touch curve name is displayed here. Left click in the name area to change the name.
B Toolbar Provides tools for editing the touch curves.
C Graph Display area
In this area, the touch curve is displayed as a line between two points on the graph. It can be a linear straight line between two control points on the graph or contain multiple control points that modify the shape to create different touch curves. You can edit the touch curve by adding or moving the con-trol points.
A B
C

6
Offset Edit Screen
On this screen, you can adjust the velocity offset for each key, and align the balance of the entire touch curve. By adjusting the velocity offset for
any key, it is possible eliminate any unevenness with a particular MIDI sound source when playing the VPC1 Virtual Piano Controller. The mouse
or the arrow keys on your computer keyboard can be used to select the key number and offset value. You can also select a key number by press-
ing a key on the VPC1 Virtual Piano Controller. The key number of the note being pressed will be displayed in the upper area of the screen.
The Offset Edit Screen is composed of the following items.
A Toolbar Provides tools for adjusting the offset.
B Graph Display area The offset value of each key will be displayed with a bar. Move the bar to edit the offset.
MIDI Setup Screen
On this screen, You can select the MIDI Transmit Channel, the Pedal CC#, and configure the Output Settings for the VPC1 Virtual Piano Controller’
s MIDI OUT and USB to HOST ports.
The MIDI Setup screen is composed of the following items.
A MIDI Transmit Channel Selects the MIDI transmit channel.
B Pedal CC# Selects the CC # assignment for each pedal.
C Output Settings Selects the MIDI signal routing for the MIDI OUT port and the USB to HOST port.
A
A
B
B
C

7
Version Information Screen
On this screen, you can check the version information of the VPC Editor, the VPC1 Virtual Piano Controller, and the Kawai USB driver that you are
using. On this screen you can also check when the latest updates have been published on the KAWAI server and perform the updates. Addition-
ally you can view the Owner’s Manual in PDF format.
The Version Information screen is composed of the following items.
A VPC Editor Software Version Information Displays the software version of the VPC editor.
B VPC1 Version Information Displays the software version of the VPC1 Virtual Piano Controller.
C Driver Version Information Displays the software version of the Kawai USB MIDI driver.
D Footer areaProvides access to the Owner’s Manual PDF. You can also set the auto-updater to check for updates on startup.
Switching Between the Presets
There are five presets for VPC editor and VPC1 Virtual Piano Controller that can be used to store five different configurations of the VPC editor
settings. By simply switching the preset, you can recall the optimal setting. Use the Preset bar to select the presets.
Preset Bar
The Preset bar provides the following tools.
A Preset Number Selects the presets. The power button color will change for each preset 1 / 2 / 3 / 4 / 5
B Power Sets the time for the auto power off.
Switching Between Presets
To select a preset, left click on the preset number button on the preset bar.
A
B
C
D
A B

8
Changing the Touch Curve
You can select a touch curve on the Touch Curve Selection Screen. This screen provides some basic preset touch curves.
To select a touch curve left click on the touch curve’s icon
Changing the Touch Curve
To select a touch curve, left click on the icon for the touch curve, or select a touch curve by using the arrow keys on your computer keyboard.
A maximum of nine touch curves can be displayed per page. If there are more than nine touch curves available a new page will be created. A
Next (or Previous) button will be displayed on the right (or left) side of the screen. By left clicking this button, you can scroll to the next (or previ-
ous) page. You can also scroll through these pages using the arrow keys on your computer keyboard. The number of pages and the current page
will be indicated by dots in the upper left corner of the page.
Previous
The current page
and page number

9
Creating a Touch Curve
You can create a new touch curve or copy a default touch curve, then edit it. This is done on the Touch Curve Selection Screen.
The default touch curve presets designated with a “locked” icon cannot be edited or deleted.
Touch Curve Selection Screen Toolbar
The Touch Curve Selection Screen toolbar provides the following tools.
A Create New Creates a new touch curve. Ctrl+N
B Duplicate Duplicates the selected touch curve. Ctrl+D / Ctrl+C
C Delete Deletes the selected touch curve. Delete
D Edit Touch Curve Opens the Touch Curve Edit Screen, Enter
*You can also access these tools by right-clicking on the icon for an existing touch curve.
Creating the Touch Curve
To create a touch curve, do one of the following: 1.
To create a new touch curve; left click on the New button. •
To edit an existing touch curve, select the touch curve you want to edit, and then left click on the Duplicate button.•
To open the Touch Curve Edit screen left click on the “Edit Touch Curve” button, or double-click on the icon for the touch curve you want to edit. 2.

10
Editing a Touch Curve
You can edit an existing touch curve on the Touch Curve Edit Screen. To edit the touch curve, you can move or add control points to change the
shape of the touch curve. You can use the Touch Curve Lean Function to edit a touch curve by playing some keys on the VPC1 Virtual Piano Con-
troller dynamically from soft to loud. The Touch Curve Learn function will analyze your playing style and modify the existing touch curve shape
according to your dynamics and playing style.
To open the Touch Curve Edit Screen
To open the Touch Curve Edit Screen, select an editable touch curve in the Touch Curve Select Screen, then left click on the “Edit Touch Curve”
button or double click on the icon for the touch curve you want to edit.
Toolbar and Touch Curve Name Display Area of the Touch Curve Edit Screen
The Touch Curve Edit Screen provides the following tools.
A Rename To edit the name of the touch curve. F2
B Touch Curve Learn To use the Touch Curve Learn Function. (See the next page) Ctrl+L / Space
C Undo To cancel the editing. Ctrl+Z
D Redo To re-execute the editing. Ctrl+Y
E Delete To switch the cursor to delete mode. Delete
F Reset To reset all edits. Ctrl+R / F5
G Back (Quit) To return to the Touch Curve Select Screen. Backspace
*You can also access these tools by right-clicking on the Touch Curve Edit Screen.

11
Editing a Touch Curve
In the Touch Curve Edit Screen, you can perform the following editing operations.
Editing the touch curve name
Left click on the “Rename” button or in the name field. Press the Enter key to confirm the new name.•
*You can also edit the touch curve name on the Touch Curve Select Screen. To edit the name, select the touch curve, then left click on the icon again or press the F2 key on your computer keyboard.
Add a control point
Move the cursor to the point on the graph where you want to add a new control point. The In and Out • velocity values are displayed in real time next to the cursor to help you locate a specific point. Left click to add a control point at that location. New control points or the currently selected control point is al-ways indicated with a white circle and the In and Out velocity values for the selected control point will be displayed in the upper area of the screen.
Pressing the Enter key on your computer keyboard will also add a new control point next to the current-• ly selected control point. The newly created control point will then be selected (indicated with a white circle)
You can use the arrow keys on your computer keyboard to adjust the position of the selected control • point.
Move a control point
Left click on a control point to select it, then drag the control point to a new location using the mouse.• You can also use the Tab key on your computer keyboard to select a control point to edit (The selected control point is indicated with a white circle). Holding the Shift key changes the direction of the Tab key.
You can also use the arrow keys on your computer keyboard to move the selected control point loca-• tion. (By holding down the Ctrl key, you can move the point faster.)
Delete
Double-click on any control point you want to delete.•
Left click on the Delete button, to change the cursor from add to delete, then left click on any control • points that you want to delete.
Undo / Redo Left click on the UNDO/REDO button.•
Resets the editing Left click on the Reset button.•
Return tothe Touch Curve Select Screen
Left click on the Back button.•

12
Using the Touch Curve Learn Function
With the Touch Curve Lean Function, you can create a curve automatically by playing the VPC1 Virtual Piano Controller dynamically from soft
to loud in order to let the VPC editor analyze your dynamics. By playing the VPC1 Virtual Piano Controller keyboard in this way, you can create a
touch curve that reflects your personal playing dynamics.
Left click on the “Touch Curve Learn” button to enter the Touch Curve Learn mode.1.
Play any key on the VPC1 Virtual Piano Controller repeatedly and change gradually from a soft touch to a strong touch. .2.
A new control point will be added each time a key is struck.•
The volume/velocity value for each control point is determined by the strength of each key stroke. •
After 3 seconds if no more keys are played, a touch curve will be created automatically based on the number of times you played a key and the • strength of each key stroke.
13
Adjusting the Volume Balance of each Key
To adjust the balance of the touch curve, you can adjust the offset velocity of each key, a selected group of keys, or all keys at once on the Offset
Edit Screen.
Displaying the Offset Edit Screen
To display the Offset Edit Screen, left click on the Offset button in the menu.
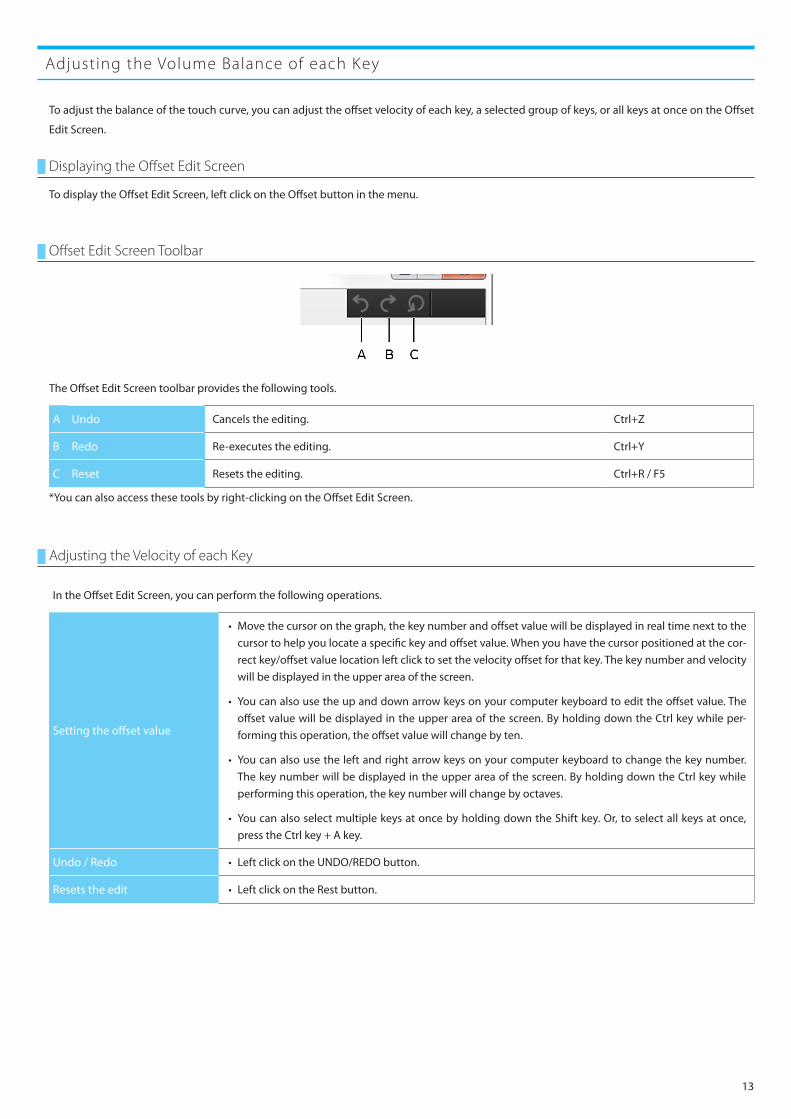
Offset Edit Screen Toolbar
The Offset Edit Screen toolbar provides the following tools.
A Undo Cancels the editing. Ctrl+Z
B Redo Re-executes the editing. Ctrl+Y
C Reset Resets the editing. Ctrl+R / F5
*You can also access these tools by right-clicking on the Offset Edit Screen.
Adjusting the Velocity of each Key
In the Offset Edit Screen, you can perform the following operations.
Setting the offset value
Move the cursor on the graph, the key number and offset value will be displayed in real time next to the • cursor to help you locate a specific key and offset value. When you have the cursor positioned at the cor-rect key/offset value location left click to set the velocity offset for that key. The key number and velocity will be displayed in the upper area of the screen.
You can also use the up and down arrow keys on your computer keyboard to edit the offset value. The • offset value will be displayed in the upper area of the screen. By holding down the Ctrl key while per-forming this operation, the offset value will change by ten.
You can also use the left and right arrow keys on your computer keyboard to change the key number. • The key number will be displayed in the upper area of the screen. By holding down the Ctrl key while performing this operation, the key number will change by octaves.
You can also select multiple keys at once by holding down the Shift key. Or, to select all keys at once, • press the Ctrl key + A key.
Undo / Redo Left click on the UNDO/REDO button.•
Resets the edit Left click on the Rest button.•

14
Configuring the MIDI Transmit Channel, the Pedal CC# and the Output settings
You can configure the MIDI transmit channel, the Pedal CC# and the Output settings.
Displaying the MIDI Setup Screen
To display the MIDI Setup Screen, left click on the “Setting” button in the menu.
Changing the MIDI Transmit Channel
When you play a MIDI instrument or software sound source using the VPC1 Virtual Piano Controller, you will need to match the receive channels
of any MIDI instruments or software sound sources to the transmit channel of the VPC1 Virtual Piano Controller.
To change the MIDI transmit channel, left click on a MIDI channel number to select that channel or use the left and right arrow keys on your
computer keyboard.
Changing the Pedal CC#
To change the CC # of pedal, do one of the following.
Left click in the CC # field for the pedal you want to edit then enter the desired CC#. Press the Enter key on your computer keyboard or simply left • click outside of the CC# field to confirm the setting.
You can also left click on the up and down buttons next to the CC # field to change the CC #. •

15
Configuring the Output Settings
You can configure the output routing for the VPC1 Virtual Piano Controller’s keyboard, MIDI IN port, and the MIDI signal from your computer to the VPC1 Virtual Piano Controller by changing the output status for the MIDI OUT port and the “USB to HOST” port.
To change the output setting, do one of the following.
Left click on the sources in the MIDI OUT field, to turn on or off the output for each source for the MIDI OUT port.•
Left click on the sources in the USB MIDI OUT field, to turn on or off the output for each source for the “USB to HOST” port. •
You can also use the up or down arrow keys on your computer keyboard to select each source. Press the spacebar to toggle on and off. •
Computer
External MIDI Device
External MIDI Controlleror Keyboard
Keyboard
USB-MIDI IN
USB to HOST
MIDI IN
MIDI OUT
USB-MIDI OUT
16
Checking for Version and latest Updates
In the Version Information Screen, you can check the versions of the VPC-related programs, and the latest update. From this screen you can also
update those programs.
Viewing the Version Information
To view the Version Information Screen, press the Ctrl + I keys or left click on the Kawai logo.
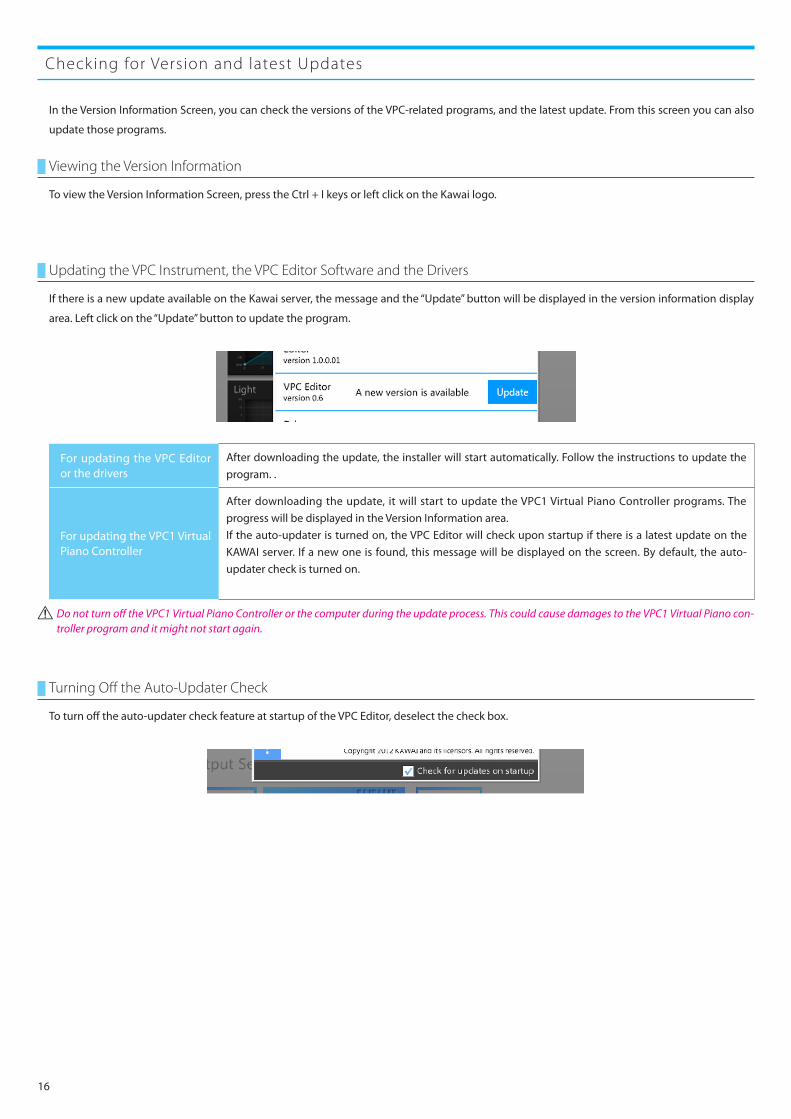
Updating the VPC Instrument, the VPC Editor Software and the Drivers
If there is a new update available on the Kawai server, the message and the “Update” button will be displayed in the version information display
area. Left click on the “Update” button to update the program.
For updating the VPC Editor or the drivers
After downloading the update, the installer will start automatically. Follow the instructions to update the program. .
For updating the VPC1 Virtual Piano Controller
After downloading the update, it will start to update the VPC1 Virtual Piano Controller programs. The progress will be displayed in the Version Information area. If the auto-updater is turned on, the VPC Editor will check upon startup if there is a latest update on the KAWAI server. If a new one is found, this message will be displayed on the screen. By default, the auto-updater check is turned on.
Do not turn off the VPC1 Virtual Piano Controller or the computer during the update process. This could cause damages to the VPC1 Virtual Piano con-troller program and it might not start again.
Turning Off the Auto-Updater Check
To turn off the auto-updater check feature at startup of the VPC Editor, deselect the check box.

17
Setting the Auto Power Off Timer
The VPC1 Virtual Piano Controller features a power saving function that can be used to automatically turn off the instrument after a specified pe-
riod of inactivity.
Setting the Auto Power Off Timer
To set the auto power off time for the VPC Instrument, left click on the Power icon on the preset bar, then select the time for auto power off from
the menu displayed.
Auto Power Off Description
Off The Auto Power Off function is disabled.
30 min. The instrument will turn off automatically after 30 minutes of inactivity.
60 min. The instrument will turn off automatically after 60 minutes of inactivity.
120 min. The instrument will turn off automatically after 120 minutes of inactivity.
18
Troubleshooting
A Checking Connec-tion Screen Appears Continuously
To use the VPC Editor, the VPC1 Virtual Piano Controller needs to be connected to your computer. If the connection is not detected, you will be prompted to check the connection. Check the connection again and left click on the SYNC button.
Touch Curves Added Arbitrarily
The settings of the VPC1 Virtual Piano Controller are always displayed in the VPC Editor. Therefore, when a touch curve that is loaded in the VPC1 Virtual Piano Controller, but is not in the VPC Editor, the VPC Edi-tor adds that touch curve automatically. This enables you to use a touch curve that was loaded into the VPC1 Virtual Piano Controller even when you use a different computer.
The Touch Curve can-not be edited
The preset touch curves indicated with a “Locked” icon are not editable. Use the Duplicate function to copy a “locked” preset touch curve and edit it.
Cannot detect keys be-ing played on the VPC1 Virtual Piano Control-ler. Even after changing the setting, this is not reflected in the VPC editor.
The communication between the VPC Editor and VPC1 Virtual Piano Controller may not work properly. Disconnect the VPC1 Virtual Piano Controller from the computer once, when the Checking Connection Screen appears, reconnect it and left click on the SYNC button. If this does not solve the problem, dis-connect the VPC1 Virtual Piano Controller from the computer, and after reconnecting it, restart the VPC Editor.
Slow behavior in the Offset Edit Screen
When you are editing the offset for more than one key, the response may become slower depending on your operating environment. Reduce the number of keys to edit, and try again.
The program aborts when trying to view the Version Informa-tion Screen
Install the latest service pack for your OS.
19
Shortcut Keys
Common
Alt + F4 Exit
1 / 2 / 3 / 4 / 5 Switches the presets
Ctrl+ Tab / Ctrl + Shift + Tab Switches the menu
Ctrl + I Shows the version information
Touch Curve Select Screen
Ctrl + D / Ctrl + C Duplicate
Ctrl + N Create New
Enter Edit (goes to the Edit Screen)
Delete Delete
F2 Rename
←↑↓→ Select the touch curve
Touch Curve Edit Screen
Backspace Exit from editing (to the Select Screen)
Ctrl + L / Space Touch Curve Learn Function
Ctrl + Z Undo
Ctrl + Y Redo
F2 Rename
Ctrl + R / F5 Reset
←↑↓→ Fine-tunes the point in editing
←↑↓→ + Ctrl Adjusts the points in editing by increments of 10
Tab / Shift + Tab Switches the points in editing
Delete Delete mode toggles On and Off
Enter Adds a control point (or deletes a point while in the Delete mode)
Editing Offset Screen
Ctrl + Z Undo
Ctrl + Y Redo
Ctrl + R / F5 Reset
←↑↓→ Fine-tunes the key and the offset values in editing
←↑↓→ + Ctrl Adjusts the key in editing by an octave and the offset value by increments of 10
←→ + Shift Selects multi keys in editing
Ctrl + A Select All
MIDI Setup Screen
←→ Switches the output channel
↑↓ Switches the output setting in active
Space Output setting toggles On and Off
Enter Edit the pedal CC#
Tab / Shift + Tab(while editing the pedals)
Switches the pedals in editing