EdBuild EdRoboClaw instructions - meetedison.com · programmed using the barcodes in this guide and...
16
EdBuild Let’s build the EdRoboClaw The EdRoboClaw EdBuild by Microbric Education is licensed under a Creative Commons Attribution-ShareAlike 4.0 International License. Difficulty:
Transcript of EdBuild EdRoboClaw instructions - meetedison.com · programmed using the barcodes in this guide and...

EdBuild
Let’s build the EdRoboClaw
The EdRoboClaw EdBuild by Microbric Education is licensed under a Creative
Commons Attribution-ShareAlike 4.0 International License.
Difficulty:
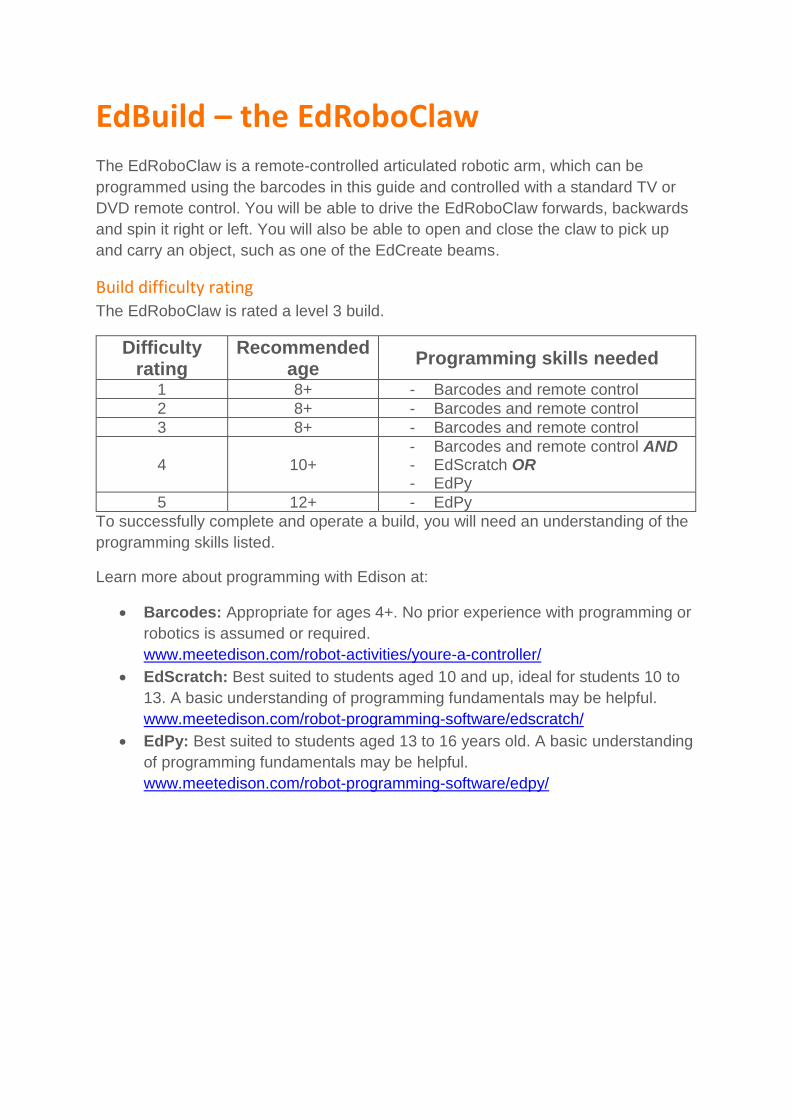
EdBuild – the EdRoboClaw
The EdRoboClaw is a remote-controlled articulated robotic arm, which can be
programmed using the barcodes in this guide and controlled with a standard TV or
DVD remote control. You will be able to drive the EdRoboClaw forwards, backwards
and spin it right or left. You will also be able to open and close the claw to pick up
and carry an object, such as one of the EdCreate beams.
Build difficulty rating The EdRoboClaw is rated a level 3 build.
Difficulty rating
Recommended age
Programming skills needed
1 8+ - Barcodes and remote control
2 8+ - Barcodes and remote control
3 8+ - Barcodes and remote control
4 10+ - Barcodes and remote control AND - EdScratch OR - EdPy
5 12+ - EdPy
To successfully complete and operate a build, you will need an understanding of the
programming skills listed.
Learn more about programming with Edison at:
• Barcodes: Appropriate for ages 4+. No prior experience with programming or
robotics is assumed or required.
www.meetedison.com/robot-activities/youre-a-controller/
• EdScratch: Best suited to students aged 10 and up, ideal for students 10 to
13. A basic understanding of programming fundamentals may be helpful.
www.meetedison.com/robot-programming-software/edscratch/
• EdPy: Best suited to students aged 13 to 16 years old. A basic understanding
of programming fundamentals may be helpful.
www.meetedison.com/robot-programming-software/edpy/

Get set up Before you begin this build, check that you have everything you need and that you
can do the programming required. It’s also a good idea to get familiar with how to
build with your Edison robot.
What you need To make the EdRoboClaw, you will need:
• 2 Edison robots
• 1 EdCreate – Edison robot creator’s kit
• 1 TV or DVD remote
• 1 print-out of the ‘Bottom Edison’ barcodes sheet (from in this guide)
• 1 print-out of the ‘Top Edison’ barcodes sheet (from in this guide)
Programming required in this build To program the EdRoboClaw, you will need to program a remote control with six
different commands using the barcodes in this guide.
Building with Edison You can build with Edison using an EdCreate creator’s kit or any other LEGO brick
compatible building system.
Bricks can be attached to the top and bottom of your Edison robot. Pegs can be
attached on the sides of Edison. When Edison’s wheels are removed, cross axles
can be used in the powered sockets.
There are three types of holes on the side of Edison: pin holes, stud holes, and cross
axle sockets. Look at the following images to learn more about how to connect and
build with Edison.

Hole type Description Connects to
Pin hole A full-depth hole for
connecting pegs.
Stud hole A hole of normal stud-depth which works with
half pegs.
Cross axle socket A powered socket which
rotates.
Stud hole
2 x 8 studs
2 x 8 studs
2x stud holes
Powered cross
axle socket 2x pin holes
Stud hole
Pin hole
Edison’s side and top connections
Edison’s bottom and wheel connections
2 x 8 sockets
2 x 8 sockets
2 x 2 studs
Removable skid

Let’s build the EdRoboClaw! The EdRoboClaw is a remote-controlled robotic arm with a moving base that you can
drive around. The robotic arm of the EdRoboClaw can open and close to pick up and
carry objects such as the grey 7-hole long beam from the EdCreate kit.
This is what the finished EdRoboClaw looks like:
Step 1: Program Edison Before you begin building with the EdCreate parts, you will need to program the
remote-control codes into both Edison robots.
The next two pages have the remote-control barcodes for the bottom and top Edison
robots. Print out these pages so you can drive your Edison robots over the barcodes.

Bottom Edison – barcodes The bottom Edison is the driving Edison.
Program the driving Edison The driving Edison will control the movement of the EdRoboClaw (forwards,
backwards, spin left and spin right). Drive this Edison over the following barcodes,
programming each to a button that corresponds well with the driving manoeuvre on
the remote control. Don’t use buttons that you want to use to control the robotic claw.
Reading the barcode
1. Place Edison facing the barcode on the right side 2. Press the record (round) button 3 times 3. Edison will drive forward and scan the barcode 4. Press a button on your TV/DVD remote that you want to activate that function
Print out this page!
Barcode – IR learn drive forward
Barcode – IR learn drive backward
Barcode – IR learn spin left
Barcode – IR learn spin right

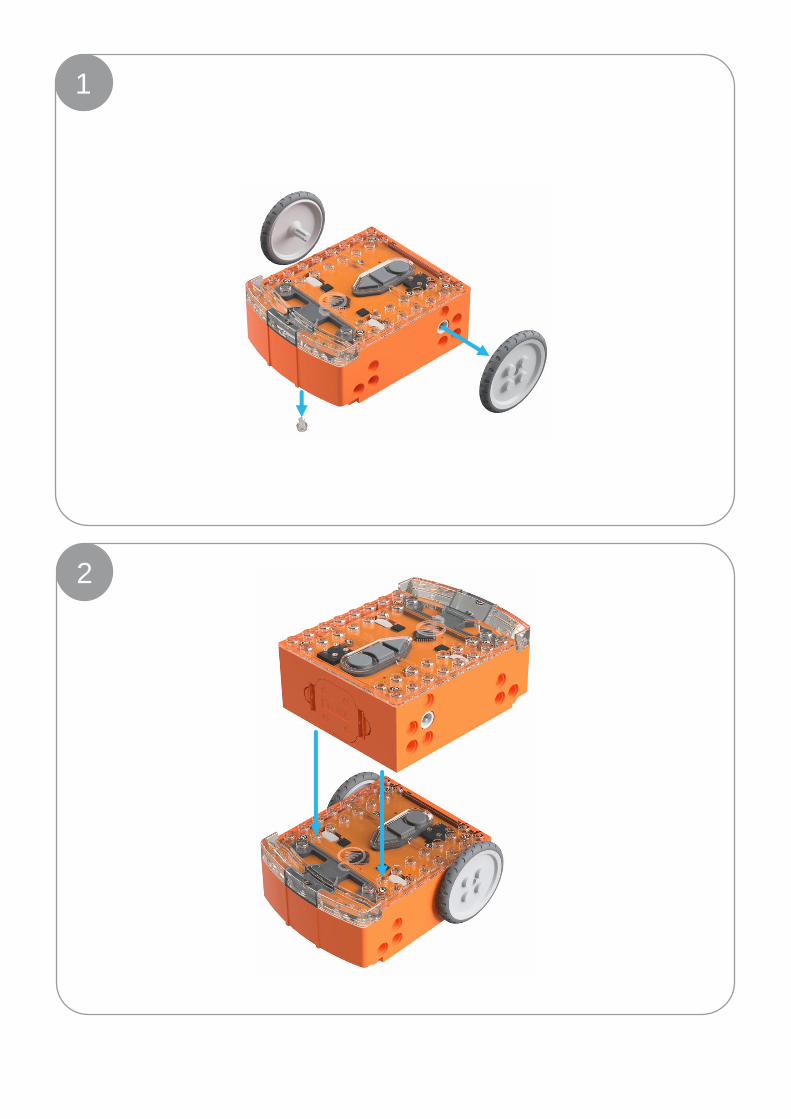
Top Edison – barcodes The top Edison controls the robotic claw arm.
You may want to mark the Edison robots so you don’t confuse which one is
programmed to be the bottom robot and which one is programmed to be the top one
while you are building. You can mark one of the Edison’s as the ‘top’ robot by using
a spare brick or a piece of tape to indicate it is the top Edison. You can also take the
wheels off the top robot as soon as you finish programming this Edison so you won’t
get confused!
Program the claw arm Edison The claw arm Edison will control the articulated robotic arm. Drive this Edison over
the following barcodes, programming each to a button that corresponds well with the
open or close manoeuvre on the remote control. Don’t use buttons that you used to
control how the EdRoboClaw drives.
Reading the barcode
1. Place Edison facing the barcode on the right side 2. Press the record (round) button 3 times 3. Edison will drive forward and scan the barcode 4. Press a button on your TV/DVD remote that you want to activate that function
Print out this page!
Barcode – IR learn Claw Arm close claw and pick up
Barcode – IR learn Claw Arm drop down and open claw
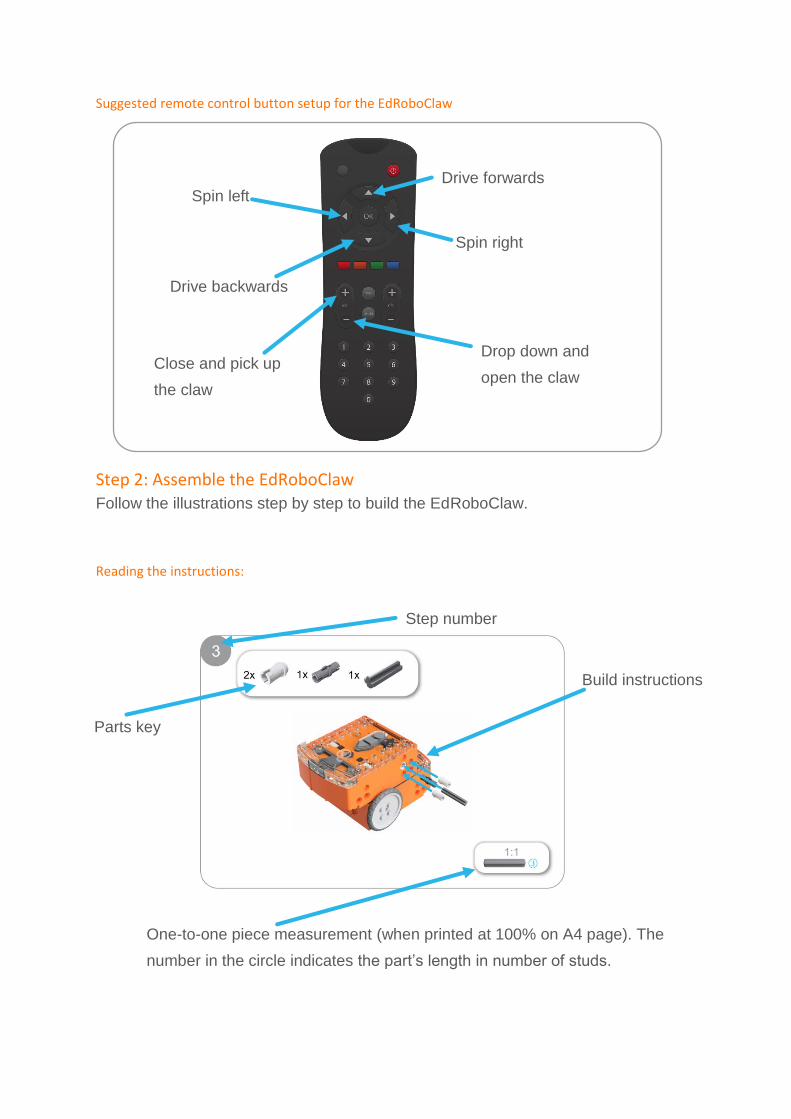
Suggested remote control button setup for the EdRoboClaw
Step 2: Assemble the EdRoboClaw Follow the illustrations step by step to build the EdRoboClaw.
Reading the instructions:
Build instructions
One-to-one piece measurement (when printed at 100% on A4 page). The
number in the circle indicates the part’s length in number of studs.
Parts key
Step number
Drop down and
open the claw
Drive forwards
Spin right
Spin left
Drive backwards
Close and pick up
the claw
1
2

3
2x 1x 1x
1:1 ③
4
1:1 ⑫
1x 1x 1x 1x

5
2x x1 x1
③
1:1
6
1x 1x

⑮
1:1
7
1x 2x 1x
8
1:1
④
2x 1x 3x

9
1x 1x 1x
10
00 3x 2x

11
1x 1x 1x
⑮
1:1
12
1x 1x 1x
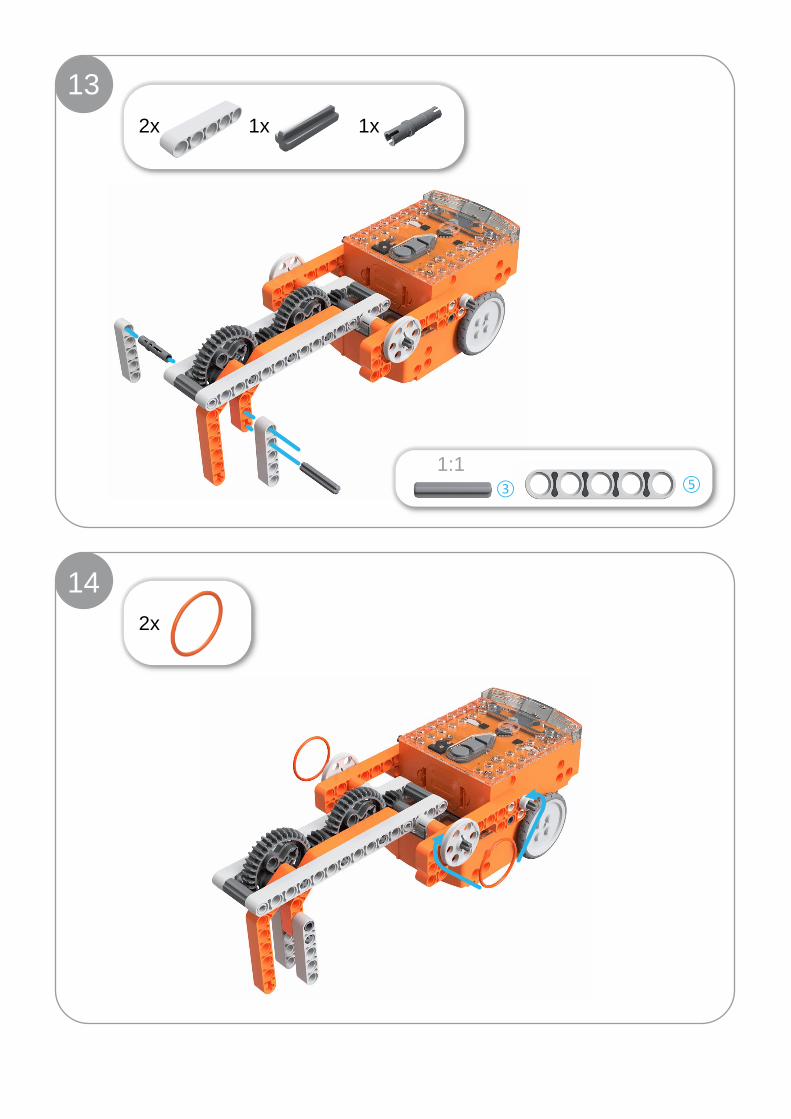
13
③ ⑤
1:1
2x 1x 1x
14
2x

15