Easy Tough WARNING...Pegue la etiqueta de advertencia en el centro del panel superior como se...
30
1848407COM Media Firepalce WARNING Date of Purchase ___ / ___ / ___ Lot Number: Do Not Return This Product! Contact our customer service team for help first. Call: 1-800-489-3351 (toll free) Monday-Friday 9am - 5pm CST Visit: www.ameriwoodhome.com Assembly Difficulty Meter Easy Tough
Transcript of Easy Tough WARNING...Pegue la etiqueta de advertencia en el centro del panel superior como se...

1848407COMMedia Firepalce
WARNING
Date of Purchase ___ / ___ / ___Lot Number:
Do Not Return This Product!Contact our customer service team for help first.
Call: 1-800-489-3351 (toll free)Monday-Friday 9am - 5pm CST
Visit: www.ameriwoodhome.comAssembly Difficulty MeterEasy Tough

Contact Us!
ameriwoodhome.com
PEOPLE NEEDED FOR ASSEMBLY: 1-2ESTIMATED ASSEMBLY TIME: 1 HOUR
Helpful Hints

ameriwoodhome.com
Read through each step carefully and follow the proper order
Separate and count all your parts and hardware
Give yourself enough room for the assembly process
Have the following tools: Flat Head Screwdriver, #2 Phillips HeadScrewdriver and Hammer
Caution: If using a power drill or power screwdriver for screwing,please be aware to slow down and stop when screw is tight.Failure to do so may result in stripping the screw.
Before You Start
Cam Lock Fastening System

ameriwoodhome.com
Board IdentificationNot actual size
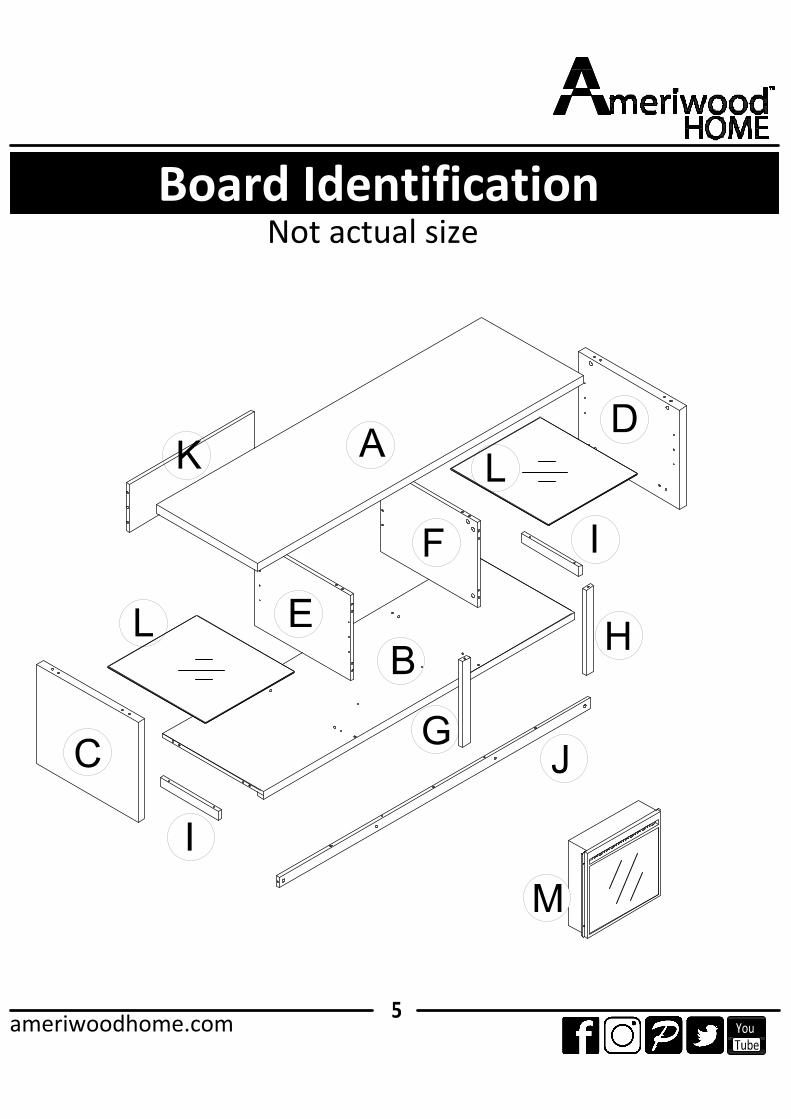
Board IdentificationNot actual size
ameriwoodhome.com
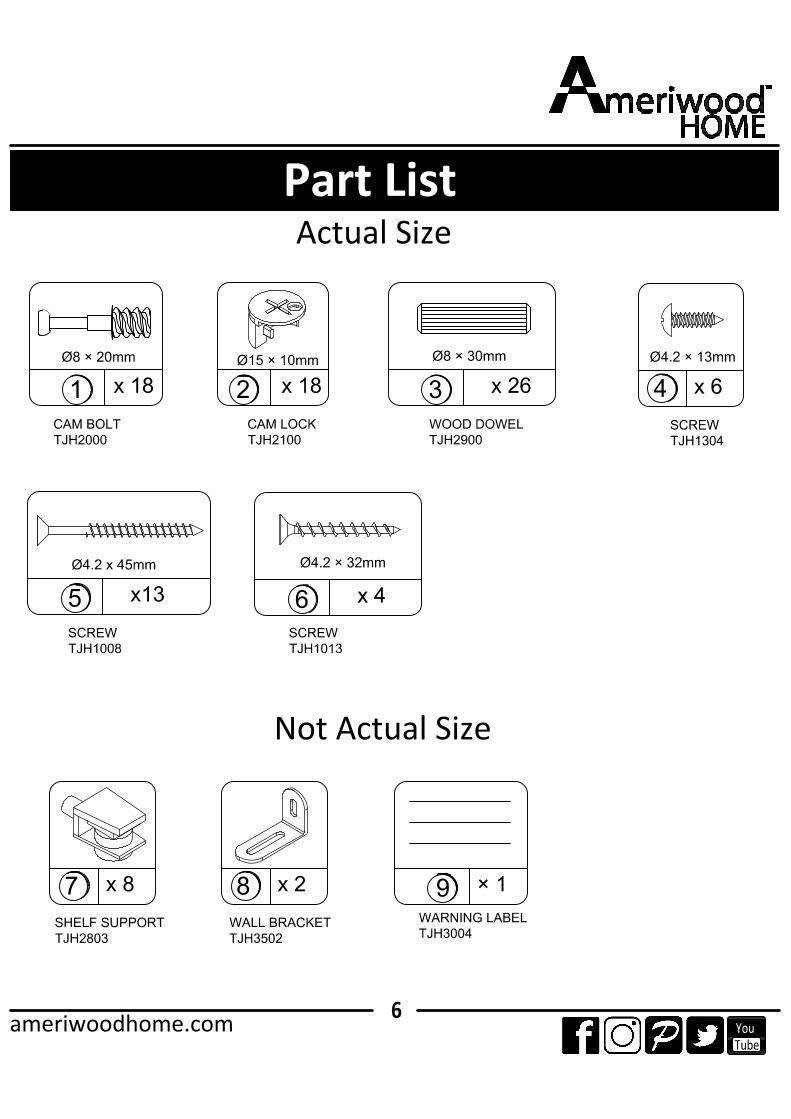
Part ListActual Size
ameriwoodhome.com
Not Actual Size

ameriwoodhome.com
STEP1

ameriwoodhome.com
STEP2

ameriwoodhome.com
STEP3
5
1
m
m
6
0
m
m
6
0
m
m
5
1
m
m

ameriwoodhome.com
STEP4

ameriwoodhome.com
STEP5

ameriwoodhome.com
STEP6
ameriwoodhome.com
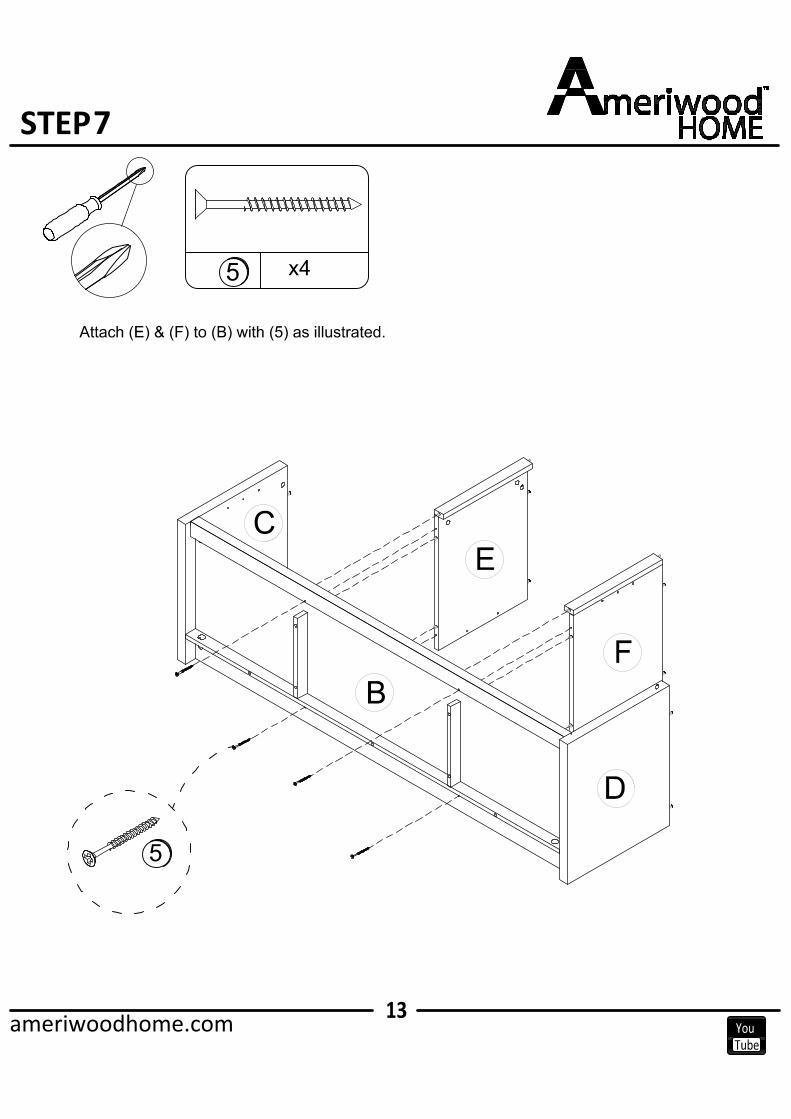
STEP7
ameriwoodhome.com
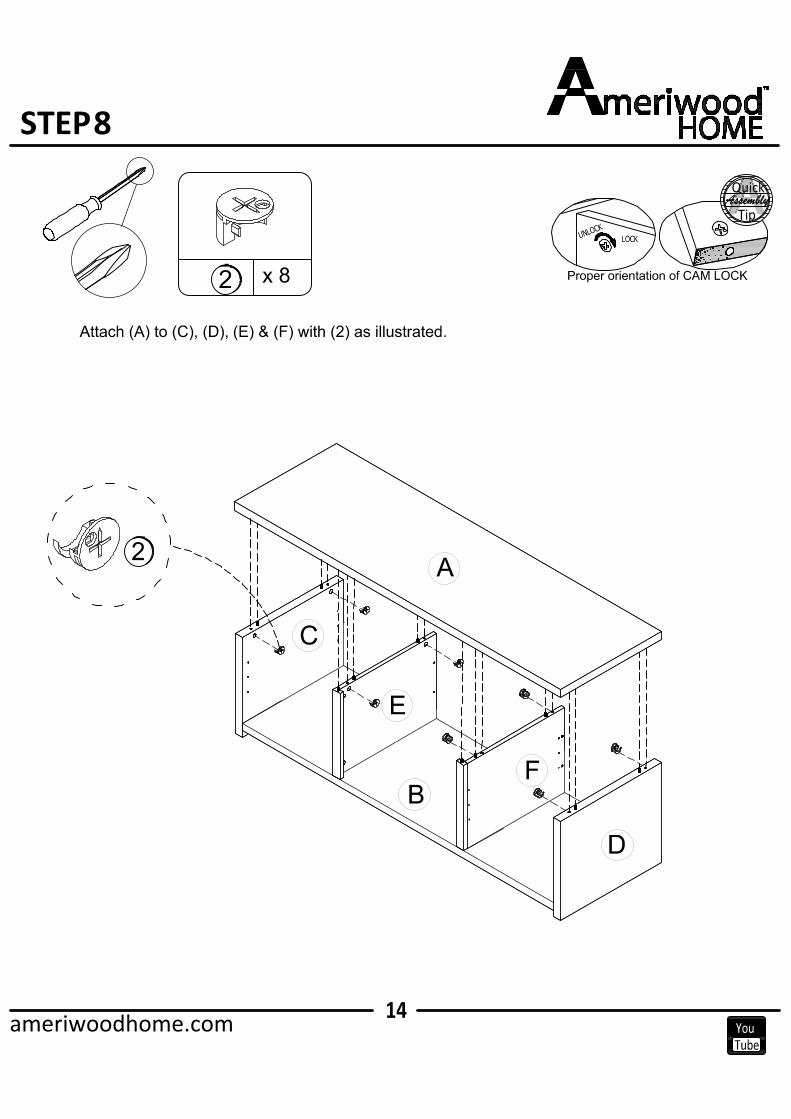
STEP8

ameriwoodhome.com
STEP9

ameriwoodhome.com
STEP10

ameriwoodhome.com
STEP11

ameriwoodhome.com
STEP12

ameriwoodhome.com
STEP13

ameriwoodhome.com
STEP14
BEFORE CONNECTING THE UNIT TO A WALL ELECTRIC OUTLET
Please carefully read and follow instructions and safety warnings in “Fireplace Homeowners
Operating Manual” to operate your fireplace.
≥1-1/2"

Maximum Loads
Apply the warning label to the center of the top panel as shown, ensure the TV covers the label in use.You will not be able to remove the label after it is applied to the top panel.
This unit has been designed to support the maximum loads shown. Exceeding these load limits couldcause sagging, instability, product collapse, and/or serious injury.
ameriwoodhome.com

ameriwoodhome.com
Register your product to receive the following:
* New trend details - sneak peek on what's new* Surveys - have a voice within our community* Exclusive deals and discount codes* Quick and easy replacement part service
To register your product, visit ameriwoodhome.com
Visit your local retailer's website, rate your purchasedproduct and leave us some feedback!
We would like to extend a big "Thank You" to all ofour customers for taking the time to assemble thisAmeriwood Home product, and to give us yourvaluable feedback.

ameriwoodhome.com
Español

ameriwoodhome.com
Identificación de los Paneles (Página 4)Este no es el tamaño real(A) PANEL SUPERIOR(B) BASE(C) PANEL LATERAL IZQUIERDO(D) PANEL LATERAL DERECHO(E) PARTICIÓN IZQUIERDO(F) PARTICIÓN DERECHO(G) RIEL IZQUIERDO(H) RIEL DERECHO(I) SOPORTE CORTO(J) SOPORTE LARGA(K) PANEL TRASERO(L) REPISA DE VIDRIO(M) CHIMENEA
Español
Página 7
1.1 Atornille (1) dentro de (A) como se ilustra.
1.2 Insertar (3) dentro de (J) como se ilustra.
Página 8
2.1 Atornille (1) dentro de (C) & (D) como se ilustra.
2.2 Insertar (3) dentro de (C), (D), (E) & (F) como se ilustra.
Página 9
3.1 Atornille (1) dentro de (G) & (H) como se ilustra.
3.2 Insertar (3) dentro de (B), (G) & (H) como se ilustra.
Página 10
Una la parte (I) & (J) con (B) con (5) como se ilustra.
Lista de Piezas (Página 6)Tamaño real(1) Perno de la leva(2) Cerradura de la leva(3) Clavija de madera(4) torillo(5) torillo(6) torillo
Este no es el tamaño real(7) Soporte de repisa
(8) Soporte para la pared
(9) Etiqueta de advertencia

ameriwoodhome.com
EspañolPágina 11Una la parte (C) & (D) con (B) & (J) con (2) como se ilustra.
Página 126.1 Una la parte (G) con (E) con (2) como se ilustra.6.2 Una la parte (H) con (F) con (2) como se ilustra.
Página 13Una la parte (E) & (F) con (B) con (5) como se ilustra.
Página 14Una la parte (A) con (C), (D), (E) & (F) con (2) como se ilustra.
Página 159.1 Presione (M) en subconjunto A/B/C/D/E/F del paso anterior como se ilustra.9.2 Gire la Asamblea 90 grado.9.3 Una la parte (M) con (G) & (H) con (4) como se ilustra.
Página 1610.1 Gire la asamblea en (B).10.2 Una la parte (8) con (B) con (4) como se ilustra.
Página 17Una la parte (K) con (E) & (F) con (6) como se ilustra.
Página 18Inserte los soportes de estante (7) en el nivel deseado y suelte el tornillo plástico indicado en (7) comose muestra.
Página 19Coloque los estantes de vidrio (L) en los soportes de estante y apriete el tornillo plástico indicado en (7)como se muestra.
Página 20ANTES DE CONECTAR LA UNIDAD A UNA TOMA DE CORRIENTE ELÉCTRICAPor favor lea detenidamente y siga las instrucciones y advertencias deseguridad en el "Manual Operativo para Propietarios de Chimenea " para funcionar su chimenea.

EspañolADVERTENCIASI NO SIGUE LA INFORMACIÓN EN EL MANUAL OPERATIVO PARA PROPIETARIOS DE CHIMENEA, UNADESCARGA ELÉCTRICA O UN INCENDIO PUEDE RESULTAR EN DAÑO DEL PRODUCTO, LESIONESPERSONALES O MUERTE.
ADVERTENCIARiesgo de muete o lesión. Esta unidad debe ser colocada frente a una pared y debe ser instalada porlo menos a la misma altura que una televisión.
Para permitir una ventilación adecuada del calentador, esta unidad debe ubicarse a unmínimo de 1-1 / 2 "de distancia de una pared posterior.
Página 21CARGA MAXIMAEsta unidad ha sido diseñada para soportar la carga máxima anotada. El exceder estos límites puedecausar inestabilidad, colapsarse y/o causar serias lesiones.
ETIQUETA DE ADVERTENCIASe ajusta a la mayoría de las televisiones de pantalla plana de hasta 70",120 lbs./54.4 kgs.
Pegue la etiqueta de advertencia en el centro del panel superior como se muestra, asegúrese de que laTV cubra la etiqueta antes de pegarla. Usted no podra quitar la etiqueta una vez que se esta se apliqueen el panel superior.
Página 22Registre su producto para recibir lo siguiente:* Detalles de nuevas tendencias - Vistazo a lo nuevo* Encuestas - alec su voz entre su comunidad* Códigos de ofertas y descuentos exclusivos* Fácil y rápido servicio de partes de remplacePara registrar su producto, visite ameriwoodhome.comClasificasión de 5 estrellasVisite el sitio web de su tienda local, califique su compradoy denos sus comentarios!Nos gustaría enviar un gran "Agradecimiento" a todos nuestros clientes por tomarse el tiempo deensamblar este producto de Ameriwood Home, y por darnos sus valiosos comentarios.Gracias
ameriwoodhome.com

Français
ameriwoodhome.com
ameriwoodhome.com
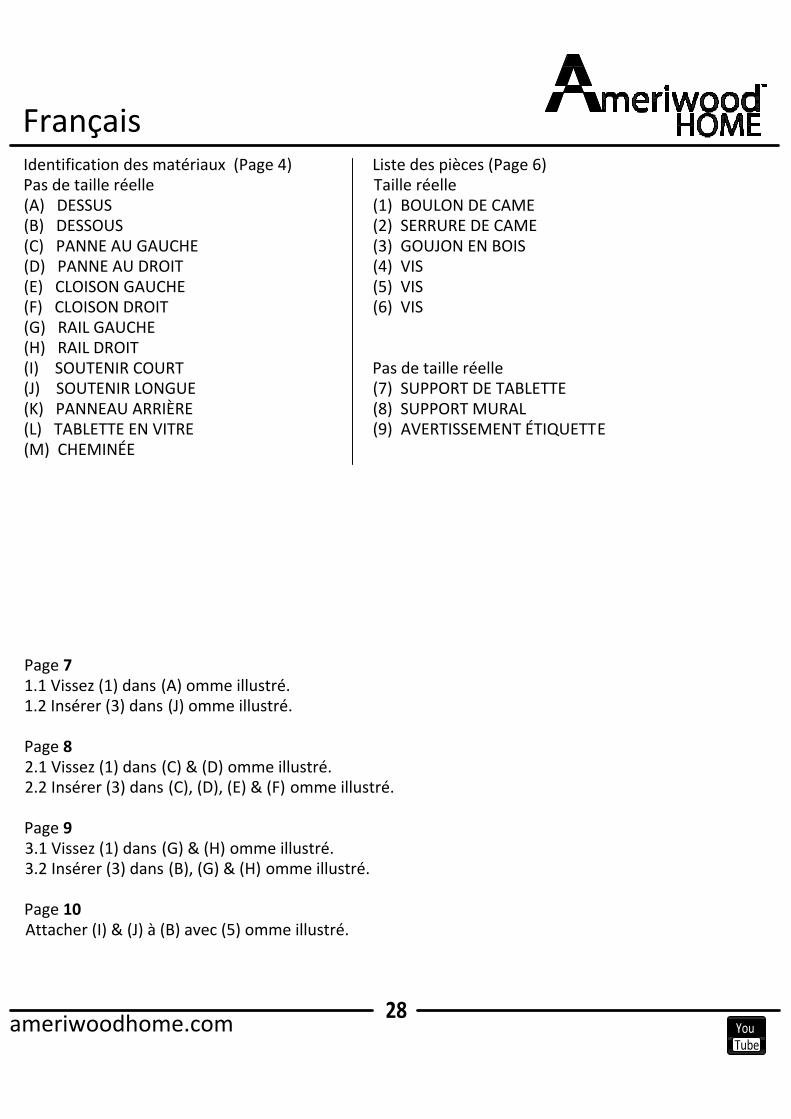
Identification des matériaux (Page 4)Pas de taille réelle(A) DESSUS(B) DESSOUS(C) PANNE AU GAUCHE(D) PANNE AU DROIT(E) CLOISON GAUCHE(F) CLOISON DROIT(G) RAIL GAUCHE(H) RAIL DROIT(I) SOUTENIR COURT(J) SOUTENIR LONGUE(K) PANNEAU ARRIÈRE(L) TABLETTE EN VITRE(M) CHEMINÉE
Français
Page 71.1 Vissez (1) dans (A) omme illustré.1.2 Insérer (3) dans (J) omme illustré.
Page 82.1 Vissez (1) dans (C) & (D) omme illustré.2.2 Insérer (3) dans (C), (D), (E) & (F) omme illustré.
Page 93.1 Vissez (1) dans (G) & (H) omme illustré.3.2 Insérer (3) dans (B), (G) & (H) omme illustré.
Page 10Attacher (I) & (J) à (B) avec (5) omme illustré.
Liste des pièces (Page 6)Taille réelle(1) BOULON DE CAME(2) SERRURE DE CAME(3) GOUJON EN BOIS(4) VIS(5) VIS(6) VIS
Pas de taille réelle(7) SUPPORT DE TABLETTE(8) SUPPORT MURAL(9) AVERTISSEMENT ÉTIQUETTE

ameriwoodhome.com
FrançaisPage 11Attacher (C) & (D) à (B) & (J) avec (2) omme illustré.
Page 126.1 Attacher (G) à (E) avec (2) omme illustré.6.2 Attacher (H) à (F) avec (2) omme illustré.
Page 13Attacher (E) & (F) à (B) avec (5) omme illustré.
Page 14Attacher (A) à (C), (D), (E) & (F) avec (2) omme illustré.
Page 159.1 Pousser (M) dans sous-ensemble A/B/C/D/E/F de étape précédente omme illustré.9.2 Tour l'assemblée de 90 degrés.9.3 Attacher (M) à (G) & (H) avec (4) omme illustré..
Page 1610.1 Tour l'assemblée sur (B).10.2 Attacher (8) à (B) avec (4) omme illustré.
Page 17Attacher (K) à (E) & (F) avec (6) omme illustré.
Page 18Insérez les supports d'étagère (7) au niveau désiré et desserrez la vis en plastique indiquée en (7)comme illustré.
Page 19Placez les étagères en verre (L) dans les supports d'étagère et serrez la vis en plastique indiquée en (7)comme illustré.
Page 20AVANT DE BRANCHER L'APPAREIL À UNE PRISE ÉLECTRIQUE MURALEVeuillez lire et suivre attentivement les instructions et les mises en garde de sécurité dans le "Moded'emploi du Manuel du propriétaire du Foyer" pour faire fonctionner votre foyer.

FrançaisMISE EN GARDESI LES INFORMATIONS DANS LE MANUEL DU PROPRIÉTAIRE DU FOYER NE SONT PAS SUIVIESATTENTIVEMENT, UN CHOC ÉLECTRIQUE OU UN INCENDIE PEUT SE PRODUIRE ET CAUSER DESDOMMAGES MATÉRIELS, DES BLESSURES, OU DES PERTES DE VIES .
AVERTISSEMENTDanger de mort ou de blessures graves. Cette surface doit être placée contre un mur fixé en placeau moins aussi grand que la télévision.
Pour permettre une bonne ventilation du radiateur, cet appareil doit être situé à1-1/2” d'un mur arrière.
Page 21CHARGES MAXIMALESCe meuble a été conçu pour supporter les charges maximales indiquées. En excédant ces limites decharge, le meuble pourrait devenir instable, s'effondrer, et/ou causer des blessures graves.
AVERTISSEMENT ÉTIQUETTEPeut accueillir la plupart des TV à écran plat jusqu'à 70", 120 kg (54.4 lb) MAX.
Appliquez l'étiquette de mise en garde au centre du panneau supérieur comme montré. Assurez-vousque le téléviseur couvre l'étiquette utilisée. Vous ne pourrez pas retirer l'étiquette après l'avoirappliquée sur le panneau supérieur.
Page 22Enregistrez votre produit pour recevoir les éléments suivantes:* Détails sur les nouvelles tendances - un aperçu sur les nouveautés* Sondages - avoir une voix au sein de notre communauté* Offres exclusives et codes promo* Service de pièces de rechange rapide et facilePour enregistrer votre produit, visitez ameriwoodhome.com5 ÉtoilesVisitez le site Web de votre détaillant local, évaluez votre produitacheté et laissez-nous quelques commentaires !Nous tenons à offrir un grand "Merci" à tous nos clients pour avoir pris le temps d'assembler ce produit"Ameriwood Home", et de nous donner vos commentaires précieux.Merci
ameriwoodhome.com