Easy Access with Templates II: Modify a database Overview: Change is at hand You’ve just created a...
16
Easy Access with Templates II: Modify a database Overview: Change is at hand You’ve just created a new database using a template, but you’ve decided that the database needs a few modifications. What do you do? It’s easy — you can make modifications to the database that you created from a template. This course walks you through a few common modifications.
-
Upload
elfrieda-bailey -
Category
Documents
-
view
217 -
download
0
Transcript of Easy Access with Templates II: Modify a database Overview: Change is at hand You’ve just created a...

Easy Access with Templates II: Modify a database
Overview: Change is at hand
You’ve just created a new database using a template, but you’ve decided that the database needs a few modifications.
What do you do?
It’s easy — you can make modifications to the database that you created from a template. This course walks you through a few common modifications.

Easy Access with Templates II: Modify a database
Modify your database
You’ve created a database from a template to track customers at a stationery store.
The store owner is happy with it, but wants a few changes.
In this course, you’ll see how to make common modifications:
• Changing a field name
• Adding a field, and then including the new field in a form
• Changing the title of a form
Easy Access with Templates II: Modify a database
Back up your data
Access makes it easy for you to modify a database.
But what if you make a change and then decide it’s not what you want?
Although you can use the Undo command to reverse some changes, certain actions cannot be reversed.
That’s why it’s a good idea to back up the database.

Easy Access with Templates II: Modify a database
Back up your data
Click the Microsoft Office Button , and then point to Manage to open the Manage this database submenu. From there, click Back Up Database.
When you back up a database, Access saves the database and then saves a copy of the database file.

Easy Access with Templates II: Modify a database
Back up your data
Click the Microsoft Office Button , and then point to Manage to open the Manage this database submenu. From there, click Back Up Database.
For the copy, Access adds the date to the existing database name, but you can change it to any name.
Likewise, Access stores the backup in the same location where the original database is stored, but you can change it to any location.

Easy Access with Templates II: Modify a database
Let Access do some of the work
Your Access database is made up of tables, forms, reports and other parts that rely on each other.
If you make a change to a field name in a table, the other database parts that call on that field might not work as they did.
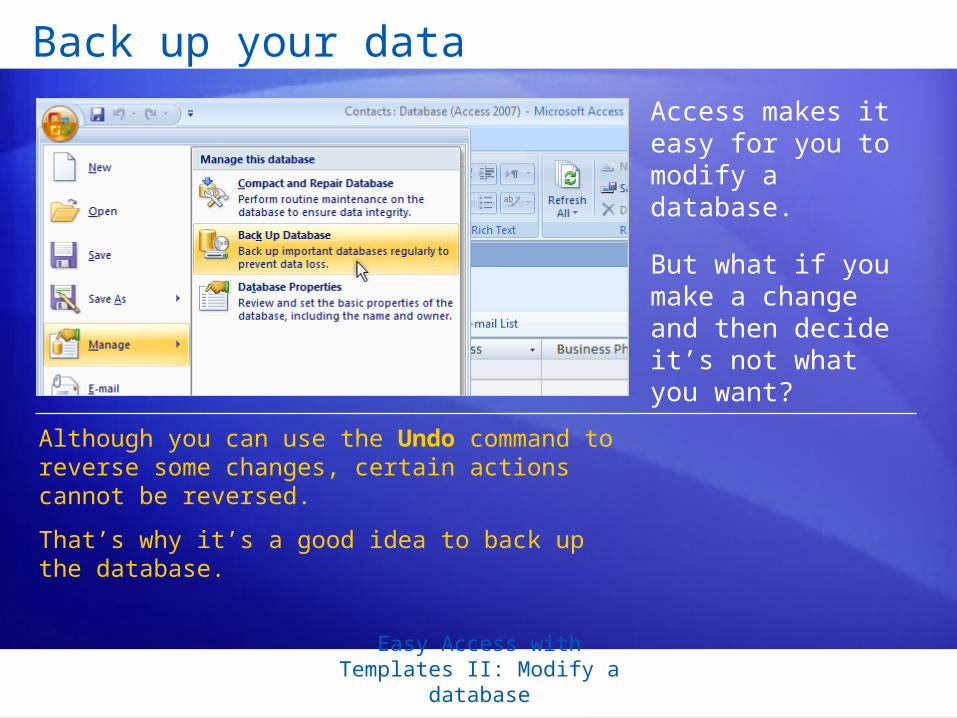
Access provides Name AutoCorrect options that help keep your database parts in sync.
Easy Access with Templates II: Modify a database
Let Access do some of the work
Most of the time these options are already checked, but it’s a good idea to confirm it by checking that the Name AutoCorrect Options are on.
Click the Microsoft Office Button, and then click Access Options.
In the options for Current Database, scroll down to the Name AutoCorrect Options and make sure that there are checkmarks next to Track name AutoCorrect info and Perform name AutoCorrect.

Easy Access with Templates II: Modify a database
Rename a field
For the stationery store, you want to rename a field name from “Mobile Phone” to “Wireless Phone”.
Changing a field name is a common modification you can make to any database table.

Easy Access with Templates II: Modify a database
Rename a field
But right now, you have the “Contact List” form open.
Before you rename your field name, you must open the Contacts table by using the Navigation Pane.
Then you must close all the other forms and reports that may be open. Finally, you select the field name and type in the new name.

Easy Access with Templates II: Modify a database
Rename a field
But right now, you have the “Contact List” form open.
Once you’ve made the change, you know that Access has made changes to the reports and forms that use this field because you know that the Name AutoCorrect Options are on.
Now we’re ready to add an entire new field to a table.

Easy Access with Templates II: Modify a database
Add a field to a table
Now, you’re ready to add a new field for Mr., Ms., Mrs., and other honorifics.
You’ll begin at the Contacts table, which is already open.
1
2
On the Home tab, click View, and then click Datasheet View.
Tell Access where you want the new field by clicking a field heading to select it. Access will insert the new field to the left of the field you’ve selected.

Easy Access with Templates II: Modify a database
Add a field to a table
Now, you’re ready to add a new field for Mr., Ms., Mrs., and other honorifics.
You’ll begin at the Contacts table, which is already open.
3 Click the Datasheet tab.
4 Click Insert, then type the field name by double-clicking the field name and typing “Title”.

Easy Access with Templates II: Modify a database
Add a field to a table
Because you changed an underlying structure of a table, you need to save this change.
Click the Microsoft Office Button, and then click Save.
Now you’re ready to add that same field to a form.

Easy Access with Templates II: Modify a database
Add a field to a form
Once you have created a new field, you add the new field to a form.
An easy way to do this is in Layout View.
In Layout View, you can drag a field from the Field List pane to your form, as shown in the picture.
You can also move the new field to where you want it by clicking and dragging the field name.
Easy Access with Templates II: Modify a database
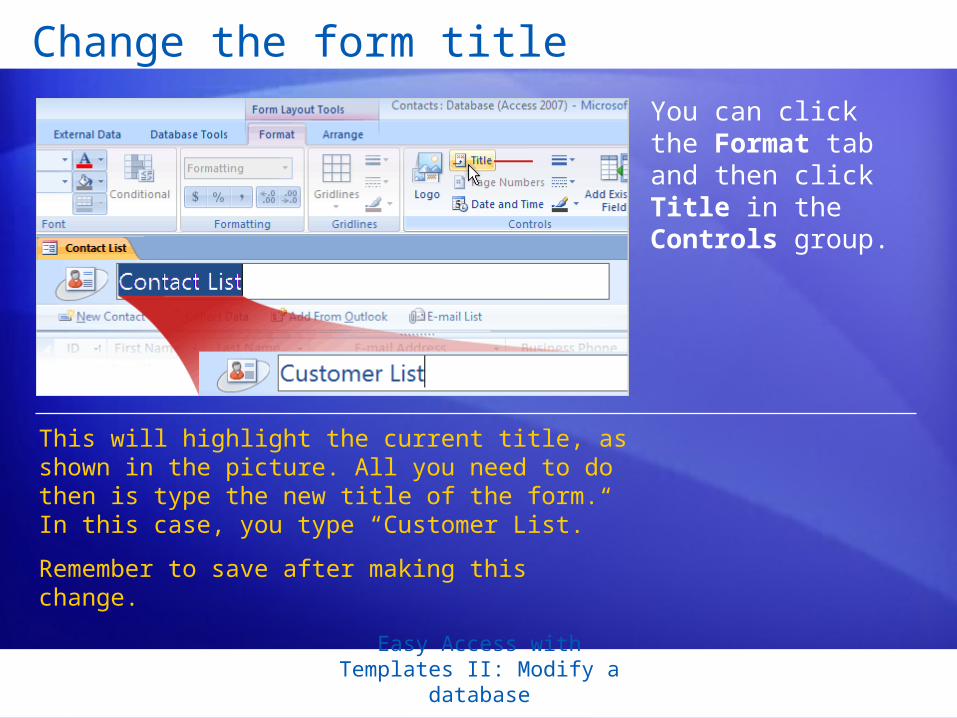
Change the form title
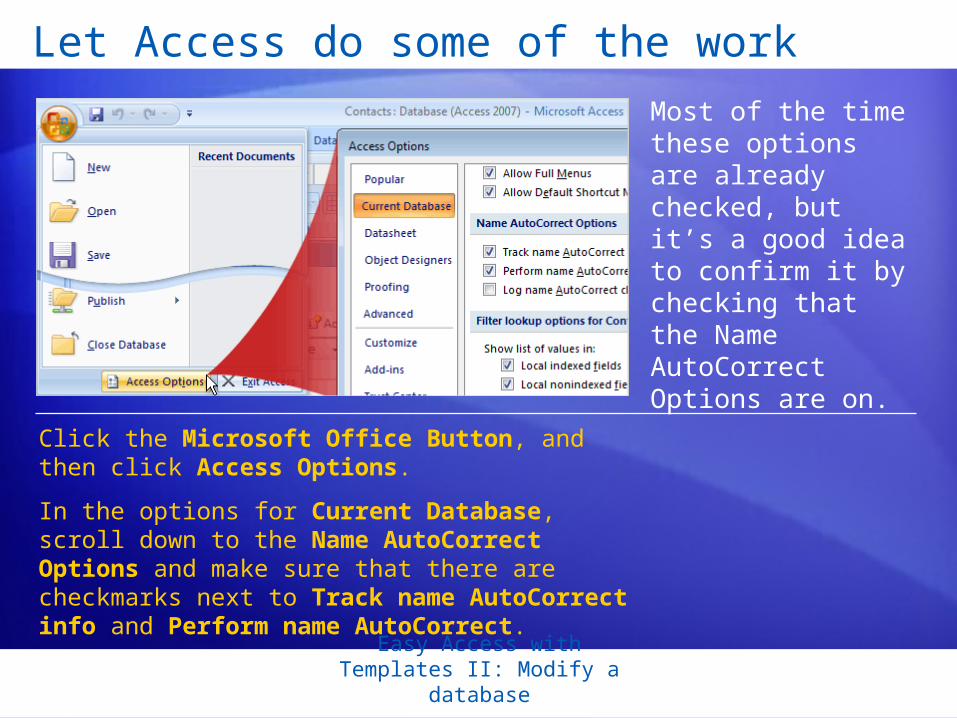
Because you are already in Layout view for the form, you can easily make one last change.
Because this database contains customer names for a stationery store, you’re going to change the form title to Customer List.
Easy Access with Templates II: Modify a database
Change the form title
You can click the Format tab and then click Title in the Controls group.
This will highlight the current title, as shown in the picture. All you need to do then is type the new title of the form. In this case, you type “Customer List.”
Remember to save after making this change.