eAgreements User Guide: Open Value Programs User Guide 4 For information on using eAgreements with...
28
eAgreements User Guide: Open Value Programs MICROSOFT ® VOLUME LICENSING MAY 2016
Transcript of eAgreements User Guide: Open Value Programs User Guide 4 For information on using eAgreements with...

eAgreements User Guide: Open Value Programs
MICROSOFT® VOLUME LICENSING
MAY 2016

eAgreements User Guide
2
Contents About eAgreements ........................................................................................................................................... 3
About this User Guide ..................................................................................................................................................... 3
The eAgreements site ........................................................................................................................................ 4 Sign in and create an Open Value Agreement ......................................................................................... 4
Choose Program Attributes........................................................................................................................................... 5
Creating an Agreement (Contract Package) ........................................................................................................... 6
Prior Agreements .............................................................................................................................................................. 7
Choose Organizations ..................................................................................................................................................... 7
Choose Contacts ............................................................................................................................................................. 10
Additional Information ................................................................................................................................................. 13
Choose Offerings ............................................................................................................................................................ 13
Choose Media .................................................................................................................................................................. 14
Summary ............................................................................................................................................................................ 14
Preview/Upload and Preparing for Signature ..................................................................................................... 15
Prepare for Signature.................................................................................................................................................... 17
Withdrawal of Submission .......................................................................................................................................... 20
Resend the Notification ............................................................................................................................................... 20
Extending an Open Value Agreement ...................................................................................................... 21 Renewing an Open Value Agreement ...................................................................................................... 23 Accepting and Signing the Agreement .................................................................................................... 24
Accepting ........................................................................................................................................................................... 26
Rejecting ............................................................................................................................................................................ 27
Summary .............................................................................................................................................................. 28

eAgreements User Guide
3
About eAgreements
Microsoft eAgreements is an online tool for Microsoft Partners that automates the
electronic creation, assembly, signature, and activation of Volume Licensing agreements.
Microsoft eAgreements helps you reduce data-input errors and agreement cycle times so
you have more time to spend on other sales activities.
About this User Guide
This eAgreements User Guide demonstrates the creation, assembly, signature, and
execution of Open Value (OV) and Open Value Subscription (OVS) agreements.

eAgreements User Guide
4
For information on using eAgreements with other volume licensing programs, see the
other guide titled eAgreements User Guide: Open Value Programs.
Note: There may be some minor differences between the live eAgreements tool and the
screenshots in this guide.
The eAgreements site
The eAgreements tool is online at
https://eagreements.microsoft.com/AgreementWeb/Login.aspx
Sign in and create an Open Value Agreement
Microsoft Partners can sign into the eAgreements application using their Partner Domain
Account, Microsoft Account or Windows Live ID, depending on their role.
Sign in at: https://eagreements.microsoft.com/AgreementWeb/Login.aspx
1. After you sign in, open the Organization Search page and create a new contract
package (Open Value Agreement), so you can begin using eAgreements.
2. In the section labeled To begin creating a contract package, do one of the following:
Enter the Organization Name and City in their respective fields. Select the
Country from the Country drop-down list box. Enter the State or Province in
the State/Province field.
OR
Enter enter the Public Customer Number (PCN) in the Public Customer
Number (PCN) field.

eAgreements User Guide
5
3. Select the desired organization from the list.
4. Click Add Program to begin creating a new agreement.
Choose Program Attributes
The Choose Program page opens.
1. Enter a Reference Name and Reference Number of your choice.

eAgreements User Guide
6
Note: The Reference Name and Reference Number are identifiers used as
eAgreements tracking reference numbers for the Partner. Partners can use these
numbers to search for an Agreement Package within eAgreements.
2. Choose Select from the Program drop-down list box.
3. Choose the required Version of the agreement program from the Version drop-down
list box.
4. Select the correct Program Type from the Program Type drop-down list box.
Selecting Program Type automatically populates the Partner Type and Agreement Language
fields. Countries with more than one partner type for a program will have to choose these fields.
To create a new contract with the chosen company, create a new contract is selected here.
5. Verify the Partner Type.
6. Select the correct language for the agreement from the Agreement Language drop-
down list box.
7. Click Next.
Creating an Agreement (Contract Package)
After you select a new company and decide on the type of agreement to create, you must
complete the Contract Package. Click the icons at the top of the Contact Package page to
move through the tabs to gather the information required to complete a contract package.
Partner information is pre-populated.

eAgreements User Guide
7
Prior Agreements
1. Within the Prior Agreements tab select Yes or No to confirm whether the new agreement
you are creating is part of an SA Renewal.
Choose Organizations
1. Click the Choose Organizations tab.
2. Click Search/New to add details of the Distributor associated to contract package.

eAgreements User Guide
8
3. Enter the Distributor’s Organization Name or Public Customer Number.
4. Click Search.
5. Click on the required organization and click Select.
6. Click Search/New to add details of the Reseller associated to contract package.

eAgreements User Guide
9
7. Enter the Reseller’s Organization Name or Public Customer Number.
8. Click Search.
9. Click on the required organization and click Select.
10. Choose from the options to define the customer’s enterprise and affiliates.

eAgreements User Guide
10
Note: An affiliate is a company that is more than 50% owned by the parent company.
Options available here include selecting –
• The customer organization only.
• The customer organization and all affiliate organizations
• The customer organization and the following affiliates – in which case the contract
package creator will select each affiliate, which should be included.
• The customer organization and all affiliates with the following affiliates excluded – in
which case the contract package creator will select each affiliate, which should not be
included.
Finally, the contract package creator should determine whether the customer’s organization
would include all new Affiliates acquired after the start of the Agreement, which is being
created.
Choose Contacts
1. To assign Participant Roles as Agreement Contacts click the Choose Contacts tab.
2. Select the Customer organization from the Organization drop-down list box to view the
available contacts for that organization. Use the Contact drop-down list box to choose
the appropriate contacts within the organization.

eAgreements User Guide
11
Note: Contacts can be added at this time by clicking Search/New next to the Contact drop-
down list box and details for an existing contact can be updated by clicking Edit.
The red asterisks indicate required contact roles assigned to a contract in the Available
Participant Roles field.
3. Select any or all of the items in the Available Participant Roles box.
Note: Press and hold the <Ctrl> key to choose multiple Participant Roles or press and hold
the <Shift> key to choose a range of Participant Roles.
When the Customer Organization is selected in the Organization drop-down list, the Reseller
Primary Contact and Distributor Primary Contact roles are grayed out and unavailable for
attachment to the Customer contact.
4. Click Assign to move Participant Roles to the Assigned Contacts field. This action
assigns the participant to those roles in the contract. Repeat these two steps until all
required contacts/roles are assigned.
5. Select the Distributor Organization and Contact from the drop down lists.
eAgreements User Guide
12
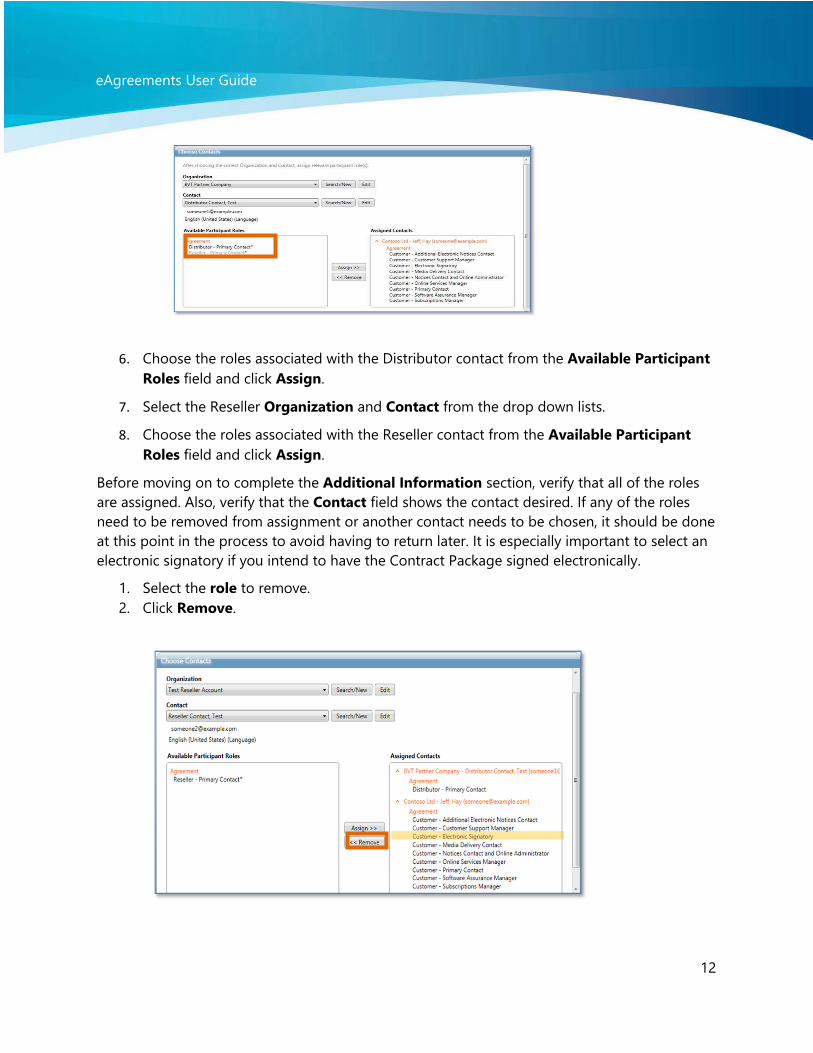
6. Choose the roles associated with the Distributor contact from the Available Participant
Roles field and click Assign.
7. Select the Reseller Organization and Contact from the drop down lists.
8. Choose the roles associated with the Reseller contact from the Available Participant
Roles field and click Assign.
Before moving on to complete the Additional Information section, verify that all of the roles
are assigned. Also, verify that the Contact field shows the contact desired. If any of the roles
need to be removed from assignment or another contact needs to be chosen, it should be done
at this point in the process to avoid having to return later. It is especially important to select an
electronic signatory if you intend to have the Contract Package signed electronically.
1. Select the role to remove.
2. Click Remove.

eAgreements User Guide
13
Additional Information
The Additional Information tab allows you to add any miscellaneous information require to
the Contract Package. The example below is the Additional Information page a user would see
during the creation of Open Value Agreements.
1. Select the Additional Information tab.
2. Choose Language Option (applicable to Customers in EMEA only) and enter Additional
Reference Information as needed.
Choose Offerings
The Choose Offerings tab allows you to select from various purchasing options and determine
the Customer price level.
1. Select the Choose Offerings tab.
2. Choose from the Purchasing Options and Customer Price Level options as required.
Note: The purchasing options and customer price level options may differ slightly from the
screen below depending on whether you are creating a contract package for the Open Value or
Open Value Subscription program.

eAgreements User Guide
14
Choose Media
What is Digital by Choice? This is Microsoft's simplified and environmentally conscious digital
fulfilment initiative for your Microsoft Volume Licensing Agreement. This initiative allows your
organization to choose the best method to receive software. To simplify the experience and
reduce the environmental impact of production and shipment of media, choose the Digital by
Choice download method.
On the navigation menu, click Choose Media. The Download option is preselected. No other
action is required; go to the Summary section.
Summary
The Summary section gives the agreement creator a page on which to view the agreement
content.
1. Select the Summary tab.
View each area within the summary by clicking on the headers on the left. In addition, an area
can be revisited by clicking the links on the right.

eAgreements User Guide
15
Preview/Upload and Preparing for Signature
Before submitting the Contract Package for signature, contract package documents can be
reviewed and additional miscellaneous documents can be attached if required.
1. Click Preview/Upload.
2. Click on the document name to review/print each draft document in .pdf format.
Note: Contracts printed from preview/upload at this stage are not final. Physical versions should
not be sent for customer signature.
3. To attach any additional documents enter a title for the document.

eAgreements User Guide
16
4. Click Browse to locate the document for attaching.
5. Choose whether the document should be visible to the customer when signing.
In the case of Open Value or Open Value Subscription, Partners or Resellers may choose to
attach additional documentation (e.g. sales/marketing information) that they would like to send
to the customer for informational purposes, which will not be taken into account by the
processing team at the Regional Operations Center (ROC) when processing the agreement.
Additional forms should not be included.
The Visible to Customer check box determines whether a miscellaneous document will be
visible to the Customer when signing. If there are reasons that the customer should not see the
document, DO NOT select this choice. The option chosen for each document listed in the
Uploaded Documents section.
6. Click Upload.
Repeat as necessary until all miscellaneous documents required are attached. Each document
will appear in the Uploaded Documents section.
7. Click Close once complete.
Note: It is also possible to remove any Uploaded Documents that were uploaded in error. To do
this select the document and click the Remove button.

eAgreements User Guide
17
Prepare for Signature
There are two submission for signature options. You can submit for either electronic or physical
signature. This section explains both.
Electronic Signature
1. Click Prepare for Signature
The prepare to send dialog box opens
2. Verify the Electronic Signatory.
3. Enter any CC or BCC e-mail addresses.
4. Click Send.
Note: Choose Electronic Signature to submit this contract package for signature electronically.
An email is sent to the specified signatory requesting their signature. The Distributor and
Reseller contacts listed during the package creation will receive a copy of the invitation email by
default.
5. Click OK to acknowledge confirmation of submitted package.

eAgreements User Guide
18
Physical Signature
1. Click Prepare for Signature
If you did not include an electronic signatory when you assigned contacts, you will receive a
warning when attempting to prepare you agreement package for signature. If this preparation
requires an electronic signature, return to the Choose Contacts section and assign electronic
signatories. Alternately, click Assign to assign one from the Prepare for Signature screen.
2. To proceed with the physical signature option select Physical Signature.
3. Click the Document Name to review the desired document.
Note: Prior to submitting the contract package all documents will have a ‘Draft’ watermark.
Documents with this watermark cannot be accepted at the Regional Operations Center for
processing. Once the package is submitted successfully, the watermark on the documents is
updated to ‘Physically
Submitted’. Ensure all documents have this watermark before sending for Customer signature.

eAgreements User Guide
19
4. Use Adobe Reader to review the documents.
5. Click Submit when you have completed reviewing.
When the submission process has completed a confirmation dialog will open.
6. Click OK.
You must now print all documents included in the contract package to send to the customer for
signature.
1. Click the Document Name to open and print each desired document.
Note: All documents will now have a ‘Physically Submitted’ watermark rather than ‘Draft’
watermark.
2. Click Print.
3. Send printed package to Customer for signature.
Note: It is important that the date of the physically signed agreement is not earlier than the
agreement submitted date, or it will be invalid and the Regional Operations Center will reject it.

eAgreements User Guide
20
Withdrawal of Submission
Where a contract package is created within eAgreements, it is possible to withdraw submission
of the package to make further edits should this be required. Once a package is submitted, the
Withdraw button becomes visible. By withdrawing the package, its status returns to draft. Any
edits should be completed and package resubmitted for Customer signature. Note, that once
withdrawn, the previous version of the contract is void.
1. Click Withdraw to withdraw the agreement.
2. Click Yes to confirm the withdrawal.
When complete, there are two indicators that the package has been withdrawn:
1. The Withdraw button has reverted to the Delete button.
2. The status has changed from Pending Customer Signature to Draft
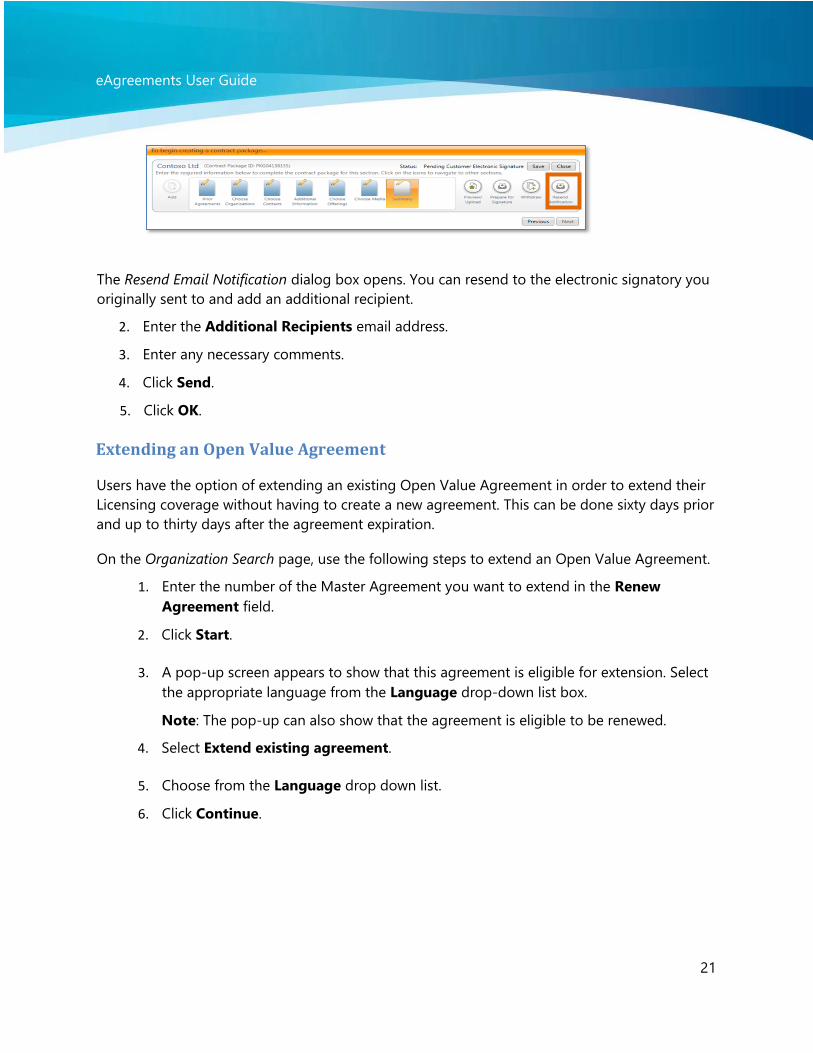
Resend the Notification
It is possible to resend the Submission Notification emails.
1. Click Resend Notification.
eAgreements User Guide
21
The Resend Email Notification dialog box opens. You can resend to the electronic signatory you
originally sent to and add an additional recipient.
2. Enter the Additional Recipients email address.
3. Enter any necessary comments.
4. Click Send.
5. Click OK.
Extending an Open Value Agreement
Users have the option of extending an existing Open Value Agreement in order to extend their
Licensing coverage without having to create a new agreement. This can be done sixty days prior
and up to thirty days after the agreement expiration.
On the Organization Search page, use the following steps to extend an Open Value Agreement.
1. Enter the number of the Master Agreement you want to extend in the Renew
Agreement field.
2. Click Start.
3. A pop-up screen appears to show that this agreement is eligible for extension. Select
the appropriate language from the Language drop-down list box.
Note: The pop-up can also show that the agreement is eligible to be renewed.
4. Select Extend existing agreement.
5. Choose from the Language drop down list.
6. Click Continue.

eAgreements User Guide
22
7. Select the appropriate signatory from the Signatory drop-down list box.
8. Click New to add a new signatory where required. Complete the contact details for
the signatory. Alternatively, click Edit to amend the signatory’s details.
9. Click Preview and Upload and attach any documents required.
10. Click Prepare for Signature and follow the directions for signature as explained in
Prepare for Signature.

eAgreements User Guide
Renewing an Open Value Agreement Users can renew an existing Open Value Agreement into a new Open Value agreement. This can
be done sixty days prior to and up to thirty days after the agreement expiration. The tool also
allows out of grace renewals. Regional Operations Centers have the empowerment to approve
exceptions up to 120 days after renewal date. If a renewal is required later than 120 days,
contact your subsidiary for approval (special deal). The special deal number should then be
included in the CLT log requesting that the new agreement be set up as a renewal and
backdated to ensure no gap in coverage.
On the Organization Search page, use the following steps to extend an Open Value Agreement.
1. Enter the number of the Master Agreement you want to extend in the Renew
Agreement field.
2. Click Start.
3. A pop-up screen appears to show that this agreement is eligible for renewal.
Note: The pop-up may also show that the agreement is eligible to be extended.
4. Select Renew into a New Agreement.
5. Click Continue
The organization appears on the Organization Search page
6. Select the organization name.
7. Click Add Program.

eAgreements User Guide
8. Configure your program choices on the Choose Program dialog box.
9. Click Next.
This action brings the user to the Prior Agreements page.
10. Choose Yes or No to indicate whether the Customer organization has agreements
that are eligible for Software Assurance by selecting the appropriate media button.
You may add additional prior agreements simply by entering additional prior agreements in the
Prior Agreement Number field and clicking Search. Additional prior agreements will appear in
the Selected Prior Agreements table.
11. Click the Choose Organizations tab to continue building what essentially is a new
Open Value Agreement. Continue the package creation process for as described in
the Open Value Agreement section.
Accepting and Signing the Agreement
When a contract package is created and submitted for electronic signature an e-mail is sent to
the Customer signatory. This instructs them to complete the agreement process by clicking the
Accept and Sign link, logging into the eAgreements web site and electronically accepting the
agreement.

eAgreements User Guide
1. Click on the link in the notification email to open the eAgreements Website.
2. Sign in with your Microsoft Account.
Note: It is also possible to create a Microsoft Account at this stage if you do not already
have one.
Unlike eAgreements for OV, with the new eAgreements tool, customers can now sign
multiple contract packages associated to the same organization using a single Microsoft
Account.
On signing in, the Contract Package view opens.
3. Click the Document Name to view the contents of each document.
4. Review the agreement.

eAgreements User Guide
Accepting
To sign the contract package, review the documents and acknowledge your review by
completing the following steps:
5. Click I Confirm.
6. Select I hereby authorize Microsoft to apply my signature to the signature form.
7. Enter your Name exactly as it appears on the form.
8. Enter your Job Title.
9. Click Submit.

eAgreements User Guide
Upon submission, the document package is routed to Microsoft for final processing. Barring any
activation issues, the contract package will be activated in eAgreements. An email notification
sent to the Distributor and Reseller to advise when the package is active. The Customer will
receive a welcome letter. Once an order is placed, if requested media will be shipped.
Rejecting
Signers also have the ability to reject their Contract Package. To reject a contract package, click I
Reject and specify the Rejection Reason, and provide additional details in the Comment
section. The entire package is routed back to the Agreement Creator, who can review your
comments, edit the document package, and resubmit as needed.

eAgreements User Guide
28
Note: If you want copies of any of the documents in your package, you must save and/or print
them before you reject the package. Once rejected, the document package will disappear from
your view, as it will no longer be in an active status for you.
Summary
This eAgreements User Guide has demonstrated how to use the eAgreements tool to
create and manage agreements for the Open Value and Open Value Subscription
programs. The guide demonstrates the creation, assembly, signature, and execution of
these agreements.
By automating the complexities of setting up and signing an agreement, the eAgreements tool
can help reduce data input errors and cycles times, thus improving the Partner and Customer
experience with the agreement process.
Note: For information on using eAgreements with Enterprise Agreements, Select Plus,
Service Provider License (SPLA), Enrollent for Education Solutions (EES) and other programs,
see the other guide titled eAgreements User Guide: All Programs.