E1/T1 GSM Channel Bank User Manual Manual.pdf · Digital Mobile Trunk (DMT) accepts incoming call...
44
- 1 - DMT E1/T1 GSM Channel Bank User Manual PORTech Communications Inc.
Transcript of E1/T1 GSM Channel Bank User Manual Manual.pdf · Digital Mobile Trunk (DMT) accepts incoming call...

- 1 -
DMT
E1/T1 GSM Channel Bank
User Manual
PORTech Communications Inc.

- 2 -
【【【【Content】】】】
1. Introduction…………………………………………………3
2. Products illustration………………………………………..3
3. Dimension: 43d×48w×24h cm……………………………4
4. Chart of the device…………………………………………5
5. System Setting……………………………………………..5
6. Structure of DMT………………………………………......6
7. DMT/System Parameters Setup………………………….7
8. MT Group Setting…………………………………………18
9. Q&A………………………………………………………..23
- 3 -
1. Introduction
Digital Mobile Trunk (DMT) accepts incoming call from E1/T1 PRI of PSTN or
PBX or VoIP Trunk Gateway and chooses one GSM channel to dial out
according to the prefix of the destination mobile number. In this way, we can
have least cost routing (LCR). DMT can provide Call Detail Record (CDR) for
traffic and accounting management.
� Besides PRI to GSM, you may also apply GSM to PRI (two ways).
� Besides GSM, you may also apply CDMA (WCDMA or
CDMA20000)/UMTS.
� GSM ,CDMA can be mixed in one DMT
2. Products illustration
Please contact our agents if there are any parts missing.
2.1 Hardware
GTS Card (back-up use) Antenna
PC Disc: DMT disc, Trend disc;
Power Cord: Network cable
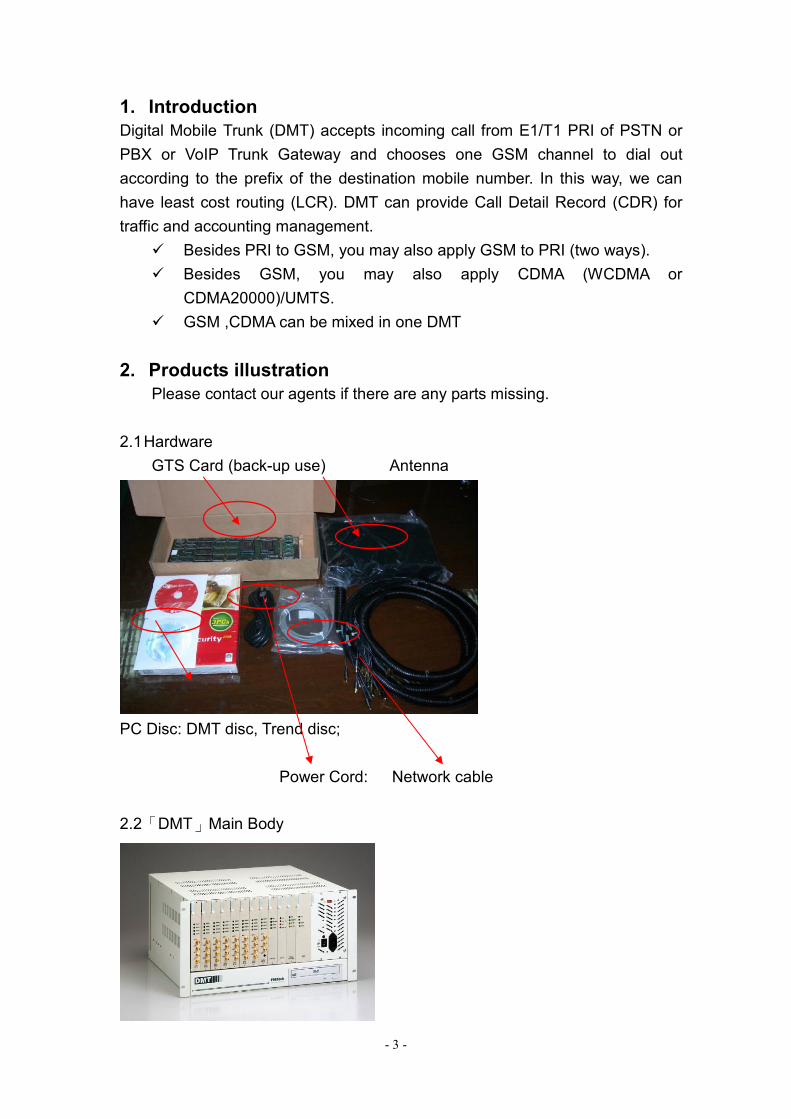
2.2「DMT」Main Body

- 4 -
3. Dimension: 43d×48w×24h cm
4. Chart of the device
4.1 Turn on DMT
Please check power voltage (110-120V or 220-240V), then turn on.
4.2 Light signal (right to left)
1) IMS
� Alive (Every flicker for 3 seconds)
� STO TXD: Light on when sending to GTS Card
� STD RXD: Light on when receiving from GTS Card
2) PLCC Control
� Alive
� Normal: light on for 3 seconds, off for 3 seconds by turns
� Disconnect: Light on for 1 second, off for 1 second
� STO TXD: Light on when sending to GTS card
- 5 -
� STD RXD: Light on when receiving from GTS Card
3) E1/T1
� Alive (light on for 3 seconds, off for 3 seconds by turns)
� Frame Loss, CRC-4, and Yellow alarm light only when E1 got
trouble.
4) GTS MTIC: Flickering in 2 seconds by turns
NOTE:
If everything is settle down, but no signal shows on the monitor; please try
Crtl+Alt+F1 to remove Screen Saver mode
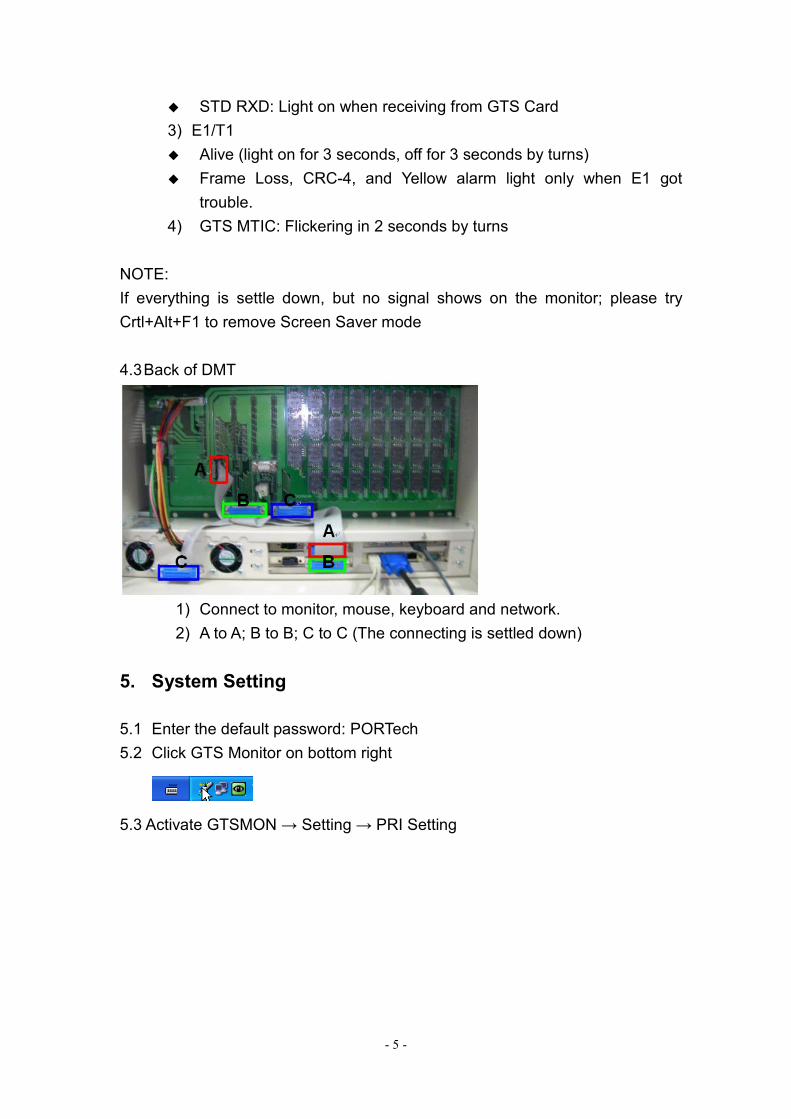
4.3 Back of DMT
1) Connect to monitor, mouse, keyboard and network.
2) A to A; B to B; C to C (The connecting is settled down)
5. System Setting
5.1 Enter the default password: PORTech
5.2 Click GTS Monitor on bottom right
5.3 Activate GTSMON → Setting → PRI Setting

- 6 -
1) Rack 0 is for E1
2) The parameter of TE and NT can not be the same as front end device
(Trunk Gateway or others)
6. Structure of DMT(E1/T1 PRI)

- 7 -
7. DMT System Parameters Setup
7.1 Line/Talk Times

- 8 -
7.1.1 MTIC Mapping Type
1) E1 Channel/ MTIC one by one
When you select type 1), DMT E1-PRI (channel 0 to 29) will go with MTIC
(channel 32 to 62).
� For example, when an incoming call from E1 (channel 0), it will be
dialed out from MTIC (channel 32); an incoming call from E1 (channel
1) will be dialed out from MTIC (33); an incoming call from E1 (channel
29) and dialed out from MTIC (61).
� In that way, if MTIC (channel 62) doesn’t go with any line of E1, the
channel 62 won’t be used.
There are two other functions:
� Validate prefix for incoming call: to select incoming call by prefix
number.
� Play busy tone while outgoing line not ready: if MTIC is not ready, E1
Channel will answer busy tone.
2) Choose MTIC according to prefix

- 9 -
When you select type 2), E1-PRI will dial out the call according to prefix
groups of MTIC; and divided into “cyclic” and “first available”
There are two other functions:
� Search prefix in multiple groups
� If not available, allow to use other group
7.1.2 MTIC Total Talk Time Limit
You can setup talk time limit for each MTIC SIM Card.
� Not limit
� Restrict without alert
� Restrict and alert in (_) minutes
*E.g. when user reaches the talk time limit, it will send out DO DO tone to
alert
*force to cut line when exceed talk time
7.1.3 Talk Time Limit for Each Call
In this type, you can select to setup the limit minutes of each talk.
7.1.4 Number Portability Database
In this part, you can check number portability databases
� If yes, you need to input User ID and Password
7.1.5 Log real talk time in CDR
To setup the real talk time minutes in CDR
� If you don’t mark this, the system will write your billing charge according
to your GSM operator into CDR database
7.1.6 Not available line reject code
� When there’s incoming call from E1 but cant’ find any available MTIC
line, it will report to Protocol Q931
7.1.7 Line / Group Settings:
Here’s screen shot showing all the setting
- 10 -
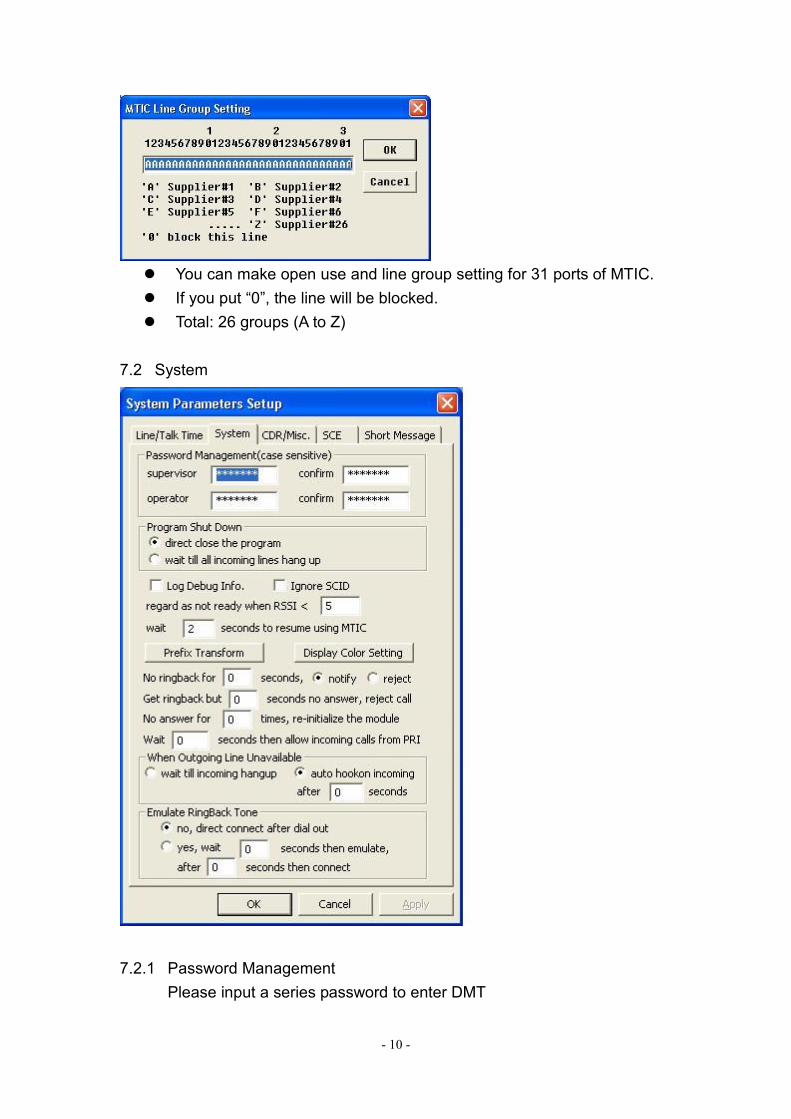
� You can make open use and line group setting for 31 ports of MTIC.
� If you put “0”, the line will be blocked.
� Total: 26 groups (A to Z)
7.2 System
7.2.1 Password Management
Please input a series password to enter DMT

- 11 -
� There are two password managements: “Supervisor” and
“Operator”
� When “operator” is selected, the user can’t revise any parameters
in the system, only checking data is available.
7.2.2 Program Shut Down
� Direct close the program: the user can direct end the all system.
� Wait till all incoming lines hang up: Until all incoming lines hang up, the
user may close the system.
7.2.3 Log Debug Info
� When you mark this, DMT will automatically save all the following
process for debug
� Remember to close this function when log debug is done because it
will take lots of CPU-Time and Discs Space.
7.2.4 Ignore SCID
Normally, after registering GSM operator, the SIM Card message will be
showed up during MTIC process.
� If mark it, you can choose to show SIM Card information or not when
MTIC is starting.
� Otherwise, MTIC will be ready while registering is done.
7.2.5 Regard as not ready when RSSI < 5
MTIC will show the intension of internet signal, and the maximum will be 31
� E.g. MTIC should not be used when the signal value is under 5.
7.2.6 Wait 2 seconds to resume using MTIC
� E.g. MTIC will wait for 2 seconds after another call coming
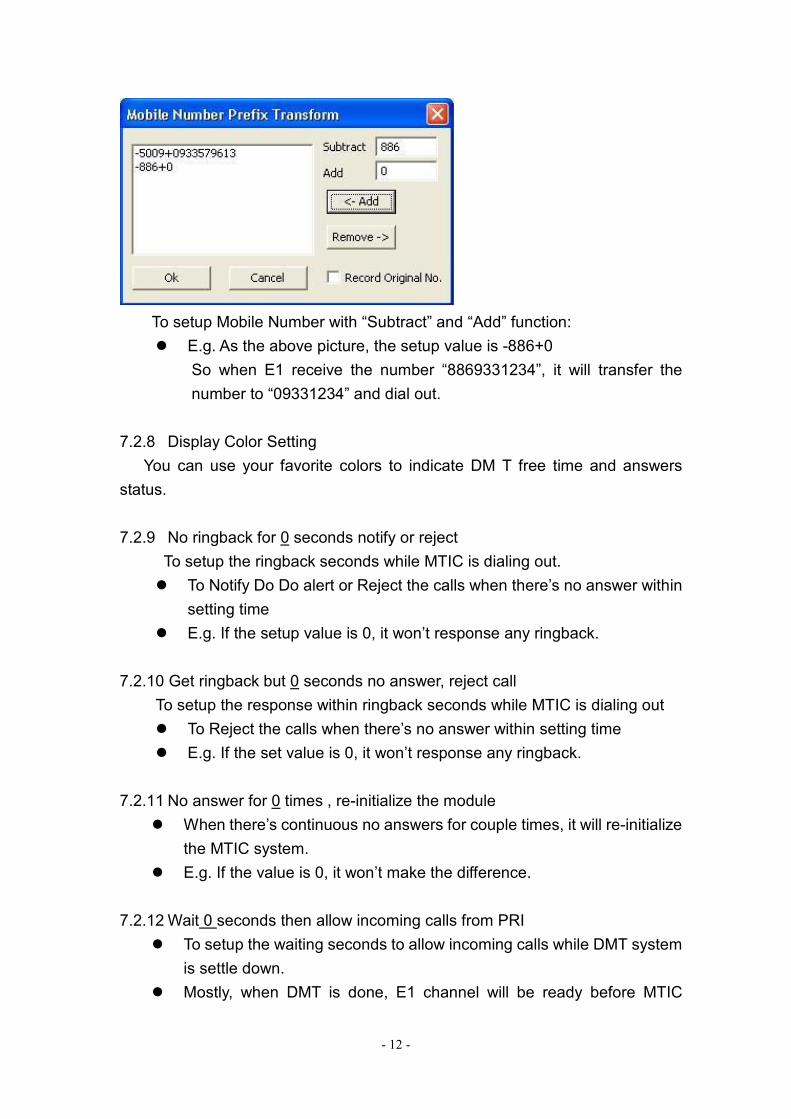
7.2.7 Prefix Transform
Here is screen shot in this parameter:
- 12 -
To setup Mobile Number with “Subtract” and “Add” function:
� E.g. As the above picture, the setup value is -886+0
So when E1 receive the number “8869331234”, it will transfer the
number to “09331234” and dial out.
7.2.8 Display Color Setting
You can use your favorite colors to indicate DM T free time and answers
status.
7.2.9 No ringback for 0 seconds notify or reject
To setup the ringback seconds while MTIC is dialing out.
� To Notify Do Do alert or Reject the calls when there’s no answer within
setting time
� E.g. If the setup value is 0, it won’t response any ringback.
7.2.10 Get ringback but 0 seconds no answer, reject call
To setup the response within ringback seconds while MTIC is dialing out
� To Reject the calls when there’s no answer within setting time
� E.g. If the set value is 0, it won’t response any ringback.
7.2.11 No answer for 0 times , re-initialize the module
� When there’s continuous no answers for couple times, it will re-initialize
the MTIC system.
� E.g. If the value is 0, it won’t make the difference.
7.2.12 Wait 0 seconds then allow incoming calls from PRI
� To setup the waiting seconds to allow incoming calls while DMT system
is settle down.
� Mostly, when DMT is done, E1 channel will be ready before MTIC

- 13 -
channel.
� In that way, you can adjust the waiting time for MTIC to prepare.
7.2.13 When Outgoing Line Unavailable
� If all MTIC channel are busy and can’t go with outgoing E1 channel,
you can make the calls to wait till incoming hang up or auto hook on
incoming after 0 seconds.
7.2.14 Emulate RingBack Tone
MTIC line will take a little time while receiving the ringback tone.
� By this part, you can emulate ringback tone for this blank time or not
� If yes, you need to setup the period of ringback time after MTIC is
dialing out and how long to stop the connection time
� When MTIC is receiving the real ringback tone, the system will
automatically stop the emulating tone.
7.3 CDR/Misc.

- 14 -
7.1.2 Write “Left Seconds” into SIM Card
In this part, you can decide whether to write (record) left seconds into SIM
card.
� If no, please mark “disable”
� If yes, you can make the record timing; like after each call, when switch
SIM card or after every (__) minutes
7.1.3 E1 Trunk Group Information
� Enter the name of DMT and ID for your reference
7.1.4 CDR Backup
� If backup is necessary, please mark “enable” and enter the path for CDR
backup save.
7.1.5 CDR Database
� Write CDR into database, and put those following information
* CDR ODBC name
* User ID and password.
7.3.5 Write CDR Information According To
� To decide to write CDR information into GSM no. or SIM Card ID
7.3.6 Speech Codec Bearer Capability(only for Siemens TC35i)
� If your DMT is Siemens TC35i, you can use Speech Codec Bearer
Capability
7.3.7 Redial When Remote Busy
� To setup remote busy times after MTIC line is dialing out.
� If not, please input 0 for it.
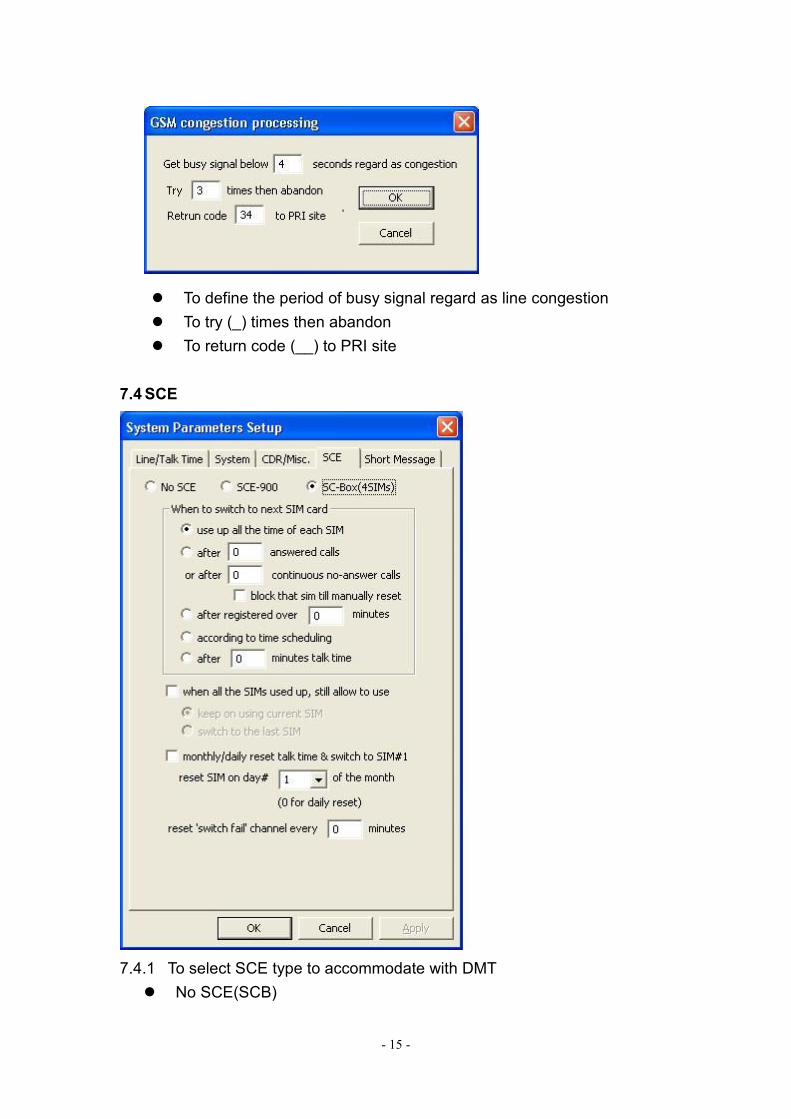
7.3.8 GSM congestion
Here is screen shot in GSM congestion processing
- 15 -
� To define the period of busy signal regard as line congestion
� To try (_) times then abandon
� To return code (__) to PRI site
7.4 SCE
7.4.1 To select SCE type to accommodate with DMT
� No SCE(SCB)

- 16 -
� SCE-900
� SC-Box
7.4.2 When to switch to next SIM Card
To select the timing when to switch the next SIM card
� Use up all the time of each SIM
� After (_) answered calls or after (_)continuous no-answer calls; block
that SIM till manually reset
� After registered over (_) minutes
� According to time schedule
� After (_) minutes talk time
7.4.3 when all SIMs used up, still allow use
To continue using SIM card while all SIMs card are used up
� If yes, please select keep on using current SIM or switch to the last SIM
7.4.4 monthly/daily reset talk time & switch to SIM#1
� To setup whether to monthly/daily reset talk time &switch to SIM#1 or
not
7.4.5 reset SIM on day# 1 of the month (0 for daily reset)
� To setup the day of the month to reset SIM
� E.g. If you input “0” on it, it will reset SIM talk time everyday
7.5 Short Message
- 17 -
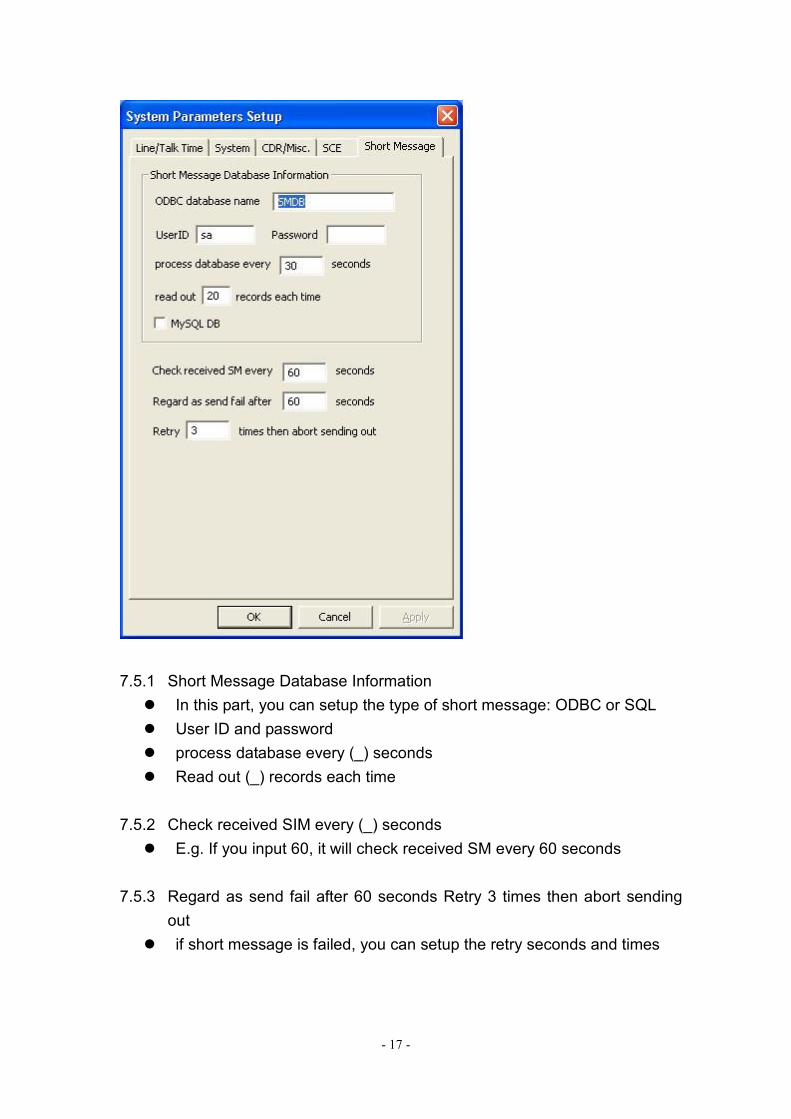
7.5.1 Short Message Database Information
� In this part, you can setup the type of short message: ODBC or SQL
� User ID and password
� process database every (_) seconds
� Read out (_) records each time
7.5.2 Check received SIM every (_) seconds
� E.g. If you input 60, it will check received SM every 60 seconds
7.5.3 Regard as send fail after 60 seconds Retry 3 times then abort sending
out
� if short message is failed, you can setup the retry seconds and times
- 18 -
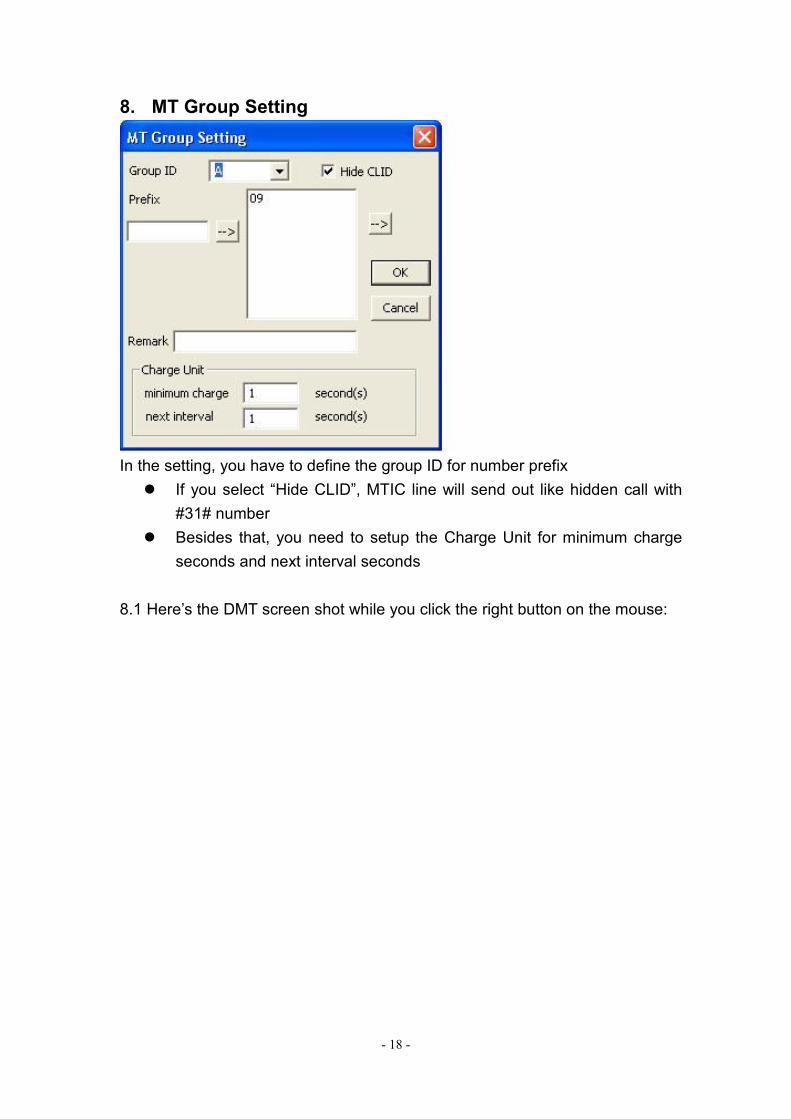
8. MT Group Setting
In the setting, you have to define the group ID for number prefix
� If you select “Hide CLID”, MTIC line will send out like hidden call with
#31# number
� Besides that, you need to setup the Charge Unit for minimum charge
seconds and next interval seconds
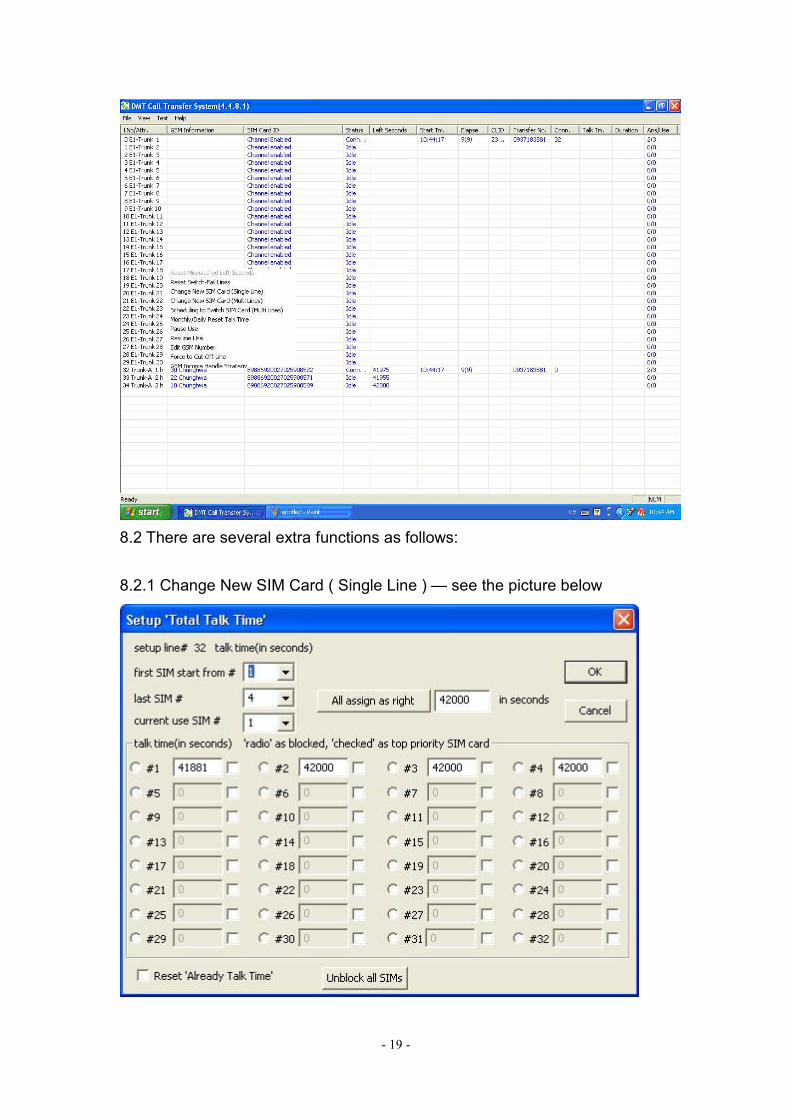
8.1 Here’s the DMT screen shot while you click the right button on the mouse:
- 19 -
8.2 There are several extra functions as follows:
8.2.1 Change New SIM Card ( Single Line ) — see the picture below
- 20 -
Please Notice:
The symbol of ○ means “radio as blocked
The symbol of □ means “check as top priority SIM card
� E.g. If ○ is marked in #1, SIM card #1 won’t be blocked
� E.g. If □ is marked in #1, SIM card #1 will be the first priority
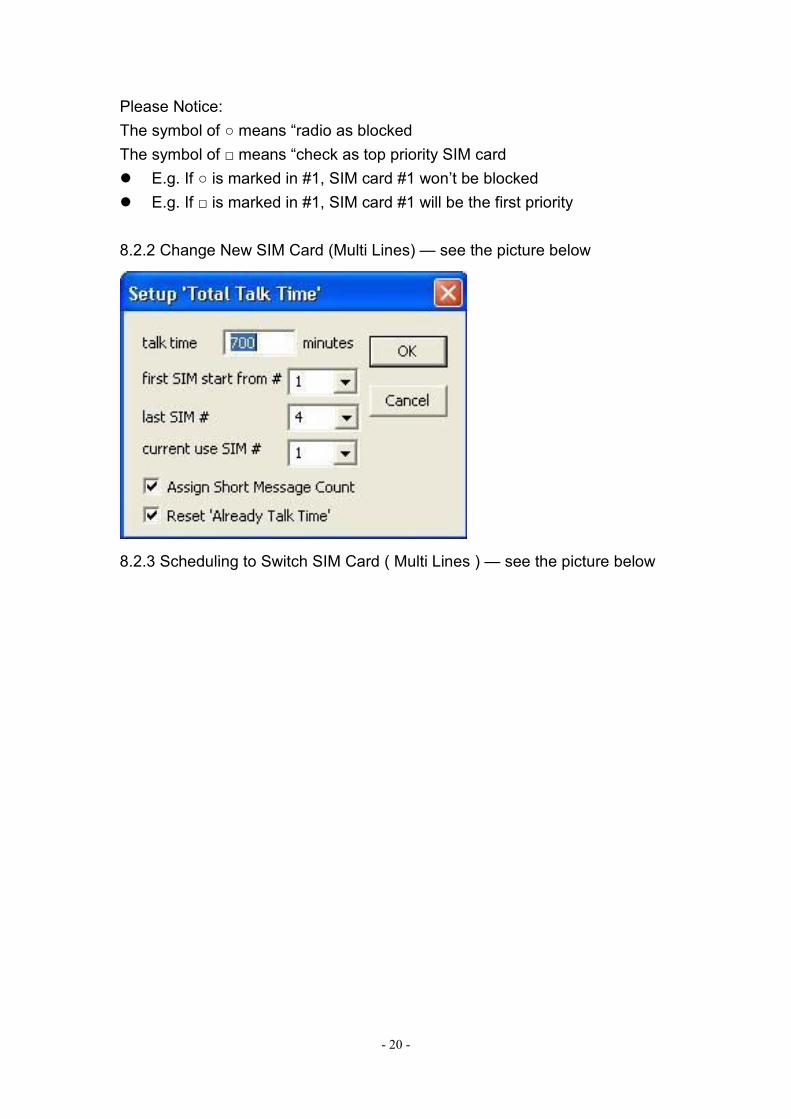
8.2.2 Change New SIM Card (Multi Lines) — see the picture below
8.2.3 Scheduling to Switch SIM Card ( Multi Lines ) — see the picture below
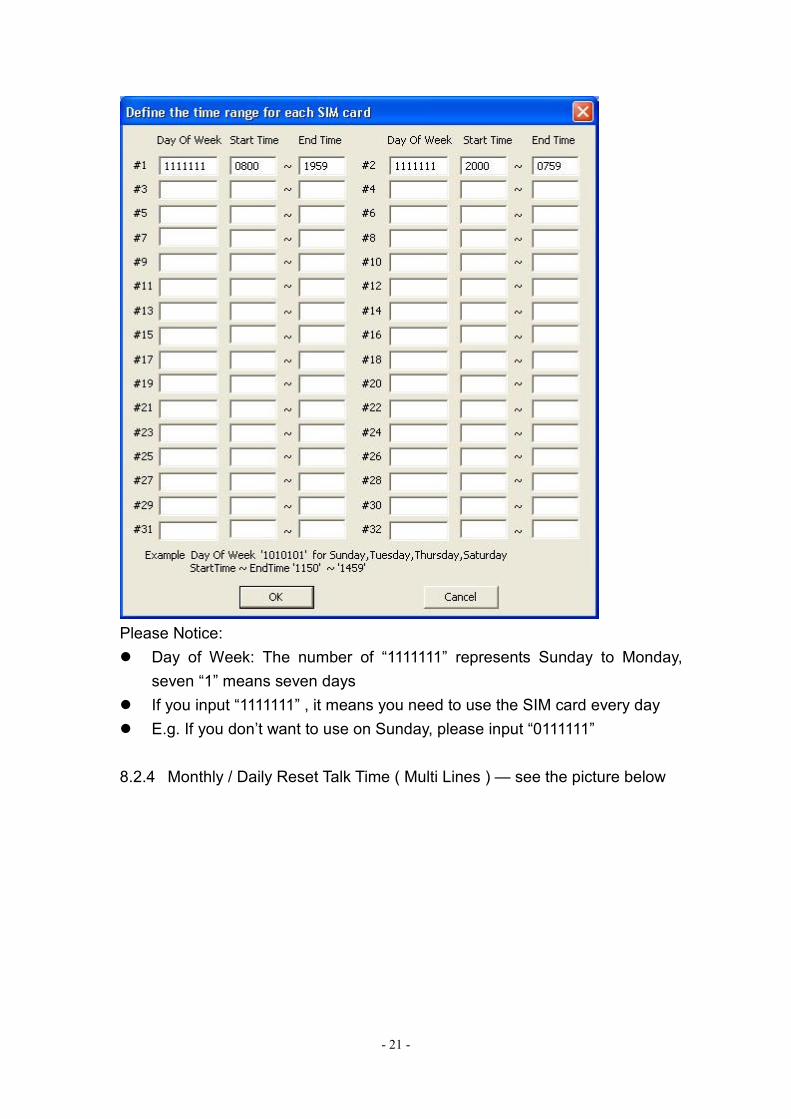
- 21 -
Please Notice:
� Day of Week: The number of “1111111” represents Sunday to Monday,
seven “1” means seven days
� If you input “1111111” , it means you need to use the SIM card every day
� E.g. If you don’t want to use on Sunday, please input “0111111”
8.2.4 Monthly / Daily Reset Talk Time ( Multi Lines ) — see the picture below

- 22 -
8.3.5 Edit GSM Number — see the picture below
8.3.6 GSM Income Handle Strategy— see the picture below

- 23 -
There are four options when calls coming from MTIC line
1) Wait till the calling party hang up: ignore the call
2) Reject the call automatically
3) Answer the call and play a pre-recorded voice file
4) Divert the call to PRI channel: Transfer function
� If you select this one, you need to input the “Outgo called number”
(called ID) and “Outgo calling number”(calling ID)
� Outgo calling ID:
* quote the CLID from GSM: The calling number will be the same as
caller number.
* defined as: Input any number you’d like to be calling number
9. Q&A
Q1: How to setup Bio system?
A1: Please follow the 12 steps as follows:
Step 1:

- 24 -
Step 2:
Step 3:

- 25 -
Step 4:
Step 5:

- 26 -
Step 6:
Step 7:
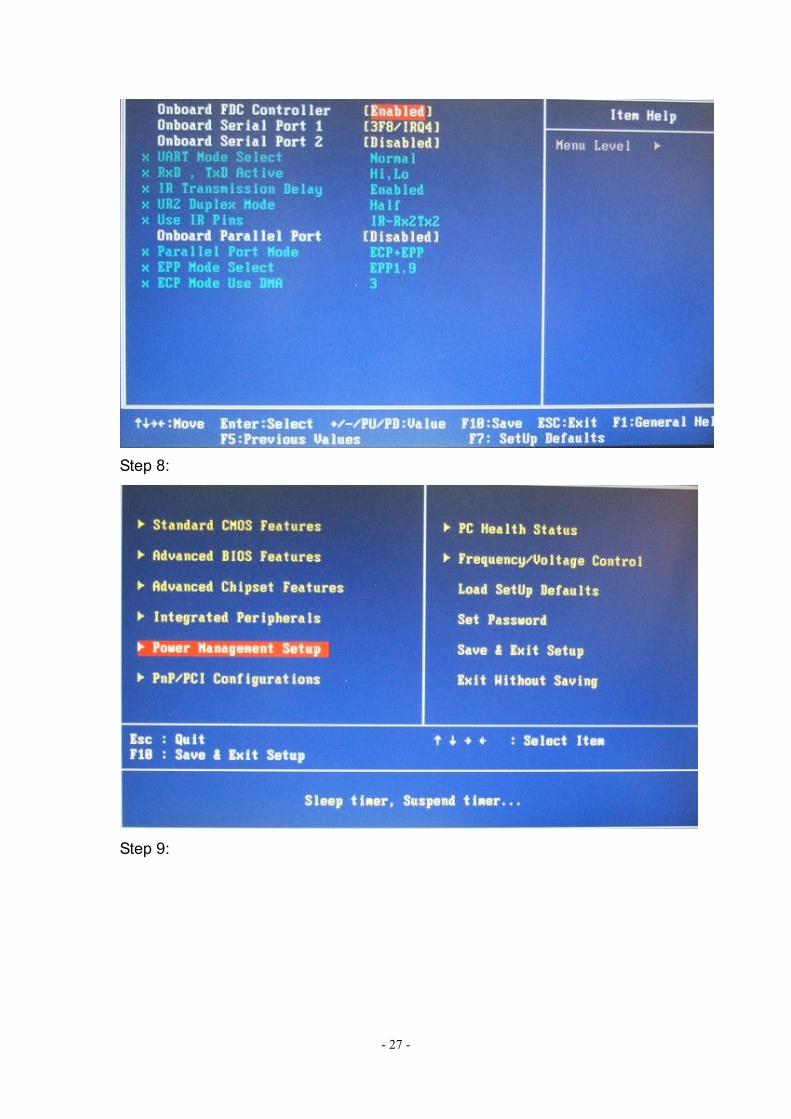
- 27 -
Step 8:
Step 9:
- 28 -
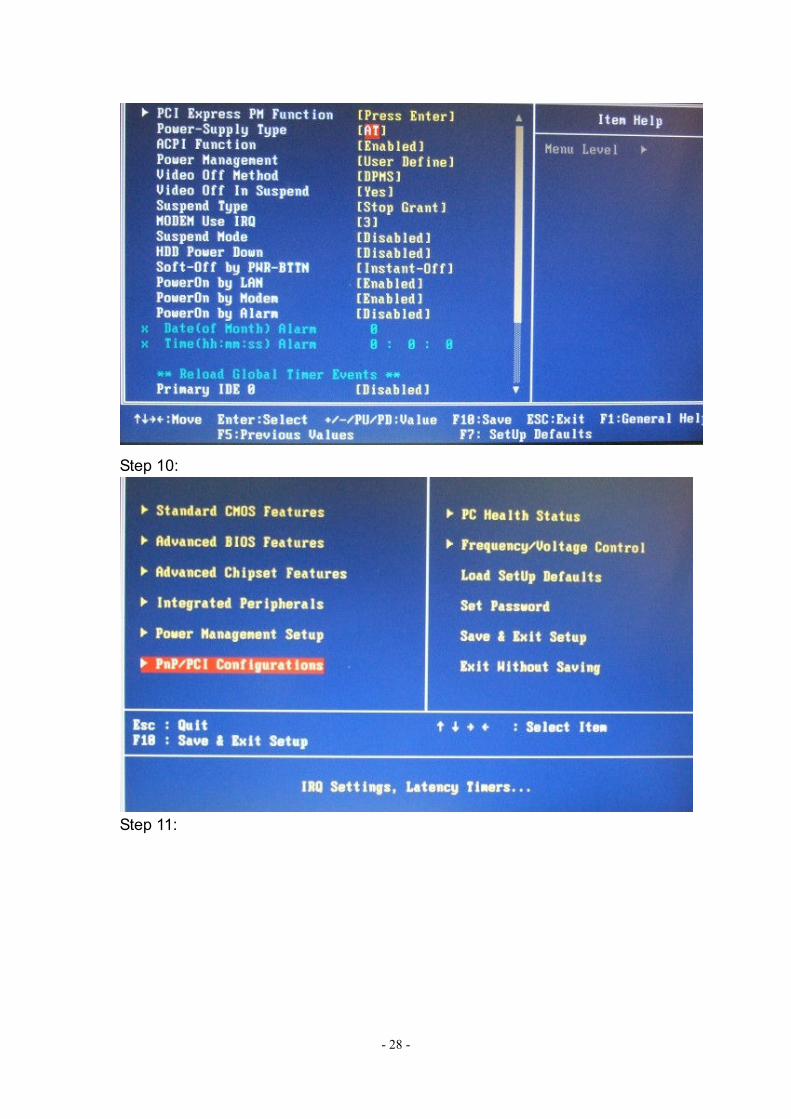
Step 10:
Step 11:

- 29 -
Step 12:
Q2: How to setup DMT’s XP embedded System Recovery Recommend?
A2:
1) Put the Recover CD into DMT
2) Turn off the power
3) Power on and press any key to continue

- 30 -
4) Welcome to Advanced XP Embedded Recovery CD: choose “English”
version, and click “next”
- 31 -
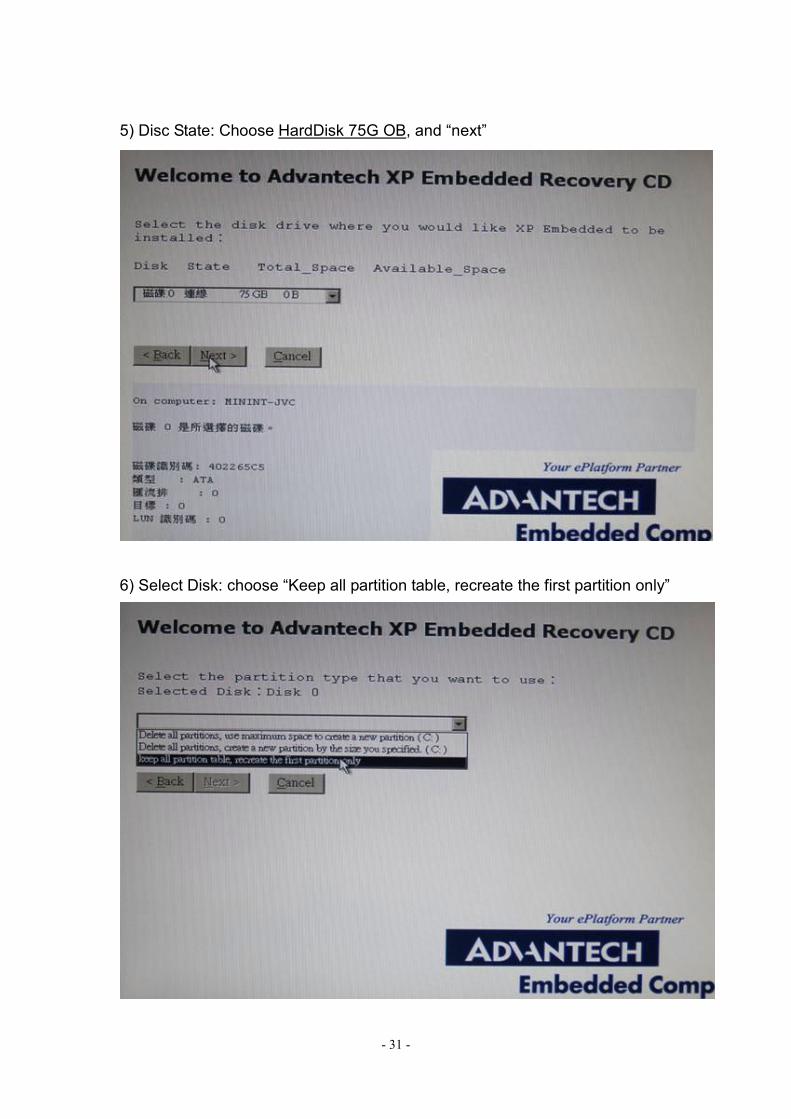
5) Disc State: Choose HardDisk 75G OB, and “next”
6) Select Disk: choose “Keep all partition table, recreate the first partition only”

- 32 -
7) Click “yes” to continue
8) Format Disk Drive: choose “Format as NTFS (quick)”
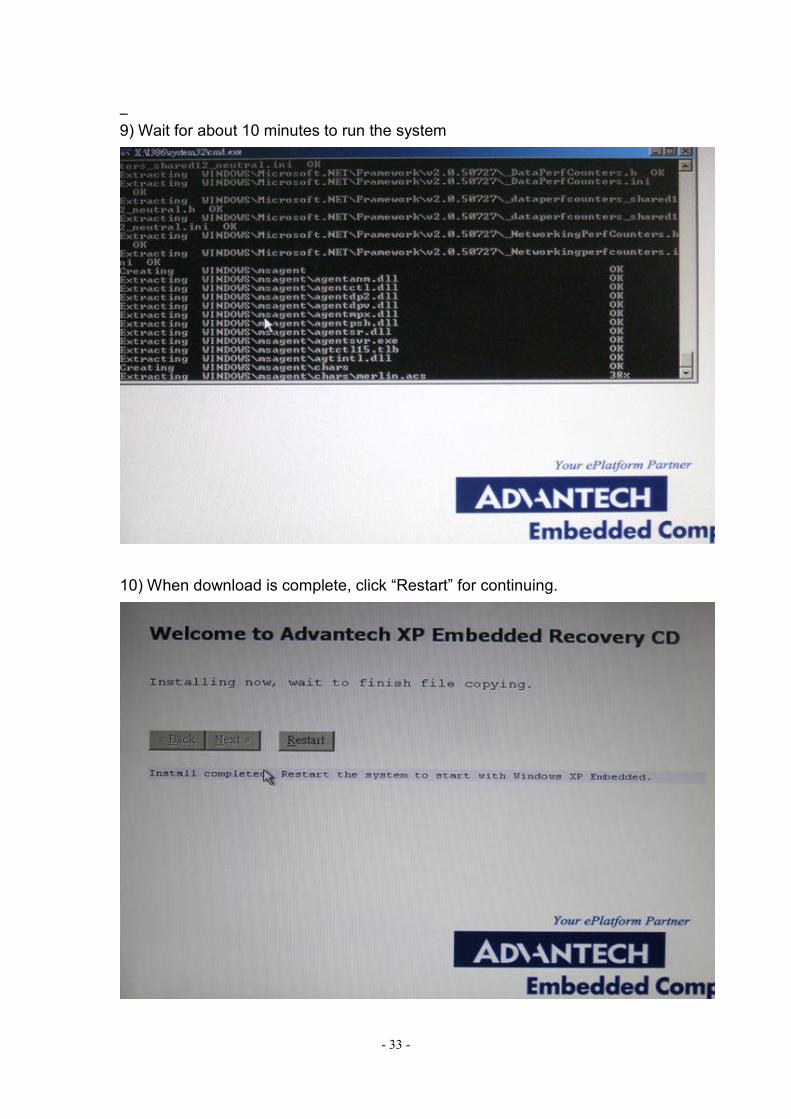
- 33 -
9) Wait for about 10 minutes to run the system
10) When download is complete, click “Restart” for continuing.
- 34 -
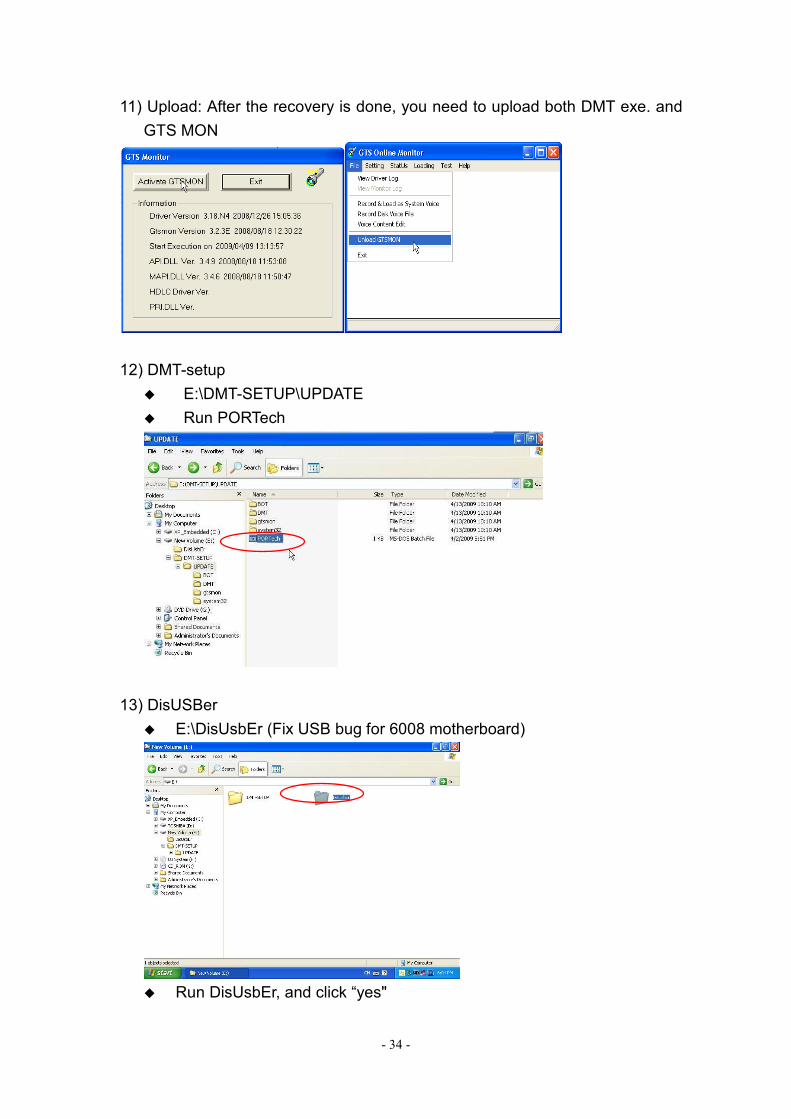
11) Upload: After the recovery is done, you need to upload both DMT exe. and
GTS MON
12) DMT-setup
� E:\DMT-SETUP\UPDATE
� Run PORTech
13) DisUSBer
� E:\DisUsbEr (Fix USB bug for 6008 motherboard)
� Run DisUsbEr, and click “yes"

- 35 -
� Go to “Shut down” instead of “Reboot System”
13) Turn on the DMT-V and take out the Disc
14) All done
Q3: How to setup Prefix number:
A3: E.g. To setup 2 sets of area code and 3 sets of groups, please see the steps
as follows:
1) Transform Area Code

- 36 -
2) To setup Group A, B, C
3) To setup area code of Group A

- 37 -
4) To setup area code of Group B
5) To setup area code of Group C
- 38 -
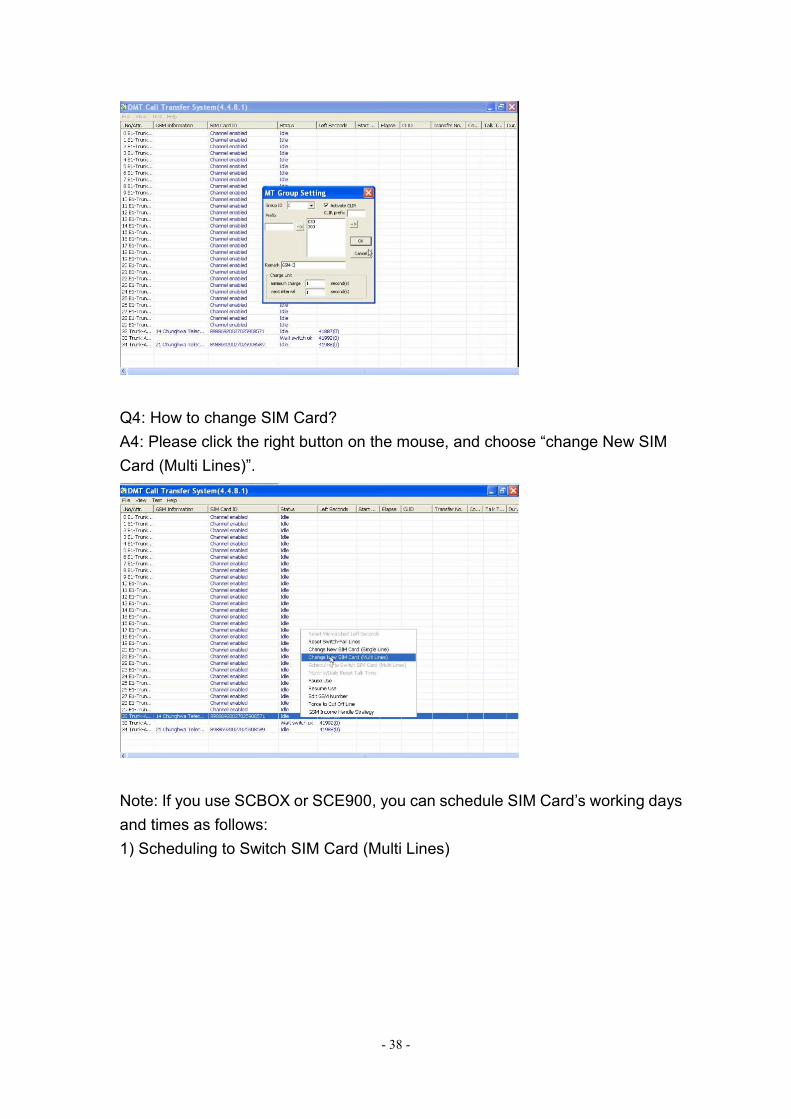
Q4: How to change SIM Card?
A4: Please click the right button on the mouse, and choose “change New SIM
Card (Multi Lines)”.
Note: If you use SCBOX or SCE900, you can schedule SIM Card’s working days
and times as follows:
1) Scheduling to Switch SIM Card (Multi Lines)

- 39 -
2) Define the time range for each SIM Card
Q5: Why can’t make the call?
A5: When you setup #31# or *31# as private call, please check with your
operator to see if it’s available or not.
Q6: How to check up system status?
A6: It can divided into two parts: CONTROL; MTIC
1) CONTROL
31(Control-PLCC-VOIP)-status
63(Control)-status

- 40 -
NOTE: If CTR doesn’t show up in the monitor like above diagram, it means
the control card or GTS card is broken or damaged.
b) MTIC
1)32-62(MTIC)-32~62
- 41 -
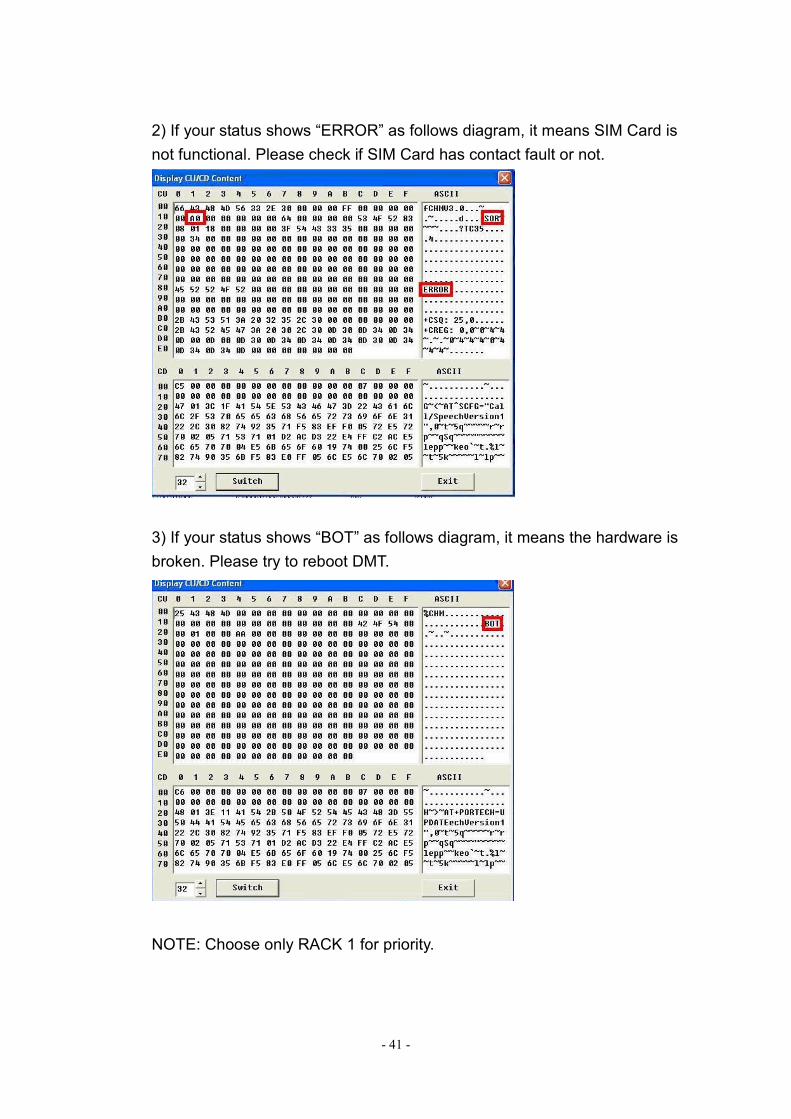
2) If your status shows “ERROR” as follows diagram, it means SIM Card is
not functional. Please check if SIM Card has contact fault or not.
3) If your status shows “BOT” as follows diagram, it means the hardware is
broken. Please try to reboot DMT.
NOTE: Choose only RACK 1 for priority.

- 42 -
Q8: Why E1 can’t start up?
A8: When status shows “PRI not ready”, please double check these 3 ways as
follows.
NOTE:
If the condition of DMT is the same as below description, the hardware is
functional working.
If not, it means that hardware had problem.
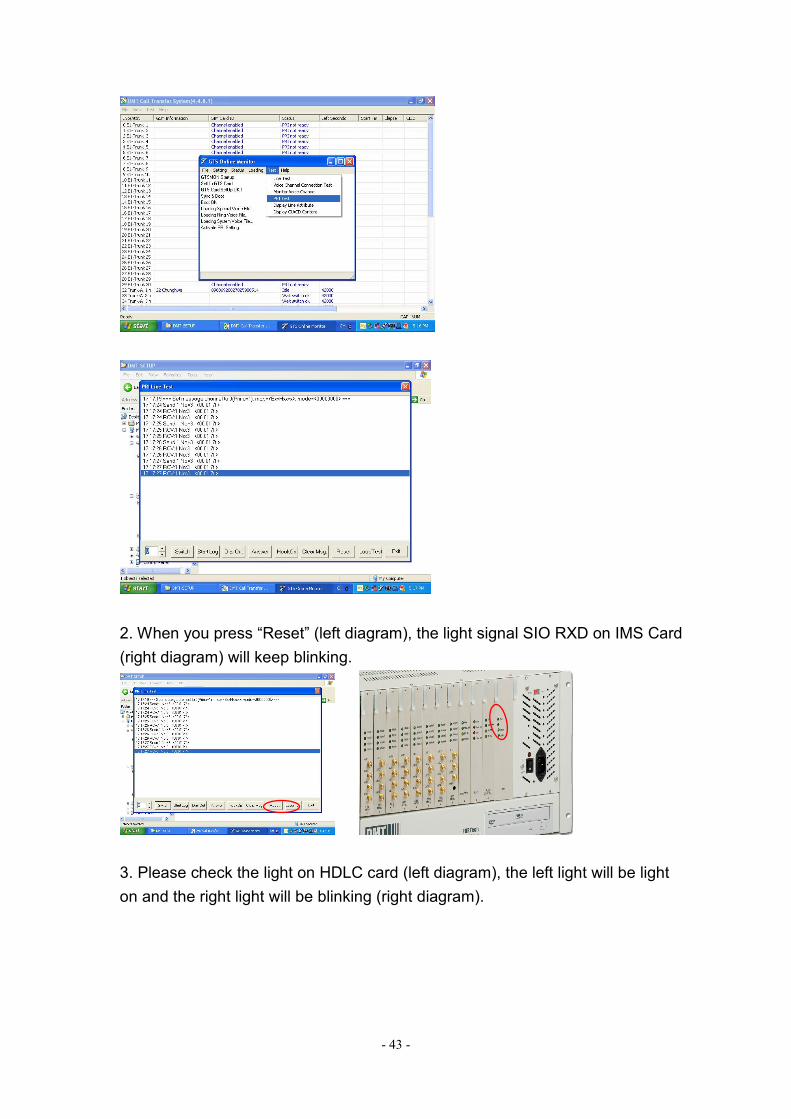
1. When you install Loop, it will show 3 Bytes send for 1 time and received for 2
times as follows
- 43 -
2. When you press “Reset” (left diagram), the light signal SIO RXD on IMS Card
(right diagram) will keep blinking.
3. Please check the light on HDLC card (left diagram), the left light will be light
on and the right light will be blinking (right diagram).

- 44 -
Note:
If not working, please check the Bus part like follows diagram. It may be
connecting fault.
![FOM-E1/T1 · FOM-E1/T1 E1/T1 Fiber Optic Modem Option Wavelength Fiber Type Transmitter Type Typical Power Receiver Sensitivity Connector Typical Max. Range [nm] [µm] [dBm] [km]](https://static.fdocuments.in/doc/165x107/60bbc714da2ed42bab706100/fom-e1t1-fom-e1t1-e1t1-fiber-optic-modem-option-wavelength-fiber-type-transmitter.jpg)