
対象年令18才以上. FN F2000 SERIES... · FN F2000 SERIES TROUBLESHOOTING 1. Drop a few drops...
20
TAIWAN Tel : +886-4-798-9000 Fax : +886-4-798-9900 No.999, Zhonghua Rd. Shengang Township,Changhua County 50952, Taiwan (R.O.C.) [email protected], [email protected] [email protected] [email protected] Sales Dept. Technology Dept. ChangHua (Head Quarter) EN PR Dept. FN F2000 SERIES G2-201807-02-多 450 EN ES FR JP ● Product is intended for adults 18 years and older. ● Wear proper eye protection while shooting. ● Misuse may cause injury or death. ● The muzzle of an airsoft gun should never point in a direction in which, if discharged, it would do injury. ● Read this entire manual to ensure proper usage. ● Buyers and users should obey the laws and rules of the local authority. ● Remove the battery from the product when it is not in use. ● Si el jugador o jugadores tienen menos de 18 años se les requerirá ir acompañados de un mayor de edad que se responsabilice del menor en todo momento. ● Durante la práctica del Airsoft, es obligatorio llevar gafas de protección ocular acorde a las normativas vigentes en todo momento. ● El uso descuidado o indebido del Airsoft puede causar fácilmente daños a sí mismo y a los que le rodean. ● No se debe apuntar a personas o animales. ● Lea bien los manuales que acompañan las replicas antes de empezar a usarlas para practicar Airsoft. ● Los poseedores de réplicas de Airsoft deben seguir estríctamente las leyes y regulaciones locales vigentes en el país de residencia o uso de las mismas, e informarse debidamente en los puntos de venta o autoridades del país antes de comprar y utilizar cualquier réplica de airsoft. ● Retire la batería del producto cuando no esté en uso. ● Ce produit est réservé aux utilisateurs de 18 ans et plus. ● Toujours porter des protections oculaires adaptées lors de l'utilisation du produit. ● La mauvaise utilisation de ce produit peut causer des blessures graves ou la mort. ● Ne jamais pointer le canon de la réplique vers une personne ou un animal. ● Lire attentivement le mode d'emploi avant d'utiliser ce produit. ● L'acheteur et l'utilisateur de ce produit doivent se conformer aux lois du pays qui réglementent l'usage et la possession de répliques airsoft. ● Retirez la batterie du produit lorsque vous l'utilisez. ● 対象年令18才以上. ● 弾を発射する時やゲームなどの場合は、必ずプロゴーグルを装着してください. ● 不用意に引き金を引くと非常に危険です. ● 50m以内は危険です. ● 取扱い説明書は最後まで必ずお読み下さい. ● 購入者及び販売者は, エアーガンの使用及び所有に関するすべての現地法律に準ずる. ● ゲームが終わりましたら、バッテリーをコネクターから取り外してください。 Operating Instructions I 01-10 EN Instrucciones de operación I 11-20 ES 取扱説明書 I 21-30 JP
Transcript of 対象年令18才以上. FN F2000 SERIES... · FN F2000 SERIES TROUBLESHOOTING 1. Drop a few drops...

TAIWAN Tel : +886-4-798-9000 Fax : +886-4-798-9900No.999, Zhonghua Rd. Shengang Township,Changhua County 50952, Taiwan (R.O.C.)[email protected], [email protected] [email protected]@guay2.com
Sales Dept.Technology Dept.
ChangHua(Head Quarter)
EN
PR Dept.
FN F2000 SERIES
G2-201807-02-多
450
EN
ES
FR
JP
● Product is intended for adults 18 years and older.● Wear proper eye protection while shooting.● Misuse may cause injury or death.● The muzzle of an airsoft gun should never point in a direction in which, if discharged, it would do injury.● Read this entire manual to ensure proper usage.● Buyers and users should obey the laws and rules of the local authority.● Remove the battery from the product when it is not in use.
● Si el jugador o jugadores tienen menos de 18 años se les requerirá ir acompañados de un mayor de edad que se responsabilice del menor en todo momento.● Durante la práctica del Airsoft, es obligatorio llevar gafas de protección ocular acorde a las normativas vigentes en todo momento.● El uso descuidado o indebido del Airsoft puede causar fácilmente daños a sí mismo y a los que le rodean.● No se debe apuntar a personas o animales.● Lea bien los manuales que acompañan las replicas antes de empezar a usarlas para practicar Airsoft. ● Los poseedores de réplicas de Airsoft deben seguir estríctamente las leyes y regulaciones locales vigentes en el país de residencia o uso de las mismas, e informarse debidamente en los puntos de venta o autoridades del país antes de comprar y utilizar cualquier réplica de airsoft.● Retire la batería del producto cuando no esté en uso.
● Ce produit est réservé aux utilisateurs de 18 ans et plus.● Toujours porter des protections oculaires adaptées lors de l'utilisation du produit.● La mauvaise utilisation de ce produit peut causer des blessures graves ou la mort. ● Ne jamais pointer le canon de la réplique vers une personne ou un animal.● Lire attentivement le mode d'emploi avant d'utiliser ce produit. ● L'acheteur et l'utilisateur de ce produit doivent se conformer aux lois du pays qui réglementent l'usage et la possession de répliques airsoft.● Retirez la batterie du produit lorsque vous l'utilisez.
● 対象年令18才以上.● 弾を発射する時やゲームなどの場合は、必ずプロゴーグルを装着してください.● 不用意に引き金を引くと非常に危険です.● 50m以内は危険です.● 取扱い説明書は最後まで必ずお読み下さい.● 購入者及び販売者は, エアーガンの使用及び所有に関するすべての現地法律に準ずる. ● ゲームが終わりましたら、バッテリーをコネクターから取り外してください。 Operating Instructions I 01-10EN Instrucciones de operación I 11-20ES 取扱説明書 I 21-30JP

Steel flash suppressorfor FN F2000 Tactical
Front sightCharging handle
Hop-up cover
Stock
Grip Receiver Pin
Steel flash suppressorfor FN FS2000 Tactical
Magazine
Magazinecatch
Folding rear sight Scope mount railStock Pad
Trigger
Safety / Fire selector
Handguard
Steel flash suppressorfor FN F2000
Front sight Charging handle
Scope
Hop-up cover
Stock
Grip Receiver Pin
Steel flash suppressorfor FN FS2000
Magazine
Magazinecatch
Scope
Stock Pad
Trigger
Safety / Fire selector
Handguard
FN F2000 Tactical (BLACK)
FN FS2000 Tactical (BLACK) FN FS2000 Tactical FDE (DESERT TAN)
FN FS2000 (BLACK) FN FS2000 FDE (DESERT TAN)
FN F2000 (BLACK) FN F2000 FDE (DESERT TAN) FN F2000 Tactical FDE (DESERT TAN)
FN F2000 SERIESCOMPONENTS 1
EN
EN
2

HOP-UP ADJUSTMENT
FN F2000 SERIES
Hop-up adjustment
Open the Hop-up cover. Turning hop-up dial for desired flight pattern of the BB pellet.The hop-up dial can be turned to a certain degree.Turning it too much will damage the unit.
Open the cover
HopNormalNormal Hop
Sight adjustmentHop-up adjustment
Remove front sight
For front sight up-down adjustment.Turning clockwise : Front sight post goes up.Turning counterclockwise : Front sight post goes down.
Flip up the rear sight.
Front sight adjustment
Rear sight adjustment
Turning the screw will move the rear sight to the left or right.
LEFTLEFT
RIGHT
Too much hop-up ( Return the lever toward Normal ).
Direction.
Not enough hop-up ( Move the lever toward HOP ).or too much hop-up ( Return the lever toward Normal ).
Warning
► Never hold the gun sideways as the BB pellets will curve right or left.► This is due to the HOP-UP system.
Use a allen key to remove or install thefront sight.
SIGHT ADJUSTMENT
EN
4
3
EN

ADJUST SCOPEINSTALL BATTERY
1. Setting the scope on the rail.2. Fasten the screw.
1
2
1. Flip the lower part of the stock pad.2. Pull up to remove the pad.
► Remove the battery when not in use.Warning
For spring force adjustment.Turning clockwise : To increase the spring force.Turning counterclockwise : To decrease the spring force.
Insert battery into the stock. 1. Flip the lower part of stock pad.2. Slide down to install the pad.
Connect battery until it clicks into place.
1. Flip the lower part of stock pad.2. Slide down to install the pad.
Spring adjustment
Install battery
Install scope cover.
Uninstall scope cover
1. Setting the sling swivel to the side.2. Press the button.
Push the scope cover to the front. Remove the scope cover.
1
1
2
1
2
1
2
2
1. Elevation adjustment.2. Windage adjustment.
1
2
FN F2000 SERIES 6
EN
5
EN

Safety OnThe gun will not fire.
Semi AutoSingle shot.
Full AutoAutomatic firing.
Always keep the safety on if not ready to shoot.
Warning ► Make sure the magazine is inserted into the receiver and securely locked.
Press the magazine catch to release the magazine..
Pull the magazine out of receiver.
Setting the magazine To release the magazine
Open the top cover of magazine.Load bbs until the magazine is full.
Loading the magazine
Click
Setting the magazine
1. Push the receiver pin until it reaches to the end.
Disassemble upper receiver FIRING MODE & SAFETY
1
Slide out the upper receiver.
Turn the winding wheel on the bottom of the magazine to tighten the spring. This will allow the BBs to feed through the top of the magazine.
Insert the magazine into the receiver unit it clicks into place
To set up full auto to 3-round bursts.Switch the selector switch to semi-auto mode and hold the trigger for 10 seconds, the set-up is now completed.Repeat above steps to switch 3-round bursts to full auto.
Empty magazine and chamber before set up 3-round bursts or full auto mode.
Due to the low voltage from different battery and/or motor specifications, it might cause an auto-semi problem, please charge the battery to full when this problem occurs to assure the longevity of the product.
ETU & FULL AUTO TO 3-ROUND BURSTS SETTING
LOADING BBS FN F2000 SERIES7
EN
EN
8

TROUBLESHOOTINGFN F2000 SERIES
1. Drop a few drops of silicone oil or teflon oil into the pellet entrance.After insert BB pellets into the magazine , fire the gun for up to 200~300 pellets.2. To complete the cleaning, use the cleaning rod ( with cotton ) to remove excess oil.
Maintenance when pellets speed becomes low
Removing clogged pellets
Warning
► Do not jam the cleaning rod into the barrel by force.► Should the BB’s remains inside the barrel after following the instruction above, with the protection cap over the barrel,point the gun to a safe direction, and discharge any loosened BB’s in semi-automatic mode.
► Make sure no dirt gets into the chamber to avoid clogging of pellets.► Hop-up may be unstable for the first 200 to 300 rounds after using silicone oil, this is the normal operation of the gun.► Never use CRC-556, WD40 or other corrosive lubricant.
Warning
1. Return the hop-up dial to the Normal position and insert the cleaning rod from the lead edge of the barrel.2. To remove clogged BB’s, carefully insert the cleaning rod inside the flat tip facing down as shown below.
Maintenance
[ DISCLAIMER ]All products in this manual are imitation firearms and are not intended nor represented to be comparable in design, appearance, or function to any actural firearm offered by other manufacturers.Product names are trademarks of G&G, which has no affiliation to, and is not associated, or sponsored by any manufacturer of actual or imitation firearms. Products may vary form those pictured.
Accessories in the pictures are not always included with product.Adult supervision required for users under 18 years of age.The purchaser and user should conform to all laws governing the ownership of airsoft guns.
No operation at all
Although motor is revolving, no pellet can be fired
Impossible full-auto opera-tion(automatic firing)
Shooting distance becomes shorter
Too loud operating noise
Pellets being fallen out from barrel end
If gun gets wet
SYMPTOM POTENTIAL CORRECTIVE
Stop operation immediately, disconnect the battery, wipe off water from inside the main body and the battery. After the gun is completely dry, carry out trial firing. If the unit is not operational, please contact your local dealer for repair.
Selector lever is set to safety.Battery is not charged.Battery connector is disconnected.The and of battery connector is reversed.Expired motor life (50,000 to 60,000 rounds) or poor electrical connection.Pellets are clogged inside the magazine.
Pellets are clogged in the chamber.Faulty gear.Insufficient battery power.Faulty pellet feed of magazine.Poor electrical connection.Damaged or worn chamber set.Damaged or worn piston set (O-ring,piston spring)Something is jammed in the inner barrelFaulty BB pellets (too small or heavy)Shortage of silicone oilGear problem caused by too many blank firingWorn or damaged gearGear problem caused by too many blank firingDamaged or worn chamber set.No hop setting.Faulty BB Pellets (too small or heavy)
Set the selector lever to Semi or Full Auto.Charge the battery.Connect the connector.Switch the batteries to the correct position.Replace the dead motor (can be purchased from local dealer or directly from G&G). Check and repair the contacts.Insert the charging rod into the magazine and move up and down a few times to remove clogged pellets.Remove clogged pellets using the cleaning rod.Purchase the replacement gear from your dealer or G&G and repair.Charge the battery.Repair clogging of the magazine.Consult your dealer or G&G for overhaul maintenance or repair.
Replace the replacement parts (purchase from your dealer or G&G)
Use the cleaning rod and clean the inner barrel.Use G&G Armament high precision BB's.Place a few drops of silicone oil onto the upper chamber.
Consult your dealer or G&G for overhaul maintenance, part replacement (gear,etc.) or repair.
Turn the hop adjustment lever toward Hop.Use G&G Armament high precision BB's.
MAINTENANCE9
EN
10
EN

FN F2000 Táctico (Negro)
FN FS2000 Táctico (Negro)FN FS2000 Táctico FDE (Desierto)
FN FS2000 (Negro) FN FS2000 FDE (Desierto)
FN F2000 (Negro) FN F2000 FDE (Desierto) FN F2000 Táctico FDE (Desierto)
Bocacha de Acero para F2000 Tactical
Mira DelanteraManija de Carga
Covertura de Hop Up
Culata
Empuñadura Pin de Recibidor
Bocacha de Acero paraFS2000 Tactical
Cargador
Liberador de Cargador
Mira Trasera PlegableMontura de Mira
Tapa de Culata
Gatillo
Seguro / Selector de Tiro
Guardamano
Bocacha de Acero para F2000
Mira DelanteraManija de Carga
Mira
Covertura de Hop Up
Culata
Empuñadura Pin de Recibidor
Bocacha de Acero para FS2000
Cargador
Liberador de Cargador
Mira
Tapa de Culata
Gatillo
Seguro / Selector de Tiro
Guardamano
FN F2000 SERIESCOMPONENTES11
ES
ES
12

AJUSTES DE HOP UP
FN F2000 SERIES
Ajustes de Hop Up
Abrir la Covertura de Hop Up
Abrir la Covertura de Hop Up
HopNormalNormal Hop
Ajustes de MiraAjustes de Hop Up
Instalación de Mira Delantera
Plegar la mira trasera.
Ajuste de Mira Delantera
Ajustes de Mira Trasera
IzquierdaIzquierda
Derecha
Demasiado Hop-up.( Gire el ajuste a Normal ).
Dirección correcta.
No demasiado Hop-up. ( Gire el ajuste a HOP ).o demasiado Hop-up. ( Gire el ajuste a Normal ).
Advertencia
► Nunca dispare la réplica lateralmente, los balines pueden curvear.► Esto se debe al sistema de Hop-Up.
Use una llave allen para retirar o installar la mira delantera.
Presione el botón para ajustar la mira arriba o abajo. Girando a favor de las manecillas del reloj sube el punto de mira. Girando en contra de las manecillas del reloj, baja el punto de mira.
Girando el dial del hop-up puede ajustar la posición de vuelo del balín.El dial del Hop-Up puede girarse en cierto grado.Girarlo demasiado dañará la unidad.
Apretando el tornillo podrá mover la mira trasera de derecha a izquierda.
AJUSTES DE MIRA13
ES
ES
14

ADJUSTE DE MIRAINSTALACIÓN DE BATERÍA
1
2
► Retire la batería cuando la replica no esté en uso.Advertencia
Conecte la batería hasta que escuche un sonido Click.
Inserte la batería dentro de la culata.
Ajuste de Resorte
Instalación de Batería
Instalación de la Covertura de Mira
Retire la covertura de la mira.
1
1
2
1
2
1
2
2
1
2
FN F2000 SERIES
1. Voltee la parte inferior de la almohadilla de la tapa de la culata.2. Deslice hacia arriba para retirar la tapa.
Para el ajuste de la fuerza del resorte:Gire a favor de las manecillas del reloj: Para aumentar la fuerza del resorte.Gire en sentido contrario de las manecillas del reloj:Para disminuir la fuerza del resorte.
1.Voltee la parte inferior de la almohadilla de la tapa de la culata.2.Deslice hacia abajo para instalar la tapa de la culata.
1. Colocando la eslinga giratoria hacia un lado.2. Presione el botón.
1. Instale la mira en el riel.2. Apriete el tornillo.
1. Ajuste de perilla de elevación.2. Ajuste de perilla corta vientos.
Instale la covertura de la mira.
Empuje la cobertura de la mira hacia delante.
1. Voltee la parte inferior de la almohadilla de la tapa de la culata.2. Deslice hacia abajo para instalar la tapa de la culata.
15
ES
16
ES

Modo seguroLa réplica no dispara
Semi AutoDisparo sencillo
AutomáticoDisparo automático
Siempre coloque en modo seguro si no está listo para disparar.
Advertencia. ► Asegúrese que el cargador esté bien insertado en el recibidor y bloqueada de forma segura.
Presione el botón liberardor de cargador para poder retirarlo.
Retire el cargador del recibidor.
Ajustes de Cargador Extracción de Cargador
Abra la tapa en la parte superior del cargador.Llene con balines y cierre cuando esté lleno.
Llenando el cargador
Click
Ajustes de Cargador
1. Empuje el pin del recibidor hasta que llegue al final.
Desmontaje del Recibidor MODOS DISPAROS Y SEGURO
1
Deslice el recibidor superior.
Gire el engranaje en la parte inferior del cargador para atiesar el resorte. Esto hará que los balines alimenten la recámara.
Inserte el cargador en el recibidor inferior hasta que escuche un sonido click.
Ajustar de full auto a ráfagas de 3 rondas.Coloque el selector en modo semi-auto y mantenga apretado el gatillo por 10 segundos, luego estará ajustada.Repita el procedimiento para volver de 3 rondas al modo automático.
Saque el cargador y revise que la recámara no tenga bbs. antes de configurar las ráfagas de 3 rondas o el disparo automático.Debido al bajo voltaje de diferentes baterías y/o especificaciones del motor, puede causar problemas en modo semi-automático. Por favor cargue bien la batería cuando ocurra este problema para asegurar la longevidad del producto.
GATILLO ELECTRÓNICO - AJUSTE DISPARO AUTOMÁTICO Y RÁFAGAS DE 3 RONDAS
LLENANDO EL CARGADOR FN F2000 SERIES17
ES
ES
18

SOLUCIÓN DE PROBLEMASFN F2000 SERIES
LIMPIANDO EL CAÑÓN
DESBLOQUEANDO
Advertencia
1. Gire el dial de Hop-up a posición normal e inserte la varilla por la bocacha dentro del cañón.2. Asegúrese de introducir la varilla con la parte segmentada hacia abajo. Remueva los balines atascados.
MANTENIMIENTO
► Asegúrese de que la recámara no esté sucia para evitar el atasco de balines.► El Hop-up puede estar inestable por 200 o 300 rondas luego de usar el aceite de Silicona. Esto es normal en la operación de la réplica.► Nunca use CRC'556, WD40 u otro lubricante corrosivo.
El selector puede estar colocado en modo seguro.La batería no está cargada.Los conectores están desconectados.El y de la batería están mal conectados.Motor agotado (50,000 o 60,000 rondas) o pobre conección eléctrica.Balines atascados en el cargador.Balines atascados en la recámara.Caja de engranajes defectuosa.Insuficiente carga de batería.Llenado incorrecto del cargador.Pobre conección eléctrica.Conjunto de recámara defectuoso o dañado.Conjunto de Pistón dañado o defectuoso (Sellos, Spring)Algo atascado en el cañón interior.Balines defectuosos (muy pequeños o pesados)Escasez de aceite de silicona.Problemas de la caja de engranajes por disparos en seco.Caja de engranajes dañada o defectuososa.Problemas en la caja de engranajes por muchos disparos en seco.Conjunto de recámara dañada o defectuosa.No ajuste del hop.Balines defectuosos (muy pequeños o pesados)
No funciona
A pesar de que el motor funciona, no se pueden disparar los balines
No opera el automático
La distancia de disparo se hace corta
Ruido de operación alto
Balines fallan y salen por el cañón
Si la réplica se moja
SÍNTOMA PROBLEMA POTENCIAL POSIBLE SOLUCIÓN
Detenga la operación inmediatamente, desconecte la batería, seque todas las partes internas y la batería. Después de completarel secado, trate de disparar. Si la unidad no funciona por favor contacte su distribuidor local para reparación.
Coloque el selector en Semi o en Automático.Cargue la batería.Ajuste los conectores.Coloque los conectores correctamente (Revise el fusible).Reemplace el motor dañado (puede ser comprado en su distribuidor local o directamente en G&G. Revise y repare los contactos. Inserte la varilla de carga dentro del cargador y mueva hacia arriba y abajo varias veces para remover los balines atascados.Remueva los balines atascados usando la varilla de limpieza. Compre el reemplazo del engranaje en su distribuidor local o en G&G y repare.Cargue la batería.Repare el atasco del cargador.Consulte su distribuidor o a G&G para mantenimento general o reparación.
Reemplace las partes (comprándolas en su distribuidor local o en G&G).
Use la varilla de limpieza y limpie el cañón interior.Use balines genuinos G&G.Eche varias gotas de aceite de silicona por encima de la recámara.
Consulte su distribuidor o a G&G para mantenimiento general, reemplazo de piezas (Engranajes, etc.) o reparación.
Gire el dial de ajuste del hop-up hacia Hop.Use los balines G&G.
[ DESCARGO ]Todos los productos en este manual son imitaciones de armas reales y no está representada a ser comparada en diseño, apariencia o funciones con ninguna arma actual ofrecida por otros fabricantes.Los nombres de los productos son marcas registradas de G&G, los cuales no tienen afiliación ni están asociados o patrocinados por ningún fabricante de imitiaciones de armas. Productos pueden variar en la forma a los presentados en las fotos.
Los accesorios en las fotos no siempre están incluidos con el producto.La supervisión de un adulto es requerida para usuarios menores de 18 años.El comprador y el usuario final deben obedecer todas las leyes y reglamentos locales acerca de la propiedad de réplicas de armas.
1. Coloque algunas gotas de aceite de Silicona o teflón en un paño limpio y sujete con la varilla.2. Inserte la carilla de limpieza dentro del cañón girando la varilla cuando la introduzca. Repita estos pasos hasta que el cañón esté limpio.
► No atasque la varilla de limpieza en el cañón a la fuerza.► Si el BB permanece dentro del cañón después de seguir las instrucciones anteriores,use una tapa de protección sobre el cañón, apunte el arma a una dirección segura y descargue cualquier BB suelto en modo semiautomático.
LIMPIANDO EL CAÑÓN 19
ES
20
ES

FN F2000 Tactical (BLACK)
FN FS2000 Tactical (BLACK) FN FS2000 Tactical FDE (DESERT TAN)
FN FS2000 (BLACK) FN FS2000 FDE (DESERT TAN)
FN F2000 (BLACK) FN F2000 FDE (DESERT TAN) FN F2000 Tactical FDE (DESERT TAN)
ストックパッド
ストックパッド
マガジンキャッチ
マガジンキャッチ
マガジン
スチール製のフラッシュサプレッサー
スチール製のフラッシュサプレッサー
スチール製のフラッシュサプレッサー
マガジン
折り畳みリアサイトスコープマウントレール
スコープ
スコープ
ハンドガードハンドガード セレクター
セレクタートリガー
トリガー
フロントサイト フロントサイトキャリングハンドル キャリングハンドル
ホップアップカバー ホップアップカバー
ストックストック
レシーバピン レシーバピングリップ グリップ
スチール製のフラッシュサプレッサー
FN F2000 SERIES構成要素21
JP
JP
22

HOP-UP ADJUSTMENT
FN F2000 SERIES
HopNormalNormal Hop
LEFTLEFT
RIGHT
ホップアップのかけ過ぎ。(ノーマル方向に回してください)
ベストポジション
ホップアップの不足。(ホップ方向に回してください)または、ホップアップのかけ過ぎ。(ノーマル方向に回してください)
Warning
フロントサイト調整
リアサイト調整
フロントサイトを取り外す
カバーを開く ホップアップ調整
サイト調整
サイト調整
Hop-up調整
フロントサイトの上下調整時計回り: 着弾点を上げます。反時計回り: 着弾点を下げます。
ネジを回してリアサイトを左右に調整できます。
リアサイトを起こします。
六角レンチを使用して、フロントサイトを取り外します。
カバーを開いてください。
エアガンを横に向けた状態で弾を発射しないでください。ホップアップシステムの構造により、弾が左右にぶれる場合があります。
ホップの調整ダイヤルは、発射されるBB弾に一定方向の回転を与える事によりBB弾に揚力を持たせ、より遠い目標に向かって水平に、かつ遠距離に飛ばす事を実現させるものです。あまり強くかけすぎると逆に飛行性能を低下させます。
23
JP
JP
24

ADJUST SCOPEINSTALL BATTERY
1
2
► 使用しないときは、バッテリーをコネクターから取り外してください。警 告
1
1
2
1
2
1
2
2
1
2
FN F2000 SERIES
スプリング調整
バッテリーの接続
スコープカバーの着脱
1.ストックパッドの下部を裏返します。2.引き上げてパッドを取り外します。
バッテリーのコネクターをカチンというまで押し込んでください。
1.ストックパッドの下部を裏返します。2.スライドさせてパッドを取り付けます。警告:使用しないときは、バッテリーをコネクターから取り外してください。
バッテリをストックに挿入します。
バネ力調整用時計回り:バネ力を上げる。反時計回り:ばね力を減少させる。
1.ストックパッドの下部を裏返します。2.スライドさせてパッドを取り付けます。
1.スリングスイベルを上に向けます。2.ボタンを押します。
1.レールのスコープを設置できます。2.ネジを締めます。
スコープカバーを閉めます。1.高度調整。2.偏流調整。
スコープカバーを前に押します。 スコープカバーを取り外します。
25
JP
26
JP

セーフティオン
発射できません
セミオート
単発
フルオート
連発
撃たないときは、常にセーフティにしてください。
発射モード & セーフティ
Click
1. レシーバピンを最後まで押し込みます。 アッパーレシーバーをスライドさせます。
1
フルオートと3発バーストの設定。セレクターをセミオートに切り替えて、トリガーを引いたままで10秒間待ちます。するとセットアップが完了します。
3発バーストをフルオートに切り替えるのも、上記の操作を繰り返してください。
セットする前にマガジンとチャンバーを空にし、3発バーストまたはフルオートモードにします。
低電圧の状態で作動していると、フルオート―セミオートの切り替えで、バッテリーとモーターに影響を及ぼす場合があります、電子部品の寿命維持のためにも、継続使用を避けて、バッテリーの交換をお勧めします。
ETU & フルオート 3発バースト設定上部のプレートを開けてください。
カチッと音がするまでマガジンを押し込みます。
マガジンキャッチレバーを押します。 マガジンをレシーバーから引き出します。(マガジンが落ちることがあるので、手で押さえてください。)
BB弾をチャンバーに詰めて、チャンバー内がいっぱいになったら、プレートを閉じてください。
巻取りバネを締めるために、マガジンの底部を向けてください。 BB弾がマガジンの上部に行き配給されるためです。
警 告 ► この銃には、必ず「G&G製BB弾」をご使用ください。 他社製BB弾を使用して発生した故障については、一切の責任を負いません。 マガジン装着
アッパーレシーバーを分解
マガジンの取り扱い
マガジンの装着 マガジンの取り外し
LOADING BBS FN F2000 SERIES27
JP
JP
28

FN F2000 SERIES
1. 数滴のシリコンオイルまたは、テフロンオイルを布に付けて、ロッドに巻きつけてください。2. クリーニングロッドをインナーバレルに挿入して、ロッドを回してください。バレルがきれいになるまで、同じことを繰り返してください。
バレルクリーニング
弾詰まり
Warning
► ホップアップダイアルをノーマルの位置に戻して、インナーバレル先端部から、 クリーニングロッドを挿入してください。
► 必ずロッドを下方向に向けて、奥まで延ばしてください。詰まったBB弾を取り除いてください。
1. ホップアップダイアルをノーマルの位置に戻して、 インナーバレル先端部から、クリーニングロッドを挿入してください。2. 必ずロッドを下方向に向けて、奥まで延ばしてください。 詰まったBB弾を取り除いてください。
メンテナンス
► シリコンオイルを使った後に、ホップアップは、200~300発不安定である場合があります。 これは、エアソフトガンの通常の作動です。► CRC-556、WD40または他の腐食性潤滑油を決して使わないでください。
► 弾詰まりが起きないようにチャンバーにほこりなどが入らないように注意してください。
バレルクリーニング29
JP
30
JP
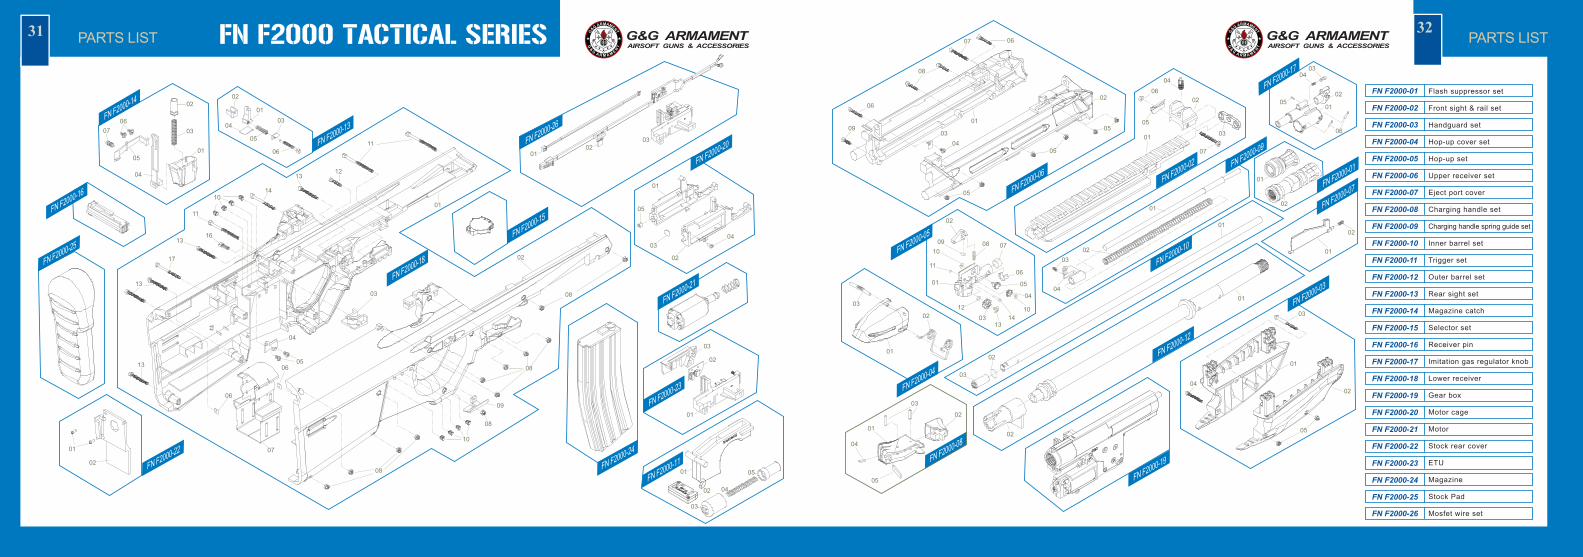
PARTS LIST
FN F2000-01
FN F2000-02
FN F2000-03
FN F2000-04
FN F2000-05
FN F2000-06
FN F2000-07
FN F2000-08
FN F2000-09
FN F2000-10
FN F2000-11
FN F2000-12
FN F2000-13
FN F2000-14
FN F2000-15
FN F2000-16
FN F2000-17
FN F2000-18
FN F2000-19
FN F2000-20
FN F2000-21
FN F2000-22
FN F2000-23
FN F2000-24
FN F2000-25
Flash suppressor set
Front sight & rail set
Handguard set
Hop-up cover set
Hop-up set
Upper receiver set
Eject port cover
Charging handle set
Charging handle spring guide set
Inner barrel set
Trigger set
Outer barrel set
Rear sight set
Magazine catch
Selector set
Receiver pin
Imitation gas regulator knob
Lower receiver
Gear box
Motor cage
Motor
Stock rear cover
ETU
Magazine
Stock Pad
Mosfet wire set
FN F2000 TACTICAL SERIES
FN F2000-26
FN F2000-02
FN F2000-06
FN F2000-17
FN F2000-09
FN F2000-10
FN F2000-12
FN F2000-19
FN F2000-04
FN F2000-05
FN F2000-07
FN F2000-03
FN F2000-23
01
02
03
FN F2000-26
FN F2000-11
02
03
04
05
0102
03
01
FN F2000-20
FN F2000-21FN F2000-18
FN F2000-15
FN F2000-13FN F2000-14
FN F2000-16
FN F2000-25
FN F2000-22
FN F2000-24
0202
03
03
06
05
04
01
01
01
02 02
03
03
01
02
02
02
02
02
080910
11
01
12
0313
1410
0404
0302
01
01
01
01
02
03
04
05
01
04
06
05
03
0304
0502
01
01
02
06
07
01
02
02
05
06
06
08
0903
04
05
05
05
0607
02
01
07
03
03
01
04
05
05
01
04
11
1213
1410
11
1613
13
13
01
02
06
06
07
05
04
03
08
08
08
08
09
10
17
0607
05
04
FN F2000-01
FN F2000-08
PARTS LIST31 32

PARTS LIST
FN F2000-01
FN F2000-02A
FN F2000-03
FN F2000-04
FN F2000-05
FN F2000-06A
FN F2000-07
FN F2000-08
FN F2000-09
FN F2000-10
FN F2000-11
FN F2000-12
FN F2000-13
FN F2000-14
FN F2000-15
FN F2000-16
FN F2000-17
FN F2000-18
FN F2000-19
FN F2000-20
FN F2000-21
FN F2000-22
FN F2000-23
FN F2000-24
FN F2000-25
FN F2000-26
FN F2000 SERIES
Flash suppressor set
Rail set
Handguard set
Hop-up cover set
Hop-up set
Upper receiver & scope cover
Eject port cover
Charging handle set
Charging handle spring guide set
Inner barrel set
Trigger set
Outer barrel set
Rear sight set
Magazine catch
Selector set
Receiver pin
Imitation gas regulator knob
Lower receiver
Gear box
Motor cage
Motor
Stock rear cover
ETU
Magazine
Stock Pad
Mosfet wire set
FN F2000-02A
FN F2000-06A
FN F2000-17
FN F2000-09
FN F2000-10
FN F2000-12
FN F2000-19
FN F2000-04
FN F2000-05
FN F2000-07
FN F2000-03
FN F2000-20
FN F2000-21FN F2000-18
FN F2000-15
FN F2000-13FN F2000-14
FN F2000-16
FN F2000-25
FN F2000-22
FN F2000-23
FN F2000-24
0202
03
03
06
05
04
01
01
01
02 02
03
03
01
01
02
03
02
02
02
02
02
080910
11
01
12
0313
1410
0404
0302
01
01
03
04
05
06
07
08 09
1011
12
13
14
15
02
01
01
01
02
03
04
05
0304
0502
01
06
01
02
01
02
05
06
07
03
03
01
04
05
05
01
04
11
1213
1410
11
1613
13
13
01
02
06
06
07
05
04
03
08
08
08
08
09
10
17
0607
05
04FN F2000-01
FN F2000-26
FN F2000-11
02
03
04
05
0102
03
01
FN F2000-08
PARTS LIST33 34

FN F2000 SERIESPlease select quality battery with the CE approval, to avoid any unnecessary damage on the product.
Please use suggested battery in the manual, if different voltage used, it might damage the product.
Remove the battery from the product when it is not in use.
Do not wet nor incinerate the battery, nor to deform terminal.
You may be liable for damaging public or personal property or for injuring a person or an animal even if you only meant to shoot as a “practical joke”. Always observe good manners and enjoy fun sport shooting.
When shooting the air guns for target practice or in a game situation, You and all participants must wear safety goggles or other eye protective gear. Also pay attention to ricochet. It is very important to pay attention to third parties other than the participants.
When you carry the air gun, attach the safety cap, set the selector lever to the safety position and always put the air gun in a case or bag.
Safety procedures: 1.Attach the safety cap to the muzzle. 2.Set the selector lever to the safety position. 3.Remove the magazine. 4.Remove the battery.
Always attach the safety cap to the muzzle, remove the battery and store the air gun in a case or bag and at a place that is out of reach by children.
There may be cases where some BB's remain in the gun after the magazine has been removed. After removal of the magazine, direct the muzzle towards a safe direction and pull the trigger to confirm that there are no BB's remain in the gun, then attach the safety cap.
Disassembling or modifying the gun may adversely affect the performance and make it dangerous. “lt may be against the Law.”
Never direct the muzzle towards a person, animal or in any direction. That may cause harm or damage to the third party.
Looking into the muzzle is extremely dangerous regardless of BB's having been loaded or not. lf you get hit in the eye by a BB pellet, you may in worst case, lose your eye sight.
Activating the trigger carelessly is extremely dangerous. Never put your finger on the trigger unless the safety cap is removed and you are ready to shoot a target.
Make sure to put the barrel and safety cap on the muzzle, except when you are shooting. Do this to prevent accident, discharge of BB's and also for dust protection purpose. Never pull the trigger while the barrel and the safety cap is attached.
Select a safe place for operating the air gun,avoid places where people and cars are around.
EN
ES
WARNING35
36

FR
JP
FN F2000 SERIESWARNING37
38


