
e13880
280
Oracle® Fusion Middleware Administrator's Guide for Oracle Business Intelligence Publisher Release 11g (11.1.1) Part No. E13880-02 April 2011
Transcript of e13880

Oracle® Fusion MiddlewareAdministrator's Guide for Oracle Business Intelligence PublisherRelease 11g (11.1.1)Part No. E13880-02
April 2011

Oracle Fusion Middleware Administrator's Guide for Oracle Business Intelligence Publisher, Release 11g (11.1.1)
Part No. E13880-02
Copyright © 2010, 2011, Oracle and/or its affiliates. All rights reserved.
Primary Author: Leslie Grumbach Studdard
Contributing Author: Trish Fuzesy
Contributor: Oracle Business Intelligence Publisher development, product management, and quality assurance teams
Oracle is a registered trademark of Oracle Corporation and/or its affiliates. Other names may be trademarks of their respective owners.
This software and related documentation are provided under a license agreement containing restrictions on use and disclosure and are protected by intellectual property laws. Except as expressly permitted in your license agreement or allowed by law, you may not use, copy, reproduce, translate, broadcast, modify, license, transmit, distribute, exhibit, perform, publish or display any part, in any form, or by any means. Reverse engineering, disassembly, or decompilation of this software, unless required by law for interoperability, is prohibited.
The information contained herein is subject to change without notice and is not warranted to be error-free. If you find any errors, please report them to us in writing.
If this software or related documentation is delivered to the U.S. Government or anyone licensing it on behalf of the U.S. Government, the following notice is applicable:
U.S. GOVERNMENT RIGHTSPrograms, software, databases, and related documentation and technical data delivered to U.S. Government customers are "commercial computer software" or "commercial technical data" pursuant to the applicable Federal Acquisition Regulation and agency-specific supplemental regulations. As such, the use, duplication, disclosure, modification, and adaptation shall be subject to the restrictions and license terms set forth in the applicable Government contract, and, to the extent applicable by the terms of the Government contract, the additional rights set forth in FAR 52.227-19, Commercial Computer Software License (December 2007). Oracle USA, Inc., 500 Oracle Parkway, Redwood City, CA 94065.
This software or hardware is developed for general use in a variety of information management applications. It is not developed or intended for use in any inherently dangerous applications, including applications that may create a risk of personal injury. If you use this software or hardware in dangerous applications, then you shall be responsible to take all appropriate fail-safe, backup, redundancy, and other measures to ensure its safe use. Oracle Corporation and its affiliates disclaim any liability for any damages caused by use of this software or hardware in dangerous applications.
This software and documentation may provide access to or information on content, products and services from third parties. Oracle Corporation and its affiliates are not responsible for and expressly disclaim all warranties of any kind with respect to third party content, products and services. Oracle Corporation and its affiliates will not be responsible for any loss, costs, or damages incurred due to your access to or use of third party content, products or services.
iii
Contents
Send Us Your Comments
Preface
Part 1 Introduction
1 Introduction to Oracle BI Publisher AdministrationIntroduction............................................................................................................................... 1-1Starting and Stopping BI Publisher.......................................................................................... 1-3About the Administration Page................................................................................................ 1-5Flow of Tasks for First Time Setup of BI Publisher................................................................. 1-6About Integration with Oracle Business Intelligence Enterprise Edition...............................1-7About the Security Model Options...........................................................................................1-8About the Data Source Connections......................................................................................... 1-9About Report Delivery Destinations........................................................................................ 1-9About Setting Runtime Configuration Properties................................................................. 1-10About the Server Configuration Settings............................................................................... 1-10
Part 2 Configuring Security
2 Configuring Oracle Fusion Middleware Security ModelUnderstanding the Security Model...........................................................................................2-1
Key Security Elements......................................................................................................... 2-2Permission Grants and Inheritance...................................................................................... 2-3Default Security Configuration............................................................................................ 2-6

iv
Managing Authentication ...................................................................................................... 2-12Managing Authorization......................................................................................................... 2-20Managing Credentials............................................................................................................. 2-27Customizing the Default Security Configuration.................................................................. 2-28
Configuring a New Authentication Provider.....................................................................2-29Configuring a New Policy Store and Credential Store Provider........................................2-29Customizing the Policy Store............................................................................................. 2-30
3 Alternative Security OptionsAbout Alternative Security Options......................................................................................... 3-1Understanding BI Publisher's Users, Roles, and Permissions................................................. 3-2About Privileges to Use Functionality...................................................................................... 3-3About Catalog Permissions....................................................................................................... 3-5How Functional Privileges and Permissions Work Together.................................................. 3-6About Access to Data Sources................................................................................................... 3-7Configuring Users, Roles, and Data Access..............................................................................3-7Security and Catalog Organization......................................................................................... 3-11Configuring BI Publisher to Use an LDAP Provider............................................................. 3-15Integrating with Microsoft Active Directory.......................................................................... 3-21Configuring Single Sign-On................................................................................................... 3-24Configuring BI Publisher to Use Oracle Access Manager (OAM) Single Sign-On.............. 3-25Setting Up Oracle Single Sign-On.......................................................................................... 3-27
4 Other Security TopicsEnabling a Local Superuser.......................................................................................................4-1Enabling a Guest User............................................................................................................... 4-2Configuring BI Publisher for Secure Socket Layer (SSL) Communication.............................4-3Configuring Proxy Settings....................................................................................................... 4-5
5 Integrating with Other Oracle Security ModelsIntroduction............................................................................................................................... 5-1Before You Begin: Create a Local Superuser............................................................................ 5-1Integrating with Oracle BI Server Security.............................................................................. 5-2Integrating with Oracle E-Business Suite................................................................................. 5-4Integrating with Oracle Database Security.............................................................................. 5-6Integrating with Oracle Siebel CRM Security..........................................................................5-9
6 Implementing a Digital SignatureIntroduction............................................................................................................................... 6-1

v
Prerequisites and Limitations................................................................................................... 6-2Implementing a Digital Signature............................................................................................ 6-4Running and Signing Reports with a Digital Signature.......................................................... 6-7
Part 3 Administering Oracle Business Intelligence Publisher
7 Configuring the SchedulerOverview................................................................................................................................... 7-1Understanding the BI Publisher Scheduler..............................................................................7-2Set Up Considerations............................................................................................................... 7-5About the Scheduler Configuration......................................................................................... 7-5Configuring Processors and Processor Threads....................................................................... 7-6Adding Managed Servers.......................................................................................................... 7-7Scheduler Diagnostics............................................................................................................. 7-12
8 Configuring Server PropertiesOverview................................................................................................................................... 8-1Setting the Path to the Configuration Folder........................................................................... 8-1Configuring the Catalog............................................................................................................ 8-2Setting General Properties........................................................................................................ 8-3Setting Server Caching Specifications...................................................................................... 8-5Setting Retry Properties for Database Failover........................................................................ 8-6
9 Setting Up Data SourcesOverview of Setting Up Data Sources...................................................................................... 9-1Setting Up a JDBC Connection to Your Data Source............................................................... 9-5Setting Up a Database Connection Using a JNDI Connection Pool........................................ 9-8Setting Up a Connection to an LDAP Server Data Source....................................................... 9-8Setting Up a Connection to an OLAP Data Source.................................................................. 9-9Setting Up a Connection to a File Data Source.......................................................................9-10Viewing or Updating a Data Source....................................................................................... 9-11
10 Setting Up IntegrationsOverview................................................................................................................................. 10-1Configuring Integration with Oracle BI Presentation Services............................................. 10-1
11 Setting Up Delivery DestinationsOverview................................................................................................................................. 11-1

vi
Configuring Delivery Options................................................................................................11-1Adding a Printer or Fax Server................................................................................................ 11-2Adding an E-mail Server......................................................................................................... 11-4Adding a WebDAV Server...................................................................................................... 11-5Adding an HTTP Server.......................................................................................................... 11-5Adding an FTP Server............................................................................................................. 11-6Adding a Common Unix Printing System (CUPS) Server..................................................... 11-7
12 Defining Runtime ConfigurationsSetting Runtime Properties..................................................................................................... 12-1PDF Output Properties............................................................................................................ 12-2PDF Security Properties.......................................................................................................... 12-3PDF Digital Signature Properties........................................................................................... 12-7RTF Output Properties............................................................................................................ 12-9HTML Output Properties...................................................................................................... 12-10FO Processing Properties...................................................................................................... 12-11RTF Template Properties...................................................................................................... 12-14PDF Template Properties...................................................................................................... 12-15Flash Template Properties.....................................................................................................12-16CSV Output Properties......................................................................................................... 12-17Excel 2007 Output Properties................................................................................................ 12-18All Outputs............................................................................................................................ 12-18Defining Font Mappings....................................................................................................... 12-19Defining Currency Formats.................................................................................................. 12-24
13 Diagnostics and Performance Monitoring in Oracle BI PublisherDiagnosing and Resolving Issues in Oracle BI Publisher..................................................... 13-1
About Diagnostic Log Files................................................................................................ 13-2Configuring Log Files............................................................................................................. 13-4Viewing Log Messages............................................................................................................ 13-5About Performance Monitoring and User Auditing.............................................................. 13-9Enabling Monitoring ............................................................................................................ 13-10Viewing the Audit Log.......................................................................................................... 13-15Configuring an Audit Repository......................................................................................... 13-15Using BI Publisher to Create Audit Reports from Your Audit Repository......................... 13-20Viewing Performance Statistics in the MBean Browser.......................................................13-23
14 Adding Translations for the BI Publisher Catalog and Reports Introduction............................................................................................................................. 14-1Exporting and Importing a Catalog Translation File............................................................. 14-2

vii
Template Translation.............................................................................................................. 14-5Using the Localized Template Option ................................................................................... 14-7
15 Moving Catalog Objects Between EnvironmentsOverview................................................................................................................................. 15-1Preparing to Use the BI Publisher Catalog Utility................................................................. 15-4Exporting BI Publisher Reporting Objects............................................................................. 15-5Importing BI Publisher Reporting Objects............................................................................ 15-7Generating Translation Files and Checking for Translatability............................................15-9
A Setting Up Print ServersPrint Server Options for BI Publisher...................................................................................... A-1Setting Up CUPS....................................................................................................................... A-1Setting UP Internet Printing Protocol (IPP) on Windows........................................................A-6
B Scheduler Configuration ReferenceIntroduction.............................................................................................................................. B-1Configuring BI Publisher for ActiveMQ................................................................................. B-1Manually Configuring the Quartz Scheduler.......................................................................... B-2
C Integration Reference for Oracle Business Intelligence Enterprise EditionAbout Integration..................................................................................................................... C-1Configuring BI Publisher to Use the Oracle BI Presentation Catalog ....................................C-2Configuring Integration with Oracle BI Presentation Services.............................................. C-2Setting Up a JDBC Connection to the Oracle BI Server.......................................................... C-3
D Configuration File Reference BI Publisher Configuration Files ............................................................................................ D-1Setting Properties in the Runtime Configuration File............................................................ D-1Structure.................................................................................................................................... D-3Properties.................................................................................................................................. D-3Font Definitions........................................................................................................................ D-4Predefined Fonts....................................................................................................................... D-7
Index


ix
Send Us Your Comments
Oracle Fusion Middleware Administrator's Guide for Oracle Business Intelligence Publisher, Release 11g (11.1.1)Part No. E13880-02
Oracle welcomes customers' comments and suggestions on the quality and usefulness of this document. Your feedback is important, and helps us to best meet your needs as a user of our products. For example:
• Are the implementation steps correct and complete? • Did you understand the context of the procedures? • Did you find any errors in the information? • Does the structure of the information help you with your tasks? • Do you need different information or graphics? If so, where, and in what format? • Are the examples correct? Do you need more examples?
If you find any errors or have any other suggestions for improvement, then please tell us your name, the name of the company who has licensed our products, the title and part number of the documentation andthe chapter, section, and page number (if available).
Note: Before sending us your comments, you might like to check that you have the latest version of the document and if any concerns are already addressed. To do this, access the new Oracle E-Business Suite Release Online Documentation CD available on My Oracle Support and www.oracle.com. It contains the most current Documentation Library plus all documents revised or released recently.
Send your comments to us using the electronic mail address: [email protected]
Please give your name, address, electronic mail address, and telephone number (optional).
If you need assistance with Oracle software, then please contact your support representative or Oracle Support Services.
If you require training or instruction in using Oracle software, then please contact your Oracle local officeand inquire about our Oracle University offerings. A list of Oracle offices is available on our Web site at www.oracle.com.

xi
Preface
Intended AudienceWelcome to Release 11g (11.1.1) of the Oracle Fusion Middleware Administrator's Guide for Oracle Business Intelligence Publisher.
This book is intended for the following users:
Administrators of Oracle BI Publisher
See Related Information Sources on page xii for more Oracle E-Business Suite product information.
Documentation AccessibilityFor information about Oracle's commitment to accessibility, visit the Oracle Accessibility Program website at http://www.oracle.com/us/corporate/accessibility/
Structure1 Introduction to Oracle BI Publisher Administration2 Configuring Oracle Fusion Middleware Security Model3 Alternative Security Options4 Other Security Topics5 Integrating with Other Oracle Security Models6 Implementing a Digital Signature7 Configuring the Scheduler8 Configuring Server Properties9 Setting Up Data Sources10 Setting Up Integrations11 Setting Up Delivery Destinations12 Defining Runtime Configurations13 Diagnostics and Performance Monitoring in Oracle BI Publisher14 Adding Translations for the BI Publisher Catalog and Reports 15 Moving Catalog Objects Between Environments
xii
A Setting Up Print ServersB Scheduler Configuration ReferenceC Integration Reference for Oracle Business Intelligence Enterprise EditionD Configuration File Reference
Related Information SourcesFor more information, see the following documents in the Oracle Business Intelligence Enterprise Edition 11g Release 1 (11.1.1) documentation set:
• Oracle Fusion Middleware Report Designer's Guide for Oracle Business Intelligence Publisher
• Oracle Fusion Middleware Java API Reference for Oracle Business Intelligence Publisher
• The Oracle Business Intelligence chapter in the Oracle Fusion Middleware Release Notes for your platform
• Oracle Fusion Middleware Installation Guide for Oracle Business Intelligence
• Oracle Fusion Middleware Upgrade Guide for Oracle Business Intelligence Enterprise Edition
• Oracle Fusion Middleware Application Security Guide
• Oracle Fusion Middleware System Administrator's Guide for Oracle Business Intelligence Enterprise Edition
• Oracle Fusion Middleware Security Guide for Oracle Business Intelligence Enterprise Edition
• Oracle Fusion Middleware User's Guide for Oracle Business Intelligence Enterprise Edition
• Oracle Fusion Middleware Administrator's Guide
• Oracle WebLogic Server Administration Console Online Help
System Requirements and CertificationRefer to the system requirements and certification documentation for information abouthardware and software requirements, platforms, databases, and other information. Bothof these documents are available on Oracle Technology Network (OTN).
The system requirements document covers information such as hardware and software requirements, minimum disk space and memory requirements, and required system libraries, packages, or patches:
http://www.oracle.com/technology/software/products/ias/files/fusion_requirements.htm

xiii
The certification document covers supported installation types, platforms, operating systems, databases, JDKs, and third-party products:
http://www.oracle.com/technology/software/products/ias/files/fusion_certification.html
Do Not Use Database Tools to Modify Oracle E-Business Suite DataOracle STRONGLY RECOMMENDS that you never use SQL*Plus, Oracle Data Browser, database triggers, or any other tool to modify Oracle E-Business Suite data unless otherwise instructed.
Oracle provides powerful tools you can use to create, store, change, retrieve, and maintain information in an Oracle database. But if you use Oracle tools such as SQL*Plus to modify Oracle E-Business Suite data, you risk destroying the integrity of your data and you lose the ability to audit changes to your data.
Because Oracle E-Business Suite tables are interrelated, any change you make using an Oracle E-Business Suite form can update many tables at once. But when you modify Oracle E-Business Suite data using anything other than Oracle E-Business Suite, you may change a row in one table without making corresponding changes in related tables.If your tables get out of synchronization with each other, you risk retrieving erroneous information and you risk unpredictable results throughout Oracle E-Business Suite.
When you use Oracle E-Business Suite to modify your data, Oracle E-Business Suite automatically checks that your changes are valid. Oracle E-Business Suite also keeps track of who changes information. If you enter information into database tables using database tools, you may store invalid information. You also lose the ability to track whohas changed your information because SQL*Plus and other database tools do not keep arecord of changes.


Part 1Introduction


Introduction to Oracle BI Publisher Administration 1-1
1Introduction to Oracle BI Publisher
Administration
This chapter covers the following topics:
• Introduction
• Starting and Stopping BI Publisher
• About the Administration Page
• Flow of Tasks for First Time Setup of BI Publisher
• About Integration with Oracle Business Intelligence Enterprise Edition
• About the Security Model Options
• About the Data Source Connections
• About Report Delivery Destinations
• About Setting Runtime Configuration Properties
• About the Server Configuration Settings
IntroductionOracle BI Publisher is an enterprise reporting solution for authoring, managing, and delivering all your highly formatted documents, such as operational reports, electronic funds transfer documents, government PDF forms, shipping labels, checks, sales and marketing letters, and much more.
Administering BI Publisher requires setting up and maintaining the following system components:
• BI Publisher security
• Data source connections

1-2 Oracle Fusion Middleware Administrator's Guide for Oracle Business Intelligence Publisher
• Report delivery destinations
• BI Publisher Scheduler configurations
• Runtime configuration settings
• Server configuration settings
See these other guides for more information about using the product for other business roles:
Role Sample Tasks Guide
Data model developer Fetching and structuring the data to usein reports
Oracle Fusion Middleware Data Modeling Guide for Oracle Business Intelligence Publisher
Application developer or integrator
Integrating BI Publisher into existing applications using the application programming interfaces
Oracle Fusion Middleware Developer's Guide for Oracle Business Intelligence Publisher
Report consumer Viewing reports
Scheduling report jobs
Managing report jobs
Oracle Fusion Middleware User's Guide forOracle Business Intelligence Publisher
Report designer Creating report definitions
Designing layouts
Oracle Fusion Middleware Report Designer's Guide for Oracle Business Intelligence Publisher
Information About Installing, Patching, and Upgrading BI PublisherThe following table provides a quick reference for administration tasks documented in other books:
Topic Description Example For More Information
Installation Copying new software on a system where no prior installation of the softwareexists
Installing a new instance of Oracle Business Intelligence 11.1.1.5
See Oracle Fusion Middleware Installation Guide for Oracle Business Intelligence

Introduction to Oracle BI Publisher Administration 1-3
Topic Description Example For More Information
Patching Copying a small collection of files over an existing instance (also referred to as an "in-place installation"). A patch is normally associated with aparticular version of an Oracle product and involves updating from one minor version of the product to a newer minor version of the same product. A patch set is a single patch that contains a collection of patches designed to be applied together.
Copying the Oracle Business Intelligence 11.1.1.5 patch set over an Oracle Business Intelligence 11.1.1.3 instance
See Oracle Fusion Middleware Patching Guide, especially the section entitled "Summary of the Patch Set Installation Process"
Upgrade Moving from a previous major version to a new major version
Upgrading from Oracle Business Intelligence Publisher 10g to Oracle Business Intelligence Publisher 11g
See Oracle Fusion Middleware Upgrade Guide for Oracle Business Intelligence Enterprise Edition
Also of interest:
• Oracle Fusion Middleware Enterprise Deployment Guide for Oracle Business Intelligence
This guide defines an architectural blueprint that captures Oracle's recommended best practices for a highly available and secure Oracle Business Intelligence deployment. The best practices described in this blueprint use Oracle products fromacross the technology stack, including Oracle Database, Oracle Fusion Middleware, and Oracle Enterprise Manager. The resulting enterprise deployment can be readilyscaled out to support increasing capacity requirements.
• Oracle Fusion Middleware High Availability Guide
This guide discusses the architecture, interaction, and dependencies of Oracle Fusion Middleware components, and explains how they can be deployed in a high availability architecture. (See chapter "Configuring High Availability for Oracle Business Intelligence and EPM.")
Starting and Stopping BI PublisherUse the Oracle WebLogic Server Administration Console to centrally manage Oracle

1-4 Oracle Fusion Middleware Administrator's Guide for Oracle Business Intelligence Publisher
Business Intelligence Publisher.
For detailed information about Oracle WebLogic Server, see:
• Oracle WebLogic Server Administration Console Online Help
• Oracle Fusion Middleware Administrator's Guide
Display Oracle WebLogic Server Administration Console, using one of the following methods:
• Using the Start menu in Windows
• Clicking a link on the Overview page in Fusion Middleware Control
• Entering a URL into a Web browser window
The Oracle WebLogic Server Administration Console is available only if the Administration Server for WebLogic Server is running.
To display Oracle WebLogic Server Administration Console:1. If the Administration Server for WebLogic Server is not running, start it.
2. Display the Oracle WebLogic Server Administration Console using one of the following methods:
Using the Windows Start menu:1. From the Start menu, select All Programs, Oracle WebLogic, User Projects,
bifoundation_domain, and Admin Server Console.
The Oracle WebLogic Server Administration Console login page is displayed.
Clicking a link on the Overview page in Fusion Middleware Control:1. Display Oracle Fusion Middleware Control.
2. Expand the WebLogic Domain node and select the bifoundation_domain.
3. Click the Oracle WebLogic Server Administration Console link in the Summary region.
The Oracle WebLogic Server Administration Console login page is displayed.
Using a URL in a Web browser window:1. Enter the following URL into the browser:
http://<host>:<port>/console/
For example, http://mycomputer:7001/console/
where host is the DNS name or IP address of the Administration Server and port is the listen port on which the Administration Server is listening for requests (port 7001 by default).

Introduction to Oracle BI Publisher Administration 1-5
If you have configured a domain-wide Administration port, then use that port number. If you configured the Administration Server to use Secure Socket Layer (SSL), then you must add the letter 's' after http as follows:
https://<host>:7001/console/
Using Oracle WebLogic Server Administration Console to Start and Stop BI PublisherTo use the Oracle WebLogic Server Administration Console to start and stop BI Publisher:
1. Start the Oracle WebLogic Server Administration Console.
2. Under the Domain Structure, expand Environment.
3. Click Servers to display the Summary of Servers table.
4. Click Control. Select the server and then click the appropriate action.
About the Administration PageMany of the tasks described in the Administration section of this guide are performed from the BI Publisher Administration page. You must be granted Administrator privileges to access the Administration page.
The Administration page is accessed via the Administration link in the global header. The following figure shows the Administration page:

1-6 Oracle Fusion Middleware Administrator's Guide for Oracle Business Intelligence Publisher
Flow of Tasks for First Time Setup of BI Publisher
Configurations Performed by the Oracle Business Intelligence Platform InstallerAfter installation is complete, the following will be configured:
• The security model will be configured to use Oracle Fusion Middleware Security
• The scheduler will be configured to use Oracle WebLogic JMS. The schema tables will be installed and configured in the database.
• The BI Publisher catalog and repository will be configured to ${xdo.server.config.dir}/repository
If you are setting up BI Publisher for the first time, following is the recommended flow of tasks to get your system up and running.
Task Where to Get Information
Define a Local Superuser
Set up this Superuser to ensure access to all administrative functions in case of problems with the current security setup.
Enabling a Local Superuser, page 4-1

Introduction to Oracle BI Publisher Administration 1-7
Task Where to Get Information
Set up your chosen security model and test Configuring Oracle Fusion Middleware Security Model,page 2-1
Alternative Security Options, page 3-1
Integrating with Other Oracle Security Models, page 5-1
Set up your data sources and test Setting Up Data Sources, page 9-1
Set up you delivery servers and test Setting Up Delivery Destinations, page 11-1
Configure server properties Configuring Server Properties, page 8-1
Configure system runtime properties Defining Runtime Configurations, page 12-1
About Integration with Oracle Business Intelligence Enterprise EditionIf you installed Oracle BI Publisher with the Oracle Business Intelligence Enterprise Edition you will need to perform the following Administration tasks in the BI Publisher Administration page. Navigate to the BI Publisher Administration page as follows:
In the global header, click Administration, on the Administration page, click Manage BI Publisher.
Task Where to Get Information
Set up data source connections for reporting Setting Up Data Sources, page 9-1
Grant access to data sources for user roles defined in Oracle Business Intelligence
Granting Data Access, page 3-11
Configure the connections to delivery servers (for example, printers, e-mail servers, FTP servers, and so on)
Setting Up Delivery Destinations, page 11-1
Configure the scheduler processors Configuring the Scheduler, page 7-1

1-8 Oracle Fusion Middleware Administrator's Guide for Oracle Business Intelligence Publisher
Task Where to Get Information
Configure system runtime properties such as PDF security properties, properties specific to each output format, template type properties, font mappings, and currency formats.
Defining Runtime Configurations, page 12-1
Configure server properties such as caching specifications, database failover properties, and database fetch size.
Configuring Server Properties, page 8-1
About the Security Model OptionsBI Publisher offers the following security options:
• Oracle Fusion Middleware Security
After installation, BI Publisher will be configured to use Oracle Fusion Middleware Security. For more information, see Configuring Oracle Fusion Middleware Security Model, page 2-1. If you prefer to use another security model, choose fromthe alternative options.
• BI Publisher Security
Use BI Publisher's Users and Roles paradigm to control access to reports and data sources. For more information see Alternative Security Options, page 3-1.
• Integration with an LDAP server
Set up the BI Publisher roles in your LDAP server then configure BI Publisher to integrate with it. For more information see Alternative Security Options, page 3-1.
• Oracle E-Business Suite
Upload a DBC file to recognize your Oracle E-Business Suite users. For more information see Integrating with Other Oracle Security Models, page 5-1.
• Oracle BI Server
You can still leverage the 10g legacy BI Server authentication method if you choose not to upgrade to Oracle Fusion Middleware Security. For more information see Integrating with Other Oracle Security Models, page 5-1.
• Oracle Database
Set up the BI Publisher roles in your Oracle Database and then configure BI Publisher to integrate with it. For more information see Integrating with Other

Introduction to Oracle BI Publisher Administration 1-9
Oracle Security Models, page 5-1.
• Oracle Siebel CRM Security Model
For more information, see Integrating with Other Oracle Security Models, page 5-1.
About the Data Source ConnectionsBI Publisher reports rely on XML data. BI Publisher supports retrieving data from a variety of data sources.
The following data sources must be first set up in BI Publisher through the Administration page:
• Database connections
BI Publisher supports direct JDBC connections and connections through a JNDI pool (recommended)
• LDAP connections
• OLAP connections
• File directory connections - you can use an existing XML file or Microsoft Excel file that is stored in a directory that BI Publisher can access
For more information on setting up these data source connections, see Setting Up Data Sources, page 9-1.
The following data sources are defined when you create the data model:
• Web services
• HTTP XML feed
If you have integrated your system with Oracle Business Intelligence you can also take advantage of the following data source:
• Oracle BI Analysis
About Report Delivery DestinationsThe BI Publisher delivery manager supports the following delivery channels:
• Printer
• Fax

1-10 Oracle Fusion Middleware Administrator's Guide for Oracle Business Intelligence Publisher
• HTTP notification
• FTP
• Web Folder (or WebDAV)
For more information on setting up the delivery options, see Setting Up Delivery Options, page 11-1.
About Setting Runtime Configuration PropertiesUse the Runtime Configuration page to enable configuration settings for your system. The properties include settings that
• control the processing for different output types
• enable digital signature
• tune for scalability and performance
• define font mappings
For more information on setting configuration properties and font mappings, see Setting Runtime Properties, page 12-1.
About the Server Configuration SettingsBI Publisher administration also includes a set of system maintenance settings and tasks. These are:
• configuring the catalog
• setting caching properties
• setting retry properties for failover
For more information on these tasks and settings, see Configuring Server Properties, page 8-1.

Part 2Configuring Security


Configuring Oracle Fusion Middleware Security Model 2-1
2Configuring Oracle Fusion Middleware
Security Model
This chapter covers the following topics:
• Understanding the Security Model
• Managing Authentication
• Managing Authorization
• Managing Credentials
• Customizing the Default Security Configuration
Understanding the Security ModelThe Oracle Fusion Middleware security model is built upon the Oracle Fusion Middleware platform, which incorporates the Java security model. The Java model is a role-based, declarative model that employs container-managed security where resources are protected by roles that are assigned to users. However, extensive knowledge of the Java-based architecture is unnecessary when using the Oracle Fusion Middleware Security model. When using this security model, BI Publisher can furnish uniform security and identity management across the enterprise.
After installation BI Publisher is automatically installed into a Oracle WebLogic Server domain, which is a logically related group of WebLogic Server resources that are managed as a unit. After a Simple installation type the WebLogic Server domain that is created is named bifoundation_domain. This name may vary depending upon the installation type performed. One instance of WebLogic Server in each domain is configured as an Administration Server. The Administration Server provides a central point for managing a WebLogic Server domain. The Administration Server hosts the Administration Console, which is a Web application accessible from any supported Web browser with network access to the Administration Server. BI Publisher is part of the active security realm configured for the Oracle WebLogic Server domain into which it is installed.

2-2 Oracle Fusion Middleware Administrator's Guide for Oracle Business Intelligence Publisher
For more information about the Oracle Fusion Middleware platform and the common security framework, see Oracle Fusion Middleware Application Security Guide. For more information about managing the Oracle WebLogic Server domain and security realm, see Oracle Fusion Middleware Understanding Security for Oracle WebLogic Server and OracleFusion Middleware Securing Oracle WebLogic Server.
Key Security ElementsThe Oracle Fusion Middleware security model depends upon the following key elements in order to provide uniform security and identity management across the enterprise:
• Application policy
BI Publisher permissions are granted to members of its application roles. In the default security configuration, each application role conveys a predefined set of permissions. Permission grants are defined and managed in an application policy. After an application role is associated with an application policy, that role becomes a Grantee of the policy. An application policy is specific to a particular application.
• Application role
After permission grants are defined in an application policy, an application role canbe mapped to that policy, and the application role then becomes the mechanism to convey the permissions. In this manner an application role becomes the container that grants permissions to its members. The permissions become associated with the application role through the relationship between policy and role. After groups are mapped to an application role, the corresponding permissions are granted to all members equally. Membership is defined in the application role definition. Application roles are assigned in accordance with specific conditions and are granted dynamically based on the conditions present at the time authentication occurs. More than one user or group can be members of the same application role.
• Authentication provider
An authentication provider is used to access user and group information and is responsible for authenticating users. The default authentication provider that BI Publisher uses during a Simple or Enterprise installation is named DefaultAuthenticator. This is the same default authenticator used by a basic Oracle WebLogic Server installation. An Oracle WebLogic Server authentication provider enables you to manage users and groups in one place.
An identity store contains user name, password, and group membership information. An authentication provider accesses the data in the identity store and authenticates against it. For example, when a user name and password combinationis entered at log in, the authentication provider searches the identity store to verify the credentials provided. The BI Publisher default authentication provider authenticates against Oracle WebLogic Server embedded directory server.

Configuring Oracle Fusion Middleware Security Model 2-3
• Users and groups
A user is an entity that can be authenticated. A user can be a person, such as an application user, or a software entity, such as a client application. Every user is given a unique identifier.
Groups are organized collections of users that have something in common. Users should be organized into groups with similar access needs in order to facilitate efficient security management.
• Security realm
During installation an Oracle WebLogic Server domain is created and BI Publisher is installed into that domain. BI Publisher security is managed within the security realm for this Oracle WebLogic Server domain. A security realm acts as a scoping mechanism. Each security realm consists of a set of configured security providers, users, groups, security roles, and security policies. Only one security realm can be active for the domain. BI Publisher authentication is performed by the authentication provider configured for the default security realm for the WebLogic Server domain in which it is installed. Oracle WebLogic Server Administration Console is the administration tool used for managing an Oracle WebLogic Server domain.
Permission Grants and InheritanceBI Publisher provides application-specific permissions for accessing different features. BI Publisher permissions are typically granted by becoming a member in an application role. Permissions can be granted two ways: through membership in an application role (direct) and through group and role hierarchies (inheritance). Application role membership can be inherited by nature of the application role hierarchy. In the default security configuration, each application role is preconfigured to grant a predefined set of permissions. Groups are mapped to an application role. The mapping of a group to a role conveys the role's permissions to all members of the group. In short, permissions are granted in BI Publisher by establishing the following relationships:
• A group defines a set of users having similar system access requirements. Users are added as members to one or more groups according to the level of access required.
• Application roles are defined to represent the role a user typically performs when using BI Publisher. The default security configuration provides the following preconfigured application roles: BIAdministrator (an administrator), BIAuthor (an author of content), and BIConsumer (a consumer of content).
• The groups of users are mapped to one or more application roles that match the type of access required by the population.
• Application policies are created and BI Publisher permissions are mapped that grant a set of access rights corresponding to role type.

2-4 Oracle Fusion Middleware Administrator's Guide for Oracle Business Intelligence Publisher
• An application role is mapped to the application policy that grants the set of permissions required by the role type (an administrator, an author, a consumer).
• Group membership can be inherited by nature of the group hierarchy. Application roles mapped to inherited groups are also inherited, and those permissions are likewise conveyed to the members.
How a user's permissions are determined by the system is as follows:
1. A user enters credentials into a Web browser at login. The user credentials are authenticated by the authentication provider against data contained the identity store.
2. After successful authentication, a Java subject and principal combination is issued, which is populated with the user name and a user's groups.
3. A list of the user's groups is generated and checked against the application roles. A list is created of the application roles that are mapped to each of the user's groups.
4. A user's permission grants are determined from knowing which application roles the user is a member of. The list of groups is generated only to determine what rolesa user has, and is not used for any other purpose.
A user can also be granted permissions if they inherit other application roles. Members of application roles can include other groups and application roles. The result is a hierarchical role structure where permissions can be inherited in addition to being explicitly granted. This hierarchy provides that a group is granted the permissions of the application role for which it is a member, and the permissions granted by all roles descended from that role.
For example, the default security configuration includes several predefined groups and application roles. The default BIAdministrator application role includes the BIAdministrators group, the BIAuthor application role includes the BIAuthors group, and the BIConsumer application role includes the BIConsumers group. The default BIAdministrator application role is a member the BIAuthor application role, and the BIAuthor application role is a member of the BIConsumer application role. The members of these application roles inherit permissions as follows. Members of the BIAdministrators group are granted all the permissions of the BIAdministrator role, the BIAuthor role, and the BIConsumer role. By nature of this role hierarchy, the user who is a member of a particular group is granted permissions both explicitly and through inheritance. For more information about the default application roles and groups, see Default Application Roles and Permissions., page 2-9
Note: By themselves, groups and group hierarchies do not enable any privilege to access resources controlled by an application. Privileges areconveyed by the permission grants defined in an application policy. A user, group, or application role becomes a Grantee of the application

Configuring Oracle Fusion Middleware Security Model 2-5
policy. The application policy Grantee conveys the permissions and thisis done by direct association (user) or by becoming a member of the Grantee (group or application role).
The following figure shows these relationships between the default groups and application roles.
The following table summarizes how permissions are granted explicitly or are inheritedin the previous example and figure.
Permissions Granted by the Role Hierarchy Example
User Name Group Membership: Explicit/Inherited
Application Role Membership: Explicit/Inherited
Permission Grants: Explicit/Inherited
User1, User2, User3 BIConsumers: Explicit BIConsumer: Explicit Permission A: Explicit
User4, User5 BIAuthors: Explicit
BIConsumers: Inherited
BIAuthor: Explicit
BIConsumer: Inherited
Permission B: Explicit
Permission A: Inherited
User6, User7 BIAdministrators: Explicit
BIAuthors: Inherited
BIConsumers: Inherited
BIAdministrator: Explicit
BIAuthor: Inherited
BIConsumer: Inherited
Permission C: Explicit
Permission B: Inherited
Permission A: Inherited

2-6 Oracle Fusion Middleware Administrator's Guide for Oracle Business Intelligence Publisher
Default Security ConfigurationAccess control of system resources is achieved by requiring users to authenticate at login and by restricting users to only those resources for which they are authorized. A default security configuration is available for immediate use after BI Publisher is installed and is configured to use the Oracle Fusion Middleware security model. BI Publisher is installed into the Oracle WebLogic Server domain and uses its security realm. The default configuration includes three predefined security stores available for managing user identities, credentials, and BI Publisher-specific permission grants. Userscan be added to predefined groups that are mapped to preconfigured application roles. Each application role is preconfigured to grant specific BI Publisher permissions.
The BI Publisher default security stores are configured as follows during installation.
Store Name Purpose Default Provider Options
Identity store • Used to control authentication.
• Stores the users and groups, and the users group for Oracle WebLogic Server embedded directory server.
• Oracle WebLogic Server embedded directory server.
• Managed with Oracle WebLogic Server Administration Console.
BI Publisher can be reconfigured to use alternative authentication providers. For a complete list, see System Requirements and Supported Platforms for Oracle Fusion Middleware 11gR1.
Policy store • Used to control authorization.
• Stores the application role definitions and the mapping definitions between groups and application roles.
• system.jazn-data.xml file. Default installation location is MW_HOME/user_projects/domain/your_domain/config/fmwconfig
• Managed with Oracle Enterprise Manager Fusion Middleware Control.
BI Publisher can be reconfigured to use Oracle Internet Directory as the policy store provider.
Credential store Stores the passwords and other security-related credentials either suppliedor system-generated.
• cwallet.sso file.
• Managed using Fusion Middleware Control.
BI Publisher can be reconfigured to use Oracle Internet Directory as the credential store provider.

Configuring Oracle Fusion Middleware Security Model 2-7
Default Users and GroupsThe following table lists the default user names and passwords added to the BI Publisher identity store provider after installation. These defaults can be changed to different values and additional users can be added to the identity store by an administrative user using Oracle WebLogic Server Administration Console.
Default User Name and Password Purpose Description
Name: administrator user
Password: user supplied
Is the administrative user. • This user name is entered by theperson performing the installation, it can be any desired name, and does not need to be named Administrator.
• The password entered during installation can be changed later using the administration interface for the identity store provider.
• This single administrative user is shared by BI Publisher and Oracle WebLogic Server. This user is automatically made a member of the Oracle WebLogicServer default Administrators group after installation. This enables this user to perform all Oracle WebLogic Server administration tasks, including the ability to manage Oracle WebLogic Server's embedded directory server.

2-8 Oracle Fusion Middleware Administrator's Guide for Oracle Business Intelligence Publisher
Default User Name and Password Purpose Description
Name: BISystemUser
Password: system generated
• A fixed user created during installation for trusted communication between components when using OracleBI Analysis as a data source for your BI Publisher Data Model.
• If you are integrating BI Publisher with Oracle Business Intelligence Enterprise Edition, the recommendation is to use this default user name for trusted communication with Oracle BI Presentation Services.This is the default configurationautomatically configured during installation.
Important: This is a highly privileged user whose credentials should be protected from non-administrative users.
• Using a separate trusted system account for secure inter-component communication enables you to change the password for the system administrator account without affecting communication between components.
• The name of this user can be changed or a different user can be created for the purpose of inter-component communication.
The following table lists the default group names and group members added to the identity store provider during installation. These defaults can be changed to different values and additional group names can be added by an administrative user using Oracle WebLogic Server Administration Console.

Configuring Oracle Fusion Middleware Security Model 2-9
Default Group Name and Members
Purpose Description
Name: BIAdministrators
Members: Any administrator user
Contains the BI Publisher administrative users.
• Members of the BIAdministrators group are granted administrative permissions because this group is mapped to the BIAdministrator application role at installation.
• All users requiring administrative permissions should be added to the BIAdministrators group when using the default security configuration.
Name: BIAuthors
Members: BIAdministrators group
Contains the BI Publisher authors. Members of the BIAuthors group have the permissions necessary to create content for other users to use, or to consume.
Name: BIConsumers
Members: BIAuthors group and Oracle WebLogic Server LDAP server users group.
Contains the BI Publisher consumers.
• Members of the BIConsumers group have the permissions necessary to use, or consume, content created by other users.
• The BIConsumers group represents all users that have been authenticated by BI Publisher. By default, every authenticated user is automatically added to this group.
• Oracle WebLogic Server LDAP server users group members have the permissions necessary to log in to and use Oracle WebLogic Server Administration Console.
Default Application Roles and PermissionsThe following table lists the BI Publisher permissions and the application role that

2-10 Oracle Fusion Middleware Administrator's Guide for Oracle Business Intelligence Publisher
grants these permissions. This mapping exists in the default policy store.
Note: The following table lists the permissions explicitly granted by membership in the corresponding default application role. Permissions can also be inherited as a result of group and application role hierarchies. For more information about permission inheritance, see Permission Grants and Inheritance, page 2-3.
BI Publisher Permission Description Default Application Role Granting Permission Explicitly
oracle.bi.publisher.administerServer Enables the Administration link to access the Administration page and grants permission to set any of the system settings.
Important: See Granting the BIAdministratorRole Catalog Permissions, page 2-11 for additional steps required to grant the BIAdministrator permissions on Shared Folders.
BIAdministrator
oracle.bi.publisher.developDataModel
Grants permission to create or edit data models. BIAuthor
oracle.bi.publisher.developReport Grants permission to create or edit reports, style templates, and sub templates. This permission also enables connection to the BI Publisher server from the Template Builder.
BIAuthor
oracle.bi.publisher.runReportOnline Grants permission to open (execute) reports and view the generated document in the report viewer.
BIConsumer
oracle.bi.publisher.scheduleReport Grants permission to create or edit jobs and also to manage and browse jobs.
BIConsumer
oracle.bi.publisher.accessReportOutput
Grants permission to browse and manage job history and output.
BIConsumer

Configuring Oracle Fusion Middleware Security Model 2-11
BI Publisher Permission Description Default Application Role Granting Permission Explicitly
oracle.bi.publisher.accessExcelReportAnalyzer
Grants permission to download the Analyzer for Excel and to download data from a report to Excelusing the Analyzer for Excel. Note that to enable auser to upload an Analyzer for Excel template back to the report definition, the permission oracle.bi.publisher.developReport must also be granted.
BIConsumer
oracle.bi.publisher.accessOnlineReportAnalyzer
Grants permission to launch the Analyzer and manipulate the data. Note that to save an Analyzer template to a report definition, the permission oracle.bi.publisher.developReport must also be granted.
BIConsumer
BIConsumer permissions granted implicitly
The authenticated role is a member of the BIConsumer role by default and, as such, all authenticated role members are granted the permissions of the BIConsumer role implicitly.
Authenticated Role
The authenticated role is a special application role provided by the Oracle Fusion Middleware security model and is made available to any application deploying this security model. BI Publisher uses the authenticated application role to grant permissions implicitly derived by the role and group hierarchy of which the authenticated role is a member. The authenticated role is a member of the BIConsumer role by default and, as such, all authenticated role members are granted the permissionsof the BIConsumer role implicitly. By default, every authenticated user is automatically added to the BIConsumers group. The authenticated role is not stored in the obi application stripe and is not searchable in the BI Publisher policy store. However, the authenticated role will appear in the administrative interface for the policy store, is available in application role lists, and can be added as a member of another application role. You can map the authenticated role to another user, group, or application role, but you cannot remove the authenticated role itself. Removal of the authenticated role would result in the inability to log into the system and this right would need to be granted explicitly.
For more information about the Oracle Fusion Middleware security model and the authenticated role, see Oracle Fusion Middleware Application Security Guide.
Granting the BIAdministrator Role Catalog PermissionsThe BIAdministrator role is granted only Read permissions on the catalog by default. This means that before a BIAdministrator can manage Shared Folders the BIAdministrator role must grant to the BIAdministrator role Write and Delete

2-12 Oracle Fusion Middleware Administrator's Guide for Oracle Business Intelligence Publisher
permissions on the Shared Folders node. See Granting Catalog Permissions, page 3-8 for a detailed description of granting permissions in the catalog.
Managing Authentication Authentication is the process of verifying identity by confirming the user is who she claims to be. Oracle WebLogic Server embedded directory server is the authentication provider for the default security configuration. Users, groups, and passwords are managed using Oracle WebLogic Server Administration Console. It is fine to use the default authentication provider for a development or test environment. In a production environment, best practice is to use a full featured authentication provider.
Note: Refer to the system requirements and certification documentationfor information about hardware and software requirements, platforms, databases, and other information. These documents are available on Oracle Technology Network (OTN).
During installation an Oracle WebLogic Server domain is created. BI Publisher is installed into that domain and uses the Oracle WebLogic Server security realm. The security realm can have multiple authentication providers configured but only one provider can be active at a time. The order of providers in the list determines priority. The effect of having multiple authentication providers defined in a security realm is not cumulative; rather, the first provider in list is the source for all user and password data needed during authentication. This enables you to switch between authentication providers as needed. For example, if you have separate LDAP servers for your development and production environments, you can change which directory server is used for authentication by re-ordering them in the Administration Console. For information about how to configure a different authentication provider, see Configuring a New Authentication Provider, page 2-29.
Detailed information about managing an authentication provider in Oracle WebLogic Server is available in its online help. For more information, log in to Oracle WebLogic Server Administration Console and launch Oracle Fusion Middleware Oracle WebLogic Server Administration Console Online Help.
Accessing Oracle WebLogic Server Administration ConsoleOracle WebLogic Server is automatically installed and serves as the default administration server. The Administration Console is browser-based and is used to manage the embedded directory server that is configured as the default authenticator. Itis launched by entering its URL into a web browser. The default URL takes the following form: http://hostname:port_number/console. The port number is the number of the administration server. By default, the port number is 7001.
To launch the Oracle WebLogic Server Administration Console:

Configuring Oracle Fusion Middleware Security Model 2-13
1. Log into Oracle WebLogic Server by entering its URL into a Web browser.
For example, http://hostname:7001/console. The Administration Console login page displays.
2. Log in using the BI Publisher administrative user and password and click Login.
The password is the one you supplied during the installation of BI Publisher. If these values have been changed, then use the current administrative user name andpassword combination.
The Administration Console displays.

2-14 Oracle Fusion Middleware Administrator's Guide for Oracle Business Intelligence Publisher
Managing Users and Groups Using the Default Authentication ProviderManaging a group is more efficient than managing a large number of users individually. Best practice is to first organize all BI Publisher users into groups that have similar system access requirements. These groups can then be mapped to application roles that provide the correct level of access. If system access requirements change, then you need only modify the permissions granted by the application roles, or create a new application roles with appropriate permissions. Once your groups are established, continue to add or remove users directly in the identity store using its administration interface as you normally would.
To create a user in the default directory server:
1. If needed, launch Oracle WebLogic Server Administration Console.
For more information, see Accessing Oracle WebLogic Server Administration Console, page 2-12
2. Log in as an administrative user.
3. In the Administration Console, select Security Realms from the left pane and click the realm you are configuring. For example, myrealm.

Configuring Oracle Fusion Middleware Security Model 2-15
4. Select Users and Groups tab, then Users. Click New.
5. In the Create a New User page provide the following information:
• Name: Enter the name of the user. See online help for a list of invalid characters.
• (Optional) Description: Enter a description.
• Provider: Select the authentication provider from the list that corresponds to where the user information is contained. DefaultAuthenticator is the name for the default authentication provider.
• Password: Enter a password for the user that is at least 8 characters long.
• Confirm Password: Re-enter the user password.

2-16 Oracle Fusion Middleware Administrator's Guide for Oracle Business Intelligence Publisher
6. Click OK.
The user name is added to the User table.
To create a group in the default directory server:
1. If needed, launch Oracle WebLogic Server Administration Console.
For more information, see Accessing Oracle WebLogic Server Administration Console, page 2-12.
2. Log in as an administrative user.
3. In the Administration Console, select Security Realm from the left pane and click the realm you are configuring. For example, myrealm.
4. Select Users and Groups tab, then Groups. Click New.
5. In the Create a New Group page provide the following information:
• Name: Enter the name of the Group. Group names are case insensitive but mustbe unique. See online help for a list of invalid characters.
• (Optional) Description: Enter a description.

Configuring Oracle Fusion Middleware Security Model 2-17
• Provider: Select the authentication provider from the list that corresponds to where the group information is contained. DefaultAuthenticator is the name forthe default authentication provider.
6. Click OK.
The group name is added to the Group table.
To add a user to a group in the default directory server:
1. If needed, launch Oracle WebLogic Server Administration Console.
For more information, see Accessing Oracle WebLogic Server Administration Console, page 2-12.
2. Log in as an administrative user.
3. In the Administration Console, select Security Realm from the left pane and click the realm you are configuring. For example, myrealm.
4. Select Users and Groups tab, then Users. Select the user from Name.

2-18 Oracle Fusion Middleware Administrator's Guide for Oracle Business Intelligence Publisher
5. From the Settings page, select the Groups tab to display the list of available groups.
6. Select one or more groups from the Available list and use the shuttle controls to move them to the Chosen list.

Configuring Oracle Fusion Middleware Security Model 2-19
7. Click Save.
The user is added to the group.
To change a user password in the default directory server:
1. If needed, launch Oracle WebLogic Server Administration Console.
For more information, see Accessing Oracle WebLogic Server Administration Console, page 2-12.
2. Log in as an administrative user.
3. In the Administration Console, select Security Realms from the left pane and click the realm you are configuring. For example, myrealm.
4. Select Users and Groups tab, then Users.
5. In the Users table select the user you want to change the password for.
The settings page for the user displays.

2-20 Oracle Fusion Middleware Administrator's Guide for Oracle Business Intelligence Publisher
6. Select the Passwords tab and enter the password in the New Password and Confirm Password fields.
7. Click Save.
Managing AuthorizationAfter a user is authenticated, further access to BI Publisher resources is controlled by the granting of permissions, also known as authorization. The policy store contains the system and application-specific policies and roles required for BI Publisher. A policy store can be file-based or LDAP-based and holds the mapping definitions between the default BI Publisher application roles, permissions, users and groups. BI Publisher permissions are granted by mapping users and groups from the identity store to application roles and permission grants located in the policy store. These mapping definitions between users and groups (identity store) and the application roles (policy store) are also kept in the policy store.
Important: Best practice is to map groups instead of individual users to application roles. Controlling membership in a group reduces the complexity of tracking access rights for multiple individual users. Group membership is controlled in the identity store.
The system-jazn-data.xml file is installed and configured as the default policy store. Youcan continue to use the default store and modify it as needed for your environment, or you can migrate its data to an LDAP-based provider. Oracle Internet Directory is the supported LDAP server in this release.
The policy store and credential store must be of the same type in your environment. That is, both must be either file-based or LDAP-based.
Permissions must be defined in a manner that BI Publisher understands. All valid BI Publisher permissions are premapped to application policies, which are in turn premapped to the default application roles. You cannot create new permissions in the policy store. However, you can customize the default application policy permission grants and application role mappings as well as create your own.

Configuring Oracle Fusion Middleware Security Model 2-21
For more information about the default BI Publisher permissions grants, see Default Application Roles and Permissions., page 2-9. For more information about customizing application roles and permission grants, see Customizing the Policy Store, page 2-30
Accessing Oracle Enterprise Manager Fusion Middleware ControlFusion Middleware Control is a Web browser-based, graphical user interface that you can use to monitor and administer a farm. A farm is a collection of components managed by Fusion Middleware Control. It can contain Oracle WebLogic Server domains, one Administration Server, one or more Managed Servers, clusters, and the Oracle Fusion Middleware components that are installed, configured, and running in the domain. During installation an Oracle WebLogic domain is created and BI Publisheris installed into that domain. If you performed a Simple or Enterprise installation type, this domain is named bifoundation_domain and is located within the WebLogic Domain in the Fusion Middleware Control target navigation pane.
Launch Fusion Middleware Control by entering its URL into a Web browser. The URL includes the name of the host and the administration port number assigned during the installation. This URL takes the following form: http://hostname:port_number/em. The default port is 7001. For more information about using Fusion Middleware Control, see Oracle Fusion Middleware Administrator's Guide.
To display the Security menu in Fusion Middleware Control:
1. Log into Oracle Enterprise Manager Fusion Middleware Control by entering the URL in a Web browser.
For example, http://hostname:7001/em.
The Fusion Middleware Control login page displays.
2. Enter the BI Publisher administrative user name and password and click Login.
The password is the one you supplied during the installation of BI Publisher. If

2-22 Oracle Fusion Middleware Administrator's Guide for Oracle Business Intelligence Publisher
these values have been changed, then use the current administrative user name andpassword combination.
3. From the target navigation pane, open WebLogic Domain to display bifoundation_domain. Display the Security menu by selecting one of the followingmethods:
• Right-click bifoundation_domain to display the Security menu. Select Securityto display a submenu.
• From the content pane, display the WebLogic Domain menu and select Security. Select Security to display a submenu.

Configuring Oracle Fusion Middleware Security Model 2-23
Managing the Policy Store Using Fusion Middleware ControlUse Fusion Middleware Control to manage the BI Publisher application policies and application roles maintained in the policy store whether it is file-based or LDAP-based. For more information about configuring an LDAP-based policy store, see Configuring aNew Policy Store and Credential Store Provider, page 2-29.
Caution: Oracle recommends you make a copy of the original system-jazn-data.xml policy file and place it in a safe location. Use the copy of the original file to restore the default policy store configuration,if needed. Changes to the default security configuration may lead to an unwanted state. The default installation location is MW_HOME/user_projects/domain/your_domain/config/fmwconfig.
The following are common policy store management tasks:
• Modifying the membership of an application role. For more information, see Modifying Membership in an Application Role, page 2-24.
• Modifying the permission grants for an application role. For more information, see Changing Permission Grants for an Application Role, page 2-38.
• Creating a new application role from the beginning. For more information, see

2-24 Oracle Fusion Middleware Administrator's Guide for Oracle Business Intelligence Publisher
Creating Application Roles Using Fusion Middleware Control, page 2-30.
• Creating a new application role based on an existing application role. For more information, see Creating Application Roles Using Fusion Middleware Control, page 2-30.
Modifying Application Roles Using Fusion Middleware ControlMembers can be added or deleted from an application role using Fusion Middleware Control. You must perform these tasks while in the WebLogic Domain that BI Publisheris installed in. For example, bifoundation_domain.
Caution: Be very careful when changing the permission grants and membership for the default application roles. Changes could result in an unusable system.
Modifying Membership in an Application RoleValid members of an application role are users, groups, or other application roles. The process of becoming a member of an application role is called mapping. That is, being mapped to an application role is to become a member of an application role. Best practice is to map groups instead of individual users to application roles for easier maintenance.
To add or remove members from an application role:
1. Log into Fusion Middleware Control, navigate to Security, then select Application Roles to display the Application Roles page.
For information about navigating to the Security menu, see Accessing Oracle Enterprise Manager Fusion Middleware Control, page 2-21.
2. Choose Select Application Stripe to Search, then select the obi from the list. Click the search icon next to Role Name.

Configuring Oracle Fusion Middleware Security Model 2-25
The BI Publisher application roles are displayed. In the following figure the default application roles are shown.
3. Select the cell next to the application role name and click Edit to display the Edit Application Role page. In the following figure the BIAuthor application role has been selected.

2-26 Oracle Fusion Middleware Administrator's Guide for Oracle Business Intelligence Publisher
You can add or delete members from the Edit Application Role page. Valid members are application roles, groups, and users.
4. Select from the following options:
• To delete a member: From Members, select from Name the member to activatethe Delete button. Click Delete.
• To add a member: Click the Add button that corresponds to the member type being added. Select from Add Application Role, Add Group, and Add User.
5. If adding a member, complete Search and select from the available list. Use the shuttle controls to move the member to the selected field. Click OK.
For example, the following figure shows the Add Group dialog and after the Report_Dev group has been selected.

Configuring Oracle Fusion Middleware Security Model 2-27
The added member displays in the Members column corresponding to the application role modified in the Application Roles page.
Managing CredentialsCredentials used by the system are stored in a single secure credential store. Oracle Wallet is the default credential store file (cwallet.sso). The credential store alternatively can be LDAP-based and Oracle Internet Directory is the supported LDAP server in this release. LDAP-based credential stores are configured and administered using Oracle Enterprise Manager Fusion Middleware Control or WLST commands.
Each credential is uniquely identified by a map name and a key name. Each map contains a series of keys and each key is a credential. The combination of map name and key name must be unique for all credential store entries. The following credential maps are used by BI Publisher:
• oracle.bi.system: Contains the credentials that span the entire BI Publisher platform.
• oracle.bi.publisher: Contains the credentials used by only BI Publisher.
The following two credential types are supported:
2-28 Oracle Fusion Middleware Administrator's Guide for Oracle Business Intelligence Publisher
• Password: Encapsulates a user name and a password.
• Generic: Encapsulates any customized data or arbitrary token, such as public key certificates.
To facilitate getting started with your development environment, default credentials areinserted into the file-based credential store during installation. Be aware that BI Publisher credentials such as user passwords are stored in the identity store and managed with its corresponding administrative interface.
Managing the Credential StoreCredentials can be managed either in Fusion Middleware Control or using WLST command. For more information about both methods, see "Managing the Domain Credential Store" in Oracle Fusion Middleware Application Security Guide.
Managing BISystemUser CredentialsIf using Oracle Business Intelligence as a data store, BI Publisher establishes system communication with it as BISystemUser. If you change the BISystemUser password in the identity store administrative interface, you also must change the password in the credential store (oracle.bi.system credential map). This applies if you have created a custom application role to take the place of the default BISystemUser. Components will be unable to communicate with each other if the credentials are out-of-sync. For more information about how Oracle Business Intelligence uses BISystemUser for trusted system communication, see Oracle Fusion Middleware Security Guide for Oracle Business Intelligence Enterprise Edition.
Customizing the Default Security ConfigurationYou can customize the default security configuration in the following ways:
• Configure a new authentication provider. For more information, see Configuring a New Authentication Provider, page 2-29.
• Configure new policy store and credential store providers. For more information, see Configuring a New Policy Store and Credential Store Provider, page 2-29.
• Migrate policies and credentials from one store to another. For more information, see Reassociating the Policy Store and Credential Store, page 2-29.
• Create new application roles. For more information, see Creating Application Roles Using Fusion Middleware Control, page 2-30.
• Create new application policies. For more information, see Creating Application Policies Using Fusion Middleware Control, page 2-30.

Configuring Oracle Fusion Middleware Security Model 2-29
• Modify the permission grants for an application policy. For more information, see Changing Permission Grants for an Application Policy, page 2-38.
Configuring a New Authentication ProviderYou can configure another supported LDAP server to be the authentication provider. Configuring BI Publisher to use an alternative external identity store is performed usingthe Oracle WebLogic Server Administration Console. BI Publisher delegates authentication and user population management to the authentication provider and identity store configured for the domain it is a part of. For example, if configured to use Oracle WebLogic Server's default authentication provider, then management is performed in the Oracle WebLogic Server Administration Console. If configured to use Oracle Internet Directory (OID), then the OID management user interface is used, and so on.
If using an authentication provider other than the one installed as part of the default security configuration, the default users and groups discussed in Default Users and Groups, page 2-7 will not be automatically present. You can create users and groups with names of your own choosing or re-create the default user and group names if the authentication provider supports this. After this work is completed, you must map the default BI Publisher application roles to different groups again. For example, if your corporate LDAP server is being used as the identity store and you are unable to re-create the BI Publisher default users and groups in it, you will need to map the default application roles to different groups specific to the corporate LDAP server. Use Fusion Middleware Control to map the groups to application roles.
For information about how to configure a different authentication provider, see Oracle Fusion Middleware Oracle WebLogic Server Administration Console Online Help and Oracle Fusion Middleware Securing Oracle WebLogic Server.
Configuring a New Policy Store and Credential Store ProviderThe policy store and credential store can be file-based or LDAP-based. The supported LDAP server for both stores in this release is Oracle Internet Directory. The pre-requisites for using an LDAP-based store are the same as for both the policy store and credential store. For more information, see "Configuring a Domain to Use an LDAP-Based Policy Store" in Oracle Fusion Middleware Application Security Guide.
Reassociating the Policy Store and Credential StoreMigrating policies and credentials from one security store to another is called reassociation. Both policy store and credential store data can be reassociated (migrated) from a file-based store to an LDAP-based store, or from an LDAP-based store to anotherLDAP-based store
Since the credential store and the policy store must both be of the same type, when reassociating one store you must reassociate the other.

2-30 Oracle Fusion Middleware Administrator's Guide for Oracle Business Intelligence Publisher
For more information about reassociation and the steps required to migrate credential store and policy store data to Oracle Internet Directory, see "Reassociating Domain Stores with Fusion Middleware Control" in Oracle Fusion Middleware Application Security Guide.
Customizing the Policy StoreThe Fusion Middleware Security model can be customized for your environment by creating your own application policies and application roles. Existing application roles can be modified by adding or removing members as needed. Existing application policies can be modified by adding or removing permission grants. For more information about managing application policies and application roles, see Oracle FusionMiddleware Application Security Guide.
Important: Before creating a new application policy or application role and adding it to the default BI Publisher security configuration, familiarize yourself with how permission and group inheritance works.It is important when constructing a role hierarchy that circular dependencies are not introduced. Best practice is to leave the default security configuration in place and first incorporate your customized application policies and application roles in a test environment. For more information, see Permission Grants and Inheritance, page 2-3.
Creating Application Roles Using Fusion Middleware ControlThere are two methods for creating a new application role:
• Create New - A new application role is created. Members can be added at the same time or you can save the new role after naming it and add members later.
• Copy Existing - A new application role is created by copying an existing application role. The copy contains the same members as the original, and is made aGrantee of the same application policy. You can modify the copy as needed to finishcreating the new role.
To create a new application role:
1. Log into Fusion Middleware Control, navigate to Security, then select Application Roles to display the Application Roles page.
For information, see Accessing Oracle Enterprise Manager Fusion Middleware Control, page 2-21.
2. Choose Select Application Stripe to Search, then select obi from the list. Click the search icon next to Role Name.
The BI Publisher application roles display.

Configuring Oracle Fusion Middleware Security Model 2-31
3. Click Create to display the Create Application Role page. You can enter all information at once or you can enter a Role Name, save it, and complete the remaining fields later. Complete the fields as follows:
In the General section:
• Role Name - Enter the name of the application role.
• (Optional) Display Name - Enter the display name for the application role.
• (Optional) Description - Enter a description for the application role.
In the Members section, select the users, groups, or application roles to be mapped to the application role, Select Add Application Role or Add Group or Add Users accordingly. To search in the dialog box that displays:
• Enter a name in Name field and click the blue button to search.
• Select from the results returned in the Available box.
• Use the shuttle controls to move the desired name to the Selected box.
• Click OK to return to the Create Application Role page.
• Repeat the steps until all members are added to the application role.
4. Click OK to return to the Application Roles page.
The application role just created displays in the table at the bottom of the page.
To create an application role based on an existing one:
1. Log into Fusion Middleware Control, navigate to Security, then select Application Roles to display the Application Roles page.
For information, see Accessing Oracle Enterprise Manager Fusion Middleware Control, page 2-21.
2. Choose Select Application Stripe to Search, then select the obi from the list. Click the search icon next to Role Name.
The BI Publisher application roles display.
3. Select an application role from the list to enable the action buttons.
4. Click Create Like to display the Create Application Role Like page.
The Members section is completed with the same application roles, groups, or usersthat are mapped to the original role.
5. Complete the Role Name, Display Name, and Description fields.

2-32 Oracle Fusion Middleware Administrator's Guide for Oracle Business Intelligence Publisher
The following figure shows an application role based upon BIAuthor after being named MyNewRole, as an example.
6. Use Add and Delete to modify the members as appropriate and click OK.
The just created application role displays in the table at the bottom of the page. The following figure shows the example MyNewRole that is based upon the default BIAuthor application role.

Configuring Oracle Fusion Middleware Security Model 2-33
Creating Application Policies Using Fusion Middleware ControlAll BI Publisher permissions are provided and you cannot create new permissions. Permission grants are controlled in the Fusion Middleware Control Application Policies page. The permission grants are defined in an application policy. An application role, user, or group, is then mapped to an application policy. This process makes the application role, user, or group a Grantee of the application policy.
There are two methods for creating a new application policy:
• Create New - A new application policy is created and permissions are added to it.
• Copy Existing - A new application policy is created by copying an existing application policy. The copy is named and existing permissions are removed or permissions are added as needed.
To create a new application policy:
1. Log into Fusion Middleware Control, navigate to Security, then select Application Policies to display the Application Policies page.
For information, see Accessing Oracle Enterprise Manager Fusion Middleware Control, page 2-21.
2. Choose Select Application Stripe to Search, then select the obi from the list. Click the search icon next to Permission.
The BI Publisher application policies are displayed. The Principal column displays the name of the policy Grantee.

2-34 Oracle Fusion Middleware Administrator's Guide for Oracle Business Intelligence Publisher
3. Click Create to display the Create Application Grant page.
4. To add permissions to the policy being created, click Add in the Permissions area to display the Add Permission dialog.
• Complete the Search area and click the blue search button next to the Resource Name field.
All permissions located in the obi application stripe are displayed. For information about the BI Publisher permissions, see Default Application Roles and Permissions, page 2-9.
• Select the desired BI Publisher permission and click OK. Repeat until all desiredpermissions are selected. Selecting non-BI Publisher permissions will have no effect in the policy.
• To remove any items, select it and click Delete.
You are returned to the Create Application Grant page. The selected permissions display in the Permissions area.
5. To add an application role to the policy being created, click Add Application Role in the Grantee area to display the Add Application Role dialog.
• Complete the Search area and click the blue search button next to the Resource Name field.
• Select from the Available Roles list and use the shuttle controls to move it to Selected Roles.
• Click OK.
You are returned to the Application Policies page. The Principal (Grantee) and Permissions of the policy just created are displayed in the table.
To create an application policy based on an existing one:
1. Log into Fusion Middleware Control navigate to Security, then select Application Policies to display the Application Policies page.
For information, see Accessing Oracle Enterprise Manager Fusion Middleware Control, page 2-21.
2. Choose Select Application Stripe to Search, then select obi from the list. Click the search icon next to Permission.
The BI Publisher application policies are displayed. The Principal column displays the name of the policy Grantee.
3. Select an existing policy from the table.

Configuring Oracle Fusion Middleware Security Model 2-35
For example, the following figure shows the BIAuthor Principal (Grantee) selected and the Create Like button activated.
4. Click Create Like to display the Create Application Grant Like page. The Permissions table displays the names of the permissions granted by the policy selected.
5. To remove any items, select it and click Delete.
6. To add application roles to the policy, click Add Application Role in the Grantee area to display the Add Application Role dialog.
The following figures use the MyNewRole application role as an example.
• Complete the Search area and click the blue search button next to the Resource Name field.

2-36 Oracle Fusion Middleware Administrator's Guide for Oracle Business Intelligence Publisher
• Select from the Available Roles list and use the shuttle controls to move it to Selected Roles. The Create Application Grant Like page displays with the selected application role added as Grantee.
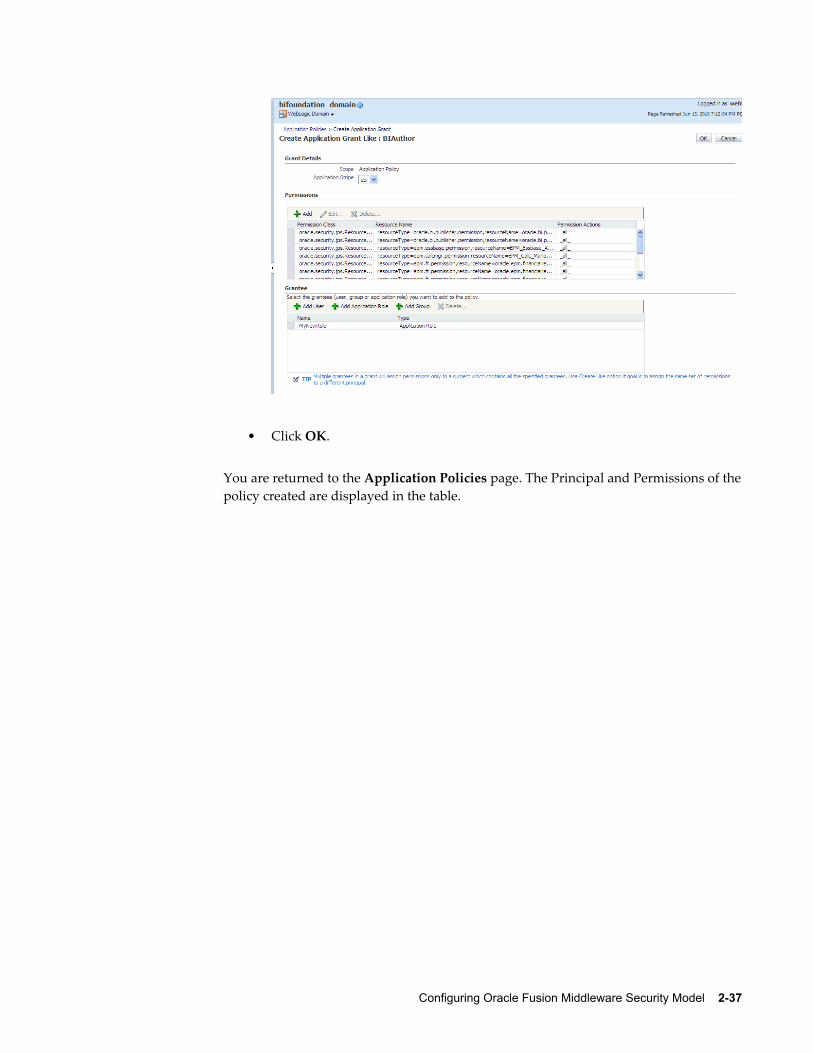
Configuring Oracle Fusion Middleware Security Model 2-37
• Click OK.
You are returned to the Application Policies page. The Principal and Permissions of thepolicy created are displayed in the table.

2-38 Oracle Fusion Middleware Administrator's Guide for Oracle Business Intelligence Publisher
Changing Permission Grants for an Application PolicyYou can change one or more permissions granted by an application policy.
To add or remove permission grants from an application policy:
1. Log into Fusion Middleware Control, navigate to Security, then select Application Policies to display the Application Policies page.
For information, see Accessing Oracle Enterprise Manager Fusion Middleware Control, page 2-21.
2. Choose Select Application Stripe to Search, then select obi from the list. Click the search icon next to Role Name.
The BI Publisher application policies are displayed. The Principal column displays the name of the policy Grantee.
3. Select the name of the application role from the Principal column and click Edit.
4. Add or delete permissions from the Edit Application Grant view and click OK to save the changes.
For additional information, see "Managing Application Policies" in Oracle Fusion Middleware Application Security Guide.
Alternative Security Options 3-1
3Alternative Security Options
This chapter covers the following topics:
• About Alternative Security Options
• Understanding BI Publisher's Users, Roles, and Permissions
• About Privileges to Use Functionality
• About Catalog Permissions
• How Functional Privileges and Permissions Work Together
• About Access to Data Sources
• Configuring Users, Roles, and Data Access
• Security and Catalog Organization
• Configuring BI Publisher to Use an LDAP Provider
• Integrating with Microsoft Active Directory
• Configuring Single Sign-On
• Configuring BI Publisher to Use Oracle Access Manager (OAM) Single Sign-On
• Setting Up Oracle Single Sign-On
About Alternative Security OptionsThis chapter describes security concepts and options for a standalone implementation of Oracle BI Publisher, that is, not installed as part of the Oracle Business Intelligence Enterprise Edition. Please note the following:
• If you have installed the Oracle BI Enterprise Edition, see the Oracle Fusion Middleware Security Guide for Oracle Business Intelligence Enterprise Edition for information about security.
• If you have installed BI Publisher on its own and you plan to use Oracle Fusion

3-2 Oracle Fusion Middleware Administrator's Guide for Oracle Business Intelligence Publisher
Middleware Security, see Configuring Oracle Fusion Middleware Security Model, page 2-1. The following topics will be of interest in this chapter:
• About Catalog Permissions, page 3-5
• About Access to Data Sources, page 3-7
• To configure BI Publisher with these other Oracle security models:
• Oracle BI Server security
• Oracle E-Business Suite security
• Oracle Database security
• Siebel CRM security
see Integrating with Other Oracle Security Models, page 5-1.
Use the information in this chapter to configure the following:
• BI Publisher (native) Security
• Integration with an external LDAP provider
Note: Any identity store provider supported by Oracle WebLogic Server can be configured to be used with BI Publisher. Configuring BI Publisher to use an alternative external identity store is performed using the Oracle WebLogic Server Administration Console. For this configuration, see Customizing the Default Security Configuration, page 2-28.
• Integration with a Single Sign-On provider
Understanding BI Publisher's Users, Roles, and PermissionsA user is assigned one or multiple Roles. A Role can grant any or all of the following:
• privileges to use functionality
• permissions to perform actions on catalog objects
• access to data sources
You can create a hierarchy of roles by assigning roles to other roles. In this way the privileges and permissions of multiple roles can roll up to higher level roles. The following graphic shows an example of the hierarchy structure of User, Role, and

Alternative Security Options 3-3
Folder:
Options for Configuring Users and RolesThere are three options for setting up users and roles:
• Set up users and roles in the BI Publisher Security Center
For this option, follow the instructions in this section.
• Configure BI Publisher with an existing LDAP server
For this option, see Configuring BI Publisher to Use an External LDAP Provider, page 3-15.
• Set up users and roles in a supported Oracle security model. For this option see Integrating with Other Oracle Security Models, page 5-1.
About Privileges to Use FunctionalityBI Publisher provides a set of functional roles to grant access to specific functionality within the application. Assign these roles to users based on their need to perform the associated tasks. These roles cannot be updated or deleted.
The following table shows the privileges granted to each functional role:

3-4 Oracle Fusion Middleware Administrator's Guide for Oracle Business Intelligence Publisher
Role Privileges
BI Publisher Excel Analyzer View
Export
History (public reports only)
Grants access to the Excel Analyzer
BI Publisher Online Analyzer View
Export
History (public reports only)
Grants access to the Online Analyzer
BI Publisher Scheduler View
Export
History
Schedule
BI Publisher Template Designer View
Export
History (public reports only)
Enables access to Layout Editor
Enables log on from Template Builder
BI Publisher Developer View
Export
Schedule
History
Edit Report
Enables access to Layout Editor
Enables log on from the Template Builder
Enables access to the Data Model Editor

Alternative Security Options 3-5
Role Privileges
BI Publisher Administrator Enables the privileges of all other roles
Grants access to the Administration page and all administration tasks
Roles assigned these privileges cannot perform any actions on objects in the catalog until they are also granted permissions on the catalog objects.
About Catalog PermissionsTo perform the actions allowed by the functional roles above, a role must also be granted permissions to access the objects in the catalog.
Note that each of these permissions can be granted at the folder level to enable the operations on all items within a folder.
Permission Description
Read Enables a role to display an object in the catalog. If the object resides within a folder, a role must be granted the Read permission on the object and its parent Folder.
Write Enables a role to edit an object.
A role must be granted Write permissions on a folder to save objects to the folder or edit objects within the folder.
A role must also be granted one of the following roles to enable editing of the specified object:
• Report - requires the BI Publisher Developer role
• Data Model - requires the BI Publisher Developer role
• Sub Template and Style Template - requires the BI Publisher Developer Role or the BI Publisher Template Designer Role
Delete Enables a role to delete an object.
Run Report Online Enables a role to run a report and view it in the report viewer.

3-6 Oracle Fusion Middleware Administrator's Guide for Oracle Business Intelligence Publisher
Permission Description
Schedule Report Enables a role to schedule a report.
View Report Output Enables a role to access the Report Job History for a report.
It is important to note that for a report consumer to successfully run a report, his role must have read access to every object that is referenced by the report.
For example, a report consumer must run a report in a folder named Reports. The data model for this report, resides in a folder named Data Models. This report references a Sub Template stored in a folder named Sub Templates, and also references a Style Template stored in a folder named Style Templates. The report consumer's role must be granted Read access to all of these folders and the appropriate objects within.
How Functional Privileges and Permissions Work TogetherIt is important to understand the following rules regarding the behavior of privileges and permissions:
• A role assigned a functional privilege cannot perform any actions in the catalog until catalog permissions are also assigned
• A role can be assigned a set of permissions on catalog objects without being assigned any functional privileges
• If a role is already assigned a functional privilege, when catalog permissions are assigned, some permissions will be inherited
A Role Must Be Assigned Catalog PermissionsA role assigned a functional role cannot perform any actions in the catalog until catalog permissions are granted. Note that the functional roles themselves (BI Publisher Developer, BI Publisher Scheduler, and so on) cannot be directly assigned permissions in the catalog. The functional roles must first be assigned to a custom role and then the custom role is available in the catalog permissions table.
A Role Can Be Granted Catalog Permissions OnlyThe permissions available directly in the catalog enable running reports, scheduling reports, and viewing report output. Therefore if your enterprise includes report consumers who will have no other reason to access BI Publisher except to run and view reports, the roles for these users will consist of catalog permissions only.

Alternative Security Options 3-7
Roles Already Assigned a Functional Role Will Inherit Some Permissions When Catalog Permissions Are Granted
If a role is already assigned one of the functional roles, when that role is granted permissions on a particular folder in the catalog, some permissions will be granted automatically based on the functional role.
For example, assume you create a role called Financial Report Developer. You assign this role the BI Publisher Developer role. In order for this role to create reports in the Financial Reports folder in the catalog, you must grant this role Read, Write, and Delete permissions on the folder. Because the BI Publisher Developer role includes run report, schedule report, and view report history privileges, these permissions will be automatically granted on any folder to which a role assigned the BI Publisher Developer role is granted Read access.
About Access to Data SourcesA role must be granted access to a data source to view reports that run against the data source or to build and edit data models that use the data source. Add access to data sources in the Roles and Permissions page. See Granting Data Access, page 3-11.
Configuring Users, Roles, and Data Access
Creating RolesTo create a new role in BI Publisher:
1. Navigate to the BI Publisher Administration page.
2. Under Security Center, click Roles and Permissions.
3. Click Create Role.
4. Enter a Name for the role and optionally, enter a Description.
5. Click Apply.
6. Click Assign Roles to assign roles to the user.
7. Use the shuttle buttons to move Available Roles to Assigned Roles. Click Apply.
8. To add a role to a role, click Add Roles.
9. Use the shuttle buttons to move Available Roles to Included Roles. Click Apply.
To add data sources to a role, see Granting Data Access, page 3-11.

3-8 Oracle Fusion Middleware Administrator's Guide for Oracle Business Intelligence Publisher
Creating Users and Assigning Roles to a UserTo create a new user in BI Publisher:
1. Navigate to the BI Publisher Administration page.
2. Under Security Center, click Users.
3. Click Create User.
4. Add the User Name and Password for the user.
5. Click Apply.
6. Click Assign Roles to assign roles to the user.
7. Use the shuttle buttons to move Available Roles to Assigned Roles. Click Apply.
Granting Catalog PermissionsFor a role to access an object in the catalog, the role must be granted Read permissions on both the object and the folder in which the object resides. Permissions can be grantedat the folder level and applied to all the objects and subfolders it contains, or applied to individual objects.
To grant catalog permissions to a role:
1. Navigate to the Catalog.
2. Locate the folder or object on which you wish to grant permissions and click More. From the menu, select Permissions. Alternatively, you can select the folder and click Permissions in the Tasks region.
Note: Permissions cannot be granted on the root Shared folder.
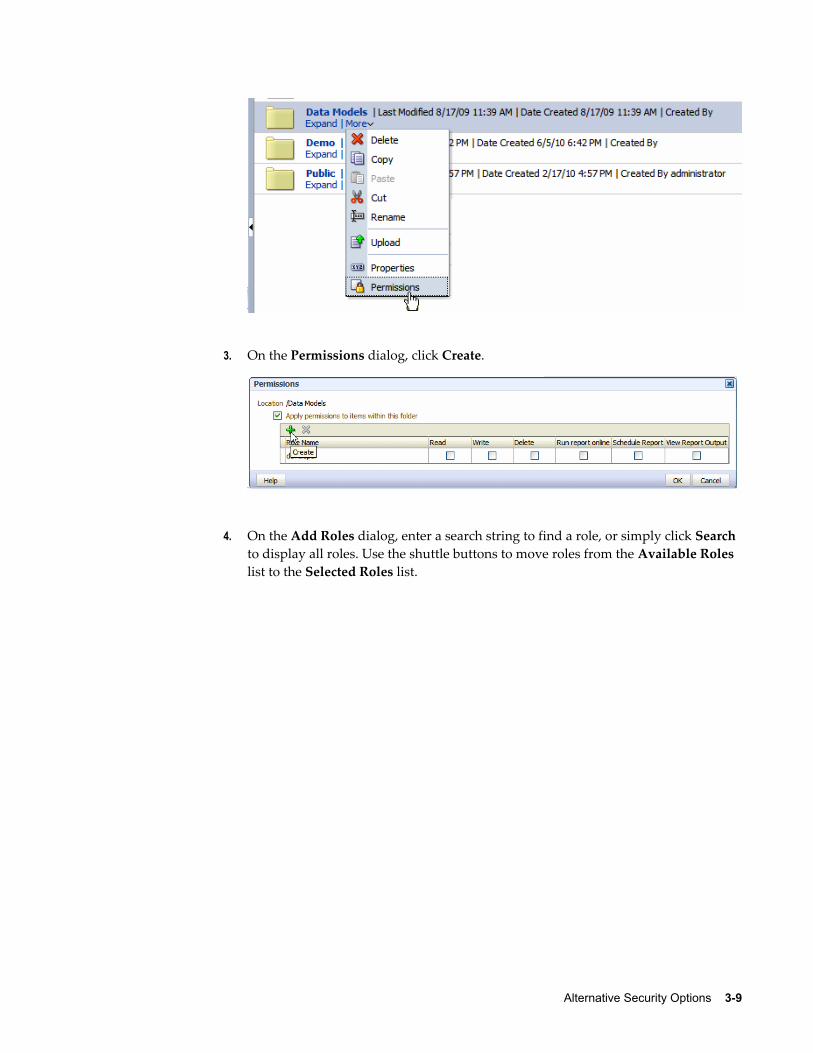
Alternative Security Options 3-9
3. On the Permissions dialog, click Create.
4. On the Add Roles dialog, enter a search string to find a role, or simply click Search to display all roles. Use the shuttle buttons to move roles from the Available Roles list to the Selected Roles list.

3-10 Oracle Fusion Middleware Administrator's Guide for Oracle Business Intelligence Publisher
5. When finished, click OK to return to the Permissions dialog.
6. On the Permissions dialog, configure the permissions required by the role.
Note the following:
• The icon next to the Report Developer role indicates that this role is assigned one of the BI Publisher functional roles (in this case, the BI Publisher Developer role).
• Once the Report Developer role is assigned access to this folder, the following permissions are automatically granted based on the privileges that make up theBI Publisher Developer Role: Run report online, Scheduler Report, View Report Output.

Alternative Security Options 3-11
7. If you are granting permissions on a Folder, select Apply permissions to items within this folder, if the permissions should apply to all objects.
Granting Data AccessA role must be granted access to a data source if the role must:
• Run or schedule a report built on a data model that retrieves data from the data source
• Create or edit a data model that retrieves data from the data source
To grant a role access to a data source:
1. Navigate to the BI Publisher Administration page.
2. Under Security Center, click Roles and Permissions.
3. On the Roles and Permissions page, locate the role, then click Add Data Sources.
4. On the Add Data Sources page you will see a region for each of the following typesof data sources:
• Database Connections
• File Directories
• LDAP Connections
• OLAP Connections
5. Use the shuttle buttons to move the required data sources from the Available Data Sources list to the Allowed Data Sources list.
6. When finished, click Apply.
Security and Catalog OrganizationBecause permissions are granted in the catalog, it is very important to be aware of this design when creating roles for your organization and when structuring the catalog.
For example, assume your organization requires the following roles:
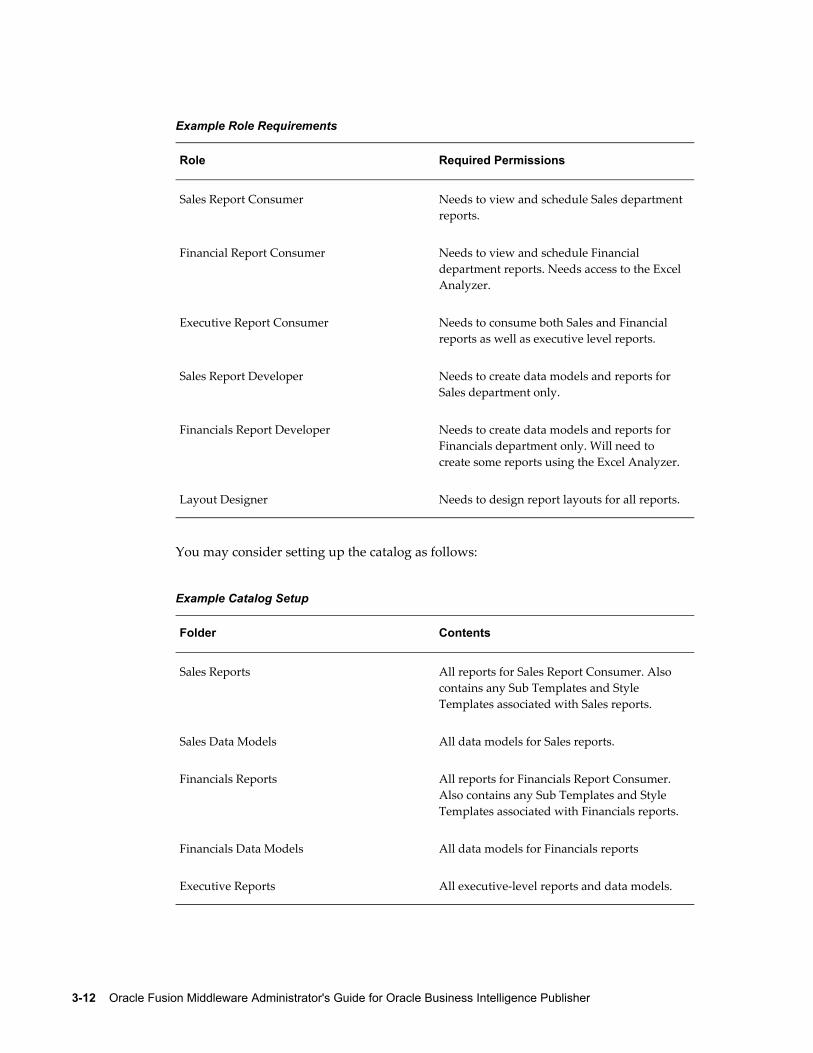
3-12 Oracle Fusion Middleware Administrator's Guide for Oracle Business Intelligence Publisher
Example Role Requirements
Role Required Permissions
Sales Report Consumer Needs to view and schedule Sales department reports.
Financial Report Consumer Needs to view and schedule Financial department reports. Needs access to the Excel Analyzer.
Executive Report Consumer Needs to consume both Sales and Financial reports as well as executive level reports.
Sales Report Developer Needs to create data models and reports for Sales department only.
Financials Report Developer Needs to create data models and reports for Financials department only. Will need to create some reports using the Excel Analyzer.
Layout Designer Needs to design report layouts for all reports.
You may consider setting up the catalog as follows:
Example Catalog Setup
Folder Contents
Sales Reports All reports for Sales Report Consumer. Also contains any Sub Templates and Style Templates associated with Sales reports.
Sales Data Models All data models for Sales reports.
Financials Reports All reports for Financials Report Consumer. Also contains any Sub Templates and Style Templates associated with Financials reports.
Financials Data Models All data models for Financials reports
Executive Reports All executive-level reports and data models.

Alternative Security Options 3-13
Set up the roles as follows:
Example Role ConfigurationSales Report Consumer:
Grant catalog permissions:
• To the Sales Reports folder add the Sales Report Consumer and grant:
Read
Schedule Report
Run Report Online
View Report Online
Select Apply permissions to items within this folder
• To the Sales Data Models folder add the Sales Report Consumer and grant:
Read
Grant Data Access:
On the Roles page, locate the role, then click Add Data Sources. Add all data sources used by Sales reports.
Financials Report Consumer
Assign Roles:
On the Roles tab assign the Financials Report Consumer the BI Publisher Excel Analyzer role.
Grant catalog permissions:
• To the Financials Reports folder add the Financials Report Consumer and grant:
Read
Schedule Report
Run Report Online
View Report Online
Select Apply permissions to items within this folder
• To the Financials Data Models folder add the Financials Report Consumer and grant:
Read
Grant Data Access:
On the Roles page, locate the role, then click Add Data Sources. Add all data sources used by Financials reports.
Executive Report Consumer

3-14 Oracle Fusion Middleware Administrator's Guide for Oracle Business Intelligence Publisher
Assign Roles:
On the Roles tab, assign the Executive Report Consumer the Sales Report Consumer and the Financials Report Consumer roles.
Grant catalog permissions:
• To the Executive Reports folder add the Executive Report Consumer and grant:
Read
Schedule Report
Run Report Online
View Report Online
Select Apply permissions to items within this folder
Grant Data Access:
On the Roles tab, locate the role, then click Add Data Sources. Add all data sources used by Executive reports.
Sales Report Developer
Assign Roles:
On the Roles tab, assign the Sales Report Developer the BI Publisher Developer Role and the BI Publisher Template Designer Role.
Grant Data Access:
On the Roles tab, locate the Sales Report Developer and click Add Data Sources. Add all data sources from which Sales data models will be built.
Grant Catalog Permissions:
• In the catalog, to the Sales Data Models folder add the Sales Report Developer and grant:
Read, Write, Delete
• To the Sales Reports folder, add the Sales Report Developer and grant:
Read, Write, Delete
Financials Report Developer
Assign Roles:
On the Roles tab, assign the Financials Report Developer the BI Publisher Developer Role, the BI Publisher Excel Analyzer Role, and the BI Publisher Template Designer Role.
Grant Data Access:
On the Roles tab, locate the Financials Report Developer and click Add Data Sources. Add all data sources from which Financials data models will be built.

Alternative Security Options 3-15
Grant Catalog Permissions:
• In the catalog, to the Financials Data Models folder add the Financials Report Developer and grant:
Read, Write, Delete
• To the Financials Reports folder, add the Financials Report Developer and grant:
Read, Write, Delete
Layout Designer
Assign Roles:
On the Roles tab, assign the Layout Designer the BI Publisher Template Designer Role and the BI Publisher Developer Role.
Grant Catalog Permissions:
• In the catalog, to the Financials Data Models and the Sales Data Models folders add the Layout Designer Role and grant:
Read
• To the Financials Reports and Sales Reports folders, add the Layout Designer and grant:
Read, Write, Delete
Configuring BI Publisher to Use an LDAP ProviderBI Publisher can be integrated with your LDAP provider to manage users and report access. Create the users and roles within your LDAP server, then configure the BI Publisher server to access your LDAP server.
In the BI Publisher security center module, assign folders to those roles. When a user logs into the server they will have access to those folders and reports assigned to the LDAP roles.
Integrating the BI Publisher server with Oracle LDAP consists of three main tasks:
1. Set up users and roles in your LDAP provider
2. Configure BI Publisher to recognize your LDAP server
3. Assign catalog permissions and data access to roles
For information on supported LDAP servers, see System Requirements and Certification, page xii for the most up-to-date information on supported hardware and software.

3-16 Oracle Fusion Middleware Administrator's Guide for Oracle Business Intelligence Publisher
Using the Client ApplicationThe following steps must be performed in your LDAP provider. See the documentation for your provider for details on how to perform these tasks.
Set Up Users and Roles1. In the Domain root node of your LDAP provider, create the following roles to
integrate with BI Publisher. See Understanding Users and Roles, page 3-2 for full descriptions of the required functional roles.
BI Publisher System Group Description
XMLP_ADMIN The administrator role for the BI Publisher server.
You must assign the Administrator account used to access your LDAP server the XMLP_ADMIN group.
XMLP_DEVELOPER Allows users to create and edit reports and data models.
XMLP_SCHEDULER Allows users to schedule reports.
XMLP_ANALYZER_EXCEL Allows users to use the Excel Analyzer feature.
XMLP_ANALYZER_ONLINE Allows users to use the online analysis feature (online analyzer).
XMLP_TEMPLATE_BUILDER Allows users to connect to the BI Publisher server from the Template Builder for Word and to upload and download templates. Allows users to design layouts using the BI Publisher Layout Editor.
2. Create other functional roles as required by your implementation (for example: HR Manager, Warehouse Clerk, or Sales Manager), and assign the appropriate BI Publisher functional roles.
3. Assign roles to users.
Important: Ensure to assign the Administrator account the XMLP_ADMIN role.

Alternative Security Options 3-17
Configure the BI Publisher to Recognize Your LDAP ServerTo configure the BI Publisher server to recognize your LDAP server, update the Security properties in the BI Publisher Administration page as follows:
1. On the Administration page, under Security Center click Security Configuration.
2. Create a Local Superuser.
Enter a Superuser Name and Password and select Enable Local Superuser check box. Enabling a local superuser will ensure that you can access the Administration page of BI Publisher in case of security model configuration errors.
3. Scroll down to the Security Model region. Select LDAP for the Security Model.
4. Enter the following:
• URL
For example: ldap://example.com:389/
Important: If your are using LDAP over SSL note the following:
• the protocol is "ldaps"
• the default port is 636
An example URL would be: ldaps://example.com:636/
• Administrator Username
For example: orcladmin
• Administrator Password
For example: welcome
• Distinguished Name for Users
For example: cn=Users,dc=example,dc=com
Important: The distinguished name values are case-sensitive and must match the settings in your LDAP server.
• Distinguished Name for Groups
For example: cn=Groups,dc=us,dc=oracle,dc=com
The default value is cn=OracleDefaultDomain,cn=OracleDBSecurity,cn=Products,cn=

3-18 Oracle Fusion Middleware Administrator's Guide for Oracle Business Intelligence Publisher
OracleContext,dc=example,dc=com
• Group Search Filter
The default values is (&(objectclass=groupofuniquenames)(cn=*))
• Group Attribute Name
The default value is cn
• Group Member Attribute Name
The default value is uniquemember
• Member of Group Attribute Name
(Optional) Set this attribute only if memberOf attribute is available for User and Group. Group Member Attribute is not required when this attribute is available. Example: memberOf or wlsMemberOf
• Group Description Attribute Name
The default value is description
• JNDI Context Factory Class
The default value is com.sun.jndi.ldap.LdapCtxFactory
• Group Retrieval Page Size
Setting this values enables support of the LDAPv3 control extension for simple paging of search results. By default, pagination is not used. This value determines the number of results to return on a page (for example, 200). Your LDAP server must support control type 1.2.840.113556.1.4.319 to support this feature, such as OID 10.1.4. See your LDAP server documentation for information on support of this control type.
For more information about LDAP pagination and the required control type, see the article: RFC 2696 - LDAP Control Extension for Simple Paged Results Manipulation (http://www.faqs.org/rfcs/rfc2696.html) .
• Attribute used for Login Username
Enter the attribute that supplies the value for the Login user name. This is also known as the Relative Distinguished Name (RDN). This value defaults to cn.
• Automatically clear LDAP cache - to schedule the automatic refresh of the LDAP cache the LDAP cache per a designated interval, select this box. After you select this box the following additional fields become enabled:
• Enter an integer for Ldap Cache Interval. For example, to clear the LDAP cache once a day, enter 1.

Alternative Security Options 3-19
• Select the appropriate Ldap Cache Interval Unit: Day, Hour, or Minute.
• Default User Group Name
(Optional) Use this option if your site has the requirement to allow all authenticated users access to a set of folders, reports, or other catalog objects. The user group name that you enter here is added to all authenticated users. Any catalog or data source permissions that you assign to this default user group will be granted to all users.
• Attribute Names for Data Query Bind Variables
(Optional) Use this property to set attribute values to be used as bind variables in a data query. Enter LDAP attribute names separated by a commas for example: memberOf, primaryGroupID,mail
See Creating Bind Variables from LDAP User Attributes, Oracle Fusion Middleware Data Modeling Guide for Oracle Business Intelligence Publisher.
5. Restart the BI Publisher server.
The following figure shows a sample of the LDAP security model entry fields from the Security Configuration page:

3-20 Oracle Fusion Middleware Administrator's Guide for Oracle Business Intelligence Publisher
Note that if you are configuring BI Publisher to use LDAP over SSL, you must also configure Java keystore to add the server certificate to JVM. For more information, see Configuring BI Publisher for Secure Socket Layer (SSL) Communication, page 4-3.
Assign Data Access and Catalog Permissions to Roles1. Log in to BI Publisher as a user assigned the XMLP_ADMIN role in your LDAP
provider.
2. On the Administration page click Roles and Permissions.
You will see the roles you created in your LDAP provider to which you assigned the XMLP_ roles. Note the following:
• The XMLP_X roles are not shown because these are controlled through the LDAP interface.
• The Users tab is no longer available under the Security Center because users arenow managed through your LDAP interface.
• Roles are not updateable in the BI Publisher interface, with the exception of adding data sources.
3. Click Add Data Sources to add BI Publisher data sources to the role. A role must be

Alternative Security Options 3-21
assigned access to a data source to run reports from that data source or to build data models from the data source. For more information see Granting Data Access, page 3-11.
4. Grant catalog permissions to roles. See About Catalog Permissions, page 3-5 and Granting Catalog Permissions, page 3-8 for details on granting catalog permissions to roles.
Users can now log in using their LDAP username/password.
Integrating with Microsoft Active DirectoryMicrosoft Active Directory supports the LDAP interface and therefore can be configured with BI Publisher using LDAP Security.
Active Directory Configuration1. Add users that will need access to BI Publisher.
Add the users under "Users" or any other organization unit in the Domain Root.
2. Add the BI Publisher system groups. The Scope of the groups must be Domain Local.
The following must be added as BI Publisher system groups:
BI Publisher System Group Description
XMLP_ADMIN The administrator role for the BI Publisher server.
You must assign the Administrator account used to access your LDAP server the XMLP_ADMIN group.
XMLP_DEVELOPER Allows users to create and edit reports and data models.
XMLP_SCHEDULER Allows users to schedule reports.
XMLP_ANALYZER_EXCEL Allows users to use the Excel Analyzer feature.
XMLP_ANALYZER_ONLINE Allows users to use the online analysis feature (online analyzer).

3-22 Oracle Fusion Middleware Administrator's Guide for Oracle Business Intelligence Publisher
BI Publisher System Group Description
XMLP_TEMPLATE_BUILDER Allows users to connect to the BI Publisher server from the Template Builder for Word and to upload and download templates. Allows users to design layouts using the BI Publisher Layout Editor.
3. Grant BI Publisher system groups to global groups or users.
You can grant BI Publisher system groups directly to users or through global groups.
Example 1: Grant Users the BI Publisher Administrator Role1. Under the Active Directory User and Computers, open the XMLP_ADMIN group
and click the Members tab.
2. Click Add to add users who need to BI Publisher Administrator privileges.
Example 2: Grant Users Access to Scheduling Reports The "HR Manager" global group is defined under "Users".
All users in this group need to schedule reports.
To achieve this, add "HR Manager" as a Member of the XMLP_SCHEDULER group.
BI Publisher Configuration1. On the Administration page, click Security Configuration.
2. Set up a Local Superuser if one has not already been configured. This is very important in case the security configuration fails, you will still be able to log in to BIPublisher using the Superuser credentials.
3. In the Security Model region of the page, select LDAP from the Security Model list.
4. Enter the details for the Active Directory server, as described in the preceding section Configuring BI Publisher to Use an LDAP Provider, page 3-15, noting the following specific information for Active Directory:
• Set Group Search Filter objectclass to "group"
• Set Member of Group Member Attribute Name to "memberOf" (Group Member Attribute Name can be left blank).
• Set Attribute used for Login Username to "sAMAccountName".
• If your are using LDAP over SSL note the following:

Alternative Security Options 3-23
• the protocol is "ldaps"
• the default port is 636
An example URL would be: ldaps://example.com:636/
The following figure shows an example configuration highlighting the recommendations stated above:
5. Restart the BI Publisher application.
Note that if you are configuring BI Publisher to use LDAP over SSL, you must also configure Java keystore to add the server certificate to JVM. For more information, see Configuring BI Publisher for Secure Socket Layer (SSL) Communication, page 4-3.
Logging In to BI Publisher Using the Active Directory CredentialsThe User login name defined in Active Directory Users and Computers >User Properties >Account is used for the BI Publisher login name. Add the Domain to the user name to log in to BI Publisher. For example: "[email protected]".
Note the following:
• The Attribute used for Login Username can be sAMAccountName instead of userPrincipalName.

3-24 Oracle Fusion Middleware Administrator's Guide for Oracle Business Intelligence Publisher
• You must use sAMAccountName for the Attribute used for Login Username when the "User logon name (pre-Windows 2000)" is required to use for the BI Publisher login username.
• User names must be unique across all organization units.
Assign Data Access and Catalog Permissions to Roles1. Log in to BI Publisher as a user assigned the XMLP_ADMIN role Active Directory.
2. On the Administration page click Roles and Permissions.
You will see the roles you created in Active Directory to which you assigned the XMLP_ roles. Note the following:
• The XMLP_X roles are not shown because these are controlled through the Active Directory interface.
• The Users tab is no longer available under the Security Center because users arenow managed through Active Directory.
• Roles are not updateable in the BI Publisher interface, with the exception of adding data sources.
3. Click Add Data Sources to add BI Publisher data sources to the role. A role must beassigned access to a data source to run reports from that data source or to build data models from the data source. For more information see Granting Data Access, page 3-11.
4. Grant catalog permissions to roles. See About Catalog Permissions, page 3-5 and Granting Catalog Permissions, page 3-8 for details on granting catalog permissions to roles.
Configuring Single Sign-OnIntegrating a single sign-on (SSO) solution enables a user to log on (sign-on) and be authenticated once per browser session. Thereafter, the authenticated user is given access to system components or resources according to the permissions and privileges granted to that user. Oracle BI Publisher can be configured to trust incoming HTTP requests already authenticated by a SSO solution that is configured for use with Oracle Fusion Middleware and Oracle WebLogic Server.
When BI Publisher is configured to use SSO authentication, it accepts authenticated users from whatever SSO solution Oracle Fusion Middleware is configured to use. If SSO is not enabled, then BI Publisher challenges each user for authentication credentials. When BI Publisher is configured to use SSO, a user is first redirected to the SSO solution's login page for authentication.

Alternative Security Options 3-25
Configuring BI Publisher to work with SSO authentication requires minimally that the following be done:
• Oracle Fusion Middleware and Oracle WebLogic Server are configured to accept SSO authentication. Oracle Access Manager is recommended in production environments.
• The HTTP header information required for identity propagation with SSO configurations (namely, user identity and SSO cookie) is specified and configured.
• BI Publisher is configured to trust incoming messages.
See "Configuring Single Sign-On in Oracle Fusion Middleware" in Oracle Fusion Middleware Applications Security Guide.
Once you have configured your Single-Sign-On provider to protect Oracle BI Publisher, configure BI Publisher to trust incoming messages.
On the Administration page, under Security Center, click Security Configuration.
In the Single Sign-On region, select the User Single Sign-On check box.
Enter the fields appropriate for you your SSO provider.
Configuring BI Publisher to Use Oracle Access Manager (OAM) Single Sign-On
BI Publisher can be configured to use Oracle Access Manager as your SSO provider.
Required components:
• Oracle Fusion Middleware is configured with Oracle WebLogic Server's embedded LDAP server as the default authenticator (DefaultAuthenticator)
• Oracle Access Manager 10.1.4.x is configured with Oracle Internet Directory as the default LDAP server
• Oracle HTTP is configured to be a Web proxy to access the application server, namely Oracle WebLogic Server
• Oracle Access Manager SSO is configured to be the authentication provider for Oracle Fusion Middleware
• Oracle BI Publisher is installed and has been configured to use Oracle Internet Directory (see Configure the BI Publisher Server to Recognize Your LDAP Server, page 3-17).
Directly after BI Publisher is installed, the embedded LDAP server in Oracle WebLogic Server is the default authentication source (identity store). The BI WebLogic domain must be configured to the new identity store, Oracle Internet Directory, as the main

3-26 Oracle Fusion Middleware Administrator's Guide for Oracle Business Intelligence Publisher
authentication source.
For more information about creating a new default authenticator in Oracle WebLogic Server, see the following Oracle Fusion Middleware guides:
• Oracle Fusion Middleware Oracle WebLogic Server Administration Console Online Help
• Oracle Fusion Middleware Understanding Security for Oracle WebLogic Server 11g
• Oracle Fusion Middleware Application Security Guide 11g
After Oracle WebLogic Server has been configured, perform the following in BI Publisher:
Note: The is procedure assumes that you have the Single Sign-Off URL.If you do not know the Single-Sign-Off URL, consult the Oracle Access Manager administrator at your site.
1. On the Administration page, under Security Center, click Security Configuration.
2. If you have not already done so, set up a Local Superuser. The Superuser credentials will enable you to log in to the BI Publisher Administration page in case of errors in the security configuration.
3. In the Single Sign-On region, select the User Single Sign-On check box.
4. Enter the following:
• On the Single Sign-On Type list select Oracle Access Manager.
• Enter the Single Sign-Off URL.
• Select the method for How to get Username.
• Enter the User Name Parameter, for example: REMOTE_USER.
• Select How to get user locale, for example: HTTP Parameter.
• Enter the User Locale Parameter, for example: LOCALE_LANGUAGE.
A sample configuration is shown in the following figure:

Alternative Security Options 3-27
Setting Up Oracle Single Sign-OnTo set up Oracle Single Sign-On, first configure WebLogic Server using the instructions in the chapter, "Configuring Single Sign-On in Oracle Fusion Middleware" in the Oracle Fusion Middleware Application Security Guide 11g. BI Publisher must be configured to use Oracle Internet Directory as the default LDAP server
IMPORTANT: When using Oracle SSO, BI Publisher assumes that a login username can be derived from Osso-User-Dn, which is HTTP Header value. For example, if your Osso-User-Dn on HTTP Header looks like this:
cn=admin,cn=users, dc=us,dc=oracle,dc=com
Then BI Publisher assumes the value of first cn= is the login username (that is, "admin" in this case).
Therefore if your Osso-User-Dn does not contain a login username as the first cn value, then select "Other SSO Type" to configure your settings (even if you use Oracle SSO).
Setup Procedure1. Modify the application server configuration file to protect the xmlpserver. See the
topic "Configuring mod_osso to Protect Web Resources" in the Oracle Fusion Middleware Application Security Guide 11g
2. In the mod_osso.conf add a new "Location" directive as follows:<!-- Protect xmlpserver --><Location /xmlpserver> require valid-user AuthType Basic</Location>
3. To allow Web service communication between BI Publisher and its client components (the Template Builder and the Excel Analyzer) you must make additional modifications to the mod_osso.conf file. To open up the xmlpserver to allow these Web services, enter the following directives:

3-28 Oracle Fusion Middleware Administrator's Guide for Oracle Business Intelligence Publisher
<Location /xmlpserver/services/> require valid-user AuthType Basic Allow from All Satisfy any</Location>
<Location /xmlpserver/report_service/> require valid-user AuthType Basic Allow from All Satisfy any</Location>
Location /xmlpserver/ReportTemplateService.xls/> require valid-user AuthType Basic Allow from All Satisfy any</Location>
4. For integration with Oracle BI Presentation Services, you must disable SSO for Web services between the BI Presentation Services server and the BI Publisher server. If you made this entry when performing the previous step, you do not need to repeat this setup.
To open up the xmlpserver to allow the Web service, enter the following directive in the mod_osso.conf file:<Location /xmlpserver/services/> require valid-user AuthType Basic Allow from All Satisfy any</Location>
A sample mod_osso.conf file with the entries discussed in this section is shown below:

Alternative Security Options 3-29
LoadModule osso_module libexec/mod_osso.so
<IfModule mod_osso.c> OssoIpCheck off OssoIdleTimeout off OssoConfigFile /home/as1013/ohome/Apache/Apache/conf/osso/osso.conf
<Location /xmlpserver> require valid-user AuthType Basic </Location>
<Location /xmlpserver/services/> require valid-user AuthType Basic Allow from All Satisfy any</Location>
<Location /xmlpserver/report_service/> require valid-user AuthType Basic Allow from All Satisfy any</Location>
Location /xmlpserver/ReportTemplateService.xls/> require valid-user AuthType Basic Allow from All Satisfy any</Location>
<Location /xmlpserver/Guest/> require valid-user AuthType Basic Allow from All Satisfy any</Location> # # Insert Protected Resources: (see Notes below for how to protect resources) #
#______- # # Notes # #______- # # 1. Here's what you need to add to protect a resource, # e.g. <ApacheServerRoot>/htdocs/private: # # <Location /private> # require valid-user # AuthType Basic # </Location> #

3-30 Oracle Fusion Middleware Administrator's Guide for Oracle Business Intelligence Publisher
</IfModule>
# # If you would like to have short hostnames redirected to # fully qualified hostnames to allow clients that need # authentication via mod_osso to be able to enter short # hostnames into their browsers uncomment out the following # lines # #PerlModule Apache::ShortHostnameRedirect #PerlHeaderParserHandler Apache::ShortHostnameRedirect
5. Restart the HTTP server.
6. In the BI Publisher: Set up the Single Sign-Off URL on the BI Publisher Security Configuration page.
From the Administration page, click Security Configuration. Enter the following in the Oracle Single Sign-On region:
• Select Use Oracle Single Sign-On
• Enter the Single Sign-Off URL with the value you wrote down in the preceding step. The remaining fields are not applicable to Oracle SSO.
A sample BI Publisher Security Configuration page is shown in the following figure:
7. Create a BI Publisher Local Superuser to ensure access to BI Publisher regardless of your selected security configuration. See Enabling a Local Superuser, page 4-1 for more information.
8. Restart the application through the Oracle Fusion Middleware Control page.
9. Enter the URL to access the BI Publisher Enterprise application, and you will be

Alternative Security Options 3-31
redirected to the SSO login page.


Other Security Topics 4-1
4Other Security Topics
This chapter covers the following topics:
• Enabling a Local Superuser
• Enabling a Guest User
• Configuring BI Publisher for Secure Socket Layer (SSL) Communication
• Configuring Proxy Settings
Enabling a Local SuperuserBI Publisher allows you to define an administration Superuser. Using the Superuser credentials you can directly access the BI Publisher administrative functions without logging in through the defined security model.
Set up this Superuser to ensure access to all administrative functions in case of failures with the configured security model. It is highly recommended that you set up a Superuser.
1. Click Administration.
2. Under Security Center click Security Configuration.
3. Under Local Superuser, select the box and enter the credentials for the Superuser.

4-2 Oracle Fusion Middleware Administrator's Guide for Oracle Business Intelligence Publisher
4. Restart the BI Publisher application.
Enabling a Guest UserBI Publisher allows you configure public access to specific reports by defining a "Guest"folder. Any user can access the reports in this folder without entering credentials. Note that Guest access is not supported if you are using a shared catalog with Oracle Business Intelligence Enterprise Edition.
Important: Guest access is not supported with Single Sign-On.
Note that all objects required to view a report must be present in the Guest folder because the Guest folder is the only folder the guest user will have any access rights to. Therefore the report and the data model must be present in the Guest folder as well as Sub Templates and Style Templates, if applicable. The guest user will have read access only.
The Guest user must also be granted access to the report data source.
To enable guest access:
1. Under Shared Folders, create the folder to which you want to grant public access.
2. Click Administration.
3. Under Security Center select Security Configuration.
4. Under Guest Access, select Allow Guest Access.
5. Enter the name of the folder that you created for public access.

Other Security Topics 4-3
6. Restart the BI Publisher application.
7. Add the objects to the Guest folder that you want the guest users to access: folders, reports, data models, Sub Templates and Style Templates.
Note: The report must reference the data model that is stored in theguest folder. Therefore, if you copy a report with its data model from another location, ensure to open the report and reselect the data model so that the report references the data model inside the guest folder.
Similarly, any references to Sub Templates or Style Templates must also be updated.
8. Grant access to the data sources used by data models in your Guest folder. See Setting Up Data Sources, page 9-1 for information on granting Guest access to a data source.
Users who access BI Publisher will see the Guest button on the log on page. Users can select this button and view the reports in your chosen guest folder without presenting credentials.
Configuring BI Publisher for Secure Socket Layer (SSL) CommunicationIf BI Publisher is communicating with other applications over SSL you may need to perform additional configuration to ensure operability.
4-4 Oracle Fusion Middleware Administrator's Guide for Oracle Business Intelligence Publisher
Important: It is strongly recommended that you enable Secure Socket Layer (HTTPS) on the middle tier hosting the Web services because the trusted username/password that is passed can be intercepted. This also pertains to Web services that are used for communication between BI Publisher and Oracle BI Presentation Services.
• Point BI Publisher to the System-Wide Keystore
• Import certificates to the Java keystore
• Configure the Delivery Manager
Pointing BI Publisher to the System-Wide KeystoreBy default, BI Publisher uses the Java keystore: {java.home}/lib/security/cacerts
If you are using a different location as your keystore, set the JAVA_OPTS environment variable for your Web server to tell the BI Publisher server where to find the keystore, as follows:set JAVA_OPTS=-Djavax.net.ssl.trustStore=<keystore file>
Importing Certificates for Web Services Protected by SSLIf you make calls to Web services that are protected via Secure Sockets Layer (SSL) you must export the certificate from the Web server hosting the Web service and import it into the Java keystore on the machine running BI Publisher.
1. Navigate to the HTTPS site where the WSDL resides.
2. Download the certificate following the prompts (the prompts you see will vary depending on the browser you are using).
3. Install the Certificate into your keystore using the Java keytool, as follows:keytool -import -file <certfile> -alias <certalias> -keystore <keystore file>
4. Restart the application server.
These steps should not be required if the server certificate is linked to some certificate authority (such as Verisign). But if the Web service server is using a self-generated certificate (for example, in a testing environment), then these steps will be required.
Configuring the Delivery Manager If you wish to use the default certificates built-in with BI Publisher, no further

Other Security Topics 4-5
configuration is required. SSL will work with the default certificate if the server uses thecertificate signed by a trusted certificate authority such as Verisign.
If the user uses the SSL with a self-signed certificate, the certificate information must be entered in the Delivery Configuration page. A self-signed certificate means the certificate is signed by a non-trusted certificate authority (usually the user).
Configuring Proxy SettingsTo use external Web Services or HTTP data sources when your BI Publisher server is setup behind a firewall or requires a proxy to access the internet, you must configure Oracle WebLogic Server to be aware of the proxy.
Add the following to setDomainEnv.sh:EXTRA_JAVA_PROPERTIES="-Dhttp.proxyHost=www-proxy.example.com-Dhttp.proxyPort=80-Djavax.xml.soap.MessageFactory=oracle.j2ee.ws.saaj.soap.MessageFactoryImpl-Djavax.xml.soap.SOAPFactory=oracle.j2ee.ws.saaj.SOAPFactoryImpl-Djavax.xml.soap.SOAPConnectionFactory=oracle.j2ee.ws.saaj.client.p2p.HttpSOAPConnectionFactory ${EXTRA_JAVA_PROPERTIES}"export EXTRA_JAVA_PROPERTIES
where-www-proxy.example.com
is the proxy host.
Note that for communication between BI Publisher and the other components of Oracle BI Enterprise Edition, you must also set the http.nonProxyHosts JVM parameter. This property indicates the hosts that BI Publisher will connect to directly and not through the proxy server. Specify the list of hosts, each separated by a |, and in addition a wildcard character (*) can be used for matching. For example:-Dhttp.proxySet=true -Dhttp.proxyHost=www-proxy.example.com-Dhttp.proxyPort=80-Dhttp.nonProxyHosts="localhost|*.example1.com|*.example2.com"


Integrating with Other Oracle Security Models 5-1
5Integrating with Other Oracle Security
Models
This chapter covers the following topics:
• Introduction
• Before You Begin: Create a Local Superuser
• Integrating with Oracle BI Server Security
• Integrating with Oracle E-Business Suite
• Integrating with Oracle Database Security
• Integrating with Oracle Siebel CRM Security
IntroductionOracle BI Publisher supports security models of other Oracle products. This chapter describes how to configure BI Publisher to use the following:
• Oracle BI Server Security, page 5-2
• Oracle E-Business Suite Security, page 5-4
• Oracle Database Security, page 5-6
• Oracle Siebel CRM Security, page 5-9
For conceptual information regarding BI Publisher roles and permissions, see Understanding BI Publisher Users, Roles, and Permissions, page 3-2.
Before You Begin: Create a Local SuperuserBefore you implement any of these security models, first create a local superuser. The local superuser credentials ensure that you can access the Administration pages of

5-2 Oracle Fusion Middleware Administrator's Guide for Oracle Business Intelligence Publisher
Oracle BI Publisher in case of any unexpected failures in the configured security settings.
To create a local superuser:
1. On the Administration page, click Security Configuration.
2. On the Security Configuration tab, under the Local Superuser region, select the Enable Local Superuser check box.
3. Enter a name and password for your superuser.
4. Restart BI Publisher for the Superuser to become activated in the system.
Integrating with Oracle BI Server SecurityIf you have installed BI Publisher as part of the Oracle Business Intelligence Enterprise Edition and you have configured Oracle BI Enterprise Edition to use legacy Oracle BI Server authentication, follow these procedures to configure BI Publisher to use the BI Server security.
Important: The Oracle BI Server security option is for customers wishing to use legacy 10g authentication. This section does not apply toyou if you have configured Oracle Fusion Middleware Security.
These procedures assume that you have already performed the configuration required in the Oracle BI Server. For information on configuring legacy Oracle BI security, see theOracle Fusion Middleware Security Guide for Oracle Business Intelligence Enterprise Edition.
Perform the following in BI Publisher:
1. In the Oracle BI Publisher Administration page, configure Oracle BI Publisher to use Oracle BI Server security.

Integrating with Other Oracle Security Models 5-3
2. In the Oracle BI Publisher Administration page, assign BI Publisher data sources to roles
Configuring BI Publisher To Use Oracle BI Server Security1. Log in to BI Publisher with administrator credentials. Navigate to the BI Publisher
Administration page. On the Administration page click Security Configuration.
Note: To log in directly to the BI Publisher server, use the login URL with the /xmlpserver suffix, for example: http://example.com:9704/xmlpserver
2. In the Security Model region of the page, select Oracle BI Server from the list. Provide the following connection information for the Oracle BI Server:
• JDBC Connection String - example: jdbc:oraclebi://host:port/
If you do not know the connection string to the BI Server, you can copy it from data source connection page. From the Administration page, under Data Sources, click JDBC Connection. Locate the Oracle BIEE server and copy the connection string. If this has not been configured, see Setting Up a JDBC Connection to the Oracle BI Server, page C-3.
• Administrator Username and Administrator Password
Enter the BISystemUser and password.
• Database Driver Class - example: oracle.bi.jdbc.AnaJdbcDriver
3. Restart the BI Publisher application for the security changes to take effect.
Add Data Sources to the Oracle BI Server Roles1. Log in to Oracle Business Intelligence as an administrator.
2. On the global header click Administration. On the Oracle BI Administration page, click Manage BI Publisher.
3. On the BI Publisher Administration page click Roles and Permissions. The groups to which you assigned the BI Publisher groups will display as available roles.
4. Find the group (role) that you wish to add data sources to and click Add Data Sources.
Note: Alternatively, you can navigate to the data source and add the roles that will require access to the data source.
5. Locate the appropriate data sources in the Available Data Sources list and use the

5-4 Oracle Fusion Middleware Administrator's Guide for Oracle Business Intelligence Publisher
shuttle buttons to move the sources to the Allowed Data Sources list for the role.
6. Click Apply.
7. Repeat for all roles that need access to report data sources.
Integrating with Oracle E-Business SuiteBI Publisher can leverage your E-Business Suite security to enable your E-Business Suiteusers to log in to BI Publisher using their E-Business Suite credentials. When you integrate with the E-Business Suite security, your E-Business Suite responsibilities become available as roles in the BI Publisher security center. You can then add BI Publisher catalog permissions and data access privileges to the imported roles/responsibilities. See Understanding Users and Roles, page 3-2.
Note: In this release your users will not be able to access or execute reports stored on the E-Business Suite instance.
Oracle BI Publisher relies on information stored in the DBC file to connect to the E-Business Suite instance. Ensure you can locate and have access to this file. The DBC file is typically located under the $FND_SECURE directory.
Configuring BI Publisher to Use E-Business Suite Security 1. In the Oracle E-Business Suite, log in as a System Administrator and create the
following responsibilities to correspond to the BI Publisher functional roles:
• XMLP_ADMIN – this is the administrator role for the BI Publisher server.
• XMLP_DEVELOPER – allows users to build reports in the system.
• XMLP_SCHEDULER – allows users to schedule reports.
• XMLP_ANALYZER_EXCEL – allows users to use the Excel Analyzer feature.
• XMLP_ANALYZER_ONLINE – allows users to use the online analysis feature.
• XMLP_TEMPLATE_BUILDER - allows users to connect to the BI Publisher server from the Template Builder and to upload and download templates. Allows users to design layouts using the BI Publisher Layout Editor.
2. Add these new BI Publisher responsibilities to the appropriate Users.
Note: Ensure to assign at least one user to the XMLP_ADMIN

Integrating with Other Oracle Security Models 5-5
group.
3. Log in to Oracle BI Publisher. On the Administration page, select Security Configuration.
4. In the Security Model section of the page, select Oracle E-Business Suite from the list.
5. Load the DBC file from the E-Business Suite instance. This is typically located underthe $FND_SECURE directory. If you do not have access to this file, contact your E-Business Suite system administrator. This file specifies how BI Publisher should access the E-Business Suite instance.
6. Restart BI Publisher for the security changes to take effect.
Once you restart the system, the E-Business Suite responsibilities to which BI Publisher roles have been assigned will be visible as roles in the BI Publisher security center.
Adding Data Sources to the E-Business Suite RolesTo view a report generated from a particular data source, a report consumer's role must be granted access to the data source. Similarly, to create a data model based on a particular data source, the report author's role must be granted access to the data source.
To grant a role access to a data source:
1. On the Administration tab, under Security Configuration, click Roles and Permissions. The responsibilities assigned BI Publisher roles in your E-Business Suite instance will display as available roles.
2. Find the role to which you want to add data sources and click Add Data Sources. The Add Data Sources page will display.
3. Locate the appropriate data sources in the Available Data Sources list and use the shuttle buttons to move the sources to the Allowed Data Sources list for the role.
4. Click Apply.
5. Repeat for all roles that need access to report data sources.
Granting Catalog Permissions to the E-Business Suite RolesFor a role to access objects in a folder, you must grant the role permissions to the catalogobject. You can grant permissions at the folder level, so that a role has the same access to every object in a folder, or you can assign access individually to each object in a

5-6 Oracle Fusion Middleware Administrator's Guide for Oracle Business Intelligence Publisher
folder.
See the following for more information:
• Understanding BI Publisher's Users, Roles, and Permissions, page 3-2
• About Privileges to Use Functionality, page 3-3
• About Catalog Permissions, page 3-5
• How Functional Privileges and Permissions Work Together, page 3-6
1. In the catalog, navigate to a catalog object required for a role.
2. Click the More link for the object and then click Permissions to open the Permissions dialog.
3. Click the Create icon to open the Add Roles dialog.
4. Click Search to populate the list of Available Roles.
5. Use the Move button to move the appropriate roles from the Available Roles list tothe Selected Roles list.
6. Click OK.
7. Enable the appropriate permissions for the role by selecting the check boxes.
8. If you have selected a folder: To apply the selections to all items within a folder, select Apply permissions to items within this folder.
Integrating with Oracle Database SecurityBI Publisher offers integration with Oracle Database security so that you can administerthe BI Publisher users with your Oracle Database users. To accomplish this you must define the BI Publisher functional roles in your Oracle Database, assign the roles to yourOracle Database users, and then specify Oracle Database as your security model in the BI Publisher Administration page.
Note: For information on setting up Oracle Database security, see the Oracle Database Security Guide.
1. In your Oracle Database, create the following roles to correspond to the BI Publisher functional roles:
• XMLP_ADMIN – this is the administrator role for the BI Publisher server.

Integrating with Other Oracle Security Models 5-7
• XMLP_DEVELOPER – allows users to build reports in the system.
• XMLP_SCHEDULER – allows users to schedule reports.
• XMLP_ANALYZER_EXCEL – allows users to use the Excel analysis feature.
• XMLP_ANALYZER_ONLINE – allows users to use the online analysis feature.
• XMLP_TEMPLATE_BUILDER - allows users to connect to the BI Publisher server from the Template Builder and to upload and download templates.
2. Assign these roles to the appropriate Database roles and users. You may also want to create additional reporting roles that you can utilize when setting up your report privileges on the BI Publisher side. For example, you might create a role called "HUMAN_RESOURCES_MANAGER" that you can assign a Human Resources Folder of reports to. You can then assign that role to any user requiring access to theHuman Resources reports.
3. Ensure to assign the XMLP_ADMIN role to a user with administration privileges, such as SYSTEM.
4. In the BI Publisher application, log in with Administration privileges. From the Administration tab select Security Configuration.
5. In the Security Model section of the page, select Oracle Database from the list. Provide the following connection information:
• JDBC Connection String - example: jdbc:oracle:thin:@mycompany.com:1521:orcl
• Administrator Username and Administrator Password - note the following requirements for this user:
• the user must be granted the XMLP_ADMIN role
• the user must have privileges to access data from the dba_users/_roles/_role_privs tables.
• Database Driver Class - example: oracle.jdbc.driver.OracleDriver
6. Restart the BI Publisher server for the security changes to take effect.
Once you restart the server, the roles to which BI Publisher roles have been assigned will be visible as roles in the BI Publisher security center.

5-8 Oracle Fusion Middleware Administrator's Guide for Oracle Business Intelligence Publisher
Adding Data Sources to RolesTo view a report generated from a particular data source, a report consumer's role must be granted access to the data source. Similarly, to create a data model based on a particular data source, the report author's role must be granted access to the data source.
To grant a role access to a data source:
1. On the Administration tab, under Security Configuration, click Roles and Permissions.
2. Find the role to which you want to add data sources and click Add Data Sources. The Add Data Sources page will display.
3. Locate the appropriate data sources in the Available Data Sources list and use the shuttle buttons to move the sources to the Allowed Data Sources list for the role.
4. Click Apply.
5. Repeat for all roles that need access to report data sources.
Granting Catalog Permissions to RolesFor a role to access objects in a folder, you must grant the role permissions to the catalogobject. You can grant permissions at the folder level, so that a role has the same access to every object in a folder, or you can assign access individually to each object in a folder.
See the following for more information:
• Understanding BI Publisher's Users, Roles, and Permissions, page 3-2
• About Privileges to Use Functionality, page 3-3
• About Catalog Permissions, page 3-5
• How Functional Privileges and Permissions Work Together, page 3-6
1. In the catalog, navigate to a catalog object required for a role.
2. Click the More link for the object and then click Permissions to open the Permissions dialog.
3. Click the Create icon to open the Add Roles dialog.
4. Click Search to populate the list of Available Roles.

Integrating with Other Oracle Security Models 5-9
5. Use the Move button to move the appropriate roles from the Available Roles list tothe Selected Roles list.
6. Click OK.
7. Enable the appropriate permissions for the role by selecting the check boxes.
8. If you have selected a folder: To apply the selections to all items within a folder, select Apply permissions to items within this folder.
Integrating with Oracle Siebel CRM SecurityTo configure BI Publisher to integrate with Siebel security, perform the following three general tasks (described in more detail below):
1. Set up BI Publisher roles as Siebel CRM responsibilities.
2. Configure BI Publisher to use Siebel Security.
3. Authorize Siebel responsibilities to access data sources and catalog objects in BI Publisher.
Setting Up BI Publisher Roles as Siebel CRM Responsibilities1. Using Siebel Administrator credentials, navigate to Administration - Application,
and then Responsibilities.
2. In the Responsibilities list, add a new record for each of the BI Publisher functional roles:
• XMLP_ADMIN – this is the administrator role for the BI Publisher server.
• XMLP_DEVELOPER – allows users to build reports in the system.
• XMLP_SCHEDULER – allows users to schedule reports.
• XMLP_ANALYZER_EXCEL – allows users to use the Excel analyzer feature.
• XMLP_ANALYZER_ONLINE – allows users to use the online analysis feature.
• XMLP_TEMPLATE_BUILDER - allows users to connect to the BI Publisher server from the Template Builder and to upload and download templates and grants access to the layout editor.
3. Assign these roles to the appropriate users. You may also want to create additional reporting roles that you can utilize when setting up your report privileges in the BI

5-10 Oracle Fusion Middleware Administrator's Guide for Oracle Business Intelligence Publisher
Publisher. For example, you might create a role called "EXECUTIVE_SALES" that you can assign a executive-level report folder. You can then assign that role to any user requiring access to the Executive reports.
4. Ensure to assign the XMLP_ADMIN role to a user with administration privileges.
Configure BI Publisher to Use Siebel Security1. In the BI Publisher application, log in with Administration privileges. From the
Administration tab select Security Configuration.
2. In the Security Model section of the page, select Siebel Security from the list. Provide the following connection information:
• Siebel Web Service Endpoint String
• Administrator Username.
• Administrator Password
3. Restart the BI Publisher server for the security changes to take effect.
When you log back in to BI Publisher, the responsibilities to which you added the BI Publisher functional roles will display in the Roles and Permissions page.
Add Data Sources to RolesTo view a report generated from a particular data source, a report consumer's role must be granted access to the data source. Similarly, to create a data model based on a particular data source, the report author's role must be granted access to the data source.
To grant a role access to a data source:
1. On the Administration tab, under Security Configuration, click Roles and Permissions.
2. Find the role to which you want to add data sources and click Add Data Sources. The Add Data Sources page will display.
3. Locate the appropriate data sources in the Available Data Sources list and use the shuttle buttons to move the sources to the Allowed Data Sources list for the role.
4. Click Apply.
5. Repeat for all roles that need access to report data sources.

Integrating with Other Oracle Security Models 5-11
Grant Catalog Permissions to RolesFor a role to access objects in a folder, you must grant the role permissions to the catalogobject. You can grant permissions at the folder level, so that a role has the same access to every object in a folder, or you can assign access individually to each object in a folder.
See the following for more information:
• Understanding BI Publisher's Users, Roles, and Permissions, page 3-2
• About Privileges to Use Functionality, page 3-3
• About Catalog Permissions, page 3-5
• How Functional Privileges and Permissions Work Together, page 3-6
1. In the catalog, navigate to a catalog object required for a role.
2. Click the More link for the object and then click Permissions to open the Permissions dialog.
3. Click the Create icon to open the Add Roles dialog.
4. Click Search to populate the list of Available Roles.
5. Use the Move button to move the appropriate roles from the Available Roles list tothe Selected Roles list.
6. Click OK.
7. Enable the appropriate permissions for the role by selecting the check boxes.
8. If you have selected a folder: To apply the selections to all items within a folder, select Apply permissions to items within this folder.


Implementing a Digital Signature 6-1
6Implementing a Digital Signature
This chapter covers the following topics:
• Introduction
• Prerequisites and Limitations
• Implementing a Digital Signature
• Running and Signing Reports with a Digital Signature
IntroductionOracle BI Publisher supports digital signatures on PDF output documents. Digital signatures enable you to verify the authenticity of the documents you send and receive. Oracle BI Publisher can access your digital ID file from a central, secure location and at runtime sign the PDF output with the digital ID. The digital signature verifies the signer's identity and ensures that the document has not been altered after it was signed.
For additional information on digital signatures, see the following sources:
• Digital ID Introduction by Verisign
• http://www.verisign.com/support/tlc/per/whitepaper.htm
• http://www.verisign.com/stellent/groups/public/documents/gui des/005326.pdf
• Digital Signature by Adobe
• http://www.adobe.com/security/digsig.html
• Digital Signatures in PDF and Acrobat
• http://www.acrobatusers.com/articles/2006/07/digital_ signatures/index.php

6-2 Oracle Fusion Middleware Administrator's Guide for Oracle Business Intelligence Publisher
Prerequisites and Limitations
PrerequisitesBefore you can implement digital signatures with Oracle BI Publisher output documents, you need the following:
A digital ID obtained from a public certificate authority or from a private/internal certificate authority (if for internal use only). You must copy the digital ID file to a secure location of the file system on the server that is accessible by the BI Publisher server. See Obtaining Digital Certificates, page 6-2 for more information.
LimitationsUse of digital signatures with Oracle BI Publisher output documents has the following limitations:
• Only a single digital ID can be registered with BI Publisher.
• Only reports submitted through BI Publisher's Schedule Report Job interface can include the digital signature.
• The digital signature is enabled at the report level; therefore, all layouts assigned to the same report share the digital signature properties.
Obtaining Digital CertificatesTo obtain a digital certificate, do one of the following:
• Purchase one from a certificate authority, such as Verisign, and save it to your computer. This method is recommended because it is easier to verify (and, therefore, trust) the authenticity of the certificate that you purchase. Next, use Microsoft Internet Explorer 7 or later to create a PFX file based on the certificate youpurchased. See Creating PFX Files, page 6-3.
• Create a self-signed certificate using a software program, such as Adobe Acrobat, Adobe Reader, OpenSSL, or OSDT. This method is less preferred because anyone can create a self-signed certificate. Therefore, it is more difficult to verify and trust the authenticity of the certificate.
Typically, when you create a self-signed certificate using a software program, the program saves the certificate as part of a PFX file. If this is the case, you do not needto create another PFX file (as described in Creating PFX Files, page 6-3).
To create a self-signed certificate using Adobe Reader:
1. Open Adobe Reader.
Implementing a Digital Signature 6-3
2. On the Document menu click Security Settings.
3. Select Digital IDs on the left.
4. On the toolbar, click Add ID.
5. Follow the steps in the Add Digital ID wizard. For assistance, refer to the documentation provided with Adobe Reader.
6. When prompted, save your self-signed certificate as part of a PFX file to an accessible location on your computer.
After you create your self-signed certificate as part of a PFX file, you can use the PFX file to sign PDF documents by registering it with BI Publisher. See Implementing a Digital Signature, page 6-4.
Creating PFX FilesIf you obtained a digital certificate from a certificate authority, you can create a PFX file using that certificate and Microsoft Internet Explorer 7 or later.
Note: If you created a self-signed certificate using a software program such as Adobe Reader, it is likely that the program created the certificate in a PFX file. If this is the case, you don't have to create another PFX file. You can use the one you have.
To create a PFX file with Microsoft Windows Explorer 7 or later:
1. Ensure your digital certificate is saved on your computer.
2. Open Microsoft Internet Explorer.
3. On the Tools menu, click Internet Options and then click the Content tab.
4. Click Certificates.
5. In the Certificates dialog, click the tab that contains your digital certificate and thenclick the certificate.
6. Click Export.
7. Follow the steps in the Certificate Export Wizard. For assistance, refer to the documentation provided with Microsoft Internet Explorer.
8. When prompted, select Use DER encoded binary X.509 as your export file format.
9. When prompted, save your certificate as part of a PFX file to an accessible location
6-4 Oracle Fusion Middleware Administrator's Guide for Oracle Business Intelligence Publisher
on your computer.
After you create your PFX file, you can use it to sign PDF documents. See Implementinga Digital Signature, page 6-4.
Implementing a Digital Signature
Procedure OverviewThe following steps provide an overview of the tasks required to set up and sign your output PDF documents with a digital signature:
1. Register the digital ID in the BI Publisher Administration page.
2. Specify the Roles that are authorized to sign documents.
3. (Optional for PDF templates) Add a signature field to the PDF template in which to place the digital signature at runtime. See 'Adding or Designating a Field for DigitalSignature, Oracle Fusion Middleware Report Designers Guide for Business Intelligence Publisher for instructions on designating a specific field in a PDF template for the digital signature.
4. Enable Digital Signature for the report in the Report Properties, page 12-7 dialog and specify the position to place the digital signature on the completed document. This can be a signature field (for PDF templates), general location (top left, top center, or top right), or you can specify x and y coordinates.
5. Log in to BI Publisher as a user with an authorized role and submit the report through the BI Publisher scheduler, choosing PDF output. When the report completes it will be signed with your digital ID in the specified location of the document.
Registering Your Digital Signature ID and Assigning Authorized RolesBI Publisher supports the identification of a single digital ID file. Register the digital ID in the BI Publisher Administration page as follows:
1. On the Administration tab, under Security Center, click Digital Signature.
2. On the Digital Signature subtab, enter the file path to the digital ID file and enter the password for the digital ID.
3. Enable the Roles that will have the authority to sign documents with this digital ID. Use the shuttle buttons to move Available Roles to the Allowed Roles list.
4. Click Apply. The following figure shows the Digital Signature subtab:

Implementing a Digital Signature 6-5
Specifying the Signature Display Field or LocationYou must specify the location for the digital signature to appear in the completed document. The methods available depend on whether your template type is PDF or RTF.
If your template is PDF, you have the following options:
• specify a template field in which to put the digital signature
• use the Report Properties dialog to specify a location (x,y coordinates) for the signature to appear in your final document
If your template is RTF:
• use the Report Properties dialog to specify a location (x,y coordinates) for the signature to appear in your final document
Specifying a Template Field in a PDF Template for the Digital SignatureSee the chapter: Creating a PDF Template, topic: "Adding or Designating a Field for a Digital Signature" in the Oracle Fusion Middleware Report Designer's Guide for Oracle Business Intelligence Publisher for instructions on including a field in your PDF template for the digital signature.

6-6 Oracle Fusion Middleware Administrator's Guide for Oracle Business Intelligence Publisher
Specifying the Location for the Digital Signature Using the Report Properties (RTF and PDF Templates)When you specify a location in the document to place the digital signature, you can either specify a general location (Top Left, Top Center, or Top Right) or you can specify x and y coordinates in the document. You can also specify the field height and width. This is done through properties on the Runtime Configuration page. Therefore you do not need to alter the template to include a digital signature.
1. In the catalog, navigate to the report.
2. Click the Edit link for the report to open the report for editing.
3. Click Properties and then click the Formatting tab.
4. Scroll to the PDF Digital Signature group of properties.
5. Set Enable Digital Signature to True.
6. Specify the location in the document where you want the digital signature to appearby setting the appropriate properties as follows (note that the signature is inserted on the first page of the document only):
• Existing signature field name – does not apply to this method.
• Signature field location – provides a list containing the following values:
Top Left, Top Center, Top Right
Select one of these general locations and BI Publisher will place the digital signature in the output document sized and positioned appropriately.
If you set this property, do not enter X and Y coordinates or width and height properties.
• Signature field X coordinate – using the left edge of the document as the zero point of the X axis, enter the position in points to place the digital signature from the left.
For example, to place the digital signature horizontally in the middle of an 8.5 inch by 11 inch document (that is, 612 points in width and 792 points in height),enter 306.
• Signature field Y coordinate – using the bottom edge of the document as the zero point of the Y axis, enter the position in points to place digital signature from the bottom.
For example, to place the digital signature vertically in the middle of an 8.5 inchby 11 inch document (that is, 612 points in width and 792 points in height), enter 396.

Implementing a Digital Signature 6-7
• Signature field width – enter in points the desired width of the inserted digital signature field. This applies only if you are setting the X and Y coordinates.
• Signature field height – enter in points the desired height of the inserted digital signature field. This applies only if you are setting the X and Y coordinates.
The following figure shows a report configured to place the digital signature at specific x and y coordinates in the document:
Running and Signing Reports with a Digital SignatureUsers assigned a role with the digital signature privilege can attach the digital signatureto their generated reports configured to include the digital signature. The digital signature can only be inserted on scheduled reports.
1. Log in to BI Publisher as a user with a role granted digital signature privileges.
2. In the catalog, navigate to the report that has been enabled for digital signature and click Schedule.
3. Complete the fields in the Schedule Report Job page, selecting PDF output, and then submit the job.
4. The completed PDF will display the digital signature.


Part 3Administering Oracle Business Intelligence
Publisher

Configuring the Scheduler 7-1
7Configuring the Scheduler
This chapter covers the following topics:
• Overview
• Understanding the BI Publisher Scheduler
• Set Up Considerations
• About the Scheduler Configuration
• Configuring Processors and Processor Threads
• Adding Managed Servers
• Scheduler Diagnostics
OverviewThe updated architecture of the 11g BI Publisher Scheduler uses the Java Messaging Service (JMS) queue technology. This architecture enables you to add multiple BI Publisher servers to a cluster and then dedicate each server to a particular function: report generation, document generation, or specific delivery channels. This increases the flexibility to scale up Publisher for high volume scheduled jobs. Topics include:
• Understanding the BI Publisher Scheduler
• Set Up Considerations
• About the Scheduler Configuration Performed by the BI Platform Installer
• Configuring Processors and Processor Threads
• Adding Manager Servers
• Scheduler Diagnostics

7-2 Oracle Fusion Middleware Administrator's Guide for Oracle Business Intelligence Publisher
Understanding the BI Publisher Scheduler
ArchitectureThe architecture of the BI Publisher Scheduler uses JMS queues and topics to provide a highly scalable, highly performing and robust report scheduling and delivery system. The following diagram displays the scheduler architecture:
Following describes the tasks performed by the scheduler when a job is submitted:
1. Submit Job
• Stores job information and triggers in Quartz tables
2. Job Processor
• When quartz trigger is fired, puts job information in Scheduler job queue
3. Bursting Engine / Batch Job Process
• Bursting Engine Listener
• Takes the scheduled job information from the queue

Configuring the Scheduler 7-3
• Extracts data from data source
• Splits data as per bursting split by definition
• Stores data temporarily in temp folder
• Puts report metadata into Report Queue
• Batch Job Process
• Takes the scheduled job information from the queue
• Extracts data from data source
• Stores data temporarily in temp folder
• Puts report metadata into Report Queue
4. FO Report Processor
• Listens to Report Q
• Generates report based on metadata
• Stores report in shared TEMP directory
• Puts report delivery information in Delivery Queue
5. Delivery (E-mail, File, FTP) Processors
• Listen to Delivery queue
• Call delivery API to deliver to different channels
• BI Publisher (BIP) System Topic
The BIP System Topic publishes the runtime status and health of the scheduling engine. The topic publishes the status of all instances, the thread status of messages in the JMS queues, the status of all scheduler configurations such as database configuration, JNDI configuration of JMS queues and so on.
About ClusteringBI Publisher clustering support enables you to add server instances on demand to handle processing and delivery load. The following diagram illustrates clustering in an Oracle WebLogic Server. Note that the report repository and the scheduler database are shared across the multiple instances; also, the JMS queues for scheduling and JMS topic

7-4 Oracle Fusion Middleware Administrator's Guide for Oracle Business Intelligence Publisher
for publishing diagnostic information are shared across the server by registering JMS queues and topics via JNDI services.
Each managed server instance points to the same report repository. In each managed server instance all the processes (Job Processor, Report Processor, Email Processor, FTP Processor, Fax Processor, File Processor, Print Processor, and Web Dav Processor) are configured. Therefore the moment a server instance pointing to the same repository is deployed, it is added to the cluster and all the processors in this instance are ready to run.
You can select the process that you want to enable on any server instance, thereby utilizing the resources optimally. Moreover, if there is a demand to process heavier jobs you can add more instances for report processing. Similarly, if e-mail delivery is the most preferred delivery channel, then more instances can be added to scale up e-mail delivery.
For more information about clustering and high availability, see the Oracle Fusion Middleware High Availability Guide 11g Release 1 (11.1.1).
How Failover WorksBI Publisher provides a robust failover mechanism so that no report fails to deliver due to server unavailability. Achieve this by balancing each process of the Scheduler using two or more nodes in a cluster thereby ensuring that a failure of any node will be backed up by the second node. For example, by enabling the Job Processor in two nodes, in the event of failure of one node, the second node will be able to process the jobs.

Configuring the Scheduler 7-5
Important: If a node goes down, the other nodes will continue to service the queue. However, if a report job is in one of the following stages of execution: data retrieval, data formatting, or report delivery, the job will be marked as failed, and must be manually resubmitted.
Set Up ConsiderationsFollowing are topics to consider before setting up the scheduler:
Choosing JNDI or JDBC ConnectionBy default, the BI Platform installer configures the WebLogic JNDI connection URL. JDBC is not recommended for production use. JDBC should only be used for low volume local testing.
Supported JMS ProvidersWhen you install BI Publisher, the scheduler is automatically configured to use WebLogic JMS. To use configure BI Publisher to use ActiveMQ instead, see ConfiguringBI Publisher for ActiveMQ, page B-1.
About the Scheduler ConfigurationAfter you install BI Publisher using the BI Platform Installer and start up the servers, theBI Publisher scheduler will be running and the following is configured:
• The scheduler schema is installed to the database by the Repository Creation Utilityas a pre-install step.
• JMS is configured in your server for BI Publisher.
• The WebLogic JNDI URL is configured.
• Default threads per processor is set to 5.
See the Oracle Fusion Middleware Installation Guide for Oracle Business Intelligence for moreinformation on configurations performed by the Oracle BI Platform Installer.
You can see this configuration in the Scheduler Configuration page: From the Administration page, under System Maintenance, click Scheduler Configuration. The following screenshot shows the Database Connection and JMS Configuration regions of the Scheduler Configuration page:

7-6 Oracle Fusion Middleware Administrator's Guide for Oracle Business Intelligence Publisher
Configuring the Shared DirectoryThe Shared Directoryis used to temporarily store data and files used by the scheduler while jobs are executing. After a job completes, the temporary data for the job is deleted.If the BI Publisher scheduler is configured to run on different nodes or machines, you must define this directory. The directory is used to exchange data and document information among all the BI Publisher nodes and therefore must be accessible by all BI Publisher nodes.
The size of the directory depends on the total size of the job data, output documents, and the number of concurrent jobs. The directory should be big enough to hold all the XML data and documents for all the parallel running jobs. If BI Publisher runs on different machines while this directory is not configured, the scheduler may fail.
If BI Publisher runs on a single machine, the directory setup is optional. BI Publisher will use the application server's temporary directory to store this data.
Configuring Processors and Processor ThreadsFor each cluster instance that you have configured, a processor configuration table will display. Use the tables to enable and disable processors and specify threads for each processor.
The default number of threads for each processor is set by the Threads per JMS Processor property under JMS Configuration (shown above). Edit the threads for a specific processor in the Cluster Instances region by updating the Number Threads setting. Note that processors that use the default setting will show no entry in the table. Enter a Number Threads value only to set a thread count for a particular processor to differ from the default.

Configuring the Scheduler 7-7
The optimum number of threads per processor will depend on the requirements of yoursystem. You can use the Scheduler Diagnostics page to help in assessing load in your system. See Scheduler Diagnostics, page 7-12.
To add managed servers to your system, see Adding Managed Servers, page 7-7.
Adding Managed ServersAdd managed servers in the Oracle WebLogic Administration Console and then configure the cluster instances in the BI Publisher Administration page.
Adding a Managed Server For detailed information on using the Oracle WebLogic Administration Console see Oracle WebLogic Server Administration Console Help system. For additional information about Fusion Middleware Control and how to use it, see Oracle Fusion Middleware Administrator's Guide.
1. Access the Oracle WebLogic Administration Console using one of the following methods:
2. Click Lock & Edit.
3. Under Domain Structure, expand Environment and click Servers.

7-8 Oracle Fusion Middleware Administrator's Guide for Oracle Business Intelligence Publisher
4. On the Servers table, click New.
5. On the Create a New Server: Server Properties page:

Configuring the Scheduler 7-9
• Enter the name of the server in the Name field.
• In Listen Port, enter the port number from which you want to access the server instance.
• Select Yes, make this server a member of an existing cluster.
Select the bi_cluster from the list.
• Click Next.
6. Review the configuration options you have chosen.
7. Click Finish.
8. The new server displays in the Servers table.

7-10 Oracle Fusion Middleware Administrator's Guide for Oracle Business Intelligence Publisher
9. Click the server name to open the Settings page.

Configuring the Scheduler 7-11
10. Select a Machine for the new server.
11. Click Save.
12. Click Activate Changes.
13. Start the new server.
Configure the Processors in BI PublisherAfter the new managed server has been started, the set of processors for that server display in the BI Publisher, as shown in the following figure:
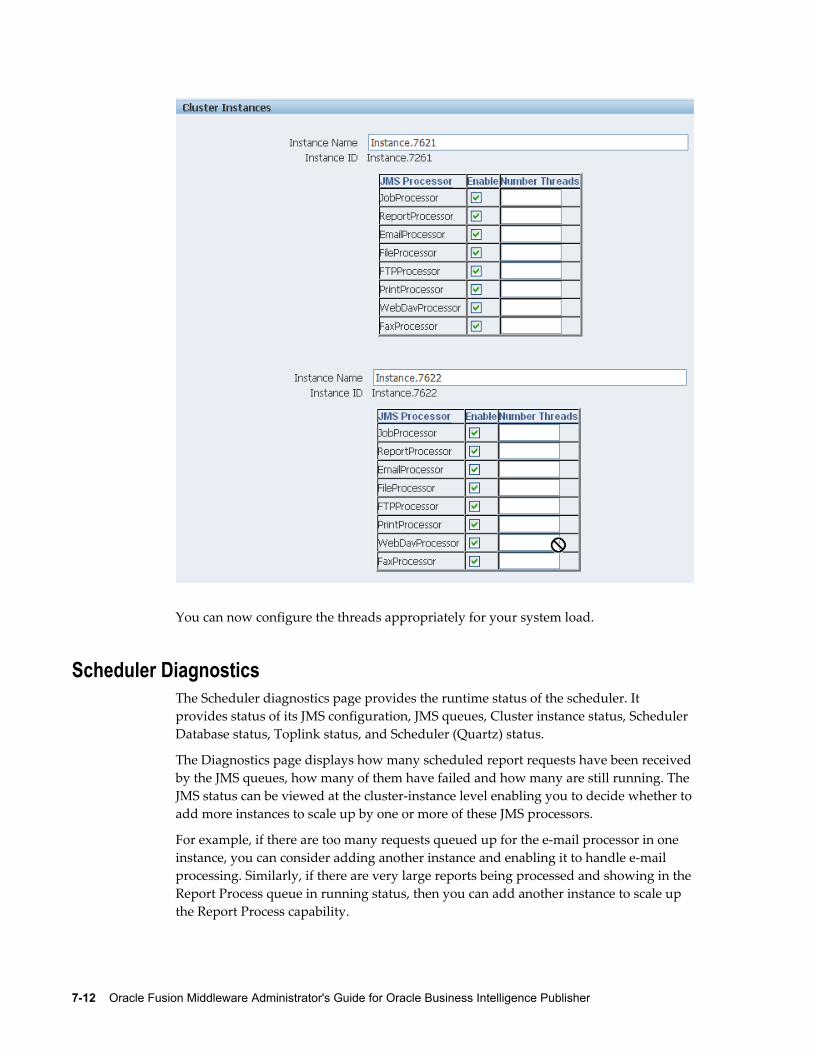
7-12 Oracle Fusion Middleware Administrator's Guide for Oracle Business Intelligence Publisher
You can now configure the threads appropriately for your system load.
Scheduler DiagnosticsThe Scheduler diagnostics page provides the runtime status of the scheduler. It provides status of its JMS configuration, JMS queues, Cluster instance status, Scheduler Database status, Toplink status, and Scheduler (Quartz) status.
The Diagnostics page displays how many scheduled report requests have been receivedby the JMS queues, how many of them have failed and how many are still running. The JMS status can be viewed at the cluster-instance level enabling you to decide whether toadd more instances to scale up by one or more of these JMS processors.
For example, if there are too many requests queued up for the e-mail processor in one instance, you can consider adding another instance and enabling it to handle e-mail processing. Similarly, if there are very large reports being processed and showing in theReport Process queue in running status, then you can add another instance to scale up the Report Process capability.
Configuring the Scheduler 7-13
Also, the Scheduler Diagnostics page reflects the status of each component to show if any component is down. You can see the connection string or JNDI name to the database, which cluster instance associates to which managed server instance, Toplink connection pool configuration, and so on.
If an instance shows a failed status, you can recover the instance and with the failover mechanism of the JMS set up in the cluster, no jobs submitted will be lost. Once the server instance is brought back, it will immediately be available in the cluster for service. The instance removal and addition will reflect dynamically on the diagnostic page.
When an instance is added to the cluster, the Scheduler Diagnostics page immediately recognizes the new instance and displays the status of the new instances and all the threads running on that instance. This provides a powerful monitoring capability to the administrator to trace and resolve issues in any instance or any component of the scheduler.
The Scheduler Diagnostics page provides information on the following components:
• JMS
• Cluster
• Database
• Scheduler Engine

7-14 Oracle Fusion Middleware Administrator's Guide for Oracle Business Intelligence Publisher
The JMS section provides information on the following:
• JMS Cluster Config: This section provides configuration information for JMS setup:
• provider type (Weblogic / ActiveMQ)
• Weblogic version
• Weblogic JNDI Factory
• JNDI URL for JMS
• Queue names
• Temporary directory
• JMS Runtime: This provides runtime status of all JMS queues and topics

Configuring the Scheduler 7-15
The Cluster section provides details on the cluster instance. Use this information to understand the load on each processor:
• JMS instance config
• JMS Wrapper
• JMS Client – System - provides status of the BIP System topic. The scheduler diagnostic page is a subscriber to this topic.
• JMS Client_producer - not used in this release.
• JMS Client_schedule - provides status of the job processor and report processor, each processor showing number of active threads, number of messages received, number of messages failed, and number of messages running.
• JMS Client_delivery - provides status of different delivery processors as listeners, each delivery processor showing number of active threads, number of messages received, number of messages failed, and number of messages running.
The Database section provides information on:
• Database Config - connection type, JNDI Name, or connection string

7-16 Oracle Fusion Middleware Administrator's Guide for Oracle Business Intelligence Publisher
• Toplink Config - connection pooling, logging level
• Database Schema
The Quartz section provides information on:
• Quartz Configuration
• Quartz Initialization
Configuring Server Properties 8-1
8Configuring Server Properties
OverviewThis chapter covers server configuration settings under the System Maintenance regionof the Administration page. It includes the following:
• Setting the Path to the Configuration Folder, page 8-1
• Configuring the Catalog, page 8-2
• Setting General Properties, page 8-3
• Setting Caching Specifications, page 8-5
• Setting Retry Properties for Database Failover, page 8-6
Setting the Path to the Configuration FolderThe Configuration folder stores the files that contain your server configuration settings, for example, your data source connections, delivery server definitions, and scheduler settings.
The path to the Configuration folder is stored in the xmlp-server-config.xml configuration file.
When you install BI Publisher, this is automatically configured to ${xdo.server.config.dir}/repository
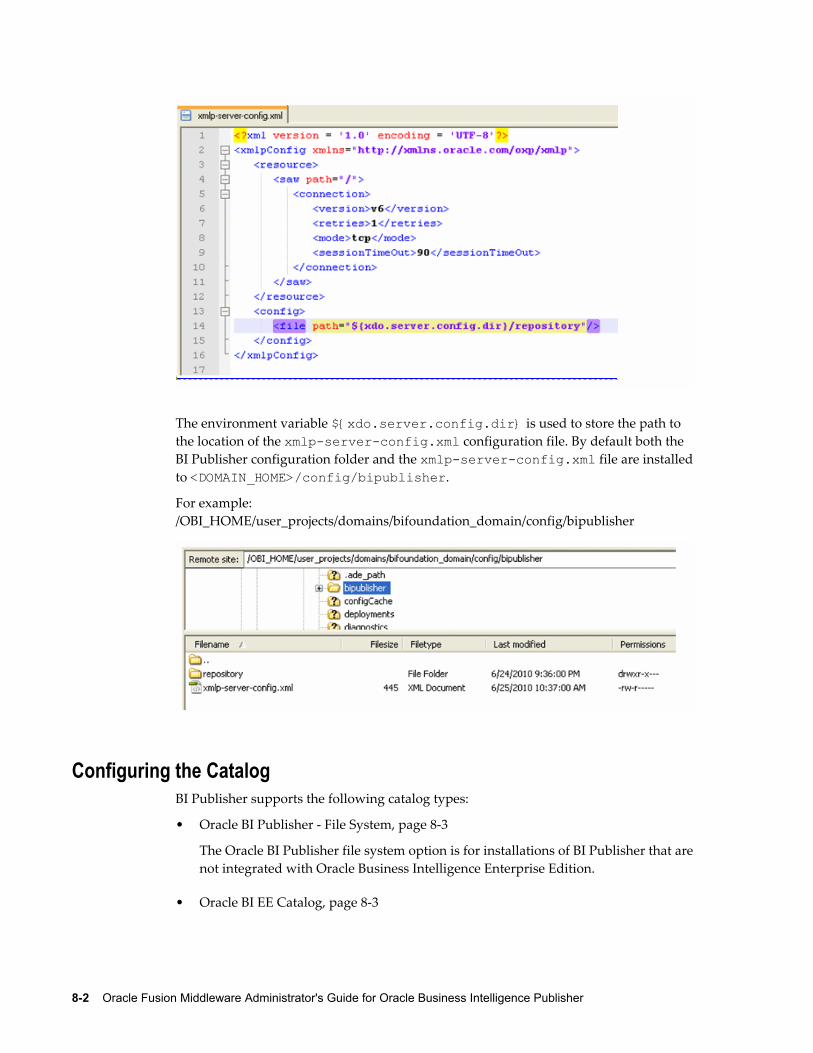
8-2 Oracle Fusion Middleware Administrator's Guide for Oracle Business Intelligence Publisher
The environment variable ${xdo.server.config.dir} is used to store the path to the location of the xmlp-server-config.xml configuration file. By default both the BI Publisher configuration folder and the xmlp-server-config.xml file are installedto <DOMAIN_HOME>/config/bipublisher.
For example: /OBI_HOME/user_projects/domains/bifoundation_domain/config/bipublisher
Configuring the CatalogBI Publisher supports the following catalog types:
• Oracle BI Publisher - File System, page 8-3
The Oracle BI Publisher file system option is for installations of BI Publisher that arenot integrated with Oracle Business Intelligence Enterprise Edition.
• Oracle BI EE Catalog, page 8-3

Configuring Server Properties 8-3
If you install BI Publisher with the Oracle Business Intelligence Enterprise Edition, the catalog will be automatically configured to use the shared Oracle BI Presentation catalog.
Configuring the Oracle BI Publisher File System CatalogImportant: When using file systems such as NFS, Windows, or NAS for your repository, you must ensure that your file system is secured.
When you install BI Publisher, the catalog will be configured by default to: ${xdo.server.config.dir}/repository
To change the location for your repository, perform the following:
1. Under Catalog, select Oracle BI Publisher - File System as the Catalog Type.
2. Enter the absolute Path.
3. Apply your changes and restart your BI Publisher application.
Important: Note that because the repository is in the file system, the case sensitivity of folder and report names is determined by the platform on which you are running BI Publisher. For Windows-based environments, the repository object names will not be case sensitive. For Unix-based environments, the repository object names will be case sensitive.
Configuring BI Publisher to Use the Oracle BI EE Catalog If you installed BI Publisher as part of the Oracle Business Intelligence Enterprise Edition BI Publisher will be automatically configured to use the shared Oracle BI EE (Oracle BI Presentation) catalog.
For prerequisites and steps for manually integrating BI Publisher with Oracle BI Enterprise Edition, see Integration Reference for Oracle Business Intelligence Enterprise Edition, page C-1.
Setting General PropertiesThe general properties region includes the following settings:
• System Temporary Directory
• Report Scalable Threshold

8-4 Oracle Fusion Middleware Administrator's Guide for Oracle Business Intelligence Publisher
• Database Fetch Size
The System Temporary DirectoryThis setting is optional. As long as the disk drive where BI Publisher is deployed has enough space to run BI Publisher, it is not required.
About Temporary FilesBI Publisher creates the following types of temporary and cache files:
Temporary files:
• Temporary files created by the formatting engines (FO processor, PDF Form Processor, PDF generators and so on)
• Data Files
These files are removed after the reports generate successfully.
Dynamic image files for HTML output:
• Dynamic charts
• Embedded images in RTF templates
Cache files:
• Data cache
• LOV (List of Values) cache
• Document Cache
• XSL Cache from RTF templates
Setting the System Temporary DirectoryIf you do not specify a temporary directory here, temporary files and dynamic image files are generated under {bip_deployment_directory}/xdo/tmp. Cache files are generated under {bip_deployment_directory}/xdo/cache.
When you configure a System Temporary Directory using this field, for example: "/disk1/BIP_Temp", the BI Publisher server automatically creates the following directories:
• /disk1/BIP_Temp/xdo
• /disk1/BIP_Temp/xdo/tmp

Configuring Server Properties 8-5
• /disk1/BIP_Temp/xdo/cache
Temporary files are generated under /disk1/BIP_Temp/xdo/tmp.
Cache files are generated under /disk1/BIP_Temp/xdo/cache.
Dynamic image files are still created in the {bip_deployment_directory}/xdo/tmp directory and are not affected by this configuration.
Whenever the BI Publisher server is restarted, any files under /disk1/BIP_Temp/xdo are removed.
Sizing the System Temporary DirectorySizing requirements will depend on how big your generated data files and reports are, how many reports enabled cache, and the number of concurrent users. If you need to process 1 GB of data and then to generate a report that is 1 GB, the temp disk should have more than 2 GB of disk space for a single report run. If you require ten concurrent report runs of similarly sized reports, then more than 20 GB of disk space is required. Inaddition, if you need to cache the data and reports for these ten users, you will need additional 20 GB of disk space. Note that cache is per user.
Setting the Report Scalable ThresholdThis property specifies the threshold at which data is cached on the disk. When the datavolume is large, caching the data will save memory, but will result in slower processing.Enter a value in bytes. The default and general recommendation for this property is 10000000 (10 megabytes).
Setting the Database Fetch SizeThis property specifies the number of rows that are fetched from the database at a time when more rows are needed. This setting can be overridden at the data model level by setting the Database Fetch Size in the general properties of the data model (see Entering Data Model Properties, Oracle Fusion Middleware Data Modeling Guide for Oracle Business Intelligence Publisher). If neither value is set, the system default value of 300 is used.
Setting Server Caching SpecificationsWhen BI Publisher processes a report, the data and the report document are stored in cache. Each item creates a separate cache file. Set the following properties to configure the size and expiration of this cache:
• Cache Expiration - enter the expiration period for the cache in minutes. The default is 30.
• Cache Size Limit - enter the maximum number of cached items to maintain regardless of the size of these items. The default is 1000.
8-6 Oracle Fusion Middleware Administrator's Guide for Oracle Business Intelligence Publisher
When BI Publisher processes a report it stores the report definition in memory so that for subsequent requests for the same report the report definition can be retrieved from memory rather than from disk. Set the following property to configure this cache:
• Maximum Cached Report Definitions - enter the maximum number of report definitions to maintain in cache. The default is 50. This cache does not expire.
Note: Report-specific caching of data sets can be set as a report property. See Configuring Report Properties, Oracle Fusion Middleware Report Designer's Guide for Oracle Business Intelligence Publisher.
Setting Retry Properties for Database FailoverIf BI Publisher fails to connect to a data source via the defined JDBC or JNDI connection,these properties control the number of retries that will be attempted before switching to the backup connection for the database.
• Number of Retries
Default value is 6. Enter the number of times to attempt to make a connection before switching to the backup database.
• Retry Interval (seconds)
Default value is 10 seconds. Enter the number of seconds to wait before retrying theconnection.

Setting Up Data Sources 9-1
9Setting Up Data Sources
This chapter covers the following topics:
• Overview of Setting Up Data Sources
• Setting Up a JDBC Connection to Your Data Source
• Setting Up a Database Connection Using a JNDI Connection Pool
• Setting Up a Connection to an LDAP Server Data Source
• Setting Up a Connection to an OLAP Data Source
• Setting Up a Connection to a File Data Source
• Viewing or Updating a Data Source
Overview of Setting Up Data SourcesBI Publisher supports a variety of data sources. The data can come from a database, an HTTP XML feed, a Web service, an Oracle BI Analysis, an OLAP cube, an LDAP server, or a previously generated XML file or Microsoft Excel file.
This section describes how to set up connections to the following:
• A database via a direct JDBC connection, page 9-5
• A database via a JNDI connection pool , page 9-8
• An LDAP server, page 9-8
• A database configured for Online Analytical Processing (OLAP), page 9-9
• A File Directory, page 9-10
About Other Types of Data SourcesConnections to an HTTP XML feed or a Web service are configured when you define

9-2 Oracle Fusion Middleware Administrator's Guide for Oracle Business Intelligence Publisher
the data model for your report (see Creating Data Sets, Oracle Fusion Middleware Data Modeling Guide for Business Intelligence Publisher). Connection to Oracle BI Presentation Services is automatically configured by the Oracle BI Installer.
About Data Sources and SecurityWhen you set up data sources, you can also define security for the data source by selecting which user roles can access the data source.
Access must be granted for the following:
• a report consumer must have access to the data source to view reports that retrieve data from the data source
• a report designer must have access to the data source to build or edit a data model against the data source
By default, a role with administrator privileges can access all data sources.
The configuration page for the data source includes a Security region that lists all the available roles. You can grant roles access from this page, or you can also assign the data sources to roles from the roles and permissions page. See Configuring Users and Roles, page 3-3 for more information.
If this data source will be used in guest reports, you must also enable guest access here. For more information about guess access see Enabling a Guest User, page 4-2.
The following figure shows the Security region of the data source configuration page:
About Proxy AuthenticationBI Publisher supports proxy authentication for connections to the following data sources:
• Oracle 10g database
• Oracle 11g database

Setting Up Data Sources 9-3
• Oracle BI Server
For direct data source connections via JDBC and connections via a JNDI connection pool, BI Publisher enables you to select "Use Proxy Authentication". When you select Use Proxy Authentication, BI Publisher passes the user name of the individual user (as logged into BI Publisher) to the data source and thus preserves the client identity and privileges when the BI Publisher server connects to the data source.
Note: Enabling this feature may require additional setup on your database. For example, your database must have Virtual Private Database (VPD) enabled for row-level security.
For more information on Proxy Authentication in Oracle databases, refer to Oracle Database Security Guide 10g or the Oracle Database Security Guide 11g.
Note that for connections to the Oracle BI Server, Proxy Authentication is required. In this case, proxy authentication is handled by the Oracle BI Server, therefore the underlying database can be any database that is supported by the Oracle BI Server.
Choosing JDBC or JNDI Connection TypeIn general, a JNDI connection pool is recommended because it provides the most efficient use of your resources. For example, if a report contains chained parameters, each time the report is executed, the parameters will initiate to open a database session every time.
About Backup DatabasesWhen you configure a JDBC connection to a database, you can also configure a backup database. A backup database can be used in two ways:
• As a true backup when the connection to the primary database is unavailable
• As the reporting database for the primary. To improve performance you can configure your report data models to execute against the backup database only.
To use the backup database in either of these ways, you must also configure the report data model to use it.
See Setting Data Model Properties, Oracle Fusion Middleware Data Modeling Guide for Oracle Business Intelligence Publisher for information on configuring a report data model to use the backup data source.
About Pre Process Functions and Post Process FunctionsYou can define PL/SQL functions for BI Publisher to execute when a connection to a JDBC data source is created (preprocess function) or closed (postprocess function). The function must return a boolean value. This feature is supported for Oracle databases

9-4 Oracle Fusion Middleware Administrator's Guide for Oracle Business Intelligence Publisher
only.
These two fields enable the administrator to set a user's context attributes before a connection is made to a database and then to dismiss the attributes after the connection is broken by the extraction engine.
The system variable :xdo_user_name can be used as a bind variable to pass the login username to the PL/SQL function calls. Setting the login user context in this way enables you to secure data at the data source level (rather than at the SQL query level).
For example, assume you have defined the following sample function:
ExampleFUNCTION set_per_process_username (username_in IN VARCHAR2) RETURN BOOLEAN IS BEGIN SETUSERCONTEXT(username_in); return TRUE; END set_per_process_username
To call this function every time a connection is made to the database, enter the following in the Pre Process Function field: set_per_process_username(:xdo_user_name)
Another sample usage may be to insert a row to the LOGTAB table every time a user connects or disconnects:
ExampleCREATE OR REPLACE FUNCTION BIP_LOG (user_name_in IN VARCHAR2, smode IN VARCHAR2) RETURN BOOLEAN AS BEGIN INSERT INTO LOGTAB VALUES(user_name_in, sysdate,smode); RETURN true; END BIP_LOG;
In the Pre Process Function field enter: BIP_LOG(:xdo_user_name)
As a new connection is made to the database, it is logged in the LOGTAB table. The SMODE value specifies the activity as an entry or an exit. Calling this function as a Post Process Function as well will return results like the following:

Setting Up Data Sources 9-5
Setting Up a JDBC Connection to Your Data Source
Prerequisites❒ The JDBC driver for your selected database must be available to BI Publisher. If you
are using an Oracle database or one of the DataDirect drivers provided by WebLogic Server, then the drivers will be installed in the correct location and there is no further setup required.
If you plan to use a different version of any of the drivers installed with WebLogic Server, you can replace the driver file in WL_HOME\server\lib with an updated version of the file or add the new file to the front of your CLASSPATH.
If you plan to use a third-party JDBC driver that is not installed with WebLogic Server, you need to update the WebLogic Server classpath to include the location of the JDBC driver classes. Edit the commEnv.cmd/sh script in WL_HOME/common/bin and prefix your classes as described in "Modifying the Classpath" in the Command Reference for Oracle WebLogic Server.
For more information, see Oracle Fusion Middleware Configuring and Managing JDBC for Oracle WebLogic Server 11g.
Setting Up a JDBC Connection to Your Data Source:1. From the Administration page click JDBC Connection. This will display the list of
existing JDBC connections.
2. Click Add Data Source.
3. Enter the following fields for the new connection:
• Data Source Name - enter a display name for the data source. This name will appear in the Data Source selection list in the Data Model Editor.
• Driver Type - select your database type from the list. When you select a driver type, BI Publisher will automatically display the appropriate Database Driver Class as well as provide the appropriate Connection String format for your selected database.
• Database Driver Class - this will be automatically entered based on your selection for Driver Type. You can update this field if desired.
For example: oracle.jdbc.OracleDriver or
hyperion.jdbc.sqlserver.SQLServerDriver
• Connection String - enter the database connection string.

9-6 Oracle Fusion Middleware Administrator's Guide for Oracle Business Intelligence Publisher
When you select the driver type, this field will automatically display the appropriate connection string format for your database type.
For an Oracle database the connect string will have the following format:
jdbc:oracle:thin:@[host]:[port]:[sid]
For example: jdbc:oracle:thin:@myhost.us.example.com:1521:prod
For a Microsoft SQL Server, the connect string will have the following format:
jdbc:hyperion:sqlserver://[hostname]:[port];DatabaseName=[Databasename]
For example:
jdbc:hyperion:sqlserver://myhost.us.example.com:7777;DatabaseName=mydatabase
• Use System User - this is reserved for connections to the Oracle BI Server. See Setting Up a JDBC Connection to the Oracle BI Server, page C-3.
• User Name - enter the user name required to access the data source on the database.
• Password - enter the password associated with the user name for access to the data source on the database.
• Pre Process Function and Post Process Function - (optional) enter a PL/SQL function to execute when a connection is created (Pre Process) or closed (Post Process). For more information see About Pre Process and Post Process Functions, page 9-3.
• Use Proxy Authentication - select this box to enable Proxy Authentication. See About Proxy Authentication, page 9-2 for more information.
4. Click Test Connection. A confirmation will display.
The following figure shows the general settings of the JDBC connection page:

Setting Up Data Sources 9-7
5. (Optional) Enable a backup database for this connection by entering the following:
• Use Backup Data Source - select this box.
• Connection String - enter the connection string for the backup database.
• Username / Password - enter the username and password for this database.
• Click Test Connection. A confirmation will display.
The following figure shows the Backup Data Source region of the page:
6. Define security for this data source. Use the shuttle buttons to move roles from the Available Roles list to the Allowed Roles list. Only users assigned the roles on the Allowed Roles list will be able to create or view reports from this data source.

9-8 Oracle Fusion Middleware Administrator's Guide for Oracle Business Intelligence Publisher
The settings defined here will be passed down to the backup data source, if one is defined.
Setting Up a Database Connection Using a JNDI Connection PoolBI Publisher supports connecting to your JDBC data source via a connection pool. Usinga connection pool increases efficiency by maintaining a cache of physical connections that can be reused. When a client closes a connection, the connection gets placed back into the pool so that another client can use it. A connection pool improves performance and scalability by allowing multiple clients to share a small number of physical connections. You set up the connection pool in your application server and access it via Java Naming and Directory Interface (JNDI).
After you set up the connection pool in your application server, enter the required fieldsin this page so that BI Publisher can utilize the pool to establish connections. For information on setting up a connection pool in WebLogic Server, see the chapter "Configuring JDBC Data Sources" in the Oracle Fusion Middleware Configuring and Managing JDBC for Oracle WebLogic Server 11g.
1. From the Administration page click JNDI Connection. This will display the list of existing JNDI connections.
2. Click Add Data Source.
3. Enter the following fields for the new connection:
• Data Source Name - enter a display name for the data source. This name will appear in the Data Source selection list in the Data Model Editor.
• JNDI Name - enter the JNDI location for the pool. For example, jdbc/BIP10gSource.
• Use Proxy Authentication - select this box to enable Proxy Authentication. See About Proxy Authentication, page 9-2 for more information.
4. Click Test Connection. A confirmation message will display.
5. Define security for this data source. Use the shuttle buttons to move roles from the Available Roles list to the Allowed Roles list. Only users assigned the roles on the Allowed Roles list will be able to create or view reports from this the data source.
Setting Up a Connection to an LDAP Server Data Source1. From the Administration page select LDAP Connection. This will display the list of
existing LDAP connections.

Setting Up Data Sources 9-9
2. Click Add Data Source.
3. Enter the following fields for the new connection:
• Enter the Data Source Name. This is the display name that will appear in the Data Source selection list in the Data Model Editor.
• Enter the LDAP Connection URL for your LDAP server in the format: ldap://hostname:port.
• Enter the Username (for example: cn=admin,cn=users,dc=us,dc=company,dc=com).
• Password - enter the password if required.
• Enter the JNDI Context Factor Class (for example: com.sun.jndi.ldap.LdapCtxFactory).
4. Click Test Connection.
5. Define security for this data source. Use the shuttle buttons to move roles from the Available Roles list to the Allowed Roles list. Only users assigned the roles on the Allowed Roles list will be able to create data models from this the data source or view reports that run against this data source.
Setting Up a Connection to an OLAP Data SourceBI Publisher supports connecting to several types of OLAP databases. Note that to connect to Microsoft SQL Server 2000 Analysis Services, BI Publisher must be installed on a supported Windows operating system.
1. From the Administration page click OLAP Connection. This will display the list of existing OLAP connections.
2. Click Add Data Source.
3. Enter the following fields for the new connection:
• Data Source Name - enter a display name for the data source. This name will appear in the Data Source selection list in the Data Model Editor.
OLAP Type - choose from the list of supported OLAP databases. When you choose the type, the OLAP Connection String field will update with the appropriate connection string format for your selection.
• OLAP Connection String - enter the connection string for your OLAP database. Following are examples for each of the supported OLAP types:

9-10 Oracle Fusion Middleware Administrator's Guide for Oracle Business Intelligence Publisher
• Oracle's Hyperion Essbase
Format: [server]
Example: myServer.us.example.com
• Microsoft SQL Server 2000 Analysis Services
Format: Data Source=[server];Provider=msolap;Initial Catalog=[catalog]
Example: Data Source=myServer;Provider=msolap;Initial Catalog=VideoStore
• Microsoft SQL Server 2005 Analysis Services
Format: Data Source=[server];Provider=msolap.3;Initial Catalog=[catalog]
Example: Data Source=myServer;Provider=msolap.3;Initial Catalog=VideoStore
• SAP BW
Format: ASHOST=[server] SYSNR=[system number] CLIENT=[client] LANG=[language]
Example: ASHOST=172.16.57.44 SYSNR=01 CLIENT=800 LANG=EN
• Username and Password for the OLAP database.
4. Click Test Connection. A confirmation message will display.
5. Define security for this data source. Use the shuttle buttons to move roles from the Available Roles list to the Allowed Roles list. Only users assigned the roles on the Allowed Roles list will be able to create or view reports from this the data source.
Setting Up a Connection to a File Data SourceBI Publisher enables you to use existing XML or Microsoft Excel files created from othersources as input to your BI Publisher reports. To use a file as a data source, it must reside in a directory that BI Publisher can connect to. Set up the connection details to thefile data source directory using this page.
1. From the Administration page click File. This will display the list of existing file sources.
2. Click Add Data Source.
3. Enter the following fields for the new data source:
• Data Source Name - enter a display name for the data source. This name will

Setting Up Data Sources 9-11
appear in the Data Source selection list in the Data Model Editor.
• Path - enter the full path to the top-level directory on your server. Users will be able to access files in this directory and any subdirectories.
4. Define security for this data source. Use the shuttle buttons to move roles from the Available Roles list to the Allowed Roles list. Only users assigned the roles on the Allowed Roles list will be able to create or view reports from this data source.
Viewing or Updating a Data Source1. From the Administration page select the Data Source type to update.
2. Select the name of the connection to view or update. All fields are updateable. See the appropriate section for setting up the data source type for information on the required fields.
3. Select Apply to apply any changes or Cancel to exit the update page.


Setting Up Integrations 10-1
10Setting Up Integrations
OverviewThis chapter describes how to set up integration with the following:
• Oracle BI Presentation Services , page 10-1
This integration enables you to use Oracle BI analyses as data sources for your reports. Once you have successfully set up the integration, Oracle BI Analysis will be enabled as a data set type selection in the Data Model Editor.
Configuring Integration with Oracle BI Presentation ServicesThe integration with Oracle BI Presentation Services enables the access to Oracle BI analyses as data sources for your reports.
When you install BI Publisher with Oracle BI Enterprise Edition this integration is automatically configured.
For prerequisites and steps for manually integrating BI Publisher with Oracle BI Enterprise Edition, see Integration Reference for Oracle Business Intelligence Enterprise Edition, page C-1.


Setting Up Delivery Destinations 11-1
11Setting Up Delivery Destinations
OverviewUse the Delivery Options page to set up the delivery channels that you wish to use withyour BI Publisher application. This chapter includes the following procedures:
• Defining Delivery Configuration Options, page 11-1
• Adding a Print or Fax Server, page 11-2
• Adding a WebDAV Server, page 11-5
• Adding an HTTP Server, page 11-5
• Adding an Email or FTP Server, page 11-6
• Adding a Common Unix Printing System (CUPS) Server, page 11-7
Configuring Delivery OptionsUse the Delivery Configuration Options page to set general properties for e-mail deliveries from BI Publisher and for defining your SSL certificate file.
1. From the Admin page select Delivery Configuration.

11-2 Oracle Fusion Middleware Administrator's Guide for Oracle Business Intelligence Publisher
2. Enter the following properties:
• SSL Certificate File - if SSL is enabled for your installation, you can leave this field empty if you wish to use the default certificates built-in with BI Publisher. SSL will work with the default certificate if the server uses the certificate signed by a trusted certificate authority such as Verisign. This field is mandatory only if the user uses the SSL with a self-signed certificate. The self-signed certificate means the certificate is signed by a non-trusted certificate authority (usually theuser).
• Email From Address - enter the From address that you want to appear on emailreport deliveries from the BI Publisher server. The default value is [email protected].
• Delivery Notification Email From Address - enter the From address that you want to appear on notifications delivered from the BI Publisher server. The default value is [email protected].
• Success Notification Subject - enter the subject line to display for e-mail notification recipients when the report status is Success. Example: Auto: Success
• Warning Notification Subject - enter the subject line to display for e-mail notification recipients when the report status is Warning. Example: Auto: Report Generated with errors
• Failure Notification Subject - enter the subject line to display for e-mail notification recipients when the report status is Failed. Example: Auto: Failed
Adding a Printer or Fax ServerPrinting is only supported through Internet Printing Protocol (IPP). If BI Publisher is

Setting Up Delivery Destinations 11-3
operating in a Linux environment, you must set up the Common Unix Printing Service (CUPS). If BI Publisher is operating in a Windows environment, you must set up Windows Print Server for IPP. For information on setting up CUPS and Windows IPP, see Print Server Setup, page A-1.
About Printing PDF
PDF is a popular output format for business reports and is printable from viewer software such as Adobe Reader. However, some reports require printing directly from the report server. For example, paychecks and invoices are usually printed as scheduledbatch jobs. Some newer printers with Postscript Level 3 compliant Raster Image Processing can natively support PDF documents, but there are still many printers in business use that only support Postscript Level 2 that cannot print PDF documents directly.
To print PDF documents directly from the BI Publisher server you have the following options:
• Select BI Publisher's PDF to Postscript filter. This can be enabled for Unix or Windows print servers.
• Configure a custom, or third-party filter.
After completing all other required fields for the print server, you will be able to schedule reports to print directly from the BI Publisher server to any printer in your system that supports PostScript Level 2.
To set up your printer or fax:
1. From the Admin page select Printer or Fax. Select Add Server.
2. Enter the following required fields:
• Server Name - enter a unique name. Example: Localprinter
Important: You must enter a unique name for each server regardless of the type (printer, fax, e-mail, WebDAV, or FTP).
• URI - enter the Uniform Resource Identifier for the printer. Example: ipp://myhost:631/printers/myprinter
3. Enter a Filter (optional).
A filter enables you to call a conversion utility to convert PDF to Postscript or PDF to TIFF (for fax) for Windows-based print servers.
BI Publisher includes a PDF to Postscript filter. This filter converts PDF to PostscriptLevel 2. Choose PDF to Postscript from the list if you wish to use BI Publisher's predefined filter. See About Printing PDF, page 11-3 for more information.

11-4 Oracle Fusion Middleware Administrator's Guide for Oracle Business Intelligence Publisher
About Custom Filters
To specify a custom filter, pass the native OS command string with the 2 placeholders for the input and output filename, {infile} and {outfile}.
This is useful especially if you are trying to call IPP printers directly or IPP printers on Microsoft Internet Information Service (IIS). Unlike CUPS, those print servers donot translate the print file to a format the printer can understand, therefore only limited document formats are supported. With the filter functionality, you can call any of the native OS commands to transform the document to the format that the target printer can understand.
For example, to transform a PDF document to a Postscript format, enter the following PDF to PS command in the Filter field:
pdftops {infile} {outfile}
To call an HP LaserJet printer setup on a Microsoft IIS from Linux, you can set Ghostscript as a filter to transform the PDF document into the format that the HP LaserJet can understand. To do this, enter the following Ghostscript command in the Filter field:gs -q -dNOPAUSE -dBATCH -sDEVICE=laserjet -sOutputFile={outfile} {infile}
For fax servers, you can use the filter to transform the file to Tag Image File Format (TIFF).
4. Optionally enter the following fields if appropriate:
• Security fields: Username and Password, Authentication Type (None, Basic, Digest) and Encryption Type (None, SSL).
• Proxy Server fields: Host, Port, User Name, Password, Authentication Type (None, Basic, Digest)
Adding an E-mail Server1. From the Admin page select Email. This will show the list of servers already added.
Select Add Server.
2. Enter the Server Name, Host, and Port for the e-mail server.
Important: You must enter a unique name for each server regardless of the type (printer, fax, e-mail, WebDAV, or FTP).
3. Select a Secure Connection method to use for connections with the e-mail server. The options are:

Setting Up Delivery Destinations 11-5
• None
• SSL - use Secure Sockets Layer
• TLS - (Transport Layer Security) use TLS when the server supports the protocol;SSL will be accepted in the response.
• TLS Required - if the server does not support TLS, the connection will not be made.
4. Optionally enter the following fields if appropriate:
• General fields: Port
• Security fields: Username and Password.
Adding a WebDAV Server1. From the Admin page select WebDAV. This will show the list of servers already
added. Select Add Server.
2. Enter the Name and Host for the new server.
Important: You must enter a unique name for each server regardless of the type (printer, fax, email, WebDAV, or FTP).
3. Optionally enter the following fields if appropriate:
• General fields: Port
• Security fields: Authentication Type (None, Basic, Digest) and Encryption Type (None, SSL).
• Proxy Server fields: Host, Port, User Name, Password, Authentication Type (None, Basic, Digest)
Adding an HTTP ServerYou can register an application URL or postprocess HTTP URL as an HTTP server to send a notification request to after your report has completed. The HTTP notification sent by BI Publisher will post a form data for Job ID, report URL and Job Status to the HTTP Server URL page.
For more information about setting up an HTTP notification to integrate with a third-party application, see Setting Up an After Report Trigger, Oracle Fusion Middleware

11-6 Oracle Fusion Middleware Administrator's Guide for Oracle Business Intelligence Publisher
Developer's Guide for Oracle Business Intelligence Publisher. For information on enabling anHTTP notification for a scheduled report, see Configuring Notifications, Oracle Fusion Middleware User's Guide for Oracle Business Intelligence Publisher.
1. From the Admin page select HTTP. This will show the list of servers already added.Select Add Server.
2. Enter a name for your server, and enter the URL. When your report finishes processing, BI Publisher will post form data for Job ID, report URL and Job Status.
3. Enter the Security information, if required. If your server is password protected, enter the Username and Password. Select the Authentication Type: None, Basic, or Digest; and Encryption Type: None or SSL.
4. If the notification is to be sent through a proxy server, enter the fully qualified Host name, the Port, the Username and Password, and Authentication type of the proxy server.
Adding an FTP ServerImportant: If the destination file name supplied to the BI Publisher scheduler contains non-ascii characters, BI Publisher will use UTF-8 encoding to specify the file name to the destination FTP server. Your FTP server must support UTF-8 encoding or the job delivery will fail with "Delivery Failed" error message.
1. From the Admin page select FTP. This will show the list of servers already added. Click Add Server.
2. Enter the following fields for the FTP server:
• Server Name - example: myftpserver
• Host - example: myhost.company.com
• Port: example: 21
Important: You must enter a unique name for each server regardless of the type (printer, fax, email, WebDAV, or FTP).
3. Select the Use Secure FTP box to enable Secure FTP (SFTP)
4. Enter a Username and Password for the server if required.

Setting Up Delivery Destinations 11-7
Adding a Common Unix Printing System (CUPS) Server1. From the Admin page select CUPS. This will show the list of servers already added.
Select Add Server.
2. Enter the Server Name and Host and Port for the CUPS server.
For more information see Setting Up Cups, page A-1.


Defining Runtime Configurations 12-1
12Defining Runtime Configurations
This chapter covers the following topics:
• Setting Runtime Properties
• PDF Output Properties
• PDF Security Properties
• PDF Digital Signature Properties
• RTF Output Properties
• HTML Output Properties
• FO Processing Properties
• RTF Template Properties
• PDF Template Properties
• Flash Template Properties
• CSV Output Properties
• Excel 2007 Output Properties
• All Outputs
• Defining Font Mappings
• Defining Currency Formats
Setting Runtime PropertiesThe Runtime Configuration page enables you to set runtime properties at the server level. These same properties can also be set at the report level, from the report editor's Properties dialog (see Defining Report Properties, Oracle Fusion Middleware Report Designer's Guide for Oracle Business Intelligence Publisher). If different values are set for a property at each level, the report level will take precedence.

12-2 Oracle Fusion Middleware Administrator's Guide for Oracle Business Intelligence Publisher
PDF Output PropertiesThe following table describes the properties that are available for PDF output:
Property Name Description
Compress PDF output Default: true
Description: Specify "true" or "false" to control compression of the output PDF file.
Internal Name:pdf-compression
Hide PDF viewer's menu bars Default: false
Description: Specify "true" to hide the viewer application's menu bar when the document is active. The menu bar option is only effective when using the Exportbutton, which displays the output in a standalone Acrobat Reader application outside of the browser.
Internal Name: pdf-hide-menubar
Hide PDF viewer's tool bars Default: false
Description: Specify "true" to hide the viewer application's toolbar when the document is active.
Internal Name:pdf-hide-toolbar
Replace smart quotes Default: true
Description: Set to "false" if you do not want curly quotes replaced with straightquotes in your PDF output.
Internal Name: pdf-replace-smartquotes

Defining Runtime Configurations 12-3
Property Name Description
Use only one shared resources object for all pages
Default: true
Description: The default mode of BI Publisher creates one shared resources object for all pages in a PDF file. This mode has the advantage of creating an overall smaller file size. However, the disadvantages are the following:
• Viewing may take longer for a large file with many SVG objects
• If you choose to break the file up by using Adobe Acrobat to extract or delete portions, the edited PDF files will be larger because all of the single shared resource object (containing all of the SVG objects for the entire file) will be included with each extracted portion.
Setting this property to "false" will create a resource object for each page. The file size will be bigger, but the PDF viewing will be faster and the PDF can be broken up into smaller files more easily.
Internal Name: pdf-use-one-resources
PDF Security PropertiesUse the following properties to control the security settings for your output PDF documents:
Property Name Description
Enable PDF Security Default: false
Description: If you specify "true," the output PDF file will be encrypted. You can then also specify the following properties:
• Open document password
• Modify permissions password
• Encryption Level
Internal Name: pdf-security

12-4 Oracle Fusion Middleware Administrator's Guide for Oracle Business Intelligence Publisher
Property Name Description
Open document password Default: N/A
Description: This password will be required for opening the document. It will enable users to open the document only. This property is enabled only when "Enable PDF Security" is set to "true".
Note that BI Publisher follows Adobe's password restrictions. The password must contain only Latin 1 characters and must be no more than 32 bytes long.
Internal Name:pdf-open-password
Modify permissions password Default: N/A
Description: This password enables users to override the security setting. This property is effective only when "Enable PDF Security" is set to "true".
Note that BI Publisher follows the Adobe's password restrictions. The password must contain only Latin 1 characters and must be no more than 32 bytes long.
Internal Name:pdf-permissions-password

Defining Runtime Configurations 12-5
Property Name Description
Encryption level Default: 2 - high
Description: Specify the encryption level for the output PDF file. The possible values are:
• 0: Low (40-bit RC4, Acrobat 3.0 or later)
• 1: Medium (128-bit RC4, Acrobat 5.0 or later)
• 2: High (128-bit AES, Acrobat 7.0 or later)
This property is effective only when "Enable PDF Security" is set to "true". When Encryption level is set to 0, you can also set the followingproperties:
• Disable printing
• Disable document modification
• Disable context copying, extraction, and accessibility
• Disable adding or changing comments and form fields
When Encryption level is set to 1 or higher, the following properties are available:
• Enable text access for screen readers
• Enable copying of text, images, and other content
• Allowed change level
• Allowed printing level
Internal Name: pdf-encryption-level
Disable document modification Default: false
Description: Permission available when "Encryption level" is set to 0. When set to "true", the PDF file cannot be edited.
Internal Name:pdf-no-changing-the-document

12-6 Oracle Fusion Middleware Administrator's Guide for Oracle Business Intelligence Publisher
Property Name Description
Disable printing Default: false
Description: Permission available when "Encryption level" is set to 0. When set to "true", printing is disabled for the PDF file.
Internal Name:pdf-no-printing
Disable adding or changing comments and form fields
Default: false
Description: Permission available when "Encryption level" is set to 0. When set to "true", the ability to add or change comments and form fields is disabled.
Internal Name:pdf-no-accff
Disable context copying, extraction, and accessibility
Default: false
Description: Permission available when "Encryption level" is set to 0. When set to "true", the context copying, extraction, and accessibility features are disabled.
Internal Name:
pdf-no-cceda
Enable text access for screen readers Default: true
Description: Permission available when "Encryption level" is set to 1 or higher. When set to "true", text access for screen reader devices is enabled.
Internal Name:
pdf-enable-accessibility
Enable copying of text, images, and other content
Default: false
Description: Permission available when "Encryption level" is set to 1 or higher. When set to "true", copying of text, images, and other content is enabled.
Internal Name: pdf-enable-copying

Defining Runtime Configurations 12-7
Property Name Description
Allowed change level Default: 0
Description: Permission available when "Encryption level" is set to 1 or higher. Valid Values are:
• 0: none
• 1: Allows inserting, deleting, and rotating pages
• 2: Allows filling in form fields and signing
• 3: Allows commenting, filling in form fields, and signing
• 4: Allows all changes except extracting pages
Internal Name:pdf-changes-allowed
Allowed printing level Default: 0
Description: Permission available when "Encryption level" is set to 1 or higher. Valid values are:
• 0: None
• 1: Low resolution (150 dpi)
• 2: High resolution
Internal Name:pdf-printing-allowed
PDF Digital Signature PropertiesThe following properties should only be set at the report level to enable digital signature for a report and to define the placement of the signature in the output PDF document. For more information on how to enable digital signature for your output PDF documents, see Implementing a Digital Signature, page 6-1.
Note that to implement digital signature for a report based on a PDF layout template or an RTF layout template, you must set the property Enable Digital Signature to "True" for the report.
You also must set the appropriate properties to place the digital signature in the desiredlocation on your output report. Your choices for placement of the digital signature depend on the template type. The choices are as follows:

12-8 Oracle Fusion Middleware Administrator's Guide for Oracle Business Intelligence Publisher
• (PDF only) Place the digital signature in a specific field by setting the Existing signature field name property.
• (RTF and PDF) Place the digital signature in a general location of the page (top left, top center, or top right) by setting the Signature field location property.
• (RTF and PDF) Place the digital signature in a specific location designated by x and y coordinates by setting the Signature field x coordinate and Signature field y coordinate properties.
If you choose this option, you can also set Signature field width and Signature field height to define the size of the field in your document.
Note that if you enable digital signature, but do not set any location properties, the digital signature placement will default to the top left of the document.
Property Name Description
Enable Digital Signature Default: false
Description: Set this to "true" to enable digital signature for the report.
Internal Name: signature-enable
Existing signature field name Default: N/A
Description: This property applies to PDF layout templates only. If your report is based on a PDF template, you can enter a field from the PDF template in which to place the digital signature. For more information on defining a field for the signature in a PDF template, see Adding or Designating a Field for a Digital Signature, Oracle Fusion Middleware Report Designer's Guide for Oracle Business IntelligencePublisher.
Internal Name: signature-field-name
Signature field location Default: top-left
Description: This property can apply to RTF or PDF layout templates. This property provides a list containing the following values: Top Left, Top Center, Top Right. Choose one of these general locations andBI Publisher will insert the digital signature to the output document, sized and positioned appropriately. If you choose to set this property, do not enter X and Y coordinates or width and height properties.
Internal Name: signature-field-location

Defining Runtime Configurations 12-9
Property Name Description
Signature field X coordinate Default: 0
Description: This property can apply to RTF or PDF layout templates. Using the left edge of the document as the zero point of the X axis, enter the position in points that you want the digital signature to be placed from the left. For example, if you want the digital signature to be placed horizontally in the middle of an 8.5 inch by 11 inch document (that is, 612 points in width and 792 points in height), enter 306.
Internal Name: signature-field-pos-x
Signature field Y coordinate Default: 0
Description: This property can apply to RTF or PDF layout templates. Using the bottom edge of the document as the zero point of the Y axis,enter the position in points that you want the digital signature to be placed from the bottom. For example, if you want the digital signatureto be placed vertically in the middle of an 8.5 inch by 11 inch document (that is, 612 points in width and 792 points in height), enter 396.
Internal Name: signature-field-pos-y
Signature field width Default: 0
Description: Enter in points (72 points equal one inch) the desired width of the inserted digital signature field. This applies only if you are also setting the properties Signature field x coordinate and Signature field Y coordinate.
Internal Name: signature-field-width
Signature field height Default: 0
Description: Enter in points (72 points equal one inch) the desired height of the inserted digital signature field. This applies only if you are also setting the properties Signature field x coordinate and Signature field Y coordinate.
Internal Name: signature-field-height
RTF Output PropertiesThe following properties can be set to govern RTF output files:

12-10 Oracle Fusion Middleware Administrator's Guide for Oracle Business Intelligence Publisher
Property Name Description
Enable change tracking Default: false
Description: Set to "true" to enable change tracking in the output RTF document.
Internal Name: rtf-track-changes
Protect document for tracked changes
Default: false
Description: Set to "true" to protect the document for tracked changes.
Internal Name:rtf-protect-document-for-tracked-changes
Default font Default: Arial:12
Description: Use this property to define the font style and size in RTF output when no other font has been defined. This is particularly useful to control the sizing of empty table cells in generated reports.
Enter the font name and size in the following format <FontName>:<size>
for example: Arial:12.
Note that the font you choose must be available to the BI Publisher processing engine at runtime. See Defining Font Mappings, page 12-19 for information on installing fonts for the BI Publisher server and also for the list of fonts predefined for BI Publisher.
Internal Name: rtf-output-default-font
HTML Output PropertiesThe following properties can be set to govern HTML output files:
Property Name Description
Show header Default: true
Description: Set to "false" to suppress the template header in HTML output.
Internal Name: html-show-header

Defining Runtime Configurations 12-11
Property Name Description
Show footer Default: true
Description: Set to "false" to suppress the template footer in HTML output.
Internal Name: html-show-footer
Replace smart quotes Default: true
Description: Set to "false" if you do not want curly quotes replaced with straight quotes in your HTML output.
Internal Name: html-replace-smartquotes
Character set Default: UTF-8
Description: Specifies the output HTML character set.
Internal Name: html-output-charset
Make HTML output accessible Default: false
Description: Specify true if you want to make the HTML output accessible.
Internal Name: make-accessible
Use percentage width for table columns
Default: true
Description: Set this property to true to render table columns according toa percentage value of the total width of the table rather than as a value in points.
This property is especially useful if your browser renders tables with extremely wide columns. Setting this property to true will improve readability of the tables.
Internal Name: html-output-width-in-percentage
FO Processing PropertiesThe following properties can be set to govern FO processing:
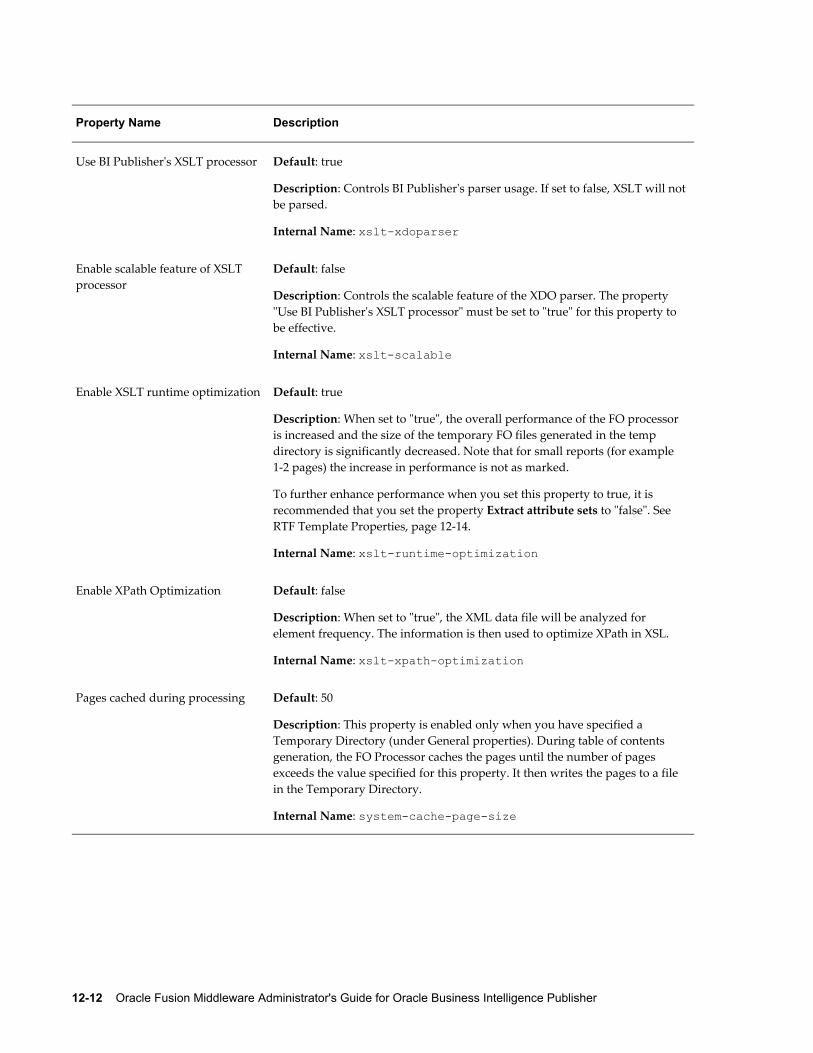
12-12 Oracle Fusion Middleware Administrator's Guide for Oracle Business Intelligence Publisher
Property Name Description
Use BI Publisher's XSLT processor Default: true
Description: Controls BI Publisher's parser usage. If set to false, XSLT will notbe parsed.
Internal Name: xslt-xdoparser
Enable scalable feature of XSLT processor
Default: false
Description: Controls the scalable feature of the XDO parser. The property "Use BI Publisher's XSLT processor" must be set to "true" for this property to be effective.
Internal Name: xslt-scalable
Enable XSLT runtime optimization Default: true
Description: When set to "true", the overall performance of the FO processor is increased and the size of the temporary FO files generated in the temp directory is significantly decreased. Note that for small reports (for example 1-2 pages) the increase in performance is not as marked.
To further enhance performance when you set this property to true, it is recommended that you set the property Extract attribute sets to "false". See RTF Template Properties, page 12-14.
Internal Name: xslt-runtime-optimization
Enable XPath Optimization Default: false
Description: When set to "true", the XML data file will be analyzed for element frequency. The information is then used to optimize XPath in XSL.
Internal Name: xslt-xpath-optimization
Pages cached during processing Default: 50
Description: This property is enabled only when you have specified a Temporary Directory (under General properties). During table of contents generation, the FO Processor caches the pages until the number of pages exceeds the value specified for this property. It then writes the pages to a file in the Temporary Directory.
Internal Name: system-cache-page-size

Defining Runtime Configurations 12-13
Property Name Description
Bidi language digit substitution type
Default: None
Description: Valid values are "None" and "National". When set to "None", Eastern European numbers will be used. When set to "National", Hindi format (Arabic-Indic digits) will be used. This setting is effective only when the locale is Arabic, otherwise it is ignored.
Internal Name: digit-substitution
Disable variable header support Default: false
Description: If "true", prevents variable header support. Variable header support automatically extends the size of the header to accommodate the contents.
Internal Name: fo-prevent-variable-header
Add prefix to IDs when merging FO
Default: false
Description: When merging multiple XSL-FO inputs, the FO Processor automatically adds random prefixes to resolve conflicting IDs. Setting this property to "true" disables this feature.
Internal Name: fo-merge-conflict-resolution
Enable multithreading Default: false
Description: If you have a multiprocessor machine or a machine with a dual-core single processor, you may be able to achieve faster document generation by setting this option to True.
Internal Name: fo-multi-threads
Disable external references Default: true
Description: A "true" setting (default) disallows the importing of secondary files such as subtemplates or other XML documents during XSL processing and XML parsing. This increases the security of your system. Set this to "false"if your report or template calls external files.
Internal Name: xdk-secure-io-mode
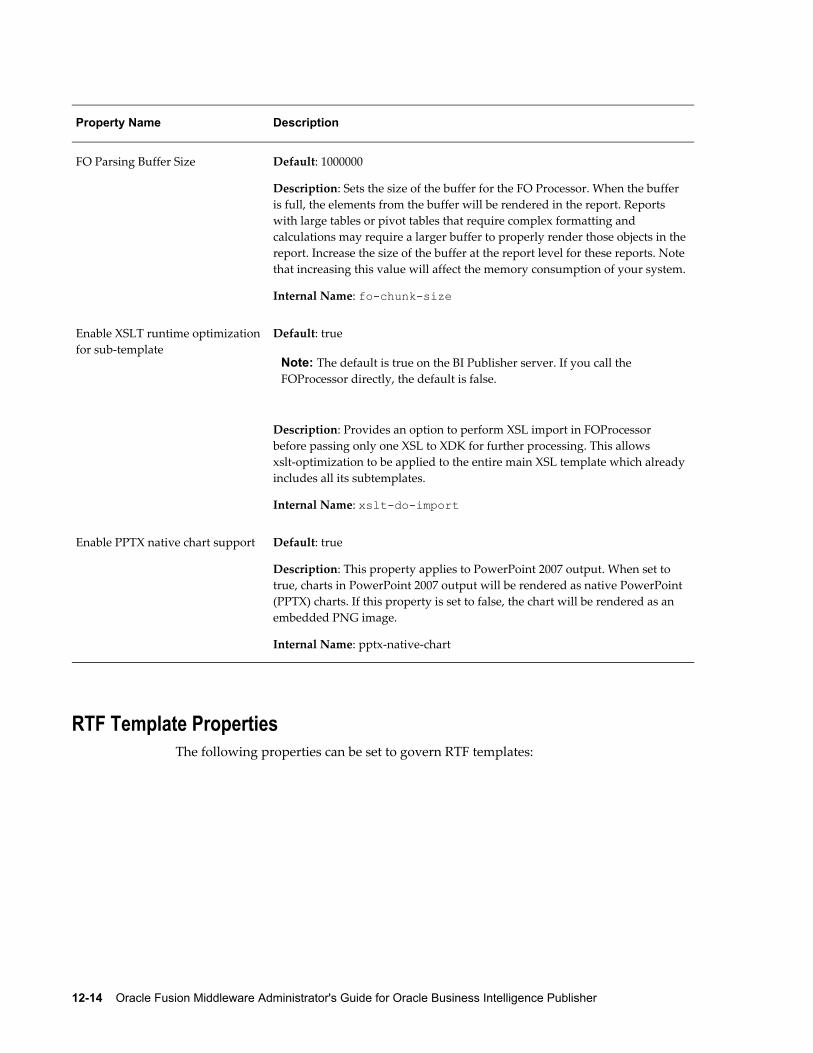
12-14 Oracle Fusion Middleware Administrator's Guide for Oracle Business Intelligence Publisher
Property Name Description
FO Parsing Buffer Size Default: 1000000
Description: Sets the size of the buffer for the FO Processor. When the buffer is full, the elements from the buffer will be rendered in the report. Reports with large tables or pivot tables that require complex formatting and calculations may require a larger buffer to properly render those objects in thereport. Increase the size of the buffer at the report level for these reports. Notethat increasing this value will affect the memory consumption of your system.
Internal Name: fo-chunk-size
Enable XSLT runtime optimizationfor sub-template
Default: true
Note: The default is true on the BI Publisher server. If you call the FOProcessor directly, the default is false.
Description: Provides an option to perform XSL import in FOProcessor before passing only one XSL to XDK for further processing. This allows xslt-optimization to be applied to the entire main XSL template which alreadyincludes all its subtemplates.
Internal Name: xslt-do-import
Enable PPTX native chart support Default: true
Description: This property applies to PowerPoint 2007 output. When set to true, charts in PowerPoint 2007 output will be rendered as native PowerPoint (PPTX) charts. If this property is set to false, the chart will be rendered as an embedded PNG image.
Internal Name: pptx-native-chart
RTF Template PropertiesThe following properties can be set to govern RTF templates:

Defining Runtime Configurations 12-15
Property Name Description
Extract attribute sets Default: Auto
Description: The RTF processor will automatically extract attribute sets within the generated XSL-FO. The extracted sets are placed in an extra FO block, which can be referenced. This improves processing performance and reduces file size.
Valid values are:
• Enable - extract attribute sets for all templates and subtemplates
• Auto - extract attribute sets for templates, but not subtemplates
• Disable - do not extract attribute sets
Internal Name:rtf-extract-attribute-sets
Enable XPath rewriting Default: true
Description: When converting an RTF template to XSL-FO, the RTF processorwill automatically rewrite the XML tag names to represent the full XPath notations. Set this property to "false" to disable this feature.
Internal Name: rtf-rewrite-path
Characters used for checkbox Default: Albany WT J;9746;9747/A
Description: The BI Publisher default PDF output font does not include a glyph to represent a checkbox. If your template contains a checkbox, use this property to define a Unicode font for the representation of checkboxes in yourPDF output. You must define the Unicode font number for the "checked" stateand the Unicode font number for the "unchecked" state using the following syntax: fontname;<unicode font number for true value's glyph >;<unicode font number for false value's glyph>
Example: Albany WT J;9746;9747/A
Note that the font that you specify must be made available to BI Publisher at runtime.
Internal Name: rtf-checkbox-glyph
PDF Template PropertiesThe following properties can be set to govern PDF templates:
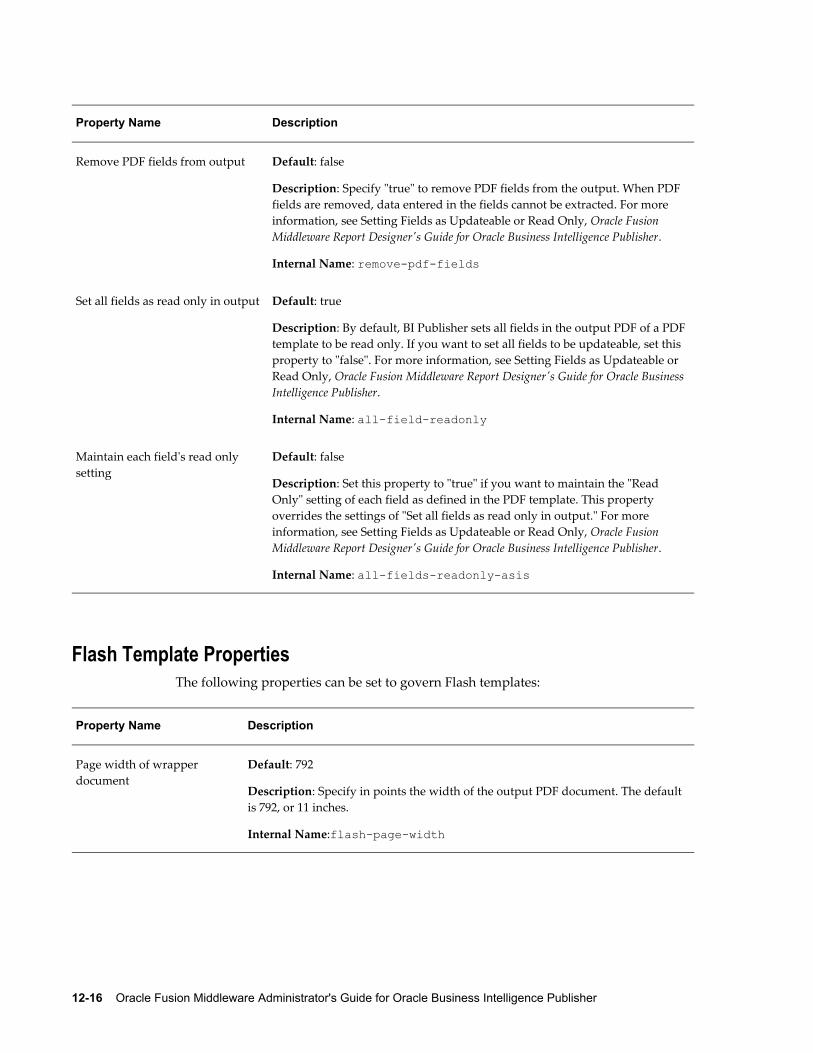
12-16 Oracle Fusion Middleware Administrator's Guide for Oracle Business Intelligence Publisher
Property Name Description
Remove PDF fields from output Default: false
Description: Specify "true" to remove PDF fields from the output. When PDF fields are removed, data entered in the fields cannot be extracted. For more information, see Setting Fields as Updateable or Read Only, Oracle Fusion Middleware Report Designer's Guide for Oracle Business Intelligence Publisher.
Internal Name: remove-pdf-fields
Set all fields as read only in output Default: true
Description: By default, BI Publisher sets all fields in the output PDF of a PDFtemplate to be read only. If you want to set all fields to be updateable, set this property to "false". For more information, see Setting Fields as Updateable or Read Only, Oracle Fusion Middleware Report Designer's Guide for Oracle BusinessIntelligence Publisher.
Internal Name: all-field-readonly
Maintain each field's read only setting
Default: false
Description: Set this property to "true" if you want to maintain the "Read Only" setting of each field as defined in the PDF template. This property overrides the settings of "Set all fields as read only in output." For more information, see Setting Fields as Updateable or Read Only, Oracle Fusion Middleware Report Designer's Guide for Oracle Business Intelligence Publisher.
Internal Name: all-fields-readonly-asis
Flash Template PropertiesThe following properties can be set to govern Flash templates:
Property Name Description
Page width of wrapper document
Default: 792
Description: Specify in points the width of the output PDF document. The default is 792, or 11 inches.
Internal Name:flash-page-width

Defining Runtime Configurations 12-17
Property Name Description
Page height of wrapper document
Default: 612
Description: Specify in points the height of the output PDF document. The defaultis 612, or 8.5 inches
Internal Name: flash-page-height
Start x position of Flash area in PDF
Default: 18
Description: Using the left edge of the document as the 0 axis point, specify in points the beginning horizontal position of the Flash object in the PDF document. The default is 18, or .25 inch
Internal Name: flash-startx
Start y position of Flash area in PDF
Default: 18
Description: Using the upper left corner of the document as the 0 axis point, specify in points the beginning vertical position of the Flash object in the PDF document. The default is 18, or .25 inch.
Internal Name: flash-starty
Width of Flash area Default: Same as flash width in points in swf
Description: Enter in points the width of the area in the document for the Flash object to occupy. The default is the width of the SWF object.
Internal Name: flash-width
Height of Flash area Default: Same as flash height in points in swf
Description: Enter in points the height of the area in the document for the Flash object to occupy. The default is the height of the SWF object.
Internal Name: flash-height
CSV Output PropertiesUse the following properties to control comma-separated value output:

12-18 Oracle Fusion Middleware Administrator's Guide for Oracle Business Intelligence Publisher
Property Name Description
CSV delimiter Default: ,
Description: Specifies the character used to delimit the data in comma-separated value output. Other options are: Semicolon (;), Tab (\t) and Pipe (|).
Remove leading and trailing white space
Default: false
Description: Specify "True" to remove leading and trailing white space between data elements and the delimiter.
Excel 2007 Output PropertiesUse the following properties to control Excel 2007 output:
Property Name Description
Show grid lines Default: false
Description: Set to true to show the Excel table grid lines in the report output.
Page break as a new sheet
Default: true
Description: When set to "True" a page break specified in the report template will generate a new sheet in the Excel workbook.
Minimum column width
Default: 3 (in points, 0.04 inch)
Description: When the column width is less than the specified minimum and it contains no data, the column will be merged with the preceding column.
Minimum row height Default: 1 (in points, 0.01 inch)
Description: When the row height is less than the specified minimum and it contains no data, the row will be removed.
All Outputs

Defining Runtime Configurations 12-19
Property Name Description
Hide version number in output
Default: true
Description: Some report output documents display Oracle BI Publisher in the document properties. For example, PDF documents identify Oracle BI Publisher as the PDF Producer in the properties for the document. If you wish to include the version of BI Publisher (for example, Oracle BI Publisher 11.1.1.5.0) that generated the document, set this property to false.
Defining Font MappingsBI Publisher's Font Mapping feature enables you to map base fonts in RTF or PDF templates to target fonts to be used in the published document. Font Mappings can be specified at the site or report level. Font mapping is performed only for PDF output andPowerPoint output.
There are two types of font mappings:
• RTF Templates - for mapping fonts from RTF templates and XSL-FO templates to PDF and PowerPoint output fonts
• PDF Templates - for mapping fonts from PDF templates to different PDF output fonts.
Making Fonts Available to BI Publisher BI Publisher provides a set of Type1 fonts and a set of TrueType fonts. You can select any of the fonts in these sets as a target font with no additional setup required. For a listof the predefined fonts see BI Publisher's Predefined Fonts, page 12-20.
The predefined fonts are located in $JAVA_HOME/jre/lib/fonts. If you wish to mapto another font, you must place the font in this directory to make it available to BI Publisher at runtime. If your environment is clustered, you must place the font on everyserver.
Setting Font Mapping at the Site Level or Report LevelA font mapping can be defined at the site level or the report level:
• To set a mapping at the site level, select the Font Mappings link from the Administration page.
• To set a mapping at the report level, view the Properties for the report, then select

12-20 Oracle Fusion Middleware Administrator's Guide for Oracle Business Intelligence Publisher
the Font Mappings tab. These settings will apply to the selected report only.
The report-level settings will take precedence over the site-level settings.
Creating a Font MappingFrom the Administration page, under Runtime Configuration, select Font Mappings.
To create a Font Mapping• Under RTF Templates or PDF Templates, select Add Font Mapping.
• Enter the following on the Add Font Mapping page:
• Base Font - enter the font family that will be mapped to a new font. Example: Arial
• Select the Style: Normal or Italic (Not applicable to PDF Template font mappings)
• Select the Weight: Normal or Bold (Not applicable to PDF Template font mappings)
• Select the Target Font Type: Type 1 or TrueType
• Enter the Target Font
If you selected TrueType, you can enter a specific numbered font in the collection. Enter the TrueType Collection (TTC) Number of the desired font.
For a list of the predefined fonts see BI Publisher's Predefined Fonts, page 12-20
BI Publisher's Predefined FontsThe following Type1 fonts are built-in to Adobe Acrobat and BI Publisher provides a mapping for these fonts by default. You can select any of these fonts as a target font with no additional setup required.
The Type1 fonts are listed in the following table:
Type 1 Fonts
Number Font Family Style Weight Font Name
1 serif normal normal Time-Roman

Defining Runtime Configurations 12-21
Number Font Family Style Weight Font Name
1 serif normal bold Times-Bold
1 serif italic normal Times-Italic
1 serif italic bold Times-BoldItalic
2 sans-serif normal normal Helvetica
2 sans-serif normal bold Helvetica-Bold
2 sans-serif italic normal Helvetica-Oblique
2 sans-serif italic bold Helvetica-BoldOblique
3 monospace normal normal Courier
3 monospace normal bold Courier-Bold
3 monospace italic normal Courier-Oblique
3 monospace italic bold Courier-BoldOblique
4 Courier normal normal Courier
4 Courier normal bold Courier-Bold
4 Courier italic normal Courier-Oblique
4 Courier italic bold Courier-BoldOblique
5 Helvetica normal normal Helvetica
5 Helvetica normal bold Helvetica-Bold
5 Helvetica italic normal Helvetica-Oblique
5 Helvetica italic bold Helvetica-BoldOblique

12-22 Oracle Fusion Middleware Administrator's Guide for Oracle Business Intelligence Publisher
Number Font Family Style Weight Font Name
6 Times normal normal Times
6 Times normal bold Times-Bold
6 Times italic normal Times-Italic
6 Times italic bold Times-BoldItalic
7 Symbol normal normal Symbol
8 ZapfDingbats normal normal ZapfDingbats
The TrueType fonts are listed in the following table. All TrueType fonts will be subset and embedded into PDF.
Number Font Family Name
Style Weight Actual Font Actual Font Type
1 Albany WT normal normal ALBANYWT.ttf TrueType (Latin1 only)
2 Albany WT J normal normal ALBANWTJ.ttf TrueType (Japanese flavor)
3 Albany WT K normal normal ALBANWTK.ttf TrueType (Korean flavor)
4 Albany WT SC normal normal ALBANWTS.ttf TrueType (Simplified Chinese flavor)
5 Albany WT TC normal normal ALBANWTT.ttf TrueType (Traditional Chinese flavor)
6 Andale Duospace WT
normal normal ADUO.ttf TrueType (Latin1 only, Fixed width)

Defining Runtime Configurations 12-23
Number Font Family Name
Style Weight Actual Font Actual Font Type
6 Andale Duospace WT
bold bold ADUOB.ttf TrueType (Latin1 only, Fixed width)
7 Andale Duospace WT J
normal normal ADUOJ.ttf TrueType (Japanese flavor, Fixed width)
7 Andale Duospace WT J
bold bold ADUOJB.ttf TrueType (Japanese flavor, Fixed width)
8 Andale Duospace WT K
normal normal ADUOK.ttf TrueType (Korean flavor, Fixed width)
8 Andale Duospace WT K
bold bold ADUOKB.ttf TrueType (Korean flavor, Fixed width)
9 Andale Duospace WT SC
normal normal ADUOSC.ttf TrueType (Simplified Chinese flavor, Fixed width)
9 Andale Duospace WT SC
bold bold ADUOSCB.ttf TrueType (Simplified Chinese flavor, Fixed width)
10 Andale Duospace WT TC
normal normal ADUOTC.ttf TrueType (Traditional Chinese flavor, Fixed width)
10 Andale Duospace WT TC
bold bold ADUOTCB.ttf TrueType (Traditional Chinese flavor, Fixed width)

12-24 Oracle Fusion Middleware Administrator's Guide for Oracle Business Intelligence Publisher
Defining Currency FormatsCurrency formats defined in the Administration Runtime Configuration page will be applied at the system level. Currency formats can also be applied at the report level. The report-level settings will take precedence over the system-level settings here. For information on setting a report-level currency format, see About Currency Formats, Oracle Fusion Middleware Report Designer's Guide for Oracle Business Intelligence Publisher.
Understanding Currency FormatsThe Currency Formats tab enables you to map a number format mask to a specific currency so that your reports can display multiple currencies with their own corresponding formatting. Currency formatting is only supported for RTF and XSL-FO templates.
To apply these currency formats in your RTF template, you must use theformat-currency function. See Currency Formatting, Oracle Fusion Middleware ReportDesigner's Guide for Oracle Business Intelligence Publisher for detailed procedures.
To add a currency format:
1. Click the Add icon.
2. Enter the ISO currency code, for example: USD, JPY, EUR, GBP, INR.
3. Enter the format mask to apply for this currency.
The Format Mask must be in the Oracle number format. The Oracle number format uses the components "9", "0", "D", and "G" to compose the format, for example: 9G999D00
where
9 represents a displayed number only if present in data
G represents the group separator
D represents the decimal separator
0 represents an explicitly displayed number regardless of incoming data
See Using the Oracle Format Mask, Oracle Fusion Middleware Report Designer's Guide for Oracle Business Intelligence Publisher for more information about these format mask components.
The following figure shows sample currency formats:
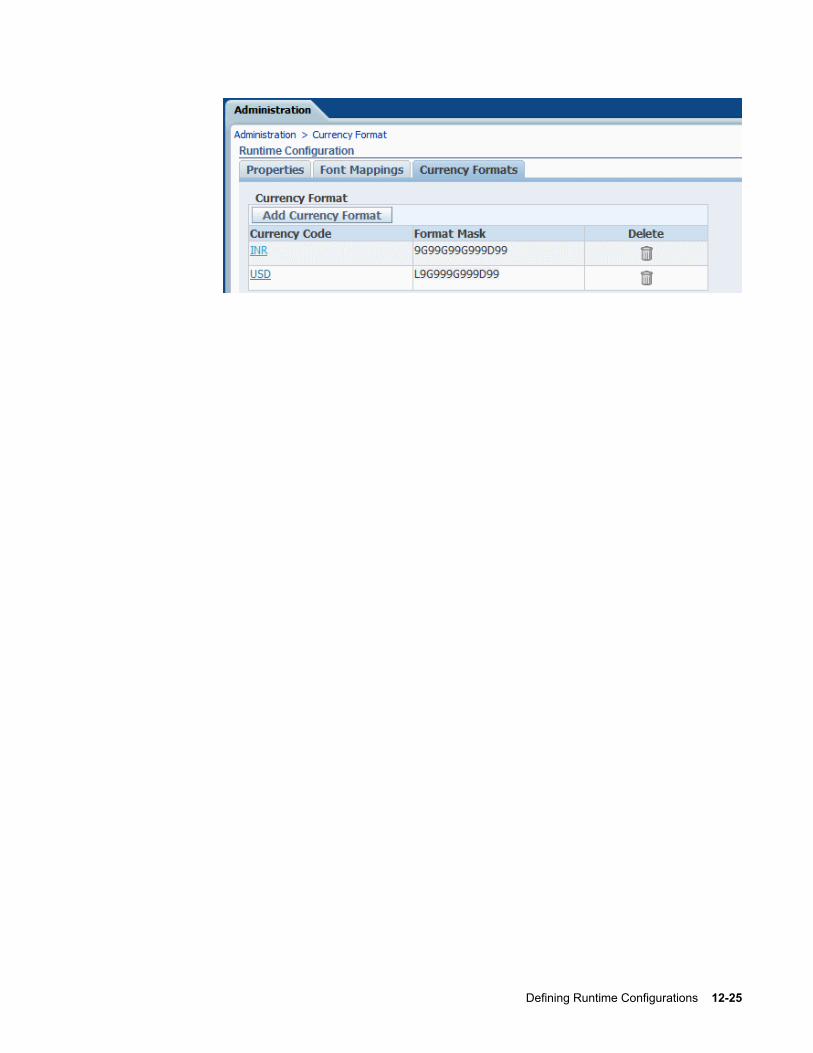
Defining Runtime Configurations 12-25


Diagnostics and Performance Monitoring in Oracle BI Publisher 13-1
13Diagnostics and Performance Monitoring in
Oracle BI Publisher
This chapter covers the following topics:
• Diagnosing and Resolving Issues in Oracle BI Publisher
• Configuring Log Files
• Viewing Log Messages
• About Performance Monitoring and User Auditing
• Enabling Monitoring
• Viewing the Audit Log
• Configuring an Audit Repository
• Using BI Publisher to Create Audit Reports from Your Audit Repository
• Viewing Performance Statistics in the MBean Browser
Diagnosing and Resolving Issues in Oracle BI PublisherSystem Administrators are typically responsible for supporting end users when they experience issues with the use of Oracle BI Publisher and for interacting with Oracle Support to understand the cause of issues and apply fixes.
Issues may be reported in response to end users receiving error messages, experiencing poor performance, or lack of availability.
The principal activities administrators perform to support issue resolution include:
• Examination of error and diagnostic log information. For more information, see:
• About Diagnostic Log Files, page 13-2
• Configuring Log Files, page 13-4

13-2 Oracle Fusion Middleware Administrator's Guide for Oracle Business Intelligence Publisher
• Viewing Log Messages, page 13-5
• Examination of system and process metrics to understand availability and performance issues. For more information, see:
• About Performance Monitoring and User Auditing, page 13-9
• Enabling Monitoring, page 13-10
• Viewing the Audit Log, page 13-15
• Configuring an Audit Repository, page 13-15
• Using BI Publisher to Create Audit Reports from Your Audit Repository, page 13-20
• Viewing Performance Statistics in the MBean Browser, page 13-23
About Diagnostic Log FilesBI Publisher writes diagnostic log files in the Oracle Diagnostic Logging (ODL) format. Log file naming and the format of the contents of log files conforms to an Oracle standard. You can view log files by using the WLST displayLogs command, or you can download log files to your local client and view them using another tool (for example a text editor, or another file viewing utility).
Log files are created and edited using Oracle Fusion Middleware Control. By default, after install, the bipublisher-handler log is created. You can configure this log file or create a new logger.
About Log File Message Categories and LevelsEach log file message category is set to a specific default value between 1-32, and only messages with a level less or equal to the log level will be logged.
Five log file message categories exist as follows:
Level Description
IncidentError:1 A serious problem caused by unknown reasons. You can only fix the problem by contacting Oracle support.
Examples are errors from which you cannot recover or serious problems.

Diagnostics and Performance Monitoring in Oracle BI Publisher 13-3
Level Description
Error:1 A problem requiring attention from the system administrator has occurred, and is not caused by a bug in the product. No performance impact.
Warning:1 A potential problem that should be reviewed by the administrator.
Examples are invalid parameter values or a specified file does not exist.
Notification:1 A major lifecycle event such as the activation or deactivation of a primarysub-component or feature.
This is the default level for NOTIFICATION.
NOTIFICATION:16 A finer level of granularity for reporting normal events.
TRACE:1 Trace or debug information for events that are meaningful to administrators, such as public API entry or exit points.
TRACE:16 Detailed trace or debug information that can help Oracle Support diagnose problems with a particular subsystem.
TRACE:32 Very detailed trace or debug information that can help Oracle Support diagnose problems with a particular subsystem.
About Log File FormatsA log file must contain a consistent format. However, since there can be multiple formats, you can change the format used in a log file. When you change the format usedin a log file, and the new format differs from the current log file's format, a new log file is created. For example, a log file containing ODL-XML, always contains XML, and will never be mixed with text.
Configure the log file format in the Edit Log File dialog (see Configuring Log Files, page13-4). The format can by Text or XML.
About Log File RotationLog file rotation can be file size based or time based. Whenever a log file exceeds the rotation criterion, the existing log file is renamed, and a new log file is created.
The file naming looks like this:
• log.xml
• log.xml.1 (oldest log file)

13-4 Oracle Fusion Middleware Administrator's Guide for Oracle Business Intelligence Publisher
• log.xml.n
Configuring Log FilesConfigure log files in Oracle Fusion Middleware Control.
1. In Oracle Fusion Middleware Control, locate the BI Publisher server. For example:
Under Application Deployments, expand bipublisher (11.1.1) (bi_cluster), and then right-click bipublisher (11.1.1)(bi_server1)
2. From the menu, click Logs and then Log Configuration, as shown in the following figure:
3. By default, the bipublisher-handler log is created. Select bipublisher-handler in the table and click Edit Configuration.

Diagnostics and Performance Monitoring in Oracle BI Publisher 13-5
4. In the Edit Configuration dialog, set the Log Level and configure other options.
Viewing Log MessagesYou can view log messages using Oracle Fusion Middleware Control or you can view the log files directly.
To view log messages in Oracle Fusion Middleware Control:
1. In Oracle Fusion Middleware Control, locate the BI Publisher server. For example:
Under Application Deployments, expand bipublisher (11.1.1) (bi_cluster), and then right-click bipublisher (11.1.1)(bi_server1)
2. From the menu, click Logs and then View Log Messages, as shown in the following

13-6 Oracle Fusion Middleware Administrator's Guide for Oracle Business Intelligence Publisher
figure:
3. To view a specific log file, click Target Log Files.

Diagnostics and Performance Monitoring in Oracle BI Publisher 13-7
4. From the Log Files page, select a specific log to view messages or download the log file.
5. Click View Log File to view the messages.

13-8 Oracle Fusion Middleware Administrator's Guide for Oracle Business Intelligence Publisher
Viewing Messages by Reading the Log FileThe log file is located in the directory specified in the Log Path in the Edit Log File dialog. Navigate to the directory on your server to view the log file:
The following example shows an ODL format error message:<msg time="2009-07-30T16:00:03.150-07:00" comp_id="xdo" type="ERROR" level="1" host_id="MyBIPHost" host_addr="120.19.168.17" module="oracle.xdo" tid="11" user="Administrator"><txt>Variable 'G_dept' is missing...</txt></msg>

Diagnostics and Performance Monitoring in Oracle BI Publisher 13-9
Attribute Name Description
time The date and time when the message was generated. This reflects the local time zone.
comp_id The ID of the component that originated the message.
type The type of message. Possible values are: INCIDENT_ERROR, ERROR, WARNING, NOTIFICATION, TRACE, and UNKNOWN. See the following table for information about the message types.
level The message level, represented by an integer value that qualifies the messagetype. Possible values are from 1 (highest severity) through 32 (lowest severity).
host_id The name of the host where the message originated.
host_addr The network address of the host where the message originated.
module The ID of the module that originated the message. If the component is a single module, the component ID is listed for this attribute.
tid The ID of the thread that generated the message.
user The name of the user whose execution context generated the message.
About Performance Monitoring and User AuditingPerformance monitoring enables you to monitor the performance of queries, reports and document generation and to analyze the provided details. User auditing provides information about what users logged in, when, how many times, what reports they accessed, and other actions they took within the application.
BI Publisher collects performance statistics through JMX Management Beans or Mbeans.Each MBean reveals attributes, operations, and relevant statistics gathered by the OracleDynamic Monitoring Service (DMS). The following table summarizes the beans that are provided:
Management Bean Description
ReportEventMonitor Creates an Mbean per report and displays detailed monitoring data for the report.

13-10 Oracle Fusion Middleware Administrator's Guide for Oracle Business Intelligence Publisher
Management Bean Description
ServerEventMonitor Exists per server and displays user and server activity summaries.
UserEventMonitor Creates an Mbean per user and displays detailed monitoring data for the user.
Enabling Monitoring To enable monitoring:
1. Update properties in the BI Publisher server configuration file.
2. Copy the component_events.xml file to your Middleware Home.
3. Configure the Audit Policy Settings with Fusion Middleware Control (Enterprise Manager)
4. Restart WebLogic Server.
Update Properties in the BI Publisher Server Configuration FileLocate the xmlp-server-config.xml file in the BI Publisher repository under config/bipublisher/repository/Admin/Configuration/xmlp-server-config.xml located under the Oracle BI Domain Home (for example:MIDDLEWARE_HOME/user_projects/domains/bifoundation_domain/config/bipublisher/repository/Admin/Configuration.
A sample configuration file is shown in the following figure:

Diagnostics and Performance Monitoring in Oracle BI Publisher 13-11
Perform the following:
1. Make a backup of the file.
2. Add the following property to the file and set it to "true":
<property name="AUDIT_JPS_INTEGRATION" value="true"/>
This property enables the integration of performance monitoring and auditing with Oracle Fusion Middleware Control.
3. Update the properties in the following table to enable performance monitoring and auditing:
Property Description
MONITORING_ENABLED Set to "true" to enable monitoring. The default is "false".
AUDIT_ENABLED Set to "true" to enable auditing. The default is "false".
Following is a sample configuration file with the properties updated:

13-12 Oracle Fusion Middleware Administrator's Guide for Oracle Business Intelligence Publisher
<xmlpConfig xmlns="http://xmlns.oracle.com/oxp/xmlp"> <property name="SAW_SERVER" value=""/> <property name="SAW_SESSION_TIMEOUT" value="90"/> <property name="DEBUG_LEVEL" value="exception"/> <property name="SAW_PORT" value=""/> <property name="SAW_PASSWORD" value=""/> <property name="SAW_PROTOCOL" value="http"/> <property name="SAW_VERSION" value="v4"/> <property name="SAW_USERNAME" value=""/> <property name="MONITORING_ENABLED" value="true"/> <property name="AUDIT_ENABLED" value="true"/> <property name="AUDIT_JPS_INTEGRATION" value="true"/</xmlpConfig>
Copy the component_events.xml File to Your Middleware Home1. Navigate to the MIDDLEWARE_HOME
/oracle_common/modules/oracle.iau_11.1.1/components directory.
2. In the components directory create a directory named "xmlpserver".
3. Locate the component_events.xml file in the BI Publisher repository under config/bipublisher/repository/Admin/Audit/component_events.xml located under the Oracle BI Domain Home (for example: MIDDLEWARE_HOME/user_projects/domains/bifoundation_domain/config/bipublisher/repository/Admin/Audit.
4. Copy the component_events.xml file to the newly created xmlpserver directory.
Configure the Audit Policy Settings with Fusion Middleware ControlTo configure the audit policy settings:

Diagnostics and Performance Monitoring in Oracle BI Publisher 13-13
1. In Oracle Fusion Middleware Control, under WebLogic Domain, right-click bifoundation_domain. From the menu click Security and then click Audit Policy as shown in the following figure:
2. The Audit Policy table displays all the audited applications under the bifoundation_domain. Set the Audit Level to enable auditing for BI Publisher.

13-14 Oracle Fusion Middleware Administrator's Guide for Oracle Business Intelligence Publisher
You will most likely set the Audit Level to Medium. If you wish to customize the audit level for each event, select Custom from the Audit Level list. This will enable you to set the audit level for each event and apply filters.
The events that are audited for the BI Publisher server are:
• User Logins
• User Logouts
• Report Request
• Scheduled Request
• Report Republish
• Report Data Download
• Report Download
• Report Data Process
• Report Rendering
• Report Delivery

Diagnostics and Performance Monitoring in Oracle BI Publisher 13-15
Restart WebLogic ServerRestart the WebLogic Serve instance. You can do this using Oracle Fusion Middleware Control, or if you are running Windows, you can select "Stop BI Servers" and then "StartBI Servers" from the Start menu.
Viewing the Audit LogIf you set the property AUDIT_JPS_INTEGRATION to true, the audit log can be viewedunder the xmlpserver folder under the WebLogic Server AdminServer directory: /AdminServer/logs/auditlogs/xmlpserver/audit.log
Alternatively, if you can configure an audit repository in your database to store audit data in database tables instead of the log file (the file is not generated in this case). The collected data can be analyzed using reports provided by Audit Framework, or you can create your own reports using BI Publisher.
For more information on the reports provided by Audit Framework, see "Using Audit Analysis and Reporting" in the Oracle Fusion Middleware Application Security Guide 11g.
The following section describes how to set up the audit repository in your database to store the auditing data.
Configuring an Audit RepositoryConfigure an audit repository to store your auditing data collected by the Fusion Middleware Auditing Framework in database tables rather than a log file.
To set up the audit database in WebLogic Server:
1. Create the audit schema using RCU.
2. Create a data source in your WebLogic server.
3. Register the audit database to your domain.
Creating the Audit Schema Using RCU1. Go to $RCU_HOME/bin and execute the rcu command.
2. Choose Create at the starting screen and click Next.
3. Enter your database details and click Next.
4. Choose the option to create a new prefix, and enter a prefix; for example: BIP
5. Select Audit Services from the list of schemas (shown in the following figure).

13-16 Oracle Fusion Middleware Administrator's Guide for Oracle Business Intelligence Publisher
6. Click Next and accept the tablespace creation.
7. Click Finish to start the process.
When the Repository Creation Utility process finishes, the following three audit-related schemas will be created in your database:
• <prefix>_IAU (for example:. BIP_IAU)
• <prefix>_IAU_APPEND (for example: BIP_IAU_APPEND)
• <prefix>_IAU_VIEWER (for example:. BIP_IAU_VIEWER)
Create a Data Source in WebLogic ServerAfter you create a database schema for your auditing data, next create a JDBC connection on your WebLogic Server so the Audit Framework can access the database schema that was created with the RCU in the previous step.
To create the JDBC connection:
1. Connect to the Oracle WebLogic Server administration console: http://hostname:port/console (e.g. http://report.oracle.com:7001/console)
2. Under Services, click the Data Sources link, as shown in the following figure:
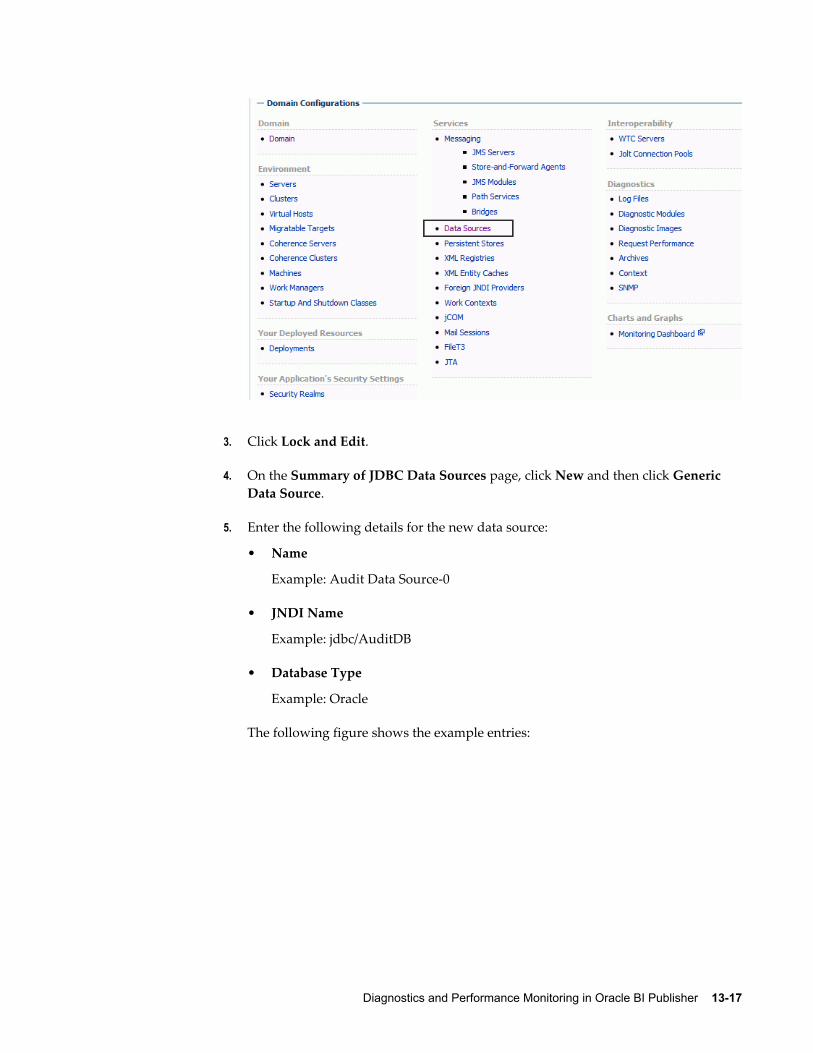
Diagnostics and Performance Monitoring in Oracle BI Publisher 13-17
3. Click Lock and Edit.
4. On the Summary of JDBC Data Sources page, click New and then click Generic Data Source.
5. Enter the following details for the new data source:
• Name
Example: Audit Data Source-0
• JNDI Name
Example: jdbc/AuditDB
• Database Type
Example: Oracle
The following figure shows the example entries:

13-18 Oracle Fusion Middleware Administrator's Guide for Oracle Business Intelligence Publisher
6. Click Next and select the database driver. Choose "Oracle's Driver (Thin XA) Versions: 9.0.1 or later" if you are using Oracle database, and click Next.
7. In the Connections Properties page, enter the following:
• Database Name: Enter the name of the database (SID) to which you will connect.
• Host Name: Enter the hostname of the database.
• Port: Enter the database port.
• Database User Name: Enter the name of the audit schema that you created in RCU. The suffix is always _IAU for the audit schema. For example, if you supplied the prefix as "BIP"', then the schema name would be "BIP_IAU".
• Password: Enter the password for the audit schema that you created in RCU.
An example Connections Properties page is shown in the following figure:

Diagnostics and Performance Monitoring in Oracle BI Publisher 13-19
8. Click Next. Accept the defaults, and click Test Configuration to verify the connection.
9. Click Next. Select the listed servers where you want to make this JDBC connection available.
10. Click Finish and then click Activate Changes in the Change Center.
Register the Audit-Storing Database to Your DomainTo register the JNDI/JDBC data source as your auditing data storage with Fusion Middleware Control (Enterprise Manager):

13-20 Oracle Fusion Middleware Administrator's Guide for Oracle Business Intelligence Publisher
1. Log in to Fusion Middleware Control.
2. Navigate to the WebLogic Domain, right click bifoundation_domain, then select Security, then Audit Store. The navigation path is shown in the following figure:
3. Click Search Data Sources. From the Select Data Source dialog, select the data source you created and click OK.
4. Click Apply to continue
5. Restart WebLogic Server.
When the WebLogic Server is restarted, BI Publisher will store all auditing data into the database table called "IAU_BASE". To verify this procedure, try logging in to BI Publisher and opening a few reports. You should see the activity audited in the "IAU_BASE" table. If not, check the log file, which is located at: $BI_HOME/user_projects/domains/bifoundation_domain/servers/AdminServer/logs/AdminServer-diagnostic.log
for possible errors. Once the data is successfully loading to the database tables, you can design your own auditing reports using BI Publisher.
Using BI Publisher to Create Audit Reports from Your Audit RepositoryOnce you have the auditing repository set up, you can use BI Publisher to create your

Diagnostics and Performance Monitoring in Oracle BI Publisher 13-21
own reports to visualize your auditing data. To create a report on your auditing data in BI Publisher:
1. Register the data source in BI Publisher.
2. Create a data model.
3. Create the report.
Registering the Data Source in BI PublisherRegister the audit data source (JNDI/JDBC connection) that you created in the previous procedure as a JNDI data source in BI Publisher. Because you created a JDBC connection registered as JNDI, you do not need to create a new JDBC connection by typing the connection URL, username/password, and so on. You can just register it using the JNDI name (for example: jdbc/AuditDB).
1. Log in to BI Publisher with administrator privileges and click the Administration link.
2. Under Data Sources, click JNDI Connection, then click Add Data Source.
3. Enter the Data Source Name and JNDI Name. The JNDI Name is the name you provided in the WebLogic Console as the auditing data source (for example :jdbc/AuditDB).
4. Click Test Connection to ensure that the data source connection works.
5. Add the appropriate roles to the data source so that the report developers and consumers can view the reports built on this data source.
6. Click Apply to save.
Creating a Data ModelTo create a data model from your auditing data source:
Note: For the complete guidelines for developing data models in BI Publisher, see the Oracle Fusion Middleware Data Modeling Guide for Oracle Business Intelligence Publisher.
1. On the global header, click New and then click Data Model.
2. Set the Default Data Source to the audit JNDI data source.
3. Select SQL Query for your data set

13-22 Oracle Fusion Middleware Administrator's Guide for Oracle Business Intelligence Publisher
4. Use the Query Builder to build a query or just type a SQL query against the IAU_BASE table. The IAU_BASE table contains all the auditing data for other products running on the WebLogic Server such as JPS, OID, and so on. To create a data model that contains only the BI Publisher data, then you can filter the data based on the value of the IAU_COMPONENTTYPE column that contains the product name. For BI Publisher, the value is "xmlpserver".
The following SQL query sample selects only BI Publisher data:select "IAU_BASE"."IAU_COMPONENTTYPE" as "IAU_COMPONENTTYPE", "IAU_BASE"."IAU_EVENTTYPE" as "IAU_EVENTTYPE", "IAU_BASE"."IAU_EVENTCATEGORY" as "IAU_EVENTCATEGORY", "IAU_BASE"."IAU_TSTZORIGINATING" as "IAU_TSTZORIGINATING", to_char("IAU_TSTZORIGINATING", 'YYYY-MM-DD') IAU_DATE, to_char("IAU_TSTZORIGINATING", 'DAY') as IAU_DAY, to_char("IAU_TSTZORIGINATING", 'HH24') as IAU_HH24, to_char("IAU_TSTZORIGINATING", 'WW') as IAU_WEEK_OF_YEAR, "IAU_BASE"."IAU_INITIATOR" as "IAU_INITIATOR", "IAU_BASE"."IAU_RESOURCE" as "IAU_RESOURCE", "IAU_BASE"."IAU_TARGET" as "IAU_TARGET", "IAU_BASE"."IAU_MESSAGETEXT" as "IAU_MESSAGETEXT", "IAU_BASE"."IAU_FAILURECODE" as "IAU_FAILURECODE", "IAU_BASE"."IAU_REMOTEIP" as "IAU_REMOTEIP" from "BIP_IAU"."IAU_BASE" "IAU_BASE" where "IAU_BASE"."IAU_COMPONENTTYPE" = 'xmlpserver'
5. To test your data model, click Get XML Output. Select a sample size, and run your data model. Save the sample XML to your data model.
6. Save your data model.
Creating the ReportNow you can use one of the BI Publisher's layout options to design the report layout and visualize the auditing data. To create a report using the BI Publisher layout editor: .
1. On the global header, click New and then click Report.
2. Select the data model you created in the previous procedure.
3. To use the layout editor, click Add New Layout, and then click one of the Basic Templates to get started.
For complete instructions on using the layout editor, see the topic: "Creating a BI Publisher Layout Template" in the Help or in the Oracle Fusion Middleware Report Designer's Guide for Oracle Business Intelligence Publisher.
The following figure shows using the layout editor to design a report based on the auditing data:

Diagnostics and Performance Monitoring in Oracle BI Publisher 13-23
The following figure shows a sample completed auditing report displayed in the report viewer:
Viewing Performance Statistics in the MBean BrowserTo view the performance statistics collected by the Report Event Monitor, Service Event Monitor, and User Event Monitor, navigate to the System MBean browser as follows:
1. In Oracle Fusion Middleware Control, locate the BI Publisher server. For example:

13-24 Oracle Fusion Middleware Administrator's Guide for Oracle Business Intelligence Publisher
Under Application Deployments, expand bipublisher (11.1.1) (bi_cluster), and then right-click bipublisher (11.1.1)(bi_server1)
2. From the menu, click System MBean Browser, as shown in the following figure:
3. In the System MBean Browser, under the Application Defined MBeans, expand the oracle.xdo folder to view the BI Publisher MBeans. Expand the list and select the bean to view the details.

Diagnostics and Performance Monitoring in Oracle BI Publisher 13-25


Adding Translations for the BI Publisher Catalog and Reports 14-1
14Adding Translations for the BI Publisher
Catalog and Reports
IntroductionIn release 11g, BI Publisher supports two types of translation:
• Catalog Translation
• Template (or layout) Translation
Catalog translation enables the extraction of translatable strings from all objects contained in a selected catalog folder into a single translation file; this file can then be translated and uploaded back to BI Publisher and assigned the appropriate language code.
Catalog translation extracts not only translatable strings from the report layouts, but also the user interface strings that are displayed to users, such as catalog object descriptions, report parameter names, and data display names.
Users viewing the catalog will see the item translations appropriate for the UI Languagethey selected in their My Account preferences. Users will see report translations appropriate for the Report Locale they selected in their My Account preferences.
Template translation enables the extraction of the translatable strings from a single RTF-based template (including sub templates and style templates) or a single BI Publisher layout template (.xpt file). Use this option when you only need the final report documents translated. For example, your enterprise requires translated invoices to send to German and Japanese customers.
This chapter describes the process of downloading and uploading translation files. For more information on the concepts and processes of translating the files see the part "Translating Reports and Catalog Objects" in the Oracle Fusion Middleware Report Designer's Guide for Oracle Business Intelligence Publisher.

14-2 Oracle Fusion Middleware Administrator's Guide for Oracle Business Intelligence Publisher
Limitations of Catalog Translation• If you have existing XLIFF file translations for specific reports and then you import
a catalog translation file for the folder in which the existing translations reside, the existing XLIFF files will be overwritten.
Exporting and Importing a Catalog Translation FileThis procedure describes the process of exporting an XLIFF file from the catalog, importing the translated file back to the catalog, and testing the translation. Importing and Exporting XLIFF files can only be performed by an Administrator.
1. Select the folder in the catalog, click the Translation toolbar button, and then click Export XLIFF, as shown in the following figure:
2. Save the XLIFF file to a local directory.

Adding Translations for the BI Publisher Catalog and Reports 14-3
3. Open the Translation file (catalog.xlf) and apply translations to the Boilerplate text. Refer to the topic "What Is an XLIFF?" in the Oracle Fusion Middleware Report Designer's Guide for Oracle Business Intelligence Publisher for details on how to translate an XLIFF file.

14-4 Oracle Fusion Middleware Administrator's Guide for Oracle Business Intelligence Publisher
4. After the file is translated, upload the XLIFF file to the BI Publisher server: Click theTranslation toolbar button, then click Import XLIFF. Upload the translated XLIFF to the server.
5. To test the translation, go to My Account:
6. Change the Report Locale and the UI Language preferences:

Adding Translations for the BI Publisher Catalog and Reports 14-5
7. View the objects in the translated folder.
Template TranslationTemplate translation includes
• RTF templates
• RTF sub templates
• Style templates
• BI Publisher templates (.xpt)
RTF and BI Publisher (.xpt) templates can be translated from the Properties page. To access the Properties page, click the Properties link for the layout in the Report Editor.

14-6 Oracle Fusion Middleware Administrator's Guide for Oracle Business Intelligence Publisher
From the Properties page you can generate an XLIFF file for a single template. Click Extract Translation to generate the XLIFF file.
Generating the XLIFF from the Layout Properties PageFor report layout templates:1. Navigate to the report in the catalog and click Edit to open it for editing.
2. From the thumbnail view of the report layouts, click the Properties link of the layout (RTF or XPT) to open the Layout Properties page.
3. In the Translations region, click Extract Translation.
BI Publisher extracts the translatable strings from the template and exports them to an XLIFF (.xlf file).
4. Save the XLIFF to a local directory.
For style templates and sub templates:1. Navigate to the style template or sub template in the catalog and click Edit to open
the Template Manager.
2. In the Translations region, click Extract Translation.
BI Publisher extracts the translatable strings from the template and exports them to an XLIFF (.xlf file).
3. Save the XLIFF to a local directory.

Adding Translations for the BI Publisher Catalog and Reports 14-7
Translating the XLIFFOnce you have downloaded the XLIFF, it can be sent to a translation provider, or using a text editor, you can enter the translation for each string. See Structure of the XLIFF File, Oracle Fusion Middleware Report Designer's Guide for Oracle Business Intelligence Publisher for instructions on how to edit the XLIFF file.
A "translatable string" is any text in the template that is intended for display in the published report, such as table headers and field labels. Text supplied at runtime from the data is not translatable, nor is any text that you supply in the Microsoft Word form fields.
You can translate the template XLIFF file into as many languages as desired and then associate these translations to the original template.
Uploading the Translated XLIFF to BI Publisher1. Navigate to the report, sub template, or style template in the catalog and click Edit
to open it for editing.
For reports only:
From the thumbnail view of the report layouts, click the Properties link of the layout to open the Template Manager.
2. In the Translations region, click the Upload toolbar button.
3. In the Upload Translation File dialog, locate the file in your local directory and select the Locale for this translation.
4. Click OK to upload the file and view it in the Translations table.
Using the Localized Template Option If you need to design a different layout for the reports that you present for different localizations, you can create new RTF file that is designed and translated for the locale and upload this file to the Template Manager.

14-8 Oracle Fusion Middleware Administrator's Guide for Oracle Business Intelligence Publisher
Note: The localized template option is not supported for XPT templates.
The process overview for using the localized template option is:
1. Design the localized RTF layout template, subtemplate, or style template.
2. Upload the localized file to the Template Manager.
Designing the Localized Template FileUse the same tools you used to create the base template file, translating the strings and customizing the layout as desired for the locale.
Uploading the Localized Template to BI Publisher1. Navigate to the report, subtemplate, or style template in the catalog and click Edit
to open it for editing.
For reports only:
From the thumbnail view of the report layouts, click the Properties link of the layout to open the Template Manager.
2. In the Templates region, click the Upload toolbar button.
3. In the Upload Template File dialog, locate the file in your local directory, select rtf as the Template Type and select the Locale for this template file.
4. Click OK to upload the file and view it in the Templates table.

Moving Catalog Objects Between Environments 15-1
15Moving Catalog Objects Between
Environments
This chapter covers the following topics:
• Overview
• Preparing to Use the BI Publisher Catalog Utility
• Exporting BI Publisher Reporting Objects
• Importing BI Publisher Reporting Objects
• Generating Translation Files and Checking for Translatability
OverviewThe BI Publisher catalog utility enables administrators and report developers to export the reporting object-related files from the catalog where all BI Publisher reports are stored, and to import them to a different catalog. Use this tool to manage BI Publisher reports using a third party tool as a source control or when you need to move a specific set of reports from a development environment to a quality assurance or production environment. The catalog utility can also be used to help manage translations of reporting objects.
Use the BI Publisher catalog utility to perform the following tasks:
• Export BI Publisher reports from the catalog
• Import BI Publisher reports into the catalog
• Extract translatable strings and generate a translation file (XLIFF)
• Generate a security.xml file that contains the reporting object-level permission settings

15-2 Oracle Fusion Middleware Administrator's Guide for Oracle Business Intelligence Publisher
When to Use the Catalog UtilityUse the catalog utility to move BI Publisher report artifacts from one environment to another. For example, use the catalog utility to move reports from a development environment to a quality assurance environment. This process is illustrated in the following diagram:
Other Options for Moving Catalog ObjectsIf you need to download or upload a small number of objects, the download feature of the BI Publisher catalog enables you to bundle and download multicomponent objects (such as reports) in an archive file. You can then use the upload feature to unarchive thedata to another location in the catalog. For more information about this feature, see Downloading and Uploading Catalog Objects in the Oracle Fusion Middleware User's Guide for Oracle Business Intelligence Publisher.
Caution: Do Not Manually Edit the BI Publisher Files in the File System
BI Publisher uses metadata files to maintain information about catalog objects. Manually editing objects in the file system can result in the corruption of the metadata files. If the metadata file becomes corrupt it is possible to restore it by deleting the corrupt file and restarting BI Publisher.
What Files Are MovedThe following table lists the files that are included when you export an object from the catalog:

Moving Catalog Objects Between Environments 15-3
Object Files
Report
Example: Balance+Letter.xdo
• _report.xdo - the report definition file
• xdo.cfg - the configuration file that contains the report property settings
• ~metadata.meta - metadata file that contains the catalogpath information. This file is used by the utility to import objects back to their original locations.
• security.xml file - specifies the object level permissions defined for the report
• template files - all template files loaded to the report definition. The file names will include language suffix, for example: My_RTF_template_en_us.rtf, My_BIP_layout_en_us.xpt
• translation files - all translation files (.xlf), for example: My_RTF_template_jp_jp.xlf
Data Model
Example: myDataModel.xdm
• _datamodel.xdm - the report definition file
• ~metadata.meta - metadata file that contains the catalogpath information. This file is used by the utility to import objects back to their original locations.
• security.xml file - specifies the object level permissions defined for the data model
Subtemplate
Example: mysubtempate.xsb
• _template_en_us.rtf - the subtemplate file with locale designation
• ~metadata.meta - metadata file that contains the catalogpath information. This file is used by the utility to import objects back to their original locations.
• security.xml file - specifies the object level permissions defined for the subtemplate
• translation files - any translations, when present; for example: _template_jp_jp.rtf
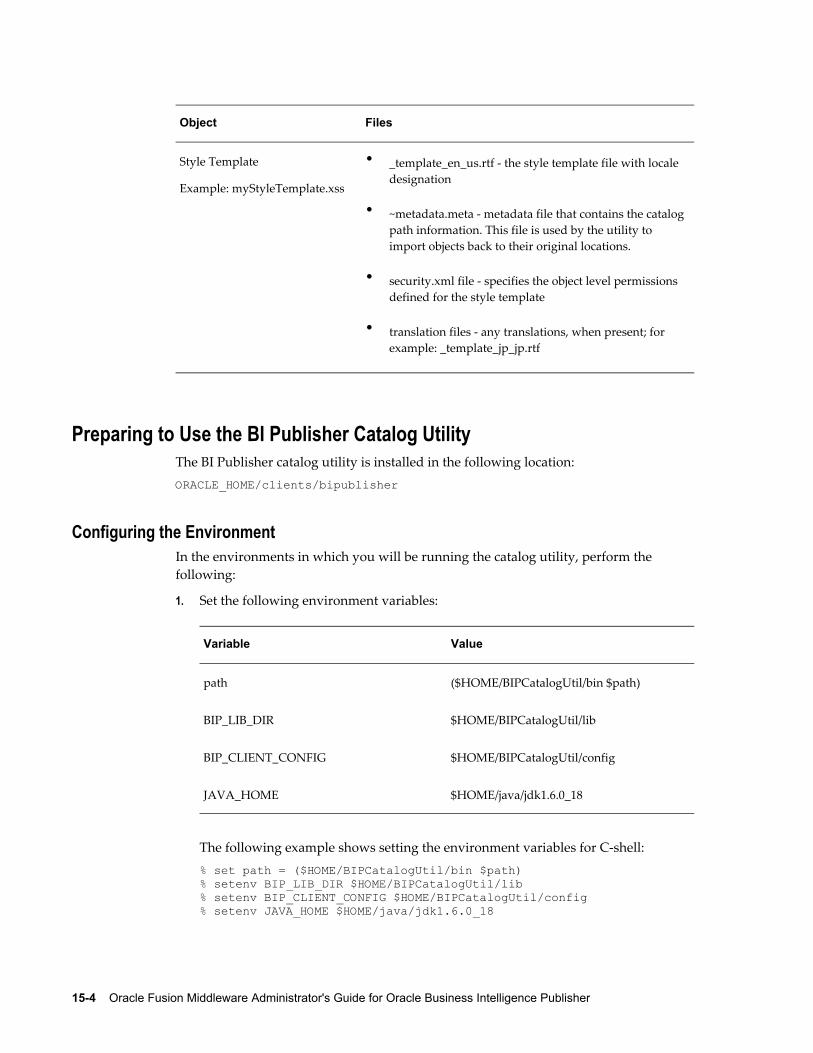
15-4 Oracle Fusion Middleware Administrator's Guide for Oracle Business Intelligence Publisher
Object Files
Style Template
Example: myStyleTemplate.xss
• _template_en_us.rtf - the style template file with locale designation
• ~metadata.meta - metadata file that contains the catalogpath information. This file is used by the utility to import objects back to their original locations.
• security.xml file - specifies the object level permissions defined for the style template
• translation files - any translations, when present; for example: _template_jp_jp.rtf
Preparing to Use the BI Publisher Catalog UtilityThe BI Publisher catalog utility is installed in the following location:ORACLE_HOME/clients/bipublisher
Configuring the EnvironmentIn the environments in which you will be running the catalog utility, perform the following:
1. Set the following environment variables:
Variable Value
path ($HOME/BIPCatalogUtil/bin $path)
BIP_LIB_DIR $HOME/BIPCatalogUtil/lib
BIP_CLIENT_CONFIG $HOME/BIPCatalogUtil/config
JAVA_HOME $HOME/java/jdk1.6.0_18
The following example shows setting the environment variables for C-shell:% set path = ($HOME/BIPCatalogUtil/bin $path)% setenv BIP_LIB_DIR $HOME/BIPCatalogUtil/lib% setenv BIP_CLIENT_CONFIG $HOME/BIPCatalogUtil/config% setenv JAVA_HOME $HOME/java/jdk1.6.0_18

Moving Catalog Objects Between Environments 15-5
2. Edit xmlp-client-config.xml. This configuration file is located under the BIPCatalogUtil/config directory.
Specify the BI Publisher instance URL ("bipurl") and the username and password of the BI Publisher instance from which you will be exporting or to which you will be importing.<?xml version="1.0" encoding="UTF-8"?><!DOCTYPE properties SYSTEM "http://java.sun.com/dtd/properties.dtd"><properties> <comment>BIP Server Information</comment> <entry key="bipurl">http://sta00XXX.us.oracle.com:14001/xmlpserver/</entry> <entry key="username">OPERATIONS</entry> <entry key="password">welcome</entry></properties>
If you do not wish to store this information in the configuration file, at the time of import/export you can also set the bipurl, username, and password as parameters in the command line to overwrite values defined in xmlp-client-config.xml.
Exporting BI Publisher Reporting ObjectsUse the export command to export either a single reporting object or a set of BI Publisher reporting objects under a specified folder. There are two export commands:
• -export - use this command to export a single report object
• -exportfolder - use this command to export a folder and its contents
Following is a list of the supported parameters for the -export and -exportfolder commands:
Parameter Used With Sample Description
catalogpath -export
-exportfolder
/Samples/Financials/Balance+Letter.xdo
The path to the object in the catalog. If there are spaces in any of the names, use the '+' sign to substitute.
target -export /tmp/Financials/BalanceLetter
The destination directory in which to place the extracted reporting objects.
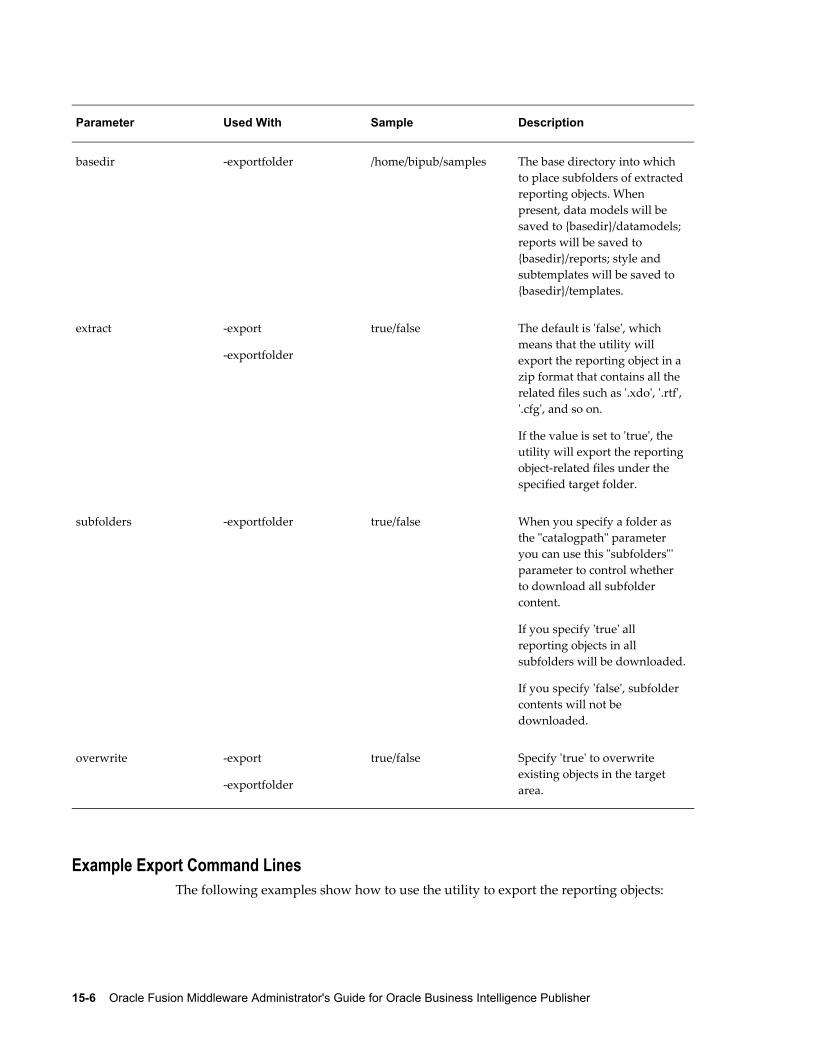
15-6 Oracle Fusion Middleware Administrator's Guide for Oracle Business Intelligence Publisher
Parameter Used With Sample Description
basedir -exportfolder /home/bipub/samples The base directory into which to place subfolders of extractedreporting objects. When present, data models will be saved to {basedir}/datamodels; reports will be saved to {basedir}/reports; style and subtemplates will be saved to {basedir}/templates.
extract -export
-exportfolder
true/false The default is 'false', which means that the utility will export the reporting object in a zip format that contains all the related files such as '.xdo', '.rtf', '.cfg', and so on.
If the value is set to 'true', the utility will export the reportingobject-related files under the specified target folder.
subfolders -exportfolder true/false When you specify a folder as the "catalogpath" parameter you can use this "subfolders"' parameter to control whether to download all subfolder content.
If you specify 'true' all reporting objects in all subfolders will be downloaded.
If you specify 'false', subfolder contents will not be downloaded.
overwrite -export
-exportfolder
true/false Specify 'true' to overwrite existing objects in the target area.
Example Export Command LinesThe following examples show how to use the utility to export the reporting objects:

Moving Catalog Objects Between Environments 15-7
Export a Single Report in Archive FormatThe following example exports the reporting object in a zip format. The zip file containsall the reporting object related files such as .xdo, .rtf, .cfg, and so on. To extract a report in archived format use the ".xdoz" extension for the target. To extract a data model, use the ".xdmz" extension. $ BIPCatalogUtil.sh -export catalogpath=/Samples/Financials/Balance+Letter.xdo target=/home/bipub/reports/BalanceLetter.xdoz extract=false
Export a Single Report with Files ExtractedThe following example extracts the reporting object-related files to a directory named "/home/bipub/reports/BalanceLetter". Existing files will be overwritten. $ BIPCatalogUtil.sh -export catalogpath=/Samples/Financials/Balance+Letter.xdo target=/home/bipub/reports/BalanceLetter extract=true overwrite=true
Export a Set of Reports to a Specified FolderThe following example extracts all the reporting objects under the "/Samples" folder andits subfolders in the catalog. Data models are saved under {basedir}/datamodels. Reports are saved into {basedir}/reports. Style and subtemplates are saved into {basedir}/templates.$ BIPCatalogUtil.sh -exportfolder catalogpath=/Samples basedir=/home/bipub/samples subfolders=true extract=true overwrite=true
Importing BI Publisher Reporting ObjectsUse the import command to import either a single BI Publisher reporting object or a set of BI Publisher reporting objects under a specified folder. Following is the list of the supported parameters for the import command.
Parameter Sample Description
catalogpath /Samples/Financials/Balance+Letter.xdo
Specify the catalog path to where you want to import the reporting object only when you want to override the default information. If you do not specify this parameter, the reporting object will be imported to the same location where it was originally exported from.

15-8 Oracle Fusion Middleware Administrator's Guide for Oracle Business Intelligence Publisher
Parameter Sample Description
source /tmp/Financials/BalanceLetter The directory where the reporting object is located. Use this parameter when you are importing a single report.
basedir /home/bipub/samples The directory that contains multiple reports or data models to be imported. Specify this parameter when importing a set of reports or data models.
overwrite true/false Specify 'true' to overwrite existing objects in the target area.
Typically, you would import the reporting object to where it was originally exported from. When you export the reporting object with the utility it will generate a metafile (.meta) that contains the catalog path information. The utility will use this information to import the reporting object to the original location. However, if you want to import the objects into a different location, you can override the original catalog path location by specifying the catalogpath parameter.
Example Import Command LinesThe following examples show how to use the utility to export the reporting objects:
Import a Report to an Original LocationThe following example imports a report to a catalog path saved in its metafile (.meta). Existing reports will be overwritten.$ BIPCatalogUtil.sh -import source=/tmp/Financials/BalanceLetter overwrite=true
Import a Report to a New LocationThe following example imports a report into a new location in the catalog.$ BIPCatalogUtil.sh -import source=/home/bipub/reports/BalanceLetter catalogpath=/Production/Financials/Balance+Letter+Report.xdo
Import a Zipped Report The following example imports a zipped reporting object to an original location in the catalog.$ BIPCatalogUtil.sh -import source=/home/bipub/reports/BalanceLetter.xdoz overwrite=true

Moving Catalog Objects Between Environments 15-9
Import a set of BI Publisher Reporting Objects under a Specified Folder The following example imports all the reports under the base directory (basedir) into the original locations in the catalog.$ BIPCatalogUtil.sh -import basedir=/Users/bipub subfolders=true overwrite=true
Generating Translation Files and Checking for TranslatabilityThe catalog utility supports the -xliff command to generate a translatable XLIFF file for a specific file.
The source file can be the report definition (.xdo) file, an RTF template file (.rtf), or a BI Publisher layout template file (.xpt). When the source is the .xdo file, the generated XLIFF file will include all user-entered strings from the report definition interface, for example: description, layout names, parameter names.
Parameter Sample Description
source /Samples/Financials/Balance+Letter.xdo
The path to the report or template file (RTF or XPT) for which to generate the XLIFF file.
target /home/bipub/reports/Balance+Letter/Balance+Letter.xlf
The location to save the generated .xlf document.
basedir /home/bipub/reports/Balance+Letter/
The directory to place the generated .xlf files into.
Generate Translation File for a Report Definition File (.xdo)The following example generates an XLIFF file for a single report definition file:$ BIPCatalogUtil.sh -xliff source=/home/bipub/reports/Balance+Letter/Balance+Letter.xdo target=/home/bipub/reports/Balance+Letter/Balance+Letter.xlf
To save the XLIFF to a base directory:$ BIPCatalogUtil.sh -xliff source=/home/bipub/reports/Balance/Balance+Letter.xdo basedir=/home/bipub/reports/Balance+Letter/
Generate Translation File for RTF TemplateThe following example generates an XLIFF file for a single RTF template file:

15-10 Oracle Fusion Middleware Administrator's Guide for Oracle Business Intelligence Publisher
$ BIPCatalogUtil.sh -xliff source=/home/bipub/reports/Balance+Letter/Balance+Letter+Template.rtf target=/home/bipub/reports/Balance+Letter/Balance+Letter+Template.xlf
To save the XLIFF to a base directory:$ BIPCatalogUtil.sh -xliff source=/home/bipub/reports/Balance/Balance+Letter+Template.rtf basedir=/home/bipub/reports/Balance+Letter/

Setting Up Print Servers A-1
ASetting Up Print Servers
Print Server Options for BI Publisher• CUPS on Linux
• Internet Printing Protocol (IPP) on Windows
Setting Up CUPSThe delivery manager requires Common UNIX Printing System (CUPS) to print and faxdocuments. This section describes how to set up CUPS for printing and faxing on RedHat Linux.
The following diagram shows the integration between BIPublisher and CUPS:

A-2 Oracle Fusion Middleware Administrator's Guide for Oracle Business Intelligence Publisher
The following procedures describe how to add a printer or fax to CUPS and how to test your setup. For more information, see the CUPS Software Administrators Manual (http://www.cups.org/doc-1.1/sam.html) and the Redhat Advanced Server online help.
Prerequisites• RedHat Advanced Server 3.0 or later
• Fax Modem connected to the Linux box
• Development Tools for the RedHat Advanced Server installed
• CUPS (Installed by default when installing RedHat AS 3.0 or later)
Setting Up a Printer on CUPSThe RedHat Advanced Server provides a configuration wizard to help you set up your printers. The RedHat process is summarized below:
Using the RedHat Printer Configuration Wizard:1. Run "redhat-config-printer"
While logged on as the root user, open a terminal and execute "redhat-config-printer". This invokes the Printer configuration window.
2. Select the New tab to launch the Add a new print queue wizard.
3. Follow the wizard prompts to:
• Enter a queue name.

Setting Up Print Servers A-3
• Select the queue type.
Select "Networked_JetDirect" to set up a network printer. For this selection, youmust also enter the following:
• Printer - enter a hostname or IP address.
• Port - enter a port.
If the printer driver is installed in Microsoft Windows, the Printer and Port information is available from the Properties dialog for the printer (Settings > Printers and Faxes > (select printer) > File > Properties).
• Select the printer model.
If your printer supports PostScript, select the following:
• Manufacturer: "Generic"
• Model: "PostScript Printer"
• Review your selections and select "Apply" to create your new print queue.
4. Your new queue now displays in the Printer configuration window.
Test Your Printer on CUPS:1. Launch a browser on RedHat and enter the following URL:
http://localhost:631
2. Select the Printers tab. The printer you just created will be listed.
To use your Windows browser to access this page, see Making CUPS Accessible from Other Machines, page A-5.
3. Select Print Test Page to test your printer setup. If the test page does not print, repeat the configuration steps. Ensure that your printer type and model selections are correct.
Installing and Setting Up Fax for CUPSThis section describes how to install efax-0.9 software and configure it for CUPS.
Install the Fax Software:1. Download efax-0.9 from one of the following locations:
• http://www.cce.com/efax/download/

A-4 Oracle Fusion Middleware Administrator's Guide for Oracle Business Intelligence Publisher
• ftp://ftp.metalab.unc.edu/pub/Linux/apps/serialcomm/fax/efax-0.9.tar.gz
2. Extract the files to a working directory using the following commands:
• gunzip efax-0.9.tar.gz
• tar xvf efax-0.9.tar
3. Compile and install using the following commands (refer to the Readme for more information):
• make
• make install
Note: You must have make and gcc installed in your RedHat AS.
4. Test the fax.
Enter the following command:
fax send <fax_number><tiff file>
For example:
fax send 1234567 test.tiff
The fax is successful if you get the return code:
done, returning 0 (success)
5. Download fax4CUPs. It is available from the following site:
• http://www.gnu.org/directory/productivity/special/fax4CUPS.html
6. Install fax4CUPS as follows:
• Extract the tar file to a temporary directory
• Change the directory: cd fax4CUPS-1.23
• Open the INSTALL file and follow all steps.
7. Restart CUPS using the following command:/etc/rc.d/init.d/cups restart
Setting Up a Fax on CUPS:1. Launch a browser and go to the following URL: http://localhost:631/admin

Setting Up Print Servers A-5
2. Enter the admin username and password in the dialog that launches.
3. From the Admin page, select Add Printer.
4. Add a Fax queue as follows:
In the Add New Printer region, enter the following fields:
• Name - enter a meaningful name for the, such as "efaxserver". This will be referred to as "ipp://serverName:631/printers/efaxserver".
• Location - optional.
• Description - optional.
5. Select a device for the fax queue.
Select "Faxmodem (efax on /dev/modem)". In some cases, "/dev/ttySxx" will be shown instead.
6. Select a model for the fax queue.
Select "efax". You can also select either "HylaFAX" or "mgetty-fax" if these have been installed.
7. Select the driver for the fax queue.
Select "efax (en)".
8. Verify that the new fax queue appears on the CUPS Admin Web page.
9. Text the fax on CUPS.
Enter the following command to test the fax:/usr/bin/lp -d <printer name> -t <phone#> test.pdf
Example:/usr/bin/lp -d efax1 -t 5556231 myfax.pdf
Making CUPS Accessible from Other MachinesBy default, CUPS does not allow access from other network machines. However, it can be configured to allow access, as follows:
1. Open a CUPS configuration file using the following command:Open /etc/cups/cupsd.conf
2. Add a "Listen" instruction.
• Scroll to the bottom of the configuration file where the other Listen instructions are declared.

A-6 Oracle Fusion Middleware Administrator's Guide for Oracle Business Intelligence Publisher
• Copy "Listen 127.0.0.1:631" and paste it above or below the original.
• Replace "127.0.0.1" with the Linux server's IP address.
3. Configure each printer.
• In the configuration file, locate:
<Location /printers/your_printer_queue>
• Comment the instruction "Deny From All".
Example:
# Deny From All
• Change "Allow from 127.0.0.1" to "Allow from All"
• Repeat for all printer or fax queues that you wan to make accessible.
4. Save the configuration file and restart CUPS.
• Use the following command to stop CUPS:
/etc/rc.d/init.d/cups stop
• Use the following command to start CUPS:
/etc/rc.d/init.d/cups start
5. Test the accessibility from other machines.
Launch a browser from another machine and enter one of the following URLs to ensure that the CUPS web page can be accessed:
• http://linux_server_name:631
• http://linux_ip_address:631
Setting UP Internet Printing Protocol (IPP) on WindowsThis section describes how to set up Internet Printing Protocol (IPP) on a Windows XP server.
Setting Up IPP Printers on Windows XP Professional1. Install Internet Information Services (IIS).
• Open the Control Panel. Select Add or Remove Programs, then Add/Remove Windows Components.

Setting Up Print Servers A-7
• Select the check box for Internet Information Services (IIS) from the list of available Windows Components (shown in the following figure).
• With IIS highlighted, select Details. Ensure that World Wide Web Service is selected (shown in the following figure).

A-8 Oracle Fusion Middleware Administrator's Guide for Oracle Business Intelligence Publisher
• With World Wide Web Service highlighted, select Details. Ensure that Printersvirtual directory is selected (shown in the following figure).

Setting Up Print Servers A-9
2. Restart Windows XP.
3. Share the printers.
• From the Start menu, select Settings, then Printers and Faxes.
• Right-click the printer icon and select Sharing.
• In the printer Properties dialog, select Share this printer and assign a Share name (for example: myprinter1). An example is shown in the following figure.
4. Configure the Windows Firewall to open a port to your XMLP Server:
• From the Start menu, select Settings, then Control Panel.
• From the Control Panel, select Windows Firewall.
• From the Windows Firewall dialog, select the Exceptions tab.
• Create an entry in the list of Programs and Services as follows:

A-10 Oracle Fusion Middleware Administrator's Guide for Oracle Business Intelligence Publisher
1. Select Add Port.
2. Enter the Name: for example, Web
Enter the Port number: for example, 80
Select TCP.
An example is shown in the following figure:
• To allow access from a specific IP address only:
1. Select your entry, then select Edit.
2. From the Edit a Program dialog, select Change Scope.
3. Choose Custom list, and enter the IP address of the XMLP Server.
Note that if you use the HTTP proxy server in BI Publisher Server, you must enter the IP address of the proxy server.
An example is shown in the following figure.
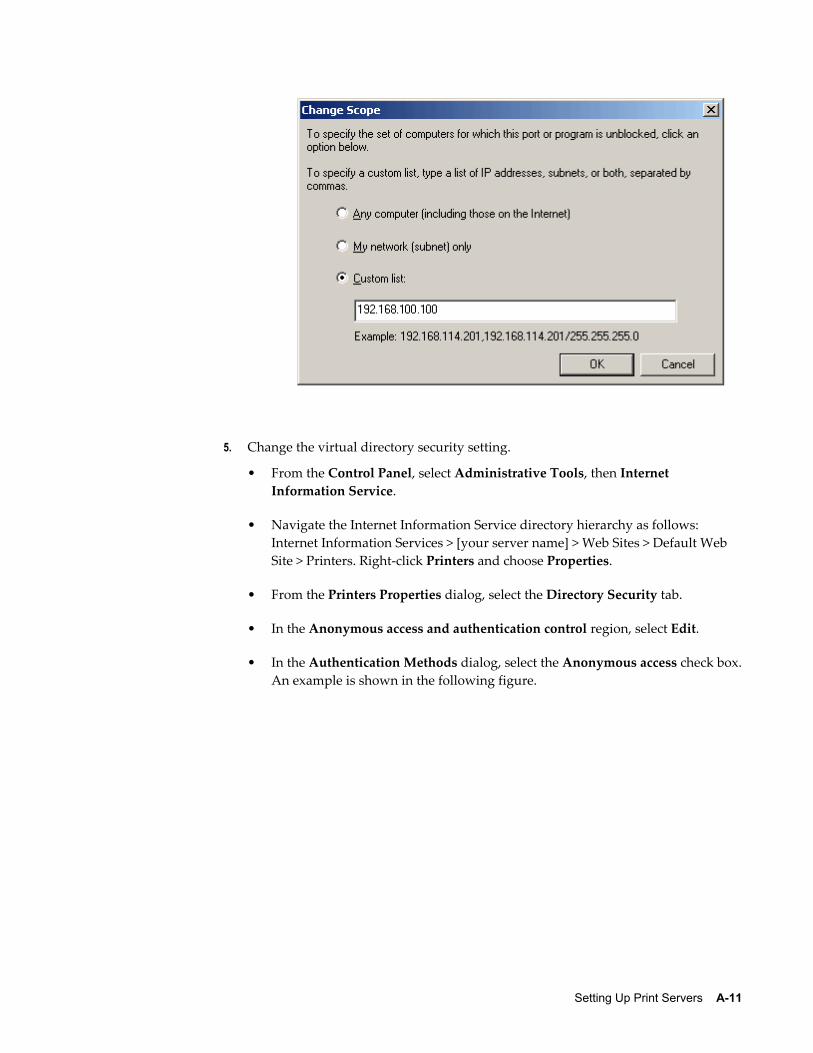
Setting Up Print Servers A-11
5. Change the virtual directory security setting.
• From the Control Panel, select Administrative Tools, then Internet Information Service.
• Navigate the Internet Information Service directory hierarchy as follows: Internet Information Services > [your server name] > Web Sites > Default Web Site > Printers. Right-click Printers and choose Properties.
• From the Printers Properties dialog, select the Directory Security tab.
• In the Anonymous access and authentication control region, select Edit.
• In the Authentication Methods dialog, select the Anonymous access check box.An example is shown in the following figure.

A-12 Oracle Fusion Middleware Administrator's Guide for Oracle Business Intelligence Publisher
6. Open a browser in a remote machine and enter the following URL: http://<yourserver name>/printers
You will see the list of shared printers.

Scheduler Configuration Reference B-1
BScheduler Configuration Reference
This appendix covers the following topics:
• Introduction
• Configuring BI Publisher for ActiveMQ
• Manually Configuring the Quartz Scheduler
IntroductionThe Oracle Business Intelligence Platform Installer configures the connection to the scheduler and installs the scheduler schema to your selected scheduler database. The WebLogic JMS queues are set up and the scheduler is up and running after installation is complete and the servers have been started.
This information in this appendix is provided for reference for manually configuring the scheduler and for setting up ActiveMQ as an alternative JMS provider.
For conceptual information about the scheduler, information for installing and configuring additional managed servers, and a description of the scheduler diagnostics page, see Configuring the Scheduler, page 7-1.
Configuring BI Publisher for ActiveMQThe scheduler is configured by default to use WebLogic JMS. The scheduler also supports ActiveMQ as an alternative JMS provider. Use these guidelines in conjunction with the ActiveMQ documentation to configure BI Publisher if you choose to use ActiveMQ as the JMS provider.
Install ActiveMQIt is recommended that you install ActiveMQ version 5.2.0 or later. This can be installedin Windows, Unix or Linux. Follow the installation steps documented athttp://activemq.apache.org/

B-2 Oracle Fusion Middleware Administrator's Guide for Oracle Business Intelligence Publisher
Register ActiveMQ as a JNDI ServiceWhen you start ActiveMQ, the queues can be accessed using JNDI service.
The default URL to access this service is:
failover://tcp://localhost:61616
To change this configuration, update the activemq.xml configuration file found in apache-activemq-x.x.x\conf for example: apache-activemq-5.2.0\conf .
Update the BI Publisher Scheduler Configuration PagePerform the following:
1. On the BI Publisher Administration page, under System Maintenance, click Scheduler Configuration.
2. Under the JMS Configuration region, select ActiveMQ.
3. Enter the ActiveMQ JNDI URL. For example: failover://tcp://localhost:61616
4. Enter the threads per processor (for example: 5).
5. Enter the path to a shared temporary directory.
6. Click Test JMS to test the connection.
7. Click Apply to apply the changes to this page.
The ActiveMQ URL is dynamically applied. The queues and topics are automatically created in ActiveMQ and are ready for scheduling. You can confirm the queues by checking them in the Scheduler Diagnostics page. Alternatively, you can check the status in the ActiveMQ Web console: http://localhost:8161/admin.
Manually Configuring the Quartz SchedulerBI Publisher includes the Hyperion-branded DataDirect Connect for JDBC drivers to setup a connection to install and use the scheduler tables in your database. These drivers can be used as an alternative to the native JDBC drivers provided by your database vendor. When you choose a database for which a DataDirect driver is available, BI Publisher automatically enters the database driver class information in the setup screen for you. There is no additional setup required for the driver files.
If you choose to use a data direct driver not provided by the BI Platform Installer, you must download, install, and configure the driver manually.

Scheduler Configuration Reference B-3
Recommendations for Using DataDirect Connect or Native Database DriversDataDirect Connect for JDBC drivers are provided for the following databases:
• IBM DB2 v8.1, v9.1
• Microsoft SQL Server 2000, 2005
• Sybase Adaptive Server Enterprise
• Oracle 9i, Oracle 10g, Oracle 11g,
Note: Some database options listed here and in the Scheduler page maynot be supported in this release. See System Requirements and Certification, page xii for the most up-to-date information on supportedhardware and software.
The following table displays the driver recommendations for the supported scheduler databases:
Database Native JDBC Driver DataDirect JDBC Driver
Oracle 10g, Oracle 11g Recommended Supported
IBM DB2 v8.1, v9.1 Supported Recommended
Microsoft SQL Server 2000, 2005
Supported Recommended
Sybase Adaptive Server Enterprise
Supported Recommended
MySQL 4.1.10a-NT, 5.0 Supported Not Supplied
Set Up a User on Your Scheduler DatabaseTo set up the connection to your scheduler database, you must ensure you have created a user on your selected database. BI Publisher will use this user to connect to the database. Depending on your database type, this user may require specific privileges. These are detailed in the database-specific sections below.

B-4 Oracle Fusion Middleware Administrator's Guide for Oracle Business Intelligence Publisher
Entering Connection Information for Your Scheduler Database and Installing the SchemaFollowing are the general steps for setting up the Scheduler database. Please also refer to the subsequent section that is specific to your database.
1. Log in to BI Publisher with Administrator credentials and select the Administrationtab.
2. Under System Maintenance, click Scheduler Configuration.
3. In the Scheduler Selection region, select Quartz.
Note: The option "Enterprise Scheduler Services" is reserved for a future release.
4. Enter the following fields for the Database Connection:
• Database Type - select your database from the list. After you make a selection, the Database Driver Class field will automatically update with the recommended driver class.
• Connection String - enter the connection string for your selected database. Sample strings are provided in the database-specific sections that follow.
• Username and Password - enter the scheduler user you set up for your database. The user must have permissions to connect to the database and createtables. Other permissions may be required depending on your database type. Please see the appropriate database-specific section below.
• Database Driver Class - when you select the database type this field is automatically updated with the recommended driver. If you wish to use another driver, specify it in this field.
Note: The Oracle database drivers and the DataDirect drivers are installed with BI Publisher and no further setup is required.Note that for other databases, even though the recommended native drivers are automatically populated in this field, additional setup is required to make the drivers available to BI Publisher.
5. Click Test Connection to ensure that BI Publisher can connect to the database. If theconnection fails, ensure that you have entered the fields as shown and set up your database appropriately.
6. Click Install Schema to install the BI Publisher scheduler schema to your database.

Scheduler Configuration Reference B-5
Entering Connection Information for an Oracle DatabasePrerequisite: Ensure that the database user you enter has "connect" or "create session" and "create table" privileges and that the user has been assigned a quota (otherwise the quota will be 0).
For example, the following sample creates the user "bipuser":SQL> CREATE USER bipuser 2 IDENTIFIED BY welcome 3 DEFAULT TABLESPACE USERS 4 TEMPORARY TABLESPACE TEMP 5 QUOTA 20G ON USERS 6 QUOTA 1M ON TEMP;
User created.
SQL> GRANT CREATE SESSION TO bipuser; -- or "GRANT CONNECT TO bipuser;"
Grant succeeded.
SQL> grant create table to bipuser;
Grant succeeded.
Enter the following to use the Oracle native driver to connect to your Oracle database:
Field Entry
Database Type: Select Oracle 11g or Oracle 10g from the list.
Connection String: Enter the following connection string parameters:
jdbc:oracle:thin:@<hostname>:<port>:<oracle SID>
For example:
jdbc:oracle:thin:@mydatabaseserver.com:1521:bipscheduler
Database Driver Class: oracle.jdbc.driver.OracleDriver
Entering Connection Information for IBM DB2Prerequisite: Ensure that the user that you enter to configure the scheduler has been set up with a 32 K page size tablespace. If not, create the table and assign it to the user. The user must also have "Connect to database" and "Create tables" privileges.
Enter the following to use the DataDirect driver to connect to an IBM DB2 v8 or IBM DB2 v9 database:

B-6 Oracle Fusion Middleware Administrator's Guide for Oracle Business Intelligence Publisher
Field Entry
Database Type: Select IBM DB2 v9 or IBM DB2 v8 from the list.
Connection String: Enter the following connection string parameters:jdbc:hyperion:db2://<hostname>:<port>;DatabaseName=<DATABASENAME>
For example:
jdbc:hyperion:db2:// mydatabaseserver.com:1433;DatabaseName=bipscheduler
Database Driver Class: hyperion.jdbc.db2.DB2Driver
Entering Connection Information for Microsoft SQL ServerPrerequisite: Ensure that your Microsoft SQL Server is set up with mixed mode authentication. Also ensure that the user you enter to configure the scheduler has the "db_owner" role.
Enter the following to use the DataDirect driver to connect to a Microsoft SQL Server 2000 or 2005 database:
Field Entry
Database Type: Select Microsoft SQL Server 2000 or Microsoft SQL Server 2005 from the list.
Connection String: Enter the following connection string parameters:
jdbc:hyperion:sqlserver://<hostname>:<port>;DatabaseName=<DATABASENAME>
For example:
jdbc:hyperion:sqlserver:// mydatabaseserver.com:1433;DatabaseName=bipscheduler
Database Driver Class: hyperion.jdbc.sqlserver.SQLServerDriver
Entering Connection Information for a Sybase Adaptive Server Enterprise DatabasePrerequisite: Ensure that you set the "ddl in tran" mode to true in the database. Consult

Scheduler Configuration Reference B-7
the Sybase documentation or contact your database administrator for instruction how toenable this option.
Enter the following to use the DataDirect driver to connect to your Sybase Adaptive Server Enterprise database:
Field Entry
Database Type: Select Sybase Adaptive Server Enterprise from the list.
Connection String: Enter the following connection string parameters:
jdbc:hyperion:sybase://<hostname>:<port>;DatabaseName=<DATABASENAME>
For example:
jdbc:hyperion:sybase://mydatabaseserver.com:4100;DatabaseName=bipscheduler
Database Driver Class: hyperion.jdbc.sybase.SybaseDriver


Integration Reference for Oracle Business Intelligence Enterprise Edition C-1
CIntegration Reference for Oracle Business
Intelligence Enterprise Edition
This appendix covers the following topics:
• About Integration
• Configuring BI Publisher to Use the Oracle BI Presentation Catalog
• Configuring Integration with Oracle BI Presentation Services
• Setting Up a JDBC Connection to the Oracle BI Server
About IntegrationThe information in this chapter is for reference to highlight the integration points between BI Publisher and the Oracle BI Enterprise Edition.
You may need to reference this information in the following scenarios:
• You are upgrading from a 10g release to the 11g release
• You are running a separate installation of BI Publisher and wish to integrate it
• You need to modify the installed configuration
The points of integration discussed in this chapter are:
• Connecting to Oracle BI Server as a data source
• Configuring BI Publisher to use the Oracle BI Presentation Catalog
• Configuring integration with Oracle BI Presentation Services
PrerequisitesOracle BI Publisher must be installed on the same server with the other components of

C-2 Oracle Fusion Middleware Administrator's Guide for Oracle Business Intelligence Publisher
Oracle BI Enterprise Edition.
The security configuration must be either Oracle Fusion Middleware security or Oracle BI Server security.
Configuring BI Publisher to Use the Oracle BI Presentation Catalog To manually configure BI Publisher to use the Oracle BI Presentation Catalog, perform the following:
1. On the Server Configuration page in the Catalog region, select Catalog Type: Oracle BI EE Catalog
2. Enter the following:
• Server Version - v6
• System Username
Enter BISystemUser
BISystemUser is a fixed user created during installation for trusted communication between components.
• System Password
Enter the password for BISystemUser.
• Connection Protocol - TCP
3. Click Test Connection to ensure BI Publisher can connect to Oracle BI Presentation Services.
4. Enter the path of the current BI Publisher repository.
5. Click Upload to BI Presentation Catalog. This will upload the contents of your BI Publisher catalog to the BI Presentation catalog.
6. Restart the BI Publisher application.
Configuring Integration with Oracle BI Presentation ServicesWhen you install Oracle BI Enterprise Edition the integration with BI Publisher is automatically configured. This means that the Oracle BI Platform installer sets the Presentation Services hostname, port, and URL suffix values. Furthermore, the username and password fields will be hidden because both products will be configured to use Oracle Fusion Middleware security.
1. From the Administration page, under Integration, click Oracle BI Presentation

Integration Reference for Oracle Business Intelligence Enterprise Edition C-3
Services.
2. Enter the following information about your BI Presentation Services server:
• Server Protocol - select http or https
• Server Version - select v6
• Server - enter the server host name. For example: BIEEServer
• Port for the server where the BI Presentation Services plug-in is running. For example: 9704
• Administrator Username and Password - these fields will be hidden when using Oracle Fusion Middleware Security. If you are manually configuring the integration, enter the BISystemUser username and password.
• URL Suffix - default value is: analytics/saw.dll
Note: If your deployment is configured for SSO, the suffix mustbe entered as "analytics-ws/saw.dll" to allow the Web services between BI Publisher and BI Presentation Services. For more information on configuring SSO for Oracle BI Enterprise Edition, see Oracle Fusion Middleware Security Guide for Oracle Business Intelligence Enterprise Edition.
• Session time out in minutes
Setting Up a JDBC Connection to the Oracle BI ServerNote: If you installed BI Publisher with the Oracle BI Enterprise Edition, this data source will be automatically configured.
To add the Oracle BI Enterprise Edition server as a JDBC data source, follow the guidelines in Adding a JDBC Data Source, page 9-5 in conjunction with these specific guidelines.
You must use the BISystemUser user name and password for connection to the BI Server.
Note that if your Oracle BI Server is SSL-enabled, you must copy the keystore to the BI Publisher server and provide it in the connection string.
The entries for Database Driver Class and Connection String must be as follows:
Database Driver Class: oracle.bi.jdbc.AnaJdbcDriver

C-4 Oracle Fusion Middleware Administrator's Guide for Oracle Business Intelligence Publisher
Connection String: The appropriate connection string depends on your specific deployment. Clustered and SSL-enabled deployments require specific parameters to construct the URL. For example, if your Oracle BI Server is SSL-enabled, you must copy the keystore to the BI Publisher server and provide it in the connection string. For more information on SSL, see the Oracle Fusion Middleware Security Guide for Business Intelligence.
The URL for the connection string requires the following format:<URL>:= <Prefix>: [//<Host>:<Port>/][<Property Name>=<Property Value>;]*
where
<Prefix>: is the string jdbc:oraclebi
<Host>: is the hostname of the analytics server. It can be an IP Address or hostname. The default is localhost.
<Port> is he port number that the server is listening on. The default is 9703.<Property Name>:= <Catalog>|<User>|<Password>|<SSL>|<SSLKeyStoreFileName> |<SSLKeyStorePassword>|<TrustAnyServer>|<TrustStoreFileName >|<TrustStorePassword>|<LogLevel>|<LogFilePath>|<PrimaryCCS>|<PrimaryCCSPort>| <SecondaryCCS>|<SecondaryCCSPort>
Valid property values are:
<Catalog> - can be any catalog name that is available on the server. If the catalog is not specified, then it will default to the default catalog specified by the server. If the catalog name is not found in the server, it will still use the default catalog and issue a warning during connect.
<User> - specifies the username for the BI Server. The default is "Administrator".
<Password>- specifies the password for the BI Server for the username. The password will be encrypted using 3DES.
<SSL>True|False - default is False. Specifies if the JDBC driver will use SSL or not. If true, the driver will check if SSLKeyStoreFileName is readable; if not, it will issue an error message.
<SSLKeyStoreFileName> - the name of the file that store the SSL Keys. This file mustexist in the local file system and be readable by the driver.
<SSLKeyStorePassword> - the password to open the file pointed to by SSLKeyStoreFileName.
<TrustAnyServer> - True | False - the default is False. If SSL is set to "True" the property specifies whether to check the trust store for the server. If TrustAnyServer is set to "False", the driver will verify that TrustStoreFileName is readable.
<TrustStoreFileName> - if TrustAnyServer is set to false, this property is required to specify the trust store file name.
<TrustStorePassword> - if TrustAnyServer and TrustStoreFileName are specified, this property specifies the password to open up the file specified by

Integration Reference for Oracle Business Intelligence Enterprise Edition C-5
TrustStoreFileName.
<LogLevel> - specify the log level. Valid values are
SEVERE | WARNING | INFO | CONFIG | FINE | FINER | FINEST
<LogFilePath> - specifies the file path of the desired logging destination. Default is %TEMP% on windows, $TMP on UNIX. Driver needs to have write permission on the file. It will create a new entry marked as _0, _1 if the same file name already exists.
<PrimaryCCS> -(For clustered configurations) specifies the primary CCS machine name instead of using the "host" to connect. If this property is specified, the "host" property value is ignored. The jdbc driver will try to connect to the CCS to obtain the load-balanced machine. Default is localhost.
<PrimaryCCSPort> - specifies the primary CCS port number running on the PrimaryCCS machine. Default is 9706.
<SecondaryCCS> - specifies the secondary CCS machine name instead of using the "host" to connect. If this property is specified, then the jdbc driver will try to connect to the CCS to obtain the load-balanced machine. Default is localhost.
<SecondaryCCSPort> - specifies the secondary CCS port number running on the secondary machine. Default is 9706.
Following is an example connection string for a clustered deployment with SSL enabled:jdbc:oraclebi://machine01.domain:9706/PrimaryCCS=machine01;PrimaryCCSPort=9706;SecondaryCCS=machine02;SecondaryCCSPort=9706;user=admin;password=welcome;ssl=true;sslKeystorefilename=c:\mycompany\OracleBI\sslc\javahost.keystore;sslKeystorepassword=welcome;trustanyserver=true;
Use Proxy Authentication - (Required) select this box. Proxy authentication is required.


Configuration File Reference D-1
DConfiguration File Reference
This appendix covers the following topics:
• BI Publisher Configuration Files
• Setting Properties in the Runtime Configuration File
• Structure
• Properties
• Font Definitions
• Predefined Fonts
BI Publisher Configuration Files This chapter contains reference information about the following BI Publisher configuration file:
• Runtime Configuration Properties File
The properties in the Runtime Configuration file are set through the Runtime Configuration Properties, Currency Formats, and Font Mappings pages (see Setting Runtime Properties, page 12-1).
Setting Properties in the Runtime Configuration FileThe runtime properties and font mappings are set through the Runtime Configuration Properties page and the Font Mappings page in the Administration interface.
If you do not use the Administration page to set the properties, BI Publisher will fall back to the properties set in this file.
It is important to note that the Administration interface does not update this file. Any settings in the Administration pages will take precedence over the settings in the xdo.cfg file.

D-2 Oracle Fusion Middleware Administrator's Guide for Oracle Business Intelligence Publisher
File Name and LocationThe configuration file is named xdo.cfg.
The file is located under the <BI Publisher Repository>/Admin/Configuration.
NamespaceThe namespace for this configuration file is:
http://xmlns.oracle.com/oxp/config/
Configuration File ExampleFollowing is a sample configuration file:<config version="1.0.0" xmlns="http://xmlns.oracle.com/oxp/config/"><!-- Properties --> <properties> <!-- System level properties --> <property name="system-temp-dir">/tmp</property>
<!-- PDF compression --> <property name="pdf-compression">true</property>
<!-- PDF Security --> <property name="pdf-security">true</property> <property name="pdf-open-password">user</property> <property name="pdf-permissions-password">owner</property> <property name="pdf-no-printing">true</property> <property name="pdf-no-changing-the-document">true</property> </properties>
<!-- Font setting --> <fonts> <!-- Font setting (for FO to PDF etc...) --> <font family="Arial" style="normal" weight="normal"> <truetype path="/fonts/Arial.ttf" /> </font> <font family="Default" style="normal" weight="normal"> <truetype path="/fonts/ALBANWTJ.ttf" /> </font>
<!--Font substitute setting (for PDFForm filling etc...) --> <font-substitute name="MSGothic"> <truetype path="/fonts/msgothic.ttc" ttcno="0" /> </font-substitute> </fonts></config>
How to Read the Element SpecificationsThe following is an example of an element specification:

Configuration File Reference D-3
<Element Name Attribute1="value" Attribute2="value" AttributeN="value" <Subelement Name1/>[occurrence-spec] <Subelement Name2>...</Subelement Name2> <Subelement NameN>...</Subelement NameN></Element Name>
The [occurrence-spec] describes the cardinality of the element, and corresponds to the following set of patterns:
• [0..1] - indicates the element is optional, and may occur only once.
• [0..n] - indicates the element is optional, and may occur multiple times.
StructureThe <config> element is the root element. It has the following structure:<config version="cdata" xmlns="http://xmlns.oracle.com/oxp/config/"> <fonts> ... </fonts> [0..n] <properties> ... </properties> [0..n]</config>
Attributesversion The version number of the configuration file format.
Specify 1.0.0.
xmlns The namespace for BI Publisher's configuration file. Must be http://xmlns.oracle.com/oxp/config/
DescriptionThe root element of the configuration file. The configuration file consists of two parts:
• Properties (<properties> elements)
• Font definitions (<fonts> elements)
The <fonts> and <properties> elements can appear multiple times. If conflicting definitions are set up, the last occurrence prevails.
PropertiesThis section describes the <properties> element and the <property> element.
The <properties> elementThe properties element is structured as follows:

D-4 Oracle Fusion Middleware Administrator's Guide for Oracle Business Intelligence Publisher
<properties locales="cdata"> <property>... </property> [0..n]</properties>
DescriptionThe <properties> element defines a set of properties. You can specify the locales attribute to define locale-specific properties. Following is an example:
Example<!-- Properties for all locales --><properties>...Property definitions here...</properties>
<!--Korean specific properties--><properties locales="ko-KR"> ...Korean-specific property definitions here...</properties>
The <property> elementThe <property> element has the following structure:<property name="cdata"> ...pcdata...</property>
Attributesname Specify the property name.
DescriptionProperty is a name-value pair. Specify the internal property name (key) to the name attribute and the value to the element value. The internal property names used in the configuration file are listed in the property descriptions in the Setting Runtime Properties, page 12-1 chapter.
Example<properties> <property name="system-temp-dir">d:\tmp</property> <property name="system-cache-page-size">50</property> <property name="pdf-replace-smart-quotes">false</property></properties>
Font DefinitionsFont definitions include the following elements:
• <fonts>
• <font>
• <font-substitute>

Configuration File Reference D-5
• <truetype>
• <type1>
For the list of Truetype and Type1 fonts, see Predefined Fonts, page D-7.
<fonts> elementThe <fonts> element is structured as follows:<fonts locales="cdata"> <font> ... </font> [0..n] <font-substitute> ... </font-substitute> [0..n]</fonts>
Attributeslocales Specify the locales for this font definition. This attribute is
optional.
DescriptionThe <fonts> element defines a set of fonts. Specify the locales attribute to define locale-specific fonts.
Example<!-- Font definitions for all locales --><fonts> ..Font definitions here...</fonts>
<!-- Korean-specific font definitions --><fonts locales="ko-KR">... Korean Font definitions here...</fonts>
<font> elementFollowing is the structure of the <font> element:<font family="cdata" style="normalitalic"weight="normalbold"> <truetype>...</truetype>or <type1> ... <type1></font>
Attributesfamily Specify any family name for the font. If you specify
"Default" for this attribute, you can define a default fallbackfont. The family attribute is case-insensitive.
style Specify "normal" or "italic" for the font style.

D-6 Oracle Fusion Middleware Administrator's Guide for Oracle Business Intelligence Publisher
weight Specify "normal" or "bold" for the font weight.
DescriptionDefines a BI Publisher font. This element is primarily used to define fonts for FO-to-PDFprocessing (RTF to PDF). The PDF Form Processor (used for PDF templates) does not refer to this element.
Example<!-- Define "Arial" font --><font family="Arial" style="normal" weight="normal"> <truetype path="/fonts/Arial.ttf"/></font>
<font-substitute> elementFollowing is the structure of the font-substitute element:<font-substitute name="cdata"> <truetype>...</truetype>or <type1>...</type1></font-substitute>
Attributesname Specify the name of the font to be substituted.
DescriptionDefines a font substitution. This element is used to define fonts for the PDF Form Processor.
Example<font-substitute name="MSGothic"> <truetype path="/fonts/msgothic.ttc" ttccno=0"/></font-substitute>
<type1> element>The form of the <type1> element is as follows:<type1 name="cdata"/>
Attributesname Specify one of the Adobe standard Latin1 fonts, such as
"Courier".
Description<type1> element defines an Adobe Type1 font.

Configuration File Reference D-7
Example<!--Define "Helvetica" font as "Serif" --><font family="serif" style="normal" weight="normal"> <type1 name="Helvetica"/></font>
Predefined FontsThe following Type1 fonts are built-in to Adobe Acrobat and BI Publisher provides a mapping for these fonts by default. You can select any of these fonts as a target font with no additional setup required.
The Type1 fonts are listed in the following table:
Type 1 Fonts
Number Font Family Style Weight Font Name
1 serif normal normal Time-Roman
1 serif normal bold Times-Bold
1 serif italic normal Times-Italic
1 serif italic bold Times-BoldItalic
2 sans-serif normal normal Helvetica
2 sans-serif normal bold Helvetica-Bold
2 sans-serif italic normal Helvetica-Oblique
2 sans-serif italic bold Helvetica-BoldOblique
3 monospace normal normal Courier
3 monospace normal bold Courier-Bold
3 monospace italic normal Courier-Oblique
3 monospace italic bold Courier-BoldOblique
4 Courier normal normal Courier

D-8 Oracle Fusion Middleware Administrator's Guide for Oracle Business Intelligence Publisher
Number Font Family Style Weight Font Name
4 Courier normal bold Courier-Bold
4 Courier italic normal Courier-Oblique
4 Courier italic bold Courier-BoldOblique
5 Helvetica normal normal Helvetica
5 Helvetica normal bold Helvetica-Bold
5 Helvetica italic normal Helvetica-Oblique
5 Helvetica italic bold Helvetica-BoldOblique
6 Times normal normal Times
6 Times normal bold Times-Bold
6 Times italic normal Times-Italic
6 Times italic bold Times-BoldItalic
7 Symbol normal normal Symbol
8 ZapfDingbats normal normal ZapfDingbats
The TrueType fonts are listed in the following table. All TrueType fonts will be subsetted and embedded into PDF.
Number Font Family Name
Style Weight Actual Font Actual Font Type
1 Albany WT normal normal ALBANYWT.ttf TrueType (Latin1 only)
2 Albany WT J normal normal ALBANWTJ.ttf TrueType (Japanese flavor)

Configuration File Reference D-9
Number Font Family Name
Style Weight Actual Font Actual Font Type
3 Albany WT K normal normal ALBANWTK.ttf TrueType (Korean flavor)
4 Albany WT SC normal normal ALBANWTS.ttf TrueType (Simplified Chinese flavor)
5 Albany WT TC normal normal ALBANWTT.ttf TrueType (Traditional Chinese flavor)
6 Andale Duospace WT
normal normal ADUO.ttf TrueType (Latin1 only, Fixed width)
6 Andale Duospace WT
bold bold ADUOB.ttf TrueType (Latin1 only, Fixed width)
7 Andale Duospace WT J
normal normal ADUOJ.ttf TrueType (Japanese flavor, Fixed width)
7 Andale Duospace WT J
bold bold ADUOJB.ttf TrueType (Japanese flavor, Fixed width)
8 Andale Duospace WT K
normal normal ADUOK.ttf TrueType (Korean flavor, Fixed width)
8 Andale Duospace WT K
bold bold ADUOKB.ttf TrueType (Korean flavor, Fixed width)
9 Andale Duospace WT SC
normal normal ADUOSC.ttf TrueType (Simplified Chinese flavor, Fixed width)

D-10 Oracle Fusion Middleware Administrator's Guide for Oracle Business Intelligence Publisher
Number Font Family Name
Style Weight Actual Font Actual Font Type
9 Andale Duospace WT SC
bold bold ADUOSCB.ttf TrueType (Simplified Chinese flavor, Fixed width)
10 Andale Duospace WT TC
normal normal ADUOTC.ttf TrueType (Traditional Chinese flavor, Fixed width)
10 Andale Duospace WT TC
bold bold ADUOTCB.ttf TrueType (Traditional Chinese flavor, Fixed width)
Included Barcode FontsBI Publisher also includes the following barcode fonts:
Font File Supported Algorithm
128R00.TTF code128a, code128b, and code128c
B39R00.TTF code39, code39mod43
UPCR00.TTF upca, upce
For information on using barcode fonts in an RTF template, see Using the Barcodes Shipped with BI Publisher, Oracle Fusion Middleware Report Designer's Guide for Oracle Business Intelligence Publisher.

Index-1
Index
AActive Directory, 3-21ActiveMQ
for scheduler, B-1Answers
setting up integration with, 10-1auditing
setting audit policies, 13-12user, 13-10users, 13-9
audit logviewing, 13-15
Ccache
server settings, 8-5system, expiration, 8-5system, maximum cached report definitions, 8-6system, size limit, 8-5
catalogconfiguring, 8-2exporting objects, 15-5importing objects, 15-7Oracle BI Publisher , 8-2translation, 14-2
catalog permissions, 3-5catalog utility, 15-1
using, 15-4clustering support
scheduler, 7-3
configurationmanual, D-1setting runtime properties, 12-1
configuration file<properties> element, D-3<root> element, D-3structure, D-3
Configuration foldersetting path to, 8-1
configuration propertiesprecedence of levels, 12-1
CUPS setup, A-1currency formats
defining at system-level, 12-24
Ddata access, 3-7database
backup data source, 9-3database fetch size, 8-5Datadirect drivers
for scheduler, B-3data source
access, 3-7data sources
setting up, 9-1supported, 9-1viewing and updating, 9-11
diagnostic logging, 13-2diagnostics
scheduler, 7-12digital signature

Index-2
setting properties, 12-7support for, 6-1
EE-Business Suite
security integration, 5-4e-mail default settings, 11-1e-mail server
configuring, 11-4export objects from catalog, 15-5
Ffailover
scheduler jobs, 7-4setting retry properties, 8-6
fax serverconfiguring, 11-2
font definitionsconfiguration file, D-4
fontsmapping, 12-19
FTP serverconfiguring, 11-6
GGhostscript
setting print filters, 11-4guest user
enabling, 4-2
HHTML output
controlling table widths, 12-11HTTP server
configuring, 11-5
Iimport objects to catalog, 15-7Internet Printing Protocol, A-6IPP, A-6
JJDBC
database connection, 9-5
JDBC driversfor data sources, 9-5
JMSin scheduler architecture, 7-2
JMS providerssupported, 7-5
JNDIchoosing, 9-3setting up connection, 9-8
Kkeystore, 4-
pointing BI Publisher to, 4-4
LLDAP
data source connection, 9-8general configuration, 3-15
LDAP providersMicrosoft Active Directory, 3-21
local superuser, 4-1log files
configuring, 13-4viewing, 13-5
logging, 13-2message levels, 13-2supported formats, 13-3
logs, 13-2log file rotation, 13-3
MMbeans
in performance monitoring, 13-9Microsoft Active Directory, 3-21monitoring
performance, 13-9enabling, 13-10
users, 13-9
Nnotification subjects
setting, 11-2
OODL, 13-2

Index-3
OLAP, 9-data source connection, 9-9
Oracle BI EE Catalog, 8-3Oracle BI Presentation Catalog, 8-3Oracle BI Server
security, 5-2setting as data source connection, C-3
Oracle databasesecurity integration, 5-6
Oracle Diagnostic Logging, 13-2Oracle Siebel CRM
security integration, 5-9Oracle SSO, 3-27
PPDF output properties, 12-2PDF security properties, 12-3PDF to Postscript filter, 11-3performance monitoring, 13-9
enabling, 13-10permissions
catalog, about, 3-5postprocess function
for JDBC data source, 9-3predefined fonts, 12-20, D-7preprocess function
for JDBC data source, 9-3Presentation Services catalog
setting up integration with, 10-1printers
setupUnix/Linux, A-1Windows, A-6
printingdefining custom filters, 11-4PDF to Postscript filter, 11-3
print serverconfiguring, 11-2
properties elementconfiguration file, D-3
proxyconfiguring settings, 4-5
proxy authentication, 9-2
Rreport scalable threshold, 8-5
rolesBI Publisher functional, 3-3
Sscheduler
Active MQ support, B-1adding managed servers, 7-7architecture, 7-2configuring processors, 7-6diagnostics, 7-12manual setup reference, B-2preconfiguration, 7-5
securityPDF properties, 12-3roles and permissions
concepts, 3-2superuser, 4-1
shared directoryscheduler, 7-6
Siebel CRMsecurity integration, 5-9
single sign-onOracle Access Manager, 3-25Oracle SSO, 3-27
SSLconfiguring, 4-3
SSL certificate filedefining for delivery manager, 11-1
superuser, 4-1system temporary file directory, 8-4
Ttables
controlling table widths in HTML output, 12-11
temp file locations, 8-4temporary file directory, 8-4translation
exporting and importing XLIFF files, 14-2template-based, 14-5
translation filesgenerating with catalog utility, 15-9
Uuser auditing, 13-9, 13-10

Index-4
users and rolesoptions for configuring, 3-3
WWebDAV server
configuring, 11-5
Xxliff files
generating with catalog utility, 15-9XLIFF files
exporting and importing, 14-2


