E-Vision Laser 10K Series - projectorcentral.com · igital Proetion E-Vision Laser 10K Series Page...
22
Rev A December 2016 118-061A Super High Brightness Digital Video Projector 3 Important Information E-Vision Laser 10K Series
Transcript of E-Vision Laser 10K Series - projectorcentral.com · igital Proetion E-Vision Laser 10K Series Page...

Rev A December 2016 118-061A
Super High Brightness Digital Video Projector3 Important Information
E-Vision Laser 10K Series

Digital Projection E-Vision Laser 10K Series
Rev A December 2016Page 2
Important Information
Digital Projection
Digital Projection Asia
16 New Industrial Road #02-10 Hudson Technocentre Singapore 536204
Tel (+65) 6284-1138 Fax (+65) 6284-1238
www.digitalprojectionasia.com
Digital Projection Inc.
55 Chastain Road, Suite 115 Kennesaw, GA 30144, USA
Tel (+1) 770 420 1350 Fax (+1) 770 420 1360
[email protected] www.digitalprojection.com
Digital Projection China中国 北京市 朝阳区 芍药居北里101号 世奥国际中心A座2006室(100029)
Rm A2006 ShaoYaoJu 101 North Lane Shi Ao International Center Chaoyang District Beijing 100029, PR CHINA
Tel (+86) 10 84888566 Fax (+86) 10 84888566-805
[email protected] www.dp-china.com.cn
Digital Projection LimitedGreenside Way, Middleton Manchester M24 1XX, UK
Registered in England No. 2207264 Registered Office: as above
Tel (+44) 161 947 3300 Fax (+44) 161 684 7674
[email protected] [email protected]
www.digitalprojection.co.uk

Digital Projection E-Vision Laser 10K Series
Rev A December 2016 Page 3
Important Information
Super High Brightness Digital Video ProjectorImportant Information
Full information about operating, connecting and setting up the projector can be found in the User Manual, located on the CD.
ContentsSymbols used in the User Manual ...............................................................................................4Electrical and physical specifications ........................................................................................5Laser precautions .............................................................................................................................5Product labels ....................................................................................................................................6
Label Locations ..............................................................................................................................7Location of laser aperture ..............................................................................................................8Interlock switches ............................................................................................................................8General precautions ........................................................................................................................9Installation precautions ................................................................................................................10Operation and configuration precautions ...............................................................................11Compliance with international standards ...............................................................................11
RF Interference .............................................................................................................................11Noise .............................................................................................................................................11European Waste Electrical and Electronic Equipment (WEEE) Directive ..............................11
Basic Operation Instructions ......................................................................................................12Positioning the screen and projector .........................................................................................12Connecting the power supply .....................................................................................................13Switching the projector on ..........................................................................................................14Switching the projector off ..........................................................................................................14Selecting an input signal .............................................................................................................14Selecting a test pattern ................................................................................................................15Adjusting the lens ........................................................................................................................15Adjusting the image .....................................................................................................................15Inserting a new lens .....................................................................................................................16Removing the lens .......................................................................................................................17
Control Panel Reference...............................................................................................................18Projector indicators .....................................................................................................................19
Remote Control Reference ..........................................................................................................20

Digital Projection E-Vision Laser 10K Series
Rev A December 2016Page 4
Important Information
Symbols used in the User Manual
LASER WARNING: this symbol indicates that there is a potential hazard of eye exposure to laser radiation unless the instructions are closely followed.
ELECTRICAL WARNING: this symbol indicates that there is a danger of electrical shock unless the instructions are closely followed.
WARNING: this symbol indicates that there is a danger of physical injury to yourself and/or damage to the equipment unless the instructions are closely followed.
NOTE: this symbol indicates that there is some important information that you should read.
Specifications are subject to change without notice.

Digital Projection E-Vision Laser 10K Series
Rev A December 2016 Page 5
Important Information
Electrical and physical specificationsMain Voltage 200-240 VAC 6.2A 50/60Hz 100-130 VAC 13.4A 50/60HzOperating Temperature 0°C to 45°CStorage Temperature -20°C to 60°COperating Humidity 20% to 90% non-condensingWeight 28 kg (61.7 lb) without lensPower Consumption (typical) at 110 Vac: 1270 W at 240 Vac: 1215 WThermal Dissipation at 110 Vac: 4334 BTU/hr at 240 Vac 4146 BTU/hr
Laser precautions
CLASS 3R LASER PRODUCT This Laser Product is designated as Class 3R during all procedures of operation.
LASER LIGHT - AVOID DIRECT EYE EXPOSURE. Do not point laser or allow laser light to be directed or reflected toward other people or
reflective objects. Direct or scattered light can be hazardous to eyes and skin. There is a potential hazard of eye exposure to laser radiation if the included
instructions are not followed. Caution – use of controls or adjustments or performance of procedures other than
those specified herein may result in hazardous radiation exposure.
Laser Parameters:
Wavelength 450nm - 460nmMode of operation Pulsed, due to frame ratePulse width 0.5msMaximum laser energy 0.253mJTotal internal power >100WApparent source size >10mm, at lens stopDivergence >100 mili Radian

Digital Projection E-Vision Laser 10K Series
Rev A December 2016Page 6
Important Information
Product labelsManufacturer’s ID Label and Explanatory Label
Certification Statement Label
Laser Hazard Warning Symbol and Aperture Label
Risk Group 2 Direct Eye Exposure Caution Symbol
Complies with FDA performance standards for laserproducts except for deviations pursuant to Laser Notice No. 50, dated June 24, 2007
LASER RADIATIONAVOID DIRECT EYE EXPOSURE
CLASS 3R LASER PRODUCTEmitted wavelength : 450-460 nm
Max. Pulse energy: 0.253 mJ, Pulse duration: 0.5 ms
激光輻射 避免眼睛受到直接照射 3R 激光產品波長 : 450-460 nm
最大脈衝能量: 0.253 mJ, 脈衝時間: 0.5 ms
RAYONNEMENT LASEREXPOSITION DIRECTE DANGEREUSE POUR LES YEUX
APPAREIL À LASER DE CLASSE 3Rlongueur d'onde : 450-460nm
maximum énergie de impulsion : 0.253 mJ,durée de impulsion : 0.5 ms
GB 7247.1-2012 / IEC/EN 60825-1:2007
CLASS 1 LASER PRODUCTIEC/EN 60825-1:2014
PRODUIT LASER DE CLASSE 1IEC/EN 60825-1:2014
DLP Projector / Projecteur DLP (數位投影機/數字投影機)Model/Modèle/( 型號/型號) : E-Vision Laser 10K
AC INPUT/Entrée CA( 輸入/輸入) : 100-130 VAC 13.4A 50/60Hz
AC INPUT/Entrée CA( 輸入/輸入) : 200-240 VAC 6.2A 50/60Hz This device complies with part 15 of the FCC rules. Operation is subject to the following two conditions:(1) this device may not cause harmful interference, and(2) this device must accept any interference received, including interference that may cause undesired operation.CAN ICES-3(A) /NMB-3(A)Caution : Do not open the cover. No user-serviceable parts insideAvertissement : ne pas ouvrir le couvercle. Le produit ne contient aucune pièce interne réparable par l’utilisateur.警 告 : 請 勿 打 開 外 殼 , 設 備 內 無 服 務 性 維 修 之 元 件警 告 : 請 勿 打 開 外 殼 , 設 備 內 無 服 務 性 維 修 之 元 件警告: 此為A級產品,在生活環境中,該產品可能會造成無線電干擾。在這種情況下,可能需要用戶對干擾採取切實可行的措施。
XXXXXXXXXX XX XXXX製造商:Digital Projection LimitedGreenside Way MiddletonManchester, M24 1XX UK(製造地:中國/製造地:中國) Made in China
Part No.: CCC-CCC
*XXXXXXXXXXXXX*MANUFACTURED YYYY.WW
Code 39 or 128 of serial no
DLP Projector / Projecteur DLP (數位投影機/數字投影機)Model/Modèle/( 型號/型號) :
AC INPUT/Entrée CA( 輸入/輸入) : 100-130 VAC 9.5A 50/60Hz
AC INPUT/Entrée CA( 輸入/輸入) : 200-240 VAC 4.5A 50/60Hz This device complies with part 15 of the FCC rules. Operation is subject to the following two conditions:(1) this device may not cause harmful interference, and(2) this device must accept any interference received, including interference that may cause undesired operation.
Caution : Do not open the cover. No user-serviceable parts insideAvertissement : ne pas ouvrir le couvercle. Le produit ne contient aucune pièce interne réparable par l’utilisateur.警 告 : 請 勿 打 開 外 殼 , 設 備 內 無 服 務 性 維 修 之 元 件警 告 : 請 勿 打 開 外 殼 , 設 備 內 無 服 務 性 維 修 之 元 件警告: 此為A級產品,在生活環境中,該產品可能會造成無線電干擾。在這種情況下,可能需要用戶對干擾採取切實可行的措施。
3264621200製造商:Digital Projection LimitedGreenside Way MiddletonManchester, M24 1XX UK(製造地:中國/製造地:中國) Made in China
E-Vision Laser 8500 WUXGA
Part No.: CCC-CCC
*XXXXXXXXXXXXX*MANUFACTURED YYYY.WW
Code 39 or 128 of serial no
Complies with FDA performance standards for laserproducts except for deviations pursuant to Laser Notice No. 50, dated June 24, 2007
LASER RADIATIONAVOID DIRECT EYE EXPOSURE
CLASS 3R LASER PRODUCTEmitted wavelength : 450-460 nm
Max. Pulse energy: 0.376 mJ, Pulse duration: 0.74 ms
激光輻射 避免眼睛受到直接照射 3R 激光產品波長 : 450-460 nm
最大脈衝能量: 0.376 mJ, 脈衝時間: 0.74 ms
RAYONNEMENT LASEREXPOSITION DIRECTE DANGEREUSE POUR LES YEUX
APPAREIL À LASER DE CLASSE 3Rlongueur d'onde : 450-460nm
maximum énergie de impulsion : 0.376 mJ,durée de impulsion : 0.74 ms
GB 7247.1-2012 / IEC/EN 60825-1:2007
RG2CAUTION: Do not look into the lens

Digital Projection E-Vision Laser 10K Series
Rev A December 2016 Page 7
Important Information
Label Locations
1 Location of Manufacturer’s ID Label, Certification Statement Label and Explanatory Label on the body of the projector
4 Explanatory Label
5 Serial number
2 Manufacturer’s ID Label (manufacturer’s name, address and projector model) 6 Location of Laser Hazard Warning Symbol and
Aperture Label on the body of the projector
3 Certification Statement Label 7 Risk Group 2 Direct Eye Exposure Caution Symbol
WIREDREMOTE HDBaseT/LAN HDMI 1 DISPLAYPORTDVI-D IN OUT HDMI II
IN
TRIGGERI II
RS-232 V H B/Pb G/Y R/Pr VGA OUTMONITOR OUT
SDI 3D SYNC
MENU EXITLENSSHIFT
POWER INPUT ASPECT PIC MUTECENTERLENS
AUTOSYNC
FOCUS ZOOM
Complies with FDA performance standards for laserproducts except for deviations pursuant to Laser Notice No. 50, dated June 24, 2007
LASER RADIATIONAVOID DIRECT EYE EXPOSURE
CLASS 3R LASER PRODUCTEmitted wavelength : 450-460 nm
Max. Pulse energy: 0.253 mJ, Pulse duration: 0.5 ms
激光輻射 避免眼睛受到直接照射 3R 激光產品波長 : 450-460 nm
最大脈衝能量: 0.253 mJ, 脈衝時間: 0.5 ms
RAYONNEMENT LASEREXPOSITION DIRECTE DANGEREUSE POUR LES YEUX
APPAREIL À LASER DE CLASSE 3Rlongueur d'onde : 450-460nm
maximum énergie de impulsion : 0.253 mJ,durée de impulsion : 0.5 ms
GB 7247.1-2012 / IEC/EN 60825-1:2007
CLASS 1 LASER PRODUCTIEC/EN 60825-1:2014
PRODUIT LASER DE CLASSE 1IEC/EN 60825-1:2014
DLP Projector / Projecteur DLP (數位投影機/數字投影機)Model/Modèle/( 型號/型號) : E-Vision Laser 10K
AC INPUT/Entrée CA( 輸入/輸入) : 100-130 VAC 6.2A 50/60Hz
AC INPUT/Entrée CA( 輸入/輸入) : 200-240 VAC 13.4A 50/60Hz This device complies with part 15 of the FCC rules. Operation is subject to the following two conditions:(1) this device may not cause harmful interference, and(2) this device must accept any interference received, including interference that may cause undesired operation.CAN ICES-3(A) /NMB-3(A)Caution : Do not open the cover. No user-serviceable parts insideAvertissement : ne pas ouvrir le couvercle. Le produit ne contient aucune pièce interne réparable par l’utilisateur.警 告 : 請 勿 打 開 外 殼 , 設 備 內 無 服 務 性 維 修 之 元 件警 告 : 請 勿 打 開 外 殼 , 設 備 內 無 服 務 性 維 修 之 元 件警告: 此為A級產品,在生活環境中,該產品可能會造成無線電干擾。在這種情況下,可能需要用戶對干擾採取切實可行的措施。
XXXXXXXXXX XX XXXX製造商:Digital Projection LimitedGreenside Way MiddletonManchester, M24 1XX UK(製造地:中國/製造地:中國) Made in China
Part No.: CCC-CCC
*XXXXXXXXXXXXX*MANUFACTURED YYYY.WW
Code 39 or 128 of serial no 1
Complies with FDA performance standards for laserproducts except for deviations pursuant to Laser Notice No. 50, dated June 24, 2007
LASER RADIATIONAVOID DIRECT EYE EXPOSURE
CLASS 3R LASER PRODUCTEmitted wavelength : 450-460 nm
Max. Pulse energy: 0.253 mJ, Pulse duration: 0.5 ms
激光輻射 避免眼睛受到直接照射 3R 激光產品波長 : 450-460 nm
最大脈衝能量: 0.253 mJ, 脈衝時間: 0.5 ms
RAYONNEMENT LASEREXPOSITION DIRECTE DANGEREUSE POUR LES YEUX
APPAREIL À LASER DE CLASSE 3Rlongueur d'onde : 450-460nm
maximum énergie de impulsion : 0.253 mJ,durée de impulsion : 0.5 ms
GB 7247.1-2012 / IEC/EN 60825-1:2007
CLASS 1 LASER PRODUCTIEC/EN 60825-1:2014
PRODUIT LASER DE CLASSE 1IEC/EN 60825-1:2014
DLP Projector / Projecteur DLP (數位投影機/數字投影機)Model/Modèle/( 型號/型號) : E-Vision Laser 10K
AC INPUT/Entrée CA( 輸入/輸入) : 100-130 VAC 13.4A 50/60Hz
AC INPUT/Entrée CA( 輸入/輸入) : 200-240 VAC 6.2A 50/60Hz This device complies with part 15 of the FCC rules. Operation is subject to the following two conditions:(1) this device may not cause harmful interference, and(2) this device must accept any interference received, including interference that may cause undesired operation.CAN ICES-3(A) /NMB-3(A)Caution : Do not open the cover. No user-serviceable parts insideAvertissement : ne pas ouvrir le couvercle. Le produit ne contient aucune pièce interne réparable par l’utilisateur.警 告 : 請 勿 打 開 外 殼 , 設 備 內 無 服 務 性 維 修 之 元 件警 告 : 請 勿 打 開 外 殼 , 設 備 內 無 服 務 性 維 修 之 元 件警告: 此為A級產品,在生活環境中,該產品可能會造成無線電干擾。在這種情況下,可能需要用戶對干擾採取切實可行的措施。
XXXXXXXXXX XX XXXX製造商:Digital Projection LimitedGreenside Way MiddletonManchester, M24 1XX UK(製造地:中國/製造地:中國) Made in China
Part No.: CCC-CCC
*XXXXXXXXXXXXX*MANUFACTURED YYYY.WW
Code 39 or 128 of serial no
2
3
5
4
RG
2CAUTION: Do not look into the lens
6
7

Digital Projection E-Vision Laser 10K Series
Rev A December 2016Page 8
Important Information
Location of laser apertureThe laser aperture is located as indicated below.
1 Laser aperture
Interlock switchesThree interlock switches installed at the main frame, inside the cover, will power-off the system individually when activated.
1 Will be activated when the top cover is removed.
2 x2. Will be activated when the projection lens is removed.
1
1
2
2
Digital Projection E-Vision Laser 10K Series
Rev A December 2016 Page 9
Important Information
General precautions
The unit is never to be operated if the unit is defective or the cover or seal is damaged. No maintenance allowed by end user. Do not open the cabinet. There are no user serviceable parts inside. No service is allowed except by authorized personnel. Use only the power cable provided. Ensure that the power outlet includes a Ground connection, as this equipment MUST be
earthed. Take care to prevent small objects such as paper or wire from falling into the projector.
If this does happen, switch off immediately, and have the objects removed by authorised service personnel.
Do not expose the projector to rain or moisture, and do not place any liquids on top of the projector.
Unplug before cleaning, and use a damp, not wet, cloth. Do not touch the power plug with wet hands. Do not touch the power plug during a thunder storm. Handle the power cable carefully and avoid sharp bends. Do not use a damaged power
cable.
Do not touch the ventilation outlets, as they will become hot in use. Do not cover or obstruct the ventilation outlets or inlets. Do not cover the lens whilst the projector is switched on. This could cause a fire Always allow the projector to cool for 5 minutes before disconnecting the power or
moving the projector. Never use strong detergents or solvents such as alcohol or thinners to clean the
projector and lens. RISK GROUP 2 CAUTION. Possibly hazardous optical radiation emitted from this
product. Do not stare at operating light source. May be harmful to the eyes.

Digital Projection E-Vision Laser 10K Series
Rev A December 2016Page 10
Important Information
Installation precautions
Connect the LAN cable only to a computer LAN connection. Other similar connectors may have a dangerously high voltage source.
The projector must be installed only by suitably qualified personnel, in accordance with local building codes.
The projector should be installed as close to the power outlet as possible. The power connection should be easily accessible, so that it can be disconnected in an
emergency. Ensure that there is at least 50cm (19.7in) of space between the ventilation outlets and
any wall, and 30cm (11.8in) on all other sides. Do not install the projector close to anything that might be affected by its operational
heat, for instance, polystyrene ceiling tiles, curtains etc. Place the projector in a dry area away from sources of dust, moisture, steam, smoke,
sunlight or heat. The projector is heavy. Use safe handling techniques when lifting the projector. Do not drop or knock the projector. Before installation, make sure that the surface, ceiling or rigging that is to support the
projector is capable of supporting the combined weight of the projector and lens. When stacking projectors, the stack MUST be vertical, to ensure that the stresses are
distributed to all four chassis corners. Do not stack more than 3 projectors. Do not place heavy objects on top of the projector chassis. Only the chassis corners
and the optional rigging frame are capable of withstanding the weight of another projector.
Backup safety chains or wires should always be used with ceiling mount installations. The projector can be operated in any position. However, it is not recommended to
position the projector in portrait mode with inputs facing upward, as shown in the diagram:
1 Positions to avoid: inputs side up2 Recommended positions
Pitch
360° 230°
330° 2
1
Roll
Digital Projection E-Vision Laser 10K Series
Rev A December 2016 Page 11
Important Information
Operation and configuration precautions
Do not make changes to the networking configuration unless you understand what you are doing, or have taken advice from your Network Manager. If you make a mistake, it is possible that you will lose contact with the projector. Always double-check your settings before pressing the APPLY button. Always keep a written note of the original settings, and any changes you have made.
Software update should NOT be carried out except by, or with the supervision of, Digital Projection Service personnel.
Compliance with international standards
RF InterferenceFCC
The Federal Communications Commission does not allow any modifications or changes to the unit EXCEPT those specified by Digital Projection in this manual. Failure to comply with this government regulation could void your right to operate this equipment.
This equipment has been tested and found to comply with the limits for a Class A digital device, pursuant with Part 15 of the FCC Rules. These limits are designed to provide reasonable protection against harmful interference when the equipment is operated in a commercial environment. This equipment generates, uses, and can radiate radio frequency energy and, if not installed and used in accordance with the instruction manual, may cause harmful interference to radio communications. Operation of this equipment in a residential area may cause harmful interference, in which case the user will be responsible for correcting any interference.
NoiseGSGV Acoustic Noise Information Ordinance
The sound pressure level is less than 44 dB (A) according to ISO 3744 or ISO 7779.
European Waste Electrical and Electronic Equipment (WEEE) DirectiveDigital Projection Ltd is fully committed to minimising Waste Electrical and Electronic Equipment. Our products are designed with reuse, recycling and recovery of all components in mind. To this end, at end of life, your projector may be returned to Digital Projection Ltd or its agent so that the environmental impact can be minimised.

Digital Projection E-Vision Laser 10K Series
Rev A December 2016Page 12
Important Information
Basic Operation Instructions
Positioning the screen and projector1. Install the screen, ensuring that it is in the best position for viewing by your audience.
2. Mount the projector, ensuring that it is at a suitable distance from the screen for the image to fill the screen. Set the adjustable feet so that the projector is level, and perpendicular to the screen.
The drawing below shows the positions of the feet for table mounting, and the fixing holes for ceiling mounting.
1 Four adjustable feet
2 Six M4 holes for ceiling mountThe screws should not penetrate more than 15 mm into the body of the projector.
1
2
1
1
1
2
2
2
2
2

Digital Projection E-Vision Laser 10K Series
Rev A December 2016 Page 13
Important Information
Connecting the power supplyAdjust the VOLTAGE SELECT switch 1 to the required voltage, then firmly push the mains connector into the socket 2 .
Voltage selectionThe VOLTAGE SELECT switch must be set to match the power supply you are using:
Voltage of power supply used Position of VOLTAGE SELECT switch100-130VAC outlet
200-240VAC (single phase) outlet
Use only the power cable provided.
Ensure that the power outlet includes a ground connection as this equipment MUST be earthed.
Handle the power cable carefully and avoid sharp bends. Do not use a damaged power cable.
1
2

Digital Projection E-Vision Laser 10K Series
Rev A December 2016Page 14
Important Information
Switching the projector on1. Connect the power cable between the mains supply and the projector. (See Connecting the
power supply above.) Switch on at the switch next to the power connector.
2. The POWER indicator lights red to signal that the projector is in STANDBY mode. Press one of the following buttons:
• On the remote control, the ON button
• On the projector control panel, the POWER button.
The fans begin working, then the POWER indicator begins flashing green. When the flashing stops, the POWER and LIGHT indicators both light steady green. The projector is switched on.
Switching the projector off1. Press OFF on the remote control or POWER on the control panel, then press again to confirm
your choice.
The POWER indicator on the control panel will start flashing amber, the system will go out and the cooling fans will run for a short time until the POWER indicator goes stready red to indicate that the projector has entered STANDBY mode.
2. If you need to switch the projector off completely, switch off at the mains power switch next to the power connector and then disconnect the power cable from the projector.
Selecting an input signal1. Connect one or more image sources to the projector.
2. Select the input you want to display:
• Press one of the input buttons on the remote control.
• Alternatively, open the On-screen display (OSD) by pressing MENU. Highlight Input from the main menu, press ENTER/OK and then select an input signal using the UP and DOWN arrow buttons. Press ENTER/OK to confirm your choice.

Digital Projection E-Vision Laser 10K Series
Rev A December 2016 Page 15
Important Information
Selecting a test patternTo display a test pattern:
• Press TEST on the remote control. If necessary, press again to change the test pattern. Test patterns are displayed in the following order:
White, Black, Red, Green, Blue, CheckerBoard, CrossHatch, V Burst, H Burst, ColorBar, Off
After the final test pattern, the projector exits test pattern mode and returns to the main image. To view test patterns again, you need to press TEST again.
• Alternatively, open the OSD by pressing MENU. Highlight Test Patterns from the main menu, then select a test pattern using the LEFT and RIGHT arrow buttons.
Adjusting the lensThe lens can be adjusted using the Lens menu, or using the lens buttons on the remote control.
Lens menuThe Lens menu provides access to the Lens Control setting and the Lens Center command.
Lens Control allows Zoom, Focus and Shift adjustment using the arrow buttons. The setting operates in Zoom/Focus Adjustment and Shift Adjustment mode.
Press ENTER/SELECT to switch between the two modes.
Remote controlUse the remote control to adjust zoom, focus and shift directly, without opening a menu:
• OK enters lens control, then switches between Zoom/Focus Adjustment and Shift Adjustment.
• EXIT exits lens control and opens the Lens menu.
• MENU exits lens control and returns to the main image.
• The arrow buttons adjust zoom, focus and shift as indicated on the screen.
Adjusting the imageOrientation• This can be set from the Setup menu.
Highlight Projector Mode and choose from Front Tabletop, Front Ceiling, Rear Tabletop and Rear Ceiling.
Keystone• This can be set from the Geometry menu.
Picture• Settings such as Gamma, Brightness, Contrast, Saturation, Hue and Sharpness can be set
from the Image menu.
Digital Projection E-Vision Laser 10K Series
Rev A December 2016Page 16
Important Information
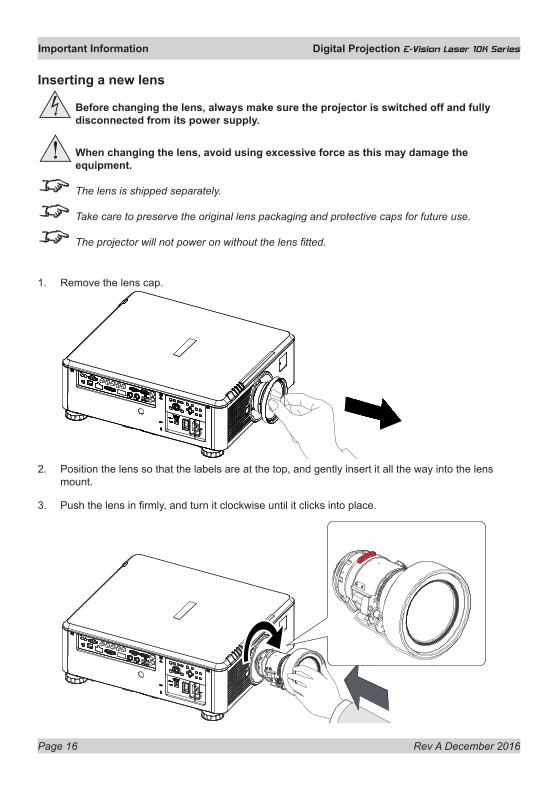
Inserting a new lens
Before changing the lens, always make sure the projector is switched off and fully disconnected from its power supply.
When changing the lens, avoid using excessive force as this may damage the equipment.
The lens is shipped separately.
Take care to preserve the original lens packaging and protective caps for future use.
The projector will not power on without the lens fitted.
1. Remove the lens cap.
2. Position the lens so that the labels are at the top, and gently insert it all the way into the lens mount.
3. Push the lens in firmly, and turn it clockwise until it clicks into place.

Digital Projection E-Vision Laser 10K Series
Rev A December 2016 Page 17
Important Information
Removing the lens
Before changing the lens, always make sure the projector is switched off and fully disconnected from its power supply.
When changing the lens, avoid using excessive force as this may damage the equipment.
The lens is shipped separately.
Take care to preserve the original lens packaging and protective caps for future use.
The projector will not power on without the lens fitted.
1. Push in the lens release lever, and turn the lens anti-clockwise.
2. Remove the lens.

Digital Projection E-Vision Laser 10K Series
Rev A December 2016Page 18
Important Information
Control Panel Reference
POWER INPUT AUTOSYNC ASPECT CENTER
LENS PIC MUTE
1 2 3 4 5 6
7 8 9 10 11 12

Digital Projection E-Vision Laser 10K Series
Rev A December 2016 Page 19
Important Information
1 POWERSwitches the projector on and off (STANDBY).
2 INPUTSwitches to the next input source.
3 AUTO SYNCRe-synchronises with the current input signal.
4 ASPECTChanges the aspect ratio.
5 CENTER LENSCenters the lens.
6 PIC MUTESwitches the laser off/on.
7 MENUDisplays and exits the OSD.
8 Arrow buttons & ENTERNavigation buttons used to highlight menu entries in the OSD.Press ENTER to open or execute the highlighted menu entry.
9 EXITExits the current OSD page and enters the level above.
10 LENS SHIFT arrow buttonsEach of these buttons moves the lens in the specified direction.
11 FOCUS plus and minus buttonsUsed to move the focus in and out.
12 ZOOM plus and minus buttonsUsed to zoom in and out.
Projector indicatorsTEMP. Off = no problem Flashing red = temperature error
LIGHT Off = light is switched off Flashing green = light is preparign to switch on Flashing red (cycles of six flashes) = light module failure On, red = light module has reached end of life On, green = light is switched on
STATUS Off = no problem Flashing red (continuously) = cover error Flashing red (cycles of four flashes) = fan error On, red = system error
POWER Off = the projector is switched off Flashing green = the projector is warming up Flashing amber = the projector is cooling down On, red = STANDBY mode On, green = the projector is switched on
POW
ERSTATU
SLIGHT
TEMP.

Digital Projection E-Vision Laser 10K Series
Rev A December 2016Page 20
Important Information
Remote Control Reference
1 Power ON/OFFTurns the projector on and off.To turn the projector off, press the OFF button twice within five seconds.
2 Pic Mute OPEN / CLOSEShows and hides the projected image.
3 OSD ON / OFFEnables and disables screen timeout messages and showing the OSD during projection.
4 MENUAccess the projector OSD (on-screen display). If the OSD is open, press this button to go back to the previous menu.
5 Navigation (arrows and OK)Navigate through the menus with the arrows, confirm your choice with OK.In lens adjustment modes, the arrows are used to move, zoom or focus the lens. See 11 below.In lens adjustment modes, or when the OSD is not showing, the OK button switches between modes: Shift Adjustment and Zoom / Focus Adjustment.
6 EXITClose the current OSD page and return to the level above.
7 FREEZEFreeze the current frame.
8 DEFAULTRestore default settings.
9 INFOAccess information about the projector.
10 RE-SYNCRe-synchronise with the current input signal.
Pic Mute
MENU
EXIT INFO
HDMI1
OK
OFF ON
ALT
LENSFOCUS ZOOM
IN
OUT
IN
OUT
SHIFT
21 3HDMI2 DVI
DISPLAYPORT HD-T 3GSDI
VGA COMP1 COMP2
BRI
TEST
CON GAMMA
R G B ALL
3D EYE PIP SWAP
4 5 6
7 8 9 0
ALT
ADDR
OSD
OFF ON
DEFAULT
FREEZE RE-SYNC
A B C DUSER PRESET
OPEN CLOSE
1
2
5
6
84
9
7
3
10

Digital Projection E-Vision Laser 10K Series
Rev A December 2016 Page 21
Important Information
11 LENS adjustmentFOCUS IN / OUT: adjust focus.SHIFT: press and hold this button, then use the Navigation arrow buttons to move the lens.ZOOM IN / OUT: adjust zoom.
12 USER PRESET A, B, C, DLoad user presets.
13 ALTPress and hold this button to access alternative functions for all buttons with a green label.
14 DVI / GAMMA / numeric input 3Select the DVI input.Use with ALT to switch to the next Gamma value:...1.0, 1.8, 2.0, 2.2, 2.35, 2.5...
15 HDMI 2 / CON / numeric input 2Select the HDMI 1 input.Use with ALT to bring up the Contrast control, then adjust the value with the LEFT and RIGHT arrow buttons.
16 HDMI 1 / BRI / numeric input 1Select the HDMI 1 input.Use with ALT to bring up the Brightness control, then adjust the value with the LEFT and RIGHT arrow buttons.
17 TEST / SWAP / numeric input 0Show a test pattern. Press again to show the next test pattern:...Off, White, Black, Red, Green, Blue, CheckerBoard, CrossHatch, V Burst, H Burst, ColorBar...
Pic Mute
MENU
EXIT INFO
HDMI1
OK
OFF ON
ALT
LENSFOCUS ZOOM
IN
OUT
IN
OUT
SHIFT
21 3HDMI2 DVI
DISPLAYPORT HD-T 3GSDI
VGA COMP1 COMP2
BRI
TEST
CON GAMMA
R G B ALL
3D EYE PIP SWAP
4 5 6
7 8 9 0
ALT
ADDR
OSD
OFF ON
DEFAULT
FREEZE RE-SYNC
A B C DUSER PRESET
OPEN CLOSE
13
11
12
14
15
16
17

Digital Projection E-Vision Laser 10K Series
Rev A December 2016Page 22
Important Information
17 DISPLAYPORT / R / numeric input 4Select DisplayPort input.
18 HD-T / G / numeric input 5Select the HDBaseT input.
19 3GSDI / B / numeric input 6Select the 3G-SDI input.
20 VGA / 3D / numeric input 7Select the VGA input.Use with ALT to toggle the 3D Format setting between Off and Auto.
21 COMP1 / EYE / numeric input 8Select the Component 1 input. Use with ALT to switch between left and right eye 3D dominance.
22 COMP2 / PIP / numeric input 9Select the Component 2 input.
23 ADDR / ALLAssign and unassign an IR remote address.To assign an address:1. Press and hold this button
until the indicator starts flashing.
2. Release this button and while the indicator is still flashing, enter a two-digit address using the numeric input buttons. The indicator will flash three times quickly to confirm the change.
To unassign an address and return to the default address 00,• Press and hold ALT and this
button simultaneously until the indicator flashes to confirm the change.
Pic Mute
MENU
EXIT INFO
HDMI1
OK
OFF ON
ALT
LENSFOCUS ZOOM
IN
OUT
IN
OUT
SHIFT
21 3HDMI2 DVI
DISPLAYPORT HD-T 3GSDI
VGA COMP1 COMP2
BRI
TEST
CON GAMMA
R G B ALL
3D EYE PIP SWAP
4 5 6
7 8 9 0
ALT
ADDR
OSD
OFF ON
DEFAULT
FREEZE RE-SYNC
A B C DUSER PRESET
OPEN CLOSE
21
18
19
17
20
21
22


![ZYBO - Digilent Documentation [Reference.Digilentinc] Z7 B.2 out of 14 2017 MIPI, General I/O 10K R60 10K R62 10K R64 10K R67 GND VCC3V3 SW3 SW2 SW1 SW0 10K R57 10K R71 10K R72 GND](https://static.fdocuments.in/doc/165x107/5abecaa37f8b9a3a428d6851/zybo-digilent-documentation-z7-b2-out-of-14-2017-mipi-general-io-10k-r60.jpg)