e-Leave User Guide User Guide July 2010 i Navy Standard Integrated Personnel System (NSIPS),...
53
e-Leave User Guide July 2010 i Navy Standard Integrated Personnel System (NSIPS), Operations & Maintenance e-Leave User Guide (SAAR Only) 31 July 2010 Version 1.0 Program Executive Office, Enterprise Information System (PEO-EIS) 2251 Lakeshore Drive Building 4, 5 th New Orleans, LA 70145-0001 Floor
Transcript of e-Leave User Guide User Guide July 2010 i Navy Standard Integrated Personnel System (NSIPS),...

e-Leave User Guide July 2010
i
Navy Standard Integrated Personnel System (NSIPS), Operations & Maintenance
e-Leave User Guide (SAAR Only)
31 July 2010 Version 1.0
Program Executive Office, Enterprise Information System (PEO-EIS) 2251 Lakeshore Drive Building 4, 5th
New Orleans, LA 70145-0001 Floor

e-Leave User Guide July 2010
ii SG12FY1502
REVISION HISTORY
REVISION DATE RESPONSIBLE INDIVIDUAL REVISION DATE RESPONSIBLE
INDIVIDUAL
Phase I 05 March 2010 Kenneth Crook
SG12FY1502 31 July 2010 Kenneth Crook
e-Leave User Guide July 2010
iii SG12FY1502
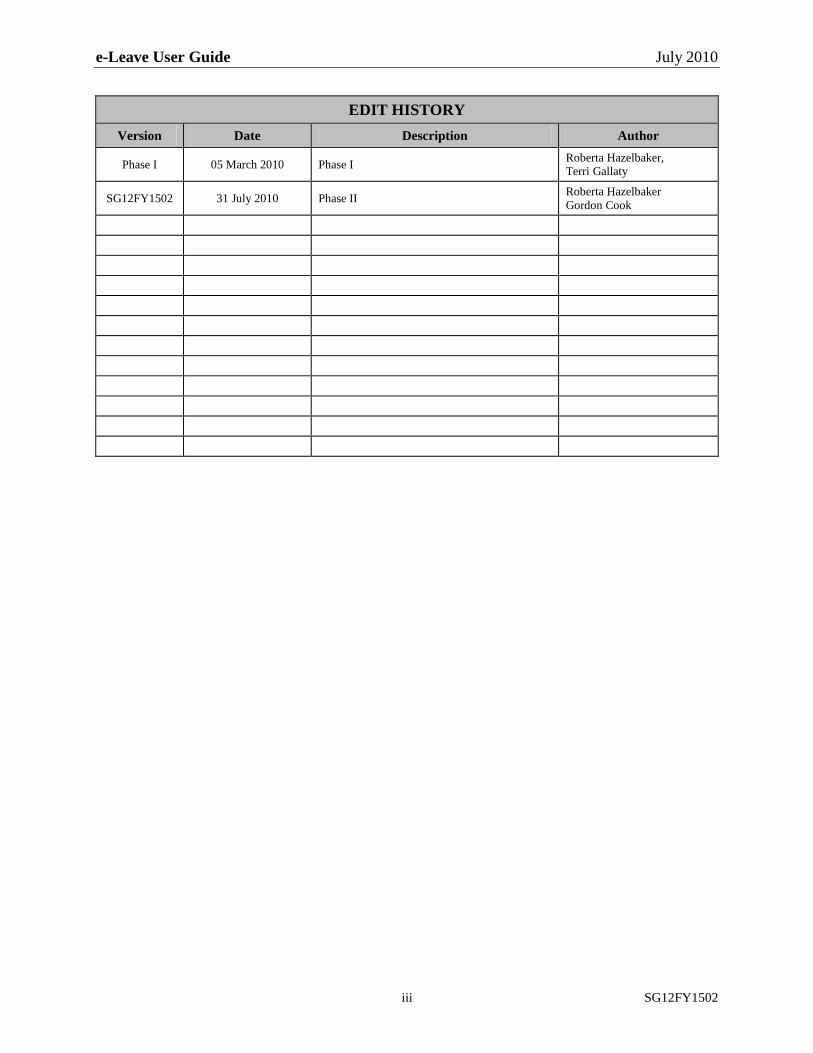
EDIT HISTORY
Version Date Description Author
Phase I 05 March 2010 Phase I Roberta Hazelbaker, Terri Gallaty
SG12FY1502 31 July 2010 Phase II Roberta Hazelbaker Gordon Cook
e-Leave User Guide July 2010
iv SG12FY1502
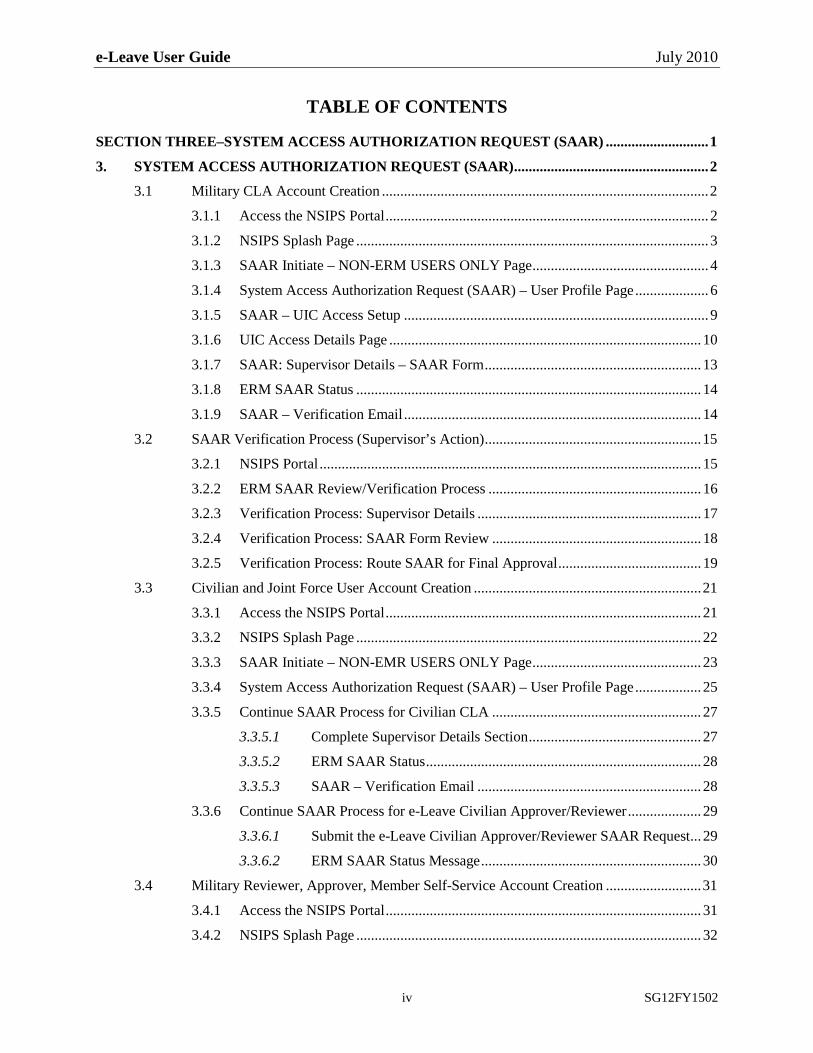
TABLE OF CONTENTS
SECTION THREE–SYSTEM ACCESS AUTHORIZATION REQUEST (SAAR) ............................ 1
3. SYSTEM ACCESS AUTHORIZATION REQUEST (SAAR) ..................................................... 2
3.1 Military CLA Account Creation ......................................................................................... 2
3.1.1 Access the NSIPS Portal ........................................................................................ 2
3.1.2 NSIPS Splash Page ................................................................................................ 3
3.1.3 SAAR Initiate – NON-ERM USERS ONLY Page ................................................ 4
3.1.4 System Access Authorization Request (SAAR) – User Profile Page .................... 6
3.1.5 SAAR – UIC Access Setup ................................................................................... 9
3.1.6 UIC Access Details Page ..................................................................................... 10
3.1.7 SAAR: Supervisor Details – SAAR Form ........................................................... 13
3.1.8 ERM SAAR Status .............................................................................................. 14
3.1.9 SAAR – Verification Email ................................................................................. 14
3.2 SAAR Verification Process (Supervisor’s Action) ........................................................... 15
3.2.1 NSIPS Portal ........................................................................................................ 15
3.2.2 ERM SAAR Review/Verification Process .......................................................... 16
3.2.3 Verification Process: Supervisor Details ............................................................. 17
3.2.4 Verification Process: SAAR Form Review ......................................................... 18
3.2.5 Verification Process: Route SAAR for Final Approval ....................................... 19
3.3 Civilian and Joint Force User Account Creation .............................................................. 21
3.3.1 Access the NSIPS Portal ...................................................................................... 21
3.3.2 NSIPS Splash Page .............................................................................................. 22
3.3.3 SAAR Initiate – NON-EMR USERS ONLY Page .............................................. 23
3.3.4 System Access Authorization Request (SAAR) – User Profile Page .................. 25
3.3.5 Continue SAAR Process for Civilian CLA ......................................................... 27
3.3.5.1 Complete Supervisor Details Section ............................................... 27
3.3.5.2 ERM SAAR Status ........................................................................... 28
3.3.5.3 SAAR – Verification Email ............................................................. 28
3.3.6 Continue SAAR Process for e-Leave Civilian Approver/Reviewer .................... 29
3.3.6.1 Submit the e-Leave Civilian Approver/Reviewer SAAR Request ... 29
3.3.6.2 ERM SAAR Status Message ............................................................ 30
3.4 Military Reviewer, Approver, Member Self-Service Account Creation .......................... 31
3.4.1 Access the NSIPS Portal ...................................................................................... 31
3.4.2 NSIPS Splash Page .............................................................................................. 32

e-Leave User Guide July 2010
v SG12FY1502
3.4.3 Member Self-Service Account Request Page ...................................................... 33
3.5 Adding a UIC Outside of the CLA’s ADSN .................................................................... 35
3.5.1 Accessing e-Leave ............................................................................................... 35
3.5.2 NSIPS Splash Page .............................................................................................. 36
3.5.3 NSIPS Account List Page .................................................................................... 37
3.5.4 ERM Menu .......................................................................................................... 38
3.5.5 SAAR Initiate – ERM USERS ONLY Page ........................................................ 38
APPENDIX A–ACRONYMS AND ABBREVIATIONS ..................................................................... A1

e-Leave User Guide July 2010
vi SG12FY1502
LIST OF FIGURES
Figure 3-1–Security Disclaimer .................................................................................................................... 2
Figure 3-2–NSIPS Splash Page ..................................................................................................................... 3
Figure 3-3–SAAR Initiate: NON-ERM USERS ONLY Page ...................................................................... 4
Figure 3-4–SAAR Cancellation Results ....................................................................................................... 5
Figure 3-5–SAAR: User Profile – CLA ........................................................................................................ 6
Figure 3-6–SAAR: User Profile – General Attributes Section ..................................................................... 7
Figure 3-7–SAAR: User Profile – Security Type & User Roles Section ...................................................... 8
Figure 3-8–SAAR: User Profile – UIC Access Setup Section ..................................................................... 9
Figure 3-9–Pay and Personnel Support Level UIC Access Profile Page .................................................... 10
Figure 3-10–SAAR: UIC Access Page ....................................................................................................... 11
Figure 3-11–Pay and Personnel Support Level UIC Access Profile Page – UICs Listed .......................... 12
Figure 3-12–SAAR: Supervisor Details – SAAR Form Section ................................................................ 13
Figure 3-13–SAAR: ERM SAAR Status .................................................................................................... 14
Figure 3-14–SAAR Verification E-mail: Sample ....................................................................................... 14
Figure 3-15–Verification Process: NSIPS Portal ........................................................................................ 15
Figure 3-16–Verification Process: ERM SAAR Review/Verification Process .......................................... 16
Figure 3-17–Verification Process: Supervisor Details Section ................................................................... 17
Figure 3-18–SAAR Supervisor Name Error Message ................................................................................ 18
Figure 3-19–Verification Process: SAAR Form Buttons ............................................................................ 18
Figure 3-20–Verification Process: Route SAAR for Final Approval ......................................................... 19
Figure 3-21–Verification Process: ERM SAAR Status Message ............................................................... 20
Figure 3-22–Security Disclaimer ................................................................................................................ 21
Figure 3-23–NSIPS Splash Page ................................................................................................................. 22
Figure 3-24–SAAR Initiate: NON-ERM USERS ONLY Page .................................................................. 23
Figure 3-25–SSN Error Message ................................................................................................................ 23
Figure 3-26–Results of SAAR Cancellation ............................................................................................... 24
Figure 3-27–SAAR Account: User Profile Page – Civilian ........................................................................ 25
Figure 3-28–SAAR: User Profile Page – General Attributes Section ........................................................ 26
Figure 3-29–SAAR: User Profile Page – Security Type & User Roles Section ......................................... 26
Figure 3-30–SAAR: Supervisor Details – SAAR Form Section ................................................................ 27
Figure 3-31–SAAR: ERM SAAR Status .................................................................................................... 28
Figure 3-32–SAAR Verification E-mail: Sample ....................................................................................... 28
Figure 3-33–SAAR Verification E-mail: Sample ....................................................................................... 29
e-Leave User Guide July 2010
vii SG12FY1502
Figure 3-34–SAAR: Supervisor Details – SAAR Form Section ................................................................ 29
Figure 3-35–ERM SAAR Status Message .................................................................................................. 30
Figure 3-36–Security Disclaimer ................................................................................................................ 31
Figure 3-37–NSIPS Splash Page ................................................................................................................. 32
Figure 3-38–Member Self-Service Account Request Page ........................................................................ 33
Figure 3-39–Official Email Address Confirmation .................................................................................... 34
Figure 3-40–Self-Service Account Status Message .................................................................................... 34
Figure 3-41–Self-Service Account Cancelation Message ........................................................................... 34
Figure 3-42–Security Disclaimer ................................................................................................................ 35
Figure 3-43–NSIPS Splash Page ................................................................................................................. 36
Figure 3-44–NSIPS Account List Page ...................................................................................................... 37
Figure 3-45–ERM Menu ............................................................................................................................. 38
Figure 3-46–SAAR Initiate –ERM USERS ONLY Page ........................................................................... 39
Figure 3-47–SAAR – ERM SAAR –Type Section ..................................................................................... 39
Figure 3-48–ERM UIC Access Section ...................................................................................................... 40
Figure 3-49–Pay & Personnel Support Level UIC Access Profile Page ..................................................... 40
Figure 3-50–UIC Access Page .................................................................................................................... 41
Figure 3-51–Pay & Personnel Support Level UIC Access Profile: New UIC ............................................ 41
Figure 3-52– SAAR Form .......................................................................................................................... 42
Figure 3-53–Route SAAR for Final Approval Page ................................................................................... 42
Figure 3-54–Sample Notification email ...................................................................................................... 43
e-Leave User Guide July 2010
3-1 SG12FY1502
Section Three–System Access Authorization Request (SAAR)

e-Leave User Guide July 2010
3-2 SG12FY1502
3. SYSTEM ACCESS AUTHORIZATION REQUEST (SAAR) A System Access Authorization Request (SAAR) form is needed to obtain the necessary rights to access e-Leave. The SAAR process is used to create accounts to support the military and civilian Command Leave Administrator CLA, military and civilian Reviewer/Watch Coordinator and Approver, and military member. Each uses the SAAR to create a different type of account and accesses e-Leave in different ways.
The CLA uses the SAAR to establish his/her User Role. The CLA accesses e-Leave via the Navy Standard Integrated Personnel System (NSIPS) menu. The military/civilian Reviewer/Watch Coordinator/Approver and military member uses the SAAR to establish the Self-Service account. All actions performed in support of e-Leave Request requires a Self-Service account. From the Self-Service account, they access e-Leave to process e-Leave Requests.
The steps to create the SAAR for each e-Leave user are similar.
3.1 This Section describes the steps to create a SAAR account for the military personnel performing the task as the CLA. First, obtain a Letter of Designation (LOD) from the Commanding Officer (CO) indicating you are identified as the CLA and the UICs you need to be assigned. After the SAAR is submitted, the NSIPS Access Manager (NAM) approves the SAAR request based on the instructions in the LOD. After the LOD is received, begin the SAAR process from the NSIPS Portal.
Military CLA Account Creation
3.1.1 Access the NSIPS Portal In the Internet Explorer window, navigate to https://nsips.nmci.navy.mil/ . The Security Disclaimer page (Figure 3-1) loads.
Figure 3-1–Security Disclaimer

e-Leave User Guide July 2010
3-3 SG12FY1502
1. Security Disclaimer
2.
– Review the Security Disclaimer. Click the checkbox to indicate you have read and agree with the disclaimer. A check mark displays in the field.
Agree
3.1.2 NSIPS Splash Page
– Click the Agree button. The NSIPS Splash page displays.
The NSIPS Splash page (Figure 3-2) provides links to access the SAAR form. In the System Access Authorization Request (SAAR) section, links provide access to create new User Role accounts, create Self-Service accounts, and validate submitted SAAR requests.
To create a new User Role account, use the New Users (NSIPS, ESR, Web Ad Hoc) link. This link is used by the CLA to create his/her e-Leave User Role account.
Figure 3-2–NSIPS Splash Page
3. New Users (NSIPS, ESR, Web Ad Hoc)
– Click the link to initiate the SAAR process to establish the CLA’s User Role account. The SAAR Initiate page displays.

e-Leave User Guide July 2010
3-4 SG12FY1502
3.1.3 SAAR Initiate – NON-ERM USERS ONLY Page The SAAR Initiate - NON-ERM USERS ONLY page (Figure 3-3) begins the SAAR process.
NOTE: ERM refers to Enterprise Record Management.
Figure 3-3–SAAR Initiate: NON-ERM USERS ONLY Page
1. EmplIDNOTE: The Tab key initiates data verification with the database. Since this member is
Active Duty military, a record currently exists in NSIPS. The data stored in the database automatically populates the Name and Command Unit Identification Code (UIC) fields.
– (Required) Enter the SSN. Press the Tab key to move to the next field.
2. Name
3.
– System displays name in the Last,First Middle Initial format. Press the Tab key.
Command UIC
4.
– System displays current Command UIC for the member. Press the Tab key.
Submit
5.
– Click the Submit button to open the next page in the SAAR application process. The SAAR-User Profile (Figure 3-5) displays.
Cancel
6.
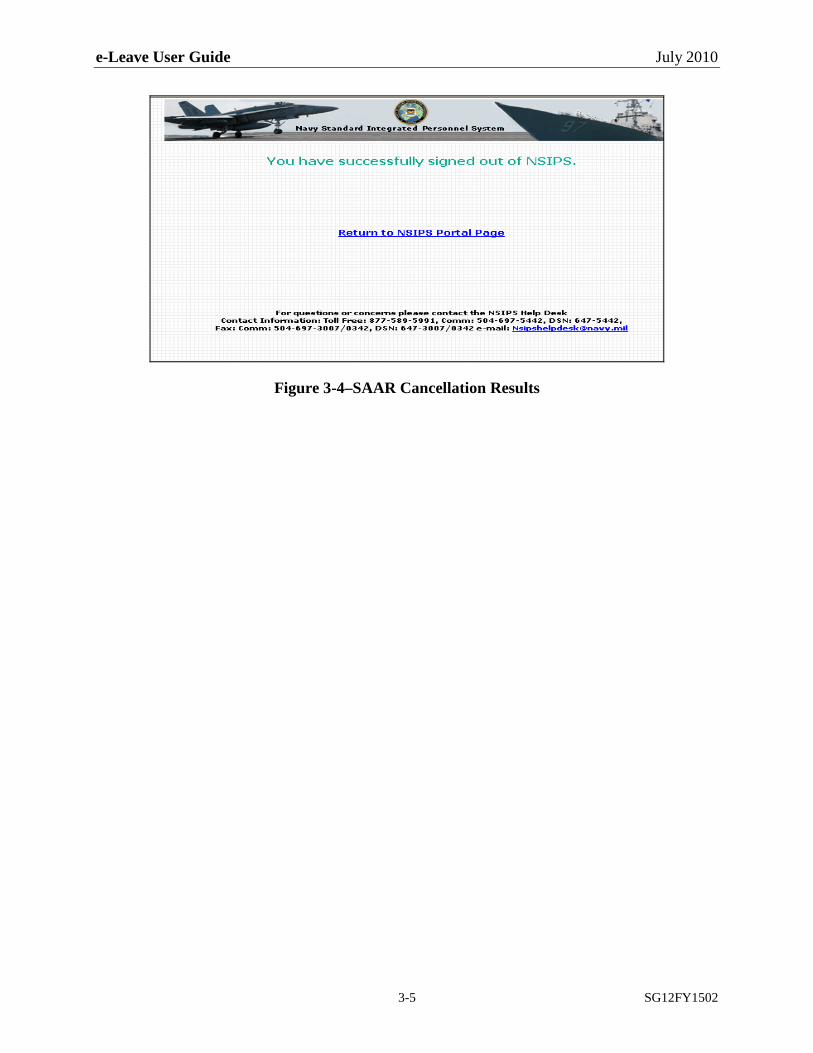
– Click the Cancel button to cancel the request and close the SAAR process. The cancellation message page (Figure 3-4) displays. Click the Return to NSIPS Portal Page link to return to the NSIPS Portal page.
Reset – Click the Reset button to clear all information entered on the NON-ERM USERS ONLY page. Re-enter user information.
e-Leave User Guide July 2010
3-5 SG12FY1502
Figure 3-4–SAAR Cancellation Results
e-Leave User Guide July 2010
3-6 SG12FY1502
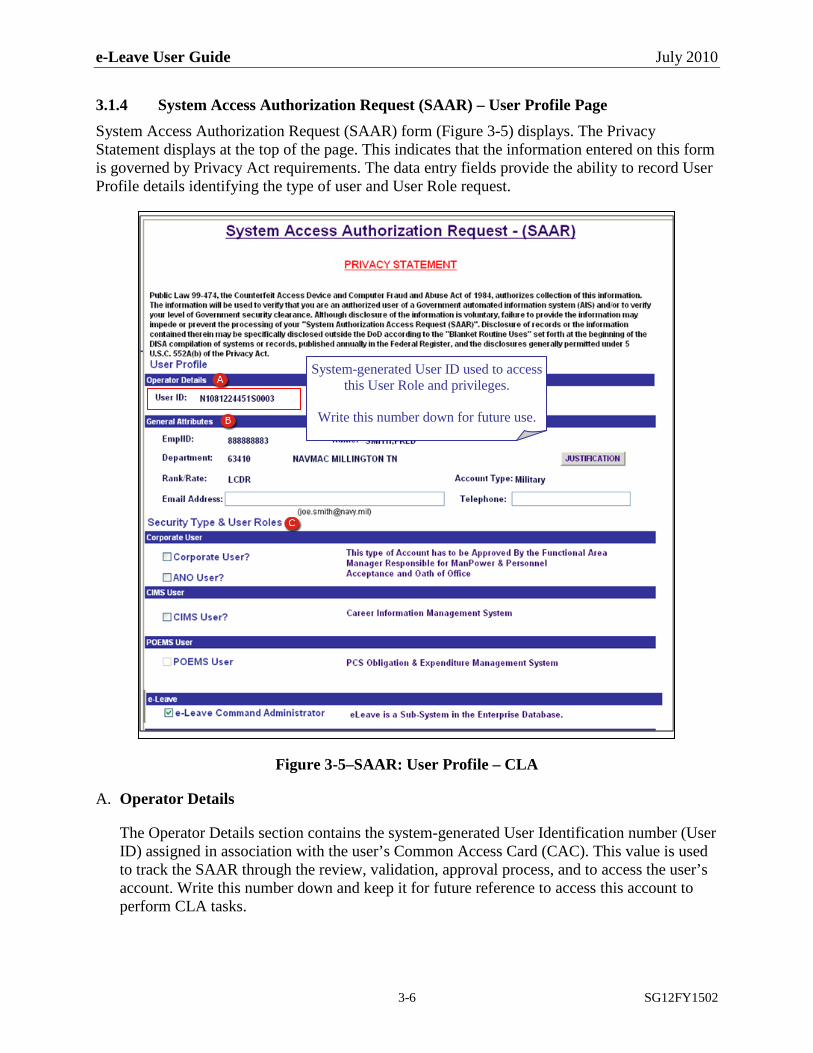
3.1.4 System Access Authorization Request (SAAR) – User Profile Page System Access Authorization Request (SAAR) form (Figure 3-5) displays. The Privacy Statement displays at the top of the page. This indicates that the information entered on this form is governed by Privacy Act requirements. The data entry fields provide the ability to record User Profile details identifying the type of user and User Role request.
Figure 3-5–SAAR: User Profile – CLA
A. Operator Details
The Operator Details section contains the system-generated User Identification number (User ID) assigned in association with the user’s Common Access Card (CAC). This value is used to track the SAAR through the review, validation, approval process, and to access the user’s account. Write this number down and keep it for future reference to access this account to perform CLA tasks.
System-generated User ID used to access this User Role and privileges.
Write this number down for future use.
e-Leave User Guide July 2010
3-7 SG12FY1502
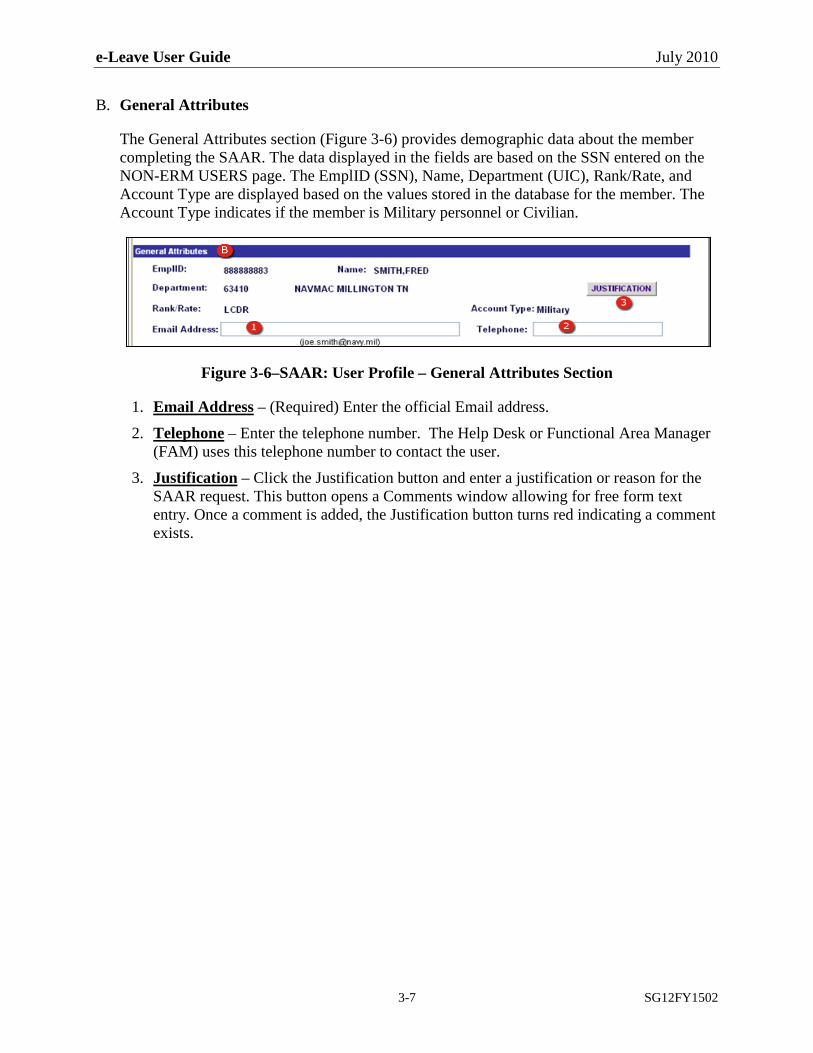
B. General Attributes
The General Attributes section (Figure 3-6) provides demographic data about the member completing the SAAR. The data displayed in the fields are based on the SSN entered on the NON-ERM USERS page. The EmplID (SSN), Name, Department (UIC), Rank/Rate, and Account Type are displayed based on the values stored in the database for the member. The Account Type indicates if the member is Military personnel or Civilian.
Figure 3-6–SAAR: User Profile – General Attributes Section
1. Email Address2.
– (Required) Enter the official Email address.
Telephone
3.
– Enter the telephone number. The Help Desk or Functional Area Manager (FAM) uses this telephone number to contact the user.
Justification
– Click the Justification button and enter a justification or reason for the SAAR request. This button opens a Comments window allowing for free form text entry. Once a comment is added, the Justification button turns red indicating a comment exists.
e-Leave User Guide July 2010
3-8 SG12FY1502
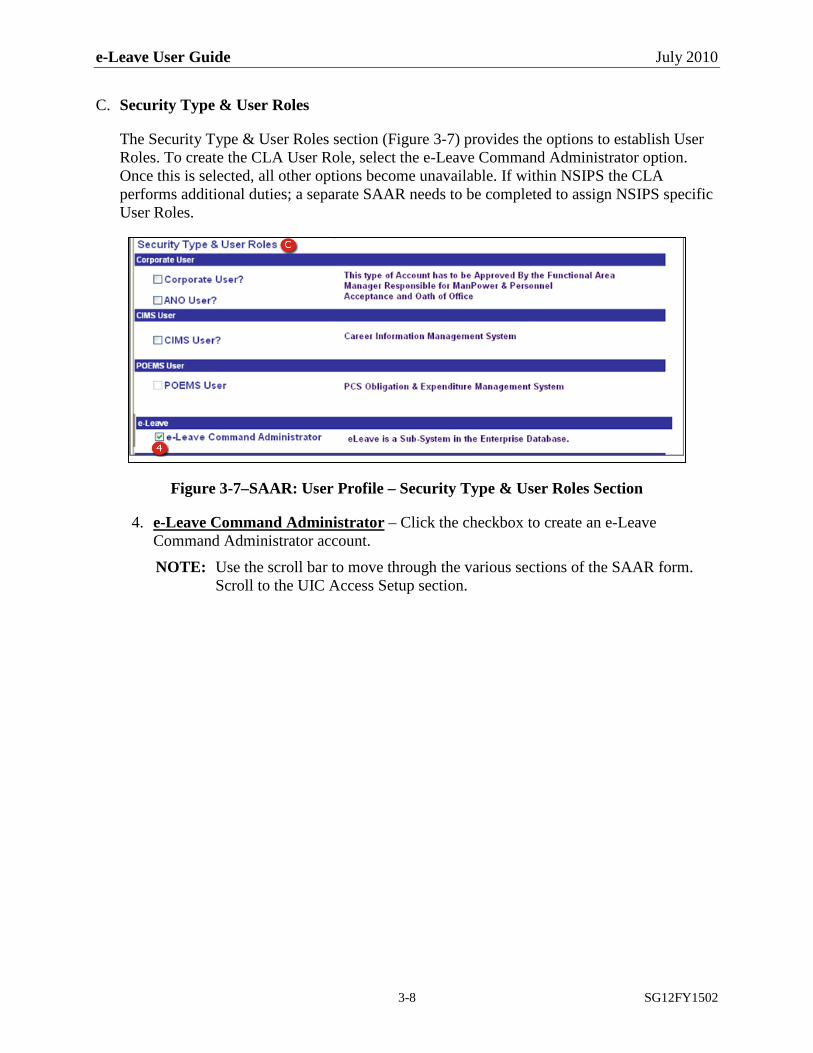
C. Security Type & User Roles
The Security Type & User Roles section (Figure 3-7) provides the options to establish User Roles. To create the CLA User Role, select the e-Leave Command Administrator option. Once this is selected, all other options become unavailable. If within NSIPS the CLA performs additional duties; a separate SAAR needs to be completed to assign NSIPS specific User Roles.
Figure 3-7–SAAR: User Profile – Security Type & User Roles Section
4. e-Leave Command Administrator
NOTE: Use the scroll bar to move through the various sections of the SAAR form. Scroll to the UIC Access Setup section.
– Click the checkbox to create an e-Leave Command Administrator account.

e-Leave User Guide July 2010
3-9 SG12FY1502
3.1.5 SAAR – UIC Access Setup This section (Figure 3-8) provides a link to identify the UICs assigned to the CLA.
Figure 3-8–SAAR: User Profile – UIC Access Setup Section
5. ERM UIC Access
– Click this link to open the UIC Access page to identify the UICs assigned to the CLA.
e-Leave User Guide July 2010
3-10 SG12FY1502
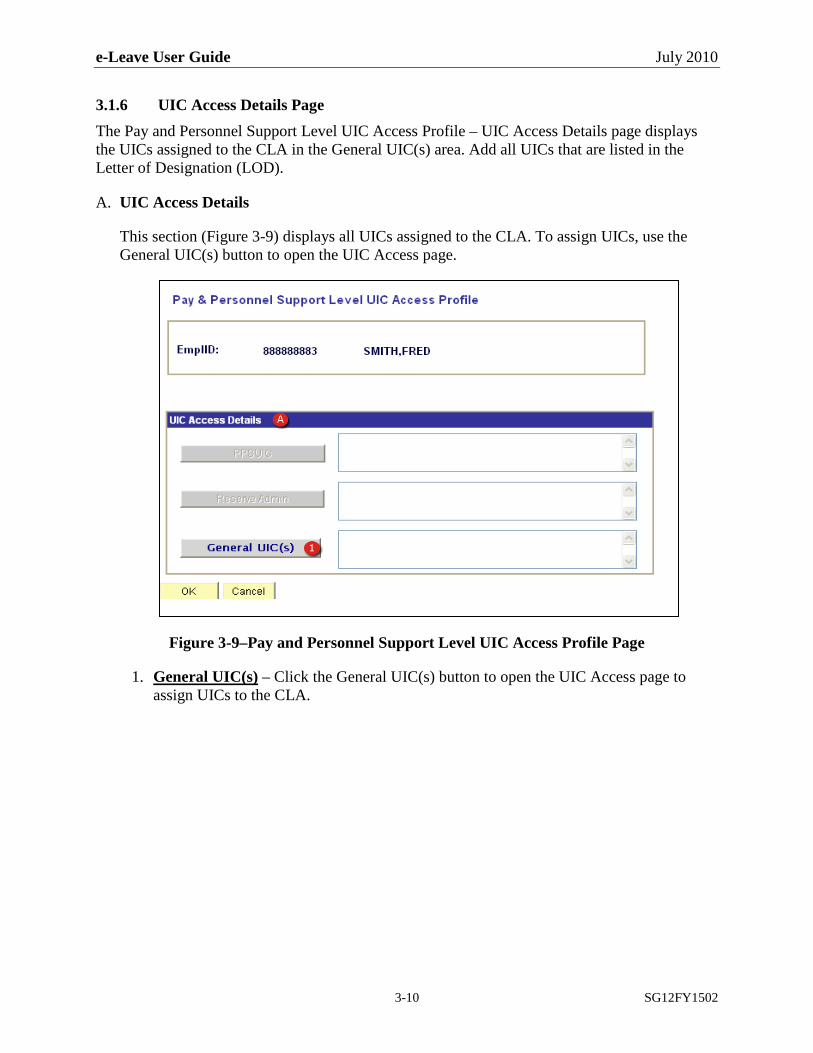
3.1.6 UIC Access Details Page The Pay and Personnel Support Level UIC Access Profile – UIC Access Details page displays the UICs assigned to the CLA in the General UIC(s) area. Add all UICs that are listed in the Letter of Designation (LOD).
A. UIC Access Details
This section (Figure 3-9) displays all UICs assigned to the CLA. To assign UICs, use the General UIC(s) button to open the UIC Access page.
Figure 3-9–Pay and Personnel Support Level UIC Access Profile Page
1. General UIC(s)
– Click the General UIC(s) button to open the UIC Access page to assign UICs to the CLA.
e-Leave User Guide July 2010
3-11 SG12FY1502
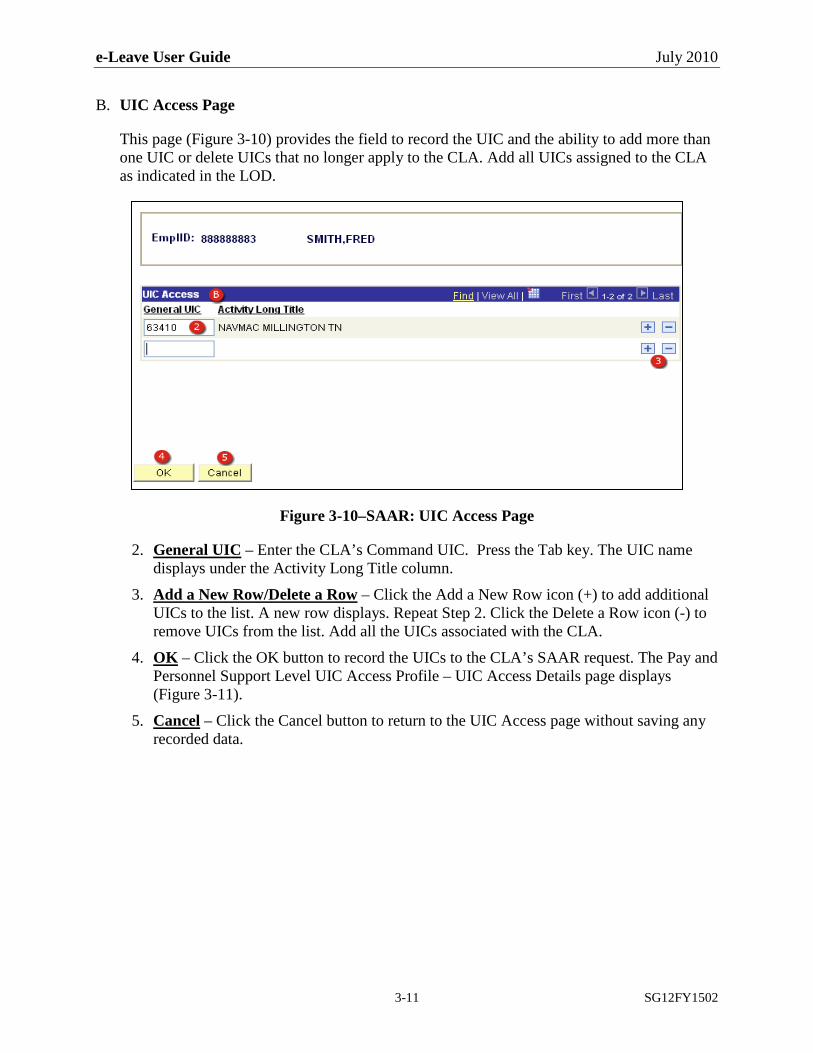
B. UIC Access Page
This page (Figure 3-10) provides the field to record the UIC and the ability to add more than one UIC or delete UICs that no longer apply to the CLA. Add all UICs assigned to the CLA as indicated in the LOD.
Figure 3-10–SAAR: UIC Access Page
2. General UIC
3.
– Enter the CLA’s Command UIC. Press the Tab key. The UIC name displays under the Activity Long Title column.
Add a New Row/Delete a Row
4.
– Click the Add a New Row icon (+) to add additional UICs to the list. A new row displays. Repeat Step 2. Click the Delete a Row icon (-) to remove UICs from the list. Add all the UICs associated with the CLA.
OK
5.
– Click the OK button to record the UICs to the CLA’s SAAR request. The Pay and Personnel Support Level UIC Access Profile – UIC Access Details page displays (Figure 3-11).
Cancel
– Click the Cancel button to return to the UIC Access page without saving any recorded data.

e-Leave User Guide July 2010
3-12 SG12FY1502
C. Pay and Personnel Support Level UIC Access Profile Page – UICs Recorded
The Pay and Personnel Support Level UIC Access Profile – UIC Access Details page (Figure 3-11) re-displays with the assigned UIC(s) listed in the General UIC(s) area.
Figure 3-11–Pay and Personnel Support Level UIC Access Profile Page – UICs Listed
6. OK
7.
– Click the OK button to save the assigned UICs and return to the SAAR User Profile page (Figure 3-12).
Cancel
– Click the Cancel button to return to the UIC Access page without saving any recorded data.
e-Leave User Guide July 2010
3-13 SG12FY1502
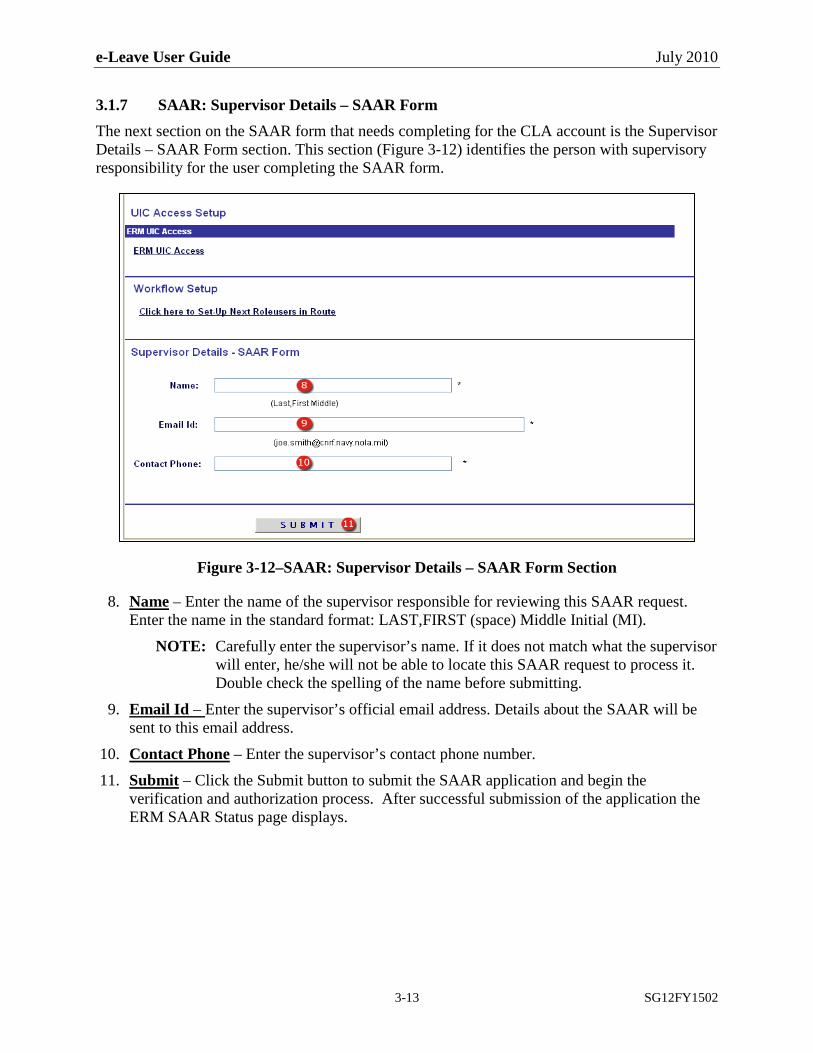
3.1.7 SAAR: Supervisor Details – SAAR Form The next section on the SAAR form that needs completing for the CLA account is the Supervisor Details – SAAR Form section. This section (Figure 3-12) identifies the person with supervisory responsibility for the user completing the SAAR form.
Figure 3-12–SAAR: Supervisor Details – SAAR Form Section
8. Name
NOTE: Carefully enter the supervisor’s name. If it does not match what the supervisor will enter, he/she will not be able to locate this SAAR request to process it. Double check the spelling of the name before submitting.
– Enter the name of the supervisor responsible for reviewing this SAAR request. Enter the name in the standard format: LAST,FIRST (space) Middle Initial (MI).
9. Email Id –
10.
Enter the supervisor’s official email address. Details about the SAAR will be sent to this email address.
Contact Phone11.
– Enter the supervisor’s contact phone number.
Submit
– Click the Submit button to submit the SAAR application and begin the verification and authorization process. After successful submission of the application the ERM SAAR Status page displays.

e-Leave User Guide July 2010
3-14 SG12FY1502
3.1.8 ERM SAAR Status Once the SAAR application is submitted, the ERM SAAR Status message (Figure 3-13) displays indicating it was sent to the supervisor for verification and the SAAR review process has begun.
Figure 3-13–SAAR: ERM SAAR Status
12. Close
3.1.9 SAAR – Verification Email
– Click the Close button to close the status message.
After the SAAR application is submitted, email verification is sent to the supervisor identified on the user’s SAAR form in the Supervisor Details – SAAR Form section. The email (Figure 3-14) provides the supervisor with the Confirmation Code and instruction on how to access the user’s SAAR form. If you are a supervisor for SAAR review, follow the instructions provided in the email. Section 3.2 provides instructional details about the SAAR verification process.
Figure 3-14–SAAR Verification E-mail: Sample
e-Leave User Guide July 2010
3-15 SG12FY1502
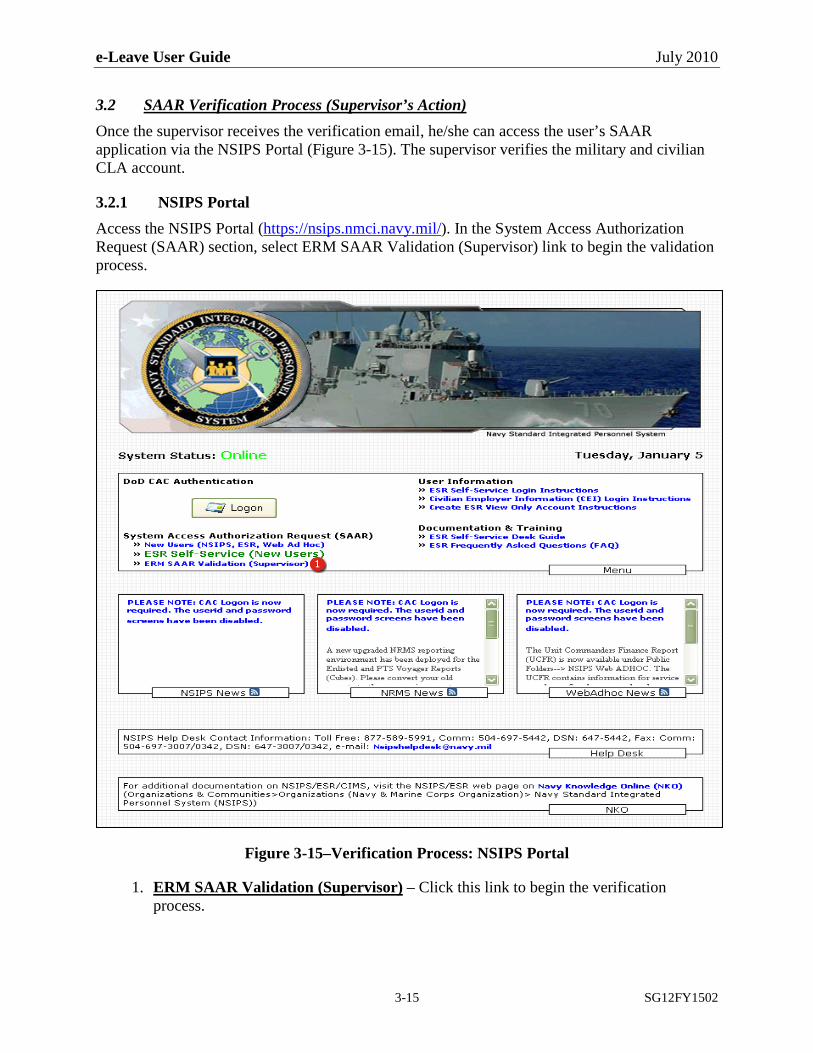
3.2 Once the supervisor receives the verification email, he/she can access the user’s SAAR application via the NSIPS Portal (Figure 3-15). The supervisor verifies the military and civilian CLA account.
SAAR Verification Process (Supervisor’s Action)
3.2.1 NSIPS Portal Access the NSIPS Portal (https://nsips.nmci.navy.mil/). In the System Access Authorization Request (SAAR) section, select ERM SAAR Validation (Supervisor) link to begin the validation process.
Figure 3-15–Verification Process: NSIPS Portal
1. ERM SAAR Validation (Supervisor)
– Click this link to begin the verification process.

e-Leave User Guide July 2010
3-16 SG12FY1502
3.2.2 ERM SAAR Review/Verification Process To begin the verification process, enter the user’s Confirmation Code provided in the verification email on the ERM SAAR Review/Verification Process section (Figure 3-16). Figure 3-14 illustrates an example of the email.
Figure 3-16–Verification Process: ERM SAAR Review/Verification Process
2. CodeNOTE: It is recommended to copy and paste the code from the email
(Figure 3-14) into this field.
– Enter the Confirmation Code provided in the verification email.
3. Confirm
– Click the Confirm button. The Supervisor Details section displays.
e-Leave User Guide July 2010
3-17 SG12FY1502
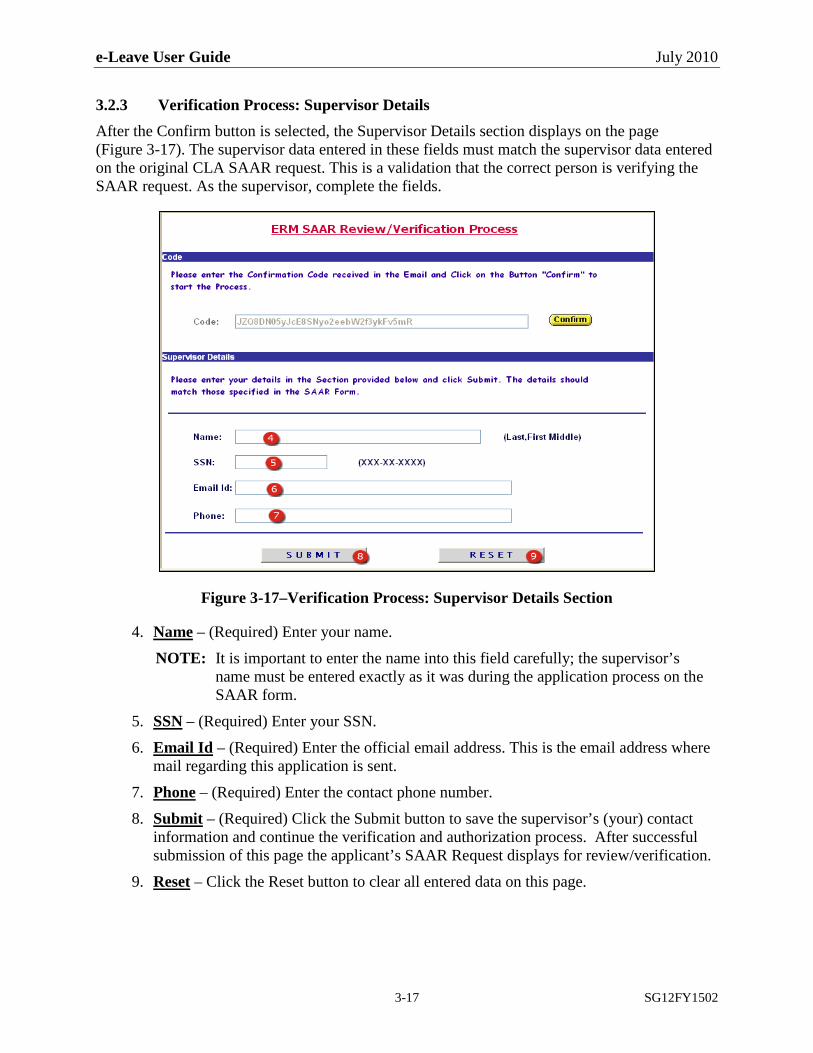
3.2.3 Verification Process: Supervisor Details After the Confirm button is selected, the Supervisor Details section displays on the page (Figure 3-17). The supervisor data entered in these fields must match the supervisor data entered on the original CLA SAAR request. This is a validation that the correct person is verifying the SAAR request. As the supervisor, complete the fields.
Figure 3-17–Verification Process: Supervisor Details Section
4. NameNOTE: It is important to enter the name into this field carefully; the supervisor’s
name must be entered exactly as it was during the application process on the SAAR form.
– (Required) Enter your name.
5. SSN6.
– (Required) Enter your SSN.
Email Id
7.
– (Required) Enter the official email address. This is the email address where mail regarding this application is sent.
Phone8.
– (Required) Enter the contact phone number.
Submit
9.
– (Required) Click the Submit button to save the supervisor’s (your) contact information and continue the verification and authorization process. After successful submission of this page the applicant’s SAAR Request displays for review/verification.
Reset
– Click the Reset button to clear all entered data on this page.
e-Leave User Guide July 2010
3-18 SG12FY1502
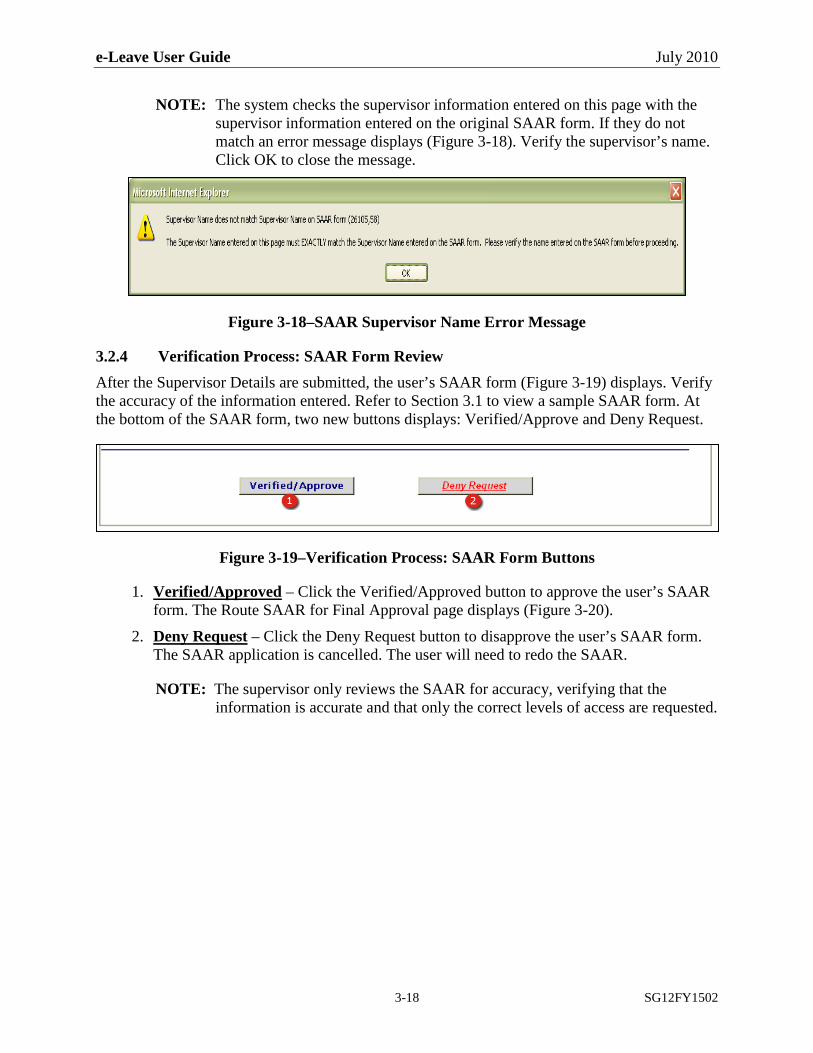
NOTE: The system checks the supervisor information entered on this page with the supervisor information entered on the original SAAR form. If they do not match an error message displays (Figure 3-18). Verify the supervisor’s name. Click OK to close the message.
Figure 3-18–SAAR Supervisor Name Error Message
3.2.4 Verification Process: SAAR Form Review After the Supervisor Details are submitted, the user’s SAAR form (Figure 3-19) displays. Verify the accuracy of the information entered. Refer to Section 3.1 to view a sample SAAR form. At the bottom of the SAAR form, two new buttons displays: Verified/Approve and Deny Request.
Figure 3-19–Verification Process: SAAR Form Buttons
1. Verified/Approved
2.
– Click the Verified/Approved button to approve the user’s SAAR form. The Route SAAR for Final Approval page displays (Figure 3-20).
Deny Request
NOTE: The supervisor only reviews the SAAR for accuracy, verifying that the information is accurate and that only the correct levels of access are requested.
– Click the Deny Request button to disapprove the user’s SAAR form. The SAAR application is cancelled. The user will need to redo the SAAR.

e-Leave User Guide July 2010
3-19 SG12FY1502
3.2.5 Verification Process: Route SAAR for Final Approval After the user’s SAAR is verified, the SAAR is sent to the local NSIPS Area Manager (NAM) for final approval and account activation. The supervisor verifying the SAAR selects the NAM from the list. The Route SAAR for Final Approval page (Figure 3-20) lists all NAMs available for this user. Select the appropriate NAM.
Figure 3-20–Verification Process: Route SAAR for Final Approval
1. Select
2.
– Click the checkbox next to the name to select the NAM for final approval and account activation. More than one can be selected.
OK
– Click OK to route the SAAR to the identified NAM. The ERMS SAAR Status message displays.
e-Leave User Guide July 2010
3-20 SG12FY1502
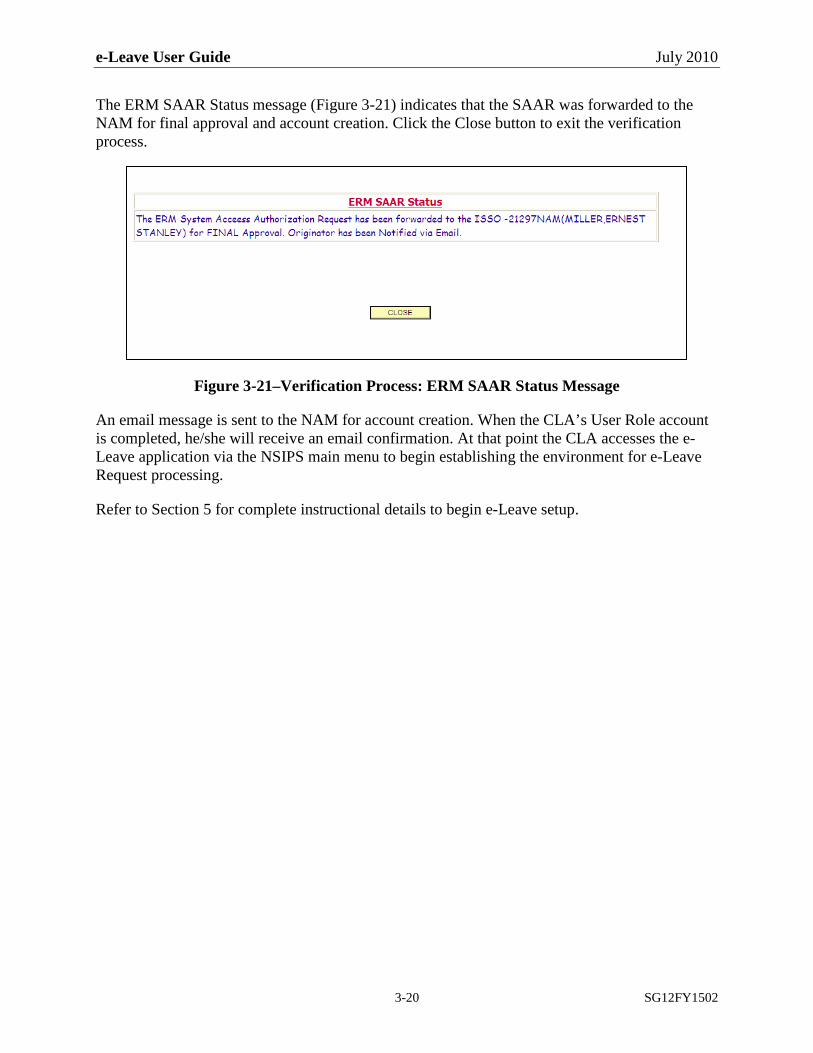
The ERM SAAR Status message (Figure 3-21) indicates that the SAAR was forwarded to the NAM for final approval and account creation. Click the Close button to exit the verification process.
Figure 3-21–Verification Process: ERM SAAR Status Message
An email message is sent to the NAM for account creation. When the CLA’s User Role account is completed, he/she will receive an email confirmation. At that point the CLA accesses the e-Leave application via the NSIPS main menu to begin establishing the environment for e-Leave Request processing.
Refer to Section 5 for complete instructional details to begin e-Leave setup.

e-Leave User Guide July 2010
3-21 SG12FY1502
3.3 Civilians and Joint Forces can assume the role of Command Leave Administrator (CLA), Reviewer, and/or Approver. From this point forward, civilians and Joint Forces will be referred to as civilians. Since the civilian does not have an NSIPS account, special arrangements are made to allow the civilian the ability to request an account to perform the CLA, Reviewer, and/or Approver tasks.
Civilian and Joint Force User Account Creation
The civilian uses his/her Common Access Card (CAC) and accesses the SAAR request using the New User (NSIPS, ESR, Web Ad Hoc) link on the NSIPS Splash page. The SAAR provides the Security Type and User Role of e-Leave Command Administrator and e-Leave Civilian Approver/Reviewer option. The CLA assigns the Reviewer/Approver role to the civilian and unlocks the account. This section details the instructional steps for the civilian and the CLA to establish the civilian account. As with all personnel the process begins by accessing the NSIPS Portal.
3.3.1 Access the NSIPS Portal In the Internet Explorer window, navigate to https://nsips.nmci.navy.mil/ . The Security Disclaimer page (Figure 3-22) loads.
Figure 3-22–Security Disclaimer
1. Security Disclaimer
2.
– Review the Security Disclaimer. Click the checkbox to indicate you have read and agree with the disclaimer. A check mark displays in the field.
Agree
– Click the Agree button. The NSIPS Splash page displays.
e-Leave User Guide July 2010
3-22 SG12FY1502
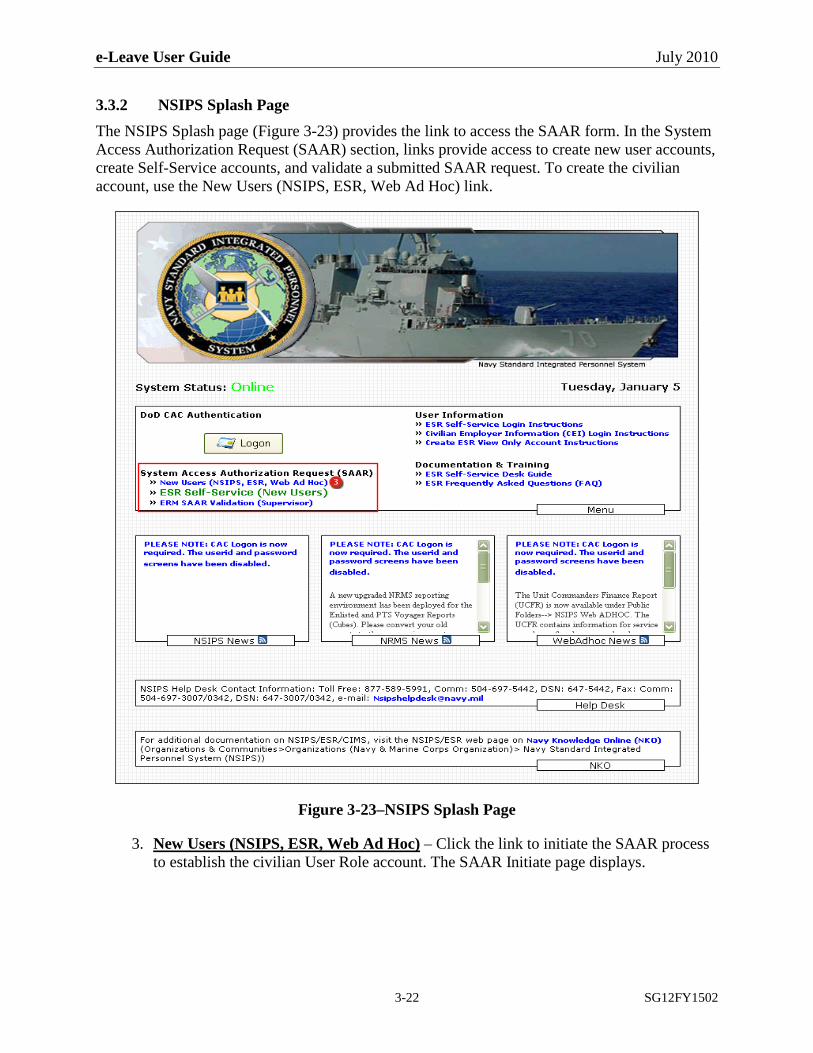
3.3.2 NSIPS Splash Page The NSIPS Splash page (Figure 3-23) provides the link to access the SAAR form. In the System Access Authorization Request (SAAR) section, links provide access to create new user accounts, create Self-Service accounts, and validate a submitted SAAR request. To create the civilian account, use the New Users (NSIPS, ESR, Web Ad Hoc) link.
Figure 3-23–NSIPS Splash Page
3. New Users (NSIPS, ESR, Web Ad Hoc)
– Click the link to initiate the SAAR process to establish the civilian User Role account. The SAAR Initiate page displays.

e-Leave User Guide July 2010
3-23 SG12FY1502
3.3.3 SAAR Initiate – NON-EMR USERS ONLY Page The SAAR Initiate – NON-ERM USERS ONLY page (Figure 3-24) begins the SAAR process.
Figure 3-24–SAAR Initiate: NON-ERM USERS ONLY Page
1. EmplIDNOTE: The Tab key initiates data verification with the database. Since this member is
a civilian/Joint Force a record does not exist in NSIPS. The error message (Figure 3-25) displays. Click OK to close the error message and return to the NON-ERM USERS ONLY page and complete the remaining fields.
– (Required) Enter the SSN. Press the Tab key to move to the next field.
Figure 3-25–SSN Error Message
2. Name3.
– (Required) Enter the name in Last,First (space) MI format. Press the Tab key.
Command UIC – (Required) Enter the current Command UIC. Press the Tab key.
e-Leave User Guide July 2010
3-24 SG12FY1502
4. Submit
5.
– Click the Submit button to open the next page in the SAAR application process. The SAAR User Profile page displays (Figure 3-27).
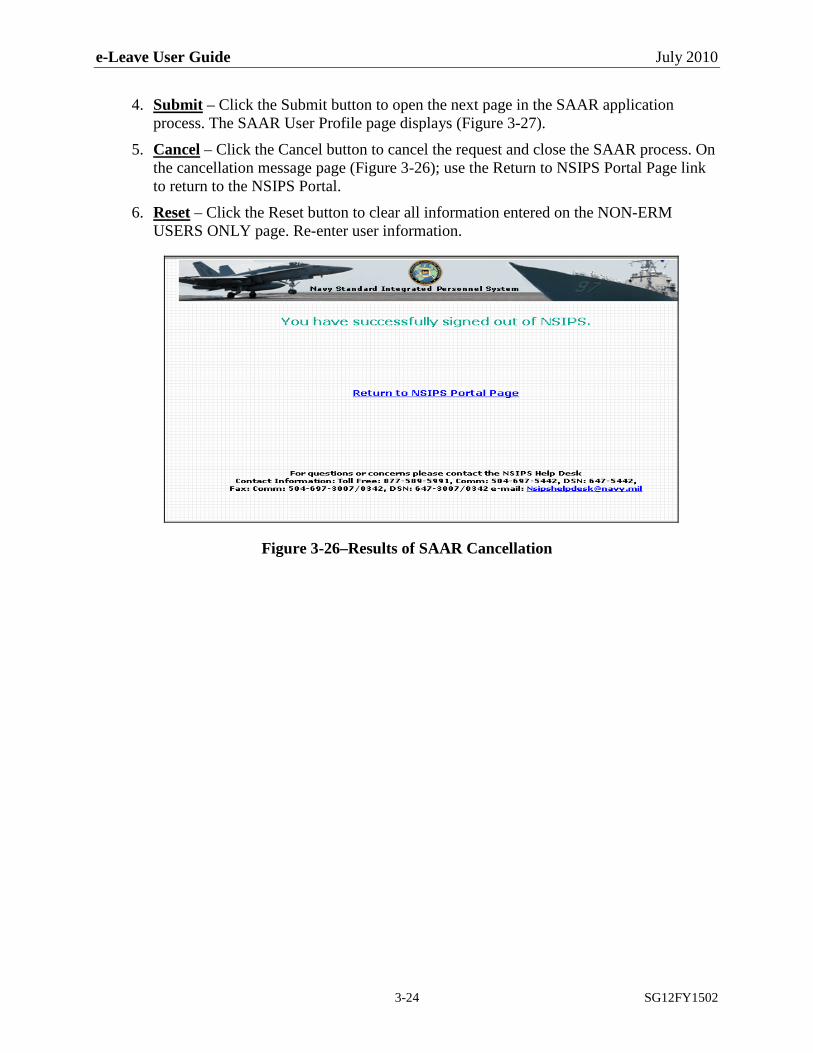
Cancel
6.
– Click the Cancel button to cancel the request and close the SAAR process. On the cancellation message page (Figure 3-26); use the Return to NSIPS Portal Page link to return to the NSIPS Portal.
Reset – Click the Reset button to clear all information entered on the NON-ERM USERS ONLY page. Re-enter user information.
Figure 3-26–Results of SAAR Cancellation
e-Leave User Guide July 2010
3-25 SG12FY1502
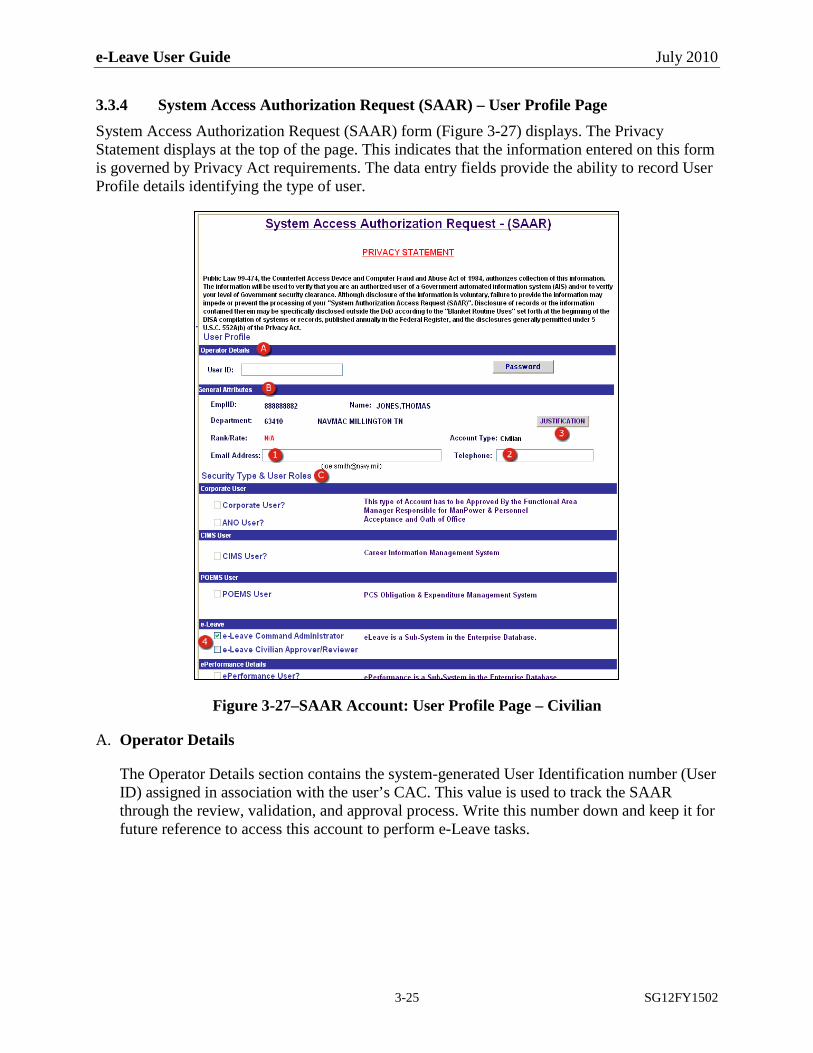
3.3.4 System Access Authorization Request (SAAR) – User Profile Page System Access Authorization Request (SAAR) form (Figure 3-27) displays. The Privacy Statement displays at the top of the page. This indicates that the information entered on this form is governed by Privacy Act requirements. The data entry fields provide the ability to record User Profile details identifying the type of user.
Figure 3-27–SAAR Account: User Profile Page – Civilian
A. Operator Details
The Operator Details section contains the system-generated User Identification number (User ID) assigned in association with the user’s CAC. This value is used to track the SAAR through the review, validation, and approval process. Write this number down and keep it for future reference to access this account to perform e-Leave tasks.

e-Leave User Guide July 2010
3-26 SG12FY1502
B. General Attributes
The General Attributes section (Figure 3-28) provides demographic data about the civilian completing the SAAR. Data displays in the EmplID (SSN), Name, and Department (UIC) fields based on the values entered on the NON-ERM USERS ONLY page (Figure 3-24). The Account Type indicates Civilian and the Rank/Rate field displays Not Applicable (N/A).
Figure 3-28–SAAR: User Profile Page – General Attributes Section
1. Email Address2.
– (Required) Enter the official Email address.
Telephone
3.
– Enter the telephone number. The Help Desk or NSIPS Area Manager (NAM) uses this telephone number to contact the person.
Justification
C. Security Type & User Roles
– Click the Justification button and enter a justification or reason for the SAAR request. This button opens a Comments window allowing for free form text entry. Once a comment is added, the Justification button turns red indicating a comment exists.
The Security Type & User Roles section (Figure 3-29) provides the options to establish User Roles. To create the Civilian User Role, select the e-Leave Command Administrator or e-Leave Civilian Approver/Reviewer option. Once this is selected, all remaining fields become unavailable.
Figure 3-29–SAAR: User Profile Page – Security Type & User Roles Section
4. e-Leave – Click the appropriate checkbox, e-Leave Command Administrator or e-Leave Civilian Approver/Reviewer.

e-Leave User Guide July 2010
3-27 SG12FY1502
NOTE: The next step varies depending upon the selection made in the Security Type & User Roles section (Figure 3-29). Refer to Section 3.3.5 for civilian CLA and Section 3.3.6 for e-Leave Civilian Approver/Reviewer.
3.3.5 Continue SAAR Process for Civilian CLA After e-Leave Command Administrator is selected from the e-Leave section under Security Type & User Roles (Figure 3-29), scroll down to the Supervisor Details section (Figure 3-30). As with the military CLA account, the civilian account needs to be reviewed by the supervisor.
3.3.5.1 Complete Supervisor Details Section In the Supervisor Details section (Figure 3-30), identify the supervisor. It is important to remember that the supervisor’s name must be correctly entered.
Figure 3-30–SAAR: Supervisor Details – SAAR Form Section
5. Name
NOTE: Carefully enter the supervisor’s name. If it does not match what the supervisor will enter, he/she will not be able to locate this SAAR request to process it. Double check the spelling of the name before submitting.
– Enter the name of the supervisor responsible for reviewing this SAAR request. Enter the name in the standard format: LAST,FIRST (space) Middle Initial (MI).
6. Email Id
7.
– Enter the supervisor’s official email address. Details about the SAAR will be sent to this email address.
Contact Phone8.
– Enter the supervisor’s contact phone number.
Submit
– Click the Submit button to submit the SAAR application and begin the verification and authorization process. After successful submission of the application the ERM SAAR Status page displays.
e-Leave User Guide July 2010
3-28 SG12FY1502
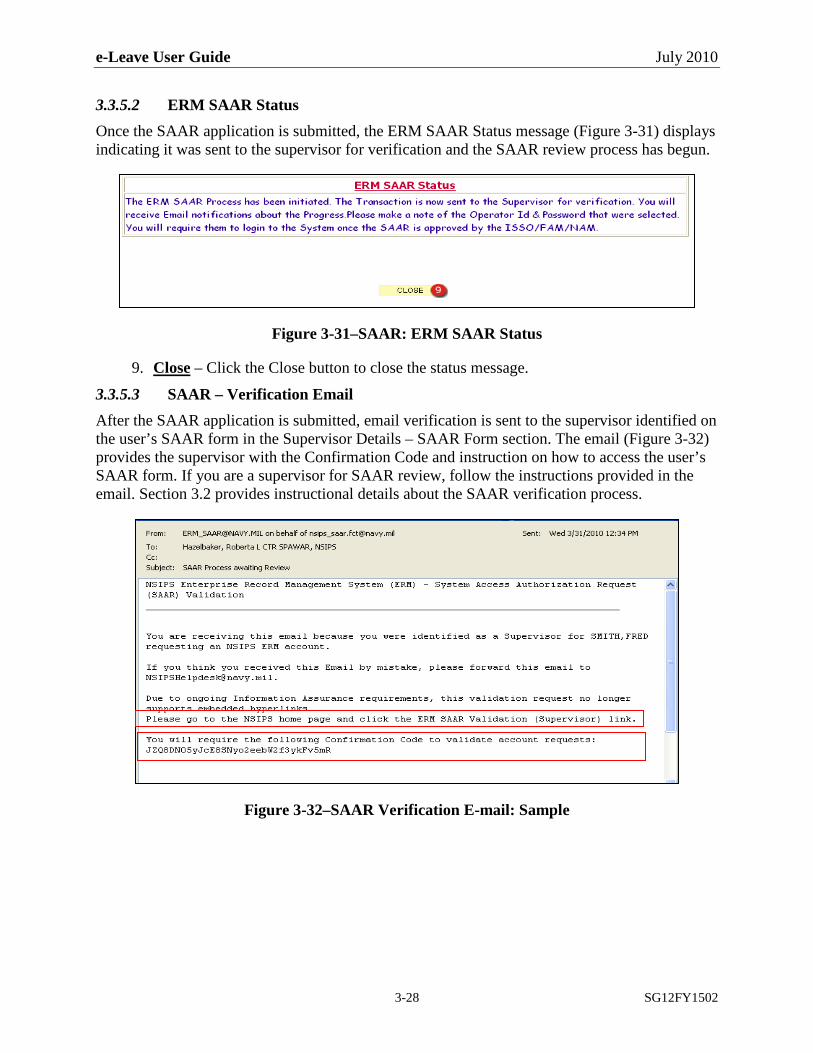
3.3.5.2 ERM SAAR Status Once the SAAR application is submitted, the ERM SAAR Status message (Figure 3-31) displays indicating it was sent to the supervisor for verification and the SAAR review process has begun.
Figure 3-31–SAAR: ERM SAAR Status
9. Close
3.3.5.3 SAAR – Verification Email
– Click the Close button to close the status message.
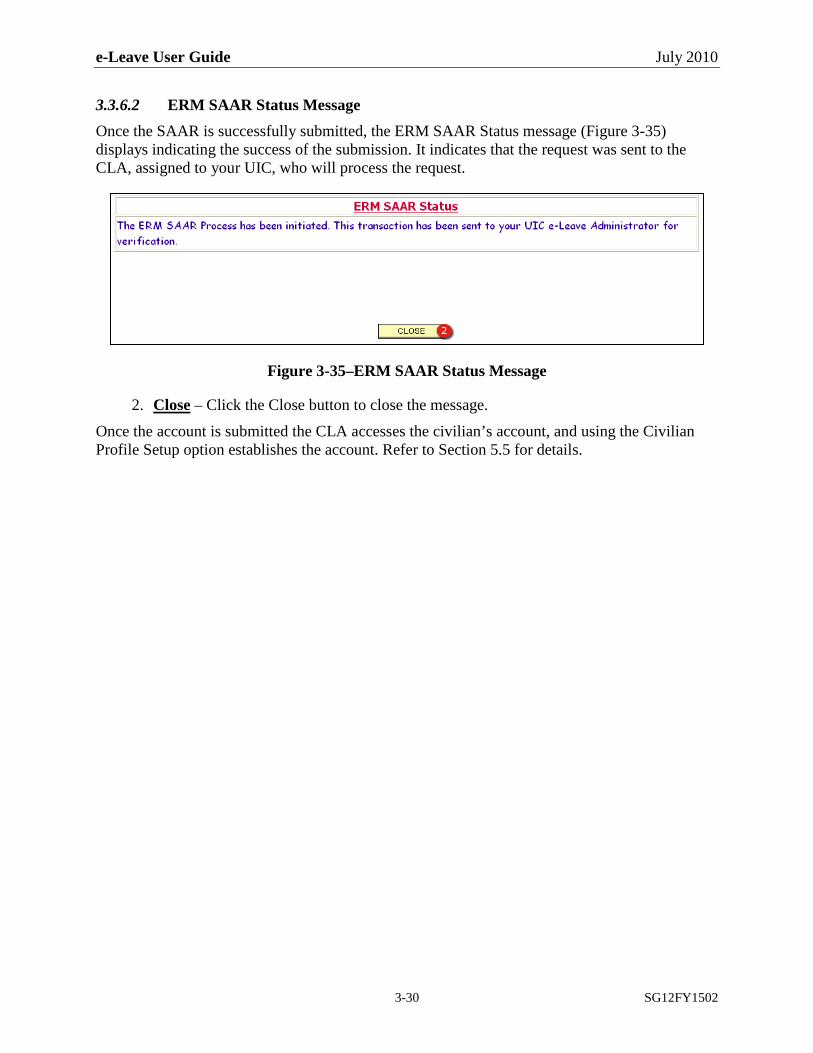
After the SAAR application is submitted, email verification is sent to the supervisor identified on the user’s SAAR form in the Supervisor Details – SAAR Form section. The email (Figure 3-32) provides the supervisor with the Confirmation Code and instruction on how to access the user’s SAAR form. If you are a supervisor for SAAR review, follow the instructions provided in the email. Section 3.2 provides instructional details about the SAAR verification process.
Figure 3-32–SAAR Verification E-mail: Sample

e-Leave User Guide July 2010
3-29 SG12FY1502
3.3.6 Continue SAAR Process for e-Leave Civilian Approver/Reviewer After e-Leave Civilian Approver/Reviewer is selected from the e-Leave section under Security Type & User Roles (Figure 3-33), scroll down to the Supervisor Details section (Figure 3-34).
Figure 3-33–SAAR Verification E-mail: Sample
3.3.6.1 Submit the e-Leave Civilian Approver/Reviewer SAAR Request The CLA verifies and creates the civilian account for Approvers/Reviewers. The CLA accesses the civilian account, unlocks the account, assigns UIC access, and assigns the civilian as Reviewer and/or Approver to specific ember accounts. Refer to Section 5.5 for details about establishing civilian Reviewer/Approver accounts.
Since the CLA takes care of the civilian account, the supervisor details are not needed. Use the Submit button at the bottom of the SAAR form (Figure 3-34).
Figure 3-34–SAAR: Supervisor Details – SAAR Form Section
1. Submit
– Click the Submit button. The ERM SAAR Status message displays.
e-Leave User Guide July 2010
3-30 SG12FY1502
3.3.6.2 ERM SAAR Status Message Once the SAAR is successfully submitted, the ERM SAAR Status message (Figure 3-35) displays indicating the success of the submission. It indicates that the request was sent to the CLA, assigned to your UIC, who will process the request.
Figure 3-35–ERM SAAR Status Message
2. CloseOnce the account is submitted the CLA accesses the civilian’s account, and using the Civilian Profile Setup option establishes the account. Refer to Section 5.5 for details.
– Click the Close button to close the message.

e-Leave User Guide July 2010
3-31 SG12FY1502
3.4 Military e-Leave Reviewers, Approvers, and the member request and process e-Leave Requests via a Self-Service account. Reviewers and Approvers use the Self-Service account to complete his/her own e-Leave Request; as well as, review/approve e-Leave Requests for assigned members. Each person must complete a SAAR requesting the Self-Service account. The process begins by accessing the NSIPS Portal.
Military Reviewer, Approver, Member Self-Service Account Creation
3.4.1 Access the NSIPS Portal In the Internet Explorer window, navigate to https://nsips.nmci.navy.mil/ . The Security Disclaimer page loads (Figure 3-36).
Figure 3-36–Security Disclaimer
1. Security Disclaimer
2.
– Review the Security Disclaimer. Click the checkbox to indicate you have read and agree with the disclaimer. A check mark displays in the field.
Agree
– Click the Agree button. The NSIPS Splash page displays.

e-Leave User Guide July 2010
3-32 SG12FY1502
3.4.2 NSIPS Splash Page The NSIPS Splash page (Figure 3-37) provides links to access the SAAR form. In the System Access Authorization Request (SAAR) section, links provide access to create new User Role accounts, create Self-Service accounts, and validate and submit SAAR requests. To create a military Reviewer, Approver, or member account, use the ESR Self-Service (New Users) link.
Figure 3-37–NSIPS Splash Page
3. ESR Self-Service (New Users)
– Click the link to initiate the SAAR process. The Member Self-Service Account Request page displays to begin the SAAR account request process.
e-Leave User Guide July 2010
3-33 SG12FY1502
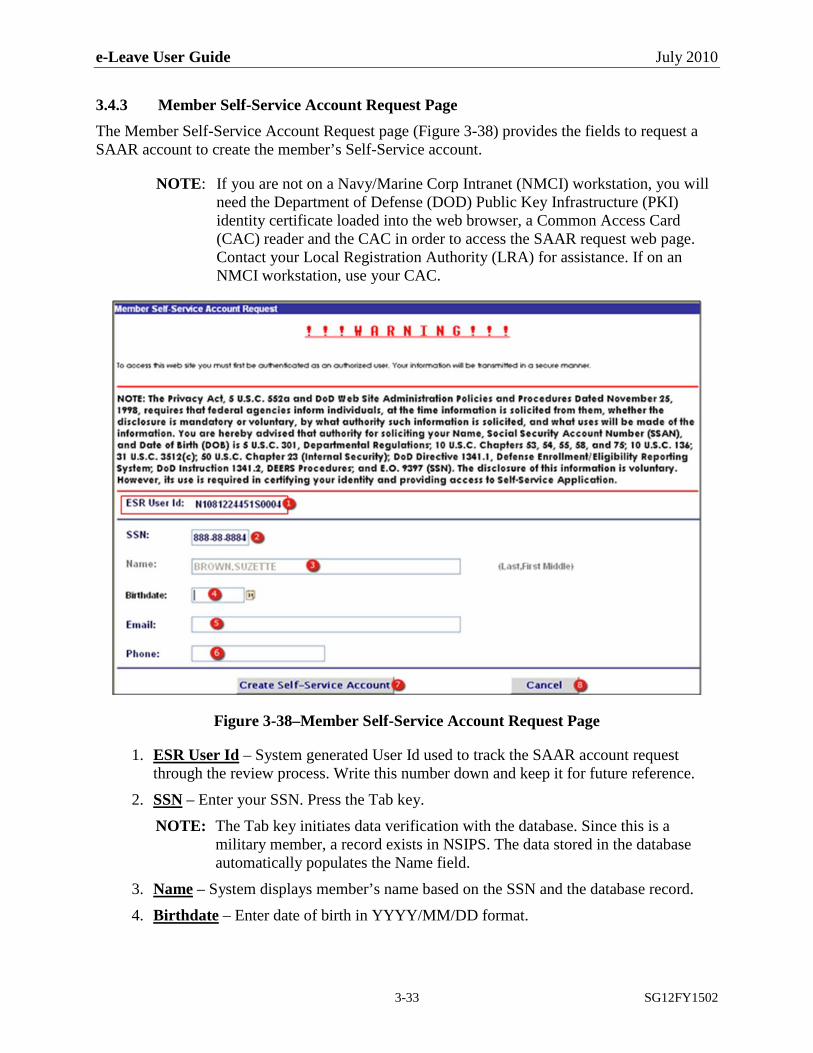
3.4.3 Member Self-Service Account Request Page The Member Self-Service Account Request page (Figure 3-38) provides the fields to request a SAAR account to create the member’s Self-Service account.
NOTE: If you are not on a Navy/Marine Corp Intranet (NMCI) workstation, you will need the Department of Defense (DOD) Public Key Infrastructure (PKI) identity certificate loaded into the web browser, a Common Access Card (CAC) reader and the CAC in order to access the SAAR request web page. Contact your Local Registration Authority (LRA) for assistance. If on an NMCI workstation, use your CAC.
Figure 3-38–Member Self-Service Account Request Page
1. ESR User Id
2.
– System generated User Id used to track the SAAR account request through the review process. Write this number down and keep it for future reference.
SSNNOTE: The Tab key initiates data verification with the database. Since this is a
military member, a record exists in NSIPS. The data stored in the database automatically populates the Name field.
– Enter your SSN. Press the Tab key.
3. Name4.
– System displays member’s name based on the SSN and the database record.
Birthdate – Enter date of birth in YYYY/MM/DD format.
e-Leave User Guide July 2010
3-34 SG12FY1502
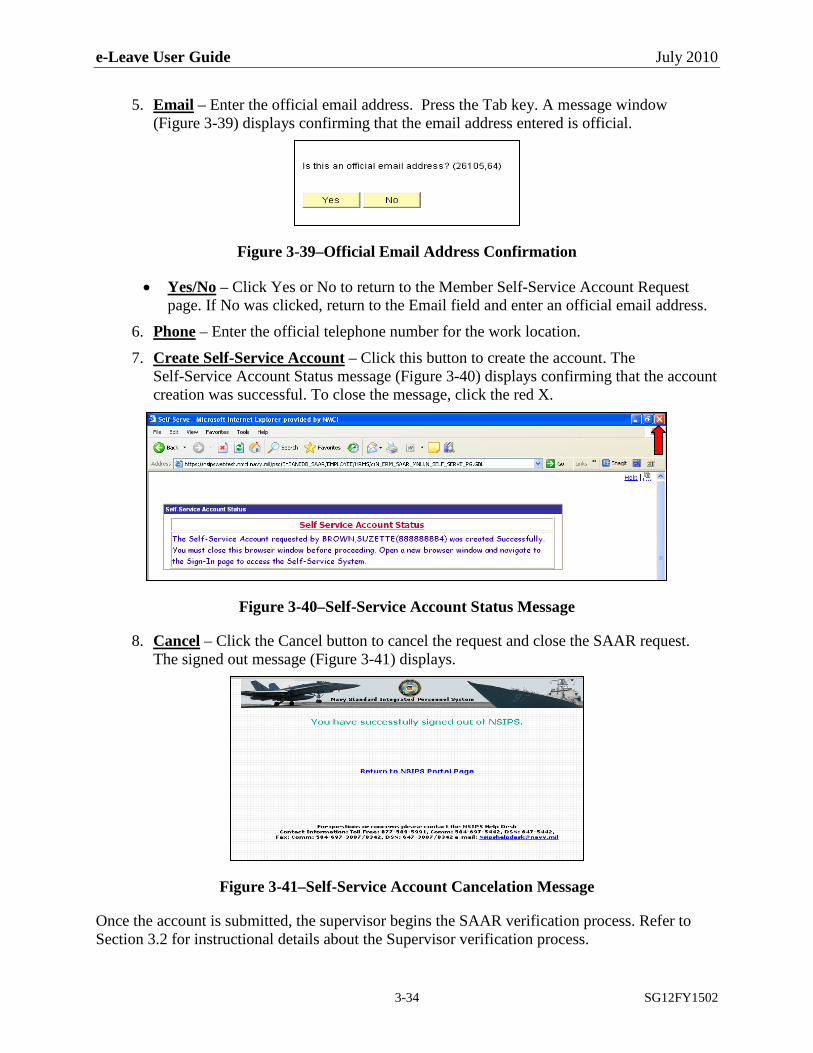
5. Email
– Enter the official email address. Press the Tab key. A message window (Figure 3-39) displays confirming that the email address entered is official.
Figure 3-39–Official Email Address Confirmation
• Yes/No
6.
– Click Yes or No to return to the Member Self-Service Account Request page. If No was clicked, return to the Email field and enter an official email address.
Phone7.
– Enter the official telephone number for the work location.
Create Self-Service Account
– Click this button to create the account. The Self-Service Account Status message (Figure 3-40) displays confirming that the account creation was successful. To close the message, click the red X.
Figure 3-40–Self-Service Account Status Message
8. Cancel
– Click the Cancel button to cancel the request and close the SAAR request. The signed out message (Figure 3-41) displays.
Figure 3-41–Self-Service Account Cancelation Message
Once the account is submitted, the supervisor begins the SAAR verification process. Refer to Section 3.2 for instructional details about the Supervisor verification process.

e-Leave User Guide July 2010
3-35 SG12FY1502
3.5 During the initial request for the CLA account, the UICs identified are UICs within the Accounting and Disbursing Symbol Number (ADSN) for the CLA’s Command. If as the CLA, you need access to UICs outside your ADSN, a modification to the SAAR is needed. The modification is completed AFTER the initial SAAR request is granted and the CLA account created.
Adding a UIC Outside of the CLA’s ADSN
For example, as the CLA for Norfolk, you have access to the Norfolk UICs. A sailor, attached to a San Diego UIC, needs assistance with processing his e-Leave Request. You will need access to this San Diego UIC in order to assist. Using the SAAR modification process, request access to the San Diego UIC, which is outside your command’s ADSN.
To access the modification to the SAAR form, access the e-Leave Home menu from the Navy Standard Integrated Personnel System (NSIPS) Portal using your CLA User Role account.
3.5.1 Accessing e-Leave The CLA accesses the SAAR modification feature from the ERM Menu via the NSIPS Portal. In the Internet Explorer window, navigate to https://nsips.nmci.navy.mil/. The Security Disclaimer page (Figure 3-42) displays.
Figure 3-42–Security Disclaimer
1. Security Disclaimer
2.
– Review the Security Disclaimer. Click the checkbox to indicate you have read and agree with the disclaimer. A check mark displays in the field.
Agree
– Click the Agree button. The NSIPS Splash page (Figure 3-43) displays.

e-Leave User Guide July 2010
3-36 SG12FY1502
3.5.2 NSIPS Splash Page On the NSIPS Splash page (Figure 3-43) log into the NSIPS environment to access e-Leave.
Figure 3-43–NSIPS Splash Page
3. Logon
– Click the Logon button. The NSIPS Account List page displays.
e-Leave User Guide July 2010
3-37 SG12FY1502
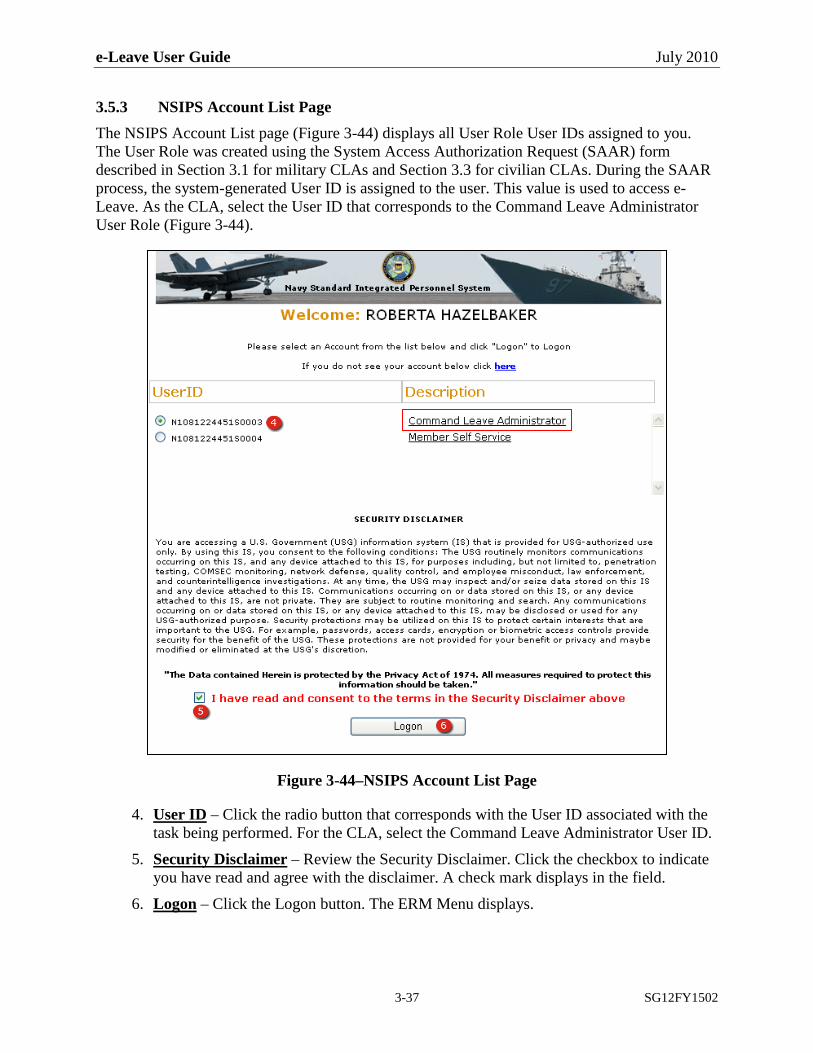
3.5.3 NSIPS Account List Page The NSIPS Account List page (Figure 3-44) displays all User Role User IDs assigned to you. The User Role was created using the System Access Authorization Request (SAAR) form described in Section 3.1 for military CLAs and Section 3.3 for civilian CLAs. During the SAAR process, the system-generated User ID is assigned to the user. This value is used to access e-Leave. As the CLA, select the User ID that corresponds to the Command Leave Administrator User Role (Figure 3-44).
Figure 3-44–NSIPS Account List Page
4. User ID
5.
– Click the radio button that corresponds with the User ID associated with the task being performed. For the CLA, select the Command Leave Administrator User ID.
Security Disclaimer
6.
– Review the Security Disclaimer. Click the checkbox to indicate you have read and agree with the disclaimer. A check mark displays in the field.
Logon
– Click the Logon button. The ERM Menu displays.
e-Leave User Guide July 2010
3-38 SG12FY1502
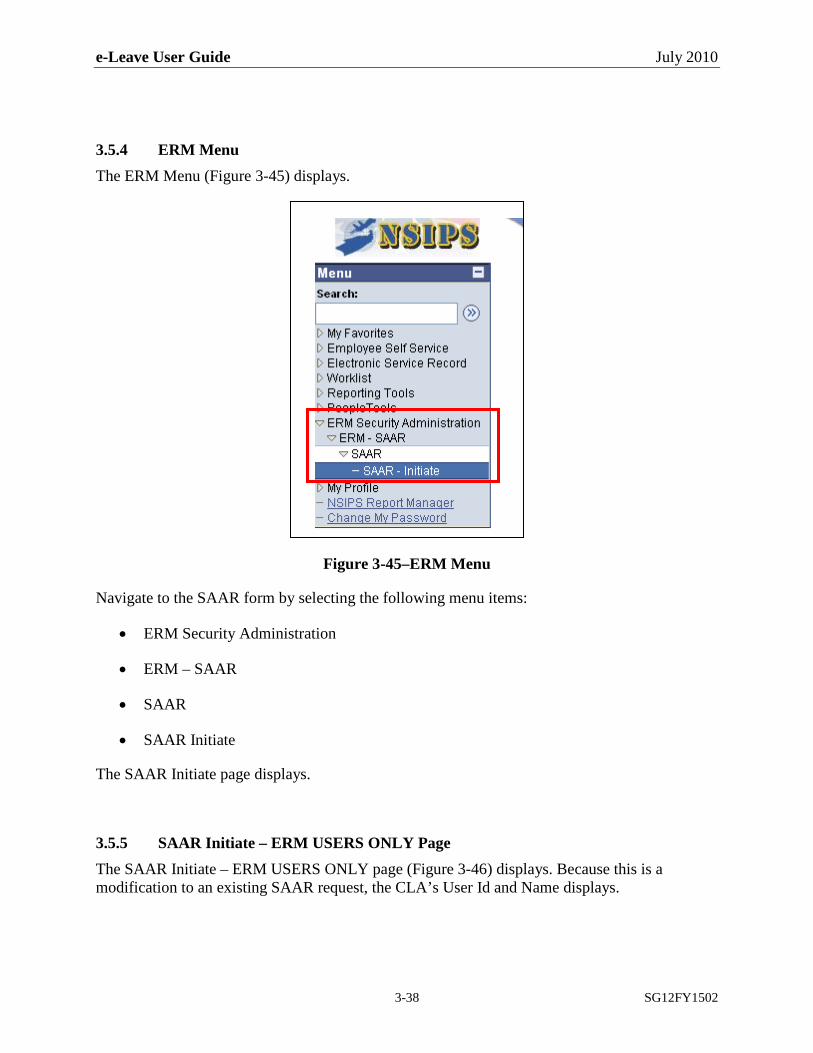
3.5.4 ERM Menu The ERM Menu (Figure 3-45) displays.
Figure 3-45–ERM Menu
Navigate to the SAAR form by selecting the following menu items:
• ERM Security Administration
• ERM – SAAR
• SAAR
• SAAR Initiate
The SAAR Initiate page displays.
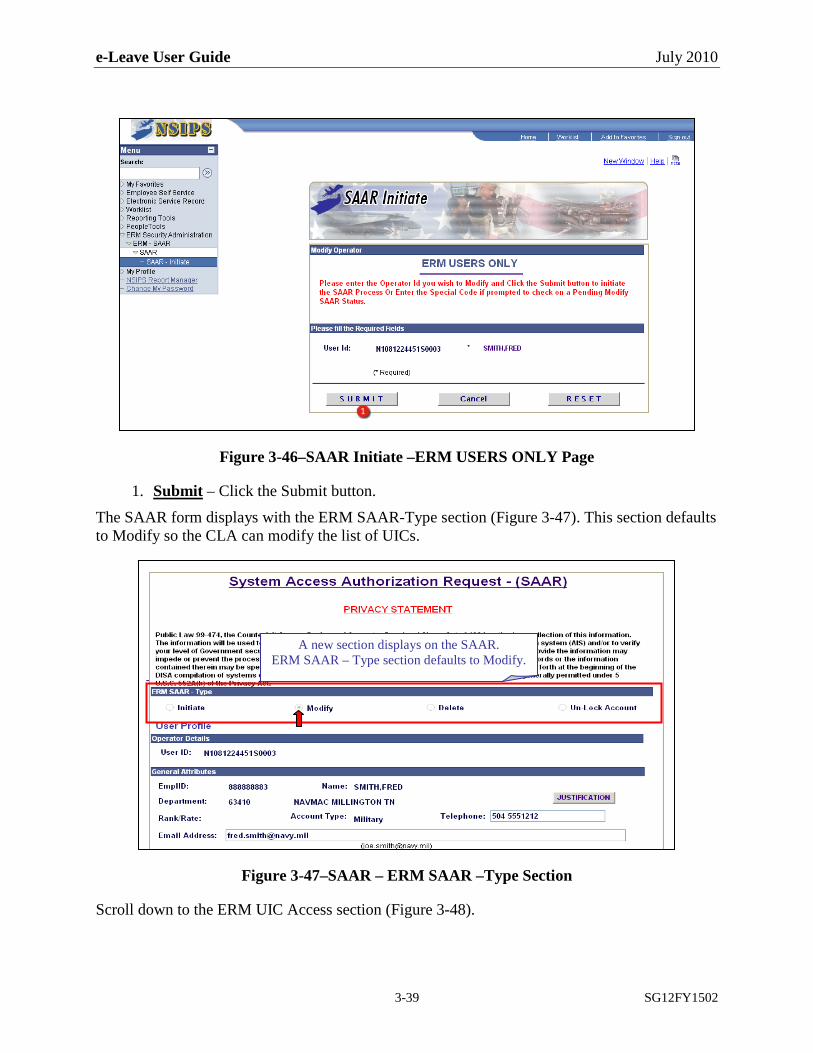
3.5.5 SAAR Initiate – ERM USERS ONLY Page The SAAR Initiate – ERM USERS ONLY page (Figure 3-46) displays. Because this is a modification to an existing SAAR request, the CLA’s User Id and Name displays.
e-Leave User Guide July 2010
3-39 SG12FY1502
Figure 3-46–SAAR Initiate –ERM USERS ONLY Page
1. SubmitThe SAAR form displays with the ERM SAAR-Type section (Figure 3-47). This section defaults to Modify so the CLA can modify the list of UICs.
– Click the Submit button.
Figure 3-47–SAAR – ERM SAAR –Type Section
Scroll down to the ERM UIC Access section (Figure 3-48).
A new section displays on the SAAR. ERM SAAR – Type section defaults to Modify.

e-Leave User Guide July 2010
3-40 SG12FY1502
Figure 3-48–ERM UIC Access Section
1. ERM UIC AccessThe Pay & Personnel Support Level UIC Access Profile page (Figure 3-49) displays. In the General UIC(s) section, the UIC assigned during the initial SAAR request display. These UICs are within the ADSN of the CLA’s Command.
– Click the ERM UIC Access link.
Figure 3-49–Pay & Personnel Support Level UIC Access Profile Page
2. General UIC(s)
– Click the General UIC(s) button.
e-Leave User Guide July 2010
3-41 SG12FY1502
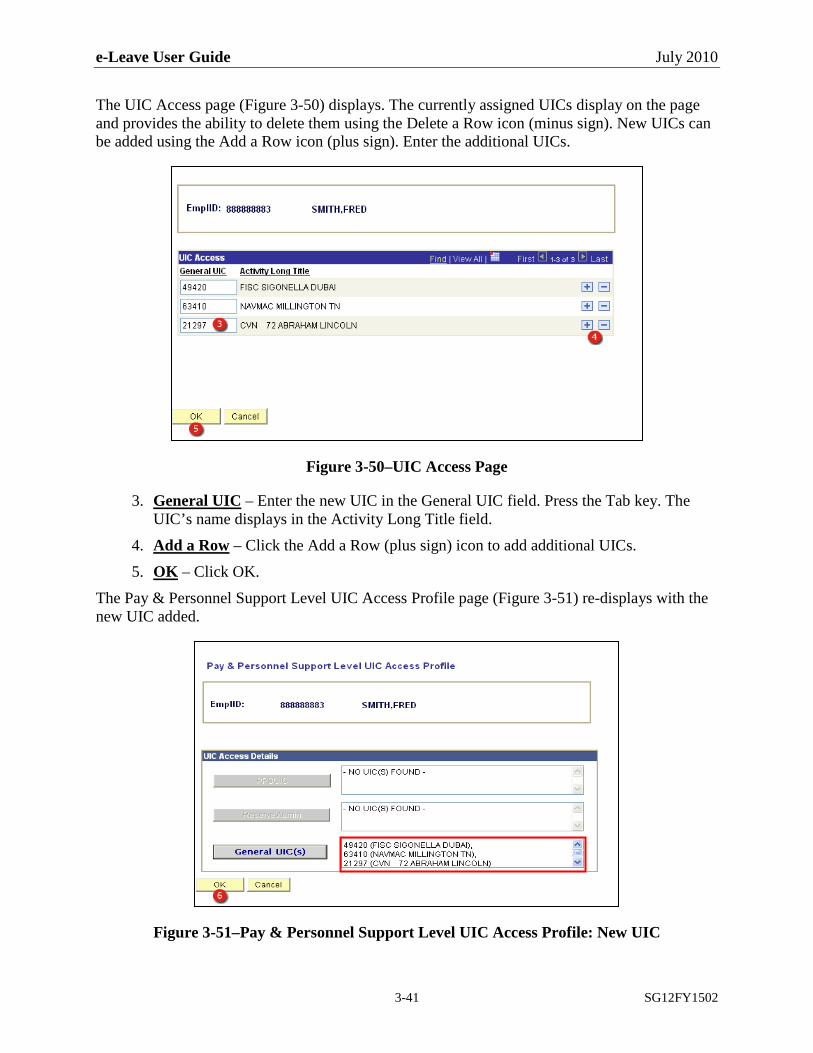
The UIC Access page (Figure 3-50) displays. The currently assigned UICs display on the page and provides the ability to delete them using the Delete a Row icon (minus sign). New UICs can be added using the Add a Row icon (plus sign). Enter the additional UICs.
Figure 3-50–UIC Access Page
3. General UIC
4.
– Enter the new UIC in the General UIC field. Press the Tab key. The UIC’s name displays in the Activity Long Title field.
Add a Row5.
– Click the Add a Row (plus sign) icon to add additional UICs.
OKThe Pay & Personnel Support Level UIC Access Profile page (Figure 3-51) re-displays with the new UIC added.
– Click OK.
Figure 3-51–Pay & Personnel Support Level UIC Access Profile: New UIC
e-Leave User Guide July 2010
3-42 SG12FY1502
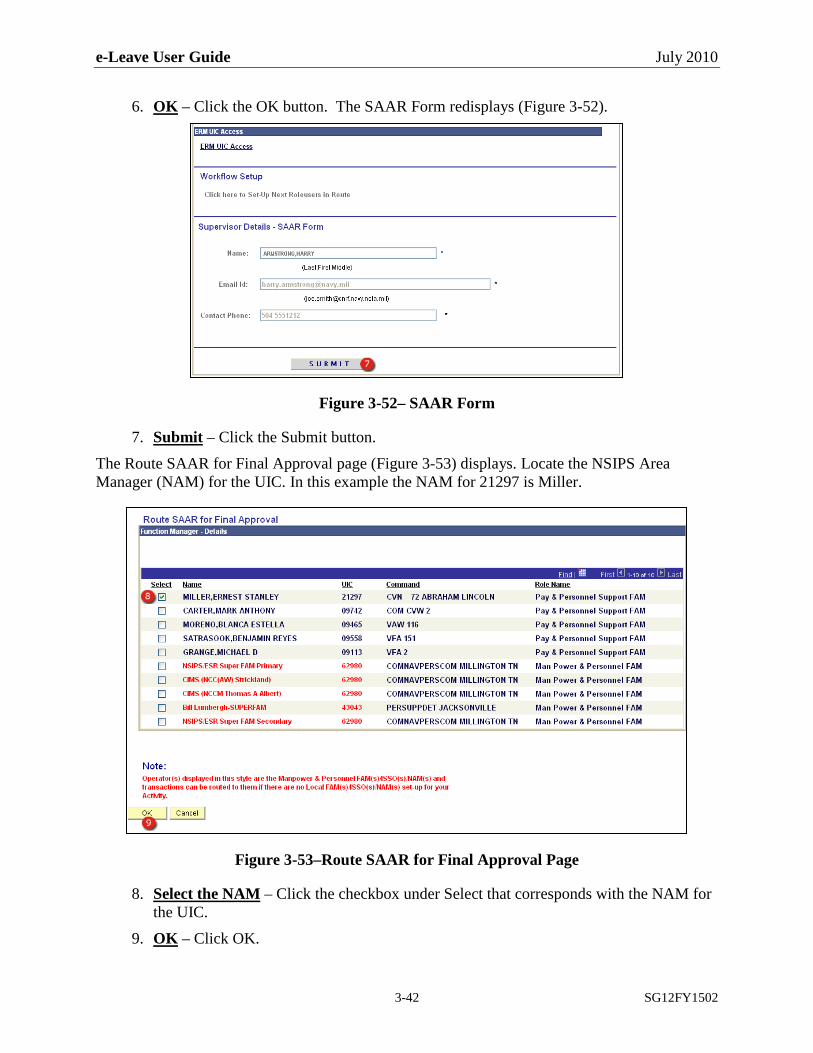
6. OK
– Click the OK button. The SAAR Form redisplays (Figure 3-52).
Figure 3-52– SAAR Form
7. SubmitThe Route SAAR for Final Approval page (Figure 3-53) displays. Locate the NSIPS Area Manager (NAM) for the UIC. In this example the NAM for 21297 is Miller.
– Click the Submit button.
Figure 3-53–Route SAAR for Final Approval Page
8. Select the NAM
9.
– Click the checkbox under Select that corresponds with the NAM for the UIC.
OK – Click OK.
e-Leave User Guide July 2010
3-43 SG12FY1502
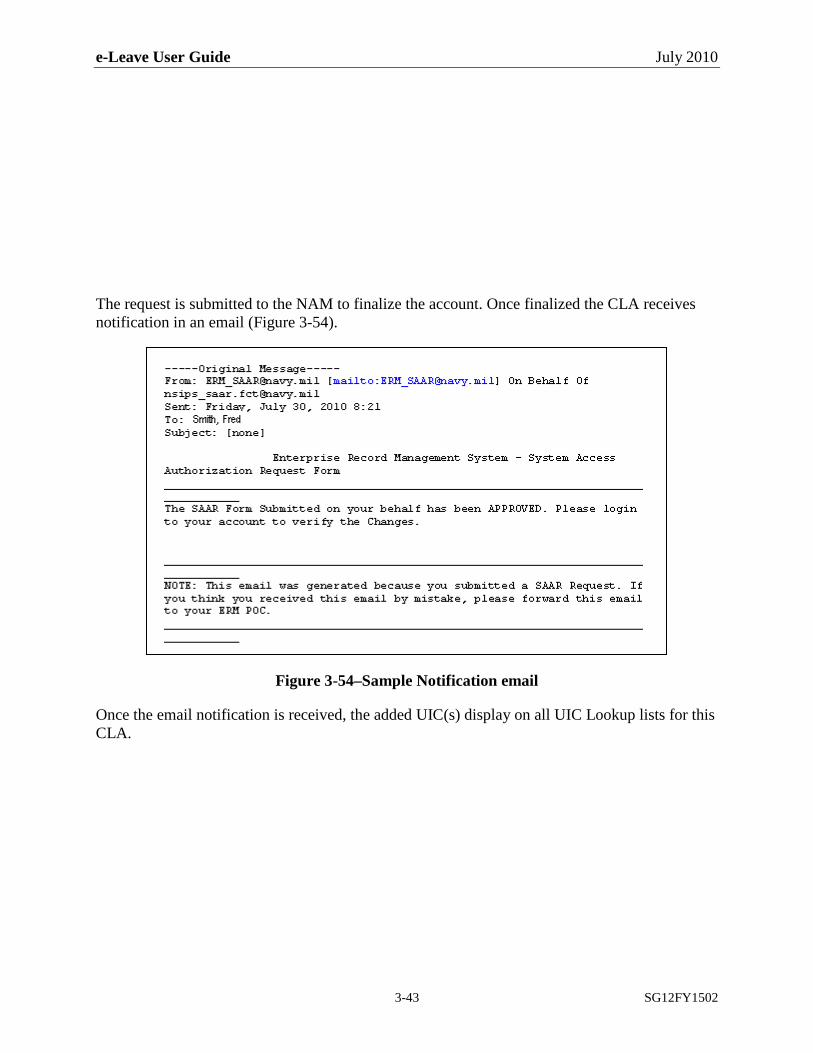
The request is submitted to the NAM to finalize the account. Once finalized the CLA receives notification in an email (Figure 3-54).
Figure 3-54–Sample Notification email
Once the email notification is received, the added UIC(s) display on all UIC Lookup lists for this CLA.

e-Leave User Guide July 2010
A-1 SG12FY1502
APPENDIX A–ACRONYMS AND ABBREVIATIONS

e-Leave User Guide July 2010
A-2 SG12FY1502
ACRONYMS AND ABBREVIATIONS
ADSN Accounting and Disbursing Symbol Number
BAS Basic Allowance for Subsistence
CAC Common Access Card
CIMS Career Information Management System
CIV Civilian
CO Commanding Officer
COTS Commercial Off-the Shelf
CST Central Standard Time
DEPT Department
DEPTID Department Identification or Unit Identification Code
DFAS Defense Finance and Accounting Service
DIV Division
DJMS Defense Joint Military Pay System
DJMS-AC Defense Joint Military Pay System – Active Component
DoD Department of Defense
DSC Duty Status Code
EAOS Expiration Active Obligated Service
e-Leave Electronic-Leave
EmplID Employee Identification (reflects member’s Social Security Number)
ERM Enterprise Record Management
ESR Electronic Service Record
FAM Functional Area Manager
FID Format Identifier
FY Fiscal Year
HR Human Resource
ID Id
Identification Number
e-Leave User Guide July 2010
A-3 SG12FY1502
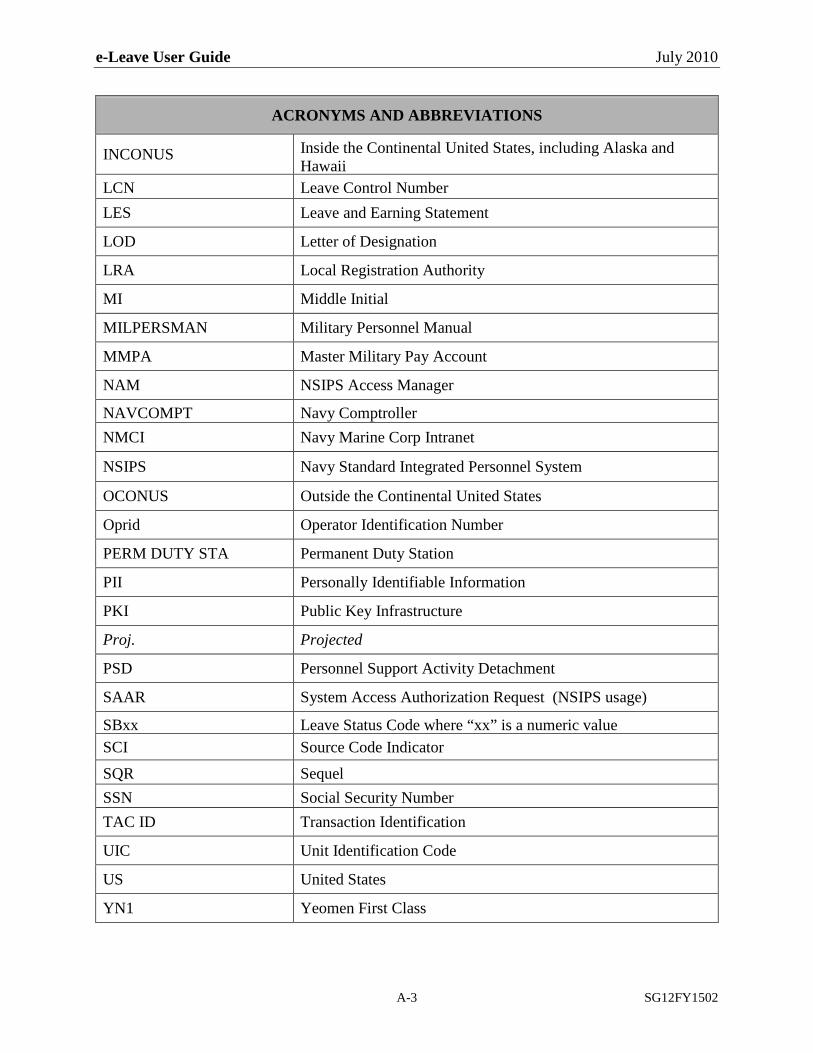
ACRONYMS AND ABBREVIATIONS
INCONUS Inside the Continental United States, including Alaska and Hawaii
LCN Leave Control Number LES Leave and Earning Statement
LOD Letter of Designation
LRA Local Registration Authority
MI Middle Initial
MILPERSMAN Military Personnel Manual
MMPA Master Military Pay Account
NAM NSIPS Access Manager
NAVCOMPT Navy Comptroller NMCI Navy Marine Corp Intranet
NSIPS Navy Standard Integrated Personnel System
OCONUS Outside the Continental United States
Oprid Operator Identification Number
PERM DUTY STA Permanent Duty Station
PII Personally Identifiable Information
PKI Public Key Infrastructure
Proj. Projected
PSD Personnel Support Activity Detachment
SAAR System Access Authorization Request (NSIPS usage)
SBxx Leave Status Code where “xx” is a numeric value SCI Source Code Indicator
SQR Sequel SSN Social Security Number TAC ID Transaction Identification
UIC Unit Identification Code
US United States
YN1 Yeomen First Class