Dynamics GP 2015 R2 - The Resource Groups...What’s New in Microsoft Dynamics GP 2015 R2 ......
14
Microsoft Dynamics GP June 2015 This document describes enhancments add for the Microsoft Dynamics 2015 R2 release, including where needed, step-by-step instructions for using the features. What’s New in Microsoft Dynamics GP 2015 R2 www.microsoft.com/dynamics/gp Feedback is welcome at [email protected]
-
Upload
vuongtuong -
Category
Documents
-
view
216 -
download
1
Transcript of Dynamics GP 2015 R2 - The Resource Groups...What’s New in Microsoft Dynamics GP 2015 R2 ......

What’s New in Microsoft Dynamics GP 2015 R2
Microsoft Dynamics GP June 2015
This document describes enhancments add for the
Microsoft Dynamics 2015 R2 release, including
where needed, step-by-step instructions for using
the features.
What’s New in Microsoft
Dynamics GP 2015 R2
www.microsoft.com/dynamics/gp
Feedback is welcome at [email protected]

What’s New in Microsoft Dynamics GP 2015 R2
Contents
What’s New in Microsoft Dynamics GP 2015 R 2 3
Introduction 3 Workflow – Payables Transaction Approval 4 Workflow – Document Attachment 5 Purchasing All-in-One view 6 Automatically Deposit Cash Receipts 7 Date effective tax rates 7
Important: 8 Enable Email on All Purchase Orders and Sales orders 8 Reporting Enhancements 8
Display Debits before Credits 8 Default SmartList Visibility 9 Workflow SmartList Designer Create View Approval 9
Sales Visual Customer over Credit limit function 9 Self Service User Type 10 Historical Received Not Invoiced Report 10 Mask Employee Social Security Number on Reports 10 Analytical Accounting Transaction Lists 11 Combine General Ledger Inquiry 11 Employee Self Service – W2 12 VAT Tax Routine 12 Time Management App 12 Service-based Architecture 13 Scriptable Provisioning & Management 13

What’s New in Microsoft Dynamics GP 2015 R2
What’s New in Microsoft Dynamics GP 2015 R 2
Introduction What’s New is your guide to enhancements in Microsoft Dynamics GP 2015. We add enhancements based on feedback
we receive from customers, as well as on market research. Your willingness to help us build better products makes this a
more complete solution for small and medium-sized businesses, putting you in a better position to manage your
organization successfully. We encourage you to share your thoughts and reactions with us at any time.
Some enhancements described in this documentation are optional and can be purchased through your Microsoft
Dynamics GP partner. If you currently have a license for one of these modules and have an active enhancement
program, you automatically will receive the enhancements contained in that module.
This document describes enhancements that were added to Microsoft Dynamics GP since Microsoft Dynamics
GP 2015 R2.

What’s New in Microsoft Dynamics
Page1
4
Workflow – Payables Transaction Approval A new workflow type for Payables Transaction approval in Workflow Maintenance is now available. When you set up
and mark this workflow active, the Payables Transaction Approval workflow type will allow you to submit and approve
transactions in the Payables Transaction Entry window. Approval is also available through the email notif ication and the
navigation lists. The PM Batch Approval workflow type is still available as well. If the PM Batch Approval workflow type
and the Payables Transaction Approval workflow type are both Active the batch origin of Payables Trx Entry is not
available for batch approval.
The Payables Transaction Entry window is the primary window for the Payables Transaction Approval workflow type. As
soon as the data is entered or modif ied in the window, you can view the InfoBar, showing the status of the workflow.
The Payables Transaction Entry window has Workflow action added to the ribbon.
The workflow process to follow is similar to the other workflow processes available in Microsoft Dynamics GP.
You can def ine messages that can be sent out for workflow activities that are specif ic to the Payables Transaction
Approval workflow type using the Message Setup window.
To approve a single transaction in the Payables Transaction Entry window, add the transaction to a batch and then
follow the workflow process to Submit and approve.

What’s New in Microsoft Dynamics
Page1
4
Workflow – Document Attachment When a document has been added to a transaction or record using the Microsoft Dynamics GP Document Attachment
feature, that attachment can be sent with the workflow task notif ication email. This feature is available for the following
workflow types:
Payables Batch Approval
Purchase Order Approval
Purchase Requisition Approval
Vendor Approval
Payables Transaction Approval
For example, you can now enter a payables invoice, scan it and attach the record from the vendor, and then submit the
invoice for approval. When the approver receives the email, the image of the scanned invoice is included as an
attachment.
To use this feature, mark a new checkbox that is available in the Workflow Maintenance window for the specif ied
workflow types. The prerequisites to make this checkbox available or marking are:
• The Allow Document Attachments checkbox must be marked in the Document Attachment Setup window
(Administration – Setup – Company – Document Attachment Setup).
• The Send Message checkbox above it in the Workflow Maintenance window is marked.
You can now send Document Attachment documents as attachments to email when the messages are sent through
workflow. All attachments will be sent in the order they are attached. Attachments from the header will be f irst, then
attachments from line items.
You can view the status of the document attached in the Document Attachment Status Inquiry window (Document
Attach >> Attach (Document Attachment Management) >> Line expansion next to Date). A new status called Workflow
Message has been added.

What’s New in Microsoft Dynamics
Page1
4
Purchasing All-in-One view A Purchasing All-in-One View window is available for locating vendor records and displaying related purchasing
documents in the same window. For example, suppose a vendor calls asking about a specif ic payment. You can use the
Purchasing All-in-One View window to select that vendor and then view all documents related to the payment, such as
the purchase order, receipt, invoice, credits, miscellaneous charges and f inance charges, and payment to assist you in
responding to the vendor’s inquiries.
You can access the Purchasing All-in-One View window from the following windows and navigation lists:
• Your home page
• Vendor Maintenance
• Purchase Order Processing Document Inquiry
• Vendor Inquiry
• Payables Transaction Inquiry - Vendor
• Payables Transaction Inquiry – Document
• Purchase Order Processing Document Inquiry
• Purchase Order Processing Item Inquiry
• Navigation lists and any views of these lists
Vendors
All Purchasing Transactions
Payables Transactions
Purchase Order Transactions
The icon for the Purchasing All-in-One View window is available only if a single record is selected in the navigation list.
The data that’s displayed in the Purchasing All-in-One View window depends on your selection in the navigation list. For
example, if you select only a vendor record in the navigation list, the vendor ID and name information are displayed in
the Purchasing All-in-One View window. If you select a transaction in the navigation list, the vendor ID, name and
transaction information are displayed.
When you open the Purchasing All-in-One View window from Purchasing >> Inquiry >> All-in-One View, or Home >>
Quick Links >> All-in-One View, the window opens without any data. You can specify the vendor and the details of the
information to display in the window. Mark the checkbox in the upper right corner of the document to display only the
related documents.
The Options button allows you to select which columns and document types to display in the window. For example, if
you don’t use Purchase Orders, clear the Purchase Orders selection and the f irst column displays receipts. The Credit
Documents column marked to display by default, but with this column marked, up to six columns of data can be shown.
You can view the last f ive transactions by document date, arranged by the newest to the oldest in each column. Use the
sort order ( ) buttons to change the order for transaction information. You can view the next set of transactions by
clicking Next 5.

What’s New in Microsoft Dynamics
Page1
4
Each section displays a summary of the transactions that you select to display in columns in the window. Click the down
arrow ( ) icon to view the details, and return to the summary display by clicking the up arrow ( ) icon. The f ilters
provided in the section’s headings open a pop-up window that allow you to apply additional f ilters, as well as to search
for the specif ic transaction. The clear f ilters icon will reset the f ilters back to the default selection.
Automatically Deposit Cash Receipts You can now choose to have cash receipts directly update the checkbook balance without manually posting the cash
receipt deposit in Bank Reconciliation. To select the option, mark the “Automatically post cash receipt deposits” checkbox
in the Company Setup Options window. When this option is marked, cash receipts entered in Cash Receipt Entry,
Receivables Transaction Entry, Sales Transaction Entry, and Invoice Entry windows, and on return documents in Payables
Transaction Entry, will be deposited automatically in the checkbook, and the deposits will update the checkbook
balance.
Previously the option to automatically post cash receipts was available only to customers who used Analytical
Accounting. This option is now available to all customers.
Date effective tax rates You can now enter the tax rates in advance for transactions, and calculate the taxes based on the rates specif ied for a
date range. You can also recalculate the taxes for the saved transactions by modifying the specif ied tax rates based on
the latest tax rates specif ied by the tax authorities. You can mass modify the tax rates, and regenerate the taxes for the
saved transaction batches.
Follow these steps to set up a date effective tax:
1. Open the Company Setup Options window.
2. Microsoft Dynamics GP >> Tools >> Set up >> Company >> Company >> Options
3. In the Company Setup Options window, mark the Enable Tax Date checkbox, to allow you to use the tax date option
for calculating the tax rate for the transaction based on a tax date.
4. Mark the Use Date-effective Tax checkbox. Select the option to calculate the tax. The option that you select here is
used for updating the taxes for saved transactions within the tax effective date range. Transactions that are
corrected will be based on the date you select here. You can select the Document date, Posting date or the Tax date
to calculate the tax.
NOTE: Select posting date if you want to calculate tax based on the posting date that you specify. Select Tax date if
you want to calculate tax based on the tax date that you specify. Select Document date if you want to calculate tax
based on the document date that you specify.
You must set up the date range for the specif ied Tax ID to calculate the tax amount or percentage for the transaction.
Follow these steps to create the date range for the tax ID.
1. Open the Date effective Tax Rates window.
2. Microsoft Dynamics GP >> Tools >> Set up >> Company >> Tax Details >> Select the tax ID in the Tax Detail ID
f ield to set up the date range for >> Date effective Tax Rates.
3. Specify the date range for the specif ied tax amount or percentage.
You can mass modify the tax percentage of multiple tax IDs. You can choose to modify the tax percentage or amount for
the taxes detail or the tax type based on date range, or for the tax without any specifying any date range, or both.
Follow these steps to mass modify the tax percentage.
1. Open the Mass Modify Taxes window.
Microsoft Dynamics GP >> Tools >> Utilities >> Company >> Mass Modify Tax Percentage
2. Select the option to modify the tax percentage. You can choose:
• Date effective Tax – To update the dates specif ied in the date range, and the percentage that you have specif ied
in the Date effective Tax rates window.

What’s New in Microsoft Dynamics
Page1
4
• Tax details – To update the tax percentage that you have specif ied in the Tax Detail Maintenance window.
• Both – To update the tax percentage that you have specif ied in the Date effective Tax rates window, and in the
Tax Detail Maintenance window.
3. Click Insert to view the list of the tax IDs listed for the modif ication.
NOTE: Within the specif ied Tax IDs, if you do not want to modify any Tax ID, you can select the Tax ID record, and
click Remove.
4. Click Modify to modify the listed Tax IDs based on your specif ications.
You can also regenerate taxes for the transaction batches with the updated tax percentage. You can regenerate taxes
for all the saved transactions of all the modules (except GL) or the selected module, only if you mark the use date
effective tax in the Company Setup Options window. You can specify the modules and the batches for which you want
the taxes to be regenerated, or regenerate the taxes for all the batches in all the modules (except GL) at one time.
Follow these steps to regenerate the taxes for the saved batch transactions.
1. Open the Regenerate Taxes window.
Microsoft Dynamics GP >> Tools >> Company >> Utilities >> Regenerate Taxes
2. Select the module to regenerate the updated tax for the batches. You can choose All to update the tax for the saved
batch transactions in all the modules (except GL). Or, you can choose the module to update the tax for the saved
batch transactions in the selected module.
3. If you choose a particular module to update the batch transactions, specify the batches in the batch range f ields.
4. Click Insert to view the list of the batches that will be updated with the modif ied tax percentage.
NOTE: You can select a batch ID record and click Remove, to prevent updating the transactions with the modif ied
tax percentage.
5. Click Process to recalculate the tax for the transaction in the module and batch specif ied.
Important: 1. The tax calculation of a transaction will be overridden if there is a date effective tax rate that exist for any tax detail.
2. If the tax calculation routine does not f ind the rate for a particular date range, then the percentage in the tax detail
maintenance will be taken.
3. For the receiving transaction entry, only shipment/Invoice will be considered for date effective tax calculation.
4. For the returns transaction entry, only return with credit and inventory with credit type of transactions will be
considered for date effective tax calculation.
5. You can regenerate taxes for transactions when workflow is active for the Receivables Management Batch Approval,
Payables Management Transaction and Payables Management Batch Approval.
Enable Email on All Purchase Orders and Sales orders You can now send all document format types (Short, Long, or Other) for all purchase order and sales order documents
via email. A template must exist for the document you wish to email and it must be assigned to a customer or vendor,
or be set as the default template for a particular company.
Reporting Enhancements The following enhancements are made to Microsoft Dynamics GP 2015 R2
Display Debits before Credits In Microsoft Dynamics GP 2015 R2, the Debit column is repositioned to display before the Credit column by default in
account transaction reporting options in which the Credit column previously displayed before the Debit column. This
applies to SmartList and Excel Reports and the associated data connection, as well as the database tables and views on
which the reports are based.

What’s New in Microsoft Dynamics
Page1
4
Default SmartList Visibility A new setting that’s available to system administrators allows them to set defaults that determine who can see new
SmartList favorites. When users create new SmartList favorites, they can change the default visibility setting, if
appropriate.
Previously, the default setting allowed everyone with access to the system to see new SmartLlist favorites. Typically the
default visibility setting was accepted when new SmartList favorites were created, which could result in users seeing
more favorites than they used. This feature can help limit the availability of unused favorites. The default visibility
settings include:
• Everyone with access to the system
• Users for a specif ic company
• Members of a user class
• Individual users
System administrators enable the visibility setting, which allows those who create new SmartList reports to accept the
default visibility setting their administrator determined, or to override the default and give other users access to the new
report.
Follow these steps to def ine the default selection for SmartList visibility.
1. Open the System Preferences window.
Administration >> Setup >> System >> System Preferences.
2. In the Default SmartList Visibility drop-down, select the option to default in the Visible To drop-down list when
adding a new SmartList Favorite.
Workflow SmartList Designer Create View Approval Within SmartList Designer you can send a SmartList through workflow to create a SQL view based on the SmartList
query. This SQL view can be used outside of Microsoft Dynamics GP when creating reports using SQL Server Reporting
Services or Power BI reports in Excel. The view will also allow the user to publish the SmartList as a refreshable Excel
report from Microsoft Dynamics GP.
SmartList workflows must be set up under the Administration series within the Workflow Maintenance window.
To approve the workflow, you must be added to the SQL group SMARTLISTDESIGNERWF.
Sales Visual Customer over Credit limit function A common issue for a sales organization involves managing the accounts of customers whose purchases have
exceeded their credit limit. This requires an early notif ication to a sales representative, so that the representative can
communicate appropriately with the impacted customer. It is now possible in Microsoft Dynamics GP 2015 R2 to receive
a warning and display a visual cue when a customer has exceeded their limit.
Follow these steps to set up these options in Receivables Management:
1. Click Sales >> Setup >> Receivables.
2. In the Options section, mark the Display Over Credit Icon checkbox.
3. Mark the Warn if Customer Over Credit checkbox.
NOTE: Though you set up these options in Receivables Management, the warning is displayed in all the modules for
all the transactions of the customer who exceeds the credit limit.

What’s New in Microsoft Dynamics
Page1
4
Self Service User Type A self-service user type is added in the Microsoft Dynamics GP 2015 R2 release. Self-service type users can perform a
specif ic set of tasks that include entering hours, recording time spent on projects and or related expenses, or creating a
requisition.
Follow these steps to assign the self-service user type to a user.
1. Click Administration >> Setup >> User.
2. Select the user ID of the user that you want to assign the self-service user type.
3. In the User Type f ield, select the Self Service option. This option is displayed only if you have the Self Service license.
The following table describes the action that follows when you assign a user with self-service user type:
User Self-service user type
assignment possible
Message displayed
POWERUSER No This user has been assigned access to the “POWERUSER”
security role and cannot be def ined as a Self Service Type.
Please review the security that has been setup for this user
Existing User Yes Setting this user to Self Service type will restrict the user to
employee self-service tasks. You should review any security
that has been def ined for this user.
New User Yes None
NOTE: When an existing user type is changed from self-service to Full or Limited user types, a message is displayed that
notif ies you that the user’s access may be changed.
Historical Received Not Invoiced Report A new SSRS report shows what was received into inventory but not invoiced, as of a date you specify. The cutoff date
can be either the transaction date or the General Ledger posting date.
Mask Employee Social Security Number on Reports You have the ability to mask the employee’s Social Security Number on specif ic payroll reports that you print. Access the
Report Masking window (Microsoft Dynamics GP >>Tools >>Setup>>Payroll >> Payroll From the Payroll Setup window,
choose the Social Security Number Mask button) and mark the checkbox next to each report you want to apply the
mask to, and then select OK. When the selected report is generated, the Social Security Number will appear on the
report in the form XXX-XX-XXXX.
What’s New in Microsoft Dynamics
Page1
4
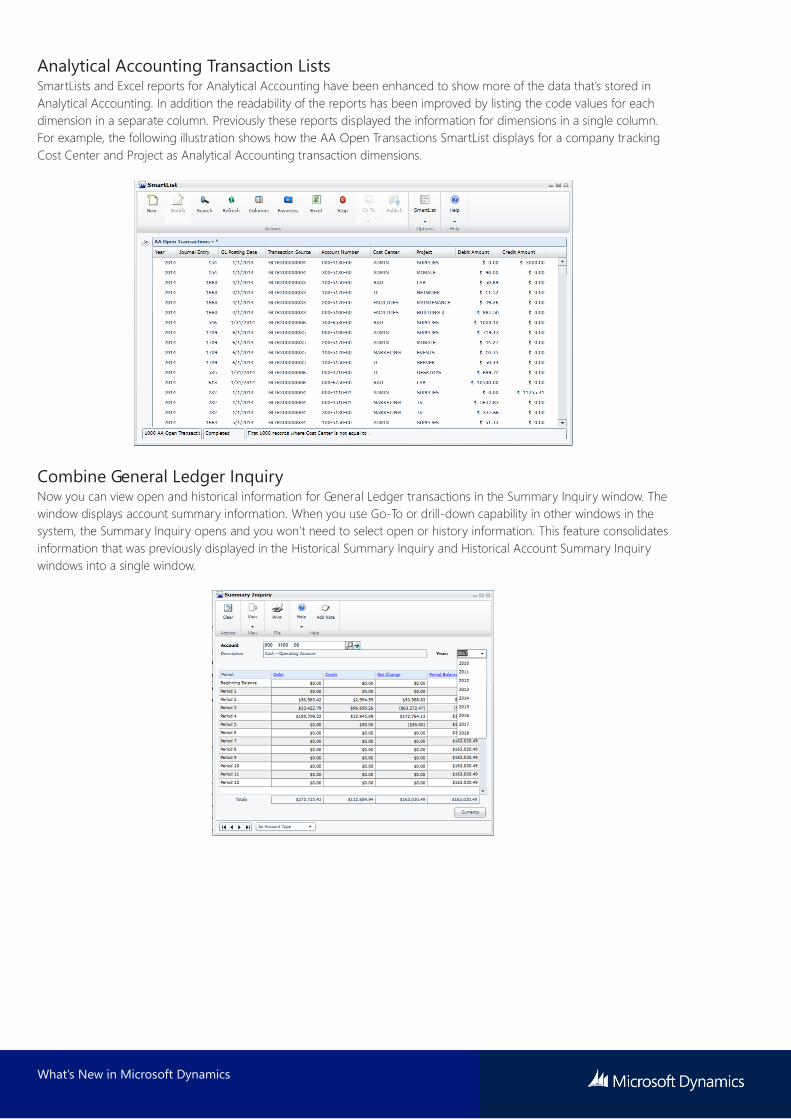
Analytical Accounting Transaction Lists SmartLists and Excel reports for Analytical Accounting have been enhanced to show more of the data that’s stored in
Analytical Accounting. In addition the readability of the reports has been improved by listing the code values for each
dimension in a separate column. Previously these reports displayed the information for dimensions in a single column.
For example, the following illustration shows how the AA Open Transactions SmartList displays for a company tracking
Cost Center and Project as Analytical Accounting transaction dimensions.
Combine General Ledger Inquiry Now you can view open and historical information for General Ledger transactions in the Summary Inquiry window. The
window displays account summary information. When you use Go-To or drill-down capability in other windows in the
system, the Summary Inquiry opens and you won’t need to select open or history information. This feature consolidates
information that was previously displayed in the Historical Summary Inquiry and Historical Account Summary Inquiry
windows into a single window.

What’s New in Microsoft Dynamics
Page1
4
Employee Self Service – W2 Employees can now view and print their own W-2 statements. In Microsoft Dynamics GP 2015 R2, this functionality is
now available as part of Time Management self-service.
VAT Tax Routine The VAT Tax Routine is enhanced to identify cash receipt overpayments that have been posted and applied to invoices
for which the discount was not taken and the VAT tax amount was calculated on the original invoice. This routine will
print the list of the customers who have not used the discount so that debit memos can be entered to adjust the
payments they’ve made. The debit memos must be created manually to adjust the unapplied amount from the cash
receipt.
To use this feature, select the Calculate Terms Discount Before Taxes checkbox in the Company Setup Options window
to calculate the VAT tax for the payments made after the discount period. You can print the report before running the
process, or run the process to update the tax amount, and then print the report.
Time Management App Microsoft Dynamics Timecard Management App provides a platform where you can view, and update your timecards
without starting Microsoft Dynamics GP. You can enter vacation and sick time, and submit your timecard to your
manager, all from the app loaded on your personal computer or tablet device.
Timecard Management App allows users to see the total for the timecard that they’re submitting. The calendar control
within the application displays the month they’re submitting the time for.

What’s New in Microsoft Dynamics
Page1
4
Service-based Architecture
Additional objects have incorporated the Service-based Architecture, which enables the use of GP functionality across
devices and operating systems, including Android and iOS.
The following SBA objects are for Microsoft Dynamics GP 2015 R2:
Objects Module in which the object is added
ServiceGetHRAttendanceInfo Human Resources
ServiceGetTimeCodesListAll Human Resources
ServiceGetWorkflowListAll System
ServiceGetWorkflowListByType System
ServiceCreateTimeCard Payroll
ServiceCreateTimeCardLines Payroll
ServiceDeleteTimeCardLine Payroll
ServiceGetActiveTimeCardList Payroll
ServiceGetApprovedTimeCardList Payroll
ServiceGetEmployeeDetails Payroll
ServiceGetPayCodesListAll Payroll
ServiceGetPayScheduleAll Payroll
ServiceGetRestrictionCode Payroll
ServiceGetSubmittedTimeCardList Payroll
ServiceGetTimeCard Payroll
ServiceRecallTimeCard Payroll
ServiceSubmitTimeCard Payroll
ServiceUpdateTimeCardLine Payroll
ServiceGetHRAttendanceInfo Human Resources
ServiceGetTimeCodesListAll Human Resources
ServiceGetWorkflowListAll System
Scriptable Provisioning & Management To deliver Microsoft Dynamics GP as a cloud offering, you must be able to centralize and automate the provisioning and
management of the application. In scriptable provisioning a number of PowerShell cmdlets are added, which make
automated provisioning easier. Tasks that should be automated in a cloud offering include the provisioning of a new
customer, conf iguring existing customers, upgrading of customers to a new version, and removing customers. APIs and
PowerShell cmdlets allow you to automate or script GP provisioning and management. Automation will speed up
delivery and minimize human involvement. View the GP Provisioning documentation for a full list of cmdlets available.

What’s New in Microsoft Dynamics
What’s New in Microsoft Dynamics
Send feedback.
Microsoft Dynamics is a line of integrated, adaptable business management
solutions that enables you and your people to make business decisions with
greater conf idence. Microsoft Dynamics works like and with familiar
Microsoft software, automating and streamlining f inancial, customer
relationship, and supply chain processes in a way that helps you drive
business success.
United States and Canada toll free: (888) 477-7989
Worldwide: (1) (701) 281-6500
www.microsoft.com/dynamics
The information contained in this document
represents the current view of Microsoft
Corporation on the issues discussed as of
the date of publication. Because Microsoft
must respond to changing market
conditions, this document should not be
interpreted to be a commitment on the part
of Microsoft, and Microsoft cannot
guarantee the accuracy of any information
presented after the date of publication.
This white paper is for informational
purposes only. MICROSOFT MAKES NO
WARRANTIES, EXPRESS, IMPLIED, OR
STATUTORY, AS TO THE INFORMATION IN
THIS DOCUMENT.
Complying with all applicable copyright laws
is the responsibility of the user. Without
limiting the rights under copyright, no part of
this document may be reproduced, stored in,
or introduced into a retrieval system, or
transmitted in any form or by any means
(electronic, mechanical, photocopying,
recording, or otherwise), or for any purpose,
without the express written permission of
Microsoft Corporation. Microsoft may have
patents, patent applications, trademarks,
copyrights, or other intellectual property
rights covering subject matter in this
document. Except as expressly provided in
any written license agreement from
Microsoft, the furnishing of this document
does not give you any license to these
patents, trademarks, copyrights, or other
intellectual property.
© 2015 Microsoft. All rights reserved.
Microsoft, Microsoft Dynamics, and the
Microsoft Dynamics logo are trademarks of
the Microsoft group of companies.