DVR Series User Manual - ZKTeco · ZKDVR Series User Manual 4 4. Connect power cable to the hard...
59
DVR Series User Manual
Transcript of DVR Series User Manual - ZKTeco · ZKDVR Series User Manual 4 4. Connect power cable to the hard...

DVR Series User Manual

Precautions and Operating Environment
Precautions
! Please do not place heavy objects on this device.
! Please do not let any solid or liquid fall or seep into the device.
! Please brush the circuit board, connectors, chassis fan and the chassis regularly. Before cleaning, please switch off the power supply and unplug it from the mains.
! Please do not disassemble or repair this device or replace any component by yourself.
! Please avoid strong collision with this product or dropping the device on the ground.
! The device can only be used within the rated input/output range.
Operating Environment
! Please put and use this device in a place under a temperature of 0ºC-40ºC, and avoid direct sunlight or nearby heat sources.
! Please do not install the device in a damp environment.
! Please do not expose this device in a smoky or dusty environment.
! Please install the device in a horizontal position in a stable place where adequate means are in place to prevent the product from falling.
! Please install the device in a well ventilated place and do not block the vents of the device.

Contents
I
Contents 1 Product Introduction.............................................................................................................................................................1
1.1 Instruction....................................................................................................................................................................1 1.2 Functions and Features.............................................................................................................................................1
2 Out of Box Inspection and Cable Connections................................................................................................................3 2.1 Check after Unpacking..............................................................................................................................................3 2.2 Hard Disk Installation ................................................................................................................................................3 2.3 Device Installation......................................................................................................................................................4 2.4 Front Panel...................................................................................................................................................................4 2.5 Schematic Diagram of Rear Panel Interfaces........................................................................................................4 2.6 Video and Audio Input and Output Connection .................................................................................................5
2.6.1 Video Input Connection................................................................................................................................5 2.6.2 Selection and Connection of Video Output Devices...............................................................................5 2.6.3 Audio Input......................................................................................................................................................5 2.6.4 Audio Output ..................................................................................................................................................6 2.6.5 PTZ Decoder Connection..............................................................................................................................6 2.6.6 Front-end Device Grounding........................................................................................................................6
3 Operations ..............................................................................................................................................................................7 3.1 Start Up ........................................................................................................................................................................7 3.2 Login.............................................................................................................................................................................7 3.3 Preview .........................................................................................................................................................................8 3.4 Shortcut Menu............................................................................................................................................................8
3.4.1 Main menu.......................................................................................................................................................8 3.4.2 Record Mode...................................................................................................................................................9 3.4.3 Record Playback..............................................................................................................................................9 3.4.4 PTZ Control ....................................................................................................................................................11 3.4.5 Color Setting..................................................................................................................................................16 3.4.6 Output Adjust................................................................................................................................................16 3.4.7 Logout.............................................................................................................................................................17 3.4.8 Screen Switch.................................................................................................................................................17
4 Main menus..........................................................................................................................................................................19 4.1 Main Menu Navigation...........................................................................................................................................20 4.2 Record ........................................................................................................................................................................21
4.2.1 Record Configuration ..................................................................................................................................21 4.2.2 Record Playback............................................................................................................................................22 4.2.3 Backup ............................................................................................................................................................22
4.3 Alarm ..........................................................................................................................................................................23 4.3.1 Motion Detect ...............................................................................................................................................23 4.3.2 Video Loss......................................................................................................................................................25 4.3.3 Abnormity ......................................................................................................................................................25
4.4 System Setting..........................................................................................................................................................26 4.4.1 General............................................................................................................................................................26 4.4.2 Encode ............................................................................................................................................................27

Contents
II
4.4.3 Network..........................................................................................................................................................29 4.4.4 Net Service.....................................................................................................................................................29 4.4.5 GUI Display ....................................................................................................................................................35 4.4.6 PTZ Configuration ........................................................................................................................................36 4.4.7 RS232 Set .......................................................................................................................................................37 4.4.8 Tour..................................................................................................................................................................37
4.5 Advanced...................................................................................................................................................................38 4.5.1 Storage Manage ...........................................................................................................................................38 4.5.2 Account Manage ..........................................................................................................................................38 4.5.3 Online User ....................................................................................................................................................41 4.5.4 Output Adjust................................................................................................................................................41 4.5.5 Auto Maintain................................................................................................................................................41 4.5.6 Restore............................................................................................................................................................41 4.5.7 Upgrade..........................................................................................................................................................42 4.5.8 Device Information.......................................................................................................................................42 4.5.9 Import/Export................................................................................................................................................42
4.6 Information................................................................................................................................................................43 4.6.1 HDD Information ..........................................................................................................................................43 4.6.2 BPS...................................................................................................................................................................44 4.6.3 Log...................................................................................................................................................................44 4.6.4 Version ............................................................................................................................................................45 4.7 Logout................................................................................................................................................................45
5 FAQ and Maintenance........................................................................................................................................................46 5.1 FAQ..............................................................................................................................................................................46 5.2 Maintenance .............................................................................................................................................................49
Appendix ..................................................................................................................................................................................51 Appendix 1 Operations of Remote Control (Optional)...........................................................................................51 Appendix 2 Mouse Operation .....................................................................................................................................52 Appendix 3 Calculation of the Space of Hard Disks ................................................................................................53 Appendix 4 Technical Parameters................................................................................................................................54
Contents
1
1 Product Introduction
1.1 Instruction
ZKDVR series is an excellent digital surveillance product designed specifically for the security field. It features:
Embedded LINUX operating system for stable system running.
Standard H.264MP video compression algorithms and a unique spatio-temporal filtering algorithm for high-quality, low-bit rate synchronous audio and video surveillance.
TCP and IP network technologies for powerful network data transmission and remote control capabilities.
This device can either work in a stand-alone mode or be connected to a security surveillance network to offer strong networking and remote monitoring capabilities by using a professional network video surveillance platform. This device can be widely used for security purpose in both public and private sectors including banking, telecommunications, power, judiciary, transportation, intelligent residential area, factory, warehouse, resources, and water conservancy facilities.
1.2 Functions and Features
Real-time Surveillance 4-channel and 8-channel DVR offer an analog output port, a VGA port and an HDMI interface, and 16-channel DVR also have an HDMI interface. Both 4-channel/8-channel DVR and 16-channel DVR support real-time surveillance through a monitor or a display.
Storage Non-working hard disks in sleep mode, facilitating heat dissipation, reducing power consumption, and extending service life. Dedicated storage format for data, preventing tampering and ensuring data security. Maximum HDD space supported: 3T.
Compression Audio and video signals of each channel are compressed by independent hardware in real-time and audio and images are kept synchronized and stable.
Backup Back up through SATA and USB interfaces (for example, common USB flash drives and removable hard disks). Download from hard disks over network and back up on a client.
Record and playback Each channel can not only achieve independent real-time recording, but also achieve retrieval, rewind, network surveillance, video search and downloading simultaneously. This device has multiple playback modes, with multi-channel playback and random combinations of channels.
Alarm Linkage

Contents
2
Alarm linkage recording, tour, screen prompt, and buzzer.
Network Operation Remote real-time surveillance through network (including cell phones) Remote records search and real-time playback. Device parameter setting through a client. Real-time recording and playback through a client.
Communication Interface Standard Ethernet interfaces for network remote access.
Intelligent Operation Mouse operation Copy and paste supported in the menu Encoding capabilities:
- 4-channel PAL 100 frames / NTSC 120 frames.
- 8-channel PAL 200 frames / NTSC 240 frames.
- 16-channel PAL 400 frames / NTSC 480 frames.

ZKDVR Series User Manual
3
2 Out of Box Inspection and Cable Connections
2.1 Check after Unpacking
When you receive this product, please:
Check that the packaging has no obvious damage since the protective material used for the package can withstand most of the accidental impact during transportation.
Take out the device, remove the plastic protective film from the DVR, and check whether there is any visible damage.
Open the case, and check whether the connection of the front panel data cable, power cable, fan power cord and motherboard is loose.
1. Front Panel and Rear Panel
Read the descriptions of buttons on the front panel and interfaces on the rear panel in the instruction.
Check the model on the protective film of the front panel against the order contract.
Keep the label on the rear panel intact. It is required for after-sales services. Do not tear down or discard the label. Otherwise, no warranty service will be provided. When you call after-sales personnel of the company, provide the serial number of the product.
2. Internal Check
Check for damage and scratches. Check whether data cables, power cables, are connected to the main board on the front panel properly.
2.2 Hard Disk Installation
At your first use, please first install the hard disk. This chassis can house one hard disk (the space of the hard disk is theoretically not limited, but we recommend that you use a disk within 3T space.).
1. Remove the set screws on the upper cover of the host.
2. Remove the cover. 3. Fasten hard disk mounting screws.

ZKDVR Series User Manual
4
4. Connect power cable to the hard disk.
5. Connect data cable to the hard disk.
6. After connections.
7. Close the chassis cover. 8. Fix the cover. 9. After installation.
2.3 Device Installation
The chassis specification for this product is standard 1U, so the chassis can be installed in a standard rack.
Procedure and precautions:
1. Ensure that the temperature in the room is below 35ºC (95ºF).
2. Leave a 15 cm (6 in.) space around the device for air circulation.
3. Install assemblies on the rack from bottom to top.
4. When multiple assemblies are installed on the rack, take proper measures to avoid overload of the power socket on the rack.
2.4 Front Panel
1. Power Indicator 2. REC Indicator 3. Alarm Indicator 4. ESC Button 5. Menu Button 6. Direction Button s / OK Button
2.5 Schematic Diagram of Rear Panel Interfaces
1. Video Input 2. Video Output 3. Audio Input 4. Ethernet 5. Audio Output 6. VGA 7. USB Interface 8. Power Interface

ZKDVR Series User Manual
5
2.6 Video and Audio Input and Output Connection
2.6.1 Video Input Connection
DVR video input port is a BNC connector. Input signal requirements: PAL / NTSC BNC (1.0VP-P, 75Ω).
Video signals must meet national standards with a higher signal-to-noise ratio (SNR), low distortion, and low interference. Images should be clear with no distortion, the color should be true and natural, and the brightness should be appropriate.
Ensure a stable and reliable camera signal
Cameras should be installed in a suitable position to avoid backlighting or low-light. Otherwise, use cameras with good backlight compensation and low-light shooting.
Camera power supply should share a common ground with the DVR and be stable and reliable in order to ensure the normal operation of the camera.
Ensure stable and reliable transmission lines
Use high-quality video coaxial cables with good shielding, and choose suitable models according to transmission distance. If the distance is too far, choose shielded twisted pair, video compensation device, or fiber-optic cables for transmission to ensure good signal quality according to specific circumstances.
Video signal cables should avoid strong electromagnetic interference from other devices or circuits, and in particular, should avoid high-voltage current.
Ensure good contact lugs
Signal and shielded cables should be firmly and well connected and avoid false or joint welding or oxidation.
2.6.2 Selection and Connection of Video Output Devices
Video output is divided into PAL / NTSC BNC (1.0VP-P, 75Ω) output and VGA output (simultaneous output is allowed).
Note the following when you use computer displays as monitors:
1. Power off the device after operating for a long time to extend the service life of the device.
2. Perform degaussing regularly to ensure proper operating of the displays.
3. Keep the displays away from devices that generate strong electromagnetic interference.
TV is unreliable to function as a video output device. It also needs the user to cut down use time and strictly control interference from the power source and nearby devices. And leakage risks of low-quality TV may result in damage to other devices.
2.6.3 Audio Input
Audio signals are input through AV interfaces.
Audio input impedance is high, so you must use active audio monitoring units.
Similar to video input, audio transmission also requires the cables to avoid interference, false welding, and poor contact, and in particular, avoid high-voltage current.
ZKDVR Series User Manual
6
2.6.4 Audio Output
Generally, the audio output signal parameter of the DVR is larger than 200 mV 1 KΩ (AV). The DVR can be connected to external low-impedance headsets and active sound boxes directly or connected to other sound output devices through power amplification drives. When the external sound boxes and audio monitoring units are not spatially separated, output squealing may occur. In this case, take the following measures:
1. Use audio monitoring units with superb directionality.
2. Adjust the volume of the sound box to be smaller than the threshold at which output squealing occurs.
3. Use sound-absorbing materials during decoration to reduce the reflection of sound and improve the acoustic environment.
4. Adjust the layout of the audio monitoring units and sound boxes.
2.6.5 PTZ Decoder Connection
1. Please pay great attention to the common ground of the PTZ decoder and DVR; otherwise, potential common-mode voltage may make us lose control of the PTZ. (It is recommended that you use shielded twisted pair with shielding for common ground connection).
2. Avoid high-voltage current, lay out the cables properly, and take protective measures against lightning.
3. Incorporate a 120-ohm resistor into the remote end to reduce reflection and ensure signal quality.
4. Do not connect DVR RS-485 A/B lines (A: positive; B: negative) with other RS-485-compliant output devices.
5. The voltage between decoder lines A and B (A: positive; B: negative) must be less than 5V.
2.6.6 Front-end Device Grounding
Improper grounding may result in chip burn and damage.

ZKDVR Series User Manual
7
3 Operations
Notes: The button in grey indicates nonsupport.
3.1 Start Up
Connect power supply, then the power indicator lights and DVR is powered on. After starting up, the buzzer makes a beep sound. Video output is in a multi-screen output mode by default. If start-up time overlaps with set surveillance time, the system will start the recording function automatically. If recording indicators of corresponding channels light, system works normally.
Notes:
(1). Make sure that the input voltage of power supply corresponds to the device, and connect power cord to the device when power supply is turned off. The external power supply must be 220V 10% / 50Hz or 110V
10% / 60Hz.
(2). It is recommended that you use power input with stable voltage and less moiré interference. Use UPS power protection devices when possible.
3.2 Login
After the computer is turned on, the user needs to log in before operating, and the system provides login users with corresponding right.
Under factory settings, there are three preset users Admin, Guest, and Default with no password by default. User Admin is preset as a user with super user rights. Users Guest and Default have the factory preset rights of preview and playback. Users Admin and Guest can change password but not permissions. User Default is a default login user and can change permissions but not password.
Figure 3.1 Login
Password protection: If an incorrect password is entered three times in a row, the DVR alarm will activate. If a wrong password is entered five times in a row the account will be locked out. The locked out account will be automatically unlocked if you reboot the system or wait for half an hour.
ZKDVR Series User Manual
8
For your system security, please modify your username and password in User Management after first login. (See chapter 4.5.2 Account Manage)
3.3 Preview
When the DVR boots up, the user logs in and enters preview screen. You can right-click mouse to choose the switch between the screens.
The system date, time and channel name are shown in each preview screen. The surveillance video and alarm status are shown in each screen.
1
Recording status 3
Video loss
2
Motion detect 4
Camera lock
List 3.1 Preview Icons
3.4 Shortcut Menu
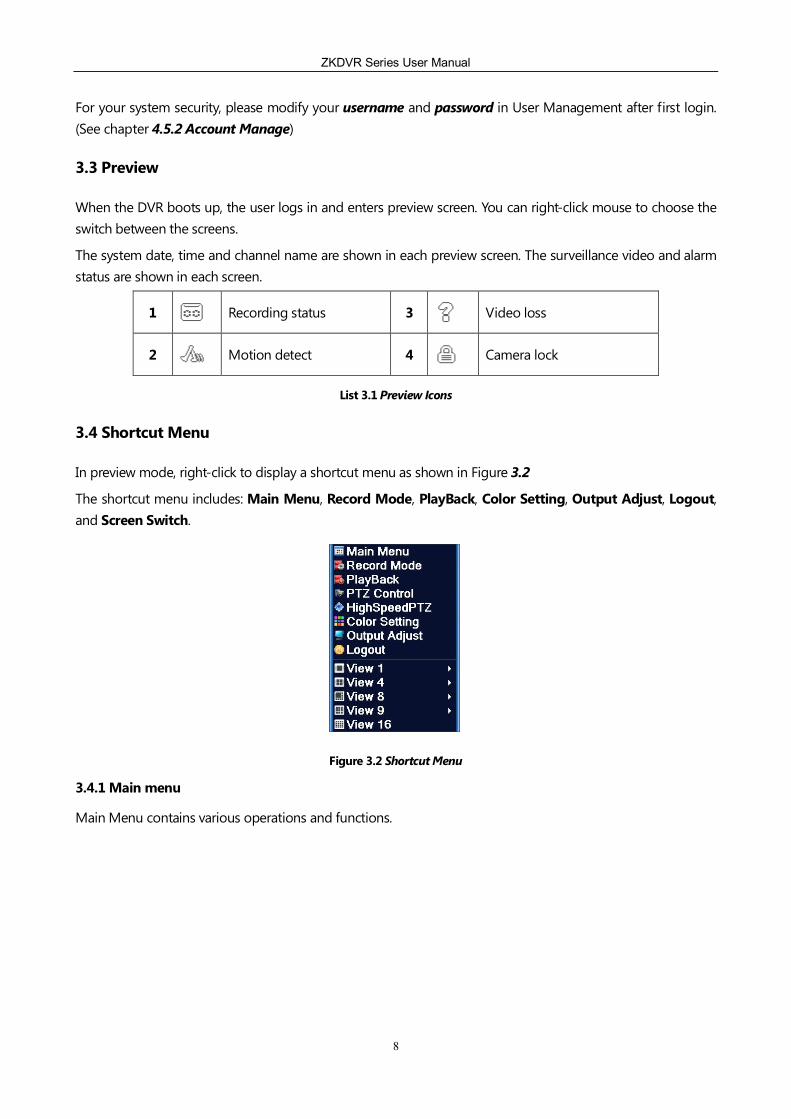
In preview mode, right-click to display a shortcut menu as shown in Figure 3.2
The shortcut menu includes: Main Menu, Record Mode, PlayBack, Color Setting, Output Adjust, Logout, and Screen Switch.
Figure 3.2 Shortcut Menu
3.4.1 Main menu
Main Menu contains various operations and functions.

ZKDVR Series User Manual
9
Figure 3.3 Main menu
3.4.2 Record Mode
Record Control controls recording status of all channels. " " Means it is in recording mode. You can use the desktop shortcut menu or click Shortcut Menu > Record Mode to enter the Record Mode interface. (Please see 4.2.1 Record Configuration)
Figure 3.4 Record Mode
[Schedule]: Record according to the configuration.
[Manual]: Click the Manual button and the according channel is recording no matter what state the channel is in.
[Stop]: Click the Stop button and the according channel stops recording no matter what state the channel is in.
3.4.3 Record Playback
Playback plays the video files in the hard disk. You can use the desktop shortcut menu or click Shortcut Menu > Playback to enter the Playback interface.
Notes: The hard disk that saves the video files must be set as read-write or read-only for normal playback. (Please see 4.5.1 Storage Management)

ZKDVR Series User Manual
10
Figure 3.5 Record Play Back
1. File List 2. File Contents 3. Search Records 4. Operation Tips 5. Play Back Keys
[File List] shows all the listed files according with searching criteria.
[File Information] shows detailed information of selected files.
[Record Search] searches video files according to set searching parameters.
Figure 3.6 Search Record
[Type]: Select file types of playback video files.
[Storage Select]: Select storage disk type.
[Channel]: Select playback channel number.
[Start Time]: set the start time of the searched video file.
[End Time]: set the end time of the searched video file.
[Playback]: select the video playback mode through priority decoding, division decoding or full decoding.
[Sync Mode]: means synchronous mode, and means asynchronous mode.
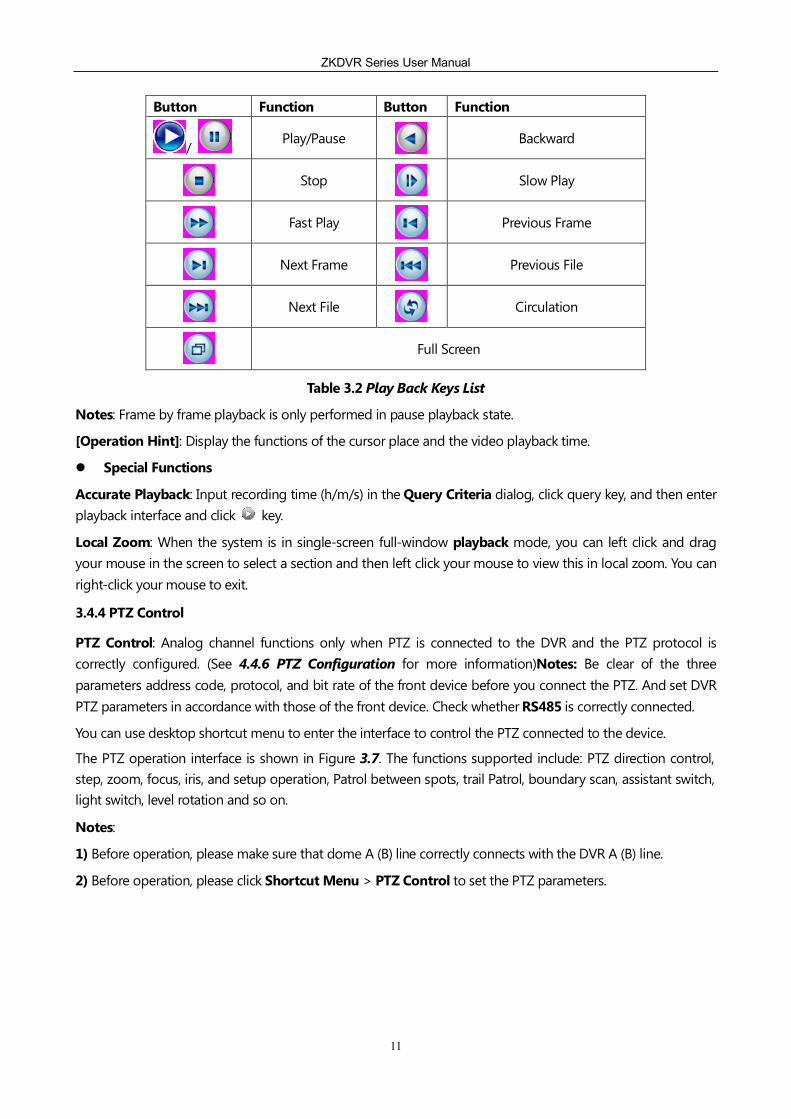
[Playback]: refer to the following table for detailed information:
ZKDVR Series User Manual
11
Button Function Button Function
/ Play/Pause
Backward
Stop
Slow Play
Fast Play
Previous Frame
Next Frame
Previous File
Next File
Circulation
Full Screen
Table 3.2 Play Back Keys List
Notes: Frame by frame playback is only performed in pause playback state.
[Operation Hint]: Display the functions of the cursor place and the video playback time.
Special Functions
Accurate Playback: Input recording time (h/m/s) in the Query Criteria dialog, click query key, and then enter playback interface and click key.
Local Zoom: When the system is in single-screen full-window playback mode, you can left click and drag your mouse in the screen to select a section and then left click your mouse to view this in local zoom. You can right-click your mouse to exit.
3.4.4 PTZ Control
PTZ Control: Analog channel functions only when PTZ is connected to the DVR and the PTZ protocol is correctly configured. (See 4.4.6 PTZ Configuration for more information)Notes: Be clear of the three parameters address code, protocol, and bit rate of the front device before you connect the PTZ. And set DVR PTZ parameters in accordance with those of the front device. Check whether RS485 is correctly connected.
You can use desktop shortcut menu to enter the interface to control the PTZ connected to the device.
The PTZ operation interface is shown in Figure 3.7. The functions supported include: PTZ direction control, step, zoom, focus, iris, and setup operation, Patrol between spots, trail Patrol, boundary scan, assistant switch, light switch, level rotation and so on.
Notes:
1) Before operation, please make sure that dome A (B) line correctly connects with the DVR A (B) line.
2) Before operation, please click Shortcut Menu > PTZ Control to set the PTZ parameters.

ZKDVR Series User Manual
12
Figure 3.7 PTZ Control
Speed: set the PTZ rotation range. The bigger the number, the bigger the rotation ranges. Set range: 1~8. Default range: 5.
Zoom: Click / to adjust the zoom multiple of the camera.
Focus: Click / to adjust the focus of the camera.
Iris: Click / to adjust the iris of the camera.
Hide: Click Hide to hide the current interface.
Direction Control: Direction Control Controls the PTZ rotation and supports control of 8 directions. (The front panel only supports control of 4 directions)
PTZ Trace: Click PTZ Trace, then the channel image is showed in full screen. Left click the mouse to control the PTZ rotation and orientation. Left click mouse again and rotate the mouse to adjust the zoom multiple of the camera.
Set: Enter function set menu by clicking Set.
Screen Switch: Enter function operation menu by clicking Screen Switch.
1. Preset Point
Set a location for the preset point, call up the preset point, and the PTZ will automatically turn to the setting position.
(1) Preset Point Setting
To set a location for the preset point, take the following steps:
Step 1: In Figure 3.7, use the direction key to turn the PTZ to the preset position, and click [Set] to enter Figure 3.8.
Step 2: Click Preset, and enter the preset point number in the [Preset Point Box].
Step 3: Click [Set] to return to Figure 3.7. Finish the setup, and check that the preset point number corresponds with the preset point position.
Del Preset: Input preset point number, click [Del Preset] key to remove the preset point.

ZKDVR Series User Manual
13
Figure 3.8 Preset
(2) Call A Preset Point
In Figure 3.7, click [Page Switch] key and enter PTZ Control interface as shown in Figure 3.9. Enter preset point number in the [No. Input box], click [Preset] key, and then the PTZ turns to the corresponding preset point.
Figure 3.9 PTZ Control
2. Tour
A Patrol line is formed by connecting multiple preset points. If Patrol between spots is performed, the PTZ will operate repeatedly in the Patrol line.
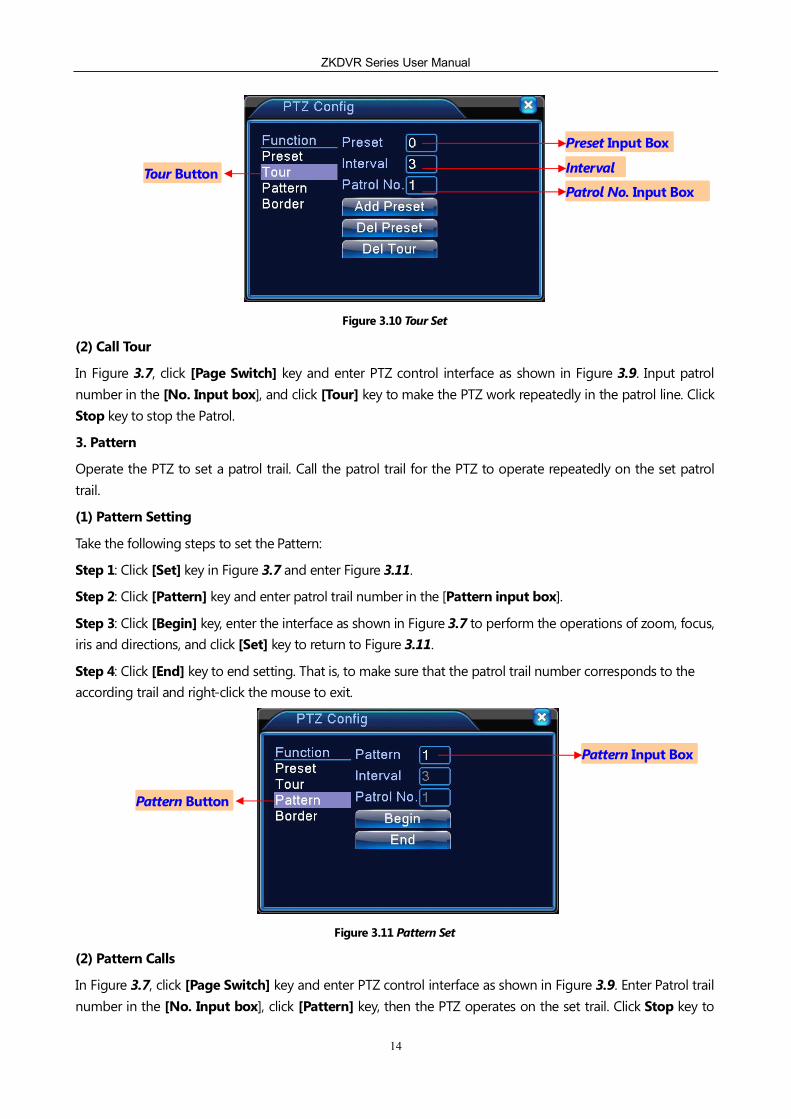
(1) Tour setting
A Patrol line is a Patrol trail form by multiple preset points, the steps to set a Patrol line are as follows:
Step 1: In Figure 3.7, use the direction key to turn the PTZ to the preset position, and click [Set] to enter Figure 3.10.
Step 2: Click [Tour] key, enter the number of the patrol line in the Patrol No. Input Box, and enter preset point number in the Preset Input Box.
Click [Add Preset] key to set designated direction to be one of the patrol line preset points. (You can also add or delete patrol line preset point that you set before)
Step 3: Repeat steps 1 and 2, until all the preset points of the designated patrol line are set.
Del Preset: Input preset point number, click [Del Preset] key to remove the preset point.
Del Tour: Input patrol line number, click [Del Tour] key to remove the setting of the patrol line.
Preset Button Preset Point Box
No. Input Box
ZKDVR Series User Manual
14
Figure 3.10 Tour Set
(2) Call Tour
In Figure 3.7, click [Page Switch] key and enter PTZ control interface as shown in Figure 3.9. Input patrol number in the [No. Input box], and click [Tour] key to make the PTZ work repeatedly in the patrol line. Click Stop key to stop the Patrol.
3. Pattern
Operate the PTZ to set a patrol trail. Call the patrol trail for the PTZ to operate repeatedly on the set patrol trail.
(1) Pattern Setting
Take the following steps to set the Pattern:
Step 1: Click [Set] key in Figure 3.7 and enter Figure 3.11.
Step 2: Click [Pattern] key and enter patrol trail number in the [Pattern input box].
Step 3: Click [Begin] key, enter the interface as shown in Figure 3.7 to perform the operations of zoom, focus, iris and directions, and click [Set] key to return to Figure 3.11.
Step 4: Click [End] key to end setting. That is, to make sure that the patrol trail number corresponds to the according trail and right-click the mouse to exit.
Figure 3.11 Pattern Set
(2) Pattern Calls
In Figure 3.7, click [Page Switch] key and enter PTZ control interface as shown in Figure 3.9. Enter Patrol trail number in the [No. Input box], click [Pattern] key, then the PTZ operates on the set trail. Click Stop key to
Tour Button
Preset Input Box
Interval
Patrol No. Input Box
Pattern Button
Pattern Input Box

ZKDVR Series User Manual
15
stop.
4. Border
Set a horizontal line, and call the boundary scan for the PTZ to operate repeatedly according to the set line.
(1) Border Setting
Take the following steps to set a horizontal arc as the PTZ searching trail:
Step 1: In Figure 3.7, use the direction key to turn the PTZ to the preset position, and click [Set] key to enter Figure 3.12. Select left boundary and return back to Figure 3.7.
Step 2: Operate the direction keys to select a position, click [Set] key to enter Figure 3.12, select right boundary and return to Figure 3.7.
Step 3: Finish setting, that is, finishes setting left boundary and right boundary.
Notes: If the left and right boundaries are on the same horizontal level, the PTZ will rotate from the left boundary to the right boundary in a reverse direction, and rotate in circulation.
If the left and right boundaries are not on the same horizontal level, the PTZ will set the other end of the horizontal trail as the right boundary point and only rotate from the left boundary point to this right boundary point.
Figure 3.12 Border Setting
(2) Call Border
In Figure 3.7, click [Page Switch] key and enter PTZ control interface as shown in Figure 3.9. Click [Auto Scan] key and the PTZ will operate repeatedly according to the set line. Click [Stop] key to stop the boundary scan.
5. Auto Pan
Click [Auto Pan] key, then the PTZ rotates horizontally (according to the original position of the camera). Click [Stop] key to stop the horizontal rotation.
6. Flip
Click [Flip] key to make the PTV rotate.
7. Reset
The PTV will restart and clear all the set data back to zero.
8. Page Switch
In Figure 3.9, click Page Switch key to enter Figure 3.13 and set auxiliary functions. The auxiliary number
Border Button Left and Right Set Button

ZKDVR Series User Manual
16
corresponds to the auxiliary switch on the decoder.
Figure 3.13 Auxiliary Function Operations
Direct Auxiliary Operation: Select auxiliary device, and control the switch by selecting Open/Close button.
Auxiliary Number operates relative auxiliary switches according to PTZ protocol.
Page Shift: In Figure 3.13, click Page Switch to enter Figure 3.7 PTZ menu, the menu itself can be controlled by the menu control keys.
3.4.5 Color Setting
Set the image parameters of the selected channel (the current channel for the single screen display or the cursor place for the multi-screen display), and enter the interface buy using desktop shortcut menu. Image parameters include: Brightness, Contrast, Saturation, Hue, Gain, Horizontal Sharpness and Vertical Sharpness. You can set different image parameters at different time sections.
Figure 3.14 Color Setting (Notes: Left-clicking advanced key equals to right-clicking the mouse)
3.4.6 Output Adjust
Adjust TV output area parameters. You can use desktop shortcut menu or click Shortcut Menu > Output Adjust to enter the Output Adjust interface.

ZKDVR Series User Manual
17
Figure 3.15 Output Adjust
3.4.7 Logout
To logout, shut down or restart the system. You can use the desktop shortcut menu or click Shortcut Menu > Logout to enter the Logout interface.
Figure 3.16 Logout
Logout: It is used to exit the menu. You need to type the password again next time when you access the menu.
Reboot: It is used to log out of and restart the system.
3.4.8 Screen Switch
If you choose a 4-channel surveillance device, you can preview in a single screen or 4 split screens.
If you choose an 8-channel surveillance device, you can preview in a single screen, or in 4/8/9 split screens.
Figure 3.17 shows a 4-split screen preview.

ZKDVR Series User Manual
18
Figure 3.17 View 4

ZKDVR Series User Manual
19
4 Main menus
Main Menu --> Record Main Menu --> Alarm
Main Menu --> System Main Menu --> Advanced
Main Menu --> Info Main Menu --> Logout

ZKDVR Series User Manual
20
4.1 Main Menu Navigation
Main Menu Submenu Function Overview Record Conf. Set record schedule, record type and record time for each channel.
Playback Record query and record play Record Backup Test backup device, format backup device and back up selected files.
Motion Detect
Set motion detection alarm channel, sensitivity, areas and the linkage parameters: time segment of workday arming, screen prompt, record and tour.
Video Loss Set video loss alarm channel and the linkage parameters: time segment of workday arming and non-workday arming, screen prompt, record and tour.
Alarm
Abnormity Alarm is generated when there is problem with the device hardware (no hard disk, disk error).
General Set system time, date format, time format, language, operation for full disk, device number. Video format, standby time and DST.
Encode
Set parameters of main stream and sub stream for each channel: schedule mode, resolution, frame rate, code stream control, image quality type, code stream value, I frame interval parameter and video/audio function.
Network Set basic network parameter, DHCP, DNS parameter and network high-speed download.
Net Service PPPOE, NTP, Email, IP address, DDNS, FTP, ARSP, alarm center, mobile phone surveillance and UPNP.
GUI Display Set channel name, icon state preview, transparency, area coverage, time display and channel display.
PTZ Config Set channel, PTZ protocol, address, baud rate, data bit, stop bit and check.
RS232 Set interface function, baud rate, data bit, stop bit and check
System Setup
Tour Set tour mode and interval.
Storage Set read-write disk, read-only disk, redundant disk, clear and restore for a specified hard disk.
Account Modify user, user group and password; add user and user group; delete user and user group.
Online Users Disconnect the network user logged in. After disconnection, the user's account is blocked and will be restored in next startup
Output Adjust
Adjust the top, bottom, left and right edge spacing of TV.
Auto Maintain
Set automatic system restart and file deletion.
Restore Restore setup items: General, Schedule, Record, Alarm, Network, Network Service, Display, Serial and User Management.
Upgrade Upgrade system through external devices (such as a USB).
Advanced
Device Info. Display interfaces of the device.

ZKDVR Series User Manual
21
Main Menu Submenu Function Overview
Import /Export
Export logs or configurations of the device into external devices (such as a USB disk) and import the configurations of external devices (such as a USB disk) into the device.
HDD Info. Display hard disk space and record time BPS Display the stream information of each channel
LOG Query log and clear all logs' information according to log record and time
Information
Version Display version information Logout Perform log-out, shutdown and restart.
4.2 Record
Related operations for recording include: Record Configuration, Record Playback and Backup.
4.2.1 Record Configuration
Set record parameters for surveillance channel. When you start the system for the first time, set the system to 24-hour continuous recording: click Main Menu>Record >Record Conf. to make corresponding setup.
Notes: To make the device work normally, there should be at least one read-write disk among the hard disks installed (for detailed operation, see 4.5.1 Storage Manage)
Figure 4.1 Record Configuration
Channel: Select corresponding channel number and set the channel. To set all channels at a time, select All.
Redundancy: Select redundancy function to achieve record file double backup, namely, write the record of one channel to two disks at the same time. Two hard disks should be installed on the device. One disk is read-write disk and the other is redundancy disk (for details, see 4.5.1 Storage Manage).
Length: Set length of time for each record file. Default length is 60 minutes.
Pre Record: Start record within 1-30 seconds before recording action is taken (length of time may be changed as stream varies).
Record Mode: Set record states, including: Schedule, Manual and Stop.
Schedule: Perform recording, according to specified (General, Detect and Alarm) record type and record time.

ZKDVR Series User Manual
22
Manual: No matter what state the channel is currently in, select Manual and all of the corresponding channels start general recording.
Stop: No matter what state the channel is currently in, select Stop and the corresponding channel stops recording.
Period: Set time range of general record. Only in the specified time range, can record be started.
Record Type: Set record type, including: General, Detection and Alarm.
Regular: In the specified time range, start general record. The record file type is "R".
Detection: In the specified time range, trigger alarm signals, such as Motion Detection, Video Mask and Video Loss. When corresponding alarm function is set to start record function, start detection record. The record file type is "M".
Alarm: In specified time range, trigger external alarm signals. When alarm input function is set to open record function, start detection record. The record file type is "A".
Notes:
1).This series of network DVR doesn't have external alarm function so they cannot support alarm record file type.
2).As for corresponding setup of Alarm Function, read chapter 4.3 Alarm.
4.2.2 Record Playback
As same as the 3.4.3 Record Playback.
4.2.3 Backup
By setup, backup record files in the device to an external storage device.
Notes: before backing up files, install storage device that can contain storage files. If backup is terminated midway, the files that have been copied to storage device support independent playback.
Figure 4.2 Detect Memorizer
Detect: Detect the storage devices connected to the device, such as USB flash disks and hard disks.
Erase: Select the device to delete files and click Erase button to delete the files in device.
Stop: Stop backup.
Backup: Click Backup to display backup dialog box as shown in Figure 4.3 and according to type, channel and time, select backup record files.

ZKDVR Series User Manual
23
Figure 4.3 Backup Record
Erase: Clear displayed file information.
Add: Display information of the files that meet specified file attributes.
Start/Stop: After you select the file, click Start button to start backup and click Stop button to stop backup.
Notes: During backup, you can exit this page layout to carry out other functions.
4.3 Alarm
Device performs alarm operations including: Motion Detection, Video Mask, Video Loss and Abnormity.
4.3.1 Motion Detect
Through video image being analyzed, when system detects the motion signal that reaches pre-set sensitivity, the motion detection alarm is switched on and the linkage function is turned on.
Notes: Advanced key and the mouse right key.
Figure 4.4 Motion Detect
Channel No.: Select the channel that needs to set motion detection Area.
Enable: indicates that this option is selected. Open Motion Detection and select Enable then corresponding setups can be performed.
Sensitivity: According to sensitivity degree, sensitivity is set to six degrees: extremely low, low, medium, high,

ZKDVR Series User Manual
24
very high and extremely high.
Region: Click [Set] button and setup Regions is displayed, which are divided into PA22X18. Red regions are dynamic detection defense region and black region is non-defense area, as shown in Figure 4.5. Press the left mouse button and select the setup region. (All of the selected regions are surveillance regions by default) Right-click the mouse button and then return to the Motion Detect interface.
Figure 4.5 Set Regions
Period: Only in specified time range, does the device trigger the alarm signal of motion detection, as shown in Figure 4.6. It can be set weekly or uniformly. Set four time segments within a day. Select the before time segment and then specified time is effective.
Figure 4.6 Period Set
Interval: During specified interval, if motion detection occurs repeatedly only successive alarm signals are triggered.
Record Channel: Select the needed record channel (multiple channels can be selected) and when alarm occurs, the system triggers this channel record signal.
Note: Linkage record is set in Record setup. During the corresponding time segment, start detection record.
Tour: indicates that this option is selected. When alarm occurs, the selected channel performs single-screen tour preview. The tour interval is set in System >Tour.
Record delay: When alarm ends, alarm record will extend for a while with a range from 10 seconds to 300 seconds and then stop.

ZKDVR Series User Manual
25
Show Message: On local host screen, alarm information prompt dialog box is displayed.
Send Email: indicates this option is selected, which means when alarm occurs, send an email to inform users.
Note: Sending Email must be set in Net Service.
Buzzer: When alarm occurs, the device will make two long buzzes with beep sound.
FTP Upload: indicates that this option is selected. Select the record channel in this setup page, which means when alarm occurs, upload record file to inform users.
Note: FTP uploading should be set in Net Service.
4.3.2 Video Loss
When the video image acquired by device is subject to outside influence, such as dark light, and reaches specified sensitivity parameters, start video mask alarm and enable linkage function.
Note: Advanced button and the mouse right button.
Figure 4.7 Video Loss
As for the method of setting, see chapter 错误!未找到引用源。.
4.3.3 Abnormity
When device cannot acquire channel video signal, start video loss alarm and enable linkage function.
Note: advanced button and the mouse right button.
Analyze and detect the software and hardware of current device. When abnormity is detected, the device will make corresponding responses, such as Show Message, Buzzer.
ZKDVR Series User Manual
26
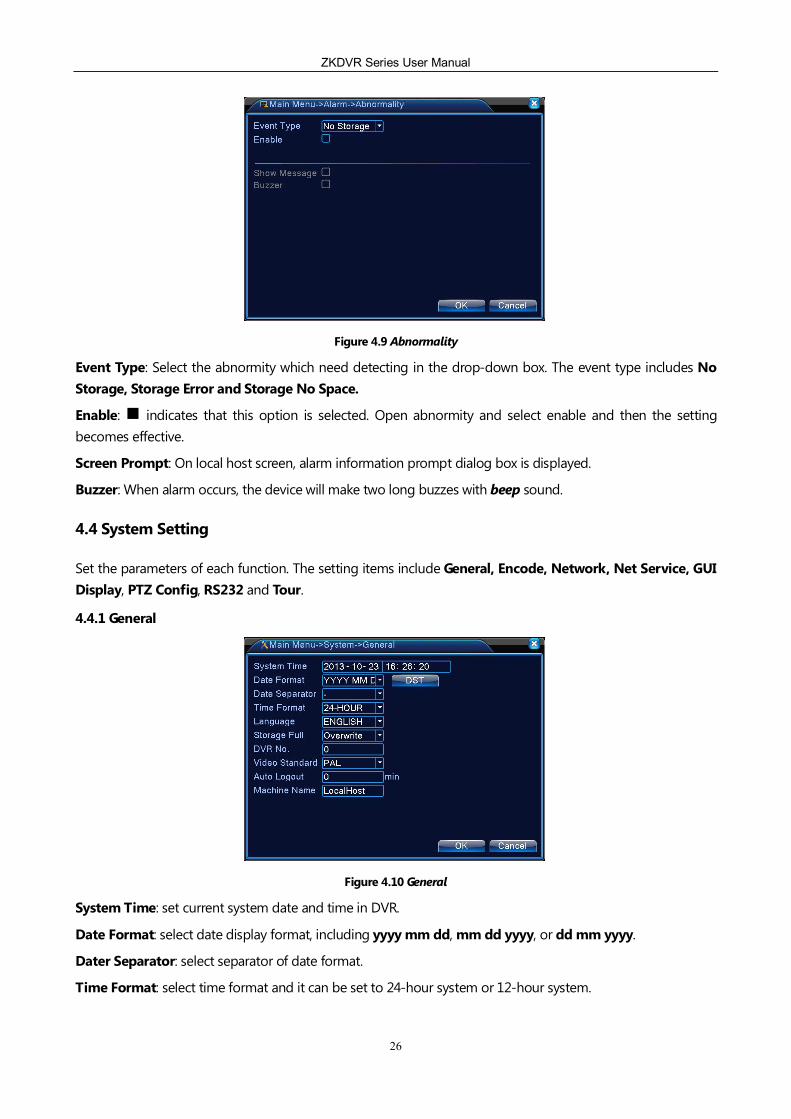
Figure 4.9 Abnormality
Event Type: Select the abnormity which need detecting in the drop-down box. The event type includes No Storage, Storage Error and Storage No Space.
Enable: indicates that this option is selected. Open abnormity and select enable and then the setting becomes effective.
Screen Prompt: On local host screen, alarm information prompt dialog box is displayed.
Buzzer: When alarm occurs, the device will make two long buzzes with beep sound.
4.4 System Setting
Set the parameters of each function. The setting items include General, Encode, Network, Net Service, GUI Display, PTZ Config, RS232 and Tour.
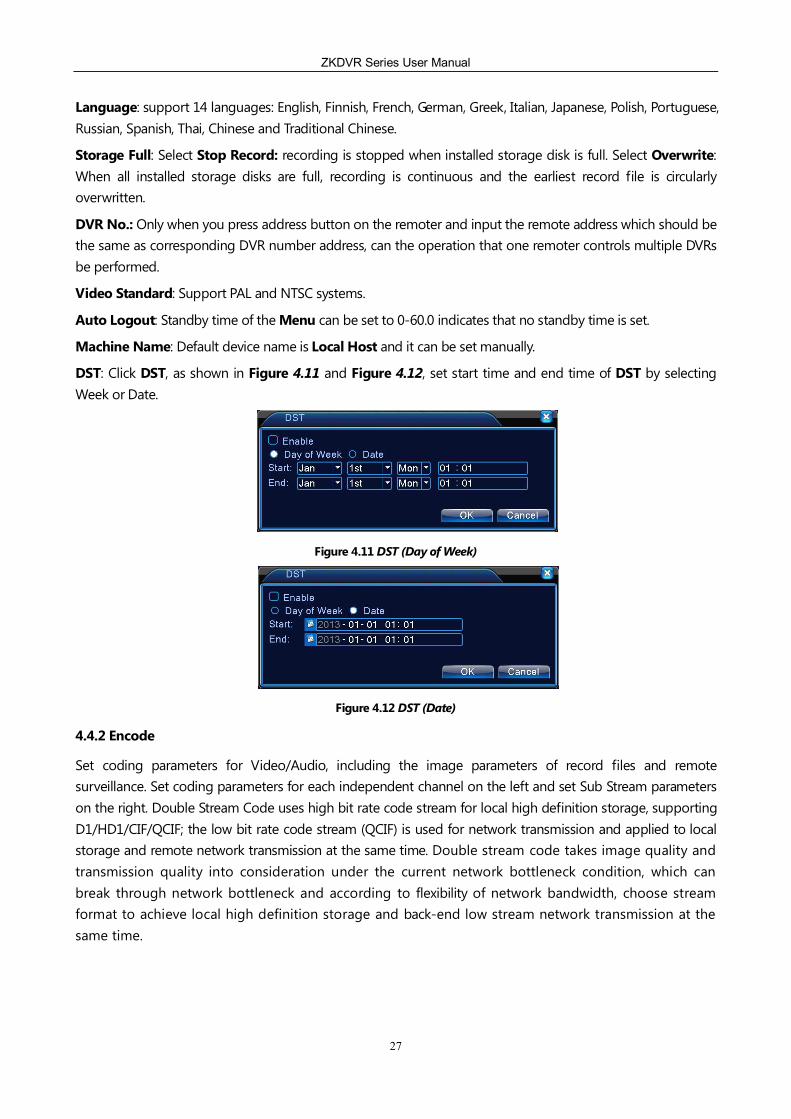
4.4.1 General
Figure 4.10 General
System Time: set current system date and time in DVR.
Date Format: select date display format, including yyyy mm dd, mm dd yyyy, or dd mm yyyy.
Dater Separator: select separator of date format.
Time Format: select time format and it can be set to 24-hour system or 12-hour system.
ZKDVR Series User Manual
27
Language: support 14 languages: English, Finnish, French, German, Greek, Italian, Japanese, Polish, Portuguese, Russian, Spanish, Thai, Chinese and Traditional Chinese.
Storage Full: Select Stop Record: recording is stopped when installed storage disk is full. Select Overwrite: When all installed storage disks are full, recording is continuous and the earliest record file is circularly overwritten.
DVR No.: Only when you press address button on the remoter and input the remote address which should be the same as corresponding DVR number address, can the operation that one remoter controls multiple DVRs be performed.
Video Standard: Support PAL and NTSC systems.
Auto Logout: Standby time of the Menu can be set to 0-60.0 indicates that no standby time is set.
Machine Name: Default device name is Local Host and it can be set manually.
DST: Click DST, as shown in Figure 4.11 and Figure 4.12, set start time and end time of DST by selecting Week or Date.
Figure 4.11 DST (Day of Week)
Figure 4.12 DST (Date)
4.4.2 Encode
Set coding parameters for Video/Audio, including the image parameters of record files and remote surveillance. Set coding parameters for each independent channel on the left and set Sub Stream parameters on the right. Double Stream Code uses high bit rate code stream for local high definition storage, supporting D1/HD1/CIF/QCIF; the low bit rate code stream (QCIF) is used for network transmission and applied to local storage and remote network transmission at the same time. Double stream code takes image quality and transmission quality into consideration under the current network bottleneck condition, which can break through network bottleneck and according to flexibility of network bandwidth, choose stream format to achieve local high definition storage and back-end low stream network transmission at the same time.

ZKDVR Series User Manual
28
Figure 4.13 Encode
Note: Sub-stream is mainly used for multiple channels real time surveillance and mobile phone surveillance when network is bad.
Independent Channel Schedule
Channel: Select channel number;
Compression: Standard H.264MP;
Resolution: Display types of resolution in D1/CIF/OCIF;
Frame Rate: Adjustable. Real time standard: PAL system, 25 frames/ second NTSC system, 30 frames/ second;
Bit Rate Type: Select CBR or VBR. Under VBR, you can select 6 grades for image quality; under limited code stream, you can select the stream value that you need.
Bit Rate (Kb/S): Set stream value to change image quality. Permitted by the facility, the larger the stream value is, the better the image quality is.
Bit Rate value scope: D1 (512-2560kbps) HD1 (384-2048kbps) CIF (64-1024kbps), QCIF (64-512kbps).
1 Frame Interval: range for being selected: 2~12s.
Audio/Video: When all icons are reversed, record file is multi-stream of audio and video.
Extra stream
Sub-stream is mainly used for client surveillance and mobile phone surveillance.
Channel No. Firstly select channel No., then select the Enable under audio and video.
The parameters of Resolution, Frame Rate, Bit Rate Type, Bit Rate should be set as the same as that of independent channel.

ZKDVR Series User Manual
29
4.4.3 Network
Figure 4.14 Network
Net Card: Select Wire Net card.
DHCP Enable: IP address is obtained automatically. (Not recommend)
Note: Should set up DHCP server in advance.
IP Address: Set IP address. Default IP address is 192.168.1.10.
Subnet Mask: Set subnet Mask. Default subnet mask is 255.255.255.0.
Gateway: Set default gateway. Default gateway is 192.168.1.1.
Primary DNS: DNS server is used to resolve domain name into its corresponding IP address which is provided by your network operator. The specified address will be effective after system is restarted.
Media Port: Default TCP Port is 34567.
HTTP Port: Default HTTP Port is 80.
HS Download: Network downloads with high speed.
Transfer Policy: Provide 3 strategies: Adaptive, Quality Preferred and Fluency Preferred. During network transmission, according to the setting, adjust code stream automatically. Adaptive can trade off between image quality and fluency, which takes fluency into consideration without affecting image quality badly. Fluency priority and Adaptive become effective only when Extra Stream is enabled. If Extra Stream is not enabled, Fluency Preferred and Adaptive will be adjusted according to Fluency Preferred under the network condition.
4.4.4 Net Service
Configuration for network functions. Select Network Service and click Set button or double-click Service to set parameters.

ZKDVR Series User Manual
30
Figure 4.15 Net Service
[PPPoE Set]
Figure 4.16 PPPoE Set
Enable: indicates that this option is selected. Your setting takes effect after Enable is selected.
Input PPPoE User Name and Password provided by ISP (Internet service operator) and then restart system after they are saved. After system is restarted, DVR will set up network connection in PPPoE mode automatically. When the connection is set up successfully, IP on IP Address will be modified automatically into obtained WAN dynamic IP address
Operation: After PPPoE dials successfully, query the IP on IP Address to obtain the current IP address and then through client, use this IP address to access the device.
[NTP Set]
Figure 4.17 NTP Set
NTP service should be installed in Personal Computer.

ZKDVR Series User Manual
31
Enable: indicates that this option is selected. This setting becomes effective after Enable is selected.
Server IP: Input the IP address of the PC in which NTP server is installed.
Port: Default NTP port is 123 and it can be set according to the real NTP server port.
Time Zone: London GMT +0, Berlin GMT+1, Cairo GMT+2, Moscow GMT+3, New Delhi GMT+5, Bangkok GMT+7, HK/Bejing GMT+8, Tokyo GMT+9, Sydney GMT+10, Hawaii GMT-10, Alaska GMT-9, Pacific Time GMT-8, MST GMT-7, CST GMT-6, Eastern time GMT-5, Atlantic Time GMT-4, Brazil GMT-3, Atlantic- Central GMT-2.
Update Period: Default correction interval time of NTP server is 10 minutes.
[EMAIL Set]
EMAIL is used to, when alarm occurs or there is alarm linkage snapshot, send detailed alarm information and snapshot to the specified email address.
Figure 4.18 EMAIL Set
SMTP Server: Email Server address may be IP address or domain name (If it is domain name, DNS setting should be confirmed before domain name is correctly resolved.)
Port: Mail server port number.
Need SSL: This server requires log-in with using Secure Socket Layer or not.
User Name: The user name of the EMAIL server that you applied.
Password: Password for this user name.
Sender: Set the EMAIL address of sender.
Receiver: When alarm occurs, it will be sent by email to the specified receiver. At most 3 specified receivers can be set.
Title: You can set the subject of the email by yourself.
[IP FILTER]
Select White list, indicating that only the IP in the list can connect to this DVR. White list supports 64 IP addresses setting.
Select Black list, indicating that the IP in the list cannot log in this DVR through network. White list supports 64 IP addresses.

ZKDVR Series User Manual
32
Select the IP address that you want to delete and click Delete to delete it.
Note: When black list and white list have the same IP address, black list has a higher rights priority.
Figure 4.19 IP FILTER
[DDNS]
Figure 4.20 DDNS Set
Through dynamic DDNS server, select DDNS type.
Domain Name: A domain name registered in DNS provider.
Sever Name: Domain name resolves sever domain name.
User Name: An account registered in DNS provider.
Password: A password registered in DNS provider.
When DDNS is successfully set and enabled, the applied domain name can be directly input into IE address bar to access the device.
Note: DNS should be correctly set in network.
[FTP Set]
FTP is used to, when alarm occurs or there is alarm linkage record or snapshot, upload specific record and snapshot to the specified FTP server.

ZKDVR Series User Manual
33
Figure 4.21 FTP Set
Enable: indicates that this option is selected. The setting becomes effective after Enable is selected.
Server IP: indicates the IP address of the FTP Server.
Port: indicates the domain port number for setting FTP. Default port is 21.
User Name: The user name that has the right to log in FTP.
Password: password for this user.
Anonymous: indicates that this option is selected. It is not necessary to set user name and password once Anonymous is selected.
Max File Length: The maximum length of the packaged file to be uploaded is 128 M by default.
Dir Name: directory of uploaded file.
Note: This user name has the rights to upload files to server.
[ARSP]
Through setting, start DDNS Server and add the device to DDNS server, to manage the device.
Figure 4.22 ARSP Set
Type: Select DNS.
Enable: indicates that this option is selected. The setting becomes effective after Enable is selected.
Server IP: indicate the IP address of DDNS Server.
Port: The port number of the device is corresponding with the Service snooping port of DDNS server.

ZKDVR Series User Manual
34
User Name: indicates the user name for device to log in DDNS server.
Password: Password is corresponded with the user name.
Update Period: indicates synchronization interval between device and DDNS.
Note: DDNS server should be set up before you use the device.
[Alarm Server]
After alarm occurs, Alarm Center reports alarm information to alarm server.
Figure 4.23 Alarm Server
Protocol Type: Protocol type is GENERAL.
Enable: indicates that this option is selected. The setting becomes effective after enable is selected.
Server Name: indicates IP address of Alarm Server.
Port: indicates port number of the device.
Alarm Report: indicates that this option is selected. Report alarm information to server.
Log Report: indicates that this option is selected. Report log information to server.
[Mobile Monitor]
Use mobile phone to access the device and map this port on the router. Through Protocol, monitor and operate the client of the device.
Figure 4.24 Mobile Monitor Set
Enable: indicates this option is selected. Open Mobile Phone Surveillance and select Enable and then this setting becomes effective.
Port: the port number for mobile phone surveillance. Map this port on the router before you access to the device by mobile phone.
[UPNP Set]
ZKDVR Series User Manual
35
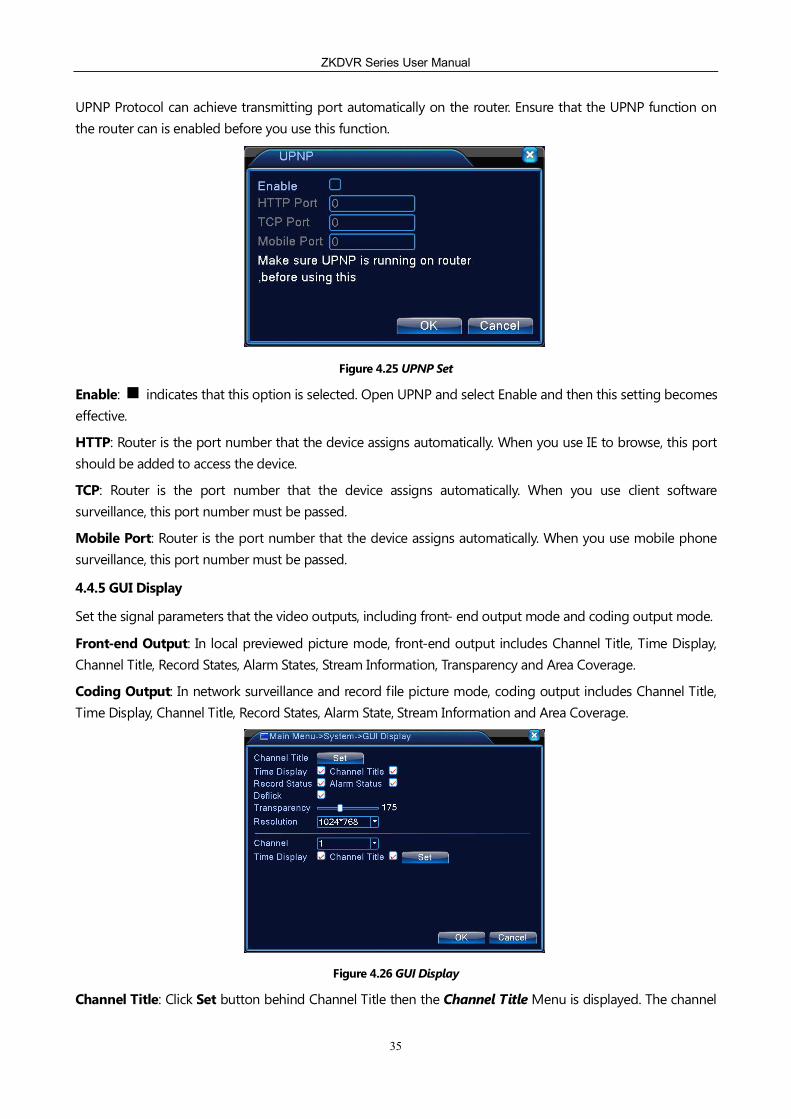
UPNP Protocol can achieve transmitting port automatically on the router. Ensure that the UPNP function on the router can is enabled before you use this function.
Figure 4.25 UPNP Set
Enable: indicates that this option is selected. Open UPNP and select Enable and then this setting becomes effective.
HTTP: Router is the port number that the device assigns automatically. When you use IE to browse, this port should be added to access the device.
TCP: Router is the port number that the device assigns automatically. When you use client software surveillance, this port number must be passed.
Mobile Port: Router is the port number that the device assigns automatically. When you use mobile phone surveillance, this port number must be passed.
4.4.5 GUI Display
Set the signal parameters that the video outputs, including front- end output mode and coding output mode.
Front-end Output: In local previewed picture mode, front-end output includes Channel Title, Time Display, Channel Title, Record States, Alarm States, Stream Information, Transparency and Area Coverage.
Coding Output: In network surveillance and record file picture mode, coding output includes Channel Title, Time Display, Channel Title, Record States, Alarm State, Stream Information and Area Coverage.
Figure 4.26 GUI Display
Channel Title: Click Set button behind Channel Title then the Channel Title Menu is displayed. The channel

ZKDVR Series User Manual
36
title can be modified. (A maximum of 25 characters are supported).
Time Display: indicates that this option is selected. The system time and date are displayed on the surveillance screen.
Channel Title: indicates that this option is selected. The system channel number is displayed on the surveillance screen.
Record States: indicates that this option is selected. The system record state is displayed on the surveillance screen.
Alarm States: indicates that this option is selected. The system alarm state is displayed on the surveillance screen.
Stream Information: indicates that this option is selected. When there is 9 split displays on a full screen, stream information is displayed in the ninth display after Stream Information is selected.
Transparency: Select the transparency of background image. The transparency varies from 128 to 255.
Resolution: Set resolution of the displayer.
Channel: Select the channel number that the specified code outputs.
Area Coverage: Reverse , select Coverage Area Number, and click Setting button and access to corresponding channel screen. Users can select any area on the screen by using mouse.
Time Display and Channel Title: Set time display and channel display to show the location.
4.4.6 PTZ Configuration
Figure 4.27 PTZ Configuration
Channel: Select the channel connected with dome camera.
Protocol: Select dome protocol (such as PELCOD) corresponded with the brand.
Address: Set corresponding dome address. Default address is 1. (Note: the address should be consistent with the dome address, otherwise the dome camera is beyond control)
Baud Rate: Select the baud rate used by corresponding dome camera and control the PTZ with corresponding channel and camera. The default baud rate is set to115200.
Date Bits: includes 5-8 options. Default data bit is set to 8.
Stop Bits: includes 1 or 2 options. Default stop bit is set to 1.

ZKDVR Series User Manual
37
Parity: It can be set to Odd, Even, Mark, Space or None. None is default.
4.4.7 RS232 Set
Figure 4.28 RS232 Set
Function: General serial port is used to debug serial and update program. It can also be used to set specified external serial.
Baud Rate: Select the corresponding baud rate length.
Data Bits: includes 5-8 options.
Stop Bits: includes 1 or 2 options.
Parity: It can be set to Odd, Even, Checkmark or None. None is default.
4.4.8 Tour
Set scrolling display on the screen. ■ indicates that Tour is started. Select Single Tour, such as View 1, View 4, View 8, View 9, or select Mixed Tour.
Figure 4.29 Tour
Interval: Set the interval of changing Tour with a range 5-120 seconds.
Return after finished: After alarm is ended, return to previewed display with multi split screen displays.
Notes: In preview mode, click the icon / in the upper right corner. Indicates Tour is open and indicates Tour is closed.
ZKDVR Series User Manual
38
4.5 Advanced
The Management Tool menu includes the following options: Storage Manage, Account, Online User, Output Adjust, Auto Maintain, Restore, Upgrade, and Device Information.
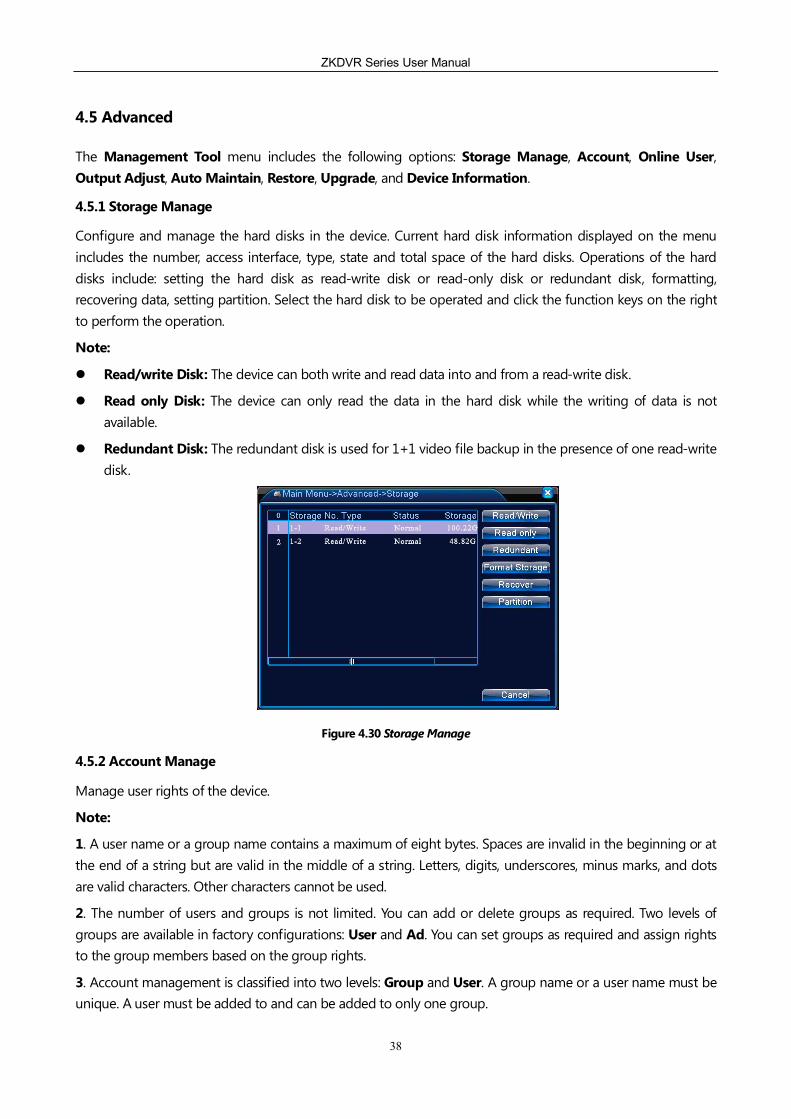
4.5.1 Storage Manage
Configure and manage the hard disks in the device. Current hard disk information displayed on the menu includes the number, access interface, type, state and total space of the hard disks. Operations of the hard disks include: setting the hard disk as read-write disk or read-only disk or redundant disk, formatting, recovering data, setting partition. Select the hard disk to be operated and click the function keys on the right to perform the operation.
Note:
Read/write Disk: The device can both write and read data into and from a read-write disk.
Read only Disk: The device can only read the data in the hard disk while the writing of data is not available.
Redundant Disk: The redundant disk is used for 1+1 video file backup in the presence of one read-write disk.
Figure 4.30 Storage Manage
4.5.2 Account Manage
Manage user rights of the device.
Note:
1. A user name or a group name contains a maximum of eight bytes. Spaces are invalid in the beginning or at the end of a string but are valid in the middle of a string. Letters, digits, underscores, minus marks, and dots are valid characters. Other characters cannot be used.
2. The number of users and groups is not limited. You can add or delete groups as required. Two levels of groups are available in factory configurations: User and Ad. You can set groups as required and assign rights to the group members based on the group rights.
3. Account management is classified into two levels: Group and User. A group name or a user name must be unique. A user must be added to and can be added to only one group.
ZKDVR Series User Manual
39
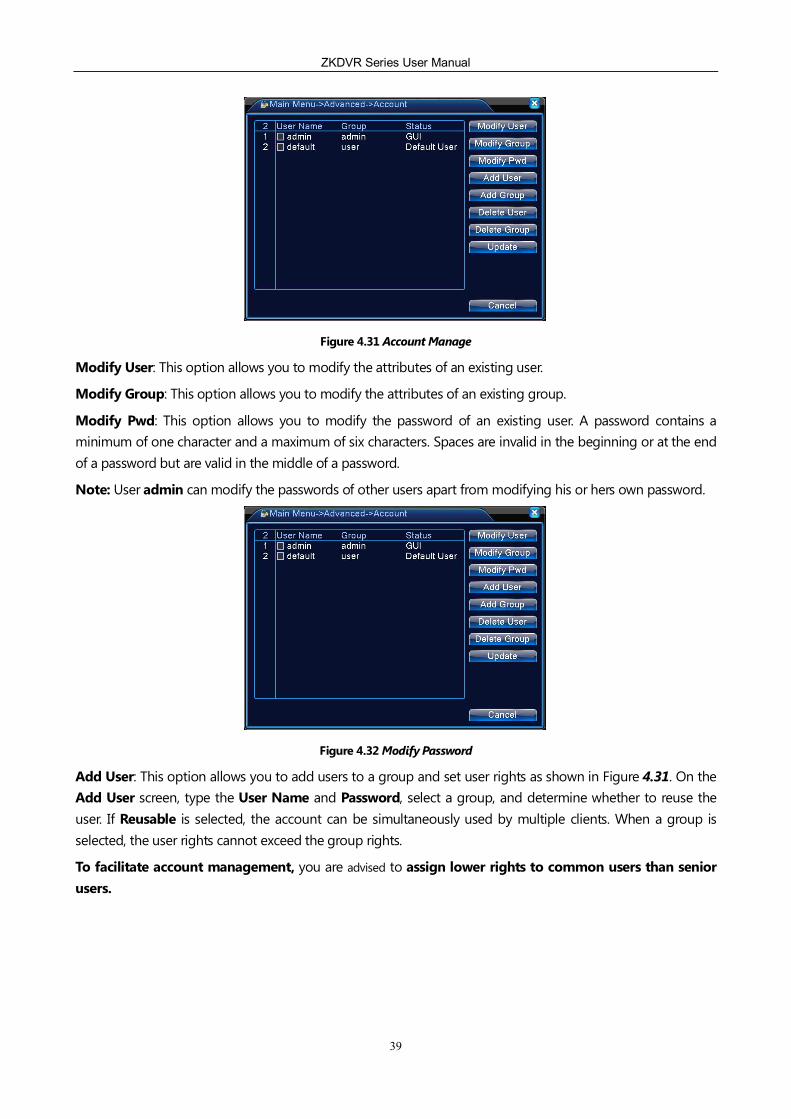
Figure 4.31 Account Manage
Modify User: This option allows you to modify the attributes of an existing user.
Modify Group: This option allows you to modify the attributes of an existing group.
Modify Pwd: This option allows you to modify the password of an existing user. A password contains a minimum of one character and a maximum of six characters. Spaces are invalid in the beginning or at the end of a password but are valid in the middle of a password.
Note: User admin can modify the passwords of other users apart from modifying his or hers own password.
Figure 4.32 Modify Password
Add User: This option allows you to add users to a group and set user rights as shown in Figure 4.31. On the Add User screen, type the User Name and Password, select a group, and determine whether to reuse the user. If Reusable is selected, the account can be simultaneously used by multiple clients. When a group is selected, the user rights cannot exceed the group rights.
To facilitate account management, you are advised to assign lower rights to common users than senior users.

ZKDVR Series User Manual
40
Figure 4.33 Add User
Add Group: This option allows you to add a new group and set group rights as shown in Figure 4.32. There are 53 basic group rights available for to you select, including Shutdown the device, Schedule, Backup and so on.
Figure 4.34 Add Group
Delete User: This option allows you to delete an existing user. As shown in Figure 4.29, select the user to be deleted, and click Delete User.
Delete Group: This option allows you to delete an existing group (ensure that there is no user in this group).As shown in Figure 4.29, click Delete Group and figure 4.33 pops up, select the group to be deleted, and click Delete.
Figure 4.35 Delete Group

ZKDVR Series User Manual
41
4.5.3 Online User
View the network user information connected to a local DVR. You can also disconnect the selected network user (select the Network user checkbox), and the account will be blocked until next startup.
Figure 4.36 Online User
4.5.4 Output Adjust
As same as 3.4.6 Output Adjust.
4.5.5 Auto Maintain
You can set the time as required for the device to automatically restart and automatically delete the files in a specified time period.
Figure 4.37 Auto Maintain
Auto- Reboot System: This option allows you to set the time point of DVR scheduled auto-reboot.
Auto-Delete Old Files: This option allows you select Never or Custom, and users can set the time period of old files to be automatically deleted under user-defined condition.
4.5.6 Restore
The system restores the factory default configurations (choose the specific items to be restored according to the options on the menu.), or check Select All to implement all options and restore default configurations.

ZKDVR Series User Manual
42
Figure 4.38 Restore
4.5.7 Upgrade
Figure 4.39 Upgrade
Upgrade Position: This option allows you to choose the USB interface.
Upgrade File: This option allows you to choose the files to be upgraded.
4.5.8 Device Information
Interface device information is displayed. Users can view the number of audio input, alarm input and alarm output, and set the type of the remote control.
Figure 4.40 Device Information
4.5.9 Import/Export
Users can export the log information and configuration files to an external device (such as a USB flash disk), or

ZKDVR Series User Manual
43
import the configuration files in an external device to settings, which greatly facilitates users' operation.
Figure 4.41 Import/Export Interface
4.6 Information
The device information is displayed, including HDD information, BPS, LOG and Version information.
4.6.1 HDD Information
The state of installed hard disks is displayed, including the recording Type, Capacity, Left Capacity and View recording time.
Figure 4.41 HDD Information
Notes: In the HDD Information, O indicates that hard disks are normal. X indicates that hard disks are faulty, - indicates that hard disks are not installed. To replace a faulty hard disk, shut down the device, remove the faulty hard disk, and install a new hard disk.
If the serial number of a hard disk is marked by *, the hard disk is the current working disk (for example, 1*). If the hard disk is faulty, a question mark (?) is displayed in the Status column.
Click View Recording Time as shown in Figure 4.40

ZKDVR Series User Manual
44
Figure 4.42 Type and capacity
4.6.2 BPS
The BPS screen displays the code stream (kbit/s) and occupied disk space (MB/H) for each channel in real time, and the code stream value of each channel will change constantly and slightly. The BPS of each channel in a specific time point is displayed in Figure 4.41.
Figure 4.43 BPS
4.6.3 Log
View the system log according to the set query mode.
Log is classified into: system operation, configuration operation, data management, alarm event, recording operation, user management and file operation. Set the time segment of logs to be searched, the recorded logs will be displayed in the form of a list (each page displays 128 logs), click Next Page to view logs on other pages, and click Remove to clear all the logs' information.

ZKDVR Series User Manual
45
Figure 4.44 Log
4.6.4 Version
Basic information of the device is displayed, including Device information, System version and Build Date.
Figure 4.45 Version
4.7 Logout
As same as 3.4.7 Logout.

ZKDVR Series User Manual
46
5 FAQ and Maintenance
5.1 FAQ
If the problems you encounter are not included in the following question list, please contact the local customer service personnel or call the customer service center of the headquarters for advice, and we will try our best to solve your problems.
1. Why can't the DVR boot up normally after power-on?
Answer: possible causes:
Input power supply is incorrect.
The contact of switching power cable is bad.
Switching power supply is bad.
Program update is wrong.
Hard disk is bad or hard disk cable is damaged.
The front panel is bad.
The main board of the DVR is bad.
2. Why does my DVR restart automatically or frequently crash several minutes after startup?
Answer: possible causes:
Input voltage is unstable or too low.
Hard disk has bad track or hard disk cable is bad.
The power of switching power supply is not enough.
The video signal of front end is unstable.
Bad ventilation, too much dust, the operating conditions of machine is too severe.
Hardware failure of the DVR.
3. Why can't I find the hard disk after startup?
Answer: possible causes:
The power cable of the hard disk is not connected.
The power cable of the hard disk is bad.
The hard disk is bad.
SATA interface of the main board is bad.
4. Why do the single channel, multiple channels and all channels have no video output?
Answer: possible causes:
The program is not matched. Please upgrade the correct program.
Check image brightness to see if it becomes 0. Please restore to default setting.

ZKDVR Series User Manual
47
There is no video input signal or the signal is too weak.
Channel protection (or screen protection) is set.
The hardware failure of the DVD is damaged.
5. Why do I have problems with real-time image such as serious distortion of video color and brightness?
Answer: possible causes:
When BNC is used for output, the image will become black and white if video standard (PAL or NTSC) is not properly set.
DVR and the impedance of monitor do not match.
Video transmission distance is too far or the loss of video transmission cable is too large.
The settings of color, brightness of DVR are incorrect.
6. Why can't I find any video file in local playback mode?
Answer: possible causes:
The data cable with the hard disk or jumper is incorrect.
The hard disk is bad.
Update the different program with the origin program files system.
The video to be queried has been covered.
The recording is not on.
7. Why does the blurry screen occur during local query?
Answer: possible causes:
The image quality is set too low.
Error occurs in the reading of program data, the displayed code stream is small, and mosaics fill the entire screen. The device recovers after shutdown and reboot.
The data cable or jumper with the hard disk is wrong.
The hard disk is faulty.
The hardware of the device is faulty.
8. Why is there no sound in the surveillance video?
Answer: possible causes:
The absence of active audio monitoring unit.
The absence of active acoustics.
Problem with the audio cable.
Hardware failure of the DVR.
9. Why does the sound exist in surveillance mode while no sound exists in playback mode?
Answer: possible causes:
Settings: The audio option is not enabled.

ZKDVR Series User Manual
48
The corresponding channel is not connected to video, and when blue screen occurs, the playback will be discontinuous.
10. Why is the time display wrong?
Answer: possible causes:
Settings are incorrect..
The contact of battery is bad or the voltage is relatively low.
Crystal oscillator is bad.
11. Why does the motion detection not work?
Answer: possible causes:
Incorrect time segment setting.
Inappropriate setting of motion detection area.
Low sensitivity.
Hardware restrictions of certain versions.
12. Why does an error occur during recording/USB backup?
Answer: possible causes:
The recorder and hard disk are connected to the same data cable.
The data amount is too large, and the resource of CUP is too much occupied, please backup after recording is stopped.
Data amount is greater than the space of backup device, which can lead to error in recording.
Backup device is incompatible.
Backup device is damaged.
13. Why can’t I control the DVR through the keyboard?
Answer: possible causes:
PTZ of the DVR is incorrect.
The address is incorrect.
The power supply is insufficient when multiple converters are connected, each converter should be sufficiently powered up.
The transmission distance is too long.
14. Why does the remote control not work?
Answer: possible causes:
The address of remote control is wrong.
The distance of remote control is too far or the angle is too deflective.
The battery of remote control is used up.
The remote control is damaged or the front panel of video recorder is damaged.
15. Why is my video recording time so short?

ZKDVR Series User Manual
49
Answer: possible causes:
Low quality, dusty lens, backlighting installing and inaccurate adjustment of aperture of the front-end cameras cause large size of code stream.
The space of the hard disk is not sufficient.
The hard disk is damaged.
16. Why can't I play the downloaded file?
Answer: possible causes:
A player is not installed.
Graphics acceleration software with DX8.1 or above version is not installed.
The file is played with MEDIA PLAYER after converted to AVI format, and the computer is not installed with the plug DivX503Bundle.exe.
Windows XP operating system requires the installation of DivX503Bundle.exe and ffdshow-2004 1012 .exe.
17. What if I forget the administrator password or network password during local menu operation?
Answer: Solution: Please contact the local service personnel or call the customer service center of the headquarters for advice, and we will give you instruction according to the provided device model and program version.
18. Why can't the IE control be automatically downloaded or installed on Windows 7 operating systems?
Answer: possible causes:
When manual installing the IE Plug-ins, the installation is incomplete or invalid if you are not an administrator. Right-click the controls to be installed and choose Run as administrator.
Automatic control downloading is intercepted by the system; and the following operations are available: Start > Operation, then enter msconfig and choose Tools > Change UAC settings > Never notify.
The control is intercepted by Antivirus software. Close the Antivirus software before installation, and after installation is completed, set the control as trusted software.
19. In the Windows 7 operating system, why does the CMS installation fail? Why can't I open CMS upon successful installation?
Answer: Possible causes: The installation is incomplete or invalid if you do not install the CMS as an administrator.
5.2 Maintenance
1. Dust on the circuit board, if affected with damp, will cause a short circuit, influence normal operation of and even damage the DVR. To ensure the long-term and stable operation of the DVR, please regularly wipe away the dust on the circuit board, connector, chassis fan and chassis with a brush.
2. Please ensure that the device has proper grounding, so that video and audio signals are not interfered, and the DVR is free from the damages by static electricity or induced voltage.

ZKDVR Series User Manual
50
3. For Video and audio signal cables, RS-232 interface and RS-485 interface, hot plugging is not advised; otherwise, these interfaces will be damaged easily.
4. Avoiding using a TV on the VOUT interface, or the video output circuit of the DVR will be susceptible to damages.
5. Please keep the DVR away from heat source or places with high temperature.
6. Please ensure proper ventilation around the DVR chassis to facilitate heat dissipation.
7. Please perform regular system check and maintenance.

ZKDVR Series User Manual
51
Appendix
Appendix 1 Operations of Remote Control (Optional)
SN. Name Function 1 Multi-screen Access to the multi-screen preview interface 2 Numeric Password input, digits input or channels switching 3 ESC Go back to the previous page 4 Direction Direction button and confirmation button 5 Playback Control Perform the basic operation during playback 6 Record Control Access to Record Playback menu
7 Remote Control Address Press the button and type the serial number of the device to control the recorder.
8 Secondary Key Access to Secondary Function menu of the corresponding page.
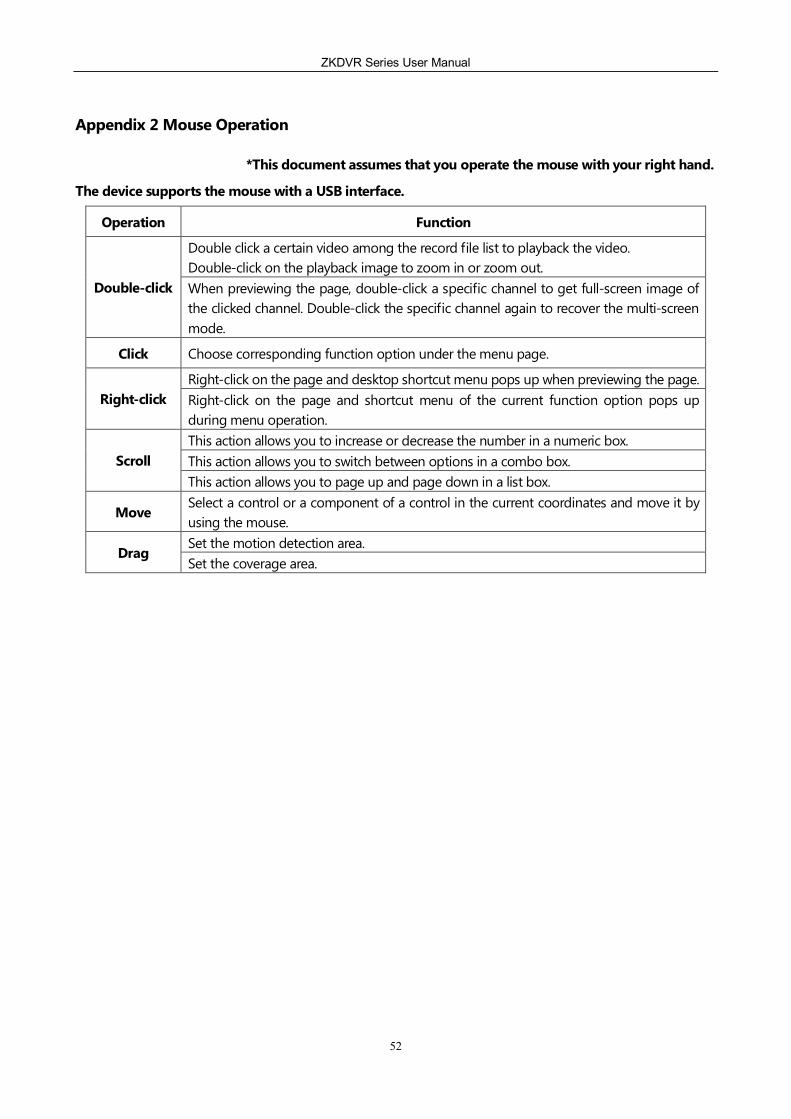
ZKDVR Series User Manual
52
Appendix 2 Mouse Operation
*This document assumes that you operate the mouse with your right hand.
The device supports the mouse with a USB interface.
Operation Function
Double click a certain video among the record file list to playback the video. Double-click on the playback image to zoom in or zoom out.
Double-click When previewing the page, double-click a specific channel to get full-screen image of the clicked channel. Double-click the specific channel again to recover the multi-screen mode.
Click Choose corresponding function option under the menu page.
Right-click on the page and desktop shortcut menu pops up when previewing the page. Right-click Right-click on the page and shortcut menu of the current function option pops up
during menu operation. This action allows you to increase or decrease the number in a numeric box. This action allows you to switch between options in a combo box. Scroll This action allows you to page up and page down in a list box.
Move Select a control or a component of a control in the current coordinates and move it by using the mouse. Set the motion detection area.
Drag Set the coverage area.

ZKDVR Series User Manual
53
Appendix 3 Calculation of the Space of Hard Disks
Determine if hard disks are installed in the DVR when DVR is installed for the first time, and pay attention to the jumper of hard disks during IDE hard disk installation.
1. Space of a hard disk itself
The recorder has no limit for the space of a single hard disk and can choose a hard disk with the space of over 10G.It is recommended that you use the hard disk with space between 120G-250G for better stability.
2. Choice of total space of hard disks
The formula for calculating the total space of hard disk is: total space of hard disks (M) = Number of channels * required time (hours) * Occupied space of hard disks per hour (M/hour).
In the same way, we can obtain the formula for calculating the recording time:
Recording time (hours) = Total space of hard disks (M)
Hard disk space occupied per hour (M/hour) x Number of channels
The DVR adopts the MPEG4/H.264 compression technology featuring very large dynamic range, so size estimate of files generated in each channel per hour needs to be made according to code stream to calculate the space of hard disks.
For example:
A 500G hard disk is available for recording for about 25 days at CIF resolution in real-time. The occupied space of a hard disk for a single channel per hour is 200M/hour, and the number of days using four channels for 24-hour continuous recording at CIF resolution in real time is: 500G/(200M/hour x 24 hours x four channels) = 26.
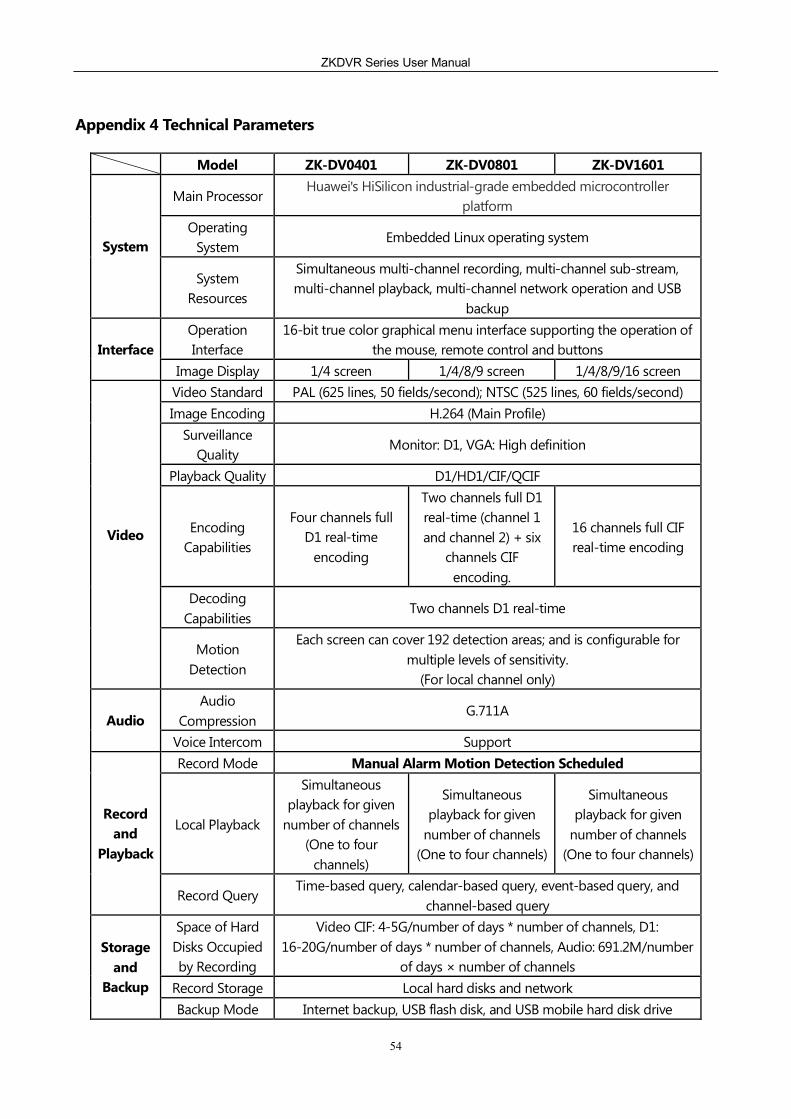
ZKDVR Series User Manual
54
Appendix 4 Technical Parameters
Model ZK-DV0401 ZK-DV0801 ZK-DV1601
Main Processor Huawei's HiSilicon industrial-grade embedded microcontroller
platform Operating
System Embedded Linux operating system System
System Resources
Simultaneous multi-channel recording, multi-channel sub-stream, multi-channel playback, multi-channel network operation and USB
backup Operation Interface
16-bit true color graphical menu interface supporting the operation of the mouse, remote control and buttons Interface
Image Display 1/4 screen 1/4/8/9 screen 1/4/8/9/16 screen Video Standard PAL (625 lines, 50 fields/second); NTSC (525 lines, 60 fields/second) Image Encoding H.264 (Main Profile)
Surveillance Quality
Monitor: D1, VGA: High definition
Playback Quality D1/HD1/CIF/QCIF
Encoding Capabilities
Four channels full D1 real-time
encoding
Two channels full D1 real-time (channel 1 and channel 2) + six
channels CIF encoding.
16 channels full CIF real-time encoding
Decoding Capabilities
Two channels D1 real-time
Video
Motion Detection
Each screen can cover 192 detection areas; and is configurable for multiple levels of sensitivity.
(For local channel only) Audio
Compression G.711A
Audio Voice Intercom Support Record Mode Manual Alarm Motion Detection Scheduled
Local Playback
Simultaneous playback for given
number of channels (One to four
channels)
Simultaneous playback for given
number of channels (One to four channels)
Simultaneous playback for given
number of channels (One to four channels)
Record and
Playback
Record Query Time-based query, calendar-based query, event-based query, and
channel-based query Space of Hard Disks Occupied by Recording
Video CIF: 4-5G/number of days * number of channels, D1: 16-20G/number of days * number of channels, Audio: 691.2M/number
of days × number of channels Record Storage Local hard disks and network
Storage and
Backup Backup Mode Internet backup, USB flash disk, and USB mobile hard disk drive

ZKDVR Series User Manual
55
Model ZK-DV0401 ZK-DV0801 ZK-DV1601 Video Input Four channel BNC Eight channel BNC Sixteen channel BNC
Video Output One channel BNC, one channel VGA and one channel HDMI Audio Input Four channel RCA Two channel RCA
Audio Output One channel RCA Alarm Input None
Alarm Output None Network Interface
One RJ45 10M/100M adaptive Ethernet interface
Control Port One RS485 interface supporting 18 PTZ protocols USB Interface Two USB interfaces
Interface
Hard Disk Interface
One SATA interface (each ASTA supports a maximum of 3T)
Power Supply 12V/2A Others
Dimension 255mm (L) x 225mm (W) x 45mm (H)