DVD Player DV-S555 - ONKYO Asia and Oceania Website
60
DVD Player DV-S555 Instruction Manual Thank you for purchasing the ONKYO DVD Player. Please read this manual thoroughly before making connections and plugging in the unit. Following the instructions in this manual will enable you to obtain optimum performance and listening enjoyment from your new DVD Player. Please retain this manual for future reference. Contents Getting Started Basic Playback Advanced Playback Others Before Using Your DVD Player 2 Function Setup
Transcript of DVD Player DV-S555 - ONKYO Asia and Oceania Website
DVD Player
DV-S555Instruction Manual
Thank you for purchasing the ONKYO DVD Player.Please read this manual thoroughly before makingconnections and plugging in the unit.Following the instructions in this manual will enableyou to obtain optimum performance and listeningenjoyment from your new DVD Player.Please retain this manual for future reference.
Contents
Getting Started
Basic Playback
Advanced Playback
Others
Before Using Your DVD Player 2
Function Setup
2
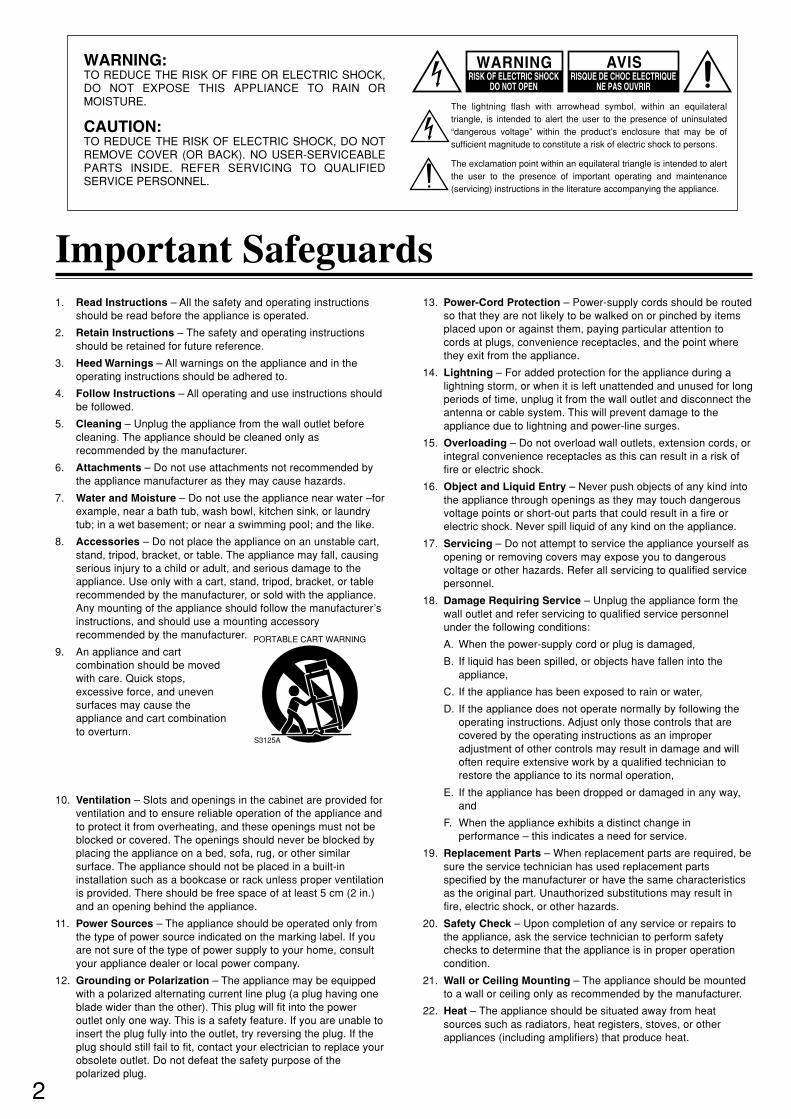
Important Safeguards
WARNING:TO REDUCE THE RISK OF FIRE OR ELECTRIC SHOCK, DO NOT EXPOSE THIS APPLIANCE TO RAIN OR MOISTURE.
CAUTION:TO REDUCE THE RISK OF ELECTRIC SHOCK, DO NOT REMOVE COVER (OR BACK). NO USER-SERVICEABLE PARTS INSIDE. REFER SERVICING TO QUALIFIED SERVICE PERSONNEL.
The lightning flash with arrowhead symbol, within an equilateral triangle, is intended to alert the user to the presence of uninsulated “dangerous voltage” within the product’s enclosure that may be of sufficient magnitude to constitute a risk of electric shock to persons.
The exclamation point within an equilateral triangle is intended to alert the user to the presence of important operating and maintenance (servicing) instructions in the literature accompanying the appliance.
WARNINGRISK OF ELECTRIC SHOCK
DO NOT OPENRISQUE DE CHOC ELECTRIQUE
NE PAS OUVRIR
AVIS
1. Read Instructions – All the safety and operating instructionsshould be read before the appliance is operated.
2. Retain Instructions – The safety and operating instructionsshould be retained for future reference.
3. Heed Warnings – All warnings on the appliance and in theoperating instructions should be adhered to.
4. Follow Instructions – All operating and use instructions shouldbe followed.
5. Cleaning – Unplug the appliance from the wall outlet beforecleaning. The appliance should be cleaned only asrecommended by the manufacturer.
6. Attachments – Do not use attachments not recommended bythe appliance manufacturer as they may cause hazards.
7. Water and Moisture – Do not use the appliance near water –forexample, near a bath tub, wash bowl, kitchen sink, or laundrytub; in a wet basement; or near a swimming pool; and the like.
8. Accessories – Do not place the appliance on an unstable cart,stand, tripod, bracket, or table. The appliance may fall, causingserious injury to a child or adult, and serious damage to theappliance. Use only with a cart, stand, tripod, bracket, or tablerecommended by the manufacturer, or sold with the appliance.Any mounting of the appliance should follow the manufacturer’sinstructions, and should use a mounting accessoryrecommended by the manufacturer.
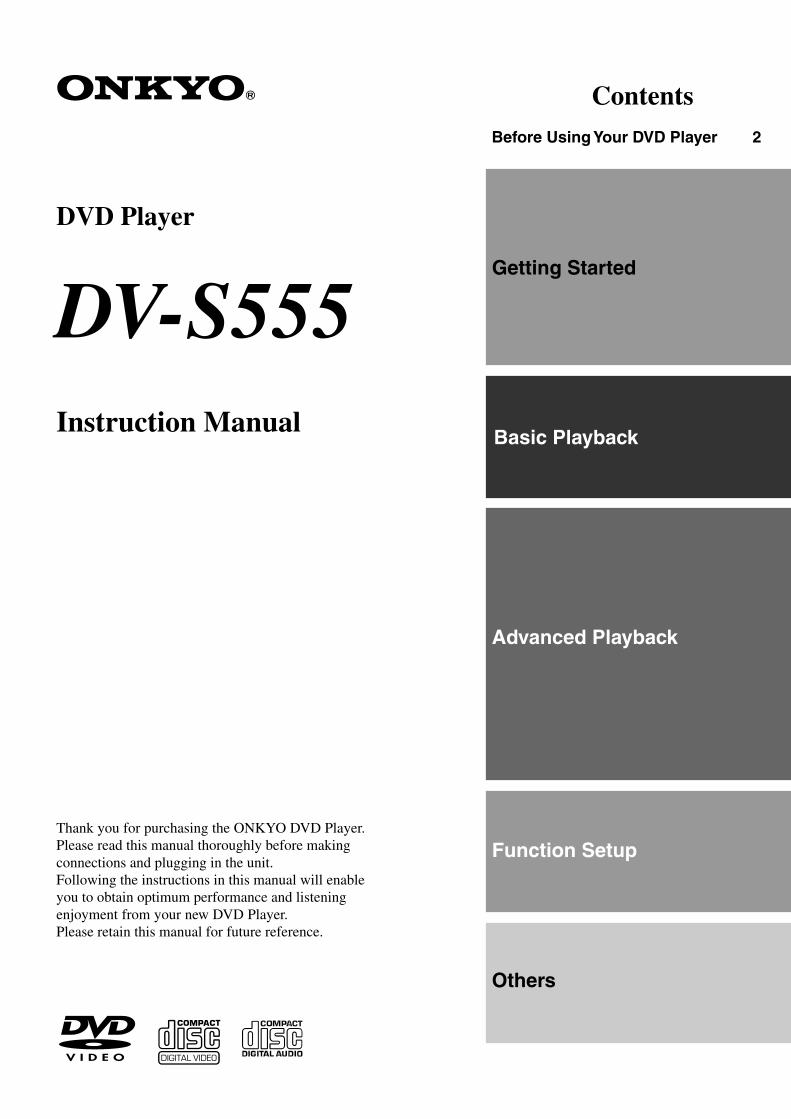
9. An appliance and cartcombination should be movedwith care. Quick stops,excessive force, and unevensurfaces may cause theappliance and cart combinationto overturn.
10. Ventilation – Slots and openings in the cabinet are provided forventilation and to ensure reliable operation of the appliance andto protect it from overheating, and these openings must not beblocked or covered. The openings should never be blocked byplacing the appliance on a bed, sofa, rug, or other similarsurface. The appliance should not be placed in a built-ininstallation such as a bookcase or rack unless proper ventilationis provided. There should be free space of at least 5 cm (2 in.)and an opening behind the appliance.
11. Power Sources – The appliance should be operated only fromthe type of power source indicated on the marking label. If youare not sure of the type of power supply to your home, consultyour appliance dealer or local power company.
12. Grounding or Polarization – The appliance may be equippedwith a polarized alternating current line plug (a plug having oneblade wider than the other). This plug will fit into the poweroutlet only one way. This is a safety feature. If you are unable toinsert the plug fully into the outlet, try reversing the plug. If theplug should still fail to fit, contact your electrician to replace yourobsolete outlet. Do not defeat the safety purpose of thepolarized plug.
13. Power-Cord Protection – Power-supply cords should be routedso that they are not likely to be walked on or pinched by itemsplaced upon or against them, paying particular attention tocords at plugs, convenience receptacles, and the point wherethey exit from the appliance.
14. Lightning – For added protection for the appliance during alightning storm, or when it is left unattended and unused for longperiods of time, unplug it from the wall outlet and disconnect theantenna or cable system. This will prevent damage to theappliance due to lightning and power-line surges.
15. Overloading – Do not overload wall outlets, extension cords, orintegral convenience receptacles as this can result in a risk offire or electric shock.
16. Object and Liquid Entry – Never push objects of any kind intothe appliance through openings as they may touch dangerousvoltage points or short-out parts that could result in a fire orelectric shock. Never spill liquid of any kind on the appliance.
17. Servicing – Do not attempt to service the appliance yourself asopening or removing covers may expose you to dangerousvoltage or other hazards. Refer all servicing to qualified servicepersonnel.
18. Damage Requiring Service – Unplug the appliance form thewall outlet and refer servicing to qualified service personnelunder the following conditions:
A. When the power-supply cord or plug is damaged,
B. If liquid has been spilled, or objects have fallen into theappliance,
C. If the appliance has been exposed to rain or water,
D. If the appliance does not operate normally by following theoperating instructions. Adjust only those controls that arecovered by the operating instructions as an improperadjustment of other controls may result in damage and willoften require extensive work by a qualified technician torestore the appliance to its normal operation,
E. If the appliance has been dropped or damaged in any way,and
F. When the appliance exhibits a distinct change inperformance – this indicates a need for service.
19. Replacement Parts – When replacement parts are required, besure the service technician has used replacement partsspecified by the manufacturer or have the same characteristicsas the original part. Unauthorized substitutions may result infire, electric shock, or other hazards.
20. Safety Check – Upon completion of any service or repairs tothe appliance, ask the service technician to perform safetychecks to determine that the appliance is in proper operationcondition.
21. Wall or Ceiling Mounting – The appliance should be mountedto a wall or ceiling only as recommended by the manufacturer.
22. Heat – The appliance should be situated away from heatsources such as radiators, heat registers, stoves, or otherappliances (including amplifiers) that produce heat.
PORTABLE CART WARNING
S3125A
3
Precautions
For Canadian model
NOTE: This class B digital apparatus complies with CanadianICES-003.
For models having a power cord with a polarized plug:
CAUTION: TO PREVENT ELECTRIC SHOCK, MATCH WIDEBLADE OF PLUG TO WIDE SLOT, FULLY INSERT.
Modele pour les Canadien
REMARQUE: Cet appareil numérique de la classe B estconforme à la norme NMB-003 du Canada.
Sur les modeles dont la fiche est polarisee:
ATTENTION: POUR EVITER LES CHOCS ELECTRIQUES,INTRODUIRE LA LAME LA PLUS LARGE DE LA FICHE DANS LABORNE CORRESPONDANTE DE LA PRISE ET POUSSERJUSQU’AU FOND.
For U.S. model
The laser is covered by a housing which prevents exposure duringoperation or maintenance. However, this product is classified as aLaser Product by CDRH (Center for Devices and RadiologicalHealth) which is a department of the Food and Drug Administration.According to their regulations 21 CFR section 1002.30, allmanufactures who sell Laser Products must maintain records ofwritten communications between the manufacturer, dealers andcustomers concerning radiation safety. If you have any complaintsabout instructions or explanations affecting the use of this product,please feel free to write to the address on the back page of thismanual. When you write us, please include the model number andserial number of your unit.
In compliance with Federal Regulations, the certification,identification and the period of manufacture are indicated on the rearpanel.
FCC INFORMATION FOR USER
CAUTION:
The user changes or modifications not expressly approved by theparty responsible for compliance could void the user’s authority tooperate the equipment.
NOTE:
This equipment has been tested and found to comply with the limitsfor a Class B digital device, pursuant to Part 15 of the FCC Rules.These limits are designed to provide reasonable protection againstharmful interference in a residential installation. This equipmentgenerates, uses and can radiate radio frequency energy and, if notinstalled and used in accordance with the instructions, may causeharmful interference to radio communications. However, there is noguarantee that interference will not occur in a particular installation.If this equipment does cause harmful interference to radio ortelevision reception, which can be determined by turning theequipment off and on, the user is encouraged to try to correct theinterference by one or more of the following measures:• Reorient or relocate the receiving antenna.• Increase the separation between the equipment and receiver.• Connect the equipment into an outlet on a circuit different from
that to which the receiver is connected.• Consult the dealer or an experienced radio/TV technician for help.
This unit contains a semiconductor laser system and is classifiedas a “CLASS 1 LASER PRODUCT”. So, to use this modelproperly, read this Instruction Manual carefully. In case of anytrouble, please contact the store where you purchased the unit.To prevent being exposed to the laser beam, do not try to openthe enclosure.
CAUTION:VISIBLE LASER RADIATION WHEN OPEN AND INTERLOCKFAILED OR DEFEATED. DO NOT STARE INTO BEAM.
CAUTION:THIS PRODUCT UTILIZES A LASER. USE OF CONTROLS ORADJUSTMENTS OR PERFORMANCE OF PROCEDURESOTHER THAN THOSE SPECIFIED HEREIN MAY RESULT INHAZARDOUS RADIATION EXPOSURE.
The label on the rightis applied on the rearpanel except for USAand Canadianmodels.
1. This unit is a CLASS 1 LASER PRODUCT and employs alaser inside the cabinet.
2. To prevent the laser from being exposed, do not removethe cover. Refer servicing to qualified personnel.
“CLASS 1 LASER
PRODUCT”
4
Precautions1. Regional Restriction Codes (Region Number)
Regional restriction codes are built into DVD Players and DVD-Video media for each sales region. If the regional code of theDVD Player does not match one of the regional codes on theDVD-Video, playback is not possible.The regional number can be found on the rear panel of the DVD
Player. (e.g. 1 for Region 1)
2. About This ManualThis manual explains the basic procedures for operating theDVD Player. Some DVD-Video and DVD-Audio discs do notsupport the full potential of the DVD technology. Your DVDPlayer may therefore not respond to all operating commands.Refer to instruction notes on discs.
A “ ” mark may appear on the TV screen during operation. Itmeans that the operation is not permitted by the DVD Player orthe disc.
3. Recording CopyrightRecording of copyrighted material for other than personal use isillegal without permission of the copyright holder.
4. Power
WARNINGBEFORE PLUGGING IN THE UNIT FOR THE FIRST TIME,READ THE FOLLOWING SECTION CAREFULLY.
The voltage of the available power supply differs according tocountry or region. Be sure that the power supply voltage of thearea where the unit will be used meets the required voltage(e.g., AC 120 V, 60 Hz) written on the rear panel.
5. Do not touch the unit with wet handsDo not handle the unit or power cord when your hands are wetor damp. If water or any other liquid enters the case, take theunit to an authorized service center for inspection.
6. Location of the unit• Place the unit in a well-ventilated location.
Take special care to provide plenty of ventilation on all sides ofthe unit especially when it is placed in an audio rack. Ifventilation is blocked, the unit may overheat and malfunction.
• Do not expose the unit to direct sunlight or heating units asthe unit’s internal temperature may rise and shorten the life ofthe pickup.
• Avoid damp and dusty places and places directly affected byvibrations from the speakers. In particular, avoid placing theunit on or above one of the speakers.
• Be sure the unit is placed in a horizontal position. Never placeit on its side or on a slanted surface as it may malfunction.
• When you place the unit near a TV, radio, or VCR, theplayback picture may become poor and the sound may bedistorted. In this case, place the unit away from the TV, radio,or VCR.
7. CareFrom time to time you should wipe the front and rear panels andthe cabinet with a soft cloth. For heavier dirt, dampen a soft clothin a weak solution of mild detergent and water, wring it out dry,and wipe off the dirt. Following this, dry immediately with a cleancloth.Do not use rough material, thinners, alcohol or other chemicalsolvents or cloths since these could damage the finish or removethe panel lettering.
8. Notes on Handling• When shipping the unit, use the original shipping carton and
packing materials. For maximum protection, repack the unit asit was originally packed at the factory.
• Do not use volatile liquids, such as insect spray, near the unit.Do not leave rubber or plastic products in contact with the unitfor a long time. They will leave marks on the finish.
• The top and rear panels of the unit may become warm aftera long period of use. This is not a malfunction.
• When the unit is not in use, be sure to remove the disc andturn off the power.
• If you do not use the unit for a long period, the unit may notfunction properly in the future. Turn on and use the unitoccasionally.
9. To Obtain a Clear PictureThe unit is a high technology, precision device. If the opticalpick-up lens and disc drive parts are dirty or worn down, thepicture quality becomes poor. To obtain a clear picture, werecommend regular inspection and maintenance (cleaning orparts replacement) every 1,000 hours of use depending on theoperating environment. For details, contact your nearest dealer.
10. Notes on Moisture CondensationMoisture condensation damages the unit.Please read the following carefully.
• What is moisture condensation?Moisture condensation occurs, for example, when you pour acold drink into a glass on a warm day. Drops of water form onthe outside of the glass. In the same way, moisture maycondense on the optical pick-up lens inside the unit, one ofthe most crucial internal parts of the unit.
• Moisture condensation occurs in the following cases.– When you bring the unit directly from a cold place to a
warm place.– When you use the unit in a room where you just turned on
the heater, or a place where the cold wind from the airconditioner directly hits the unit.
– In summer, when you use the unit in a hot and humid placejust after you move the unit from an air conditioned room.
– When you use the unit in a humid place.
• Do not use the unit when moisture condensation mayoccur.If you use the unit in such a situation, it may damage discsand internal parts. Remove the disc, connect the power cordof the unit to the wall outlet, turn on the unit, and leave it fortwo or three hours. After a few hours, the unit will havewarmed up and evaporated any moisture. Keep the unitconnected to the wall outlet and moisture condensation willseldom occur.
5
This section shows you how to handle, clean, and store discs.
Notes on Discs
Disc mark
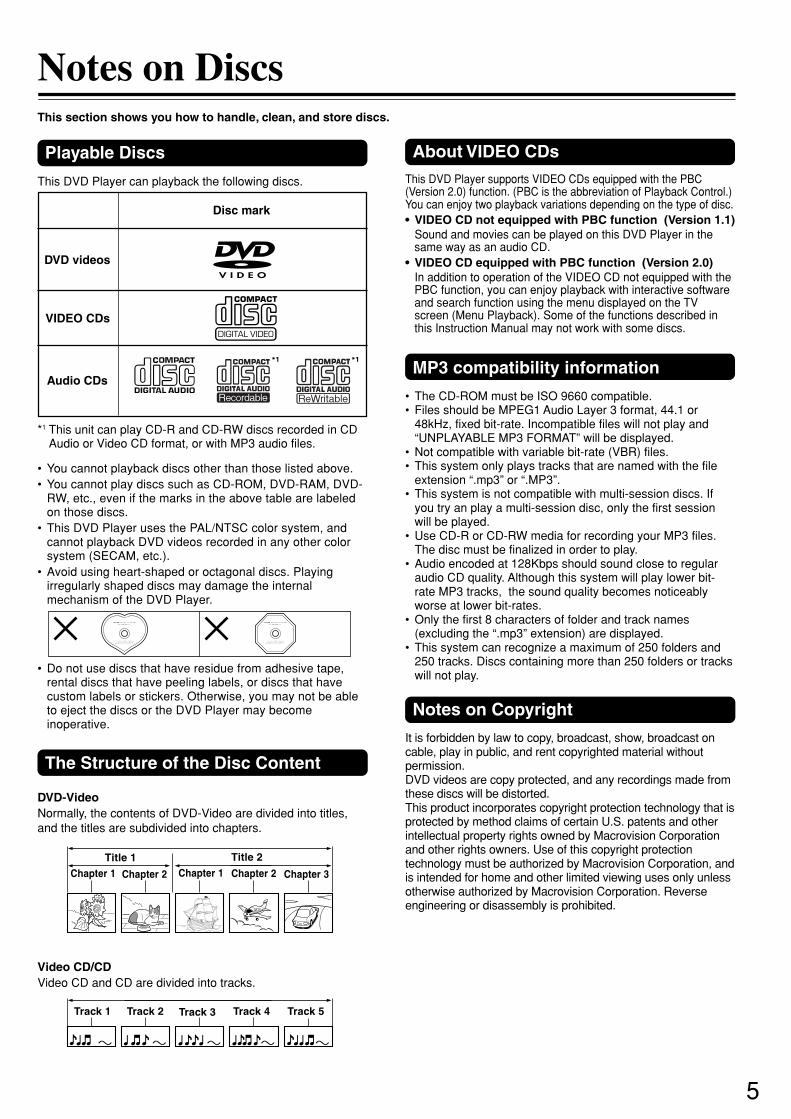
DVD videos
Playable Discs
This DVD Player can playback the following discs.
• You cannot playback discs other than those listed above.• You cannot play discs such as CD-ROM, DVD-RAM, DVD-
RW, etc., even if the marks in the above table are labeledon those discs.
• This DVD Player uses the PAL/NTSC color system, andcannot playback DVD videos recorded in any other colorsystem (SECAM, etc.).
• Avoid using heart-shaped or octagonal discs. Playingirregularly shaped discs may damage the internalmechanism of the DVD Player.
• Do not use discs that have residue from adhesive tape,rental discs that have peeling labels, or discs that havecustom labels or stickers. Otherwise, you may not be ableto eject the discs or the DVD Player may becomeinoperative.
About VIDEO CDsThis DVD Player supports VIDEO CDs equipped with the PBC(Version 2.0) function. (PBC is the abbreviation of Playback Control.)You can enjoy two playback variations depending on the type of disc.• VIDEO CD not equipped with PBC function (Version 1.1)
Sound and movies can be played on this DVD Player in thesame way as an audio CD.
• VIDEO CD equipped with PBC function (Version 2.0)In addition to operation of the VIDEO CD not equipped with thePBC function, you can enjoy playback with interactive softwareand search function using the menu displayed on the TVscreen (Menu Playback). Some of the functions described inthis Instruction Manual may not work with some discs.
VIDEO CDs
Audio CDs
*1 *1
*1 This unit can play CD-R and CD-RW discs recorded in CDAudio or Video CD format, or with MP3 audio files.
MP3 compatibility information
• The CD-ROM must be ISO 9660 compatible.• Files should be MPEG1 Audio Layer 3 format, 44.1 or
48kHz, fixed bit-rate. Incompatible files will not play and“UNPLAYABLE MP3 FORMAT” will be displayed.
• Not compatible with variable bit-rate (VBR) files.• This system only plays tracks that are named with the file
extension “.mp3” or “.MP3”.• This system is not compatible with multi-session discs. If
you try an play a multi-session disc, only the first sessionwill be played.
• Use CD-R or CD-RW media for recording your MP3 files.The disc must be finalized in order to play.
• Audio encoded at 128Kbps should sound close to regularaudio CD quality. Although this system will play lower bit-rate MP3 tracks, the sound quality becomes noticeablyworse at lower bit-rates.
• Only the first 8 characters of folder and track names(excluding the “.mp3” extension) are displayed.
• This system can recognize a maximum of 250 folders and250 tracks. Discs containing more than 250 folders or trackswill not play.
Notes on Copyright
It is forbidden by law to copy, broadcast, show, broadcast oncable, play in public, and rent copyrighted material withoutpermission.DVD videos are copy protected, and any recordings made fromthese discs will be distorted.This product incorporates copyright protection technology that isprotected by method claims of certain U.S. patents and otherintellectual property rights owned by Macrovision Corporationand other rights owners. Use of this copyright protectiontechnology must be authorized by Macrovision Corporation, andis intended for home and other limited viewing uses only unlessotherwise authorized by Macrovision Corporation. Reverseengineering or disassembly is prohibited.
Track 1 Track 2 Track 3 Track 4 Track 5
The Structure of the Disc Content
DVD-VideoNormally, the contents of DVD-Video are divided into titles,and the titles are subdivided into chapters.
Video CD/CDVideo CD and CD are divided into tracks.
Title 1 Title 2
Chapter 2Chapter 2 Chapter 1Chapter 1 Chapter 3
6
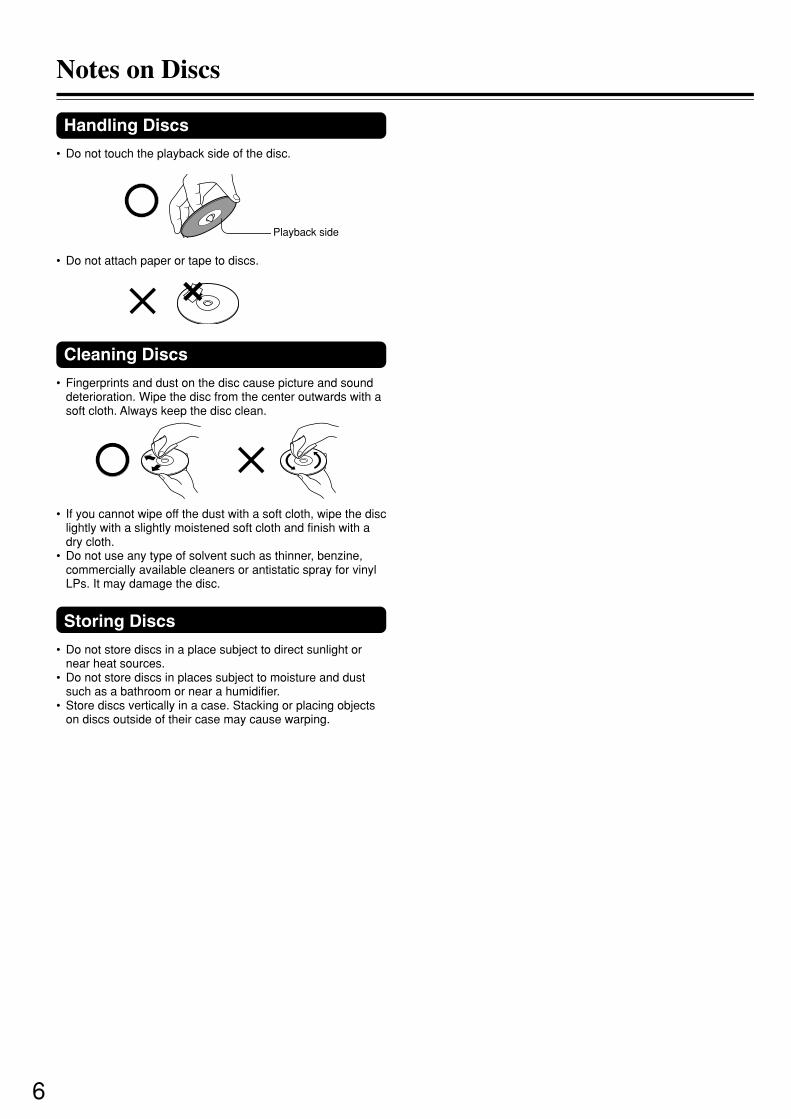
Playback side
Cleaning Discs
• Fingerprints and dust on the disc cause picture and sounddeterioration. Wipe the disc from the center outwards with asoft cloth. Always keep the disc clean.
• If you cannot wipe off the dust with a soft cloth, wipe the disclightly with a slightly moistened soft cloth and finish with adry cloth.
• Do not use any type of solvent such as thinner, benzine,commercially available cleaners or antistatic spray for vinylLPs. It may damage the disc.
Storing Discs
• Do not store discs in a place subject to direct sunlight ornear heat sources.
• Do not store discs in places subject to moisture and dustsuch as a bathroom or near a humidifier.
• Store discs vertically in a case. Stacking or placing objectson discs outside of their case may cause warping.
Handling Discs
• Do not touch the playback side of the disc.
• Do not attach paper or tape to discs.
Notes on Discs
7
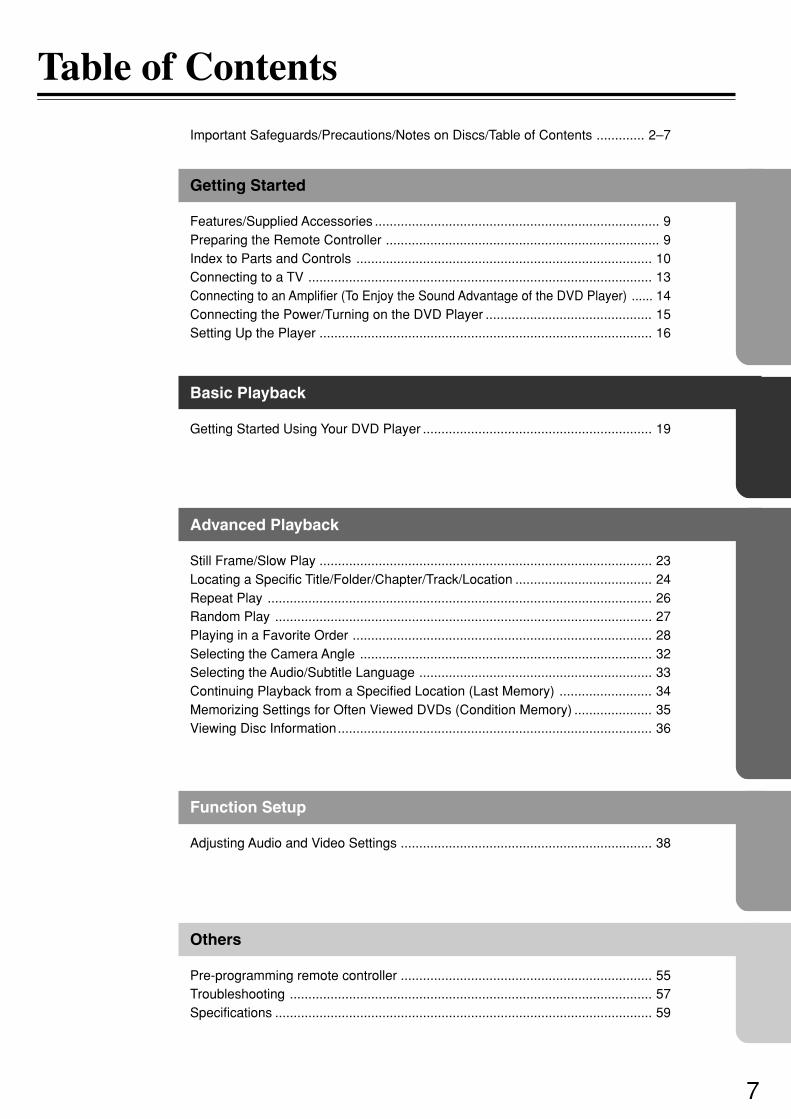
Table of Contents
Important Safeguards/Precautions/Notes on Discs/Table of Contents ............. 2–7
Getting Started
Features/Supplied Accessories ............................................................................. 9Preparing the Remote Controller .......................................................................... 9Index to Parts and Controls ................................................................................ 10Connecting to a TV ............................................................................................. 13Connecting to an Amplifier (To Enjoy the Sound Advantage of the DVD Player) ...... 14Connecting the Power/Turning on the DVD Player ............................................. 15Setting Up the Player .......................................................................................... 16
Basic Playback
Getting Started Using Your DVD Player .............................................................. 19
Advanced Playback
Still Frame/Slow Play .......................................................................................... 23Locating a Specific Title/Folder/Chapter/Track/Location ..................................... 24Repeat Play ........................................................................................................ 26Random Play ...................................................................................................... 27Playing in a Favorite Order ................................................................................. 28Selecting the Camera Angle ............................................................................... 32Selecting the Audio/Subtitle Language ............................................................... 33Continuing Playback from a Specified Location (Last Memory) ......................... 34Memorizing Settings for Often Viewed DVDs (Condition Memory) ..................... 35Viewing Disc Information..................................................................................... 36
Function Setup
Adjusting Audio and Video Settings .................................................................... 38
Others
Pre-programming remote controller .................................................................... 55Troubleshooting .................................................................................................. 57Specifications ...................................................................................................... 59
8
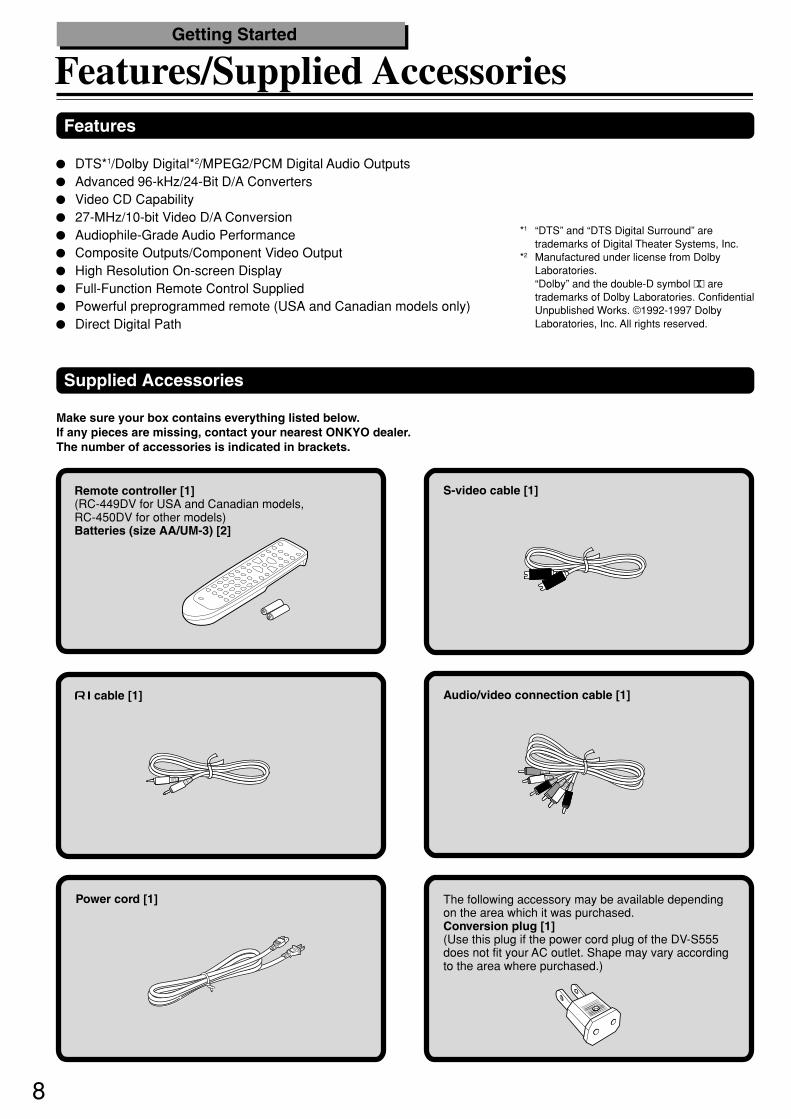
Features/Supplied Accessories
Remote controller [1](RC-449DV for USA and Canadian models,RC-450DV for other models)Batteries (size AA/UM-3) [2]
Getting Started
*1 “DTS” and “DTS Digital Surround” aretrademarks of Digital Theater Systems, Inc.
*2 Manufactured under license from DolbyLaboratories.“Dolby” and the double-D symbol Ÿ aretrademarks of Dolby Laboratories. ConfidentialUnpublished Works. ©1992-1997 DolbyLaboratories, Inc. All rights reserved.
Audio/video connection cable [1]
Supplied Accessories
Make sure your box contains everything listed below.If any pieces are missing, contact your nearest ONKYO dealer.The number of accessories is indicated in brackets.
Features
DTS*1/Dolby Digital*2/MPEG2/PCM Digital Audio OutputsAdvanced 96-kHz/24-Bit D/A ConvertersVideo CD Capability27-MHz/10-bit Video D/A ConversionAudiophile-Grade Audio PerformanceComposite Outputs/Component Video OutputHigh Resolution On-screen DisplayFull-Function Remote Control SuppliedPowerful preprogrammed remote (USA and Canadian models only)Direct Digital Path
Power cord [1]
S-video cable [1]
z cable [1]
The following accessory may be available dependingon the area which it was purchased.Conversion plug [1](Use this plug if the power cord plug of the DV-S555does not fit your AC outlet. Shape may vary accordingto the area where purchased.)
9
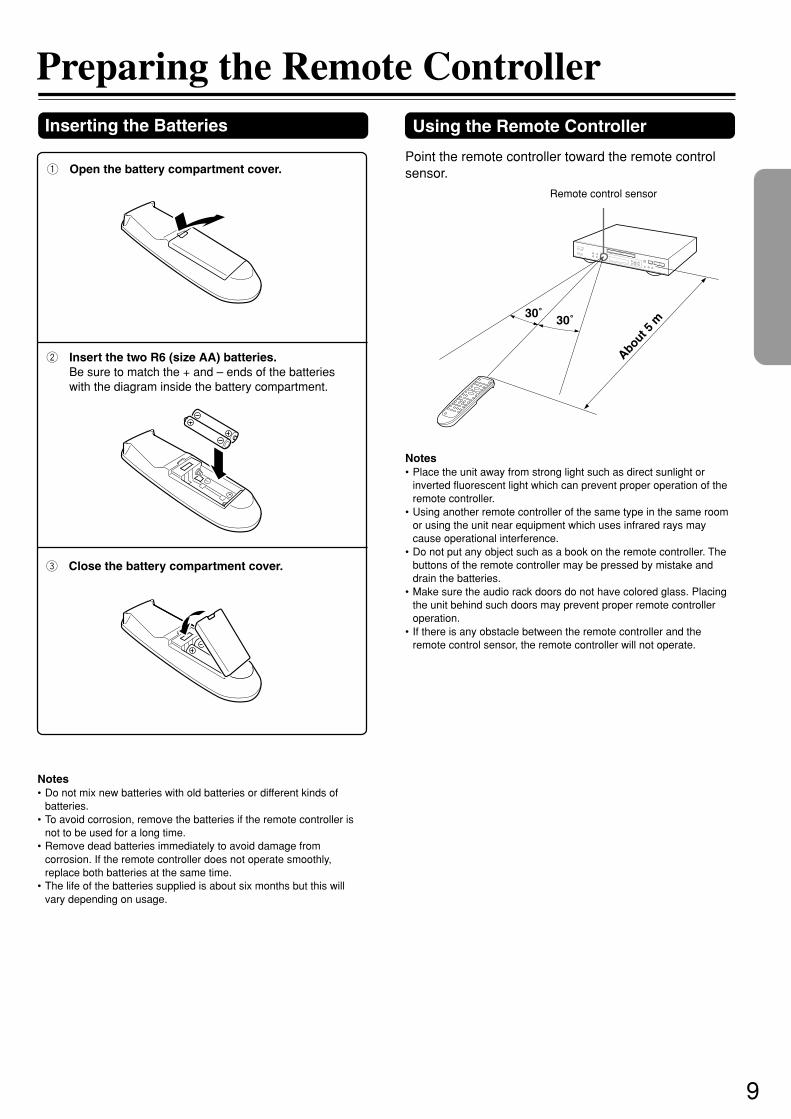
Preparing the Remote Controller
Notes• Do not mix new batteries with old batteries or different kinds of
batteries.• To avoid corrosion, remove the batteries if the remote controller is
not to be used for a long time.• Remove dead batteries immediately to avoid damage from
corrosion. If the remote controller does not operate smoothly,replace both batteries at the same time.
• The life of the batteries supplied is about six months but this willvary depending on usage.
30˚30˚
About
5 m
Remote control sensor
1 Open the battery compartment cover.
2 Insert the two R6 (size AA) batteries.Be sure to match the + and – ends of the batterieswith the diagram inside the battery compartment.
3 Close the battery compartment cover.
Inserting the Batteries Using the Remote Controller
Point the remote controller toward the remote controlsensor.
Notes• Place the unit away from strong light such as direct sunlight or
inverted fluorescent light which can prevent proper operation of theremote controller.
• Using another remote controller of the same type in the same roomor using the unit near equipment which uses infrared rays maycause operational interference.
• Do not put any object such as a book on the remote controller. Thebuttons of the remote controller may be pressed by mistake anddrain the batteries.
• Make sure the audio rack doors do not have colored glass. Placingthe unit behind such doors may prevent proper remote controlleroperation.
• If there is any obstacle between the remote controller and theremote control sensor, the remote controller will not operate.
10
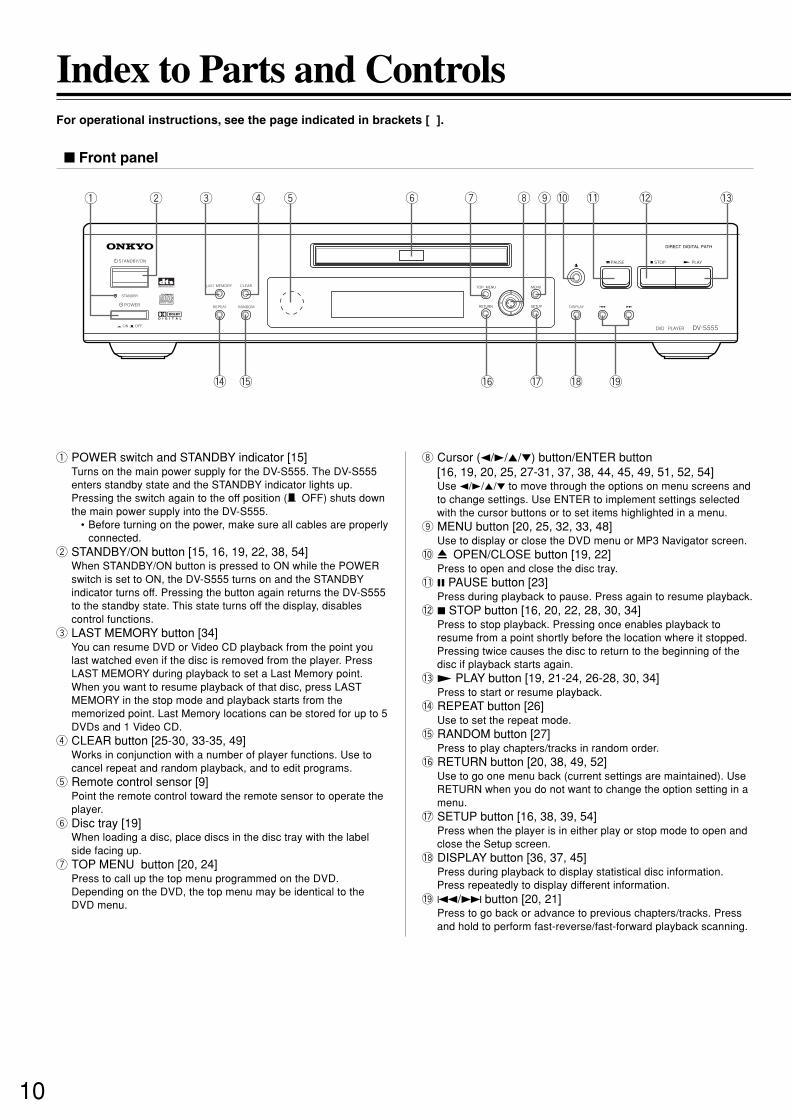
Index to Parts and ControlsFor operational instructions, see the page indicated in brackets [ ].
Front panel
1 2 3
! @ # $ % ^
4 5 6 7 8 9 0 - = ~
1 POWER switch and STANDBY indicator [15]Turns on the main power supply for the DV-S555. The DV-S555enters standby state and the STANDBY indicator lights up.Pressing the switch again to the off position (— OFF) shuts downthe main power supply into the DV-S555.
• Before turning on the power, make sure all cables are properlyconnected.
2 STANDBY/ON button [15, 16, 19, 22, 38, 54]When STANDBY/ON button is pressed to ON while the POWERswitch is set to ON, the DV-S555 turns on and the STANDBYindicator turns off. Pressing the button again returns the DV-S555to the standby state. This state turns off the display, disablescontrol functions.
3 LAST MEMORY button [34]You can resume DVD or Video CD playback from the point youlast watched even if the disc is removed from the player. PressLAST MEMORY during playback to set a Last Memory point.When you want to resume playback of that disc, press LASTMEMORY in the stop mode and playback starts from thememorized point. Last Memory locations can be stored for up to 5DVDs and 1 Video CD.
4 CLEAR button [25-30, 33-35, 49]Works in conjunction with a number of player functions. Use tocancel repeat and random playback, and to edit programs.
5 Remote control sensor [9]Point the remote control toward the remote sensor to operate theplayer.
6 Disc tray [19]When loading a disc, place discs in the disc tray with the labelside facing up.
7 TOP MENU button [20, 24]Press to call up the top menu programmed on the DVD.Depending on the DVD, the top menu may be identical to theDVD menu.
8 Cursor (2/3/5/∞) button/ENTER button[16, 19, 20, 25, 27-31, 37, 38, 44, 45, 49, 51, 52, 54]Use 2/3/5/∞ to move through the options on menu screens andto change settings. Use ENTER to implement settings selectedwith the cursor buttons or to set items highlighted in a menu.
9 MENU button [20, 25, 32, 33, 48]Use to display or close the DVD menu or MP3 Navigator screen.
0 0 OPEN/CLOSE button [19, 22]Press to open and close the disc tray.
- 8 PAUSE button [23]Press during playback to pause. Press again to resume playback.
= 7 STOP button [16, 20, 22, 28, 30, 34]Press to stop playback. Pressing once enables playback toresume from a point shortly before the location where it stopped.Pressing twice causes the disc to return to the beginning of thedisc if playback starts again.
~ £ PLAY button [19, 21-24, 26-28, 30, 34]Press to start or resume playback.
! REPEAT button [26]Use to set the repeat mode.
@ RANDOM button [27]Press to play chapters/tracks in random order.
# RETURN button [20, 38, 49, 52]Use to go one menu back (current settings are maintained). UseRETURN when you do not want to change the option setting in amenu.
$ SETUP button [16, 38, 39, 54]Press when the player is in either play or stop mode to open andclose the Setup screen.
% DISPLAY button [36, 37, 45]Press during playback to display statistical disc information.Press repeatedly to display different information.
^ 4/¢ button [20, 21]Press to go back or advance to previous chapters/tracks. Pressand hold to perform fast-reverse/fast-forward playback scanning.
11
Rear panel
Display
TITLE CHAPTER TRACK REMAIN
LAST
COND.
DTS
REPEATDVD VC D
D
GUI
1 2 3 4 5 6 7 8 9
~=-0
L
MONO
R
VIDEOOUTPUT
Y
PB
P R
COMPONENT
OPTICAL COAXIAL
AC INLET
REMOTE CONTROL
ANALOGOUTPUT
DIGITALOUTPUT
VIDEO
S VIDEO
DV-S555DVD PLAYER
21 3 4 5 6 7 8
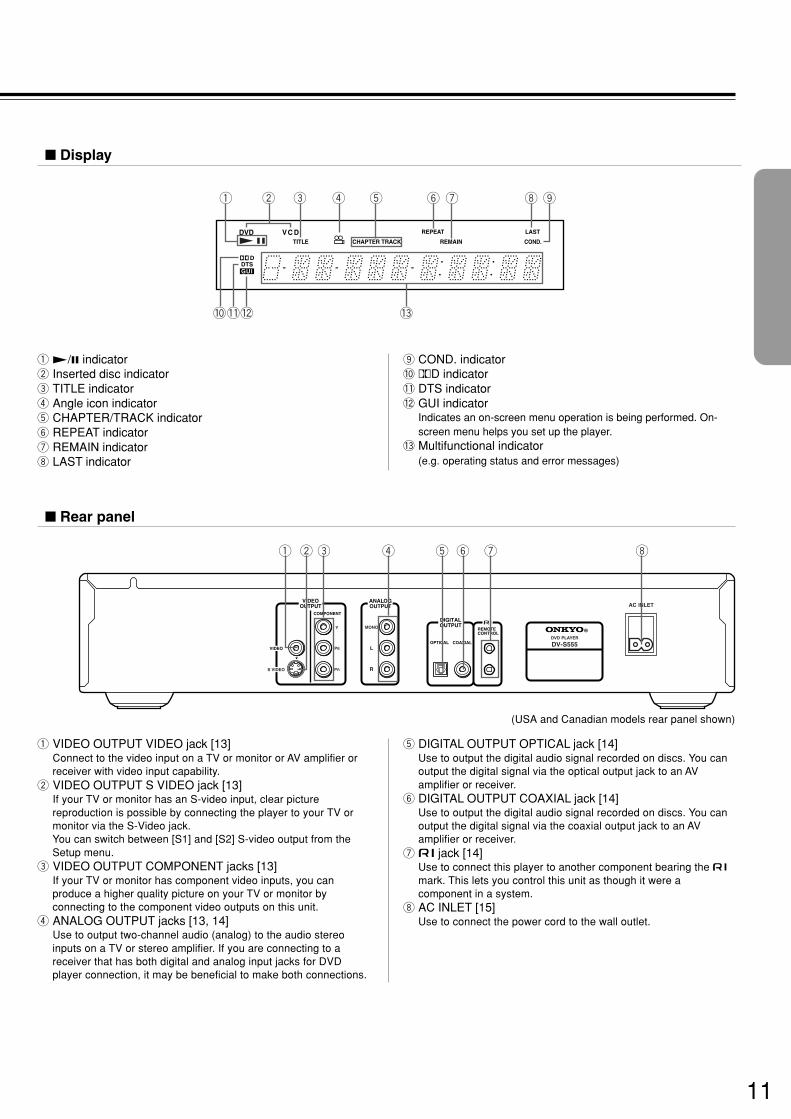
1 £/8 indicator2 Inserted disc indicator3 TITLE indicator4 Angle icon indicator5 CHAPTER/TRACK indicator6 REPEAT indicator7 REMAIN indicator8 LAST indicator
9 COND. indicator0 ŸD indicator- DTS indicator= GUI indicator
Indicates an on-screen menu operation is being performed. On-screen menu helps you set up the player.
~ Multifunctional indicator(e.g. operating status and error messages)
1 VIDEO OUTPUT VIDEO jack [13]Connect to the video input on a TV or monitor or AV amplifier orreceiver with video input capability.
2 VIDEO OUTPUT S VIDEO jack [13]If your TV or monitor has an S-video input, clear picturereproduction is possible by connecting the player to your TV ormonitor via the S-Video jack.You can switch between [S1] and [S2] S-video output from theSetup menu.
3 VIDEO OUTPUT COMPONENT jacks [13]If your TV or monitor has component video inputs, you canproduce a higher quality picture on your TV or monitor byconnecting to the component video outputs on this unit.
4 ANALOG OUTPUT jacks [13, 14]Use to output two-channel audio (analog) to the audio stereoinputs on a TV or stereo amplifier. If you are connecting to areceiver that has both digital and analog input jacks for DVDplayer connection, it may be beneficial to make both connections.
5 DIGITAL OUTPUT OPTICAL jack [14]Use to output the digital audio signal recorded on discs. You canoutput the digital signal via the optical output jack to an AVamplifier or receiver.
6 DIGITAL OUTPUT COAXIAL jack [14]Use to output the digital audio signal recorded on discs. You canoutput the digital signal via the coaxial output jack to an AVamplifier or receiver.
7 z jack [14]Use to connect this player to another component bearing the zmark. This lets you control this unit as though it were acomponent in a system.
8 AC INLET [15]Use to connect the power cord to the wall outlet.
(USA and Canadian models rear panel shown)

12
Index to Parts and Controls
Remote controller (The illustration shows the RC-449DV remote controller.)
LAST M COND. M DIMMER DISPLAY
STANDBY
ON
ANGLE AUDIO SUBTITLE
MENUTOP MENU
SETUPRETURN
STOPPAUSE
FUNCTION M
OPEN / CLOSE
DOWN UPFR FF
CLEAR
PROGRAMRANDOM REPEAT A-B
STEP/ SLOW
SEARCH
REMOTE CONTROLLER RC-449DV
PLAY
2 3
4 5 6
7 8 9
1
0+10
+
-
ENTER
TVON / STANDBY
VOL +
VOL -
TV/ VCR
CH +CH -
TVDVD
1 @
#$
%^
&*
(
)_
+
¡
™£
¢
§
∞
23
45
6
7
89
0-
=
~!
1 ON button [15, 16, 19, 22, 38, 55]Press to switch the player on.
2 STANDBY button [15, 22, 34, 55]Press to put the player in standby.
3 ANGLE button [32]Some DVDs are recorded with various camera angle playbackoptions. Press ANGLE repeatedly to display different cameraangles.
4 LAST MEMORY button [34]You can resume DVD or Video CD playback from the point youlast watched even if the disc is removed from the player. PressLAST MEMORY during playback to set a Last Memory point.When you want to resume playback of that disc, press LASTMEMORY in the stop mode and playback starts from thememorized point. Last Memory locations can be stored for up to 5DVDs and 1 Video CD.
5 COND. M button [35]You can store in memory the settings for up to 15 DVDs. PressCOND. M during DVD playback to memorize the settings.
6 TOP MENU button* [20, 24]Press to call up the top menu programmed on the DVD.Depending on the DVD, the top menu may be identical to the DVDmenu.
7 Cursor buttons (2/3/5/∞)* [16, 19, 20, 25, 28-31, 37, 38]VOL +/– buttons [55] (USA and Canadian models only)Use to move through the options on menu screens and to changesettings.
8 RETURN button* [20, 38, 49, 52]TV/VCR button [55] (USA and Canadian models only)Use to go one menu back (current settings are maintained). UseRETURN when you do not want to change the option setting in amenu.
9 PAUSE 8 button [23]Press to pause playback of a disc. Press again to resumeplayback.
0 STOP 7 button [16, 20, 22, 28, 30, 34]Press to stop playback. Pressing once enables playback toresume from a point shortly before the location where it wasstopped. Pressing twice causes the disc to return to the beginningof the disc when playback starts again.
- FR/FF 1/¡ buttons [21]During playback of DVD and Video CD, press ¡ to perform fastforward scanning or 1 to perform fast reverse scanning of DVDand Video CD. When a CD or MP3 is loaded, audio scanning isperformed.
= Number buttons (1-9, 0, +10)* [19-21, 24-30, 49, 51, 52, 55]Use to perform direct title/folder and chapter/track searches, andto input numerical values.
~ RANDOM button [27]Press to play chapters/tracks in random order.
! REPEAT button [26]Use to set the repeat mode.
@ OPEN/CLOSE 0 button [19, 22]Press to open or close the disc tray.
# SUBTITLE button [33, 48, 49]Press repeatedly to select one of the subtitle languagesprogrammed on a DVD or to turn the subtitles off.
$ AUDIO button [33, 47]Press repeatedly to select one of the audio languagesprogrammed on a DVD.For Video CD, CD and MP3, each press changes the audiooutput as follows. → Stereo → 1L(Left) → 2/R(Right)
% DISPLAY button [36, 37, 45]Press during playback to display statistical disc information.Press repeatedly to display different information.
^ DIMMER button [37]Toggle to control the lightness of the display.
& MENU button* [20, 25, 32, 33, 48]Use to display or close the DVD menu or MP3 Navigator screen.
* ENTER button*[16, 19, 20, 25, 27-31, 38, 44, 45, 49, 51, 52, 54, 55]Use to implement settings selected with the cursor buttons or toset items highlighted in a menu.
( SETUP button* [16, 38, 39, 54]Press when the player is in either play or stop mode to open andclose the Setup screen.
) PLAY £ [19, 21-24, 26-28, 30, 34]Press to start or resume playback.
_ UP/DOWN 4/¢ [20, 21]During playback, press 4 to go back to a previous chapter/trackand ¢ to advance to the next chapter/track .
+ STEP/SLOW +/– buttons [23]Press STEP/SLOW + or – during playback to view still frame.Press and hold STEP/SLOW + or – during playback to view slowplayback. In still frame, press STEP/SLOW + to advance DVDsand Video CDs frame by frame and STEP/SLOW – to back up afew frames at a time (DVD only).
¡ FUNCTION M button [54]You can store in memory up to 5 settings. Press FUNCTION M tomemorize and recall the settings.
™ CLEAR button [25-30, 33-35, 49]Works in conjunction with a number of player functions. Use tocancel repeat and random playback, and to edit programs.
£ SEARCH button [24]Press to perform a title/folder, chapter/track or elapsed timesearch.
¢ PROGRAM button [25, 28-31]You can program titles, chapters, or tracks to play back in adesired order. Programs can be a maximum of 24 steps.Additionally, DVD programs for up to 24 discs can be stored inthe player’s memory for future use.
∞ A-B button [26]Press at the beginning and end of the section you want to repeator to mark a location you want to return to.
§ DVD/TV switch (USA and Canadian models only) [55]
(Buttons indicated with * are used for menu operation.)
13
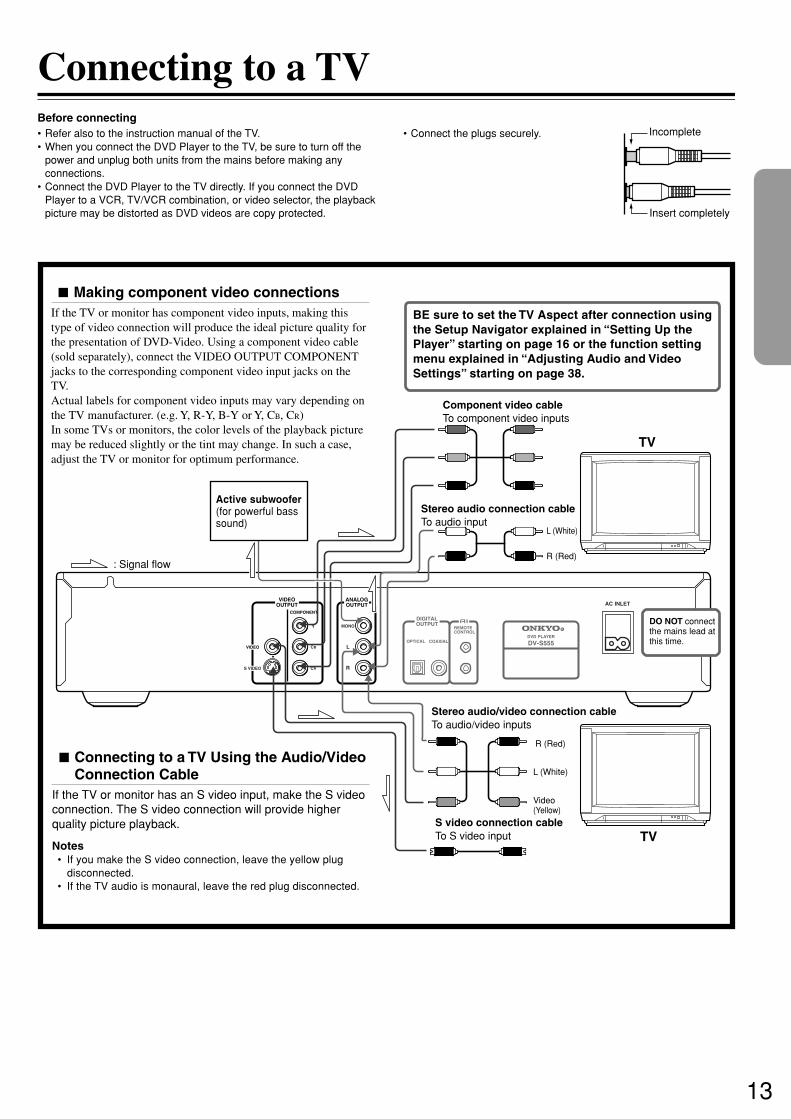
Connecting to a TVBefore connecting• Refer also to the instruction manual of the TV.• When you connect the DVD Player to the TV, be sure to turn off the
power and unplug both units from the mains before making anyconnections.
• Connect the DVD Player to the TV directly. If you connect the DVDPlayer to a VCR, TV/VCR combination, or video selector, the playbackpicture may be distorted as DVD videos are copy protected.
• Connect the plugs securely. Incomplete
Insert completely
TV
: Signal flow
Making component video connectionsIf the TV or monitor has component video inputs, making thistype of video connection will produce the ideal picture quality forthe presentation of DVD-Video. Using a component video cable(sold separately), connect the VIDEO OUTPUT COMPONENTjacks to the corresponding component video input jacks on theTV.Actual labels for component video inputs may vary depending onthe TV manufacturer. (e.g. Y, R-Y, B-Y or Y, CB, CR)In some TVs or monitors, the color levels of the playback picturemay be reduced slightly or the tint may change. In such a case,adjust the TV or monitor for optimum performance.
BE sure to set the TV Aspect after connection usingthe Setup Navigator explained in “Setting Up thePlayer” starting on page 16 or the function settingmenu explained in “Adjusting Audio and VideoSettings” starting on page 38.
Stereo audio connection cableTo audio input
L (White)
R (Red)
Component video cableTo component video inputs
L
MONO
R
VIDEOOUTPUT
Y
C B
C R
COMPONENT
OPTICAL COAXIAL
AC INLET
REMOTE CONTROL
ANALOGOUTPUT
DIGITALOUTPUT
VIDEO
S VIDEO
DV-S555DVD PLAYER
DO NOT connectthe mains lead atthis time.
Connecting to a TV Using the Audio/VideoConnection Cable
If the TV or monitor has an S video input, make the S videoconnection. The S video connection will provide higherquality picture playback.
Notes• If you make the S video connection, leave the yellow plug
disconnected.• If the TV audio is monaural, leave the red plug disconnected.
S video connection cableTo S video input
Stereo audio/video connection cableTo audio/video inputs
Video(Yellow)
L (White)
R (Red)
TV
Active subwoofer(for powerful basssound)
14
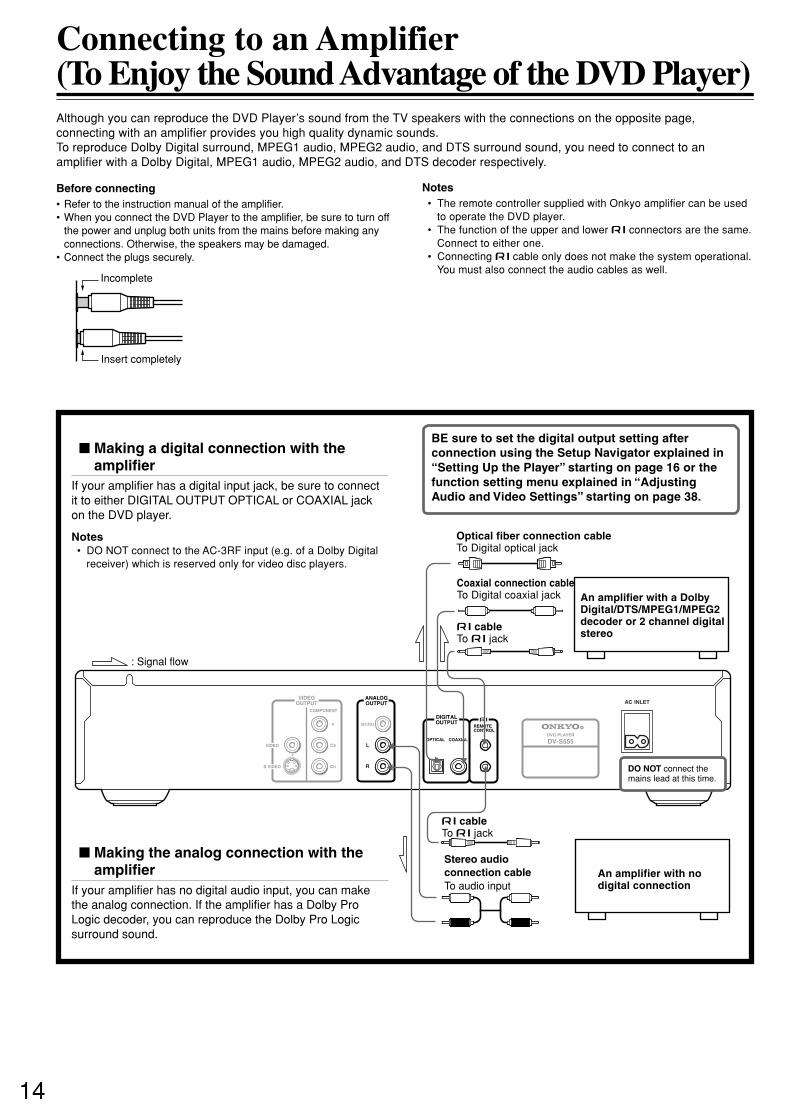
Connecting to an Amplifier(To Enjoy the Sound Advantage of the DVD Player)
Before connecting• Refer to the instruction manual of the amplifier.• When you connect the DVD Player to the amplifier, be sure to turn off
the power and unplug both units from the mains before making anyconnections. Otherwise, the speakers may be damaged.
• Connect the plugs securely.
Notes• The remote controller supplied with Onkyo amplifier can be used
to operate the DVD player.• The function of the upper and lower z connectors are the same.
Connect to either one.• Connecting z cable only does not make the system operational.
You must also connect the audio cables as well.
Making a digital connection with theamplifier
If your amplifier has a digital input jack, be sure to connectit to either DIGITAL OUTPUT OPTICAL or COAXIAL jackon the DVD player.
Notes• DO NOT connect to the AC-3RF input (e.g. of a Dolby Digital
receiver) which is reserved only for video disc players.
Making the analog connection with theamplifier
If your amplifier has no digital audio input, you can makethe analog connection. If the amplifier has a Dolby ProLogic decoder, you can reproduce the Dolby Pro Logicsurround sound.
An amplifier with a DolbyDigital/DTS/MPEG1/MPEG2decoder or 2 channel digitalstereo
Although you can reproduce the DVD Player’s sound from the TV speakers with the connections on the opposite page,connecting with an amplifier provides you high quality dynamic sounds.To reproduce Dolby Digital surround, MPEG1 audio, MPEG2 audio, and DTS surround sound, you need to connect to anamplifier with a Dolby Digital, MPEG1 audio, MPEG2 audio, and DTS decoder respectively.
An amplifier with nodigital connection
: Signal flow
Optical fiber connection cableTo Digital optical jack
Incomplete
Insert completely
L
MONO
R
VIDEOOUTPUT
Y
C B
C R
COMPONENT
OPTICAL COAXIAL
AC INLET
REMOTE CONTROL
ANALOGOUTPUT
DIGITALOUTPUT
VIDEO
S VIDEO
DV-S555DVD PLAYER
Stereo audioconnection cableTo audio input
Coaxial connection cableTo Digital coaxial jack
z cableTo z jack
z cableTo z jack
DO NOT connect themains lead at this time.
BE sure to set the digital output setting afterconnection using the Setup Navigator explained in“Setting Up the Player” starting on page 16 or thefunction setting menu explained in “AdjustingAudio and Video Settings” starting on page 38.
15
Before connecting• The DV-S555 is shipped with the main power (POWER)
switch in the on position (_ ON). When the power cord isplugged in for the first time, the DV-S555 will automaticallyenter the standby state and the STANDBY indicator willlight (same condition after step 2 below).
• Make sure that all the connections on pages 13 and 14 arecomplete (the connection to a TV is required).
Connecting the Power/Turning on the DVD Player
AC INLET
1
2
3
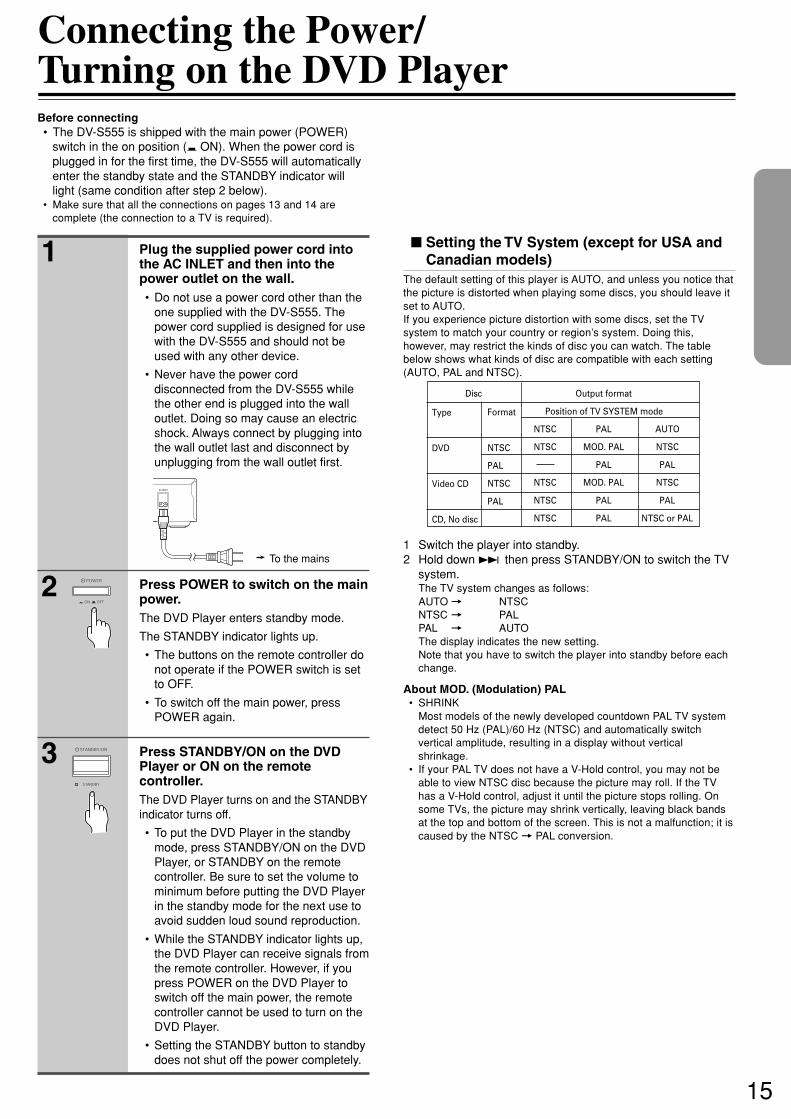
Plug the supplied power cord intothe AC INLET and then into thepower outlet on the wall.• Do not use a power cord other than the
one supplied with the DV-S555. Thepower cord supplied is designed for usewith the DV-S555 and should not beused with any other device.
• Never have the power corddisconnected from the DV-S555 whilethe other end is plugged into the walloutlet. Doing so may cause an electricshock. Always connect by plugging intothe wall outlet last and disconnect byunplugging from the wall outlet first.
Press POWER to switch on the mainpower.The DVD Player enters standby mode.
The STANDBY indicator lights up.
• The buttons on the remote controller donot operate if the POWER switch is setto OFF.
• To switch off the main power, pressPOWER again.
Press STANDBY/ON on the DVDPlayer or ON on the remotecontroller.The DVD Player turns on and the STANDBYindicator turns off.
• To put the DVD Player in the standbymode, press STANDBY/ON on the DVDPlayer, or STANDBY on the remotecontroller. Be sure to set the volume tominimum before putting the DVD Playerin the standby mode for the next use toavoid sudden loud sound reproduction.
• While the STANDBY indicator lights up,the DVD Player can receive signals fromthe remote controller. However, if youpress POWER on the DVD Player toswitch off the main power, the remotecontroller cannot be used to turn on theDVD Player.
• Setting the STANDBY button to standbydoes not shut off the power completely.
To the mains
Setting the TV System (except for USA andCanadian models)
The default setting of this player is AUTO, and unless you notice thatthe picture is distorted when playing some discs, you should leave itset to AUTO.If you experience picture distortion with some discs, set the TVsystem to match your country or region’s system. Doing this,however, may restrict the kinds of disc you can watch. The tablebelow shows what kinds of disc are compatible with each setting(AUTO, PAL and NTSC).
1 Switch the player into standby.2 Hold down ¢ then press STANDBY/ON to switch the TV
system.The TV system changes as follows:AUTO = NTSCNTSC = PALPAL = AUTOThe display indicates the new setting.Note that you have to switch the player into standby before eachchange.
About MOD. (Modulation) PAL• SHRINK
Most models of the newly developed countdown PAL TV systemdetect 50 Hz (PAL)/60 Hz (NTSC) and automatically switchvertical amplitude, resulting in a display without verticalshrinkage.
• If your PAL TV does not have a V-Hold control, you may not beable to view NTSC disc because the picture may roll. If the TVhas a V-Hold control, adjust it until the picture stops rolling. Onsome TVs, the picture may shrink vertically, leaving black bandsat the top and bottom of the screen. This is not a malfunction; it iscaused by the NTSC = PAL conversion.
Type
DVD
Video CD
CD, No disc
Format
NTSC
PAL
NTSC
PAL
Disc Output format
Position of TV SYSTEM mode
NTSC PAL AUTO
NTSC MOD. PAL NTSC
PAL PAL
NTSC MOD. PAL NTSC
NTSC PAL PAL
NTSC PAL NTSC or PAL
16
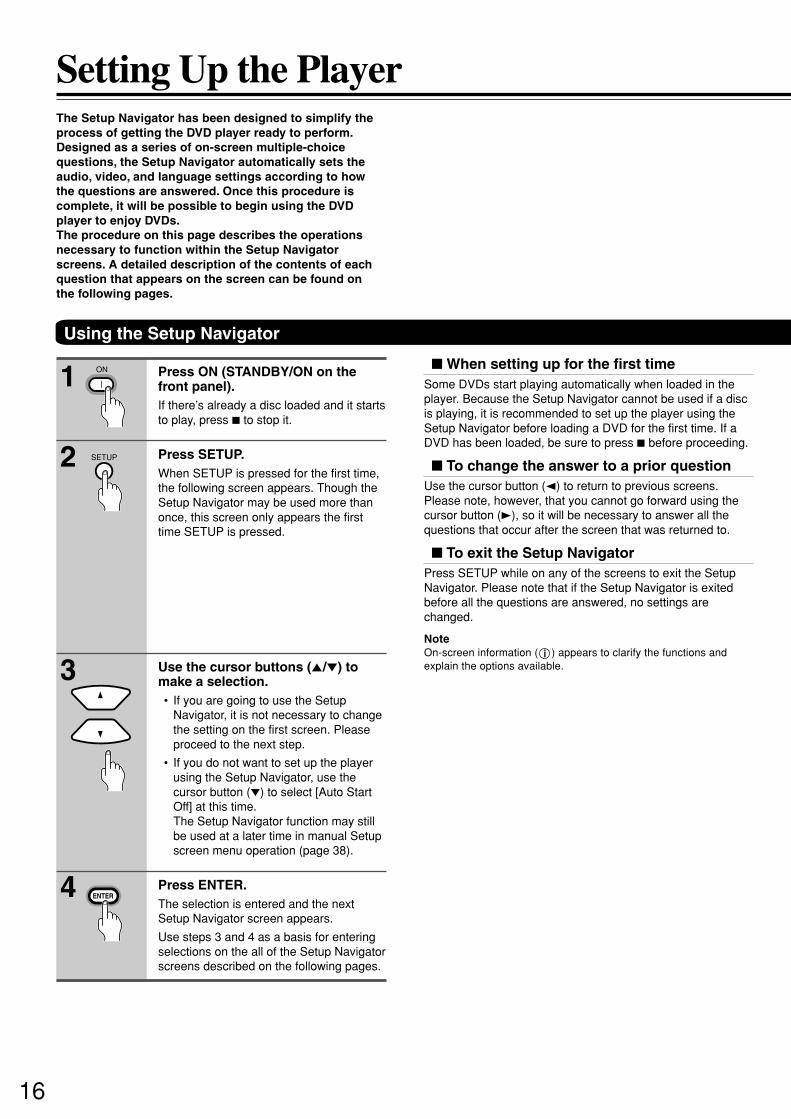
Setting Up the PlayerThe Setup Navigator has been designed to simplify theprocess of getting the DVD player ready to perform.Designed as a series of on-screen multiple-choicequestions, the Setup Navigator automatically sets theaudio, video, and language settings according to howthe questions are answered. Once this procedure iscomplete, it will be possible to begin using the DVDplayer to enjoy DVDs.The procedure on this page describes the operationsnecessary to function within the Setup Navigatorscreens. A detailed description of the contents of eachquestion that appears on the screen can be found onthe following pages.
Press ON (STANDBY/ON on thefront panel).If there’s already a disc loaded and it startsto play, press 7 to stop it.
Press SETUP.When SETUP is pressed for the first time,the following screen appears. Though theSetup Navigator may be used more thanonce, this screen only appears the firsttime SETUP is pressed.
Use the cursor buttons (5/∞) tomake a selection.• If you are going to use the Setup
Navigator, it is not necessary to changethe setting on the first screen. Pleaseproceed to the next step.
• If you do not want to set up the playerusing the Setup Navigator, use thecursor button (∞) to select [Auto StartOff] at this time.The Setup Navigator function may stillbe used at a later time in manual Setupscreen menu operation (page 38).
Press ENTER.The selection is entered and the nextSetup Navigator screen appears.
Use steps 3 and 4 as a basis for enteringselections on the all of the Setup Navigatorscreens described on the following pages.
When setting up for the first timeSome DVDs start playing automatically when loaded in theplayer. Because the Setup Navigator cannot be used if a discis playing, it is recommended to set up the player using theSetup Navigator before loading a DVD for the first time. If aDVD has been loaded, be sure to press 7 before proceeding.
To change the answer to a prior questionUse the cursor button (2) to return to previous screens.Please note, however, that you cannot go forward using thecursor button (3), so it will be necessary to answer all thequestions that occur after the screen that was returned to.
To exit the Setup NavigatorPress SETUP while on any of the screens to exit the SetupNavigator. Please note that if the Setup Navigator is exitedbefore all the questions are answered, no settings arechanged.
NoteOn-screen information ( i ) appears to clarify the functions andexplain the options available.
2
1
3
4
Using the Setup Navigator
ON
SETUP
ENTER
17
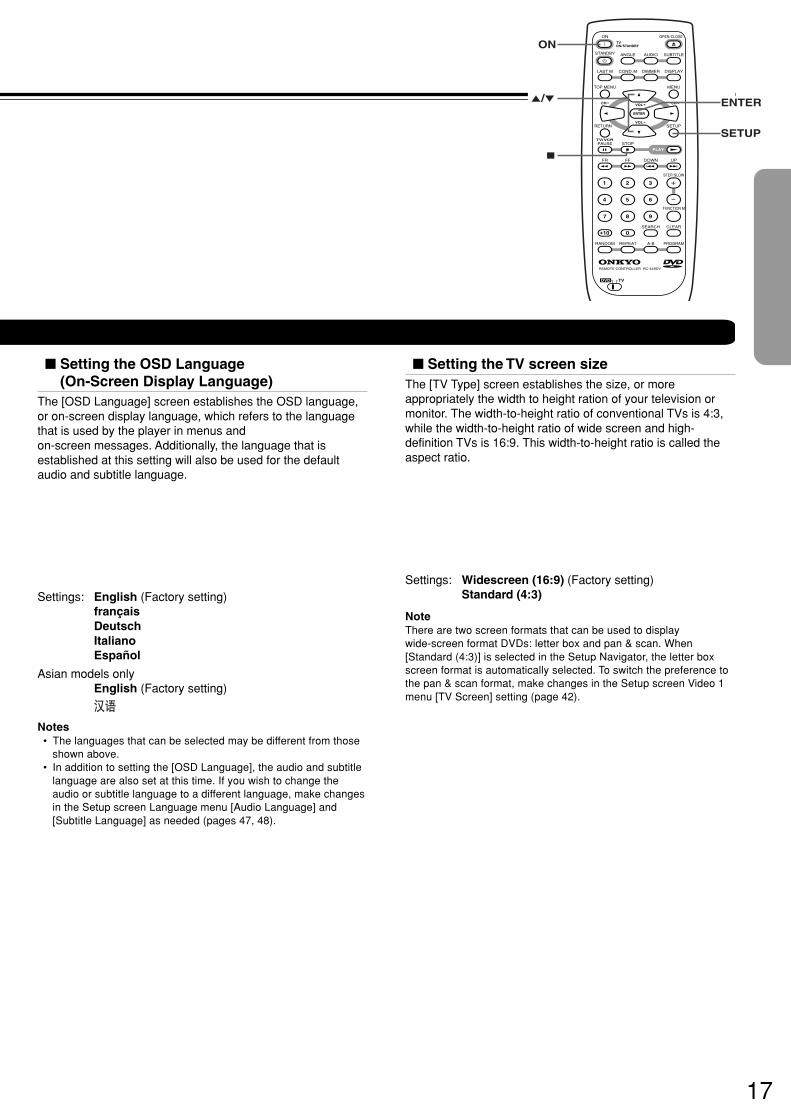
Setting the OSD Language(On-Screen Display Language)
The [OSD Language] screen establishes the OSD language,or on-screen display language, which refers to the languagethat is used by the player in menus andon-screen messages. Additionally, the language that isestablished at this setting will also be used for the defaultaudio and subtitle language.
Settings: English (Factory setting)françaisDeutschItalianoEspañol
Asian models onlyEnglish (Factory setting)
Notes• The languages that can be selected may be different from those
shown above.• In addition to setting the [OSD Language], the audio and subtitle
language are also set at this time. If you wish to change theaudio or subtitle language to a different language, make changesin the Setup screen Language menu [Audio Language] and[Subtitle Language] as needed (pages 47, 48).
Settings: Widescreen (16:9) (Factory setting)Standard (4:3)
NoteThere are two screen formats that can be used to displaywide-screen format DVDs: letter box and pan & scan. When[Standard (4:3)] is selected in the Setup Navigator, the letter boxscreen format is automatically selected. To switch the preference tothe pan & scan format, make changes in the Setup screen Video 1menu [TV Screen] setting (page 42).
Setting the TV screen sizeThe [TV Type] screen establishes the size, or moreappropriately the width to height ration of your television ormonitor. The width-to-height ratio of conventional TVs is 4:3,while the width-to-height ratio of wide screen and high-definition TVs is 16:9. This width-to-height ratio is called theaspect ratio.
LAST M COND. M DIMMER DISPLAY
STANDBY
ON
ANGLE AUDIO SUBTITLE
MENUTOP MENU
SETUPRETURN
STOPPAUSE
FUNCTION M
OPEN / CLOSE
DOWN UPFR FF
CLEAR
PROGRAMRANDOM REPEAT A-B
STEP/ SLOW
SEARCH
REMOTE CONTROLLER RC-449DV
PLAY
2 3
4 5 6
7 8 9
1
0+10
+
-
ENTER
TVON / STANDBY
VOL +
VOL -
TV/ VCR
CH +CH -
TVDVD
ON
SETUP
ENTER
7
5/∞
18
Confirming the settingsThe [Exit Setup Navigator] is the final screen in the SetupNavigator.
Settings: Save Changes (Factory setting)Select to have the player make all of the necessaryaudio, video and language settings according toyour responses in the Setup Navigator.
Delete ChangesSelect to exit the Setup Navigator without changingany of the system settings.
Start AgainSelect to return to the [OSD Language] screen ofthe Setup Navigator and do the settings again.
To change other player settings in the Setupscreen menus
The procedure for changing the settings in the Setup screenmenus is described on page 38.
Setting digital audio connections to an AVamplifier or decoder
The [Digital Jack] screen establishes whether digitalconnections have been made to an AV amplifier, receiver, orexternal decoder. As there are numerous options available,please refer to the instructions supplied with the componentthe player is connected to determine what digital audioformats can be decoded. If you have made no digitalconnections, select [Not Connected].
Settings: Dolby Digital (Factory setting)Dolby Digital/DTSDolby Digital/MPEGDolby D/DTS/MPEGPCMNot Connected
Warning• Do not set [Digital Jack] to [Dolby Digital/DTS] or [Dolby D/DTS/
MPEG] if the amplifier does not have a DTS decoder. If you doso, high volume sound may be output and damage your hearingas well as speakers.
• Select [PCM] when you connect the player to a 2 channel digitalstereo amplifier. If you select other than [PCM], high volumesound may be output and damage your hearing as well asspeakers.
Setting compatibility with 96 kHz outputThe [96 kHz PCM Audio] screen establishes whether or notthe AV component the player is connected to is capable ofprocessing an audio signal with a sampling rate of 96 kHz.This screen only appears if connections have been made toan external AV component as determined in previous screens.
Using the Setup Navigator
Settings: No (Factory setting)Select if the connected AV component cannotprocess an audio signal with a sampling rate of 96kHz.
YesSelect if the connected AV component can processan audio signal with a sampling rate of 96 kHz.
Don’t KnowSelect if you are uncertain whether the connectedAV component can process an audio signal with asampling rate of 96 kHz.
19
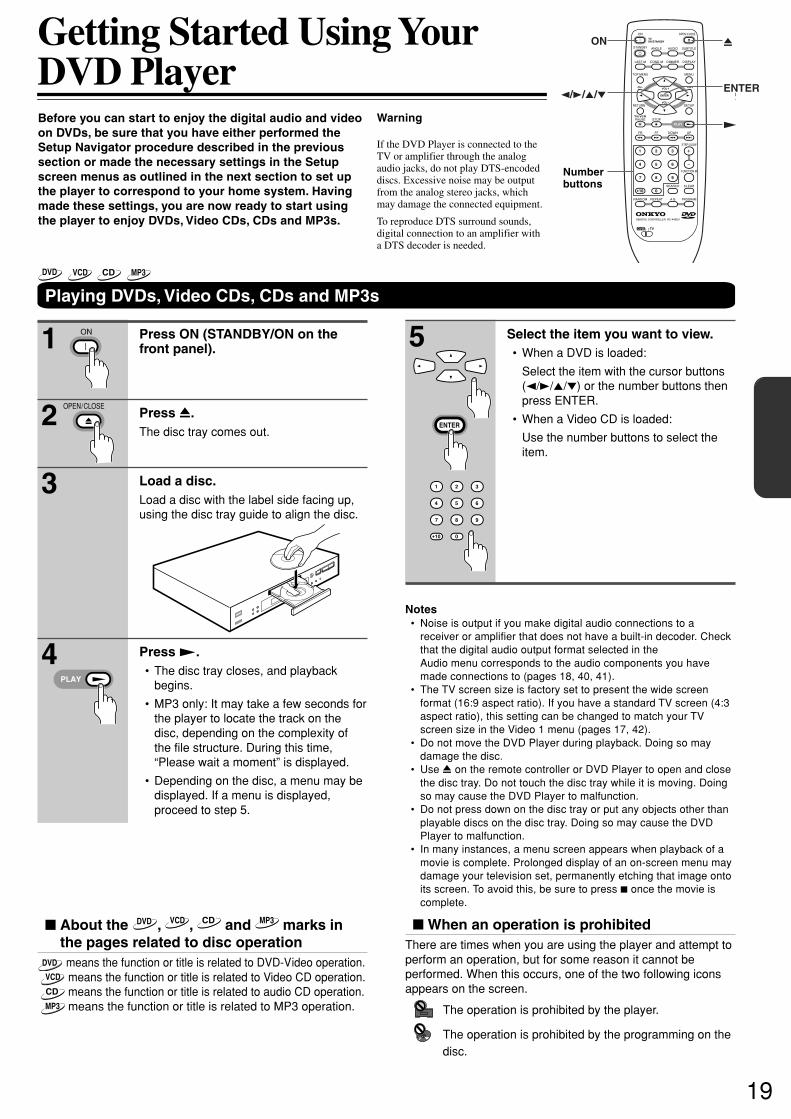
Press ON (STANDBY/ON on thefront panel).
Press 0.The disc tray comes out.
Load a disc.Load a disc with the label side facing up,using the disc tray guide to align the disc.
1
2
3
4
5 Select the item you want to view.• When a DVD is loaded:
Select the item with the cursor buttons(2/3/5/∞) or the number buttons thenpress ENTER.
• When a Video CD is loaded:
Use the number buttons to select theitem.
Notes• Noise is output if you make digital audio connections to a
receiver or amplifier that does not have a built-in decoder. Checkthat the digital audio output format selected in theAudio menu corresponds to the audio components you havemade connections to (pages 18, 40, 41).
• The TV screen size is factory set to present the wide screenformat (16:9 aspect ratio). If you have a standard TV screen (4:3aspect ratio), this setting can be changed to match your TVscreen size in the Video 1 menu (pages 17, 42).
• Do not move the DVD Player during playback. Doing so maydamage the disc.
• Use 0 on the remote controller or DVD Player to open and closethe disc tray. Do not touch the disc tray while it is moving. Doingso may cause the DVD Player to malfunction.
• Do not press down on the disc tray or put any objects other thanplayable discs on the disc tray. Doing so may cause the DVDPlayer to malfunction.
• In many instances, a menu screen appears when playback of amovie is complete. Prolonged display of an on-screen menu maydamage your television set, permanently etching that image ontoits screen. To avoid this, be sure to press 7 once the movie iscomplete.
When an operation is prohibitedThere are times when you are using the player and attempt toperform an operation, but for some reason it cannot beperformed. When this occurs, one of the two following iconsappears on the screen.
The operation is prohibited by the player.
The operation is prohibited by the programming on thedisc.
Press £.• The disc tray closes, and playback
begins.
• MP3 only: It may take a few seconds forthe player to locate the track on thedisc, depending on the complexity ofthe file structure. During this time,“Please wait a moment” is displayed.
• Depending on the disc, a menu may bedisplayed. If a menu is displayed,proceed to step 5.
Playing DVDs, Video CDs, CDs and MP3s
Getting Started Using YourDVD PlayerBefore you can start to enjoy the digital audio and videoon DVDs, be sure that you have either performed theSetup Navigator procedure described in the previoussection or made the necessary settings in the Setupscreen menus as outlined in the next section to set upthe player to correspond to your home system. Havingmade these settings, you are now ready to start usingthe player to enjoy DVDs, Video CDs, CDs and MP3s.
ON
OPEN / CLOSE
PLAY
ENTER
LAST M COND. M DIMMER DISPLAY
STANDBY
ON
ANGLE AUDIO SUBTITLE
MENUTOP MENU
SETUPRETURN
STOPPAUSE
FUNCTION M
OPEN / CLOSE
DOWN UPFR FF
CLEAR
PROGRAMRANDOM REPEAT A-B
STEP/ SLOW
SEARCH
REMOTE CONTROLLER RC-449DV
PLAY
2 3
4 5 6
7 8 9
1
0+10
+
-
ENTER
TVON / STANDBY
VOL +
VOL -
TV/ VCR
CH +CH -
TVDVD
ON 0
ENTER
£
2/3/5/∞
Numberbuttons
2 3
4 5 6
7 8 9
1
0+10
DVD VCD CD MP3
Warning
If the DVD Player is connected to theTV or amplifier through the analogaudio jacks, do not play DTS-encodeddiscs. Excessive noise may be outputfrom the analog stereo jacks, whichmay damage the connected equipment.
To reproduce DTS surround sounds,digital connection to an amplifier witha DTS decoder is needed.
About the DVD , VCD , CD and MP3 marks inthe pages related to disc operation
DVD means the function or title is related to DVD-Video operation. VCD means the function or title is related to Video CD operation. CD means the function or title is related to audio CD operation. MP3 means the function or title is related to MP3 operation.

20
Getting Started Using Your DVD Player
When a Menu Screen is DisplayedMenu screens are displayed for DVDs that have menuscreens or Video CDs that include Playback Control (PBC).DVDs often contain extra information that can be accessed inthe DVD menu and sometimes makes navigating DVD menuscreens as enjoyable as watching the feature presentation.
Example: When a DVD that has menu screens is loaded
Example: When a Video CD that has Playback Control isloaded
To Open or Return To the DVD or VideoCD Menu Screen
Although this differs depending on the disc, pressing MENU,TOP MENU, or RETURN during DVD playback or RETURNduring Video CD playback displays the menu screen. Refer tothe DVD or Video CD disc jacket and accompanyingdocumentation for more information.
To play Video CDs without displaying menuscreens
Video CDs with Playback Control (PBC) display a menuscreen when play is started. It is possible, however, to playback Video CDs without displaying menu screens.When a Video CD with PBC is loaded, press 7, and then thenumber button of the track you want to play.
1 Highlight Clips2 Chapter List3 Commercial Header4 Subtitles5 Soundtrack6 Start Main Feature
1
2
3
4
5
6
7
8
Don't Tekno for an Answer
Bad Whack Naff Riff
dubmyheadbassman
Gooey Love Jingle
Praise the Day
G3, Ba-san
Abstract Jazz Phunk
Rock the Love Jive
Bertie B.& the Goans
Hood in the Boyz
Sleek Machine
Philip William
Formerly an Artist
Pfeuti
John Torn
Hot Monkey Stick
STANDARD VOCAL BEST
To navigate a menu screen• Although individual DVD titles may differ, when a menu
screen is displayed, use the cursor buttons (2/3/5/∞) andENTER on the remote control. The cursor buttons are usedto move around the options on the screen and ENTER isused for selection.
• Occasionally, the number buttons may also be used tomake selections. If this is possible, using number buttonsserves to directly select an option on a menu screen. Onlynumber buttons are used to make selections on Video CDmenu screens.
• When the Video CD has more than one menu, pages canbe advanced to or returned to with 4 or ¢.
DVD VCD DVD VCD
21
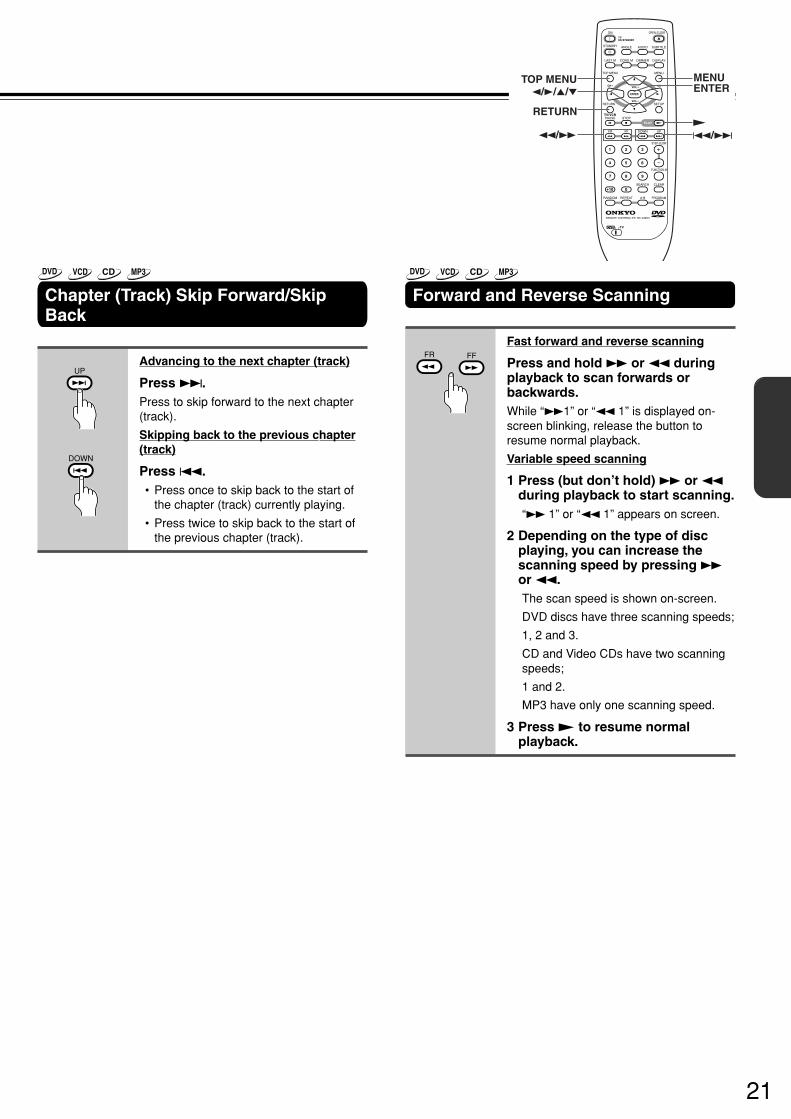
Chapter (Track) Skip Forward/SkipBack
Advancing to the next chapter (track)
Press ¢.Press to skip forward to the next chapter(track).
Skipping back to the previous chapter(track)
Press 4.• Press once to skip back to the start of
the chapter (track) currently playing.
• Press twice to skip back to the start ofthe previous chapter (track).
Forward and Reverse Scanning
Fast forward and reverse scanning
Press and hold ¡ or 1 duringplayback to scan forwards orbackwards.While “¡1” or “1 1” is displayed on-screen blinking, release the button toresume normal playback.
Variable speed scanning
1 Press (but don’t hold) ¡ or 1during playback to start scanning.“¡ 1” or “1 1” appears on screen.
2 Depending on the type of discplaying, you can increase thescanning speed by pressing ¡or 1.The scan speed is shown on-screen.
DVD discs have three scanning speeds;
1, 2 and 3.
CD and Video CDs have two scanningspeeds;
1 and 2.
MP3 have only one scanning speed.
3 Press £ to resume normalplayback.
UP
DOWN
FFFR
LAST M COND. M DIMMER DISPLAY
STANDBY
ON
ANGLE AUDIO SUBTITLE
MENUTOP MENU
SETUPRETURN
STOPPAUSE
FUNCTION M
OPEN / CLOSE
DOWN UPFR FF
CLEAR
PROGRAMRANDOM REPEAT A-B
STEP/ SLOW
SEARCH
REMOTE CONTROLLER RC-449DV
PLAY
2 3
4 5 6
7 8 9
1
0+10
+
-
ENTER
TVON / STANDBY
VOL +
VOL -
TV/ VCR
CH +CH -
TVDVD
2/3/5/∞
1/¡ 4/¢£
TOP MENU
RETURN
ENTERMENU
DVD VCD CD MP3 DVD VCD CD MP3
22
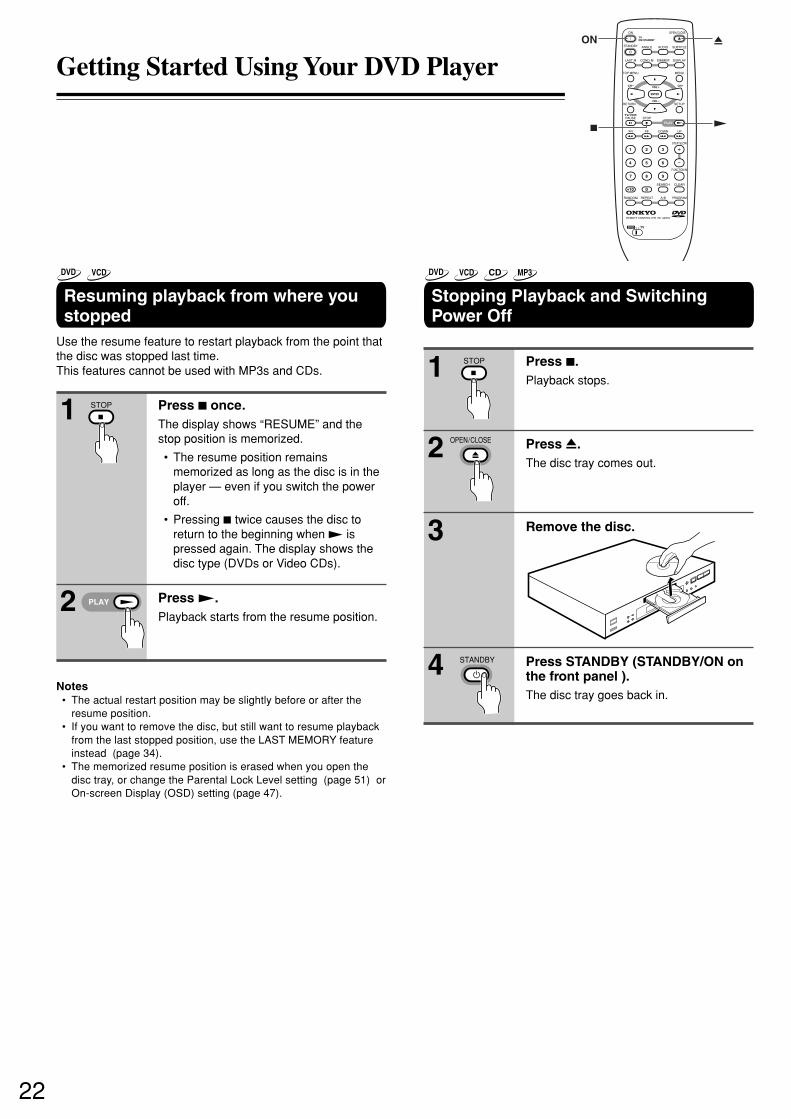
Resuming playback from where youstopped
Use the resume feature to restart playback from the point thatthe disc was stopped last time.This features cannot be used with MP3s and CDs.
Press 7 once.The display shows “RESUME” and thestop position is memorized.
• The resume position remainsmemorized as long as the disc is in theplayer — even if you switch the poweroff.
• Pressing 7 twice causes the disc toreturn to the beginning when £ ispressed again. The display shows thedisc type (DVDs or Video CDs).
Press £.Playback starts from the resume position.
Notes• The actual restart position may be slightly before or after the
resume position.• If you want to remove the disc, but still want to resume playback
from the last stopped position, use the LAST MEMORY featureinstead (page 34).
• The memorized resume position is erased when you open thedisc tray, or change the Parental Lock Level setting (page 51) orOn-screen Display (OSD) setting (page 47).
Stopping Playback and SwitchingPower Off
Press 7.Playback stops.
Press 0.The disc tray comes out.
Remove the disc.
Press STANDBY (STANDBY/ON onthe front panel ).The disc tray goes back in.
1
2
3
4
1
2
STOP
PLAY
STOP
OPEN / CLOSE
STANDBY
Getting Started Using Your DVD Player LAST M COND. M DIMMER DISPLAY
STANDBY
ON
ANGLE AUDIO SUBTITLE
MENUTOP MENU
SETUPRETURN
STOPPAUSE
FUNCTION M
OPEN / CLOSE
DOWN UPFR FF
CLEAR
PROGRAMRANDOM REPEAT A-B
STEP/ SLOW
SEARCH
REMOTE CONTROLLER RC-449DV
PLAY
2 3
4 5 6
7 8 9
1
0+10
+
-
ENTER
TVON / STANDBY
VOL +
VOL -
TV/ VCR
CH +CH -
TVDVD
ON 0
£7
DVD VCD DVD VCD CD MP3
23
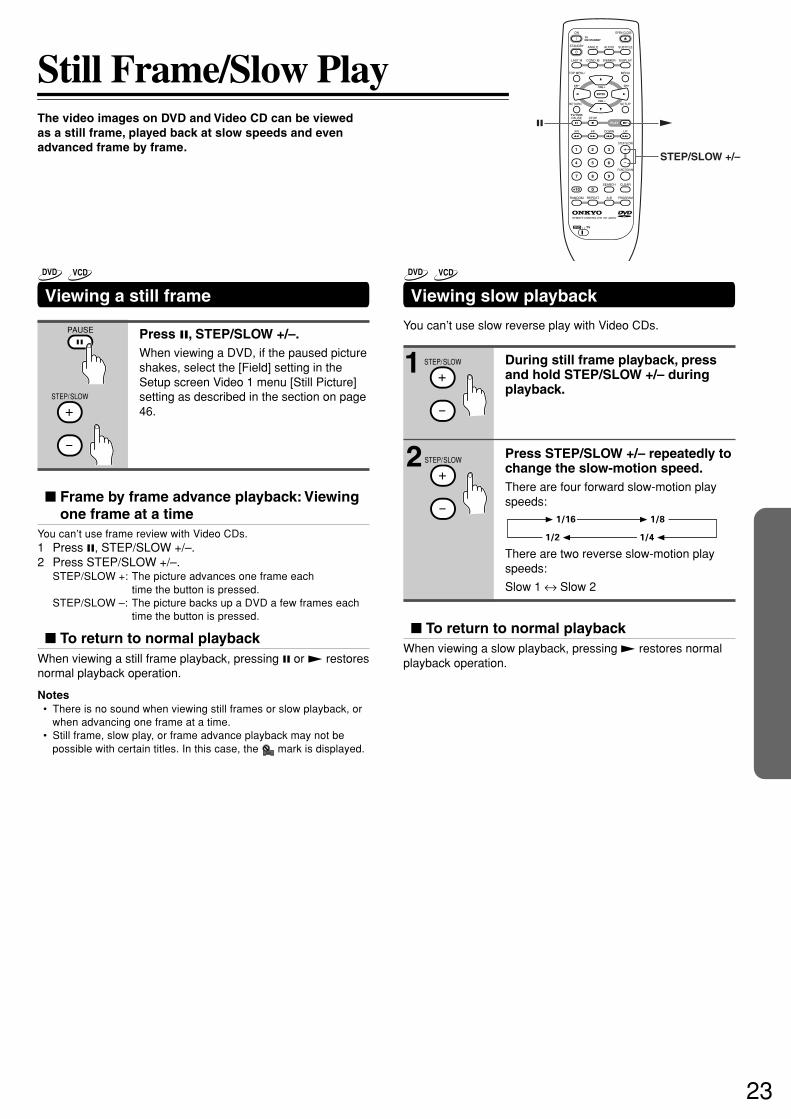
Viewing slow playback
3 1/16 3 1/8
1/2 2 1/4 2
Still Frame/Slow PlayThe video images on DVD and Video CD can be viewedas a still frame, played back at slow speeds and evenadvanced frame by frame.
Viewing a still frame
Press 8, STEP/SLOW +/–.When viewing a DVD, if the paused pictureshakes, select the [Field] setting in theSetup screen Video 1 menu [Still Picture]setting as described in the section on page46.
Frame by frame advance playback: Viewingone frame at a time
You can’t use frame review with Video CDs.1 Press 8, STEP/SLOW +/–.2 Press STEP/SLOW +/–.
STEP/SLOW +: The picture advances one frame eachtime the button is pressed.
STEP/SLOW –: The picture backs up a DVD a few frames eachtime the button is pressed.
To return to normal playbackWhen viewing a still frame playback, pressing 8 or £ restoresnormal playback operation.
Notes• There is no sound when viewing still frames or slow playback, or
when advancing one frame at a time.• Still frame, slow play, or frame advance playback may not be
possible with certain titles. In this case, the mark is displayed.
You can’t use slow reverse play with Video CDs.
During still frame playback, pressand hold STEP/SLOW +/– duringplayback.
Press STEP/SLOW +/– repeatedly tochange the slow-motion speed.There are four forward slow-motion playspeeds:
There are two reverse slow-motion playspeeds:
Slow 1 ↔ Slow 2
To return to normal playbackWhen viewing a slow playback, pressing £ restores normalplayback operation.
1
2
PAUSE
STEP/ SLOW
+
-
STEP/ SLOW
+
-
STEP/ SLOW
+
-
LAST M COND. M DIMMER DISPLAY
STANDBY
ON
ANGLE AUDIO SUBTITLE
MENUTOP MENU
SETUPRETURN
STOPPAUSE
FUNCTION M
OPEN / CLOSE
DOWN UPFR FF
CLEAR
PROGRAMRANDOM REPEAT A-B
STEP/ SLOW
SEARCH
REMOTE CONTROLLER RC-449DV
PLAY
2 3
4 5 6
7 8 9
1
0+10
+
-
ENTER
TVON / STANDBY
VOL +
VOL -
TV/ VCR
CH +CH -
TVDVD
STEP/SLOW +/–
£8
DVD VCD DVD VCD

24
This player offers different ways of accessing the informationon a DVD, Video CD, CD or MP3. Using SEARCH, you cansearch for titles or chapters on a DVD, tracks on a Video CD,CD or folders or tracks on a MP3 and even select the point intime to start playback.
Press SEARCH repeatedly to selectthe type of search.The type of search changes which eachpress as follows.
Notes• For some discs, selection can be made using the top menu on
the DVD. In this case, press TOP MENU to display the menuscreen and then make your selection.
• With some DVDs, the search operation may not be possible andmay stop shortly after being performed. In this case, the markis displayed.
• Time search is not possible with CDs and MP3s.• When performing DVD or Video CD time search, playback may
start from a slightly different time than that specified.• Time search is not possible during when the disc is stopped.• Search using time search is not possible during PBC playback of
Video CDs.
To perform a direct title or chapter/tracksearch using the number buttons
• Press the number buttons while the disc is stopped toselect a title or track number.
• Press the number buttons while the disc is playing to selecta chapter or track number.
• To select number 3, press 3.• To select number 10, press 1 and 0.• To select number 37, press +10, +10, +10 and 7.
3 Title 3 Chapter
Off 2 Time 2
3 Track 3 Time
Off 2
3 Track 3 Off
3 Folder 3 Track
Off 2
DVD
Video CD
CD
MP3
Press the number button(s) of thedesired title, chapter or track or ofthe specific time where you wouldlike to begin playback.• To select number 3, press 3.
• To select number 10, press 1 and 0.
• To select number 87, press 8 and 7.
When performing a time search:• To select 21 minutes, 43 seconds,
press 2, 1, 4, and 3.
• To select 1 hour, 14 minutes, press 7, 4,0, and 0.
Press £.Playback of the selected title, folder,chapter or track starts. When a time searchis performed, playback begins at theappointed time.
Searching for a Title, Folder, Chapter, Track, or Location on a Disc
1
2
3
Locating a Specific Title/Folder/Chapter/Track/Location
SEARCH
2 3
4 5 6
7 8 9
1
0+10
PLAY
DVD VCD CD MP3
25
Using the MP3 Navigator
MP3 Navigator
ExitPlayClear
Folder
Current : 3 1-1
Track
1.TRACK1~12.TRACK2~23.TRACK3~34.TRACK4~4
1.FOLDER~12.FOLDER~23.FOLDER~34.FOLDER~45.FOLDER~56.FOLDER~6
SETUPENTERCREAR
1~41~10
Total number of Track
Total number of Folder
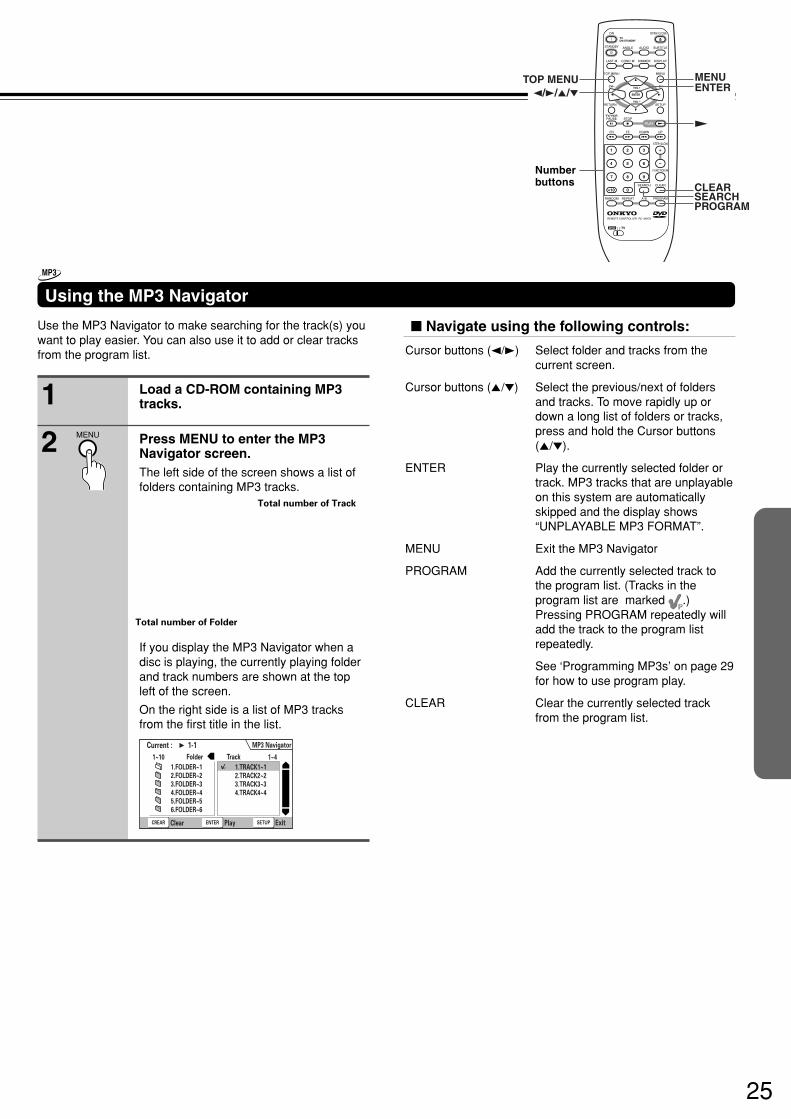
Navigate using the following controls:
Cursor buttons (2/3) Select folder and tracks from thecurrent screen.
Cursor buttons (5/∞) Select the previous/next of foldersand tracks. To move rapidly up ordown a long list of folders or tracks,press and hold the Cursor buttons(5/∞).
ENTER Play the currently selected folder ortrack. MP3 tracks that are unplayableon this system are automaticallyskipped and the display shows“UNPLAYABLE MP3 FORMAT”.
MENU Exit the MP3 Navigator
PROGRAM Add the currently selected track tothe program list. (Tracks in theprogram list are marked .)Pressing PROGRAM repeatedly willadd the track to the program listrepeatedly.
See ‘Programming MP3s’ on page 29for how to use program play.
CLEAR Clear the currently selected trackfrom the program list.
Use the MP3 Navigator to make searching for the track(s) youwant to play easier. You can also use it to add or clear tracksfrom the program list.
Load a CD-ROM containing MP3tracks.
Press MENU to enter the MP3Navigator screen.The left side of the screen shows a list offolders containing MP3 tracks.
If you display the MP3 Navigator when adisc is playing, the currently playing folderand track numbers are shown at the topleft of the screen.
On the right side is a list of MP3 tracksfrom the first title in the list.
1
2 MENU
LAST M COND. M DIMMER DISPLAY
STANDBY
ON
ANGLE AUDIO SUBTITLE
MENUTOP MENU
SETUPRETURN
STOPPAUSE
FUNCTION M
OPEN / CLOSE
DOWN UPFR FF
CLEAR
PROGRAMRANDOM REPEAT A-B
STEP/ SLOW
SEARCH
REMOTE CONTROLLER RC-449DV
PLAY
2 3
4 5 6
7 8 9
1
0+10
+
-
ENTER
TVON / STANDBY
VOL +
VOL -
TV/ VCR
CH +CH -
TVDVD
2/3/5/∞
£
TOP MENU MENUENTER
CLEARSEARCHPROGRAM
Numberbuttons
MP3
26
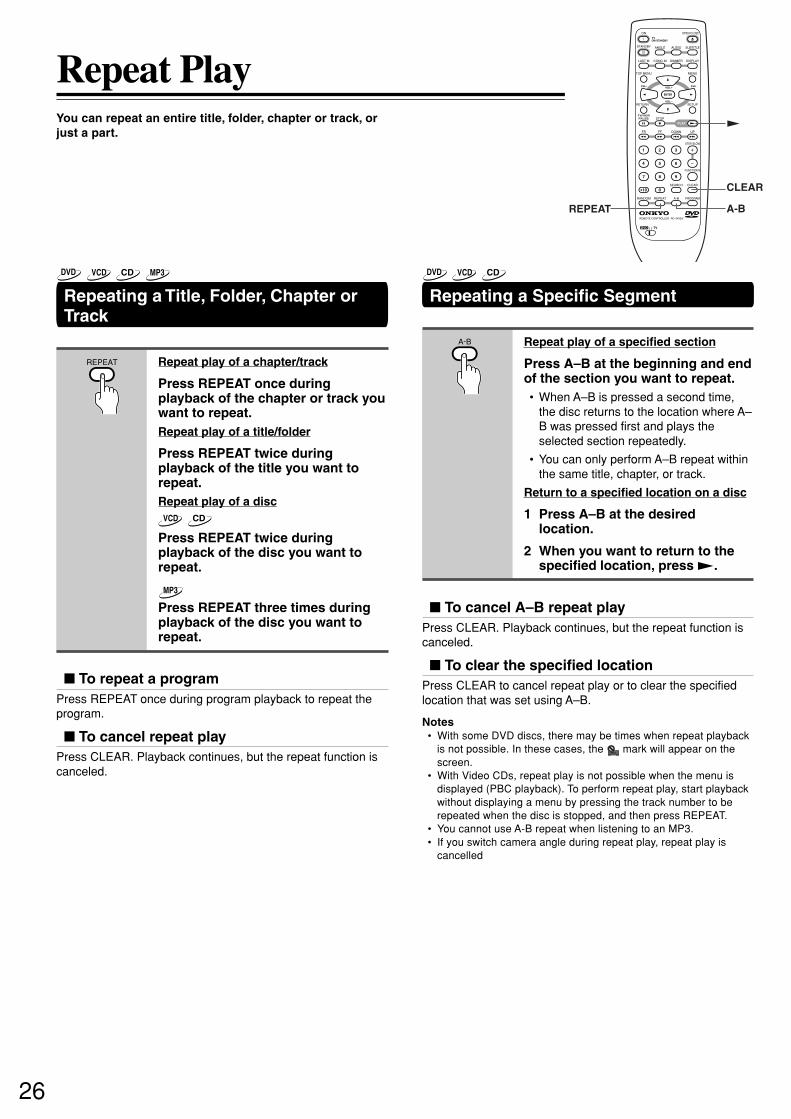
Repeating a Title, Folder, Chapter orTrack
Repeat play of a chapter/track
Press REPEAT once duringplayback of the chapter or track youwant to repeat.Repeat play of a title/folder
Press REPEAT twice duringplayback of the title you want torepeat.Repeat play of a disc
Press REPEAT twice duringplayback of the disc you want torepeat.
Press REPEAT three times duringplayback of the disc you want torepeat.
To repeat a programPress REPEAT once during program playback to repeat theprogram.
To cancel repeat playPress CLEAR. Playback continues, but the repeat function iscanceled.
You can repeat an entire title, folder, chapter or track, orjust a part.
Repeating a Specific Segment
Repeat play of a specified section
Press A–B at the beginning and endof the section you want to repeat.• When A–B is pressed a second time,
the disc returns to the location where A–B was pressed first and plays theselected section repeatedly.
• You can only perform A–B repeat withinthe same title, chapter, or track.
Return to a specified location on a disc
1 Press A–B at the desiredlocation.
2 When you want to return to thespecified location, press £.
To cancel A–B repeat playPress CLEAR. Playback continues, but the repeat function iscanceled.
To clear the specified locationPress CLEAR to cancel repeat play or to clear the specifiedlocation that was set using A–B.
Notes• With some DVD discs, there may be times when repeat playback
is not possible. In these cases, the mark will appear on thescreen.
• With Video CDs, repeat play is not possible when the menu isdisplayed (PBC playback). To perform repeat play, start playbackwithout displaying a menu by pressing the track number to berepeated when the disc is stopped, and then press REPEAT.
• You cannot use A-B repeat when listening to an MP3.• If you switch camera angle during repeat play, repeat play is
cancelled
Repeat Play
REPEAT
A-B
LAST M COND. M DIMMER DISPLAY
STANDBY
ON
ANGLE AUDIO SUBTITLE
MENUTOP MENU
SETUPRETURN
STOPPAUSE
FUNCTION M
OPEN / CLOSE
DOWN UPFR FF
CLEAR
PROGRAMRANDOM REPEAT A-B
STEP/ SLOW
SEARCH
REMOTE CONTROLLER RC-449DV
PLAY
2 3
4 5 6
7 8 9
1
0+10
+
-
ENTER
TVON / STANDBY
VOL +
VOL -
TV/ VCR
CH +CH -
TVDVD
£
CLEAR
REPEAT A-B
DVD VCD CD MP3 DVD VCD CD
VCD CD
MP3
27
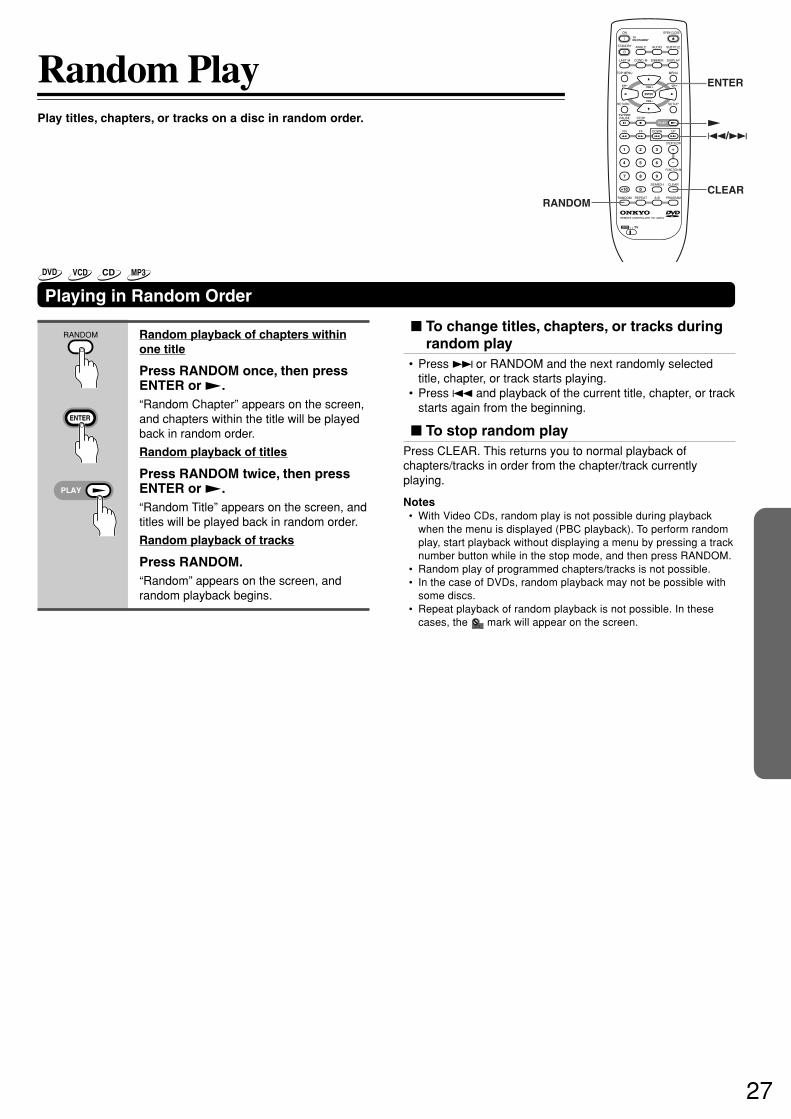
Random playback of chapters withinone title
Press RANDOM once, then pressENTER or £.“Random Chapter” appears on the screen,and chapters within the title will be playedback in random order.
Random playback of titles
Press RANDOM twice, then pressENTER or £.“Random Title” appears on the screen, andtitles will be played back in random order.
Random playback of tracks
Press RANDOM.“Random” appears on the screen, andrandom playback begins.
Play titles, chapters, or tracks on a disc in random order.
To change titles, chapters, or tracks duringrandom play
• Press ¢ or RANDOM and the next randomly selectedtitle, chapter, or track starts playing.
• Press 4 and playback of the current title, chapter, or trackstarts again from the beginning.
To stop random playPress CLEAR. This returns you to normal playback ofchapters/tracks in order from the chapter/track currentlyplaying.
Notes• With Video CDs, random play is not possible during playback
when the menu is displayed (PBC playback). To perform randomplay, start playback without displaying a menu by pressing a tracknumber button while in the stop mode, and then press RANDOM.
• Random play of programmed chapters/tracks is not possible.• In the case of DVDs, random playback may not be possible with
some discs.• Repeat playback of random playback is not possible. In these
cases, the mark will appear on the screen.
Playing in Random Order
Random Play
RANDOM
ENTER
PLAY
LAST M COND. M DIMMER DISPLAY
STANDBY
ON
ANGLE AUDIO SUBTITLE
MENUTOP MENU
SETUPRETURN
STOPPAUSE
FUNCTION M
OPEN / CLOSE
DOWN UPFR FF
CLEAR
PROGRAMRANDOM REPEAT A-B
STEP/ SLOW
SEARCH
REMOTE CONTROLLER RC-449DV
PLAY
2 3
4 5 6
7 8 9
1
0+10
+
-
ENTER
TVON / STANDBY
VOL +
VOL -
TV/ VCR
CH +CH -
TVDVD
£
4/¢
CLEAR
ENTER
RANDOM
DVD VCD CD MP3
28
A program with a maximum of 24 steps can be memorized.
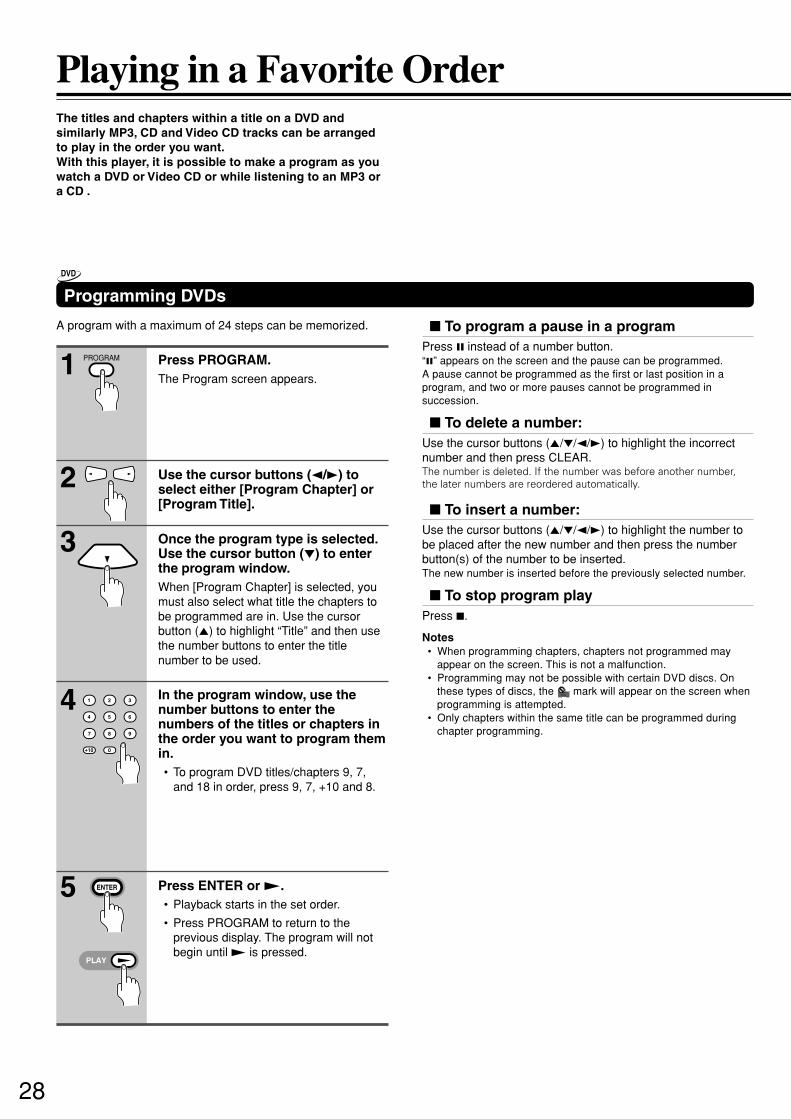
Press PROGRAM.The Program screen appears.
The titles and chapters within a title on a DVD andsimilarly MP3, CD and Video CD tracks can be arrangedto play in the order you want.With this player, it is possible to make a program as youwatch a DVD or Video CD or while listening to an MP3 ora CD .
To program a pause in a programPress 8 instead of a number button.“8” appears on the screen and the pause can be programmed.A pause cannot be programmed as the first or last position in aprogram, and two or more pauses cannot be programmed insuccession.
To delete a number:Use the cursor buttons (5/∞/2/3) to highlight the incorrectnumber and then press CLEAR.The number is deleted. If the number was before another number,the later numbers are reordered automatically.
To insert a number:Use the cursor buttons (5/∞/2/3) to highlight the number tobe placed after the new number and then press the numberbutton(s) of the number to be inserted.The new number is inserted before the previously selected number.
To stop program playPress 7.
Notes• When programming chapters, chapters not programmed may
appear on the screen. This is not a malfunction.• Programming may not be possible with certain DVD discs. On
these types of discs, the mark will appear on the screen whenprogramming is attempted.
• Only chapters within the same title can be programmed duringchapter programming.
Use the cursor buttons (2/3) toselect either [Program Chapter] or[Program Title].
Once the program type is selected.Use the cursor button (∞) to enterthe program window.When [Program Chapter] is selected, youmust also select what title the chapters tobe programmed are in. Use the cursorbutton (5) to highlight “Title” and then usethe number buttons to enter the titlenumber to be used.
In the program window, use thenumber buttons to enter thenumbers of the titles or chapters inthe order you want to program themin.• To program DVD titles/chapters 9, 7,
and 18 in order, press 9, 7, +10 and 8.
Programming DVDs
Playing in a Favorite Order
1
2
3
4
5
PROGRAM
2 3
4 5 6
7 8 9
1
0+10
ENTER
PLAY
Press ENTER or £.• Playback starts in the set order.
• Press PROGRAM to return to theprevious display. The program will notbegin until £ is pressed.
DVD
29
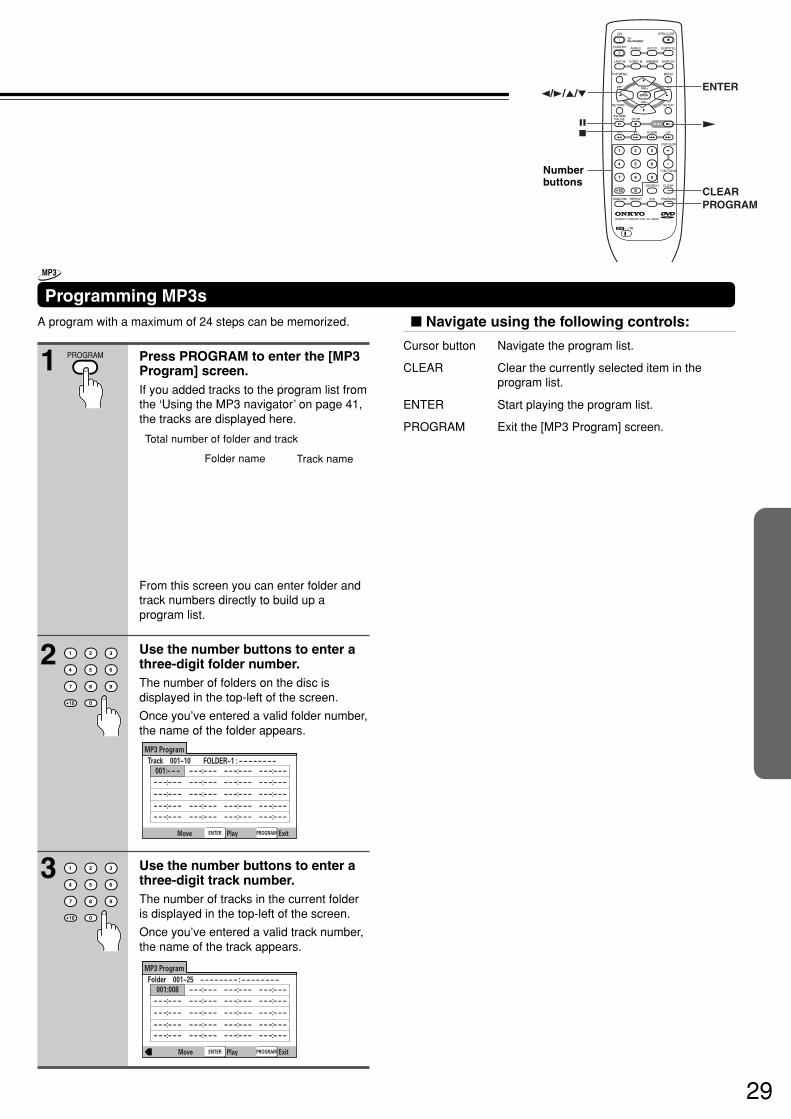
A program with a maximum of 24 steps can be memorized.
Press PROGRAM to enter the [MP3Program] screen.If you added tracks to the program list fromthe ‘Using the MP3 navigator’ on page 41,the tracks are displayed here.
Total number of folder and track
Folder name Track name
ENTER PROGRAM
MP3 Program
ExitPlayMove
Track 001~10
001:– – – – – –:– – – – – –:– – – – – –:– – –
– – –:– – – – – –:– – – – – –:– – – – – –:– – –
– – –:– – – – – –:– – – – – –:– – – – – –:– – –
– – –:– – – – – –:– – – – – –:– – – – – –:– – –
– – –:– – – – – –:– – – – – –:– – – – – –:– – –
FOLDER~1 : – – – – – – – –
ENTER PROGRAM
MP3 Program
ExitPlay
Folder 001~25
001:008 – – –:– – – – – –:– – – – – –:– – –
– – –:– – – – – –:– – – – – –:– – – – – –:– – –
– – –:– – – – – –:– – – – – –:– – – – – –:– – –
– – –:– – – – – –:– – – – – –:– – – – – –:– – –
– – –:– – – – – –:– – – – – –:– – – – – –:– – –
– – – – – – – – : – – – – – – – –
Move
From this screen you can enter folder andtrack numbers directly to build up aprogram list.
Use the number buttons to enter athree-digit folder number.The number of folders on the disc isdisplayed in the top-left of the screen.
Once you’ve entered a valid folder number,the name of the folder appears.
Use the number buttons to enter athree-digit track number.The number of tracks in the current folderis displayed in the top-left of the screen.
Once you’ve entered a valid track number,the name of the track appears.
Navigate using the following controls:
Cursor button Navigate the program list.
CLEAR Clear the currently selected item in theprogram list.
ENTER Start playing the program list.
PROGRAM Exit the [MP3 Program] screen.
Programming MP3s
1
2
3
PROGRAM
2 3
4 5 6
7 8 9
1
0+10
2 3
4 5 6
7 8 9
1
0+10
LAST M COND. M DIMMER DISPLAY
STANDBY
ON
ANGLE AUDIO SUBTITLE
MENUTOP MENU
SETUPRETURN
STOPPAUSE
FUNCTION M
OPEN / CLOSE
DOWN UPFR FF
CLEAR
PROGRAMRANDOM REPEAT A-B
STEP/ SLOW
SEARCH
REMOTE CONTROLLER RC-449DV
PLAY
2 3
4 5 6
7 8 9
1
0+10
+
-
ENTER
TVON / STANDBY
VOL +
VOL -
TV/ VCR
CH +CH -
TVDVD
2/3/5/∞
£8
CLEAR
ENTER
PROGRAM
7
Numberbuttons
MP3
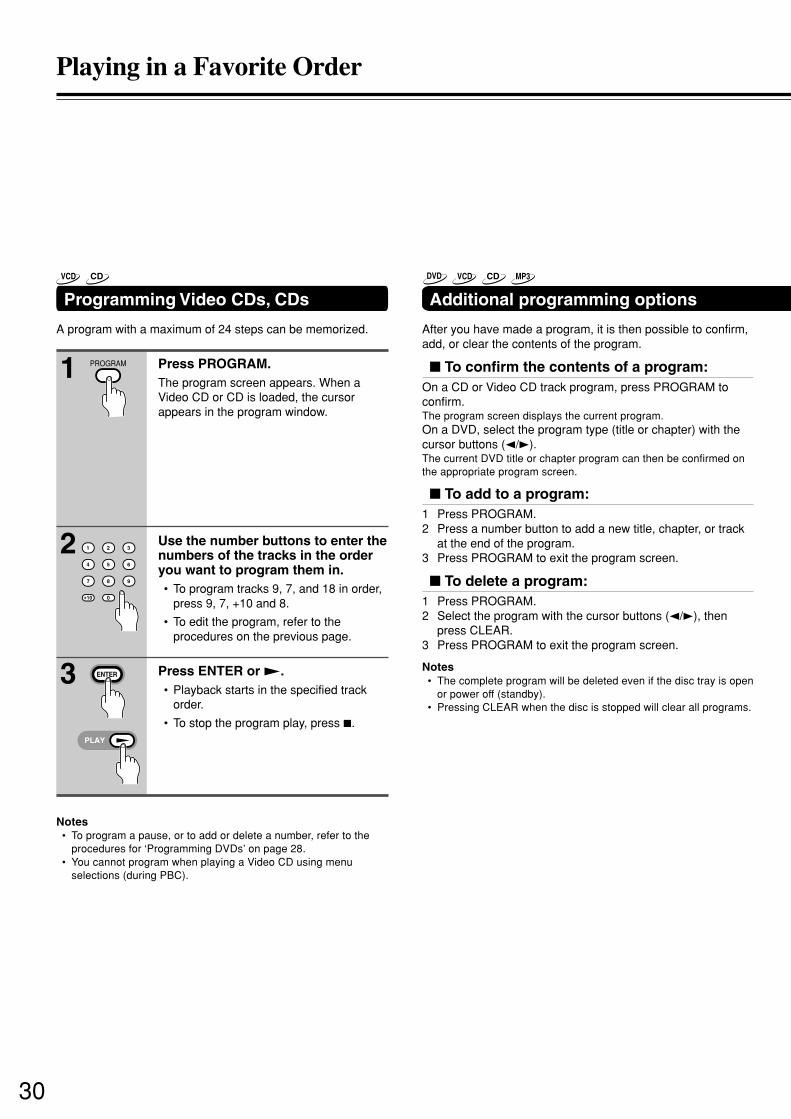
30
A program with a maximum of 24 steps can be memorized.
Press PROGRAM.The program screen appears. When aVideo CD or CD is loaded, the cursorappears in the program window.
Use the number buttons to enter thenumbers of the tracks in the orderyou want to program them in.• To program tracks 9, 7, and 18 in order,
press 9, 7, +10 and 8.
• To edit the program, refer to theprocedures on the previous page.
Press ENTER or £.• Playback starts in the specified track
order.
• To stop the program play, press 7.
Notes• To program a pause, or to add or delete a number, refer to the
procedures for ‘Programming DVDs’ on page 28.• You cannot program when playing a Video CD using menu
selections (during PBC).
Programming Video CDs, CDs
After you have made a program, it is then possible to confirm,add, or clear the contents of the program.
To confirm the contents of a program:On a CD or Video CD track program, press PROGRAM toconfirm.The program screen displays the current program.On a DVD, select the program type (title or chapter) with thecursor buttons (2/3).The current DVD title or chapter program can then be confirmed onthe appropriate program screen.
To add to a program:1 Press PROGRAM.2 Press a number button to add a new title, chapter, or track
at the end of the program.3 Press PROGRAM to exit the program screen.
To delete a program:1 Press PROGRAM.2 Select the program with the cursor buttons (2/3), then
press CLEAR.3 Press PROGRAM to exit the program screen.
Notes• The complete program will be deleted even if the disc tray is open
or power off (standby).• Pressing CLEAR when the disc is stopped will clear all programs.
Additional programming options
1
2
3
2 3
4 5 6
7 8 9
1
0+10
PROGRAM
ENTER
PLAY
VCD CD DVD VCD CD MP3
Playing in a Favorite Order
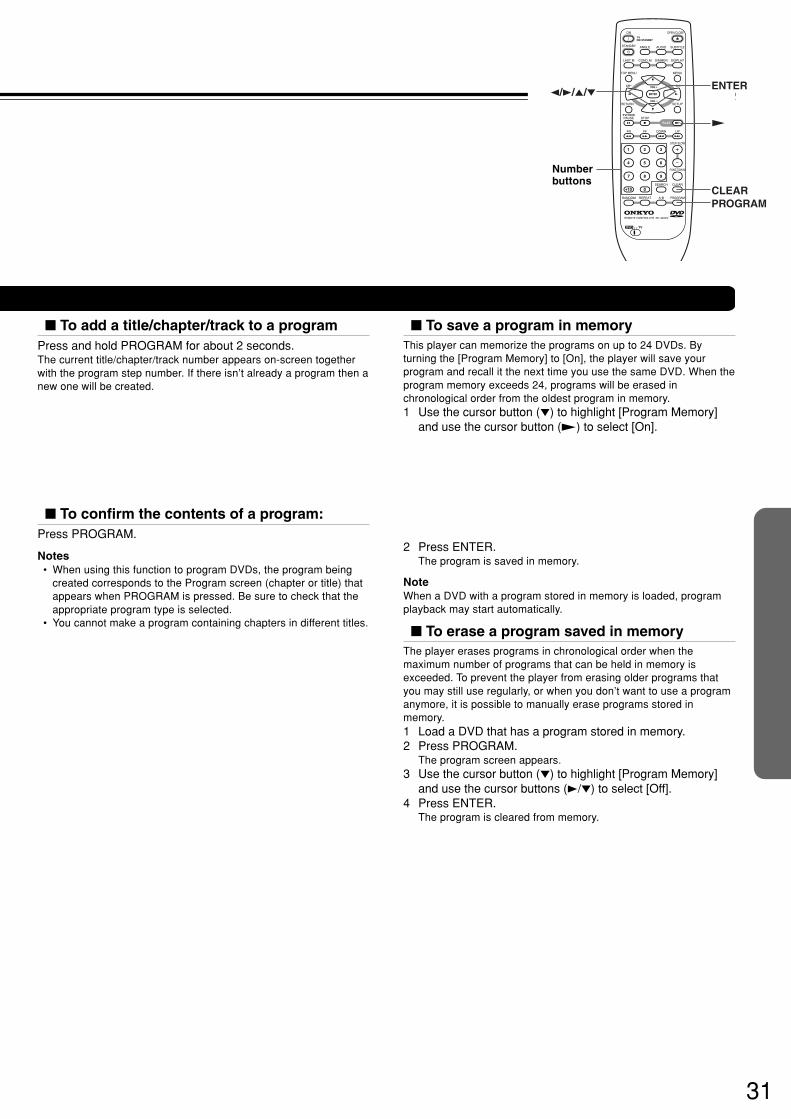
31
To add a title/chapter/track to a programPress and hold PROGRAM for about 2 seconds.The current title/chapter/track number appears on-screen togetherwith the program step number. If there isn’t already a program then anew one will be created.
To save a program in memoryThis player can memorize the programs on up to 24 DVDs. Byturning the [Program Memory] to [On], the player will save yourprogram and recall it the next time you use the same DVD. When theprogram memory exceeds 24, programs will be erased inchronological order from the oldest program in memory.1 Use the cursor button (∞) to highlight [Program Memory]
and use the cursor button (£) to select [On].
To confirm the contents of a program:Press PROGRAM.
Notes• When using this function to program DVDs, the program being
created corresponds to the Program screen (chapter or title) thatappears when PROGRAM is pressed. Be sure to check that theappropriate program type is selected.
• You cannot make a program containing chapters in different titles.
2 Press ENTER.The program is saved in memory.
NoteWhen a DVD with a program stored in memory is loaded, programplayback may start automatically.
To erase a program saved in memoryThe player erases programs in chronological order when themaximum number of programs that can be held in memory isexceeded. To prevent the player from erasing older programs thatyou may still use regularly, or when you don’t want to use a programanymore, it is possible to manually erase programs stored inmemory.1 Load a DVD that has a program stored in memory.2 Press PROGRAM.
The program screen appears.3 Use the cursor button (∞) to highlight [Program Memory]
and use the cursor buttons (3/∞) to select [Off].4 Press ENTER.
The program is cleared from memory.
LAST M COND. M DIMMER DISPLAY
STANDBY
ON
ANGLE AUDIO SUBTITLE
MENUTOP MENU
SETUPRETURN
STOPPAUSE
FUNCTION M
OPEN / CLOSE
DOWN UPFR FF
CLEAR
PROGRAMRANDOM REPEAT A-B
STEP/ SLOW
SEARCH
REMOTE CONTROLLER RC-449DV
PLAY
2 3
4 5 6
7 8 9
1
0+10
+
-
ENTER
TVON / STANDBY
VOL +
VOL -
TV/ VCR
CH +CH -
TVDVD
2/3/5/∞
£
CLEAR
ENTER
PROGRAM
Numberbuttons
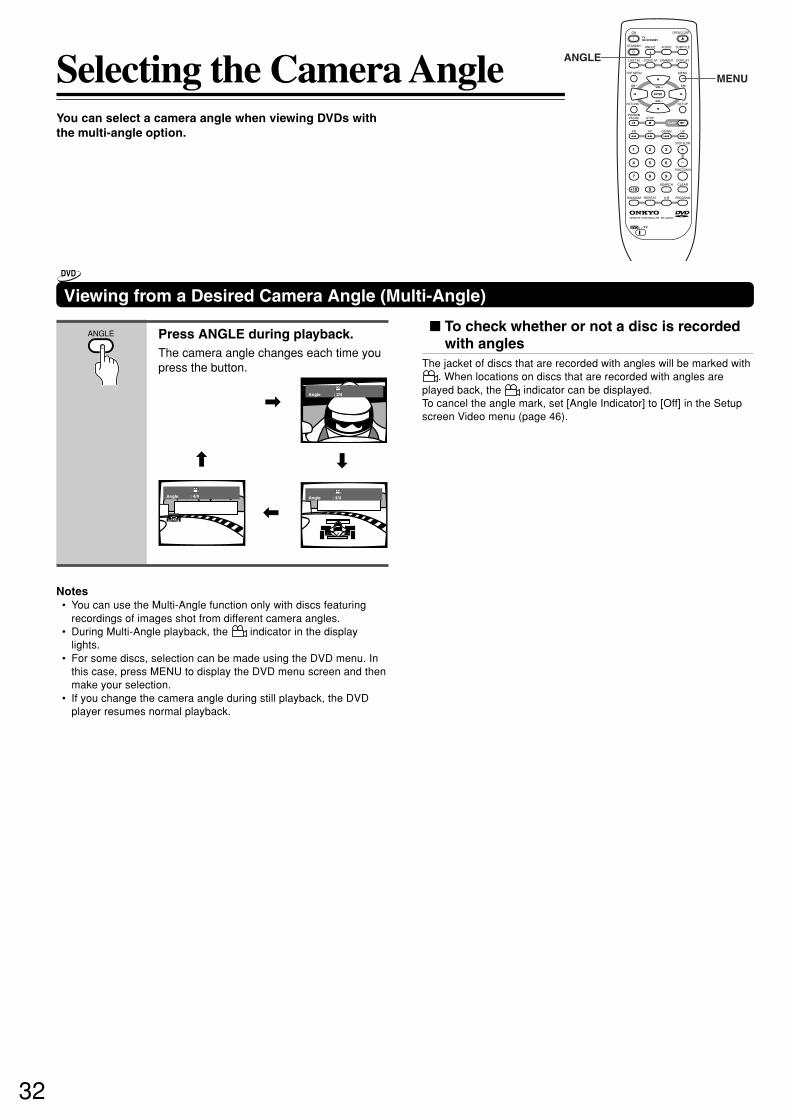
32
You can select a camera angle when viewing DVDs withthe multi-angle option.
Press ANGLE during playback.The camera angle changes each time youpress the button.
\
«»
|
Angle : 2/4
Angle : 3/4Angle : 4/4
To check whether or not a disc is recordedwith angles
The jacket of discs that are recorded with angles will be marked with. When locations on discs that are recorded with angles are
played back, the indicator can be displayed.To cancel the angle mark, set [Angle Indicator] to [Off] in the Setupscreen Video menu (page 46).
Notes• You can use the Multi-Angle function only with discs featuring
recordings of images shot from different camera angles.• During Multi-Angle playback, the indicator in the display
lights.• For some discs, selection can be made using the DVD menu. In
this case, press MENU to display the DVD menu screen and thenmake your selection.
• If you change the camera angle during still playback, the DVDplayer resumes normal playback.
Viewing from a Desired Camera Angle (Multi-Angle)
Selecting the Camera Angle
ANGLE
LAST M COND. M DIMMER DISPLAY
STANDBY
ON
ANGLE AUDIO SUBTITLE
MENUTOP MENU
SETUPRETURN
STOPPAUSE
FUNCTION M
OPEN / CLOSE
DOWN UPFR FF
CLEAR
PROGRAMRANDOM REPEAT A-B
STEP/ SLOW
SEARCH
REMOTE CONTROLLER RC-449DV
PLAY
2 3
4 5 6
7 8 9
1
0+10
+
-
ENTER
TVON / STANDBY
VOL +
VOL -
TV/ VCR
CH +CH -
TVDVD
MENU
ANGLE
DVD

33
Changing the Audio Language(Multi-Language Function)
Dolby Digital, PCM, and other audio data can be recorded onDVDs in a number of languages or audio tracks, letting youchoose the desired language or audio.
Press AUDIO repeatedly to selectthe desired language.Pressing AUDIO once displays thecurrently selected language. Subsequentpresses rotates through the audiolanguages available on the DVD.
Audio : 1 EnglishDolby Digital
5.1CH Audio : 2 Spanish
HELLO HOLA
Dolby Digital 5.1CH
Notes• You cannot switch languages if there is only one language
recorded on the disc.• Switching the audio language may not be possible with some
titles. In this case, the mark is displayed.• For some titles, selection can be made using the DVD menu.
In these cases, press MENU to display the DVD menu screenand then make your selection.
• When you erase the resume position or replace a disc, the DVDplayer returns to the automatic setting in the setting menu (page 47)
Changing Audio TypeFor enjoyment of karaoke or similar format Video CDs, CDs andMP3s, it is possible to select stereo audio, or either right or leftchannel mono depending on the requirements of the source.Press AUDIO repeatedly during playback to switch the audiotype.Audio output changes from [1/L] (Left channel) to[2/R] (Right channel) to [Stereo].
Audio : 1/L Audio : 2/R
Audio : Stereo
NoteWith karaoke and other discs, set the appropriate audio type forsinging and accompaniment after referring to information on the discjacket or accompanying material.
HELLO! HOLA!
Subtitle :1 English Subtitle :2 Spanish
Selecting a Subtitle Language(Multi-Language Subtitles)
You can select a desired subtitle language with DVDs thathave subtitle data in multiple languages recorded on them.
Press SUBTITLE repeatedly duringplayback.Pressing SUBTITLE once displays thecurrently selected subtitle language.Subsequent presses rotates through thesubtitle languages available on the DVD.
Notes• The subtitle language cannot be switched if the subtitle language
is not recorded, or if only one language is recorded.• Switching the subtitle language may not be possible with some
discs. In this case, the mark will be displayed.• To clear subtitles during playback, press SUBTITLE and then
press CLEAR, or press SUBTITLE until [Off] appears.• For some discs, subtitle language selection can be made using
the menu on the DVD. In this case, press MENU to display theDVD menu screen and then make your selection.
• When you erase the resume position or replace a disc, the DVDplayer returns to the automatic setting in the setting menu (page 48)
Selecting the Audio/Subtitle Language
AUDIO
SUBTITLE
LAST M COND. M DIMMER DISPLAY
STANDBY
ON
ANGLE AUDIO SUBTITLE
MENUTOP MENU
SETUPRETURN
STOPPAUSE
FUNCTION M
OPEN / CLOSE
DOWN UPFR FF
CLEAR
PROGRAMRANDOM REPEAT A-B
STEP/ SLOW
SEARCH
REMOTE CONTROLLER RC-449DV
PLAY
2 3
4 5 6
7 8 9
1
0+10
+
-
ENTER
TVON / STANDBY
VOL +
VOL -
TV/ VCR
CH +CH -
TVDVD
SUBTITLEAUDIO
MENU
CLEAR
DVD DVD
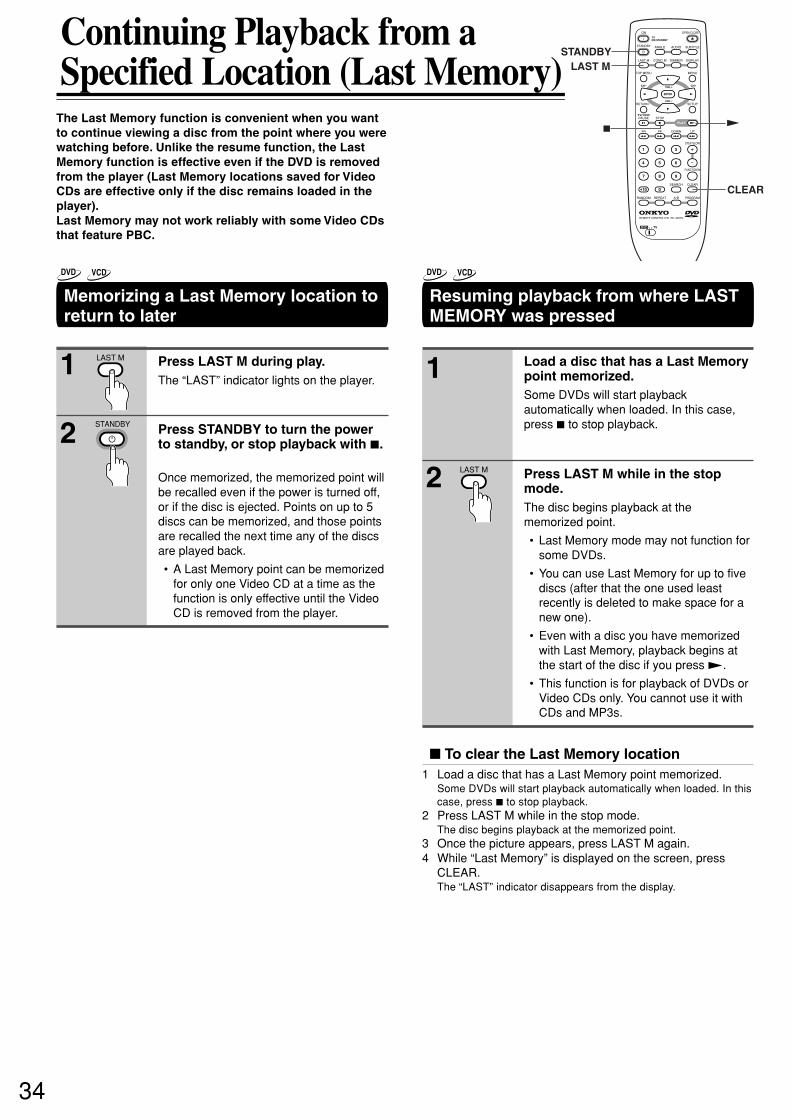
34
Memorizing a Last Memory location toreturn to later
Press LAST M during play.The “LAST” indicator lights on the player.
Press STANDBY to turn the powerto standby, or stop playback with 7.
Once memorized, the memorized point willbe recalled even if the power is turned off,or if the disc is ejected. Points on up to 5discs can be memorized, and those pointsare recalled the next time any of the discsare played back.
• A Last Memory point can be memorizedfor only one Video CD at a time as thefunction is only effective until the VideoCD is removed from the player.
Continuing Playback from aSpecified Location (Last Memory)
The Last Memory function is convenient when you wantto continue viewing a disc from the point where you werewatching before. Unlike the resume function, the LastMemory function is effective even if the DVD is removedfrom the player (Last Memory locations saved for VideoCDs are effective only if the disc remains loaded in theplayer).Last Memory may not work reliably with some Video CDsthat feature PBC.
Resuming playback from where LASTMEMORY was pressed
Load a disc that has a Last Memorypoint memorized.Some DVDs will start playbackautomatically when loaded. In this case,press 7 to stop playback.
Press LAST M while in the stopmode.The disc begins playback at thememorized point.
• Last Memory mode may not function forsome DVDs.
• You can use Last Memory for up to fivediscs (after that the one used leastrecently is deleted to make space for anew one).
• Even with a disc you have memorizedwith Last Memory, playback begins atthe start of the disc if you press £.
• This function is for playback of DVDs orVideo CDs only. You cannot use it withCDs and MP3s.
To clear the Last Memory location1 Load a disc that has a Last Memory point memorized.
Some DVDs will start playback automatically when loaded. In thiscase, press 7 to stop playback.
2 Press LAST M while in the stop mode.The disc begins playback at the memorized point.
3 Once the picture appears, press LAST M again.4 While “Last Memory” is displayed on the screen, press
CLEAR.The “LAST” indicator disappears from the display.
1
2
1
2
LAST M
STANDBY
LAST M
LAST M COND. M DIMMER DISPLAY
STANDBY
ON
ANGLE AUDIO SUBTITLE
MENUTOP MENU
SETUPRETURN
STOPPAUSE
FUNCTION M
OPEN / CLOSE
DOWN UPFR FF
CLEAR
PROGRAMRANDOM REPEAT A-B
STEP/ SLOW
SEARCH
REMOTE CONTROLLER RC-449DV
PLAY
2 3
4 5 6
7 8 9
1
0+10
+
-
ENTER
TVON / STANDBY
VOL +
VOL -
TV/ VCR
CH +CH -
TVDVD
CLEAR
£7
LAST MSTANDBY
DVD VCD DVD VCD
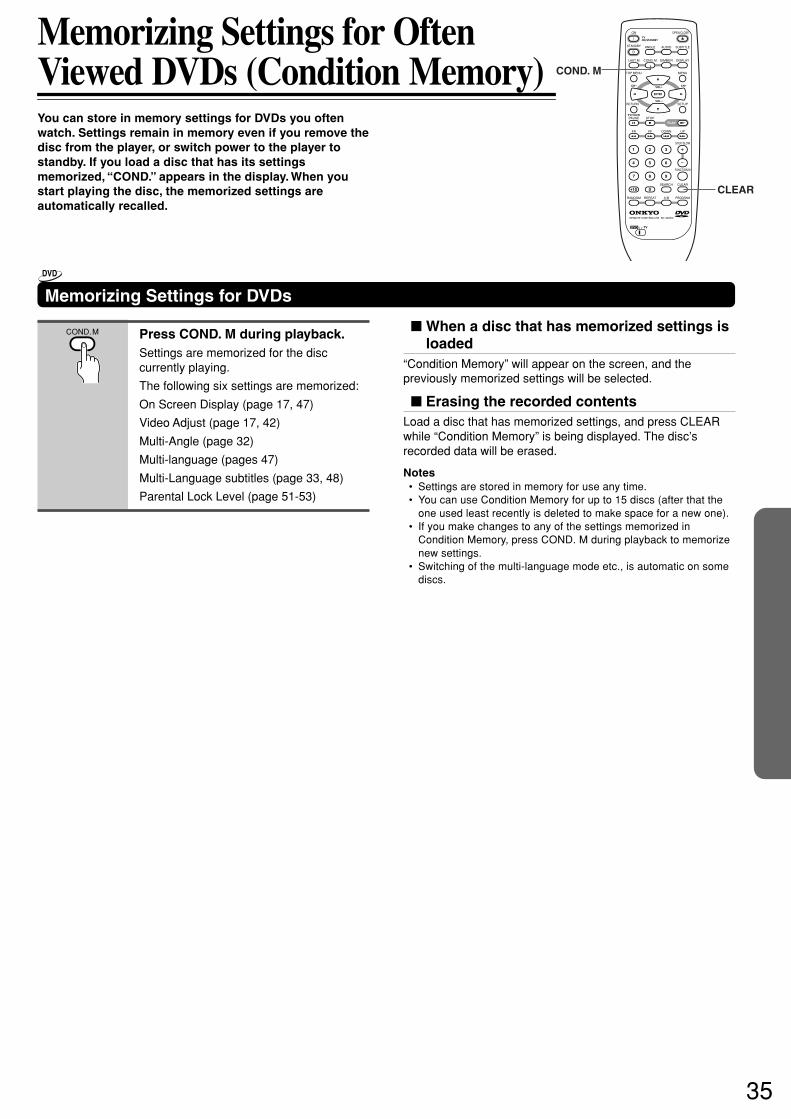
35
Memorizing Settings for OftenViewed DVDs (Condition Memory)You can store in memory settings for DVDs you oftenwatch. Settings remain in memory even if you remove thedisc from the player, or switch power to the player tostandby. If you load a disc that has its settingsmemorized, “COND.” appears in the display. When youstart playing the disc, the memorized settings areautomatically recalled.
When a disc that has memorized settings isloaded
“Condition Memory” will appear on the screen, and thepreviously memorized settings will be selected.
Erasing the recorded contentsLoad a disc that has memorized settings, and press CLEARwhile “Condition Memory” is being displayed. The disc’srecorded data will be erased.
Notes• Settings are stored in memory for use any time.• You can use Condition Memory for up to 15 discs (after that the
one used least recently is deleted to make space for a new one).• If you make changes to any of the settings memorized in
Condition Memory, press COND. M during playback to memorizenew settings.
• Switching of the multi-language mode etc., is automatic on somediscs.
Memorizing Settings for DVDs
Press COND. M during playback.Settings are memorized for the disccurrently playing.
The following six settings are memorized:
On Screen Display (page 17, 47)
Video Adjust (page 17, 42)
Multi-Angle (page 32)
Multi-language (pages 47)
Multi-Language subtitles (page 33, 48)
Parental Lock Level (page 51-53)
COND. M
LAST M COND. M DIMMER DISPLAY
STANDBY
ON
ANGLE AUDIO SUBTITLE
MENUTOP MENU
SETUPRETURN
STOPPAUSE
FUNCTION M
OPEN / CLOSE
DOWN UPFR FF
CLEAR
PROGRAMRANDOM REPEAT A-B
STEP/ SLOW
SEARCH
REMOTE CONTROLLER RC-449DV
PLAY
2 3
4 5 6
7 8 9
1
0+10
+
-
ENTER
TVON / STANDBY
VOL +
VOL -
TV/ VCR
CH +CH -
TVDVD
CLEAR
COND. M
DVD
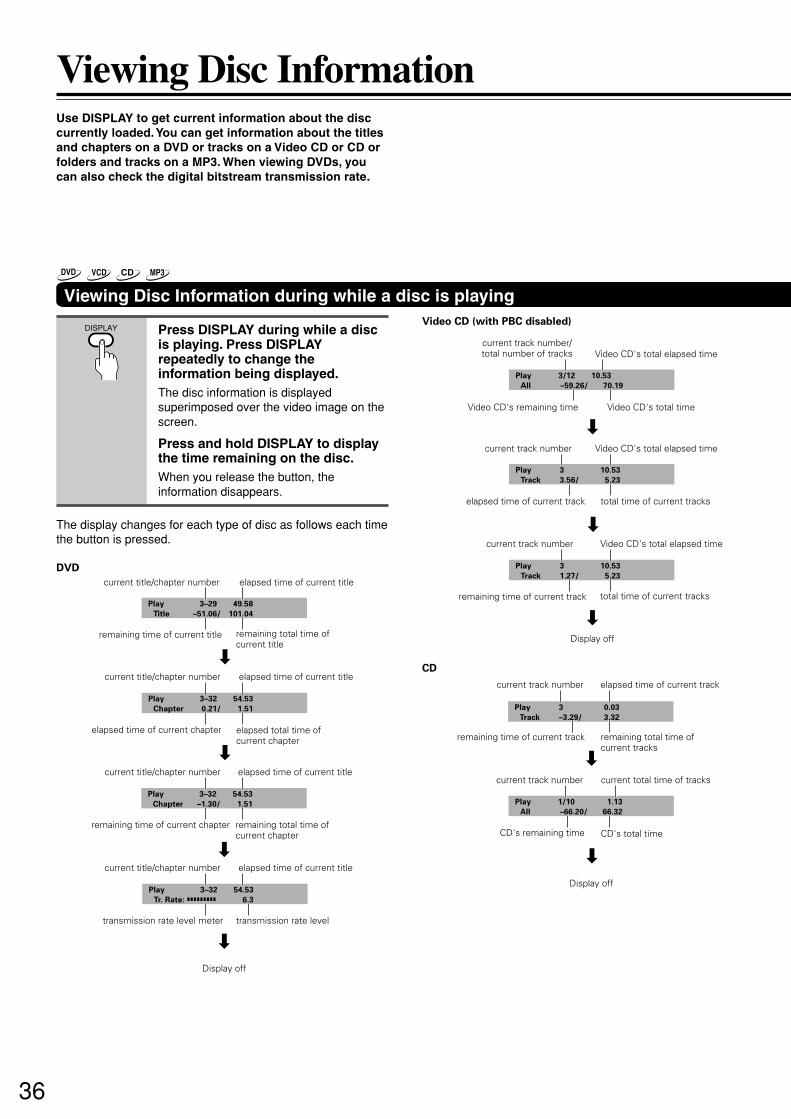
36
CD
Play
Track
3 0.03
3.32–3.29/
Play
All
1/10 1.13
66.32–66.20/
«
«
current track number elapsed time of current track
current track number current total time of tracks
remaining time of current track remaining total time of current tracks
CD's remaining time CD's total time
Display off
Press DISPLAY during while a discis playing. Press DISPLAYrepeatedly to change theinformation being displayed.The disc information is displayedsuperimposed over the video image on thescreen.
Press and hold DISPLAY to displaythe time remaining on the disc.When you release the button, theinformation disappears.
The display changes for each type of disc as follows each timethe button is pressed.
DVD
Play
Title
3–29 49.58
101.04–51.06/
Play
Chapter
3–32 54.53
1.510.21/
Play
Chapter
3–32 54.53
1.51–1.30/
Play
Tr. Rate:
3–32 54.53
6.3
«
«
«
«
current title/chapter number elapsed time of current title
current title/chapter number elapsed time of current title
remaining time of current title remaining total time of current title
elapsed time of current chapter elapsed total time of current chapter
current title/chapter number elapsed time of current title
remaining time of current chapter remaining total time of current chapter
current title/chapter number elapsed time of current title
transmission rate level meter transmission rate level
Display off
Video CD (with PBC disabled)
Play
All
3/12 10.53
70.19–59.26/
Play
Track
3 10.53
5.233.56/
Play
Track
3 10.53
5.231.27/
«
«
«
current track number/total number of tracks Video CD's total elapsed time
current track number Video CD's total elapsed time
Video CD's remaining time Video CD's total time
elapsed time of current track total time of current tracks
current track number Video CD's total elapsed time
remaining time of current track total time of current tracks
Display off
Viewing Disc InformationUse DISPLAY to get current information about the disccurrently loaded. You can get information about the titlesand chapters on a DVD or tracks on a Video CD or CD orfolders and tracks on a MP3. When viewing DVDs, youcan also check the digital bitstream transmission rate.
Viewing Disc Information during while a disc is playing
DISPLAY
DVD VCD CD MP3
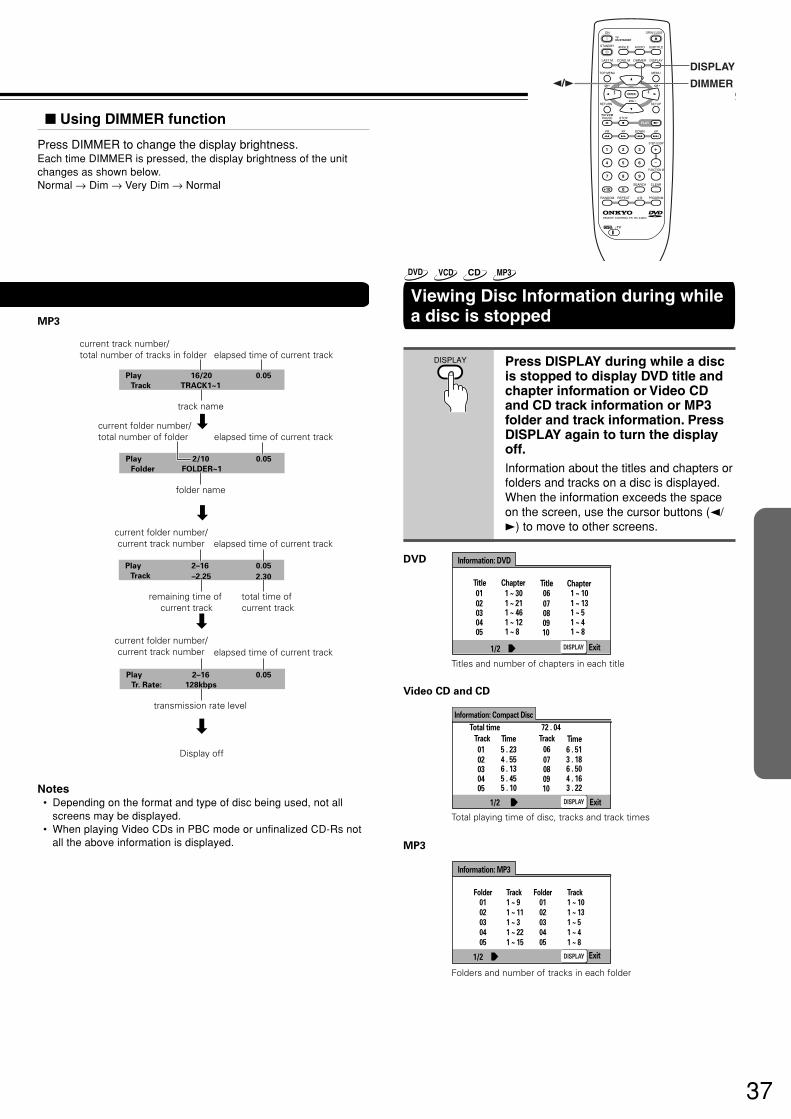
37
Viewing Disc Information during whilea disc is stopped
Press DISPLAY during while a discis stopped to display DVD title andchapter information or Video CDand CD track information or MP3folder and track information. PressDISPLAY again to turn the displayoff.Information about the titles and chapters orfolders and tracks on a disc is displayed.When the information exceeds the spaceon the screen, use the cursor buttons (2/3) to move to other screens.
MP3
Video CD and CD
DISPLAY Exit
Title Chapter Title Chapter01 06
07080910
02030405
1 ~ 301 ~ 211 ~ 461 ~ 121 ~ 8
1 ~ 101 ~ 131 ~ 51 ~ 41 ~ 8
1/2
Information: DVD
Titles and number of chapters in each title
DISPLAY
Total time 72 . 04
Track Time Track Time
01 06
07080910
02030405
5 . 234 . 556 . 135 . 455 . 10
6 . 513 . 186 . 504 . 163 . 22
1/2
Information: Compact Disc
Exit
Total playing time of disc, tracks and track times
Exit
Folder
01
02
03
04
05
Folder
01
02
03
04
05
Track
1 ~ 10
1 ~ 13
1 ~ 5
1 ~ 4
1 ~ 8
Track
1 ~ 9
1 ~ 11
1 ~ 3
1 ~ 22
1 ~ 15
1/2
Information: MP3
Folders and number of tracks in each folder
DISPLAY
Play
Track
16/20 0.05
TRACK1~1
Play
Folder
2/10 0.05
FOLDER~1
Play
Track
2–16 0.05
2.30–2.25
Play
Tr. Rate:
2–16 0.05
128kbps
«
«
«
«
current track number/total number of tracks in folder
current folder number/total number of folder
elapsed time of current track
elapsed time of current track
track name
folder name
current folder number/current track number
current folder number/current track number
elapsed time of current track
elapsed time of current track
remaining time of current track
total time of current track
transmission rate level
Display off
MP3
Notes• Depending on the format and type of disc being used, not all
screens may be displayed.• When playing Video CDs in PBC mode or unfinalized CD-Rs not
all the above information is displayed.
DVD
DISPLAY
LAST M COND. M DIMMER DISPLAY
STANDBY
ON
ANGLE AUDIO SUBTITLE
MENUTOP MENU
SETUPRETURN
STOPPAUSE
FUNCTION M
OPEN / CLOSE
DOWN UPFR FF
CLEAR
PROGRAMRANDOM REPEAT A-B
STEP/ SLOW
SEARCH
REMOTE CONTROLLER RC-449DV
PLAY
2 3
4 5 6
7 8 9
1
0+10
+
-
ENTER
TVON / STANDBY
VOL +
VOL -
TV/ VCR
CH +CH -
TVDVD
2/3
DISPLAY
DIMMER
DVD VCD CD MP3
Using DIMMER function
Press DIMMER to change the display brightness.Each time DIMMER is pressed, the display brightness of the unitchanges as shown below.Normal → Dim → Very Dim → Normal
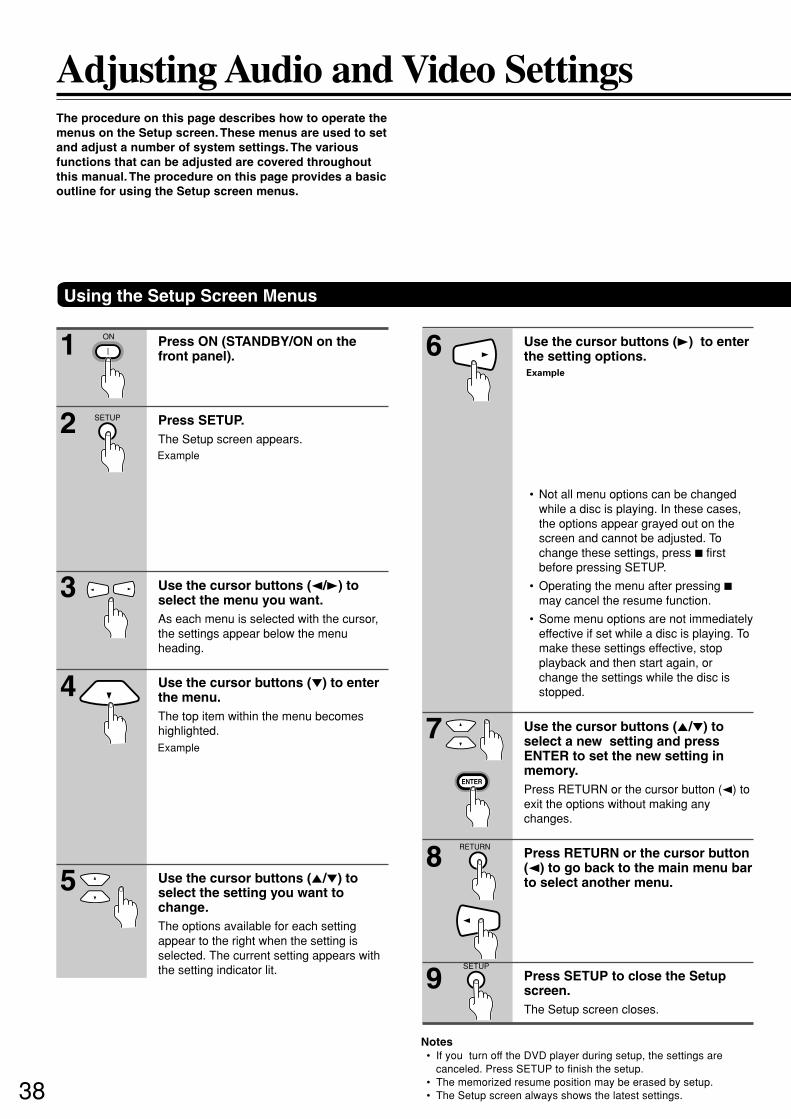
38
Use the cursor buttons (5/∞) toselect the setting you want tochange.The options available for each settingappear to the right when the setting isselected. The current setting appears withthe setting indicator lit.
Example
Adjusting Audio and Video Settings
Example
Example
The procedure on this page describes how to operate themenus on the Setup screen. These menus are used to setand adjust a number of system settings. The variousfunctions that can be adjusted are covered throughoutthis manual. The procedure on this page provides a basicoutline for using the Setup screen menus.
Use the cursor buttons (2/3) toselect the menu you want.As each menu is selected with the cursor,the settings appear below the menuheading.
Use the cursor buttons (∞) to enterthe menu.The top item within the menu becomeshighlighted.
Use the cursor buttons (3) to enterthe setting options.
• Not all menu options can be changedwhile a disc is playing. In these cases,the options appear grayed out on thescreen and cannot be adjusted. Tochange these settings, press 7 firstbefore pressing SETUP.
• Operating the menu after pressing 7may cancel the resume function.
• Some menu options are not immediatelyeffective if set while a disc is playing. Tomake these settings effective, stopplayback and then start again, orchange the settings while the disc isstopped.
Use the cursor buttons (5/∞) toselect a new setting and pressENTER to set the new setting inmemory.Press RETURN or the cursor button (2) toexit the options without making anychanges.
Press RETURN or the cursor button(2) to go back to the main menu barto select another menu.
Press SETUP to close the Setupscreen.The Setup screen closes.
Using the Setup Screen Menus
Press ON (STANDBY/ON on thefront panel).
Press SETUP.The Setup screen appears.
1
2
3
4
5
6
7
8
9
SETUP
ON
ENTER
RETURN
SETUP
Notes• If you turn off the DVD player during setup, the settings are
canceled. Press SETUP to finish the setup.• The memorized resume position may be erased by setup.• The Setup screen always shows the latest settings.
39
Changing to the Setup Screen “Expert”Menu Mode
The Setup screen menus are divided into two levels, [Basic]and [Expert], to make this unit more convenient to operate fordifferent levels of users. The [Basic] menu mode containsfunctions that may be considered necessary for the basicoperations of this player and helpful on-screen informationidentified by the i mark. The [Expert] menu mode adds to the[Basic] menu mode additional functions of the player that canbe adjusted to further personalize performance of the player.In this manual, functions that are contained in the [Expert]menu mode are identified by the Expert icon.Make changes to the [Setup Menu Mode] setting in the Setupscreen General menu.
Color of indicator Disc format(s)Blue DVD only
All compatible formats
DVD/Video CD
Green
Yellow
When setting up for the first timeIt is recommended to set up player using the Setup Navigator(page 16). If you selected [Auto Start Off] when the SetupNavigator appeared, you may still set up the player using theSetup Navigator in the General menu screen.If you choose not to use the Setup Navigator, be sure to makethe necessary settings in the Setup screenAudio, Video 1, Video 2 and Language menus as described onthe following pages.Some DVDs start playing automatically when loaded in theplayer. If a DVD has been loaded, be sure to press 7 beforeproceeding.
NoteThe next time you press SETUP, you’ll see the menu screen that youexited from last time.
How to interpret the setting indicator colorsin the Setup screen menus
When setting up the system, or when making adjustments, it isconvenient to know what settings are applicable to thedifferent disc formats. When the settings appear for eachmenu option, the currently selected setting appears with thesetting indicator highlighted in one of three colors: blue, greenor yellow. These colors correspond to what formats the menuoption effects as shown in the table below.
NoteIf a setting applicable only to DVDs is changed while a Video CD orCD is loaded, a blue DVD icon appears in the upper right handcorner of the screen to indicate that the setting is not applicable tothe currently loaded disc. The setting will be effective the next time aDVD is loaded.
Settings: ExpertBasic (Factory setting)
NoteOn-screen information only appears in the [Basic] menu mode .
LAST M COND. M DIMMER DISPLAY
STANDBY
ON
ANGLE AUDIO SUBTITLE
MENUTOP MENU
SETUPRETURN
STOPPAUSE
FUNCTION M
OPEN / CLOSE
DOWN UPFR FF
CLEAR
PROGRAMRANDOM REPEAT A-B
STEP/ SLOW
SEARCH
REMOTE CONTROLLER RC-449DV
PLAY
2 3
4 5 6
7 8 9
1
0+10
+
-
ENTER
TVON / STANDBY
VOL +
VOL -
TV/ VCR
CH +CH -
TVDVD
2/3/5/∞ ENTER
SETUPRETURN
40
This player is capable of digital audio output for Dolby Digital,DTS, MPEG, and signals with a sampling rate of 96 kHz.Make settings in the Setup screen Audio menu to reflect thecapabilities of the components that you have made digitalconnections to.
Notes• If you have already completed the Setup Navigator screen
operations, the settings on this page have already been set bythe player.
• If you have made only stereo line connections (analog) using thesupplied audio cord, it is not necessary to make any changes inthis menu.
Dolby Digital OutThis player is capable of outputting the Dolby Digital surroundsound audio signal. When the player is connected to an AVcomponent that has a built-in Dolby Digital decoder, select[Dolby Digital]. This player can also convert the Dolby Digitalsignal to a digital Linear PCM signal, the same digital signaloutput from a CD. Select [Dolby Digital 3 PCM] when youhave made connections to an amplifier or receiver with aDolby Pro Logic decoder or a Digital Analog Converter (DAC).
Adjusting the Dynamic Range of theAudio Soundtrack
Audio DRC stands for Audio Dynamic Range Compression.When Audio DRC is on, soft sounds such as dialog can beheard more clearly without making loud sounds even louder.Select from three levels of compression depending on howmuch effect you want. When Audio DRC is set to [Off], there isno effect on the audio source.Make changes to the [Audio DRC] setting in the Setup screenAudio menu.
Settings: Off (Factory setting)On
Notes• Audio DRC is only effective with Dolby Digital audio sources.• The level of Audio DRC may differ depending on the DVD.• If you have set the [Dolby Digital Out] to [PCM] and the [Digital
Out] setting to [On], the Audio DRC effect is output through thedigital out jack.
• The effect of Audio DRC depends on your speakers and AVamplifier settings.
Settings: Dolby Digital (Factory setting)Dolby Digital 3 PCM
Setting the Digital Audio Output
Adjusting Audio and Video Settings
41
DTS OutThis player is capable of outputting DTS digital audio for DVDsrecorded in DTS. When this player is connected to an AVcomponent that has a built-in DTS decoder, select [DTS]. Ifyour system is not equipped to decode DTS, select [Off]. Referto the operating instructions supplied with your audiocomponents if you are unsure about compatibility with DTS.
MPEG OutThis player is capable of outputting the MPEG digitalbitstream. When the player is connected to an AV componentthat has a built-in MPEG decoder, select the [MPEG] setting.Otherwise, select [MPEG 3 PCM] to convert the digital signalto the PCM signal, the digital signal output from a CD.
Settings: Off (Factory setting)DTS
NoteIf you have made digital audio connections to component(s) notequipped to decode the DTS digital bitstream, be sure to select [Off].If a DTS signal is output without decoding, the output is digital noisethat could potentially cause damage to your speakers.
96 kHz PCM OutThis player is capable of outputting digital signals with asampling frequency of 96 kHz. If you have made connectionsto a component capable of processing this signal rate, select[96 kHz] for the signal to be output as is. As some componentsare incapable of processing digital signal input with samplingrates of 96 kHz, selecting [96 kHz 3 48 kHz] compresses thesignal to a standard signal with a sampling rate of 48 kHz.
Settings: 96 kHz 3 48 kHz (Factory setting )96 kHz
NoteOn DVDs that contain copy protection, the 96 kHz signal may onlybe output from the analog audio jacks.
Settings: MPEGMPEG 3 PCM (Factory setting)
Digital Out Expert
Depending on your preferences and the type of connectionsmade, you may opt not to have the digital audio signal outputat all. When this setting is set to [Off] there is no signal outputfrom the digital audio output jacks.Make changes to the [Digital Out] setting in the Setup screenAudio menu in the [Expert] menu mode (page 39).
Settings: On (Digital bitstream is output) (Factory setting)Off (Digital bitstream is not output)
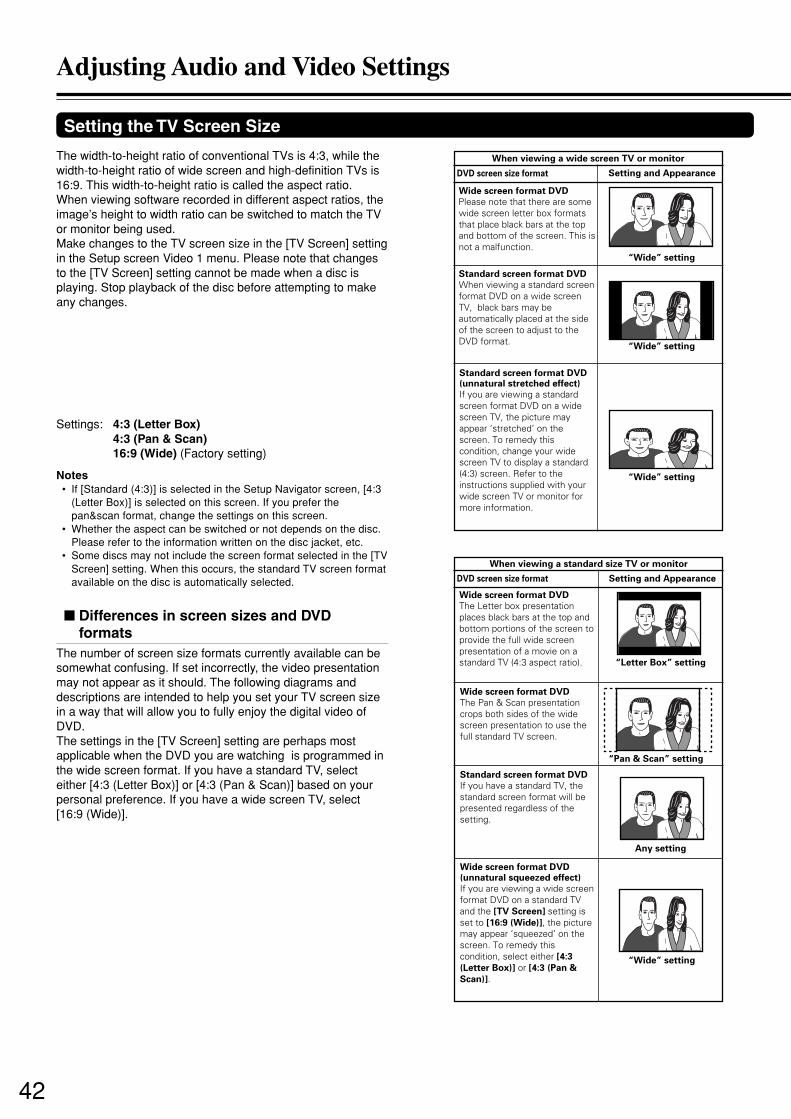
42
The width-to-height ratio of conventional TVs is 4:3, while thewidth-to-height ratio of wide screen and high-definition TVs is16:9. This width-to-height ratio is called the aspect ratio.When viewing software recorded in different aspect ratios, theimage’s height to width ratio can be switched to match the TVor monitor being used.Make changes to the TV screen size in the [TV Screen] settingin the Setup screen Video 1 menu. Please note that changesto the [TV Screen] setting cannot be made when a disc isplaying. Stop playback of the disc before attempting to makeany changes.
When viewing a wide screen TV or monitor
Standard screen format DVD
When viewing a standard screenformat DVD on a wide screenTV, black bars may beautomatically placed at the sideof the screen to adjust to theDVD format.
“Wide” setting
Wide screen format DVD
Please note that there are somewide screen letter box formatsthat place black bars at the topand bottom of the screen. This isnot a malfunction.
“Wide” setting
“Wide” setting
Standard screen format DVD(unnatural stretched effect)
If you are viewing a standardscreen format DVD on a widescreen TV, the picture mayappear ‘stretched’ on thescreen. To remedy thiscondition, change your widescreen TV to display a standard(4:3) screen. Refer to theinstructions supplied with yourwide screen TV or monitor formore information.
DVD screen size format Setting and Appearance
Standard screen format DVD
If you have a standard TV, thestandard screen format will bepresented regardless of thesetting.
When viewing a standard size TV or monitor
Wide screen format DVD
The Pan & Scan presentationcrops both sides of the widescreen presentation to use thefull standard TV screen.
“Letter Box” setting
Wide screen format DVD
The Letter box presentationplaces black bars at the top andbottom portions of the screen toprovide the full wide screenpresentation of a movie on astandard TV (4:3 aspect ratio).
“Pan & Scan” setting
Any setting
Wide screen format DVD
(unnatural squeezed effect)
If you are viewing a wide screenformat DVD on a standard TVand the [TV Screen] setting isset to [16:9 (Wide)], the picturemay appear ‘squeezed’ on thescreen. To remedy thiscondition, select either [4:3
(Letter Box)] or [4:3 (Pan &
Scan)].
Setting and Appearance
“Wide” setting
DVD screen size format
Settings: 4:3 (Letter Box)4:3 (Pan & Scan)16:9 (Wide) (Factory setting)
Notes• If [Standard (4:3)] is selected in the Setup Navigator screen, [4:3
(Letter Box)] is selected on this screen. If you prefer thepan&scan format, change the settings on this screen.
• Whether the aspect can be switched or not depends on the disc.Please refer to the information written on the disc jacket, etc.
• Some discs may not include the screen format selected in the [TVScreen] setting. When this occurs, the standard TV screen formatavailable on the disc is automatically selected.
Differences in screen sizes and DVDformats
The number of screen size formats currently available can besomewhat confusing. If set incorrectly, the video presentationmay not appear as it should. The following diagrams anddescriptions are intended to help you set your TV screen sizein a way that will allow you to fully enjoy the digital video ofDVD.The settings in the [TV Screen] setting are perhaps mostapplicable when the DVD you are watching is programmed inthe wide screen format. If you have a standard TV, selecteither [4:3 (Letter Box)] or [4:3 (Pan & Scan)] based on yourpersonal preference. If you have a wide screen TV, select[16:9 (Wide)].
Setting the TV Screen Size
Adjusting Audio and Video Settings
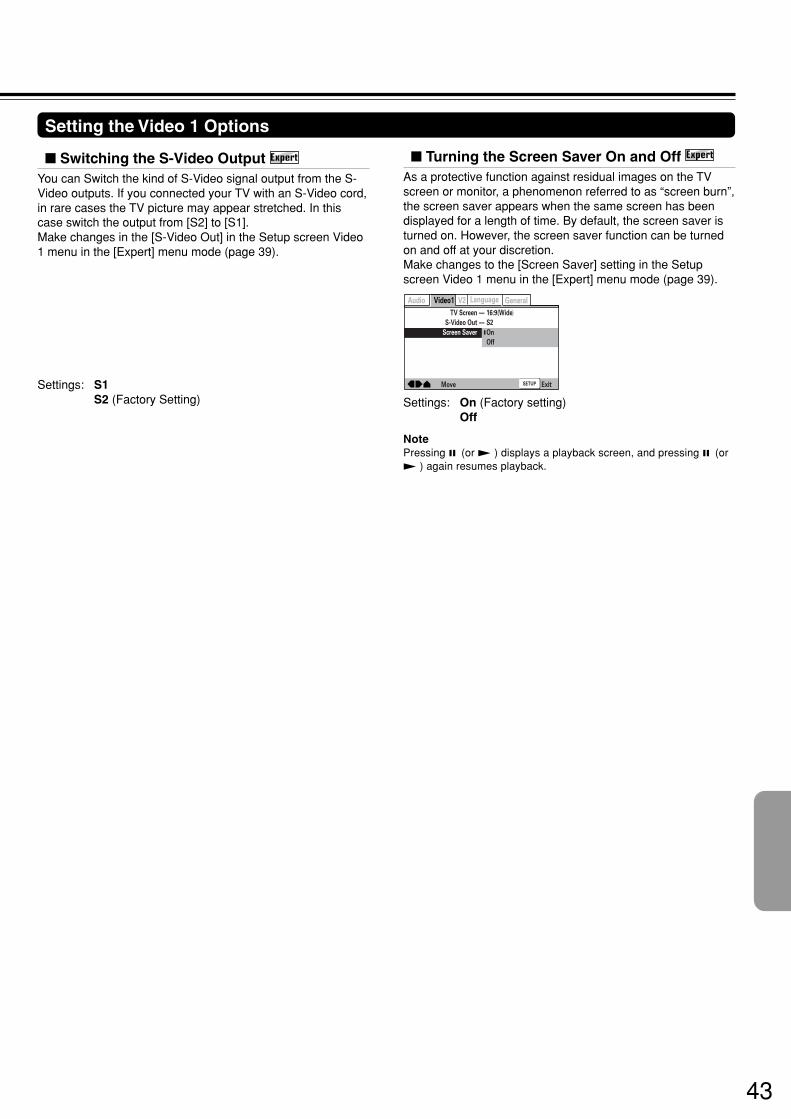
43
Settings: S1S2 (Factory Setting)
Turning the Screen Saver On and Off Expert
As a protective function against residual images on the TVscreen or monitor, a phenomenon referred to as “screen burn”,the screen saver appears when the same screen has beendisplayed for a length of time. By default, the screen saver isturned on. However, the screen saver function can be turnedon and off at your discretion.Make changes to the [Screen Saver] setting in the Setupscreen Video 1 menu in the [Expert] menu mode (page 39).
—
—
—
Audio Video1 Language GeneralV2
ExitMove
TV Screen
S-Video Out
Screen Saver
16:9(Wide)
S2
On
Off
SETUP
Settings: On (Factory setting)Off
NotePressing 8 (or £ ) displays a playback screen, and pressing 8 (or£ ) again resumes playback.
Switching the S-Video Output Expert
You can Switch the kind of S-Video signal output from the S-Video outputs. If you connected your TV with an S-Video cord,in rare cases the TV picture may appear stretched. In thiscase switch the output from [S2] to [S1].Make changes in the [S-Video Out] in the Setup screen Video1 menu in the [Expert] menu mode (page 39).
Setting the Video 1 Options
44
Adjusting the picture quality settings– To create your own setting (1)
1 Use the cursor button (3) to select [Start] then pressENTER.
2 Use the cursor button (∞) to select [Video Setup] thenpress ENTER.
3 Use the cursor buttons (2/3) to select the setting to [On] or[Off].
4 Use the cursor buttons (5/∞) to select the setting to adjust.You can adjust any or all of the following picture quality factors:Fine FocusSwitch on to reveal greater detail (higher resolution) in thepicture.ContrastAdjusts the contrast of the elements in the picture.SharpnessAdjusts the sharpness of the mid-frequency (less detailed)elements in the picture. (This setting is only effective when [FineFocus] is [On].)Chroma LevelAdjusts how saturated colors appear.HueAdjusts the overall color balance between red and green. (This isonly effective when the player is connected using the VIDEOOUT or S-VIDEO OUT jacks.)
You can either select a preprogrammed setting designed tomatch certain program types or make adjustments to matchyour own preferences and save them in the player’s memory.Make changes to the [Video Adjust] setting in the Setupscreen Video 2 menu.
Selecting a preprogrammed setting1 Use the cursor button (3) to select [Start] then press
ENTER.
2 Press ENTER.
Standard (Factory Setting)Presents the video with no effect added.CinemaDelivers a cinema-like picture.AnimationProvides images with bright clear colors.Memory 1, Memory 2, and Memory 3These are user programmable settings. See ‘Adjusting the picturequality settings’ on pages 44 and 45 for more information.
3 Use the cursor buttons (2/3/5/∞) to select one of thepreprogrammed picture quality settings.If there is a DVD or Video CD playing, the effects of each settingcan be viewed while it is highlighted on the screen. This may beuseful in selecting an appropriate setting.
4 Press ENTER.The new selection is set.
Notes• Each picture quality setting is defined by a number of individual
settings, described in ‘Adjusting the picture quality settings’ onpages 44 and 45.
• Depending on the disc and the TV/monitor, you may not see theeffect clearly.
Adjusting the Video Quality
Adjusting Audio and Video Settings
45
Adjusting the picture quality settings– To create your own setting (2)
1 Use the cursor button (3) to select [Start] then pressENTER.
5 Use the cursor buttons (2/3) to adjust the settings.Adjust these while a disc is playing to see the effect of changesimmediately.
6 Repeat steps 4 and 5 to make adjustments to othersettings.If you would like to save the settings in the player’s memory, besure to select either [1], [2], or [3] in the [Memory] setting toestablish which memory location to save the new settings in.Please note that if you select a location where settings havealready been saved, the old settings will be replaced by the newones.
2 Use the cursor button (∞) to select [Video Setup] and pressENTER.
3 Press DISPLAY.
4 Use the cursor buttons (5/∞) to select the setting and usethe cursor buttons (2/3) to adjust the settings.Adjust these while a disc is playing to see the effect of changesimmediately.
5 To memorize the setting, select Memory 1, 2, 3, then pressENTER.The previous setting will be erased.
7 When you are finished making adjustments, press ENTERto establish the new settings.
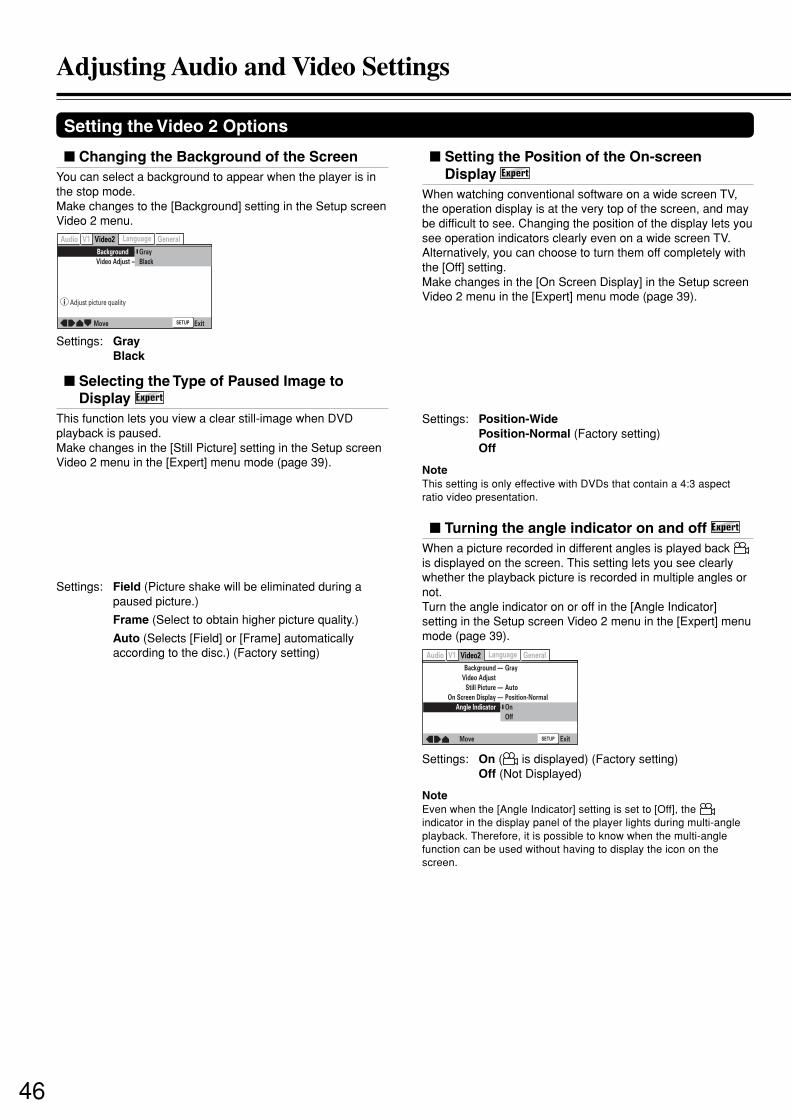
46
Changing the Background of the ScreenYou can select a background to appear when the player is inthe stop mode.Make changes to the [Background] setting in the Setup screenVideo 2 menu.
—
—
SETUP
Video2 Language GeneralAudio V1
ExitMove
Background
Video Adjust
Gray
Black
Adjust picture quality
Selecting the Type of Paused Image toDisplay Expert
This function lets you view a clear still-image when DVDplayback is paused.Make changes in the [Still Picture] setting in the Setup screenVideo 2 menu in the [Expert] menu mode (page 39).
Settings: Field (Picture shake will be eliminated during apaused picture.)
Frame (Select to obtain higher picture quality.)
Auto (Selects [Field] or [Frame] automaticallyaccording to the disc.) (Factory setting)
Settings: GrayBlack
Setting the Position of the On-screenDisplay Expert
When watching conventional software on a wide screen TV,the operation display is at the very top of the screen, and maybe difficult to see. Changing the position of the display lets yousee operation indicators clearly even on a wide screen TV.Alternatively, you can choose to turn them off completely withthe [Off] setting.Make changes in the [On Screen Display] in the Setup screenVideo 2 menu in the [Expert] menu mode (page 39).
Settings: Position-WidePosition-Normal (Factory setting)Off
NoteThis setting is only effective with DVDs that contain a 4:3 aspectratio video presentation.
Turning the angle indicator on and off Expert
When a picture recorded in different angles is played back is displayed on the screen. This setting lets you see clearlywhether the playback picture is recorded in multiple angles ornot.Turn the angle indicator on or off in the [Angle Indicator]setting in the Setup screen Video 2 menu in the [Expert] menumode (page 39).
—
—
—
—
Video2 Language GeneralAudio V1
ExitMove
Background
Video Adjust
Still Picture
On Screen Display
Angle Indicator
Gray
Auto
Position-Normal
On
Off
SETUP
Settings: On ( is displayed) (Factory setting)Off (Not Displayed)
NoteEven when the [Angle Indicator] setting is set to [Off], the indicator in the display panel of the player lights during multi-angleplayback. Therefore, it is possible to know when the multi-anglefunction can be used without having to display the icon on thescreen.
Setting the Video 2 Options
Adjusting Audio and Video Settings
47
DVDs have the capacity to contain a great deal of audioinformation, which includes the ability to hold up to 8 differentlanguage tracks and subtitle information in as many as 32different languages. This section outlines the variety of audiolanguage and subtitle options available with this player.Please note that if you have completed the Setup Navigator,the audio and subtitle language options have automaticallybeen set in accordance with the [OSD Language] (thelanguage that appears on the screen).
NoteDVDs differ in content and do not all contain multiple language orsubtitle information. Therefore making settings in this section mayhave no effect on some DVDs.
Setting the On-screen Display (OSD)Language
This setting is used to establish the language that operationindicators and on-screen messages and operations display.Change this setting in the Setup screen Language menu [OSDLanguage] setting.
Settings: English (Factory setting)françaisDeutschItalianoEspañol
Asian models onlyEnglish (Factory setting)
Notes• The menu settings may be different from those shown above.• The [OSD Language] setting is factory set to [English]. If you
want English to be displayed, it is not necessary to adjust thissetting.
Selecting an audio language preferenceThe audio language that you normally listen to can beselected from the various audio languages on a DVD. Evenwhen the audio language is changed during playback bypressing AUDIO, the language selected at this setting will beselected as the default when the DVD is changed.Make changes to the [Audio Language] setting in the Setupscreen Language menu.You cannot make this setting with a disc playing.
Settings: English (Factory setting)FrenchGermanItalianSpanishOther (For details on how to select otherlanguages, see ‘When [Other] is selected’ on page49.)
Asian models onlyEnglish (Factory setting)ChineseOther
NoteThe menu settings may be different from those shown above.
Setting the Language Options
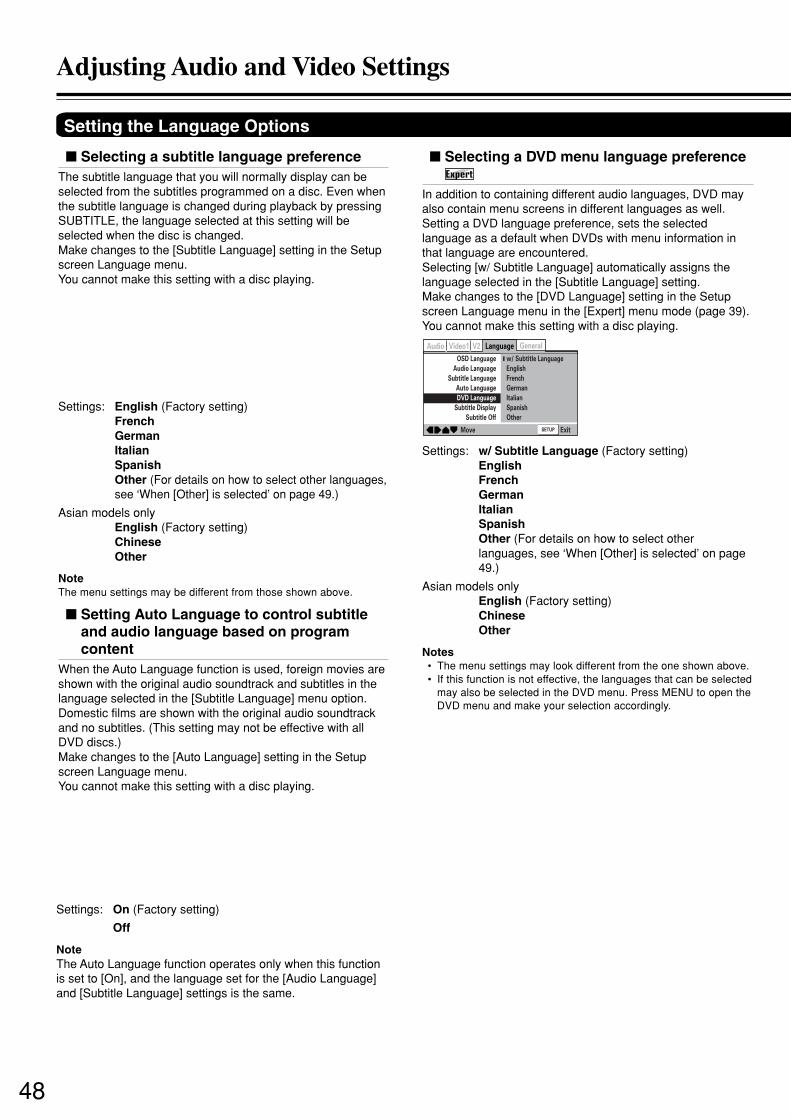
48
Selecting a subtitle language preferenceThe subtitle language that you will normally display can beselected from the subtitles programmed on a disc. Even whenthe subtitle language is changed during playback by pressingSUBTITLE, the language selected at this setting will beselected when the disc is changed.Make changes to the [Subtitle Language] setting in the Setupscreen Language menu.You cannot make this setting with a disc playing.
Settings: English (Factory setting)FrenchGermanItalianSpanishOther (For details on how to select other languages,see ‘When [Other] is selected’ on page 49.)
Asian models onlyEnglish (Factory setting)ChineseOther
NoteThe menu settings may be different from those shown above.
Setting Auto Language to control subtitleand audio language based on programcontent
When the Auto Language function is used, foreign movies areshown with the original audio soundtrack and subtitles in thelanguage selected in the [Subtitle Language] menu option.Domestic films are shown with the original audio soundtrackand no subtitles. (This setting may not be effective with allDVD discs.)Make changes to the [Auto Language] setting in the Setupscreen Language menu.You cannot make this setting with a disc playing.
Settings: On (Factory setting)
Off
NoteThe Auto Language function operates only when this functionis set to [On], and the language set for the [Audio Language]and [Subtitle Language] settings is the same.
Selecting a DVD menu language preferenceExpert
In addition to containing different audio languages, DVD mayalso contain menu screens in different languages as well.Setting a DVD language preference, sets the selectedlanguage as a default when DVDs with menu information inthat language are encountered.Selecting [w/ Subtitle Language] automatically assigns thelanguage selected in the [Subtitle Language] setting.Make changes to the [DVD Language] setting in the Setupscreen Language menu in the [Expert] menu mode (page 39).You cannot make this setting with a disc playing.
Settings: w/ Subtitle Language (Factory setting)EnglishFrenchGermanItalianSpanishOther (For details on how to select otherlanguages, see ‘When [Other] is selected’ on page49.)
Asian models onlyEnglish (Factory setting)ChineseOther
Notes• The menu settings may look different from the one shown above.• If this function is not effective, the languages that can be selected
may also be selected in the DVD menu. Press MENU to open theDVD menu and make your selection accordingly.
LanguageV2 GeneralAudio Video1
ExitMove
OSD Language
Audio Language
Subtitle Language
Auto Language
DVD Language
Subtitle Display
Subtitle Off
w/ Subtitle Language
English
French
German
Italian
Spanish
Other
SETUP
Setting the Language Options
Adjusting Audio and Video Settings

49
—
—
—
—
LanguageV2 GeneralAudio Video1
ExitMove
OSD Language
Audio Language
Subtitle Language
Auto Language
DVD Language
Subtitle Display
Subtitle Off
English
English
English
On
On
Off
Assist Subtitle
SETUP
—
—
—
—
—
—
SETUP
LanguageV2 GeneralAudio Video1
ExitMove
OSD Language
Audio Language
Subtitle Language
Auto Language
DVD Language
Subtitle Display
Subtitle Off
English
English
English
On
English
With Audio
Selected Subtitle
When [Other] is selectedWhen you want to select one of the 136 languages as themain audio language, follow the steps below when thefollowing screen appears.A language code list can be found on page 50.
Code (0~2)
1 0 0 1
ja: Japanese
List of Languages
1 Use the cursor buttons to select [Other] and press ENTER.The language selection screen appears.
2 Use the cursor buttons (2/3) to select either “List ofLanguages” or “Code”.
3 If you select “List of Languages”, use the cursor buttons(5/∞) to select the language.For languages which are only shown as a code, please refer to‘Language Code List’ on page 50.
If you select “Code”, use the cursor buttons (5/∞) to inputthe numbers of the input code.Use the cursor buttons (2/3) to change the position of thecursor. You can also use the number buttons to enter the code.
4 Press ENTER to set the new language.To exit the screen without making any changes, press RETURN.
Selecting subtitles, assist subtitles or nosubtitles Expert
Use this function to turn the subtitles on or off. Additionally,some DVDs provide assist subtitles that provide additionalexplanations of scenes in addition to the standard subtitles forviewers who are hard of hearing. Select [Assist Subtitle] todisplay these subtitles on DVDs where this function is offered.Make changes to the [Subtitle Display] setting in the Setupscreen Language menu in the [Expert] menu mode (page 39).You cannot make this setting with a disc playing.
Settings: On (Factory setting)OffAssist Subtitle
Notes• If there is no subtitle information recorded on the DVD, no
subtitles are displayed even if this function is set to [On].• This setting serves as a default as whether or not to display
subtitles. Even if this option is set to [Off], subtitles can bedisplayed by pressing SUBTITLE. Similarly, if this option is set to[On], the subtitles can be turned off by pressing SUBTITLE andthen CLEAR.
Forcing subtitles to be displayed Expert
Even when the subtitles are turned off, some DVDs willnevertheless display them on the screen. This setting allowsyou to select the language of the subtitles to be displayed withthis type of DVD.Select [With Audio] to display the subtitles in the samelanguage as the currently selected Audio Language. Select[Selected Subtitle] to display the subtitles in the language setin the [Subtitle Language] setting.Make changes to the [Subtitle Off] setting in the Setup screenLanguage menu in the [Expert] menu mode (page 39).You cannot make this setting with a disc playing.
Settings: With AudioSelected Subtitle (Factory setting)
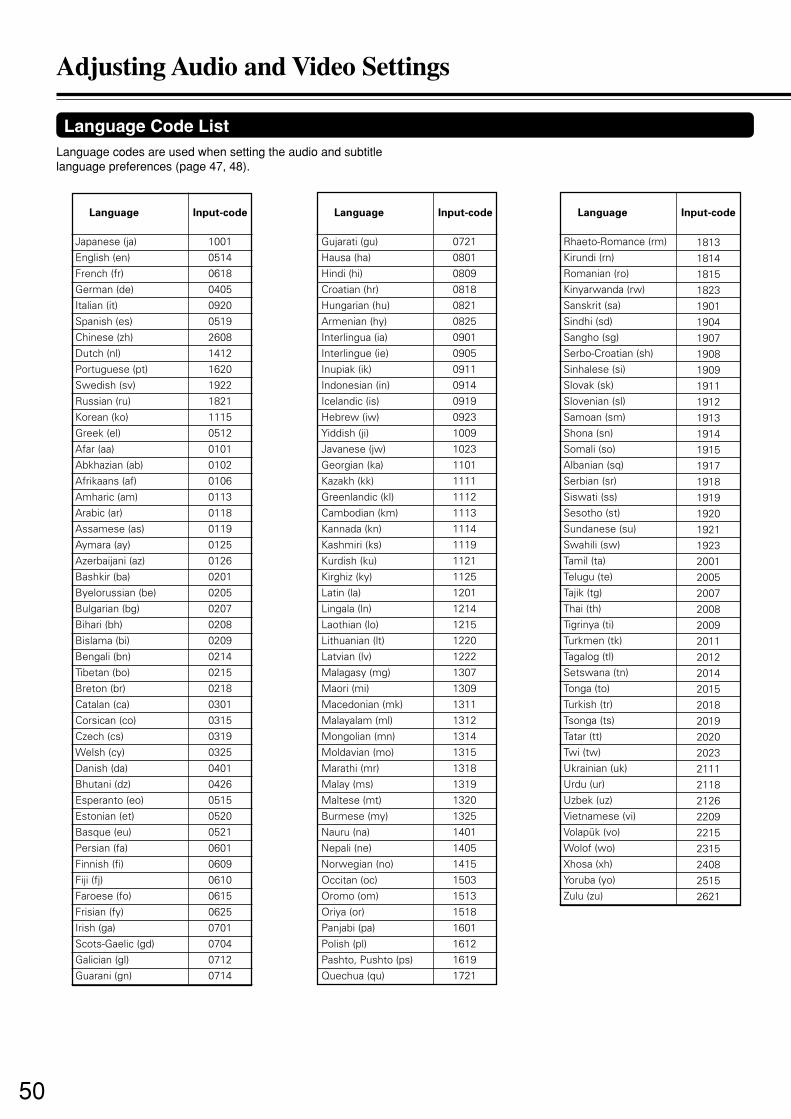
50
Language Code ListLanguage codes are used when setting the audio and subtitlelanguage preferences (page 47, 48).
Japanese (ja)English (en)French (fr)German (de)Italian (it)Spanish (es)Chinese (zh)Dutch (nl)Portuguese (pt)Swedish (sv)Russian (ru)Korean (ko)Greek (el)Afar (aa)Abkhazian (ab)Afrikaans (af)Amharic (am)Arabic (ar)Assamese (as)Aymara (ay)Azerbaijani (az)Bashkir (ba)Byelorussian (be)Bulgarian (bg)Bihari (bh)Bislama (bi)Bengali (bn)Tibetan (bo)Breton (br)Catalan (ca)Corsican (co)Czech (cs)Welsh (cy)Danish (da)Bhutani (dz)Esperanto (eo)Estonian (et)Basque (eu)Persian (fa)Finnish (fi)Fiji (fj)Faroese (fo)Frisian (fy)Irish (ga)Scots-Gaelic (gd)Galician (gl)Guarani (gn)
10010514061804050920051926081412162019221821111505120101010201060113011801190125012602010205020702080209021402150218030103150319032504010426051505200521060106090610061506250701070407120714
Language Input-code
Gujarati (gu)Hausa (ha)Hindi (hi)Croatian (hr)Hungarian (hu)Armenian (hy)Interlingua (ia)Interlingue (ie)Inupiak (ik)Indonesian (in)Icelandic (is)Hebrew (iw)Yiddish (ji)Javanese (jw)Georgian (ka)Kazakh (kk)Greenlandic (kl)Cambodian (km)Kannada (kn)Kashmiri (ks)Kurdish (ku)Kirghiz (ky)Latin (la)Lingala (ln)Laothian (lo)Lithuanian (lt)Latvian (lv)Malagasy (mg)Maori (mi)Macedonian (mk)Malayalam (ml)Mongolian (mn)Moldavian (mo)Marathi (mr)Malay (ms)Maltese (mt)Burmese (my)Nauru (na)Nepali (ne)Norwegian (no)Occitan (oc)Oromo (om)Oriya (or)Panjabi (pa)Polish (pl)Pashto, Pushto (ps)Quechua (qu)
07210801080908180821082509010905091109140919092310091023110111111112111311141119112111251201121412151220122213071309131113121314131513181319132013251401140514151503151315181601161216191721
Language Input-code
Rhaeto-Romance (rm)Kirundi (rn)Romanian (ro)Kinyarwanda (rw)Sanskrit (sa)Sindhi (sd)Sangho (sg)Serbo-Croatian (sh)Sinhalese (si)Slovak (sk)Slovenian (sl)Samoan (sm)Shona (sn)Somali (so)Albanian (sq)Serbian (sr)Siswati (ss)Sesotho (st)Sundanese (su)Swahili (sw)Tamil (ta)Telugu (te)Tajik (tg)Thai (th)Tigrinya (ti)Turkmen (tk)Tagalog (tl)Setswana (tn)Tonga (to)Turkish (tr)Tsonga (ts)Tatar (tt)Twi (tw)Ukrainian (uk)Urdu (ur)Uzbek (uz)Vietnamese (vi)Volapük (vo)Wolof (wo)Xhosa (xh)Yoruba (yo)Zulu (zu)
181318141815182319011904190719081909191119121913191419151917191819191920192119232001200520072008200920112012201420152018201920202023211121182126220922152315240825152621
Language Input-code
Adjusting Audio and Video Settings
51
This player lets you set the Parental Lock if the DVD has aparental lock level recorded on it. With Parental Lock capablediscs, you can block access to material you feel isinappropriate for your children. Refer to the DVD disc jacketand the accompanying documentation to see if a particulardisc contains a parental lock level.Make changes to the [Parental Lock] setting in the Setupscreen General menu. Please note that changes to theParental Lock level cannot be made when a disc is playing.Stop playback of the disc before attempting to make anychanges.You cannot select [Level] or [Country Code] until you haveregistered a password. Select [Password] to register a newpassword. See ‘Entering the password’ on the this page forhow to register a new password.
Settings: Password(For information, refer to ‘Entering the Password’ onthe this page.)
Level(For information, refer to ‘Setting the Parental LockLevel’ on the following page.)
Country Code(For information, refer to ‘Setting the Country Code’on the following page.)
When a DVD with a set Parental Lock level is loadedPlayback cannot be started until the code number has been correctlyinput by using the cursor buttons (2/3/5/∞) or the number buttons,and ENTER has been pressed.
Entering the PasswordWhen you select either [Level] or [Country Code], it isnecessary to register the password (4-digit code number).You’ll be asked to confirm your existing password beforeregistering a new one. Use the following steps at any time youare asked to enter or confirm your password.1 Use the cursor buttons (5/∞) or the number buttons to
select a number between 0 and 9.You can also use the number buttons to enter the numbersdirectly. When entering your password for the first time, orchanging it, you will be asked to reenter your password. Whenusing the number buttons to confirm the password, the numbersappear as asterisks, and the cursor advances automatically tothe next position.
2 Use the cursor buttons (2/3) to move the cursor to adifferent position in the password.When all four numbers of the password have been entered,ENTER appears on the screen.
3 Press ENTER to set the password.The password is entered.
Notes• Be sure not to forget your password. If you should forget it, reset
the system, and enter a new password. To reset the system, see‘Resetting the Player to System Settings’ (page 54). Please notethat this procedure resets the system, and clears all savedsettings, not just the password.
• Some discs lock out violent scenes. Refer to instruction notes ondiscs.
Setting the Parental Lock Level
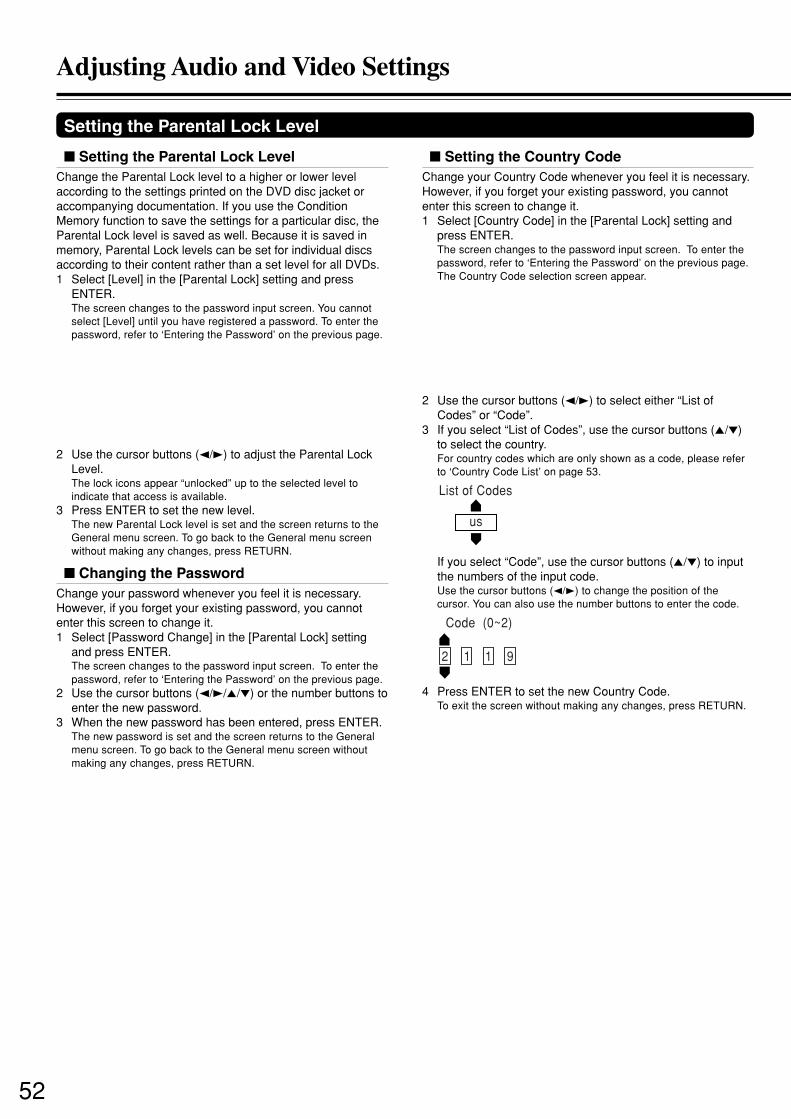
52
Setting the Parental Lock LevelChange the Parental Lock level to a higher or lower levelaccording to the settings printed on the DVD disc jacket oraccompanying documentation. If you use the ConditionMemory function to save the settings for a particular disc, theParental Lock level is saved as well. Because it is saved inmemory, Parental Lock levels can be set for individual discsaccording to their content rather than a set level for all DVDs.1 Select [Level] in the [Parental Lock] setting and press
ENTER.The screen changes to the password input screen. You cannotselect [Level] until you have registered a password. To enter thepassword, refer to ‘Entering the Password’ on the previous page.
2 Use the cursor buttons (2/3) to adjust the Parental LockLevel.The lock icons appear “unlocked” up to the selected level toindicate that access is available.
3 Press ENTER to set the new level.The new Parental Lock level is set and the screen returns to theGeneral menu screen. To go back to the General menu screenwithout making any changes, press RETURN.
Changing the PasswordChange your password whenever you feel it is necessary.However, if you forget your existing password, you cannotenter this screen to change it.1 Select [Password Change] in the [Parental Lock] setting
and press ENTER.The screen changes to the password input screen. To enter thepassword, refer to ‘Entering the Password’ on the previous page.
2 Use the cursor buttons (2/3/5/∞) or the number buttons toenter the new password.
3 When the new password has been entered, press ENTER.The new password is set and the screen returns to the Generalmenu screen. To go back to the General menu screen withoutmaking any changes, press RETURN.
Setting the Country CodeChange your Country Code whenever you feel it is necessary.However, if you forget your existing password, you cannotenter this screen to change it.1 Select [Country Code] in the [Parental Lock] setting and
press ENTER.The screen changes to the password input screen. To enter thepassword, refer to ‘Entering the Password’ on the previous page.The Country Code selection screen appear.
us
List of Codes
Code (0~2)
2 1 1 9
2 Use the cursor buttons (2/3) to select either “List ofCodes” or “Code”.
3 If you select “List of Codes”, use the cursor buttons (5/∞)to select the country.For country codes which are only shown as a code, please referto ‘Country Code List’ on page 53.
If you select “Code”, use the cursor buttons (5/∞) to inputthe numbers of the input code.Use the cursor buttons (2/3) to change the position of thecursor. You can also use the number buttons to enter the code.
4 Press ENTER to set the new Country Code.To exit the screen without making any changes, press RETURN.
Setting the Parental Lock Level
Adjusting Audio and Video Settings

53
Country Code List
ARGENTINAAUSTRALIAAUSTRIABELGIUMBRAZILCANADACHILECHINADENMARKFINLANDFRANCEGERMANYHONG KONGINDIAINDONESIAITALYJAPANKOREA, REPUBLIC OFMALAYSIAMEXICONETHERLANDSNEW ZEALANDNORWAYPAKISTANPHILIPPINESPORTUGALRUSSIAN FEDERATIONSINGAPORESPAINSWEDENSWITZERLANDTAIWAN, PROVINCEOF CHINATHAILANDUNITED KINGDOMUNITED STATES OFAMERICA
01180121012002050218030103120314041106090618040508110914090409201016111813251324141214261415161116081620182119070519190503082023
200807022119
Country Input-code Country-code
arauatbebrcaclcndkfifrdehkiniditjpkrmymxnlnznopkphptrusgessechtw
thgbus

54
Adjusting Audio and Video Settings
Memorizing settings (FunctionMemory)
Up to 5 settings can be memorized.
Press SETUP.The Setup screen appears.
Use the cursor buttons (2/3) toselect the menu you want.
Use the cursor buttons (5/∞) toselect the setting to be memorized.As each menu is selected with the cursor,the settings appear below the menuheading.
Press FUNCTION M.“FM” will appear on the screen, and thesetting will be memorized.
To clear the Function MemoryPress FUNCTION M. again
NoteSome settings cannot be memorized.
1
2
3
4
SETUP
FUNCTION M
Recalling memorized settings
Press FUNCTION M.Only memorized settings are displayed.
Use the cursor buttons (5/∞) toselect the menu to be recalled.
Press ENTER.
FUNCTION M
ENTER
1
2
3
Resetting the Player to System SettingsTo reset the player, press and hold 7 on the front panelwhen pressing STANDBY/ON to turn the unit fromstandby to on .All program memory, saved settings from functions such asVideo Memory, Last Memory and Condition Memory arecleared, TV System is reset to AUTO and all Setup screenmenus are returned to factory settings.
LAST M COND. M DIMMER DISPLAY
STANDBY
ON
ANGLE AUDIO SUBTITLE
MENUTOP MENU
SETUPRETURN
STOPPAUSE
FUNCTION M
OPEN / CLOSE
DOWN UPFR FF
CLEAR
PROGRAMRANDOM REPEAT A-B
STEP/ SLOW
SEARCH
REMOTE CONTROLLER RC-449DV
PLAY
2 3
4 5 6
7 8 9
1
0+10
+
-
ENTER
TVON / STANDBY
VOL +
VOL -
TV/ VCR
CH +CH -
TVDVD
2/3/5/∞ ENTER
SETUP
FUNCTION M
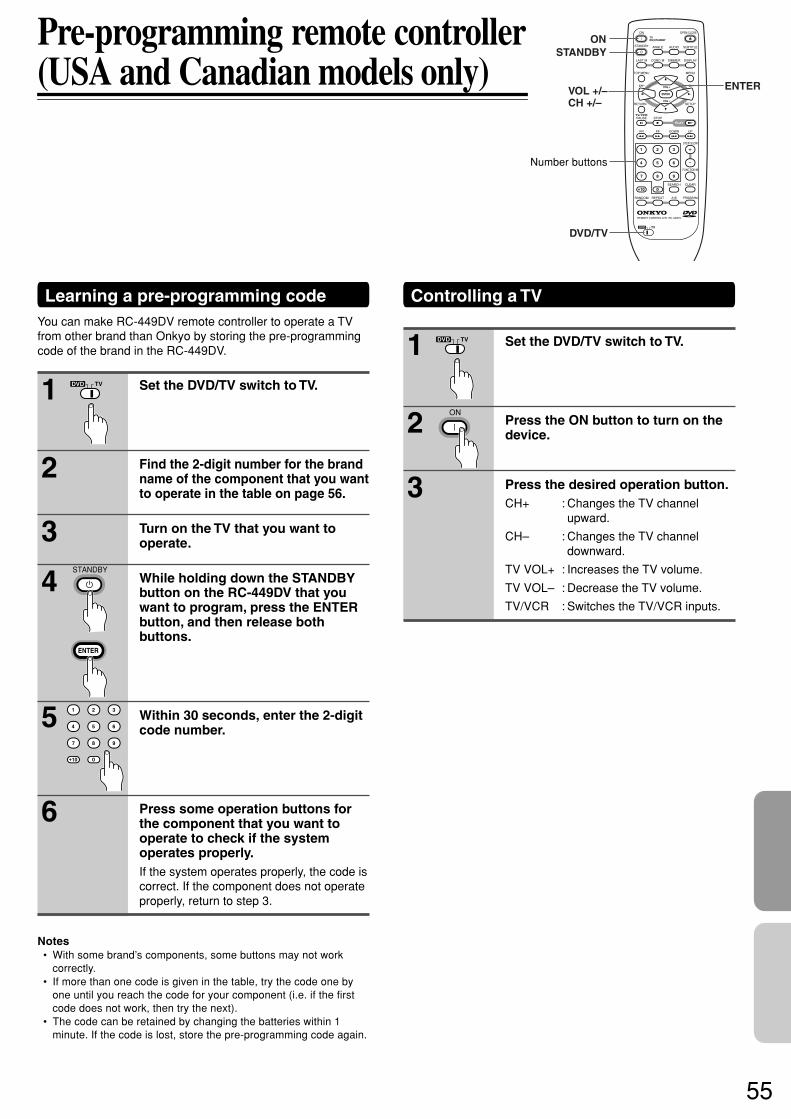
55
Pre-programming remote controller(USA and Canadian models only)
Learning a pre-programming codeYou can make RC-449DV remote controller to operate a TVfrom other brand than Onkyo by storing the pre-programmingcode of the brand in the RC-449DV.
Set the DVD/TV switch to TV.
Find the 2-digit number for the brandname of the component that you wantto operate in the table on page 56.
Turn on the TV that you want tooperate.
While holding down the STANDBYbutton on the RC-449DV that youwant to program, press the ENTERbutton, and then release bothbuttons.
Within 30 seconds, enter the 2-digitcode number.
Press some operation buttons forthe component that you want tooperate to check if the systemoperates properly.If the system operates properly, the code iscorrect. If the component does not operateproperly, return to step 3.
Notes• With some brand’s components, some buttons may not work
correctly.• If more than one code is given in the table, try the code one by
one until you reach the code for your component (i.e. if the firstcode does not work, then try the next).
• The code can be retained by changing the batteries within 1minute. If the code is lost, store the pre-programming code again.
1
2
3
4
5
6
Controlling a TV
Set the DVD/TV switch to TV.
Press the ON button to turn on thedevice.
Press the desired operation button.CH+ : Changes the TV channel
upward.
CH– : Changes the TV channeldownward.
TV VOL+ : Increases the TV volume.
TV VOL– : Decrease the TV volume.
TV/VCR : Switches the TV/VCR inputs.
TVDVD
ENTER
STANDBY
2 3
4 5 6
7 8 9
1
0+10
1 TVDVD
2ON
3
LAST M COND. M DIMMER DISPLAY
STANDBY
ON
ANGLE AUDIO SUBTITLE
MENUTOP MENU
SETUPRETURN
STOPPAUSE
FUNCTION M
OPEN / CLOSE
DOWN UPFR FF
CLEAR
PROGRAMRANDOM REPEAT A-B
STEP/ SLOW
SEARCH
REMOTE CONTROLLER RC-449DV
PLAY
2 3
4 5 6
7 8 9
1
0+10
+
-
ENTER
TVON / STANDBY
VOL +
VOL -
TV/ VCR
CH +CH -
TVDVD
ENTER
ONSTANDBY
VOL +/–CH +/–
DVD/TV
Number buttons
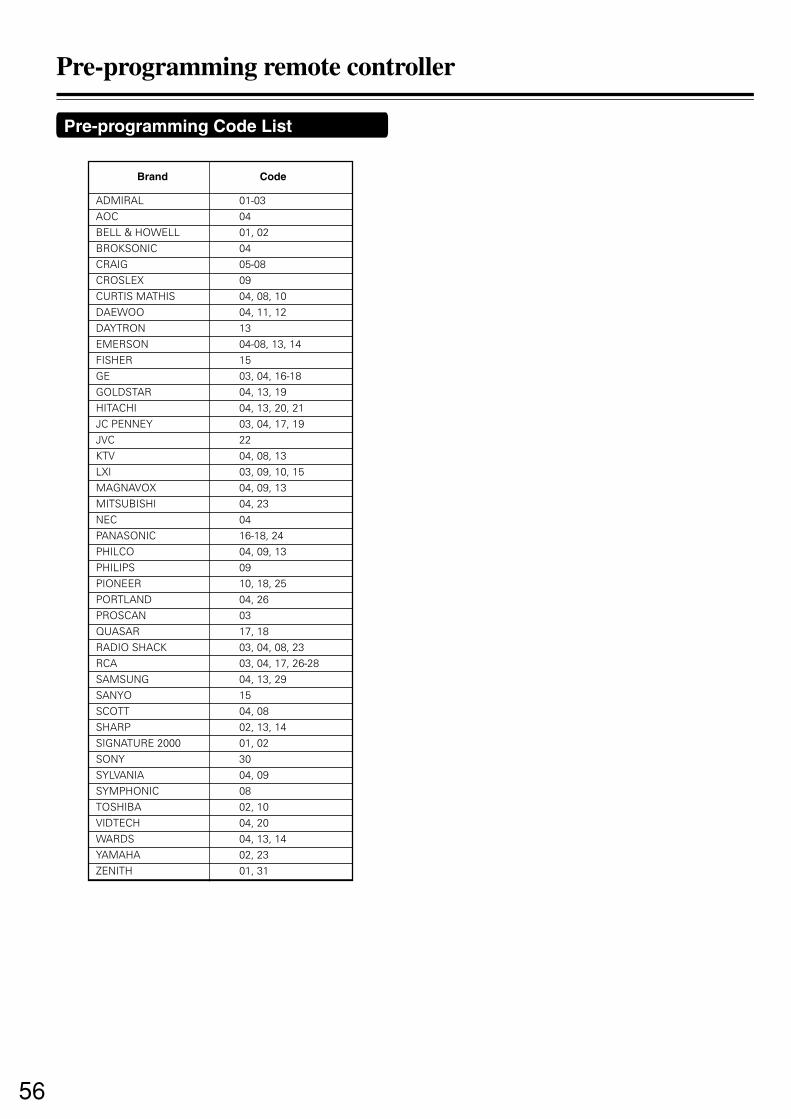
56
Brand Code
ADMIRAL 01-03AOC 04BELL & HOWELL 01, 02BROKSONIC 04CRAIG 05-08CROSLEX 09CURTIS MATHIS 04, 08, 10DAEWOO 04, 11, 12DAYTRON 13EMERSON 04-08, 13, 14FISHER 15GE 03, 04, 16-18GOLDSTAR 04, 13, 19HITACHI 04, 13, 20, 21JC PENNEY 03, 04, 17, 19JVC 22KTV 04, 08, 13LXI 03, 09, 10, 15MAGNAVOX 04, 09, 13MITSUBISHI 04, 23NEC 04PANASONIC 16-18, 24PHILCO 04, 09, 13PHILIPS 09PIONEER 10, 18, 25PORTLAND 04, 26PROSCAN 03QUASAR 17, 18RADIO SHACK 03, 04, 08, 23RCA 03, 04, 17, 26-28SAMSUNG 04, 13, 29SANYO 15SCOTT 04, 08SHARP 02, 13, 14SIGNATURE 2000 01, 02SONY 30SYLVANIA 04, 09SYMPHONIC 08TOSHIBA 02, 10VIDTECH 04, 20WARDS 04, 13, 14YAMAHA 02, 23ZENITH 01, 31
Pre-programming remote controller
Pre-programming Code List
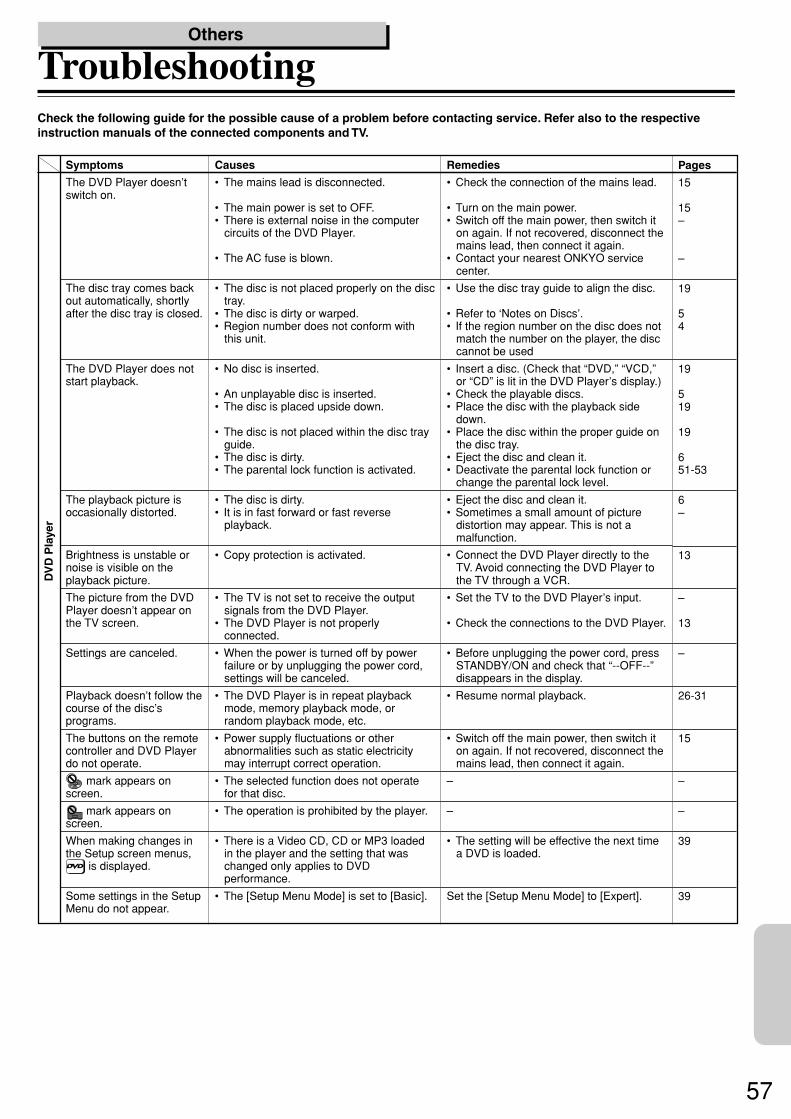
57
Causes
• The mains lead is disconnected.
• The main power is set to OFF.• There is external noise in the computer
circuits of the DVD Player.
• The AC fuse is blown.
• The disc is not placed properly on the disctray.
• The disc is dirty or warped.• Region number does not conform with
this unit.
• No disc is inserted.
• An unplayable disc is inserted.• The disc is placed upside down.
• The disc is not placed within the disc trayguide.
• The disc is dirty.• The parental lock function is activated.
• The disc is dirty.• It is in fast forward or fast reverse
playback.
• Copy protection is activated.
• The TV is not set to receive the outputsignals from the DVD Player.
• The DVD Player is not properlyconnected.
• When the power is turned off by powerfailure or by unplugging the power cord,settings will be canceled.
• The DVD Player is in repeat playbackmode, memory playback mode, orrandom playback mode, etc.
• Power supply fluctuations or otherabnormalities such as static electricitymay interrupt correct operation.
• The selected function does not operatefor that disc.
• The operation is prohibited by the player.
• There is a Video CD, CD or MP3 loadedin the player and the setting that waschanged only applies to DVDperformance.
• The [Setup Menu Mode] is set to [Basic].
Remedies
• Check the connection of the mains lead.
• Turn on the main power.• Switch off the main power, then switch it
on again. If not recovered, disconnect themains lead, then connect it again.
• Contact your nearest ONKYO servicecenter.
• Use the disc tray guide to align the disc.
• Refer to ‘Notes on Discs’.• If the region number on the disc does not
match the number on the player, the disccannot be used
• Insert a disc. (Check that “DVD,” “VCD,”or “CD” is lit in the DVD Player’s display.)
• Check the playable discs.• Place the disc with the playback side
down.• Place the disc within the proper guide on
the disc tray.• Eject the disc and clean it.• Deactivate the parental lock function or
change the parental lock level.
• Eject the disc and clean it.• Sometimes a small amount of picture
distortion may appear. This is not amalfunction.
• Connect the DVD Player directly to theTV. Avoid connecting the DVD Player tothe TV through a VCR.
• Set the TV to the DVD Player’s input.
• Check the connections to the DVD Player.
• Before unplugging the power cord, pressSTANDBY/ON and check that “--OFF--”disappears in the display.
• Resume normal playback.
• Switch off the main power, then switch iton again. If not recovered, disconnect themains lead, then connect it again.
–
–
• The setting will be effective the next timea DVD is loaded.
Set the [Setup Menu Mode] to [Expert].
Symptoms
The DVD Player doesn’tswitch on.
The disc tray comes backout automatically, shortlyafter the disc tray is closed.
The DVD Player does notstart playback.
The playback picture isoccasionally distorted.
Brightness is unstable ornoise is visible on theplayback picture.
The picture from the DVDPlayer doesn’t appear onthe TV screen.
Settings are canceled.
Playback doesn’t follow thecourse of the disc’sprograms.
The buttons on the remotecontroller and DVD Playerdo not operate.
mark appears onscreen.
mark appears onscreen.
When making changes inthe Setup screen menus,
is displayed.
Some settings in the SetupMenu do not appear.
Check the following guide for the possible cause of a problem before contacting service. Refer also to the respectiveinstruction manuals of the connected components and TV.
Pages
15
15–
–
19
54
19
519
19
651-53
6–
13
–
13
–
26-31
15
–
–
39
39
DV
D P
laye
r
TroubleshootingOthers
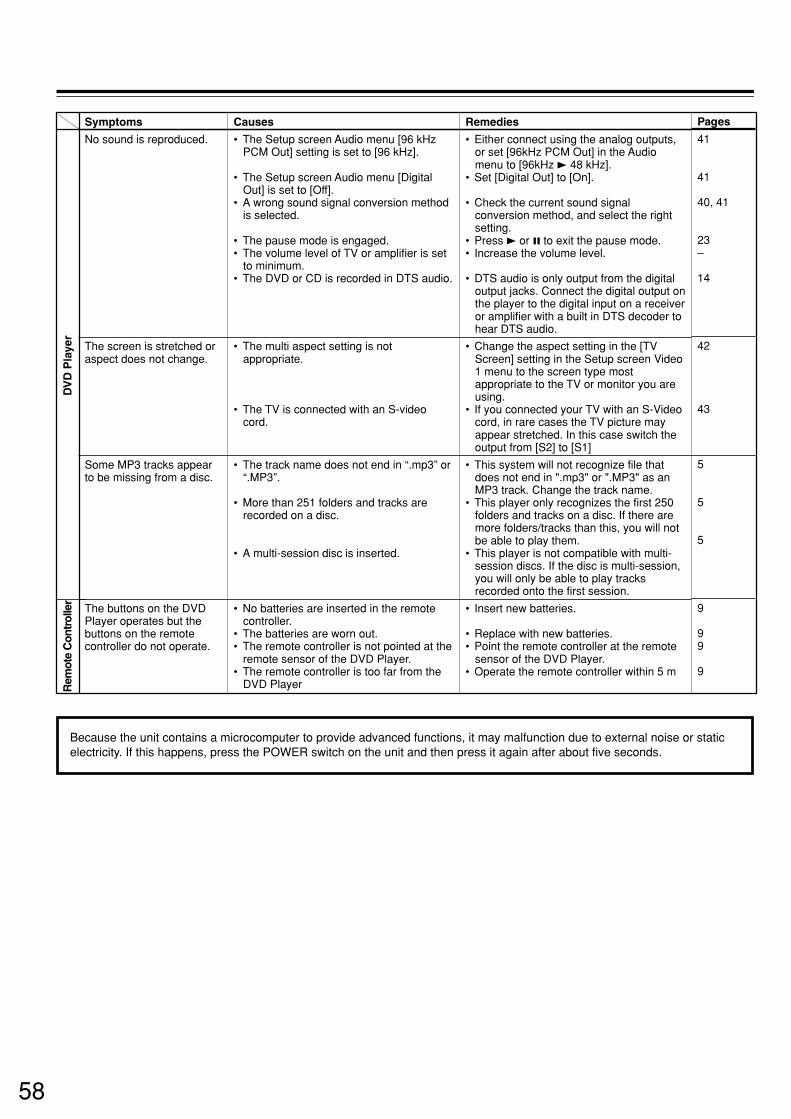
58
Causes
• The Setup screen Audio menu [96 kHzPCM Out] setting is set to [96 kHz].
• The Setup screen Audio menu [DigitalOut] is set to [Off].
• A wrong sound signal conversion methodis selected.
• The pause mode is engaged.• The volume level of TV or amplifier is set
to minimum.• The DVD or CD is recorded in DTS audio.
• The multi aspect setting is notappropriate.
• The TV is connected with an S-videocord.
• The track name does not end in “.mp3” or“.MP3”.
• More than 251 folders and tracks arerecorded on a disc.
• A multi-session disc is inserted.
• No batteries are inserted in the remotecontroller.
• The batteries are worn out.• The remote controller is not pointed at the
remote sensor of the DVD Player.• The remote controller is too far from the
DVD Player
Remedies
• Either connect using the analog outputs,or set [96kHz PCM Out] in the Audiomenu to [96kHz 3 48 kHz].
• Set [Digital Out] to [On].
• Check the current sound signalconversion method, and select the rightsetting.
• Press 3 or 8 to exit the pause mode.• Increase the volume level.
• DTS audio is only output from the digitaloutput jacks. Connect the digital output onthe player to the digital input on a receiveror amplifier with a built in DTS decoder tohear DTS audio.
• Change the aspect setting in the [TVScreen] setting in the Setup screen Video1 menu to the screen type mostappropriate to the TV or monitor you areusing.
• If you connected your TV with an S-Videocord, in rare cases the TV picture mayappear stretched. In this case switch theoutput from [S2] to [S1]
• This system will not recognize file thatdoes not end in ".mp3" or ".MP3" as anMP3 track. Change the track name.
• This player only recognizes the first 250folders and tracks on a disc. If there aremore folders/tracks than this, you will notbe able to play them.
• This player is not compatible with multi-session discs. If the disc is multi-session,you will only be able to play tracksrecorded onto the first session.
• Insert new batteries.
• Replace with new batteries.• Point the remote controller at the remote
sensor of the DVD Player.• Operate the remote controller within 5 m
Symptoms
No sound is reproduced.
The screen is stretched oraspect does not change.
Some MP3 tracks appearto be missing from a disc.
The buttons on the DVDPlayer operates but thebuttons on the remotecontroller do not operate.
Pages
41
41
40, 41
23–
14
42
43
5
5
5
9
99
9
DV
D P
laye
rR
emot
e C
ontr
olle
r
Because the unit contains a microcomputer to provide advanced functions, it may malfunction due to external noise or staticelectricity. If this happens, press the POWER switch on the unit and then press it again after about five seconds.
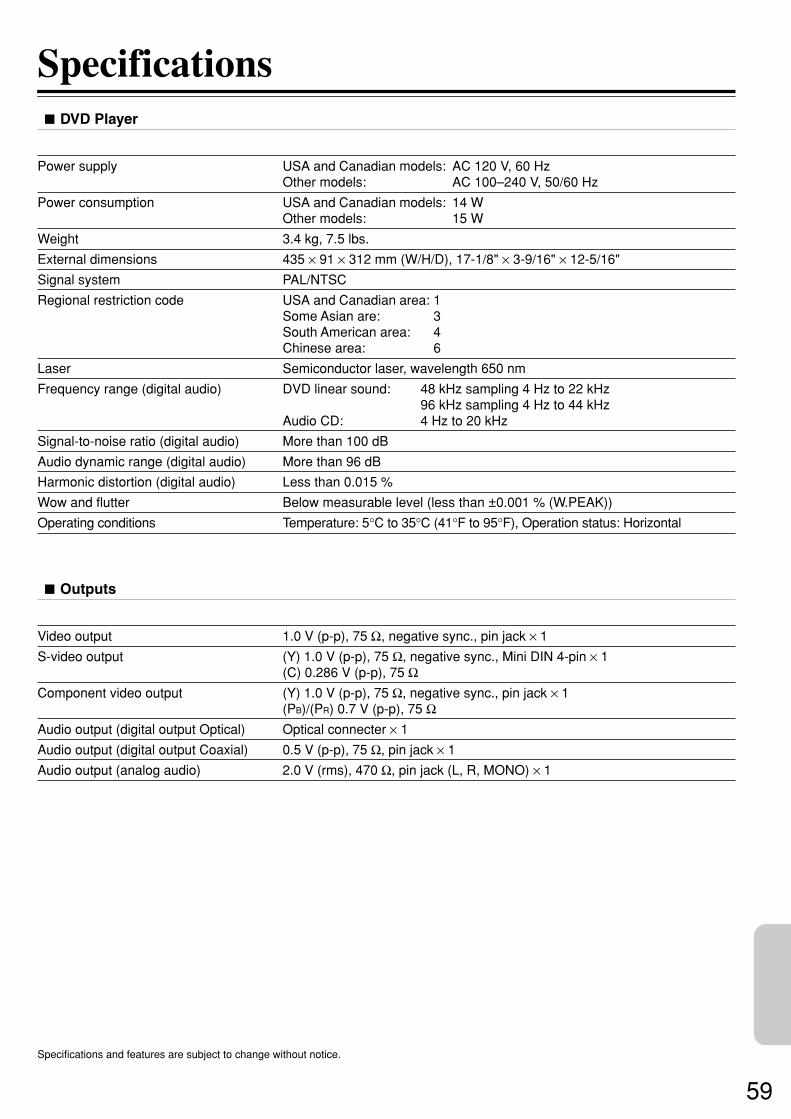
59
Specifications
Specifications and features are subject to change without notice.
DVD Player
Power supply USA and Canadian models: AC 120 V, 60 HzOther models: AC 100–240 V, 50/60 Hz
Power consumption USA and Canadian models: 14 WOther models: 15 W
Weight 3.4 kg, 7.5 lbs.
External dimensions 435 × 91 × 312 mm (W/H/D), 17-1/8" × 3-9/16" × 12-5/16"
Signal system PAL/NTSC
Regional restriction code USA and Canadian area: 1Some Asian are: 3South American area: 4Chinese area: 6
Laser Semiconductor laser, wavelength 650 nm
Frequency range (digital audio) DVD linear sound: 48 kHz sampling 4 Hz to 22 kHz96 kHz sampling 4 Hz to 44 kHz
Audio CD: 4 Hz to 20 kHz
Signal-to-noise ratio (digital audio) More than 100 dB
Audio dynamic range (digital audio) More than 96 dB
Harmonic distortion (digital audio) Less than 0.015 %
Wow and flutter Below measurable level (less than ±0.001 % (W.PEAK))
Operating conditions Temperature: 5°C to 35°C (41°F to 95°F), Operation status: Horizontal
Outputs
Video output 1.0 V (p-p), 75 Ω, negative sync., pin jack × 1
S-video output (Y) 1.0 V (p-p), 75 Ω, negative sync., Mini DIN 4-pin × 1(C) 0.286 V (p-p), 75 Ω
Component video output (Y) 1.0 V (p-p), 75 Ω, negative sync., pin jack × 1(PB)/(PR) 0.7 V (p-p), 75 Ω
Audio output (digital output Optical) Optical connecter × 1
Audio output (digital output Coaxial) 0.5 V (p-p), 75 Ω, pin jack × 1
Audio output (analog audio) 2.0 V (rms), 470 Ω, pin jack (L, R, MONO) × 1

W0111-2SN 29343107A E
Sales & Product Planning Div. : 2-1, Nisshin-cho, Neyagawa-shi, OSAKA 572-8540, JAPANTel: 072-831-8111 Fax: 072-833-5222 http://www.onkyo-intlcom
ONKYO U.S.A. CORPORATION18 Park Way, Upper Saddle River, N.J. 07458, U.S.A.Tel: 201-785-2600 Fax: 201-785-2650 http://www.onkyousa.com
ONKYO EUROPE ELECTRONICS GmbHLiegnitzerstrasse 6, 82194 Groebenzell, GERMANYTel: +49-8142-4401-0 Fax: +49-8142-4401-555 http://www.onkyo.net
ONKYO CHINA LIMITEDUnits 2102-2107, Metroplaza Tower I, 223 Hing Fong Road, Kwai Chung,N.T., HONG KONG Tel: 852-2429-3118 Fax: 852-2428-9039 http://www.onkyochina.com http://www.onkyo.co.jp/
HOMEPAGE