DSDirector Guide
92
Ascential DataStage Director Guide Version 6.0 September 2002 Part No. 00D-007DS60
description
DSDirector Guide
Transcript of DSDirector Guide

Ascential DataStage
Director Guide
Version 6.0 September 2002Part No. 00D-007DS60

Published by Ascential Software
© 1997–2002 Ascential Software Corporation. All rights reserved.
Ascential, DataStage and MetaStage are trademarks of Ascential Software Corporation or its affiliates and may be registered in other jurisdictions.
Documentation Team: Mandy deBelin
GOVERNMENT LICENSE RIGHTS
Software and documentation acquired by or for the US Government are provided with rights as follows: (1) if for civilian agency use, with rights as restricted by vendor’s standard license, as prescribed in FAR 12.212; (2) if for Dept. of Defense use, with rights as restricted by vendor’s standard license, unless superseded by a negotiated vendor license, as prescribed in DFARS 227.7202. Any whole or partial reproduction of software or documentation marked with this legend must reproduce this legend.

Table of Contents
PrefaceOrganization of This Manual ...................................................................................... viiDocumentation Conventions ..................................................................................... viiiDataStage Documentation .......................................................................................... viii
Chapter 1. Introducing DataStageWhat Is a Data Warehouse? ....................................................................................... 1-1Why Do I Need One? .................................................................................................. 1-1
What Does DataStage Do? ......................................................................................... 1-2How Is DataStage Packaged? .................................................................................... 1-2
DataStage Projects and Jobs ....................................................................................... 1-3
Chapter 2. The DataStage DirectorStarting the DataStage Director ................................................................................ 2-2The DataStage Director Window .............................................................................. 2-3
Job Category Pane ................................................................................................ 2-4Display Area ......................................................................................................... 2-4Menu Bar ............................................................................................................... 2-5Toolbar ................................................................................................................... 2-6Status Bar .............................................................................................................. 2-6
Job Status View ............................................................................................................ 2-6Job States ............................................................................................................... 2-7Job Status Details ................................................................................................. 2-8
Shortcut Menus ........................................................................................................... 2-9Shortcut Menus in the Job Status View .......................................................... 2-10Shortcut Menus in the Job Log View .............................................................. 2-10Shortcut Menus in the Job Schedule View ..................................................... 2-11
Table of Contents iii
Shortcut Menus in the Job Category Pane ..................................................... 2-12Shortcut Menu in the Monitor Window ......................................................... 2-12

Filtering the Job Status or Job Schedule View ....................................................... 2-13Examples of Filtering by Job Name ................................................................. 2-15
Finding Text ................................................................................................................ 2-15
Sorting Columns ........................................................................................................ 2-17Printing the Current View ........................................................................................ 2-17
What Is in the Printout? ..................................................................................... 2-18Changing the Printer Setup .............................................................................. 2-19
Director Options ........................................................................................................ 2-19General Page .......................................................................................................2-20Limits Page .......................................................................................................... 2-21View Page ............................................................................................................2-22Priority Page ........................................................................................................ 2-23
Choosing an Alternative Project .............................................................................. 2-24Viewing Jobs in Another Project ...................................................................... 2-24Viewing Jobs on a Different Server .................................................................. 2-25
Exiting the DataStage Director ................................................................................ 2-25
Chapter 3. Running DataStage JobsSetting Job Options ...................................................................................................... 3-1
Validating a Job ............................................................................................................ 3-3Running a Job ............................................................................................................... 3-4
Stopping a Job ..............................................................................................................3-4Resetting a Job ..............................................................................................................3-5
Job Scheduling ............................................................................................................. 3-5Job Schedule View ................................................................................................ 3-6Viewing Details of a Job Schedule ..................................................................... 3-8Scheduling a Job ................................................................................................... 3-9Unscheduling a Job ............................................................................................ 3-10Rescheduling a Job ............................................................................................. 3-11
Deleting a Job ............................................................................................................. 3-11Job Administration .................................................................................................... 3-12
Cleaning Up Job Resources ............................................................................... 3-12
iv Ascential DataStage Director Guide
Clearing a Job Status File .................................................................................. 3-15Multiple Job Instances .............................................................................................. 3-16
Setting Tracing Options ............................................................................................ 3-19

Chapter 4. Job BatchesWhat Is a Job Batch? ................................................................................................... 4-1
Creating a Job Batch .................................................................................................... 4-2Running a Job Batch ................................................................................................... 4-4
Scheduling a Job Batch ............................................................................................... 4-5Unscheduling a Job Batch .......................................................................................... 4-6
Rescheduling a Job Batch ........................................................................................... 4-6Job Schedule Errors ..................................................................................................... 4-7
Editing a Job Batch ...................................................................................................... 4-7Copying a Job Batch .................................................................................................... 4-8
Deleting a Job Batch .................................................................................................... 4-8
Chapter 5. Monitoring JobsThe Monitor Window ................................................................................................. 5-1
Setting the Server Update Interval .................................................................... 5-3Saving Monitor Window Settings ..................................................................... 5-3
Showing Links ............................................................................................................. 5-3Showing CPU Usage ................................................................................................... 5-5
Viewing and Cleaning Up Job Resources ................................................................ 5-6Switching Between Monitor Windows .................................................................... 5-6
The Stage Status Window .......................................................................................... 5-6
Chapter 6. The Job Log FileJob Log View ................................................................................................................ 6-1The Event Detail Window .......................................................................................... 6-3
Viewing Related Logs ................................................................................................. 6-4Filtering the Job Log View ......................................................................................... 6-4
Purging Log File Entries ............................................................................................ 6-7Purging Log Entries Immediately ..................................................................... 6-8Purging Log Entries Automatically .................................................................. 6-8
Glossary
Table of Contents v
Index

vi Ascential DataStage Director Guide

Preface
Ascential DataStage is a powerful software suite that is used to develop and run DataStage jobs. A DataStage job can extract from different sources, and then cleanse, integrate, and transform the data according to your requirements. The clean data is ready to be imported into a data ware-house for analysis and processing by business information software.
This manual describes the DataStage Director, the DataStage component that is used to validate, schedule, run, and monitor DataStage server jobs. For information about how to perform these tasks for DataStage main-frame jobs, refer to the documentation supplied with the mainframe computer. (For a brief explanation of server and mainframe jobs, refer to “DataStage Projects and Jobs” on page 1-3.)
To use this manual you should be familiar with the Windows 2000 or Windows NT interface, but no other special skills or knowledge are required.
Organization of This ManualThis manual contains the following:
Chapter 1 contains an overview of DataStage and its component parts.
Chapter 2 describes the DataStage Director and how to use it.
Chapter 3 covers how to validate, run, delete, schedule, and admin-ister DataStage server jobs.
Chapter 4 describes job batches.
Chapter 5 describes how to monitor a running server job.
Chapter 6 describes the job log file and the Job Log view.
The Glossary defines terms that have specific meaning in DataStage.
Preface vii

Documentation ConventionsThis manual uses the following conventions:
DataStage DocumentationDataStage documentation includes the following:
DataStage Director Guide: This guide describes the DataStage Director and how to validate, schedule, run, and monitor DataStage server jobs.
DataStage Manager Guide: This guide describes the DataStage Manager and describes how to use and maintain the DataStage Repository.
DataStage Designer Guide: This guide describes the DataStage
Convention Usage
Bold In syntax, bold indicates commands, function names, keywords, and options that must be input exactly as shown. In text, bold indicates keys to press, function names, and menu selections.
Italic In syntax, italic indicates information that you supply. In text, italic also indicates UNIX commands and options, file names, and pathnames.
Plain In text, plain indicates Windows NT commands and options, file names, and pathnames.
Courier Courier indicates examples of source code and system output.
Courier Bold In examples, courier bold indicates characters that the user types or keys the user presses (for example, <Return>).
➤ A right arrow between menu commands indicates you should choose each command in sequence. For example, “Choose File ➤ Exit” means you should choose File from the menu bar, then choose Exit from the File pull-down menu.
viii Ascential DataStage Director Guide
Designer, and gives a general description of how to create, design, and develop a DataStage application.

DataStage Server Job Developer Guide: This guide describes the specific tools that are used in building a server job, and supplies programmer’s reference information.
DataStage Parallel Job Developer Guide: This guide describes the specific tools that are used in building a parallel job, and supplies programmer’s reference information.
XE/390 Job Developer Guide: This guide describes the specific tools that are used in building a mainframe job, and supplies programmer’s reference information.
DataStage Administrator Guide: This guide describes DataStage setup, routine housekeeping, and administration.
DataStage Install and Upgrade Guide. This guide contains instruc-tions for installing DataStage on Windows and UNIX platforms, and for upgrading existing installations of DataStage.
These guides are also available online in PDF format. You can read them using the Adobe Acrobat Reader supplied with DataStage. See Install and Upgrade Guide for details on installing the manuals and the Adobe Acrobat Reader.
Extensive online help is also supplied. This is particularly useful when you have become familiar with DataStage, and need to look up specific information.
Preface ix

x Ascential DataStage Director Guide

1Introducing DataStage
Many organizations want to make better use of their data. But that data may be stored in different formats in different types of database. Some data sources may be dormant archives, others may be busy operational databases. Extracting and cleaning data from these varied sources has always been time-consuming and costly – until now. DataStage makes it simple to design and develop efficient applications that make data ware-housing a reality where it was impossible before.
What Is a Data Warehouse?A data warehouse is a central database containing copies of data from all the operational sources and archive systems in an organization. But the database does not have to be large. Instead of storing details of every transaction, order, or set of sales figures, the data warehouse stores totals, averages, area figures, and so on. This data is structured to make it easy to query and to generate reports.
Inside the data warehouse you can perform analyses that would be impractical on a working database. This means that anyone who needs access to the data gets all the information they want, and only the informa-tion they want. The data warehouse can be created or updated at any time, with minimum disruption to working systems.
Why Do I Need One? Working databases are busy. It is hard to gain an accurate picture of the contents of the database at any time because it changes frequently. By
Introducing DataStage 1-1
transferring working data into a data warehouse, you can take snapshots of what is going on. Also, working databases contain dirty data – records in different formats, with key values missing or out of range, and so on. In
a fast-moving working database it is difficult to trap mistakes or incom-plete entries. Using DataStage, you can cleanse data before loading it into a data warehouse, ensuring that your business decisions are based only on valid information.
As well as a working database, you may have archive systems or incom-patible data sources that you have inherited. These may be static, but inaccessible because their format is different from your working system. You can use DataStage to transform this data into compatible formats that can be stored in the data warehouse.
What Does DataStage Do?DataStage comes in between your data and your data warehouse. DataStage jobs process the data to meet your needs, including:
• Extraction – DataStage takes data from indexed files, sequential files, networked databases, archives, and external data sources and stores it in the data warehouse.
• Aggregation – DataStage takes your working data, calculates totals and averages, then stores it in the data warehouse. This means you have to store much less data, which is quicker and easier to access.
• Transformation – DataStage converts inconsistent data into the required format and loads it into the data warehouse.
How Is DataStage Packaged? DataStage is client/server software. The server holds the data while it is being processed. The client is the interface to DataStage that is used for designing and running jobs, or managing the data in the Repository. The client components include:
• DataStage Designer, for creating DataStage server and mainframe jobs. Server jobs are compiled into executable programs that are scheduled by the DataStage Director and run by the DataStage Server. Mainframe jobs are downloaded from the Designer to mainframe computers, where they are compiled and run by main-frame tools.
1-2 Ascential DataStage Director Guide
• DataStage Director, for running DataStage server jobs.
• DataStage Manager, for viewing and editing the contents of the Repository.
• DataStage Administrator, for administering DataStage projects and conducting housekeeping on the server.
The client and server components installed depend on the edition of DataStage you have purchased. DataStage is packaged in two ways:
• Developer’s Edition, used by developers to design, develop, and create executable DataStage jobs. The Developer’s Edition contains all the client components described earlier and the server. The developer’s role, DataStage Designer, and DataStage Manager are described in DataStage Designer Guide and DataStage Manager Guide.
• Operator’s Edition, used by operators to validate, schedule, run, and monitor DataStage jobs that have been developed elsewhere. The Operator’s Edition contains DataStage Director, DataStage Administrator, and DataStage Server components only.
DataStage Projects and JobsYou always enter DataStage through a DataStage project. When you start a DataStage client you are prompted to attach to a project. Each project contains DataStage jobs and the components required to develop or run them.
DataStage jobs are made up of individual stages. A stage represents a data source or a process. For example, one stage may extract data from a data source, while another transforms it. The data required at each stage and how it is handled is specified in the job design. When the job is run, the processing described in the job design is performed. Variable parameters such as file names, dates, and so on, can be specified when the job is run. DataStage jobs can be exported for use on other DataStage systems.
DataStage supports three types of job:
• Server jobs are both developed and compiled using DataStage client tools. Compilation of a server job creates an executable that is scheduled and run from the DataStage Director.
• Parallel jobs. These are compiled and run on the DataStage server in a similar way to server jobs, but support parallel processing on SMP, MPP, and cluster systems.
• Mainframe jobs are developed using the same DataStage client
Introducing DataStage 1-3
tools as for server jobs, but compilation and execution occur on a mainframe computer. The DataStage Designer generates a COBOL

source file and supporting JCL script, then lets you upload them to the target mainframe computer. The job is compiled and run on the mainframe computer under the control of native mainframe software.
There are also:
• Job Sequences. A job sequence allows you to specify a sequence of DataStage jobs to be executed, and actions to take depending on results.
1-4 Ascential DataStage Director Guide

2The DataStage Director
The DataStage Director is the client component that validates, runs, sched-ules, and monitors jobs run by the DataStage Server. It is the starting point for most of the tasks a DataStage operator needs to do in respect of DataStage jobs.
Note: DataStage mainframe jobs run on a mainframe computer, and use mainframe-specific tools. These jobs are not visible in the DataStage Director. In this manual the term job therefore refers to DataStage server and parallel jobs only. For information about running DataStage mainframe jobs, consult the documentation supplied with your mainframe software.
This chapter describes the interface to the DataStage Director and how to use it, including:
• Starting the DataStage Director
• Using the DataStage Director window
• Finding text in the DataStage Director window, sorting data, and printing out the display
• Setting options and defaults for the DataStage Director window and for jobs you want to run
• Switching between projects and exiting the DataStage Director
The DataStage Director 2-1
Starting the DataStage DirectorTo start the DataStage Director:
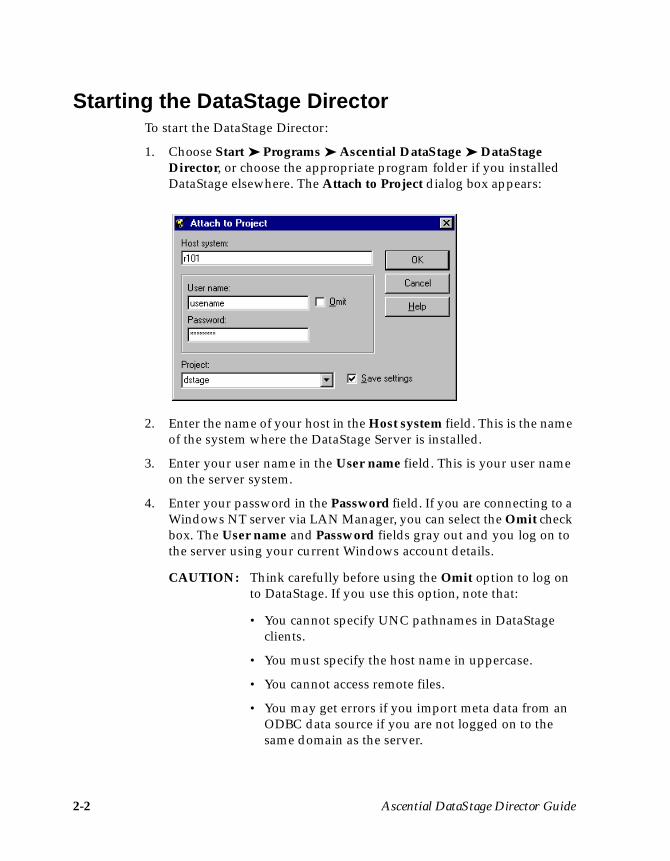
1. Choose Start ➤ Programs ➤ Ascential DataStage ➤ DataStage Director, or choose the appropriate program folder if you installed DataStage elsewhere. The Attach to Project dialog box appears:
2. Enter the name of your host in the Host system field. This is the name of the system where the DataStage Server is installed.
3. Enter your user name in the User name field. This is your user name on the server system.
4. Enter your password in the Password field. If you are connecting to a Windows NT server via LAN Manager, you can select the Omit check box. The User name and Password fields gray out and you log on to the server using your current Windows account details.
CAUTION: Think carefully before using the Omit option to log on to DataStage. If you use this option, note that:
• You cannot specify UNC pathnames in DataStage clients.
• You must specify the host name in uppercase.
• You cannot access remote files.
2-2 Ascential DataStage Director Guide
• You may get errors if you import meta data from an ODBC data source if you are not logged on to the same domain as the server.

5. Enter the name of the project you want to use or choose one from the Project list, which displays all the projects installed on the server.
6. Select the Save settings check box to save your logon settings. The next time you start the DataStage Director or any other DataStage client, you are presented with the saved settings (except for your password).
7. Click OK. The DataStage Director window appears.
Note: You can also start the DataStage Director from the DataStage Designer or the DataStage Manager by choosing Tools ➤ Run Director. You are automatically attached to the same project and you do not see the Attach to Project dialog box. For more informa-tion about the DataStage Designer and Manager, see DataStage Designer Guide and DataStage Manager Guide.
The DataStage Director WindowThe DataStage Director window appears when you start the Director:
This section describes the features of the DataStage Director window including:
• The job category pane• The display area• The menu bar• The toolbar• The status bar
The DataStage Director 2-3

Job Category PaneThe left pane of the DataStage Director window is the job category pane. It displays the job category tree, which lists job categories and subcatego-ries that contain server jobs. The jobs in the currently selected category are listed in the display area. You can hide the job category pane by choosing View ➤ Show Categories.
Display AreaThe display area is the main part of the DataStage Director window. There are three views:
• Job Status. The default view, which appears in the right pane of the DataStage Director window. It displays the status of all jobs in the category currently selected in the job category tree. If you hide the job category pane, the Job Status view includes a Category column, and displays the status of all server jobs in the current project, regardless of their category. See “Job Status View” on page 2-6 for more information.
• Job Schedule. Displays a summary of scheduled jobs and batches in the currently selected job category. If the job category pane is hidden, the display area shows all scheduled jobs and batches, regardless of their category. See Chapter 3, “Running DataStage Jobs,” for a description of this view. To switch to the Job Schedule view, choose View ➤ Schedule, or click the Schedule button on the toolbar.
• Job Log. Displays the log file for a job chosen from the Job Status view or the Job Schedule view. The job category pane is always hidden. See Chapter 6, “The Job Log File,” for more details. To switch to this view, choose View ➤ Log, or click the Log button on the toolbar.
Updating the Display
You can set how often the display area is updated from the server by editing the Director options. For more information, see “Director Options” on page 2-19.
2-4 Ascential DataStage Director Guide

You can also update the screen immediately by doing one of the following:
• Choose View ➤ Refresh.
• Choose Refresh from the shortcut menus (see “Shortcut Menus” on page 2-9 for more details).
• Press Ctrl-R.
Each entry in the display area represents a job, scheduled job, or event in the job log, depending on the current view. An icon is displayed by default for each entry. To hide the icons, choose Tools ➤ Options ➤ View.
Note: You can increase the refresh rate by organizing jobs within job cate-gories, so that you do not display more jobs than necessary in the display area. For information about how to organize jobs within categories, refer to DataStage Designer Guide.
Menu BarThe menu bar has six pull-down menus that give access to all the functions of the Director:
• Project. Opens an alternative project and sets up printing.
• View. Displays or hides the toolbar, status bar, buttons, or job cate-gory pane, specifies the sorting order, changes the view, filters entries, shows further details of entries, and refreshes the screen.
• Search. Starts a text search dialog box.
• Job. Validates, runs, schedules, stops, and resets jobs, purges old entries from the job log file, deletes unwanted jobs, cleans up job resources (if the administrator has enabled this option), and allows you to set default job parameter values.
• Tools. Monitors running jobs, manages job batches, and starts the DataStage Designer and DataStage Manager. It also starts MetaStage Explorer and Quality Manager, if these components are installed on the system, and custom software. If you are running parallel jobs on a UNIX server, allows you to manage data sets (see DataStage Parallel Job developer’s Guide for details).
• Help. Invokes the Help system. You can also get help from any
The DataStage Director 2-5
screen or dialog box in the DataStage Director.

ToolbarThe toolbar gives quick access to the main functions of the DataStage Director.
The toolbar is displayed by default, but can be hidden by choosing View ➤ Toolbar or by changing the Director options. See “Director Options” on page 2-19 for more details. To display ToolTips, let the cursor rest on a button in the toolbar.
Status BarThe status bar appears at the bottom of the DataStage Director window and displays the following information:
• The name of a job (if you are displaying the Job Log view).
• The number of entries in the display. If you look at the Job Status or Job Schedule view and use the Filter Entries… command, this panel specifies the number of lines that meet the filter criteria. If you have set a filter then (filtered) or (limited) is displayed.
• The date and time on the DataStage server.
Note: Under certain circumstances, the number of entries in the display is replaced by the last error message issued by the server. The message disappears when the screen is refreshed.
Job Status View
Job Run aJob
Find
Sort - Reset a
Help
Reschedulea Job
OpenJobJobAscendingLogStatusProject
Schedulea Job
Stop aJob
PrintView
JobSchedule
Sort -Descending
2-6 Ascential DataStage Director Guide
The Job Status view is the default view displayed when you start the DataStage Director (see “The DataStage Director Window” on page 2-3). You can change the default view by editing the Director options (see

“Director Options” on page 2-19 for more details). You can also filter the jobs displayed in the view (see “Filtering the Job Status or Job Schedule View” on page 2-13).
The Job Status view shows the status of all the jobs in the currently selected job category, or, if the job category pane is hidden, in the current project. The view has the following columns:
Job StatesThe Status column in the Job Status view displays the current status of the job. The possible job states are as follows:
Column Description
Job name The name of the job.
Status The status of the job. See “Job States” for the possible job states and what they mean.
Started On date
The time and date a job was started. These fields are only filled in for a job with a status of Running.
Last ran On date
The time and date the job was finished, stopped, or aborted. These columns are blank for jobs that have never been run.
Description A description of the job, if available.
Job State Description
Compiled The job has been compiled but has not been vali-dated or run since compilation.
Not compiled The job is under development and has not been compiled successfully.
Running The job is currently being run, reset, or validated.
Finished The job has finished.
Finished (see log) The job has finished but warning messages were generated or rows were rejected. View the log file for more details.
Stopped The job was stopped by the operator.
Aborted The job finished prematurely.
The DataStage Director 2-7
Validated OK The job has been validated with no errors.

Job Status DetailsTo view more details about a job’s status, select it in the display and do one of the following:
• Choose View ➤ Detail.• Right-click to display the shortcut menu and choose Detail.• Double-click the job in the display.
The Job Status Detail dialog box appears:
Validated (see log) The job has been validated but warning messages were generated or rows were rejected. View the log file for more details.
Failed validation The job has been validated, but an error was found.
Has been reset The job has been reset with no errors.
Job State Description
2-8 Ascential DataStage Director Guide

This dialog box contains details of the selected job’s status:
Use Copy to copy the whole window or selected text to the Clipboard for use elsewhere.
Click Next or Previous to display status details for the next or previous job in the list.
Click Close to close the dialog box.
Shortcut MenusDataStage has shortcut menus that appear when you right-click in the display area or job category pane. The menu you see depends on the view or window you are using, and what is highlighted in the window when you click the mouse.
This field… Contains this information…
Project The name of the project and the DataStage server.
Status The current status of the chosen job.
Wave # An internal number used by DataStage when the job is run.
Job name The name of the job.
Started at The date and time the job was started. This field is used only for a job with a status of Running.
Last run at The date and time the job was last run.
Description A description of the job. This is the description entered by the developer when the job was created. If the job has job parameters, this column also displays the values used in the run.
The DataStage Director 2-9
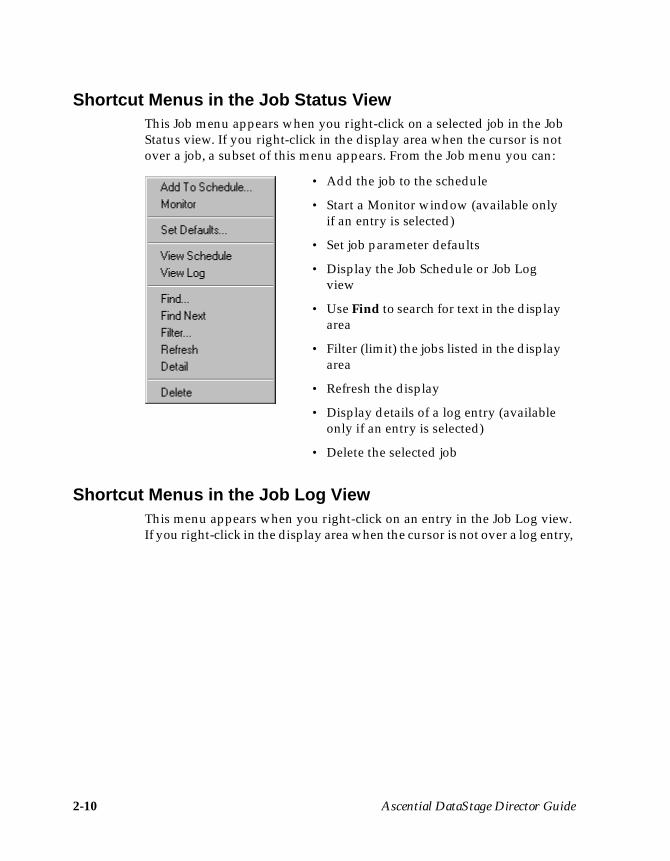
Shortcut Menus in the Job Status ViewThis Job menu appears when you right-click on a selected job in the Job Status view. If you right-click in the display area when the cursor is not over a job, a subset of this menu appears. From the Job menu you can:
Shortcut Menus in the Job Log ViewThis menu appears when you right-click on an entry in the Job Log view. If you right-click in the display area when the cursor is not over a log entry,
• Add the job to the schedule
• Start a Monitor window (available only if an entry is selected)
• Set job parameter defaults
• Display the Job Schedule or Job Log view
• Use Find to search for text in the display area
• Filter (limit) the jobs listed in the display area
• Refresh the display
• Display details of a log entry (available only if an entry is selected)
• Delete the selected job
2-10 Ascential DataStage Director Guide
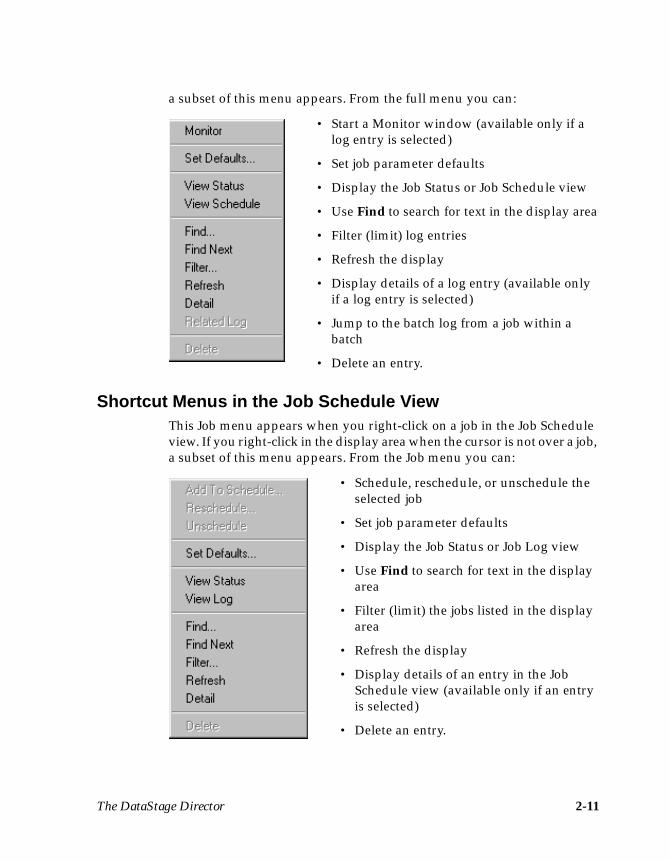
a subset of this menu appears. From the full menu you can:
Shortcut Menus in the Job Schedule ViewThis Job menu appears when you right-click on a job in the Job Schedule view. If you right-click in the display area when the cursor is not over a job, a subset of this menu appears. From the Job menu you can:
• Start a Monitor window (available only if a log entry is selected)
• Set job parameter defaults
• Display the Job Status or Job Schedule view
• Use Find to search for text in the display area
• Filter (limit) log entries
• Refresh the display
• Display details of a log entry (available only if a log entry is selected)
• Jump to the batch log from a job within a batch
• Delete an entry.
• Schedule, reschedule, or unschedule the selected job
• Set job parameter defaults
• Display the Job Status or Job Log view
• Use Find to search for text in the display area
• Filter (limit) the jobs listed in the display area
• Refresh the display
• Display details of an entry in the Job Schedule view (available only if an entry is selected)
The DataStage Director 2-11
• Delete an entry.

Shortcut Menus in the Job Category PaneWhen you right-click in the job category pane, this menu appears, from which you can:
Shortcut Menu in the Monitor WindowThis menu appears when you right-click in the Monitor window (described in Chapter 5). From this menu you can:
• Filter (limit) the jobs listed in the display area
• Refresh the job category pan
• Refresh the display
• Display details of a selected stage
• Show link information in the Monitor window
• Show CPU usage in the Monitor window
• Clean up job resources
• Save or clear the Monitor window settings
• Display information about the DataStage release
2-12 Ascential DataStage Director Guide

Filtering the Job Status or Job Schedule ViewBy default, the Job Status view or Job Schedule view displays information about all the jobs in the currently selected job category. If you hide the job category pane, the view displays information about all the jobs in a project. On a large project, the display may include more information than you need. If you want to focus on specific types of job, based either on their name or their status, you can filter the view so that it displays only those jobs.
To filter the jobs in the Job Status view or the Job Schedule view:
1. If the view you want to filter is not already displayed, choose View ➤ Status or View ➤ Schedule, as appropriate.
2. Start the Filter facility by doing one of the following:
• Choose View ➤ Filter Entries… from the menu bar.• Choose Filter… from the shortcut menu.• Press Ctrl-T.
The Filter Jobs dialog box appears:
3. Choose which jobs to include in the view by clicking either the All jobs or Jobs matching option button in the Include area.
The DataStage Director 2-13

If you select Jobs matching, enter a string in the Jobs matching field. Only jobs that match this string will be displayed. The string can include wildcards, character lists, and character ranges.
4. Choose which jobs to exclude from the view by clicking either the No jobs or Jobs matching option button in the Include area. If you select Jobs matching, enter a string in the Jobs matching field. Only jobs that match this string will be excluded. The string definition is the same as in step 3.
5. Specify the status of the jobs you want to display by clicking an option button in the Job status area.
• All lists jobs that have any status.
• All, except “Not compiled” lists jobs with any status except Not compiled.
• Terminated normally lists jobs with a status of Finished, Validated, Compiled, or Has been reset.
• Terminated abnormally lists jobs with a status of Aborted, Stopped, Failed validation, Finished (see log), or Validated (see log).
6. If you want to restrict the display to released jobs, select the Include only released jobs check box in the Released jobs area.
7. Click OK to activate the filter. The updated view displays the jobs that meet the filter criteria. The status bar indicates that the entries have been filtered.
Wildcard/Pattern Description
? Matches any single character.
* Matches zero or more characters.
# Matches a single digit.
[charlist] Matches any single character in charlist.
[!charlist] Matches any single character not in charlist.
[a–z] Matches any single character in the range a–z.
2-14 Ascential DataStage Director Guide

Examples of Filtering by Job NameThe following examples show how to use the Jobs Matching field in the Filter Jobs dialog box to filter the Job Status view or the Job Schedule view.
Example 1
Example 2
Continuing Example 1, if you also specify *input as an “Exclude” filter, the Job Status view shows only job2output.
Example 3
Finding TextIf there are many entries in the display area, you can use Find to search for a particular job or event. You start Find in one of three ways:
• Choose Search ➤ Find… .• Choose Find… from the shortcut menu.• Click the Find button on the toolbar.
Job Names “Include” Filter Job View
job2input job2* job2input
job2output job2output
job3input
job3output
Job Names “Include” Filter Job View
A3tires [A-E]3* A3tires
A3valves A3valves
B3tires B3tires
B3valves B3valves
F3tires
F3valves
The DataStage Director 2-15

The Find dialog box appears:
The Look in field shows the currently selected job category. If the job cate-gory pane is hidden, and the display area lists jobs from all job categories, the Look in field specifies All Categories. You cannot edit this field.
To use Find:
1. Enter text in the Find what field. This could be a date, time, status, or the name of a job.
Note: If the text entered matches any portion of the text in any column, this constitutes a match.
2. If the displayed entry must match the case of the text you entered, select the Match Case check box. The default setting is cleared.
3. Choose the search direction by clicking the Up or Down option button. The default setting is Down.
4. Click Find Next. The display columns are searched to find the entered text. The first occurrence of the text is highlighted in the display. The text can appear in any column or row of the display area.
5. Click Find Next again to search for the next occurrence of the text.
6. Click Cancel to close the Find dialog box.
Note: You can also use Search ➤ Find Next to search for an entry in the display. If there is a search string in the Find dialog box, Find Next
2-16 Ascential DataStage Director Guide
acts in the same way as the Find Next button on the Find dialog box. If there is no search string in the Find dialog box, this option displays the Find dialog box where you must enter a search string.

Sorting ColumnsYou can organize the entries in the display area by sorting the columns in ascending or descending order. The column currently being used for sorting is indicated by a symbol in the column title:
• > indicates the sort is in ascending order. • < indicates the sort is in descending order.
To sort a column do any one of the following:
• Click the column title. This selects the column for sorting toggles between ascending and descending.
• Click the Ascending or Descending button on the toolbar.
• Choose View ➤ Ascending or View ➤ Descending.
If you choose a column that contains a date or a time, both the date and time columns are sorted together.
Printing the Current ViewYou can print information from the current view. The content of the printout depends on the view you are using and the options you choose in the Print dialog box. To print the current view:
1. Do one of the following to display the Print dialog box:
• Choose Project ➤ Print… .• Click the Print button on the toolbar.
The DataStage Director 2-17
This dialog box contains the name of the printer to use. By default, this is the default Windows printer. For information on how to specify an alternative printer, see “Changing the Printer Setup” on page 2-19.
2. Choose the range of items to print by clicking an appropriate option button in the Range area:
• All entries prints all entries in the current view.
• Current page prints all entries visible in the display area for the current view.
• Current item prints the selected item only.
3. Choose what to print by clicking an appropriate option button in the Print what area:
• Summary only prints a summary for each item.• Full details prints detailed information for each item.
4. Specify the print quality to use by choosing an appropriate setting from the Print quality list:
• High (the default setting)• Medium• Low• Draft
Note: This setting is ignored if Print to file is selected.
5. Select the Print to file check box if you want to print to a file only.
6. Click OK. If you are printing to file, the Print to file dialog box appears. Enter the name of a text file to use. The default is DSDirect.txt in the Program Files \Ascential\DataStage directory.
What Is in the Printout?The content of the printout depends on the view you are using:
• For the Job Status view, the printout contains the current status for each job in the project, and the date and time the job was last run.
• For the Job Schedule view, the printout contains an entry for each scheduled job in the project specifying when the job is scheduled to run.
2-18 Ascential DataStage Director Guide
• For the Job Log view, the printout can include information about each event in the job log file. For more information about the job log file, see Chapter 6.
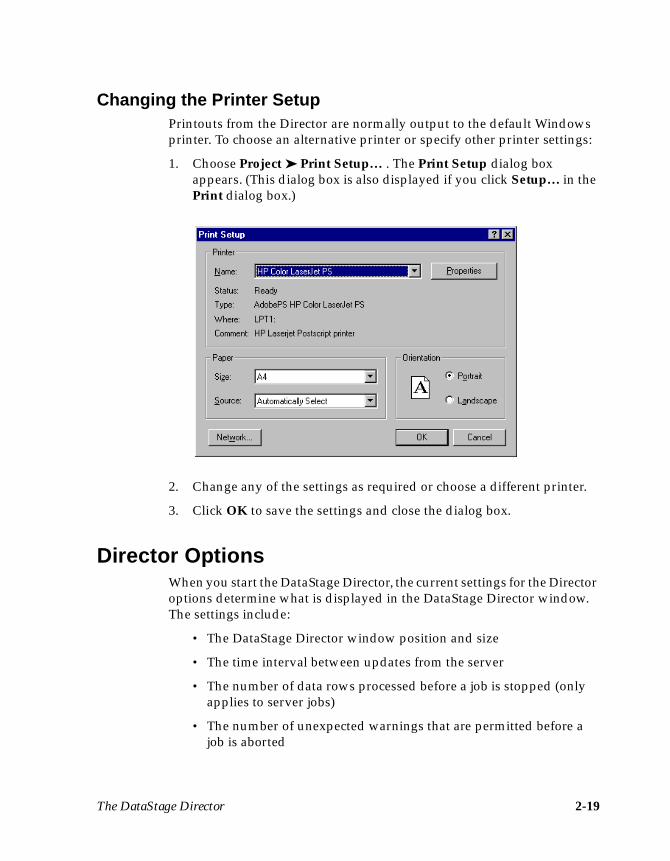
Changing the Printer SetupPrintouts from the Director are normally output to the default Windows printer. To choose an alternative printer or specify other printer settings:
1. Choose Project ➤ Print Setup… . The Print Setup dialog box appears. (This dialog box is also displayed if you click Setup… in the Print dialog box.)
2. Change any of the settings as required or choose a different printer.
3. Click OK to save the settings and close the dialog box.
Director OptionsWhen you start the DataStage Director, the current settings for the Director options determine what is displayed in the DataStage Director window. The settings include:
• The DataStage Director window position and size
• The time interval between updates from the server
• The number of data rows processed before a job is stopped (only applies to server jobs)
The DataStage Director 2-19
• The number of unexpected warnings that are permitted before a job is aborted

• Whether the toolbar, status bar, or icons are displayed
• The filter criteria
• The process priority level for the DataStage Director
You can modify the settings for the Director options by choosing Tools ➤ Options… . The Options dialog box appears:
The five pages in the dialog box are described in the following sections.
General Page From the General page you can:
• Change the server update interval• Save window settings• Compare the client and server times
Changing the Server Update Interval
The Refresh Interval (seconds) is the time, in seconds, between updates from the server. Click the arrow buttons to increase or decrease the value in the box. The default setting is 4, the minimum is 2, and the maximum is 65.
Note that if you choose a long refresh time, the status displayed in the
2-20 Ascential DataStage Director Guide
DataStage Director window may not represent what is happening on the server. For example, if you start a run, the job status may not update to Running until a whole refresh interval has elapsed. Conversely, if you
choose a refresh time that is too short, the DataStage Director requests information from the server at a rate that is too frequent and unproductive. You must find a value between these extremes that meets your update requirements.
Saving Window Settings
The Save on exit area contains two check boxes that determine the settings that are saved on exit from the DataStage Director.
• If Main window size and position is selected, the DataStage Director is restarted at the same screen coordinates as when it exited.
• If Filter settings is selected, the current filter settings are saved and used when the DataStage Director is started.
Both check boxes are selected by default.
Comparing Client and Server Times
If you select the Compare client and server system times check box, when the Director first attaches to a project, it checks that the system times on the client and the server are within five minutes of each other. If they are not, a warning message appears. This check box is selected by default.
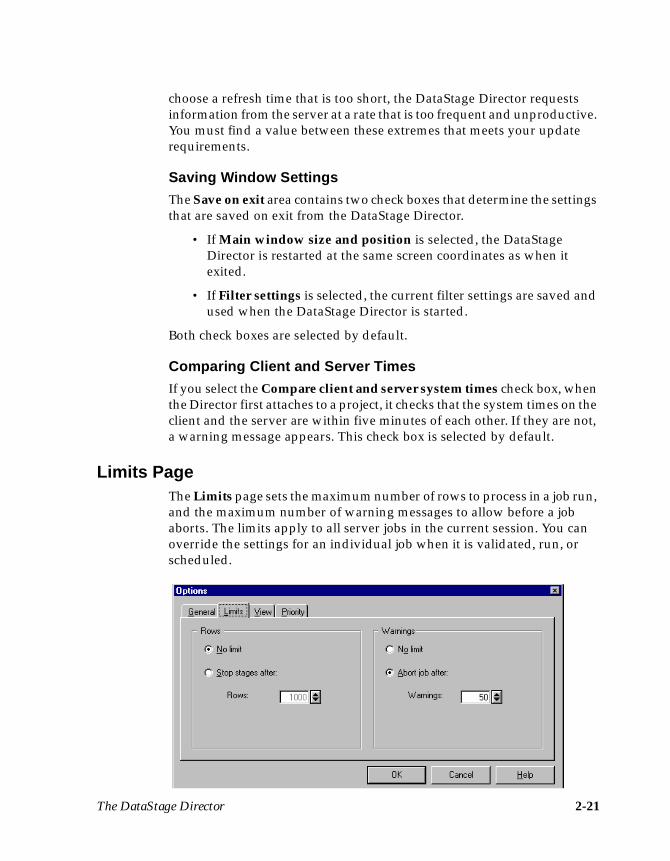
Limits PageThe Limits page sets the maximum number of rows to process in a job run, and the maximum number of warning messages to allow before a job aborts. The limits apply to all server jobs in the current session. You can override the settings for an individual job when it is validated, run, or scheduled.
The DataStage Director 2-21
Setting the Maximum Number of Rows
The option buttons set the maximum number of rows to be processed by the job. Click No limit to process all rows or Stop stages after n rows to specify a number of rows.
Enter a value 1 thru 99999 or click the arrow buttons to increase or decrease the value. The default value is 1000.
Setting the Maximum Number of Warnings
The option buttons set the maximum number of warning messages allowed before a job is aborted. Select No limit to log all error messages or Abort job after to specify a number of warning messages. Enter a value 1 thru 99999 or click the arrow buttons to increase or decrease the value. The default value is 50.
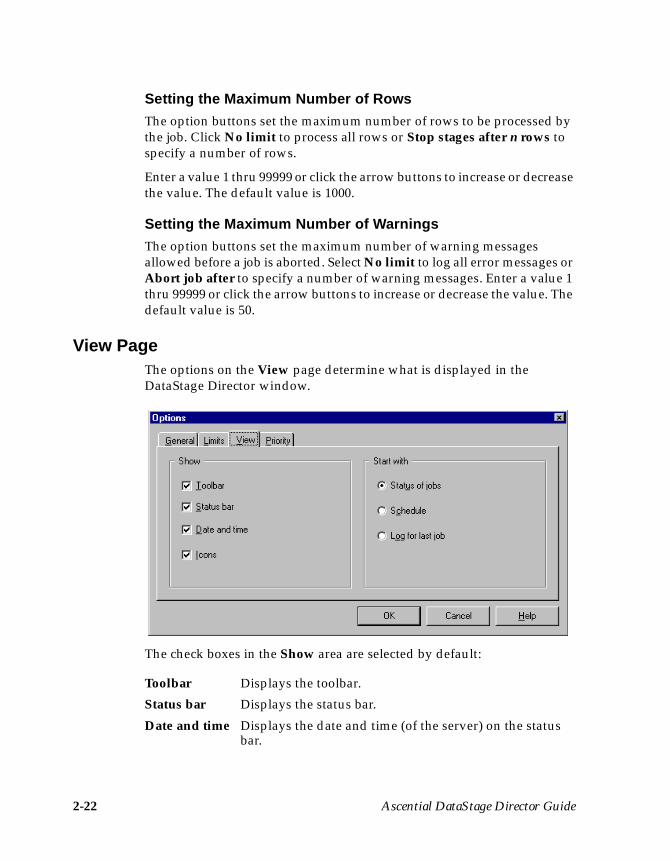
View Page The options on the View page determine what is displayed in the DataStage Director window.
The check boxes in the Show area are selected by default:
Toolbar Displays the toolbar.
Status bar Displays the status bar.
2-22 Ascential DataStage Director Guide
Date and time Displays the date and time (of the server) on the status bar.

Specify the view to display when the Director is started, by clicking the appropriate option button:
• Status of jobs (the default setting)• Schedule• Log for last job
Priority Page The Priority page is included for sites where the DataStage client and server components are installed on the same computer (this currently excludes systems running parallel jobs). When jobs are running, the performance of the DataStage Director may be noticeably slower. You can improve the performance by changing the priority of the DataStage Director process.
Setting the Process Priority
The option buttons in the Set process priority area allow you to change the priority of the DataStage Director process.
• Click High always to increase the priority of the DataStage Director, regardless of where the client and server components are
Icons Displays the icons in the views.
The DataStage Director 2-23
installed. Note that if you choose this option and the client and server components are installed on different computers, you may

not see an improvement in the performance of the DataStage Director.
• Click High if project on local system to increase the priority of the DataStage Director process if the client and server components reside on the same machine. This is the default setting.
• Click Normal always if you do not want to change the priority setting for the DataStage Director process.
Displaying the Current State
The Current state area displays the current priority setting.
Note: If you choose a high priority setting, it may take longer for a job to run. This is because processor cycles are directed toward moni-toring jobs rather than running them.
Click OK to save the settings.
Choosing an Alternative ProjectWhen you start the DataStage Director, the project chosen in the Attach to Project dialog box is opened. You can view the jobs in another DataStage project without exiting the DataStage Director.
Viewing Jobs in Another ProjectTo view the jobs in another project:
1. Do one of the following to display the Open Project dialog box:
• Choose Project ➤ Open… .• Click the Open Project button on the toolbar.
2-24 Ascential DataStage Director Guide

2. Choose the project you want to open from the Projects list box. This list box contains all the DataStage projects on the server specified in the Host system field, which is the server you initially attached to.
3. Click OK to open the chosen project. The updated DataStage Director window displays the jobs in the new project.
Viewing Jobs on a Different ServerTo open a project on a different DataStage server:
1. Click New host… . The Attach to Project dialog box appears.
2. Enter the name of the DataStage server and your logon details before choosing the project from the Project drop-down list.
3. Click OK to open the chosen project. The updated DataStage Director window displays the jobs in the new project.
Note: If you have Monitor windows open when you choose an alterna-tive project, you are prompted to confirm that you want to change projects. If you click Yes, the Monitor windows are closed before the new project is opened. See Chapter 5, “Monitoring Jobs,” for more details.
Exiting the DataStage DirectorTo exit the Director, choose Project ➤ Exit. Any open windows (for
The DataStage Director 2-25
example, Monitor windows) are automatically closed on exit.

2-26 Ascential DataStage Director Guide

3Running DataStage
Jobs
This chapter describes how to run DataStage jobs, including the following topics:
• Setting job options• Validating jobs• Starting, stopping, and resetting a job run• Deleting jobs from a project• Cleaning up the resources of jobs that have hung or aborted• Creating multiple job instances
These tasks are performed from the Job Status view in the DataStage Director window. To switch to this view, choose View ➤ Status, or click the Status button on the toolbar.
Setting Job OptionsEach time you validate, run, or schedule a job you can:
• Change the job parameters associated with the job, as appropriate, and set values for environment variables that have been defined as job parameters.
• Override any default limits for row processing (server jobs and job sequences only) and warning messages that are set for the job run.
• Assign Invocation IDs to create multiple job instances. You can
Running DataStage Jobs 3-1
create as many invocations as you want. For more information on creating Multiple Job Instances see “Multiple Job Instances” on page 3-16. (Server jobs and job sequences only.)
• Set tracing options for server jobs and job sequences. For more information, see “Setting Tracing Options” on page 3-19.
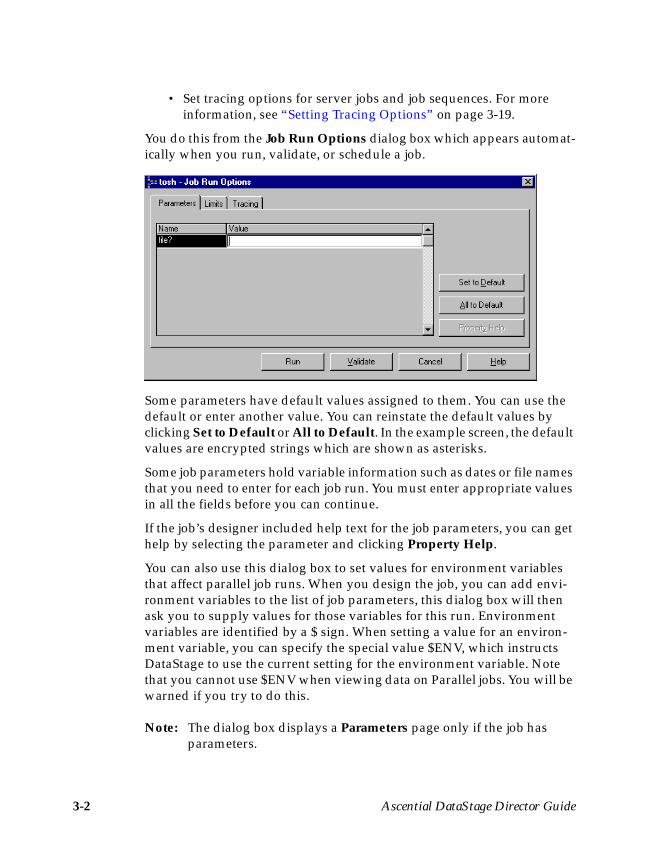
You do this from the Job Run Options dialog box which appears automat-ically when you run, validate, or schedule a job.
Some parameters have default values assigned to them. You can use the default or enter another value. You can reinstate the default values by clicking Set to Default or All to Default. In the example screen, the default values are encrypted strings which are shown as asterisks.
Some job parameters hold variable information such as dates or file names that you need to enter for each job run. You must enter appropriate values in all the fields before you can continue.
If the job’s designer included help text for the job parameters, you can get help by selecting the parameter and clicking Property Help.
You can also use this dialog box to set values for environment variables that affect parallel job runs. When you design the job, you can add envi-ronment variables to the list of job parameters, this dialog box will then ask you to supply values for those variables for this run. Environment variables are identified by a $ sign. When setting a value for an environ-ment variable, you can specify the special value $ENV, which instructs DataStage to use the current setting for the environment variable. Note that you cannot use $ENV when viewing data on Parallel jobs. You will be warned if you try to do this.
3-2 Ascential DataStage Director Guide
Note: The dialog box displays a Parameters page only if the job has parameters.
Validating a JobYou can check that a job or job invocation will run successfully by vali-dating it. Jobs should be validated before running them for the first time, or after making any significant changes to job parameters.
When a server job is validated, the following checks are made without actually extracting, converting, or writing data:
• Connections are made to the data sources or data warehouse.
• SQL SELECT statements are prepared.
• Files are opened. Intermediate files in Hashed File, UniVerse, or ODBC stages that use the local data source are created, if they do not already exist.
When a parallel job is validated, the job is run in ‘check only’ mode so data is not affected.
To validate a job:
1. Select the job or job invocation you want to validate in the Job Status view.
2. Choose Job ➤ Validate… . The Job Run Options dialog box appears. See “Setting Job Options” on page 3-1.
3. Fill in the job parameters as required.
4. Click Validate. Click OK to acknowledge the message. The job is vali-dated and the job’s status is updated to Running.
Note: It may take some time for the job status to be updated, depending on the load on the server and the refresh rate for the client.
Once validation is complete, the updated job’s status displays one of these status messages:
• Validated OK. You can now schedule or run the job.
• Failed validation. You need to view the job log file for details of where the validation failed. For more details, see Chapter 6, “The Job Log File.”
Running DataStage Jobs 3-3
If you want to monitor the validation in progress, you can use a Monitor window. For more information, see Chapter 5, “Monitoring Jobs.”

Running a JobYou can run a job in two ways:
• Immediately.
• By scheduling it to run at a later time or date. See “Job Scheduling” on page 3-5 for how to do this.
If you run a job immediately, you must ensure that the data sources and data warehouse are accessible, and that other users on your system will not be affected by the job run. To run a job immediately:
1. Select the job or job invocation in the Job Status view.
2. Do one of the following:
• Choose Job ➤ Run Now… .• Click the Run button on the toolbar.
The Job Run Options dialog box appears. See “Setting Job Options” on page 3-1.
3. Fill in the job parameters and check warning and row limits for the job, as appropriate.
4. Optionally, click Validate to validate the job.
5. Click Run. The job is scheduled to run with the current date and time and the job’s status is updated to Running.
Note: It may take some time for the job status to be updated, depending on the load on the server and the refresh rate for the client.
Stopping a JobTo stop a job that is currently running:
1. Select it in the Job Status view.
2. Do one of the following:
• Choose Job ➤ Stop.• Click the Stop button on the toolbar.
The job or invocation is stopped, regardless of the stage currently being processed, and the job’s status is updated to Stopped.
3-4 Ascential DataStage Director Guide
Note: It may take some time for the job status to be updated, depending on the load on the server and the refresh rate for the client.

Resetting a JobIf a job has stopped or aborted, it is difficult to determine whether all the required data was written to the target data tables. When a job has a status of Stopped or Aborted, you must reset it before running the job again.
By resetting a job, you set it back to a runnable state and, optionally, return your target files to the state they were in before the job was run.
Note: You can only reinstate sequential files and hashed files to a prerun state if the backup option has been chosen on the corresponding stage in the job design.
If you want to undo the updates performed during a successful job, you can also use the Reset command for jobs with a status of Finished. The Reset command is not available for jobs with a status of Not compiled or Running.
To reset a job or job invocation:
1. Select the job or invocation you want to reset in the Job Status view.
2. Choose Job ➤ Reset or click the Reset button on the toolbar. A message box appears.
3. Click Yes to reset the tables. All the files in the job are reinstated to the state they were in before the job was run. The job’s status is updated to Has been reset.
Note: It may take some time for the job status to be updated, depending on the load on the server and the refresh rate for the client.
Job SchedulingYou can schedule a job to run in a number of ways:
• Once today at a specified time• Once tomorrow at a specified time• On a specific day and at a particular time• Daily at a particular time• On the next occurrence of a particular date and time
Each job can be scheduled to run on any number of occasions, using
Running DataStage Jobs 3-5
different job parameters if necessary. The scheduled jobs are displayed in the Job Schedule view.

Note: Windows NT restricts job scheduling to administrators, therefore you need to be logged on as a Windows NT administrator in order to use the DataStage scheduling features. Microsoft have published a workaround to this restriction – visit http://support.microsoft.com/directory/ and look up article Q124859 for details.
Job Schedule ViewThe Job Schedule view displays details of all scheduled and unscheduled jobs and batches in the currently selected job category. If the job category pane is hidden, the Job Schedule view displays details of all scheduled and unscheduled jobs and batches in the project, regardless of their job category.
To display the job schedule, choose View ➤ Schedule or click the Schedule button on the toolbar.
You can filter the view to display specific types of job, based on their name or status (see “Filtering the Job Status or Job Schedule View” on page 2-13). The icon on the left of the Job name column indicates that a job is scheduled.
The To be run column shows when the job is scheduled to run, as shown in the following table:
To be run… Means this…
3-6 Ascential DataStage Director Guide
Every n n is a number representing the date. For example, Every 12&27 means the job is scheduled to run on the 12th and 27th day of each month.

The At time column lists the time at which the job will run. This is displayed in the system’s current time format: 12-hour or 24-hour clock.
The Parameters/Description column lists the parameters required to run the job. Each job has built-in job parameters which must be entered when you schedule or run a job. The entered values are displayed in this column in the following format:
parameter1 name = value, parameter2 name = value, …
A brief description appears here if there is a short description defined and there are no job parameters.
Every x x represents the day of the week:
M = MondayT = TuesdayW = WednesdayTh = ThursdayF = FridayS = SaturdaySu = Sunday
For example, Every Th&F means the job is scheduled to run every Thursday and Friday.
Every n&x n is a date and x is a day of the week (as above). For example, Every 10&Su means the job is scheduled to run on every 10th day of the month and every Sunday.
Today The job is run today at the specified time.
Tomorrow The job will run tomorrow at the specified time.
Next n n is a date (as above). For example, Next 28 means the job is run on the next 28th of the month.
Next x x is a day of the week. For example, Next W means the job is run the next Wednesday in the month.
Next n&x n is a number and x is a day of the week. For example, Next 5&12&T means the job is scheduled to run on the next 5th and 12th day of the month, and the next Tuesday.
To be run… Means this…
Running DataStage Jobs 3-7
Viewing Details of a Job ScheduleTo view more details about a scheduled job or batch, select it in the display area and do one of the following:
• Choose View ➤ Detail.• Choose Detail from the shortcut menu. • Double-click the job or batch in the display.
If you choose a batch, it has the same effect as choosing Tools ➤ Batch, as described in “Creating a Job Batch” on page 4-2.
If you choose a job, the Job Schedule Detail dialog box appears:
This dialog box contains a summary of the job details and all the settings used to schedule the job.
This field… Contains this information…
Project The name of the project and the DataStage server.
Schedule # The schedule number the job has been assigned.
Occurrences The number of times the job will be run using this schedule. A value of Repeats means that the job is continuously rescheduled.
Job name The name of the job.
Run time The time the job is set to run, in 24-hour format.
3-8 Ascential DataStage Director Guide
Run date The date the job is set to run.

Note: The parameter name displayed here is the name used internally by the job, not the descriptive parameter name you see when you enter job parameter values.
Use Copy to copy the schedule details and job parameters to the Clipboard for use elsewhere.
Click Next or Previous to display schedule details for the next or previous job in the list. These buttons are only active if the next or previous job is scheduled to run.
Click Close to close the window.
Scheduling a JobTo schedule a job:
1. Select the job or job invocation you want to schedule in the Job Status or Job Schedule view.
Note: You cannot schedule a job with a status of Not compiled.
2. Do one of the following to display the Add to schedule dialog box:
• Choose Job ➤ Add to Schedule… .• Choose Add To Schedule… from the appropriate shortcut menu.• Click the Schedule button on the toolbar.
Job parameters The job parameters. Each entry in this field is in the format parameter name=value.
This field… Contains this information…
Running DataStage Jobs 3-9

3. Choose when to run the job by clicking the appropriate option button:
Today runs the job today at the specified time (in the future).
Tomorrow runs the job tomorrow at the specified time.
Every runs the job on the chosen day or date at the specified time in this month and repeats the run at the same date and time in the following months.
Next runs the job on the next occurrence of the day or date at the spec-ified time.
Daily runs the job every day at the specified time.
4. If you selected Every or Next in step 3, choose the day to run the job by doing one of the following:
• Choose an appropriate day or days from the Day list. • Choose a date from the calendar.
Note: If you choose an invalid date, for example, 31 September, the behavior of the scheduler depends upon the server operating system, and you may not receive a warning of the invalid date. Refer to your server documentation for further information.
5. Choose the time to run the job. There are two time formats:
• 12-hour clock. Click either AM or PM.• 24-hour clock. Click 24H Clock.
Click the arrow buttons to increase or decrease the hours and minutes, or enter the values directly.
6. Click OK. The Add to schedule dialog box closes and the Job Run Options dialog box appears.
7. Fill in the job parameter fields and check warning and row limits, as appropriate.
8. Click Schedule. The job is scheduled to run and is added to the Job Schedule view.
Unscheduling a Job
3-10 Ascential DataStage Director Guide
If you want to prevent a job from running at the scheduled time, you must unschedule it. To unschedule a job:

1. Select the job you want to unschedule in the Job Schedule view.
2. Do one of the following:
• Choose Job ➤ Unschedule. • Choose Unschedule from the Job shortcut menu.
If the job is not scheduled to run at another time, the job status is updated to Not scheduled in the To be run column, and is not run again until you add it to the schedule.
Rescheduling a JobIf you have a job scheduled to run, but you want to change the frequency, day, or time it is run, you can reschedule it. To reschedule a job:
1. Select the job you want to reschedule in the Job Schedule view.
2. Do one of the following to display the Add to schedule dialog box:
• Choose Job ➤ Reschedule… . • Choose Reschedule… from the Job shortcut menu.• Click the Reschedule button on the toolbar.
The current settings for the job are shown in the dialog box.
3. Edit the frequency, day, or time you want the job to run.
4. Click OK. The Add to schedule dialog box closes and the Job Run Options dialog box appears.
5. Fill in the job parameters and check warning and row limits as appropriate.
6. Click Reschedule. The job is rescheduled and the To be run column in the Job Schedule view is updated.
Deleting a JobYou can remove unwanted or old versions of jobs from your project as follows:
1. Select the job or job invocation in the Job Status view. You can make multiple selections.
Running DataStage Jobs 3-11
2. Choose Job ➤ Delete. A message confirms that you want to delete the chosen job, or jobs.

3. Click Yes to delete the jobs. A message confirms they have been deleted.
4. Click OK. The jobs and all the associated components used at run time are deleted, including the files and records used by the Job Log view and the Monitor window.
5. If you delete a job that is part of a batch, edit the batch to remove the deleted job to prevent the batch from failing. See Chapter 4, “Job Batches.”
If you delete the last server job from a job category, that category is removed from the job category tree in the Director window.
Job AdministrationFrom the DataStage Administration client, the administrator can enable job administration commands that let you clean up the resources of a job that has hung or aborted. These commands help you return the job to a state in which you can rerun it after the cause of the problem has been fixed. You should use them with care, and only after you have tried to reset the job and you are sure it has hung or aborted.
There are two job administration commands:
• Cleanup Resources• Clear Status File
Cleaning Up Job ResourcesThis facility only applies to server jobs. The Cleanup Resources command lets you:
• View and end job processes• View and release the associated locks
To run this command, do one of the following:
• Choose Job ➤ Cleanup Resources from the menu bar.
• Choose Cleanup Resources from the Monitor window shortcut menu.
3-12 Ascential DataStage Director Guide

The Job Resources dialog box appears, from which you can view and clean up the resources of the selected job:
In the Processes area:
This column… Displays this information…
PID # The process identification number.
Context The process context. In a job with more than one active stage, a PID may be reused during a job run. In that case the context field may have entries for more than one active stage. The context will always be listed as Unavailable if the Show All option button is selected.
User Name The identity of the user whose job started the process.
Last Command The command executed most recently by the
Running DataStage Jobs 3-13
Processed process.
In the Locks area:
Viewing Processes and Locks
The default is for the Job Resources dialog box to display all the processes and locks associated with the job currently selected in the DataStage Director. You can, however, filter the display by using the option buttons in the Processes and Locks areas of the Job Resources dialog box.
In the Processes area:
• Show All displays all current DataStage processes.
• Show by job (the default) displays all processes for the selected job.
In the Locks area:
• Show All displays all the current locks.
• Show by job (the default) displays all locks for the selected job.
• Show by process displays all the locks associated with the process that you have selected in the Processes area in the Job Resources dialog box.
Ending Job Processes
To end job processes:
1. From the Job Resources dialog box, choose the range of processes to list by using the Show All or Show by job option buttons in the Processes area.
2. To end all the processes associated with a job, click Logout All. (This button is disabled if you have clicked the Show All option button.)
This column… Displays this information…
PID/User # The identification number of the process associated with the lock.
Lock Type The type of lock: File, Record, or Group.
Item Id The identity of the item (record) locked by the process. For a Group lock, this column is left blank.
3-14 Ascential DataStage Director Guide
To end a particular process, select the process in the Processes list box, then click Logout.
3. Wait for the processes to end (log out) and the display to update.
You can refresh the display manually at any time by clicking Refresh.
If this procedure fails to end a process that you believe is causing a job to hang, try the following steps:
1. Log out of all DataStage clients.
2. Try to end the process using the Windows NT Task Manager or kill the process in UNIX.
3. Stop and restart the DataStage Server Engine.
4. Reset the job from the DataStage Director (see “Resetting a Job” on page 3-5).
If there is a problem with a job, you can also release locks (see the next section), or clear the job status file (see “Clearing a Job Status File” on page 3-15).
Releasing Locks
To release locks:
1. From the Job Resources dialog box, choose the range of locks to list by doing either of the following:
• Click the Show by job option button in the Locks area.
• Select a process in the Processes area, then click the Show by process option button.
Note: You cannot release locks if you have clicked the Show All option button in the Locks area.
2. Click Release All. Each of the displayed locks is unlocked and the display updates automatically. (You cannot select or release indi-vidual locks.)
You can refresh the display manually at any time by clicking Refresh.
Clearing a Job Status FileWhen you clear a job’s status file you reset the status records associated with all stages in that job. You should therefore use this option with great care, and only when you believe a job has hung or aborted. In particular, before you clear a status file you should:
Running DataStage Jobs 3-15
1. Try to reset the job (see “Resetting a Job” on page 3-5).
2. Ensure that all the job’s processes have ended (see “Ending Job Processes” on page 3-14).
To clear the job status file, choose Job ➤ Clear Status File from the menu bar. The job status changes to Compiled and no evidence will remain that the job has ever run.
If there is a problem with a job, you can also release the locks (see “Releasing Locks” on page 3-15).
Multiple Job InstancesYou can create multiple instances of a DataStage server job, with each instance starting with different parameters to process different data sets. A job instance can be invoked regardless of the state of other instances which are processing different data sets.
If you run a job in the Director without giving an invocation Id then you can't create any new invocations of that job until the job has finished. If you want to run several invocations of the same job at the same time, you must give an invocation Id for the first instance.
Note: The job designer should ensure that the job is suitable to have multiple instances run. For example, an unsuitable job may have different instances running concurrently and writing to the same table. An unsuitable job may also adversely affect job performance.
Creating Multiple Job Instances
1. You enable multiple job instances from the DataStage Designer. You must select the Allow Multiple Instance option on the Job Proper-ties page. See the DataStage Designer Guide for more details on editing job properties.
2. Compile the job as normal. See the DataStage Designer Guide for more details on compiling jobs.
Note: When you recompile an job, the invocations are canceled, and new invocations will have to be recreated. This is to
3-16 Ascential DataStage Director Guide

ensure that job integrity is maintained after job design changes.
3. From the Job Status view select the job, and choose Job ³ Validate. The Job Run Options dialog box appears:
4. Enter an Invocation Id in the text field. This will be suffixed to the job name to create the invocation. For example if the job name is ‘Exercise 3’ and you enter an Invocation Id of ‘Test1’, then job will appear as ‘Execrcise3.Test1’.
Running DataStage Jobs 3-17
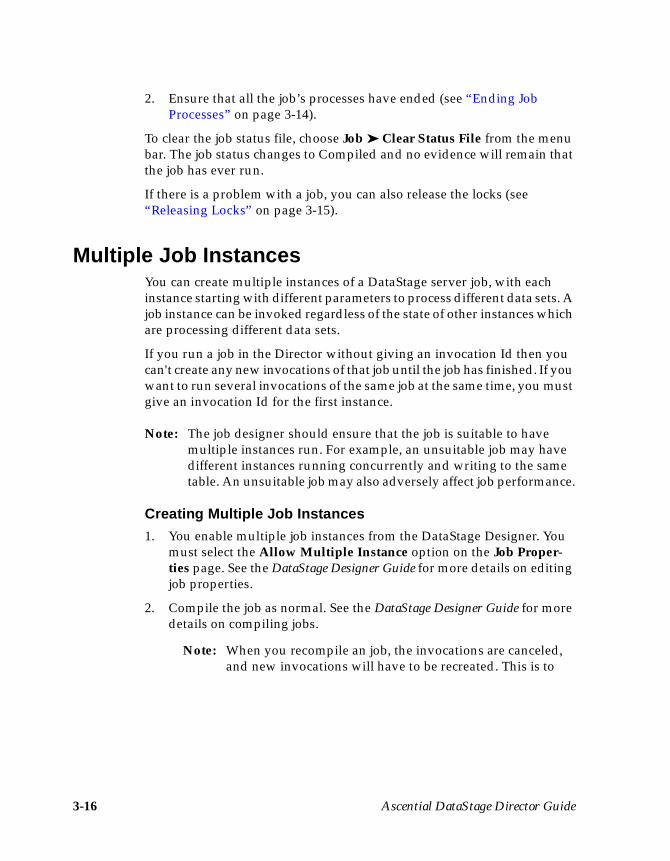
5. Click Validate. The Job Status view now shows the new job invocation:
Running a Job Invocation
Running an invocation is done in the same way as you would other jobs.
1. From the Job Status view select the invocation from the list and choose Job ³ Run now. The Job Run Option dialog appears:
3-18 Ascential DataStage Director Guide
2. Fill in any Parameters, Rows and Warning Limits as required. Click Run.

Note: Another way to run an invocation is to choose the job from the list, enter the Invocation Id in the text field and then click Run.
Viewing the Job Log for an Invocation
Viewing the job log for job invocations is exactly the same as for viewing other job log, except that you see an additional Invocation column.
Setting Tracing OptionsThe Tracing page is included in the Job Run Options dialog box to help Ascential Software analysts during troubleshooting. You can generate tracing information and performance statistics for server jobs.
The options on this page determine the amount of diagnostic information generated the next time a job is run. Diagnostic information is generated
Running DataStage Jobs 3-19

only for the active stages in a chosen job. To specify the job, highlight it in the Job Status or Job Schedule view before choosing Tools ➤ Options… .
The Stage names list box contains the names of the active stages in the job in the format jobname.stagename. To set a trace level, highlight the stages in the Stage names list box, then select any of the following check boxes:
• Report row data. Records an entry for every data row read on input and written on output. This check box is cleared by default.
• Property values. Records an entry for every input and output opened and closed. This check box is cleared by default.
• Subroutine calls. Records an entry for every BASIC subroutine used. This check box is cleared by default.
• Performance statistics. When performance tracing is turned on a special log entry is generated immediately after the stage comple-tion message. This contains performance statistics about the selected stages statistics in a tabular form. (For more information see Chapter 2 of DataStage Server Job Developer’s Guide)
When the job runs, a file is created for each active stage in the job. The files are named using the format jobname.stagename.trace and are stored in the &PH& subdirectory of your DataStage server installation directory. If you need to view the content of these files, contact your local Ascential Customer Support center for assistance.
3-20 Ascential DataStage Director Guide

4Job Batches
This chapter describes how to create and run DataStage job batches, including the following topics:
• What is a job batch• Creating and running job batches• Scheduling, unscheduling and rescheduling job batches• Deleting batches from a project
What Is a Job Batch?A job batch is a group of jobs or separate instances of the same job (with different job parameters) that you want to run sequentially. DataStage treats a batch as though it were a single job. If any job fails to complete successfully, the batch run stops. You can follow the progress of jobs within a batch by examining the log files of each job or of the batch itself. These contain messages about the progress of the batch, as well as the job. You can create, schedule, edit, or delete job batches.
Job Batches 4-1

Creating a Job BatchTo create a job batch:
1. Choose Tools ➤ Batch ➤ New… . The Create New Batch dialog box appears:
2. Enter a name for the new batch in the Batch name field. You can also select it from the list of existing batches and categories.
3. In the Category field, enter the name of the job category in which the new batch will be created. You can also select it from the list of existing batches and categories. If you leave the Category field blank, the new batch is located below the Jobs node in the job category tree.
4-2 Ascential DataStage Director Guide

4. Click OK. The Job Properties dialog box appears:
5. Select the jobs to add to the batch from the Add Job list on the Job control page. This list displays all the server and parallel jobs in the project. You are prompted to enter parameter values, and row and warning limits for each job in the batch. As each job is added to the batch, the control information is added to the Job control page.
6. Click the General tab. The General page appears at the front of the Job Properties dialog box. Optionally, enter a brief description of the batch in the Short job description field. This description appears in the Parameters/Description column in the Job Schedule view.
7. Optionally, enter a more detailed description of the batch in the Full job description field.
8. Click the Parameters tab. The Parameters page appears at the front of the Job Properties dialog box.
9. Define any parameters that you want to specify for the batch. For example, a user name and password to prompt for when the batch is
Job Batches 4-3
run.
10. When you have defined the batch, click OK. The batch is compiled and appears in the Job Status view.
Note: The Dependencies page allows you to specify the dependencies of the batch job. You only need to do this if you intend to package the batch job for deployment on another system using the DataStage Manager. Information on dependencies and packaging jobs is in DataStage Designer Guide, DataStage Manager Guide and DataStage Developer’s Help.
Running a Job BatchYou can run a job batch in the same way as a standard job:
• Immediately.
• By scheduling it to run at a later time or date. See “Scheduling a Job Batch” on page 4-5 for how to do this.
If you run a batch immediately, you must ensure that the data sources and data warehouse are accessible, and that other users on your system will not be affected by the job run.
To run a batch immediately:
1. Select the batch in the Job Status view.
2. Do one of the following:
• Choose Job ➤ Run Now… .• Click the Run button on the toolbar.
The Job Run Options dialog box appears. See “Setting Job Options” on page 3-1.
3. Fill in the job parameters and check warning and row limits for the batch, as appropriate.
4. Optionally, click Validate to validate the job.
5. Click Run. The batch is started and its status is updated to Running.
Note: It may take some time for the job status to be updated, depending on the load on the server and the refresh rate for the client.
4-4 Ascential DataStage Director Guide

Scheduling a Job BatchTo schedule a batch:
1. Display the Job Schedule view. Job batches are displayed in the Job Schedule view in the format Batch::batchname. batchname is the name entered when the batch was created.
2. Select the batch in the list and do one of the following to display the Add to schedule dialog box:
• Choose Job ➤ Add to Schedule… .• Choose Add To Schedule… from the Job shortcut menu.• Click the Schedule button on the toolbar.
3. Choose when to run the batch by clicking the appropriate option button:
Today runs the batch today at the specified time (in the future).
Tomorrow runs the batch tomorrow at the specified time.
Every runs the batch on the chosen day or date at the specified time in this month and repeats the run at the same date and time in the following months.
Next runs the batch on the next occurrence of the day or date at the specified time.
Job Batches 4-5
Daily runs the batch every day at the specified time.

4. If you selected Every or Next in step 3, choose the day to run the batch from the Day list or a date from the calendar.
Note: If you choose an invalid date, for example, 31 September, the behavior of the scheduler depends upon the server operating system, and you may not receive a warning of the invalid date. Refer to your server documentation for further information.
5. In the Time area, select one option from AM, PM, or 24H Clock. Then click the arrow buttons to increase or decrease the hours and minutes, or enter the values directly.
6. Click OK. The Add to schedule dialog box closes and the Job Run Options dialog box appears.
7. Click Schedule. The batch is scheduled to run and is added to the Job Schedule view. The job parameters entered when the batch was created are used when the batch is run.
Unscheduling a Job BatchIf you want to prevent a batch from running at the scheduled time, you must unschedule it. To unschedule a batch, select the batch in the Job Schedule view and do one of the following:
• Choose Job ➤ Unschedule. • Choose Unschedule from the Job shortcut menu.
The batch status is updated to Not scheduled in the To be run column and is not run again until you schedule it again.
Rescheduling a Job BatchIf you have a batch scheduled to run, but you want to change the frequency, day, or time it is run, you can reschedule it. To reschedule a batch:
1. Select the batch in the Job Schedule view and do one of the following:
• Choose Job ➤ Reschedule… . • Choose Reschedule… from the Job shortcut menu.
4-6 Ascential DataStage Director Guide
• Click the Reschedule button on the toolbar.
The Add to schedule dialog box appears with the current settings for the batch.

2. Edit the frequency, day, or time you want the batch to run.
3. Click OK. The Add to schedule dialog box closes, the batch is rescheduled, and the To be run column in the Job Schedule view is updated.
Job Schedule ErrorsIf you get an error when you try to schedule jobs, ask your system admin-istrator to check that:
• The Windows NT Schedule service is running on the server (see the DataStage Administrator Guide).
• You belong to a Windows NT group that has permission to use the Schedule service.
Editing a Job BatchTo add or remove jobs from a job batch or change any job parameters, you must edit the job batch.
Note: Do not edit a job batch while it is running.
To edit a job batch:
1. Select the batch and choose Tools ➤ Batch ➤ Properties. The Job Properties dialog box appears.
2. Add further jobs by selecting them in the Add Job list, or remove jobs from the batch by selecting them in the Job control page and using the Cut button or the Delete key.
3. Click the General tab and edit the batch description, if required.
4. Click the Parameters page and edit the batch parameters, if required.
5. Click OK to save the edits.
Job Batches 4-7

Copying a Job BatchTo copy a job batch:
1. In the Job Status view, select the batch and choose Tools ➤ Batch ➤ Save As… . The Save Batch As dialog box appears.
2. Enter the name for the new copy of the batch.
3. Enter the name of the job category in which the copy of the batch will be held. If you leave the Category field blank, the new batch is located below the Jobs node in the job category tree.
4. Click OK to copy the batch.
Deleting a Job BatchIf you do not need a job batch, you can delete it. To delete job batches:
1. Select the batch, or batches, in the Job Status view.
2. Choose Tools ➤ Batch ➤ Delete. A message appears asking you to confirm the deletion.
3. Click Yes to delete the batch or batches.
4-8 Ascential DataStage Director Guide
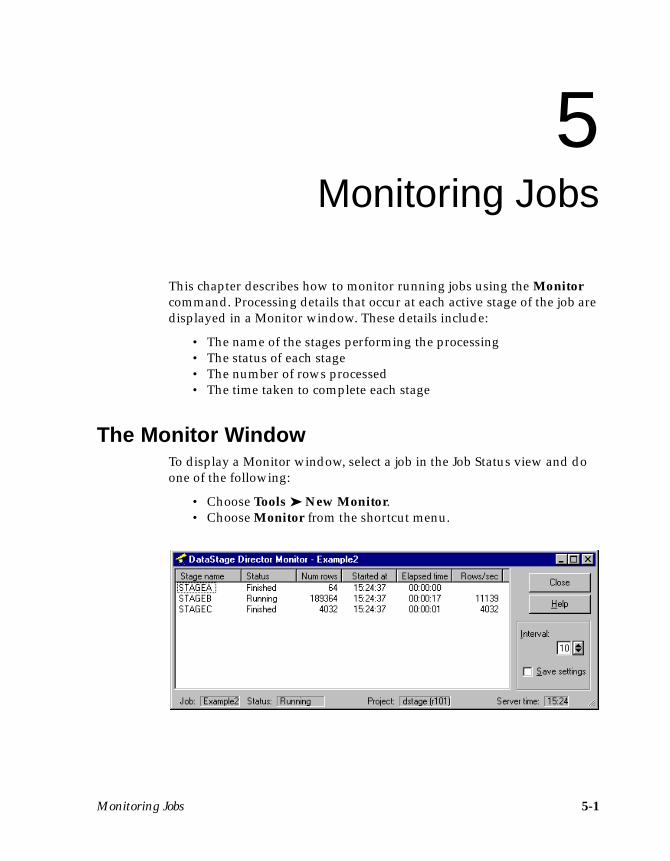
5Monitoring Jobs
This chapter describes how to monitor running jobs using the Monitor command. Processing details that occur at each active stage of the job are displayed in a Monitor window. These details include:
• The name of the stages performing the processing• The status of each stage• The number of rows processed• The time taken to complete each stage
The Monitor WindowTo display a Monitor window, select a job in the Job Status view and do one of the following:
• Choose Tools ➤ New Monitor.• Choose Monitor from the shortcut menu.
Monitoring Jobs 5-1
By default, this window displays summary information about the active stages in a job. The columns in the display are described in the following table:
The status bar at the bottom of the window displays the name and status of the job, the name of the project and the DataStage server, and the current time on the server.
The monitor displays information for Parallel jobs as follows:
• If a stage is running in parallel, and processes more than APT_MONITOR_SIZE rows per instance, then x N is appended to
This column… Contains this information…
Stage name The names of the active stages in the job. These are the stages that perform the processing (for example, Transformer stages). Stages that represent data sources or data warehouses are not displayed in this window.
For Parallel jobs all stages types are displayed.
Status The status of each active stage. The possible states are:
State Meaning
Aborted The processing terminated abnormally at this stage.
Finished All data has been processed by the stage.
Ready The stage is ready to process the data.
Running Data is being processed by the stage.
Starting The processing is starting.
Stopped The processing was stopped manually at this stage.
Waiting The stage is waiting to start processing.
Num Rows The number of rows of data processed so far by each stage on its primary input.
Started at The time the processing started on the server.
Elapsed time The elapsed time since processing started.
Rows/sec The number of rows processed per second.
5-2 Ascential DataStage Director Guide
the stage name, where N gives how many instances are running. (APT_MONITOR _SIZE is a parallel job environment variable.)

• If a stage is running in parallel then the Num Rows column shows the total number of rows processed by all instances. The Rows/sec is derived from this value and shows the total throughput of all instances.
• If a stage is running in parallel then the %CP may be more than 100 if there are multiple CPUs on the server. For example, on a machine with four CPUs, %CP could be as high as 400 where a stage is occu-pying 100% of each of the four processors, on the other hand, if the stage is occupying only 25% of each processor the %CP would be 100%.
Setting the Server Update IntervalThe Monitor window display is updated with new information from the server at regular intervals. You can set how often the updates occur by setting a time (in seconds) in the Interval field. Click the arrow buttons to increase or decrease the value, or enter the value directly. The default setting is 10, the minimum is 5, and the maximum is 65.
Saving Monitor Window SettingsYou can save the Monitor window size and position (and the Interval setting) by selecting the Save settings check box. These settings are used the next time you open a Monitor window for any job.
You can also save the window settings immediately by choosing Save window settings from the Monitor shortcut menu. If you want to clear any saved settings and return to the default values, choose Clear window settings from the shortcut menu.
Showing LinksAs well as the default Monitor window view, you can display link infor-mation for each active stage in a job. To show the links, choose Show links from the Monitor shortcut menu. The updated Monitor window displays the link information:
Monitoring Jobs 5-3

Each link to or from an active stage is represented by one row in the Monitor window. Primary input links are listed first, followed by other (reference) inputs, then outputs and rejects.
The link information is displayed in two additional columns in the Monitor window. Link name is the name of the link in the job design. Type displays the type of link. The types available are:
primary input link <<Pri
input link <Ref
output link >Out
output link for rejected rows >Rej!
5-4 Ascential DataStage Director Guide

The properties of the stage as a whole (stage status and the start and elapsed times) are displayed in the row for the primary input link. The order used to display the rows is determined by the server. If you try to reorder the columns, a message box appears. Click OK to close the message box.
To disable the link information, choose Show links from the shortcut menu again.
Showing CPU UsageWhile a stage is processing data rows, it can use a large portion of the CPU. You can use the Monitor window to check what percentage of the computer processor is being used by an active stage.
To show the percentage of CPU usage, choose Show %CP from the Monitor shortcut menu. The updated Monitor window includes the %CP column. The following screen shows the %CP column in the default Monitor window:
The number displayed in the %CP column updates at regular intervals. The %CP column is empty if a stage is not processing data or has finished. If several running stages share a process, only one of the stages displays a value in the %CP column; the other stages display the same value in parentheses.
Note: If you are viewing link information in a Monitor window, the percentage of computer processor time is displayed only in the row for the primary input link.
Monitoring Jobs 5-5
To hide the %CP column, choose Show %CP from the shortcut menu again.

Viewing and Cleaning Up Job ResourcesIf the DataStage administrator has enabled job administration within the Director, you can view and clean up resources associated with the job being monitored. To do so, choose Cleanup Resources from the Monitor shortcut menu. The Job Resources dialog box is displayed, from which you can:
• View and end processes• View and release the associated locks
For full information about these options, refer to “Cleaning Up Job Resources” on page 3-12.
Switching Between Monitor WindowsYou can display a Monitor window before you start the job or while a job is running. If you want to monitor more than one job at a time, you can display more than one Monitor window.
If you have several Monitor windows open, they can become hidden by other windows on the screen.
To bring a Monitor window to the front of the screen:
1. Choose Tools ➤ View Monitor > .
2. Select the job you want to view from the submenu.
The Stage Status WindowAs well as viewing the information in the Monitor window, you can obtain more information about each stage from the Stage Status window. To display the Stage Status window, select a stage in the Monitor window and do one of the following:
• Choose Detail from the shortcut menu.• Double-click the stage in the Monitor window.
The fields and parameters displayed in the Stage Status window depend on whether you are displaying the default Monitor window or link infor-mation when you choose a stage.
5-6 Ascential DataStage Director Guide

The following screen shows the Stage Status window from a default Monitor window:
The fields in the window cannot be edited.
This field… Displays this information…
Project The name of the project and the DataStage server.
Job name The name of the job.
Stage The name of the stage.
Status The status of the stage. This is one of the states described on page 5-2.
Started at The date and time (on the server) the processing started at this stage.
Ended at The date and time (on the server) the processing ended. This is set to 00:00:00 or is left blank if processing is still taking place.
Row count The number of rows processed.
Control An internal number assigned by DataStage.
Wave # An internal number assigned by DataStage.
Monitoring Jobs 5-7

The following screen shows the Stage Status window if you are displaying link information:
The same fields described earlier are displayed in this window except:
• Stage is replaced by Stage.Link. This field contains the name of the stage followed by the name of the link.
• Control is replaced by Link type. This field contains the type of link. There are four possible settings:
User The name or process number of the user who ran the job.
Retrieved The date and time (on the server) the stage retrieved the data to process.
This field… Displays this information…
Primary A primary input link
Reference A reference input link
Output An output link
Reject An output link marked as “Rejected Rows”
5-8 Ascential DataStage Director Guide

6The Job Log File
This chapter describes the job log file and the Job Log view. The job log file is updated when you validate, run, or reset a job. You can use the log file to troubleshoot jobs that fail during validation, or that are aborted when they are run.
Job Log ViewA job’s log file is displayed in the Job Log view. To display the log file, select the job in the Job Status view, then choose View ➤ Log or click the View Log toolbar button. The display is updated to list the job log file.
The Job Log File 6-1
Each log file contains entries describing events that occurred during the last (or previous) runs of the job.

Entries are written to the log when:
• A job or batch starts or finishes
• A stage starts or finishes
• Rejected rows are output (server jobs and some stage types in parallel jobs)
• Errors are generated
The four columns in the Job Log view are described in the following table:
This column… Contains this information…
Occurred The time the event occurred.
On date The date the event occurred.
Type The type of event:
This event… Occurs when…
Info Stages start and finish. No action required.
Warning An error occurred. You may need to investigate the cause of the warning, as this may cause the job to abort.
Fatal A fatal error occurred. You need to investigate the cause of this error.
Control The job starts and finishes.
Reject Rejected rows are output.
Reset A job is reset.
Event A message describing the event. The first line of the message is displayed. If a message has an ellipsis (…) at the end, it contains more than one line. You can view the full message in the Event Detail window.
6-2 Ascential DataStage Director Guide
The Event Detail WindowThe full message for an event can be viewed in the Event Detail window. To display the Event Detail window, select an event in the Job Log view and do one of the following:
• Choose View ➤ Detail.• Choose Detail from the shortcut menu.• Double-click the event line. • Press Ctrl-D.
This window contains a summary of the job and event details. The fields are described in the following table:
This field… Contains this information…
Project The name of the project and the DataStage server.
Event # The ID assigned to the event during the job run.
Event type The type of event. The event types are:
• Info
• Warning
• Fatal
• Control
The Job Log File 6-3
• Reject
• Reset
For a description of each event type, see page 6-2.

You can use Copy to copy the event details and message or selected text to the Clipboard for use elsewhere.
Click Next or Previous to display details for the next or previous event in the list.
Click Close to close the window.
Viewing Related LogsTo examine the log entries for a job that was run as part of a batch:
1. Switch to the log entries for the batch itself by selecting a log entry.
2. Do one of the following:
• Choose View ➤ Related Log. • Choose Related Log from the shortcut menu.
You see the first log entry for the batch that the job belongs to.
Filtering the Job Log ViewBy default, the information displayed in the Job Log view includes all the events that have occurred for the chosen job, regardless of how many times the job has been run. On an established system, the display may
Job name The name of the job.
Timestamp The date and time the event occurred.
User The name of the user who reset, validated, or ran the job.
Message The full event message. The text contains names of stages in the job which were processed during this event. If you are viewing an event with an event type of Fatal or Warning, this text describes the cause of the event. The message also displays data associated with the event, unless the DataStage administrator has restricted the operator’s view of the log, in which case the data is visible to users with Developer rights only (see DataStage Admin-istrator Guide).
This field… Contains this information…
6-4 Ascential DataStage Director Guide
include more information than you need.
If you want specific information, for example, a list of all the events after a particular date, you can use the Filter facility.

To start the Filter facility, do one of the following:
• Choose View ➤ Filter Entries… from the menu bar.• Choose Filter… from the shortcut menu. • Press Ctrl-T.
The Filter dialog box appears:
You can choose to display only those entries between particular dates and times. You can also further reduce the entries by displaying only those entries with a particular event type.
The Job Log File 6-5
To use the Filter facility:
1. Choose where to start the filter by clicking the appropriate option button:
• Oldest displays all the entries from the oldest event in the log file.
• Start of last run displays the entries from the start of the last run.
• Day and Time displays all the entries from the specified date and time. Enter the date and time or click the arrow buttons. The format of the date depends on how your Windows system is set up, for example, dd\mm\yyyy or mm\dd\yyyy. The time is always in 24-hour format.
2. Choose where to end the filter by clicking the appropriate option button:
• Newest displays entries up to the most recent date and time.• Day and Time displays all the entries up to the specified date and
time.
3. Choose what to display from the filtered selection by clicking the appropriate option button:
• Select all entries displays all the entries between the chosen start and end points.
• Last displays the last n number of entries, where n is a number. The default setting is 100. Click the arrow buttons to increase or decrease the value, or enter a value 1 thru 9999.
4. Choose the event types you want to display by selecting the appro-priate check boxes:
• Information• Warning• Fatal• Reject• Other. All event types other than those listed above.
5. Click OK to activate the filter. The updated Job Log view displays the entries that meet the filter criteria. The status bar indicates that the entries have been filtered.
6-6 Ascential DataStage Director Guide
The Job Log view uses the filter settings until you change them or redis-play the whole log file. To display all the entries, choose View ➤ Show All.

Purging Log File EntriesYou must purge job log entries routinely so that the log files do not become too large. There are three ways to purge log entries:
• Automatically for a whole project. This is set up by the DataStage administrator. See the DataStage Administrator Guide.
• Automatically for each job. You can override any project-wide purging policy and set the purging policy for individual jobs.
• Manually for individual jobs.
You purge log entries for a job from the Clear Log dialog box. To display this dialog box, select the job in the Job Status view, then choose Job ➤ Clear Log… .
The Job Log File 6-7

For job shows the name of the job. Oldest entry shows the date and time of the oldest entry in the log file. (The format of the date and time may look different on your screen depending on your Windows settings.)
Purging Log Entries ImmediatelyClick Immediate purge to select the Immediate area. You set the purging criteria by clicking one of the following:
• Clear all entries. Deletes all entries in the log file.
• Up to last run. Deletes all entries except the last one.
• Before date. Deletes all entries before the specified date. Specify the date by clicking the arrow buttons or entering the values directly.
The log file is purged after you click OK.
Purging Log Entries AutomaticallyClick Auto-purge to select the Auto-purge area. You set the purging criteria by clicking one of the following:
• Up to previous (job runs). Purges old log entries, leaving the spec-ified number of recent job run entries in the file.
• Older than (days). Purges all log entries older than the specified number of days.
Specify the number of job run entries or days by clicking the arrow buttons or entering the value directly.
Click OK to close the dialog box. The log file is purged at the next job run, and at subsequent job runs, according to your settings.
The log files are held in a hash file, and automatically purging the log does not actually empty the file. The aim of auto-purge is to purge the log regu-larly so that the hash file does not keep growing, but remains at a constant size. To completely empty a log, use the manual purge facilities to clear the whole log, then set up auto-purge to keep it at a manageable size.
6-8 Ascential DataStage Director Guide

Glossary
This glossary contains terms that have a specific meaning in DataStage.
active stage A stage in a job that carries out processing. Only active stages can be monitored from a Monitor window. See Chapter 5.
data source A source for the data to be processed in a DataStage job, for example, a database, file, or device.
DataStage Administrator The client program used for administering DataStage projects. See DataStage Administrator’s Guide.
DataStage Designer A graphical design program used to design and develop DataStage jobs. See DataStage Designer Guide.
DataStage Director A program used to run and monitor DataStage jobs.
DataStage Manager A program used to view and manage the contents of the Repository. See DataStage Designer Guide.
DataStage Server The DataStage component that links the DataStage client programs to the server engine.
developer The person designing and developing DataStage jobs.
job A program that defines how to extract, cleanse, transform, integrate, and load data into a target database. Jobs are designed and packaged by the developer, using the DataStage Designer. See also server job, parallel job, and mainframe job.
job batches A group of jobs that are run together as a sequence. See Chapter 4.
job instance From the Director you can run multiple instances of
Glossary-1
the same job. See Chapter 3.

job log A file containing entries for events that occur during a job run. You view log entries from the Job Log view. See Chapter 6.
job parameter A variable included in the job design, for example, a file name or a password. A suitable value must be entered for the variable when the job is validated, scheduled, or run.
link A link joins stages of a job, and comprises either a flow of data, or a reference lookup. You can monitor links in a job using a Monitor window. See Chapter 5.
mainframe job A DataStage job that is compiled and run on a main-frame computer by a mainframe software tool. See also job.
operator The person running, scheduling, and monitoring DataStage jobs.
parallel job A DataStage job that allows you to take advantage of parallel processing on SMP, MPP, and cluster systems.
project A collection of jobs and the components required to develop or run them. The level at which you enter DataStage from a client. DataStage projects must be licensed.
Repository A server area where projects and jobs are stored. The Repository also holds definitions for data, stages, and so on. The Repository is accessed through the DataStage Manager. See DataStage Designer Guide.
server engine The server software that holds, cleanses, and trans-forms the data during a DataStage job run.
server job A DataStage job that is compiled by the DataStage Designer, then run on a DataStage server from the Director. See also job.
stage A component that represents a data source, a processing step, or a data mart in a DataStage job. See also active stage.
Glossary-2 Ascential DataStage Director Guide
A
active stages 5-1definition Gl-1
Add to schedule dialog box 4-5aggregating data 1-2alternative printer 2-19alternative project 2-24Attach to Project dialog box 2-2
B
batches, see job batches
C
changing the printer setup 2-19choosing an alternative printer 2-19cleaning up job resources 3-12, 5-6clearing
job log file 6-7job status file 3-15
client components of DataStage 1-2columns, sorting 2-17CPU usage, showing 5-5Create New Batch dialog box 4-2creating job batches 4-2
D
dataaggregating 1-2extracting 1-2
DataStageclient components 1-2introduction 1-2projects 1-3
DataStage Administrator, definition Gl-1
DataStage Designer 1-2definition Gl-1
DataStage Directordefinition Gl-1exiting 2-25starting 2-2
DataStage Director options 2-19display settings 2-22Filter settings 2-21limits 2-21, 2-25Main window size and
position 2-21Options dialog box 2-20priority 2-23Refresh setting 2-20save settings 2-21
DataStage Director window 2-3display area 2-6menu bar 2-4shortcut menus 2-9status bar 2-6toolbar 2-6
DataStage Manager 1-2definition Gl-1
DataStage Server 2-1definition Gl-1
default display options 2-19
Index
Index-1
transforming 1-2data sources, definition Gl-1data warehouses, overview 1-1
deletingjob batches 4-8jobs 3-11

dependencies, specifying 4-4Designer, see DataStage Designerdeveloper 1-3
definition Gl-1Developer’s Edition 1-3Director, see DataStage Directordisplaying
Monitor window 5-1Stage Status window 5-6ToolTips 2-6
documentation conventions viii
E
editing job batches 4-7ending job processes 3-12, 5-6entering job parameters 3-1Event Detail window 6-3examples
filtering views 2-15Job Log view 6-1Job Schedule view 3-6Job Status view 2-6
exiting DataStage Director 2-25extracting data 1-2
F
Filter dialog box 6-5Filter facility 2-13, 6-4Filter Jobs dialog box 2-13filtering
examples 2-15Job Schedule view 2-13Job Status view 2-13
Find dialog box 2-16Find facility 2-15
icons 2-5job category pane 2-4
I
icons, hiding 2-5instances, job 3-16
J
job administration 3-12job batches 4-1
copying 4-8creating 4-2definition Gl-1deleting 4-8editing 4-7related log entries 6-4rescheduling 4-6running 4-4scheduling 4-4, 4-5unscheduling 4-6
job category pane 2-4hiding 2-4shortcut menus 2-12
job category tree 2-4job instances 3-16
definition Gl-1job log file 6-1
purging entries 6-7Job Log view 2-4, 6-1
Event Detail window 6-3filtering the display 6-4shortcut menus 2-10
job log, definition Gl-2job parameters 3-1
definition Gl-2job processes
ending 3-12, 5-6
Index-2 Ascential DataStage Director Guide
H
Help system, starting 2-5hiding
viewing 3-12, 5-6Job Properties Job control page 4-3Job Resources dialog box 3-13
job resources, cleaning up 3-12, 5-6Job Run Options dialog box 3-2Job Schedule Detail window 3-8Job Schedule view 2-4, 3-6
filtering the display 2-13shortcut menus 2-11
Job Status Detail dialog box 2-8job status file, clearing 3-15Job Status view 2-4, 2-6
filtering the display 2-13shortcut menus 2-10
jobsdefinition Gl-1deleting 3-11overview 1-3rescheduling 3-11resetting 3-5running 3-4scheduling 3-5status 2-7stopping 3-4types 1-3unscheduling 3-10validating 3-3
L
l 3-19limiters
row 2-22warning 2-22
link information, showing 5-3links, definition Gl-2locks
releasing 3-12, 5-6viewing 3-12, 5-6
log file, see job log file
menuspull-down 2-5shortcut 2-9
Monitor window% CPU 5-5cleaning up job resources 5-6clearing settings 5-3contents 5-2displaying 5-1link information 5-3saving settings 5-3shortcut menu 2-12switching between 5-6
multiple job instances 3-16
O
operator 1-3definition Gl-2
Operator’s Edition 1-3options, DataStage Director 2-19overview
of data warehouses 1-1of DataStage 1-2of jobs 1-3of projects 1-3
P
parallel jobdefinition Gl-2
parameters, see job parametersPrint dialog box 2-17Print Setup dialog box 2-19printers, choosing alternative 2-19printing current view 2-17priority of Director process 2-23process priority 2-23projects
Index-3
M
mainframe jobs 1-3, 2-1definition Gl-2
choosing alternative 2-24definition Gl-2overview 1-3

purging log file entries 6-7
R
Refresh setting 2-20related logs 6-4releasing locks 3-12Repository, definition Gl-2rescheduling
job batches 4-6jobs 3-11
resetting jobs 3-5row limiters 2-22running jobs 3-4
immediately 3-4scheduling 3-4
S
saving window settings 2-21scheduling
job batches 4-5jobs 3-5
server engine, definition Gl-2server jobs 1-3, 2-1
definition Gl-2setting default display options 2-19shortcut menus 2-9
in Monitor windows 2-12in the job category pane 2-12in the Job Log view 2-10in the Job Schedule view 2-11in the Job Status view 2-10
showingCPU usage 5-5link information 5-3
sorting columns 2-17Stage Status window
contents 5-7
DataStage Director 2-2Help system 2-5
statusjobs 2-7stages 5-2
status bar 2-6stopping jobs 3-4switching between Monitor
windows 5-6
T
times, comparing client and server 2-21
toolbar 2-6ToolTips 2-6tracing options 3-19transforming data 1-2
U
unschedulingjob batches 4-6jobs 3-10
usingFilter option 6-4Find facility 2-15job parameters 3-1
V
validating jobs 3-3viewing
event details 6-3job processes 3-12, 5-6job status details 2-8jobs in another project 2-24jobs on a different server 2-25locks 3-12, 5-6
Index-4 Ascential DataStage Director Guide
displaying 5-6stages, definition Gl-2starting
schedule details 3-8views
filtering 2-13

Job Log 2-4, 6-1Job Schedule 2-4, 3-6Job Status 2-4, 2-6
W
warning limiter 2-22window settings, saving 2-21
Index-5

Index-6 Ascential DataStage Director Guide