![Preparing for Advanced Heart Failure Certificationwcm/@gra/documents/... · Title: Microsoft PowerPoint - DSC Adv HF 03.11.16 B & W.ppt [Compatibility Mode] Author: Isbeyc Created](https://static.fdocuments.in/doc/165x107/5b860c597f8b9a3a608bfba4/preparing-for-advanced-heart-failure-certification-wcmgradocuments-title.jpg)
DSC-HX99 - Sony · DSC-HX99: Accessories compatibility information This website provides the...
511
Help Guide Digital Still Camera DSC-HX99 Use this manual if you encounter any problems, or have any questions about your product. How to transfer images to smartphone You can transfer images shot with this camera to smartphone. The application PlayMemories Mobile must be installed in advance. Zoom Assist This function helps you compose your shot by zooming out temporarily when you lose track of the subject, so that you can relocate the subject quickly. DSC-HX99: Accessories compatibility information This website provides the accessories compatibility information. (Another window will open.) Names of parts/Icons and indicators Identifying parts Basic operations 1
Transcript of DSC-HX99 - Sony · DSC-HX99: Accessories compatibility information This website provides the...

Help Guide
Digital Still CameraDSC-HX99
Use this manual if you encounter any problems, or have any questions about your product.
How to transfer images to smartphone
You can transfer images shot with this camera to smartphone. The application PlayMemories Mobilemust be installed in advance.
Zoom Assist
This function helps you compose your shot by zooming out temporarily when you lose track of thesubject, so that you can relocate the subject quickly.
DSC-HX99: Accessories compatibility information
This website provides the accessories compatibility information. (Another window will open.)
Names of parts/Icons and indicators
Identifying parts
Basic operations
1

Using the control wheel
Using the control ring
Using MENU items
Using the Fn (Function) button
How to use the Quick Navi screen
How to use the keyboard
Icons and indicators
List of icons on the screen
Switching the screen display (while shooting/during playback)
DISP Button (Monitor/Finder)
Preparing the camera
Checking the camera and the supplied items
Charging the battery pack
Inserting/removing the battery pack
Charging the battery pack while it is inserted in the camera
Charging by connecting to a computer
Battery life and number of recordable images
Supplying power from a wall outlet (wall socket)
Notes on the battery pack
Notes on charging the battery pack
Inserting a memory card (sold separately)
Inserting/removing a memory card
Memory cards that can be used
Notes on memory card
Setting language, date and time
In-Camera Guide
Shooting
Shooting still images
Focusing
Focus Mode
2
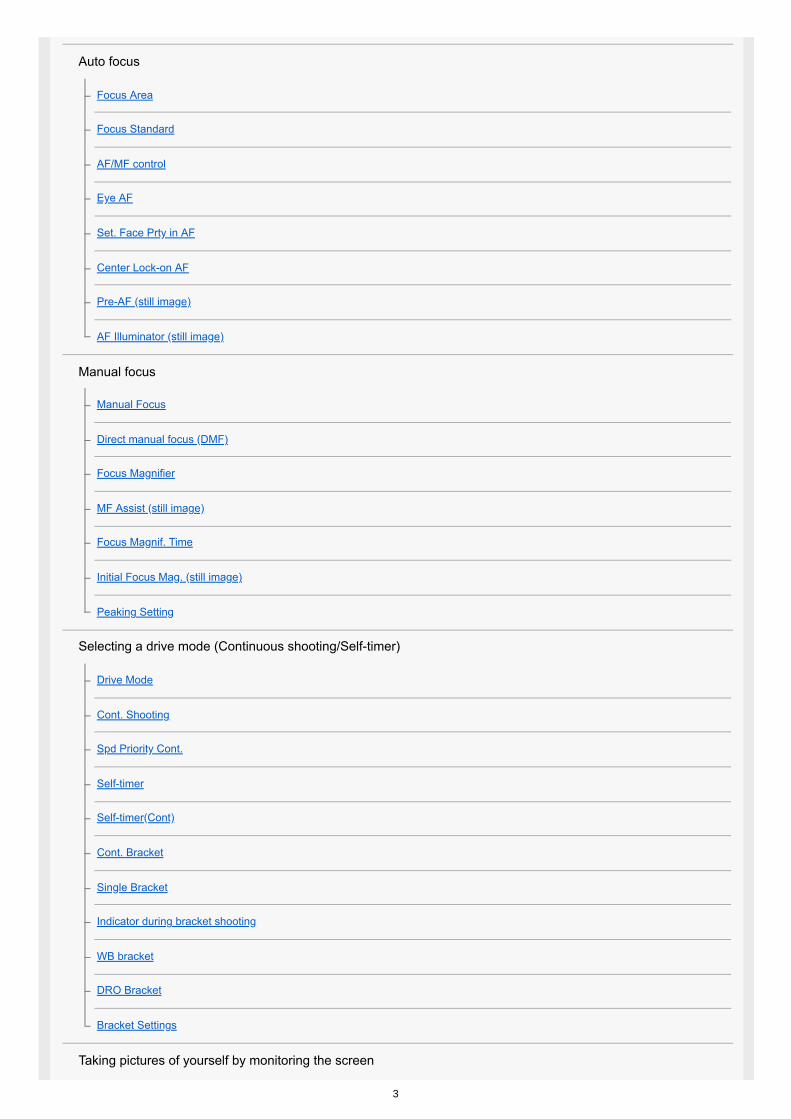
Auto focus
Focus Area
Focus Standard
AF/MF control
Eye AF
Set. Face Prty in AF
Center Lock-on AF
Pre-AF (still image)
AF Illuminator (still image)
Manual focus
Manual Focus
Direct manual focus (DMF)
Focus Magnifier
MF Assist (still image)
Focus Magnif. Time
Initial Focus Mag. (still image)
Peaking Setting
Selecting a drive mode (Continuous shooting/Self-timer)
Drive Mode
Cont. Shooting
Spd Priority Cont.
Self-timer
Self-timer(Cont)
Cont. Bracket
Single Bracket
Indicator during bracket shooting
WB bracket
DRO Bracket
Bracket Settings
Taking pictures of yourself by monitoring the screen
3
Self-portrait/ -timer
Using touch functions
Touch Operation
Touch Panel/Pad
Func. of Touch Oprtn: Touch Shutter
Func. of Touch Oprtn: Touch Focus
Touch Pad Settings
Selecting still image size/image quality
JPEG Image Size (still image)
JPEG Quality (still image)
Aspect Ratio (still image)
File Format (still image)
Panorama: Size
Panorama: Direction
Selecting a shooting mode
List of mode dial function
Intelligent Auto
Superior Auto
Switching the auto mode (Auto Mode)
About Scene Recognition
Program Auto
Aperture Priority
Shutter Priority
Manual Exposure
Sweep Panorama
Scene Selection
Recall (Camera Settings1/Camera Settings2)
Movie: Exposure Mode
Controlling the exposure/metering modes
Exposure Comp.
4

Exposure Set. Guide
Metering Mode
Face Prty in Mlti Mtr
AE lock
Zebra Setting
Correcting brightness and contrast automatically
D-Range Opt. (DRO)
Auto HDR
Selecting the ISO sensitivity
ISO
Using the zoom
The zoom features available with this product
Zoom
Zoom Setting
About zoom scale
Zoom Assist
Rng. of Zoom Assist
Zoom Speed
Zoom Func. on Ring
White balance
White Balance
Priority Set in AWB
Capturing a basic white color in [Custom Setup] mode
Setting how to process images
Photo Creativity
Creative Style
Picture Effect
Soft Skin Effect (still image)
Auto Obj. Framing (still image)
Color Space (still image)
5

Shutter settings
Release w/o Card
Reducing blur
SteadyShot (still image)
Noise reduction
High ISO NR (still image)
Face detection
Regist. Faces Priority
Smile Shutter
Face Registration (New Registration)
Face Registration (Order Exchanging)
Face Registration (Delete)
Using the flash
Using flash
Red Eye Reduction
Flash Mode
Flash Comp.
Recording movies
Shooting movies
Movie w/ shutter
Movie recording formats
File Format (movie)
Record Setting (movie)
Proxy Recording
Audio Recording
Micref Level
Wind Noise Reduct.
Auto Slow Shut. (movie)
SteadyShot (movie)
TC/UB Settings
6

TC/UB Disp. Switch
MOVIE Button
Marker Display (movie)
Marker Settings (movie)
4K Output Sel. (movie)
Viewing
Viewing images
Playing back still images
Enlarging an image being played back (Enlarge Image)
Rotating recorded images automatically (Display Rotation)
Rotating an image (Rotate)
Playing back panoramic images
Enlarge Init. Mag.
Enlarge Initial Pos.
Playing back movies
Motion Shot Video
Motion Interval ADJ
Volume Settings
Photo Capture
Playing back images on the image index screen (Image Index)
Switching between still images and movies (View Mode)
Disp Cont Shoot Grp
Playing back images using slideshow (Slide Show)
Protecting data
Protecting images (Protect)
Setting Rating function
Rating
Rating Set(Cust Key)
Designating images for printing (DPOF)
Specifying images to be printed (Specify Printing)
7

Deleting images
Deleting a displayed image
Deleting multiple selected images (Delete)
Delete confirm.
Viewing images on a TV
Viewing images on a TV using an HDMI cable
Customizing the camera
Registering frequently used functions
Memory (Camera Settings1/Camera Settings2)
Assigning selected functions to the button
Custom Key (still image/movie/playback)
Function Menu Set.
Customizing MENU (My Menu)
Add Item
Sort Item
Delete Item
Delete Page
Delete All
Checking images before/after recording
Auto Review
Monitor/viewfinder settings
Grid Line
FINDER/MONITOR
Monitor Brightness
Viewfinder Bright.
Finder Color Temp.
Function for VF close
Display Quality
Auto Monitor OFF
Bright Monitoring
8

Memory card settings
Format
File Number
Set File Name
Display Media Info.
Select REC Folder
New Folder
Folder Name
Recover Image DB
Camera settings
Audio signals
Write Date (still image)
Tile Menu
Mode Dial Guide
Pwr Save Start Time
Auto Pwr OFF Temp.
NTSC/PAL Selector
HDMI Settings: HDMI Resolution
HDMI Settings: 24p/60p Output (movie) (Only for 1080 60i compatible models)
HDMI Settings: HDMI Info. Display
HDMI Settings: TC Output (movie)
HDMI Settings: REC Control (movie)
HDMI Settings: CTRL FOR HDMI
HDMI Settings: HDMI Audio Out. (movie)
USB Connection
USB LUN Setting
USB Power Supply
PC Remote Settings: Still Img. Save Dest.
PC Remote Settings: RAW+J PC Save Img
Language
9
Date/Time Setup
Area Setting
Version
Demo Mode
Initializing the camera
Setting Reset
Using network functions
Connecting this product and a Smartphone
PlayMemories Mobile
Controlling the camera using an Android smartphone (NFC One-touch remote)
Controlling the camera using an Android smartphone (QR Code)
Controlling the camera using an Android smartphone (SSID)
Controlling the camera using an iPhone or iPad (QR Code)
Controlling the camera using an iPhone or iPad (SSID)
Transferring images to a Smartphone
Snd to Smrtphn Func: Send to Smartphone
Snd to Smrtphn Func: Sending Target (proxy movies)
Sending images to an Android smartphone (NFC One-touch Sharing)
Transferring images to a computer
Send to Computer
Transferring images to a TV
View on TV
Reading location information from a smartphone
Loc. Info. Link Set.
Changing the network settings
Airplane Mode
Wi-Fi Settings: WPS Push
Wi-Fi Settings: Access Point Set.
Wi-Fi Settings: Disp MAC Address
Wi-Fi Settings: SSID/PW Reset
10

Edit Device Name
Reset Network Set.
Using a computer
Recommended computer environment
Software for Mac computers
Importing images for use on a computer
PlayMemories Home
Installing PlayMemories Home
Connecting to a computer
Importing images to the computer without using PlayMemories Home
Disconnecting the camera from the computer
Developing RAW images/Remote shooting (Imaging Edge)
Imaging Edge
Creating a movie disc
Selecting a disc to be created
Creating Blu-ray Discs from high-definition image quality movies
Creating DVD discs (AVCHD recording discs) from high-definition image quality movies
Creating DVD discs from standard image quality movies
List of MENU items
Using MENU items
Camera Settings1
File Format (still image)
JPEG Quality (still image)
JPEG Image Size (still image)
Aspect Ratio (still image)
Panorama: Size
Panorama: Direction
High ISO NR (still image)
Color Space (still image)
Switching the auto mode (Auto Mode)
11

Scene Selection
Drive Mode
Bracket Settings
Memory (Camera Settings1/Camera Settings2)
Focus Mode
Focus Area
AF Illuminator (still image)
Center Lock-on AF
Set. Face Prty in AF
Pre-AF (still image)
Exposure Comp.
ISO
Metering Mode
Face Prty in Mlti Mtr
Flash Mode
Flash Comp.
Red Eye Reduction
White Balance
Priority Set in AWB
D-Range Opt. (DRO)
Auto HDR
Creative Style
Picture Effect
Soft Skin Effect (still image)
Focus Magnifier
Focus Magnif. Time
Initial Focus Mag. (still image)
MF Assist (still image)
Peaking Setting
Face Registration (New Registration)
12

Face Registration (Order Exchanging)
Face Registration (Delete)
Regist. Faces Priority
Smile Shutter
Auto Obj. Framing (still image)
Self-portrait/ -timer
Camera Settings2
Movie: Exposure Mode
File Format (movie)
Record Setting (movie)
Proxy Recording
Auto Slow Shut. (movie)
Audio Recording
Micref Level
Wind Noise Reduct.
SteadyShot (movie)
Marker Display (movie)
Marker Settings (movie)
Movie w/ shutter
Release w/o Card
SteadyShot (still image)
Rng. of Zoom Assist
Zoom Setting
Zoom Speed
Zoom Func. on Ring
DISP Button (Monitor/Finder)
FINDER/MONITOR
Zebra Setting
Grid Line
Exposure Set. Guide
13

Auto Review
Custom Key (still image/movie/playback)
Function Menu Set.
Func. of Touch Oprtn: Touch Shutter
Func. of Touch Oprtn: Touch Focus
MOVIE Button
Audio signals
Write Date (still image)
Network
Snd to Smrtphn Func: Send to Smartphone
Snd to Smrtphn Func: Sending Target (proxy movies)
Send to Computer
View on TV
Ctrl w/ Smartphone
Airplane Mode
Wi-Fi Settings: WPS Push
Wi-Fi Settings: Access Point Set.
Wi-Fi Settings: Disp MAC Address
Wi-Fi Settings: SSID/PW Reset
Bluetooth Settings
Loc. Info. Link Set.
Edit Device Name
Reset Network Set.
Playback
Protecting images (Protect)
Rotating an image (Rotate)
Deleting multiple selected images (Delete)
Rating
Rating Set(Cust Key)
Specifying images to be printed (Specify Printing)
14
Photo Capture
Enlarging an image being played back (Enlarge Image)
Enlarge Init. Mag.
Enlarge Initial Pos.
Motion Interval ADJ
Playing back images using slideshow (Slide Show)
Switching between still images and movies (View Mode)
Playing back images on the image index screen (Image Index)
Disp Cont Shoot Grp
Rotating recorded images automatically (Display Rotation)
Setup
Monitor Brightness
Viewfinder Bright.
Finder Color Temp.
Volume Settings
Tile Menu
Mode Dial Guide
Delete confirm.
Display Quality
Auto Monitor OFF
Pwr Save Start Time
Function for VF close
NTSC/PAL Selector
Auto Pwr OFF Temp.
Touch Operation
Touch Panel/Pad
Touch Pad Settings
Demo Mode
TC/UB Settings
HDMI Settings: HDMI Resolution
15

HDMI Settings: 24p/60p Output (movie) (Only for 1080 60i compatible models)
HDMI Settings: HDMI Info. Display
HDMI Settings: TC Output (movie)
HDMI Settings: REC Control (movie)
HDMI Settings: CTRL FOR HDMI
HDMI Settings: HDMI Audio Out. (movie)
4K Output Sel. (movie)
USB Connection
USB LUN Setting
USB Power Supply
PC Remote Settings: Still Img. Save Dest.
PC Remote Settings: RAW+J PC Save Img
Language
Date/Time Setup
Area Setting
Format
File Number
Set File Name
Select REC Folder
New Folder
Folder Name
Recover Image DB
Display Media Info.
Version
Setting Reset
My Menu
Add Item
Sort Item
Delete Item
Delete Page
16

4-745-578-11(1) Copyright 2018 Sony Corporation
Delete All
Precautions/This product
Precautions
On cleaning
Number of recordable images
Recordable movie times
Using the AC Adaptor/battery charger abroad
AVCHD format
License
Specifications
Trademarks
If you have problems
Troubleshooting
Self-diagnosis display
Warning messages
17

Help Guide
Digital Still CameraDSC-HX99
Identifying parts
ON/OFF (Power) button1.Shutter button2.Mode dial3.For shooting:W/T (zoom) lever For viewing: (Index) lever/Playback zoom lever
4.
Self-timer lamp/AF illuminator5.Flash
Do not cover the flash with your finger. If not using the flash, press it down manually.
6.
Diopter-adjustment lever
Move the diopter-adjustment lever until the image is clear in the viewfinder.
7.
Viewfinder
When you look into the viewfinder, the viewfinder mode is activated, and when you take your face away from theviewfinder, the viewing mode returns to the monitor mode.
8.
Viewfinder pop-up switch9. (N mark)
Align this mark when you connect the camera to a smartphone with an NFC function. For details, refer to theoperating instructions supplied with your smartphone.NFC (Near Field Communication) is an international standard of the short-range wireless communicationtechnology.
10.
Control ring11.Lens12.
18

Microphone1. (Flash pop-up) switch
When using the flash, slide the (Flash pop-up) switch.
2.
Monitor (For touch operation: Touch panel/Touch pad)
When shooting from low angles or shooting self-portraits, adjust the monitor angle.
3.
Eye sensor4.For shooting: Fn (Function) button For viewing: (Send to Smartphone) button
5.
MOVIE (Movie) button6.MENU button7.Charge lamp8.Multi/Micro USB Terminal
This terminal supports Micro USB-compatible devices.
9.
Wi-Fi/Bluetooth antenna (built-in)10.Hook for strap
Attach the wrist strap and place your hand through the loop to prevent damage caused by dropping the product.
11.
19

When using the viewfinder
Control wheel12. (Playback) button13.
C/ (Custom/Delete) button14.
Battery lock lever1.Battery insertion slot2.Tripod socket hole
Use a tripod with a screw less than 5.5 mm (7/32 inches) long. Otherwise, you cannot firmly secure the camera,and damage to the camera may occur.
3.
Memory card slot4.Access lamp5.HDMI micro jack6.Battery/Memory card cover7.Speaker8.
Slide down the viewfinder pop-up switch (A).
If you slide the viewfinder pop-up switch when the power is off, the camera turns on.To choose whether or not to turn the camera off when the viewfinder is stowed, select MENU → (Setup) →[Function for VF close].
1.
Grasp both sides of the eyepiece (B) and pull it towards the monitor side until it clicks.2.20

To store the viewfinderGrasp both sides of the eyepiece and push it back into the viewfinder until it clicks. Then push down the viewfinder.
NoteBe careful not to push down on the viewfinder when it is being raised.
Be sure that the eyepiece is stored in the viewfinder unit before attempting to push down the viewfinder. If it is not stored and youtry to force the viewfinder down, a malfunction may result.
4-745-578-11(1) Copyright 2018 Sony Corporation
Adjust the diopter-adjustment lever to your eyesight until the display appears clearly in the viewfinder.3.
21

Help Guide
Digital Still CameraDSC-HX99
Using the control wheel
You can select setting items by turning or pressing the top/bottom/left/right side of the control wheel. Your selection isdetermined when you press the center of the control wheel.The DISP (Display Setting), (Exposure Comp./Photo Creativity), / (Drive Mode), and (FlashMode) functions are assigned to the top/bottom/left/right side of the control wheel. In addition, you can assignselected functions to the left/right side and the center of the control wheel.During playback, you can display the next/previous image by pressing the right/left side of the control wheel or byturning the control wheel.
Related TopicFocus StandardCustom Key (still image/movie/playback)
4-745-578-11(1) Copyright 2018 Sony Corporation
22

Help Guide
Digital Still CameraDSC-HX99
Using the control ring
By turning the control ring (A), you can change the desired settings instantly for various shooting modes. You can also allocate frequently used functions to the control ring by selecting MENU → (Camera Settings2) → [
Custom Key] or [ Custom Key] → [Control Ring].
Icons and function names are displayed on the screen as follows.Ex.
: Adjust zoom by turning the control ring.
4-745-578-11(1) Copyright 2018 Sony Corporation
23

Help Guide
Digital Still CameraDSC-HX99
Using MENU items
You can change settings related to all the camera operations including shooting, playback, and operating method. Youcan also execute camera functions from the MENU.
Related TopicTile MenuAdd Item
Press the MENU button to display the menu screen.1
Select the desired setting you want to adjust using the top/bottom/left/right sides of the control wheel or byturning the control wheel, and then press the center of the control wheel.
Select an icon at the top of the screen (A) and press the left/right side of the control wheel to move to anotherMENU item.You can go back to the previous screen by pressing the MENU button (B).
2
Select the desired setting value, and press the center to confirm your selection.3
24

4-745-578-11(1) Copyright 2018 Sony Corporation
25

Help Guide
Digital Still CameraDSC-HX99
Using the Fn (Function) button
You can register frequently used functions to the Fn (Function) button and recall them while shooting. Up to 12 frequentlyused functions can be registered to the Fn (Function) button.
Press the DISP on the control wheel repeatedly to display a screen mode other than [For viewfinder], andthen press the Fn (Function) button.
1
Select the desired function by pressing the top/bottom/left/right side of the control wheel.2
Select the desired setting by turning the control wheel, and press the center of the control wheel.
Some functions can be fine-tuned using the control ring.
3
26
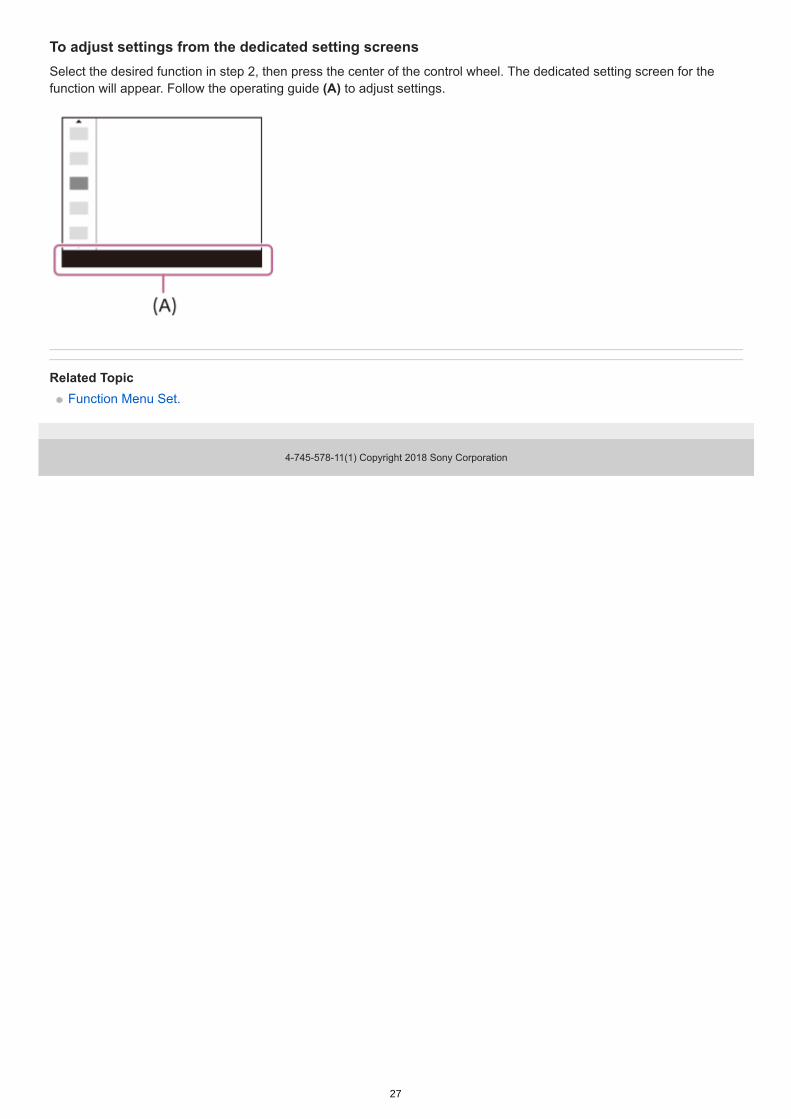
To adjust settings from the dedicated setting screensSelect the desired function in step 2, then press the center of the control wheel. The dedicated setting screen for thefunction will appear. Follow the operating guide (A) to adjust settings.
Related TopicFunction Menu Set.
4-745-578-11(1) Copyright 2018 Sony Corporation
27
Help Guide
Digital Still CameraDSC-HX99
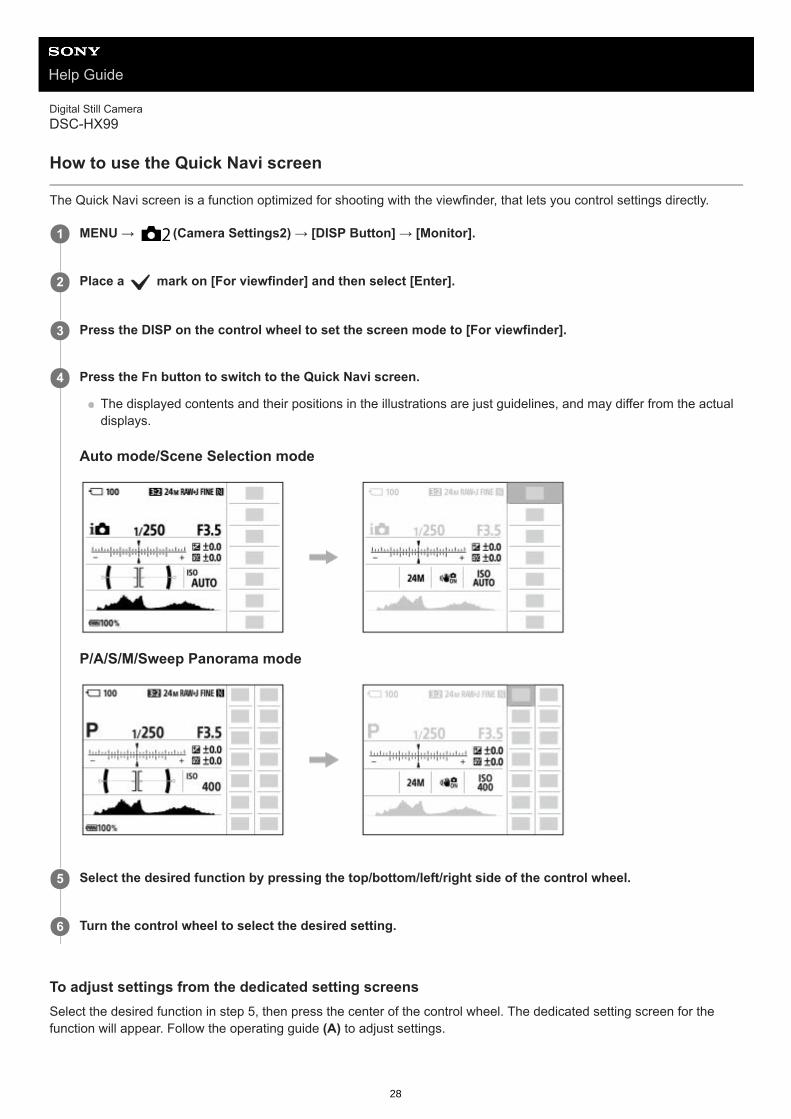
How to use the Quick Navi screen
The Quick Navi screen is a function optimized for shooting with the viewfinder, that lets you control settings directly.
To adjust settings from the dedicated setting screensSelect the desired function in step 5, then press the center of the control wheel. The dedicated setting screen for thefunction will appear. Follow the operating guide (A) to adjust settings.
MENU → (Camera Settings2) → [DISP Button] → [Monitor].1
Place a mark on [For viewfinder] and then select [Enter].2
Press the DISP on the control wheel to set the screen mode to [For viewfinder].3
Press the Fn button to switch to the Quick Navi screen.
The displayed contents and their positions in the illustrations are just guidelines, and may differ from the actualdisplays.
Auto mode/Scene Selection mode
P/A/S/M/Sweep Panorama mode
4
Select the desired function by pressing the top/bottom/left/right side of the control wheel.5
Turn the control wheel to select the desired setting.6
28

NoteItems that are gray on the Quick Navi screen are not adjustable.
When using [Creative Style], some of the setup tasks can only be accomplished on a dedicated screen.
Related TopicSwitching the screen display (while shooting/during playback)
4-745-578-11(1) Copyright 2018 Sony Corporation
29

Help Guide
Digital Still CameraDSC-HX99
How to use the keyboard
When manual character entry is required, a keyboard is displayed on the screen.
Move the cursor on desired key using the control wheel, then press the center to enter.
To cancel input, select [Cancel].
4-745-578-11(1) Copyright 2018 Sony Corporation
Input box The characters you entered are displayed.
1.
Switch character types Each time you press this key, the character type will switch between alphabet letters, numerals and symbols.
2.
Keyboard Each time you press this key, the characters corresponding to that key will be displayed one-by-one in order.For example: If you want to enter “abd”Press the key for “abc” once to display “a” → select “ ”((5) Move cursor) and press the key for “abc” twice todisplay “b” → press the key for “def” once to display “d.”
3.
Finalize Finalizes the entered characters.
4.
Move cursor Moves the cursor in the input box to the right or left.
5.
Delete Deletes the character preceding the cursor.
6.
Switches the next character to a capital or lowercase letter.
7.
Enters a space.
8.
30

Help Guide
Digital Still CameraDSC-HX99
List of icons on the screen
The displayed contents and their positions shown below are just a guideline, and may differ from the actual display.
Icons on the shooting screen
Monitor mode
Viewfinder mode
Shooting mode/Scene recognition P P* A S M
Shooting mode
Register number
Scene Recognition icons
Scene Selection
1.
Camera settings NO CARD
Memory card status100Remaining number of recordable images
Writing data / Number of images left to write
Aspect ratio of still images
2.
31

18M / 16M / 13M / 10M / 8.9M / 7.5M / 5.0M / 4.5M / 3.7M / 2.1M / VGA
Image size of still imagesRAWRAW recordingX.FINE FINE STDJPEG QualityXAVC S 4K XAVC S HD AVCHDFile format of movies
Record setting of movies120p 100p 60p 50p 60i 50i 30p 25p 24pFrame rate of movies
Proxy Recording
Flash charge in progress
AF Illuminator
SteadyShot Off/On, Camera shake warning
Smart Zoom/ Clear Image Zoom/Digital Zoom
PC Remote
Bright Monitoring
Overlay icon
No audio recording of movies
Micref Level Low
Wind Noise Reduct.
Touch Shutter
Focus Cancel
Lock-on AF CancelSpot FocusPerforming Spot Focus
NFC active
Bluetooth connection available / Bluetooth connection unavailable
Connected to smartphone / Not connected to smartphone
Obtaining location information / Location information cannot be obtained
Airplane Mode
32

Overheating warning20 secRemaining recordable time when overheating warning is displayed
Database file full / Database file errorBattery
Remaining battery
Remaining battery warning
USB power supply
3.
Shooting settings
Drive Mode
Flash Mode/Red Eye Reduction ±0.0
Flash Comp.
Focus Mode
Focus AreaJPEG RAW RAW+JFile Format
Metering Mode
7500K A5 G5White Balance (Auto, Preset, Custom, Color temperature, Color filter)
D-Range Opt. /Auto HDR
+3 +3 +3Creative Style /Contrast, saturation, and sharpness
Smile detection sensitivity indicator
Picture Effect
Face Priority in AF
Soft Skin Effect
4.
Focus indicator/exposure settings
Focus indicator1/250Shutter speedF3.5
5.
33

Icons on the playback screen
Single-image playback
Aperture value
Exposure compensation/Metered ManualISO400 ISO AUTOISO sensitivity
AE lockGuides/other
Lock-on AF Lock-on AF Cancel
Guide display for Lock-on AF Select Focus Point On/Off
Guide display for setting the focus area Focus Cancel
Guide display for canceling focusing Switch Av/Tv
Guide display for switching aperture value and shutter speed
Bracket indicator
Spot metering areaC:32:00Self-diagnosis display
Exposure Setting Guide
Shutter speed indicator
Aperture indicator
Histogram
Digital level gaugeSTBY RECMovie recording standby/Movie recording in progress0:12Movie recording time (minutes: seconds)
Control ring function
Control wheel function
REC Control00:00:00:00Time code (hours: minutes: seconds: frames)00 00 00 00User Bit
6.
34

Histogram display
Basic information
View Mode
Rating
ProtectDPOFDPOF set
Auto object framing image3/7File number/Number of images in the view mode
NFC active
Remaining battery
Continuous shooting group
Proxy movie included
1.
Camera settingsRefer to “Icons on the shooting screen.”
2.
Shooting settings
Picture Effect error
Auto HDR error Refer to “Icons on the shooting screen” for other icons displayed in this area.
3.
Image information4.
35

4-745-578-11(1) Copyright 2018 Sony Corporation
Latitude/longitude information
2018-1-1 10:37PMDate of recording
100-0003Folder number - file number
Histogram (Luminance/R/G/B)
36

Help Guide
Digital Still CameraDSC-HX99
Switching the screen display (while shooting/during playback)
You can change the display contents on the screen.
Press the DISP (Display Setting) button.
To switch the information displayed on the viewfinder, press the DISP button while looking into the viewfinder.Each time you press the DISP button, the screen display changes.The displayed contents and their position are just a guideline, and may differ from the actual display.
During shooting (Monitor)Display All Info. → No Disp. Info. → Histogram → Level → For viewfinder → Display All Info.
During shooting (Viewfinder)Level → No Disp. Info. → Histogram → Level
During playback (Monitor/Viewfinder)
1
37

Histogram displayA histogram shows the luminance distribution, displaying how many pixels there are by luminance. It shows darkertoward the left and brighter toward the right.The histogram changes depending on the exposure compensation.A peak at the right or left end of the histogram indicates that the image has an overexposed or underexposed area,respectively. You cannot correct such defects using a computer after shooting. Perform exposure compensation beforeshooting as necessary.
(A): Pixel count(B): Brightness
NoteThe viewfinder display and the monitor display for shooting can be set separately. Look through the viewfinder to set the displaysettings for the viewfinder.
[Histogram] is not displayed during panorama shooting.
The information in the histogram display does not indicate the final photograph. It is information about image displayed on thescreen. The final result depends on the aperture value, etc.
The histogram display is extremely different between shooting and playback in the following cases:When the flash is usedWhen shooting a low luminance subject such as a night scene
In movie mode, [For viewfinder] cannot be displayed.
Hint
Display Info. → Histogram → No Disp. Info. → Display Info.
If the image has an overexposed or underexposed area, the corresponding section will blink on the histogramdisplay (overexposed/underexposed warning).The settings for playback are also applied in [Auto Review].
38

The following are not displayed in the default settings.Graphic DisplayMonitor OffDisplay All Info. (when using the viewfinder)
To change the display modes that are switched when you press the DISP button, select MENU → (Camera Settings2) →[DISP Button] and change the setting.
Related TopicDISP Button (Monitor/Finder)
4-745-578-11(1) Copyright 2018 Sony Corporation
39
Help Guide
Digital Still CameraDSC-HX99
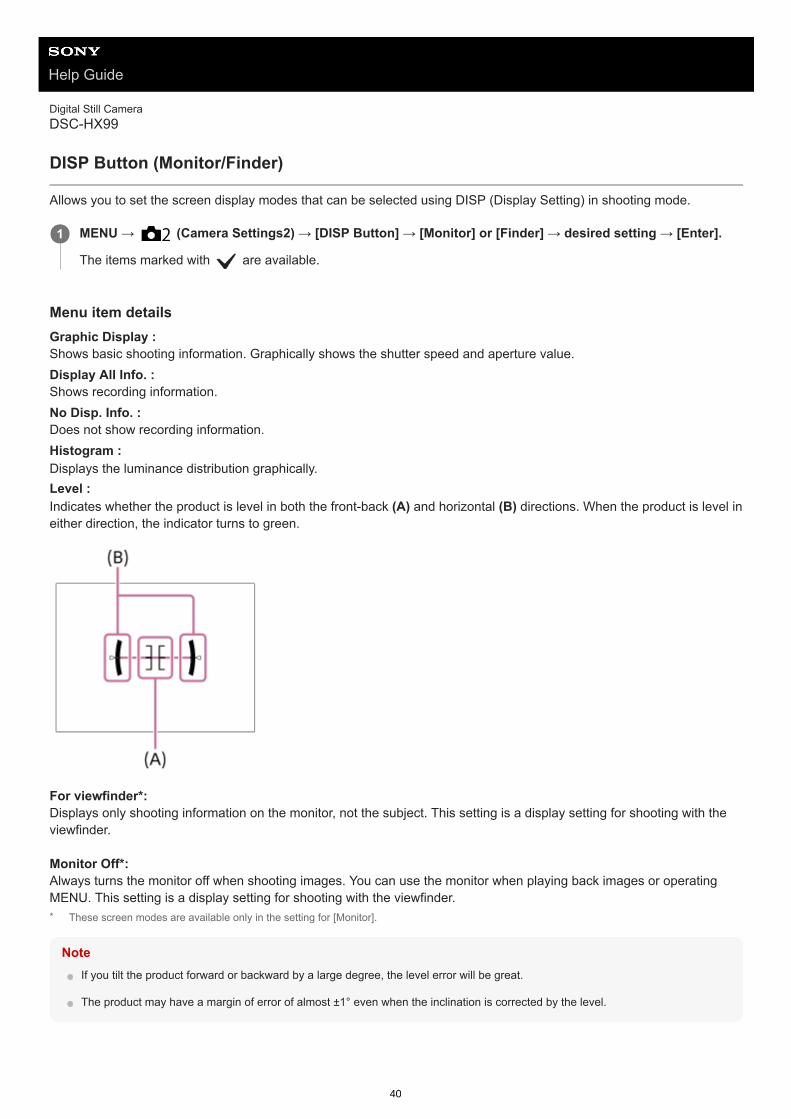
DISP Button (Monitor/Finder)
Allows you to set the screen display modes that can be selected using DISP (Display Setting) in shooting mode.
Menu item detailsGraphic Display :Shows basic shooting information. Graphically shows the shutter speed and aperture value.Display All Info. :Shows recording information.No Disp. Info. :Does not show recording information.Histogram :Displays the luminance distribution graphically.Level :Indicates whether the product is level in both the front-back (A) and horizontal (B) directions. When the product is level ineither direction, the indicator turns to green.
For viewfinder*:Displays only shooting information on the monitor, not the subject. This setting is a display setting for shooting with theviewfinder.
Monitor Off*:Always turns the monitor off when shooting images. You can use the monitor when playing back images or operatingMENU. This setting is a display setting for shooting with the viewfinder.
NoteIf you tilt the product forward or backward by a large degree, the level error will be great.
The product may have a margin of error of almost ±1° even when the inclination is corrected by the level.
MENU → (Camera Settings2) → [DISP Button] → [Monitor] or [Finder] → desired setting → [Enter].
The items marked with are available.
1
These screen modes are available only in the setting for [Monitor].*
40

Related TopicSwitching the screen display (while shooting/during playback)
4-745-578-11(1) Copyright 2018 Sony Corporation
41

Help Guide
Digital Still CameraDSC-HX99
Checking the camera and the supplied items
The number in parentheses indicates the number of pieces.
Camera (1)Power cord (mains lead) (1)(supplied in some countries/regions)
Rechargeable Battery Pack NP-BX1 (1)
Micro USB cable (1)
AC Adaptor (1)The type of the AC Adaptor may differ depending on the country/region.
Wrist strap (1)
Startup Guide (1)Reference Guide (1)
4-745-578-11(1) Copyright 2018 Sony Corporation
42

Help Guide
Digital Still CameraDSC-HX99
Inserting/removing the battery pack
Open the battery/memory card cover.1
Insert the battery pack while pressing the lock lever (A) with the tip of the battery until the battery locks intoplace.
2
Close the cover.3
43

To remove the battery packMake sure that the access lamp is not lit, and turn off the camera. Then, slide the lock lever (A) and remove the batterypack. Be careful not to drop the battery pack.
4-745-578-11(1) Copyright 2018 Sony Corporation
44

Help Guide
Digital Still CameraDSC-HX99
Charging the battery pack while it is inserted in the camera
NoteIf the charge lamp flashes when the battery pack is not fully charged, remove the battery pack or disconnect the USB cable fromthe camera and then re-insert it to recharge.
If the charge lamp on the camera flashes when the AC Adaptor is connected to the wall outlet (wall socket), this indicates thatcharging is temporarily stopped because the temperature is outside the recommended range. When the temperature gets backwithin the appropriate range, the charging resumes. We recommend charging the battery pack at an ambient temperature ofbetween 10°C to 30°C (50ºF to 86ºF).
Use a nearby wall outlet (wall socket) when using the AC Adaptor/Battery Charger. If any malfunction occurs, disconnect the plugfrom the wall outlet (wall socket) immediately to disconnect from the power source. If you use the product with a charge lamp, note that the product is not disconnected from the power source even when the lampturns off.
If you turn on the camera, power will be supplied from the wall outlet (wall socket) and you will be able to operate the camera.However, the battery pack will not be charged.
When you use a completely new battery pack or a battery pack that has not been used for a long time, the charge lamp may flashquickly when the battery is charged. If this happens, remove the battery pack or disconnect the USB cable from the camera andthen re-insert it to recharge.
Do not continuously or repeatedly charge the battery pack without using it if it is already fully charged or close to fully charged.Doing so may cause a deterioration in battery performance.
When charging is finished, disconnect the AC Adaptor from the wall outlet (wall socket).
Turn the power off.1
Connect the camera with the battery pack inserted to the AC Adaptor (supplied) using the micro USB cable(supplied), and connect the AC Adaptor to the wall outlet (wall socket).
Charge lamp on the camera (A) (orange) Lit: Charging Off: Charging finished Flashing: Charging error or charging paused temporarily because the camera is not within the proper temperaturerange
Charging time (Full charge): The charging time is approximately 230 min.The above charging time applies when charging a fully depleted battery pack at a temperature of 25 °C (77 °F).Charging may take longer depending on conditions of use and circumstances.The charge lamp turns off when charging is completed.If the charge lamp lights up and then immediately turns off, the battery pack is fully charged.
2
45

Be sure to use only genuine Sony brand battery packs, micro USB cables (supplied) and AC Adaptors (supplied).
Related TopicNotes on the battery packNotes on charging the battery packUsing the AC Adaptor/battery charger abroad
4-745-578-11(1) Copyright 2018 Sony Corporation
46

Help Guide
Digital Still CameraDSC-HX99
Charging by connecting to a computer
The battery pack can be charged by connecting the camera to a computer using a micro USB cable.
NoteIf the product is connected to a laptop computer that is not connected to a power source, the laptop battery level decreases. Donot leave the product connected to a laptop computer for an extended period of time.
Do not turn on/off or restart the computer, or wake the computer from sleep mode when a USB connection has been establishedbetween the computer and the camera. Doing so may cause a malfunction. Before turning on/off or restarting the computer, orwaking the computer from sleep mode, disconnect the camera from the computer.
Proper operation cannot be guaranteed on all types of computers.
Charging cannot be guaranteed with a custom-built computer, modified computer, or a computer connected through a USB hub.
The camera may not operate correctly when other USB devices are used at the same time.
Related TopicNotes on the battery packNotes on charging the battery pack
4-745-578-11(1) Copyright 2018 Sony Corporation
Turn off the product, and connect to the USB terminal of the computer.1
47
Help Guide
Digital Still CameraDSC-HX99
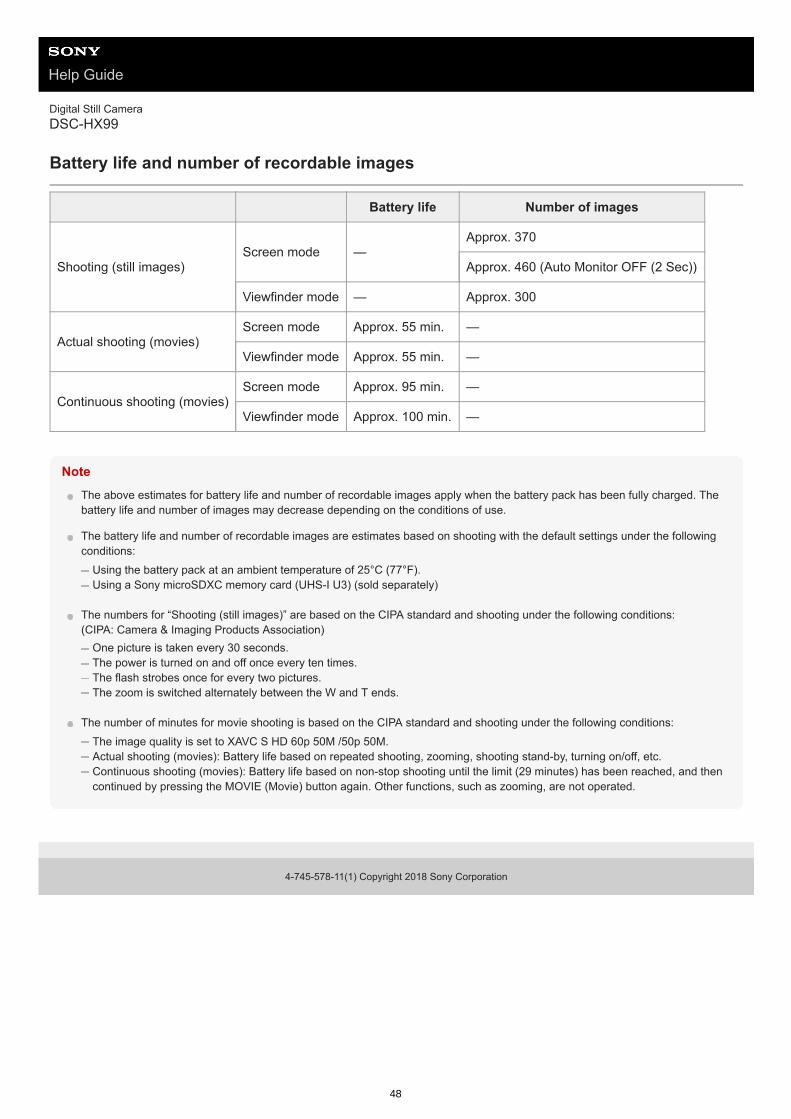
Battery life and number of recordable images
NoteThe above estimates for battery life and number of recordable images apply when the battery pack has been fully charged. Thebattery life and number of images may decrease depending on the conditions of use.
The battery life and number of recordable images are estimates based on shooting with the default settings under the followingconditions:
Using the battery pack at an ambient temperature of 25°C (77°F).Using a Sony microSDXC memory card (UHS-I U3) (sold separately)
The numbers for “Shooting (still images)” are based on the CIPA standard and shooting under the following conditions: (CIPA: Camera & Imaging Products Association)
One picture is taken every 30 seconds.The power is turned on and off once every ten times.The flash strobes once for every two pictures.The zoom is switched alternately between the W and T ends.
The number of minutes for movie shooting is based on the CIPA standard and shooting under the following conditions:The image quality is set to XAVC S HD 60p 50M /50p 50M.Actual shooting (movies): Battery life based on repeated shooting, zooming, shooting stand-by, turning on/off, etc.Continuous shooting (movies): Battery life based on non-stop shooting until the limit (29 minutes) has been reached, and thencontinued by pressing the MOVIE (Movie) button again. Other functions, such as zooming, are not operated.
4-745-578-11(1) Copyright 2018 Sony Corporation
Battery life Number of images
Shooting (still images)Screen mode —
Approx. 370
Approx. 460 (Auto Monitor OFF (2 Sec))
Viewfinder mode — Approx. 300
Actual shooting (movies)Screen mode Approx. 55 min. —
Viewfinder mode Approx. 55 min. —
Continuous shooting (movies)Screen mode Approx. 95 min. —
Viewfinder mode Approx. 100 min. —
48

Help Guide
Digital Still CameraDSC-HX99
Supplying power from a wall outlet (wall socket)
Use the supplied AC adaptor to shoot and play back images while power is supplied from a wall outlet (wall socket). Thisconserves the camera's battery power.
NoteThe camera will not activate if there is no remaining battery. Insert a sufficiently charged battery pack into the camera.
If you use the camera while power is being supplied from a wall outlet (wall socket), make sure that the icon that shows thatpowering via USB is in progress ( ) is displayed on the monitor.
Do not remove the battery pack while power is supplied from a wall outlet (wall socket). If you remove the battery pack, thecamera will be turned off.
Do not remove the battery pack while the access lamp is lit. The data in the memory card may be damaged.
As long as the power is on, the battery pack will not be charged even if the camera is connected to the AC Adaptor.
Under certain conditions, power may be supplied from the battery pack supplementarily even if you are using the AC adaptor.
Do not remove the Micro USB cable while power is supplied from a wall outlet (wall socket). Before you remove the Micro USBcable, turn off the camera.
Depending on the camera and battery temperature, the continuous recording time may be shortened while power is supplied froma wall outlet (wall socket).
When using a mobile charger as a power source, confirm that it is fully charged before use. Also, be careful of the remainingpower on the mobile charger during use.
4-745-578-11(1) Copyright 2018 Sony Corporation
Insert the battery pack into the camera.1
Connect the camera to the wall outlet (wall socket) with a micro USB cable (supplied) and an AC adaptor(supplied).
2
49

Help Guide
Digital Still CameraDSC-HX99
Notes on the battery pack
Notes on using the battery pack
Be sure to use only battery packs specified for this product.The correct remaining battery indicator may not be displayed under some operating or environmental conditions.Do not expose the battery pack to water. The battery pack is not water-resistant.Do not leave the battery pack in extremely hot places, such as in a car or under direct sunlight.
Charging the battery pack
Charge the battery pack (supplied) before using the product for the first time.The charged battery pack will discharge little by little even if you do not use it. Charge the battery pack each timebefore you use the product so that you do not miss any opportunities to shoot images.Do not charge battery packs except battery packs specified for this product. Doing so can result in leaks,overheating, explosions, electric shocks, burns, or injuries.If the charge lamp flashes when the battery pack is not fully charged, remove the battery pack or disconnect the USBcable from the camera and then reinsert it to recharge.We recommend charging the battery pack in an ambient temperature of between 10 °C and 30 °C (50 °F and 86 °F).The battery pack may not be effectively charged in temperatures outside this range.When you connect this product and a laptop computer that is not connected to a power source, the laptop’s batterycharge may decrease. Do not charge this product using the laptop computer for too long.Do not turn on/restart a computer, wake a computer from sleep mode, or turn off a computer while this product isconnected to the computer via USB cable. Doing so may cause a malfunction of this product. Disconnect the productand the computer before performing the above operations.We do not guarantee charging if you are using a self-built or modified computer.When charging is finished, disconnect the AC Adaptor from the wall outlet (wall socket) or disconnect the USB cablefrom the camera. Not doing so may result in a shorter battery life.
Remaining battery indicator
The remaining battery indicator appears on the screen.
A: Battery level highB: Battery exhausted
It takes about one minute for the correct remaining battery indicator to appear.The correct remaining battery indicator may not be displayed under some operating or environmental conditions.If you do not operate the product for a certain period of time while the power is on, the product turns off automatically(Auto power-off function).If the remaining battery indicator does not appear on the screen, press the DISP (Display Setting) button to display it.
Charging time (Full charge)
The charging time is approximately 230 minutes using the AC adaptor (supplied).The above charging time applies when charging a fully depleted battery pack at a temperature of 25 °C (77 °F). Chargingmay take longer depending on conditions of use and circumstances.
Effective use of the battery pack50

Battery performance decreases in low temperature environments. So in cold places, the operational time of thebattery pack is shorter. To ensure longer battery pack use, we recommend putting the battery pack in your pocketclose to your body to warm it up, and insert it in the product immediately before you start shooting. If there are anymetal objects such as keys in your pocket, be careful of causing a short-circuit.The battery pack will run down quickly if you use the flash or continuous shooting function frequently, turn the poweron/off frequently, or set the monitor very bright.We recommend preparing spare battery packs and taking trial shots before taking the actual shots.If the battery terminal is dirty, you may not be able to turn on the product or the battery pack may not be properlycharged. In that case, clean the battery by lightly wiping off any dust using a soft cloth or a cotton swab.
How to store the battery pack
To maintain the battery pack’s function, charge the battery pack and then fully discharge it in the camera at least once ayear before storing it. Store the battery in a cool, dry place after removing it from the camera.
On battery life
The battery life is limited. If you use the same battery repeatedly, or use the same battery for a long period, thebattery capacity decreases gradually. If the available time of the battery is shortened significantly, it is probably timeto replace the battery pack with a new one.The battery life varies according to how the battery pack is stored and the operating conditions and environment inwhich each battery pack is used.
4-745-578-11(1) Copyright 2018 Sony Corporation
51

Help Guide
Digital Still CameraDSC-HX99
Notes on charging the battery pack
The supplied AC Adaptor is dedicated to this product. Do not connect with other electronic devices. Doing so maycause a malfunction.Make sure to use a genuine Sony AC Adaptor.If the product's charge lamp flashes while charging, remove the battery pack being charged, and then insert thesame battery pack firmly back into the product. If the charge lamp flashes again, this may indicate a faulty battery orthat a battery pack other than the specified type has been inserted. Check that the battery pack is the specified type. If the battery pack is the specified type, remove the battery pack, replace it with a new or different one and check thatthe newly inserted battery is charging correctly. If the newly inserted battery is charging correctly, the previouslyinserted battery may be faulty.If the charge lamp flashes even if the AC Adaptor is connected to the product and the wall outlet (wall socket), thisindicates that charging has stopped temporarily and is on standby. Charging stops and enters standby statusautomatically when the temperature is outside of the recommended operating temperature. When the temperaturereturns to the appropriate range, charging resumes and the charge lamp lights up again. We recommend chargingthe battery pack in an ambient temperature of between 10°C to 30°C (50°F to 86°F).
4-745-578-11(1) Copyright 2018 Sony Corporation
52
Help Guide
Digital Still CameraDSC-HX99
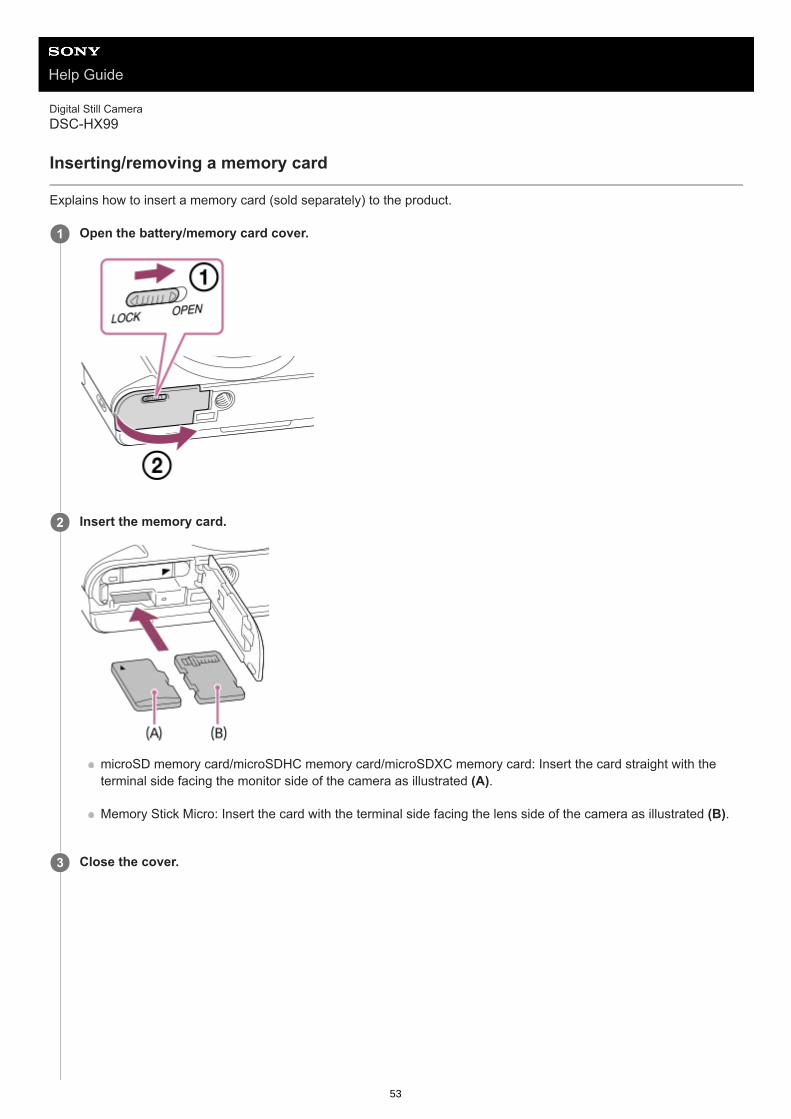
Inserting/removing a memory card
Explains how to insert a memory card (sold separately) to the product.
Open the battery/memory card cover.1
Insert the memory card.
microSD memory card/microSDHC memory card/microSDXC memory card: Insert the card straight with theterminal side facing the monitor side of the camera as illustrated (A).
Memory Stick Micro: Insert the card with the terminal side facing the lens side of the camera as illustrated (B).
2
Close the cover.3
53

HintWhen you use a memory card with the camera for the first time, it is recommended that you format the card on the camera formore stable performance of the memory card.
To remove the memory cardOpen the memory card cover and make sure that the access lamp (A) is not lit, then push in the memory card lightlyonce to remove it.
Related TopicMemory cards that can be usedNotes on memory cardFormat
4-745-578-11(1) Copyright 2018 Sony Corporation
54
Help Guide
Digital Still CameraDSC-HX99
Memory cards that can be used
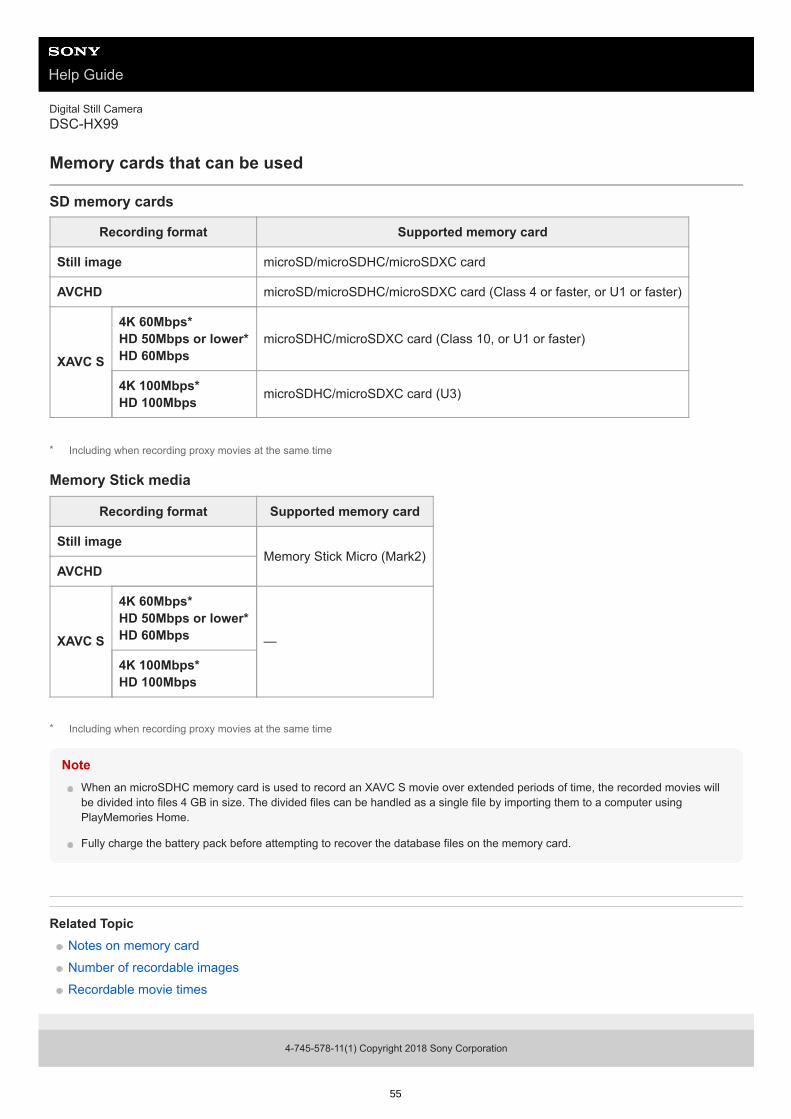
SD memory cards
Memory Stick media
NoteWhen an microSDHC memory card is used to record an XAVC S movie over extended periods of time, the recorded movies willbe divided into files 4 GB in size. The divided files can be handled as a single file by importing them to a computer usingPlayMemories Home.
Fully charge the battery pack before attempting to recover the database files on the memory card.
Related TopicNotes on memory cardNumber of recordable imagesRecordable movie times
4-745-578-11(1) Copyright 2018 Sony Corporation
Recording format Supported memory card
Still image microSD/microSDHC/microSDXC card
AVCHD microSD/microSDHC/microSDXC card (Class 4 or faster, or U1 or faster)
XAVC S
4K 60Mbps* HD 50Mbps or lower* HD 60Mbps
microSDHC/microSDXC card (Class 10, or U1 or faster)
4K 100Mbps* HD 100Mbps microSDHC/microSDXC card (U3)
Including when recording proxy movies at the same time*
Recording format Supported memory card
Still imageMemory Stick Micro (Mark2)
AVCHD
XAVC S
4K 60Mbps* HD 50Mbps or lower* HD 60Mbps —
4K 100Mbps* HD 100Mbps
Including when recording proxy movies at the same time*
55

Help Guide
Digital Still CameraDSC-HX99
Notes on memory card
If you repeatedly shoot and delete images for a long time, fragmentation of data in a file in the memory card mayoccur, and movie recording may be interrupted in the middle of shooting. If this happens, save your images to acomputer or other storage location, then execute [Format] using this camera.Do not remove the battery pack or the memory card, disconnect the USB cable, or turn the camera off while theaccess lamp is lit up. This may cause the data on the memory card to become damaged.Be sure to back up the data for protection.Not all memory cards are guaranteed to operate correctly.Images recorded on an microSDXC memory card cannot be imported to or played on computers or AV devices thatare not compatible with exFAT when connected using a USB cable. Make sure that the device is compatible withexFAT before connecting it to the camera. If you connect your camera to an incompatible device, you may beprompted to format the card. Never format the card in response to this prompt, as doing so will erase all data on thecard. (exFAT is the file system used on microSDXC memory cards.)Do not expose the memory card to water.Do not strike, bend or drop the memory card.Do not use or store the memory card under the following conditions:
High temperature locations such as in a car parked under the sunLocations exposed to direct sunlightHumid locations or locations with corrosive substances present
If the memory card is used near areas with strong magnetization, or used in locations subject to static electricity orelectrical noise, the data on the memory card may become damaged.Do not touch the terminal section of the memory card with your hand or a metal object.Do not leave the memory card within the reach of small children. They might accidentally swallow it.Do not disassemble or modify the memory card.The memory card may be hot just after it has been used for a long time. Be careful when you handle it.Memory card formatted with a computer is not guaranteed to operate with the product. Format the memory cardusing this product.Data read/write speeds differ depending on the combination of the memory card and the equipment used.Do not attach a label on the memory card itself nor on a memory card adaptor.
4-745-578-11(1) Copyright 2018 Sony Corporation
56
Help Guide
Digital Still CameraDSC-HX99
Setting language, date and time
The setting screen for language, date and time is displayed automatically when you turn on this product for the first time,initialize this product or when the internal rechargeable backup battery has discharged.
On maintaining the date and timeThis camera has an internal rechargeable battery for maintaining the date and time and other settings regardless ofwhether the power is on or off, or whether the battery pack is charged or discharged.To charge the internal rechargeable backup battery, insert a charged battery pack into the camera, and leave the productfor 24 hours or more with the power off.If the clock resets every time the battery pack is charged, the internal rechargeable backup battery may be worn out.Consult your service facility.
HintTo set the date and time or geographic location again after the date and time setting is finished, select MENU → (Setup) →[Date/Time Setup] or [Area Setting].
NoteIf the date and time setting is canceled halfway, the setting screen for the date and time appears every time you turn on thecamera.
Related TopicDate/Time Setup
Turn on the camera.
The language setting screen will appear and then setting screen for date and time will appear.
1
Select your language, and then press the center of the control wheel.2
Check that [Enter] is selected on the screen, then press the center.3
Select your desired geographic location, and then press the center.4
Select a setting item using the top/bottom side of the control wheel or by turning the control wheel, thenpress the center.
5
Set [Daylight Savings], [Date/Time], and [Date Format] using the top/bottom/left/right sides, then press thecenter.
Midnight is indicated as 12:00 AM, and noon as 12:00 PM when you set [Date/Time].Change the values using the top/bottom when you set [Date/Time].
6
Repeat Steps 5 and 6 to set other items, then select [Enter] and press the center.7
57

Area SettingUsing the control wheel
4-745-578-11(1) Copyright 2018 Sony Corporation
58

Help Guide
Digital Still CameraDSC-HX99
In-Camera Guide
The [In-Camera Guide] displays descriptions of MENU items, Fn (Function) items, and settings.Assign the [In-Camera Guide] function to the desired key in advance using [ Custom Key] or [ Custom Key].
Related TopicCustom Key (still image/movie/playback)
4-745-578-11(1) Copyright 2018 Sony Corporation
MENU → (Camera Settings2) → [ Custom Key] or [ Custom Key] → desired key, then assignthe [In-Camera Guide] function to the key.
The [In-Camera Guide] function cannot be assigned to some keys.
1
Select the MENU or Fn item of which you want to see descriptions, then press the button to which the [In-Camera Guide] function is assigned.
The descriptions of the item are displayed.
2
59
Help Guide
Digital Still CameraDSC-HX99
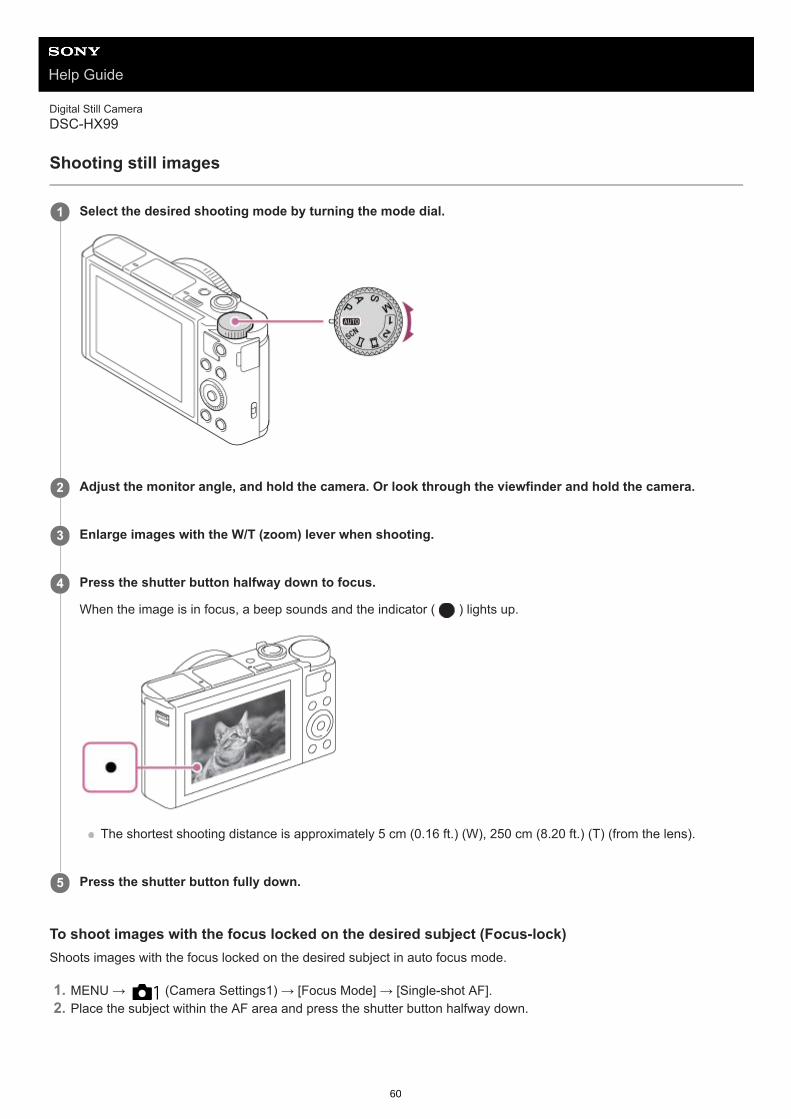
Shooting still images
To shoot images with the focus locked on the desired subject (Focus-lock)Shoots images with the focus locked on the desired subject in auto focus mode.
Select the desired shooting mode by turning the mode dial.1
Adjust the monitor angle, and hold the camera. Or look through the viewfinder and hold the camera.2
Enlarge images with the W/T (zoom) lever when shooting.3
Press the shutter button halfway down to focus.
When the image is in focus, a beep sounds and the indicator ( ) lights up.
The shortest shooting distance is approximately 5 cm (0.16 ft.) (W), 250 cm (8.20 ft.) (T) (from the lens).
4
Press the shutter button fully down.5
MENU → (Camera Settings1) → [Focus Mode] → [Single-shot AF].1.Place the subject within the AF area and press the shutter button halfway down.2.
60
HintWhen the product cannot focus automatically, the focus indicator flashes and the beep does not sound. Either recompose theshot or change the focus setting.
An icon indicating that data is being written is displayed after shooting. Do not remove the memory card while the icon isdisplayed.
Related TopicList of mode dial functionZoomPlaying back still imagesAuto ReviewFocus ModeFocus Area
4-745-578-11(1) Copyright 2018 Sony Corporation
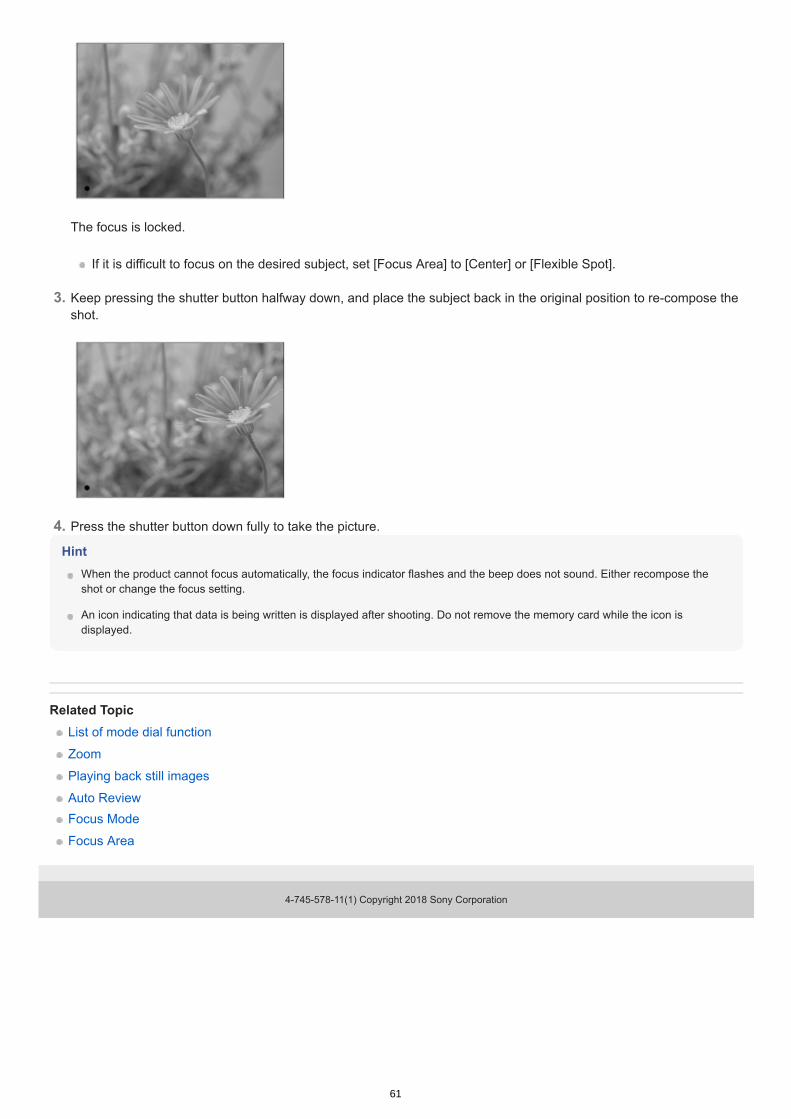
The focus is locked.
If it is difficult to focus on the desired subject, set [Focus Area] to [Center] or [Flexible Spot].
Keep pressing the shutter button halfway down, and place the subject back in the original position to re-compose theshot.
3.
Press the shutter button down fully to take the picture.4.
61

Help Guide
Digital Still CameraDSC-HX99
Focus Mode
Selects the focus method.
Menu item details (Single-shot AF):
The product performs auto focusing. The focus locks onto the subject. (Continuous AF):
During movie shooting, the focus mode is locked to [Continuous AF]. The camera maintains focus on the subject.[Continuous AF] cannot be selected when shooting still images.
(DMF): You can make fine adjustments manually after performing auto focusing, letting you focus on a subject more quickly thanwhen using the manual focus from the beginning. This is convenient in situations such as macro shooting.
(Manual Focus): Adjusts the focus manually. If you cannot focus on the intended subject using auto focus, use manual focus.
Rotate the control ring to adjust the focus manually in the direct manual focus mode or manual focus mode.
Focus indicator(lit):
The subject is in focus and the focus is locked.(flashing):
The subject is not in focus.
Subjects on which it is difficult to focus using auto focusDark and distant subjectsSubjects with poor contrastSubjects seen through glassFast-moving subjectsReflective light or shiny surfacesFlashing lightBack-lit subjectsSubjects in the focusing area with different focal distances
HintWhen you set the focus to infinity in the manual focus mode or the direct manual focus mode, make sure that the focus is on asufficiently distant subject by checking the monitor or the viewfinder.
NoteOnly [Continuous AF] and [Manual Focus] are available in the movie shooting mode.
Related TopicDirect manual focus (DMF)
MENU → (Camera Settings1) → [Focus Mode] → desired setting.1
62

Manual FocusMF Assist (still image)
4-745-578-11(1) Copyright 2018 Sony Corporation
63

Help Guide
Digital Still CameraDSC-HX99
Focus Area
Selects the focusing area. Use this function when it is difficult to focus properly in the auto focus mode.
Menu item details Wide :
Focuses on a subject covering the whole range of the screen automatically. When you press the shutter button halfwaydown in the still image shooting mode, a green frame is displayed around the area that is in focus.
Center :Focuses automatically on a subject in the center of the image. Use together with the focus-lock function to create thecomposition you want.
Flexible Spot :Allows you to move the focusing frame to a desired point on the screen and focus on an extremely small subject in anarrow area. On the Flexible Spot shooting screen, you can change the size of the focusing frame by turning the control wheel.
Expand Flexible Spot :If the product cannot focus on a single selected point, it uses focus points around the flexible spot as a secondary priorityarea for focusing. To move the focus area
When [Focus Area] is set to [Flexible Spot] or [Expand Flexible Spot], if pressing the button to which [FocusStandard] is assigned, you can shoot while moving the focusing frame using the top/bottom/left/right sides of thecontrol wheel. To return the focusing frame to the center of the monitor, press the C/ button while moving theframe. To change the shooting settings using the control wheel, press the button to which [Focus Standard] isassigned.You can move the focusing frame quickly by touching and dragging it on the monitor. Set [Touch Operation] to [On]beforehand.
Note[Focus Area] is locked to [Wide] in the following situations:
[Intelligent Auto][Superior Auto][Scene Selection]During Smile Shutter mode
The focus area may not light up during continuous shooting or when the shutter button is pressed all the way down at once.
You cannot execute functions assigned to the control wheel or the custom button while moving the focusing frame.
Related TopicTouch Operation
4-745-578-11(1) Copyright 2018 Sony Corporation
MENU → (Camera Settings1) → [Focus Area] → desired setting.1
64
Help Guide
Digital Still CameraDSC-HX99
Focus Standard
If you assign [Focus Standard] to the desired custom key, you can recall useful functions such as moving the focusingframe quickly, etc., depending on the focus area settings.
When [Focus Area] is set to [Flexible Spot] or [Expand Flexible Spot]:Pressing the key moves the position of the focusing frame using the top/bottom/left/right sides of the control wheel.When [Focus Area] is set to [Wide] or [Center]:
When [Center Lock-on AF] is set to [On], [Center Lock-on AF] is activated by pressing the key. The camera detectsthe subject positioned in the center of the screen and starts tracking by pressing the center of the control wheel. Ifyou press the key while the subject is being tracked, tracking will be canceled.
NoteYou cannot set the [Focus Standard] function to [Left Button] or [Right Button].
Related TopicCustom Key (still image/movie/playback)Focus AreaCenter Lock-on AF
4-745-578-11(1) Copyright 2018 Sony Corporation
MENU → (Camera Settings2) → [ Custom Key] → desired key, then assign the [Focus Standard]function to the key.
To use the [Focus Standard] function while shooting movies, select MENU → (Camera Settings2) → [Custom Key] → the desired button, and then assign [Focus Standard] to the key.
1
Press the key to which [Focus Standard] is assigned.
What you can do by pressing the key varies depending on the settings for [Focus Area] and [Center Lock-onAF].
2
65

Help Guide
Digital Still CameraDSC-HX99
AF/MF control
You can easily switch the focusing mode from auto to manual and vice versa while shooting without changing yourholding position.
Menu item detailsAF/MF Control Hold :Switches the focusing mode while the button is held down.AF/MF Ctrl Toggle :Switches the focusing mode until the button is pressed again.
NoteYou cannot set the [AF/MF Control Hold] function to [Left Button] or [Right Button] of the control wheel.
Related TopicCustom Key (still image/movie/playback)
4-745-578-11(1) Copyright 2018 Sony Corporation
MENU → (Camera Settings2) → [ Custom Key] or [ Custom Key] → desired button → [AF/MFControl Hold] or [AF/MF Ctrl Toggle].
1
66
Help Guide
Digital Still CameraDSC-HX99
Eye AF
The camera focuses on the subject's eyes while you keep the button pressed.
HintWhen the camera focuses on the eyes, a detection frame is displayed over the eyes. The detection frame over the eyes turns intothe face detection frame after a certain period of time. However, [Eye AF] remains active. The camera continues tracking theeyes unless the distance of the subject changes.
NoteDepending on the circumstances, the camera may not be able to focus on the eyes. In such cases, the camera detects a faceand focuses on the face.
If the camera cannot detect a person’s face, you cannot use [Eye AF].
Depending on the circumstances, you cannot use [Eye AF] such as when [Focus Mode] is set to [Manual Focus].
The [Eye AF] function may not function very well in the following situations:When the person is wearing sunglasses.When the front hair covers the person’s eyes.In low-light or back-lit conditions.When the eyes are closed.When the person is in the shade.When the person is out of focus.When the person is moving too much.
If the person is moving too much, the detection frame may not display correctly over their eyes.
When the mode dial is set to (Movie), or during movie recording, [Eye AF] is unavailable.
Related TopicCustom Key (still image/movie/playback)Set. Face Prty in AF
4-745-578-11(1) Copyright 2018 Sony Corporation
MENU → (Camera Settings2) → [ Custom Key] → desired key, then assign the [Eye AF] function tothe key.
1
Point the camera at a person's face, and press the button to which you have assigned the [Eye AF]function.
2
Press the shutter button while pressing the button.3
67

Help Guide
Digital Still CameraDSC-HX99
Set. Face Prty in AF
Sets whether the camera focuses on detected faces with higher priority in the auto-focus mode.
Menu item detailsOn:The camera focuses on detected faces with higher priority.Off:The camera focuses without face detection.
Face Dtct Frame DspSets whether to display the face detection frame when [Face Priority in AF] is set to [On].
On:Displays the face detection frame when [Face Priority in AF] is set to [On].Off:Does not display the face detection frame.
Face Detection frameWhen the product detects a face, the gray face detection frame appears. When the product determines thatautofocus is enabled, the face detection frame turns white.In case you have registered the priority order for each face using [Face Registration], the product automaticallyselects the first prioritized face and the face detection frame over that face turns white. The face detection frames ofother registered faces turn reddish-purple.
HintWhen [Set. Face Prty in AF] is set to [On], a detection frame is displayed over the eyes when the camera focuses on eyes. Theframe displayed over the eyes will disappear after a period of time.
NoteYou cannot use the face detection function with the following functions:
Other zoom functions than the optical zoom[Sweep Panorama][Posterization] under [Picture Effect]
MENU → (Camera Settings1) → [Set. Face Prty in AF] → [Face Priority in AF] → desired setting.1
MENU → (Camera Settings1) → [Set. Face Prty in AF] → [Face Dtct Frame Dsp] → desired setting.1.
68

[Focus Magnifier][Landscape], [Night Scene], [Sunset], [Pet], [Gourmet] or [Fireworks] under [Scene Selection]Movie shooting with [ Record Setting] set to [120p]/[ 100p].
Up to 8 faces of your subjects can be detected.
Even if [Face Dtct Frame Dsp] is set to [Off], a green focusing frame will be displayed over faces that are in focus.
When the shooting mode is set to [Intelligent Auto] or [Superior Auto], [Face Priority in AF] is set to [On].
The product may not detect faces at all or may accidentally detect other objects as faces in some conditions.
Related TopicFace Registration (New Registration)Face Registration (Order Exchanging)
4-745-578-11(1) Copyright 2018 Sony Corporation
69

Help Guide
Digital Still CameraDSC-HX99
Center Lock-on AF
When you press the center of the control wheel, the camera detects the subject positioned in the center of the screenand continues to track the subject.
HintIf you assign the [Focus Standard] function to the key of your choice, you can activate [Center Lock-on AF] or detect a subjectagain by pressing the key when [Focus Area] is set to [Wide] or [Center].
You can select the subject to be tracked by touch operation when shooting using the monitor. With touch panel operationsenabled, select MENU → (Camera Settings2) → [Func. of Touch Oprtn] → [Touch Focus].
NoteThe [Center Lock-on AF] function may not function very well in the following situations:
The subject is moving too quickly.The subject is too small, or too large.The contrast between the subject and the background is poor.It is dark.The ambient light changes.
Lock-on AF does not work in the following situations:[Sweep Panorama]When [Scene Selection] is set to [Hand-held Twilight], [Anti Motion Blur] or [Fireworks].When shooting in the Manual Focus or Direct Manual Focus (DMF) mode.When using the digital zoomWhen the shooting mode is set to Movie, and [ SteadyShot] is set to [Intelligent Active].When shooting movies with [ Record Setting] set to [120p]/[100p]
MENU → (Camera Settings1) → [Center Lock-on AF] → [On].1
Align the target frame (A) over the subject and press the center of the control wheel.
Press the center again to stop tracking.
2
Press the shutter button fully down to shoot the image.3
70

Related TopicFocus StandardTouch Operation
4-745-578-11(1) Copyright 2018 Sony Corporation
71

Help Guide
Digital Still CameraDSC-HX99
Pre-AF (still image)
The product automatically adjusts focus before you press the shutter button halfway down. During focusing operations,the screen may shake.
Menu item detailsOn:Adjusts focus before you press the shutter button halfway down.Off:Does not adjust focus before you press the shutter button halfway down.
4-745-578-11(1) Copyright 2018 Sony Corporation
MENU → (Camera Settings1) → [ Pre-AF] → desired setting.1
72

Help Guide
Digital Still CameraDSC-HX99
AF Illuminator (still image)
The AF illuminator supplies fill light to focus more easily on a subject in dark surroundings. In the time between pressingthe shutter button halfway down and locking the focus, the AF illuminator lights up to allow the camera to focus easily.
Menu item detailsAuto:The AF illuminator lights up automatically in dark surroundings.Off:Does not use the AF illuminator.
NoteYou cannot use [ AF Illuminator] in the following situations:
In movie modeSweep PanoramaWhen [Focus Magnifier] is activated.When [Scene Selection] is set to the following modes:
[Landscape][Night Scene][Pet][Fireworks]
The AF illuminator emits a very bright light. Although there is no health hazard, do not look directly into the AF illuminator at closerange.
4-745-578-11(1) Copyright 2018 Sony Corporation
MENU → (Camera Settings1) → [ AF Illuminator] → desired setting.1
73
Help Guide
Digital Still CameraDSC-HX99
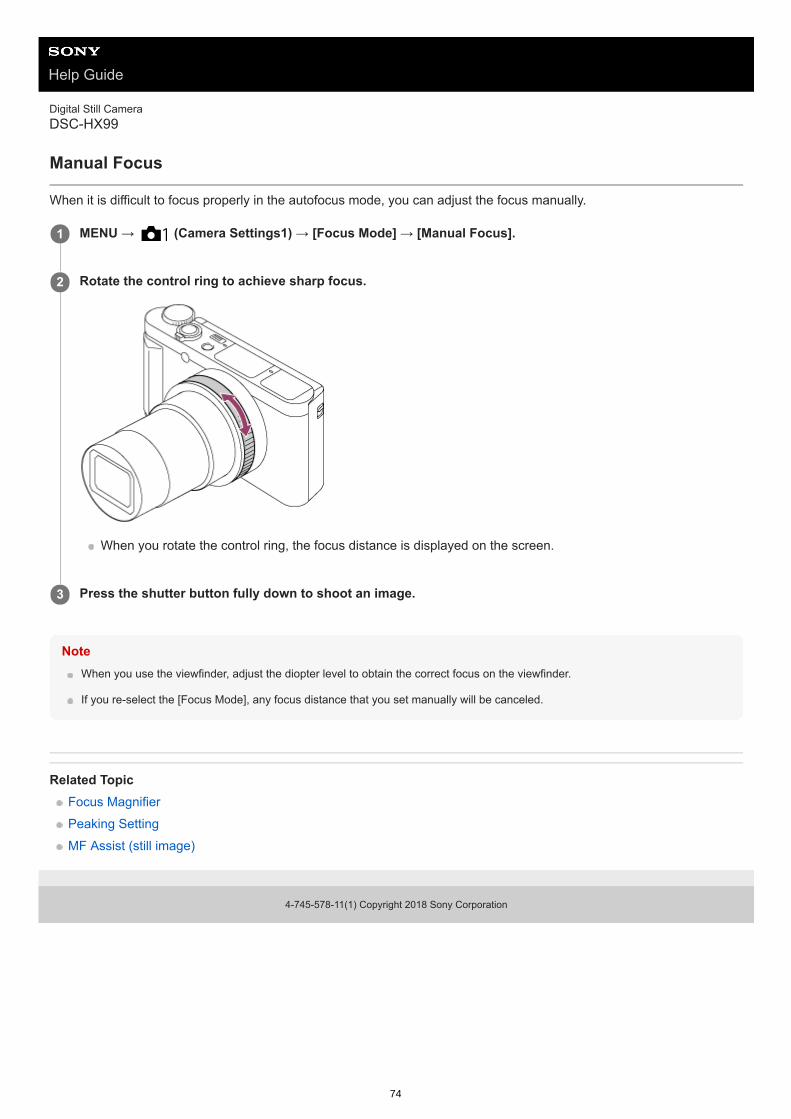
Manual Focus
When it is difficult to focus properly in the autofocus mode, you can adjust the focus manually.
NoteWhen you use the viewfinder, adjust the diopter level to obtain the correct focus on the viewfinder.
If you re-select the [Focus Mode], any focus distance that you set manually will be canceled.
Related TopicFocus MagnifierPeaking SettingMF Assist (still image)
4-745-578-11(1) Copyright 2018 Sony Corporation
MENU → (Camera Settings1) → [Focus Mode] → [Manual Focus].1
Rotate the control ring to achieve sharp focus.
When you rotate the control ring, the focus distance is displayed on the screen.
2
Press the shutter button fully down to shoot an image.3
74

Help Guide
Digital Still CameraDSC-HX99
Direct manual focus (DMF)
You can make fine adjustments manually after performing auto focusing, letting you focus on a subject more quickly thanwhen using the manual focus from the beginning. This is convenient in situations such as macro shooting.
Related TopicPeaking Setting
4-745-578-11(1) Copyright 2018 Sony Corporation
MENU → (Camera Settings1) → [Focus Mode] → [DMF].1
Press the shutter button halfway down to focus automatically.2
Keep the shutter button pressed halfway down, and then rotate the control ring to achieve a sharper focus.
When you rotate the control ring, the focus distance is displayed on the screen.
3
Press the shutter button fully down to shoot an image.4
75

Help Guide
Digital Still CameraDSC-HX99
Focus Magnifier
You can check the focus by enlarging the image before shooting.Unlike with [ MF Assist], you can magnify the image without operating the control ring.
To use the focus magnifier function by touch operationYou can magnify the image and adjust the focus by touching the monitor. Set [Touch Operation] to [On] beforehand.Then, select the appropriate settings under [Touch Panel/Pad]. When the focus mode is [Manual Focus], you canperform [Focus Magnifier] by double-tapping the area to focus on while shooting with the monitor. While shooting with the viewfinder, a frame is displayed in the center of the monitor by double-tapping and you can movethe frame by dragging it. The image is magnified by pressing the center of the control wheel.
HintWhile using the focus magnifier function, you can move the magnified area by dragging it on the touch panel.
To exit the focus magnifier function, double-tap the monitor again. You can also exit the focus magnifier function by pressing theshutter button halfway down.
Related TopicMF Assist (still image)Focus Magnif. TimeInitial Focus Mag. (still image)Custom Key (still image/movie/playback)Touch Operation
4-745-578-11(1) Copyright 2018 Sony Corporation
MENU → (Camera Settings1) → [Focus Magnifier].1
Press the center of the control wheel to enlarge the image and select the area you want to enlarge usingtop/bottom/left/right side of the control wheel.
Each time you press the center, the magnification scale will change.You can set the initial magnification by selecting MENU → (Camera Settings1) → [ Initial FocusMag.].
2
Confirm the focus.
Press the (Delete) button to bring the magnified position into the center of an image.When the focus mode is [Manual Focus], you can adjust the focus while an image is magnified. The [FocusMagnifier] function will be canceled when the shutter button is pressed halfway.You can set how long the image is to be shown magnified by selecting MENU → (Camera Settings1) →[Focus Magnif. Time].
3
Press the shutter button fully down to shoot the image.4
76

77

Help Guide
Digital Still CameraDSC-HX99
MF Assist (still image)
Enlarges the image on the screen automatically to make manual focusing easier. This works in Manual Focus or DirectManual Focus shooting.
HintYou can set how long the image is to be shown magnified by selecting MENU → (Camera Settings1) → [Focus Magnif.Time].
NoteYou cannot use [ MF Assist] when shooting movies. Use the [Focus Magnifier] function instead.
Related TopicManual FocusDirect manual focus (DMF)Focus Magnif. Time
4-745-578-11(1) Copyright 2018 Sony Corporation
MENU → (Camera Settings1) → [ MF Assist] → [On].1
Turn the control ring to adjust the focus.
The image is enlarged. You can magnify images further by pressing the center of the control wheel.
2
78

Help Guide
Digital Still CameraDSC-HX99
Focus Magnif. Time
Set the duration for which an image is to be magnified using the [ MF Assist] or [Focus Magnifier] function.
Menu item details2 Sec:Magnifies the images for 2 seconds.5 Sec:Magnifies the images for 5 seconds.No Limit:Magnifies the images until you press the shutter button.
Related TopicFocus MagnifierMF Assist (still image)
4-745-578-11(1) Copyright 2018 Sony Corporation
MENU → (Camera Settings1) → [Focus Magnif. Time] → desired setting.1
79

Help Guide
Digital Still CameraDSC-HX99
Initial Focus Mag. (still image)
Sets the initial magnification scale when using [Focus Magnifier]. Select a setting that will help you frame your shot.
Menu item detailsx1.0:Displays the image with the same magnification as the shooting screen.x7.7:Displays a 7.7-times enlarged image.
Related TopicFocus Magnifier
4-745-578-11(1) Copyright 2018 Sony Corporation
MENU → (Camera Settings1) → [ Initial Focus Mag.] → desired setting.1
80

Help Guide
Digital Still CameraDSC-HX99
Peaking Setting
Sets the peaking function, which enhances the outline of in-focus areas during shooting with Manual Focus or DirectManual Focus.
Menu item detailsPeaking Display:Sets whether to display peaking.Peaking Level:Sets the level of enhancement of in-focus areas.Peaking Color:Sets the color used to enhance in-focus areas.
NoteSince the product recognizes sharp areas as in focus, the effect of peaking differs, depending on the subject.
The outline of in-focus ranges is not enhanced on devices connected via HDMI.
Related TopicManual FocusDirect manual focus (DMF)
4-745-578-11(1) Copyright 2018 Sony Corporation
MENU → (Camera Settings1) → [Peaking Setting] → desired setting.1
81

Help Guide
Digital Still CameraDSC-HX99
Drive Mode
Select the appropriate mode for the subject, such as single shooting, continuous shooting or bracketing shooting.
Menu item details Single Shooting:
Normal shooting mode. Cont. Shooting:
Shoots images continuously while you press and hold down the shutter button. Spd Priority Cont.:
Shoots images continuously at high speed while you press and hold down the shutter button. Self-timer:
Shoots an image using the self-timer after a designated number of seconds have elapsed since the shutter button waspressed.
Self-timer(Cont):Shoots a designated number of images using the self-timer after a designated number of seconds have elapsed sincethe shutter button was pressed.
Cont. Bracket:Shoots images while holding the shutter button down, each with different degrees of exposure.
Single Bracket:Shoots a specified number of images, one by one, each with a different degrees of exposure.
WB bracket:Shoots a total of three images, each with different color tones according to the selected settings for white balance, colortemperature and color filter.
DRO Bracket:Shoots a total of three images, each at a different degree of D-Range Optimizer.
Related TopicCont. ShootingSpd Priority Cont.Self-timerSelf-timer(Cont)Cont. BracketSingle BracketWB bracketDRO Bracket
4-745-578-11(1) Copyright 2018 Sony Corporation
Select / (Drive Mode) on the control wheel → desired setting.
You can also set the drive mode by selecting MENU → (Camera Settings1) → [Drive Mode].
1
Select the desired mode using the right/left side of the control wheel.2
82

Help Guide
Digital Still CameraDSC-HX99
Cont. Shooting
Shoots images continuously while you press and hold down the shutter button.
HintThe focus, exposure, and white balance are locked to their values in the first shot.
NoteContinuous shooting is unavailable in the following situations:
The shooting mode is set to [Sweep Panorama].[Picture Effect] is set to one of the following: [Soft Focus] [HDR Painting] [Rich-tone Mono.] [Miniature] [Watercolor] [Illustration][DRO/Auto HDR] is set to [Auto HDR].[ISO] is set to [Multi Frame NR].[Smile Shutter] is being used.
Related TopicFocus Mode
4-745-578-11(1) Copyright 2018 Sony Corporation
Select / (Drive Mode) of the control wheel → [Cont. Shooting].
You can also set the continuous shooting by selecting MENU → (Camera Settings1) → [Drive Mode].
1
83

Help Guide
Digital Still CameraDSC-HX99
Spd Priority Cont.
The product continues to shoot as long as the shutter button is pressed. You can continuously shoot at a rate faster thanthat of [Cont. Shooting].
NoteBetween continuous shooting frames, an image of each frame is immediately displayed.
Continuous shooting is unavailable in the following situations:The shooting mode has been set to [Sweep Panorama].The [Picture Effect] is set to [Soft Focus], [HDR Painting], [Rich-tone Mono.], [Miniature], [Watercolor], or [Illustration].The [DRO/Auto HDR] is set to [Auto HDR].[ISO] is set to [Multi Frame NR].[Smile Shutter] is being used.
HintThe focus, exposure, and white balance are locked to their values in the first shot.
4-745-578-11(1) Copyright 2018 Sony Corporation
Press / (Drive Mode) of the control wheel → [Spd Priority Cont.].
You can also set the drive mode by selecting MENU→ (Camera Settings1) → [Drive Mode].
1
84
Help Guide
Digital Still CameraDSC-HX99
Self-timer
Shoots an image using the self-timer after a designated number of seconds have elapsed since the shutter button waspressed. Use the 5-second/10-second self-timer when you are going to be in the picture, and use the 2-second self-timerto reduce camera-shake caused by pressing the shutter button.
Menu item detailsThe mode determines the number of seconds until a picture is taken after the shutter button is pressed.
Self-timer: 10 Sec Self-timer: 5 Sec Self-timer: 2 Sec
HintPress the shutter button again or press / on the control wheel to stop the count of the self-timer.
Press / on the control wheel and select (Single Shooting) to cancel the self-timer.
Set [Audio signals] to [Off] to turn off the beeping sound during the self-timer countdown.
To use the self-timer in bracket mode, select bracket mode under drive mode, then select MENU → (Camera Settings1) →[Bracket Settings] → [Selftimer during Brkt].
NoteThe self-timer is unavailable in the following situations:
The shooting mode is set to [Sweep Panorama].[Smile Shutter]
Related TopicAudio signals
4-745-578-11(1) Copyright 2018 Sony Corporation
Press / (Drive Mode) of the control wheel → [Self-timer].
You can also set the drive mode by selecting MENU→ (Camera Settings1) → [Drive Mode].
1
Select the desired mode using the right/left side of the control wheel.2
Adjust the focus and shoot the image.
The self-timer lamp flashes, a beep sounds, and a picture is taken after the designated number of seconds haveelapsed.
3
85

Help Guide
Digital Still CameraDSC-HX99
Self-timer(Cont)
Shoots a designated number of images using the self-timer after a designated number of seconds have elapsed sincethe shutter button was pressed. You can choose the best from multiple shots.
Menu item detailsFor example, three images are shot when 10 seconds have elapsed after the shutter button is pressed when [Self-timer(Cont.): 10 Sec. 3 Img.] is selected.
Self-timer(Cont.): 10 Sec. 3 Img. Self-timer(Cont.): 10 Sec. 5 Img. Self-timer(Cont.): 5 Sec. 3 Img. Self-timer(Cont.): 5 Sec. 5 Img. Self-timer(Cont.): 2 Sec. 3 Img. Self-timer(Cont.): 2 Sec. 5 Img.
HintPress the shutter button again or press / on the control wheel to stop the count of the self-timer.
Press / on the control wheel and select (Single Shooting) to cancel the self-timer.
4-745-578-11(1) Copyright 2018 Sony Corporation
Press / (Drive Mode) of the control wheel → [Self-timer(Cont)].
You can also set the drive mode by selecting MENU→ (Camera Settings1) → [Drive Mode].
1
Select the desired mode using the right/left side of the control wheel.2
Adjust the focus and shoot the image.
The self-timer lamp flashes, a beep sounds, and pictures are taken after the designated number of seconds haselapsed. The designated number of pictures are taken continuously.
3
86

Help Guide
Digital Still CameraDSC-HX99
Cont. Bracket
Shoots multiple images while automatically shifting the exposure from base to darker and then to lighter. You can selectan image that suits your purpose after recording.
Menu item detailsFor example, the camera shoots a total of three images continuously with an exposure value shifted by plus or minus 0.3EV when [Cont. Bracket: 0.3EV 3 Image] is selected.
NoteThe last shot is shown on the auto review.
When [ISO AUTO] is selected in [Manual Exposure] mode, the exposure is changed by adjusting the ISO value. If a setting otherthan [ISO AUTO] is selected, the exposure is changed by adjusting the shutter speed.
When the exposure is compensated, the exposure is shifted based on the compensated value.
Bracket shooting is unavailable in the following shooting modes:[Intelligent Auto][Superior Auto][Scene Selection][Sweep Panorama]
When the flash is used, the product performs flash bracket shooting, which shifts the amount of flash light even if [Cont. Bracket]is selected. Press the shutter button for each image.
Related TopicBracket SettingsIndicator during bracket shooting
4-745-578-11(1) Copyright 2018 Sony Corporation
Press / (Drive Mode) of the control wheel → [Cont. Bracket].
You can also set the drive mode by selecting MENU→ (Camera Settings1) → [Drive Mode].
1
Select the desired mode using the right/left side of the control wheel.2
Adjust the focus and shoot the image.
The base exposure is set at the first shot.Keep pressing and holding the shutter button until bracket shooting is finished.
3
87

Help Guide
Digital Still CameraDSC-HX99
Single Bracket
Shoots multiple images while automatically shifting the exposure from base to darker and then to lighter. You can selectthe image that suits your purpose after recording. Since a single picture is taken each time you press the shutter button, you can adjust the focus or the composition foreach shot.
Menu item detailsFor example, when [Single Bracket: 0.3EV 3 Image] is selected, three images are shot one at a time with the exposurevalue shifted up and down in increments of 0.3 EV.
NoteWhen [ISO AUTO] is selected in [Manual Exposure] mode, the exposure is changed by adjusting the ISO value. If a setting otherthan [ISO AUTO] is selected, the exposure is changed by adjusting the shutter speed.
When the exposure is compensated, the exposure is shifted based on the compensated value.
Bracket shooting is unavailable in the following shooting modes:[Intelligent Auto][Superior Auto][Scene Selection][Sweep Panorama]
Related TopicBracket SettingsIndicator during bracket shooting
4-745-578-11(1) Copyright 2018 Sony Corporation
Select / (Drive Mode) of the control wheel → [Single Bracket].
You can also set the drive mode by selecting MENU → (Camera Settings1) → [Drive Mode].
1
Select the desired mode using the right/left side of the control wheel.2
Adjust the focus and shoot the image.
Press the shutter button for each image.
3
88

Help Guide
Digital Still CameraDSC-HX99
Indicator during bracket shooting
ViewfinderAmbient light* bracketing 3 images shifted by 0.3 EV steps Exposure compensation ±0.0 EV
Monitor (Display All Info. or Histogram)Ambient light* bracketing 3 images shifted by 0.3 EV steps Exposure compensation ±0.0 EV
Flash bracketing 3 images shifted by 0.7 EV steps Flash compensation -1.0 EV
Monitor (For viewfinder)Ambient light* bracketing (upper indicator) 3 images shifted by 0.3 EV steps Exposure compensation ±0.0 EV
Flash bracketing (lower indicator) 3 images shifted by 0.7 EV steps Flash compensation -1.0 EV
NoteDuring bracket shooting, guides equal to the number of images to be shot are displayed over/under the bracket indicator.
When you start single bracket shooting, the guides will disappear one by one as the camera records images.
4-745-578-11(1) Copyright 2018 Sony Corporation
Ambient light: A generic term for non-flash light including natural light, electric bulb and fluorescent lighting. Whereas the flash light blinks for amoment, ambient light is constant, so this kind of light is called "ambient light."
*
89

90
Help Guide
Digital Still CameraDSC-HX99
WB bracket
Shoots a total of three images, each with different color tones according to the selected settings for white balance, colortemperature and color filter.
Menu item details White Balance Bracket: Lo:
Records a series of three images with small changes in the white balance (within the range of 10MK-1*). White Balance Bracket: Hi:
Records a series of three images with large changes in the white balance (within the range of 20MK-1*).* MK-1 is the unit that indicates the capability of color temperature conversion filters and indicates the same value as"mired."
NoteThe last shot is shown on the auto review.
Related TopicBracket Settings
4-745-578-11(1) Copyright 2018 Sony Corporation
Select / (Drive Mode) of the control wheel → [WB bracket].
You can also set the drive mode by selecting MENU→ (Camera Settings1) → [Drive Mode].
1
Select the desired mode using the right/left side of the control wheel.2
Adjust the focus and shoot the image.3
91

Help Guide
Digital Still CameraDSC-HX99
DRO Bracket
You can record a total of three images, each at a different degree of D-Range Optimizer value.
Menu item details DRO Bracket: Lo:
Records a series of three images with small changes in the D-Range Optimizer value (Lv 1, Lv 2, and Lv 3). DRO Bracket: Hi:
Records a series of three images with large changes in the D-Range Optimizer value (Lv 1, Lv 3, and Lv 5).
NoteThe last shot is shown on the auto review.
Related TopicBracket Settings
4-745-578-11(1) Copyright 2018 Sony Corporation
Select / (Drive Mode) of the control wheel → [DRO Bracket].
You can also set the drive mode by selecting MENU→ (Camera Settings1) → [Drive Mode].
1
Select the desired mode using the right/left side of the control wheel.2
Adjust the focus and shoot the image.3
92

Help Guide
Digital Still CameraDSC-HX99
Bracket Settings
You can set the self-timer in bracket shooting mode, and the shooting order for exposure bracketing and white balancebracketing.
Menu item detailsSelftimer during Brkt:Sets whether to use the self-timer during bracket shooting. Also sets the number of seconds until the shutter is releasedif using the self-timer. (OFF/2 Sec/5 Sec/10 Sec)Bracket order:Sets the order of exposure bracketing and white balance bracketing. (0→-→+/-→0→+)
Related TopicCont. BracketSingle BracketWB bracketDRO Bracket
4-745-578-11(1) Copyright 2018 Sony Corporation
Select / (Drive Mode) of the control wheel → select bracket shooting mode.
You can also set the drive mode by selecting MENU → (Camera Settings1) → [Drive Mode].
1
MENU → (Camera Settings1) → [Bracket Settings] → desired setting.2
93

Help Guide
Digital Still CameraDSC-HX99
Self-portrait/ -timer
You can change the angle of the monitor and shoot images while watching the monitor.
HintIf you want to use another Drive Mode than the 3-second self-timer mode, first set [Self-portrait/ -timer] to [Off], then tilt themonitor upward approx. 180 degrees.
4-745-578-11(1) Copyright 2018 Sony Corporation
MENU → (Camera Settings1) → [Self-portrait/ -timer] → [On].1
Tilt the monitor approximately 180° upward, and then point the lens at yourself.2
Press the shutter button.
The product starts the self-timer shooting after three seconds.
3
94

Help Guide
Digital Still CameraDSC-HX99
Touch Operation
Sets whether or not to activate touch operations on the monitor.
Menu item detailsOn:Activates the touch operation.Off:Deactivates the touch operation.
Related TopicFunc. of Touch Oprtn: Touch ShutterFunc. of Touch Oprtn: Touch FocusTouch Pad SettingsTouch Panel/Pad
4-745-578-11(1) Copyright 2018 Sony Corporation
MENU → (Setup) → [Touch Operation] → desired setting.1
95

Help Guide
Digital Still CameraDSC-HX99
Touch Panel/Pad
Touch operations when shooting with the monitor are referred to as "touch panel operations," and touch operations whenshooting with the viewfinder are referred to as "touch pad operations." You can select whether to activate touch paneloperations or touch pad operations.
Menu item detailsTouch Panel+Pad:Activates both the touch panel operations when shooting with the monitor and touch pad operations when shooting withthe viewfinder.Touch Panel Only:Activates only the touch panel operations when shooting with the monitor.Touch Pad Only:Activates only the touch pad operations when shooting with the viewfinder.
Related TopicTouch Operation
4-745-578-11(1) Copyright 2018 Sony Corporation
MENU → (Setup) → [Touch Panel/Pad] → desired setting.1
96

Help Guide
Digital Still CameraDSC-HX99
Func. of Touch Oprtn: Touch Shutter
When you shoot using the monitor, the camera automatically focuses on the point you touch and shoots a still image. Set MENU → (Setup) → [Touch Operation] to [On] in advance.
HintYou can operate the shooting functions below by touching the monitor:
Shooting burst images using the touch shutterWhen [Drive Mode] is set to [Cont. Shooting] or [Spd Priority Cont.], you can record burst images while touching the monitor.
Shooting continuous bracket images using the touch shutterThe product shoots three images while automatically shifting the exposure from base, to darker, and then to lighter. When[Drive Mode] is set to [Cont. Bracket], keep touching the monitor until the shooting ends. After the recording you can select theimage you prefer.
NoteThe [Touch Shutter] function is unavailable in the following situations:
During viewfinder shootingWhen the shooting mode is set to [Movie]When the shooting mode is set to [Sweep Panorama]During [Smile Shutter] modeWhen [Focus Mode] is [Manual Focus]When [Focus Area] is [Flexible Spot]When [Focus Area] is [Expand Flexible Spot]While using the digital zoom functionWhile using the [ Clear Image Zoom]
Related TopicTouch OperationTouch Panel/Pad
4-745-578-11(1) Copyright 2018 Sony Corporation
Select MENU → (Camera Settings2) → [Func. of Touch Oprtn] → [Touch Shutter].1
Touch the icon on the monitor while the shooting screen is displayed.
The mark to the left of the icon turns orange.
To cancel [Touch Shutter], touch the icon again.
2
Touch the subject to focus on.
When the subject you touched is in focus, a still image is recorded.
3
97
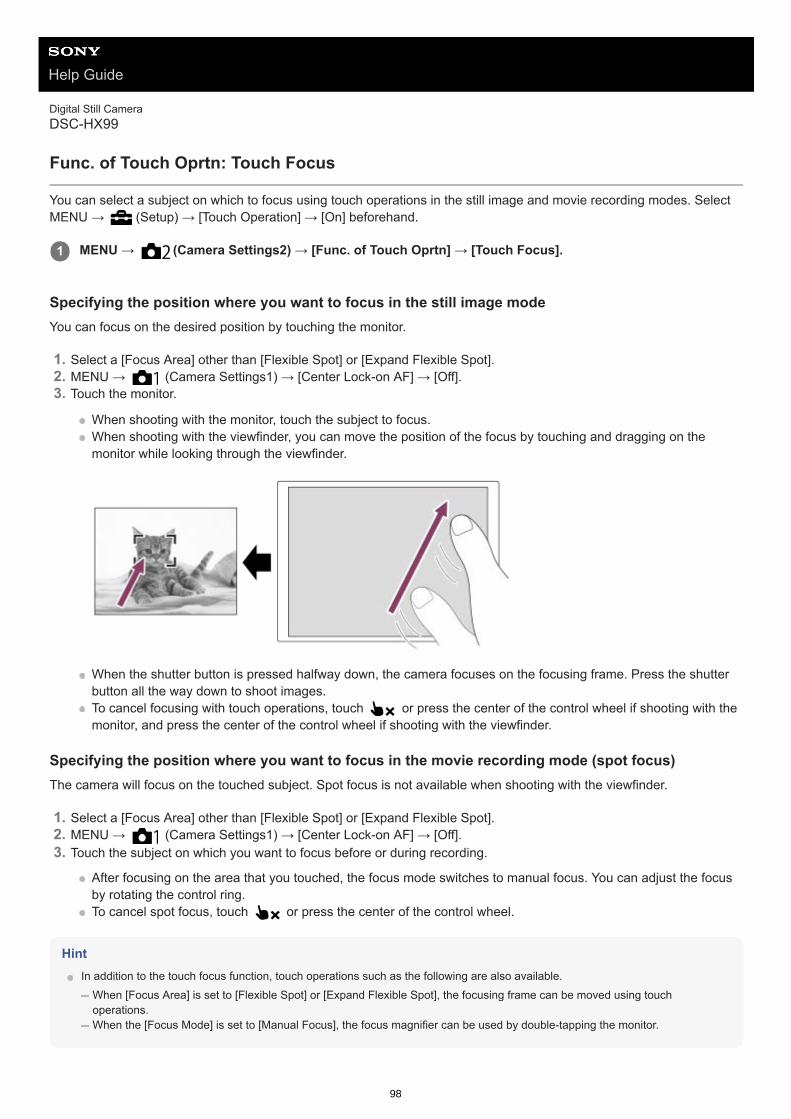
Help Guide
Digital Still CameraDSC-HX99
Func. of Touch Oprtn: Touch Focus
You can select a subject on which to focus using touch operations in the still image and movie recording modes. SelectMENU → (Setup) → [Touch Operation] → [On] beforehand.
Specifying the position where you want to focus in the still image modeYou can focus on the desired position by touching the monitor.
Specifying the position where you want to focus in the movie recording mode (spot focus)The camera will focus on the touched subject. Spot focus is not available when shooting with the viewfinder.
HintIn addition to the touch focus function, touch operations such as the following are also available.
When [Focus Area] is set to [Flexible Spot] or [Expand Flexible Spot], the focusing frame can be moved using touchoperations.When the [Focus Mode] is set to [Manual Focus], the focus magnifier can be used by double-tapping the monitor.
MENU → (Camera Settings2) → [Func. of Touch Oprtn] → [Touch Focus].1
Select a [Focus Area] other than [Flexible Spot] or [Expand Flexible Spot].1.MENU → (Camera Settings1) → [Center Lock-on AF] → [Off].2.Touch the monitor.
When shooting with the monitor, touch the subject to focus.When shooting with the viewfinder, you can move the position of the focus by touching and dragging on themonitor while looking through the viewfinder.
When the shutter button is pressed halfway down, the camera focuses on the focusing frame. Press the shutterbutton all the way down to shoot images.To cancel focusing with touch operations, touch or press the center of the control wheel if shooting with themonitor, and press the center of the control wheel if shooting with the viewfinder.
3.
Select a [Focus Area] other than [Flexible Spot] or [Expand Flexible Spot].1.MENU → (Camera Settings1) → [Center Lock-on AF] → [Off].2.Touch the subject on which you want to focus before or during recording.
After focusing on the area that you touched, the focus mode switches to manual focus. You can adjust the focusby rotating the control ring.To cancel spot focus, touch or press the center of the control wheel.
3.
98

NoteThe touch focus function is not available in the following situations:
When the shooting mode is set to [Sweep Panorama].When [Focus Mode] is set to [Manual Focus].When using the digital zoom
Related TopicTouch OperationTouch Panel/Pad
4-745-578-11(1) Copyright 2018 Sony Corporation
99

Help Guide
Digital Still CameraDSC-HX99
Touch Pad Settings
You can adjust settings related to touch pad operations during viewfinder shooting.
Menu item detailsOperation in V Orien.:Sets whether to enable touch pad operations during vertically oriented viewfinder shooting. You can prevent erroneousoperations during vertically oriented shooting caused by your nose, etc. touching the monitor.Touch Pos. Mode:Sets whether to move the focusing frame to the position touched on the screen ([Absolute Position]), or move thefocusing frame to the desired position based on the direction of dragging and the amount of movement ([RelativePosition]).Operation Area:Sets the area to be used for touch pad operations. Restricting the operational area can prevent erroneous operationscaused by your nose, etc. touching the monitor.
About Touch Positioning ModeSelecting [Absolute Position] lets you move the focusing frame to a distant position more quickly because you candirectly specify the position of the focusing frame with touch operations.
Selecting [Relative Position] lets you operate the touch pad from wherever is easiest, without having to move your fingerover a wide area.
HintIn touch pad operations when [Touch Pos. Mode] is set to [Absolute Position], the area set in [Operation Area] is treated as theentire screen.
MENU→ (Setup) → [Touch Pad Settings] → desired setting.1
100

Related TopicTouch Operation
4-745-578-11(1) Copyright 2018 Sony Corporation
101

Help Guide
Digital Still CameraDSC-HX99
JPEG Image Size (still image)
The larger the image size, the more detail will be reproduced when the image is printed on large-format paper. Thesmaller the image size, the more images can be recorded.
Menu item details
NoteWhen [ File Format] is set to [RAW] or [RAW & JPEG], the image size for RAW images corresponds to “L.”
Related TopicAspect Ratio (still image)
MENU → (Camera Settings1) → [ JPEG Image Size] → desired setting.1
When [ Aspect Ratio] is set to 3:2
L: 16M 4896×3264 pixels
M: 8.9M 3648×2432 pixels
S: 4.5M 2592×1728 pixels
When [ Aspect Ratio] is set to 4:3
L: 18M 4896×3672 pixels
M: 10M 3648×2736 pixels
S: 5.0M 2592×1944 pixels
VGA 640×480 pixels
When [ Aspect Ratio] is set to 16:9
L: 13M 4896×2752 pixels
M: 7.5M 3648×2056 pixels
S: 2.1M 1920×1080 pixels
When [ Aspect Ratio] is set to 1:1
L: 13M 3664×3664 pixels
M: 7.5M 2736×2736 pixels
S: 3.7M 1920×1920 pixels
102

4-745-578-11(1) Copyright 2018 Sony Corporation
103

Help Guide
Digital Still CameraDSC-HX99
JPEG Quality (still image)
Selects the JPEG image quality when [ File Format] is set to [RAW & JPEG] or [JPEG].
Menu item detailsExtra fine/Fine/Standard:Since the compression rate increases from [Extra fine] to [Fine] to [Standard], the file size decreases in the same order.This allows more files to be recorded on one memory card, but the image quality is lower.
Related TopicFile Format (still image)
4-745-578-11(1) Copyright 2018 Sony Corporation
MENU → (Camera Settings1) → [ JPEG Quality] → desired setting.1
104

Help Guide
Digital Still CameraDSC-HX99
Aspect Ratio (still image)
Menu item details3:2:Same aspect ratio as 35 mm plate film4:3:An aspect ratio suitable for viewing on a TV that does not support high definition16:9:An aspect ratio suitable for viewing on a TV that supports high definition1:1:The horizontal and vertical ratio is equal.
4-745-578-11(1) Copyright 2018 Sony Corporation
MENU → (Camera Settings1) → [ Aspect Ratio] → desired setting.1
105

Help Guide
Digital Still CameraDSC-HX99
File Format (still image)
Sets the file format for still images.
Menu item detailsRAW:Digital processing is not performed on this file format. Select this format to process images on a computer forprofessional purposes.RAW & JPEG:A RAW image and a JPEG image are created at the same time. This is suitable when you need two image files, a JPEGfor viewing, and a RAW for editing.JPEG:The image is recorded in the JPEG format. About RAW images
To open a RAW image file recorded with this camera, the software Imaging Edge is needed. With Imaging Edge, youcan open a RAW image file, then convert it into a popular image format such as JPEG or TIFF, or readjust the whitebalance, saturation or contrast of the image.You cannot apply [Auto HDR] or [Picture Effect] functions with RAW images.RAW images shot by the camera are recorded in the compressed RAW format.
NoteIf you do not intend to edit the images on your computer, we recommend that you record in JPEG format.
You cannot add DPOF (print order) registration marks to RAW images.
Related TopicJPEG Image Size (still image)
4-745-578-11(1) Copyright 2018 Sony Corporation
MENU → (Camera Settings1) → [ File Format] → desired setting.1
106

Help Guide
Digital Still CameraDSC-HX99
Panorama: Size
Sets the image size when shooting panoramic images. The image size varies depending on the [Panorama: Direction]setting.
Menu item detailsWhen [Panorama: Direction] is set to [Up] or [Down]Standard: 3872×2160Wide: 5536×2160
When [Panorama: Direction] is set to [Left] or [Right]Standard: 8192×1856Wide: 12416×1856
Related TopicSweep PanoramaPanorama: Direction
4-745-578-11(1) Copyright 2018 Sony Corporation
MENU → (Camera Settings1) → [Panorama: Size] → desired setting.1
107

Help Guide
Digital Still CameraDSC-HX99
Panorama: Direction
Sets the direction to pan the camera when shooting panoramic images.
Menu item detailsRight:Pan the camera from the left to the right.Left:Pan the camera from the right to the left.Up:Pan the camera from the bottom to the top.Down:Pan the camera from the top to the bottom.
Related TopicSweep Panorama
4-745-578-11(1) Copyright 2018 Sony Corporation
MENU → (Camera Settings1) → [Panorama: Direction] → desired setting.1
108

Help Guide
Digital Still CameraDSC-HX99
List of mode dial function
You can switch the shooting mode according to the subject or purpose of shooting.
Available functions (Auto Mode):
Allows you to shoot still images of any subject under any condition with good results by setting the values determinedappropriate by the product.P (Program Auto): Allows you to shoot with the exposure adjusted automatically (both the shutter speed and the aperture value (F value)).Also you can select various settings using the menu.A (Aperture Priority): Allows you to adjust the aperture and shoot when you want to blur the background, etc.S (Shutter Priority): Allows you to shoot fast-moving subjects etc., by manually adjusting the shutter speed.M (Manual Exposure): Allows you to shoot still images with the desired exposure by adjusting the exposure (both the shutter speed and theaperture value (F value)).1/2(Memory recall): Allows you to shoot an image after recalling often-used modes or numeric settings registered in advance.
(Movie): Allows you to change the exposure mode for movie recording.
(Sweep Panorama): Allows you to shoot a panoramic image by compositing the images.SCN (Scene Selection): Allows you to shoot with preset settings according to the scene.
Related TopicIntelligent AutoSuperior AutoProgram AutoAperture PriorityShutter Priority
Turn the mode dial to select the desired shooting mode.1
109

Manual ExposureRecall (Camera Settings1/Camera Settings2)Movie: Exposure ModeSweep PanoramaScene Selection
4-745-578-11(1) Copyright 2018 Sony Corporation
110
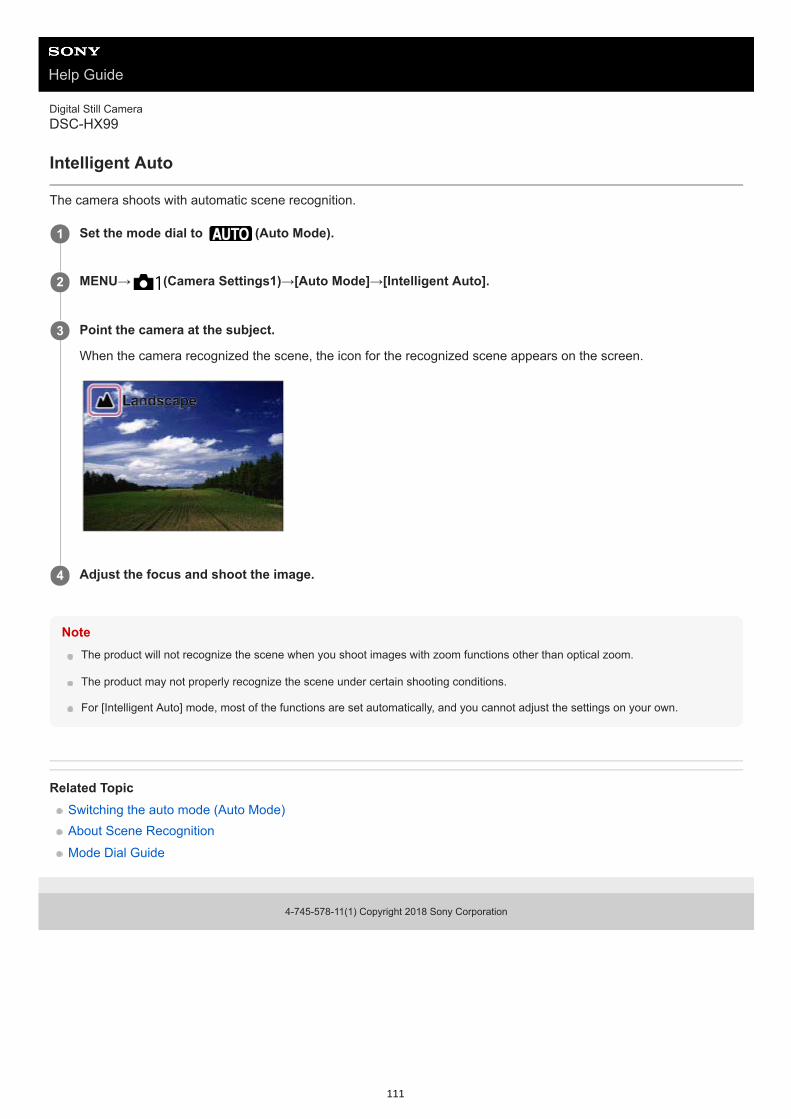
Help Guide
Digital Still CameraDSC-HX99
Intelligent Auto
The camera shoots with automatic scene recognition.
NoteThe product will not recognize the scene when you shoot images with zoom functions other than optical zoom.
The product may not properly recognize the scene under certain shooting conditions.
For [Intelligent Auto] mode, most of the functions are set automatically, and you cannot adjust the settings on your own.
Related TopicSwitching the auto mode (Auto Mode)About Scene RecognitionMode Dial Guide
4-745-578-11(1) Copyright 2018 Sony Corporation
Set the mode dial to (Auto Mode).1
MENU→ (Camera Settings1)→[Auto Mode]→[Intelligent Auto].2
Point the camera at the subject.
When the camera recognized the scene, the icon for the recognized scene appears on the screen.
3
Adjust the focus and shoot the image.4
111

Help Guide
Digital Still CameraDSC-HX99
Superior Auto
The camera shoots with automatic scene recognition. This mode takes clear images of dark or backlit scenes.
For low-lit or backlit scenes, if necessary the camera may shoot multiple images and create a composite image, etc., torecord higher quality images than in Intelligent Auto mode.
NoteWhen the product is used to create composite images, the recording process takes longer than usual. In this case, the (overlay icon) is displayed and the shutter sound is heard multiple times, but only one image is recorded.
When the (overlay icon) is displayed, be sure not to move the camera before the multiple shots are recorded.
The product will not recognize the scene when you use zoom functions other than optical zoom.
The product may not properly recognize a scene under some shooting conditions.
When [ File Format] is set to [RAW] or [RAW & JPEG], the product cannot create a composite image.
For [Superior Auto] mode, most of the functions are set automatically, and you cannot adjust the settings on your own.
Related TopicSwitching the auto mode (Auto Mode)Mode Dial GuideAbout Scene Recognition
Set the mode dial to (Auto Mode).1
MENU → (Camera Settings1) → [Auto Mode] → [Superior Auto].2
Point the camera to the subject.
When the camera recognizes a scene, scene recognition icon appears on the screen. If necessary, (overlayicon) may appear.
3
Adjust the focus and shoot the image.4
112

4-745-578-11(1) Copyright 2018 Sony Corporation
113

Help Guide
Digital Still CameraDSC-HX99
Switching the auto mode (Auto Mode)
This camera is equipped with the following two automatic shooting modes: [Intelligent Auto] and [Superior Auto]. You canswitch the auto mode to shoot according to the subject and your preferences.
Menu item details Intelligent Auto:
Allows you to shoot with automatic scene recognition. Superior Auto:
Allows you to shoot with automatic scene recognition. This mode takes clear images of dark or backlit scenes.
NoteIn [Superior Auto] mode, the recording process takes longer, since the product creates a composite image. In this case, the (overlay icon) is displayed and the shutter sound is heard multiple times, but only one image is recorded.
In [Superior Auto] mode and when the (overlay icon) is displayed, be sure not to move the camera before the multiple shotsare recorded.
For [Intelligent Auto] and [Superior Auto] mode, most of the functions are set automatically, and you cannot adjust the settings onyour own.
Related TopicIntelligent AutoSuperior AutoProgram Auto
4-745-578-11(1) Copyright 2018 Sony Corporation
Set the mode dial to .1
MENU → (Camera Settings1) → [Auto Mode] → desired setting.2
114

Help Guide
Digital Still CameraDSC-HX99
About Scene Recognition
Scene Recognition operates in [Intelligent Auto] mode and [Superior Auto] mode.
This function allows the product to automatically recognize the shooting conditions and shoot the image.
Scene Recognition
When the product recognizes certain scenes, the following icons and guides are displayed on the first line:
(Portrait) (Infant) (Night Portrait)
(Night Scene) (Backlight Portrait) (Backlight) (Landscape)
(Macro) (Spotlight)
(Low Light)
When the product recognizes certain conditions, the following icons are displayed on the second line:
(Tripod) (Walk)*
(Move) (Move (Bright)) (Move (Dark))
* The condition (Walk) is recognized only when [ SteadyShot] is set to [Active] or [Intelligent Active].
Related TopicIntelligent AutoSuperior Auto
4-745-578-11(1) Copyright 2018 Sony Corporation
115

Help Guide
Digital Still CameraDSC-HX99
Program Auto
Allows you to shoot with the exposure adjusted automatically (both the shutter speed and the aperture value).
You can set shooting functions such as [ISO].
Program ShiftWhen you are not using a flash, you can change the shutter speed and aperture (F-value) combination without changingthe appropriate exposure set by the camera.Turn the control wheel to select the aperture value and shutter speed combination.
“P” on the screen changes to “P*” when you turn the control wheel.To cancel program shift, set the shooting mode to other than [Program Auto], or turn off the camera.
NoteAccording to the brightness of the environment, the program shift may not be used.
Set the shooting mode to another one than “P” or turn off the power to cancel the setting you made.
When the brightness changes, the aperture (F-value) and shutter speed also change while maintaining the shift amount.
Related TopicSwitching the auto mode (Auto Mode)
4-745-578-11(1) Copyright 2018 Sony Corporation
Set the mode dial to P (Program Auto).1
Set the shooting functions to your desired settings.2
Adjust the focus and shoot the subject.3
116

Help Guide
Digital Still CameraDSC-HX99
Aperture Priority
You can shoot by adjusting the aperture and changing the range in focus, or by defocusing the background.
NoteThe brightness of the image on the screen may differ from the actual image being shot.
4-745-578-11(1) Copyright 2018 Sony Corporation
Set the mode dial to A (Aperture Priority).1
Select the desired value by turning the control wheel.
Smaller F-value: The subject is in focus, but objects in front of and beyond the subject are blurred. Larger F-value: The subject and its foreground and background are all in focus.If the aperture value you have set is not suitable for appropriate exposure, the shutter speed on the shootingscreen will blink. If this happens, change the aperture value.
2
Adjust the focus and shoot the subject.
The shutter speed is automatically adjusted to obtain proper exposure.
3
117
Help Guide
Digital Still CameraDSC-HX99
Shutter Priority
You can express the movement of a moving subject in various ways by adjusting the shutter speed, for example, at theinstant of the movement with high speed shutter, or as a trailing image with low speed shutter.
HintUse a tripod to prevent camera-shake when you have selected a slow shutter speed.
When you shoot indoor sports scenes, set the ISO sensitivity to a higher value.
NoteThe SteadyShot warning indicator does not appear in shutter speed priority mode.
When the shutter speed is 1/3 second(s) or longer, noise reduction will be done after shooting for the same amount of time thatthe shutter was open. However, you cannot shoot any more while noise reduction is in progress.
The brightness of the image on the screen may differ from the actual image being shot.
4-745-578-11(1) Copyright 2018 Sony Corporation
Set the mode dial to S (Shutter Priority).1
Select the desired value by turning the control wheel.
If proper exposure cannot be obtained after setup, the aperture value on the shooting screen blinks. If thishappens, change the shutter speed.
2
Adjust the focus and shoot the subject.
The aperture is automatically adjusted to obtain proper exposure.
3
118

Help Guide
Digital Still CameraDSC-HX99
Manual Exposure
You can shoot with the desired exposure setting by adjusting both the shutter speed and aperture.
HintBy assigning [AEL hold] or [AEL toggle] to a desired key using [ Custom Key] or [ Custom Key] and turning the controlring or control wheel while pressing that key, you can change the shutter speed and aperture (F-value) combination withoutchanging the set exposure value. (Manual shift)
NoteThe Metered Manual indicator does not appear when [ISO] is set to [ISO AUTO].
When the amount of ambient light exceeds the metering range of the Metered Manual, the Metered Manual indicator flashes.
The SteadyShot warning indicator does not appear in manual exposure mode.
The brightness of the image on the screen may differ from the actual image being shot.
4-745-578-11(1) Copyright 2018 Sony Corporation
Set the mode dial to M (Manual Exposure).1
Press the down side of the control wheel to select the shutter speed or aperture value, then turn the controlwheel to select a value.
You can also set [ISO] to [ISO AUTO] in manual exposure mode. The ISO value automatically changes toachieve the appropriate exposure using the aperture value and shutter speed you have set.When [ISO] is set to [ISO AUTO], the ISO value indicator will blink if the value you have set is not suitable forappropriate exposure. If this happens, change the shutter speed or aperture value.When [ISO] is set to other than [ISO AUTO], use MM (Metered Manual)* to check the exposure value. Toward +: Images become brighter. Toward -: Images become darker. 0: Appropriate exposure analyzed by the product.
2
Indicates under/over for appropriate exposure.*It is displayed using a numerical value on the monitor and with a metering indicator on the viewfinder.
Adjust the focus and shoot the subject.3
119

Help Guide
Digital Still CameraDSC-HX99
Sweep Panorama
Allows you to create a single panoramic image from multiple images shot while panning the camera.
Set the mode dial to (Sweep Panorama).1
Point the camera at the subject.2
While pressing the shutter button halfway down, aim the camera at one end of the desired panoramiccomposition.
You can change the shooting direction prior to shooting using the control wheel.
(A) This part will not be shot.
3
Press the shutter button fully down.4
Pan the camera to the end of the guide in the direction of the arrow on the monitor.5
120

NoteIf the entire angle of the panoramic shot is not achieved within the set time, a gray area occurs in the composite image. If thishappens, move the product faster to record the full panoramic image.
When [Wide] is selected for [Panorama: Size], the entire angle of the panoramic shot may not be achieved within the given time.If this happens, try shooting after changing [Panorama: Size] to [Standard].
Since several images are stitched together, the stitched part may not be recorded smoothly in some cases.
When a light source such as a fluorescent light flickers, the brightness and color of a stitched image may not be consistent.
When the whole angle of panoramic shooting and the AE/AF locked angle are very different in brightness and focus, the shootingmay not be successful. If this happens, change AE/AF locked angle and shoot again.
The following situations are not suited for shooting Sweep Panorama:Moving subjects.Subjects that are too close to the product.Subjects with continuously similar patterns, such as the sky, beach, or a lawn.Subjects with constant change such as waves or water falls.Subjects with brightness widely different from its surroundings such as the sun or a light bulb.
The Sweep Panorama shooting may be interrupted in the following situations:When the camera is panned too fast or too slow.When the camera shakes too much.
Continuous shooting is performed during shooting Sweep Panorama and the shutter sound keeps beeping until shooting isfinished.
The following functions are not available with Sweep Panorama:Smile ShutterSet. Face Prty in AFFace Prty in Mlti Mtr
Auto Obj. FramingDRO/Auto HDRPicture Effect
Soft Skin EffectCenter Lock-on AFZoomDrive ModeBright Monitoring
The values of the settings for some functions are fixed with Sweep Panorama, as follows:[ISO] is fixed to [ISO AUTO].[Focus Area] is fixed to [Wide].[ High ISO NR] is fixed to [Normal].[Flash Mode] is fixed to [Flash Off].
(B) Guidance bar
121

Related TopicPanorama: SizePanorama: Direction
4-745-578-11(1) Copyright 2018 Sony Corporation
122

Help Guide
Digital Still CameraDSC-HX99
Scene Selection
Allows you to shoot with preset settings according to the scene.
Menu item details Portrait:
Blurs background and sharpens the subject. Accentuates the skin tones softly.
Macro:Shoots close-ups of the subjects, such as flowers, insects, food, or small items.
Landscape:Shoots the entire range of a scenery in sharp focus with vivid colors.
Sunset:Shoots the red of the sunset beautifully.
Night Scene:Shoots night scenes without losing the dark atmosphere.
Set the mode dial to SCN (Scene Selection).1
Turn the control wheel to select the desired setting.2
123

Hand-held Twilight:Shoots night scenes with less noise and blur without using a tripod. A burst of shots are taken, and image processing isapplied to reduce subject blur, camera-shake, and noise.
Night Portrait:Shoots night scene portraits using the flash. The flash does not pop up automatically. Pop up the flash manually before shooting.
Anti Motion Blur:Allows you to shoot indoor shots without using the flash and reduces subject blur. The product shoots burst images andcombines them to create the image, reducing subject blur and noise.
Pet:Allows you to shoot images of your pet with the best settings.
Gourmet:Allows you to shoot food arrangements in delicious and bright colors.
Fireworks:Allows you to shoot images of fireworks in all their splendor.
124
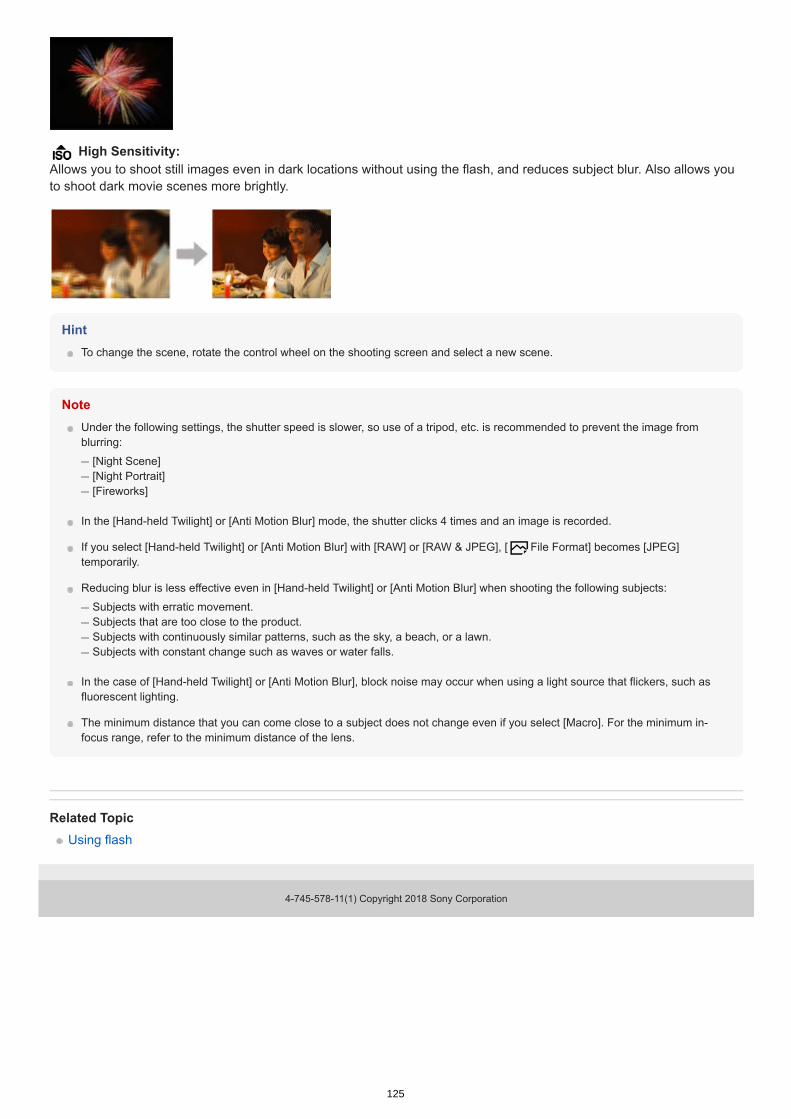
High Sensitivity:Allows you to shoot still images even in dark locations without using the flash, and reduces subject blur. Also allows youto shoot dark movie scenes more brightly.
HintTo change the scene, rotate the control wheel on the shooting screen and select a new scene.
NoteUnder the following settings, the shutter speed is slower, so use of a tripod, etc. is recommended to prevent the image fromblurring:
[Night Scene][Night Portrait][Fireworks]
In the [Hand-held Twilight] or [Anti Motion Blur] mode, the shutter clicks 4 times and an image is recorded.
If you select [Hand-held Twilight] or [Anti Motion Blur] with [RAW] or [RAW & JPEG], [ File Format] becomes [JPEG]temporarily.
Reducing blur is less effective even in [Hand-held Twilight] or [Anti Motion Blur] when shooting the following subjects:Subjects with erratic movement.Subjects that are too close to the product.Subjects with continuously similar patterns, such as the sky, a beach, or a lawn.Subjects with constant change such as waves or water falls.
In the case of [Hand-held Twilight] or [Anti Motion Blur], block noise may occur when using a light source that flickers, such asfluorescent lighting.
The minimum distance that you can come close to a subject does not change even if you select [Macro]. For the minimum in-focus range, refer to the minimum distance of the lens.
Related TopicUsing flash
4-745-578-11(1) Copyright 2018 Sony Corporation
125

Help Guide
Digital Still CameraDSC-HX99
Recall (Camera Settings1/Camera Settings2)
Allows you to shoot an image after recalling often-used modes or camera settings registered with [ /Memory] in advance.
NoteIf you set [ / Recall] after completing the shooting settings, the registered settings are given priority and theoriginal settings may become invalid. Check the indicators on the screen before shooting.
Related TopicMemory (Camera Settings1/Camera Settings2)
4-745-578-11(1) Copyright 2018 Sony Corporation
Set the mode dial to 1, 2 (Memory recall).1
Press the center of the control wheel to confirm.2
126

Help Guide
Digital Still CameraDSC-HX99
Movie: Exposure Mode
You can set the exposure mode for movie shooting.
Menu item details Program Auto:
Allows you to shoot with the exposure adjusted automatically (both the shutter speed and the aperture value). Aperture Priority:
Allows you to shoot after adjusting the aperture value manually. Shutter Priority:
Allows you to shoot after adjusting the shutter speed manually. Manual Exposure:
Allows you to shoot after adjusting the exposure (both the shutter speed and the aperture value) manually.
4-745-578-11(1) Copyright 2018 Sony Corporation
Set the mode dial to (Movie).1
MENU→ (Camera Settings2) → [ Exposure Mode] → desired setting.2
Press the MOVIE (movie) button to start recording.
Press the MOVIE button again to stop recording.
3
127

Help Guide
Digital Still CameraDSC-HX99
Exposure Comp.
Normally, exposure is set automatically (auto exposure). Based on the exposure value set by auto exposure, you canmake the entire image brighter or darker if you adjust [Exposure Comp.] to the plus side or minus side, respectively(exposure compensation).
/ (Exposure Comp.) on the control wheel → press the left/right side of the control wheel or turn thecontrol wheel, and select the desired setting.
+ (over) side: Images become brighter.- (under) side: Images become darker.
When using [Intelligent Auto] or [Superior Auto], you can display the setting screen for [Photo Creativity] bypressing / .
You can also select MENU → (Camera Settings1) → [Exposure Comp.].
You can adjust the exposure compensation value within the range of -3.0 EV to +3.0 EV.You can confirm the exposure compensation value that you set on the shooting screen.Monitor
Viewfinder
1
128

NoteYou cannot perform the exposure compensation in the following shooting modes:
[Intelligent Auto][Superior Auto][Scene Selection]
When using [Manual Exposure], you can perform the exposure compensation only when [ISO] is set to [ISO AUTO].
You can adjust the exposure compensation value within the range of -2.0 EV to +2.0 EV for movies.
If you shoot a subject in extremely bright or dark conditions, or when you use the flash, you may not be able to get a satisfactoryeffect.
Related TopicCont. BracketSingle BracketZebra Setting
4-745-578-11(1) Copyright 2018 Sony Corporation
129
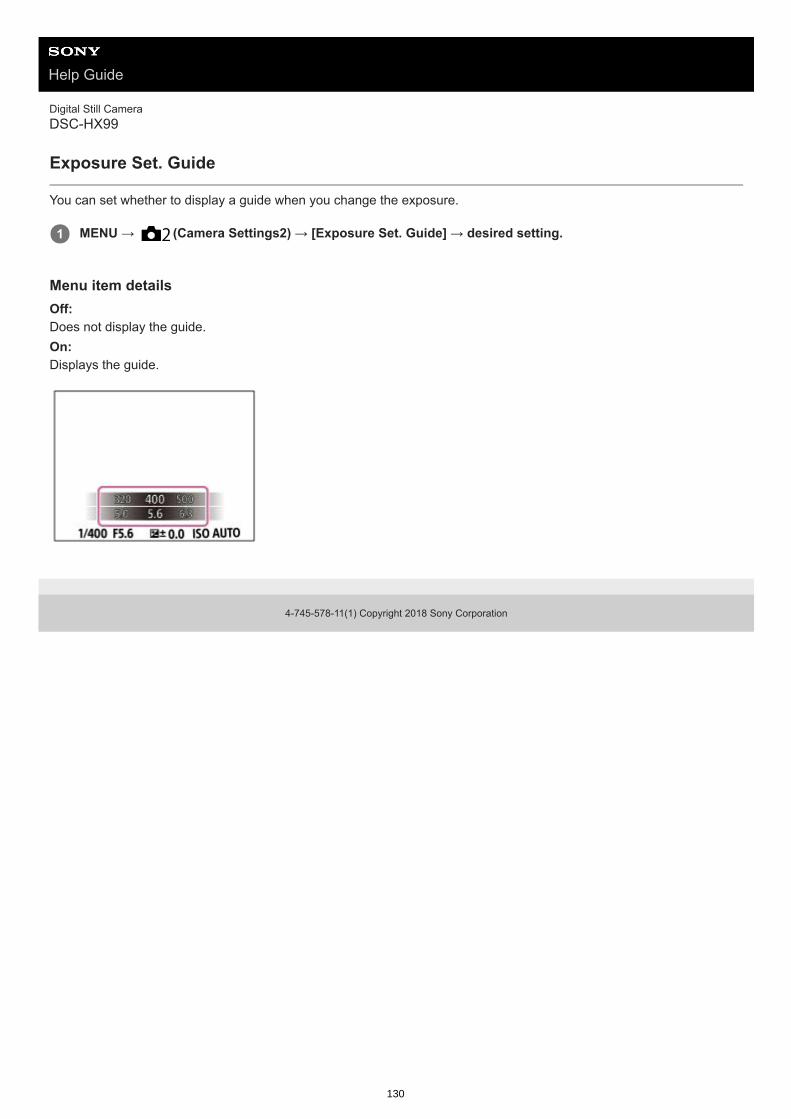
Help Guide
Digital Still CameraDSC-HX99
Exposure Set. Guide
You can set whether to display a guide when you change the exposure.
Menu item detailsOff:Does not display the guide.On:Displays the guide.
4-745-578-11(1) Copyright 2018 Sony Corporation
MENU → (Camera Settings2) → [Exposure Set. Guide] → desired setting.1
130
Help Guide
Digital Still CameraDSC-HX99
Metering Mode
Selects the metering mode that sets which part of the screen to measure for determining the exposure.
Menu item details Multi:
Measures light on each area after dividing the total area into multiple areas and determines the proper exposure of theentire screen (Multi-pattern metering).
Center:Measures the average brightness of the entire screen, while emphasizing the central area of the screen (Center-weighted metering).
Spot:Measures only the central area (Spot metering). This mode is suitable for measuring light on a specified part of the entirescreen. The size of the metering circle can be selected from [Spot: Standard] and [Spot: Large].
Entire Screen Avg.:Measures the average brightness of the entire screen. The exposure will be stable even if the composition or the positionof the subject changes.
Highlight:Measures the brightness while emphasizing the highlighted area on the screen. This mode is suitable for shooting thesubject while avoiding overexposure.
HintWhen [Multi] is selected and [Face Prty in Mlti Mtr] is set to [On], the camera measures brightness based on detected faces.
When [Metering Mode] is set to [Highlight] and the [D-Range Opt.] or [Auto HDR] function is activated, the brightness and thecontrast will be corrected automatically by dividing the image into small areas and analyzing the contrast of light and shadow.Make settings based on the shooting circumstances.
Note[Metering Mode] is locked to [Multi] in the following shooting modes:
[Intelligent Auto][Superior Auto][Scene Selection]Other zoom functions than the optical zoom
In [Highlight] mode, the subject may be dark if a brighter part exists on the screen.
Related TopicAE lockFace Prty in Mlti MtrD-Range Opt. (DRO)Auto HDR
4-745-578-11(1) Copyright 2018 Sony Corporation
MENU → (Camera Settings1) → [Metering Mode] → desired setting.1
131

132

Help Guide
Digital Still CameraDSC-HX99
Face Prty in Mlti Mtr
Sets whether the camera measures brightness based on detected faces when [Metering Mode] is set to [Multi].
Menu item detailsOn:The camera measures brightness based on detected faces.Off:The camera measures brightness using the [Multi] setting, without detecting faces.
NoteWhen the shooting mode is set to [Intelligent Auto] or [Superior Auto], [Face Prty in Mlti Mtr] is locked to [On].
Related TopicMetering Mode
4-745-578-11(1) Copyright 2018 Sony Corporation
MENU → (Camera Settings1) → [Face Prty in Mlti Mtr] → desired setting.1
133

Help Guide
Digital Still CameraDSC-HX99
AE lock
When the contrast between the subject and background is high, such as when shooting a backlit subject or a subjectnear a window, meter the light at a spot where the subject appears to have the appropriate brightness and lock theexposure before shooting. To reduce the brightness of the subject, meter the light at a spot brighter than the subject andlock the exposure of the entire screen. To make the subject brighter, meter the light at a spot darker than the subject andlock the exposure of the entire screen.
HintIf you select the [AEL hold] function in [ Custom Key] or [ Custom Key], you can lock the exposure as long as you areholding down the button. You cannot set the [AEL hold] function to [Left Button] or [Right Button].
Note[ AEL hold] and [ AEL toggle] are not available when using zoom functions other than optical zoom.
4-745-578-11(1) Copyright 2018 Sony Corporation
MENU → (Camera Settings2) → [ Custom Key] or [ Custom Key] → desired key, then assign[AEL toggle] to the key.
1
Adjust the focus on the spot at which the exposure is adjusted.2
Press the button to which [AEL toggle] is assigned.
The exposure is locked, and (AE lock) is displayed.
3
Focus on the subject again and press the shutter button.
To cancel the exposure lock, press the button to which the [AEL toggle] function is assigned.
4
134

Help Guide
Digital Still CameraDSC-HX99
Zebra Setting
Sets a zebra pattern, which appears over part of an image if the brightness level of that part meets the IRE level that youhave set. Use this zebra pattern as a guide to adjust the brightness.
Menu item detailsZebra Display:Sets whether to display the zebra pattern.Zebra Level:Adjusts the brightness level of the zebra pattern.
HintYou can register values to check the correct exposure or overexposure as well as the brightness level for [Zebra Level]. Thesettings for correct exposure confirmation and overexposure confirmation are registered to [Custom1] and [Custom2] respectivelyin the default settings.
To check the correct exposure, set a standard value and the range for the brightness level. The zebra pattern will appear onareas that fall within the range you set.
To check the overexposure, set a minimum value for the brightness level. The zebra pattern will appear over areas with abrightness level equal to or higher than the value you set.
NoteThe zebra pattern is not displayed on devices connected via HDMI.
4-745-578-11(1) Copyright 2018 Sony Corporation
MENU → (Camera Settings2) → [Zebra Setting] → desired setting.1
135

Help Guide
Digital Still CameraDSC-HX99
D-Range Opt. (DRO)
By dividing the image into small areas, the product analyzes the contrast of light and shadow between the subject andthe background, and creates an image with the optimal brightness and gradation.
Menu item details D-Range Optimizer: Auto:
Corrects the brightness automatically. D-Range Optimizer: Lv1 ― D-Range Optimizer: Lv5:
Optimizes the gradation of a recorded image for each divided area. Select the optimization level from Lv1 (weak) to Lv5(strong).
NoteIn the following situations, [D-Range Opt.] is fixed to [Off]:
The shooting mode is set to [Sweep Panorama].Multi Frame NRWhen [Picture Effect] is set to other than [Off]
[DRO/Auto HDR] is fixed to [Off] when the following modes are selected in [Scene Selection].[Sunset][Night Scene][Night Portrait][Hand-held Twilight][Anti Motion Blur][Fireworks]
The setting is fixed to [D-Range Optimizer: Auto] when [Scene Selection] modes other than the above modes are selected.
When shooting with [D-Range Opt.], the image may be noisy. Select the proper level by checking the recorded image, especiallywhen you enhance the effect.
4-745-578-11(1) Copyright 2018 Sony Corporation
MENU → (Camera Settings1) → [DRO/Auto HDR] → [D-Range Opt.].1
Select the desired setting using the left/right sides of the control wheel.2
136

Help Guide
Digital Still CameraDSC-HX99
Auto HDR
Shoots three images using different exposures and combines the images with correct exposure, the bright parts of anunderexposed image, and the dark parts of an overexposed image to create images with a greater range of gradation(High Dynamic Range). One image with proper exposure and one overlaid image are recorded.
Menu item details Auto HDR: Exposure Diff. Auto:
Corrects the brightness automatically. Auto HDR: Exposure Diff. 1.0EV ― Auto HDR: Exposure Diff. 6.0EV:
Sets the exposure difference, based on the contrast of the subject. Select the optimization level from 1.0EV (weak) to6.0EV (strong). For example, if you set the exposure value to 2.0 EV, three images will be composed with the following exposure levels:-1.0 EV, correct exposure and +1.0 EV.
HintThe shutter is released three times for one shot. Be careful about the following:
Use this function when the subject is motionless or does not flash light.Do not change the composition before shooting.
NoteThis function is not available when the [ File Format] is [RAW] or [RAW & JPEG].
[Auto HDR] is not available in the following shooting modes:[Intelligent Auto][Superior Auto][Sweep Panorama][Scene Selection]
[Auto HDR] is not available in the following situations:When [Multi Frame NR] is selected.When [Picture Effect] is set to other than [Off].
You cannot start the next shot until the capture process is completed after you shoot.
You may not obtain the desired effect depending on the luminance difference of a subject and the shooting conditions.
When the flash is used, this function has little effect.
When the contrast of the scene is low or when product shake or subject blur occurs, you may not obtain good HDR images. will be displayed over the recorded image to inform you when the camera detects image blurring. Change the
composition or re-shoot the image carefully to avoid image blur, as needed.
4-745-578-11(1) Copyright 2018 Sony Corporation
MENU → (Camera Settings1) → [DRO/Auto HDR] → [Auto HDR].1
Select the desired setting using the left/right sides of the control wheel.2
137
Help Guide
Digital Still CameraDSC-HX99
ISO
Sensitivity to light is expressed by the ISO number (recommended exposure index). The larger the number, the higherthe sensitivity.
Menu item detailsMulti Frame NR:Combines continuous shots to create an image with less noise. Press the right side to display the setting screen, thenselect a desired value using the top/bottom sides of the control wheel.Select the desired ISO number from ISO AUTO or ISO 100 – ISO 12800.ISO AUTO:Sets the ISO sensitivity automatically.ISO 80 – ISO 6400:Sets the ISO sensitivity manually. Selecting a larger number increases the ISO sensitivity.
HintYou can change the range of ISO sensitivity that is set automatically in [ISO AUTO] mode. Select [ISO AUTO] and press the rightside of the control wheel, and set the desired values for [ISO AUTO Maximum] and [ISO AUTO Minimum]. The values are alsoapplied when shooting in [ISO AUTO] mode under [Multi Frame NR].
NoteWhen [ File Format] is set to [RAW] or [RAW & JPEG], [Multi Frame NR] cannot be selected.
When [Multi Frame NR] is selected, the flash, [D-Range Opt.], or [Auto HDR] cannot be used.
When [Picture Effect] is set to other than [Off], [Multi Frame NR] cannot be selected.
[ISO AUTO] is selected when using the following functions:[Intelligent Auto][Superior Auto][Scene Selection][Sweep Panorama]
The higher the ISO value, the more noise will appear on the images.
When shooting movies, ISO values between 80 and 6400 are available.
When you use [Multi Frame NR], it takes some time for the product to perform the overlay processing of images.
When you select [ISO AUTO] with the shooting mode set to [P], [A], [S] or [M], the ISO sensitivity will be automatically adjustedwithin the set range.
4-745-578-11(1) Copyright 2018 Sony Corporation
MENU → (Camera Settings1) → [ISO] → desired setting.1
138

Help Guide
Digital Still CameraDSC-HX99
The zoom features available with this product
The zoom feature of the product provides a higher magnification zoom by combining various zoom features. The icondisplayed on the screen changes, according to the selected zoom feature.
NoteThe default setting for the [Zoom Setting] is [Optical zoom only].
The default setting for the [ JPEG Image Size] is [L]. To use the smart zoom, change [ JPEG Image Size] to [M], [S] or[VGA].
Zooming is not available when shooting panoramic images.
The Smart Zoom, Clear Image Zoom and Digital Zoom functions are not available when shooting in the following situations:[ File Format] is set to [RAW] or [RAW & JPEG].[ Record Setting] is set to [120p]/[100p].
You cannot use the Smart Zoom function with movies.
When you use the Smart Zoom, Clear Image Zoom or Digital Zoom function, [Metering Mode] is fixed to [Multi].
When using the Smart Zoom, Clear Image Zoom or Digital Zoom function, the following functions are not available:Face Priority in AFFace Prty in Mlti MtrLock-on AF
Auto Obj. Framing
Related TopicZoomZoom SettingAbout zoom scaleZoom Speed
Optical zoom range Images are magnified within the optical zoom range of this product.
1.
Smart Zoom range ( ) Zoom images without causing the original quality to deteriorate by partially cropping an image (only when [ JPEGImage Size] is set to [M], [S] or [VGA]).
2.
Clear Image Zoom range ( ) Zoom images using an image process with less deterioration. When you set [Zoom Setting] to [On:ClearImageZoom] or [On:Digital Zoom], you can use this zoom function.
3.
Digital Zoom range ( ) You can magnify images using an image process. When you set [Zoom Setting] to [On:Digital Zoom], you can usethis zoom function.
4.
139

4-745-578-11(1) Copyright 2018 Sony Corporation
140

Help Guide
Digital Still CameraDSC-HX99
Zoom
Enlarge images using the W/T (zoom) lever when shooting.
HintWhen you select other than [Optical zoom only] for [Zoom Setting], you can exceed the zoom range of the optical zoom to zoomimages.
You can assign the zoom function to the control ring.
Related TopicZoom SettingThe zoom features available with this productZoom AssistZoom SpeedZoom Func. on Ring
4-745-578-11(1) Copyright 2018 Sony Corporation
Enlarge images with the W/T (zoom) lever when shooting.
Move the W/T (zoom) lever to the T side to zoom in and to the W side to zoom out.
1
141

Help Guide
Digital Still CameraDSC-HX99
Zoom Setting
You can select the zoom setting of the product.
Menu item detailsOptical zoom only:Limits the zoom range to the optical zoom. You can use the Smart Zoom function if you set [ JPEG Image Size] to[M], [S] or [VGA].On:ClearImage Zoom:Select this setting to use Clear Image Zoom. Even if the zoom range exceeds the optical zoom, the product magnifiesimages within the range in which image quality does not deteriorate significantly.On:Digital Zoom:When the zoom range of the Clear Image Zoom is exceeded, the product magnifies images to the largest scale.However, the image quality will deteriorate.
NoteSet [Optical zoom only] if you want to magnify images within the range in which image quality does not deteriorate.
Related TopicThe zoom features available with this productAbout zoom scaleZoom Speed
4-745-578-11(1) Copyright 2018 Sony Corporation
MENU → (Camera Settings2) → [Zoom Setting] → desired setting.1
142

Help Guide
Digital Still CameraDSC-HX99
About zoom scale
The zoom scale that is used in combination with the zoom of the lens changes according to the selected image size.
When [ Aspect Ratio] is [4:3]
Related TopicZoomThe zoom features available with this productZoom SettingJPEG Image Size (still image)
4-745-578-11(1) Copyright 2018 Sony Corporation
JPEG Image SizeZoom Setting
Optical zoom only (smart zoom) On:ClearImage Zoom On:Digital Zoom
L: 18M - Approx. 2.0× Approx. 4.0×
M: 10M Approx. 1.3× Approx. 2.7× Approx. 5.4×
S: 5.0M Approx. 1.9× Approx. 3.8× Approx. 7.6×
143

Help Guide
Digital Still CameraDSC-HX99
Zoom Assist
Zooms out temporarily and displays wider area when shooting a subject at the telephoto end (T end) of the zoom range.Quickly locates subjects you have lost track of and makes it easier to compose your shot. Be sure to assign the [ZoomAssist] function to a key using [ Custom Key] or [ Custom Key] in advance.
HintYou can change the size of the zoom assist frame by using the standard zoom function while pressing the key to which [ZoomAssist] has been assigned. After you release the key, the zoom scale changes to the new size of the zoom assist frame.
You can change how much to zoom out by selecting MENU → (Camera Settings2) → [Rng. of Zoom Assist].
NoteIf you press the shutter button all the way down while pressing the key, the previous zoom scale will not be restored and shootingwill be performed with the angle of view set during zoom assist.
When you use the [Zoom Assist] function during movie shooting, the captured area is not displayed inside the zoom assist framebut on the screen. In addition, the zoom sound may be recorded.
Related TopicRng. of Zoom Assist
4-745-578-11(1) Copyright 2018 Sony Corporation
Hold down the key to which you have assigned [Zoom Assist].
The zoom scale will become lower and the shooting screen display will zoom out. The angle of view before the keywas pressed is displayed as a frame (A: zoom assist frame).
1
Compose your shot so that the subject fits inside the zoom assist frame, and release the key.
The previous zoom scale is restored and the area inside the zoom assist frame is displayed full-screen.
2
144

Help Guide
Digital Still CameraDSC-HX99
Rng. of Zoom Assist
Selects how much to zoom out with the [Zoom Assist] function.
Menu item detailsS:Zooms out a small amount.M:Zooms out a medium amount.L:Zooms out a large amount.
Related TopicZoom Assist
4-745-578-11(1) Copyright 2018 Sony Corporation
MENU → (Camera Settings2) → [Rng. of Zoom Assist] → desired setting.1
145

Help Guide
Digital Still CameraDSC-HX99
Zoom Speed
Sets the zoom speed of the camera's zoom lever.
Menu item detailsNormal:Sets the zoom speed of the zoom lever to normal.Fast:Sets the zoom speed of the zoom lever to fast.
HintThe [Zoom Speed] settings are also used when you are zooming with a remote controller (sold separately) connected to thecamera.
NoteSelecting [Fast] increases the likelihood that the zoom sound will be recorded.
Related TopicZoomThe zoom features available with this productZoom Setting
4-745-578-11(1) Copyright 2018 Sony Corporation
MENU → (Camera Settings2) → [Zoom Speed] → desired setting.1
146

Help Guide
Digital Still CameraDSC-HX99
Zoom Func. on Ring
Sets the zoom functions when using the control ring to change zoom scales. The settings for [Zoom Func. on Ring] arevalid only when auto-focusing.
Menu item detailsStandard:Zooms in/out smoothly when you operate the zoom by turning the control ring.Quick:Zooms in/out to an angle of view corresponding to how far the control ring has been rotated.Step:Zooms in/out at certain angle steps when you operate the zoom by turning the control ring.
NoteIn the following situations, the zoom function activates as if [Zoom Func. on Ring] is set to [Standard], even if it is set to [Step].
When using the W/T (zoom) lever to change the zoom scale.When recording movies.When using zoom functions other than the optical zoom.
When the shooting mode is set to something other than [Intelligent Auto] or [Superior Auto], assign the [Zoom] function to thecontrol ring before using the control ring.
Selecting [Quick] increases the likelihood that the zoom sound will be recorded.
4-745-578-11(1) Copyright 2018 Sony Corporation
MENU → (Camera Settings2) → [Zoom Func. on Ring] → desired setting.1
147

Help Guide
Digital Still CameraDSC-HX99
White Balance
Corrects the tone effect of the ambient light condition to record a neutral white subject in white. Use this function whenthe color tones of the image did not come out as you expected, or when you want to change the color tones on purposefor photographic expression.
Menu item details Auto/ Daylight / Shade / Cloudy / Incandescent / Fluor.: Warm White / Fluor.: Cool White / Fluor.: Day White / Fluor.: Daylight / Flash : When you select a light source
that illuminates the subject, the product adjusts the color tones to suit to the selected light source (preset white balance).When you select [Auto], the product automatically detects the light source and adjusts the color tones.
C.Temp./Filter: Adjusts the color tones depending on the light source. Achieves the effect of CC (Color Compensation) filters forphotography.
Custom 1/Custom 2/Custom 3: Uses the white balance setting saved in [Custom Setup].
Custom Setup: Memorizes the basic white color under the light conditions for the shooting environment. Select a memorized custom white balance number.
HintYou can display the fine adjustment screen and perform fine adjustments of the color tones as required by pressing the right sideof the control wheel.
If the color tones do not come out as you expected in the selected settings, perform [WB bracket] shooting.
or is displayed only when [Priority Set in AWB] is set to [Ambience] or [White].
Note[White Balance] is fixed to [Auto] in the following shooting modes:
[Intelligent Auto][Superior Auto][Scene Selection]
If you use a mercury lamp or a sodium lamp as a light source, the accurate white balance will not be obtained because of thecharacteristics of the light. It is recommended to shoot images using a flash or select [Custom Setup].
Related TopicCapturing a basic white color in [Custom Setup] modePriority Set in AWBWB bracket
4-745-578-11(1) Copyright 2018 Sony Corporation
MENU → (Camera Settings1) → [White Balance] → desired setting.1
148

Help Guide
Digital Still CameraDSC-HX99
Priority Set in AWB
Selects which tone to prioritize when shooting under lighting conditions such as incandescent light when [White Balance]is set to [Auto].
Menu item details Standard:
Shoots with standard auto white balance. The camera automatically adjusts the color tones. Ambience:
Prioritizes the color tone of the light source. This is suitable when you want to produce a warm atmosphere. White:
Prioritizes a reproduction of white color when the color temperature of the light source is low.
Related TopicWhite Balance
4-745-578-11(1) Copyright 2018 Sony Corporation
MENU → (Camera Settings1) → [Priority Set in AWB] → desired setting.1
149

Help Guide
Digital Still CameraDSC-HX99
Capturing a basic white color in [Custom Setup] mode
In a scene where the ambient light consists of multiple types of light sources, it is recommended to use the custom whitebalance in order to accurately reproduce the whiteness. You can register 3 settings.
NoteThe message [Custom WB Error] indicates that the value is in the unexpected range, for example when the subject is too vivid.You can register the setting at this point, but it is recommended that you set the white balance again. When an error value is set,the indicator turns orange on the recording information display. The indicator will be displayed in white when the set valueis in the expected range.
If you use a flash when capturing a basic white color, the custom white balance will be registered with the lighting from the flash.Be sure to use a flash whenever you shoot with recalled settings that were registered with a flash.
4-745-578-11(1) Copyright 2018 Sony Corporation
MENU → (Camera Settings1) → [White Balance] → [Custom Setup].1
Hold the product so that the white area fully covers the circle located in the center of the screen, and thenpress the center of the control wheel.
After the shutter sound beeps, the calibrated values (Color Temperature and Color Filter) are displayed.
2
Select a registration number using the left/right sides of the control wheel, and then press the center.
The monitor returns to the recording information display while retaining the memorized custom white balancesetting.
The registered custom white balance setting will remain memorized until overwritten by the another setting.
3
150

Help Guide
Digital Still CameraDSC-HX99
Photo Creativity
[Photo Creativity] is a mode that allows you to operate the camera intuitively with a different screen display. When theshooting mode is set to (Intelligent Auto) or (Superior Auto), you can change the settings easily and shootimages.
NoteWhen [ File Format] is set to [RAW] or [RAW & JPEG], you cannot use [Photo Creativity].
When you record movies using the [Photo Creativity] function, you cannot change any settings during the recording.
If you switch the shooting mode to [Intelligent Auto] mode or [Superior Auto] mode, or turn off the product, the settings you havechanged revert to the default settings.
When the shooting mode is set to [Superior Auto], and you use [Photo Creativity], the product does not perform the overlayprocessing of images.
Related TopicPicture Effect
Set the mode dial to (Auto Mode).1
Set the shooting mode to (Intelligent Auto) or (Superior Auto).2
Press (Photo Creativity) on the control wheel.3
Select the item to be changed using the control wheel.
(Brightness):Adjusts brightness.
(Color):Adjusts color.
(Vividness):Adjusts vividness.
(Picture Effect):You can select a desired effect and shoot images with the specific texture.
4
Select the desired settings.
You can use some settings together by repeating steps 4 and 5.To reset the changed settings to the default settings, press the C/ (Delete) button. (Brightness), (Color)and (Vividness) are set to [AUTO], and (Picture Effect) is set to .
5
For shooting still images: Press the shutter button. When recording movies: Press the MOVIE button to start recording.
6
151

4-745-578-11(1) Copyright 2018 Sony Corporation
152

Help Guide
Digital Still CameraDSC-HX99
Creative Style
Allows you to set the desired image processing and finely adjust contrast, saturation and sharpness for each imagestyle. You can adjust exposure (shutter speed and aperture) as you like with this function, unlike with [Scene Selection],where the product adjusts the exposure.
Menu item details Standard:
For shooting various scenes with rich gradation and beautiful colors. Vivid:
The saturation and contrast are heightened for shooting striking images of colorful scenes and subjects such as flowers,spring greenery, blue sky, or ocean views.
Portrait:For capturing skin in a soft tone, ideally suited for shooting portraits.
Landscape:The saturation, contrast, and sharpness are heightened for shooting vivid and crisp scenery. Distant landscapes alsostand out more.
Sunset:For shooting the beautiful red of the setting sun.
Black & White:For shooting images in black and white monotone.
Sepia:For shooting images in sepia monotone.
To set [Contrast], [Saturation] and [Sharpness][Contrast], [Saturation], and [Sharpness] can be adjusted for each image style preset such as [Standard] and[Landscape].Select an item to be set by pressing the right/left sides of the control wheel, then set the value using the top/bottom sidesof the control wheel.
Contrast:
MENU → (Camera Settings1) → [Creative Style].1
Select the desired style using the top/bottom sides of the control wheel.2
To adjust (Contrast), (Saturation) and (Sharpness), select the desired item using the right/leftsides, and then select the value using the top/bottom sides.
3
153
The higher the value selected, the more the difference of light and shadow is accentuated, and the bigger the effect onthe image.
Saturation:The higher the value selected, the more vivid the color. When a lower value is selected, the color of the image isrestrained and subdued.
Sharpness:Adjusts the sharpness. The higher the value selected, the more the contours are accentuated, and the lower the valueselected, the more the contours are softened.
Note[Creative Style] is fixed to [Standard] in the following situations:
[Intelligent Auto][Superior Auto][Scene Selection][Picture Effect] is set to other than [Off].
When this function is set to [Black & White] or [Sepia], [Saturation] cannot be adjusted.
4-745-578-11(1) Copyright 2018 Sony Corporation
154

Help Guide
Digital Still CameraDSC-HX99
Picture Effect
Select the desired effect filter to achieve more impressive and artistic images.
Menu item details Off:
Disables the [Picture Effect] function. Toy Camera:
Creates a soft image with shaded corners and reduced sharpness. Pop Color:
Creates a vivid look by emphasizing color tones. Posterization:
Creates a high contrast, abstract look by heavily emphasizing primary colors, or in black and white. Retro Photo:
Creates the look of an aged photo with sepia color tones and faded contrast. Soft High-key:
Creates an image with the indicated atmosphere: bright, transparent, ethereal, tender, soft. Partial Color:
Creates an image which retains a specific color, but converts others to black and white. High Contrast Mono.:
Creates a high-contrast image in black and white. Soft Focus:
Creates an image filled with a soft lighting effect. HDR Painting:
Creates the look of a painting, enhancing the colors and details. Rich-tone Mono.:
Creates an image in black and white with rich gradation and reproduction of details. Miniature:
Creates an image which enhances the subject vividly, with the background defocused considerably. This effect may oftenbe found in pictures of miniature models.
Watercolor:Creates an image with ink bleed and blurring effects as if painted using watercolors.
Illustration:Creates an illustration-like image by emphasizing the outlines.
HintYou can perform detailed settings for some items using the left/right sides of the control wheel.
NoteWhen you use a zoom function other than the optical zoom, setting the zoom scale larger makes [Toy Camera] less effective.
When [Partial Color] is selected, images may not retain the selected color, depending on the subject or shooting conditions.
You cannot check the following effects on the shooting screen, because the product processes the image after the shot. Also, youcannot shoot another image until image processing is finished. You cannot use these effects with movies.
[Soft Focus][HDR Painting]
MENU → (Camera Settings1) → [Picture Effect] → desired setting.1
155

[Rich-tone Mono.][Miniature][Watercolor][Illustration]
In the case of [HDR Painting] and [Rich-tone Mono.], the shutter is released three times for one shot. Be careful about thefollowing:
Use this function when the subject is motionless or does not flash light.Do not change the composition during shooting.
When the contrast of the scene is low or when significant camera-shake or subject blur has occurred, you may not be able toobtain good HDR images. If the product detects such a situation, appear on the recorded image to inform you of thissituation. Change the composition or re-shoot the image carefully to avoid image blur, as needed.
This function is not available in the following shooting modes:[Intelligent Auto][Superior Auto][Scene Selection][Sweep Panorama]
When [ File Format] is set to [RAW] or [RAW & JPEG], this function is not available.
4-745-578-11(1) Copyright 2018 Sony Corporation
156

Help Guide
Digital Still CameraDSC-HX99
Soft Skin Effect (still image)
Sets the effect used for shooting the skin smoothly in the Face Detection function.
Menu item detailsOff:
Does not use the [ Soft Skin Effect] function.On:
Uses the [ Soft Skin Effect].
HintWhen [ Soft Skin Effect] is set to [On], you can select the effect level. Select the effect level by pressing the right/left side ofthe control wheel.
Note[ Soft Skin Effect] is not available when [ File Format] is [RAW].
[ Soft Skin Effect] is not available for RAW images when the [ File Format] is [RAW & JPEG].
4-745-578-11(1) Copyright 2018 Sony Corporation
MENU → (Camera Settings1) → [ Soft Skin Effect] → desired setting.1
157

Help Guide
Digital Still CameraDSC-HX99
Auto Obj. Framing (still image)
When this product detects and shoots faces, macro shooting subjects or subjects that are tracked by [Lock-on AF], theproduct automatically trims the image into an appropriate composition, and then saves it. Both the original and thetrimmed images are saved. The trimmed image is recorded in the same size as the original image size.
Menu item detailsOff:Does not trim images.Auto:Automatically trims images into an appropriate composition.
Note[ Auto Obj. Framing] is not available when the shooting mode is set to [Sweep Panorama], [Movie], or when [Scene Selection]is set to [Hand-held Twilight], or [Anti Motion Blur].
The trimmed image may not be the best possible composition, depending on the shooting conditions.
[ Auto Obj. Framing] cannot be set when [ File Format] is set to [RAW] or [RAW & JPEG].
[ Auto Obj. Framing] is not available in the following situations.[Drive Mode] is set to [Cont. Shooting], [Spd Priority Cont.], [Self-timer(Cont)], [Cont. Bracket], [Single Bracket], [WB bracket],or [DRO Bracket].The ISO sensitivity is set to [Multi Frame NR].[DRO/Auto HDR] is set to [Auto HDR].Other zoom functions than the optical zoomWhen shooting in Manual Focus mode[Picture Effect] is set to [Soft Focus], [HDR Painting], [Rich-tone Mono.], [Miniature], [Watercolor], or [Illustration].
4-745-578-11(1) Copyright 2018 Sony Corporation
MENU → (Camera Settings1) → [ Auto Obj. Framing] → desired setting.1
158

Help Guide
Digital Still CameraDSC-HX99
Color Space (still image)
The way colors are represented using combinations of numbers or the range of color reproduction is called “colorspace.” You can change the color space depending on the purpose of the image.
Menu item detailssRGB:This is the standard color space of the digital camera. Use [sRGB] in normal shooting, such as when you intend to printout the images without any modification.AdobeRGB:This color space has a wide range of color reproduction. When a large part of the subject is vivid green or red, AdobeRGB is effective. The file name of the recorded image starts with “_.”
Note[AdobeRGB] is for applications or printers that support color management and DCF2.0 option color space. Images may not beprinted or viewed in the correct colors if you use applications or printers that do not support Adobe RGB.
When displaying images that were recorded with [AdobeRGB] on non-Adobe RGB-compliant devices, the images will bedisplayed with low saturation.
4-745-578-11(1) Copyright 2018 Sony Corporation
MENU → (Camera Settings1) → [ Color Space] → desired setting.1
159

Help Guide
Digital Still CameraDSC-HX99
Release w/o Card
Sets whether the shutter can be released when no memory card has been inserted.
Menu item detailsEnable:Releases the shutter even if no memory card has been inserted.Disable:Does not release the shutter when no memory card has been inserted.
NoteWhen no memory card has been inserted, the images shot will not be saved.
The default setting is [Enable]. It is recommended that you select [Disable] prior to actual shooting.
4-745-578-11(1) Copyright 2018 Sony Corporation
MENU → (Camera Settings2) → [Release w/o Card] → desired setting.1
160

Help Guide
Digital Still CameraDSC-HX99
SteadyShot (still image)
Sets whether or not to use the SteadyShot function.
Menu item detailsOn:Uses [ SteadyShot].Off:Does not use [ SteadyShot]. We recommend that you set the camera to [Off] when using a tripod.
4-745-578-11(1) Copyright 2018 Sony Corporation
MENU → (Camera Settings2) → [ SteadyShot] → desired setting.1
161

Help Guide
Digital Still CameraDSC-HX99
High ISO NR (still image)
When shooting with high ISO sensitivity, the product reduces noise that becomes more noticeable when the productsensitivity is high.
Menu item detailsNormal:Activates high ISO noise reduction normally.Low:Activates high ISO noise reduction moderately.
Note[ High ISO NR] is fixed to [Normal] in the following shooting modes:
[Intelligent Auto][Superior Auto][Scene Selection][Sweep Panorama]
When [ File Format] is set to [RAW], this function is not available.
[ High ISO NR] does not work for RAW images when the [ File Format] is [RAW & JPEG].
4-745-578-11(1) Copyright 2018 Sony Corporation
MENU → (Camera Settings1) → [ High ISO NR] → desired setting.1
162

Help Guide
Digital Still CameraDSC-HX99
Regist. Faces Priority
Sets whether to focus with higher priority on faces registered using [Face Registration] when [Face Priority in AF] is setto [On].
Menu item detailsOn:Focuses with higher priority on faces registered using [Face Registration].Off:Focuses without giving higher priority to registered faces.
Related TopicSet. Face Prty in AFFace Registration (New Registration)Face Registration (Order Exchanging)
4-745-578-11(1) Copyright 2018 Sony Corporation
MENU → (Camera Settings1) → [Regist. Faces Priority] → desired setting.1
163

Help Guide
Digital Still CameraDSC-HX99
Smile Shutter
The camera automatically shoots an image when it detects a smiling face.
Menu item detailsOff:Does not use the [Smile Shutter] function.On:The camera automatically shoots an image when it detects a smiling face. You can select [On: Slight Smile], [On: NormalSmile], or [On: Big Smile] for the sensitivity of detection.Tips for capturing smiles more effectively
Do not cover the eyes with front hair and keep the eyes narrowed.Do not obscure the face by a hat, masks, sunglasses, etc.Try to orient the face in front of the product and be as level as possible.Give a clear smile with an open mouth. The smile is easier to be detected when the teeth are shown.If you press the shutter button during Smile Shutter, the product shoots the image. After shooting, the product returnsto Smile Shutter mode.
NoteYou cannot use the [Smile Shutter] function with the following functions:
[Sweep Panorama][Picture Effect]When using the [Focus Magnifier] function.[Scene Selection] is set to [Landscape], [Night Scene], [Sunset], [Hand-held Twilight], [Anti Motion Blur], [Pet], [Gourmet] or[Fireworks].When recording movies.
Up to 8 faces of your subjects can be detected.
The product may not detect faces at all or may accidentally detect other objects as faces in some conditions.
If the product cannot detect a smile, adjust the Smile Detection Sensitivity.
If you track a face using [Lock-on AF] while executing Smile Shutter function, Smile Detection is performed only for that face.
4-745-578-11(1) Copyright 2018 Sony Corporation
MENU → (Camera Settings1) → [Smile Shutter] → desired setting.1
164

Help Guide
Digital Still CameraDSC-HX99
Face Registration (New Registration)
If you register faces in advance, the product can focus on the registered face as a priority. Set both [Face Priority in AF]and [Regist. Faces Priority] to [On] before shooting.
NoteUp to eight faces can be registered.
Shoot the face from the front in a brightly lit place. The face may not be registered correctly if it is obscured by a hat, a mask,sunglasses, etc.
Related TopicRegist. Faces PrioritySet. Face Prty in AFSmile Shutter
4-745-578-11(1) Copyright 2018 Sony Corporation
MENU → (Camera Settings1) → [Face Registration] → [New Registration].1
Align the guide frame with the face to be registered, and press the shutter button.2
When a confirmation message appears, select [Enter].3
165

Help Guide
Digital Still CameraDSC-HX99
Face Registration (Order Exchanging)
When multiple faces are registered to be given priority, the face registered first will be given priority. You can change thepriority order.
Related TopicRegist. Faces PrioritySet. Face Prty in AFSmile Shutter
4-745-578-11(1) Copyright 2018 Sony Corporation
MENU → (Camera Settings1) → [Face Registration] → [Order Exchanging].1
Select a face to change the order of priority.2
Select the destination.3
166

Help Guide
Digital Still CameraDSC-HX99
Face Registration (Delete)
Deletes a registered face.
NoteEven if you execute [Delete], the data for registered face will remain in the product. To delete the data for registered faces fromthe product, select [Delete All].
4-745-578-11(1) Copyright 2018 Sony Corporation
MENU → (Camera Settings1) → [Face Registration] → [Delete].
If you select [Delete All], you can delete all registered faces.
1
167
Help Guide
Digital Still CameraDSC-HX99
Using flash
In dark environments, use the flash to light up the subject while shooting. Also use the flash to prevent camera-shake.
When you do not use the flashWhen not using the flash, press it back into the camera body.
NoteIf you fire the flash before the flash unit pops up entirely, it may cause malfunction.
You cannot use the flash when recording movies.
When shooting with the flash and the zoom is set to W, the shadow of the lens may appear on the screen, depending on theshooting conditions. If this happens, shoot away from the subject or set the zoom to T and shoot with the flash again.
When the monitor is tilted upward 90 degrees or more, it is difficult to operate the (Flash pop-up) switch. Raise the flash unitbefore adjusting the monitor angle.
When using flash to shoot pictures of yourself, be careful not to look directly at the light, because the flash will go off at a closedistance. To prevent the flash from hitting the monitor when you press it back down into the camera body after use, first return themonitor to its original position.
Related TopicFlash Mode
Slide the (Flash pop-up) switch to pop up the flash.
The flash does not pop up automatically.
1
Press the shutter button fully down.
The available flash modes depend on the shooting mode and function.
2
168

4-745-578-11(1) Copyright 2018 Sony Corporation
169

Help Guide
Digital Still CameraDSC-HX99
Red Eye Reduction
When using the flash, it is fired two or more times before shooting to reduce the red-eye phenomenon.
Menu item detailsOn:The flash is always fired to reduce the red-eye phenomenon.Off:Does not use Red Eye Reduction.
NoteRed Eye Reduction may not produce the desired effects. It depends on individual differences and conditions, such as distance tothe subject, or whether the subject looks at the pre-strobe or not.
4-745-578-11(1) Copyright 2018 Sony Corporation
MENU → (Camera Settings1) → [Red Eye Reduction] → desired setting.1
170

Help Guide
Digital Still CameraDSC-HX99
Flash Mode
You can set the flash mode.
Menu item details Flash Off:
The flash does not operate. Autoflash:
The flash works in dark environments or when shooting towards bright light. Fill-flash:
The flash works every time you trigger the shutter. Slow Sync.:
The flash works every time you trigger the shutter. Slow sync shooting allows you to shoot a clear image of both thesubject and the background by slowing the shutter speed.
Rear Sync.:The flash works right before the exposure is completed every time you trigger the shutter. Rear sync shooting allows youto shoot a natural image of the trail of a moving subject such as a moving car or a walking person.
NoteThe default setting depends on the shooting mode.
Some [Flash Mode] settings are not available, depending on the shooting mode.
Related TopicUsing flash
4-745-578-11(1) Copyright 2018 Sony Corporation
Select (Flash Mode) on the control wheel → desired setting.
You can also set the flash mode by selecting MENU → (Camera Settings1) → [Flash Mode].
1
171

Help Guide
Digital Still CameraDSC-HX99
Flash Comp.
Adjusts the amount of flash light in a range of –3.0 EV to +3.0 EV. Flash compensation changes the amount of flash lightonly. Exposure compensation changes the amount of flash light along with the change of the shutter speed and aperture.
Note[Flash Comp.] does not work when the shooting mode is set to the following modes:
[Intelligent Auto][Superior Auto][Sweep Panorama][Scene Selection]
The higher flash effect (+ side) may not be visible due to the limited amount of flash light available, if the subject is outside themaximum range of the flash. If the subject is very close, the lower flash effect (- side) may not be visible.
Related TopicUsing flash
4-745-578-11(1) Copyright 2018 Sony Corporation
MENU → (Camera Settings1) → [Flash Comp.] → desired setting.
Selecting higher values (+ side) makes the flash level higher, and lower values (- side) makes the flash levellower.
1
172

Help Guide
Digital Still CameraDSC-HX99
Shooting movies
You can record movies by pressing the MOVIE (Movie) button.
HintYou can assign the start/stop movie recording function to a preferred key. MENU → (Camera Settings2) → [ CustomKey] → set [MOVIE] to the preferred key.
When you want to specify the area to be focused on, set the area using [Focus Area].
To keep the focus on a face, arrange the composition so that the focusing frame and face detection frame overlap, or set the[Focus Area] to [Wide].
To adjust the shutter speed and aperture value to the desired settings, set the shooting mode to (Movie) and select thedesired exposure mode.
An icon indicating that data is being written is displayed after shooting. Do not remove the memory card while the icon isdisplayed.
The following settings for still image shooting are applied to the movie shooting:White BalanceCreative StyleMetering ModeFace Priority in AFFace Prty in Mlti MtrD-Range Opt.
You can change the settings for ISO sensitivity, exposure compensation, and focus area while shooting movies.
While shooting movies, the recorded image can be output without the shooting information display by setting [HDMI Info. Display]to [Off].
NoteYou cannot record still images during movie recording.
Press the MOVIE button to start recording.
Since the [MOVIE Button] is set to [Always] in the default setting, movie recording can be started from anyshooting mode.
1
Press the MOVIE button again to stop recording.2
173

The sound of the lens and the product in operation may be recorded during movie recording. The sound of the zoom isparticularly likely to be recorded during movie recording if [Zoom Speed] is set to [Fast] or [Zoom Func. on Ring] is set to [Quick]. You can turn the sound off by selecting MENU → (Camera Settings2) → [Audio Recording] → [Off].
The temperature of the camera tends to rise when shooting movies continuously, and you may feel that the camera is warm. Thisis not a malfunction. Also, [Internal temp. high. Allow it to cool.] may appear. In such cases, turn the power off and cool thecamera and wait until the camera is ready to shoot again.
If the icon appears, the temperature of the camera has risen. Turn the power off and cool the camera and wait until thecamera is ready to shoot again.
For the continuous shooting time of a movie recording, refer to “Recordable movie times.” When movie recording is finished, youcan record another movie by pressing the MOVIE button again. Recording may stop to protect the product, depending on thetemperature of the product or the battery.
In [Program Auto] mode when shooting movies, the aperture value and the shutter speed will be set automatically and cannot bechanged. For that reason, the shutter speed may become fast in a bright environment, and the motion of the subject may not berecorded smoothly. By changing the exposure mode and adjusting the aperture value and the shutter speed, the motion of thesubject can be recorded smoothly.
When ISO sensitivity is set to [Multi Frame NR], [ISO AUTO] will be set temporarily.
In movie shooting mode, the following settings cannot be set in [Picture Effect]. When a movie recording starts, [Off] will be settemporarily.
Soft FocusHDR PaintingRich-tone Mono.MiniatureWatercolorIllustration
If you point the camera at an extremely strong light source while shooting a movie at low ISO sensitivity, the highlighted area inthe image may be recorded as a black area.
If the display mode of the monitor is set to [For viewfinder], the display mode will switch to [Display All Info.] when movie shootingstarts.
Use PlayMemories Home when importing XAVC S movies and AVCHD movies to a computer.
Related TopicMOVIE ButtonMovie w/ shutterFile Format (movie)Recordable movie timesCustom Key (still image/movie/playback)Focus Area
4-745-578-11(1) Copyright 2018 Sony Corporation
174
Help Guide
Digital Still CameraDSC-HX99
Movie w/ shutter
You can start or stop recording movies by pressing the shutter button, which is bigger and easier to press than theMOVIE (Movie) button.
Menu item detailsOn:Enables movie recording using the shutter button when the shooting mode is set to [Movie].Off:Disables movie recording using the shutter button.
HintWhen [Movie w/ shutter] is set to [On], you can still start or stop recording movies using the MOVIE button.
When [Movie w/ shutter] is set to [On], you can use the shutter button to start or stop recording movies on an externalrecording/playback device using [ REC Control].
Related TopicShooting movies
4-745-578-11(1) Copyright 2018 Sony Corporation
MENU → (Camera Settings2) → [Movie w/ shutter] → desired setting.1
175

Help Guide
Digital Still CameraDSC-HX99
Movie recording formats
The following movie recording formats are available with this camera.
What is XAVC S?Records movies in high definition such as 4K by converting them into MP4 movies using the MPEG-4 AVC/H.264 codec.MPEG-4 AVC/H.264 is capable of compressing images with higher efficiency. You can record high-quality images whilereducing the amount of data.
XAVC S/AVCHD recording formatXAVC S 4K:Bit-rate: Approx. 100 Mbps or approx. 60 Mbps Records movies in 4K resolution (3840×2160).XAVC S HD:Bit-rate: Approx. 100 Mbps, approx. 60 Mbps, approx. 50 Mbps, approx. 25 Mbps, or approx. 16 Mbps Records movies in crisper quality than AVCHD with larger amounts of data.AVCHD:Bit-rate: Approx. 24 Mbps (maximum) or approx. 17 Mbps (average) The AVCHD format has a high degree of compatibility with storage devices other than computers.
Bit rate is the amount of data processed within a given period of time.
Related TopicFile Format (movie)Record Setting (movie)AVCHD format
4-745-578-11(1) Copyright 2018 Sony Corporation
176

Help Guide
Digital Still CameraDSC-HX99
File Format (movie)
Selects the movie file format.
Menu item details
NoteWhen recording XAVC S 4K or XAVC S HD movies in 120p/100p, the amount of time available for continuous recording isapproximately 5 minutes. The remaining time for movie recording is displayed on the monitor. If you want to record anothersession of 4K or HD 120p/100p movie shooting, turn off the camera and wait for some time before you start the next session ofshooting. Even if the recording time was less than 5 minutes, recording may stop to protect the product, depending on thetemperature of the shooting environment.
When [ File Format] is set to [AVCHD], the file size of movies is limited to approx. 2 GB. If the movie file size reaches approx.2 GB during recording, a new movie file will be created automatically.
If you set [ File Format] to [XAVC S 4K] and shoot movies while the camera is connected to an HDMI device, images will notbe displayed on the monitor of the camera.
4-745-578-11(1) Copyright 2018 Sony Corporation
MENU → (Camera Settings2) → [ File Format] → desired setting.1
File
FormatCharacteristics
XAVCS 4K
Records movies in 4K resolution (3840×2160).You can save movies on a computer using thePlayMemories Home software.XAVC
S HDRecords movies in crisper quality than AVCHDwith larger amounts of data.
AVCHDThe AVCHD format has a high degree ofcompatibility with storage devices other thancomputers.
You can save movies on a computer or create a disc thatsupports this format using the PlayMemories Homesoftware.
177

Help Guide
Digital Still CameraDSC-HX99
Record Setting (movie)
Selects the frame rate and bit-rate for movie recording.
Menu item detailsWhen [ File Format] is set to [XAVC S 4K]
When [ File Format] is set to [XAVC S HD]
MENU → (Camera Settings2) → [ Record Setting] → desired setting.
The higher the bit-rate, the higher the image quality.
1
Record Setting Bit-rate Description
30p 100M/25p 100M Approx. 100 Mbps Records movies in 3840×2160 (30p/25p).
30p 60M/25p 60M Approx. 60 Mbps Records movies in 3840×2160 (30p/25p).
24p 100M* Approx. 100 Mbps Records movies in 3840×2160 (24p).
24p 60M* Approx. 60 Mbps Records movies in 3840×2160 (24p).
Only when [NTSC/PAL Selector] is set to NTSC*
RecordSetting
Bit-rate Description
60p 50M/50p50M
Approx. 50Mbps
Records movies in 1920×1080 (60p/50p).
60p 25M/50p25M
Approx. 25Mbps
Records movies in 1920×1080 (60p/50p).
30p 50M/25p50M
Approx. 50Mbps
Records movies in 1920×1080 (30p/25p).
30p 16M/25p16M
Approx. 16Mbps
Records movies in 1920×1080 (30p/25p).
24p 50M* Approx. 50Mbps
Records movies in 1920×1080 (24p).
120p 100M/100p100M
Approx. 100Mbps
Records high-speed movies in 1920×1080 (120p/100p). You can record moviesin 120 fps or 100 fps.
You can create smoother slow-motion movies by using compatible editingdevices.
178

When [ File Format] is set to [AVCHD]
NoteCreating an AVCHD recording disc from movies that were recorded with [60i 24M(FX)]/[50i 24M(FX)] as the [ Record Setting]takes a long time because the image quality of movies is converted. If you want to store movies without converting them, use aBlu-ray Disc.
[120p]/[100p] cannot be selected for the following settings.
[Intelligent Auto][Superior Auto][Scene Selection]
When [ Record Setting] is set to [120p]/[100p], the image quality becomes almost equal to HD quality.
4-745-578-11(1) Copyright 2018 Sony Corporation
RecordSetting Bit-rate Description
120p 60M/100p60M
Approx. 60Mbps
Records high-speed movies in 1920×1080 (120p/100p). You can record moviesin 120 fps or 100 fps.
You can create smoother slow-motion movies by using compatible editingdevices.
Only when [NTSC/PAL Selector] is set to NTSC*
Record Setting Bit-rate Description
60i 24M(FX)/50i 24M(FX) 24 Mbps at maximum Records movies in 1920×1080 (60i/50i).
60i 17M(FH)/50i 17M(FH) Approx. 17 Mbps on average Records movies in 1920×1080 (60i/50i).
179

Help Guide
Digital Still CameraDSC-HX99
Proxy Recording
Sets whether to simultaneously record low-bit-rate proxy movies when recording XAVC S movies. Since proxy moviesare small in file size, they are suitable for transferring to smartphones or uploading to websites.
Menu item detailsOn :Proxy movies are simultaneously recorded.Off :Proxy movies are not recorded.
HintProxy movies are recorded in the XAVC S HD format (1280×720) at 9 Mbps. The frame rate of the proxy movie is the same asthat of the original movie.
Proxy movies are not displayed on the playback screen (single-image playback screen or image index screen). is displayedover movies for which a proxy movie was simultaneously recorded.
NoteProxy movies cannot be played back on this camera.
Proxy recording is not available in the following situations.When [ File Format] is set to [AVCHD]When [ File Format] is set to [XAVC S HD] and [ Record Setting] is set to [120p]/[100p]When [ SteadyShot] is set to [Intelligent Active]
Deleting/protecting movies that have proxy movies removes/protects both the original and proxy movies. You cannotdelete/protect only original movies or proxy movies.
Movies cannot be edited on this camera.
Related TopicSnd to Smrtphn Func: Sending Target (proxy movies)Movie recording formatsPlaying back images on the image index screen (Image Index)Memory cards that can be used
4-745-578-11(1) Copyright 2018 Sony Corporation
MENU → (Camera Settings2) → [ Proxy Recording] → desired setting.1
180
Help Guide
Digital Still CameraDSC-HX99
Audio Recording
Sets whether to record sounds when shooting movies. Select [Off] to avoid recording the sounds of the lens and thecamera operating.
Menu item detailsOn:Records sound (stereo).Off:Does not record sound.
4-745-578-11(1) Copyright 2018 Sony Corporation
MENU → (Camera Settings2) → [Audio Recording] → desired setting.1
181

Help Guide
Digital Still CameraDSC-HX99
Micref Level
You can select the microphone level for movie recording.
Menu item detailsNormal:Records the ambient sounds within a certain level. This setting is suitable for recording everyday conversations.Low:Records the ambient sounds faithfully. This setting is suitable for recording realistic sounds, for example at a concert.
4-745-578-11(1) Copyright 2018 Sony Corporation
MENU → (Camera Settings2) → [Micref Level] → desired setting.1
182

Help Guide
Digital Still CameraDSC-HX99
Wind Noise Reduct.
Sets whether or not to reduce wind noise by cutting the low-range sound of the input audio from the built-in microphone.
Menu item detailsOn:Reduces wind noise.Off:Does not reduce wind noise.
NoteSetting this item to [On] where wind is not blowing sufficiently hard may cause normal sound to be recorded with too low volume.
4-745-578-11(1) Copyright 2018 Sony Corporation
MENU → (Camera Settings2) → [Wind Noise Reduct.] → desired setting.1
183

Help Guide
Digital Still CameraDSC-HX99
Auto Slow Shut. (movie)
Sets whether or not to adjust the shutter speed automatically when recording movies if the subject is dark.
Menu item detailsOn:Uses Auto Slow Shutter. The shutter speed automatically slows when recording in dark locations. You can reduce noisein the movie by using a slow shutter speed when recording in dark locations.Off:Does not use Auto Slow Shutter. The recorded movie will be darker than when [On] is selected, but you can recordmovies with smoother motion and less object blur.
Note[ Auto Slow Shut.] does not function in the following situations:
(Shutter Priority)(Manual Exposure)
When [ISO] is set to other than [ISO AUTO]
4-745-578-11(1) Copyright 2018 Sony Corporation
MENU → (Camera Settings2) → [ Auto Slow Shut.] → desired setting.1
184

Help Guide
Digital Still CameraDSC-HX99
SteadyShot (movie)
Sets [ SteadyShot] effect when shooting movies. If you set the [ SteadyShot] effect to [Off] when using a tripod(sold separately), a natural image is produced.
Menu item detailsIntelligent Active:Provides a more powerful SteadyShot effect than [Active].Active:Provides a more powerful SteadyShot effect.Standard:Reduces camera shake under stable movie shooting conditions.Off:Does not use [ SteadyShot].
NoteIf you change the setting for [ SteadyShot], the angle of view will change.
[Intelligent Active] and [Active] cannot be selected when [ File Format] is set to [XAVC S 4K] or [XAVC S HD 120p/100p].
4-745-578-11(1) Copyright 2018 Sony Corporation
MENU → (Camera Settings2) → [ SteadyShot] → desired setting.1
185

Help Guide
Digital Still CameraDSC-HX99
TC/UB Settings
The time code (TC) and the user bit (UB) information can be recorded as data attached to movies.
Menu item detailsTC/UB Disp. Setting:Sets the display for the counter, time code, and user bit.TC Preset:Sets the time code.UB Preset:Sets the user bit.TC Format:Sets the recording method for the time code. (Only when [NTSC/PAL Selector] is set to NTSC.)TC Run:Sets the count up format for the time code.TC Make:Sets the recording format for the time code on the recording medium.UB Time Rec:Sets whether or not to record the time as a user bit.How to set the time code (TC Preset)
NoteWhen you tilt the monitor to shoot a self-portrait, the time code and user bit will not be displayed.
How to reset the time code
You can also reset the time code (00:00:00:00) using the RMT-VP1K remote commander (sold separately).
How to set the user bit (UB Preset)
How to reset the user bit
MENU → (Setup) → [TC/UB Settings] → setting value you want to change.1
MENU → (Setup) → [TC/UB Settings] → [TC Preset].1.Turn the control wheel and select the first two digits.
The time code can be set between the following range. When [60i] is selected: 00:00:00:00 to 23:59:59:29
2.
When [24p] is selected, you can select the last two digits of the time code in multiples of four from 0 to 23 frames. When [50i] is selected: 00:00:00:00 to 23:59:59:24
*
Set the other digits following the same procedure as in step 2, then press in the center of the control wheel.3.
MENU → (Setup) → [TC/UB Settings] → [TC Preset].1.Press the (Delete) button to reset the time code (00:00:00:00).2.
MENU → (Setup) → [TC/UB Settings] → [UB Preset].1.Turn the control wheel and select the first two digits.2.Set the other digits following the same procedure as in step 2, then press in the center of the control wheel.3.
186

How to select the recording method for the time code (TC Format *1)
DF:Records the time code in Drop Frame*2 format.NDF:Records the time code in Non-Drop Frame format.
The setting is fixed to [NDF] when recording in 4K/24p or 1080/24p.
How to select the count up format for the time code (TC Run)
Rec Run:Sets the stepping mode for the time code to advance only while recording. The time code is recorded sequentially fromthe last time code of the previous recording.Free Run:Sets the stepping mode for the time code to advance anytime, regardless of the camera operation.
The time code may not be recorded sequentially in the following situations even when the time code advances in[Rec Run] mode.
When the recording format is changed.When the recording medium is removed.
How to select how the time code is recorded (TC Make)
Preset:Records the newly set time code on the recording medium.Regenerate:Reads the last time code for the previous recording from the recording medium and records the new time codeconsecutively from the last time code. The time code advances in [Rec Run] mode regardless of the [TC Run] setting.
4-745-578-11(1) Copyright 2018 Sony Corporation
MENU → (Setup) → [TC/UB Settings] → [UB Preset].1.Press the (Delete) button to reset the user bit (00 00 00 00).2.
MENU → (Setup) → [TC/UB Settings] → [TC Format].1.
Only when [NTSC/PAL Selector] is set to NTSC.*1The time code is based on 30 frames per second. However, a gap between the actual time and the time code will occur during extended periodsof recording as the frame frequency of the NTSC image signal is approximately 29.97 frames per second. Drop frame corrects this gap to makethe time code and actual time equal. In drop frame, the first 2 frame numbers are removed every minute except for every tenth minute. The timecode without this correction is called non-drop frame.
*2
MENU → (Setup) → [TC/UB Settings] → [TC Run].1.
MENU → (Setup) → [TC/UB Settings] → [TC Make].1.
187

Help Guide
Digital Still CameraDSC-HX99
TC/UB Disp. Switch
Allows you to display the time code (TC) and user bit (UB) of a movie by pressing the key to which [TC/UB Disp. Switch]function has been assigned.
NoteWhen the monitor is flipped while in a shooting mode, such as during self-portrait shooting, TC/UB information is not displayed. Inthe playback mode, TC/UB information is displayed even when the monitor is flipped.
4-745-578-11(1) Copyright 2018 Sony Corporation
MENU → (Camera Settings2) → [ Custom Key], [ Custom Key], or [ Custom Key] → assignthe [TC/UB Disp. Switch] function to the desired key.
1
Press the key to which [TC/UB Disp. Switch] is assigned.
Each time you press the key, the monitor display will switch from the movie recording time counter → time code(TC) → user bit (UB), in that order.
2
188
Help Guide
Digital Still CameraDSC-HX99
MOVIE Button
Sets whether or not to activate the MOVIE (Movie) button.
Menu item detailsAlways:Starts movie recording when you press the MOVIE button in any mode.Movie Mode Only:Starts movie recording when you press the MOVIE button only if the shooting mode is set to [ Movie] mode.
4-745-578-11(1) Copyright 2018 Sony Corporation
MENU → (Camera Settings2) → [MOVIE Button] → desired setting.1
189

Help Guide
Digital Still CameraDSC-HX99
Marker Display (movie)
Sets whether or not to display markers set using [ Marker Settings] on the monitor or the viewfinder while shootingmovies.
Menu item detailsOn:Markers are displayed. The markers are not recorded.Off:No marker is displayed.
NoteThe markers are displayed when the mode dial is set to ( Movie) or when shooting movies.
You cannot display markers when using [Focus Magnifier].
The markers are displayed on the monitor or viewfinder. (You cannot output the markers.)
Related TopicMarker Settings (movie)
4-745-578-11(1) Copyright 2018 Sony Corporation
MENU → (Camera Settings2) → [ Marker Display] → desired setting.1
190

Help Guide
Digital Still CameraDSC-HX99
Marker Settings (movie)
Sets the markers to be displayed while shooting movies.
Menu item detailsCenter:Sets whether or not to display the center marker in the center of the shooting screen. [Off]/[On]Aspect:Sets the aspect marker display. [Off]/[4:3]/[13:9]/[14:9]/[15:9]/[1.66:1]/[1.85:1]/[2.35:1]Safety Zone:Sets the safety zone display. This becomes the standard range that can be received by a general household TV. [Off]/[80%]/[90%]Guideframe:Sets whether or not to display the guide frame. You can verify whether the subject is level or perpendicular to the ground.[Off]/[On]
HintYou can display several markers at the same time.
Place the subject on the cross point of the [Guideframe] to make a balanced composition.
4-745-578-11(1) Copyright 2018 Sony Corporation
MENU → (Camera Settings2) → [ Marker Settings] → desired setting.1
191

Help Guide
Digital Still CameraDSC-HX99
4K Output Sel. (movie)
You can set how to record movies and perform HDMI output when your camera is connected to 4K-compatible externalrecording/playback devices, etc.
Menu item detailsMemory Card+HDMI:Simultaneously outputs to the external recording/playback device and records on the camera’s memory card.HDMI Only(30p):Outputs a 4K movie in 30p to the external recording/playback device without recording on the camera’s memory card.HDMI Only(24p):Outputs a 4K movie in 24p to the external recording/playback device without recording on the camera’s memory card.
HDMI Only(25p) *:Outputs a 4K movie in 25p to the external recording/playback device without recording on the camera’s memory card.
NoteThis item can be set only when the camera is in movie mode and connected to a 4K-compatible device.
When [HDMI Only(30p)], [HDMI Only(24p)] or [HDMI Only(25p)] is set, [HDMI Info. Display] will temporarily be set to [Off].
When [HDMI Only(30p)], [HDMI Only(24p)] or [HDMI Only(25p)] is set, the counter does not move forward (the actual recordingtime is not counted) while the movie is being recorded on an external recording/playback device.
When [ File Format] is set to [XAVC S 4K] and the camera is connected via HDMI, the following functions are not available.[Face Priority in AF][Face Prty in Mlti Mtr][Center Lock-on AF]
Related TopicHDMI Settings: REC Control (movie)File Format (movie)Record Setting (movie)HDMI Settings: HDMI Info. Display
4-745-578-11(1) Copyright 2018 Sony Corporation
Turn the mode dial to (movie).1
Connect the camera to the desired device via an HDMI cable.2
MENU → (Setup) → [ 4K Output Sel.] → desired setting.3
Only when [NTSC/PAL Selector] is set to PAL.*
192
Help Guide
Digital Still CameraDSC-HX99
Playing back still images
Plays back the recorded images.
HintThe product creates an image database file on a memory card to record and play back images. An image that is not registered inthe image database file may not be played back correctly. To play back images shot using other devices, register those images tothe image database file using MENU → (Setup) → [Recover Image DB].
If you play back the images right after continuous shooting, the monitor may display an icon indicating that data is beingwritten/the number of images left to write. During writing, some functions are not available.
You can also enlarge an image by double-tapping the monitor. In addition, you can drag and move the magnified position on themonitor. Set [Touch Operation] to [On] beforehand.
Related TopicRecover Image DB
4-745-578-11(1) Copyright 2018 Sony Corporation
Press the (Playback) button to switch to the playback mode.1
Select the image with the control wheel.
Continuously shot images are displayed as one group. To play back the images in the group, press the center ofthe control wheel.
2
193
Help Guide
Digital Still CameraDSC-HX99
Enlarging an image being played back (Enlarge Image)
Enlarges the image being played back. Use this function to check the focus of the image, etc.
HintYou can also enlarge an image being played back using MENU.
You can change the initial magnification and initial position of enlarged images by selecting MENU → (Playback) → [Enlarge Init. Mag.] or [ Enlarge Initial Pos.].
You can also enlarge an image by double-tapping the monitor. In addition, you can drag and move the magnified position on themonitor. Set [Touch Operation] to [On] beforehand.
NoteYou cannot enlarge movies.
Related TopicTouch OperationEnlarge Init. Mag.Enlarge Initial Pos.
4-745-578-11(1) Copyright 2018 Sony Corporation
Display the image you want to enlarge, and slide the W/T (zoom) lever to the T side.
Slide the W/T (zoom) lever to the W side to adjust the zoom scale.The view will zoom in on the part of the image where the camera focused during shooting. If the focus locationinformation cannot be obtained, the camera will zoom in on the center of the image.
1
Select the portion you want to enlarge by pressing the top/bottom/right/left sides of the control wheel.2
Press the MENU button or the center of the control wheel to exit the playback zoom.3
194

Help Guide
Digital Still CameraDSC-HX99
Rotating recorded images automatically (Display Rotation)
Selects the orientation when playing back recorded images.
Menu item detailsAuto:When you rotate the camera, the displayed image rotates automatically by detecting the orientation of the camera.Manual:Images shot vertically are displayed vertically. If you have set the image orientation using the [Rotate] function, the imagewill be displayed accordingly.Off:Images are always displayed horizontally.
Related TopicRotating an image (Rotate)
4-745-578-11(1) Copyright 2018 Sony Corporation
MENU → (Playback) → [Display Rotation] → desired setting.1
195
Help Guide
Digital Still CameraDSC-HX99
Rotating an image (Rotate)
Rotates a recorded still image counter-clockwise.
NoteYou cannot rotate the movies.
You may not be able to rotate images shot using other products.
When viewing rotated images on a computer, the images may be displayed in their original orientation depending on thesoftware.
4-745-578-11(1) Copyright 2018 Sony Corporation
Display the image to be rotated, then select MENU → (Playback) → [Rotate].1
Press the center of the control wheel.
The image is rotated counter-clockwise. The image rotates as you press the center. If you rotate the image once, the image remains rotated even after the product is turned off.
2
196
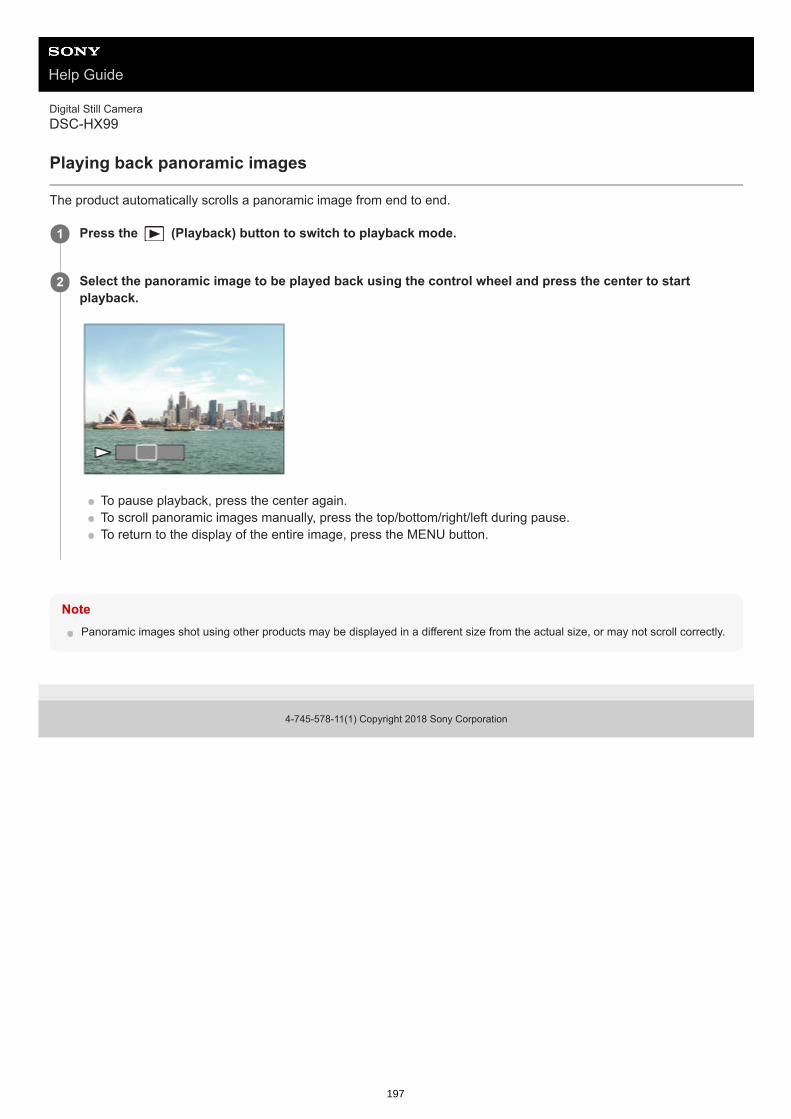
Help Guide
Digital Still CameraDSC-HX99
Playing back panoramic images
The product automatically scrolls a panoramic image from end to end.
NotePanoramic images shot using other products may be displayed in a different size from the actual size, or may not scroll correctly.
4-745-578-11(1) Copyright 2018 Sony Corporation
Press the (Playback) button to switch to playback mode.1
Select the panoramic image to be played back using the control wheel and press the center to startplayback.
To pause playback, press the center again.To scroll panoramic images manually, press the top/bottom/right/left during pause.To return to the display of the entire image, press the MENU button.
2
197

Help Guide
Digital Still CameraDSC-HX99
Enlarge Init. Mag.
Sets the initial magnification scale when playing back enlarged images.
Menu item detailsStandard. Mag.:Displays an image with the standard magnification.Previous Mag.:Displays an image with the previous magnification. The previous magnification is stored even after exiting the playbackzoom mode.
Related TopicEnlarging an image being played back (Enlarge Image)Enlarge Initial Pos.
4-745-578-11(1) Copyright 2018 Sony Corporation
MENU → (Playback) → [ Enlarge Init. Mag.] → desired setting.1
198

Help Guide
Digital Still CameraDSC-HX99
Enlarge Initial Pos.
Sets the initial position when enlarging an image in playback.
Menu item detailsFocused Position: Enlarges the image from the point of focus during shooting.Center: Enlarges the image from the center of the screen.
Related TopicEnlarging an image being played back (Enlarge Image)Enlarge Init. Mag.
4-745-578-11(1) Copyright 2018 Sony Corporation
MENU → (Playback) → [ Enlarge Initial Pos.] → desired setting.1
199

Help Guide
Digital Still CameraDSC-HX99
Playing back movies
Plays back the recorded movies.
Available operations during movie playbackYou can perform slow playback and sound volume adjustment, etc. by pressing the down side of the control wheel.
: Playback: Pause
: Fast-forward: Fast-rewind
: Forward slow playback: Reverse slow playback
: Next movie file: Previous movie file
: Displays the next frame: Displays the previous frame
: Motion Shot Video (Shows the tracking of a subject in motion.): Photo Capture: Sound volume adjustment: Closes the operation panel
Hint“Forward slow playback,” “Reverse slow playback,” “Displays the next frame” and “Displays the previous frame” are availableduring pause.
Movie files recorded using other products may not be able to be playable on this camera.
Related TopicSwitching between still images and movies (View Mode)Motion Shot Video
4-745-578-11(1) Copyright 2018 Sony Corporation
Press the (playback) button to switch to playback mode.1
Select the movie to be played back using the control wheel and press the center of the control wheel tostart playback.
2
200
Help Guide
Digital Still CameraDSC-HX99
Motion Shot Video
You can see the tracking of the subject's motion in high-speed, like a stroboscopic image.
HintYou can also change the interval of the image tracking using MENU → (Playback) → [Motion Interval ADJ].
NoteYou cannot save the images made with [Motion Shot Video] as a movie file.
If the motion of the subject is too slow or the subject does not move enough, the product may fail to create the image.
Related TopicMotion Interval ADJ
4-745-578-11(1) Copyright 2018 Sony Corporation
Press the bottom side of the control wheel during movie playback, then select .
To exit [Motion Shot Video] playback, select .If you fail to make the trail, you can adjust the interval of the image tracking using .
1
201

Help Guide
Digital Still CameraDSC-HX99
Motion Interval ADJ
You can adjust the interval of the tracking of the subject’s motion.
Related TopicMotion Shot Video
4-745-578-11(1) Copyright 2018 Sony Corporation
MENU → (Playback) → [Motion Interval ADJ] → desired setting.1
202

Help Guide
Digital Still CameraDSC-HX99
Volume Settings
Sets the sound volume for movie playback.
Adjusting the volume during playbackPress the bottom side of the control wheel while playing back movies to display the operation panel, then adjust thevolume. You can adjust the volume while listening to the actual sound.
4-745-578-11(1) Copyright 2018 Sony Corporation
MENU → (Setup) → [Volume Settings] → desired setting.1
203

Help Guide
Digital Still CameraDSC-HX99
Photo Capture
Captures a chosen scene in a movie to save as a still image. First shoot a movie, then pause the movie during playbackto capture decisive moments that tend to be missed when shooting still images, and save them as still images.
Related TopicShooting moviesPlaying back movies
4-745-578-11(1) Copyright 2018 Sony Corporation
Display the movie that you want to capture as a still image.1
MENU → (Playback) → [Photo Capture].2
Play back the movie and pause it.3
Find the desired scene using forward slow playback, reverse slow playback, displays the next frame, anddisplays the previous frame, and then stop the movie.
4
Press (Photo Capture) to capture the chosen scene.
The scene is saved as a still image.
5
204

Help Guide
Digital Still CameraDSC-HX99
Playing back images on the image index screen (Image Index)
You can display multiple images at the same time in playback mode.
To change the number of images to be displayedMENU → (Playback) → [Image Index] → desired setting.
Menu item details9 Images/25 Images
To return to single-image playbackSelect the desired image and press the center of the control wheel.
To display a desired image quicklySelect the bar on the left of the image index screen using the control wheel, then press the top/bottom sides of thecontrol wheel. While the bar is being selected, you can display the calendar screen or folder selection screen by pressingthe center. In addition, you can switch View Mode by selecting an icon.
Related TopicSwitching between still images and movies (View Mode)
4-745-578-11(1) Copyright 2018 Sony Corporation
Slide the W/T (zoom) lever to the W side while the image is being played back.1
Select the image by pressing the top/bottom/right/left sides of the control wheel or turning the controlwheel.
2
205

Help Guide
Digital Still CameraDSC-HX99
Switching between still images and movies (View Mode)
Sets the View Mode (image display method).
Menu item details Date View:
Displays the images by date. Folder View(Still):
Displays only still images. AVCHD View:
Displays only AVCHD-format movies. XAVC S HD View:
Displays only XAVC S HD-format movies. XAVC S 4K View:
Displays only XAVC S 4K-format movies.
4-745-578-11(1) Copyright 2018 Sony Corporation
MENU → (Playback) → [View Mode] → desired setting.1
206

Help Guide
Digital Still CameraDSC-HX99
Disp Cont Shoot Grp
Sets whether to display continuously shot images as a group.
Menu item detailsOn:Displays continuously shot images as a group.Off:Does not display continuously shot images as a group.
HintImages shot with [Drive Mode] set to [Cont. Shooting] or [Spd Priority Cont.] are grouped. One sequence of images shotcontinuously by holding down the shutter button during continuous shooting becomes one group.
On the image index screen, is displayed over the continuous shooting group.
NoteImages can be grouped and displayed only when [View Mode] is set to [Date View]. When it is not set to [Date View], imagescannot be grouped and displayed, even if [Disp Cont Shoot Grp] is set to [On].
If you delete the continuous shooting group, all the images in the group will be deleted.
Related TopicCont. ShootingSpd Priority Cont.
4-745-578-11(1) Copyright 2018 Sony Corporation
MENU → (Playback) → [Disp Cont Shoot Grp] → desired setting.1
207
Help Guide
Digital Still CameraDSC-HX99
Playing back images using slideshow (Slide Show)
Automatically plays back images continuously.
Menu item detailsRepeat:Select [On], in which images are played back in a continuous loop, or [Off], in which the product exits the slideshowwhen all the images are played back once.Interval:Select the display interval for images from among [1 Sec], [3 Sec], [5 Sec], [10 Sec] or [30 Sec].To quit the slideshow in the middle of playbackPress the MENU button to quit the slideshow. You cannot pause the slideshow.
HintDuring playback, you can display the next/previous image by pressing the right/left side of the control wheel.
You can activate a slideshow only when [View Mode] is set to [Date View] or [Folder View(Still)].
4-745-578-11(1) Copyright 2018 Sony Corporation
MENU → (Playback) → [Slide Show] → desired setting.1
Select [Enter].2
208

Help Guide
Digital Still CameraDSC-HX99
Protecting images (Protect)
Protects recorded images against accidental erasure. The mark is displayed on protected images.
Menu item detailsMultiple Img.:Applies the protection of the selected multiple images.(1) Select the image to be protected, then press the center of the control wheel. The mark is displayed in the checkbox. To cancel the selection, press the center again to remove the mark.(2) To protect other images, repeat step (1).(3) MENU → [OK].
All in this Folder:Protects all images in the selected folder.All with this date:Protects all images taken on the selected date.Cancel All in this Folder:Cancels the protection of all images in the selected folder.Cancel All with this date:Cancels the protection of all images taken on the selected date.All in Cont. Shoot Grp:Protects all the images in the selected continuous shooting group.Cancel All in Cnt Sht Grp:Cancels the protection of all the images in the selected continuous shooting group.
HintIf you select a continuous shooting group in [Multiple Img.], all the images in the group will be protected. To select and protectparticular images within the group, execute [Multiple Img.] while displaying the images within the group.
NoteThe menu items that can be selected vary according to the [View Mode] setting and the selected content.
4-745-578-11(1) Copyright 2018 Sony Corporation
MENU → (Playback) → [Protect] → desired setting.1
209
Help Guide
Digital Still CameraDSC-HX99
Rating
You can assign ratings to recorded images on a scale from to to make it easier to find images.
HintYou can also assign ratings when playing back images by using the custom key. Assign [Rating] to the desired key using [Custom Key] beforehand, and then press the custom key while playing back an image to which you want to assign a rating. Thenumber of (Rating) changes each time you press the custom key.
NoteYou can assign ratings to still images only.
Related TopicCustom Key (still image/movie/playback)Rating Set(Cust Key)
4-745-578-11(1) Copyright 2018 Sony Corporation
MENU → (Playback) → [Rating].
The image rating selection screen will appear.
1
Press the left/right sides of the control wheel to display an image to which you want to assign a rating, andthen press the center.
2
Select the number of (Rating) by pressing the left/right sides of the control wheel, and then press thecenter.
3
Press the MENU button to exit the rating setting screen.4
210
Help Guide
Digital Still CameraDSC-HX99
Rating Set(Cust Key)
Sets the available number of when rating images with the key to which you have assigned [Rating] using [Custom Key].
Related TopicRatingCustom Key (still image/movie/playback)
4-745-578-11(1) Copyright 2018 Sony Corporation
MENU → (Playback) → [Rating Set(Cust Key)].1
Add a mark to the number of that you want to activate.
You can select the checked number when setting [Rating] using the custom key.
2
211
Help Guide
Digital Still CameraDSC-HX99
Specifying images to be printed (Specify Printing)
You can specify in advance on the memory card which still images you want to print out later. The (print order)icon will appear on the specified images. DPOF refers to “Digital Print Order Format.” DPOF setting will be retained after the image is printed. We recommend that you cancel this setting after printing.
Menu item detailsMultiple Img.:Selects images to order printing.(1) Select an image and press the center of the control wheel. The mark is displayed in the check box. To cancelthe selection, press the center again and delete the mark.(2) Repeat step (1) to print other images. To select all the images from a certain date or in a certain folder, select thecheck box for the date or folder.(3) MENU → [OK].
Cancel All:Clears all DPOF marks.Print Setting:Sets whether to print the date on images registered with DPOF marks.
The position or size of the date (inside or outside of the image) may differ depending on the printer.
NoteYou cannot add the DPOF mark to the following files:
RAW images
The number of copies cannot be specified.
Some printers do not support the date print function.
4-745-578-11(1) Copyright 2018 Sony Corporation
MENU → (Playback) → [Specify Printing] → desired setting.1
212

Help Guide
Digital Still CameraDSC-HX99
Deleting a displayed image
You can delete an image displayed. Once you have deleted an image, you cannot restore it. Confirm the image to bedeleted beforehand.
NoteThe protected images cannot be deleted.
Related TopicDeleting multiple selected images (Delete)
4-745-578-11(1) Copyright 2018 Sony Corporation
Display the image you want to delete.1
Press the (Delete) button.2
Select [Delete] using the control wheel.3
213
Help Guide
Digital Still CameraDSC-HX99
Deleting multiple selected images (Delete)
You can delete multiple selected images. Once you have deleted an image, you cannot restore it. Confirm the image tobe deleted beforehand.
Menu item detailsMultiple Img.: Deletes the selected images.(1) Select the images to be deleted, then press the center of the control wheel. The mark is displayed in the checkbox. To cancel the selection, press the center again to remove the mark.(2) To delete other images, repeat step (1).(3) MENU → [OK].
All in this Folder:Deletes all images in the selected folder.All with this date:Deletes all images taken on the selected date.All Other Than This Img.:Deletes all images in the continuous shooting group except the selection.All in Cont. Shoot Grp:Deletes all images in the selected continuous shooting group.
HintPerform [Format] to delete all images, including protected images.
To display the desired folder or date, select the desired folder or date during playback by performing the following procedure: (Image Index) lever → select the bar on the left using the control wheel → select the desired folder or date using the
top/bottom sides of the control wheel.
If you select a continuous shooting group in [Multiple Img.], all the images in the group will be deleted. To select and deleteparticular images within the group, execute [Multiple Img.] while displaying the images within the group.
NoteThe protected images cannot be deleted.
The menu items that can be selected vary according to the [View Mode] setting and the selected content.
Related TopicDeleting a displayed imageFormat
4-745-578-11(1) Copyright 2018 Sony Corporation
MENU → (Playback) → [Delete] → desired setting.1
214

Help Guide
Digital Still CameraDSC-HX99
Delete confirm.
You can set whether [Delete] or [Cancel] is selected as a default on the delete confirmation screen.
Menu item details"Delete" first: [Delete] is selected as the default setting."Cancel" first: [Cancel] is selected as the default setting.
4-745-578-11(1) Copyright 2018 Sony Corporation
MENU → (Setup) → [Delete confirm.] → desired setting.1
215

Help Guide
Digital Still CameraDSC-HX99
Viewing images on a TV using an HDMI cable
To view images stored on this product using a TV, an HDMI cable (sold separately) and an HD TV equipped with anHDMI jack are required.
“BRAVIA” SyncBy connecting this product to a TV that supports “BRAVIA” Sync using an HDMI cable (sold separately), you can operatethis product's playback functions with the TV remote control.
If you connect this camera to a TV using an HDMI cable, available menu items are limited.Only TVs that support “BRAVIA” Sync can provide SYNC MENU operations. For details, refer to the operatinginstructions supplied with the TV.If the product performs unwanted operations in response to the TV remote control when the product is connected toanother manufacturer’s TV using an HDMI connection, select MENU → (Setup) → [HDMI Settings] → [CTRLFOR HDMI] → [Off].
Hint
Turn off both this product and the TV.1
Connect the HDMI micro terminal of this product to the HDMI jack of the TV using an HDMI cable (soldseparately).
2
Turn on the TV and switch the input.3
Turn on this product.
Images shot with the product appear on the TV screen.
4
Select an image using the right/left sides of the control wheel.
The monitor of this camera is not lit up on the playback screen.If the playback screen is not displayed, press the (Playback) button.
5
After performing the steps above to connect this camera to a TV, select MENU → (Setup) → [HDMI Settings] →[CTRL FOR HDMI] → [On].
1.
Press the SYNC MENU button on the TV remote control, and select the desired mode.2.
216
This product is compatible with the PhotoTV HD standard. If you connect Sony PhotoTV HD-compatible devices using an HDMIcable (sold separately), the TV is set to the image quality suitable for viewing still images, and a whole new world of photos canbe enjoyed in breathtaking high quality.
You can connect this product to Sony PhotoTV HD-compatible devices with a USB terminal using the USB cable.
The PhotoTV HD allows for a highly-detailed, photo-like expression of subtle textures and colors.
For details, refer to the operating instructions supplied with the compatible TV.
NoteDo not connect this product and another device using the output terminals of both. Doing so may cause a malfunction.
Some devices may not work properly when connected to this product. For example, they may not output video or audio.
Use an HDMI cable with the HDMI logo or a genuine Sony cable.
Use an HDMI cable that is compatible with the HDMI micro terminal of the product and the HDMI jack of the TV.
When [ TC Output] is set to [On], the image may not be output properly to the TV or recording device. In such cases, set [TC Output] to [Off].
If images do not appear on the TV screen properly, select MENU → (Setup) → [HDMI Settings] → [HDMI Resolution] →[2160p/1080p], [1080p] or [1080i] according to the TV to be connected.
During HDMI output, when you switch the movie from 4K to HD image quality or vice-versa, or change the movie to a differentframe rate, the screen may become dark. This is not a malfunction.
If you set [ File Format] to [XAVC S 4K] and shoot movies while the camera is connected to an HDMI device, images will notbe displayed on the monitor.
4-745-578-11(1) Copyright 2018 Sony Corporation
217

Help Guide
Digital Still CameraDSC-HX99
Memory (Camera Settings1/Camera Settings2)
Allows you to register up to 2 often-used modes or product settings in the product. You can recall the settings using justthe mode dial.
Items that can be registeredYou can register various functions for shooting. The items that can actually be registered are displayed on the menuof the camera.Aperture (F number)Shutter speedOptical zoom scale
To change registered settingsChange the setting to the desired one and re-register the setting to the same mode number.
NoteProgram Shift cannot be registered.
Related TopicRecall (Camera Settings1/Camera Settings2)
4-745-578-11(1) Copyright 2018 Sony Corporation
Set the product to the setting you want to register.1
MENU → (Camera Settings1) → [ / Memory] → desired number.2
Press the center of the control wheel to confirm.3
218

Help Guide
Digital Still CameraDSC-HX99
Custom Key (still image/movie/playback)
You can assign a desired function to a desired key.Some functions are available only when they are assigned to a custom key. For example, if you assign [Eye AF] to[Center Button] for [ Custom Key], you can easily recall [Eye AF] simply by pressing the center of the control wheelwhile shooting.
Menu item detailsCustom Key:
Sets the custom key function to use when shooting still images.Custom Key:
Sets the custom key function to use when recording movies. You can assign a different function from the one used whenshooting still images.
Custom Key:Sets the custom key function to use when playing back images.
MENU → (Camera Settings2) → [ Custom Key], [ Custom Key] or [ Custom Key].1
Select the key to which you want to assign the function on the selection screen, and press the center of thecontrol wheel.
The keys that can be assigned functions are different for [ Custom Key], [ Custom Key] and [Custom Key].
You can assign the desired functions to the following keys.
2
Control Ring1.Fn/ Button2.Center Button/Left Button/Right Button3.C Button4.
Select the function to be assigned.
The functions that can be assigned differ depending on the keys.
3
219

Related TopicUsing the control wheelFocus Standard
4-745-578-11(1) Copyright 2018 Sony Corporation
220

Help Guide
Digital Still CameraDSC-HX99
Function Menu Set.
You can assign the functions to be called up when you press the Fn (Function) button.
4-745-578-11(1) Copyright 2018 Sony Corporation
MENU → (Camera Settings2) → [Function Menu Set.] → set a function to the desired location.
The functions that can be assigned are displayed on the setup item selection screen.
1
221

Help Guide
Digital Still CameraDSC-HX99
Add Item
You can register the desired menu items to (My Menu) under MENU.
HintYou can add up to 30 items to (My Menu).
NoteYou cannot add the following items to (My Menu).
Any item under MENU → (Playback)[View on TV]
Related TopicSort ItemDelete ItemUsing MENU items
4-745-578-11(1) Copyright 2018 Sony Corporation
MENU → (My Menu) → [Add Item].1
Select an item that you want to add to (My Menu) using the top/bottom/left/right sides of the controlwheel.
2
Select a destination using the top/bottom/left/right sides of the control wheel.3
222

Help Guide
Digital Still CameraDSC-HX99
Sort Item
You can rearrange the menu items added to (My Menu) under MENU.
Related TopicAdd Item
4-745-578-11(1) Copyright 2018 Sony Corporation
MENU → (My Menu) → [Sort Item].1
Select an item that you want to move using the top/bottom/left/right sides of the control wheel.2
Select a destination using the top/bottom/left/right sides of the control wheel.3
223

Help Guide
Digital Still CameraDSC-HX99
Delete Item
You can delete menu items added to (My Menu) of MENU.
HintTo delete all the items on a page, select MENU → (My Menu) → [Delete Page].
You can delete all the items added to (My Menu) by selecting MENU → (My Menu) → [Delete All].
Related TopicDelete PageDelete AllAdd Item
4-745-578-11(1) Copyright 2018 Sony Corporation
MENU → (My Menu) → [Delete Item].1
Select an item that you want to delete using the top/bottom/left/right sides of the control wheel, and thenpress the center to delete the selected item.
2
224
Help Guide
Digital Still CameraDSC-HX99
Delete Page
You can delete all the menu items added to a page under (My Menu) in MENU.
Related TopicAdd ItemDelete All
4-745-578-11(1) Copyright 2018 Sony Corporation
MENU → (My Menu) → [Delete Page].1
Select a page that you want to delete using the left/right sides of the control wheel, and then press thecenter of the control wheel to delete the items.
2
225

Help Guide
Digital Still CameraDSC-HX99
Delete All
You can delete all the menu items added to (My Menu) in MENU.
Related TopicAdd ItemDelete Page
4-745-578-11(1) Copyright 2018 Sony Corporation
MENU → (My Menu) → [Delete All].1
Select [OK].2
226
Help Guide
Digital Still CameraDSC-HX99
Auto Review
You can check the recorded image on the screen right after the shooting. You can also set the display time for AutoReview.
Menu item details10 Sec/5 Sec/2 Sec:Displays the recorded image on the screen right after shooting for the selected duration of time. If you perform amagnifying operation during Auto Review, you can check that image using the magnified scale.Off:Does not display the Auto Review.
NoteWhen you use a function that performs image processing, the image before processing may be displayed temporarily, followed bythe image after processing.
The DISP (Display Setting) settings are applied for the Auto Review display.
Related TopicEnlarging an image being played back (Enlarge Image)
4-745-578-11(1) Copyright 2018 Sony Corporation
MENU → (Camera Settings2) → [Auto Review] → desired setting.1
227

Help Guide
Digital Still CameraDSC-HX99
Grid Line
Sets whether the grid line is displayed or not. The grid line will help you to adjust the composition of images.
Menu item detailsRule of 3rds Grid:Place main subjects close to one of the grid lines that divide the image into thirds for a well-balanced composition.Square Grid:Square grids make it easier to confirm the horizontal level of your composition. This is useful for assessing thecomposition when shooting landscapes, closeups, or when performing camera scanning.Diag. + Square Grid:Place a subject on the diagonal line to express an uplifting and powerful feeling.Off:Does not display the grid line.
4-745-578-11(1) Copyright 2018 Sony Corporation
MENU → (Camera Settings2) → [Grid Line] → desired setting.1
228

Help Guide
Digital Still CameraDSC-HX99
FINDER/MONITOR
Sets the method for switching the display between the viewfinder and the monitor.
Menu item detailsAuto:When you look into the viewfinder, the eye sensor reacts and the display is switched to the viewfinder automatically.Viewfinder(Manual):The monitor is turned off and the image is displayed only in the viewfinder.Monitor(Manual):The viewfinder is turned off and the image is always displayed on the monitor.
HintYou can assign the [FINDER/MONITOR] function to your preferred key. MENU → (Camera Settings2) → [ Custom Key], [ Custom Key] or [ Custom Key] → set [Finder/Monitor Sel.] tothe preferred key.
If you want to retain the viewfinder display or the monitor display, set [FINDER/MONITOR] to [Viewfinder(Manual)] or[Monitor(Manual)] beforehand. You can keep the monitor off when you take your eyes off the viewfinder during recording by setting the monitor display to[Monitor Off] using the DISP button. Select MENU → (Camera Settings2) → [DISP Button] → [Monitor] and add a checkmark to [Monitor Off] beforehand.
NoteWhen the viewfinder is pushed down, the images are always displayed on the monitor regardless of the [FINDER/MONITOR]setting.
When the monitor is pulled out, the eye sensor will not detect your eye's approach even if the viewfinder is popped up and[FINDER/MONITOR] is set to [Auto]. The image will continue to be displayed on the monitor.
Related TopicCustom Key (still image/movie/playback)DISP Button (Monitor/Finder)
4-745-578-11(1) Copyright 2018 Sony Corporation
MENU → (Camera Settings2) → [FINDER/MONITOR] → desired setting.1
229

Help Guide
Digital Still CameraDSC-HX99
Monitor Brightness
Adjust the brightness of the screen.
Menu item detailsManual:Adjusts the brightness within the range of –2 to +2.Sunny Weather:Sets the brightness appropriately for shooting outdoors.
NoteThe [Sunny Weather] setting is too bright for shooting indoors. Set [Monitor Brightness] to [Manual] for indoor shooting.
The monitor brightness cannot be adjusted in the following situations. The maximum brightness will be [±0].When [ File Format] is set to [XAVC S 4K].When [ File Format] is set to [XAVC S HD] and [ Record Setting] is set to [120p]/[100p].
The monitor brightness is locked at [-2] when shooting a movie using the Wi-Fi functions.
4-745-578-11(1) Copyright 2018 Sony Corporation
MENU → (Setup) → [Monitor Brightness] → desired setting.1
230

Help Guide
Digital Still CameraDSC-HX99
Viewfinder Bright.
When using the viewfinder, this product adjusts the brightness of the viewfinder according to the surroundingenvironment.
Menu item detailsAuto:Adjusts the brightness automatically.Manual:Selects the brightness of the viewfinder within the range of –2 to +2.
NoteThe viewfinder brightness cannot be adjusted in the following situations. The maximum brightness will be [±0].
When [ File Format] is set to [XAVC S 4K].When [ File Format] is set to [XAVC S HD] and [ Record Setting] is set to [120p]/[100p].
4-745-578-11(1) Copyright 2018 Sony Corporation
MENU → (Setup) → [Viewfinder Bright.] → desired setting.1
231
Help Guide
Digital Still CameraDSC-HX99
Finder Color Temp.
Adjusts the color temperature of the electronic viewfinder.
Menu item details-2 to +2:When you select “-,” the viewfinder screen changes to a warmer color, and when you select “+,” it changes to a coldercolor.
4-745-578-11(1) Copyright 2018 Sony Corporation
MENU → (Setup) → [Finder Color Temp.] → desired setting.1
232

Help Guide
Digital Still CameraDSC-HX99
Function for VF close
Sets whether to turn the power off when the viewfinder is stowed.
Menu item detailsPower OFF:Turns the power off when the viewfinder is stowed.Not Power OFF:Does not turn the power off when the viewfinder is stowed.
NotePush the eyepiece into the viewfinder before stowing the viewfinder. If you try to squeeze the viewfinder into the camera with theeyepiece pulled out, the viewfinder may be subjected to force and become damaged.
4-745-578-11(1) Copyright 2018 Sony Corporation
MENU → (Setup) → [Function for VF close] → desired setting.1
233

Help Guide
Digital Still CameraDSC-HX99
Display Quality
You can change the display quality.
Menu item detailsHigh: Displays in high quality.Standard: Displays in standard quality.
NoteWhen [High] is set, battery consumption will be higher than when [Standard] is set.
When the temperature of the camera rises, the setting may become locked to [Standard].
4-745-578-11(1) Copyright 2018 Sony Corporation
MENU → (Setup) → [Display Quality] → desired setting.1
234

Help Guide
Digital Still CameraDSC-HX99
Auto Monitor OFF
The camera automatically switches to the power-saving mode if you do not operate the camera for a certain period oftime in the still-image shooting mode. This function is useful for reducing the power consumption.
Menu item detailsDoes not turn OFF:The camera does not switch to the power-saving mode automatically.2 Sec/5 Sec/10 Sec:The camera switches to the power-saving mode and the monitor turns off if a certain number of seconds elapses withoutany operations. When [5 Sec] or [10 Sec] is selected, the monitor darkens two seconds before the end of the duration you have set.
Note[Auto Monitor OFF] does not activate in the following situations:
When the monitor is flipped up by approximately 180 degreesWhen the shooting mode is set to [Sweep Panorama]When the power-saving function is not activated
4-745-578-11(1) Copyright 2018 Sony Corporation
MENU → (Setup) → [Auto Monitor OFF] → desired setting1
235

Help Guide
Digital Still CameraDSC-HX99
Bright Monitoring
Allows you to adjust the composition when shooting in dark environments. By extending the exposure time, you cancheck the composition on the viewfinder/monitor even in dark locations such as under the night sky.
NoteDuring [Bright Monitoring], setting values such as exposure compensation will not be reflected in the live view display. It isrecommended that you use [Bright Monitoring] only in dark locations.
[Bright Monitoring] will be automatically cancelled in the following situations.When the camera is turned off.When the shooting mode is changed from P/A/S/M to a mode that is not P/A/S/M.When the focus mode is set to other than manual focus.When [ MF Assist] is executed.When [Focus Magnifier] is selected.
During [Bright Monitoring], the shutter speed may be slower than normal while shooting in dark locations. Also, because themeasured brightness range is expanded, the exposure may change.
4-745-578-11(1) Copyright 2018 Sony Corporation
MENU → (Camera Settings2) → [ Custom Key] → assign the [Bright Monitoring] function to thedesired key.
1
Press the key to which you assigned the [Bright Monitoring] function, then shoot an image.
The brightness due to [Bright Monitoring] will continue after shooting.To return the monitor brightness to normal, press the key to which you assigned the [Bright Monitoring] functiononce again.
2
236

Help Guide
Digital Still CameraDSC-HX99
Format
When you use a memory card with this camera for the first time, we recommend that you format the card using thecamera for stable performance of the memory card. Note that formatting permanently erases all data on the memorycard, and is unrecoverable. Save valuable data on a computer, etc.
NoteFormatting permanently erases all data including even protected images.
The access lamp lights up during formatting. Do not remove the memory card while the access lamp is lit up.
Format the memory card on this camera. If you format the memory card on the computer, the memory card may not be usabledepending on the format type.
It may take a few minutes to complete formatting, depending on the memory card.
You cannot format the memory card if the remaining battery charge is less than 1%.
4-745-578-11(1) Copyright 2018 Sony Corporation
MENU → (Setup) → [Format].1
237

Help Guide
Digital Still CameraDSC-HX99
File Number
Selects how to assign file numbers to still images.
Menu item detailsSeries:The product will assign numbers to files sequentially up to "9999" without resetting.Reset :The product resets numbers when a file is recorded in a new folder and assigns numbers to files starting with "0001". (When the recording folder contains a file, a number one higher than the largest number is assigned.)
4-745-578-11(1) Copyright 2018 Sony Corporation
MENU → (Setup) → [File Number] → desired setting.1
238

Help Guide
Digital Still CameraDSC-HX99
Set File Name
You can specify the first three characters of the file name for images you shoot.
NoteOnly capital letters, numbers, and underscores can be entered. However, an underscore cannot be used as the first character.
The three characters of the file name you specify using [Set File Name] will only be applied to images you shoot after changingthe setting.
Related TopicHow to use the keyboard
4-745-578-11(1) Copyright 2018 Sony Corporation
MENU → (Setup) → [Set File Name].1
Select the entry field for the file name to display a keyboard on the screen, and then enter three charactersof your choice.
2
239

Help Guide
Digital Still CameraDSC-HX99
Display Media Info.
Displays the recordable time of movies for the inserted memory card. Also displays the number of recordable still imagesfor the inserted memory card.
4-745-578-11(1) Copyright 2018 Sony Corporation
MENU → (Setup) → [Display Media Info.].1
240

Help Guide
Digital Still CameraDSC-HX99
Select REC Folder
If [Folder Name] is set to [Standard Form] and there are 2 folders or more, you can select the folder on the memory cardto which images are to be recorded.
NoteYou cannot select the folder when [Folder Name] is set to [Date Form].
Related TopicFolder Name
4-745-578-11(1) Copyright 2018 Sony Corporation
MENU→ (Setup)→[Select REC Folder]→desired folder.1
241

Help Guide
Digital Still CameraDSC-HX99
New Folder
Creates a new folder on the memory card for recording still images. A new folder is created with a folder number onegreater than the largest folder number currently used. Images are recorded in the newly created folder.
NoteWhen you insert a memory card that was used with other equipment into this product and shoot images, a new folder may beautomatically created.
Up to 4,000 images in total can be stored in one folder. When the folder capacity is exceeded, a new folder may be automaticallycreated.
4-745-578-11(1) Copyright 2018 Sony Corporation
MENU→ (Setup)→[New Folder].1
242

Help Guide
Digital Still CameraDSC-HX99
Folder Name
Still images are recorded in a folder that is automatically created inside the DCIM folder on the memory card. You canchange the way folder names are assigned.
Menu item detailsStandard Form:The folder name form is as follows: folder number + MSDCF. Example: 100MSDCFDate Form:The folder name form is as follows: folder number + Y (the last digit)/MM/DD. Example: 10080405(Folder number: 100, date: 04/05/2018)
NoteYou cannot change the [Folder Name] settings for movies.
4-745-578-11(1) Copyright 2018 Sony Corporation
MENU → (Setup) → [Folder Name] → desired setting.1
243

Help Guide
Digital Still CameraDSC-HX99
Recover Image DB
If image files were processed on a computer, problems may occur in the image database file. In such cases, the imageson the memory card will not be played back on this product. If these problems happen, repair the file using [RecoverImage DB].
NoteUse a sufficiently charged battery pack. Low battery power during repairing can cause damage to data.
4-745-578-11(1) Copyright 2018 Sony Corporation
MENU → (Setup) → [Recover Image DB] → [Enter].1
244

Help Guide
Digital Still CameraDSC-HX99
Audio signals
Selects whether the product produces a sound or not.
Menu item detailsOn:all:Sounds are produced for example when the focus is achieved by pressing the shutter button halfway down.On:Shutter Only:Only the shutter sound is produced.Off:Sounds are not produced.
4-745-578-11(1) Copyright 2018 Sony Corporation
MENU → (Camera Settings2) → [Audio signals] → desired setting.1
245

Help Guide
Digital Still CameraDSC-HX99
Write Date (still image)
Sets whether to record a shooting date on the still image.
Menu item detailsOn:Records a shooting date.Off:Does not record a shooting date.
NoteIf you shoot images with the date once, you cannot delete the date from the images later.
The dates are doubly printed if you set the product to print dates when printing the images using PCs or printers.
The recorded time of the image cannot be superimposed on the image.
[ Write Date] is not available for RAW images.
4-745-578-11(1) Copyright 2018 Sony Corporation
MENU → (Camera Settings2) → [ Write Date] → desired setting.1
246

Help Guide
Digital Still CameraDSC-HX99
Tile Menu
Selects whether to always display the first screen of the menu when you press the MENU button.
Menu item detailsOn:Always displays the first screen of the menu (Tile Menu).Off:Deactivates the Tile Menu display.
4-745-578-11(1) Copyright 2018 Sony Corporation
MENU → (Setup) → [Tile Menu] → desired setting.1
247

Help Guide
Digital Still CameraDSC-HX99
Mode Dial Guide
You can display the description of a shooting mode when you turn the mode dial and change the settings available forthat shooting mode.
Menu item detailsOn: Displays the Mode Dial Guide.Off: Does not display the Mode Dial Guide.
4-745-578-11(1) Copyright 2018 Sony Corporation
MENU → (Setup) → [Mode Dial Guide] → desired setting.1
248
Help Guide
Digital Still CameraDSC-HX99
Pwr Save Start Time
You can set the time by which the power goes off automatically.
Menu item details30 Min/5 Min/2 Min/1 Min
NoteThe power save function is not activated when power is being supplied via USB, when playing back slideshows, when recordingmovies, or when connected to a computer or TV.
4-745-578-11(1) Copyright 2018 Sony Corporation
MENU → (Setup) → [Pwr Save Start Time] → desired setting.1
249

Help Guide
Digital Still CameraDSC-HX99
Auto Pwr OFF Temp.
Sets the temperature of the camera at which the camera turns off automatically during shooting. When it is set to [High],you can continue shooting even when the temperature of the camera gets hotter than normal.
Menu item detailsStandard:Sets the standard temperature at which the camera turns off.High:Sets a higher temperature than the standard at which the camera turns off.Notes when [Auto Pwr OFF Temp.] is set to [High]
Do not shoot while holding the camera in your hand. Use a tripod.Using the camera while holding it in your hand for a long period of time may cause low-temperature burns.
Continuous recording time for movies when [Auto Pwr OFF Temp.] is set to [High]The duration of time available for continuous movie recording is as follows when the camera starts recording with thedefault settings after the power has been turned off for a while. The following values indicate the continuous time fromwhen the camera starts recording until the camera stops recording.
Ambient temperature: 20°C (68°F)Continuous recording time for movies (HD): Approx. 29 minutesContinuous recording time for movies (4K): Approx. 5 minutesAmbient temperature: 30°C (86°F)Continuous recording time for movies (HD): Approx. 29 minutesContinuous recording time for movies (4K): Approx. 5 minutesAmbient temperature: 40°C (104°F)Continuous recording time for movies (HD): Approx. 15 minutesContinuous recording time for movies (4K): Approx. 5 minutesHD: XAVC S HD (60p 50M/50p 50M, not connected via Wi-Fi)4K: XAVC S 4K (30p 60M/25p 60M, not connected via Wi-Fi)
NoteEven if [Auto Pwr OFF Temp.] is set to [High], depending on the conditions or the temperature of the camera, the recordable timefor movies may not change.
Continuous movie shooting is possible for a maximum of approximately 29 minutes at a time. The recording time is approximately5 minutes when shooting movies in XAVC S 4K/XAVC S HD 120p/100p format. (a product specification limit)
Related TopicRecordable movie times
4-745-578-11(1) Copyright 2018 Sony Corporation
MENU → (Setup) → [Auto Pwr OFF Temp.] → desired setting.1
250

Help Guide
Digital Still CameraDSC-HX99
NTSC/PAL Selector
Plays back movies recorded with the product on a NTSC/PAL system TV.
NoteIf you insert a memory card that has previously been formatted with a different video system, a message telling you that you mustreformat the card will appear. If you want to record using another system, re-format the memory card or use another memory card.
When you perform [NTSC/PAL Selector], and the setting is changed from the default one, a message "Running on NTSC." or"Running on PAL." will appear on the start-up screen.
4-745-578-11(1) Copyright 2018 Sony Corporation
MENU → (Setup) → [NTSC/PAL Selector] → [Enter]1
251

Help Guide
Digital Still CameraDSC-HX99
HDMI Settings: HDMI Resolution
When you connect the product to a High Definition (HD) TV with HDMI terminals using an HDMI cable (sold separately),you can select HDMI Resolution to output images to the TV.
Menu item detailsAuto:The product automatically recognizes an HD TV and sets the output resolution.2160p/1080p:Outputs signals in 2160p/1080p.1080p:Outputs signals in HD picture quality (1080p).1080i:Outputs signals in HD picture quality (1080i).
NoteIf the images are not displayed properly using the [Auto] setting, select either [1080i], [1080p] or [2160p/1080p], based on whichTV is to be connected.
4-745-578-11(1) Copyright 2018 Sony Corporation
MENU → (Setup) → [HDMI Settings] → [HDMI Resolution] → desired setting.1
252

Help Guide
Digital Still CameraDSC-HX99
HDMI Settings: 24p/60p Output (movie) (Only for 1080 60i compatible models)
You can set 1080/24p or 1080/60p as the HDMI output format when [ Record Setting] is set to [24p 50M], [24p 60M]or [24p 100M].
Menu item details60p:Movies are output as 60p.24p:Movies are output as 24p.
NoteSteps 1 and 2 can be set in either order.
Related TopicRecord Setting (movie)
4-745-578-11(1) Copyright 2018 Sony Corporation
MENU → (Setup) → [HDMI Settings] → [HDMI Resolution] → [1080p] or [2160p/1080p].1
MENU → (Setup) → [HDMI Settings] → [ 24p/60p Output] → desired setting.2
253
Help Guide
Digital Still CameraDSC-HX99
HDMI Settings: HDMI Info. Display
Selects whether to display the shooting information when this product and the TV are connected using an HDMI cable(sold separately).
Menu item detailsOn:Displays the shooting information on the TV.The recorded image and the shooting information are displayed on the TV, while nothing is displayed on the camera’smonitor.
Off:Does not display the shooting information on the TV.Only the recorded image is displayed on the TV, while the recorded image and the shooting information are displayed onthe camera’s monitor.
NoteWhen this product is connected to a 4K-compatible TV, [Off] is selected automatically.
If you set [ File Format] to [XAVC S 4K] and shoot movies while the camera is connected to an HDMI device, images will notbe displayed on the monitor.
4-745-578-11(1) Copyright 2018 Sony Corporation
MENU → (Setup) → [HDMI Settings] → [HDMI Info. Display] → desired setting.1
254

Help Guide
Digital Still CameraDSC-HX99
HDMI Settings: TC Output (movie)
Sets whether or not to layer the TC (time code) information on the output signal via the HDMI terminal when outputtingthe signal to other professional-use devices. This function layers the time code information on the HDMI output signal. The product sends the time code informationas digital data, not as an image displayed on the screen. The connected device can then refer to the digital data torecognize the time data.
Menu item detailsOn:Time code is output to other devices.Off:Time code is not output to other devices.
NoteWhen [ TC Output] is set to [On], the image may not be output properly to the TV or recording device. In such cases, set [
TC Output] to [Off].
4-745-578-11(1) Copyright 2018 Sony Corporation
MENU → (Setup) → [HDMI Settings] → [ TC Output] → desired setting.1
255

Help Guide
Digital Still CameraDSC-HX99
HDMI Settings: REC Control (movie)
If you connect the camera to an external recorder/player, you can remotely command the recorder/player to start/stoprecording using the camera.
Menu item detailsOn:
The camera can send a recording command to an external recorder/player. The camera is sending a recording command to an external recorder/player.
Off:The camera is not able to send a command to an external recorder/player to start/stop recording.
NoteAvailable for external recorders/players compatible with [ REC Control].
When you use the [ REC Control] function, set the shooting mode to (Movie).
When [ TC Output] is set to [Off], you cannot use the [ REC Control] function.
Even when is displayed, the external recorder/player may not work properly depending on the settings or status of therecorder/player. Check if the external recorder/player works properly before use.
4-745-578-11(1) Copyright 2018 Sony Corporation
MENU → (Setup) → [HDMI Settings] → [ REC Control] → desired setting.1
256

Help Guide
Digital Still CameraDSC-HX99
HDMI Settings: CTRL FOR HDMI
When connecting this product to a “BRAVIA” Sync-compatible TV using an HDMI cable (sold separately), you canoperate this product by aiming the TV remote control at the TV.
Menu item detailsOn:You can operate this product with a TV’s remote control.Off:You cannot operate this product with a TV’s remote control.
NoteIf you connect this product to a TV using an HDMI cable, available menu items are limited.
[CTRL FOR HDMI] is available only with a “BRAVIA” Sync-compatible TV. Also, the SYNC MENU operation differs depending onthe TV you are using. For details, refer to the operating instructions supplied with the TV.
If the product performs unwanted operations in response to the TV remote control when the product is connected to anothermanufacturer’s TV using an HDMI connection, select MENU → (Setup) → [HDMI Settings] → [CTRL FOR HDMI] → [Off].
4-745-578-11(1) Copyright 2018 Sony Corporation
MENU → (Setup) → [HDMI Settings] → [CTRL FOR HDMI] → desired setting.1
Connect this product to a “BRAVIA” Sync-compatible TV.
The input of the TV is switched automatically and images on this product are displayed on the TV screen.
2
Press the SYNC MENU button of the TV’s remote control.3
Operate this product using the TV’s remote control.4
257

Help Guide
Digital Still CameraDSC-HX99
HDMI Settings: HDMI Audio Out. (movie)
When the camera is connected to an external device such as a television via an HDMI cable (sold separately), the audiopicked up by the camera’s microphone is output to the external device during movie shooting and standby mode. Duringshooting, you can check both the image and sound from the external device.
Standby for movie shootingThis is the state before you start movie shooting by pressing the MOVIE button, after turning the mode dial to (Movie) and setting the values for shutter speed and aperture. The icon “STBY” is displayed on the screen.
Menu item detailsOn:Sound is output to the external device.Off:Sound is not output to the external device.
NoteDuring HDMI audio output, no electronic sound is produced when performing or ending movie recording even if [Audio signals] isset to [On].
Related TopicViewing images on a TV using an HDMI cable
4-745-578-11(1) Copyright 2018 Sony Corporation
MENU → (Setup) → [HDMI Settings] → [ HDMI Audio Out.] → desired setting.1
258

Help Guide
Digital Still CameraDSC-HX99
USB Connection
Selects the USB connection method when this product is connected to a computer, etc.Select MENU → (Network) → [Ctrl w/ Smartphone] → [Ctrl w/ Smartphone] → [Off] beforehand.
Menu item detailsAuto:Establishes a Mass Storage or MTP connection automatically, depending on the computer or other USB devices to beconnected. Windows 7, Windows 8.1, or Windows 10 computers are connected in MTP, and their unique functions areenabled for use.Mass Storage:Establishes a Mass Storage connection between this product, a computer, and other USB devices.MTP:Establishes an MTP connection between this product, a computer, and other USB devices. Windows 7, Windows 8.1, orWindows 10 computers are connected in MTP, and their unique functions are enabled for use.
PC Remote:Uses Imaging Edge to control the product from a computer, including such functions as shooting and storing images onthe computer.
NoteIt may take some time to make the connection between this product and a computer when [USB Connection] is set to [Auto].
Related TopicPC Remote Settings: Still Img. Save Dest.PC Remote Settings: RAW+J PC Save Img
4-745-578-11(1) Copyright 2018 Sony Corporation
MENU → (Setup) → [USB Connection] → desired setting.1
259

Help Guide
Digital Still CameraDSC-HX99
USB LUN Setting
Enhances compatibility by limiting of USB connection functions.
Menu item detailsMulti: Normally, use [Multi].Single: Set [USB LUN Setting] to [Single] only if you cannot make a connection.
4-745-578-11(1) Copyright 2018 Sony Corporation
MENU → (Setup) → [USB LUN Setting] → desired setting.1
260
Help Guide
Digital Still CameraDSC-HX99
USB Power Supply
Sets whether to supply power via the micro USB cable when the product is connected to a computer or an USB device.
Menu item detailsOn:Power is supplied to the product via a micro USB cable when the product is connected to a computer, etc.Off:Power is not supplied to the product via a micro USB cable when the product is connected to a computer, etc. If you usethe supplied AC Adaptor, power will be supplied even when [Off] is selected.
Operations available while supplying power via a USB cableThe following table shows you which operations are available/unavailable while supplying power via a USB cable. A checkmark indicates that the operation is available, and “―” indicates that the operation is unavailable.
NoteInsert the battery pack into the product to supply power via USB cable.
4-745-578-11(1) Copyright 2018 Sony Corporation
MENU → (Setup) → [USB Power Supply] → desired setting.1
Operation Available / Unavailable
Shooting images
Playing back images
Wi-Fi/NFC/Bluetooth connections
Charging a battery pack ―
Turning the camera on without a battery pack inserted ―
261

Help Guide
Digital Still CameraDSC-HX99
PC Remote Settings: Still Img. Save Dest.
Sets whether to save still images stored in both the camera and the computer during PC Remote shooting. This settingis useful when you want to check recorded images on the camera without leaving the camera.
Menu item detailsPC Only:Saves still images only on the computer.PC+Camera:Saves still images on the computer and the camera.
NoteDuring PC Remote shooting, you cannot change settings for [Still Img. Save Dest.]. Adjust the settings before you start shooting.
If you insert a memory card that is not recordable, you cannot shoot still images even if you select [PC+Camera].
If you select [PC+Camera] and you have not inserted a memory card into the camera, you cannot release the shutter even if[Release w/o Card] is set to [Enable].
While you are playing back still images on the camera, you cannot shoot using PC Remote.
Related TopicUSB ConnectionRelease w/o CardPC Remote Settings: RAW+J PC Save Img
4-745-578-11(1) Copyright 2018 Sony Corporation
PC Remote: Uses Imaging Edge to control the product from a computer, including such functions as shooting and storing images on thecomputer.
*
MENU → (Setup) → [PC Remote Settings] → [Still Img. Save Dest.] → desired setting.1
262

Help Guide
Digital Still CameraDSC-HX99
PC Remote Settings: RAW+J PC Save Img
Selects the file type for images to be transferred to the computer in PC Remote shooting. When shooting still images using PC Remote, the application on the computer does not display the image until theimage has been completely transferred. When performing RAW+JPEG shooting, you can accelerate the displayprocessing speed by transferring only JPEG images instead of transferring both RAW and JPEG images.
Menu item detailsRAW & JPEG:Transfers both RAW and JPEG files to the computer.JPEG Only:Transfers only JPEG files to the computer.RAW Only:Transfers only RAW files to the computer.
NoteThe setting for [RAW+J PC Save Img] cannot be changed during PC Remote shooting. Adjust the setting before shooting.
[RAW+J PC Save Img] can be set only when [ File Format] is set to [RAW & JPEG].
Related TopicUSB ConnectionFile Format (still image)PC Remote Settings: Still Img. Save Dest.
4-745-578-11(1) Copyright 2018 Sony Corporation
PC Remote: Uses Imaging Edge to control the product from a computer, including such functions as shooting and storing images on thecomputer.
*
MENU → (Setup) → [PC Remote Settings] → [RAW+J PC Save Img] → desired setting.1
263

Help Guide
Digital Still CameraDSC-HX99
Language
Selects the language to be used in the menu items, warnings and messages.
4-745-578-11(1) Copyright 2018 Sony Corporation
MENU → (Setup) → [ Language] → desired language.1
264
Help Guide
Digital Still CameraDSC-HX99
Date/Time Setup
The Clock Set screen is displayed automatically when you turn on this product for the first time or when the internalrechargeable backup battery has fully discharged. Select this menu when setting the date and time after the first time.
Menu item detailsDaylight Savings: Selects Daylight Savings [On]/[Off].Date/Time: Sets the date and time.Date Format: Selects the date and time display format.
HintTo charge the internal rechargeable backup battery, insert a charged battery pack, and leave the product for 24 hours or morewith the power off.
If the clock resets every time the battery is charged, the internal rechargeable backup battery may be worn out. Consult yourservice facility.
4-745-578-11(1) Copyright 2018 Sony Corporation
MENU → (Setup) → [Date/Time Setup] → desired setting.1
265

Help Guide
Digital Still CameraDSC-HX99
Area Setting
Sets the area where you are using the product.
4-745-578-11(1) Copyright 2018 Sony Corporation
MENU → (Setup) → [Area Setting] → desired area.1
266

Help Guide
Digital Still CameraDSC-HX99
Version
Displays the version of this product’s software. Check the version when updates for this product’s software are released,etc.
NoteUpdating can be performed only when the battery level is (3 remaining battery bars) or more. Use a sufficiently chargedbattery pack.
4-745-578-11(1) Copyright 2018 Sony Corporation
MENU → (Setup) → [Version].1
267

Help Guide
Digital Still CameraDSC-HX99
Demo Mode
The [Demo Mode] function displays the movies recorded on the memory card automatically (demonstration), when thecamera has not been operated for a certain time. Normally select [Off].
Menu item detailsOn:The movie playback demonstration starts automatically if the product is not operated for about one minute. Onlyprotected AVCHD movies can be played back. Set the view mode to [AVCHD View], and protect the movie file with the oldest recorded date and time.Off:Does not show the demonstration.
NoteYou can activate this function only when the product is connected using a dedicated AC Adaptor.
When there is no protected AVCHD movies on the memory card, you cannot select [On].
4-745-578-11(1) Copyright 2018 Sony Corporation
MENU → (Setup) → [Demo Mode] → desired setting.1
268

Help Guide
Digital Still CameraDSC-HX99
Setting Reset
Resets the product to the default settings. Even if you perform [Setting Reset], the recorded images are retained.
Menu item detailsCamera Settings Reset:Initializes the main shooting settings to the default settings.Initialize:Initializes all the settings to the default settings.
NoteBe sure not to eject the battery pack while resetting.
4-745-578-11(1) Copyright 2018 Sony Corporation
MENU → (Setup) → [Setting Reset] → desired setting.1
269

Help Guide
Digital Still CameraDSC-HX99
PlayMemories Mobile
Using the smartphone application PlayMemories Mobile, you can shoot an image while controlling the camera using asmartphone or transfer the images recorded on the camera to the smartphone. Download and install the applicationPlayMemories Mobile from your smartphone’s application store. If PlayMemories Mobile is already installed on yoursmartphone, be sure to update it to the latest version. For details on PlayMemories Mobile, refer to the support page (http://www.sony.net/pmm/).
NoteDepending on future version upgrades, the operational procedures or screen displays are subject to change without notice.
4-745-578-11(1) Copyright 2018 Sony Corporation
270

Help Guide
Digital Still CameraDSC-HX99
Controlling the camera using an Android smartphone (NFC One-touch remote)
You can connect this product to an NFC-enabled Android smartphone by touching them together and then operate theproduct using the smartphone. Make sure that [Ctrl w/ Smartphone] is set to [On] by selecting MENU → (Network) → [Ctrl w/ Smartphone].
About “NFC”NFC is a technology that enables short-range wireless communication between various devices, such as mobile phonesor IC tags, etc. NFC makes data communication simpler with just a touch on the designated touch-point.
NFC (Near Field Communication) is an international standard of short-range wireless communication technology.
NoteIf you cannot make a connection, do as the following:
Launch PlayMemories Mobile on your smartphone, and then move the smartphone slowly toward the (N mark) of thisproduct.If the smartphone is in a case, remove it.If the product is in a case, remove it.Check whether the NFC function is activated on your smartphone.
Radio wave interference may occur as Bluetooth communications and Wi-Fi communications use the same frequency band. Ifyour Wi-Fi connection is unstable, it may be improved by turning off the Bluetooth function of the smartphone. If you do this, thelocation information link function is not available.
Activate the NFC function of the smartphone.1
Switch this product to shooting mode.
The NFC function is available only when the (N mark) is displayed on the screen.
2
Touch the smartphone to the product.
The smartphone and the product are connected, and PlayMemories Mobile launches.
You can shoot an image by remote control while checking the composition of the image on the smartphonescreen.Touch the smartphone to the product for 1-2 seconds until PlayMemories Mobile launches.
3
271

When you record movies using a smartphone as a remote controller, the monitor of the product becomes darker.
When [Airplane Mode] is set to [On], you cannot connect this product and the smartphone. Set [Airplane Mode] to [Off].
If this product and the smartphone are connected when the product is in playback mode, the displayed image is sent to thesmartphone.
Related TopicPlayMemories MobileAirplane Mode
4-745-578-11(1) Copyright 2018 Sony Corporation
272

Help Guide
Digital Still CameraDSC-HX99
Controlling the camera using an Android smartphone (QR Code)
You can control this product using your smartphone by connecting your smartphone to the camera using the QR Code. Make sure that [Ctrl w/ Smartphone] is set to [On] by selecting MENU → (Network) → [Ctrl w/ Smartphone].
MENU → (Network) → [Ctrl w/ Smartphone] → [ Connection].
QR Code (A) and the SSID (B) are displayed on the monitor of this product.
1
Launch PlayMemories Mobile on your smartphone and select [Scan QR Code of the Camera].2
Select [OK] on the smartphone screen.
When a message is displayed, select [OK] again.
3
Read the QR Code displayed on the monitor of this product with the smartphone.4
273

HintOnce the QR Code has been read, this product's SSID (DIRECT-xxxx) and password are registered to the smartphone. Thisenables you to easily connect the smartphone to the product via Wi-Fi at a later date by selecting the SSID. (Set [Ctrl w/Smartphone] to [On] in advance.)
NoteRadio wave interference may occur as Bluetooth communications and Wi-Fi communications use the same frequency band. Ifyour Wi-Fi connection is unstable, it may be improved by turning off the Bluetooth function of the smartphone. If you do this, thelocation information link function is not available.
When you record movies using a smartphone as a remote controller, the monitor of the product becomes darker.
If you cannot connect your smartphone to this product using the [One-touch(NFC)] function or QR Code, use the SSID andpassword.
Related TopicPlayMemories MobileControlling the camera using an Android smartphone (SSID)
4-745-578-11(1) Copyright 2018 Sony Corporation
Once the QR Code has been read, a message [Connect with the camera?] will be displayed on the smartphonescreen.
Select [OK] on the smartphone screen.
The smartphone is connected to the product.You can now shoot images remotely while checking the composition on the smartphone screen.
5
274

Help Guide
Digital Still CameraDSC-HX99
Controlling the camera using an Android smartphone (SSID)
You can control this product using your smartphone by connecting your smartphone to the camera using the SSID andpassword. Make sure that [Ctrl w/ Smartphone] is set to [On] by selecting MENU → (Network) → [Ctrl w/ Smartphone].
MENU → (Network) → [Ctrl w/ Smartphone] → [ Connection].
QR Code is displayed on the monitor of this product.
1
Press the (Delete) button of this product.
This product's SSID and password are displayed on the monitor of this product.
2
Launch PlayMemories Mobile on your smartphone.3
Select the model name of this product (DIRECT-xxxx: xxxx).4
Input the password that is displayed on this product.5
275
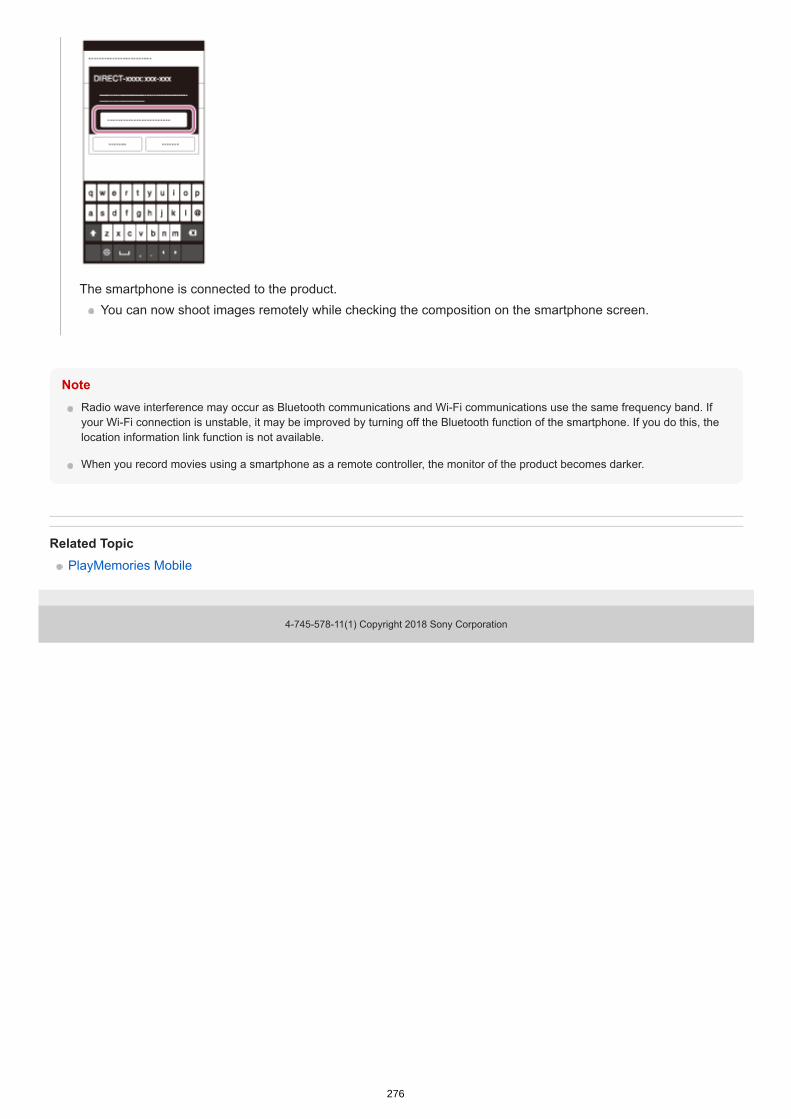
NoteRadio wave interference may occur as Bluetooth communications and Wi-Fi communications use the same frequency band. Ifyour Wi-Fi connection is unstable, it may be improved by turning off the Bluetooth function of the smartphone. If you do this, thelocation information link function is not available.
When you record movies using a smartphone as a remote controller, the monitor of the product becomes darker.
Related TopicPlayMemories Mobile
4-745-578-11(1) Copyright 2018 Sony Corporation
The smartphone is connected to the product.You can now shoot images remotely while checking the composition on the smartphone screen.
276

Help Guide
Digital Still CameraDSC-HX99
Controlling the camera using an iPhone or iPad (QR Code)
You can connect an iPhone or iPad to the camera using the QR Code and operate the camera using the iPhone or iPad. Make sure that [Ctrl w/ Smartphone] is set to [On] by selecting MENU → (Network) → [Ctrl w/ Smartphone].
MENU → (Network) → [Ctrl w/ Smartphone] → [ Connection].
QR Code (A) and the SSID (B) are displayed on the monitor of this product.
1
Launch PlayMemories Mobile on your iPhone or iPad and select [Scan QR Code of the Camera].2
Select [OK] on the iPhone or iPad screen.
When a message is displayed, select [OK] again.
3
Read the QR Code displayed on the monitor of this product with the iPhone or iPad.4
277

HintOnce the QR Code has been read, this product's SSID (DIRECT-xxxx) and password are registered to the iPhone or iPad. Thisenables you to easily connect the iPhone or iPad to the product via Wi-Fi at a later date by selecting the SSID. (Set [Ctrl w/Smartphone] to [On] in advance.)
Install the profile (setting information) by following the instructions shown on the iPhone or iPad screenand select [OK].
The profile will be installed to the iPhone or iPad.If you have activated the passcode lock function for your iPhone or iPad, you will need to enter the passcode.Enter the passcode that you set for your iPhone or iPad.
5
Select [Settings] on the "Home" screen → [Wi-Fi] → the SSID for this product on the iPhone or iPad.
The iPhone or iPad will connect to the product.
6
Return to the "Home" screen of the iPhone or iPad and launch PlayMemories Mobile.
You can now shoot images remotely while checking the composition on the screen of your iPhone or iPad.
7
278

NoteRadio wave interference may occur as Bluetooth communications and Wi-Fi communications use the same frequency band. Ifyour Wi-Fi connection is unstable, it may be improved by turning off the Bluetooth function of the smartphone. If you do this, thelocation information link function is not available.
When you record movies using a smartphone as a remote controller, the monitor of the product becomes darker.
If you cannot connect your iPhone or iPad to this product using the QR Code, use the SSID and password.
Related TopicPlayMemories MobileControlling the camera using an iPhone or iPad (SSID)
4-745-578-11(1) Copyright 2018 Sony Corporation
279

Help Guide
Digital Still CameraDSC-HX99
Controlling the camera using an iPhone or iPad (SSID)
You can control the camera using an iPhone or iPad by connecting the iPhone or iPad to the camera using the SSID andpassword. Make sure that [Ctrl w/ Smartphone] is set to [On] by selecting MENU → (Network) → [Ctrl w/ Smartphone].
MENU → (Network) → [Ctrl w/ Smartphone] → [ Connection].
QR Code is displayed on the monitor of this product.
1
Press the (Delete) button of this product.
This product's SSID and password are displayed on the monitor of this product.
2
Select the model name of this product (DIRECT-xxxx: xxxx) on the Wi-Fi setting screen of your iPhone oriPad.
3
Input the password that is displayed on this product.4
280

NoteRadio wave interference may occur as Bluetooth communications and Wi-Fi communications use the same frequency band. Ifyour Wi-Fi connection is unstable, it may be improved by turning off the Bluetooth function of the smartphone. If you do this, thelocation information link function is not available.
When you record movies using a smartphone as a remote controller, the monitor of the product becomes darker.
Related TopicPlayMemories Mobile
4-745-578-11(1) Copyright 2018 Sony Corporation
The iPhone or iPad is connected to the product.
Confirm that your iPhone or iPad was connected to the “SSID” shown on this product.5
Return to the "Home" screen of the iPhone or iPad and launch PlayMemories Mobile.
You can now shoot images remotely while checking the composition on the screen of your iPhone or iPad.
6
281

Help Guide
Digital Still CameraDSC-HX99
Snd to Smrtphn Func: Send to Smartphone
You can transfer still images or XAVC S movies to a smartphone and view them. The application PlayMemories Mobilemust be installed on your smartphone.
Menu item detailsSelect on This Device: Selects an image on the product to be transferred to the smartphone.(1) Select from among [This Image], [All with this date] or [Multiple Images].
The options displayed may differ depending on the View Mode selected on the camera.
(2) If you select [Multiple Images], select the desired images using the center of the control wheel, then press MENU →[Enter].Select on Smartphone: Displays all images recorded on the product’s memory card on the smartphone.
NoteYou can only transfer images that are saved on the camera's memory card.
You can select an image size to be sent to the smartphone from [Original], [2M] or [VGA]. To change the image size, refer to the following steps.
For Android smartphone Start PlayMemories Mobile, and change the image size by [Settings] → [Copy Image Size].For iPhone/iPad Select PlayMemories Mobile in the setting menu, and change the image size by [Copy Image Size].
RAW images are converted to JPEG format when they are sent.
You cannot send AVCHD format movies.
You cannot transfer XAVC S 4K movies or the original data of XAVC S HD movies recorded in [120p]/[100p] to a smartphone.You can only transfer proxy movies.
MENU → (Network) → [Snd to Smrtphn Func]→ [Send to Smartphone] → desired setting.
If you press the (Send to Smartphone) button in playback mode, the setting screen for [Send toSmartphone] will appear.
1
If the product is ready for the transfer, the information screen appears on the product. Connect thesmartphone and the product using that information.
The setting method for connecting the smartphone and the product varies depending on the smartphone.
2
282

Depending on the smartphone, the transferred movie may not be played back correctly. For example, the movie may not playsmoothly, or there may be no sound.
Depending on the format of the still image or movie, it may not be possible to play it back on a smartphone.
This product shares the connection information for [Send to Smartphone] with a device that has permission to connect. If youwant to change the device that is permitted to connect to the product, reset the connection information by following these steps.MENU → (Network) → [Wi-Fi Settings] → [SSID/PW Reset]. After resetting the connection information, you must register thesmartphone again.
When [Airplane Mode] is set to [On], you cannot connect this product and the smartphone. Set [Airplane Mode] to [Off].
While you transfer many images or long movies, we recommend that you supply power to the camera from a wall outlet (wallsocket) using the AC Adaptor (supplied).
Related TopicPlayMemories MobileControlling the camera using an Android smartphone (NFC One-touch remote)Controlling the camera using an Android smartphone (QR Code)Controlling the camera using an Android smartphone (SSID)Controlling the camera using an iPhone or iPad (QR Code)Controlling the camera using an iPhone or iPad (SSID)Sending images to an Android smartphone (NFC One-touch Sharing)Snd to Smrtphn Func: Sending Target (proxy movies)Airplane Mode
4-745-578-11(1) Copyright 2018 Sony Corporation
283

Help Guide
Digital Still CameraDSC-HX99
Snd to Smrtphn Func: Sending Target (proxy movies)
When transferring XAVC S video to a smartphone with [Send to Smartphone], you can set whether to transfer the low-bit-rate proxy movie or the high-bit-rate original movie.
Menu item detailsProxy Only:Transfers only proxy movies.Original Only:Transfers only original movies.Proxy & Original:Transfers both proxy and original movies.
NoteYou cannot transfer XAVC S 4K movies or the original data of XAVC S HD movies recorded in [120p]/[100p] to a smartphone.You can only transfer proxy movies.
While you transfer many images or long movies, we recommend that you supply power to the camera from a wall outlet (wallsocket) using the AC Adaptor (supplied).
Related TopicSnd to Smrtphn Func: Send to SmartphoneProxy Recording
4-745-578-11(1) Copyright 2018 Sony Corporation
MENU → (Network) → [Snd to Smrtphn Func] → [ Sending Target] → desired setting.1
284

Help Guide
Digital Still CameraDSC-HX99
Sending images to an Android smartphone (NFC One-touch Sharing)
With just one touch, you can connect this product and an NFC-enabled Android smartphone, and send an imagedisplayed on the product screen directly to the smartphone. You can transfer still images and XAVC S movies
About “NFC”NFC is a technology that enables short-range wireless communication between various devices, such as mobile phonesor IC tags, etc. NFC makes data communication simpler with just a touch on the designated touch-point.
NFC (Near Field Communication) is an international standard of short-range wireless communication technology.
NoteYou can select an image size to be sent to the smartphone from [Original], [2M] or [VGA]. To change the image size, refer to the following steps.
Start PlayMemories Mobile, and change the image size by [Settings] → [Copy Image Size].
RAW images are converted to JPEG format when they are sent.
You cannot send AVCHD format movies.
Activate the NFC function of the smartphone.1
Display a single image on the product.2
Touch the smartphone to the product.
The product and the smartphone are connected, and PlayMemories Mobile automatically launches on thesmartphone, and then the displayed image is sent to the smartphone.
Before you touch the smartphone, cancel the sleep and lock-screen functions of the smartphone.The NFC function is available only when the (N mark) is displayed on the product.Touch the smartphone to the product for 1-2 seconds until PlayMemories Mobile launches.To transfer two or more images, select MENU → (Network) → [Snd to Smrtphn Func] → [Send toSmartphone] to select images. After the connection enabled screen appears, use NFC to connect the productand the smartphone.
3
285

You cannot transfer XAVC S 4K movies or the original data of XAVC S HD movies recorded in [120p]/[100p] to a smartphone.You can only transfer proxy movies.
Depending on the smartphone, the transferred movie may not be played back correctly. For example, the movie may not playsmoothly, or there may be no sound.
If the Image Index is displayed on the product, you cannot transfer images using the NFC function.
If you cannot make a connection, do as the following:Launch PlayMemories Mobile on your smartphone, and then move the smartphone slowly toward the (N mark) of thisproduct.If the smartphone is in a case, remove it.If the product is in a case, remove it.Check whether the NFC function is activated on your smartphone.
When [Airplane Mode] is set to [On], you cannot connect the product and the smartphone. Set [Airplane Mode] to [Off].
Related TopicPlayMemories MobileSnd to Smrtphn Func: Send to SmartphoneSnd to Smrtphn Func: Sending Target (proxy movies)Airplane Mode
4-745-578-11(1) Copyright 2018 Sony Corporation
286

Help Guide
Digital Still CameraDSC-HX99
Send to Computer
You can transfer images stored in the product to a computer connected to a wireless access point or wireless broadbandrouter and easily make backup copies using this operation. Before starting this operation, install PlayMemories Home onyour computer and register the access point on the product.
NoteDepending on the application settings of your computer, the product will turn off after saving the images to your computer.
You can transfer images from the product to only one computer at a time.
If you want to transfer images to another computer, connect the product and the computer via a USB connection and follow theinstructions in PlayMemories Home.
Proxy movies cannot be transferred.
Related TopicInstalling PlayMemories HomeWi-Fi Settings: WPS PushWi-Fi Settings: Access Point Set.
4-745-578-11(1) Copyright 2018 Sony Corporation
Start your computer.1
MENU → (Network) → [Send to Computer].2
287

Help Guide
Digital Still CameraDSC-HX99
View on TV
You can view images on a network-enabled TV by transferring them from the product without connecting the product andTV with a cable. For some TVs, you may need to perform operations on the TV. For details, refer to the operatinginstructions supplied with the TV.
Slideshow settingsYou can change the slideshow settings by pressing the down side of the control wheel.Playback Selection: Selects the group of images to be shown.Folder View(Still): Selects from [All] and [All in Folder].Date View: Selects from [All] and [All in Date Rng.].Interval: Selects from [Short] and [Long].Effects*: Selects from [On] and [Off].Playback Image Size: Selects from [HD] and [4K].
NoteYou can use this function on a TV that supports DLNA renderer.
You can view images on a Wi-Fi Direct-enabled TV or network-enabled TV (including wired network-enabled TVs).
If you connect TV and this product and do not use Wi-Fi Direct, you need to register your access point first.
Displaying the images on the TV may take time.
Movies cannot be shown on a TV via Wi-Fi. Use an HDMI cable (sold separately).
MENU → (Network) → [View on TV] → desired device to be connected.1
When you want to play back images using slideshow, press the center of the control wheel.
To display the next/previous image manually, press the right/left sides of the control wheel.To change the device to be connected, press the down side of the control wheel, then select [Device list].
2
The settings are effective only for BRAVIA TV which is compatible with the functions.*
288

Related TopicWi-Fi Settings: WPS PushWi-Fi Settings: Access Point Set.
4-745-578-11(1) Copyright 2018 Sony Corporation
289

Help Guide
Digital Still CameraDSC-HX99
Loc. Info. Link Set.
You can use the application PlayMemories Mobile to obtain location information from a smartphone that is connectedwith your camera using Bluetooth communication. You can record the obtained location information when shootingimages.
Preparation in advance
To use the location information linking function of the camera, the application PlayMemories Mobile is required.If “Location Information Linkage” is not displayed on the top page of PlayMemories Mobile, you need to perform thefollowing steps beforehand.
Operating procedure
: Operations performed on the smartphone: Operations performed on the camera
Install PlayMemories Mobile on your smartphone.
You can install PlayMemories Mobile from the application store of your smartphone. If you have already installedthe application, update it to the latest version.
1.
Transfer a pre-recorded image to your smartphone using the [Send to Smartphone] function of the camera.
After you transfer an image recorded using the camera to your smartphone, “Location Information Linkage” willappear on the top page of the application.
2.
: Confirm that the Bluetooth function of your smartphone is activated.
Do not perform the Bluetooth pairing operation on the smartphone setting screen. In steps 2 to 7, the pairingoperation is performed using the camera and the application PlayMemories Mobile.If you accidentally perform the pairing operation on the smartphone setting screen in step 1, cancel the pairingand then perform the pairing operation by following Steps 2 through 7 using the camera and the applicationPlayMemories Mobile.
1.
: On the camera, select MENU → (Network) → [Bluetooth Settings] → [Bluetooth Function] → [On].2.
: On the camera, select MENU → (Network) → [Bluetooth Settings] → [Pairing].3.
: Launch PlayMemories Mobile on your smartphone and tap “Location Information Linkage.”
If “Location Information Linkage” is not displayed, follow the steps in “Preparation in advance” above.
4.
: Activate [Location Information Linkage] on the [Location Information Linkage] setting screen of PlayMemoriesMobile.
5.
: Follow the instructions on the [Location Information Linkage] setting screen of PlayMemories Mobile, and thenselect your camera from the list.
6.
: Select [OK] when a message is displayed on the monitor of the camera.
Pairing of the camera and PlayMemories Mobile is complete.
7.
290

Menu item detailsLocation Info. Link:Sets whether to obtain the location information by linking with a smartphone.Auto Time Correct.:Sets whether to automatically correct the date setting of the camera using information from a linked smartphone.Auto Area Adjust.:Sets whether to automatically correct the area setting of the camera using information from a linked smartphone.
Icons displayed when obtaining the location information (Obtaining location information): The camera is obtaining the location information. (Location information cannot be obtained): The camera cannot obtain the location information. (Bluetooth connection available): Bluetooth connection with the smartphone is established. (Bluetooth connection unavailable): Bluetooth connection with the smartphone is not established.
HintLocation information can be linked when PlayMemories Mobile is running on your smartphone even if the smartphone monitor isoff. However, if the camera has been turned off for a while, location information may not be linked immediately when you turn thecamera back on. In this case, location information will be linked immediately if you open the PlayMemories Mobile screen on thesmartphone.
When PlayMemories Mobile is not operating, such as when the smartphone is restarted, launch PlayMemories Mobile to resumelocation information linking.
In the application PlayMemories Home, you can view images on a map by importing images with location information to yourcomputer. For details, refer to Help for PlayMemories Home.
If the location information linking function does not work properly, see the following notes and perform pairing again.Confirm that the Bluetooth function of your smartphone is activated.Confirm that the camera is not connected with other devices using the Bluetooth function.Confirm that [Airplane Mode] for the camera is set to [Off].Delete the pairing information for the camera registered in PlayMemories Mobile.Execute [Reset Network Set.] of the camera.
For more detailed video instructions, refer to the following support page. http://www.sony.net/pmm/btg/
NoteWhen you initialize the camera, the pairing information is also deleted. To perform pairing again, delete the pairing information forthe camera registered in PlayMemories Mobile before trying again.
The location information will not be recorded when it cannot be obtained, such as when the Bluetooth connection is disconnected.
The camera can be paired with up to 15 Bluetooth devices, but can link the location information with that of only one smartphone.If you want to link the location information with that of another smartphone, turn off the [Location Information Linkage] function ofthe smartphone that is already linked.
If the Bluetooth connection is unstable, remove any obstacles, such as people or metal objects from between the camera and thepaired smartphone.
When pairing the camera and your smartphone, be sure to use the [Location Information Linkage] menu on PlayMemoriesMobile.
Supported smartphonesAndroid smartphones: Android 5.0 or later and compatible with Bluetooth 4.0 or later*
iPhone/iPad: iPhone 4S or later/iPad 3rd generation or later
: On the camera, select MENU → (Network) → [ Loc. Info. Link Set.] → [Location Info. Link] → [On].
(obtaining location information icon) will be displayed on the monitor of the camera. Location informationobtained by your smartphone using GPS, etc., will be recorded when shooting images.
8.
291

Related TopicPlayMemories HomePlayMemories MobileSnd to Smrtphn Func: Send to SmartphoneBluetooth Settings
4-745-578-11(1) Copyright 2018 Sony Corporation
For the latest information, refer to the support site.*For the Bluetooth version, refer to the website for your smartphone.*
292

Help Guide
Digital Still CameraDSC-HX99
Airplane Mode
When you board an airplane, etc., you can temporarily disable all the wireless-related functions including Wi-Fi.
4-745-578-11(1) Copyright 2018 Sony Corporation
MENU → (Network) → [Airplane Mode] → desired setting.
If you set [Airplane Mode] to [On], an airplane mark will be displayed on the screen.
1
293

Help Guide
Digital Still CameraDSC-HX99
Wi-Fi Settings: WPS Push
If your access point has a Wi-Fi Protected Setup (WPS) button, you can register the access point to this product easily.
Note[WPS Push] works only if the security setting of your access point is set to WPA or WPA2 and your access point supports the Wi-Fi Protected Setup (WPS) button method. If the security setting is set to WEP or your access point does not support the Wi-FiProtected Setup (WPS) button method, perform [Access Point Set.].
For details about the available functions and settings of your access point, see the access point operating instructions or contactthe administrator of the access point.
A connection may not be possible or the communication distance may be shorter depending on the surrounding conditions, suchas the type of wall material and the presence of obstructions or radio waves between the product and access point. In this case,change the location of the product or move the product closer to the access point.
Related TopicWi-Fi Settings: Access Point Set.
4-745-578-11(1) Copyright 2018 Sony Corporation
MENU → (Network) →[Wi-Fi Settings] → [WPS Push].1
Push the Wi-Fi Protected Setup (WPS) button on the access point to connect.2
294

Help Guide
Digital Still CameraDSC-HX99
Wi-Fi Settings: Access Point Set.
You can register your access point manually. Before starting the procedure, check the SSID name of the access point,security system, and password. The password may be preset in some devices. For details, see the access pointoperating instructions, or consult the access point administrator.
Other setting itemsDepending on the status or the setting method of your access point, you may want to set more items.
WPS PIN:Displays the PIN code you enter into the connected device.Priority Connection:Select [On] or [Off].IP Address Setting:
MENU → (Network) → [Wi-Fi Settings] → [Access Point Set.].1
Select the access point you want to register.
When the desired access point is displayed on the screen: Select the desired access point.When the desired access point is not displayed on the screen: Select [Manual Setting] and set the accesspoint.
If you select [Manual Setting], input the SSID name of the access point, then select the security system.
2
Input the password, and select [OK].
Access points without the mark do not require a password.
3
Select [OK].4
295

Select [Auto] or [Manual].IP Address:If you are entering the IP address manually, enter the set address.Subnet Mask/Default Gateway:If you have set [IP Address Setting] to [Manual], enter each address according to your network environment.
NoteTo give the registered access point priority in the future, set [Priority Connection] to [On].
Related TopicWi-Fi Settings: WPS PushHow to use the keyboard
4-745-578-11(1) Copyright 2018 Sony Corporation
296

Help Guide
Digital Still CameraDSC-HX99
Wi-Fi Settings: Disp MAC Address
Displays the MAC address of this product.
4-745-578-11(1) Copyright 2018 Sony Corporation
MENU → (Network) → [Wi-Fi Settings] → [Disp MAC Address].1
297

Help Guide
Digital Still CameraDSC-HX99
Wi-Fi Settings: SSID/PW Reset
This product shares the connection information for [Send to Smartphone] and [ Connection] with a device that haspermission to connect. If you want to change the device that is permitted to connect, reset the connection information.
NoteIf you connect this product to a smartphone after resetting the connection information, you must make the settings for thesmartphone again.
Related TopicSnd to Smrtphn Func: Send to SmartphoneCtrl w/ Smartphone
4-745-578-11(1) Copyright 2018 Sony Corporation
MENU → (Network) → [Wi-Fi Settings] → [SSID/PW Reset] → [OK].1
298

Help Guide
Digital Still CameraDSC-HX99
Edit Device Name
You can change the device name for the Wi-Fi Direct or Bluetooth connection.
Related TopicWi-Fi Settings: WPS PushWi-Fi Settings: Access Point Set.How to use the keyboard
4-745-578-11(1) Copyright 2018 Sony Corporation
MENU → (Network) → [Edit Device Name].1
Select the input box, then input the device name→[OK].2
299

Help Guide
Digital Still CameraDSC-HX99
Reset Network Set.
Resets all the network settings to default settings.
4-745-578-11(1) Copyright 2018 Sony Corporation
MENU → (Network) → [Reset Network Set.] → [Enter].1
300

Help Guide
Digital Still CameraDSC-HX99
Recommended computer environment
You can confirm the operating computer environment of the software from the following URL: http://www.sony.net/pcenv/
4-745-578-11(1) Copyright 2018 Sony Corporation
301

Help Guide
Digital Still CameraDSC-HX99
Software for Mac computers
For details on software for Mac computers, access the following URL:http://www.sony.co.jp/imsoft/Mac/
NoteThe software that can be used varies depending on the region.
Related TopicSend to Computer
4-745-578-11(1) Copyright 2018 Sony Corporation
302
Help Guide
Digital Still CameraDSC-HX99
PlayMemories Home
With PlayMemories Home, you can do the following:
You can import images shot with this product to your computer.You can play back the images imported to your computer.You can share your images using PlayMemories Online.You can edit movies such as by cutting or merging.You can add various effects such as BGM and subtitles to movies.
Also for Windows, you can do the following:
You can organize images on the computer on a calendar by shooting date to view them.You can edit and correct images, such as by trimming and resizing.You can create a disc from movies imported to a computer. Blu-ray discs or AVCHD discs can be created from XAVC S-format movies.You can upload images to a network service. (An Internet connection is required.)You can import images recorded with location information to a computer and view them on a map.For other details, please refer to the Help of PlayMemories Home.
Related TopicInstalling PlayMemories Home
4-745-578-11(1) Copyright 2018 Sony Corporation
303
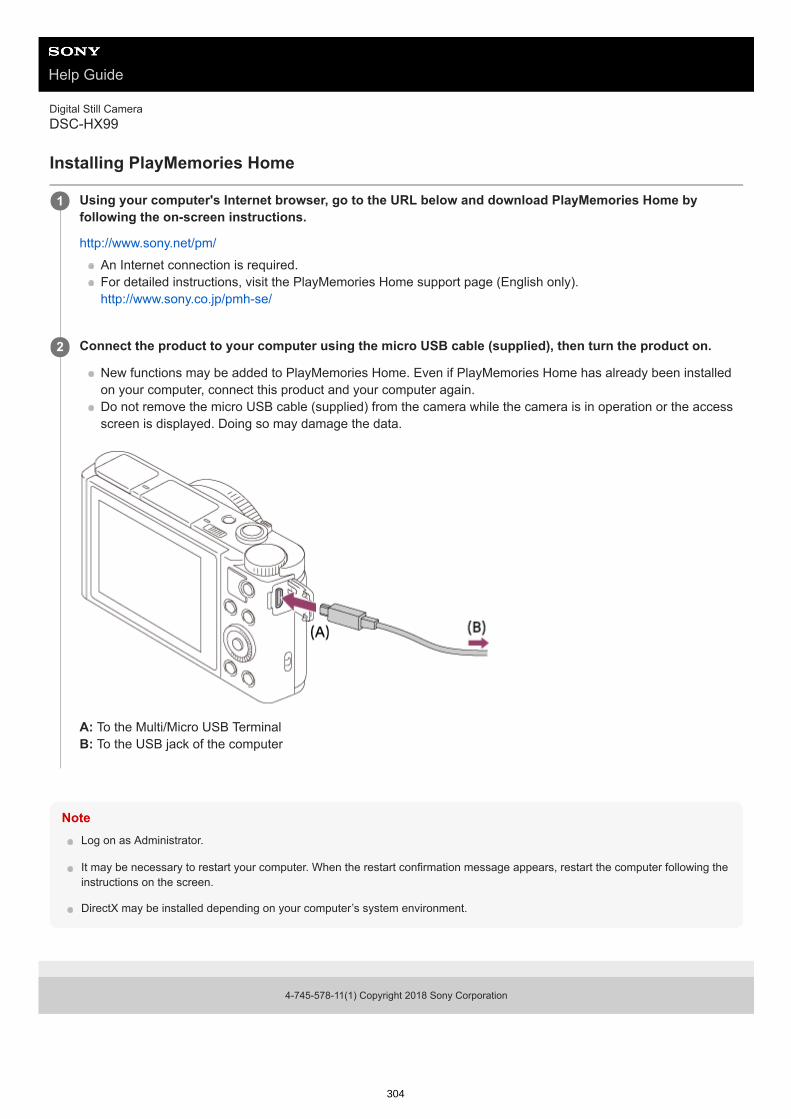
Help Guide
Digital Still CameraDSC-HX99
Installing PlayMemories Home
NoteLog on as Administrator.
It may be necessary to restart your computer. When the restart confirmation message appears, restart the computer following theinstructions on the screen.
DirectX may be installed depending on your computer’s system environment.
4-745-578-11(1) Copyright 2018 Sony Corporation
Using your computer's Internet browser, go to the URL below and download PlayMemories Home byfollowing the on-screen instructions.
http://www.sony.net/pm/An Internet connection is required.For detailed instructions, visit the PlayMemories Home support page (English only). http://www.sony.co.jp/pmh-se/
1
Connect the product to your computer using the micro USB cable (supplied), then turn the product on.
New functions may be added to PlayMemories Home. Even if PlayMemories Home has already been installedon your computer, connect this product and your computer again.Do not remove the micro USB cable (supplied) from the camera while the camera is in operation or the accessscreen is displayed. Doing so may damage the data.
A: To the Multi/Micro USB TerminalB: To the USB jack of the computer
2
304

Help Guide
Digital Still CameraDSC-HX99
Connecting to a computer
NoteDo not turn on/off or restart the computer, or wake the computer from sleep mode when a USB connection has been establishedbetween the computer and the camera. Doing so may cause a malfunction. Before turning on/off or restarting the computer, orwaking the computer from sleep mode, disconnect the camera from the computer.
Related TopicUSB ConnectionUSB LUN Setting
4-745-578-11(1) Copyright 2018 Sony Corporation
Insert a sufficiently charged battery pack into the camera.1
Turn on the camera and the computer.2
Check that [USB Connection] under (Setup) is set to [Mass Storage].3
Connect the camera to the computer using the micro USB cable (supplied) (A).
When you connect the camera to the computer for the first time, the procedure for recognizing the camera maystart automatically on the computer. Wait until the procedure is finished.
If you connect the product to your computer using the micro USB cable when [USB Power Supply] is set to[On], power is supplied from your computer. (Default setting: [On])
4
305
Help Guide
Digital Still CameraDSC-HX99
Importing images to the computer without using PlayMemories Home
PlayMemories Home allows you to easily import images. For details on PlayMemories Home functions, see the Help ofPlayMemories Home.
Importing images to the computer without using PlayMemories Home (For Windows)When the AutoPlay Wizard appears after making a USB connection between this product and a computer, click [Openfolder to view files] → [OK] → [DCIM]. Then copy the desired images to the computer.
Importing images to the computer without using PlayMemories Home (For Mac)Connect the product to your Mac computer. Double-click the newly recognized icon on the desktop → the folder in whichthe image you want to import is stored. Then drag and drop the image file on to the hard disk icon.
NoteFor operations such as importing XAVC S movies or AVCHD movies to the computer, use PlayMemories Home.
Do not edit or otherwise process AVCHD or XAVC S movie files/folders from the connected computer. Movie files may bedamaged or become unplayable. Do not delete or copy AVCHD movies or XAVC S movies on the memory card from thecomputer. Sony is not held liable for consequences resulting from such operations via the computer.
4-745-578-11(1) Copyright 2018 Sony Corporation
306

Help Guide
Digital Still CameraDSC-HX99
Disconnecting the camera from the computer
Perform steps 1 and 2 below before performing the following operations:
Disconnecting the micro USB cable.Removing a memory card.Turning off the product.
NoteOn Mac computers, drag and drop the memory card icon or the drive icon into the “Trash” icon. The camera will be disconnectedfrom the computer.
On Windows 7/Windows 8 computers, the disconnection icon may not appear. In that case, you can skip the steps above.
Do not remove the micro USB cable from the camera while the access lamp is lit. The data may be damaged.
4-745-578-11(1) Copyright 2018 Sony Corporation
Click (Safely Remove Hardware and Eject Media ) in the taskbar.1
Click the displayed message.2
307

Help Guide
Digital Still CameraDSC-HX99
Imaging Edge
Imaging Edge is a software suite that includes functions such as remote shooting from a computer, and adjusting ordeveloping RAW images recorded with the camera.
Viewer:You can display and search images. Edit:You can edit images with various corrections such as tone curve and sharpness, and develop images recorded in RAWformat.Remote:You can adjust the camera settings or shoot images from a computer connected to the camera with a USB cable. To control the camera using a computer, select MENU → (Setup) → [USB Connection] → [PC Remote] beforeconnecting the camera to the computer with a USB cable. For details on how to use Imaging Edge, refer to the support page. http://www.sony.net/disoft/help/
Installing Imaging Edge on your computerDownload and install the software by accessing the following URL: http://www.sony.net/disoft/d/
Related TopicUSB Connection
4-745-578-11(1) Copyright 2018 Sony Corporation
308

Help Guide
Digital Still CameraDSC-HX99
Selecting a disc to be created
You can create a disc that can be played back on other devices from a movie recorded on this camera. What devices can play back the disc depends on the disc type. Select a disc type suitable for the playback devices youwill be using. Depending on the movie type, the movie format may be converted when creating a disc.
High-definition image quality (HD) (Blu-ray Disc) High-definition image quality (HD) movies can be recorded on a Blu-ray Disc, creating a high-definition image quality(HD) disc. A Blu-ray Disc enables you to record longer-duration high-definition image quality (HD) movies than DVD discs. Writable movie formats: XAVC S, AVCHD Players: Blu-ray Disc playback devices (Sony Blu-ray Disc players, PlayStation 4, etc.)
High-definition image quality (HD) (AVCHD recording disc) High-definition image quality (HD) movies can be recorded on DVD media such as DVD-R discs, creating a high-definition image quality (HD) disc. Writable movie formats: XAVC S, AVCHD Players: AVCHD format playback devices (Sony Blu-ray Disc players, PlayStation 4, etc.) You cannot play these kinds of discs on ordinary DVD players.
Standard definition image quality (STD) Standard definition image quality (STD) movies converted from high-definition image quality (HD) movies can berecorded on DVD media such as DVD-R discs, creating a standard image quality (STD) disc. Writable movie formats: AVCHD Players: Ordinary DVD playback devices (DVD players, computers that can play back DVD discs, etc.)
HintYou can use the following types of 12 cm discs with PlayMemories Home. BD-R/DVD-R/DVD+R/DVD+R DL: Non-rewritable BD-RE/DVD-RW/DVD+RW: Rewritable Additional recording is not possible.
Always maintain your “PlayStation 4” to use the latest version of the “PlayStation 4” system software.
Note4K movies cannot be recorded on a disc in 4K image quality.
Related TopicCreating Blu-ray Discs from high-definition image quality moviesCreating DVD discs (AVCHD recording discs) from high-definition image quality movies
309

Creating DVD discs from standard image quality movies
4-745-578-11(1) Copyright 2018 Sony Corporation
310
Help Guide
Digital Still CameraDSC-HX99
Creating Blu-ray Discs from high-definition image quality movies
You can create Blu-ray Discs that can be played back on Blu-ray Disc playback devices (such as Sony Blu-ray Discplayers or the PlayStation 4, etc.).
A. How to create using a computerWith a Windows computer, you can copy movies imported to the computer and create Blu-ray Discs using PlayMemoriesHome. Your computer must be able to create Blu-ray Discs. When you create a Blu-ray Disc for the first time, connect your camera to the computer using a USB cable. Thenecessary software is automatically added to your computer. (An Internet connection is needed.)For details on how to create a disc using PlayMemories Home, refer to the Help guide for PlayMemories Home.
B. How to create using a device other than a computerYou can also create Blu-ray Discs using a Blu-ray recorder, etc. For details, refer to the device's operating instructions.
NoteWhen creating Blu-ray discs using PlayMemories Home from movies recorded in the XAVC S movie format, the image quality isconverted to 1920×1080 (60i/50i). It is not possible to create discs with the original image quality. To record movies with the original image quality, copy movies to a computer or an external medium.
Related TopicSelecting a disc to be createdCreating DVD discs (AVCHD recording discs) from high-definition image quality moviesCreating DVD discs from standard image quality movies
4-745-578-11(1) Copyright 2018 Sony Corporation
311

Help Guide
Digital Still CameraDSC-HX99
Creating DVD discs (AVCHD recording discs) from high-definition image qualitymovies
You can create DVD discs (AVCHD recording discs) that can be played back on AVCHD-compatible playback devices(such as Sony Blu-ray Disc players or the PlayStation 4, etc.).
A. How to create using a computerWith a Windows computer, you can copy movies imported to the computer and create DVD discs (AVCHD recordingdiscs) using PlayMemories Home. Your computer must be able to create DVD discs (AVCHD recording discs). When you create a DVD disc for the first time, connect your camera to the computer using a USB cable. The necessarysoftware is automatically added to your computer. (An Internet connection is needed.)For details on how to create a disc using PlayMemories Home, refer to the Help guide for PlayMemories Home.
B. How to create using a device other than a computerYou can also create DVD discs (AVCHD recording discs) using a Blu-ray recorder, etc. For details, refer to the device's operating instructions.
NoteWhen creating DVD discs (AVCHD recording discs) using PlayMemories Home from movies recorded in the XAVC S movieformat, the image quality is converted to 1920×1080 (60i/50i). It is not possible to create discs with the original image quality. To record movies with the original image quality, copy movies to a computer or an external medium.
When creating AVCHD recording discs using PlayMemories Home from movies recorded in the AVCHD movie format with [Record Setting] set to [60i 24M(FX)]/[50i 24M(FX)], the image quality is converted and it is not possible to create discs with theoriginal image quality. This conversion can take a long time. To record movies with the original image quality, use a Blu-ray Disc.
Related TopicSelecting a disc to be createdCreating Blu-ray Discs from high-definition image quality moviesCreating DVD discs from standard image quality movies
4-745-578-11(1) Copyright 2018 Sony Corporation
312

Help Guide
Digital Still CameraDSC-HX99
Creating DVD discs from standard image quality movies
You can create DVD discs that can be played back on ordinary DVD playback devices (DVD players, computers that canplay back DVD discs, etc.).
A. How to create using a computerWith a Windows computer, you can copy movies imported to the computer and create DVD disc using PlayMemoriesHome. Your computer must be able to create DVD discs. When you create a DVD disc for the first time, connect your camera to the computer using a USB cable. Install thededicated add-on software following the on-screen instructions. (An internet connection is needed.)For details on how to create a disc using PlayMemories Home, refer to the Help for PlayMemories Home.
B. How to create using a device other than a computerYou can also create DVD discs using a Blu-ray recorder, HDD recorder, etc. For details, refer to the device's operating instructions.
Related TopicSelecting a disc to be createdCreating Blu-ray Discs from high-definition image quality moviesCreating DVD discs (AVCHD recording discs) from high-definition image quality movies
4-745-578-11(1) Copyright 2018 Sony Corporation
313

Help Guide
Digital Still CameraDSC-HX99
Using MENU items
You can change settings related to all the camera operations including shooting, playback, and operating method. Youcan also execute camera functions from the MENU.
Related TopicTile MenuAdd Item
Press the MENU button to display the menu screen.1
Select the desired setting you want to adjust using the top/bottom/left/right sides of the control wheel or byturning the control wheel, and then press the center of the control wheel.
Select an icon at the top of the screen (A) and press the left/right side of the control wheel to move to anotherMENU item.You can go back to the previous screen by pressing the MENU button (B).
2
Select the desired setting value, and press the center to confirm your selection.3
314

4-745-578-11(1) Copyright 2018 Sony Corporation
315

Help Guide
Digital Still CameraDSC-HX99
File Format (still image)
Sets the file format for still images.
Menu item detailsRAW:Digital processing is not performed on this file format. Select this format to process images on a computer forprofessional purposes.RAW & JPEG:A RAW image and a JPEG image are created at the same time. This is suitable when you need two image files, a JPEGfor viewing, and a RAW for editing.JPEG:The image is recorded in the JPEG format. About RAW images
To open a RAW image file recorded with this camera, the software Imaging Edge is needed. With Imaging Edge, youcan open a RAW image file, then convert it into a popular image format such as JPEG or TIFF, or readjust the whitebalance, saturation or contrast of the image.You cannot apply [Auto HDR] or [Picture Effect] functions with RAW images.RAW images shot by the camera are recorded in the compressed RAW format.
NoteIf you do not intend to edit the images on your computer, we recommend that you record in JPEG format.
You cannot add DPOF (print order) registration marks to RAW images.
Related TopicJPEG Image Size (still image)
4-745-578-11(1) Copyright 2018 Sony Corporation
MENU → (Camera Settings1) → [ File Format] → desired setting.1
316

Help Guide
Digital Still CameraDSC-HX99
JPEG Quality (still image)
Selects the JPEG image quality when [ File Format] is set to [RAW & JPEG] or [JPEG].
Menu item detailsExtra fine/Fine/Standard:Since the compression rate increases from [Extra fine] to [Fine] to [Standard], the file size decreases in the same order.This allows more files to be recorded on one memory card, but the image quality is lower.
Related TopicFile Format (still image)
4-745-578-11(1) Copyright 2018 Sony Corporation
MENU → (Camera Settings1) → [ JPEG Quality] → desired setting.1
317

Help Guide
Digital Still CameraDSC-HX99
JPEG Image Size (still image)
The larger the image size, the more detail will be reproduced when the image is printed on large-format paper. Thesmaller the image size, the more images can be recorded.
Menu item details
NoteWhen [ File Format] is set to [RAW] or [RAW & JPEG], the image size for RAW images corresponds to “L.”
Related TopicAspect Ratio (still image)
MENU → (Camera Settings1) → [ JPEG Image Size] → desired setting.1
When [ Aspect Ratio] is set to 3:2
L: 16M 4896×3264 pixels
M: 8.9M 3648×2432 pixels
S: 4.5M 2592×1728 pixels
When [ Aspect Ratio] is set to 4:3
L: 18M 4896×3672 pixels
M: 10M 3648×2736 pixels
S: 5.0M 2592×1944 pixels
VGA 640×480 pixels
When [ Aspect Ratio] is set to 16:9
L: 13M 4896×2752 pixels
M: 7.5M 3648×2056 pixels
S: 2.1M 1920×1080 pixels
When [ Aspect Ratio] is set to 1:1
L: 13M 3664×3664 pixels
M: 7.5M 2736×2736 pixels
S: 3.7M 1920×1920 pixels
318

4-745-578-11(1) Copyright 2018 Sony Corporation
319

Help Guide
Digital Still CameraDSC-HX99
Aspect Ratio (still image)
Menu item details3:2:Same aspect ratio as 35 mm plate film4:3:An aspect ratio suitable for viewing on a TV that does not support high definition16:9:An aspect ratio suitable for viewing on a TV that supports high definition1:1:The horizontal and vertical ratio is equal.
4-745-578-11(1) Copyright 2018 Sony Corporation
MENU → (Camera Settings1) → [ Aspect Ratio] → desired setting.1
320

Help Guide
Digital Still CameraDSC-HX99
Panorama: Size
Sets the image size when shooting panoramic images. The image size varies depending on the [Panorama: Direction]setting.
Menu item detailsWhen [Panorama: Direction] is set to [Up] or [Down]Standard: 3872×2160Wide: 5536×2160
When [Panorama: Direction] is set to [Left] or [Right]Standard: 8192×1856Wide: 12416×1856
Related TopicSweep PanoramaPanorama: Direction
4-745-578-11(1) Copyright 2018 Sony Corporation
MENU → (Camera Settings1) → [Panorama: Size] → desired setting.1
321

Help Guide
Digital Still CameraDSC-HX99
Panorama: Direction
Sets the direction to pan the camera when shooting panoramic images.
Menu item detailsRight:Pan the camera from the left to the right.Left:Pan the camera from the right to the left.Up:Pan the camera from the bottom to the top.Down:Pan the camera from the top to the bottom.
Related TopicSweep Panorama
4-745-578-11(1) Copyright 2018 Sony Corporation
MENU → (Camera Settings1) → [Panorama: Direction] → desired setting.1
322

Help Guide
Digital Still CameraDSC-HX99
High ISO NR (still image)
When shooting with high ISO sensitivity, the product reduces noise that becomes more noticeable when the productsensitivity is high.
Menu item detailsNormal:Activates high ISO noise reduction normally.Low:Activates high ISO noise reduction moderately.
Note[ High ISO NR] is fixed to [Normal] in the following shooting modes:
[Intelligent Auto][Superior Auto][Scene Selection][Sweep Panorama]
When [ File Format] is set to [RAW], this function is not available.
[ High ISO NR] does not work for RAW images when the [ File Format] is [RAW & JPEG].
4-745-578-11(1) Copyright 2018 Sony Corporation
MENU → (Camera Settings1) → [ High ISO NR] → desired setting.1
323

Help Guide
Digital Still CameraDSC-HX99
Color Space (still image)
The way colors are represented using combinations of numbers or the range of color reproduction is called “colorspace.” You can change the color space depending on the purpose of the image.
Menu item detailssRGB:This is the standard color space of the digital camera. Use [sRGB] in normal shooting, such as when you intend to printout the images without any modification.AdobeRGB:This color space has a wide range of color reproduction. When a large part of the subject is vivid green or red, AdobeRGB is effective. The file name of the recorded image starts with “_.”
Note[AdobeRGB] is for applications or printers that support color management and DCF2.0 option color space. Images may not beprinted or viewed in the correct colors if you use applications or printers that do not support Adobe RGB.
When displaying images that were recorded with [AdobeRGB] on non-Adobe RGB-compliant devices, the images will bedisplayed with low saturation.
4-745-578-11(1) Copyright 2018 Sony Corporation
MENU → (Camera Settings1) → [ Color Space] → desired setting.1
324

Help Guide
Digital Still CameraDSC-HX99
Switching the auto mode (Auto Mode)
This camera is equipped with the following two automatic shooting modes: [Intelligent Auto] and [Superior Auto]. You canswitch the auto mode to shoot according to the subject and your preferences.
Menu item details Intelligent Auto:
Allows you to shoot with automatic scene recognition. Superior Auto:
Allows you to shoot with automatic scene recognition. This mode takes clear images of dark or backlit scenes.
NoteIn [Superior Auto] mode, the recording process takes longer, since the product creates a composite image. In this case, the (overlay icon) is displayed and the shutter sound is heard multiple times, but only one image is recorded.
In [Superior Auto] mode and when the (overlay icon) is displayed, be sure not to move the camera before the multiple shotsare recorded.
For [Intelligent Auto] and [Superior Auto] mode, most of the functions are set automatically, and you cannot adjust the settings onyour own.
Related TopicIntelligent AutoSuperior AutoProgram Auto
4-745-578-11(1) Copyright 2018 Sony Corporation
Set the mode dial to .1
MENU → (Camera Settings1) → [Auto Mode] → desired setting.2
325

Help Guide
Digital Still CameraDSC-HX99
Scene Selection
Allows you to shoot with preset settings according to the scene.
Menu item details Portrait:
Blurs background and sharpens the subject. Accentuates the skin tones softly.
Macro:Shoots close-ups of the subjects, such as flowers, insects, food, or small items.
Landscape:Shoots the entire range of a scenery in sharp focus with vivid colors.
Sunset:Shoots the red of the sunset beautifully.
Night Scene:Shoots night scenes without losing the dark atmosphere.
Set the mode dial to SCN (Scene Selection).1
Turn the control wheel to select the desired setting.2
326

Hand-held Twilight:Shoots night scenes with less noise and blur without using a tripod. A burst of shots are taken, and image processing isapplied to reduce subject blur, camera-shake, and noise.
Night Portrait:Shoots night scene portraits using the flash. The flash does not pop up automatically. Pop up the flash manually before shooting.
Anti Motion Blur:Allows you to shoot indoor shots without using the flash and reduces subject blur. The product shoots burst images andcombines them to create the image, reducing subject blur and noise.
Pet:Allows you to shoot images of your pet with the best settings.
Gourmet:Allows you to shoot food arrangements in delicious and bright colors.
Fireworks:Allows you to shoot images of fireworks in all their splendor.
327

High Sensitivity:Allows you to shoot still images even in dark locations without using the flash, and reduces subject blur. Also allows youto shoot dark movie scenes more brightly.
HintTo change the scene, rotate the control wheel on the shooting screen and select a new scene.
NoteUnder the following settings, the shutter speed is slower, so use of a tripod, etc. is recommended to prevent the image fromblurring:
[Night Scene][Night Portrait][Fireworks]
In the [Hand-held Twilight] or [Anti Motion Blur] mode, the shutter clicks 4 times and an image is recorded.
If you select [Hand-held Twilight] or [Anti Motion Blur] with [RAW] or [RAW & JPEG], [ File Format] becomes [JPEG]temporarily.
Reducing blur is less effective even in [Hand-held Twilight] or [Anti Motion Blur] when shooting the following subjects:Subjects with erratic movement.Subjects that are too close to the product.Subjects with continuously similar patterns, such as the sky, a beach, or a lawn.Subjects with constant change such as waves or water falls.
In the case of [Hand-held Twilight] or [Anti Motion Blur], block noise may occur when using a light source that flickers, such asfluorescent lighting.
The minimum distance that you can come close to a subject does not change even if you select [Macro]. For the minimum in-focus range, refer to the minimum distance of the lens.
Related TopicUsing flash
4-745-578-11(1) Copyright 2018 Sony Corporation
328

Help Guide
Digital Still CameraDSC-HX99
Drive Mode
Select the appropriate mode for the subject, such as single shooting, continuous shooting or bracketing shooting.
Menu item details Single Shooting:
Normal shooting mode. Cont. Shooting:
Shoots images continuously while you press and hold down the shutter button. Spd Priority Cont.:
Shoots images continuously at high speed while you press and hold down the shutter button. Self-timer:
Shoots an image using the self-timer after a designated number of seconds have elapsed since the shutter button waspressed.
Self-timer(Cont):Shoots a designated number of images using the self-timer after a designated number of seconds have elapsed sincethe shutter button was pressed.
Cont. Bracket:Shoots images while holding the shutter button down, each with different degrees of exposure.
Single Bracket:Shoots a specified number of images, one by one, each with a different degrees of exposure.
WB bracket:Shoots a total of three images, each with different color tones according to the selected settings for white balance, colortemperature and color filter.
DRO Bracket:Shoots a total of three images, each at a different degree of D-Range Optimizer.
Related TopicCont. ShootingSpd Priority Cont.Self-timerSelf-timer(Cont)Cont. BracketSingle BracketWB bracketDRO Bracket
4-745-578-11(1) Copyright 2018 Sony Corporation
Select / (Drive Mode) on the control wheel → desired setting.
You can also set the drive mode by selecting MENU → (Camera Settings1) → [Drive Mode].
1
Select the desired mode using the right/left side of the control wheel.2
329

Help Guide
Digital Still CameraDSC-HX99
Bracket Settings
You can set the self-timer in bracket shooting mode, and the shooting order for exposure bracketing and white balancebracketing.
Menu item detailsSelftimer during Brkt:Sets whether to use the self-timer during bracket shooting. Also sets the number of seconds until the shutter is releasedif using the self-timer. (OFF/2 Sec/5 Sec/10 Sec)Bracket order:Sets the order of exposure bracketing and white balance bracketing. (0→-→+/-→0→+)
Related TopicCont. BracketSingle BracketWB bracketDRO Bracket
4-745-578-11(1) Copyright 2018 Sony Corporation
Select / (Drive Mode) of the control wheel → select bracket shooting mode.
You can also set the drive mode by selecting MENU → (Camera Settings1) → [Drive Mode].
1
MENU → (Camera Settings1) → [Bracket Settings] → desired setting.2
330

Help Guide
Digital Still CameraDSC-HX99
Memory (Camera Settings1/Camera Settings2)
Allows you to register up to 2 often-used modes or product settings in the product. You can recall the settings using justthe mode dial.
Items that can be registeredYou can register various functions for shooting. The items that can actually be registered are displayed on the menuof the camera.Aperture (F number)Shutter speedOptical zoom scale
To change registered settingsChange the setting to the desired one and re-register the setting to the same mode number.
NoteProgram Shift cannot be registered.
Related TopicRecall (Camera Settings1/Camera Settings2)
4-745-578-11(1) Copyright 2018 Sony Corporation
Set the product to the setting you want to register.1
MENU → (Camera Settings1) → [ / Memory] → desired number.2
Press the center of the control wheel to confirm.3
331

Help Guide
Digital Still CameraDSC-HX99
Focus Mode
Selects the focus method.
Menu item details (Single-shot AF):
The product performs auto focusing. The focus locks onto the subject. (Continuous AF):
During movie shooting, the focus mode is locked to [Continuous AF]. The camera maintains focus on the subject.[Continuous AF] cannot be selected when shooting still images.
(DMF): You can make fine adjustments manually after performing auto focusing, letting you focus on a subject more quickly thanwhen using the manual focus from the beginning. This is convenient in situations such as macro shooting.
(Manual Focus): Adjusts the focus manually. If you cannot focus on the intended subject using auto focus, use manual focus.
Rotate the control ring to adjust the focus manually in the direct manual focus mode or manual focus mode.
Focus indicator(lit):
The subject is in focus and the focus is locked.(flashing):
The subject is not in focus.
Subjects on which it is difficult to focus using auto focusDark and distant subjectsSubjects with poor contrastSubjects seen through glassFast-moving subjectsReflective light or shiny surfacesFlashing lightBack-lit subjectsSubjects in the focusing area with different focal distances
HintWhen you set the focus to infinity in the manual focus mode or the direct manual focus mode, make sure that the focus is on asufficiently distant subject by checking the monitor or the viewfinder.
NoteOnly [Continuous AF] and [Manual Focus] are available in the movie shooting mode.
Related TopicDirect manual focus (DMF)
MENU → (Camera Settings1) → [Focus Mode] → desired setting.1
332

Manual FocusMF Assist (still image)
4-745-578-11(1) Copyright 2018 Sony Corporation
333

Help Guide
Digital Still CameraDSC-HX99
Focus Area
Selects the focusing area. Use this function when it is difficult to focus properly in the auto focus mode.
Menu item details Wide :
Focuses on a subject covering the whole range of the screen automatically. When you press the shutter button halfwaydown in the still image shooting mode, a green frame is displayed around the area that is in focus.
Center :Focuses automatically on a subject in the center of the image. Use together with the focus-lock function to create thecomposition you want.
Flexible Spot :Allows you to move the focusing frame to a desired point on the screen and focus on an extremely small subject in anarrow area. On the Flexible Spot shooting screen, you can change the size of the focusing frame by turning the control wheel.
Expand Flexible Spot :If the product cannot focus on a single selected point, it uses focus points around the flexible spot as a secondary priorityarea for focusing. To move the focus area
When [Focus Area] is set to [Flexible Spot] or [Expand Flexible Spot], if pressing the button to which [FocusStandard] is assigned, you can shoot while moving the focusing frame using the top/bottom/left/right sides of thecontrol wheel. To return the focusing frame to the center of the monitor, press the C/ button while moving theframe. To change the shooting settings using the control wheel, press the button to which [Focus Standard] isassigned.You can move the focusing frame quickly by touching and dragging it on the monitor. Set [Touch Operation] to [On]beforehand.
Note[Focus Area] is locked to [Wide] in the following situations:
[Intelligent Auto][Superior Auto][Scene Selection]During Smile Shutter mode
The focus area may not light up during continuous shooting or when the shutter button is pressed all the way down at once.
You cannot execute functions assigned to the control wheel or the custom button while moving the focusing frame.
Related TopicTouch Operation
4-745-578-11(1) Copyright 2018 Sony Corporation
MENU → (Camera Settings1) → [Focus Area] → desired setting.1
334
Help Guide
Digital Still CameraDSC-HX99
AF Illuminator (still image)
The AF illuminator supplies fill light to focus more easily on a subject in dark surroundings. In the time between pressingthe shutter button halfway down and locking the focus, the AF illuminator lights up to allow the camera to focus easily.
Menu item detailsAuto:The AF illuminator lights up automatically in dark surroundings.Off:Does not use the AF illuminator.
NoteYou cannot use [ AF Illuminator] in the following situations:
In movie modeSweep PanoramaWhen [Focus Magnifier] is activated.When [Scene Selection] is set to the following modes:
[Landscape][Night Scene][Pet][Fireworks]
The AF illuminator emits a very bright light. Although there is no health hazard, do not look directly into the AF illuminator at closerange.
4-745-578-11(1) Copyright 2018 Sony Corporation
MENU → (Camera Settings1) → [ AF Illuminator] → desired setting.1
335

Help Guide
Digital Still CameraDSC-HX99
Center Lock-on AF
When you press the center of the control wheel, the camera detects the subject positioned in the center of the screenand continues to track the subject.
HintIf you assign the [Focus Standard] function to the key of your choice, you can activate [Center Lock-on AF] or detect a subjectagain by pressing the key when [Focus Area] is set to [Wide] or [Center].
You can select the subject to be tracked by touch operation when shooting using the monitor. With touch panel operationsenabled, select MENU → (Camera Settings2) → [Func. of Touch Oprtn] → [Touch Focus].
NoteThe [Center Lock-on AF] function may not function very well in the following situations:
The subject is moving too quickly.The subject is too small, or too large.The contrast between the subject and the background is poor.It is dark.The ambient light changes.
Lock-on AF does not work in the following situations:[Sweep Panorama]When [Scene Selection] is set to [Hand-held Twilight], [Anti Motion Blur] or [Fireworks].When shooting in the Manual Focus or Direct Manual Focus (DMF) mode.When using the digital zoomWhen the shooting mode is set to Movie, and [ SteadyShot] is set to [Intelligent Active].When shooting movies with [ Record Setting] set to [120p]/[100p]
MENU → (Camera Settings1) → [Center Lock-on AF] → [On].1
Align the target frame (A) over the subject and press the center of the control wheel.
Press the center again to stop tracking.
2
Press the shutter button fully down to shoot the image.3
336

Related TopicFocus StandardTouch Operation
4-745-578-11(1) Copyright 2018 Sony Corporation
337

Help Guide
Digital Still CameraDSC-HX99
Set. Face Prty in AF
Sets whether the camera focuses on detected faces with higher priority in the auto-focus mode.
Menu item detailsOn:The camera focuses on detected faces with higher priority.Off:The camera focuses without face detection.
Face Dtct Frame DspSets whether to display the face detection frame when [Face Priority in AF] is set to [On].
On:Displays the face detection frame when [Face Priority in AF] is set to [On].Off:Does not display the face detection frame.
Face Detection frameWhen the product detects a face, the gray face detection frame appears. When the product determines thatautofocus is enabled, the face detection frame turns white.In case you have registered the priority order for each face using [Face Registration], the product automaticallyselects the first prioritized face and the face detection frame over that face turns white. The face detection frames ofother registered faces turn reddish-purple.
HintWhen [Set. Face Prty in AF] is set to [On], a detection frame is displayed over the eyes when the camera focuses on eyes. Theframe displayed over the eyes will disappear after a period of time.
NoteYou cannot use the face detection function with the following functions:
Other zoom functions than the optical zoom[Sweep Panorama][Posterization] under [Picture Effect]
MENU → (Camera Settings1) → [Set. Face Prty in AF] → [Face Priority in AF] → desired setting.1
MENU → (Camera Settings1) → [Set. Face Prty in AF] → [Face Dtct Frame Dsp] → desired setting.1.
338

[Focus Magnifier][Landscape], [Night Scene], [Sunset], [Pet], [Gourmet] or [Fireworks] under [Scene Selection]Movie shooting with [ Record Setting] set to [120p]/[ 100p].
Up to 8 faces of your subjects can be detected.
Even if [Face Dtct Frame Dsp] is set to [Off], a green focusing frame will be displayed over faces that are in focus.
When the shooting mode is set to [Intelligent Auto] or [Superior Auto], [Face Priority in AF] is set to [On].
The product may not detect faces at all or may accidentally detect other objects as faces in some conditions.
Related TopicFace Registration (New Registration)Face Registration (Order Exchanging)
4-745-578-11(1) Copyright 2018 Sony Corporation
339

Help Guide
Digital Still CameraDSC-HX99
Pre-AF (still image)
The product automatically adjusts focus before you press the shutter button halfway down. During focusing operations,the screen may shake.
Menu item detailsOn:Adjusts focus before you press the shutter button halfway down.Off:Does not adjust focus before you press the shutter button halfway down.
4-745-578-11(1) Copyright 2018 Sony Corporation
MENU → (Camera Settings1) → [ Pre-AF] → desired setting.1
340

Help Guide
Digital Still CameraDSC-HX99
Exposure Comp.
Normally, exposure is set automatically (auto exposure). Based on the exposure value set by auto exposure, you canmake the entire image brighter or darker if you adjust [Exposure Comp.] to the plus side or minus side, respectively(exposure compensation).
/ (Exposure Comp.) on the control wheel → press the left/right side of the control wheel or turn thecontrol wheel, and select the desired setting.
+ (over) side: Images become brighter.- (under) side: Images become darker.
When using [Intelligent Auto] or [Superior Auto], you can display the setting screen for [Photo Creativity] bypressing / .
You can also select MENU → (Camera Settings1) → [Exposure Comp.].
You can adjust the exposure compensation value within the range of -3.0 EV to +3.0 EV.You can confirm the exposure compensation value that you set on the shooting screen.Monitor
Viewfinder
1
341

NoteYou cannot perform the exposure compensation in the following shooting modes:
[Intelligent Auto][Superior Auto][Scene Selection]
When using [Manual Exposure], you can perform the exposure compensation only when [ISO] is set to [ISO AUTO].
You can adjust the exposure compensation value within the range of -2.0 EV to +2.0 EV for movies.
If you shoot a subject in extremely bright or dark conditions, or when you use the flash, you may not be able to get a satisfactoryeffect.
Related TopicCont. BracketSingle BracketZebra Setting
4-745-578-11(1) Copyright 2018 Sony Corporation
342

Help Guide
Digital Still CameraDSC-HX99
ISO
Sensitivity to light is expressed by the ISO number (recommended exposure index). The larger the number, the higherthe sensitivity.
Menu item detailsMulti Frame NR:Combines continuous shots to create an image with less noise. Press the right side to display the setting screen, thenselect a desired value using the top/bottom sides of the control wheel.Select the desired ISO number from ISO AUTO or ISO 100 – ISO 12800.ISO AUTO:Sets the ISO sensitivity automatically.ISO 80 – ISO 6400:Sets the ISO sensitivity manually. Selecting a larger number increases the ISO sensitivity.
HintYou can change the range of ISO sensitivity that is set automatically in [ISO AUTO] mode. Select [ISO AUTO] and press the rightside of the control wheel, and set the desired values for [ISO AUTO Maximum] and [ISO AUTO Minimum]. The values are alsoapplied when shooting in [ISO AUTO] mode under [Multi Frame NR].
NoteWhen [ File Format] is set to [RAW] or [RAW & JPEG], [Multi Frame NR] cannot be selected.
When [Multi Frame NR] is selected, the flash, [D-Range Opt.], or [Auto HDR] cannot be used.
When [Picture Effect] is set to other than [Off], [Multi Frame NR] cannot be selected.
[ISO AUTO] is selected when using the following functions:[Intelligent Auto][Superior Auto][Scene Selection][Sweep Panorama]
The higher the ISO value, the more noise will appear on the images.
When shooting movies, ISO values between 80 and 6400 are available.
When you use [Multi Frame NR], it takes some time for the product to perform the overlay processing of images.
When you select [ISO AUTO] with the shooting mode set to [P], [A], [S] or [M], the ISO sensitivity will be automatically adjustedwithin the set range.
4-745-578-11(1) Copyright 2018 Sony Corporation
MENU → (Camera Settings1) → [ISO] → desired setting.1
343

Help Guide
Digital Still CameraDSC-HX99
Metering Mode
Selects the metering mode that sets which part of the screen to measure for determining the exposure.
Menu item details Multi:
Measures light on each area after dividing the total area into multiple areas and determines the proper exposure of theentire screen (Multi-pattern metering).
Center:Measures the average brightness of the entire screen, while emphasizing the central area of the screen (Center-weighted metering).
Spot:Measures only the central area (Spot metering). This mode is suitable for measuring light on a specified part of the entirescreen. The size of the metering circle can be selected from [Spot: Standard] and [Spot: Large].
Entire Screen Avg.:Measures the average brightness of the entire screen. The exposure will be stable even if the composition or the positionof the subject changes.
Highlight:Measures the brightness while emphasizing the highlighted area on the screen. This mode is suitable for shooting thesubject while avoiding overexposure.
HintWhen [Multi] is selected and [Face Prty in Mlti Mtr] is set to [On], the camera measures brightness based on detected faces.
When [Metering Mode] is set to [Highlight] and the [D-Range Opt.] or [Auto HDR] function is activated, the brightness and thecontrast will be corrected automatically by dividing the image into small areas and analyzing the contrast of light and shadow.Make settings based on the shooting circumstances.
Note[Metering Mode] is locked to [Multi] in the following shooting modes:
[Intelligent Auto][Superior Auto][Scene Selection]Other zoom functions than the optical zoom
In [Highlight] mode, the subject may be dark if a brighter part exists on the screen.
Related TopicAE lockFace Prty in Mlti MtrD-Range Opt. (DRO)Auto HDR
4-745-578-11(1) Copyright 2018 Sony Corporation
MENU → (Camera Settings1) → [Metering Mode] → desired setting.1
344

345

Help Guide
Digital Still CameraDSC-HX99
Face Prty in Mlti Mtr
Sets whether the camera measures brightness based on detected faces when [Metering Mode] is set to [Multi].
Menu item detailsOn:The camera measures brightness based on detected faces.Off:The camera measures brightness using the [Multi] setting, without detecting faces.
NoteWhen the shooting mode is set to [Intelligent Auto] or [Superior Auto], [Face Prty in Mlti Mtr] is locked to [On].
Related TopicMetering Mode
4-745-578-11(1) Copyright 2018 Sony Corporation
MENU → (Camera Settings1) → [Face Prty in Mlti Mtr] → desired setting.1
346

Help Guide
Digital Still CameraDSC-HX99
Flash Mode
You can set the flash mode.
Menu item details Flash Off:
The flash does not operate. Autoflash:
The flash works in dark environments or when shooting towards bright light. Fill-flash:
The flash works every time you trigger the shutter. Slow Sync.:
The flash works every time you trigger the shutter. Slow sync shooting allows you to shoot a clear image of both thesubject and the background by slowing the shutter speed.
Rear Sync.:The flash works right before the exposure is completed every time you trigger the shutter. Rear sync shooting allows youto shoot a natural image of the trail of a moving subject such as a moving car or a walking person.
NoteThe default setting depends on the shooting mode.
Some [Flash Mode] settings are not available, depending on the shooting mode.
Related TopicUsing flash
4-745-578-11(1) Copyright 2018 Sony Corporation
Select (Flash Mode) on the control wheel → desired setting.
You can also set the flash mode by selecting MENU → (Camera Settings1) → [Flash Mode].
1
347

Help Guide
Digital Still CameraDSC-HX99
Flash Comp.
Adjusts the amount of flash light in a range of –3.0 EV to +3.0 EV. Flash compensation changes the amount of flash lightonly. Exposure compensation changes the amount of flash light along with the change of the shutter speed and aperture.
Note[Flash Comp.] does not work when the shooting mode is set to the following modes:
[Intelligent Auto][Superior Auto][Sweep Panorama][Scene Selection]
The higher flash effect (+ side) may not be visible due to the limited amount of flash light available, if the subject is outside themaximum range of the flash. If the subject is very close, the lower flash effect (- side) may not be visible.
Related TopicUsing flash
4-745-578-11(1) Copyright 2018 Sony Corporation
MENU → (Camera Settings1) → [Flash Comp.] → desired setting.
Selecting higher values (+ side) makes the flash level higher, and lower values (- side) makes the flash levellower.
1
348

Help Guide
Digital Still CameraDSC-HX99
Red Eye Reduction
When using the flash, it is fired two or more times before shooting to reduce the red-eye phenomenon.
Menu item detailsOn:The flash is always fired to reduce the red-eye phenomenon.Off:Does not use Red Eye Reduction.
NoteRed Eye Reduction may not produce the desired effects. It depends on individual differences and conditions, such as distance tothe subject, or whether the subject looks at the pre-strobe or not.
4-745-578-11(1) Copyright 2018 Sony Corporation
MENU → (Camera Settings1) → [Red Eye Reduction] → desired setting.1
349

Help Guide
Digital Still CameraDSC-HX99
White Balance
Corrects the tone effect of the ambient light condition to record a neutral white subject in white. Use this function whenthe color tones of the image did not come out as you expected, or when you want to change the color tones on purposefor photographic expression.
Menu item details Auto/ Daylight / Shade / Cloudy / Incandescent / Fluor.: Warm White / Fluor.: Cool White / Fluor.: Day White / Fluor.: Daylight / Flash : When you select a light source
that illuminates the subject, the product adjusts the color tones to suit to the selected light source (preset white balance).When you select [Auto], the product automatically detects the light source and adjusts the color tones.
C.Temp./Filter: Adjusts the color tones depending on the light source. Achieves the effect of CC (Color Compensation) filters forphotography.
Custom 1/Custom 2/Custom 3: Uses the white balance setting saved in [Custom Setup].
Custom Setup: Memorizes the basic white color under the light conditions for the shooting environment. Select a memorized custom white balance number.
HintYou can display the fine adjustment screen and perform fine adjustments of the color tones as required by pressing the right sideof the control wheel.
If the color tones do not come out as you expected in the selected settings, perform [WB bracket] shooting.
or is displayed only when [Priority Set in AWB] is set to [Ambience] or [White].
Note[White Balance] is fixed to [Auto] in the following shooting modes:
[Intelligent Auto][Superior Auto][Scene Selection]
If you use a mercury lamp or a sodium lamp as a light source, the accurate white balance will not be obtained because of thecharacteristics of the light. It is recommended to shoot images using a flash or select [Custom Setup].
Related TopicCapturing a basic white color in [Custom Setup] modePriority Set in AWBWB bracket
4-745-578-11(1) Copyright 2018 Sony Corporation
MENU → (Camera Settings1) → [White Balance] → desired setting.1
350

Help Guide
Digital Still CameraDSC-HX99
Priority Set in AWB
Selects which tone to prioritize when shooting under lighting conditions such as incandescent light when [White Balance]is set to [Auto].
Menu item details Standard:
Shoots with standard auto white balance. The camera automatically adjusts the color tones. Ambience:
Prioritizes the color tone of the light source. This is suitable when you want to produce a warm atmosphere. White:
Prioritizes a reproduction of white color when the color temperature of the light source is low.
Related TopicWhite Balance
4-745-578-11(1) Copyright 2018 Sony Corporation
MENU → (Camera Settings1) → [Priority Set in AWB] → desired setting.1
351
Help Guide
Digital Still CameraDSC-HX99
D-Range Opt. (DRO)
By dividing the image into small areas, the product analyzes the contrast of light and shadow between the subject andthe background, and creates an image with the optimal brightness and gradation.
Menu item details D-Range Optimizer: Auto:
Corrects the brightness automatically. D-Range Optimizer: Lv1 ― D-Range Optimizer: Lv5:
Optimizes the gradation of a recorded image for each divided area. Select the optimization level from Lv1 (weak) to Lv5(strong).
NoteIn the following situations, [D-Range Opt.] is fixed to [Off]:
The shooting mode is set to [Sweep Panorama].Multi Frame NRWhen [Picture Effect] is set to other than [Off]
[DRO/Auto HDR] is fixed to [Off] when the following modes are selected in [Scene Selection].[Sunset][Night Scene][Night Portrait][Hand-held Twilight][Anti Motion Blur][Fireworks]
The setting is fixed to [D-Range Optimizer: Auto] when [Scene Selection] modes other than the above modes are selected.
When shooting with [D-Range Opt.], the image may be noisy. Select the proper level by checking the recorded image, especiallywhen you enhance the effect.
4-745-578-11(1) Copyright 2018 Sony Corporation
MENU → (Camera Settings1) → [DRO/Auto HDR] → [D-Range Opt.].1
Select the desired setting using the left/right sides of the control wheel.2
352
Help Guide
Digital Still CameraDSC-HX99
Auto HDR
Shoots three images using different exposures and combines the images with correct exposure, the bright parts of anunderexposed image, and the dark parts of an overexposed image to create images with a greater range of gradation(High Dynamic Range). One image with proper exposure and one overlaid image are recorded.
Menu item details Auto HDR: Exposure Diff. Auto:
Corrects the brightness automatically. Auto HDR: Exposure Diff. 1.0EV ― Auto HDR: Exposure Diff. 6.0EV:
Sets the exposure difference, based on the contrast of the subject. Select the optimization level from 1.0EV (weak) to6.0EV (strong). For example, if you set the exposure value to 2.0 EV, three images will be composed with the following exposure levels:-1.0 EV, correct exposure and +1.0 EV.
HintThe shutter is released three times for one shot. Be careful about the following:
Use this function when the subject is motionless or does not flash light.Do not change the composition before shooting.
NoteThis function is not available when the [ File Format] is [RAW] or [RAW & JPEG].
[Auto HDR] is not available in the following shooting modes:[Intelligent Auto][Superior Auto][Sweep Panorama][Scene Selection]
[Auto HDR] is not available in the following situations:When [Multi Frame NR] is selected.When [Picture Effect] is set to other than [Off].
You cannot start the next shot until the capture process is completed after you shoot.
You may not obtain the desired effect depending on the luminance difference of a subject and the shooting conditions.
When the flash is used, this function has little effect.
When the contrast of the scene is low or when product shake or subject blur occurs, you may not obtain good HDR images. will be displayed over the recorded image to inform you when the camera detects image blurring. Change the
composition or re-shoot the image carefully to avoid image blur, as needed.
4-745-578-11(1) Copyright 2018 Sony Corporation
MENU → (Camera Settings1) → [DRO/Auto HDR] → [Auto HDR].1
Select the desired setting using the left/right sides of the control wheel.2
353
Help Guide
Digital Still CameraDSC-HX99
Creative Style
Allows you to set the desired image processing and finely adjust contrast, saturation and sharpness for each imagestyle. You can adjust exposure (shutter speed and aperture) as you like with this function, unlike with [Scene Selection],where the product adjusts the exposure.
Menu item details Standard:
For shooting various scenes with rich gradation and beautiful colors. Vivid:
The saturation and contrast are heightened for shooting striking images of colorful scenes and subjects such as flowers,spring greenery, blue sky, or ocean views.
Portrait:For capturing skin in a soft tone, ideally suited for shooting portraits.
Landscape:The saturation, contrast, and sharpness are heightened for shooting vivid and crisp scenery. Distant landscapes alsostand out more.
Sunset:For shooting the beautiful red of the setting sun.
Black & White:For shooting images in black and white monotone.
Sepia:For shooting images in sepia monotone.
To set [Contrast], [Saturation] and [Sharpness][Contrast], [Saturation], and [Sharpness] can be adjusted for each image style preset such as [Standard] and[Landscape].Select an item to be set by pressing the right/left sides of the control wheel, then set the value using the top/bottom sidesof the control wheel.
Contrast:
MENU → (Camera Settings1) → [Creative Style].1
Select the desired style using the top/bottom sides of the control wheel.2
To adjust (Contrast), (Saturation) and (Sharpness), select the desired item using the right/leftsides, and then select the value using the top/bottom sides.
3
354

The higher the value selected, the more the difference of light and shadow is accentuated, and the bigger the effect onthe image.
Saturation:The higher the value selected, the more vivid the color. When a lower value is selected, the color of the image isrestrained and subdued.
Sharpness:Adjusts the sharpness. The higher the value selected, the more the contours are accentuated, and the lower the valueselected, the more the contours are softened.
Note[Creative Style] is fixed to [Standard] in the following situations:
[Intelligent Auto][Superior Auto][Scene Selection][Picture Effect] is set to other than [Off].
When this function is set to [Black & White] or [Sepia], [Saturation] cannot be adjusted.
4-745-578-11(1) Copyright 2018 Sony Corporation
355

Help Guide
Digital Still CameraDSC-HX99
Picture Effect
Select the desired effect filter to achieve more impressive and artistic images.
Menu item details Off:
Disables the [Picture Effect] function. Toy Camera:
Creates a soft image with shaded corners and reduced sharpness. Pop Color:
Creates a vivid look by emphasizing color tones. Posterization:
Creates a high contrast, abstract look by heavily emphasizing primary colors, or in black and white. Retro Photo:
Creates the look of an aged photo with sepia color tones and faded contrast. Soft High-key:
Creates an image with the indicated atmosphere: bright, transparent, ethereal, tender, soft. Partial Color:
Creates an image which retains a specific color, but converts others to black and white. High Contrast Mono.:
Creates a high-contrast image in black and white. Soft Focus:
Creates an image filled with a soft lighting effect. HDR Painting:
Creates the look of a painting, enhancing the colors and details. Rich-tone Mono.:
Creates an image in black and white with rich gradation and reproduction of details. Miniature:
Creates an image which enhances the subject vividly, with the background defocused considerably. This effect may oftenbe found in pictures of miniature models.
Watercolor:Creates an image with ink bleed and blurring effects as if painted using watercolors.
Illustration:Creates an illustration-like image by emphasizing the outlines.
HintYou can perform detailed settings for some items using the left/right sides of the control wheel.
NoteWhen you use a zoom function other than the optical zoom, setting the zoom scale larger makes [Toy Camera] less effective.
When [Partial Color] is selected, images may not retain the selected color, depending on the subject or shooting conditions.
You cannot check the following effects on the shooting screen, because the product processes the image after the shot. Also, youcannot shoot another image until image processing is finished. You cannot use these effects with movies.
[Soft Focus][HDR Painting]
MENU → (Camera Settings1) → [Picture Effect] → desired setting.1
356

[Rich-tone Mono.][Miniature][Watercolor][Illustration]
In the case of [HDR Painting] and [Rich-tone Mono.], the shutter is released three times for one shot. Be careful about thefollowing:
Use this function when the subject is motionless or does not flash light.Do not change the composition during shooting.
When the contrast of the scene is low or when significant camera-shake or subject blur has occurred, you may not be able toobtain good HDR images. If the product detects such a situation, appear on the recorded image to inform you of thissituation. Change the composition or re-shoot the image carefully to avoid image blur, as needed.
This function is not available in the following shooting modes:[Intelligent Auto][Superior Auto][Scene Selection][Sweep Panorama]
When [ File Format] is set to [RAW] or [RAW & JPEG], this function is not available.
4-745-578-11(1) Copyright 2018 Sony Corporation
357
Help Guide
Digital Still CameraDSC-HX99
Soft Skin Effect (still image)
Sets the effect used for shooting the skin smoothly in the Face Detection function.
Menu item detailsOff:
Does not use the [ Soft Skin Effect] function.On:
Uses the [ Soft Skin Effect].
HintWhen [ Soft Skin Effect] is set to [On], you can select the effect level. Select the effect level by pressing the right/left side ofthe control wheel.
Note[ Soft Skin Effect] is not available when [ File Format] is [RAW].
[ Soft Skin Effect] is not available for RAW images when the [ File Format] is [RAW & JPEG].
4-745-578-11(1) Copyright 2018 Sony Corporation
MENU → (Camera Settings1) → [ Soft Skin Effect] → desired setting.1
358

Help Guide
Digital Still CameraDSC-HX99
Focus Magnifier
You can check the focus by enlarging the image before shooting.Unlike with [ MF Assist], you can magnify the image without operating the control ring.
To use the focus magnifier function by touch operationYou can magnify the image and adjust the focus by touching the monitor. Set [Touch Operation] to [On] beforehand.Then, select the appropriate settings under [Touch Panel/Pad]. When the focus mode is [Manual Focus], you canperform [Focus Magnifier] by double-tapping the area to focus on while shooting with the monitor. While shooting with the viewfinder, a frame is displayed in the center of the monitor by double-tapping and you can movethe frame by dragging it. The image is magnified by pressing the center of the control wheel.
HintWhile using the focus magnifier function, you can move the magnified area by dragging it on the touch panel.
To exit the focus magnifier function, double-tap the monitor again. You can also exit the focus magnifier function by pressing theshutter button halfway down.
Related TopicMF Assist (still image)Focus Magnif. TimeInitial Focus Mag. (still image)Custom Key (still image/movie/playback)Touch Operation
4-745-578-11(1) Copyright 2018 Sony Corporation
MENU → (Camera Settings1) → [Focus Magnifier].1
Press the center of the control wheel to enlarge the image and select the area you want to enlarge usingtop/bottom/left/right side of the control wheel.
Each time you press the center, the magnification scale will change.You can set the initial magnification by selecting MENU → (Camera Settings1) → [ Initial FocusMag.].
2
Confirm the focus.
Press the (Delete) button to bring the magnified position into the center of an image.When the focus mode is [Manual Focus], you can adjust the focus while an image is magnified. The [FocusMagnifier] function will be canceled when the shutter button is pressed halfway.You can set how long the image is to be shown magnified by selecting MENU → (Camera Settings1) →[Focus Magnif. Time].
3
Press the shutter button fully down to shoot the image.4
359

360

Help Guide
Digital Still CameraDSC-HX99
Focus Magnif. Time
Set the duration for which an image is to be magnified using the [ MF Assist] or [Focus Magnifier] function.
Menu item details2 Sec:Magnifies the images for 2 seconds.5 Sec:Magnifies the images for 5 seconds.No Limit:Magnifies the images until you press the shutter button.
Related TopicFocus MagnifierMF Assist (still image)
4-745-578-11(1) Copyright 2018 Sony Corporation
MENU → (Camera Settings1) → [Focus Magnif. Time] → desired setting.1
361

Help Guide
Digital Still CameraDSC-HX99
Initial Focus Mag. (still image)
Sets the initial magnification scale when using [Focus Magnifier]. Select a setting that will help you frame your shot.
Menu item detailsx1.0:Displays the image with the same magnification as the shooting screen.x7.7:Displays a 7.7-times enlarged image.
Related TopicFocus Magnifier
4-745-578-11(1) Copyright 2018 Sony Corporation
MENU → (Camera Settings1) → [ Initial Focus Mag.] → desired setting.1
362

Help Guide
Digital Still CameraDSC-HX99
MF Assist (still image)
Enlarges the image on the screen automatically to make manual focusing easier. This works in Manual Focus or DirectManual Focus shooting.
HintYou can set how long the image is to be shown magnified by selecting MENU → (Camera Settings1) → [Focus Magnif.Time].
NoteYou cannot use [ MF Assist] when shooting movies. Use the [Focus Magnifier] function instead.
Related TopicManual FocusDirect manual focus (DMF)Focus Magnif. Time
4-745-578-11(1) Copyright 2018 Sony Corporation
MENU → (Camera Settings1) → [ MF Assist] → [On].1
Turn the control ring to adjust the focus.
The image is enlarged. You can magnify images further by pressing the center of the control wheel.
2
363
Help Guide
Digital Still CameraDSC-HX99
Peaking Setting
Sets the peaking function, which enhances the outline of in-focus areas during shooting with Manual Focus or DirectManual Focus.
Menu item detailsPeaking Display:Sets whether to display peaking.Peaking Level:Sets the level of enhancement of in-focus areas.Peaking Color:Sets the color used to enhance in-focus areas.
NoteSince the product recognizes sharp areas as in focus, the effect of peaking differs, depending on the subject.
The outline of in-focus ranges is not enhanced on devices connected via HDMI.
Related TopicManual FocusDirect manual focus (DMF)
4-745-578-11(1) Copyright 2018 Sony Corporation
MENU → (Camera Settings1) → [Peaking Setting] → desired setting.1
364

Help Guide
Digital Still CameraDSC-HX99
Face Registration (New Registration)
If you register faces in advance, the product can focus on the registered face as a priority. Set both [Face Priority in AF]and [Regist. Faces Priority] to [On] before shooting.
NoteUp to eight faces can be registered.
Shoot the face from the front in a brightly lit place. The face may not be registered correctly if it is obscured by a hat, a mask,sunglasses, etc.
Related TopicRegist. Faces PrioritySet. Face Prty in AFSmile Shutter
4-745-578-11(1) Copyright 2018 Sony Corporation
MENU → (Camera Settings1) → [Face Registration] → [New Registration].1
Align the guide frame with the face to be registered, and press the shutter button.2
When a confirmation message appears, select [Enter].3
365
Help Guide
Digital Still CameraDSC-HX99
Face Registration (Order Exchanging)
When multiple faces are registered to be given priority, the face registered first will be given priority. You can change thepriority order.
Related TopicRegist. Faces PrioritySet. Face Prty in AFSmile Shutter
4-745-578-11(1) Copyright 2018 Sony Corporation
MENU → (Camera Settings1) → [Face Registration] → [Order Exchanging].1
Select a face to change the order of priority.2
Select the destination.3
366

Help Guide
Digital Still CameraDSC-HX99
Face Registration (Delete)
Deletes a registered face.
NoteEven if you execute [Delete], the data for registered face will remain in the product. To delete the data for registered faces fromthe product, select [Delete All].
4-745-578-11(1) Copyright 2018 Sony Corporation
MENU → (Camera Settings1) → [Face Registration] → [Delete].
If you select [Delete All], you can delete all registered faces.
1
367

Help Guide
Digital Still CameraDSC-HX99
Regist. Faces Priority
Sets whether to focus with higher priority on faces registered using [Face Registration] when [Face Priority in AF] is setto [On].
Menu item detailsOn:Focuses with higher priority on faces registered using [Face Registration].Off:Focuses without giving higher priority to registered faces.
Related TopicSet. Face Prty in AFFace Registration (New Registration)Face Registration (Order Exchanging)
4-745-578-11(1) Copyright 2018 Sony Corporation
MENU → (Camera Settings1) → [Regist. Faces Priority] → desired setting.1
368

Help Guide
Digital Still CameraDSC-HX99
Smile Shutter
The camera automatically shoots an image when it detects a smiling face.
Menu item detailsOff:Does not use the [Smile Shutter] function.On:The camera automatically shoots an image when it detects a smiling face. You can select [On: Slight Smile], [On: NormalSmile], or [On: Big Smile] for the sensitivity of detection.Tips for capturing smiles more effectively
Do not cover the eyes with front hair and keep the eyes narrowed.Do not obscure the face by a hat, masks, sunglasses, etc.Try to orient the face in front of the product and be as level as possible.Give a clear smile with an open mouth. The smile is easier to be detected when the teeth are shown.If you press the shutter button during Smile Shutter, the product shoots the image. After shooting, the product returnsto Smile Shutter mode.
NoteYou cannot use the [Smile Shutter] function with the following functions:
[Sweep Panorama][Picture Effect]When using the [Focus Magnifier] function.[Scene Selection] is set to [Landscape], [Night Scene], [Sunset], [Hand-held Twilight], [Anti Motion Blur], [Pet], [Gourmet] or[Fireworks].When recording movies.
Up to 8 faces of your subjects can be detected.
The product may not detect faces at all or may accidentally detect other objects as faces in some conditions.
If the product cannot detect a smile, adjust the Smile Detection Sensitivity.
If you track a face using [Lock-on AF] while executing Smile Shutter function, Smile Detection is performed only for that face.
4-745-578-11(1) Copyright 2018 Sony Corporation
MENU → (Camera Settings1) → [Smile Shutter] → desired setting.1
369

Help Guide
Digital Still CameraDSC-HX99
Auto Obj. Framing (still image)
When this product detects and shoots faces, macro shooting subjects or subjects that are tracked by [Lock-on AF], theproduct automatically trims the image into an appropriate composition, and then saves it. Both the original and thetrimmed images are saved. The trimmed image is recorded in the same size as the original image size.
Menu item detailsOff:Does not trim images.Auto:Automatically trims images into an appropriate composition.
Note[ Auto Obj. Framing] is not available when the shooting mode is set to [Sweep Panorama], [Movie], or when [Scene Selection]is set to [Hand-held Twilight], or [Anti Motion Blur].
The trimmed image may not be the best possible composition, depending on the shooting conditions.
[ Auto Obj. Framing] cannot be set when [ File Format] is set to [RAW] or [RAW & JPEG].
[ Auto Obj. Framing] is not available in the following situations.[Drive Mode] is set to [Cont. Shooting], [Spd Priority Cont.], [Self-timer(Cont)], [Cont. Bracket], [Single Bracket], [WB bracket],or [DRO Bracket].The ISO sensitivity is set to [Multi Frame NR].[DRO/Auto HDR] is set to [Auto HDR].Other zoom functions than the optical zoomWhen shooting in Manual Focus mode[Picture Effect] is set to [Soft Focus], [HDR Painting], [Rich-tone Mono.], [Miniature], [Watercolor], or [Illustration].
4-745-578-11(1) Copyright 2018 Sony Corporation
MENU → (Camera Settings1) → [ Auto Obj. Framing] → desired setting.1
370

Help Guide
Digital Still CameraDSC-HX99
Self-portrait/ -timer
You can change the angle of the monitor and shoot images while watching the monitor.
HintIf you want to use another Drive Mode than the 3-second self-timer mode, first set [Self-portrait/ -timer] to [Off], then tilt themonitor upward approx. 180 degrees.
4-745-578-11(1) Copyright 2018 Sony Corporation
MENU → (Camera Settings1) → [Self-portrait/ -timer] → [On].1
Tilt the monitor approximately 180° upward, and then point the lens at yourself.2
Press the shutter button.
The product starts the self-timer shooting after three seconds.
3
371
Help Guide
Digital Still CameraDSC-HX99
Movie: Exposure Mode
You can set the exposure mode for movie shooting.
Menu item details Program Auto:
Allows you to shoot with the exposure adjusted automatically (both the shutter speed and the aperture value). Aperture Priority:
Allows you to shoot after adjusting the aperture value manually. Shutter Priority:
Allows you to shoot after adjusting the shutter speed manually. Manual Exposure:
Allows you to shoot after adjusting the exposure (both the shutter speed and the aperture value) manually.
4-745-578-11(1) Copyright 2018 Sony Corporation
Set the mode dial to (Movie).1
MENU→ (Camera Settings2) → [ Exposure Mode] → desired setting.2
Press the MOVIE (movie) button to start recording.
Press the MOVIE button again to stop recording.
3
372
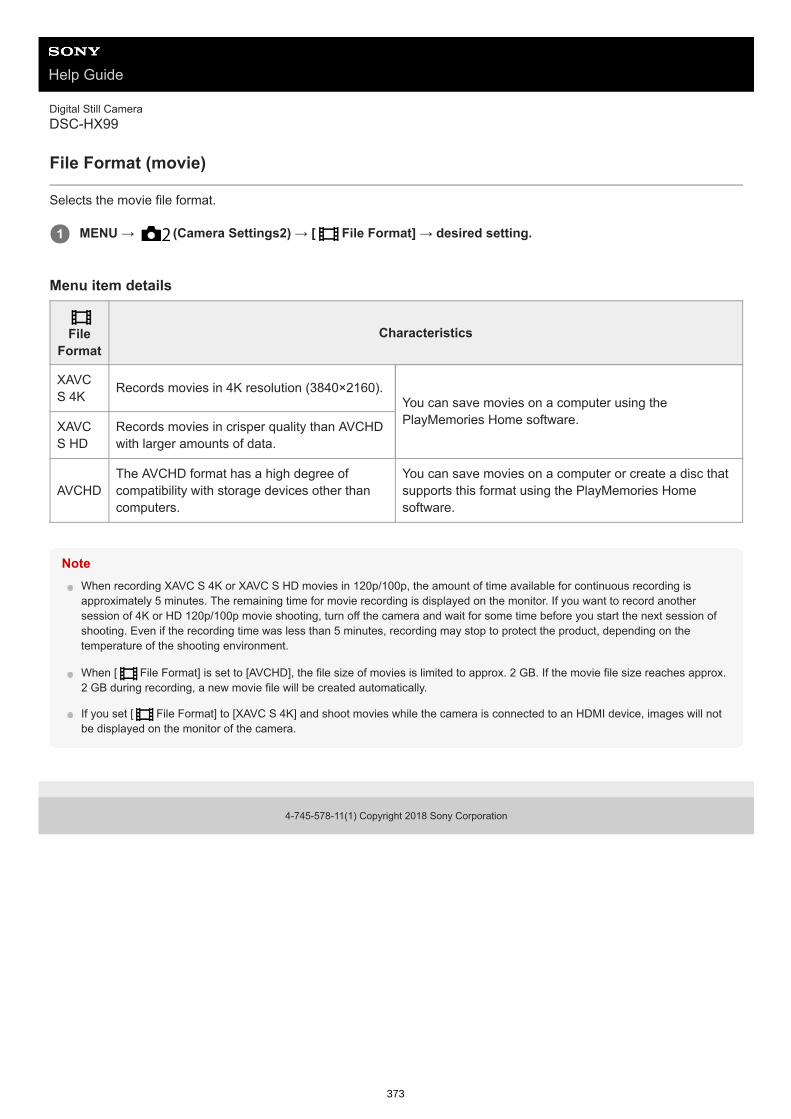
Help Guide
Digital Still CameraDSC-HX99
File Format (movie)
Selects the movie file format.
Menu item details
NoteWhen recording XAVC S 4K or XAVC S HD movies in 120p/100p, the amount of time available for continuous recording isapproximately 5 minutes. The remaining time for movie recording is displayed on the monitor. If you want to record anothersession of 4K or HD 120p/100p movie shooting, turn off the camera and wait for some time before you start the next session ofshooting. Even if the recording time was less than 5 minutes, recording may stop to protect the product, depending on thetemperature of the shooting environment.
When [ File Format] is set to [AVCHD], the file size of movies is limited to approx. 2 GB. If the movie file size reaches approx.2 GB during recording, a new movie file will be created automatically.
If you set [ File Format] to [XAVC S 4K] and shoot movies while the camera is connected to an HDMI device, images will notbe displayed on the monitor of the camera.
4-745-578-11(1) Copyright 2018 Sony Corporation
MENU → (Camera Settings2) → [ File Format] → desired setting.1
File
FormatCharacteristics
XAVCS 4K
Records movies in 4K resolution (3840×2160).You can save movies on a computer using thePlayMemories Home software.XAVC
S HDRecords movies in crisper quality than AVCHDwith larger amounts of data.
AVCHDThe AVCHD format has a high degree ofcompatibility with storage devices other thancomputers.
You can save movies on a computer or create a disc thatsupports this format using the PlayMemories Homesoftware.
373

Help Guide
Digital Still CameraDSC-HX99
Record Setting (movie)
Selects the frame rate and bit-rate for movie recording.
Menu item detailsWhen [ File Format] is set to [XAVC S 4K]
When [ File Format] is set to [XAVC S HD]
MENU → (Camera Settings2) → [ Record Setting] → desired setting.
The higher the bit-rate, the higher the image quality.
1
Record Setting Bit-rate Description
30p 100M/25p 100M Approx. 100 Mbps Records movies in 3840×2160 (30p/25p).
30p 60M/25p 60M Approx. 60 Mbps Records movies in 3840×2160 (30p/25p).
24p 100M* Approx. 100 Mbps Records movies in 3840×2160 (24p).
24p 60M* Approx. 60 Mbps Records movies in 3840×2160 (24p).
Only when [NTSC/PAL Selector] is set to NTSC*
RecordSetting
Bit-rate Description
60p 50M/50p50M
Approx. 50Mbps
Records movies in 1920×1080 (60p/50p).
60p 25M/50p25M
Approx. 25Mbps
Records movies in 1920×1080 (60p/50p).
30p 50M/25p50M
Approx. 50Mbps
Records movies in 1920×1080 (30p/25p).
30p 16M/25p16M
Approx. 16Mbps
Records movies in 1920×1080 (30p/25p).
24p 50M* Approx. 50Mbps
Records movies in 1920×1080 (24p).
120p 100M/100p100M
Approx. 100Mbps
Records high-speed movies in 1920×1080 (120p/100p). You can record moviesin 120 fps or 100 fps.
You can create smoother slow-motion movies by using compatible editingdevices.
374

When [ File Format] is set to [AVCHD]
NoteCreating an AVCHD recording disc from movies that were recorded with [60i 24M(FX)]/[50i 24M(FX)] as the [ Record Setting]takes a long time because the image quality of movies is converted. If you want to store movies without converting them, use aBlu-ray Disc.
[120p]/[100p] cannot be selected for the following settings.
[Intelligent Auto][Superior Auto][Scene Selection]
When [ Record Setting] is set to [120p]/[100p], the image quality becomes almost equal to HD quality.
4-745-578-11(1) Copyright 2018 Sony Corporation
RecordSetting Bit-rate Description
120p 60M/100p60M
Approx. 60Mbps
Records high-speed movies in 1920×1080 (120p/100p). You can record moviesin 120 fps or 100 fps.
You can create smoother slow-motion movies by using compatible editingdevices.
Only when [NTSC/PAL Selector] is set to NTSC*
Record Setting Bit-rate Description
60i 24M(FX)/50i 24M(FX) 24 Mbps at maximum Records movies in 1920×1080 (60i/50i).
60i 17M(FH)/50i 17M(FH) Approx. 17 Mbps on average Records movies in 1920×1080 (60i/50i).
375

Help Guide
Digital Still CameraDSC-HX99
Proxy Recording
Sets whether to simultaneously record low-bit-rate proxy movies when recording XAVC S movies. Since proxy moviesare small in file size, they are suitable for transferring to smartphones or uploading to websites.
Menu item detailsOn :Proxy movies are simultaneously recorded.Off :Proxy movies are not recorded.
HintProxy movies are recorded in the XAVC S HD format (1280×720) at 9 Mbps. The frame rate of the proxy movie is the same asthat of the original movie.
Proxy movies are not displayed on the playback screen (single-image playback screen or image index screen). is displayedover movies for which a proxy movie was simultaneously recorded.
NoteProxy movies cannot be played back on this camera.
Proxy recording is not available in the following situations.When [ File Format] is set to [AVCHD]When [ File Format] is set to [XAVC S HD] and [ Record Setting] is set to [120p]/[100p]When [ SteadyShot] is set to [Intelligent Active]
Deleting/protecting movies that have proxy movies removes/protects both the original and proxy movies. You cannotdelete/protect only original movies or proxy movies.
Movies cannot be edited on this camera.
Related TopicSnd to Smrtphn Func: Sending Target (proxy movies)Movie recording formatsPlaying back images on the image index screen (Image Index)Memory cards that can be used
4-745-578-11(1) Copyright 2018 Sony Corporation
MENU → (Camera Settings2) → [ Proxy Recording] → desired setting.1
376

Help Guide
Digital Still CameraDSC-HX99
Auto Slow Shut. (movie)
Sets whether or not to adjust the shutter speed automatically when recording movies if the subject is dark.
Menu item detailsOn:Uses Auto Slow Shutter. The shutter speed automatically slows when recording in dark locations. You can reduce noisein the movie by using a slow shutter speed when recording in dark locations.Off:Does not use Auto Slow Shutter. The recorded movie will be darker than when [On] is selected, but you can recordmovies with smoother motion and less object blur.
Note[ Auto Slow Shut.] does not function in the following situations:
(Shutter Priority)(Manual Exposure)
When [ISO] is set to other than [ISO AUTO]
4-745-578-11(1) Copyright 2018 Sony Corporation
MENU → (Camera Settings2) → [ Auto Slow Shut.] → desired setting.1
377

Help Guide
Digital Still CameraDSC-HX99
Audio Recording
Sets whether to record sounds when shooting movies. Select [Off] to avoid recording the sounds of the lens and thecamera operating.
Menu item detailsOn:Records sound (stereo).Off:Does not record sound.
4-745-578-11(1) Copyright 2018 Sony Corporation
MENU → (Camera Settings2) → [Audio Recording] → desired setting.1
378

Help Guide
Digital Still CameraDSC-HX99
Micref Level
You can select the microphone level for movie recording.
Menu item detailsNormal:Records the ambient sounds within a certain level. This setting is suitable for recording everyday conversations.Low:Records the ambient sounds faithfully. This setting is suitable for recording realistic sounds, for example at a concert.
4-745-578-11(1) Copyright 2018 Sony Corporation
MENU → (Camera Settings2) → [Micref Level] → desired setting.1
379

Help Guide
Digital Still CameraDSC-HX99
Wind Noise Reduct.
Sets whether or not to reduce wind noise by cutting the low-range sound of the input audio from the built-in microphone.
Menu item detailsOn:Reduces wind noise.Off:Does not reduce wind noise.
NoteSetting this item to [On] where wind is not blowing sufficiently hard may cause normal sound to be recorded with too low volume.
4-745-578-11(1) Copyright 2018 Sony Corporation
MENU → (Camera Settings2) → [Wind Noise Reduct.] → desired setting.1
380

Help Guide
Digital Still CameraDSC-HX99
SteadyShot (movie)
Sets [ SteadyShot] effect when shooting movies. If you set the [ SteadyShot] effect to [Off] when using a tripod(sold separately), a natural image is produced.
Menu item detailsIntelligent Active:Provides a more powerful SteadyShot effect than [Active].Active:Provides a more powerful SteadyShot effect.Standard:Reduces camera shake under stable movie shooting conditions.Off:Does not use [ SteadyShot].
NoteIf you change the setting for [ SteadyShot], the angle of view will change.
[Intelligent Active] and [Active] cannot be selected when [ File Format] is set to [XAVC S 4K] or [XAVC S HD 120p/100p].
4-745-578-11(1) Copyright 2018 Sony Corporation
MENU → (Camera Settings2) → [ SteadyShot] → desired setting.1
381
Help Guide
Digital Still CameraDSC-HX99
Marker Display (movie)
Sets whether or not to display markers set using [ Marker Settings] on the monitor or the viewfinder while shootingmovies.
Menu item detailsOn:Markers are displayed. The markers are not recorded.Off:No marker is displayed.
NoteThe markers are displayed when the mode dial is set to ( Movie) or when shooting movies.
You cannot display markers when using [Focus Magnifier].
The markers are displayed on the monitor or viewfinder. (You cannot output the markers.)
Related TopicMarker Settings (movie)
4-745-578-11(1) Copyright 2018 Sony Corporation
MENU → (Camera Settings2) → [ Marker Display] → desired setting.1
382

Help Guide
Digital Still CameraDSC-HX99
Marker Settings (movie)
Sets the markers to be displayed while shooting movies.
Menu item detailsCenter:Sets whether or not to display the center marker in the center of the shooting screen. [Off]/[On]Aspect:Sets the aspect marker display. [Off]/[4:3]/[13:9]/[14:9]/[15:9]/[1.66:1]/[1.85:1]/[2.35:1]Safety Zone:Sets the safety zone display. This becomes the standard range that can be received by a general household TV. [Off]/[80%]/[90%]Guideframe:Sets whether or not to display the guide frame. You can verify whether the subject is level or perpendicular to the ground.[Off]/[On]
HintYou can display several markers at the same time.
Place the subject on the cross point of the [Guideframe] to make a balanced composition.
4-745-578-11(1) Copyright 2018 Sony Corporation
MENU → (Camera Settings2) → [ Marker Settings] → desired setting.1
383

Help Guide
Digital Still CameraDSC-HX99
Movie w/ shutter
You can start or stop recording movies by pressing the shutter button, which is bigger and easier to press than theMOVIE (Movie) button.
Menu item detailsOn:Enables movie recording using the shutter button when the shooting mode is set to [Movie].Off:Disables movie recording using the shutter button.
HintWhen [Movie w/ shutter] is set to [On], you can still start or stop recording movies using the MOVIE button.
When [Movie w/ shutter] is set to [On], you can use the shutter button to start or stop recording movies on an externalrecording/playback device using [ REC Control].
Related TopicShooting movies
4-745-578-11(1) Copyright 2018 Sony Corporation
MENU → (Camera Settings2) → [Movie w/ shutter] → desired setting.1
384

Help Guide
Digital Still CameraDSC-HX99
Release w/o Card
Sets whether the shutter can be released when no memory card has been inserted.
Menu item detailsEnable:Releases the shutter even if no memory card has been inserted.Disable:Does not release the shutter when no memory card has been inserted.
NoteWhen no memory card has been inserted, the images shot will not be saved.
The default setting is [Enable]. It is recommended that you select [Disable] prior to actual shooting.
4-745-578-11(1) Copyright 2018 Sony Corporation
MENU → (Camera Settings2) → [Release w/o Card] → desired setting.1
385

Help Guide
Digital Still CameraDSC-HX99
SteadyShot (still image)
Sets whether or not to use the SteadyShot function.
Menu item detailsOn:Uses [ SteadyShot].Off:Does not use [ SteadyShot]. We recommend that you set the camera to [Off] when using a tripod.
4-745-578-11(1) Copyright 2018 Sony Corporation
MENU → (Camera Settings2) → [ SteadyShot] → desired setting.1
386
Help Guide
Digital Still CameraDSC-HX99
Rng. of Zoom Assist
Selects how much to zoom out with the [Zoom Assist] function.
Menu item detailsS:Zooms out a small amount.M:Zooms out a medium amount.L:Zooms out a large amount.
Related TopicZoom Assist
4-745-578-11(1) Copyright 2018 Sony Corporation
MENU → (Camera Settings2) → [Rng. of Zoom Assist] → desired setting.1
387

Help Guide
Digital Still CameraDSC-HX99
Zoom Setting
You can select the zoom setting of the product.
Menu item detailsOptical zoom only:Limits the zoom range to the optical zoom. You can use the Smart Zoom function if you set [ JPEG Image Size] to[M], [S] or [VGA].On:ClearImage Zoom:Select this setting to use Clear Image Zoom. Even if the zoom range exceeds the optical zoom, the product magnifiesimages within the range in which image quality does not deteriorate significantly.On:Digital Zoom:When the zoom range of the Clear Image Zoom is exceeded, the product magnifies images to the largest scale.However, the image quality will deteriorate.
NoteSet [Optical zoom only] if you want to magnify images within the range in which image quality does not deteriorate.
Related TopicThe zoom features available with this productAbout zoom scaleZoom Speed
4-745-578-11(1) Copyright 2018 Sony Corporation
MENU → (Camera Settings2) → [Zoom Setting] → desired setting.1
388

Help Guide
Digital Still CameraDSC-HX99
Zoom Speed
Sets the zoom speed of the camera's zoom lever.
Menu item detailsNormal:Sets the zoom speed of the zoom lever to normal.Fast:Sets the zoom speed of the zoom lever to fast.
HintThe [Zoom Speed] settings are also used when you are zooming with a remote controller (sold separately) connected to thecamera.
NoteSelecting [Fast] increases the likelihood that the zoom sound will be recorded.
Related TopicZoomThe zoom features available with this productZoom Setting
4-745-578-11(1) Copyright 2018 Sony Corporation
MENU → (Camera Settings2) → [Zoom Speed] → desired setting.1
389
Help Guide
Digital Still CameraDSC-HX99
Zoom Func. on Ring
Sets the zoom functions when using the control ring to change zoom scales. The settings for [Zoom Func. on Ring] arevalid only when auto-focusing.
Menu item detailsStandard:Zooms in/out smoothly when you operate the zoom by turning the control ring.Quick:Zooms in/out to an angle of view corresponding to how far the control ring has been rotated.Step:Zooms in/out at certain angle steps when you operate the zoom by turning the control ring.
NoteIn the following situations, the zoom function activates as if [Zoom Func. on Ring] is set to [Standard], even if it is set to [Step].
When using the W/T (zoom) lever to change the zoom scale.When recording movies.When using zoom functions other than the optical zoom.
When the shooting mode is set to something other than [Intelligent Auto] or [Superior Auto], assign the [Zoom] function to thecontrol ring before using the control ring.
Selecting [Quick] increases the likelihood that the zoom sound will be recorded.
4-745-578-11(1) Copyright 2018 Sony Corporation
MENU → (Camera Settings2) → [Zoom Func. on Ring] → desired setting.1
390

Help Guide
Digital Still CameraDSC-HX99
DISP Button (Monitor/Finder)
Allows you to set the screen display modes that can be selected using DISP (Display Setting) in shooting mode.
Menu item detailsGraphic Display :Shows basic shooting information. Graphically shows the shutter speed and aperture value.Display All Info. :Shows recording information.No Disp. Info. :Does not show recording information.Histogram :Displays the luminance distribution graphically.Level :Indicates whether the product is level in both the front-back (A) and horizontal (B) directions. When the product is level ineither direction, the indicator turns to green.
For viewfinder*:Displays only shooting information on the monitor, not the subject. This setting is a display setting for shooting with theviewfinder.
Monitor Off*:Always turns the monitor off when shooting images. You can use the monitor when playing back images or operatingMENU. This setting is a display setting for shooting with the viewfinder.
NoteIf you tilt the product forward or backward by a large degree, the level error will be great.
The product may have a margin of error of almost ±1° even when the inclination is corrected by the level.
MENU → (Camera Settings2) → [DISP Button] → [Monitor] or [Finder] → desired setting → [Enter].
The items marked with are available.
1
These screen modes are available only in the setting for [Monitor].*
391

Related TopicSwitching the screen display (while shooting/during playback)
4-745-578-11(1) Copyright 2018 Sony Corporation
392

Help Guide
Digital Still CameraDSC-HX99
FINDER/MONITOR
Sets the method for switching the display between the viewfinder and the monitor.
Menu item detailsAuto:When you look into the viewfinder, the eye sensor reacts and the display is switched to the viewfinder automatically.Viewfinder(Manual):The monitor is turned off and the image is displayed only in the viewfinder.Monitor(Manual):The viewfinder is turned off and the image is always displayed on the monitor.
HintYou can assign the [FINDER/MONITOR] function to your preferred key. MENU → (Camera Settings2) → [ Custom Key], [ Custom Key] or [ Custom Key] → set [Finder/Monitor Sel.] tothe preferred key.
If you want to retain the viewfinder display or the monitor display, set [FINDER/MONITOR] to [Viewfinder(Manual)] or[Monitor(Manual)] beforehand. You can keep the monitor off when you take your eyes off the viewfinder during recording by setting the monitor display to[Monitor Off] using the DISP button. Select MENU → (Camera Settings2) → [DISP Button] → [Monitor] and add a checkmark to [Monitor Off] beforehand.
NoteWhen the viewfinder is pushed down, the images are always displayed on the monitor regardless of the [FINDER/MONITOR]setting.
When the monitor is pulled out, the eye sensor will not detect your eye's approach even if the viewfinder is popped up and[FINDER/MONITOR] is set to [Auto]. The image will continue to be displayed on the monitor.
Related TopicCustom Key (still image/movie/playback)DISP Button (Monitor/Finder)
4-745-578-11(1) Copyright 2018 Sony Corporation
MENU → (Camera Settings2) → [FINDER/MONITOR] → desired setting.1
393

Help Guide
Digital Still CameraDSC-HX99
Zebra Setting
Sets a zebra pattern, which appears over part of an image if the brightness level of that part meets the IRE level that youhave set. Use this zebra pattern as a guide to adjust the brightness.
Menu item detailsZebra Display:Sets whether to display the zebra pattern.Zebra Level:Adjusts the brightness level of the zebra pattern.
HintYou can register values to check the correct exposure or overexposure as well as the brightness level for [Zebra Level]. Thesettings for correct exposure confirmation and overexposure confirmation are registered to [Custom1] and [Custom2] respectivelyin the default settings.
To check the correct exposure, set a standard value and the range for the brightness level. The zebra pattern will appear onareas that fall within the range you set.
To check the overexposure, set a minimum value for the brightness level. The zebra pattern will appear over areas with abrightness level equal to or higher than the value you set.
NoteThe zebra pattern is not displayed on devices connected via HDMI.
4-745-578-11(1) Copyright 2018 Sony Corporation
MENU → (Camera Settings2) → [Zebra Setting] → desired setting.1
394

Help Guide
Digital Still CameraDSC-HX99
Grid Line
Sets whether the grid line is displayed or not. The grid line will help you to adjust the composition of images.
Menu item detailsRule of 3rds Grid:Place main subjects close to one of the grid lines that divide the image into thirds for a well-balanced composition.Square Grid:Square grids make it easier to confirm the horizontal level of your composition. This is useful for assessing thecomposition when shooting landscapes, closeups, or when performing camera scanning.Diag. + Square Grid:Place a subject on the diagonal line to express an uplifting and powerful feeling.Off:Does not display the grid line.
4-745-578-11(1) Copyright 2018 Sony Corporation
MENU → (Camera Settings2) → [Grid Line] → desired setting.1
395

Help Guide
Digital Still CameraDSC-HX99
Exposure Set. Guide
You can set whether to display a guide when you change the exposure.
Menu item detailsOff:Does not display the guide.On:Displays the guide.
4-745-578-11(1) Copyright 2018 Sony Corporation
MENU → (Camera Settings2) → [Exposure Set. Guide] → desired setting.1
396

Help Guide
Digital Still CameraDSC-HX99
Auto Review
You can check the recorded image on the screen right after the shooting. You can also set the display time for AutoReview.
Menu item details10 Sec/5 Sec/2 Sec:Displays the recorded image on the screen right after shooting for the selected duration of time. If you perform amagnifying operation during Auto Review, you can check that image using the magnified scale.Off:Does not display the Auto Review.
NoteWhen you use a function that performs image processing, the image before processing may be displayed temporarily, followed bythe image after processing.
The DISP (Display Setting) settings are applied for the Auto Review display.
Related TopicEnlarging an image being played back (Enlarge Image)
4-745-578-11(1) Copyright 2018 Sony Corporation
MENU → (Camera Settings2) → [Auto Review] → desired setting.1
397

Help Guide
Digital Still CameraDSC-HX99
Custom Key (still image/movie/playback)
You can assign a desired function to a desired key.Some functions are available only when they are assigned to a custom key. For example, if you assign [Eye AF] to[Center Button] for [ Custom Key], you can easily recall [Eye AF] simply by pressing the center of the control wheelwhile shooting.
Menu item detailsCustom Key:
Sets the custom key function to use when shooting still images.Custom Key:
Sets the custom key function to use when recording movies. You can assign a different function from the one used whenshooting still images.
Custom Key:Sets the custom key function to use when playing back images.
MENU → (Camera Settings2) → [ Custom Key], [ Custom Key] or [ Custom Key].1
Select the key to which you want to assign the function on the selection screen, and press the center of thecontrol wheel.
The keys that can be assigned functions are different for [ Custom Key], [ Custom Key] and [Custom Key].
You can assign the desired functions to the following keys.
2
Control Ring1.Fn/ Button2.Center Button/Left Button/Right Button3.C Button4.
Select the function to be assigned.
The functions that can be assigned differ depending on the keys.
3
398

Related TopicUsing the control wheelFocus Standard
4-745-578-11(1) Copyright 2018 Sony Corporation
399

Help Guide
Digital Still CameraDSC-HX99
Function Menu Set.
You can assign the functions to be called up when you press the Fn (Function) button.
4-745-578-11(1) Copyright 2018 Sony Corporation
MENU → (Camera Settings2) → [Function Menu Set.] → set a function to the desired location.
The functions that can be assigned are displayed on the setup item selection screen.
1
400

Help Guide
Digital Still CameraDSC-HX99
Func. of Touch Oprtn: Touch Shutter
When you shoot using the monitor, the camera automatically focuses on the point you touch and shoots a still image. Set MENU → (Setup) → [Touch Operation] to [On] in advance.
HintYou can operate the shooting functions below by touching the monitor:
Shooting burst images using the touch shutterWhen [Drive Mode] is set to [Cont. Shooting] or [Spd Priority Cont.], you can record burst images while touching the monitor.
Shooting continuous bracket images using the touch shutterThe product shoots three images while automatically shifting the exposure from base, to darker, and then to lighter. When[Drive Mode] is set to [Cont. Bracket], keep touching the monitor until the shooting ends. After the recording you can select theimage you prefer.
NoteThe [Touch Shutter] function is unavailable in the following situations:
During viewfinder shootingWhen the shooting mode is set to [Movie]When the shooting mode is set to [Sweep Panorama]During [Smile Shutter] modeWhen [Focus Mode] is [Manual Focus]When [Focus Area] is [Flexible Spot]When [Focus Area] is [Expand Flexible Spot]While using the digital zoom functionWhile using the [ Clear Image Zoom]
Related TopicTouch OperationTouch Panel/Pad
4-745-578-11(1) Copyright 2018 Sony Corporation
Select MENU → (Camera Settings2) → [Func. of Touch Oprtn] → [Touch Shutter].1
Touch the icon on the monitor while the shooting screen is displayed.
The mark to the left of the icon turns orange.
To cancel [Touch Shutter], touch the icon again.
2
Touch the subject to focus on.
When the subject you touched is in focus, a still image is recorded.
3
401

Help Guide
Digital Still CameraDSC-HX99
Func. of Touch Oprtn: Touch Focus
You can select a subject on which to focus using touch operations in the still image and movie recording modes. SelectMENU → (Setup) → [Touch Operation] → [On] beforehand.
Specifying the position where you want to focus in the still image modeYou can focus on the desired position by touching the monitor.
Specifying the position where you want to focus in the movie recording mode (spot focus)The camera will focus on the touched subject. Spot focus is not available when shooting with the viewfinder.
HintIn addition to the touch focus function, touch operations such as the following are also available.
When [Focus Area] is set to [Flexible Spot] or [Expand Flexible Spot], the focusing frame can be moved using touchoperations.When the [Focus Mode] is set to [Manual Focus], the focus magnifier can be used by double-tapping the monitor.
MENU → (Camera Settings2) → [Func. of Touch Oprtn] → [Touch Focus].1
Select a [Focus Area] other than [Flexible Spot] or [Expand Flexible Spot].1.MENU → (Camera Settings1) → [Center Lock-on AF] → [Off].2.Touch the monitor.
When shooting with the monitor, touch the subject to focus.When shooting with the viewfinder, you can move the position of the focus by touching and dragging on themonitor while looking through the viewfinder.
When the shutter button is pressed halfway down, the camera focuses on the focusing frame. Press the shutterbutton all the way down to shoot images.To cancel focusing with touch operations, touch or press the center of the control wheel if shooting with themonitor, and press the center of the control wheel if shooting with the viewfinder.
3.
Select a [Focus Area] other than [Flexible Spot] or [Expand Flexible Spot].1.MENU → (Camera Settings1) → [Center Lock-on AF] → [Off].2.Touch the subject on which you want to focus before or during recording.
After focusing on the area that you touched, the focus mode switches to manual focus. You can adjust the focusby rotating the control ring.To cancel spot focus, touch or press the center of the control wheel.
3.
402

NoteThe touch focus function is not available in the following situations:
When the shooting mode is set to [Sweep Panorama].When [Focus Mode] is set to [Manual Focus].When using the digital zoom
Related TopicTouch OperationTouch Panel/Pad
4-745-578-11(1) Copyright 2018 Sony Corporation
403

Help Guide
Digital Still CameraDSC-HX99
MOVIE Button
Sets whether or not to activate the MOVIE (Movie) button.
Menu item detailsAlways:Starts movie recording when you press the MOVIE button in any mode.Movie Mode Only:Starts movie recording when you press the MOVIE button only if the shooting mode is set to [ Movie] mode.
4-745-578-11(1) Copyright 2018 Sony Corporation
MENU → (Camera Settings2) → [MOVIE Button] → desired setting.1
404
Help Guide
Digital Still CameraDSC-HX99
Audio signals
Selects whether the product produces a sound or not.
Menu item detailsOn:all:Sounds are produced for example when the focus is achieved by pressing the shutter button halfway down.On:Shutter Only:Only the shutter sound is produced.Off:Sounds are not produced.
4-745-578-11(1) Copyright 2018 Sony Corporation
MENU → (Camera Settings2) → [Audio signals] → desired setting.1
405

Help Guide
Digital Still CameraDSC-HX99
Write Date (still image)
Sets whether to record a shooting date on the still image.
Menu item detailsOn:Records a shooting date.Off:Does not record a shooting date.
NoteIf you shoot images with the date once, you cannot delete the date from the images later.
The dates are doubly printed if you set the product to print dates when printing the images using PCs or printers.
The recorded time of the image cannot be superimposed on the image.
[ Write Date] is not available for RAW images.
4-745-578-11(1) Copyright 2018 Sony Corporation
MENU → (Camera Settings2) → [ Write Date] → desired setting.1
406

Help Guide
Digital Still CameraDSC-HX99
Snd to Smrtphn Func: Send to Smartphone
You can transfer still images or XAVC S movies to a smartphone and view them. The application PlayMemories Mobilemust be installed on your smartphone.
Menu item detailsSelect on This Device: Selects an image on the product to be transferred to the smartphone.(1) Select from among [This Image], [All with this date] or [Multiple Images].
The options displayed may differ depending on the View Mode selected on the camera.
(2) If you select [Multiple Images], select the desired images using the center of the control wheel, then press MENU →[Enter].Select on Smartphone: Displays all images recorded on the product’s memory card on the smartphone.
NoteYou can only transfer images that are saved on the camera's memory card.
You can select an image size to be sent to the smartphone from [Original], [2M] or [VGA]. To change the image size, refer to the following steps.
For Android smartphone Start PlayMemories Mobile, and change the image size by [Settings] → [Copy Image Size].For iPhone/iPad Select PlayMemories Mobile in the setting menu, and change the image size by [Copy Image Size].
RAW images are converted to JPEG format when they are sent.
You cannot send AVCHD format movies.
You cannot transfer XAVC S 4K movies or the original data of XAVC S HD movies recorded in [120p]/[100p] to a smartphone.You can only transfer proxy movies.
MENU → (Network) → [Snd to Smrtphn Func]→ [Send to Smartphone] → desired setting.
If you press the (Send to Smartphone) button in playback mode, the setting screen for [Send toSmartphone] will appear.
1
If the product is ready for the transfer, the information screen appears on the product. Connect thesmartphone and the product using that information.
The setting method for connecting the smartphone and the product varies depending on the smartphone.
2
407
Depending on the smartphone, the transferred movie may not be played back correctly. For example, the movie may not playsmoothly, or there may be no sound.
Depending on the format of the still image or movie, it may not be possible to play it back on a smartphone.
This product shares the connection information for [Send to Smartphone] with a device that has permission to connect. If youwant to change the device that is permitted to connect to the product, reset the connection information by following these steps.MENU → (Network) → [Wi-Fi Settings] → [SSID/PW Reset]. After resetting the connection information, you must register thesmartphone again.
When [Airplane Mode] is set to [On], you cannot connect this product and the smartphone. Set [Airplane Mode] to [Off].
While you transfer many images or long movies, we recommend that you supply power to the camera from a wall outlet (wallsocket) using the AC Adaptor (supplied).
Related TopicPlayMemories MobileControlling the camera using an Android smartphone (NFC One-touch remote)Controlling the camera using an Android smartphone (QR Code)Controlling the camera using an Android smartphone (SSID)Controlling the camera using an iPhone or iPad (QR Code)Controlling the camera using an iPhone or iPad (SSID)Sending images to an Android smartphone (NFC One-touch Sharing)Snd to Smrtphn Func: Sending Target (proxy movies)Airplane Mode
4-745-578-11(1) Copyright 2018 Sony Corporation
408
Help Guide
Digital Still CameraDSC-HX99
Snd to Smrtphn Func: Sending Target (proxy movies)
When transferring XAVC S video to a smartphone with [Send to Smartphone], you can set whether to transfer the low-bit-rate proxy movie or the high-bit-rate original movie.
Menu item detailsProxy Only:Transfers only proxy movies.Original Only:Transfers only original movies.Proxy & Original:Transfers both proxy and original movies.
NoteYou cannot transfer XAVC S 4K movies or the original data of XAVC S HD movies recorded in [120p]/[100p] to a smartphone.You can only transfer proxy movies.
While you transfer many images or long movies, we recommend that you supply power to the camera from a wall outlet (wallsocket) using the AC Adaptor (supplied).
Related TopicSnd to Smrtphn Func: Send to SmartphoneProxy Recording
4-745-578-11(1) Copyright 2018 Sony Corporation
MENU → (Network) → [Snd to Smrtphn Func] → [ Sending Target] → desired setting.1
409

Help Guide
Digital Still CameraDSC-HX99
Send to Computer
You can transfer images stored in the product to a computer connected to a wireless access point or wireless broadbandrouter and easily make backup copies using this operation. Before starting this operation, install PlayMemories Home onyour computer and register the access point on the product.
NoteDepending on the application settings of your computer, the product will turn off after saving the images to your computer.
You can transfer images from the product to only one computer at a time.
If you want to transfer images to another computer, connect the product and the computer via a USB connection and follow theinstructions in PlayMemories Home.
Proxy movies cannot be transferred.
Related TopicInstalling PlayMemories HomeWi-Fi Settings: WPS PushWi-Fi Settings: Access Point Set.
4-745-578-11(1) Copyright 2018 Sony Corporation
Start your computer.1
MENU → (Network) → [Send to Computer].2
410
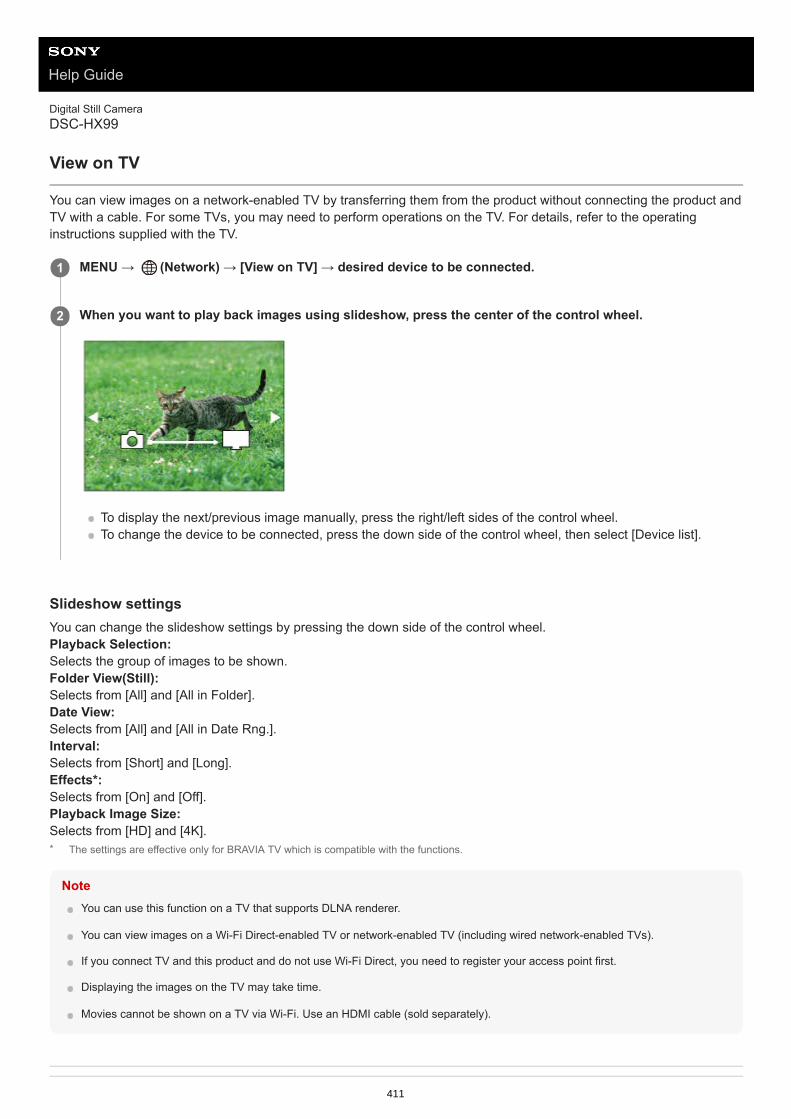
Help Guide
Digital Still CameraDSC-HX99
View on TV
You can view images on a network-enabled TV by transferring them from the product without connecting the product andTV with a cable. For some TVs, you may need to perform operations on the TV. For details, refer to the operatinginstructions supplied with the TV.
Slideshow settingsYou can change the slideshow settings by pressing the down side of the control wheel.Playback Selection: Selects the group of images to be shown.Folder View(Still): Selects from [All] and [All in Folder].Date View: Selects from [All] and [All in Date Rng.].Interval: Selects from [Short] and [Long].Effects*: Selects from [On] and [Off].Playback Image Size: Selects from [HD] and [4K].
NoteYou can use this function on a TV that supports DLNA renderer.
You can view images on a Wi-Fi Direct-enabled TV or network-enabled TV (including wired network-enabled TVs).
If you connect TV and this product and do not use Wi-Fi Direct, you need to register your access point first.
Displaying the images on the TV may take time.
Movies cannot be shown on a TV via Wi-Fi. Use an HDMI cable (sold separately).
MENU → (Network) → [View on TV] → desired device to be connected.1
When you want to play back images using slideshow, press the center of the control wheel.
To display the next/previous image manually, press the right/left sides of the control wheel.To change the device to be connected, press the down side of the control wheel, then select [Device list].
2
The settings are effective only for BRAVIA TV which is compatible with the functions.*
411

Related TopicWi-Fi Settings: WPS PushWi-Fi Settings: Access Point Set.
4-745-578-11(1) Copyright 2018 Sony Corporation
412

Help Guide
Digital Still CameraDSC-HX99
Ctrl w/ Smartphone
Sets the condition for connecting the camera to a smartphone.
Menu item detailsCtrl w/ Smartphone:Sets whether to connect the camera and a smartphone using Wi-Fi. ([On]/[Off])
Connection:Displays the QR code or SSID used to connect the camera to a smartphone.Always Connected:Sets whether to keep the camera connected to a smartphone. If this item is set to [On], once you connect the camera toa smartphone, it will remain connected to the smartphone at all times. If it is set to [Off], the camera will connect to asmartphone only when the connection procedure is performed.
NoteIf [Always Connected] is set to [On], the power consumption will be greater than when it is set to [Off].
If [Always Connected] is set to [On], it will take a while for the camera to turn off.
Related TopicControlling the camera using an Android smartphone (NFC One-touch remote)Controlling the camera using an Android smartphone (QR Code)Controlling the camera using an Android smartphone (SSID)Controlling the camera using an iPhone or iPad (QR Code)Controlling the camera using an iPhone or iPad (SSID)Snd to Smrtphn Func: Send to Smartphone
4-745-578-11(1) Copyright 2018 Sony Corporation
MENU → (Network) → [Ctrl w/ Smartphone] → desired setting.1
413
Help Guide
Digital Still CameraDSC-HX99
Airplane Mode
When you board an airplane, etc., you can temporarily disable all the wireless-related functions including Wi-Fi.
4-745-578-11(1) Copyright 2018 Sony Corporation
MENU → (Network) → [Airplane Mode] → desired setting.
If you set [Airplane Mode] to [On], an airplane mark will be displayed on the screen.
1
414
Help Guide
Digital Still CameraDSC-HX99
Wi-Fi Settings: WPS Push
If your access point has a Wi-Fi Protected Setup (WPS) button, you can register the access point to this product easily.
Note[WPS Push] works only if the security setting of your access point is set to WPA or WPA2 and your access point supports the Wi-Fi Protected Setup (WPS) button method. If the security setting is set to WEP or your access point does not support the Wi-FiProtected Setup (WPS) button method, perform [Access Point Set.].
For details about the available functions and settings of your access point, see the access point operating instructions or contactthe administrator of the access point.
A connection may not be possible or the communication distance may be shorter depending on the surrounding conditions, suchas the type of wall material and the presence of obstructions or radio waves between the product and access point. In this case,change the location of the product or move the product closer to the access point.
Related TopicWi-Fi Settings: Access Point Set.
4-745-578-11(1) Copyright 2018 Sony Corporation
MENU → (Network) →[Wi-Fi Settings] → [WPS Push].1
Push the Wi-Fi Protected Setup (WPS) button on the access point to connect.2
415

Help Guide
Digital Still CameraDSC-HX99
Wi-Fi Settings: Access Point Set.
You can register your access point manually. Before starting the procedure, check the SSID name of the access point,security system, and password. The password may be preset in some devices. For details, see the access pointoperating instructions, or consult the access point administrator.
Other setting itemsDepending on the status or the setting method of your access point, you may want to set more items.
WPS PIN:Displays the PIN code you enter into the connected device.Priority Connection:Select [On] or [Off].IP Address Setting:
MENU → (Network) → [Wi-Fi Settings] → [Access Point Set.].1
Select the access point you want to register.
When the desired access point is displayed on the screen: Select the desired access point.When the desired access point is not displayed on the screen: Select [Manual Setting] and set the accesspoint.
If you select [Manual Setting], input the SSID name of the access point, then select the security system.
2
Input the password, and select [OK].
Access points without the mark do not require a password.
3
Select [OK].4
416

Select [Auto] or [Manual].IP Address:If you are entering the IP address manually, enter the set address.Subnet Mask/Default Gateway:If you have set [IP Address Setting] to [Manual], enter each address according to your network environment.
NoteTo give the registered access point priority in the future, set [Priority Connection] to [On].
Related TopicWi-Fi Settings: WPS PushHow to use the keyboard
4-745-578-11(1) Copyright 2018 Sony Corporation
417

Help Guide
Digital Still CameraDSC-HX99
Wi-Fi Settings: Disp MAC Address
Displays the MAC address of this product.
4-745-578-11(1) Copyright 2018 Sony Corporation
MENU → (Network) → [Wi-Fi Settings] → [Disp MAC Address].1
418

Help Guide
Digital Still CameraDSC-HX99
Wi-Fi Settings: SSID/PW Reset
This product shares the connection information for [Send to Smartphone] and [ Connection] with a device that haspermission to connect. If you want to change the device that is permitted to connect, reset the connection information.
NoteIf you connect this product to a smartphone after resetting the connection information, you must make the settings for thesmartphone again.
Related TopicSnd to Smrtphn Func: Send to SmartphoneCtrl w/ Smartphone
4-745-578-11(1) Copyright 2018 Sony Corporation
MENU → (Network) → [Wi-Fi Settings] → [SSID/PW Reset] → [OK].1
419
Help Guide
Digital Still CameraDSC-HX99
Bluetooth Settings
Controls the settings for connecting the camera to a smartphone via a Bluetooth connection. You need to pair thecamera and smartphone before using the location information link function. If you want to pair the camera and smartphone in order to use the location information link function, refer to “Loc. Info.Link Set..”
Menu item detailsBluetooth Function (On/Off):Sets whether to activate or not the Bluetooth function of the camera.Pairing:Displays the screen for pairing the camera and smartphone using PlayMemories Mobile.Disp Device Address:Displays the BD address of the camera.
NoteIf [Bluetooth Function] is set to [On], it will take a while for the camera to turn off.
Related TopicLoc. Info. Link Set.
4-745-578-11(1) Copyright 2018 Sony Corporation
MENU → (Network) → [Bluetooth Settings] → desired setting.1
420

Help Guide
Digital Still CameraDSC-HX99
Loc. Info. Link Set.
You can use the application PlayMemories Mobile to obtain location information from a smartphone that is connectedwith your camera using Bluetooth communication. You can record the obtained location information when shootingimages.
Preparation in advance
To use the location information linking function of the camera, the application PlayMemories Mobile is required.If “Location Information Linkage” is not displayed on the top page of PlayMemories Mobile, you need to perform thefollowing steps beforehand.
Operating procedure
: Operations performed on the smartphone: Operations performed on the camera
Install PlayMemories Mobile on your smartphone.
You can install PlayMemories Mobile from the application store of your smartphone. If you have already installedthe application, update it to the latest version.
1.
Transfer a pre-recorded image to your smartphone using the [Send to Smartphone] function of the camera.
After you transfer an image recorded using the camera to your smartphone, “Location Information Linkage” willappear on the top page of the application.
2.
: Confirm that the Bluetooth function of your smartphone is activated.
Do not perform the Bluetooth pairing operation on the smartphone setting screen. In steps 2 to 7, the pairingoperation is performed using the camera and the application PlayMemories Mobile.If you accidentally perform the pairing operation on the smartphone setting screen in step 1, cancel the pairingand then perform the pairing operation by following Steps 2 through 7 using the camera and the applicationPlayMemories Mobile.
1.
: On the camera, select MENU → (Network) → [Bluetooth Settings] → [Bluetooth Function] → [On].2.
: On the camera, select MENU → (Network) → [Bluetooth Settings] → [Pairing].3.
: Launch PlayMemories Mobile on your smartphone and tap “Location Information Linkage.”
If “Location Information Linkage” is not displayed, follow the steps in “Preparation in advance” above.
4.
: Activate [Location Information Linkage] on the [Location Information Linkage] setting screen of PlayMemoriesMobile.
5.
: Follow the instructions on the [Location Information Linkage] setting screen of PlayMemories Mobile, and thenselect your camera from the list.
6.
: Select [OK] when a message is displayed on the monitor of the camera.
Pairing of the camera and PlayMemories Mobile is complete.
7.
421

Menu item detailsLocation Info. Link:Sets whether to obtain the location information by linking with a smartphone.Auto Time Correct.:Sets whether to automatically correct the date setting of the camera using information from a linked smartphone.Auto Area Adjust.:Sets whether to automatically correct the area setting of the camera using information from a linked smartphone.
Icons displayed when obtaining the location information (Obtaining location information): The camera is obtaining the location information. (Location information cannot be obtained): The camera cannot obtain the location information. (Bluetooth connection available): Bluetooth connection with the smartphone is established. (Bluetooth connection unavailable): Bluetooth connection with the smartphone is not established.
HintLocation information can be linked when PlayMemories Mobile is running on your smartphone even if the smartphone monitor isoff. However, if the camera has been turned off for a while, location information may not be linked immediately when you turn thecamera back on. In this case, location information will be linked immediately if you open the PlayMemories Mobile screen on thesmartphone.
When PlayMemories Mobile is not operating, such as when the smartphone is restarted, launch PlayMemories Mobile to resumelocation information linking.
In the application PlayMemories Home, you can view images on a map by importing images with location information to yourcomputer. For details, refer to Help for PlayMemories Home.
If the location information linking function does not work properly, see the following notes and perform pairing again.Confirm that the Bluetooth function of your smartphone is activated.Confirm that the camera is not connected with other devices using the Bluetooth function.Confirm that [Airplane Mode] for the camera is set to [Off].Delete the pairing information for the camera registered in PlayMemories Mobile.Execute [Reset Network Set.] of the camera.
For more detailed video instructions, refer to the following support page. http://www.sony.net/pmm/btg/
NoteWhen you initialize the camera, the pairing information is also deleted. To perform pairing again, delete the pairing information forthe camera registered in PlayMemories Mobile before trying again.
The location information will not be recorded when it cannot be obtained, such as when the Bluetooth connection is disconnected.
The camera can be paired with up to 15 Bluetooth devices, but can link the location information with that of only one smartphone.If you want to link the location information with that of another smartphone, turn off the [Location Information Linkage] function ofthe smartphone that is already linked.
If the Bluetooth connection is unstable, remove any obstacles, such as people or metal objects from between the camera and thepaired smartphone.
When pairing the camera and your smartphone, be sure to use the [Location Information Linkage] menu on PlayMemoriesMobile.
Supported smartphonesAndroid smartphones: Android 5.0 or later and compatible with Bluetooth 4.0 or later*
iPhone/iPad: iPhone 4S or later/iPad 3rd generation or later
: On the camera, select MENU → (Network) → [ Loc. Info. Link Set.] → [Location Info. Link] → [On].
(obtaining location information icon) will be displayed on the monitor of the camera. Location informationobtained by your smartphone using GPS, etc., will be recorded when shooting images.
8.
422

Related TopicPlayMemories HomePlayMemories MobileSnd to Smrtphn Func: Send to SmartphoneBluetooth Settings
4-745-578-11(1) Copyright 2018 Sony Corporation
For the latest information, refer to the support site.*For the Bluetooth version, refer to the website for your smartphone.*
423

Help Guide
Digital Still CameraDSC-HX99
Edit Device Name
You can change the device name for the Wi-Fi Direct or Bluetooth connection.
Related TopicWi-Fi Settings: WPS PushWi-Fi Settings: Access Point Set.How to use the keyboard
4-745-578-11(1) Copyright 2018 Sony Corporation
MENU → (Network) → [Edit Device Name].1
Select the input box, then input the device name→[OK].2
424

Help Guide
Digital Still CameraDSC-HX99
Reset Network Set.
Resets all the network settings to default settings.
4-745-578-11(1) Copyright 2018 Sony Corporation
MENU → (Network) → [Reset Network Set.] → [Enter].1
425

Help Guide
Digital Still CameraDSC-HX99
Protecting images (Protect)
Protects recorded images against accidental erasure. The mark is displayed on protected images.
Menu item detailsMultiple Img.:Applies the protection of the selected multiple images.(1) Select the image to be protected, then press the center of the control wheel. The mark is displayed in the checkbox. To cancel the selection, press the center again to remove the mark.(2) To protect other images, repeat step (1).(3) MENU → [OK].
All in this Folder:Protects all images in the selected folder.All with this date:Protects all images taken on the selected date.Cancel All in this Folder:Cancels the protection of all images in the selected folder.Cancel All with this date:Cancels the protection of all images taken on the selected date.All in Cont. Shoot Grp:Protects all the images in the selected continuous shooting group.Cancel All in Cnt Sht Grp:Cancels the protection of all the images in the selected continuous shooting group.
HintIf you select a continuous shooting group in [Multiple Img.], all the images in the group will be protected. To select and protectparticular images within the group, execute [Multiple Img.] while displaying the images within the group.
NoteThe menu items that can be selected vary according to the [View Mode] setting and the selected content.
4-745-578-11(1) Copyright 2018 Sony Corporation
MENU → (Playback) → [Protect] → desired setting.1
426

Help Guide
Digital Still CameraDSC-HX99
Rotating an image (Rotate)
Rotates a recorded still image counter-clockwise.
NoteYou cannot rotate the movies.
You may not be able to rotate images shot using other products.
When viewing rotated images on a computer, the images may be displayed in their original orientation depending on thesoftware.
4-745-578-11(1) Copyright 2018 Sony Corporation
Display the image to be rotated, then select MENU → (Playback) → [Rotate].1
Press the center of the control wheel.
The image is rotated counter-clockwise. The image rotates as you press the center. If you rotate the image once, the image remains rotated even after the product is turned off.
2
427

Help Guide
Digital Still CameraDSC-HX99
Deleting multiple selected images (Delete)
You can delete multiple selected images. Once you have deleted an image, you cannot restore it. Confirm the image tobe deleted beforehand.
Menu item detailsMultiple Img.: Deletes the selected images.(1) Select the images to be deleted, then press the center of the control wheel. The mark is displayed in the checkbox. To cancel the selection, press the center again to remove the mark.(2) To delete other images, repeat step (1).(3) MENU → [OK].
All in this Folder:Deletes all images in the selected folder.All with this date:Deletes all images taken on the selected date.All Other Than This Img.:Deletes all images in the continuous shooting group except the selection.All in Cont. Shoot Grp:Deletes all images in the selected continuous shooting group.
HintPerform [Format] to delete all images, including protected images.
To display the desired folder or date, select the desired folder or date during playback by performing the following procedure: (Image Index) lever → select the bar on the left using the control wheel → select the desired folder or date using the
top/bottom sides of the control wheel.
If you select a continuous shooting group in [Multiple Img.], all the images in the group will be deleted. To select and deleteparticular images within the group, execute [Multiple Img.] while displaying the images within the group.
NoteThe protected images cannot be deleted.
The menu items that can be selected vary according to the [View Mode] setting and the selected content.
Related TopicDeleting a displayed imageFormat
4-745-578-11(1) Copyright 2018 Sony Corporation
MENU → (Playback) → [Delete] → desired setting.1
428

Help Guide
Digital Still CameraDSC-HX99
Rating
You can assign ratings to recorded images on a scale from to to make it easier to find images.
HintYou can also assign ratings when playing back images by using the custom key. Assign [Rating] to the desired key using [Custom Key] beforehand, and then press the custom key while playing back an image to which you want to assign a rating. Thenumber of (Rating) changes each time you press the custom key.
NoteYou can assign ratings to still images only.
Related TopicCustom Key (still image/movie/playback)Rating Set(Cust Key)
4-745-578-11(1) Copyright 2018 Sony Corporation
MENU → (Playback) → [Rating].
The image rating selection screen will appear.
1
Press the left/right sides of the control wheel to display an image to which you want to assign a rating, andthen press the center.
2
Select the number of (Rating) by pressing the left/right sides of the control wheel, and then press thecenter.
3
Press the MENU button to exit the rating setting screen.4
429

Help Guide
Digital Still CameraDSC-HX99
Rating Set(Cust Key)
Sets the available number of when rating images with the key to which you have assigned [Rating] using [Custom Key].
Related TopicRatingCustom Key (still image/movie/playback)
4-745-578-11(1) Copyright 2018 Sony Corporation
MENU → (Playback) → [Rating Set(Cust Key)].1
Add a mark to the number of that you want to activate.
You can select the checked number when setting [Rating] using the custom key.
2
430
Help Guide
Digital Still CameraDSC-HX99
Specifying images to be printed (Specify Printing)
You can specify in advance on the memory card which still images you want to print out later. The (print order)icon will appear on the specified images. DPOF refers to “Digital Print Order Format.” DPOF setting will be retained after the image is printed. We recommend that you cancel this setting after printing.
Menu item detailsMultiple Img.:Selects images to order printing.(1) Select an image and press the center of the control wheel. The mark is displayed in the check box. To cancelthe selection, press the center again and delete the mark.(2) Repeat step (1) to print other images. To select all the images from a certain date or in a certain folder, select thecheck box for the date or folder.(3) MENU → [OK].
Cancel All:Clears all DPOF marks.Print Setting:Sets whether to print the date on images registered with DPOF marks.
The position or size of the date (inside or outside of the image) may differ depending on the printer.
NoteYou cannot add the DPOF mark to the following files:
RAW images
The number of copies cannot be specified.
Some printers do not support the date print function.
4-745-578-11(1) Copyright 2018 Sony Corporation
MENU → (Playback) → [Specify Printing] → desired setting.1
431

Help Guide
Digital Still CameraDSC-HX99
Photo Capture
Captures a chosen scene in a movie to save as a still image. First shoot a movie, then pause the movie during playbackto capture decisive moments that tend to be missed when shooting still images, and save them as still images.
Related TopicShooting moviesPlaying back movies
4-745-578-11(1) Copyright 2018 Sony Corporation
Display the movie that you want to capture as a still image.1
MENU → (Playback) → [Photo Capture].2
Play back the movie and pause it.3
Find the desired scene using forward slow playback, reverse slow playback, displays the next frame, anddisplays the previous frame, and then stop the movie.
4
Press (Photo Capture) to capture the chosen scene.
The scene is saved as a still image.
5
432

Help Guide
Digital Still CameraDSC-HX99
Enlarging an image being played back (Enlarge Image)
Enlarges the image being played back. Use this function to check the focus of the image, etc.
HintYou can also enlarge an image being played back using MENU.
You can change the initial magnification and initial position of enlarged images by selecting MENU → (Playback) → [Enlarge Init. Mag.] or [ Enlarge Initial Pos.].
You can also enlarge an image by double-tapping the monitor. In addition, you can drag and move the magnified position on themonitor. Set [Touch Operation] to [On] beforehand.
NoteYou cannot enlarge movies.
Related TopicTouch OperationEnlarge Init. Mag.Enlarge Initial Pos.
4-745-578-11(1) Copyright 2018 Sony Corporation
Display the image you want to enlarge, and slide the W/T (zoom) lever to the T side.
Slide the W/T (zoom) lever to the W side to adjust the zoom scale.The view will zoom in on the part of the image where the camera focused during shooting. If the focus locationinformation cannot be obtained, the camera will zoom in on the center of the image.
1
Select the portion you want to enlarge by pressing the top/bottom/right/left sides of the control wheel.2
Press the MENU button or the center of the control wheel to exit the playback zoom.3
433

Help Guide
Digital Still CameraDSC-HX99
Enlarge Init. Mag.
Sets the initial magnification scale when playing back enlarged images.
Menu item detailsStandard. Mag.:Displays an image with the standard magnification.Previous Mag.:Displays an image with the previous magnification. The previous magnification is stored even after exiting the playbackzoom mode.
Related TopicEnlarging an image being played back (Enlarge Image)Enlarge Initial Pos.
4-745-578-11(1) Copyright 2018 Sony Corporation
MENU → (Playback) → [ Enlarge Init. Mag.] → desired setting.1
434

Help Guide
Digital Still CameraDSC-HX99
Enlarge Initial Pos.
Sets the initial position when enlarging an image in playback.
Menu item detailsFocused Position: Enlarges the image from the point of focus during shooting.Center: Enlarges the image from the center of the screen.
Related TopicEnlarging an image being played back (Enlarge Image)Enlarge Init. Mag.
4-745-578-11(1) Copyright 2018 Sony Corporation
MENU → (Playback) → [ Enlarge Initial Pos.] → desired setting.1
435

Help Guide
Digital Still CameraDSC-HX99
Motion Interval ADJ
You can adjust the interval of the tracking of the subject’s motion.
Related TopicMotion Shot Video
4-745-578-11(1) Copyright 2018 Sony Corporation
MENU → (Playback) → [Motion Interval ADJ] → desired setting.1
436

Help Guide
Digital Still CameraDSC-HX99
Playing back images using slideshow (Slide Show)
Automatically plays back images continuously.
Menu item detailsRepeat:Select [On], in which images are played back in a continuous loop, or [Off], in which the product exits the slideshowwhen all the images are played back once.Interval:Select the display interval for images from among [1 Sec], [3 Sec], [5 Sec], [10 Sec] or [30 Sec].To quit the slideshow in the middle of playbackPress the MENU button to quit the slideshow. You cannot pause the slideshow.
HintDuring playback, you can display the next/previous image by pressing the right/left side of the control wheel.
You can activate a slideshow only when [View Mode] is set to [Date View] or [Folder View(Still)].
4-745-578-11(1) Copyright 2018 Sony Corporation
MENU → (Playback) → [Slide Show] → desired setting.1
Select [Enter].2
437

Help Guide
Digital Still CameraDSC-HX99
Switching between still images and movies (View Mode)
Sets the View Mode (image display method).
Menu item details Date View:
Displays the images by date. Folder View(Still):
Displays only still images. AVCHD View:
Displays only AVCHD-format movies. XAVC S HD View:
Displays only XAVC S HD-format movies. XAVC S 4K View:
Displays only XAVC S 4K-format movies.
4-745-578-11(1) Copyright 2018 Sony Corporation
MENU → (Playback) → [View Mode] → desired setting.1
438

Help Guide
Digital Still CameraDSC-HX99
Playing back images on the image index screen (Image Index)
You can display multiple images at the same time in playback mode.
To change the number of images to be displayedMENU → (Playback) → [Image Index] → desired setting.
Menu item details9 Images/25 Images
To return to single-image playbackSelect the desired image and press the center of the control wheel.
To display a desired image quicklySelect the bar on the left of the image index screen using the control wheel, then press the top/bottom sides of thecontrol wheel. While the bar is being selected, you can display the calendar screen or folder selection screen by pressingthe center. In addition, you can switch View Mode by selecting an icon.
Related TopicSwitching between still images and movies (View Mode)
4-745-578-11(1) Copyright 2018 Sony Corporation
Slide the W/T (zoom) lever to the W side while the image is being played back.1
Select the image by pressing the top/bottom/right/left sides of the control wheel or turning the controlwheel.
2
439

Help Guide
Digital Still CameraDSC-HX99
Disp Cont Shoot Grp
Sets whether to display continuously shot images as a group.
Menu item detailsOn:Displays continuously shot images as a group.Off:Does not display continuously shot images as a group.
HintImages shot with [Drive Mode] set to [Cont. Shooting] or [Spd Priority Cont.] are grouped. One sequence of images shotcontinuously by holding down the shutter button during continuous shooting becomes one group.
On the image index screen, is displayed over the continuous shooting group.
NoteImages can be grouped and displayed only when [View Mode] is set to [Date View]. When it is not set to [Date View], imagescannot be grouped and displayed, even if [Disp Cont Shoot Grp] is set to [On].
If you delete the continuous shooting group, all the images in the group will be deleted.
Related TopicCont. ShootingSpd Priority Cont.
4-745-578-11(1) Copyright 2018 Sony Corporation
MENU → (Playback) → [Disp Cont Shoot Grp] → desired setting.1
440

Help Guide
Digital Still CameraDSC-HX99
Rotating recorded images automatically (Display Rotation)
Selects the orientation when playing back recorded images.
Menu item detailsAuto:When you rotate the camera, the displayed image rotates automatically by detecting the orientation of the camera.Manual:Images shot vertically are displayed vertically. If you have set the image orientation using the [Rotate] function, the imagewill be displayed accordingly.Off:Images are always displayed horizontally.
Related TopicRotating an image (Rotate)
4-745-578-11(1) Copyright 2018 Sony Corporation
MENU → (Playback) → [Display Rotation] → desired setting.1
441

Help Guide
Digital Still CameraDSC-HX99
Monitor Brightness
Adjust the brightness of the screen.
Menu item detailsManual:Adjusts the brightness within the range of –2 to +2.Sunny Weather:Sets the brightness appropriately for shooting outdoors.
NoteThe [Sunny Weather] setting is too bright for shooting indoors. Set [Monitor Brightness] to [Manual] for indoor shooting.
The monitor brightness cannot be adjusted in the following situations. The maximum brightness will be [±0].When [ File Format] is set to [XAVC S 4K].When [ File Format] is set to [XAVC S HD] and [ Record Setting] is set to [120p]/[100p].
The monitor brightness is locked at [-2] when shooting a movie using the Wi-Fi functions.
4-745-578-11(1) Copyright 2018 Sony Corporation
MENU → (Setup) → [Monitor Brightness] → desired setting.1
442

Help Guide
Digital Still CameraDSC-HX99
Viewfinder Bright.
When using the viewfinder, this product adjusts the brightness of the viewfinder according to the surroundingenvironment.
Menu item detailsAuto:Adjusts the brightness automatically.Manual:Selects the brightness of the viewfinder within the range of –2 to +2.
NoteThe viewfinder brightness cannot be adjusted in the following situations. The maximum brightness will be [±0].
When [ File Format] is set to [XAVC S 4K].When [ File Format] is set to [XAVC S HD] and [ Record Setting] is set to [120p]/[100p].
4-745-578-11(1) Copyright 2018 Sony Corporation
MENU → (Setup) → [Viewfinder Bright.] → desired setting.1
443

Help Guide
Digital Still CameraDSC-HX99
Finder Color Temp.
Adjusts the color temperature of the electronic viewfinder.
Menu item details-2 to +2:When you select “-,” the viewfinder screen changes to a warmer color, and when you select “+,” it changes to a coldercolor.
4-745-578-11(1) Copyright 2018 Sony Corporation
MENU → (Setup) → [Finder Color Temp.] → desired setting.1
444

Help Guide
Digital Still CameraDSC-HX99
Volume Settings
Sets the sound volume for movie playback.
Adjusting the volume during playbackPress the bottom side of the control wheel while playing back movies to display the operation panel, then adjust thevolume. You can adjust the volume while listening to the actual sound.
4-745-578-11(1) Copyright 2018 Sony Corporation
MENU → (Setup) → [Volume Settings] → desired setting.1
445
Help Guide
Digital Still CameraDSC-HX99
Tile Menu
Selects whether to always display the first screen of the menu when you press the MENU button.
Menu item detailsOn:Always displays the first screen of the menu (Tile Menu).Off:Deactivates the Tile Menu display.
4-745-578-11(1) Copyright 2018 Sony Corporation
MENU → (Setup) → [Tile Menu] → desired setting.1
446

Help Guide
Digital Still CameraDSC-HX99
Mode Dial Guide
You can display the description of a shooting mode when you turn the mode dial and change the settings available forthat shooting mode.
Menu item detailsOn: Displays the Mode Dial Guide.Off: Does not display the Mode Dial Guide.
4-745-578-11(1) Copyright 2018 Sony Corporation
MENU → (Setup) → [Mode Dial Guide] → desired setting.1
447

Help Guide
Digital Still CameraDSC-HX99
Delete confirm.
You can set whether [Delete] or [Cancel] is selected as a default on the delete confirmation screen.
Menu item details"Delete" first: [Delete] is selected as the default setting."Cancel" first: [Cancel] is selected as the default setting.
4-745-578-11(1) Copyright 2018 Sony Corporation
MENU → (Setup) → [Delete confirm.] → desired setting.1
448
Help Guide
Digital Still CameraDSC-HX99
Display Quality
You can change the display quality.
Menu item detailsHigh: Displays in high quality.Standard: Displays in standard quality.
NoteWhen [High] is set, battery consumption will be higher than when [Standard] is set.
When the temperature of the camera rises, the setting may become locked to [Standard].
4-745-578-11(1) Copyright 2018 Sony Corporation
MENU → (Setup) → [Display Quality] → desired setting.1
449
Help Guide
Digital Still CameraDSC-HX99
Auto Monitor OFF
The camera automatically switches to the power-saving mode if you do not operate the camera for a certain period oftime in the still-image shooting mode. This function is useful for reducing the power consumption.
Menu item detailsDoes not turn OFF:The camera does not switch to the power-saving mode automatically.2 Sec/5 Sec/10 Sec:The camera switches to the power-saving mode and the monitor turns off if a certain number of seconds elapses withoutany operations. When [5 Sec] or [10 Sec] is selected, the monitor darkens two seconds before the end of the duration you have set.
Note[Auto Monitor OFF] does not activate in the following situations:
When the monitor is flipped up by approximately 180 degreesWhen the shooting mode is set to [Sweep Panorama]When the power-saving function is not activated
4-745-578-11(1) Copyright 2018 Sony Corporation
MENU → (Setup) → [Auto Monitor OFF] → desired setting1
450

Help Guide
Digital Still CameraDSC-HX99
Pwr Save Start Time
You can set the time by which the power goes off automatically.
Menu item details30 Min/5 Min/2 Min/1 Min
NoteThe power save function is not activated when power is being supplied via USB, when playing back slideshows, when recordingmovies, or when connected to a computer or TV.
4-745-578-11(1) Copyright 2018 Sony Corporation
MENU → (Setup) → [Pwr Save Start Time] → desired setting.1
451

Help Guide
Digital Still CameraDSC-HX99
Function for VF close
Sets whether to turn the power off when the viewfinder is stowed.
Menu item detailsPower OFF:Turns the power off when the viewfinder is stowed.Not Power OFF:Does not turn the power off when the viewfinder is stowed.
NotePush the eyepiece into the viewfinder before stowing the viewfinder. If you try to squeeze the viewfinder into the camera with theeyepiece pulled out, the viewfinder may be subjected to force and become damaged.
4-745-578-11(1) Copyright 2018 Sony Corporation
MENU → (Setup) → [Function for VF close] → desired setting.1
452
Help Guide
Digital Still CameraDSC-HX99
NTSC/PAL Selector
Plays back movies recorded with the product on a NTSC/PAL system TV.
NoteIf you insert a memory card that has previously been formatted with a different video system, a message telling you that you mustreformat the card will appear. If you want to record using another system, re-format the memory card or use another memory card.
When you perform [NTSC/PAL Selector], and the setting is changed from the default one, a message "Running on NTSC." or"Running on PAL." will appear on the start-up screen.
4-745-578-11(1) Copyright 2018 Sony Corporation
MENU → (Setup) → [NTSC/PAL Selector] → [Enter]1
453

Help Guide
Digital Still CameraDSC-HX99
Auto Pwr OFF Temp.
Sets the temperature of the camera at which the camera turns off automatically during shooting. When it is set to [High],you can continue shooting even when the temperature of the camera gets hotter than normal.
Menu item detailsStandard:Sets the standard temperature at which the camera turns off.High:Sets a higher temperature than the standard at which the camera turns off.Notes when [Auto Pwr OFF Temp.] is set to [High]
Do not shoot while holding the camera in your hand. Use a tripod.Using the camera while holding it in your hand for a long period of time may cause low-temperature burns.
Continuous recording time for movies when [Auto Pwr OFF Temp.] is set to [High]The duration of time available for continuous movie recording is as follows when the camera starts recording with thedefault settings after the power has been turned off for a while. The following values indicate the continuous time fromwhen the camera starts recording until the camera stops recording.
Ambient temperature: 20°C (68°F)Continuous recording time for movies (HD): Approx. 29 minutesContinuous recording time for movies (4K): Approx. 5 minutesAmbient temperature: 30°C (86°F)Continuous recording time for movies (HD): Approx. 29 minutesContinuous recording time for movies (4K): Approx. 5 minutesAmbient temperature: 40°C (104°F)Continuous recording time for movies (HD): Approx. 15 minutesContinuous recording time for movies (4K): Approx. 5 minutesHD: XAVC S HD (60p 50M/50p 50M, not connected via Wi-Fi)4K: XAVC S 4K (30p 60M/25p 60M, not connected via Wi-Fi)
NoteEven if [Auto Pwr OFF Temp.] is set to [High], depending on the conditions or the temperature of the camera, the recordable timefor movies may not change.
Continuous movie shooting is possible for a maximum of approximately 29 minutes at a time. The recording time is approximately5 minutes when shooting movies in XAVC S 4K/XAVC S HD 120p/100p format. (a product specification limit)
Related TopicRecordable movie times
4-745-578-11(1) Copyright 2018 Sony Corporation
MENU → (Setup) → [Auto Pwr OFF Temp.] → desired setting.1
454

Help Guide
Digital Still CameraDSC-HX99
Touch Operation
Sets whether or not to activate touch operations on the monitor.
Menu item detailsOn:Activates the touch operation.Off:Deactivates the touch operation.
Related TopicFunc. of Touch Oprtn: Touch ShutterFunc. of Touch Oprtn: Touch FocusTouch Pad SettingsTouch Panel/Pad
4-745-578-11(1) Copyright 2018 Sony Corporation
MENU → (Setup) → [Touch Operation] → desired setting.1
455

Help Guide
Digital Still CameraDSC-HX99
Touch Panel/Pad
Touch operations when shooting with the monitor are referred to as "touch panel operations," and touch operations whenshooting with the viewfinder are referred to as "touch pad operations." You can select whether to activate touch paneloperations or touch pad operations.
Menu item detailsTouch Panel+Pad:Activates both the touch panel operations when shooting with the monitor and touch pad operations when shooting withthe viewfinder.Touch Panel Only:Activates only the touch panel operations when shooting with the monitor.Touch Pad Only:Activates only the touch pad operations when shooting with the viewfinder.
Related TopicTouch Operation
4-745-578-11(1) Copyright 2018 Sony Corporation
MENU → (Setup) → [Touch Panel/Pad] → desired setting.1
456
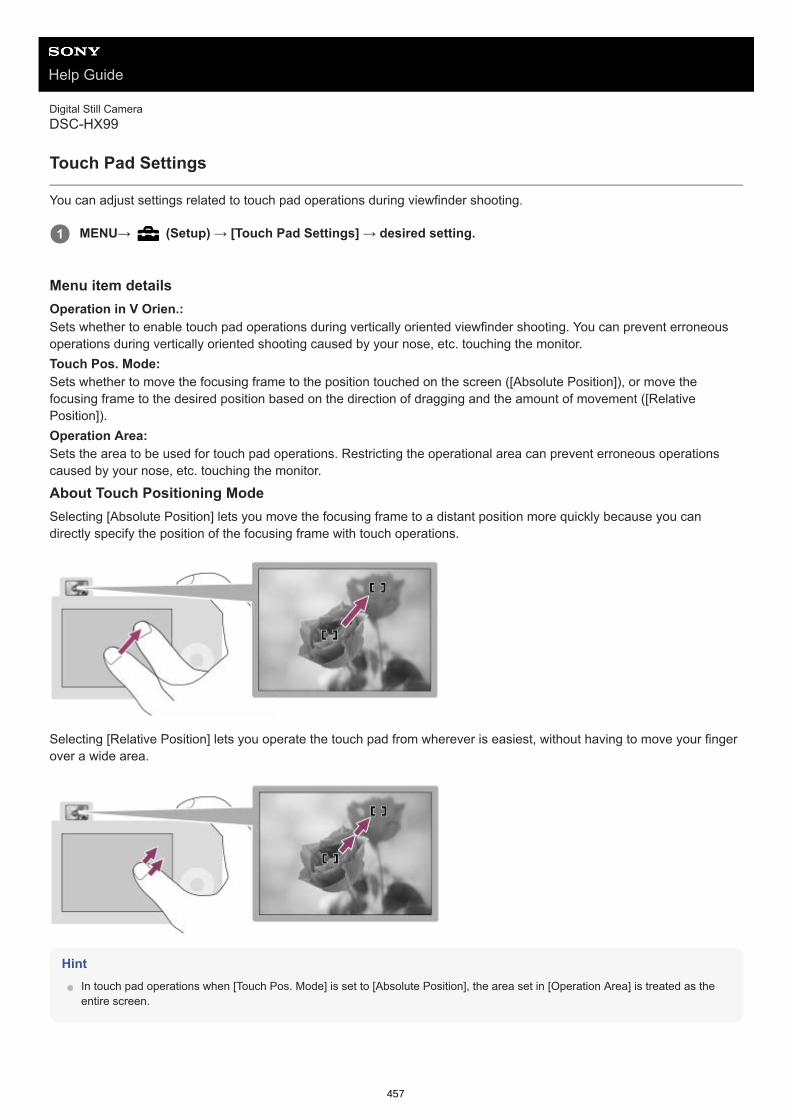
Help Guide
Digital Still CameraDSC-HX99
Touch Pad Settings
You can adjust settings related to touch pad operations during viewfinder shooting.
Menu item detailsOperation in V Orien.:Sets whether to enable touch pad operations during vertically oriented viewfinder shooting. You can prevent erroneousoperations during vertically oriented shooting caused by your nose, etc. touching the monitor.Touch Pos. Mode:Sets whether to move the focusing frame to the position touched on the screen ([Absolute Position]), or move thefocusing frame to the desired position based on the direction of dragging and the amount of movement ([RelativePosition]).Operation Area:Sets the area to be used for touch pad operations. Restricting the operational area can prevent erroneous operationscaused by your nose, etc. touching the monitor.
About Touch Positioning ModeSelecting [Absolute Position] lets you move the focusing frame to a distant position more quickly because you candirectly specify the position of the focusing frame with touch operations.
Selecting [Relative Position] lets you operate the touch pad from wherever is easiest, without having to move your fingerover a wide area.
HintIn touch pad operations when [Touch Pos. Mode] is set to [Absolute Position], the area set in [Operation Area] is treated as theentire screen.
MENU→ (Setup) → [Touch Pad Settings] → desired setting.1
457

Related TopicTouch Operation
4-745-578-11(1) Copyright 2018 Sony Corporation
458

Help Guide
Digital Still CameraDSC-HX99
Demo Mode
The [Demo Mode] function displays the movies recorded on the memory card automatically (demonstration), when thecamera has not been operated for a certain time. Normally select [Off].
Menu item detailsOn:The movie playback demonstration starts automatically if the product is not operated for about one minute. Onlyprotected AVCHD movies can be played back. Set the view mode to [AVCHD View], and protect the movie file with the oldest recorded date and time.Off:Does not show the demonstration.
NoteYou can activate this function only when the product is connected using a dedicated AC Adaptor.
When there is no protected AVCHD movies on the memory card, you cannot select [On].
4-745-578-11(1) Copyright 2018 Sony Corporation
MENU → (Setup) → [Demo Mode] → desired setting.1
459

Help Guide
Digital Still CameraDSC-HX99
TC/UB Settings
The time code (TC) and the user bit (UB) information can be recorded as data attached to movies.
Menu item detailsTC/UB Disp. Setting:Sets the display for the counter, time code, and user bit.TC Preset:Sets the time code.UB Preset:Sets the user bit.TC Format:Sets the recording method for the time code. (Only when [NTSC/PAL Selector] is set to NTSC.)TC Run:Sets the count up format for the time code.TC Make:Sets the recording format for the time code on the recording medium.UB Time Rec:Sets whether or not to record the time as a user bit.How to set the time code (TC Preset)
NoteWhen you tilt the monitor to shoot a self-portrait, the time code and user bit will not be displayed.
How to reset the time code
You can also reset the time code (00:00:00:00) using the RMT-VP1K remote commander (sold separately).
How to set the user bit (UB Preset)
How to reset the user bit
MENU → (Setup) → [TC/UB Settings] → setting value you want to change.1
MENU → (Setup) → [TC/UB Settings] → [TC Preset].1.Turn the control wheel and select the first two digits.
The time code can be set between the following range. When [60i] is selected: 00:00:00:00 to 23:59:59:29
2.
When [24p] is selected, you can select the last two digits of the time code in multiples of four from 0 to 23 frames. When [50i] is selected: 00:00:00:00 to 23:59:59:24
*
Set the other digits following the same procedure as in step 2, then press in the center of the control wheel.3.
MENU → (Setup) → [TC/UB Settings] → [TC Preset].1.Press the (Delete) button to reset the time code (00:00:00:00).2.
MENU → (Setup) → [TC/UB Settings] → [UB Preset].1.Turn the control wheel and select the first two digits.2.Set the other digits following the same procedure as in step 2, then press in the center of the control wheel.3.
460

How to select the recording method for the time code (TC Format *1)
DF:Records the time code in Drop Frame*2 format.NDF:Records the time code in Non-Drop Frame format.
The setting is fixed to [NDF] when recording in 4K/24p or 1080/24p.
How to select the count up format for the time code (TC Run)
Rec Run:Sets the stepping mode for the time code to advance only while recording. The time code is recorded sequentially fromthe last time code of the previous recording.Free Run:Sets the stepping mode for the time code to advance anytime, regardless of the camera operation.
The time code may not be recorded sequentially in the following situations even when the time code advances in[Rec Run] mode.
When the recording format is changed.When the recording medium is removed.
How to select how the time code is recorded (TC Make)
Preset:Records the newly set time code on the recording medium.Regenerate:Reads the last time code for the previous recording from the recording medium and records the new time codeconsecutively from the last time code. The time code advances in [Rec Run] mode regardless of the [TC Run] setting.
4-745-578-11(1) Copyright 2018 Sony Corporation
MENU → (Setup) → [TC/UB Settings] → [UB Preset].1.Press the (Delete) button to reset the user bit (00 00 00 00).2.
MENU → (Setup) → [TC/UB Settings] → [TC Format].1.
Only when [NTSC/PAL Selector] is set to NTSC.*1The time code is based on 30 frames per second. However, a gap between the actual time and the time code will occur during extended periodsof recording as the frame frequency of the NTSC image signal is approximately 29.97 frames per second. Drop frame corrects this gap to makethe time code and actual time equal. In drop frame, the first 2 frame numbers are removed every minute except for every tenth minute. The timecode without this correction is called non-drop frame.
*2
MENU → (Setup) → [TC/UB Settings] → [TC Run].1.
MENU → (Setup) → [TC/UB Settings] → [TC Make].1.
461

Help Guide
Digital Still CameraDSC-HX99
HDMI Settings: HDMI Resolution
When you connect the product to a High Definition (HD) TV with HDMI terminals using an HDMI cable (sold separately),you can select HDMI Resolution to output images to the TV.
Menu item detailsAuto:The product automatically recognizes an HD TV and sets the output resolution.2160p/1080p:Outputs signals in 2160p/1080p.1080p:Outputs signals in HD picture quality (1080p).1080i:Outputs signals in HD picture quality (1080i).
NoteIf the images are not displayed properly using the [Auto] setting, select either [1080i], [1080p] or [2160p/1080p], based on whichTV is to be connected.
4-745-578-11(1) Copyright 2018 Sony Corporation
MENU → (Setup) → [HDMI Settings] → [HDMI Resolution] → desired setting.1
462

Help Guide
Digital Still CameraDSC-HX99
HDMI Settings: 24p/60p Output (movie) (Only for 1080 60i compatible models)
You can set 1080/24p or 1080/60p as the HDMI output format when [ Record Setting] is set to [24p 50M], [24p 60M]or [24p 100M].
Menu item details60p:Movies are output as 60p.24p:Movies are output as 24p.
NoteSteps 1 and 2 can be set in either order.
Related TopicRecord Setting (movie)
4-745-578-11(1) Copyright 2018 Sony Corporation
MENU → (Setup) → [HDMI Settings] → [HDMI Resolution] → [1080p] or [2160p/1080p].1
MENU → (Setup) → [HDMI Settings] → [ 24p/60p Output] → desired setting.2
463

Help Guide
Digital Still CameraDSC-HX99
HDMI Settings: HDMI Info. Display
Selects whether to display the shooting information when this product and the TV are connected using an HDMI cable(sold separately).
Menu item detailsOn:Displays the shooting information on the TV.The recorded image and the shooting information are displayed on the TV, while nothing is displayed on the camera’smonitor.
Off:Does not display the shooting information on the TV.Only the recorded image is displayed on the TV, while the recorded image and the shooting information are displayed onthe camera’s monitor.
NoteWhen this product is connected to a 4K-compatible TV, [Off] is selected automatically.
If you set [ File Format] to [XAVC S 4K] and shoot movies while the camera is connected to an HDMI device, images will notbe displayed on the monitor.
4-745-578-11(1) Copyright 2018 Sony Corporation
MENU → (Setup) → [HDMI Settings] → [HDMI Info. Display] → desired setting.1
464

Help Guide
Digital Still CameraDSC-HX99
HDMI Settings: TC Output (movie)
Sets whether or not to layer the TC (time code) information on the output signal via the HDMI terminal when outputtingthe signal to other professional-use devices. This function layers the time code information on the HDMI output signal. The product sends the time code informationas digital data, not as an image displayed on the screen. The connected device can then refer to the digital data torecognize the time data.
Menu item detailsOn:Time code is output to other devices.Off:Time code is not output to other devices.
NoteWhen [ TC Output] is set to [On], the image may not be output properly to the TV or recording device. In such cases, set [
TC Output] to [Off].
4-745-578-11(1) Copyright 2018 Sony Corporation
MENU → (Setup) → [HDMI Settings] → [ TC Output] → desired setting.1
465

Help Guide
Digital Still CameraDSC-HX99
HDMI Settings: REC Control (movie)
If you connect the camera to an external recorder/player, you can remotely command the recorder/player to start/stoprecording using the camera.
Menu item detailsOn:
The camera can send a recording command to an external recorder/player. The camera is sending a recording command to an external recorder/player.
Off:The camera is not able to send a command to an external recorder/player to start/stop recording.
NoteAvailable for external recorders/players compatible with [ REC Control].
When you use the [ REC Control] function, set the shooting mode to (Movie).
When [ TC Output] is set to [Off], you cannot use the [ REC Control] function.
Even when is displayed, the external recorder/player may not work properly depending on the settings or status of therecorder/player. Check if the external recorder/player works properly before use.
4-745-578-11(1) Copyright 2018 Sony Corporation
MENU → (Setup) → [HDMI Settings] → [ REC Control] → desired setting.1
466
Help Guide
Digital Still CameraDSC-HX99
HDMI Settings: CTRL FOR HDMI
When connecting this product to a “BRAVIA” Sync-compatible TV using an HDMI cable (sold separately), you canoperate this product by aiming the TV remote control at the TV.
Menu item detailsOn:You can operate this product with a TV’s remote control.Off:You cannot operate this product with a TV’s remote control.
NoteIf you connect this product to a TV using an HDMI cable, available menu items are limited.
[CTRL FOR HDMI] is available only with a “BRAVIA” Sync-compatible TV. Also, the SYNC MENU operation differs depending onthe TV you are using. For details, refer to the operating instructions supplied with the TV.
If the product performs unwanted operations in response to the TV remote control when the product is connected to anothermanufacturer’s TV using an HDMI connection, select MENU → (Setup) → [HDMI Settings] → [CTRL FOR HDMI] → [Off].
4-745-578-11(1) Copyright 2018 Sony Corporation
MENU → (Setup) → [HDMI Settings] → [CTRL FOR HDMI] → desired setting.1
Connect this product to a “BRAVIA” Sync-compatible TV.
The input of the TV is switched automatically and images on this product are displayed on the TV screen.
2
Press the SYNC MENU button of the TV’s remote control.3
Operate this product using the TV’s remote control.4
467

Help Guide
Digital Still CameraDSC-HX99
HDMI Settings: HDMI Audio Out. (movie)
When the camera is connected to an external device such as a television via an HDMI cable (sold separately), the audiopicked up by the camera’s microphone is output to the external device during movie shooting and standby mode. Duringshooting, you can check both the image and sound from the external device.
Standby for movie shootingThis is the state before you start movie shooting by pressing the MOVIE button, after turning the mode dial to (Movie) and setting the values for shutter speed and aperture. The icon “STBY” is displayed on the screen.
Menu item detailsOn:Sound is output to the external device.Off:Sound is not output to the external device.
NoteDuring HDMI audio output, no electronic sound is produced when performing or ending movie recording even if [Audio signals] isset to [On].
Related TopicViewing images on a TV using an HDMI cable
4-745-578-11(1) Copyright 2018 Sony Corporation
MENU → (Setup) → [HDMI Settings] → [ HDMI Audio Out.] → desired setting.1
468

Help Guide
Digital Still CameraDSC-HX99
4K Output Sel. (movie)
You can set how to record movies and perform HDMI output when your camera is connected to 4K-compatible externalrecording/playback devices, etc.
Menu item detailsMemory Card+HDMI:Simultaneously outputs to the external recording/playback device and records on the camera’s memory card.HDMI Only(30p):Outputs a 4K movie in 30p to the external recording/playback device without recording on the camera’s memory card.HDMI Only(24p):Outputs a 4K movie in 24p to the external recording/playback device without recording on the camera’s memory card.
HDMI Only(25p) *:Outputs a 4K movie in 25p to the external recording/playback device without recording on the camera’s memory card.
NoteThis item can be set only when the camera is in movie mode and connected to a 4K-compatible device.
When [HDMI Only(30p)], [HDMI Only(24p)] or [HDMI Only(25p)] is set, [HDMI Info. Display] will temporarily be set to [Off].
When [HDMI Only(30p)], [HDMI Only(24p)] or [HDMI Only(25p)] is set, the counter does not move forward (the actual recordingtime is not counted) while the movie is being recorded on an external recording/playback device.
When [ File Format] is set to [XAVC S 4K] and the camera is connected via HDMI, the following functions are not available.[Face Priority in AF][Face Prty in Mlti Mtr][Center Lock-on AF]
Related TopicHDMI Settings: REC Control (movie)File Format (movie)Record Setting (movie)HDMI Settings: HDMI Info. Display
4-745-578-11(1) Copyright 2018 Sony Corporation
Turn the mode dial to (movie).1
Connect the camera to the desired device via an HDMI cable.2
MENU → (Setup) → [ 4K Output Sel.] → desired setting.3
Only when [NTSC/PAL Selector] is set to PAL.*
469

Help Guide
Digital Still CameraDSC-HX99
USB Connection
Selects the USB connection method when this product is connected to a computer, etc.Select MENU → (Network) → [Ctrl w/ Smartphone] → [Ctrl w/ Smartphone] → [Off] beforehand.
Menu item detailsAuto:Establishes a Mass Storage or MTP connection automatically, depending on the computer or other USB devices to beconnected. Windows 7, Windows 8.1, or Windows 10 computers are connected in MTP, and their unique functions areenabled for use.Mass Storage:Establishes a Mass Storage connection between this product, a computer, and other USB devices.MTP:Establishes an MTP connection between this product, a computer, and other USB devices. Windows 7, Windows 8.1, orWindows 10 computers are connected in MTP, and their unique functions are enabled for use.
PC Remote:Uses Imaging Edge to control the product from a computer, including such functions as shooting and storing images onthe computer.
NoteIt may take some time to make the connection between this product and a computer when [USB Connection] is set to [Auto].
Related TopicPC Remote Settings: Still Img. Save Dest.PC Remote Settings: RAW+J PC Save Img
4-745-578-11(1) Copyright 2018 Sony Corporation
MENU → (Setup) → [USB Connection] → desired setting.1
470

Help Guide
Digital Still CameraDSC-HX99
USB LUN Setting
Enhances compatibility by limiting of USB connection functions.
Menu item detailsMulti: Normally, use [Multi].Single: Set [USB LUN Setting] to [Single] only if you cannot make a connection.
4-745-578-11(1) Copyright 2018 Sony Corporation
MENU → (Setup) → [USB LUN Setting] → desired setting.1
471

Help Guide
Digital Still CameraDSC-HX99
USB Power Supply
Sets whether to supply power via the micro USB cable when the product is connected to a computer or an USB device.
Menu item detailsOn:Power is supplied to the product via a micro USB cable when the product is connected to a computer, etc.Off:Power is not supplied to the product via a micro USB cable when the product is connected to a computer, etc. If you usethe supplied AC Adaptor, power will be supplied even when [Off] is selected.
Operations available while supplying power via a USB cableThe following table shows you which operations are available/unavailable while supplying power via a USB cable. A checkmark indicates that the operation is available, and “―” indicates that the operation is unavailable.
NoteInsert the battery pack into the product to supply power via USB cable.
4-745-578-11(1) Copyright 2018 Sony Corporation
MENU → (Setup) → [USB Power Supply] → desired setting.1
Operation Available / Unavailable
Shooting images
Playing back images
Wi-Fi/NFC/Bluetooth connections
Charging a battery pack ―
Turning the camera on without a battery pack inserted ―
472

Help Guide
Digital Still CameraDSC-HX99
PC Remote Settings: Still Img. Save Dest.
Sets whether to save still images stored in both the camera and the computer during PC Remote shooting. This settingis useful when you want to check recorded images on the camera without leaving the camera.
Menu item detailsPC Only:Saves still images only on the computer.PC+Camera:Saves still images on the computer and the camera.
NoteDuring PC Remote shooting, you cannot change settings for [Still Img. Save Dest.]. Adjust the settings before you start shooting.
If you insert a memory card that is not recordable, you cannot shoot still images even if you select [PC+Camera].
If you select [PC+Camera] and you have not inserted a memory card into the camera, you cannot release the shutter even if[Release w/o Card] is set to [Enable].
While you are playing back still images on the camera, you cannot shoot using PC Remote.
Related TopicUSB ConnectionRelease w/o CardPC Remote Settings: RAW+J PC Save Img
4-745-578-11(1) Copyright 2018 Sony Corporation
PC Remote: Uses Imaging Edge to control the product from a computer, including such functions as shooting and storing images on thecomputer.
*
MENU → (Setup) → [PC Remote Settings] → [Still Img. Save Dest.] → desired setting.1
473
Help Guide
Digital Still CameraDSC-HX99
PC Remote Settings: RAW+J PC Save Img
Selects the file type for images to be transferred to the computer in PC Remote shooting. When shooting still images using PC Remote, the application on the computer does not display the image until theimage has been completely transferred. When performing RAW+JPEG shooting, you can accelerate the displayprocessing speed by transferring only JPEG images instead of transferring both RAW and JPEG images.
Menu item detailsRAW & JPEG:Transfers both RAW and JPEG files to the computer.JPEG Only:Transfers only JPEG files to the computer.RAW Only:Transfers only RAW files to the computer.
NoteThe setting for [RAW+J PC Save Img] cannot be changed during PC Remote shooting. Adjust the setting before shooting.
[RAW+J PC Save Img] can be set only when [ File Format] is set to [RAW & JPEG].
Related TopicUSB ConnectionFile Format (still image)PC Remote Settings: Still Img. Save Dest.
4-745-578-11(1) Copyright 2018 Sony Corporation
PC Remote: Uses Imaging Edge to control the product from a computer, including such functions as shooting and storing images on thecomputer.
*
MENU → (Setup) → [PC Remote Settings] → [RAW+J PC Save Img] → desired setting.1
474

Help Guide
Digital Still CameraDSC-HX99
Language
Selects the language to be used in the menu items, warnings and messages.
4-745-578-11(1) Copyright 2018 Sony Corporation
MENU → (Setup) → [ Language] → desired language.1
475

Help Guide
Digital Still CameraDSC-HX99
Date/Time Setup
The Clock Set screen is displayed automatically when you turn on this product for the first time or when the internalrechargeable backup battery has fully discharged. Select this menu when setting the date and time after the first time.
Menu item detailsDaylight Savings: Selects Daylight Savings [On]/[Off].Date/Time: Sets the date and time.Date Format: Selects the date and time display format.
HintTo charge the internal rechargeable backup battery, insert a charged battery pack, and leave the product for 24 hours or morewith the power off.
If the clock resets every time the battery is charged, the internal rechargeable backup battery may be worn out. Consult yourservice facility.
4-745-578-11(1) Copyright 2018 Sony Corporation
MENU → (Setup) → [Date/Time Setup] → desired setting.1
476

Help Guide
Digital Still CameraDSC-HX99
Area Setting
Sets the area where you are using the product.
4-745-578-11(1) Copyright 2018 Sony Corporation
MENU → (Setup) → [Area Setting] → desired area.1
477

Help Guide
Digital Still CameraDSC-HX99
Format
When you use a memory card with this camera for the first time, we recommend that you format the card using thecamera for stable performance of the memory card. Note that formatting permanently erases all data on the memorycard, and is unrecoverable. Save valuable data on a computer, etc.
NoteFormatting permanently erases all data including even protected images.
The access lamp lights up during formatting. Do not remove the memory card while the access lamp is lit up.
Format the memory card on this camera. If you format the memory card on the computer, the memory card may not be usabledepending on the format type.
It may take a few minutes to complete formatting, depending on the memory card.
You cannot format the memory card if the remaining battery charge is less than 1%.
4-745-578-11(1) Copyright 2018 Sony Corporation
MENU → (Setup) → [Format].1
478

Help Guide
Digital Still CameraDSC-HX99
File Number
Selects how to assign file numbers to still images.
Menu item detailsSeries:The product will assign numbers to files sequentially up to "9999" without resetting.Reset :The product resets numbers when a file is recorded in a new folder and assigns numbers to files starting with "0001". (When the recording folder contains a file, a number one higher than the largest number is assigned.)
4-745-578-11(1) Copyright 2018 Sony Corporation
MENU → (Setup) → [File Number] → desired setting.1
479

Help Guide
Digital Still CameraDSC-HX99
Set File Name
You can specify the first three characters of the file name for images you shoot.
NoteOnly capital letters, numbers, and underscores can be entered. However, an underscore cannot be used as the first character.
The three characters of the file name you specify using [Set File Name] will only be applied to images you shoot after changingthe setting.
Related TopicHow to use the keyboard
4-745-578-11(1) Copyright 2018 Sony Corporation
MENU → (Setup) → [Set File Name].1
Select the entry field for the file name to display a keyboard on the screen, and then enter three charactersof your choice.
2
480

Help Guide
Digital Still CameraDSC-HX99
Select REC Folder
If [Folder Name] is set to [Standard Form] and there are 2 folders or more, you can select the folder on the memory cardto which images are to be recorded.
NoteYou cannot select the folder when [Folder Name] is set to [Date Form].
Related TopicFolder Name
4-745-578-11(1) Copyright 2018 Sony Corporation
MENU→ (Setup)→[Select REC Folder]→desired folder.1
481

Help Guide
Digital Still CameraDSC-HX99
New Folder
Creates a new folder on the memory card for recording still images. A new folder is created with a folder number onegreater than the largest folder number currently used. Images are recorded in the newly created folder.
NoteWhen you insert a memory card that was used with other equipment into this product and shoot images, a new folder may beautomatically created.
Up to 4,000 images in total can be stored in one folder. When the folder capacity is exceeded, a new folder may be automaticallycreated.
4-745-578-11(1) Copyright 2018 Sony Corporation
MENU→ (Setup)→[New Folder].1
482

Help Guide
Digital Still CameraDSC-HX99
Folder Name
Still images are recorded in a folder that is automatically created inside the DCIM folder on the memory card. You canchange the way folder names are assigned.
Menu item detailsStandard Form:The folder name form is as follows: folder number + MSDCF. Example: 100MSDCFDate Form:The folder name form is as follows: folder number + Y (the last digit)/MM/DD. Example: 10080405(Folder number: 100, date: 04/05/2018)
NoteYou cannot change the [Folder Name] settings for movies.
4-745-578-11(1) Copyright 2018 Sony Corporation
MENU → (Setup) → [Folder Name] → desired setting.1
483

Help Guide
Digital Still CameraDSC-HX99
Recover Image DB
If image files were processed on a computer, problems may occur in the image database file. In such cases, the imageson the memory card will not be played back on this product. If these problems happen, repair the file using [RecoverImage DB].
NoteUse a sufficiently charged battery pack. Low battery power during repairing can cause damage to data.
4-745-578-11(1) Copyright 2018 Sony Corporation
MENU → (Setup) → [Recover Image DB] → [Enter].1
484

Help Guide
Digital Still CameraDSC-HX99
Display Media Info.
Displays the recordable time of movies for the inserted memory card. Also displays the number of recordable still imagesfor the inserted memory card.
4-745-578-11(1) Copyright 2018 Sony Corporation
MENU → (Setup) → [Display Media Info.].1
485

Help Guide
Digital Still CameraDSC-HX99
Version
Displays the version of this product’s software. Check the version when updates for this product’s software are released,etc.
NoteUpdating can be performed only when the battery level is (3 remaining battery bars) or more. Use a sufficiently chargedbattery pack.
4-745-578-11(1) Copyright 2018 Sony Corporation
MENU → (Setup) → [Version].1
486
Help Guide
Digital Still CameraDSC-HX99
Setting Reset
Resets the product to the default settings. Even if you perform [Setting Reset], the recorded images are retained.
Menu item detailsCamera Settings Reset:Initializes the main shooting settings to the default settings.Initialize:Initializes all the settings to the default settings.
NoteBe sure not to eject the battery pack while resetting.
4-745-578-11(1) Copyright 2018 Sony Corporation
MENU → (Setup) → [Setting Reset] → desired setting.1
487

Help Guide
Digital Still CameraDSC-HX99
Add Item
You can register the desired menu items to (My Menu) under MENU.
HintYou can add up to 30 items to (My Menu).
NoteYou cannot add the following items to (My Menu).
Any item under MENU → (Playback)[View on TV]
Related TopicSort ItemDelete ItemUsing MENU items
4-745-578-11(1) Copyright 2018 Sony Corporation
MENU → (My Menu) → [Add Item].1
Select an item that you want to add to (My Menu) using the top/bottom/left/right sides of the controlwheel.
2
Select a destination using the top/bottom/left/right sides of the control wheel.3
488
Help Guide
Digital Still CameraDSC-HX99
Sort Item
You can rearrange the menu items added to (My Menu) under MENU.
Related TopicAdd Item
4-745-578-11(1) Copyright 2018 Sony Corporation
MENU → (My Menu) → [Sort Item].1
Select an item that you want to move using the top/bottom/left/right sides of the control wheel.2
Select a destination using the top/bottom/left/right sides of the control wheel.3
489
Help Guide
Digital Still CameraDSC-HX99
Delete Item
You can delete menu items added to (My Menu) of MENU.
HintTo delete all the items on a page, select MENU → (My Menu) → [Delete Page].
You can delete all the items added to (My Menu) by selecting MENU → (My Menu) → [Delete All].
Related TopicDelete PageDelete AllAdd Item
4-745-578-11(1) Copyright 2018 Sony Corporation
MENU → (My Menu) → [Delete Item].1
Select an item that you want to delete using the top/bottom/left/right sides of the control wheel, and thenpress the center to delete the selected item.
2
490

Help Guide
Digital Still CameraDSC-HX99
Delete Page
You can delete all the menu items added to a page under (My Menu) in MENU.
Related TopicAdd ItemDelete All
4-745-578-11(1) Copyright 2018 Sony Corporation
MENU → (My Menu) → [Delete Page].1
Select a page that you want to delete using the left/right sides of the control wheel, and then press thecenter of the control wheel to delete the items.
2
491

Help Guide
Digital Still CameraDSC-HX99
Delete All
You can delete all the menu items added to (My Menu) in MENU.
Related TopicAdd ItemDelete Page
4-745-578-11(1) Copyright 2018 Sony Corporation
MENU → (My Menu) → [Delete All].1
Select [OK].2
492
Help Guide
Digital Still CameraDSC-HX99
Precautions
Refer also to “Notes on use” in the Startup Guide (supplied) for this product.
On the data specifications described in this manual
The data on performance and specifications in this manual are based on an ordinary ambient temperature of 25ºC(77°F), except where otherwise indicated.For the battery pack, the data are based on a battery pack that was fully charged until the charge lamp turned off.
On operating temperatures
Shooting in extremely cold or hot places that exceed this range is not recommended.Under high ambient temperatures, the temperature of the camera rises quickly.When the temperature of the camera rises, the image quality may deteriorate. It is recommended that you wait untilthe temperature of the camera drops before continuing to shoot.
Notes on recording for long periods of time or recording 4K movies
Especially during 4K movie shooting, the recording time may be shorter under low temperature conditions. Warm up thebattery pack or replace it with a new battery.
Notes on playing movies on other devices
XAVC S movies can be played back only on XAVC S-supported devices.
Backing up memory cards
Data may be corrupted in the following cases. Be sure to back up the data for protection.
When the memory card is removed, the USB cable is disconnected, or the product is turned off in the middle of aread or write operation.When the memory card is used in locations subject to static electricity or electrical noise.
Database file error
If you insert a memory card that does not contain an image database file into the product and turn on the power, theproduct automatically creates an image database file using some of the memory card’s capacity. The process maytake a long time and you cannot operate the product until the process is completed.If a database file error occurs, export all images to your computer using PlayMemories Home, and then format thememory card using this product.
Do not use/store the product in the following places
In an extremely hot, cold or humid place In places such as in a car parked in the sun, the camera body may become deformed and this may cause amalfunction.Storing under direct sunlight or near a heater The camera body may become discolored or deformed, and this may cause a malfunction.In a location subject to rocking vibration It may cause malfunctions and an inability to record data. In addition, the recording media may become unusable,and recorded data may be corrupted.Near strong magnetic place
493
In sandy or dusty places Be careful not to let sand or dust get into the product. This may cause the product to malfunction, and in some casesthis malfunction cannot be repaired.In places with high humidity This may cause the lens to mold.In areas where strong radio waves or radiation are being emitted Recording and playback may not function correctly.
On moisture condensation
If the product is brought directly from a cold to a warm location, moisture may condense inside or outside theproduct. This moisture condensation may cause a malfunction of the product.To prevent moisture condensation when you bring the product directly from a cold to a warm location, first put it in aplastic bag and seal it to prevent air from entering. Wait for about an hour until the temperature of the product hasreached the ambient temperature.If moisture condensation occurs, turn off the product and wait about an hour for the moisture to evaporate. Note thatif you attempt to shoot with moisture remaining inside the lens, you will be unable to record clear images.
Precaution on carrying
Do not hold, hit, or apply excessive force to the following parts, if your camera is equipped with them:
The lens partThe movable monitor partThe movable flash partThe movable viewfinder part
Do not carry the camera with the tripod attached. This may cause the tripod socket hole to break.Do not sit down in a chair or other place with the camera in the back pocket of your trousers or skirt, as this maycause malfunction or damage the camera.
Notes on handling the product
Before you connect the cable to the terminal, be sure to check the orientation of the terminal. Then, insert the cablestraight. Do not insert or remove the cable forcefully. This may cause the terminal part to break.The camera uses magnetic parts including magnets. Do not bring objects affected by magnetism, including creditcards and floppy disks, close to the camera.The recorded image may be different from the image you monitored before recording.
On storing
For lens-integrated cameras Always attach the lens cap when you are not using the camera. (Only for models supplied with a lens cap)For interchangeable-lens cameras Always attach the lens front cap or body cap when you are not using the camera. To prevent dust or debris fromgetting inside the camera, remove dust from the body cap before attaching it to the camera.If the camera is dirty after use, clean it. Water, sand, dust, salt, etc. left in the camera may cause a malfunction.
Notes on using lenses
When using the power zoom lens, be careful not to get your fingers or any other objects caught in the lens. (Only formodels with a power zoom feature or interchangeable lens cameras)If you must place the camera under a light source such as sunlight, attach the lens cap to the camera. (Only formodels supplied with a lens cap or interchangeable lens cameras)When you shoot with backlighting, keep the sun sufficiently far away from the angle of view. Otherwise, the sunlightmay enter the focus inside the camera and cause smoke or fire. Even if the sun is slightly away from the angle ofview, it may still cause smoke or fire.Do not directly expose the lens to beams such as laser beams. That may damage the image sensor and cause thecamera to malfunction.If the subject is too close, the image may show any dust or fingerprints on the lens. Wipe the lens with a soft cloth,etc.
494

Notes on the flash (Only for models with a flash)
Keep your fingers away from the flash. The light-emitting part may get hot.Remove any dirt from the surface of the flash. Dirt on the surface of the flash may emit smoke or burn due to heatgenerated by the emission of light. If there is dirt/dust, clean it off with a soft cloth.Restore the flash to its original position after using it. Make sure that the flash portion is not sticking up. (Only formodels with a movable flash)
Notes on the Multi Interface Shoe (Only for models with a Multi Interface Shoe)
When attaching or detaching accessories such as an external flash to the Multi Interface Shoe, first turn the power toOFF. When attaching the accessory, confirm that it is firmly fastened to the camera.Do not use the Multi Interface Shoe with a commercially available flash that applies voltages of 250 V or more or hasthe opposite polarity of the camera. It may cause a malfunction.
Notes on the viewfinder and flash (Only for models with a viewfinder or a flash)
Take care that your finger is not in the way when pushing the viewfinder or flash down. (Only for models with amovable viewfinder or a movable flash)If water, dust or sand adheres to the viewfinder or flash unit, it may cause a malfunction. (Only for models with amovable viewfinder or a movable flash)
Notes on the viewfinder (Only for models with a viewfinder)
When shooting with the viewfinder, you may experience symptoms such as eyestrain, fatigue, travel sickness, ornausea. We recommend that you take a break at regular intervals when you are shooting with the viewfinder.Do not forcibly push down the viewfinder when the eyepiece is pulled out. It may cause a malfunction. (Only formodels with a movable viewfinder and an eyepiece that can be pulled out)If you pan the camera while looking into the viewfinder or move your eyes around, the image in the viewfinder maybe distorted or the color of the image may change. This is a characteristic of the lens or display device and is not amalfunction. When you shoot an image, we recommend that you look at the center area of the viewfinder.The image may be slightly distorted near the corners of the viewfinder. This is not a malfunction. When you want tosee the full composition with all its details, you can also use the monitor.If you use the camera in a cold location, the image may have a trailing appearance. This is not a malfunction.
Notes on the monitor
Do not press against the monitor. The monitor may be discolored and that may cause a malfunction.If the monitor has drops of water or other liquids on it, wipe it with a soft cloth. If the monitor stays wet, the surface ofthe monitor may change or deteriorate. This may cause a malfunction.If you use the camera in a cold location, the image may have a trailing appearance. This is not a malfunction.
On image data compatibility
This product conforms with DCF (Design rule for Camera File system) universal standard established by JEITA (JapanElectronics and Information Technology Industries Association).
Services and software provided by other companies
Network services, content, and the [operating system and] software of this Product may be subject to individual termsand conditions and changed, interrupted or discontinued at any time and may require fees, registration and credit cardinformation.
4-745-578-11(1) Copyright 2018 Sony Corporation
495

Help Guide
Digital Still CameraDSC-HX99
On cleaning
Cleaning the lens, finder and flash
Wipe the lens, finder and flash with a soft cloth to remove fingerprints, dust, etc.
Cleaning the lens
Do not use a cleaning solution containing organic solvents, such as thinner, or benzine.When cleaning the lens surface, remove dust with a commercially available blower. In case of dust that sticks to thesurface, wipe it off with a soft cloth or tissue paper slightly moistened with lens cleaning solution. Wipe in a spiralpattern from the center to the outside. Do not spray lens cleaning solution directly onto the lens surface.
Cleaning the product surface
Clean the product surface with a soft cloth slightly moistened with water, then wipe the surface with a dry cloth. Toprevent damage to the finish or casing:
Do not expose the product to chemical products such as thinner, benzine, alcohol, disposable cloths, insect repellent,sunscreen or insecticide.Do not touch the product with any of the above on your hand.Do not leave the product in contact with rubber or vinyl for a long time.
Cleaning the monitor
If you wipe the monitor firmly using tissue paper, etc., the coating may be scratched.If the monitor becomes dirty with fingerprints or dust, gently remove the dust from the surface, and then clean themonitor using soft cloth, etc.
4-745-578-11(1) Copyright 2018 Sony Corporation
496

Help Guide
Digital Still CameraDSC-HX99
Number of recordable images
When you insert a memory card into the camera and turn the camera on, the number of images that can be recorded(should you continue to shoot using the current settings) is displayed on the screen.
NoteWhen “0” (the number of recordable images) flashes in orange, the memory card is full. Replace the memory card with anotherone, or delete images from the current memory card.
When “NO CARD” flashes in orange, it means no memory card has been inserted. Insert a memory card.
The number of images that can be recorded on a memory cardThe table below shows the approximate number of images that can be recorded on a memory card formatted with thiscamera. The values are defined using Sony standard memory cards for testing.The values may vary depending on the shooting conditions and the type of memory card used.
[ JPEG Image Size]: [L: 18M] [ Aspect Ratio] is set to [4:3] *1(Units: Images)
NoteEven if the number of recordable images is higher than 9999 images, “9999” will appear.
The numbers shown are when using a Sony memory card.
4-745-578-11(1) Copyright 2018 Sony Corporation
JPEG Quality/ File Format 8 GB 32 GB 64 GB 128 GB
Standard 1600 6600 13000 26000
Fine 1100 4600 9200 18000
Extra fine 570 2300 4600 9200
RAW & JPEG *2 290 1150 2350 4700
RAW 390 1550 3150 6300
When the [ Aspect Ratio] is set to other than [4:3], you can record more images than the numbers shown in the table above.*1[ JPEG Quality] when [RAW & JPEG] is selected: [Fine]*2
497

Help Guide
Digital Still CameraDSC-HX99
Recordable movie times
The table below shows the approximate total recording times using a memory card formatted with this camera. Thevalues may vary depending on the shooting conditions and the type of memory card used.
The recording times for when [ File Format] is set to [XAVC S 4K] and [XAVC S HD] are recording times whenshooting with [ Proxy Recording] set to [Off].
(h (hour), min (minute))
Continuous movie shooting is possible for a maximum of approximately 29 minutes at a time with the camera’s defaultsettings and an ambient temperature of approximately 25°C (77°F).However, the recording time is approximately 5 minutes when shooting movies in XAVC S 4K/XAVC S HD 120p/100pformat.(a product specification limit)
NoteThe recordable time of movies varies because the camera is equipped with VBR (Variable Bit-Rate), which automatically adjustsimage quality depending on the shooting scene. When you record a fast-moving subject, the image is clearer but the recordabletime is shorter because more memory is required for recording. The recordable time also varies depending on the shootingconditions, the subject or the image quality/size settings.
The times shown are recordable times using a Sony memory card.
Notes on continuous movie recording
8 GB 32 GB 64 GB 128 GB
XAVC S 4K 30p 100M/25p 100M 9 min 35 min 1 h 15 min 2 h 35 min
XAVC S 4K 30p 60M/25p 60M 10 min 1 h 2 h 5 min 4 h 15 min
XAVC S 4K 24p 100M*/– 9 min 35 min 1 h 15 min 2 h 35 min
XAVC S 4K 24p 60M*/– 10 min 1 h 2 h 5 min 4 h 15 min
XAVC S HD 120p 100M/100p 100M 9 min 35 min 1 h 15 min 2 h 35 min
XAVC S HD 120p 60M/100p 60M 10 min 1 h 2 h 5 min 4 h 15 min
XAVC S HD 60p 50M/50p 50M 15 min 1 h 15 min 2 h 35 min 5 h 10 min
XAVC S HD 60p 25M/50p 25M 30 min 2 h 25 min 5 h 10 h 05 min
XAVC S HD 30p 50M/25p 50M 15 min 1 h 15 min 2 h 35 min 5 h 10 min
XAVC S HD 30p 16M/25p 16M 50 min 3 h 50 min 7 h 45 min 15 h 40 min
XAVC S HD 24p 50M*/– 15 min 1 h 15 min 2 h 35 min 5 h 10 min
AVCHD 60i 24M(FX)/50i 24M(FX) 40 min 2 h 55 min 6 h 12 h 05 min
AVCHD 60i 17M(FH)/50i 17M(FH) 55 min 4 h 5 min 8 h 15 min 16 h 35 min
Only when [NTSC/PAL Selector] is set to NTSC.*
498

High-quality movie recording and high-speed continuous shooting require large amounts of power. Therefore, if youcontinue to shoot, the temperature inside the camera will rise, especially that of the image sensor. In such cases, thecamera will turn off automatically because the surface of the camera is heated to a high temperature or the hightemperature affects the quality of the images or the internal mechanism of the camera.The duration of time available for continuous movie recording when the camera records with the default settings afterthe power has been turned off for a while is as follows. The values indicate the continuous time from when thecamera starts recording until the camera stops recording. Ambient temperature: 20°C (68°F)
Continuous recording time for movies (HD): Approx. 29 minutesContinuous recording time for movies (4K): Approx. 5 minutes
Ambient temperature: 30°C (86°F)
Continuous recording time for movies (HD): Approx. 20 minutesContinuous recording time for movies (4K): Approx. 5 minutes
Ambient temperature: 40°C (104°F)
Continuous recording time for movies (HD): Approx. 15 minutesContinuous recording time for movies (4K): Approx. 5 minutes
[Auto Pwr OFF Temp.]: [Standard]HD: XAVC S HD (60p 50M/50p 50M, when the camera is not connected via Wi-Fi)4K: XAVC S 4K (30p 60M/25p 60M, when the camera is not connected via Wi-Fi)
The duration of time available for movie recording varies with the temperature, file format/record setting for movies,Wi-Fi network environment, or condition of the camera before you start recording. If you frequently recompose orshoot images after the power is turned on, the temperature inside the camera will rise and the recording timeavailable will be shorter.If the icon appears, the temperature of the camera has risen.If the camera stops movie recording due to a high temperature, leave it for some time with the power turned off. Startrecording after the temperature inside the camera drops fully.If you observe the following points, you will be able to record movies for longer periods of time.
Keep the camera out of direct sunlight.Turn the camera off when it is not being used.
When [ File Format] is set to [AVCHD], the file size of movies is limited to approx. 2 GB. If the movie file sizereaches approx. 2 GB during recording, a new movie file will be created automatically.
4-745-578-11(1) Copyright 2018 Sony Corporation
499
Help Guide
Digital Still CameraDSC-HX99
Using the AC Adaptor/battery charger abroad
You can use the battery charger (sold separately) and the AC Adaptor (supplied) in any country or region where thepower supply is within 100 V to 240 V AC and 50 Hz/60 Hz. Depending on the country/region, a converting plug adaptor may be needed to connect to a wall outlet (wall socket).Consult a travel agency, etc., and prepare one in advance.
NoteDo not use an electronic voltage transformer as doing so may cause a malfunction.
4-745-578-11(1) Copyright 2018 Sony Corporation
500

Help Guide
Digital Still CameraDSC-HX99
AVCHD format
The AVCHD format was developed for high-definition digital video cameras when recording an HD (High-Definition)signal using high-efficiency compression coding technology. The MPEG-4 AVC/H.264 format is used to compress videodata, and the Dolby Digital or Linear PCM system is used to compress audio data. The MPEG-4 AVC/H.264 format is capable of compressing images at higher efficiency than that of the conventionalimage compressing format.
As the AVCHD format uses compression coding technology, the picture may be unstable in scenes where the screen,angle of view, or brightness, etc. change drastically, but this is not a malfunction.
4-745-578-11(1) Copyright 2018 Sony Corporation
501

Help Guide
Digital Still CameraDSC-HX99
License
Notes on the License
This product comes with software that are used based on licensing agreements with the owners of that software. Basedon requests by the owners of copyright of these software applications, we have an obligation to inform you of thefollowing. Licenses (in English) are recorded in the internal memory of your product. Establish a Mass Storageconnection between the product and a computer to read licenses in the “PMHOME” - “LICENSE” folder.
THIS PRODUCT IS LICENSED UNDER THE AVC PATENT PORTFOLIO LICENSE FOR THE PERSONAL USE OF ACONSUMER OR OTHER USES IN WHICH IT DOES NOT RECEIVE REMUNERATION TO(i) ENCODE VIDEO IN COMPLIANCE WITH THE AVC STANDARD (“AVC VIDEO”)AND/OR(ii) DECODE AVC VIDEO THAT WAS ENCODED BY A CONSUMER ENGAGED IN A PERSONAL ACTIVITY AND/ORWAS OBTAINED FROM A VIDEO PROVIDER LICENSED TO PROVIDE AVC VIDEO.NO LICENSE IS GRANTED OR SHALL BE IMPLIED FOR ANY OTHER USE. ADDITIONAL INFORMATIONINCLUDING THAT RELATING TO PROMOTIONAL, INTERNAL AND COMMERCIAL USES AND LICENSING MAY BEOBTAINED FROM MPEG LA, L.L.C.SEE HTTP://WWW.MPEGLA.COM
On GNU GPL/LGPL applied softwareThe software that is eligible for the following GNU General Public License (hereinafter referred to as “GPL”) or GNULesser General Public License (hereinafter referred to as “LGPL”) are included in the product. This informs you that you have a right to have access to, modify, and redistribute source code for these softwareprograms under the conditions of the supplied GPL/LGPL. Source code is provided on the web. Use the following URL to download it. http://oss.sony.net/Products/Linux/ We would prefer you do not contact us about the contents of source code.
4-745-578-11(1) Copyright 2018 Sony Corporation
502

Help Guide
Digital Still CameraDSC-HX99
Specifications
Camera
[System]Camera TypeDigital Still Camera [Image sensor]Image format7.82 mm (1/2.3 type), Exmor R CMOS image sensorEffective pixel number of cameraApprox. 18 200 000 pixelsTotal pixel number of camera:Approx. 21 100 000 pixels [Lens]ZEISS Vario-Sonnar T*f = 4.25 – 118 mm (84 deg. – 3 deg. 30 min. (24 – 720 mm) (Angle of View (35 mm format equivalent))) F3.5 (W) – 6.4 (T) [SteadyShot]SystemOptical [Auto focus system]Detection systemContrast detection system [Flash]Flash range (ISO sensitivity (Recommended Exposure Index) set to Auto)Approx. 0.3 m to 5.4 m (11 13/16 inches to 17 ft. 8 19/32 inches) (W)/Approx. 2.5 m to 3.0 m (8 ft. 2 27/64 inches to 9 ft.10 7/64 inches) (T) [Electronic Viewfinder]TypeElectronic Viewfinder (Organic Electro-Luminescence)Total number of dots638 400 dotsMagnificationApprox. 0.50× with 50 mm lens at infinity, –1 m–1
Eye PointApprox. 20 mm from the eyepiece and approx. 19.2 mm from the eyepiece frame at –1 m–1
Diopter Adjustment–4.0 m–1 to +3.0 m–1
503

[Monitor]LCD monitor7.5 cm (3.0 type) TFT drive, touch panelTotal number of dots921 600 dots [Recording format]File formatJPEG (DCF Ver. 2.0, Exif Ver. 2.31, MPF Baseline) compliant, RAW (Sony ARW 2.3 format)Movie (XAVC S format)MPEG-4 AVC/H.264 XAVC S ver.1.0 format compliantVideo: MPEG-4 AVC/H.264Audio: LPCM 2ch (48 kHz 16 bit)Movie (AVCHD format)AVCHD format Ver. 2.0 compatibleVideo: MPEG-4 AVC/H.264Audio: Dolby Digital 2ch, equipped with Dolby Digital Stereo Creator
Manufactured under license from Dolby Laboratories.
[Recording media]Memory Stick Micro media, microSD memory cards
[Input/output terminals]Multi/Micro USB Terminal*Hi-Speed USB (USB 2.0)
HDMIHDMI type D micro jack [Power, general]Rated input3.6 V , 1.8 WOperating temperature0 to 40°C (32 to 104°F)Storage temperature–20 to 55°C (–4 to 131°F)Dimensions (W/H/D) (Approx.)102.0 × 58.1 × 35.5 mm (4 1/8 × 2 3/8 × 1 7/16 in.)Mass (CIPA compliant) (Approx.)242 g (8.6 oz) (including battery pack, microSD memory card) [Wireless LAN]Supported formatIEEE 802.11 b/g/nFrequency band2.4 GHzSecurityWEP/WPA-PSK/WPA2-PSKConnection methodWi-Fi Protected Setup™ (WPS)/ManualAccess methodInfrastructure mode
Supports Micro USB compatible devices.*
504

[NFC]Tag typeNFC Forum Type 3 Tag compliant [Bluetooth communications]Bluetooth standard Ver. 4.1
Frequency band2.4 GHz
AC Adaptor AC-UUD12/AC-UUE12
Rated input100 - 240 V , 50/60 Hz, 0.2 ARated output5 V , 1.5 A
AC Adaptor AC-UB10C
Rated input100 - 240 V , 50/60 Hz, 70 mARated output5 V , 0.5 A
Rechargeable battery pack NP-BX1
Rated voltage3.6 V Design and specifications are subject to change without notice.
4-745-578-11(1) Copyright 2018 Sony Corporation
505
Help Guide
Digital Still CameraDSC-HX99
Trademarks
Memory Stick and are trademarks or registered trademarks of Sony Corporation.XAVC S and are registered trademarks of Sony Corporation.AVCHD and AVCHD logotype are trademarks of Panasonic Corporation and Sony Corporation.Mac is a trademark of Apple Inc., registered in the United States and other countries.iPhone and iPad are trademarks of Apple Inc., registered in the U.S. and other countries.Blu-ray Disc™ and Blu-ray™ are trademarks of the Blu-ray Disc Association.DLNA and DLNA CERTIFIED are trademarks of Digital Living Network Alliance.Dolby, Dolby Audio and double-D symbol are trademarks of Dolby Laboratories.The terms HDMI and HDMI High-Definition Multimedia Interface, and the HDMI Logo are trademarks or registeredtrademarks of HDMI Licensing Administrator, Inc. in the United States and other countries.Microsoft and Windows are registered trademarks or trademarks of Microsoft Corporation in the United States and/orother countries.microSDXC logo is a trademark of SD-3C, LLC.Android and Google Play are trademarks or registered trademarks of Google Inc.Wi-Fi, the Wi-Fi logo and Wi-Fi Protected Setup are registered trademarks or trademarks of the Wi-Fi Alliance.The N Mark is a trademark or registered trademark of NFC Forum, Inc. in the United States and in other countries.The Bluetooth® word mark and logos are registered trademarks owned by the Bluetooth SIG, Inc. and any use ofsuch marks by Sony Corporation is under license.QR Code is a trademark of Denso Wave Inc.In addition, system and product names used in this manual are, in general, trademarks or registered trademarks oftheir respective developers or manufacturers. However, the ™ or ® marks may not be used in all cases in thismanual.
4-745-578-11(1) Copyright 2018 Sony Corporation
506

Help Guide
Digital Still CameraDSC-HX99
Troubleshooting
If you experience trouble with the product, try the following solutions.
Related TopicSelf-diagnosis displaySetting Reset
4-745-578-11(1) Copyright 2018 Sony Corporation
If a message such as “C/E:□□:□□” appears on the screen, refer to the self-diagnosis display.1
Remove the battery pack, wait for about one minute, re-insert the battery pack, then turn on the power.2
Initialize the settings.3
Consult your dealer or local authorized service facility. Additional information on this product and answersto frequently asked questions can be found at our Customer Support Website. http://www.sony.net/
4
507

Help Guide
Digital Still CameraDSC-HX99
Self-diagnosis display
If a code starting with a letter of the alphabet appears, the self-diagnosis function on this product is working. The last twodigits (indicated by □□) will differ depending on the state of this product. If you cannot solve the problem even after trying the following corrective actions a few times, this product may needrepair. Contact your Sony dealer or local authorized Sony service facility.
C:32:□□
There is trouble with the product’s hardware. Turn the power off and on again.
C:13:□□
This product cannot read or write data on the memory card. Try turning off and on this product again, or taking outand inserting the memory card several times.An unformatted memory card is inserted. Format the memory card.The inserted memory card cannot be used with this product, or the data is damaged. Insert a new memory card.
E:61:□□E:62:□□E:91:□□
A product malfunction has occurred. Initialize this product, then turn the power on again.
E:94:□□
There is a malfunction when writing or deleting data. Repair is required. Contact your Sony dealer or local authorizedSony service facility. Be prepared to give all numbers in the error code beginning from the E.
Related TopicFormatSetting Reset
4-745-578-11(1) Copyright 2018 Sony Corporation
508
Help Guide
Digital Still CameraDSC-HX99
Warning messages
Set Area/Date/Time.
Set the area, date and time. If you have not used the product for a long time, charge the internal rechargeablebackup battery.
Unable to use memory card. Format?
The memory card was formatted on a computer and the file format was modified. Select [Enter] and then format thememory card. You can use the memory card again, however, all previous data in the memory card is erased. It maytake some time to complete the format. If the message still appears, change the memory card.
Memory Card Error
An incompatible memory card is inserted.Formatting has failed. Format the memory card again.
Unable to read memory card. Reinsert memory card.
An incompatible memory card is inserted.The memory card is damaged.The terminal section of the memory card is dirty.
Cannot open the shutter since the memory card is not inserted.
No memory card has been inserted.To release the shutter without inserting a memory card into the camera, set [Release w/o Card] to [Enable]. In thiscase, images will not be saved.
This memory card may not be capable of recording and playing normally.
An incompatible memory card is inserted.
Processing...
When performing noise reduction, the reduction process takes place. You cannot do any further shooting during thisreduction process.
Unable to display.
Images recorded with other products or images modified with a computer may not be displayed.Processing on the computer such as deletion of the image files may cause inconsistencies in the image databasefiles. Repair the image database files.
Unable to print.
You tried to mark RAW images with a DPOF mark.
Internal temp. high. Allow it to cool.
The product has become hot because you have been shooting continuously. Turn the power off and cool the productand wait until the product is ready to shoot again.
509
You have been recording images for a long time, the product temperature has risen.
The number of images exceeds that for which date management in a database file by the product is possible.
Unable to register to the database file. Import all the images to a computer using PlayMemories Home and recoverthe memory card.
Image DataBase File error
There is something wrong in the Image Database File. Select [Setup] → [Recover Image DB].
System Error Camera Error. Turn power off then on.
Remove the battery pack, and then re-insert it. If the message appears frequently, consult local authorized Sonyservice facility.
Image Database File error. Recover?
You cannot record and play back an AVCHD movie because the Image Database File is damaged. Recover theImage Database File following the on-screen instructions.
Unable to magnify. Unable to rotate image.
Images recorded with other products may not be enlarged or rotated.
Cannot create more folders.
A folder in the memory card has the first three digits “999.” You cannot create any more folders on this camera.
Related TopicNotes on memory cardFormat
4-745-578-11(1) Copyright 2018 Sony Corporation
510

Help Guide
Digital Still CameraDSC-HX99
Recommended pages
How to transfer images to smartphoneYou can transfer images shot with this camera to smartphone. The application PlayMemories Mobile must beinstalled in advance.
Zoom AssistThis function helps you compose your shot by zooming out temporarily when you lose track of the subject, so thatyou can relocate the subject quickly.
DSC-HX99: Accessories compatibility informationThis website provides the accessories compatibility information. (Another window will open.)
4-745-578-11(1) Copyright 2018 Sony Corporation
511