DS3000 Storage Manager Demo Guide - gst-samara.ru to the DS3000 Storage Manager Demo Guide. ......
44
DS3000 Storage Manager Software Demo Guide – 10.35 - 1 - DS3000 Storage Manager Demo Guide Storage Manager 10.35 Demo Guide Revision 2.0 February 2009
Transcript of DS3000 Storage Manager Demo Guide - gst-samara.ru to the DS3000 Storage Manager Demo Guide. ......

DS3000 Storage Manager Software Demo Guide – 10.35 - 1 -
DS3000 Storage Manager Demo Guide Storage Manager 10.35 Demo Guide Revision 2.0 February 2009

DS3000 Storage Manager Software Demo Guide – 10.35 - 2 -
Overview
• Getting Started
• Exploring the DS3000 Storage Manager
o Tab Screen Views
• Putting Together an Effective Demo
• Scenarios
o Scenario 1: Limited IT Expertise and Time
o Scenario 2: Newly Added Capacity to be Configured
o Scenario 3: Adding a Hot Spare
o Scenario 4: Adding Capacity
o Scenario 5: Change a RAID level
o Scenario 6: Adding Additional Security to an IP SAN (DS3300-specific)
o Scenario 7: Tiered Storage within a Single Enclosure
• Premium License Feature Scenarios
o Scenario 1: Sharing Data
o Scenario 2: Improving Service Levels with Hot Backups
o Scenario 3: Relocating Data
• Advanced Features and Manual Functions
o Manual Hot Spare Configuration
o Media Scan Settings
o Command Line Interface

DS3000 Storage Manager Software Demo Guide – 10.35 - 3 -
Disclaimer
The intent of the DS3000 Storage Manager Demo software and this Demo Guide is to provide IBM field sales and support personnel, IBM Business Partners, and their resellers, distributors and integrators a tool for illustrating the features, functions and power of the DS3000 Storage Manager software.
At the time these tools are released and internally distributed, there may be minor errors, yet do not result in intentional misrepresentation of the DS3000 Storage Manager or DS3000 disk systems’ capabilities. However, the Demo is neither tested, nor updated, nor maintained to the extent of the actual products offered for sale or other customer use. As a result, certain features and functionality may not behave as they would in a production release of DS3000 Storage Manager.
Technical questions should be verified through official published documents, support resources, or directed to appropriate Systems Engineers, field support or customer service personnel.

DS3000 Storage Manager Software Demo Guide – 10.35 - 4 -
Getting Started Audience Welcome to the DS3000 Storage Manager Demo Guide.
The audience for this demo guide is technically-oriented members of the sales community who hope to understand more about how the DS3000 Storage Manager works. This guide is also for members of Field Sales wishing to use this tool to demonstrate capabilities of the DS3000 disk systems.
Background Information The DS3000 Storage Manager Software Demo is designed for use in testing environments as a stand-alone simulator of DS3000 Storage Manager’s functions. To prevent accidental access or corruption of critical data, the DS3000 Storage Manager Demo does not have the ability to access actual storage disk systems.
Prerequisites The Storage Manager Demo program runs on Windows 2003 or XP environments. Other environments have not been tested nor are they approved for use.
Terminology Before we begin our journey through the DS3000 Storage Manager, there is some terminology you may not be familiar with. We will provide you with a short summary of these terms.
Array: A set of physical drives logically grouped together with an assigned RAID level. Arrays can vary in the number of drives to meet required data protection, capacity, or performance requirements (the more physical drives in an array, the higher the performance capability of the array).
FlashCopy: This feature provides the ability to create a point-in-time image of a logical drive. It is very useful for as a data source for backup applications.
Host-to-Logical-Drive Mappings: When there are several hosts and many logical drives to associate to these hosts, Host-to-Logical-Drive-Mappings are utilized to configure a set of logical drives to each host server. This term is often referred to as a partition.
Logical Drive: This is the basic storage unit that is created on the DS3000 and presented to a host server. It is synonymous with LUN and is a drive letter (H: for example) in Windows environments.
Partition: This premium feature logically divides a single disk system into multiple systems by defining which host or host group can access each logical drive. This enables a range of hosts with different capacity, performance, or data protection demands to effectively share a single storage system. This term is also referred to as host-to-logical-drive mappings.
Storage subsystem: This term will be used interchangeably with disk system. Both refer to the DS3000 series disk systems which are managed by the DS3000 Storage Manager
VolumeCopy: This feature provides the ability to create an independent copy of another logical drive or FlashCopy. This term is also used interchangeably with logical drive copy.

DS3000 Storage Manager Software Demo Guide – 10.35 - 5 -
Loading the Software The Storage Manager Demo program is available from a variety of sources including
CDs IBM Internal Sales Kit:
http://w3.ibm.com/sales/support/ShowDoc.wss?docid=P408778Z86983L72&infotype=SK&infosubtype=S0&node=doctype,S0|doctype,STL|brands,B5000|brands,B8S00|geography,AMR&appname=CC_CFSS
External PartnerWorld Kit: http://www.ibm.com/partnerworld/wps/servlet/ContentHandler/SSDS345simulator
The Demo is zip file with the following name: DSSM_335_V4.zip. Save this zip file into a folder of your choice. Then, extract the zip file within this same folder. Within this folder simply execute the batch file named Start_Demo.bat. And, you are ready to go!

DS3000 Storage Manager Software Demo Guide – 10.35 - 6 -
Exploring the DS3000 Storage Manager Demo
Executing the Start_Demo.bat initiates a Java session with the Storage Manager Demo program. You’ll see the following screens – the DS3000 Storage Manager splash screen identifying the Storage Manager Demo followed by the Enterprise Management Window screens.

DS3000 Storage Manager Software Demo Guide – 10.35 - 7 -
The Enterprise Management Window Task Assistant is a series of wizards that helps you install and manage your new DS3000 disk system. The Task Assistant helps with common tasks such as:
Add Storage Subsystems
Name/Rename Storage Subsystems
Configure Alerts
Manage a Storage Subsystem
Feel free to explore the Task Assistant. You can auto-discover the storage subsystems by selecting Add Storage Subsystem from the Task Assistant, or closing the Task Assistant window and clicking on the leftmost icon button in the Enterprise Management Window.
__________________________________________________________________________________
Note: In subsequent simulator sessions, the storage subsystems may not need to be rediscovered. However, a simulator which has already been demonstrated will retain any configuration changes demonstrated (i.e. creating a virtual disk) or state that is “unresponsive”. Therefore, when re-opening the simulator, it is important to return to the original configuration settings to ensure a smooth demonstration by simply deleting the systems (right click on the system and select remove) and rediscovering them (the leftmost icon on the EMW . __________________________________________________________________________________
In the right panel of the Enterprise Management window, you will see three preconfigured storage systems: 1) the DS3200, 2) the DS3300, and 3) the DS3400.
With various systems to choose from, you can select the appropriate subsystem to demonstrate the features you wish:
1) The DS3200 is ideal for an in-depth exploration of the DS3000 Storage Manager feature set. Nothing is pre-defined for the subsystem, so it can serve as a basis for configuring all the arrays, logical drives and host-to-volume mappings,
2) The DS3300 is also ideal for an in-depth exploration of the DS3000 Storage Manager feature set. Nothing is pre-defined for the subsystem, so it can serve as a basis for configuring all the arrays, logical drives and host-to-volume mappings,
3) The DS3400 is suitable for a comprehensive tour of the DS3000 Storage Manager features. It includes a number of defined arrays and logical drives.
Each configuration includes a total of 48 SAS and SATA drives and 3 EXP3000 drive trays. In addition, all premium features, FlashCopy, VolumeCopy and partitioning, are enabled.
It is important to note that the DS3200, DS3300 and DS3400 are identical in their functionality. The features and tasks presented in this Demo Guide can be used interchangeably.

DS3000 Storage Manager Software Demo Guide – 10.35 - 8 -
Tab Bar Screen Views For this initial exploration of the Storage Manager Demo, we will use the DS3300 disk system configuration.
Select the DS3300 system by double-clicking it in the right panel. This displays the DS3000 Subsystem Management window (SMW).
The SMW provides access to most components and functions of the DS3000 series disk systems.

DS3000 Storage Manager Software Demo Guide – 10.35 - 9 -
There are six tabs in the SMW view:
The Summary tab provides access to: o Initial Setup Tasks link o Recovery Guru - This is the automatic discovery tool for systems problems o Hardware components profile and drive location o Locate arrays and logical drives - Drive group(ings) and disk system targets (LUNS) o Host and mappings - The attachment of LUNs to servers o Information center and online help
• The Configure tab provides access to:
o Configure host access – Automatic or manual o Create host group – A group of servers or cluster o Create host-to-logical drive mappings o Automatic storage configuration o Configure Hot Spares o Create logical drives (including FlashCopy logical drives)
• The Modify tab provides access to:
o Edit host topology - Servers using LUNs o Edit host-to-logical drive mappings o Rename or delete logical drives o Add free capacity - Drive space available in the arrays and not yet assigned to a logical-drive) o Change Array RAID level o Change logical drive ownership (preferred path) - Route from/to server and disk system o Modify FlashCopy logical drives - Drive used for FlashCopy o Manage logical drive copies - Premium feature of VolumeCopy or logical drive copy
• The Tools tab provides access to:
o Rename storage subsystem o Set or change password o Turn on indicator lights for various components to identify them physically (e.g. locate a drive) o View/enable premium features o Change enclosure ID numbers - Identification number assigned to a expansion unit o Change media scan settings - System data block check done in the background o Change pre-read redundancy check settings o Synchronize controller clocks o Configure Ethernet management ports for out-of-band Ethernet connections o Inherit system settings – Leverage already existing array configurations

DS3000 Storage Manager Software Demo Guide – 10.35 - 10 -
• The iSCSI tab manages all things specific to the DS3300 IP SAN configuration such as :
o Change Target Authentication o Enter Mutual Authentication Permissions o Change Target Identification o Change Target Discovery o Configure iSCSI Host Ports o View/End iSCSI Sessions o View iSCSI Statistics
• The Support tab provides troubleshooting and maintenance access to:
o Gather support information o View storage subsystem profile o Download firmware o Manage controllers o Advanced support tasks o View online help

DS3000 Storage Manager Software Demo Guide – 10.35 - 11 -
Putting Together an Effective Demo
Selecting a disk system for their organization can be a difficult decision for customers. It is also not always clear what criteria or requirements are behind their selection process. The DS3000 Storage Manager Demo is one means for you to understand your customers buying criteria. This Demo leads to open discussion with your customer as you go through the simulator together. By reviewing with them what they are likely to experience with the DS3000 disk systems and DS3000 Storage Manager, you can work with them to define what features are most important to them and why.
An effective way to win over the prospect is to provide training to the eventual administrators and managers of the IBM DS3000 disk systems. This will show the ease of use of the DS3000 Storage Manager as well as address any of their concerns about learning a new software system. Stressing the task-oriented user interface and its simplicity, this training can be tailored to the specific needs of the group you are training:
Initial set-up and configuration
Basic operations for their particular environment
Advanced premium features for when they need them
Specific operations for growing their disk system
Application specific tips and techniques
This course is best held as an interactive exchange of “How do I…?” topics and exercises that provide best practices for common tasks of the DS3000 Storage Manager.
This strategy has been used successfully on numerous occasions in parallel with the pre and post sales process. It’s an excellent vehicle to familiarize, practice, and sell.

DS3000 Storage Manager Software Demo Guide – 10.35 - 12 -
Scenarios The following sections will provide some scenarios for you to engage with your customers and how to address a specific business issue utilizing the DS3000 Storage Manager functions. As well, you may decide to highlight some of the features you have found in addition to the demo guide and develop your own scenarios.
Scenario 1: “I have little time and experience to configure a storage system. How do I get started?” Initial Setup Tasks dialog box
The DS3000 Storage Manager’s Initial Setup Tasks dialog box provides step-by-step instructions on setting up a DS3000 disk system. As a task-based user interface, it provides a more obvious starting point to setting-up and managing the disk system.
The Initial Setup Tasks window offers a step-by-step process of tasks directing users to complete an initial configuration. It pops up automatically when the SMW is first brought up, or can be launched by selecting Perform Initial Setup Tasks from the summary tab of the SMW.
The steps listed as initial setup tasks include:
1. Locate the storage subsystem
2. Rename the storage subsystem
3. Set a storage subsystem password
4. Configure iSCSI host ports (DS3300-specific)
5. Configure host access
6. Configure storage subsystem (automatic or manual)
This scenario we will cover each step in the initial setup tasks list.

DS3000 Storage Manager Software Demo Guide – 10.35 - 13 -
Step 1: Locate the Disk System This optional step helps locate the subsystem if it’s in a data center or room with other systems. Click Locate the Storage Subsystem to go to the following screen:
From this screen, select a device and click on Locate to have the lights on the DS3000 disk system indicate its location. This allows you to locate the physical location of the disk system in your network. The disk system can then be identified with a label.
Step 2: Rename the Storage Subsystem This optional step allows you to rename the subsystem. Click Rename the Storage Subsystem to go to the following screen:
Enter the new subsystem name and click OK.

DS3000 Storage Manager Software Demo Guide – 10.35 - 14 -
Step 3: Set a Storage Subsystem Password
This optional step allows you to set a password for the subsystem, so that unauthorized users can not make changes. Click Set a Storage Subsystem Password to go to the following screen:
Enter the current password (if applicable) and the new password twice, then click OK. You will receive confirmation that your new password has been set up.

DS3000 Storage Manager Software Demo Guide – 10.35 - 15 -
Step 4: Configure iSCSI Host Ports (DS3300-specific)
This step allows you to configure network parameters for the iSCSI host ports on the DS3300 controller module(s). From the Initial Setup Tasks window, select Configure iSCSI Host Ports. In the iSCSI Host Ports window, you can see that each host port is identified and configured by the controller number and port location. Select one of the ports. After port is chosen, you have the option of obtaining the configuration automatically from the DHCP server or the IP address can be manually entered.
For this example, select the automatic configuration option.
As you can see, the ICMP PING responses have been enabled. The Internet Control Message Protocol (ICMP) is one of the core protocols of the Internet protocol suite. The operating systems of networked computers use this protocol to send messages. ICMP contains a ping tool, which sends ICMP Echo Request messages (and receives Echo Response messages). These ICMP messages determine whether a host is reachable and how long it takes to get packets to and from that host. Whether enabled or disabled, this selection will apply to all iSCSI host ports in the DS3300.
Select OK. You will then receive confirmation that the configuration of the iSCSI host port has been completed.

DS3000 Storage Manager Software Demo Guide – 10.35 - 16 -
Step 5: Configure Host Access
This step allows you to provide one or more hosts access to the subsystem. Select Configure Host Access and you will be directed to the following window:
After selecting the appropriate host, click Add and then OK. You will then receive confirmation of host access.
__________________________________________________________________________________
Note: In the Demo, several hosts have been pre-configured for access. __________________________________________________________________________________

DS3000 Storage Manager Software Demo Guide – 10.35 - 17 -
Step 6: Configure the Storage Subsystem
This step has two options: the Automatic (Simple) option and the Manual (Advanced) option. The Automatic (Simple) option is the quickest and easiest, but provides less control over the configuration. It will be covered in this scenario. The Manual (Advanced) option still provides some automated assistance, yet allows the users to have more control over the configuration. The Manual (Advanced) option will be covered in Scenario 2, with the creation of logical drives.
Automatic (Simple) Option
Expand the Automatic (Simple) option under Configure the Storage Subsystem and select Step 1: Automatic Configuration. This will open the Automatic Configuration window. You will proceed to choose a RAID level and click Finish. The DS3000 Storage Manager will then configure the entire subsystem into multiple arrays based on the selected RAID level and create a single logical drive within each array.
________________________________________________________________________________
Note: Users that wish to define the number of drives in each array, and the number and size of the logical drives in each array, should use the Create Logical Drives option. ________________________________________________________________________________
After reviewing and accepting your configuration options with RAID 5, select Finish. Return to the task window and select Step 2 in the Automatic option - Create Host-to-Logical Drive Mappings.

DS3000 Storage Manager Software Demo Guide – 10.35 - 18 -
This will open the Create Host-to-Logical Drive Mappings window. Select the host you would like to map to and click Next.
Select the logical drives you wish to be mapped to the host and click Finish. If more than one logical drive is selected, the logical unit number will be assigned automatically. If only one logical drive is selected, you will also be prompted to assign it a logical unit number (see below).
After this process has been completed, click OK and you will be notified that you have successfully mapped the host to a logical drive. You will be given the option to map another host-to-logical drive. For this example, select NO.
You have successfully created arrays, logical drives and mapped logical drives to a host with the simple Automatic option.

DS3000 Storage Manager Software Demo Guide – 10.35 - 19 -
Scenario 2: “I have newly added capacity that I would like configure.” Logical Drive Creation
Logical drives can be easily configured by either creating a new array in which the logical drives are automatically created with it or by creating logical drives by using the free capacity on an existing array. For this example, we will use the latter approach and create logical drives from available capacity on an existing array.
From the Configure tab, or from the Initial Setup Tasks window under the Manual (Advanced) option, select step 2, Create Logical Drives. This will take you to the Create Arrays and Logical Drives – Select Task. Select logical drive when prompted to choose from creating and array or a logical drive.
Then select a free capacity node which will make up this logical drive. Click Next.

DS3000 Storage Manager Software Demo Guide – 10.35 - 20 -
The window Create Arrays and Logical Drives – Specify Logical Drive will appear. Set the new logical drive’s capacity, name and I/O characteristics.
________________________________________________________________________________
Note: Leave some capacity free if more logical drives are desired on the same array. ________________________________________________________________________________

DS3000 Storage Manager Software Demo Guide – 10.35 - 21 -
The Create Arrays and Logical Drives – Map Logical Drives to Host will open. Select Map Now and choose the host which you would like the logical drive to be mapped to (for this example select “Host Killian”. Assign a logical unit number (LUN) and select Finish.
And a logical drive was successfully created and mapped to a host!
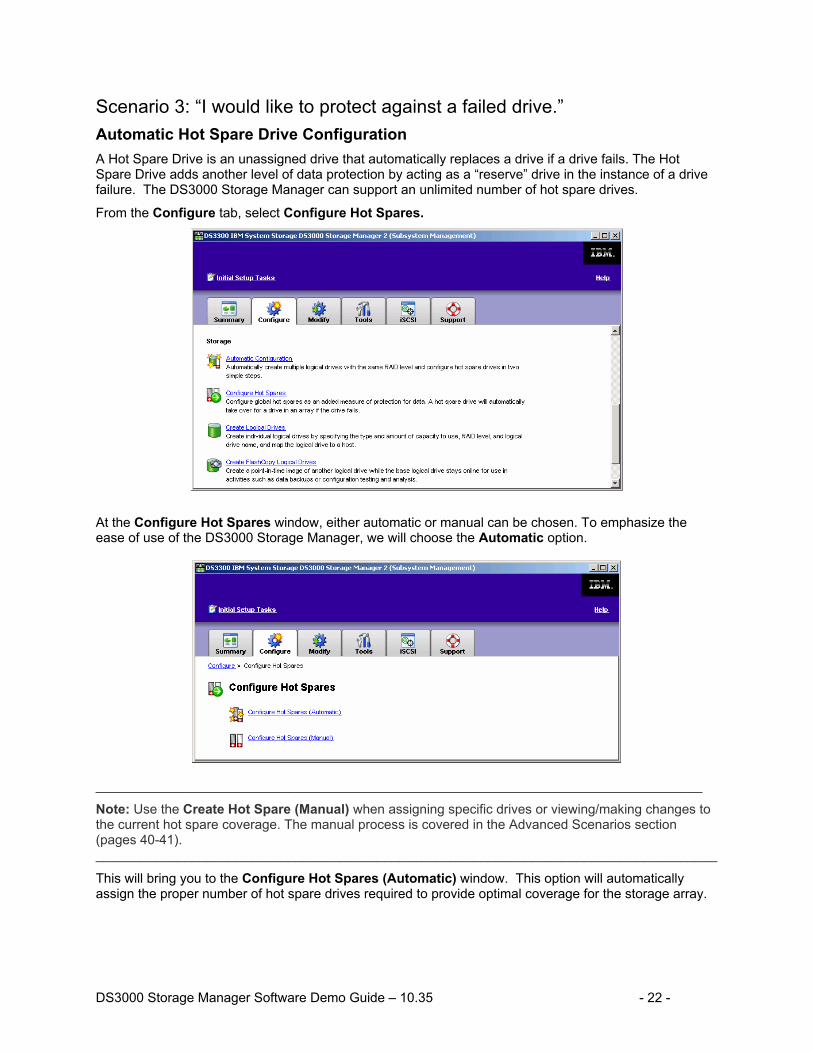
DS3000 Storage Manager Software Demo Guide – 10.35 - 22 -
Scenario 3: “I would like to protect against a failed drive.” Automatic Hot Spare Drive Configuration A Hot Spare Drive is an unassigned drive that automatically replaces a drive if a drive fails. The Hot Spare Drive adds another level of data protection by acting as a “reserve” drive in the instance of a drive failure. The DS3000 Storage Manager can support an unlimited number of hot spare drives.
From the Configure tab, select Configure Hot Spares.
At the Configure Hot Spares window, either automatic or manual can be chosen. To emphasize the ease of use of the DS3000 Storage Manager, we will choose the Automatic option.
__________________________________________________________________________________
Note: Use the Create Hot Spare (Manual) when assigning specific drives or viewing/making changes to the current hot spare coverage. The manual process is covered in the Advanced Scenarios section (pages 40-41). ____________________________________________________________________________________
This will bring you to the Configure Hot Spares (Automatic) window. This option will automatically assign the proper number of hot spare drives required to provide optimal coverage for the storage array.

DS3000 Storage Manager Software Demo Guide – 10.35 - 23 -
Select Assign and you will be informed if this task was completed.
You will receive confirmation of the number of hot spares that have been configured successfully.

DS3000 Storage Manager Software Demo Guide – 10.35 - 24 -
Scenario 4: “How do I add capacity to an array?” Expanding Drive Capacity (Dynamic Array Expansion)
The DS3000 Storage Manager provides a simple method of expanding the capacity of an array by adding more drives to it. This provides additional performance and capacity to the array.
First, select the Modify tab. Click Add Free Capacity (Drives).
The window, Add Free Capacity (Drives) – Select Array, will then prompt you to select the array that you wish to expand. Select this array and click Next.

DS3000 Storage Manager Software Demo Guide – 10.35 - 25 -
You are almost there! At the Add Free Capacity (Drives) – Select Capacity screen, the DS3000 Storage Manager will provide some status information about the array you selected. From here you can add one or two drives to the existing array (Note: this process can be repeated if desired). Click Finish.
The process of adding free capacity is initiated.
__________________________________________________________________________________
Note: This operation will take an extended period of time to complete and you cannot cancel it once it starts. However, the data on the volume group will remain accessible. __________________________________________________________________________________
You can monitor the process of this operation by viewing the logical drives and arrays display.

DS3000 Storage Manager Software Demo Guide – 10.35 - 26 -
Scenario 5: “I would like to change a RAID level” Change Array RAID Level window
With Dynamic RAID Level Migration, A RAID level set across an array and its associated logical drives can be reset while remaining online with complete read/write data access. Perhaps it is necessary for mission critical data on an array, which is currently RAID 5, to be protected from a dual drive failure. In this instance, RAID 6 would be the appropriate level to migrate this array to.
From the Modify tab, select Change Array RAID Level.
This will redirect you to the Change Array RAID Level window in which you will select the array group which you would like the RAID level changed. In this example we will select an array group with a current level of RAID 5. Next, select the new desired RAID level. In this instance, we will select RAID 6. Click Change.
A prompt with then ask you to confirm this RAID level change. Click Yes. This operation will then be initiated.

DS3000 Storage Manager Software Demo Guide – 10.35 - 27 -
Scenario 6: “I would like to add additional security to my IP SAN.” (DS3300-specific) Change Target Authentication A best practice for an IP SAN is to separate storage traffic from normal LAN traffic by deploying IP storage traffic to a physically separate network. In addition to maintaining an IP SAN separate from the rest of network, iSCSI inherently provides its own protection which can be leveraged as an additional security measure. An example of this protection is CHAP (Challenge Handshake Authentication Protocol), which is used to verify the identity of iSCSI host systems that are attempting to access storage targets in which the iSCSI initiator and iSCSI target share a predefined secret. If the secret values match, the initiator is authenticated and a session can begin. To enable CHAP, go to the iSCSI tab and select Change Target Authentication.
At the Change Target Authentication window, CHAP is disabled by default. For this example, we would like to enable CHAP.
Click the CHAP prompt and the click the CHAP Secret button. This will open the CHAP secret prompt.

DS3000 Storage Manager Software Demo Guide – 10.35 - 28 -
Enter the target CHAP secret, re-enter for confirmation and select OK. The target CHAP secret can also be randomly created by selecting the Generate Random Secret tab. You will then be returned to the Change Target Authentication window. Click OK to receive confirmation that a CHAP secret has been enabled.

DS3000 Storage Manager Software Demo Guide – 10.35 - 29 -
Scenario 7: ‘How do I achieve tiered storage within a single enclosure?” Today, the growth of applications and the need for 24x7 availability are likely reasons organizations experience increased data requirements. In addition, new laws and government mandates are requiring extensive archiving of corporate information which also fuels this demand. The dilemma is how to keep more data online and accessible while keeping costs down. The DS3000 series of systems offer a unique solution to this predicament. A key attribute of the DS3000 series of disk systems is the integration of SAS and SATA technologies within the same enclosure. SAS drives are notable for high availability and typically utilized for mainstream transaction-based applications while SATA technology is generally deployed for near-line data and can drastically reduce the cost of a storage investment when cost/GB is the most important factor. By optimizing the right workload demand with the appropriate drive technology, the DS3000 disk systems can cost effectively support an organizations entire range of data capacity requirements. The DS3000 series of disk systems are an ideal platform with up to 12.0TB in a compact 2U package that offers the lowest cost per MB and capacity expansion up to 48.0TB. It is an ideal blend of capacity, performance, manageability, and reliability. Its ability to solve business problems with an appealing cost advantage makes it an excellent storage solution for applications such as: • Keeping more information online for quicker access • Online backups to disk for faster recovery • Moving data from online databases to data warehouse applications, data-marts and decision support
systems As volume/RAID groups can only be created with same drive types, the DS3000 Storage Manager ensures that such a configuration cannot be created. When creating logical in the automatic mode the user is prompted to select from same-type drive groups.

DS3000 Storage Manager Software Demo Guide – 10.35 - 30 -
In manual mode only same-type drives are allowed to be added to the volume/RAID group.

DS3000 Storage Manager Software Demo Guide – 10.35 - 31 -
DS3000 Storage Manager Premium License Features
The Premium Feature Licenses offered with the DS3000 Storage Manager includes Partitioning, FlashCopy and VolumeCopy.
These features can be viewed and enabled by accessing the Tools tab on the main tool bar.
As you can see in the following window, all Premium Features have been enabled. For these Premium Features to be enabled, a Feature Enable Identifier was entered. This Feature Enable Identifier is provided when a one of the following Premium Features are purchased.
The following scenarios will show you both why and how to utilize the premium features of the DS3000 Storage Manager.

DS3000 Storage Manager Software Demo Guide – 10.35 - 32 -
Premium Feature Scenario 1: “How can I share capacity across my hosts?” Storage Partitioning Storage partitions are created when you define Host-to-logical Drive Mappings. Partitioning allows administrators to create multiple virtual systems from a single DS3000 series disk system. Each partition represents a virtual disk system and consists of one or more logical drives assigned to an individual server or group of servers.
Create Host-to-Logical Drive Mapping can be administered by going to the Configure tab. At the Configure window, select Create Host-to-Logical Drive Mappings.
This will open the Create Host-to-Logical Drive Mappings - Select Host window.
Select the host you would like to map and click Next. This will take you to Create Host-to-Logical Drive Mappings – Select Logical Drives screen in which you select the logical drive(s) you wish to be mapped to the host.
________________________________________________________________________________
Note: Unmapped logical drives will need to be created to demonstrate this feature. __________________________________________________________________________________

DS3000 Storage Manager Software Demo Guide – 10.35 - 33 -
If more than one logical drive is selected, the logical unit numbers will be assigned automatically. If only one logical drive is selected, you will also be prompted to assign it a logical unit number.
Select Finish following your logical drive selection.
After this process has been completed, click OK. You will then be informed if the host-to-logical drive mapping was a success and if you would like to map another host-to-logical drive. For this example, select NO.
You have successfully mapped a host to a logical drive!

DS3000 Storage Manager Software Demo Guide – 10.35 - 34 -
Premium Feature Scenario 2: “How do I improve my application service levels with hot backups?” FlashCopy One significant business problem that the DS3000 Storage Manager helps eliminate is the ever-increasing amount time it takes to complete a backup of applications. As data grows, the time to back it up also grows. The difficulty of provisioning time for backups in a 24x7 environment is challenging for administrators.
The DS3000 Storage Manager’s FlashCopy feature minimizes the amount of time application I/O must be suspended, or the amount of time the application is in hot backup mode.
Instead of impacting the application for the length of the backup process, FlashCopy is used to create a nearly instantaneous image of the source data. The application can then come out of hot backup mode and resume normal processing while the backup application begins copying the point-in-time FlashCopy to the desired target.
FlashCopy can be used to create a point-in-time image of any standard logical drive at any time, as long as there are no tasks (such as rebuilds or expansions) in process on that logical drive.
A simple demonstration of the DS3000 Storage Manager’s FlashCopy function will show the benefits of reducing the impact of lengthy backups.
Once the FlashCopy feature is enabled (see page 30), go to the Configure tab and select Create FlashCopy Logical Drives.
_____________________________________________________________________________
Note: You must refer to the specific instructions in online help for your host OS before creating a FlashCopy. Failure to complete the steps listed for your host OS may result in loss of FlashCopy data consistency. You will also receive a dialog box reminding you of this before you proceed. _____________________________________________________________________________

DS3000 Storage Manager Software Demo Guide – 10.35 - 35 -
At the Create FlashCopy Logical Drives - Select Base Logical Drive window, select the logical drive you would like a FlashCopy image of.
Also note that when you create a FlashCopy logical drive, you automatically create a FlashCopy Repository logical drive. A FlashCopy Repository logical drive stores information about the data that has changed since the FlashCopy logical drive was created. Repository logical drives are reserved for DS3000 Storage Manager use. For example, you cannot select a FlashCopy Repository logical drive for use as a base logical drive or as a target logical drive in a FlashCopy or VolumeCopy operation.
After your logical drive selection, you will be asked to select a path. You have the choice of taking the Simple setup, or the Advanced setup for more control over the FlashCopy parameters. To demonstrate the intuitive and simple nature of the DS3000 Storage Manager, we will select the Simple option.
You will then be able to change the default logical drive names if desired.

DS3000 Storage Manager Software Demo Guide – 10.35 - 36 -
Once you specify the appropriate names and click Next, you will select which host or host groups you would like the FlashCopy mapped to.
After selecting the host or host group mapping, assign a LUN and Finish. This will complete your FlashCopy logical drive creation. A Summary screen will open which shows summary information regarding the logical drive and the FlashCopy point-in-time image.

DS3000 Storage Manager Software Demo Guide – 10.35 - 37 -
Premium Feature Scenario 3: “How can I create an independent copy of my data?” VolumeCopy Another premium feature of the DS3000 Storage Manager is VolumeCopy. VolumeCopy creates a complete physical copy, or a clone, of a logical drive within a disk system. The clone is a unique entity that can be assigned to any host and used by applications requiring a point-in-time (PiT) copy of production data, without affecting the performance of that production data. This feature is typically used in conjunction with FlashCopy to provide an independent copy of a point-in-time FlashCopy logical drive.
Once the VolumeCopy feature is enabled (see page 30), go to the Configure tab and select Create Logical Drive Copies.
At the Create Logical Drive Copies – Select Source Logical Drive window, select the logical drive you wish to copy.
You will then be directed to the Create Logical Drive Copies – Select Target Logical Drive. Select the logical drive that will be the target copy and click Next.

DS3000 Storage Manager Software Demo Guide – 10.35 - 38 -
____________________________________________________________________________________
Note: Starting the copy process will overwrite all existing data on the target logical drive and the source logical drive will go into READ-ONLY mode during the copy. Therefore, the best practice is to copy a FlashCopy image, which will maintain access to the production data. ____________________________________________________________________________________
The Create Logical Drive Copies – Set Copy Priority window will then appear and give you the ability to change the copy priority to designate how the disk system resources should be used when creating the copy. This enables your customers to minimize copy time or the overall I/O impact to their disk system.
Move the priority bar between Lowest and Highest (with lowest allocating the fewest resources to the copy process and having minimal performance impact to the highest which requires the most resources and a greater impact on overall performance) and click Next.
The final window, Create Logical Drive Copies – Confirm Copy Settings, reviews the source logical drive, target logical drive and priority settings you have selected. As this will overwrite all existing data on

DS3000 Storage Manager Software Demo Guide – 10.35 - 39 -
the target logical drive and make the source logical drive read-only while it is being copied, it is important to ensure that these settings are correct.
At the available prompt, type yes and select Finish. The VolumeCopy finishes in a short period of time.
And your VolumeCopy has been created!

DS3000 Storage Manager Software Demo Guide – 10.35 - 40 -
Advanced Features and Manual Functions This section of the DS3000 Storage Manager Demo Guide is intended to highlight some of the more advanced and manual features that the Storage Manager offers. As the key selling point of the DS3000 Storage Manager is its ease of use and intuitive interface, many of your customers will not see a need for these advanced features for their organization.
However, the DS3000 disk systems may be sold to an organization with experienced IT staff that may want to take advantage of these features or “take the wheel” in creating the specific configurations they have in mind versus a pre-set configuration that is offered through the automatic options. And as your customers become more comfortable with the Storage Manager, they may request this additional functionality that is available to them.

DS3000 Storage Manager Software Demo Guide – 10.35 - 41 -
Manual Hot Spare Configuration
The manual Hot Spare configuration option is especially useful for assigning specific drives or viewing and making changes to the current hot spare coverage.
From the Configure tab, select Configure Hot Spares. You will then be directed to the Configure Hot Spares window.
Select Configure Hot Spares (Manual).
The Configure Hot Spares (Manual) screen provides the current hot spare drives in use and prompts you to select the drive type you wish to assign as the new hot spare drive.

DS3000 Storage Manager Software Demo Guide – 10.35 - 42 -
For this example, select the SAS drive capacity, and click Assign.
The Assign Hot Spares window will provide the available disk drives and fit the type of drive and capacity you specified. Select the desired drive and click OK.
You have completed the manual configuration of a Hot Spare drive.

DS3000 Storage Manager Software Demo Guide – 10.35 - 43 -
Media Scan Settings
The DS3000 Storage Manager has the ability to perform a background scan of media to ensure data integrity. Once the media scan process is complete, it will report any errors that are found are saved to the Event Log and critical events are sent to SNMP management console or to the email recipient that has been designate to receive alert notifications.
On the Tools tab select Change Media Scans Settings.
At the Change Media Scans Settings dialog box select the logical drives (one or more) to scan and select each drives’ settings (scan duration and redundancy check). Media scans can also be suspended from this window.
Click OK and the operation begins.

DS3000 Storage Manager Software Demo Guide – 10.35 - 44 -
Command Line Interface
There is a command line interface (CLI) for the DS3000 disk systems that can be accessed from the Enterprise Management Window under Tools. (Note: This function may not be well suited for the part-time administrator)
This will open up the script editor.
Creating scripts is an advanced function. Please consult IBM for specific scripting instructions.