drw-1000 manual
59
Only cassettes marked can be used with this VCR/DVD Recorder. Please read this manual carefully before connecting your VCR/DVD Recorder and operating it for the first time. Keep the manual in a safe place for future reference. INSTRUCTION MANUAL DRW-1000 DVD VIDEO RECORDER & 4 HEAD Hi-Fi STEREO VCR English GRABADORA DE DVDs Y VIDEOCASETERA ESTÉREO DE ALTA FIDELIDAD DE 4 CABEZAS Español SANYO'S HELP-LINE Call the toll-free number below if you have any difficulties operating this product. 1-800-813-3435 (Weekdays: 7:30 AM - 4:00 PM Central Time)
-
Upload
julie-savoie -
Category
Documents
-
view
119 -
download
4
description
drw-1000 manual
Transcript of drw-1000 manual

Only cassettes marked can be used with this VCR/DVD Recorder.
Please read this manual carefully before connecting your VCR/DVD Recorder and operating it for the first time.Keep the manual in a safe place for future reference.
INSTRUCTION MANUAL DRW-1000
DVD VIDEO RECORDER & 4 HEAD Hi-Fi STEREO VCR English
GRABADORA DE DVDs Y VIDEOCASETERA ESTÉREO
DE ALTA FIDELIDAD DE 4 CABEZAS
Español
SANYO'S HELP-LINECall the toll-free number below if you have any difficulties operating this product.1-800-813-3435 (Weekdays: 7:30 AM - 4:00 PM Central Time)

2
Safety Precautions
This lightning flash with arrowhead symbol within anequilateral triangle is intended to alert the user tothe presence of uninsulated dangerous voltagewithin the product’s enclosure that may be of sufficient magnitude to constitute a risk of electricshock to persons.
The exclamation point within an equilateral triangleis intended to alert the user to the presence ofimportant operating and maintenance (servicing)instructions in the literature accompanying the product.
WARNING: Do not install this equipment in a confined spacesuch as a bookcase or similar unit.
NOTE TO CATV SYSTEM INSTALLER: This reminder is pro-vided to call the CATV system installer's attention to Section820-40 of the NEC which provides guidelines for propergrounding and, in particular, specifies that the cable groundshall be connected to the grounding system of the building,as close to the point of cable entry as practical.
CAUTION:
This VCR/DVD Recorder employs a Laser System.
To ensure proper use of this product, please read this owner’smanual carefully and retain for future reference. Should theunit require maintenance, contact an authorized service center.
Use of controls, adjustments, or the performance of proce-dures other than those specified herein may result in haz-ardous radiation exposure.
To prevent direct exposure to laser beam, do not try to openthe enclosure. Visible laser radiation when open. DO NOTSTARE INTO BEAM.
CAUTION: The apparatus should not be exposed to water (dripping or splashing) and no objects filled with liquids, suchas vases, should be placed on the apparatus.
FCC WARNING: This equipment may generate or use radiofrequency energy. Changes or modifications to this equipment may cause harmful interference unless the modifi-cations are expressly approved in the instruction manual. Theuser could lose the authority to operate this equipment if anunauthorized change or modification is made.
REGULATORY INFORMATION: FCC Part 15This product has been tested and found to comply with thelimits for a Class B digital device, pursuant to Part 15 of theFCC Rules. These limits are designed to provide reasonableprotection against harmful interference when the product isoperated in a residential installation. This product generates,uses, and can radiate radio frequency energy and, if notinstalled and used in accordance with the instruction manual,may cause harmful interference to radio communications.However, there is no guarantee that interference will not occurin a particular installation. If this product does cause harmfulinterference to radio or television reception, which can bedetermined by turning the product off and on, the user isencouraged to try to correct the interference by one or moreof the following measures:
Reorient or relocate the receiving antenna. Increase the separation between the product and receiver. Connect the product into an outlet on a circuit differentfrom that to which the receiver is connected. Consult the dealer or an experienced radio/TV technicianfor help.
SERIAL NUMBER: The serial number is found on the back ofthis unit. This number is for this unit only. You should recordrequested information here and retain this guide as a perma-nent record of your purchase.
Model No. DRW-1000
Serial No.
CAUTION: TO PREVENT ELECTRIC SHOCK, MATCHWIDE BLADE OF PLUG TO WIDE SLOT, FULLY INSERT.
ATTENTION: POUR ÉVITER LES CHOC ÉLECTRIQUES,INTRODUIRE LA LAME LA PLUS LARGE DE LA FICHEDANS LA BORNE CORRESPONDANTE DE LA PRISE ETPOUSSER JUSQU’AU FOND.
WARNING: TO REDUCE THE RISK OF FIRE OR ELEC-TRIC SHOCK, DO NOT EXPOSE THIS APPARATUS TORAIN OR MOISTURE.
CAUTIONRISK OF ELECTRIC SHOCK
DO NOT OPEN
CAUTION: TO REDUCE THE RISK OF ELECTRIC SHOCK
DO NOT REMOVE COVER (OR BACK)NO USER-SERVICEABLE PARTS INSIDE
REFER SERVICING TO QUALIFIED SERVICEPERSONNEL.

1. Read these instructions. - All these safety and oper-ating instructions should be read before the product isoperated.
2. Keep these instructions. - The safety, operating anduse instructions should be retained for future refer-ence.
3. Heed all warnings. - All warnings on the product andin the operating instructions should be adhered to.
4. Follow all instructions. - All operating and useinstructions should be followed.
5. Do not use this apparatus near water. – For exam-ple: near a bath tub, wash bowl, kitchen sink, laundrytub, in a wet basement; or near a swimming pool; andlike.
6. Clean only with dry cloth. – Unplug this product fromthe wall outlet before cleaning. Do not use liquidcleaners.
7. Do not block any ventilation openings. Install inaccordance with the manufacturer’s instructions. -Slots and openings in the cabinet are provided forventilation and to ensure reliable operation of theproduct and to protect it from over heating. The open-ings should never be blocked by placing the producton a bed, sofa, rug or other similar surface. This prod-uct should not be placed in a built-in installation suchas a bookcase or rack unless proper ventilation is pro-vided or the manufacturer’s instructions have beenadhered to.
8. Do not install near any heat sources such as radi-ators, heat registers, stoves, or other apparatus(including amplifiers) that produce heat.
9. Do not defeat the safety purpose of the polarized orgrounding-type plug. A polarized plug has twoblades with one wider than the other. A groundingtype plug has two blades and a third groundingprong. The wide blade or the third prong are pro-vided for your safety. If the provided plug does notfit into your outlet, consult an electrician forreplacement of the obsolete outlet.
10. Protect the power cord from being walked on orpinched particularly at plugs, conveniencereceptacles, and the point where they exit fromthe apparatus.
11. Only use attachments/accessories specified bythe manufacturer.
12. Use only with the cart, stand, tripod, bracket, ortable specified by the manufacturer, or sold withapparatus. When a cart is used, use cautionwhen moving the cart/apparatus combination toavoid injury from tip-over.
13. Unplug this apparatus during lightning storms orwhen unused for long periods of time.
14. Refer all servicing to qualified service personnel.Servicing is required when the apparatus hasbeen damaged in any way, such as power-supplycord or plug is damaged, liquid has been spilledor objects have fallen into the apparatus, theapparatus has been exposed to rain or moisture,does not operate normally, or has been dropped.
INT
RO
DU
CT
ION
3
IMPORTANT SAFETY INSTRUCTIONSCAUTION: PLEASE READ AND OBSERVE ALL WARNINGS AND INSTRUCTIONS IN THIS OWNER’S MANUAL.
AND THOSE MARKED ON THE PRODUCT. RETAIN THIS MANUAL FOR FUTURE REFERENCE.This product has been designed and manufactured to assure personal safety. Improper use can result in electricshock or fire hazard. The safeguards incorporated in this product will protect you if you observe the following proce-dures for installation, use, and servicing.This product does not contain any parts that can be repaired by the user.
DO NOT REMOVE THE CABINET COVER, OR YOU MAY BE EXPOSED TO DANGEROUS VOLTAGE. REFERSERVICING TO QUALIFIED SERVICE PERSONNEL ONLY.
4
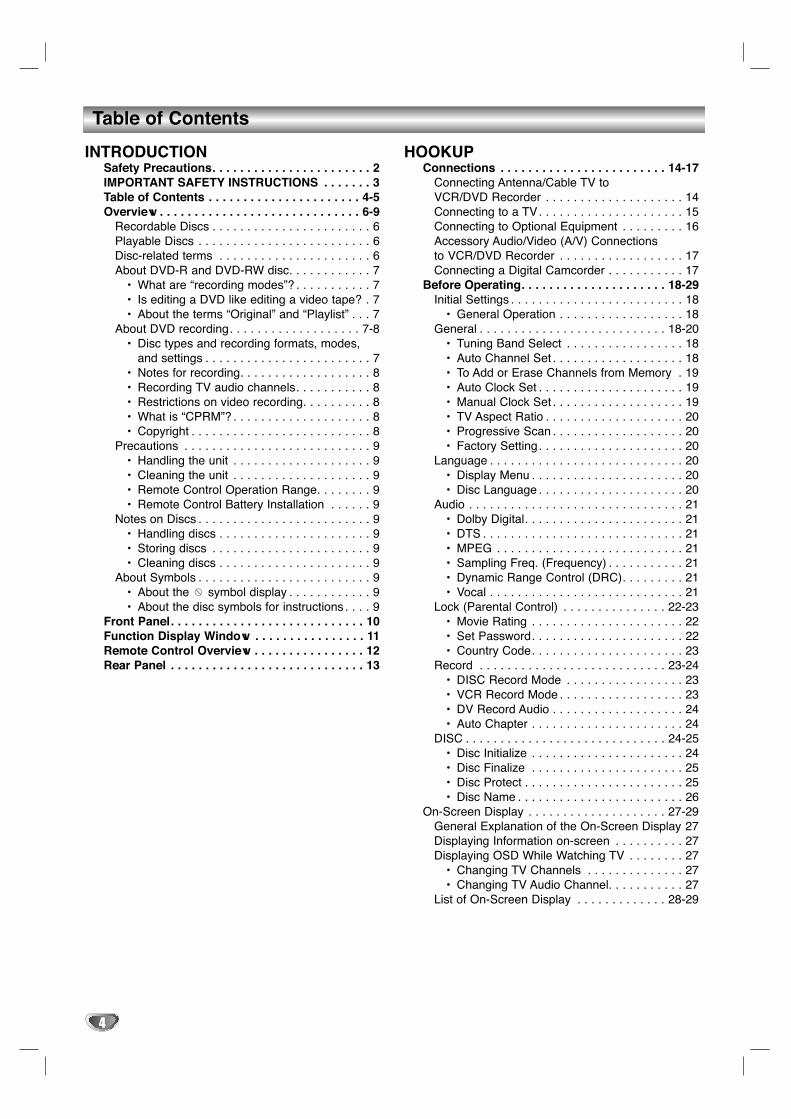
Table of Contents
INTRODUCTIONSafety Precautions. . . . . . . . . . . . . . . . . . . . . . . 2IMPORTANT SAFETY INSTRUCTIONS . . . . . . . 3Table of Contents . . . . . . . . . . . . . . . . . . . . . . 4-5Overview . . . . . . . . . . . . . . . . . . . . . . . . . . . . . 6-9
Recordable Discs . . . . . . . . . . . . . . . . . . . . . . . 6Playable Discs . . . . . . . . . . . . . . . . . . . . . . . . . 6Disc-related terms . . . . . . . . . . . . . . . . . . . . . . 6About DVD-R and DVD-RW disc. . . . . . . . . . . . 7
• What are “recording modes”? . . . . . . . . . . . 7• Is editing a DVD like editing a video tape? . 7• About the terms “Original” and “Playlist” . . . 7
About DVD recording. . . . . . . . . . . . . . . . . . . 7-8• Disc types and recording formats, modes,
and settings . . . . . . . . . . . . . . . . . . . . . . . . 7• Notes for recording. . . . . . . . . . . . . . . . . . . 8• Recording TV audio channels. . . . . . . . . . . 8• Restrictions on video recording. . . . . . . . . . 8• What is “CPRM”? . . . . . . . . . . . . . . . . . . . . 8• Copyright . . . . . . . . . . . . . . . . . . . . . . . . . . 8
Precautions . . . . . . . . . . . . . . . . . . . . . . . . . . . 9• Handling the unit . . . . . . . . . . . . . . . . . . . . 9• Cleaning the unit . . . . . . . . . . . . . . . . . . . . 9• Remote Control Operation Range. . . . . . . . 9• Remote Control Battery Installation . . . . . . 9
Notes on Discs . . . . . . . . . . . . . . . . . . . . . . . . . 9• Handling discs . . . . . . . . . . . . . . . . . . . . . . 9• Storing discs . . . . . . . . . . . . . . . . . . . . . . . 9• Cleaning discs . . . . . . . . . . . . . . . . . . . . . . 9
About Symbols . . . . . . . . . . . . . . . . . . . . . . . . . 9• About the symbol display . . . . . . . . . . . . 9• About the disc symbols for instructions . . . . 9
Front Panel. . . . . . . . . . . . . . . . . . . . . . . . . . . . 10Function Display Window . . . . . . . . . . . . . . . . 11Remote Control Overview . . . . . . . . . . . . . . . . 12Rear Panel . . . . . . . . . . . . . . . . . . . . . . . . . . . . 13
HOOKUPConnections . . . . . . . . . . . . . . . . . . . . . . . . 14-17
Connecting Antenna/Cable TV to VCR/DVD Recorder . . . . . . . . . . . . . . . . . . . . 14Connecting to a TV. . . . . . . . . . . . . . . . . . . . . 15Connecting to Optional Equipment . . . . . . . . . 16Accessory Audio/Video (A/V) Connections to VCR/DVD Recorder . . . . . . . . . . . . . . . . . . 17Connecting a Digital Camcorder . . . . . . . . . . . 17
Before Operating. . . . . . . . . . . . . . . . . . . . . 18-29Initial Settings . . . . . . . . . . . . . . . . . . . . . . . . . 18
• General Operation . . . . . . . . . . . . . . . . . . 18General . . . . . . . . . . . . . . . . . . . . . . . . . . . 18-20
• Tuning Band Select . . . . . . . . . . . . . . . . . 18• Auto Channel Set . . . . . . . . . . . . . . . . . . . 18• To Add or Erase Channels from Memory . 19• Auto Clock Set . . . . . . . . . . . . . . . . . . . . . 19• Manual Clock Set . . . . . . . . . . . . . . . . . . . 19• TV Aspect Ratio . . . . . . . . . . . . . . . . . . . . 20• Progressive Scan . . . . . . . . . . . . . . . . . . . 20• Factory Setting. . . . . . . . . . . . . . . . . . . . . 20
Language . . . . . . . . . . . . . . . . . . . . . . . . . . . . 20• Display Menu . . . . . . . . . . . . . . . . . . . . . . 20• Disc Language . . . . . . . . . . . . . . . . . . . . . 20
Audio . . . . . . . . . . . . . . . . . . . . . . . . . . . . . . . 21• Dolby Digital. . . . . . . . . . . . . . . . . . . . . . . 21• DTS . . . . . . . . . . . . . . . . . . . . . . . . . . . . . 21• MPEG . . . . . . . . . . . . . . . . . . . . . . . . . . . 21• Sampling Freq. (Frequency) . . . . . . . . . . . 21• Dynamic Range Control (DRC). . . . . . . . . 21• Vocal . . . . . . . . . . . . . . . . . . . . . . . . . . . . 21
Lock (Parental Control) . . . . . . . . . . . . . . . 22-23• Movie Rating . . . . . . . . . . . . . . . . . . . . . . 22• Set Password. . . . . . . . . . . . . . . . . . . . . . 22• Country Code. . . . . . . . . . . . . . . . . . . . . . 23
Record . . . . . . . . . . . . . . . . . . . . . . . . . . . 23-24• DISC Record Mode . . . . . . . . . . . . . . . . . 23• VCR Record Mode . . . . . . . . . . . . . . . . . . 23• DV Record Audio . . . . . . . . . . . . . . . . . . . 24• Auto Chapter . . . . . . . . . . . . . . . . . . . . . . 24
DISC . . . . . . . . . . . . . . . . . . . . . . . . . . . . . 24-25• Disc Initialize . . . . . . . . . . . . . . . . . . . . . . 24• Disc Finalize . . . . . . . . . . . . . . . . . . . . . . 25• Disc Protect . . . . . . . . . . . . . . . . . . . . . . . 25• Disc Name . . . . . . . . . . . . . . . . . . . . . . . . 26
On-Screen Display . . . . . . . . . . . . . . . . . . . . 27-29General Explanation of the On-Screen Display 27Displaying Information on-screen . . . . . . . . . . 27Displaying OSD While Watching TV . . . . . . . . 27
• Changing TV Channels . . . . . . . . . . . . . . 27• Changing TV Audio Channel. . . . . . . . . . . 27
List of On-Screen Display . . . . . . . . . . . . . 28-29
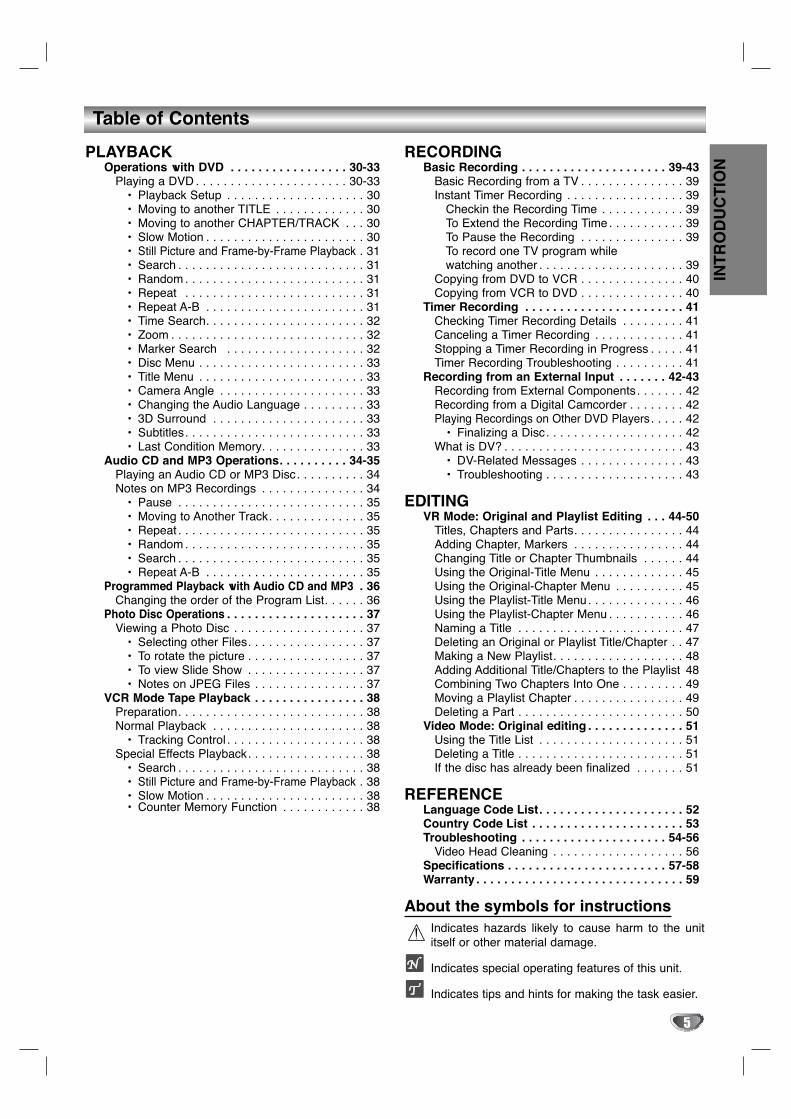
Table of Contents
PLAYBACKOperations with DVD . . . . . . . . . . . . . . . . . 30-33
Playing a DVD . . . . . . . . . . . . . . . . . . . . . . 30-33• Playback Setup . . . . . . . . . . . . . . . . . . . . 30• Moving to another TITLE . . . . . . . . . . . . . 30• Moving to another CHAPTER/TRACK . . . 30• Slow Motion . . . . . . . . . . . . . . . . . . . . . . . 30• Still Picture and Frame-by-Frame Playback . 31• Search . . . . . . . . . . . . . . . . . . . . . . . . . . . 31• Random . . . . . . . . . . . . . . . . . . . . . . . . . . 31• Repeat . . . . . . . . . . . . . . . . . . . . . . . . . . 31• Repeat A-B . . . . . . . . . . . . . . . . . . . . . . . 31• Time Search. . . . . . . . . . . . . . . . . . . . . . . 32• Zoom . . . . . . . . . . . . . . . . . . . . . . . . . . . . 32• Marker Search . . . . . . . . . . . . . . . . . . . . 32• Disc Menu . . . . . . . . . . . . . . . . . . . . . . . . 33• Title Menu . . . . . . . . . . . . . . . . . . . . . . . . 33• Camera Angle . . . . . . . . . . . . . . . . . . . . . 33• Changing the Audio Language . . . . . . . . . 33• 3D Surround . . . . . . . . . . . . . . . . . . . . . . 33• Subtitles. . . . . . . . . . . . . . . . . . . . . . . . . . 33• Last Condition Memory. . . . . . . . . . . . . . . 33
Audio CD and MP3 Operations. . . . . . . . . . 34-35Playing an Audio CD or MP3 Disc. . . . . . . . . . 34Notes on MP3 Recordings . . . . . . . . . . . . . . . 34
• Pause . . . . . . . . . . . . . . . . . . . . . . . . . . . 35• Moving to Another Track. . . . . . . . . . . . . . 35• Repeat . . . . . . . . . . . . . . . . . . . . . . . . . . . 35• Random . . . . . . . . . . . . . . . . . . . . . . . . . . 35• Search . . . . . . . . . . . . . . . . . . . . . . . . . . . 35• Repeat A-B . . . . . . . . . . . . . . . . . . . . . . . 35
Programmed Playback with Audio CD and MP3 . 36Changing the order of the Program List. . . . . . 36
Photo Disc Operations . . . . . . . . . . . . . . . . . . . . 37Viewing a Photo Disc . . . . . . . . . . . . . . . . . . . 37
• Selecting other Files. . . . . . . . . . . . . . . . . 37• To rotate the picture . . . . . . . . . . . . . . . . . 37• To view Slide Show . . . . . . . . . . . . . . . . . 37• Notes on JPEG Files . . . . . . . . . . . . . . . . 37
VCR Mode Tape Playback . . . . . . . . . . . . . . . . 38Preparation. . . . . . . . . . . . . . . . . . . . . . . . . . . 38Normal Playback . . . . . . . . . . . . . . . . . . . . . . 38
• Tracking Control . . . . . . . . . . . . . . . . . . . . 38Special Effects Playback. . . . . . . . . . . . . . . . . 38
• Search . . . . . . . . . . . . . . . . . . . . . . . . . . . 38• Still Picture and Frame-by-Frame Playback . 38• Slow Motion . . . . . . . . . . . . . . . . . . . . . . . 38• Counter Memory Function . . . . . . . . . . . . 38
RECORDINGBasic Recording . . . . . . . . . . . . . . . . . . . . . 39-43
Basic Recording from a TV . . . . . . . . . . . . . . . 39Instant Timer Recording . . . . . . . . . . . . . . . . . 39
Checkin the Recording Time . . . . . . . . . . . . 39To Extend the Recording Time . . . . . . . . . . . 39To Pause the Recording . . . . . . . . . . . . . . . 39To record one TV program while watching another . . . . . . . . . . . . . . . . . . . . . 39
Copying from DVD to VCR . . . . . . . . . . . . . . . 40Copying from VCR to DVD . . . . . . . . . . . . . . . 40
Timer Recording . . . . . . . . . . . . . . . . . . . . . . . 41Checking Timer Recording Details . . . . . . . . . 41Canceling a Timer Recording . . . . . . . . . . . . . 41Stopping a Timer Recording in Progress . . . . . 41Timer Recording Troubleshooting . . . . . . . . . . 41
Recording from an External Input . . . . . . . 42-43Recording from External Components. . . . . . . 42Recording from a Digital Camcorder . . . . . . . . 42Playing Recordings on Other DVD Players . . . . . 42
• Finalizing a Disc. . . . . . . . . . . . . . . . . . . . 42What is DV? . . . . . . . . . . . . . . . . . . . . . . . . . . 43
• DV-Related Messages . . . . . . . . . . . . . . . 43• Troubleshooting . . . . . . . . . . . . . . . . . . . . 43
EDITINGVR Mode: Original and Playlist Editing . . . 44-50
Titles, Chapters and Parts. . . . . . . . . . . . . . . . 44Adding Chapter, Markers . . . . . . . . . . . . . . . . 44Changing Title or Chapter Thumbnails . . . . . . 44Using the Original-Title Menu . . . . . . . . . . . . . 45Using the Original-Chapter Menu . . . . . . . . . . 45Using the Playlist-Title Menu. . . . . . . . . . . . . . 46Using the Playlist-Chapter Menu . . . . . . . . . . . 46Naming a Title . . . . . . . . . . . . . . . . . . . . . . . . 47Deleting an Original or Playlist Title/Chapter . . 47Making a New Playlist. . . . . . . . . . . . . . . . . . . 48Adding Additional Title/Chapters to the Playlist 48Combining Two Chapters Into One . . . . . . . . . 49Moving a Playlist Chapter . . . . . . . . . . . . . . . . 49Deleting a Part . . . . . . . . . . . . . . . . . . . . . . . . 50
Video Mode: Original editing . . . . . . . . . . . . . . 51Using the Title List . . . . . . . . . . . . . . . . . . . . . 51Deleting a Title . . . . . . . . . . . . . . . . . . . . . . . . 51If the disc has already been finalized . . . . . . . 51
REFERENCELanguage Code List. . . . . . . . . . . . . . . . . . . . . 52Country Code List . . . . . . . . . . . . . . . . . . . . . . 53Troubleshooting . . . . . . . . . . . . . . . . . . . . . 54-56
Video Head Cleaning . . . . . . . . . . . . . . . . . . . 56Specifications . . . . . . . . . . . . . . . . . . . . . . . 57-58Warranty . . . . . . . . . . . . . . . . . . . . . . . . . . . . . . 59
About the symbols for instructionsIndicates hazards likely to cause harm to the unititself or other material damage.
Indicates special operating features of this unit.
Indicates tips and hints for making the task easier.
INT
RO
DU
CT
ION
5

6
Overview
Recordable Discs
DVD-RW5 inch/3 inch (12cm/8cm), single-sided, sin-gle layer disc Approx. max. recording time (LP mode): 240minutes (4.7GB), 80 minutes (1.46GB)
DVD-R5 inch/3 inch (12 cm/8 cm), single-sided, sin-gle layer disc Approx. max. recording time (LP mode): 240 minutes (4.7GB), 80 minutes (1.46GB)
otes• This recorder cannot record CD-R or CD-RW discs.• DVD-R/RW and CD-R/RW discs recorded using a per-
sonal computer or a DVD or CD recorder may not beplayed if the disc is damaged or dirty, or if there is dirt orcondensation on the recorder’s lens.
• If you record a disc using a personal computer, even if itis recorded in a compatible format, there are cases inwhich it may not be played because of the settings of theapplication software used to create the disc. (Check withthe software publisher for more detailed information.)
Playable Discs
DVD (5 inch/3 inch (12cm/8cm) disc)
Audio CD (5 inch/3 inch (12cm/8cm) disc)
In addition, the VCR/DVD Recorder can playDVD±R/DVD±RW discs, CD-R/CD-RW discs that contain audio titles, MP3 files, or JPEG files and KodakPicture CDs.
otes• Depending on the conditions of the recording equipment
or the CD-R/RW (DVD-R/RW or DVD+R/RW) disc itself,some CD-R/RW (DVD-R/RW or DVD+R/RW) discs maynot be played on the unit.
• Do not attach any seal or label to either side (the labeledside or the recorded side) of a disc.
• Do not use irregularly shaped CDs (e.g., heart-shapedor octagonal). Doing so may result in malfunctions.
Regional code of the VCR/DVD Recorder and DVDsThis VCR/DVD Recorder isdesigned and manufactured forplayback of Region 1 encoded DVDsoftware. The region code on the labels of some DVDdiscs indicates which type of VCR/DVD Recorder canplay those discs. This unit can play only DVD discslabeled 1 or ALL. If you try to play any other discs, themessage “Incorrect region code. Can’t playback” willappear on the TV screen. Some DVD discs may nothave a region code label even though their playback isprohibited by area limits.
otes on DVDs Some playback operations of DVDs may be intentional-ly set by software manufacturers. As this VCR/DVDRecorder plays DVDs according to disc contentdesigned by the software manufacturer, some playbackfeatures of the VCR/DVD Recorder may not be avail-able or other functions may be added.Refer also to the instructions supplied with the DVDs.Some DVDs made for business purposes may not beplayed on the VCR/DVD Recorder.
Disc-related termsTitle (DVD only)The main film content or accompanying feature contentor music album.Each title is assigned a title reference number enablingyou to locate it easily.
Chapter (DVD only)Sections of a picture or a musical piece that are smallerthan titles. A title is composed of one or several chap-ters. Each chapter is assigned a chapter number toenable you to locate the chapter you want. Dependingon the disc, chapters may not be labeled.
Track (Audio CD only)Sections of a picture or a musical piece on an audioCD. Each track is assigned a track number, enablingyou to locate the track you want.
1 ALL

Overview (Continued)
About DVD-R and DVD-RW discHow are DVD-R and DVD-RW discs different?The essential difference between DVD-R and DVD-RWis that DVD-R is a record-once medium, while DVD-RWis a re-recordable/erasable medium. You can re-record/erase a DVD-RW disc approximately 1,000 times.
Can I play my recordable discs in a regular DVDplayer?Generally, DVD-R discs and DVD-RW discs recorded inVideo mode are playable in a regular DVD player, butthey must be ‘finalized’ first. This process fixes the con-tents of the disc to make them readable to other DVDplayers as DVD-Video discs.DVD-RW discs recorded in VR (Video Recording) modeare playable in some players.
This indicates a product feature that is capa-ble of playing DVD-RW discs recorded withVideo Recording format.
What are “Recording modes”?There are two recording modes available using thisrecorder: VR mode and Video mode. When recording toa DVD-R disc, recordings are always in Video mode.DVD-RW discs can be formatted for VR mode recordingor Video mode recording.
VR mode recording• 3 different picture quality/recording time settings are
available (SP, LP, XP)• Not playable on regular DVD players• Recordings can be extensively edited
Video mode recording• 3 different picture quality/recording time settings are
available (SP, LP, XP)• Playable on regular DVD players (after finalizing)• Limited editing features
Many functions of this recorder are dependent on therecording mode. One or more of the symbols
( , , ,
) appear by each function explained inthis manual so that you can see at a glance whether it’srelevant for the disc loaded.You can find more information on disc formats andrecording modes on the next page.
oteDVD-Video Format (Video mode) is a new format forrecording on DVD-R/RW discs that was approved bythe DVD Forum in 2000. You may therefore experienceproblems playing recordable DVD discs in some play-ers. Symptoms include video artifacts, audio and/orvideo dropouts, and playback suddenly stopping.Our company cannot take responsibility for problemsencountered on other players when playing discsrecorded on this recorder.
Is editing a DVD like editing a video tape?No. When you edit a video tape you need one videodeck to play the original tape and another to record theedits. With DVD, you edit by making a ‘Playlist’ of whatto play and when to play it. On playback, the VCR/DVDRecorder plays the disc according to the Playlist.
About the terms “Original” and “Playlist”Throughout this manual, you will often see the termsOriginal and Playlist to refer to the actual content andthe edited version.• Original content: refers to what’s actually recorded
on the disc.• Playlist content: refers to the edited version of the
disc — how the Original content is to be played.
About DVD recording
otes• This recorder cannot make recordings on CD-R or
CD-RW discs.• SANYO takes no responsibility for recording failure
due to power cuts, defective discs, or damage to therecorder.
• Fingerprints and small scratches on a disc can affectplayback and/or recording performance. Please takeproper care of your discs.
Disc types and recording formats, modes, and settings
This recorder can play three different kinds of DVDdiscs: pre-recorded DVD-Video discs, DVD-RW, andDVD-R discs. The disc format for DVD-R discs isalways “Video format”—the same as pre-recorded DVD-Video discs. This means that once finalized, you canplay a DVD-R in a regular DVD player.By default, the DVD-RW disc format is Video Recordingformat, though you can change this to Video format, ifrequired. (Reinitializing the disc will erase the contentsof the disc.)The recording mode is closely related to the disc for-mat. If the disc format is Video Recording format, thenthe recording mode is VR mode. If the disc format isVideo mode, then the recording mode is Video mode(except for DVD-Video, which is not recordable, and sodoes not have a recording mode).Within the recording modes (which are fixed for thewhole disc) are the record settings. These can bechanged as required for each recording, and determinethe picture quality and how much space the recordingwill take up on the disc.
DVD-Video
DVD-RDVD-RW VRDVD-RW Video
INT
RO
DU
CT
ION
7
Overview (Continued)
Notes for recording• The recording times shown are not exact because the
recorder uses variable bit-rate video compression.This means that the exact recording time will dependon the material being recorded.
• When recording a TV broadcast, if the reception ispoor or the picture contains interference, the record-ing time may be shorter.
• If you record still pictures or audio only, the recordingtime may be longer.
• The displayed times for recording and time remainingmay not always add up to exactly the length of thedisc.
• The recording time available may decrease if youheavily edit a disc.
• If using a DVD-RW disc, make sure you change therecording format (Video mode or VR mode) beforeyou record anything on the disc. See page 24 (DiscInitialize) for details on how to do this.
• When using a DVD-R disc, you can keep recordinguntil the disc is full, or until you finalize the disc.Before you start a recording session, check theamount of recording time left on the disc.
• When using a DVD-RW disc in Video mode, recordingtime available will only increase if you erase the lasttitle recorded on the disc.
• The Erase Title option in the Original-Title menu onlyhides the title, it does not actually erase the title fromthe disc and increase the recording time available(except for the last recorded title on a DVD-RW discin Video mode).
Recording TV audio channelsThis recorder can record one or two channel audio. ForTV broadcasts, this usually means mono or stereo, butsome programs are broadcast with a main and a SAP(Secondary Audio Program) audio channel.If you’re recording in Video mode (or in VR mode), youcan record either the main audio or the SAP audio.
Restrictions on video recording• You cannot record copy-protected video using this
recorder. Copy-protected video includes DVD-Videodiscs and some satellite broadcasts. If copy-protectedmaterial is encountered during a recording, recordingwill pause or stop automatically and an error messagewill be displayed on-screen.
• Video that is “copy-once only” can only be recordedusing a DVD-RW disc in VR mode with CPRM (seebelow).
What is “CPRM”?CPRM is a copy protection system (utilizing a scramblesystem) that only allows the recording of “copy-once”broadcast programs. CPRM stands for ContentProtection for Recordable Media.This recorder is CPRM compatible, which means thatyou can record copy-once broadcast programs, but youcannot then make a copy of those recordings. CPRMrecordings can only be made on DVD-RW discs format-ted in VR mode, and CPRM recordings can only beplayed on players that are specifically compatible withCPRM.
Copyright• Audio and video recordings you make using this
recorder are for your personal use only. You may notsell, lend, or rent them to other people.
• This product incorporates copyright protection tech-nology that is protected by method claims of certainU.S. patents and other intellectual property rightsowned by Macrovision Corporation and other rightsowners. Use of this copyright protection technologymust be authorized by Macrovision Corporation, andis intended for home and other limited viewing usesonly, unless otherwise authorized by Macrovision cor-poration. Reverse engineering or disassembly is pro-hibited.
8
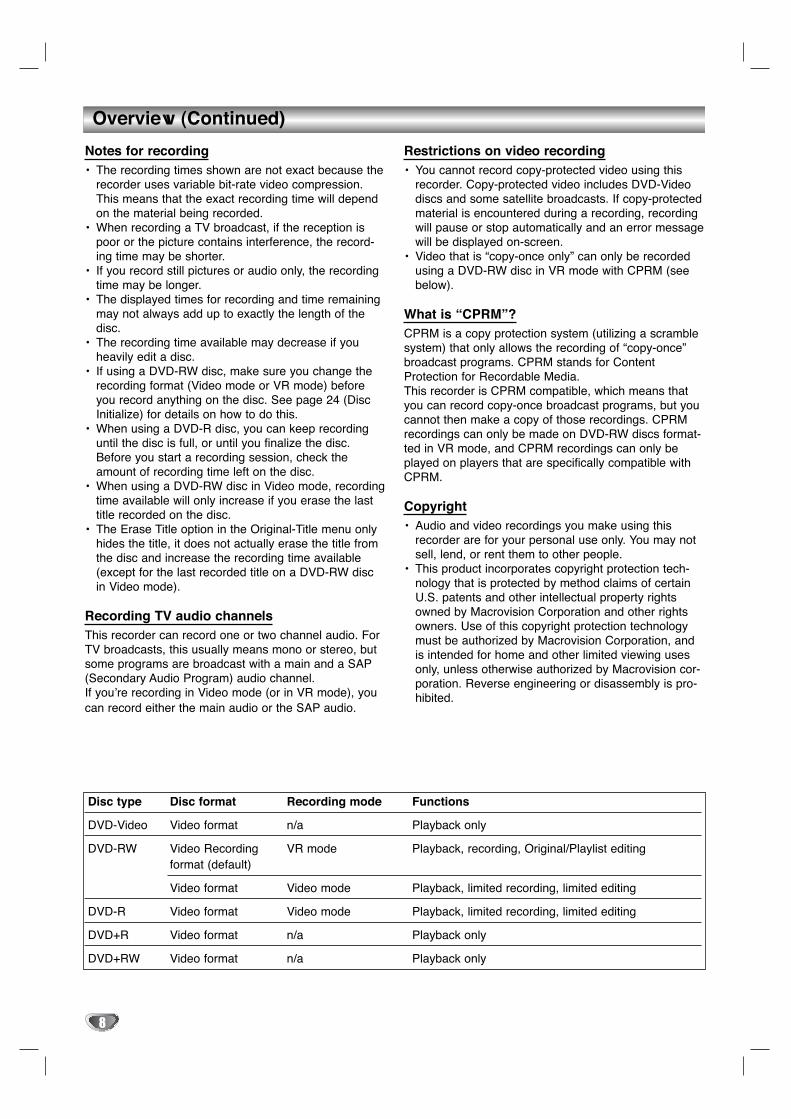
Disc type Disc format Recording mode Functions
DVD-Video Video format n/a Playback only
DVD-RW Video Recording VR mode Playback, recording, Original/Playlist editingformat (default)
Video format Video mode Playback, limited recording, limited editing
DVD-R Video format Video mode Playback, limited recording, limited editing
DVD+R Video format n/a Playback only
DVD+RW Video format n/a Playback only

Overview (Continued)
Precautions
Handling the unit
When shipping the unitThe original shipping carton and packing materialscome in handy. For maximum protection, re-pack theunit as it was originally packaged at the factory.
When setting up the unitThe picture and sound of a nearby TV, VCR, or radiomay be distorted during playback. In this case, positionthe unit away from the TV, VCR, or radio, or turn off theunit after removing the disc.
To keep the surface cleanDo not use volatile liquids, such as insecticide spray,near the unit. Do not leave rubber or plastic products incontact with the unit for a long period of time. They willleave marks on the surface.
Cleaning the unit
To clean the cabinetUse a soft, dry cloth. If the surfaces are extremely dirty,use a soft cloth lightly moistened with a mild detergentsolution. Do not use strong solvents such as alcohol,benzine, or thinner, as these might damage the surfaceof the unit.
To obtain a clear pictureThe VCR/DVD Recorder is a high-tech, precisiondevice. If the optical pick-up lens and disc drive partsare dirty or worn, the picture quality will be poor.Regular inspection and maintenance are recommendedafter every 1,000 hours of use. (This depends on theoperating environment.)For details, please contact your nearest dealer.
Remote Control Operation Range
Point the remote control at the remote sensor and pressthe buttons.
Distance: Approx. 23 ft (7 m) from the front of theremote sensor.Angle: Approx. 30° in each direction from the front ofthe remote sensor.
Remote Control Battery Installation
Detach the battery cover on the rear ofthe remote control, and insert two AAAbatteries with the and endsaligned correctly.
CautionDo not mix old and new batteries. Never mix differenttypes of batteries (standard, alkaline, etc.).
Notes on Discs
Handling discs
Do not touch the playback side of the disc. Hold thedisc by the edges so that fingerprints will not get on thesurface. Do not stick paper or tape on the disc.
Storing discs
After playing, store the disc in its case.Do not expose the disc to direct sunlight or sources ofheat, or leave it in a parked car exposed to direct sun-light, as there may be considerable heat build-up insidethe car.
Cleaning discs
Fingerprints and dust on the disc can cause poor pic-ture quality and sound distortion. Before playing, cleanthe disc with a clean cloth. Wipe the disc from the cen-ter outward.
Do not use strong solvents such as alcohol, benzine,thinner, commercially available cleaners, or anti-staticspray intended for older vinyl records.
About Symbols
About the symbol display
“ “ may appear on the TV screen during operation.This icon means the function explained in this owner’smanual is not available on that specific disc.
About the disc symbols for instructions
A section whose title has one of the following symbols areapplicable only to those discs represented by the symbol.
DVD-RW with VR recording mode
DVD-RW with Video recording mode
DVD-R discs
DVD-Video discsAudio CDs
MP3 Discs
JPEG Discs
VHS TapeVHS
JPEG
MP3
CD
DVD-Video
DVD-R
DVD-RW Video
DVD-RW VR
INT
RO
DU
CT
ION
9
SPENT OR DISCHARGED BATTERIES MUST BERECYCLED OR DISPOSED OF PROPERLY IN COM-PLIANCE WITH ALL APPLICABLE LAWS.FOR DETAILED INFORMATION, CONTACT YOURLOCAL COUNTY SOLID WASTE AUTHORITY.

10
Front Panel
REC (z) Starts recording. Press
repeatedly to set therecording time.
CHANNEL (v / V)Scans up or downthrough memorizedchannels.
PLAY (N)Plays back a disc or tape.
OPEN/CLOSE (Z)Opens or closes the disc tray.
AV INPUT (VIDEO IN/AUDIO IN (Left/Right)) Connect the audio/video output of an external source(Audio system, TV/ Monitor, VCR, Camcorder, etc.).
S-VIDEO (S-VIDEO IN) Connect the S-Video output of an external source (TV/ Monitor, VCR, Camcorder, etc.).
DV INConnect the DV output of adigital camcorder.
PAUSE (X)Pauses playback or recording
temporarily. Presses repeatedlyfor frame-by-frame playback.
Disc Tray (DVD deck)Insert a disc here.
POWER buttonSwitches the VCR/DVD Recorder ON and OFF.
STOP (x)Stops playback.
EASY DUBPresses to copy DVD toVCR (or VCR to DVD).
Cassette Compartment (VCR deck)Insert a video cassette here.
EJECT (ZZ)Ejects the tape in the VCR deck.
DVD/VCRToggles control between the DVD
deck and the VCR deck.
FF (M)DVD: Goes to NEXT chapter/track. Press and hold for two seconds for a fast forward search.
VCR: Advances the tape during the STOP mode or for fast forward picture search.
REW (m)DVD: Goes to beginning of the current chapter/track or to previous chapter/track.
Press and hold for a fast reverse search.VCR: Rewinds the tape during the STOP mode or for fast reverse picture search.
Display Window Shows the current status of
the VCR/DVD Recorder.
Remote SensorPoints the VCR/DVD Recorder
remote control here.
Function Display Window
INT
RO
DU
CT
ION
11
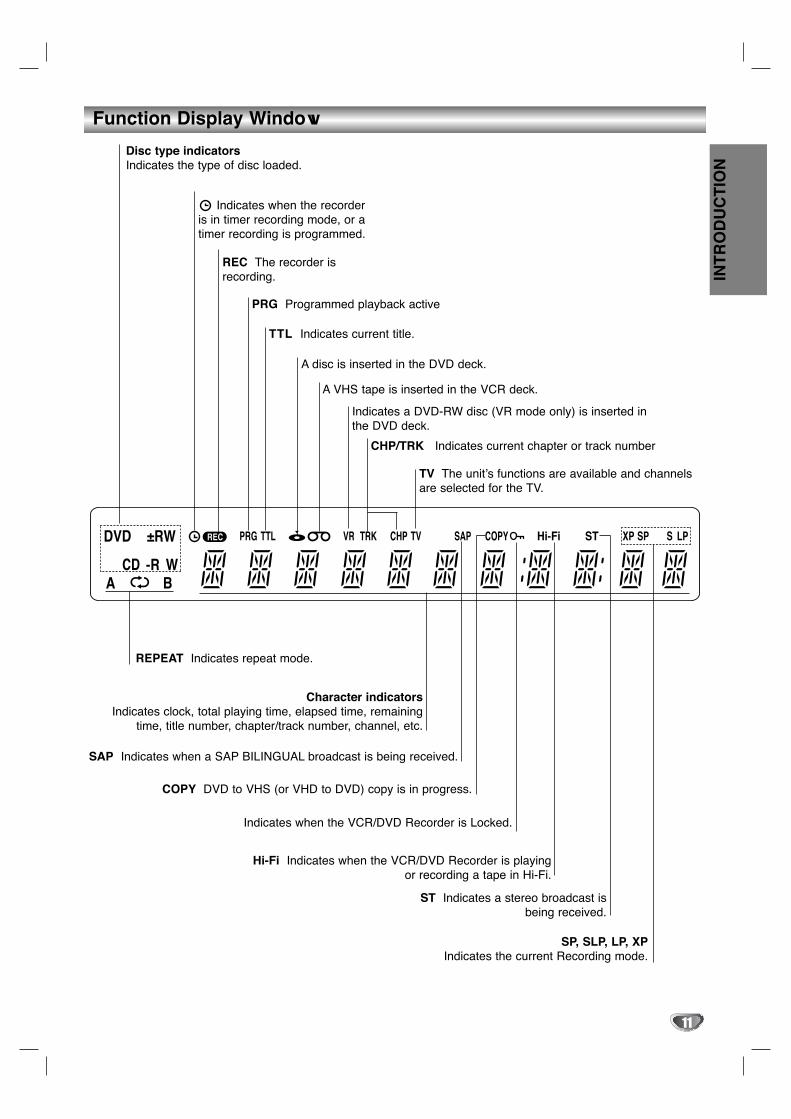
ST Indicates a stereo broadcast isbeing received.
Disc type indicatorsIndicates the type of disc loaded.
Hi-Fi Indicates when the VCR/DVD Recorder is playing or recording a tape in Hi-Fi.
COPY DVD to VHS (or VHD to DVD) copy is in progress.
SAP Indicates when a SAP BILINGUAL broadcast is being received.
Character indicatorsIndicates clock, total playing time, elapsed time, remaining
time, title number, chapter/track number, channel, etc.
REPEAT Indicates repeat mode.
REC The recorder isrecording.
Indicates when the recorderis in timer recording mode, or atimer recording is programmed.
SP, SLP, LP, XPIndicates the current Recording mode.
PRG Programmed playback active
TTL Indicates current title.
A disc is inserted in the DVD deck.
A VHS tape is inserted in the VCR deck.
Indicates a DVD-RW disc (VR mode only) is inserted inthe DVD deck.
CHP/TRK Indicates current chapter or track number
TV The unit’s functions are available and channelsare selected for the TV.
Indicates when the VCR/DVD Recorder is Locked.

TV
12
Remote Control Overview
POWERSwitches the VCR/DVD Recorder ON
and OFF.
TV/VCR Views channels selected by the VCR
tuner or by the TV tuner.DVD
Selects the VCR/DVD Recorder’s func-tion mode to DVD.
VCR Selects the VCR/DVD Recorder’s func-
tion mode to VCR.
INPUT Changes the input to use for recording
(Tuner, AV1, AV2 (AV INPUT), or DV IN).
0-9 number buttonsSelects numbered options in a menu.
Selects TV’s channel.
TV Control Buttons (SANYO TV only)POWER: Switches TV ON and OFF.
INPUT: Selects the TV’s source.CH v / V: Selects TV’s channel.VOL v / V: Adjusts TV’s volume.MUTE: Turns on or off TV sound.
REC MODESelects the recording mode:
SP, LP, or XP.
TIMER RECDisplays Timer Record menu.
REC (z)Starts recording. Press repeatedly to set
the recording time.
REW / FF (m / M)- DVD: Searches backward or forward.- VCR: Rewinds the tape during STOP
mode or fast reverse picture search, andAdvances the tape during STOP
mode or fast forward picture search.
SKIP (. / >)Goes to next chapter or track. Returnsto beginning of the current chapter or
track or goes to the previous chapter ortrack.
AUDIOSelects an audio language (DVD) or an
audio channel.
SUBTITLESelects a subtitle language.
ANGLESelects a DVD camera angle,
if available.
ZOOMEnlarges DVD video image.
OPEN/CLOSE (Z)- Opens and closes the disc tray.- Ejects the tape in the VCR deck.
EASY DUBPresses to copy DVD to VCR (or VCRto DVD).
CLEARRemoves a mark on the Marker Searchmenu.
TITLEDisplays the disc’s Title menu, if available.
DISC MENU / LISTAccesses menu on a DVD disc.Switches between Original and Playlistediting in VR mode.
SETUPAccesses or removes the Setup menu.
DISPLAYAccesses On-Screen Display.Displays information while viewing a TVprogram.
RETURN (O)Hides the menu.v / V / b / B (up/down/left/right)Selects an option in the menu.CH/TRK(v/V): Selects a program.Adjusts manually the tape’s pictureonscreen.
ENTER ( )Confirms menu selections.
PAUSE/STILL (X) Pauses playback or recording temporari-ly. Presses again to exit pause mode.Presses repeatedly for frame-by-frameplayback.
PLAY (N)Starts playback.
STOP (x)Stops playback or recording.
CHP ADDInserts a chapter marker when playing/recording a DVD-RW disc in VR mode.
THUMBNAILSelects a thumbnail picture for the current title for use in the Original-Title.
REPEATRepeats chapter, track, title, or all.
A-BRepeats sequence between two points(A and B).
MARKERMarks any point during playback.
SEARCHDisplays Marker Search menu.
LOCKDisables front panel buttons.
RANDOMPlays tracks in random order.
LOCKThe Lock feature disables the front panel buttons to prevent childrenfrom tampering with the VCR/DVD Recorder. Simply press LOCK on theremote control to toggle this feature on and off.
appears in the display window in the Lock mode.
Rear Panel
INT
RO
DU
CT
ION
13
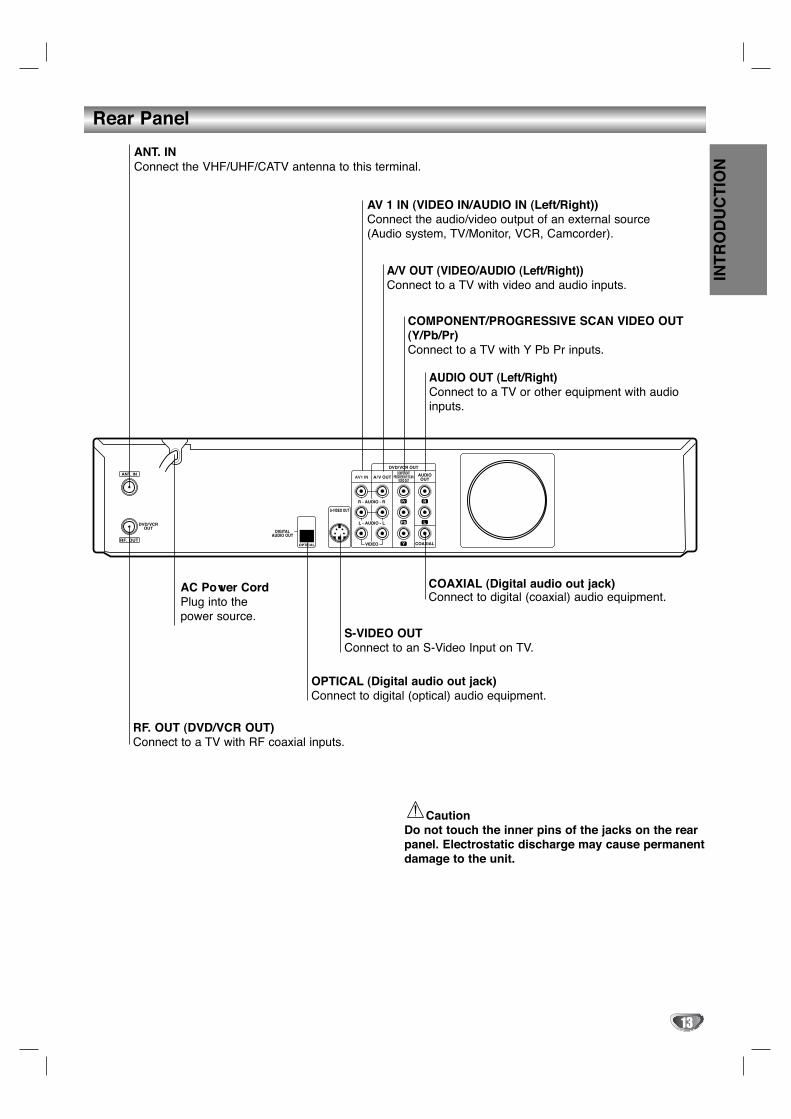
CautionDo not touch the inner pins of the jacks on the rearpanel. Electrostatic discharge may cause permanentdamage to the unit.
ANT. INConnect the VHF/UHF/CATV antenna to this terminal.
COAXIAL (Digital audio out jack) Connect to digital (coaxial) audio equipment.
AUDIO OUT (Left/Right)Connect to a TV or other equipment with audioinputs.
A/V OUT (VIDEO/AUDIO (Left/Right))Connect to a TV with video and audio inputs.
COMPONENT/PROGRESSIVE SCAN VIDEO OUT (Y/Pb/Pr)Connect to a TV with Y Pb Pr inputs.
AV 1 IN (VIDEO IN/AUDIO IN (Left/Right))Connect the audio/video output of an external source(Audio system, TV/Monitor, VCR, Camcorder).
AC Power CordPlug into thepower source.
S-VIDEO OUTConnect to an S-Video Input on TV.
OPTICAL (Digital audio out jack) Connect to digital (optical) audio equipment.
RF. OUT (DVD/VCR OUT)Connect to a TV with RF coaxial inputs.

Connections
ipsDepending on your TV and other equipment you wishto connect, there are various ways you could connectthe VCR/DVD Recorder. Use only one of the connec-tions described below.Please refer to the manuals of your TV, VCR, StereoSystem, or other devices as necessary to make thebest connections.For better sound reproduction, connect the recorder’sAUDIO OUT jacks to the audio in jacks of your amplifier, receiver, stereo, or audio/video equipment.See “Connecting to Optional Equipment” on page 16.
CautionMake sure the VCR/DVD Recorder is connecteddirectly to the TV. Tune the TV to the correct videoinput channel.Do not connect the VCR/DVD Recorder's AUDIO OUTjack to the phono in jack (record deck) of your audiosystem.Do not connect your VCR/DVD Recorder via yourVCR. The DVD image could be distorted by the copyprotection system.
Connecting Antenna/Cable TV toVCR/DVD Recorder
11 Disconnect the antenna leads from the rear of theTV.
22 Identify the type of cable from your antenna. If it isa round cable as illustrated, it is a 75 ohm coaxialantenna cable. This cable will connect directly tothe jack marked ANT. IN on your VCR/DVDRecorder.
ipIf your antenna lead wire is a flat type antenna cable,connect it to an Antenna Adapter (300-ohm to 75-ohm)(not supplied) and slip the Adapter onto the ANT. IN jack. The Adapter does not screw on to the VCR/DVDRecorder, it just slips over the jack.
Cable Service Without Cable BoxIf your cable wire is connected to your TV without a converteror descrambler box, unscrew the wire from your TV and attachit to the ANT. IN jack on the VCR/DVD Recorder. Use the sup-plied round coaxial cable to connect between the VCR/DVDRecorder’s RF. OUT jack and the 75 ohm antenna input jackon the TV. With this connection, you can receive all midband,super band, and hyperband channels (all cable channels).
Cable Service With Cable BoxIf a converter is required in your cable system, follow theinstructions below:The cable hookup permits both TV and VCR/DVD Recorderoperation. To view or record a CATV channel1 Tune the TV to the correct video input channel.2 Set the VCR/DVD Recorder channel selector to the output
channel of the Cable Converter box using the CH/TRK (v /V) or number (0-9) buttons of your VCR/DVD Recorder(example: CH3).
3 Select the channel to view at the Cable Converter Box.
oteIf you are using a cable box to tune channels, it is not neces-sary to do Auto Channel Set as indicated on page 18.
14
Antenna Antenna
Flat Wire(300 ohm)
300/75 ohmAdapter
(Not supplied)
Cable TVWall Jack
OR OR
Rear of VCR/DVD Recorder
Cable TVWall Jack
Back Panel ofTypical Cable Box
Rear of VCR/DVD Recorder
Connections (Continued)
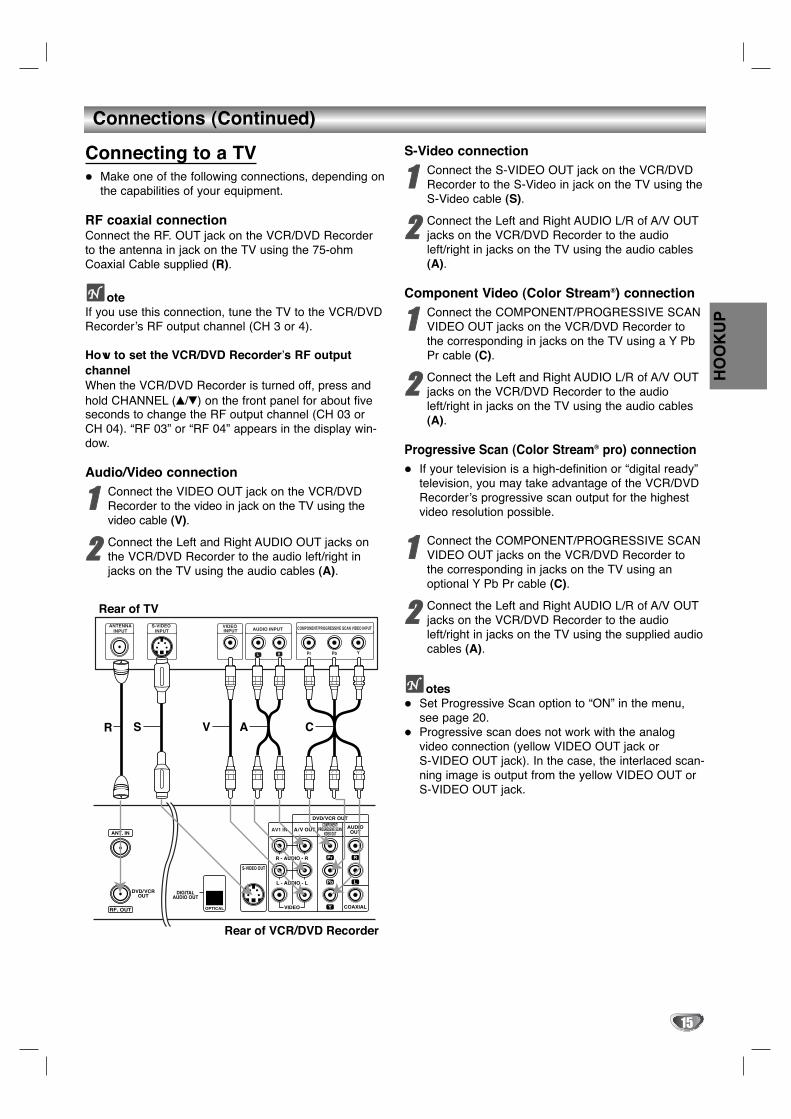
Connecting to a TVMake one of the following connections, depending onthe capabilities of your equipment.
RF coaxial connectionConnect the RF. OUT jack on the VCR/DVD Recorderto the antenna in jack on the TV using the 75-ohmCoaxial Cable supplied (R).
oteIf you use this connection, tune the TV to the VCR/DVDRecorder’s RF output channel (CH 3 or 4).
How to set the VCR/DVD Recorder’s RF outputchannel When the VCR/DVD Recorder is turned off, press andhold CHANNEL (v/V) on the front panel for about five seconds to change the RF output channel (CH 03 orCH 04). “RF 03” or “RF 04” appears in the display win-dow.
Audio/Video connection
11 Connect the VIDEO OUT jack on the VCR/DVDRecorder to the video in jack on the TV using thevideo cable (V).
22 Connect the Left and Right AUDIO OUT jacks onthe VCR/DVD Recorder to the audio left/right injacks on the TV using the audio cables (A).
S-Video connection
11 Connect the S-VIDEO OUT jack on the VCR/DVDRecorder to the S-Video in jack on the TV using theS-Video cable (S).
22 Connect the Left and Right AUDIO L/R of A/V OUTjacks on the VCR/DVD Recorder to the audioleft/right in jacks on the TV using the audio cables(A).
Component Video (Color Stream®) connection
11 Connect the COMPONENT/PROGRESSIVE SCANVIDEO OUT jacks on the VCR/DVD Recorder tothe corresponding in jacks on the TV using a Y PbPr cable (C).
22 Connect the Left and Right AUDIO L/R of A/V OUTjacks on the VCR/DVD Recorder to the audioleft/right in jacks on the TV using the audio cables(A).
Progressive Scan (Color Stream® pro) connectionIf your television is a high-definition or “digital ready”television, you may take advantage of the VCR/DVDRecorder’s progressive scan output for the highestvideo resolution possible.
11 Connect the COMPONENT/PROGRESSIVE SCANVIDEO OUT jacks on the VCR/DVD Recorder tothe corresponding in jacks on the TV using anoptional Y Pb Pr cable (C).
22 Connect the Left and Right AUDIO L/R of A/V OUTjacks on the VCR/DVD Recorder to the audioleft/right in jacks on the TV using the supplied audiocables (A).
otesSet Progressive Scan option to “ON” in the menu,see page 20.Progressive scan does not work with the analogvideo connection (yellow VIDEO OUT jack or S-VIDEO OUT jack). In the case, the interlaced scan-ning image is output from the yellow VIDEO OUT orS-VIDEO OUT jack.
15
HO
OK
UP
Connections (Continued)
16
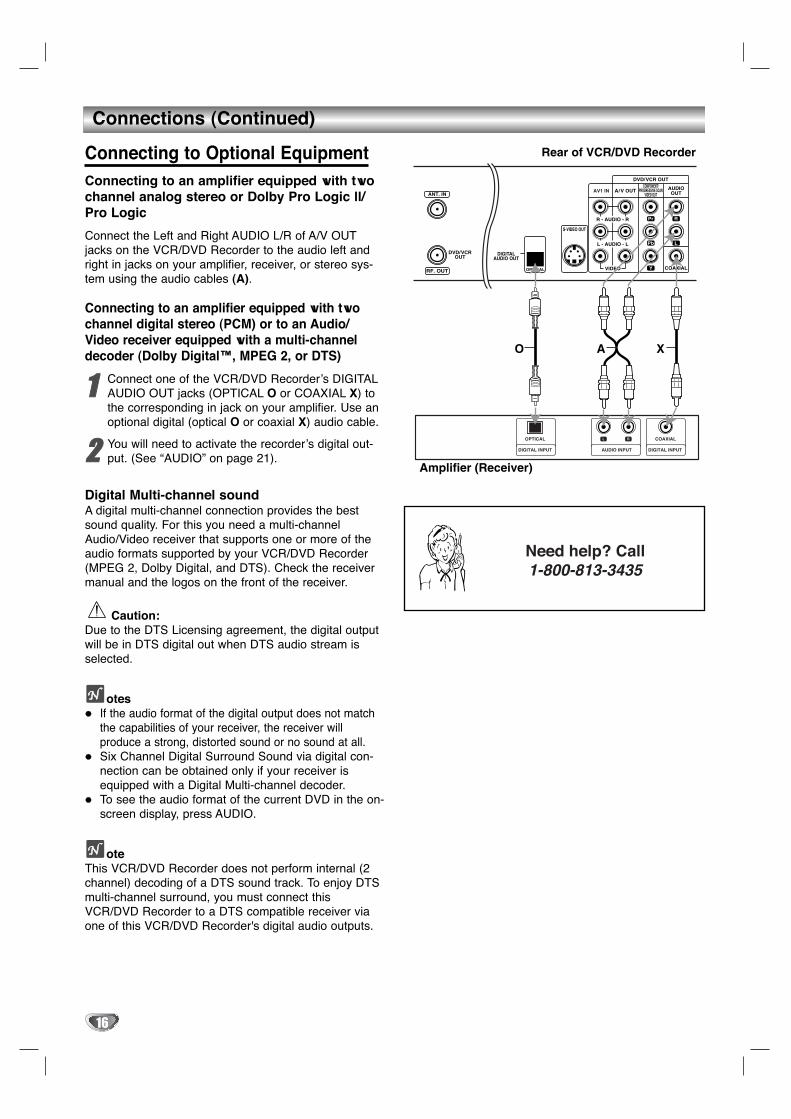
Connecting to Optional EquipmentConnecting to an amplifier equipped with twochannel analog stereo or Dolby Pro Logic ll/Pro Logic
Connect the Left and Right AUDIO L/R of A/V OUTjacks on the VCR/DVD Recorder to the audio left andright in jacks on your amplifier, receiver, or stereo sys-tem using the audio cables (A).
Connecting to an amplifier equipped with twochannel digital stereo (PCM) or to an Audio/Video receiver equipped with a multi-channeldecoder (Dolby Digital™, MPEG 2, or DTS)
11 Connect one of the VCR/DVD Recorder’s DIGITALAUDIO OUT jacks (OPTICAL O or COAXIAL X) tothe corresponding in jack on your amplifier. Use anoptional digital (optical O or coaxial X) audio cable.
22 You will need to activate the recorder’s digital out-put. (See “AUDIO” on page 21).
Digital Multi-channel soundA digital multi-channel connection provides the bestsound quality. For this you need a multi-channelAudio/Video receiver that supports one or more of theaudio formats supported by your VCR/DVD Recorder (MPEG 2, Dolby Digital, and DTS). Check the receivermanual and the logos on the front of the receiver.
Caution:Due to the DTS Licensing agreement, the digital outputwill be in DTS digital out when DTS audio stream isselected.
otesIf the audio format of the digital output does not matchthe capabilities of your receiver, the receiver will produce a strong, distorted sound or no sound at all. Six Channel Digital Surround Sound via digital con-nection can be obtained only if your receiver isequipped with a Digital Multi-channel decoder. To see the audio format of the current DVD in the on-screen display, press AUDIO.
oteThis VCR/DVD Recorder does not perform internal (2channel) decoding of a DTS sound track. To enjoy DTS multi-channel surround, you must connect thisVCR/DVD Recorder to a DTS compatible receiver viaone of this VCR/DVD Recorder's digital audio outputs.
Amplifier (Receiver)
Rear of VCR/DVD Recorder
A XO
RL
AUDIO INPUT DIGITAL INPUT
COAXIAL
DIGITAL INPUT
OPTICAL

Connections (Continued)
Accessory Audio/Video (A/V) Connections to VCR/DVD RecorderConnect the AV1 IN or AV INPUT (AV2) jacks on theVCR/DVD Recorder to the audio/video out jacks onyour accessory component, using optional audio/videocables.
oteIf you use the S-VIDEO in jack on the front panel, theVIDEO in jack on the front panel is not available.
Connecting a Digital CamcorderUsing the front panel DV IN jack, it is possible to con-nect a DV digital camcorder, video deck, or DVD-R/RWrecorder and digitally transfer DV tapes or DVD-R/RWdiscs to DVD-R/RW.
Use a DV cable (not supplied) to connect the DV in/outjack of your DV Digital Camcorder to the front panel DVIN jack of this VCR/DVD Recorder.
oteThis jack is for connection to DV equipment only. It isnot compatible with digital satellite tuners or D-VHSvideo decks.
17
HO
OK
UP
Rear of VCR/DVD Recorder
Front of VCR/DVD Recorder
OR
OR
DV Digital Camcorder
Front of VCR/DVD Recorder
DVIN/OUT

18
Initial SettingsIn this menu system, there are several ways to cus-tomize the settings provided. Most menus consist ofthree levels to set up the options, but some requiregreater depth for the variety of settings. If you pressSETUP, only the first and second level of the menu sys-tem will appear on the TV screen. The third level can bedisplayed by pressing B. For navigating the menu lev-els, you will see “B” on the right side of the menu labelto help you go to the next level.
To bring up and exit the Menu:Press SETUP to bring up the menu. A second press ofSETUP will take you back to initial screen.
To go to the next level: Press B on the remote control.
To go back to the previous level:Press b on the remote control.
General Operation
11 Press SETUP.The Setup menu appears.
22 Use v / V to select the desired option.
33 While the selected item is highlighted, press Bto move to the second level.
44 Use v / V to select the second desired option.
55 Press B to move to the third level.
66 Use v / V to select the desired setting thenpress ENTER to confirm your selection.Some items require additional steps.
77 Press SETUP to exit the Setup menu.
GENERAL
Tuning Band Select
11 Press SETUP.The Setup menu appears.
22 Use v / V to select the GENERAL option.
33 While the GENERAL option is highlighted, pressB to move to the second level.
44 Use v / V to select the Tuning Band option.
55 Press B to move to the third level.
66 Use v / V to select the tuning band option (TVor CATV) then press ENTER.TV: If you are using a standard antenna to receive channels. CATV: If you are using basic cable to receive channels.
Auto Channel Set
This VCR/DVD Recorder is equipped with a frequency synthesized tuner capable of receiving up to 181 channels. These include VHF channels 2-13, UHFchannels 14-69 and CATV channels 1-125.
Preparation:Connect the VCR/DVD Recorder to the desired type ofantenna or cable TV system, as shown in “ConnectingAntenna/Cable TV to VCR/DVD Recorder” on page 14.
11 Press SETUP.The Setup menu appears.
22 Use v / V to select the GENERAL option.
33 While the GENERAL option is highlighted, pressB to move to the second level.
44 Use v / V to select the Auto Channel Set option.
55 Press B to move to the third level.The Start icon is highlighted.
66 Press ENTER to begin the channel search.The tuner will automatically cycle through all available channels in the area and place them inthe tuner’s memory.
77 Press SETUP to exit the Setup menu.
oteAfter the Auto Channel Set proceeding is complete,make sure the Tuning Band is set appropriately (TV orCATV) on tuning band, follow steps 1~6 as shown pre-vious (Tuning Band Select) to choose the correct TuningBand (TV or CATV).
Before Operating
Tuning Band
Auto Channel Set
CH. Add/Del
Clock
TV Aspect Ratio
Progressive Scan
Factory Setting
Prev. Select
TV
CATV
Tuning Band
Auto Channel Set
CH. Add/Del
Clock
TV Aspect Ratio
Progressive Scan
Factory Setting
Prev. Select
11%
Edit
Before Operating (Continued)
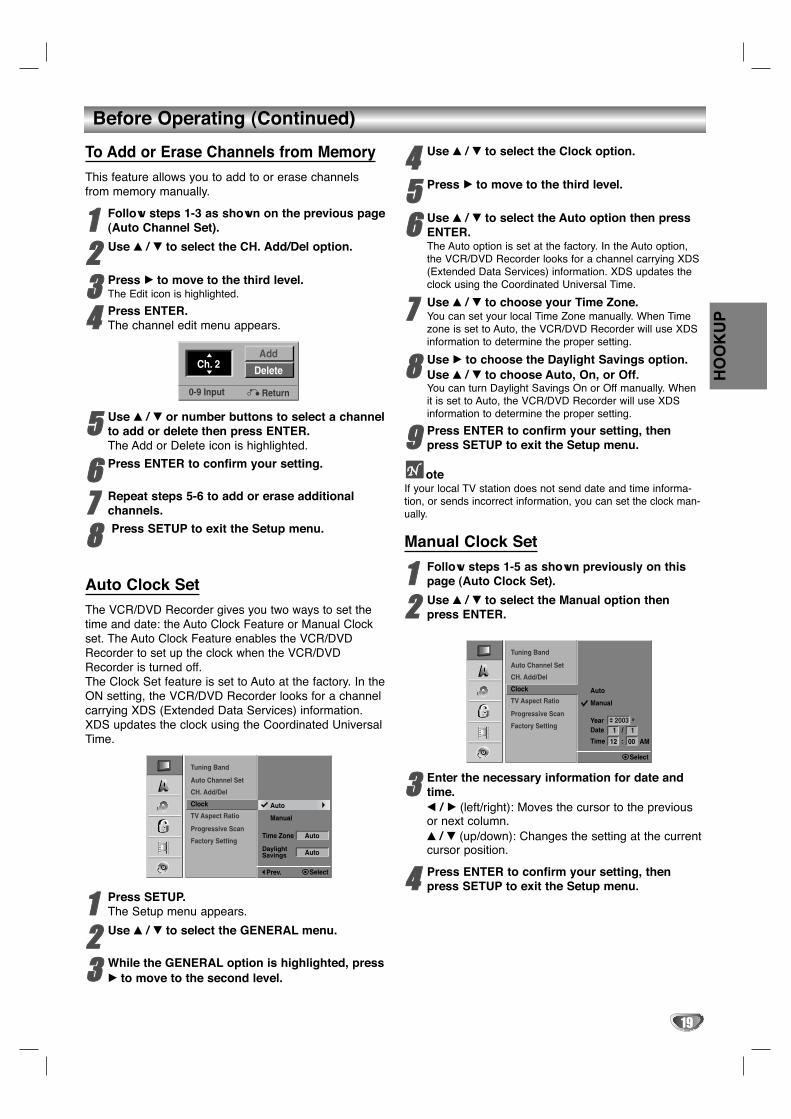
To Add or Erase Channels from Memory
This feature allows you to add to or erase channelsfrom memory manually.
11 Follow steps 1-3 as shown on the previous page(Auto Channel Set).
22 Use v / V to select the CH. Add/Del option.
33 Press B to move to the third level.The Edit icon is highlighted.
44 Press ENTER.The channel edit menu appears.
55 Use v / V or number buttons to select a channelto add or delete then press ENTER.The Add or Delete icon is highlighted.
66 Press ENTER to confirm your setting.
77 Repeat steps 5-6 to add or erase additionalchannels.
88 Press SETUP to exit the Setup menu.
Auto Clock Set
The VCR/DVD Recorder gives you two ways to set thetime and date: the Auto Clock Feature or Manual Clockset. The Auto Clock Feature enables the VCR/DVDRecorder to set up the clock when the VCR/DVDRecorder is turned off.The Clock Set feature is set to Auto at the factory. In theON setting, the VCR/DVD Recorder looks for a channelcarrying XDS (Extended Data Services) information.XDS updates the clock using the Coordinated UniversalTime.
11 Press SETUP.The Setup menu appears.
22 Use v / V to select the GENERAL menu.
33 While the GENERAL option is highlighted, pressB to move to the second level.
44 Use v / V to select the Clock option.
55 Press B to move to the third level.
66 Use v / V to select the Auto option then pressENTER.The Auto option is set at the factory. In the Auto option,the VCR/DVD Recorder looks for a channel carrying XDS(Extended Data Services) information. XDS updates theclock using the Coordinated Universal Time.
77 Use v / V to choose your Time Zone.You can set your local Time Zone manually. When Timezone is set to Auto, the VCR/DVD Recorder will use XDSinformation to determine the proper setting.
88 Use B to choose the Daylight Savings option.Use v / V to choose Auto, On, or Off.You can turn Daylight Savings On or Off manually. Whenit is set to Auto, the VCR/DVD Recorder will use XDSinformation to determine the proper setting.
99 Press ENTER to confirm your setting, thenpress SETUP to exit the Setup menu.
oteIf your local TV station does not send date and time informa-tion, or sends incorrect information, you can set the clock man-ually.
Manual Clock Set
11 Follow steps 1-5 as shown previously on thispage (Auto Clock Set).
22 Use v / V to select the Manual option thenpress ENTER.
33 Enter the necessary information for date andtime.b / B (left/right): Moves the cursor to the previousor next column.v / V (up/down): Changes the setting at the currentcursor position.
44 Press ENTER to confirm your setting, thenpress SETUP to exit the Setup menu.
19
HO
OK
UP
Tuning Band
Auto Channel Set
CH. Add/Del
Clock
TV Aspect Ratio
Progressive Scan
Factory SettingTime Zone
Manual
Auto
Auto
DaylightSavings Auto
Prev. Select
Tuning Band
Auto Channel Set
CH. Add/Del
Clock
TV Aspect Ratio
Progressive Scan
Factory Setting
AM
Manual
Auto
YearDate
Time
Select
12
2003
00
1 1/
:
Ch. 2 Delete
Add
0-9 Input Return
20
Before Operating (Continued)
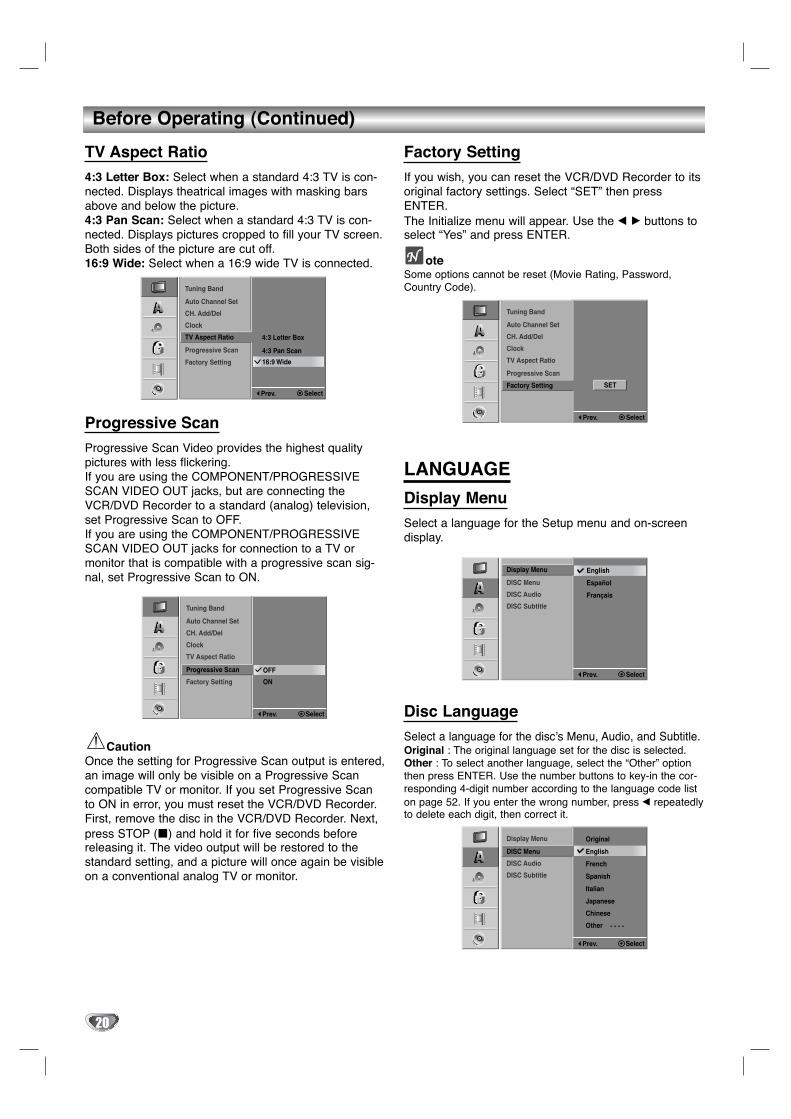
TV Aspect Ratio
4:3 Letter Box: Select when a standard 4:3 TV is con-nected. Displays theatrical images with masking barsabove and below the picture.4:3 Pan Scan: Select when a standard 4:3 TV is con-nected. Displays pictures cropped to fill your TV screen.Both sides of the picture are cut off.16:9 Wide: Select when a 16:9 wide TV is connected.
Progressive Scan
Progressive Scan Video provides the highest quality pictures with less flickering.If you are using the COMPONENT/PROGRESSIVESCAN VIDEO OUT jacks, but are connecting theVCR/DVD Recorder to a standard (analog) television,set Progressive Scan to OFF.If you are using the COMPONENT/PROGRESSIVESCAN VIDEO OUT jacks for connection to a TV ormonitor that is compatible with a progressive scan sig-nal, set Progressive Scan to ON.
CautionOnce the setting for Progressive Scan output is entered,an image will only be visible on a Progressive Scancompatible TV or monitor. If you set Progressive Scanto ON in error, you must reset the VCR/DVD Recorder.First, remove the disc in the VCR/DVD Recorder. Next,press STOP (x) and hold it for five seconds beforereleasing it. The video output will be restored to thestandard setting, and a picture will once again be visibleon a conventional analog TV or monitor.
Factory Setting
If you wish, you can reset the VCR/DVD Recorder to itsoriginal factory settings. Select “SET” then pressENTER.The Initialize menu will appear. Use the b B buttons toselect “Yes” and press ENTER.
oteSome options cannot be reset (Movie Rating, Password,Country Code).
LANGUAGE
Display Menu
Select a language for the Setup menu and on-screendisplay.
Disc Language
Select a language for the disc’s Menu, Audio, and Subtitle.Original : The original language set for the disc is selected.Other : To select another language, select the “Other” optionthen press ENTER. Use the number buttons to key-in the cor-responding 4-digit number according to the language code liston page 52. If you enter the wrong number, press b repeatedlyto delete each digit, then correct it.
Tuning Band
Auto Channel Set
CH. Add/Del
Clock
TV Aspect Ratio
Progressive Scan
Factory Setting ON
OFF
Prev. Select
Tuning Band
Auto Channel Set
CH. Add/Del
Clock
TV Aspect Ratio
Progressive Scan
Factory Setting
4:3 Letter Box
4:3 Pan Scan
16:9 Wide
Prev. Select
Tuning Band
Auto Channel Set
CH. Add/Del
Clock
TV Aspect Ratio
Progressive Scan
Factory Setting SET
Prev. Select
Display Menu
DISC Menu
DISC Audio
DISC Subtitle
English
Prev. Select
Display Menu
DISC Menu
DISC Audio
DISC Subtitle
English
French
Spanish
Italian
Japanese
Chinese
Other - - - -
Original
Prev. Select

Before Operating (Continued)
AUDIO Each DVD disc has a variety of audio output options. Setthe VCR/DVD Recorder Audio Output according to the typeof audio system you use.
Dolby Digital
PCM: Select when connected to a 2-channel digital stereoamplifier. The VCR/DVD Recorder’s digital audio is outputin PCM 2ch format when you play a DVD video discrecorded on the Dolby Digital recording system.Bitstream: Select when connected to a Dolby Digitaldecoder (or an amplifier or other equipment with a DolbyDigital decoder).
DTS
OFF: The DTS signal will not be output from the DIGITALAUDIO OUT jack.Bitstream: Select when connected to a DTS decoder (oran amplifier or other equipment with a DTS decoder).
MPEG
PCM: Select when connected to a 2-channel digital stereoamplifier. The VCR/DVD Recorder’s digital audio is outputin PCM 2ch format when you play a DVD video discrecorded on the MPEG1, or MPEG2 recording system.Bitstream: Select when connected to an MPEG decoder(or an amplifier or other equipment with an MPEGdecoder).
Sampling Freq. (Frequency)If your receiver or amplifier is NOT capable of handling 96kHz signals, select 48 kHz. When this choice is made, thisunit will automatically convert any 96 kHz signals to 48 kHzso your system can decode them. If your receiver or amplifier is capable of handling 96 kHz signals, select 96 kHz.
DRC (Dynamic Range Control)
The DVD format provides program soundtracks as accu-rately as possible, thanks to digital audio technology.However, you may wish to compress the dynamic range ofthe audio output (the difference between the loudestsounds and the quietest ones). This allows you to listen toa movie at a lower volume without losing clarity of sound.Set DRC to ON for this effect.
VocalSet Vocal to ON only when a multi-channel karaoke DVDis playing. The karaoke channels on the disc will mix intonormal stereo sound.
21
HO
OK
UP
Dolby Digital
DTS
MPEG
Sampling Freq.
DRC
Vocal
Bitstream
OFF
Prev. Select
Dolby Digital
DTS
MPEG
Sampling Freq.
DRC
Vocal
96KHz
48KHz
Prev. Select
Dolby Digital
DTS
MPEG
Sampling Freq.
DRC
Vocal
ON
OFF
Prev. Select
Dolby Digital
DTS
MPEG
Sampling Freq.
DRC
Vocal ON
OFF
Prev. Select
Dolby Digital
DTS
MPEG
Sampling Freq.
DRC
Vocal
Bitstream
PCM
Prev. Select
Dolby Digital
DTS
MPEG
Sampling Freq.
DRC
Vocal
Bitstream
PCM
Prev. Select

Before Operating (Continued)
LOCK (Parental Control)
Movie Rating
Movies on DVDs may contain scenes not suitable forchildren. Therefore, discs may contain Parental Controlinformation that applies to the complete disc or to certain scenes on the disc. These scenes are ratedfrom Level 1 to 8. Alternate, more suitable scenes areavailable for selection on some discs. Ratings are coun-try-dependent. The Parental Control feature allows youto prevent your children from viewing certain discs, or toplay alternate scenes for some discs.
11 Press SETUP.The Setup menu appears.
22 Use v / V to select the LOCK option.
33 While the LOCK option is highlighted, press Bto move to the second level.
44 Use v / V to select the Movie Rating option.
55 Press B to move to the third level.
66 When you have not entered a password yet: Enter a 4-digit password using the number buttonsto create a personal 4-digit security password.Enter the 4-digit password again to confirm.When you have already entered a password:Enter a 4-digit password using the number buttonsto confirm the personal 4-digit security password.
ipIf you enter the wrong number, press b repeatedly todelete password numbers one by one, then correct it.
77 Select a rating from 2 to 8 using the v / V but-tons. One (1) has the least playback restrictions,and eight (8) has the most playback restrictions.Unlock: If you select Unlock, Parental Control isnot active. The disc will play in full.
oteThe rating level one (1) cannot be set in this VCR/DVDRecorder .
Level 1 to 8: Some discs contain scenes not suit-able for children. If you set a rating for theVCR/DVD Recorder, all disc scenes with the samerating or lower will be played. Higher rated sceneswill not be played unless an alternative scene isavailable on the disc. The alternative must have thesame rating or a lower one. If no suitable alterna-tive is found, playback will stop. You must enter the4-digit password or change the rating level in orderto play the disc.
88 Press ENTER to confirm your rating selection,then press SETUP to exit the menu.
Set Password
Changing the 4-digit code
11 Follow steps 1-3 as shown previously on thispage (Movie Rating).
22 Use v / V to select the Password option.
33 Press B to move to the third level.
44 While “Change” is highlighted, press ENTER.If you want to delete, select “Delete” then pressENTER.
55 Follow step 6 as shown previously on this page(Movie Rating).
66 Enter a 4-digit password using the number but-tons to create a personal 4-digit security pass-word.
77 Enter the 4-digit password again.
ipIf you enter the wrong number, press b repeatedly todelete password numbers one by one, then correct it.
If you forget your 4-digit code
If you forget your password, to clear the current pass-word, follow the procedure below.
1 Press SETUP to display the Setup menu.2 Use the number buttons to enter the 5-digit number
“21019”. A message appears on the TV screen.
3 Select “yes”, then press ENTER. The 4-digit pass-word is cleared. Enter a new code as shown previously on this page (Movie Rating).
22
Level 8(Adult)Level 7Level 6Level 5Level 4Level 3Level 2Level 1(Kid Safe)
UnlockMovie Rating
Password
Country Code
Prev. Select
ChangeDelete
Movie Rating
Password
Country CodeNew Password
0-9 Input
Prev. Select
Before Operating (Continued)
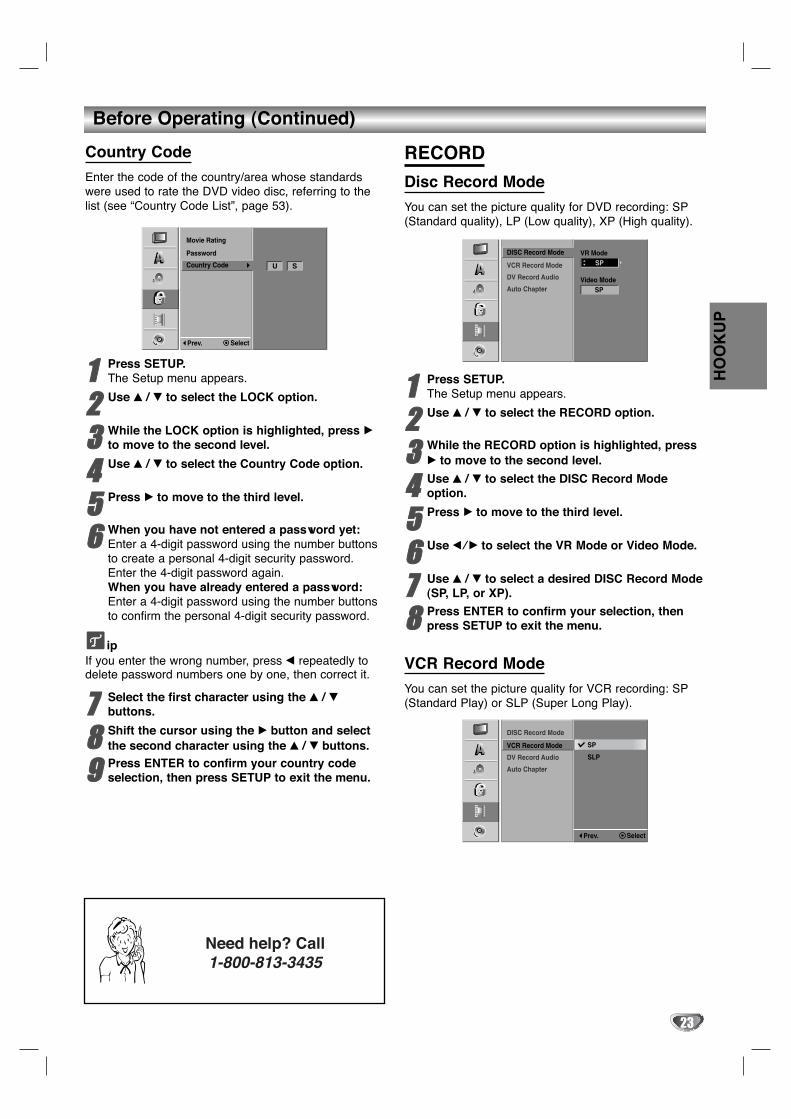
Country Code
Enter the code of the country/area whose standardswere used to rate the DVD video disc, referring to thelist (see “Country Code List”, page 53).
11 Press SETUP.The Setup menu appears.
22 Use v / V to select the LOCK option.
33 While the LOCK option is highlighted, press Bto move to the second level.
44 Use v / V to select the Country Code option.
55 Press B to move to the third level.
66 When you have not entered a password yet:Enter a 4-digit password using the number buttonsto create a personal 4-digit security password.Enter the 4-digit password again.When you have already entered a password:Enter a 4-digit password using the number buttonsto confirm the personal 4-digit security password.
ipIf you enter the wrong number, press b repeatedly todelete password numbers one by one, then correct it.
77 Select the first character using the v / Vbuttons.
88 Shift the cursor using the B button and selectthe second character using the v / V buttons.
99 Press ENTER to confirm your country codeselection, then press SETUP to exit the menu.
RECORD
Disc Record Mode
You can set the picture quality for DVD recording: SP(Standard quality), LP (Low quality), XP (High quality).
11 Press SETUP.The Setup menu appears.
22 Use v / V to select the RECORD option.
33 While the RECORD option is highlighted, pressB to move to the second level.
44 Use v / V to select the DISC Record Modeoption.
55 Press B to move to the third level.
66 Use b/B to select the VR Mode or Video Mode.
77 Use v / V to select a desired DISC Record Mode(SP, LP, or XP).
88 Press ENTER to confirm your selection, thenpress SETUP to exit the menu.
VCR Record Mode
You can set the picture quality for VCR recording: SP(Standard Play) or SLP (Super Long Play).
23
HO
OK
UP
Movie Rating
Password
Country Code U S
Prev. Select
Video Mode
VR ModeSP
SP
DISC Record Mode
VCR Record Mode
DV Record Audio
Auto Chapter
SLP
SP
DISC Record Mode
VCR Record Mode
DV Record Audio
Auto Chapter
Prev. Select
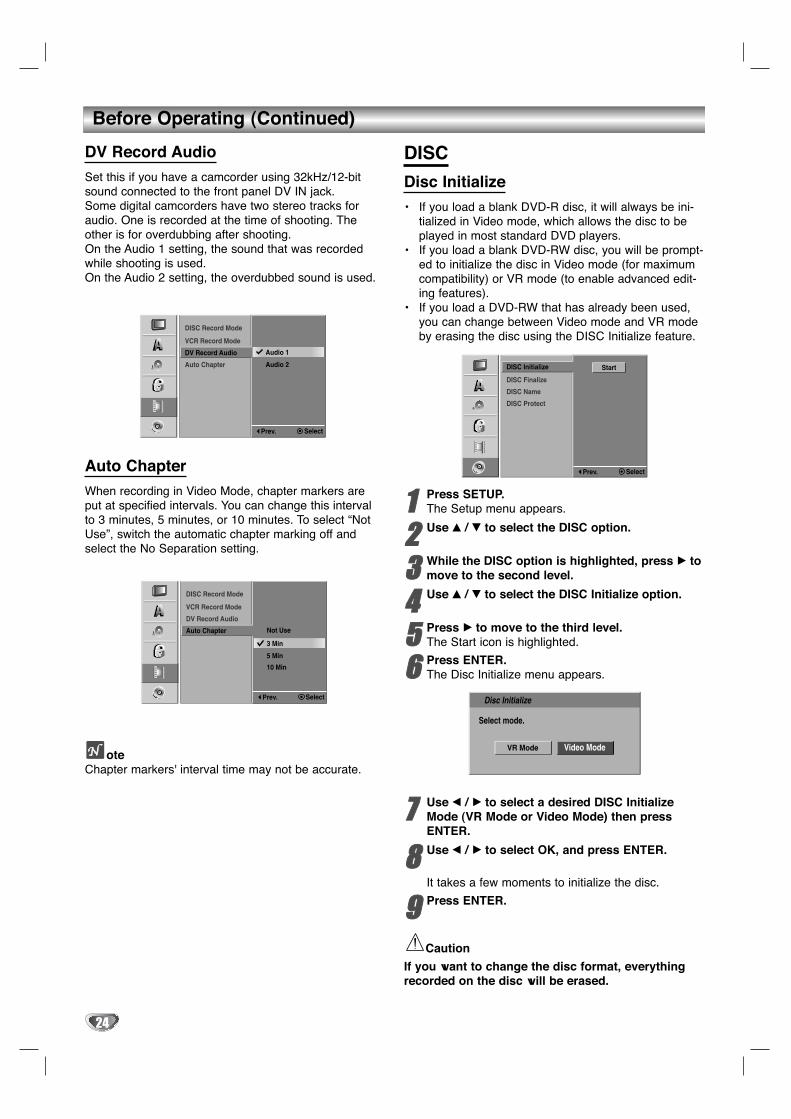
DV Record Audio
Set this if you have a camcorder using 32kHz/12-bitsound connected to the front panel DV IN jack.Some digital camcorders have two stereo tracks foraudio. One is recorded at the time of shooting. Theother is for overdubbing after shooting.On the Audio 1 setting, the sound that was recordedwhile shooting is used. On the Audio 2 setting, the overdubbed sound is used.
Auto Chapter
When recording in Video Mode, chapter markers areput at specified intervals. You can change this intervalto 3 minutes, 5 minutes, or 10 minutes. To select “NotUse”, switch the automatic chapter marking off andselect the No Separation setting.
oteChapter markers' interval time may not be accurate.
DISC
Disc Initialize
• If you load a blank DVD-R disc, it will always be ini-tialized in Video mode, which allows the disc to beplayed in most standard DVD players.
• If you load a blank DVD-RW disc, you will be prompt-ed to initialize the disc in Video mode (for maximumcompatibility) or VR mode (to enable advanced edit-ing features).
• If you load a DVD-RW that has already been used,you can change between Video mode and VR modeby erasing the disc using the DISC Initialize feature.
11 Press SETUP.The Setup menu appears.
22 Use v / V to select the DISC option.
33 While the DISC option is highlighted, press B tomove to the second level.
44 Use v / V to select the DISC Initialize option.
55 Press B to move to the third level.The Start icon is highlighted.
66 Press ENTER.The Disc Initialize menu appears.
77 Use b / B to select a desired DISC InitializeMode (VR Mode or Video Mode) then pressENTER.
88 Use b / B to select OK, and press ENTER.
It takes a few moments to initialize the disc.
99 Press ENTER.
Caution
If you want to change the disc format, everythingrecorded on the disc will be erased.
24
Before Operating (Continued)
Audio 2
Audio 1
DISC Record Mode
VCR Record Mode
DV Record Audio
Auto Chapter
Prev. Select
5 Min
10 Min
Not Use
3 Min
DISC Record Mode
VCR Record Mode
DV Record Audio
Auto Chapter
Prev. Select
StartDISC Initialize
DISC Finalize
DISC Name
DISC Protect
Prev. Select
Video Mode
Select mode.
Disc Initialize
VR Mode

Before Operating (Continued)
DISC Finalize
Finalizing fixes the recordings in place so that the disccan be played on a regular DVD player or computerequipped with a suitable DVD-ROM drive.Finalizing a Video mode disc creates a menu screen fornavigating the disc. This is accessed by pressing DISCMENU/LIST or TITLE.
Caution
Once you have finalized a DVD-R disc, you cannotedit or record anything else on that disc.However, you can record and edit a DVD-RW discby choosing Unfinalize.
11 Follow steps 1-3 as shown on page 24 (DISCInitialize).
22 Use v / V to select the DISC Finalize option.
33 Press B to move to the third level.Finalize is highlighted.
44 Press ENTER.Finalize menu appears.
55 Use b / B to select OK then press ENTER.The VCR/DVD Recorder starts finalizing the disc.
oteThe amount of required time for finalization depends onthe type of disc, the volume of recorded contents, andthe number of title on the disc. A recorded disc can takeup to 3-4 minutes to finalize.
ipIf you load a DVD-RW that has already been finalizedon a different DVD Recorder, you can “un-finalize” it bychoosing Unfinaliza from the DISC Finalize menu. Afterdoing this, you can edit and re-record onto the disc.
DISC Protect
When recording in VR mode, set to ON to prevent acci-dental recording, editing, or erasing of the disc loaded.If you need to unlock the disc to make edits, selectOFF.
25
HO
OK
UP
DISC Initialize
DISC Finalize
DISC Name
DISC Protect
Unfinalize
Finalize
Prev. Select
OK
Do you want to finalize the disc?
Finalize
Cancel
DISC Initialize
DISC Finalize
DISC Name
DISC Protect
ON
OFF
Prev. Select
Before Operating (Continued)
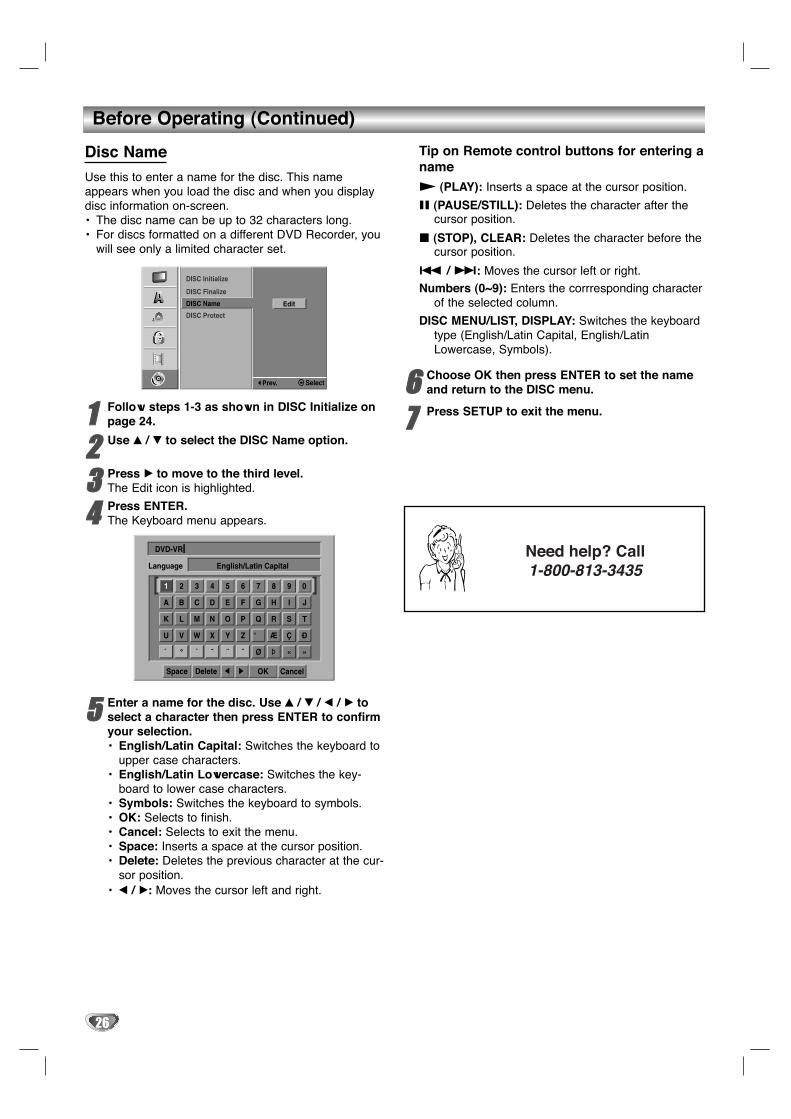
Disc Name
Use this to enter a name for the disc. This nameappears when you load the disc and when you displaydisc information on-screen.• The disc name can be up to 32 characters long.• For discs formatted on a different DVD Recorder, you
will see only a limited character set.
11 Follow steps 1-3 as shown in DISC Initialize onpage 24.
22 Use v / V to select the DISC Name option.
33 Press B to move to the third level.The Edit icon is highlighted.
44 Press ENTER.The Keyboard menu appears.
55 Enter a name for the disc. Use v / V / b / B toselect a character then press ENTER to confirmyour selection.• English/Latin Capital: Switches the keyboard to
upper case characters.• English/Latin Lowercase: Switches the key-
board to lower case characters.• Symbols: Switches the keyboard to symbols.• OK: Selects to finish.• Cancel: Selects to exit the menu.• Space: Inserts a space at the cursor position.• Delete: Deletes the previous character at the cur-
sor position.• b / B: Moves the cursor left and right.
Tip on Remote control buttons for entering anameN (PLAY): Inserts a space at the cursor position.
X (PAUSE/STILL): Deletes the character after thecursor position.
x (STOP), CLEAR: Deletes the character before thecursor position.
. / >: Moves the cursor left or right.
Numbers (0~9): Enters the corrresponding characterof the selected column.
DISC MENU/LIST, DISPLAY: Switches the keyboardtype (English/Latin Capital, English/LatinLowercase, Symbols).
66 Choose OK then press ENTER to set the nameand return to the DISC menu.
77 Press SETUP to exit the menu.
26
DISC Initialize
DISC Finalize
DISC Name
DISC Protect
Edit
Prev. Select
01 2 3 4 5 6 7 8 9
A B C D E F G H I J
K L M N O P Q R S T
U V W X Y Z
DVD-VR
English/Latin CapitalLanguage
OK CancelSpace Delete

Before Operating (Continued)
On-Screen Display
General Explanation of the On-Screen Display
This manual gives basic instructions for operating theVCR/DVD Recorder. Some DVDs require specific oper-ations or allow only limited operations during playback.When this occurs, the symbol appears on the TVscreen indicating that the operation is not permitted bythe VCR/DVD Recorder or is not available on the disc.
Displaying Information on-screenYou can display various information on-screen about thedisc or tape loaded.
On-screen display operation
11 Press DISPLAY repeatedly to display/change theinformation displayed on-screen.
22 To remove the on-screen display, press DIS-PLAY or RETURN repeatedly until it disappears.See the following descriptions for detailed explana-tions while playing a disc.
Temporary Feedback Field Icons
Resume play from this point
Action prohibited or not available
otesSome discs may not provide all of the features on theon-screen display example shown below.If no button is pressed for 7 seconds, the on-screendisplay disappears.
Displaying OSD While Watching TV
While viewing the TV, press DISPLAY todisplay/remove the information displayed on-screen.
Example- when a DVD-RW in VR mode is inserted:
Changing TV ChannelsIf no disc is playing, you can change TV channels usingthe number or CH/TRK (v / V) buttons on the remotecontrol, or the CHANNEL (v / V) buttons on the frontpanel.
oteAntenna channels are numbered 2 through 69. Cablechannels are numbered 1 through 125.
Changing TV Audio ChannelSome TV programs are broadcast with both a main anda Secondary Audio Program (SAP). You can change theTV audio using the AUDIO button.
Press AUDIO repeatedly to change the TV audioaccording to Broadcast audio signal as shownbelow.
• STEREO+SAP Audio Signal Stereo → SAP → Mono → Stereo
• STEREO Audio Signal Stereo → L → R → Mono Stereo
• SAP Audio Signal Mono → SAP → Mono
• MONO Audio Signal Mono
The current audio channel is displayed on-screen.
• If SAP is selected, but there is no SAP channel beingbroadcast, you will still hear the main audio (mono orstereo) channel.
• If the sound is of poor quality when set to Stereo, youcan improve it by changing to Mono.
• When an external input is selected, the audio channelcan be switched only to Stereo.
27
HO
OK
UP
DVD-VRVR Mode SP 1H 32M Free
28/8/2003Mono 11:35 AM
MONO
DVD
ch. 6
Indicates disc type. Indicates channelnumber andaudio input
signal receivedby the tuner.
Indicates the record mode, free space, and elapsed
progress bar.
Indicates current date and time.
Indicates output audio signal.
28
Before Operating (Continued)
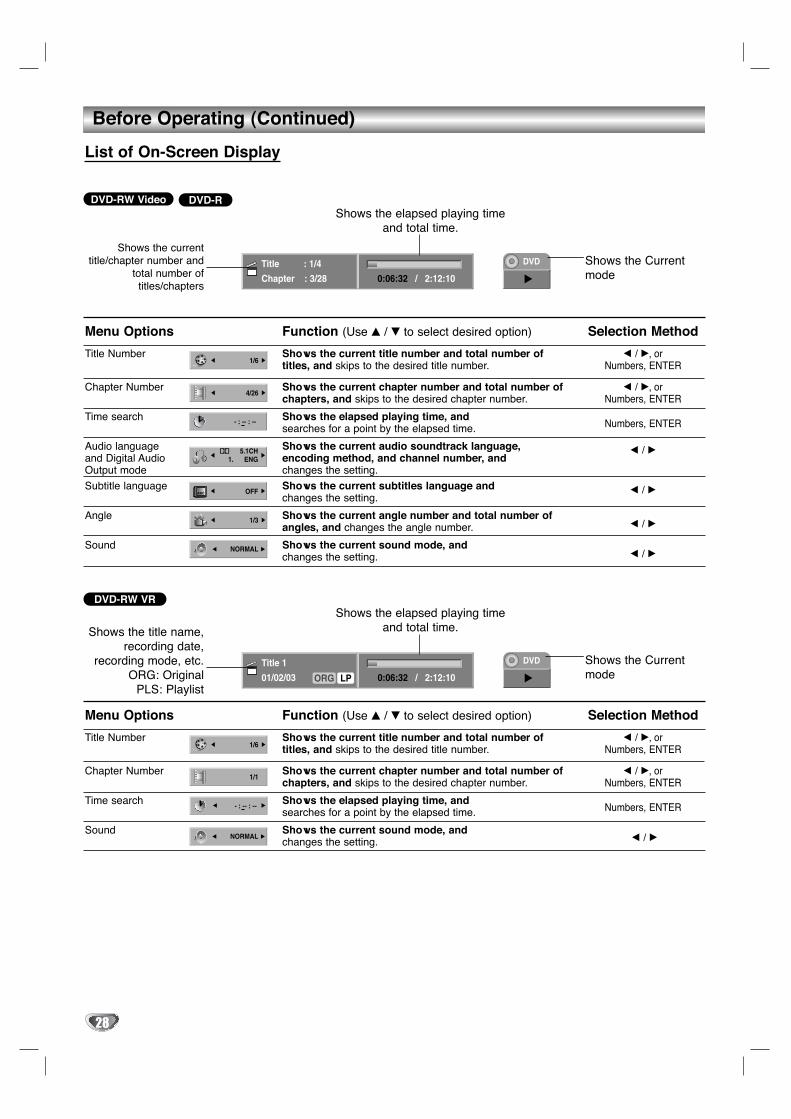
Menu Options
Title Number
Chapter Number
Time search
Audio language and Digital Audio Output mode
Subtitle language
Angle
Sound
Function (Use v / V to select desired option)
Shows the current title number and total number oftitles, and skips to the desired title number.
Shows the current chapter number and total number ofchapters, and skips to the desired chapter number.
Shows the elapsed playing time, and searches for a point by the elapsed time.
Shows the current audio soundtrack language,encoding method, and channel number, andchanges the setting.
Shows the current subtitles language andchanges the setting.
Shows the current angle number and total number ofangles, and changes the angle number.
Shows the current sound mode, andchanges the setting.
Selection Method
b / B, orNumbers, ENTER
b / B, orNumbers, ENTER
Numbers, ENTER
b / B
b / B
b / B
b / B
1/6
4/26
- : -- : --
ABC OFF
NORMAL
1/3
5.1CH1. ENG
Title : 1/4
Chapter : 3/28 0:06:32 / 2:12:10
DVDShows the current
title/chapter number andtotal number oftitles/chapters
Shows the Currentmode
Shows the elapsed playing timeand total time.
Menu Options
Title Number
Chapter Number
Time search
Sound
Function (Use v / V to select desired option)
Shows the current title number and total number oftitles, and skips to the desired title number.
Shows the current chapter number and total number ofchapters, and skips to the desired chapter number.
Shows the elapsed playing time, and searches for a point by the elapsed time.
Shows the current sound mode, andchanges the setting.
Selection Method
b / B, orNumbers, ENTER
b / B, orNumbers, ENTER
Numbers, ENTER
b / B
1/6
1/1
- : -- : --
NORMAL
DVD-RW Video
LPORG
Title 1
01/02/03 0:06:32 / 2:12:10
DVD
Shows the title name,recording date,
recording mode, etc.ORG: Original
PLS: Playlist
Shows the Currentmode
Shows the elapsed playing timeand total time.
List of On-Screen Display
DVD-RW VR
DVD-R

HO
OK
UP
Before Operating (Continued)
29
Menu Options
Time
Audio Channel
Function (Use v / V to select desired option)
Shows the elapsed playing time (Display only).
Shows the audio channel andchanges the audio channel.
Selection Method
–
b / B
0:00:20
HIFI
VCRSP
Shows playing speed,recording tape information
and the elapsed playingprogress bar.
Shows the Currentmode
VHS
DVD-Video
Title: 1/4
Chapter: 3/28 0:06:32 / 2:12:10
DVD
Shows the title name,recording date,
recording mode, etc.ORG: Original
PLS: Playlist
Shows the Currentmode.
Shows the elapsed playing timeand total time.
Menu Options
Title Number
Chapter Number
Time search
Sound
Function (Use v / V to select desired option)
Shows the current title number and total number oftitles, and skips to the desired title number.
Shows the current chapter number and total numberof chapters, and skips to the desired chapter number.
Shows the elapsed playing time, and searches for a point by the elapsed time.
Shows the current sound mode andchanges the setting.
Selection Method
b / B, orNumbers, ENTER
b / B, orNumbers, ENTER
Numbers, ENTER
b / B
1/6
1/1
- : -- : --
NORMAL

30
Operations with DVD
Playing a DVD
Playback SetupBefore using the remote control, press the DVD but-ton to select the device to be operated.Turn the TV on and select the video input source con-nected to the VCR/DVD Recorder. Audio system: Turn the audio system on and selectthe input source connected to the VCR/DVDRecorder.
11 Press OPEN/CLOSE (Z) to open the disc tray.
22 Load a disc in the tray with the playback sidedown.
33 Press OPEN/CLOSE (Z) to close the tray.READING appears on the display window and playback starts automatically. If playback does notstart, press PLAY (N).In some cases, the disc menu might appearinstead.
ipIf a menu screen is displayedThe menu screen may be displayed first after loading aDVD which contains a menu.
Use the b / B / v / V buttons to select the title/chap-ter you want to view, then press ENTER to start play-back. Press TITLE or DISC MENU/LIST to return tothe menu screen.
Menu settings and the exact operating procedures forusing the menu may differ depending on the disc.Follow the instructions on each menu screen.
otesIf Parental Control is set and the disc is not within theMovie Rating settings (not authorized), the 4-digitcode must be entered and/or the disc must be author-ized (see “Movie Rating”, on page 22).
DVDs may have a Region Code.Your VCR/DVD Recorder will not play discs that havea region code different from your VCR/DVD Recorder.The region code for this VCR/DVD Recorder is 1(one).
oteUnless stated otherwise, all operations described usethe remote control. Some features may also be avail-able on the Setup menu.
Moving to another TITLE
When a disc has more than one title, you can move toanother title as follows:
Press DISPLAY twice and use v / V to select the titleicon. Then, press the appropriate number button (0-9) or b / B to select a title number and press ENTERto confirm.
Moving to another CHAPTER
When a title on a disc has more than one chapter, youcan move to another chapter as follows:
Press SKIP (. or >) briefly during playback toselect the next chapter or to return to the beginning ofthe current chapter/track.Press SKIP (.) twice briefly to go back to the pre-vious chapter.To go directly to any chapter during playback, pressDISPLAY twice. Then, use v / V to select the chaptericon. Then, enter the chapter number using the num-ber buttons (0-9) or press b / B and press ENTER.
Slow Motion
1 Press REW (m) or FF (M) during pause mode.The VCR/DVD Recorder will enter SLOW mode.
2 Use the REW (m) or FF (M) to select the requiredspeed: t 1/16, t 1/8, t 1/4, t 1/2, or T 1/16,T 1/8, T 1/4, T 1/2.
3 To exit Slow Motion mode, press PLAY.
DVD-RDVD-RW Video
DVD-RW VRDVD-Video
4/26DVD-R
DVD-RW VideoDVD-RW VRDVD-Video
1/6DVD-R
DVD-RW VideoDVD-RW VRDVD-Video
DVD-Video

Operations with DVD (Continued)
Playing a DVD (continued)
Still Picture and Frame-by-Frame Playback
1 Press PAUSE/STILL (X) during playback.The VCR/DVD Recorder will enter PAUSE mode.
2 You can advance or back up the picture frame-by-frame by pressing b / B repeatedly during PAUSEmode.
Search
1 Press REW (m) or FF (M) during playback.The recorder will enter SEARCH mode.
2 Press REW (m) or FF (M) to select the requiredspeed: MX2, MX4, MX8, MX16, MX100, N(forward) or n, mX2, mX4, mX8, mX16,mX100 (backward).
3 To exit SEARCH mode, press PLAY (N).
oteWhen you press REW or FF during Search mode togo to normal speed, search mode is canceled.Search speed may vary by the condition of a disc,though the search speed is displayed in the TVscreen.
Random
1 Press RANDOM during playback.The VCR/DVD Recorder automatically beginsRandom Playback and “RANDOM” appears on thedisplay window.
2 To return to normal playback, press RANDOM until“NORMAL” appears on the display window.
ipBy pressing SKIP (>) during Random playback, theVCR/DVD Recorder selects another title (track) andresumes Random playback.
oteThis function only works with DVD Karaoke discs.
Repeat
DVD Video Discs - Repeat Chapter/Title/All/Off
1 To repeat the chapter currently playing, pressREPEAT.The REPEAT CHAPTER appears on the TV screen.
2 To repeat the title currently playing, press REPEAT asecond time.The REPEAT TITLE appears on the TV screen.
3 To repeat the whole disc, press REPEAT a third time (onlyfor DVD-RW VR mode).
4 To exit Repeat mode, press REPEAT a third time or afourth time (for DVD-RW VR mode).The REPEAT OFF icon appears on the TV screen.
Repeat A-B
To repeat a sequence in a title:
1 Press A-B at your chosen starting point.REPEAT A- appears on the TV screen.
2 Press A-B again at your chosen end point.REPEAT A-B appears briefly on the TV screen, and the repeatsequence begins.
3 To cancel the sequence, press A-B repeatedly toselect REPEAT OFF.
REPEATA - BDVD-RDVD-RW Video
DVD-RW VRDVD-Video
REPEATCHAPTERDVD-RDVD-RW Video
DVD-RW VRDVD-Video
Karaoke DVD
DVD-RDVD-RW Video
DVD-RW VRDVD-Video
DVD-R
DVD-RW VideoDVD-RW VRDVD-Video
31
PL
AY
BA
CK

Operations with DVD (Continued)
Playing a DVD (continued)
Time Search
The Time Search function allows you to start playing atany chosen time on the disc.
1 Press DISPLAY twice during playback. The on-screendisplay appears on the TV screen.The Time Search box shows the elapsed playing time of thecurrent disc.
2 Within 7 seconds, use v / V to select the TimeSearch icon in the on-screen display.The “-:--:--” appears in the Time Search box.
3 Within 7 seconds, use the number buttons to enterthe required start time. Enter hours, minutes, and sec-onds from left to right in the box.You cannot enter an invalid time.If you enter the wrong numbers, press b / B to move theunder bar (_) to the wrong number. Then enter the correctnumbers.
4 Within 7 seconds, press ENTER to confirm the starttime.Playback starts from the selected time on the disc.
Zoom
The Zoom function allows you to enlarge the videoimage and to move to different areas within it.
1 Press ZOOM during playback or still playback to acti-vate the Zoom function.A square frame will be displayed in the right bottom of thepicture. If no button is pressed for more than 5 seconds, thesquare frame will disappear.Each press of the ZOOM button changes the image on theTV screen in the following sequence:
X1(normal size) → X2 size → X4 size → X1(normal size)
2 Use the b / B / v / V buttons to move to differentareas within the picture.
3 To resume normal playback, press CLEAR or ZOOMrepeatedly until the normal picture appears.
oteThe Zoom function may not work for some DVDs.
Marker Search
You can start playback from a memorized point. Up tosix points can be memorized.To enter a mark, follow these steps.
1 During disc playback, press MARKER when playback reaches the spot that you want to memorize. The Marker icon will appear on the TV screen briefly.
2 Repeat step 1 to enter up to six Marker points on adisc.
To Recall a Marked Scene
1 During disc playback, press SEARCH. The Marker Search menu will appear on the TV screen.
2 Use the b / B / v / V buttons to select a Markedscene that you want to recall.
3 Press ENTER.Playback will start from the Marked scene.
4 To remove the Marker Search menu, press RETURN.
To clear a Marked Scene1 During disc playback, press SEARCH.
The Marker Search menu will appear on the TV screen.
2 Use b / B / v / V to select the Marked scene thatyou want to erase.
3 Press CLEAR.“Delete selected marker. Continue?” message appears.
4 Use b / B to select “Yes”, then press ENTER.
5 Repeat steps 2-4 to erase additional Marked scenes.
6 To remove the Marker Search menu, press RETURN (O).
oteMemorized marker points are deleted when theVCR/DVD Recorder is turned off.
MAKER1 / 6DVD-RDVD-RW Video
DVD-RW VRDVD-Video
DVD-RDVD-RW Video
DVD-RW VRDVD-Video
- : -- : --DVD-RDVD-RW Video
DVD-RW VRDVD-Video
DeleteCLEAR CloseSelect
Marker SearchMarker Search
Move
32
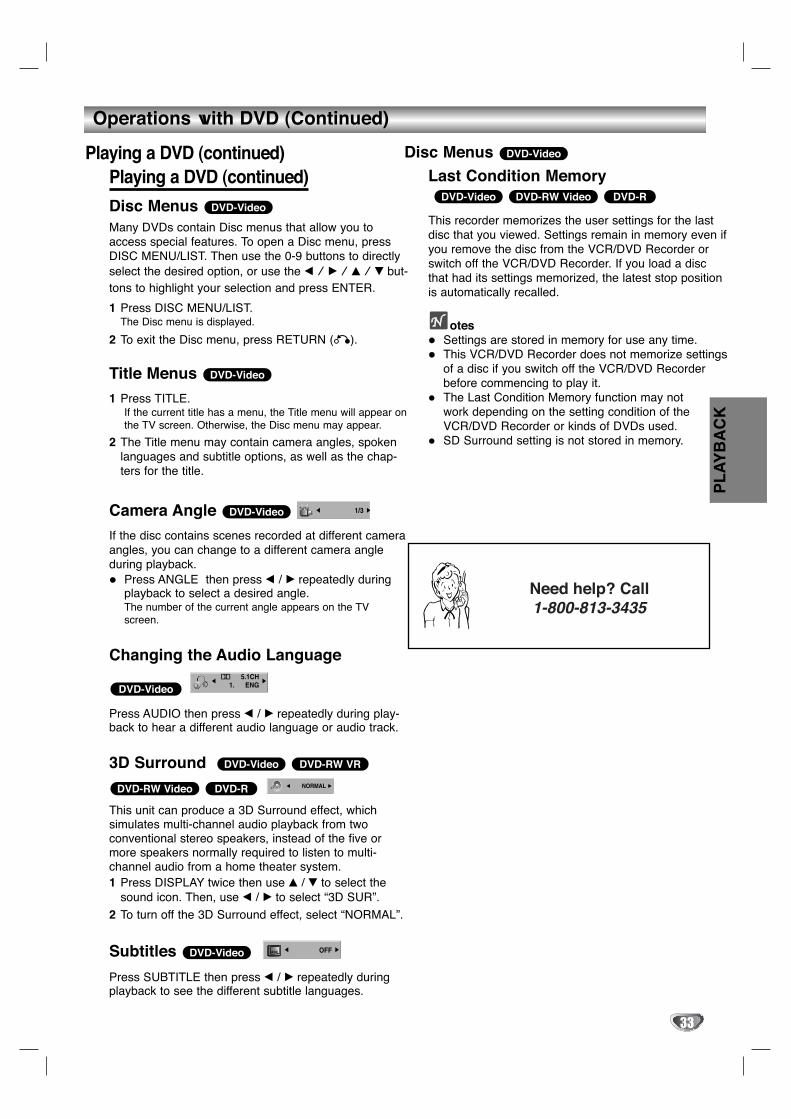
Operations with DVD (Continued)
Playing a DVD (continued) Disc Menus DVD-Video
Playing a DVD (continued)
Disc Menus Many DVDs contain Disc menus that allow you toaccess special features. To open a Disc menu, pressDISC MENU/LIST. Then use the 0-9 buttons to directlyselect the desired option, or use the b / B / v / V but-tons to highlight your selection and press ENTER.
1 Press DISC MENU/LIST.The Disc menu is displayed.
2 To exit the Disc menu, press RETURN (O).
Title Menus
1 Press TITLE.If the current title has a menu, the Title menu will appear onthe TV screen. Otherwise, the Disc menu may appear.
2 The Title menu may contain camera angles, spokenlanguages and subtitle options, as well as the chap-ters for the title.
Camera Angle
If the disc contains scenes recorded at different cameraangles, you can change to a different camera angleduring playback.
Press ANGLE then press b / B repeatedly duringplayback to select a desired angle.The number of the current angle appears on the TVscreen.
Changing the Audio Language
Press AUDIO then press b / B repeatedly during play-back to hear a different audio language or audio track.
3D Surround
This unit can produce a 3D Surround effect, which simulates multi-channel audio playback from two conventional stereo speakers, instead of the five ormore speakers normally required to listen to multi-channel audio from a home theater system. 1 Press DISPLAY twice then use v / V to select the
sound icon. Then, use b / B to select “3D SUR”.
2 To turn off the 3D Surround effect, select “NORMAL”.
Subtitles
Press SUBTITLE then press b / B repeatedly duringplayback to see the different subtitle languages.
Last Condition Memory
This recorder memorizes the user settings for the lastdisc that you viewed. Settings remain in memory even ifyou remove the disc from the VCR/DVD Recorder orswitch off the VCR/DVD Recorder. If you load a discthat had its settings memorized, the latest stop positionis automatically recalled.
otesSettings are stored in memory for use any time.This VCR/DVD Recorder does not memorize settingsof a disc if you switch off the VCR/DVD Recorderbefore commencing to play it.The Last Condition Memory function may notwork depending on the setting condition of theVCR/DVD Recorder or kinds of DVDs used.SD Surround setting is not stored in memory.
DVD-RDVD-RW VideoDVD-Video
ABC OFFDVD-Video
NORMALDVD-RDVD-RW Video
DVD-RW VRDVD-Video
5.1CH1. ENGDVD-Video
1/3DVD-Video
DVD-Video
DVD-Video
33
PL
AY
BA
CK

34
Audio CD and MP3 Operations
Playing an Audio CD or MP3 Disc
The VCR/DVD Recorder can play audio CDs and MP3formatted recordings on CD-ROM, CD-R, or CD-RWdiscs. Before playing MP3 recordings, read the “Noteson MP3 Recordings” on the right.
11 Insert a disc and close the tray.The AUDIO CD or MP3 CD menu appears on theTV screen.
AUDIO CD Menu MP3 CD Menu
22 Use v / V to select a track, then press PLAY (NN). Playback starts. During playback, the current track’s elapsed playingtime will appear on the display window and menu.Playback will stop at the end of the disc.
ipsOn the MP3 CD menu, you can display the folders onthe disc. Use v / V / b / B to select the “Folder” icon onthe MP3 CD menu, then press ENTER twice. You can only display tracks in the folders. Use v / V / b / B to select a folder, then press ENTER.On a mixed CD with audio titles and MP3 files, you canswitch the AUDIO CD menu and the MP3 CD menu bypressing the TITLE button repeatedly in STOP mode.If you select a track and press DISPLAY, the file infor-mation is displayed.If you select a folder and press DISPLAY, the number ofsubfolders and MP3 files in the folder are displayed. If you are in a file list on the MP3 menu and want to
return to the Folder list, use 33/44 to highlight andpress ENTER to return to the previous menu screen.You can view TV channel or video input source bypressing RETURN. If you want to return to the MP3 orAUDIO CD menu, press DISC MENU/LIST.
33 To stop playback at any time, press STOP (xx).
Notes on MP3 Recordings
About MP3An MP3 file is compressed audio data using theMPEG1 audio layer-3 file-coding scheme. We callfiles that have the “.mp3” file extension “MP3 files”.The VCR/DVD Recorder cannot read an MP3 filethat has a file extension other than “.mp3”.
MP3 Disc compatibility with this recorder islimited as follows:1. CD-R/RW physical format should be “ISO 9660” and
“JOLIET”.2. If you record MP3 files using software which cannot
create a FILE SYSTEM (e.g., “Direct-CD” etc.), thenyou cannot playback MP3 files. We recommend thatyou use “Easy-CD Creator”, which creates anISO9660 or JOLIET file system.
3. The total number of files and folders on the disc arefree but the total number of files and folders on thefolder should be less than 1999.
This VCR/DVD Recorder requires discs/recordings tomeet certain technical standards in order to achieveoptimal playback quality. Pre-recorded DVDs are auto-matically set to these standards. There are many differ-ent types of recordable disc formats (including CD-Rcontaining MP3 files) that require certain pre-existingconditions (see above) to insure compatible playback.
Customers should also note that permission isrequired in order to download MP3 files and musicfrom the Internet. SANYO has no right to grant suchpermission. Permission should always be soughtfrom the copyright owner.
MP3CD
Audio CD
52:16
Title DurationTrack 1 04:47Track 2 04:01
03:0103:3004:2405:0103:4804:0905:1004:11
Track 3Track 4Track 5Track 6Track 7Track 8Track 9Track 10
Program CloseMarkMARKERSelect LIST
MP3 CD
00:00
ROOT 152 ItemsFOLDER 01FILE 2.mp3FILE 3.mp3FILE 4.mp3FILE 5.mp3FILE 6.mp3FILE 7.mp3FILE 8.mp3FILE 9.mp3FILE 10.mp3
Program CloseMarkMARKERSelect LIST

Audio CD and MP3 Operations (Continued)
Pause 1 Press PAUSE/STILL during playback.
2 To return to playback, press PAUSE/STILL again.
Moving to Another Track Press SKIP (. / >) briefly during playback to go to the next track or to return to thebeginning of the current track.
Press SKIP (.) twice briefly to go to the previoustrack.
On an Audio CD, to go directly to any track, enter thetrack number using the number buttons (0-9) duringplayback.
Repeat Press REPEAT to select a desired repeat mode.
• Audio CD- TRACK: repeats the current track.- ALL: repeats all the tracks on a disc.- OFF (no display) : no repeat play.
• MP3 Disc- TRACK: repeats the current track.- FOLDER: repeats all the tracks on a current folder.- OFF (no display) : no repeat play.
Random 1 Press RANDOM during playback or when playback
has stopped.The VCR/DVD Recorder automatically beginsRandom Playback and RANDOM appears on the leftside of menu screen.
2 To return to normal playback, press RANDOM again,then RANDOM disappears from the menu screen.
Search 1 Press REW (m) or FF (M) during playback.
The recorder will enter SEARCH mode.
2 Press REW or FF to select the required speed:mX2, mX4, mX8 (backward), or MX2, MX4,MX8 (forward).Search speed and direction are indicated on the menuscreen.
3 To exit SEARCH mode, press PLAY.
Repeat A-B To repeat a sequence in a title:
1 Press A-B at your chosen start point.The Repeat icon and “A-” appear on the menu screen.
2 Press A-B again at your chosen end point.The Repeat icon and “A - B” appear on the left side of menuscreen and the repeat sequence begins.
3 To exit the sequence and return to normal play, pressA-B again.The Repeat icon disappears from the menu screen.
CD
CD
MP3CD
MP3CD
MP3CD
MP3CD
35
PL
AY
BA
CK

36
Programmed Playback with Audio CD and MP3
The Program function enables you to store your favoritetracks from any disc in the recorder memory.Programs can contain 99 tracks (Audio CD) or 256tracks (MP3).
11 Insert an Audio CD or MP3 disc.The Audio CD or MP3 CD menu will appear.
22 Use v / V to select a track or folder on the List,then press ENTER.The options appears on the left side of the menu.
otePress and hold V to quickly move to the follow-ing tracks or folders.Press and hold v to quickly move to the pre-ceding tracks or folders.
33 Use v / V to highlight the “Program Add” iconthen press ENTER.The selected track is added to the Program List.
44 Repeat steps 2-3 to place additional tracks onthe Program list.
ipYou can add multiple tracks from the List to theProgram List.
1. Select a track then press MARKER.
2. Repeat step 1 to mark additional tracks.
3. Select any track then press ENTER.The options appears on the left side of the menu.
4. Use v / V to highlight the “Program Add” icon, thenpress ENTER.All the marked tracks are added to the Program List.
otesBy using CLEAR, you can select all tracks, or cancelall marked tracks.If you select a folder for Programmed Playback, allthe tracks in the folder are added to the program list.
55 Use B to move the tracks to the Program list.The programmed track you selected last is highlighted onthe program list.
66 Use v / V to select the track you want to startplaying.
77 Press PLAY to start.Playback begins in the order in which you programmedthe tracks and the “PRG” indicator appears on the displaywindow.Playback stops after playing the last programmed track onthe program list.
88 To resume normal playback from pro-grammed playback, select a track on theList and press PLAY.The “PRG” indicator disappears from the display window.
Repeat Programmed Tracks
Press REPEAT to select a desired repeat mode.• TRACK : repeats the current track.• ALL : repeats all the Programmed tracks.• OFF (no display) : no repeat play
Erasing a Track from the Program List1 Select the track you want to erase from the Program
List and press ENTER.The options appear on the left side of the menu.
2 Select the Delete icon and press ENTER.The selected track is deleted on the Program List.
3 Repeat steps 1-2 to delete additional tracks on theProgram List.
Erasing multiple tracks from the Program List1. Select a track on the Program List and press
MARKER.
2. Repeat step 1 to mark additional tracks.
3. Select any track and press ENTER.The options appear on the left side of the menu.
4. Use v / V to highlight the “Delete” icon and pressENTER.All the marked tracks are deleted from the ProgramList.
Changing the order of the Program List
1 Select the track you wish to move on the ProgramList then press ENTER.The options appear on the left side of the menu.
2 Select Move then press ENTER.A yellow bar appears in the Program List.
3 Use v/V to move the yellow bar to the desired loca-tion, then press ENTER.The selected track is moved.
4 If you wish to move other tracks repeat stages 1 - 3.
ipUse MARKER to move multiple tracks.
05/12
Track 5
Track 1Track 2Track 3Track 4Track 5Track 6Track 7Track 8Track 9Track 10
Track 5Track 2Track 8Track 4
Audio CD
00:42
Title Program List
Program CloseMarkMARKERSelect LIST
MP3 CD
9/152
02:13
FILE 9.mp3
ROOT Program List
FILE 1.mp3FILE 2.mp3FILE 3.mp3FILE 4.mp3FILE 5.mp3FILE 6.mp3
FILE 6.mp3
FILE 7.mp3FILE 8.mp3FILE 9.mp3
FILE 2.mp3FILE 4.mp3
FILE 9.mp3
FILE 10.mp3
Program CloseMarkMARKERSelect LIST

Photo Disc Operations
Viewing a Photo DiscThis VCR/DVD Recorder can play discs with JPEGfiles. Before playing JPEG files, read the notes onJPEG files at right.
1 Insert a disc and close the tray.The Photo menu appears on the TV screen.
22 Use v / V / b / B to select a folder and pressENTER.The Open icon is highlighted on the left side of themenu.
33 Press ENTER.A list of files in the folder appears.
ote
If the icon displays in a JPEG file list, it means youcannot see those JPEG files.
44 Use v / V / b / B to select a file and pressENTER.The options appears on the left side of the menu.
ipIf you are in a file list and want to return to the Folderlist, use the v / V buttons on the remote to highlight the
icon and press ENTER.
55 Use v / V to select the Full Screen option thenpress ENTER.
66 To stop viewing at any time, press STOP orRETURN (O).The Photo menu appears.
Selecting other FilesWhile viewing a picture, press SKIP (./>) or b / Bonce to advance to the next file or return to the previousfile.
To rotate the pictureUse v / V while showing a picture to flip the picture clockwise or counterclockwise.
To view Slide Show1. Select the Slide Show option on the menu.
2. Press ENTER.The Slide Show menu appears.
3. Use v / V / b / B to set the options.Object: All files or a Selected file. Speed: Selects Slide Show speed (Slow, Normal,Fast).
4. Select START, then press ENTER to start SlideShow.
oteUse the MARKER button to select multiple files.
Notes on JPEG Files
Depending on the size and number of the JPEG files,it could take a long time for the DVD player to readthe disc’s content. If you don’t see an on-screen dis-play after several minutes, some of the files are toobig — reduce the resolution of the JPEG files to lessthan 4 mega pixels and burn another disc.
The total number of files and folders on the disc arefree but the total number of files and folders on thefolder should be less than 1999.Some discs may be incompatible due to differentrecording formats or the condition of the disc.
When you are using software such as “Easy CDCreator” to burn jpeg files on a CD-R, ensure that allthe selected files have the “.jpg” extension beforecopying onto the CD.
If the files have “.jpe” or “.jpeg” extensions, renamethem as “.jpg” files.
File names without the “.jpg” extension will not beread by this VCR/DVD Recorder, even if the files areshown as JPEG image files in Windows Explorer.
On a mixed CD with audio titles, MP3 files, and JPEGfiles, you can switch the AUDIO CD menu, MP3 CDmenu, and Photo CD menu by pressing the TITLEbutton repeatedly in STOP mode.
JPEG
37
PL
AY
BA
CK
MP3Select MARKER TITLEMark
Photo
JPEG Folder 01 Folder 02
Folder 03 Folder 04 Folder 05
Folder 08Folder 06 Folder 07
Start
Object
Speed
Slide Show
Cancel
AllNormal
PhotoJPEG
MP3Select MARKER TITLEMark
4/20 90 90 Stop HidePrev Next
File 03.jpg

VCR Mode Tape Playback
38
PreparationBefore using the remote control, press the VCR but-ton to select the device to be operated.Turn the TV on and select the video input source con-nected to the VCR/DVD Recorder. Audio system: Turn the audio system on and selectthe input source connected to the VCR/DVDRecorder.
Normal Playback
11 Insert a prerecorded video cassette.The indicator will light and the VCR/DVD Recorderwill power-up automatically.
Make sure that the TIMER indicator in the display window is not lit. If it is, press POWER once.If a tape without a safety tab is inserted, the unit willstart playback automatically.
22 Press PLAY (N) once.PLAY icon appears on the TV screen.
It is not necessary to select the tape speed for play-back. It will be automatically selected by the VCR/DVDRecorder.
In playback, the TV/VCR selector switches to VCRmode automatically.
33 Press STOP (x) to stop playback.STOP icon appears on the TV screen.If the tape reaches the end before STOP (x) is pressed,the VCR/DVD Recorder will automatically stop, rewind,eject the tape, and turn itself off.
oteClosed-Captioned signal is not output even if the VCR/DVDRecorder plays tapes with Closed Caption (CC).
Tracking Control Auto TrackingThe automatic tracking function adjusts the picture toremove snow or streaks.The AUTO TRACKING function works in the followingcases:
A tape is played back for the first time.Tape speed (SP, LP, SLP) changes.Streaks or snow appear because of scratches on the tape.
Manual TrackingIf noise appears on the screen during playback, presseither CH/TRK (v/V) on the remote control or CHANNEL (v/V) on the front panel until the noise onthe screen is reduced.
In case of vertical jitter, adjust these controls very carefully.Tracking is automatically reset to normal when the tape isejected or the power cord is unplugged for more than 3 sec-onds.
Special Effects Playback Note on Special effects playback
Horizontal lines (noise bars) may appear on the TV screen dur-ing special effects. This is normal.The audio is automatically muted during special effect modes,so there is no sound during search.During the high-speed picture search modes, a short time isneeded to stabilize tape speed when re-entering the PLAYmode. Slight interference may be observed during this time.
SearchThis function lets you quickly and visually search for adesired tape section in either direction: forward andreverse.
1 Press REW (m) or FF (M) during playback.The VCR/DVD Recorder will enter SEARCH mode.
If the VCR/DVD Recorder is left in the SEARCH mode formore than 3 minutes, the VCR/DVD Recorder will auto-matically enter the PLAY mode to protect the tape andvideo heads.
2 To return to playback, press PLAY (N).
Still Picture and Frame-by-Frame Playback1 Press PAUSE/STILL (X) during playback.
A still picture appears on the TV screen.If a still picture vibrates vertically, stabilize it by usingCH/TRK (v/V) on the remote control.If the VCR/DVD Recorder is left in the STILL mode formore than 5 minutes, the VCR/DVD Recorder will auto-matically enter the STOP mode to protect the tape andvideo heads.
2 Press PAUSE/STILL (X) repeatedly to advance the video picture one frame at a time while viewing stillpictures.
3 To return to playback, press PLAY (N).
Slow Motion1 While in still mode, press FF (M).
The tape will be played back at a speed 1/19 timesslower than the normal speed.
During slow playback, use CH/TRK (v/V) on the RemoteControl to minimize noise bands.If slow motion mode continues for more than 3 minutes,the VCR/DVD Recorder will automatically change to nor-mal play mode.
2 To return to playback, press PLAY (N).
Counter Memory Function This is useful if there is a section of tape you want toview immediately after recording or if you want to returnto the same point several times.1 Begin recording or playing a tape.2 Press DISPLAY repeatedly to display the real-time
counter on the TV screen.3 At the point you want to locate later, reset the real-
time counter to 0:00:00 by pressing CLEAR.Continue to play or record.4 Press STOP when recording or playback finishes.5 Press RETURN (O).
The tape automatically stops when the tape counterreturns to about “0:00:00”.
VHS
VHS
VHS
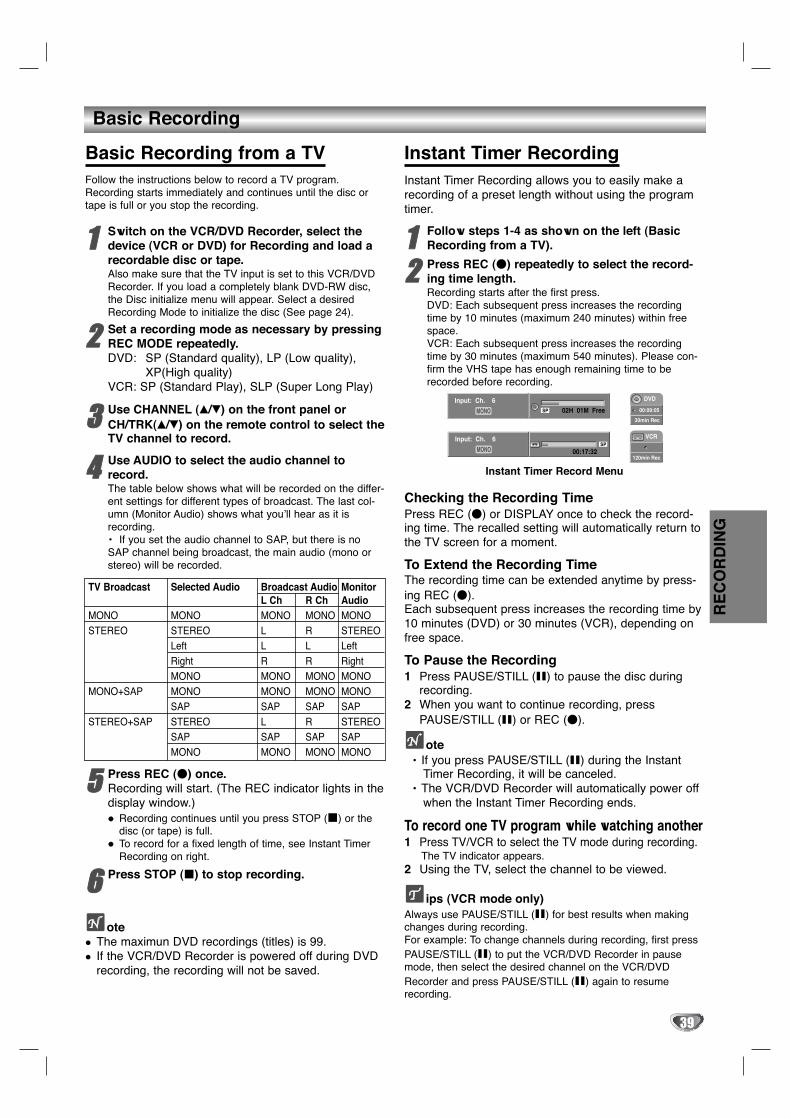
Basic Recording
Basic Recording from a TVFollow the instructions below to record a TV program.Recording starts immediately and continues until the disc ortape is full or you stop the recording.
11 Switch on the VCR/DVD Recorder, select thedevice (VCR or DVD) for Recording and load arecordable disc or tape.Also make sure that the TV input is set to this VCR/DVDRecorder. If you load a completely blank DVD-RW disc,the Disc initialize menu will appear. Select a desiredRecording Mode to initialize the disc (See page 24).
22 Set a recording mode as necessary by pressingREC MODE repeatedly. DVD: SP (Standard quality), LP (Low quality),
XP(High quality)VCR: SP (Standard Play), SLP (Super Long Play)
33 Use CHANNEL (v/V) on the front panel orCH/TRK(v/V) on the remote control to select theTV channel to record.
44 Use AUDIO to select the audio channel torecord.The table below shows what will be recorded on the differ-ent settings for different types of broadcast. The last col-umn (Monitor Audio) shows what you’ll hear as it isrecording.• If you set the audio channel to SAP, but there is noSAP channel being broadcast, the main audio (mono orstereo) will be recorded.
55 Press REC (z) once.Recording will start. (The REC indicator lights in thedisplay window.)
Recording continues until you press STOP (x) or thedisc (or tape) is full.To record for a fixed length of time, see Instant TimerRecording on right.
66 Press STOP (x) to stop recording.
oteThe maximun DVD recordings (titles) is 99.If the VCR/DVD Recorder is powered off during DVDrecording, the recording will not be saved.
Instant Timer RecordingInstant Timer Recording allows you to easily make arecording of a preset length without using the programtimer.
11 Follow steps 1-4 as shown on the left (BasicRecording from a TV).
22 Press REC (z) repeatedly to select the record-ing time length.Recording starts after the first press.DVD: Each subsequent press increases the recordingtime by 10 minutes (maximum 240 minutes) within freespace. VCR: Each subsequent press increases the recordingtime by 30 minutes (maximum 540 minutes). Please con-firm the VHS tape has enough remaining time to berecorded before recording.
Instant Timer Record Menu
Checking the Recording TimePress REC (z) or DISPLAY once to check the record-ing time. The recalled setting will automatically return tothe TV screen for a moment.
To Extend the Recording TimeThe recording time can be extended anytime by press-ing REC (z).Each subsequent press increases the recording time by10 minutes (DVD) or 30 minutes (VCR), depending onfree space.
To Pause the Recording1 Press PAUSE/STILL (X) to pause the disc during
recording.2 When you want to continue recording, press
PAUSE/STILL (X) or REC (z).
ote• If you press PAUSE/STILL (X) during the Instant
Timer Recording, it will be canceled.• The VCR/DVD Recorder will automatically power off
when the Instant Timer Recording ends.
To record one TV program while watching another1 Press TV/VCR to select the TV mode during recording.
The TV indicator appears.2 Using the TV, select the channel to be viewed.
ips (VCR mode only)Always use PAUSE/STILL (X) for best results when makingchanges during recording.For example: To change channels during recording, first pressPAUSE/STILL (X) to put the VCR/DVD Recorder in pausemode, then select the desired channel on the VCR/DVDRecorder and press PAUSE/STILL (X) again to resumerecording.
39
RE
CO
RD
ING
TV Broadcast Selected Audio Broadcast Audio MonitorL Ch R Ch Audio
MONO MONO MONO MONO MONOSTEREO STEREO L R STEREO
Left L L LeftRight R R RightMONO MONO MONO MONO
MONO+SAP MONO MONO MONO MONOSAP SAP SAP SAP
STEREO+SAP STEREO L R STEREOSAP SAP SAP SAPMONO MONO MONO MONO
VCR
120min Rec
DVD
00:09:05
30min Rec
MONO
Input: Ch. 6
00:17:32SP
MONO
Input: Ch. 602H 01M FreeSP

Copying from DVD to VCRThis unit allows you to copy the contents of a DVD (ordisc,) to a VHS tape using EASY DUB button.
oteIf the DVD (or disc,) is copy protected, you will not beable to copy the disc. It is not permitted to copyMacrovision encoded DVDs (or discs). “Copy-protected.Cannot record.” is displayed on the TV screen.
11 Insert a Disc.Insert the disc you wish to copy in the DVD deckand close the disc tray.
22 Insert a VHS Tape.Insert a blank VHS video tape into the VCR deck.
33 Select DVD mode by pressing DVD on theremote control or pressing DVD/VCR on thefront panel.
44 Find the place on the DVD (or Disc) from whichyou want to start recording using the PLAY andPAUSE functions.
55 Press the EASY DUB button on the remote con-trol or on the front panel.The Copy to VCR menu appears.
66 Use vv / VV / bb / BB to select the desired RecordMode (SP (Standard Play), SLP (Super LongPlay, 3 times SP)).
77 Select Copy then press ENTER or EASY DUB tostart copying.
ipIf you press PAUSE during Copy mode, both the DVD andVCR decks go into Pause mode and the “COPY” indicatorblinks on the front panel display. While in Pause mode,you can adjust the DVD playback position using PLAY,REW, FF, PAUSE/STILL, etc. The VCR deck will remain inPause mode. To resume copying, press the EASY DUBbutton twice.
88 Stop the Copy ProcessTo stop copying at any other time, press STOP (x).You must stop the Copy process manually when theDVD movie ends, or the unit may replay and recordover and over again.
Copying from VCR to DVDThis unit allows you to copy the contents of a VHS to aDVD-R or a DVD-RW using the EASY DUB button.
oteIf the VHS video tape is copy protected, you will not beable to copy the tape. It is not permitted to copyMacrovision encoded tapes.
11 Insert a VHS Tape.Insert a VHS video tape you wish to copy into theVCR deck.
22 Insert a DVD-R or DVD-RW disc.Insert a blank DVD-R or DVD-RW disc in the DVDdeck and close the disc tray.
oteWhen using a new DVD-RW disc, you must initial-ize it before copying (See page 24).
33 Select VCR mode by pressing VCR on theremote control or pressing DVD/VCR on thefront panel.
44 Find the place on the VHS tape from which youwant to start recording using the PLAY, FF, REWand PAUSE functions.For best results, pause playback at the point from whichyou want to record.
55 Press the EASY DUB button on the remote con-trol or on the front panel.The Copy to DVD menu appears.
66 Use vv / VV / bb / BB to select the desired RecordMode (LP (Low Quality), SP (Standard Quality),XP (High Quality)).
77 Select Copy then press ENTER or EASY DUB tostart copying.
ipIf you press PAUSE during Copy mode, both the DVD andVCR decks go into Pause mode and the “COPY” indicatorblinks on the front panel display. While in Pause mode,you can adjust the VCR playback position using PLAY,REW, FF, PAUSE/STILL, etc. The DVD deck will remain inPause mode. To resume copying, press the EASY DUBbutton twice.
88 Stop the Copy ProcessTo stop copying at any other time, press STOP (x).Copying will stop automatically when the VHS tapeends. Subsequently the VCR/DVD Recorder willrewind the tape and eject it, then the VCR/DVDRecorder will be turned off.ote
• The VCR/DVD Recorder cannot be turned off whilecopying to VCR or DVD.
• When the Copy process is stopped usingPAUSE/STILL (X), pressing the PAUSE/STILL (X)button does not resume the Copy process.
40
Basic Recording
Copy
Free Space
Rec. Mode
Copy to VCR
- - %SP
Stop
Copy
Free SpaceRec. Mode
Copy to DVD
01:54MSP
Stop
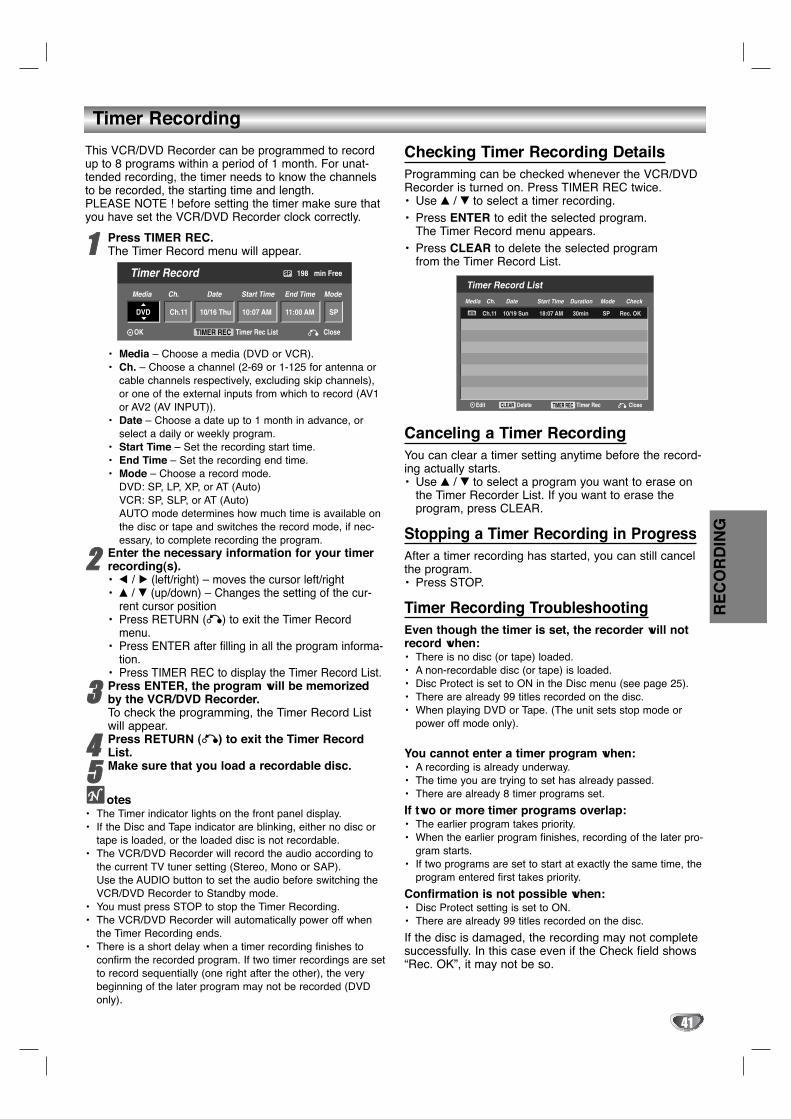
Timer Recording
This VCR/DVD Recorder can be programmed to recordup to 8 programs within a period of 1 month. For unat-tended recording, the timer needs to know the channelsto be recorded, the starting time and length.PLEASE NOTE ! before setting the timer make sure thatyou have set the VCR/DVD Recorder clock correctly.
11 Press TIMER REC.The Timer Record menu will appear.
• Media – Choose a media (DVD or VCR).• Ch. – Choose a channel (2-69 or 1-125 for antenna or
cable channels respectively, excluding skip channels),or one of the external inputs from which to record (AV1or AV2 (AV INPUT)).
• Date – Choose a date up to 1 month in advance, orselect a daily or weekly program.
• Start Time – Set the recording start time.• End Time – Set the recording end time.• Mode – Choose a record mode.
DVD: SP, LP, XP, or AT (Auto)VCR: SP, SLP, or AT (Auto)AUTO mode determines how much time is available onthe disc or tape and switches the record mode, if nec-essary, to complete recording the program.
22 Enter the necessary information for your timerrecording(s).• b / B (left/right) – moves the cursor left/right• v / V (up/down) – Changes the setting of the cur-
rent cursor position• Press RETURN (O) to exit the Timer Record
menu.• Press ENTER after filling in all the program informa-
tion.• Press TIMER REC to display the Timer Record List.
33 Press ENTER, the program will be memorizedby the VCR/DVD Recorder.To check the programming, the Timer Record Listwill appear.
44 Press RETURN (O) to exit the Timer RecordList.
55 Make sure that you load a recordable disc.
otes• The Timer indicator lights on the front panel display.• If the Disc and Tape indicator are blinking, either no disc or
tape is loaded, or the loaded disc is not recordable.• The VCR/DVD Recorder will record the audio according to
the current TV tuner setting (Stereo, Mono or SAP).Use the AUDIO button to set the audio before switching theVCR/DVD Recorder to Standby mode.
• You must press STOP to stop the Timer Recording.• The VCR/DVD Recorder will automatically power off when
the Timer Recording ends.• There is a short delay when a timer recording finishes to
confirm the recorded program. If two timer recordings are setto record sequentially (one right after the other), the verybeginning of the later program may not be recorded (DVDonly).
Checking Timer Recording DetailsProgramming can be checked whenever the VCR/DVDRecorder is turned on. Press TIMER REC twice.• Use v / V to select a timer recording.• Press ENTER to edit the selected program.
The Timer Record menu appears.• Press CLEAR to delete the selected program
from the Timer Record List.
Canceling a Timer RecordingYou can clear a timer setting anytime before the record-ing actually starts.• Use v / V to select a program you want to erase on
the Timer Recorder List. If you want to erase the program, press CLEAR.
Stopping a Timer Recording in ProgressAfter a timer recording has started, you can still cancelthe program.• Press STOP.
Timer Recording TroubleshootingEven though the timer is set, the recorder will notrecord when:• There is no disc (or tape) loaded.• A non-recordable disc (or tape) is loaded.• Disc Protect is set to ON in the Disc menu (see page 25).• There are already 99 titles recorded on the disc.• When playing DVD or Tape. (The unit sets stop mode or
power off mode only).
You cannot enter a timer program when:• A recording is already underway.• The time you are trying to set has already passed.• There are already 8 timer programs set.
If two or more timer programs overlap:• The earlier program takes priority.• When the earlier program finishes, recording of the later pro-
gram starts.• If two programs are set to start at exactly the same time, the
program entered first takes priority.
Confirmation is not possible when:• Disc Protect setting is set to ON.• There are already 99 titles recorded on the disc.
If the disc is damaged, the recording may not completesuccessfully. In this case even if the Check field shows“Rec. OK”, it may not be so.
41
RE
CO
RD
ING
TIMER REC
Media Ch. Date Start Time End Time Mode
Timer Record
OK Timer Rec List Close
198 min Free
Ch.11DVD 10/16 Thu 10:07 AM 11:00 AM SP
SP
Media Start Time DurationDateCh. Mode Check
Timer Record List
Edit CloseDeleteCLEAR
10/19 SunCh.11 18:07 AM 30min SP Rec. OK
Timer RecTIMER REC
Recording from an External Input
42
Recording from External ComponentsYou can record from an external component, such as acamcorder or VCR connected to any of the recorder’sexternal inputs.
11 Make sure that the component you want torecord from is connected properly to theVCR/DVD Recorder. See page 17.
22 Press INPUT repeatedly to select the externalinput to record from.• AV1: Audio/Video Input on back panel • AV2 (AV INPUT): Audio/Video Input on front panel • DV: DV Input on front panel
oteCheck that the Audio In settings for DV Record Audioare set appropriately. See page 24.
33 Load a recordable disc or tape.
44 Set a recording mode by pressing REC MODErepeatedly. DVD: SP (Standard quality), LP (Low quality),
XP(High quality)VCR: SP (Standard Play), SLP (Super Long Play)
55 Press REC (z) once.Recording will start. (The REC indicator lights in thedisplay window.)
Recording continues until you press STOP (x) or thedisc (or tape) is full.To record for a fixed length of time, see Instant TimerRecording on page 39.
66 Press STOP (x) to stop recording.
oteIf your source is copy-protected using Copy Guard, you will notbe able to record it using this VCR/DVD Recorder. SeeCopyright on page 8 for more details.
Recording from a Digital CamcorderYou can record from a digital camcorder connected tothe DV IN jack on the front panel of this VCR/DVDRecorder. You can use the VCR/DVD Recorder’sremote control to control both the camcorder and theVCR/DVD Recorder. Before recording, make sure that the audio input for theDV IN jack is set up (see page 24).
ips• The source signal must be DVC-SD format.• Some camcorders cannot be controlled using this
VCR/DVD Recorder’s remote control.• If you connect a second VCR/DVD Recorder using a DV
cable, you cannot control the second DVD from this one.• You cannot control this VCR/DVD Recorder remotely
from a component connected to the DV IN jack.• You cannot record date and time information from a
DV cassette.
11 Make sure your digital camcorder is connectedto DV IN jack on the front panel. See page 17.
22 Check that the DV audio input is set appropri-ately.You can choose Audio 1 (original audio) or Audio 2 (over-dubbed audio).• The DV Input is set in DV Record Audio of the General
menu. See DV Record Audio on page 24 for more infor-mation.
33 Press INPUT repeatedly to select the DV input.DV appears in the display window.
44 Find the place on the camcorder tape that youwant the recording to start from.For best results, pause playback at the point from whichyou want to record.• Depending on your camcorder, you can use this
VCR/DVD Recorder’s remote control to control thecamcorder using the STOP, PLAY, and PAUSE func-tions.
55 Press REC (z) once to start recording.
• Recording is automatically stopped if the recorderdetects no signal.
• You can pause or stop the recording by pressingPAUSE/STILL (X) or STOP (x). You cannot control thecamcorder from this remote control during recording.
• In Video mode, the final frame of the recording mayremain displayed on the screen for a few moments afterrecording stops.
Playing Recordings on Other DVD PlayersMost regular DVD players can play finalized discsrecorded in Video mode. A few players can also playDVD-RW discs recorded in VR mode, finalized or not.Check the manual that came with the other player tocheck what kinds of discs it will play.
Finalizing a Disc
Finalizing “fixes” the recordings in place so that thedisc can be played on a regular DVD player or com-puter equipped with a suitable DVD-ROM drive.Finalizing a Video mode disc creates a menu screenfor navigating the disc. This is accessed by pressingDISC MENU/LIST or TITLE. To finalize a disc, referto “DISC Finalize” on page 25.

Recording from an External Input (Continued)
What is DV?Using DV, also known as i.LINK, you can connect a DV-equipped camcorder to this VCR/DVD Recorderusing a single DV cable for input and output of audio,video, data, and control signals.The i.LINK interface is also known as IEEE 1394-1995.“i.LINK” and the “i.LINK” logo are trademarks.• This VCR/DVD Recorder is only compatible with DV-
format (DVC-SD) camcorders. Digital satellite tunersand Digital VHS video recorders are not compatible.
• You cannot connect more than one DV camcorder ata time to this VCR/DVD Recorder.
• You cannot control this VCR/DVD Recorder fromexternal equipment connected via the DV IN jack(including two DVD Recorders).
• It may not always be possible to control the connect-ed camcorder via the DV IN jack.
• Digital camcorders can usually record audio as stereo16-bit/48kHz, or twin stereo tracks of 12-bit/32kHz.This VCR/DVD Recorder can only record one stereoaudio track. Set DV Record Audio to Audio 1 or Audio2 as necessary (see page 24).
• Audio input to the DV IN jack should be 32 or 48kHz(not 44.1kHz).
• Picture disturbance on the recording may occur if thesource component pauses playback or plays anunrecorded section of tape, or if the power fails in thesource component, or the DV cable becomes discon-nected.
• If DV Rec Audio is set to Audio 2, but no Audio 2 sig-nal is present, DV Audio will be reset to Audio 1 auto-matically.
DV-Related Messages
You may see the following messages appear on yourTV screen when using the DV IN jack.
Camcorder not connectedThe camcorder is not connected properly, or the cam-corder is switched off.
Too many devices connectedThe DV IN jack on this VCR/DVD Recorder supportsconnection to just one camcorder.
Check tapeThere is no cassette loaded into the connected equip-ment.
Uncontrollable deviceThis VCR/DVD Recorder cannot control the camcorder.
Updating device informationCamcorder is updating information for DV.
Camera ModeCamcorder is set to camera mode.
Troubleshooting
If you cannot get a picture and/or audio through the DVIN jack, check the following:• Make sure the DV cable is properly connected.• Try switching off the connected equipment, then
switching it back on.• Try switching the audio input.
oteDepending on the connected camcorder, you may notbe able to control it using the remote control suppliedwith this VCR/DVD Recorder.
43
RE
CO
RD
ING

VR Mode: Original and Playlist Editing
44
When you edit Original content, the actual content ofthe disc is changed. For example, if you delete a title orchapter of Original content, that title or chapter is delet-ed from the disc. Consequently, extra recording time iscreated.When you edit a Playlist, on the other hand, you are notactually changing the content of the disc. For example,when you delete a title from a Playlist, you are justtelling the VCR/DVD Recorder not to play that title;nothing is actually deleted from the disc.
Titles, Chapters, and Parts
Titles in the disc’s original content contain one or morechapters. When you insert a title into the Playlist, all thechapters within that title also appear. In other words,chapters in the Playlist behave exactly as chapters on aDVD-Video disc do. Parts are sections of Original orPlaylist titles. From the Original and Playlist menu youcan add or delete parts. Adding a chapter or title to thePlaylist creates a new title made up of a section (i.e.,chapter) of an Original title. Deleting a part removespart of a title from the Original or Playlist menu.
Caution• When editing using the Delete, Add, and Move func-
tions, the start and end frames may not be exactly asset in the start and end point display.
• During Playlist playback, you may notice a momen-tary pause between edits. This is not a malfunction.
• It takes some time to record edited effects in a disc.So these effects may not be recorded if the powersupply is cut off just after editing operations (e.g.copy, deleting contents, rename, or moving playlist,etc.).
Adding Chapter Markers
You can put a chapter marker anywhere in a Playlist orOriginal title during recording or playback.Once the chapter is marked, you can use the ChapterSearch feature. You can also Erase, combine, andmove chapters in the Original-Chapter or Playlist-Chapter menu.You can insert up to 999 chapter markers in both theOriginal and Playlist contents.
11 Play the title (Original or Playlist).
22 At the point you want to start a new chapter,press CHP ADD.A chapter marker icon appears on the TV screen.• You can also put chapter markers in during recording.
Changing Title or Chapter Thumbnails
Each title and chapter displayed in the Original orPlaylist menu is represented by a thumbnail picturetaken from the start of that title or chapter.If you prefer, select a different still picture from within atitle.
11 Play the title (Original or Playlist).
22 Press THUMBNAIL to make the currently dis-played picture the one that appears in theOriginal or Playlist menu.The still picture that you choose appears in both theOriginal and Playlist Menus.
ipYou can also change the thumbnail picture of the title onthe Original-Chapter or Playlist-Chapter menu. Select achapter on the Original-Chapter or Playlist-Chaptermenu then press THUMBNAIL. The thumbnail picture ofthe title that includes the chapter is changed.
Thumb.DVD-RW VR
Chapter
DVD-RW VR
DVD-RW VR

VR Mode: Original and Playlist Editing (Continued)
Using the Original-Title Menu The Original-Title is where you build and edit yourPlaylist, and where you can delete titles and make otherchanges to the Original content of the disc. You canalso play individual titles directly from the Original-Titlemenu.
11 Press DISC MENU/LIST repeatedly to displaythe Original-Title menu.• Use the v / V buttons to display the previous/
next page if there are more than 6 titles.• To exit the Original-Title menu, press
RETURN (O).
oteTo switch between the Original (Title) and Playlist(Title) menu, press DISC MENU/LIST repeatedly.The Original and Playlist heading at the top of thescreen indicate which mode you are in.
22 To view Original-Title options, select the titleyou want then press ENTER.Original-Title options appear on the left side of thedisplay.
33 Use v / V to select an option then press ENTERto confirm.
Play: Starts playback of theselected title.
View Chap.: Shows theOriginal-Chapter menu of thetitle (refer to right on this page).
Rename: Edits the title name(page 47).
Delete: Deletes the title from theOriginal-Title menu (page 47).
Playlist Add: Adds the title tothe Playlist (page 48).
Delete Part: Deletes a part ofthe Title (page 50).
Copy to VCR: Copies the title toa VHS tape (page 40).
44 Press RETURN (O) repeatedly to exit Original-Title menu.
ipPress DISPLAY to display more detailed information onthe selected title.
Using the Original-Chapter Menu
11 Press DISC MENU/LIST repeatedly to displaythe Original-Title menu.
22 Use v / V / b / B to choose the title you want toview, then press ENTER.Original-Title options appear on the left side of themenu.
33 Use v / V to select “View Chap.” from Original-Title options, then press ENTER.The original-Chapter menu appears on the TVscreen.
44 To view Original-Chapter options, select thechapter you want then press ENTER.Original-Chapter options appear on the left side ofthe menu.
55 Use v / V to select an option then press ENTERto confirm.
Play: Starts playback of theselected chapter.
View Title: Shows the selectedTitle from the Original-Titlemenu (refer to left on thispage).
Delete: Deletes the chapterfrom the Original-Chaptermenu. (page 47)
Merge: Merges two chaptersinto one (page 49).
Playlist Add: Adds the chapterto the Playlist (page 48).
66 Press RETURN (O) repeatedly to exit Original-Chapter menu.
DVD-RW VR
DVD-RW VR
45
ED
ITIN
G
Original -Title
DVD-VR
1hour 57min
PlaylistLIST
FreeSP
CloseInfo.DISPLAYSelect
TITLE 110/12 0:25:20
TITLE 210/14 0:5:12
TITLE 310/16 0:2:34
1/4
TITLE 410/17 0:6:06
Play
View Chap.
Rename
Delete
Playlist Add
Delete Part
Copy to VCR
Original -Chapter
TITLE 110/12/2003 Wed 0:25:20 TV 11
1/3
PlaylistLIST CloseSelect
Play
View Title
Delete
Merge
Playlist Add

VR Mode: Original and Playlist Editing (Continued)
Using the Playlist-Title Menu
11 Press DISC MENU/LIST repeatedly to displaythe Playlist-Title menu.• Use the v/V buttons to display the previous/next
page if there are more than 6 titles or chapters.• To exit the Playlist-Title, press RETURN (O).
22 To view Playlist-Title options, select the title youwant then press ENTER.Playlist-Title options appear on the left side of themenu.
33 Use v / V to select an option then press ENTERto confirm.
Play: Starts playback of theselected title.
View Chap.: Shows thePlaylist-Chapter menu of thetitle (refer to right on this page).
Rename: Edits the title name(page 47).
Delete: Deletes the title from thePlaylist-Title menu (page 47).
Delete Part: Deletes a part ofthe Title (page 50).
Copy to VCR: Copies the title toa VHS tape. (page 40)
44 Press RETURN (O) repeatedly to exit Playlist-Title menu.
Using the Playlist-Chapter Menu
11 Press DISC MENU/LIST repeatedly to display thePlaylist-Title menu.
22 Use v / V / b / B to choose the title you want toview from the Playlist-title menu, then pressENTER.Playlist-Title options appear on the left side of themenu.
33 Use v / V to select “View Chap.” from thePlaylist-Title options, then press ENTER.The Playlist-Chapter menu appears on the TVscreen.
44 To view Playlist-Chapter options, select thechapter you want and press ENTER.Playlist-Chapter options appear on the left side ofthe Playlist-Chapter menu.
55 Use v / V to select an option, then press ENTERto confirm.
Play: Starts playback of theselected chapter.
View Title: Shows the Playlist-Title menu (refer to left on thispage).
Delete: Deletes the chapter fromthe Playlist-Chapter menu (page47).
Move: Moves a chapter to anew position with a title (page49).
Merge: Merges two chaptersinto one (page 49).
66 Press RETURN (O) repeatedly to exit Playlist-Chapter menu.
DVD-RW VRDVD-RW VR
46
Playlist -Title
TITLE 110/12 0:25:20
TITLE 210/14 0:5:12
1/2
OriginalLIST CloseSelect
Play
View Chap.
Rename
Delete
Delete Part
Copy to VCR
Playlist -Chapter
OriginalLIST CloseSelect
TITLE 110/12/2003 Wed 0:25:20 TV 11
1/3
Play
View Title
Delete
Move
Merge

VR Mode: Original and Playlist Editing (Continued)
Naming a Title
You can name Original and Playlist titles independently.Names can be up to 32 characters long.
11 Press DISC MENU/LIST repeatedly to displayOriginal-Title or Playlist-Title menu.
22 Use v / V / b / B to choose the title you want toname and press ENTER.Options appears on the left side of the menu.
Original-Title Playlist-Title
33 Use v/V to select “Rename” option, then pressENTER. The Keyboard menu appears.
44 Enter a name for the title. Use v / V / b / B toselect a character, then press ENTER to confirmyour selection. Refer to step 5 as shown onpage 26 (Disc Name).
55 Choose OK and press ENTER to fix the nameand return to the previous menu screen.
66 Press RETURN (O) repeatedly to exit themenu.
oteFor discs formatted on a different DVD Recorder, youwill see only a limited character set.
Deleting an Original or Playlist Title/Chapter
When you erase a title or chapter from the Playlistmenu, you only remove it from the Playlist; thetitle/chapter remains in the Original menu.
If you choose to delete a title or chapter from theOriginal (title/chapter) menu, the title or chapter is actu-ally deleted from the disc and the remaining time avail-able for recording increases. Titles/chapters deletedfrom the Original are also removed from the Playlist.
oteIt may not be possible to delete chapters that are lessthan 5 seconds long.
11 Press DISC MENU/LIST repeatedly to displaythe Original-Title or Playlist-Title menu.If you want to display the Original-Chapter orPlaylist-Chapter menu, refer to “Using Original-Chapter Menu” or “Using Playlist-Chapter Menu” onpages 45-46.
22 Use v / V / b / B to choose a chapter or titleyou want to delete, then press ENTER.Options appear on the left side of the screen.
33 Select “Delete”.
44 Press ENTER to confirm.The confirm message for deleting will appear.
55 Use b / B to select “Yes”, then press ENTER.The selected chapter or title is deleted.After pressing ENTER, the new, updated menu isdisplayed.
66 Repeat steps 2 - 5 to delete more from themenu.
77 Press RETURN (O) repeatedly to exit themenu.
DVD-RW VR
DVD-RW VR
47
ED
ITIN
G
01 2 3 4 5 6 7 8 9
A B C D E F G H I J
K L M N O P Q R S T
U V W X Y Z
TITLE 2
English/Latin CapitalLanguage
OK CancelSpace Delete
Play
View Chap.
Rename
Delete
Playlist Add
Delete Part
Copy to VCR
Play
View Chap.
Rename
Delete
Delete Part
Copy to VCR
Play
View Chap.
Rename
Delete
Playlist Add
Delete Part
Copy to VCR

Making a New Playlist
Use this function to add an Original title or chapter tothe Playlist. When you do this, the whole title is put intothe Playlist (you can delete bits you don’t need later —see Deleting an Original or Playlist Title/Chapter onpage 48).
The title appears in the Playlist complete with the chap-ter markers that appear in the Original. However, if youadd more chapter markers to the Original later, theseare not automatically copied over into the Playlist title.
You can add up to 999 chapters to one disc . If you onlywant to add a chapter of a title, use the Adding atitle/chapter to the Playlist on page 48.
11 Press DISC MENU/LIST repeatedly to displayOriginal-Title menu. If you want to display the Original-Chapter menu,refer to “Using the Original-Chapter menu” on page45.
22 Choose a title or chapter on the Original menuto put into the Playlist, then press ENTER.The Original (Title or Chapter) options appear onthe left side of the menu.
Original-Title Original-Chapter
33 Use v / V to select ‘Playlist Add’ from Originaloptions and press ENTER.
44 Select “New Playlist” and press ENTER.The new title appears in the updated Playlist. Allchapters of the title are added to the Playlist.
Adding Additional Title/Chapters to the Playlist
You can add an Original title or chapter to add to aPlaylist title even if it is already registered.
11 Press DISC MENU/LIST repeatedly to displayOriginal-Title menu. If you want to show the Original-Chapter menu,refer to “Using the Original-Chapter” on page 45.
22 Choose an Original title or chapter to put intothe Playlist, then press ENTER.Original menu options appear on the left side of thescreen.
Original-Title Original-Chapter
33 Use v / V to select “Playlist Add” from Originalmenu options and press ENTER.
44 Choose a Playlist-Title that is already registeredto insert a title or chapter, then press ENTER.The title or chapter appears in the updated Playlistmenu.
55 Repeat steps 1-4 to add other titles or chaptersto the Playlist.
66 Press RETURN (O) to exit, or DISC MENU/LISTto go back to the Original-Title menu.
DVD-RW VR
DVD-RW VR
VR Mode: Original and Playlist Editing (Continued)
48
New Playlist
Select Playlist.
TITLE 1
Play
View Chap.
Rename
Delete
Playlist Add
Delete Part
Copy to VCR
Play
View Title
Delete
Merge
Playlist Add
New Playlist
Select Playlist.
Play
View Chap.
Rename
Delete
Playlist Add
Delete Part
Copy to VCR
Play
View Title
Delete
Merge
Playlist Add
Playlist -Title
TITLE 110/12 0:25:20
TITLE 210/14 0:5:12
3/3
TITLE 310/19 0:17:23
OriginalLIST CloseSelect

VR Mode: Original and Playlist Editing (Continued)
Combining Two Chapters Into One
Use this function to combine two adjacent Playlist orOriginal chapters into one.
11 Press DISC MENU/LIST repeatedly to displaythe Original-Title or Playlist-Title menu. If you want to display the Original-Chapter orPlaylist-Chapter menu, refer to “Using the Original-Chapter Menu” and “Using the Playlist-ChapterMenu” on page 45-46.
22 First, select the second chapter of the two chap-ters you want to combine then press ENTER onthe Original-Chapter or Playlist-Chapter menu.Playlist-Chapter or Original-Chapter options appearon the left side of the screen.
Original-Chapter Playlist-Chapter
33 Use v / V to select “Merge” option then pressENTER.The Merge message for combining will appear.
44 Use b / B to select “Yes”, then press ENTER.After pressing ENTER, the new, updated menu isdisplayed.
55 Repeat steps 2 - 5 to merge more from themenu.
66 Press RETURN (O) repeatedly to exit themenu.
oteThis function cannot operate listed below;
• If there is only one chapter within the title.• If two chapters created by erasing a part from an
original title.• If two chapters created from different titles.• If two chapters created by moving an order from an
original title.• Edited chapters may not be combined.
Moving a Playlist Chapter
Use this function to re-arrange the playing order ofPlaylist chapters on the Playlist-Title menu.
11 Press DISC MENU/LIST repeatedly to displayPlaylist-Title menu.To display the Playlist-Chapter menu, refer to“Using the Playlist-Chapter Menu” on page 46.
oteThis function is not available if there is only one chapter.
22 Select a chapter you want to move to from thePlaylist-Chapter menu.
33 Press ENTER.Playlist-Chapter options appear on the left side ofthe screen.
44 Use v / V to select “Move” from Playlist options, then press ENTER.
55 Use v / V / b / B to choose the place you wantto move the chapter to and press ENTER.The confirm message for moving will appear.
66 Use b / B to select “Yes”, then press ENTER.After pressing ENTER, the updated menu is dis-played.
77 Repeat steps 2 - 6 to move more from the menu.
88 Press RETURN (O) repeatedly to exit themenu.
DVD-RW VR
DVD-RW VR
49
ED
ITIN
G
Play
View Title
Delete
Move
Merge
Play
View Title
Delete
Merge
Playlist Add
Play
View Title
Delete
Move
Merge
Playlist -Chapter
OriginalLIST CloseSelect
TITLE 110/12/2003 Wed 0:25:20 TV 11
1/3

VR Mode: Original and Playlist Editing (Continued)
Deleting a Part
You can delete a part from a title.
11 Press DISC MENU/LIST repeatedly to displayOriginal-Title or Playlist-Title menu.
22 Use v / V / b / B to choose a title you want todelete, then press ENTER.The options appear on the left side of the menu.
Original-Title Playlist-Title
33 Use v / V to select “Delete Part” then pressENTER.The Title Edit menu appears on the TV screen andthe VCR/DVD Recorder goes into Pause mode.The Start Point option is highlighted.
44 Use PLAY, PAUSE/STEP, FF, REW, and SlowMotion playback to find the starting point.
55 Press ENTER at the starting point of the seg-ment you want to erase.The segment is indicated in yellow on the ProgressBar. The End Point option is selected.
66 Use PLAY, PAUSE/STEP, FF, REW, and SlowMotion playback to find the ending point.
77 Press ENTER at the ending point of the sectionyou want to edit.The Done option is selected.To cancel the Edit mode, select Cancel using v / V
then press ENTER.
88 Press ENTER to delete the selected part.When the confirm menu appears, select “Yes” usingb / B then press ENTER.To erase additional segments, repeat steps 4-8.
99 When finished editing, press RETURN (O)repeatedly to exit the menu.The Original (Title) or Playlist (Title) menu appears.
oteIf you select the Cancel icon and press ENTER, theVCR/DVD Recorder will go to the start point of the titleand into Pause mode.
DVD-RW VR
50
Play
View Chap.
Rename
Delete
Playlist Add
Delete Part
Copy to VCR
Play
View Chap.
Rename
Delete
Delete Part
Copy to VCR
Title Edit
Move PointSelect
Start Point
Play & Select the Start Point
-Delete Part
End PointCancelDone
00:00:00
Start
End
TITLE 210/14 0:34:12
Close

Video Mode: Original Editing
Using the Title List
From the Title List display you can play, name, anderase titles.Once a Video mode disc is finalized, the Title Listscreen changes its appearance and you can only selecttitles to play.
11 Press DISC MENU/LIST to display the Title List.
22 Use v / V to choose a title and press ENTER.Title List options appear on the left side of the TitleList display.For more information, press DISPLAY.
33 Use v / V to select an option and press ENTERto confirm.
Play: Starts playback of theselected title.
Rename: Edits the title name(page 47).
Delete: Deletes the title from theTitle List.Copy to VCR: Copies the title toa VHS tape. (page 40)
44 Press RETURN (O) repeatedly to exit Title List.
Deleting a Title
Before a disc is finalized, you can erase titles recordedon the disc.
Caution• If you erase a title from a DVD-R disc, the title will
disappear from the Title List, but the available record-ing time will not increase.
• When erasing a title from a DVD-RW disc, theremaining time available for recording will onlyincrease if it is the last title on the disc.
11 Press DISC MENU/LIST to display Title List.
22 Use v / V / b / B to choose a title you want toerase and press ENTER.Title List options appear on the left side of the TitleList screen.
33 Use v / V to select “Delete” then press ENTERto confirm.The confirm message for deleting will appear.
44 Use b / B to select “Yes” then press ENTER.The selected chapter or title is deleted.After pressing ENTER, the new, updated menu isdisplayed.
55 Repeat steps 2 - 4 to continue to delete from themenu.
66 Press RETURN (O) repeatedly to exit themenu.
If the disc has already been finalized
You will see a screen as shown below.
DVD-VideoDVD-Video
51
ED
ITIN
G
Play
Rename
Delete
Copy to VCR
Play
Rename
Delete
Copy to VCR
Title List
DVD VIDEO TITLE 1 1/ 3 0:02:01
TITLE 2 1/ 3 0:06:21
TITLE 3 4/ 15 0:52:31
CloseInfo.
1/3
DISPLAYSelect
1hour 57minFreeSP
Title DurationDate
DVD VIDEO 1/1
PAGEUP
PAGEDOWN
EXIT
1 TITLE 1 1/03 0:02:01
2 TITLE 2 1/03 0:24:12
3 TITLE 3 1/03 0:36:30
Disc name
Title list
Exits the Title List screen.
Moves to the next or previous page.
Indicates total and current page number.
52
Language Code List
Language Code
Abkhazian 6566
Afar 6565
Afrikaans 6570
Albanian 8381
Amharic 6577
Arabic 6582
Armenian 7289
Assamese 6583
Aymara 6588
Azerbaijani 6590
Bashkir 6665
Basque 6985
Bengali, Bangla 6678
Bhutani 6890
Bihari 6672
Breton 6682
Bulgarian 6671
Burmese 7789
Byelorussian 6669
Cambodian 7577
Catalan 6765
Chinese 9072
Corsican 6779
Croatian 7282
Czech 6783
Danish 6865
Dutch 7876
English 6978
Esperanto 6979
Estonian 6984
Faeroese 7079
Language Code
Fiji 7074
Finnish 7073
French 7082
Frisian 7089
Galician 7176
Georgian 7565
German 6869
Greek 6976
Greenlandic 7576
Guarani 7178
Gujarati 7185
Hausa 7265
Hebrew 7387
Hindi 7273
Hungarian 7285
Icelandic 7383
Indonesian 7378
Interlingua 7365
Irish 7165
Italian 7384
Japanese 7465
Javanese 7487
Kannada 7578
Kashmiri 7583
Kazakh 7575
Kirghiz 7589
Korean 7579
Kurdish 7585
Laothian 7679
Latin 7665
Latvian, Lettish 7686
Language Code
Lingala 7678
Lithuanian 7684
Macedonian 7775
Malagasy 7771
Malay 7783
Malayalam 7776
Maltese 7784
Maori 7773
Marathi 7782
Moldavian 7779
Mongolian 7778
Nauru 7865
Nepali 7869
Norwegian 7879
Oriya 7982
Panjabi 8065
Pashto, Pushto 8083
Persian 7065
Polish 8076
Portuguese 8084
Quechua 8185
Rhaeto-Romance 8277
Romanian 8279
Russian 8285
Samoan 8377
Sanskrit 8365
Scots Gaelic 7168
Serbian 8382
Serbo-Croatian 8372
Shona 8378
Sindhi 8368
Language Code
Singhalese 8373
Slovak 8375
Slovenian 8376
Somali 8379
Spanish 6983
Sudanese 8385
Swahili 8387
Swedish 8386
Tagalog 8476
Tajik 8471
Tamil 8465
Tatar 8484
Telugu 8469
Thai 8472
Tibetan 6679
Tigrinya 8473
Tonga 8479
Turkish 8482
Turkmen 8475
Twi 8487
Ukrainian 8575
Urdu 8582
Uzbek 8590
Vietnamese 8673
Volapük 8679
Welsh 6789
Wolof 8779
Xhosa 8872
Yiddish 7473
Yoruba 8979
Zulu 9085
Enter the appropriate code number for the initial settings “Disc Audio”, “Disc Subtitle” and/or “Disc Menu” (See page 20).

Country Code List
Country CodeAfghanistan AFAlbania ALAlgeria DZAmerican Samoa ASAndorra ADAngola AOAnguilla AIAntarctica AQAntigua and Barbuda AGArgentina ARArmenia AMAruba AWAustralia AUAustria ATAzerbaidjan AZBahamas BSBahrain BHBangladesh BDBarbados BBBelarus BYBelgium BEBelize BZBenin BJBermuda BMBhutan BTBolivia BOBosnia-Herzegovina BABotswana BWBouvet Island BVBrazil BRBritish Indian
Ocean Territory IOBrunei Darussalam BNBulgaria BGBurkina Faso BFBurundi BICambodia KHCameroon CMCanada CACape Verde CVCayman Islands KYCentral African Republic CFChad TDChile CLChina CNChristmas Island CXCocos (Keeling) Islands CCColombia COComoros KMCongo CGCook Islands CKCosta Rica CRCroatia HRCuba CUCyprus CYCzech Republic CZDenmark DKDjibouti DJDominica DMDominican Republic DOEast Timor TPEcuador ECEgypt EG
Country CodeEl Salvador SVEquatorial Guinea GQEritrea EREstonia EEEthiopia ETFalkland Islands FKFaroe Islands FOFiji FJFinland FIFormer Czechoslovakia CSFormer USSR SUFrance FRFrance (European Territory) FXFrench Guyana GFFrench Southern Territories TFGabon GAGambia GMGeorgia GEGermany DEGhana GHGibraltar GIGreat Britain GBGreece GRGreenland GLGrenada GDGuadeloupe (French) GPGuam (USA) GUGuatemala GTGuinea GNGuinea Bissau GWGuyana GYHaiti HTHeard and
McDonald Islands HMHonduras HNHong Kong HKHungary HUIceland ISIndia INIndonesia IDIran IRIraq IQIreland IEIsrael ILItaly ITIvory Coast CIJamaica JMJapan JPJordan JOKazakhstan KZKenya KEKiribati KIKuwait KWKyrgyzstan KGLaos LALatvia LVLebanon LBLesotho LSLiberia LRLibya LYLiechtenstein LILithuania LTLuxembourg LU
Country CodeMacau MOMacedonia MKMadagascar MGMalawi MWMalaysia MYMaldives MVMali MLMalta MTMarshall Islands MHMartinique (French) MQMauritania MRMauritius MUMayotte YTMexico MXMicronesia FMMoldavia MDMonaco MCMongolia MNMontserrat MSMorocco MAMozambique MZMyanmar MMNamibia NANauru NRNepal NPNetherlands NLNetherlands Antilles ANNew Caledonia (French) NCNew Zealand NZNicaragua NINiger NENigeria NGNiue NUNorfolk Island NFNorth Korea KPNorthern Mariana Islands MPNorway NOOman OMPakistan PKPalau PWPanama PAPapua New Guinea PGParaguay PYPeru PEPhilippines PHPitcairn Island PNPoland PLPolynesia (French) PFPortugal PTPuerto Rico PRQatar QAReunion (French) RERomania RORussian Federation RURwanda RWS. Georgia
& S. Sandwich Isls. GSSaint Helena SHSaint Kitts
& Nevis Anguilla KNSaint Lucia LCSaint Pierre and Miquelon PMSaint Tome and Principe ST
Country CodeSaint Vincent
& Grenadines VCSamoaWSSan Marino SMSaudi Arabia SASenegal SNSeychelles SCSierra Leone SLSingapore SGSlovak Republic SKSlovenia SISolomon Islands SBSomalia SOSouth Africa ZASouth Korea KRSpain ESSri Lanka LKSudan SDSuriname SRSvalbard and
Jan Mayen Islands SJSwaziland SZSweden SESwitzerland CHSyria SYTadjikistan TJTaiwan TWTanzania TZThailand THTogo TGTokelau TKTonga TOTrinidad and Tobago TTTunisia TNTurkey TRTurkmenistan TMTurks and Caicos Islands TCTuvalu TVUganda UGUkraine UAUnited Arab Emirates AEUnited Kingdom UKUnited States USUruguay UYUSA Minor Outlying Islands UMUzbekistan UZVanuatu VUVatican City State VAVenezuela VEVietnam VNVirgin Islands (British) VGVirgin Islands (USA) VIWallis and Futuna Islands WFWestern Sahara EHYemen YEYugoslavia YUZaire ZRZambia ZMZimbabwe ZW
53
RE
FE
RE
NC
E
Enter the appropriate code number for the initial setting “Country Code” (See page 23).
54
Troubleshooting
Check the following guide for the possible cause of a problem before contacting service.
SymptomNo power.
No picture.
No sound.
Playback picture is poor.
VCR/DVD Recorder doesnot start playback.
Picture from external inputis distorted
Some channels are skipped over when usingCH (v / V)
Picture or sound of
broadcasting channel isweak or missing.
Camcorder image notshown.
Camcorder image via A/Vinput or DV IN toVCR/DVD Recorder is notshown on TV screen.
Can’t play disc recordedon this VCR/DVDRecorder on another DVDplayer.
CauseThe power cord is disconnected.
The TV is not set to receive VCR/DVDRecorder signal output.
The video cable is not connected securely.
The TV power is turned off.
The equipment connected with the audiocable is not set to receive VCR/DVDRecorder signal output.
The audio cables are not connected securely.
The power of the equipment connected withthe audio cable is turned off.
The audio connecting cord is damaged.
The disc is dirty.
Tape heads are dirty.
Tape is a rental or was recorded on anotherVCR.
No disc is inserted.
No tape is inserted.
An unplayable disc is inserted.
The disc is placed upside down.
The disc is not placed within the guide.
The disc is dirty.
The Movie Rating level is set.
The video signal from the external compo-nent is copy-protected.
The skipped channels were deleted with theCH. Add/Del feature.
Antenna or cables are loose.
Wrong Tuning Band is selected in theVCR/DVD Recorder Setup menu.
Camcorder is off.
VCR/DVD Recorder’s source is not set toAV1, AV2 (AV2 COMP) or DV IN.
The disc was recorded in Video mode.
Some players will not play even a finalizeddisc recorded in Video mode.
The disc was recorded in VR mode.
Discs recorded with copy-once material can-not be played on other players.
SolutionPlug the power cord into the wall outletsecurely.
Select the appropriate video input on the TVso the picture from the VCR/DVD Recorderappears on the TV screen.
Connect the video cable securely.
Turn on the TV.
Select the correct input mode on the audioreceiver so you can listen to the sound fromthe VCR/DVD Recorder.
Connect the audio cable securely.
Turn on the equipment connected with theaudio cable.
Replace it with a new one.
Clean the disc.
Clean video heads.
Use v/V for manual tracking adjustment whiletape is playing.
Insert a disc or tape. (Check that the disc
indicator on the front panel display is lit.)
Insert a playable disc. (Check the disc type,color system, and regional code.)
Place the disc with the playback side down.
Place the disc on the disc tray correctly insidethe guide.
Clean the disc.
Cancel the Movie Rating function or changethe rating level.
You cannot connect via the VCR/DVDRecorder. Connect the component directly toyour TV.
Use the CH. Add/Del feature to restore chan-nels. See “To Add or Erase Channels fromMemory” on page 19.
Tighten connections or replace cable.
Try all “Tuning Band” options; see page 18 fordetails.
Turn camcorder on and operate properly.
Use INPUT to select AV input channel (AV1,AV2 (AV2 COMP) or DV IN).
Finalize the disc; see page 25.
No solution.
The other player must be RW compatible inorder to play it.
No solution.

RE
FE
RE
NC
E
Troubleshooting (Continued)
55
SymptomCannot record or did notrecord successfully.
Timer Recording not possi-ble.
Stereo Audio Recordand/or Playback not pres-ent.
Remote control does notwork properly.
CauseThe remaining blank space on the disc isinsufficient.
The source you are trying to record is copy-protected.
When setting the recording channel, thechannel is tuned on the TV’s own tuner.
When recording to a Video mode disc, pro-grams that are copy-once protected cannotbe recorded.
Clock in VCR/DVD Recorder is not set tocorrect time.
Timer has been programmed incorrectly.
TIMER indicator light does not appear afterprogramming timer.
TV is not Stereo-compatible.
Broadcast program is not in stereo format.
VCR/DVD Recorder A/V Out jacks are notconnected to TV A/V In jacks.
VCR/DVD Recorder Audio/Video Out is notselected for viewing at the TV.
VCR/DVD Recorder’s TV audio channel isset to SAP or MONO.
The remote control is not pointed at theremote sensor of the VCR/DVD Recorder.
The remote control is too far from theVCR/DVD Recorder.
There is an obstacle in the path of theremote control and the VCR/DVD Recorder.
The batteries in the remote control areexhausted.
SolutionUse another disc.
You cannot record the source.
Select the channel on the VCR/DVDRecorder’s built-in TV tuner.
Use a VR mode formatted disc for copy-oncematerial.
Set clock to correct time. See “Auto ClockSet” or “Manual Clock Set” on page 19.
Reprogram Timer. See “Timer Recording” onpage 41.
Reprogram Timer.
No solution.
No solution.
Make A/V connections. Stereo is availableonly via A/V output from VCR/DVD Recorder.
Select AUX or A/V source as TV input.
Set TV audio channel mode to Stereo. See“Changing TV Audio Channel” on page 27.
Point the remote control at the remote sensorof the VCR/DVD Recorder.
Operate the remote control within 23 ft (7 m).
Remove the obstacle.
Replace the batteries with new ones.
Moisture Condensation
Moisture condensation can occur:
• When the VCR/DVD Recorder is moved from a coldplace to a warm place.
• Under extremely humid conditions.
In locations where moisture condensation may occur:
• Keep the VCR/DVD Recorder plugged into an AC poweroutlet with POWER On. This will help prevent conden-sation.
• When condensation has occurred, wait a few hoursfor the VCR/DVD Recorder to dry before using it.
Reset the VCR/DVD Recorder
If you observe any of the following symptoms...When the VCR/DVD Recorder is plugged in, but the power will not be turned on or off.When the display window does not work.When the VCR/DVD Recorder does not operate normally.
You can reset the VCR/DVD Recorder as follows :
Press and hold the POWER button for more than five seconds. This will force the VCR/DVD Recorder to power off. . Press the POWER button again to turn the VCR/DVD Recorder back on.Unplug the power cord and then plug the power cord again after more than five seconds.
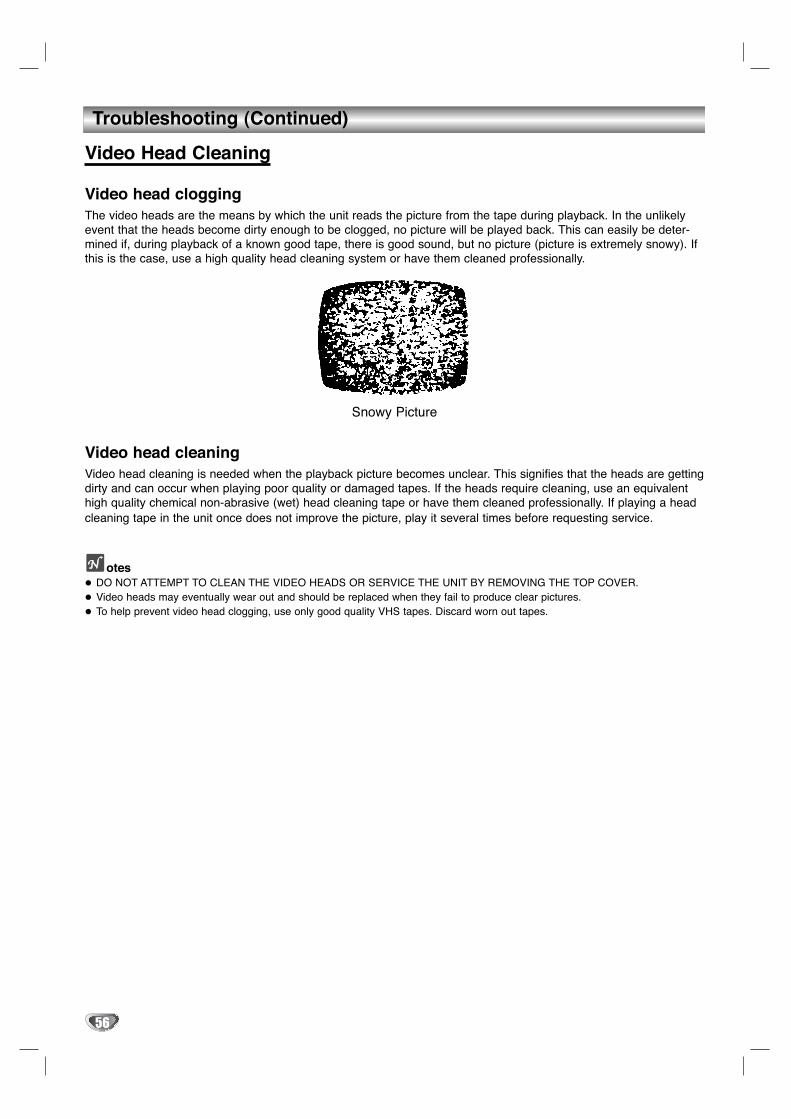
56
Troubleshooting (Continued)
Video Head Cleaning
Video head cloggingThe video heads are the means by which the unit reads the picture from the tape during playback. In the unlikelyevent that the heads become dirty enough to be clogged, no picture will be played back. This can easily be deter-mined if, during playback of a known good tape, there is good sound, but no picture (picture is extremely snowy). Ifthis is the case, use a high quality head cleaning system or have them cleaned professionally.
Snowy Picture
Video head cleaningVideo head cleaning is needed when the playback picture becomes unclear. This signifies that the heads are gettingdirty and can occur when playing poor quality or damaged tapes. If the heads require cleaning, use an equivalenthigh quality chemical non-abrasive (wet) head cleaning tape or have them cleaned professionally. If playing a headcleaning tape in the unit once does not improve the picture, play it several times before requesting service.
otesDO NOT ATTEMPT TO CLEAN THE VIDEO HEADS OR SERVICE THE UNIT BY REMOVING THE TOP COVER.Video heads may eventually wear out and should be replaced when they fail to produce clear pictures.To help prevent video head clogging, use only good quality VHS tapes. Discard worn out tapes.

Specifications
GeneralPower requirements AC 120V, 60 HzPower consumption 35W
Dimensions (approx.) 16.9” x 3.7” x 14.2” (430 X 83.5 X 360 mm) (w x h x d)Mass (approx.) 14.1 lbs (6.4 kg)
Operating temperature 5˚C to 35˚C (41˚F to 95˚F)Operating humidity 5 % to 90 %
Signal system NTSC
Recording Recording format DVD Video Recording, DVD-VIDEORecordable discs DVD-Re-recordable, DVD-RecordableRecordable time DVD ; Approx. 1 hour (XP mode), 2 hours (SP mode), 4 hours (LP mode)
VCR ; SP: 2 HOURS (T-120), SLP: 6 HOURS (T-120)/8 HOURS (T-160)
Video recording formatSampling frequency 27MHzCompression format MPEG 2
Audio recording formatSampling frequency 48kHzCompression format Dolby Digital
VCR SpecificationsHead system Four head helical scan azimuth system
Timer 12-hour display type with AM, PMTape speed SP: 33.35 mm/sec, LP: 16.67 mm/sec, SLP: 11.12 mm/secTape width 12.7 mm
Rewind time About 65 seconds (T-120)Antenna 75 ohms (VHF/UHF)
VHF output signal Channel 3 or 4 (Switchable)Channel coverage VHF: 2-13, UHF: 14-69, CATV: 1-125 (4A, A-W, W+1 - W+84, A-5 - A-1)
Frequency range 20Hz to 20kHzSignal-to-noise ratio 43dB
Dynamic range 88 dBChannel separation 60 dB
DVD SpecificationsLaser system Semiconductor laser, wavelength 650 nm
Frequency response DVD (PCM 48 kHz): 8 Hz to 22 kHz, CD: 8 Hz to 20 kHzSignal-to-noise ratio More than 95dB Harmonic distortion Less than 0.008%
Dynamic range More than 90 dB
InputsANTENNA IN Antenna or CATV input, 75 ohms
VIDEO IN (AV1,2) 1.0 Vp-p 75 ohms, sync negative, RCA jack x 2AUDIO IN (AV1,2) -6 dBm more than 47 kohms, RCA jack (L, R) x 2
DV IN 4 pin (i.LINK/IEEE 1394 standard)
57
RE
FE
RE
NC
E

Specifications (Continued)
OutputsVIDEO OUT 1 Vp-p 75 Ω, sync negative, RCA jack x 1
S-VIDEO OUT (Y) 1.0 V (p-p), 75 Ω, negative sync, Mini DIN 4-pin x 1(C) 0.286 V (p-p) 75 Ω
COMPONENT VIDEO OUT (Y) 1.0 V (p-p), 75 Ω, negative sync, RCA jack x 1(PROGRESSIVE SCAN) (Pb)/(Pr) 0.7 V (p-p), 75 Ω, RCA jack x 2
Audio output (digital audio) 0.5 V (p-p), 75 Ω, RCA jack x 1Audio output (optical audio) Optical connector x 1Audio output (analog audio) 1.1 Vrms (1 kHz, -6 dB), 600 Ω, RCA jack (L, R) x 2
RF OUT Channel 3 or 4 (Switchable)
Accessory:
Video cable . . . . . . . . . . . . . . . . . . . . . . . . . . . . .1 Audio cable . . . . . . . . . . . . . . . . . . . . .1RF 75-ohm Coaxial cable . . . . . . . . . . . . . . . . . . .1 Remote control . . . . . . . . . . . . . . . . . .1Batteries . . . . . . . . . . . . . . . . . . . . . . . . . . . . . . .2
Design and specifications are subject to change without notice.
58
Manufactured under license from Dolby Laboratories. “Dolby”, “Pro Logic” and the double-D symbol are trademarks of DolbyLaboratories.
DTS and DTS Digital Out are registered trademarks of Digital Theater Systems, Inc.

For assistance in obtaining repairs and operational information, please contact the following Toll Free Number:
DIAL TOLL FREE: 1-800-813-3435Weekdays 7:30AM ~ 4:00PM Central Time
Also, you may write to SANYO Manufacturing Corporation, 3333 Sanyo Road Forrest City Arkansas 72335
LIMITED WARRANTYLABOR 90 DAYS PARTS 1 YEAR CARRY-IN ONLY
THIS WARRANTY IS VALID ONLY ON SANYO PRODUCTS PURCHASED FROM A WAL-MART STORE AND USED IN THE UNITEDSTATES OF AMERICA, EXCLUDING HAWAII AND ALL U.S. TERRITORIES AND PROTECTORATES. THIS WARRANTY APPLIES ONLY TOTHE ORIGINAL RETAIL PURCHASER AND DOES NOT APPLY TO PRODUCTS USED FOR ANY INDUSTRIAL, PROFESSIONAL OR COMMERCIAL PURPOSE.
Subject to the OBLIGATIONS and EXCLUSIONS below, SANYO Manufacturing Corporation (“SANYO”) warrants this SANYO productagainst defects in materials and workmanship for the periods of LABOR and PARTS specified above. SANYO will repair or replace (at itsoption) the product and any of its parts which fail to conform to this warranty with new or refurbished products or parts. The warranty periodcommences on the date the product was first purchased at retail from a Wal-Mart Store.
OBLIGATIONSIn order to obtain warranty service, the product must be delivered to and picked up from a Wal-Mart Store at the original retail purchaser’sexpense. The original dated bill of sale, or sales slip from a Wal-Mart Store must be submitted to a Wal-Mart Store at the time warranty serviceis requested.
EXCLUSIONS1. This warranty does not cover (A) the adjustment of customer-operated controls as explained in the appropriate model’s instruction manual,
or (B) the repair of any product whose serial number has been altered, defaced or removed.
2. This warranty shall not apply to the cabinet or cosmetic parts, broken or damaged video heads, batteries or routine maintenance.
3. This warranty does not apply to uncrating, setup, installation, removal of the product for repair or reinstallation of the product after repair.
4. This warranty does not apply to repairs or replacements necessitated by any cause beyond the control of SANYO including, but not limitedto, any malfunction, defect or failure caused by or resulting from unauthorized service or parts, improper maintenance, operation contrary to furnished instructions, shipping or transit accidents, modification or repair by user or any third party, abuse, misuse, neglect, accident, incorrect line voltage, fire, flood or other Acts of God, or normal wear and tear.
The foregoing is in lieu of all other express warranties and SANYO does not assume or authorize any party to assume for it any other obligation or liability.
THE DURATION OF ANY WARRANTIES WHICH MAY BE IMPLIED BY LAW (INCLUDING THE WARRANTIES OF MERCHANTABILITY AND FITNESS) IS LIMITED TO THE TERM OF THIS WARRANTY. IN NO EVENT SHALL SANYO OR THE MANUFACTURER OF THE PRODUCTBE LIABLE FOR SPECIAL, INCIDENTAL OR CONSEQUENTIAL DAMAGES ARISING FROM OWNERSHIP OR USE OF THIS PRODUCT,OR FOR ANY DELAY IN THE PERFORMANCE OF ITS OBLIGATIONS UNDER THIS WARRANTY DUE TO CAUSES BEYOND ITS CONTROL.
SOME STATES DO NOT ALLOW LIMITATIONS ON HOW LONG AN IMPLIED WARRANTY LASTS AND/OR DO NOT ALLOW THE EXCLUSION OR LIMITATION OF CONSEQUENTIAL DAMAGES, SO THE ABOVE LIMITATIONS AND EXCLUSIONS MAY NOT APPLY TOYOU.
THIS WARRANTY GIVES YOU SPECIAL LEGAL RIGHTS. YOU MAY HAVE OTHER RIGHTS, WHICH VARY FROM STATE TO STATE.
For your protection in the event of theft or loss of this product, please keep the following information with a sales receipt in a safe place.
Model No. Serial No.
Date of Purchase Purchase Price
Where Purchased
SANYO Manufacturing Corporation
SANYO Electric Co., Ltd.