Drumagog 5 Getting Started Guide
34
Drumagog 5 ____________________________________________________ Getting Started Guide
-
Upload
equipa-playburn -
Category
Documents
-
view
18 -
download
4
Transcript of Drumagog 5 Getting Started Guide

Drumagog 5 ____________________________________________________
Getting Started Guide

2
Information in this document is subject to change without notice and does not represent a commitment on the part of WaveMachine Labs, Inc. The software described in this document is furnished under this license agreement. The software may be used or copied only under the terms of the agreement. It is against the law to copy the software on any medium except as specifically allowed in the license agreement.. No part of this document may be reproduced or transmitted in any form or by any means, electronic or mechanical, including photocopying and recording, for any purpose without the express written permission of WaveMachine Labs, Inc.
Copyright © 2010 WaveMachine Labs, Inc. All rights reserved. Drumagog is a registered trademark of WaveMachine Labs, Inc. Other company and product names are trademarks of their respective owners. Visit us on the web: www.drumagog.com
3
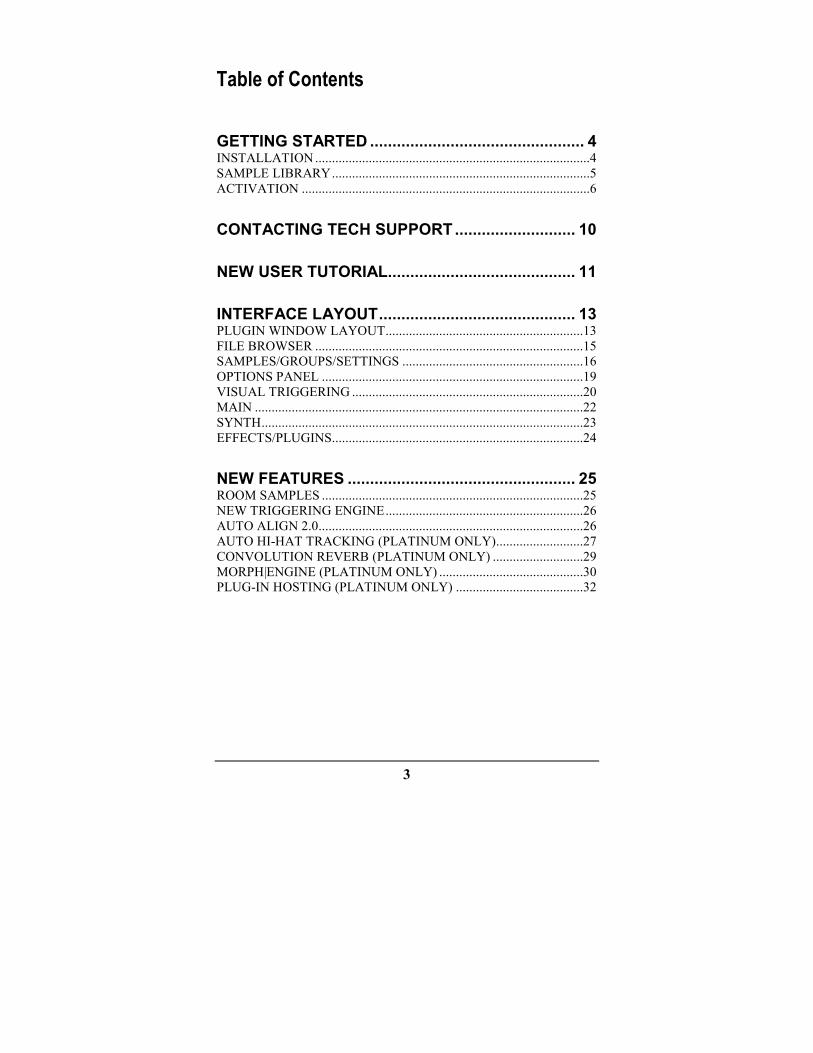
Table of Contents
GETTING STARTED ................................................ 4 INSTALLATION..................................................................................4 SAMPLE LIBRARY.............................................................................5 ACTIVATION ......................................................................................6
CONTACTING TECH SUPPORT........................... 10
NEW USER TUTORIAL.......................................... 11
INTERFACE LAYOUT............................................ 13 PLUGIN WINDOW LAYOUT...........................................................13 FILE BROWSER ................................................................................15 SAMPLES/GROUPS/SETTINGS ......................................................16 OPTIONS PANEL ..............................................................................19 VISUAL TRIGGERING .....................................................................20 MAIN ..................................................................................................22 SYNTH................................................................................................23 EFFECTS/PLUGINS...........................................................................24
NEW FEATURES ................................................... 25 ROOM SAMPLES ..............................................................................25 NEW TRIGGERING ENGINE...........................................................26 AUTO ALIGN 2.0...............................................................................26 AUTO HI-HAT TRACKING (PLATINUM ONLY)..........................27 CONVOLUTION REVERB (PLATINUM ONLY) ...........................29 MORPH|ENGINE (PLATINUM ONLY) ...........................................30 PLUG-IN HOSTING (PLATINUM ONLY) ......................................32

4
1 Getting Started ____________________________________________________
Thank you for purchasing Drumagog 5, the latest drum
replacement plugin from WaveMachine Labs. Version 5
includes a number of new features and exciting changes, and the
goal of this guide is to help familiarize users with the new
developments.
Another way to use this guide is as a supplement to the
Drumagog 4 User Manual (available for download at
www.drumagog.com). A complete Drumagog 5 User Manual is
on the way and will also be available through the website.
INSTALLATION
Installation of Drumagog 5 is a relatively straight-forward
process (either via download or DVD).
DOWNLOADABLE VERSION
If you purchased Drumagog through our website (or just want
the latest version), visit the My Account section of
www.drumagog.com to find your download (Mac and PC).
Download the latest installer for your specific OS and simply
double-click on the finished download to start the install.
5
DVD VERSION
If you purchased Drumagog through a retail store, insert the
DVD into your DVD drive, open the folder labeled for your OS
and run the appropriate installer.
NOTE: The Drumagog 5 DVD contains both the Pro and
Platinum editions. You must select your purchased version when
installing, or else the subsequent authorization process will fail.
The actual install itself is very simple, as the Drumagog installer
will automatically copy the necessary components into their
default locations. For those who wish to install into custom
locations options are available to do so during the install.
SAMPLE LIBRARY
DVD INSTALLATION
The full Drumagog 5 Sample Library is contained on the
installation DVD, and can be installed immediately after
installing the plugin itself:
PC USERS
The Drumagog 5 DVD installer will automatically prompt you
to install the included Gog Files. Simply click “NEXT” to have
the installer automatically copy the library to your hard drive.
MAC USERS
Inside the “MAC” folder, alongside the plugin installer, is a
folder called “Gog Samples”. Simply copy (or drag) this folder
onto your hard drive. The default location is inside the
Drumagog 5 folder (inside the “Applications” folder), but with
the new FILE BROWSER section of Drumagog 5 the sample
folder can be located wherever you choose.
DOWNLOAD INSTALLATION
The entire Drumagog 5 Sample Library is available to all
registered Drumagog 5 users via www.drumagog.com. Visit the
Downloads page (found in the Support section) to find the full

6
list of sample installers. The library is divided into smaller
downloads for easier transport.
Each download contains a number of Gog Files compressed in
ZIP format. After downloading a particular file, simply unzip
the file into the “Drumagog 5/Gog Files” folder (found in the
“Applications” folder for Mac, Program Files for PC). The ZIP
files will create new folders where needed.
NOTE: Using the new FILE BROWSER section, the Sample
Library can be installed in any location you prefer, as you can
easily just browse to the samples’ location.
ACTIVATION
Drumagog 5 introduces iLok support, for those who prefer it to
the previous unlock process. We have also included an updated
Challenge/Response system for those who prefer the older
system.
When purchasing Drumagog through our web store or
registering a store-bought copy, there will be a choice for which
copy protection system to use.
iLOK USERS
There will be a field in the online Shopping Cart/Registration
form where you can designate an iLok Account Name (User ID).
A Drumagog 5 license will then be automatically deposited into
that account and made available for download to the user’s iLok
(through www.ilok.com). Once the license is deposited the
authorization process is complete, and any system the iLok is
connected to will allow Drumagog 5 to run.
CHALLENGE/RESPONSE
If you do not own an iLok (or otherwise prefer not to use one),
Drumagog 5 can be unlocked via a Challenge/Response system
similar to the one used in Drumagog 4.

7
Once a customer has either purchased Drumagog 5 through
www.drumagog.com, or registered a retail copy purchased
through a store, a special Challenge/Response page will be
accessible through the My Account section of
www.drumagog.com.
The first-time Drumagog 5 is opened without an iLok present
(or with an iLok present without a valid Drumagog 5 license) a
window will appear on-screen:
Authorization Window
Press the “AUTHORIZE” button to continue.
The next window will present the Challenge/Response section:
8
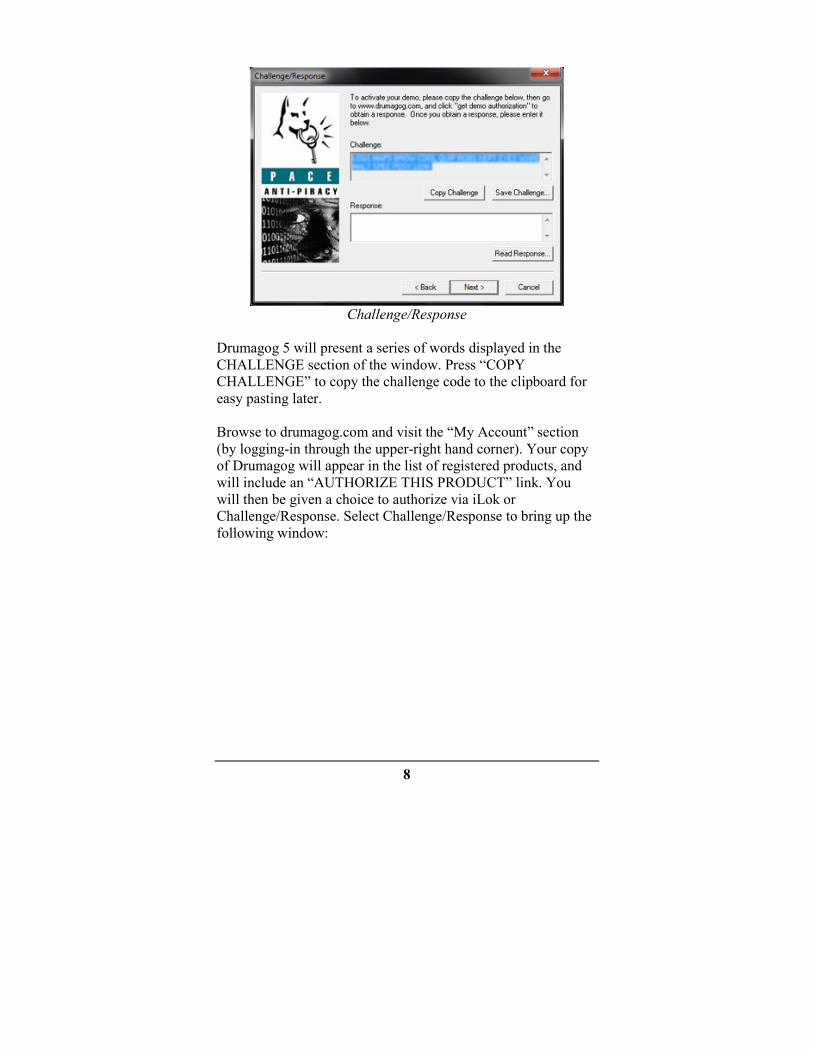
Challenge/Response
Drumagog 5 will present a series of words displayed in the
CHALLENGE section of the window. Press “COPY
CHALLENGE” to copy the challenge code to the clipboard for
easy pasting later.
Browse to drumagog.com and visit the “My Account” section
(by logging-in through the upper-right hand corner). Your copy
of Drumagog will appear in the list of registered products, and
will include an “AUTHORIZE THIS PRODUCT” link. You
will then be given a choice to authorize via iLok or
Challenge/Response. Select Challenge/Response to bring up the
following window:

9
www.drumagog.com Challenge/Response Window
Paste the CHALLENGE code into the above field and click
“AUTHORIZE”. After a slight pause while the drumagog.com
website contacts the PACE/iLok servers, a RESPONSE code
will be displayed. Copy the RESPONSE code and switch back
to Drumagog 5, and finally paste the RESPONSE into the
corresponding field. Press NEXT to complete the
Challenge/Response authorization process.
10
2 Contacting Tech Support ____________________________________________________
We’re always glad to answer any questions you may have about
using Drumagog. Please don’t hesitate to contact us by:
E-mail: [email protected]
Phone: (877) 318-WAVE (9283)
US Mail: WaveMachine Labs, Inc.
4256 N. Ravenswood Ave
Suite 111
Chicago, IL 60613
Our web site at: http://www.drumagog.com contains support
information, FAQ’s, and other tips.
Also, our user’s forum has many helpful questions and answers
from other users. Posting your question on the forum usually
results in a quick answer. To visit the forum, visit the Support
page at drumagog.com and click on “Forum” at the top of the
page.

11
3 New User Tutorial ____________________________________________________
For those new to using Drumagog (or drum replacement in
general), please follow along with this basic overview to jump in
and begin enhancing your drum sound!
Open your preferred audio application (Pro Tools, Cubase,
Logic, SONAR, etc) and find an individual audio drum track.
Try it with a kick or snare track at first, as these are usually
easier to replace than a tom or cymbal (though it certainly is
possible!). Add Drumagog 5 to an insert point on that track, and
the Drumagog 5 plugin window will open.
By default Drumagog will have one of its stock “DEMO
COLLECTION” sounds loaded, indicated by a filename being
highlighted (selected) in the FILE BROWSER window on the
left-hand side of the plugin window. We’ll stick with the pre-
selected sound for now. Press play in your audio application’s
transport to begin playback.
As soon as your drum track begins, Drumagog 5 will display the
incoming audio in the bottom-left corner’s VISUAL
TRIGGERING window. The louder the audio, the higher the
audio is on the display. Drag the horizontal SENSITIVITY
slider down until white circles begin appearing superimposed on
the audio display. You should now be hearing Drumagog trigger
its samples on every hit. Adjust the SENSITIVITY slider until
all the wanted drum hits are above the slider (i.e. louder than the
threshold), but the bleed-thru from the other drums are below

12
the slider. Adjust the TRANSIENT DETAILS slider if needed:
move it right if Drumagog is missing quick flams, blast beats,
ghost notes, etc, or move it left if Drumagog is adding extra hits
(i.e. double triggering).
Look at the MAIN window, in the center of the bottom section,
for a mixer section. Find a fader that says “St Room”, and begin
raising the level of the fader. You are now adding a stereo room
to your chosen drum sound (if the faders are grayed out then you
don’t have Drumagog 5’s default Gog File loaded). Add as
much or as little of the two available ROOM SAMPLES faders
as you like.
Watch the SAMPLES window, found at the top of the plugin
window. This section lists the individual samples that make up
the currently loaded Gog File, and will light up as each one
plays. Watch how Drumagog randomly chooses from the sample
pool, one of the ways Drumagog achieves the most natural drum
sound possible.

13
4 Interface Layout ____________________________________________________
Drumagog 5 contains many new and exciting features. This
chapter will explain each one individually.
PLUGIN WINDOW LAYOUT
The first change most users will notice is the all-new plugin
window. Drumagog 5 uses a much larger interface with more
useful information available at once.

14
Drumagog 5 Plugin Window
The new plugin window is divided into several sections:
1. FILE BROWSER
2. SAMPLES/GROUPS/SETTINGS
3. OPTIONS PANEL
4. VISUAL TRIGGERING
5. MAIN/SYNTH/EFFECTS/PLUGINS
15
FILE BROWSER
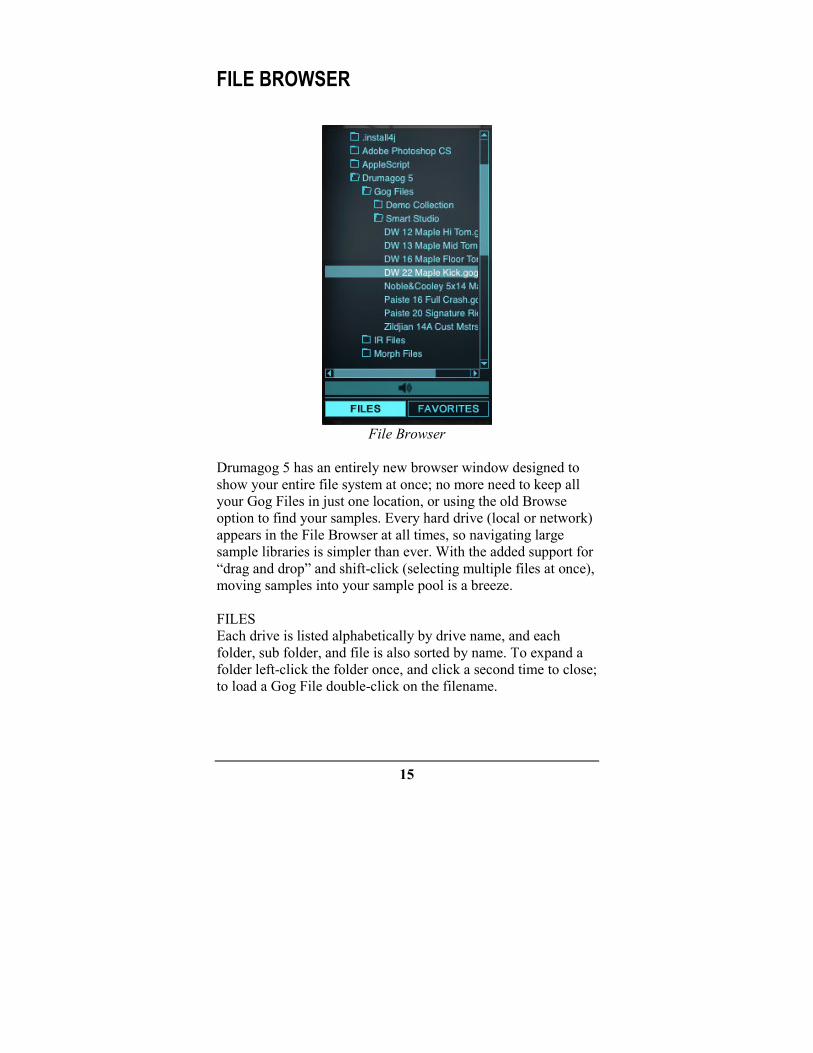
File Browser
Drumagog 5 has an entirely new browser window designed to
show your entire file system at once; no more need to keep all
your Gog Files in just one location, or using the old Browse
option to find your samples. Every hard drive (local or network)
appears in the File Browser at all times, so navigating large
sample libraries is simpler than ever. With the added support for
“drag and drop” and shift-click (selecting multiple files at once),
moving samples into your sample pool is a breeze.
FILES
Each drive is listed alphabetically by drive name, and each
folder, sub folder, and file is also sorted by name. To expand a
folder left-click the folder once, and click a second time to close;
to load a Gog File double-click on the filename.
16
FAVORITES
Often used Gog Files can be stored in a separate “Favorites” list,
making them easily accessible even on the largest hard drives.
Click “FAVORITES” to switch to this view. To add a file to
your Favorites list, just right-click on the Gog File and select
“ADD TO FAVORITES”.
Additional file functions are accessible through right-clicking:
“DELETE”, which deletes the selected file, and “RENAME”,
which renames it.
SAMPLES/GROUPS/SETTINGS
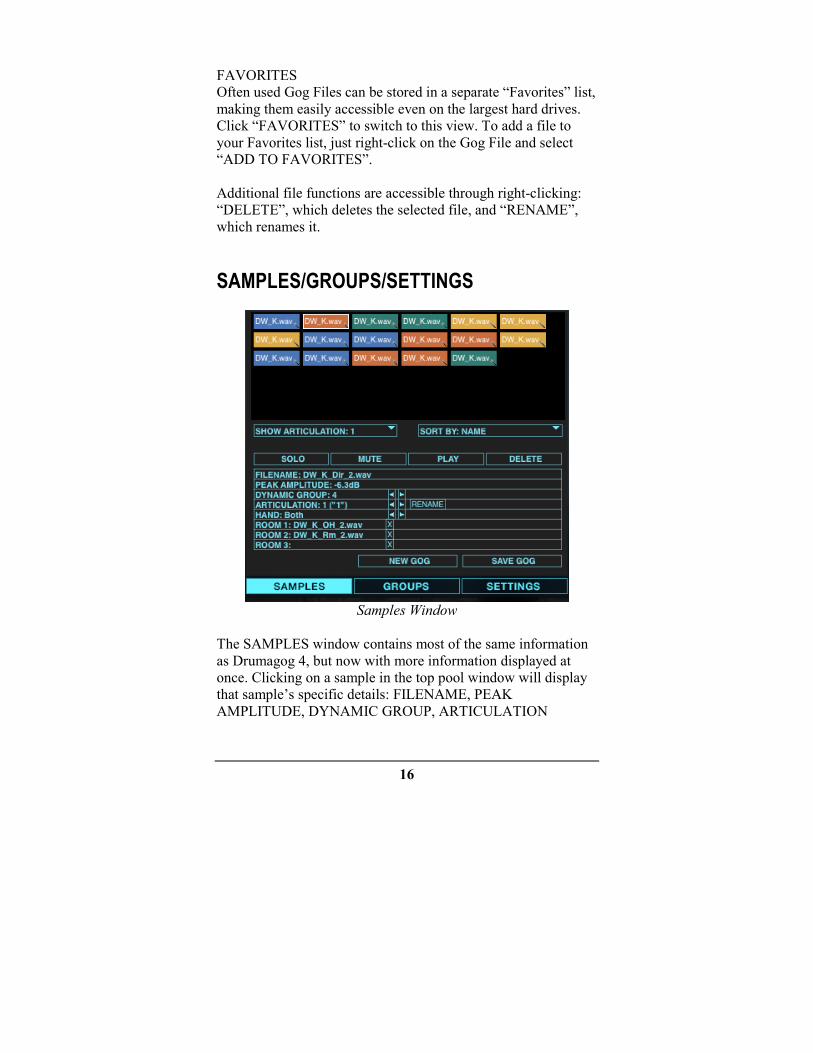
Samples Window
The SAMPLES window contains most of the same information
as Drumagog 4, but now with more information displayed at
once. Clicking on a sample in the top pool window will display
that sample’s specific details: FILENAME, PEAK
AMPLITUDE, DYNAMIC GROUP, ARTICULATION

17
GROUP, LEFT/RIGHT HAND, and the new ROOM
SAMPLES information.
There is a new SORT option in Drumagog 5, accessed through
the “SORT BY” drop-down list. The sample list can be sorted
either alphabetically (by name), by peak dynamic level (i.e.
loudness), or by DYNAMIC GROUP.
NOTE: ARTICULATIONS has replaced POSITIONS (used in
version 4), and simply represents a change in name to better
coincide with other drum software packages.
Groups Window
The GROUPS window remains unchanged from version 4. Just
slide the horizontal lines (one for each DYNAMIC GROUP) to
adjust the dynamic-level break points between each group.

18
Settings Window
The SETTINGS window has been re-designed, but contains
most of the same information as in version 4. There are some
changes, however:
ADVANCED and LIVE TRIGGERING MODE switches
between Drumagog 5’s two different engines. ADVANCED
TRIGGERING mode is the default, and is the appropriate
setting for all mixing scenarios. LIVE MODE is a low-latency
mode designed for live use.
LATENCY adjusts the overall, total latency through Drumagog
5 (except for any caused by AUTO HI-HAT TRACKING. For
more information see that section). The default setting is 80ms,
and should be left as is in most situations. However, for those
users who prefer lower total latency (like Pro Tools HD users
using Plugin Delay Compensation) other lower settings are
available, however use of these lower latencies may result in
lowered accuracy.
19
NOTE: Changing the above settings alters Drumagog’s total
latency, and will require restarting the plugin (and in some cases
the audio host) to take affect.
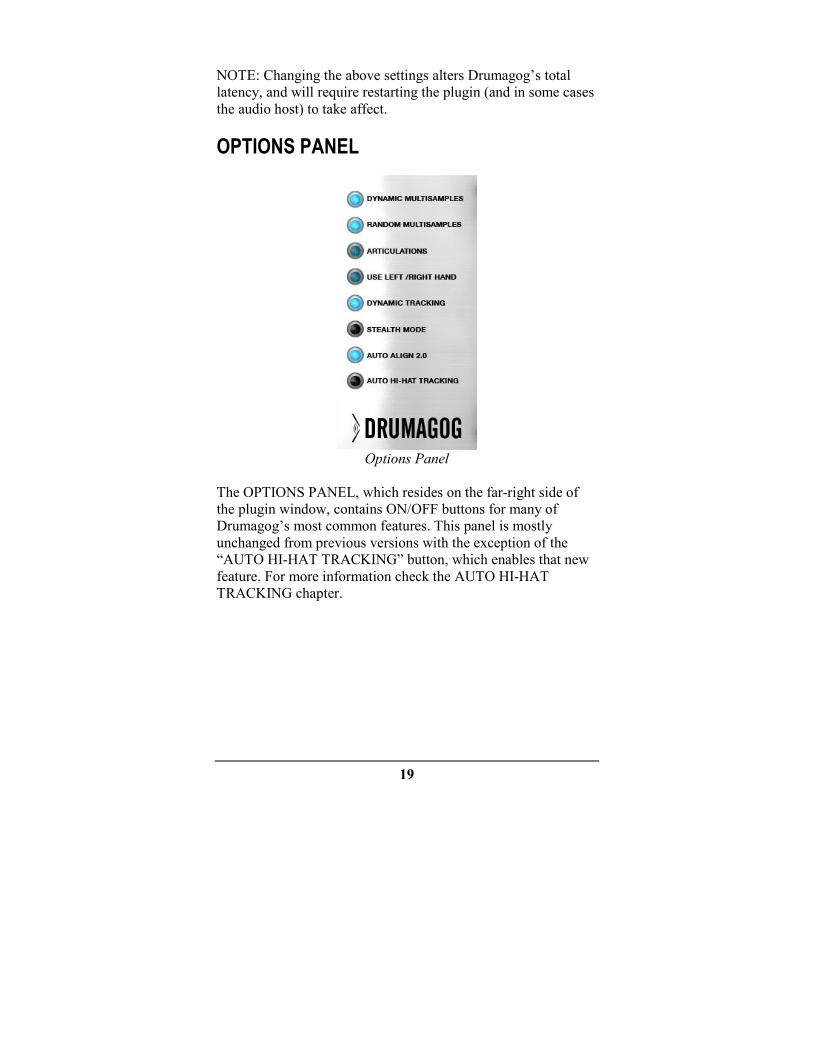
OPTIONS PANEL
Options Panel
The OPTIONS PANEL, which resides on the far-right side of
the plugin window, contains ON/OFF buttons for many of
Drumagog’s most common features. This panel is mostly
unchanged from previous versions with the exception of the
“AUTO HI-HAT TRACKING” button, which enables that new
feature. For more information check the AUTO HI-HAT
TRACKING chapter.

20
VISUAL TRIGGERING
Visual Triggering Window
Drumagog uses a visual triggering interface that streamlines the
adjustment of the related controls. A scrolling, real-time
waveform display is shown with the controls superimposed on
top. This provides a visual indication of exactly how the various
controls interact with the incoming audio. For example, the
sensitivity control is represented as a horizontal line that can be
moved up or down, and as the incoming audio scrolls past it's
easy to see which audio impulses will trigger Drumagog and
which will not. All the audio above the line will cause a trigger,
and the audio below it will be ignored. The incoming audio that
scored a "hit" is displayed as a white dot, making it easy to see a
history of Drumagog’s triggered hits.
SENSITIVITY
Adjusting Drumagog using the VISUAL TRIGGERING
window is quite intuitive. As seen above, the SENSITIVITY
control is represented by a horizontal line; any peak above this
line will trigger Drumagog. If there is background noise or bleed
from other instruments present in the audio track just raise the
horizontal line above the noise floor. Simply adjust the line
above the noise floor and below the softest drum hits.
21
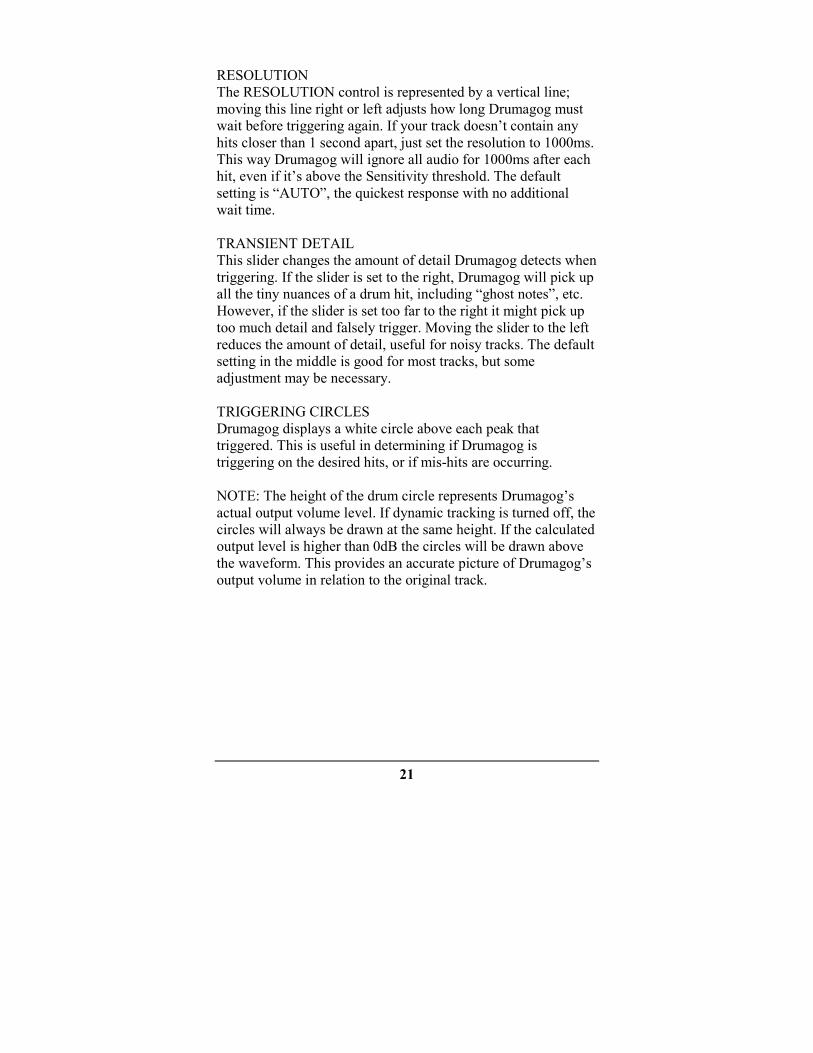
RESOLUTION
The RESOLUTION control is represented by a vertical line;
moving this line right or left adjusts how long Drumagog must
wait before triggering again. If your track doesn’t contain any
hits closer than 1 second apart, just set the resolution to 1000ms.
This way Drumagog will ignore all audio for 1000ms after each
hit, even if it’s above the Sensitivity threshold. The default
setting is “AUTO”, the quickest response with no additional
wait time.
TRANSIENT DETAIL
This slider changes the amount of detail Drumagog detects when
triggering. If the slider is set to the right, Drumagog will pick up
all the tiny nuances of a drum hit, including “ghost notes”, etc.
However, if the slider is set too far to the right it might pick up
too much detail and falsely trigger. Moving the slider to the left
reduces the amount of detail, useful for noisy tracks. The default
setting in the middle is good for most tracks, but some
adjustment may be necessary.
TRIGGERING CIRCLES
Drumagog displays a white circle above each peak that
triggered. This is useful in determining if Drumagog is
triggering on the desired hits, or if mis-hits are occurring.
NOTE: The height of the drum circle represents Drumagog’s
actual output volume level. If dynamic tracking is turned off, the
circles will always be drawn at the same height. If the calculated
output level is higher than 0dB the circles will be drawn above
the waveform. This provides an accurate picture of Drumagog’s
output volume in relation to the original track.

22
MAIN
Main Window
The MAIN window contains controls for some of the most basic
elements in Drumagog 5. This is where many of the knobs found
in Drumagog 4 have been moved, and now are controlled via
faders.
The PITCH and TRIGGER FILTER sections remain unchanged.
The ARTICULATIONS fader has replaced the POSITION knob
and performs the same function, switching between
Open/Closed Hi-Hats, etc.
New to version 5 are the ROOM SAMPLES faders, three new
controls found in the mixer section of the MAIN window. In the
above example the loaded Gog File contains two separate slots
(O/H and St Room), so the first two ROOM SAMPLES faders
are enabled while the third is grayed out (as the third slot has no
room samples). To use them just raise the corresponding fader to
start utilizing the ambient sounds.

23
SYNTH
Synthesizer
Drumagog 5 includes a more powerful synthesizer section than
previous versions. Utilizing the OSCILLATOR and FILTER
options, additional waveforms can be added to the drum sound,
allowing a vast amount of control to enhance the resulting
sound.
To use the synth, first press the “SYNTH” button to bring up the
synth window. Various waveforms are available in a menu on
the left-hand side, including sine, square, and saw-tooth. A real-
time waveform is displayed at the top of the window, showing
the overall waveshape of the resulting output.
The OSCILLATOR section has the following controls:
FREQ sets the fundamental frequency of the selected waveform.
NOISE determines the total amount of additional complex noise
that is added to the waveform.
NOISE F sets the fundamental frequency of the noise.
ATTACK sets the oscillator’s envelope attack, expressed in
milliseconds. A long attack time creates more of a swell, or
gradual onset of the synth.

24
DECAY adjusts the oscillator’s envelope decay time, again in
milliseconds. A short decay can be used to just add an additional
emphasis to a drum transient.
The FILTER section is a brand-new feature in Drumagog 5: a
true resonance filter. Think of old analog synths. Again, just like
every control, this can be automated to create a dynamic,
changing drum track.
CUTOFF sets the low-pass cutoff frequency, which allows for
control of how much high frequency content is present.
EFFECTS/PLUGINS
Each of the various effects (CONVOLUTION REVERB,
MORPH|ENGINE) and the included PLUGIN HOSTING
capability has its own detailed section found later in this guide.

25
5 New Features ____________________________________________________
ROOM SAMPLES The Gog sample format has been extended to include room and
mic samples: Simply dial in the amount of room desired using
the new mixer interface. Drumagog 5 comes with an updated
Gog sample library to take advantage of this powerful new
feature.
ROOM SAMPLES are essentially additional samples attached
to specific direct samples. Take a snare drum as an example: the
primary sample is the close-mic’d, or “direct” sample; a
recording of an up-close mic right on the snare, with little to no
ambience. Attached to this direct sample can be up to three more
samples, allowing for three different room or ambient sounds.
Drumagog 5 allows sample makers the ability to designate
specific room samples for every hit, and does not use a
“generic” sample for every hit. This is not only for phase-
accuracy, but it creates a more realistic sound, as the original
hit’s dynamics are 100% reproduced in the room sounds.
At the bottom of Drumagog 5’s MAIN tab is a new mixer
window, where each of these additional room sounds will appear
on individual faders. Drumagog 5 comes with new Gog Files
that contain both an “O/H” slot (stereo Over-Heads) and a “St
26
Room” slot (Stereo Room). Simply slide the fader higher on the
mixer to add these new ambient mics to Drumagog’s playback.
Adding room samples to your own library is easy: Find and drag
the desired room sample file from the FILE BROWSER window
(on the left-side of the plugin window) and simply drop it on the
corresponding direct sample; a pop-up window will appear
requesting which Room Slot the room sample should correspond
to. Once the first room sample is added to a slot the
corresponding fader will activate in Drumagog’s mixer. To re-
name the slot just double-click the “Room #” label at the bottom
of the fader.
NEW TRIGGERING ENGINE
Drumagog's already powerful triggering engine has been
improved to more accurately track the most demanding drum
tracks. Even complicated rolls and flams are no match for
Drumagog 5's new triggering engine.
The “TRANSIENT DETAIL” slider has been moved from the
SETTINGS page into the VISUAL TRIGGERING window,
making it much easier to adjust for complicated flams, rolls,
blast beats, etc. See the VISUAL TRIGGERING section for
more information on this control.
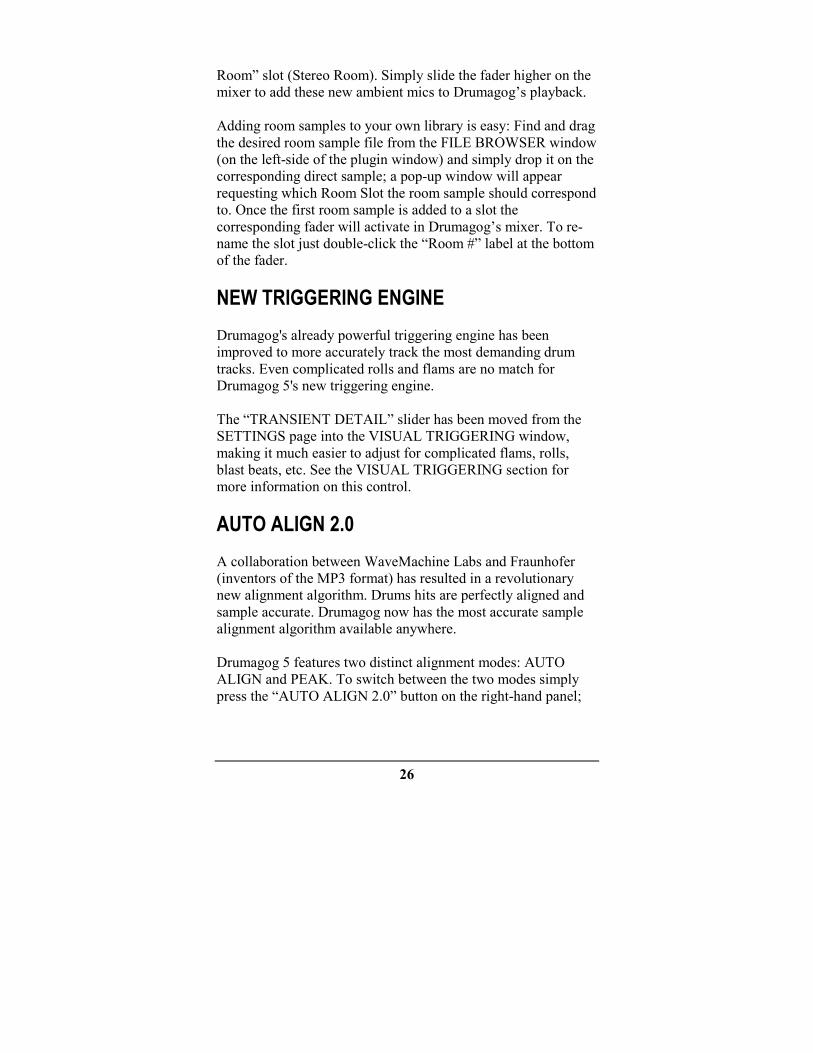
AUTO ALIGN 2.0
A collaboration between WaveMachine Labs and Fraunhofer
(inventors of the MP3 format) has resulted in a revolutionary
new alignment algorithm. Drums hits are perfectly aligned and
sample accurate. Drumagog now has the most accurate sample
alignment algorithm available anywhere.
Drumagog 5 features two distinct alignment modes: AUTO
ALIGN and PEAK. To switch between the two modes simply
press the “AUTO ALIGN 2.0” button on the right-hand panel;

27
turning off (i.e. the light is off) AUTO ALIGN enables PEAK
mode, and vice-versa.
The default setting in Drumagog 5 is AUTO ALIGN, which
usually results in the closest and tightest alignment of the
original and new drum hits. This algorithm takes into account a
number of factors when aligning the hits, including phase
accuracy. This mode analyzes the whole drum hit, not just the
initial transient, when aligning.
In PEAK mode Drumagog 5 uses a simpler approach, and aligns
the initial transient peaks of the two hits. This mode usually
works best on tracks where the original and new drum sounds
are fairly similar.
AUTO HI-HAT TRACKING (PLATINUM ONLY)
One of Drumagog 5’s new features is an exciting breakthrough
in drum replacement, AUTO HI-HAT TRACKING. Now
Drumagog will recognize different hi-hat pedal articulations,
like fully closed, fully open, half-open, etc, and then
automatically play back those articulations.
To use AUTO HI-HAT TRACKING, first insert Drumagog 5
onto a hi-hat track, and then load a hi-hat Gog file that contains
multiple articulations (i.e. open, half-open, closed, etc). Next,
click the “AUTO HI-HAT TRACKING” button in OPTIONS
PANEL (see figure) to enable the tracking.

28
Auto Hi-Hat Tracking
When you press play in your DAW, Drumagog will
automatically begin following the detected pedal articulations.
The “ARTICULATIONS” slider will begin moving during
playback showing how Drumagog is following the changes.
AUTO HH THRESHOLD
To control how sensitively the tracking algorithm determines the
differences between the track’s various articulations, use the
“AUTO HH THRESHOLD” slider in the SETTINGS tab.
Moving the slider down causes Drumagog to favor closed hits,
and moving it higher favors open hits. Adjust this slider until
Drumagog is choosing the appropriate articulations in relation to
your source track.
PLEASE NOTE: Once Drumagog is correctly following the hi-
hat track there is one minor correction that must take place. In
order for Drumagog to accurately analyze the incoming audio
and determine which articulation is which, Drumagog’s
incoming audio buffer needs more time to analyze the source
29
track. This results in an extra amount of delay through the
plugin, which will cause a slightly delayed output that is NOT
automatically corrected by Plugin Delay Compensation. The
simplest way to correct for this is to move the hi-hat track
EARLIER in time; you will find the exact amount of time shift
needed displayed just below the AUTO HI-HAT TRACKING
button in Drumagog’s right-hand panel. Just slide the hi-hat
track exactly that much earlier in the timeline and your resulting
track will sound perfectly in time.
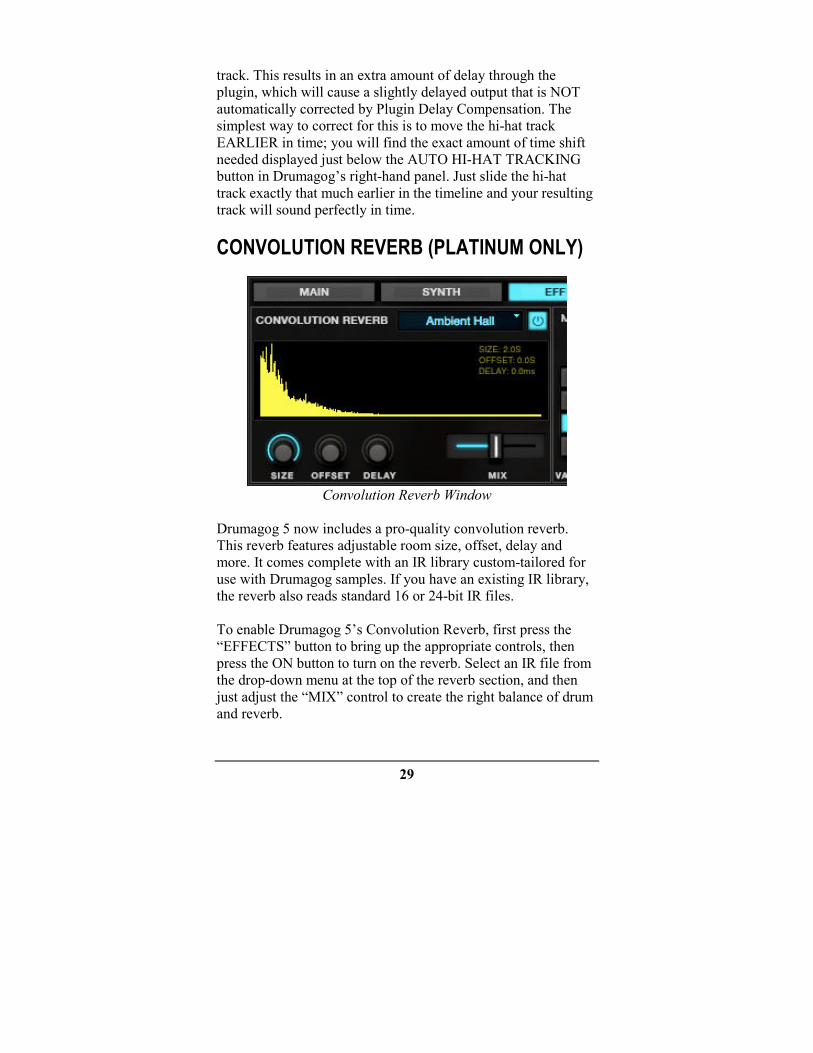
CONVOLUTION REVERB (PLATINUM ONLY)
Convolution Reverb Window
Drumagog 5 now includes a pro-quality convolution reverb.
This reverb features adjustable room size, offset, delay and
more. It comes complete with an IR library custom-tailored for
use with Drumagog samples. If you have an existing IR library,
the reverb also reads standard 16 or 24-bit IR files.
To enable Drumagog 5’s Convolution Reverb, first press the
“EFFECTS” button to bring up the appropriate controls, then
press the ON button to turn on the reverb. Select an IR file from
the drop-down menu at the top of the reverb section, and then
just adjust the “MIX” control to create the right balance of drum
and reverb.

30
The following controls offer more adjustable parameters:
SIZE adjusts the overall size of the acoustical space, expressed
in seconds (i.e. length of the reverb tail).
OFFSET moves the start of the reverb further back in the IR; in
other words it moves the listener forward or back inside the
acoustical space. Increasing the OFFSET will lessen the early
reflections captured at the beginning of the IR, creating a more
diffuse sound, albeit with a shorter reverb tail.
DELAY shifts the entire reverb later in time, creating “dead
space” before the start of the reverb. This control is the same as
the pre-delay control found in most reverbs.
MIX simply adjusts the balance between the original “dry” drum
sound and the “wet” reverb.
MORPH|ENGINE (PLATINUM ONLY)
Morph|Engine Window
In collaboration with MoReVoX sound designer Sabino
Cannone, Drumagog 5 includes an entirely new way to process

31
drums. Morph|Engine is a dynamic morphing processor which
shapes your drums in a way never heard before. Snare drums
take on an organic "growl", bass drums sound like they have
liquid skins. Unlike traditional processing, Morph|Engine is
fluid and dynamic, changing with the dynamics of every beat.
To use the new Morph|Engine, click the “EFFECTS” button in
the Drumagog 5 interface, and enable the engine by pressing the
ON button. First select a Morph (the basic element of the
engine) from the drop-down list at the top of Morph|Engine
window. Then try the eight included variations of this Morph by
selecting the corresponding numbered buttons on the left-side of
the window. Each variation makes some slight changes to the
overall Morph, allowing a great number of combinations.
Finally, grab the “Blob”! Click and drag the “Blob” around the
window to shape and mold the resulting sound: Moving the
“Blob” left and right adjusts the “MIX” (or balance) of the
original vs. Morphed drums, while up and down adjusts the
color “HUE” (or frequency spectrum). Like all Drumagog
controls these parameters can be automated for precision
changes to your settings.

32
PLUG-IN HOSTING (PLATINUM ONLY)
Plug-In Window
One of the biggest new features in Drumagog 5 Platinum is
Plug-In Hosting, which is the ability for Drumagog to now
“host” another VST Virtual Instrument (VSTi). This allows
Drumagog to trigger the VSTi’s selected sound without using
any cumbersome (and less accurate) MIDI routing. Drumagog
will trigger the VSTi in real-time, and even supports virtual
instruments through the new PLUGIN OUTPUT MIXER.
To use Plugin Hosting, first press the “PLUGINS” button to
switch to this view. The first pull-down menu is labeled
“SELECT”, and contains several different options:
UNLOAD PLUGIN does exactly that and un-instantiates the
loaded VSTi.
REFRESH PLUGIN LIST will re-scan your VST Plugins folder.
Use this whenever a new VSTi is installed onto the system
(otherwise it won’t appear in the list).
SET PLUGIN FOLDER changes the folder location where
Drumagog looks for installed VSTi’s. By default this is set to
the default VST Plugins folder.
Below the above options will be the detected VSTi list. Double-
clicking on something from the list will load that specific VSTi
into Drumagog.

33
There are a few additional parameters available in this section
that need to be set when hosting a VSTi:
MIDI CHANNEL and MIDI NOTE assigns the specific MIDI
channel and note values Drumagog sends to the VSTi. Both the
note name and MIDI note value are displayed, as in “C3 (60)”,
as not all VSTi’s use the same MIDI standard to designate
octaves.
MIX simply adjusts the level between Drumagog’s selected Gog
File and the hosted plugin. This allows users to layer two
simultaneous drum sounds at once!
Finally, the OUTPUT MIXER allows for VSTi’s with multiple
outputs to be mixed inside Drumagog 5.
PLEASE NOTE: Drumagog 5 works by hosting the selected
VSTi in an individual instance of Drumagog, using Steinberg’s
VST hosting. The VST hosting spec does not contain a system
for multiple hosts to access the same VSTi at once, which means
that if a project has three different Drumagogs instantiated, and
the user wants each one to trigger a VSTi, then each Drumagog
instance must host its own VSTi; there is no way to load only
one instance of the VSTi. The good news is that as long as only
the needed sound(s) is loaded in the VSTi, memory usage won’t
be appreciably higher running several smaller instances of a
VSTi over running one larger instance.

34
Manual Revision 1.0 © 1999 - 2010 WaveMachine Labs, Inc.
Mac and Mac Logo are trademarks of Apple Computer, Inc.
Pro Tools and Digidesign are registered trademarks of Digidesign, a
division of Avid Technology, Inc.
VST, Nuendo and Cubase are trademarks of Steinberg Media
Technology AG
Digital Performer is a trademark of Mark of the Unicorn, Inc.
Windows XP is a trademark of Microsoft Corporation.
Cubase and Halion are registered trademarks of Steinberg A.G.
SONAR and Cakewalk are registered trademarks of Twelve Tone Systems,
Inc.
BFD is a trademark of FXpansion Audio UK, Ltd.
EZ Drummer and Superior Drummer are registered trademarks of
Toontrack Music