
Drug Control Organization User Manual
74
1 Drug Control Organization User Manual Homeopathic
Transcript of Drug Control Organization User Manual
1
Drug Control Organization
User Manual
Homeopathic

2
Contents 1. Accessing DCO Application ............................................................................................................ 4
................................................................................................................... Error! Bookmark not defined.
2.1 New License Registration ................................................................................................................ 8
2.2 Applicant’s Form ................................................................................................................................ 9
2.3 Firm Registration Form ................................................................................................................. 16
2.4 Competent Technical Staff Form ................................................................................................. 19
2.5 Uploading of Documents .............................................................................................................. 25
2.6 Product Form ............................................................................................................................... 29
2.7 Add Dilutions ............................................................................................................................... 31
2.8 Adding Equipments/Instrument Details for Manufacturing .......................................... 33
2.9 Adding Equipment’s/Instrument Details for Laboratory................................................. 34
2.10 Application Status Form ........................................................................................................... 36
2.11 Payment ........................................................................................................................................ 37
3. Document Scructining Process .................................................................................................... 39
4. Inspection Process .......................................................................................................................... 45
4.1 Inspection Report ...................................................................................................................... 47
4.1.1 “Re-Inspection Schedule By” Option in Inspection Report ............................................... 53
5. Product Permission ........................................................................................................................ 54
5.1 Product Permission by Drug Controller ................................................................................ 54
5.2 Product Permission by product Committee ......................................................................... 56
5.3 Product Approval by Drug Controller ................................................................................... 66
6 Grant of License .............................................................................................................................. 70
3
Abbreviations
CDSCO : Central Drug Standard Control Organization
DCGI : Drugs Controller general of India
ADC : Assistant Drug Controller
DCO : Drug Controller Officer
DC : Drug Controller

4
1. Accessing DCO Application
Users Access through the URL (“dco.rajasthan.gov.in”).Following Screen will appear.
User Clicks on SSO Login.
1.1 Login page User is required to login into the application by entering valid SSOID and password.
User Clicks on Drug Control Organization Icon.

5
If the profile on SSOID is incomplete, then an alert message will come to the user to complete the
profile on SSOID.

6
The following screen comes if the profile on SSOID is complete

7
2. Registration of Homeopathic Service by Applicant
Authorized User : Citizen
Pre-requisites: Applicant gets logged into the application through his SSOID.
Description: The authorized user is required to register the Homeopathic service
in the application.
Once the user is logged into the application through his SSOID, then
Step 1: Click on “New License Registration ” link if he is new user or
Click on Edit/Update your application” link if he is already registered or he has
completed some part of the registration.

8
2.1 New License Registration
On click of “ New License Registration” , following screen comes.
Step 1: Select License Application Type as “Homeopathic”
Step 2: Select License Application Form as “Application for the grant of a license to
manufacture for sale or for distribution of Homoeopathic medicines or a license to
manufacture potentised preparations from back potencies by licensees holding
license in Form 20-C.”
Step 3: Click on submit Button.

9
2.2 Applicant’s Form
Pre-Requisite : Applicant should fill New Registration Form as given in Point 2.1
Step 1: Enter the aadhar number of applicant and click on submit Button. Screen as given
below:
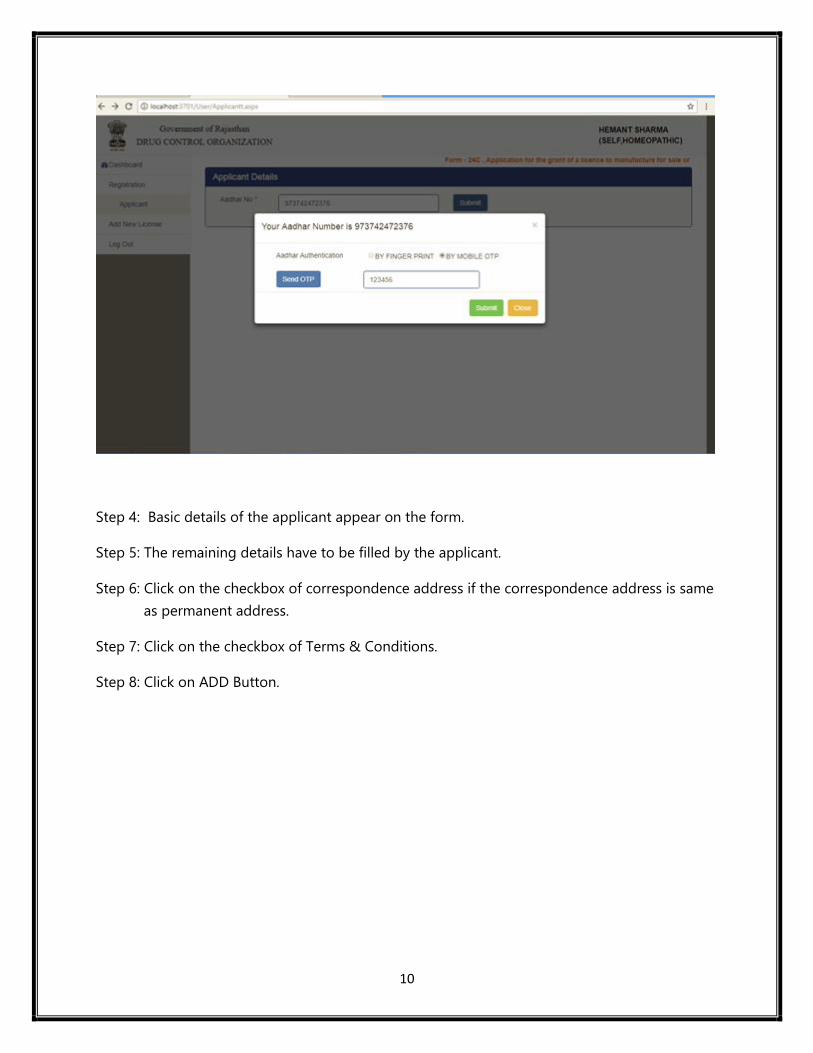
Step 2: One modal pop up comes, select BY Mobile OTP and click on Send OTP Button.
Step 3: OTP will be received on mobile number which is registered with Aadhar. Enter OTP
in Text Box and click on submit Button. Screen as given below:
10
Step 4: Basic details of the applicant appear on the form.
Step 5: The remaining details have to be filled by the applicant.
Step 6: Click on the checkbox of correspondence address if the correspondence address is same
as permanent address.
Step 7: Click on the checkbox of Terms & Conditions.
Step 8: Click on ADD Button.

11

12
Step 9: On click of the above ADD button, following Screen appears.
Step 11: Click on Save Button.
The data of the applicant can be edited by click on the edit button below Action.
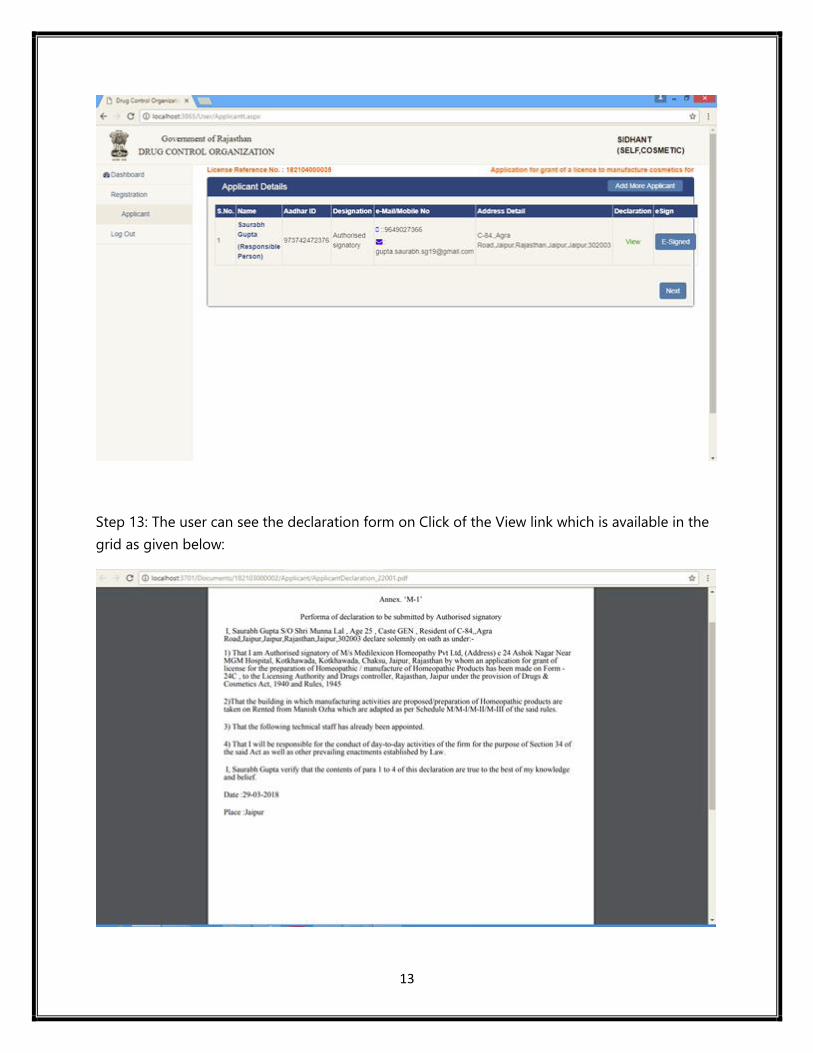
Step 12: The user can add more applicant by clicking on the “Add more Applicant” Button as
given below screen:
13
Step 13: The user can see the declaration form on Click of the View link which is available in the
grid as given below:
14
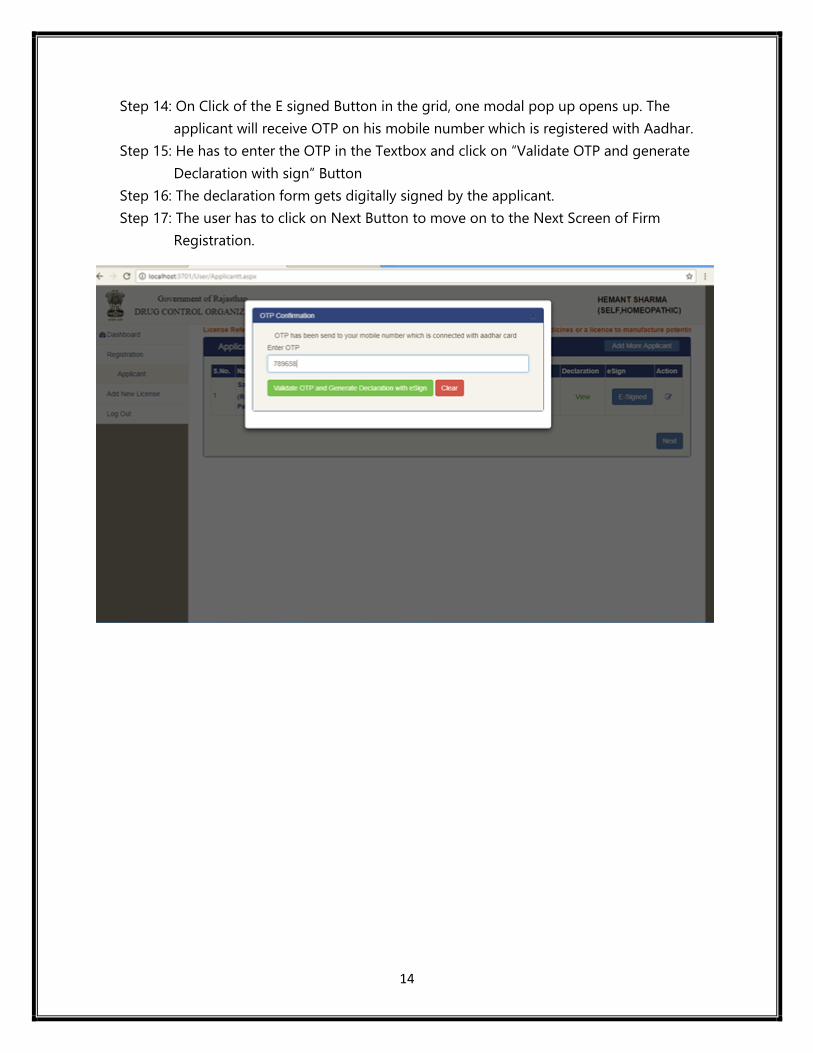
Step 14: On Click of the E signed Button in the grid, one modal pop up opens up. The
applicant will receive OTP on his mobile number which is registered with Aadhar.
Step 15: He has to enter the OTP in the Textbox and click on “Validate OTP and generate
Declaration with sign” Button
Step 16: The declaration form gets digitally signed by the applicant.
Step 17: The user has to click on Next Button to move on to the Next Screen of Firm
Registration.

15
Step 18 : On click of Name in the above Grid , the applicant can view his details

16
2.3 Firm Registration Form
Pre-Requisite – Applicant’s details should be filled first
Step 1: User click on the firm available in the left menu Or he can come to this page by
clicking on the next Button available in the applicant Details page.
Step 2: The user has to fill the details given in the Screen and click on Save Button. One
modal pop up comes, In the modal pop up Click on the Yes Button in order to save
the details of the firm.
17
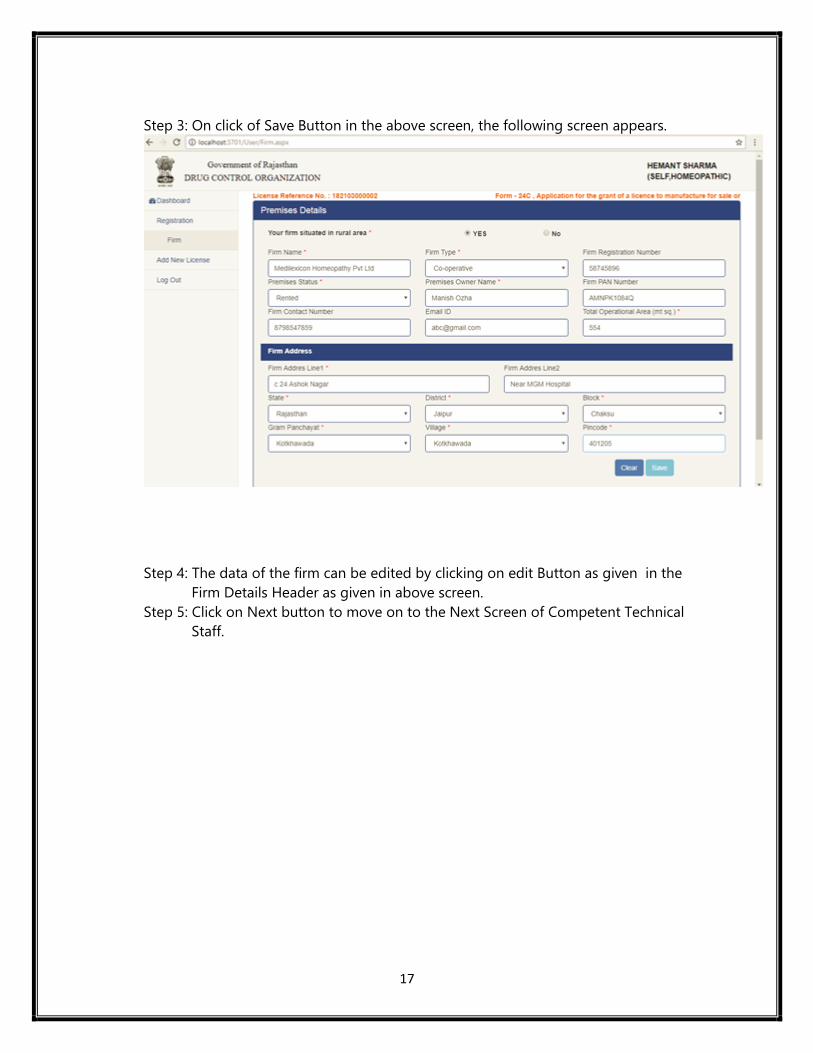
Step 3: On click of Save Button in the above screen, the following screen appears.
Step 4: The data of the firm can be edited by clicking on edit Button as given in the
Firm Details Header as given in above screen.
Step 5: Click on Next button to move on to the Next Screen of Competent Technical
Staff.

18

19
2.4 Competent Technical Staff Form
Pre-requisite : Firm’s Details should be filled.
There should be minimum two competent Technical staff. They are as follows
Manufacturing Chemist
Analytical Chemist
Step 1: User clicks on competent Technical Staff in the left menu or he clicks on the next
button available in the firm page.
Step 2: Enter the aadhar number and click on submit Button.
Step 3: One modal pop up comes, select BY Mobile OTP and click on Send OTP Button.
Step 4: OTP will be received on mobile number which is registered with aadhar. Enter
OTP in Textbox and click on submit Button.

20
Step 5: Basic details of the competent technical staff appear on the form as given below
screen
Step 6: The remaining details have to be filled by the competent technical staff .
21
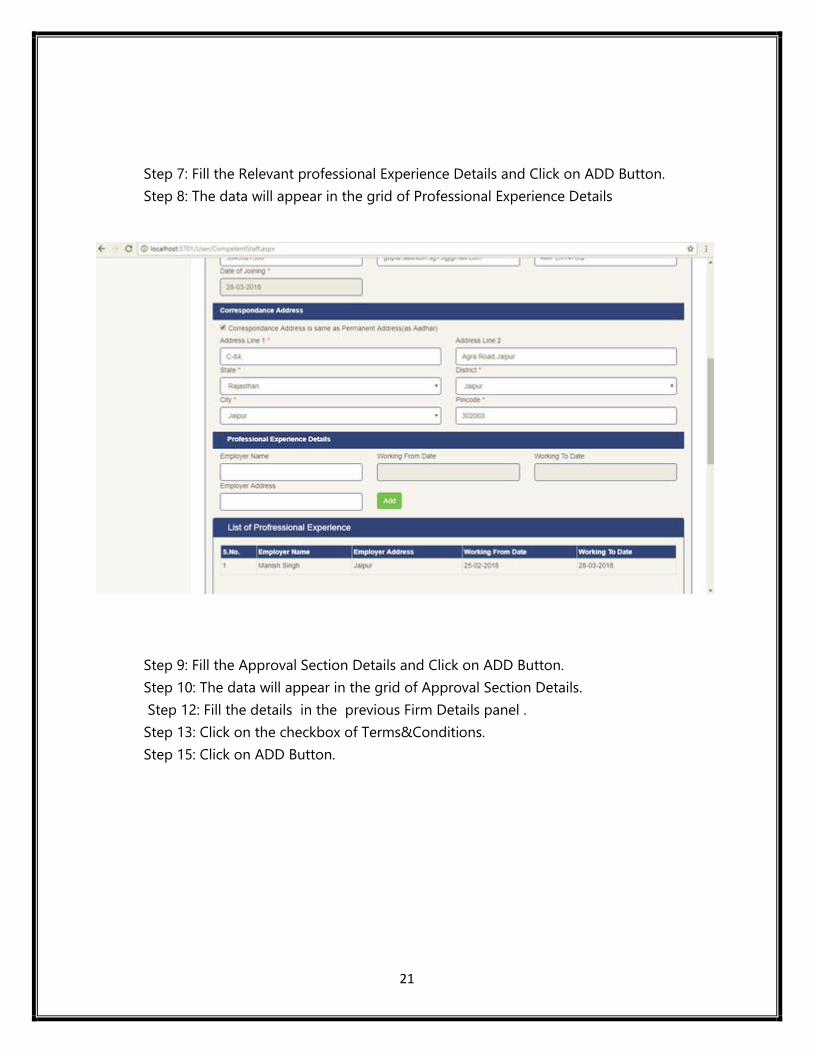
Step 7: Fill the Relevant professional Experience Details and Click on ADD Button.
Step 8: The data will appear in the grid of Professional Experience Details
Step 9: Fill the Approval Section Details and Click on ADD Button.
Step 10: The data will appear in the grid of Approval Section Details.
Step 12: Fill the details in the previous Firm Details panel .
Step 13: Click on the checkbox of Terms&Conditions.
Step 15: Click on ADD Button.

22
Step 16: On click of the above ADD button in the above Screen, following Screen appears.
Click on the Save Button.
Step 17: The user can add more competent technical staff by clicking on the “Add more
Competent” Button.

23
Step 18: Click on Next Button to move on the next Screen of Upload Documents.
Step 19: On click of View Link in the above grid, the competent’s technical staff can see the
declaration form.
24
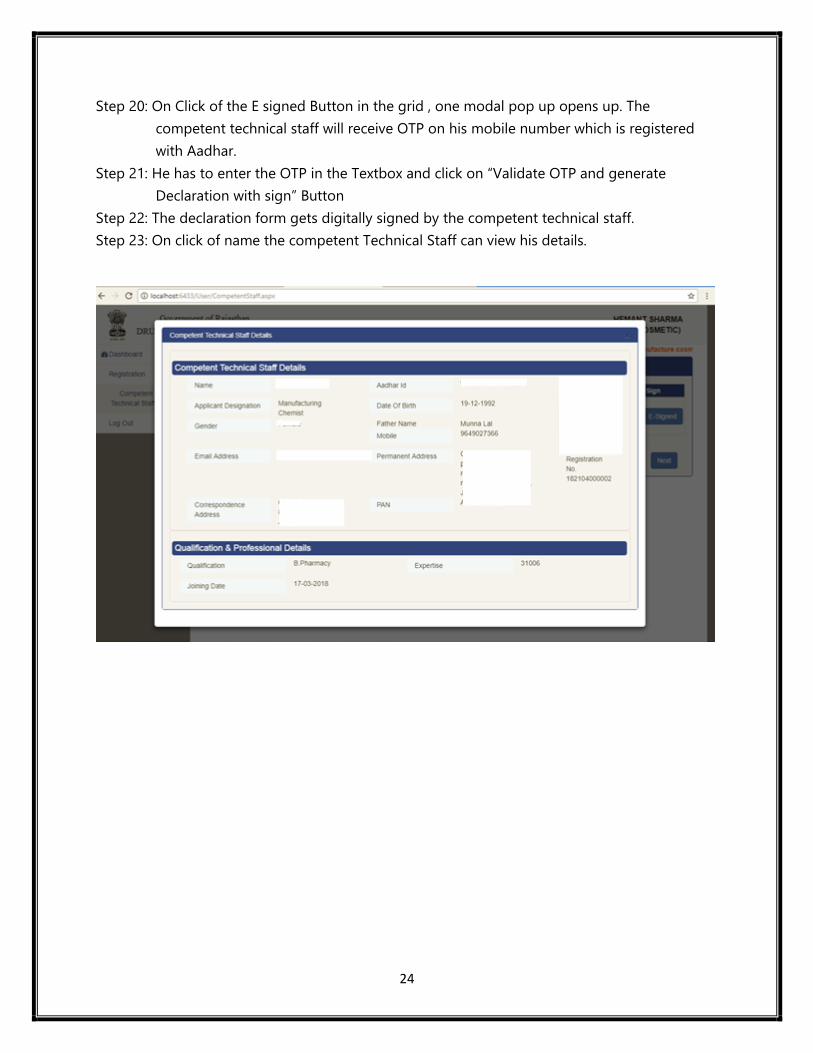
Step 20: On Click of the E signed Button in the grid , one modal pop up opens up. The
competent technical staff will receive OTP on his mobile number which is registered
with Aadhar.
Step 21: He has to enter the OTP in the Textbox and click on “Validate OTP and generate
Declaration with sign” Button
Step 22: The declaration form gets digitally signed by the competent technical staff.
Step 23: On click of name the competent Technical Staff can view his details.

25
2.5 Uploading of Documents
Pre-Requisite: Competent Technical Staff Details should be filled
Step 1: Click on the “Upload Document” link on the left menu or click on the Next Button on the
Competent Technical Staff form.
Step 2: Click on the firm tab.
Step 3: The documents pertaining to the firm appear on the screen.
Step 4: All the files to be uploaded should be in PDF Format and should be of the size as
specified in the given Screen.
Step 5: The current Photo and the current Signature of the applicant and Competent Technical
Staff can be uploaded in a jpg Format.
Step 6: The documents marked with red star are the mandatory documents to be uploaded.
Step 7: Browse the file by clicking on Choose File Button.
Step 8: Click on the arrow of green color to upload the file.
Step 9: Click on Cancel of red color if you want to cancel the file.
Step 10: Click on the image of eye to view the uploaded document.

26
Step 11: Click on Firm Tab, in order to upload the documents as given below

27
Step 12: Click on the applicant tab to upload the documents of experience certificate and
educational Certificate, Current photo and Current Signature of the applicant.

28
Step 13: Click on the competent technical staff tab to upload the documents of experience
certificate and educational certificate, approval certificate, registration certificate,
current photo and current Signature of each competent technical staff.

29
2.6 Product Form
Pre-requisites: Uploading of Documents should be done
Step 1 : Click on the product in the left menu or click on the Next Button available on the
upload Document to get redirected to Product page.
Step 2: Fill the details in the products panel.
Step 3: Fill all the details in the composition Panel and Click on Add Button.
The data added in the composition panel can be seen in the grid. The data in the
grid can be edited and removed from the grid.
Step 4: Fill the details in the Pack Size panel and Click on Add Button.
The data added in the Pack Size panel can be seen in the grid. The data in the grid
can be edited and removed from the grid.
Step 5: Click on the Checkbox of Undertaking Terms and Conditions.
Step 6: A modal pop up opens up displaying the Undertaking Terms and Conditions.
Step 7: Click on Accept Button in the modal Pop Up.

30
31
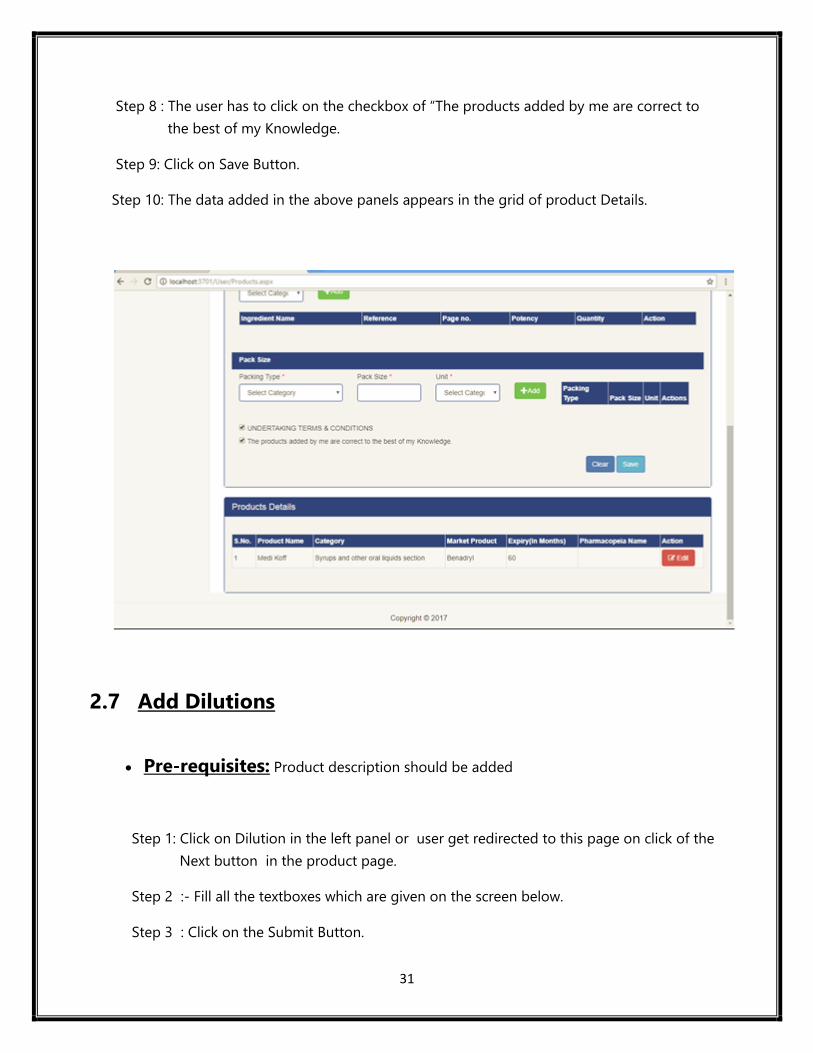
Step 8 : The user has to click on the checkbox of “The products added by me are correct to
the best of my Knowledge.
Step 9: Click on Save Button.
Step 10: The data added in the above panels appears in the grid of product Details.
2.7 Add Dilutions
Pre-requisites: Product description should be added
Step 1: Click on Dilution in the left panel or user get redirected to this page on click of the
Next button in the product page.
Step 2 :- Fill all the textboxes which are given on the screen below.
Step 3 : Click on the Submit Button.

32
Step 4 : The data added can be seen in the grid.
Step 5 : The Data in the grid can be updated and deleted.
Step 6 : Click on Next button to move on to the next Screen of “Adding
equipment’s/instrument Details for manufacturing.”

33
2.8 Adding Equipments/Instrument Details for
Manufacturing
Pre-Requisite: Products should be added by applicant.
Step 1: Fill the details given on the screen.
Step 2: Upload the files in the PDF format.
Step 3: Click on Submit Button.
Step 4: The data appears in the grid and the uploaded documents can be seen on the
click of image of eye.
Step 5: The data in the grid can be edited and deleted.
Step 6: Once the payment is done by the user , he will not be allowed to add the
equipment’s/Instruments for the manufacturing. He can only see the data
available in the Grid.
Step 7: User clicks on Next Button to move on the Equipment/Instrument Details for
Laboratory page.

34
2.9 Adding Equipment’s/Instrument Details for Laboratory
Pre-Requisite: Equipment’s/Instrument Details for manufacturing should
be added by applicant.
Step 1 : User has to fill the details given on the form.
Step 2 : User has to upload the mandatory documents in the PDF format.
Step 3 : User Clicks on Submit Button.
Step 4 : The data appears in the grid and the uploaded documents can be seen on the click
of image of eye.
Step 5 : The data in the grid can be edited and deleted.
Step 6 : Once the payment is done by the user, he will not be allowed to add the
equipment’s/Instruments for the laboratory. He can only see the data available in
the Grid.
Step 7 : User clicks on Next Button to move on the application Status form.

35

36
2.10 Application Status Form
Pre-Requisite: Equipment’s/Instrument Details for laboratory should be
added by applicant.
Step 1 : Click on “Application Status” link in the left menu or click on the Next Button on
the Equipment/Instrument Details for Laboratory Page.
Step 2 : The details of the license, firm, applicant, technical staff, products, License
Amount, Inspection amount and Total Amount can be seen
Step 3 : Click on the image of eye to view the documents related to firm.
Step 4 : Click on the image of eye to view the declaration forms of both applicant and
competent Technical staff.
Step 5 : Click on edit button to view the documents uploaded by the applicant and
competent technical staff.
Step 6 : Click on the checkbox and then click on the Pay Button.
Step 7 : On click of pay Button the user is redirected to the payment form.

37
2.11 Payment
Pre-Requisite: The user has to check and confirm all the details on the
application status form.
Step 1: The user comes to this page when he clicks pay Button on the Application Status
Form.
Step 2 : Click on Proceed to Pay Button.

38
Step 3 : On Click of pay button the user is redirected to e-Mitra payment gateway.

39
Step 4 : On Click of Receipt, the payment receipt can be generated.
3. Document Scructining Process
Authorized User: Drug Controller(DC)
Pre-Requisite: The user has done the payment through e mitra
gateway for the license required. DC logs into the application
Description: The documents uploaded by the user will be scrutinized
by Drug Controller(DC) only .
Document Scructining will be done by Drug Controller (DC). The documents uploaded
by the user will be scrutinized by Drug Controller (DC) only.
Step 1 : DC gets logged into the application through their SSOID.
Step 2 : Select from the dropdown the type of license “Homeopathic” for which the
scructining has to be done.
Step 3 : Click on the reference ID.
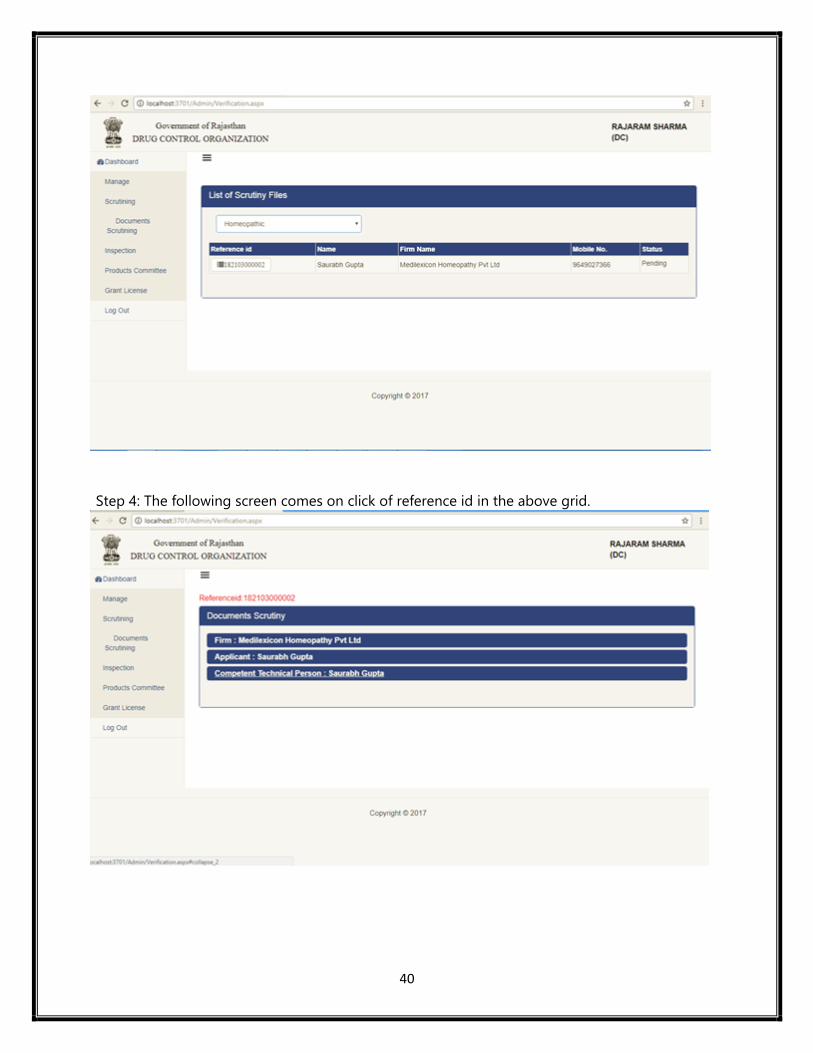
40
Step 4: The following screen comes on click of reference id in the above grid.

41
Step 5 : Click on the firm panel to scrutinize the firm documents.
Step 6 : Click on the image of eye to view the uploaded document.
Step 7: Click on the image of correct to accept that the uploaded document is correct.
Step 8: Click on the image of wrong to reject the uploaded document.
On click of image of Wrong, one modal pop up opens up
Step 9: The DC has to give the reason in the textbox for rejecting the document and
click on submit Button. See the screen below.
Step 10: One message and email will be sent to the responsible person of the firm
regarding the documents rejected in order to complete the compliances found.
The user will login with his SSOID .He will go to the application Status form and can
update the documents which were in compliance.
Re Scructining will be done by DC again. Only the documents which were in compliance
will be rescrutinized by DC.

42
Step 10 : Once the documents are uploaded again by the user re scrutining will be
done by Drug Controller (DC).The file will come to the drug Controller again. Repeat the
steps from Step 1 to step 6.
Then repeat the steps from step 11 to Step 17 which are given below.
Step 11 : Click on the applicant tab to view applicant details and to scrutinize the
documents of the applicant.

43
Step 12 : Click on the competent technical Person to view Competent Technical Person
details and to scrutinize the documents of the competent Technical Staff.

44
Step 13: Once all the documents are scrutinized by DC, a final remark is given by DC and click
on Submit Button.
Step 14 : On click of submit button one modal pop up comes.
Step 15 : Click on “completed” Button to complete the scrutining process.
Step 16 : If Pending Button is clicked, the file remains there itself.
Step 17 : The file goes to further level that is Inspection process

45
4. Inspection Process
Authorized User: Drug Controller(DC)
Pre-Requisite: :- Document Scrutiny is completed by the Drug
Controller. DC logs into the application
Description: DC appointed ADC/DCO for Inspection and Inspection
Date
Step 1 : Initially the DC gets logged into the application through his SSOID.
Step 2 : Click on inspection in the left menu.
Step 3 : Click on “List of institutions to be inspected”.

46
Step 4 : Select from the license dropdown the type of license for which the inspection is
to be done and the status as “Pending by DC”.
Step 5 : Click on the “To be Appointed” button on the registration number for which the
inspection is to be done.
Step 6 : DC will assign a ADC/DCO and will assign a date of inspection to him.
Step 7: Fill the details in the modal pop up and Click on Appoint Button.
Step 8 : An email and SMS will be send to the ADC/DCO about the date of Inspection
and the location at which the inspection is to be done.

47
4.1 Inspection Report
Authorized User: Drug Controller(DC)
Pre-Requisite:- DC appointed ADC/DCO for Inspection and
Inspection Date. ADC/DCO logs into the application
Description: Inspection on site will be done by ADC/DCO
Step 1:- The ADC/DCO Logins with his SSOID.
Step 2 :- Click on the “Manage” in the left menu.
Step 3: -Click on List of Institutions to be inspected in the left menu.
Step 4 :- Select “Homeopathic” from the license category dropdown.
Step 5:- Click on “Inspection Pending” from the grid for which the inspection is to be done.

48
Step 6 :-The inspection report will open.
Step 7:- Click on the checkbox of yes if the firm is ready for Inspection and the whole inspection
report will open or else not.
Step 8:- If the firm is not ready for inspection Click on the Checkbox of No and click on Submit
Button.
Step 9 :- The Inspection report will be filled by ADC or DCO and will be send to the Drug
Controller for approval.

49

50
Step 10:- Fill the complete report and observation remarks.

51
Step 11 :- Fill the Recommendation Textbox and click on the checkbox of the competent
technical staff whose name we want to be printed in the license.
Step 12 :- Click on the “Recommended for Grant of License to DC”.
Step 13 :- The ADC/DCO has to again Click on the “Manage” in the left menu.
Step 14: Again Click on List of Institutions to be inspected in the left menu.
Step 15: Again Select “Homeopathy” from the license category dropdown. Following Screen
will appear as given below:
//////////////////////screeen
Step 16:- The ADC/DCO has to click on e sign in the grid, then one modal pop up opens up.
Step 17:- The ADC will receive OTP on his mobile number which is registered with Aadhar. He
has to enter the OTP in the Textbox and Click on Submit Button.

52
Step 18:- The inspection report gets digitally signed by the ADC and needs to be send to Drug
controller.
Step 19:- The inspection report can be viewed in the PDF format

53
4.1.1 “Re-Inspection Schedule By” Option in Inspection
Report
Step 1: Under “Re-Inspection Schedule By” of Inspection Report which has three options as
given below:
By SLA
No Re-Inspection Required

54
Step 2: Click on checkbox of “No re inspection Required” if re inspection is not required.
OR
If the By SLA Checkbox is checked then re inspection will take by State level
Authority(ADC/DCO).
Step 3: The file will be send to the user to complete the compliances if any found.
Step 4: An inspection fee of Rs 1500 will be charged to the user for re inspection.
Step 5: Once the re inspection payment is done by the user , the drug controller will
assign the ADC or DCO for re inspection.
Step 6: REPEAT the steps given Point 4 and 4.1
5. Product Permission
5.1 Product Permission by Drug Controller
Authorized User : Drug Controller
Pre-Requisite: Inspection Process is completed successfully and Inspection Report is
generated. Initially the DC gets logged into the application through his SSOID.
Description: DC will allow Product Committee Team to test the product and dilutions.

55
Step 1 : Drug Controller gets logged into the application through SSOID.
Step 2 : DC Clicks on the “Remark List” in the left menu Under Inspection.
Step 3 : The inspection report can be viewed by DC on click of image of eye.
Step 4 : The DC has to click on link” Send for Product Approval”.
Step 5 : One modal pop up opens up up.
Step 6 : The DC has to enter his remarks in the given Textbox and Click on “Send product
approval” Button.
Step 7 : The file goes to all the three Members of Product Committee.

56
5.2 Product Permission by product Committee
Authorized User : Any Members of the Product Committee
Pre-Requisite DC allows Product Committee Team to test the product and dilution.
There should be minimum three members in the product Committee for Product
approval
o Initially the Any Members of the Product Committee gets logged into the
application through his SSOID.
Description: All three Members of the Product Committee can test the added product
and dilutions
There are minimum three members in the product Committee for Product approval.
Any Members of the Product Committee gets logged into the application with their
SSOID.
Click on Manage in the left menu.
Click on Product Approval below manage in the left menu.
57
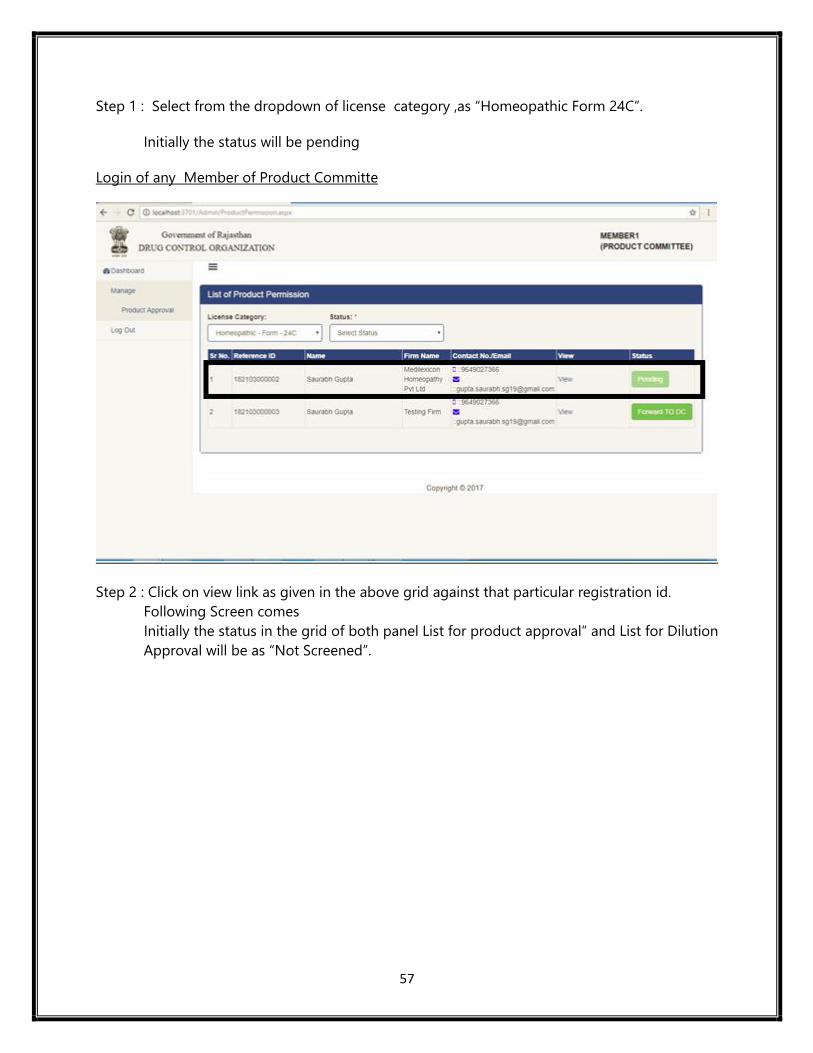
Step 1 : Select from the dropdown of license category ,as “Homeopathic Form 24C”.
Initially the status will be pending
Login of any Member of Product Committe
Step 2 : Click on view link as given in the above grid against that particular registration id.
Following Screen comes
Initially the status in the grid of both panel List for product approval” and List for Dilution
Approval will be as “Not Screened”.

58
Step 3 : On click of view link in the “List of product approval” panel grid, following screen comes.

59
Fill the remarks in the Textbox of “Final product Committee Remark”.
Select the status from the dropdown as “May be approved”
Click on Submit Button.
Step 4 : On click of the above Submit Button, following Screen comes.
In the list for product approval panel, the status in the grid gets changed to “Screened”.

60
Step 5 : Now click on each of the View link in the “ List of Dilution Approval” panel.
Initially the status in the grid of “ List of Dilution Approval” panel
will be “Not Screened”.

61
Step 6 : On click of view link in the grid of List for Dilution approval panel following screen
comes.
Step 7 : Click on Submit Button

62
On click of Submit Button the status gets changed to “Screened” in the grid of List for
Dilution approval panel. Screen is given below:
Click on the product approval under manage in the left menu.Below screen comes
Click on the view link against that reference id

63
Repeat the steps from step 5 to step 7 in order to test the dilution .
Once all the dilutions are tested by the product committee members, following screen
comes.

64
Step 8 : Click on the product approval under manage in the left menu. Below Screen Comes
The status of the button is “Forward to DC”.
Step 9 :-On click of the button “Forward to DC” in the above grid below screen comes.
65
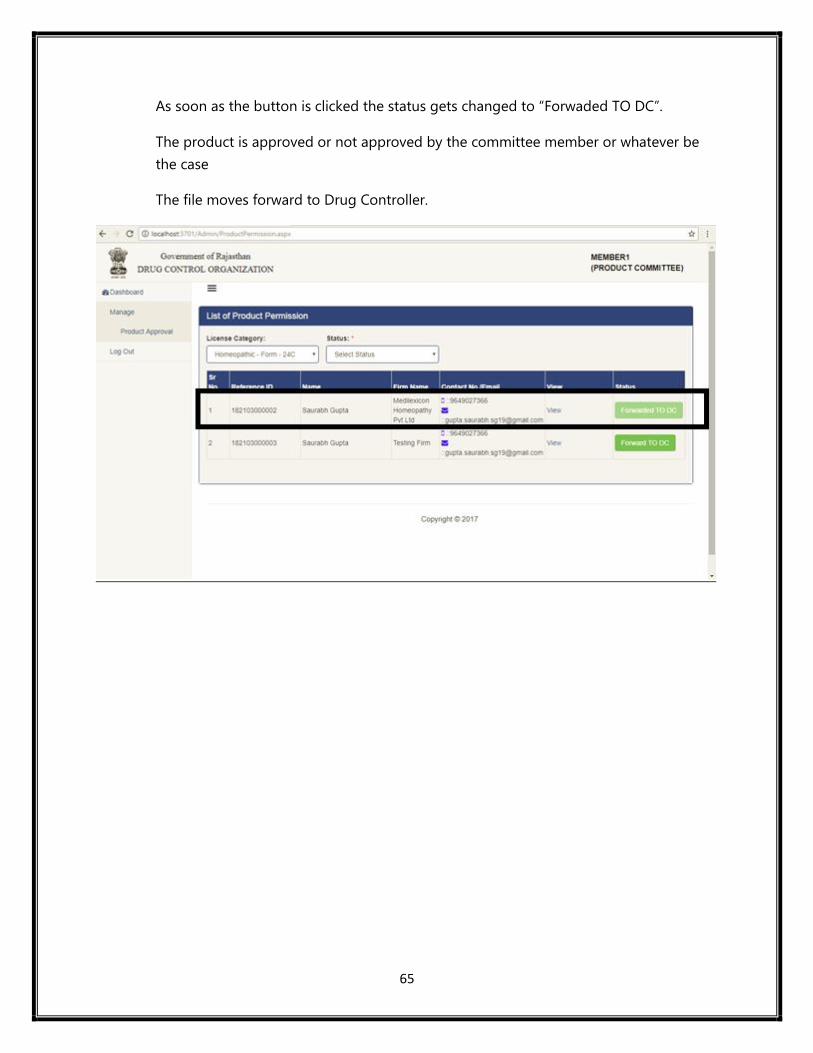
As soon as the button is clicked the status gets changed to “Forwaded TO DC”.
The product is approved or not approved by the committee member or whatever be
the case
The file moves forward to Drug Controller.

66
5.3 Product Approval by Drug Controller
Authorized User : Drug Controller
Pre-Requisite All three Members of the Product Committee has successfully test the
added product .Initially DC gets logged into the application through his SSOID.
Description: DC will approve the product and dilutions that are tested by three
members of Product Committee.
Step 1 : The Drug Controller logins with his SSOID.
Step 2 :- The Drug Controller click on the product Committee in the left menu.
Step 3 : The Drug Controller clicks on the product approval under product committee in the left
menu.
Step 4 : Select from the dropdown of license category as “ Homeopathic Form 24C”.
Step 5 : Click on the view link in the grid.

67
On click of view link in the above grid , below screen comes :-
Step 6: On click of image of eye in the above grid , the performa for approval of products can be
seen. Screen given as below .The “Performa for approval of product” will be digitally signed by
the Drug Controller.
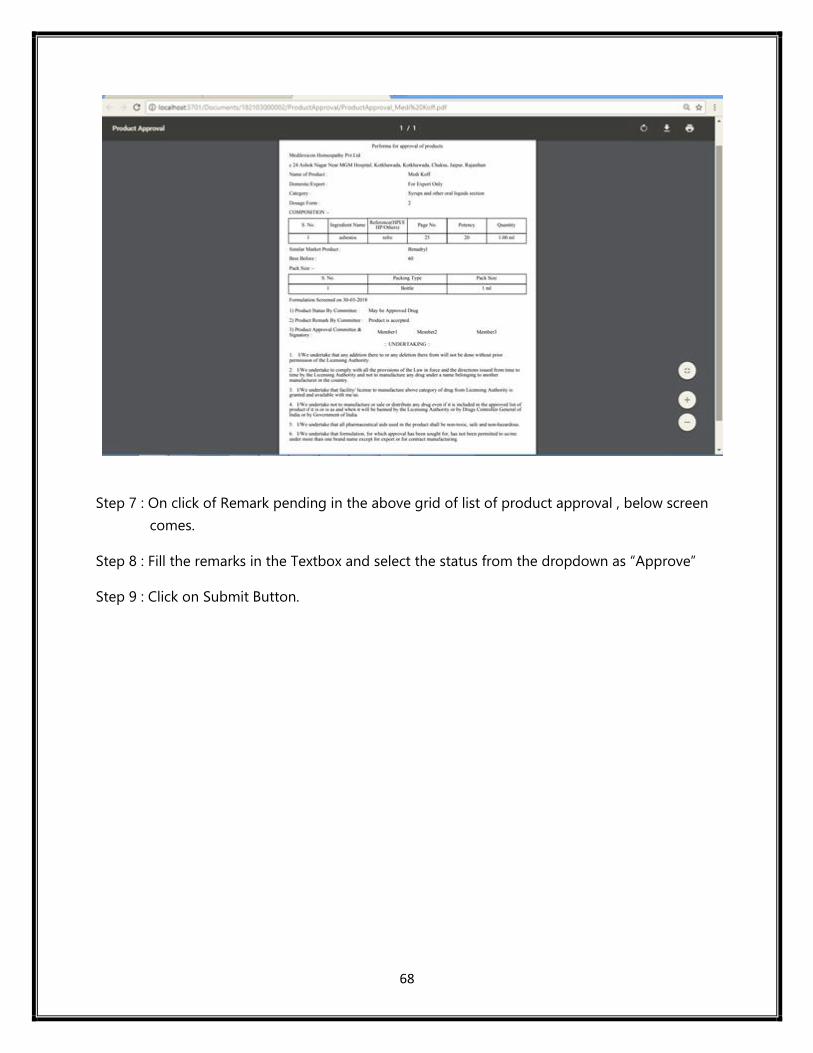
68
Step 7 : On click of Remark pending in the above grid of list of product approval , below screen
comes.
Step 8 : Fill the remarks in the Textbox and select the status from the dropdown as “Approve”
Step 9 : Click on Submit Button.

69
Step 10 : On click of above submit Button Below screen comes.
The Button gets changed to “Remark Done” which was earlier as Remark Pending.

70
6 Grant of License
Authorized User: DC
Pre-Requisite: Product permission committee has given their views
about the product.
Description: DC generates digitally signed Homeopathic License.
Step 1: DC logs into the application through his SSOID.
Step 2: DC Clicks on “Generate OTP TO E Sign License” Button to grant the license.
Step 3: Enter the OTP which is received on the registered mobile number of DC.
Step 4: Enter the remarks and click on “Validate OTP and generate Certificate with E –sign”
Button to digitally signed the license.

71
Step 5: Digitally Signed Homeopathic License will be generated

72
On Click of Objection Button
Step 1 :- If the Objection Button is Clicked in the Grid , one modal pop up comes.
Step 2 :- Remarks has to be entered in the textbox given.
Step 3 :-Click on the checkbox “Check if inspection is required”. Re Inspection will take place by
the ADC and a re inspection fee of Rs 1500 will be charged to the user.
Step 4 :- If the checkbox of “Send to applicant to resolve issue is checked then” then an SMS and
Email will be send to user to complete the compliances found.

73
On click of Reject Button
If the reject Button is clicked following screen comes
Fill the remarks in the given Text Box and click on “reject Application” . A SMS and
Email will be send to the user informing him that his application is rejection along
with reasons.
.

74


