Dropship For Magento 2 · Stores>Configuration>Webkul>Dropship Manager. Here, following settings...
43
January 22, 2016 Dropship webkul.com/blog/dropship-for-magento2/ Dropship is a shipping method where the store owner does not keep the products stocked in its store. Instead, all the products are stored in different warehouses across the region. So when a customer places an order, the product is directly shipped from the nearest warehouse instead of the store. The admin can add multiple warehouses for a product with the quantity. Now, the admin will be able to import products from the AliExpress into his store and can start selling those products within his own store very easily. To place the orders at AliExpress the admin just needs to click a single button and then make the payment as we have automated the order process for the AliExpress orders. Features Import AliExpress products(simple and with custom options) from AliExpress into your selected store. Import products from the AliExpress search page or from the category pages. Shop URL verification while registering your Magento store URL. Add Product Price Synchronization from AliExpress using cron. Description of the product also gets imported same as AliExpress. Import AliExpress products to your multiple websites separately. The product information like base name, price, product reviews, meta title, meta keywords, meta description, SKU, description(simple tags, HTML tags, and multiple images), and variations(custom options) get imported along with the product. View all AliExpress Orders in a separate section. Automated Order Process for the AliExpress Orders. Mass Assign/Un-Assign the imported products to various warehouses. Set the Default quantity and cost of the imported products when they are assigned to the warehouse. Assign warehouse automatically or manually. Google Maps API based address auto-complete. Select the email template for order approval and new warehouse account. Select shipping methods for every warehouse. Separate warehouse manager login for managing the orders and shipments. The admin can do complete management (add/edit/delete) of the warehouses. The admin can assign warehouses to unassigned orders. Add shipping rates information using a CSV file. Mention warehouse stock quantity in the products. Shipping cost is calculated according to the warehouse location. The admin can add warehouse(supplier) products price rules. The admin can map Magento category with warehouse category. The admin can add the Data-Flow Profile to map Magento product attributes with 1/43
Transcript of Dropship For Magento 2 · Stores>Configuration>Webkul>Dropship Manager. Here, following settings...

January 22, 2016
Dropshipwebkul.com/blog/dropship-for-magento2/
Dropship is a shipping method where the store owner does not keep the products stockedin its store. Instead, all the products are stored in different warehouses across the region.So when a customer places an order, the product is directly shipped from the nearestwarehouse instead of the store. The admin can add multiple warehouses for a product withthe quantity.
Now, the admin will be able to import products from the AliExpress into his store and canstart selling those products within his own store very easily. To place the orders atAliExpress the admin just needs to click a single button and then make the payment as wehave automated the order process for the AliExpress orders.
Features
Import AliExpress products(simple and with custom options) from AliExpress intoyour selected store.Import products from the AliExpress search page or from the category pages.Shop URL verification while registering your Magento store URL.Add Product Price Synchronization from AliExpress using cron.Description of the product also gets imported same as AliExpress.Import AliExpress products to your multiple websites separately.The product information like base name, price, product reviews, meta title, metakeywords, meta description, SKU, description(simple tags, HTML tags, and multipleimages), and variations(custom options) get imported along with the product.View all AliExpress Orders in a separate section.Automated Order Process for the AliExpress Orders.Mass Assign/Un-Assign the imported products to various warehouses.Set the Default quantity and cost of the imported products when they are assigned tothe warehouse.Assign warehouse automatically or manually.Google Maps API based address auto-complete.Select the email template for order approval and new warehouse account.Select shipping methods for every warehouse.Separate warehouse manager login for managing the orders and shipments.The admin can do complete management (add/edit/delete) of the warehouses.The admin can assign warehouses to unassigned orders.Add shipping rates information using a CSV file.Mention warehouse stock quantity in the products.Shipping cost is calculated according to the warehouse location.The admin can add warehouse(supplier) products price rules.The admin can map Magento category with warehouse category.The admin can add the Data-Flow Profile to map Magento product attributes with
1/43
warehouse product attributes.The admin can import multiple warehouse(supplier) products using single CSV, XML,and XLS file.Allowed admin to import individual warehouse(supplier) products using CSV, XML,and XLS file.Automatically created supplier account if not exist during warehouse products importusing CSV, XML, and XLS file.Applying price rules on warehouse(supplier) products during import using CSV, XML,and XLS file.The admin can view warehouse(supplier) dashboard to analyze sales.The admin can view warehouse(supplier) orders.The admin can view warehouse(supplier) products.Allowed Warehouses(suppliers) to view their dashboard to analyze sales.The module properly works with default Magento shipping methods.
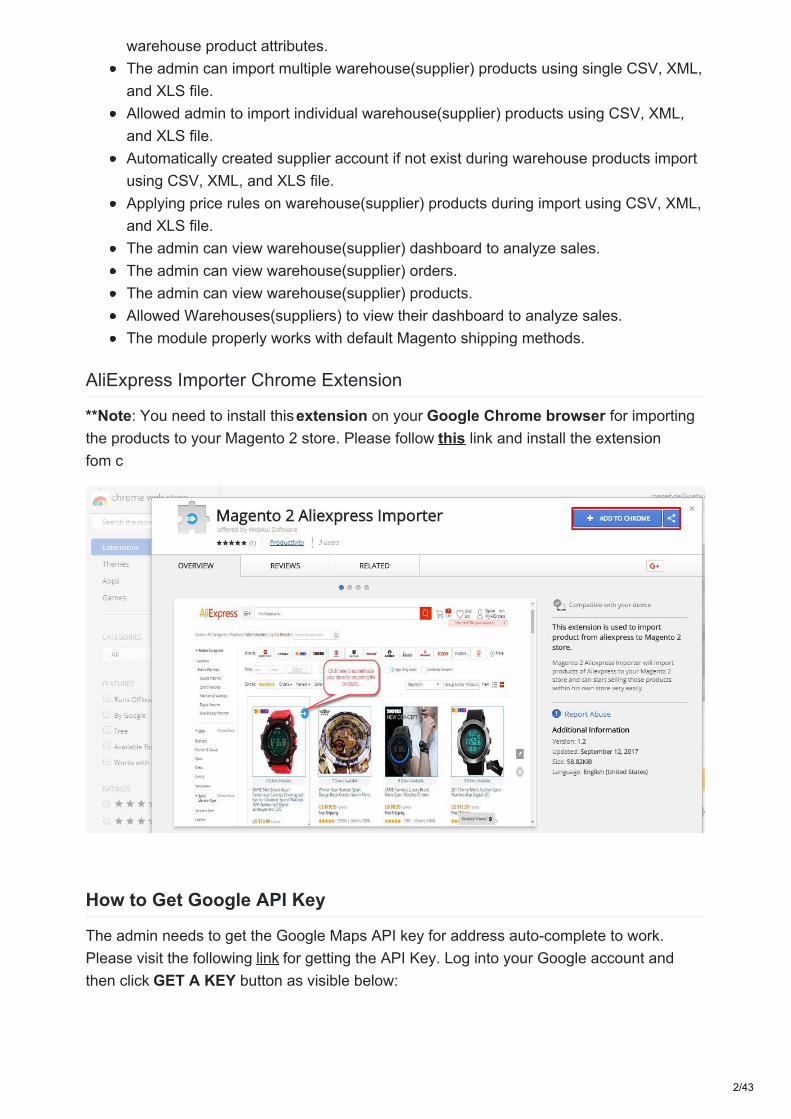
AliExpress Importer Chrome Extension
**Note: You need to install this extension on your Google Chrome browser for importingthe products to your Magento 2 store. Please follow this link and install the extensionfom c
How to Get Google API Key
The admin needs to get the Google Maps API key for address auto-complete to work.Please visit the following link for getting the API Key. Log into your Google account andthen click GET A KEY button as visible below:
2/43
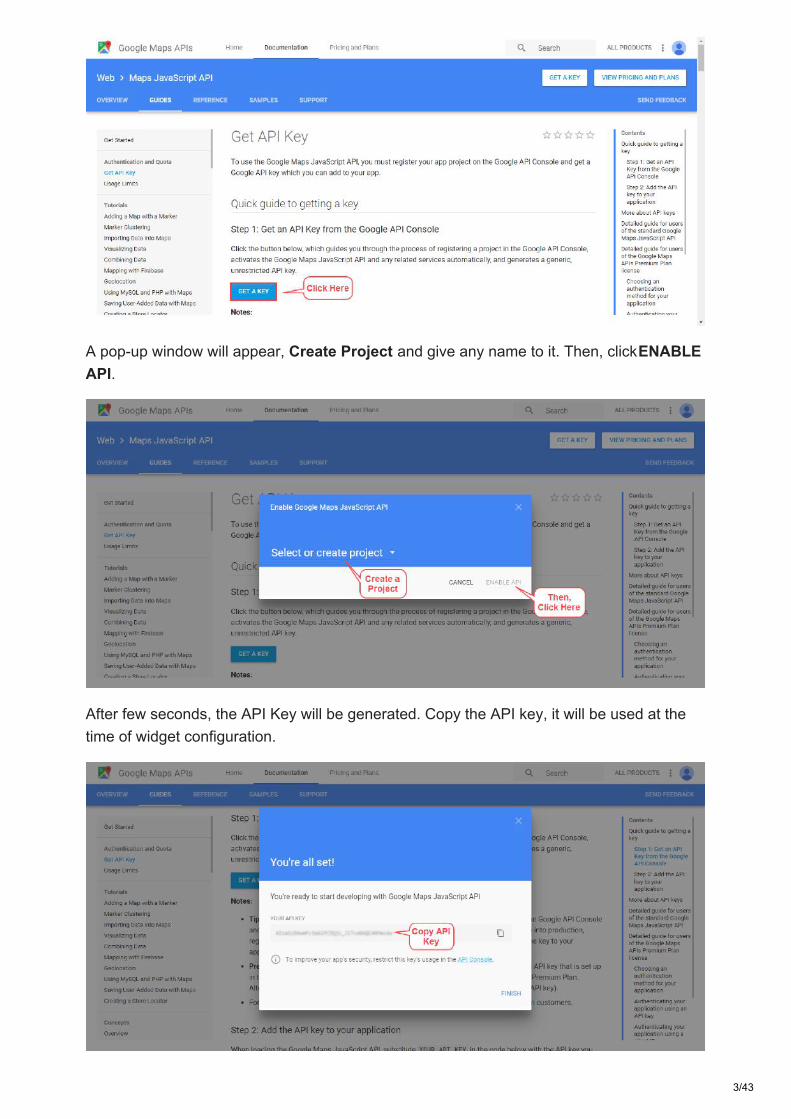
A pop-up window will appear, Create Project and give any name to it. Then, click ENABLEAPI.
After few seconds, the API Key will be generated. Copy the API key, it will be used at thetime of widget configuration.
3/43
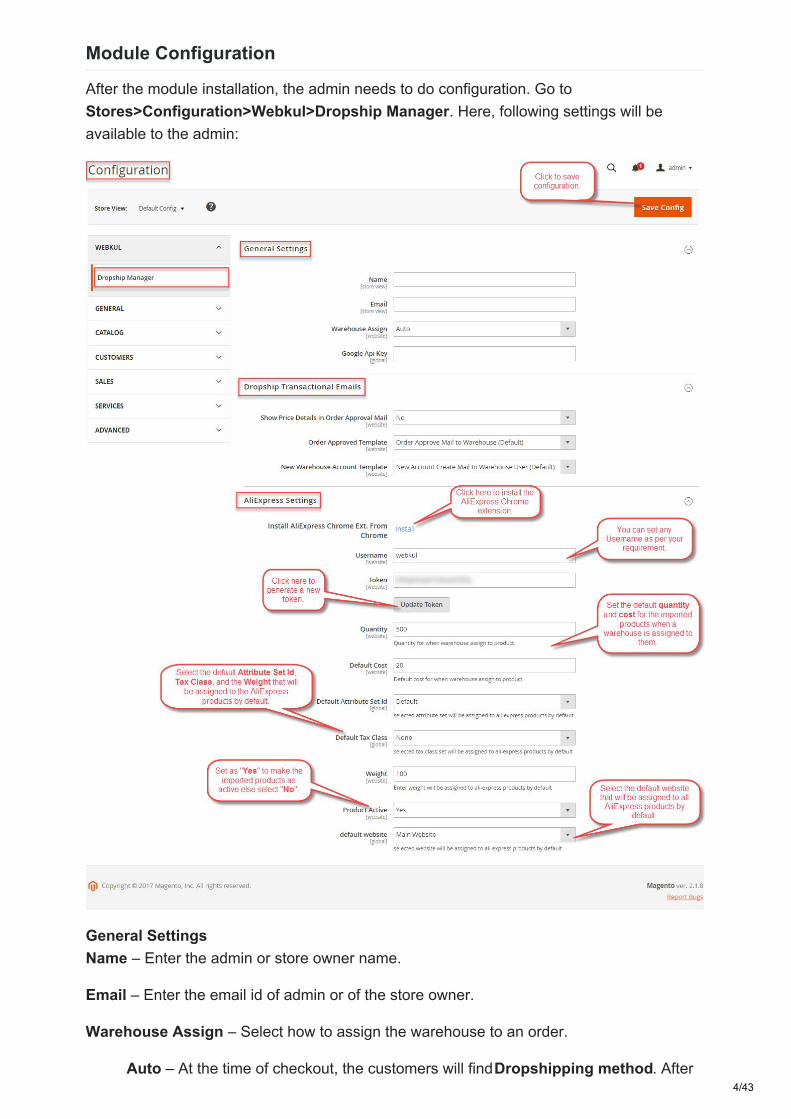
Module Configuration
After the module installation, the admin needs to do configuration. Go toStores>Configuration>Webkul>Dropship Manager. Here, following settings will beavailable to the admin:
General SettingsName – Enter the admin or store owner name.
Email – Enter the email id of admin or of the store owner.
Warehouse Assign – Select how to assign the warehouse to an order.
Auto – At the time of checkout, the customers will find Dropshipping method. After4/43
placing the order, the nearest warehouse will be assigned where the product isavailable.Manual – In Manual mode, the customers will only find the default shippingmethods. After placing the order using the available shipping method, the admin willneed to assign the nearest warehouse manually where the product is available.
Google API Key – Enter Google Maps API Key here.
Dropship Transactional EmailsShow Price Details in Order Approval Mail – Select either “Yes” or “No” whether todisplay price details or not.
Order Approved Template – Select the email template for warehouse manager when anorder is approved.
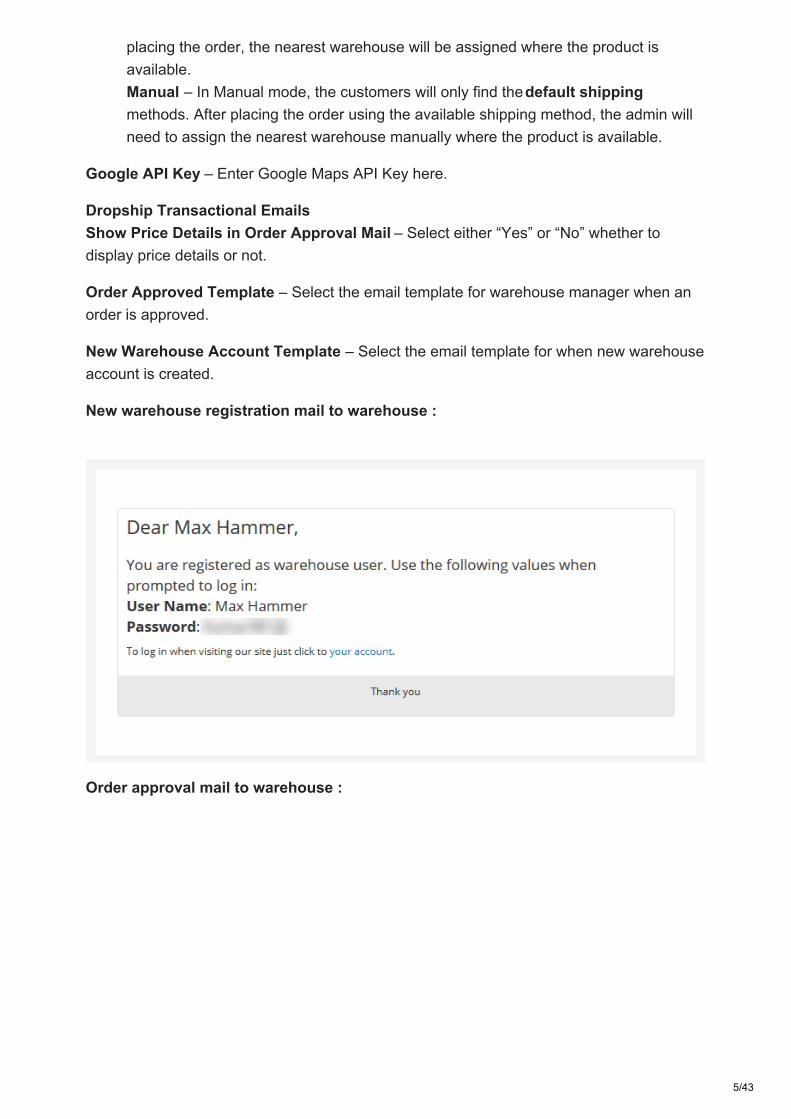
New Warehouse Account Template – Select the email template for when new warehouseaccount is created.
New warehouse registration mail to warehouse :
Order approval mail to warehouse :
5/43
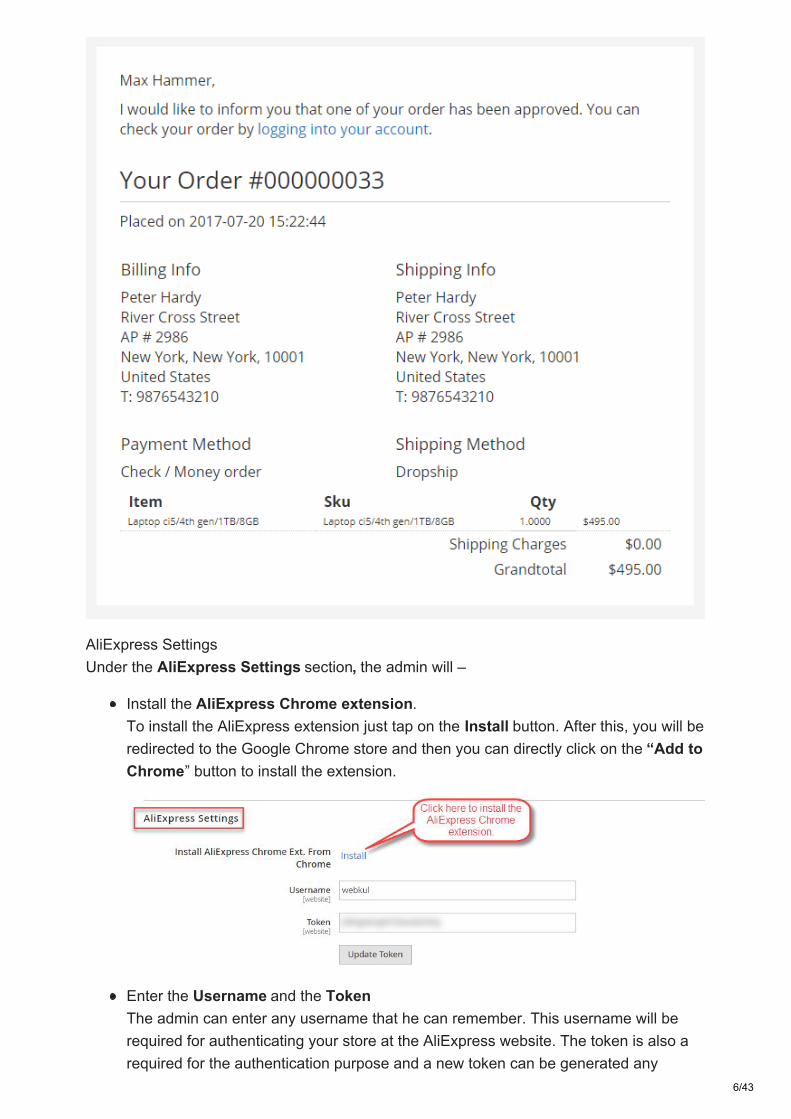
AliExpress SettingsUnder the AliExpress Settings section, the admin will –
Install the AliExpress Chrome extension.To install the AliExpress extension just tap on the Install button. After this, you will beredirected to the Google Chrome store and then you can directly click on the “Add toChrome” button to install the extension.
Enter the Username and the TokenThe admin can enter any username that he can remember. This username will berequired for authenticating your store at the AliExpress website. The token is also arequired for the authentication purpose and a new token can be generated any
6/43
number of times.**Note: While generating a new token, you must first save theconfiguration and then make use of the entered username and the token forauthenticating your store at the AliExpress website.QuantityEnter the default quantity that will be applicable to the imported products fromAliExpress whilst assigning the products to the warehouseDefault CostEnter the default cost that will be applicable to the Imported products from theAliExpress when the products are assigned to a warehouseDefault Attribute Set IDSelect the default attribute set for the products being imported from the AliExpressDefault Tax ClassSelect the default tax class for the products being imported from the AliExpressWeightSet the weight that will be applicable to the products being imported from theAliExpressProduct ActiveSet ‘Yes‘ to enable the imported products in your store after importing the productsfrom AliExpress else select ‘No‘Default WebsiteSelect the default website where the imported products from AliExpress will be addedto.
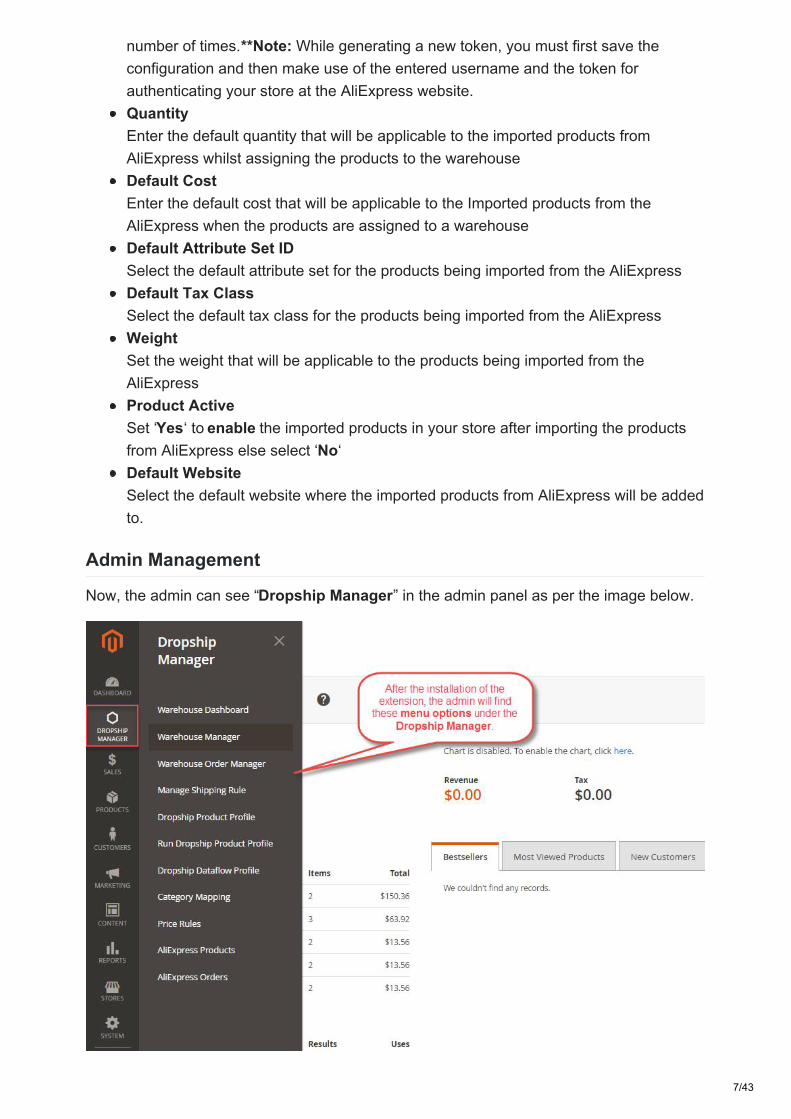
Admin Management
Now, the admin can see “Dropship Manager” in the admin panel as per the image below.
7/43
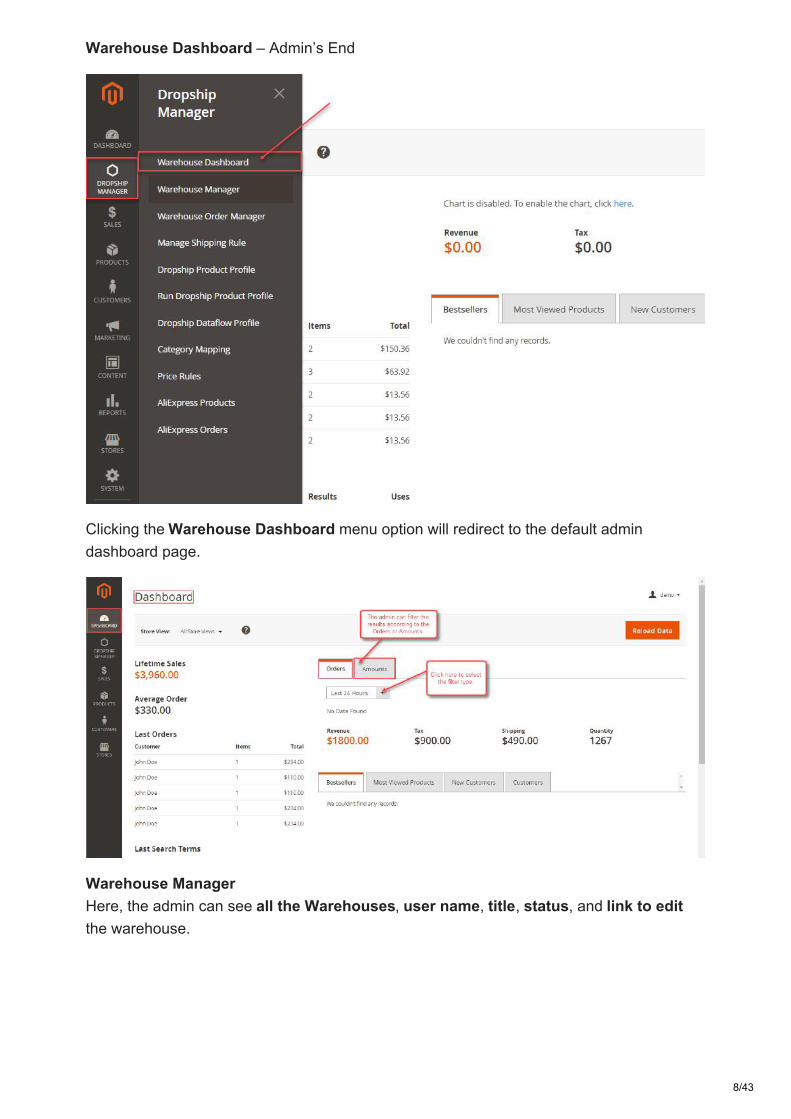
Warehouse Dashboard – Admin’s End
Clicking the Warehouse Dashboard menu option will redirect to the default admindashboard page.
Warehouse ManagerHere, the admin can see all the Warehouses, user name, title, status, and link to editthe warehouse.
8/43
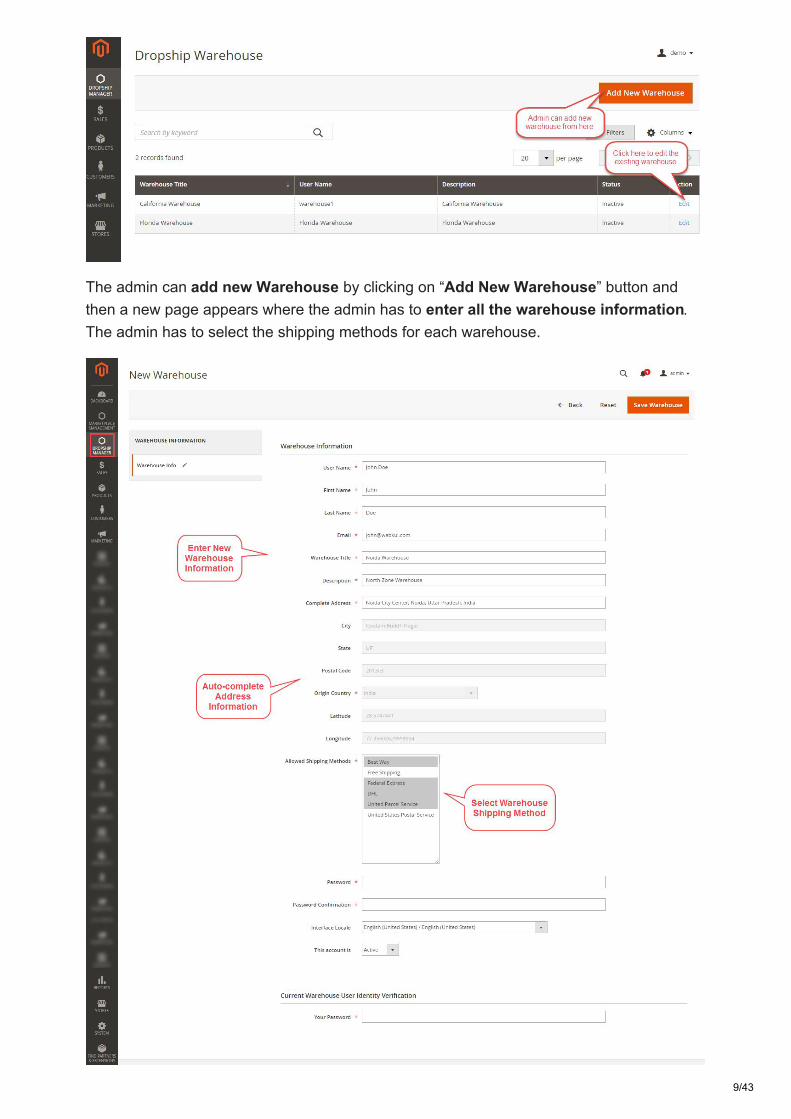
The admin can add new Warehouse by clicking on “Add New Warehouse” button andthen a new page appears where the admin has to enter all the warehouse information.The admin has to select the shipping methods for each warehouse.
9/43
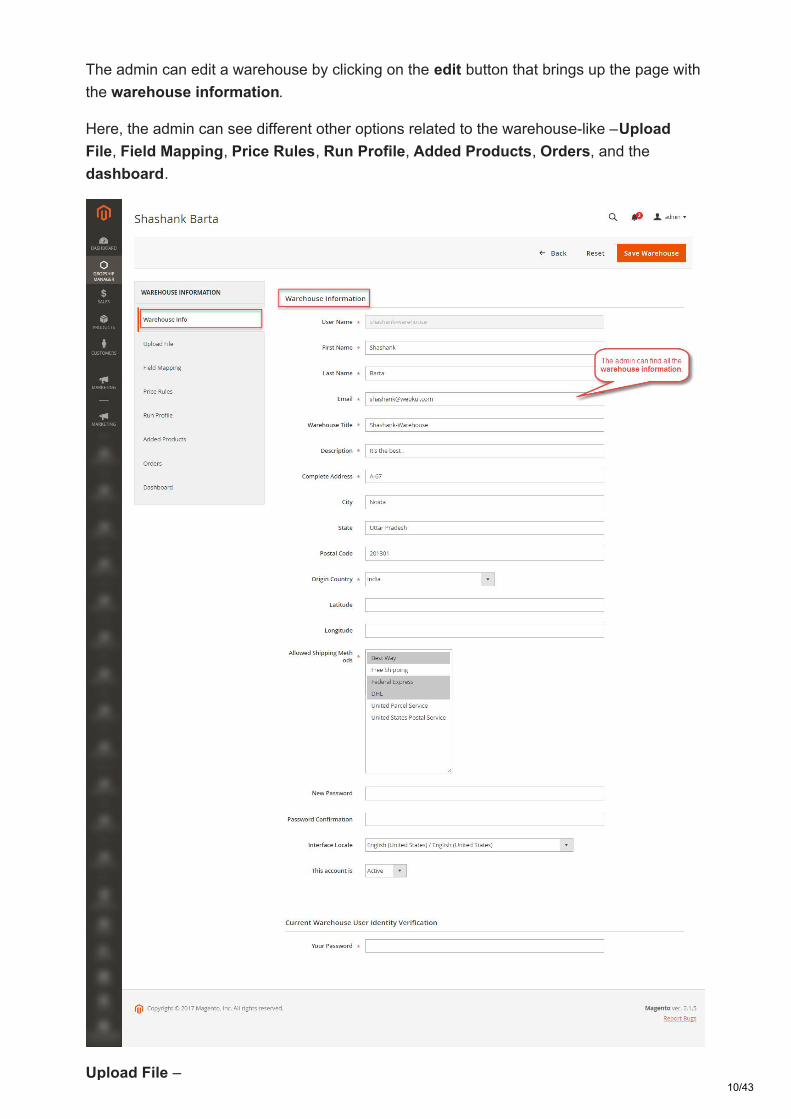
The admin can edit a warehouse by clicking on the edit button that brings up the page withthe warehouse information.
Here, the admin can see different other options related to the warehouse-like – UploadFile, Field Mapping, Price Rules, Run Profile, Added Products, Orders, and thedashboard.
Upload File –10/43
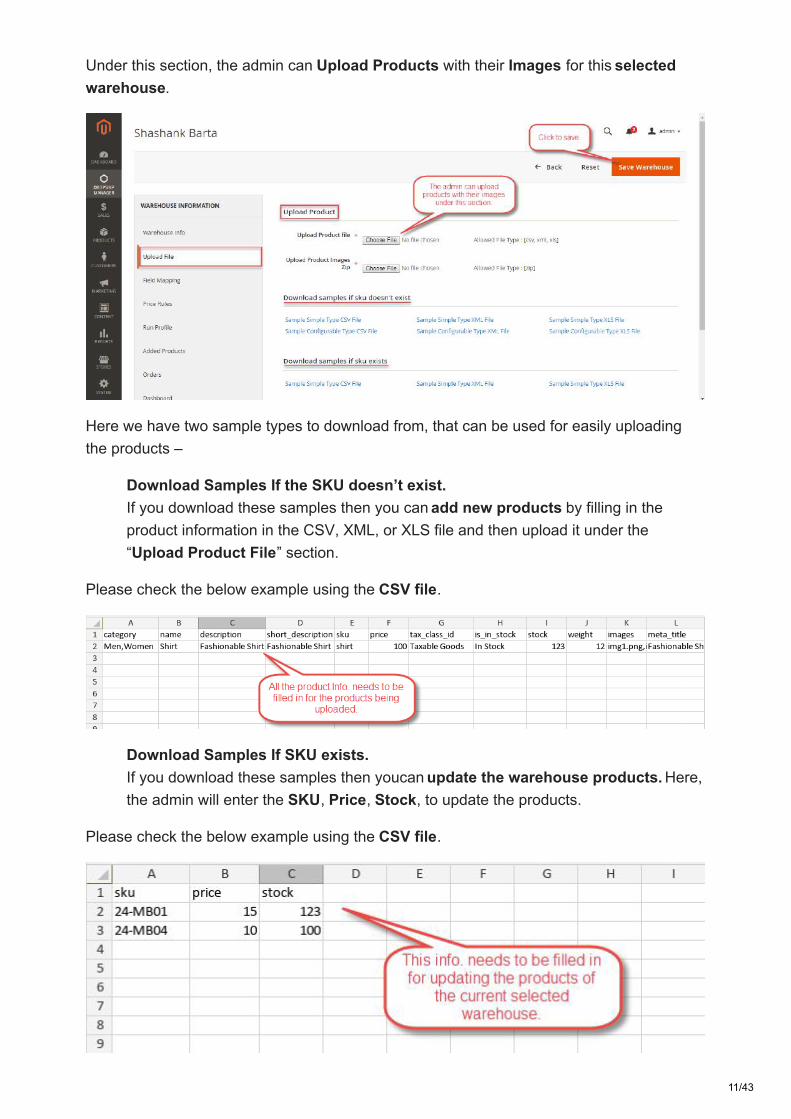
Under this section, the admin can Upload Products with their Images for this selectedwarehouse.
Here we have two sample types to download from, that can be used for easily uploadingthe products –
Download Samples If the SKU doesn’t exist.If you download these samples then you can add new products by filling in theproduct information in the CSV, XML, or XLS file and then upload it under the“Upload Product File” section.
Please check the below example using the CSV file.
Download Samples If SKU exists.If you download these samples then youcan update the warehouse products. Here,the admin will enter the SKU, Price, Stock, to update the products.
Please check the below example using the CSV file.
11/43
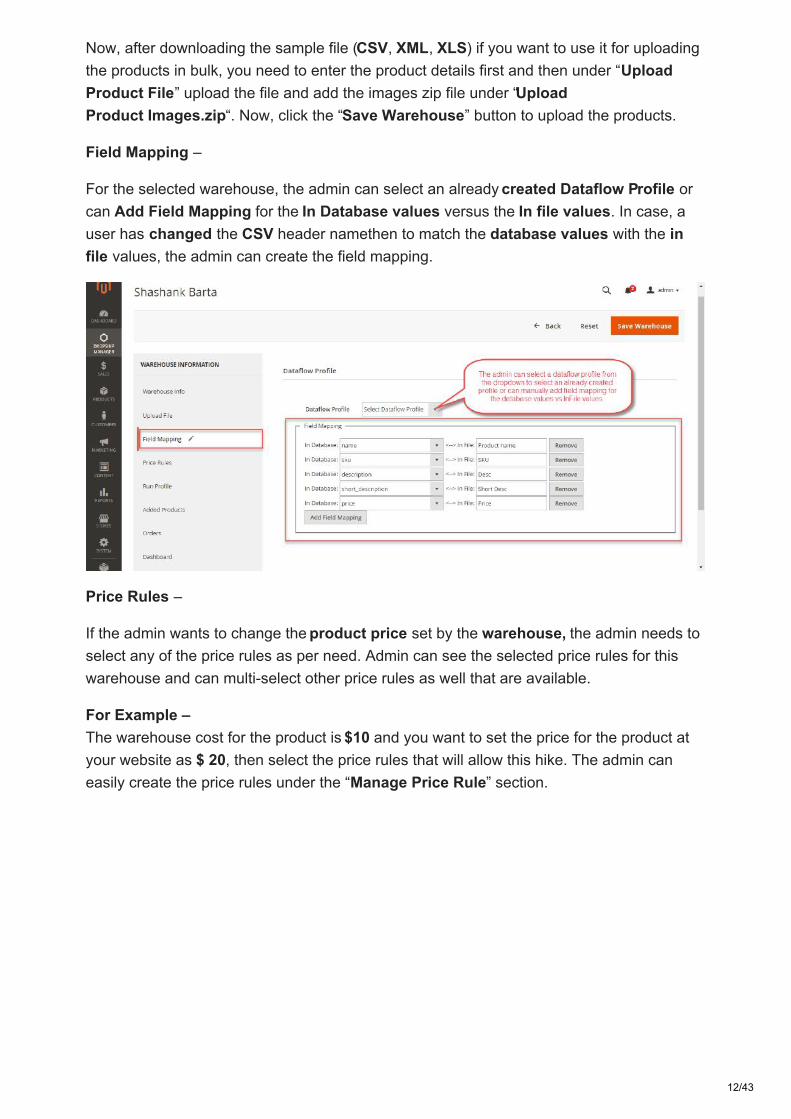
Now, after downloading the sample file (CSV, XML, XLS) if you want to use it for uploadingthe products in bulk, you need to enter the product details first and then under “UploadProduct File” upload the file and add the images zip file under “UploadProduct Images.zip“. Now, click the “Save Warehouse” button to upload the products.
Field Mapping –
For the selected warehouse, the admin can select an already created Dataflow Profile orcan Add Field Mapping for the In Database values versus the In file values. In case, auser has changed the CSV header namethen to match the database values with the infile values, the admin can create the field mapping.
Price Rules –
If the admin wants to change the product price set by the warehouse, the admin needs toselect any of the price rules as per need. Admin can see the selected price rules for thiswarehouse and can multi-select other price rules as well that are available.
For Example –The warehouse cost for the product is $10 and you want to set the price for the product atyour website as $ 20, then select the price rules that will allow this hike. The admin caneasily create the price rules under the “Manage Price Rule” section.
12/43
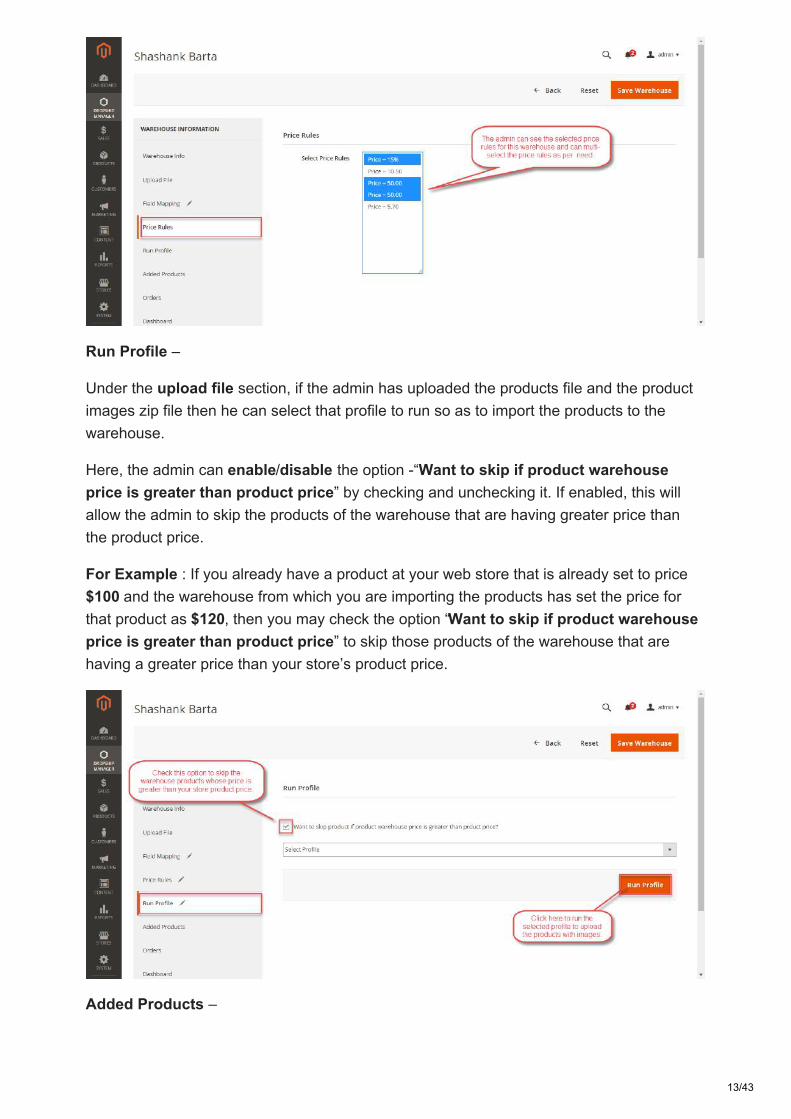
Run Profile –
Under the upload file section, if the admin has uploaded the products file and the productimages zip file then he can select that profile to run so as to import the products to thewarehouse.
Here, the admin can enable/disable the option -“Want to skip if product warehouseprice is greater than product price” by checking and unchecking it. If enabled, this willallow the admin to skip the products of the warehouse that are having greater price thanthe product price.
For Example : If you already have a product at your web store that is already set to price$100 and the warehouse from which you are importing the products has set the price forthat product as $120, then you may check the option “Want to skip if product warehouseprice is greater than product price” to skip those products of the warehouse that arehaving a greater price than your store’s product price.
Added Products –
13/43
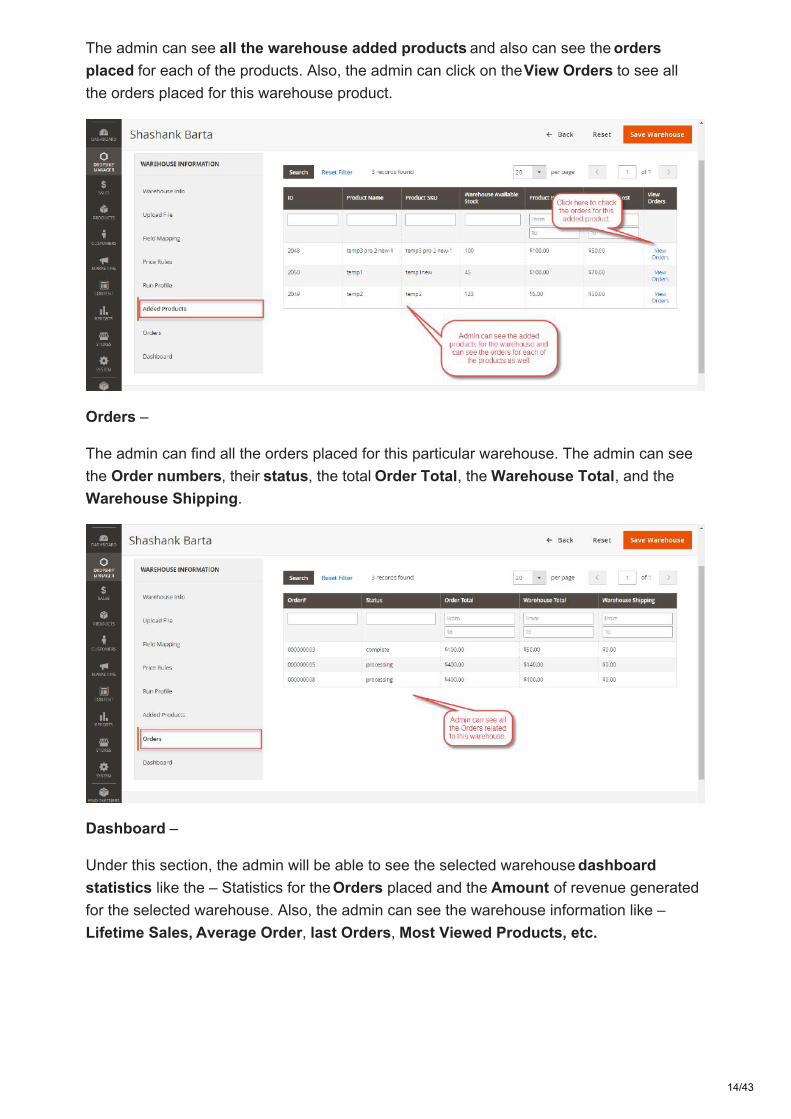
The admin can see all the warehouse added products and also can see the ordersplaced for each of the products. Also, the admin can click on the View Orders to see allthe orders placed for this warehouse product.
Orders –
The admin can find all the orders placed for this particular warehouse. The admin can seethe Order numbers, their status, the total Order Total, the Warehouse Total, and theWarehouse Shipping.
Dashboard –
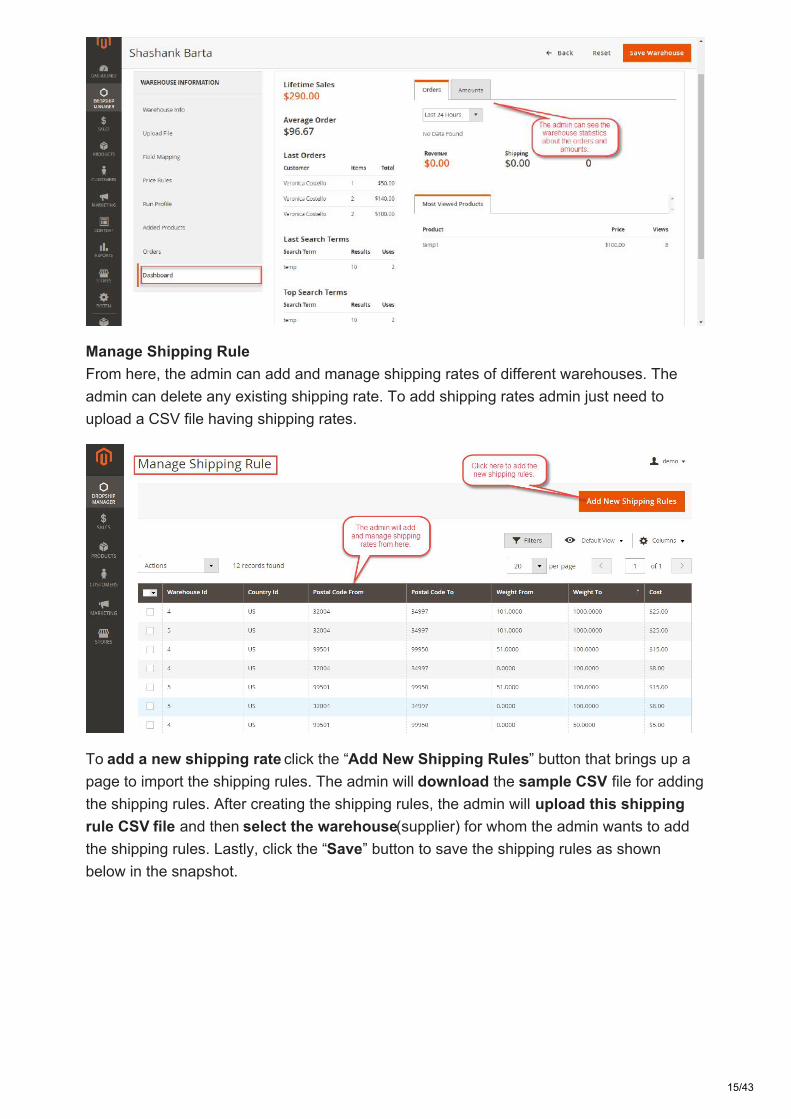
Under this section, the admin will be able to see the selected warehouse dashboardstatistics like the – Statistics for the Orders placed and the Amount of revenue generatedfor the selected warehouse. Also, the admin can see the warehouse information like –Lifetime Sales, Average Order, last Orders, Most Viewed Products, etc.
14/43
Manage Shipping RuleFrom here, the admin can add and manage shipping rates of different warehouses. Theadmin can delete any existing shipping rate. To add shipping rates admin just need toupload a CSV file having shipping rates.
To add a new shipping rate click the “Add New Shipping Rules” button that brings up apage to import the shipping rules. The admin will download the sample CSV file for addingthe shipping rules. After creating the shipping rules, the admin will upload this shippingrule CSV file and then select the warehouse(supplier) for whom the admin wants to addthe shipping rules. Lastly, click the “Save” button to save the shipping rules as shownbelow in the snapshot.
15/43

Shipping Rule CSV file Example –
Here, the admin can create the shipping rule for the Warehouses(suppliers) if they have notadded the shipping cost from their end. The admin will enter the Country Code, Zip From,Zip To, Price, Weight from, and Weight To values in the CSV file.
How To Assign A Product To A Single Or Multiple WarehouseAdmin can easily assign an individual product to the available warehouses by navigatingthrough Products >Catalog and clicking the edit button next to the product as shownbelow.
After clicking Edit, go to Warehouse Stock option. Tick the warehouse where the product isavailable and enter the quantity of the product.
16/43
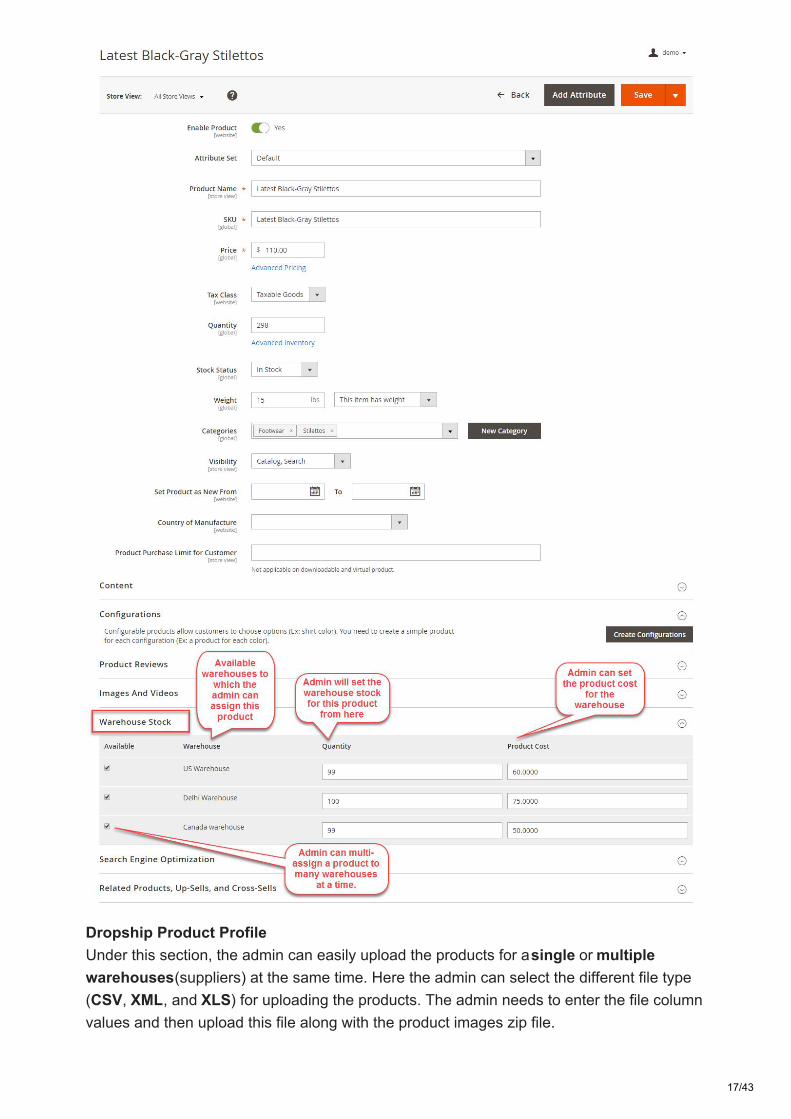
Dropship Product ProfileUnder this section, the admin can easily upload the products for a single or multiplewarehouses(suppliers) at the same time. Here the admin can select the different file type(CSV, XML, and XLS) for uploading the products. The admin needs to enter the file columnvalues and then upload this file along with the product images zip file.
17/43
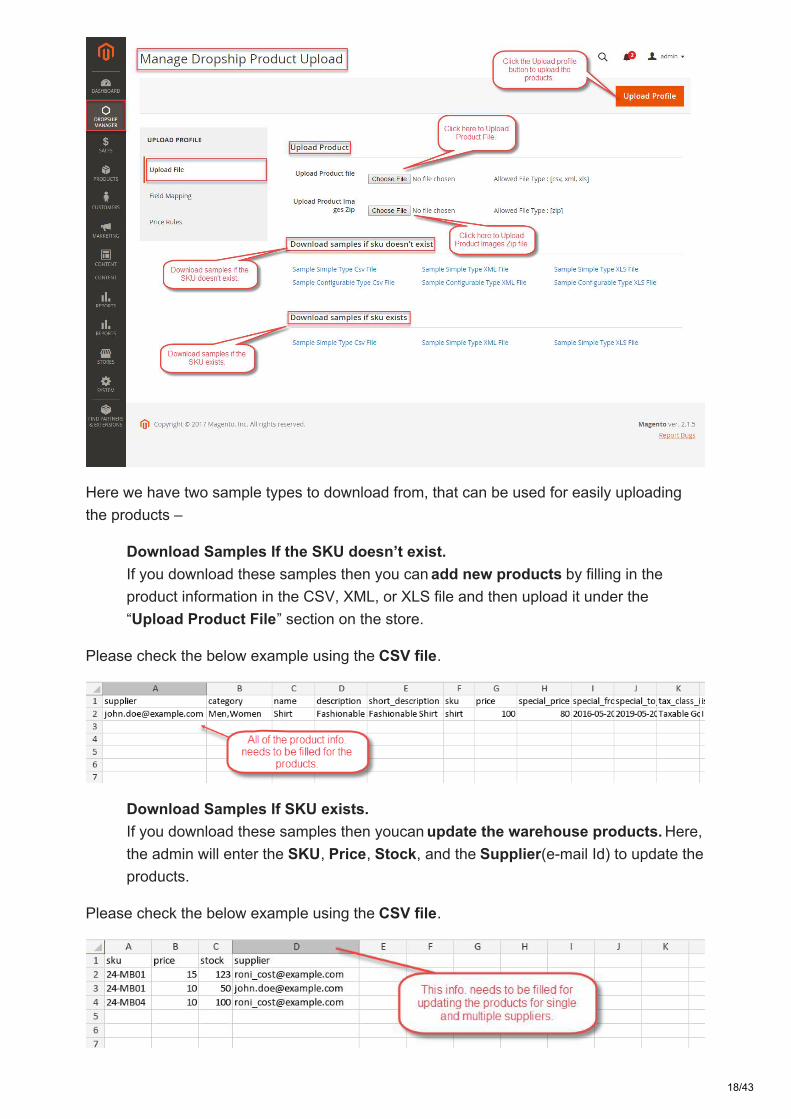
Here we have two sample types to download from, that can be used for easily uploadingthe products –
Download Samples If the SKU doesn’t exist.If you download these samples then you can add new products by filling in theproduct information in the CSV, XML, or XLS file and then upload it under the“Upload Product File” section on the store.
Please check the below example using the CSV file.
Download Samples If SKU exists.If you download these samples then youcan update the warehouse products. Here,the admin will enter the SKU, Price, Stock, and the Supplier(e-mail Id) to update theproducts.
Please check the below example using the CSV file.
18/43
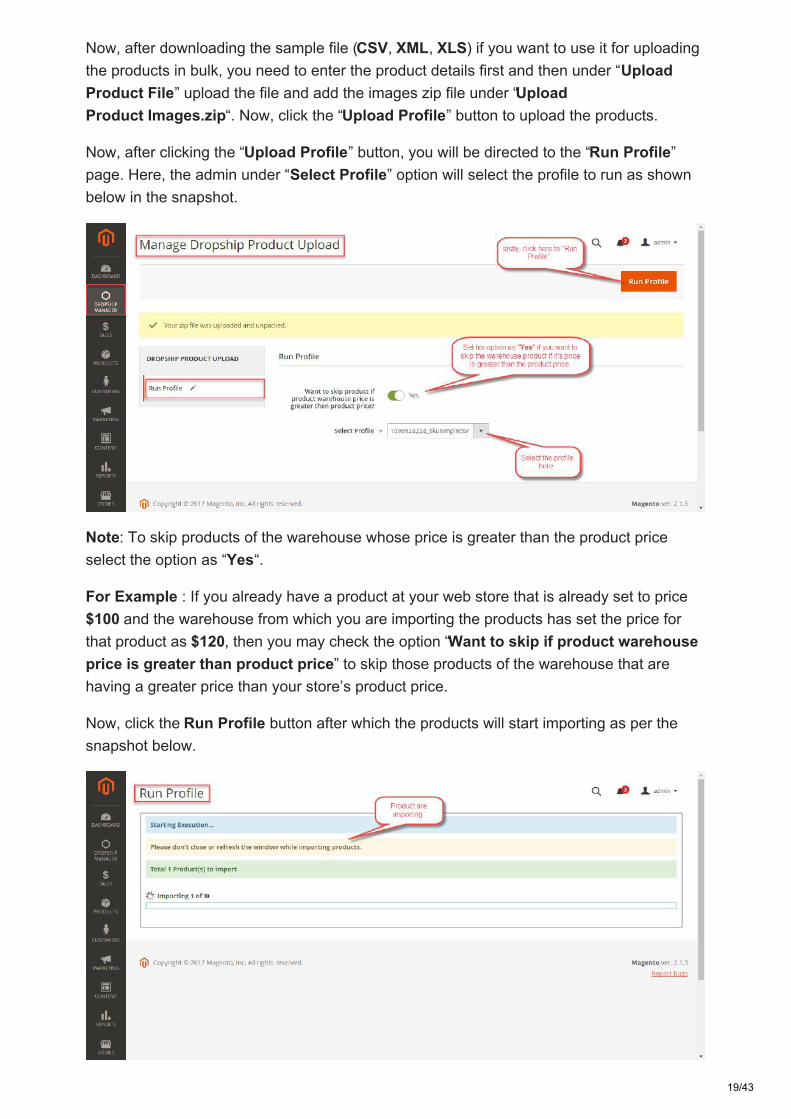
Now, after downloading the sample file (CSV, XML, XLS) if you want to use it for uploadingthe products in bulk, you need to enter the product details first and then under “UploadProduct File” upload the file and add the images zip file under “UploadProduct Images.zip“. Now, click the “Upload Profile” button to upload the products.
Now, after clicking the “Upload Profile” button, you will be directed to the “Run Profile”page. Here, the admin under “Select Profile” option will select the profile to run as shownbelow in the snapshot.
Note: To skip products of the warehouse whose price is greater than the product priceselect the option as “Yes“.
For Example : If you already have a product at your web store that is already set to price$100 and the warehouse from which you are importing the products has set the price forthat product as $120, then you may check the option “Want to skip if product warehouseprice is greater than product price” to skip those products of the warehouse that arehaving a greater price than your store’s product price.
Now, click the Run Profile button after which the products will start importing as per thesnapshot below.
19/43
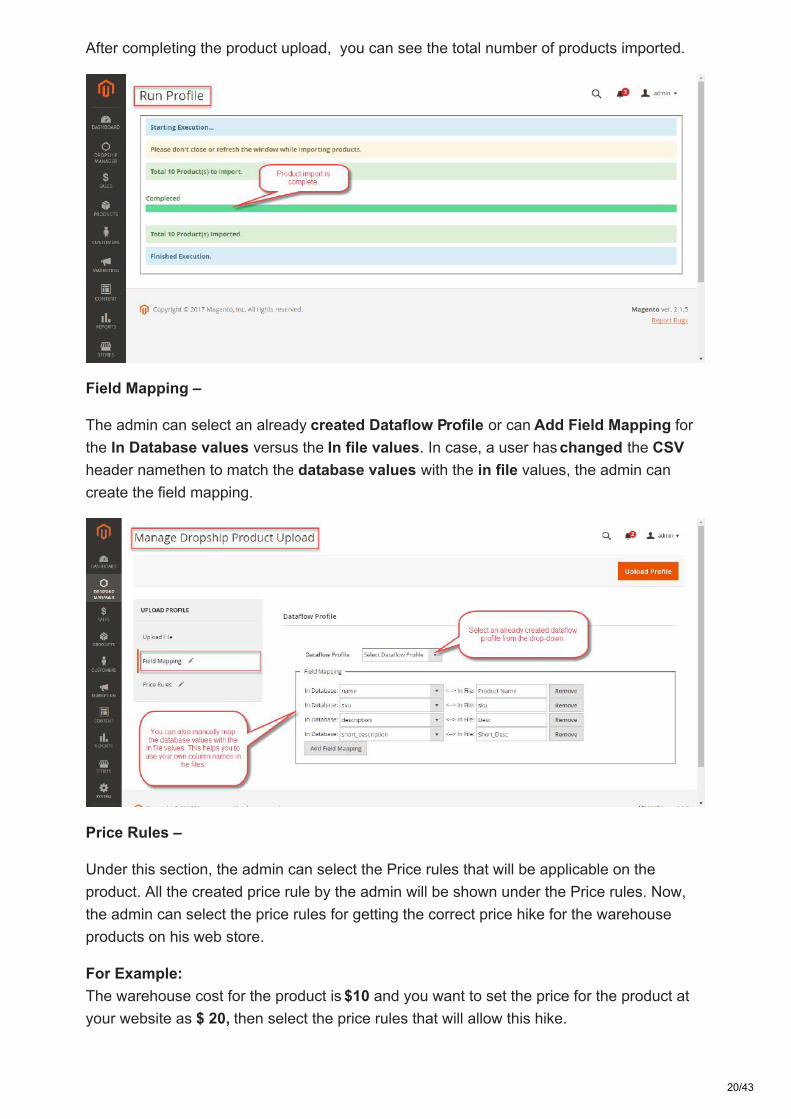
After completing the product upload, you can see the total number of products imported.
Field Mapping –
The admin can select an already created Dataflow Profile or can Add Field Mapping forthe In Database values versus the In file values. In case, a user has changed the CSVheader namethen to match the database values with the in file values, the admin cancreate the field mapping.
Price Rules –
Under this section, the admin can select the Price rules that will be applicable on theproduct. All the created price rule by the admin will be shown under the Price rules. Now,the admin can select the price rules for getting the correct price hike for the warehouseproducts on his web store.
For Example:The warehouse cost for the product is $10 and you want to set the price for the product atyour website as $ 20, then select the price rules that will allow this hike.
20/43
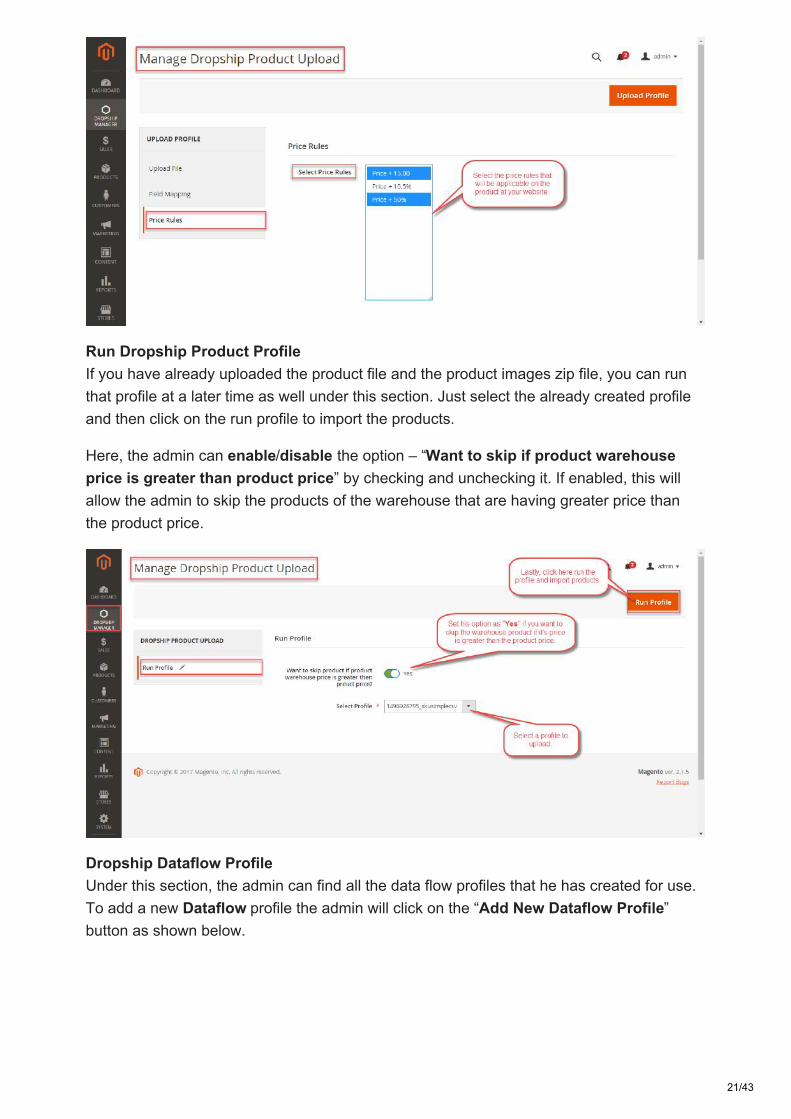
Run Dropship Product ProfileIf you have already uploaded the product file and the product images zip file, you can runthat profile at a later time as well under this section. Just select the already created profileand then click on the run profile to import the products.
Here, the admin can enable/disable the option – “Want to skip if product warehouseprice is greater than product price” by checking and unchecking it. If enabled, this willallow the admin to skip the products of the warehouse that are having greater price thanthe product price.
Dropship Dataflow ProfileUnder this section, the admin can find all the data flow profiles that he has created for use.To add a new Dataflow profile the admin will click on the “Add New Dataflow Profile”button as shown below.
21/43

Clicking the “Add New Dataflow Profile” button will bring up the section where the admincan do the field mapping between the actual database entries and the column names ofthe file that will be uploaded for the product import. This allows the admin to use his ownspecific and understandable column names for the file.
Now, the admin can use these “In File” names for the file as shown below in the snapshotwhile uploading their products.
Category MappingUnder this section, the admin will be able to manage category mapping. Here, the admincan map the warehouse category with his store category. For category mapping, clickthe “Map New Category” button at the top right-hand side of the page.
22/43
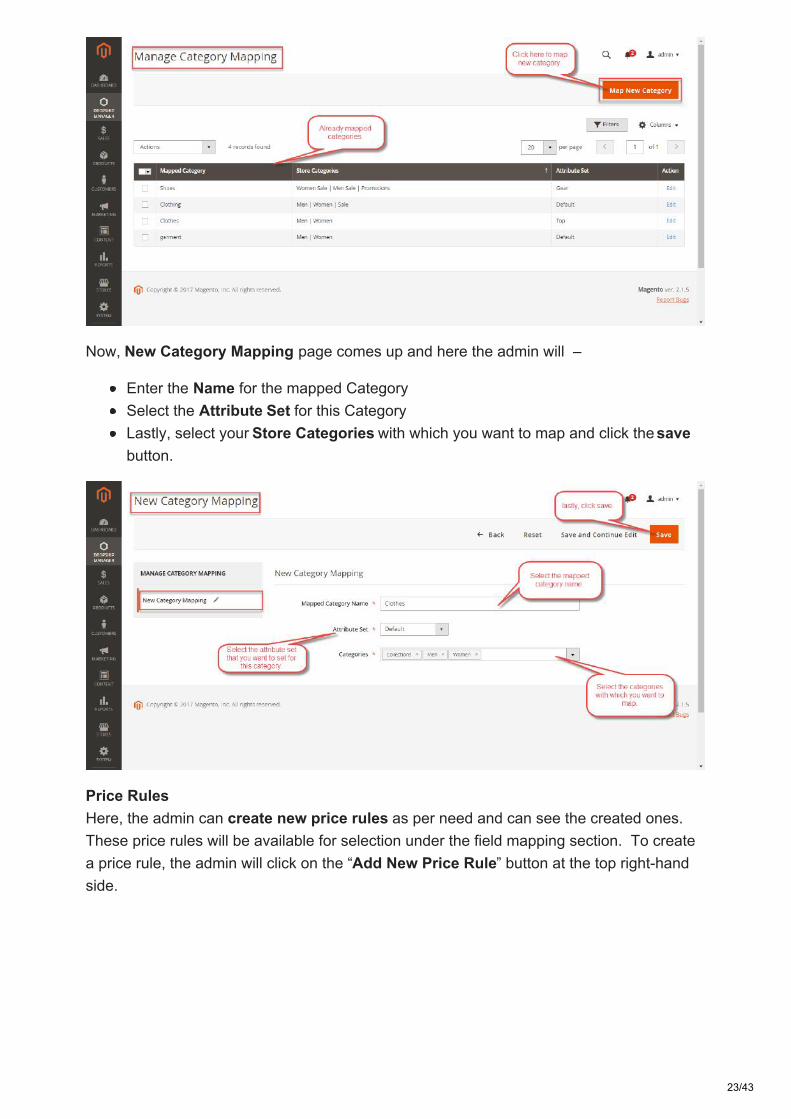
Now, New Category Mapping page comes up and here the admin will –
Enter the Name for the mapped CategorySelect the Attribute Set for this CategoryLastly, select your Store Categories with which you want to map and click the savebutton.
Price RulesHere, the admin can create new price rules as per need and can see the created ones.These price rules will be available for selection under the field mapping section. To createa price rule, the admin will click on the “Add New Price Rule” button at the top right-handside.
23/43
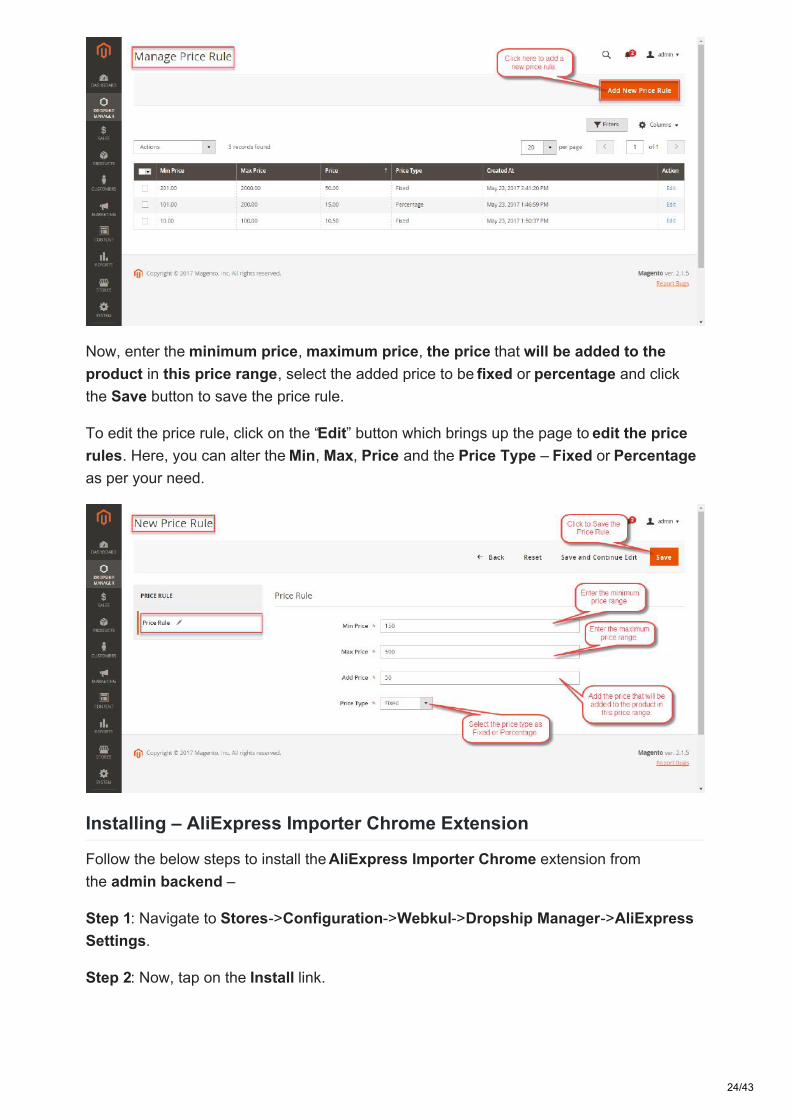
Now, enter the minimum price, maximum price, the price that will be added to theproduct in this price range, select the added price to be fixed or percentage and clickthe Save button to save the price rule.
To edit the price rule, click on the “Edit” button which brings up the page to edit the pricerules. Here, you can alter the Min, Max, Price and the Price Type – Fixed or Percentageas per your need.
Installing – AliExpress Importer Chrome Extension
Follow the below steps to install the AliExpress Importer Chrome extension fromthe admin backend –
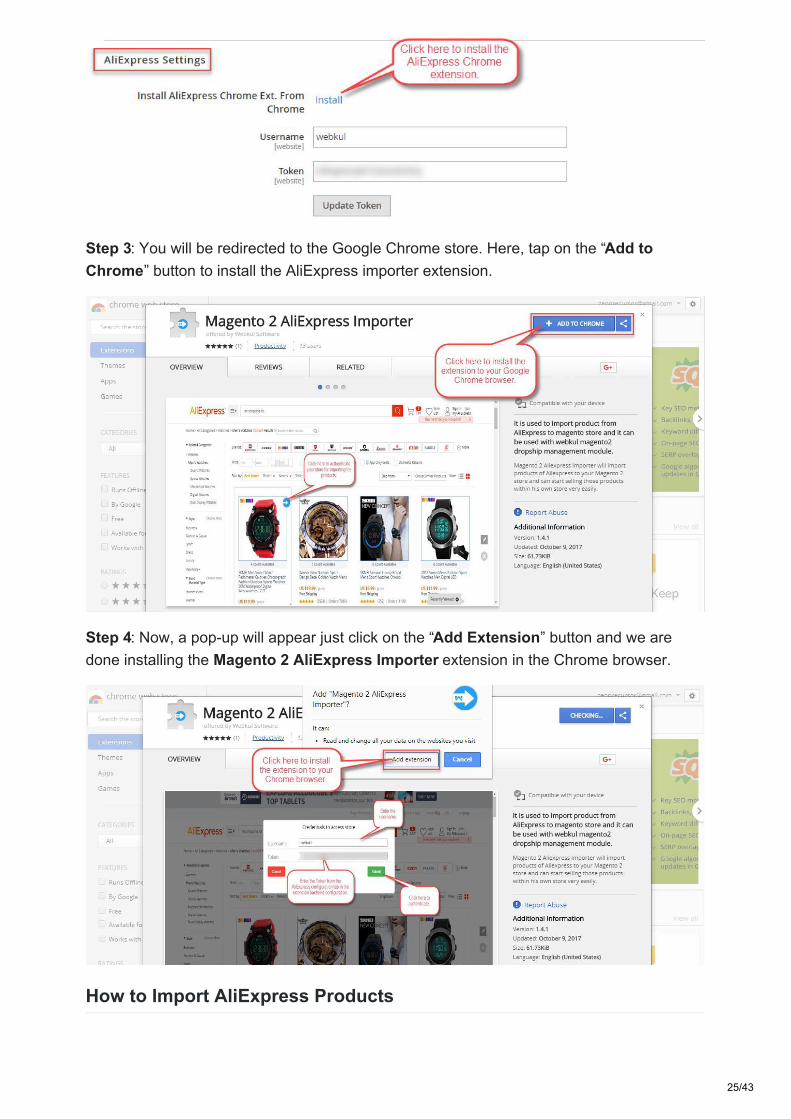
Step 1: Navigate to Stores->Configuration->Webkul->Dropship Manager->AliExpressSettings.
Step 2: Now, tap on the Install link.
24/43
Step 3: You will be redirected to the Google Chrome store. Here, tap on the “Add toChrome” button to install the AliExpress importer extension.
Step 4: Now, a pop-up will appear just click on the “Add Extension” button and we aredone installing the Magento 2 AliExpress Importer extension in the Chrome browser.
How to Import AliExpress Products
25/43
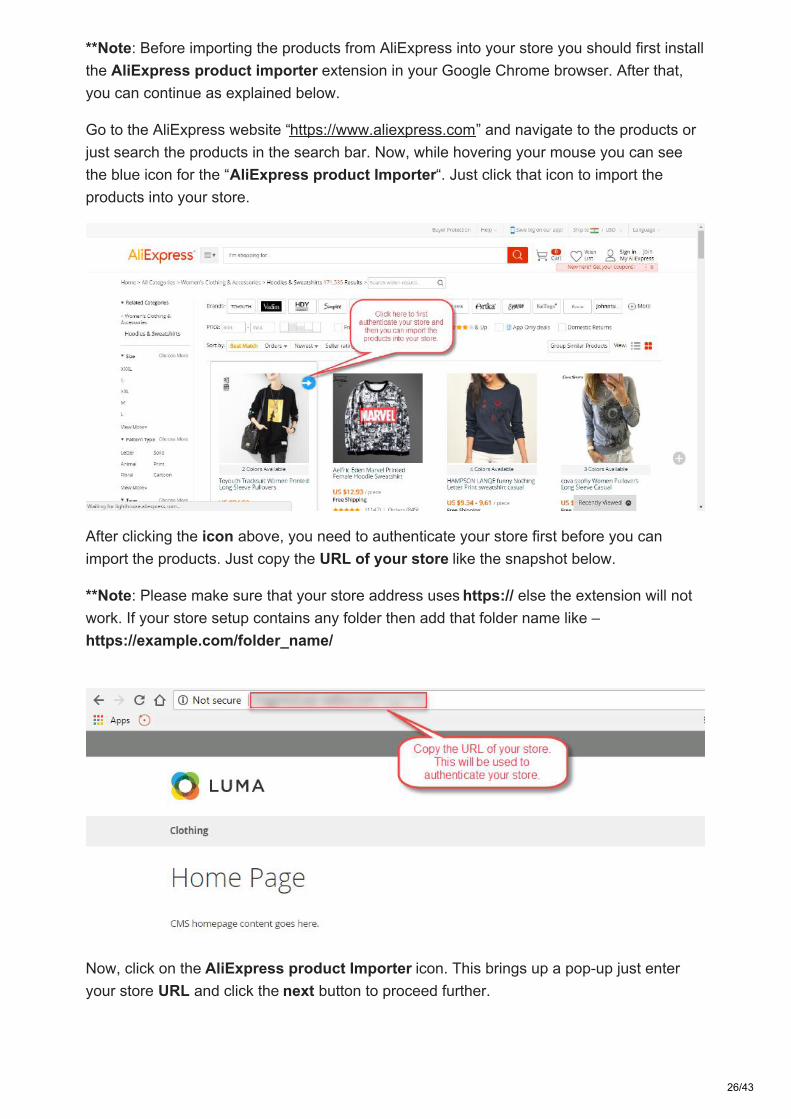
**Note: Before importing the products from AliExpress into your store you should first installthe AliExpress product importer extension in your Google Chrome browser. After that,you can continue as explained below.
Go to the AliExpress website “https://www.aliexpress.com” and navigate to the products orjust search the products in the search bar. Now, while hovering your mouse you can seethe blue icon for the “AliExpress product Importer“. Just click that icon to import theproducts into your store.
After clicking the icon above, you need to authenticate your store first before you canimport the products. Just copy the URL of your store like the snapshot below.
**Note: Please make sure that your store address uses https:// else the extension will notwork. If your store setup contains any folder then add that folder name like –https://example.com/folder_name/
Now, click on the AliExpress product Importer icon. This brings up a pop-up just enteryour store URL and click the next button to proceed further.
26/43
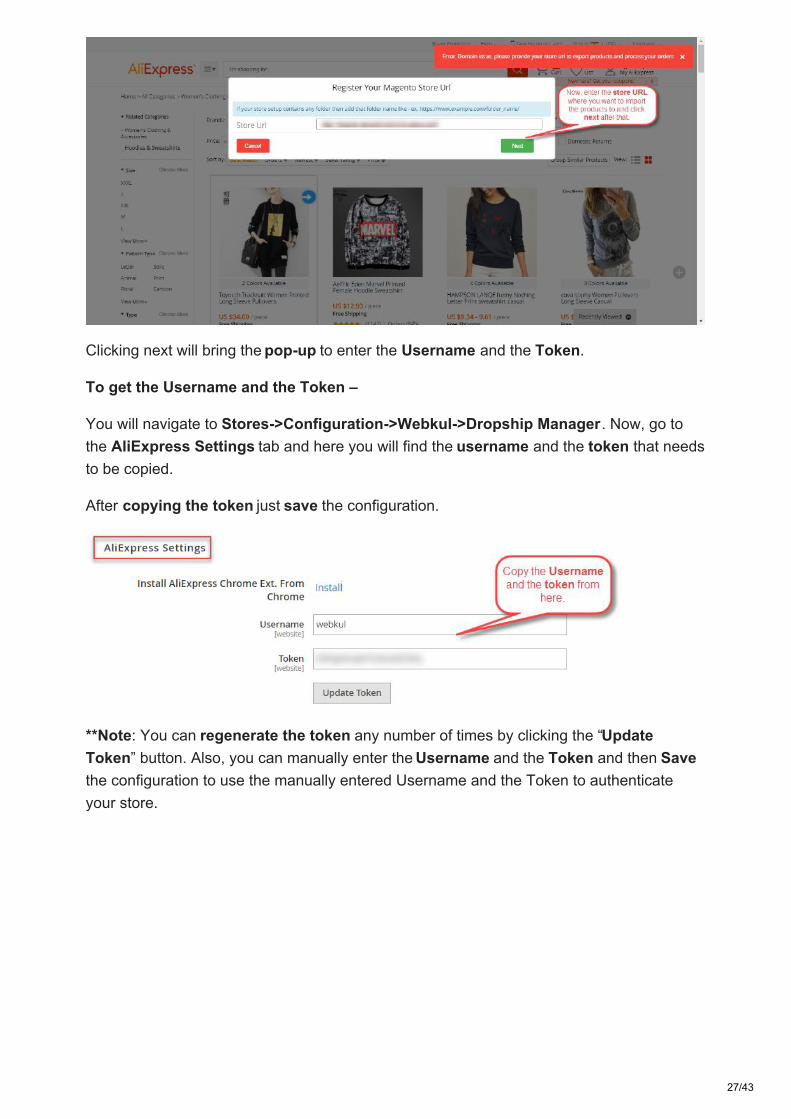
Clicking next will bring the pop-up to enter the Username and the Token.
To get the Username and the Token –
You will navigate to Stores->Configuration->Webkul->Dropship Manager. Now, go tothe AliExpress Settings tab and here you will find the username and the token that needsto be copied.
After copying the token just save the configuration.
**Note: You can regenerate the token any number of times by clicking the “UpdateToken” button. Also, you can manually enter the Username and the Token and then Savethe configuration to use the manually entered Username and the Token to authenticateyour store.
27/43
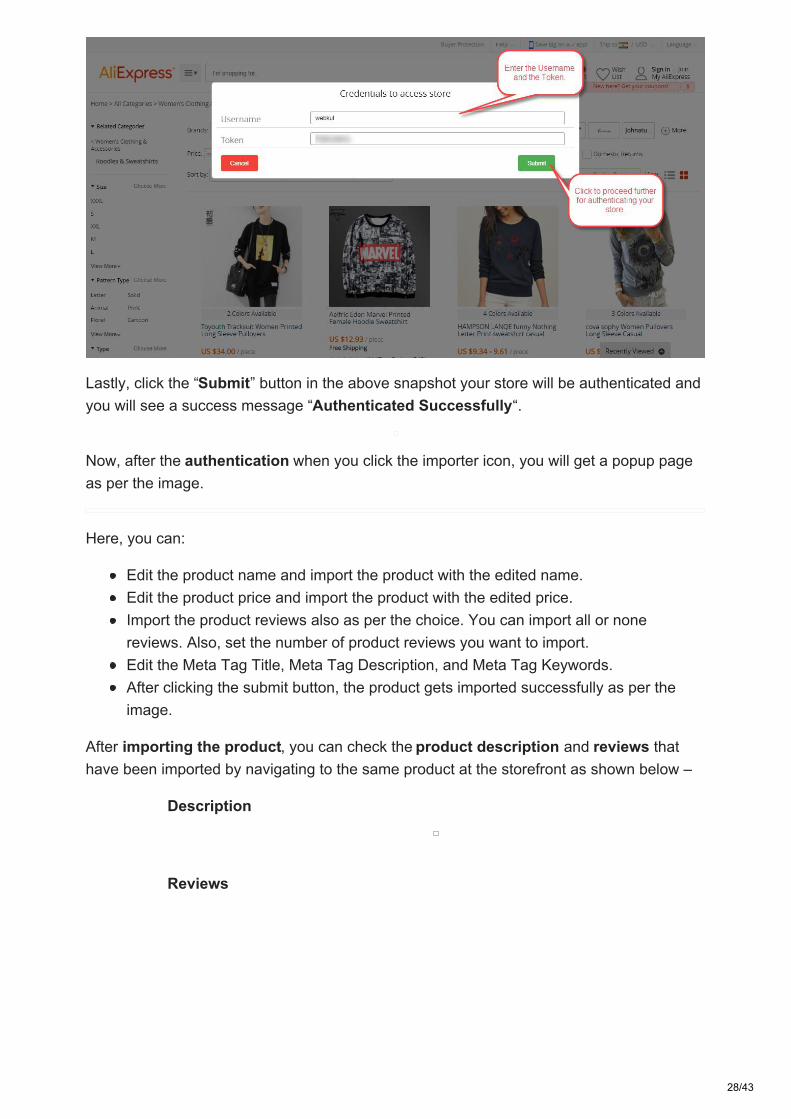
Lastly, click the “Submit” button in the above snapshot your store will be authenticated andyou will see a success message “Authenticated Successfully“.
Now, after the authentication when you click the importer icon, you will get a popup pageas per the image.
Here, you can:
Edit the product name and import the product with the edited name.Edit the product price and import the product with the edited price.Import the product reviews also as per the choice. You can import all or nonereviews. Also, set the number of product reviews you want to import.Edit the Meta Tag Title, Meta Tag Description, and Meta Tag Keywords.After clicking the submit button, the product gets imported successfully as per theimage.
After importing the product, you can check the product description and reviews thathave been imported by navigating to the same product at the storefront as shown below –
Description
Reviews
28/43
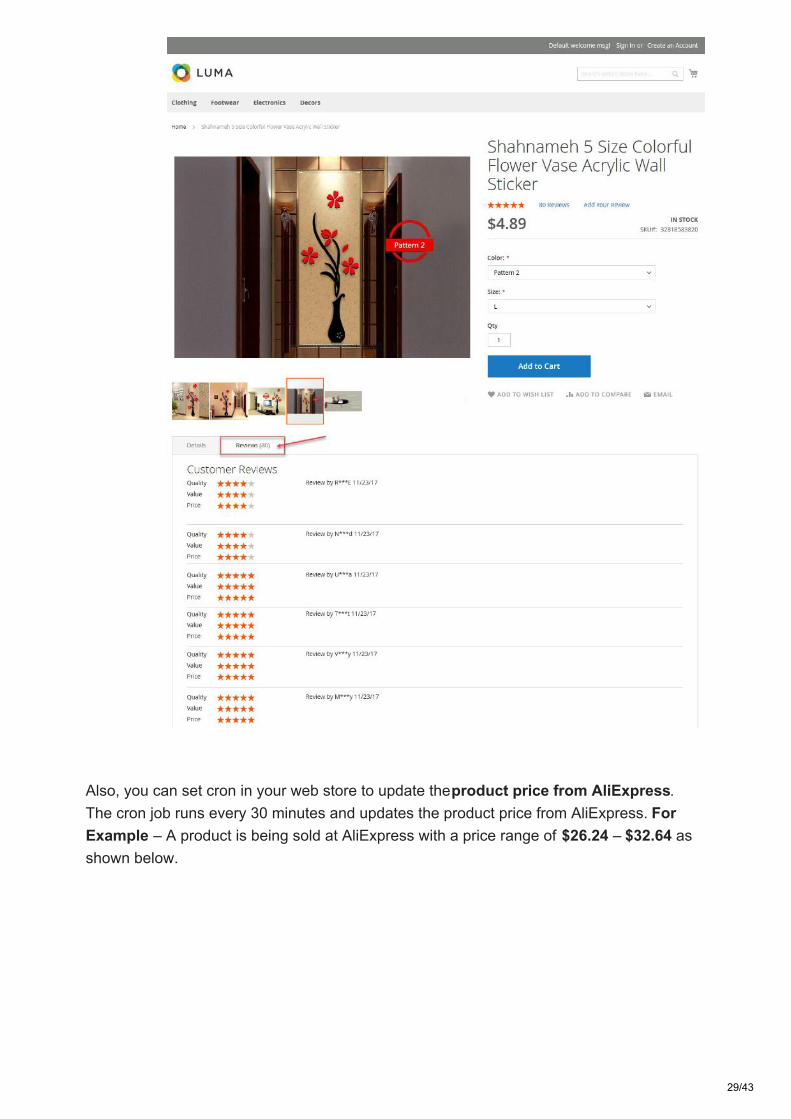
Also, you can set cron in your web store to update the product price from AliExpress.The cron job runs every 30 minutes and updates the product price from AliExpress. ForExample – A product is being sold at AliExpress with a price range of $26.24 – $32.64 asshown below.
29/43
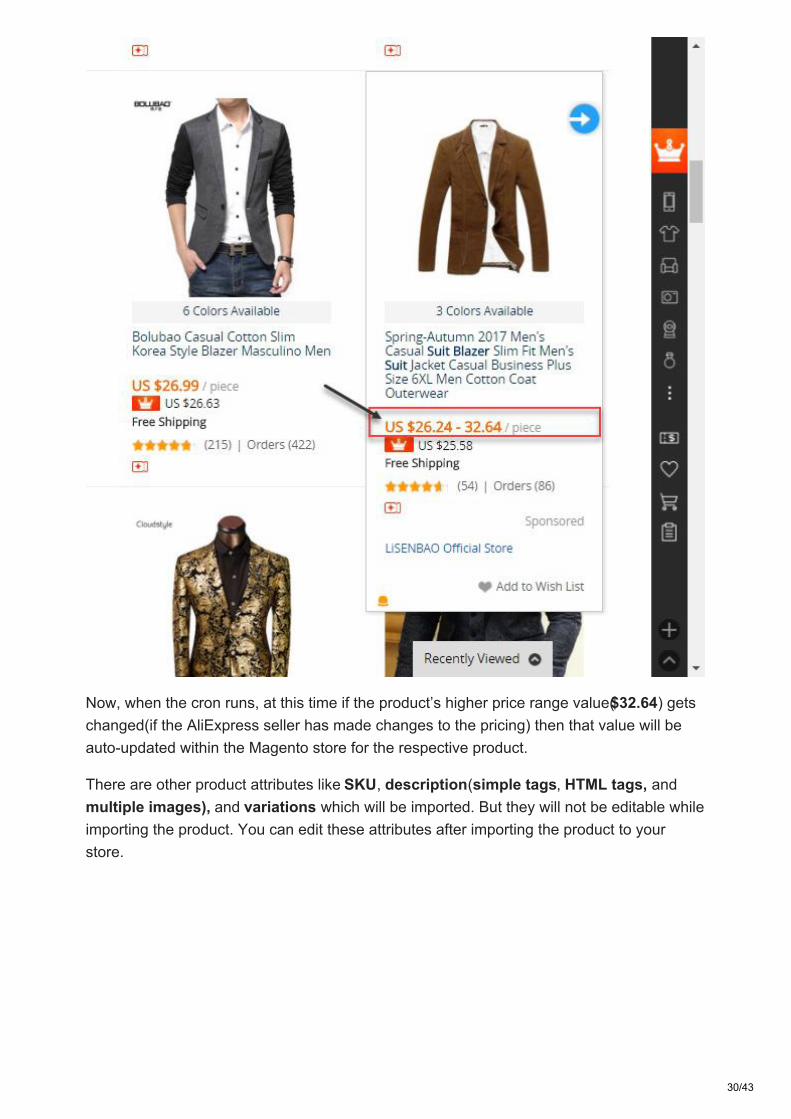
Now, when the cron runs, at this time if the product’s higher price range value($32.64) getschanged(if the AliExpress seller has made changes to the pricing) then that value will beauto-updated within the Magento store for the respective product.
There are other product attributes like SKU, description(simple tags, HTML tags, andmultiple images), and variations which will be imported. But they will not be editable whileimporting the product. You can edit these attributes after importing the product to yourstore.
30/43
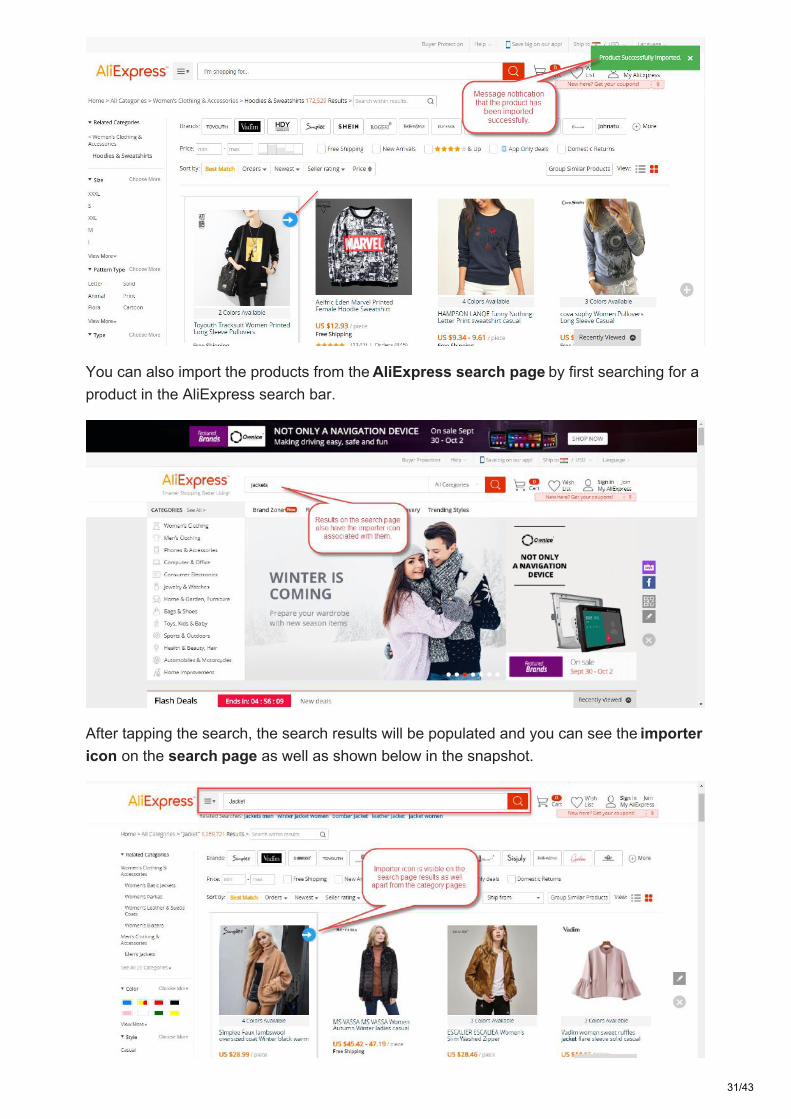
You can also import the products from the AliExpress search page by first searching for aproduct in the AliExpress search bar.
After tapping the search, the search results will be populated and you can see the importericon on the search page as well as shown below in the snapshot.
31/43
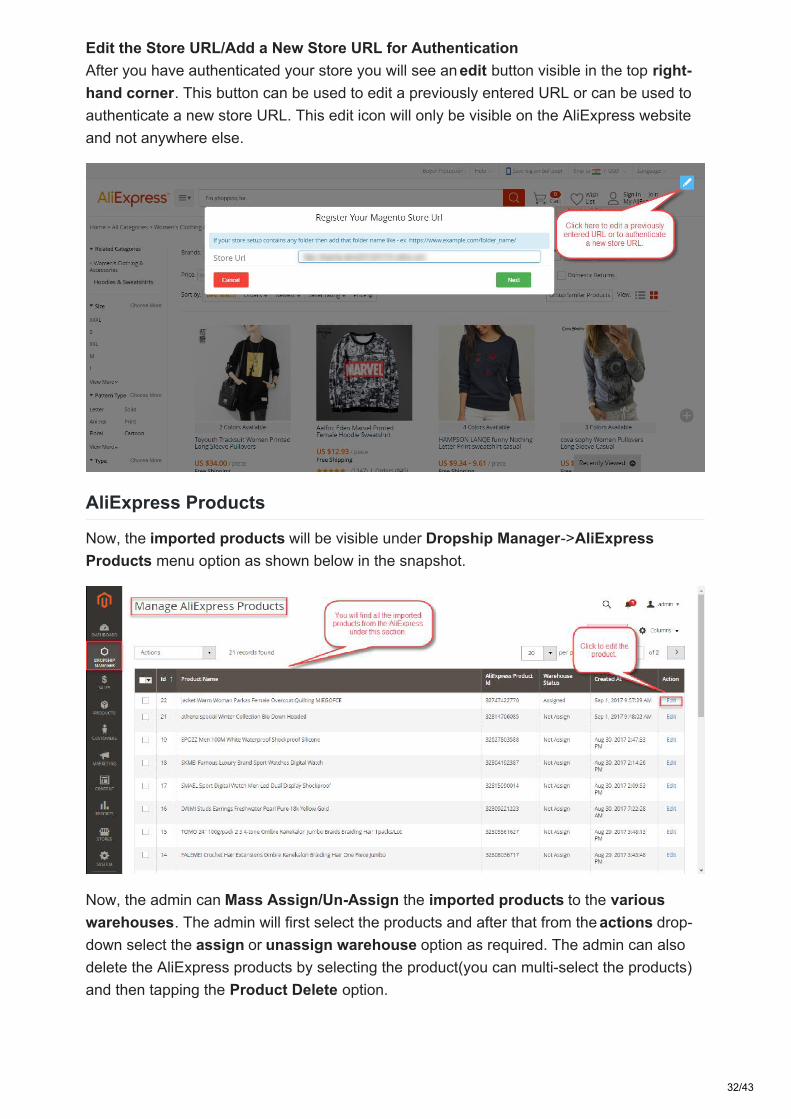
Edit the Store URL/Add a New Store URL for Authentication After you have authenticated your store you will see an edit button visible in the top right-hand corner. This button can be used to edit a previously entered URL or can be used toauthenticate a new store URL. This edit icon will only be visible on the AliExpress websiteand not anywhere else.
AliExpress Products
Now, the imported products will be visible under Dropship Manager->AliExpressProducts menu option as shown below in the snapshot.
Now, the admin can Mass Assign/Un-Assign the imported products to the variouswarehouses. The admin will first select the products and after that from the actions drop-down select the assign or unassign warehouse option as required. The admin can alsodelete the AliExpress products by selecting the product(you can multi-select the products)and then tapping the Product Delete option.
32/43
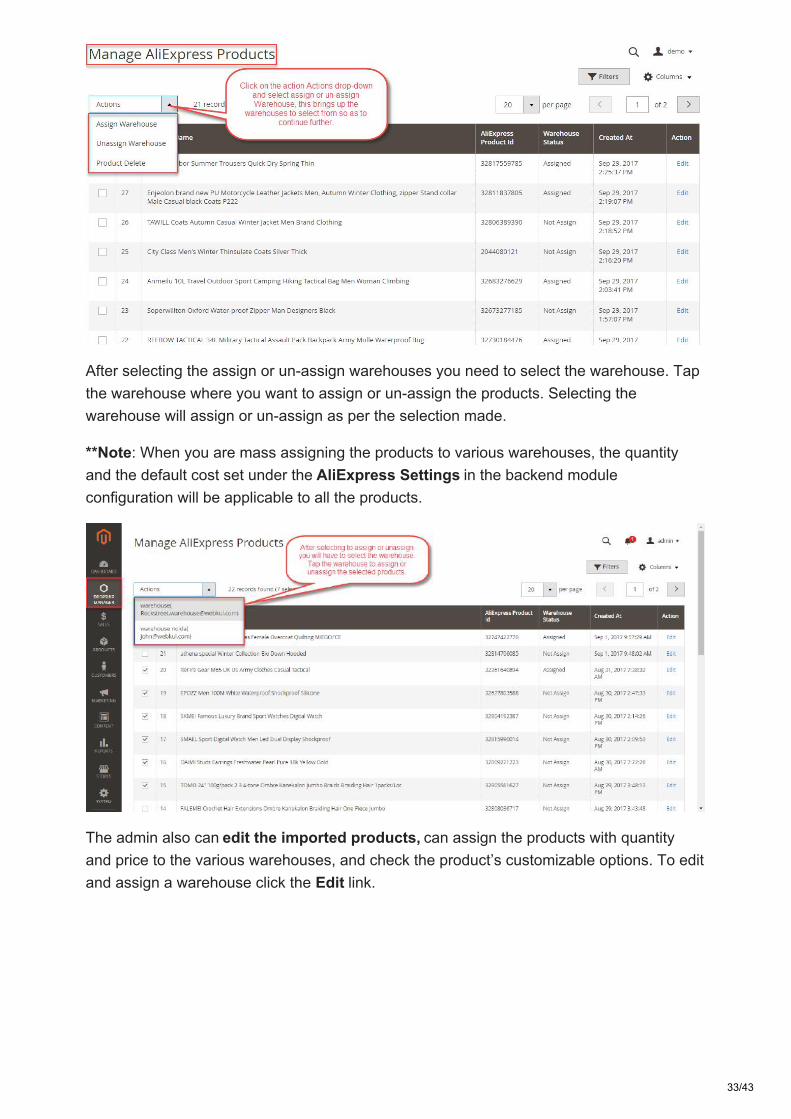
After selecting the assign or un-assign warehouses you need to select the warehouse. Tapthe warehouse where you want to assign or un-assign the products. Selecting thewarehouse will assign or un-assign as per the selection made.
**Note: When you are mass assigning the products to various warehouses, the quantityand the default cost set under the AliExpress Settings in the backend moduleconfiguration will be applicable to all the products.
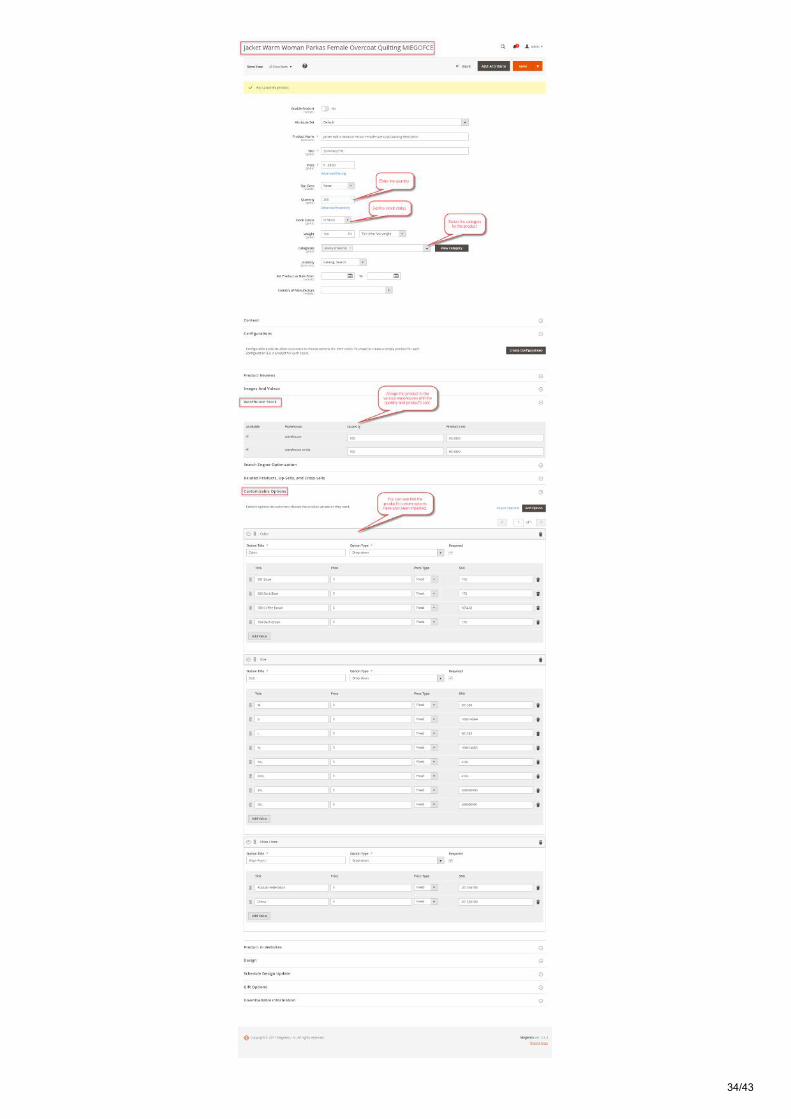
The admin also can edit the imported products, can assign the products with quantityand price to the various warehouses, and check the product’s customizable options. To editand assign a warehouse click the Edit link.
33/43
34/43
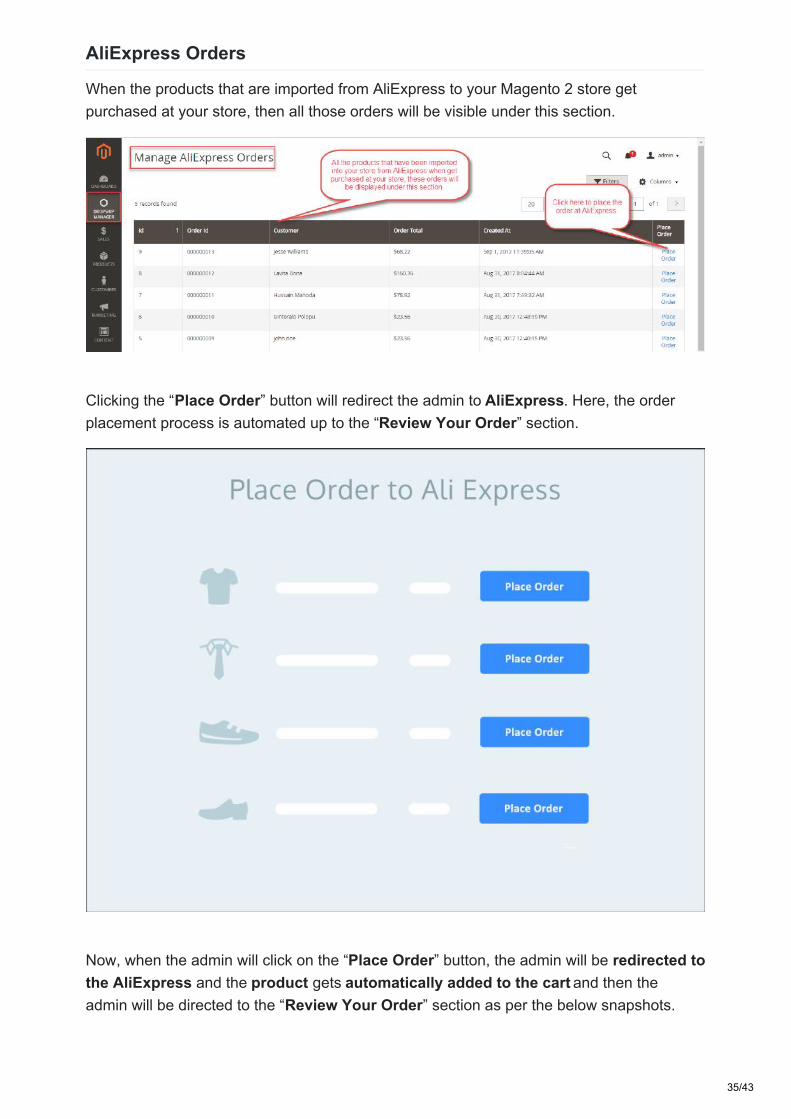
AliExpress Orders
When the products that are imported from AliExpress to your Magento 2 store getpurchased at your store, then all those orders will be visible under this section.
Clicking the “Place Order” button will redirect the admin to AliExpress. Here, the orderplacement process is automated up to the “Review Your Order” section.
Now, when the admin will click on the “Place Order” button, the admin will be redirected tothe AliExpress and the product gets automatically added to the cart and then theadmin will be directed to the “Review Your Order” section as per the below snapshots.
35/43
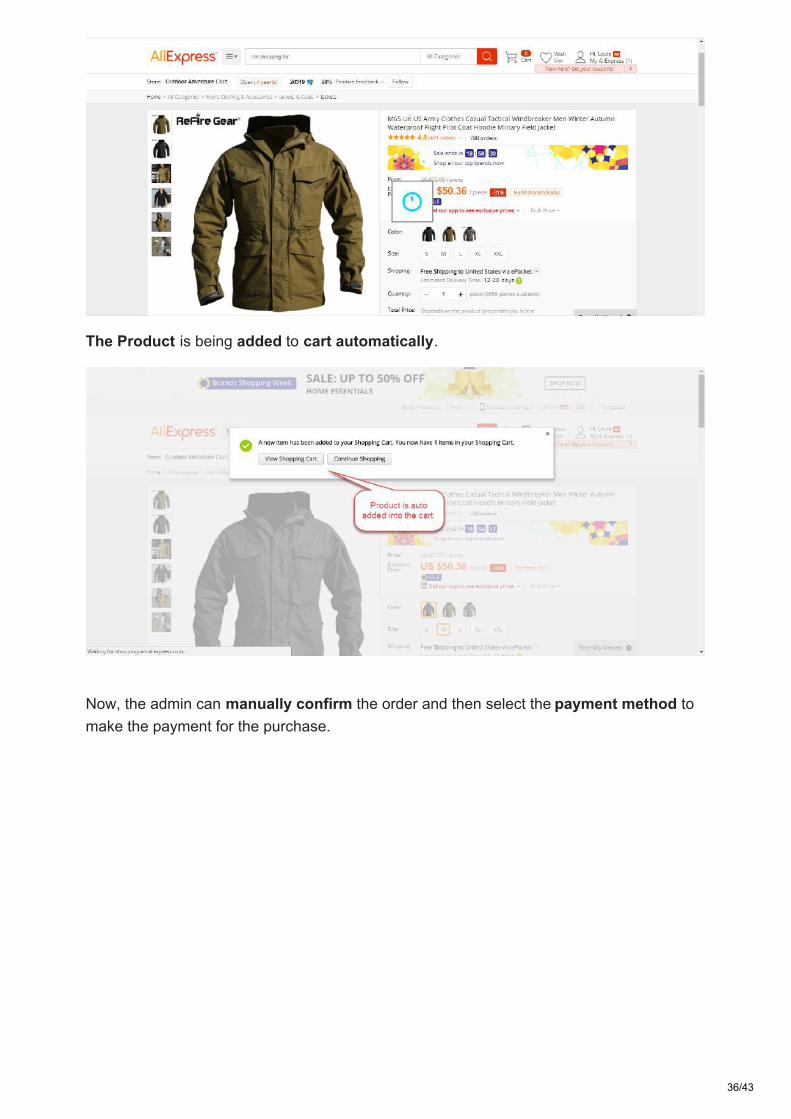
The Product is being added to cart automatically.
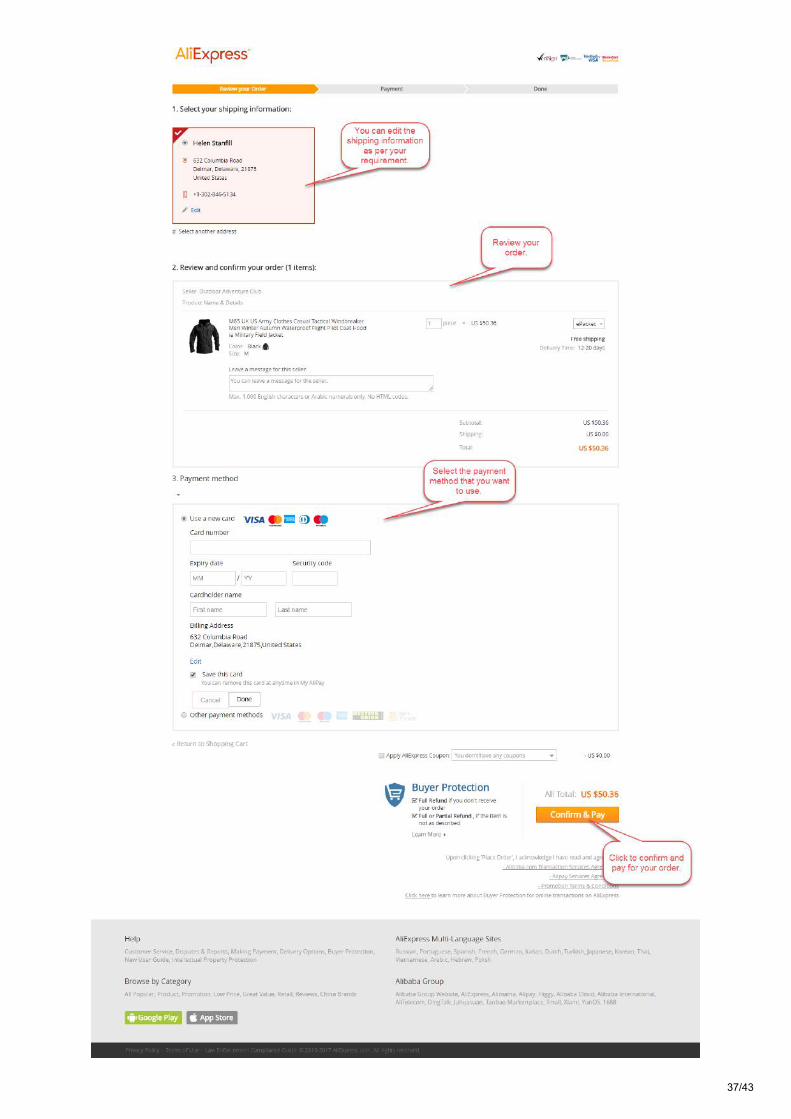
Now, the admin can manually confirm the order and then select the payment method tomake the payment for the purchase.
36/43
37/43
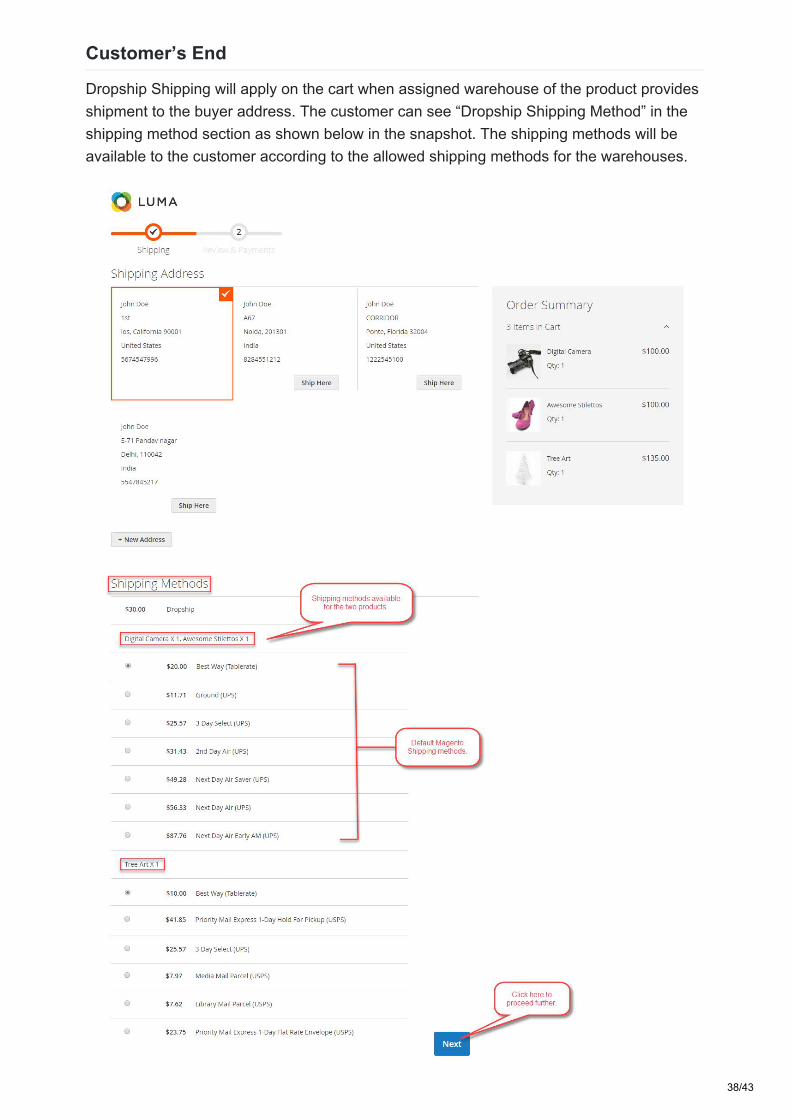
Customer’s End
Dropship Shipping will apply on the cart when assigned warehouse of the product providesshipment to the buyer address. The customer can see “Dropship Shipping Method” in theshipping method section as shown below in the snapshot. The shipping methods will beavailable to the customer according to the allowed shipping methods for the warehouses.
38/43
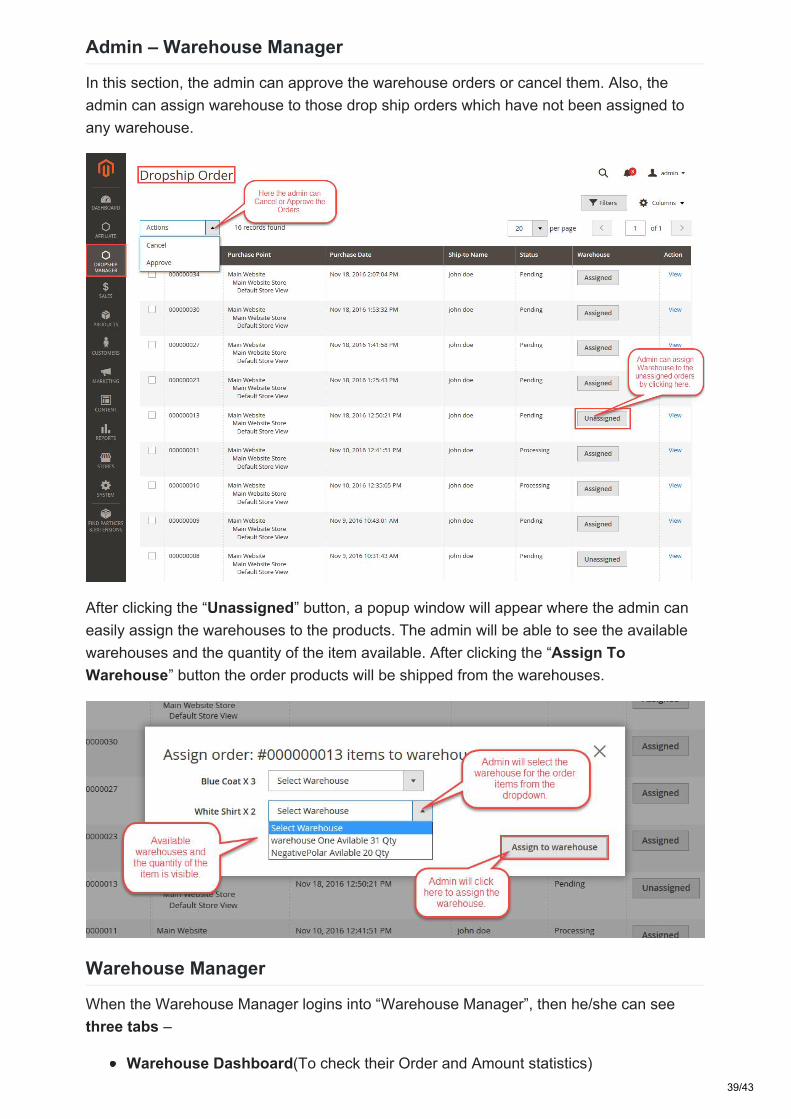
Admin – Warehouse Manager
In this section, the admin can approve the warehouse orders or cancel them. Also, theadmin can assign warehouse to those drop ship orders which have not been assigned toany warehouse.
After clicking the “Unassigned” button, a popup window will appear where the admin caneasily assign the warehouses to the products. The admin will be able to see the availablewarehouses and the quantity of the item available. After clicking the “Assign ToWarehouse” button the order products will be shipped from the warehouses.
Warehouse Manager
When the Warehouse Manager logins into “Warehouse Manager”, then he/she can seethree tabs –
Warehouse Dashboard(To check their Order and Amount statistics)39/43
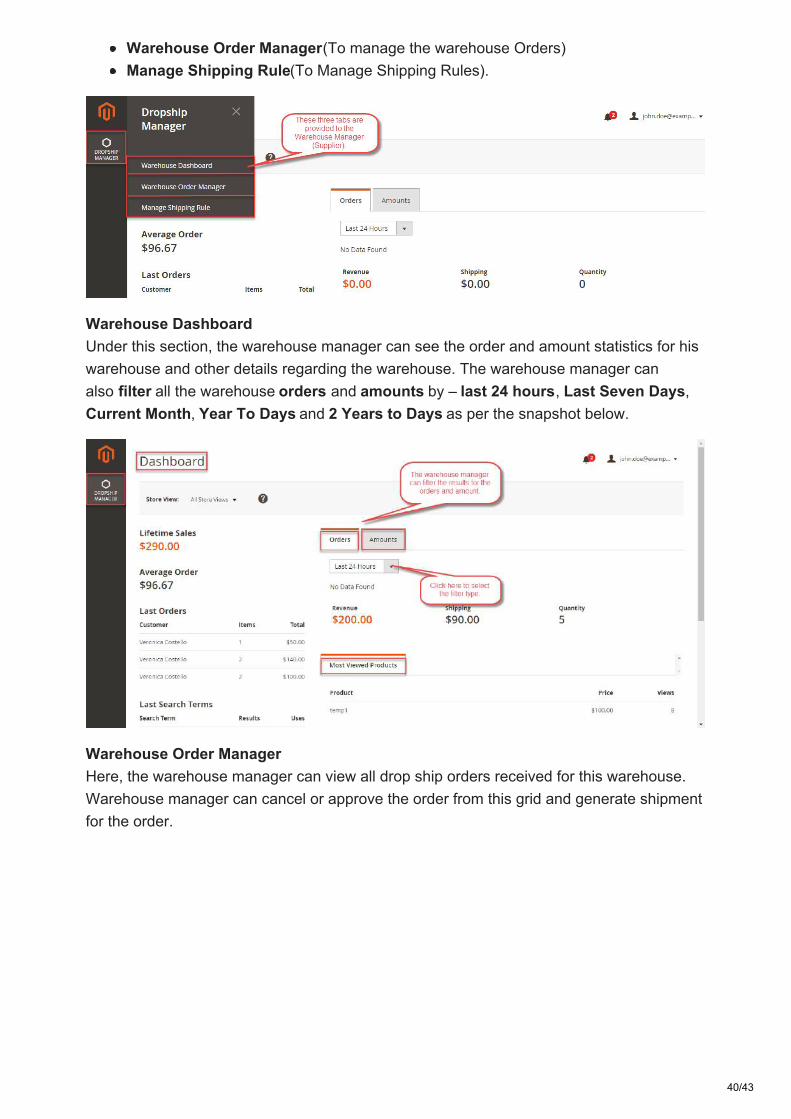
Warehouse Order Manager(To manage the warehouse Orders)Manage Shipping Rule(To Manage Shipping Rules).
Warehouse DashboardUnder this section, the warehouse manager can see the order and amount statistics for hiswarehouse and other details regarding the warehouse. The warehouse manager canalso filter all the warehouse orders and amounts by – last 24 hours, Last Seven Days,Current Month, Year To Days and 2 Years to Days as per the snapshot below.
Warehouse Order ManagerHere, the warehouse manager can view all drop ship orders received for this warehouse.Warehouse manager can cancel or approve the order from this grid and generate shipmentfor the order.
40/43
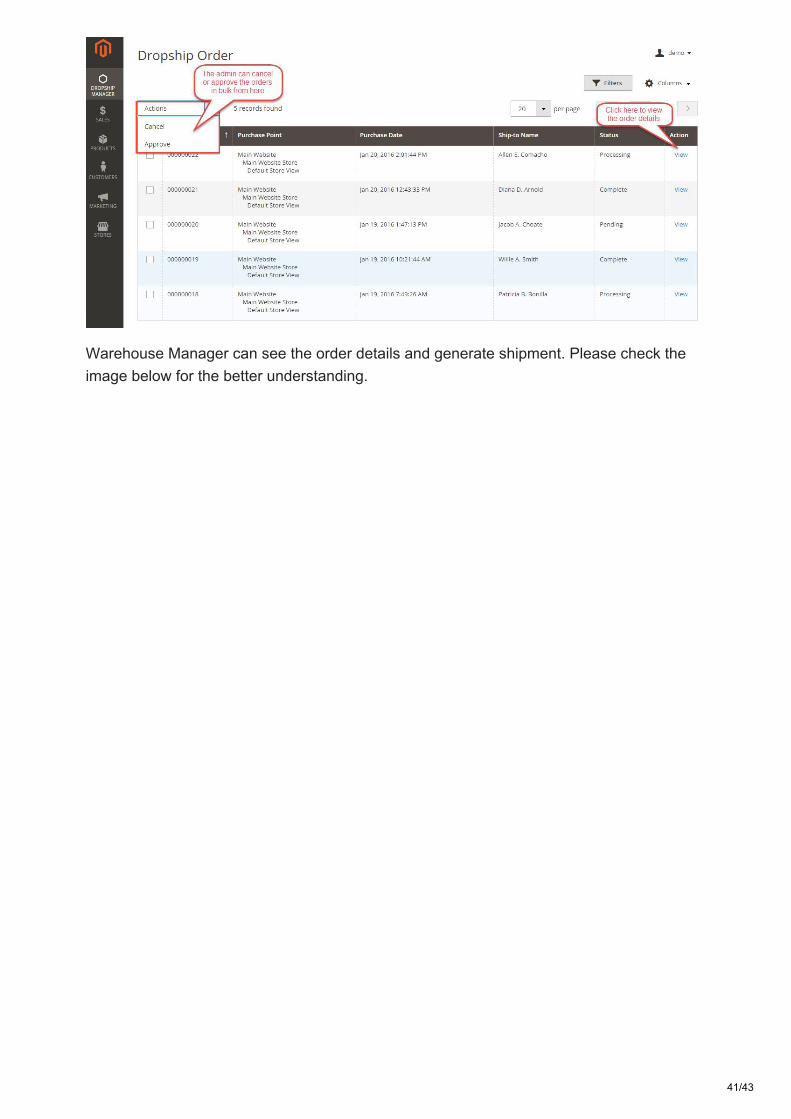
Warehouse Manager can see the order details and generate shipment. Please check theimage below for the better understanding.
41/43
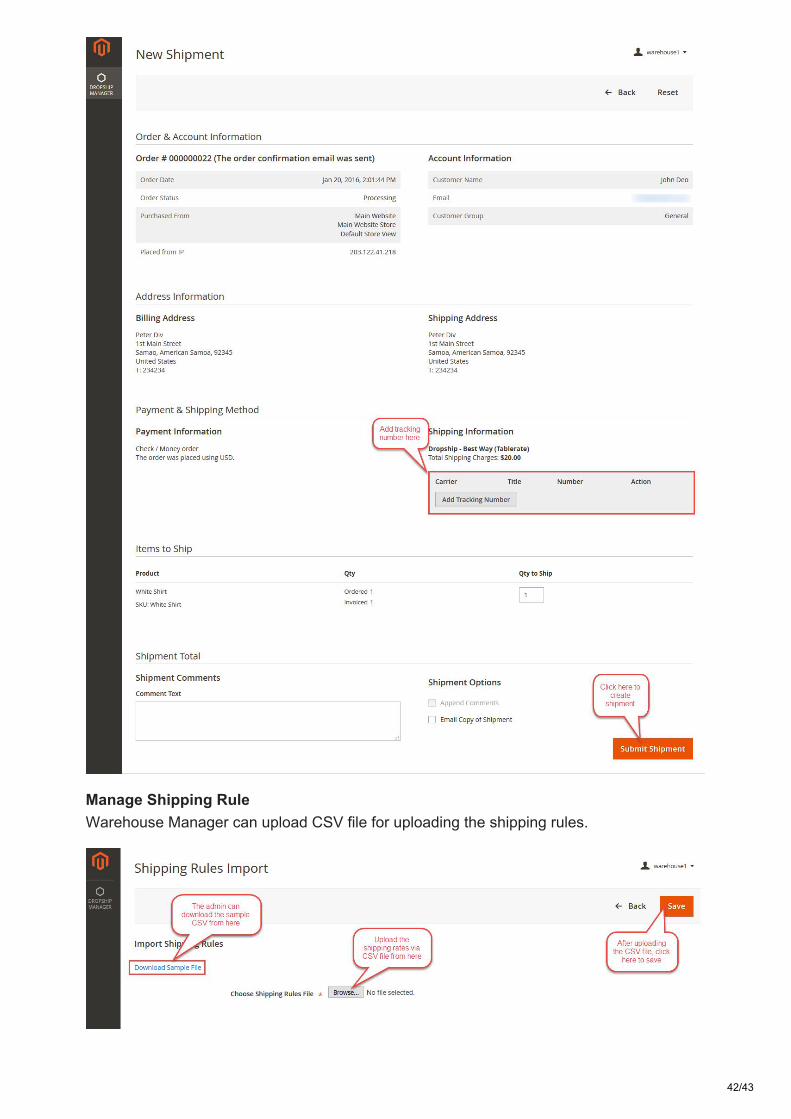
Manage Shipping RuleWarehouse Manager can upload CSV file for uploading the shipping rules.
42/43
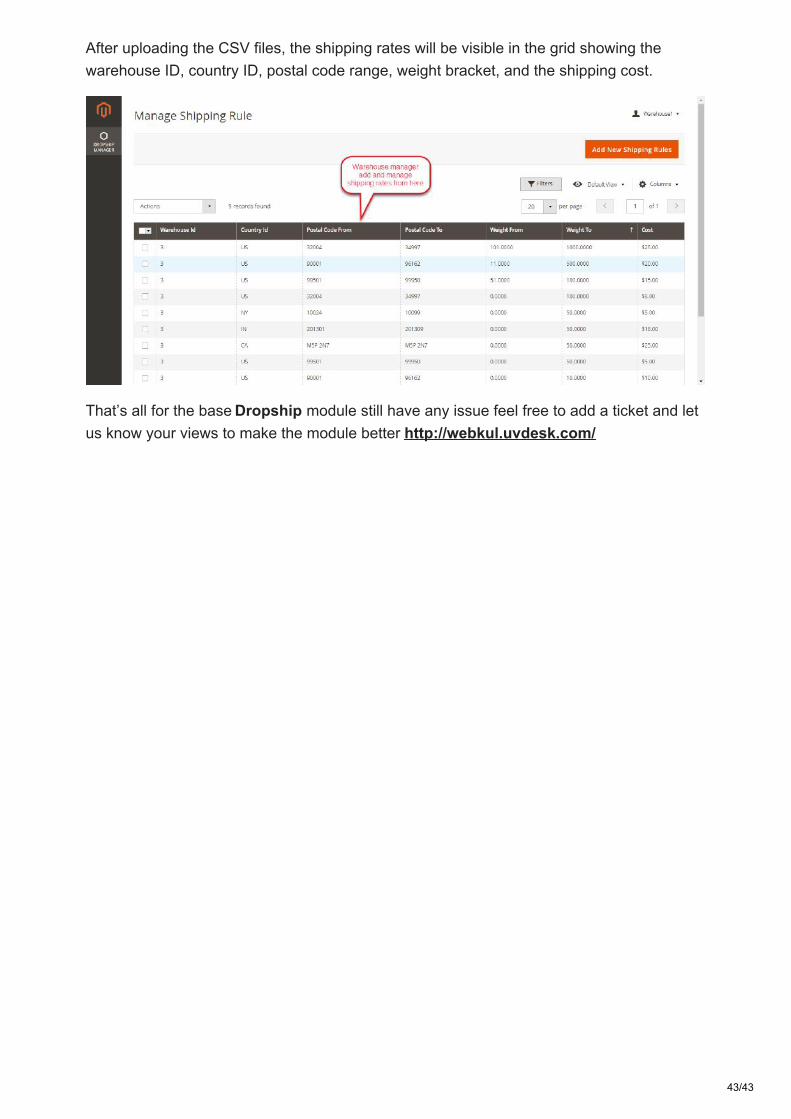
After uploading the CSV files, the shipping rates will be visible in the grid showing thewarehouse ID, country ID, postal code range, weight bracket, and the shipping cost.
That’s all for the base Dropship module still have any issue feel free to add a ticket and letus know your views to make the module better http://webkul.uvdesk.com/
43/43