Driver Maker User Guide (Plug-in for ECM Titanium) · • Use the key combination If the original...
36
Version 1.0 Driver Maker U Titanium) Introduction This guide contains a complete e ECM Titanium, the chip-tuning s in the basic version of ECM Titan This manual contains all the info the description of its functions, belong to a previous version of th version of the guide is available. In the explanation of the sectio questions about the operation of t ECM Titanium USB flash drive ( The Driver Maker add-on, like Windows® Vista or 7. User Guide (Plug-in explanation of the Driver Maker plug-in, an software produced by Alientech S.r.l.. Driver nium, but can be purchased separately. ormation you need to make the best use the pl the sections of this guide often contain pi he software, please contact your dealer to fin ons there are references to ECM Titanium s this software, you should first read the Quick (USB Picodisk). e ECM Titanium software, is designed fo 1 n for ECM add-on developed for Maker is not included lug-in, and to simplify ictures. If the pictures nd out whether a newer software. If you have User Guide located in or computers running
Transcript of Driver Maker User Guide (Plug-in for ECM Titanium) · • Use the key combination If the original...

Version 1.0
Driver Maker User Guide
Titanium)
Introduction
This guide contains a complete explanation of the
ECM Titanium, the chip-tuning software produced by
in the basic version of ECM Titanium
This manual contains all the information you need to
the description of its functions, the sections of this guide often contain picture
belong to a previous version of the software, please contact your
version of the guide is available.
In the explanation of the sections there are references to
questions about the operation of this software
ECM Titanium USB flash drive (USB
The Driver Maker add-on, like
Windows® Vista or 7.
User Guide (Plug-in
This guide contains a complete explanation of the Driver Maker plug-in, an add
tuning software produced by Alientech S.r.l.. Driver Maker
ECM Titanium, but can be purchased separately.
information you need to make the best use the plug
, the sections of this guide often contain picture
belong to a previous version of the software, please contact your dealer to find out
In the explanation of the sections there are references to ECM Titanium software.
this software, you should first read the Quick User Guide
(USB Picodisk).
on, like ECM Titanium software, is designed for computers running
1
in for ECM
in, an add-on developed for
Driver Maker is not included
the plug-in, and to simplify
, the sections of this guide often contain pictures. If the pictures
dealer to find out whether a newer
software. If you have
Quick User Guide located in
is designed for computers running
Version 1.0
Table of contents
Introduction ................................................................
Section 1 – What the Driver Maker plug
Alientech Drivers ................................
Custom Drivers ................................
Section 2 – How to run the Driver Maker plug
Opening Driver Maker from ECM Titanium main window
Opening Driver Maker from the 2D Graphics window of ECM Titanium
Section 3 – Features ................................
Driver Maker Main Window ................................
EPROM data ................................
2D Graphic Area ................................
Address Scrollbar ................................
DRIVER data ................................
Display ................................
MOD Selection ................................
Menu ................................................................
Driver ................................................................
Graphics ................................
Help ................................................................
Supported views ................................
Entering new map names ................................
Editor ................................................................
Search window ................................
Section 4 – How to develop a new Driver
Adding a single map ................................
Adding a map with its similars
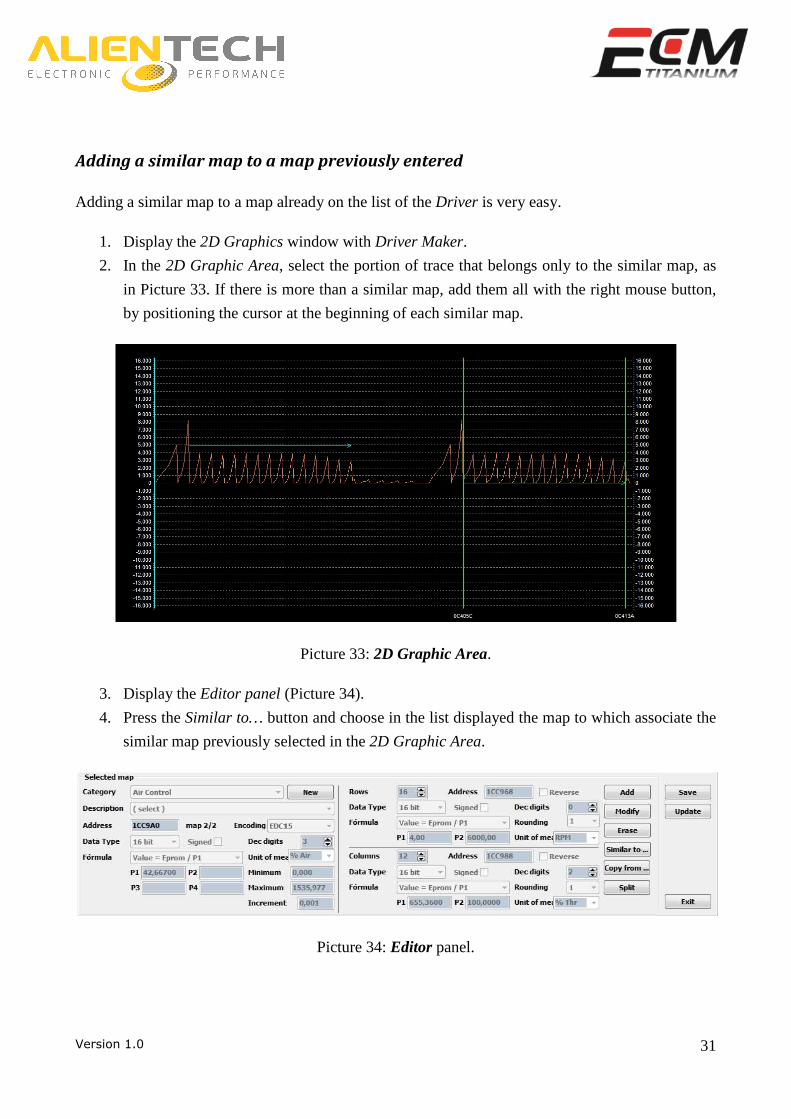
Adding a similar map to a map previously entered
................................................................................................
What the Driver Maker plug-in is ................................................................
................................................................................................
................................................................................................
How to run the Driver Maker plug-in ................................................................
Opening Driver Maker from ECM Titanium main window ................................
Opening Driver Maker from the 2D Graphics window of ECM Titanium ................................
................................................................................................
................................................................................................
................................................................................................
................................................................................................
................................................................................................
................................................................................................
................................................................................................................................
................................................................................................
................................................................................................
................................................................................................
................................................................................................
................................................................................................
How to develop a new Driver ................................................................
................................................................................................
Adding a map with its similars ................................................................................................
Adding a similar map to a map previously entered ................................................................
2
.......................................... 1
..................................................... 4
............................................................. 5
................................................................ 5
............................................... 6
............................................................ 6
..................................... 7
............................................................. 9
............................................ 9
................................................................ 9
........................................................ 10
....................................................... 11
............................................................. 12
....................................... 12
.......................................................... 14
.............................................. 15
......................................... 15
..................................... 16
............................................ 17
............................................................. 18
............................................... 21
.............................................. 22
............................................................... 25
......................................................... 27
...................................................... 28
...................................... 29
....................................... 31

Version 1.0
Section 5 – How to associate a Checksum family
Section 6 – How to save a custom Driver
Section 7 – How to load an original stock file with a User Driver
How to associate a Checksum family ................................................................
How to save a custom Driver ................................................................
How to load an original stock file with a User Driver ................................
3
............................................. 32
.......................................................... 34
.................................................... 36
Version 1.0
Section 1 – What the Driver Maker
Driver Maker is an add-on for
develop and edit Driver files used by the
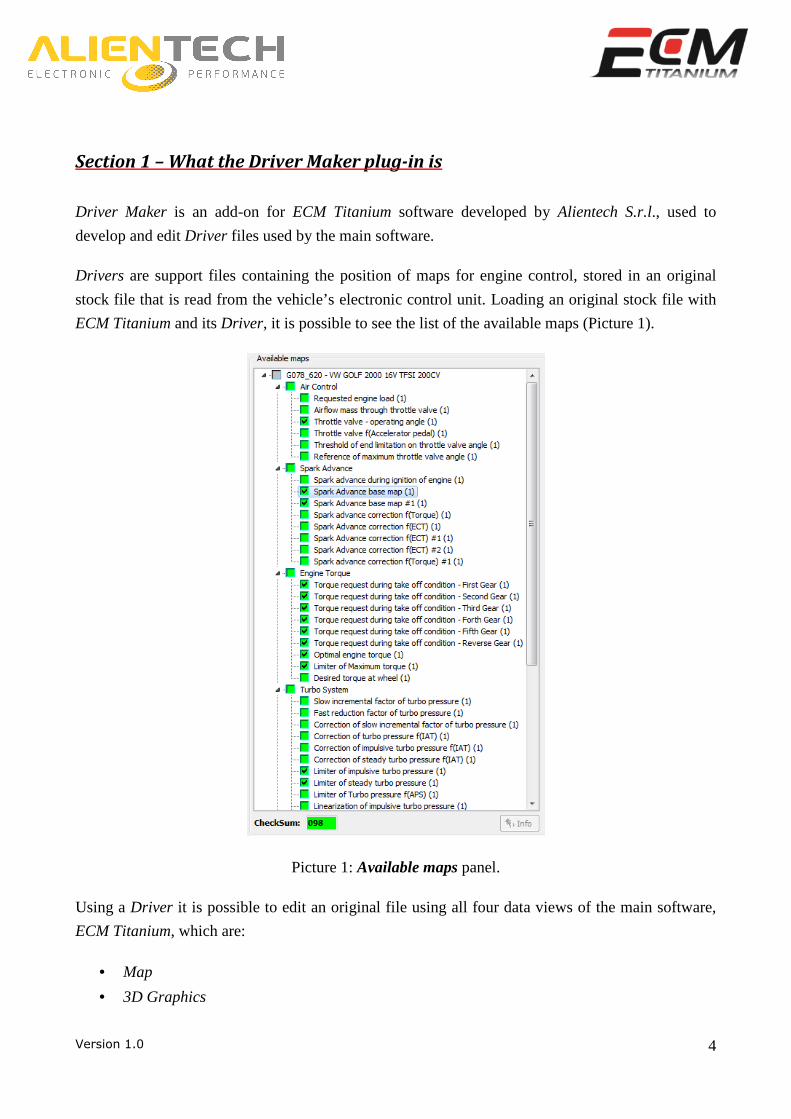
Drivers are support files containing the position of maps for engine control,
stock file that is read from the vehicle’s electronic control unit.
ECM Titanium and its Driver, it is possible to see the list of the available maps (Picture 1).
Using a Driver it is possible to edit
ECM Titanium, which are:
• Map
• 3D Graphics
Driver Maker plug-in is
ECM Titanium software developed by Alientech
used by the main software.
are support files containing the position of maps for engine control,
stock file that is read from the vehicle’s electronic control unit. Loading an original
, it is possible to see the list of the available maps (Picture 1).
Picture 1: Available maps panel.
it is possible to edit an original file using all four data views
4
Alientech S.r.l., used to
are support files containing the position of maps for engine control, stored in an original
original stock file with
, it is possible to see the list of the available maps (Picture 1).
data views of the main software,

Version 1.0
• 2D Graphics
• Hexadecimal
There are two types of Drivers:
• Alientech Official Drivers
Internet Data Bank.
• Custom Drivers: developed by the user using
obsolete plug-in for ECM Titanium
Alientech Drivers
They are provided only to Alientech S.r.l
company or its authorized reseller, and can be downloaded
downloaded, Drivers are stored in
is no longer possible to download or reques
ECM Titanium software will continue to operate normally anyway
Alientech official Drivers already contain all the
order to achieve a good modified file.
Custom Drivers
They are developed by ECM Titanium
Manager Plus (an obsolete plug-
only be used from the USB Flash drive
custom Driver developed by another
Custom Drivers are useful for adding
develop new Drivers for original files
It is possible to modify an Alientech official
Driver has been previously downloaded
associated is loaded into the main software
To develop a new Custom Driver
only the original stock file in ECM Titanium
Official Drivers: developed by Alientech, they can be downloaded from the
developed by the user using Driver Maker or Driver Manager Plus
ECM Titanium).
Alientech S.r.l customers who have subscribed a contract with the
company or its authorized reseller, and can be downloaded from the Internet Data Bank.
are stored in ECM Titanium USB Flash drive. At the end of the subscription it
is no longer possible to download or request new Drivers from the Internet Data Bank
software will continue to operate normally anyway
already contain all the maps and parameters that are usually
modified file.
ECM Titanium users using plug-in softwares, Driver Maker
-in). Their structure is identical to that of official
from the USB Flash drive that has generated them. It is therefore not
by another ECM Titanium Flash drive.
are useful for adding custom maps to the official ones (e.g. for
original files not supported by reading tools.
Alientech official Driver with Driver Maker, but it is necessary
previously downloaded from the Internet Data Bank and that the original stock file
e main software, ECM Titanium.
Custom Driver without inheriting any information, the only condition
ECM Titanium software.
5
y can be downloaded from the
Driver Manager Plus (an
ed a contract with the
Internet Data Bank. Once
At the end of the subscription it
Internet Data Bank service.
that are usually increased in
Driver Maker or Driver
that of official Drivers, but can
It is therefore not possible to use a
for special tunings), or
but it is necessary that this
that the original stock file
the only condition is to load
Version 1.0
Section 2 – How to run the
When buying the Driver Maker
DriverMaker.plt, which must be
name given to the USB Picodisk
This file cannot be transferred to
Flash drive for which it was generated.
To run the Driver Maker plug-in,
stock file must have been loaded.
When using the plug-in for the first time
present on the memory of the USB Flash drive
Opening Driver Maker from
To run Driver Maker from ECM Titanium
• Click on the icon (top left
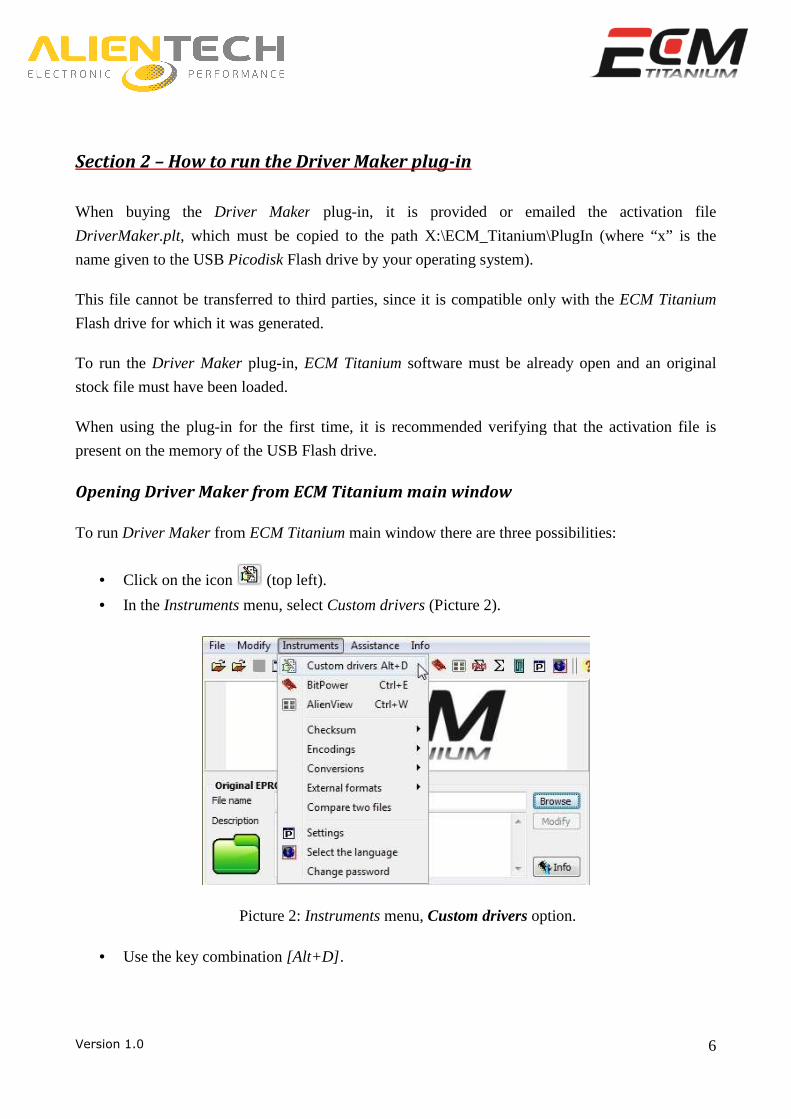
• In the Instruments menu,
Picture
• Use the key combination
How to run the Driver Maker plug-in
aker plug-in, it is provided or emailed
, which must be copied to the path X:\ECM_Titanium\PlugIn
Flash drive by your operating system).
transferred to third parties, since it is compatible only with the
which it was generated.
in, ECM Titanium software must be already open
loaded.
r the first time, it is recommended verifying that
of the USB Flash drive.
from ECM Titanium main window
ECM Titanium main window there are three possibilities
top left).
select Custom drivers (Picture 2).
2: Instruments menu, Custom drivers option.
[Alt+D] .
6
emailed the activation file
PlugIn (where “x” is the
compatible only with the ECM Titanium
must be already open and an original
it is recommended verifying that the activation file is
main window there are three possibilities:
.

Version 1.0
Opening Driver Maker from the
To run Driver Maker from 2D Graphics
• Click on the icon (top left
• In the Instruments menu, select
Picture 3:
• Use the key combination
If the original stock file was not
Picture 4.
from the 2D Graphics window of ECM Titanium
2D Graphics window there are three possibilities:
top left).
menu, select Custom drivers (Picture 3).
3: Instruments menu, Custom drivers option.
[Alt+D] .
was not associated with a Driver, the window open
7
Titanium
opened is the one in the

Version 1.0
Picture 4: Driver Maker
If the original file was associated with a
Picture 5: Driver Maker
Driver Maker main window (no Driver associated to the original file
associated with a Driver, the window opened is the one
Driver Maker main window (Driver associated to the original file
8
associated to the original file).
the one in Picture 5.
associated to the original file).
Version 1.0
Section 3 – Features
This section explains all the features of
other information in a custom Driver
Driver Maker Main Window
In the main window of the plug-
specific function.
Picture
EPROM data
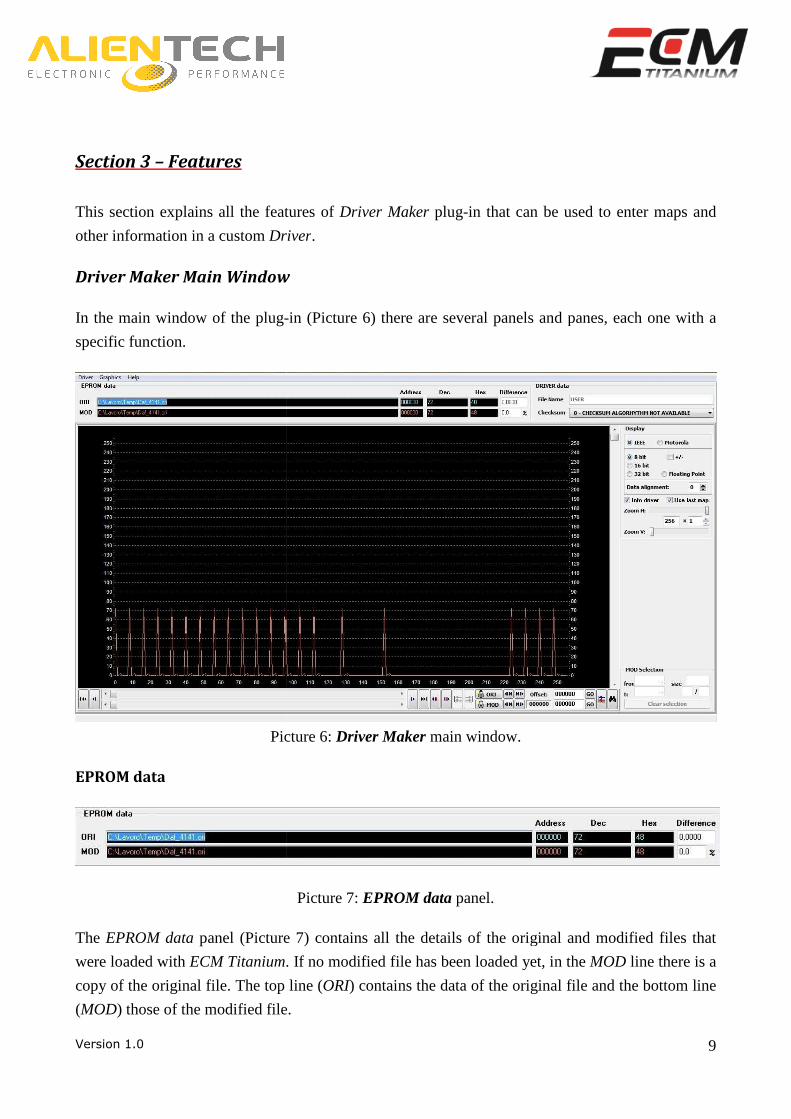
The EPROM data panel (Picture
were loaded with ECM Titanium. If no modified file has been
copy of the original file. The top
(MOD) those of the modified file.
the features of Driver Maker plug-in that can be used to
Driver.
Main Window
-in (Picture 6) there are several panels and panes,
Picture 6: Driver Maker main window.
Picture 7: EPROM data panel.
Picture 7) contains all the details of the original and modified files that
. If no modified file has been loaded yet, in the
line (ORI) contains the data of the original file and the
) those of the modified file.
9
can be used to enter maps and
panes, each one with a
s all the details of the original and modified files that
yet, in the MOD line there is a
) contains the data of the original file and the bottom line

Version 1.0
The details displayed in the EPROM data
• ORI: Path to the folder where the
• MOD: Path to the folder where the
• Address: Hexadecimal address
• Dec: Conversion to decimal
depends on the binary format selecte
• Hex: Hexadecimal view of the data in the hexadecimal address pointed
on the binary format selected in the
• Difference: Difference expressed
line) between the pointed decimal values of the original and modified file.
2D Graphic Area
The 2D Graphic Area panel (Picture 8) shows the
overlapping each other. Traces are formed by a s
values found in their respective hexadecimal address
and right of the 2D Graphic Area
therefore of the traces. The horizontal axis
addresses of the original and modified file,
file).
EPROM data panel are:
where the original file is saved.
where the modified file is saved.
exadecimal address pointed by the cursor located in the 2D
decimal of the data in the hexadecimal address pointed.
depends on the binary format selected in the Display panel.
exadecimal view of the data in the hexadecimal address pointed
on the binary format selected in the Display panel.
expressed in absolute value (first line) and in percentage (second
line) between the pointed decimal values of the original and modified file.
Picture 8: 2D Graphic Area.
panel (Picture 8) shows the traces of the original and modified file
overlapping each other. Traces are formed by a sequence of points, whose height
values found in their respective hexadecimal addresses. The vertical axes that are located
2D Graphic Area are used as "rulers", to help realize the height
The horizontal axis of the 2D Graphic Area is formed by the
modified file, increasing from left to right (000000h
10
2D Graphic Area.
of the data in the hexadecimal address pointed. Conversion
exadecimal view of the data in the hexadecimal address pointed. Conversion depends
in absolute value (first line) and in percentage (second
line) between the pointed decimal values of the original and modified file.
original and modified file
equence of points, whose height depend on the
es. The vertical axes that are located at the left
the height of the points and
is formed by the hexadecimal
000000h = beginning of the
Version 1.0
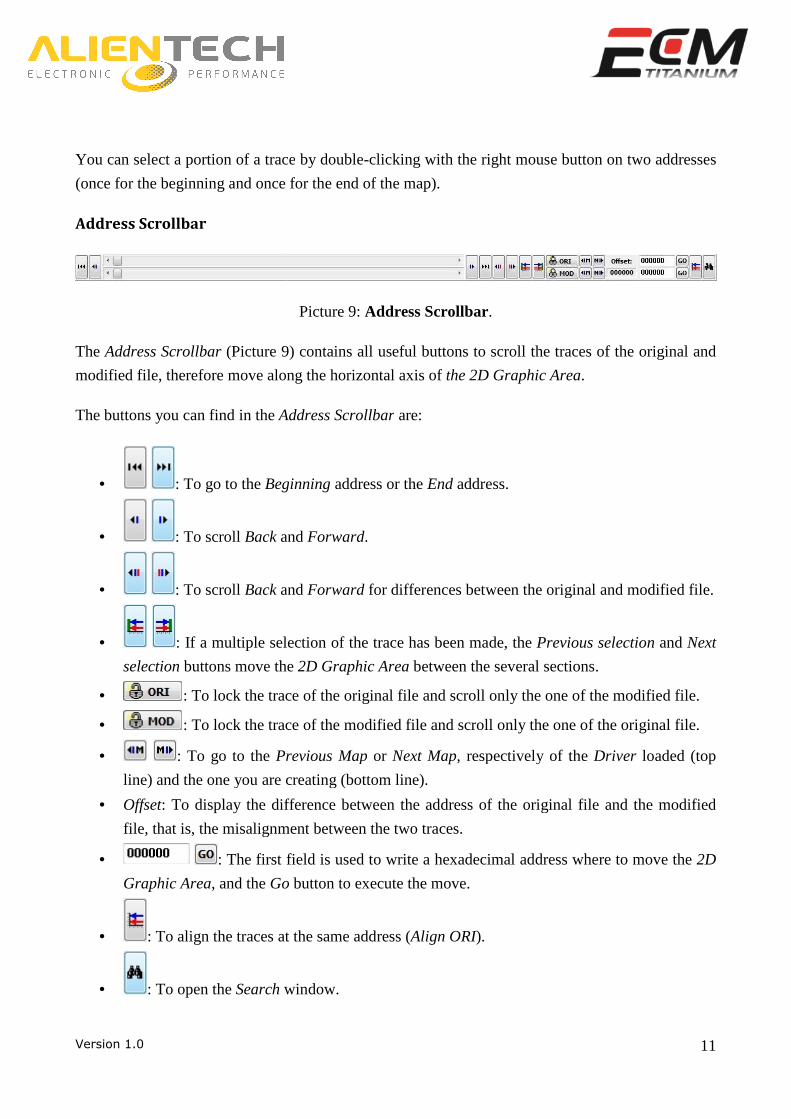
You can select a portion of a trace
(once for the beginning and once for
Address Scrollbar
The Address Scrollbar (Picture 9)
modified file, therefore move along the horizontal axis of
The buttons you can find in the Address Scrollbar
• : To go to the Beginning
• : To scroll Back and
• : To scroll Back and
• : If a multiple selection of the trace h
selection buttons move the
• : To lock the trace of the original file and scroll only the
• : To lock the trace of the modified file and scr
• : To go to the Previous Map
line) and the one you are creating (bottom line).
• Offset: To display the difference between the address of the original file and the m
file, that is, the misalignment
• : The first field is used to write a hexadecimal address where to move the
Graphic Area, and the Go
• : To align the traces at the same address
• : To open the Search window
trace by double-clicking with the right mouse button
once for the end of the map).
Picture 9: Address Scrollbar.
(Picture 9) contains all useful buttons to scroll the traces of the original and
move along the horizontal axis of the 2D Graphic Area
Address Scrollbar are:
Beginning address or the End address.
and Forward.
and Forward for differences between the original and
If a multiple selection of the trace has been made, the Previous selection
buttons move the 2D Graphic Area between the several sections.
trace of the original file and scroll only the one of the modified file
lock the trace of the modified file and scroll only the one
Previous Map or Next Map, respectively of the
line) and the one you are creating (bottom line).
the difference between the address of the original file and the m
misalignment between the two traces.
The first field is used to write a hexadecimal address where to move the
Go button to execute the move.
To align the traces at the same address (Align ORI).
window.
11
right mouse button on two addresses
all useful buttons to scroll the traces of the original and
the 2D Graphic Area.
original and modified file.
Previous selection and Next
between the several sections.
of the modified file.
one of the original file.
, respectively of the Driver loaded (top
the difference between the address of the original file and the modified
The first field is used to write a hexadecimal address where to move the 2D
Version 1.0
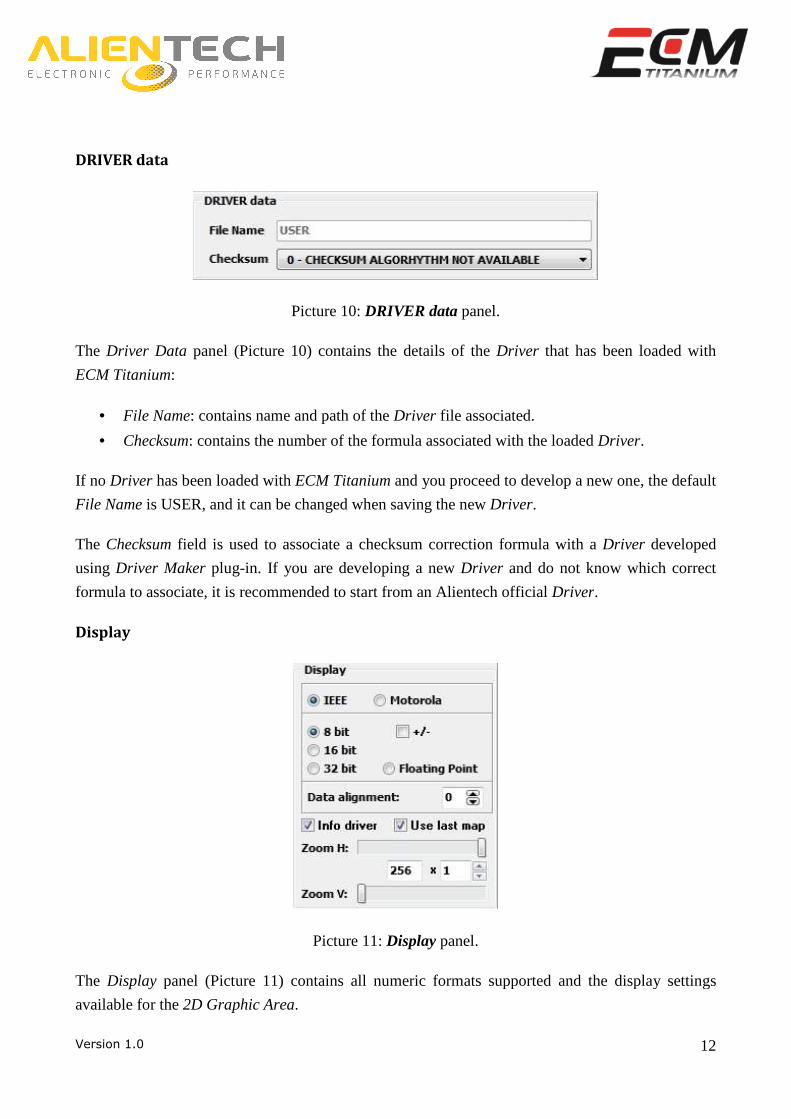
DRIVER data
The Driver Data panel (Picture
ECM Titanium:
• File Name: contains name and path of the
• Checksum: contains the number of the
If no Driver has been loaded with
File Name is USER, and it can be changed when saving the new
The Checksum field is used to associate a checksum correction formula with a
using Driver Maker plug-in. If you
formula to associate, it is recommended to start from an Alientech
Display
The Display panel (Picture 11)
available for the 2D Graphic Area
Picture 10: DRIVER data panel.
10) contains the details of the Driver that has been loaded with
contains name and path of the Driver file associated.
contains the number of the formula associated with the loaded
has been loaded with ECM Titanium and you proceed to develop
is USER, and it can be changed when saving the new Driver.
is used to associate a checksum correction formula with a
in. If you are developing a new Driver and do not know which correct
formula to associate, it is recommended to start from an Alientech official Driver
Picture 11: Display panel.
panel (Picture 11) contains all numeric formats supported and the display settings
2D Graphic Area.
12
that has been loaded with
associated with the loaded Driver.
a new one, the default
is used to associate a checksum correction formula with a Driver developed
and do not know which correct
Driver.
all numeric formats supported and the display settings
Version 1.0
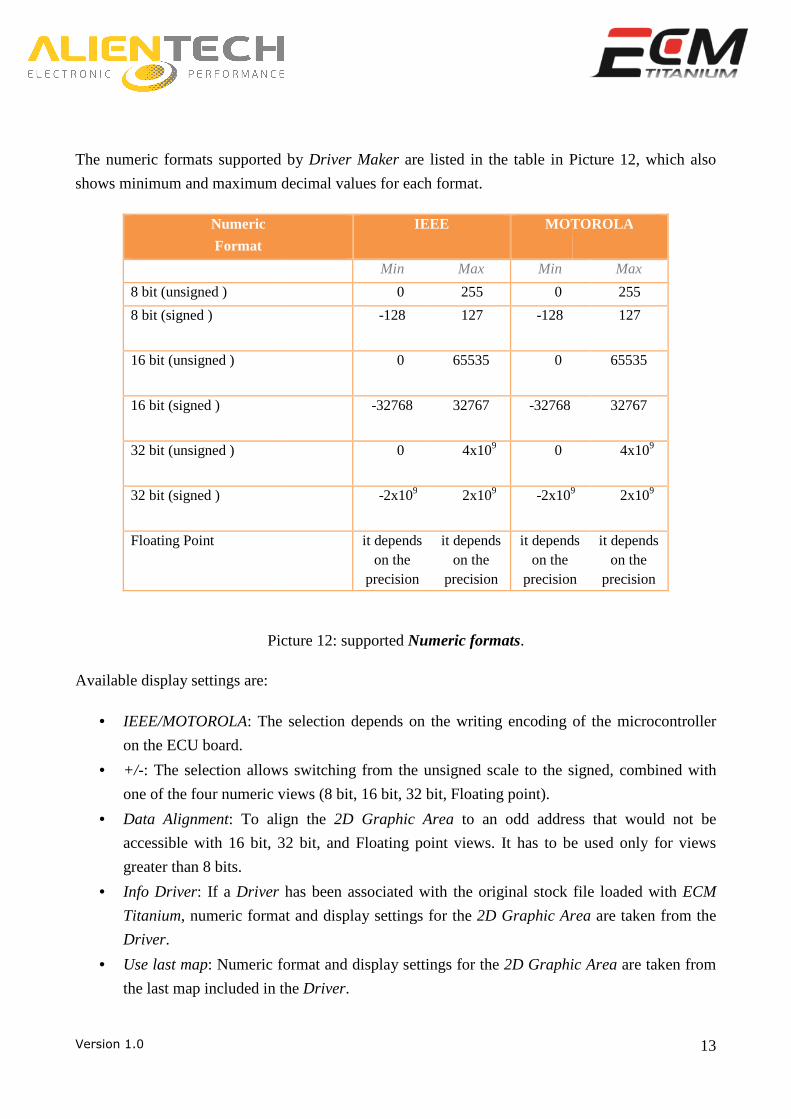
The numeric formats supported by
shows minimum and maximum decimal values for each
Numeric
Format
8 bit (unsigned )
8 bit (signed )
16 bit (unsigned )
16 bit (signed )
32 bit (unsigned )
32 bit (signed )
Floating Point
Picture
Available display settings are:
• IEEE/MOTOROLA: The selection
on the ECU board.
• +/- : The selection allows switching from
one of the four numeric views
• Data Alignment: To align
accessible with 16 bit, 32
greater than 8 bits.
• Info Driver: If a Driver ha
Titanium, numeric format and display settings
Driver.
• Use last map: Numeric format and display settings for the
the last map included in the
The numeric formats supported by Driver Maker are listed in the table in Picture
shows minimum and maximum decimal values for each format.
IEEE MOTOROLA
Min Max Min
0 255 0
-128 127 -128
0 65535 0
-32768 32767 -32768
0 4x10⁹ 0
-2x10⁹ 2x10⁹ -2x10⁹
it depends on the
precision
it depends on the
precision
it depends on the
precision
Picture 12: supported Numeric formats.
The selection depends on the writing encoding
allows switching from the unsigned scale to the signed,
numeric views (8 bit, 16 bit, 32 bit, Floating point).
To align the 2D Graphic Area to an odd address
bit, 32 bit, and Floating point views. It has to be
has been associated with the original stock file loaded with
, numeric format and display settings for the 2D Graphic Area
Numeric format and display settings for the 2D Graphic Area
t map included in the Driver.
13
Picture 12, which also
MOTOROLA
Max
255
127
65535
32767
4x10⁹
9 2x10⁹
it depends
precision
it depends on the
precision
of the microcontroller
signed, combined with
an odd address that would not be
be used only for views
s been associated with the original stock file loaded with ECM
2D Graphic Area are taken from the
2D Graphic Area are taken from

Version 1.0
• Zoom H: The cursor is used to
Area. With the horizontal zoom
display 256 consecutive
display multiples of 256 addresses at a time
• Zoom V: The cursor is used to increase or decrease the vertical zoom of the
Area.
MOD Selection
The Mod Selection panel (Picture 13) contains the details of the single or multiple selection made
with the mouse (right button) on the trace of the file
The details you can find in the Mod Selec
• From: It is the first hexadecimal address of the selection made on the trace of the modified
file. In Picture 12, the first
• To: It is the last hexadecimal
In Picture 13, the last address is
• size: It is the number of
first address to the last (from
long.
• Number/Number: It represents the number
being, compared to the total number of
13, 1/1 is the first map of
• Clear selection: To remove the single or multiple selection made in the
To remove singularly only one of the selections made in the
right mouse button on the first address of the desired selection.
is used to increase or decrease the horizontal zoom
the horizontal zoom to maximum (cursor all the way to the right
hexadecimal addresses. Increasing the box
addresses at a time in the 2D Graphic Area (default
The cursor is used to increase or decrease the vertical zoom of the
Picture 13: MOD Selection panel.
panel (Picture 13) contains the details of the single or multiple selection made
with the mouse (right button) on the trace of the file loaded as modified in the
Mod Selection panel are:
It is the first hexadecimal address of the selection made on the trace of the modified
file. In Picture 12, the first address is 000000h.
hexadecimal address of the selection made on the trace of the modified file.
In Picture 13, the last address is 000098h.
points (expressed in decimal) included in the
from 000000h to 000098h). In Picture 13, the selection is
represents the number of the selection pointed by
total number of selections made in the 2D Graphic Area
a selection that includes only one map (single selection
o remove the single or multiple selection made in the
only one of the selections made in the 2D Graphic Area
right mouse button on the first address of the desired selection.
14
the horizontal zoom of the 2D Graphic
to the right) it is possible to
box x1, it is possible to
(default 256 x1).
The cursor is used to increase or decrease the vertical zoom of the 2D Graphic
panel (Picture 13) contains the details of the single or multiple selection made
in the 2D Graphic Area.
It is the first hexadecimal address of the selection made on the trace of the modified
address of the selection made on the trace of the modified file.
) included in the selection; from the
the selection is 153 points
pointed by the cursor at the time
2D Graphic Area. In Picture
(single selection).
o remove the single or multiple selection made in the 2D Graphic Area.
2D Graphic Area, just click with the

Version 1.0
Menu
Driver Maker main window has a menu
plug-in.
Driver
The Driver menu (Picture 14) contains
• Save: To save the Driver just
• New: To create a new Driver
• Current: To copy the information
previously loaded with ECM Titanium
for the file loaded as modified
• Map List [Ctrl+W]: To switch between the
2D Graphic Area to the one that displays the
• Show editor [Ctrl+E]: To open the
• New map code [Ctrl+N]:
with the Driver Maker plug
• Previous similar map [Page Up
map, in the event that the
• Next similar map [Page Down
in the event that the Driver
main window has a menu that contains the most important functions
Picture 14: Driver menu.
contains the following functions and their shortcuts to recall them
just created associated with the file loaded as modified
Driver associated with the file loaded as modified
o copy the information of the Driver associated with the original stock file
ECM Titanium and paste it in the new Driver that you want to create
modified.
To switch between the Driver Maker plug-in window that displays the
to the one that displays the Map data view.
To open the Editor panel at the bottom of the open window.
: To add a new name to the list of default map names for later
plug-in.
Page Up] : To move the view of the 2D Graphic Area
Driver has similar maps.
Page Down] : To move the view of the 2D Graphic Area
Driver has similar maps.
15
the most important functions included in the
the following functions and their shortcuts to recall them:
as modified.
as modified.
associated with the original stock file
that you want to create
in window that displays the
panel at the bottom of the open window.
To add a new name to the list of default map names for later use
2D Graphic Area to the previous
2D Graphic Area to the next map,
Version 1.0
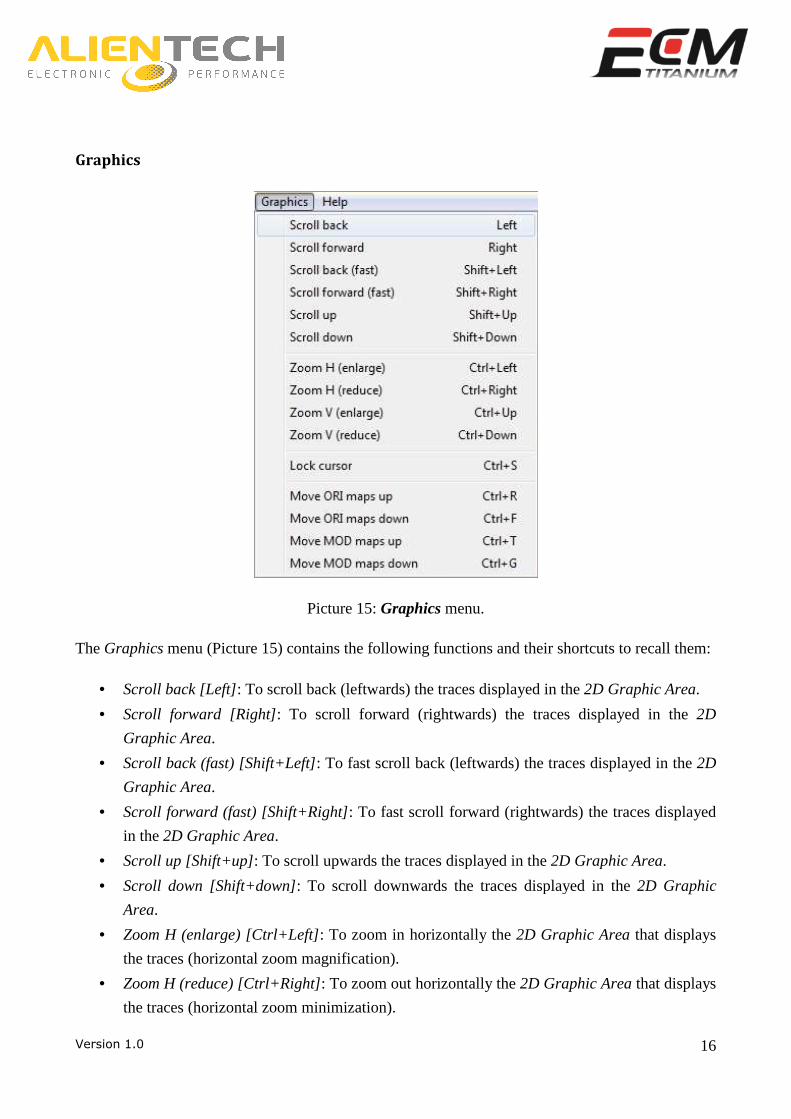
Graphics
The Graphics menu (Picture 15)
• Scroll back [Left]: To scroll back (leftwards) the traces displayed in the
• Scroll forward [Right]:
Graphic Area.
• Scroll back (fast) [Shift+Left]
Graphic Area.
• Scroll forward (fast) [Shift+Right]
in the 2D Graphic Area.
• Scroll up [Shift+up]: To scroll upwards the traces displayed in the
• Scroll down [Shift+down]
Area.
• Zoom H (enlarge) [Ctrl+Left]
the traces (horizontal zoom
• Zoom H (reduce) [Ctrl+Right]
the traces (horizontal zoom
Picture 15: Graphics menu.
ture 15) contains the following functions and their shortcuts to recall them:
To scroll back (leftwards) the traces displayed in the
To scroll forward (rightwards) the traces displayed in the
) [Shift+Left]: To fast scroll back (leftwards) the traces displayed in the
) [Shift+Right]: To fast scroll forward (rightwards) the traces displayed
To scroll upwards the traces displayed in the 2D Graphic Area
[Shift+down]: To scroll downwards the traces displayed in the
) [Ctrl+Left] : To zoom in horizontally the 2D Graphic Area
horizontal zoom magnification).
) [Ctrl+Right] : To zoom out horizontally the 2D Graphic Area
horizontal zoom minimization).
16
the following functions and their shortcuts to recall them:
To scroll back (leftwards) the traces displayed in the 2D Graphic Area.
To scroll forward (rightwards) the traces displayed in the 2D
To fast scroll back (leftwards) the traces displayed in the 2D
To fast scroll forward (rightwards) the traces displayed
2D Graphic Area.
the traces displayed in the 2D Graphic
2D Graphic Area that displays
2D Graphic Area that displays
Version 1.0
• Zoom V (enlarge) [Ctrl+Up]
traces (vertical zoom magnification
• Zoom V (reduce) [Ctrl+Down]
the traces (vertical zoom minimization
• Lock cursor [Ctrl+S]: To lock the cursor
unlock, simply repeat the
• Move ORI maps up [Ctrl+R]
the Driver of the file loaded
• Move ORI maps down [Ctrl+F]
map on the Driver of the file loaded as original.
• Move MOD maps up [Ctrl+
on the Driver of the file loaded as modified.
• Move MOD maps down [Ctrl+
map on the Driver of the file loaded as modified.
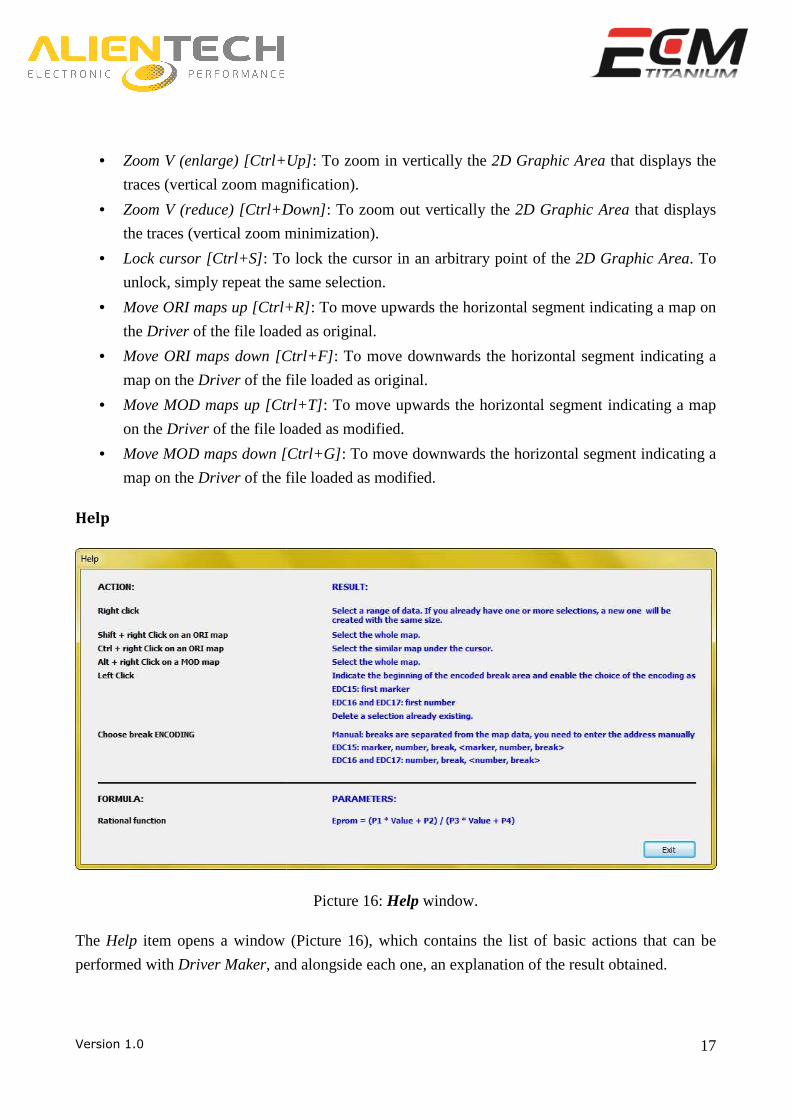
Help
The Help item opens a window (Picture 16), which contains the list of basic
performed with Driver Maker, and
) [Ctrl+Up] : To zoom in vertically the 2D Graphic Area
magnification).
) [Ctrl+Down] : To zoom out vertically the 2D Graphic Area
minimization).
To lock the cursor in an arbitrary point of the
same selection.
[Ctrl+R] : To move upwards the horizontal segment
of the file loaded as original.
[Ctrl+F] : To move downwards the horizontal segment
of the file loaded as original.
[Ctrl+ T] : To move upwards the horizontal segment
of the file loaded as modified.
[Ctrl+ G] : To move downwards the horizontal segment
of the file loaded as modified.
Picture 16: Help window.
item opens a window (Picture 16), which contains the list of basic
, and alongside each one, an explanation of the result obtained.
17
2D Graphic Area that displays the
2D Graphic Area that displays
of the 2D Graphic Area. To
the horizontal segment indicating a map on
the horizontal segment indicating a
the horizontal segment indicating a map
the horizontal segment indicating a
item opens a window (Picture 16), which contains the list of basic actions that can be
result obtained.

Version 1.0
If you are developing a Driver
EDC17, Driver Maker includes
ENCODING), and you can quickly add
The lower part of the Help window
P2, P3 and P4. The parameters
formulas used by engine control unit manufacturers.
Conversion formulas are already included
Standard structure Drivers, instead, does
are simply the conversion to decimal
Supported views
The views supported by Driver Maker
• 2D Graphics window (Picture
• Map window (Picture 18)
for a file belonging to a BOSCH ECU type
includes already the data structure of these ECU
quickly add their maps and corresponding axes.
window presents a rational function which includes four
are often used by advanced users to apply the same
engine control unit manufacturers.
are already included in Alientech official Drivers with advanced structure
, instead, does not include conversion formulas, so the numbers
to decimal of values belonging to each hexadecimal address
Maker are two:
Picture 17).
18).
Picture 17: 2D Graphics window.
18
to a BOSCH ECU type EDC15, EDC16 or
ECUs (Choose break
which includes four parameters: P1,
to apply the same conversion
advanced structure.
, so the numbers displayed
adecimal address of each map.

Version 1.0
2D Graphics window allows you to
Address Scrollbar, zoom horizontally or vertically,
number format for each map met
window, it is possible to select the maps belonging to the
them using the Editor panel.
Map window allows you to display
own name, and immediately observ
Editor panel (Picture 19), it is possible to
P2, P3 and P4) and axes (P1 and
Picture 18: Map window.
you to scroll the traces of loaded files (original and modified)
horizontally or vertically, and choose in the Display
met. By using the mouse buttons and basic actions
the maps belonging to the trace of the modified file
you to display the list of maps in the Driver, sorted by category and
observe values and reference axes of each map
it is possible to see the conversion parameters of the selected map
P2).
Picture 19: Editor panel.
19
and modified) with the
Display panel the correct
basic actions listed in the Help
modified file and then enter
by category and under its
map. By activating the
of the selected map (P1,
Version 1.0
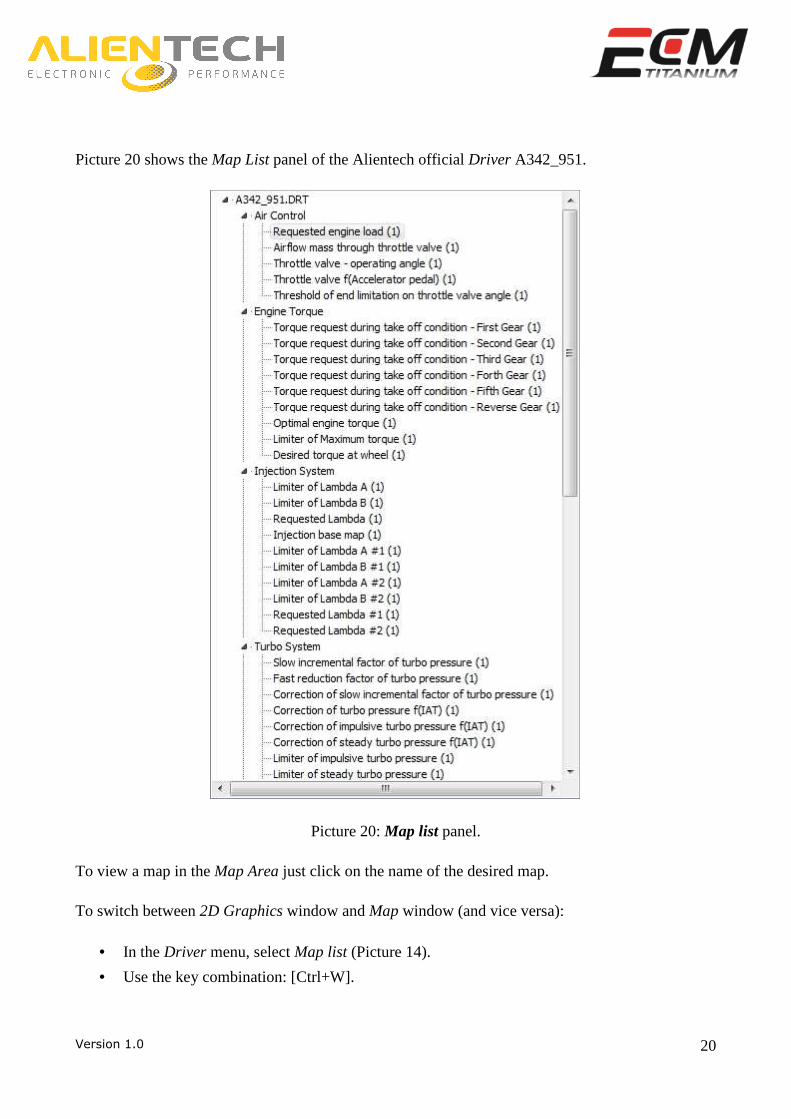
Picture 20 shows the Map List panel of
To view a map in the Map Area just click on the
To switch between 2D Graphics
• In the Driver menu, select
• Use the key combination:
panel of the Alientech official Driver A342_951
Picture 20: Map list panel.
just click on the name of the desired map.
window and Map window (and vice versa):
select Map list (Picture 14).
: [Ctrl+W].
20
A342_951.
Version 1.0
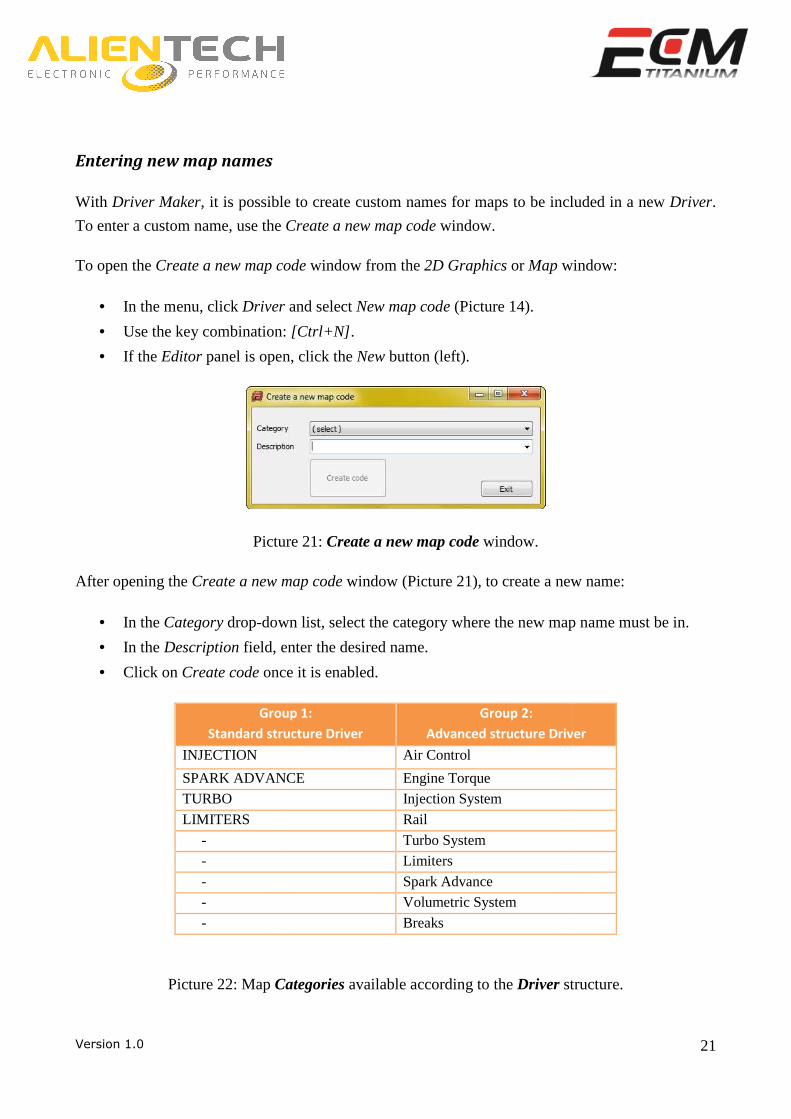
Entering new map names
With Driver Maker, it is possible to
To enter a custom name, use the Create a
To open the Create a new map code
• In the menu, click Driver
• Use the key combination:
• If the Editor panel is open,
Picture
After opening the Create a new map code
• In the Category drop-down list
• In the Description field, enter
• Click on Create code once it is enabled
Group
Standard structure Driver
INJECTION
SPARK ADVANCE
TURBO
LIMITERS
-
-
-
-
-
Picture 22: Map Cat
, it is possible to create custom names for maps to be included
Create a new map code window.
ode window from the 2D Graphics or Map window
and select New map code (Picture 14).
: [Ctrl+N] .
is open, click the New button (left).
Picture 21: Create a new map code window.
map code window (Picture 21), to create a new name:
down list, select the category where the new map name must be in.
enter the desired name.
once it is enabled.
oup 1:
Standard structure Driver
Group 2:
Advanced structure Driver
Air Control
SPARK ADVANCE Engine Torque
Injection System
Rail
Turbo System
Limiters
Spark Advance
Volumetric System
Breaks
Categories available according to the Driver structure
21
to be included in a new Driver.
window:
a new name:
map name must be in.
Advanced structure Driver
structure.
Version 1.0
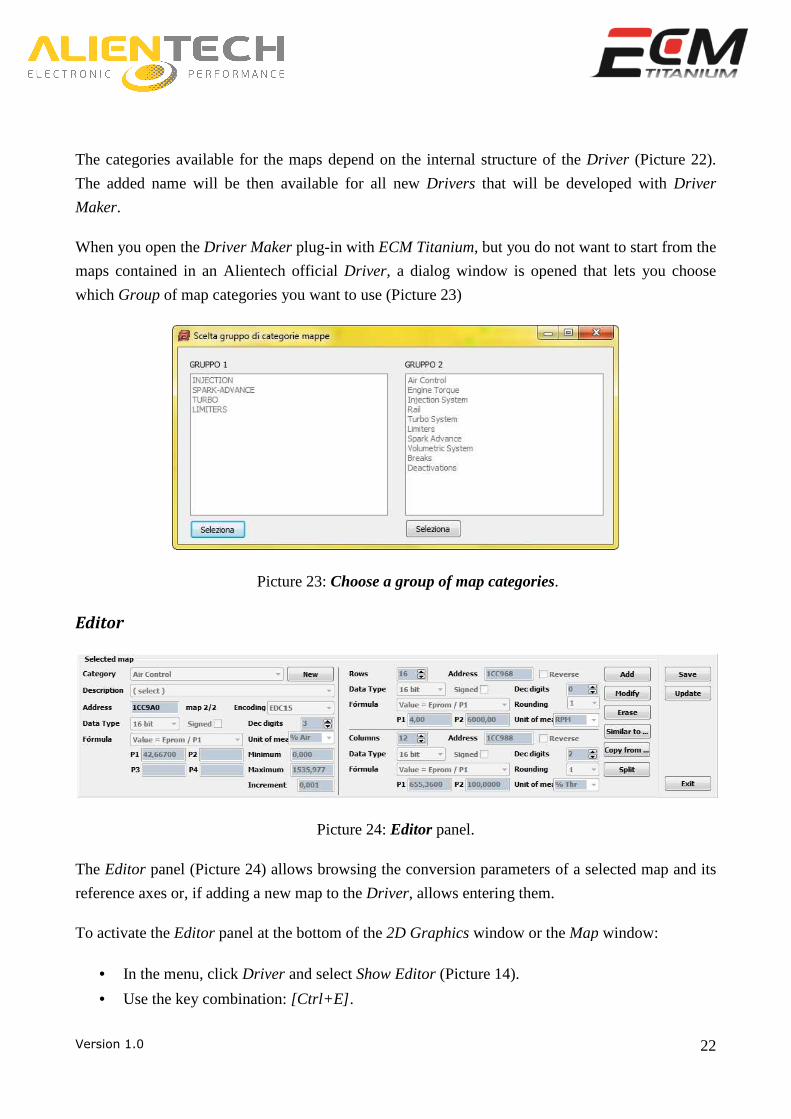
The categories available for the maps
The added name will be then available
Maker.
When you open the Driver Maker
maps contained in an Alientech
which Group of map categories you want to use
Picture
Editor
The Editor panel (Picture 24) allows browsing
reference axes or, if adding a new map
To activate the Editor panel at the bottom of
• In the menu, click Driver
• Use the key combination:
for the maps depend on the internal structure of the
available for all new Drivers that will be developed with
Maker plug-in with ECM Titanium, but you do not
official Driver, a dialog window is opened
you want to use (Picture 23)
Picture 23: Choose a group of map categories.
Picture 24: Editor panel.
allows browsing the conversion parameters of
a new map to the Driver, allows entering them.
at the bottom of the 2D Graphics window or the Map
and select Show Editor (Picture 14).
: [Ctrl+E] .
22
internal structure of the Driver (Picture 22).
developed with Driver
but you do not want to start from the
window is opened that lets you choose
a selected map and its
Map window:
Version 1.0
The conversion parameters and details
• Category: Category to which the selected map belongs
• New: To open the Create a new map code
name.
• Description: Name of the selected map
• Address: Hexadecimal address where the map be
• map Number/Number: N
compared to the total number
represents the second similar
• Encoding: Selection of a
16). The manual selection
• Data Type: Numeric format associated with
• Signed: To apply the signed
• Dec digits: Number of decimal digits
of the map.
• Formula: Conversion formula
• Unit of meas.: Unit of measurement
• P1, P2, P3 and P4: The four
the data of the map (Picture
• Minimum: Minimum value
take on, through a modification
• Maximum: Maximum value
can take on, through a modification
• Increment: Minimum increment value
applied to a data of the map
• Rows: Number of rows forming
• Address: Hexadecimal address where the vertical
• Reverse: To swap the byte order of th
• Data Type: Numeric format associated with the data of the vertical axis
• Signed: To apply the signed scale
vertical axis.
• Dec digits: Number of decimal digits
of the vertical axis.
and details of the selected map contained in the Edi
Category to which the selected map belongs (Picture 23).
Create a new map code window (Picture 21), and create a custom map
Name of the selected map.
Hexadecimal address where the map begins.
Number of the similar map currently displayed
to the total number of similar maps with the same name. In
similar map of a total of two similar maps that have the s
type of common data structure that some ECUs
selection is associated to a generic data structure.
Numeric format associated with the data of the map.
the signed scale to the numeric format associated with the
of decimal digits after the decimal point that are displayed
onversion formula applied to the data of the map.
easurement associated with the data of the map
The four parameters of the conversion rational formula
Picture 16).
Minimum value (converted with the selected Formula) that
modification made with ECM Titanium.
Maximum value (converted with the selected Formula) that a data of the map
through a modification made with ECM Titanium.
increment value (converted with the selected
map, through a modification made with ECM Titanium
Number of rows forming the map.
Hexadecimal address where the vertical reference axis begins.
To swap the byte order of the data forming the vertical axis.
: Numeric format associated with the data of the vertical axis
the signed scale to the numeric format associated with the
of decimal digits after the decimal point that are displayed
23
Editor panel are:
and create a custom map
currently displayed in the Map Area,
In Picture 24, map 2/2
have the same name.
some ECUs possess (Picture
associated with the data of the map.
that are displayed for each data
of the map.
rational formula associated with
that a data of the map can
that a data of the map
Formula) that can be
Titanium.
axis begins.
: Numeric format associated with the data of the vertical axis.
associated with the data of the
that are displayed for each data
Version 1.0
• Formula: Conversion formula
• Rounding: To round off the data of the vertical axis, converted with the selected
• P1, P2: The two parameter
the vertical axis.
• Unit of meas.: Unit of measurement
• Columns: Number of columns forming the map
• Address: Hexadecimal address where the horizon
• Reverse: To swap the byte order of the data forming the horizontal axis.
• Data Type: Numeric format associated with the data of the horizontal axis.
• Signed: To apply the signed scale
horizontal axis.
• Dec digits: Number of decimal digits
of the horizontal axis.
• Formula: Conversion formula
• Rounding: To round off the data of the hor
• P1, P2: The two parameters
the horizontal axis.
• Unit of meas.: Unit of measurement
• Add: To add the selected map to the list of the current
• Modify: To modify the selected map applying the parameters currently displayed.
• Erase: Erase the selected map from the map list of the current
• Similar to...: To add a map selected in the
included in the list of the current
• Copy from...: To copy the details of the
the list of the current Driver.
• Split: To turn a selection made in the 2D Graph
a single value (example: when
series of 10 consecutive selections
• Save: To save the custom
stored in ECM Titanium Database.
• Update: To update the map list of the
in the ECM Titanium program memory.
• Exit: To exit Driver Maker
onversion formula applied to the data of the vertical axis.
To round off the data of the vertical axis, converted with the selected
parameters of the conversion rational formula associated with the
Unit of measurement associated with the data of the vertical axis.
of columns forming the map.
: Hexadecimal address where the horizontal reference axis begins
: To swap the byte order of the data forming the horizontal axis.
: Numeric format associated with the data of the horizontal axis.
the signed scale to the numeric format associated with the
of decimal digits after the decimal point that are displayed
onversion formula applied to the data of the horizontal axis
: To round off the data of the horizontal axis, converted with the selected
parameters of the conversion rational formula associated with the
Unit of measurement associated with the data of the horizontal
d the selected map to the list of the current Driver.
To modify the selected map applying the parameters currently displayed.
Erase the selected map from the map list of the current Driver.
To add a map selected in the 2D Graphic Area as a similar
included in the list of the current Driver.
To copy the details of the conversion formulas from a map already included in
Driver.
To turn a selection made in the 2D Graphic Area into a series of selections formed by
example: when selecting a range of 10 values, Split turns this range into
consecutive selections formed by an interval of a single value
To save the custom Driver just developed with Driver Maker
ECM Titanium Database.
To update the map list of the Driver modified with Driver Maker
program memory.
Maker plug-in and return to ECM Titanium program.
24
To round off the data of the vertical axis, converted with the selected Formula.
associated with the data of
of the vertical axis.
axis begins.
: To swap the byte order of the data forming the horizontal axis.
: Numeric format associated with the data of the horizontal axis.
associated with the data of the
that are displayed for each data
axis.
izontal axis, converted with the selected Formula.
associated with the data of
horizontal axis.
To modify the selected map applying the parameters currently displayed.
similar map to one already
formulas from a map already included in
ic Area into a series of selections formed by
turns this range into a
a single value).
in the user Driver list
Driver Maker, currently loaded
program.

Version 1.0
Search window
The Driver Maker plug-in includes
other things, to automatically find
control units (EDC15, EDC16, E
By pressing the button, the Search
and selection to refine the test of
modified (MOD).
includes within a handy tool to search data, which allows
automatically find the maps that belong to a certain category
EDC17).
Picture 25: Search window.
Search window is opened, which contains several
test of data that belongs to the file loaded as
25
which allows you, among
category of Bosch engine
which contains several criteria of analysis
original (ORI) or as

Version 1.0
• Numeric values: By enabling the
entered in the white box next to the
• Values in a range: By enabling the
search is performed between
maximum in the box to:.
• Text String: By enabling the selection, the
to enter the text to search (characters, letters and
• Hex string: By enabling the selection, the white box
to enter the hexadecimal data to search (two digits at a time, separated by a space).
• ASCII Blocks: To search for all possible sequences of characters, letters, and punctuation
marks, starting from a minimum
Data option is useful for those files where the text has been entered
• Selected Block: To search for a section of file,
with the right mouse button, in the original or modified file
• BOSCH EDC15-EDC16 maps
(3 dimensions) objects, starting from a minimum of 8 up to a
• Data format: To choose the
values in a range searches are performed.
• Search in: To select the original (ORI) or modified (MOD)
• Center the address: To display each result
• Always on foreground: To keep the
• >> : To expand or reduce the
• Start: To start the search,
• Stop: To abort the ongoing se
• Exit: To close the Search
• Search Result: The box
Address and Description.
enabling the selection, it possible to search for the
next to the from: item.
y enabling the selection, also the second white box is activated and the
performed between the minimum value contained in the box
y enabling the selection, the white box below is activated, where it is possible
to enter the text to search (characters, letters and punctuation marks).
bling the selection, the white box below in activated, where it is possible
to enter the hexadecimal data to search (two digits at a time, separated by a space).
To search for all possible sequences of characters, letters, and punctuation
minimum number selectable in the min box. The
option is useful for those files where the text has been entered reversed
To search for a section of file, previously selected in the
with the right mouse button, in the original or modified file.
maps: To search for Curves Type (2 dimensions) and
(3 dimensions) objects, starting from a minimum of 8 up to a maximum
To choose the numeric format according to which the
searches are performed.
To select the original (ORI) or modified (MOD) file as object of the search.
: To display each result on the list in the middle of the
To keep the Search window always visible in the foreground.
reduce the Search window.
, according to the parameters previously selected
To abort the ongoing search.
window.
contains the list of search results. Each result
26
search for the numeric value
, also the second white box is activated and the
contained in the box from: and the
white box below is activated, where it is possible
in activated, where it is possible
to enter the hexadecimal data to search (two digits at a time, separated by a space).
To search for all possible sequences of characters, letters, and punctuation
box. The View the reversed
reversed.
selected in the 2D Graphic Area
(2 dimensions) and Tables Type
maximum of 32 as Sizes.
the Numeric Values and
as object of the search.
of the 2D Graphic Area.
window always visible in the foreground.
previously selected.
Each result is displayed by

Version 1.0
Section 4 – How to develop
To develop a User Driver with
hard disk of your PC or from the
ways to launch Driver Maker from the
• Click the icon (top left
• In the Instruments menu,
• Use the key combination:
If the original file is associated with an
following message (Picture 26) at the opening
Picture
By choosing Yes, it is possible to proceed
Driver, while by choosing No, it will be displayed
of Driver.
develop a new Driver
Driver Maker plug-in, first it is necessary to
from the Database with ECM Titanium, and then
from the main window of the software:
top left).
, select Custom Drivers.
: [Alt+D] .
If the original file is associated with an Alientech official Driver, the plug
at the opening.
Picture 26: Create a new map code message.
it is possible to proceed with the addition of new maps to
it will be displayed the message in the next figure to choose
27
is necessary to load a file from the
choose one of several
, the plug-in will display the
new maps to the Alientech official
t figure to choose the type
Version 1.0
Picture 27
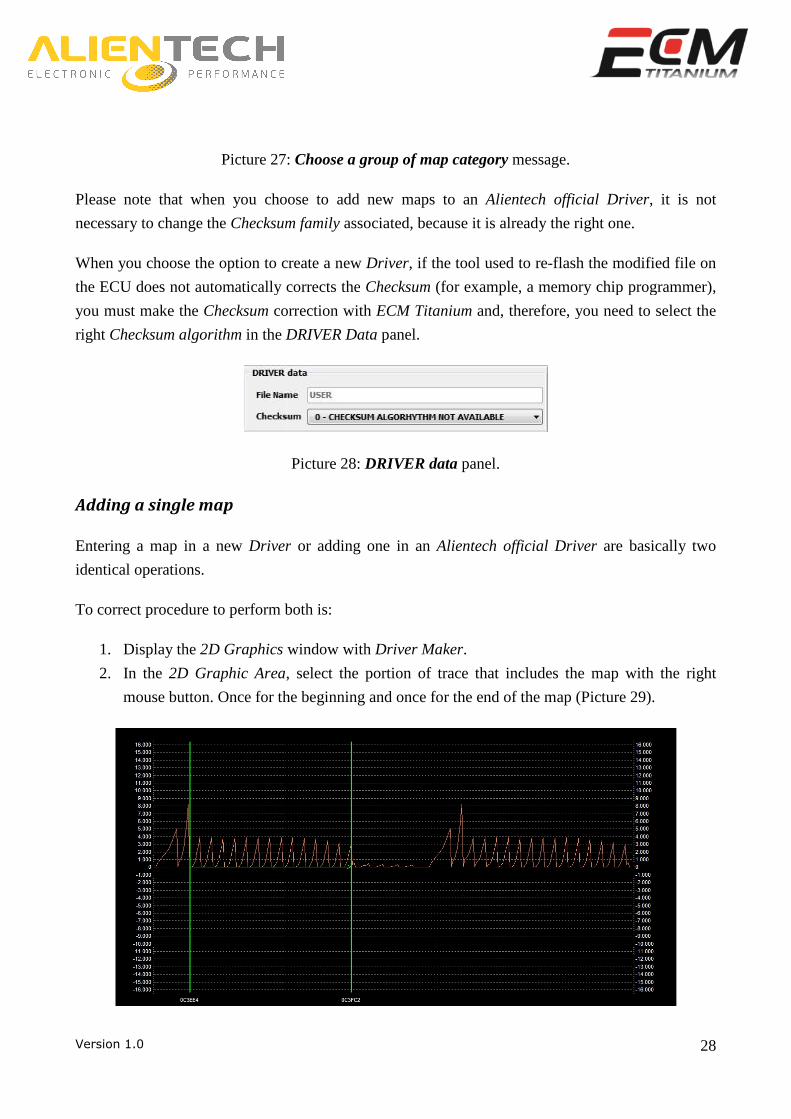
Please note that when you choose to add
necessary to change the Checksum
When you choose the option to create
the ECU does not automatically corrects the
you must make the Checksum correction with
right Checksum algorithm in the DRIVER
Adding a single map
Entering a map in a new Driver
identical operations.
To correct procedure to perform both is:
1. Display the 2D Graphics
2. In the 2D Graphic Area, select the portion of trace that includes the map with the right
mouse button. Once for the
27: Choose a group of map category message.
when you choose to add new maps to an Alientech official
Checksum family associated, because it is already the right one.
the option to create a new Driver, if the tool used to re-flash
automatically corrects the Checksum (for example, a memory chip programmer),
correction with ECM Titanium and, therefore, you need to
DRIVER Data panel.
Picture 28: DRIVER data panel.
Driver or adding one in an Alientech official Driver
To correct procedure to perform both is:
window with Driver Maker.
, select the portion of trace that includes the map with the right
mouse button. Once for the beginning and once for the end of the map
28
Alientech official Driver, it is not
the right one.
flash the modified file on
emory chip programmer),
therefore, you need to select the
ech official Driver are basically two
, select the portion of trace that includes the map with the right
(Picture 29).
Version 1.0
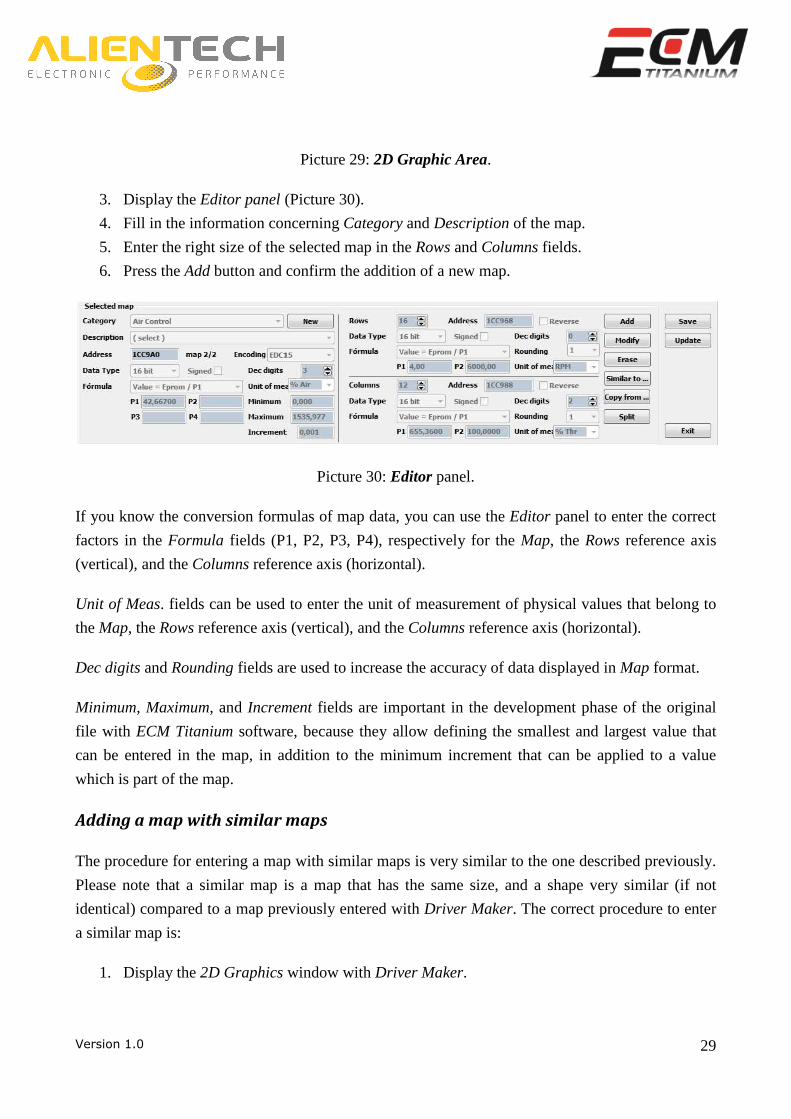
3. Display the Editor panel (
4. Fill in the information concerning
5. Enter the right size of the selected map in the
6. Press the Add button and confirm the addition
If you know the conversion formulas
factors in the Formula fields (P1
(vertical), and the Columns reference axis
Unit of Meas. fields can be used
the Map, the Rows reference axis
Dec digits and Rounding fields are used to
Minimum, Maximum, and Increment
file with ECM Titanium software, because they allow
can be entered in the map, in addition to the
which is part of the map.
Adding a map with similar maps
The procedure for entering a map
Please note that a similar map is a map
identical) compared to a map previously entered
a similar map is:
1. Display the 2D Graphics
Picture 29: 2D Graphic Area.
(Picture 30).
the information concerning Category and Description of the map.
Enter the right size of the selected map in the Rows and Columns fields
confirm the addition of a new map.
Picture 30: Editor panel.
formulas of map data, you can use the Editor panel
fields (P1, P2, P3, P4), respectively for the Map, the
reference axis (horizontal).
to enter the unit of measurement of physical
reference axis (vertical), and the Columns reference axis (horizontal).
are used to increase the accuracy of data displayed in
Increment fields are important in the development phase of the
software, because they allow defining the smallest and largest
in addition to the minimum increment that can be applied to
maps
map with similar maps is very similar to the one
is a map that has the same size, and a shape
previously entered with Driver Maker. The correct procedure
window with Driver Maker.
29
of the map.
fields.
panel to enter the correct
the Rows reference axis
physical values that belong to
(horizontal).
displayed in Map format.
development phase of the original
the smallest and largest value that
can be applied to a value
the one described previously.
a shape very similar (if not
The correct procedure to enter

Version 1.0
2. In the 2D Graphic Area, select the portion of trace that in
maps can be added with the right mouse button, by positioning the cursor at the beginning of
each similar map, in order to create a multiple selection as
7. Display the Editor panel (Picture 32).
8. Fill in the information concerning
9. Enter the right size of the selected map in the
3. Press the Add button and confirm the addition
The map 2/2 fields in Picture 32 shows
By pressing the Add button, in addition to the main map all the similar maps selected in the
procedure are added to the list of the
same properties are applied also to the values of the similar maps.
, select the portion of trace that includes the main map. All similar
added with the right mouse button, by positioning the cursor at the beginning of
each similar map, in order to create a multiple selection as in Picture 31.
Picture 31: 2D Graphic Area.
(Picture 32).
Fill in the information concerning Category and Description of the map.
Enter the right size of the selected map in the Rows and Columns fields.
confirm the addition of a new map.
Picture 32: Editor panel.
32 shows the input of two similar maps (main map and its similar)
button, in addition to the main map all the similar maps selected in the
list of the Driver. If all fields in the Editor panel have been filled, the
same properties are applied also to the values of the similar maps.
30
cludes the main map. All similar
added with the right mouse button, by positioning the cursor at the beginning of
31.
of the map.
fields.
main map and its similar).
button, in addition to the main map all the similar maps selected in the
panel have been filled, the
Version 1.0
Adding a similar map to a map previously entered
Adding a similar map to a map already on the list of the
1. Display the 2D Graphics
2. In the 2D Graphic Area, select the portion of trace that belongs
in Picture 33. If there is more than a similar map, add them all with the right mouse button,
by positioning the cursor at the beginning of each
3. Display the Editor panel (Picture 34).
4. Press the Similar to… button and choose
similar map previously selected in the
Adding a similar map to a map previously entered
to a map already on the list of the Driver is very easy.
window with Driver Maker.
, select the portion of trace that belongs only
in Picture 33. If there is more than a similar map, add them all with the right mouse button,
by positioning the cursor at the beginning of each similar map.
Picture 33: 2D Graphic Area.
(Picture 34).
button and choose in the list displayed the map to which associate the
similar map previously selected in the 2D Graphic Area.
Picture 34: Editor panel.
31
to the similar map, as
in Picture 33. If there is more than a similar map, add them all with the right mouse button,
the map to which associate the

Version 1.0
Section 5 – How to associate a
Alientech official Drivers contain an indication of the
modified with ECM Titanium. The correction formulas are called
identified by a number; for example, in Picture 35 the number is
If the tool used to re-flash the modified file on the
Checksum (for example, a memory chip programmer), you must
with ECM Titanium.
Even custom Drivers must then contain the number that refers to the
Titanium to apply the correction to the modified file
How to associate a Checksum family
contain an indication of the Checksum algorithm to use to validate a file
. The correction formulas are called Checksum family
a number; for example, in Picture 35 the number is 98.
Picture 35: Available maps panel.
flash the modified file on the ECU does not automatically corrects the
emory chip programmer), you must make the
must then contain the number that refers to the Checksum
to the modified file.
32
to use to validate a file
Checksum family, and are
automatically corrects the
make the Checksum correction
Checksum algorithm of ECM

Version 1.0
The DRIVER data panel (Picture
Titanium:
• File Name: Contains name and path of the
• Checksum: Contains the number of the formula associated with the loaded
To associate a Checksum algorithm
• Locate the DRIVER data
• Select the number of the desired
When saving the custom Driver, the
support file.
If no Driver was loaded with ECM Titanium
Maker, the number referred to the
you do not know which correct formula to associate, it is recommended to start from an
Alientech Driver, or contact your dealer.
Picture 36: DRIVER data panel.
Picture 36) contains the details of the Driver that was loaded
ontains name and path of the Driver file associated.
ontains the number of the formula associated with the loaded
algorithm, it is necessary to:
panel.
desired Checksum algorithm.
, the Checksum correction family will be associated with the new
ECM Titanium and you want to develop a new one with
, the number referred to the Checksum algorithm can be changed when saving. In this case, if
you do not know which correct formula to associate, it is recommended to start from an
ct your dealer.
33
that was loaded with ECM
ontains the number of the formula associated with the loaded Driver.
correction family will be associated with the new
a new one with Driver
can be changed when saving. In this case, if
you do not know which correct formula to associate, it is recommended to start from an official

Version 1.0
Section 6 – How to save a custom
To save a custom Diver in the ECM Titanium Database,
• In the Driver menu, select
• In the Editor panel, click
Picture
How to save a custom Driver
ECM Titanium Database, there are two options:
select Save (Picture 37).
the Save button (Picture 38).
Picture 37: Driver menu.
Picture 38: Editor panel.
39: Save Driver in the Database window.
34
there are two options:

Version 1.0
The Save Driver in the Database
new Driver, such as:
• Manufacturer: The vehicle manufacturer
• Model: The specific model of the vehicle
• Description: A short comment for the new
After specifying Manufacturer and
to click the Record button to
description.
It is always better to add, in the
custom Driver, to be able to easily distinguish
with an original stock file loaded with
After developing a new custom Driver
is possible to close the Driver Maker
base window (Picture 39) is used to enter the Identification data
The vehicle manufacturer.
model of the vehicle.
A short comment for the new Driver.
and Model of the car which the original file belongs
permanently save the new Driver, even
in the Description field, a short comment of the maps
easily distinguish it later, for example when you need to
oaded with ECM Titanium.
Driver and saving it in the Database of ECM Titanium
Driver Maker plug-in.
35
Identification data of the
belongs to, it is possible
, even without writing any
the maps included in the
when you need to associate it
ECM Titanium software, it

Version 1.0
Section 7 – How to load an original stock file with a User Driver
To load an original stock file with
necessary to use ECM Titanium software.
To load a file associating it with a
1. Load a new file from the hard disk of your PC or from
2. Open the Search for a Driver in DB
window of ECM Titanium
3. Stop the search for a Driver
automatically).
4. Enable the Only personal D
5. Then select Manufacturer
Search criteria (optional)
6. Press the Start search button.
The search may include more than one result
vehicle which Manufacturer and
Driver, it is helpful to read the short
saved the Driver with the Driver
Picture
For this reason it is very important to add
How to load an original stock file with a User Driver
with a User Driver developed using Driver Maker
software.
oad a file associating it with a User Driver, it is necessary to:
Load a new file from the hard disk of your PC or from ECM Titanium
Search for a Driver in DB window (Open button next to
Titanium).
Driver with the Abort search button (in case it is carried out
Only personal Drivers selection.
Manufacturer and Model for the vehicle to which the file loaded belongs in the
Search criteria (optional) panel.
button.
more than one result, if more than one User Drivers
and Model are entered as criteria for the search.
hort comment that was entered in the Description
Maker plug-in.
40: Save Driver in the Database window.
very important to add a short comment when saving a new
36
How to load an original stock file with a User Driver
Driver Maker plug-in, it is only
Database.
button next to Driver, in the main
button (in case it is carried out
to which the file loaded belongs in the
User Drivers was made for the
To find the right User
Description panel, when you
saving a new custom Driver.