Draftsight CAD Tutorial MAC - Mr. Alder · Draftsight CAD Tutorial MAC Author: Todd Alder Created...
8
1 CAD Tutorial Procedure: 1. Double click the DraftSight Icon on the Application bar at the bottom of your screen to open the program. An activations window will open, click “Activate later”. When the program loads your screen should now look like this: 2. To open the template file I. click on Finder. This will change the menu options at the top of the screen II. click GO < CONNECT TO SERVER it should bring up a Connect to Server Box. III. In the address bar enter this address = smb://10.253.40.17/CTE$/projects. Next, hit the + button. This will add the address to the list below and you will never have to type in the address again. When you are finished click Connect and it will take you to Mr. Alders folder on the school server. IV. Double click to open the file WMS TEMPLATE COPY.DWG. 3. With the Template file open, go to File / Save as and save a new copy to the desktop. Name the new file Your Name Patterns and click on the save button. 4. To get ready to start drawing we need to first click on the Properties tab. (See the big red “A” above.) This will open the properties window that we will use later. (This may already be set to the properties box.)
Transcript of Draftsight CAD Tutorial MAC - Mr. Alder · Draftsight CAD Tutorial MAC Author: Todd Alder Created...

1
CAD Tutorial
Procedure:
1. Double click the DraftSight Icon on the Application bar at the bottom of your screen to open the
program. An activations window will open, click “Activate later”. When the program loads your screen should
now look like this:
2. To open the template file
I. click on Finder. This will change the menu options at the top of the screen
II. click GO < CONNECT TO SERVER -‐ it should bring up a Connect to Server Box.
III. In the address bar enter this address = smb://10.253.40.17/CTE$/projects. Next, hit the + button. This will add the address to the list below and you will never have to type in the address again. When you are finished click Connect and it will take you to Mr. Alders folder on the school server.
IV. Double click to open the file WMS TEMPLATE COPY.DWG.
3. With the Template file open, go to File / Save as and save a new copy to the desktop. Name the new file Your Name Patterns and click on the save button.
4. To get ready to start drawing we need to first click on the Properties tab. (See the big red “A” above.) This will open the properties window that we will use later. (This may already be set to the properties box.)

2
5. We should now have a screen that looks like this:
6. There are a few things that we need to know when using the Draftsight workspace.
I. The Command Line will tell you what command you are in and give the needed instructions for
the next step of the command.
II. The Tool Bar is where we will find all of the tools we need to draw. To select a tool click on the
button. There are (2) tool bars, one on each side of your screen. Tool bar left, and tool bar right.
III. The Ribbon is where the normal computer operations will be found.
You can start a New drawing , Open, Save, or Print with these buttons.
IV. The Drafting Settings will allow us to only draw in straight lines, or snap to certain parts of our
line. We can also draw angled lines or see a grid behind our drawing. Make sure before starting
that the “Ortho” and the “Esnap” buttons are grey (it should say “Ortho on” in the command
window when you
click on it).

3
7. Before we start drawing lets change the text in our title block. To change text, double-‐click on the “Student
name”. Draftsight should bring up this box:
In the “Edit Note” box we have many options to adjust our text. All we need to do is change what the words say.
Make sure that your cursor is after “Student Name” and using your keyboard, delete each letter. Please type
your first and last name in this box so that you can get credit for this assignment.
Remember in drafting we use all capital letters so make sure your
“Caps Lock” key is on. When you have finished changing your text you
can close the box and save the text changes by clicking the green
checkmark in the bottom right hand side of the “Edit Note” box (See above).
8. Change the other areas of your Title Block from:
I. Drawing name à Patterns
II. Period # à (to your class period)
(If you do not remember how to change text see
step 8)
9. We are now ready to start drawing. For this assignment we
will be drawing two patterns that look like this:
We will start our patterns by drawing the outside lines of
the square. To do this we will use the LINE tool.
To draw a line click on the line button in your left toolbar: The line command wants two points, a starting point
and an end point. To create a line, click your mouse and move in the direction that you want the line to go. Once
you have moved the mouse, type “4 Enter” on the keyboard.
The line command automatically draws a line that is 4 inches
long. You can now move your mouse again and type “4
Enter”. The line command is a continuous command, which
means that you can keep drawing as many connected lines
as you need. When you are finished with your connected
lines hit “Esc” on your keyboard. Draw 4 lines inside of your
Title Block to make a square like this:
If you need to move your lines, see the Move command help
on the Bonus Commands page. You can also find the Delete command if you need to erase some lines.

4
10. To add the lines inside of the square we will use a command called OFFSET. The offset command allows us to
copy a line and paste it a certain distance away. Click on the offset button on your right toolbar:
Now we need to enter a copy distance. Type “.5 Enter”, this will give us (8) sections in our box. Click on the line
that you want to copy. Move your mouse in the direction it needs to copy, and click again.
Just like the line command the offset command is a continuous command and we can click and copy lines as long
as we need to. When you have copied all of the lines to make your first pattern hit “Esc”.
11. We will now make the second pattern by starting with
the outside square. Follow step 10 and make a second
box inside your Title Block.
12. To draw the angled lines in our second pattern we need
to turn off the “Ortho” button (it should be white now).
Start a new line by clicking on the Line button: Click on the top left corner of the square. Now click on the
bottom right corner and hit “Esc”. Repeat this procedure and draw a line from the bottom left corner and click
the top right. You should have a two lines that look like this:
5
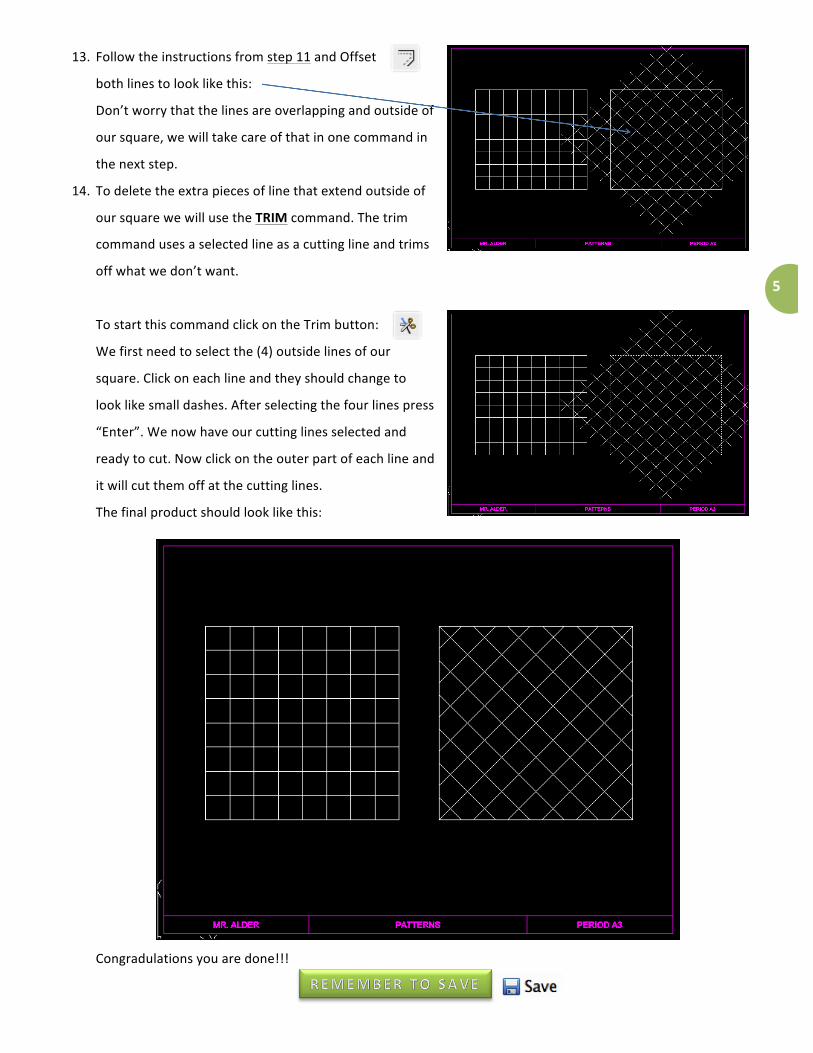
13. Follow the instructions from step 11 and Offset
both lines to look like this:
Don’t worry that the lines are overlapping and outside of
our square, we will take care of that in one command in
the next step.
14. To delete the extra pieces of line that extend outside of
our square we will use the TRIM command. The trim
command uses a selected line as a cutting line and trims
off what we don’t want.
To start this command click on the Trim button:
We first need to select the (4) outside lines of our
square. Click on each line and they should change to
look like small dashes. After selecting the four lines press
“Enter”. We now have our cutting lines selected and
ready to cut. Now click on the outer part of each line and
it will cut them off at the cutting lines.
The final product should look like this:
Congradulations you are done!!!


8
Bonus Commands Here are a few of commands that may be useful to you.
Move:
The move command will help relocate items on the paper. To use the move command click on the Move button located on the right toolbar. Draftsight now wants you to select the items that you would like to move. Click on a line (or multiple lines) that need to move and press Enter. The next thing that it will ask is for a position that you would like to grab things from. You can click anywhere on the screen but sometimes it is helpful to click on one of the grips associated with your line. Now that you have clicked a grab point, move your mouse to the desired location on the paper and click. You may need to turn off the Ortho button to move things in a diagonal pattern.
You can also use a quick method to move items, the difference is that it doesn’t allow you to use the grips associated with your lines. To use this method select all of the items that you want to move. Now click on one of the items selected and hold your mouse button down. With the mouse button down, move the cursor to the desired location and release the button.
Copy:
The copy command will allow us to create an exact replica of something and place it in a new location. To use the copy command click on the Copy button located on the right toolbar. It now wants you to select the item or items that you want to copy. Click on the items you would like to copy and press Enter. The next thing that it will ask is for a position that you would like to grab things from. You can click anywhere on the screen but sometimes it is helpful to click on one of the grips associated with your line. Now that you have clicked a grab point, move your mouse to the desired location on the paper and click. You may need to turn off the Ortho button to move things in a diagonal pattern.
Delete:
The easiest way to delete something in Draftsight is to click on the item or items that you need to erase and press the delete key on your keyboard.
Undo:
To Undo any mistake that you may have made press APPLE+Z. You can undo as many times as you need to.

9
Mirror:
The Mirror command will allow us to create an exact replica of something and duplicate it across a mirror line.