DRAFT PRE-PUBLICATION MATERIAL - · PDF fileknowledge related to the generation and...
49
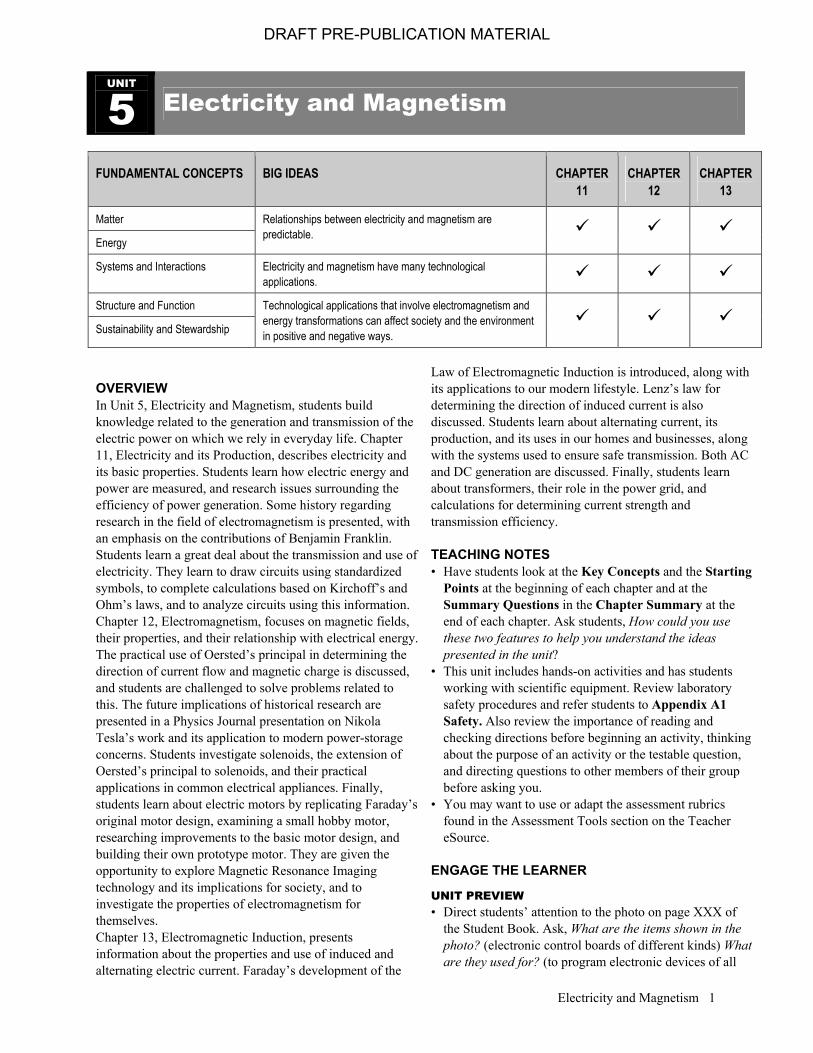
UNIT 5 Electricity and Magnetism FUNDAMENTAL CONCEPTS BIG IDEAS CHAPTER 11 CHAPTER 12 CHAPTER 13 Matter Energy Relationships between electricity and magnetism are predictable. Systems and Interactions Electricity and magnetism have many technological applications. Structure and Function Sustainability and Stewardship Technological applications that involve electromagnetism and energy transformations can affect society and the environment in positive and negative ways. OVERVIEW In Unit 5, Electricity and Magnetism, students build knowledge related to the generation and transmission of the electric power on which we rely in everyday life. Chapter 11, Electricity and its Production, describes electricity and its basic properties. Students learn how electric energy and power are measured, and research issues surrounding the efficiency of power generation. Some history regarding research in the field of electromagnetism is presented, with an emphasis on the contributions of Benjamin Franklin. Students learn a great deal about the transmission and use of electricity. They learn to draw circuits using standardized symbols, to complete calculations based on Kirchoff’s and Ohm’s laws, and to analyze circuits using this information. Chapter 12, Electromagnetism, focuses on magnetic fields, their properties, and their relationship with electrical energy. The practical use of Oersted’s principal in determining the direction of current flow and magnetic charge is discussed, and students are challenged to solve problems related to this. The future implications of historical research are presented in a Physics Journal presentation on Nikola Tesla’s work and its application to modern power-storage concerns. Students investigate solenoids, the extension of Oersted’s principal to solenoids, and their practical applications in common electrical appliances. Finally, students learn about electric motors by replicating Faraday’s original motor design, examining a small hobby motor, researching improvements to the basic motor design, and building their own prototype motor. They are given the opportunity to explore Magnetic Resonance Imaging technology and its implications for society, and to investigate the properties of electromagnetism for themselves. Chapter 13, Electromagnetic Induction, presents information about the properties and use of induced and alternating electric current. Faraday’s development of the Law of Electromagnetic Induction is introduced, along with its applications to our modern lifestyle. Lenz’s law for determining the direction of induced current is also discussed. Students learn about alternating current, its production, and its uses in our homes and businesses, along with the systems used to ensure safe transmission. Both AC and DC generation are discussed. Finally, students learn about transformers, their role in the power grid, and calculations for determining current strength and transmission efficiency. TEACHING NOTES • Have students look at the Key Concepts and the Starting Points at the beginning of each chapter and at the Summary Questions in the Chapter Summary at the end of each chapter. Ask students, How could you use these two features to help you understand the ideas presented in the unit? • This unit includes hands-on activities and has students working with scientific equipment. Review laboratory safety procedures and refer students to Appendix A1 Safety. Also review the importance of reading and checking directions before beginning an activity, thinking about the purpose of an activity or the testable question, and directing questions to other members of their group before asking you. • You may want to use or adapt the assessment rubrics found in the Assessment Tools section on the Teacher eSource. ENGAGE THE LEARNER UNIT PREVIEW • Direct students’ attention to the photo on page XXX of the Student Book. Ask, What are the items shown in the photo? (electronic control boards of different kinds) What are they used for? (to program electronic devices of all Electricity and Magnetism 1 DRAFT PRE-PUBLICATION MATERIAL
Transcript of DRAFT PRE-PUBLICATION MATERIAL - · PDF fileknowledge related to the generation and...
UNIT
5 Electricity and Magnetism
FUNDAMENTAL CONCEPTS BIG IDEAS CHAPTER 11
CHAPTER 12
CHAPTER 13
Matter
Energy
Relationships between electricity and magnetism are predictable.
Systems and Interactions Electricity and magnetism have many technological applications.
Structure and Function
Sustainability and Stewardship
Technological applications that involve electromagnetism and energy transformations can affect society and the environment in positive and negative ways.
OVERVIEW In Unit 5, Electricity and Magnetism, students build knowledge related to the generation and transmission of the electric power on which we rely in everyday life. Chapter 11, Electricity and its Production, describes electricity and its basic properties. Students learn how electric energy and power are measured, and research issues surrounding the efficiency of power generation. Some history regarding research in the field of electromagnetism is presented, with an emphasis on the contributions of Benjamin Franklin. Students learn a great deal about the transmission and use of electricity. They learn to draw circuits using standardized symbols, to complete calculations based on Kirchoff’s and Ohm’s laws, and to analyze circuits using this information. Chapter 12, Electromagnetism, focuses on magnetic fields, their properties, and their relationship with electrical energy. The practical use of Oersted’s principal in determining the direction of current flow and magnetic charge is discussed, and students are challenged to solve problems related to this. The future implications of historical research are presented in a Physics Journal presentation on Nikola Tesla’s work and its application to modern power-storage concerns. Students investigate solenoids, the extension of Oersted’s principal to solenoids, and their practical applications in common electrical appliances. Finally, students learn about electric motors by replicating Faraday’s original motor design, examining a small hobby motor, researching improvements to the basic motor design, and building their own prototype motor. They are given the opportunity to explore Magnetic Resonance Imaging technology and its implications for society, and to investigate the properties of electromagnetism for themselves. Chapter 13, Electromagnetic Induction, presents information about the properties and use of induced and alternating electric current. Faraday’s development of the
Law of Electromagnetic Induction is introduced, along with its applications to our modern lifestyle. Lenz’s law for determining the direction of induced current is also discussed. Students learn about alternating current, its production, and its uses in our homes and businesses, along with the systems used to ensure safe transmission. Both AC and DC generation are discussed. Finally, students learn about transformers, their role in the power grid, and calculations for determining current strength and transmission efficiency.
TEACHING NOTES • Have students look at the Key Concepts and the Starting
Points at the beginning of each chapter and at the Summary Questions in the Chapter Summary at the end of each chapter. Ask students, How could you use these two features to help you understand the ideas presented in the unit?
• This unit includes hands-on activities and has students working with scientific equipment. Review laboratory safety procedures and refer students to Appendix A1 Safety. Also review the importance of reading and checking directions before beginning an activity, thinking about the purpose of an activity or the testable question, and directing questions to other members of their group before asking you.
• You may want to use or adapt the assessment rubrics found in the Assessment Tools section on the Teacher eSource.
ENGAGE THE LEARNER
UNIT PREVIEW • Direct students’ attention to the photo on page XXX of
the Student Book. Ask, What are the items shown in the photo? (electronic control boards of different kinds) What are they used for? (to program electronic devices of all
Electricity and Magnetism 1
DRAFT PRE-PUBLICATION MATERIAL

kinds) What kinds of electronic devices do you use on a regular basis? (cell phones, computers, television sets, etc.) Lead a discussion regarding the changes in the tools we use in everyday life, and the implications of those changes. Emphasize that there are positive and negative factors to consider; for example, electronic devices require more power but use very little paper.
• Guide students in a discussion about the power grid. Ask, Where does the electricity in your home come from, and how does it get there? (power plant, transmission lines) Direct students to conduct research about power plants in your region.
• Have students read the Big Ideas on page XXX of the Student Book. Ask, Where do you normally see magnets in everyday life? (transportation security check points, retail check outs, bulletin boards) How do you think magnets are related to electricity?(they are used to produce electricity)
UNIT TASK PREVIEW • Formulate a plan for incorporating the Unit Task into the
whole learning experience for the unit. Whenever possible, highlight ideas that relate to or might be helpful in carrying out the Unit Task. Consider the following questions to help you decide how to manage the Unit Task: – Will students begin the Unit Task early in the unit or
toward the end of the unit? – Will students work on the Unit Task as individuals, in
pairs, or in small groups? – Will you set aside class time for students to work on the
task or will students be expected to complete it on their own time?
– How will the task fit into the overall assessment plan for the unit?
• Point out the Unit Task Bookmark found within some sections (The first Unit Task Bookmark appears in Chapter 11 on page XXX of the Student Book). Explain that these icons alert students to information or procedures that may be helpful in completing the task.
• The Unit Task involves building a model power plant. • For further support with the Unit Task, refer to pages xx–
xx of this resource.
FOCUS ON STSE • Have students preview the title and examine the
photograph on page XXX of the Student Book. Ask, Why do you think these items are piled up like this? (they are being thrown away) Ask, How many devices do you estimate have been thrown away to create this waste? (answers will vary) What kind of problems to you think this might cause? (filling landfills, chemical pollution, resource shortages) Have students research the amount of waste that results annually from the discarding of cell phones and other cordless devices.
• Have students read the article. Ask students to share their reactions to the information presented.
• Divide students into groups and have them answer the questions at the end of the article. Have each group summarize their reactions and responses and share this with the class.
ARE YOU READY? • You can use the questions in this feature as a quick
review of relevant concepts and skills and as a means of assessing student understanding of them. Several years may have elapsed since students last encountered some of these concepts or skills, so in many cases it will feel like a first time introduction for students. Use this feature as an instructional opportunity and do not assume students will know the answers.
• Use student responses to identify concepts and subject areas that students may need to review.
• Should weaknesses or needs be identified, you may want to set aside time for review before students begin to work on the unit. Alternatively, you might review the targeted concepts as they present themselves in the unit.
CAREER PATHWAYS PREVIEW • Formulate a plan for incorporating Career Pathways into
the whole learning experience for the unit. • Point out the Career Links found within some sections
(The first Career Link appears in Chapter 11 on p. XXX of the Student Book). Explain that these icons alert students to information or procedures that may be helpful in completing the Career Pathways assignment.
• For further support with Career Pathways, refer to pages xx-xx of this resource.
DIFFERENTIATED INSTRUCTION • Students should be encouraged to record information in
the format they find most useful; Visual learners should draw diagram, flowcharts and use other graphic organizers, Auditory learners may want to record notes to listen to later, Kinesthetic learners may want to build models of the concepts introduced.
ENGLISH LANGUAGE LEARNERS • Encourage English language learners to create a brief
“handbook” on electricity and magnetism that includes a page for each main concept. Pages could include labeled drawings, key terms and their definitions, and notes written in students’ native languages to help them clarify the concepts.
Electricity and Magnetism 2
DRAFT PRE-PUBLICATION MATERIAL

CHAPTER
11 Electricity and Its Production
PROGRAM RESOURCES BLM 11.6-1 Applying Kirchhoff’s Law BLM 11.8-1 Equivalent Resistance in Circuits BLM 11.9-1 Circuit Analysis for a Mixed Circuit BLM 11.Q Chapter 11 Quiz Physics 11 ExamView ® Test Bank Physics 11 Online Teacher’s Centre Physics 11 website,
www.nelson.com/onseniorscience/physics11u/
TEACHING NOTES • Draw students’ attention to the Chapter Opener photo.
Have them read the caption. Ask, How are nuclear materials used at the plant? (They provide energy to produce electricity.)
• Read the Key Question aloud, and then ask, How do the properties and movement of electricity relate to the Chapter Opener photograph? (Once electricity is produced at the power plant, it must be transported to other places. Its properties affect the transportation.)
• Have students write answers to the Starting Points questions. Save the answers for them to review later.
ENGAGE THE LEARNER
CHAPTER INTRODUCTION • Have students name electrical devices in their homes.
Point out that some devices must be plugged into an outlet, but others have batteries.
• Ask students about some of the devices they name. Have them compare the amount of electricity different devices use. Discuss the path of electrical wiring for an object. For example, if an overhead light is controlled by a switch on the other side of the room, students should realize that wires conduct electricity to the light from a source that lies beyond the switch.
• To preview the major ideas that will be explored in the chapter, review the Key Concepts. Ask a student volunteer to read each Key Concept aloud before it is discussed. Ask prompting questions to assess students’ prior knowledge and to engage students in the topics. Examples are given: 1. How is the flow of electrical energy in your home
similar to the flow of water through a pipe? (Sample answer: A break in a pipe or wire stops the flow, and both need a continual push to keep the flow going.)
2. What are some methods used for the production of electricity? (Sample answers: nuclear, fossil fuels, hydro, wind, solar) A major cause of low efficiency in the production of electricity is the production of
thermal energy instead of electrical energy. Based on this, which of these technologies do you think would have the lowest efficiency? Why? (Solar energy is least efficient because much of the sunlight is converted to thermal energy on and around the solar photovoltaic panel.)
3. Which atomic particle carries charges through a wire? (electron) Why do you think electrical energy moves more easily through metals than through some other materials, such as rubber? (Electrons can move more freely in metals.)
4. How do you think the terms “series” and “parallel” apply to circuits? (Devices are in a row in a series circuit. Devices are side-by-side in a parallel circuit.)
5. What does “resistance” in a wire mean? (Sample answer: Resistance refers to how difficult it is for the current to flow in the wire.)
6. What are some basic materials you could use to build a simple electrical circuit? What is the purpose of each of the materials? (Sample answer: A wire carries the current. A bulb uses the energy to emit light. A switch allows you to turn the circuit on and off. A battery provides energy to move the charges.)
• Have students complete Mini-Investigation: Building an LED Circuit.
MINI-INVESTIGATION: BUILDING AN LED CIRCUIT Skills: Performing, Observing, Analyzing Purpose: Students will build an LED circuit and observe the direction of the flow of electricity. Equipment and Materials (per group): 1 LED; 2 AA cells; 2 cell holders; approximately 6 alligator clip leads Student Safety • Caution students that the wire can become extremely hot if it is
connected to the battery terminals without the LED. Notes • Point out that an LED is different from an incandescent bulb,
which has a filament that becomes hot and emits light. An LED emits light as electrons move within the diode.
• Draw students’ attention to the LED. A longer leg indicates the anode (positive) side. A shorter leg indicates the cathode (negative) side. The LED will only work if the anode is connected to the positive side of the circuit and the cathode is connected to the negative side.
DIFFERENTIATED INSTRUCTION • Visual learners should draw a diagram depicting a
possible path of electrical wiring through their home or the classroom. Auditory learners should discuss their knowledge of electrical circuits and energy flow. Kinesthetic learners can use manipulatives.
ENGLISH LANGUAGE LEARNERS • As English language learners encounter vocabulary terms or unfamiliar terms, have them make an index card with a definition and sample sentence for each term.
Electricity and Its Production 1
DRAFT PRE-PUBLICATION MATERIAL

11.1 Electrical Energy and Power Plants
OVERALL EXPECTATIONS: A2; F1; F2
SPECIFIC EXPECTATIONS Career Exploration: A2.1 Relating Science to Technology, Society, and the
Environment: F1.1; F1.2 Developing Skills of Investigation and Communication:
F2.1, F2.6 The full Overall and Specific Expectations are listed on pages xx–xx.
VOCABULARY electrical power kilowatt-hour
SKILLS Researching Communicating
ASSESSMENT RESOURCES Assessment Rubric 1: Knowledge and Understanding Assessment Summary 1: Knowledge and Understanding
OTHER PROGRAM RESOURCES Skills Handbook 3. Scientific Inquiry Skills Physics 11 ExamView ® Test Bank Physics 11 Online Teacher’s Centre Physics 11 website
www.nelson.com/onseniorscience/physics11u
RELATED RESOURCES Schewe, Phillip. The Grid: A Journey Through the Heart of
Our Electrified World, Joseph Henry Press, 2006. Ball, Norman. The Canadian Niagara Power Company
Story, Boston Mills Press, 2006.
EVIDENCE OF LEARNING Look for evidence that students can • use correct units to calculate the rate at which electrical
energy is generated or transformed • identify various energy sources used to produce electrical
energy, and contrast these energy sources with regard to efficiency and impact on environment and society
• describe the effect that improved efficiency of power plants would have on the use of resources
SCIENCE BACKGROUND Methods of Generating Electricity
• All methods of electrical energy production have both advantages and disadvantages. Using nuclear fission does not cause air pollution or contribute to greenhouse gases, but the radioactive wastes produced are dangerous and difficult to store. Nuclear plants are also expensive.
• Fossil fuels are less expensive, but using them contributes to air pollution and climate change.
• Hydro-electric generation does not pollute the air or water, but finding suitable locations is difficult.
• Wind and sunlight are free, but finding a good location for wind farms is difficult, and solar power production is currently expensive and inefficient.
Energy Efficiency Labels • An Energy Star symbol is placed on many electrical
products to identify them as being energy efficient. A product must meet strict criteria in order to have the symbol. For example, in order for compact fluorescent lamps (CFLs) to carry the Energy Star symbol, they must fit in most electrical fixtures, use up to 75% less energy than comparable incandescent bulbs, and last five years or longer. They must also be efficient enough that the energy savings offsets their cost.
• EnerGuide labels are also placed on some appliances, homes, and products to indicate that they are energy-efficient. These labels list information such as amount of power the products can be expected to use each year, and help consumers make wise choices in purchasing.
POSSIBLE MISCONCEPTIONS Identify: Students might think that large electrical devices in the home are always more expensive to use than smaller electrical devices. Clarify: The power rating of an electrical device is a measure of how expensive that device is to use. For example, suppose the cost of electrical energy is $0.11/kW•h. The power rating of a refrigerator might be 1000 W, and the power rating of a hair dryer might be 1275 W. Per hour of use, then, the refrigerator costs $0.11, but the hair dryer costs $0.14. Ask What They Think Now: At the end of this discussion, ask, A clothes dryer and a washing machine are about the same size. Can you conclude that they use about the same amount of power? (No; amount of power use depends on the power rating of each device.)
TEACHING NOTES
ENGAGE • Demonstrate how a simple generator depends on the
spinning of a turbine to produce electrical energy. Explain that most power plants produce energy in a similar way, using different types of energy to spin the turbine. (You may also tell them that they will learn more about generators in Ch 13.)
Electricity and Its Production 2
DRAFT PRE-PUBLICATION MATERIAL

EXPLORE AND EXPLAIN • Review energy transformation by turning on various
electrical devices. Ask questions that encourage students to consider the type of transformation in each device. For example, after turning on a fan ask, What energy transformation occurs as the fan spins? (Electrical energy changes to kinetic energy, thermal energy, and sound energy.) How did electrical energy get to the lamp? (It was transferred through transmission lines from a power plant.)
• Write the equation for power on the board: P = ∆E/∆t. Remind students that the Greek symbol delta, ∆, indicates change in a quantity. The power equation can be stated Power is change in energy divided by change in time.
• Draw students’ attention to Tutorial 1: Using the Power Equation on page xxx of the Student Book.
• Work through Sample Problem 1 with the class. Point out the change in units from minutes to seconds. Stress the importance of including units in calculations to be sure all conversions are included.
• Remind students to use the correct number of significant digits in their calculations. In Sample Problem 1, because ∆E and ∆t have two significant digits, the answer also should have two significant digits. Point out that even though 60 s has one significant digit, that number started out as 1.0 min, which has two significant digits.
• Allow time for students to work through the practice problems. If they have difficulty, have them work with a partner, or perform the calculations on the board. They will need to convert minutes to seconds to solve the second problem.
• Point out the power ratings listed in Table 1. Encourage students to look at ratings on devices in their homes.
• After students read “Measuring Electrical Energy”, ask, Why do you think Canadians use so much more electrical energy than many other parts of the world? (Sample answer: People here use so many electrical devices.)
• Draw students’ attention to Tutorial 2: Calculating Energy on page xxx of the Student Book.
• Work aloud through Sample Problem 1. Emphasize that extra digits should be carried to avoid rounding errors. Only at the end should significant digit rules be applied.
• Point out the two methods used for solving Sample Problem 1. Ask, How might you decide which method to use when solving a problem? (Sample answer: Use the first method if you want the answer in joules. Use the second method if you want the answer in kilowatt-hours.)
• Allow time for students to work through the practice problems in class. Circulate throughout the classroom to make sure students use the correct procedure.
• Lead students in comparing the average efficiencies listed in Table 2. Ask, If solar power is so inefficient, why is it an attractive method of producing electrical energy?
(Sample answer: It is a renewable energy source that does not pollute the environment.)
• Have students complete Research This: Power Plant Efficiency.
RESEARCH THIS: POWER PLANT EFFICIENCY Skills: Researching, Communicating Purpose: Students will research the thermal efficiency of one type of electricity generation technology. Notes • Students can research the topic individually or with a partner. • Help students understand the difference between operational
efficiency and thermal efficiency. Use a simple example, such as riding a bicycle, as an example. Operational efficiency is reduced by having a broken chain or a flat tire. Thermal efficiency is reduced by friction between the tires and the ground.
• Students may discover that some of the topics apply to many methods of energy production. Provide an opportunity for students to present reports to the class and compare research.
EXTEND AND ASSESS • Review by reading each summary point aloud. Have
students name details that they learned about the concept. • Have students complete the Questions on page xxx of the
Student Book.
UNIT TASK BOOKMARK Remind students that what they have learned about the production and transfer of electrical energy in this section will be useful when they complete the Unit Task.
DIFFERENTIATED INSTRUCTION • Visual learners might find it helpful to create a bar graph
to compare the energy ratings listed in Table 1. Anchor charts should be posted to aid students with calculations. Auditory learners should be encouraged to work with a partner on calculations and discuss the process.
ENGLISH LANGUAGE LEARNERS • Allow English language learners to conduct their research
for the Research This using materials in their native language.
11.2 Explore an Issue in Generating Electricity
OVERALL EXPECTATIONS: A1; F1
SPECIFIC EXPECTATIONS Scientific Investigation Skills: A1.1; A1.3; A1.7; A1.8;
A1.9; A1.10; A1.11
Electricity and Its Production 3
DRAFT PRE-PUBLICATION MATERIAL

Relating Science to Technology, Society, and the Environment: F1.2
Developing Skills of Investigation and Communication: F2.1
The full Overall and Specific Expectations are listed on pages xx–x.
ASSESSMENT RESOURCES Assessment Rubric 1: Thinking and Investigation Assessment Rubric 2: Communication Assessment Summary 1: Thinking and Investigation Assessment Summary 2: Communication
PROGRAM RESOURCES Skills Handbook 3. Scientific Inquiry Skills Physics 11 ExamView ® Test Bank Physics 11 Online Teacher’s Centre Physics 11 website
www.nelson.com/onseniorscience/physics11u
RELATED RESOURCES Shively, Bob, and Ferrare, John. Understanding Today’s
Electricity Business, Enerdynamics LLC, 2010. Clean Coal Technology: Webster’s Timeline, Icon Group
International, Inc., 2009. Miller, Bruce G. Clean Coal Engineering Technology,
Butterworth-Heinemann, 2010.
EVIDENCE OF LEARNING Look for evidence that students can • explain clean coal technology, and identify some of its
benefits and drawbacks • describe various methods of alternative power generation • contrast the efficiency, financial costs, and community
impacts of clean coal technology and methods of alternative power generation
SCIENCE BACKGROUND • Over half of the energy generation in Canada occurs at
hydroelectric plants. Coal-fired plants and nuclear plants are the next largest producers.
• Carbon dioxide is necessary for life on Earth. Plants use carbon dioxide in photosynthesis to produce sugar with the release of oxygen. People depend on the oxygen released in this process. However, too much carbon dioxide in the atmosphere can be harmful. It is considered a greenhouse gas because, like a greenhouse, it traps the Sun’s energy in the form of infrared radiation. This process is necessary for warmth on Earth, but too much carbon dioxide can result in an increase in Earth’s temperature (global warming) and can significantly alter ecosystems and possibly threaten the existence of some life forms on Earth. One source of carbon dioxide in the
atmosphere is the burning of fossil fuels. Clean coal technology is a method developed to reduce the amount of carbon dioxide released by the burning of coal, a type of fossil fuel. Although clean coal technology reduces the amount of carbon dioxide released into the atmosphere, it does not improve the efficiency of burning coal for energy.
POSSIBLE MISCONCEPTIONS Identify: Students may think that clean coal technology literally refers to coal that is washed. They may believe that washing the coal means that the coal will not release harmful greenhouse gases when it is burned. Clarify: Emphasize to students that some forms of clean coal technology do refer to cleaning the emissions of coal before they are released to the atmosphere, or altering the chemical makeup of coal so that burning them releases less pollution. However, the major focus of clean coal technology is to capture and store the carbon dioxide that is released when coal is burned. Ask What They Think Now: At the end of the section, ask, What is cleaner about clean coal technology? (The emissions released when the coal is burned are cleaner.)
TEACHING NOTES
THE ISSUE • Have students read the issue. Guide them in summarizing
the issue in their own words. • Discuss the different roles with the class. Try to have each
role chosen by at least one student. • Point out that many people attending the town hall
meeting will not be familiar with clean coal technology or methods of alternative power generation. Students should include clear descriptions in their presentations.
GOAL • Lead students in discussing their preliminary ideas about
spending money to upgrade the coal-fired plant or use alternative methods of power generation.
RESEARCH • Have students research the pros and cons of clean coal
technology or alternative methods. Remind them to think about issues from the perspective of the role they chose.
• Caution students that this is a controversial issue. Some sources might present biased or untrue information. Remind them to check that their sources are reliable.
IDENTIFY SOLUTIONS • Suggest that students use a concept map to record ideas.
MAKE A DECISION • Have students review the information they found about
CSS technology and alternative methods of electricity generation before deciding on a solution.
Electricity and Its Production 4
DRAFT PRE-PUBLICATION MATERIAL
COMMUNICATE • Provide time for students to present their graphic
organizers to the entire class. • Arrange a place for students to post graphic organizers,
electronically or in the classroom. Make sure all students have a chance to discuss the graphic organizers.
PLAN FOR ACTION • Review the parts of an effective argument essay with
students. Reflections should include opinions and details about the issue. Students should state arguments in favour of their position and address opposing arguments.
DIFFERENTIATED INSTRUCTION Students could be encouraged to present their findings in a variety of formats. Kinesthetic learners may create a skit or video expressing their viewpoint(s). Visual students may develop a multimedia presentation or website about the class’s findings about the different types of clean coal technology. Auditory learners could produce a podcast and post it on the web for the class to listen to.
ENGLISH LANGUAGE LEARNERS • Make sure all students understand the differences between
the clean coal technologies discussed in the chapters. Have them search for applicable diagrams or photographs online that illustrate the processes involved.
11.3 Electric Potential Difference
OVERALL EXPECTATIONS: A1; A2; F2; F3
SPECIFIC EXPECTATIONS Scientific Investigation Skills: A1.5; A1.6; A1.8; A1.11 Career Exploration: A2.1 Developing Skills of Investigation and Communication:
F2.1; F2.6; Understanding Basic Concepts: F3.3 The full Overall and Specific Expectations are listed on pages xx–x.
VOCABULARY electric potential electric potential difference voltmeter
SKILLS Performing Observing
Analyzing Communicating
EQUIMENT AND MATERIALS per group: • a Newton’s cradle
ASSESSMENT RESOURCES Assessment Rubric 1: Knowledge and Understanding Assessment Summary 1: Knowledge and Understanding
OTHER PROGRAM RESOURCES Skills Handbook 3. Scientific Inquiry Skills Physics 11 ExamView ® Test Bank Physics 11 Online Teacher’s Centre Physics 11 website
www.nelson.com/onseniorscience/physics11u
EVIDENCE OF LEARNING Look for evidence that students can • explain how electric potential energy is transferred
through a transmission wire • solve problems using the equation for voltage • describe how a voltmeter is used to measure electric
potential difference in circuits
SCIENCE BACKGROUND • Voltages in transmission lines might be hundreds of
thousands of volts. Transmission at lower voltages would result in energy losses. Electrical substations are located near areas where the energy will be used. The electricity is transformed back to lower voltages at the substation. It is then transformed to even lower voltages before entering homes. Homes typically have electrical lines with voltages of 240 volts. Some larger appliances, such as stoves, use voltage of 220 to 240 volts. Smaller devices use lower voltages, between 110 and 120 volts. Chapter 13 covers the purpose and function of transformers in detail.
• A voltmeter measures the difference in electrical potential between two points in a circuit. Current flows through a circuit from an area of high potential to an area of low potential, so the reading on a voltmeter should always be positive. If the anode and cathode of a voltmeter are switched, the voltmeter will subtract the higher potential from the lower potential, so the reading will be negative.
TEACHING NOTES
ENGAGE • To model the electric potential energy in transmission
wires, have students hold two bar magnets apart with north poles directed toward each other; then have them slowly move the magnets together. Explain that the repulsive force indicates an increase in potential energy as the distance between the magnets decreases. If the magnets were released from this position at a high potential energy state, they would move back to their
Electricity and Its Production 5
DRAFT PRE-PUBLICATION MATERIAL
original locations at lower potential energy state. Electrons in a wire experience a similar effect.
EXPLORE AND EXPLAIN • After students read Electrical Energy Transfer, ask,
How does the distance between electrons affect electric potential energy? (It increases as distance decreases.)
• Have students complete Mini-Investigation: Modelling Electric Potential Energy.
MINI-INVESTIGATION: MODELLING ELECTRIC POTENTIAL ENERGY Skills: Performing, Observing, Analyzing, Communicating Purpose: Students will model energy transfer through a wire. Equipment and Materials (per group): a Newton’s cradle Notes • Demonstrate how to pull back and release the end sphere so that
it strikes the second sphere. • Emphasize that students should consider both movement of the
spheres and transfer of energy as they make observations. • In this model, potential energy is increased by increasing the
physical distance between spheres. However, electrical potential is determined by the charge difference between two points, not the physical distance.
• Write electric potential, electric potential energy, and electric potential difference on the board. Hold up a battery and ask, Which term describes the voltage of this battery? (electric potential difference)
• Point out the difference in the abbreviation V, which represents volts and is not italicized, and the variable V, which represents electric potential difference (or voltage) and is italicized. Students should realize that the units of measurement for voltage, V, are volts, V.
• Ask, What unit is equivalent to the volt? (joule per coulomb, or J/C)
• Draw students’ attention to Tutorial 1: Using the Electric Potential Difference Equation on page xxx of the Student Book.
• Students should be able to rearrange the equation for electric potential difference to solve for any of the variables if given the other two:
VEQ ∆
= and QVE =∆
Demonstrate this procedure using quantities in Sample Problem 1.
• Allow time for students to work through the practice problem in class.
• Draw students’ attention to Figure 3 and ask, How are the two circuits different? (The series circuit has the lamps connected along the same path. The parallel circuit has the lamps connected along different paths.)
• Point out how the voltmeters are attached to the circuit in Figure 4. In both cases, the voltmeter is attached in parallel. It is attached across the two terminals of the battery. It is attached to the separate wires of the lamp.
• Tell students that voltage can also be measured with a multimeter. Explain that a multimeter is a device that can measure other properties of a circuit as well as voltage. If students will be using a multimeter in class, demonstrate how it can be used to make voltage measurements.
EXTEND AND ASSESS • Set up a simple circuit to provide an opportunity for
students to apply the concepts and use the terminology presented in this section. For example, connect a voltmeter across a 1.5 V battery in a circuit and ask, What is the voltage? (1.5 V) Is it a voltage gain or a voltage drop? (a voltage gain) Is it a voltage gain across a source or across a load? (source) What is another way of describing voltage gain? (increase in electric potential)
• Have students complete the Questions on page xxx of the Student Book.
DIFFERENTIATED INSTRUCTION • Auditory learners should be encouraged discuss
calculation methods and steps with a partner. Visual learners and other students may find a flow chart aids in calculations as does having circuit symbols and formula posted around the classroom. Have kinaesthetic learners and other students build a circuit and use a voltmeter to reinforce the discussed topics.
ENGLISH LANGUAGE LEARNERS • Point out to students struggling with literacy that many of
the terms used in this unit are very similar to one another. Have them list key words in groups by similarity, underline the parts of each word that are different, and then write the definition of each word.
11.4 Physics Journal: Is Benjamin Franklin to Blame?
PROGRAM RESOURCES Skills Handbook 3. Scientific Inquiry Skills Physics 11 ExamView ® Test Bank Physics 11 Online Teacher’s Centre Physics 11 website,
www.nelson.com/onseniorscience/physics11u
RELATED RESOURCES Schiffer, Michael Brian. Draw the Lightning Down:
Benjamin Franklin and Electrical Technology in the Age of Enlightenment, University of California Press, 2006.
Electricity and Its Production 6
DRAFT PRE-PUBLICATION MATERIAL

TEACHING NOTES • Ask students to share any knowledge they have about Ben
Franklin. Write their responses on the board. • Ask, What questions do you have about Ben Franklin?
List responses on the board. • Have students read the abstract. Ask students to share
their responses to the paragraph. Ask, Did you learn anything from the abstract? What new questions do you have now? Which questions do you expect to be answered by the article?
• Have students read, “The Life of Ben Franklin.” Ask students what they think about Franklin’s education and experience. Ask, What do you think sparked his interest in science?
• After reading the rest of the section, ask students to share their thoughts about the passage.
• Ask, How does Ben Franklin’s story illustrate the process of scientific inquiry? (He made a hypothesis that was tested but later proven to be partially incorrect.)
• Ask, Is Ben Franklin considered a failure by scientists because he made a mistake? (No, his conclusion was reasonable and is still useful in many ways.)
• Have students complete the Questions on page xxx of the Student Book.
DIFFERENTIATED INSTRUCTION • As a multi modality activity have students work in groups
to produce a play, social networking site, graphic novel, monologue, or computer animation about the impact of Benjamin Franklin..
ENGLISH LANGUAGE LEARNERS • Have students work in pairs to re-enact the famous kite-
flying scene, while describing the event in scientific terms. Have ELL and other students write a brief letter explaining Franklin’s mistake to him.
11.5 Electric Current OVERALL EXPECTATIONS: A1; F2; F3
SPECIFIC EXPECTATIONS Scientific Investigation Skills: A1.5; A1.10 Developing Skills of Investigation and Communication:
F2.1; F2.3; F2.6 Understanding Basic Concepts: F3.3; F3.7 The full Overall and Specific Expectations are listed on pages xx–xx.
VOCABULARY direct current ammeter
SKILLS Performing Observing Analyzing
EQUIPMENT AND MATERIALS per group: • zinc strip • copper strip • ammeter with a milliamp scale • 6 or more alligator clip leads • LED • lemons
ASSESSMENT RESOURCES Assessment Rubric 1: Knowledge and Understanding Assessment Summary 1: Knowledge and Understanding
OTHER PROGRAM RESOURCES BLM 11.6-1 Applying Kirchhoff’s Law Skills Handbook 3. Scientific Inquiry Skills Physics 11 ExamView ® Test Bank Physics 11 Online Teacher’s Centre Physics 11 website
www.nelson.com/onseniorscience/physics11u
RELATED RESOURCES Fujitaki, Kazuhiro, et al., The Manga Guide to Electricity,
No Starch Press, 2009.
EVIDENCE OF LEARNING Look for evidence that students can • describe how a direct current is directed through a circuit • perform calculations using the current equation • explain how to measure current using an ammeter
SCIENCE BACKGROUND • Atoms consist of a nucleus (made up of protons and
neutrons) and electrons (moving as a cloud of charge around the nucleus). The outermost electrons of an atom are called valence electrons. In a metal, the valence electrons are not constrained to a single atom. Instead, they freely move among all of the metal’s atoms. These freely moving electrons are the reason that metals so easily carry electric charge.
• The direction of current can be described in two ways. Conventional current describes the direction of positive charge flow. In metals, however, positive charges (protons) are bound to atomic nuclei, and negatively charged electrons are the charge carriers. As a result, the
Electricity and Its Production 7
DRAFT PRE-PUBLICATION MATERIAL

direction of current is the direction of electron flow (from the negative terminal to the positive terminal).
TEACHING NOTES
ENGAGE • Pass around the room a strip of electrical wire that has
several centimetres of insulation stripped from its end. Ask, Why is metal used on the inside and rubber used on the outside of the wire? (Charge can flow easily through the metal but not through the rubber.)
• Point to the heading “Direct Current”. Ask, What do you think direct current means? (current that moves directly from one point to another) Some students may be familiar with direct current and alternating current. Explain that later they will read about alternating current, which is used in homes and businesses.
EXPLORE AND EXPLAIN • Have students study the picture of the wire in Figure 1.
Ask, Which type of charge is shown moving in the drawing? (negative charge; electrons) Why do positive charges not move? (They are bound to the nuclei of atoms.)
• Point out that the figure shows the direction of electron flow in a simple circuit. What is this direction? (from the negative terminal of an energy source such as a battery to the positive terminal)
• Write the equation for electric current on the board: I = Q/∆t. Ask, What do the variables in this equation represent? (I represents current, Q represents the amount of charge, and ∆t represents the time interval.)
• Have students rearrange the current equation to solve for amount of charge and for the time interval. Write the new versions of the equation on the board:
tIQ ∆= and IQt =∆
• Draw students’ attention to Tutorial 1: Using the Current Equation on page xxx of the Student Book.
• Caution students against inserting quantities into an equation without first checking units. In Sample Problem 1, students must convert seconds to minutes. Explain that they can do this before inserting the quantity into the equation, as shown in the problem. Alternatively, they can insert the original version of the quantity into the equation and then make the conversion, as shown below:
A 0057.0s 60
min 1min 5.2
C 85.0=×=
∆=
tQI
• Allow time for students to work through the practice problems in class. You may wish to provide these unit conversions: 103 mC = 1 C; 1 µA = 10–6A.
• Remind students that they learned in Section 11.3 about measuring voltage with a voltmeter. Have students compare Figure 3 in that section with Figure 4 in this section. Ask, How is the placement of the ammeter different from the placement of the voltmeter? (The
voltmeter is connected in parallel with the source and with the load. The ammeter is connected in series.)
• Have students complete Mini-Investigation: How Much Current Can a Lemon Produce?
MINI-INVESTIGATION: HOW MUCH CURRENT CAN A LEMON PRODUCE? Skills: Performing, Observing, Analyzing Purpose: Students will measure current through a lemon battery. Equipment and Materials (per group): zinc strip; copper strip; ammeter with a milliamp scale; 6 or more alligator clip leads; LED; lemons Notes • Have students work in pairs or small groups for this investigation. • You can purchase both zinc and copper strips at many hardware
stores. Alternatively, you can use a zinc nail and a copper penny. Canadian pennies dated 1996 or earlier can be used.
• The zinc is the negative cathode, which is the source of electrons in the lemon battery. The copper is the positive cathode, which accepts electrons in the current.
• If students performed the Mini-Investigation in the chapter opener, they should recall that current can only flow in one direction through an LED. Have them look closely at the LED. The side near the flat edge must be connected to the zinc strip.
EXTEND AND ASSESS • Place several simple circuits with different currents
around the classroom. Have students work in small groups to move from one circuit to the next and measure the current in each circuit. Rotate among the groups to ensure that each student has a chance to use the ammeter. Alternatively, you could have students use online simulations of circuits to measure current.
• Have students complete the Questions on page xxx of the Student Book.
DIFFERENTIATED INSTRUCTION • Kinaesthetic, visual and auditory learners can work
together to build a model of a direct current using small manipulatives or clay. Have them choose items to represent the wire (a tube or track), the nuclei, the electrons, and the ammeter. Kinaesthetic learners should build the model, as auditory learners describe the steps, and visual learners draw a diagram of the process.
ENGLISH LANGUAGE LEARNERS • Have students draw a diagram of the direct current
moving through a circuit, labelling the nuclei and electrons involved in the current.
11.6 Kirchhoff’s Laws OVERALL EXPECTATIONS: A2; F2; F3
Electricity and Its Production 8
DRAFT PRE-PUBLICATION MATERIAL
SPECIFIC EXPECTATIONS Career Exploration: A2.2 Developing Skills of Investigation and Communication:
F2.2; F2.6 Understanding Basic Concepts: F3.4 The full Overall and Specific Expectations are listed on pages xx–xx.
VOCABULARY Kirchhoff’s voltage law (KVL) Kirchhoff’s current law (KCL)
ASSESSMENT RESOURCES Assessment Rubric 1: Knowledge and Understanding Assessment Summary 1: Knowledge and Understanding
OTHER PROGRAM RESOURCES Skills Handbook 3. Scientific Inquiry Skills Physics 11 ExamView ® Test Bank Physics 11 Online Teacher’s Centre Physics 11 website
www.nelson.com/onseniorscience/physics11u
EVIDENCE OF LEARNING Look for evidence that students can • state Kirchhoff’s voltage law and Kirchhoff’s current law • use Kirchhoff’s laws to analyze mixed circuits with
various loads
SCIENCE BACKGROUND • Kirchhoff’s Current Law can be restated in terms of
conservation of electric charge: The amount of electric charge entering a junction is equal to the amount of electric charge exiting the junction.
• Current always is directed along the path of least resistance. If you touch a circuit and you are connected to a ground, you become the path of least resistance. At high voltages, a person can suffer serious injury from the dangerous amount of current that travels through the body.
• The symbol for a battery is drawn in different ways. The basic symbol is a long line alongside a short line. A + sign next to the long line indicates the positive terminal, and a – sign next to the short line indicates the negative terminal. One set of short and long lines refers to one cell. More than one set of long and short lines can refer to more than one cell. For example, if three batteries are in series, the battery symbol would be three sets of long and short lines. In practice, however, the battery symbol is often drawn as either one set of long and short lines or two sets of long and short lines, regardless of the number of cells that are at that location in the circuit.
TEACHING NOTES
ENGAGE • Connect a string of holiday lights in the classroom. Have
students observe whether the lights are connected in parallel or in series. Ask, Can you tell from the design whether the voltage and current are the same at all parts of the circuit? (The correct answer depends on the design. Students may believe that current and voltage are always the same.) Tell students that they will learn to analyze the voltage and current of circuits in this section.
EXPLORE AND EXPLAIN • After students read “Kirchhoff’s Voltage Law” and
“Kirchhoff’s Current Law”, ask, What do the subscripts mean in the Kirchhoff equations? (The subscripts identify different loads in a circuit.)
• Provide students with four index cards. On the front of one, have them write V1 + V2 + V3 + ···. On the back, have them write Vseries. Have them make up analogous cards for the other three equations of Kirchhoff’s laws. Have students use the cards as flash cards to learn how to analyze the voltage and current of mixed circuits.
• Students need to be very familiar with the symbols in Table 1 when analyzing circuits. Have students work with a partner to quiz each other about the symbols.
• Read aloud the first sentences under the headings “Series Circuits” and “Parallel Circuits”. Point out that calculations here have identical loads. The loads in Tutorial 1 vary.
• Draw students’ attention to Tutorial 1: Applying Kirchhoff’s Laws on page xxx of the Student Book.
• Have students read Case 1: Applying Kirchhoff’s Voltage Law to a Mixed Circuit.
• Stress the value of identifying different sections of a circuit. Tell students to write a voltage equation for each parallel path.
• Remind students that after they complete their voltage calculations, they should always check that the voltages are the same at each load in parallel.
• Have students read Case 2: Applying Kirchhoff’s Current Law to a Mixed Circuit.
• Students may incorrectly apply Kirchhoff’s Current Law and write Iseries = I1 = I2 = I3 for the circuit in Figure 6. Explain that the current at each load is only equal until the junction. Because there is a junction between lamp 2 and lamp 3, they cannot assume that I3 = I2.
• Point out the type of equations students can write for mixed circuits. They should write one for each set of loads in series and one equation for loads in parallel.
• Allow time for students to work through the practice problems in class. Because mixed circuit problems can be complicated, you may wish to have students work with a partner to solve the problems.
Electricity and Its Production 9
DRAFT PRE-PUBLICATION MATERIAL

EXTEND AND ASSESS • Distribute BLM 11.6-1 Applying Kirchhoff’s Laws, and
have students complete it. • Have students work with a partner to make up new
problems using the circuit diagrams in Tutorial 1. Students should assign different voltages or currents to the source and loads, and solve for unknown quantities.
• Have students complete the Questions on page xxx of the Student Book.
DIFFERENTIATED INSTRUCTION • Anchor charts should be provided for all calculations. • Have students work with partners to complete practice
problems and/or questions, pairing up students with different learning styles so they can share strategies and ideas.
ENGLISH LANGUAGE LEARNERS • Direct students to create flashcards for each of the circuit
symbols listed in Table 1 and for all four of Kirchoff’s equations. On the back of each card, have them write a description in their own words, and draw an example of an applicable circuit.
11.7 Electrical Resistance OVERALL EXPECTATIONS: A1; F2; F3
SPECIFIC EXPECTATIONS Scientific Investigation Skills: A1.5; A1.6; A1.8; A1.10 Developing Skills of Investigation and Communication:
F2.1; F2.2; F2.6 Understanding Basic Concepts: F3.4 The full Overall and Specific Expectations are listed on pages xx–xx.
VOCABULARY electrical resistance resistor Ohm’s law Ohmmeter
SKILLS Performing Observing Analyzing
EQUIPMENT AND MATERIALS per group: variable DC power supply ceramic resistors of different values 5-6 alligator leads
voltmeter ammeter
ASSESSMENT RESOURCES Assessment Rubric 1: Knowledge and Understanding Assessment Rubric 2: Thinking and Investigation Assessment Summary 1: Knowledge and Understanding Assessment Summary 2: Thinking and Investigation
OTHER PROGRAM RESOURCES Skills Handbook 3. Scientific Inquiry Skills Physics 11 ExamView ® Test Bank Physics 11 Online Teacher’s Centre Physics 11 website
www.nelson.com/onseniorscience/physics11u
RELATED RESOURCES Kybett, H. and Boysen, Earl, All New Electronics Self-
Teaching Guide, Wiley Publishing, Inc., 2008.
EVIDENCE OF LEARNING Look for evidence that students can • explain electrical resistance • apply Ohm’s law to calculate unknown resistance in a
circuit • identify some advantages and disadvantages of resistance
in a wire • describe how to use an ohmmeter to measure electrical
resistance
SCIENCE BACKGROUND • Colour bands are used to indicate the resistance of a
resistor. A gold or silver band separated from the other bands indicates percent tolerance. To determine the resistance, consider the bands starting from the side opposite this gold or silver band. For the first two bands, the colours refer to the following digits: black 0, brown 1, red 2, orange 3, yellow 4, green 5, blue 6, violet 7, gray 8, white 9. The third band is a multiplier. For this band, the colours refer to the following values: black × 100, brown × 101, red × 102, orange × 103, yellow × 104, green × 105, blue × 106, violet × 107, gray × 108, white × 109, gold × 10–1, silver × 10–2. The following are some sample resistor band colours (first three colours given only):
5.1 Ω: green, brown, gold 12 Ω: brown, red, black 20 Ω: red, black, black 360 Ω: orange, blue, brown 6800 kΩ: blue, gray, red • Resistors are rated according to the maximum power that
they can dissipate. Using the equation P = I2R (power equals the square of the current multiplied by the resistance), you can also determine the current rating for the resistor. Consider, for example, a resistor labelled 2 Ω
Electricity and Its Production 10
DRAFT PRE-PUBLICATION MATERIAL

10 W. The maximum power is 10 W. Using these values in the power equation gives a current of about 2.2 A. Using the equation for a 33 Ω resistor with a 1/2 W rating gives a current of about 0.12 A.
POSSIBLE MISCONCEPTIONS Identify: Students might incorrectly interpret the meanings of an ohmmeter reading of 0 or infinity. Clarify: A reading of 0 on an ohmmeter means zero resistance. Current can freely flow across the measured area. If an ohmmeter placed across a load indicates a resistance of 0, it could mean that the load has a short circuit. A reading of infinity on an ohmmeter means infinite resistance. Current cannot flow across the measured area. One reason this might occur is if a lamp or other load is broken. Ask What They Think Now: At the end of this discussion, ask, If you obtain a 0 reading on an ohmmeter, does that mean current cannot flow in the circuit? Explain. (No. A 0 reading indicates no resistance. Current can flow freely. It might indicate a short circuit.)
TEACHING NOTES
ENGAGE • Have students look back at Figure 1 on page xxx. Ask,
How do you think the thickness of the wire might affect the ability of charge to move through it? (Sample answer: Charge might move more easily through a thick wire than a thin wire.) How do you think the type of material could affect the charge? (Sample answer: The atoms of some materials might exert a greater electrical attraction or repulsion on the charge.) Tell students that they will learn in this section about the resistance to the flow of charges in a circuit.
EXPLORE AND EXPLAIN • Read aloud the definitions for electrical resistance and
resistor. Explain that the term resistor is used in two ways. Sometimes it refers to a specially designed material (such as a metal filament) with relatively high electrical resistance. Other times the term is used to refer to a specific device placed in a circuit.
• Have students complete Mini-Investigation: Determining Unknown Resistance.
MINI-INVESTIGATION: DETERMINING UNKNOWN RESISTANCE Skills: Performing, Observing, Analyzing Purpose: Students will determine unknown resistance in a circuit. Equipment and Materials (per group): variable DC power supply; ceramic resistors of different values; 5-6 alligator leads; voltmeter; ammeter Student Safety: Caution students that the resistor can become very hot when the power supply is turned on. Notes • Have students work in small groups for this investigation.
• If resistors are labelled, place a piece of electrical tape over the label to hide the answer.
• Review with students how to use the power supply. Remind them to turn the power supply to its lowest setting before turning it on.
• Resistors of 5 ohms will produce 0.4 A of current with 2V on the power supply. Use this as a guide to tell students how high to go with the power supply.
• Suggest that students produce a data table to record the values they measure for voltage and current.
• Remind students that the best-fit line should go through as many points of the graph as possible. The slope of the line is the rise (difference in y-axis values) divided by the run (difference in x-axis values) of any two points on the best-fit line.
• If time allows, have groups calculate the resistance of more than one resistor to give them more experience.
• Relate Ohm’s law to the results students obtained in the
Mini-Investigation. Have students use Ohm’s law to calculate the resistance for each of the five voltage and current measurements they recorded. Ask, How do your calculations compare to the resistance you obtained from the best-fit line? (Answers will vary.)
• Draw students’ attention to Tutorial 1: Using Ohm’s Law on page xxx of the Student Book. Point out that the unit milliamperes is changed to amperes in the Sample Problem 1. Emphasize to students that Ohm’s law only holds if the units are ohms for resistance, volts for voltage, and amperes for current.
• Allow time for students to work through the practice problems in class.
• Ask, How is resistance important in an incandescent lamp? (The resistance in the thin filament causes some electrical energy to change to light energy.)
• What is a disadvantage of resistance in transmission wires? (Resistance changes electrical energy to wasted thermal energy.)
• Ask, Should you place an ohmmeter in parallel or in series to measure resistance in a circuit? (in parallel)
• Caution students against connecting an ohmmeter to a complete circuit. Ask, What should you do to a circuit before connecting an ohmmeter? (Disconnect the power source.) Explain that an ohmmeter measures resistance based on its internal voltage. Having the circuit’s power source connected would cause an incorrect reading by the ohmmeter and could damage the ohmmeter.
EXTEND AND ASSESS • Ask, What would be the reading on an ohmmeter for a
voltage of one volt and a current of one ampere? (1 Ω) • Have students complete the Questions on page xxx of the
Student Book.
D• Auditory learners should work with partners to talk through the steps of the calculations. Visual learners may draw a flow chart to aid them in their calculations.
IFFERENTIATED INSTRUCTION
Electricity and Its Production 11
DRAFT PRE-PUBLICATION MATERIAL

Kinaesthetic learners may find working on different calculations and concepts at different stations in the classroom aids in their ability to focus.
ENGLISH LANGUAGE LEARNERS • Draw students’ attention to the Learning Tip for
remembering Ohm’s law. Suggest that they create similar learning tips for other formulas and/or vocabulary that they find challenging.
11.8 Resistors in Circuits OVERALL EXPECTATIONS: F2
SPECIFIC EXPECTATIONS Developing Skills of Investigation and Communication:
F2.1; F2.2; F2.8 The full Overall and Specific Expectations are listed on pages xx–xx.
VOCABULARY equivalent resistance
ASSESSMENT RESOURCES Assessment Rubric 1: Knowledge and Understanding Assessment Rubric 2: Thinking and Investigation Assessment Summary 1: Knowledge and Understanding Assessment Summary 2: Thinking and Investigation
OTHER PROGRAM RESOURCES BLM 11.8-1 Equivalent Resistance in Circuits Skills Handbook 3. Scientific Inquiry Skills Physics 11 ExamView ® Test Bank Physics 11 Online Teacher’s Centre Physics 11 website
www.nelson.com/onseniorscience/physics11u
EVIDENCE OF LEARNING Look for evidence that students can • explain how connecting resistors in series or in parallel
affects the total resistance and the current in a circuit • write the equation for a single equivalent resistor for a
group of resistors connected in series and for a group of resistors connected in parallel
• apply the equations for a single equivalent resistor in analyzing a mixed circuit
SCIENCE BACKGROUND • Two resistors in series can be used to reduce the voltage
in a circuit if the battery provides a voltage that is too high. In this case, the circuit is called a voltage divider. The current across both resistors in series is the same:
Iseries = I1 = I2. The different resistances, however, means the voltage is different. By choosing specific resistances, you can obtain the voltage you need across one of the resistors.
• Resistors in parallel result in separate paths for the current. If the strengths of the resistors are different, then the current along the paths will be different.
• Placing devices in parallel in a circuit is convenient because it means disconnecting one will not cause the current to stop flowing to the others. However, adding additional devices in parallel to a circuit can be dangerous. Each device draws current from the source. If too many devices are added, the current can become dangerously high because each additional device lowers the resistance.
POSSIBLE MISCONCEPTIONS Identify: Students might think that if resistors are added in parallel, then the voltage along each path will be lower because it is divided among multiple paths. Clarify: If resistors are added in parallel, then the voltage along each path is the same before and after the junction. Voltage drops across a load, not across a junction. Ask What They Think Now: At the end of this discussion, ask, What happens to the voltage in a circuit if you add more parallel paths? (The overall voltage drop does not change.)
TEACHING NOTES
ENGAGE • Have students quickly look through the section at all the
complicated circuits. Explain that they will learn two equations that make analyzing the circuits much easier.
EXPLORE AND EXPLAIN • Work the derivations of the equations for equivalent
resistance in a series circuit (on page xxx) and a parallel circuit (on page xxx) on the board. Ask students to explain each step as you write it. Guide students in understanding that you start with Kirchhoff’s law (KVL for a series circuit and KCL for a parallel circuit) and then substitute with Ohm’s law.
• Have students compare the two circuits in Figure 1. Point out that one resistor, Rseries, could replace the three resistors, R1, R2, and R3. Ask, How could you determine what the resistance of Rseries should be? (It should be the sum of the other three resistors.)
• Draw students’ attention to Tutorial 1: Equivalent resistance in a Series Circuit on page xxx of the Student Book.
• Remind students that when they add quantities, as in Sample Problem 1, the answer should have the same number of decimal places as the quantity they add that has the fewest number of decimal places.
Electricity and Its Production 12
DRAFT PRE-PUBLICATION MATERIAL

• Allow time for students to work through the practice problems in class. Check that students’ answers have the correct number of decimal places.
• Have students study the circuits in Figure 2. Ask, Can the three resistors in the top circuit be replaced by a single resistor? (Yes) How could you determine the resistance of the single resistor? (Find the sum of the reciprocals of the three resistors; then take the reciprocal of the sum.)
• Read aloud the last sentence in “Connecting Resistors in Parallel”. Students may be surprised that an equivalent resistor can be less than existing resistors in a circuit. Explain that each path of a parallel circuit adds to the amount of current in the entire circuit. This is equivalent to decreasing the overall resistance of the circuit.
• Draw students’ attention to Tutorial 2: Equivalent Resistance in a Parallel Circuit on page xxx of the Student Book.
• Review with students how to find the least common denominator of fractions. First, identify which denominator is greatest. In Sample Problem 1, this is 15 Ω. Next, list multiples of that number until you identify one that is also a multiple of the other denominators. In this case, 60 Ω is the least multiple of 15 Ω that is also a multiple of 12 Ω and 10 Ω. It is the least common multiple.
• Direct students to choose a partner, and have them work together to solve the practice problems in class. Rotate among the groups to make sure everyone understands how to find the least common denominator and apply the equation for equivalent resistance in a parallel circuit.
• Draw students’ attention to Tutorial 3: Equivalent Resistance in a Mixed Circuit on page xxx of the Student Book.
• Work through the steps of Sample Problem 1 aloud with students. In Step 2, caution students against thinking that they can simply add the resistance of R1 and R2 because they are in series. Point out that the junction to the parallel circuit between these resistors means they must first find the equivalent resistor for the parallel part of the circuit.
• Have students work with a partner to solve the practice problems in class. Because solving mixed circuit problems can be complicated, allow plenty of time for students to work on the problems and ask questions.
EXTEND AND ASSESS • Distribute BLM 11.8-1 Equivalent Resistance in Circuits,
and have students complete it. • Divide the class into pairs of students. Have each pair
draw a circuit with at least two resistors in parallel and two resistors in series. Then have them find the equivalent resistance assuming each individual resistance is 6.0 Ω.
• Have students complete the Questions on page xxx of the Student Book.
DIFFERENTIATED INSTRUCTION • As a multimodal activity students should be divided into
groups to review the concepts introduced. Auditory learners could explain to others their understanding of the concepts, visual learners could create flowcharts and graphic organizers to share with others, kinaesthetic learners could build circuits to illustrate the concepts to their peers. .
• Many students will benefit from redrawing mixed circuits, as it will help them identify the parallel branches.
ENGLISH LANGUAGE LEARNERS • Have students complete a concept map or organized list
that includes all the terms and equations highlighted in the chapter. Have them explain the relationships between them.
11.9 Circuit Analysis OVERALL EXPECTATIONS: F2; F3
SPECIFIC EXPECTATIONS Developing Skills of Investigation and Communication:
F2.2; F2.6 Understanding Basic Concepts: F3.4 Tp
he full Overall and Specific Expectations are listed on ages xx–xx.
ASSESSMENT RESOURCES Assessment Rubric 1: Thinking and Investigation Assessment Summary 1: Thinking and Investigation
OTHER PROGRAM RESOURCES BLM 11.9-1 Circuit Analysis for a Mixed Circuit Skills Handbook 3. Scientific Inquiry Skills Physics 11 ExamView ® Test Bank Physics 11 Online Teacher’s Centre Physics 11 website
www.nelson.com/onseniorscience/physics11u
RELATED RESOURCES Floyd, Thomas L., Electronics Fundamentals, Devices and
Applications, Prentice Hall, 2006.
EVIDENCE OF LEARNING Look for evidence that students can • recognize common types of circuit analysis problems • use a combination of equivalent resistance, Kirchhoff’s
laws, and Ohm’s law to analyze mixed circuits
Electricity and Its Production 13
DRAFT PRE-PUBLICATION MATERIAL

SCIENCE BACKGROUND • The increasingly small and complex design of circuits has
greatly changed the way circuits are designed and constructed. Sophisticated computer programs are used to design circuits and print schematics. After they are designed, they can be virtually tested by inputting values for the many components to determine how the system will work. For tiny, complicated circuits, circuit boards with conductive traces imprinted on them are used.
TEACHING NOTES
ENGAGE • Have students skim sections 1 through 8 of this chapter.
Point out that they have learned many skills for analyzing circuits. Explain that they will now learn to combine those skills to analyze more complicated circuits.
• Ask student volunteers to write Ohm’s law and the equations for Vseries, Vparallel, Iseries, and Iparallel on the board. Have other students read aloud Kirchhoff’s voltage law and Kirchhoff’s current law. Tell students that these are the tools they have learned to use for analyzing circuits.
EXPLORE AND EXPLAIN • Draw students’ attention to Tutorial 1: Circuit Analysis
for a Mixed Circuit on page xxx of the Student Book. • Point out in Sample Problem 1 how extra digits are
carried until the answer is written. Explain that this is important for avoiding rounding errors.
• Direct students to read Case 1: Resistance Values are Given.
• Ask, After completing a mixed circuit problem, what should you do to check your results? (Make sure your results obey Kirchhoff’s voltage law and Kirchhoff’s current law.) Review with students the caption and diagrams in Figure 3 which explains how this is done.
• Direct students to read Case 2: Only Some Resistance Values are Given.
• Ask, How is Sample Problem 2 different from Sample Problem 1? (In Sample Problem 1, you are given all resistance values and a source voltage. Various values are missing in Sample Problem 2.) What is the first step in solving a problem like this? (Apply KVL to each complete pathway.)
• Have students work with a partner to solve the practice problems. Because of the complicated analysis required, allow plenty of time for students to work on the problems.
EXTEND AND ASSESS • Distribute BLM 11.9-1 Circuit Analysis for a Mixed
Circuit, and have students complete it. • Point out that the review for problems in Tutorial 1 states
that a reference point of 0 V was chosen. Explain that, for simplicity, the voltage across a particular point is often given in reference to “ground potential” because the ground essentially has no electrical potential. In such a
case, the potential between the two points is equal to the voltage across the first point. Ask, What would change if a reference point of 6V were chosen? (All voltages in the diagrams would increase by 6 V.)
• Have students complete the Questions on page xxx of the Student Book.
DIFFERENTIATED INSTRUCTION • Auditory learners should be encouraged to work with
other students and discuss their problem solving strategies. Visual learners should make sure to employ graphic organizers created in earlier sections. Kinaesthetic learners may benefit from the use of manipulatives. Student could be encouraged to work in small groups to take a multimodal approach to problem solving, so they can learn from each others strengths.
ENGLISH LANGUAGE LEARNERS • Have students create a list of units and their abbreviations
to which they can refer when completing problems. Help them correlate their lists with specific equations and vocabulary.
11 Investigation
11.8.1 Observational Study: Analyzing Circuits OVERALL EXPECTATIONS: A1; F2; F3
SPECIFIC EXPECTATIONS Scientific Investigation Skills: A1.1; A1.4; A1.5; A1.6.
A1.8; A1.10; A1.12 Developing Skills of Investigation and Communication:
F2.3 Understanding Basic Concepts: F3.4 The full Overall and Specific Expectations are listed on pages xx–xx.
SKILLS Planning Analyzing Performing Evaluating Observing Communicating
EQUIPMENT AND MATERIALS per group: • DC power supply or battery • 4 loads (preferably 4 different ceramic resistors ranging from 5 Ω to 20 Ω) • switch • voltmeter
Electricity and Its Production 14
DRAFT PRE-PUBLICATION MATERIAL

• ammeter • 8 to 10 leads
ASSESSMENT RESOURCES Assessment Rubric 1: Application Assessment Summary 1: Application
PROGRAM RESOURCES Skills Handbook 3. Scientific Inquiry Skills Physics 11 ExamView ® Test Bank Physics 11 Online Teacher’s Centre Physics 11 website
www.nelson.com/onseniorscience/physics11u
RELATED RESOURCES Dorf, Richard C. and Svobada, James. Introduction to
Electric Circuits, Wiley Publishing, Inc., 2010. Bird, John. Electrical Circuit Theory and Technology,
Newnes, 2007.
EVIDENCE OF LEARNING Look for evidence that students can • design and construct series, parallel, and mixed circuits. • measure potential difference and current in circuits • use potential difference and current to calculate resistance
SCIENCE BACKGROUND • Calculate the maximum voltage students should use to
stay below a current of about 1 A using the resistors in their circuits. For a series circuit, for example, if the equivalent resistance is 10 Ω, then Vmax = IR = (1 A)(10 Ω) = 10 V. For a parallel circuit, the equivalent resistance will be lower, and the voltage should be lower. For example, if the equivalent resistance is 3 Ω, then Vmax = IR = (1 A)(3 Ω) = 3 V.
TEACHING NOTES • Have students work in small groups for this investigation.
PURPOSE • Students will design and construct series, parallel, and
mixed circuits. They will then measure the values of potential difference and current for these circuits and calculate resistance values.
EQUIPMENT AND MATERIALS • Check that the meters are working properly. • Make sure there are enough resistors or other loads
available. Other loads might include lamps and buzzers.
• Caution students against letting the wires from the power supply touch. Doing this will cause a short circuit and could destroy the power supply.
PROCEDURE • Make sure the circuits in Part A include two loads
connected in series, a switch, and a power source. Remind students that the power supply should be off before closing the switch for the circuit.
• Calculate the maximum voltage students should use to stay below a current of about 1 A, depending on the equivalent resistance of their circuit. Instruct students to increase the power supply to this level. Remind them to turn it off before disconnecting parts.
• Provide help using the ammeters and voltmeters as needed. Remind students that ammeters are connected in series and voltmeters are connected in parallel.
• Make sure the parallel circuits include two loads connected in parallel, a switch, and a power source.
• Calculate the maximum voltage students should use to stay below a current of about 1 A, depending on the equivalent resistance of their circuit. Instruct students to increase the power supply to this level.
• Carefully examine students’ mixed circuits to be sure all parts are correctly connected. Make sure they include four loads, a switch, and a power source that is off.
• Calculate the maximum voltage students should use to stay below a current of about 1 A, depending on the equivalent resistance of their circuit. Instruct students to increase the power supply to this level.
OBSERVATIONS • Rotate among groups as students make measurements.
Check to be sure the ammeters are connected in series and the voltmeters are connected in parallel.
• Check that values students are recording for current and voltage are reasonable.
DIFFERENTIATED INSTRUCTION • Visual learners could look at other groups’ circuits and
draw diagrams showing the electron flow. Auditory learners could talk to other groups about their circuits and any problems they encountered. Kinaesthetic learners could help other groups assemble their circuits if required.
STUDENT SAFETY • Remind students that the power supply should be turned off before
connecting or disconnecting a circuit. They should have you check their circuits before turning on the power supply.
ENGLISH LANGUAGE LEARNERS • As students read through the investigation steps before
beginning, have them use self-stick notes to mark vocabulary terms they have learned in this chapter. Also have them note any steps about which they have questions, and work with them individually to make sure they understand the entire procedure before beginning.
Electricity and Its Production 15
DRAFT PRE-PUBLICATION MATERIAL

CHAPTER
11 Summary
ASSESSMENT RESOURCES Assessment Rubric 1: Communication Assessment Summary 1: Communication
PROGRAM RESOURCES BLM 11.Q Chapter 11 Quiz Skills Handbook 3. Scientific Inquiry Skills Physics 11 ExamView ® Test Bank Physics 11 Online Teacher’s Centre Physics 11 website
www.nelson.com/onseniorscience/physics11u
RELATED RESOURCES Meade, Russell, and Diffenderfer, Robert. Foundations of
Electronics: Circuits & Devices, Delmar Cengage Learning, 2006.
SUMMARY QUESTIONS • Direct students to work in pairs to complete the
Summary Questions. Suggest that they read aloud each Key Concept and discuss it before creating their study guide.
• After students answer the Summary Points, return the answers they wrote before studying the chapter. Have them compare their answers to discover how much they have learned.
• Ask one or two questions that will prompt students’ recall of each Key Concept. Have students explain and support their responses. 1. How are electric potential difference, electric current,
and resistance related? (by Ohm’s law: V = IR) 2. Which of the main types of power production
technologies has the highest efficiency? Which has the lowest? (Hydro has the highest. Solar has the lowest.)
3. What is the charge carrier in a circuit? (electron) 4. What is the equivalent voltage for three loads in series
in a circuit? (Vseries = V1 + V2 + V3) 5. How are the voltages of three loads in parallel related?
(Vsource = V1 = V2 = V3) 6. How is the current related for three loads in series in a
circuit? (Iseries = I1 = I2 = I3) 7. What is the equivalent resistance for three resistors
connected in series? (Rseries = R1 + R2 + R3) 8. When analyzing a circuit with a voltmeter, an ammeter,
and an ohmmeter, should the devices be connected in parallel or in series? (A voltmeter and ohmmeter
should be connected in parallel. An ammeter should be connected in series.)
CAREER PATHWAYS • Students can work either independently or with a partner
to research careers related electricity. • Students may have the misconception that studying
physics is only important in preparation for many years of college after high school. Point out that some degrees that require a background in physics do require four or more years of college. Others require just one or two years of schooling after high school.
• When researching careers related to Electricity and Its Production, have students consider whether they want to focus on jobs related to the production or the distribution of electricity. Have them consider whether they are more interested in working inside, in a location such as a power plant, or outside, perhaps on distribution line maintenance.
• Pathways to careers in the electrical field include military training, apprenticeship training, and vocational school training. All of the pathways include classroom instruction as well as on-the-job work with experienced electricians.
• Explain to students that many careers in electricity, and specifically careers as electricians, require certification. Suggest that they research certification boards in the career they have chosen to find out what schooling and experience requirements they have.
• Consider having students use computer software to create their graphic organizers. Allow class time for students to display and explain their graphic organizers to the class. Encourage students to relate what they have learned in this chapter about Electricity and Its Production to the career-related information that they have found.
DIFFERENTIATED INSTRUCTION • Encourage students to use a variety of sources in their
research, as students with different learning styles may be better suited to different research methods. For example, interpersonal and kinesthetic learners may benefit from interviewing or observing someone who works in an electrical field. Verbal and visual learners may be more comfortable using print sources.
ENGLISH LANGUAGE LEARNERS • Invite an electrician or other professional from the field to
present information about their career to the class. Encourage all students to ask questions about their work, as well as about the concepts taught in the chapter, to enhance student comfort levels with the vocabulary and concepts they have learned.
Electricity and Its Production 16
DRAFT PRE-PUBLICATION MATERIAL

CHAPTER
12 Electromagnetism
PROGRAM RESOURCES Physics 11 ExamView ® Test Bank Physics 11 Online Teacher’s Centre Physics 11 website,
www.nelson.com/onseniorscience/physics11u/
TEACHING NOTES • Have students examine the Chapter Opener photograph.
Ask, What causes computer hard drives to rotate? (electric motors)
• If possible, bring in an old computer hard drive and allow students to examine it. Alternatively, have students study images of hard drives in books, magazines, or websites.
• Ask, Why should you keep strong magnets away from computers? (Strong magnetic fields can erase the data stored on a hard drive.)
ENGAGE THE LEARNER
CHAPTER INTRODUCTION • To preview the major ideas that will be explored in the
chapter, review the Key Concepts. Ask a student volunteer to read each Key Concept aloud before it is discussed. Ask prompting questions to assess students’ prior knowledge and to engage students in the topics. Examples are given: 1. What is a magnet? (Sample answers: It is something
that attracts ferrous metal. It is something that has a magnetic field.)
2. What happens if you bring two bar magnets near each other? (Sample answers: If the north pole of one comes near the south pole of the other, they attract. If the north poles or south poles are brought together they repel each other.)
3. Why can a very sensitive magnetic compass be disrupted in a room full of electronic devices? (Sample answers: The devices produce their own magnetic fields, which affect the compass.)
4. What must be supplied to a motor for it to function? (electricity) What happens when the electricity is shut off? (The motor no longer works.)
5. What type of motion does an electric motor produce? (rotational motion)
6. What is the main function of an electric motor? (to convert electrical energy into kinetic energy)
7. What are some devices in your home that use electric motors? (Sample answers: electric fans, remote controlled cars, DVD players)
• Point out that electricity and magnets are essential elements of our everyday life. Throughout this chapter, students will learn that the two are inherently linked.
• Have students carry out a think-pair-share activity to answer the questions in the Starting Points guide. Record the questions and students' answers on chart paper. Hang the paper in the classroom. As students work through the chapter, refer them back to the questions and answers. Allow them to correct or add to their answers as they learn more about each concept.
• Have students complete Mini-Investigation: How Strong Is Electromagnetism?
MINI-INVESTIGATION: HOW STRONG IS ELECTROMAGNETISM? Skills: Performing, Observing Purpose: Students will observe the strength of an electromagnet and the effects of changing the amount of current on the strength of the magnet. Equipment and Materials (per group): variable DC power supply; 3 alligator leads; electromagnet with a handle; ammeter; thick soft-iron plate with a handle Student Safety • Remind students to pull gently and slowly increase their pulling
strength to avoid falling. Make sure they are in an open area of the classroom, so that they are unlikely to strike any desks or other objects if they do fall.
Notes • You can use a strong horseshoe magnet instead of a soft-iron
plate if necessary. If you use a horseshoe magnet, carry out the following steps prior to the investigation: 1) ensure that the electromagnet is not attracted to the horseshoe magnet when no current flows through it (if it is, you cannot use the horseshoe magnet); 2) test the setup to ensure that the electromagnet is attracted to the horseshoe magnet when electricity runs through it (if it is repelled, reverse the current through the electromagnet and try again).
• Turn down the power supply slowly and steadily to avoid sudden changes in electromagnet strength.
DIFFERENTIATED INSTRUCTION • To help auditory, visual, and other learners understand the
Mini-Investigation, read each step aloud and demonstrate it for students before they carry it out.
• You may want to have students who are interested in computers set up a class blog, wiki, or website for posting reports, lab results, presentations, images, videos, links, and other forms of information.
ENGLISH LANGUAGE LEARNERS • Have English language learners and struggling readers
create an index-card glossary for unfamiliar or difficult terms in the chapter. Tell students to write each term on the front of a card, and the definition on the back.
Electromagnetism 1
DRAFT PRE-PUBLICATION MATERIAL
12.1 Magnetic Fields OVERALL EXPECTATIONS: A1; F1; F2; F3
SPECIFIC EXPECTATIONS Scientific Investigation Skills: A1.7; A1.10; A1.11 Relating Science to Technology, Society, and the
Environment: F1.1 Developing Skills of Investigation and Communication:
F2.1; F2.4 Understanding Basic Concepts: F3.1 The full Overall and Specific Expectations are listed on pages xx–xx.
V OCABULARY magnetic field
SKILLS Researching Analyzing the Issue Communicating
ASSESSMENT RESOURCES Assessment Rubric 1: Knowledge and Understanding Assessment Rubric 2: Thinking and Investigation Assessment Summary 1: Knowledge and Understanding Assessment Summary 2: Thinking and Investigation
OTHER PROGRAM RESOURCES Skills Handbook 3. Scientific Inquiry Skills Physics 11 ExamView ® Test Bank Physics 11 Online Teacher’s Centre Physics 11 website
www.nelson.com/onseniorscience/physics11u
RELATED RESOURCES Robertson, William C. Stop Faking It! Electricity and
Magnetism. National Science Teachers Association, 2004.
EVIDENCE OF LEARNING Look for evidence that students can • describe the properties and direction of magnetic fields • describe how magnetic fields interact with one another • use magnetic field lines to describe the magnetic field
around an object • explain how magnetic fields are used in everyday objects
SCIENCE BACKGROUND • Magnets have been known for centuries. Naturally
occurring magnetic stones known as lodestones were
discovered and inspired investigations into their mysterious properties. These investigations led, among other things, to the invention of the magnetic compass.
• Earth's magnetic poles do not exactly line up with its geographic poles. As a result, the direction obtained from a magnetic compass must be corrected before it can be used to determine geographic directions. This correction is called magnetic declination, and it depends on one's location on Earth's surface. Maps used for tracking and orienteering include diagrams showing the magnetic declination for the region shown on the map.
POSSIBLE MISCONCEPTIONS Identify: Students might think that Earth’s geographic north pole and its magnetic north pole are one and the same. Clarify: Explain that the North Pole shown on most maps is the geographic North Pole, located at 90°N latitude. The magnetic pole that is closest to the geographic North Pole is actually a south magnetic pole (because it is attracted to a north magnetic pole). Earth's north magnetic pole is actually in the southern hemisphere. Ask What They Think Now: At the end of this discussion, ask, If you placed a bar magnet at the equator on a map of Earth to represent its north and south magnetic poles, how would the magnet be oriented? (The "N" pole of the magnet would be in the southern hemisphere, and the "S" pole would be in the northern hemisphere.)
TEACHING NOTES
ENGAGE • Challenge students to compare some materials that are
attracted to magnets with materials that are not attracted. Ask, Why are some things attracted to the magnet, but others are not? (Answers might include the arrangement of electrons or the amount of ferrous metal in the object.)
EXPLORE AND EXPLAIN • Ask students to compare and contrast the properties of field
forces (such as gravity and magnetism) and contact forces (such as friction). Record the properties on a sheet of poster paper and post them in the room. As students learn about magnetism and electricity, refer back to these properties and ask students to explain how each property is demonstrated by the substances or objects they are learning about.
• Bring in samples of magnetite for students to examine. Allow them to experiment with exposing the magnetite to various substances. Ask them to predict which substances will be attracted to the magnetite, and which will not.
• Bring in several magnets of different shapes and strengths. Have students use magnetic compasses and/or iron filings to determine the shape of the magnetic field lines around each magnet. Tell students to trace each magnet onto a
Electromagnetism 2
DRAFT PRE-PUBLICATION MATERIAL

sheet of paper, and then draw the magnetic field lines around the magnet. Have students compare their drawings for similar magnets and work together to determine the reasons for any differences.
• Divide students into groups. Have the groups examine the classroom (and the rest of the school building, if possible) and identify all of the items they can find that use or contain magnets. Make a class list of these items. As students work through the rest of the chapter, refer back to the list and ask them to explain how the magnets in each device help it to function.
• Have students complete Research This: The Maglev Train.
EXTEND AND ASSESS • Point out that the drawings of magnetic field lines in the
Student Book are two-dimensional. Remind students that magnetic fields are three-dimensional, and have them work in groups to create three-dimensional models of the magnetic field around a magnet of their choice.
• Have students complete the Questions on page xxx of the Student Book.
DIFFERENTIATED INSTRUCTION • As a multimodal introductory activity, divide students into
small groups. Give each group a series of pictures of technologies and organisms that use magnetism around the room. Have students read a brief description of how magnetism is used in each item. Have them match the description with the picture. Post a copy of the pictures around the room.
ENGLISH LANGUAGE LEARNERS • English language learners may not understand the term
Maglev. Write the term magnetic levitation on the board. Ask students to define each term. If necessary, assist them with their definitions. Underline mag and lev and show students how the name Maglev is a combination of these two roots. Ask students to explain why Maglev is an appropriate name for these types of trains.
12.2 Oersted’s Discovery OVERALL EXPECTATIONS: A2; F1; F2; F3
SPECIFIC EXPECTATIONS Career Exploration: A2.2 Relating Science to Technology, Society, and the
Environment: F1.2 Developing Skills of Investigation and Communication:
F2.7 Understanding Basic Concepts: F3.2; F3.3; F3.5
RESEARCH THIS: THE MAGLEV TRAIN Skills: Researching, Analyzing the Issue, Communicating Purpose: Students will research maglev trains and compare their advantages and disadvantages. Notes • Explain to students what is meant by maglev trains, as opposed
to other high speed types of rail, such as Japan’s bullet train. • Provide students with examples of things that might affect the
building of maglev trains, such as the cost of materials, the cost of land, and community opposition.
• You may want to provide copies of BLM 0.0-X Venn Diagram to students to help them compare and contrast Maglev and conventional trains.
The full Overall and Specific Expectations are listed on pages xx–x.
VOCABULARY Oersted's principle right‐hand rule for a straight conductor
ASSESSMENT RESOURCES Assessment Rubric 1: Knowledge and Understanding Assessment Summary 1: Knowledge and Understanding
OTHER PROGRAM RESOURCES Skills Handbook 3. Scientific Inquiry Skills Physics 11 ExamView ® Test Bank Physics 11 Online Teacher’s Centre Physics 11 website
www.nelson.com/onseniorscience/physics11u
RELATED RESOURCES Spaldin, Nicola A.. Magnetic Materials: Fundamentals and
Applications. Cambridge University Press, 2010.
SCIENCE BACKGROUND • Prior to the early 1800s, some researchers suspected that
there was a connection between electricity and magnetism, but were unable to prove it. Danish physicist Hans Christian Oersted proved that the two were actually different aspects of the same phenomenon.
• Today, electromagnetism is considered to be a single force. It is one of the four fundamental forces of nature, along with gravity, the strong nuclear force, and the weak nuclear force.
• Although this section focuses on straight conductors, magnetic fields also exist around curved conductors carrying a current. At any point along a curved conductor, the right-hand rule applies. The net magnetic field around a curved conductor is a continuous average of the magnetic fields at each point on the conductor. Coiling or wrapping a wire causes the magnetic fields to overlap, producing a
Electromagnetism 3
DRAFT PRE-PUBLICATION MATERIAL
stronger field around the coil than around any individual wire.
TEACHING NOTES
ENGAGE • Create a simple electric circuit using a battery, wire, and a
light bulb. Have students use a magnetic compass or a magnetic field sensor to study the magnetic field around the wire when the circuit is closed and when it is open. Explain that their observations are similar to those made by Oersted, and that in this section they will learn more about the relationship between electricity and magnetism.
EXPLORE AND EXPLAIN • Have students compare Figure 2 in this section with
Figures 3 and 4 in Section 12.1. Ask them to summarize the similarities and differences between the figures.
• Hold a straight wooden dowel against the board to represent a current-carrying wire. Draw an arrow pointing toward one end of the dowel to represent the direction of current in the dowel. Draw another arrow in a different color pointing to the opposite end to represent the direction of electron flow. Hold the dowel in various orientations and call on students to come up and use the right-hand rule and left-hand rule to determine the direction of the magnetic field around the dowel. Emphasize that both methods give the same magnetic field direction.
• To help students understand the representation shown in Figure 6, hold up the dowel again. Demonstrate the direction of the magnetic field around the dowel. Then, hold up a sharpened pencil to represent the needle of a magnetic compass. Hold the pencil so that it is pointing in the direction of the magnetic field, and demonstrate to students how the dowel and the pencil resemble the compass and wire shown in Figure 6.
EXTEND AND ASSESS • Challenge students to think about a remote controlled car.
Ask, If the battery sends electricity to the motor and makes the wheels go forward, how could you make it go in reverse? (Reverse the direction of the current.)
• Have students complete the Questions on page xxx of the Student Book.
DIFFERENTIATED INSTRUCTION • Visual learners could be asked to create graphics
summarizing the rules introduced in this section. Kinesthetic learners should be supplied with materials to reenact the rules discussed. Auditory learners should work with visual or kinesthetic learners to discuss their demonstration or graphic.
• Have students work alone or in groups to create a summary of Oersted's discovery. Students should be directed to choose the audience for their material: students in grade 6, other high school students, or adults who do not know
about electricity and magnetism. Allow students to select the format of their summary (for example, visual learners might draw diagrams; interpersonal learners might create a video) and present them to the class. Ask other students to evaluate the accuracy and creativity of each product.
ENGLISH LANGUAGE LEARNERS • Tell English language learners and struggling readers to use
sticky notes to mark the locations of terms they do not understand. Then, have them work with partners to determine the meaning of each term.
12.3 Physics Journal: Wireless Electricity
PROGRAM RESOURCES Skills Handbook 3. Scientific Inquiry Skills Physics 11 ExamView ® Test Bank Physics 11 Online Teacher’s Centre Physics 11 website,
www.nelson.com/onseniorscience/physics11u
RELATED RESOURCES Tilbury, Mitch. The ULTIMATE Tesla Coil Design and
Construction Guide. McGraw-Hill/TAB Electronics, 2007. Tesla, Nikola. My Inventions: The Autobiography of Nikola
Tesla. CreateSpace, 2010.
TEACHING NOTES • Before students read the passage, ask them to summarize
what they already know about Tesla, Tesla coils, and wireless electricity transmission. Record their ideas on the board or on poster paper and leave them visible as students read the passage.
• Read the abstract aloud (or ask a student to read it). Remind students that an abstract gives a summary of the article. Ask students to identify the main ideas in the abstract, and record them on the board. Leave space below each main idea. Tell students to look for information from the article that supports each main idea.
• Tesla's quotation in the second paragraph is somewhat long and contains complex sentence structure. Have students work in pairs or small groups to discuss the quotation and summarize it in their own words. Have pairs or groups share and compare their summaries.
• Ask students to identify the four main energy storage/transmission technologies described in the article (electric grid, Tesla coil, battery, coupled resonators). Have them summarize the advantages and disadvantages of each technology. Then, divide the class into four groups. Assign each group to defend one of the four technologies. Tell each group to put together a brief presentation explaining
Electromagnetism 4
DRAFT PRE-PUBLICATION MATERIAL

how its technology could be made more useful and/or how its disadvantages might be overcome.
• Have students return to the main ideas from the abstract that you recorded on the board. Ask volunteers to provide supporting information for each main idea. Encourage students to discuss and defend their ideas about what constitutes a main idea and a supporting detail.
• Have students complete the Questions on page xxx of the Student Book.
DIFFERENTIATED INSTRUCTION • Allow students to choose among various methods of
learning the material in the article. For example, visual learners may prefer to read the passage quietly to themselves, perhaps sketching the ideas to improve their comprehension. verbal learners may prefer to pair up, read aloud, and then discuss the article. Kinesthetic learners may benefit from using models to reinforce the concepts in the reading.
ENGLISH LANGUAGE LEARNERS • To help English language learners and struggling readers
better understand the information in the article, have them work with a partner to summarize each paragraph in their own words. Allow them to use dictionaries (including language-English dictionaries) to help them interpret the content.
12.4 Solenoids OVERALL EXPECTATIONS: F1; F3
SPECIFIC EXPECTATIONS Relating Science to Technology, Society, and the
Environment: F1.1 Understanding Basic Concepts: F3.2; F3.4 The full Overall and Specific Expectations are listed on pages xx–x.
V OCABULARY solenoid electromagnet right‐hand rule for a solenoid
ASSESSMENT RESOURCES Assessment Rubric 1: Knowledge and Understanding Assessment Summary 1: Knowledge and Understanding
OTHER PROGRAM RESOURCES BLM 12.4-X Optional Mini-Investigation: Electromagnets Skills Handbook 3. Scientific Inquiry Skills
Physics 11 ExamView ® Test Bank Physics 11 Online Teacher’s Centre Physics 11 website
www.nelson.com/onseniorscience/physics11u
RELATED RESOURCES Underhill, Charles Reginald. Solenoids, Electromagnets and
Electromagnetic Windings. Merchant Books, 2008.
SCIENCE BACKGROUND • Ampere’s work laid the groundwork for the creation of the
first electromagnets, which have many uses in devices ranging from telephones to magnetic locks. Electromagnets are extremely useful because their magnetic fields can be turned on and off. Very powerful electromagnets are used in junkyards to move wrecked vehicles around.
• Another advantage of an electromagnet over a permanent magnet is that the strength and orientation of the electromagnet's magnetic field can be adjusted by changing the strength and direction of the current flowing through it. The magnets used in magnetic resonance imaging (MRI) machines are also electromagnets, and can make use of this property of electromagnets.
• The unit of electric current, the Ampere, is named after Andre-Marie Ampere.
POSSIBLE MISCONCEPTIONS Identify: Students may think that the right-hand rule for a straight wire and the right-hand rule for a solenoid are independent. Clarify: Explain to students that the right-hand rule for solenoids is an extension of the right-hand rule for straight conductors. If you apply the right-hand rule for straight conductors to a small section of wire in a solenoid, the magnetic field around that section of wire will point in the same overall direction as the magnetic field around the solenoid. Ask What They Think Now: At the end of the lesson, ask, If you know the direction of electron flow in a solenoid, how could you use your left hand to determine the direction of the north magnetic pole of the solenoid? (Wrap the fingers of your left hand around the solenoid in the direction of electron flow. The left thumb will point toward the north magnetic pole.)
TEACHING NOTES
ENGAGE • Pass out copies of BLM 12.4-X Optional Mini-
Investigation: Electromagnets. In this mini-investigation, students build several simple electromagnets and measure the strength of the magnetic field around each electromagnet. This investigation works best if students can use an electronic magnetic field sensor connected to a computer or calculator, as the variations in magnetic field
Electromagnetism 5
DRAFT PRE-PUBLICATION MATERIAL

strength may be difficult to measure accurately using other methods. After students complete the mini-investigation, explain that they will now learn more about why they observed what they observed. If you do not have enough magnetic field sensors for all groups to have one, you can perform this mini-investigation as a demonstration instead.
EXPLORE AND EXPLAIN • Have students examine Figure 1. Use two wooden dowels
to model the current-carrying wires in the figure. Ask students to use the right-hand rule to verify the magnetic field directions shown in Figure 1. Then, reverse the direction of one of the dowels. Have students again determine the magnetic field direction and confirm that two wires with the same direction of current will attract one another.
• Ask students to think back to the mini-investigation they carried out at the beginning of the lesson. Have them work in pairs to draw the coils of wire they created and the magnetic fields around them. If necessary, help them determine the direction of current flow in the wire. Point out that the wire coils they made were solenoids, and should therefore have magnetic fields similar to the one shown in Figure 3(a).
• If time allows, have students repeat the mini-investigation from the beginning of the lesson, but reverse the batteries so the current flows in the opposite direction. The magnetic field strengths should be similar, but have opposite signs. Then, have them repeat the investigation, but insert an iron nail into the centre of the wire coil. The magnetic field strength around the solenoid should increase.
• Using a spring to represent a solenoid, have students demonstrate the right-hand rule for solenoids in the same way they demonstrated the right-hand rule for straight conductors, using the wooden dowel.
• If possible, bring in examples of subwoofer and/or electric bell solenoids and allow students to examine them. Have students make flow charts describing how each device works.
EXTEND AND ASSESS • Ask, What is a third way to increase the strength of the
electromagnet you built in the mini-investigation? (Increase the current in the wire by adding more batteries.)
• Have students complete the Questions on page xxx of the Student Book.
DIFFERENTIATED INSTRUCTION • Student should use a variety of methods to understand the
process used to create electromagnets: Kinesthetic learners could use manipulatives, visual learners could use flow charts and diagrams, verbal learners could describe the steps orally and discuss them with classmates.
ENGLISH LANGUAGE LEARNERS • To help English language learners better understand the
images in this section, simplify the labels and captions. For example, in Figure 3(a), replace interior and exterior with inside and outside.
12.5 The Motor Principle OVERALL EXPECTATIONS A1; F1; F2; F3
SPECIFIC EXPECTATIONS Scientific Investigation Skills: A1.1 Relating Science to Technology, Society, and the
Environment: F1.1 Developing Skills of Investigation and Communication:
F2.1; F2.5 Understanding Basic Concepts: F3.1; F3.4; F3.6 The full Overall and Specific Expectations are listed on pages xx–x.
VOCABULARY motor principle right‐hand rule for the motor principle
SKILLS Predicting Performing Observing
EQUIPMENT AND MATERIALS per group: • DC power supply • horseshoe magnet • 2 or 3 alligator leads
ASSESSMENT RESOURCES Assessment Rubric 1: Knowledge and Understanding Assessment Rubric 2: Thinking and Investigation Assessment Summary 1: Knowledge and Understanding Assessment Summary 2: Thinking and Investigation
OTHER PROGRAM RESOURCES BLM 12.5-X The Right-Hand Rule for the Motor Principle Skills Handbook 1. Safe Science Skills Handbook 2. Scientific Tools and Equipment Skills Handbook 3. Scientific Inquiry Skills Physics 11 ExamView ® Test Bank Physics 11 Online Teacher’s Centre Physics 11 website
www.nelson.com/onseniorscience/physics11u
Electromagnetism 6
DRAFT PRE-PUBLICATION MATERIAL

RELATED RESOURCES Sobey, Ed. The Way Kitchens Work: The Science Behind the
Microwave, Teflon Pan, Garbage Disposal, and More. Chicago Review Press, 2010.
Downie, Neil A. Exploding Disk Cannons, Slimemobiles, and 32 Other Projects for Saturday Science. The Johns Hopkins University Press, 2006.
EVIDENCE OF LEARNING Look for evidence that students can • define the motor principle • identify the factors that affect the force on a current-
carrying conductor • determine the direction of the force on a current-carrying
conductor using the right-hand rule for the motor principle • identify technologies that use the motor principle
SCIENCE BACKGROUND Michael Faraday • Michael Faraday was an English chemist and physicist who
lived during the 18th and 19th centuries. Although he had little formal training, he went on to educate himself, and became one of the world’s leading scientists. His experiments with magnets and electric currents laid the foundation for the invention of electric motors and electric generators, which make many modern technologies possible.
• The motor principle underlies many devices other than ammeters, voltmeters, and galvanometers. Nearly all electronic devices that produce motion of any kind rely on the motor principle. Examples include fans, hair dryers, motors for toy vehicles, and blenders.
• Much of our modern lifestyle is based on the two principles that moving magnets can generate electricity, and moving electrons can generate magnetic fields. These coupled effects allow us to convert motion (for example, the rotation of the blades of a wind turbine) into electricity at power plants, and then to convert the electricity back into motion in household devices.
TEACHING NOTES
ENGAGE • Challenge students to describe what their world would be
like without electric motors. Make a class list of what students already know about how motors work. Tell students that in this lesson they will learn more about how electric motors work.
EXPLORE AND EXPLAIN • Have students examine Figure 1. Make a simplified sketch
of the figure on the board. Ask students to trace the path of the current from the battery, to the wire, to the mercury, and back to the battery. Draw this path on the board.
Remind students that when electricity flows through the wire, a magnetic field forms around the wire.
• Ask students to examine Figure 2. Point out that this figure shows the interaction between a current-carrying wire and two magnets. Ask, Is this the same setup as the simple motor in Figure 1? (No. Figure 1 contains only one magnet.) Remind students that the single magnet shown in Figure 1 still produces a magnetic field that can interact with the field around the wire. Have volunteers draw magnetic field lines around the magnet and wire in Figure 1 and use them to explain the motion of the wire.
• Have students complete Mini-Investigation: Moving Wires.
MINI-INVESTIGATION: MOVING WIRES Skills: Predicting, Performing, Observing Purpose: Students will create a simple electric motor. Equipment and Materials (per group): DC power supply; horseshoe magnet; 2 or 3 alligator leads Student Safety: This circuit can produce high currents—students should only turn the power supply on briefly. Notes • Remind students of what happens when two magnetic fields
interact. Ask them to make predictions about the direction of current and the magnetic fields in the circuit. Remind them to use the right-hand rule to make these predictions.
• You may wish to have students sketch the experimental setup and draw in the current directions and the magnetic field lines. These diagrams may help students predict the motion of the wire.
• After students have examined Figure 4, refer them back to
Figure 2. Have them use the right-hand rule to confirm that the force on the wire in Figure 2 is downward.
• Show students examples of analog ammeters, voltmeters, and galvanometers, if available. An analog multimeter can be substituted for the ammeter and voltmeter.
• You may need to review with students the terminology used to describe electric circuits to help them understand the descriptions of ammeters and voltmeters.
EXTEND AND ASSESS • Have students refer back to the class list they made of what
they already knew about electric motors before beginning the lesson. Ask them to update the list to correct any errors and to add what they learned in this section.
• Pass out copies of BLM 12.5-X The Right-Hand Rule for the Motor Principle and have students complete it. This BLM gives students additional practice applying the right-hand rule for the motor principle.
• Have students complete the Questions on page xxx of the Student Book.
DIFFERENTIATED INSTRUCTION • To help students remember the three right-hand rules, have
them create memory aids in the format of their choosing. Visual learners may draw diagrams; Auditory learners may
Electromagnetism 7
DRAFT PRE-PUBLICATION MATERIAL

record audio cues or make up a poem or rap; kinesthetic learners may take photos or videos of themselves acting out the different rules.
ENGLISH LANGUAGE LEARNERS • Review the meaning of the root meter with students.
Explain that devices with the root meter in their names typically are used to measure something. Remind students that the Ampere is the unit used to describe current, and the volt is the unit used to describe potential. Show students how ammeter is a combination of Ampere and meter, and voltmeter is a combination of volt and meter.
12.6 The Direct Current Motor
OVERALL EXPECTATIONS: A1; F1; F2; F3
SPECIFIC EXPECTATIONS Scientific Investigation Skills: A1.7; A1.10 Relating Science to Technology, Society, and the
Environment: F1.2 Developing Skills of Investigation and Communication:
F2.1; F2.8 Understanding Basic Concepts: F3.4; F3.6; F3.7 The full Overall and Specific Expectations are listed on pages xx–x.
SKILLS Performing Researching Observing Communicating
EQUIPMENT AND MATERIALS per group: • DC hobby motor
ASSESSMENT RESOURCES Assessment Rubric 1: Knowledge and Understanding Assessment Rubric 2: Thinking and Investigation Assessment Summary 1: Knowledge and Understanding Assessment Summary 2: Thinking and Investigation
OTHER PROGRAM RESOURCES Skills Handbook 1. Safe Science Skills Handbook 2. Scientific Tools and Equipment Skills Handbook 3. Scientific Inquiry Skills Physics 11 ExamView ® Test Bank Physics 11 Online Teacher’s Centre Physics 11 website
www.nelson.com/onseniorscience/physics11u
RELATED RESOURCES Isaacs, David. Electric Cars: The Future Is Now! Veloce
Books, 2010.
EVIDENCE OF LEARNING Look for evidence that students can • describe the parts of a direct current electric motor • describe how regular and armature DC motors function • identify uses of DC motors
SCIENCE BACKGROUND History of Electric Motors • Although Michael Faraday conducted experiments in 1821
showing that electric motors were possible, the first practical electric motors were not invented until 1832. British scientist William Sturgeon developed the first commutator-type DC motor capable of turning machinery. The modern DC motor was invented by Belgian engineer Zenobe Theophile Gramme in 1873.
TEACHING NOTES
ENGAGE • Lead the class in a brainstorm of examples of devices that
use electric motors. Record students' ideas on the board or on chart paper for them to refer to as they work through the section. Divide the list into devices that run on batteries and devices that plug into electric wall sockets.
EXPLORE AND EXPLAIN • Point out to students that the diagrams of electric motors in
this section do not show all of the components of the motor. For example, in Figures 2–6, the split-ring commutator and wire loop are shown hovering between the magnets with no external support. In a real motor, the commutator and loop are supported by non-conducting materials. In Figures 7–9, the brushes are shown as being attached to the commutator; in reality, they touch the commutator, but are not connected to it. The brushes remain stationary while the commutator (and armature) rotates.
• Have students examine Figure 2. Point out that when the brushes touch the commutator, current flows through the wire loop, producing a magnetic field. The magnetic field causes the loop to rotate.
• Draw students’ attention to Tutorial 1: The DC Motor on page XXX of the Student Book. This tutorial explains the functioning of a DC motor in more detail.
• Have students examine Figure 3. Demonstrate using the right-hand rule to show why the forces on the two sides of the wire loop are opposite. If necessary, hold up a paper clip or piece of curved wire and demonstrate to students how an upward force on one side of the loop, coupled with a downward force on the other side, causes rotation.
Electromagnetism 8
DRAFT PRE-PUBLICATION MATERIAL
• Remind students that inertia is the tendency of an object to maintain constant motion in the absence of external forces.
• You may wish to make a model of a wire loop and split-ring commutator and demonstrate the functioning of the motor to students.
• Draw students’ attention to Tutorial 2: The Armature DC Motor on page XXX of the Student Book.
• Sketch Figure 7 on the board, omitting the labels and leader lines. Ask for volunteers to demonstrate the path of the conventional current by coming to the board and tracing it.
• Erase the armature, wire coil, and commutator from the figure, leaving the magnets, battery, and brushes on the board. Ask students to come to the board and sketch in the position of the armature and commutator as they complete one full rotation.
• Have students complete Mini-Investigation: Observing a DC Motor.
• As students read “Further Improvements in Motor Design,”
refer them back to the hobby motors they disassembled in the Mini-Investigation. Ask them to identify any components of the hobby motor that may be used to make it more useful. For example, some hobby motors contain split rings.
• Have students complete Research This: Brushless Motors.
RESEARCH THIS: BRUSHLESS MOTORS Skills: Researching, Communicating Purpose: Students will research brushless motors and their applications. Notes • Students can also use a Venn diagram to compare and contrast
brushless motors and brush-type motors.
EXTEND AND ASSESS • To extend the Research This activity, divide students into
groups and have each group further research one specific application of the brushless motor design. Each group should present to the class a profile of the specific device they researched, including how the device functioned with
a brush-type motor and how it was improved by the use of a brushless motor.
• Have students complete the Questions on page xxx of the Student Book.
UNIT TASK BOOKMARK Remind students that what they have learned about how DC motors function in this section will be useful when they complete the Unit Task.
DIFFERENTIATED INSTRUCTION • Have students work in pairs or small groups to create a
summary of how DC motors work. Allow students to summarize the information in a method of their choosing. For example, visual learners may create a video or animation. Kinesthetic learners may create a three-dimensional model.
ENGLISH LANGUAGE LEARNERS MINI-INVESTIGATION: OBSERVING A DC MOTOR Skills: Performing, Observing Purpose: Students will examine the parts of a DC motor and compare it to the motors that they have learned about. Equipment and Materials (per group): DC motor Notes • DC motors contain many small parts that are easily lost. Direct
students to keep track of all of the parts. • You will need to provide students with small screwdrivers to use in
disassembling the motors.
• Some of the terms in this section (e.g., commutator, stator) may pose pronunciation problems for English language learners. Identify any terms they struggle to pronounce correctly. Write each term on the board, along with its phonetic pronunciation. Model the correct pronunciation of the word, and ask students to use each word in a sentence. Correct any pronunciation errors, and continue to give them practice in the pronunciation.
12.7 Explore Applications in Electromagnetism
OVERALL EXPECTATIONS: A1; A2; F1
SPECIFIC EXPECTATIONS Scientific Investigation Skills: A1.3; A1.7; A1.8; A1.11 Career Exploration: A2.1 Relating Science to Technology, Society, and the
Environment: F1.1 The full Overall and Specific Expectations are listed on pages xx–x.
SKILLS Researching Communicating Identifying Alternatives Evaluating
ASSESSMENT RESOURCES Assessment Rubric 2: Thinking and Investigation Assessment Rubric 3: Communication Assessment Summary 1: Knowledge and Understanding Assessment Summary 3: Communication
Electromagnetism 9
DRAFT PRE-PUBLICATION MATERIAL

PROGRAM RESOURCES Skills Handbook 3. Scientific Inquiry Skills Physics 11 ExamView ® Test Bank Physics 11 Online Teacher’s Centre Physics 11 website
www.nelson.com/onseniorscience/physics11u
RELATED RESOURCES Macaulay, David, and Neil Ardley. The New Way Things
Work. Houghton Mifflin, 1998.
EVIDENCE OF LEARNING Look for evidence that students can • describe how magnetic resonance imaging works • describe how MRIs are used in Canada
SCIENCE BACKGROUND • Magnetic resonance imaging is a relatively new
technology. The first MRI images were published in 1973. The first MRI images of humans were published in 1977. Originally the technology was referred to as nuclear magnetic resonance imaging (NMRI), but because of negative connotation of the word “nuclear” in the minds of the public, the name was shortened to the now-familiar MRI.
• The MRI machine shown in Figure 1 is an example of a standard-style, or "closed," machine. In this type of MRI machine, the patient lies on a platform that is wheeled into a small, cylindrical enclosure. The small, enclosed space can be distressing to claustrophobic patients, patients with post-traumatic stress disorder, autistic patients, and children; it may also be impractical for overweight or pregnant patients. Many of these patients instead opt for an "open" MRI, which involves a less confining scanner. Open MRIs can be useful for certain types of diagnostic tests. However, in some cases, a traditional MRI is preferred because it produces more accurate images.
TEACHING NOTES
THE APPLICATION • Point out to students that there are two main points in the
application: first, to learn more about MRI to help their friend, and second, to document their friend's experience with the MRI. Explain that because the friend is hypothetical, they will need to look for other sources of information to learn what an MRI is like.
YOUR GOAL • Remind students that they need to both describe MRI
technology and learn how it is used.
RESEARCH • Some students in the class may have had an MRI scan. If
these students are comfortable sharing their experiences, ask them to do so. You may allow them to describe their
experiences in writing, by giving an oral presentation, or through an interview with you or with another student.
SUMMARIZE • Have students brainstorm additional questions that they
could use to organize their ideas. Encourage students to write an outline or map of their report before they begin writing.
COMMUNICATE • Have each student or group post their news report in the
classroom and/or on the class website. Alternatively, create a notebook containing all of the reports.
DIFFERENTIATED INSTRUCTION • Allow students to present their information in formats other
than a written report if they wish. For example, students could produce an informational video or give an oral presentation. Students could be encouraged to present their finding in a format that is not typical for them. For example, an auditory learner could be encouraged to produce a brochure or poster, and a visual learner could be encouraged to do a presentation.
ENGLISH LANGUAGE LEARNERS • You may wish to have English language learners approach
their research assuming that their friend does not speak English well. Ask them to identify resources for informing non-English speaking patients about the uses, benefits, and risks of MRI. If you wish, you may ask students to present their report both in English and in their native language.
12 Investigations
12.1.1 Observational Study: Properties of Magnetic Fields OVERALL EXPECTATIONS: A1; F2; F3
SPECIFIC EXPECTATIONS Scientific Investigation Skills: A1.4; A1.5; A1.6 A1.10 Developing Skills of Investigation and Communication: F2.4 Understanding Basic Concepts: F3.5 The full Overall and Specific Expectations are listed on pages xx–xx.
SKILLS Planning Analyzing Performing Communicating Observing
Electromagnetism 10
DRAFT PRE-PUBLICATION MATERIAL

EQUIPMENT AND MATERIALS per student: • eye protection per group: • 4 mini compasses • bar magnet • horseshoe magnet • circular (or button) magnet • magnetic dip needle • magnetic field sensor (if available) • sheet of acetate • iron filings
ASSESSMENT RESOURCES Assessment Rubric 1: Knowledge and Understanding Assessment Rubric 2: Thinking and Investigation Assessment Summary 1: Knowledge and Understanding Assessment Summary 2: Thinking and Investigation
PROGRAM RESOURCES Skills Handbook 3. Scientific Inquiry Skills Physics 11 ExamView ® Test Bank Physics 11 Online Teacher’s Centre Physics 11 website
www.nelson.com/onseniorscience/physics11u
RELATED RESOURCES O'Brien, Thomas. Brain-Powered Science. NSTA Press,
2010.
EVIDENCE OF LEARNING Look for evidence that students can • describe how magnetic fields interact • make predictions about the attraction and repulsion of
magnets
SCIENCE BACKGROUND • The term magnetic can have different meanings. In some
contexts, a substance is called magnetic if it responds to a magnetic field. Using this definition, all permanent magnets and all substances that are attracted to magnets (such as iron and cobalt) are magnetic. In other contexts, however, the term magnetic refers only to objects or substances that general a magnetic field. Under this definition, a permanent magnet is magnetic, as is an electromagnet while it is turned on. Iron, however, is not considered magnetic under this definition, because a piece of iron does not have an inherent magnetic field. The Student Book uses the former definition.
• Iron and other magnetic substances are magnetic because of the electronic structure of their atoms. The distribution and spin of the electrons in their outer electron shells makes them sensitive to magnetic fields.
TEACHING NOTES
STUDENT SAFETY • Iron filings can cause severe eye irritation. Make sure students
wear eye protection at all times while handling iron filings. • Iron filings can also cause irritation if inhaled. Turn off any fans in
the classroom or carry out the investigation in an area of the room in which the air is still, to prevent the filings from becoming airborne and being inhaled.
PURPOSE • In this investigation, students map and compare the
magnetic fields around three different types of magnets: a horseshoe magnet, a bar magnet, and a circular or "button" magnet.
EQUIPMENT AND MATERIALS • If a magnetic field sensor is available, students do not need
the four mini-compasses. • If one of the types of magnets is not available, you can
substitute a different magnet shape. • If clear acetate is not available, a thin sheet of plain white
paper can be used instead.
PROCEDURE • You may wish to label the direction of magnetic north
using a sheet of paper attached to the classroom wall. • Remind students to use caution when handling the iron
filings to avoid spilling them on the floor. • Tell students to place each magnet flat on their desk or
table before carrying out Step 2. This will minimize the chances of spilling iron filings.
DIFFERENTIATED INSTRUCTION • Allow students to summarize their findings in a manner of
their choice. For example, visual learners may wish to draw diagrams; auditory learners may wish to give an oral presentation or discuss their results with a partner.
ENGLISH LANGUAGE LEARNERS • To help English language learners follow the procedure,
label each of the materials. Allow students to examine the labeled materials and identify where in the procedure each material is used before carrying out the procedure.
12.4.1 Observational Study: Magnetic Fields Around Electromagnets OVERALL EXPECTATIONS: A1; F2; F3
SPECIFIC EXPECTATIONS Scientific Investigation Skills: A1.5; A1.6; A1.8; A1.11 Developing Skills of Investigation and Communication:
F2.1; F2.4; F2.5 Understanding Basic Concepts: F3.1; F3.2
Electromagnetism 11
DRAFT PRE-PUBLICATION MATERIAL
The full Overall and Specific Expectations are listed on pages xx–xx.
SKILLS Planning Analyzing Performing Communicating Observing
EQUIPMENT AND MATERIALS per pair: • straight conductor • ammeter • 4 alligator leads • variable DC power supply • 4-6 mini compasses • coiled conductor • magnetic field sensor (if available)
ASSESSMENT RESOURCES Assessment Rubric 1: Knowledge and Understanding Assessment Rubric 2: Thinking and Investigation Assessment Summary 1: Knowledge and Understanding Assessment Summary 2: Thinking and Investigation
PROGRAM RESOURCES Skills Handbook 3. Scientific Inquiry Skills Physics 11 ExamView ® Test Bank Physics 11 Online Teacher’s Centre Physics 11 website
www.nelson.com/onseniorscience/physics11u
RELATED RESOURCES Hartman, Eve, and Wendy Meshbesher. Magnetism and
Electromagnets. Raintree Publishers, 2008.
EVIDENCE OF LEARNING Look for evidence that students can • follow safe laboratory practices • describe the shape and direction of magnetic fields • use the right-hand rule to make predictions about the
direction of magnetic fields
SCIENCE BACKGROUND • Any conducting object can act as an electromagnet if a
current flows through it. This chapter focuses on two main types of electromagnets: straight wires and coiled wires. However, electromagnets can also have other shapes. The net magnetic field around an electromagnet is determined by the direction of current flow through the electromagnet and the orientation of that current. Straight wires and coils (solenoids) are the most common electromagnet shapes because these shapes produce regular and easily predictable magnetic fields.
TEACHING NOTES
STUDENT SAFETY • When students connect the leads to the power supply, they are
essentially shorting out the power supply. This can cause the wire to become warm. Students should use caution when handling the wire.
• Shorting the power supply can cause it to overload. Students should turn the current up slowly and should not leave the wires connected to the power supply for longer than is absolutely necessary. They should not turn the current up any higher than is necessary to produce a noticeable reading on the compass or magnetic field sensor.
PURPOSE • In this investigation, students will map and compare the
magnetic fields around straight and coiled electromagnets.
EQUIPMENT AND MATERIALS • If a magnetic field sensor is available, students will not
need the mini-compasses. • If a pre-coiled conductor is unavailable, you can wrap a
wire around a non-conducting cylinder (such as a wooden dowel or rubber rod) to create one.
• If you do not have enough materials for students to work in pairs, they can also work in small groups.
PROCEDURE • You may wish to demonstrate for students how to set up
their circuits. • Have one student in each pair act as the recorder for Part A.
That student should then carry out the procedure in Part B, while the second student acts as recorder.
DIFFERENTIATED INSTRUCTION • All students can work individually or in groups to design
and create an illustration, song, skit, or model that describes the relationship between the observations they made in this investigation and the information they learned in Section 12.4.
ENGLISH LANGUAGE LEARNERS • Partner each English language learner with another student
with strong English skills. If possible, pair lower proficiency English language learners with higher proficiency learners who speak the same language.
12.6.1 Controlled Experiment: Building and Investigating a Prototype Motor OVERALL EXPECTATIONS: A1; F2; F3
SPECIFIC EXPECTATIONS Scientific Investigation Skills: A1.4; A1.5; A1.8; A1.10;
A1.11
Electromagnetism 12
DRAFT PRE-PUBLICATION MATERIAL

Developing Skills of Investigation and Communication: FF2.8
Understanding Basic Concepts: F3.4; F3.6 The full Overall and Specific Expectations are listed on pages xx–xx.
SKILLS Hypothesizing Observing Predicting Analyzing Controlling Variables Evaluating Performing Communicating
EQUIPMENT AND MATERIALS per pair: • ammeter • variable DC power supply • horseshoe magnet • 3 alligator leads • strobe light to measure speed of rotation • cork • 2 short pins and 2 long pins • insulated wire to wrap around the cork • 2 paper clips • 6 thumb tacks • wooden base • 2 copper strips
ASSESSMENT RESOURCES Assessment Rubric 4: Application Assessment Summary 4: Application
PROGRAM RESOURCES Skills Handbook 3. Scientific Inquiry Skills Physics 11 ExamView ® Test Bank Physics 11 Online Teacher’s Centre Physics 11 website
www.nelson.com/onseniorscience/physics11u
RELATED RESOURCES Horton, Michael. Take-Home Physics: 65 High-Impact, Low-
Cost Labs. National Science Teachers Association, 2009.
EVIDENCE OF LEARNING Look for evidence that students can • describe how a DC electric motor works • describe factors that can affect the efficiency of a DC
electric motor
SCIENCE BACKGROUND History of Electric Motors • Although Michael Faraday conducted experiments in 1821
showing that electric motors were possible, the first practical electric motors were not invented until 1832.
British scientist William Sturgeon developed the first commutator-type DC motor capable of turning machinery. The modern DC motor was invented by Belgian engineer Zenobe Theophile Gramme in 1873.
TEACHING NOTES
STUDENT SAFETY • Strobe lights can cause seizures and other symptoms. Identify
any students with epilepsy or other seizure disorders and have them leave the room or look away while strobe lights are in operation. You should warn students not to look directly at the strobe light and leave the classroom lights on while the strobe light is in operation to minimize the chances of adverse effects.
TESTABLE QUESTION • Read the testable question aloud to the class. Ask students
to predict what they will change during the experiment and what they will measure. Have them refer back to their predictions when they complete the Variables section.
HYPOTHESIS • Remind students that a hypothesis includes both a
prediction and a reason for that prediction. • Sample hypothesis: As the number of loops in the motor
increases, the motor's speed of rotation will also increase, because the increased number of loops will produce a stronger magnetic field, which will generate a stronger force and cause the motor to turn more quickly.
VARIABLES • Remind students that controlled variables are conditions
that remain the same during all trials. Manipulated variables are conditions that are deliberately changed during each trial. Responding variables are the quantities that are measured and recorded to determine the effects of the manipulated variables.
• In this experiment, the manipulated variable is the number of loops of wire in the motor. The responding variable is rotational speed. The controlled variables include the composition, length, and thickness of the wire; the overall setup of the motor; the current through the wire; the strength and direction of the external magnetic field; and the temperature of the apparatus.
EXPERIMENTAL DESIGN • Point out the important features of the experimental design:
no two motors will be the same; certain variables will be controlled; and all groups will use the same metric (rotational speed) to compare their motors.
EQUIPMENT AND MATERIALS • You will need a strobe light with a tunable frequency to
determine rotational speed. • You can use real cork or a synthetic cork. Ensure that the
cork with the wire wrapped around it will still fit inside the
Electromagnetism 13
DRAFT PRE-PUBLICATION MATERIAL
bend of the horseshoe magnet with enough room to rotate. All pairs should have the same size cork.
• A strobe light is effective for measuring rotational speed. However, some science supply manufacturers also sell rotation-speed sensors that can measure rotational speed directly. If you wish, you may have students use one of these sensors instead of a strobe light.
PROCEDURE • To make measuring the rotation rate easier, have students
draw a dot, arrow, or other symbol on the end of the cork, in an area not covered by wire. Students can use this mark as a reference point to determine how much the motor has rotated.
• To measure the speed of the motor, shine the light on the end of the motor. Adjust the frequency of the strobing until the motor seems to freeze—that is, the wires on the cork are in the same orientation every time the light flashes. The frequency of the strobe light (in flashes per second) at this point is equal to the rotational speed of the motor (in rotations per second). Make sure students use the mark on the cork to determine when the motion appears to freeze. The mark should appear in only one spot on the cork. If the mark appears in more than one spot during each strobe, the rotational rate is greater than the strobe frequency.
OBSERVATIONS • Using the board or chart paper, draw a chart on which
students can record their observations. Have each student copy the completed chart into his or her notebook before answering the questions.
DIFFERENTIATED INSTRUCTION • Visual, auditory, and other learners may benefit from
discussing their results with others. In particular, ask students to describe the shape of the graph of R vs. N and explain its implications.
ENGLISH LANGUAGE LEARNERS • Allow English language learners to refer back to the
pronunciation guides and practice they used in Section 12.6 as they complete this activity. Ensure that they continue to pronounce each term correctly.
CHAPTER
12 Summary
ASSESSMENT RESOURCES Assessment Rubric 1: Knowledge and Understanding Assessment Summary 1: Knowledge and Understanding
PROGRAM RESOURCES BLM 12.Q Chapter 12 Quiz Skills Handbook 3.B Skills Handbook 10 Physics 11 ExamView ® Test Bank Physics 11 Online Teacher’s Centre Physics 11 website
www.nelson.com/onseniorscience/physics11u
SUMMARY QUESTIONS • Refer students to the Summary Questions on page xxx of
the Student Book. • Ask one or two questions that will prompt student recall of
each Key Concept. Have students explain and support their responses. Examples are given below. 1. In which direction do magnetic field lines point outside a
magnet? (from the north pole to the south pole) In which direction do they point inside a magnet? (from the south pole to the north pole)
2. How can you use magnetic field lines to determine whether two magnets wll attract or repel each other? (If the magnetic field lines point in the same direction, the magnets will repel. If they point in opposite directions, the magnets will attract.)
3. What do you have to do to make a piece of wire into a magnet? (Pass electric current through it.)
4. Why does the loop of wire in a motor rotate when electricity flows through it? (The electric current in the wire produces a magnetic field around the wire. The magnetic field around the wire interacts with the magnetic fields of the nearby magnets, causing the wire to turn.)
5. How does the right-hand rule for the motor principle work? (If you hold your hand with your thumb pointing in the direction of the conventional current and your fingers pointing in the direction of the external magnetic field, your palm faces in the direction of the force on the wire.)
6. What function does a split-ring commutator serve in a direct current motor? (It allows the wire loop to rotate repeatedly.)
7. What are four devices we use frequently that would not work without electromagnetism? (Sample answers: electric fans, computers, car engines, stereo speakers)
• Assign each Key Concept to a pair or small group of students. Have that pair or group identify key points from the chapter that support the Key Concept. Then, have groups share their key points. Record students' ideas on the board, and then have students use them to create their study guides.
• Refer students back to the chart paper containing their initial answers to the Starting Points questions on page xxx. Have them discuss any changes or corrections they made as they worked through the chapter. Then, ask each
Electromagnetism 14
DRAFT PRE-PUBLICATION MATERIAL
student to write a final answer to each question in his or her notebook. Allow students to discuss their answers with a partner if they wish.
• Have students complete BLM 12.Q Chapter 12 Quiz for additional review of the concepts in this chapter.
CAREER PATHWAYS • Related careers include electrical engineer, power plant
technician, automotive engineer, sound engineer, computer designer, and stereo designer.
• Suggest to students that they search the Internet for job postings or websites that promote a certain career field to learn more about the educational pathways necessary for that career. They might also use local contacts. For example, they might contact local universities to find out more about a career as an engineer.
• Emphasize to students that their reports on college diploma programs must compare two programs from two different colleges or universities. Encourage them to be creative in the presentation of their information. For example, they could summarize each program in writing, or they could use a graphic organizer.
• If necessary, help students navigate college or university Web sites to obtain information on degree programs. You may wish to assign specific colleges or universities to each student, to ensure that there is no overlap.
DIFFERENTIATED INSTRUCTION • Have each student create a summary of the content of the
chapter in a format of his or her choice. Visual learners should create graphic organizers and share with other students. Auditory learners should be encouraged to create review questions and discuss them with other students. Kinesthetic may create computer based review activities, and share them with other students.
• Instruct students to refer to the Key Concepts as they create their summaries.
ENGLISH LANGUAGE LEARNERS • Have English language learners finalize the index-card
glossaries they made as they worked through the chapter. Have them discuss any terms they are still unsure of with a partner.
Electromagnetism 15
DRAFT PRE-PUBLICATION MATERIAL
CHAPTER
13 Electromagnetic Induction
PROGRAM RESOURCES Physics 11 ExamView ® Test Bank Physics 11 Online Teacher’s Centre Physics 11 website,
www.nelson.com/onseniorscience/physics11u/
TEACHING NOTES • Have students examine the roller coaster in the Chapter
Opener photograph and provide time for them to relate their experiences riding roller coasters. Then have them read the caption. Ask, Why is a tremendous amount of energy so important at the start of a roller coaster ride? (The coaster needs the energy to move up hills.) How is the Back Lot Stunt Coaster different from most coasters? (It starts with electrical energy instead of gravitational potential energy.)
• Ask students to relate the electrical energy of the Back Lot Stunt Coaster to the key question at the start of the chapter: Why are magnets an important part of the coaster? (Magnets are used in the motor that provides electrical energy to the ride.)
• Have students write answers to the Starting Points questions. Save the answers for them to review and discuss after they study the chapter.
ENGAGE THE LEARNER
CHAPTER INTRODUCTION • Guide students in previewing unfamiliar terms on this
page and thinking about what they might mean. Point out root words that might provide clues to the meanings.
• To preview the major ideas that will be explored in the chapter, review the Key Concepts. Ask a student volunteer to read each Key Concept aloud before it is discussed. Ask prompting questions to assess students’ prior knowledge and to engage students in the topics. Examples are given: 1. What does the term electromagnetic mean? (relating to
both electric fields and to magnetic fields) The root word of induction is induce, which means “to produce or cause.” Based on this, what might electromagnetic induction mean about electric fields and magnetic fields? (One produces or causes the other in some way.)
2. According to this Key Concept, what is being induced? (an electrical current) What can you conclude from this Key Concept about the current that is induced? (It is induced in a specific direction.)
3. What does alternating mean? (changing back and forth) What is alternating current? (Current that changes direction, back and forth.)
4. What does the direct current generator generate? (a current that flows in only one direction) What do you think an alternating current generator generates? (a current that can change direction, back and forth)
5. What do you think happens to voltage if it is stepped up or stepped down? (It is increased or decreased.)
6. Based on these Key Concepts, how can you summarize the purpose of generators, transformers, and the electrical grid in providing electricity? (Generators produce the electricity and transformers change it. The electricity travels along the grid to where it is used.)
• Concepts students will study in this chapter are directly related to electromagnetism, which they studied in Chapter 12. Quickly review to help relate the chapters. Ask, What is electromagnetism? (the relationship between electricity and magnetism) What is Oersted’s principle? (A charge moving through a straight conductor produces a circular magnetic field around the conductor.) According to the motor principle, what happens when a current-carrying wire cuts across magnetic field lines? (The current experiences a force perpendicular to the magnetic field and the current direction.)
• Have students complete Mini Investigation: Electric Current from Motion?
MINI INVESTIGATION: ELECTRIC CURRENT FROM MOTION? Skills: Performing, Observing Purpose: Students will produce an electric current in a loop of wire without touching it. Equipment and Materials (per group): galvanometer; loop of wire; bar magnet; alligator leads (if necessary) Notes • Remind students that a galvanometer is used as an ammeter to
measure the presence of weak electrical current. • Suggest that students move the magnet both slowly and quickly.
Also, have them hold the magnet stationary at various places around the wire to see if there is any effect.
• Students should complete this activity in small groups.
DIFFERENTIATED INSTRUCTION • Kinesthetic learners could carry out the mini investigation
as visual learners watch and draw a diagram of it. Auditory learners could discuss the results.
• You may want to have students who are interested in computers set up a class blog, wiki, or website for posting reports, lab results, presentations, images, videos, links, and other forms of information.
ENGLISH LANGUAGE LEARNERS • As English language learners encounter vocabulary terms,
have them write each term on a separate index card and include a definition and a diagram or illustration.. Have them do the same for other unfamiliar terms.
Electromagnetic Induction 1
DRAFT PRE-PUBLICATION MATERIAL

13.1 Electromagnetic Induction
OVERALL EXPECTATIONS: A1; A2; F2; F3
SPECIFIC EXPECTATIONS Scientific Investigation Skills: A1.2; A1.5; A1.8; A1.10;
A1.11 Career Exploration: A2.2 Developing Skills of Investigation and Communication:
F2.1; F2.4; F2.8 Understanding Basic Concepts: F3.1; F3.4 The full Overall and Specific Expectations are listed on pages xx–x.
VOCABULARY electromagnetic induction law of electromagnetic induction
SKILLS Performing Observing
EQUIPMENT AND MATERIALS per group: • galvanometer • battery (or power supply) • switch • 2 pieces of conducting wire • soft-iron ring
ASSESSMENT RESOURCES Assessment Rubric 1: Knowledge and Understanding Assessment Rubric 2: Thinking and Investigation Assessment Summary 1: Knowledge and Understanding Assessment Summary 2: Thinking and Investigation
PROGRAM RESOURCES BLM 0.0-X Concept Map Skills Handbook 1. Safe Science Skills Handbook 2. Scientific Tools and Equipment Skills Handbook 3. Scientific Inquiry Skills Physics 11 ExamView ® Test Bank Physics 11 Online Teacher’s Centre Physics 11 website
www.nelson.com/onseniorscience/physics11u
RELATED RESOURCES Samuels, Charlie, The Advent of Electricity (1800-1900),
Gareth Stevens Publishing, 2010
Hirshfeld, Alan W., The Electric Life of Michael Faraday, Walker & Company, 2006
EVIDENCE OF LEARNING Look for evidence that students can • state the law of electromagnetic induction • use a Faraday’s ring to demonstrate induction • identify ways to increase the amount of electric current
that can be produced by electromagnetic induction • describe various uses of electromagnetic induction in
modern technology
SCIENCE BACKGROUND • Joseph Henry independently made observations of
electromagnetic induction a year before Faraday did. Henry also discovered the importance of insulating the wire used in the coils of electromagnets.
• Faraday considered a magnetic field to be field lines. All of the field lines that pass through a cross-sectional area are the magnetic flux. This flux is equal to the strength of the field multiplied by the area through which it passes.
• When a magnet is moved in a coil, the effect on the electric charge within the coil is a potential difference. This potential difference is known as the electromotive force, or EMF.
POSSIBLE MISCONCEPTIONS Identify: Students might think that the presence of a magnetic field is enough to produce an electric current in a nearby conductor. Clarify: Emphasize that a current is only produced if the magnetic field within the conductor is increasing or decreasing. This can be done by strengthening or weakening the magnetic field, by moving the magnet, or somehow causing the magnetic field to start and stop. Ask What They Think Now: At the end of this discussion, ask, If you set a magnet near a circle of wire, will there be a current flowing in the wire? Explain. (No. The magnet must be moving relative to the wire to induce a current.)
TEACHING NOTES
ENGAGE • Demonstrate how a magnetic field can exert a force on
electric charges. Connect a small cathode-ray tube (CRT) to a power supply. Point out that a fluorescent coating makes the electron beam in the tube visible. Slowly bring a bar magnet near the tube to show how the magnetic force can deflect the beam. Tell students that they will read in this section how a magnetic force pushes on charges in a conductor to produce an electric current.
EXPLORE AND EXPLAIN • Draw the following diagram on the board:
Electromagnetic Induction 2
DRAFT PRE-PUBLICATION MATERIAL

After students read “Discovery of Electromagnetic
Induction,” ask, What part of the diagram is incorrect? (A magnetic field must be changing in order to produce an electric current.)
• Have students complete Mini Investigation: Faraday’s Ring
• Point out that Faraday’s interest in science was the reason he was able to make significant scientific discoveries.
• Use the description of Faraday’s ring to assess students’ understanding of the Mini Investigation. Ask, Did a current in the left circuit always induce a magnetic field around the right coil? (Yes) Why, then, was there not always a current in the coil? (A current was only induced when the magnetic field was changing, that is, when the switch on the left circuit was opened or closed.)
EXTEND AND ASSESS • Distribute BLM 0.0-X Concept Map. Tell students to write
Electromagnetic Induction in the centre oval, and then write the four factors that affect electromagnetic induction in the surrounding ovals. Have them include a brief description of each factor.
• Instruct students to read about the applications of electromagnetic induction and to study the photographs.
• Ask, How does induction cooking heat food, even though the cooking surface is cool? (A changing magnetic field in the stove element induces a current in the cooking pot. The electrical resistance of the pot causes electrical energy to change to thermal energy, heating the food.)
• Have students look at Figure 4 and then describe how it works: (1) A current in a coil generates a changing
magnetic field. (2) This field induces a current in nearby metal. (3) The current in the metal induces another magnetic field. (4) The device detects this second field.
• After students read about induction chargers, ask, Why do you think induction chargers are not more widely used? (Sample answer: More work needs to be done to make them more efficient.)
• Have students complete the Questions on page 7 of the Student Book.
DIFFERENTIATED INSTRUCTION • Have students work in multimodal groups to create
posters summarizing the factors that affect electromagnetic induction. For each factor, the posters should include a diagram indicating the characteristics of the electromagnetic field and a brief written summary of the how the factor affects the field. These posters could be presented to their peers and displayed around the classroom.
MINI INVESTIGATION: FARADAY’S RING Skills: Performing, Observing Purpose: Students will construct a Faraday’s ring apparatus and use it to demonstrate electromagnetic induction. Equipment and Materials (per group): galvanometer; battery (or power supply); switch; 2 pieces of conducting wire; soft-iron ring Notes • Discuss the Faraday’s ring setup in Figure 1. Point out that there are
two circuits. Only the circuit on the left has a power source. • Review the circuit symbols to be sure students understand how to
set up their circuits. Point out the battery, the open switch, and the galvanometer symbols.
• Make sure students understand that the coiled wire in the left circuit produces a magnetic field. The purpose of the soft-iron ring is to strengthen this field.
• Students should complete this activity in small groups.
ENGLISH LANGUAGE LEARNERS • To make the Mini Investigation easier for English
language learners to follow, label each piece of equipment with its name and, if applicable, the symbol used to indicate the item on the circuit diagram.
13.2 Lenz’s Law OVERALL EXPECTATIONS: A1; A2; F2; F3
SPECIFIC EXPECTATIONS Scientific Investigation Skills: A1.1; A1.2; A1.5; A1.8;
A1.10; A1.11 Career Exploration: A2.2 Developing Skills of Investigation and Communication:
F2.1; F2.4; F2.5; F2.7; F2.8 Understanding Basic Concepts: F3.1; F3.2; F3.4; F3.5 The full Overall and Specific Expectations are listed on pages xx–x.
V RY OCABULA Lenz’s law
SKILLS Predicting Observing Performing Analyzing
EQUIPMENT AND MATERIALS per group: • galvanometer • coiled conductor
Electromagnetic Induction 3
DRAFT PRE-PUBLICATION MATERIAL

• permanent bar magnet • 2 alligator leads
ASSESSMENT RESOURCES Assessment Rubric 1: Knowledge and Understanding Assessment Rubric 2: Thinking and Investigation Assessment Summary 1: Knowledge and Understanding Assessment Summary 2: Thinking and Investigation
PROGRAM RESOURCES Skills Handbook 1. Safe Science Skills Handbook 2. Scientific Tools and Equipment Skills Handbook 3. Scientific Inquiry Skills Physics 11 ExamView ® Test Bank Physics 11 Online Teacher’s Centre Physics 11 website
www.nelson.com/onseniorscience/physics11u
RELATED RESOURCES Keljik, Jeffrey J., Electricity 4: AC/DC Motors, Controls,
and Maintenance, Delmar Cengage Learning, 2008
EVIDENCE OF LEARNING Look for evidence that students can • state Lenz’s law • apply Lenz’s law to predict the direction of current that
a magnetic field induces in a coil
SCIENCE BACKGROUND • A common example of Lenz’s law involves a magnet
swinging above a surface. If the magnet is allowed to swing freely, it will move back and forth, gradually decreasing the height of the swing until it finally stops. However, imagine a nonmagnetic conducting plate (such as a sheet of copper) placed on the surface above which the magnet swings. If the magnet again is allowed to swing freely, the swing will be more restrained. Each swing will be smaller, and the magnet will stop much sooner than before. Clearly, the magnet is experiencing a force, but the plate is nonmagnetic. The magnet is inducing so-called eddy currents in the conducting plate. Each eddy current is surrounded by a magnetic field. According to Lenz’s law, these magnetic fields act opposite to the field of the swinging magnet, slowing its motion.
ENGAGE • Have students look back at the illustration for the Mini
Investigation in Section 13.1. Point out that the direction of conventional current in the left circuit is clockwise. Explain that in this section they will learn to predict the direction of current induced in the circuit on the right.
EXPLORE AND EXPLAIN
• Have students complete Mini Investigation: Observing the Direction of Induced Current.
MINI INVESTIGATION: OBSERVING THE DIRECTION OF INDUCED CURRENT Skills: Predicting, Performing, Observing, Analyzing Purpose: Students will observe the direction of the induced current when moving a magnet into and out of a coiled conductor. Equipment and Materials (per group): galvanometer; coiled conductor; permanent bar magnet; 2 alligator leads Notes • Have students work in small groups to perform this investigation. • Instruct students to repeat their observations several times for each
step, but caution them that at each step they should consider the reaction of the galvanometer only while they are moving the magnet in the direction specified in that step.
• Remind students of the shorter way to state the right-hand rule for current in a solenoid: “Fingers follow current, thumb points north.”
• Read aloud the first sentence under the heading
“Direction of Induced Current.” Emphasize that it is the magnetic force on electrons that causes the current to flow in a certain direction. As with any force, if you know the direction of the magnetic force, you can predict its effect.
• Use Figure 3 to help students understand Lenz’s law when a magnet is pushed into or out of a coil. Caution them against incorrectly applying the right-hand rule for solenoids. In Figure 3 (a), for example, students may think that their thumb should point in the direction of the magnet’s north pole. Explain that the first step is to determine the direction of the opposing magnetic force, which is opposite the direction of the magnet’s force.
• Point out that Figure 3 shows only the case when the north pole is moved in and out of a coil. If a south pole is used instead, the current flow is in the opposite direction.
• Have students look at the drop-tower ride in Figure 4. Ask anyone who has been on the ride to describe the experience, especially while the ride was braking. Encourage students to use Lenz’s law to explain the ride.
EXTEND AND ASSESS • Divide students into pairs. Have them use a paper towel
tube and a pencil to model a coil and a bar magnet. Tell them to demonstrate for their partners how to use Lenz’s law to predict the direction of current when they move a north pole or a south pole into or out of a wire coil.
• Have students complete the Questions on page 10 of the Student Book.
DIFFERENTIATED INSTRUCTION • Students should work in groups with other students with
the same learning style to produce a project that shows how drop tower rides work. Auditory learners could write and produce a video, and visual learners could draw
Electromagnetic Induction 4
DRAFT PRE-PUBLICATION MATERIAL

a labeled diagram and flow chart, Kinesthetic learners could build a model or product a computer animation.
ENGLISH LANGUAGE LEARNERS • Demonstrate for students the steps involved in the
procedure for the Mini Investigation. As you or a student reads each step aloud, pantomime or actually perform it.
13.3 Alternating Current OVERALL EXPECTATIONS: A1; A2; F1; F2; F3
SPECIFIC EXPECTATIONS Scientific Investigation Skills: A1.1; A1.3; A1.7; A1.9;
A1.10; A1.11 Career Exploration: A2.1; A2.2 Relating Science to Technology, Society, and the
Environment: F1.2 Developing Skills of Investigation and Communication:
F2.1 Understanding Basic Concepts: F3.7; F3.9 The full Overall and Specific Expectations are listed on pages xx–x.
VOCABULARY alternating current
ASSESSMENT RESOURCES Assessment Rubric 1: Knowledge and Understanding Assessment Summary 4: Application Assessment Rubric 1: Knowledge and Understanding Assessment Summary 4: Application
PROGRAM RESOURCES BLM 0-0.X Concept Map Skills Handbook 1. Safe Science Skills Handbook 2. Scientific Tools and Equipment Skills Handbook 3. Scientific Inquiry Skills Physics 11 ExamView ® Test Bank Physics 11 Online Teacher’s Centre Physics 11 website
www.nelson.com/onseniorscience/physics11u
RELATED RESOURCES O’Neil, John J., Prodigal Genius: The Life of Nikola Tesla,
Adventures Unlimited Press, 2008 McNichol, Tom, AD/DC: The Savage Tale of the First
Standards War, Jossey-Bass, 2006
EVIDENCE OF LEARNING Look for evidence that students can
• explain what alternating current is and why it is used in the power grid
• identify typical voltages used in homes, and describe the colour-coding system used to identify voltages in wires
• describe various safety systems used for electrical wiring in homes
SCIENCE BACKGROUND • As alternating current flows through a circuit, the push
on the electrons continually switches directions. The electrons in the wire do not travel far before experiencing a force that pushes them in the opposite direction. However, even if the current did not change direction, such as with a DC current in a simple circuit, the electrons still move very slowly compared to the speed of electrical energy moving through the wire.
• Although the effective voltage supplied to homes and businesses in North America is 240 V, the wiring allows for either 120 V or 240 V use. Different voltage levels are supplied in other areas of the world. Students will learn in later sections of this chapter that higher voltages increase the efficiency of electrical energy transmission. However, changing to a higher-voltage standard would be prohibitive in North America because so many electrical devices depend on the existing standard.
POSSIBLE MISCONCEPTIONS Identify: Students may think that the terminology “changing magnetic field” means that the properties of the field change in some way. Clarify: Explain that the term “changing” refers to the effect of the field at any point in space. For example, if the field is produced by a magnet moving into and out of a wire coil, the magnet always produces the same field with the same direction and the same strength. An electron in the coil, however, will experience the strength and possibly the direction of the field increasing and decreasing as the magnet moves. Ask What They Think Now: Ask, If a magnet is moved into a Faraday ring, in what way does the magnetic field change? (The strength of the field experienced by electrons in the ring increases.)
TEACHING NOTES
ENGAGE • Point to an electrical cord or device in the classroom, and
ask students which direction current flows in it. Emphasize that, unlike current in a simple lab circuit, current that flows in schools, homes, and businesses is alternating, which means it continually changes direction.
EXPLORE AND EXPLAIN • Draw a simple circuit diagram on the board. Include +
and – signs to indicate the terminals of the battery. Ask,
Electromagnetic Induction 5
DRAFT PRE-PUBLICATION MATERIAL

In what direction does current flow in this circuit? (from the positive terminal to the negative terminal) Draw an arrow on the circuit to indicate the direction. Next, erase the battery symbol on the circuit and draw it in the opposite direction. Ask, What would happen if I kept flipping the battery’s direction? (The direction of current flow would continually change direction.) Explain that flipping the battery would change the direction of the potential difference, producing an alternating current.
• After students read “Development of Alternating Current,” ask, What disagreement did Edison and Tesla have about electrical current? (Edison wanted the power grid to use direct current. Tesla wanted it to use alternating current.) Whose idea was finally accepted? (Tesla’s)
• Ask, What is the frequency at which current alternates in the North American power grid? (60 Hz) How does this affect the resistance, current, and voltage in a circuit? (Resistance depends on the device using the electrical energy and not on the frequency. Current and voltage alternate between positive and negative values.)
• Draw students’ attention to the lines marked with voltages in Figure 2. Ask, What is the effective voltage of current that enters a home? (240 V) Why does the figure show lines with two different voltages exiting the distribution panel? (A few appliances use 240 V, but most use 120 V.)
• Point out the different parts of the distribution panel in Figure 2. Ask, What is the purpose of the main breaker? (In an emergency, pulling the main breaker immediately cuts power to all circuits in the home.) What happens if you pull one of the single circuit breakers? (Power will be cut to that circuit only.)
• Bring in an old cable that has the different colours of wire exposed, or write red, black, white, and green on the board. Ask, What is the significance of each of the colours in home electrical wiring? (Red and black are used for 120-V wires. White is used for the neutral wire. A green or bare wire is used for a ground wire.)
• Students may wonder how some of the devices listed in Table 1 can use DC power, even though they are connected to the AC system of the home. Explain that they will learn in a later section how AC can be converted to DC.
• Distribute BLM 0-0.X Concept Map. Have students write Safety Systems in the centre oval. Then have them complete the concept map with names and details about the four electrical safety systems described in this section.
EXTEND AND ASSESS • Have students look at the electrical distribution panel in
their homes, with their parents’ permission and supervision. Suggest that they identify the different parts, such as the feeder cable, the main breaker, and the neutral bus bar.
• Divide the class into small groups to research more about the dispute between Edison and Tesla about direct or alternating current. Conduct a class debate in which students present arguments about the issue.
• Have students complete the Questions on page 14 of the Student Book.
DIF• Visual and kinesthetic learners could examine sample of fuses ,circuit breakers and fault circuit interrupters. Videos showing explanations of how fuses and circuit breakers function would help visual and auditory learners.
FERENTIATED INSTRUCTION
ENGLISH LANGUAGE LEARNERS • Suggest that English language learners prepare notes for
the debate relating to Edison and Tesla. If possible, provide time for students to practice saying their arguments aloud before the debate.
13.4 Electricity Generation OVERALL EXPECTATIONS: A1; F1; F2; F3
SPECIFIC EXPECTATIONS Scientific Investigation Skills: A1.1; A1.2; A1.3; A1.4;
A1.6; A1.7; A1.8; A1.9; A1.10; A1.11 Relating Science to Technology, Society, and the
Environment: F1.1; F1.2 Developing Skills of Investigation and Communication:
F2.1 Understanding Basic Concepts: F3.1; F3.2; F3.4; F3.5;
F3.6; F3.7 The full Overall and Specific Expectations are listed on pages xx–x.
VOCABULARY electric generator
SKILLS Planning Communicating Performing Researching Observing Identifying Alternatives
EQUIPMENT AND MATERIALS per group: • galvanometer • 2 bar magnets • 2 different coils • 2 alligator leads
ASSESSMENT RESOURCES Assessment Rubric 1: Knowledge and Understanding
Electromagnetic Induction 6
DRAFT PRE-PUBLICATION MATERIAL

Assessment Rubric 2: Thinking and Investigation Assessment Summary 1: Knowledge and Understanding Assessment Summary 2: Thinking and Investigation
PROGRAM RESOURCES BLM 0.0-X Two-Column Table Skills Handbook 3. Scientific Inquiry Skills Physics 11 ExamView ® Test Bank Physics 11 Online Teacher’s Centre Physics 11 website
www.nelson.com/onseniorscience/physics11u
RELATED RESOURCES Lai, Loi Lei and Chan, Tze Fun, Distributed Generation:
Induction and Permanent Magnet Generators, Wiley-IEEE Press, 2007
EVIDENCE OF LEARNING Look for evidence that students can • explain how an alternating current generator works • describe ways to increase the current produced by an
alternating current generator • contrast a DC generator with an AC generator and with
a DC motor
SCIENCE BACKGROUND • AC generators used in a car are called alternators. Those
used with turbines at power plants are called turbo-alternators. The term dynamo most often refers to a DC generator, but sometimes it is used for an AC generator.
• The frequency at which an AC generator switches direction can affect the performance of some devices. In North America, the frequency is 60 Hz, but in areas where the standard frequency is 50 Hz, a flicker can be noticed in some devices.
• When referring to the spinning of a wire coil between the permanent magnets of a generator, common terminology is that the coil cuts across the field lines of the magnet.
POSSIBLE MISCONCEPTIONS Identify: Students might think that only the magnet of a generator can move to produce a current. Clarify: Point out that induction works because a magnet and a coil move relative to each other. It does not matter which moves and which is stationary. Ask What They Think Now: At the end of this discussion, ask, What are two ways an AC generator can change the magnetic field used to produce a current? (moving a magnet in a coil, or spinning a coil inside a magnetic field)
TEACHING NOTES
ENGAGE • Ask students to name things they do each day that involve
electricity. Have them list these on the board in two
columns: things that depend on alternating current and those that depend on direct current.
• Instruct students to preview the figures in this section and compare them to the DC motor in Chapter 12. Remind them that motors change electrical energy into mechanical energy. In this section they will learn how generators change mechanical energy into electrical energy, with either alternating current or direct current.
EXPLORE AND EXPLAIN • After students read the two introductory paragraphs for
the section, ask, What is an electric generator? (a device that transforms other forms of energy into electrical energy) Point out that the current produced by a generator can be either alternating or direct.
• Divide the class into small groups to discuss how the alternating current generator works. Instruct groups to read together “The Alternating Current Generator” and to study Figures 1-4 and make a list of the steps that occur as the generator works. To help students visualize the process, you may wish to have them develop a simple model for the coil and the permanent magnet.
• Remind students to use the right-hand rule when analyzing the figures.
• Ask questions that help students think critically about the figures. For Figure 1 ask, What is the purpose of the brushes? (They make contact with the slip rings so that current can flow from the coil to the external circuit.) For Figures 2 and 3 ask, Why is Lenz’s law important in these diagrams? (It describes the direction of current that is induced in the coil.) For Figure 4 ask, Once the direction of current is determined in the coil, what do you know about the brushes? (I know which one is positive and which one is negative.)
• Draw students’ attention to Tutorial 1: Explaining the AC Generator on page 17 of the Student Book.
• Ask, In Figure 5, how do you know which brush to label positive? (The conventional current goes into the galvanometer’s positive terminal.)
• Point out the relationship between the galvanometer’s needle and the position of the wire coil in Figures 5-8. Explain that Figure 9 summarizes this relationship.
• Have students complete Mini Investigation: What Factors Affect Electricity Generation?
MINI INVESTIGATION: WHAT FACTORS AFFECT ELECTRICITY GENERATION? Skills: Planning, Performing, Observing, Communicating Purpose: Students will determine what factors affect the amount of current a generator produces. Equipment and Materials (per group): galvanometer; 2 bar magnets; 2 different coils; 2 alligator leads Notes • Have students work in small groups for this investigation. • Instruct students to test moving the magnet faster or slower,
Electromagnetic Induction 7
DRAFT PRE-PUBLICATION MATERIAL
reversing the pole of the magnet, using more than one magnet, and changing the number of coil windings.
• Draw students’ attention to Tutorial 2: Using a Coil in
an AC Generator on page 19 of the Student Book. • Help students relate the discussion in this tutorial to the
single-loop generator they studied earlier in the section. Point out that the process is the same but the changes result in a stronger current being generated.
• Make sure students pay attention to the relationship between the shaded side of the armature, its position relative to the permanent magnet, and the direction of current in the external circuit.
• Have students compare the DC generator in Figure 15 and the AC generator in Figure 1. Ask, In what way is the DC generator different? (Instead of two slip rings, the DC generator has a commutator to prevent the current from changing direction.)
• Have students complete Research This: Wind Turbines.
EXTEND AND ASSESS • Distribute BLM 0.0-X Two-Column Table. Instruct
students to review what they have learned about alternating current generators by listing details about how they work in the left-hand column and details about factors that affect their output in the right-hand column.
• Have students complete the Questions on page 20 of the Student Book.
UNIT TASK BOOKMARK Remind students that what they have learned about the different types of generators in this section will be useful when they complete the Unit Task.
DIFFERENTIATED INSTRUCTION • Arrange for students to tour a local power plant. Visual,
and kinesthetic learners will benefit from seeing the generators in person, and auditory learners will benefit from hearing a representative or employee explain how the plant operates.
ENGLISH LANGUAGE LEARNERS • Have students work in groups to review the Tutorials.
This will give English language learners the opportunity to discuss the figures without having to read large amounts of text and refer back to the figures.
13.5 Transformers OVERALL EXPECTATIONS: A1; F1; F2; F3
SPECIFIC EXPECTATIONS Scientific Investigation Skills: A1.1; A1.2; A1.4; A1.5;
A1.6; A1.8; A1.10; A1.11; A1.12; A1.13 Relating Science to Technology, Society, and the
Environment: F1.1 Developing Skills of Investigation and Communication:
F2.1; F2.3; F2.4; F2.5; F2.6; F2.7; F2.8 Understanding Basic Concepts: F3.1; F3.2; F3.5; F3.8 RESEARCH THIS: WIND TURBINES
Skills: Researching, Identifying Alternatives, Communicating Purpose: Students will research a type of wind turbine. Notes • Have students work independently or with a partner to research
the wind turbine technology. • Make sure various types of wind technology are investigated by
the different groups of students. Allow time after students complete their research for them to present their research to the class or for students to read the pamphlets of other groups.
• You may wish to provide instruction on how to use computer graphics programs for students to prepare their pamphlets.
The full Overall and Specific Expectations are listed on pages xx–x.
VOCABULARY
er transformer step‐down transform step‐up transformer
SKILLS Performing Observing Analyzing
EQUIPMENT AND MATERIALS per group: • variable AC/DC power supply • 2 AC/DC multimeters with probes • transformer with different number of windings on primary and secondary coils • 2 alligator leads
ASSESSMENT RESOURCES Assessment Rubric 2: Thinking and Investigation Assessment Rubric 4: Application Assessment Summary 2: Thinking and Investigation Assessment Summary 4: Application
PROGRAM RESOURCES BLM 13.5-1 Transformer Equations Skills Handbook 3. Scientific Inquiry Skills Physics 11 ExamView ® Test Bank Physics 11 Online Teacher’s Centre Physics 11 website
www.nelson.com/onseniorscience/physics11u
Electromagnetic Induction 8
DRAFT PRE-PUBLICATION MATERIAL
RELATED RESOURCES Herman, Stephan L., Electrical Transformers and Rotating
Machines, Delmar Cengage Learning, 2005
EVIDENCE OF LEARNING Look for evidence that students can • identify the function and the main parts of an electrical
transformer • explain how a step-up transformer and a step-down
transformer work • state and use the transformer equations relating voltage,
current, and number of windings in transformer coils
SCIENCE BACKGROUND • Electrical transformers are easy to spot along roadways
and in neighbourhoods. Near homes, two or three canister-type transformers may be suspended near the top of an electrical pole. Inside, the transformers have the same basic design as those in this section—two wire coils with soft-iron cores—but with many more windings. Oil inside the canisters is used both as a type of insulation and as a cooling liquid.
• Devices that use transformers in homes and schools are common. Many devices that use batteries, such as laptop computers and cell phones, also have electrical cords with small boxes attached. The small boxes perform two functions. First, they contain transformers to reduce the 120-V current to a lower voltage to prevent damage to the device. Second, they contain inverters that change the AC current to DC, so that it can be used in the device’s battery.
POSSIBLE MISCONCEPTIONS Identify: Students might think that bare wire, rather than insulated wire, is better to use for a transformer because the magnetic field can somehow affect the wire better if it is bare. Clarify: Explain that insulated wire is better because it prevents the current from crossing between coils rather than along the length of the coil. Ask What They Think Now: At the end of this discussion, ask, Should the wire used for a transformer coil be bare or insulated? (insulated)
TEACHING NOTES
ENGAGE • Show students a device in the classroom that uses 120 V,
such as an electric fan, and another one that uses a much lower voltage but is plugged into a socket, such as a phone charger. Explain that some devices must have the voltage lowered before they are used. In this section, students will learn how that is done.
EXPLORE AND EXPLAIN • After students read “How Transformers Work,” ask, Why
is it impossible to have a transformer with only a DC current in the primary coil? (A DC current does not produce a continually changing magnetic field. This continually changing magnetic field is necessary for inducing a current in the secondary coil of the transformer.) How is a step-up transformer different from a step-down transformer? (A step-up transformer has more windings in the secondary coil than in the primary coil. A step-down transformer has more windings in the primary coil than in the secondary coil.)
• Have students complete Mini Investigation: Observing Transformers at Work.
MINI INVESTIGATION: OBSERVING TRANSFORMERS AT WORK Skills: Performing, Observing, Analyzing Purpose: Students will observe how a transformer works with direct current and alternating current. Equipment and Materials (per group): variable AC/DC power supply; 2 AC/DC multimeters with probes; transformer with different number of windings on primary and secondary coils; 2 alligator leads Notes • Have students work in small groups for this investigation. • Prepare the coils before the investigation begins. • Make sure students understand how to use the AC/DC power
supply and the multimeters. • As a class, work through the derivations in “Conservation
of Energy in Transformers” and “Transformer Equations.” Point out the Learning Tip that summarizes the transformer equations. Emphasize the placement of the subscripts s and p in the numerator and denominator.
• Draw students’ attention to Tutorial 1: Voltage in a Transformer on page 23 of the Student Book.
• In Sample Problem 1, students are told the primary voltage and the number of windings on each coil, and they solve for the secondary voltage. Point out that they could solve for any of the variables as long as they know the other three.
• Allow time for students to solve the practice problems in class. Point out the Learning Tip about significant digits and windings.
• Draw students’ attention to Tutorial 2: Current in a Transformer on page 24 of the Student Book.
• Work through Sample Problem 1 in class. Students are told the primary current and the voltage in both coils, and they solve for the secondary current.
• Allow students to solve the practice problems in class so that you can answer any questions and correct any misconceptions.
• Once students have had ample practice using transformer equations, assign BLM 13.5-1 Transformer Equations as a self-assessment opportunity.
Electromagnetic Induction 9
DRAFT PRE-PUBLICATION MATERIAL
• Have students read “Transformer Efficiency.” Emphasize that all transformers lose energy, but some of this is useable energy for other purposes.
EXTEND AND ASSESS • Have students work in small groups to write several
problems each that require use of the transformer equations. Then have groups trade problems and solve them.
• Have students complete the Questions on page 25 of the Student Book.
DIFFERENTIATED INSTRUCTION • Visual learners should use diagrams to explain the
relationship between the coils in step down and step up transformers. Auditory learners should explain the relationship in words, and write it down so they can read it later to review. Kinesthetic learners may benefit from doing a variety of trials using different transformers and summarizing their findings in a way that supports their learning.
• Anchor charts should be posted to support the calculations in this section.
ENGLISH LANGUAGE LEARNERS • The mathematical nature of this section should appeal to
students with language difficulties. Whenever possible, provide students with additional opportunities to practice using the equations related to transformers, and use them to reinforce the relationships described in the text.
13.6 Power Plants and the Electrical Grid
OVERALL EXPECTATIONS: A1; A2; F1; F2; F3
SPECIFIC EXPECTATIONS Scientific Investigation Skills: A1.12; A1.13 Career Exploration: A2.1; A2.2 Relating Science to Technology, Society, and the
Environment: F1.1 Developing Skills of Investigation and Communication:
F2.1; F2.6 Understanding Basic Concepts: F3.1; F3.4; F3.5; F3.6;
F3.7; F3.8; F3.9 The full Overall and Specific Expectations are listed on pages xx–x.
ASSESSMENT RESOURCES Assessment Rubric 1: Knowledge and Understanding Assessment Rubric 4: Application
Assessment Summary 1: Knowledge and Understanding Assessment Summary 4: Application
PROGRAM RESOURCES BLM 13.6-1 Power Loss Skills Handbook 3. Scientific Inquiry Skills Physics 11 ExamView ® Test Bank Physics 11 Online Teacher’s Centre Physics 11 website
www.nelson.com/onseniorscience/physics11u
RELATED RESOURCES Gale Reference Team, “Premier’s Power Grid Dream Gets
Energized,” Winnipeg Free Press, 2007 Schavemaker, Pieter, and Van der Sluis, Lou, Electrical
Power System Essentials, Wiley, 2008
EVIDENCE OF LEARNING Look for evidence that students can • explain why transformers are needed for transmission of
electrical current • identify how step-up and step-down transformers are used
in the power grid • describe parts of commercial AC generators
SCIENCE BACKGROUND • At the time of Edison and Tesla, long-distance electricity
transmission using direct current was unfeasible because of the high energy losses. With modern technology, high voltage direct current is now possible in some cases. Using a direct current system allows more current to be transmitted, reducing costs. The current levels are also more stable. When alternating current lines are joined, the current must be synchronized. The North American grid is divided into large sections that are synchronized, but each section is not synchronized with the others. Direct current lines can be used to join systems that are not synchronized.
• Three power grids provide electrical energy in Canada: the Eastern grid, the Western grid, and the Quebec grid. Canada also has systems that interconnect the grids to systems in the United States.
TEACHING NOTES
ENGAGE • Ask students if they know where the electrical energy
they use each day is generated. Point out that many sources contribute to the electrical energy grid.
• Remind students that they have learned about how to increase and decrease the voltage in electrical circuits. Explain that in this section they will learn why the ability to do this is so important when transmitting electrical energy from a power station to distant homes, schools, and businesses.
Electromagnetic Induction 10
DRAFT PRE-PUBLICATION MATERIAL
EXPLORE AND EXPLAIN • Remind students of the conflict between Edison and Tesla
about whether DC or AC current would be used in large electrical systems. Explain that the reason Tesla’s idea was accepted was because AC could be used in transformers, allowing voltage to be easily increased or decreased.
• On the board, work through the derivation of the new power equation and its application. Ask, How were we able to calculate the amount of power transformed to unusable thermal energy? (by multiplying the square of the current by the resistance of the wire) How can you use this to determine the efficiency of the system? (Divide the power transformed to other types of energy by the power produced at the generator, and multiply by 100 to obtain the percentage loss. The remaining percentage, which is 70% in this case, is the efficiency of the system.)
• Ask, How did the calculations of power loss change when the current was reduced? (The power loss decreased.) How does this explain why Tesla’s idea was more practical? (Using AC would allow voltage to be increased, which would decrease the current in long-distance transmission lines. The lower current would result in much less power loss during transmission.)
• Lead students in analyzing how the voltage is increased and decreased in the power grid in Figure 1. At each point, ask students to describe what the benefit in the change was. Help them realize that voltage is increased to achieve higher efficiency during long-distance transmission. It is decreased to provide voltages used in neighbourhoods.
• Have students read “Commercial AC Generators.” Stress that the AC generators they have studied in this chapter are a simplified case used to teach the concepts.
• Use Figure 5 to explain one type of commercial AC generator. Ask, What are some ways this generator is different from the ones you have studied? (It has multiple coils. It uses electromagnets with DC current input.) What type of energy source is shown at the power generating station? (hydro-electric)
EXTEND AND ASSESS • Encourage students to look for transformers around their
homes and the school. Provide an opportunity during class time for them to describe the placement of the transformer and to predict whether it is a step-up or a step-down transformer.
• Divide students into small groups to research how energy is supplied to the grid in your area. Allow time for students to discuss what they learn in class.
• Have students complete BLM 13.6-1 Power Loss. • Have students complete the Questions on page 29 of the
Student Book.
DIFFERENTIATED INSTRUCTION • When students research how energy is supplied to your
grid, encourage them to work in multimodal groups. Their final presentation should support all learning styles, with a visual (diagrams, flowcharts), auditory (recording or presentation) and kinesthetic (model, skit) component.
• A flow chart should be posted in the classroom summarizing the steps in the section calculations.
ENGLISH LANGUAGE LEARNERS • To help English language learners distinguish between the
purposes of transformers and generators, point out that the word root of transformer is transform, and the root of generator is generate.
13 Investigations
13.2.1 Observational Study: Investigating Electromagnetic Induction OVERALL EXPECTATIONS: A1; F2; F3
SPECIFIC EXPECTATIONS Scientific Investigation Skills: A1.1; A1.2; A1.4; A1.5;
A1.6; A1.8; A1.10; A1.11 Developing Skills of Investigation and Communication:
F2.1; F2.4; F2.5; F2.7; F2.8 Understanding Basic Concepts: F3.1; F3.2; F3.4; F3.5 The full Overall and Specific Expectations are listed on pages xx–xx.
SKILLS Performing Analyzing Observing Communicating
EQUIPMENT AND MATERIALS per group: • galvanometer (or ammeter) • 2 bar magnets • 2 different coils of wire (one with more windings
than the other) • 2 alligator leads
ASSESSMENT RESOURCES Assessment Rubric 5: Investigation Assessment Summary 5: Investigation Self-Assessment Checklist 1: Investigation
Electromagnetic Induction 11
DRAFT PRE-PUBLICATION MATERIAL

DIFFERENTIATED INSTRUCTION PROGRAM RESOURCES • Have each group create a summary of their observations
in the format of their choosing. Visual learners may chose to use diagrams and flowcharts, auditory learners may make recordings or oral presentations, Kinesthetic learners may want to film themselves discussing their results while they are manipulation the lab equipment.
Skills Handbook 3. Scientific Inquiry Skills Physics 11 ExamView ® Test Bank Physics 11 Online Teacher’s Centre Physics 11 website
www.nelson.com/onseniorscience/physics11u
RELATED RESOURCES Keljik, Jeff, AC Theory, Delmar Cengage Learning, 2010 ENGLISH LANGUAGE LEARNERS
• Before starting the investigation, have student volunteers take turns reading each step of the Procedure aloud. Demonstrate how to perform each step as it is read.
EVIDENCE OF LEARNING Look for evidence that students can • explain electromagnetic induction • identify factors that affect the strength of the current
produced by electromagnetic induction
SCIENCE BACKGROUND • When a bar magnet is moved into a coil, or when a coil is
moved around a bar magnet, the maximum force occurs on the electrons in the coil if the magnet is perpendicular to the coil. If the magnet is brought in at an angle, the value of the induced voltage is the sine of the angle multiplied by the maximum value. For example, a magnet brought into the loop at a 45° angle only induces about 7/10 the voltage it would if it is brought in at a 90° angle.
• The magnetic field of a bar magnet is strongest at its pole and weaker alongside the magnet. When a magnet is brought into a conducting coil, the stronger field at the pole will have a stronger effect on the electrons in the coil as long as the magnet is moving.
TEACHING NOTES
PURPOSE • Students will use a galvanometer to observe the effect on
a current when they change the direction of a magnetic field and when they change the strength of the field.
EQUIPMENT AND MATERIALS • Prepare the coils of wire beforehand, or have students
prepare them. Ensure that the number of windings is sufficient to result in a significant voltage difference.
PROCEDURE • Remind students that they should use the right-hand rule
for solenoids in determining the current direction. • Explain that in Steps 2 and 3, students should keep the
coil stationary and move the magnet toward it. In Step 7, they should keep the magnet stationary and move the coil toward it. In both cases, the coil and magnet move relative to each other. Emphasize that for a fair comparison, students should try to move the coil and magnet at the same speed.
Electromagnetic Induction 12
DRAFT PRE-PUBLICATION MATERIAL
CHAPTER
13 Summary
ASSESSMENT RESOURCES Assessment Rubric 1: Knowledge and Understanding Assessment Rubric 2: Thinking and Investigation Assessment Summary 1: Knowledge and Understanding Assessment Summary 2: Thinking and Investigation
PROGRAM RESOURCES Skills Handbook 3. Scientific Inquiry Skills Physics 11 ExamView ® Test Bank Physics 11 Online Teacher’s Centre Physics 11 website
www.nelson.com/onseniorscience/physics11u
RELATED RESOURCES Fairley, Peter, Electricity and Magnetism, Twenty-First
Century Books, 2007
SUMMARY QUESTIONS • Direct students to work in pairs to complete the
Summary Questions. Suggest that they discuss each Key Concept before creating their study guide.
• Return to students the Starting Points answers that they wrote before studying the chapter. Have them read over their responses and make any changes they wish. Afterwards, read each question aloud and discuss students’ answers. Consider the following points:
1. Make sure students do not omit the word changing when answering this question. (A changing magnetic field induces an electric current in a nearby conductor.)
2. Make sure students include the name Lenz’s law when answering this question. (According to Lenz’s law, if a changing magnetic field induces a current in a coil, the electric current is in such a direction that its own magnetic field opposes the change that produced it.)
3. Emphasize conservation of energy in this answer. (The energy of the two coils in a transformer must be equal. As a result, the voltage can be increased by having a greater number of coils on the secondary transformer circuit.)
4. Emphasize the efficiency of energy transfer in this answer. (The voltage of alternating current can be increased and decreased. This enables current to be transmitted at high voltages, reducing energy losses.)
• Ask one or two questions that will prompt student recall of each Key Concept. Have students explain and support their responses.
1. What happens if you move a magnet near a conductor? (A voltage is induced in the conductor, resulting in an electric current.) Does this happen if the magnet is stationary? (no)
2. If a changing magnetic field induces a current in a coil, how can you determine the direction of the magnetic field that is produced? (The induced magnetic field will be in the direction opposite the original magnetic field.) How can you determine the direction of the induced current from this field? (use the right-hand rule)
3. What is alternating current? (electric current that periodically reverses direction)
4. When analyzing the current produced by an alternating current generator, why is it important to know the direction of the external magnet’s field lines? (The magnetic field around the wire opposes the field lines of the external magnetic field. Knowing this direction, you can apply the right-hand rule to determine the current direction.)
5. What must be true about the coils of wire of a transformer in order for it to increase voltage? (The number of output coil windings must be greater than the number of input coil windings.)
6. Why are transformers so important in the power grid? (They allow current to be transferred at high voltages to increase efficiency.)
CAREER PATHWAYS • Point out that electrical engineers are employed by the
government and by electrical companies to work on various stages in the process of generation and transmission of electricity for the power grid.
• Ask students to describe what they know about TRIUMF, Canada’s National Laboratory for Particle and Nuclear Physics. Explain that TRIUMF uses magnets to guide charged particles along the path of an accelerator. High voltage engineers are employed to work on this process.
• Have students look back at “Applications of Electromagnetic Induction” in Section 13.1. Explain that any companies who produce these products would need employees who have studied electromagnetic induction.
• Point out that although electromagnetic induction is often useful, sometimes companies need to suppress it. Suggest that students search the Internet for employment opportunities related to EMI suppression.
DIFFERENTIATED INSTRUCTION • To engage auditory and other learners, arrange for a guest
speaker such as an electrician or an electrical engineer to visit your class and describe the duties and educational requirements of his or her position. Visual learners would benefit from seeing examples of their tools and workmanship. Kinesthetic learners may want to try using their tools and working on some mock projects.
ENGLISH LANGUAGE LEARNERS • Instruct students to review the vocabulary cards they have
been creating throughout the chapter. Ask them to
Electromagnetic Induction 13
DRAFT PRE-PUBLICATION MATERIAL

practice using the terms by summarizing how electricity is generated and distributed to the public.
Electromagnetic Induction 14
DRAFT PRE-PUBLICATION MATERIAL

UNIT
5 Unit Task Support
OVERALL EXPECTATIONS: A1; F1; F2
SPECIFIC EXPECTATIONS Scientific Investigation Skills: A1.1; A1.2; A1.5; A1.7;
A1.9; A1.10; A1.11. Relating Science to Technology, Society, and the
Environment: F1.2 Developing Skills of Investigation and Communication:
F2.1; F2.8 The full Overall and Specific Expectations are listed on pages xx–x.
SKILLS The Unit Task provides an opportunity for students to demonstrate their understanding of and their ability to apply the key ideas in this unit, as well as the skills and process of Planning, Controlling Variables, Performing, Analyzing, Evaluating, and Communicating.
EQUIPMENT AND MATERIALS per student: • eye protection • lab apron per group: • balsa wood • rulers • insulated wire • permanent magnets • straws • cardboard tubes • glue • adhesive tape • string per class • 2-3 ammeters
ASSESSMENT RESOURCES Assessment Rubric 6: Perform an Activity Assessment Summary 6: Perform an Activity Self-Assessment Checklist 2: Perform an Activity
PROGRAM RESOURCES Skills Handbook 1. Safe Science Skills Handbook 2. Scientific Tools and Equipment Skills Handbook 3. Scientific Inquiry Skills Physics 11 ExamView ® Test Bank Physics 11 Online Teacher’s Centre
Physics 11 website www.nelson.com/onseniorscience/physics11u
RELATED RESOURCES Kamkwamba, William, The Boy Who Harnessed the Wind:
Creating Currents of Electricity and Hope, Harper Perennial, 2010.
Wengenmayr, Roland, Renewable Energy: Sustainable Energy Concepts for the Future, Wiley-VCH, 2008.
Kruger, Paul, Alternative Energy Resources: The Quest for Sustainable Energy, Wiley, 2006
• The Unit Task is a culminating task that provides
students with an opportunity to demonstrate that they understand the concepts and can apply the skills developed in this unit. The Unit Task is also a means for students to show that they understand and appreciate how the science addressed in this unit influences their society and the environment.
• The challenge in this Unit Task is to construct a power plant.
EVIDENCE OF LEARNING Look for evidence that students can • describe how generators convert kinetic energy into
electrical energy • compare and contrast the advantages and disadvantages of
various energy sources • design, build, test, and redesign a device to generate
electricity
SCIENCE BACKGROUND • Centralized production of electricity began in the 1880s.
Most of the early electrical generation plants relied upon hydroelectric power or coal.
• In Canada, as of 2003, approximately 59% of electrical energy was produced from hydroelectric resources; 25% was produced using coal, and another 12% was produced by nuclear power. Of the remainder, approximately 4% was generated using combustion turbines, and less than 1% came from internal combustion.
• The term turbine was coined by Claude Burdin from the Latin term turbo, meaning vortex. The first modern turbine was a water turbine built in 1828 by Benoit Fourneyron, one of Burdin’s students.
TEACHING NOTES • Consider dividing the task over several class periods. In
addition to practical considerations, this may also provide
Electricity and Magnetism 1
DRAFT PRE-PUBLICATION MATERIAL
additional time for the students to reflect upon and improve their designs.
• Encourage groups to use brainstorming to come up with their initial design.
• Students may wish to designate specific jobs for each person in their group, e.g., recorder, materials manager, and time keeper, or they may wish to generalize and have all group members participate in each job. Whichever method they choose, remind them to record it in their log.
THE TASK • Have students research several different types of power
plants, and see if they can find examples of each. • Have students discuss their findings, and compare the
advantages and disadvantages of the different types of power plants.
RESEARCH AND PLANNING • Students doing research on types of wind turbines will
find two primary types: horizontal axis and vertical axis. Encourage students to research the advantages and disadvantages of both types, such as cost, efficiency and noise. In addition, ask students why one type might be more appropriate in a given location than another.
• Water turbines also come in various types, from simple water wheels to more complex propeller or screw designs. Again, encourage students to research the advantages and disadvantages of each and consider why one type might be more appropriate for a given location than another.
RECORDING • Remind students to title and date each log entry. • You may wish to create a template for students to use in
their logs. • Remind students that they will use their logbook entries to
help them in their design, testing, and final presentation. Encourage them to use photographs, drawings, and other visuals to record details of the project. Periodically review students' logbooks to ensure that they are recording appropriate and sufficiently detailed information.
EQUIPMENT AND MATERIALS • If some of the suggested materials are unavailable,
substitutes may be found. For instance, corrugated cardboard could be used instead of balsa wood, or craft sticks could be use instead of or in addition to straws.
• Note: The strength of the permanent magnets will have a large effect on the efficiency of the generator. The stronger the magnets, the more effective the generator will be.
• Students may suggest additional building materials for their designs, such as toothpicks, paper clips, electrical
tape, etc. If practical, ask students to provide these additional materials themselves.
BUILDING THE MODEL POWER PLANT • During the building of the model, it is not uncommon for
accidents to occur and for parts to be broken. Encourage students to take this into account. Suggest that they work slowly and carefully, and, when appropriate, build duplicates of critical parts. They should also allow time for repairs and incorporate access to possible problem areas in their designs.
TESTING AND MODIFYING • Have students use an ammeter to test their design. • Have students use the results of their tests to modify their
design as needed to improve its efficiency.
COMMUNICATING • Remind students to include in their presentation to the
class a description of their design process, including how they tested their design.
• Challenge students to describe the process they used in choosing a design. Ask, What type of factors influenced your final design? (Answers might include available materials or ease of construction.)
• After each group has made its presentation, encourage the students to discuss the advantages and disadvantages of each design and to suggest improvements that could be made.
DIFFERENTIATED INSTRUCTION • Students should be encouraged to choose groups with
many different styles of learners. Visual learners may use whiteboard or chart paper and markers during brainstorming. Auditory learners may need to discuss the steps in more detail. Kinesthetic learners may need to act out the process that will occur in their plant.
• Students who are not visual learners may need help visualizing the design. Suggest that they use white boards and markers while brainstorming. They may also find it helpful to have their group act out the process that will occur in their plant.
ENGLISH LANGUAGE LEARNERS • Before English language learners begin designing,
suggest that they review the Student Book and their notes. Have them revisit any terms or ideas that they found challenging. To aid understanding, encourage the groups to summarize their design verbally before they begin construction.
Electricity and Magnetism 2
DRAFT PRE-PUBLICATION MATERIAL