DR 4 -TON, ELECTRIC WOOD SPLITTER to Use the DR 4 -Ton WOOD SPLITTER ... DR 4 -Ton Electric Wood...
32
DR 4 -TON, ELECTRIC WOOD SPLITTER Safety & Operating Instructions Please read instructions before operating machine
Transcript of DR 4 -TON, ELECTRIC WOOD SPLITTER to Use the DR 4 -Ton WOOD SPLITTER ... DR 4 -Ton Electric Wood...

DR 4 -TON, ELECTRIC WOOD SPLITTER
Safety & Operating Instructions
Please read instructions before operating machine
ii DR 4 -Ton WOOD SPLITTER Safety & Operating Instructions
And congratulations on your purchase of a new DR 4 -Ton WOOD SPLITTER! We have done our utmost to ensure that your DR 4 -Ton WOOD SPLITTER will be one of the most trouble-free and satisfying pieces of equipment you have ever owned. Please let us know of any questions you may have. We want to answer them as quickly as possible. When you do call, please have your order number handy. For technical assistance, please call Toll-Free 1-800-DR-OWNER(376-9637) and one of our Technical Support Representatives will be happy to help you. We also hope to hear from you on how much you like your new helper. And, please tell your friends about your new DR 4 -Ton WOOD SPLITTER! Having DR Owners spread the word about our products and our way of doing business is the best advertising we can have, and the best way to help us provide even better service in the years to come.
Thanks once again!
for all of us at Country Home Products, Inc.
SALES MANAGER
COPYRIGHT 2005 Country Home Products, Inc. All rights reserved.
Country Home Products, Inc. Meigs Road P.O. Box 25 Vergennes, VT 05491 Toll-free phone: 1-800-DR-OWNER (376-9637) Fax: 1-802-877-1213 Web site: www.dr-owner.com
DR 4 -Ton WOOD SPLITTER Safety & Operating Instructions iii
Table of Contents Chapter 1: Introducing the DR 4 -Ton WOOD SPLITTER.....................................1
Conventions used in this manual.................................................................................................... 1
Chapter 2: Safety Considerations..........................................................................3 Preparing to Use the DR 4 -Ton WOOD SPLITTER ...................................................................... 3 Safety Information Labels............................................................................................................... 3 Protecting Yourself ......................................................................................................................... 5 Operating the Machine Safely ........................................................................................................ 5 Safety with Electric Powered Machines.......................................................................................... 7 Hydraulic Safety ............................................................................................................................. 8 Additional Information and Potential Changes................................................................................ 8
Chapter 3: Setting Up Your DR 4 -Ton WOOD SPLITTER....................................9 DR 4 -Ton WOOD SPLITTER Controls and Features.................................................................... 9 Unpacking the DR 4 -Ton WOOD SPLITTER ...............................................................................10
Chapter 4: Operating Your DR 4 -Ton WOOD SPLITTER...................................11 Before Starting the Electric Motor..................................................................................................11 Splitting Safety ..............................................................................................................................13 Operating the DR 4 -Ton WOOD SPLITTER.................................................................................14 How to Free a Jammed Log from the Wedge................................................................................15
Chapter 5: Maintaining the DR 4 -Ton WOOD SPLITTER ..................................17 Regular Maintenance Checklist before each use: .........................................................................17 Before each season: .....................................................................................................................17 Adjusting the Hydraulic Fluid Level ...............................................................................................18 Sharpening the Wedge..................................................................................................................18 Electrical Connections...................................................................................................................19 End of Season & Storage..............................................................................................................19
Chapter 6: Troubleshooting .................................................................................21 Troubleshooting Table...................................................................................................................21
Chapter 7: Parts Lists and Schematic Diagrams................................................23 DR 4 -Ton Electric Wood Splitter - Parts List.................................................................................23 DR 4 -Ton Electric Wood Splitter - Schematic...............................................................................25 Warranty........................................................................................................................................27

iv DR 4 -Ton WOOD SPLITTER Safety & Operating Instructions
DR 4 -Ton WOOD SPLITTER Safety & Operating Instructions 1
Chapter 1: Introducing the DR 4 -Ton WOOD SPLITTER This manual will help you set up and safely operate your new DR 4 -Ton WOOD SPLITTER. Careful adherence to the safety and operating instructions in this manual will ensure many years of productive use. Please let us know of any questions you may have. We want to answer them as quickly as possible. When you do call, please have your order number handy. For technical assistance, please call Toll-Free 1-800-DR-OWNER(376-9637) and one of our Technical Support Representatives will be happy to help you.
Conventions used in this manual Tip: This is a helpful hint to guide you in getting the most out of your DR 4 -Ton WOOD
SPLITTER.
Tools Needed: This indicates you will need a special tool to perform a maintenance
function on your machine.
Note: This information may be helpful to you.
If you are ever unsure about an action you are about to take, don’t do it. Contact Country Home Products’ toll-free support at 1-800-DR-OWNER (376-9637) for help or information.
WARNING! The exclamation point within a triangle alerts you toessential operating, safety, maintenance and servicinginstructions.
Important! This information is important in the proper use of yourmachine. Failure to follow this instruction could result ininjury to you and others or damage to your wood splitter.

2 DR 4 -Ton WOOD SPLITTER Safety & Operating Instructions
DR 4 -Ton WOOD SPLITTER Safety & Operating Instructions 3
Chapter 2: Safety Considerations Taking the time to read and observe all safety instructions will ensure many years of productive use from your DR 4 -Ton WOOD SPLITTER and help you avoid injury. Please take a few moments to read the following guidelines for safely operating your new machine.
Preparing to Use the DR 4 -Ton WOOD SPLITTER Read these Safety & Operating Instructions before you use the DR 4 -Ton WOOD
SPLITTER. Become familiar with the controls and service recommendations to ensure the best performance from your machine.
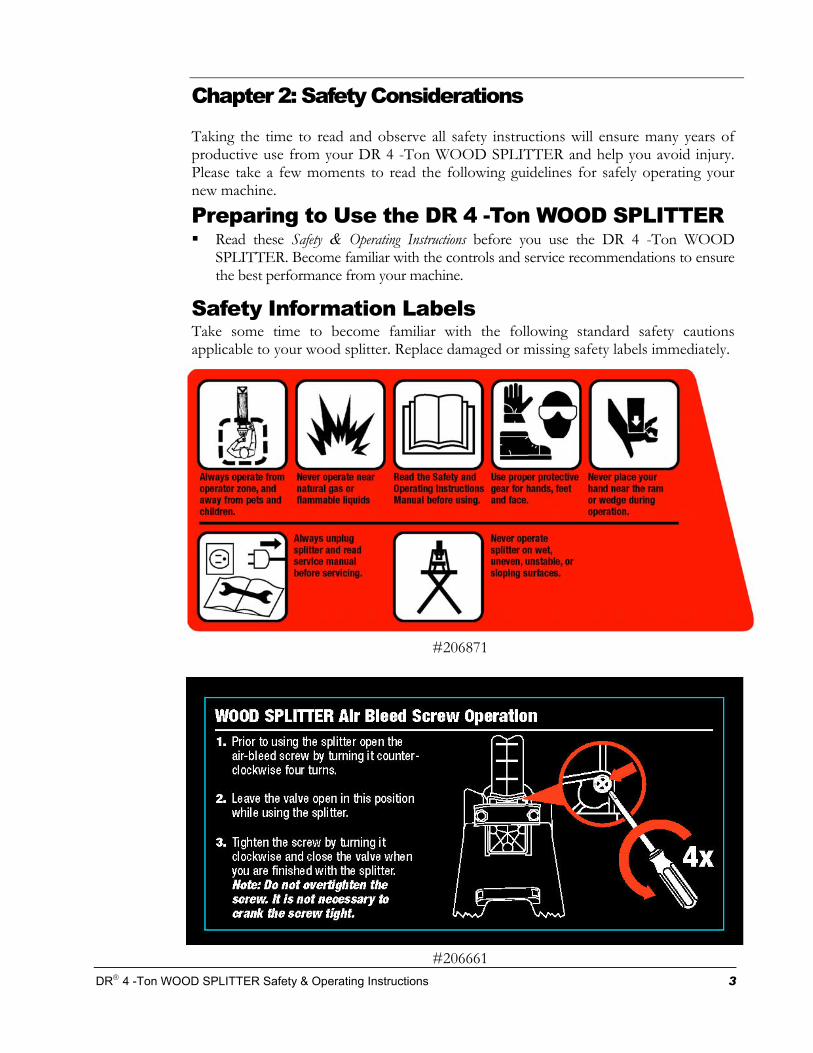
Safety Information Labels Take some time to become familiar with the following standard safety cautions applicable to your wood splitter. Replace damaged or missing safety labels immediately.
#206871
#206661

4 DR 4 -Ton WOOD SPLITTER Safety & Operating Instructions
DR 4 -Ton WOOD SPLITTER Safety & Operating Instructions 5
Protecting Yourself Always wear protective goggles or a face shield while splitting wood to protect your
eyes and face from possible thrown bits of wood. Do not, under any conditions, remove, bend, cut, fit, weld, or otherwise alter standard
parts on the DR 4 -Ton WOOD SPLITTER. Modifications to your machine could cause personal injuries and will void your warranty.
Wear shoes with non-slip treads when using your DR 4 -Ton WOOD SPLITTER. If you have safety shoes, we recommend wearing them. Do not use the machine while barefoot or wearing open sandals.
Wear long pants while splitting wood. Avoid wearing loose clothing or jewelry, which might be caught on the wood splitter’s
moving parts. We recommend wearing snug-fitting work gloves while splitting wood. Always keep safety guards in place and in working order. Always check the alignment of moving parts and for damaged or worn parts.
Operating the Machine Safely To be safe, do not operate the machine near children or pets, and never allow children
to operate the wood splitter. Keep your hands and feet clear of the splitting area while the ram is in motion. ALWAYS unplug the wood splitter from the power source before adjusting or
servicing the machine. If you have to stop to remove any debris from the machine, ALWAYS retract the ram and unplug the machine.
Do not operate the wood splitter in an area of natural gas or flammable liquids. Use the machine only in daylight or good artificial light. Do not use in wet or slippery conditions. ALWAYS OPERATE THE WOOD SPLITTER FROM THE OPERATOR ZONE
(Figure 7, page 13). Never stand on, straddle or climb over the wood splitter at any time. Use only your hands to operate the wood splitter controls. Do not place your hands at pinch points where they can get caught between a log and
the wedge, log guiding plates or the ram.
WARNING! The items listed in this section will help you keep your DR4 -Ton WOOD SPLITTER running smoothly and, mostimportantly, prevent injury to yourself or others. Pleasereview them carefully before starting your machine.
6 DR 4 -Ton WOOD SPLITTER Safety & Operating Instructions
Do not put any part of yourself, your clothing, or your personal protective equipment into a crack in a log that is being split; it might close suddenly with great force.
Never split anything other than logs free of nails, wires and branches. Maximum log length is 20" with a maximum diameter of 10" for the DR 4 -Ton WOOD SPLITTER.
Note: The log diameter does not necessarily indicate the difficulty of the split. A small
diameter log can be difficult to split if it has knots or its fiber is very tough, whereas a larger log can be split easily if its fiber is smooth and loose.
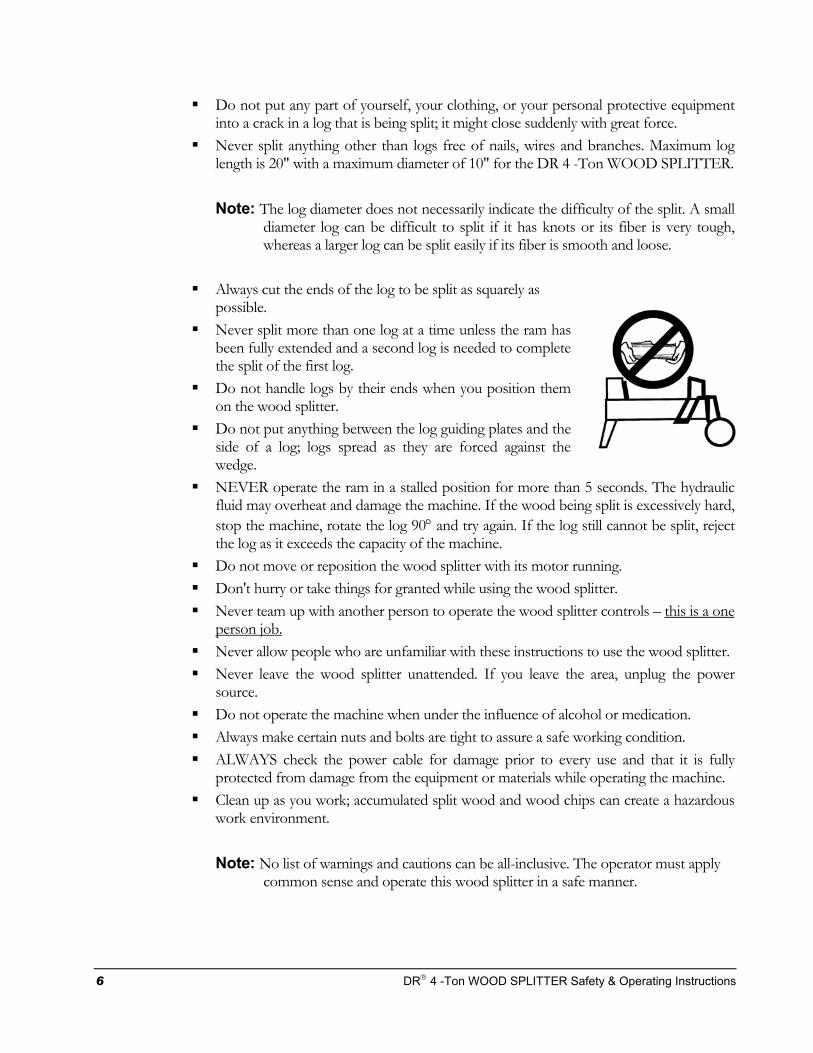
Always cut the ends of the log to be split as squarely as
possible. Never split more than one log at a time unless the ram has
been fully extended and a second log is needed to complete the split of the first log.
Do not handle logs by their ends when you position them on the wood splitter.
Do not put anything between the log guiding plates and the side of a log; logs spread as they are forced against the wedge.
NEVER operate the ram in a stalled position for more than 5 seconds. The hydraulic fluid may overheat and damage the machine. If the wood being split is excessively hard, stop the machine, rotate the log 90° and try again. If the log still cannot be split, reject the log as it exceeds the capacity of the machine.
Do not move or reposition the wood splitter with its motor running. Don't hurry or take things for granted while using the wood splitter. Never team up with another person to operate the wood splitter controls – this is a one
person job. Never allow people who are unfamiliar with these instructions to use the wood splitter. Never leave the wood splitter unattended. If you leave the area, unplug the power
source. Do not operate the machine when under the influence of alcohol or medication. Always make certain nuts and bolts are tight to assure a safe working condition. ALWAYS check the power cable for damage prior to every use and that it is fully
protected from damage from the equipment or materials while operating the machine. Clean up as you work; accumulated split wood and wood chips can create a hazardous
work environment. Note: No list of warnings and cautions can be all-inclusive. The operator must apply
common sense and operate this wood splitter in a safe manner.

DR 4 -Ton WOOD SPLITTER Safety & Operating Instructions 7
Safety with Electric Powered Machines
Never open the switch box or motor cover. DO NOT attempt any electrical repairs yourself. If in doubt, consult a qualified electrician or contact Country Home Products’ toll-free support at 1-800-DR-OWNER (376-9637) for help or information.
Never operate the wood splitter if there is an electrical hazard present.
Never operate the wood splitter in wet conditions.
Never operate the wood splitter with a damaged electrical cord or damaged extension cord.
Never pull on the power cord to move the machine.
Always grasp the power cord plug when unplugging the cord from the outlet; DO NOT pull the plug out by the cord.
Never operate the wood splitter unless the power cord is plugged into a properly grounded outlet, which supplies 110-120V power, and is protected by a 15-amp circuit breaker.
If an extension cord is to be used, it is recommended that the connection between the power cord and the extension cord be kept well away from any water.
Never use an extension cord longer than 33 feet or smaller than 12 AWG in diameter because the cord will produce a voltage drop that will prevent the motor from supplying full power and may cause damage to the motor.
Always keep the power cord and/or extension cord away from excessive heat, oil and sharp objects.
Tip: See page 21 for Troubleshooting Tips.
WARNING! The items listed in this section will help you keep your DR4 -Ton WOOD SPLITTER running smoothly and, most importantly, prevent injury to yourself or others. Pleasereview them carefully before using your machine.
8 DR 4 -Ton WOOD SPLITTER Safety & Operating Instructions
Hydraulic Safety Periodically check for hydraulic fluid leaks by placing a sheet of cardboard under the
wood splitter while the system is running.
The wood splitter must be on a level surface.
Please follow these steps to depressurize the system and release residual hydraulic energy before starting any repairs.
1. Unplug the wood splitter from the power source.
2. Move the Operating Handle down and up from one limit of travel to the other at least four times and holding the Handle for three seconds at each limit of travel. The ram should not move during the 4th cycle and should be fully retracted.
3. Call 1(800) DR-OWNER (376-9637), or a qualified hydraulic mechanic, for assistance to replace worn components.
Do not make any adjustments to the hydraulic system.
Never remove the fill/dipstick cap from the hydraulic fluid port while the motor is running or while the tank is still warm after the motor is shut off. Hot pressurized fluid can cause serious injury, so wait for the hydraulic tank to cool before removing cap.
Tip: See page 21 for Troubleshooting Tips.
Additional Information and Potential Changes Country Home Products, Inc. reserves the right to discontinue, change, and improve its products at any time without notice or obligation to the purchaser. The descriptions and specifications contained in this manual were in effect at printing. Equipment described within this manual may be optional. Some illustrations may not be applicable to your machine.
WARNING! The items listed in this section will help you keep your DR 4 -Ton WOOD SPLITTER running smoothly and, mostimportantly, prevent injury to yourself or others. Pleasereview them carefully before operating your machine.
WARNING! Escaping pressurized fluid from hydraulic system leaks canhave enough force to penetrate skin and cause serious injuryor death. Hydraulic fluid can remain pressurized while themotor is off due to the return spring force on the ram.
- Never use your hand or any part of your body to check for hydraulic systemleaks while the system is pressurized.
- Get professional medical help at once if hydraulic oil penetrates anyone's skin.
- Always release residual energy from pressurized hydraulic fluid and allow thefluid to cool before doing any maintenance or repair work on the wood splitter.
DR 4 -Ton WOOD SPLITTER Safety & Operating Instructions 9
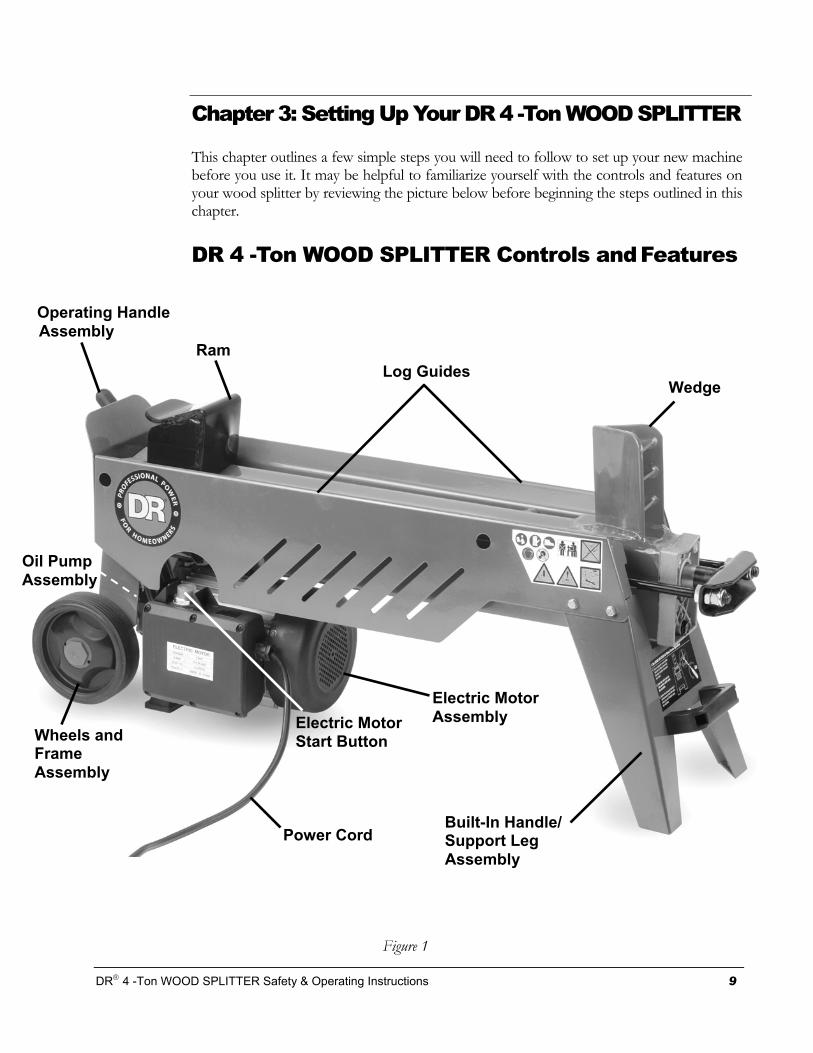
Chapter 3: Setting Up Your DR 4 -Ton WOOD SPLITTER This chapter outlines a few simple steps you will need to follow to set up your new machine before you use it. It may be helpful to familiarize yourself with the controls and features on your wood splitter by reviewing the picture below before beginning the steps outlined in this chapter.
DR 4 -Ton WOOD SPLITTER Controls and Features
Figure 1
Wedge Log Guides
Ram
Operating Handle Assembly
Wheels and Frame Assembly
Oil Pump Assembly
Electric Motor Start Button
Electric Motor Assembly
Built-In Handle/ Support Leg Assembly
Power Cord
10 DR 4 -Ton WOOD SPLITTER Safety & Operating Instructions
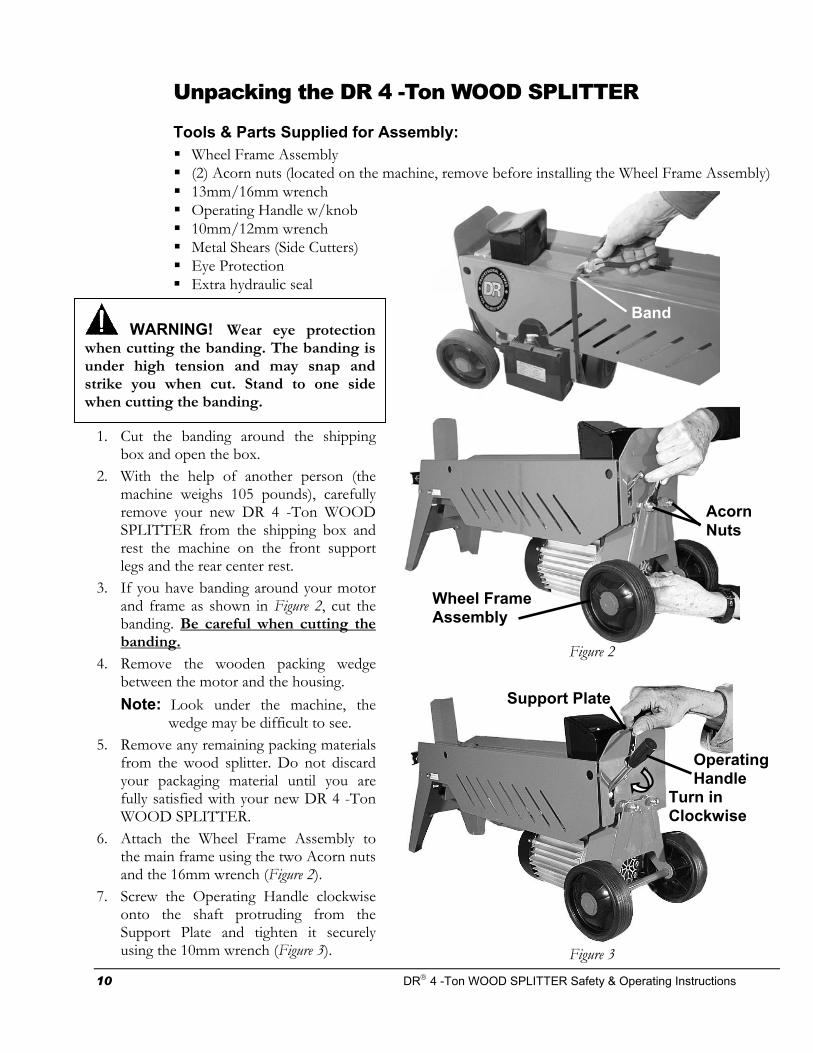
Unpacking the DR 4 -Ton WOOD SPLITTER
Tools & Parts Supplied for Assembly: Wheel Frame Assembly (2) Acorn nuts (located on the machine, remove before installing the Wheel Frame Assembly) 13mm/16mm wrench Operating Handle w/knob 10mm/12mm wrench Metal Shears (Side Cutters) Eye Protection Extra hydraulic seal
Figure 2
Figure 3
Acorn Nuts
Wheel Frame Assembly
Support Plate
Operating Handle
Turn in Clockwise
1. Cut the banding around the shippingbox and open the box.
2. With the help of another person (themachine weighs 105 pounds), carefullyremove your new DR 4 -Ton WOODSPLITTER from the shipping box andrest the machine on the front supportlegs and the rear center rest.
3. If you have banding around your motorand frame as shown in Figure 2, cut thebanding. Be careful when cutting thebanding.
4. Remove the wooden packing wedgebetween the motor and the housing. Note: Look under the machine, the
wedge may be difficult to see. 5. Remove any remaining packing materials
from the wood splitter. Do not discardyour packaging material until you arefully satisfied with your new DR 4 -TonWOOD SPLITTER.
6. Attach the Wheel Frame Assembly tothe main frame using the two Acorn nutsand the 16mm wrench (Figure 2).
7. Screw the Operating Handle clockwiseonto the shaft protruding from theSupport Plate and tighten it securelyusing the 10mm wrench (Figure 3).
WARNING! Wear eye protectionwhen cutting the banding. The banding isunder high tension and may snap andstrike you when cut. Stand to one sidewhen cutting the banding.
Band
DR 4 -Ton WOOD SPLITTER Safety & Operating Instructions 11
Chapter 4: Operating Your DR 4 -Ton WOOD SPLITTER This chapter covers the procedures for operating your new DR 4 -Ton WOOD SPLITTER and also discusses basic operation features.
Before Starting the Electric Motor Tools Needed: Adjustable Wrench Small Phillips Screwdriver
1. Inspect the area in which you will be working. ■ Place the wood splitter only on a firm, level, supported surface 2 to 3 feet above
the ground. ■ NEVER operate the wood splitter on the ground as there is risk of injury from
flying chips and would not be comfortable for the operator while in use. If necessary, block the wood splitter wheels to prevent them from rolling.
■ The site must be free of slippery surfaces and potentially hazardous obstacles. Also make sure there won't be people or animals within a six-foot radius around the wood splitter.
2. Plan your work before you start. ■ Have the logs to be split positioned where they can be easily reached.
Remember, the maximum log length is 20" and the maximum diameter is 10" for the DR 4-Ton WOOD SPLITTER.
■ Split only dry, seasoned logs as they will split more easily than green logs. Green logs may stick on the wedge and jam the wood splitter.
■ Have a site located where the split wood can be stacked or loaded onto a truck or nearby carrier.
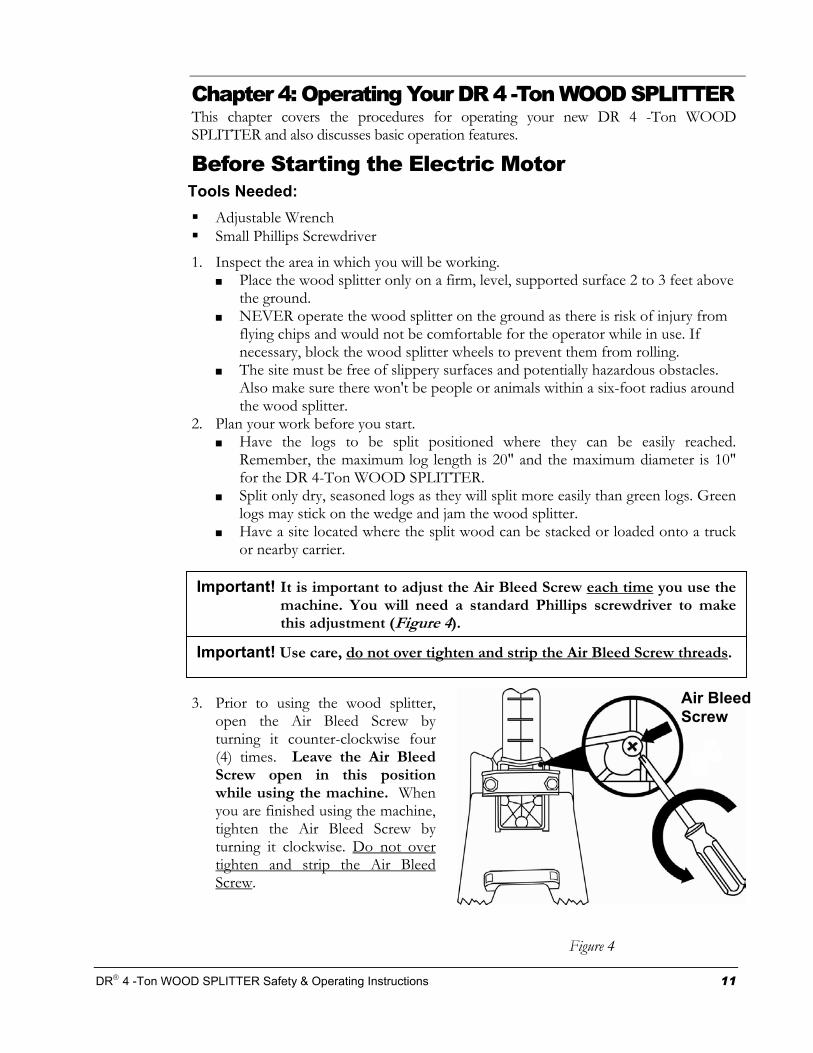
3. Prior to using the wood splitter, open the Air Bleed Screw by turning it counter-clockwise four (4) times. Leave the Air Bleed Screw open in this position while using the machine. When you are finished using the machine, tighten the Air Bleed Screw by turning it clockwise. Do not over tighten and strip the Air Bleed Screw.
Important! It is important to adjust the Air Bleed Screw each time you use themachine. You will need a standard Phillips screwdriver to makethis adjustment (Figure 4).
Important! Use care, do not over tighten and strip the Air Bleed Screw threads.
Figure 4
Air Bleed Screw
12 DR 4 -Ton WOOD SPLITTER Safety & Operating Instructions
4. Connect the main lead from the wood splitter to a standard electrical, 110-120VAC, grounded power source fused at 15 AMPS. If using an extension cord, it must be 12AWG and less than 33 feet long with a rating of 15 AMPS. Route the cord from the wood splitter to the power source in such a way that safeguards against the cord becoming damaged during the wood splitting session. Be sure to avoid wet conditions.
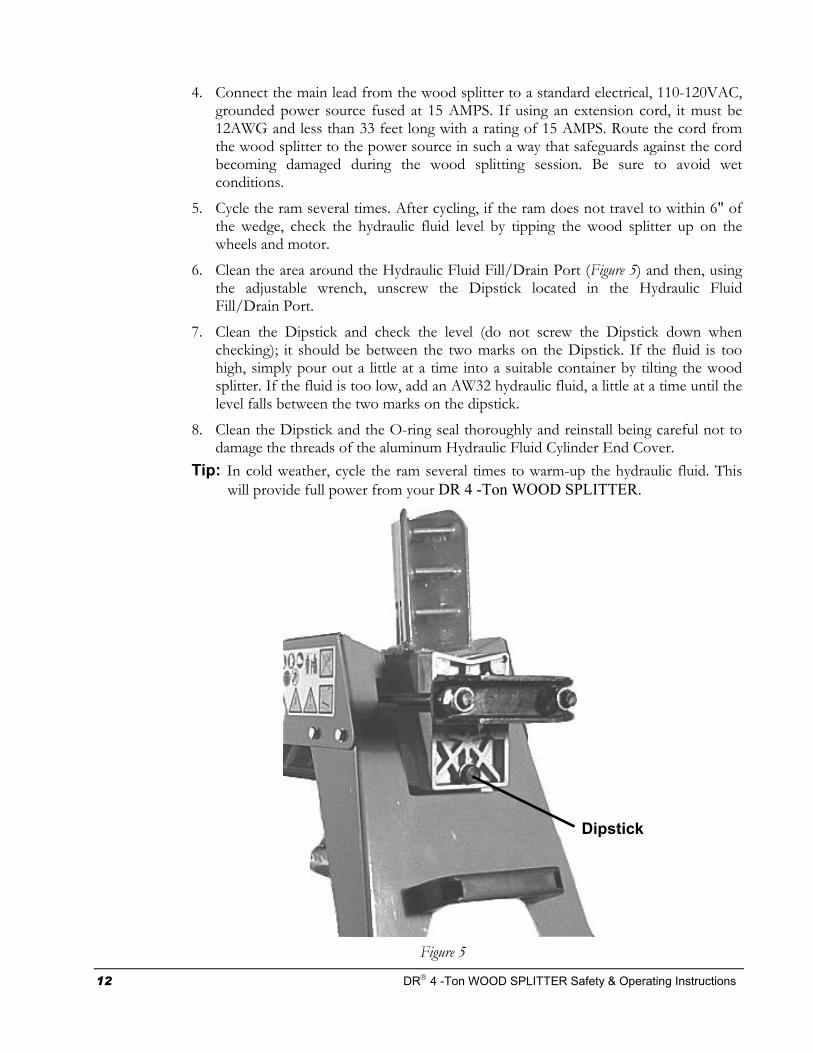
5. Cycle the ram several times. After cycling, if the ram does not travel to within 6" of the wedge, check the hydraulic fluid level by tipping the wood splitter up on the wheels and motor.
6. Clean the area around the Hydraulic Fluid Fill/Drain Port (Figure 5) and then, using the adjustable wrench, unscrew the Dipstick located in the Hydraulic Fluid Fill/Drain Port.
7. Clean the Dipstick and check the level (do not screw the Dipstick down when checking); it should be between the two marks on the Dipstick. If the fluid is too high, simply pour out a little at a time into a suitable container by tilting the wood splitter. If the fluid is too low, add an AW32 hydraulic fluid, a little at a time until the level falls between the two marks on the dipstick.
8. Clean the Dipstick and the O-ring seal thoroughly and reinstall being careful not to damage the threads of the aluminum Hydraulic Fluid Cylinder End Cover.
Tip: In cold weather, cycle the ram several times to warm-up the hydraulic fluid. This will provide full power from your DR 4 -Ton WOOD SPLITTER.
Figure 5
Dipstick
DR 4 -Ton WOOD SPLITTER Safety & Operating Instructions 13
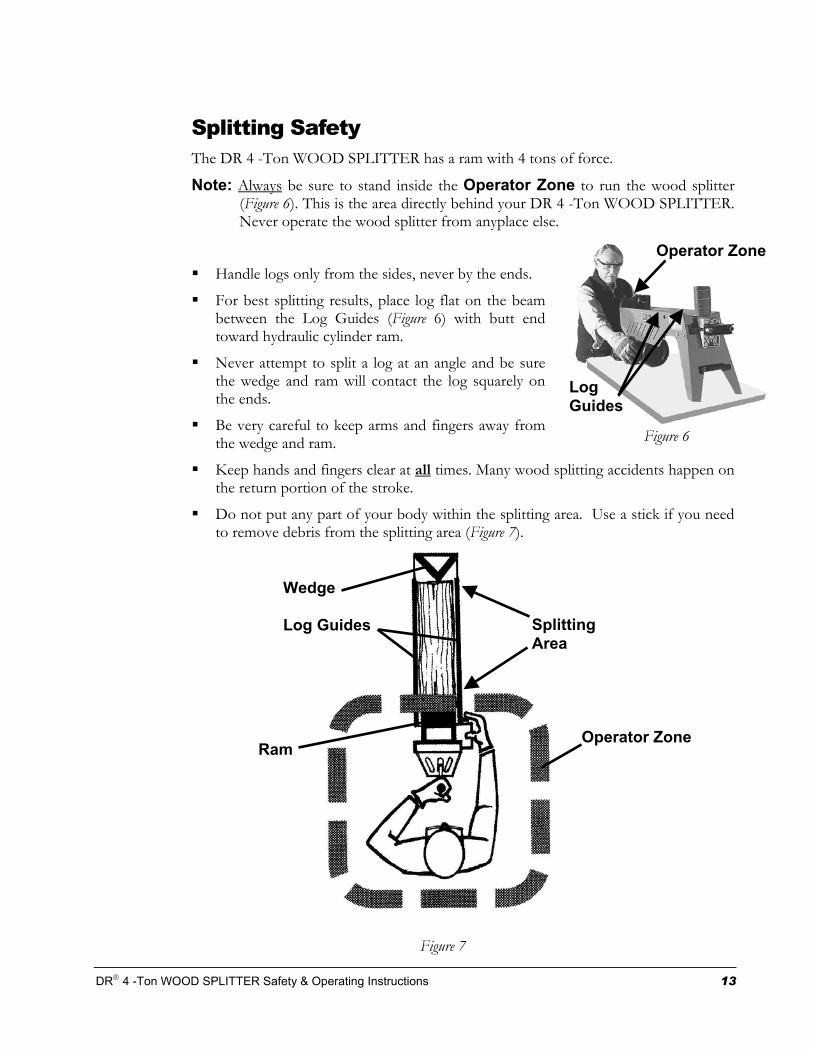
Splitting Safety The DR 4 -Ton WOOD SPLITTER has a ram with 4 tons of force.
Note: Always be sure to stand inside the Operator Zone to run the wood splitter (Figure 6). This is the area directly behind your DR 4 -Ton WOOD SPLITTER. Never operate the wood splitter from anyplace else.
Handle logs only from the sides, never by the ends.
For best splitting results, place log flat on the beam between the Log Guides (Figure 6) with butt end toward hydraulic cylinder ram.
Never attempt to split a log at an angle and be sure the wedge and ram will contact the log squarely on the ends.
Be very careful to keep arms and fingers away from the wedge and ram.
Keep hands and fingers clear at all times. Many wood splitting accidents happen on the return portion of the stroke.
Do not put any part of your body within the splitting area. Use a stick if you need to remove debris from the splitting area (Figure 7).
Figure 6
Operator Zone
Log Guides
Figure 7
Operator ZoneRam
Wedge
Splitting Area
Log Guides
14 DR 4 -Ton WOOD SPLITTER Safety & Operating Instructions
Operating the DR 4 -Ton WOOD SPLITTER
Note 1: For your added safety, this is a TWO HANDED OPERATION wood splitter. The hydraulic control is a single handle valve called the Operating Handle. The ram travels forward only while the Operating Handle is held down and Electric Motor Start Button is depressed. The cylinder automatically completes the return stroke when the Operating Handle is released and Electric Motor Start Button is released.
Note 2: Before starting the splitting operation, the log ram should be cycled 3 to 4 times back and forth (with the Air Bleed Screw open) to help remove any air that may have mixed into the hydraulic fluid from shipping and handling. See Step 3 on page 11 for the Air Bleed Screw Operation.
Tip: In cold weather, cycling the ram a few times will also warm the hydraulic fluid which will allow you to split wood with full power from your machine.
1. With a log properly loaded, and with the Air Bleed Screw open, depress the Electric Motor Start Button with your right hand and wait a few seconds as the motor creates pressure in the hydraulic pump.
2. When safe to do so, push down on the Operating Handle. The ram will now compress the log against the wedge, splitting the log.
3. Keep holding the Operating Handle down until the split pieces of the log fall away. When you have finished splitting a log, first release the Electric Motor Start Button and then release the Operator Handle. This will cause the ram to retract to its start position.
4. Make sure nothing will interfere with the ram while it retracts.
5. Stack the split wood as you work. This will provide a safer work area by keeping it uncluttered; avoiding the danger of tripping or damaging the power cord.
WARNING! If the log does not split immediately, do not continue theforward thrust of the ram for more than 5 seconds. To do socan damage the splitter. After the ram has retracted tryrepositioning the log on the splitter or set the log aside.
DR 4 -Ton WOOD SPLITTER Safety & Operating Instructions 15
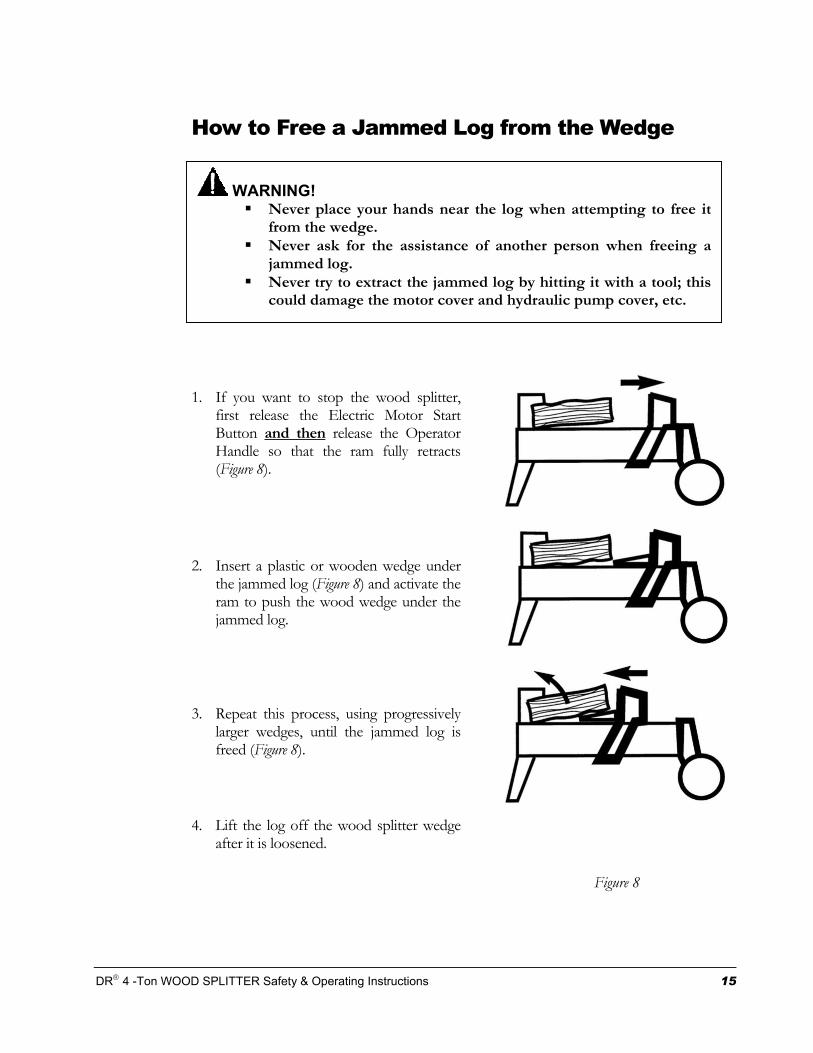
How to Free a Jammed Log from the Wedge 1. If you want to stop the wood splitter,
first release the Electric Motor Start Button and then release the Operator Handle so that the ram fully retracts (Figure 8).
2. Insert a plastic or wooden wedge under
the jammed log (Figure 8) and activate the ram to push the wood wedge under the jammed log.
3. Repeat this process, using progressively
larger wedges, until the jammed log is freed (Figure 8).
4. Lift the log off the wood splitter wedge
after it is loosened.
WARNING! Never place your hands near the log when attempting to free it
from the wedge. Never ask for the assistance of another person when freeing a
jammed log. Never try to extract the jammed log by hitting it with a tool; this
could damage the motor cover and hydraulic pump cover, etc.
Figure 8

16 DR 4 -Ton WOOD SPLITTER Safety & Operating Instructions
DR 4 -Ton WOOD SPLITTER Safety & Operating Instructions 17
Chapter 5: Maintaining the DR 4 -Ton WOOD SPLITTER Regular maintenance is the way to ensure the best performance and long life of your wood splitter. Please refer to this manual for maintenance procedures.
Regular Maintenance Checklist before each use: Clean the log ram and guides.
Check the Splitting Wedge for sharpness (page 19).
Check the general condition of the wood splitter, e.g.; nuts, bolts, welds etc.
Before each season: Check the hydraulic fluid level (page 19). Use an AW32 hydraulic fluid for operation over 40°F and Dextron automatic transmission fluid for operation below 40°F.
WARNING! When performing any maintenance, you must first unplug thewood splitter from the power source and make sure thehydraulic system is depressurized and the fluid has cooled.Read the "Safety Considerations" chapter of this manual beforeperforming any repairs or maintenance.
Important! Do not drain the hydraulic fluid. Just add enough to replenish the lost volume.
18 DR 4-Ton WOOD SPLITTER Safety & Operating Instructions
Adjusting the Hydraulic Fluid Level Tools Needed: Adjustable Wrench Small Phillips Screwdriver
1. Check the hydraulic fluid level by tipping the wood splitter up on the wheels and
motor.
2. Clean the area around the Hydraulic Fluid Fill/Drain Port. See Figure 5 on page 12. Loosen the Bleed Screw. Then, using the adjustable wrench, unscrew the Dipstick located in the Hydraulic Fluid Fill/Drain Port.
3. Clean the Dipstick and replace it without screwing down to check the level; it should be between the two marks on the Dipstick. If the fluid is too high, simply pour out a little at a time into a suitable container by tilting the wood splitter. If the fluid is too low, add an AW32 hydraulic fluid, a little at a time until the level falls between the two marks on the dipstick.
4. Clean the Dipstick and the O-ring seal thoroughly and reinstall being careful not to damage the threads of the aluminum Hydraulic Fluid Cylinder End Cover.
5. Open the Air Bleed Screw using a small Phillips screwdriver 4 turns and cycle the ram back and forth 3 or 4 times to purge any air from the hydraulic system (Figure 4 on page 11).
Sharpening the Wedge
Tool Needed: Fine-Toothed Flat File
Before each splitting session, check the sharpness of the wedge. As required, remove any burrs or flat spots on the wedge blade using a fine-toothed flat file.
WARNING! When performing any maintenance, you must first unplug thewood splitter from the power source and make sure the hydraulicsystem is depressurized and the fluid has cooled. Read the"Safety Considerations" chapter of this manual beforeperforming any repairs or maintenance. See page 8.
WARNING! When performing any maintenance, you must first unplug thewood splitter from the power source and make sure the hydraulicsystem is depressurized and the fluid has cooled. Read the"Safety Considerations" chapter of this manual beforeperforming any repairs or maintenance.
DR 4 -Ton WOOD SPLITTER Safety & Operating Instructions 19
Electrical Connections
End of Season & Storage Wipe down the wood splitter to remove any moisture, wood chips and dirt that
may have accumulated on the log guide rails, hydraulic control and motor fan housing.
Apply a thin coating of oil or #2 Lithium Grease to the wedge cutting edge to prevent rust.
Store the DR 4 -Ton WOOD SPLITTER in a dry area to prevent moisture from damaging the electrical components of the machine.
Make sure that the Air Bleed Screw is tightened (See Figure 4 on page 11).
WARNING! When performing any maintenance, you must first unplug thewood splitter from the power source and make sure the hydraulicsystem is depressurized and the fluid has cooled. Read the"Safety Considerations" chapter of this manual beforeperforming any repairs or maintenance.
WARNING! The DR 4-Ton WOOD SPLITTER MUST be grounded.
Important! Use care, do not over tighten and strip the Air Bleed Screw threads.

20 DR 4 -Ton WOOD SPLITTER Safety & Operating Instructions
DR 4 -Ton WOOD SPLITTER Safety & Operating Instructions 21
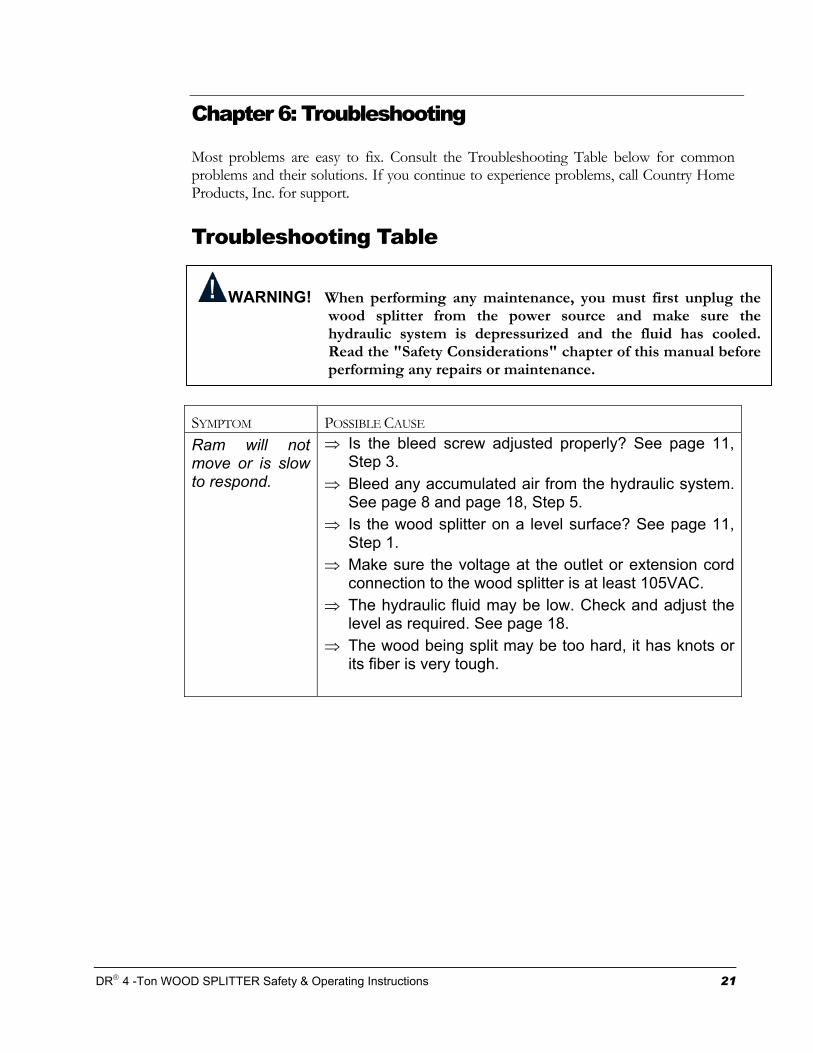
Chapter 6: Troubleshooting Most problems are easy to fix. Consult the Troubleshooting Table below for common problems and their solutions. If you continue to experience problems, call Country Home Products, Inc. for support.
Troubleshooting Table
SYMPTOM POSSIBLE CAUSE Ram will not move or is slow to respond.
⇒ Is the bleed screw adjusted properly? See page 11, Step 3.
⇒ Bleed any accumulated air from the hydraulic system. See page 8 and page 18, Step 5.
⇒ Is the wood splitter on a level surface? See page 11, Step 1.
⇒ Make sure the voltage at the outlet or extension cord connection to the wood splitter is at least 105VAC.
⇒ The hydraulic fluid may be low. Check and adjust the level as required. See page 18.
⇒ The wood being split may be too hard, it has knots or its fiber is very tough.
WARNING! When performing any maintenance, you must first unplug thewood splitter from the power source and make sure thehydraulic system is depressurized and the fluid has cooled.Read the "Safety Considerations" chapter of this manual beforeperforming any repairs or maintenance.

22 DR 4 -Ton WOOD SPLITTER Safety & Operating Instructions
SYMPTOM POSSIBLE CAUSE Log fails to split. ⇒ Check the possible causes for the previous ram
operation symptom on page 21. ⇒ Incorrect positioning of the log. Re-position the log flat
on the splitting beam with the ends squarely against the ram face and splitting wedge.
⇒ Log exceeds permitted dimensions or the wood is too hard for the capacity of the machine. The maximum log length is 20" with a maximum diameter of 10" for the DR 4 -Ton WOOD SPLITTER.
⇒ The wedge has burrs or nicks and needs to be sharpened. See page 18.
⇒ There may be a hydraulic fluid leak. Locate the leak using a piece of cardboard under the machine and call 1(800) DR-OWNER (376-9637), or a qualified hydraulic mechanic for assistance, to replace worn components.
⇒ Hydraulic pressure is too low. Call 1(800) DR-OWNER (376-9637), or a qualified hydraulic mechanic for assistance to replace worn components.
Ram advances with a jerky motion or with strong vibrations.
⇒ Check the possible causes for the ram operation symptom on page 21.
⇒ Check the hydraulic fluid level. See page 18. ⇒ Bleed any accumulated air from the hydraulic system.
See page 8 and page 18, Step 5. If the problem persists, call 1(800) DR-OWNER (376-9637) for assistance.
Hydraulic fluid leaking from the ram or other external parts.
⇒ Check that the bleed screw has been tightened before moving the machine. Use care: Do not over tighten and strip the bleed screw threads.
⇒ The hydraulic fluid seals may be worn. Call 1(800) DR-OWNER (376-9637), or a qualified hydraulic mechanic for assistance to replace worn components.
Note: Country Home Products, Inc. has provided parts lists and schematic diagrams as referencetools only. CHP makes no representation or warranty of any kind to the buyer that he/she is qualified to make any repairs to the product or that he/she is qualified to replace any parts ofthe product. In fact, CHP expressly states that all repairs and parts replacement should beundertaken by certified and licensed technicians and not by the buyer. The buyer assumes allrisk and liability arising out of his/her repairs to the original product or replacement partsthereto, or arising out of his/her installation of replacement parts thereto.
DR 4 -Ton WOOD SPLITTER Safety & Operating Instructions 23
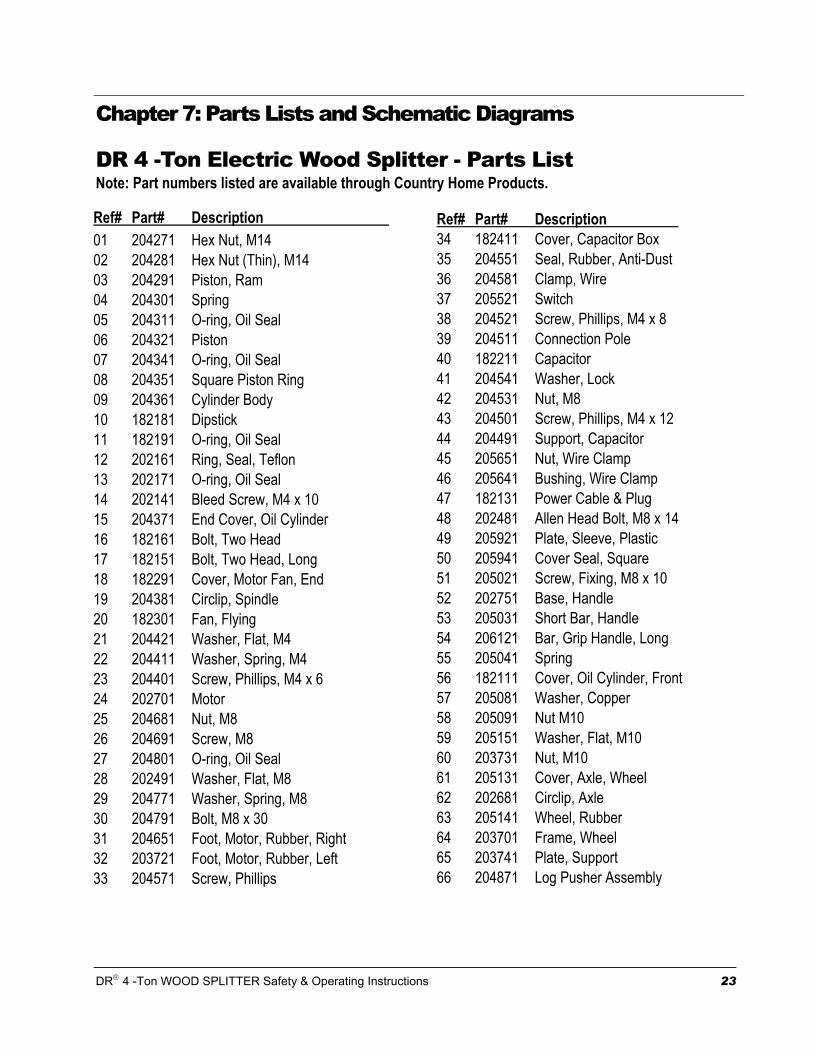
Chapter 7: Parts Lists and Schematic Diagrams
DR 4 -Ton Electric Wood Splitter - Parts List Note: Part numbers listed are available through Country Home Products.
Ref# Part# Description 01 204271 Hex Nut, M14 02 204281 Hex Nut (Thin), M14 03 204291 Piston, Ram 04 204301 Spring 05 204311 O-ring, Oil Seal 06 204321 Piston 07 204341 O-ring, Oil Seal 08 204351 Square Piston Ring 09 204361 Cylinder Body 10 182181 Dipstick 11 182191 O-ring, Oil Seal 12 202161 Ring, Seal, Teflon 13 202171 O-ring, Oil Seal 14 202141 Bleed Screw, M4 x 10 15 204371 End Cover, Oil Cylinder 16 182161 Bolt, Two Head 17 182151 Bolt, Two Head, Long 18 182291 Cover, Motor Fan, End 19 204381 Circlip, Spindle 20 182301 Fan, Flying 21 204421 Washer, Flat, M4 22 204411 Washer, Spring, M4 23 204401 Screw, Phillips, M4 x 6 24 202701 Motor 25 204681 Nut, M8 26 204691 Screw, M8 27 204801 O-ring, Oil Seal 28 202491 Washer, Flat, M8 29 204771 Washer, Spring, M8 30 204791 Bolt, M8 x 30 31 204651 Foot, Motor, Rubber, Right 32 203721 Foot, Motor, Rubber, Left 33 204571 Screw, Phillips
Ref# Part# Description 34 182411 Cover, Capacitor Box 35 204551 Seal, Rubber, Anti-Dust 36 204581 Clamp, Wire 37 205521 Switch 38 204521 Screw, Phillips, M4 x 8 39 204511 Connection Pole 40 182211 Capacitor 41 204541 Washer, Lock 42 204531 Nut, M8 43 204501 Screw, Phillips, M4 x 12 44 204491 Support, Capacitor 45 205651 Nut, Wire Clamp 46 205641 Bushing, Wire Clamp 47 182131 Power Cable & Plug 48 202481 Allen Head Bolt, M8 x 14 49 205921 Plate, Sleeve, Plastic 50 205941 Cover Seal, Square 51 205021 Screw, Fixing, M8 x 10 52 202751 Base, Handle 53 205031 Short Bar, Handle 54 206121 Bar, Grip Handle, Long 55 205041 Spring 56 182111 Cover, Oil Cylinder, Front 57 205081 Washer, Copper 58 205091 Nut M10 59 205151 Washer, Flat, M10 60 203731 Nut, M10 61 205131 Cover, Axle, Wheel 62 202681 Circlip, Axle 63 205141 Wheel, Rubber 64 203701 Frame, Wheel 65 203741 Plate, Support 66 204871 Log Pusher Assembly
24 DR 4 -Ton WOOD SPLITTER Safety & Operating Instructions
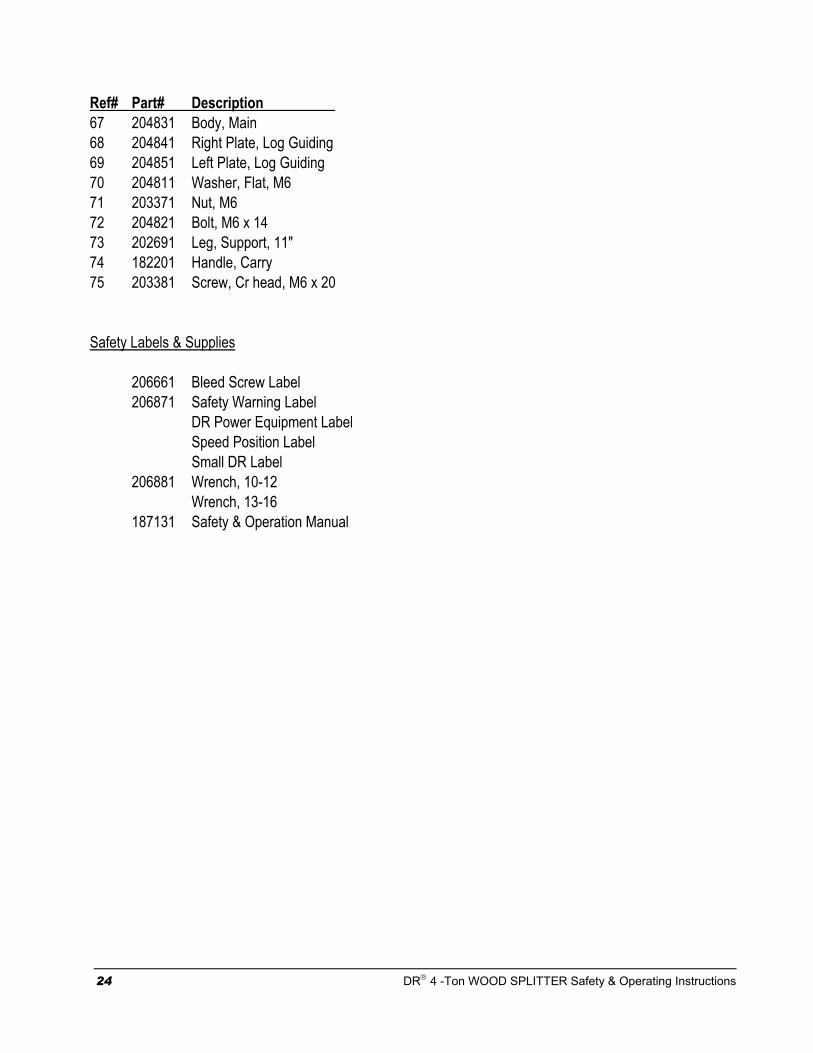
Ref# Part# Description 67 204831 Body, Main 68 204841 Right Plate, Log Guiding 69 204851 Left Plate, Log Guiding 70 204811 Washer, Flat, M6 71 203371 Nut, M6 72 204821 Bolt, M6 x 14 73 202691 Leg, Support, 11" 74 182201 Handle, Carry 75 203381 Screw, Cr head, M6 x 20
Safety Labels & Supplies 206661 Bleed Screw Label 206871 Safety Warning Label DR Power Equipment Label Speed Position Label Small DR Label 206881 Wrench, 10-12 Wrench, 13-16 187131 Safety & Operation Manual

DR 4 -Ton WOOD SPLITTER Safety & Operating Instructions 25
DR 4 -Ton Electric Wood Splitter - Schematic

26 DR 4 -Ton WOOD SPLITTER Safety & Operating Instructions
Notes
COUNTRY HOME PRODUCTS, Inc.
M E I G S R O A D , P . O . B O X 2 5 , V E R G E N N E S , V E R M O N T 0 5 4 9 1 1-800-DR-OWNER (376-9637) • www.dr-owner.com ©2003 CHP, Inc. 187131
Warranty
DR® POWER EQUIPMENT
DR® 4 -Ton WOOD SPLITTER 1-Year Limited Warranty
Terms and Conditions The DR 4 -Ton WOOD SPLITTER is warranted for one (1) year against defects in materials or workmanship when put to ordinary and normal consumer use; ninety (90) days for any other use.
For the purposes of all the above warranties, “ordinary and normal consumer use” refers to non-commercial residential use and does not include misuse, accidents or damage due to inadequate maintenance.
Country Home Products, Inc. certifies that the DR 4 -Ton WOOD SPLITTER is fit for ordinary purposes for which a product of this type is used. Country Home Products, Inc. however, limits the implied warranties of merchantability and fitness in duration to a period of one (1) year in consumer use, ninety (90) days for any other use.
The 1-Year Limited Warranty on the DR 4 -Ton WOOD SPLITTER starts on the date the machine ships from our factory. The 1-Year Limited Warranty is applicable only to the original owner.
The warranty holder is responsible for the performance of the required maintenance as defined by the manufacturer's owner's manuals. The warranty holder is responsible for replacement of normally wearing parts such as the wear plates. Attachments and accessories to the machine are not covered by this warranty.
During the warranty period, the warranty holder is responsible for the machine transportation charges, if required. During the warranty period, warranty parts will be shipped by standard method at no charge to the warranty holder. Expedited shipping of warranty parts is the responsibility of the warranty holder.
SOME STATES DO NOT ALLOW LIMITATIONS ON THE LENGTH OF IMPLIED WARRANTIES, SO THE ABOVE LIMITATIONS MAY NOT APPLY TO YOU.
Country Home Products, Inc. shall not be liable under any circumstances for any incidental or consequential damages or expenses of any kind, including, but not limited to, cost of equipment rentals, loss of profit, or cost of hiring services to perform tasks normally performed by the DR 4 -Ton WOOD SPLITTER.
SOME STATES DO NOT ALLOW THE EXCLUSION OR LIMITATION OF INCIDENTAL OR CONSEQUENTIAL DAMAGES, SO THE ABOVE LIMITATIONS MAY NOT APPLY TO YOU.
Customer Service Hotline Country Home Products, Inc.’s objective is to have 100% satisfied customers. For that reason, we operate a 6-day-a-week Technical Service Department for our Owners. You can access a Representative by dialing our TOLL-FREE Hotline at 1-800-DR-OWNER (376-9637). The sole job of our well-trained and friendly folks is to ensure that you get any help you need in a timely fashion. They are there to answer all your questions including: (1) inquiries on any of the above warranties, (2) inquiries about replacement parts, or (3) your questions regarding service, maintenance and operation.
THIS WARRANTY GIVES YOU SPECIFIC LEGAL RIGHTS, AND YOU ALSO HAVE OTHER RIGHTS, WHICH VARY FROM STATE TO STATE.
COUNTRY HOME PRODUCTS, Inc.
M E I G S R O A D , P . O . B O X 2 5 , V E R G E N N E S , V E R M O N T 0 5 4 9 1 1-800-DR-OWNER (376-9637) • www.dr-owner.com ©2005 CHP, Inc. 187131
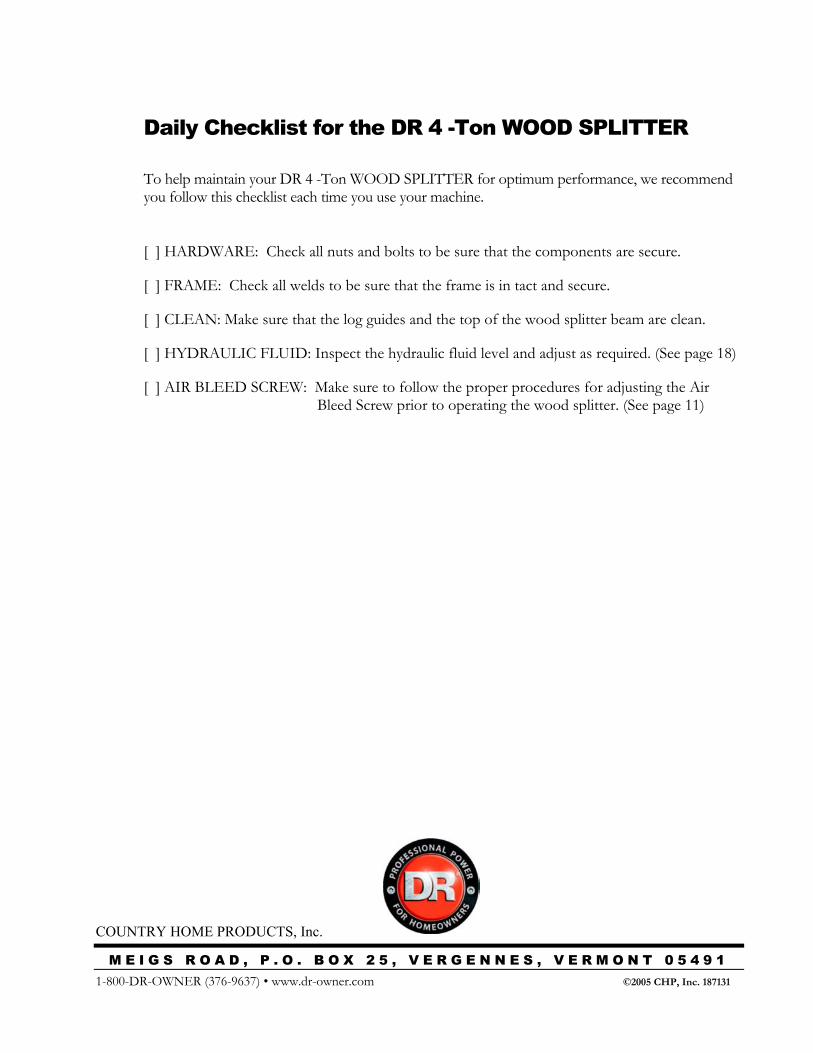
Daily Checklist for the DR 4 -Ton WOOD SPLITTER To help maintain your DR 4 -Ton WOOD SPLITTER for optimum performance, we recommend you follow this checklist each time you use your machine.
[ ] HARDWARE: Check all nuts and bolts to be sure that the components are secure.
[ ] FRAME: Check all welds to be sure that the frame is in tact and secure.
[ ] CLEAN: Make sure that the log guides and the top of the wood splitter beam are clean.
[ ] HYDRAULIC FLUID: Inspect the hydraulic fluid level and adjust as required. (See page 18)
[ ] AIR BLEED SCREW: Make sure to follow the proper procedures for adjusting the Air Bleed Screw prior to operating the wood splitter. (See page 11)