
download this toolkit in PDF.
50
FITNESS ASSESSMENTS FOR INDIVIDUALS WHO USE A WHEELCHAIR Toolkit for the Fitness Professional
Transcript of download this toolkit in PDF.

FITNESS ASSESSMENTS FOR INDIVIDUALS WHO USE A WHEELCHAIRToolkit for the Fitness Professional

2 Fitness Assessments for Individuals who use a Wheelchair
Table of Contents Introduction to Fitness Assessments 4
What are Fitness Assessments 4
Why are Fitness Assessments Important 4
What Will Your Client Need 4-5
Assessments Defined 5
Order of Tests 5
Preparation for Fitness Assessments 6
Pre Assessment 6
Types of Fitness Assessments 6
Cardiovascular Testing 7
Arm Ergometer Test 7-9
Six-Minute Push Test 9-10
Muscular Strength Testing 10
Medicine Ball Throw Test 10-11
Handgrip Test 11-12
One-Repetition Maximum Test 12-13
Muscular Endurance Testing 14
Push-Up Test 14
Curl Up Test 15-16
Balance Testing 16
Seated Balance Test 16-17
Modified Functional Reach Test 18
Flexibility Testing 19
Shoulder (Range of Motion) Flexibility Test 19-20
Back Scratch Test 20
Body Composition Testing 21
Circumference Measurements 21-23

3Fitness Assessments for Individuals who use a Wheelchair
DEXA 23-26
BIA 26
Disability Awareness 27
Are you KnowledgeABLE 27
Disability Etiquette 28-29
References 30-34
Assessment Recording Resources 35
VO2max Arm Ergometer Test Recording Sheet 35
Six-Minute Push Test Recording Sheet 36
Medicine Ball Throw Test Recording Sheet 37
Handgrip Test Recording Sheet 39
One-Repetition Maximum Test Recording Sheet 40
Push-Up/Curl Up Test Recording Sheet 41-42
Seated Balance Test Recording Sheet 43
Modified Functional Reach Test Recording Sheet 44
Shoulder (ROM) Flexibility Test Recording Sheet 45
Circumference Measurements Test Recording Sheet 46
DEXA Test Recording Sheet 48
BIA Test Recording Sheet 49
To view more resources and services which can benefit all ages and populations, connect with us:
www.nchpad.org/fitnesstesting [email protected] 1-800-900-8086
/nchpad @NCHPAD @NCHPAD
NCHPAD is supported by the National Center on Birth Defects and Developmental Disabilities at Centers for Disease Control and Prevention under Grant/Cooperative Agreement # U59DD000906.
To Watch a Video Series on How To Conduct These Tests go to www.nchpad.org/fitnesstesting.

4 Fitness Assessments for Individuals who use a Wheelchair
Introduction to Fitness Assessments
What are fitness assessments?
Fitness assessments are a combination of tests that help assess a person’s health and fitness levels. The five fitness categories that can be tested are cardiorespiratory fitness, muscular strength and endurance, body composition, balance, and flexibility.
Why are fitness assessments important?
Fitness assessments are important because they assess current fitness levels and help to develop appropriate exercise prescriptions for individuals. They also help screen for heart and other chronic diseases and secondary conditions. Fitness assessments can be used as both educational tools and motivational incentives for clients, aiding in promoting individualized health and fitness goals.
Why are fitness assessments important for people with disability?
It is well-known that individuals with disability have a higher prevalence of and/or risk for obesity and many other adverse secondary conditions than those without disability. Fitness assessments can play a key role in providing the fitness professional with ample opportunity to screen for potential red flags or contraindications specific to each client. While this may be seen as the role of a physician, often times physicians concentrate on other aspects of clients health and fail to mention the important role exercise can play on
health and current risk levels. It then becomes the fitness professional’s role to inform their clients about risks. Fitness assessments can also help illustrate how your client is able to function and his or her mobility within an exercise environment. Finally, fitness assessments help gather information in order to develop the fitness program that will best meet and satisfy clients’ individual goals and abilities. It is important to remember that health and disability may go hand in hand; even though an individual has a disability, they may still be in optimal health and in fact an elite athlete. In this case, fitness assessments can play an important role in determining the athlete’s appropriate training intensity and fitness levels.
What will your client need to do the tests?

5Fitness Assessments for Individuals who use a Wheelchair
Fitness assessments need to be performed by individuals certified to perform specific tests. Find a gym, fitness center, or research facility that performs these tests in the local area. Prior to arriving at a testing site, remind your client to bring a water bottle and wear appropriate clothes that allow full movement (i.e. tennis shoes or sneakers, gym or workout shorts or pants, t-shirts or tank tops). Your client should drink plenty of fluids during the 24-hour period before testing. They should also refrain from eating, smoking, and drinking alcohol or caffeine for three hours prior to the test. Your client should refrain from any strenuous physical activity the day of the exercise test and should get adequate sleep (six to eight hours) the night before the test. Finally, your client should be prepared to fill out both a consent and a health history form prior to testing. This information may be obtained through questionnaire or interview before testing begins.
Fitness Assessments Defined
Cardiovascular: Tests ability to perform dynamic exercise at moderate to high intensities, utilizing large muscle groups for prolonged periods of time.
Musculoskeletal: Tests both muscular strength and endurance. Muscular strength testing assesses the person’s strength in one repetition or one attempt at the most weight they can lift, press, or push. Muscular endurance testing tests how long a person can hold, curl, or press a certain amount of weight.
Flexibility: Tests a person’s range of motion in his or her functional muscles. Most commonly used muscles to test are shoulders, hamstrings, and trunk muscles.
Balance: Tests a person’s base level of balance and functional ability.
Body Composition: Measures a person’s physical proportions and potential areas of improvement. Various assessments can test body fat percentage and weight, lean mass percentage and weight, girth measurements, and bone mineral density.
Fitness Assessment Order
The order of the fitness testing can play an important role as it can affect performance. Typically the order of tests should be as follows:
1. Resting measures such as heart rate and blood pressure2. Body composition and anthropometry 3. Cardiovascular fitness4. Muscular strength and endurance5. Flexibility
Occasionally this order may need to be adjusted due to the locations of the tests, time constraints, the number of individuals being tested and the number of test administrators. When deciding your testing order, keeping the above preferred order in mind, you will need to select a testing order that logistically works best for your client. If conducting pre and post testing, be sure testing is done in the same order and at the same time of day.

6 Fitness Assessments for Individuals who use a Wheelchair
Preparation for Fitness Assessments
Prior to testing, the fitness professional should understand the client’s abilities. This will assist the fitness professional in choosing the best-suited equipment for the fitness testing. It is also good to understand that individuals with disability are more likely to have secondary health conditions and are commonly on medications that may affect their performance and physiological response to exercise. Being aware of the client’s abilities and health conditions is crucial in determining what type of equipment should be used and the appropriate fitness test for the individual. It also helps determine test termination criteria (Table 1), which are simply the range of criteria that should merit the immediate ending of the specific test
Table 1. Test Termination CriteriaRequirements of test have been achieved
Maximum heart rate reachedAngina/chest pain
Onset of lightheadedness or dizzinessBlood pressure drops more than 10 mmHg
Excessively high blood pressure (> 250/115)Client asks for test to be terminated
Client appears to be confused or agitatedVolitional fatigue, pain or spasms do not allow for continuous proper technique
Client experiences symptoms of autonomic dysreflexiaChanges in vision
Difficulty breathing during testingFailure of testing equipment
Pre-Assessment
Before beginning your exercise testing, take the resting heart rate and blood pressure of your client. Allow your client to sit still for at least five minutes before taking these resting measurements. Note the American College of Sports Medicine’s (ACSM) cutoff limit for heart rate and blood pressure before beginning exercise testing.
Types of Fitness Assessments
Fitness Assessments for Individuals who use a Wheelchair This table shows the types of tests for each fitness component. Lab-based testing is typically done in a clinical or research lab setting and is often more expensive to administer due to the equipment it requires. It is also the most accurate form of testing. Lab-and-field-mix-based testing is easier to administer than lab-based testing and is also typically less expensive.

7Fitness Assessments for Individuals who use a Wheelchair
Lab-and-field mix-based testing can be performed in a gym, YMCA, fitness center or lab setting. Field-based testing is the easiest and cheapest to administer and can be done at many different locations. However, it is important to note that, while easier to administer, field tests are often less accurate than lab-based testing.
Cardio Muscular Strength
Muscular Endurance
Balance Flexibility Body Composition
Lab-Based
-VO2 testing, -Upper body ergometer, -Wheelchair propulsion ergometer, -Wheelchair treadmill
-Biodex, -Dynamometer (isokinetic, handgrip)
-Wingate arm crank anaerobic testing (tests power)
-Biodex or Neurocom seated balance
-DEXA -Bod pod, -Hydrostatic Weighing (both bod pod and hydrostatic weighing are difficult and awkward for individual and should be limited)
Lab-and-Field Mix
-Six-Minute push test with VO2 testing (cosmed), -Spirometers (cardiorespiratory functioning), - Arm Crank, modified Astrand, -MACAFT
-Manual muscle testing, - One-repetition maximum, -Eight repetition maximum, -Myometry
-Wheeling up a ramp (modified Margaria, tests power)
-Tinetti performance orientation assessment
-Sit and reach, -Shoulder flexion and extension, -Trunk forward and lateral flexion with goniometer
-BIA - Segmented BIA
Field-Based
-Six-Minute push test, -12-Minute Wheelchair Propulsion test, -Multistage field test for wheelchair users (beep test), -Heart rate, Blood pressure
-Handgrip strength test, - Medicine ball throw
-Push-Ups, -Pull Ups, -Biceps curls test, - Curl ups
-STAR balance test
-Back scratch test, - Trunk rotation test
-Skinfold - BMI - Girth measurements
Cardiovascular Testing: Arm Ergometer VO2max Test– Lab-Based Test
“Upper Body Ergometers are appropriate in individuals unable to exercise on a treadmill or lower extremity ergometer (i.e., patients with vascular, orthopedic, and neurological comorbidities).” (ACSM’s Guidelines for Exercise Testing and Prescription, Ninth Edition)
Equipment Needed: 1. Upper Body Ergometer 2. Metabolic Cart 3. Heart Rate Monitor 4. Metronome 5. VO2 Recording Sheet (attached)

8 Fitness Assessments for Individuals who use a Wheelchair
6. Rate of Perceived Exertion (RPE) Scale Poster 7. Towel for client 8. Adaptions: Hand ties to assist in limited grip
Before Testing: Make sure you have received the informed consent and health history forms from your client. Have your client put on the heart rate monitor and record his or her resting heart rate. Next, record their predicted maximum heart rate using the equation 220 – age =maximum heart rate. You must take his or her blood pressure before testing as well. Resting heart rate and pre-test blood pressure should be recorded onto the recording sheet. After recording blood pressure and heart rate, place the VO2 mask on your client; the mask should rest over the client’s nose and mouth with the strap going around the back of his or her head. If it needs to be adjusted, allow your client to adjust it to his or her comfort.
Testing: Work rates are adjusted by altering the cranking rates and/or the resistance against the flywheel. Work rate increments of 5-25 Watts every 30 seconds at a cadence of 50-75 revolutions * min-1 (rpm) are common recommendations.
During testing, record your client’s heart rate, oxygen consumption (VO2), respiratory exchange ratio (RER), ventilatory equivalent (VE), rate of perceived exertion (RPE), and watts on the recording sheet (see Assessment Recording Resources) . Increase the watts after every minute by 10 watts. VO2, RER, and VE numbers can be found on the metabolic cart. Heart rate is taken from the heart rate monitor placed on your client prior to the test. RPE is a number system scale from zero to 10 or six to 20 that quickly describes how hard the client perceives he or she is working. Be sure to explain the scale before the test begins. During the test, have your client express to you at what number on the scale he or she thinks he or she is working. Be aware that your client may not be able to verbally respond to you during the testing due to wearing the mask. Be prepared with a chart that you or an assistant can point to and have the client nod yes or no based on how he or she feels. Be sure to review this protocol with your client before administering the test so he or she understands how it works. Follow the protocols for test termination.
After Testing: Immediately after testing, remove the mask and hand your client a towel if needed. Have your client keep the heart rate monitor on as he or she continues to cool down on the arm ergometer. Finally, you will need to record his or her recovery heart rate every minute after for three
9Fitness Assessments for Individuals who use a Wheelchair
minutes. Once your client has sufficiently cooled down, you will need to take post-test blood pressure and document it onto the recording sheet.
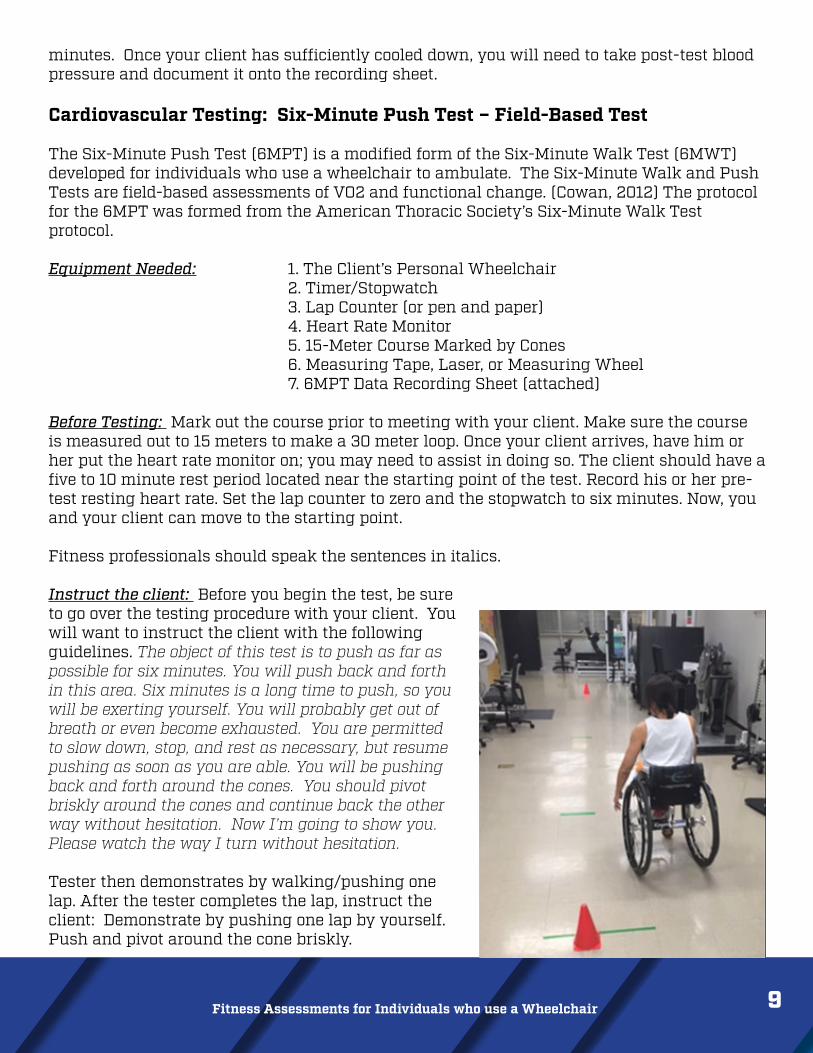
Cardiovascular Testing: Six-Minute Push Test – Field-Based Test The Six-Minute Push Test (6MPT) is a modified form of the Six-Minute Walk Test (6MWT) developed for individuals who use a wheelchair to ambulate. The Six-Minute Walk and Push Tests are field-based assessments of VO2 and functional change. (Cowan, 2012) The protocol for the 6MPT was formed from the American Thoracic Society’s Six-Minute Walk Test protocol.
Equipment Needed: 1. The Client’s Personal Wheelchair 2. Timer/Stopwatch 3. Lap Counter (or pen and paper) 4. Heart Rate Monitor 5. 15-Meter Course Marked by Cones 6. Measuring Tape, Laser, or Measuring Wheel 7. 6MPT Data Recording Sheet (attached)
Before Testing: Mark out the course prior to meeting with your client. Make sure the course is measured out to 15 meters to make a 30 meter loop. Once your client arrives, have him or her put the heart rate monitor on; you may need to assist in doing so. The client should have a five to 10 minute rest period located near the starting point of the test. Record his or her pre-test resting heart rate. Set the lap counter to zero and the stopwatch to six minutes. Now, you and your client can move to the starting point.
Fitness professionals should speak the sentences in italics.
Instruct the client: Before you begin the test, be sure to go over the testing procedure with your client. You will want to instruct the client with the following guidelines. The object of this test is to push as far as possible for six minutes. You will push back and forth in this area. Six minutes is a long time to push, so you will be exerting yourself. You will probably get out of breath or even become exhausted. You are permitted to slow down, stop, and rest as necessary, but resume pushing as soon as you are able. You will be pushing back and forth around the cones. You should pivot briskly around the cones and continue back the other way without hesitation. Now I’m going to show you. Please watch the way I turn without hesitation.
Tester then demonstrates by walking/pushing one lap. After the tester completes the lap, instruct the client: Demonstrate by pushing one lap by yourself. Push and pivot around the cone briskly.

10 Fitness Assessments for Individuals who use a Wheelchair
Ask the client: Are you ready? I am going to keep track of the number of laps you complete. I will record each time you turn around at this starting line. Remember that the object is to push AS FAR AS POSSIBLE for six minutes. Start now or whenever you are ready.
Note: The 6MWT instructs clients to walk at a comfortable pace, not run or jog. For the 6MPT, you may instruct your client to push at a comfortable velocity, like he or she is pushing around the mall.
Position the client at the starting line. You should also stand near the starting line for the duration of the test. Do not walk with the client. As soon as the client starts to push, start the stopwatch. When saying the next scripted dialogue, talk in an even tone of voice. Mark each lap when the client returns to the starting point.
During the test, prompt the client using the script below:
Minute Script1 You are doing well. You have five minutes to go.2 Keep up the good work. You have four minutes to go.3 You are doing well. You are halfway done.4 Keep up the good work. You only have two minutes left.5 You are doing well. You only have one minute to go.5:45 In a moment I’m going to tell you to stop. When I do, just stop right where you
are and I will come to you.6 Stop!NOTE: If the participant stops walking/pushing during the test and needs a break:
“You can rest if you would like; continue pushing whenever you feel able.” At the word Stop!, have the client stop where they are. Walk to them and mark the location with a cone or piece of tape on the floor. Immediately record their heart rate. You will then need to record the number of laps completed and the additional distance after the final lap covered (the number of meters in the final partial lap). You can find this exact number by using a measuring tape, laser or wheel. Calculate the total distance pushed, and record it onto the data recording sheet. Congratulate your client and offer them some water.
Muscular Strength Testing: Upper Body Power Testing Using the Medicine Ball Throw – Field-Based Test
This protocol requires the individual to explosively throw a medicine ball as far as possible in a forward direction.
Equipment Needed: 1. Measuring tape 2. Medicine ball 3. Masking tape 4. Assistant

11Fitness Assessments for Individuals who use a Wheelchair
This test can be performed seated or standing. Vary the medicine ball weight depending on client strength. Always retest with the same weight.
While the client is seated or standing, have him or her throw the medicine ball as far as possible in a forward direction. The medicine ball should be thrown in a forward position, and it can be as an overhead pass, chest pass, etc. Whatever way the ball is thrown should be recorded on the recording sheet and should be consistent every time. Put the masking tape where the medicine ball first hit the ground, not where it rolled. Repeat the medicine ball throw. With the measuring tape, measure the distances from the client to the masking tape marks. Record the best distance of the two trials for test-retest purposes.
Muscular Strength Testing: Handgrip Test – Field-Based Test Handgrip testing assesses the client’s hand and forearm strength.
Equipment Needed: 1. Handgrip Dynamometer 2. Chair 3. Table that allows client’s elbow to be at 90° 4. Recording Sheet
Adaptations and Recommendations: The use of a tensor bandage can be used to assist with maintaining proper grip.
Fitness professional should speak the sentences in italics.
Before Testing: Ask the client to: Transfer into this chair. Determine hand dominance by asking: Are you right-handed or left-handed? Document the answer on the data collection sheet. Have your client sit in the chair, shoulder adducted and neutrally rotated, elbow by their side and flexed to a 90° angle, and forearm and wrist in neutral position. If needed, your client’s elbow can be at a 45° angle or 180° angle.Adjust your client’s chair so his or her hand is off of the table. Your client’s fist will be supported by the palm of the tester’s hand. The palm of the tester’s hand is placed under the dynamometer during the test for support.

12 Fitness Assessments for Individuals who use a Wheelchair
Testing: Start with the dominant hand. Explain the procedure by saying, I want you to hold the handle like this and squeeze as hard as you can. You are going to be doing this three times on each hand. The fitness professional should demonstrate the procedure to the client, then give him or her the dynamometer. After your client is positioned appropriately, say, Are you ready? Squeeze as hard as you can. As your client begins to squeeze, say, Harder! ... Harder! ...Relax. Record the score.
Reset dynamometer to zero. Have your client rest for 30 seconds then repeat for two more trials.
Repeat this procedure using the opposite hand. Muscular Strength Testing: One-Repetition Maximum and Eight-Repetition Maximum Using Bench Press – Lab- and Field-Based Test
One-repetition maximum (1-RM) tests a person’s ability to maximally lift weight through the full range of motion in a controlled manner with good posture. This test can follow ACSM’s or the National Strength and Conditioning Association’s protocols with adaptations and modifications available depending on your client’s functional level and ability.
Equipment Needed: 1. Exercise Bench 2. Bench Press Bar 3. Weighted Plates 4. Recording Sheet 5. Spotter for safety
Adaptations and Recommendations: There are a number of adaptations and recommendations for this test. Be sure to pick the appropriate protocol for your client. If your client is new to exercise, deconditioned, a senior adult, or for any other reason the 1-RM Test is not suitable, you should select a multiple-RM test. This test should be performed using free weights or a barbell. If this is not appropriate for your client, a bench press circuit machine is an option. Be aware that these machines vary greatly by manufacturer, so if this option is chosen, it is important to use the same equipment for each subsequent test. Also, normative values will not apply to this test since the resistances are not equivalent between free weights and a machine. The seat or handlebars, depending on the machine settings, will need to be adjusted so they are at mid-chest level. Make sure you understand how to adjust the resistance and that the machine is capable of providing small and large increases in weight. From this point, the protocol remains the same.
Before Testing: Have your client transfer from his or her wheelchair onto a bench. His or her legs may need to be adjusted so they are supported during the test. The client’s legs may also need to be strapped together to help stabilize him or her. While grip position can be varied and depends on factors such as individual anatomy, previous injuries and mobility, having your client grip the bar shoulder-width apart is an easy reference point. If your client has a high level spinal cord injury, grip strength and hand function might be an issue. Grip aids, gloves or wraps can be used to secure your client’s hands to the bar. Assist your client in removing the bar from the rack and maintain your hold on the bar until it is in correct

13Fitness Assessments for Individuals who use a Wheelchair
alignment over your client. Before you release the bar, notify your client.Warm Up: The client should warm up by completing five to 10 submaximal repetitions using the bench press. Following the first warm up have the client rest for one minute. Then, perform two more warm up sets of two to five repetitions at light to moderate weight with a two-minute rest between sets.
Testing: Following the warm up, the sets will be single repetition as the weight approaches your client’s maximum. Allow for three to five minutes of rest between trials. The 1-RM (or any multiple-RM) final weight lifted should be accomplished within four attempts. Any more than that will compromise strength due to the volume of work already done.
Determining the starting resistance can be tricky and requires observation of your client’s lifts during the warm up. If your client pushed the weight up very quickly and with little effort on the last repetition of the last warm up set, a large increase in weight is acceptable for the first trial. If your client barely fished the lift, he or she is probably close to his or her 1-RM and only requires a small addition in resistance. The weight should be progressively increased during the trials by 2.5 to 20 kilograms or 5.5 to 44 pounds.
There are fitness categories for upper body strength based on the 1-RM Test; however, they might not be applicable to your client with a disability. Your client’s score should be used as a baseline value to track changes and improvements in muscular strength. Document your procedures and any modifications made to ensure test-retest reliability.
Multiple Repetition Maximum Test: A Multiple RM Test, such as the 8-RM Test, can also be used following the same steps and modifications. If your client is deconditioned and fatigues quickly or you are concerned with injury from the heavy load of a 1-RM Test, the 8-RM Test is an alternative. It will still establish a baseline for your client’s muscular strength.

14 Fitness Assessments for Individuals who use a Wheelchair
Muscular Endurance Testing: Upper Body Endurance Testing Using the Push-Up Test – Field-Based Test The push-up test assesses muscular endurance by seeing how many push-ups your client can do. The push-up test procedures follow the same guidelines as ACSM’s push up test.
Equipment Needed (optional): 1. Mat or raised platform 2. Person to count push-ups or handheld counter 3. Recording Sheet
Adaptations: Can use varied pivot points depending on client (toes, knees, or hips)
Before Testing: Before testing, allow clients to find the most comfortable position (pivot point) for the test. For men, hands should be pointing forward and under the shoulders with head up; for women, hands should be shoulder-width apart with head up. Both men and women should always have their backs straight. Make sure they know the proper form to do a push-up; demonstrations may be necessary before you start the test. The client must raise his or her body as one unit by straightening the elbows and then lowering the body by returning to the “down” position; the stomach should not touch the mat. Be sure to reassure your client throughout the testing procedure and remind him or her of the benefits of obtaining an accurate number.
Alternative Test: The maximal number of push-ups performed consecutively without rest in between is counted as the score. Note that the test is stopped when the client strains forcibly or is unable to maintain the appropriate technique within two repetitions.
If your client is unable to perform a push-up, then have them do a plank until failure. You should time them for as long as they can hold the plank position.
There are charts available to assess fitness categories from the push-up test; however, they are based off of able-bodied scores and will not be applicable to your client. Additionally, if you have used a modified protocol, the scores will not be comparable. Your client’s score should be used as a baseline value to track changes and improvements in his or her muscular endurance.

15Fitness Assessments for Individuals who use a Wheelchair
Muscular Endurance Testing: Abdominal Endurance Test Using the Curl Up Test – Field-Based Test
The curl up or sit up test is an assessment of abdominal muscular endurance. This test is simple to administer, requires minimal equipment and can be performed in almost any setting. The curl up test used for individuals with disabilities is a modified version of ACSM’s protocol, which counts the maximum number of curl up repetitions performed to a metronome. Depending on your client, additional adaptations to this procedure might need to be made.
Equipment Needed: 1.Tape 2. Tape Measure 3. Metronome 4. Counterweights (if needed) 5. Recording Sheet
Adaptations: If your client has limited abdominal or core function, a counter weight might be needed to complete the curl up movement. Examples of counter weights include resistance bands, medicine balls, dumbbells and plates. The mode of counter weight used can be based on available equipment and your client’s preference. If a counter weight is used, try to standardize your client’s curl up range of motion to the best of your ability. You can also allow your client to complete their maximum number of curl ups at their own pace, without using the metronome.
Testing: If your client is less than 45-years-old, place two strips of tape on the floor 12cm apart; if they are over 45, place tape 8cm apart. Have them lie down in a supine position with their arms at their sides, so their fingertips touch the first strip. A wedge can be placed under your client’s legs to help bend his or her knees at approximately 90 degrees. This point is the starting position. To reach the top position, your client will sit up, reaching their fingers forward until they touch the second piece of tape. Set a metronome to 40 beats per minute. On the first beep, your client will curl up to the top position then return to the bottom position on the second beep and continue that pattern. A repetition is counted every time your client returns to the starting position. The test is stopped when 75 curl ups are achieved or the client is unable to maintain the beat.

16 Fitness Assessments for Individuals who use a Wheelchair
Alternative Tests: If your client is unable to transfer onto a mat or the ground, crunches using a cable machine and rope can be performed. You may adjust the resistance to a light setting to provide a counter weight if needed. Make sure your client engages his or her brakes so their wheels are locked in place. The client will complete as many of these curl ups as possible until failure. Balance Testing: Seated Balance Test – Lab-Based Test Seated balance is an adapted form of the Biodex standing balance test. This test is the Biodex “Limits of Stability” test. This protocol was derived from the NeuroCom seated balance test. The Biodex seated balance test has been created by the UAB/Lakeshore Research Collaborative.
Equipment Needed: 1. Biodex Balancing System 2. Single Step Risers/Blocks 3. One “High Step” Top 4. 5/8ths cushion to cover step 5. Measuring Tape 6. Data Recording Sheet (attached)
Before Testing: Place risers and step/bench on the Biodex platform such that the four corners are evenly spaced at the edges of the platform. The number of risers should accommodate the client’s height and place their knees at ~90 degrees. Feet will be flat on the platform edge, roughly shoulder-width apart. Have your client transfer to the unsupported sitting position on the step (provide spotters if necessary). Adjust the amount of risers if needed based on knee angle. Document the number of risers used on the data collection sheet (do NOT count the step/bench). Set support handles (black knob on the right side of the Biodex column) to accommodate your client’s height and set screen to a comfortable height for your client (i.e., close to line of vision). The display screen height will probably need to be on the lowest setting.
Fitness professional should speak the sentences in italics.
Touch the computer screen to turn it on. Enter the client’s demographics. Position the client so that their buttocks are located toward the back of the step. Instruct him or her to sit as tall as possible. Adjust position so that the black dot is placed in the center of the screen and feet are dangling in front of the platform. Note the commands on screen and follow along: Click “Confirm” then click “Start.”
Note: This will not begin the test, just show the test screen.
Explain the procedures by saying, During each test trial you will shift your weight to move the cursor from the center target to a blinking target and back. The goal is to make as straight of a line as possible from the center target to the blinking target and back as quickly as possible. Sway with your trunk as a unit (i.e., lean from your hips). Arms should remain at your sides. Targets on the screen blink in random order. Move from the center target to the target that is blinking, pause until the blinking stops, and return to the center target once it begins blinking

17Fitness Assessments for Individuals who use a Wheelchair
again. Continue until all targets are completed.
Click “Collect Data” to begin the practice attempts. There will be a three-second countdown before the practice attempt starts. The client will get two practice attempts. If during the practice attempts the client grabs onto the handle bars for stability, encourage him or her not to use the handles unless necessary. There will be a 10-second rest countdown automatically programmed between practice attempts. Hit “Collect Data” after the 1st practice attempt to start the 2nd. There will be a three-second countdown before the 2nd practice attempt starts. After both practice attempts are complete, click “Results” then “Home” and “Ok” to exit and lose exercise results. Enter the client’s demographics: name, age, and select correct height range (in inches).
Seated height is measured with the client sitting on risers.-Measure from the balance platform to the top of the head.-Measure from the buttock to the top of the head.
Click “Next.” Re-explain to your client that they should sit up as straight as possible and adjust to where the black dot/cursor is in the middle of the screen. Click “Confirm.”
Remind your client of the instructions by saying: Now you’re beginning the scored portion of the test. It will be the same as the practice in which you were trying to move from the center target to a blinking target on the edge and back in as straight of a line as possible and as quickly as possible.
Click “Start” then “Collect Data” to begin test. There will be a three-second countdown before the test starts. Between the 1st and 2nd tests and 2nd and 3rd tests there will be a 10-second rest period countdown automatically programed. Click “Collect Data” after the 10-second rest countdown to begin the next test. There will be a three-second countdown before the test starts.
If your client uses the handles to catch him or herself when losing balance, document on the data collection sheet which of the eight points and which trials the client needed the handles to complete
When the 3rd test is complete, click “Results.” Record the Trial Time and Overall Directional Control Score. Click “Print” to automatically generate a printed report (hard copy) if desired. To save the test data, touch “Save Results” and then “OK” in response to the “Save Results for later reporting or export?” prompt. The system will display “Save Results Completed” after the results have been saved.

18 Fitness Assessments for Individuals who use a Wheelchair
Balance Testing: Modified Functional Reach – Field-Based Test The Modified Functional Reach Test is an adapted form of the commonly used Functional Reach Test. This test is used to measure sitting balance. Sitting balance is the ability of a person to maintain control over upright posture during reaching in different directions without stabilization.
Equipment Needed: 1. Straight back chair 2. Yardstick 3. Marker, pen or pencil 4. Velcro® or tape 5. Level 6. Client may use their wheelchair cushion (if needed) 7. Data Recording Sheet
Before Testing: Have your client transfer to the chair by a wall. The cushion from the wheelchair can be used or your client can stay in his or her wheelchair if unable to transfer. Hips, knees, and ankles are positioned with 90 degrees of flexion and feet flat on the floor. If their feet do not reach the floor, foot support, such as a block or box, can be used to ensure proper seated position. Place the yardstick on the wall along the client’s shoulder at the level of the acromion. If your client has an upper body imbalance, the height of the acromion might differ from right to left shoulder and the yardstick should be adjusted accordingly. Testing: The initial reach is measured with your client’s back against the chair backrest and arm extended straight out to 90 degrees of flexion. The anatomical landmark used to measure this starting position is the ulnar styloid process.
This test consists of four directional movements over three trials: • Sitting with the right side near the wall and leaning forward • Sitting with the left side near the wall and leaning forward • Sitting with the back to the wall and leaning right • Sitting with the back to the wall and leaning left
Instruct your client to lean as far as possible in each direction from the starting position. Record the distance covered in centimeters. There are two practice trials in each direction, followed by three trials of maximal reach where the distance is recorded. The final result for each direction is the average of the three trials. Allow 15 seconds of rest between each trial. If your client is unable to raise one of their arms, the value recorded is the maximal distance covered by the acromion during leaning.
Note: Make sure your client is not rotating or touching the wall/yardstick as they reach. The non-reaching arm can be used for counterbalance only, but no weight bearing or holding on to the chair, wall, or themselves. If your client loses their balance, touches the wall or chair, or requires assistance to recover to the upright position, that trial should be repeated.

19Fitness Assessments for Individuals who use a Wheelchair
Flexibility Testing: Shoulder Range of Motion (ROM) – Lab-Based Test Flexibility is defined as “the ability to move a joint through its complete ROM” (ACSM). In the laboratory setting, a goniometer is used to measure the amount of available motion at a specific joint and recorded in degrees. Flexibility can be tested through active range of motion (AROM) or passive range of motion (PROM). This following procedures describe AROM, where your client will perform the movement without any assistance.
Equipment Needed: 1. Goniometer 2. Chair with no arms 3. Recording Sheet
Before Test: Have your client sit in a straight back chair with no armrests. If they are unable to transfer, the tests can be completed in their wheelchair. Be aware that armrests on the wheelchair, push rims, and wheels can limit your client’s movement and range of motion. Have your client sit up as straight as possible with feet flat on the floor, a block, or the footrest. If your client has limited trunk control, their waist and hips can be strapped to the chair so full ROM can be measured without instabilities.
Testing: Each test should be performed three times. The score is the average of the three trials. Instruct your client to move their arm to the desired end range of motion but that is still comfortable and does not cause pain.
There is shoulder range of motion norms available for each of these tests. Due to wheelchair use, your client may have shoulder pain or muscular imbalances which will affect their shoulder range of motion.
Joint Movement Range (degrees)Shoulder Flexion 0 – 180
Extension 0 – 60 Abduction 0 – 180 Internal Rotation 0 – 70 External Rotation 0 – 90
Shoulder Flexion: Your client’s humerus is in a neutral position with their arm hanging straight down by their side. The axis of the goniometer is center of the humerus, slightly below the acromion process. The stationary bar of the goniometer is parallel to the trunk and the moveable bar is along the humerus. Instruct your client to keep their arm straight and raise it in front of their body as high as possible. The moveable bar follows the humerus and the stationary bar remained pointed down. At the end of the measurement, the moveable bar is lined up through the middle of the humerus. Make sure your client does not lean backwards or to the side during the movement.
Shoulder Extension: Your client’s humerus is in a neutral position with their arm hanging straight down by their side. The axis of the goniometer is center of the humerus, slightly below the acromion process. The stationary bar of the goniometer is parallel to the trunk and

20 Fitness Assessments for Individuals who use a Wheelchair
the moveable bar is along the humerus. Instruct your client to keep their arm straight and extend it back as far as possible. At the end of the measurement, the moveable bar is lined up through the middle of the humerus.
Shoulder Abduction: Your client’s arm is in a neutral position. The axis of the goniometer is on the acromion process of the posterior side of the shoulder. This measurement will be taken from behind your client’s back. The stationary bar of the goniometer is parallel to the trunk and the moveable bar is along the humerus. Instruct your client to raise their arm up as close to their ear as possible. The moveable bar follows the humerus. Make sure your client does not lean to the side during the movement.
Shoulder Internal Rotation: Have your client bend their elbow to 90 degrees. The humerus will remain against their trunk with their forearm in mid-position, perpendicular to their body. The axis of the goniometer is on the olecranon process of the elbow. The stationary and moveable bars are parallel to the forearm. Instruct your client to swing their forearm in towards their body. The moveable bar will follow the forearm.
Shoulder External Rotation: Have your client bend their elbow to 90 degrees. The humerus will remain against their trunk with their forearm in mid-position, perpendicular to their body. The axis of the goniometer is on the olecranon process of the elbow. The stationary and moveable bars are parallel to the forearm. Instruct your client to swing their forearm out away from their body. Make sure their humerus stays close to their trunk and does not swing out with their forearm. The moveable bar will follow the forearm.
Flexibility Testing: Back Scratch Test – Field-Based Test Back Scratch Test (Rikli and Jones 2001)This is a test from the Senior Fitness Test; however, as it is a measure of the ability to perform activities of daily living such as combing hair, dressing, and reaching for a seatbelt, it is still a good fitness indicator. Since it is a part of the Senior Fitness Test, the norms set up for this test may not be applicable to your client unless he or she is older than age 60. The back scratch test assesses upper body (shoulder joint) flexibility.
Equipment needed: 1. Ruler or tape measure 2. Recording Sheet
Testing: Ask your client to reach with his or her preferred hand with palm down and fingers extended over the shoulder and down the back while reaching with the other hand, palm up and fingers extended, toward the first hand. Allow the client to choose the best or preferred hand through trial and error. Administer two practice trials and two test trials.Use the ruler to measure the overlap (plus score) or gap (minus score) between the middle fingers of each hand. If the fingers just touch each other, then record the score as a zero. Record best results to the nearest half-inch.

21Fitness Assessments for Individuals who use a Wheelchair
Body Composition Measurements: Circumference Measurements – Field-Based Test Circumference measurements are used to measure body girth, or how large in circumference a person’s waist, hips, biceps, chest, and calves are. They can be used to show change in an individual client’s size or body dimensions over time after a fitness or weight loss intervention.
Equipment Needed: 1. Gulick tape measure (or tape measure with a spring loaded handle) OR flexible yet inelastic tape measure 2. Long mat or bed 3. Straight back chair with armrests (optional) 4. Scrubs (if needed)
At the site of measurement, the tape should be placed on the skin and pulled to the point where there is no slack but without compressing the skin. If you are using a spring-loaded handle, you should pull the handle to the same marking each time. Make sure the tape is lying flat and is horizontal. All measurements should be taken directly on the skin or with minimal clothing. At least two measurements should be taken at each site and then averaged. If a measurement differs by greater than 5mm then an additional measurement should be taken. Take the measurements in a rotating sequence. This allows the skin time to return to normal texture. Most protocols only require measuring the right side of the body; however, people with disability may have asymmetrical development, so taking measurements on both the right and left sides of the body is recommended.
Girth measurements are often used as an indicator of health or to predict the risk of developing diseases and chronic health conditions. Since these values and norms have been developed from able-bodied individuals, they will not be applicable to your client with a physical disability. For example, body mass index (BMI) and waist-to-hip ratio are not practical or accurate measurements for an individual with a spinal cord injury since there will be a reduction in muscle mass below his or her level of injury. Therefore, the use of conventional anthropometric measurements on individuals with SCI is limited by the body composition changes that follow the injury. Neck circumference has been found to provide an index of overweight or obesity and is also related to cardiovascular disease risk factors. This might be a more appropriate circumference measurement for both creating an adverse risk profile and tracking body composition changes if your client is a wheelchair user.
Waist Circumference
Waist circumference can be challenging to measure on an individual with a disability since he or she might have limited abdominal tone and function, which could lead to inaccurate results.

22 Fitness Assessments for Individuals who use a Wheelchair
There are two adaptations to the waist circumference measurement that can be applied. The first is to have your client use armrests to lift and hold him or herself over the chair. This can be done on the client’s wheelchair, or he or she can transfer to a chair with armrests. While the client is pushed off the chair, take the measurement. If this is not possible, then the measurement can be taken with the client in a supine position. Have your client transfer onto a long mat, table or bed and stay in a seated position. Place the tape measure on the table at the approximate point of the waist measurement you will be taking. Have your client lay back over the tape measure. You can then adjust the location of the tape measure to the correct position, making sure the tape measure is still even, straight and has not twisted. Record the measurement after a normal exhalation.
The ACSM/NCHPAD Inclusive Fitness Trainer manual suggests taking the waist circumference measurement
3cm over the navel or between the bottom of the rib cage and top of the iliac crest. Other organizations recommend taking this measurement at the level of the umbilicus or at the narrowest part of the torso. Document the position chosen and the anatomical landmark used so the measurement can be repeated.
Hip Circumference
The hip or thigh measurement should also be taken with the client in a supine position in a similar manner to waist circumference. Have the client transfer onto a long mat, table or bed and stay in a seated position. Place the tape measure under the approximate point of the measurement; then have the client lay down. You can adjust the tape measure if necessary. The measurement should be taken at the maximum girth around the buttocks. Record in centimeters.
Biceps Circumference
The client’s arms should be relaxed and hanging straight down by his or her sides. Use your tape measure to find the point halfway between the acromion and the tip of the elbow and make a mark at that location. This is the point of measurement and you will measure in a horizontal circle around the arm. Record in centimeters.

23Fitness Assessments for Individuals who use a Wheelchair
Chest Circumference
Your client is allowed to remain in their wheelchair or transfer onto a table for this measurement. If the client has limited core function and is not able to sit straight up, they should stay in their wheelchair for postural support. Have the client raise his or her arms to the side to allow you easy access in placing the tape measure around the chest. Have the client bring his or her arms back down, relaxed at his or her sides, and adjust the tape measure until it is at mid-sternum level. Make sure you are taking the measurement under or near the client’s armpit. Take the measurement after a normal exhalation. Record in centimeters.
Calf Circumference
The calf measurement can be taken in the wheelchair with your client’s feet supported by the footplate. This is a horizontal measurement that should be taken at the point of maximum girth. Record in centimeters. Neck Circumference
Instruct the client to stand or sit relaxed with arms at his or her sides. Place the tape measure around the client’s neck, just below the Adams Apple, and bring it gently around the neck to the front. The tape measure should be flat. Instruct the client to relax and breathe calmly as you make the measurement. Record in centimeters.
Body Composition Measurements: DEXA – Lab-Based Test
DEXA (Dual-Energy X-Ray Absorptiometry) is a scan that uses an x-ray technique to assess body composition such as evaluating fat mass, lean tissue mass and bone mineral density.
Equipment Needed: 1. Velcro straps 2. Phantom block for the quality assessment 3. Scrubs (if needed) 4. Data Recording Sheet 5. DEXA machine

24 Fitness Assessments for Individuals who use a Wheelchair
Before Testing Setup: This should be done before the client arrives. If a scan was conducted earlier that day, you can omit this step. Turn on computer and printer. Double click the “Prodigy” icon in the center of the desktop. Perform a quality assessment.
Quality Assurance: From the main menu, select “Quality Assurance.” Select “Start.” Position the phantom block in line with the laser when prompted. After the scan, print the report and keep for your records.
The fitness professional should speak the sentences in italics.
Testing: The next thing that is going to be done is called a DEXA scan. You lay on this table, the machine will scan you, and it will show you your body composition, including how much fat, muscle, and bone density you have. There is radiation exposure as part of this test, but it is not likely to adversely affect you or your health. The amount of radiation associated with the test is very small, about the amount you would be exposed to flying across the country.
Go through pre-scan questions with the client: Are you wearing any clothing that includes metal, such as zippers, buttons, snaps, buckles, or underwire? Have your client remove these or other metal items if he or she is wearing them. Are you wearing any jewelry? Have your client remove any jewelry items. If the client’s clothes are not appropriate for scanning, have him or her change into provided scrubs in the restroom.
Instruct your client to remove his or her shoes.
To enter a new participant, from “Main Menu,” select the “New Patient” Directory. From the top toolbar, select “New.” Input the following information in the primary tab:
-First and Last name -Birthdate -Height (measure before test) -Weight (weigh before test) -Gender -Ethnicity
From the “Secondary” select “Attendant”.

25Fitness Assessments for Individuals who use a Wheelchair
Double-click “Client” in the top half of the screen
Select “Total Body’” as “Exam Type.”
Explain the procedure to your client by saying, during the scan you will be laying on the table on your back. The scan should last no more than 20 minutes. The scanning arm will move slowly from your head to your feet. Please be careful not to interfere with its movement, as this can result in a bad reading and force us to stop the test. Do your best to remain as still as possible for the entire test. Any movement will impact the test results and we will have to start the test over. I will position your body on the table within these white lines. Your legs will be strapped together using these Velcro straps to avoid unwanted movement. Please remain in this position until I instruct you to relax. Do you have any questions before we proceed?
Have your client sit on the table (around the GE logo) and swing his or her legs up to the right. The client should now be sitting with their legs straight in an ‘L’ position. Say to the client, you are going to begin by sitting on the table and move backwards until you get close to the middle of the table. Next, swing your legs up to the right so that you are sitting in an ‘L’ position. I am now going to center you on the table. See this white line running down the center of the table? I would like you to do your best to center your hips up with this line. You can also think of it as straddling this line. Once your client is centered, walk up towards his or her head to protect it from hitting the arm and instruct the client to lay back. Tell your client, Go ahead and lay back. I will make sure your head does not hit the scanning arm. Be careful not to shift your body to either side.
Place your hand approximately 3cm from the top of the boundary line and tell your client, Now, I need you to move towards me on the table until you hit my hand.
Walk back down to the feet and ensure the body is centered. If it is not, instruct your client to shift slightly in the desired direction.
Retrieve the Velcro straps. Tell your client, I will now be strapping your legs together with one strap at the knees and one strap at the ankles. Let me know if at any time you are uncomfortable and we can adjust the straps.
Next, I am going to position your hands. Please hold your hand like you were going to salute. That is how I would like you to hold your hands at your sides. Make sure that your hands are not touching your legs, but are inside the boundary lines.
When the test begins, please close your eyes. There is a laser light in the scan arm, and I do not want it to shine in your eyes should it turn on. I will inform you when the arm has passed over your head and you can open your eyes. I will also need you to remain quiet, as talking will cause movement and interfere with the test.
I will now begin the scan. If at any point you feel you must stop the test, let me know and I will stop the scan. I will be in the room the entire time should you need anything or have any questions.

26 Fitness Assessments for Individuals who use a Wheelchair
Select “Position” to move the scan arm into the correct position to begin the test. Make sure your client is lying down at this point.
Select “Start” to begin the test.
As the arm passes over the body, you may instruct your client to relax that part of the body (i.e., the client can open his or her eyes once the arm has passed overhead and can relax his or her hands once the entire hand is seen on the screen).
As the scan appears on the screen, watch to make sure the client is centered and that all of his or her body is in the scan.
If there is an error (e.g., a hand moves or is out of the scan area), abort the test, reposition your client, and begin again.
Printing the Report: From the main menu, select “Directory.” Select desired scan in the bottom half of the screen. Click “ROIs” to adjust regions of interest. Select “Results” (Note: “Densitometry” and “Composition” tabs show results). Print out report for your client. Print and give to participant. Body Composition Measurements: BIA – Field-Based Test
BIA (bioelectrical impedance) is a technique used to estimate body composition based on the electrical conductive properties of different tissues.
Equipment Needed: 1. BIA device 2. Recording Sheet
Before Testing: Your client’s height, weight, and gender should be entered into the instrument. Your client should be instructed not to eat or drink for two hours before the test and to go to the bathroom immediately before the test. Performing BIA under constant conditions will give the best results.
Testing: Once the “Start” button has been pressed, the client holds the BIA out in front of him or herself at chest level with arms straight. The client’s hands must remain in contact with the metal electrode handles with thumbs on top of the instrument. The amount of lean mass, water and the client’s body fat percentage will be calculated. Record the information given onto the recording sheet.
BIA is a useful tool in measuring body composition because the equipment is inexpensive, it is a quick test and it is easy to use. However, there are several factors that can affect the measurement that need to be taken into consideration. First, your client’s hydration status is important. Changes in hydration level due to food, caffeine or alcohol consumption, strenuous exercise, stress or illness, taking medication or hormonal changes can cause an inaccurate reading.

27Fitness Assessments for Individuals who use a Wheelchair
Disability AwarenessAre You KnowledgeABLE?
When Interacting with Individuals with disability:
• Establish open communication about abilities and limitations. • Consult with others when you need additional information on a specific condition. • Apply the same principles, considerations and respect with everyone. • Offer information in alternate formats. • Speak directly to the individual with a disability, not his or her caregiver, companion or interpreter. • Respect a client’s assistive device (cane, wheelchair, etc.). Unless given permission, do not move or play with it. • Be considerate of the extra time it may require when working with a client with a disability. • Make sure your office, lab, or gym is accessible from the parking lot.• ALWAYS use person-first terminology • Never assume – disabilities may be hidden. • Individuals with disability need physical activity, too!
Person-First Terminology:
Terms like “handicapped” and “wheelchair-bound” are outdated and even offensive. Be sure to always put the person first. For example, say “an individual with a spinal cord injury” or “an individual who uses a wheelchair” versus “wheelchair-bound” or “paraplegic.” The same applies for all disabilities. Other examples: an individual with a visual impairment, an individual with limb loss

28 Fitness Assessments for Individuals who use a Wheelchair
Disability Etiquette When speaking about or with a person with a disability
• Always use person first language. While it might not be the most concise way to describe an individual, it is however the most respectful.• There are a wide range of physical disabilities, causes and levels of function. Consider each unique situation and remember that people with a disability are as diverse as people without a disability.• Do not assume that a person with a disability is unhappy or has the desire to be cured.• Individuals who are paralyzed have varying levels of paralysis. Do not assume a person is paralyzed from the waist down unless you are certain of his or her diagnosis.• Try not to give undue praise for everyday situations simply because an individual has a disability. Limit these terms to individuals with a disability who truly accomplish inspirational or heroic achievements. • A disability is not a negative characteristic and should not be portrayed as such.• An individual who uses a wheelchair may have any varying degree of mobility but they are never bound or confined to their wheelchair.• Apply the same principles, considerations and respect with everyone.• Be prepared to offer information in alternate formats.
When working with a person with a physical disability
• Never use a person’s disability to improve another individual’s perspective on life.• Make sure your workout site is accessible.• Ask ahead of time if the person will need any accommodations.• Speak to the person the same way you would speak to a person without a disability. No need to crouch or kneel to the level of the individual if your interaction will be brief.• Get to know your clients level of function. Just because they use a wheelchair doesn’t mean that they can’t stand or wouldn’t choose to transfer out of it. • Offer your client choices whenever appropriate but never over adapt.
When working with a person with a sensory disability
• Always verbally introduce and excuse yourself when you join or leave a conversation with an individual who is visually impaired.• If an individual has difficulty speaking, do not assume they have an intellectual disability or alter your own speech or attitude. • Allow sufficient time for communication, do not attempt to finish their sentence or provide words before they can say them. • If a person has hearing loss, consider writing your message or having an interpreter, the majority of this population does not read lips.

29Fitness Assessments for Individuals who use a Wheelchair
When working with a person with an Intellectual Disability
• Keep the workout space small and preferably well known to the individuals. (For example a workout done in a large gym may be overwhelming)• They may easily lose focus or get off task. It may be beneficial to keep a visible schedule or list of things you will be doing that day.• It may help to allow them access to a preferred location or object during your time together. For example they may prefer one specific piece of exercise equipment. You can use that piece as a reward when they complete something you have asked them to do.• Ask one question at a time. Explain new activities one step at a time. Make sure they understand what you have said before you move on. Don’t allow them to “just say yes” they understand.
When working with an athlete with a disability
• Treat the athlete the same as an athlete without a disability.• Have a basic understanding of the sport and any equipment used for the sport. (and if you don’t know –just ask)• Understand the different levels and types of disability sport competition. For example: o There are local< regional < national/ collegiate < international competitions o The Olympic Games- the largest sporting event in the word, held every two years for elite athletes without a disability o The Paralympic Games- the third largest sporting event in the world, held every two years for elite athletes with a disability. The same host city and venues are used as the Olympic Games and it takes place two weeks after closing ceremonies of the Olympic Games. o The Special Olympics – local, regional, national and international sport trainings and competitions for individuals with an intellectual disability.

30 Fitness Assessments for Individuals who use a Wheelchair
Reference Pescatello, L. (Ed.). (2014). ACSM’s Guidelines for Exercise Testing and Prescription (9th ed.). Wing, C. (2012). Health, Physical Fitness, and Functional Assessments. In ACSM/NCHPAD Resources for the Inclusive Fitness Trainer (1st ed., pp. 65-78). WHO | World Health Organization. (n.d.). Retrieved November 20, 2014, from http://www.who.int/en/ http://www.nsca.com/ Heyward, V. (2010). Advanced fitness assessment exercise prescription (6th ed.). Champaign, Ill.: Human Kinetics. ATS statement: guidelines for the six-minute walk test. ATS Committee on Proficiency Standards for Clinical Pulmonary Function Laboratories. Am J Respir Crit Care Med 2002;166(1):111–117. Cowan, R.E., Callahan, & M.K., Nash, M.S. (2012). The 6-min push test is reliable and predicts low fitness in spinal cord injury. Med Sci Sports Exerc, 44(10), 1993-2000.
Mathiowetz, V., Weber, K., Volland, G., & Kashman, N. (1984). Reliability and validity of grip and pinch strength evaluations. J Hand Surg, 9A, 222-226.
Adapted for the Biodex Balance machine from this article:
Harel, N.Y., Asselin, P.K., Fineberg, D.B., Pisano, T.J., Bauman, W.A., & Spungen, A.M. (2013). Adaptation of computerized posturography to assess seated balance in persons with spinal cord injury. The Journal of Spinal Cord Medicine, 36(2), 127-133. Gribble, P.A. & Hertle, J. (2003). Considerations for normalizing the measures of the star excursion balance test. Measurement in Physical Education and Exercise Science, 7(2), 89-100
Jones, C. & Rikli R. (2002). Senior Fitness Test Manual. J Aging & Physical Activity,10, 110. Hangartner, T.N., Warner, S., Braillon, P., Jankowski, L., & Sherpard, J. (2013). The official positions of the international society for clinical densitometry: acquisition of dual-energy x-ray absorptiometry body composition and considerations regarding analysis and repeatability of measures. Journal of Clinical Densitometry: Assessment & Management of Musculoskeletal Health, 16(4), 520-536.
Back Scratch TestRikli, R.E. & Jones, C.J. (1999). Development and validation of a functional fitness test for

31Fitness Assessments for Individuals who use a Wheelchair
community- residing older adults. Journal of Aging and Physical Activity, 7, 129-161.
BIA
Pescatello, L. S., & American College of Sports Medicine. (2014). ACSM’s guidelines for exercise testing and prescription. Philadelphia: Wolters Kluwer/Lippincott Williams & Wilkins Health.
Circumference Measurements
Maki, KC., Briones, ER., Langbein, WE., Inman-Felton, A., Nemchausky, B., Welch, M., & Burton, J. (1995). Associations between serum lipids and indicators of adiposity in men with spinal cord injury. International Medical Society of Paraplegia, 33, 102-109.
Pescatello, L. S., & American College of Sports Medicine. (2014). ACSM’s guidelines for exercise testing and prescription. Philadelphia: Wolters Kluwer/Lippincott Williams & Wilkins Health.
Steadwood, R. (1998). Musculoskeletal and neurological disabilities: implications for fitness appraisal, programming, and counselling. Can. J. Appl. Physiol., 23(2), 131-165.
Curl Up Test
Pescatello, L. S., & American College of Sports Medicine. (2014). ACSM’s guidelines for exercise testing and prescription. Philadelphia: Wolters Kluwer/Lippincott Williams & Wilkins Health.
DEXA
Hangartner, T.N., Warner, S., Braillon, P., Jankowski, L., & Sherpard, J. (2013). The official positions of the international society for clinical densitometry: acquisition of dual-energy x-ray absorptiometry body composition and considerations regarding analysis and repeatability of measures. Journal of Clinical Densitometry: Assessment & Management of Musculoskeletal Health, 16(4), 520-536.
Jones, LM., Goulding, A., & Gerrard, DF. (1998). DEXA: a protical and accurate tool to demonstrate total and regional bone loss, lean tissue loss and fat mass gain in paraplegia. Spinal Cord, 36, 637-640.
Jones, LM., Legge, M., & Goulding, A. (2003). Healthy body mass index values often underestimate body fat in men with spinal cord injury. Arch Phys Med Rehabil, 84, 1068-1071.Spungen, AM., Adkins, RH., Stewart, CA., Wang, J., Pierson, RN., Waters, RL., & Bauman, WA. (2003). Factors influencing body composition in persons with spinal cord injury: a cross-sectional study. J Appl Physiol, 95, 2398-2407.

32 Fitness Assessments for Individuals who use a Wheelchair
Flexibility through Shoulder Range of Motion Tests
Boublick, M. & Hawkins, R.J. (1993). Clinical Examination of the Shoulder Complex. Journal of Orthopedic & Sports Physical Therapy, 18(1), 379-385.
Finley, M.A., & Rodgers, M.M. (2004). Prevalence and identification of shoulder pathology in athletic and nonathletic wheelchair users with shoulder pain: a pilot study. Journal of Rehabilitation Research & Development, 41(3B), 395-402.
Rikli, R.E. & Jones, C.J. (2002). Senior Fitness Test Manual. Champaign, IL: Human Kinestics.Wessels, K.K., Brown, J.L., Ebersole, K.T., & Sosnoff, J.J. (2013). Sex, shoulder pain, and range of motion in manual wheelchair users. Journal of Rehabilitation Research & Development, 50(3), 351-356.
Handgrip Test
Jacobs, PL., Nash, MS., Klose, JK., Guest, RS., Needham-Shropshire, BM., & Green, BA. (1997). Evaluation of a training program for persons with SCI paraplegia using the Parastep® ambulation system: part 2. Effects on physiological responses to peak arm ergometry. Arch Phys Med Rehabil, 78, 794-798.
Jacquemin, G.L., Burns, S.P., & Little, J.W. (2004). Measuring hand intrinsic muscle strength: Normal values and interrater reliability. J Spinal Cord Med, 27(5), 460-467.
Mathiowetz, V., Weber, K., Volland, G., & Kashman, N. (1984). Reliability and validity of grip and pinch strength evaluations. J Hand Surg, 9A, 222-226.
Rodger, M.M., Keyser, R.E., Rasch, E.K., Gorman, P.H., & Russell, P.J. (2001). Influence of training on biomechanics of wheelchair propulsion. Journal of Rehabilitation Research and Development, 38(5), 505-511.
Sisto, S.A. & Dyson-Hudson, T. (2007). Dynamometry testing in spinal cord injury. Journal of Rehabilitation Research & Development, 44(1), 123-136.
Medicine Ball Throw Test
De Groot, S., Balvers, IJM., Kouwenhoven, SM., & Janssen, TWJ. (2012). Validity and reliability of tests determining performance-related components of wheelchair basketball. Journal of Sports Sciences, 30(9), 879-887.
Yanci, J., Granados, C., Otero, M., Badiola, A., Olasagasti, J., Bidaurrazaga-Letona, I., Iturricastillo, A., & Gil, SM. (2015). Sprint, agility, strength and endurance capacity in wheelchair basketball players. Biology of Sport, 32(1), 71-78.
Modified Functional Reach Test
Katz-Leurer, M., Fisher, at al. (2009). Reliability and validity of the modified functional reach

33Fitness Assessments for Individuals who use a Wheelchair
test at the sub-acute stage post-stroke. Disability and Rehabilitation, 31(3), 243-248.Lunch, S.M., Leahy, P., & Barker, S.P. (1998). Reliability of Measurements Obtained with a Modified Functional Reach Test in Subjects with Spinal Cord Injury. Physical Therapy, 78(2), 130-133.
One-Repetition Maxiumum Test
Froehlich-Grode, K., Lee, J., Aaronson, L., Nary, DE., Washburn, RA., & Little, TD. (2014). Exercise for everyone: a randomized controlled trial of project workout on wheels in promoting exercise among wheelchair users. Archives of Physical Medicine and Rehabilitation, 95, 20-28.
Hicks, AL., Martin, KA., Ditor, DS., Latimer, AE., Craven, C., Bugaresti, J., & McCartney, N. (2013). Long-term exercise training in persons with spinal cord injury effects on strength, arm ergometry performance, and physiological well-being. Spinal Cord, 41, 34-43.
Jacobs, PL., Nash, MS., Klose, JK., Guest, RS., Needham-Shropshire, BM., & Green, BA. (1997). Evaluation of a training program for persons with SCI paraplegia using the Parastep® ambulation system: part 2. Effects on physiological responses to peak arm ergometry. Arch Phys Med Rehabil, 78, 794-798.
Jacobs, PL., Nash, MS., & Rusinowski, JW. (2001). Circuit training provides cardiorespiratory and strength benefits in persons with paraplegia. Med. Sci. Sports Exerc, 33(5), 711-717.Pescatello, L. S., & American College of Sports Medicine. (2014). ACSM’s guidelines for exercise testing and prescription. Philadelphia: Wolters Kluwer/Lippincott Williams & Wilkins Health.
Turnamki, S. & Schmidtbleicher, D. (2010). Effects of heavy resistance training on strength and power in upper extremities in wheelchair athletes. The Journal of Strength and Conditioning Research, 24(1), 8-16.
Push-Up Test
Pescatello, L. S., & American College of Sports Medicine. (2014). ACSM’s guidelines for exercise testing and prescription. Philadelphia: Wolters Kluwer/Lippincott Williams & Wilkins Health.
Seated Balance Test
Harel, N.Y., Asselin, P.K., Fineberg, D.B., Pisano, T.J., Bauman, W.A., & Spungen, A.M. (2013). Adaptation of computerized posturography to assess seated balance in persons with spinal cord injury. The Journal of Spinal Cord Medicine, 36(2), 127-133.
Six-minute Push Test
ATS statement: guidelines for the six-minute walk test. ATS Committee on Proficiency Standards for Clinical Pulmonary Function Laboratories. Am J Respir Crit Care Med

34 Fitness Assessments for Individuals who use a Wheelchair
2002;166(1):111–117.
Cowan, R.E., Callahan, & M.K., Nash, M.S. (2012). The 6-min push test is reliable and predicts low fitness in spinal cord injury. Med Sci Sports Exerc, 44(10), 1993-2000.
VO2 max Arm Ergometer Test
Froehlich-Grode, K., Lee, J., Aaronson, L., Nary, DE., Washburn, RA., & Little, TD. (2014). Exercise for everyone: a randomized controlled trial of project workout on wheels in promoting exercise among wheelchair users. Archives of Physical Medicine and Rehabilitation, 95, 20-28.
Jacobs, PL., Mahoney, ET., Nash, MS., & Green, BA. (2002). Circuit resistance training in persons with complete paraplegia. Journal of Rehabilitation Research and Development, 39(1), 21-28.
Jacobs, PL. & Nash, MS. (2004), Exercise recommendations for individuals with spinal cord injury. Sports med, 34(11), 727-751
Jacobs, PL., Nash, MS., Klose, JK., Guest, RS., Needham-Shropshire, BM., & Green, BA. (1997). Evaluation of a training program for persons with SCI paraplegia using the Parastep® ambulation system: part 2. Effects on physiological responses to peak arm ergometry. Arch Phys Med Rehabil, 78, 794-798.
Langbein, W.E. & Maki, K.C. (1995). Predicting oxygen uptake during counterclockwise arm crank ergometry in men with lower limb disabilities. Arch Phys Med Rehabil, 76, 642-646.
Mossberg, K.,Willman, C., Topor, M.A., Crook, H., & Patak, S. (1999). Comparison of asynchronous versus synchronous arm crank ergometry. International Medical Society of Paraplegia, 37, 569-574.
Nash, M.S., van de Ven, I., van Elk, N., & Johnson, B. (2007). Effects of circuit resistance training on fitness attributes and upper-extremity pain in middle-aged men with paraplegia. Arch Phys Med Rehabil, 88, 70-75.
Pescatello, L. S., & American College of Sports Medicine. (2014). ACSM’s guidelines for exercise testing and prescription. Philadelphia: Wolters Kluwer/Lippincott Williams & Wilkins Health.
Tobimatsu, Y., Nakamura, R., Kusano, S., & Iwasaki, Y. (1998). Cardiorespiratory endurance in people with cerebral palsy measured using an arm ergometer. Arch Phys Med Rehabil, 79, 991-993.
Verschuren, O., Zwinkels, M., Ketelaar, M., Reijnders-van Son, F., & Takken, T. (2013). Reproducibility and validity of the 10-meter shuttle ride test in wheelchair-using children and adolescents with cerebral palsy. Physical Therapy, 93(7), 967-974.

35Fitness Assessments for Individuals who use a Wheelchair
Arm Ergometer VO2 Test Recording SheetName: Age: Date of Birth: Gender:
Height (in.): Weight (lbs.): Disability/Injury Level:
Room Temperature: Humidity: Cadence:
Stage Time Watts RPE Heart Rate VO2 (ml/kg/min) RER VE (L/min)
Rest 1:00 0 6
Warm-Up Stage 1 1:00 10
2 1:00 20
3 1:00
4 1:00
5 1:00
6 1:00
7 1:00
8 1:00
9 1:00
10 1:00
11 1:00
12 1:00
13 1:00
14 1:00
15 1:00
Blood pressure pre-test: mmHg
Blood pressure post-test: mmHg
Recovery HR (bpm): Min 1: Min 2: Min 3:

36 Fitness Assessments for Individuals who use a Wheelchair
Six-Minute Push Test Recording SheetName: Age: Date of Birth:
Gender: Height (in.): Weight (lbs.):
Time of test: am/pm
Able to complete practice lap? Yes or No
If no, why not?
Heart Rate: Before testing: bpm After testing: bpm
Minute Script Lap Number1 You are doing well. You have 5 minutes to go.
2 Keep up the good work. You have 4 minutes to go.
3 You are doing well. You are halfway done.
4 Keep up the good work. You only have 2 minutes left.
5 You are doing well. You only have 1 minute to go.
5:45 In a moment I’m going to tell you to stop. When I do, just stop right where you are and I will come to you.
6 Stop!
Lap counter:
Distance completed: m
Notes:

37Fitness Assessments for Individuals who use a Wheelchair
Medicine Ball Throw Test Recording SheetName: Date: Date of Birth:
Age (yrs.): Gender (circle one): M or F Height (in.): Weight (lbs.):
Medicine Ball Throw (circle one): Standing OR Seated
Medicine Ball Weight (lbs.):
Type of throw (circle one): Overhead or Chest Pass or One Arm
Trial 1 Trial 2Distance Thrown:
Best Distance Thrown:
Notes:

38 Fitness Assessments for Individuals who use a Wheelchair
Hand Grip Test Recording SheetName: Date: Date of Birth:
Age (yrs.): Gender (circle one): M or F Height (in.): Weight (lbs.):
Dominant Hand: Right / Left Hands tested: Both / Right / Left
Angle of right arm: 90° / 45° / 180° / Not tested
Angle of left arm: 90° / 45° / 180° / Not tested
Trial 1 Trial 2 Trial 3 Mean ScoreRight Hand (kg)Left Hand (kg)
Notes:
Age (yrs.) Hand Mean Standard Deviation
Mean Standard Deviation
20-24 R L
54.9 47.4
9.3 9.9
31.9 27.7
6.6 5.9
25-29 R L
54.7 50.1
10.4 7.3
33.8 28.8
6.3 5.5
30-34 R L
55.2 50.0
10.1 9.8
35.7 30.8
8.7 8.0
35-39 R L
54.3 51.2
10.9 9.8
33.6 30.1
4.9 5.3
40-44 R L
53.0 51.2
9.4 8.5
31.9 28.3
6.1 6.3

39Fitness Assessments for Individuals who use a Wheelchair
45-49 R L
49.8 45.7
10.4 10.3
28.2 25.4
6.8 5.8
50-54 R L
51.5 46.2
8.2 7.7
29.8 26.0
5.3 4.9
55-59 R L
45.9 37.7
12.1 10.6
26.0 21.5
5.7 5.4
60-64 R L
40.7 34.8
9.3 9.2
25.0 20.7
4.6 4.6
65-69 R L
41.3 34.8
9.3 9.0
22.5 18.6
4.4 3.7
70-74 R L
34.2 29.3
9.8 8.2
22.5 18.8
5.3 4.6
75+ R L
29.8 24.9
9.5 7.7
19.3 17.1
5.0 4.0

40 Fitness Assessments for Individuals who use a Wheelchair
One or Eight Repetition Maximum Test Recording Sheet
Name: Date: Date of Birth:
Age (yrs.): Gender (circle one): M or F Height (in.): Weight (lbs.):
Trial 1 lbs.
Trial 2 lbs.
Trial 3 lbs.
Trail 4 lbs.
Final weight for one / eight rep max lbs.
Modifications:

41Fitness Assessments for Individuals who use a Wheelchair
Push-Up Test Recording SheetName: Date: Date of Birth:
Age (yrs.): Gender (circle one): M or F Height (in.): Weight (lbs.):
Push-Up Count:
Total of push-ups:
Fitness Categories for the Push-Up Test by Age and Sex
Age (year)
Category 20-29 30-39 40-49 50-59 60-69
Sex* M W M W M W M W M W
Excellent 36 30 30 27 25 24 21 21 18 17
Very Good 35 29 29 26 24 23 20 20 17 16
29 21 22 20 17 15 13 11 11 12
Good 28 20 21 19 16 14 12 10 10 11
22 15 17 13 13 11 10 7 8 5
Fair 21 14 16 12 12 10 9 6 7 4
17 10 12 8 10 5 7 2 5 2
Needs 16 9 11 7 9 4 6 1 4 1Improvement

42 Fitness Assessments for Individuals who use a Wheelchair
Curl up Test Recording sheet
Name: Date: Date of Birth:
Age (yrs.): Gender (circle one): M or F Height (in.): Weight (lbs.):
Curl up count:
Total of curl ups done:
Notes or Modifications Used:

43Fitness Assessments for Individuals who use a Wheelchair
Seated Balance Test Recording SheetName: Date: Date of Birth:
Age (yrs.): Gender (circle one): M or F Height (in.): Weight (lbs.):
Are you able to sit unsupported? Yes or No
Number of risers: (not including the seat/bench)
Height from balance platform to top of head: in
Height from buttocks to top of head: in
Direction Control Score:
1. Overall:
2. Forward:
3. Backward:
4. Left:
5. Right:
6. Forward/Left:
7. Forward/Right:
8. Backward/Left:
9. Backward/Right:
Time: seconds

44 Fitness Assessments for Individuals who use a Wheelchair
Modified Functional Reach Test Recording Sheet
Name: Date: Date of Birth:
Age (yrs.): Gender (circle one): M or F Height (in.): Weight (lbs.):
Direction: Forward right
Practice 1 (cm)
Practice 2 (cm)
Trial 1 (cm)
Trial 2 (cm)
Trial 3 (cm)
Final (average of 3 trials)
Notes:
Direction: Forward left
Practice 1 (cm)
Practice 2 (cm)
Trial 1 (cm)
Trial 2 (cm)
Trial 3 (cm)
Final (average of 3 trials)
Notes:
Direction: Lateral right
Practice 1 (cm)
Practice 2 (cm)
Trial 1 (cm)
Trial 2 (cm)
Trial 3 (cm)
Final (average of 3 trials)
Notes:
Direction: Lateral left
Practice 1 (cm)
Practice 2 (cm)
Trial 1 (cm)
Trial 2 (cm)
Trial 3 (cm)
Final (average of 3 trials)
Notes:

45Fitness Assessments for Individuals who use a Wheelchair
Shoulder Flexibility (ROM) Test Recording Sheet
Name: Date: Date of Birth:
Age (yrs.): Gender (circle one): M or F Height (in.): Weight (lbs.):
Shoulder FlexionTrial 1 (degrees)
Trial 2 (degrees)
Trial 3 (degrees)
Final (average of 3 trials)
Notes:
Shoulder ExtensionTrial 1 (degrees)
Trial 2 (degrees)
Trial 3 (degrees)
Final (average of 3 trials)
Notes:
Shoulder AbductionTrial 1 (degrees)
Trial 2 (degrees)
Trial 3 (degrees)
Final (average of 3 trials)
Notes:
Shoulder Internal RotationTrial 1 (degrees)
Trial 2 (degrees)
Trial 3 (degrees)
Final (average of 3 trials)
Notes:
Shoulder External RotationTrial 1 (degrees)
Trial 2 (degrees)
Trial 3 (degrees)
Final (average of 3 trials)
Notes:

46 Fitness Assessments for Individuals who use a Wheelchair
Circumference Measurements Recording Sheet
Name: Date: Date of Birth:
Age (yrs.): Gender (circle one): M or F Height (in.): Weight (lbs.):
Waist Circumference Body Lifted: 1st Recording: cm
2nd Recording: cm
Average: cm
Additional Recording (if needed): cm
Waist Circumference at Supine Position: 1st Recording: cm
2nd Recording: cm
Average: cm
Additional Recording (if needed): cm
Neck Circumference: 1st Recording: cm
2nd Recording: cm
Average: cm
Additional Recording (if needed): cm
Hip Circumference: 1st Recording: cm
2nd Recording: cm
Average: cm
Additional Recording (if needed): cm
Bicep Circumference: 1st Recording: cm
2nd Recording: cm
Average: cm
Additional Recording (if needed): cm
Chest Circumference: 1st Recording: cm
2nd Recording: cm
Average: cm
Additional Recording (if needed): cm

47Fitness Assessments for Individuals who use a Wheelchair
Calf Circumference: 1st Recording: cm
2nd Recording: cm
Average: cm
Additional Recording (if needed): cm
Notes:

48 Fitness Assessments for Individuals who use a Wheelchair
DEXA Scan Recording SheetIf female of childbearing age and capability, is she pregnant (from pregnancy test results)?
Yes* or No *(if YES do NOT perform the scan)
Was the DEXA scan able to be completed? Yes or No
If no, why not?
Are you fasted? Yes or No
Do you have any metal implants? Yes or No
If yes, location:
Were the participant’s feet included in the scan? Yes or No
Which side of the body was included in the scan? Left Right Both
If the participant does not fit in the scan area, do they consent to be scanned multiple times?
Yes or No
I consent to receive this scan multiples times in one session and I understand this will increase the radiation I am exposed to as a result of these scans.
Participant Signature: Date:
Was the scan aborted and restarted: Yes or No
If yes, how many times? Once or Twice
Total mass: lbs. Lean mass: lbs.
Fat mass: lbs. Tissues (% Fat) %
BMI (from DEXA): (kg/m2) A/G Ratio
BMD (bone mineral density): (g/cm2)
Notes:
49Fitness Assessments for Individuals who use a Wheelchair
BIA Measurements Recording SheetName: Date: Date of Birth:
Age (yrs.): Gender (circle one): M or F Height (in.): Weight (lbs.):
Body Fat Percentage: %
Notes:

Building Healthy Inclusive Communities


![Forensics Investigation Toolkit - Lawful Interception · Web viewForensics Investigation Toolkit. User Guide. FIT Application Installation 2 [STEP1] - Download and install Java](https://static.fdocuments.in/doc/165x107/5e87081fc058452a357905a1/forensics-investigation-toolkit-lawful-web-view-forensics-investigation-toolkit.jpg)


