Download - PDF 29.6 MB
416
Transcript of Download - PDF 29.6 MB

2
Layer File .................................................................................................41Image File ................................................................................................42Photoshop file (EX only) ...........................................................................46TWAIN .....................................................................................................47Continuous scan (EX only) ........................................................................48
Image File ................................................................................................50
save Page Templates ................................................................................55save materials (EX only) ...........................................................................56
Page settings ...........................................................................................62Print setup ...............................................................................................62Printing ....................................................................................................63
Raster Drawing ........................................................................................66Vector Drawing (EX only) ..........................................................................66Anti-Aliased Drawing/Display(EX only) ......................................................67showing the Center Line (EX only) ............................................................67
Drawing Color[Monochrome](Black/White/Transparent) .............................68Drawing Color [Gray] ................................................................................70Drawing Color [Color]...............................................................................73
Tool Usage ...............................................................................................76Pen Tool ...................................................................................................78In/Out/Correction ......................................................................................80Notes .......................................................................................................80Brush Control ...........................................................................................81Eraser Tool ...............................................................................................82Magic Marker Marker Tool ........................................................................84Pencil Tool ................................................................................................86Calligraphy Pen (EX only) ..........................................................................88Pattern Brush Tool ....................................................................................90Eyedropper Tool (EX only) .........................................................................93Fill Tool ....................................................................................................94Fill Closed Area Tool (EX only) ...................................................................96Line Tool ..................................................................................................98Curve Tool ................................................................................................98Polyline Tool ...........................................................................................100Rectangle, Ellipse, and Polygon Tools.......................................................102
Ruler Basics............................................................................................106Object selector Tool ................................................................................112Ruler Operations ....................................................................................113
Step: 03 Shortcut preferences (For EX only)
Step: 02 Preferences
Step: 04 Custom Tools Settings (For EX only)
Step: 02 Page operation
Step: 03 Page
Step: 04 Import
Chapter: 01
Chapter 1 - Getting Started
Step: 01 Startup and shutdown
Chapter: 02
Chapter 2 - Files
Step: 01 File Operations
Step: 05 Export
Step: 06 Save
Step: 07 Printing
Step: 02 Drawing Color
Step: 03 Drawing
Chapter: 03
Chapter 3 - Drawing
Step: 01 Drawing Format
Chapter: 04
Chapter 4 - Rulers
Step: 01 Rulers
Before reading this manual .........................................................................6
startup Manga studio. ...............................................................................8shutdown Manga studio. ..........................................................................8Initialization startup. .................................................................................9
story ........................................................................................................10Page ........................................................................................................10Page: Cursor ............................................................................................11Page: Magnification Angle ........................................................................12Page: Ruler ...............................................................................................12Page: Panel settings .................................................................................13Layer ........................................................................................................13Tool .........................................................................................................14Printing scanning .....................................................................................14Memory ...................................................................................................15Tablet.......................................................................................................15Folder Path ...............................................................................................16Options ....................................................................................................16Export & Import........................................................................................17
shortcut preference basics ........................................................................18
Custom tool preference basics ..................................................................19
Regarding File Types .................................................................................22Regarding file compatibility ......................................................................23Create New File .......................................................................................24saving a File .............................................................................................30Open Files ................................................................................................32
Open Page and Close Page .......................................................................33To Next Page and To Previous Page ...........................................................33Clear Page and Delete Page ......................................................................34Insert Page ...............................................................................................34Copy Page ................................................................................................35Open two page spread, open single page (EX only) ...................................36Page display .............................................................................................36
Change Title Information ..........................................................................38Modify Binding Position/ start Page Changing .....................................................38Change Page Format Guide ......................................................................39
Page File ..................................................................................................40Multi-layer files ........................................................................................41
3
Bezier Curve Ruler Basics ........................................................................115Create Path Tool (EX only) ......................................................................116Perspective Ruler (EX only)......................................................................121
Radial Lines Ruler (EX only) ....................................................................124Radial Curve Ruler (EX only) ...................................................................125Parallel Lines Ruler (EX only) ...................................................................126Concentric Circle Ruler (EX only) .............................................................127symmetry Ruler (EX only) ........................................................................128symmetry Ruler basics (EX only) ..............................................................128
Panel Ruler Basics ..................................................................................131Panel Ruler Cutter Tool ...........................................................................136
Ruler Editing ..........................................................................................137Align Rulers ...........................................................................................143
Layer Basics ...........................................................................................146Layer Types.............................................................................................147
Layer select tool .....................................................................................153Layer Move Tool .....................................................................................154Creating New Layers ..............................................................................155selecting Layers ......................................................................................155selecting Multiple Layers ........................................................................155Layer Duplication ...................................................................................156Deleting a Layer .....................................................................................156Converting Layers to a Folder .................................................................157Layer Type Change .................................................................................158
Merging Layers ......................................................................................161show/Hide Layer ....................................................................................162Changing the Order of Layers .................................................................162Displaying the Layer Division ..................................................................163Changing the Layer Palette Color ............................................................163
Panel Folder Basics .................................................................................164Panel Creation Tool ................................................................................166
selection Basics ......................................................................................168Rectangle selection Tool .........................................................................170Ellipse selection Tool ..............................................................................170Lasso selection Tool................................................................................171
Polyline selection Tool ............................................................................171Magic Marker Wand Tool ........................................................................173Types of Tool Options .............................................................................174Create a selection ..................................................................................180Edit a selection ......................................................................................183selection Launcher .................................................................................186
selection Layer Basics .............................................................................187selection Layer Operation .......................................................................188Quick Mask (EX only) .............................................................................191Quick select (EX) ....................................................................................192
select a Vector Line ................................................................................193
Tone Basics ............................................................................................196Gradation Tool (EX only) .........................................................................200Tone Editing ...........................................................................................202searching Tones .....................................................................................210Creating Original Tones ..........................................................................210Tone settings .........................................................................................214Managing Tones .....................................................................................217
Computones Basics ................................................................................218Description of Computones Functions .....................................................220Key Combination ....................................................................................223
Cutting ..................................................................................................226Copying .................................................................................................226Copying to another Application ..............................................................227Pasting ...................................................................................................228Pasting with Transparent White ...............................................................228Pasting with Opaque Color (32-Bit Only) .................................................229
Line-Joining Tool ....................................................................................230Line Level Tool (EX only) .........................................................................232Width Changing Tool (EX only) ...............................................................233Edit Lining Tool (EX only) ........................................................................234
Basics of Moving and Transforming .........................................................235Types of Moving and Transformation .......................................................237
Distortion Tool (EX only) .........................................................................239speed Lines Tool (EX only) ......................................................................241Dust Filtering Tool (EX only) ....................................................................242Blurring Tool (EX only) ............................................................................243
Step: 02 Bezier Curve Ruler (EX only)
Step: 03 Special Ruler (EX only)
Step: 04 Panel Ruler
Step: 05 Edit・ Align Rulers
Step: 02 Using Layers
Step: 03 Displaying Layers
Step: 04 Panel Folder
Chapter: 05
Chapter 5 - Layers
Step: 01 Layers
Chapter: 06
Chapter 6 - Selection
Step: 01 Selection
Step: 02 Convert a Selection to a Layer
Step: 03 Select a Vector Line (EX only)
Step: 02 Computones (EX only)
Step: 03 Move and Transform
Step: 04 Retouching
Chapter: 07
Chapter 7 - Tone
Step: 01 Manga Studio Screen Tones
Chapter: 08
Chapter 8 - Editing
Step: 01 Cut and Paste
Step: 02 Edit Lines
4
stamping Tool (EX only) ..........................................................................244Color Mixing Tool (EX only) .....................................................................246Dodging Tool (EX only) ...........................................................................247Burning Tool (EX only) ............................................................................248
Reverse Layer .........................................................................................249Masking Layer (such as Panel Folder) ......................................................250
Filters .....................................................................................................254
Vanishing Points .....................................................................................256Focus Lines.............................................................................................257speed Lines ............................................................................................258Cloud Pattern (EX only) ..........................................................................260Lightning Bolt (EX only) ..........................................................................260
Polar Coordinates (EX only) ....................................................................262Wave (EX only) .......................................................................................263Waveforms (EX only) ..............................................................................264spiral (EX only) .......................................................................................265Zigzag (EX only) .....................................................................................265
Brightness and Contrast (EX only) .................................................................................. 266Tone Curve (EX only) ..............................................................................267Level Adjustment (EX only) .....................................................................268Hue/saturation/Value (EX only) ...............................................................269Bitmap (EX only) ....................................................................................270
Dust Filter (EX only) ................................................................................271Edit Line (EX only) ..................................................................................272Change Width (EX only) ..........................................................................273
Mosaic (EX only) ....................................................................................274sharpen (EX only) / .................................................................................274sharpen (Heavy)(EX only)........................................................................274Posterization (EX only) ............................................................................275Invert Tone (EX only)...............................................................................275
Blur (EX only) .........................................................................................276Blur (Heavy) (EX only) .............................................................................276Gaussian Blur (EX only) ..........................................................................276Radial Blur (EX only) ...............................................................................277Motion Blur (EX only) .............................................................................278
sparkle (EX only) ....................................................................................279soft Focus (EX only) ................................................................................280
Patterns (EX only) ...................................................................................281Random Grid Pattern (EX only) ...............................................................282Rain (EX only) ........................................................................................283
2D Rotate (EX only) ................................................................................284Pinch (EX only) .......................................................................................285speed Rotation (EX only) ........................................................................286Distorted Focus Lines (EX only) ...............................................................287Distorted speed Lines (EX only) ...............................................................288spherical (EX only) .................................................................................289Fisheye Lens (EX only) ............................................................................290
2DLT Rendering Function ........................................................................2922DLT setting ...........................................................................................295Preprocessing Filter ................................................................................299Move and Transform ...............................................................................299
Basics of the 3Dsketching Function .........................................................300supported 3D data .................................................................................3023D Frame Tool ........................................................................................3043D selection Tool....................................................................................305Manipulating 3D Objects ........................................................................306Camera Operation .................................................................................310Display Adjustment .................................................................................3123D space Rulers .....................................................................................316Basics of 3D Human models ...................................................................318saving Poses and scenes ........................................................................320
3DLT Rendering Function Basics ..............................................................3223DLT settings .........................................................................................324Four Views .............................................................................................327
Text function basics ................................................................................330Text tool .................................................................................................330Text preferences .....................................................................................332Ruby settings (EX only) ...........................................................................333style settings (EX only) ...........................................................................336Import text (EX only) ..............................................................................339Export text (EX only) ...............................................................................340story editor (EX only) ..............................................................................341
Balloon function basics ...........................................................................346Create balloons (EX only) .......................................................................347
Step: 05 Black-White Reversal and Masking
Step: 02 Rendering Filters
Step: 03 Transform Filters
Step: 04 Image Adjustment Filters (EX only)
Step: 05 Line Adjustment Filters (EX only)
Step: 06 Effect Filters (EX only)
Chapter: 09
Chapter 9 - Filters
Step: 01 Filters
Step: 07 Blur Filters (EX only)
Step: 08 Drawing (Comic Filters Vol. 1) (EX only)
Chapter: 11
Chapter 11 - Text and Word Balloons
Step: 01 Text
Chapter: 10
Chapter 10 - Rendering
Step: 01 2DLT (EX only)
Step: 09 Distort (EX only)
Step: 02 3D Sketching (EX only)
Step: 03 3DLT (EX only)
Step: 02 Word Balloons
Chapter: 12
Chapter 12 - Display and Windows
Step: 01 Screen Display
5
screen Display Basics..............................................................................354Hand Tool ..............................................................................................354Rotate Tool ............................................................................................355Bug Glasses Tool ....................................................................................356screen Rotation ......................................................................................357screen Inversion .....................................................................................357Actual Pixels ..........................................................................................358show All ................................................................................................358Print size ................................................................................................359show Transparent Area ...........................................................................359New Window .........................................................................................360
show Measurement scale ......................................................................361show Print Guide and Basic Frame ..........................................................361show Guide ...........................................................................................362show Grid ..............................................................................................362
show story and Author Info ....................................................................363show Page Number ................................................................................363Display Pagination ..................................................................................363
Materials basics .....................................................................................366External browsing ..................................................................................367Character basics (EX only) ......................................................................368
Undoing commands (Undo) ....................................................................370Redo command (Redo) ...........................................................................370History function ......................................................................................371
Actions basics ........................................................................................372
File Menu ...............................................................................................378Edit Menu ..............................................................................................379story Menu ............................................................................................380View Menu ............................................................................................381selection Menu ......................................................................................382Layers Menu ..........................................................................................383Ruler Menu ............................................................................................384Filter Menu ............................................................................................385Window Menu .......................................................................................386Help Menu .............................................................................................387Edit Window ..........................................................................................388Tool Bar .................................................................................................389Tools Palette ..........................................................................................390
Tools Options Palette ..............................................................................391Layers Palette .........................................................................................392
Navigator Palette ...................................................................................393Materials Palette ....................................................................................394Properties Palette ...................................................................................395History Palette ........................................................................................395Color Palette ..........................................................................................396Customize Tools Palette (EX only) ...........................................................396Action Palette (EX only) ..........................................................................396Beginner's Assistant ...............................................................................397
Step: 02 Show Guidelines
Step: 03 Show Information
Step: 03 Actions (EX only)
Chapter: 13
Chapter 13 - Other
Step: 01 Materials (For EX only)
Chapter: 14
Chapter 14 - Features Reference
Step: 01 Menus
Chapter: 15
Chapter 15 - Appendix
Step: 01 Troubleshooting
Step: 02 Glossary
Step: 02 Undoing commands
Step: 02 Windows Palette
6
Before reading this manual
■Getting StartedThis manual assumes the reader understands the following basic operations:
・ PC startup and shutdown process・ Basic mouse operations (click, double click, drag, etc)・ Basic File Operations (creating folders, moving files, copying, deleting, etc)・ Basic PC knowledge (hard disc, monitor, sort)・ Basic computer graphics and printing knowledge
For further information on these items, refer to the manuals which came with your computer, or a book on basic computer functions.
■ About「Product Lineup」Manga Studio Ver. 4. 0 has two versions: Debut and EX, both of which are covered in this manual. The limitations of each version are indicated as follows:
・ DebutIndicates the functionalities included in Manga Studio Debut.
・ EXIndicates the functionalities included in Manga Studio EX.
■ About 「Point」At the end of certain paragraphs, there are further explanations regarding the operation. They are labeled with the following titles:
・ ExplanationConvenient things to know or an explanation to increase understanding.
・ Applied OperationsIntroduction of applied operations to increase Manga studio use and increase efficiency when working.
・ NoteThese note areas in which mistakes easily occur or where added care need be taken.
第2章
第1章
第3章
第4章
第5章
Getting Started
Chapter 1
This chapter is about starting up and shutting down Manga Studio and customizing for advanced users.
Step: 01 startup and shutdown 008
Step: 02 Preferences 010
Step: 03 shortcut Preferences (For EX only) 019
Chapter 1G
etting Started
Step: 04 Custom Tools settings(For EX only) 020
Manga Studio
8
: Manga Studio
Startup and shutdown01
Startup Manga Studio. 1. Select Shutdown Option From the [File] menu, select [Exit].
2. Shutdown Will be Complete. The Manga studio application will shutdown.
1. Open Start Menu select Manga studio by selecting from the Windows [start] Menu [All Programs]
Shutdown Manga Studio.
・ [standard Interface] is the standard interface which previous users will be used to. ・ [Beginner's assistant] is an interface for beginners where all necessary tools for
sketching, inserting pen, etc are visible one space.
Explanation
4. Complete startup After selecting the UI with the [Select Default UI Mode] prompt box, Manga
studio will start.
3. Select User Interface (On first startup only) After installation a [select Default UI Mode] prompt box will be displayed,
where you can select your preferred UI mode for Manga studio start up.
1 select either the [Use The standard Interface] or [Use The Beginner’s Assistant] option.
3 Click the [OK] button.
3
1
2. Select Start Menu (Initial startup only) On the initial startup only, a [Installing Materials] prompt box will be displayed.
Follow the instructions to install the materials.
UserGuide
9
Chapter
1
Getting Started
When there is a problem with Manga studio, initialize startup and return Manga studios to original settings.
Initialization Startup.
The items selected from the [Initialize startup] prompt box will be returned post-installation status, and have all preferences deleted. Also note that all created items will be deleted.
NOTE
3. Select items to be deleted from the [Initialization Start-up] prompt box. These selections will have their current preferences reset to the time of installation. Then click the [OK] button.
2. Confirmation prompt box will be displayed When the confirmation prompt box is displayed, click [Yes].
1. Open Start Menu From the Windows [start] Menu [All Programs] select Manga Studios while
holding down the [Shift] key.
4. Initialization Startup Complete The items selected in the [Initialization start-up] dialog will be returned to the
original settings and the Manga studio application will startup.
Manga Studio
10
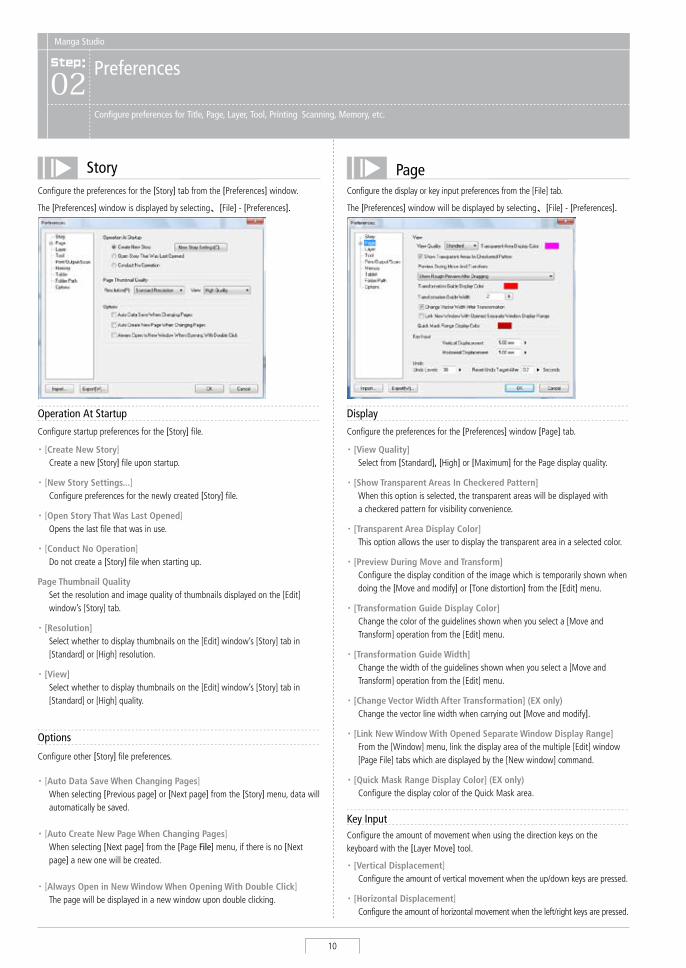
StoryConfigure the preferences for the [story] tab from the [Preferences] window.
Operation At Startup
Configure startup preferences for the [story] file.
・ [Create New Story] Create a new [story] file upon startup.
・ [New Story Settings...] Configure preferences for the newly created [story] file.
・ [Open Story That Was Last Opened] Opens the last file that was in use.
・ [Conduct No Operation] Do not create a [story] file when starting up.
Page Thumbnail Quality set the resolution and image quality of thumbnails displayed on the [Edit]
window’s [story] tab.
・ [Resolution] select whether to display thumbnails on the [Edit] window’s [story] tab in
[standard] or [High] resolution.
・ [View] select whether to display thumbnails on the [Edit] window’s [story] tab in
[standard] or [High] quality.
Options
Configure other [story] file preferences.
・ [Auto Data Save When Changing Pages] When selecting [Previous page] or [Next page] from the [story] menu, data will
automatically be saved.
・ [Auto Create New Page When Changing Pages] When selecting [Next page] from the [Page File] menu, if there is no [Next
page] a new one will be created.
・ [Always Open in New Window When Opening With Double Click] The page will be displayed in a new window upon double clicking.
PageConfigure the display or key input preferences from the [File] tab.
Display
Configure the preferences for the [Preferences] window [Page] tab.
・ [View Quality] select from [standard], [High] or [Maximum] for the Page display quality.
・ [Show Transparent Areas In Checkered Pattern] When this option is selected, the transparent areas will be displayed with
a checkered pattern for visibility convenience.
・ [Transparent Area Display Color] This option allows the user to display the transparent area in a selected color.
・ [Preview During Move and Transform] Configure the display condition of the image which is temporarily shown when
doing the [Move and modify] or [Tone distortion] from the [Edit] menu.
・ [Transformation Guide Display Color] Change the color of the guidelines shown when you select a [Move and
Transform] operation from the [Edit] menu.
・ [Transformation Guide Width] Change the width of the guidelines shown when you select a [Move and
Transform] operation from the [Edit] menu.
・ [Change Vector Width After Transformation] (EX only) Change the vector line width when carrying out [Move and modify].
・ [Link New Window With Opened Separate Window Display Range] From the [Window] menu, link the display area of the multiple [Edit] window
[Page File] tabs which are displayed by the [New window] command.
・ [Quick Mask Range Display Color] (EX only) Configure the display color of the Quick Mask area.
: Manga Studio
Preferences02
Configure preferences for Title, Page, Layer, Tool, Printing Scanning, Memory, etc.
The [Preferences] window is displayed by selecting、[File] - [Preferences]. The [Preferences] window will be displayed by selecting、[File] - [Preferences].
Key InputConfigure the amount of movement when using the direction keys on the keyboard with the [Layer Move] tool.
・ [Vertical Displacement] Configure the amount of vertical movement when the up/down keys are pressed.
・ [Horizontal Displacement] Configure the amount of horizontal movement when the left/right keys are pressed.
UserGuide
11
Chapter
1
Getting Started
Undo
Configure preferences for the [Undo] and [Reset] command on the [History] palette.
・ [Undo Levels] Configure the maximum number of operations to remember.
・ [Reset Undo Target After] select the number of seconds of non operation condition required to be
considered as a new operation.
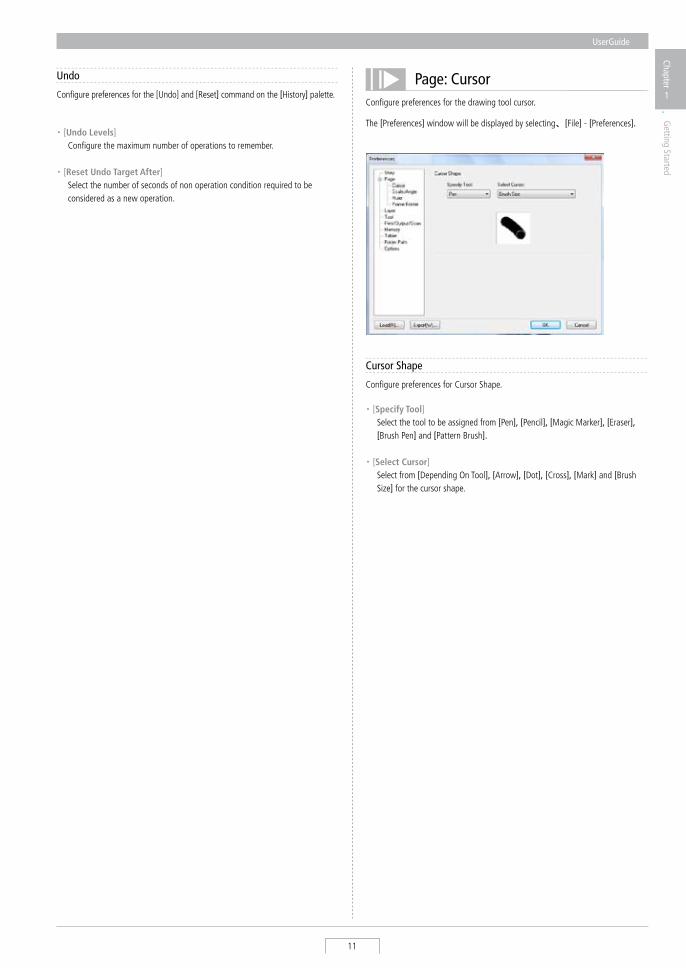
Page: CursorConfigure preferences for the drawing tool cursor.
Cursor Shape
Configure preferences for Cursor shape.
・ [Specify Tool] select the tool to be assigned from [Pen], [Pencil], [Magic Marker], [Eraser],
[Brush Pen] and [Pattern Brush].
・ [Select Cursor] select from [Depending On Tool], [Arrow], [Dot], [Cross], [Mark] and [Brush
size] for the cursor shape.
The [Preferences] window will be displayed by selecting、[File] - [Preferences].
Manga Studio
12
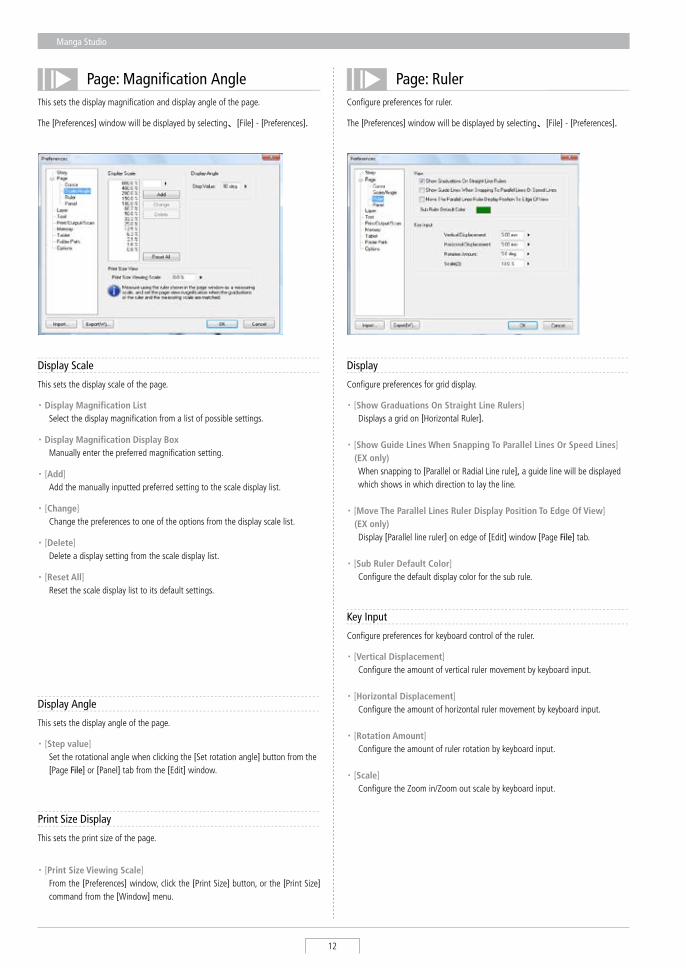
Page: Magnification AngleThis sets the display magnification and display angle of the page.
Display Scale
This sets the display scale of the page.
・ Display Magnification List select the display magnification from a list of possible settings.
・ Display Magnification Display Box Manually enter the preferred magnification setting.
・ [Add] Add the manually inputted preferred setting to the scale display list.
・ [Change] Change the preferences to one of the options from the display scale list.
・ [Delete] Delete a display setting from the scale display list.
・ [Reset All] Reset the scale display list to its default settings.
Display Angle
This sets the display angle of the page.
・ [Step value] set the rotational angle when clicking the [set rotation angle] button from the
[Page File] or [Panel] tab from the [Edit] window.
Print Size Display
This sets the print size of the page.
・ [Print Size Viewing Scale] From the [Preferences] window, click the [Print size] button, or the [Print size]
command from the [Window] menu.
Page: RulerConfigure preferences for ruler.
Display
Configure preferences for grid display.
・ [Show Graduations On Straight Line Rulers] Displays a grid on [Horizontal Ruler].
・ [Show Guide Lines When Snapping To Parallel Lines Or Speed Lines] (EX only)
When snapping to [Parallel or Radial Line rule], a guide line will be displayed which shows in which direction to lay the line.
・ [Move The Parallel Lines Ruler Display Position To Edge Of View](EX only)
Display [Parallel line ruler] on edge of [Edit] window [Page File] tab.
・ [Sub Ruler Default Color] Configure the default display color for the sub rule.
Key Input
Configure preferences for keyboard control of the ruler.
・ [Vertical Displacement] Configure the amount of vertical ruler movement by keyboard input.
・ [Horizontal Displacement] Configure the amount of horizontal ruler movement by keyboard input.
・ [Rotation Amount] Configure the amount of ruler rotation by keyboard input.
・ [Scale] Configure the Zoom in/Zoom out scale by keyboard input.
The [Preferences] window will be displayed by selecting、[File] - [Preferences]. The [Preferences] window will be displayed by selecting、[File] - [Preferences].
UserGuide
13
Chapter
1
Getting Started
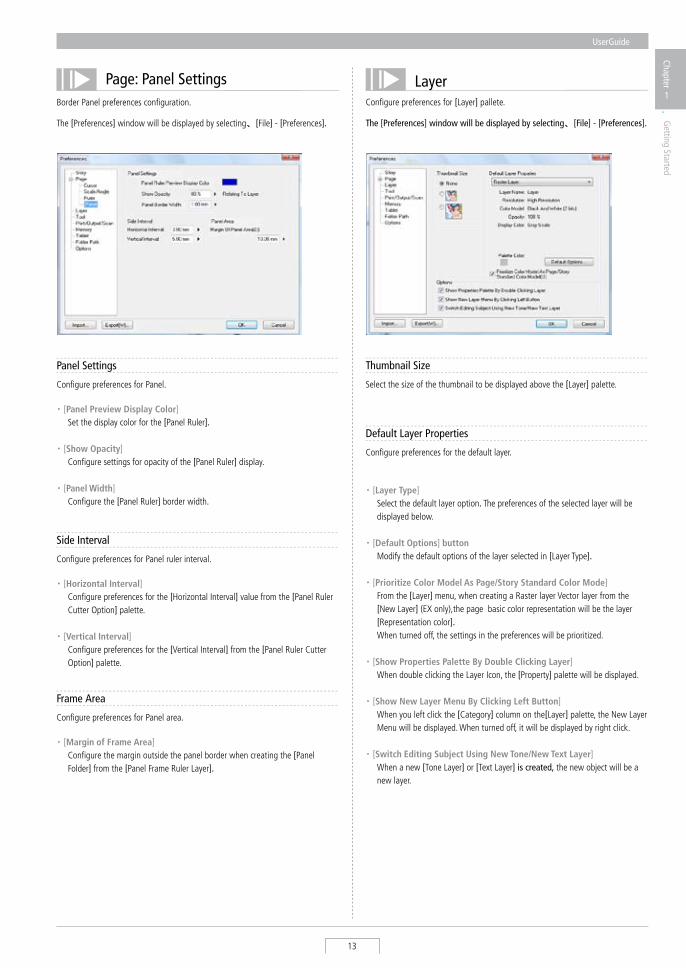
Page: Panel SettingsBorder Panel preferences configuration.
Panel Settings
Configure preferences for Panel.
・ [Panel Preview Display Color] set the display color for the [Panel Ruler].
・ [Show Opacity] Configure settings for opacity of the [Panel Ruler] display.
・ [Panel Width] Configure the [Panel Ruler] border width.
Side Interval
Configure preferences for Panel ruler interval.
・ [Horizontal Interval] Configure preferences for the [Horizontal Interval] value from the [Panel Ruler
Cutter Option] palette.
・ [Vertical Interval] Configure preferences for the [Vertical Interval] from the [Panel Ruler Cutter
Option] palette.
Frame Area
Configure preferences for Panel area.
・ [Margin of Frame Area] Configure the margin outside the panel border when creating the [Panel
Folder] from the [Panel Frame Ruler Layer].
LayerConfigure preferences for [Layer] pallete.
Default Layer Properties
Configure preferences for the default layer.
・ [Layer Type] select the default layer option. The preferences of the selected layer will be
displayed below.
・ [Default Options] button Modify the default options of the layer selected in [Layer Type].
・ [Prioritize Color Model As Page/Story Standard Color Mode] From the [Layer] menu, when creating a Raster layer Vector layer from the
[New Layer] (EX only),the page basic color representation will be the layer [Representation color].
When turned off, the settings in the preferences will be prioritized.
・ [Show Properties Palette By Double Clicking Layer] When double clicking the Layer Icon, the [Property] palette will be displayed.
・ [Show New Layer Menu By Clicking Left Button] When you left click the [Category] column on the[Layer] palette, the New Layer
Menu will be displayed. When turned off, it will be displayed by right click.
・ [Switch Editing Subject Using New Tone/New Text Layer] When a new [Tone Layer] or [Text Layer] is created, the new object will be a
new layer.
Thumbnail Size
select the size of the thumbnail to be displayed above the [Layer] palette.
The [Preferences] window will be displayed by selecting、[File] - [Preferences]. The [Preferences] window will be displayed by selecting、[File] - [Preferences].
Manga Studio
14
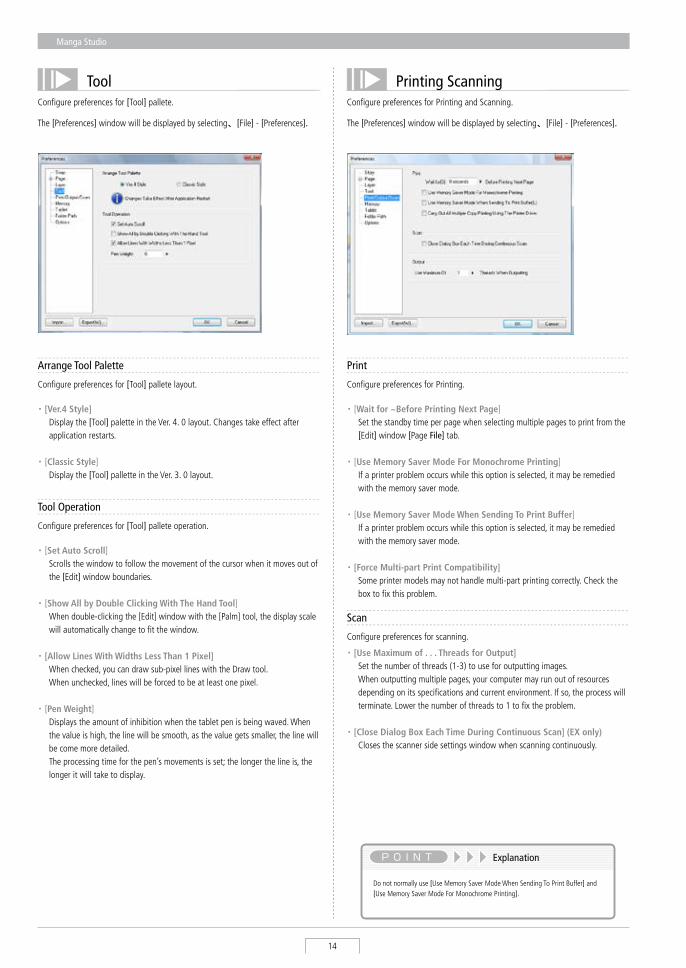
ToolConfigure preferences for [Tool] pallete.
Arrange Tool Palette
Configure preferences for [Tool] pallete layout.
・ [Ver.4 Style] Display the [Tool] palette in the Ver. 4. 0 layout. Changes take effect after
application restarts.
・ [Classic Style] Display the [Tool] pallette in the Ver. 3. 0 layout.
Tool Operation
Configure preferences for [Tool] pallete operation.
・ [Set Auto Scroll] scrolls the window to follow the movement of the cursor when it moves out of
the [Edit] window boundaries.
・ [Show All by Double Clicking With The Hand Tool] When double-clicking the [Edit] window with the [Palm] tool, the display scale
will automatically change to fit the window.
・ [Allow Lines With Widths Less Than 1 Pixel] When checked, you can draw sub-pixel lines with the Draw tool. When unchecked, lines will be forced to be at least one pixel.
・ [Pen Weight] Displays the amount of inhibition when the tablet pen is being waved. When
the value is high, the line will be smooth, as the value gets smaller, the line will be come more detailed.
The processing time for the pen’s movements is set; the longer the line is, the longer it will take to display.
Printing ScanningConfigure preferences for Printing and scanning.
Configure preferences for Printing.
・ [Wait for ~Before Printing Next Page] set the standby time per page when selecting multiple pages to print from the
[Edit] window [Page File] tab.
・ [Use Memory Saver Mode For Monochrome Printing] If a printer problem occurs while this option is selected, it may be remedied
with the memory saver mode.
・ [Use Memory Saver Mode When Sending To Print Buffer] If a printer problem occurs while this option is selected, it may be remedied
with the memory saver mode.
・ [Force Multi-part Print Compatibility] some printer models may not handle multi-part printing correctly. Check the
box to fix this problem.
Scan
Configure preferences for scanning.
・ [Use Maximum of . . . Threads for Output] set the number of threads (1-3) to use for outputting images. When outputting multiple pages, your computer may run out of resources
depending on its specifications and current environment. If so, the process will terminate. Lower the number of threads to 1 to fix the problem.
・ [Close Dialog Box Each Time During Continuous Scan] (EX only) Closes the scanner side settings window when scanning continuously.
Do not normally use [Use Memory saver Mode When sending To Print Buffer] and [Use Memory saver Mode For Monochrome Printing].
Explanation
The [Preferences] window will be displayed by selecting、[File] - [Preferences]. The [Preferences] window will be displayed by selecting、[File] - [Preferences].
UserGuide
15
Chapter
1
Getting Started
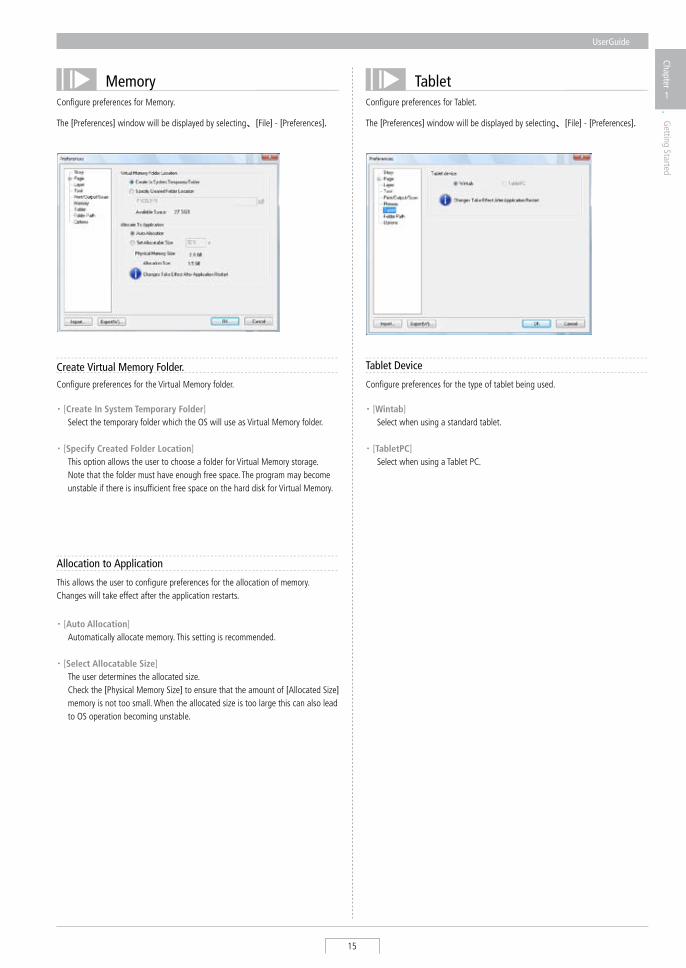
MemoryConfigure preferences for Memory.
Create Virtual Memory Folder.
・ [Create In System Temporary Folder] select the temporary folder which the Os will use as Virtual Memory folder.
・ [Specify Created Folder Location] This option allows the user to choose a folder for Virtual Memory storage.
Note that the folder must have enough free space. The program may become unstable if there is insufficient free space on the hard disk for Virtual Memory.
Configure preferences for the Virtual Memory folder.
Allocation to Application
・ [Auto Allocation] Automatically allocate memory. This setting is recommended.
・ [Select Allocatable Size] The user determines the allocated size. Check the [Physical Memory size] to ensure that the amount of [Allocated size]
memory is not too small. When the allocated size is too large this can also lead to Os operation becoming unstable.
This allows the user to configure preferences for the allocation of memory. Changes will take effect after the application restarts.
TabletConfigure preferences for Tablet.
・ [Wintab] select when using a standard tablet.
・ [TabletPC] select when using a Tablet PC.
Tablet Device
Configure preferences for the type of tablet being used.
The [Preferences] window will be displayed by selecting、[File] - [Preferences]. The [Preferences] window will be displayed by selecting、[File] - [Preferences].

Manga Studio
16
Folder PathThis sets the save location of the User Data Folder.
Folder Path
Manage the saving, copying, etc of the User Data Folder. The User Data Folder where the created data for pen settings, preferences, etc of Manga studio are saved.
・ [User Data Folder Location] select the location of the User Data Folder. settings will come into effect after
next startup of Manga studio.
・ [Copy Folder... ] Copy the User Data Folder to a selected location to serve as a back up.
・ [Browse Folder] Change the location of the User Data Folder.
Optionsset the display for the Pallete or Color Profile, etc.
View
There are a number of display settings.
・ [Display Color Palette Selection Items] select the color of the [Layer] pallete items and [History] pallete items.
・ [Beginner’s Assistant Display Location] Display the [Beginner's Assistant] on the [Left] or [Right]
・ [Properties Palette Extension Method] select whether the [Properties] pallete expands from the [Left], [Right] or
[According To Tabs].
・ [Save Default View Settings For Each Page] When checked, the display state of the [Ruler Manipulator], [Ruler Handles],
[selection Launcher], etc. will be saved with each page. The display state at the time you saved the page will be restored when you open it. This is the same as prior behavior. When unchecked, the display state of the [Ruler Manipulator], [Ruler Handles], [selection Launcher], etc. will be the same for all pages. The display state at the time you saved the page will not be restored.
Units
Configure preferences for the text units.
・ [Text Units] From the [Text] tool, the unit size of the input character [Q] (Q value)
and [pt] (Point) can be selected.
Icc ProfileConfigure preferences for color profile data.
・ [CMYK Profile] Configure the CMYK profile.
・ [RGB Profile] Configure the RGB profile.
・ [Rendering Intent] Configure the Rendering Intent.
The [Preferences] window will be displayed by selecting、[File] - [Preferences]. The [Preferences] window will be displayed by selecting、[File] - [Preferences].
Do not place Manga studio and other application or system file folders in the [User Folder Location].If other data is placed in this folder, Manga studio could fail to start or function correctly.
Notes IME Controls
Configure preferences for IME controls.
・ [Automatically Set IME to ON When Starting To Edit Text Layer] Enable IME automatically when starting to enter text in a [Text Layer].
Depending on your IME settings, you will be able to enter full-width text when you begin text editing without pressing the [Half-width/Full-width] key.
UserGuide
17
Chapter
1
Getting Started
Export & ImportCopy the preferences to allow sharing and importing.
Export
By clicking on the [Export] button on any page of the [Preferences] window detailed preferences can be exported. The [Preferences] file type will have a.pff extension.
Import
By clicking on the [Import] button on the [Preferences] window, the user can return to prior settings by choosing a previously saved [Preference] file (Extension: pff).
When importing preferences, all previous preferences will be deleted. Before importing settings, check all settings carefully.
NOTE
Manga Studio
18
: Manga Studio
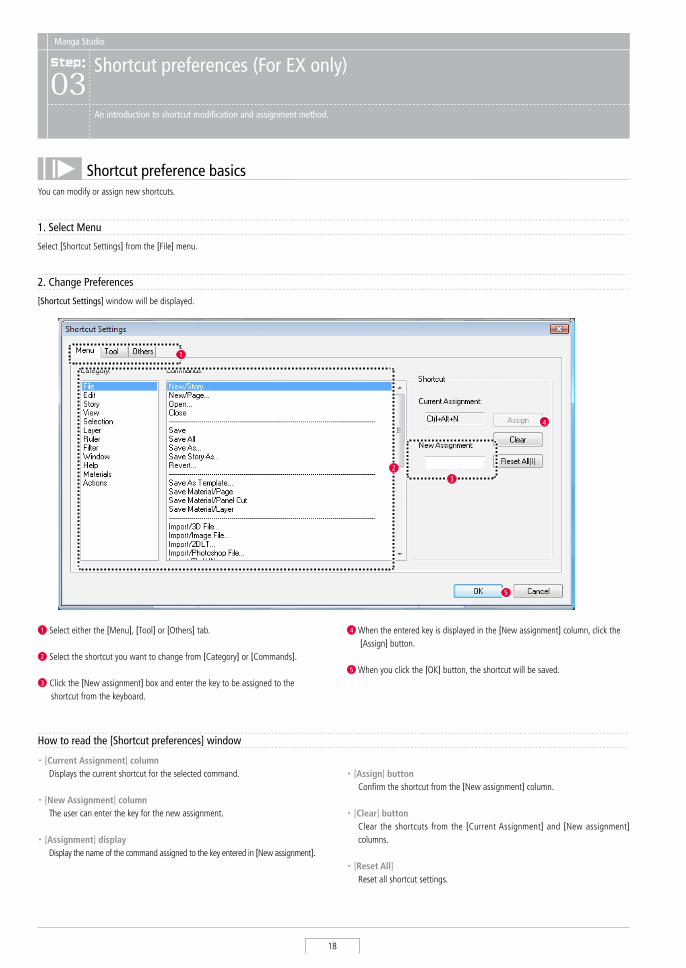
Shortcut preferences (For EX only)03
An introduction to shortcut modification and assignment method.
Shortcut preference basics
5
4
1
23
1 select either the [Menu], [Tool] or [Others] tab.
2 select the shortcut you want to change from [Category] or [Commands].
3 Click the [New assignment] box and enter the key to be assigned to the shortcut from the keyboard.
4 When the entered key is displayed in the [New assignment] column, click the [Assign] button.
5 When you click the [OK] button, the shortcut will be saved.
You can modify or assign new shortcuts.
select [shortcut settings] from the [File] menu.
1. Select Menu
[Shortcut Settings] window will be displayed.
2. Change Preferences
・ [Current Assignment] column Displays the current shortcut for the selected command.
・ [New Assignment] column The user can enter the key for the new assignment.
・ [Assignment] display Display the name of the command assigned to the key entered in [New assignment].
How to read the [Shortcut preferences] window
・ [Assign] button Confirm the shortcut from the [New assignment] column.
・ [Clear] button Clear the shortcuts from the [Current Assignment] and [New assignment]
columns.
・ [Reset All] Reset all shortcut settings.
UserGuide
19
Chapter
1
Getting Started
: Manga Studio
Custom Tools Settings(For EX only)04
Here we will introduce how to save tools and menus to the [Custom Tool] palette.
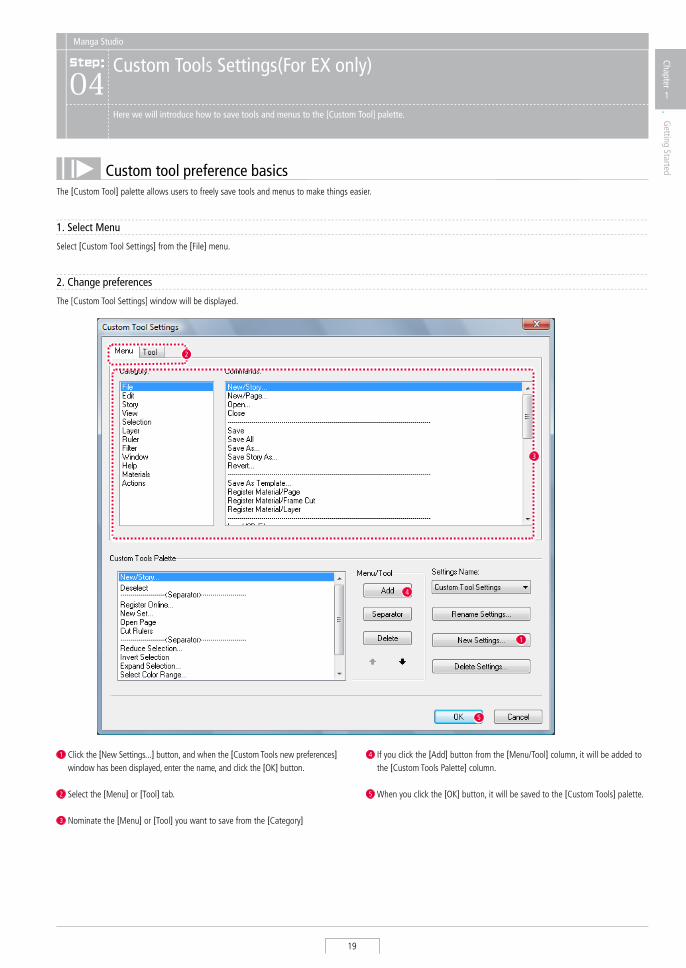
Custom tool preference basicsThe [Custom Tool] palette allows users to freely save tools and menus to make things easier.
select [Custom Tool settings] from the [File] menu.
1. Select Menu
1 Click the [New settings...] button, and when the [Custom Tools new preferences] window has been displayed, enter the name, and click the [OK] button.
2 select the [Menu] or [Tool] tab.
3 Nominate the [Menu] or [Tool] you want to save from the [Category]
4 If you click the [Add] button from the [Menu/Tool] column, it will be added to the [Custom Tools Palette] column.
5 When you click the [OK] button, it will be saved to the [Custom Tools] palette.
5
1
4
2
3
The [Custom Tool settings] window will be displayed.
2. Change preferences
Manga Studio
20
・ [Add] Add the selected [Menu/Tool] to the [Custom Tools] palette.
・ [Separator] Insert a separator into the [Custom Tools] palette.
・ [Delete] Delete the [Menu/Tool/separator] selected in the [Custom Tools] palette.
・ [↑↓] Move the selected item in the [Custom Tools] palette [Up or Down].
・ [Settings Name] select the custom tool settings from a list.
・ [Rename Settings] Change the name of the selected custom tool.
・ [New Settings] Create a new custom tool setting.
・ [Delete Settings] Delete the selected custom tool setting.
How to read the [Custom Tools Preferences] window
第2章
第1章
第3章
第4章
第5章
Files
Chapter 2
In this chapter we will introduce file and page operation.
Step: 01 File Operations 024
Step: 02 Page operation 035
Step: 03 Page 040
Chapter
2
Files
Step: 04 Import 042
Step: 05 Export 052
Step: 06 save 057
Step: 07 Print 064
Manga Studio
22
: Manga Studio
File Operations01
This will explain how to create single page [Page File] files and multiple page [Story] files.
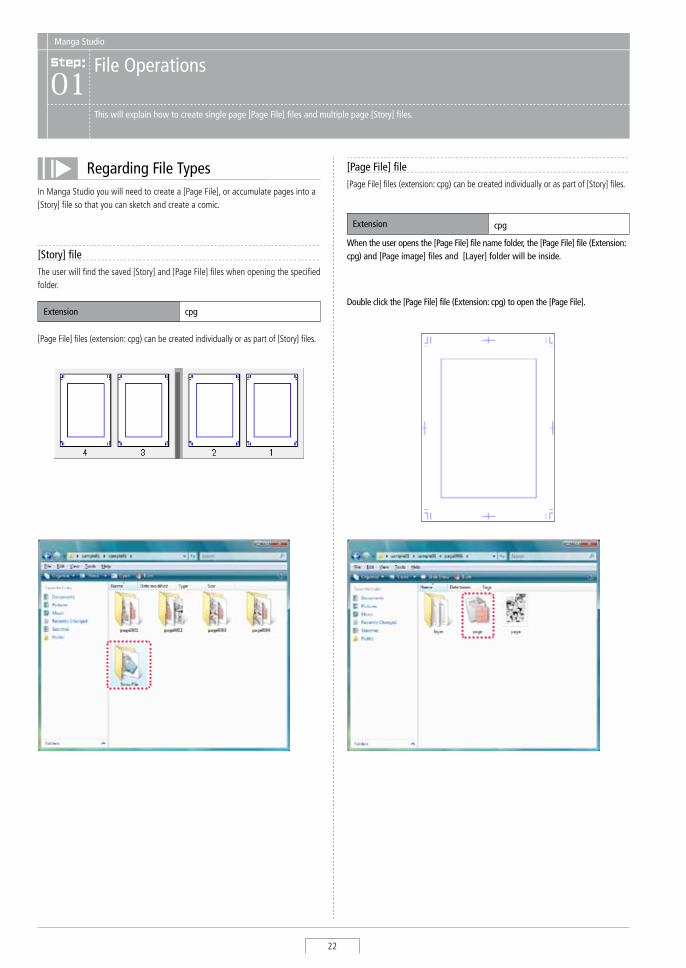
Regarding File TypesIn Manga studio you will need to create a [Page File], or accumulate pages into a [story] file so that you can sketch and create a comic.
[Page File] file[Page File] files (extension: cpg) can be created individually or as part of [story] files.
[Story] fileThe user will find the saved [story] and [Page File] files when opening the specified folder.
Extension cpg
Extension cpg
When the user opens the [Page File] file name folder, the [Page File] file (Extension: cpg) and [Page image] files and [Layer] folder will be inside.
[Page File] files (extension: cpg) can be created individually or as part of [story] files.
Double click the [Page File] file (Extension: cpg) to open the [Page File].
User Guide
23
Chapter
2
Files
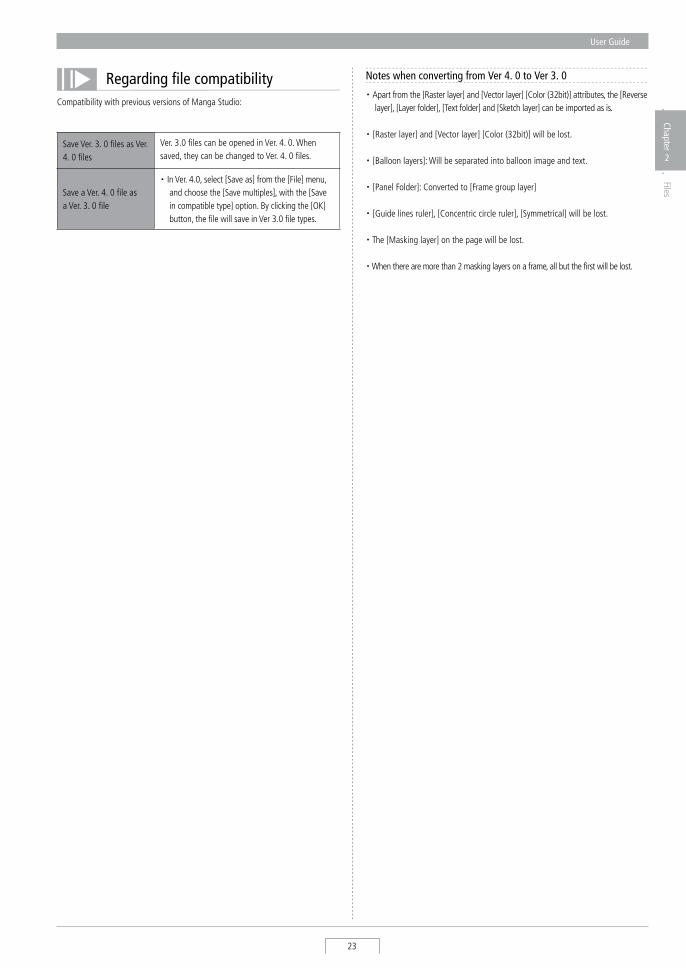
Regarding file compatibility
save Ver. 3. 0 files as Ver. 4. 0 files
Ver. 3.0 files can be opened in Ver. 4. 0. When saved, they can be changed to Ver. 4. 0 files.
save a Ver. 4. 0 file as a Ver. 3. 0 file
・ In Ver. 4.0, select [save as] from the [File] menu, and choose the [save multiples], with the [save in compatible type] option. By clicking the [OK] button, the file will save in Ver 3.0 file types.
Compatibility with previous versions of Manga studio:
Notes when converting from Ver 4. 0 to Ver 3. 0
・ Apart from the [Raster layer] and [Vector layer] [Color (32bit)] attributes, the [Reverse layer], [Layer folder], [Text folder] and [sketch layer] can be imported as is.
・ [Raster layer] and [Vector layer] [Color (32bit)] will be lost.
・ [Balloon layers]: Will be separated into balloon image and text.
・ [Panel Folder]: Converted to [Frame group layer]
・ [Guide lines ruler], [Concentric circle ruler], [symmetrical] will be lost.
・ The [Masking layer] on the page will be lost.
・ When there are more than 2 masking layers on a frame, all but the first will be lost.
Manga Studio
24
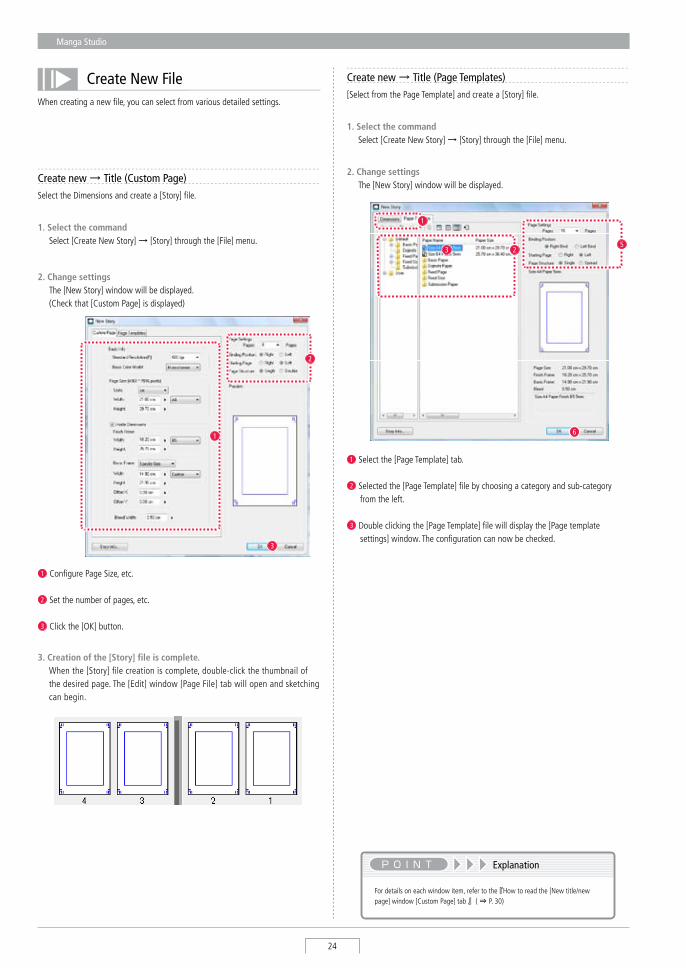
Create New FileWhen creating a new file, you can select from various detailed settings.
Create new → Title (Custom Page)select the Dimensions and create a [story] file.
1. Select the command select [Create New story] → [story] through the [File] menu.
1
2
3
1 Configure Page size, etc.
2 set the number of pages, etc.
3 Click the [OK] button.
3. Creation of the [Story] file is complete. When the [story] file creation is complete, double-click the thumbnail of
the desired page. The [Edit] window [Page File] tab will open and sketching can begin.
2. Change settings The [New story] window will be displayed. (Check that [Custom Page] is displayed)
Create new → Title (Page Templates)[select from the Page Template] and create a [story] file.
1. Select the command select [Create New story] → [story] through the [File] menu.
2. Change settings The [New story] window will be displayed.
1 select the [Page Template] tab.
2 selected the [Page Template] file by choosing a category and sub-category from the left.
3 Double clicking the [Page Template] file will display the [Page template settings] window. The configuration can now be checked.
6
25
1
3
For details on each window item, refer to the 『How to read the [New title/new page] window [Custom Page] tab 』( ⇒ P. 30)
Explanation

User Guide
25
Chapter
2
Files
3. Creation of the [Story] file is complete. When the [story] file creation is complete, and double-click the thumbnail of
the desired page, and the [Edit] window [Page File] tab will open and sketching can take place.
4 Click the [OK] button on the [Page Templates] window.
5 set the number of pages, etc.
6 Click the [OK] button on the [New story] window.
4
・ The [Page template settings] created in the [User] folder can have all but the [Basic resolution] and [Page size] modified at a later date. The items with digital keys in the [Page template settings] saved in the [Default] folder cannot be changed.
・ For details on each window item, refer to the 『How to read the [New title/new page] window [Custom Page] tab 』( ⇒ P. 30)
・ For details of the [Page Template] icons refer to 『How to read [Page Template] tab icons』( ⇒ P. 31)
Explanation
How to read a Page
On a Manga studio page there is [Basic Frame] which holds the frame and the [Finish Frame] or [Offset] which represents the book cut position.
AB
B A
C
D
D
C
A [Page size] The size of the page as a whole.
B [Basic Frame] The standard frame for the panel layout.
C [Finish Frame] The cut line when the page is printed into a book. A picture can be printed to here.
D [Offset] A standby area in case the [Finish Frame] line goes off course when the book is
being cut.
Manga Studio
26
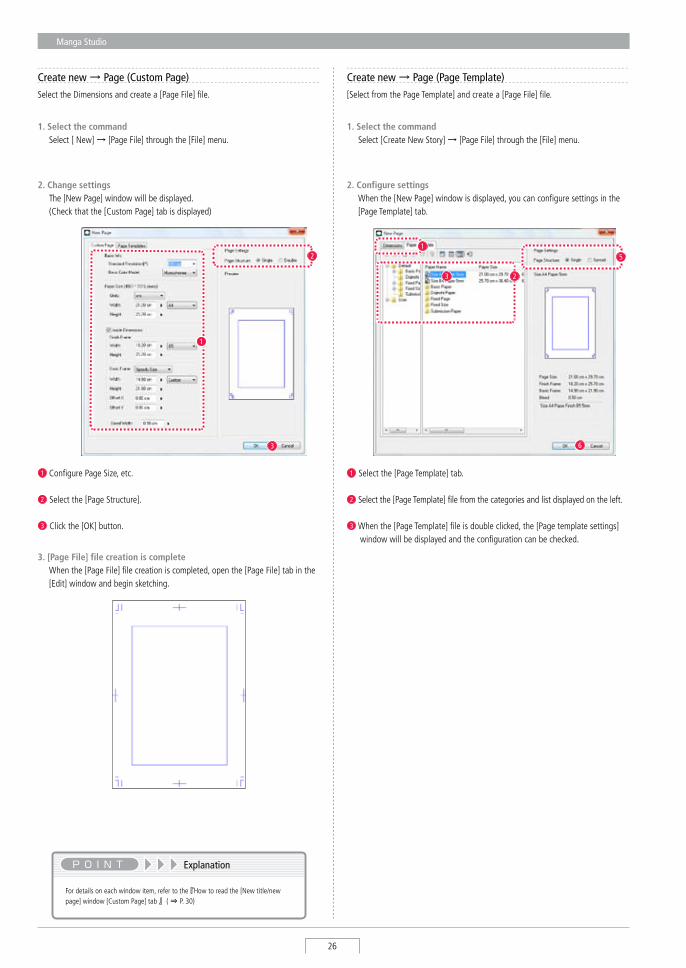
Create new → Page (Custom Page)select the Dimensions and create a [Page File] file.
1. Select the command select [ New] → [Page File] through the [File] menu.
2. Change settings The [New Page] window will be displayed.
(Check that the [Custom Page] tab is displayed)
1
2
3
1 Configure Page size, etc.
2 select the [Page structure].
3 Click the [OK] button.
3. [Page File] file creation is complete When the [Page File] file creation is completed, open the [Page File] tab in the
[Edit] window and begin sketching.
Create new → Page (Page Template)[select from the Page Template] and create a [Page File] file.
1. Select the command select [Create New story] → [Page File] through the [File] menu.
2. Configure settings When the [New Page] window is displayed, you can configure settings in the
[Page Template] tab.
1 select the [Page Template] tab.
2 select the [Page Template] file from the categories and list displayed on the left.
3 When the [Page Template] file is double clicked, the [Page template settings] window will be displayed and the configuration can be checked.
6
2
5
3
1
For details on each window item, refer to the 『How to read the [New title/new page] window [Custom Page] tab 』( ⇒ P. 30)
Explanation
User Guide
27
Chapter
2
Files
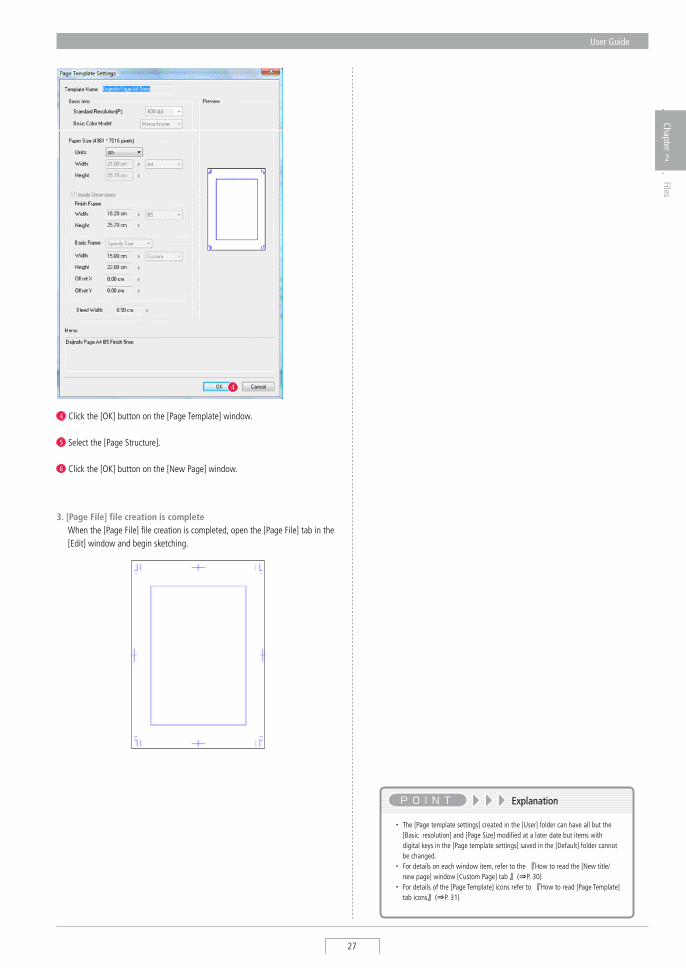
4 Click the [OK] button on the [Page Template] window.
5 select the [Page structure].
6 Click the [OK] button on the [New Page] window.
3. [Page File] file creation is complete When the [Page File] file creation is completed, open the [Page File] tab in the
[Edit] window and begin sketching.
4
・ The [Page template settings] created in the [User] folder can have all but the [Basic resolution] and [Page size] modified at a later date but items with digital keys in the [Page template settings] saved in the [Default] folder cannot be changed.
・ For details on each window item, refer to the 『How to read the [New title/new page] window [Custom Page] tab 』(⇒P. 30)
・ For details of the [Page Template] icons refer to 『How to read [Page Template] tab icons』(⇒P. 31)
Explanation
Manga Studio
28
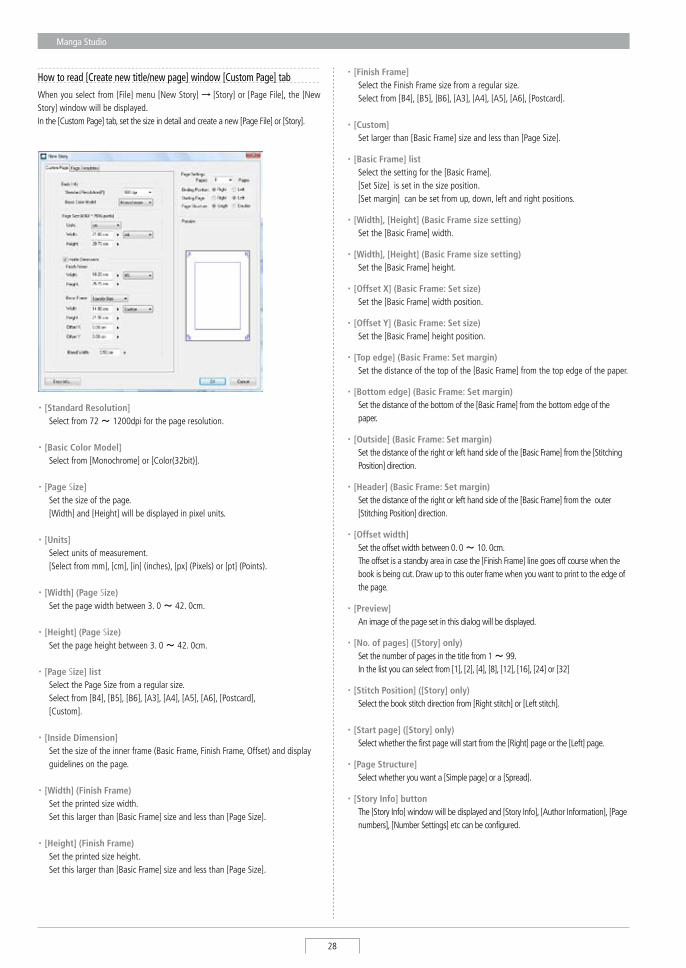
How to read [Create new title/new page] window [Custom Page] tab
When you select from [File] menu [New story] → [story] or [Page File], the [New story] window will be displayed. In the [Custom Page] tab, set the size in detail and create a new [Page File] or [story].
・ [Standard Resolution] select from 72 ~ 1200dpi for the page resolution.
・ [Basic Color Model] select from [Monochrome] or [Color(32bit)].
・ [Page size] set the size of the page. [Width] and [Height] will be displayed in pixel units. ・ [Units] select units of measurement. [select from mm], [cm], [in] (inches), [px] (Pixels) or [pt] (Points).
・ [Width] (Page size) set the page width between 3. 0 ~ 42. 0cm.
・ [Height] (Page size) set the page height between 3. 0 ~ 42. 0cm.
・ [Page size] list select the Page size from a regular size. select from [B4], [B5], [B6], [A3], [A4], [A5], [A6], [Postcard], [Custom].
・ [Inside Dimension] set the size of the inner frame (Basic Frame, Finish Frame, Offset) and display
guidelines on the page.
・ [Width] (Finish Frame) set the printed size width. set this larger than [Basic Frame] size and less than [Page size].
・ [Height] (Finish Frame) set the printed size height. set this larger than [Basic Frame] size and less than [Page size].
・ [Finish Frame] select the Finish Frame size from a regular size. select from [B4], [B5], [B6], [A3], [A4], [A5], [A6], [Postcard]. ・ [Custom] set larger than [Basic Frame] size and less than [Page size].
・ [Basic Frame] list select the setting for the [Basic Frame]. [set size] is set in the size position. [set margin] can be set from up, down, left and right positions.
・ [Width], [Height] (Basic Frame size setting) set the [Basic Frame] width.
・ [Width], [Height] (Basic Frame size setting) set the [Basic Frame] height.
・ [Offset X] (Basic Frame: Set size) set the [Basic Frame] width position.
・ [Offset Y] (Basic Frame: Set size) set the [Basic Frame] height position.
・ [Top edge] (Basic Frame: Set margin) set the distance of the top of the [Basic Frame] from the top edge of the paper.
・ [Bottom edge] (Basic Frame: Set margin) set the distance of the bottom of the [Basic Frame] from the bottom edge of the
paper.
・ [Outside] (Basic Frame: Set margin) set the distance of the right or left hand side of the [Basic Frame] from the [stitching
Position] direction.
・ [Header] (Basic Frame: Set margin) set the distance of the right or left hand side of the [Basic Frame] from the outer
[stitching Position] direction.
・ [Offset width] set the offset width between 0. 0 ~ 10. 0cm. The offset is a standby area in case the [Finish Frame] line goes off course when the
book is being cut. Draw up to this outer frame when you want to print to the edge of the page.
・ [Preview] An image of the page set in this dialog will be displayed.
・ [No. of pages] ([Story] only) set the number of pages in the title from 1 ~ 99. In the list you can select from [1], [2], [4], [8], [12], [16], [24] or [32]
・ [Stitch Position] ([Story] only) select the book stitch direction from [Right stitch] or [Left stitch].
・ [Start page] ([Story] only) select whether the first page will start from the [Right] page or the [Left] page.
・ [Page Structure] select whether you want a [simple page] or a [spread].
・ [Story Info] button The [story Info] window will be displayed and [story Info], [Author Information], [Page
numbers], [Number settings] etc can be configured.
User Guide
29
Chapter
2
Files
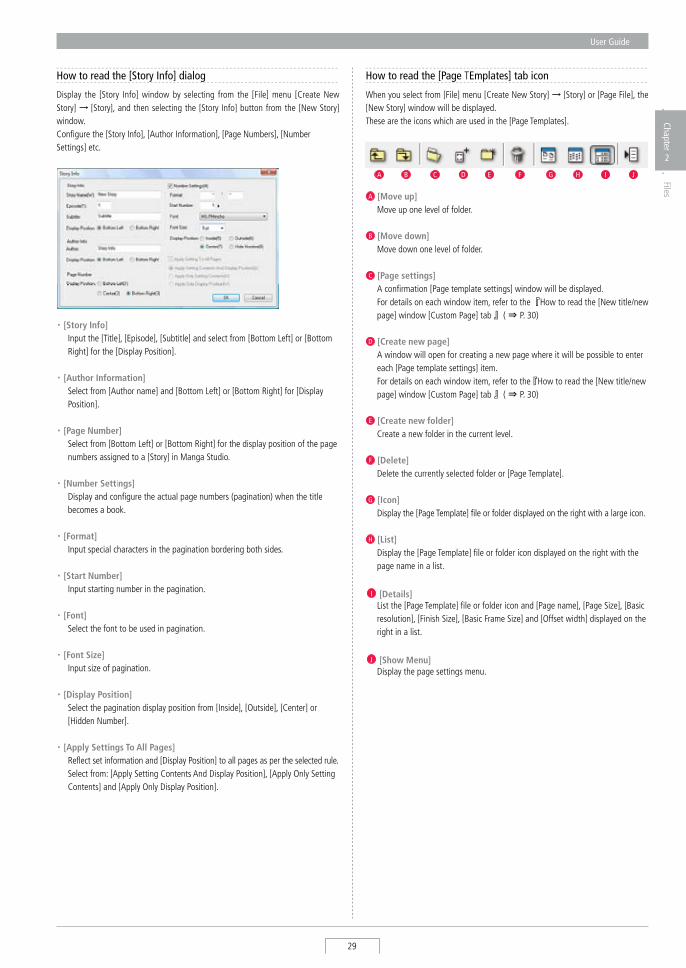
How to read the [Story Info] dialog How to read the [Page TEmplates] tab icon
When you select from [File] menu [Create New story] → [story] or [Page File], the [New story] window will be displayed. These are the icons which are used in the [Page Templates].
・ [Story Info] Input the [Title], [Episode], [subtitle] and select from [Bottom Left] or [Bottom
Right] for the [Display Position].
・ [Author Information] select from [Author name] and [Bottom Left] or [Bottom Right] for [Display
Position].
・ [Page Number] select from [Bottom Left] or [Bottom Right] for the display position of the page
numbers assigned to a [story] in Manga studio.
・ [Number Settings] Display and configure the actual page numbers (pagination) when the title
becomes a book.
・ [Format] Input special characters in the pagination bordering both sides.
・ [Start Number] Input starting number in the pagination.
・ [Font] select the font to be used in pagination.
・ [Font Size] Input size of pagination.
・ [Display Position] select the pagination display position from [Inside], [Outside], [Center] or
[Hidden Number].
・ [Apply Settings To All Pages] Reflect set information and [Display Position] to all pages as per the selected rule. select from: [Apply setting Contents And Display Position], [Apply Only setting
Contents] and [Apply Only Display Position].
Display the [story Info] window by selecting from the [File] menu [Create New story] → [story], and then selecting the [story Info] button from the [New story] window.Configure the [story Info], [Author Information], [Page Numbers], [Number settings] etc.
A B C D E F G H I J
A [Move up] Move up one level of folder.
B [Move down] Move down one level of folder.
C [Page settings] A confirmation [Page template settings] window will be displayed. For details on each window item, refer to the『How to read the [New title/new
page] window [Custom Page] tab 』( ⇒ P. 30)
D [Create new page] A window will open for creating a new page where it will be possible to enter
each [Page template settings] item. For details on each window item, refer to the 『How to read the [New title/new
page] window [Custom Page] tab 』( ⇒ P. 30)
E [Create new folder] Create a new folder in the current level.
F [Delete] Delete the currently selected folder or [Page Template].
G [Icon] Display the [Page Template] file or folder displayed on the right with a large icon.
H [List] Display the [Page Template] file or folder icon displayed on the right with the
page name in a list.
I [Details] List the [Page Template] file or folder icon and [Page name], [Page size], [Basic
resolution], [Finish size], [Basic Frame size] and [Offset width] displayed on the right in a list.
J [Show Menu] Display the page settings menu.
Manga Studio
30
Saving a FileThe file save methods are: [save], [save as], [save title with separate name] and [save all].
・ When saving [story] files and [Page File] files, under the default settings they will be saved as follows:
Vista: [start] button → [Documents] XP: [start] button → [My Documents]
Explanation
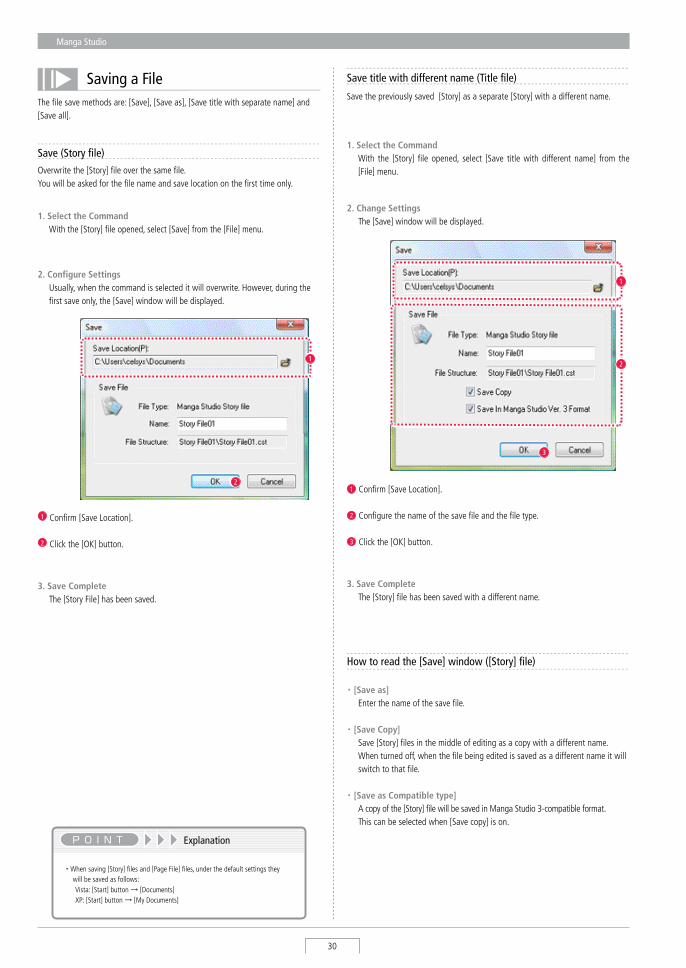
Save (Story file)Overwrite the [story] file over the same file. You will be asked for the file name and save location on the first time only.
1. Select the Command With the [story] file opened, select [save] from the [File] menu.
3. Save Complete The [story File] has been saved.
2. Configure Settings Usually, when the command is selected it will overwrite. However, during the
first save only, the [save] window will be displayed.
2
1
1 Confirm [save Location].
2 Click the [OK] button.
Save title with different name (Title file)
save the previously saved [story] as a separate [story] with a different name.
3. Save Complete The [story] file has been saved with a different name.
2. Change Settings The [save] window will be displayed.
How to read the [Save] window ([Story] file)
・ [Save as] Enter the name of the save file.
・ [Save Copy] save [story] files in the middle of editing as a copy with a different name. When turned off, when the file being edited is saved as a different name it will
switch to that file.
・ [Save as Compatible type] A copy of the [story] file will be saved in Manga studio 3-compatible format. This can be selected when [save copy] is on.
1. Select the Command With the [story] file opened, select [save title with different name] from the
[File] menu.
3
1
2
1 Confirm [save Location].
2 Configure the name of the save file and the file type.
3 Click the [OK] button.
User Guide
31
Chapter
2
Files
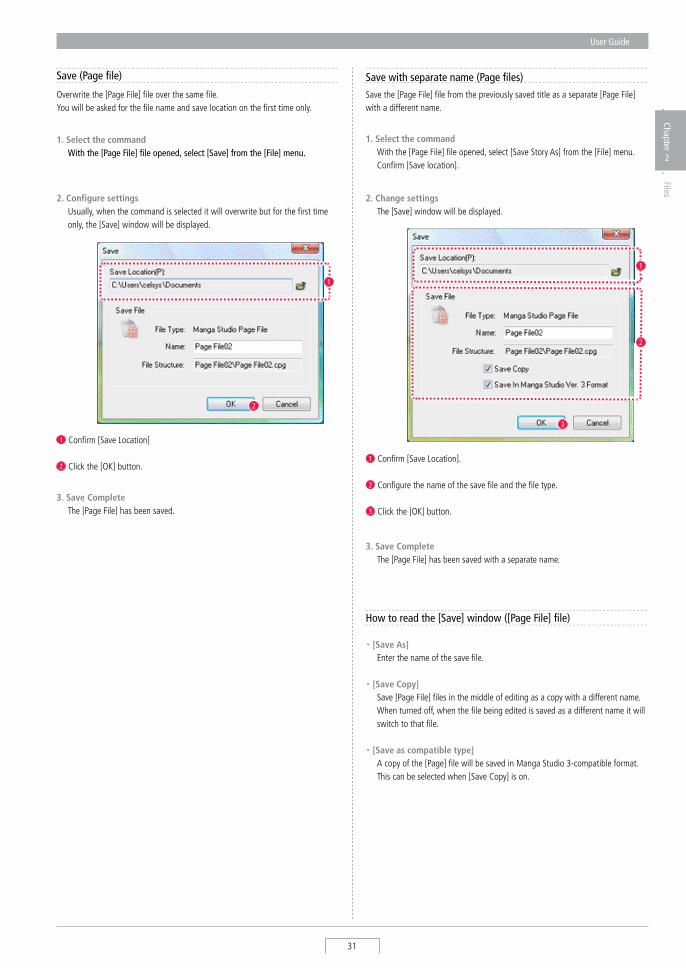
Save with separate name (Page files)save the [Page File] file from the previously saved title as a separate [Page File] with a different name.
3. Save Complete The [Page File] has been saved with a separate name.
2. Change settings The [save] window will be displayed.
Save (Page file)
Overwrite the [Page File] file over the same file. You will be asked for the file name and save location on the first time only.
2
1
1. Select the command With the [Page File] file opened, select [Save] from the [File] menu.
2. Configure settings Usually, when the command is selected it will overwrite but for the first time
only, the [save] window will be displayed.
3. Save Complete The [Page File] has been saved.
1 Confirm [save Location]
2 Click the [OK] button.
3
1. Select the command With the [Page File] file opened, select [save story As] from the [File] menu. Confirm [save location].
1 Confirm [save Location].
2 Configure the name of the save file and the file type.
3 Click the [OK] button.
1
2
How to read the [Save] window ([Page File] file)
・ [Save As] Enter the name of the save file.
・ [Save Copy] save [Page File] files in the middle of editing as a copy with a different name. When turned off, when the file being edited is saved as a different name it will
switch to that file.
・ [Save as compatible type] A copy of the [Page] file will be saved in Manga studio 3-compatible format. This can be selected when [save Copy] is on.
Manga Studio
32
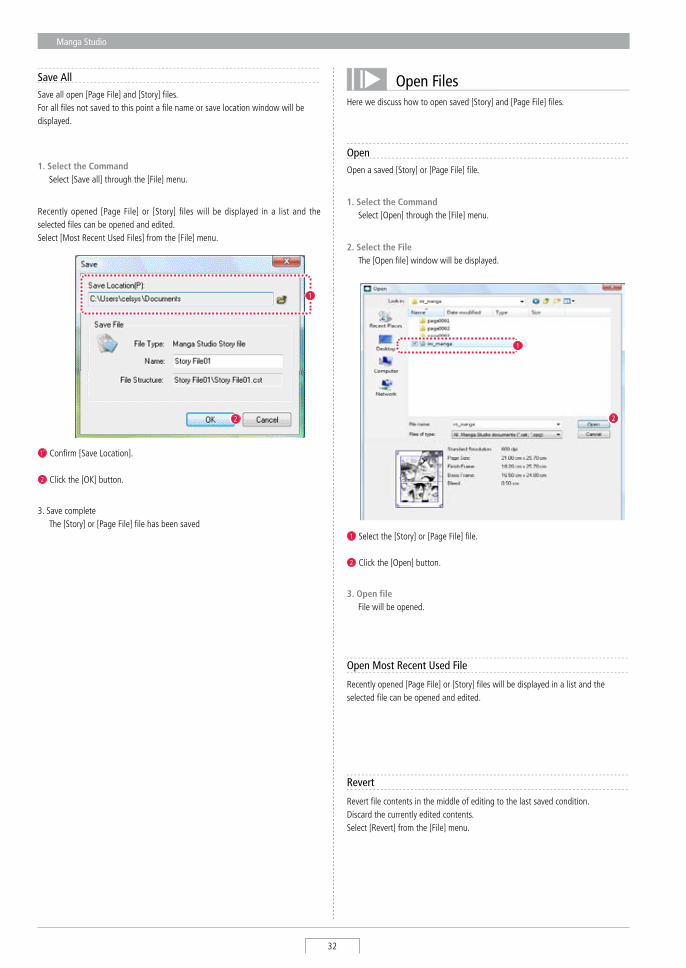
Open FilesHere we discuss how to open saved [story] and [Page File] files.
OpenOpen a saved [story] or [Page File] file.
1. Select the Command select [Open] through the [File] menu.
1 select the [story] or [Page File] file.
2 Click the [Open] button.
1
2
3. Open file File will be opened.
2. Select the File The [Open file] window will be displayed.
Save Allsave all open [Page File] and [story] files. For all files not saved to this point a file name or save location window will be displayed.
1. Select the Command select [save all] through the [File] menu.
Revert
Revert file contents in the middle of editing to the last saved condition. Discard the currently edited contents. select [Revert] from the [File] menu.
Open Most Recent Used File
Recently opened [Page File] or [story] files will be displayed in a list and the selected file can be opened and edited.
3. save complete The [story] or [Page File] file has been saved
Recently opened [Page File] or [story] files will be displayed in a list and the selected files can be opened and edited. select [Most Recent Used Files] from the [File] menu.
2
1
1` Confirm [save Location].
2 Click the [OK] button.
User Guide
33
Chapter
2
Files
: Manga Studio
Page operation02
This will introduce [Story] file and [Page File] file operation.
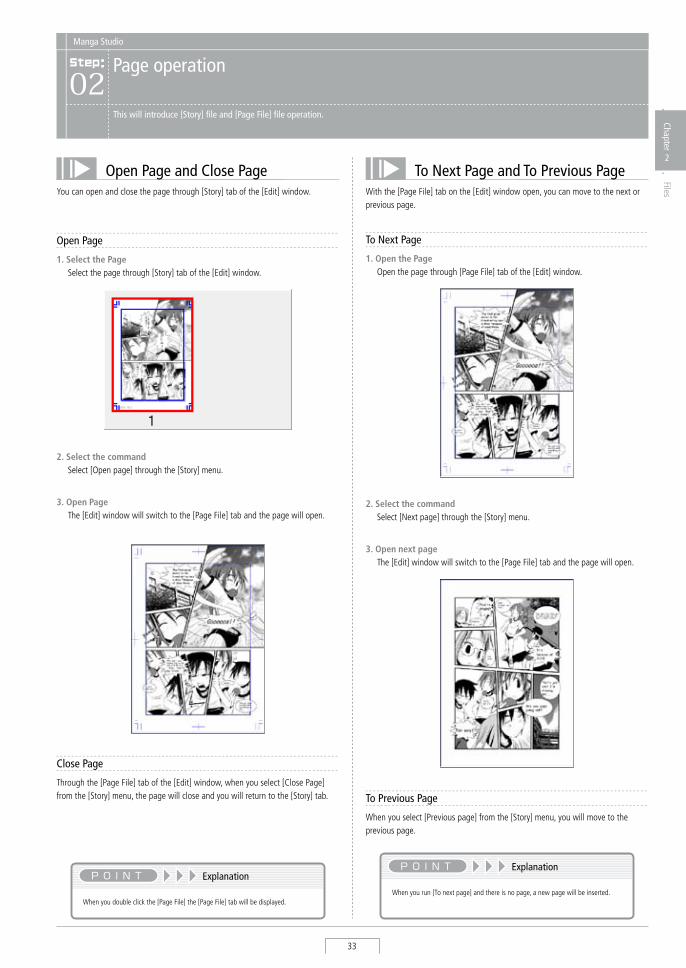
Open Page and Close PageYou can open and close the page through [story] tab of the [Edit] window.
Open Page
1. Select the Page select the page through [story] tab of the [Edit] window.
3. Open Page The [Edit] window will switch to the [Page File] tab and the page will open.
To Next Page and To Previous PageWith the [Page File] tab on the [Edit] window open, you can move to the next or previous page.
To Next Page
1. Open the Page Open the page through [Page File] tab of the [Edit] window.
3. Open next page The [Edit] window will switch to the [Page File] tab and the page will open.
2. Select the command select [Open page] through the [story] menu.
2. Select the command select [Next page] through the [story] menu.
To Previous Page
When you select [Previous page] from the [story] menu, you will move to the previous page.
Close Page
Through the [Page File] tab of the [Edit] window, when you select [Close Page] from the [story] menu, the page will close and you will return to the [story] tab.
When you run [To next page] and there is no page, a new page will be inserted.
Explanation
When you double click the [Page File] the [Page File] tab will be displayed.
Explanation
Manga Studio
34
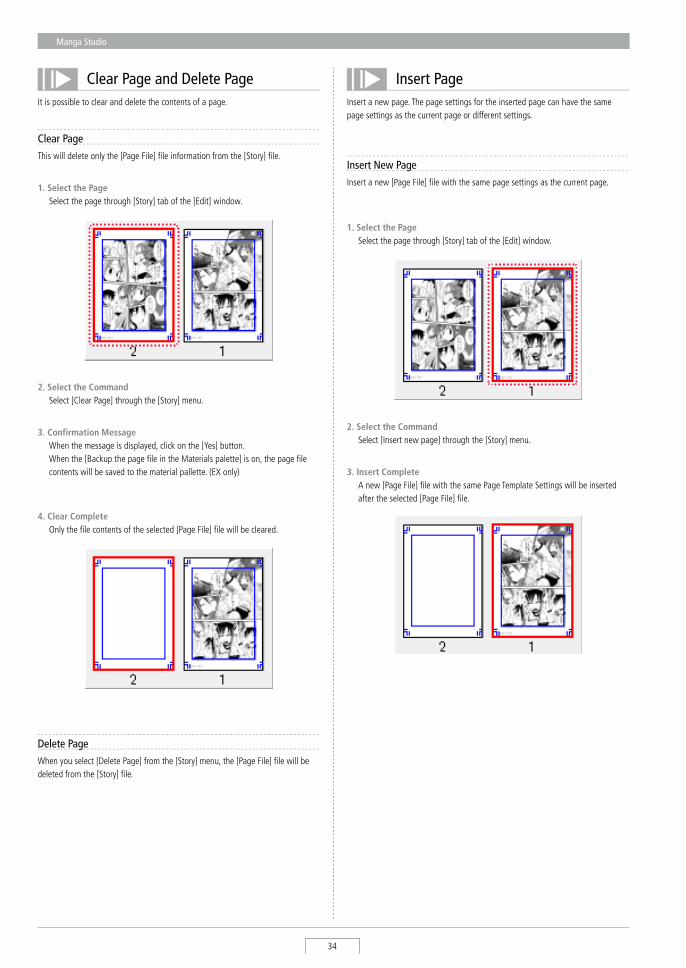
Clear Page and Delete PageIt is possible to clear and delete the contents of a page.
Insert PageInsert a new page. The page settings for the inserted page can have the same page settings as the current page or different settings.
Insert New PageInsert a new [Page File] file with the same page settings as the current page.
1. Select the Page select the page through [story] tab of the [Edit] window.
3. Insert Complete A new [Page File] file with the same Page Template settings will be inserted
after the selected [Page File] file.
2. Select the Command select [Insert new page] through the [story] menu.
Clear PageThis will delete only the [Page File] file information from the [story] file.
1. Select the Page select the page through [story] tab of the [Edit] window.
2. Select the Command select [Clear Page] through the [story] menu.
4. Clear Complete Only the file contents of the selected [Page File] file will be cleared.
3. Confirmation Message When the message is displayed, click on the [Yes] button. When the [Backup the page file in the Materials palette] is on, the page file
contents will be saved to the material pallette. (EX only)
Delete PageWhen you select [Delete Page] from the [story] menu, the [Page File] file will be deleted from the [story] file.
User Guide
35
Chapter
2
Files
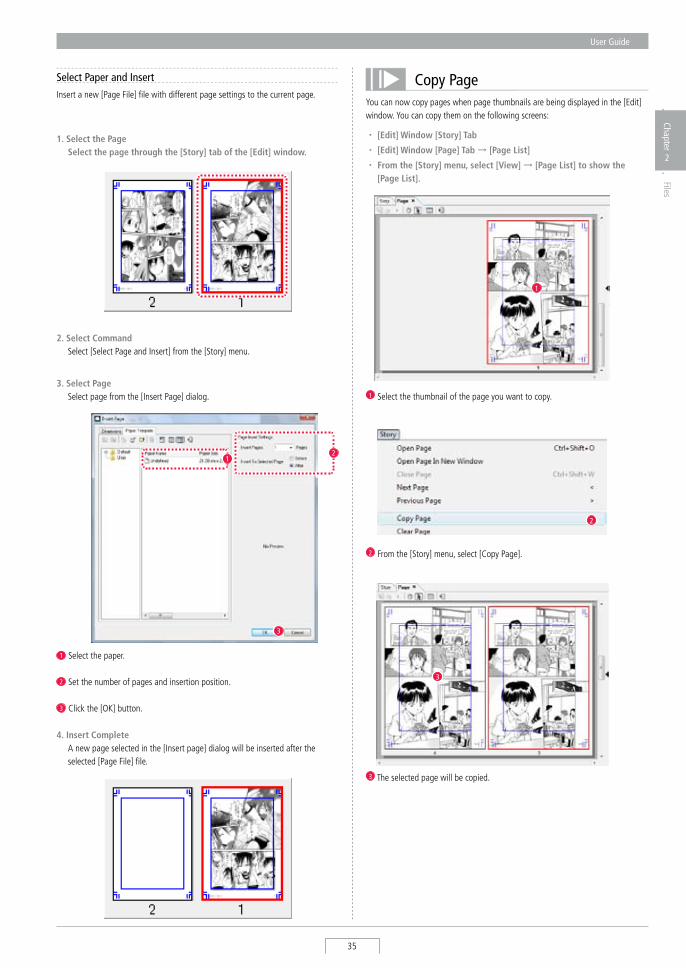
Select Paper and InsertInsert a new [Page File] file with different page settings to the current page.
4. Insert Complete A new page selected in the [Insert page] dialog will be inserted after the
selected [Page File] file.
2. Select Command select [select Page and Insert] from the [story] menu.
1. Select the Page Select the page through the [Story] tab of the [Edit] window.
3. Select Page select page from the [Insert Page] dialog.
1 select the paper.
2 set the number of pages and insertion position.
3 Click the [OK] button.
3
12
Copy PageYou can now copy pages when page thumbnails are being displayed in the [Edit] window. You can copy them on the following screens:
・ [Edit] Window [Story] Tab
・ [Edit] Window [Page] Tab → [Page List]
・ From the [Story] menu, select [View] → [Page List] to show the [Page List].
1
1 select the thumbnail of the page you want to copy.
2
2 From the [story] menu, select [Copy Page].
3
3 The selected page will be copied.
Manga Studio
36
When repeatedly using the same commands in the [story] menu, the commands will switch from display to non-display. This will apply when checked.
Explanation
It is possible to view page spreads, or view single pages separately.
2. Select the command select [spread] through the [story] menu.
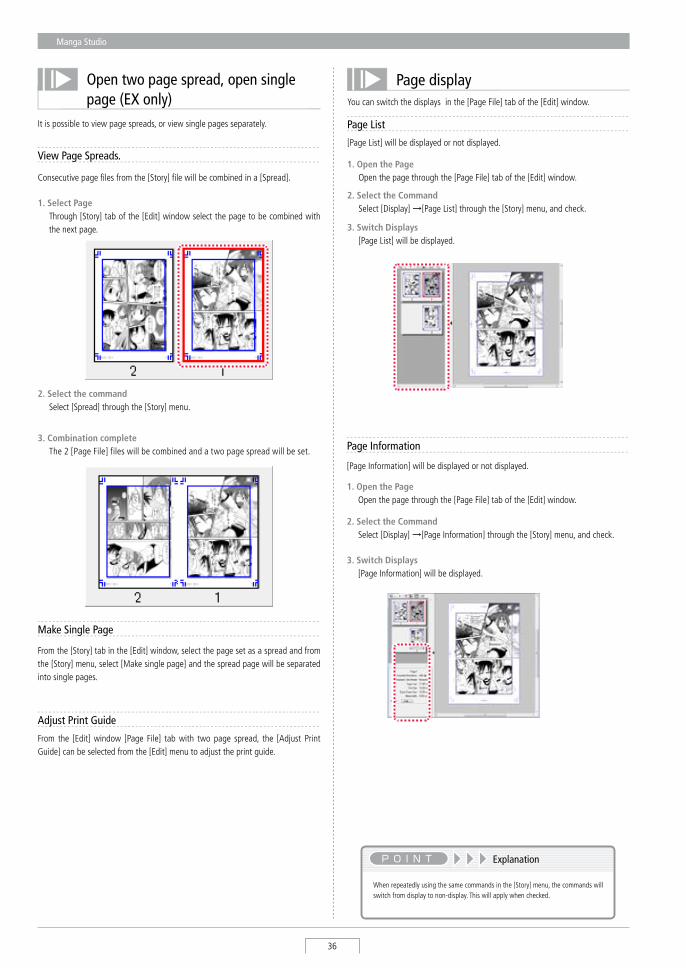
Open two page spread, open single page (EX only)
1. Select Page Through [story] tab of the [Edit] window select the page to be combined with
the next page.
View Page Spreads.
Consecutive page files from the [story] file will be combined in a [spread].
3. Combination complete The 2 [Page File] files will be combined and a two page spread will be set.
Make Single Page
From the [story] tab in the [Edit] window, select the page set as a spread and from the [story] menu, select [Make single page] and the spread page will be separated into single pages.
Adjust Print Guide
From the [Edit] window [Page File] tab with two page spread, the [Adjust Print Guide] can be selected from the [Edit] menu to adjust the print guide.
Page displayYou can switch the displays in the [Page File] tab of the [Edit] window.
3. Switch Displays [Page List] will be displayed.
Page List
[Page List] will be displayed or not displayed.
1. Open the Page Open the page through the [Page File] tab of the [Edit] window.
2. Select the Command select [Display] →[Page List] through the [story] menu, and check.
Page Information
2. Select the Command select [Display] →[Page Information] through the [story] menu, and check.
[Page Information] will be displayed or not displayed.
1. Open the Page Open the page through the [Page File] tab of the [Edit] window.
3. Switch Displays [Page Information] will be displayed.
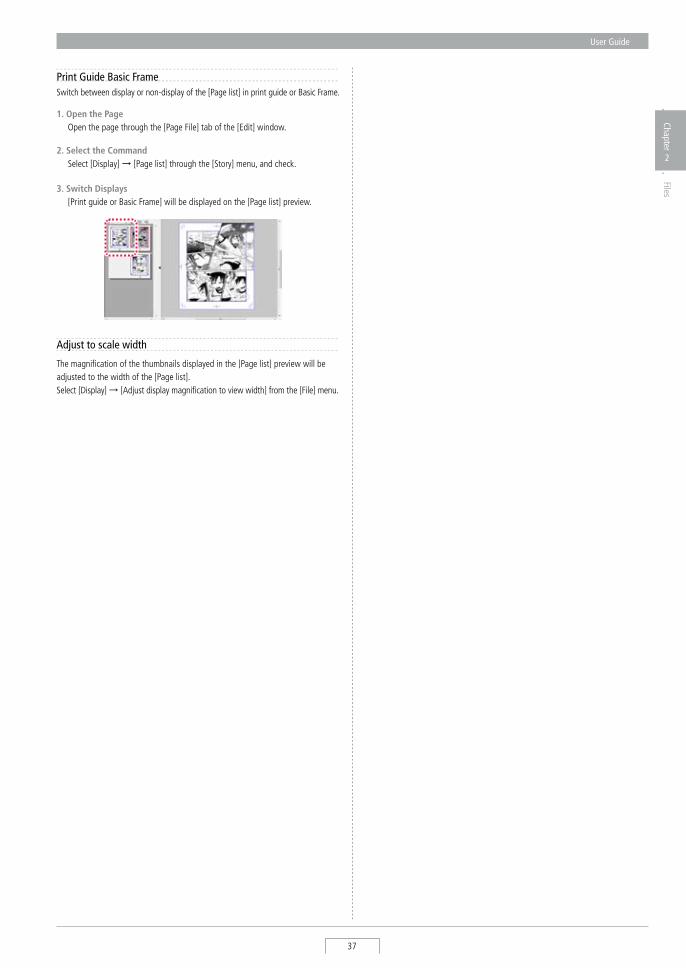
User Guide
37
Chapter
2
Files
Print Guide Basic Frame
2. Select the Command select [Display] → [Page list] through the [story] menu, and check.
switch between display or non-display of the [Page list] in print guide or Basic Frame.
1. Open the Page Open the page through the [Page File] tab of the [Edit] window.
3. Switch Displays [Print guide or Basic Frame] will be displayed on the [Page list] preview.
Adjust to scale width
The magnification of the thumbnails displayed in the [Page list] preview will be adjusted to the width of the [Page list]. select [Display] → [Adjust display magnification to view width] from the [File] menu.
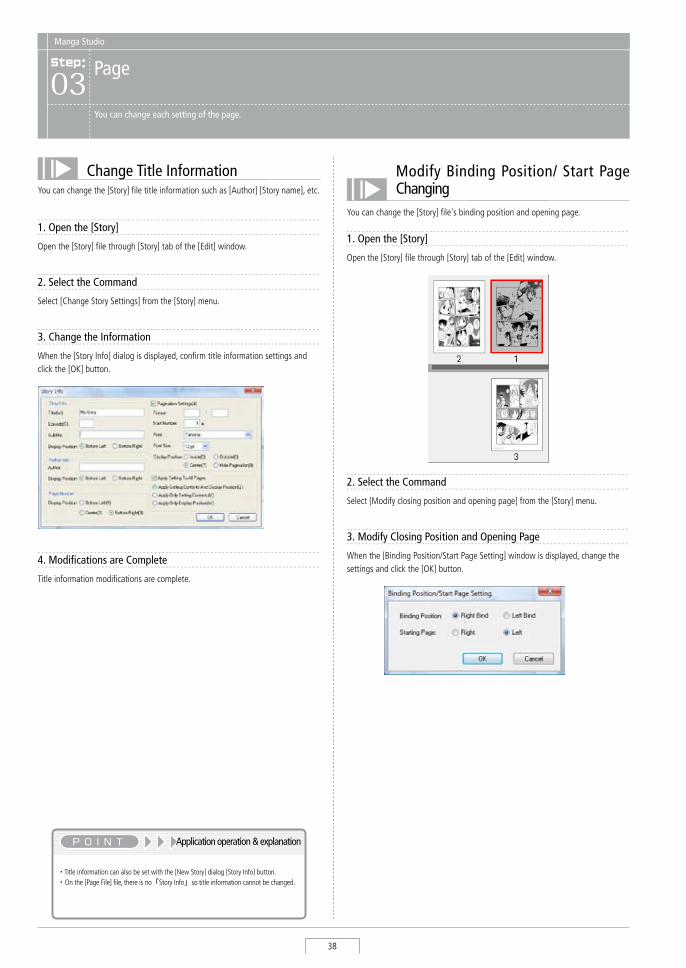
Manga Studio
38
: Manga Studio
Page03
You can change each setting of the page.
Change Title InformationYou can change the [story] file title information such as [Author] [story name], etc.
Modify Binding Position/ Start Page Changing
You can change the [story] file's binding position and opening page.
1. Open the [Story]
Open the [story] file through [story] tab of the [Edit] window.
2. Select the Command
select [Change story settings] from the [story] menu.
3. Change the Information
When the [story Info] dialog is displayed, confirm title information settings and click the [OK] button.
・ Title information can also be set with the [New story] dialog [story Info] button. ・ On the [Page File] file, there is no「story Info」so title information cannot be changed.
Application operation & explanation
1. Open the [Story]
Open the [story] file through [story] tab of the [Edit] window.
2. Select the Command
select [Modify closing position and opening page] from the [story] menu.
3. Modify Closing Position and Opening Page
When the [Binding Position/start Page setting] window is displayed, change the settings and click the [OK] button.
4. Modifications are Complete
Title information modifications are complete.
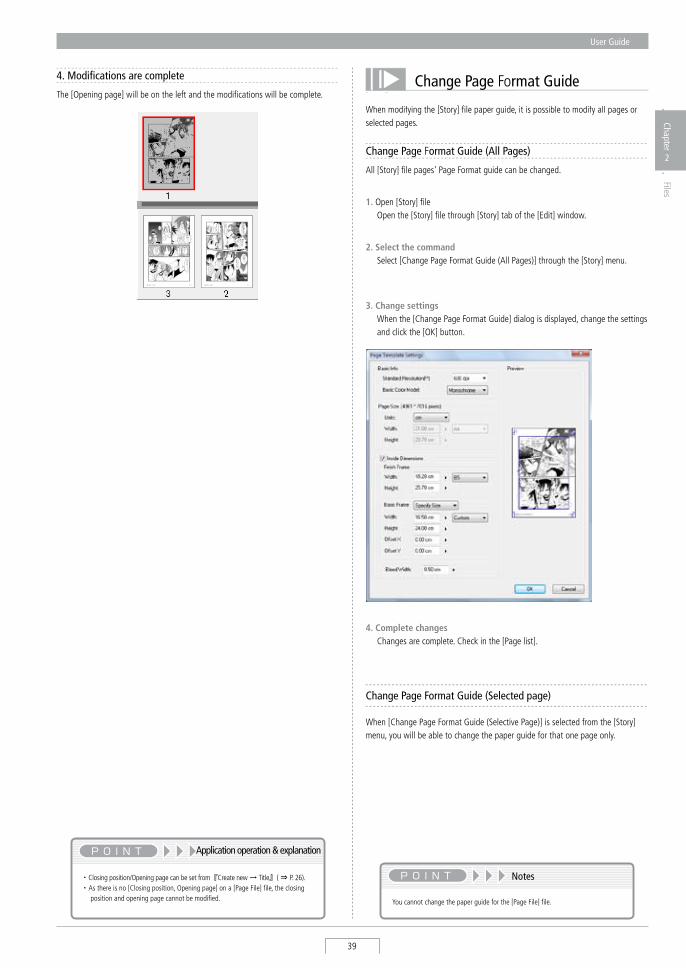
User Guide
39
Chapter
2
Files
4. Modifications are complete
The [Opening page] will be on the left and the modifications will be complete.
・ Closing position/Opening page can be set from『Create new → Title』( ⇒ P. 26). ・ As there is no [Closing position, Opening page] on a [Page File] file, the closing
position and opening page cannot be modified.
Application operation & explanation
Page Format Guide is also known as Paper Guide in parts of the applicationWhen modifying the [story] file paper guide, it is possible to modify all pages or selected pages.
You cannot change the paper guide for the [Page File] file.
Notes
Change Page Format Guide (Selected page)
When [Change Page Format Guide (selective Page)] is selected from the [story] menu, you will be able to change the paper guide for that one page only.
Change Page Format Guide (All Pages)
All [story] file pages' Page Format guide can be changed.
1. Open [story] file Open the [story] file through [story] tab of the [Edit] window.
2. Select the command select [Change Page Format Guide (All Pages)] through the [story] menu.
3. Change settings When the [Change Page Format Guide] dialog is displayed, change the settings
and click the [OK] button.
4. Complete changes Changes are complete. Check in the [Page list].
Change Page Format Guide
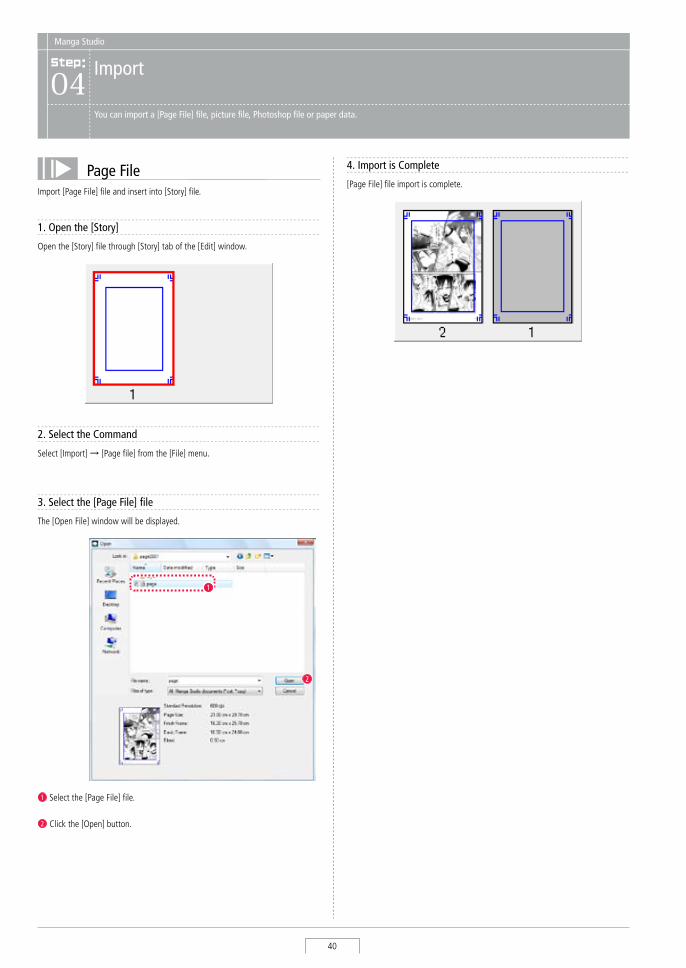
Manga Studio
40
: Manga Studio
Import04
You can import a [Page File] file, picture file, Photoshop file or paper data.
Page FileImport [Page File] file and insert into [story] file.
[Page File] file import is complete.
4. Import is Complete
1. Open the [Story]
Open the [story] file through [story] tab of the [Edit] window.
2. Select the Command
select [Import] → [Page file] from the [File] menu.
3. Select the [Page File] file
The [Open File] window will be displayed.
1 select the [Page File] file.
2 Click the [Open] button.
2
1
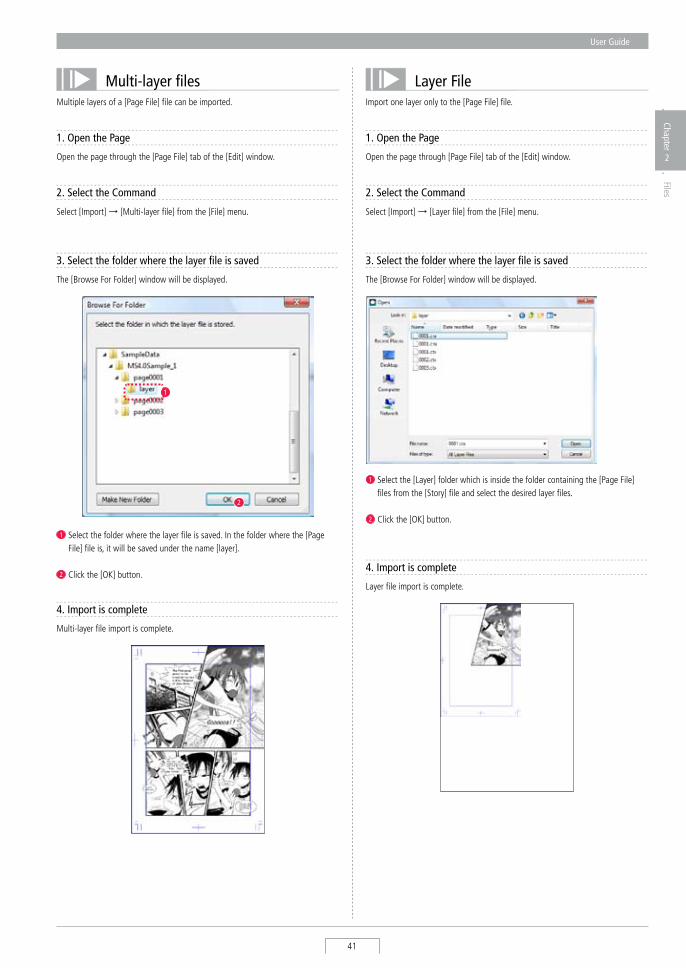
User Guide
41
Chapter
2
Files
Multi-layer filesMultiple layers of a [Page File] file can be imported.
1. Open the Page
Open the page through the [Page File] tab of the [Edit] window.
2. Select the Command
select [Import] → [Multi-layer file] from the [File] menu.
Multi-layer file import is complete.
4. Import is complete
3. Select the folder where the layer file is saved
The [Browse For Folder] window will be displayed.
1 select the folder where the layer file is saved. In the folder where the [Page File] file is, it will be saved under the name [layer].
2 Click the [OK] button.
2
1
Layer FileImport one layer only to the [Page File] file.
1. Open the Page
Open the page through [Page File] tab of the [Edit] window.
2. Select the Command
select [Import] → [Layer file] from the [File] menu.
3. Select the folder where the layer file is saved
The [Browse For Folder] window will be displayed.
1 select the [Layer] folder which is inside the folder containing the [Page File] files from the [story] file and select the desired layer files.
2 Click the [OK] button.
Layer file import is complete.
4. Import is complete
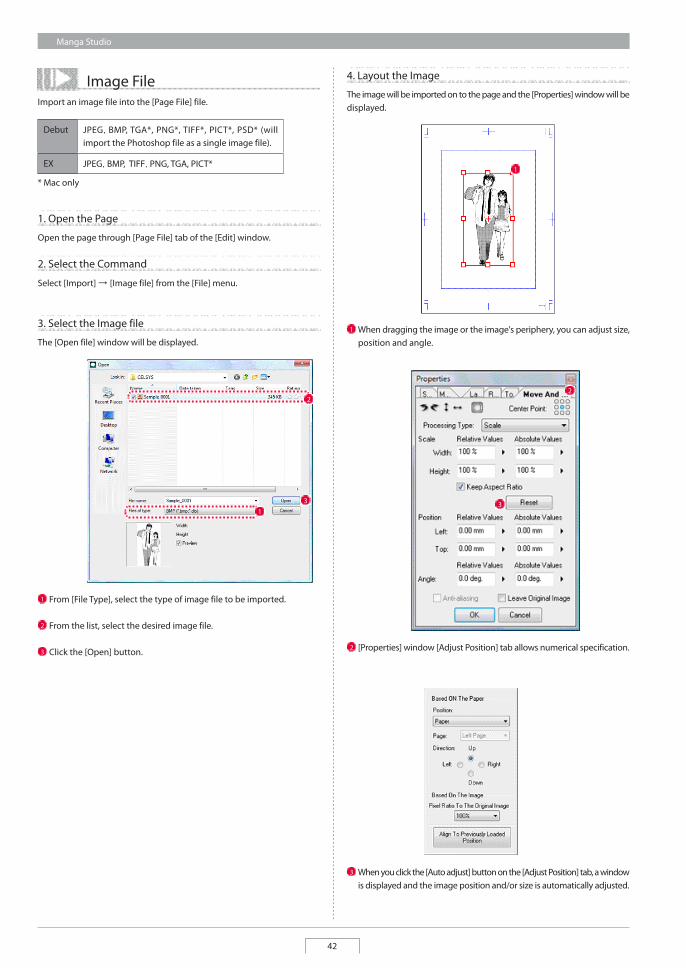
Manga Studio
42
Image fileImport an image file into the [Page file] file.
1. Open the Page
Open the page through [Page file] tab of the [Edit] window.
2. Select the Command
Select [Import] → [Image file] from the [file] menu.
3. Select the Image file
The [Open file] window will be displayed.
1 from [file Type], select the type of image file to be imported.
2 from the list, select the desired image file.
3 Click the [Open] button.
3
2
1
2
The image will be imported on to the page and the [Properties] window will be displayed.
1
4. Layout the Image
1 When dragging the image or the image's periphery, you can adjust size, position and angle.
2 [Properties] window [Adjust Position] tab allows numerical specification.
3 When you click the [Auto adjust] button on the [Adjust Position] tab, a window is displayed and the image position and/or size is automatically adjusted.
3
Debut JPEG,BMP, TGA*, PNG*, TIff*, PICT*, PSD* (will import the Photoshop file as a single image file).
EX JPEG,BMP, TIff,PNG, TGA, PICT*
* Mac only
2
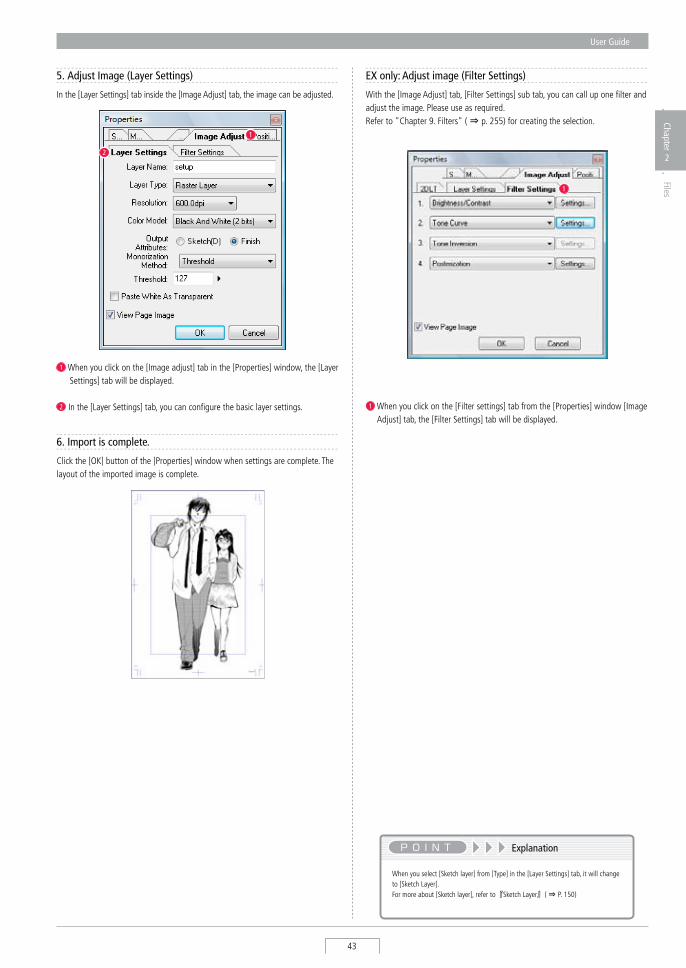
User Guide
43
Chapter
2
Files
1 When you click on the [Image adjust] tab in the [Properties] window, the [Layer settings] tab will be displayed.
2 In the [Layer settings] tab, you can configure the basic layer settings.
2
1
Click the [OK] button of the [Properties] window when settings are complete. The layout of the imported image is complete.
6. Import is complete.
5. Adjust Image (Layer Settings)
1
1 When you click on the [Filter settings] tab from the [Properties] window [Image Adjust] tab, the [Filter settings] tab will be displayed.
In the [Layer settings] tab inside the [Image Adjust] tab, the image can be adjusted.
When you select [sketch layer] from [Type] in the [Layer settings] tab, it will change to [sketch Layer]. For more about [sketch layer], refer to『sketch Layer』( ⇒ P. 150)
Explanation
EX only: Adjust image (Filter Settings)
With the [Image Adjust] tab, [Filter settings] sub tab, you can call up one filter and adjust the image. Please use as required. Refer to "Chapter 9. Filters" ( ⇒ p. 255) for creating the selection.
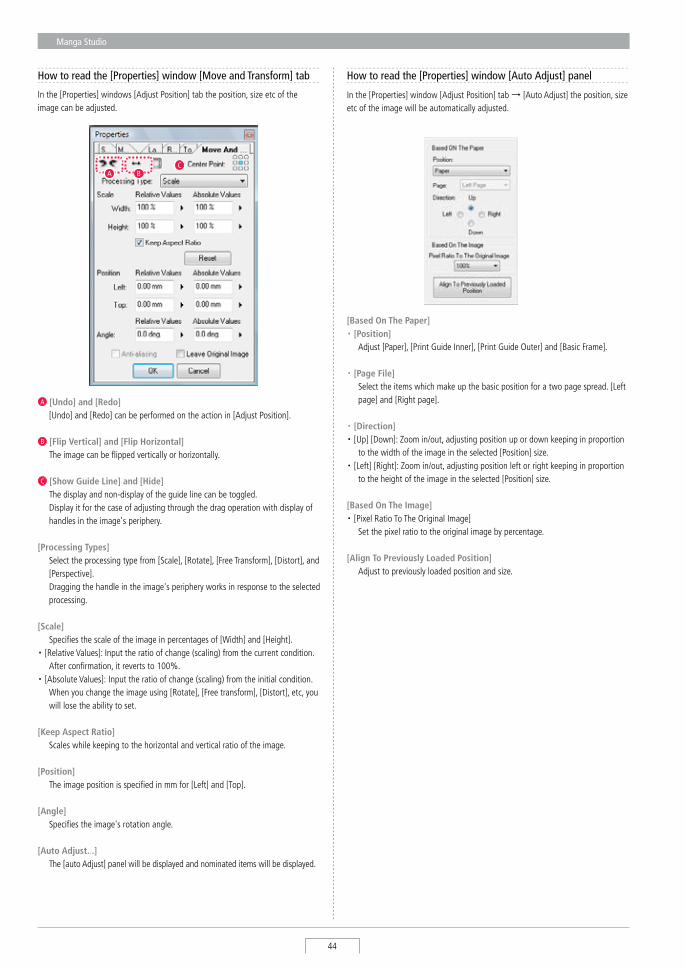
Manga Studio
44
A [Undo] and [Redo] [Undo] and [Redo] can be performed on the action in [Adjust Position].
B [Flip Vertical] and [Flip Horizontal] The image can be flipped vertically or horizontally.
C [Show Guide Line] and [Hide] The display and non-display of the guide line can be toggled. Display it for the case of adjusting through the drag operation with display of
handles in the image's periphery.
[Processing Types] select the processing type from [scale], [Rotate], [Free Transform], [Distort], and
[Perspective]. Dragging the handle in the image's periphery works in response to the selected
processing.
[Scale] specifies the scale of the image in percentages of [Width] and [Height]. ・ [Relative Values]: Input the ratio of change (scaling) from the current condition.
After confirmation, it reverts to 100%. ・ [Absolute Values]: Input the ratio of change (scaling) from the initial condition.
When you change the image using [Rotate], [Free transform], [Distort], etc, you will lose the ability to set.
[Keep Aspect Ratio] scales while keeping to the horizontal and vertical ratio of the image.
[Position] The image position is specified in mm for [Left] and [Top].
[Angle] specifies the image's rotation angle.
[Auto Adjust...] The [auto Adjust] panel will be displayed and nominated items will be displayed.
A BC
In the [Properties] windows [Adjust Position] tab the position, size etc of the image can be adjusted.
[Based On The Paper] ・ [Position] Adjust [Paper], [Print Guide Inner], [Print Guide Outer] and [Basic Frame].
・ [Page File] select the items which make up the basic position for a two page spread. [Left
page] and [Right page].
・ [Direction] ・ [Up] [Down]: Zoom in/out, adjusting position up or down keeping in proportion
to the width of the image in the selected [Position] size. ・ [Left] [Right]: Zoom in/out, adjusting position left or right keeping in proportion
to the height of the image in the selected [Position] size.
[Based On The Image] ・ [Pixel Ratio To The Original Image] set the pixel ratio to the original image by percentage.
[Align To Previously Loaded Position] Adjust to previously loaded position and size.
In the [Properties] window [Adjust Position] tab → [Auto Adjust] the position, size etc of the image will be automatically adjusted.
How to read the [Properties] window [Move and Transform] tab How to read the [Properties] window [Auto Adjust] panel
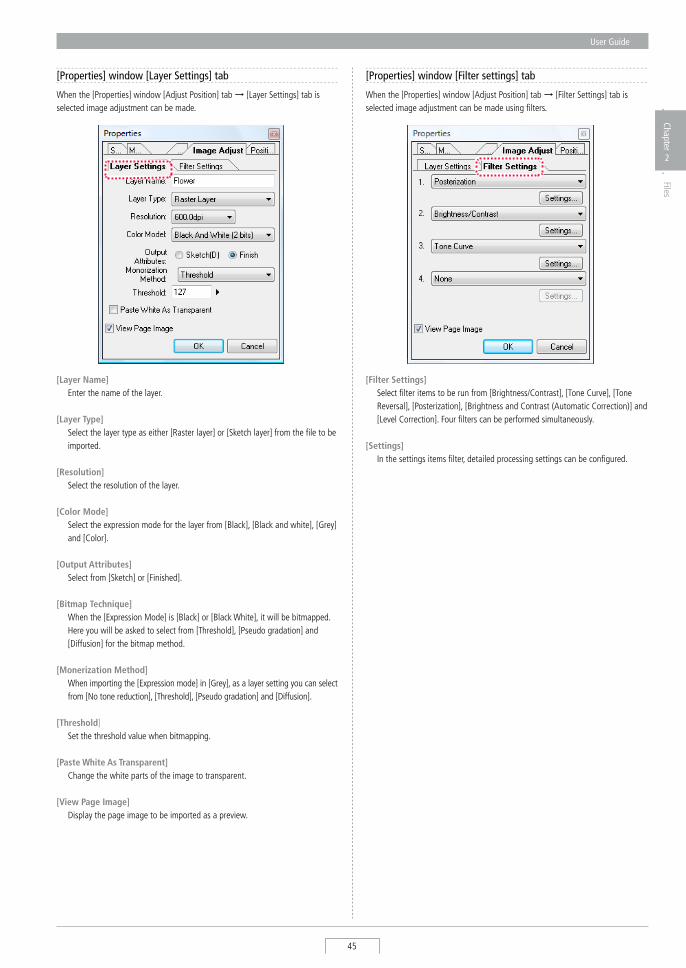
User Guide
45
Chapter
2
Files
[Properties] window [Layer Settings] tab
When the [Properties] window [Adjust Position] tab → [Layer settings] tab is selected image adjustment can be made.
[Layer Name] Enter the name of the layer.
[Layer Type] select the layer type as either [Raster layer] or [sketch layer] from the file to be
imported.
[Resolution] select the resolution of the layer.
[Color Mode] select the expression mode for the layer from [Black], [Black and white], [Grey]
and [Color].
[Output Attributes] select from [sketch] or [Finished].
[Bitmap Technique] When the [Expression Mode] is [Black] or [Black White], it will be bitmapped.
Here you will be asked to select from [Threshold], [Pseudo gradation] and [Diffusion] for the bitmap method.
[Monerization Method] When importing the [Expression mode] in [Grey], as a layer setting you can select
from [No tone reduction], [Threshold], [Pseudo gradation] and [Diffusion].
[Threshold] set the threshold value when bitmapping.
[Paste White As Transparent] Change the white parts of the image to transparent.
[View Page Image] Display the page image to be imported as a preview.
[Filter Settings] select filter items to be run from [Brightness/Contrast], [Tone Curve], [Tone
Reversal], [Posterization], [Brightness and Contrast (Automatic Correction)] and [Level Correction]. Four filters can be performed simultaneously.
[Settings] In the settings items filter, detailed processing settings can be configured.
[Properties] window [Filter settings] tab
When the [Properties] window [Adjust Position] tab → [Filter settings] tab is selected image adjustment can be made using filters.
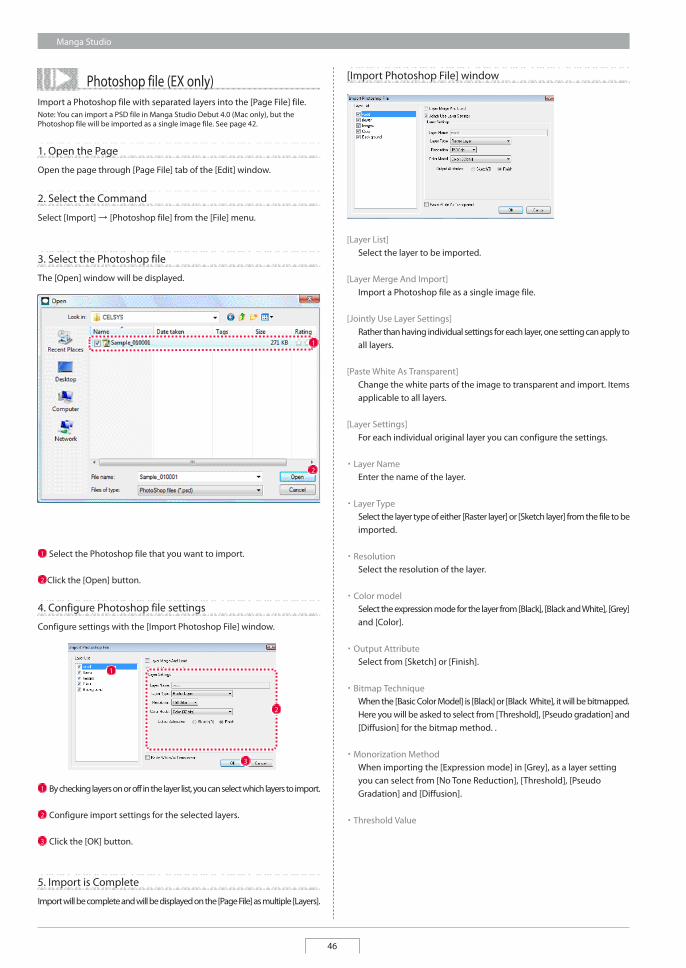
Manga Studio
46
Photoshop file (EX only)Import a Photoshop file with separated layers into the [Page File] file. Note: You can import a PSD file in Manga Studio Debut 4.0 (Mac only), but the Photoshop file will be imported as a single image file. See page 42.
2. Select the Command
Select [Import] → [Photoshop file] from the [File] menu.
1. Open the Page
Open the page through [Page File] tab of the [Edit] window.
3. Select the Photoshop file
The [Open] window will be displayed.
1 Select the Photoshop file that you want to import.
2 Click the [Open] button.
1
2
Import will be complete and will be displayed on the [Page File] as multiple [Layers].
5. Import is Complete
Configure settings with the [Import Photoshop File] window.
4. Configure Photoshop file settings
1 By checking layers on or off in the layer list, you can select which layers to import.
2 Configure import settings for the selected layers.
3 Click the [OK] button.
1
3
2
[Import Photoshop File] window
[Layer List] Select the layer to be imported.
[Layer Merge And Import] Import a Photoshop file as a single image file.
[Jointly Use Layer Settings] Rather than having individual settings for each layer, one setting can apply to
all layers.
[Paste White As Transparent] Change the white parts of the image to transparent and import. Items
applicable to all layers.
[Layer Settings] For each individual original layer you can configure the settings.
・ Layer Name Enter the name of the layer.
・ Layer Type Select the layer type of either [Raster layer] or [Sketch layer] from the file to be
imported.
・ Resolution Select the resolution of the layer.
・ Color model Select the expression mode for the layer from [Black], [Black and White], [Grey]
and [Color].
・ Output Attribute Select from [Sketch] or [Finish].
・ Bitmap Technique When the [Basic Color Model] is [Black] or [Black White], it will be bitmapped.
Here you will be asked to select from [Threshold], [Pseudo gradation] and [Diffusion] for the bitmap method. .
・ Monorization Method When importing the [Expression mode] in [Grey], as a layer setting
you can select from [No Tone Reduction], [Threshold], [Pseudo Gradation] and [Diffusion].
・ Threshold value
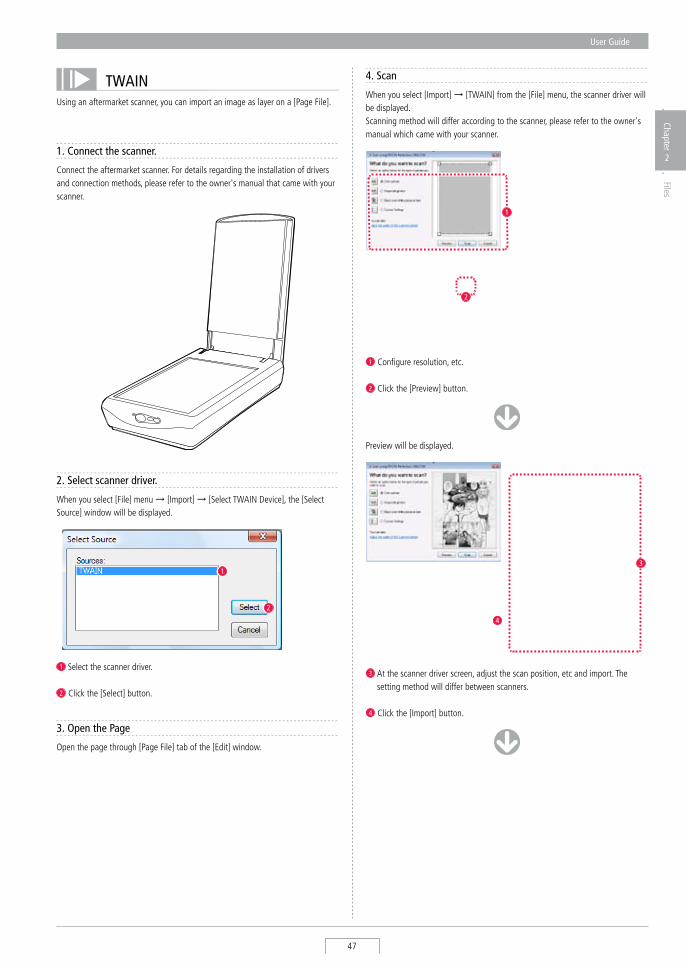
User Guide
47
Chapter
2
Files
TWAINUsing an aftermarket scanner, you can import an image as layer on a [Page File].
1. Connect the scanner.
Connect the aftermarket scanner. For details regarding the installation of drivers and connection methods, please refer to the owner's manual that came with your scanner.
When you select [Import] → [TWAIN] from the [File] menu, the scanner driver will be displayed. scanning method will differ according to the scanner, please refer to the owner's manual which came with your scanner.
4. Scan
1 Configure resolution, etc.
2 Click the [Preview] button.
1
2
3 At the scanner driver screen, adjust the scan position, etc and import. The setting method will differ between scanners.
4 Click the [Import] button.
Preview will be displayed.
4
3
2. Select scanner driver.
1
3. Open the Page
Open the page through [Page File] tab of the [Edit] window.
2
When you select [File] menu → [Import] → [select TWAIN Device], the [select source] window will be displayed.
1 select the scanner driver.
2 Click the [select] button.
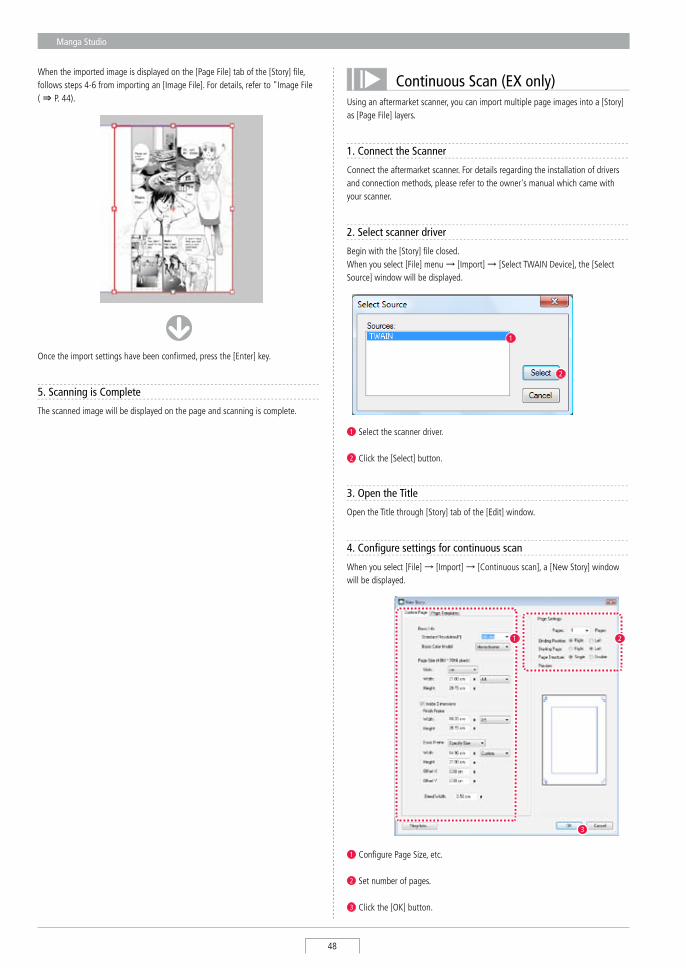
Manga Studio
48
Continuous Scan (EX only)Using an aftermarket scanner, you can import multiple page images into a [story] as [Page File] layers.
1. Connect the Scanner
Connect the aftermarket scanner. For details regarding the installation of drivers and connection methods, please refer to the owner's manual which came with your scanner.
2. Select scanner driver
Begin with the [story] file closed. When you select [File] menu → [Import] → [select TWAIN Device], the [select source] window will be displayed.
1
2
1 select the scanner driver.
2 Click the [select] button.
When you select [File] → [Import] → [Continuous scan], a [New story] window will be displayed.
4. Configure settings for continuous scan
3
21
3. Open the Title
Open the Title through [story] tab of the [Edit] window.
1 Configure Page size, etc.
2 set number of pages.
3 Click the [OK] button.
When the imported image is displayed on the [Page File] tab of the [story] file, follows steps 4-6 from importing an [Image File]. For details, refer to "Image File ( ⇒ P. 44).
Once the import settings have been confirmed, press the [Enter] key.
5. Scanning is Complete
The scanned image will be displayed on the page and scanning is complete.
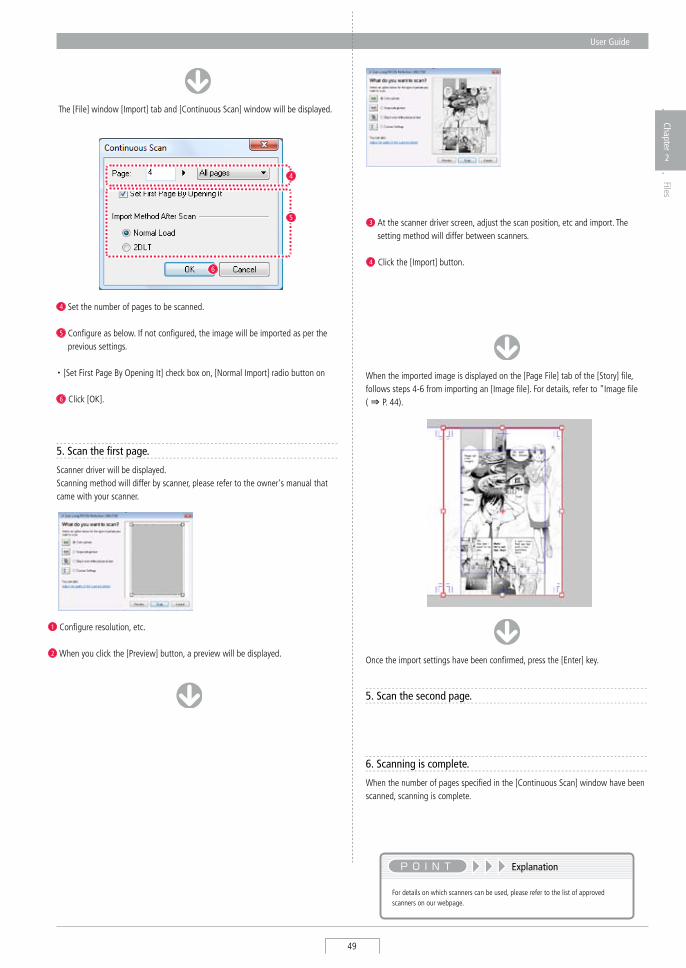
User Guide
49
Chapter
2
Files
The [File] window [Import] tab and [Continuous scan] window will be displayed.
4 set the number of pages to be scanned.
5 Configure as below. If not configured, the image will be imported as per the previous settings.
・ [set First Page By Opening It] check box on, [Normal Import] radio button on
6 Click [OK].
6
4
5
5. Scan the first page.
1 Configure resolution, etc.
2 When you click the [Preview] button, a preview will be displayed.
scanner driver will be displayed. scanning method will differ by scanner, please refer to the owner's manual that came with your scanner.
When the imported image is displayed on the [Page File] tab of the [story] file, follows steps 4-6 from importing an [Image file]. For details, refer to "Image file ( ⇒ P. 44).
Once the import settings have been confirmed, press the [Enter] key.
5. Scan the second page.
6. Scanning is complete.
When the number of pages specified in the [Continuous scan] window have been scanned, scanning is complete.
For details on which scanners can be used, please refer to the list of approved scanners on our webpage.
Explanation
3 At the scanner driver screen, adjust the scan position, etc and import. The setting method will differ between scanners.
4 Click the [Import] button.
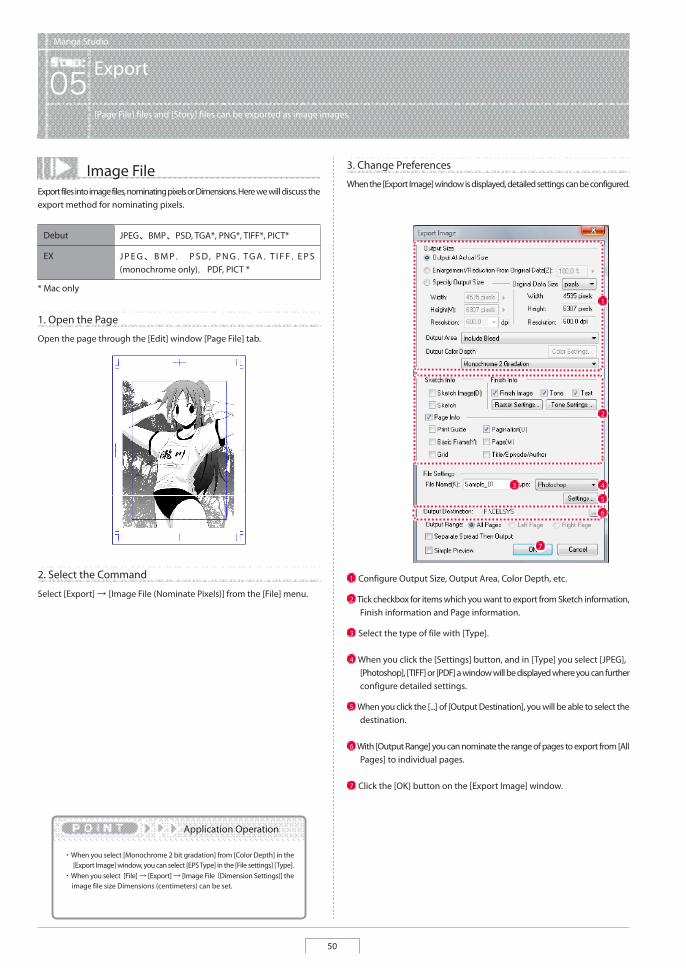
Manga Studio
50
Manga Studio
Export05[Page File] files and [Story] files can be exported as image images.
Image FileExport files into image files, nominating pixels or Dimensions. Here we will discuss the export method for nominating pixels.
1. Open the Page
Open the page through the [Edit] window [Page File] tab.
2. Select the Command
Select [Export] → [Image File (nominate Pixels)] from the [File] menu.
3. Change Preferences
When the [Export Image] window is displayed, detailed settings can be configured.
2 Tick checkbox for items which you want to export from Sketch information, Finish information and Page information.
5 When you click the [...] of [Output Destination], you will be able to select the destination.
6 With [Output Range] you can nominate the range of pages to export from [All Pages] to individual pages.
7 Click the [OK} button on the [Export Image] window.
3 Select the type of file with [Type].
4 When you click the [Settings] button, and in [Type] you select [JPEG], [Photoshop], [TIFF] or [PDF] a window will be displayed where you can further configure detailed settings.
1 Configure Output Size, Output Area, Color Depth, etc.
5
7
3 4
1
2
6
・ When you select [Monochrome 2 bit gradation] from [Color Depth] in the [Export Image] window, you can select [EPS Type] in the [File settings] [Type].
・ When you select [File] → [Export] → [Image File (Dimension Settings)] the image file size Dimensions (centimeters) can be set.
Application Operation
Debut JPEG、BMP、PSD, TGA*, PnG*, TIFF*, PICT*
EX J P E G、B M P, P S D, P n G, T G A, T I F F, E P S (monochrome only), PDF, PICT *
* Mac only
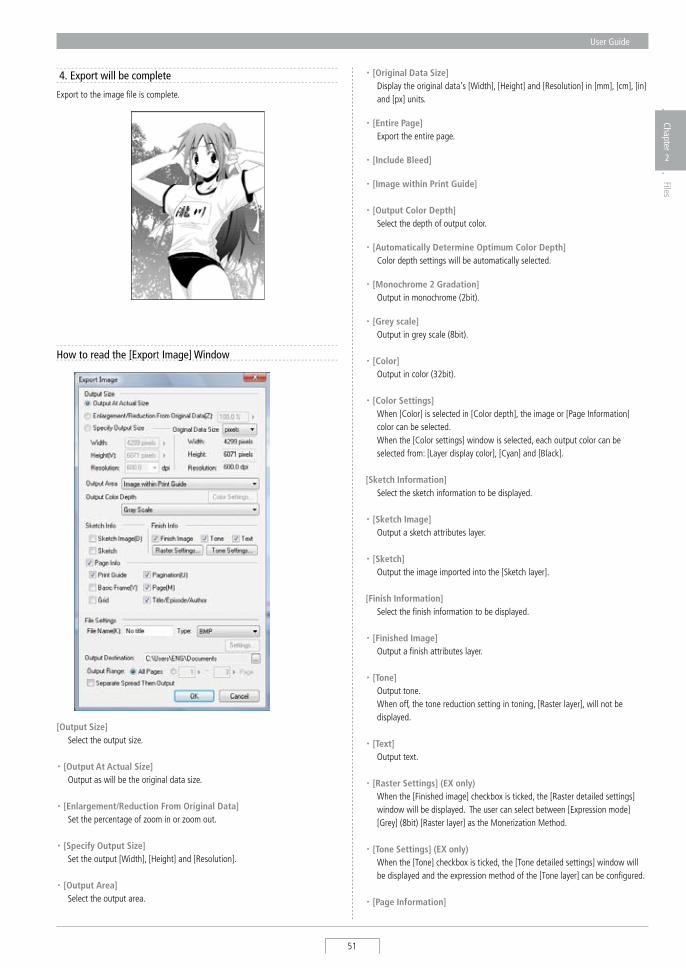
User Guide
51
Chapter
2
Files
4. Export will be complete
Export to the image file is complete.
How to read the [Export Image] Window
[Output Size] select the output size.
・ [Output At Actual Size] Output as will be the original data size.
・ [Enlargement/Reduction From Original Data] set the percentage of zoom in or zoom out.
・ [Specify Output Size] set the output [Width], [Height] and [Resolution].
・ [Output Area] select the output area.
・ [Original Data Size] Display the original data's [Width], [Height] and [Resolution] in [mm], [cm], [in]
and [px] units.
・ [Entire Page] Export the entire page.
・ [Include Bleed]
・ [Image within Print Guide] ・ [Output Color Depth] select the depth of output color.
・ [Automatically Determine Optimum Color Depth] Color depth settings will be automatically selected.
・ [Monochrome 2 Gradation] Output in monochrome (2bit).
・ [Grey scale] Output in grey scale (8bit).
・ [Color] Output in color (32bit).
・ [Color Settings] When [Color] is selected in [Color depth], the image or [Page Information]
color can be selected. When the [Color settings] window is selected, each output color can be
selected from: [Layer display color], [Cyan] and [Black].
[Sketch Information] select the sketch information to be displayed.
・ [Sketch Image] Output a sketch attributes layer.
・ [Sketch] Output the image imported into the [sketch layer].
[Finish Information] select the finish information to be displayed.
・ [Finished Image] Output a finish attributes layer.
・ [Tone] Output tone. When off, the tone reduction setting in toning, [Raster layer], will not be
displayed.
・ [Text] Output text.
・ [Raster Settings] (EX only) When the [Finished image] checkbox is ticked, the [Raster detailed settings]
window will be displayed. The user can select between [Expression mode] [Grey] (8bit) [Raster layer] as the Monerization Method.
・ [Tone Settings] (EX only) When the [Tone] checkbox is ticked, the [Tone detailed settings] window will
be displayed and the expression method of the [Tone layer] can be configured.
・ [Page Information]
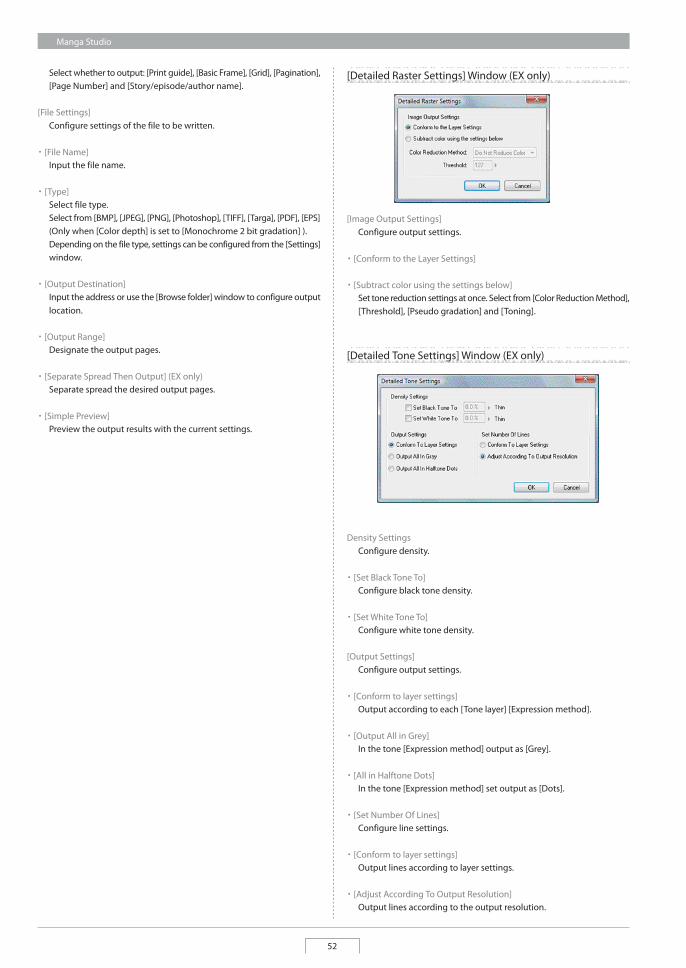
Manga Studio
52
Select whether to output: [Print guide], [Basic Frame], [Grid], [Pagination], [Page Number] and [Story/episode/author name].
[File Settings] Configure settings of the file to be written.
・ [File Name] Input the file name.
・ [Type] Select file type. Select from [BMP], [JPEG], [PNG], [Photoshop], [TIFF], [Targa], [PDF], [EPS]
(Only when [Color depth] is set to [Monochrome 2 bit gradation] ). Depending on the file type, settings can be configured from the [Settings]
window.
・ [Output Destination] Input the address or use the [Browse folder] window to configure output
location.
・ [Output Range] Designate the output pages.
・ [Separate Spread Then Output] (EX only) Separate spread the desired output pages.
・ [Simple Preview] Preview the output results with the current settings.
[Detailed Raster Settings] Window (EX only)
Density Settings Configure density.
・ [Set Black Tone To] Configure black tone density.
・ [Set White Tone To] Configure white tone density.
[Output Settings] Configure output settings.
・ [Conform to layer settings] Output according to each [Tone layer] [Expression method].
・ [Output all in Grey] In the tone [Expression method] output as [Grey].
・ [all in Halftone Dots] In the tone [Expression method] set output as [Dots].
・ [Set Number Of Lines] Configure line settings.
・ [Conform to layer settings] Output lines according to layer settings.
・ [adjust according To Output Resolution] Output lines according to the output resolution.
[Detailed Tone Settings] Window (EX only)
[Image Output Settings] Configure output settings.
・ [Conform to the Layer Settings]
・ [Subtract color using the settings below] Set tone reduction settings at once. Select from [Color Reduction Method],
[Threshold], [Pseudo gradation] and [Toning].
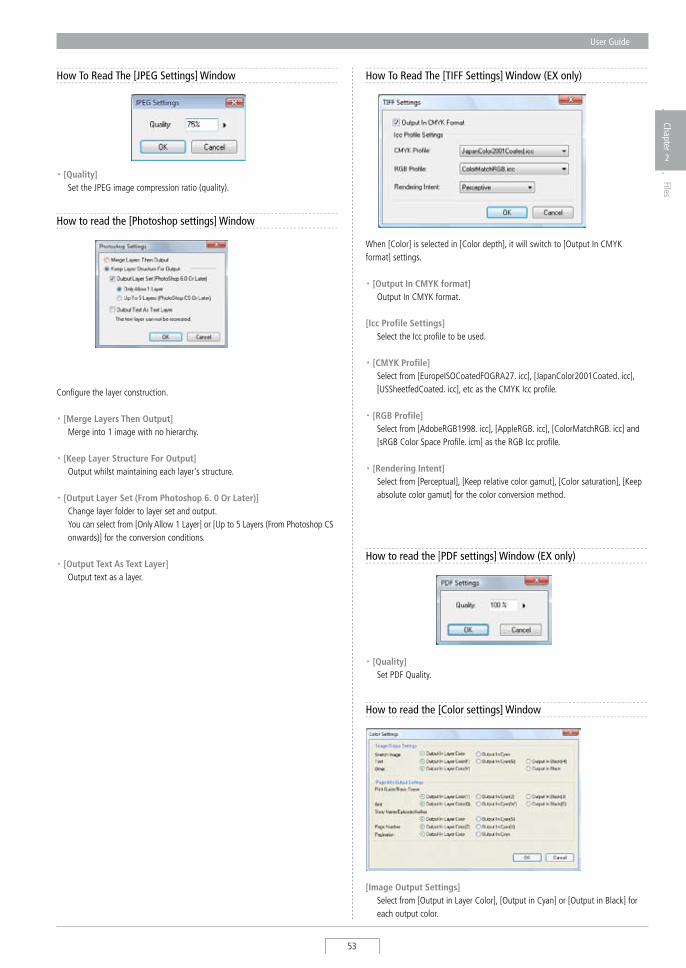
User Guide
53
Chapter
2
Files
How To Read The [JPEG Settings] Window
・ [Quality] set the JPEG image compression ratio (quality).
How to read the [Photoshop settings] Window
Configure the layer construction.
・ [Merge Layers Then Output] Merge into 1 image with no hierarchy.
・ [Keep Layer Structure For Output] Output whilst maintaining each layer's structure.
・ [Output Layer Set (From Photoshop 6. 0 Or Later)] Change layer folder to layer set and output. You can select from [Only Allow 1 Layer] or [Up to 5 Layers (From Photoshop Cs
onwards)] for the conversion conditions.
・ [Output Text As Text Layer] Output text as a layer.
How To Read The [TIFF Settings] Window (EX only)
When [Color] is selected in [Color depth], it will switch to [Output In CMYK format] settings.
・ [Output In CMYK format] Output In CMYK format.
[Icc Profile Settings] select the Icc profile to be used.
・ [CMYK Profile] select from [EuropeIsOCoatedFOGRA27. icc], [JapanColor2001Coated. icc],
[UssheetfedCoated. icc], etc as the CMYK Icc profile.
・ [RGB Profile] select from [AdobeRGB1998. icc], [AppleRGB. icc], [ColorMatchRGB. icc] and
[sRGB Color space Profile. icm] as the RGB Icc profile.
・ [Rendering Intent] select from [Perceptual], [Keep relative color gamut], [Color saturation], [Keep
absolute color gamut] for the color conversion method.
How to read the [PDF settings] Window (EX only)
・ [Quality] set PDF Quality.
How to read the [Color settings] Window
[Image Output Settings] select from [Output in Layer Color], [Output in Cyan] or [Output in Black] for
each output color.

Manga Studio
54
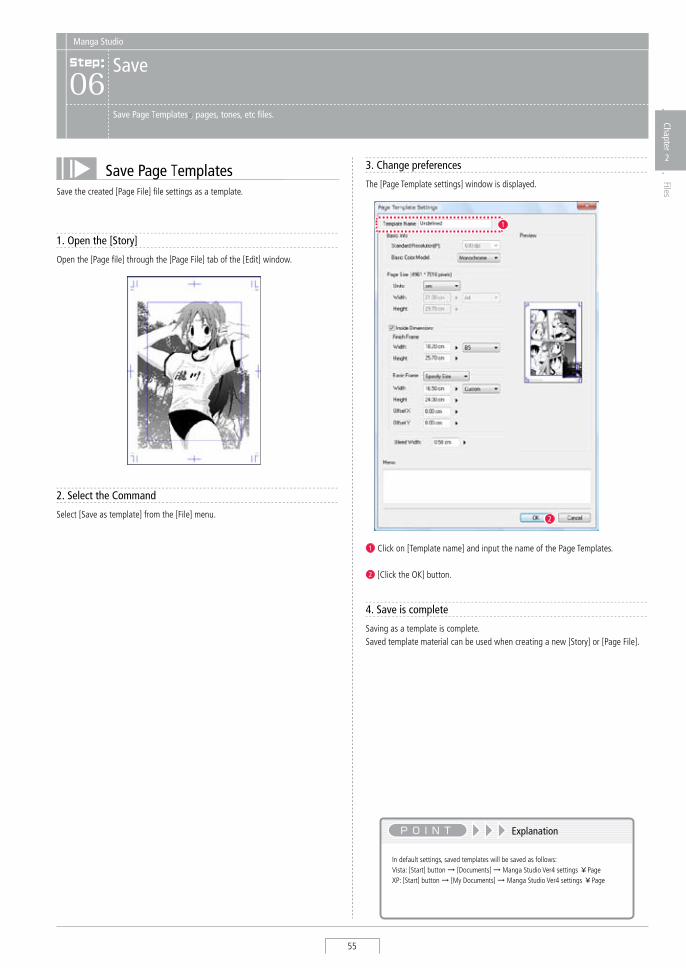
User Guide
55
Chapter
2
Files
: Manga Studio
Save06
Save Page Templatess, pages, tones, etc files.
Save Page Templatessave the created [Page File] file settings as a template.
1. Open the [Story]
Open the [Page file] through the [Page File] tab of the [Edit] window.
2. Select the Command
select [save as template] from the [File] menu.
4. Save is complete
saving as a template is complete. saved template material can be used when creating a new [story] or [Page File].
In default settings, saved templates will be saved as follows: Vista: [start] button → [Documents] → Manga studio Ver4 settings ¥PageXP: [start] button → [My Documents] → Manga studio Ver4 settings ¥Page
Explanation
2
3. Change preferences
The [Page Template settings] window is displayed.
1 Click on [Template name] and input the name of the Page Templates.
2 [Click the OK] button.
1
2
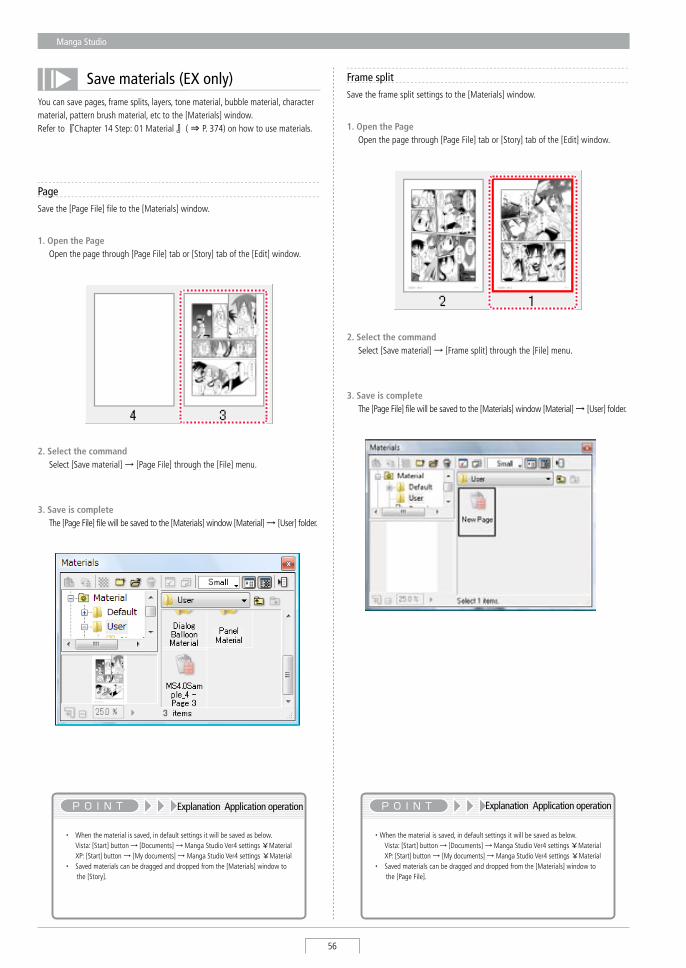
Manga Studio
56
Save materials (EX only)You can save pages, frame splits, layers, tone material, bubble material, character material, pattern brush material, etc to the [Materials] window. Refer to『Chapter 14 step: 01 Material 』( ⇒ P. 374) on how to use materials.
・ When the material is saved, in default settings it will be saved as below. Vista: [start] button → [Documents] → Manga studio Ver4 settings ¥Material XP: [start] button → [My documents] → Manga studio Ver4 settings ¥Material・ saved materials can be dragged and dropped from the [Materials] window to
the [story].
Explanation Application operation
Pagesave the [Page File] file to the [Materials] window.
1. Open the Page Open the page through [Page File] tab or [story] tab of the [Edit] window.
2. Select the command select [save material] → [Page File] through the [File] menu.
3. Save is complete The [Page File] file will be saved to the [Materials] window [Material] → [User] folder.
Frame splitsave the frame split settings to the [Materials] window.
1. Open the Page Open the page through [Page File] tab or [story] tab of the [Edit] window.
2. Select the command select [save material] → [Frame split] through the [File] menu.
・ When the material is saved, in default settings it will be saved as below. Vista: [start] button → [Documents] → Manga studio Ver4 settings ¥Material XP: [start] button → [My documents] → Manga studio Ver4 settings ¥Material・ saved materials can be dragged and dropped from the [Materials] window to
the [Page File].
Explanation Application operation
3. Save is complete The [Page File] file will be saved to the [Materials] window [Material] → [User] folder.
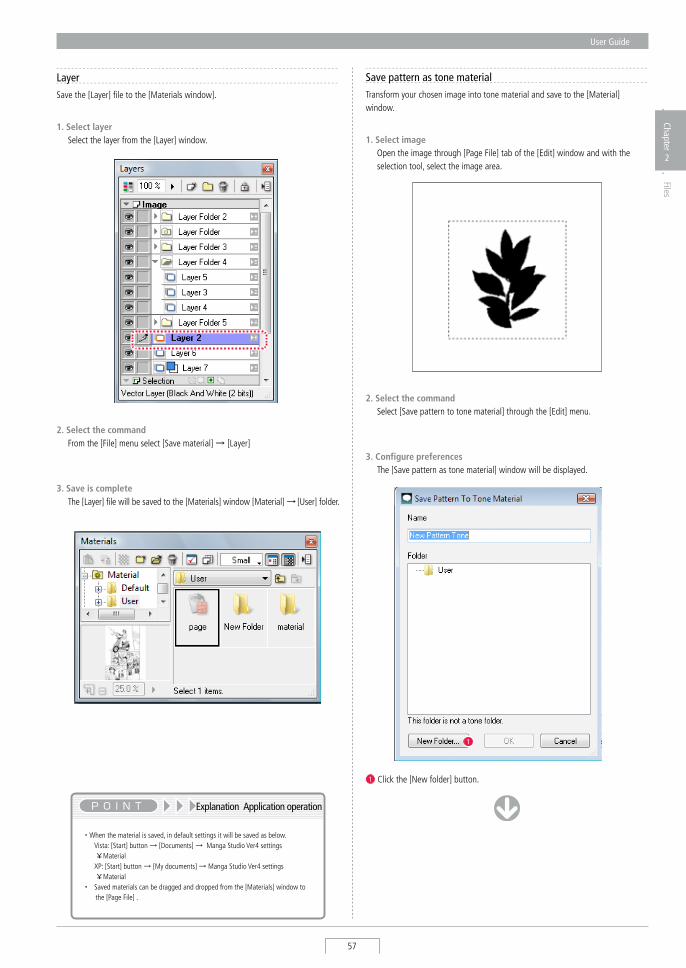
User Guide
57
Chapter
2
Files
・ When the material is saved, in default settings it will be saved as below. Vista: [start] button → [Documents] → Manga studio Ver4 settings
¥Material XP: [start] button → [My documents] → Manga studio Ver4 settings
¥Material・ saved materials can be dragged and dropped from the [Materials] window to
the [Page File] .
Explanation Application operation
Save pattern as tone materialTransform your chosen image into tone material and save to the [Material] window.
Layersave the [Layer] file to the [Materials window].
1. Select layer select the layer from the [Layer] window.
2. Select the command From the [File] menu select [save material] → [Layer]
3. Save is complete The [Layer] file will be saved to the [Materials] window [Material] → [User] folder.
1. Select image Open the image through [Page File] tab of the [Edit] window and with the
selection tool, select the image area.
2. Select the command select [save pattern to tone material] through the [Edit] menu.
1
1 Click the [New folder] button.
3. Configure preferences The [save pattern as tone material] window will be displayed.
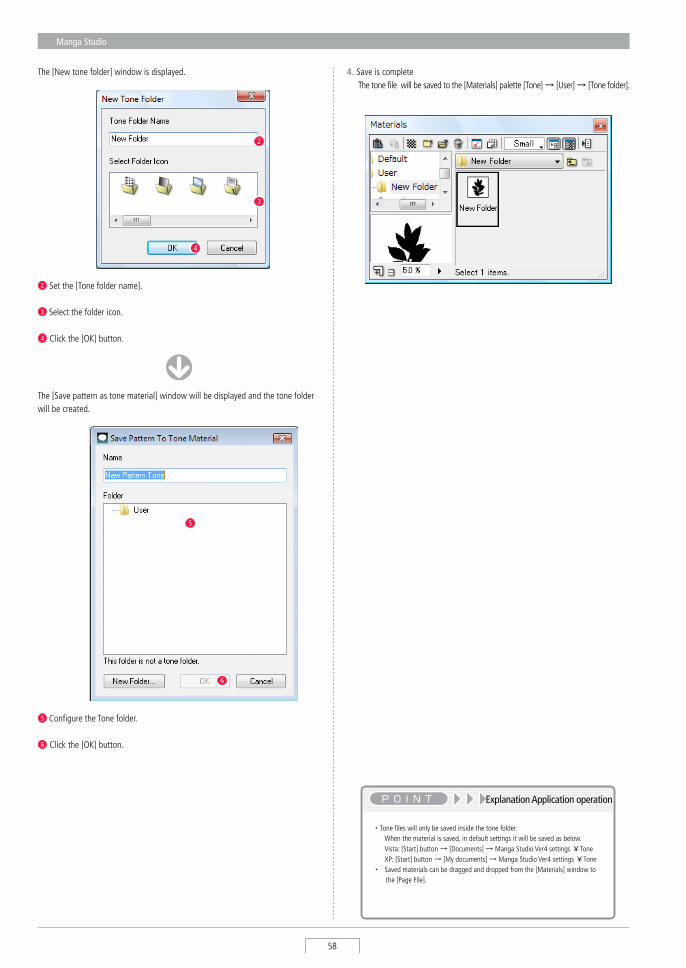
Manga Studio
58
2 set the [Tone folder name].
3 select the folder icon.
4 Click the [OK] button.
The [New tone folder] window is displayed.
2
3
4
The [save pattern as tone material] window will be displayed and the tone folder will be created.
5
6
5 Configure the Tone folder.
6 Click the [OK] button.
4. save is complete The tone file will be saved to the [Materials] palette [Tone] → [User] → [Tone folder].
・ Tone files will only be saved inside the tone folder. When the material is saved, in default settings it will be saved as below. Vista: [start] button → [Documents] → Manga studio Ver4 settings ¥Tone XP: [start] button → [My documents] → Manga studio Ver4 settings ¥Tone・ saved materials can be dragged and dropped from the [Materials] window to
the [Page File].
Explanation Application operation
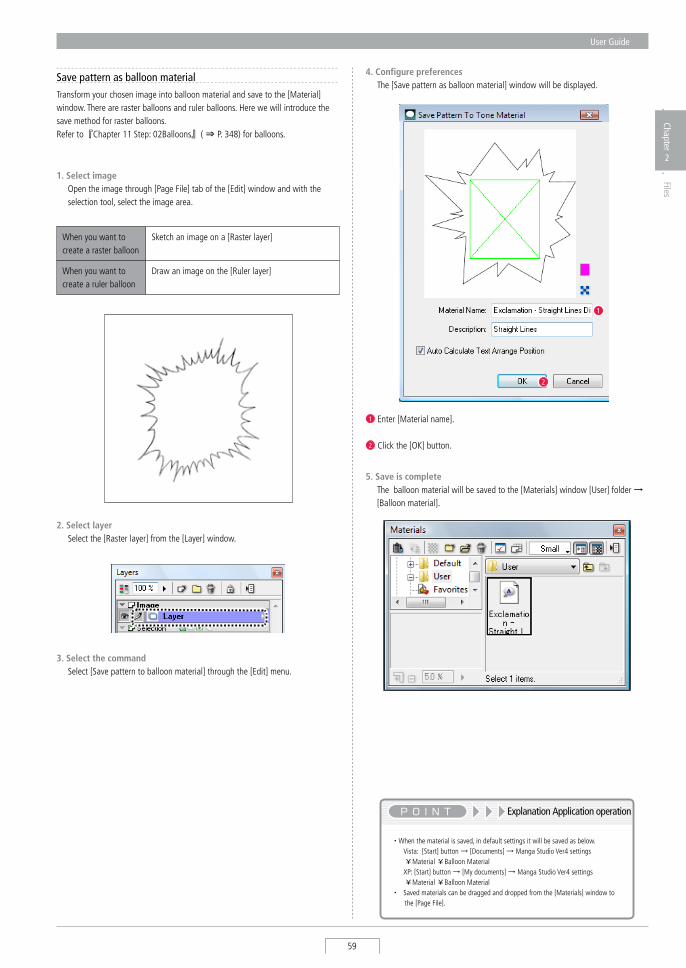
User Guide
59
Chapter
2
Files
Save pattern as balloon materialTransform your chosen image into balloon material and save to the [Material] window. There are raster balloons and ruler balloons. Here we will introduce the save method for raster balloons. Refer to『Chapter 11 step: 02Balloons』( ⇒ P. 348) for balloons.
1. Select image Open the image through [Page File] tab of the [Edit] window and with the
selection tool, select the image area.
When you want to create a raster balloon
sketch an image on a [Raster layer]
When you want to create a ruler balloon
Draw an image on the [Ruler layer]
2. Select layer select the [Raster layer] from the [Layer] window.
4. Configure preferences The [save pattern as balloon material] window will be displayed.
1
2
1 Enter [Material name].
2 Click the [OK] button.
5. Save is complete The balloon material will be saved to the [Materials] window [User] folder →
[Balloon material].
・ When the material is saved, in default settings it will be saved as below. Vista: [start] button → [Documents] → Manga studio Ver4 settings
¥Material ¥Balloon Material XP: [start] button → [My documents] → Manga studio Ver4 settings
¥Material ¥Balloon Material・ saved materials can be dragged and dropped from the [Materials] window to
the [Page File].
Explanation Application operation
3. Select the command select [save pattern to balloon material] through the [Edit] menu.
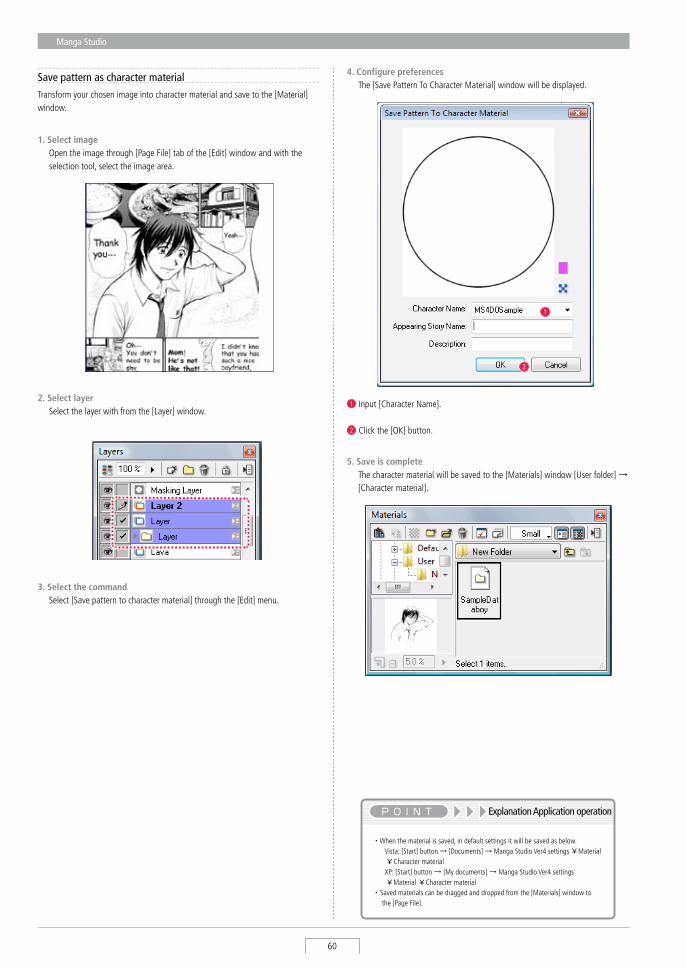
Manga Studio
60
Transform your chosen image into character material and save to the [Material] window.
Save pattern as character material
1. Select image Open the image through [Page File] tab of the [Edit] window and with the
selection tool, select the image area.
2. Select layer select the layer with from the [Layer] window.
4. Configure preferences The [save Pattern To Character Material] window will be displayed.
1
2
5. Save is complete The character material will be saved to the [Materials] window [User folder] →
[Character material].
・ When the material is saved, in default settings it will be saved as below. Vista: [start] button → [Documents] → Manga studio Ver4 settings ¥Material
¥Character material XP: [start] button → [My documents] → Manga studio Ver4 settings
¥Material ¥Character material・ saved materials can be dragged and dropped from the [Materials] window to
the [Page File].
Explanation Application operation
3. Select the command select [save pattern to character material] through the [Edit] menu.
1 Input [Character Name].
2 Click the [OK] button.
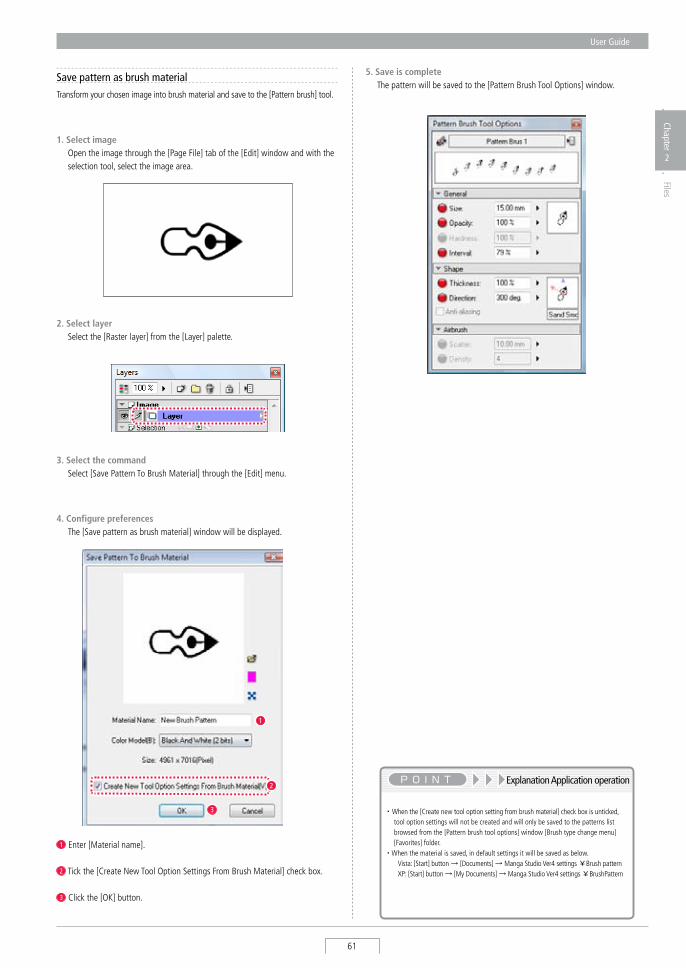
User Guide
61
Chapter
2
Files
Save pattern as brush materialTransform your chosen image into brush material and save to the [Pattern brush] tool.
1. Select image Open the image through the [Page File] tab of the [Edit] window and with the
selection tool, select the image area.
2. Select layer select the [Raster layer] from the [Layer] palette.
3. Select the command select [save Pattern To Brush Material] through the [Edit] menu.
5. Save is complete The pattern will be saved to the [Pattern Brush Tool Options] window.
1
3
1 Enter [Material name].
2 Tick the [Create New Tool Option settings From Brush Material] check box.
3 Click the [OK] button.
4. Configure preferences The [save pattern as brush material] window will be displayed.
・ When the [Create new tool option setting from brush material] check box is unticked, tool option settings will not be created and will only be saved to the patterns list browsed from the [Pattern brush tool options] window [Brush type change menu] [Favorites] folder.
・ When the material is saved, in default settings it will be saved as below. Vista: [start] button → [Documents] → Manga studio Ver4 settings ¥Brush pattern XP: [start] button → [My Documents] → Manga studio Ver4 settings ¥BrushPattern
Explanation Application operation2
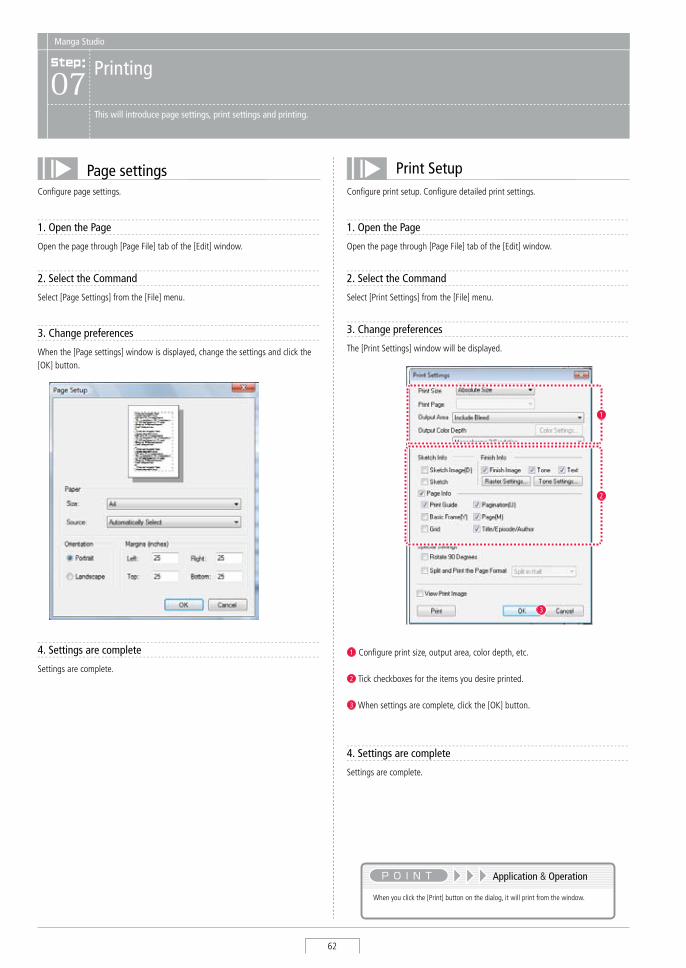
Manga Studio
62
: Manga Studio
Printing07
This will introduce page settings, print settings and printing.
Page settingsConfigure page settings.
Print SetupConfigure print setup. Configure detailed print settings.
1. Open the Page
Open the page through [Page File] tab of the [Edit] window.
2. Select the Command
select [Page settings] from the [File] menu.
3. Change preferences
When the [Page settings] window is displayed, change the settings and click the [OK] button.
4. Settings are complete
settings are complete.
1. Open the Page
Open the page through [Page File] tab of the [Edit] window.
2. Select the Command
select [Print settings] from the [File] menu.
3. Change preferences
The [Print settings] window will be displayed.
3
1 Configure print size, output area, color depth, etc.
2 Tick checkboxes for the items you desire printed.
3 When settings are complete, click the [OK] button.
1
2
4. Settings are complete
settings are complete.
When you click the [Print] button on the dialog, it will print from the window.
Application & Operation
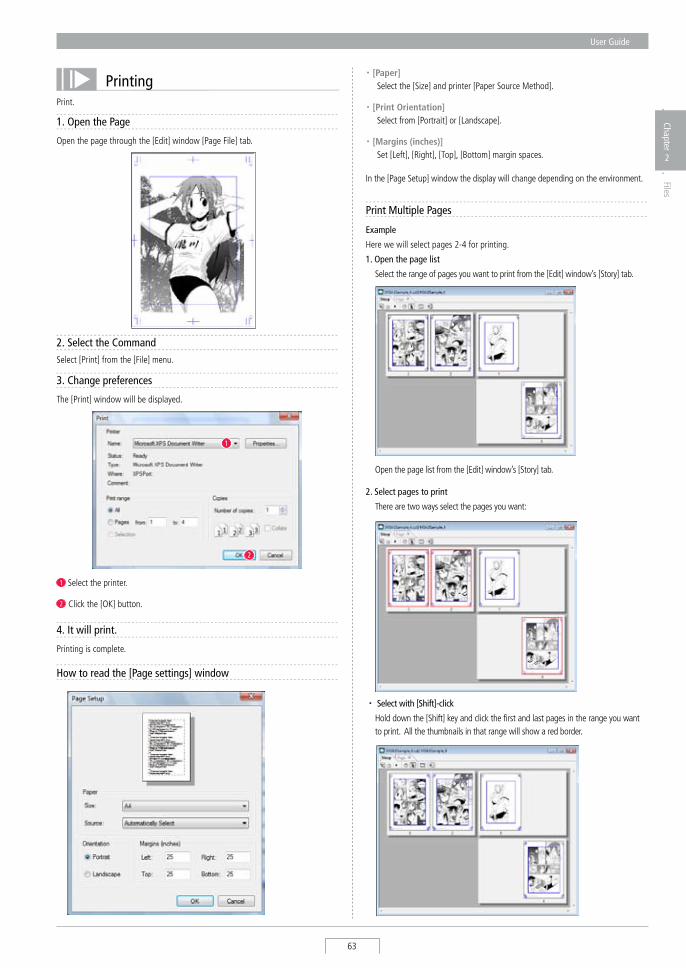
User Guide
63
Chapter
2
Files
PrintingPrint.
1. Open the Page
Open the page through the [Edit] window [Page File] tab.
2. Select the Commandselect [Print] from the [File] menu.
3. Change preferences
The [Print] window will be displayed.
1 select the printer.
2 Click the [OK] button.
1
2
4. It will print.
Printing is complete.
・ [Paper] select the [size] and printer [Paper source Method].
・ [Print Orientation] select from [Portrait] or [Landscape].
・ [Margins (inches)] set [Left], [Right], [Top], [Bottom] margin spaces.
In the [Page setup] window the display will change depending on the environment.
How to read the [Page settings] window
Print Multiple Pages
Example
Here we will select pages 2-4 for printing.
1. Open the page list
select the range of pages you want to print from the [Edit] window’s [story] tab.
Open the page list from the [Edit] window’s [story] tab.
2. Select pages to print
There are two ways select the pages you want:
・ Select with [Shift]-click
Hold down the [shift] key and click the first and last pages in the range you want to print. All the thumbnails in that range will show a red border.
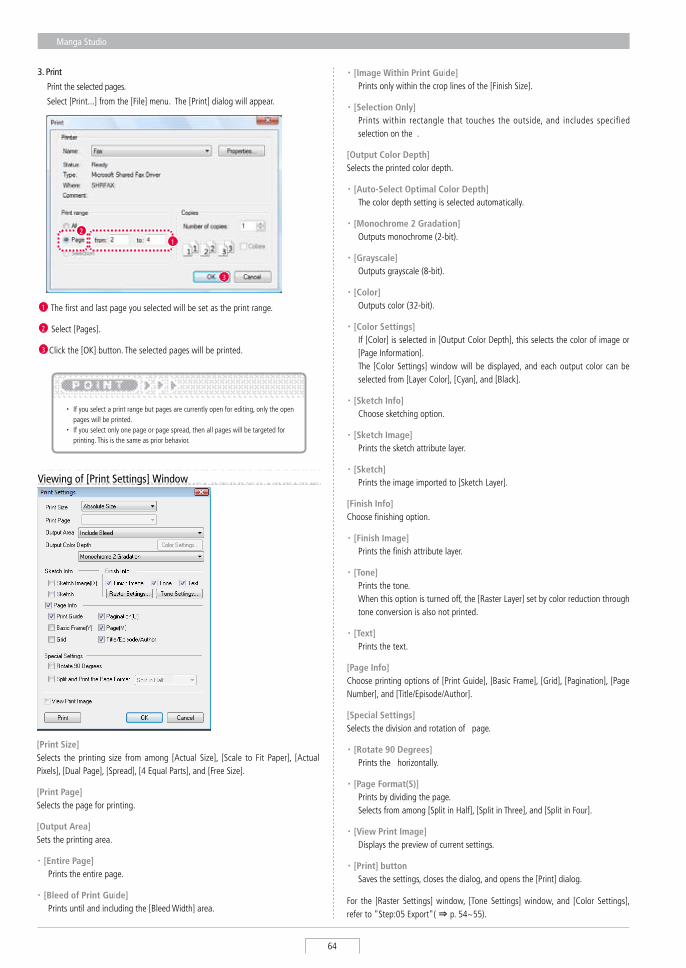
Manga Studio
64
Viewing of [Print Settings] Window
[Print Size]selects the printing size from among [Actual size], [scale to Fit Paper], [Actual Pixels], [Dual Page], [spread], [4 Equal Parts], and [Free size].
[Print Page]selects the page for printing.
[Output Area]sets the printing area.
・ [Entire Page] Prints the entire page.
・ [Bleed of Print Guide] Prints until and including the [Bleed Width] area.
・ [Image Within Print Guide] Prints only within the crop lines of the [Finish size].
・ [Selection Only] Prints within rectangle that touches the outside, and includes specified
selection on the .
[Output Color Depth]selects the printed color depth.
・ [Auto-Select Optimal Color Depth] The color depth setting is selected automatically.
・ [Monochrome 2 Gradation] Outputs monochrome (2-bit).
・ [Grayscale] Outputs grayscale (8-bit).
・ [Color] Outputs color (32-bit).
・ [Color Settings] If [Color] is selected in [Output Color Depth], this selects the color of image or
[Page Information]. The [Color settings] window will be displayed, and each output color can be
selected from [Layer Color], [Cyan], and [Black].
・ [Sketch Info] Choose sketching option.
・ [Sketch Image] Prints the sketch attribute layer.
・ [Sketch] Prints the image imported to [sketch Layer].
[Finish Info]Choose finishing option.
・ [Finish Image] Prints the finish attribute layer.
・ [Tone] Prints the tone. When this option is turned off, the [Raster Layer] set by color reduction through
tone conversion is also not printed.
・ [Text] Prints the text.
[Page Info] Choose printing options of [Print Guide], [Basic Frame], [Grid], [Pagination], [Page Number], and [Title/Episode/Author].
[Special Settings]selects the division and rotation of page.
・ [Rotate 90 Degrees] Prints the horizontally.
・ [Page Format(S)] Prints by dividing the page. selects from among [split in Half], [split in Three], and [split in Four].
・ [View Print Image] Displays the preview of current settings.
・ [Print] button saves the settings, closes the dialog, and opens the [Print] dialog.
For the [Raster settings] window, [Tone settings] window, and [Color settings], refer to "step:05 Export"( ⇒ p. 54~55).
3. Print
Print the selected pages.
select [Print...] from the [File] menu. The [Print] dialog will appear.
1 The first and last page you selected will be set as the print range.
2 select [Pages].
3 Click the [OK] button. The selected pages will be printed.
12
3
・ If you select a print range but pages are currently open for editing, only the open pages will be printed.
・ If you select only one page or page spread, then all pages will be targeted for printing. This is the same as prior behavior.

第2章
第1章
第3章
第4章
第5章
Drawing
Chapter 3
This chapter introduces drawing formats, and tools to draw pictures on your page.
Step:01 Drawing Format 068
Step:02 Drawing Color 070
Step:03 Drawing 078
Chapter
3
Drawing
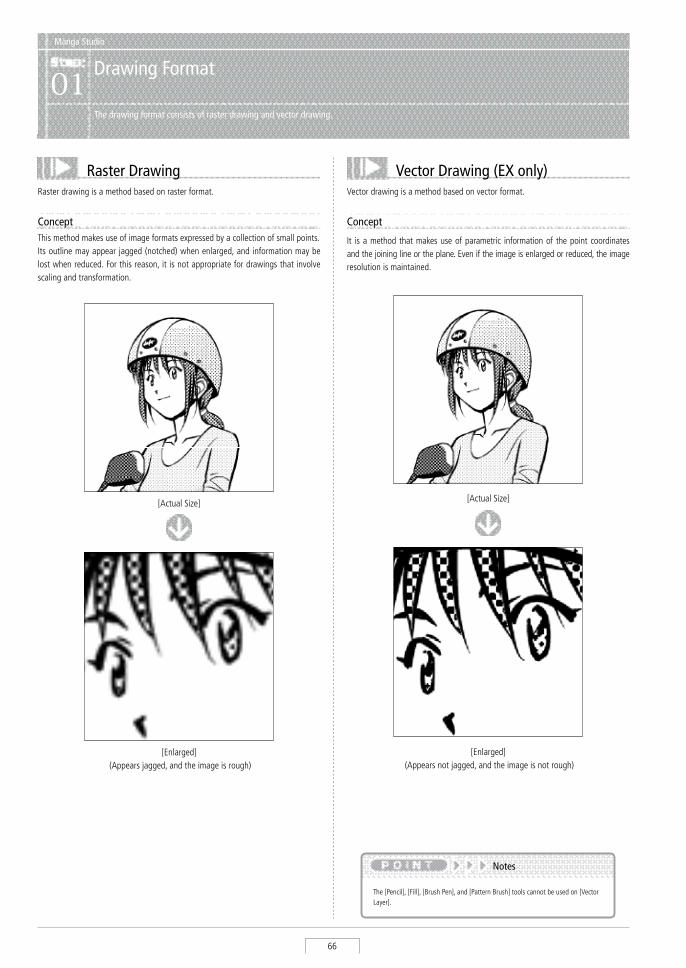
Manga Studio
66
Manga Studio
Drawing Format01
The drawing format consists of raster drawing and vector drawing.
Raster DrawingRaster drawing is a method based on raster format.
ConceptThis method makes use of image formats expressed by a collection of small points. Its outline may appear jagged (notched) when enlarged, and information may be lost when reduced. For this reason, it is not appropriate for drawings that involve scaling and transformation.
[Actual size]
[Enlarged] (Appears jagged, and the image is rough)
Vector Drawing (EX only)Vector drawing is a method based on vector format.
Concept
It is a method that makes use of parametric information of the point coordinates and the joining line or the plane. Even if the image is enlarged or reduced, the image resolution is maintained.
[Actual size]
[Enlarged] (Appears not jagged, and the image is not rough)
The [Pencil], [Fill], [Brush Pen], and [Pattern Brush] tools cannot be used on [Vector Layer].
Notes
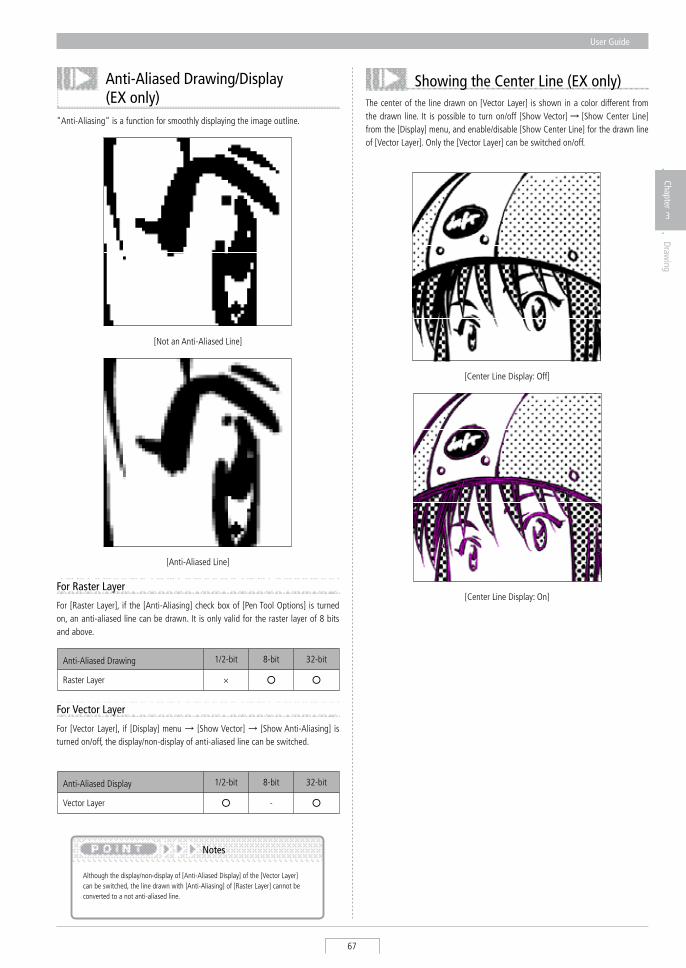
User Guide
67
Chapter
3
Drawing
Showing the Center Line (EX only)The center of the line drawn on [Vector Layer] is shown in a color different from the drawn line. It is possible to turn on/off [show Vector] → [show Center Line] from the [Display] menu, and enable/disable [show Center Line] for the drawn line of [Vector Layer]. Only the [Vector Layer] can be switched on/off.
"Anti-Aliasing" is a function for smoothly displaying the image outline.
[Not an Anti-Aliased Line]
[Anti-Aliased Line]
For Raster Layer
For [Raster Layer], if the [Anti-Aliasing] check box of [Pen Tool Options] is turned on, an anti-aliased line can be drawn. It is only valid for the raster layer of 8 bits and above.
Anti-Aliased Drawing 1/2-bit 8-bit 32-bit
Raster Layer × ○ ○
For Vector Layer
For [Vector Layer], if [Display] menu → [show Vector] → [show Anti-Aliasing] is turned on/off, the display/non-display of anti-aliased line can be switched.
Anti-Aliased Display 1/2-bit 8-bit 32-bit
Vector Layer ○ - ○
Although the display/non-display of [Anti-Aliased Display] of the [Vector Layer] can be switched, the line drawn with [Anti-Aliasing] of [Raster Layer] cannot be converted to a not anti-aliased line.
Notes
Anti-Aliased Drawing/Display (EX only)
[Center Line Display: Off]
[Center Line Display: On]
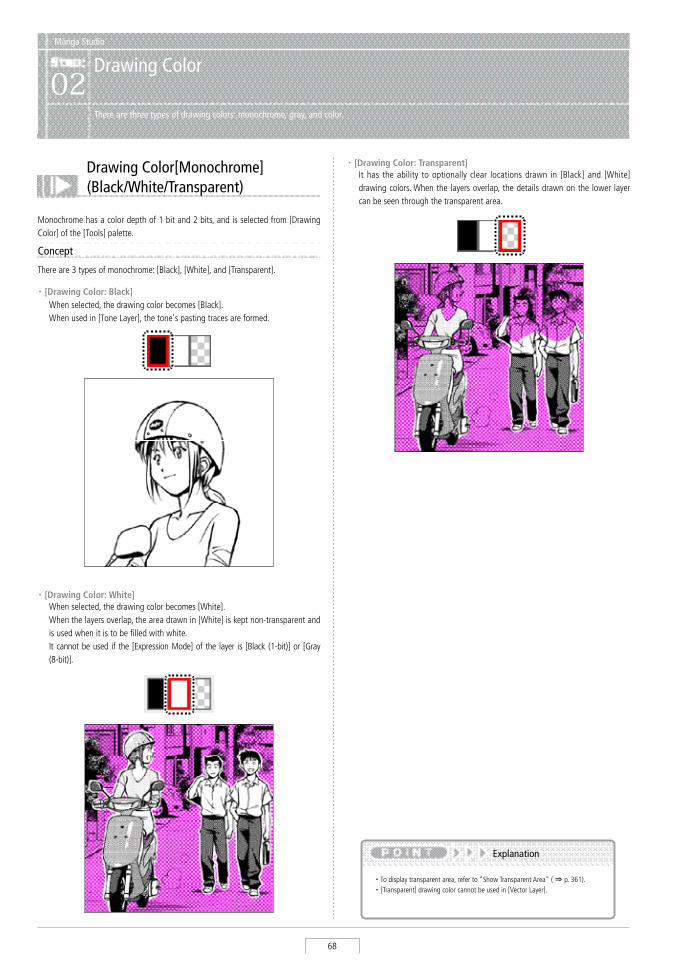
Manga Studio
68
Manga Studio
Drawing Color02
There are three types of drawing colors: monochrome, gray, and color.
Drawing Color[Monochrome] (Black/White/Transparent)
Monochrome has a color depth of 1 bit and 2 bits, and is selected from [Drawing Color] of the [Tools] palette.
Concept
There are 3 types of monochrome: [Black], [White], and [Transparent].
・ [Drawing Color: Black] When selected, the drawing color becomes [Black]. When used in [Tone Layer], the tone's pasting traces are formed.
・ [Drawing Color: White] When selected, the drawing color becomes [White]. When the layers overlap, the area drawn in [White] is kept non-transparent and
is used when it is to be filled with white. It cannot be used if the [Expression Mode] of the layer is [Black (1-bit)] or [Gray
(8-bit)].
・ [Drawing Color: Transparent] It has the ability to optionally clear locations drawn in [Black] and [White]
drawing colors. When the layers overlap, the details drawn on the lower layer can be seen through the transparent area.
・ To display transparent area, refer to "show Transparent Area" ( ⇒ p. 361). ・ [Transparent] drawing color cannot be used in [Vector Layer].
Explanation
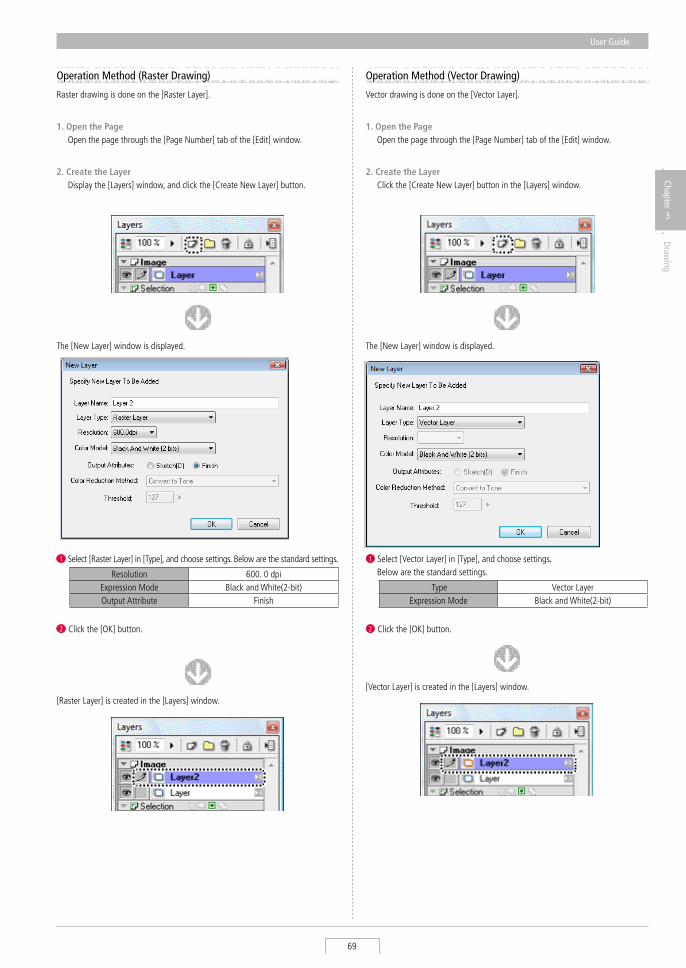
User Guide
69
Chapter
3
Drawing
Operation Method (Vector Drawing)
Vector drawing is done on the [Vector Layer].
1. Open the Page Open the page through the [Page Number] tab of the [Edit] window.
The [New Layer] window is displayed.
[Vector Layer] is created in the [Layers] window.
1 select [Vector Layer] in [Type], and choose settings. Below are the standard settings.
Type Vector LayerExpression Mode Black and White(2-bit)
2 Click the [OK] button.
2. Create the Layer Click the [Create New Layer] button in the [Layers] window.
Operation Method (Raster Drawing)
Raster drawing is done on the [Raster Layer].
1. Open the Page Open the page through the [Page Number] tab of the [Edit] window.
The [New Layer] window is displayed.
1 select [Raster Layer] in [Type], and choose settings. Below are the standard settings.
Resolution 600. 0 dpi Expression Mode Black and White(2-bit) Output Attribute Finish
2 Click the [OK] button.
[Raster Layer] is created in the [Layers] window.
2. Create the Layer Display the [Layers] window, and click the [Create New Layer] button.
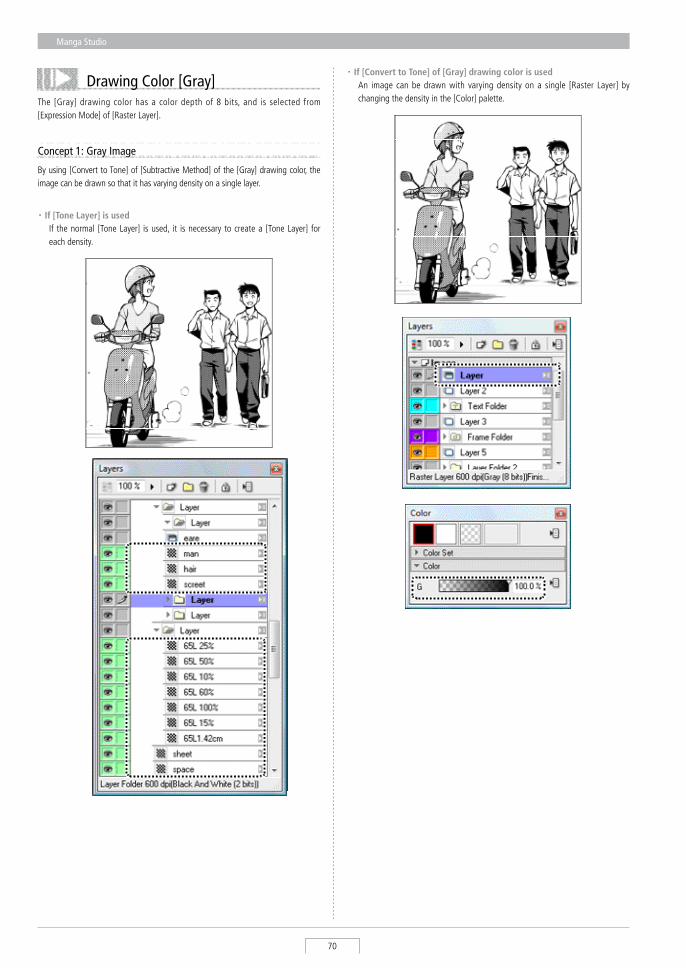
Manga Studio
70
Drawing Color [Gray]The [Gray] drawing color has a color depth of 8 bits, and is selected from [Expression Mode] of [Raster Layer].
Concept 1: Gray Image
By using [Convert to Tone] of [subtractive Method] of the [Gray] drawing color, the image can be drawn so that it has varying density on a single layer.
・ If [Tone Layer] is used If the normal [Tone Layer] is used, it is necessary to create a [Tone Layer] for
each density.
・ If [Convert to Tone] of [Gray] drawing color is used An image can be drawn with varying density on a single [Raster Layer] by
changing the density in the [Color] palette.
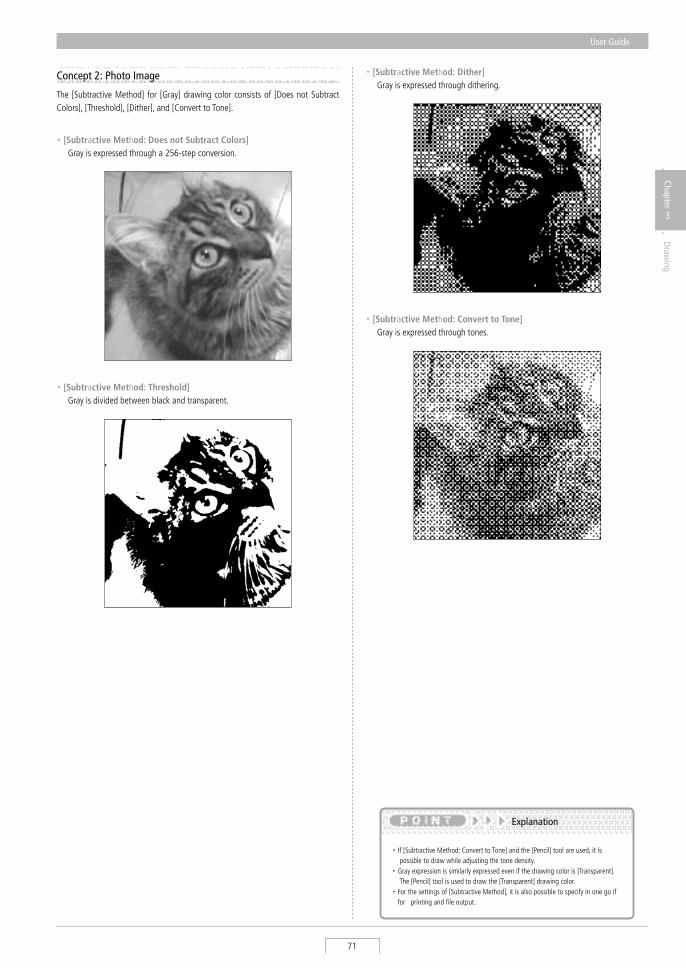
User Guide
71
Chapter
3
Drawing
Concept 2: Photo Image
The [subtractive Method] for [Gray] drawing color consists of [Does not subtract Colors], [Threshold], [Dither], and [Convert to Tone].
・ [Subtractive Method: Does not Subtract Colors] Gray is expressed through a 256-step conversion.
・ [Subtractive Method: Threshold] Gray is divided between black and transparent.
・ [Subtractive Method: Dither] Gray is expressed through dithering.
・ [Subtractive Method: Convert to Tone] Gray is expressed through tones.
・ If [subtractive Method: Convert to Tone] and the [Pencil] tool are used, it is possible to draw while adjusting the tone density.
・ Gray expression is similarly expressed even if the drawing color is [Transparent]. The [Pencil] tool is used to draw the [Transparent] drawing color.
・ For the settings of [subtractive Method], it is also possible to specify in one go if for printing and file output.
Explanation
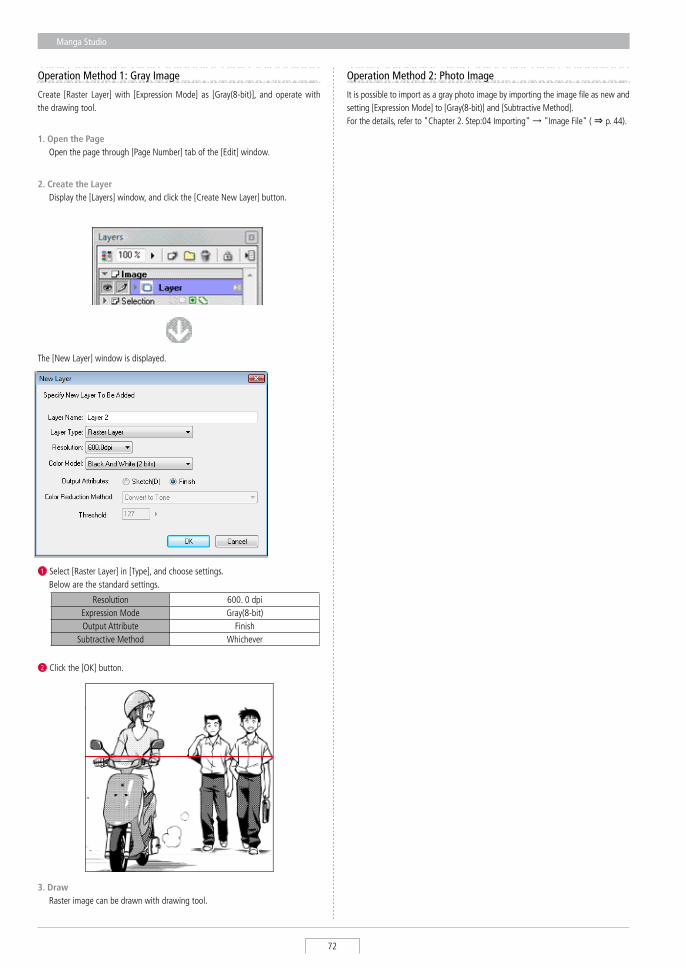
Manga Studio
72
Operation Method 1: Gray Image Operation Method 2: Photo Image
Create [Raster Layer] with [Expression Mode] as [Gray(8-bit)], and operate with the drawing tool.
1. Open the Page Open the page through [Page Number] tab of the [Edit] window.
2. Create the Layer Display the [Layers] window, and click the [Create New Layer] button.
The [New Layer] window is displayed.
1 select [Raster Layer] in [Type], and choose settings. Below are the standard settings.
Resolution 600. 0 dpi Expression Mode Gray(8-bit) Output Attribute Finish
subtractive Method Whichever
2 Click the [OK] button.
3. Draw Raster image can be drawn with drawing tool.
It is possible to import as a gray photo image by importing the image file as new and setting [Expression Mode] to [Gray(8-bit)] and [subtractive Method]. For the details, refer to "Chapter 2. step:04 Importing" → "Image File" ( ⇒ p. 44).
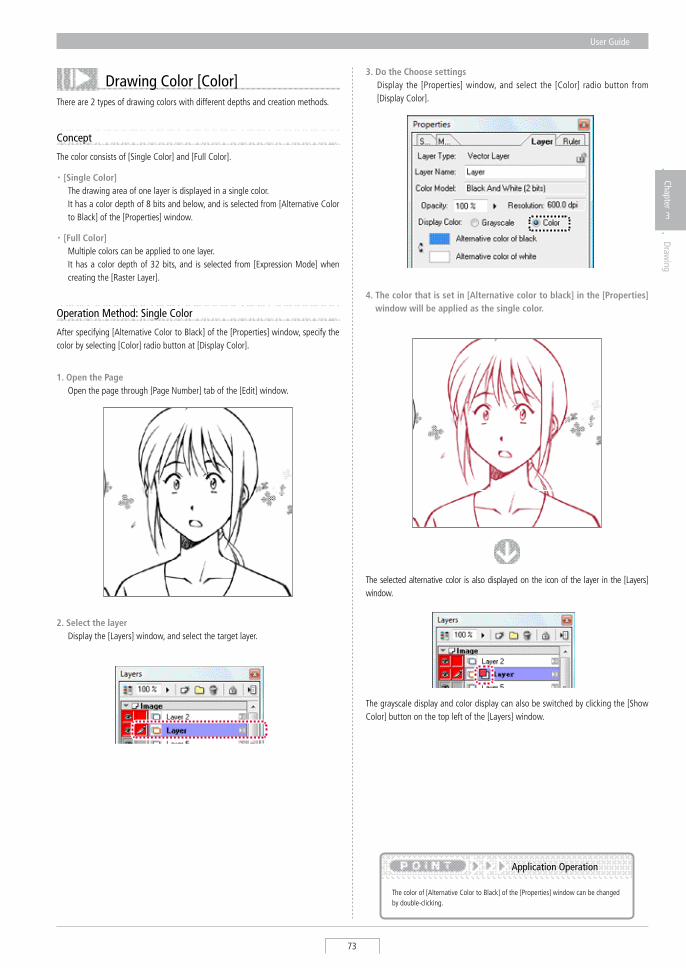
User Guide
73
Chapter
3
Drawing
Drawing Color [Color]There are 2 types of drawing colors with different depths and creation methods.
Concept
・ [Single Color] The drawing area of one layer is displayed in a single color. It has a color depth of 8 bits and below, and is selected from [Alternative Color
to Black] of the [Properties] window.
The color consists of [single Color] and [Full Color].
・ [Full Color] Multiple colors can be applied to one layer. It has a color depth of 32 bits, and is selected from [Expression Mode] when
creating the [Raster Layer].
Operation Method: Single Color
After specifying [Alternative Color to Black] of the [Properties] window, specify the color by selecting [Color] radio button at [Display Color].
1. Open the Page Open the page through [Page Number] tab of the [Edit] window.
2. Select the layer Display the [Layers] window, and select the target layer.
3. Do the Choose settings Display the [Properties] window, and select the [Color] radio button from
[Display Color].
4. The color that is set in [Alternative color to black] in the [Properties] window will be applied as the single color.
The selected alternative color is also displayed on the icon of the layer in the [Layers] window.
The color of [Alternative Color to Black] of the [Properties] window can be changed by double-clicking.
Application Operation
The grayscale display and color display can also be switched by clicking the [show Color] button on the top left of the [Layers] window.

Manga Studio
74
Operation Method: Full Color
Create [Raster Layer] with [Expression Mode] as [Color (32-bit)], and operate with the drawing tool.
1. Open the Page Open the page through [Page Number] tab of the [Edit] window.
2. Create the Layer Display the [Layers] window, and click the [Create New Layer] button.
The [New Layer] window is displayed.
1 select [Color(32-bit)] as the [Expression Mode].
2 Click the [OK] button.
A raster layer supported by [Color(32-bit)] is created.
4. Draw in colorDisplay the [Color] window, and select the [Color] to be used.
5. Draw in the imageWhen the drawing tool is used on the page, it draws in full color.
3. Select the Tool select the drawing tool from the [Tools] window.
User Guide
75
Chapter
3
Drawing
Operation Method: Edit Color
Edit the drawing color in the [Color settings] window.
1. Display the [Tools] window Double-click the [Black] or [White] drawing color of the [Tools] window.
2. Display the [Color Settings] window The [Color settings] window is displayed.
1 select the color by clicking or by numerical input.
2 The selected color is displayed in the [show selection Color] box.
3 Click the [OK] button.
3. Finish the color editing The color of the [show selection Color] button is set as the drawing color.
1 2
3
Viewing of [Color Settings] WindowDouble-clicking on [Black] or [White] drawing color of the [Color] window and [Tools] window displays the [Color settings] window.
A [Basic Settings] area A 128-bit [Color sample] is lined up.
B [Color Settings] area (EX only) Edits [Color settings].
C [Color Area] selects the color through clicking or by numerical input.
D [Color Slider] selects the color by clicking.
E [H]/[S]/[V] sets the color in [H]/[s]/[V].
F [R]/[G]/[B] sets the color in [R]/[G]/[B].
G [Show Selection Color] button The currently selected color is displayed. Clicking saves the displayed color to the color set.
H [Show Color Set] menu (EX only) Displays and selects the [Color set].
I [Get Color] (EX only) Makes the color selected in [Color set] the selection color.
J [Save Color] (EX only) saves the current selection color by overwriting to optional location of [Color set].
K [Add Color] (EX only) Adds the current selection color to [Color set] as new.
L [Delete Color] (EX only) Deletes the color of the selected location in [Color set].
M [Edit Settings] button (EX only) Addition or deletion from [Color set] can be made in the [Edit Color set] window.
N [Color Set] (EX only) The [Color set] selected in the [show Color set] menu is displayed.
・ The [set Color] dialog can only be displayed when a layer of at least [Color(32-bit)] is selected for [Expression Mode] in the [Layers] window.
・ If selection color is specified from [Color set] of the [Color settings] area, click the [Get Color] button after selecting through clicking.
・ [standard Color set] is a color set of the same structure as [Basic settings].
Explanation
1 1
1
A
B
C D
E F G
H
M
N
I J K L
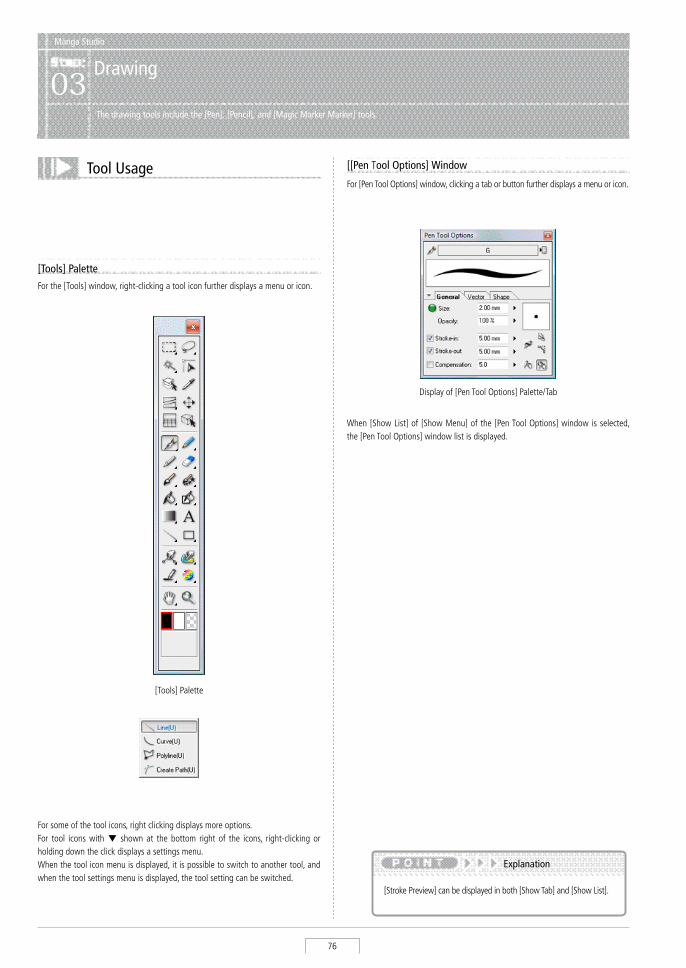
Manga Studio
76
Tool Usage
When [show List] of [show Menu] of the [Pen Tool Options] window is selected, the [Pen Tool Options] window list is displayed.
For the [Tools] window, right-clicking a tool icon further displays a menu or icon.
[Tools] Palette
For some of the tool icons, right clicking displays more options. For tool icons with ▼ shown at the bottom right of the icons, right-clicking or holding down the click displays a settings menu. When the tool icon menu is displayed, it is possible to switch to another tool, and when the tool settings menu is displayed, the tool setting can be switched.
[Tools] Palette
Display of [Pen Tool Options] Palette/Tab
For [Pen Tool Options] window, clicking a tab or button further displays a menu or icon.
[[Pen Tool Options] Window
Manga Studio
Drawing03
The drawing tools include the [Pen], [Pencil], and [Magic Marker Marker] tools.
[stroke Preview] can be displayed in both [show Tab] and [show List].
Explanation
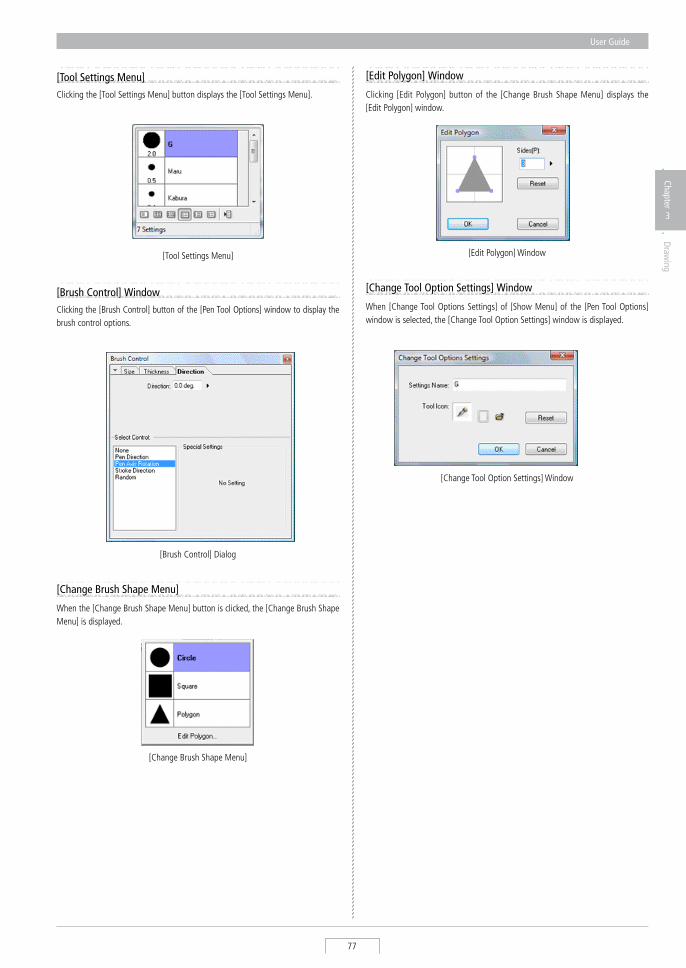
User Guide
77
Chapter
3
Drawing
[Tool Settings Menu]Clicking the [Tool settings Menu] button displays the [Tool settings Menu].
[Tool settings Menu]
[Brush Control] WindowClicking the [Brush Control] button of the [Pen Tool Options] window to display the brush control options.
[Brush Control] Dialog
[Change Brush Shape Menu]
When the [Change Brush shape Menu] button is clicked, the [Change Brush shape Menu] is displayed.
[Change Brush shape Menu]
[Edit Polygon] Window
Clicking [Edit Polygon] button of the [Change Brush shape Menu] displays the [Edit Polygon] window.
[Edit Polygon] Window
[Change Tool Option Settings] Window
When [Change Tool Options settings] of [show Menu] of the [Pen Tool Options] window is selected, the [Change Tool Option settings] window is displayed.
[Change Tool Option settings] Window
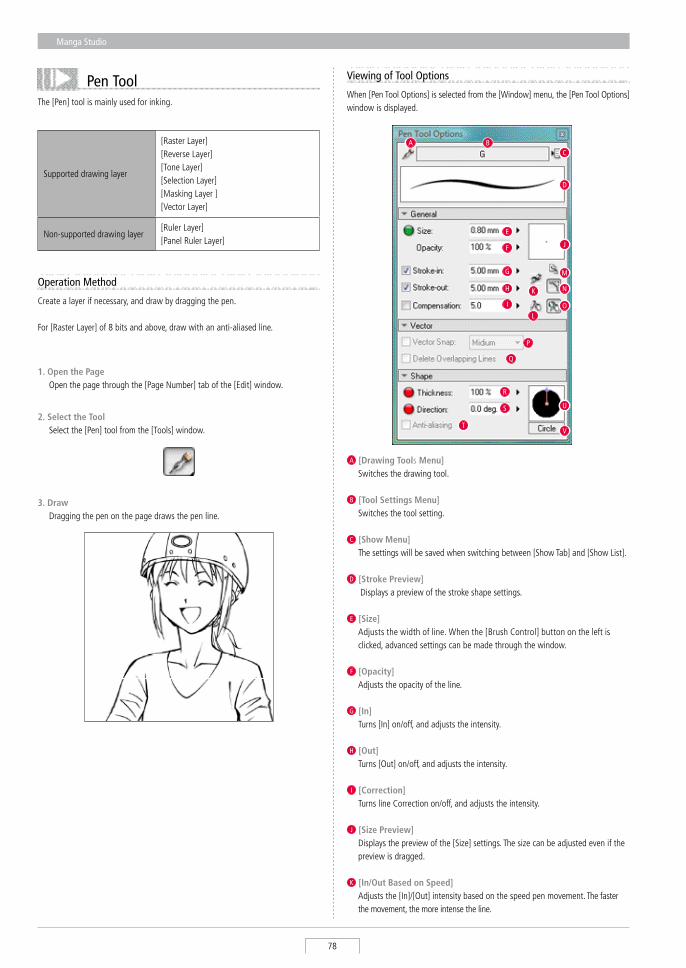
Manga Studio
78
Pen ToolThe [Pen] tool is mainly used for inking.
supported drawing layer
[Raster Layer][Reverse Layer][Tone Layer][selection Layer][Masking Layer ][Vector Layer]
Non-supported drawing layer[Ruler Layer][Panel Ruler Layer]
3. Draw Dragging the pen on the page draws the pen line.
Operation Method
Create a layer if necessary, and draw by dragging the pen.
For [Raster Layer] of 8 bits and above, draw with an anti-aliased line.
1. Open the Page Open the page through the [Page Number] tab of the [Edit] window.
2. Select the Tool select the [Pen] tool from the [Tools] window.
Viewing of Tool Options
When [Pen Tool Options] is selected from the [Window] menu, the [Pen Tool Options] window is displayed.
A [Drawing Tools Menu] switches the drawing tool.
B [Tool Settings Menu] switches the tool setting.
C [Show Menu] The settings will be saved when switching between [show Tab] and [show List].
D [Stroke Preview] Displays a preview of the stroke shape settings.
E [Size] Adjusts the width of line. When the [Brush Control] button on the left is
clicked, advanced settings can be made through the window.
F [Opacity] Adjusts the opacity of the line.
G [In] Turns [In] on/off, and adjusts the intensity.
H [Out] Turns [Out] on/off, and adjusts the intensity.
I [Correction] Turns line Correction on/off, and adjusts the intensity.
J [Size Preview] Displays the preview of the [size] settings. The size can be adjusted even if the
preview is dragged.
K [In/Out Based on Speed] Adjusts the [In]/[Out] intensity based on the speed pen movement. The faster
the movement, the more intense the line.
I
J
K
L
M
N
O
P
E
F
G
H
A BC
D
V
R
S
T
U
Q
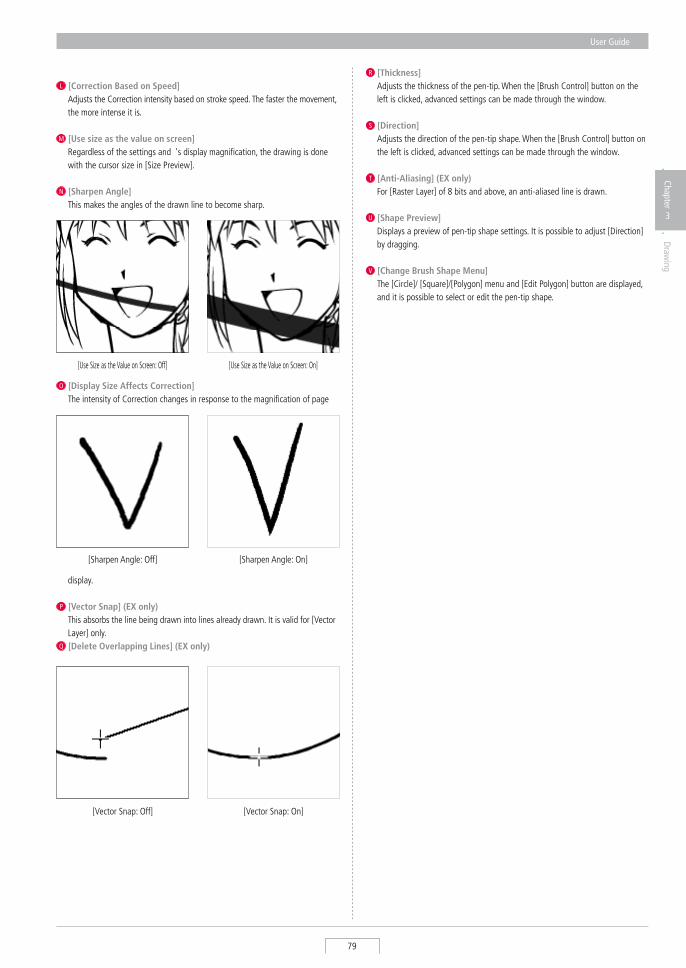
User Guide
79
Chapter
3
Drawing
O [Display Size Affects Correction] The intensity of Correction changes in response to the magnification of page
L [Correction Based on Speed] Adjusts the Correction intensity based on stroke speed. The faster the movement,
the more intense it is.
M [Use size as the value on screen] Regardless of the settings and 's display magnification, the drawing is done
with the cursor size in [size Preview].
N [Sharpen Angle] This makes the angles of the drawn line to become sharp.
[Use size as the Value on screen: Off] [Use size as the Value on screen: On]
[Vector snap: Off] [Vector snap: On]
[sharpen Angle: Off] [sharpen Angle: On]
display.
P [Vector Snap] (EX only) This absorbs the line being drawn into lines already drawn. It is valid for [Vector
Layer] only. Q [Delete Overlapping Lines] (EX only)
R [Thickness] Adjusts the thickness of the pen-tip. When the [Brush Control] button on the
left is clicked, advanced settings can be made through the window.
S [Direction] Adjusts the direction of the pen-tip shape. When the [Brush Control] button on
the left is clicked, advanced settings can be made through the window.
T [Anti-Aliasing] (EX only) For [Raster Layer] of 8 bits and above, an anti-aliased line is drawn.
U [Shape Preview] Displays a preview of pen-tip shape settings. It is possible to adjust [Direction]
by dragging.
V [Change Brush Shape Menu] The [Circle]/ [square]/[Polygon] menu and [Edit Polygon] button are displayed,
and it is possible to select or edit the pen-tip shape.
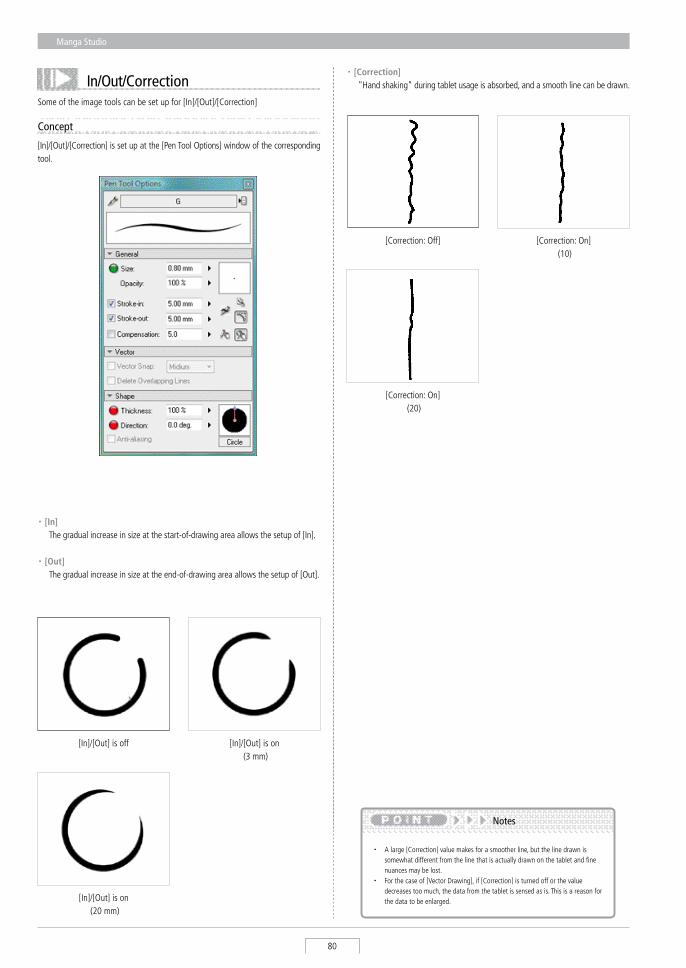
Manga Studio
80
In/Out/Correctionsome of the image tools can be set up for [In]/[Out]/[Correction]
Concept
[In]/[Out]/[Correction] is set up at the [Pen Tool Options] window of the corresponding tool.
・ [In] The gradual increase in size at the start-of-drawing area allows the setup of [In].
・ [Out] The gradual increase in size at the end-of-drawing area allows the setup of [Out].
・ A large [Correction] value makes for a smoother line, but the line drawn is somewhat different from the line that is actually drawn on the tablet and fine nuances may be lost.
・ For the case of [Vector Drawing], if [Correction] is turned off or the value decreases too much, the data from the tablet is sensed as is. This is a reason for the data to be enlarged.
Notes
[In]/[Out] is off
[In]/[Out] is on (3 mm)
[In]/[Out] is on (20 mm)
・ [Correction] "Hand shaking" during tablet usage is absorbed, and a smooth line can be drawn.
[Correction: Off] [Correction: On] (10)
[Correction: On] (20)
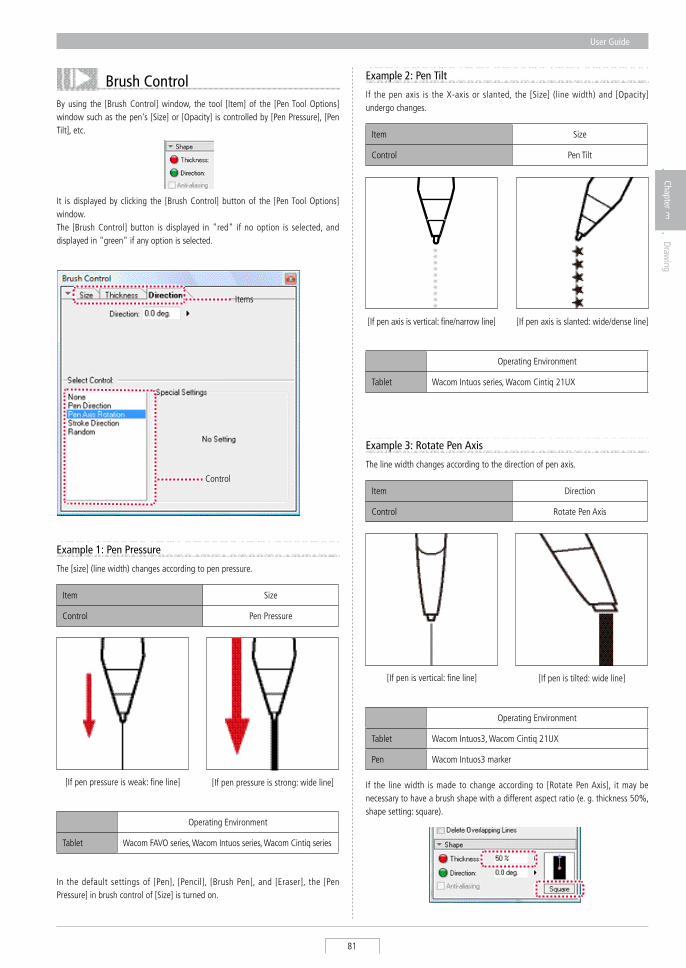
User Guide
81
Chapter
3
Drawing
Brush Control
It is displayed by clicking the [Brush Control] button of the [Pen Tool Options] window. The [Brush Control] button is displayed in "red" if no option is selected, and displayed in "green" if any option is selected.
[If pen axis is vertical: fine/narrow line] [If pen axis is slanted: wide/dense line]
[If pen pressure is weak: fine line] [If pen pressure is strong: wide line]
Items
Item size
Control Pen Pressure
Operating Environment
Tablet Wacom FAVO series, Wacom Intuos series, Wacom Cintiq series
In the default settings of [Pen], [Pencil], [Brush Pen], and [Eraser], the [Pen Pressure] in brush control of [size] is turned on.
Item size
Control Pen Tilt
Operating Environment
Tablet Wacom Intuos series, Wacom Cintiq 21UX
The [size] (line width) changes according to pen pressure.
Example 1: Pen Pressure
If the pen axis is the X-axis or slanted, the [size] (line width) and [Opacity] undergo changes.
Example 2: Pen Tilt
[If pen is vertical: fine line] [If pen is tilted: wide line]
Item Direction
Control Rotate Pen Axis
Operating Environment
Tablet Wacom Intuos3, Wacom Cintiq 21UX
Pen Wacom Intuos3 marker
If the line width is made to change according to [Rotate Pen Axis], it may be necessary to have a brush shape with a different aspect ratio (e. g. thickness 50%, shape setting: square).
The line width changes according to the direction of pen axis.
Example 3: Rotate Pen Axis
By using the [Brush Control] window, the tool [Item] of the [Pen Tool Options] window such as the pen's [size] or [Opacity] is controlled by [Pen Pressure], [Pen Tilt], etc.
Control

Manga Studio
82
Eraser ToolThe [Eraser] tool is erasing.
supported drawing layer
[Raster Layer][Vector Layer][Reverse Layer][Tone Layer][selection Layer][Masking Layer]
Non-supported drawing layer[Ruler Layer][Panel Ruler Layer]
Operation Method
select the layer of the target image, and drag to erase.
1. Open the Page Open the page on which to use the eraser through [Page Number] tab of the
[Edit] window.
4. Erase The image can be cleared by dragging on the page.
3. Select the Tool select the [Eraser] tool from the [Tools] window.
In version 4. 0, even when the eraser is applied to [Vector Layer] lines, the incision is similar to [Raster Layer].
When [Pen Tool Options] is selected from the [Window] menu, the [Eraser Tool Options] window is displayed.
Viewing Tool Options
J
K
L
M
N
E
F
G
H
A B
C
D
I
[Incision on Raster Layer] [Incision on Vector Layer]
Concept
The lines drawn on a raster layer and vector layer can be cleared.
2. Select the layer Display the [Layers] window, and select the target layer.
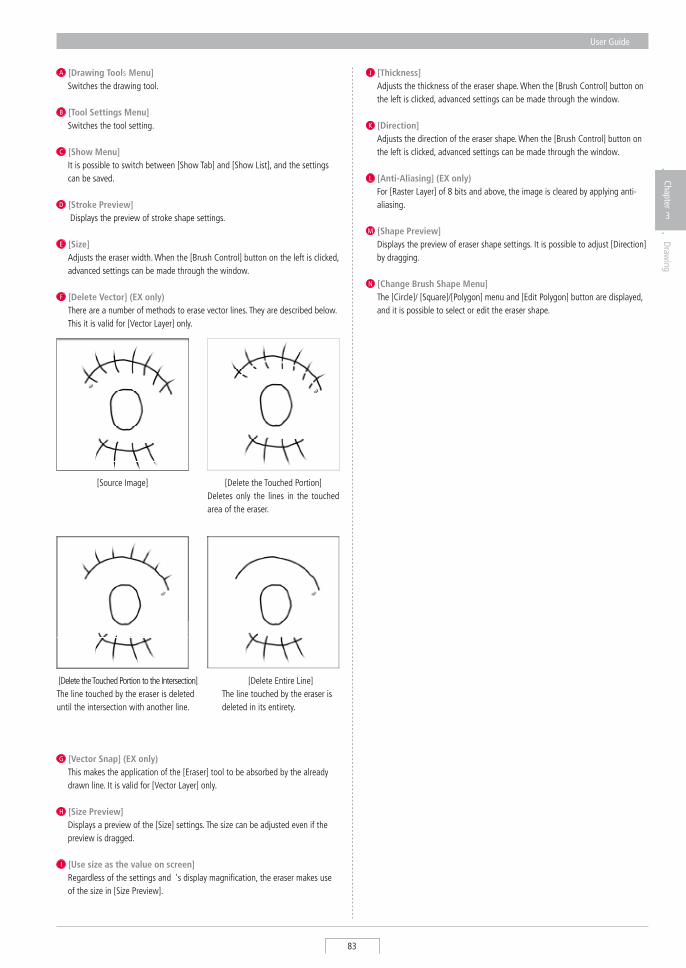
User Guide
83
Chapter
3
Drawing
J [Thickness] Adjusts the thickness of the eraser shape. When the [Brush Control] button on
the left is clicked, advanced settings can be made through the window.
K [Direction] Adjusts the direction of the eraser shape. When the [Brush Control] button on
the left is clicked, advanced settings can be made through the window.
L [Anti-Aliasing] (EX only) For [Raster Layer] of 8 bits and above, the image is cleared by applying anti-
aliasing.
M [Shape Preview] Displays the preview of eraser shape settings. It is possible to adjust [Direction]
by dragging.
N [Change Brush Shape Menu] The [Circle]/ [square]/[Polygon] menu and [Edit Polygon] button are displayed,
and it is possible to select or edit the eraser shape.
A [Drawing Tools Menu] switches the drawing tool.
B [Tool Settings Menu] switches the tool setting.
C [Show Menu] It is possible to switch between [show Tab] and [show List], and the settings
can be saved.
D [Stroke Preview] Displays the preview of stroke shape settings.
E [Size] Adjusts the eraser width. When the [Brush Control] button on the left is clicked,
advanced settings can be made through the window.
F [Delete Vector] (EX only) There are a number of methods to erase vector lines. They are described below.
This it is valid for [Vector Layer] only.
G [Vector Snap] (EX only) This makes the application of the [Eraser] tool to be absorbed by the already
drawn line. It is valid for [Vector Layer] only.
H [Size Preview] Displays a preview of the [size] settings. The size can be adjusted even if the
preview is dragged.
I [Use size as the value on screen] Regardless of the settings and 's display magnification, the eraser makes use
of the size in [size Preview].
[Delete the Touched Portion]Deletes only the lines in the touched area of the eraser.
[source Image]
[Delete Entire Line]The line touched by the eraser is deleted in its entirety.
[Delete the Touched Portion to the Intersection]The line touched by the eraser is deleted until the intersection with another line.
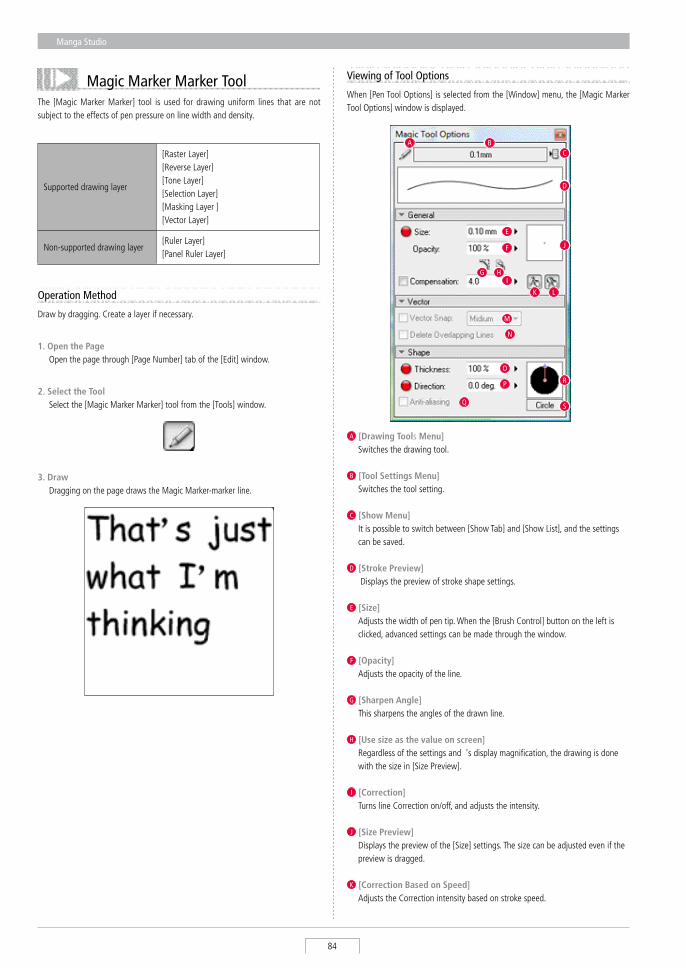
Manga Studio
84
Magic Marker Marker ToolThe [Magic Marker Marker] tool is used for drawing uniform lines that are not subject to the effects of pen pressure on line width and density.
When [Pen Tool Options] is selected from the [Window] menu, the [Magic Marker Tool Options] window is displayed.
Viewing of Tool Options
A [Drawing Tools Menu] switches the drawing tool.
B [Tool Settings Menu] switches the tool setting.
C [Show Menu] It is possible to switch between [show Tab] and [show List], and the settings
can be saved.
D [Stroke Preview] Displays the preview of stroke shape settings.
E [Size] Adjusts the width of pen tip. When the [Brush Control] button on the left is
clicked, advanced settings can be made through the window.
F [Opacity] Adjusts the opacity of the line.
G [Sharpen Angle] This sharpens the angles of the drawn line.
H [Use size as the value on screen] Regardless of the settings and 's display magnification, the drawing is done
with the size in [size Preview].
I [Correction] Turns line Correction on/off, and adjusts the intensity.
J [Size Preview] Displays the preview of the [size] settings. The size can be adjusted even if the
preview is dragged.
K [Correction Based on Speed] Adjusts the Correction intensity based on stroke speed.
I
J
K
N
L
M
E
F
G H
A BC
D
S
O
P
Q
R
supported drawing layer
[Raster Layer][Reverse Layer][Tone Layer][selection Layer][Masking Layer ][Vector Layer]
Non-supported drawing layer[Ruler Layer][Panel Ruler Layer]
3. Draw Dragging on the page draws the Magic Marker-marker line.
Operation Method
Draw by dragging. Create a layer if necessary.
1. Open the Page Open the page through [Page Number] tab of the [Edit] window.
2. Select the Tool select the [Magic Marker Marker] tool from the [Tools] window.
User Guide
85
Chapter
3
Drawing
L [Display Size Affects Correction] The intensity of Correction changes in response to zooming of page display.
M [Vector Snap] (EX only) This absorbs the line being drawn by the already drawn line. It is valid for
[Vector Layer] only.
N [Delete Overlapping Lines] (EX only) Overlapping lines are deleted. It is valid for [Vector Layer] only.
O [Thickness] Adjusts the thickness of pen tip. When the [Brush Control] button on the left is
clicked, advanced settings can be made through the window.
P [Direction] Adjusts the direction of the pen tip. When the [Brush Control] button on the
left is clicked, advanced settings can be made through the window.
Q [Anti-Aliasing] (EX only) For [Raster Layer] of 8 bits and above, draws an anti-aliased line.
R [Shape Preview] Displays the preview of pen-tip shape settings. It is possible to adjust
[Direction] by dragging.
S [Change Brush Shape Menu] The [Circle]/ [square]/[Polygon] menu and [Edit Polygon] button are displayed,
and it is possible to select or edit the pen-tip shape.
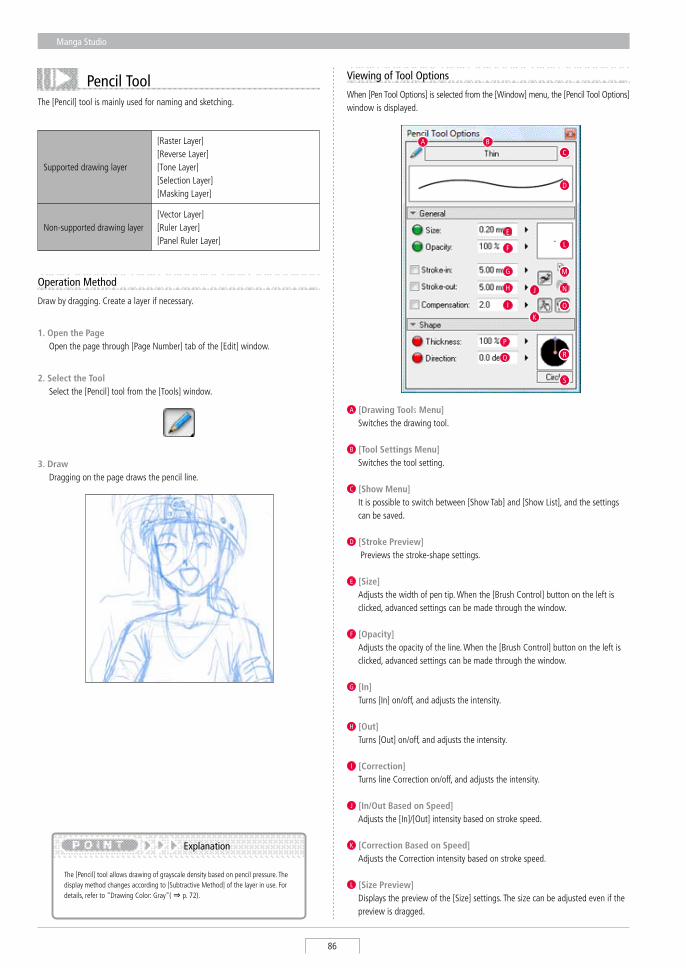
Manga Studio
86
Pencil ToolThe [Pencil] tool is mainly used for naming and sketching.
The [Pencil] tool allows drawing of grayscale density based on pencil pressure. The display method changes according to [subtractive Method] of the layer in use. For details, refer to "Drawing Color: Gray"( ⇒ p. 72).
Explanation
When [Pen Tool Options] is selected from the [Window] menu, the [Pencil Tool Options] window is displayed.
Viewing of Tool Options
A [Drawing Tools Menu] switches the drawing tool.
B [Tool Settings Menu] switches the tool setting.
C [Show Menu] It is possible to switch between [show Tab] and [show List], and the settings
can be saved.
D [Stroke Preview] Previews the stroke-shape settings.
E [Size] Adjusts the width of pen tip. When the [Brush Control] button on the left is
clicked, advanced settings can be made through the window.
F [Opacity] Adjusts the opacity of the line. When the [Brush Control] button on the left is
clicked, advanced settings can be made through the window.
G [In] Turns [In] on/off, and adjusts the intensity.
H [Out] Turns [Out] on/off, and adjusts the intensity.
I [Correction] Turns line Correction on/off, and adjusts the intensity.
J [In/Out Based on Speed] Adjusts the [In]/[Out] intensity based on stroke speed.
K [Correction Based on Speed] Adjusts the Correction intensity based on stroke speed.
L [Size Preview] Displays the preview of the [size] settings. The size can be adjusted even if the
preview is dragged.
Q
H
I
J
K
L
M
N
E
F
G
P
A BC
D
R
S
O
Operation Method
Draw by dragging. Create a layer if necessary.
2. Select the Tool select the [Pencil] tool from the [Tools] window.
3. Draw Dragging on the page draws the pencil line.
1. Open the Page Open the page through [Page Number] tab of the [Edit] window.
supported drawing layer
[Raster Layer][Reverse Layer][Tone Layer][selection Layer][Masking Layer]
Non-supported drawing layer[Vector Layer][Ruler Layer][Panel Ruler Layer]
User Guide
87
Chapter
3
Drawing
M [Use size as the value on screen] Regardless of the settings and 's display magnification, the drawing is done
with the size in [size Preview].
N [Combine During Comparison] Draws if the line is wider than drawing location. If set to OFF, the overlapping line becomes wide. It is valid for [Grayscale(8-bit)] and above. O [Display Size Affects Correction]
The intensity of Correction changes in response to zooming of page display.
P [Thickness] Adjusts the thickness of the pen-tip. When the [Brush Control] button on the
left is clicked, advanced settings can be made through the window.
Q [Direction] Adjusts the direction of the pen-tip shape. When the [Brush Control] button on
the left is clicked, advanced settings can be made through the window.
R [Shape Preview] Displays the preview of pen-tip shape settings. It is possible to adjust
[Direction] by dragging the pen.
S [Change Brush Shape Menu] The [Circle]/ [square]/[Polygon] menu and [Edit Polygon] button are displayed,
and it is possible to select or edit the pen-tip shape.
Manga Studio
88
Calligraphy Pen (EX only)The [Brush Pen] tool is used for drawing scratchy lines.
supported drawing layer
[Raster Layer][Reverse Layer][Tone Layer][selection Layer][Masking Layer]
Non-supported drawing layer[Vector Layer][Ruler Layer][Panel Ruler Layer]
Operation Method
Draw by dragging. Create a layer if necessary.
3. Draw Dragging on the page draws the brush-pen line.
2. Select the Tool select the [Brush Pen] tool from the [Tools] window.
1. Open the Page Open the page through [Page Number] tab of the [Edit] window.
[Density]: 1, [Ink Amount]: 200 drawn lines
[Density]: 50, [Ink Amount]: 200 drawn lines
[Density]: 100, [Ink Amount]: 200 drawn lines
When [Pen Tool Options] is selected from the [Window] menu, the [Brush Pen Tool Options] window is displayed.
Viewing of Tool Options
I
H
J
K L
E
F
G
A BC
D
A [Drawing Tools Menu] switches the drawing tool.
B [Tool Settings Menu] switches the tool type.
C [Show Menu] It is possible to switch between [show Tab] and [show List], and the settings
can be saved.
D [Stroke Preview] Displays a preview of stroke shape settings.
E [Size] Adjusts the width of pen tip. When the [Brush Control] button on the left is
clicked, advanced settings can be made through the window.
F [Opacity] Adjusts the opacity of the line. When the [Brush Control] button on the left is
clicked, advanced settings can be made through the window.
G [Density] The number of strands in the pen's hair tip can be adjusted.
User Guide
89
Chapter
3
Drawing
[Density]:30, [Ink Amount]:1 drawn line
[Density]:30, [Ink Amount]:50 drawn line
[Density]:30, [Ink Amount]:100 drawn line
H [Ink Amount] The width of a strand at the pen’s hair tip can be adjusted.
I [Size Preview] Displays a preview of the [size] settings. The size can be adjusted even if the
preview is dragged.
J [Thickness] Adjusts the thickness of the pen-tip. When the [Brush Control] button on the left is
clicked, advanced settings can be made through the [Brush Control] window.
K [Direction] Adjusts the direction of the pen-tip. When the [Brush Control] button on the left is
clicked, advanced settings can be made through the [Brush Control] window.
L [Shape Preview] Displays a preview of pen-tip shape settings. It is possible to adjust [Direction]
by dragging.
Manga Studio
90
Pattern Brush ToolThe [Pattern Brush] tool uses various patterns to make a drawing, similar to using a pen.
supported drawing layer
[Raster Layer][Reverse Layer][Tone Layer][selection Layer][Masking Layer]
Non-supported drawing layer[Vector Layer][Ruler Layer][Panel Ruler Layer]
Operation Method
Draw by dragging. Create a layer if necessary.
3. Draw Dragging on the page draws a continuous pattern.
2. Select the Tool select the [Pattern Brush] tool from the [Tools] window.
Right-click the [Pattern Brush] tool so the [Tool settings Menu] is displayed, and then select the tool settings for pattern brush.
1. Open the Page Open the page through [Page Number] tab of the [Edit] window.
Viewing of Tool Options
When [Pen Tool Options] is selected from the [Window] menu, the [Pattern Brush Tool Options] window is displayed.
A [Drawing Tools Menu] switches the drawing tool.
B [Tool Settings Menu] switches the tool setting.
C [Show Menu] It is possible to switch between [show Tab] and [show List], and the settings
can be saved.
D [Stroke Preview] Displays a preview of stroke shape settings.
E [Size] Adjusts the width of pen tip. When the [Brush Control] button on the left is clicked,
advanced settings can be made through the window.
F [Opacity] Adjusts the opacity of the line. When the [Brush Control] button on the left is
clicked, advanced settings can be made through the window.
G [Hardness] sets the intensity of effects at pen's periphery. When the [Brush Control] button
on the left is clicked, advanced settings can be made through the window. When this setting is reduced, blurry lines can be drawn.
H
I
J
K
L
M
N
E
F
G
P
A BC
D
O
User Guide
91
Chapter
3
Drawing
For the method of saving pattern materials, refer to "save Pattern as Brush Material" ( ⇒ p. 63) (EX only).
Application Operation
H [Interval] specifies the interval for the drawing of patterns. The smaller the value, the
closer the patterns. When the [Brush Control] button on the left is clicked, advanced settings can be made through the window.
I [Size Preview] Displays a preview of the [size] settings. The size can be adjusted even if the
preview is dragged.
J [Thickness] Adjusts the thickness of the pen-tip. When the [Brush Control] button on the
left is clicked, advanced settings can be made through the window.
K [Direction] Adjusts the direction of the pen-tip. When the [Brush Control] button on the
left is clicked, advanced settings can be made through the window.
L [Anti-Aliasing] (EX only) For [Raster Layer] of 8 bits and above, this draws an anti-aliased line. It is possible to adjust [Direction] by dragging.
M [Shape Preview] Displays the preview of pen-tip shape settings.
N [Change Brush Shape Menu] The [Circle]/ [square]/[Polygon] menu and [Edit Polygon] button are displayed,
and it is possible to select or edit the pen-tip shape.
O [Spray Area] Adjusts the range for spraying the pattern. When the [Brush Control] button on
the left is clicked, advanced settings can be made through the window.
P [Density] Adjusts the density of the pattern. When the [Brush Control] button on the left
is clicked, advanced settings can be made through the window.
Changing of Pattern Brushselect [Change Tool Options settings] from [show Menu] of the [Pen Tool Options] window.
・ [style(Pattern Brush): Pen] A line appears as if drawn by pen.
・ [style(Pattern Brush): Airbrush] This allows the user to draw as if
with airbrush.
・ [style(Pattern Brush): stamp] A continuous stamp pattern can be
drawn.
・ [style(Pattern Brush): Ribbon] The pattern changes and a natural
pattern can be drawn.
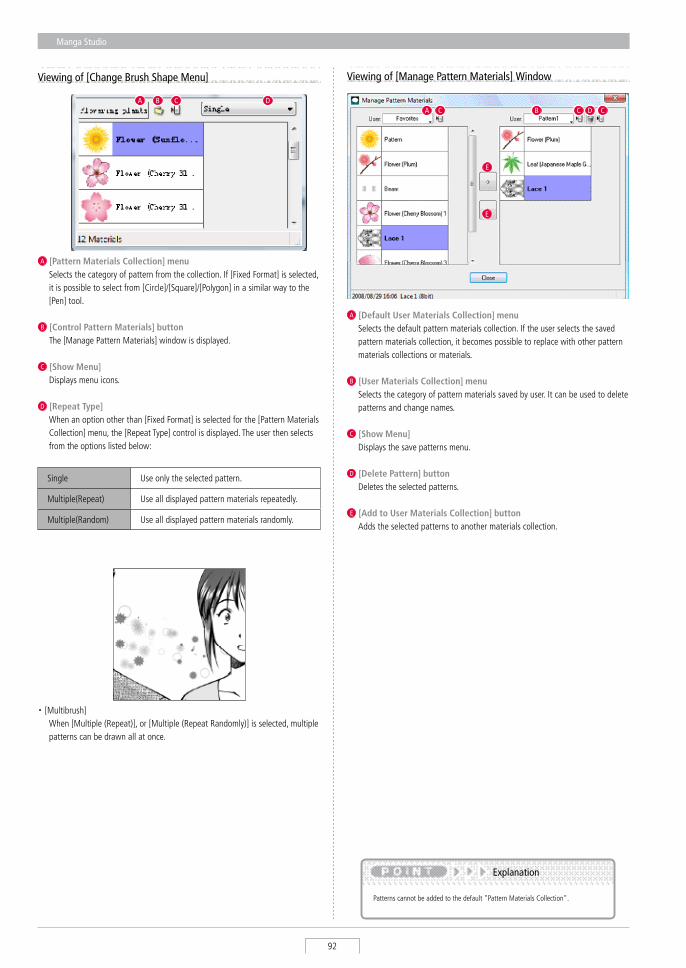
Manga Studio
92
Viewing of [Change Brush Shape Menu] Viewing of [Manage Pattern Materials] Window
A [Pattern Materials Collection] menu selects the category of pattern from the collection. If [Fixed Format] is selected,
it is possible to select from [Circle]/[square]/[Polygon] in a similar way to the [Pen] tool.
B [Control Pattern Materials] button The [Manage Pattern Materials] window is displayed.
C [Show Menu] Displays menu icons.
D [Repeat Type] When an option other than [Fixed Format] is selected for the [Pattern Materials
Collection] menu, the [Repeat Type] control is displayed. The user then selects from the options listed below:
single Use only the selected pattern.
Multiple(Repeat) Use all displayed pattern materials repeatedly.
Multiple(Random) Use all displayed pattern materials randomly.
・ [Multibrush] When [Multiple (Repeat)], or [Multiple (Repeat Randomly)] is selected, multiple
patterns can be drawn all at once.
A [Default User Materials Collection] menu selects the default pattern materials collection. If the user selects the saved
pattern materials collection, it becomes possible to replace with other pattern materials collections or materials.
B [User Materials Collection] menu selects the category of pattern materials saved by user. It can be used to delete
patterns and change names.
C [Show Menu] Displays the save patterns menu.
D [Delete Pattern] button Deletes the selected patterns.
E [Add to User Materials Collection] button Adds the selected patterns to another materials collection.
Patterns cannot be added to the default "Pattern Materials Collection".
A DCB
E
E
CDCBCA
Explanation
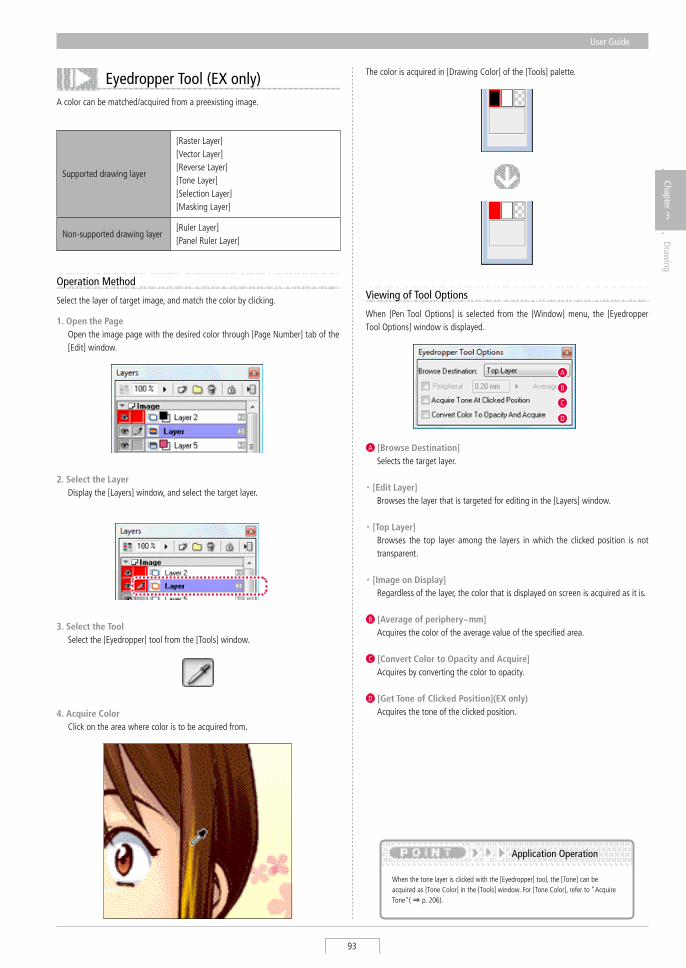
User Guide
93
Chapter
3
Drawing
Eyedropper Tool (EX only)A color can be matched/acquired from a preexisting image.
The color is acquired in [Drawing Color] of the [Tools] palette.
When the tone layer is clicked with the [Eyedropper] tool, the [Tone] can be acquired as [Tone Color] in the [Tools] window. For [Tone Color], refer to "Acquire Tone"( ⇒ p. 206).
Application Operation
supported drawing layer
[Raster Layer][Vector Layer][Reverse Layer][Tone Layer][selection Layer][Masking Layer]
Non-supported drawing layer[Ruler Layer][Panel Ruler Layer]
A [Browse Destination] selects the target layer.
・ [Edit Layer] Browses the layer that is targeted for editing in the [Layers] window.
・ [Top Layer] Browses the top layer among the layers in which the clicked position is not
transparent.
・ [Image on Display] Regardless of the layer, the color that is displayed on screen is acquired as it is.
B [Average of periphery~mm] Acquires the color of the average value of the specified area.
C [Convert Color to Opacity and Acquire] Acquires by converting the color to opacity.
D [Get Tone of Clicked Position](EX only) Acquires the tone of the clicked position.
Viewing of Tool Options
When [Pen Tool Options] is selected from the [Window] menu, the [Eyedropper Tool Options] window is displayed.
A
B
C
D
1. Open the Page Open the image page with the desired color through [Page Number] tab of the
[Edit] window.
Operation Method
select the layer of target image, and match the color by clicking.
4. Acquire Color Click on the area where color is to be acquired from.
3. Select the Tool select the [Eyedropper] tool from the [Tools] window.
2. Select the Layer Display the [Layers] window, and select the target layer.
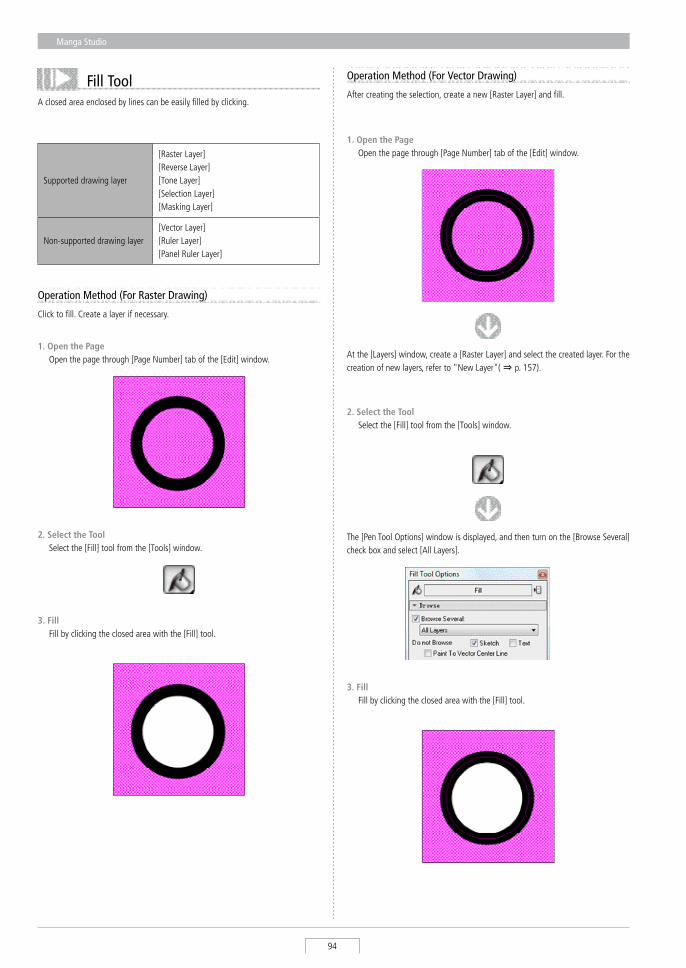
Manga Studio
94
Fill ToolA closed area enclosed by lines can be easily filled by clicking.
Operation Method (For Raster Drawing)
Click to fill. Create a layer if necessary.
3. Fill Fill by clicking the closed area with the [Fill] tool.
2. Select the Tool select the [Fill] tool from the [Tools] window.
1. Open the Page Open the page through [Page Number] tab of the [Edit] window.
supported drawing layer
[Raster Layer][Reverse Layer][Tone Layer][selection Layer][Masking Layer]
Non-supported drawing layer[Vector Layer][Ruler Layer][Panel Ruler Layer]
Operation Method (For Vector Drawing)
After creating the selection, create a new [Raster Layer] and fill.
1. Open the Page Open the page through [Page Number] tab of the [Edit] window.
At the [Layers] window, create a [Raster Layer] and select the created layer. For the creation of new layers, refer to "New Layer"( ⇒ p. 157).
2. Select the Tool select the [Fill] tool from the [Tools] window.
The [Pen Tool Options] window is displayed, and then turn on the [Browse several] check box and select [All Layers].
3. Fill Fill by clicking the closed area with the [Fill] tool.
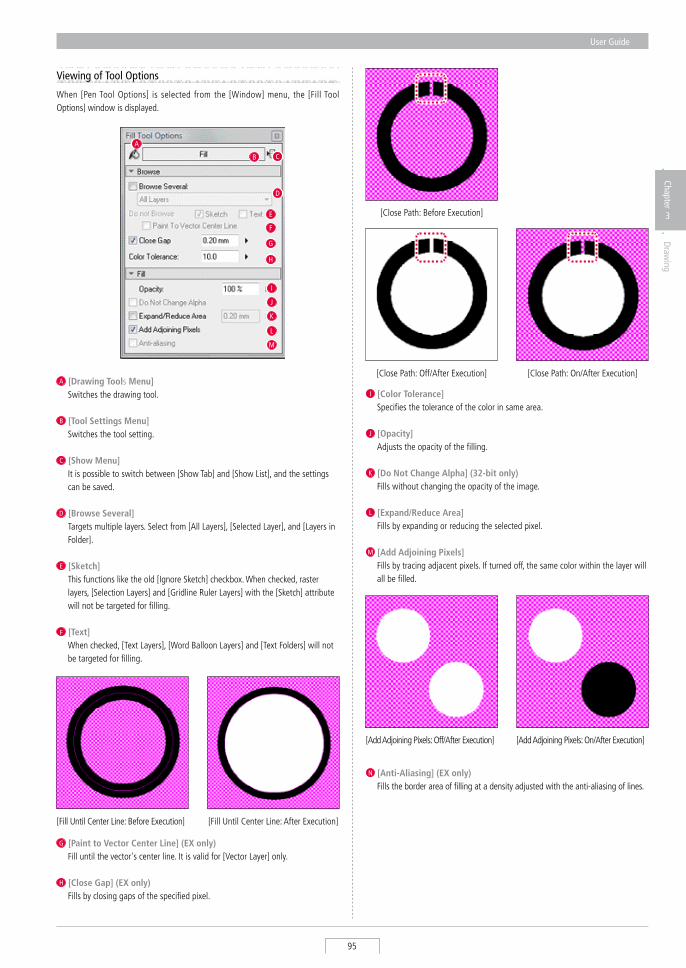
User Guide
95
Chapter
3
Drawing
Viewing of Tool Options
When [Pen Tool Options] is selected from the [Window] menu, the [Fill Tool Options] window is displayed.
A [Drawing Tools Menu] switches the drawing tool.
B [Tool Settings Menu] switches the tool setting.
C [Show Menu] It is possible to switch between [show Tab] and [show List], and the settings
can be saved.
D [Browse Several] Targets multiple layers. select from [All Layers], [selected Layer], and [Layers in
Folder].
E [Sketch] This functions like the old [Ignore sketch] checkbox. When checked, raster
layers, [selection Layers] and [Gridline Ruler Layers] with the [sketch] attribute will not be targeted for filling.
F [Text] When checked, [Text Layers], [Word Balloon Layers] and [Text Folders] will not
be targeted for filling.
G [Paint to Vector Center Line] (EX only) Fill until the vector's center line. It is valid for [Vector Layer] only.
H [Close Gap] (EX only) Fills by closing gaps of the specified pixel.
I
F
J
K
L
M
E
G
H
A
B C
D
[Fill Until Center Line: Before Execution] [Fill Until Center Line: After Execution]
I [Color Tolerance] specifies the tolerance of the color in same area.
J [Opacity] Adjusts the opacity of the filling.
K [Do Not Change Alpha] (32-bit only) Fills without changing the opacity of the image.
L [Expand/Reduce Area] Fills by expanding or reducing the selected pixel.
M [Add Adjoining Pixels] Fills by tracing adjacent pixels. If turned off, the same color within the layer will
all be filled.
[Close Path: Before Execution]
[Close Path: Off/After Execution] [Close Path: On/After Execution]
[Add Adjoining Pixels: Off/After Execution] [Add Adjoining Pixels: On/After Execution]
N [Anti-Aliasing] (EX only) Fills the border area of filling at a density adjusted with the anti-aliasing of lines.
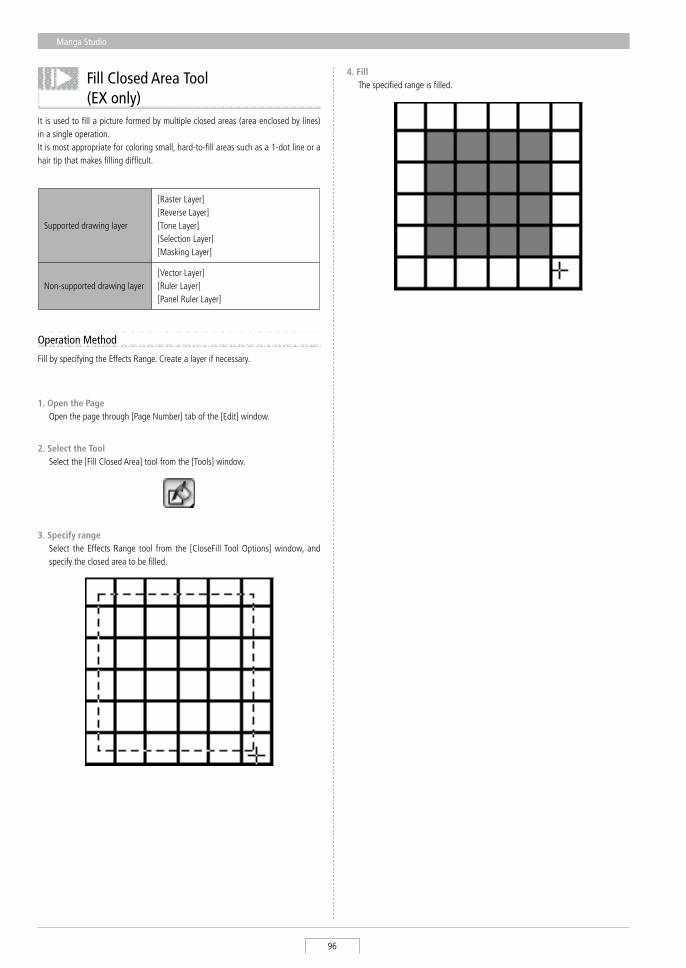
Manga Studio
96
It is used to fill a picture formed by multiple closed areas (area enclosed by lines) in a single operation. It is most appropriate for coloring small, hard-to-fill areas such as a 1-dot line or a hair tip that makes filling difficult.
4. Fill The specified range is filled.
supported drawing layer
[Raster Layer][Reverse Layer][Tone Layer][selection Layer][Masking Layer]
Non-supported drawing layer[Vector Layer][Ruler Layer][Panel Ruler Layer]
Operation Method
Fill by specifying the Effects Range. Create a layer if necessary.
1. Open the Page Open the page through [Page Number] tab of the [Edit] window.
2. Select the Tool select the [Fill Closed Area] tool from the [Tools] window.
3. Specify range select the Effects Range tool from the [CloseFill Tool Options] window, and
specify the closed area to be filled.
Fill Closed Area Tool (EX only)
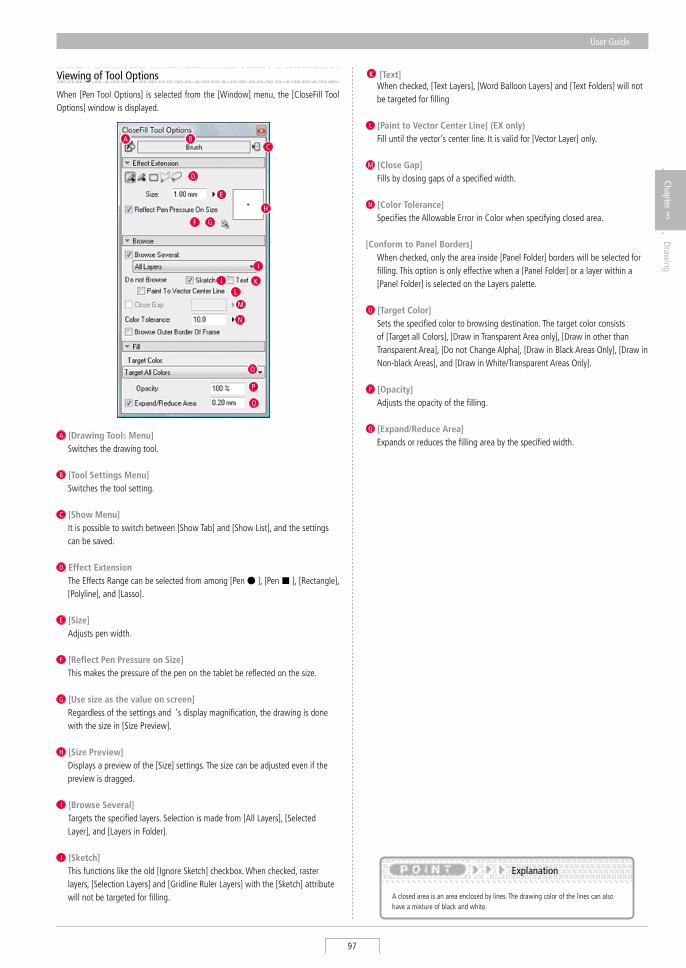
User Guide
97
Chapter
3
Drawing
K [Text] When checked, [Text Layers], [Word Balloon Layers] and [Text Folders] will not
be targeted for filling
L [Paint to Vector Center Line] (EX only) Fill until the vector's center line. It is valid for [Vector Layer] only.
M [Close Gap] Fills by closing gaps of a specified width.
N [Color Tolerance] specifies the Allowable Error in Color when specifying closed area.
[Conform to Panel Borders] When checked, only the area inside [Panel Folder] borders will be selected for
filling. This option is only effective when a [Panel Folder] or a layer within a [Panel Folder] is selected on the Layers palette.
O [Target Color] sets the specified color to browsing destination. The target color consists
of [Target all Colors], [Draw in Transparent Area only], [Draw in other than Transparent Area], [Do not Change Alpha], [Draw in Black Areas Only], [Draw in Non-black Areas], and [Draw in White/Transparent Areas Only].
P [Opacity] Adjusts the opacity of the filling.
Q [Expand/Reduce Area] Expands or reduces the filling area by the specified width.
A closed area is an area enclosed by lines. The drawing color of the lines can also have a mixture of black and white.
Explanation
Viewing of Tool Options
When [Pen Tool Options] is selected from the [Window] menu, the [CloseFill Tool Options] window is displayed.
A [Drawing Tools Menu] switches the drawing tool.
B [Tool Settings Menu] switches the tool setting.
C [Show Menu] It is possible to switch between [show Tab] and [show List], and the settings
can be saved.
D Effect Extension The Effects Range can be selected from among [Pen ● ], [Pen ■ ], [Rectangle],
[Polyline], and [Lasso].
E [Size] Adjusts pen width. F [Reflect Pen Pressure on Size]
This makes the pressure of the pen on the tablet be reflected on the size.
G [Use size as the value on screen] Regardless of the settings and 's display magnification, the drawing is done
with the size in [size Preview].
H [Size Preview] Displays a preview of the [size] settings. The size can be adjusted even if the
preview is dragged.
I [Browse Several] Targets the specified layers. selection is made from [All Layers], [selected
Layer], and [Layers in Folder].
J [Sketch] This functions like the old [Ignore sketch] checkbox. When checked, raster
layers, [selection Layers] and [Gridline Ruler Layers] with the [sketch] attribute will not be targeted for filling.
I
F
J
L
M
N
E
G
H
A BC
D
P
Q
O
K
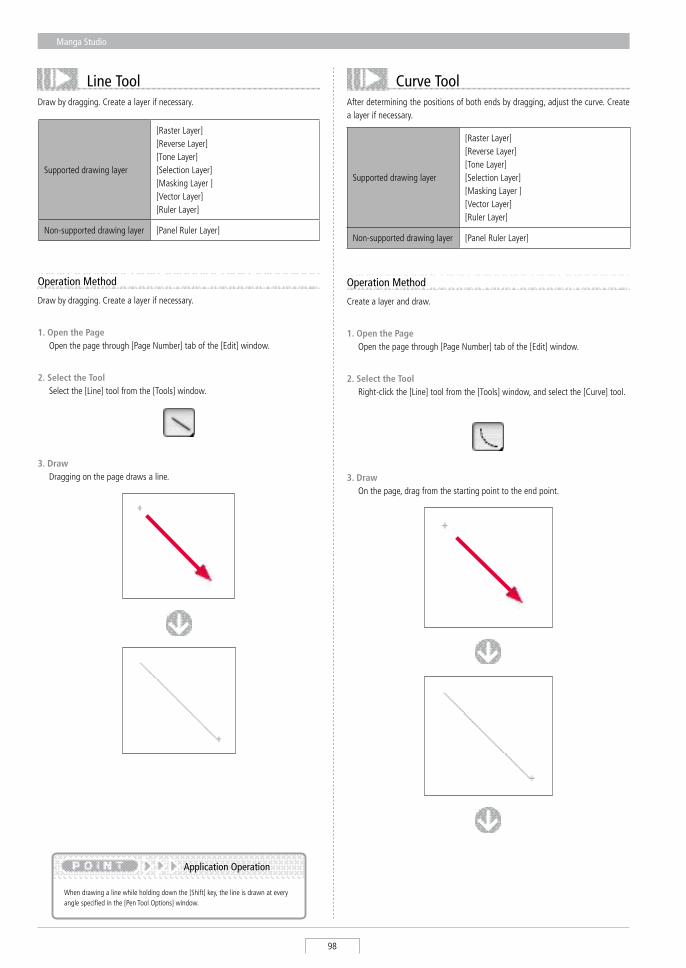
Manga Studio
98
Line ToolDraw by dragging. Create a layer if necessary.
When drawing a line while holding down the [shift] key, the line is drawn at every angle specified in the [Pen Tool Options] window.
Application Operation
supported drawing layer
[Raster Layer][Reverse Layer][Tone Layer][selection Layer][Masking Layer ][Vector Layer][Ruler Layer]
Non-supported drawing layer [Panel Ruler Layer]
Curve ToolAfter determining the positions of both ends by dragging, adjust the curve. Create a layer if necessary.
supported drawing layer
[Raster Layer][Reverse Layer][Tone Layer][selection Layer][Masking Layer ][Vector Layer][Ruler Layer]
Non-supported drawing layer [Panel Ruler Layer]
Operation Method
Create a layer and draw.
2. Select the Tool Right-click the [Line] tool from the [Tools] window, and select the [Curve] tool.
1. Open the Page Open the page through [Page Number] tab of the [Edit] window.
Operation Method
Draw by dragging. Create a layer if necessary.
1. Open the Page Open the page through [Page Number] tab of the [Edit] window.
2. Select the Tool select the [Line] tool from the [Tools] window.
3. Draw Dragging on the page draws a line. 3. Draw
On the page, drag from the starting point to the end point.
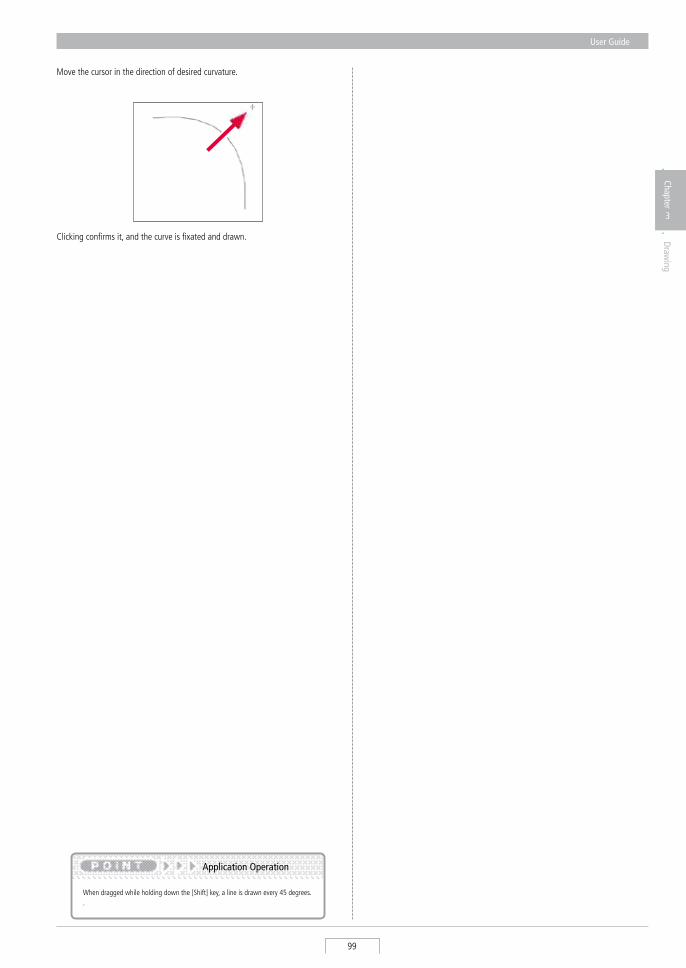
User Guide
99
Chapter
3
Drawing
When dragged while holding down the [shift] key, a line is drawn every 45 degrees. .
Application Operation
Move the cursor in the direction of desired curvature.
Clicking confirms it, and the curve is fixated and drawn.
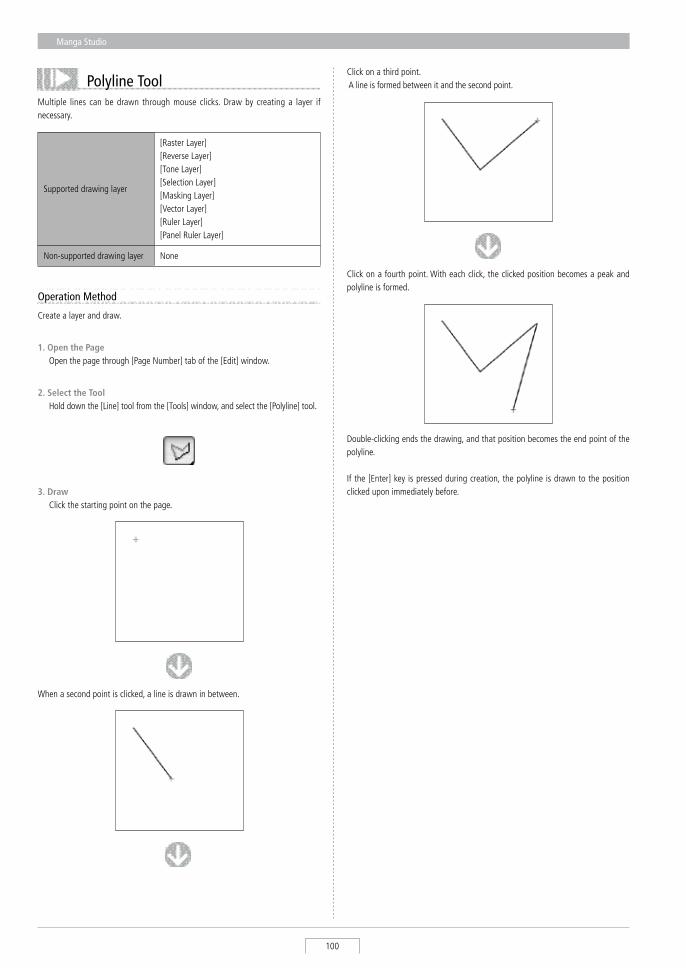
Manga Studio
100
Polyline ToolMultiple lines can be drawn through mouse clicks. Draw by creating a layer if necessary.
Operation Method
Create a layer and draw.
1. Open the Page Open the page through [Page Number] tab of the [Edit] window.
2. Select the Tool Hold down the [Line] tool from the [Tools] window, and select the [Polyline] tool.
3. Draw Click the starting point on the page.
When a second point is clicked, a line is drawn in between.
Click on a third point. A line is formed between it and the second point.
Click on a fourth point. With each click, the clicked position becomes a peak and polyline is formed.
Double-clicking ends the drawing, and that position becomes the end point of the polyline.
If the [Enter] key is pressed during creation, the polyline is drawn to the position clicked upon immediately before.
supported drawing layer
[Raster Layer][Reverse Layer][Tone Layer][selection Layer][Masking Layer][Vector Layer][Ruler Layer][Panel Ruler Layer]
Non-supported drawing layer None
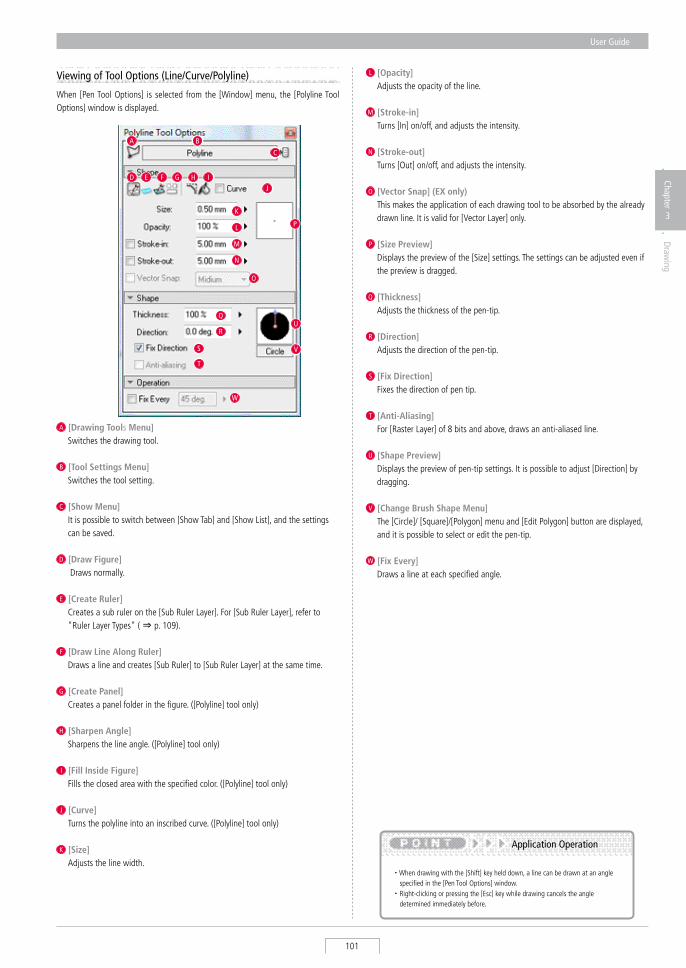
User Guide
101
Chapter
3
Drawing
・ When drawing with the [shift] key held down, a line can be drawn at an angle specified in the [Pen Tool Options] window.
・ Right-clicking or pressing the [Esc] key while drawing cancels the angle determined immediately before.
Application Operation
When [Pen Tool Options] is selected from the [Window] menu, the [Polyline Tool Options] window is displayed.
Viewing of Tool Options (Line/Curve/Polyline)
A [Drawing Tools Menu] switches the drawing tool.
B [Tool Settings Menu] switches the tool setting.
C [Show Menu] It is possible to switch between [show Tab] and [show List], and the settings
can be saved.
D [Draw Figure] Draws normally.
E [Create Ruler] Creates a sub ruler on the [sub Ruler Layer]. For [sub Ruler Layer], refer to
"Ruler Layer Types" ( ⇒ p. 109).
F [Draw Line Along Ruler] Draws a line and creates [sub Ruler] to [sub Ruler Layer] at the same time.
G [Create Panel] Creates a panel folder in the figure. ([Polyline] tool only)
H [Sharpen Angle] sharpens the line angle. ([Polyline] tool only)
I [Fill Inside Figure] Fills the closed area with the specified color. ([Polyline] tool only)
J [Curve] Turns the polyline into an inscribed curve. ([Polyline] tool only)
K [Size] Adjusts the line width.
R
P
IJ
K
L
M
E F
N
Q
A B
C
D
U
V
O
G H
S
T
W
L [Opacity] Adjusts the opacity of the line.
M [Stroke-in] Turns [In] on/off, and adjusts the intensity.
N [Stroke-out] Turns [Out] on/off, and adjusts the intensity.
O [Vector Snap] (EX only) This makes the application of each drawing tool to be absorbed by the already
drawn line. It is valid for [Vector Layer] only.
P [Size Preview] Displays the preview of the [size] settings. The settings can be adjusted even if
the preview is dragged.
Q [Thickness] Adjusts the thickness of the pen-tip.
R [Direction] Adjusts the direction of the pen-tip.
S [Fix Direction] Fixes the direction of pen tip.
T [Anti-Aliasing] For [Raster Layer] of 8 bits and above, draws an anti-aliased line.
U [Shape Preview] Displays the preview of pen-tip settings. It is possible to adjust [Direction] by
dragging.
V [Change Brush Shape Menu] The [Circle]/ [square]/[Polygon] menu and [Edit Polygon] button are displayed,
and it is possible to select or edit the pen-tip.
W [Fix Every] Draws a line at each specified angle.
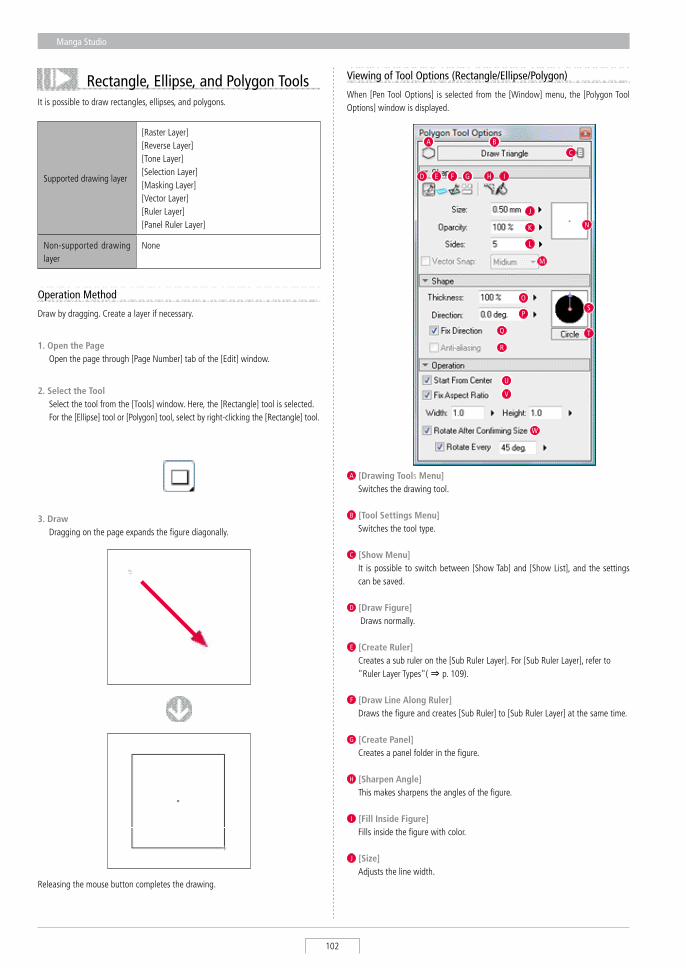
Manga Studio
102
Rectangle, Ellipse, and Polygon ToolsIt is possible to draw rectangles, ellipses, and polygons.
Operation Method
Draw by dragging. Create a layer if necessary.
1. Open the Page Open the page through [Page Number] tab of the [Edit] window.
2. Select the Tool select the tool from the [Tools] window. Here, the [Rectangle] tool is selected. For the [Ellipse] tool or [Polygon] tool, select by right-clicking the [Rectangle] tool.
supported drawing layer
[Raster Layer][Reverse Layer][Tone Layer][selection Layer][Masking Layer][Vector Layer][Ruler Layer][Panel Ruler Layer]
Non-supported drawing layer
None
A [Drawing Tools Menu] switches the drawing tool.
B [Tool Settings Menu] switches the tool type.
C [Show Menu] It is possible to switch between [show Tab] and [show List], and the settings
can be saved.
D [Draw Figure] Draws normally.
E [Create Ruler] Creates a sub ruler on the [sub Ruler Layer]. For [sub Ruler Layer], refer to
"Ruler Layer Types"( ⇒ p. 109).
F [Draw Line Along Ruler] Draws the figure and creates [sub Ruler] to [sub Ruler Layer] at the same time.
G [Create Panel] Creates a panel folder in the figure.
H [Sharpen Angle] This makes sharpens the angles of the figure.
I [Fill Inside Figure] Fills inside the figure with color.
J [Size] Adjusts the line width.
When [Pen Tool Options] is selected from the [Window] menu, the [Polygon Tool Options] window is displayed.
Viewing of Tool Options (Rectangle/Ellipse/Polygon)
Q
N
I
J
K
L
E F
M
P
A BC
D
S
T
O
G H
R
U
V
W
Releasing the mouse button completes the drawing.
3. Draw Dragging on the page expands the figure diagonally.
User Guide
103
Chapter
3
Drawing
K [Opacity] Adjusts the opacity of the line.
L [Sides] (Polygon tool only) specifies the number of sides for the polygon.
M [Vector Snap] (EX only) This makes the application of each figure tool to be absorbed by the already
drawn line. It is valid for [Vector Layer] only.
N [Size Preview] Displays the preview of the [size] settings. The size can be adjusted even if the
preview is dragged.
O [Thickness] Adjusts the thickness of the pen-tip.
P [Direction] Adjusts the direction of the pen-tip.
Q [Fix Direction] Fixes the direction of pen tip.
R [Anti-Aliasing](EX only) For [Raster Layer] of 8 bits and above, draws an anti-aliased line.
S [Shape Preview] Displays a preview of pen-tip shape settings. It is possible to adjust [Direction]
by dragging.
T [Change Brush Shape Menu] button The [Circle]/[square]/[Polygon] menu and [Edit Polygon] button are displayed,
and it is possible to select or edit the pen-tip shape.
U [Start from Center] starts drawing the figure from the center.
V [Fix Aspect Ratio] Fixes the aspect ratio of the figure.
W [Rotate after confirming size] Rotates after confirming the size of the figure.
・ When starting to create by holding down the [Ctrl] key, the shape begins from the center.
・ When the [shift] key is pressed while dragging, the aspect ratio is fixed by the value set in the [Pen Tool Options] window.
・ If [Rotate After size is Decided] of the [Pen Tool Options] window is selected, and [Rotate Every ~ °] is not selected, and the [shift] key is pressed during the rotation, the rotation is at the specified angle.
Application Operation


Rulers
Chapter 4
This chapter will introduce ruler creation, perspective with rulers, frame layout and more.
Step:01 Rulers 108
Step:02 Bezier Curve Ruler (EX only) 117
Step:03 special Ruler (EX only) 123
Chapter
4
Rulers
Step:04 symmetry Ruler (EX only) 130
Step:05 Panel Ruler 133
Step:06 Edit・ Align Rulers 139
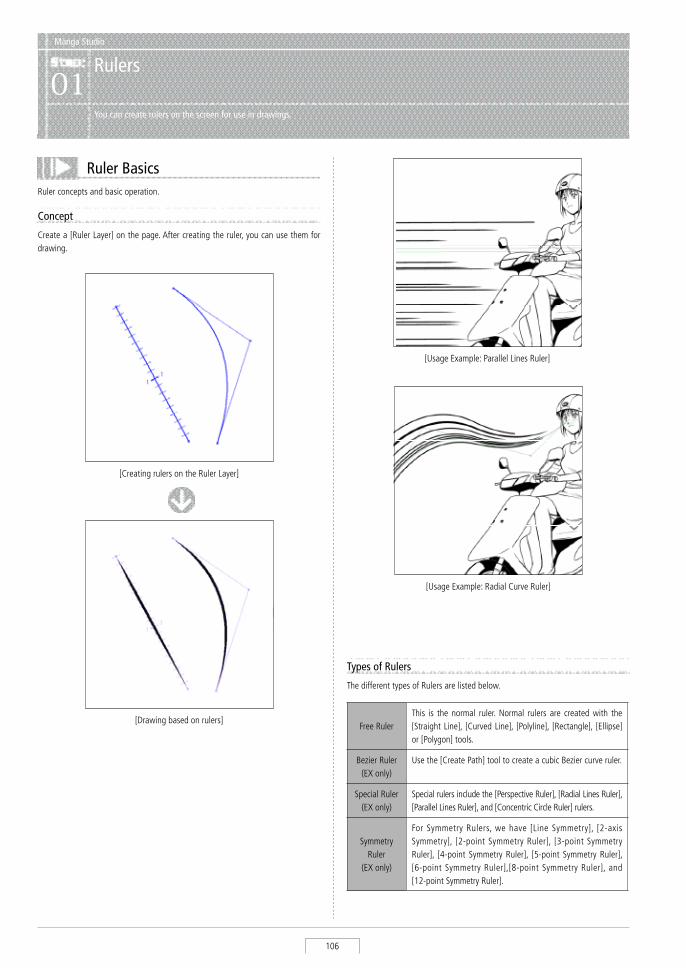
Manga Studio
106
Manga Studio
Rulers01
You can create rulers on the screen for use in drawings.
Ruler BasicsRuler concepts and basic operation.
Concept
Create a [Ruler Layer] on the page. After creating the ruler, you can use them for drawing.
[Creating rulers on the Ruler Layer]
Free RulerThis is the normal ruler. Normal rulers are created with the [straight Line], [Curved Line], [Polyline], [Rectangle], [Ellipse] or [Polygon] tools.
Bezier Ruler(EX only)
Use the [Create Path] tool to create a cubic Bezier curve ruler.
special Ruler(EX only)
special rulers include the [Perspective Ruler], [Radial Lines Ruler], [Parallel Lines Ruler], and [Concentric Circle Ruler] rulers.
symmetry Ruler
(EX only)
For symmetry Rulers, we have [Line symmetry], [2-axis symmetry], [2-point symmetry Ruler], [3-point symmetry Ruler], [4-point symmetry Ruler], [5-point symmetry Ruler], [6-point symmetry Ruler],[8-point symmetry Ruler], and [12-point symmetry Ruler].
Types of Rulers
The different types of Rulers are listed below.
[Drawing based on rulers]
[Usage Example: Parallel Lines Ruler]
[Usage Example: Radial Curve Ruler]
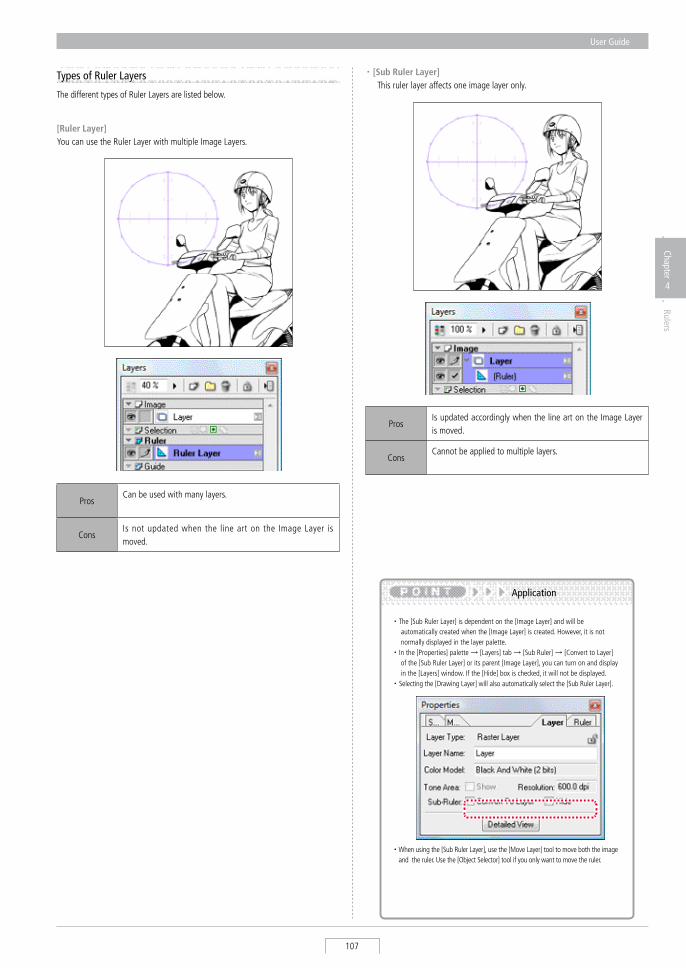
User Guide
107
Chapter
4
Rulers
Types of Ruler Layers
The different types of Ruler Layers are listed below.
[Ruler Layer]You can use the Ruler Layer with multiple Image Layers.
ProsCan be used with many layers.
ConsIs not updated when the line art on the Image Layer is moved.
・ [Sub Ruler Layer] This ruler layer affects one image layer only.
ProsIs updated accordingly when the line art on the Image Layer is moved.
ConsCannot be applied to multiple layers.
・ The [sub Ruler Layer] is dependent on the [Image Layer] and will be automatically created when the [Image Layer] is created. However, it is not normally displayed in the layer palette.
・ In the [Properties] palette → [Layers] tab → [sub Ruler] → [Convert to Layer] of the [sub Ruler Layer] or its parent [Image Layer], you can turn on and display in the [Layers] window. If the [Hide] box is checked, it will not be displayed.
・selecting the [Drawing Layer] will also automatically select the [sub Ruler Layer].
・ When using the [sub Ruler Layer], use the [Move Layer] tool to move both the image and the ruler. Use the [Object selector] tool if you only want to move the ruler.
Application
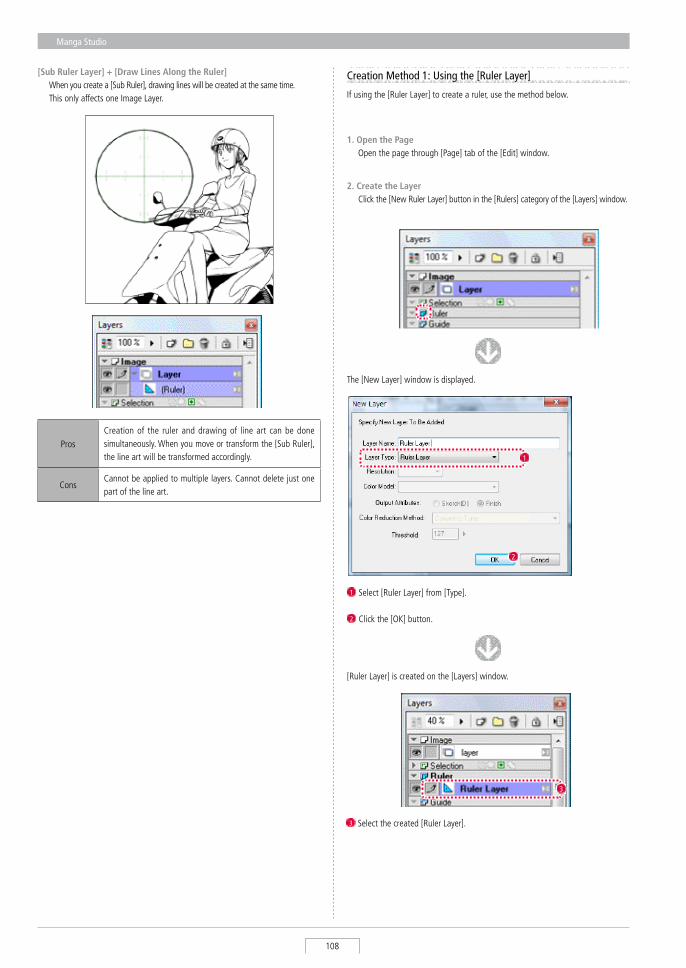
Manga Studio
108
Creation Method 1: Using the [Ruler Layer]
If using the [Ruler Layer] to create a ruler, use the method below.
1. Open the Page Open the page through [Page] tab of the [Edit] window.
The [New Layer] window is displayed.
2
1
1 select [Ruler Layer] from [Type].
2 Click the [OK] button.
3 select the created [Ruler Layer].
[Ruler Layer] is created on the [Layers] window.
3
[Sub Ruler Layer] + [Draw Lines Along the Ruler] When you create a [sub Ruler], drawing lines will be created at the same time. This only affects one Image Layer.
ProsCreation of the ruler and drawing of line art can be done simultaneously. When you move or transform the [sub Ruler], the line art will be transformed accordingly.
ConsCannot be applied to multiple layers. Cannot delete just one part of the line art.
2. Create the Layer Click the [New Ruler Layer] button in the [Rulers] category of the [Layers] window.
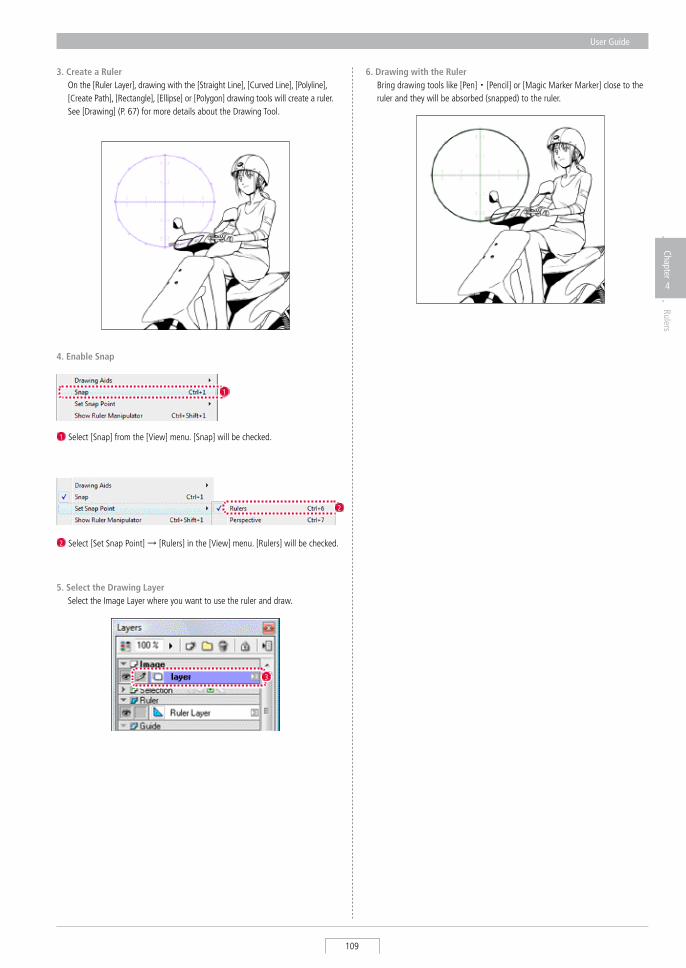
User Guide
109
Chapter
4
Rulers
3. Create a Ruler On the [Ruler Layer], drawing with the [straight Line], [Curved Line], [Polyline],
[Create Path], [Rectangle], [Ellipse] or [Polygon] drawing tools will create a ruler. see [Drawing] (P. 67) for more details about the Drawing Tool.
4. Enable Snap
1 select [snap] from the [View] menu. [snap] will be checked.
1
5. Select the Drawing Layer select the Image Layer where you want to use the ruler and draw.
3
6. Drawing with the Ruler Bring drawing tools like [Pen]・[Pencil] or [Magic Marker Marker] close to the
ruler and they will be absorbed (snapped) to the ruler.
2 select [set snap Point] → [Rulers] in the [View] menu. [Rulers] will be checked.
2
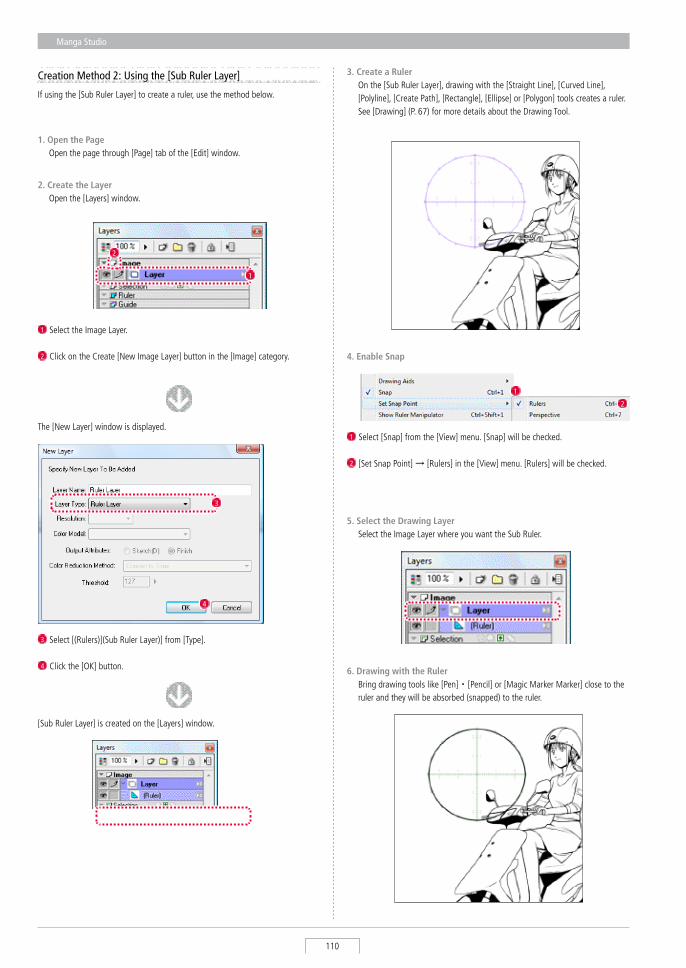
Manga Studio
110
Creation Method 2: Using the [Sub Ruler Layer]
If using the [sub Ruler Layer] to create a ruler, use the method below.
1. Open the Page Open the page through [Page] tab of the [Edit] window.
The [New Layer] window is displayed.
4
3
3 select [(Rulers)](sub Ruler Layer)] from [Type].
4 Click the [OK] button.
[sub Ruler Layer] is created on the [Layers] window.
1 select the Image Layer.
2 Click on the Create [New Image Layer] button in the [Image] category.
1
2
3. Create a Ruler On the [sub Ruler Layer], drawing with the [straight Line], [Curved Line],
[Polyline], [Create Path], [Rectangle], [Ellipse] or [Polygon] tools creates a ruler. see [Drawing] (P. 67) for more details about the Drawing Tool.
4. Enable Snap
1 select [snap] from the [View] menu. [snap] will be checked.
2 [set snap Point] → [Rulers] in the [View] menu. [Rulers] will be checked.
2
1
5. Select the Drawing Layer select the Image Layer where you want the sub Ruler.
2. Create the Layer Open the [Layers] window.
6. Drawing with the Ruler Bring drawing tools like [Pen]・[Pencil] or [Magic Marker Marker] close to the
ruler and they will be absorbed (snapped) to the ruler.
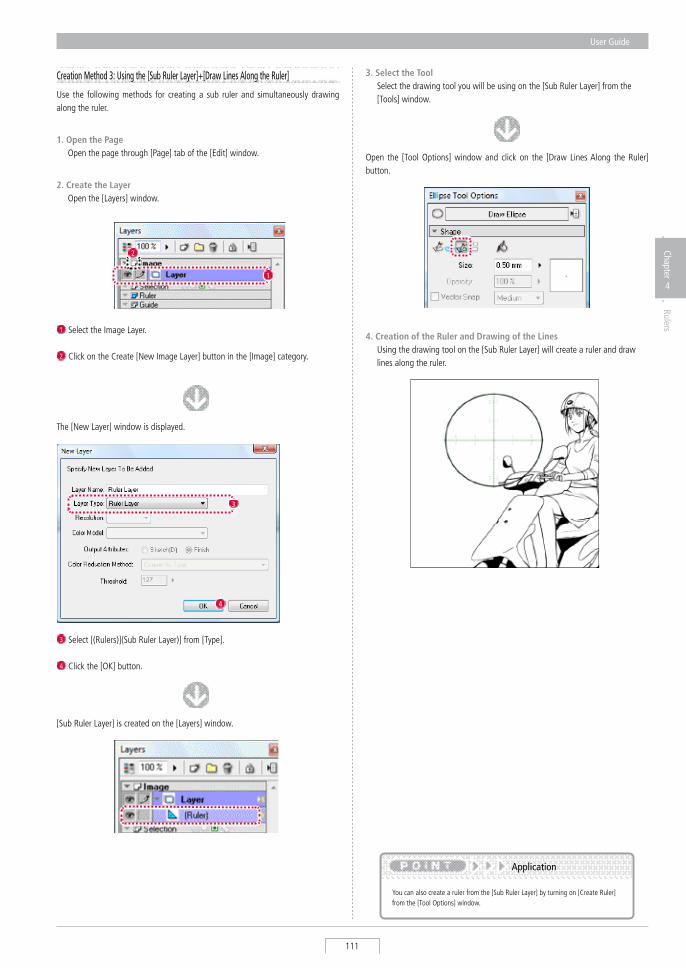
User Guide
111
Chapter
4
Rulers
Creation Method 3: Using the [Sub Ruler Layer]+[Draw Lines Along the Ruler]
Use the following methods for creating a sub ruler and simultaneously drawing along the ruler.
1. Open the Page Open the page through [Page] tab of the [Edit] window.
The [New Layer] window is displayed.
4
3
3 select [(Rulers)](sub Ruler Layer)] from [Type].
4 Click the [OK] button.
[sub Ruler Layer] is created on the [Layers] window.
1 select the Image Layer.
2 Click on the Create [New Image Layer] button in the [Image] category.
1
2
3. Select the Tool select the drawing tool you will be using on the [sub Ruler Layer] from the
[Tools] window.
Open the [Tool Options] window and click on the [Draw Lines Along the Ruler] button.
4. Creation of the Ruler and Drawing of the Lines Using the drawing tool on the [sub Ruler Layer] will create a ruler and draw
lines along the ruler.
2. Create the Layer Open the [Layers] window.
You can also create a ruler from the [sub Ruler Layer] by turning on [Create Ruler] from the [Tool Options] window.
Application

Manga Studio
112
Object Selector ToolWhen selecting a ruler on the [Ruler Layer] to move and edit, 、use the [Object selector] tool.
How to Use
Drag or click to select the ruler.
1. Open the Page Open the page created by the ruler through [Page] tab of the [Edit] window.
2. Select the Tool select the [Ruler selection] tool from the [Tools] window.
3. Select the Ruler With the [Ruler selection] tool, select the ruler by dragging or clicking.
The selected ruler will become red.
Viewing of Tool Options
When the [Tool Options] is selected from the [Window] menu, the [Ruler selection Tool Options] window is displayed.
A [Set All Layers As Target] select the rulers from all layers.
B [Select Entire Ruler] selecting any part of the ruler will select the whole ruler.
C [Add Vertex To Clicked Side] A control point will be added where you click.
D [Match Other Vertices When Shifting Vectors] Horizontally or vertically align other vertex points. This can only be used on the
Panel Ruler Layer. see [step:05 Panel Ruler] (P. 133) for more details about the Panel Ruler.
E [Snap to Rulers] Guide Lines snap to the Measurement scale when creating or moving them within
the snap interval. see [show Guide] (P. 364) for more details about Guide Lines.
E
A
B
C
D
・ Hitting the [Ctrl] key while using a drawing tool like the [Pen] will temporarily switch it to the [Ruler selection] tool.
・ While holding down the [shift] key, dragging or clicking will allow you to select multiple rulers and points on rulers.
Application

User Guide
113
Chapter
4
Rulers
Ruler OperationsYou can use rulers with the keyboard or [Ruler Manipulator]. Move, rotate, enlarge, and scale are available for displayed rulers. When wanting to operate on a specific ruler, select with the [Ruler selection] tool.
Using the Keyboard
You can operate the ruler with the keyboard.
1. Display the Ruler You Want To Use Display the layer with the ruler you want edit.
2. Adjust the Center Rotate and scale always operate around the center. Move the center point
marked with a [+] with the [Ruler selection] tool or place the mouse cursor where you want the center to be and press the [Q] key.
3. Move, Rotate, Scale Below are the key combinations for move, rotate and enlarge.
Moving the Ruler [ ← ][ → ][ ↑ ][ ↓ ]
Enlarging the Ruler [Z]
shrinking the ruler [X]
Rotating the Ruler Left [A]
Rotating the Ruler Right [s]
You can change the scaling factor for each key press by selecting [Preferences] →[Page] → [Rulers] from the [File] menu. From [Key Control], you can set up [Vertical Move]・ [Horizontal Move]・ [Rotate Volume]・ [scale].
Application
Using the Ruler Manipulator
Use the [Ruler Manipulator] to operate rulers.
1. Display the Ruler Manipulator select [show Page Rulers Manipulator] from the [View] menu to display the
[Ruler Manipulator].
2. Adjust the Center Rotate and scale always operate around the center. Move the center point
marked with a [+] with the [Ruler selection] tool or place the mouse cursor where you want the center to be and press the [Q] key.
A
B A
B
DE
F
A
B
C
A
B
Movement Relative to the screen Click A to move the ruler on top of
the image.
Movement Relative to the Paper Click B
to move the ruler according to the direction of the paper. Rotating the display screen also rotates these arrows.
Free Move Drag B to freely move the ruler.
Rotate Clockwise Click C to rotate the ruler left around the center point.
R o t a t e C o u n t e r-Clockwise Click D to rotate the ruler right around
the center point.
Free Rotate Drag C or Dto freely rotate the ruler.
Enlarge Click E to enlarge the ruler around the center point.
shrink Click F to shrink the ruler around the center point.
Free scale Drag E or F to freely scale the ruler.
3. Operating the Ruler Display the ruler you want to use and use the manipulator on it.
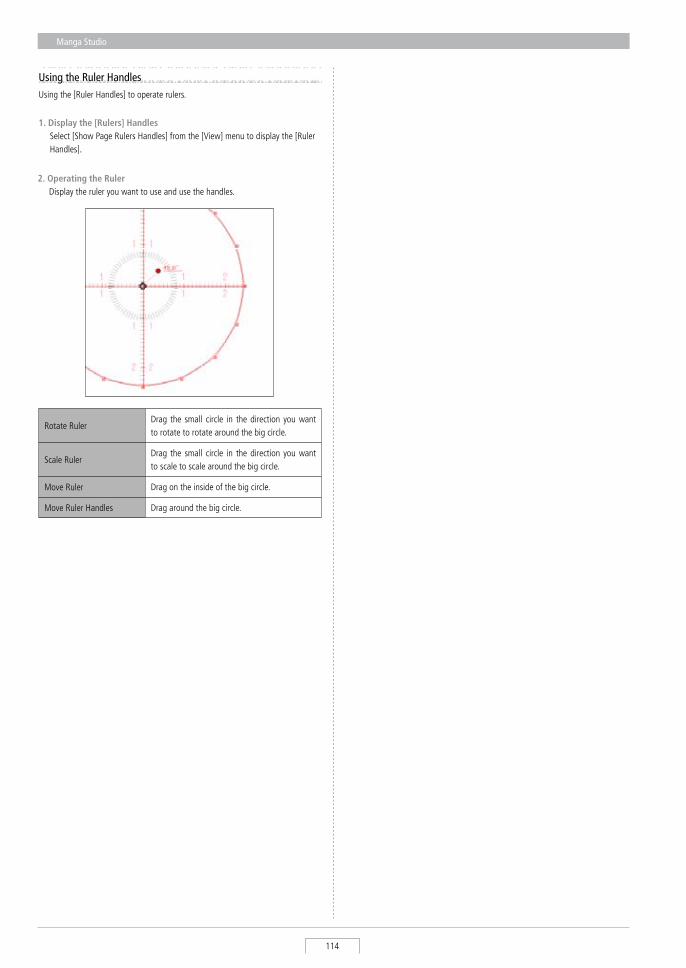
Manga Studio
114
Using the Ruler HandlesUsing the [Ruler Handles] to operate rulers.
1. Display the [Rulers] Handles select [show Page Rulers Handles] from the [View] menu to display the [Ruler
Handles].
2. Operating the Ruler Display the ruler you want to use and use the handles.
Rotate Ruler Drag the small circle in the direction you want to rotate to rotate around the big circle.
scale Ruler Drag the small circle in the direction you want to scale to scale around the big circle.
Move Ruler Drag on the inside of the big circle.
Move Ruler Handles Drag around the big circle.
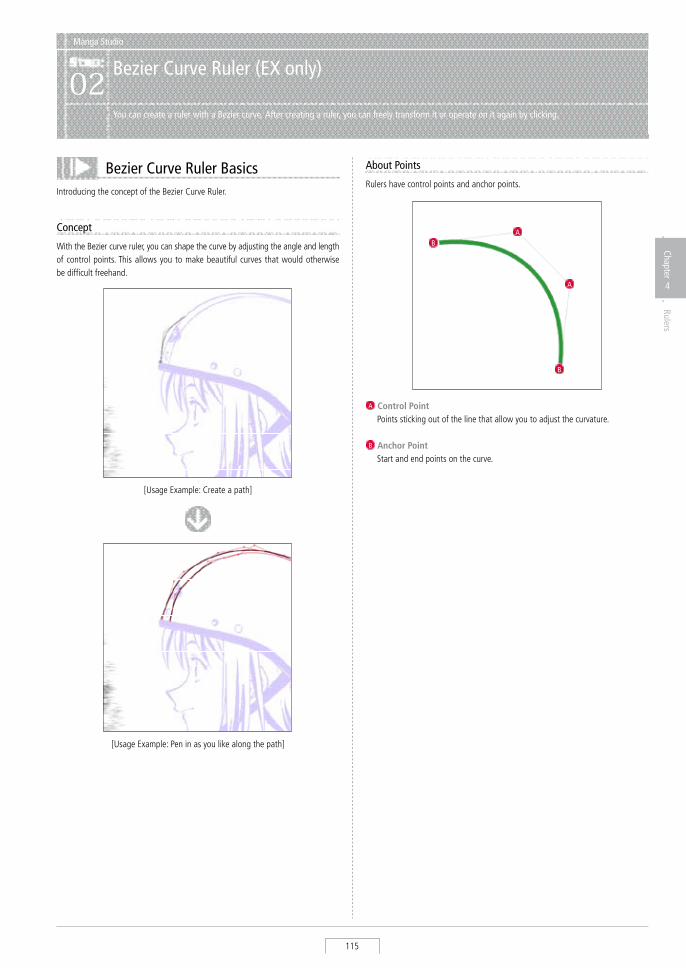
User Guide
115
Chapter
4
Rulers
Manga Studio
Bezier Curve Ruler (EX only)02
You can create a ruler with a Bezier curve. After creating a ruler, you can freely transform it or operate on it again by clicking.
Concept
With the Bezier curve ruler, you can shape the curve by adjusting the angle and length of control points. This allows you to make beautiful curves that would otherwise be difficult freehand.
A Control Point Points sticking out of the line that allow you to adjust the curvature.
B Anchor Point start and end points on the curve.
Bezier Curve Ruler BasicsIntroducing the concept of the Bezier Curve Ruler.
[Usage Example: Pen in as you like along the path]
[Usage Example: Create a path]
A
B
B
A
About Points
Rulers have control points and anchor points.

Manga Studio
116
Create Path Tool (EX only)The [Create Path] tool is used to create a Bezier Curve Ruler.
supported layer
[Raster Layer][Vector Layer][Tone Layer][Reverse Layer][Masking Layer][selection Layer][Ruler Layer]
Non-supported [Panel Ruler Layer]
3
4
3 Click and define a control point near the start point.
4 Click and define a control point near the end point. Upon doing so, a Bezier curve will be created.
5. Create the Second Curved Line
1 Click and define the end point of the second curve. Upon defining the end point, a straight line will be created and you be able to define 1 control point.
2 Click and define a control point.
3 Double click and a Bezier curve ruler will be created.
1
2
3
・ Hitting the [Enter] key will make the point you just defined into the end point to create a curve.
・ Right clicking or hitting the [Esc] key will cancel the point you just defined. ・ For the second curve, the first control point is already set, so you only need to
define 1 more point.
Note・ Usage
Creation Method 1: Create a Continued Curve
Create a curved line.
1. Open the [Edit] Window Open the [Page] tab through the [Edit] window.
4. Create the First Curved Line
1
2
1 Click and define the start point.
2 Click and define the end point. Upon defining the end point, a straight line will be created with 2 control points.
3. Select the Tool Right-click the [Line] tool from the [Tools] window, and select the [Create Path] tool.
2. Select the Layer Create [Ruler Layer] or [sub Ruler Layer] from the [Layers] window.
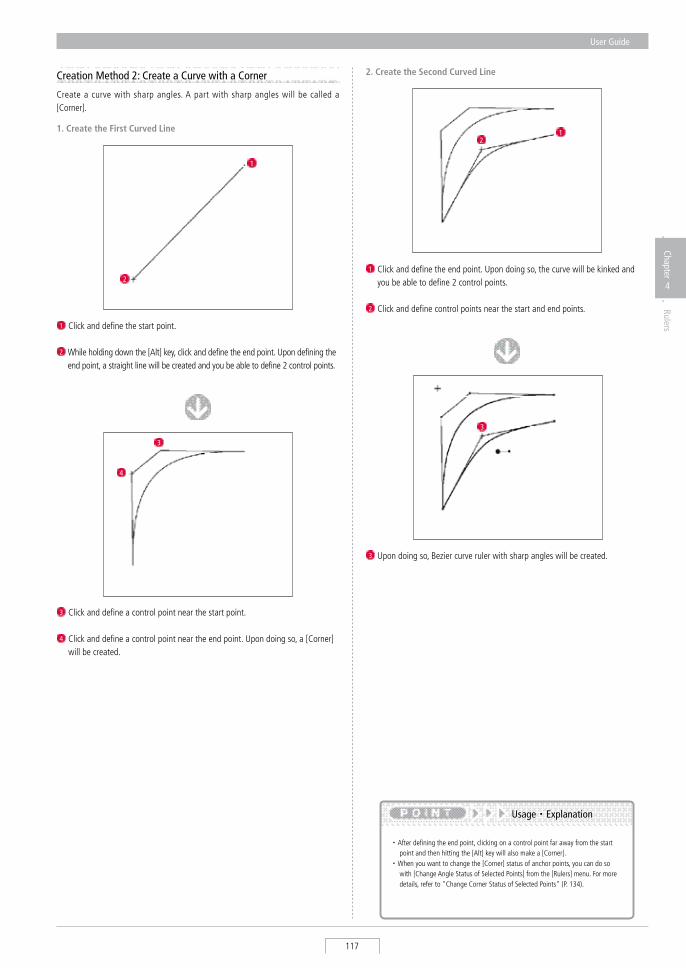
User Guide
117
Chapter
4
Rulers
Creation Method 2: Create a Curve with a Corner
Create a curve with sharp angles. A part with sharp angles will be called a [Corner].
1. Create the First Curved Line
1
2
1 Click and define the start point.
2 While holding down the [Alt] key, click and define the end point. Upon defining the end point, a straight line will be created and you be able to define 2 control points.
3
4
3 Click and define a control point near the start point.
4 Click and define a control point near the end point. Upon doing so, a [Corner] will be created.
2. Create the Second Curved Line
12
1 Click and define the end point. Upon doing so, the curve will be kinked and you be able to define 2 control points.
2 Click and define control points near the start and end points.
3
3 Upon doing so, Bezier curve ruler with sharp angles will be created.
・ After defining the end point, clicking on a control point far away from the start point and then hitting the [Alt] key will also make a [Corner].
・ When you want to change the [Corner] status of anchor points, you can do so with [Change Angle status of selected Points] from the [Rulers] menu. For more details, refer to "Change Corner status of selected Points" (P. 134).
Usage・ Explanation
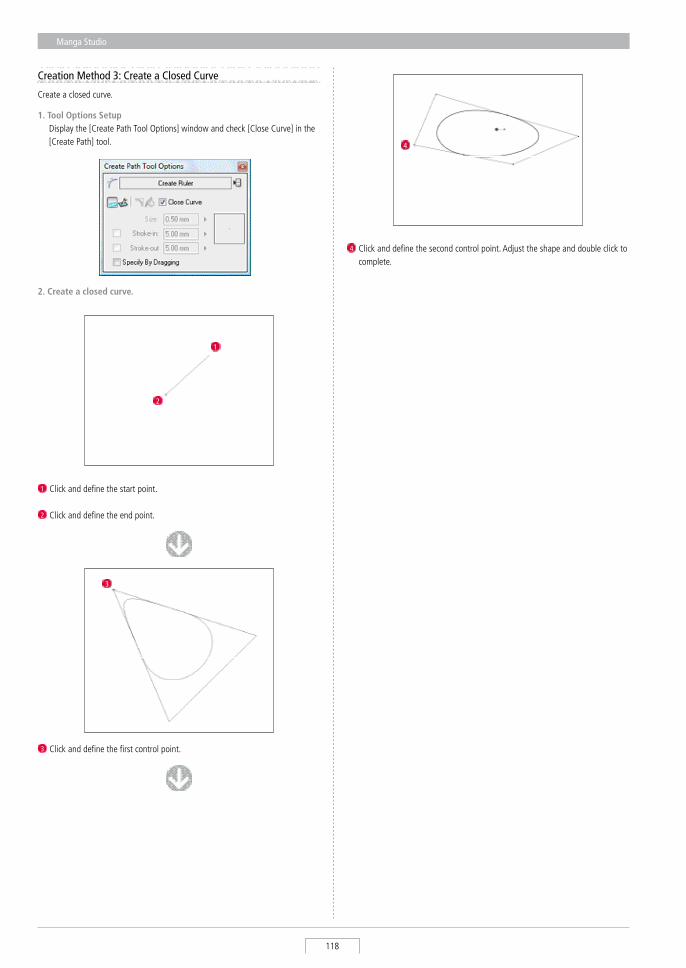
Manga Studio
118
Creation Method 3: Create a Closed Curve
Create a closed curve.
1 Click and define the start point.
2 Click and define the end point.
1. Tool Options Setup Display the [Create Path Tool Options] window and check [Close Curve] in the
[Create Path] tool.
2. Create a closed curve.
3 Click and define the first control point.
1
2
3
4 Click and define the second control point. Adjust the shape and double click to complete.
4
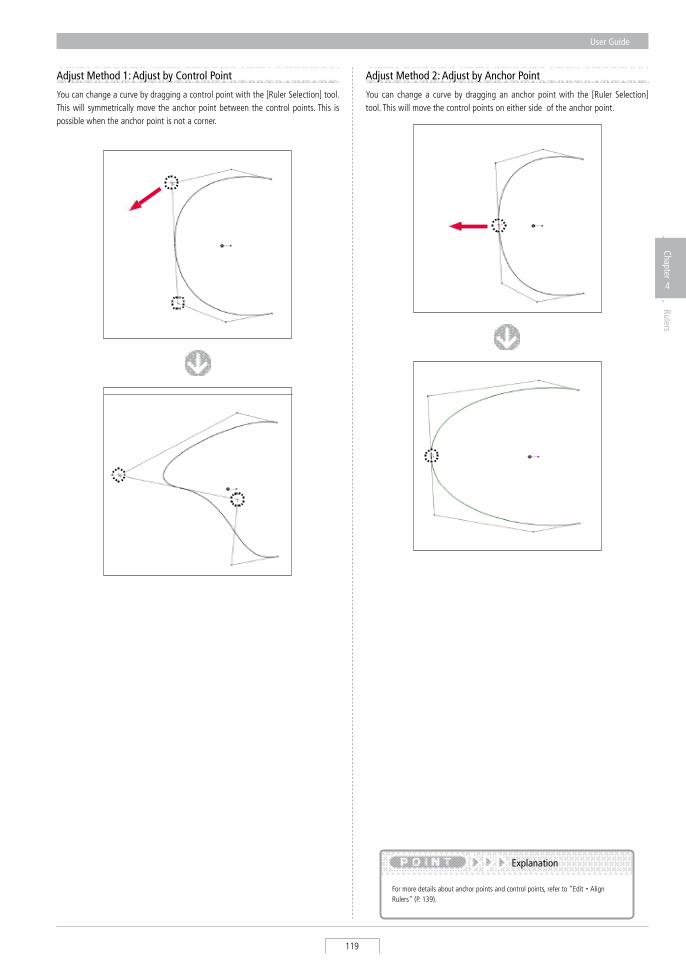
User Guide
119
Chapter
4
Rulers
Adjust Method 1: Adjust by Control Point
You can change a curve by dragging a control point with the [Ruler selection] tool. This will symmetrically move the anchor point between the control points. This is possible when the anchor point is not a corner.
Adjust Method 2: Adjust by Anchor Point
You can change a curve by dragging an anchor point with the [Ruler selection] tool. This will move the control points on either side of the anchor point.
For more details about anchor points and control points, refer to "Edit・ Align Rulers" (P. 139).
Explanation
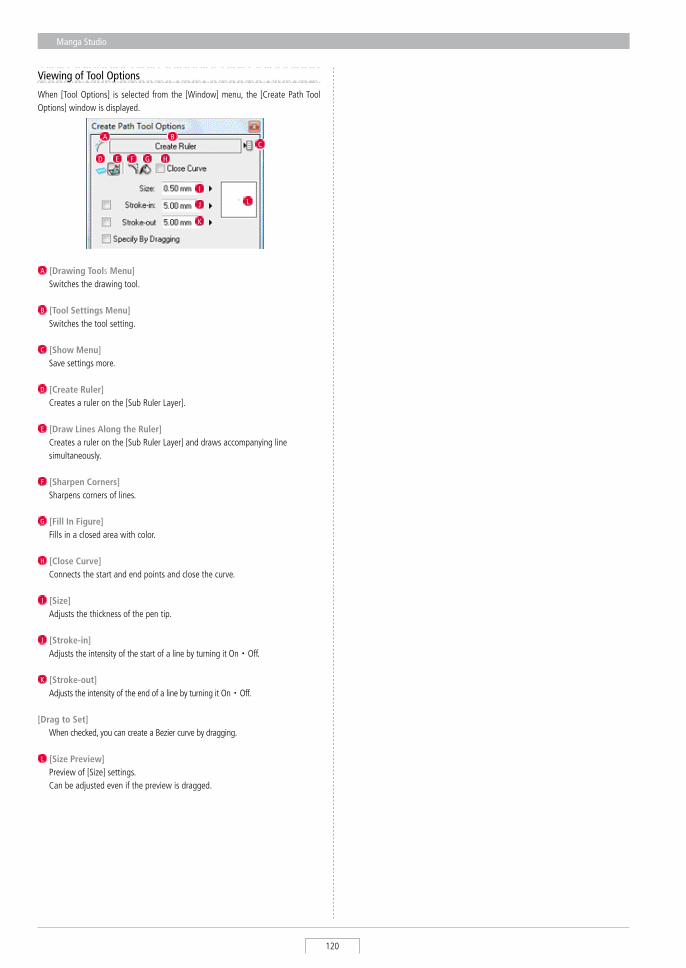
Manga Studio
120
Viewing of Tool Options
When [Tool Options] is selected from the [Window] menu, the [Create Path Tool Options] window is displayed.
A [Drawing Tools Menu] switches the drawing tool.
B [Tool Settings Menu] switches the tool setting.
C [Show Menu] save settings more.
D [Create Ruler] Creates a ruler on the [sub Ruler Layer].
E [Draw Lines Along the Ruler] Creates a ruler on the [sub Ruler Layer] and draws accompanying line
simultaneously.
F [Sharpen Corners] sharpens corners of lines.
G [Fill In Figure] Fills in a closed area with color.
H [Close Curve] Connects the start and end points and close the curve.
I [Size] Adjusts the thickness of the pen tip.
J [Stroke-in] Adjusts the intensity of the start of a line by turning it On・Off.
K [Stroke-out] Adjusts the intensity of the end of a line by turning it On・Off.
[Drag to Set] When checked, you can create a Bezier curve by dragging.
L [Size Preview] Preview of [size] settings. Can be adjusted even if the preview is dragged.
G H
I
J
K
D E F
L
CA B
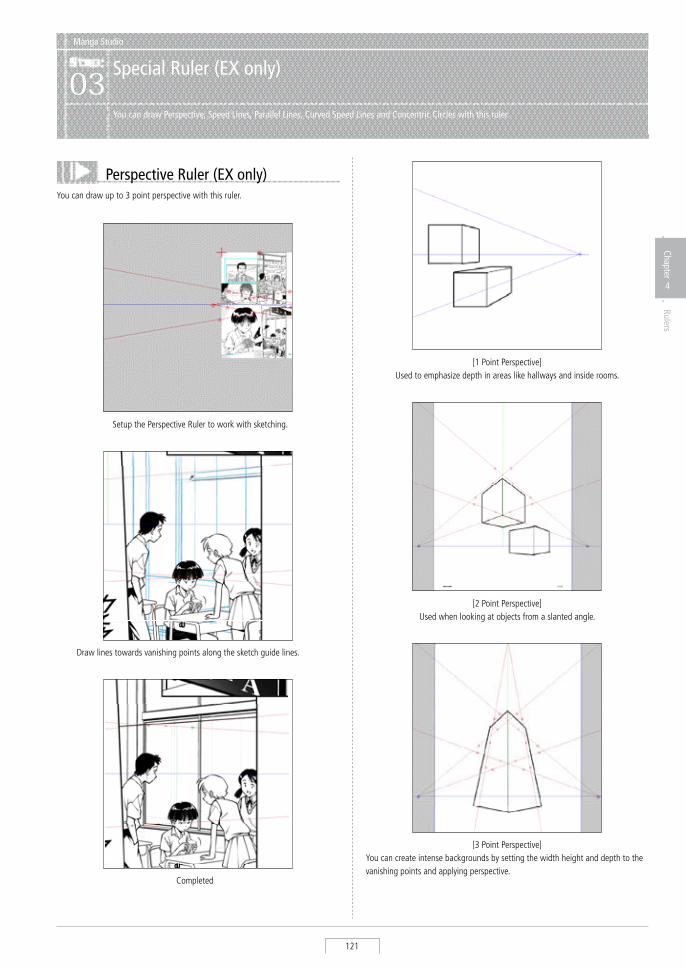
User Guide
121
Chapter
4
Rulers
Manga Studio
Special Ruler (EX only)03
You can draw Perspective, Speed Lines, Parallel Lines, Curved Speed Lines and Concentric Circles with this ruler.
Perspective Ruler (EX only)You can draw up to 3 point perspective with this ruler.
setup the Perspective Ruler to work with sketching.
Draw lines towards vanishing points along the sketch guide lines.
Completed
[1 Point Perspective]Used to emphasize depth in areas like hallways and inside rooms.
[2 Point Perspective]Used when looking at objects from a slanted angle.
[3 Point Perspective]You can create intense backgrounds by setting the width height and depth to the vanishing points and applying perspective.
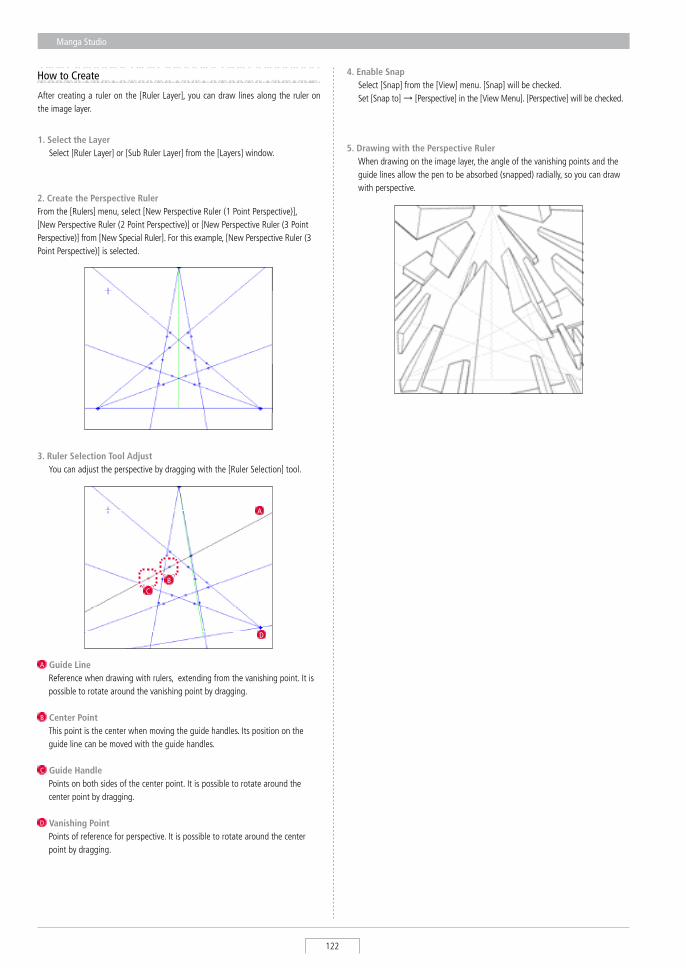
Manga Studio
122
4. Enable Snap select [snap] from the [View] menu. [snap] will be checked. set [snap to] → [Perspective] in the [View Menu]. [Perspective] will be checked.
1. Select the Layer select [Ruler Layer] or [sub Ruler Layer] from the [Layers] window.
How to Create
2. Create the Perspective RulerFrom the [Rulers] menu, select [New Perspective Ruler (1 Point Perspective)], [New Perspective Ruler (2 Point Perspective)] or [New Perspective Ruler (3 Point Perspective)] from [New special Ruler]. For this example, [New Perspective Ruler (3 Point Perspective)] is selected.
3. Ruler Selection Tool Adjust You can adjust the perspective by dragging with the [Ruler selection] tool.
A Guide Line Reference when drawing with rulers, extending from the vanishing point. It is
possible to rotate around the vanishing point by dragging.
B Center Point This point is the center when moving the guide handles. Its position on the
guide line can be moved with the guide handles.
C Guide Handle Points on both sides of the center point. It is possible to rotate around the
center point by dragging.
D Vanishing Point Points of reference for perspective. It is possible to rotate around the center
point by dragging.
A
D
CB
After creating a ruler on the [Ruler Layer], you can draw lines along the ruler on the image layer.
5. Drawing with the Perspective Ruler When drawing on the image layer, the angle of the vanishing points and the
guide lines allow the pen to be absorbed (snapped) radially, so you can draw with perspective.
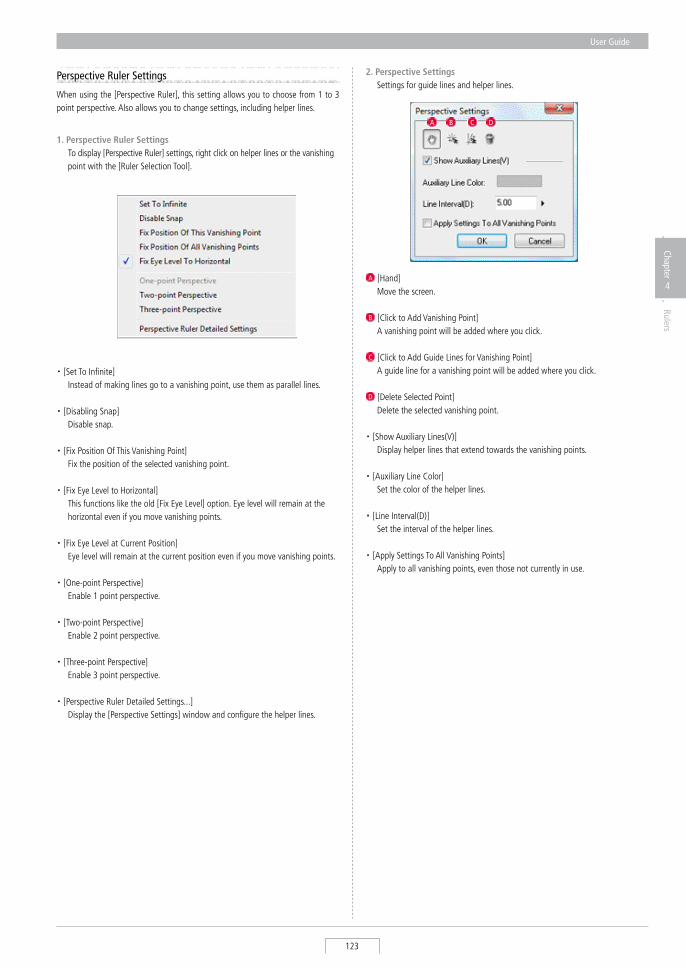
User Guide
123
Chapter
4
Rulers
Perspective Ruler Settings
When using the [Perspective Ruler], this setting allows you to choose from 1 to 3 point perspective. Also allows you to change settings, including helper lines.
1. Perspective Ruler Settings To display [Perspective Ruler] settings, right click on helper lines or the vanishing
point with the [Ruler selection Tool].
・ [set To Infinite] Instead of making lines go to a vanishing point, use them as parallel lines.
・ [Disabling snap] Disable snap.
・ [Fix Position Of This Vanishing Point] Fix the position of the selected vanishing point.
・ [Fix Eye Level to Horizontal] This functions like the old [Fix Eye Level] option. Eye level will remain at the
horizontal even if you move vanishing points.
・ [Fix Eye Level at Current Position] Eye level will remain at the current position even if you move vanishing points.
・ [One-point Perspective] Enable 1 point perspective.
・ [Two-point Perspective] Enable 2 point perspective.
・ [Three-point Perspective] Enable 3 point perspective.
・ [Perspective Ruler Detailed settings...] Display the [Perspective settings] window and configure the helper lines.
2. Perspective Settings settings for guide lines and helper lines.
A [Hand] Move the screen.
B [Click to Add Vanishing Point] A vanishing point will be added where you click.
C [Click to Add Guide Lines for Vanishing Point] A guide line for a vanishing point will be added where you click.
D [Delete selected Point] Delete the selected vanishing point.
・ [show Auxiliary Lines(V)] Display helper lines that extend towards the vanishing points.
・ [Auxiliary Line Color] set the color of the helper lines.
・ [Line Interval(D)] set the interval of the helper lines.
・ [Apply settings To All Vanishing Points] Apply to all vanishing points, even those not currently in use.
A B C D
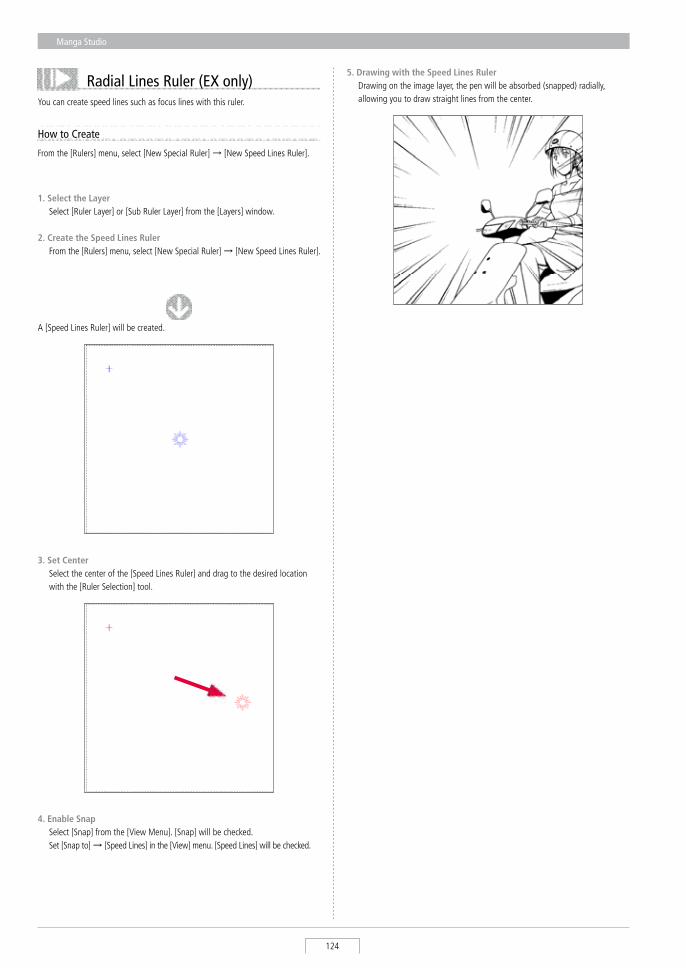
Manga Studio
124
Radial Lines Ruler (EX only)You can create speed lines such as focus lines with this ruler.
5. Drawing with the Speed Lines Ruler Drawing on the image layer, the pen will be absorbed (snapped) radially,
allowing you to draw straight lines from the center.
How to Create
From the [Rulers] menu, select [New special Ruler] → [New speed Lines Ruler].
1. Select the Layer select [Ruler Layer] or [sub Ruler Layer] from the [Layers] window.
2. Create the Speed Lines Ruler From the [Rulers] menu, select [New special Ruler] → [New speed Lines Ruler].
A [speed Lines Ruler] will be created.
4. Enable Snap select [snap] from the [View Menu]. [snap] will be checked. set [snap to] → [speed Lines] in the [View] menu. [speed Lines] will be checked.
3. Set Center select the center of the [speed Lines Ruler] and drag to the desired location
with the [Ruler selection] tool.
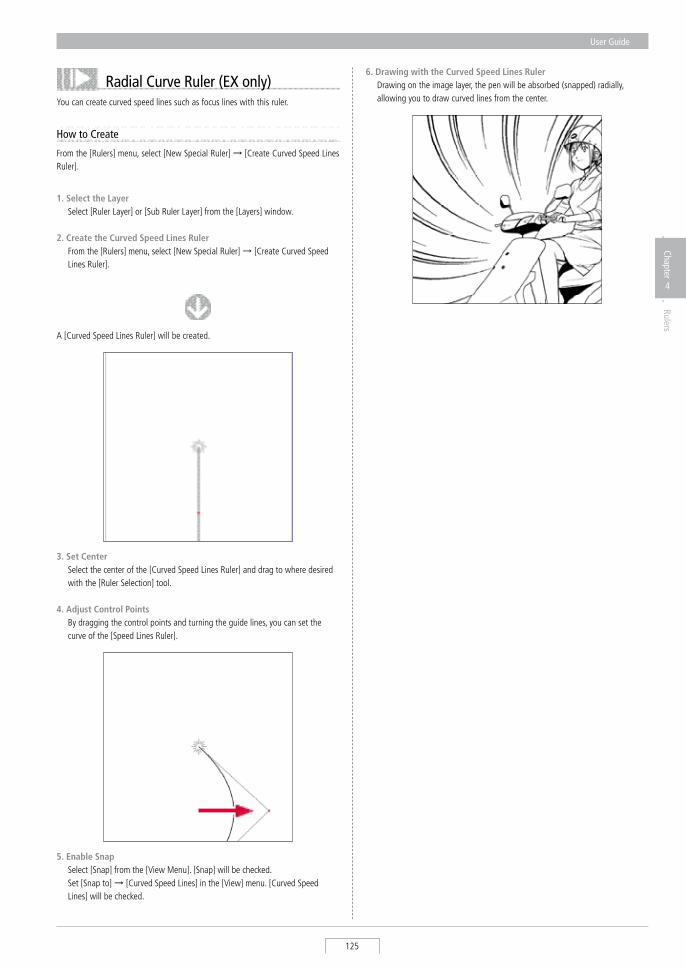
User Guide
125
Chapter
4
Rulers
Radial Curve Ruler (EX only)You can create curved speed lines such as focus lines with this ruler.
How to Create
From the [Rulers] menu, select [New special Ruler] → [Create Curved speed Lines Ruler].
6. Drawing with the Curved Speed Lines Ruler Drawing on the image layer, the pen will be absorbed (snapped) radially,
allowing you to draw curved lines from the center.
1. Select the Layer select [Ruler Layer] or [sub Ruler Layer] from the [Layers] window.
2. Create the Curved Speed Lines Ruler From the [Rulers] menu, select [New special Ruler] → [Create Curved speed
Lines Ruler].
A [Curved speed Lines Ruler] will be created.
5. Enable Snap select [snap] from the [View Menu]. [snap] will be checked. set [snap to] → [Curved speed Lines] in the [View] menu. [Curved speed
Lines] will be checked.
3. Set Center select the center of the [Curved speed Lines Ruler] and drag to where desired
with the [Ruler selection] tool.
4. Adjust Control Points By dragging the control points and turning the guide lines, you can set the
curve of the [speed Lines Ruler].
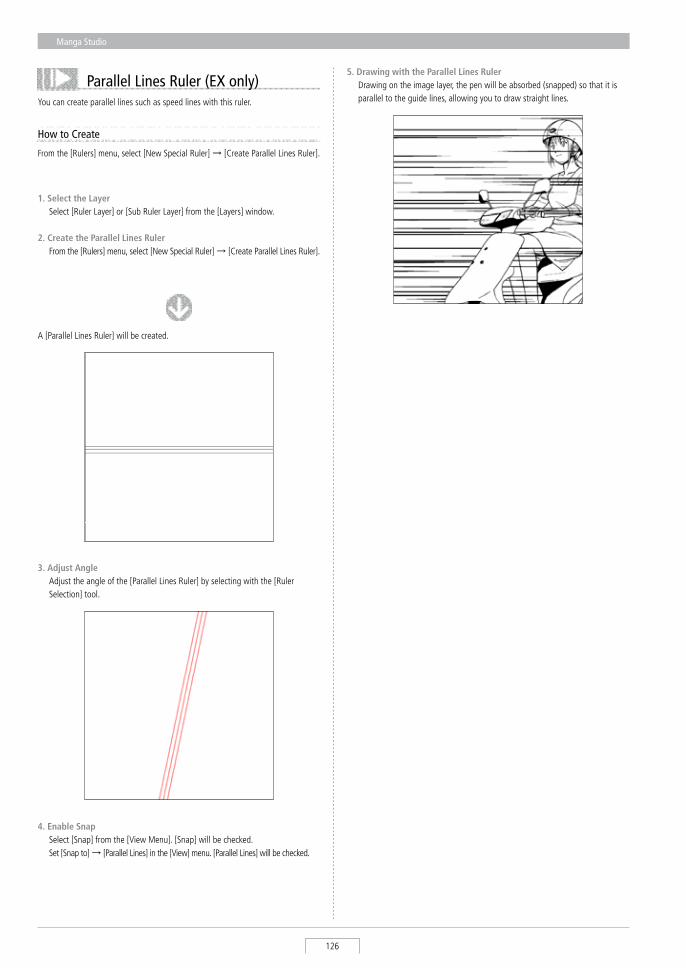
Manga Studio
126
Parallel Lines Ruler (EX only)You can create parallel lines such as speed lines with this ruler.
How to Create
From the [Rulers] menu, select [New special Ruler] → [Create Parallel Lines Ruler].
4. Enable Snap select [snap] from the [View Menu]. [snap] will be checked. set [snap to] → [Parallel Lines] in the [View] menu. [Parallel Lines] will be checked.
1. Select the Layer select [Ruler Layer] or [sub Ruler Layer] from the [Layers] window.
2. Create the Parallel Lines Ruler From the [Rulers] menu, select [New special Ruler] → [Create Parallel Lines Ruler].
A [Parallel Lines Ruler] will be created.
3. Adjust Angle Adjust the angle of the [Parallel Lines Ruler] by selecting with the [Ruler
selection] tool.
5. Drawing with the Parallel Lines Ruler Drawing on the image layer, the pen will be absorbed (snapped) so that it is
parallel to the guide lines, allowing you to draw straight lines.
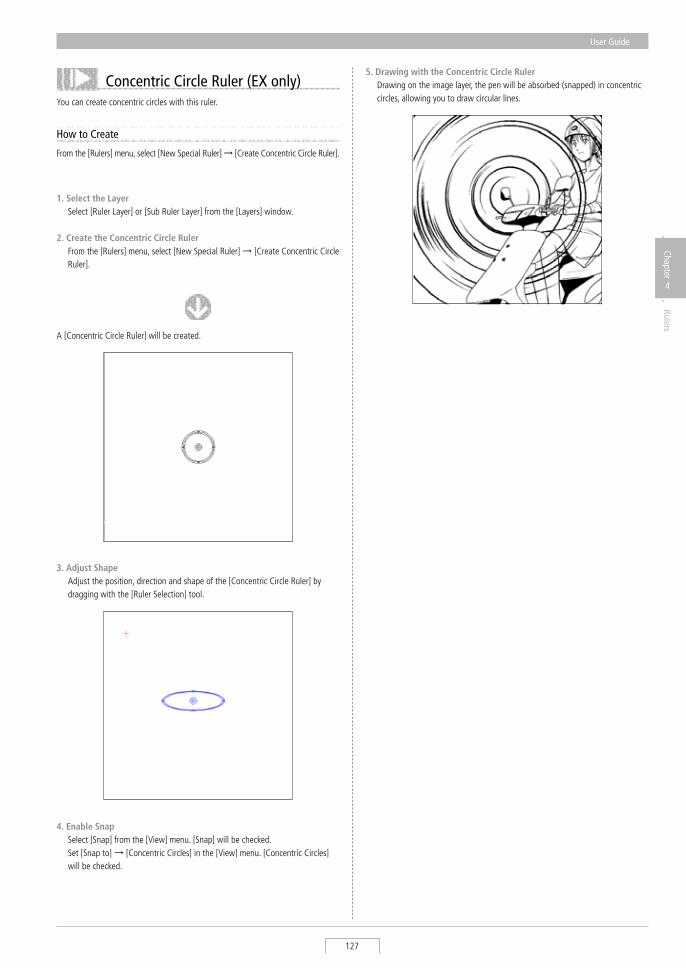
User Guide
127
Chapter
4
Rulers
Concentric Circle Ruler (EX only)You can create concentric circles with this ruler.
How to Create
From the [Rulers] menu, select [New special Ruler]→ [Create Concentric Circle Ruler].
4. Enable Snap select [snap] from the [View] menu. [snap] will be checked. set [snap to] → [Concentric Circles] in the [View] menu. [Concentric Circles]
will be checked.
1. Select the Layer select [Ruler Layer] or [sub Ruler Layer] from the [Layers] window.
2. Create the Concentric Circle Ruler From the [Rulers] menu, select [New special Ruler] → [Create Concentric Circle
Ruler].
A [Concentric Circle Ruler] will be created.
3. Adjust Shape Adjust the position, direction and shape of the [Concentric Circle Ruler] by
dragging with the [Ruler selection] tool.
5. Drawing with the Concentric Circle Ruler Drawing on the image layer, the pen will be absorbed (snapped) in concentric
circles, allowing you to draw circular lines.
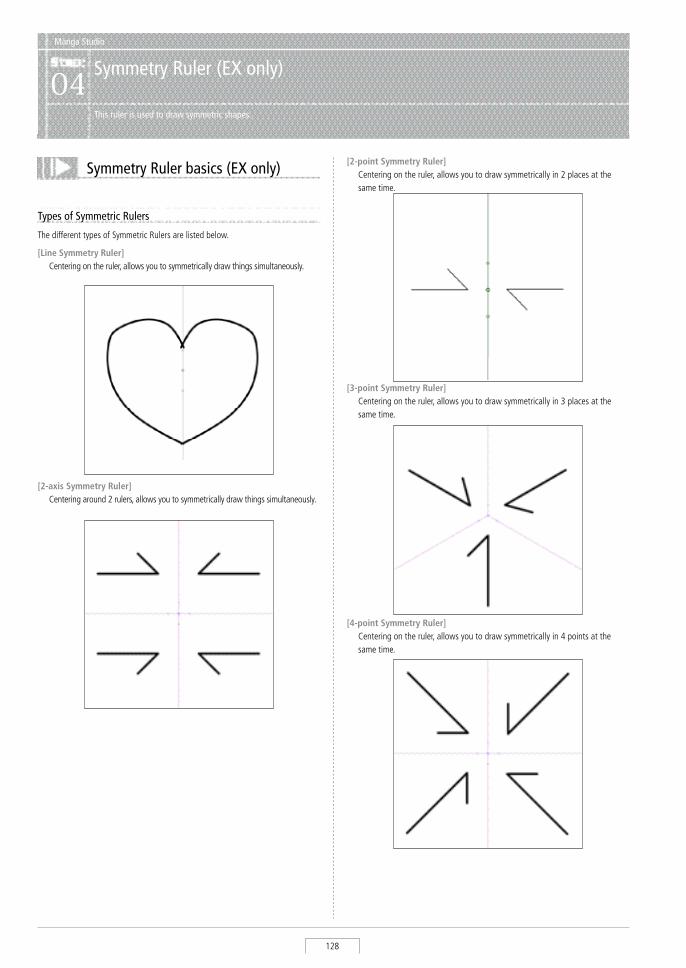
Manga Studio
128
Manga Studio
Symmetry Ruler (EX only)04
This ruler is used to draw symmetric shapes.
Types of Symmetric Rulers
The different types of symmetric Rulers are listed below.
Symmetry Ruler basics (EX only)
[Line Symmetry Ruler] Centering on the ruler, allows you to symmetrically draw things simultaneously.
[2-axis Symmetry Ruler] Centering around 2 rulers, allows you to symmetrically draw things simultaneously.
[2-point Symmetry Ruler] Centering on the ruler, allows you to draw symmetrically in 2 places at the
same time.
[3-point Symmetry Ruler] Centering on the ruler, allows you to draw symmetrically in 3 places at the
same time.
[4-point Symmetry Ruler] Centering on the ruler, allows you to draw symmetrically in 4 points at the
same time.
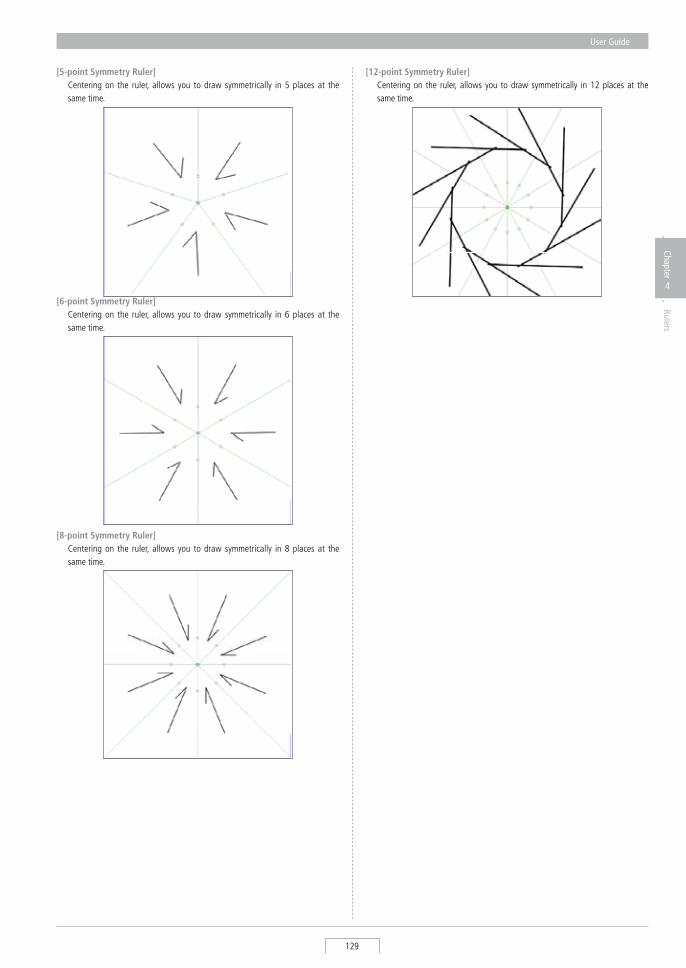
User Guide
129
Chapter
4
Rulers
[5-point Symmetry Ruler] Centering on the ruler, allows you to draw symmetrically in 5 places at the
same time.
[6-point Symmetry Ruler] Centering on the ruler, allows you to draw symmetrically in 6 places at the
same time.
[8-point Symmetry Ruler] Centering on the ruler, allows you to draw symmetrically in 8 places at the
same time.
[12-point Symmetry Ruler] Centering on the ruler, allows you to draw symmetrically in 12 places at the
same time.
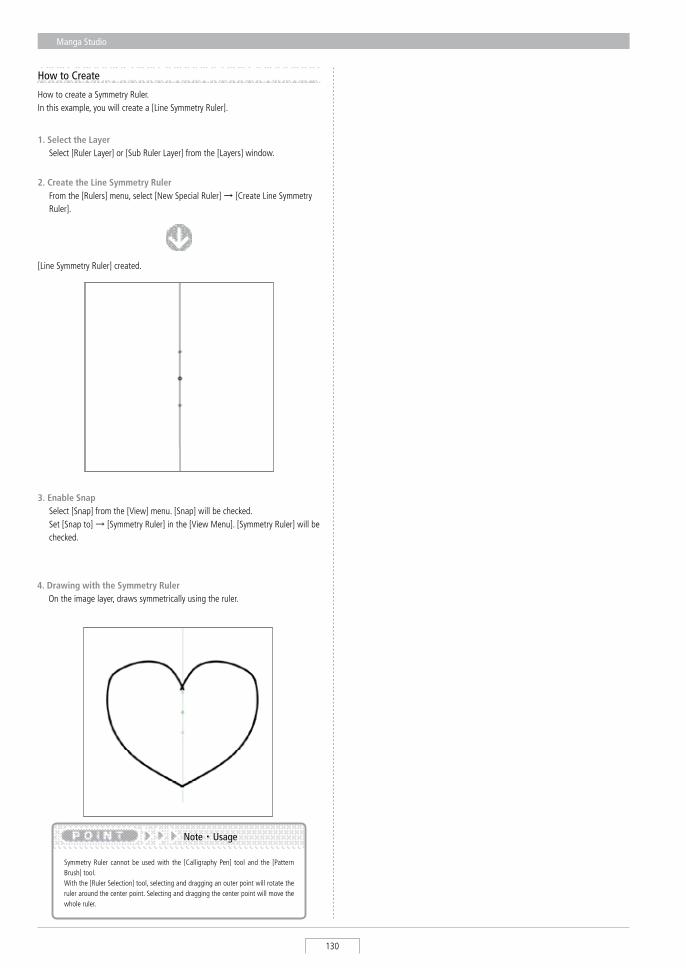
Manga Studio
130
How to Create
How to create a symmetry Ruler. In this example, you will create a [Line symmetry Ruler].
1. Select the Layer select [Ruler Layer] or [sub Ruler Layer] from the [Layers] window.
[Line symmetry Ruler] created.
3. Enable Snap select [snap] from the [View] menu. [snap] will be checked. set [snap to] → [symmetry Ruler] in the [View Menu]. [symmetry Ruler] will be
checked.
symmetry Ruler cannot be used with the [Calligraphy Pen] tool and the [Pattern Brush] tool. With the [Ruler selection] tool, selecting and dragging an outer point will rotate the ruler around the center point. selecting and dragging the center point will move the whole ruler.
Note・ Usage
2. Create the Line Symmetry Ruler From the [Rulers] menu, select [New special Ruler] → [Create Line symmetry
Ruler].
4. Drawing with the Symmetry Ruler On the image layer, draws symmetrically using the ruler.
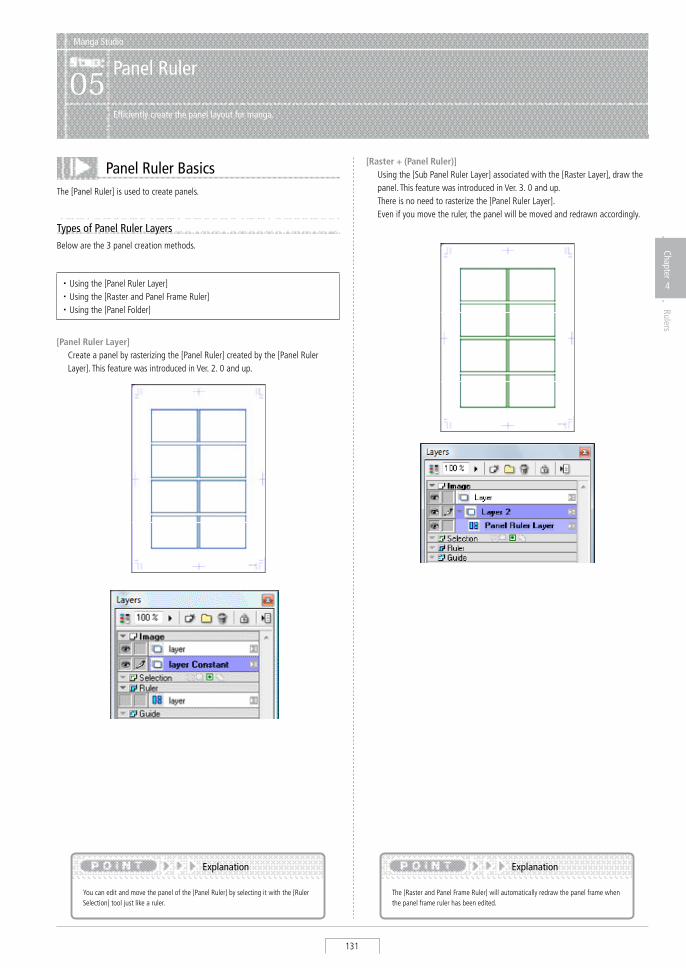
User Guide
131
Chapter
4
Rulers
Manga Studio
Panel Ruler05
Efficiently create the panel layout for manga.
Panel Ruler BasicsThe [Panel Ruler] is used to create panels.
Types of Panel Ruler LayersBelow are the 3 panel creation methods.
[Raster + (Panel Ruler)] Using the [sub Panel Ruler Layer] associated with the [Raster Layer], draw the
panel. This feature was introduced in Ver. 3. 0 and up. There is no need to rasterize the [Panel Ruler Layer]. Even if you move the ruler, the panel will be moved and redrawn accordingly.
You can edit and move the panel of the [Panel Ruler] by selecting it with the [Ruler selection] tool just like a ruler.
Explanation
The [Raster and Panel Frame Ruler] will automatically redraw the panel frame when the panel frame ruler has been edited.
Explanation
[Panel Ruler Layer] Create a panel by rasterizing the [Panel Ruler] created by the [Panel Ruler
Layer]. This feature was introduced in Ver. 2. 0 and up.
・ Using the [Panel Ruler Layer]・ Using the [Raster and Panel Frame Ruler]・ Using the [Panel Folder]
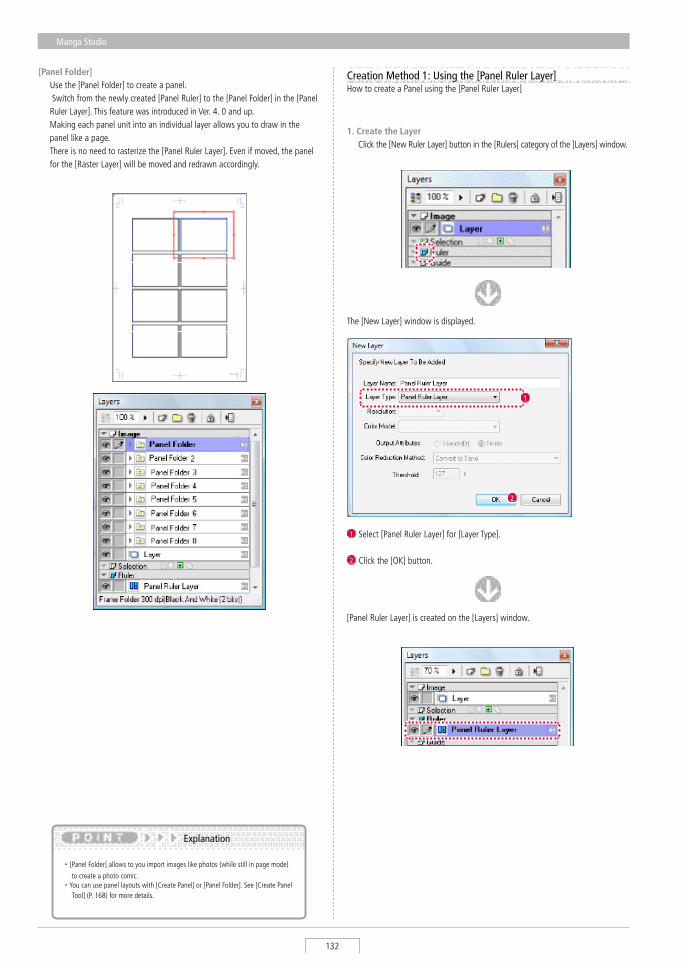
Manga Studio
132
[Panel Folder] Use the [Panel Folder] to create a panel. switch from the newly created [Panel Ruler] to the [Panel Folder] in the [Panel
Ruler Layer]. This feature was introduced in Ver. 4. 0 and up. Making each panel unit into an individual layer allows you to draw in the
panel like a page. There is no need to rasterize the [Panel Ruler Layer]. Even if moved, the panel
for the [Raster Layer] will be moved and redrawn accordingly.
Creation Method 1: Using the [Panel Ruler Layer]How to create a Panel using the [Panel Ruler Layer] PLEAs
・ [Panel Folder] allows to you import images like photos (while still in page mode)
to create a photo comic. ・ You can use panel layouts with [Create Panel] or [Panel Folder]. see [Create Panel
Tool] (P. 168) for more details.
Explanation
1. Create the Layer Click the [New Ruler Layer] button in the [Rulers] category of the [Layers] window.
The [New Layer] window is displayed.
1 select [Panel Ruler Layer] for [Layer Type].
2 Click the [OK] button.
2
[Panel Ruler Layer] is created on the [Layers] window.
1
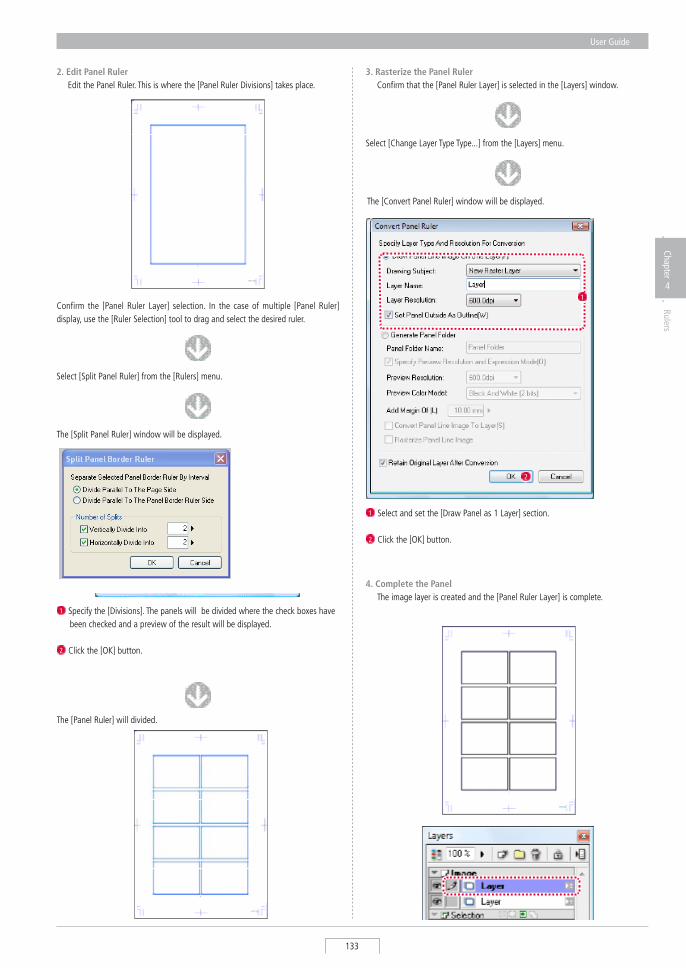
User Guide
133
Chapter
4
Rulers
2. Edit Panel Ruler Edit the Panel Ruler. This is where the [Panel Ruler Divisions] takes place.
Confirm the [Panel Ruler Layer] selection. In the case of multiple [Panel Ruler] display, use the [Ruler selection] tool to drag and select the desired ruler.
select [split Panel Ruler] from the [Rulers] menu.
The [split Panel Ruler] window will be displayed.
1 specify the [Divisions]. The panels will be divided where the check boxes have been checked and a preview of the result will be displayed.
2 Click the [OK] button.
The [Panel Ruler] will divided.
3. Rasterize the Panel Ruler Confirm that the [Panel Ruler Layer] is selected in the [Layers] window.
select [Change Layer Type Type...] from the [Layers] menu.
The [Convert Panel Ruler] window will be displayed.
1
2
1 select and set the [Draw Panel as 1 Layer] section.
2 Click the [OK] button.
4. Complete the Panel The image layer is created and the [Panel Ruler Layer] is complete.
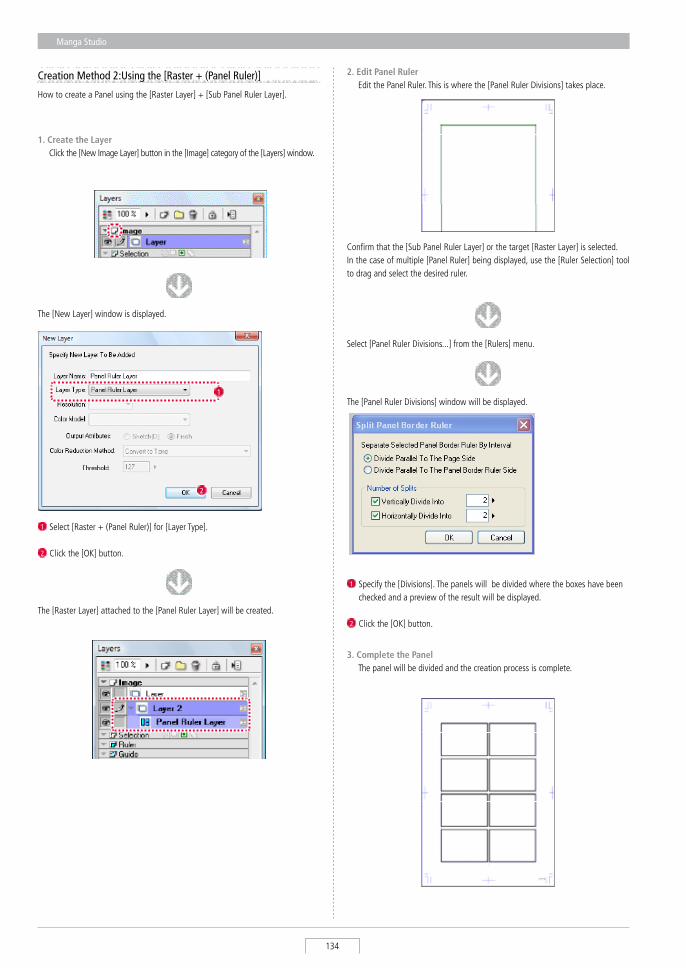
Manga Studio
134
2. Edit Panel Ruler Edit the Panel Ruler. This is where the [Panel Ruler Divisions] takes place.
Confirm that the [sub Panel Ruler Layer] or the target [Raster Layer] is selected. In the case of multiple [Panel Ruler] being displayed, use the [Ruler selection] tool to drag and select the desired ruler.
select [Panel Ruler Divisions...] from the [Rulers] menu.
The [Panel Ruler Divisions] window will be displayed.
1 specify the [Divisions]. The panels will be divided where the boxes have been checked and a preview of the result will be displayed.
2 Click the [OK] button.
3. Complete the Panel The panel will be divided and the creation process is complete.
Creation Method 2:Using the [Raster + (Panel Ruler)]
How to create a Panel using the [Raster Layer] + [sub Panel Ruler Layer].
1. Create the Layer Click the [New Image Layer] button in the [Image] category of the [Layers] window.
The [New Layer] window is displayed.
1 select [Raster + (Panel Ruler)] for [Layer Type].
2 Click the [OK] button.
2
1
The [Raster Layer] attached to the [Panel Ruler Layer] will be created.
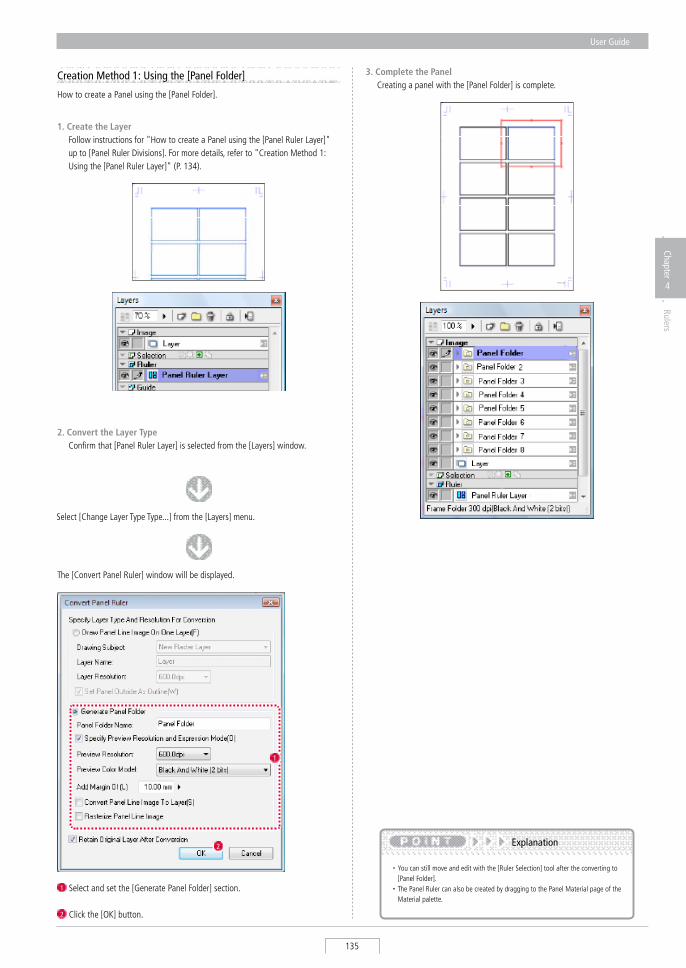
User Guide
135
Chapter
4
Rulers
Creation Method 1: Using the [Panel Folder]
How to create a Panel using the [Panel Folder].
1. Create the Layer Follow instructions for "How to create a Panel using the [Panel Ruler Layer]"
up to [Panel Ruler Divisions]. For more details, refer to "Creation Method 1: Using the [Panel Ruler Layer]" (P. 134).
2. Convert the Layer Type Confirm that [Panel Ruler Layer] is selected from the [Layers] window.
select [Change Layer Type Type...] from the [Layers] menu.
The [Convert Panel Ruler] window will be displayed.
1
2
1 select and set the [Generate Panel Folder] section.
2 Click the [OK] button.
3. Complete the Panel Creating a panel with the [Panel Folder] is complete.
・ You can still move and edit with the [Ruler selection] tool after the converting to [Panel Folder].
・ The Panel Ruler can also be created by dragging to the Panel Material page of the Material palette.
Explanation
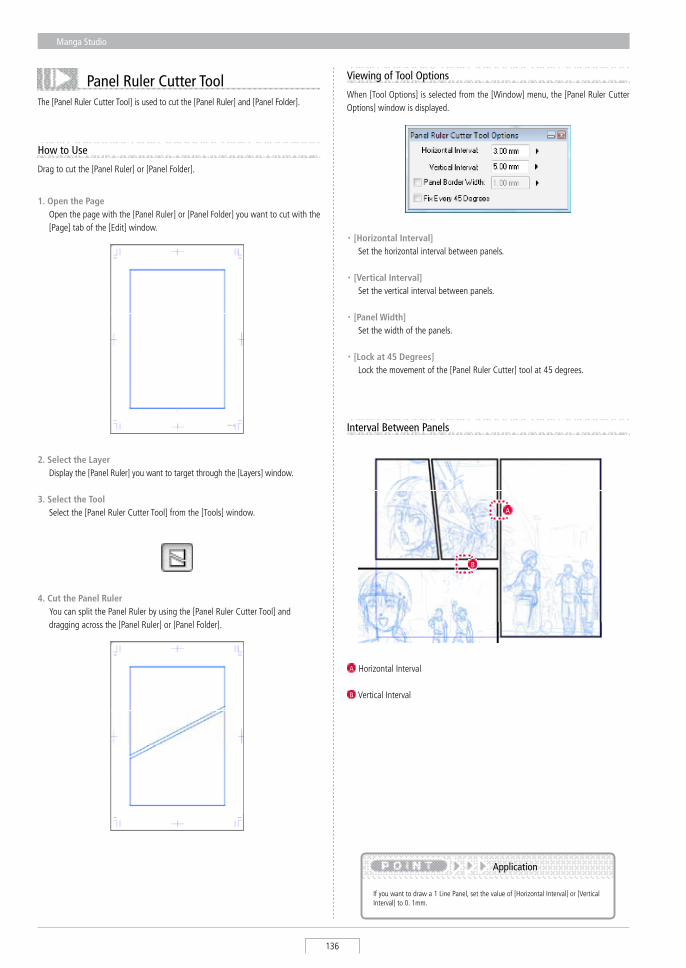
Manga Studio
136
Panel Ruler Cutter ToolThe [Panel Ruler Cutter Tool] is used to cut the [Panel Ruler] and [Panel Folder].
How to Use
Drag to cut the [Panel Ruler] or [Panel Folder].
1. Open the Page Open the page with the [Panel Ruler] or [Panel Folder] you want to cut with the
[Page] tab of the [Edit] window.
2. Select the Layer Display the [Panel Ruler] you want to target through the [Layers] window.
3. Select the Tool select the [Panel Ruler Cutter Tool] from the [Tools] window.
When [Tool Options] is selected from the [Window] menu, the [Panel Ruler Cutter Options] window is displayed.
Viewing of Tool Options
・ [Horizontal Interval] set the horizontal interval between panels.
・ [Vertical Interval] set the vertical interval between panels.
・ [Panel Width] set the width of the panels.
・ [Lock at 45 Degrees] Lock the movement of the [Panel Ruler Cutter] tool at 45 degrees.
If you want to draw a 1 Line Panel, set the value of [Horizontal Interval] or [Vertical Interval] to 0. 1mm.
Application
4. Cut the Panel Ruler You can split the Panel Ruler by using the [Panel Ruler Cutter Tool] and
dragging across the [Panel Ruler] or [Panel Folder].
Interval Between Panels
A
B
A Horizontal Interval
B Vertical Interval
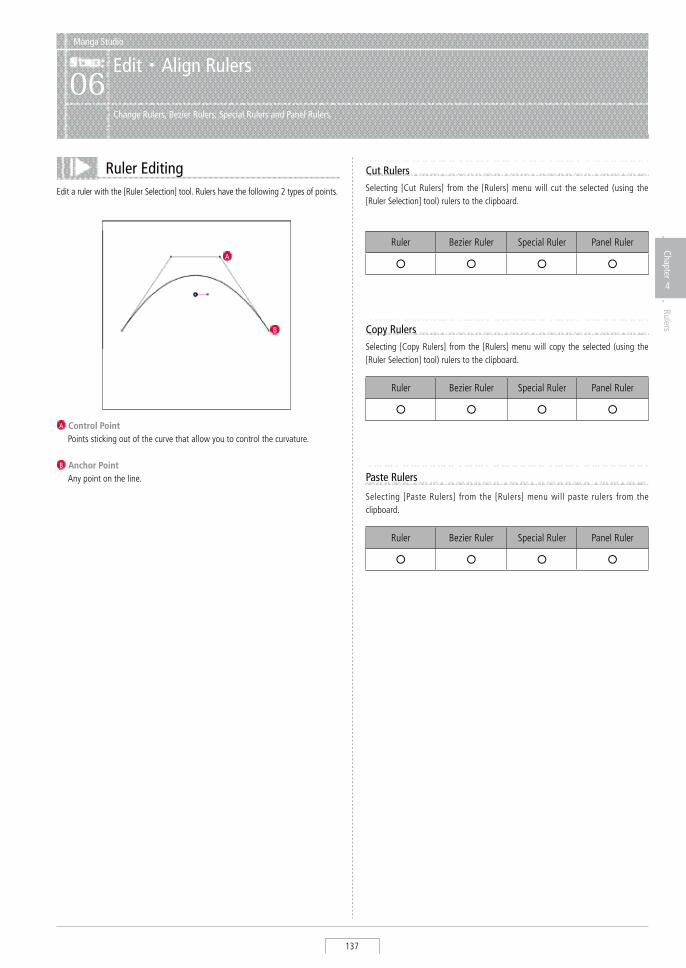
User Guide
137
Chapter
4
Rulers
Ruler EditingEdit a ruler with the [Ruler selection] tool. Rulers have the following 2 types of points.
A Control Point Points sticking out of the curve that allow you to control the curvature.
B Anchor Point Any point on the line.
A
B
Manga Studio
Edit・ Align Rulers06
Change Rulers, Bezier Rulers, Special Rulers and Panel Rulers.
Cut Rulersselecting [Cut Rulers] from the [Rulers] menu will cut the selected (using the [Ruler selection] tool) rulers to the clipboard.
Ruler Bezier Ruler special Ruler Panel Ruler
○ ○ ○ ○
Copy Rulersselecting [Copy Rulers] from the [Rulers] menu will copy the selected (using the [Ruler selection] tool) rulers to the clipboard.
Ruler Bezier Ruler special Ruler Panel Ruler
○ ○ ○ ○
Paste Rulers
selecting [Paste Rulers] from the [Rulers] menu will paste rulers from the clipboard.
Ruler Bezier Ruler special Ruler Panel Ruler
○ ○ ○ ○
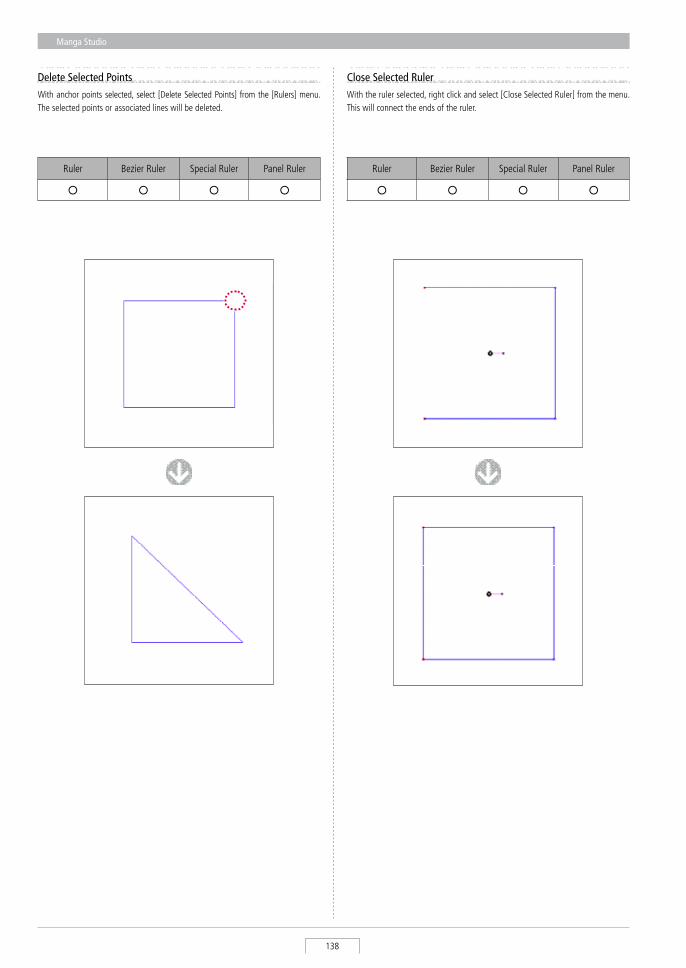
Manga Studio
138
Close Selected RulerWith the ruler selected, right click and select [Close selected Ruler] from the menu. This will connect the ends of the ruler.
Delete Selected PointsWith anchor points selected, select [Delete selected Points] from the [Rulers] menu. The selected points or associated lines will be deleted.
Ruler Bezier Ruler special Ruler Panel Ruler
○ ○ ○ ○
Ruler Bezier Ruler special Ruler Panel Ruler
○ ○ ○ ○
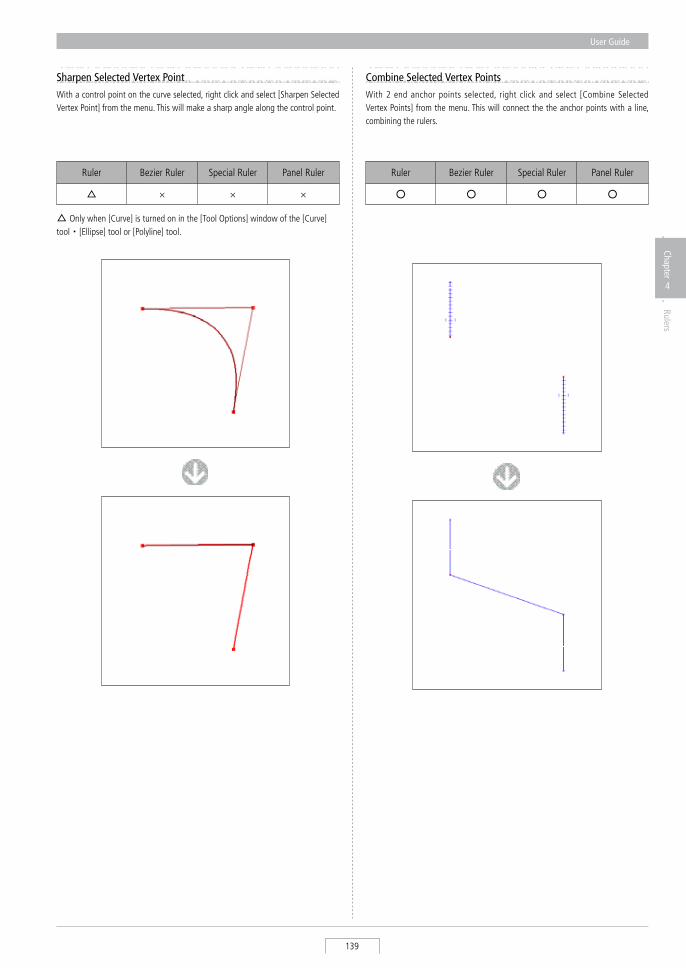
User Guide
139
Chapter
4
Rulers
Sharpen Selected Vertex PointWith a control point on the curve selected, right click and select [sharpen selected Vertex Point] from the menu. This will make a sharp angle along the control point.
Combine Selected Vertex PointsWith 2 end anchor points selected, right click and select [Combine selected Vertex Points] from the menu. This will connect the the anchor points with a line, combining the rulers.
Ruler Bezier Ruler special Ruler Panel Ruler
△ × × ×
△ Only when [Curve] is turned on in the [Tool Options] window of the [Curve] tool・ [Ellipse] tool or [Polyline] tool.
Ruler Bezier Ruler special Ruler Panel Ruler
○ ○ ○ ○

Manga Studio
140
Change Angle Status of Selected Points (EX only)With the anchor points of the curve created by the [Create Path] tool selected, select [Change Angle status of selected Points] from the [Rulers] menu. The continuity of the selected anchor points will be turned off and changed into a [Corner]. Conversely, [Corner] anchor points can have their [Corner] status turned off and become a smooth curve.
A
B
C
The image above illustrates the differences B between [Corner status] on/off when C moving anchor points.
Normally, C moving anchor points will affect the other A points symmetrically, drawing a smooth curve. B But with the [Corner] status turned on, A points become fixed and B you are able to make a corner.
A
B
C
[Corner status: Off]
A
B
C
[Corner status: On]
Separate Selected Vertex Points
With the control points or the section between the merged anchor points selected, right click and select [separate selected Vertex Points]. This will separate the rulers. If the area between the 2 anchor points is selected, the section between them will be deleted.
Ruler Bezier Ruler special Ruler Panel Ruler
○ ○ ○ ○ Ruler Bezier Ruler special Ruler Panel Ruler
○ ○ ○ ○
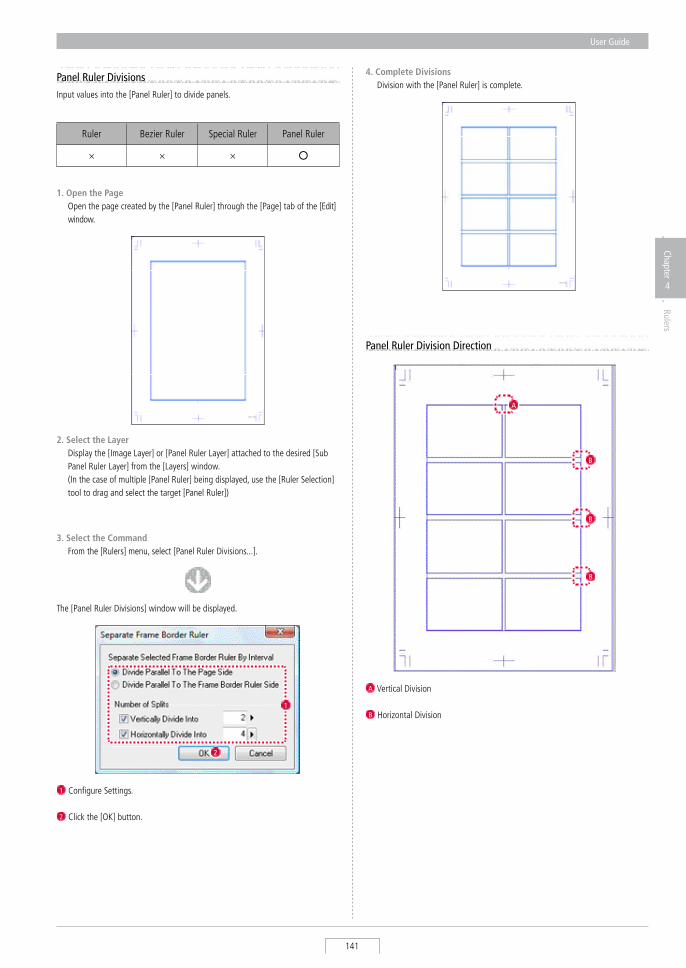
User Guide
141
Chapter
4
Rulers
4. Complete Divisions Division with the [Panel Ruler] is complete.
Panel Ruler DivisionsInput values into the [Panel Ruler] to divide panels.
1. Open the Page Open the page created by the [Panel Ruler] through the [Page] tab of the [Edit]
window.
2. Select the Layer Display the [Image Layer] or [Panel Ruler Layer] attached to the desired [sub
Panel Ruler Layer] from the [Layers] window. (In the case of multiple [Panel Ruler] being displayed, use the [Ruler selection]
tool to drag and select the target [Panel Ruler])
The [Panel Ruler Divisions] window will be displayed.
1 Configure settings.
2 Click the [OK] button.
3. Select the Command From the [Rulers] menu, select [Panel Ruler Divisions...].
1
2
Ruler Bezier Ruler special Ruler Panel Ruler
× × × ○
Panel Ruler Division Direction
A
B
B
B
A Vertical Division
B Horizontal Division

Manga Studio
142
Expand Panel Ruler (Page Bleed)Expand the width of the [Panel Ruler] and the page bleed will be processed.
5. Complete Expand Width Width expansion for the [Panel Ruler] complete.
1. Open the Edit Window Open the image of the targeted [Panel Ruler].
The [Expand Panel Ruler...] window will be displayed.
2. Select the Layer Display the [Image Layer] or [Panel Ruler Layer] attached to the desired [sub
Panel Ruler Layer] from the [Layers] window.
1 Configure settings.
2 Click the [OK] button.
4. Select the Command From the [Rulers] menu, select [Expand Panel Ruler].
3. Select the Panel select the target [Panel Ruler] with the [Ruler selection] tool.
2
1 When the [Panel Ruler] is selected, the [show Page Rulers Handles] from the [View] menu will display [Ruler Handles] which allows ruler expansion. By clicking and dragging the arrows, the panel can be enlarged up to the bleed just like with the [Expand Panel Ruler].
Application
Ruler Bezier Ruler special Ruler Panel Ruler
× × × ○
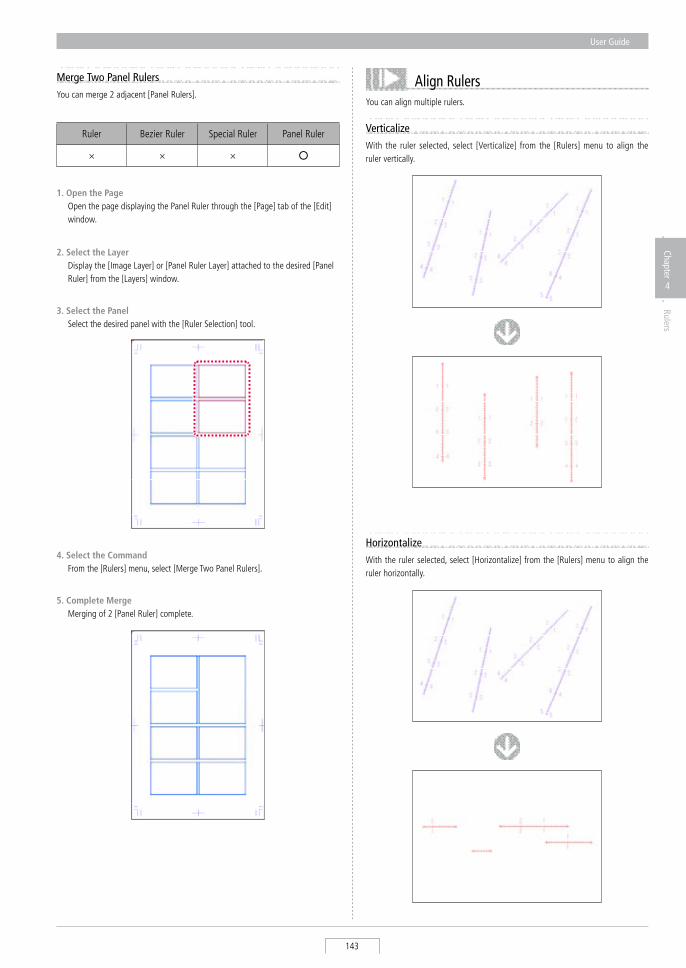
User Guide
143
Chapter
4
Rulers
Merge Two Panel RulersYou can merge 2 adjacent [Panel Rulers].
1. Open the Page Open the page displaying the Panel Ruler through the [Page] tab of the [Edit]
window.
5. Complete Merge Merging of 2 [Panel Ruler] complete.
3. Select the Panel select the desired panel with the [Ruler selection] tool.
2. Select the Layer Display the [Image Layer] or [Panel Ruler Layer] attached to the desired [Panel
Ruler] from the [Layers] window.
4. Select the Command From the [Rulers] menu, select [Merge Two Panel Rulers].
HorizontalizeWith the ruler selected, select [Horizontalize] from the [Rulers] menu to align the ruler horizontally.
Align RulersYou can align multiple rulers.
VerticalizeWith the ruler selected, select [Verticalize] from the [Rulers] menu to align the ruler vertically.
Ruler Bezier Ruler special Ruler Panel Ruler
× × × ○


Layers
Chapter 5
This chapter introduces the basic concept of layers, the different types, as well as the operation of the [Layers] window.
Step: 01 Layers 148
Step: 02 Layer Operations 155
Step: 03 Layer Display 164
Chapter
5
Layers
Step: 04 Panel Folder 166

Manga Studio
146
Manga Studio
Layers01
This chapter introduces the basic concept of layers, the different types, as well as layer operation.
Layer Basics
We can think of "layers" as several transparencies laid on top of each other. When we look down through these layers, we see a single, complete image. In the case of a digital drawing, each step of the process creates a new layer that can subsequently be edited. Combining these layers produces the final image. Layers are managed using the [Layers] window. This lets us change the layer ordering and transparency as we desire. The [Layers] window is accessed by selecting [Layers] from the [Window] menu.
Concept
[Layers] window
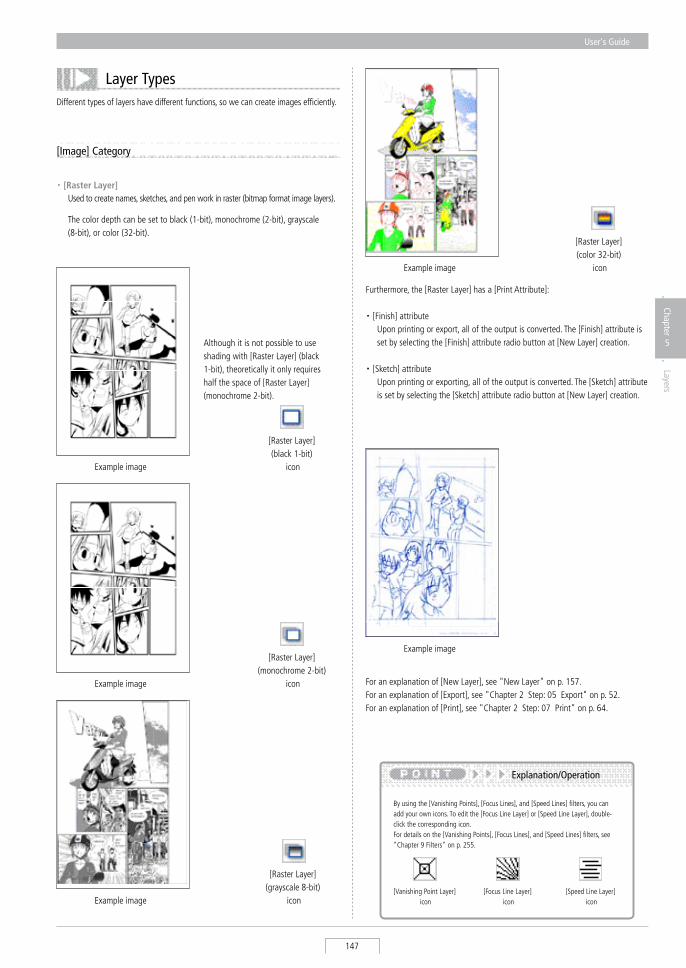
User's Guide
147
Chapter
5
Layers
Layer TypesDifferent types of layers have different functions, so we can create images efficiently.
[Image] Category
By using the [Vanishing Points], [Focus Lines], and [speed Lines] filters, you can add your own icons. To edit the [Focus Line Layer] or [speed Line Layer], double-click the corresponding icon. For details on the [Vanishing Points], [Focus Lines], and [speed Lines] filters, see "Chapter 9 Filters" on p. 255.
Explanation/Operation
[speed Line Layer] icon
[Focus Line Layer] icon
[Vanishing Point Layer] icon
Furthermore, the [Raster Layer] has a [Print Attribute]:
・ [Finish] attribute Upon printing or export, all of the output is converted. The [Finish] attribute is
set by selecting the [Finish] attribute radio button at [New Layer] creation.
・ [sketch] attribute Upon printing or exporting, all of the output is converted. The [sketch] attribute
is set by selecting the [sketch] attribute radio button at [New Layer] creation.
[Raster Layer] (color 32-bit)
iconExample image
Example image
For an explanation of [New Layer], see "New Layer" on p. 157. For an explanation of [Export], see "Chapter 2 step: 05 Export" on p. 52. For an explanation of [Print], see "Chapter 2 step: 07 Print" on p. 64.
・ [Raster Layer] Used to create names, sketches, and pen work in raster (bitmap format image layers).
The color depth can be set to black (1-bit), monochrome (2-bit), grayscale (8-bit), or color (32-bit).
[Raster Layer] (black 1-bit)
iconExample image
[Raster Layer] (grayscale 8-bit)
iconExample image
[Raster Layer] (monochrome 2-bit)
iconExample image
Although it is not possible to use shading with [Raster Layer] (black 1-bit), theoretically it only requires half the space of [Raster Layer] (monochrome 2-bit).
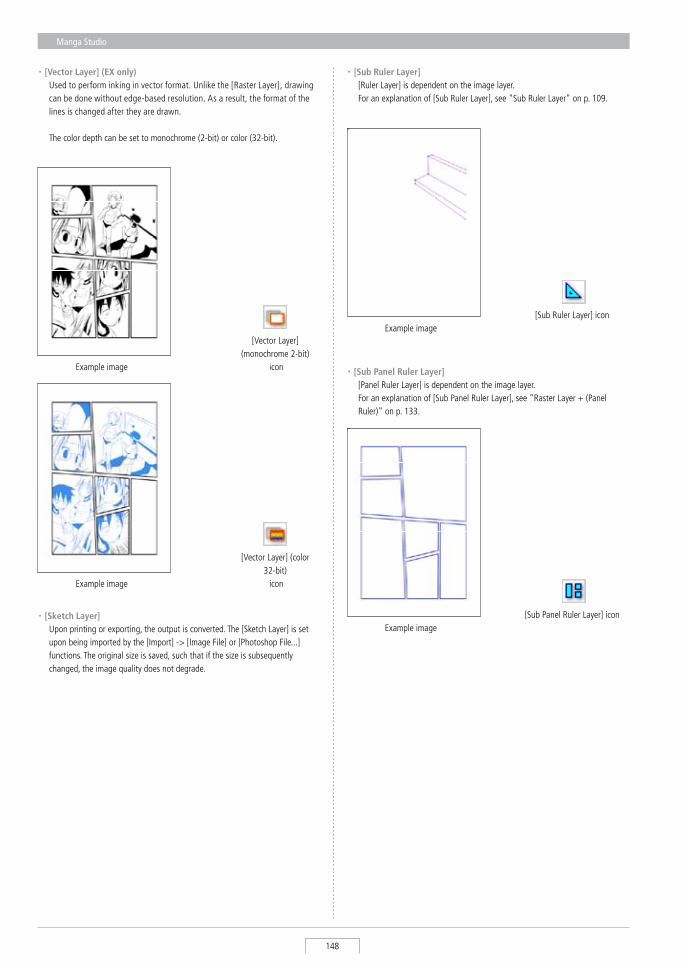
Manga Studio
148
・ [Vector Layer] (EX only) Used to perform inking in vector format. Unlike the [Raster Layer], drawing
can be done without edge-based resolution. As a result, the format of the lines is changed after they are drawn.
The color depth can be set to monochrome (2-bit) or color (32-bit).
Example image
[Vector Layer] (monochrome 2-bit)
icon
・ [Sketch Layer] Upon printing or exporting, the output is converted. The [sketch Layer] is set
upon being imported by the [Import] -> [Image File] or [Photoshop File...] functions. The original size is saved, such that if the size is subsequently changed, the image quality does not degrade.
[Vector Layer] (color 32-bit) iconExample image
・ [Sub Ruler Layer] [Ruler Layer] is dependent on the image layer. For an explanation of [sub Ruler Layer], see "sub Ruler Layer" on p. 109.
Example image[sub Ruler Layer] icon
・ [Sub Panel Ruler Layer] [Panel Ruler Layer] is dependent on the image layer. For an explanation of [sub Panel Ruler Layer], see "Raster Layer + (Panel
Ruler)" on p. 133.
[sub Panel Ruler Layer] iconExample image
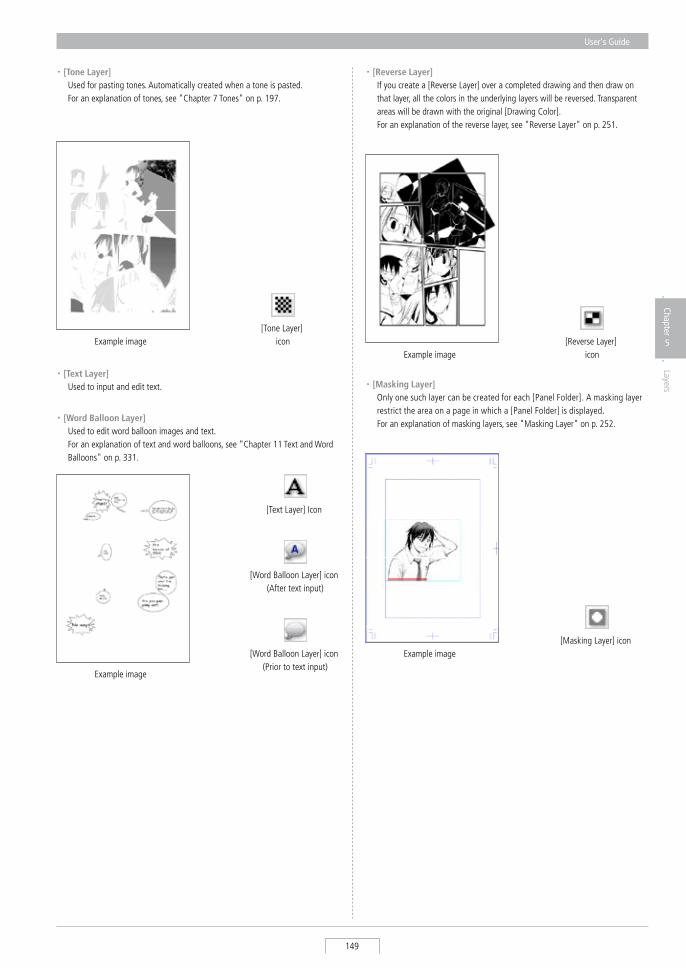
User's Guide
149
Chapter
5
Layers
・ [Text Layer] Used to input and edit text.
・ [Tone Layer] Used for pasting tones. Automatically created when a tone is pasted. For an explanation of tones, see "Chapter 7 Tones" on p. 197.
Example image[Tone Layer]
icon
Example image
・ [Word Balloon Layer] Used to edit word balloon images and text. For an explanation of text and word balloons, see "Chapter 11 Text and Word
Balloons" on p. 331.
[Word Balloon Layer] icon (Prior to text input)
[Word Balloon Layer] icon (After text input)
[Text Layer] Icon
・ [Reverse Layer] If you create a [Reverse Layer] over a completed drawing and then draw on
that layer, all the colors in the underlying layers will be reversed. Transparent areas will be drawn with the original [Drawing Color].
For an explanation of the reverse layer, see "Reverse Layer" on p. 251.
[Reverse Layer] iconExample image
・ [Masking Layer] Only one such layer can be created for each [Panel Folder]. A masking layer
restrict the area on a page in which a [Panel Folder] is displayed. For an explanation of masking layers, see "Masking Layer" on p. 252.
Example image[Masking Layer] icon
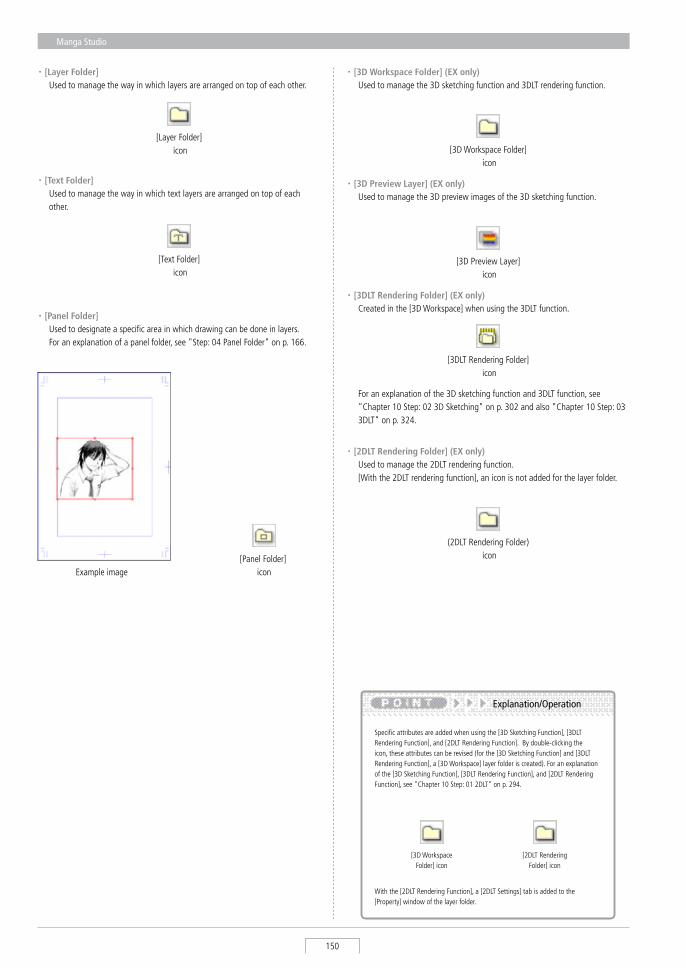
Manga Studio
150
・ [Panel Folder] Used to designate a specific area in which drawing can be done in layers. For an explanation of a panel folder, see "step: 04 Panel Folder" on p. 166.
Example image[Panel Folder]
icon
・ [Layer Folder] Used to manage the way in which layers are arranged on top of each other.
[Layer Folder] icon
・ [Text Folder] Used to manage the way in which text layers are arranged on top of each
other.
[Text Folder] icon
[3D Workspace Folder] icon
・ [3D Workspace Folder] (EX only) Used to manage the 3D sketching function and 3DLT rendering function.
[3D Preview Layer] icon
・ [3D Preview Layer] (EX only) Used to manage the 3D preview images of the 3D sketching function.
[3DLT Rendering Folder] icon
・ [3DLT Rendering Folder] (EX only) Created in the [3D Workspace] when using the 3DLT function.
For an explanation of the 3D sketching function and 3DLT function, see "Chapter 10 step: 02 3D sketching" on p. 302 and also "Chapter 10 step: 03 3DLT" on p. 324.
(2DLT Rendering Folder) icon
・ [2DLT Rendering Folder] (EX only) Used to manage the 2DLT rendering function. [With the 2DLT rendering function], an icon is not added for the layer folder.
specific attributes are added when using the [3D sketching Function], [3DLT Rendering Function], and [2DLT Rendering Function]. By double-clicking the icon, these attributes can be revised (for the [3D sketching Function] and [3DLT Rendering Function], a [3D Workspace] layer folder is created). For an explanation of the [3D sketching Function], [3DLT Rendering Function], and [2DLT Rendering Function], see "Chapter 10 step: 01 2DLT" on p. 294.
Explanation/Operation
[2DLT Rendering Folder] icon
[3D Workspace Folder] icon
With the [2DLT Rendering Function], a [2DLT settings] tab is added to the [Property] window of the layer folder.
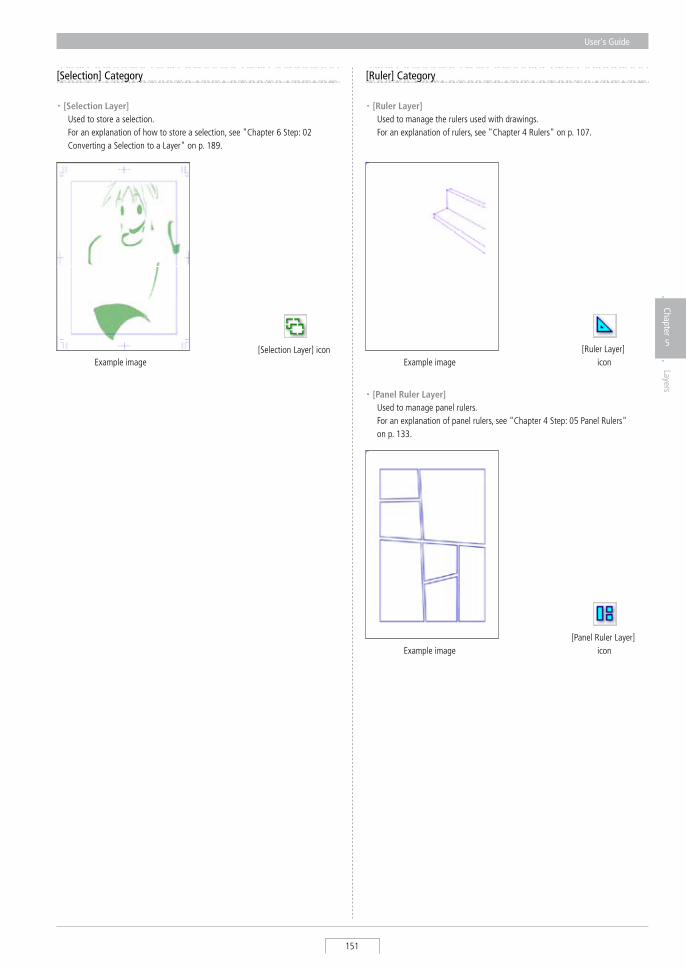
User's Guide
151
Chapter
5
Layers
・ [Selection Layer] Used to store a selection. For an explanation of how to store a selection, see "Chapter 6 step: 02
Converting a selection to a Layer" on p. 189.
Example image[selection Layer] icon
[Selection] Category
・ [Ruler Layer] Used to manage the rulers used with drawings. For an explanation of rulers, see "Chapter 4 Rulers" on p. 107.
[Ruler Layer] iconExample image
[Ruler] Category
・ [Panel Ruler Layer] Used to manage panel rulers. For an explanation of panel rulers, see "Chapter 4 step: 05 Panel Rulers"
on p. 133.
Example image[Panel Ruler Layer]
icon
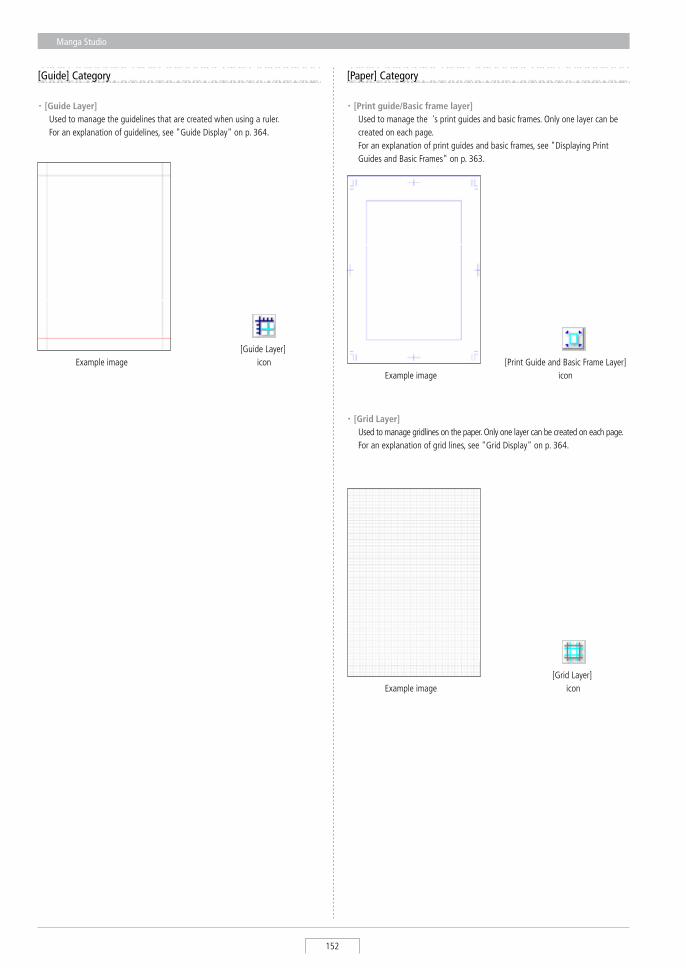
Manga Studio
152
[Guide] Category
・ [Guide Layer] Used to manage the guidelines that are created when using a ruler. For an explanation of guidelines, see "Guide Display" on p. 364.
Example image[Guide Layer]
icon
・ [Grid Layer] Used to manage gridlines on the paper. Only one layer can be created on each page. For an explanation of grid lines, see "Grid Display" on p. 364.
Example image[Grid Layer]
icon
・ [Print guide/Basic frame layer] Used to manage the 's print guides and basic frames. Only one layer can be
created on each page. For an explanation of print guides and basic frames, see "Displaying Print
Guides and Basic Frames" on p. 363.
Example image
[Paper] Category
[Print Guide and Basic Frame Layer] icon
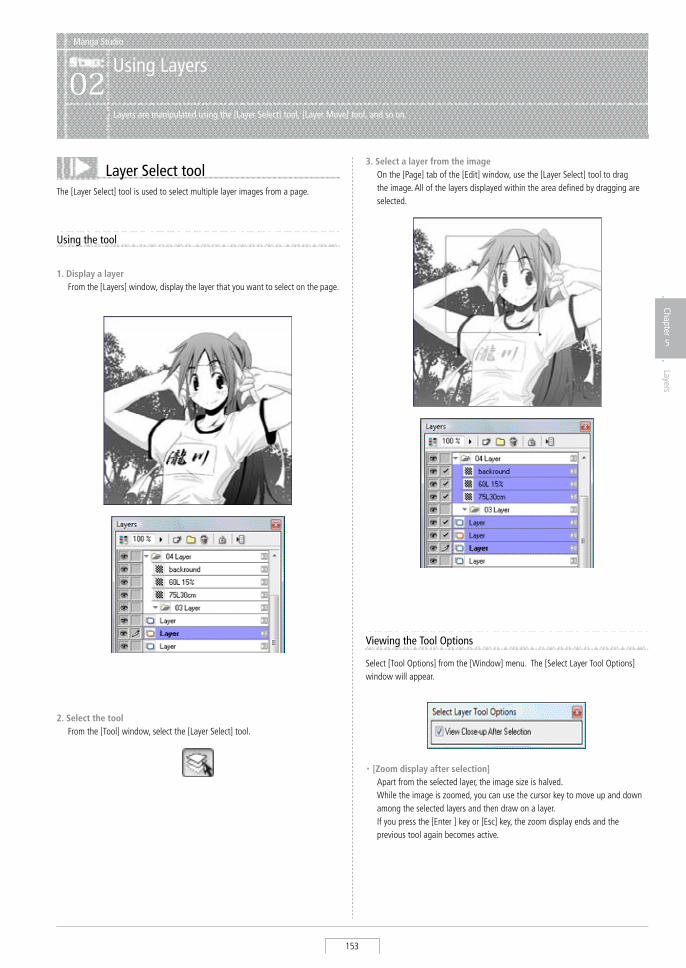
User's Guide
153
Chapter
5
Layers
Manga Studio
Using Layers02
Layers are manipulated using the [Layer Select] tool, [Layer Move] tool, and so on.
Layer Select toolThe [Layer select] tool is used to select multiple layer images from a page.
Using the tool
1. Display a layer From the [Layers] window, display the layer that you want to select on the page.
2. Select the tool From the [Tool] window, select the [Layer select] tool.
3. Select a layer from the image On the [Page] tab of the [Edit] window, use the [Layer select] tool to drag
the image. All of the layers displayed within the area defined by dragging are selected.
Viewing the Tool Options
select [Tool Options] from the [Window] menu. The [select Layer Tool Options] window will appear.
・ [Zoom display after selection] Apart from the selected layer, the image size is halved. While the image is zoomed, you can use the cursor key to move up and down
among the selected layers and then draw on a layer. If you press the [Enter ] key or [Esc] key, the zoom display ends and the
previous tool again becomes active.
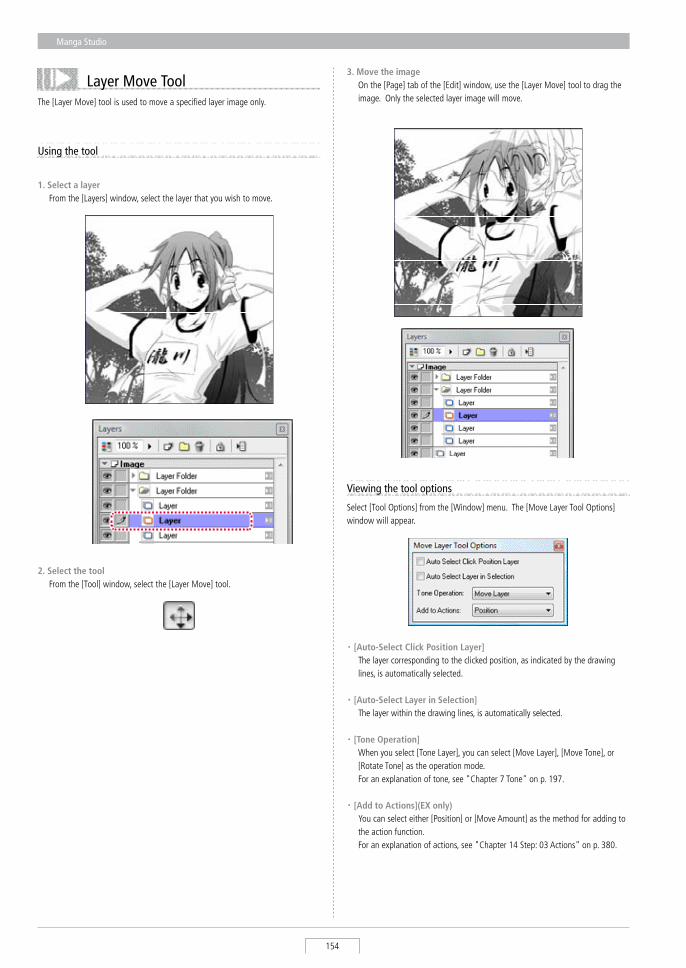
Manga Studio
154
Layer Move ToolThe [Layer Move] tool is used to move a specified layer image only.
Using the tool
1. Select a layer From the [Layers] window, select the layer that you wish to move.
2. Select the tool From the [Tool] window, select the [Layer Move] tool.
3. Move the image On the [Page] tab of the [Edit] window, use the [Layer Move] tool to drag the
image. Only the selected layer image will move.
Viewing the tool options
select [Tool Options] from the [Window] menu. The [Move Layer Tool Options] window will appear.
・ [Auto-Select Click Position Layer] The layer corresponding to the clicked position, as indicated by the drawing
lines, is automatically selected.
・ [Auto-Select Layer in Selection] The layer within the drawing lines, is automatically selected.
・ [Tone Operation] When you select [Tone Layer], you can select [Move Layer], [Move Tone], or
[Rotate Tone] as the operation mode. For an explanation of tone, see "Chapter 7 Tone" on p. 197.
・ [Add to Actions](EX only) You can select either [Position] or [Move Amount] as the method for adding to
the action function. For an explanation of actions, see "Chapter 14 step: 03 Actions" on p. 380.
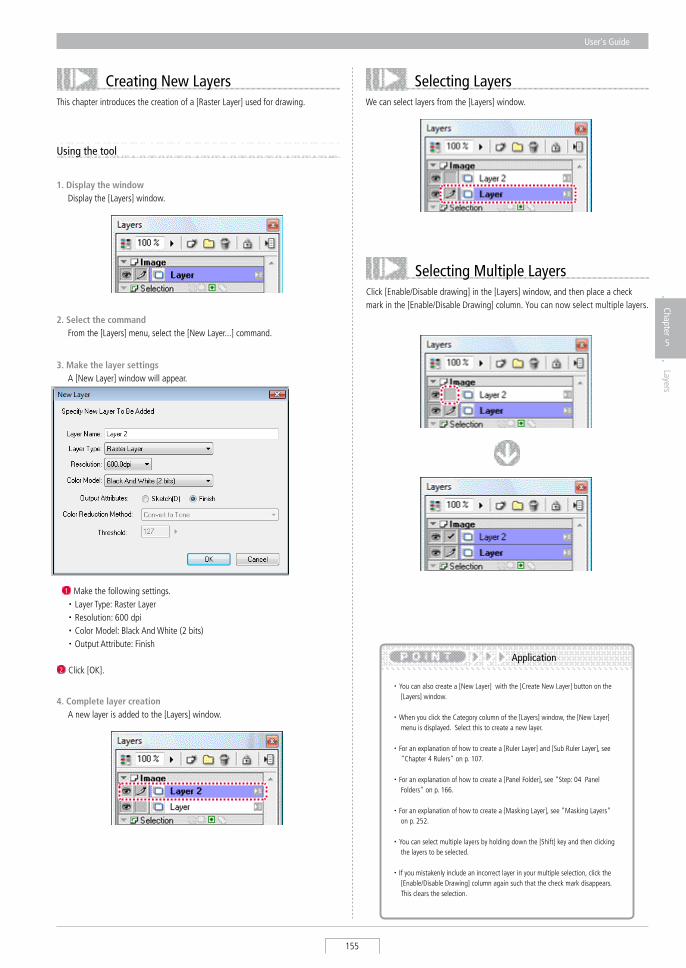
User's Guide
155
Chapter
5
Layers
Creating New LayersThis chapter introduces the creation of a [Raster Layer] used for drawing.
Using the tool
1. Display the window Display the [Layers] window.
4. Complete layer creation A new layer is added to the [Layers] window.
2. Select the command From the [Layers] menu, select the [New Layer...] command.
3. Make the layer settings A [New Layer] window will appear.
1 Make the following settings. ・ Layer Type: Raster Layer ・ Resolution: 600 dpi ・ Color Model: Black And White (2 bits) ・ Output Attribute: Finish
2 Click [OK].
Selecting LayersWe can select layers from the [Layers] window.
Selecting Multiple LayersClick [Enable/Disable drawing] in the [Layers] window, and then place a check mark in the [Enable/Disable Drawing] column. You can now select multiple layers.
・ You can also create a [New Layer] with the [Create New Layer] button on the [Layers] window.
・ When you click the Category column of the [Layers] window, the [New Layer] menu is displayed. select this to create a new layer.
・ For an explanation of how to create a [Ruler Layer] and [sub Ruler Layer], see "Chapter 4 Rulers" on p. 107.
・ For an explanation of how to create a [Panel Folder], see "step: 04 Panel Folders" on p. 166.
・ For an explanation of how to create a [Masking Layer], see "Masking Layers" on p. 252.
・ You can select multiple layers by holding down the [shift] key and then clicking the layers to be selected.
・ If you mistakenly include an incorrect layer in your multiple selection, click the [Enable/Disable Drawing] column again such that the check mark disappears. This clears the selection.
Application
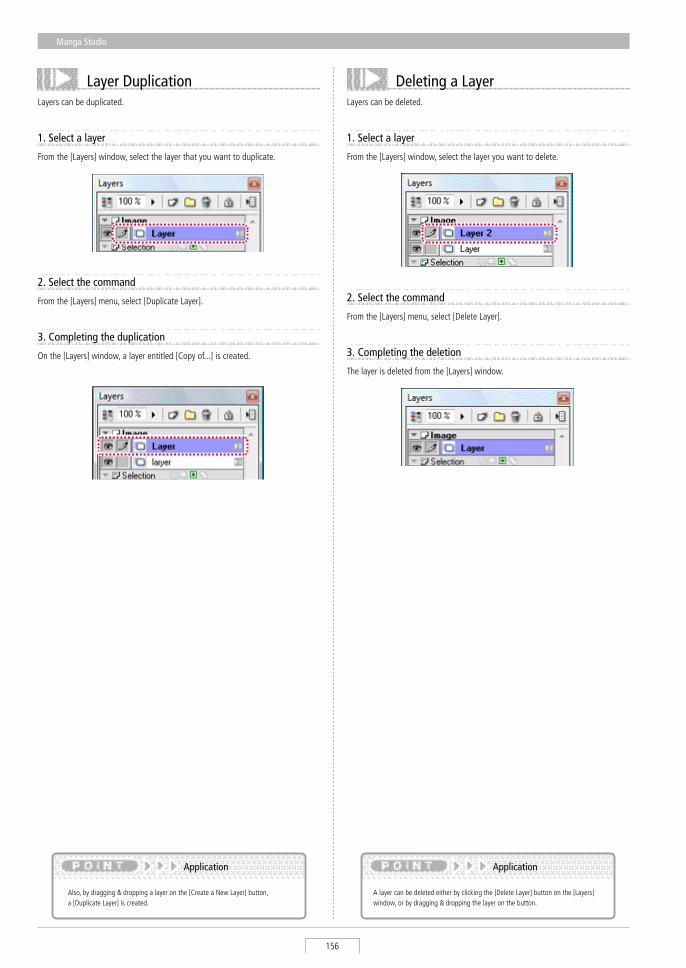
Manga Studio
156
Layer DuplicationLayers can be duplicated.
1. Select a layer
From the [Layers] window, select the layer that you want to duplicate.
2. Select the command
From the [Layers] menu, select [Duplicate Layer].
3. Completing the duplication
On the [Layers] window, a layer entitled [Copy of...] is created.
Deleting a LayerLayers can be deleted.
1. Select a layer
From the [Layers] window, select the layer you want to delete.
2. Select the command
From the [Layers] menu, select [Delete Layer].
3. Completing the deletion
The layer is deleted from the [Layers] window.
A layer can be deleted either by clicking the [Delete Layer] button on the [Layers] window, or by dragging & dropping the layer on the button.
Application
Also, by dragging & dropping a layer on the [Create a New Layer] button, a [Duplicate Layer] is created.
Application
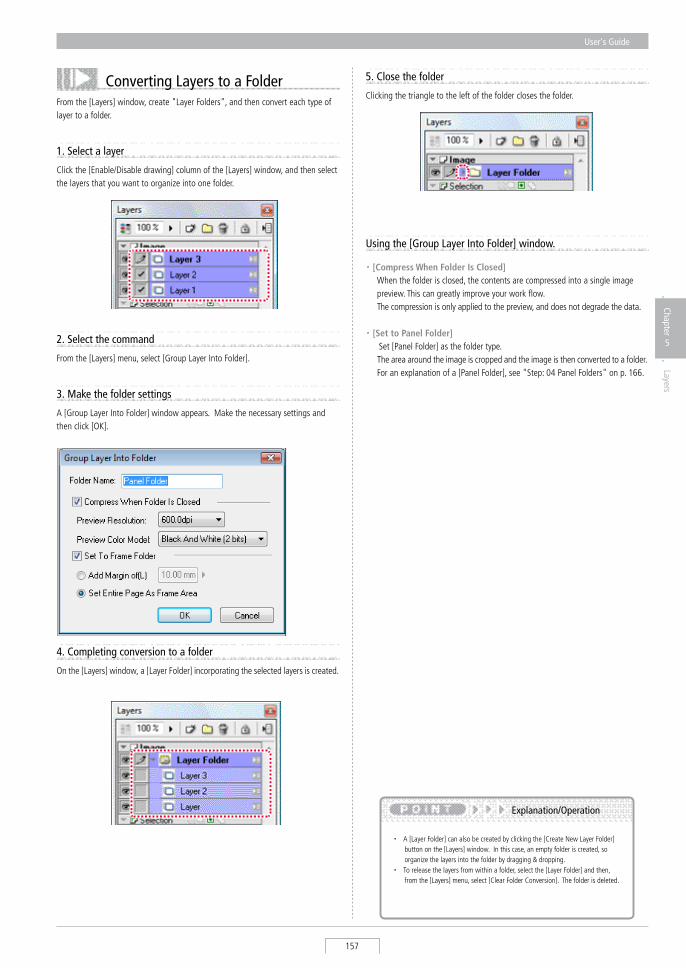
User's Guide
157
Chapter
5
Layers
Converting Layers to a FolderFrom the [Layers] window, create "Layer Folders", and then convert each type of layer to a folder.
1. Select a layer
Click the [Enable/Disable drawing] column of the [Layers] window, and then select the layers that you want to organize into one folder.
3. Make the folder settings
A [Group Layer Into Folder] window appears. Make the necessary settings and then click [OK].
2. Select the command
From the [Layers] menu, select [Group Layer Into Folder].
5. Close the folder
Clicking the triangle to the left of the folder closes the folder.
4. Completing conversion to a folder
On the [Layers] window, a [Layer Folder] incorporating the selected layers is created.
・ A [Layer Folder] can also be created by clicking the [Create New Layer Folder] button on the [Layers] window. In this case, an empty folder is created, so organize the layers into the folder by dragging & dropping.
・ To release the layers from within a folder, select the [Layer Folder] and then, from the [Layers] menu, select [Clear Folder Conversion]. The folder is deleted.
Explanation/Operation
Using the [Group Layer Into Folder] window.
・ [Compress When Folder Is Closed] When the folder is closed, the contents are compressed into a single image
preview. This can greatly improve your work flow. The compression is only applied to the preview, and does not degrade the data.
・ [Set to Panel Folder] set [Panel Folder] as the folder type. The area around the image is cropped and the image is then converted to a folder. For an explanation of a [Panel Folder], see "step: 04 Panel Folders" on p. 166.
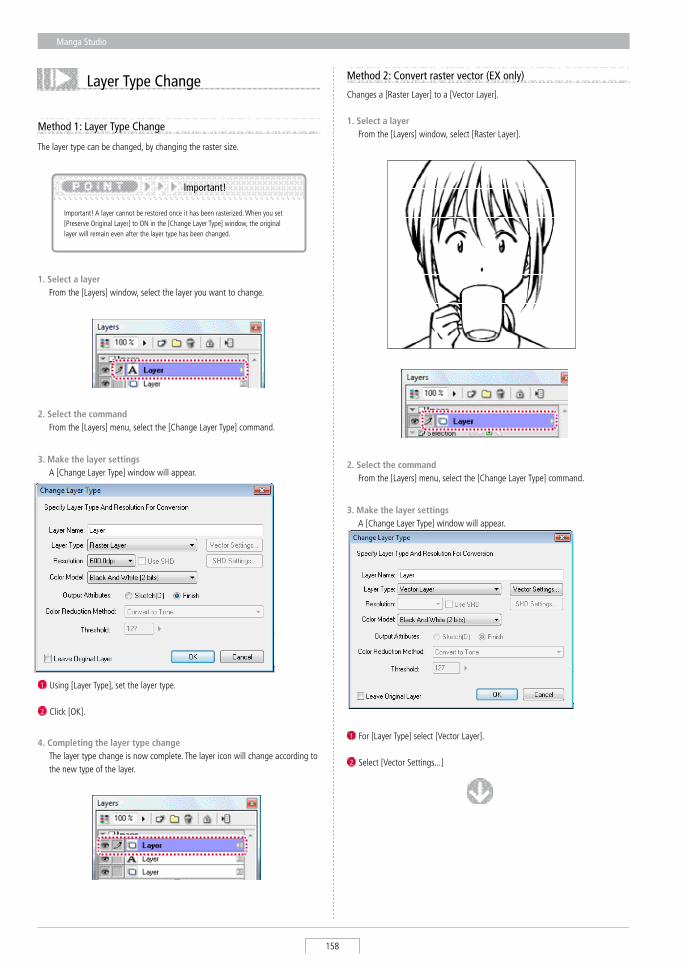
Manga Studio
158
Layer Type Change
Method 1: Layer Type Change
1. Select a layer From the [Layers] window, select the layer you want to change.
2. Select the command From the [Layers] menu, select the [Change Layer Type] command.
3. Make the layer settings A [Change Layer Type] window will appear.
1 Using [Layer Type], set the layer type.
2 Click [OK].
2
1
4. Completing the layer type change The layer type change is now complete. The layer icon will change according to
the new type of the layer.
The layer type can be changed, by changing the raster size.
Method 2: Convert raster vector (EX only)
2. Select the command From the [Layers] menu, select the [Change Layer Type] command.
Changes a [Raster Layer] to a [Vector Layer].
3. Make the layer settings A [Change Layer Type] window will appear.
1 For [Layer Type] select [Vector Layer].
2 select [Vector settings...]
1. Select a layer From the [Layers] window, select [Raster Layer].
Important! A layer cannot be restored once it has been rasterized. When you set [Preserve Original Layer] to ON in the [Change Layer Type] window, the original layer will remain even after the layer type has been changed.
Important!

User's Guide
159
Chapter
5
Layers
The [Vector Layer Conversion settings] window appears.
3 Make the necessary settings.
4 Click [OK].
The [Change Layer Type] window reappears.
5 Click [OK].
3
4
4. Completing layer type change The layer type change is now complete. The icon will change as well.
Using the [Vector Layer Conversion Settings] window
・ [Maximum Line Width] Any lines thicker than this value will not be treated as vectors.
・ [Correction] Used to set the curvature of a line.
・ [Also Convert White] White lines are also converted to vectors.
・ [Detect Line End] Line ends are detected in a way that approximates to a raster. Change processing may take some time.
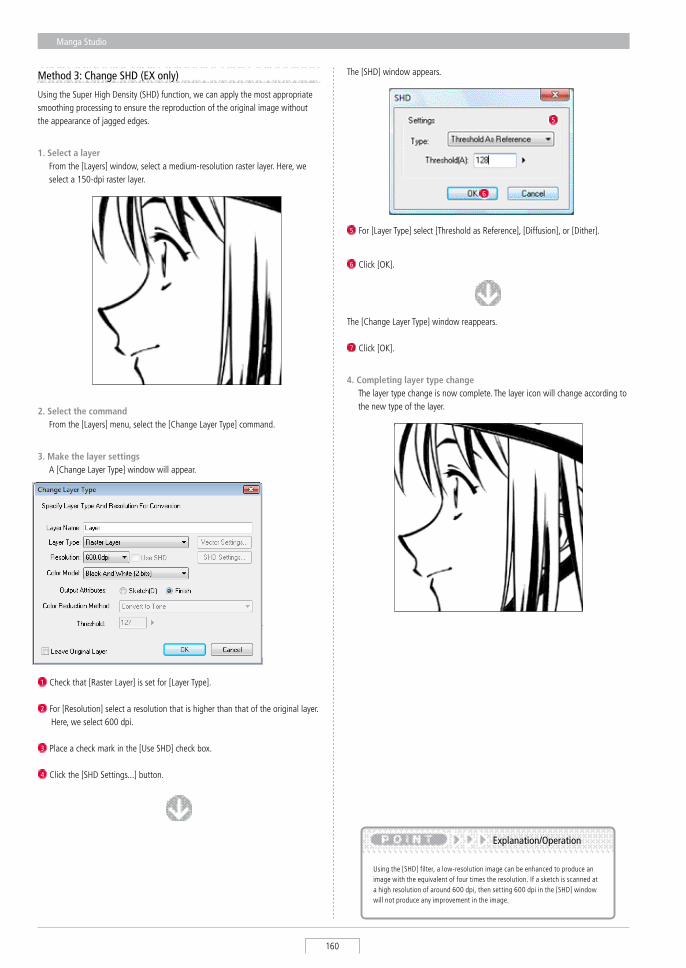
Manga Studio
160
Method 3: Change SHD (EX only)
1. Select a layer From the [Layers] window, select a medium-resolution raster layer. Here, we
select a 150-dpi raster layer.
Using the super High Density (sHD) function, we can apply the most appropriate smoothing processing to ensure the reproduction of the original image without the appearance of jagged edges.
The [sHD] window appears.
5
6
2. Select the command From the [Layers] menu, select the [Change Layer Type] command.
3. Make the layer settings A [Change Layer Type] window will appear.
1 Check that [Raster Layer] is set for [Layer Type].
2 For [Resolution] select a resolution that is higher than that of the original layer. Here, we select 600 dpi.
3 Place a check mark in the [Use sHD] check box.
4 Click the [sHD settings...] button.
5 For [Layer Type] select [Threshold as Reference], [Diffusion], or [Dither].
The [Change Layer Type] window reappears.
7 Click [OK].
6 Click [OK].
4. Completing layer type change The layer type change is now complete. The layer icon will change according to
the new type of the layer.
Using the [sHD] filter, a low-resolution image can be enhanced to produce an image with the equivalent of four times the resolution. If a sketch is scanned at a high resolution of around 600 dpi, then setting 600 dpi in the [sHD] window will not produce any improvement in the image.
Explanation/Operation
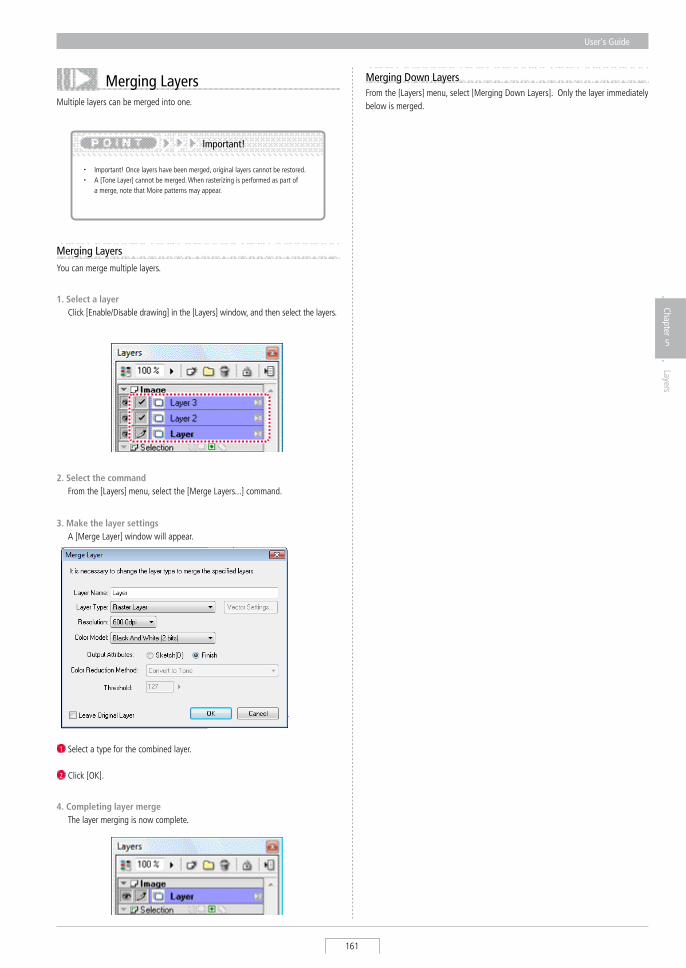
User's Guide
161
Chapter
5
Layers
Merging LayersMultiple layers can be merged into one.
・ Important! Once layers have been merged, original layers cannot be restored. ・ A [Tone Layer] cannot be merged. When rasterizing is performed as part of
a merge, note that Moire patterns may appear.
Important!
1. Select a layer Click [Enable/Disable drawing] in the [Layers] window, and then select the layers.
2. Select the command From the [Layers] menu, select the [Merge Layers...] command.
3. Make the layer settings A [Merge Layer] window will appear.
1 select a type for the combined layer.
2 Click [OK].
1
4. Completing layer merge The layer merging is now complete.
Merging LayersYou can merge multiple layers.
Merging Down LayersFrom the [Layers] menu, select [Merging Down Layers]. Only the layer immediately below is merged.
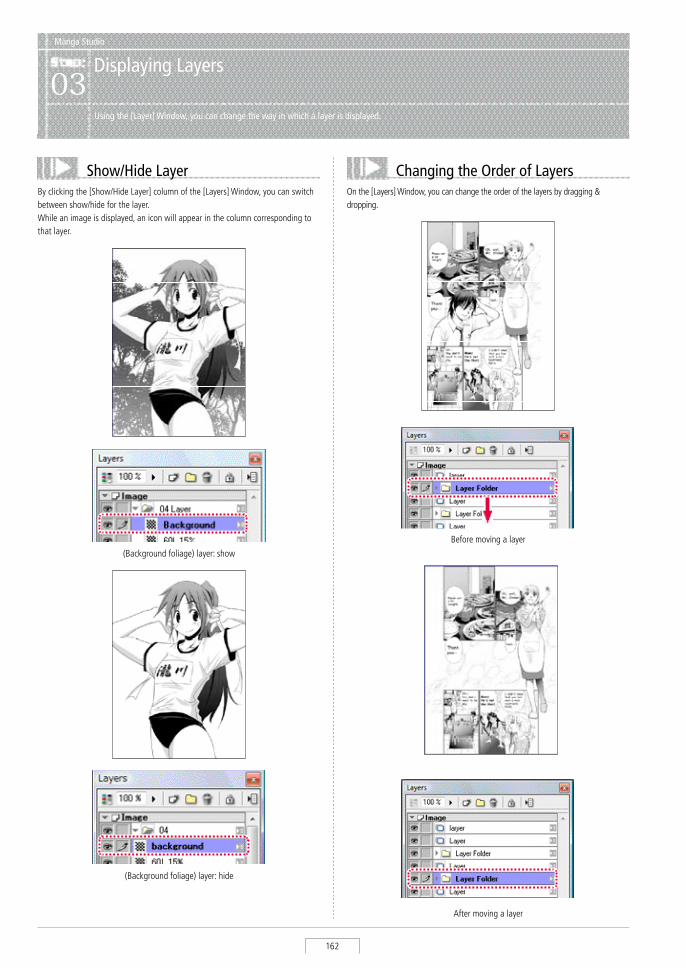
Manga Studio
162
Changing the Order of LayersOn the [Layers] Window, you can change the order of the layers by dragging & dropping.
Before moving a layer
After moving a layer
Manga Studio
Displaying Layers03
Using the [Layer] Window, you can change the way in which a layer is displayed.
Show/Hide LayerBy clicking the [show/Hide Layer] column of the [Layers] Window, you can switch between show/hide for the layer. While an image is displayed, an icon will appear in the column corresponding to that layer.
(Background foliage) layer: show
(Background foliage) layer: hide

User's Guide
163
Chapter
5
Layers
Layer order change, can only be applied to layers having the same category, such as those of the [image] category.
Explanation
Displaying the Layer DivisionThe [Layers] window can display the layer division. When the [Layers] window is displaying two layers, moving the cursor on the [Division Display Bar] drags the uppermost layer down so that the other layer is displayed.
4. Make the settings with the [Color Settings] dialog
Once the [Color settings] dialog is displayed, select a color and then click [OK].
5. The palette color is changed
The color of the [show/Hide Layer] and [Enable/Disable Drawing] columns of the [Layers] window is changed.
Changing the Layer Palette ColorYou can change the color of the [show/Hide Layer] and [Enable/Disable Drawing] columns of the [Layers] window.
1. Select a layer
From the [Layers] window, select the layers you want to change.
2. Select the command
From the [Layers] menu, select [Layer Properties...].
3. Change the palette color
Once the [Properties] window is displayed, double-click the [Palette Color] box.
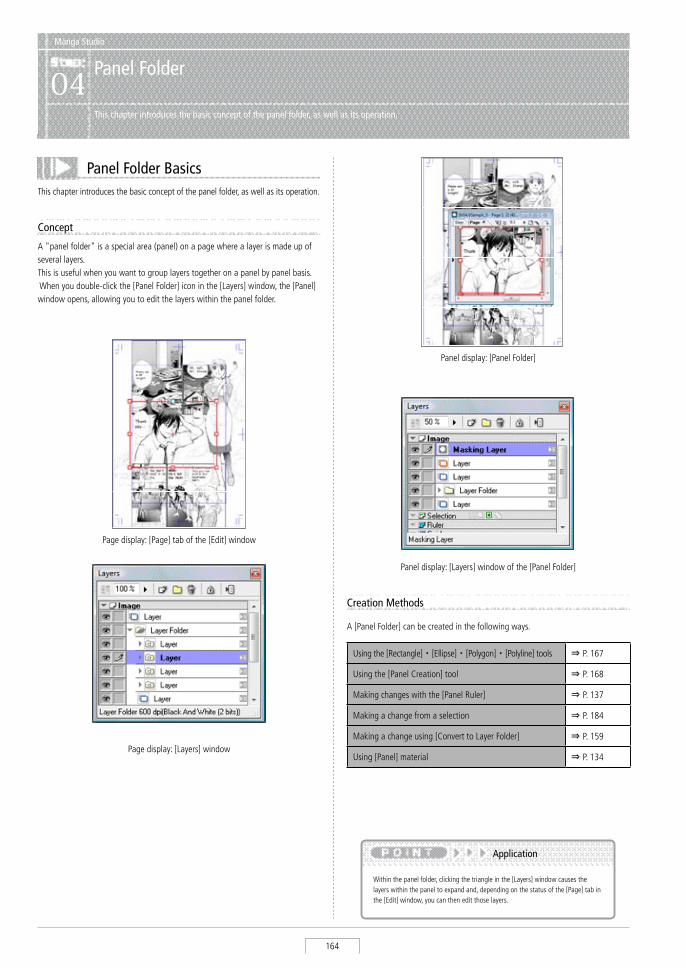
Manga Studio
164
Manga Studio
Panel Folder04
This chapter introduces the basic concept of the panel folder, as well as its operation.
Panel Folder Basics
A "panel folder" is a special area (panel) on a page where a layer is made up of several layers. This is useful when you want to group layers together on a panel by panel basis. When you double-click the [Panel Folder] icon in the [Layers] window, the [Panel] window opens, allowing you to edit the layers within the panel folder.
Concept
Page display: [Layers] window
Page display: [Page] tab of the [Edit] window
Panel display: [Layers] window of the [Panel Folder]
Panel display: [Panel Folder]
Within the panel folder, clicking the triangle in the [Layers] window causes the layers within the panel to expand and, depending on the status of the [Page] tab in the [Edit] window, you can then edit those layers.
Application
This chapter introduces the basic concept of the panel folder, as well as its operation.
A [Panel Folder] can be created in the following ways.
Creation Methods
Using the [Rectangle]・[Ellipse]・[Polygon]・[Polyline] tools ⇒ P. 167
Using the [Panel Creation] tool ⇒ P. 168
Making changes with the [Panel Ruler] ⇒ P. 137
Making a change from a selection ⇒ P. 184
Making a change using [Convert to Layer Folder] ⇒ P. 159
Using [Panel] material ⇒ P. 134
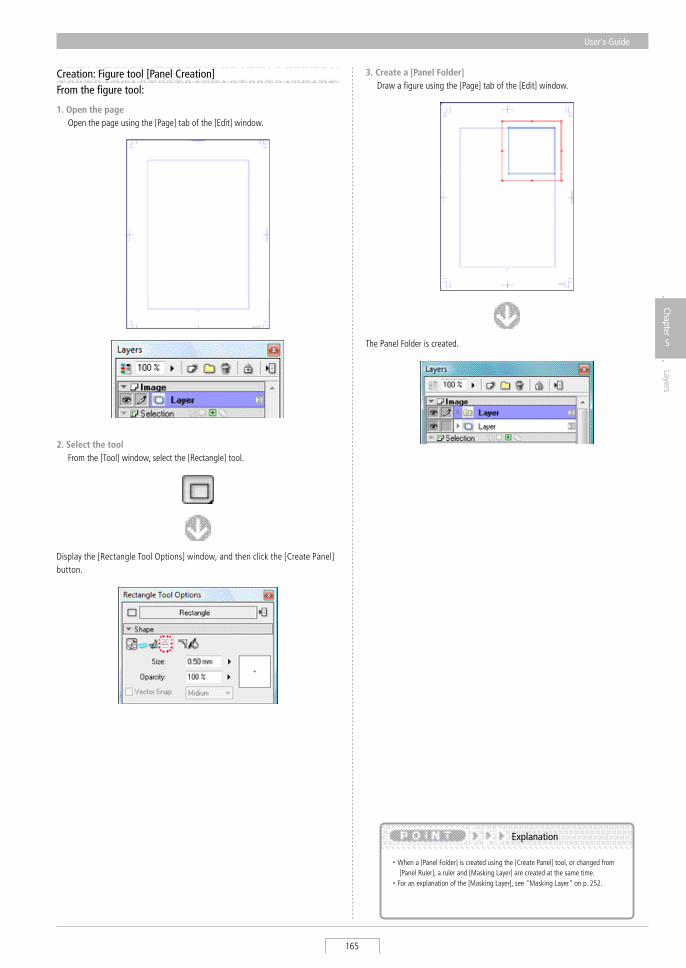
User's Guide
165
Chapter
5
Layers
Creation: Figure tool [Panel Creation]From the figure tool:
1. Open the page Open the page using the [Page] tab of the [Edit] window.
2. Select the tool From the [Tool] window, select the [Rectangle] tool.
3. Create a [Panel Folder] Draw a figure using the [Page] tab of the [Edit] window.
Display the [Rectangle Tool Options] window, and then click the [Create Panel] button.
The Panel Folder is created.
・ When a [Panel Folder] is created using the [Create Panel] tool, or changed from [Panel Ruler], a ruler and [Masking Layer] are created at the same time.
・ For an explanation of the [Masking Layer], see "Masking Layer" on p. 252.
Explanation
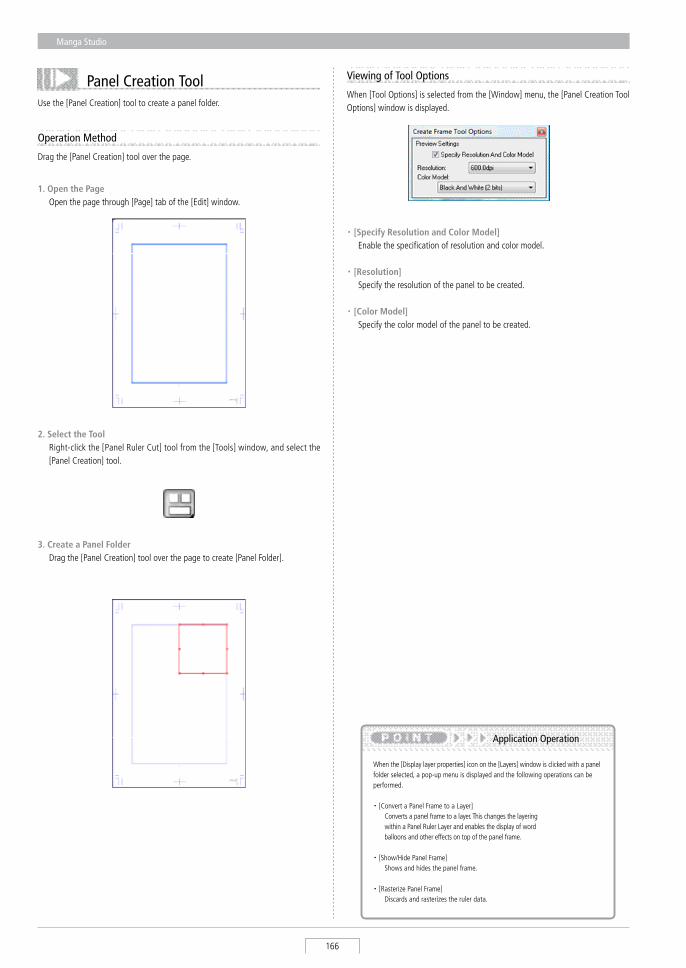
Manga Studio
166
Panel Creation ToolUse the [Panel Creation] tool to create a panel folder.
Operation Method
Drag the [Panel Creation] tool over the page.
1. Open the Page Open the page through [Page] tab of the [Edit] window.
2. Select the Tool Right-click the [Panel Ruler Cut] tool from the [Tools] window, and select the
[Panel Creation] tool.
3. Create a Panel Folder Drag the [Panel Creation] tool over the page to create [Panel Folder].
When [Tool Options] is selected from the [Window] menu, the [Panel Creation Tool Options] window is displayed.
Viewing of Tool Options
・ [Specify Resolution and Color Model] Enable the specification of resolution and color model.
・ [Resolution] specify the resolution of the panel to be created.
・ [Color Model] specify the color model of the panel to be created.
When the [Display layer properties] icon on the [Layers] window is clicked with a panel folder selected, a pop-up menu is displayed and the following operations can be performed.
・ [Convert a Panel Frame to a Layer] Converts a panel frame to a layer. This changes the layering
within a Panel Ruler Layer and enables the display of word balloons and other effects on top of the panel frame.
・ [show/Hide Panel Frame] shows and hides the panel frame.
・ [Rasterize Panel Frame] Discards and rasterizes the ruler data.
Application Operation
Selection
Chapter 6
This chapter introduces selections for specifying and working on a specific area.
Step:01 selection 170
Step:02 Convert a selection to a Layer 189
Step:03 select a Vector Line (EX only) 195
Chapter
6
Selection
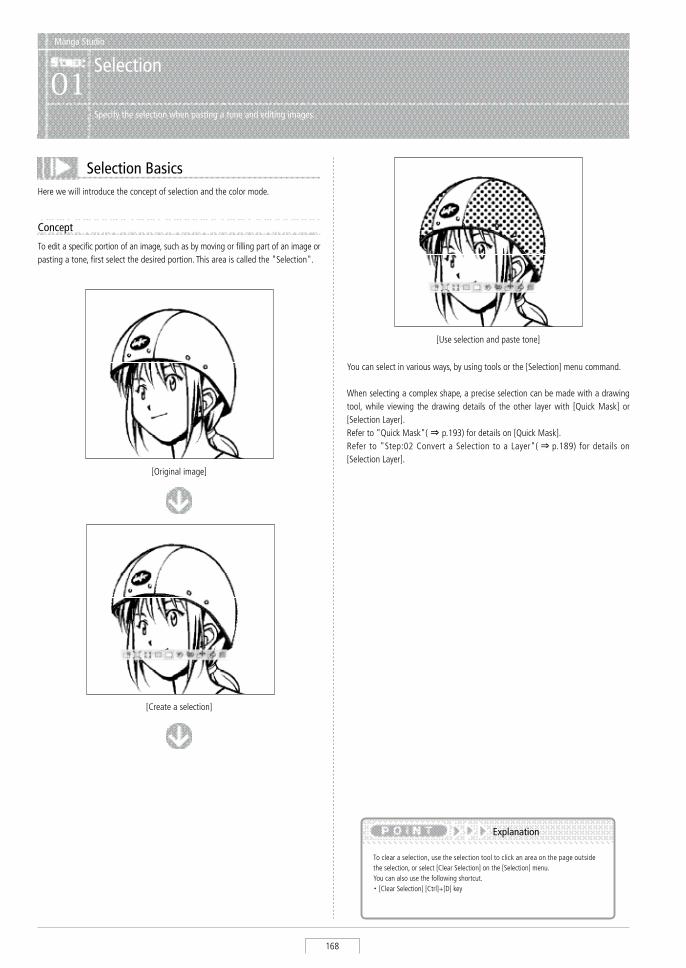
Manga Studio
168
Manga Studio
Selection01
Specify the selection when pasting a tone and editing images.
Selection BasicsHere we will introduce the concept of selection and the color mode.
Concept
To edit a specific portion of an image, such as by moving or filling part of an image or pasting a tone, first select the desired portion. This area is called the "selection".
You can select in various ways, by using tools or the [selection] menu command.
When selecting a complex shape, a precise selection can be made with a drawing tool, while viewing the drawing details of the other layer with [Quick Mask] or [selection Layer].Refer to "Quick Mask"( ⇒ p.193) for details on [Quick Mask].Refer to "step:02 Convert a selection to a Layer"( ⇒ p.189) for details on [selection Layer].
To clear a selection, use the selection tool to click an area on the page outside the selection, or select [Clear selection] on the [selection] menu.You can also use the following shortcut.・ [Clear selection] [Ctrl]+[D] key
Explanation
[Original image]
[Create a selection]
[Use selection and paste tone]
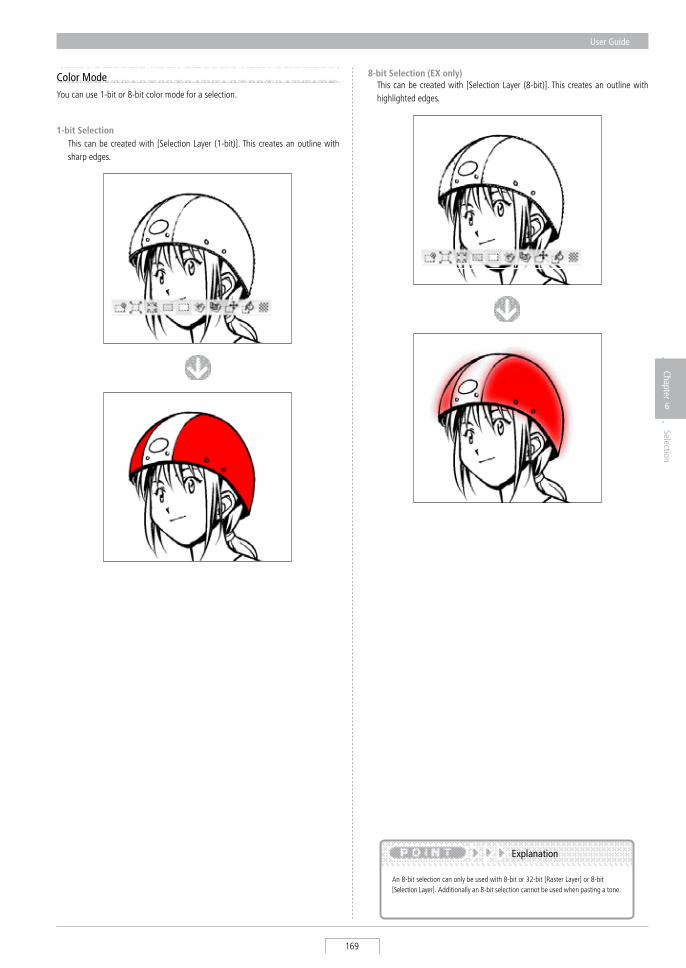
User Guide
169
Chapter
6
Selection
Color ModeYou can use 1-bit or 8-bit color mode for a selection.
1-bit Selection This can be created with [selection Layer (1-bit)]. This creates an outline with
sharp edges.
8-bit Selection (EX only) This can be created with [selection Layer (8-bit)]. This creates an outline with
highlighted edges.
An 8-bit selection can only be used with 8-bit or 32-bit [Raster Layer] or 8-bit [selection Layer]. Additionally an 8-bit selection cannot be used when pasting a tone.
Explanation
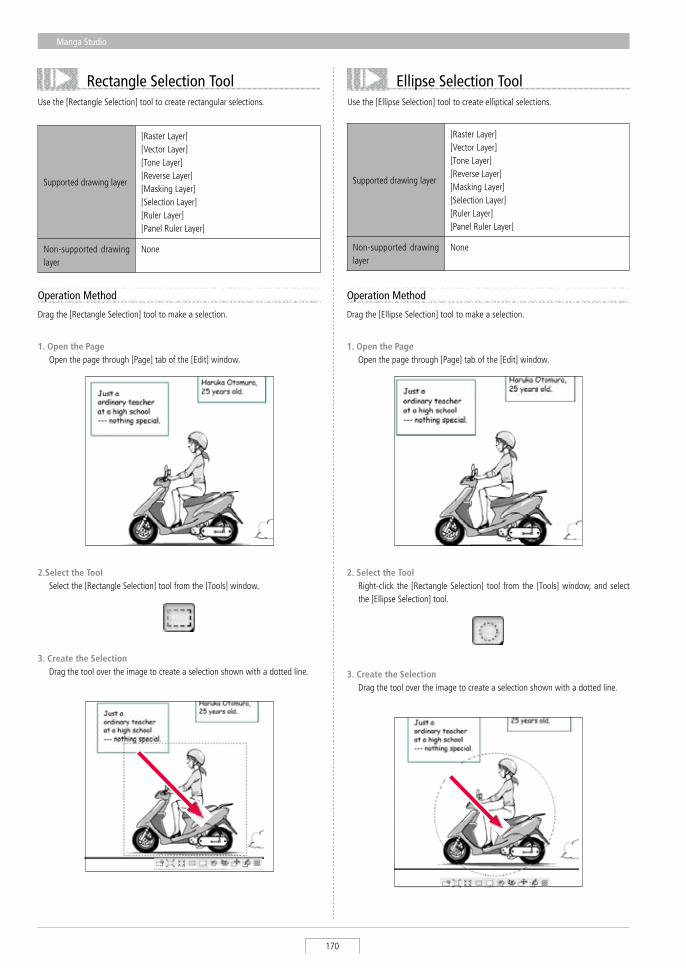
Manga Studio
170
Rectangle Selection ToolUse the [Rectangle selection] tool to create rectangular selections.
supported drawing layer
[Raster Layer][Vector Layer][Tone Layer][Reverse Layer][Masking Layer][selection Layer][Ruler Layer][Panel Ruler Layer]
Non-supported drawing layer
None
Operation Method
1. Open the Page Open the page through [Page] tab of the [Edit] window.
Drag the [Rectangle selection] tool to make a selection.
2.Select the Tool select the [Rectangle selection] tool from the [Tools] window.
3. Create the Selection Drag the tool over the image to create a selection shown with a dotted line.
Ellipse Selection ToolUse the [Ellipse selection] tool to create elliptical selections.
Operation Method
1. Open the Page Open the page through [Page] tab of the [Edit] window.
Drag the [Ellipse selection] tool to make a selection.
2. Select the Tool Right-click the [Rectangle selection] tool from the [Tools] window, and select
the [Ellipse selection] tool.
3. Create the Selection Drag the tool over the image to create a selection shown with a dotted line.
supported drawing layer
[Raster Layer][Vector Layer][Tone Layer][Reverse Layer][Masking Layer][selection Layer][Ruler Layer][Panel Ruler Layer]
Non-supported drawing layer
None
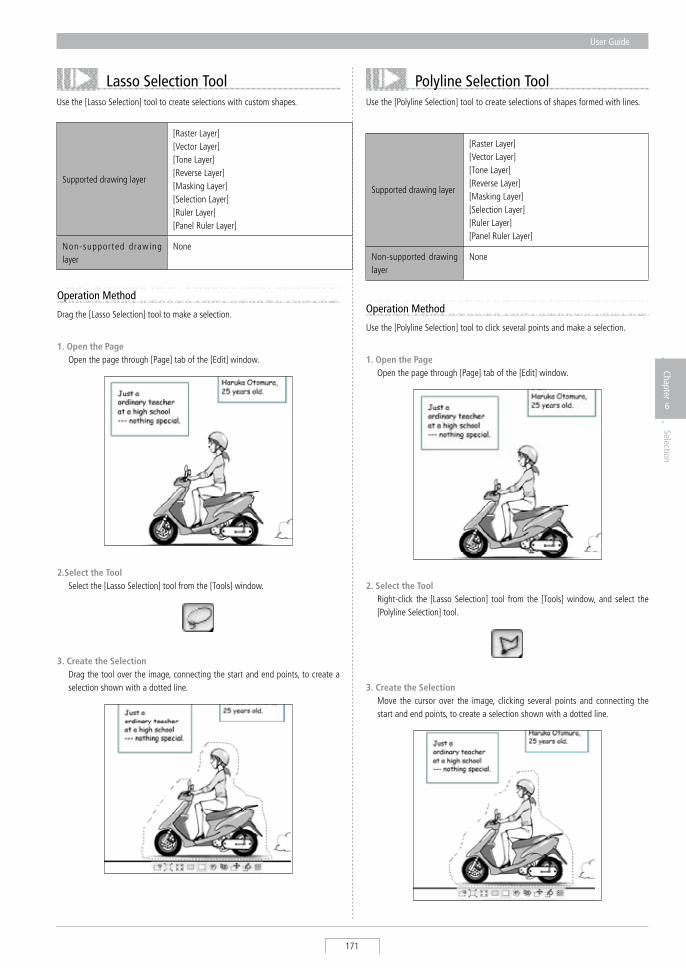
User Guide
171
Chapter
6
Selection
Lasso Selection ToolUse the [Lasso selection] tool to create selections with custom shapes.
Operation Method
1. Open the Page Open the page through [Page] tab of the [Edit] window.
Drag the [Lasso selection] tool to make a selection.
2.Select the Tool select the [Lasso selection] tool from the [Tools] window.
3. Create the Selection Drag the tool over the image, connecting the start and end points, to create a
selection shown with a dotted line.
Polyline Selection ToolUse the [Polyline selection] tool to create selections of shapes formed with lines.
Operation Method
Use the [Polyline selection] tool to click several points and make a selection.
1. Open the Page Open the page through [Page] tab of the [Edit] window.
2. Select the Tool Right-click the [Lasso selection] tool from the [Tools] window, and select the
[Polyline selection] tool.
3. Create the Selection Move the cursor over the image, clicking several points and connecting the
start and end points, to create a selection shown with a dotted line.
supported drawing layer
[Raster Layer][Vector Layer][Tone Layer][Reverse Layer][Masking Layer][selection Layer][Ruler Layer][Panel Ruler Layer]
Non-supported drawing layer
None
supported drawing layer
[Raster Layer][Vector Layer][Tone Layer][Reverse Layer][Masking Layer][selection Layer][Ruler Layer][Panel Ruler Layer]
Non-supported drawing layer
None

Manga Studio
172
Viewing of Tool Options (Rectangle Selection/Ellipse Selection/Lasso Selection/Polyline Selection)
When [Tool Options] is selected from the [Window] menu, the [Tool Options] window is displayed.
K [Inside Selection] (EX only) selects within the outline of the drawn area.
L [Shape Selection] (EX only) Creates a selection so as to create a border along the
outline of the drawn lines within a specified area.
M [Outline Selection] (EX only) selects both inside and outside the drawn lines within a specified area.
N [Browse Several] (EX only) Targets several layers. select from [All Layers], [selected Layers], or [Layers in Folder].
O [Sketch] This functions like the old [Ignore sketch] checkbox. When checked, raster layers,
[selection Layers] and [Gridline Ruler Layers] with the [sketch] attribute will not be targeted for selection.
P [Text] When checked, [Text Layers], [Word Balloon Layers] and [Text Folders] will not
be targeted for selection.
[Conform to Panel Borders] When checked, only the area inside [Panel Folder] borders will be selected. This
option is only effective when a [Panel Folder] or a layer within a [Panel Folder] is selected on the Layers palette.
Q [Paint to Vector Center Line] (EX only) Fills to the vector center line. This is valid only for [Vector Layer].
R [Close Gap] (EX only) Creates a selection by closing a gap of a specified number of pixels.
S [Expand/Reduce Area] (EX only) Expands or reduces the selection by a specified number of pixels.
T [Start from Center] starts from the center when creating a selection.
U [Fix Aspect Ratio] Fixes the aspect ratio when creating a selection.
V [Rotate After Confirming Size] Rotates after the size is confirmed when creating a selection.
A [Selection Tool Menu] switches the selection tool.
B [Tool Settings Menu] switches the tool setting.
C [Show Menu] It is possible to switch between [show Tab] and
[show List], and the settings can be saved.
D [New Selection] Creates a new selection.
E [Add to Current Selection] Adds to the current selection.
F [Subtract Current Selection] Deletes from the current selection.
G [Select from Current Selection] selects only the area overlapping the current selection.
H [Anti-aliasing] (EX only) Creates an 8-bit selection with an anti-aliased border.
I [Normal Selection] (EX only) selects the entire specified area.
J [Shrink Selection] (EX only) Creates a selection of the area adjacent to the outline
of the drawn lines within the specified area.
A B
E
L
F
M
G
N
H
O
I
Q
C
J
D
K
T
U
V
R
S
Refer to "Types of Tool Options"( ⇒ p.176) for the selection of E - G , and J ~ - M .
Explanation
P
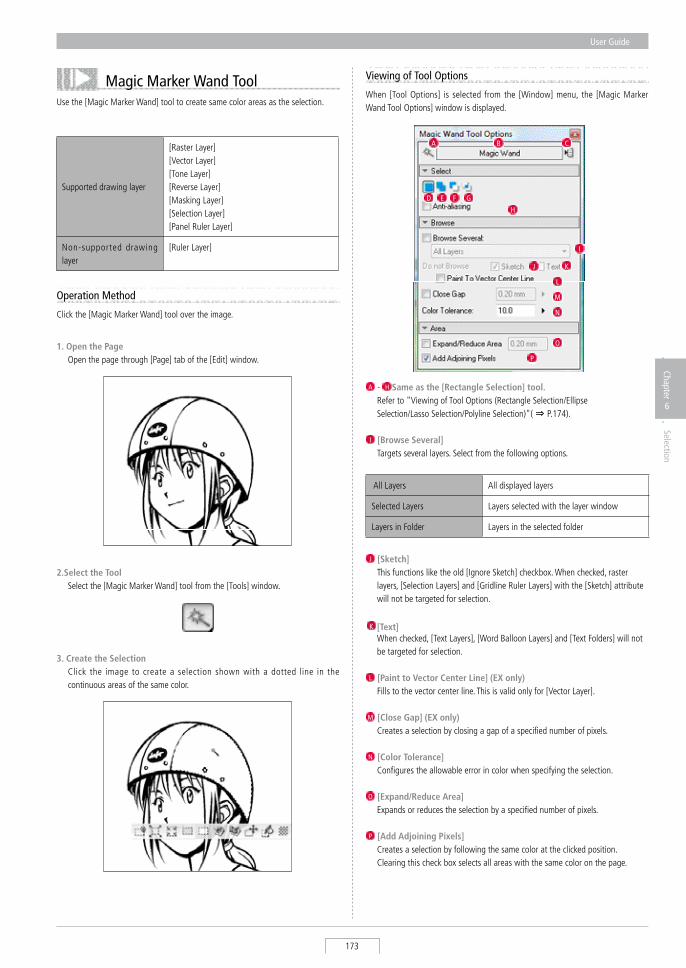
User Guide
173
Chapter
6
Selection
Magic Marker Wand ToolUse the [Magic Marker Wand] tool to create same color areas as the selection.
Operation Method
Click the [Magic Marker Wand] tool over the image.
1. Open the Page Open the page through [Page] tab of the [Edit] window.
2.Select the Tool select the [Magic Marker Wand] tool from the [Tools] window.
3. Create the Selection Click the image to create a selection shown with a dotted line in the
continuous areas of the same color.
supported drawing layer
[Raster Layer][Vector Layer][Tone Layer][Reverse Layer][Masking Layer][selection Layer][Panel Ruler Layer]
Non-supported drawing layer
[Ruler Layer]
Viewing of Tool Options
When [Tool Options] is selected from the [Window] menu, the [Magic Marker Wand Tool Options] window is displayed.
A - H Same as the [Rectangle Selection] tool. Refer to "Viewing of Tool Options (Rectangle selection/Ellipse
selection/Lasso selection/Polyline selection)"( ⇒ P.174).
I [Browse Several] Targets several layers. select from the following options.
All Layers All displayed layers
selected Layers Layers selected with the layer window
Layers in Folder Layers in the selected folder
J [Sketch] This functions like the old [Ignore sketch] checkbox. When checked, raster
layers, [selection Layers] and [Gridline Ruler Layers] with the [sketch] attribute will not be targeted for selection.
K [Text] When checked, [Text Layers], [Word Balloon Layers] and [Text Folders] will not
be targeted for selection.
L [Paint to Vector Center Line] (EX only) Fills to the vector center line. This is valid only for [Vector Layer].
M [Close Gap] (EX only) Creates a selection by closing a gap of a specified number of pixels.
N [Color Tolerance] Configures the allowable error in color when specifying the selection.
O [Expand/Reduce Area] Expands or reduces the selection by a specified number of pixels.
P [Add Adjoining Pixels] Creates a selection by following the same color at the clicked position.
Clearing this check box selects all areas with the same color on the page.
A B
E F G
H
I
M
C
J
D
L
O
P
N
K
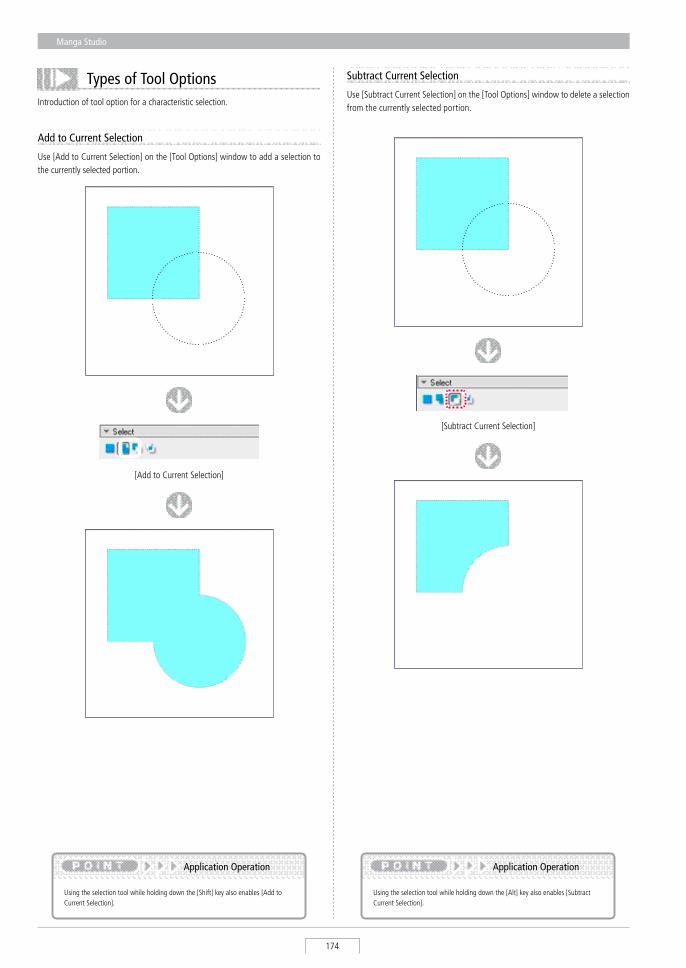
Manga Studio
174
Types of Tool OptionsIntroduction of tool option for a characteristic selection.
Add to Current Selection
Use [Add to Current selection] on the [Tool Options] window to add a selection to the currently selected portion.
[Add to Current selection]
Using the selection tool while holding down the [shift] key also enables [Add to Current selection].
Application Operation
Subtract Current Selection
Use [subtract Current selection] on the [Tool Options] window to delete a selection from the currently selected portion.
[subtract Current selection]
Using the selection tool while holding down the [Alt] key also enables [subtract Current selection].
Application Operation
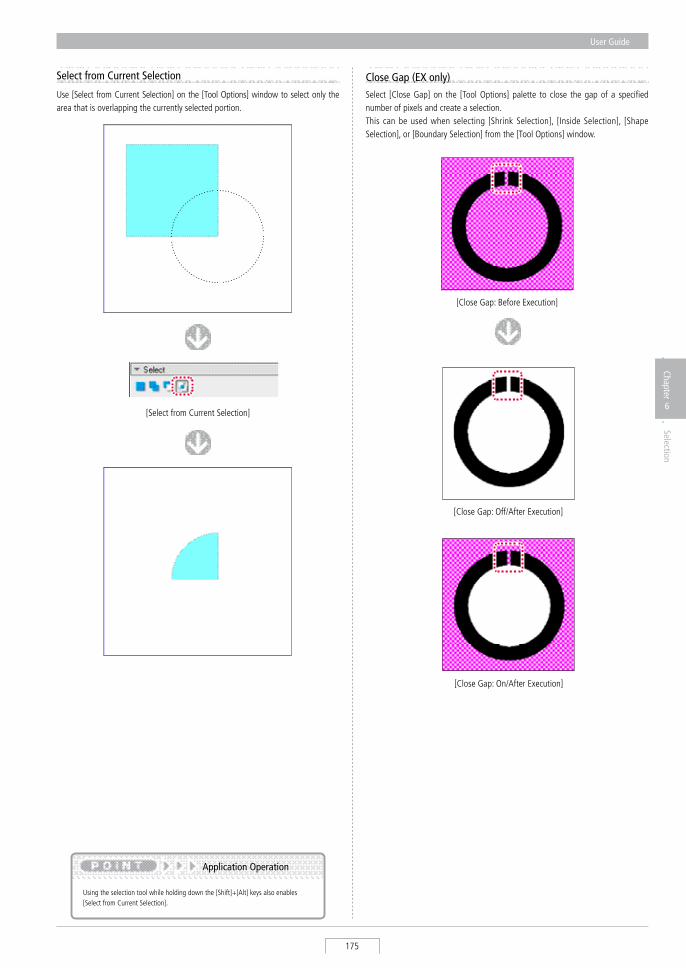
User Guide
175
Chapter
6
Selection
Select from Current Selection
Use [select from Current selection] on the [Tool Options] window to select only the area that is overlapping the currently selected portion.
[select from Current selection]
Using the selection tool while holding down the [shift]+[Alt] keys also enables [select from Current selection].
Application Operation
select [Close Gap] on the [Tool Options] palette to close the gap of a specified number of pixels and create a selection.This can be used when selecting [shrink selection], [Inside selection], [shape selection], or [Boundary selection] from the [Tool Options] window.
Close Gap (EX only)
[Close Gap: Before Execution]
[Close Gap: Off/After Execution]
[Close Gap: On/After Execution]
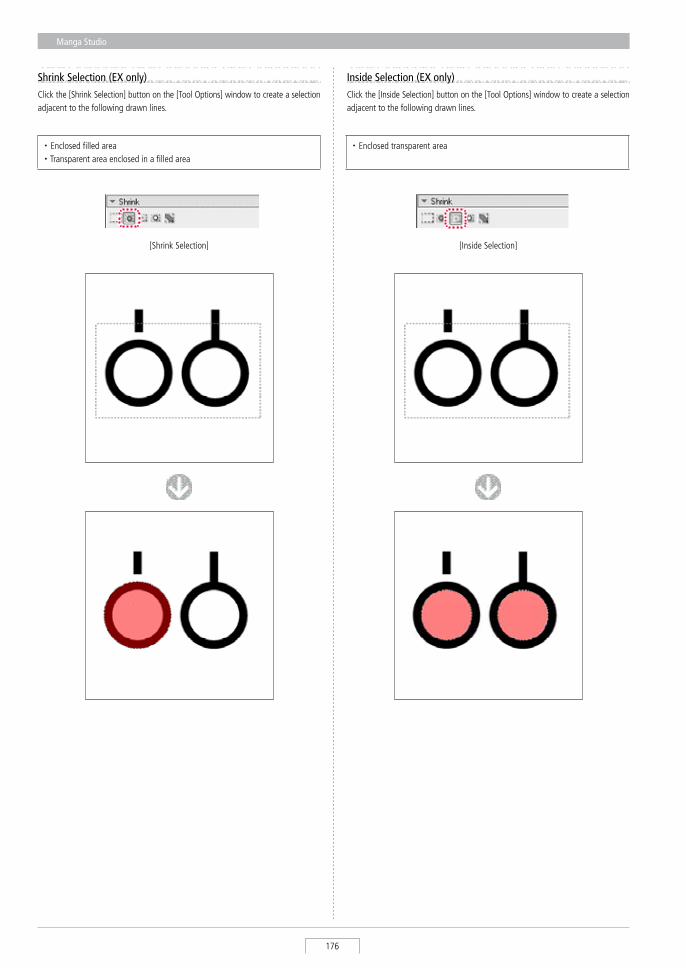
Manga Studio
176
Inside Selection (EX only)Click the [Inside selection] button on the [Tool Options] window to create a selection adjacent to the following drawn lines.
[shrink selection] [Outline selection][shape selection][Inside selection]
Shrink Selection (EX only)Click the [shrink selection] button on the [Tool Options] window to create a selection adjacent to the following drawn lines.
・ Enclosed filled area・ Transparent area enclosed in a filled area
・ Enclosed transparent area
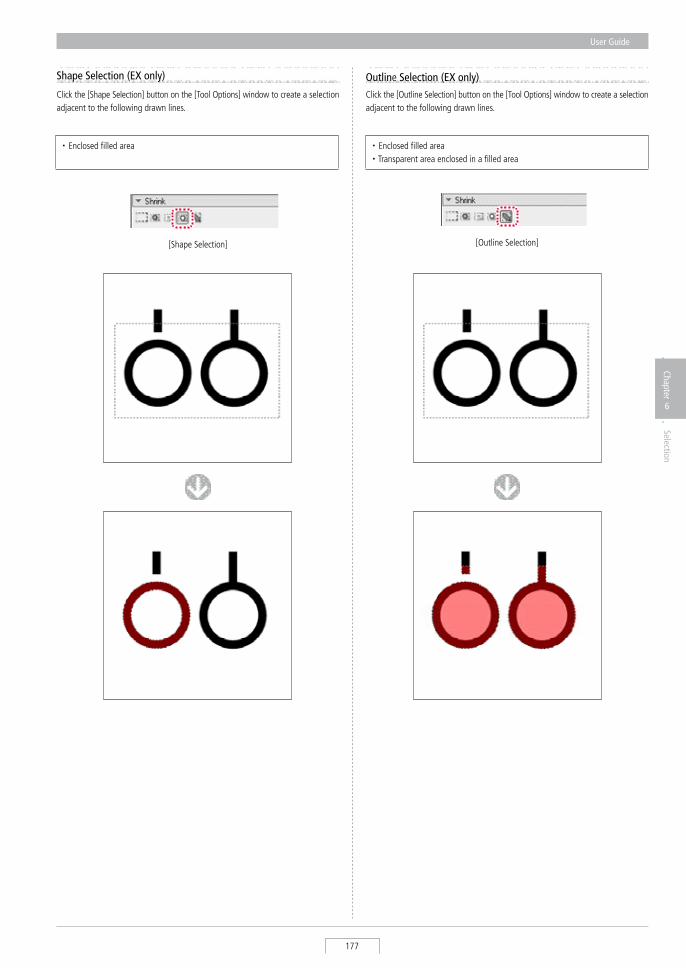
User Guide
177
Chapter
6
Selection
[shrink selection] [Outline selection][shape selection][Inside selection]
Shape Selection (EX only)
Click the [shape selection] button on the [Tool Options] window to create a selection adjacent to the following drawn lines.
Outline Selection (EX only)Click the [Outline selection] button on the [Tool Options] window to create a selection adjacent to the following drawn lines.
・ Enclosed filled area ・ Enclosed filled area・ Transparent area enclosed in a filled area
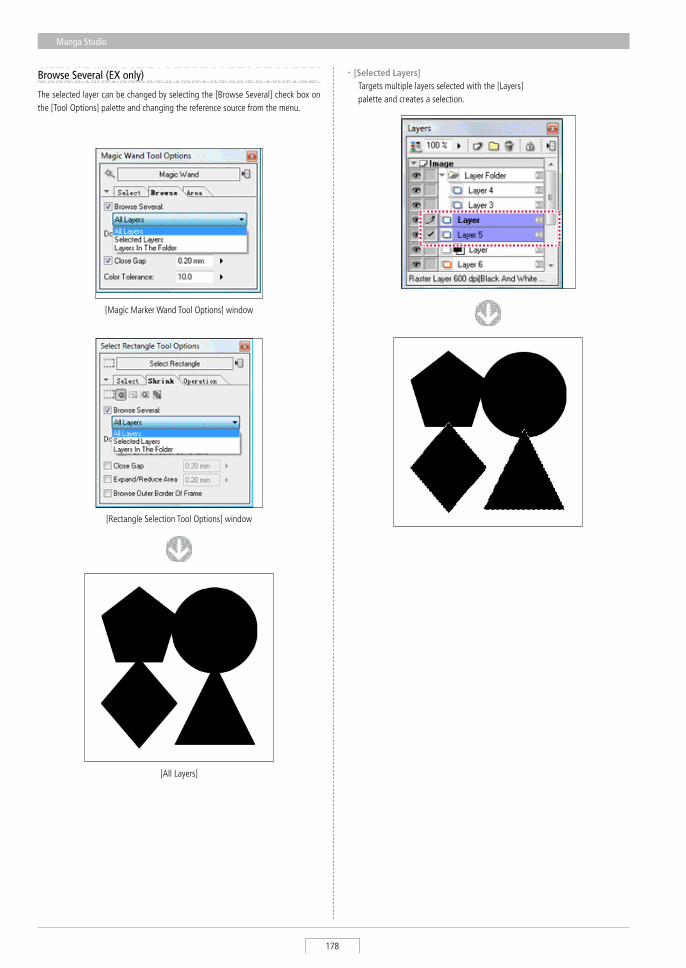
Manga Studio
178
The selected layer can be changed by selecting the [Browse several] check box on the [Tool Options] palette and changing the reference source from the menu.
Browse Several (EX only)
[All Layers]
[Rectangle selection Tool Options] window
[Magic Marker Wand Tool Options] window
・ [Selected Layers] Targets multiple layers selected with the [Layers]
palette and creates a selection.
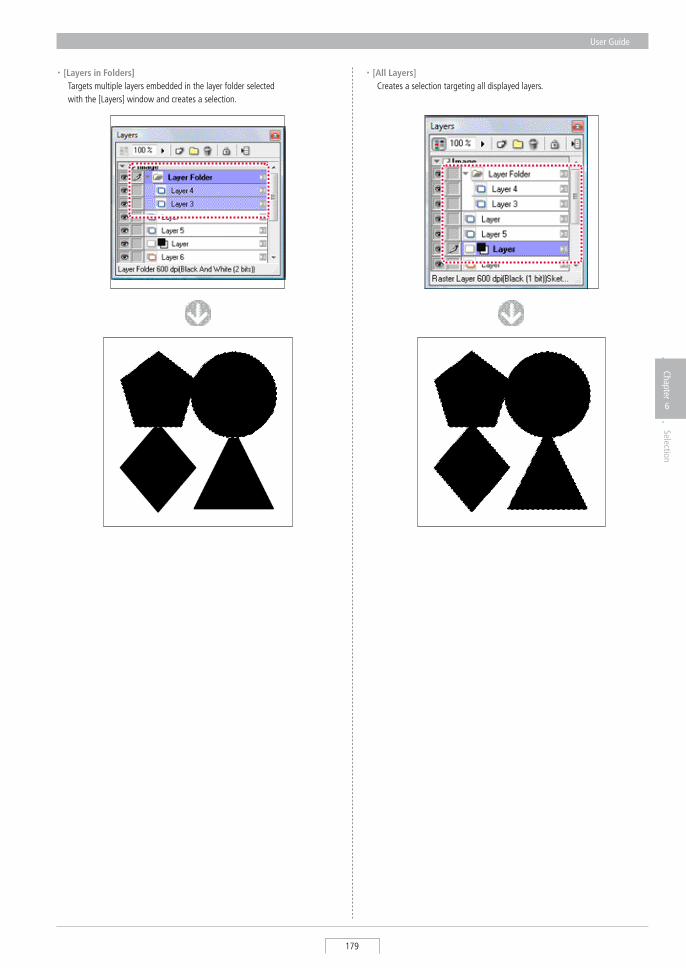
User Guide
179
Chapter
6
Selection
・ [Layers in Folders] Targets multiple layers embedded in the layer folder selected
with the [Layers] window and creates a selection.
・ [All Layers] Creates a selection targeting all displayed layers.
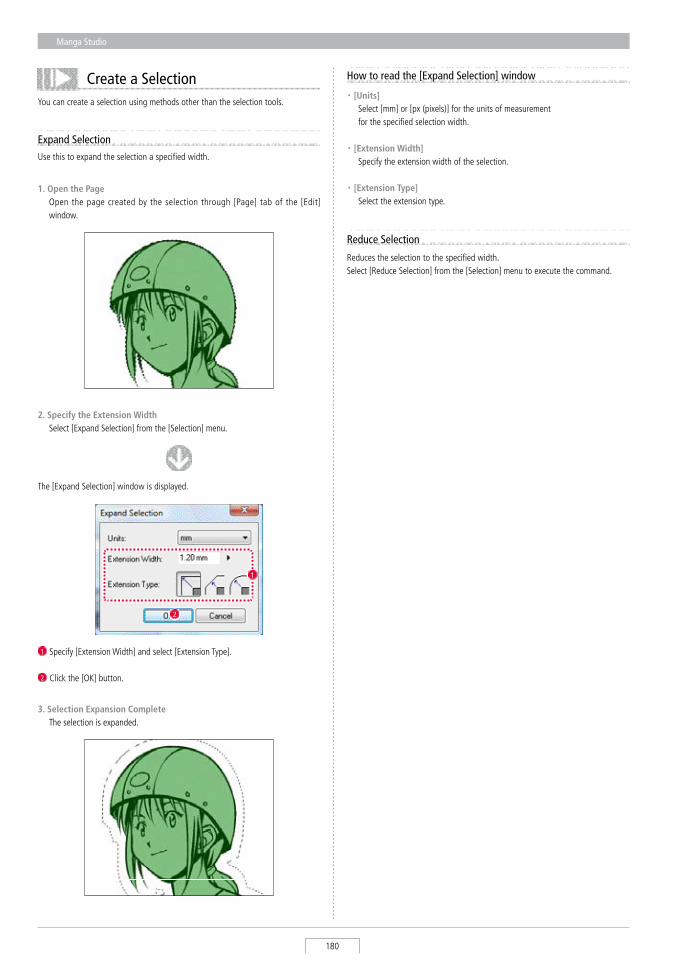
Manga Studio
180
Create a SelectionYou can create a selection using methods other than the selection tools.
Use this to expand the selection a specified width.
Expand Selection
1. Open the Page Open the page created by the selection through [Page] tab of the [Edit]
window.
1
2
The [Expand selection] window is displayed.
1 specify [Extension Width] and select [Extension Type].
2 Click the [OK] button.
2. Specify the Extension Width select [Expand selection] from the [selection] menu.
3. Selection Expansion Complete The selection is expanded.
Reduces the selection to the specified width.select [Reduce selection] from the [selection] menu to execute the command.
Reduce Selection
・ [Units] select [mm] or [px (pixels)] for the units of measurement
for the specified selection width.
・ [Extension Width] specify the extension width of the selection.
・ [Extension Type] select the extension type.
How to read the [Expand Selection] window
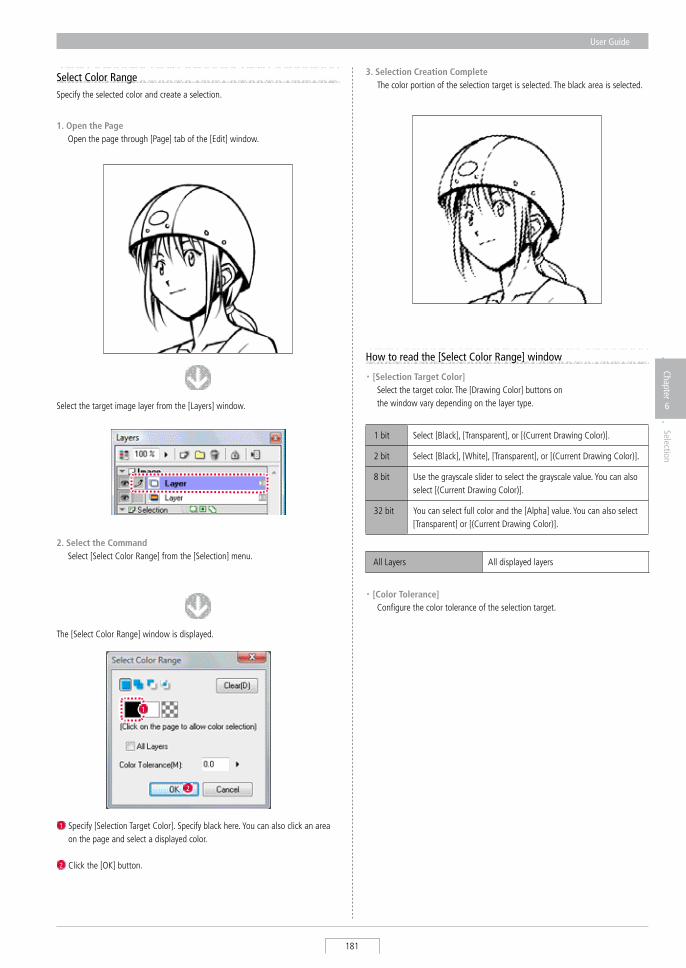
User Guide
181
Chapter
6
Selection
3. Selection Creation Complete The color portion of the selection target is selected. The black area is selected.
specify the selected color and create a selection.
1. Open the Page Open the page through [Page] tab of the [Edit] window.
The [select Color Range] window is displayed.
1 specify [selection Target Color]. specify black here. You can also click an area on the page and select a displayed color.
2 Click the [OK] button.
2
2. Select the Command select [select Color Range] from the [selection] menu.
select the target image layer from the [Layers] window.
Select Color Range
・ [Selection Target Color] select the target color. The [Drawing Color] buttons on
the window vary depending on the layer type.
1 bit select [Black], [Transparent], or [(Current Drawing Color)].
2 bit select [Black], [White], [Transparent], or [(Current Drawing Color)].
8 bit Use the grayscale slider to select the grayscale value. You can also select [(Current Drawing Color)].
32 bit You can select full color and the [Alpha] value. You can also select [Transparent] or [(Current Drawing Color)].
All Layers All displayed layers
・ [Color Tolerance] Configure the color tolerance of the selection target.
How to read the [Select Color Range] window
1
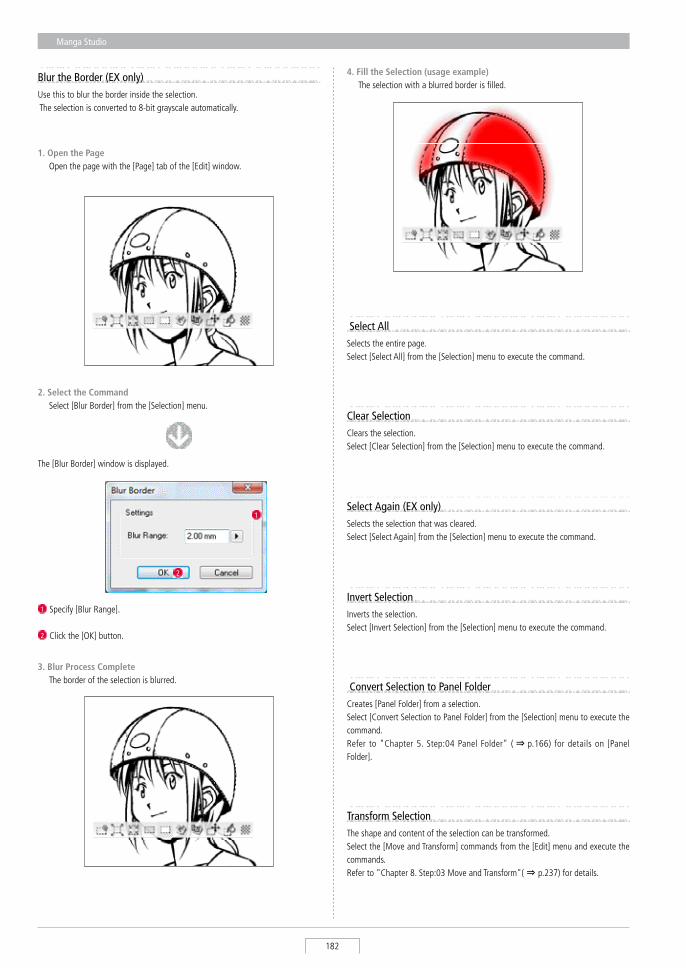
Manga Studio
182
Blur the Border (EX only)
1. Open the Page Open the page with the [Page] tab of the [Edit] window.
Use this to blur the border inside the selection. The selection is converted to 8-bit grayscale automatically.
2. Select the Command select [Blur Border] from the [selection] menu.
The [Blur Border] window is displayed.
3. Blur Process Complete The border of the selection is blurred.
1 specify [Blur Range].
2 Click the [OK] button.
2
Convert Selection to Panel FolderCreates [Panel Folder] from a selection.select [Convert selection to Panel Folder] from the [selection] menu to execute the command.Refer to "Chapter 5. step:04 Panel Folder" ( ⇒ p.166) for details on [Panel Folder].
Transform SelectionThe shape and content of the selection can be transformed.select the [Move and Transform] commands from the [Edit] menu and execute the commands.Refer to "Chapter 8. step:03 Move and Transform"( ⇒ p.237) for details.
Select Allselects the entire page.select [select All] from the [selection] menu to execute the command.
Clear SelectionClears the selection.select [Clear selection] from the [selection] menu to execute the command.
Select Again (EX only)selects the selection that was cleared.select [select Again] from the [selection] menu to execute the command.
Invert Selection Inverts the selection.select [Invert selection] from the [selection] menu to execute the command.
1
4. Fill the Selection (usage example) The selection with a blurred border is filled.
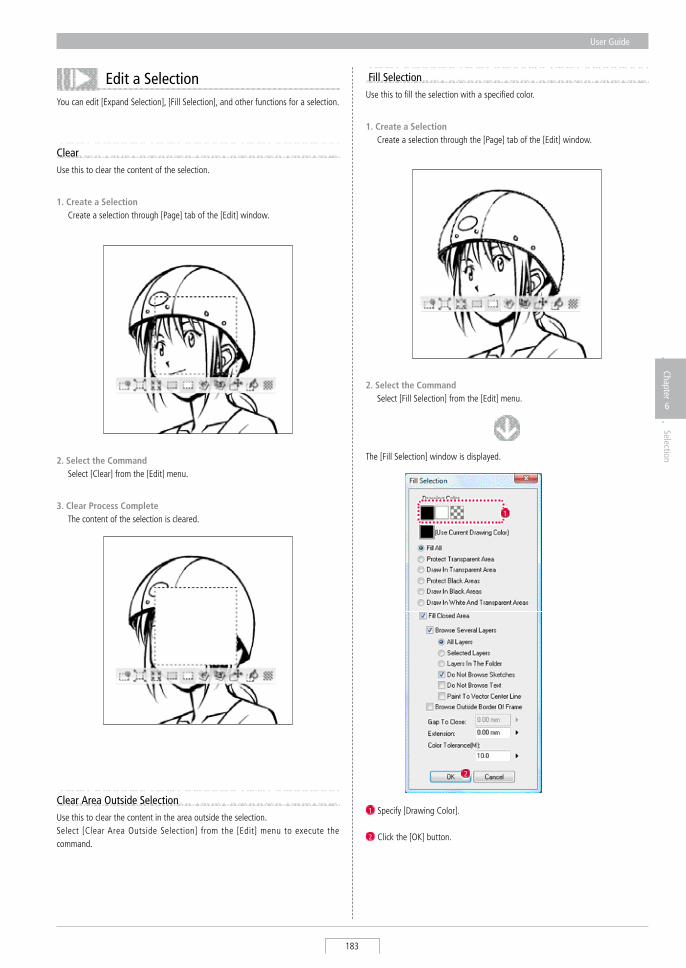
User Guide
183
Chapter
6
Selection
Edit a SelectionYou can edit [Expand selection], [Fill selection], and other functions for a selection.
ClearUse this to clear the content of the selection.
1. Create a Selection Create a selection through [Page] tab of the [Edit] window.
2. Select the Command select [Clear] from the [Edit] menu.
3. Clear Process Complete The content of the selection is cleared.
Use this to fill the selection with a specified color.
The [Fill selection] window is displayed.
1 specify [Drawing Color].
2 Click the [OK] button.
1
2
Fill Selection
1. Create a Selection Create a selection through the [Page] tab of the [Edit] window.
2. Select the Command select [Fill selection] from the [Edit] menu.
Clear Area Outside SelectionUse this to clear the content in the area outside the selection.select [Clear Area Outside selection] from the [Edit] menu to execute the command.
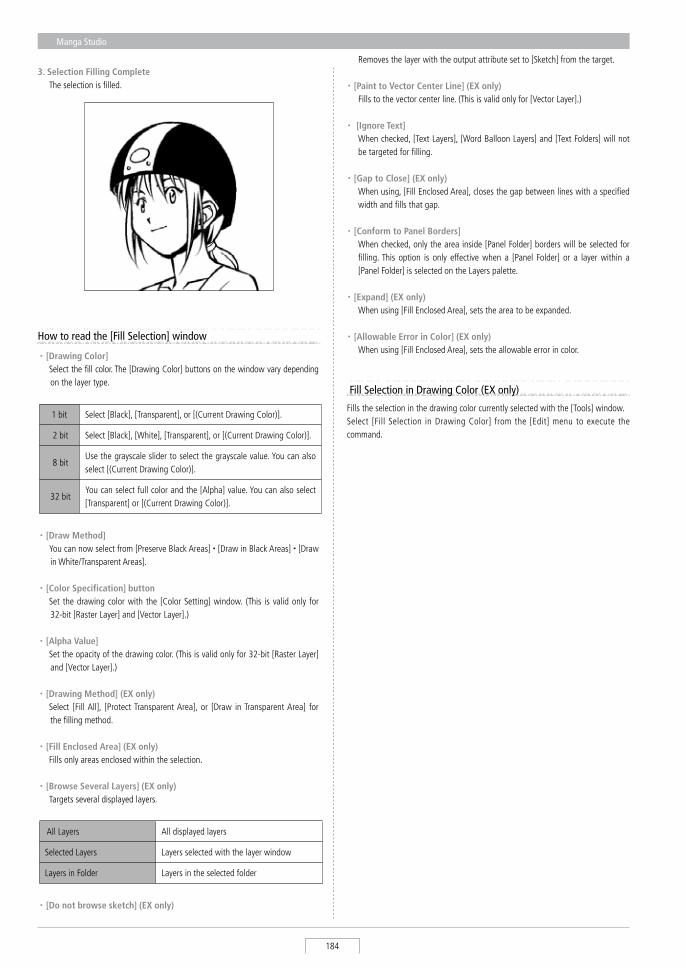
Manga Studio
184
3. Selection Filling Complete The selection is filled.
・ [Drawing Color] select the fill color. The [Drawing Color] buttons on the window vary depending
on the layer type.
1 bit select [Black], [Transparent], or [(Current Drawing Color)].
2 bit select [Black], [White], [Transparent], or [(Current Drawing Color)].
8 bitUse the grayscale slider to select the grayscale value. You can also select [(Current Drawing Color)].
32 bitYou can select full color and the [Alpha] value. You can also select [Transparent] or [(Current Drawing Color)].
・ [Draw Method] You can now select from [Preserve Black Areas]・[Draw in Black Areas]・[Draw
in White/Transparent Areas].
・ [Color Specification] button set the drawing color with the [Color setting] window. (This is valid only for
32-bit [Raster Layer] and [Vector Layer].)
・ [Alpha Value] set the opacity of the drawing color. (This is valid only for 32-bit [Raster Layer]
and [Vector Layer].)
・ [Drawing Method] (EX only) select [Fill All], [Protect Transparent Area], or [Draw in Transparent Area] for
the filling method.
・ [Fill Enclosed Area] (EX only) Fills only areas enclosed within the selection.
・ [Browse Several Layers] (EX only) Targets several displayed layers.
All Layers All displayed layers
selected Layers Layers selected with the layer window
Layers in Folder Layers in the selected folder
・ [Do not browse sketch] (EX only)
How to read the [Fill Selection] window
Fills the selection in the drawing color currently selected with the [Tools] window.select [Fill selection in Drawing Color] from the [Edit] menu to execute the command.
Fill Selection in Drawing Color (EX only)
Removes the layer with the output attribute set to [sketch] from the target.
・ [Paint to Vector Center Line] (EX only) Fills to the vector center line. (This is valid only for [Vector Layer].)
・[Ignore Text] When checked, [Text Layers], [Word Balloon Layers] and [Text Folders] will not
be targeted for filling.
・ [Gap to Close] (EX only) When using, [Fill Enclosed Area], closes the gap between lines with a specified
width and fills that gap.
・ [Conform to Panel Borders] When checked, only the area inside [Panel Folder] borders will be selected for
filling. This option is only effective when a [Panel Folder] or a layer within a [Panel Folder] is selected on the Layers palette.
・ [Expand] (EX only) When using [Fill Enclosed Area], sets the area to be expanded.
・ [Allowable Error in Color] (EX only) When using [Fill Enclosed Area], sets the allowable error in color.
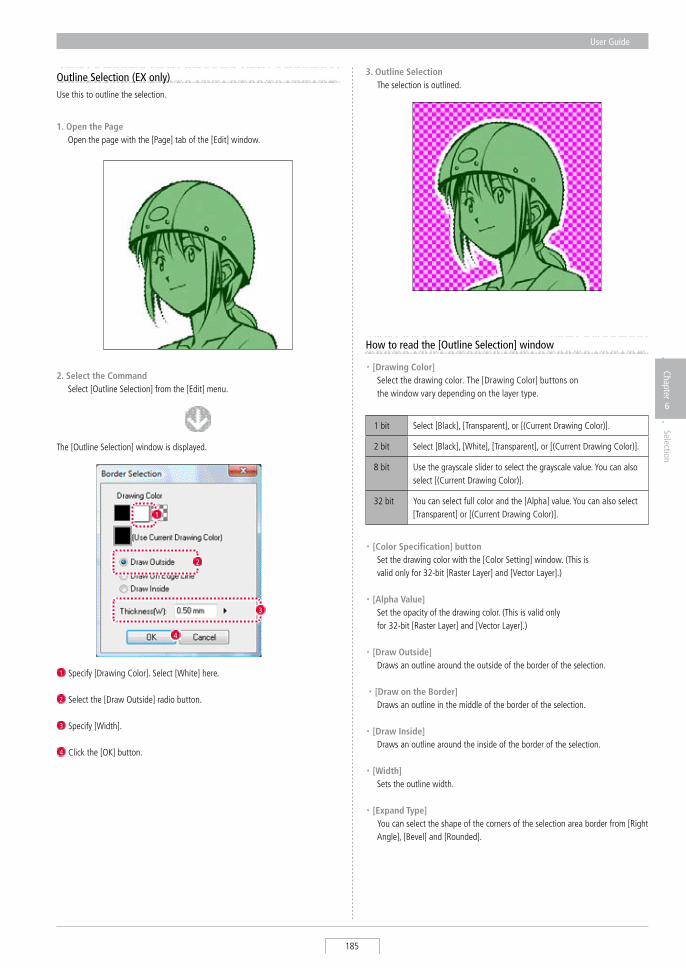
User Guide
185
Chapter
6
Selection
Outline Selection (EX only)Use this to outline the selection.
1. Open the Page Open the page with the [Page] tab of the [Edit] window.
2. Select the Command select [Outline selection] from the [Edit] menu.
The [Outline selection] window is displayed.
1 specify [Drawing Color]. select [White] here.
2 select the [Draw Outside] radio button.
3 specify [Width].
4 Click the [OK] button.
1
4
・ [Drawing Color] select the drawing color. The [Drawing Color] buttons on
the window vary depending on the layer type.
1 bit select [Black], [Transparent], or [(Current Drawing Color)].
2 bit select [Black], [White], [Transparent], or [(Current Drawing Color)].
8 bit Use the grayscale slider to select the grayscale value. You can also select [(Current Drawing Color)].
32 bit You can select full color and the [Alpha] value. You can also select [Transparent] or [(Current Drawing Color)].
・ [Color Specification] button set the drawing color with the [Color setting] window. (This is
valid only for 32-bit [Raster Layer] and [Vector Layer].)
・ [Alpha Value] set the opacity of the drawing color. (This is valid only
for 32-bit [Raster Layer] and [Vector Layer].)
・ [Draw Outside] Draws an outline around the outside of the border of the selection.
・ [Draw on the Border] Draws an outline in the middle of the border of the selection.
・ [Draw Inside] Draws an outline around the inside of the border of the selection.
・ [Width] sets the outline width.
・ [Expand Type] You can select the shape of the corners of the selection area border from [Right
Angle], [Bevel] and [Rounded].
How to read the [Outline Selection] window
3. Outline Selection The selection is outlined.
2
3
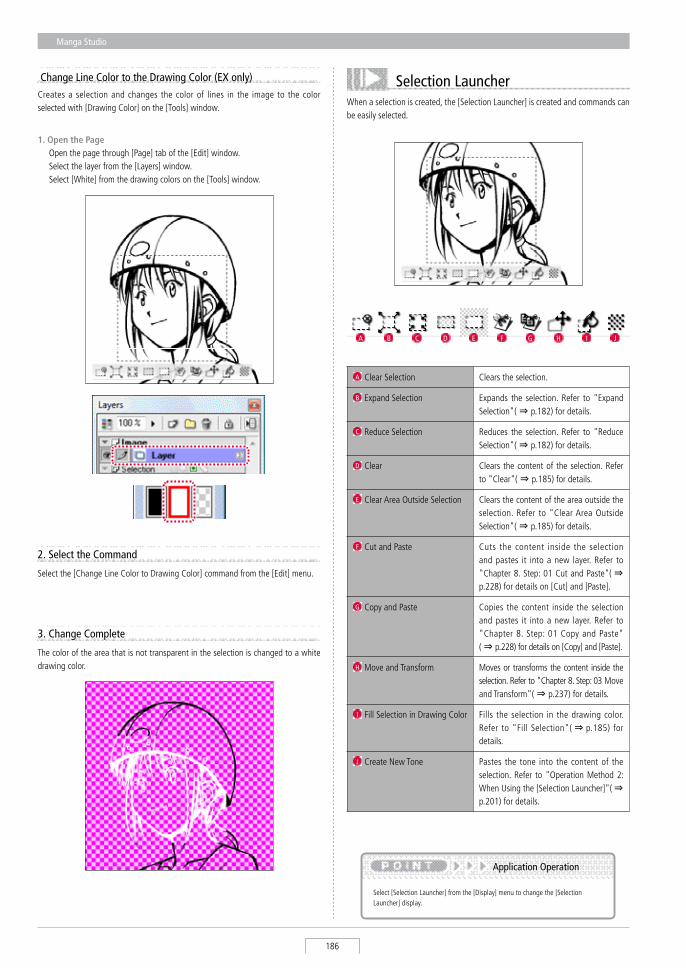
Manga Studio
186
Creates a selection and changes the color of lines in the image to the color selected with [Drawing Color] on the [Tools] window.
1. Open the Page Open the page through [Page] tab of the [Edit] window. select the layer from the [Layers] window. select [White] from the drawing colors on the [Tools] window.
2. Select the Command
select the [Change Line Color to Drawing Color] command from the [Edit] menu.
3. Change Complete
The color of the area that is not transparent in the selection is changed to a white drawing color.
Change Line Color to the Drawing Color (EX only)
When a selection is created, the [selection Launcher] is created and commands can be easily selected.
A Clear selection Clears the selection.
B Expand selection Expands the selection. Refer to "Expand selection"( ⇒ p.182) for details.
C Reduce selection Reduces the selection. Refer to "Reduce selection"( ⇒ p.182) for details.
D Clear Clears the content of the selection. Refer to "Clear"( ⇒ p.185) for details.
E Clear Area Outside selection Clears the content of the area outside the selection. Refer to "Clear Area Outside selection"( ⇒ p.185) for details.
F Cut and Paste Cuts the content inside the selection and pastes it into a new layer. Refer to "Chapter 8. step: 01 Cut and Paste"( ⇒p.228) for details on [Cut] and [Paste].
G Copy and Paste Copies the content inside the selection and pastes it into a new layer. Refer to "Chapter 8. step: 01 Copy and Paste" ( ⇒ p.228) for details on [Copy] and [Paste].
H Move and Transform Moves or transforms the content inside the selection. Refer to "Chapter 8. step: 03 Move and Transform"( ⇒ p.237) for details.
I Fill selection in Drawing Color Fills the selection in the drawing color. Refer to "Fill selection"( ⇒ p.185) for details.
J Create New Tone Pastes the tone into the content of the selection. Refer to "Operation Method 2: When Using the [selection Launcher]"( ⇒p.201) for details.
A B E F G H IC JD
Selection Launcher
select [selection Launcher] from the [Display] menu to change the [selection Launcher] display.
Application Operation
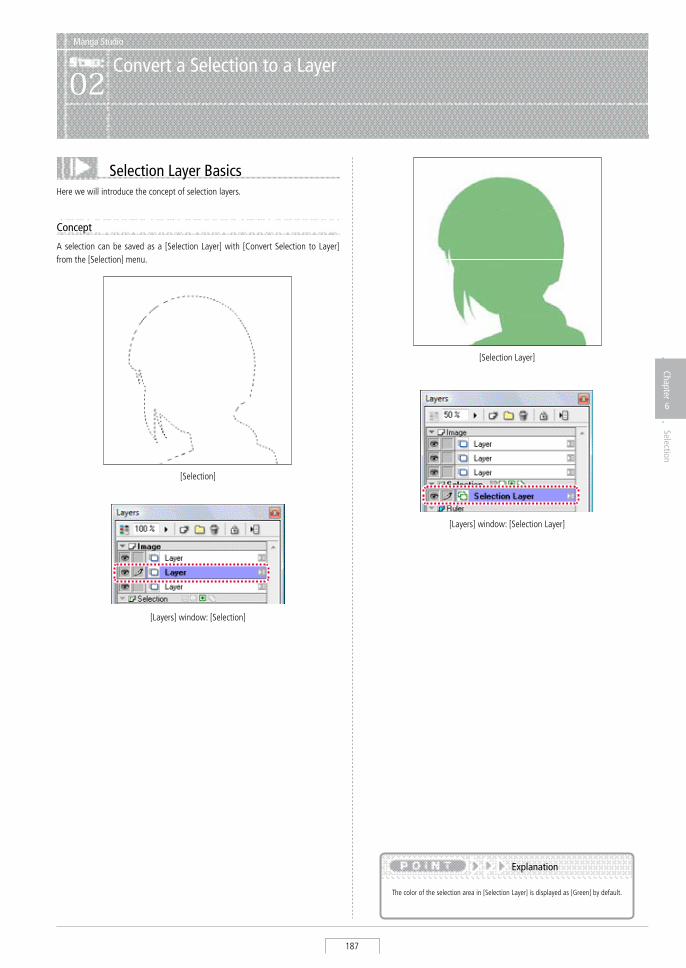
User Guide
187
Chapter
6
Selection
Manga Studio
Convert a Selection to a Layer02
Selection Layer BasicsHere we will introduce the concept of selection layers.
Concept
A selection can be saved as a [selection Layer] with [Convert selection to Layer] from the [selection] menu.
[selection]
[Layers] window: [selection]
[selection Layer]
[Layers] window: [selection Layer]
The color of the selection area in [selection Layer] is displayed as [Green] by default.
Explanation
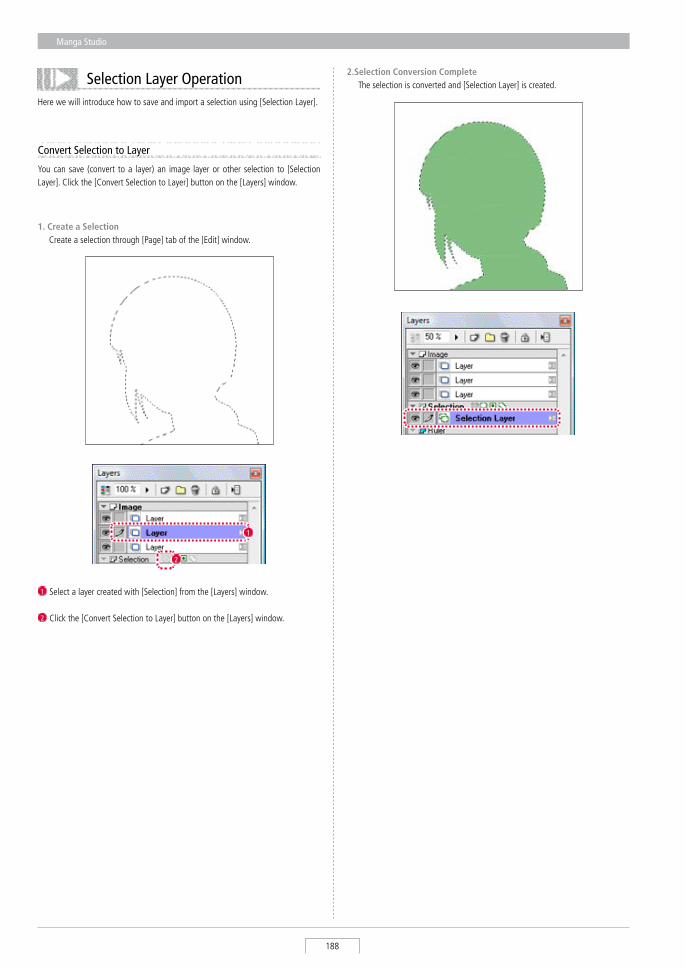
Manga Studio
188
Selection Layer OperationHere we will introduce how to save and import a selection using [selection Layer].
Convert Selection to Layer
You can save (convert to a layer) an image layer or other selection to [selection Layer]. Click the [Convert selection to Layer] button on the [Layers] window.
2.Selection Conversion Complete The selection is converted and [selection Layer] is created.
1. Create a Selection Create a selection through [Page] tab of the [Edit] window.
1 select a layer created with [selection] from the [Layers] window.
2 Click the [Convert selection to Layer] button on the [Layers] window.
1
2
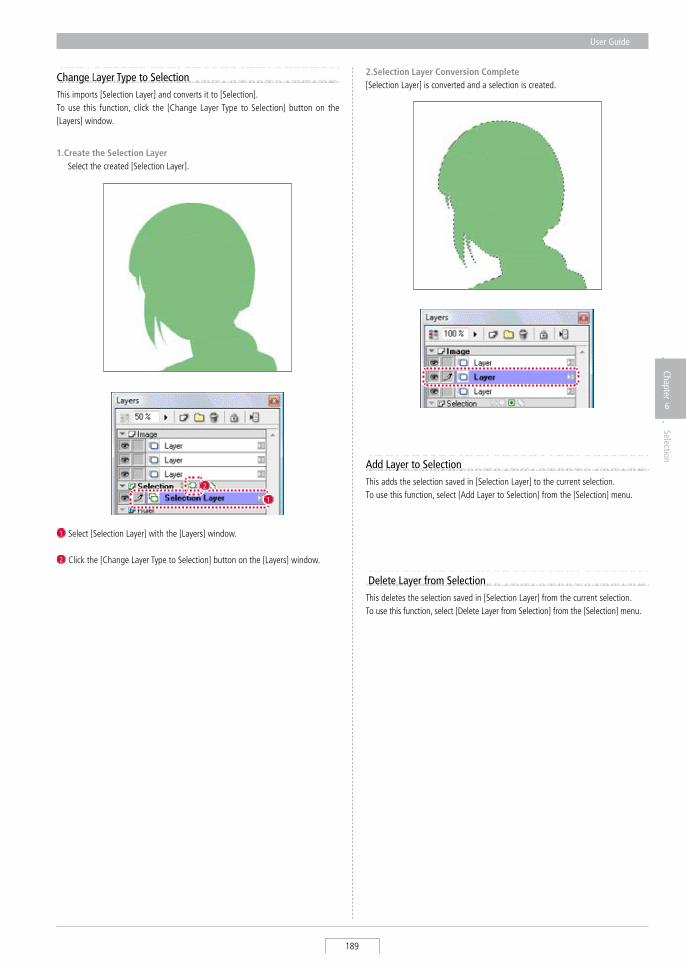
User Guide
189
Chapter
6
Selection
Change Layer Type to SelectionThis imports [selection Layer] and converts it to [selection].To use this function, click the [Change Layer Type to selection] button on the [Layers] window.
2.Selection Layer Conversion Complete[selection Layer] is converted and a selection is created.
1.Create the Selection Layer select the created [selection Layer].
1
2
1 select [selection Layer] with the [Layers] window.
2 Click the [Change Layer Type to selection] button on the [Layers] window.
Add Layer to SelectionThis adds the selection saved in [selection Layer] to the current selection.To use this function, select [Add Layer to selection] from the [selection] menu.
Delete Layer from SelectionThis deletes the selection saved in [selection Layer] from the current selection.To use this function, select [Delete Layer from selection] from the [selection] menu.
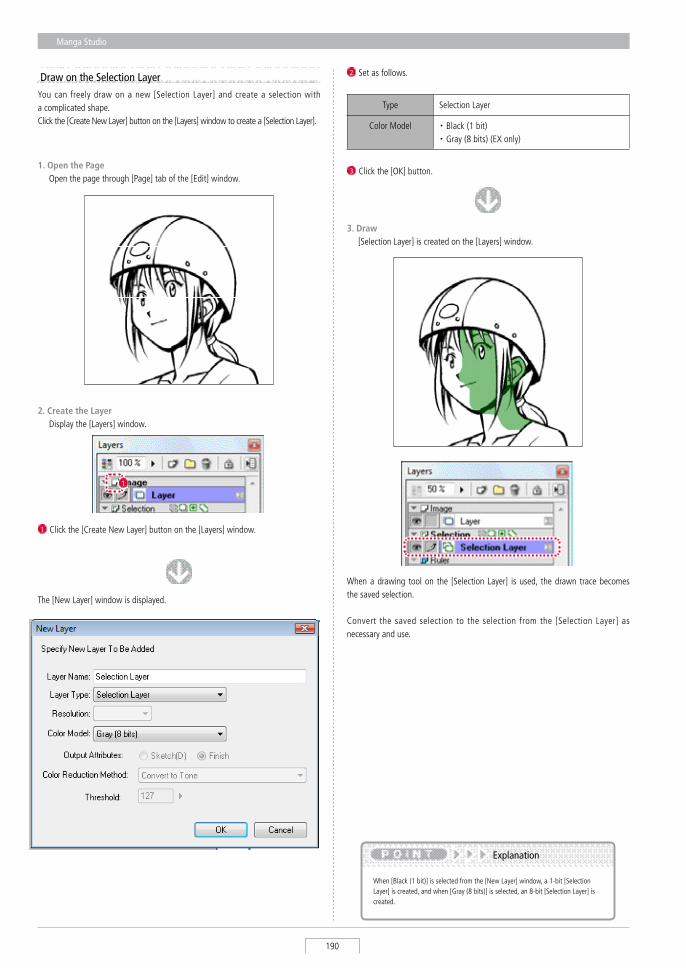
Manga Studio
190
Draw on the Selection LayerYou can freely draw on a new [selection Layer] and create a selection with a complicated shape.Click the [Create New Layer] button on the [Layers] window to create a [selection Layer].
When [Black (1 bit)] is selected from the [New Layer] window, a 1-bit [selection Layer] is created, and when [Gray (8 bits)] is selected, an 8-bit [selection Layer] is created.
Explanation
2 set as follows.
Type selection Layer
Color Model ・ Black (1 bit)・ Gray (8 bits) (EX only)
3 Click the [OK] button. 1. Open the Page Open the page through [Page] tab of the [Edit] window.
1 Click the [Create New Layer] button on the [Layers] window.
The [New Layer] window is displayed.
1
2. Create the Layer Display the [Layers] window.
3. Draw [selection Layer] is created on the [Layers] window.
When a drawing tool on the [selection Layer] is used, the drawn trace becomes the saved selection.
Convert the saved selection to the selection from the [selection Layer] as necessary and use.
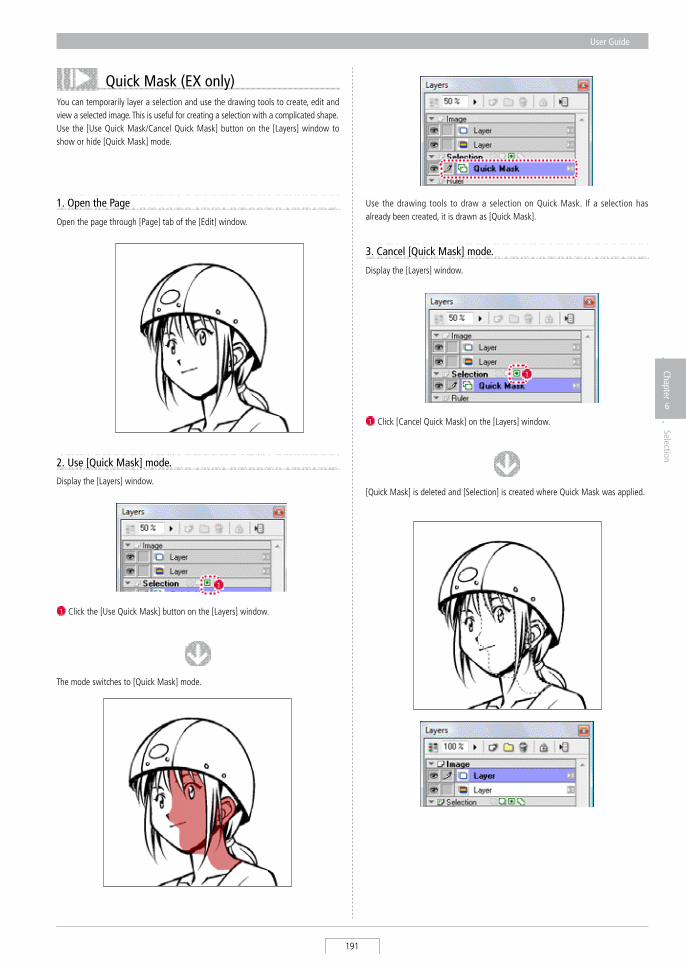
User Guide
191
Chapter
6
Selection
You can temporarily layer a selection and use the drawing tools to create, edit and view a selected image. This is useful for creating a selection with a complicated shape.Use the [Use Quick Mask/Cancel Quick Mask] button on the [Layers] window to show or hide [Quick Mask] mode.
Quick Mask (EX only)
Display the [Layers] window.
3. Cancel [Quick Mask] mode.
1 Click [Cancel Quick Mask] on the [Layers] window.
[Quick Mask] is deleted and [selection] is created where Quick Mask was applied.
1
Use the drawing tools to draw a selection on Quick Mask. If a selection has already been created, it is drawn as [Quick Mask].
1 Click the [Use Quick Mask] button on the [Layers] window.
Display the [Layers] window.
2. Use [Quick Mask] mode.
1
The mode switches to [Quick Mask] mode.
Open the page through [Page] tab of the [Edit] window.
1. Open the Page
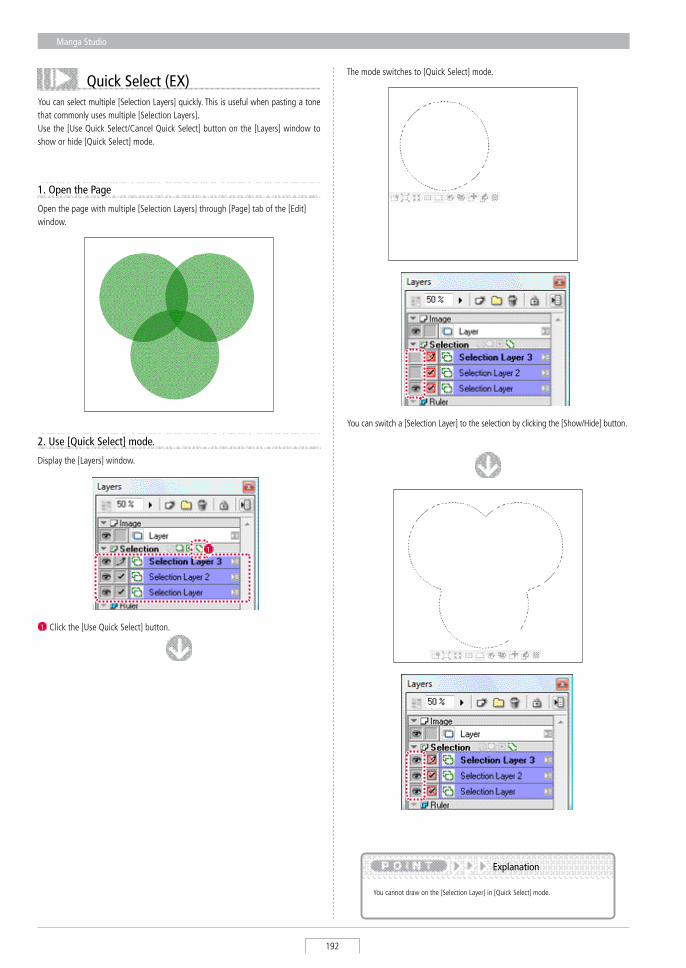
Manga Studio
192
Quick Select (EX)You can select multiple [selection Layers] quickly. This is useful when pasting a tone that commonly uses multiple [selection Layers]. Use the [Use Quick select/Cancel Quick select] button on the [Layers] window to show or hide [Quick select] mode.
You cannot draw on the [selection Layer] in [Quick select] mode.
Explanation
1 Click the [Use Quick select] button.
Open the page with multiple [selection Layers] through [Page] tab of the [Edit] window.
1. Open the Page
Display the [Layers] window.
2. Use [Quick Select] mode.
1
The mode switches to [Quick select] mode.
You can switch a [selection Layer] to the selection by clicking the [show/Hide] button.
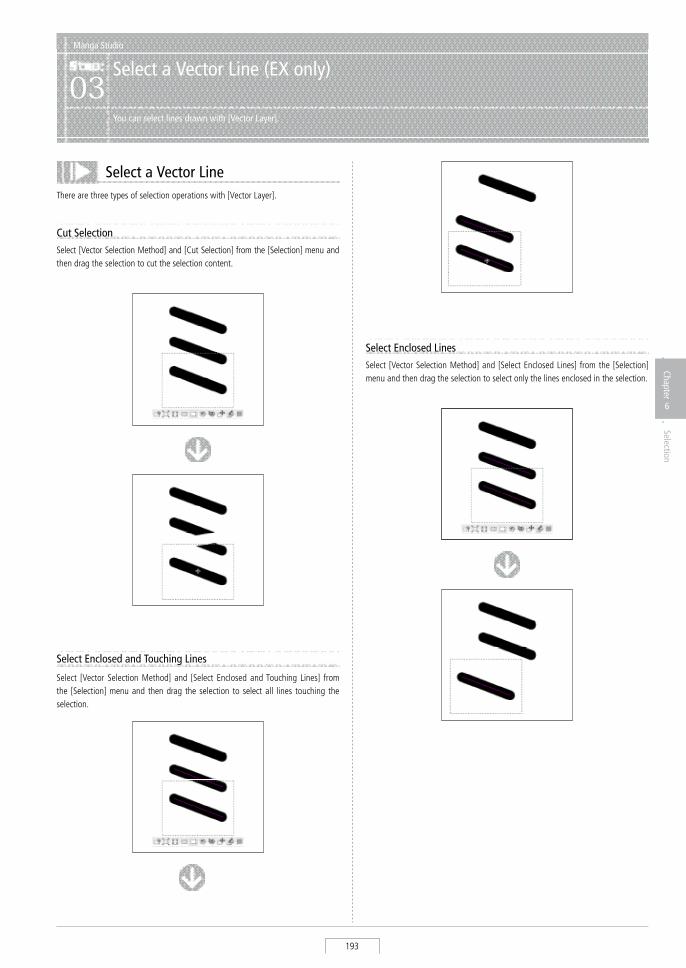
User Guide
193
Chapter
6
Selection
Manga Studio
Select a Vector Line (EX only)03
You can select lines drawn with [Vector Layer].
Select a Vector LineThere are three types of selection operations with [Vector Layer].
Cut Selectionselect [Vector selection Method] and [Cut selection] from the [selection] menu and then drag the selection to cut the selection content.
Select Enclosed Linesselect [Vector selection Method] and [select Enclosed Lines] from the [selection] menu and then drag the selection to select only the lines enclosed in the selection.
Select Enclosed and Touching Lines
select [Vector selection Method] and [select Enclosed and Touching Lines] from the [selection] menu and then drag the selection to select all lines touching the selection.

Tone
Chapter 7
This chapter introduces tone application. The digital tones handled by Manga Studio are "Manga Studio Format Tones" and "Computones Format Tones."
Step: 01 Manga studio Format Tones 198
Step: 02 Computones Format Tones (EX only) 220
Chapter
7
Tone
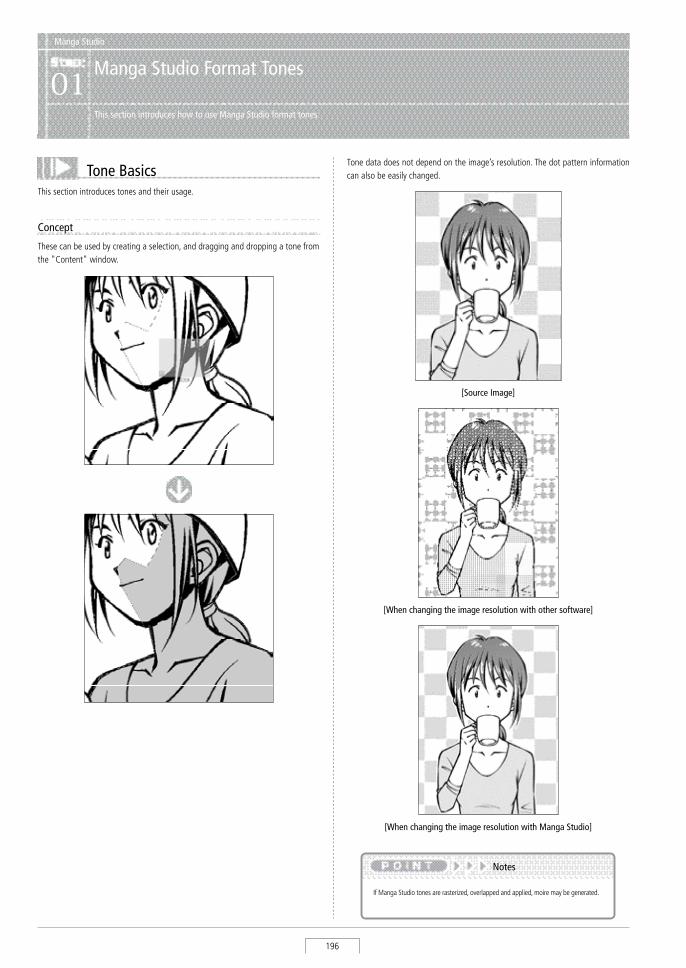
Manga Studio
196
Manga Studio
Manga Studio Format Tones01
This section introduces how to use Manga Studio format tones.
Tone BasicsThis section introduces tones and their usage.
Concept
These can be used by creating a selection, and dragging and dropping a tone from the "Content" window.
Tone data does not depend on the image’s resolution. The dot pattern information can also be easily changed.
[Source Image]
[When changing the image resolution with other software]
[When changing the image resolution with Manga Studio]
If Manga studio tones are rasterized, overlapped and applied, moire may be generated.
Notes
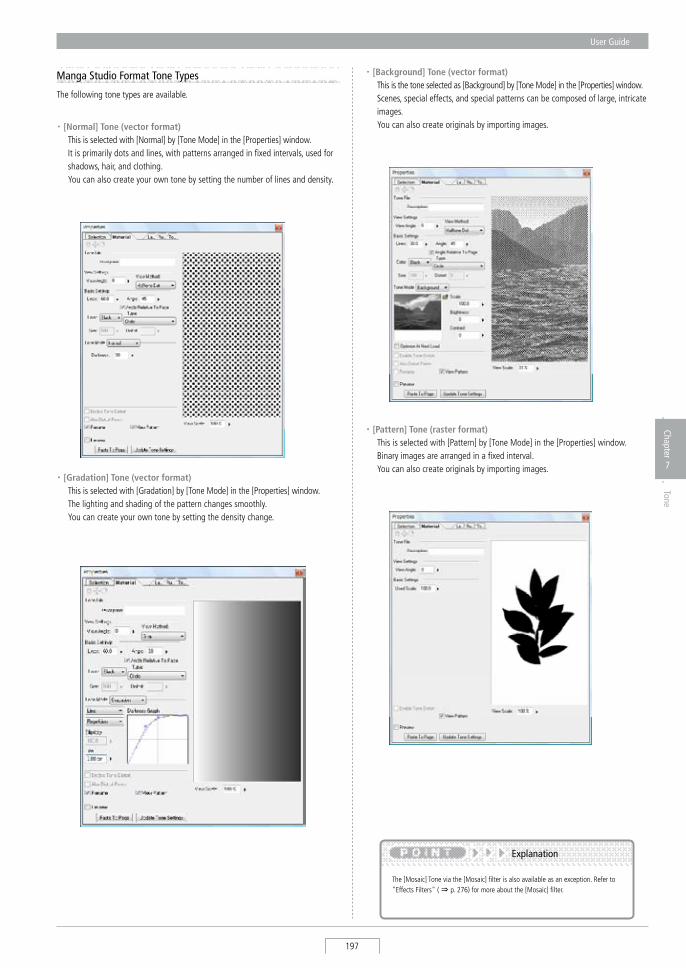
User Guide
197
Chapter
7
Tone
Manga Studio Format Tone Types
The following tone types are available.
・ [Normal] Tone (vector format) This is selected with [Normal] by [Tone Mode] in the [Properties] window. It is primarily dots and lines, with patterns arranged in fixed intervals, used for
shadows, hair, and clothing. You can also create your own tone by setting the number of lines and density.
・ [Gradation] Tone (vector format) This is selected with [Gradation] by [Tone Mode] in the [Properties] window. The lighting and shading of the pattern changes smoothly. You can create your own tone by setting the density change.
・ [Background] Tone (vector format) This is the tone selected as [Background] by [Tone Mode] in the [Properties] window. scenes, special effects, and special patterns can be composed of large, intricate
images. You can also create originals by importing images.
・ [Pattern] Tone (raster format) This is selected with [Pattern] by [Tone Mode] in the [Properties] window. Binary images are arranged in a fixed interval. You can also create originals by importing images.
The [Mosaic] Tone via the [Mosaic] filter is also available as an exception. Refer to "Effects Filters" ( ⇒ p. 276) for more about the [Mosaic] filter.
Explanation
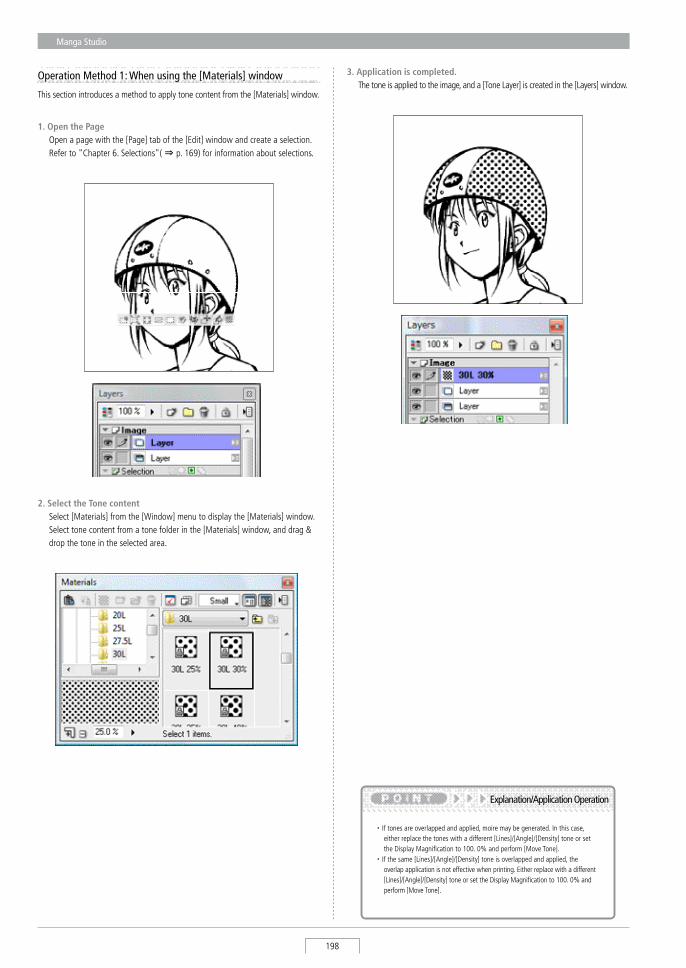
Manga Studio
198
3. Application is completed. The tone is applied to the image, and a [Tone Layer] is created in the [Layers] window.
・ If tones are overlapped and applied, moire may be generated. In this case, either replace the tones with a different [Lines]/[Angle]/[Density] tone or set the Display Magnification to 100. 0% and perform [Move Tone].
・ If the same [Lines]/[Angle]/[Density] tone is overlapped and applied, the overlap application is not effective when printing. Either replace with a different [Lines]/[Angle]/[Density] tone or set the Display Magnification to 100. 0% and perform [Move Tone].
Explanation/Application Operation
Operation Method 1: When using the [Materials] window
This section introduces a method to apply tone content from the [Materials] window.
1. Open the Page Open a page with the [Page] tab of the [Edit] window and create a selection.
Refer to "Chapter 6. selections"( ⇒ p. 169) for information about selections.
2. Select the Tone content select [Materials] from the [Window] menu to display the [Materials] window. select tone content from a tone folder in the [Materials] window, and drag &
drop the tone in the selected area.
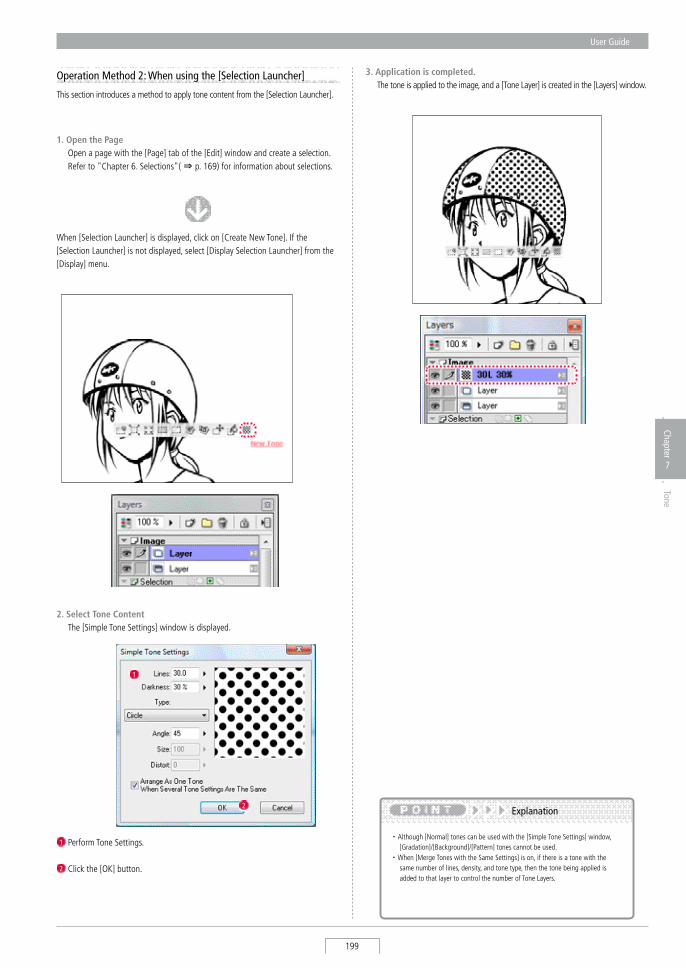
User Guide
199
Chapter
7
Tone
Operation Method 2: When using the [Selection Launcher]
This section introduces a method to apply tone content from the [selection Launcher].
1. Open the Page Open a page with the [Page] tab of the [Edit] window and create a selection.
Refer to "Chapter 6. selections"( ⇒ p. 169) for information about selections.
When [selection Launcher] is displayed, click on [Create New Tone]. If the [selection Launcher] is not displayed, select [Display selection Launcher] from the [Display] menu.
2. Select Tone Content The [simple Tone settings] window is displayed.
3. Application is completed. The tone is applied to the image, and a [Tone Layer] is created in the [Layers] window.
・ Although [Normal] tones can be used with the [simple Tone settings] window, [Gradation]/[Background]/[Pattern] tones cannot be used.
・ When [Merge Tones with the same settings] is on, if there is a tone with the same number of lines, density, and tone type, then the tone being applied is added to that layer to control the number of Tone Layers.
Explanation
1 Perform Tone settings.
2 Click the [OK] button.
1
2
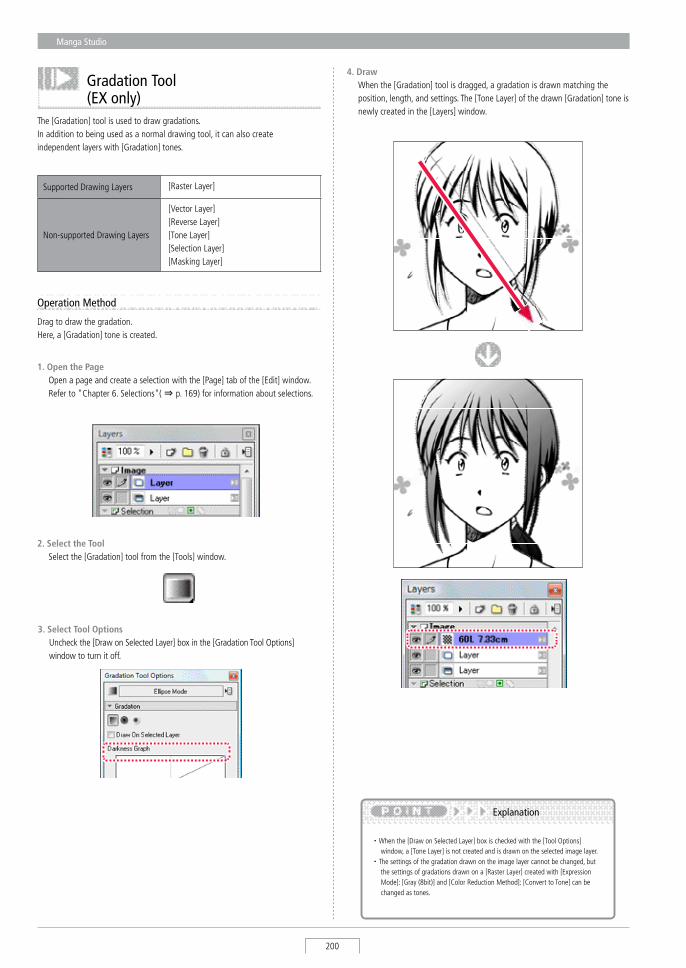
Manga Studio
200
The [Gradation] tool is used to draw gradations. In addition to being used as a normal drawing tool, it can also create independent layers with [Gradation] tones.
supported Drawing Layers [Raster Layer]
Non-supported Drawing Layers
[Vector Layer] [Reverse Layer] [Tone Layer] [selection Layer] [Masking Layer]
・ When the [Draw on selected Layer] box is checked with the [Tool Options] window, a [Tone Layer] is not created and is drawn on the selected image layer.
・ The settings of the gradation drawn on the image layer cannot be changed, but the settings of gradations drawn on a [Raster Layer] created with [Expression Mode]: [Gray (8bit)] and [Color Reduction Method]: [Convert to Tone] can be changed as tones.
Explanation
4. Draw When the [Gradation] tool is dragged, a gradation is drawn matching the
position, length, and settings. The [Tone Layer] of the drawn [Gradation] tone is newly created in the [Layers] window.
Gradation Tool(EX only)
Operation Method
Drag to draw the gradation. Here, a [Gradation] tone is created.
1. Open the Page Open a page and create a selection with the [Page] tab of the [Edit] window.
Refer to "Chapter 6. selections"( ⇒ p. 169) for information about selections.
2. Select the Tool select the [Gradation] tool from the [Tools] window.
3. Select Tool Options Uncheck the [Draw on selected Layer] box in the [Gradation Tool Options]
window to turn it off.
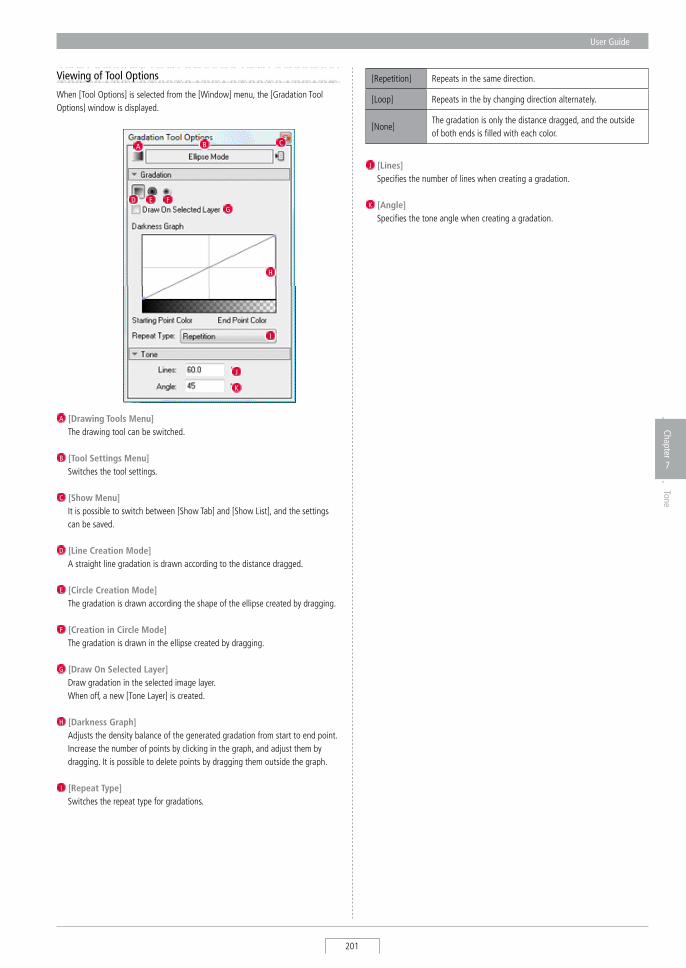
User Guide
201
Chapter
7
Tone
Viewing of Tool Options
When [Tool Options] is selected from the [Window] menu, the [Gradation Tool Options] window is displayed.
A [Drawing Tools Menu] The drawing tool can be switched.
B [Tool Settings Menu] switches the tool settings.
C [Show Menu] It is possible to switch between [show Tab] and [show List], and the settings
can be saved.
D [Line Creation Mode] A straight line gradation is drawn according to the distance dragged.
E [Circle Creation Mode] The gradation is drawn according the shape of the ellipse created by dragging.
F [Creation in Circle Mode] The gradation is drawn in the ellipse created by dragging.
G [Draw On Selected Layer] Draw gradation in the selected image layer. When off, a new [Tone Layer] is created.
H [Darkness Graph] Adjusts the density balance of the generated gradation from start to end point.
Increase the number of points by clicking in the graph, and adjust them by dragging. It is possible to delete points by dragging them outside the graph.
I [Repeat Type] switches the repeat type for gradations.
A B
E FG
H
D
C
I
J
K
[Repetition] Repeats in the same direction.
[Loop] Repeats in the by changing direction alternately.
[None]The gradation is only the distance dragged, and the outside of both ends is filled with each color.
J [Lines] specifies the number of lines when creating a gradation.
K [Angle] specifies the tone angle when creating a gradation.
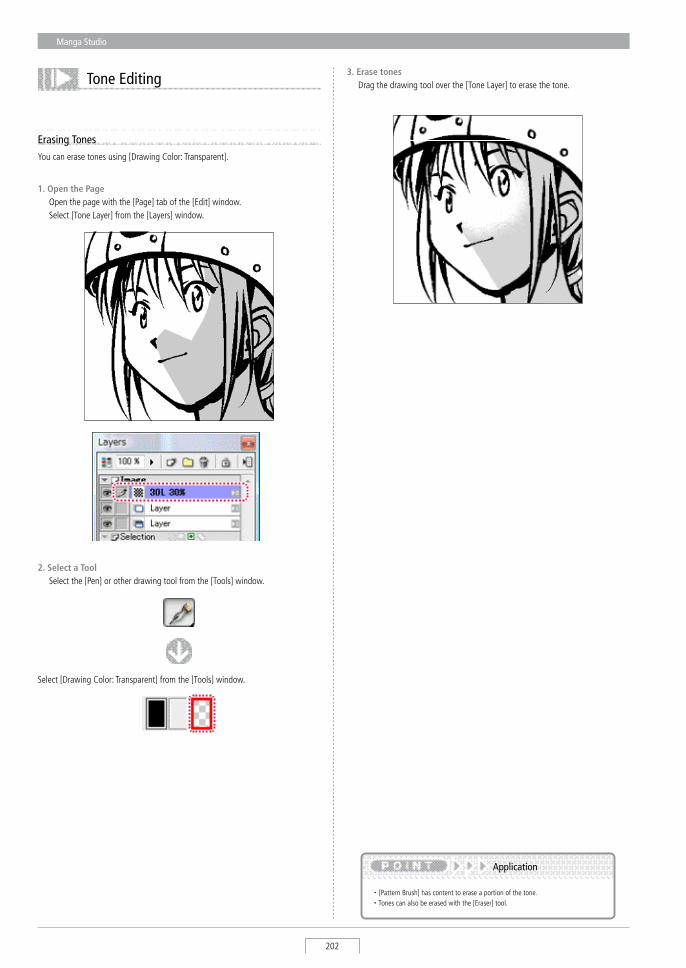
Manga Studio
202
Tone Editing
Erasing TonesYou can erase tones using [Drawing Color: Transparent].
1. Open the Page Open the page with the [Page] tab of the [Edit] window. select [Tone Layer] from the [Layers] window.
2. Select a Tool select the [Pen] or other drawing tool from the [Tools] window.
select [Drawing Color: Transparent] from the [Tools] window.
3. Erase tones Drag the drawing tool over the [Tone Layer] to erase the tone.
・ [Pattern Brush] has content to erase a portion of the tone. ・ Tones can also be erased with the [Eraser] tool.
Application
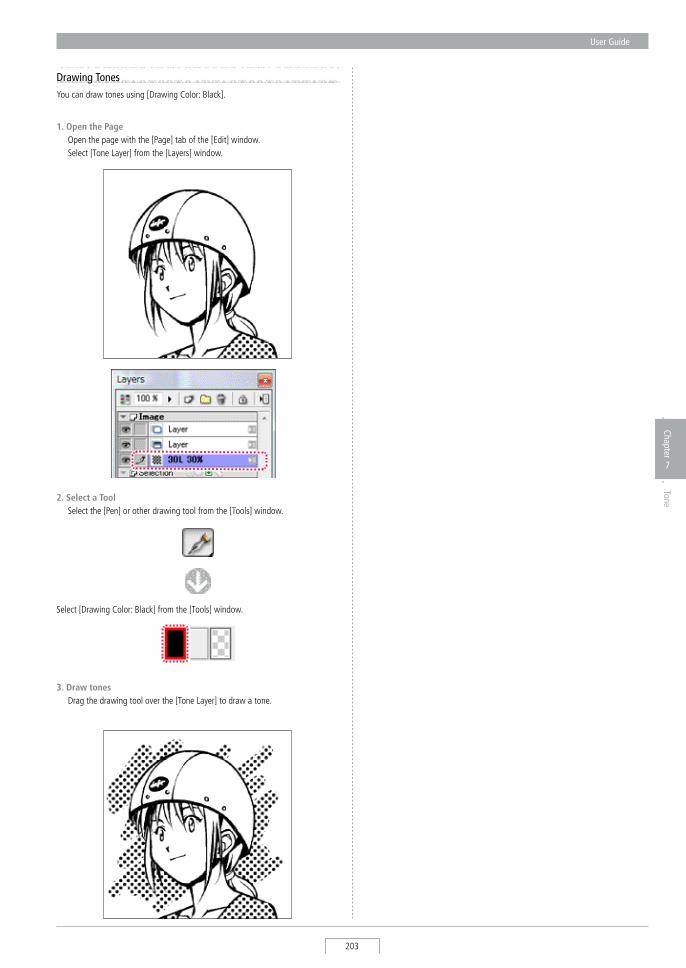
User Guide
203
Chapter
7
Tone
Drawing TonesYou can draw tones using [Drawing Color: Black].
1. Open the Page Open the page with the [Page] tab of the [Edit] window. select [Tone Layer] from the [Layers] window.
2. Select a Tool select the [Pen] or other drawing tool from the [Tools] window.
select [Drawing Color: Black] from the [Tools] window.
3. Draw tones Drag the drawing tool over the [Tone Layer] to draw a tone.
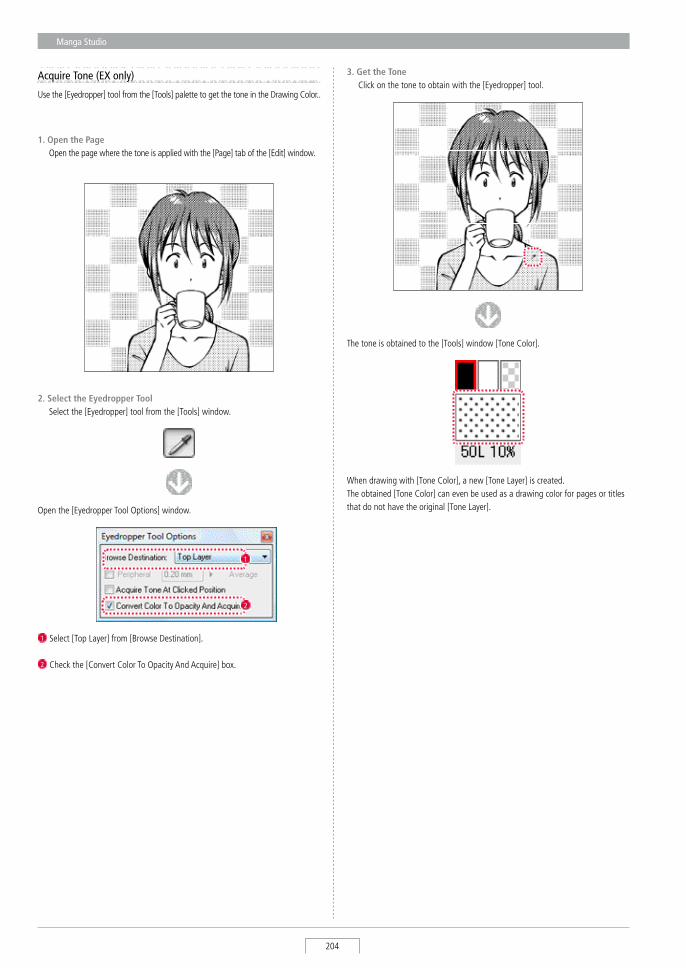
Manga Studio
204
Acquire Tone (EX only)
Use the [Eyedropper] tool from the [Tools] palette to get the tone in the Drawing Color..
1. Open the Page Open the page where the tone is applied with the [Page] tab of the [Edit] window.
2. Select the Eyedropper Tool select the [Eyedropper] tool from the [Tools] window.
Open the [Eyedropper Tool Options] window.
1 select [Top Layer] from [Browse Destination].
2 Check the [Convert Color To Opacity And Acquire] box.
1
2
3. Get the Tone Click on the tone to obtain with the [Eyedropper] tool.
The tone is obtained to the [Tools] window [Tone Color].
When drawing with [Tone Color], a new [Tone Layer] is created. The obtained [Tone Color] can even be used as a drawing color for pages or titles that do not have the original [Tone Layer].
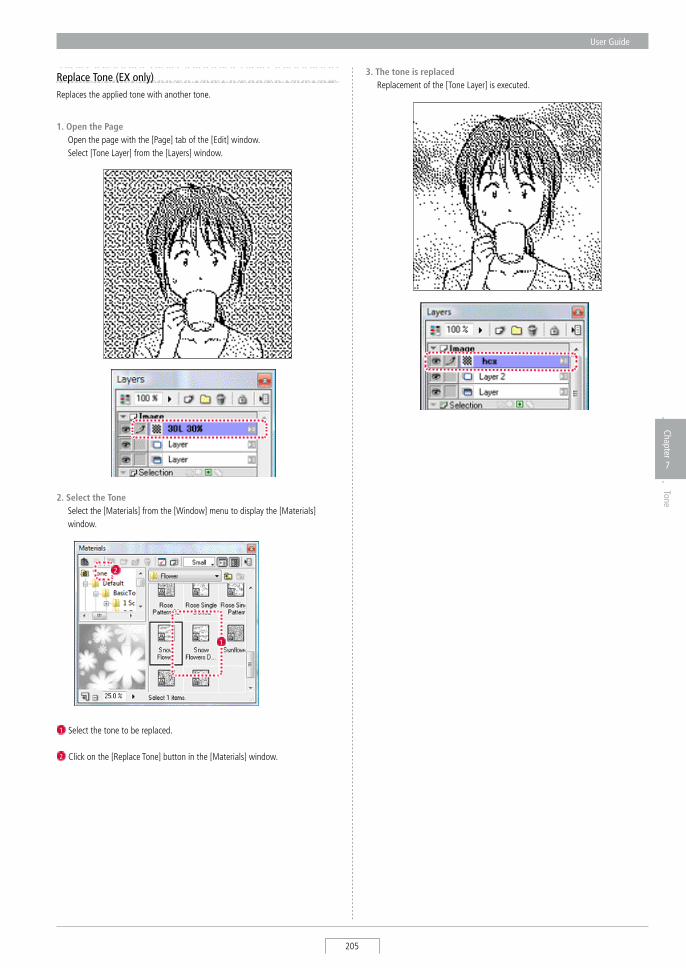
User Guide
205
Chapter
7
Tone
Replace Tone (EX only)Replaces the applied tone with another tone.
1. Open the Page Open the page with the [Page] tab of the [Edit] window. select [Tone Layer] from the [Layers] window.
2. Select the Tone select the [Materials] from the [Window] menu to display the [Materials]
window.
1 select the tone to be replaced.
2 Click on the [Replace Tone] button in the [Materials] window.
1
2
3. The tone is replaced Replacement of the [Tone Layer] is executed.
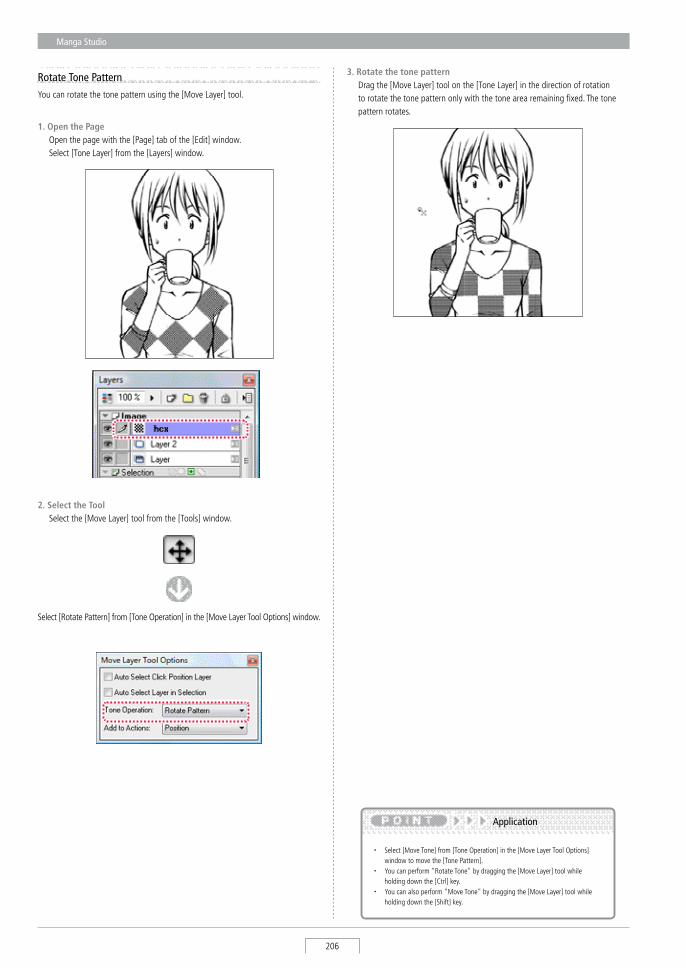
Manga Studio
206
Rotate Tone PatternYou can rotate the tone pattern using the [Move Layer] tool.
1. Open the Page Open the page with the [Page] tab of the [Edit] window. select [Tone Layer] from the [Layers] window.
2. Select the Tool select the [Move Layer] tool from the [Tools] window.
select [Rotate Pattern] from [Tone Operation] in the [Move Layer Tool Options] window.
3. Rotate the tone pattern Drag the [Move Layer] tool on the [Tone Layer] in the direction of rotation
to rotate the tone pattern only with the tone area remaining fixed. The tone pattern rotates.
・ select [Move Tone] from [Tone Operation] in the [Move Layer Tool Options] window to move the [Tone Pattern].
・ You can perform "Rotate Tone" by dragging the [Move Layer] tool while holding down the [Ctrl] key.
・ You can also perform "Move Tone" by dragging the [Move Layer] tool while holding down the [shift] key.
Application
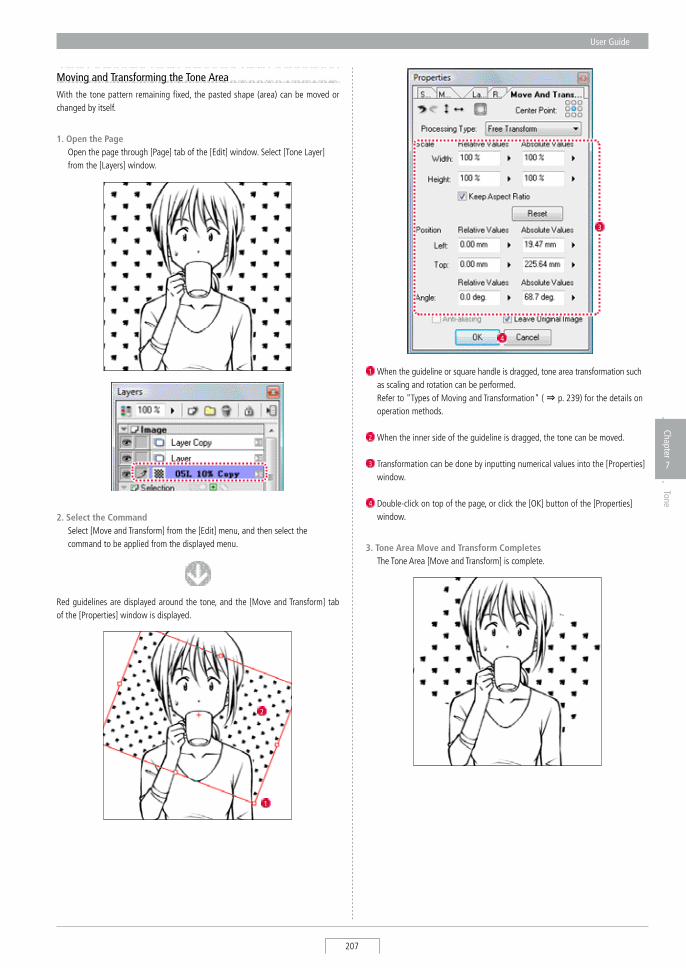
User Guide
207
Chapter
7
Tone
Moving and Transforming the Tone AreaWith the tone pattern remaining fixed, the pasted shape (area) can be moved or changed by itself.
1. Open the Page Open the page through [Page] tab of the [Edit] window. select [Tone Layer]
from the [Layers] window.
2. Select the Command select [Move and Transform] from the [Edit] menu, and then select the
command to be applied from the displayed menu.
Red guidelines are displayed around the tone, and the [Move and Transform] tab of the [Properties] window is displayed.
1 When the guideline or square handle is dragged, tone area transformation such as scaling and rotation can be performed.
Refer to "Types of Moving and Transformation" ( ⇒ p. 239) for the details on operation methods.
2 When the inner side of the guideline is dragged, the tone can be moved.
3 Transformation can be done by inputting numerical values into the [Properties] window.
4 Double-click on top of the page, or click the [OK] button of the [Properties] window.
3. Tone Area Move and Transform Completes The Tone Area [Move and Transform] is complete.
2
1
3
4
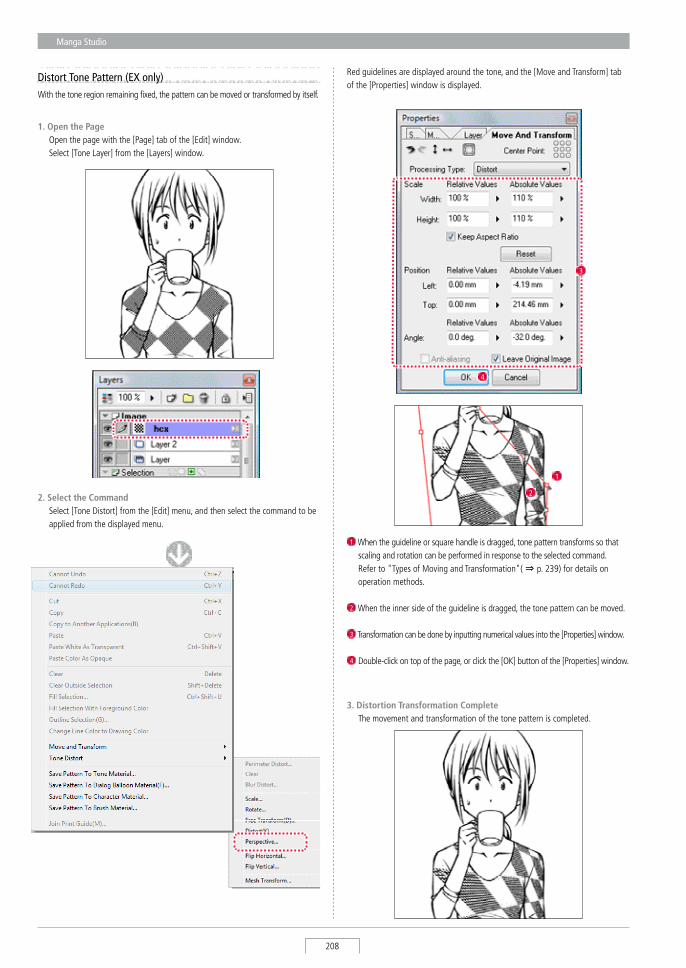
Manga Studio
208
Distort Tone Pattern (EX only)With the tone region remaining fixed, the pattern can be moved or transformed by itself.
1. Open the Page Open the page with the [Page] tab of the [Edit] window. select [Tone Layer] from the [Layers] window.
2. Select the Command select [Tone Distort] from the [Edit] menu, and then select the command to be
applied from the displayed menu.
Red guidelines are displayed around the tone, and the [Move and Transform] tab of the [Properties] window is displayed.
3. Distortion Transformation Complete The movement and transformation of the tone pattern is completed.
1 When the guideline or square handle is dragged, tone pattern transforms so that scaling and rotation can be performed in response to the selected command.
Refer to "Types of Moving and Transformation"( ⇒ p. 239) for details on operation methods.
2 When the inner side of the guideline is dragged, the tone pattern can be moved.
3 Transformation can be done by inputting numerical values into the [Properties] window.
4 Double-click on top of the page, or click the [OK] button of the [Properties] window.
3
4
1
2
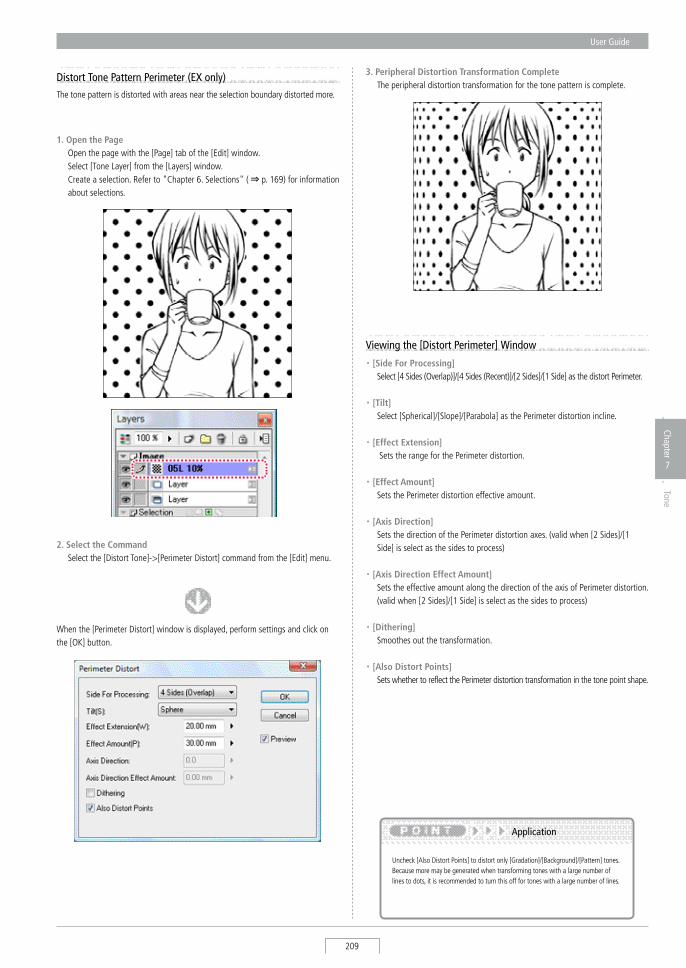
User Guide
209
Chapter
7
Tone
3. Peripheral Distortion Transformation Complete The peripheral distortion transformation for the tone pattern is complete.
Distort Tone Pattern Perimeter (EX only)The tone pattern is distorted with areas near the selection boundary distorted more.
1. Open the Page Open the page with the [Page] tab of the [Edit] window. select [Tone Layer] from the [Layers] window. Create a selection. Refer to "Chapter 6. selections" (⇒ p. 169) for information
about selections.
2. Select the Command select the [Distort Tone]->[Perimeter Distort] command from the [Edit] menu.
When the [Perimeter Distort] window is displayed, perform settings and click on the [OK] button.
Uncheck [Also Distort Points] to distort only [Gradation]/[Background]/[Pattern] tones. Because more may be generated when transforming tones with a large number of lines to dots, it is recommended to turn this off for tones with a large number of lines.
Application
・ [Side For Processing] select [4 sides (Overlap)]/[4 sides (Recent)]/[2 sides]/[1 side] as the distort Perimeter.
・ [Tilt] select [spherical]/[slope]/[Parabola] as the Perimeter distortion incline.
・ [Effect Extension] sets the range for the Perimeter distortion.
・ [Effect Amount] sets the Perimeter distortion effective amount.
・ [Axis Direction] sets the direction of the Perimeter distortion axes. (valid when [2 sides]/[1
side] is select as the sides to process)
・ [Axis Direction Effect Amount] sets the effective amount along the direction of the axis of Perimeter distortion.
(valid when [2 sides]/[1 side] is select as the sides to process)
・ [Dithering] smoothes out the transformation.
・ [Also Distort Points] sets whether to reflect the Perimeter distortion transformation in the tone point shape.
Viewing the [Distort Perimeter] Window
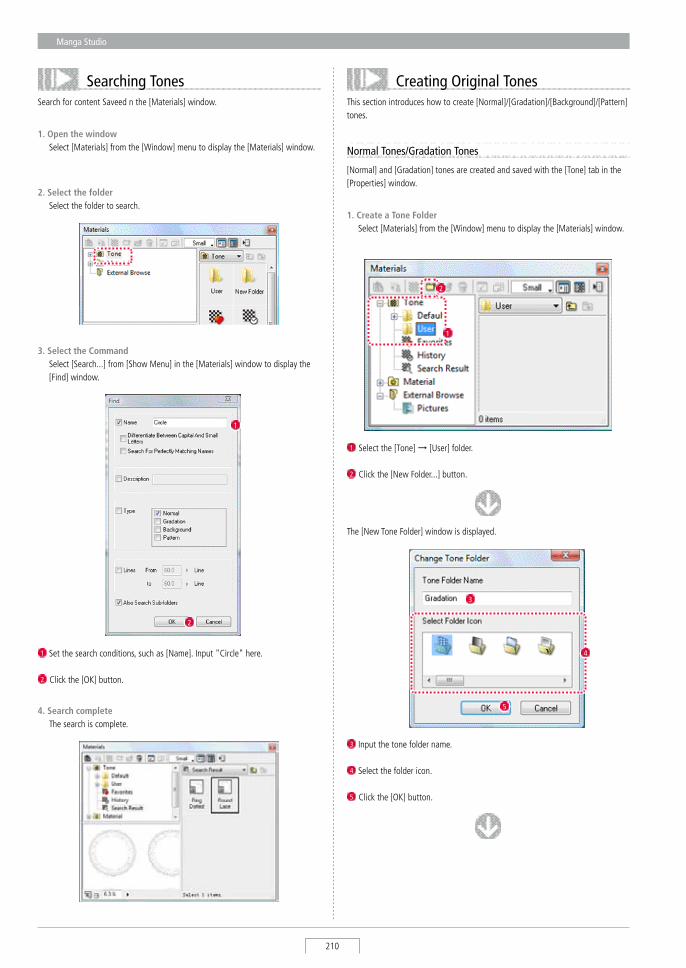
Manga Studio
210
Creating Original TonesThis section introduces how to create [Normal]/[Gradation]/[Background]/[Pattern] tones.
Normal Tones/Gradation Tones
[Normal] and [Gradation] tones are created and saved with the [Tone] tab in the [Properties] window.
1. Create a Tone Folder select [Materials] from the [Window] menu to display the [Materials] window.
1 select the [Tone] → [User] folder.
2 Click the [New Folder...] button.
1
2
The [New Tone Folder] window is displayed.
3 Input the tone folder name.
4 select the folder icon.
5 Click the [OK] button.
3
5
4
search for content saveed n the [Materials] window.
1. Open the window select [Materials] from the [Window] menu to display the [Materials] window.
2. Select the folder select the folder to search.
4. Search complete The search is complete.
3. Select the Command select [search...] from [show Menu] in the [Materials] window to display the
[Find] window.
1 set the search conditions, such as [Name]. Input "Circle" here.
2 Click the [OK] button.
1
2
Searching Tones
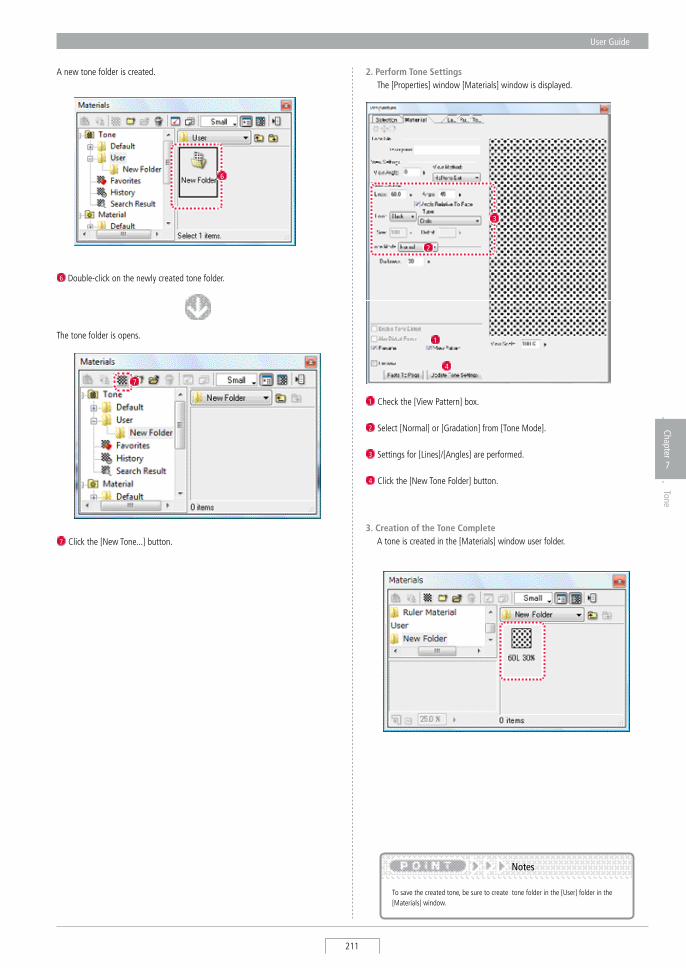
User Guide
211
Chapter
7
Tone
A new tone folder is created.
6 Double-click on the newly created tone folder.
6
The tone folder is opens.
7 Click the [New Tone...] button.
7
2. Perform Tone Settings The [Properties] window [Materials] window is displayed.
1 Check the [View Pattern] box.
2 select [Normal] or [Gradation] from [Tone Mode].
3 settings for [Lines]/[Angles] are performed.
4 Click the [New Tone Folder] button.
4
2
1
3
3. Creation of the Tone Complete A tone is created in the [Materials] window user folder.
To save the created tone, be sure to create tone folder in the [User] folder in the [Materials] window.
Notes
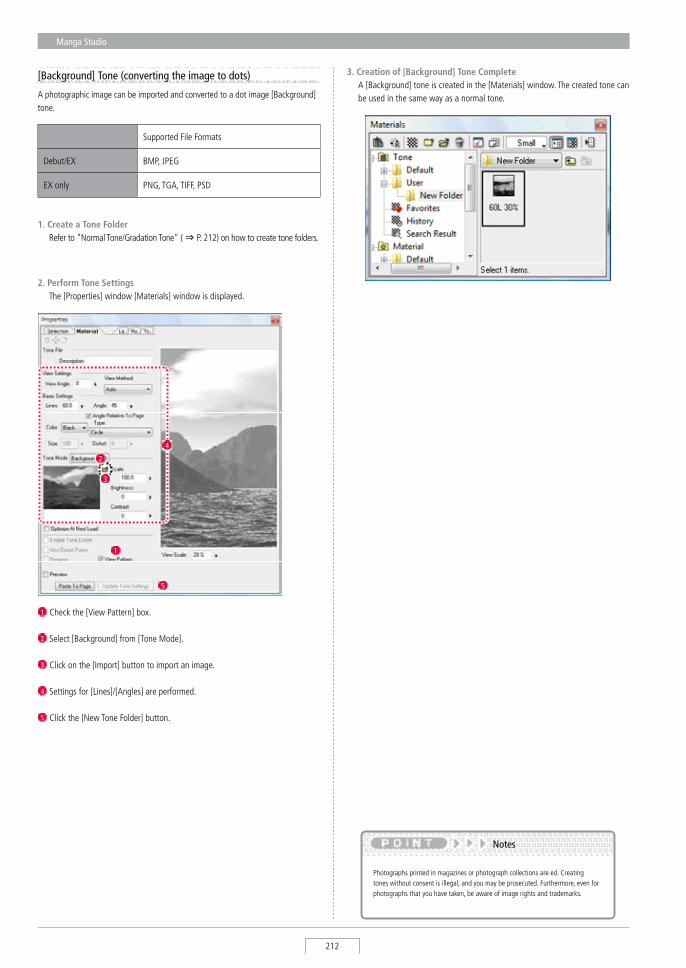
Manga Studio
212
[Background] Tone (converting the image to dots)
A photographic image can be imported and converted to a dot image [Background] tone.
supported File Formats
Debut/EX BMP, JPEG
EX only PNG, TGA, TIFF, PsD
1. Create a Tone Folder Refer to "Normal Tone/Gradation Tone" ( ⇒ P. 212) on how to create tone folders.
2. Perform Tone Settings The [Properties] window [Materials] window is displayed.
1 Check the [View Pattern] box.
2 select [Background] from [Tone Mode].
3 Click on the [Import] button to import an image.
4 settings for [Lines]/[Angles] are performed.
5 Click the [New Tone Folder] button.
1
5
3
2
4
3. Creation of [Background] Tone Complete A [Background] tone is created in the [Materials] window. The created tone can
be used in the same way as a normal tone.
Photographs printed in magazines or photograph collections are ed. Creating tones without consent is illegal, and you may be prosecuted. Furthermore, even for photographs that you have taken, be aware of image rights and trademarks.
Notes
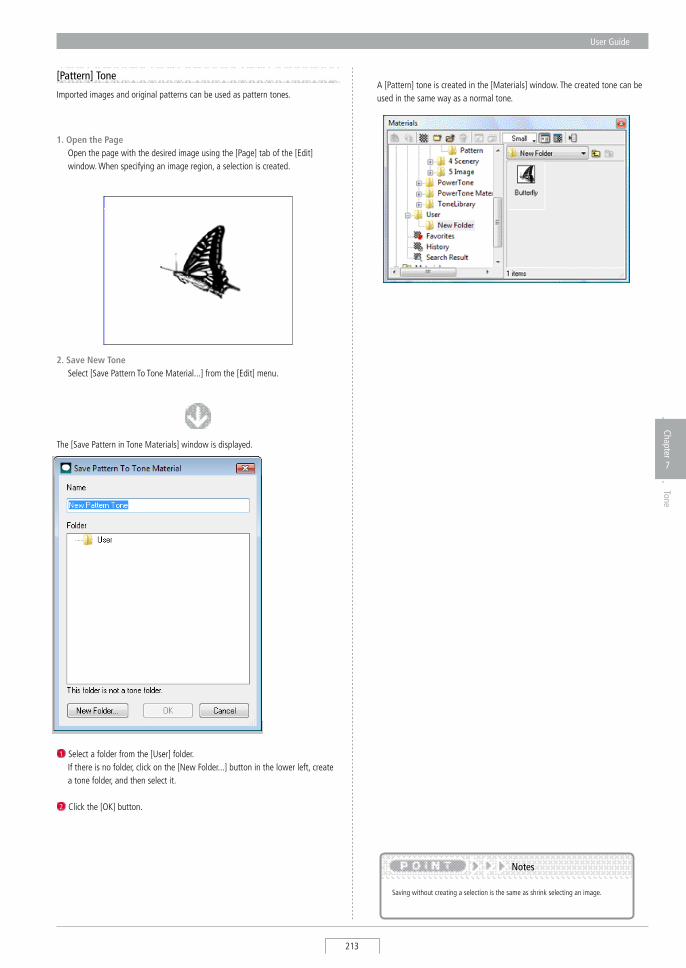
User Guide
213
Chapter
7
Tone
Imported images and original patterns can be used as pattern tones.
[Pattern] Tone
1. Open the Page Open the page with the desired image using the [Page] tab of the [Edit]
window. When specifying an image region, a selection is created.
2. Save New Tone select [save Pattern To Tone Material...] from the [Edit] menu.
The [save Pattern in Tone Materials] window is displayed.
1 select a folder from the [User] folder. If there is no folder, click on the [New Folder...] button in the lower left, create
a tone folder, and then select it.
2 Click the [OK] button.
A [Pattern] tone is created in the [Materials] window. The created tone can be used in the same way as a normal tone.
saving without creating a selection is the same as shrink selecting an image.
Notes
Manga Studio
214
Tone SettingsTone settings can be changed with the [Materials] window of the [Properties] window. The [Materials] tab of the [Properties] window is displayed when a new tone is created or when a tone is double-clicked in the [Materials] window.
[Normal] Tone
The following items are displayed when [Normal] is selected by [Tone Mode]
A [Hand] Tool Drag on the image to move the display position of the image. This is the same
function as the [Hand] tool in the [Tools] window.
B [Move Tone Pattern] Tool Drag on the preview to move the tone pattern. This is the same function as the [Move Tone] mode of the [Move Layer] tool in
the [Tools] window.
C [Rotate Tone Pattern] Tool Drag on the preview to rotate the tone. This is the same function as the [Rotate Tone] mode of the [Move Layer] tool in
the [Tools] window.
・ [Description] Enter a description of the tone.
・ [View Angle] set the angle for each tone pattern.
・ [View Method] select to set the display method of the tone.
A B C
・ [Lines] Enter the number of lines for the tone.
・ [Angle] set the angle for dot arrangement. Normally set to 45 degrees.
・ [Angle Relative to Page] Each tone pattern is set with the angle relative to the page.
・ [Color] select [Black] or [White] as the tone drawing color.
・ [Type] select the tone shape from [Circle]/[square]/[Diamond]/[Line]/[Cross]/[Ellipse]/
[Noize]/[Confection]/[Asterisk]/[star]/[Carrot]/[Round Cherry Blossom]/[Medium Cherry Blossom]/[Thin Cherry Blossom]/[Round Flower]/[Medium Flower]/[Thin Flower]/[Clover 1]/[Clover 2]/[Throwing star]/[Diamond(Cards)]/[Heart]/[Club]/[spade].
・ [Size] set the size of Noize. (only when [Noize] is selected as [Type])
・ [Distort] sets the Noize distortion factor. (only when [Noize] is selected as [Type])
・ [Tone Mode] select from [Normal]/[Gradation]/[Background].
・ [Darkness] Enters the tone density.
・ [Enable Tone Distort] (EX only) Reflect tone distortion.
・ [Also Distort Points] (EX only) Points also reflect tone distortion.
・ [Rename] Changes the [Tone Layer] name of the [Layers] window to [Lines] and [Density]
for [Normal] tones and [Lines] and [size] for [Gradation] tones.
・ [View Pattern] Display the tone pattern on the right side.
・ [Preview] Preview display the tone pattern on the page image.
・ [View Scale] set the magnification of the tone displayed with [View Pattern].
・ [Paste on Page] Button Paste on the tone on the page.
・ [Change Tone Settings] Button save the tone settings.
[Auto]When the display magnification is too small (when detailed expression is not possible with [Dot Pattern] display), automatically switches to [Gray] display.
[Gray] When displaying tones, always displays as [Gray].
[Halftone Dot]When displaying tones, displays as a [Halftone Dot] when possible.
User Guide
215
Chapter
7
Tone
The following items can be selected when [Gradation] is selected as the [Tone Mode].
Gradation
The following items can be selected when [Background] is selected as the [Tone
[Background] Tone
A [Source Image Preview] The source image selected for the [Background] tone is displayed.
B [Import] Button Click on this to display the [Open File] window. select the image to use in the
Background tone.
・ [Scale] set the size of the [Background] tone image.
・ [Brightness] set the brightness of the [Background] tone image.
・ [Contrast] set the contrast for the [Background] tone image.
・ [Optimize At Next Load] When importing the next page, the unused areas are deleted and optimization
is performed.
A
BA
B
A [Shape] select the gradation shape.
[Line] Generates the gradation in the direction of the line.
[Circle] Generates the gradation in the direction of the circle.
B [Repeat Type] select the gradation pattern.
[Repetition]Repeats in the same direction for each size that is set with [size].
[Loop]Reverses and repeats in the same direction for each size that is set with [size].
[None] Terminates the gradation pattern at the size set with [size].
・ [Ellipticity] set the flatten rate for the circle. (Only when [Circle] is selected with [shape])
・ [Size] sets distance when repeating the gradation. For example, when 5. 0 cm is set, the gradation repeats every 5. 0 cm.
・ [Darkness Graph] set density by dragging the control point. Drag the control point off of the
density graph to delete it.
Manga Studio
216
・ The settings for tone content in the [Default] folder of the [Materials] window can be confirmed but not changed. Only the settings for the tone content in the [User] folder can be changed.
・ [Pattern] tones cannot be selected with [Tone Mode] in the [Properties] window.
Explanation
The following items are displayed when [Pattern] tone is double-clicked in the [Materials] window.
[Pattern] Tone
・ [Used Scale] set the use ratio for the pattern.
Changing Tone Settingssettings for tones can be separately changed later with the [Tone] tab of the [Properties] window. Open the page through [Page] tab of the [Edit] window. Double-click on the icon of the [Tone Layer] to be changed in the [Layers] window.
The [Tone] tab of the [Properties] window is displayed.
Refer to "Tone settings"( ⇒ p. 216) for information on each item. When you click the [OK] button after the settings, the settings are reflected on the page.
・ In the [Materials] tab of the [Properties] window, the settings for the source tone content are performed; in the [Tone] tab, the [Tone Layer] settings are performed after pasting.
・ The [Tone] tab of the [Properties] window can be selected when [Tone Layer] is selected.
Explanation
User Guide
217
Chapter
7
Tone
Managing Tones
1. Select a [Tone] select [Materials] from the [Window] menu to display the [Materials] window.
1
1 select the [Tone] to be saveed from the [Tone] folder in the [Materials] window.
2. Select the Command select [save to Favorites] from [show Menu] in the [Materials] window.
3. Registration Completes The tone is added to the [Favorites] folder in the [Tone] folder.
Necessary tones can be searched for in the [Materials] window. When [search] is select from [show Menu] in a tone folder in the [Materials] window, a window is displayed and tones can be searched for. Refer to "Tone search"( ⇒ p. 212) for searching the contents.
Application
1. Show the [Materials] Window select [Materials] from the [Window] menu to display the [Materials] window.
2. Paste Tone Paste the [Tone] from the [Materials] window on the page.
3. History Registration Complete The tone is added to the [History] folder in the [Tone] folder.
Tones that are often used can be saveed in the [Favorites] folder for easy selection. Tones in the [Favorites] folder are pasted by dragging and dropping on a page.
Favorites
Pasted tones are automatically recorded in the history folder. Tones in the [History] folder can be pasted by dragging and dropping on a page, just the same as tones in other folders.
History
Record and save the tone being used, so that it can be used easily again.
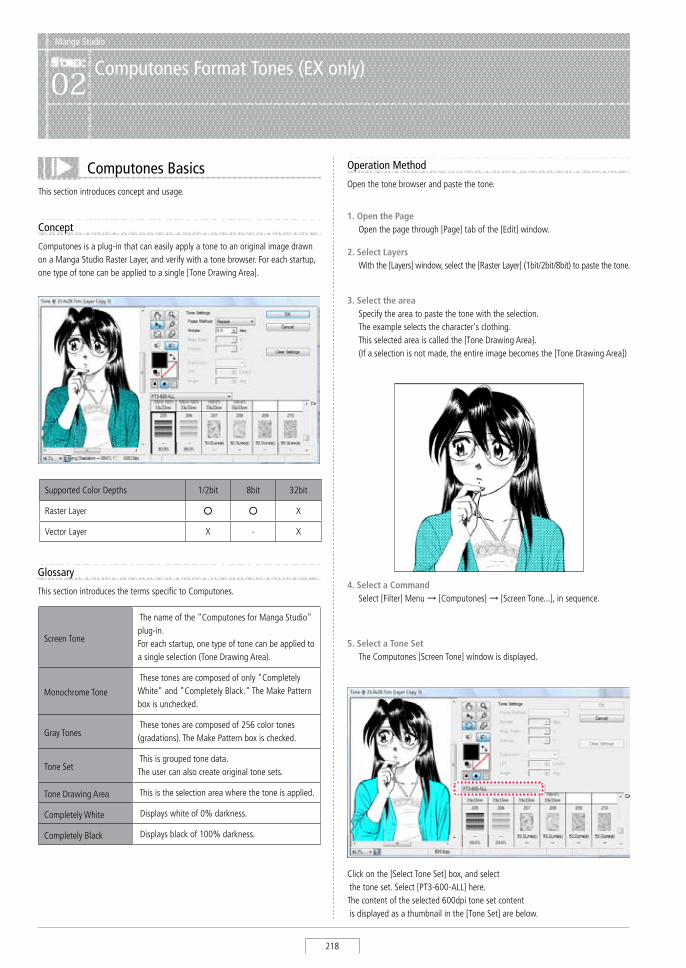
Manga Studio
218
Manga Studio
Computones Format Tones (EX only)02
Computones BasicsThis section introduces concept and usage.
Concept
Computones is a plug-in that can easily apply a tone to an original image drawn on a Manga studio Raster Layer, and verify with a tone browser. For each startup, one type of tone can be applied to a single [Tone Drawing Area].
Operation Method
Open the tone browser and paste the tone.
1. Open the Page Open the page through [Page] tab of the [Edit] window.
3. Select the area specify the area to paste the tone with the selection. The example selects the character's clothing. This selected area is called the [Tone Drawing Area]. (If a selection is not made, the entire image becomes the [Tone Drawing Area])
4. Select a Command select [Filter] Menu → [Computones] → [screen Tone...], in sequence.
Click on the [select Tone set] box, and select the tone set. select [PT3-600-ALL] here. The content of the selected 600dpi tone set content is displayed as a thumbnail in the [Tone set] are below.
5. Select a Tone Set The Computones [screen Tone] window is displayed.
Glossary
This section introduces the terms specific to Computones.
screen Tone
The name of the "Computones for Manga studio" plug-in. For each startup, one type of tone can be applied to a single selection (Tone Drawing Area).
Monochrome Tone
These tones are composed of only "Completely White" and "Completely Black." The Make Pattern box is unchecked.
Gray Tones These tones are composed of 256 color tones (gradations). The Make Pattern box is checked.
Tone set This is grouped tone data. The user can also create original tone sets.
Tone Drawing Area This is the selection area where the tone is applied.
Completely White Displays white of 0% darkness.
Completely Black Displays black of 100% darkness.
2. Select Layers With the [Layers] window, select the [Raster Layer] (1bit/2bit/8bit) to paste the tone.
supported Color Depths 1/2bit 8bit 32bit
Raster Layer ○ ○ X
Vector Layer X - X
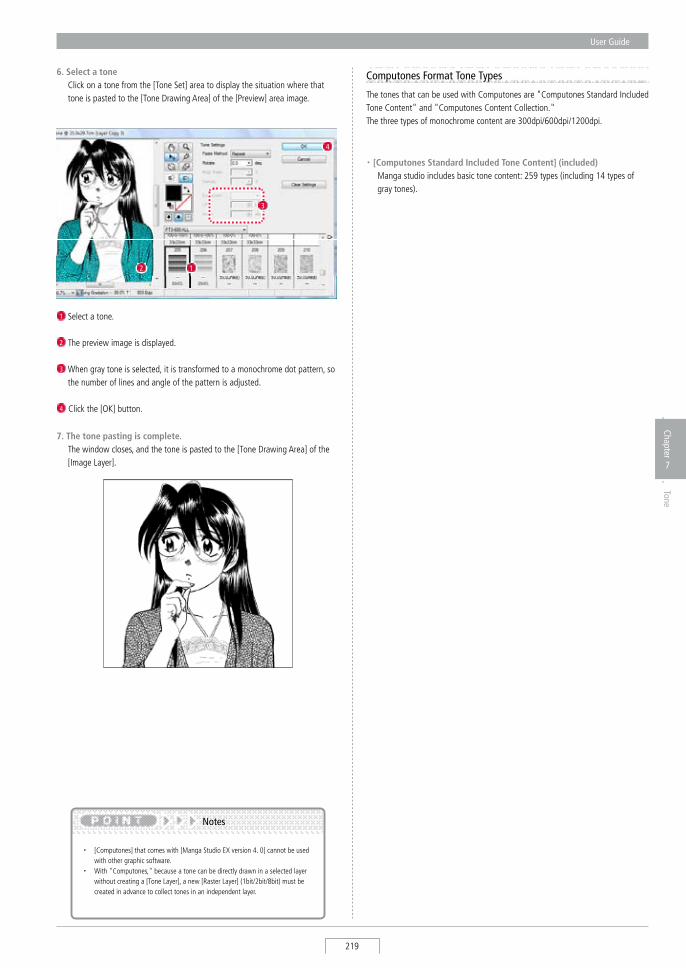
User Guide
219
Chapter
7
Tone
6. Select a tone Click on a tone from the [Tone set] area to display the situation where that
tone is pasted to the [Tone Drawing Area] of the [Preview] area image.
12
4
3
1 select a tone.
2 The preview image is displayed.
3 When gray tone is selected, it is transformed to a monochrome dot pattern, so the number of lines and angle of the pattern is adjusted.
4 Click the [OK] button.
7. The tone pasting is complete. The window closes, and the tone is pasted to the [Tone Drawing Area] of the
[Image Layer].
・ [Computones] that comes with [Manga studio EX version 4. 0] cannot be used with other graphic software.
・ With "Computones," because a tone can be directly drawn in a selected layer without creating a [Tone Layer], a new [Raster Layer] (1bit/2bit/8bit) must be created in advance to collect tones in an independent layer.
Notes
Computones Format Tone Types
The tones that can be used with Computones are "Computones standard Included Tone Content" and "Computones Content Collection."The three types of monochrome content are 300dpi/600dpi/1200dpi.
・ [Computones Standard Included Tone Content] (included) Manga studio includes basic tone content: 259 types (including 14 types of
gray tones).
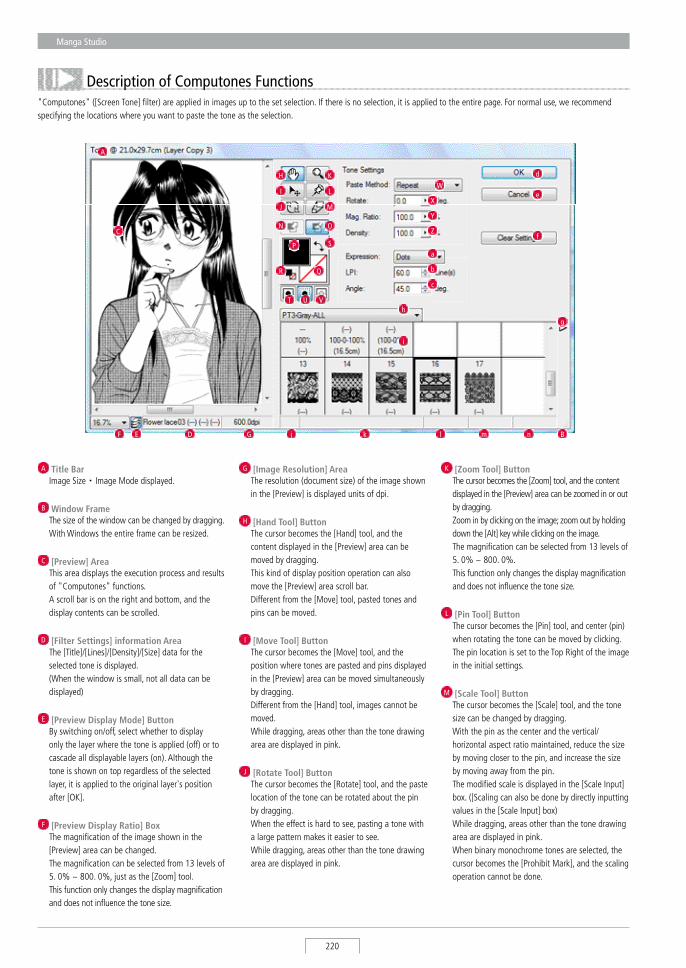
Manga Studio
220
Description of Computones Functions"Computones" ([screen Tone] filter) are applied in images up to the set selection. If there is no selection, it is applied to the entire page. For normal use, we recommend specifying the locations where you want to paste the tone as the selection.
A Title Bar Image size・Image Mode displayed.
B Window Frame The size of the window can be changed by dragging.
With Windows the entire frame can be resized.
C [Preview] Area This area displays the execution process and results
of "Computones" functions. A scroll bar is on the right and bottom, and the
display contents can be scrolled.
D [Filter Settings] information Area The [Title]/[Lines]/[Density]/[size] data for the
selected tone is displayed. (When the window is small, not all data can be
displayed)
E [Preview Display Mode] Button By switching on/off, select whether to display
only the layer where the tone is applied (off) or to cascade all displayable layers (on). Although the tone is shown on top regardless of the selected layer, it is applied to the original layer's position after [OK].
F [Preview Display Ratio] Box The magnification of the image shown in the
[Preview] area can be changed. The magnification can be selected from 13 levels of
5. 0% ~ 800. 0%, just as the [Zoom] tool. This function only changes the display magnification
and does not influence the tone size.
G [Image Resolution] Area The resolution (document size) of the image shown
in the [Preview] is displayed units of dpi.
H [Hand Tool] Button The cursor becomes the [Hand] tool, and the
content displayed in the [Preview] area can be moved by dragging.
This kind of display position operation can also move the [Preview] area scroll bar.
Different from the [Move] tool, pasted tones and pins can be moved.
I [Move Tool] Button The cursor becomes the [Move] tool, and the
position where tones are pasted and pins displayed in the [Preview] area can be moved simultaneously by dragging.
Different from the [Hand] tool, images cannot be moved.
While dragging, areas other than the tone drawing area are displayed in pink.
J [Rotate Tool] Button The cursor becomes the [Rotate] tool, and the paste
location of the tone can be rotated about the pin by dragging.
When the effect is hard to see, pasting a tone with a large pattern makes it easier to see.
While dragging, areas other than the tone drawing area are displayed in pink.
K [Zoom Tool] Button The cursor becomes the [Zoom] tool, and the content
displayed in the [Preview] area can be zoomed in or out by dragging.
Zoom in by clicking on the image; zoom out by holding down the [Alt] key while clicking on the image.
The magnification can be selected from 13 levels of 5. 0% ~ 800. 0%.
This function only changes the display magnification and does not influence the tone size.
L [Pin Tool] Button The cursor becomes the [Pin] tool, and center (pin)
when rotating the tone can be moved by clicking. The pin location is set to the Top Right of the image
in the initial settings.
M [Scale Tool] Button The cursor becomes the [scale] tool, and the tone
size can be changed by dragging. With the pin as the center and the vertical/
horizontal aspect ratio maintained, reduce the size by moving closer to the pin, and increase the size by moving away from the pin.
The modified scale is displayed in the [scale Input] box. ([scaling can also be done by directly inputting values in the [scale Input] box)
While dragging, areas other than the tone drawing area are displayed in pink.
When binary monochrome tones are selected, the cursor becomes the [Prohibit Mark], and the scaling operation cannot be done.
A
B
C
DEF G
H
I
K
J
L
M
N O
P
Y
Z
a
b
c
d
e
f
U V
W
X
QR
S
Th
g
i
j k l m n
User Guide
221
Chapter
7
Tone
d [OK] Button Executes all selected processes, and opens the
[screen Tone] window. The same operation can be done with the [Enter] key. The information for the window size and select tool
is saved on the hard disk and is applied during the next startup.
e [Cancel] Button Performs undo on all selected processes, and opens
the [screen Tone] window. The information for the window size and select tool
is saved on the hard disk and is applied during the next startup.
The execution of functions in the [Menu] are not canceled.
f [Clear Settings] Button Each parameter is restored to the following initial
values. [Paste Method] Repeat [Rotate]0. 0° [scale]100. 0% [Density]100. 0% [Expression]60. 0-line Net [Line Angle]45. 0°
N [Use Host Color] Button Cannot be used with Manga studio versions of
Computones.
O [Use Custom Color] Button Cannot be used with Manga studio versions of
Computones.
P [Foreground Color] Box The drawing color is displayed. The initial setting is
"Completely Black." When the render setting is [Render with
Background Color], this becomes transparent.
Q [Select Background Color] Box The Background color is displayed. The initial
setting is transparent. When the render setting is [Render with Drawing
Color or Background Color] or [Render with Drawing Color], this becomes "Completely White."
R [Restore Foreground and Background Colors to Initial Settings] Icon
The drawing color is set to "Completely Black," and the Background color is sent to transparent ([Render with Drawing Color] status).
S [Swap Foreground and Background Colors] Icon When clicked, the drawing color and Background
color are switched, and an effect similar to inverting black and white can be expected.
As an example, when this icon is clicked after pasting a 20% pattern, you can create a 80% pattern.
T [Render Foreground and Background Colors] Button
Becomes the setting that draws with both the drawing color and Background color.
U [Render in Foreground Color] Button Draws with only the drawing color. The Background color becomes transparent.
V [Render in Background Color] Button Draws with only the Background color. The drawing color becomes transparent.
W [Paste Method] Selection Box select the paste method for the tone. The binary tones, such as net/line/sand, are selected
from [Repeat] and [Repeat Reverse]. Binary tones and gray tones, such as Focus Lines/Tones, are selected from [Repeat], [Repeat Reverse], [No Repeat], [Reverse without Repeat], and [Repeat].
X [Rotate] Input Box/[Rotate] Input Slider Enter a value directly into the box or drag the slider
on the right to set the rotation angle for the tone. The slider is set in 2° steps. The center/left/right of
the slider are each 0. 0°. While dragging, areas other than the tone drawing
area are displayed in pink.
Y [Mag. Ratio] Input Box/[Mag. Ratio] Input Slider Enter a value directly into the box or drag the slider
on the right to set the tone magnification from 10. 0% to 1000. 0%.
The center of the slider is 100%. While dragging, areas other than the tone drawing
area are displayed in pink.
Z [Density] Input Box/[Density] Input Slider (gray tones only)
Enter a value directly into the box or drag the slider on the right to set tone density from 20. 0% to 180. 0%.
The slider is set in 0. 5% steps. The center of the slider is 100%.
a [Expression] Selection Box (gray tone only) select the expression method for making the
selected gray tone into a pattern from [Net], [Lines],[Cross], or [Random].
b [LPI] Input Box/[LPI] Input Buttons (gray tone only)
Enter a value directly into the box or click on the upper or lower button to set the number of lines for the pattern for the selected gray tone.
The Box can have input from 1. 0 lines to 85. 0 lines. The slider is set in steps of 20. 0/27. 5/32. 5/42.
5/50. 0/55. 0/60. 0/65. 0/70. 0/75. 0/80. 0/85. 0 lines with each click.
To prevent tone jump, the number of lines used must stop at 20 or fewer lines for 300dpi and 40 or fewer lines for 600dpi.
c [Angle] Input Box/[Angle] Input Buttons (gray tone only)
Enter a value directly into the box or click on the upper or lower button to set the angle for the pattern for the selected gray tone.
The button sets in steps of 0. 0/15. 0/30. 0/45. 0/60. 0/75. 0/90. 0/105. 0/120. 0/135. 0/150. 0/165. 0° with each press.
Usually, an angle of 45. 0° is recommended. When the expression method is set to [Random],
there is no angle setting.
When the [Enter] key is pressed while entering a parameter, be sure the [OK] button is executed and the [screen Tone] window is closed.
Notes
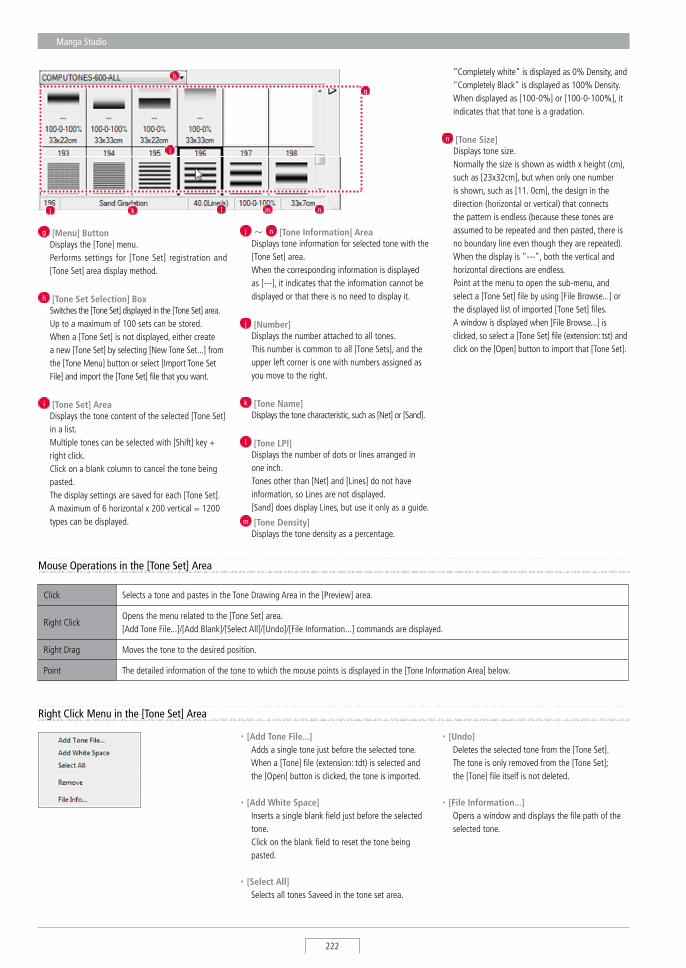
Manga Studio
222
"Completely white" is displayed as 0% Density, and "Completely Black" is displayed as 100% Density.
When displayed as [100-0%] or [100-0-100%], it indicates that that tone is a gradation.
n [Tone Size] Displays tone size. Normally the size is shown as width x height (cm),
such as [23x32cm], but when only one number is shown, such as [11. 0cm], the design in the direction (horizontal or vertical) that connects the pattern is endless (because these tones are assumed to be repeated and then pasted, there is no boundary line even though they are repeated).
When the display is "---", both the vertical and horizontal directions are endless.
Point at the menu to open the sub-menu, and select a [Tone set] file by using [File Browse...] or the displayed list of imported [Tone set] files.
A window is displayed when [File Browse...] is clicked, so select a [Tone set] file (extension: tst) and click on the [Open] button to import that [Tone set].
g [Menu] Button Displays the [Tone] menu. Performs settings for [Tone set] registration and
[Tone set] area display method.
h [Tone Set Selection] Box switches the [Tone set] displayed in the [Tone set] area. Up to a maximum of 100 sets can be stored. When a [Tone set] is not displayed, either create
a new [Tone set] by selecting [New Tone set...] from the [Tone Menu] button or select [Import Tone set File] and import the [Tone set] file that you want.
i [Tone Set] Area Displays the tone content of the selected [Tone set]
in a list. Multiple tones can be selected with [shift] key +
right click. Click on a blank column to cancel the tone being
pasted. The display settings are saved for each [Tone set]. A maximum of 6 horizontal x 200 vertical = 1200
types can be displayed.
j ~ n [Tone Information] Area Displays tone information for selected tone with the
[Tone set] area. When the corresponding information is displayed
as [---], it indicates that the information cannot be displayed or that there is no need to display it.
j [Number] Displays the number attached to all tones. This number is common to all [Tone sets], and the
upper left corner is one with numbers assigned as you move to the right.
k [Tone Name] Displays the tone characteristic, such as [Net] or [sand].
l [Tone LPI] Displays the number of dots or lines arranged in
one inch. Tones other than [Net] and [Lines] do not have
information, so Lines are not displayed. [sand] does display Lines, but use it only as a guide. m [Tone Density]
Displays the tone density as a percentage.
h
i
g
j
Mouse Operations in the [Tone Set] Area
Click selects a tone and pastes in the Tone Drawing Area in the [Preview] area.
Right ClickOpens the menu related to the [Tone set] area. [Add Tone File...]/[Add Blank]/[select All]/[Undo]/[File Information...] commands are displayed.
Right Drag Moves the tone to the desired position.
Point The detailed information of the tone to which the mouse points is displayed in the [Tone Information Area] below.
k l m n
・ [Add Tone File...] Adds a single tone just before the selected tone. When a [Tone] file (extension: tdt) is selected and
the [Open] button is clicked, the tone is imported. ・ [Add White Space] Inserts a single blank field just before the selected
tone. Click on the blank field to reset the tone being
pasted.
・ [Select All] selects all tones saveed in the tone set area.
・ [Undo] Deletes the selected tone from the [Tone set]. The tone is only removed from the [Tone set]; the [Tone] file itself is not deleted.
・ [File Information...] Opens a window and displays the file path of the
selected tone.
Right Click Menu in the [Tone Set] Area
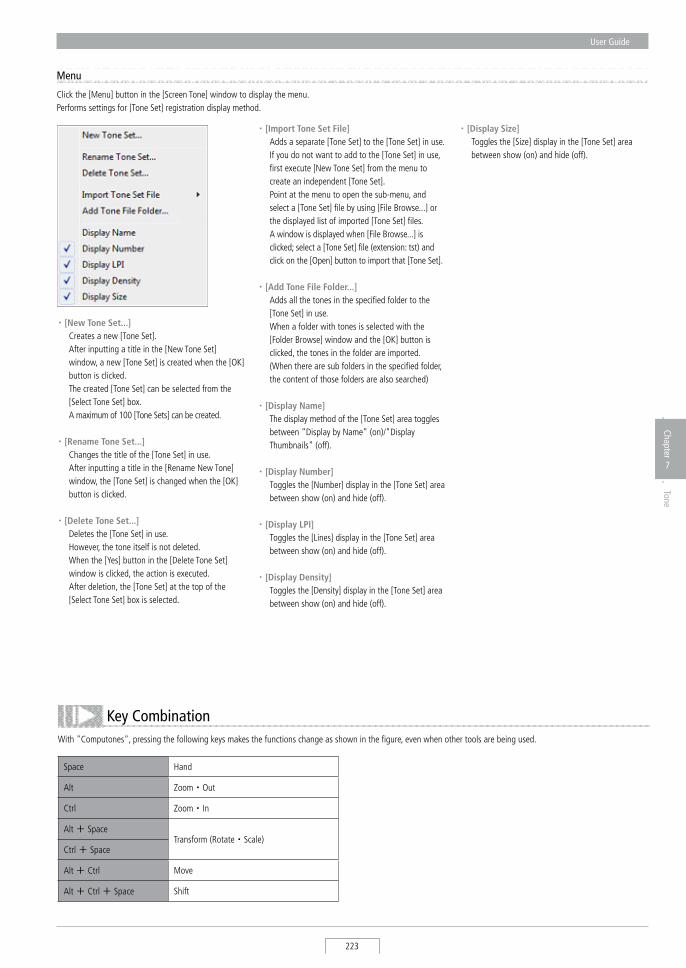
User Guide
223
Chapter
7
Tone
・ [Import Tone Set File] Adds a separate [Tone set] to the [Tone set] in use. If you do not want to add to the [Tone set] in use,
first execute [New Tone set] from the menu to create an independent [Tone set].
Point at the menu to open the sub-menu, and select a [Tone set] file by using [File Browse...] or the displayed list of imported [Tone set] files.
A window is displayed when [File Browse...] is clicked; select a [Tone set] file (extension: tst) and click on the [Open] button to import that [Tone set].
・ [Add Tone File Folder...] Adds all the tones in the specified folder to the
[Tone set] in use. When a folder with tones is selected with the
[Folder Browse] window and the [OK] button is clicked, the tones in the folder are imported.
(When there are sub folders in the specified folder, the content of those folders are also searched)
・ [Display Name] The display method of the [Tone set] area toggles
between "Display by Name" (on)/"Display Thumbnails" (off).
・ [Display Number] Toggles the [Number] display in the [Tone set] area
between show (on) and hide (off).
・ [Display LPI] Toggles the [Lines] display in the [Tone set] area
between show (on) and hide (off).
・ [Display Density] Toggles the [Density] display in the [Tone set] area
between show (on) and hide (off).
・ [Display Size] Toggles the [size] display in the [Tone set] area
between show (on) and hide (off).
・ [New Tone Set...] Creates a new [Tone set]. After inputting a title in the [New Tone set]
window, a new [Tone set] is created when the [OK] button is clicked.
The created [Tone set] can be selected from the [select Tone set] box.
A maximum of 100 [Tone sets] can be created.
・ [Rename Tone Set...] Changes the title of the [Tone set] in use. After inputting a title in the [Rename New Tone]
window, the [Tone set] is changed when the [OK] button is clicked.
・ [Delete Tone Set...] Deletes the [Tone set] in use. However, the tone itself is not deleted. When the [Yes] button in the [Delete Tone set]
window is clicked, the action is executed. After deletion, the [Tone set] at the top of the
[select Tone set] box is selected.
Menu
Click the [Menu] button in the [screen Tone] window to display the menu. Performs settings for [Tone set] registration display method.
With "Computones", pressing the following keys makes the functions change as shown in the figure, even when other tools are being used.
Key Combination
space Hand
Alt Zoom・ Out
Ctrl Zoom・ In
Alt + spaceTransform (Rotate・ scale)
Ctrl + space
Alt + Ctrl Move
Alt + Ctrl + space shift


Editing
Chapter 8
This chapter introduces the functions for editing line and image data.
Step: 01 Cut and Paste 228
Step: 02 Edit Lining 232
Chapter
8
Editing
Step: 03 Move and Transform 237
Step: 04 Retouching 241
Step: 05 Black-White Reversal and Masking 251
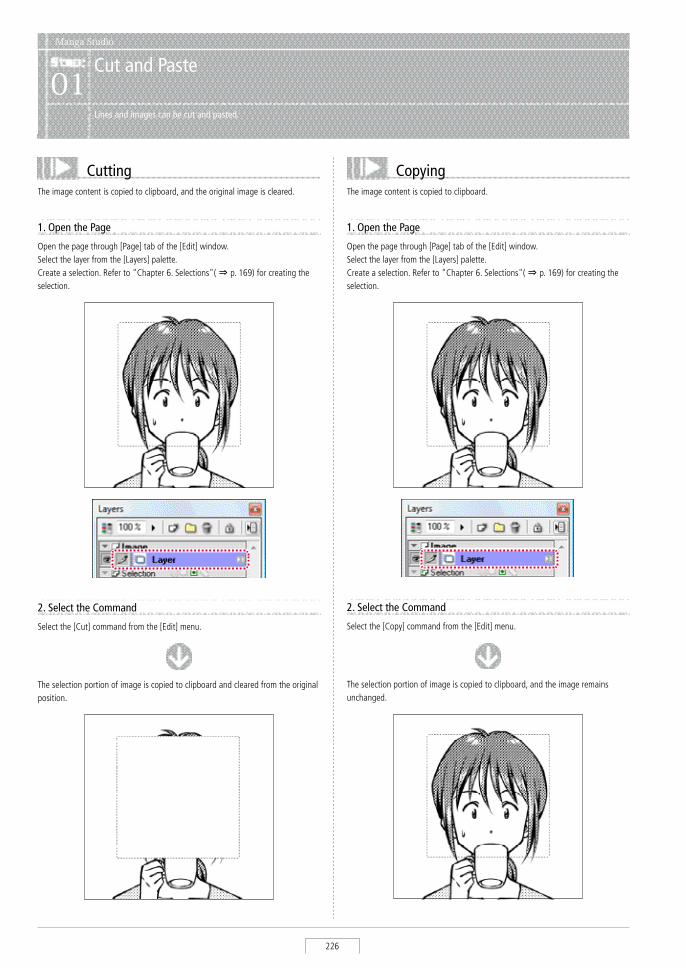
Manga Studio
226
Manga Studio
Cut and Paste01
Lines and images can be cut and pasted.
CuttingThe image content is copied to clipboard, and the original image is cleared.
1. Open the Page
Open the page through [Page] tab of the [Edit] window. select the layer from the [Layers] palette. Create a selection. Refer to "Chapter 6. selections"( ⇒ p. 169) for creating the selection.
2. Select the Command
select the [Cut] command from the [Edit] menu.
The selection portion of image is copied to clipboard and cleared from the original position.
CopyingThe image content is copied to clipboard.
1. Open the Page
Open the page through [Page] tab of the [Edit] window. select the layer from the [Layers] palette. Create a selection. Refer to "Chapter 6. selections"( ⇒ p. 169) for creating the selection.
2. Select the Command
select the [Copy] command from the [Edit] menu.
The selection portion of image is copied to clipboard, and the image remains unchanged.
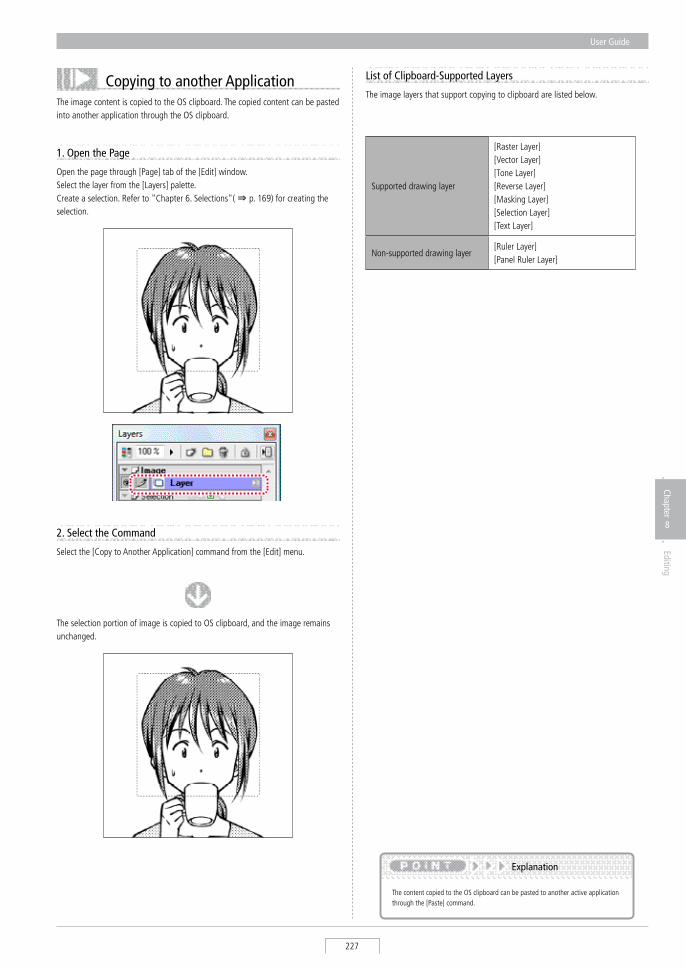
User Guide
227
Chapter
8
Editing
Copying to another ApplicationThe image content is copied to the Os clipboard. The copied content can be pasted into another application through the Os clipboard.
1. Open the Page
Open the page through [Page] tab of the [Edit] window. select the layer from the [Layers] palette. Create a selection. Refer to "Chapter 6. selections"( ⇒ p. 169) for creating the selection.
2. Select the Command
select the [Copy to Another Application] command from the [Edit] menu.
The selection portion of image is copied to Os clipboard, and the image remains unchanged.
The content copied to the Os clipboard can be pasted to another active application through the [Paste] command.
Explanation
List of Clipboard-Supported Layers
The image layers that support copying to clipboard are listed below.
supported drawing layer
[Raster Layer][Vector Layer][Tone Layer][Reverse Layer][Masking Layer][selection Layer][Text Layer]
Non-supported drawing layer[Ruler Layer][Panel Ruler Layer]
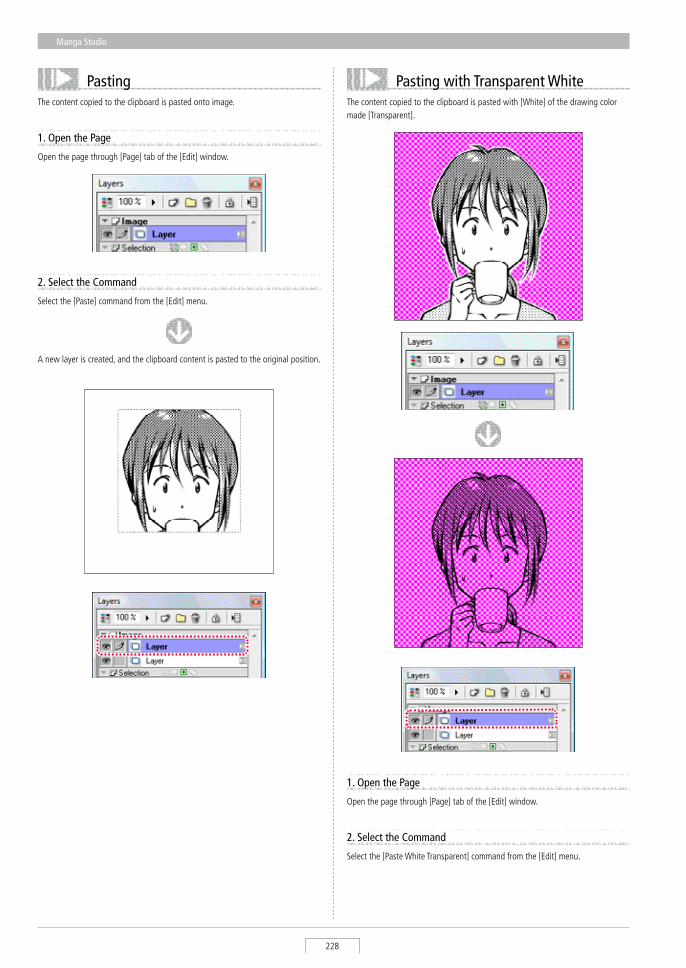
Manga Studio
228
PastingThe content copied to the clipboard is pasted onto image.
1. Open the Page
Open the page through [Page] tab of the [Edit] window.
Pasting with Transparent WhiteThe content copied to the clipboard is pasted with [White] of the drawing color made [Transparent].
2. Select the Command
select the [Paste White Transparent] command from the [Edit] menu.
1. Open the Page
Open the page through [Page] tab of the [Edit] window.
A new layer is created, and the clipboard content is pasted to the original position.
2. Select the Command
select the [Paste] command from the [Edit] menu.
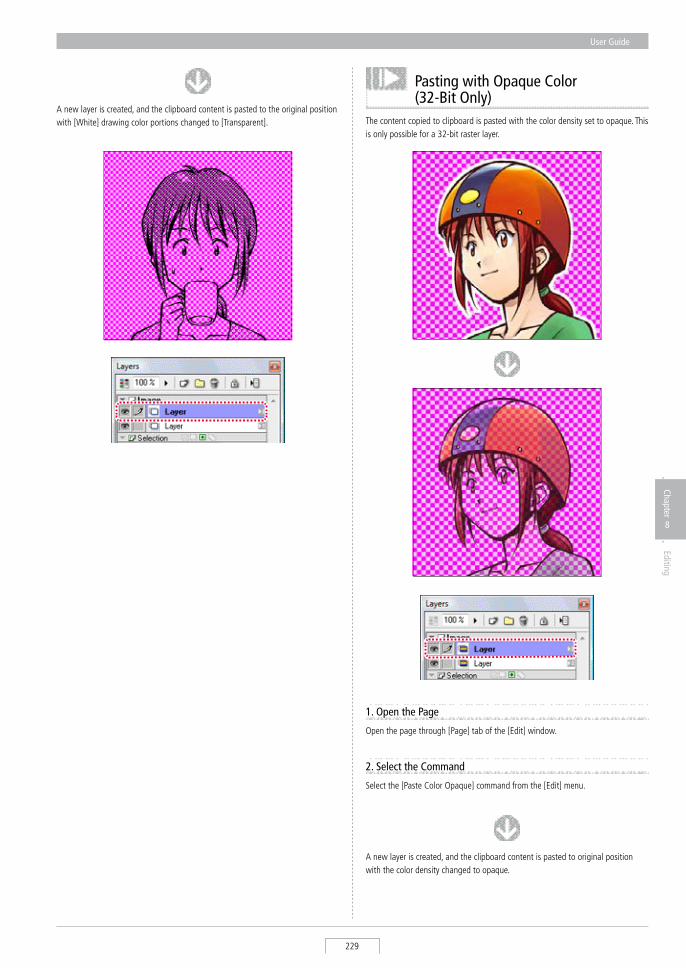
User Guide
229
Chapter
8
Editing
The content copied to clipboard is pasted with the color density set to opaque. This is only possible for a 32-bit raster layer.
Pasting with Opaque Color(32-Bit Only)
A new layer is created, and the clipboard content is pasted to the original position with [White] drawing color portions changed to [Transparent].
1. Open the Page
Open the page through [Page] tab of the [Edit] window.
A new layer is created, and the clipboard content is pasted to original position with the color density changed to opaque.
2. Select the Command
select the [Paste Color Opaque] command from the [Edit] menu.
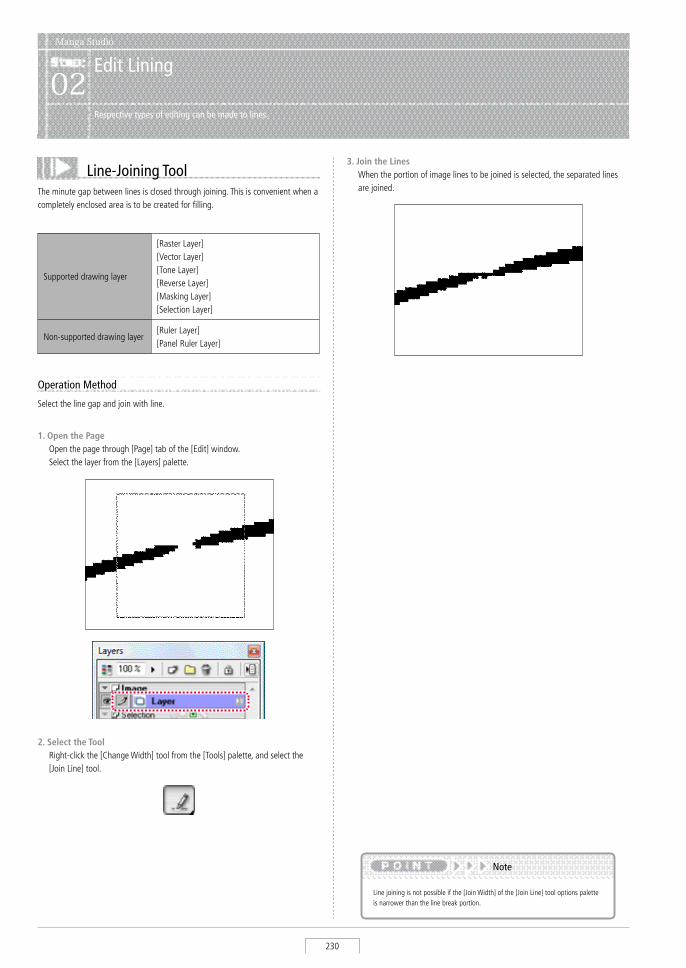
Manga Studio
230
Manga Studio
Edit Lining02
Respective types of editing can be made to lines.
Line-Joining ToolThe minute gap between lines is closed through joining. This is convenient when a completely enclosed area is to be created for filling.
supported drawing layer
[Raster Layer][Vector Layer][Tone Layer][Reverse Layer][Masking Layer][selection Layer]
Non-supported drawing layer[Ruler Layer][Panel Ruler Layer]
3. Join the Lines When the portion of image lines to be joined is selected, the separated lines
are joined.
Operation Method
select the line gap and join with line.
1. Open the Page Open the page through [Page] tab of the [Edit] window. select the layer from the [Layers] palette.
2. Select the Tool Right-click the [Change Width] tool from the [Tools] palette, and select the
[Join Line] tool.
Line joining is not possible if the [Join Width] of the [Join Line] tool options palette is narrower than the line break portion.
Note
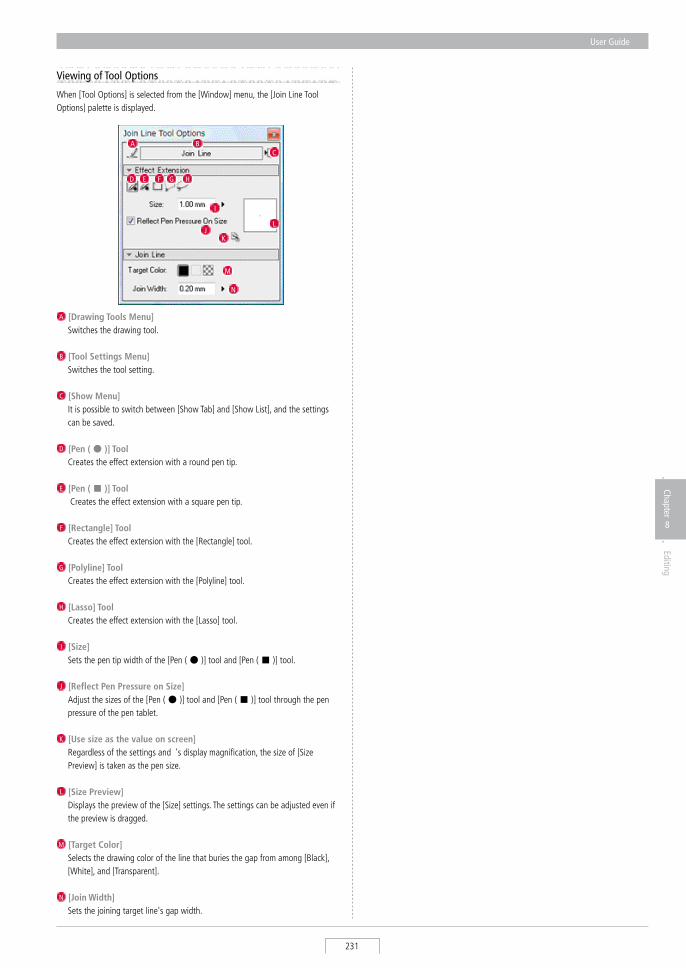
User Guide
231
Chapter
8
Editing
When [Tool Options] is selected from the [Window] menu, the [Join Line Tool Options] palette is displayed.
Viewing of Tool Options
A [Drawing Tools Menu] switches the drawing tool.
B [Tool Settings Menu] switches the tool setting.
C [Show Menu] It is possible to switch between [show Tab] and [show List], and the settings
can be saved.
D [Pen ( ● )] Tool Creates the effect extension with a round pen tip.
E [Pen ( ■ )] Tool Creates the effect extension with a square pen tip.
F [Rectangle] Tool Creates the effect extension with the [Rectangle] tool.
G [Polyline] Tool Creates the effect extension with the [Polyline] tool.
H [Lasso] Tool Creates the effect extension with the [Lasso] tool.
I [Size] sets the pen tip width of the [Pen ( ● )] tool and [Pen ( ■ )] tool.
J [Reflect Pen Pressure on Size] Adjust the sizes of the [Pen ( ● )] tool and [Pen ( ■ )] tool through the pen
pressure of the pen tablet.
K [Use size as the value on screen] Regardless of the settings and 's display magnification, the size of [size
Preview] is taken as the pen size.
L [Size Preview] Displays the preview of the [size] settings. The settings can be adjusted even if
the preview is dragged.
M [Target Color] selects the drawing color of the line that buries the gap from among [Black],
[White], and [Transparent].
N [Join Width] sets the joining target line's gap width.
L
I
JK
E F
M
N
A BC
D G H
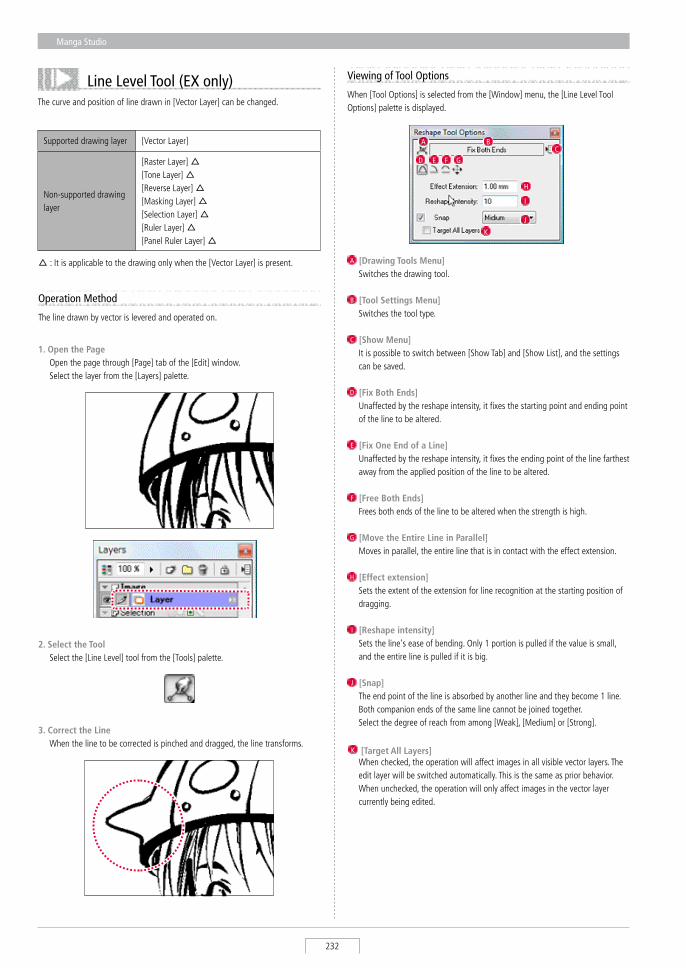
Manga Studio
232
The curve and position of line drawn in [Vector Layer] can be changed. When [Tool Options] is selected from the [Window] menu, the [Line Level Tool Options] palette is displayed.
Viewing of Tool Options
A [Drawing Tools Menu] switches the drawing tool.
B [Tool Settings Menu] switches the tool type.
C [Show Menu] It is possible to switch between [show Tab] and [show List], and the settings
can be saved.
D [Fix Both Ends] Unaffected by the reshape intensity, it fixes the starting point and ending point
of the line to be altered.
E [Fix One End of a Line] Unaffected by the reshape intensity, it fixes the ending point of the line farthest
away from the applied position of the line to be altered.
F [Free Both Ends] Frees both ends of the line to be altered when the strength is high.
G [Move the Entire Line in Parallel] Moves in parallel, the entire line that is in contact with the effect extension.
H [Effect extension] sets the extent of the extension for line recognition at the starting position of
dragging.
I [Reshape intensity] sets the line's ease of bending. Only 1 portion is pulled if the value is small,
and the entire line is pulled if it is big.
J [Snap] The end point of the line is absorbed by another line and they become 1 line. Both companion ends of the same line cannot be joined together. select the degree of reach from among [Weak], [Medium] or [strong].
K [Target All Layers] When checked, the operation will affect images in all visible vector layers. The
edit layer will be switched automatically. This is the same as prior behavior. When unchecked, the operation will only affect images in the vector layer currently being edited.
I
J
E F
A BC
D G
H
Operation Method
The line drawn by vector is levered and operated on.
2. Select the Tool select the [Line Level] tool from the [Tools] palette.
1. Open the Page Open the page through [Page] tab of the [Edit] window. select the layer from the [Layers] palette.
3. Correct the Line When the line to be corrected is pinched and dragged, the line transforms.
Line Level Tool (EX only)
supported drawing layer [Vector Layer]
Non-supported drawing layer
[Raster Layer] △[Tone Layer] △[Reverse Layer] △[Masking Layer] △[selection Layer] △[Ruler Layer] △[Panel Ruler Layer] △
△ : It is applicable to the drawing only when the [Vector Layer] is present.
K
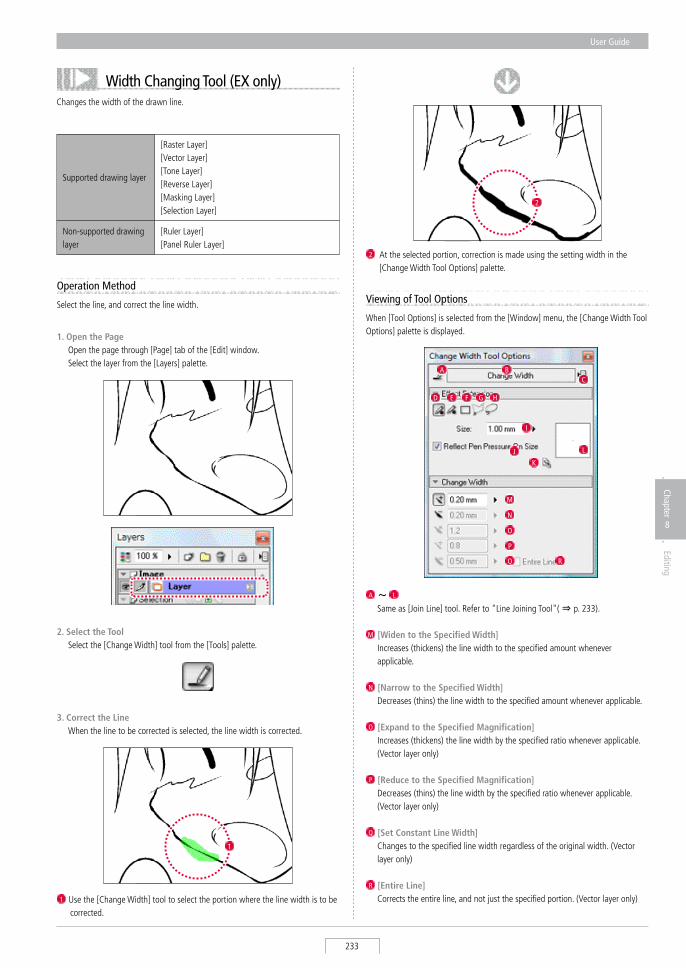
User Guide
233
Chapter
8
Editing
Changes the width of the drawn line.
supported drawing layer
[Raster Layer][Vector Layer][Tone Layer][Reverse Layer][Masking Layer][selection Layer]
Non-supported drawing layer
[Ruler Layer][Panel Ruler Layer]
When [Tool Options] is selected from the [Window] menu, the [Change Width Tool Options] palette is displayed.
Viewing of Tool Options
A ~ L
same as [Join Line] tool. Refer to "Line Joining Tool"( ⇒ p. 233).
M [Widen to the Specified Width] Increases (thickens) the line width to the specified amount whenever
applicable.
N [Narrow to the Specified Width] Decreases (thins) the line width to the specified amount whenever applicable.
O [Expand to the Specified Magnification] Increases (thickens) the line width by the specified ratio whenever applicable.
(Vector layer only)
P [Reduce to the Specified Magnification] Decreases (thins) the line width by the specified ratio whenever applicable.
(Vector layer only)
Q [Set Constant Line Width] Changes to the specified line width regardless of the original width. (Vector
layer only)
R [Entire Line] Corrects the entire line, and not just the specified portion. (Vector layer only)
L
I
J
K
E F
M
N
A BC
D G H
O
P
Q R
Width Changing Tool (EX only)
Operation Method
select the line, and correct the line width.
1. Open the Page Open the page through [Page] tab of the [Edit] window. select the layer from the [Layers] palette.
2. Select the Tool select the [Change Width] tool from the [Tools] palette.
3. Correct the Line When the line to be corrected is selected, the line width is corrected.
1
1 Use the [Change Width] tool to select the portion where the line width is to be corrected.
2 At the selected portion, correction is made using the setting width in the [Change Width Tool Options] palette.
2
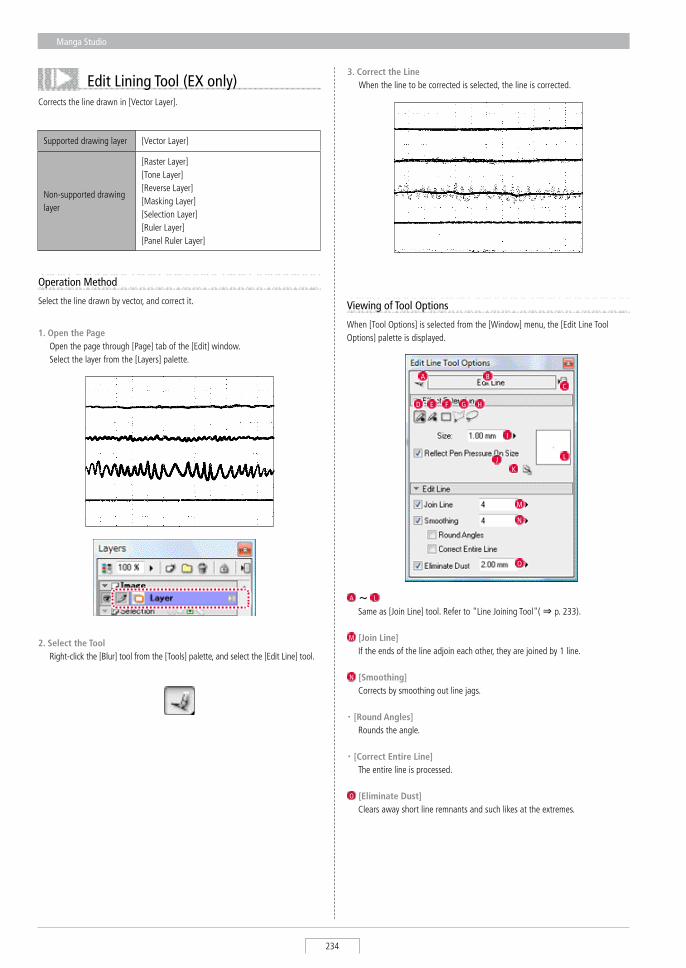
Manga Studio
234
Corrects the line drawn in [Vector Layer].
2. Select the Tool Right-click the [Blur] tool from the [Tools] palette, and select the [Edit Line] tool.
Operation Method
select the line drawn by vector, and correct it.
1. Open the Page Open the page through [Page] tab of the [Edit] window. select the layer from the [Layers] palette.
supported drawing layer [Vector Layer]
Non-supported drawing layer
[Raster Layer][Tone Layer][Reverse Layer][Masking Layer][selection Layer][Ruler Layer][Panel Ruler Layer]
3. Correct the Line When the line to be corrected is selected, the line is corrected. Edit Lining Tool (EX only)
When [Tool Options] is selected from the [Window] menu, the [Edit Line Tool Options] palette is displayed.
A ~ L
same as [Join Line] tool. Refer to "Line Joining Tool"( ⇒ p. 233).
M [Join Line] If the ends of the line adjoin each other, they are joined by 1 line.
N [Smoothing] Corrects by smoothing out line jags.
・ [Round Angles] Rounds the angle.
・ [Correct Entire Line] The entire line is processed.
O [Eliminate Dust] Clears away short line remnants and such likes at the extremes.
L
I
JK
E F
M
N
A BC
D G H
O
Viewing of Tool Options
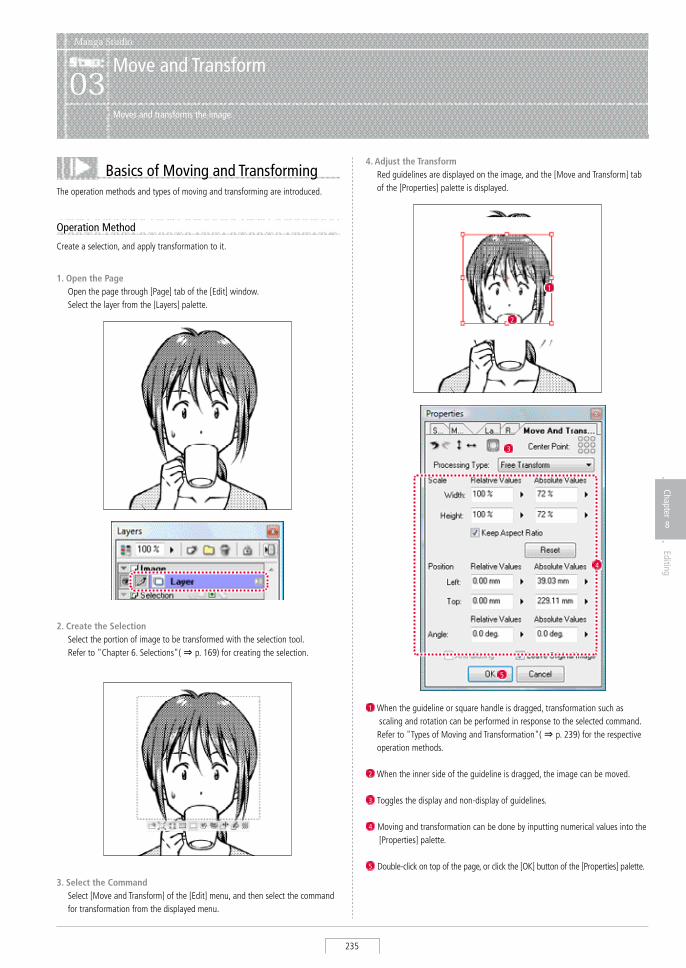
User Guide
235
Chapter
8
Editing
Manga Studio
Move and Transform03
Moves and transforms the image.
Basics of Moving and TransformingThe operation methods and types of moving and transforming are introduced.
Operation Method
Create a selection, and apply transformation to it.
1. Open the Page Open the page through [Page] tab of the [Edit] window. select the layer from the [Layers] palette.
2. Create the Selection select the portion of image to be transformed with the selection tool. Refer to "Chapter 6. selections"( ⇒ p. 169) for creating the selection.
3. Select the Command select [Move and Transform] of the [Edit] menu, and then select the command
for transformation from the displayed menu.
4. Adjust the Transform Red guidelines are displayed on the image, and the [Move and Transform] tab
of the [Properties] palette is displayed.
1
5
4
1 When the guideline or square handle is dragged, transformation such as scaling and rotation can be performed in response to the selected command.
Refer to "Types of Moving and Transformation"( ⇒ p. 239) for the respective operation methods.
2 When the inner side of the guideline is dragged, the image can be moved.
3 Toggles the display and non-display of guidelines.
4 Moving and transformation can be done by inputting numerical values into the [Properties] palette.
5 Double-click on top of the page, or click the [OK] button of the [Properties] palette.
2
3
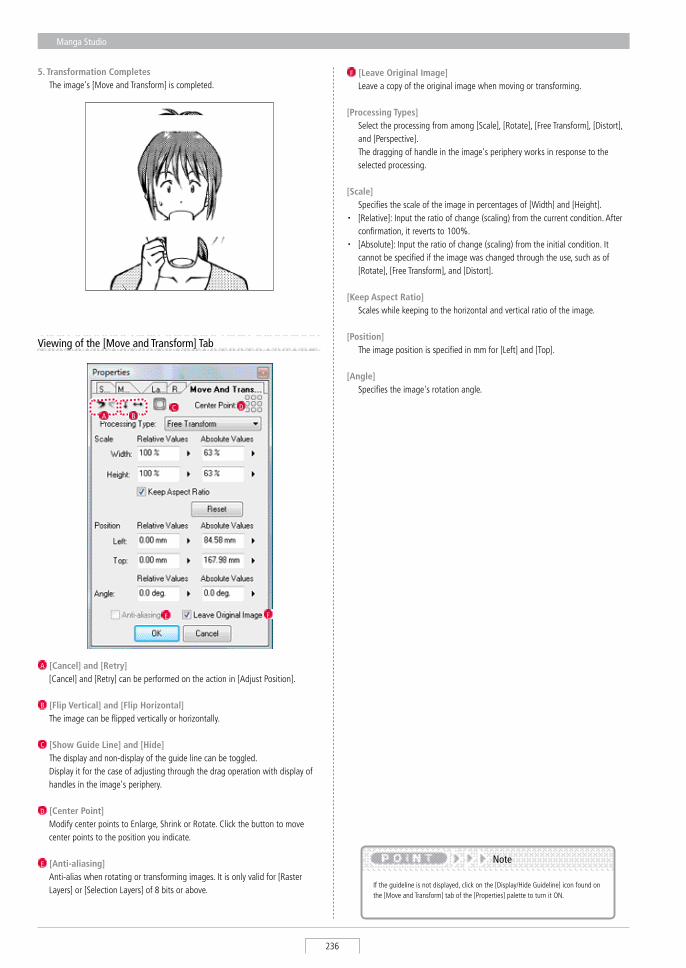
Manga Studio
236
5. Transformation Completes The image's [Move and Transform] is completed.
If the guideline is not displayed, click on the [Display/Hide Guideline] icon found on the [Move and Transform] tab of the [Properties] palette to turn it ON.
Note
Viewing of the [Move and Transform] Tab
A [Cancel] and [Retry] [Cancel] and [Retry] can be performed on the action in [Adjust Position].
B [Flip Vertical] and [Flip Horizontal] The image can be flipped vertically or horizontally.
C [Show Guide Line] and [Hide] The display and non-display of the guide line can be toggled. Display it for the case of adjusting through the drag operation with display of
handles in the image's periphery.
D [Center Point] Modify center points to Enlarge, shrink or Rotate. Click the button to move
center points to the position you indicate.
E [Anti-aliasing] Anti-alias when rotating or transforming images. It is only valid for [Raster
Layers] or [selection Layers] of 8 bits or above.
F [Leave Original Image] Leave a copy of the original image when moving or transforming.
[Processing Types] select the processing from among [scale], [Rotate], [Free Transform], [Distort],
and [Perspective]. The dragging of handle in the image's periphery works in response to the
selected processing.
[Scale] specifies the scale of the image in percentages of [Width] and [Height]. ・ [Relative]: Input the ratio of change (scaling) from the current condition. After
confirmation, it reverts to 100%. ・ [Absolute]: Input the ratio of change (scaling) from the initial condition. It
cannot be specified if the image was changed through the use, such as of [Rotate], [Free Transform], and [Distort].
[Keep Aspect Ratio] scales while keeping to the horizontal and vertical ratio of the image.
[Position] The image position is specified in mm for [Left] and [Top].
[Angle] specifies the image's rotation angle.
A BC D
E F
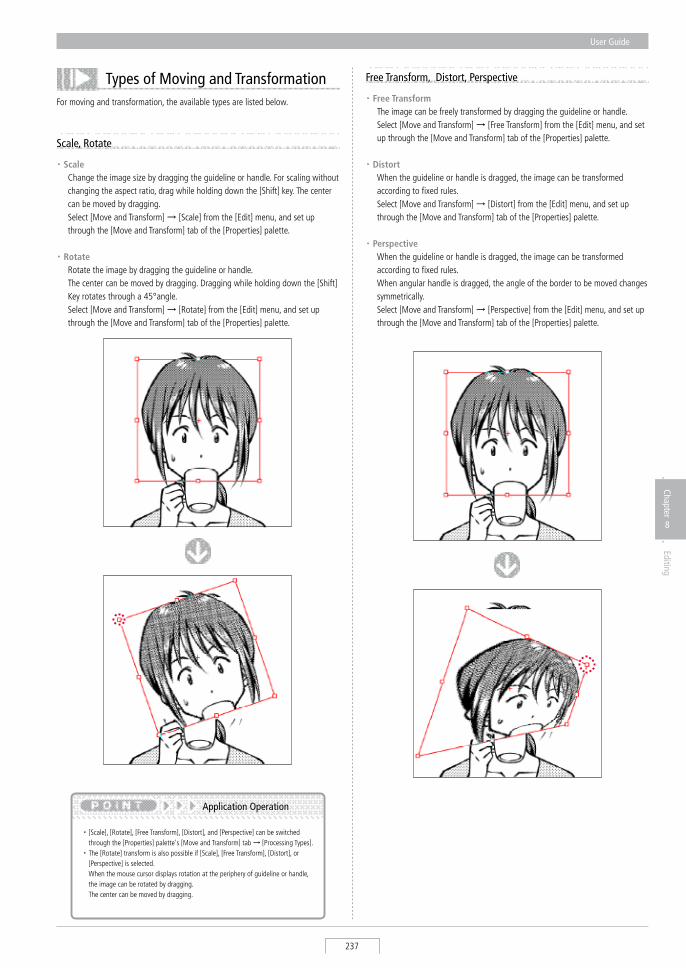
User Guide
237
Chapter
8
Editing
Types of Moving and TransformationFor moving and transformation, the available types are listed below.
Scale, Rotate
Free Transform, Distort, Perspective
・Scale Change the image size by dragging the guideline or handle. For scaling without
changing the aspect ratio, drag while holding down the [shift] key. The center can be moved by dragging.
select [Move and Transform] → [scale] from the [Edit] menu, and set up through the [Move and Transform] tab of the [Properties] palette.
・Rotate Rotate the image by dragging the guideline or handle. The center can be moved by dragging. Dragging while holding down the [shift]
Key rotates through a 45°angle. select [Move and Transform] → [Rotate] from the [Edit] menu, and set up
through the [Move and Transform] tab of the [Properties] palette.
・[scale], [Rotate], [Free Transform], [Distort], and [Perspective] can be switched through the [Properties] palette's [Move and Transform] tab → [Processing Types].
・The [Rotate] transform is also possible if [scale], [Free Transform], [Distort], or [Perspective] is selected. When the mouse cursor displays rotation at the periphery of guideline or handle, the image can be rotated by dragging. The center can be moved by dragging.
Application Operation
・Free Transform The image can be freely transformed by dragging the guideline or handle. select [Move and Transform] → [Free Transform] from the [Edit] menu, and set
up through the [Move and Transform] tab of the [Properties] palette.
・Distort When the guideline or handle is dragged, the image can be transformed
according to fixed rules. select [Move and Transform] → [Distort] from the [Edit] menu, and set up
through the [Move and Transform] tab of the [Properties] palette.
・Perspective When the guideline or handle is dragged, the image can be transformed
according to fixed rules. When angular handle is dragged, the angle of the border to be moved changes
symmetrically. select [Move and Transform] → [Perspective] from the [Edit] menu, and set up
through the [Move and Transform] tab of the [Properties] palette.
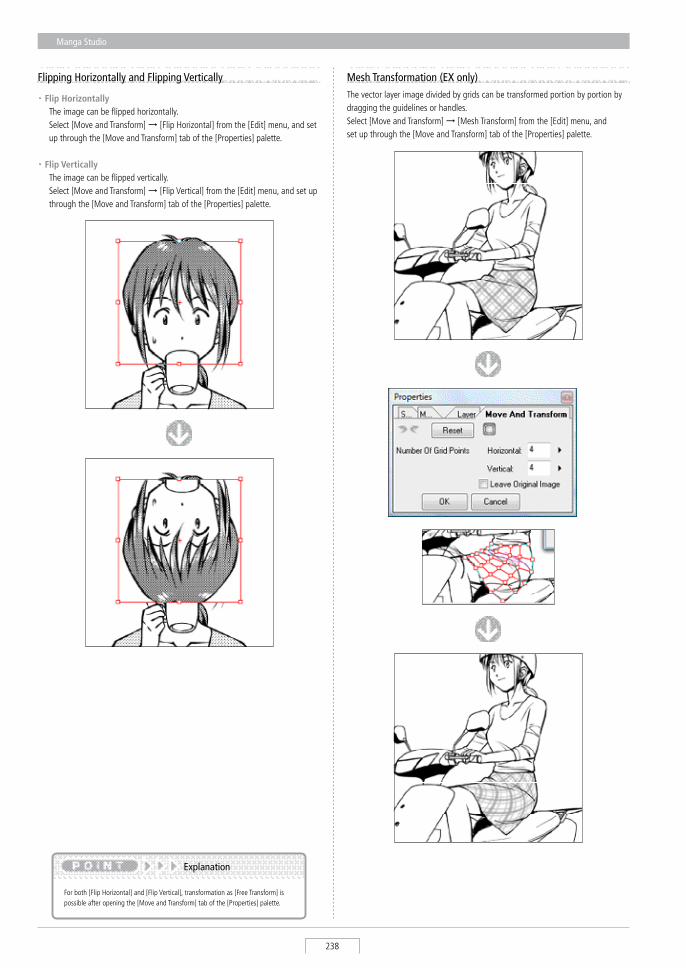
Manga Studio
238
Flipping Horizontally and Flipping Vertically Mesh Transformation (EX only)The vector layer image divided by grids can be transformed portion by portion by dragging the guidelines or handles. select [Move and Transform] → [Mesh Transform] from the [Edit] menu, and set up through the [Move and Transform] tab of the [Properties] palette.
・Flip Horizontally The image can be flipped horizontally. select [Move and Transform] → [Flip Horizontal] from the [Edit] menu, and set
up through the [Move and Transform] tab of the [Properties] palette.
・Flip Vertically The image can be flipped vertically. select [Move and Transform] → [Flip Vertical] from the [Edit] menu, and set up
through the [Move and Transform] tab of the [Properties] palette.
For both [Flip Horizontal] and [Flip Vertical], transformation as [Free Transform] is possible after opening the [Move and Transform] tab of the [Properties] palette.
Explanation
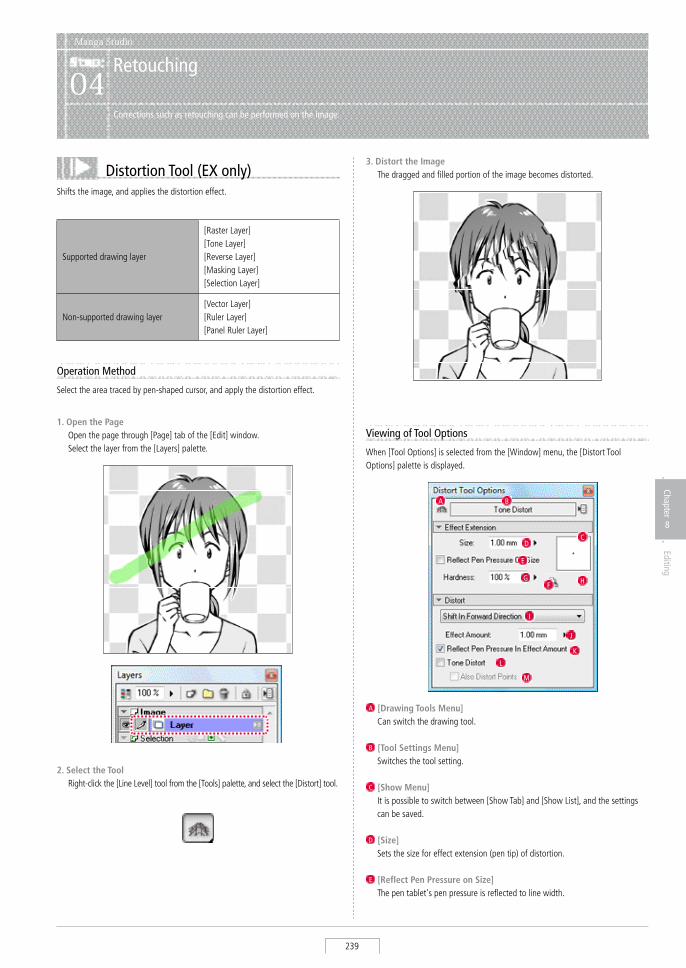
User Guide
239
Chapter
8
Editing
Manga Studio
Retouching04
Corrections such as retouching can be performed on the image.
Distortion Tool (EX only)shifts the image, and applies the distortion effect.
3. Distort the Image The dragged and filled portion of the image becomes distorted.
Operation Method
select the area traced by pen-shaped cursor, and apply the distortion effect.
1. Open the Page Open the page through [Page] tab of the [Edit] window. select the layer from the [Layers] palette.
2. Select the Tool Right-click the [Line Level] tool from the [Tools] palette, and select the [Distort] tool.
When [Tool Options] is selected from the [Window] menu, the [Distort Tool Options] palette is displayed.
Viewing of Tool Options
A [Drawing Tools Menu] Can switch the drawing tool.
B [Tool Settings Menu] switches the tool setting.
C [Show Menu] It is possible to switch between [show Tab] and [show List], and the settings
can be saved.
D [Size] sets the size for effect extension (pen tip) of distortion.
E [Reflect Pen Pressure on Size] The pen tablet's pen pressure is reflected to line width.
L
I
J
K
E
F
M
A B
D
G
supported drawing layer
[Raster Layer][Tone Layer][Reverse Layer][Masking Layer][selection Layer]
Non-supported drawing layer[Vector Layer][Ruler Layer][Panel Ruler Layer]
C
H
Manga Studio
240
F [Use size as the value on screen] Regardless of the settings and 's display magnification, the size of [size
Preview] is reflected in the effect extension for distortion.
G [Hardness] sets the intensity of effect at pen's periphery.
H [Size Preview] Displays the preview of the [size] settings. The settings can be adjusted even if
the preview is dragged.
I Offset Settings Menu It is possible to select the direction of shift from among [shift in Forward
Direction], [shift Left], [shift Right], [Expand Center], [shrink Center], [Compress to Left], [Compress to Right], [Extend to Left], and [Extend to Right].
J [Effect Amount] sets the distortion's effect amount.
K [Reflect pen pressure in effect amount] The pen pressure of pen tablet is reflected to the distortion's effect amount.
L [Tone Distort] Distorts the tone pattern.
M [Also Distort Points] Also distorts the tone point (dot). When OFF, the point (dot) position or shape
is not distorted.
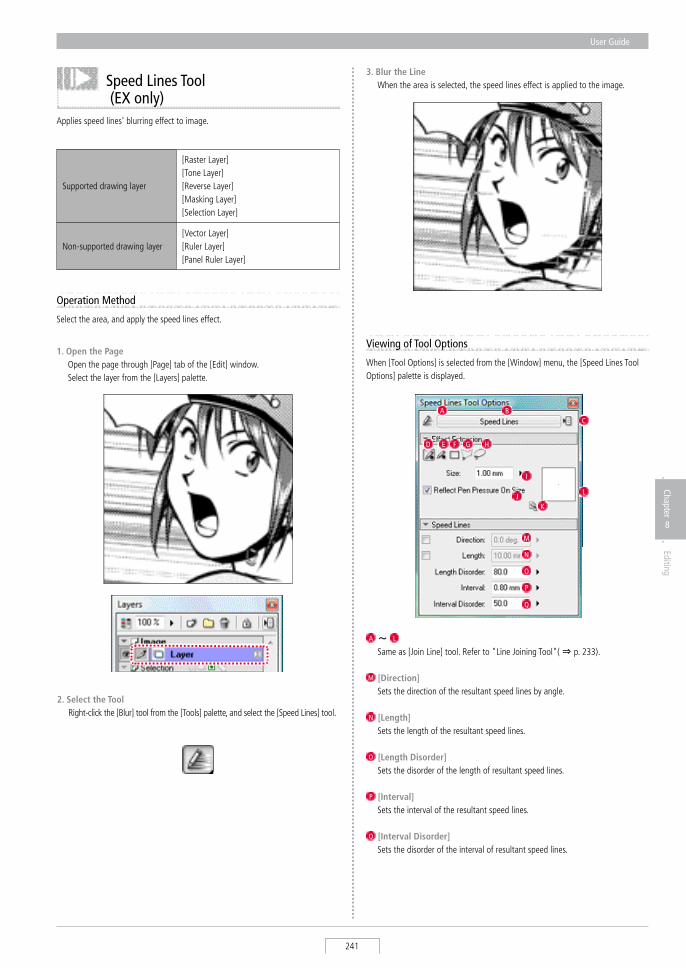
User Guide
241
Chapter
8
Editing
Applies speed lines' blurring effect to image.
3. Blur the Line When the area is selected, the speed lines effect is applied to the image.
When [Tool Options] is selected from the [Window] menu, the [speed Lines Tool Options] palette is displayed.
A ~ L
same as [Join Line] tool. Refer to "Line Joining Tool"( ⇒ p. 233).
M [Direction] sets the direction of the resultant speed lines by angle.
N [Length] sets the length of the resultant speed lines.
O [Length Disorder] sets the disorder of the length of resultant speed lines.
P [Interval] sets the interval of the resultant speed lines.
Q [Interval Disorder] sets the disorder of the interval of resultant speed lines.
L
I
JK
E F
A BC
D G H
Viewing of Tool Options
M
N
Q
O
P
Operation Method
select the area, and apply the speed lines effect.
1. Open the Page Open the page through [Page] tab of the [Edit] window. select the layer from the [Layers] palette.
2. Select the Tool Right-click the [Blur] tool from the [Tools] palette, and select the [speed Lines] tool.
supported drawing layer
[Raster Layer][Tone Layer][Reverse Layer][Masking Layer][selection Layer]
Non-supported drawing layer[Vector Layer][Ruler Layer][Panel Ruler Layer]
Speed Lines Tool (EX only)
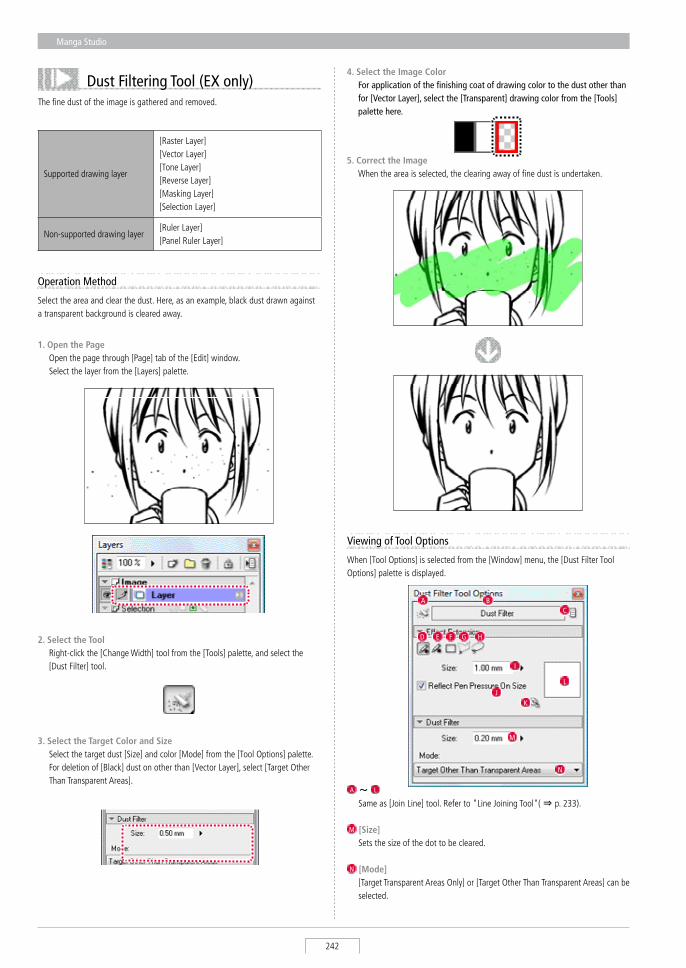
Manga Studio
242
Dust Filtering Tool (EX only)The fine dust of the image is gathered and removed.
5. Correct the Image When the area is selected, the clearing away of fine dust is undertaken. supported drawing layer
[Raster Layer][Vector Layer][Tone Layer][Reverse Layer][Masking Layer][selection Layer]
Non-supported drawing layer[Ruler Layer][Panel Ruler Layer]
When [Tool Options] is selected from the [Window] menu, the [Dust Filter Tool Options] palette is displayed.
A ~ L
same as [Join Line] tool. Refer to "Line Joining Tool"( ⇒ p. 233).
M [Size] sets the size of the dot to be cleared.
N [Mode] [Target Transparent Areas Only] or [Target Other Than Transparent Areas] can be
selected.
Viewing of Tool Options
L
I
JK
E F
A BC
D G H
M
N
Operation Method
select the area and clear the dust. Here, as an example, black dust drawn against a transparent background is cleared away.
1. Open the Page Open the page through [Page] tab of the [Edit] window. select the layer from the [Layers] palette.
2. Select the Tool Right-click the [Change Width] tool from the [Tools] palette, and select the
[Dust Filter] tool.
3. Select the Target Color and Size select the target dust [size] and color [Mode] from the [Tool Options] palette. For deletion of [Black] dust on other than [Vector Layer], select [Target Other
Than Transparent Areas].
4. Select the Image Color For application of the finishing coat of drawing color to the dust other than
for [Vector Layer], select the [Transparent] drawing color from the [Tools] palette here.
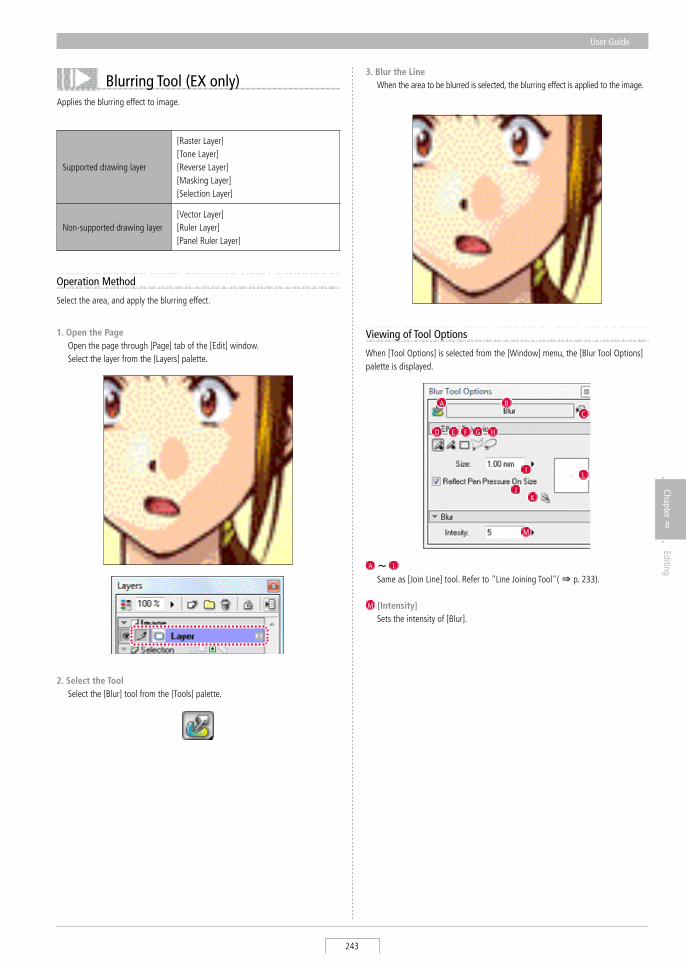
User Guide
243
Chapter
8
Editing
Applies the blurring effect to image.
Operation Method
select the area, and apply the blurring effect.
2. Select the Tool select the [Blur] tool from the [Tools] palette.
1. Open the Page Open the page through [Page] tab of the [Edit] window. select the layer from the [Layers] palette.
Blurring Tool (EX only)
When [Tool Options] is selected from the [Window] menu, the [Blur Tool Options] palette is displayed.
A ~ L
same as [Join Line] tool. Refer to "Line Joining Tool"( ⇒ p. 233).
M [Intensity] sets the intensity of [Blur].
Viewing of Tool Options
LI
JK
E F
A BC
D G H
M
supported drawing layer
[Raster Layer][Tone Layer][Reverse Layer][Masking Layer][selection Layer]
Non-supported drawing layer[Vector Layer][Ruler Layer][Panel Ruler Layer]
3. Blur the Line When the area to be blurred is selected, the blurring effect is applied to the image.
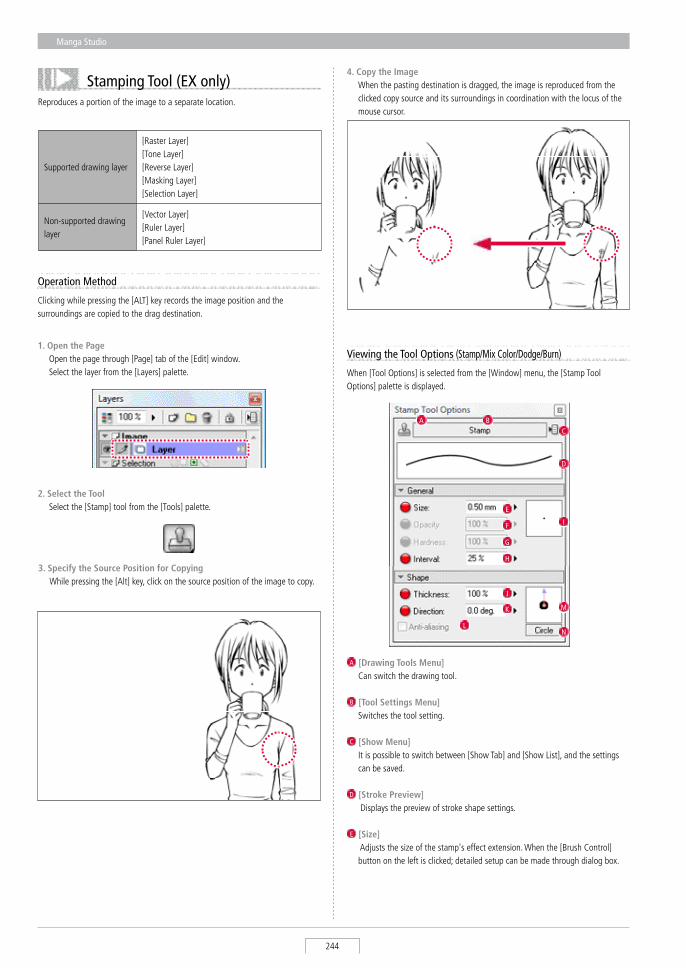
Manga Studio
244
Stamping Tool (EX only)Reproduces a portion of the image to a separate location.
Operation Method
Clicking while pressing the [ALT] key records the image position and the surroundings are copied to the drag destination.
1. Open the Page Open the page through [Page] tab of the [Edit] window. select the layer from the [Layers] palette.
2. Select the Tool select the [stamp] tool from the [Tools] palette.
3. Specify the Source Position for Copying While pressing the [Alt] key, click on the source position of the image to copy.
supported drawing layer
[Raster Layer][Tone Layer][Reverse Layer][Masking Layer][selection Layer]
Non-supported drawing layer
[Vector Layer][Ruler Layer][Panel Ruler Layer]
4. Copy the Image When the pasting destination is dragged, the image is reproduced from the
clicked copy source and its surroundings in coordination with the locus of the mouse cursor.
When [Tool Options] is selected from the [Window] menu, the [stamp Tool Options] palette is displayed.
Viewing the Tool Options (Stamp/Mix Color/Dodge/Burn)
A [Drawing Tools Menu] Can switch the drawing tool.
B [Tool Settings Menu] switches the tool setting.
C [Show Menu] It is possible to switch between [show Tab] and [show List], and the settings
can be saved.
D [Stroke Preview] Displays the preview of stroke shape settings.
E [Size] Adjusts the size of the stamp's effect extension. When the [Brush Control]
button on the left is clicked; detailed setup can be made through dialog box.
N
K
L
M
F
G
A BC
E
H
J
I
D
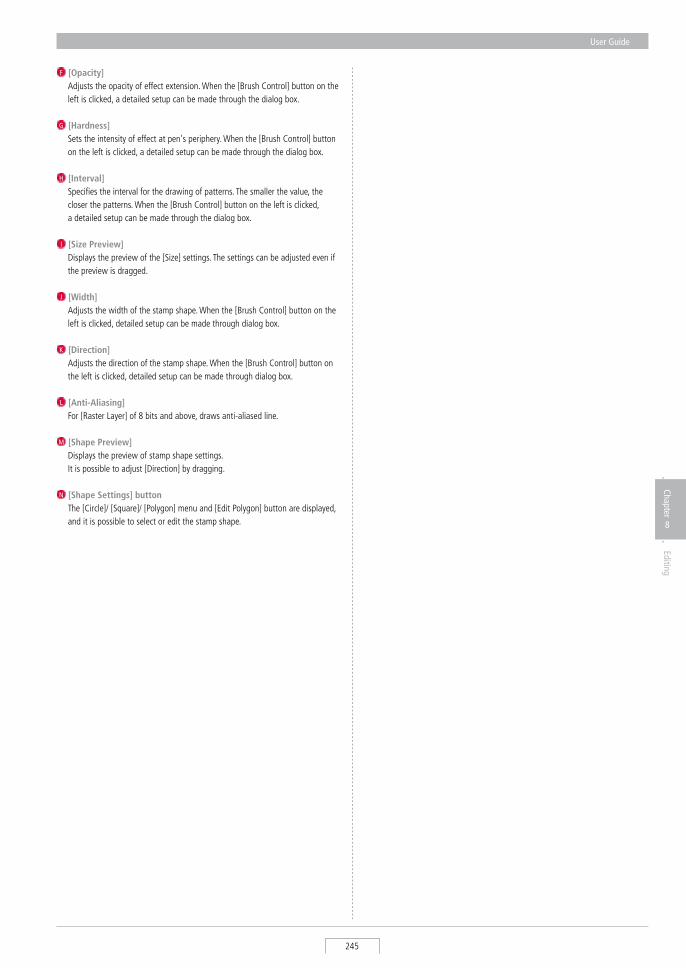
User Guide
245
Chapter
8
Editing
F [Opacity] Adjusts the opacity of effect extension. When the [Brush Control] button on the
left is clicked, a detailed setup can be made through the dialog box.
G [Hardness] sets the intensity of effect at pen's periphery. When the [Brush Control] button
on the left is clicked, a detailed setup can be made through the dialog box.
H [Interval] specifies the interval for the drawing of patterns. The smaller the value, the
closer the patterns. When the [Brush Control] button on the left is clicked, a detailed setup can be made through the dialog box.
I [Size Preview] Displays the preview of the [size] settings. The settings can be adjusted even if
the preview is dragged.
J [Width] Adjusts the width of the stamp shape. When the [Brush Control] button on the
left is clicked, detailed setup can be made through dialog box.
K [Direction] Adjusts the direction of the stamp shape. When the [Brush Control] button on
the left is clicked, detailed setup can be made through dialog box.
L [Anti-Aliasing] For [Raster Layer] of 8 bits and above, draws anti-aliased line.
M [Shape Preview] Displays the preview of stamp shape settings. It is possible to adjust [Direction] by dragging.
N [Shape Settings] button The [Circle]/ [square]/ [Polygon] menu and [Edit Polygon] button are displayed,
and it is possible to select or edit the stamp shape.
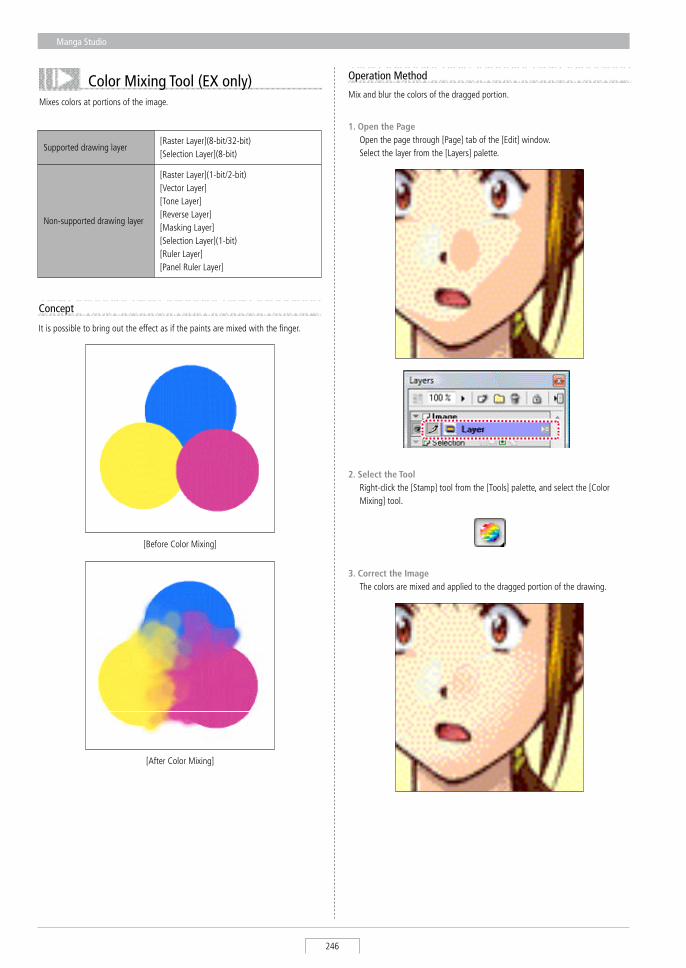
Manga Studio
246
Mixes colors at portions of the image.
3. Correct the Image The colors are mixed and applied to the dragged portion of the drawing.
Operation Method
Mix and blur the colors of the dragged portion.
1. Open the Page Open the page through [Page] tab of the [Edit] window. select the layer from the [Layers] palette.
2. Select the Tool Right-click the [stamp] tool from the [Tools] palette, and select the [Color
Mixing] tool.
Color Mixing Tool (EX only)
[Before Color Mixing]
[After Color Mixing]
Concept
It is possible to bring out the effect as if the paints are mixed with the finger.
supported drawing layer[Raster Layer](8-bit/32-bit)[selection Layer](8-bit)
Non-supported drawing layer
[Raster Layer](1-bit/2-bit)[Vector Layer][Tone Layer][Reverse Layer][Masking Layer][selection Layer](1-bit)[Ruler Layer][Panel Ruler Layer]
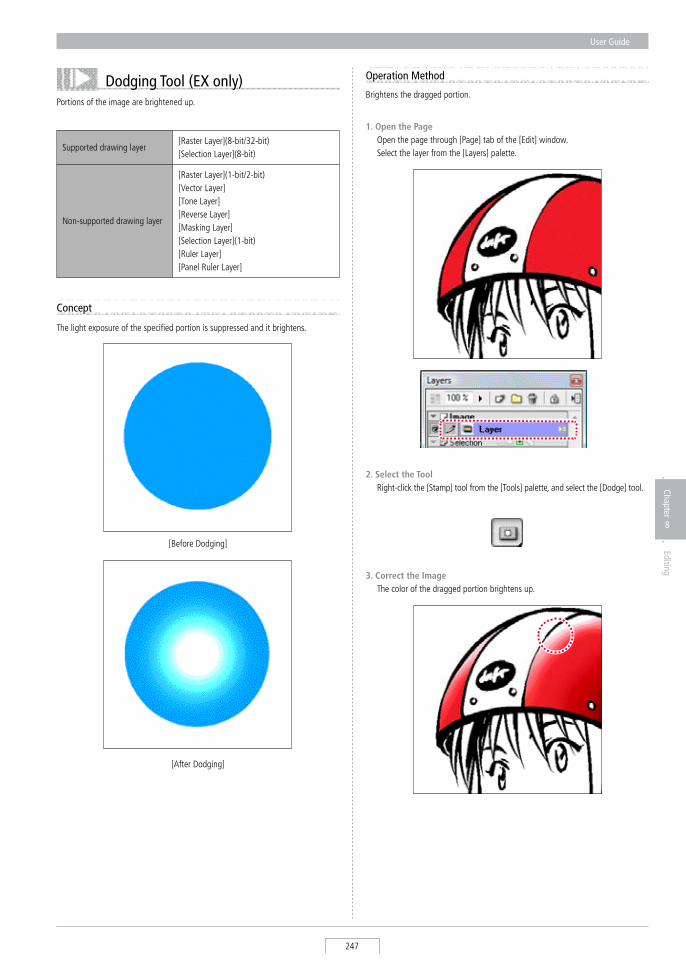
User Guide
247
Chapter
8
Editing
Portions of the image are brightened up.
Operation Method
Brightens the dragged portion.
1. Open the Page Open the page through [Page] tab of the [Edit] window. select the layer from the [Layers] palette.
2. Select the Tool Right-click the [stamp] tool from the [Tools] palette, and select the [Dodge] tool.
Dodging Tool (EX only)
3. Correct the Image The color of the dragged portion brightens up.
[Before Dodging]
[After Dodging]
Concept
The light exposure of the specified portion is suppressed and it brightens.
supported drawing layer[Raster Layer](8-bit/32-bit)[selection Layer](8-bit)
Non-supported drawing layer
[Raster Layer](1-bit/2-bit)[Vector Layer][Tone Layer][Reverse Layer][Masking Layer][selection Layer](1-bit)[Ruler Layer][Panel Ruler Layer]
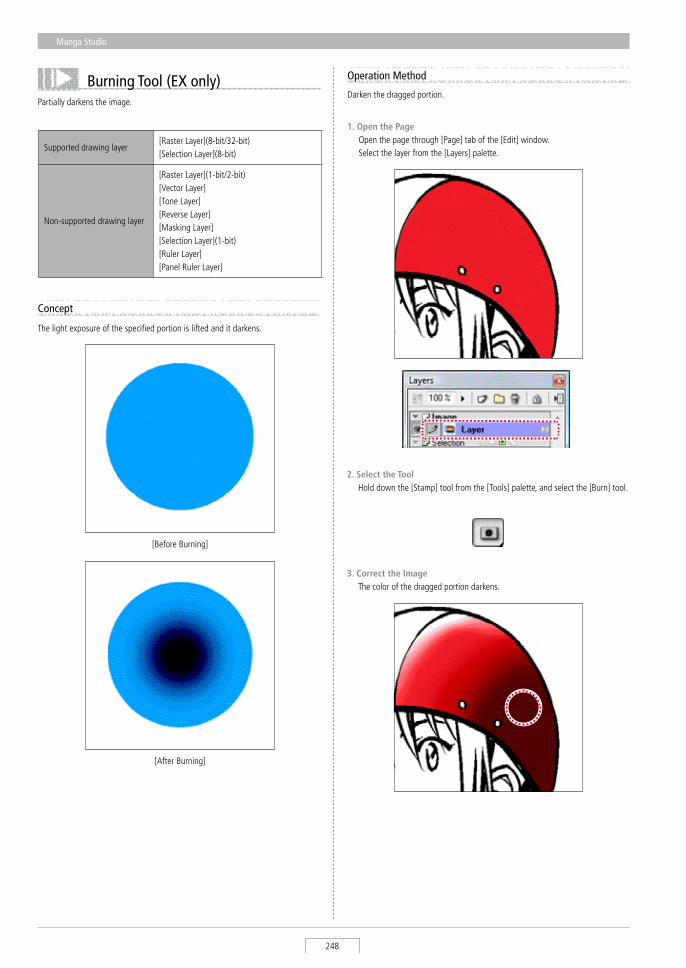
Manga Studio
248
Partially darkens the image.
3. Correct the Image The color of the dragged portion darkens.
Operation Method
Darken the dragged portion.
1. Open the Page Open the page through [Page] tab of the [Edit] window. select the layer from the [Layers] palette.
2. Select the Tool Hold down the [stamp] tool from the [Tools] palette, and select the [Burn] tool.
Burning Tool (EX only)
[Before Burning]
[After Burning]
Concept
The light exposure of the specified portion is lifted and it darkens.
supported drawing layer[Raster Layer](8-bit/32-bit)[selection Layer](8-bit)
Non-supported drawing layer
[Raster Layer](1-bit/2-bit)[Vector Layer][Tone Layer][Reverse Layer][Masking Layer][selection Layer](1-bit)[Ruler Layer][Panel Ruler Layer]
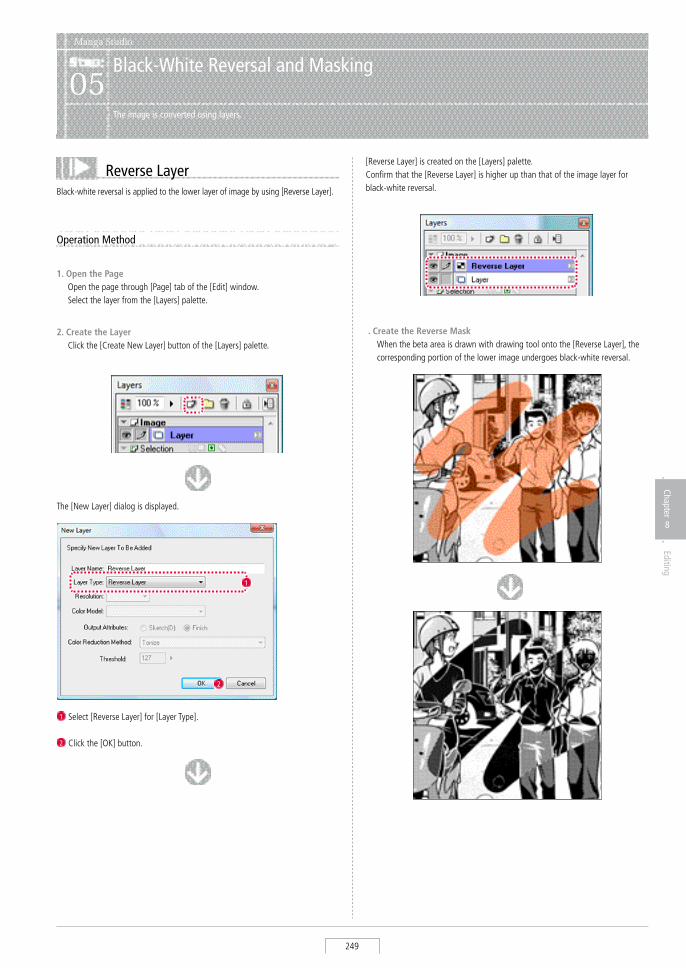
User Guide
249
Chapter
8
Editing
Manga Studio
Black-White Reversal and Masking05
The image is converted using layers.
Reverse LayerBlack-white reversal is applied to the lower layer of image by using [Reverse Layer].
Operation Method
1. Open the Page Open the page through [Page] tab of the [Edit] window. select the layer from the [Layers] palette.
2. Create the Layer Click the [Create New Layer] button of the [Layers] palette.
The [New Layer] dialog is displayed.
1 select [Reverse Layer] for [Layer Type].
2 Click the [OK] button.
1
2
[Reverse Layer] is created on the [Layers] palette. Confirm that the [Reverse Layer] is higher up than that of the image layer for black-white reversal.
3. Create the Reverse Mask When the beta area is drawn with drawing tool onto the [Reverse Layer], the
corresponding portion of the lower image undergoes black-white reversal.
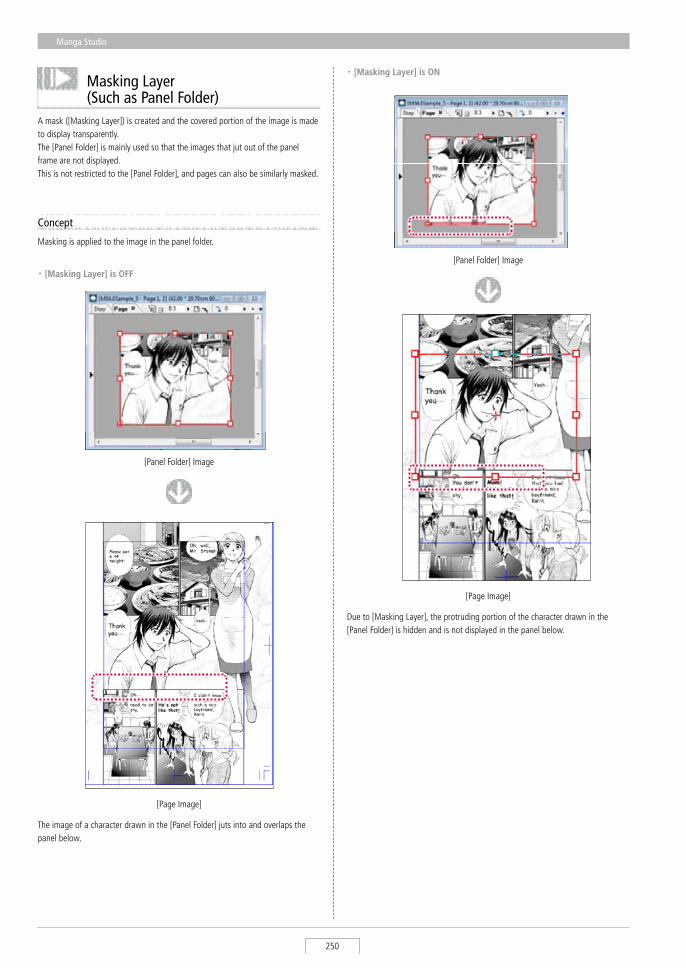
Manga Studio
250
A mask ([Masking Layer]) is created and the covered portion of the image is made to display transparently. The [Panel Folder] is mainly used so that the images that jut out of the panel frame are not displayed. This is not restricted to the [Panel Folder], and pages can also be similarly masked.
Concept
Masking is applied to the image in the panel folder.
Masking Layer(Such as Panel Folder)
[Page Image]
[Panel Folder] Image
・[Masking Layer] is OFF
The image of a character drawn in the [Panel Folder] juts into and overlaps the panel below.
[Panel Folder] Image
・[Masking Layer] is ON
[Page Image]
Due to [Masking Layer], the protruding portion of the character drawn in the [Panel Folder] is hidden and is not displayed in the panel below.
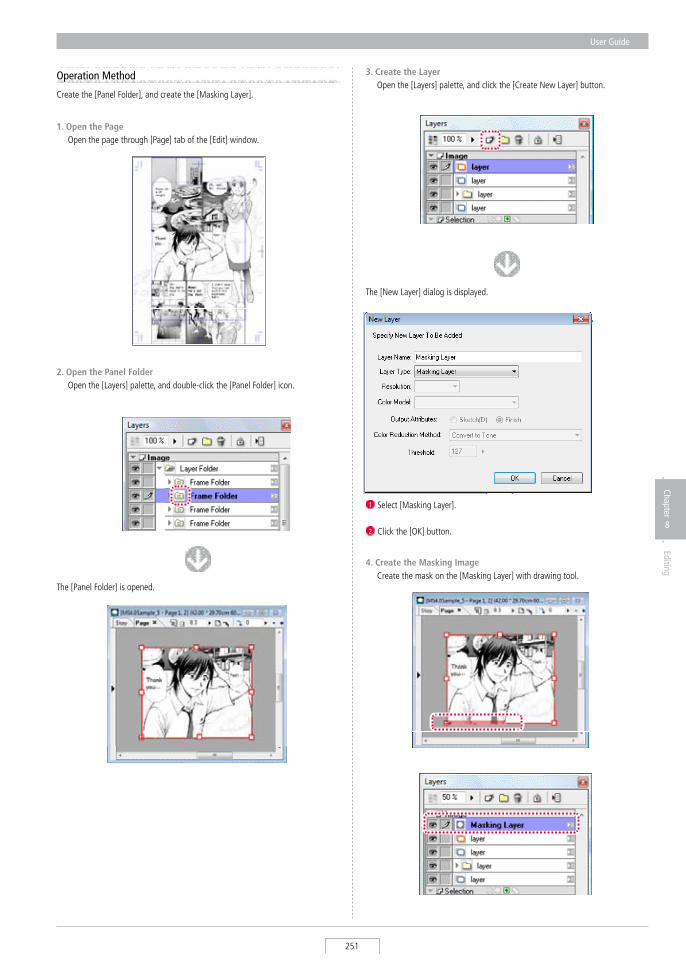
User Guide
251
Chapter
8
Editing
Operation Method
1. Open the Page Open the page through [Page] tab of the [Edit] window.
2. Open the Panel Folder Open the [Layers] palette, and double-click the [Panel Folder] icon.
The [Panel Folder] is opened.
Create the [Panel Folder], and create the [Masking Layer].
3. Create the Layer Open the [Layers] palette, and click the [Create New Layer] button.
The [New Layer] dialog is displayed.
1 select [Masking Layer].
2 Click the [OK] button.
2
4. Create the Masking Image Create the mask on the [Masking Layer] with drawing tool.
1
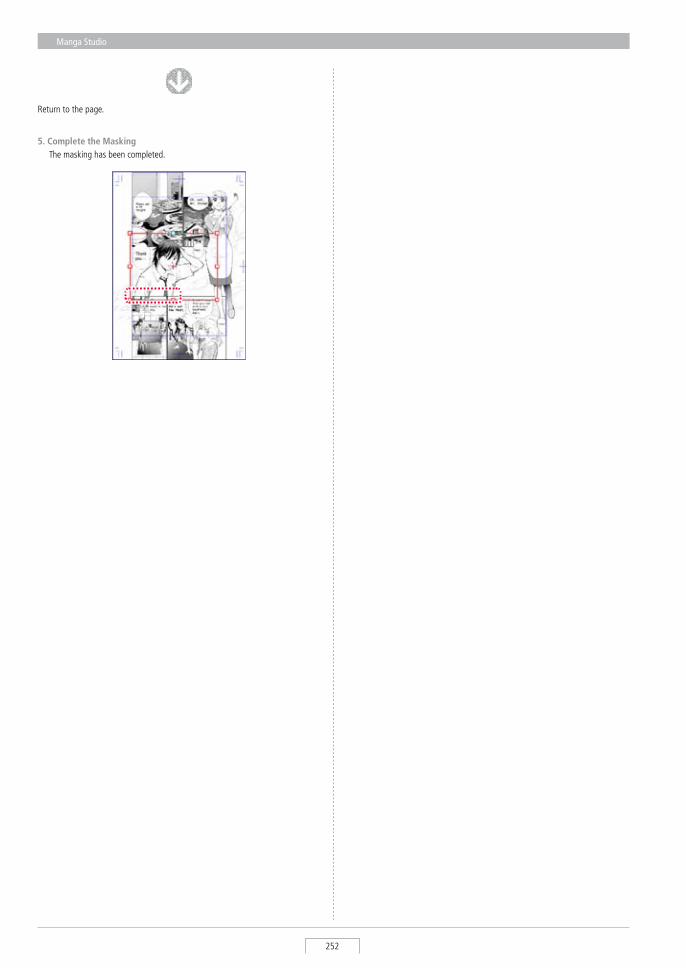
Manga Studio
252
5. Complete the Masking The masking has been completed.
Return to the page.
Filters
Chapter 9
In this chapter we'll show you how to alter your image with various transforms, adjustments and special effects available from the [Filter] menu.
Step: 01 Filters 256
Step: 02 Rendering Filters 258
Step: 03 Transform Filters 264
Step: 04 Image Adjustment Filters (EX only) 268
Step: 05 Line Adjustment Filters (EX only) 273
Step: 06 Effect Filters (EX only) 276
Step: 07 Blur Filters (EX only) 278
Step: 08 Drawing (Comic Filters Vol. 1) (EX only) 281
Step: 09 Transform (Comic Filters Vol. 2) (EX only) 286
Chapter
9
Filters
Manga Studio
254
Manga Studio
Filters01
Filters are used to adjust or add effects to images.
Filter Basics
Manga studio supports the following types of filters.
Rendering [Render] and [Drawing (Comic Filters Vol. 1)] (EX only) - Render new images
Transformation [Transform] and [Distort (Comic Filters Vol. 2)] (EX only) - Image Adjustments
Image adjustment [Image Adjustment] (EX only) - Adjust images or lines
Line adjustment(EX only)
[Effects] (EX only) - Add effects to an image
Blurring [Blur] (EX only) - Blur an image
2DLT [2DLT] - separate imported images into their outlines and tones (halftone dots). see Chapter 10 - step: 01 - 2DLT (p. 294) for details about 2DLT filters.
Overview
This section will give you an overview of how filters work and show how to use them.
[Before filtering]
[After filtering]
User's Guide
255
Chapter
9
Filters
Operation Method
To use a filter, select a filter type and then apply it. The explanation below uses the [Polar Coordinates] filter.
1. Prepare the image Open the image you want to apply a filter to.
3. Select the filter type select a filter type from the [Filter] menu. In this example, we select
[Transform]->[Polar Coordinates...] from the [Filter] menu.
4. Choose detailed settings If a settings dialog appears, choose your settings and click the [OK] button.
2. Select a Layer select [Layers] from the [Window] menu to open the [Layers] palette. select the
layer to apply the filter to.
5. Filter is applied The filter has been applied.
・ Depending on the filter, a dialog will appear where you can choose detailed settings.
・ You will be able to create a selection area when the filter requires it.
Hints
Manga Studio
256
A [Hand] Adjust the image's position on the screen.
B [Add Vanishing Point to the Clicked Position] Create a vanishing point by clicking on the image. You can also move a vanishing point by clicking and dragging the center mark.
C [Add Guide Line for Vanishing Point to the Clicked Position] Add a line to the vanishing point by clicking on the image.
D [Delete Selected Points] select vanishing point center marks (they will turn red) and click the Trash Can
to delete them.
・ [Line Interval] set the interval angle for drawing lines. This affects the number of lines.
・ [Apply Settings To All Vanishing Points] Apply the current settings to the lines for all vanishing points.
・ [Set Auxiliary Lines] Creates vanishing point lines. Choose the [Object selector] Tool and drag the
points to adjust the positions of the lines. Enable [snap] on the [View Menu] and select [set snap Point] > [Perspective]
to use it like a Perspective Ruler.
・ [Line Color] set the color of viewpoint lines. You can only set this feature when [set
Perspective Ruler] is selected.
・ [Actual Line Rendering] Draw actual lines along the vanishing point lines.
・ [Thickness] set the width of vanishing point lines.
・ [Clear Layer] Clears all drawing content from the selected layer.
[Vanishing Point Filter] DialogVanishing PointsThis filter sets a vanishing point and draws guidelines in the image for perspective drawing. When the dialog appears, select the [Add Vanishing Points] icon and click anywhere in the image to create a vanishing point. Update the settings for an existing [Vanishing Point] by double-clicking the layer icon. You can change the position of existing guidelines in a layer by moving them on the [Page].
A B C D
Manga Studio
Rendering Filters02
These filters are used to render new drawings directly onto the image.
supported Color Depth 1/2bit 8bit 32bit
Raster Layer ○ ○ ○
Vector Layer × - ×
[Vanishing Points]
select [Drawing] → [Vanishing Points...] from the [Filter] menu. For basic information on how to use filters, see Filter Basics (p. 257).
User's Guide
257
Chapter
9
Filters
A [Hand] Adjust the image's position on the screen.
B [Move] Click on the image to create a center point for the Focus Lines. You can also
move the point by clicking and dragging it.
C [Move Drawing Position] Change the shape of the starting draw position (red line) of the Focus Lines
lines by drawing with the pen.
D [Transform Drawing Position] Transform the shape of the starting draw position (red line) of the Focus Lines
lines by dragging it.
・ [Preview] select the quality of the preview image ([High Quality]/[Mid Quality]/[Low Quality])
or choose [None].
・ [Preview Setting](EX only) select from previously recorded settings for Focus Lines.
・ [Length] sets the length of the Focus Lines lines.
・ [Width] sets the width of the Focus Lines lines.
・ [Distance] sets the angle interval of the Focus Lines lines. This affects the number of lines.
・ [Curvature] sets the curvature of the Focus Lines lines.
・ [Displacement] sets the displacement of the Focus Lines lines' starting draw position.
[Properties] Palette, [Focus Lines] Tab
This filter draws a Focus Lines on an image. It creates a Focus Lines with the position, length and shape you indicate. Update the settings for a Focus Lines by double-clicking the layer icon. A B C D
Focus Lines
[Focus Lines]
select [Drawing] → [Focus Lines...] from the [Filter] menu. For basic information on how to use filters, see Filter Basics (p. 257).
supported Color Depth 1/2bit 8bit 32bit
Raster Layer ○ ○ ○
Vector Layer × - ×
Manga Studio
258
・ [Random] sets the amount of randomness (if any) for each Focus Lines setting ([Length],
[Width], [Distance], [Curvature], and [Displacement]).
・ [Regenerate] Regenerates the Focus Lines if any of the [Random] settings in the dialog are set.
・ [Distance] sets the distance of the Focus Lines lines to the center point.
・ [Arrange Curve Anchor] This option is effective only if you've set a [Curvature] value. When selected, the Focus Lines lines are placed with their vertices at the
distance you specify from the center point, and aligned so they do not cross each other.
When not selected, the curves are drawn based on the starting draw position (the red line). The curves will not be aligned.
・ [Stroke-in/Stroke-out] sets the tapering of the Focus Lines lines: [Inside], [Outside] or both.
・ [Drawing/Background Color] sets the Drawing Color and Background (BG) Color of the Focus Lines to one
of the following: [Black], [White], [Transparent], [Black BG, Transparent], or [White BG, Transparent].
・ [Clear Layer] Clears all drawing content from the selected layer and draws new Focus Lines
lines based on the current settings.
・ [Set Oversampling] Converts the Focus Lines to grayscale and smoothes any jagged edges.
・ [Show Page Image in Panel Window] selects whether to show or hide the page image.
Speed LinesThis filter draws speed Lines on an image. It creates speed Lines with the position, length and shape you indicate. Update the settings for a set of speed Lines by double-clicking the layer icon.
[speed Lines]
select [Drawing] → [speed Lines...] from the [Filter] menu. For basic information on how to use filters, see Filter Basics (p. 257).
supported Color Depth 1/2bit 8bit 32bit
Raster Layer ○ ○ ○
Vector Layer × - ×
User's Guide
259
Chapter
9
Filters
A B C
A [Hand] Adjusts the image's position on the screen.
B [Move] Click on the image to create a center point for the speed Lines. You can also
move the point by clicking and dragging it.
C [Move Drawing Position] Change the shape of the starting draw position (red line) of the speed Lines by
drawing with the pen.
・ [Preview] select the quality of the preview image ([High Quality]/[Mid Quality]/[Low Quality])
or choose [None].
・ [Settings](EX only) You can choose from previously recorded settings for speed Lines.
・ [Lines] sets the number of speed Lines.
・ [Length] sets the length of the speed Lines.
・ [Width] sets the width of the speed Lines.
・ [Elevation Angle] sets the angle of the speed Lines.
・ [Curvature] sets the curvature of the speed Lines.
・ [Distance] sets the distance interval between speed Lines.
[Properties] Palette, [Speed Lines] Tab ・ [Displacement] sets the shift of the speed Lines' starting draw position.
・ [Random] sets the amount of randomness (if any) for each speed Lines setting ([Length],
[Width], [Distance], [Curvature], and [Displacement]).
・ [Regenerate] Regenerates the speed Lines if any of the [Random] settings in the dialog are set.
・ [Curve Alignment Level] This option is effective only if you've set a [Curvature] value. When selected, the speed Lines are placed with their vertices at the distance
you specify from the center point, and aligned so they do not cross each other. When not selected, the curves are drawn based on the starting draw position
(the red line). The curves will not be aligned.
・ [Taper] sets the tapering of the speed Lines: [Inside], [Outside] or both.
・ [Drawing/Background Color] sets the Drawing color and background (BG) color of the speed Lines to one of
the following: [Black], [White], [Transparent], [Black BG, Transparent], or [White BG, Transparent].
・ [Clear Layer] Clears all drawing content from the selected layer.
・ [Set Oversampling] Converts the speed Lines to grayscale and smoothes any jagged edges.
・ [Show Page Image in Panel Window] selects whether to show or hide the page image.
[Edit Settings] Dialog (Speed Lines & Focus Lines)
・ [Save Current Settings] save the current settings.
・ [Rename Settings] Opens the [Rename settings] Dialog, where you can change the name of the
selected settings.
・ [Delete] Delete saved settings.
・ [OK] Apply the selected settings.
From the [Focus Lines] or [speed Lines] Filter Dialog, click the [Edit...] button. The [Edit settings] Dialog will appear where you can store settings that you've created.
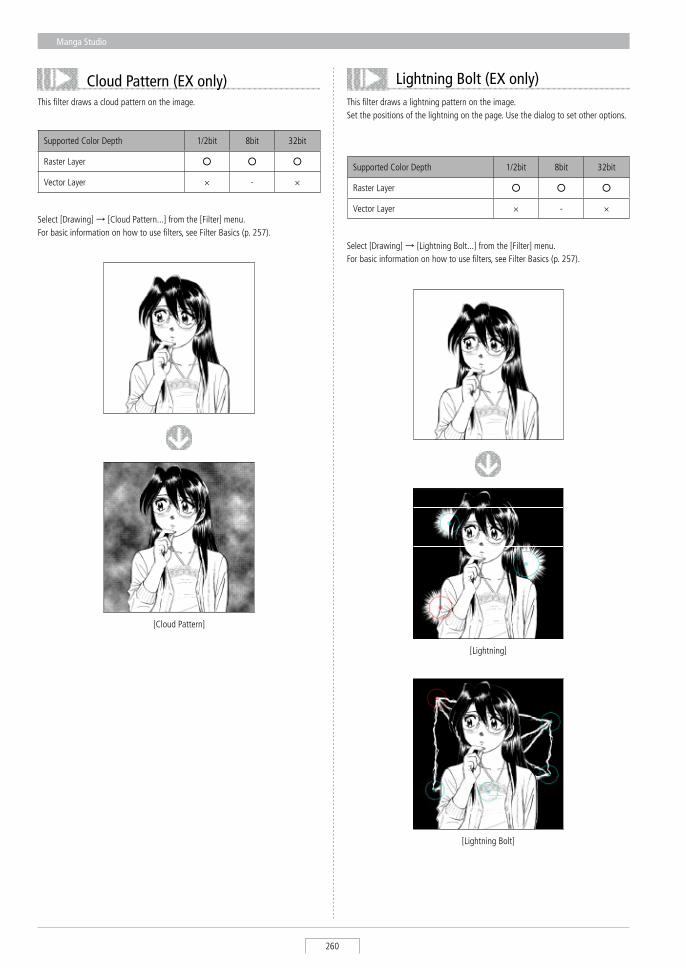
Manga Studio
260
This filter draws a cloud pattern on the image.
Cloud Pattern (EX only)This filter draws a lightning pattern on the image. set the positions of the lightning on the page. Use the dialog to set other options.
Lightning Bolt (EX only)
[Cloud Pattern]
select [Drawing] → [Cloud Pattern...] from the [Filter] menu. For basic information on how to use filters, see Filter Basics (p. 257).
supported Color Depth 1/2bit 8bit 32bit
Raster Layer ○ ○ ○
Vector Layer × - ×
supported Color Depth 1/2bit 8bit 32bit
Raster Layer ○ ○ ○
Vector Layer × - ×
[Lightning]
select [Drawing] → [Lightning Bolt...] from the [Filter] menu. For basic information on how to use filters, see Filter Basics (p. 257).
[Lightning Bolt]
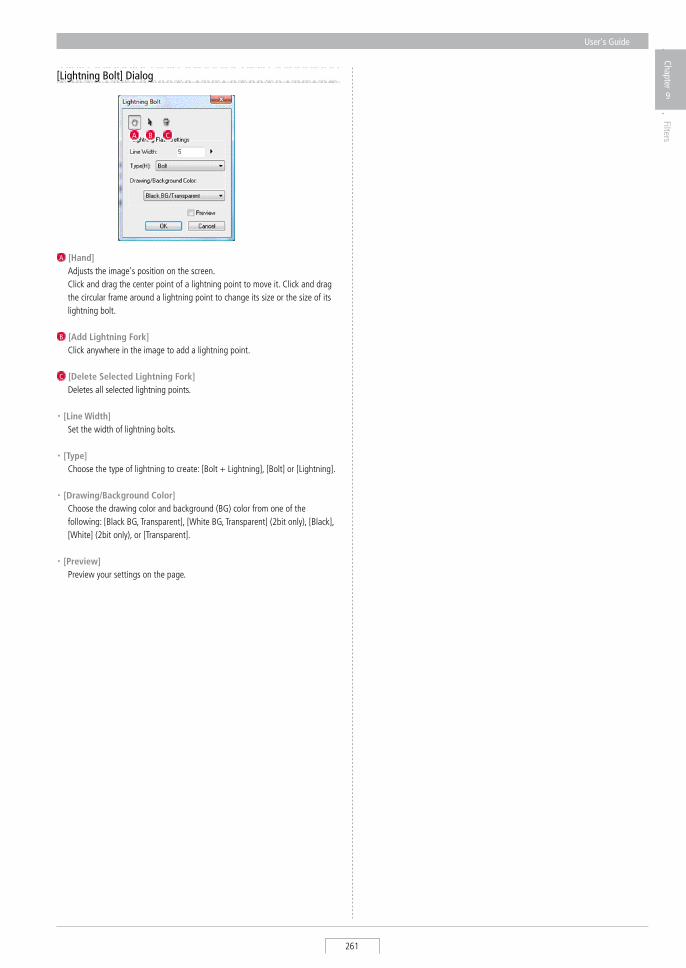
User's Guide
261
Chapter
9
FiltersA B C
A [Hand] Adjusts the image's position on the screen. Click and drag the center point of a lightning point to move it. Click and drag
the circular frame around a lightning point to change its size or the size of its lightning bolt.
B [Add Lightning Fork] Click anywhere in the image to add a lightning point.
C [Delete Selected Lightning Fork] Deletes all selected lightning points.
・ [Line Width] set the width of lightning bolts.
・ [Type] Choose the type of lightning to create: [Bolt + Lightning], [Bolt] or [Lightning].
・ [Drawing/Background Color] Choose the drawing color and background (BG) color from one of the
following: [Black BG, Transparent], [White BG, Transparent] (2bit only), [Black], [White] (2bit only), or [Transparent].
・ [Preview] Preview your settings on the page.
[Lightning Bolt] Dialog
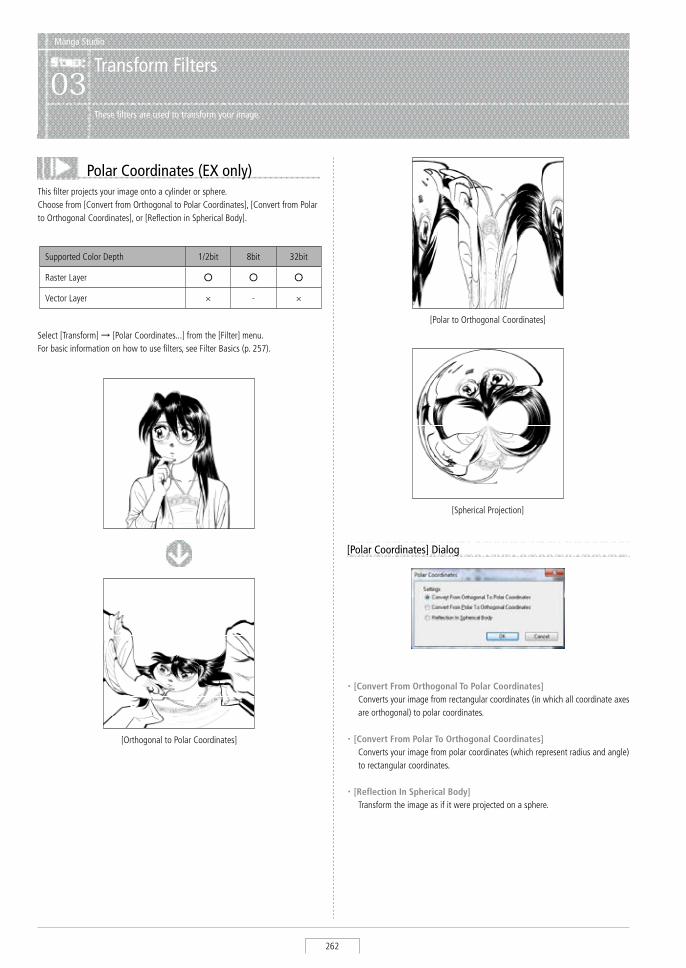
Manga Studio
262
Polar Coordinates (EX only)This filter projects your image onto a cylinder or sphere. Choose from [Convert from Orthogonal to Polar Coordinates], [Convert from Polar to Orthogonal Coordinates], or [Reflection in spherical Body].
Manga Studio
Transform Filters03
These filters are used to transform your image.
[Polar to Orthogonal Coordinates]
[spherical Projection]
・ [Convert From Orthogonal To Polar Coordinates] Converts your image from rectangular coordinates (in which all coordinate axes
are orthogonal) to polar coordinates.
・ [Convert From Polar To Orthogonal Coordinates] Converts your image from polar coordinates (which represent radius and angle)
to rectangular coordinates.
・ [Reflection In Spherical Body] Transform the image as if it were projected on a sphere.
[Polar Coordinates] Dialog
supported Color Depth 1/2bit 8bit 32bit
Raster Layer ○ ○ ○
Vector Layer × - ×
[Orthogonal to Polar Coordinates]
select [Transform] → [Polar Coordinates...] from the [Filter] menu. For basic information on how to use filters, see Filter Basics (p. 257).

User's Guide
263
Chapter
9
Filters
Wave (EX only)This filter transforms your image with a rippling wave pattern.
・ [Direction] sets the angle of the waves.
・ [Amplitude] sets the amplitude of the waves.
・ [Number of Waves] sets the number of waves.
[Wave] Dialog
supported Color Depth 1/2bit 8bit 32bit
Raster Layer ○ ○ ○
Vector Layer × - ×
[Waves]
select [Transform] → [Wave...] from the [Filter] menu. For basic information on how to use filters, see Filter Basics (p. 257).
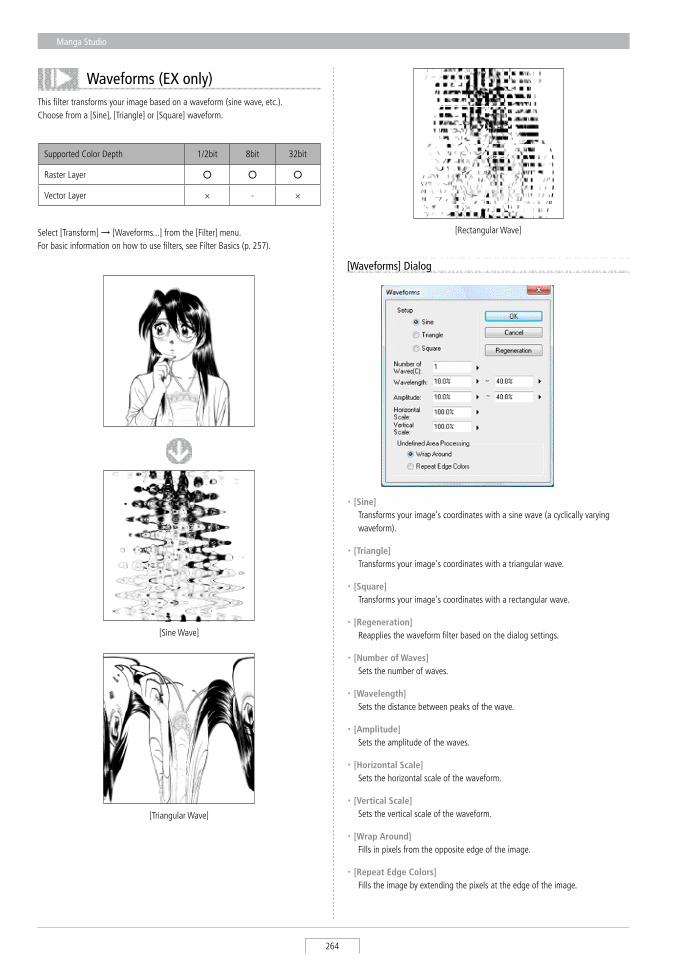
Manga Studio
264
Waveforms (EX only)This filter transforms your image based on a waveform (sine wave, etc.). Choose from a [sine], [Triangle] or [square] waveform.
[Rectangular Wave]
・ [Sine] Transforms your image's coordinates with a sine wave (a cyclically varying
waveform).
・ [Triangle] Transforms your image's coordinates with a triangular wave.
・ [Square] Transforms your image's coordinates with a rectangular wave.
・ [Regeneration] Reapplies the waveform filter based on the dialog settings.
・ [Number of Waves] sets the number of waves.
・ [Wavelength] sets the distance between peaks of the wave.
・ [Amplitude] sets the amplitude of the waves.
・ [Horizontal Scale] sets the horizontal scale of the waveform.
・ [Vertical Scale] sets the vertical scale of the waveform.
・ [Wrap Around] Fills in pixels from the opposite edge of the image.
・ [Repeat Edge Colors] Fills the image by extending the pixels at the edge of the image.
[Waveforms] Dialog
supported Color Depth 1/2bit 8bit 32bit
Raster Layer ○ ○ ○
Vector Layer × - ×
[sine Wave]
[Triangular Wave]
select [Transform] → [Waveforms...] from the [Filter] menu. For basic information on how to use filters, see Filter Basics (p. 257).
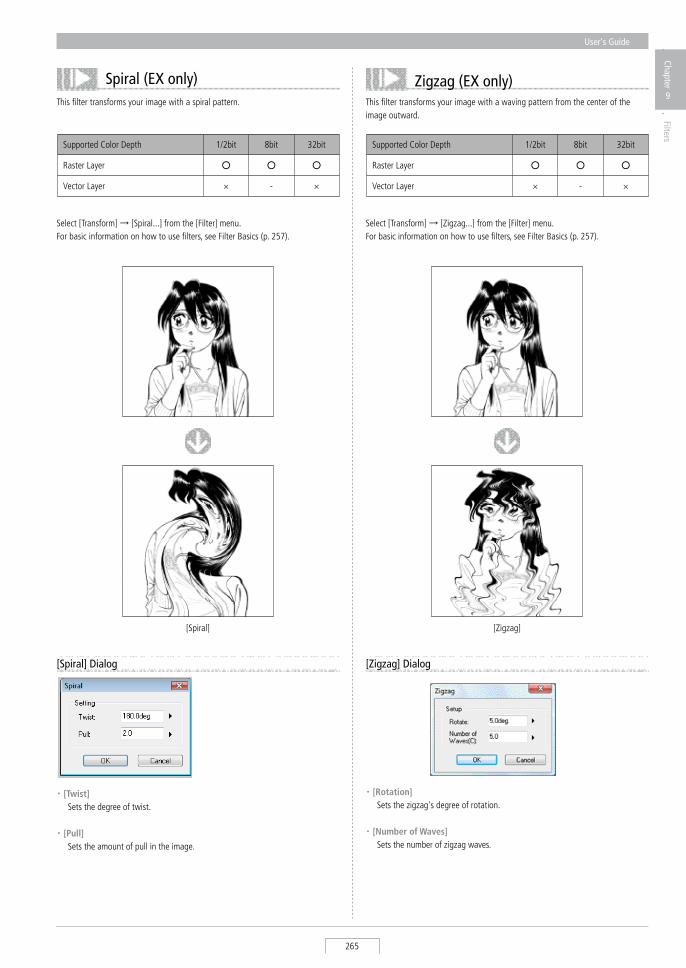
User's Guide
265
Chapter
9
Filters
Spiral (EX only)This filter transforms your image with a spiral pattern.
Zigzag (EX only)
・ [Rotation] sets the zigzag's degree of rotation.
・ [Number of Waves] sets the number of zigzag waves.
[Zigzag] Dialog
This filter transforms your image with a waving pattern from the center of the image outward.
supported Color Depth 1/2bit 8bit 32bit
Raster Layer ○ ○ ○
Vector Layer × - ×
[spiral]
・ [Twist] sets the degree of twist.
・ [Pull] sets the amount of pull in the image.
[Spiral] Dialog
select [Transform] → [spiral...] from the [Filter] menu. For basic information on how to use filters, see Filter Basics (p. 257).
supported Color Depth 1/2bit 8bit 32bit
Raster Layer ○ ○ ○
Vector Layer × - ×
[Zigzag]
select [Transform] → [Zigzag...] from the [Filter] menu. For basic information on how to use filters, see Filter Basics (p. 257).
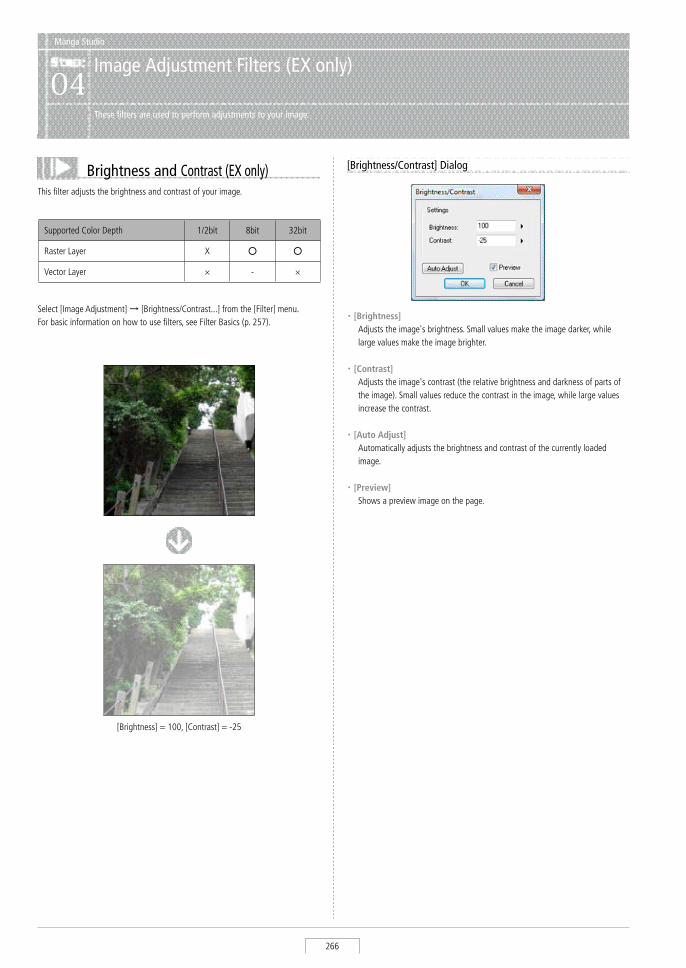
Manga Studio
266
Brightness and Contrast (EX only)This filter adjusts the brightness and contrast of your image.
Manga Studio
Image Adjustment Filters (EX only)04
These filters are used to perform adjustments to your image.
・ [Brightness] Adjusts the image's brightness. small values make the image darker, while
large values make the image brighter.
・ [Contrast] Adjusts the image's contrast (the relative brightness and darkness of parts of
the image). small values reduce the contrast in the image, while large values increase the contrast.
・ [Auto Adjust] Automatically adjusts the brightness and contrast of the currently loaded
image.
・ [Preview] shows a preview image on the page.
[Brightness/Contrast] Dialog
supported Color Depth 1/2bit 8bit 32bit
Raster Layer X ○ ○
Vector Layer × - ×
[Brightness] = 100, [Contrast] = -25
select [Image Adjustment] → [Brightness/Contrast...] from the [Filter] menu. For basic information on how to use filters, see Filter Basics (p. 257).
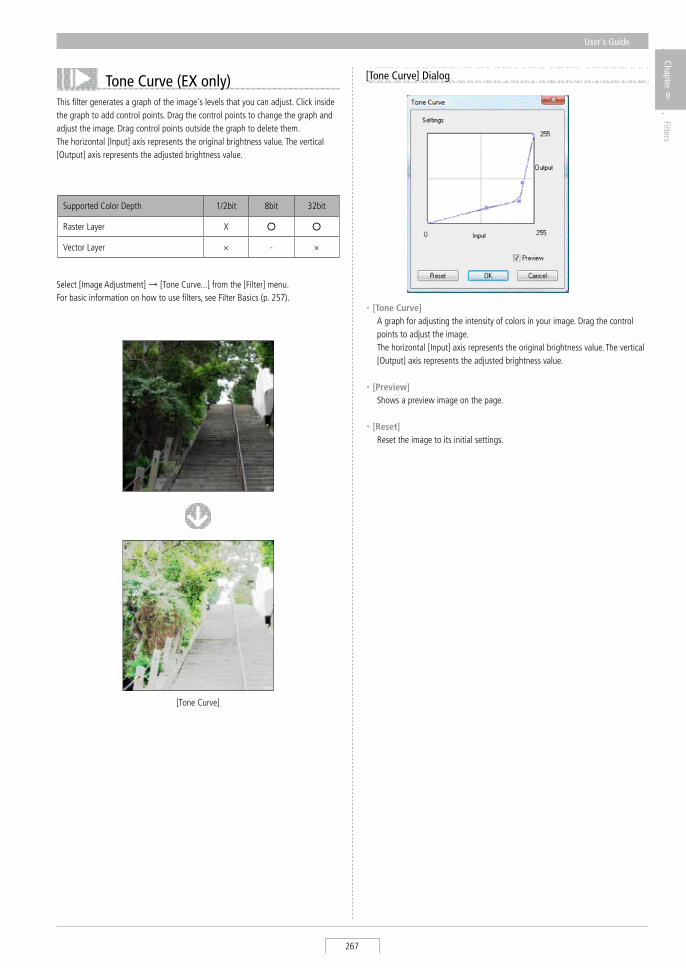
User's Guide
267
Chapter
9
Filters
Tone Curve (EX only)This filter generates a graph of the image's levels that you can adjust. Click inside the graph to add control points. Drag the control points to change the graph and adjust the image. Drag control points outside the graph to delete them. The horizontal [Input] axis represents the original brightness value. The vertical [Output] axis represents the adjusted brightness value.
・ [Tone Curve] A graph for adjusting the intensity of colors in your image. Drag the control
points to adjust the image. The horizontal [Input] axis represents the original brightness value. The vertical
[Output] axis represents the adjusted brightness value.
・ [Preview] shows a preview image on the page.
・ [Reset] Reset the image to its initial settings.
[Tone Curve] Dialog
supported Color Depth 1/2bit 8bit 32bit
Raster Layer X ○ ○
Vector Layer × - ×
[Tone Curve]
select [Image Adjustment] → [Tone Curve...] from the [Filter] menu. For basic information on how to use filters, see Filter Basics (p. 257).

Manga Studio
268
Level Adjustment (EX only)This filter is used to adjust the intensity of colors in your image with a histogram. Move the triangular control points below the histogram to the right to darken the image, or to the left to brighten it. If the histogram does not cover the entire width of the window, move the control point to the peak of the histogram. By setting the histogram's width to fill the window, you can adjust the entire image.
A [Histogram] shows a graph that contains information about the amount of darkness (left)
and brightness (right) in the image.
B Shadow [Input] sets the darkest color in your image. By default, this is set to the leftmost point on the histogram.
C Gamma [Input] sets the brightness of the midtones in your image.
D Highlight [Input] sets the brightest color in your image. By default, this is set to the rightmost point on the histogram.
E Shadow [Output] sets the depth of the darkest colors in your image.
F Highlight [Output] sets the depth of the brightest colors in your image.
・ [Preview] shows a preview image.
・ [Auto Adjust] Automatically adjusts the levels in the currently loaded image.
[Level Adjustment] Dialog
A
B C D
E F
supported Color Depth 1/2bit 8bit 32bit
Raster Layer X ○ ○
Vector Layer × - ×
[Adjust Levels]
select [Image Adjustment] → [Adjust Levels] from the [Filter] menu. For basic information on how to use filters, see Filter Basics (p. 257).

User's Guide
269
Chapter
9
Filters
Hue/Saturation/Value (EX only)This filter adjusts the three color components of your image in the HsV (Hue/saturation/Value) color model.
・ [Hue] set the tint to adjust the levels of red, blue and yellow and in your image.
・ [Saturation] set the brilliance of your image's colors to adjust the color intensity.
・ [Value] set the brightness of colors in your image.
・ [Input] shows the colors in your image before adjustment.
・ [Output] shows the colors in your image after adjustment.
・ [Preview] shows a preview image.
[Hue/Saturation/Value] Dialog
supported Color Depth 1/2bit 8bit 32bit
Raster Layer X X ○
Vector Layer × - ×
[Hue] = -86, [saturation] = 1, [Value] = 39
select [Image Adjustment] → [Hue/saturation/Value...] from the [Filter] menu. For basic information on how to use filters, see Filter Basics (p. 257).
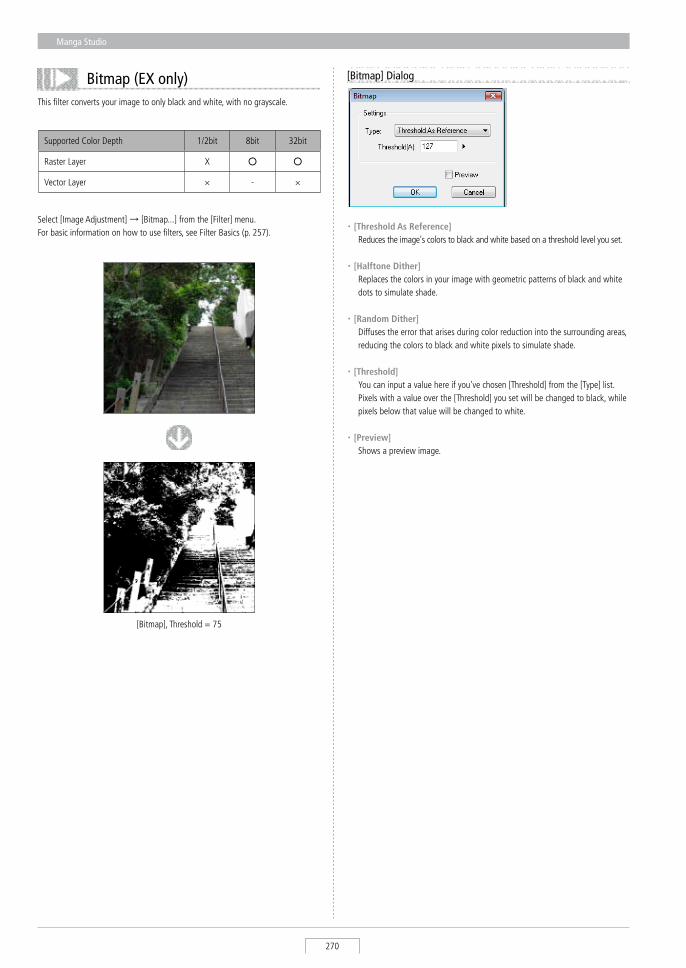
Manga Studio
270
Bitmap (EX only)This filter converts your image to only black and white, with no grayscale.
・ [Threshold As Reference] Reduces the image's colors to black and white based on a threshold level you set.
・ [Halftone Dither] Replaces the colors in your image with geometric patterns of black and white
dots to simulate shade.
・ [Random Dither] Diffuses the error that arises during color reduction into the surrounding areas,
reducing the colors to black and white pixels to simulate shade.
・ [Threshold] You can input a value here if you've chosen [Threshold] from the [Type] list. Pixels with a value over the [Threshold] you set will be changed to black, while
pixels below that value will be changed to white.
・ [Preview] shows a preview image.
[Bitmap] Dialog
supported Color Depth 1/2bit 8bit 32bit
Raster Layer X ○ ○
Vector Layer × - ×
[Bitmap], Threshold = 75
select [Image Adjustment] → [Bitmap...] from the [Filter] menu. For basic information on how to use filters, see Filter Basics (p. 257).
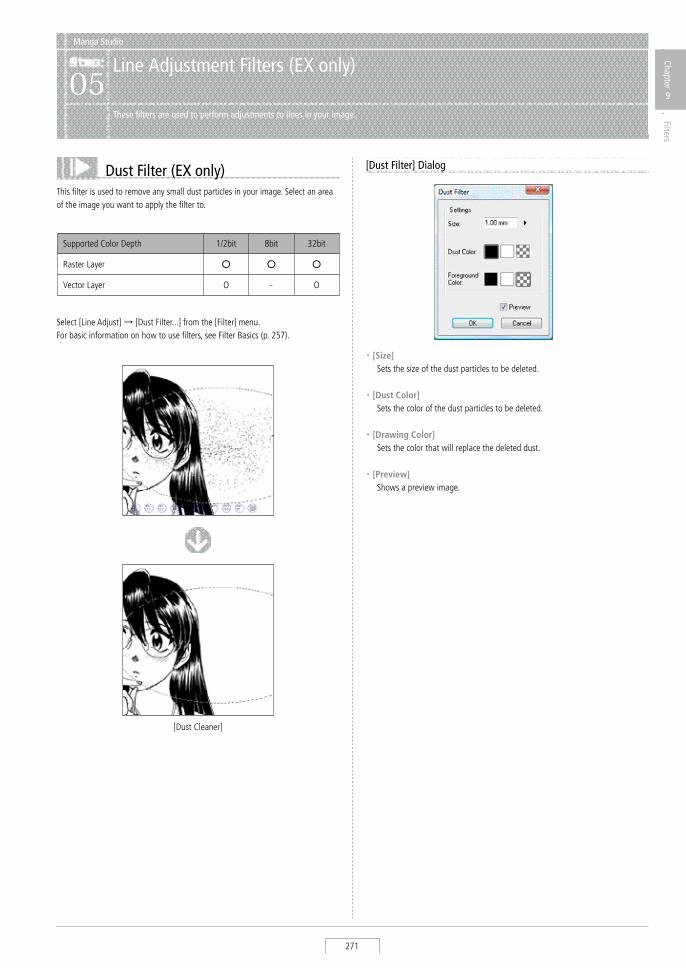
User's Guide
271
Chapter
9
Filters
Dust Filter (EX only)This filter is used to remove any small dust particles in your image. select an area of the image you want to apply the filter to.
Manga Studio
Line Adjustment Filters (EX only)05
These filters are used to perform adjustments to lines in your image.
・ [Size] sets the size of the dust particles to be deleted.
・ [Dust Color] sets the color of the dust particles to be deleted.
・ [Drawing Color] sets the color that will replace the deleted dust.
・ [Preview] shows a preview image.
[Dust Filter] Dialog
supported Color Depth 1/2bit 8bit 32bit
Raster Layer ○ ○ ○
Vector Layer O - O
[Dust Cleaner]
select [Line Adjust] → [Dust Filter...] from the [Filter] menu. For basic information on how to use filters, see Filter Basics (p. 257).
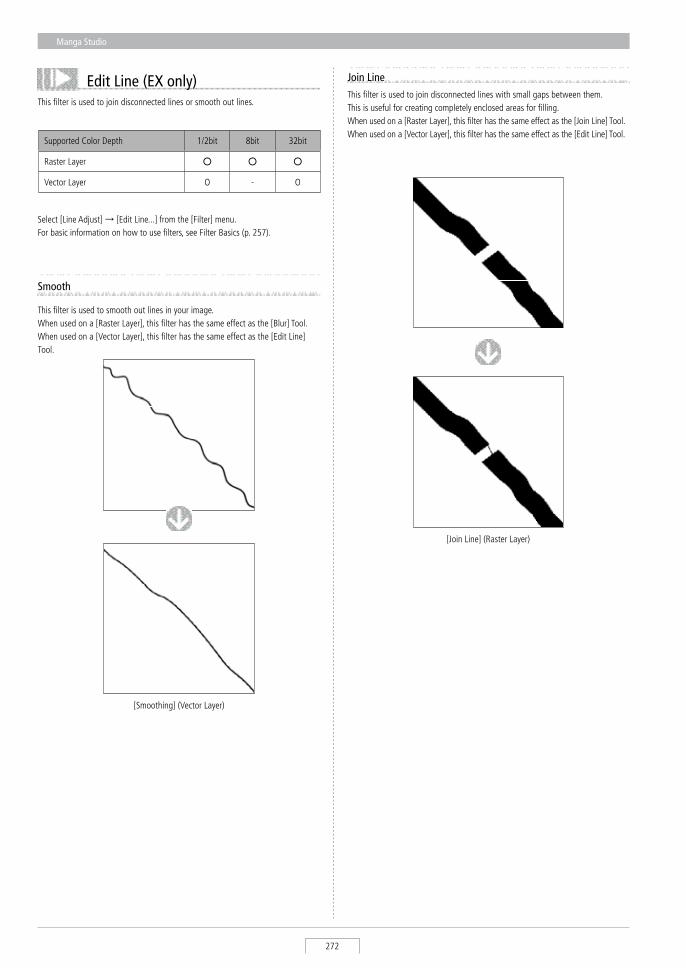
Manga Studio
272
This filter is used to join disconnected lines with small gaps between them. This is useful for creating completely enclosed areas for filling. When used on a [Raster Layer], this filter has the same effect as the [Join Line] Tool. When used on a [Vector Layer], this filter has the same effect as the [Edit Line] Tool.
Join Line
[Join Line] (Raster Layer)
This filter is used to smooth out lines in your image. When used on a [Raster Layer], this filter has the same effect as the [Blur] Tool. When used on a [Vector Layer], this filter has the same effect as the [Edit Line] Tool.
Smooth
[smoothing] (Vector Layer)
Edit Line (EX only)This filter is used to join disconnected lines or smooth out lines.
supported Color Depth 1/2bit 8bit 32bit
Raster Layer ○ ○ ○
Vector Layer O - O
select [Line Adjust] → [Edit Line...] from the [Filter] menu. For basic information on how to use filters, see Filter Basics (p. 257).
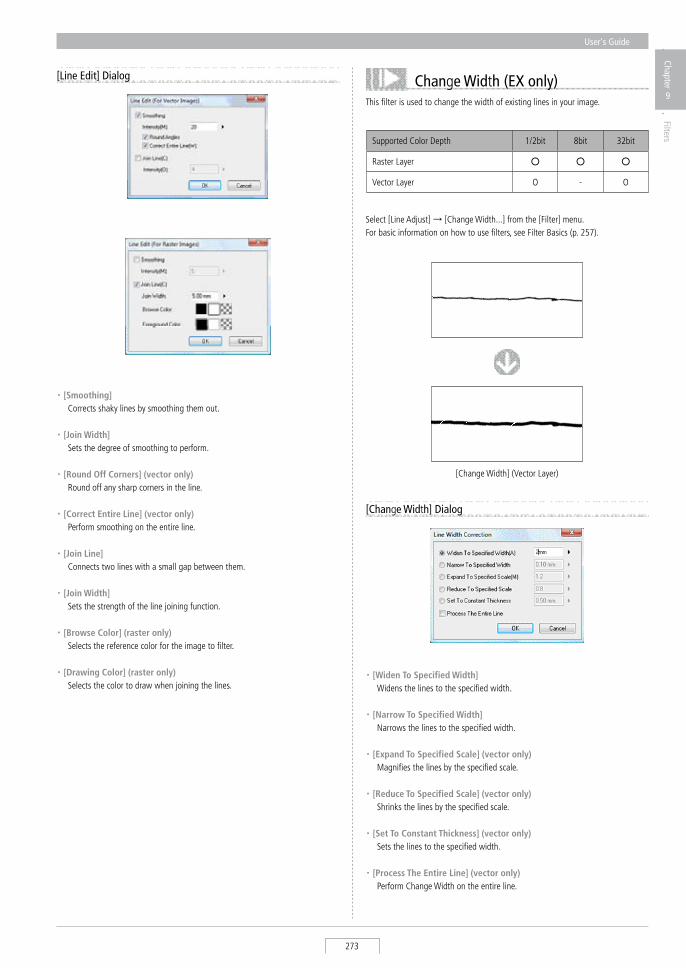
User's Guide
273
Chapter
9
Filters
・ [Smoothing] Corrects shaky lines by smoothing them out.
・ [Join Width] sets the degree of smoothing to perform.
・ [Round Off Corners] (vector only) Round off any sharp corners in the line.
・ [Correct Entire Line] (vector only) Perform smoothing on the entire line.
・ [Join Line] Connects two lines with a small gap between them.
・ [Join Width] sets the strength of the line joining function.
・ [Browse Color] (raster only) selects the reference color for the image to filter.
・ [Drawing Color] (raster only) selects the color to draw when joining the lines.
[Line Edit] Dialog
This filter is used to change the width of existing lines in your image.
Change Width (EX only)
・ [Widen To Specified Width] Widens the lines to the specified width.
・ [Narrow To Specified Width] Narrows the lines to the specified width.
・ [Expand To Specified Scale] (vector only) Magnifies the lines by the specified scale.
・ [Reduce To Specified Scale] (vector only) shrinks the lines by the specified scale.
・ [Set To Constant Thickness] (vector only) sets the lines to the specified width.
・ [Process The Entire Line] (vector only) Perform Change Width on the entire line.
[Change Width] Dialog
supported Color Depth 1/2bit 8bit 32bit
Raster Layer ○ ○ ○
Vector Layer O - O
[Change Width] (Vector Layer)
select [Line Adjust] → [Change Width...] from the [Filter] menu. For basic information on how to use filters, see Filter Basics (p. 257).

Manga Studio
274
Mosaic (EX only)This filter adds a mosaic effect to the displayed image. The mosaic effect is created as a new [Tone Layer]. You can add to them or adjust their settings just like normal tones.
Manga Studio
Effect Filters (EX only)06
These filters add special effects to your images.
This filter is used when you want to sharpen a blurry image or make shapes more distinct. It sharpens the image by increasing the contrast along boundary lines. There are two filters: [sharpen] and [sharpen (Heavy)].
Sharpen (EX only) /Sharpen (Heavy)(EX only)
・ [Block Size] sets the size of the squares that make up the mosaic.
[Mosaic] Dialog
[Mosaic]
select [Effects] → [Mosaic...] from the [Filter] menu. For basic information on how to use filters, see Filter Basics (p. 257).
supported Color Depth 1/2bit 8bit 32bit
Raster Layer X ○ ○
Vector Layer × - ×
[sharpen (Heavy)]
select [Effects] → [sharpen...] or [sharpen (Heavy)] from the [Filter] menu. For basic information on how to use filters, see Filter Basics (p. 257).
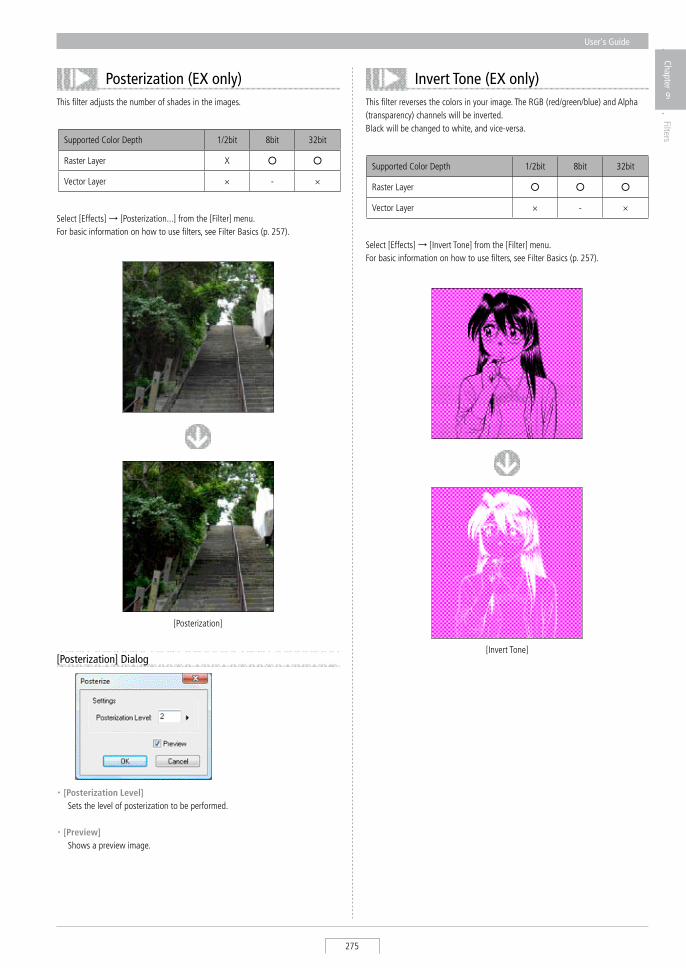
User's Guide
275
Chapter
9
Filters
Posterization (EX only)This filter adjusts the number of shades in the images.
Invert Tone (EX only)This filter reverses the colors in your image. The RGB (red/green/blue) and Alpha (transparency) channels will be inverted. Black will be changed to white, and vice-versa.
・ [Posterization Level] sets the level of posterization to be performed.
・ [Preview] shows a preview image.
[Posterization] Dialog
supported Color Depth 1/2bit 8bit 32bit
Raster Layer X ○ ○
Vector Layer × - ×
[Posterization]
select [Effects] → [Posterization...] from the [Filter] menu. For basic information on how to use filters, see Filter Basics (p. 257).
supported Color Depth 1/2bit 8bit 32bit
Raster Layer ○ ○ ○
Vector Layer × - ×
[Invert Tone]
select [Effects] → [Invert Tone] from the [Filter] menu. For basic information on how to use filters, see Filter Basics (p. 257).
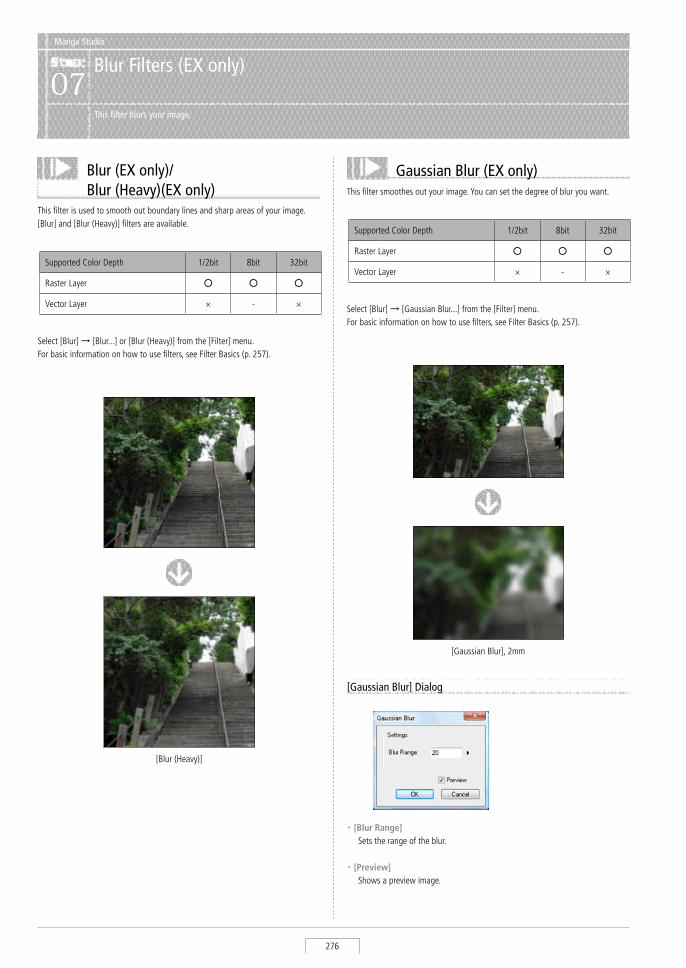
Manga Studio
276
Manga Studio
Blur Filters (EX only)07
This filter blurs your image.
Gaussian Blur (EX only)This filter smoothes out your image. You can set the degree of blur you want.
This filter is used to smooth out boundary lines and sharp areas of your image. [Blur] and [Blur (Heavy)] filters are available.
Blur (EX only)/Blur (Heavy)(EX only)
・ [Blur Range] sets the range of the blur.
・ [Preview] shows a preview image.
[Gaussian Blur] Dialog
supported Color Depth 1/2bit 8bit 32bit
Raster Layer ○ ○ ○
Vector Layer × - ×
[Blur (Heavy)]
select [Blur] → [Blur...] or [Blur (Heavy)] from the [Filter] menu. For basic information on how to use filters, see Filter Basics (p. 257).
supported Color Depth 1/2bit 8bit 32bit
Raster Layer ○ ○ ○
Vector Layer × - ×
[Gaussian Blur], 2mm
select [Blur] → [Gaussian Blur...] from the [Filter] menu. For basic information on how to use filters, see Filter Basics (p. 257).
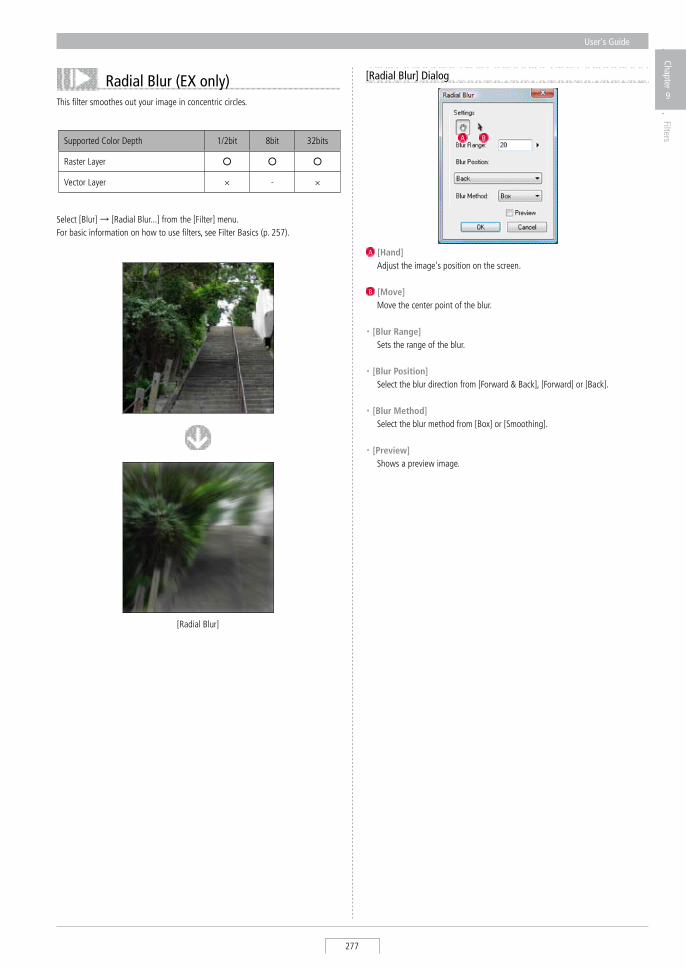
User's Guide
277
Chapter
9
Filters
Radial Blur (EX only)This filter smoothes out your image in concentric circles.
A B
A [Hand] Adjust the image's position on the screen.
B [Move] Move the center point of the blur.
・ [Blur Range] sets the range of the blur.
・ [Blur Position] select the blur direction from [Forward & Back], [Forward] or [Back].
・ [Blur Method] select the blur method from [Box] or [smoothing].
・ [Preview] shows a preview image.
[Radial Blur] Dialog
supported Color Depth 1/2bit 8bit 32bits
Raster Layer ○ ○ ○
Vector Layer × - ×
[Radial Blur]
select [Blur] → [Radial Blur...] from the [Filter] menu. For basic information on how to use filters, see Filter Basics (p. 257).
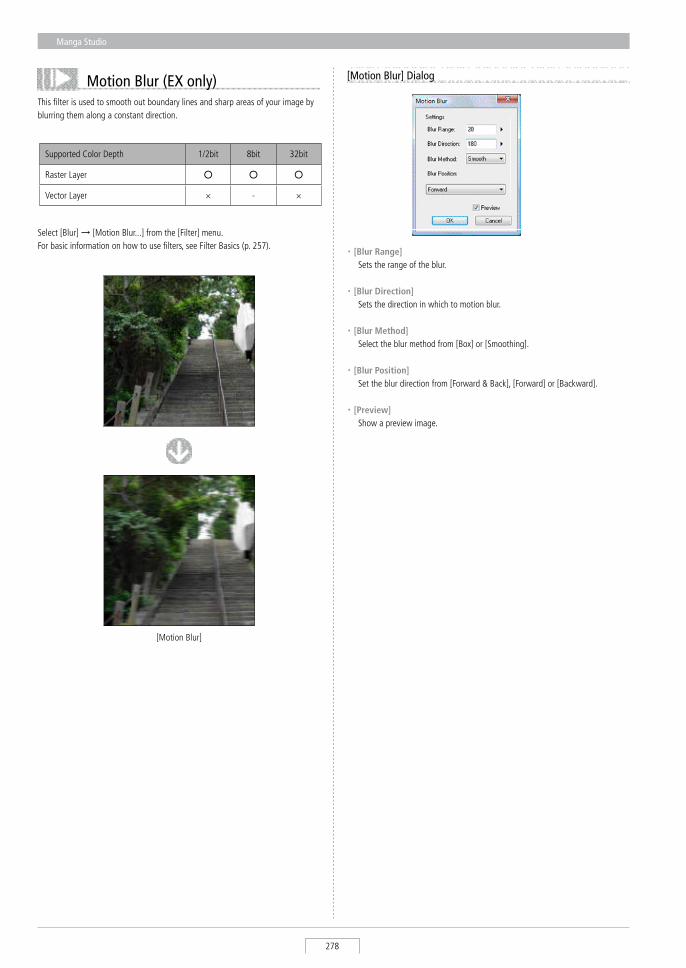
Manga Studio
278
Motion Blur (EX only)This filter is used to smooth out boundary lines and sharp areas of your image by blurring them along a constant direction.
・ [Blur Range] sets the range of the blur.
・ [Blur Direction] sets the direction in which to motion blur.
・ [Blur Method] select the blur method from [Box] or [smoothing].
・ [Blur Position] set the blur direction from [Forward & Back], [Forward] or [Backward].
・ [Preview] show a preview image.
[Motion Blur] Dialog
supported Color Depth 1/2bit 8bit 32bit
Raster Layer ○ ○ ○
Vector Layer × - ×
[Motion Blur]
select [Blur] → [Motion Blur...] from the [Filter] menu. For basic information on how to use filters, see Filter Basics (p. 257).
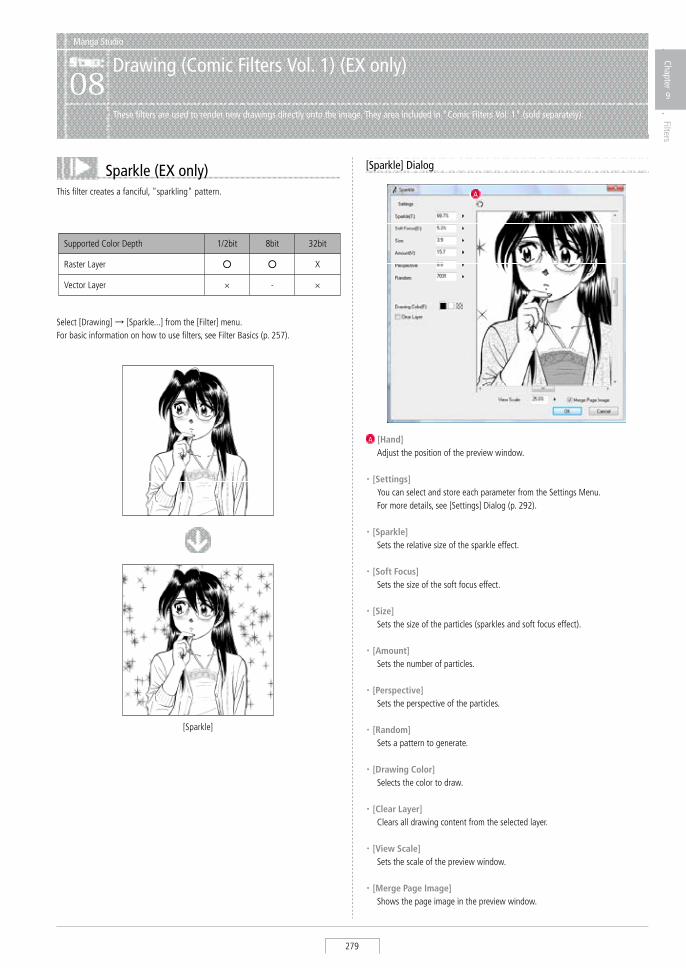
User's Guide
279
Chapter
9
Filters
Manga Studio
Drawing (Comic Filters Vol. 1) (EX only)08
These filters are used to render new drawings directly onto the image. They area included in "Comic Filters Vol. 1" (sold separately).
This filter creates a fanciful, "sparkling" pattern.
Sparkle (EX only)
A [Hand] Adjust the position of the preview window.
・ [Settings] You can select and store each parameter from the settings Menu. For more details, see [settings] Dialog (p. 292).
・ [Sparkle] sets the relative size of the sparkle effect.
・ [Soft Focus] sets the size of the soft focus effect.
・ [Size] sets the size of the particles (sparkles and soft focus effect).
・ [Amount] sets the number of particles.
・ [Perspective] sets the perspective of the particles.
・ [Random] sets a pattern to generate.
・ [Drawing Color] selects the color to draw.
・ [Clear Layer] Clears all drawing content from the selected layer.
・ [View Scale] sets the scale of the preview window.
・ [Merge Page Image] shows the page image in the preview window.
[Sparkle] Dialog
A
supported Color Depth 1/2bit 8bit 32bit
Raster Layer ○ ○ X
Vector Layer × - ×
[sparkle]
select [Drawing] → [sparkle...] from the [Filter] menu. For basic information on how to use filters, see Filter Basics (p. 257).
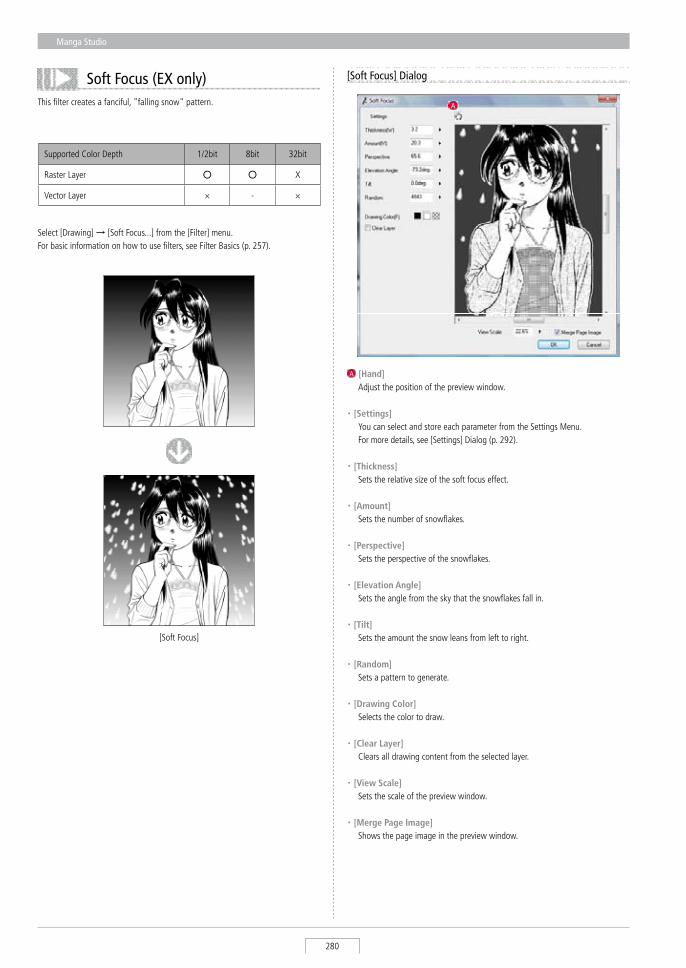
Manga Studio
280
This filter creates a fanciful, "falling snow" pattern.
Soft Focus (EX only)
A [Hand] Adjust the position of the preview window.
・ [Settings] You can select and store each parameter from the settings Menu. For more details, see [settings] Dialog (p. 292).
・ [Thickness] sets the relative size of the soft focus effect.
・ [Amount] sets the number of snowflakes.
・ [Perspective] sets the perspective of the snowflakes.
・ [Elevation Angle] sets the angle from the sky that the snowflakes fall in.
・ [Tilt] sets the amount the snow leans from left to right.
・ [Random] sets a pattern to generate.
・ [Drawing Color] selects the color to draw.
・ [Clear Layer] Clears all drawing content from the selected layer.
・ [View Scale] sets the scale of the preview window.
・ [Merge Page Image] shows the page image in the preview window.
[Soft Focus] Dialog
supported Color Depth 1/2bit 8bit 32bit
Raster Layer ○ ○ X
Vector Layer × - ×
[soft Focus]
select [Drawing] → [soft Focus...] from the [Filter] menu. For basic information on how to use filters, see Filter Basics (p. 257).
A
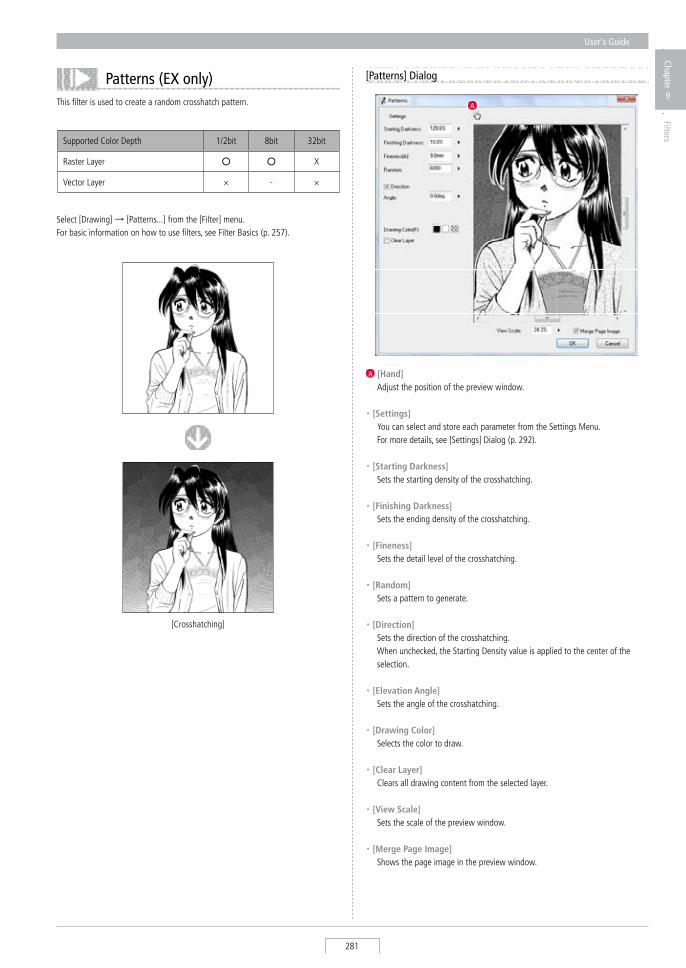
User's Guide
281
Chapter
9
Filters
This filter is used to create a random crosshatch pattern.
Patterns (EX only)
A [Hand] Adjust the position of the preview window.
・ [Settings] You can select and store each parameter from the settings Menu. For more details, see [settings] Dialog (p. 292).
・ [Starting Darkness] sets the starting density of the crosshatching.
・ [Finishing Darkness] sets the ending density of the crosshatching.
・ [Fineness] sets the detail level of the crosshatching.
・ [Random] sets a pattern to generate.
・ [Direction] sets the direction of the crosshatching. When unchecked, the starting Density value is applied to the center of the
selection.
・ [Elevation Angle] sets the angle of the crosshatching.
・ [Drawing Color] selects the color to draw.
・ [Clear Layer] Clears all drawing content from the selected layer.
・ [View Scale] sets the scale of the preview window.
・ [Merge Page Image] shows the page image in the preview window.
[Patterns] Dialog
A
supported Color Depth 1/2bit 8bit 32bit
Raster Layer ○ ○ X
Vector Layer × - ×
[Crosshatching]
select [Drawing] → [Patterns...] from the [Filter] menu. For basic information on how to use filters, see Filter Basics (p. 257).
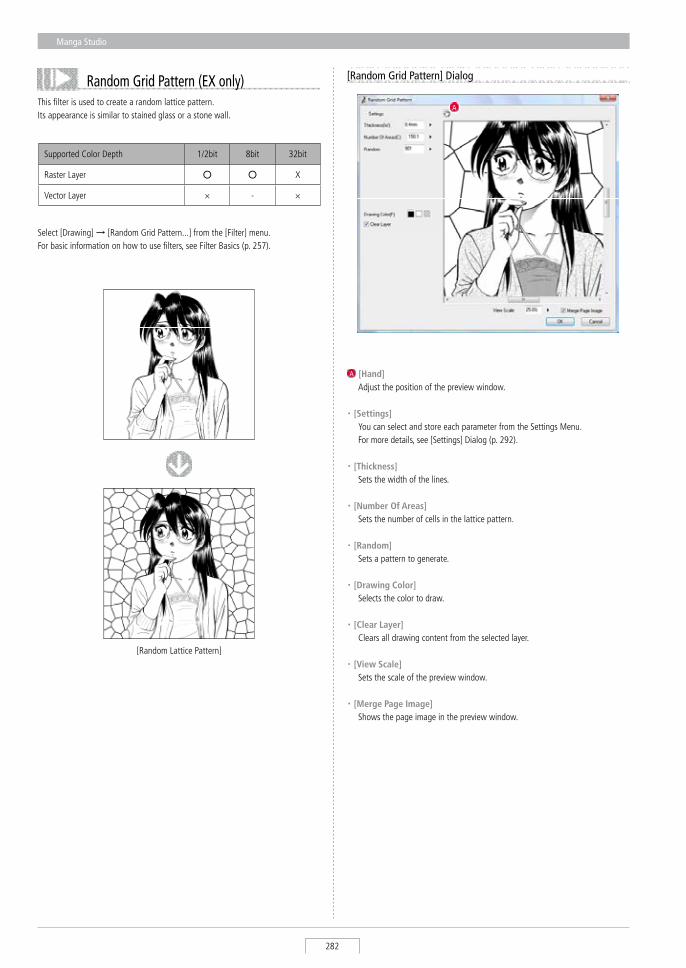
Manga Studio
282
This filter is used to create a random lattice pattern. Its appearance is similar to stained glass or a stone wall.
Random Grid Pattern (EX only)
A [Hand] Adjust the position of the preview window.
・ [Settings] You can select and store each parameter from the settings Menu. For more details, see [settings] Dialog (p. 292).
・ [Thickness] sets the width of the lines.
・ [Number Of Areas] sets the number of cells in the lattice pattern.
・ [Random] sets a pattern to generate.
・ [Drawing Color] selects the color to draw.
・ [Clear Layer] Clears all drawing content from the selected layer.
・ [View Scale] sets the scale of the preview window.
・ [Merge Page Image] shows the page image in the preview window.
[Random Grid Pattern] Dialog
A
supported Color Depth 1/2bit 8bit 32bit
Raster Layer ○ ○ X
Vector Layer × - ×
[Random Lattice Pattern]
select [Drawing] → [Random Grid Pattern...] from the [Filter] menu. For basic information on how to use filters, see Filter Basics (p. 257).
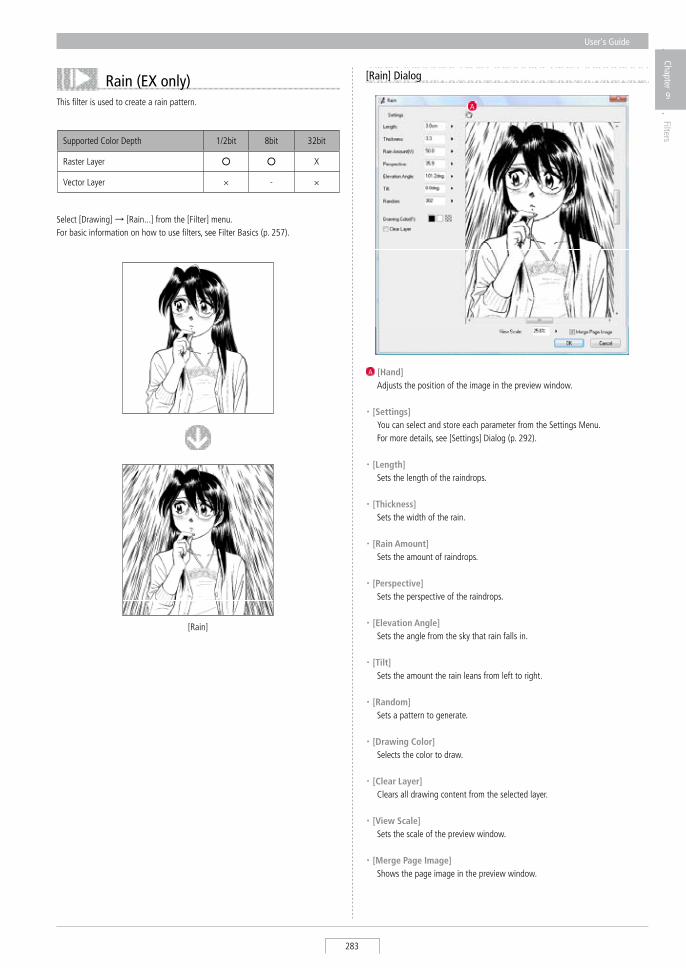
User's Guide
283
Chapter
9
Filters
This filter is used to create a rain pattern.
Rain (EX only)
A [Hand] Adjusts the position of the image in the preview window.
・ [Settings] You can select and store each parameter from the settings Menu. For more details, see [settings] Dialog (p. 292).
・ [Length] sets the length of the raindrops.
・ [Thickness] sets the width of the rain.
・ [Rain Amount] sets the amount of raindrops.
・ [Perspective] sets the perspective of the raindrops.
・ [Elevation Angle] sets the angle from the sky that rain falls in.
・ [Tilt] sets the amount the rain leans from left to right. ・ [Random] sets a pattern to generate.
・ [Drawing Color] selects the color to draw.
・ [Clear Layer] Clears all drawing content from the selected layer.
・ [View Scale] sets the scale of the preview window.
・ [Merge Page Image] shows the page image in the preview window.
supported Color Depth 1/2bit 8bit 32bit
Raster Layer ○ ○ X
Vector Layer × - ×
[Rain]
select [Drawing] → [Rain...] from the [Filter] menu. For basic information on how to use filters, see Filter Basics (p. 257).
[Rain] Dialog
A
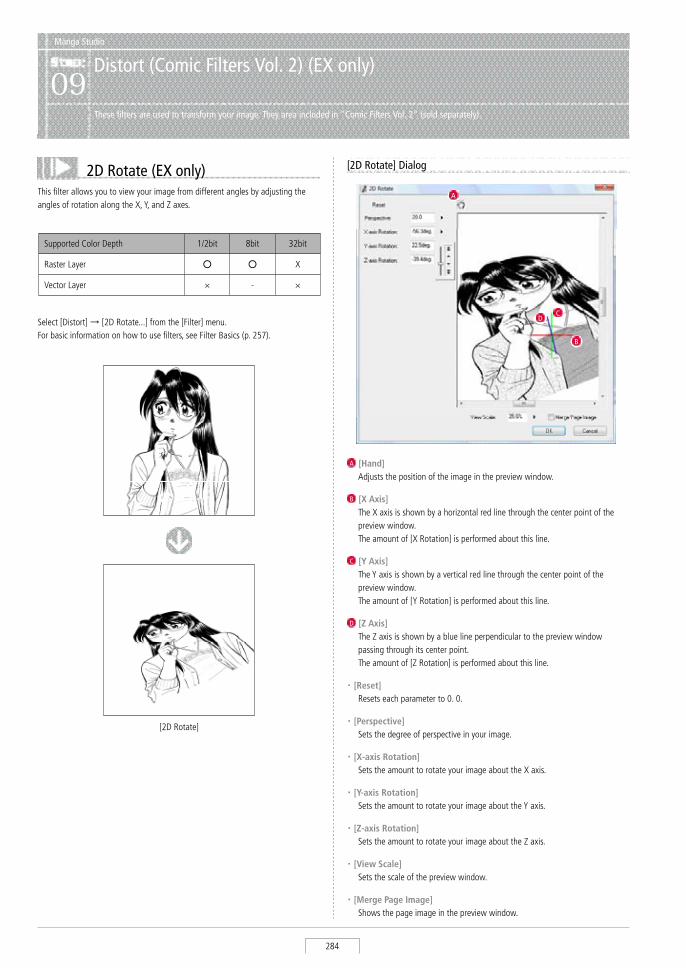
Manga Studio
284
2D Rotate (EX only)This filter allows you to view your image from different angles by adjusting the angles of rotation along the X, Y, and Z axes.
Manga Studio
Distort (Comic Filters Vol. 2) (EX only)09
These filters are used to transform your image. They area included in "Comic Filters Vol. 2" (sold separately).
A [Hand] Adjusts the position of the image in the preview window.
B [X Axis] The X axis is shown by a horizontal red line through the center point of the
preview window. The amount of [X Rotation] is performed about this line.
C [Y Axis] The Y axis is shown by a vertical red line through the center point of the
preview window. The amount of [Y Rotation] is performed about this line.
D [Z Axis] The Z axis is shown by a blue line perpendicular to the preview window
passing through its center point. The amount of [Z Rotation] is performed about this line.
・ [Reset] Resets each parameter to 0. 0.
・ [Perspective] sets the degree of perspective in your image.
・ [X-axis Rotation] sets the amount to rotate your image about the X axis.
・ [Y-axis Rotation] sets the amount to rotate your image about the Y axis.
・ [Z-axis Rotation] sets the amount to rotate your image about the Z axis.
・ [View Scale] sets the scale of the preview window.
・ [Merge Page Image] shows the page image in the preview window.
[2D Rotate] Dialog
A
B
CD
supported Color Depth 1/2bit 8bit 32bit
Raster Layer ○ ○ X
Vector Layer × - ×
[2D Rotate]
select [Distort] → [2D Rotate...] from the [Filter] menu. For basic information on how to use filters, see Filter Basics (p. 257).
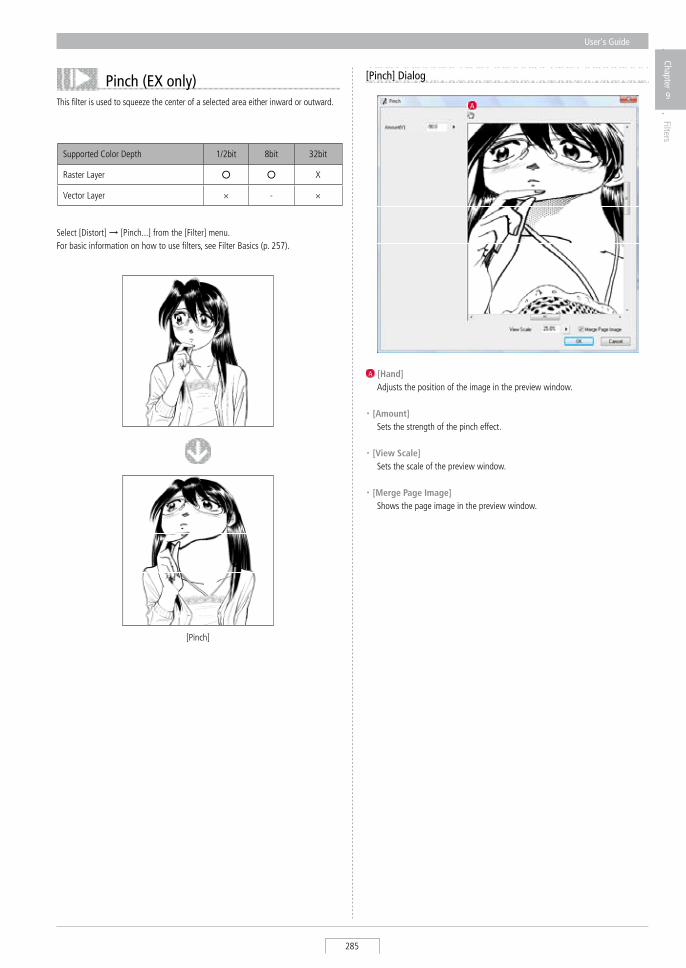
User's Guide
285
Chapter
9
Filters
This filter is used to squeeze the center of a selected area either inward or outward.
Pinch (EX only)
A [Hand] Adjusts the position of the image in the preview window.
・ [Amount] sets the strength of the pinch effect.
・ [View Scale] sets the scale of the preview window.
・ [Merge Page Image] shows the page image in the preview window.
[Pinch] Dialog
A
supported Color Depth 1/2bit 8bit 32bit
Raster Layer ○ ○ X
Vector Layer × - ×
[Pinch]
select [Distort] → [Pinch...] from the [Filter] menu. For basic information on how to use filters, see Filter Basics (p. 257).

Manga Studio
286
This filter allows you to add a "rotating" effect to your image. You can set options with the [settings] button.
BA
supported Color Depth 1/2bit 8bit 32bit
Raster Layer ○ ○ X
Vector Layer × - ×
[speed Rotation]
select [Distort] → [speed Rotation...] from the [Filter] menu. For basic information on how to use filters, see Filter Basics (p. 257).
Speed Rotation (EX only)
A [Hand] Adjusts the position of the image in the preview window.
B [Move Center Point] Move the position of the center point.
・ [Settings] You can select and store each parameter from the settings Menu. For more details, see [settings] Dialog (p. 292).
・ [Length] sets the length (i.e. intensity) of the speed lines.
・ [Length Disorder] sets the amount of variance in the length (i.e. intensity) of the speed lines.
・ [Interval (P)] sets the interval of the speed lines.
・ [Interval] sets the variance in the interval of the speed lines.
・ [Random] sets a pattern to generate.
・ [View Scale] sets the scale of the preview window.
・ [Merge Page Image] shows the page image in the preview window.
[Speed Rotation] Dialog
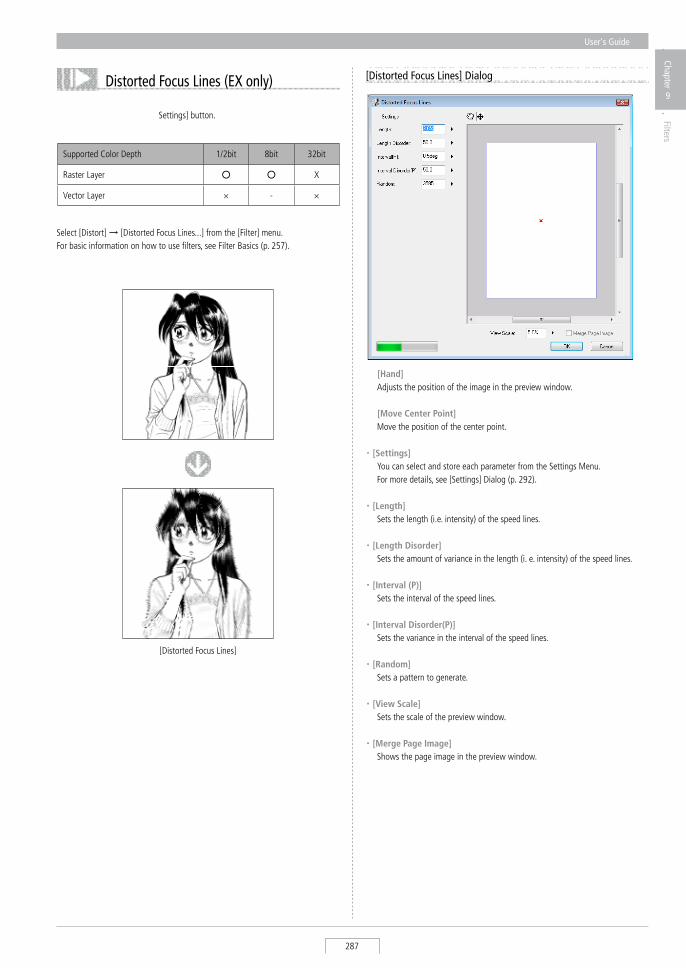
User's Guide
287
Chapter
9
Filters
settings] button.
supported Color Depth 1/2bit 8bit 32bit
Raster Layer ○ ○ X
Vector Layer × - ×
[Distorted Focus Lines]
select [Distort] → [Distorted Focus Lines...] from the [Filter] menu. For basic information on how to use filters, see Filter Basics (p. 257).
Distorted Focus Lines (EX only)
B [Move Center Point] Move the position of the center point.
・ [Settings] You can select and store each parameter from the settings Menu. For more details, see [settings] Dialog (p. 292).
・ [Length] sets the length (i.e. intensity) of the speed lines.
・ [Length Disorder] sets the amount of variance in the length (i. e. intensity) of the speed lines.
・ [Interval (P)] sets the interval of the speed lines.
・ [Interval Disorder(P)] sets the variance in the interval of the speed lines.
・ [Random] sets a pattern to generate.
・ [View Scale] sets the scale of the preview window.
・ [Merge Page Image] shows the page image in the preview window.
[Distorted Focus Lines] Dialog
A [Hand] Adjusts the position of the image in the preview window.
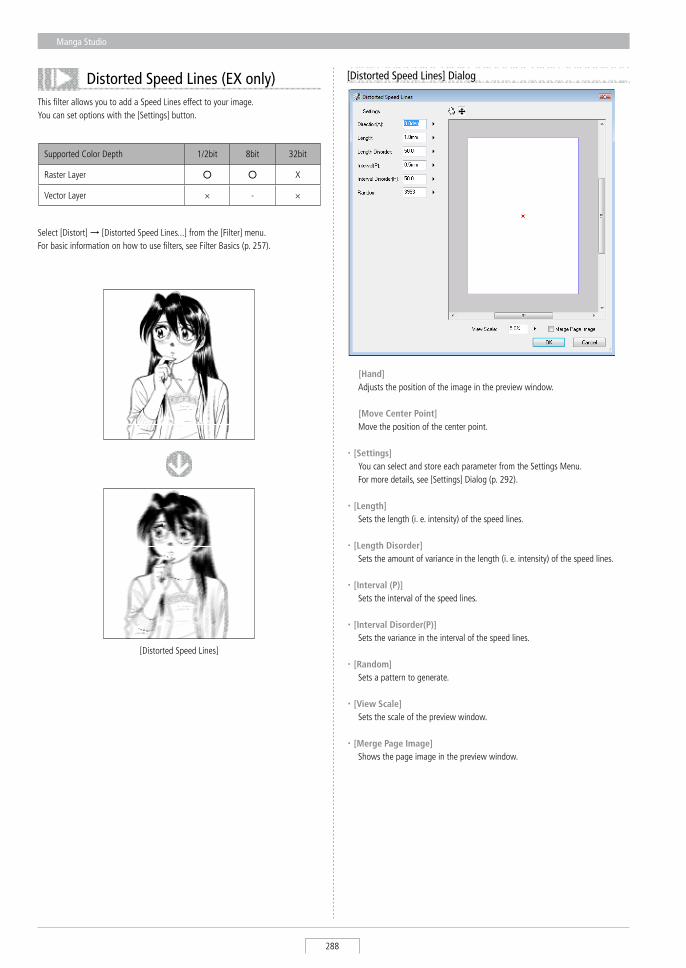
Manga Studio
288
A [Hand] Adjusts the position of the image in the preview window.
B [Move Center Point] Move the position of the center point.
・ [Settings] You can select and store each parameter from the settings Menu. For more details, see [settings] Dialog (p. 292).
・ [Length] sets the length (i. e. intensity) of the speed lines.
・ [Length Disorder] sets the amount of variance in the length (i. e. intensity) of the speed lines.
・ [Interval (P)] sets the interval of the speed lines.
・ [Interval Disorder(P)] sets the variance in the interval of the speed lines.
・ [Random] sets a pattern to generate.
・ [View Scale] sets the scale of the preview window.
・ [Merge Page Image] shows the page image in the preview window.
[Distorted Speed Lines] Dialog
AThis filter allows you to add a speed Lines effect to your image. You can set options with the [settings] button.
supported Color Depth 1/2bit 8bit 32bit
Raster Layer ○ ○ X
Vector Layer × - ×
[Distorted speed Lines]
select [Distort] → [Distorted speed Lines...] from the [Filter] menu. For basic information on how to use filters, see Filter Basics (p. 257).
Distorted Speed Lines (EX only)
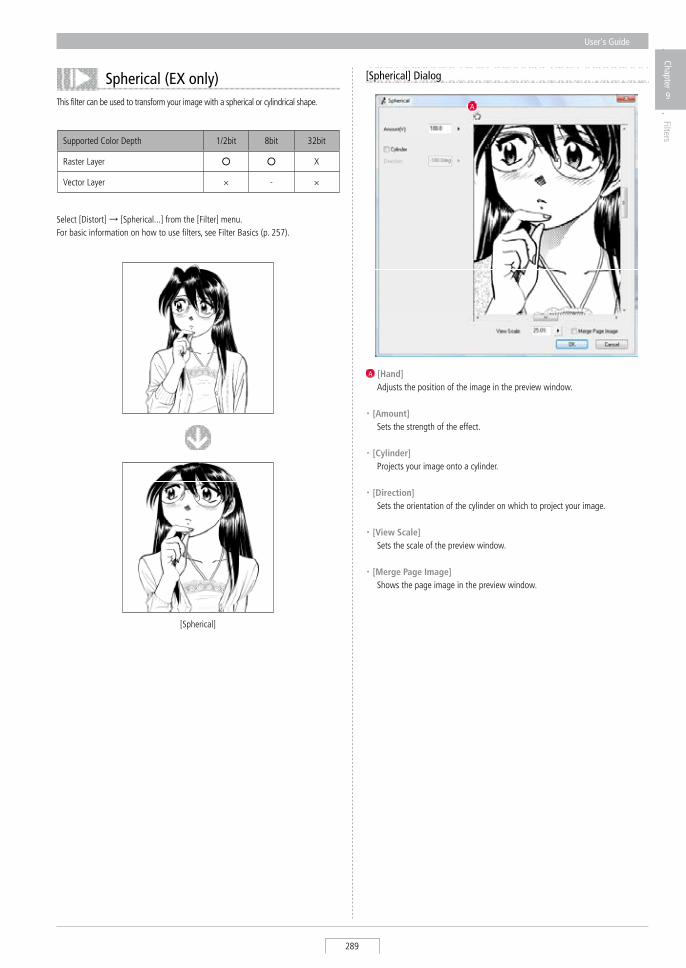
User's Guide
289
Chapter
9
Filters
This filter can be used to transform your image with a spherical or cylindrical shape.
Spherical (EX only)
A [Hand] Adjusts the position of the image in the preview window.
・ [Amount] sets the strength of the effect.
・ [Cylinder] Projects your image onto a cylinder.
・ [Direction] sets the orientation of the cylinder on which to project your image.
・ [View Scale] sets the scale of the preview window.
・ [Merge Page Image] shows the page image in the preview window.
[Spherical] Dialog
A
supported Color Depth 1/2bit 8bit 32bit
Raster Layer ○ ○ X
Vector Layer × - ×
[spherical]
select [Distort] → [spherical...] from the [Filter] menu. For basic information on how to use filters, see Filter Basics (p. 257).
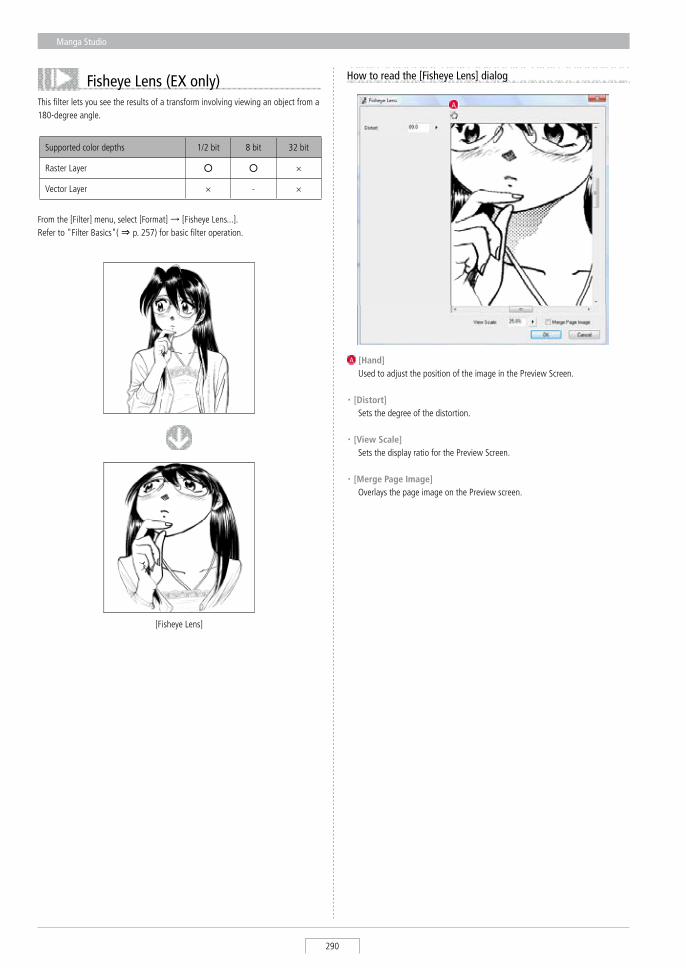
Manga Studio
290
This filter lets you see the results of a transform involving viewing an object from a 180-degree angle.
Fisheye Lens (EX only)A
A [Hand] Used to adjust the position of the image in the Preview screen.
・ [Distort] sets the degree of the distortion.
・ [View Scale] sets the display ratio for the Preview screen.
・ [Merge Page Image] Overlays the page image on the Preview screen.
How to read the [Fisheye Lens] dialog
supported color depths 1/2 bit 8 bit 32 bit
Raster Layer ○ ○ ×
Vector Layer × - ×
[Fisheye Lens]
From the [Filter] menu, select [Format] → [Fisheye Lens...]. Refer to "Filter Basics"( ⇒ p. 257) for basic filter operation.
Rendering
Chapter 10
This chapter introduces the methods for importing photo and 3D data and then incorporating it into drawings.
Step: 01 2DLT (EX only) 294
Step: 02 3D sketching (EX only) 302
Rendering
Step: 03 3DLT (EX only) 324
Chapter
10
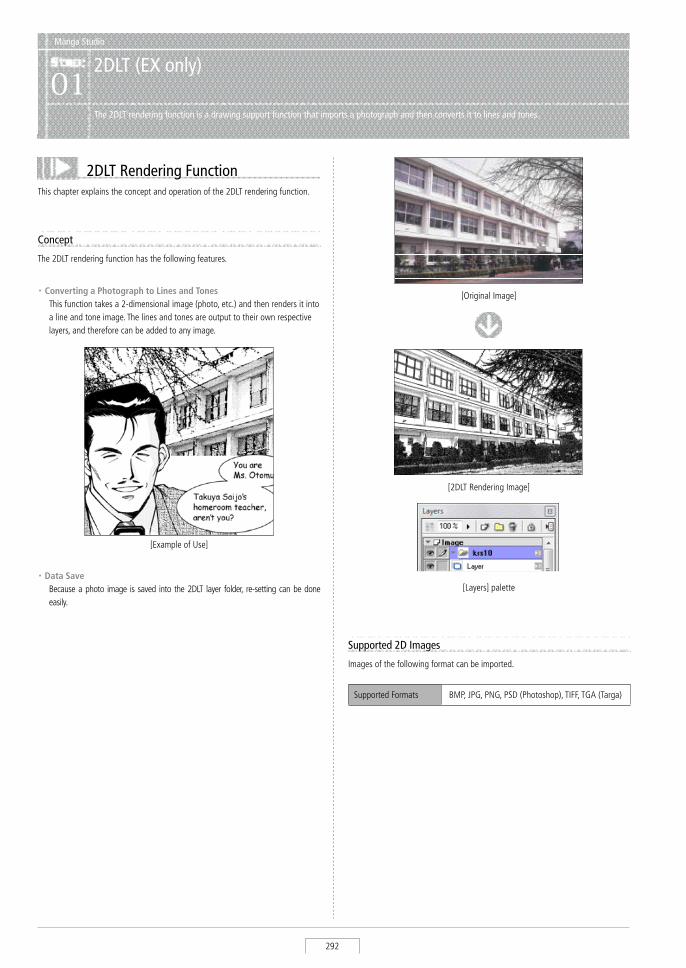
Manga Studio
292
Manga Studio
2DLT (EX only)01
The 2DLT rendering function is a drawing support function that imports a photograph and then converts it to lines and tones.
2DLT Rendering FunctionThis chapter explains the concept and operation of the 2DLT rendering function.
Concept
The 2DLT rendering function has the following features.
[Original Image]
・ Data Save Because a photo image is saved into the 2DLT layer folder, re-setting can be done
easily.
[2DLT Rendering Image]
[Layers] palette
Supported 2D Images
Images of the following format can be imported.
supported Formats BMP, JPG, PNG, PsD (Photoshop), TIFF, TGA (Targa)
・ Converting a Photograph to Lines and Tones This function takes a 2-dimensional image (photo, etc.) and then renders it into
a line and tone image. The lines and tones are output to their own respective layers, and therefore can be added to any image.
[Example of Use]
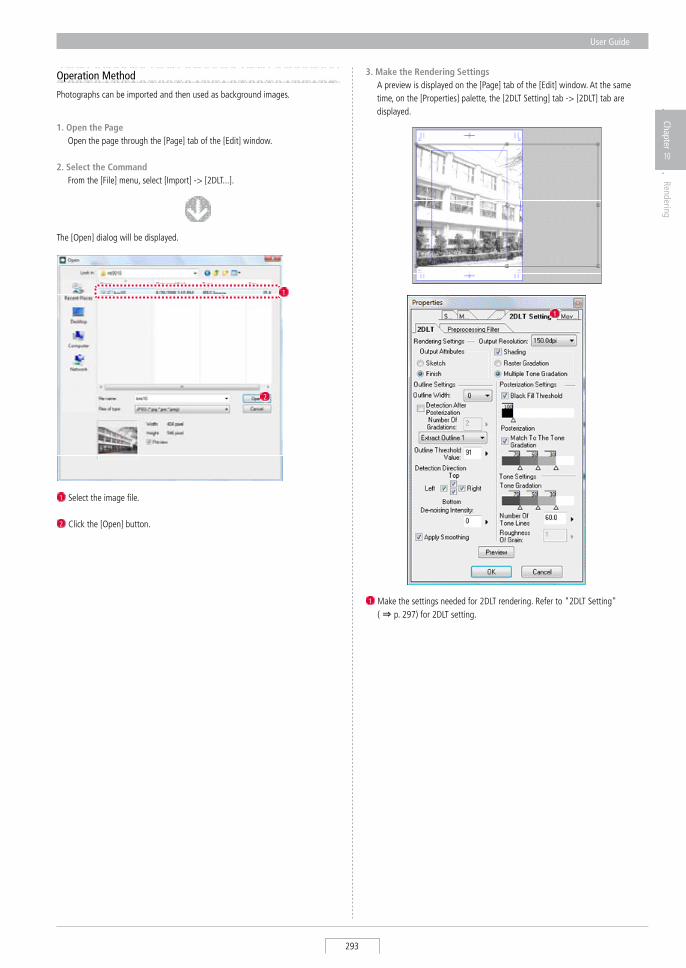
User Guide
293
Chapter
10
Rendering
Operation Method
Photographs can be imported and then used as background images.
1. Open the Page Open the page through the [Page] tab of the [Edit] window.
2. Select the Command From the [File] menu, select [Import] -> [2DLT...].
3. Make the Rendering Settings A preview is displayed on the [Page] tab of the [Edit] window. At the same
time, on the [Properties] palette, the [2DLT setting] tab -> [2DLT] tab are displayed.
The [Open] dialog will be displayed.
1 select the image file.
2 Click the [Open] button.
1
2
1
1 Make the settings needed for 2DLT rendering. Refer to "2DLT setting" ( ⇒ p. 297) for 2DLT setting.
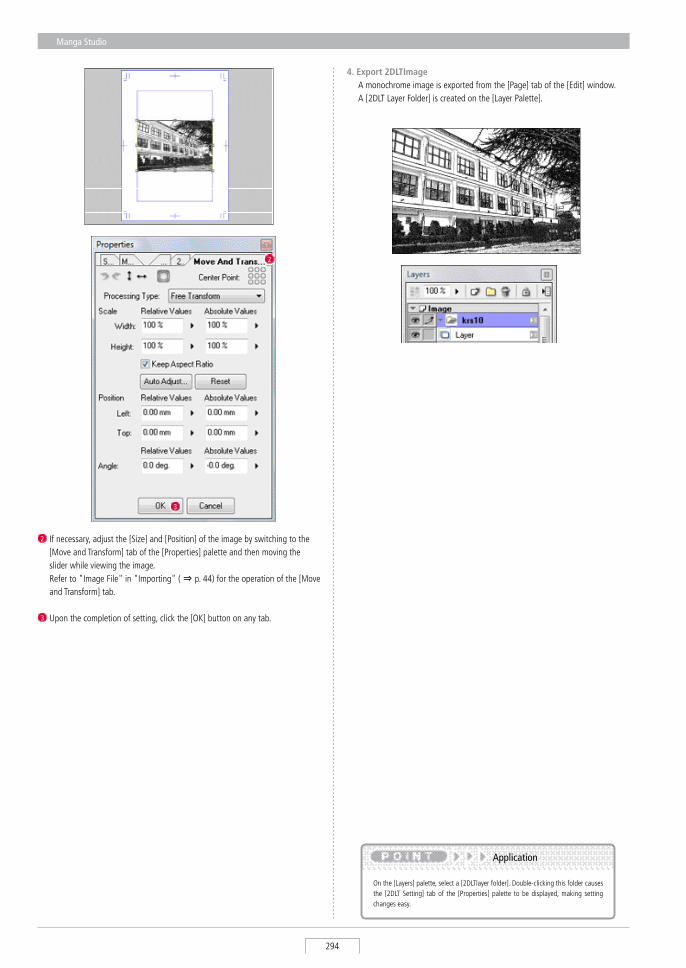
Manga Studio
294
4. Export 2DLTImage A monochrome image is exported from the [Page] tab of the [Edit] window.
A [2DLT Layer Folder] is created on the [Layer Palette].
On the [Layers] palette, select a [2DLTlayer folder]. Double-clicking this folder causes the [2DLT setting] tab of the [Properties] palette to be displayed, making setting changes easy.
Application
2 If necessary, adjust the [size] and [Position] of the image by switching to the [Move and Transform] tab of the [Properties] palette and then moving the slider while viewing the image. Refer to "Image File" in "Importing" ( ⇒ p. 44) for the operation of the [Move and Transform] tab.
3 Upon the completion of setting, click the [OK] button on any tab.
2
3
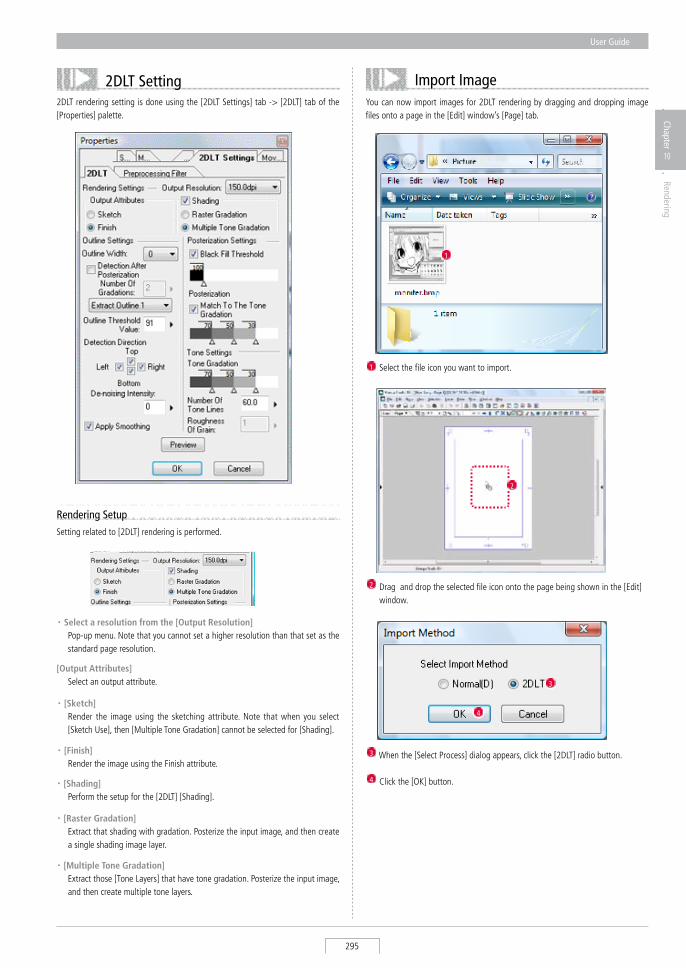
User Guide
295
Chapter
10
Rendering
2DLT Setting2DLT rendering setting is done using the [2DLT settings] tab -> [2DLT] tab of the [Properties] palette.
setting related to [2DLT] rendering is performed.
・ Select a resolution from the [Output Resolution] Pop-up menu. Note that you cannot set a higher resolution than that set as the
standard page resolution.
[Output Attributes] select an output attribute.
・ [Sketch] Render the image using the sketching attribute. Note that when you select
[sketch Use], then [Multiple Tone Gradation] cannot be selected for [shading].
・ [Finish] Render the image using the Finish attribute.
Rendering Setup
・ [Shading] Perform the setup for the [2DLT] [shading].
・ [Raster Gradation] Extract that shading with gradation. Posterize the input image, and then create
a single shading image layer.
・ [Multiple Tone Gradation] Extract those [Tone Layers] that have tone gradation. Posterize the input image,
and then create multiple tone layers.
Import ImageYou can now import images for 2DLT rendering by dragging and dropping image files onto a page in the [Edit] window’s [Page] tab.
1 select the file icon you want to import.
1
2
2 Drag and drop the selected file icon onto the page being shown in the [Edit] window.
3 When the [select Process] dialog appears, click the [2DLT] radio button.
4 Click the [OK] button.
3
4
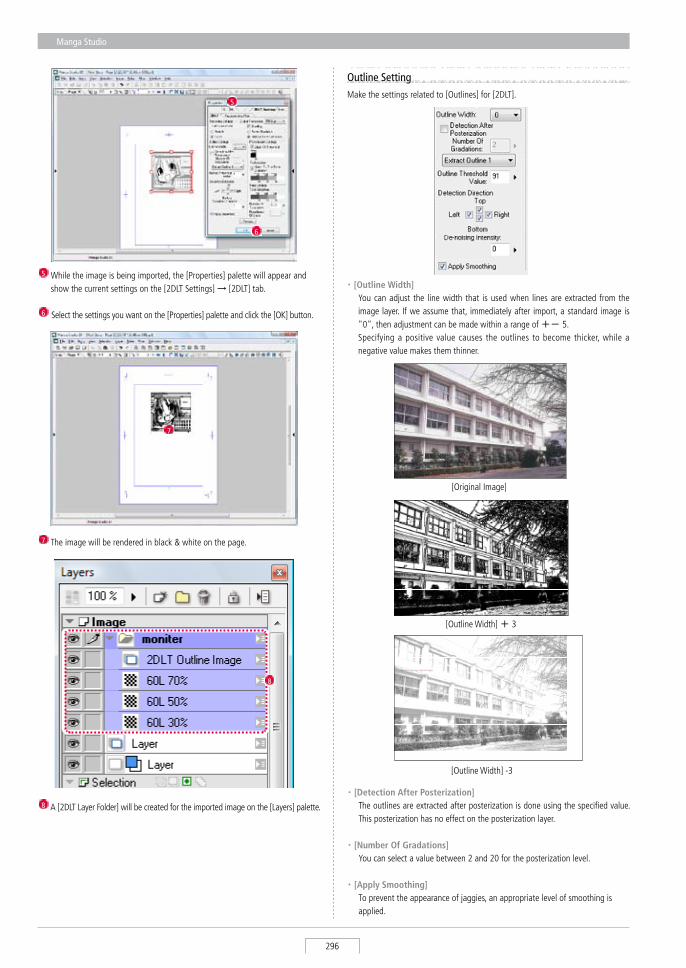
Manga Studio
296
Outline Setting
・ [Outline Width] You can adjust the line width that is used when lines are extracted from the
image layer. If we assume that, immediately after import, a standard image is "0", then adjustment can be made within a range of +- 5.
specifying a positive value causes the outlines to become thicker, while a negative value makes them thinner.
Make the settings related to [Outlines] for [2DLT].
[Outline Width] + 3
[Outline Width] -3
[Original Image]
・ [Detection After Posterization] The outlines are extracted after posterization is done using the specified value.
This posterization has no effect on the posterization layer.
・ [Number Of Gradations] You can select a value between 2 and 20 for the posterization level.
・ [Apply Smoothing] To prevent the appearance of jaggies, an appropriate level of smoothing is
applied.
5 While the image is being imported, the [Properties] palette will appear and show the current settings on the [2DLT settings] → [2DLT] tab.
6 select the settings you want on the [Properties] palette and click the [OK] button.
5
6
7
7 The image will be rendered in black & white on the page.
8
8 A [2DLT Layer Folder] will be created for the imported image on the [Layers] palette.
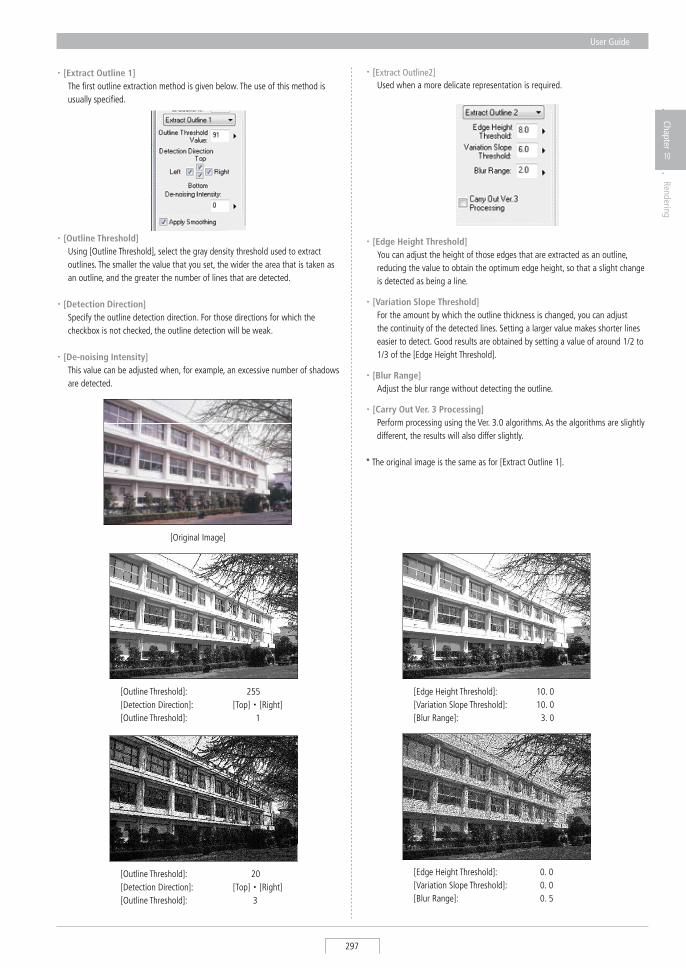
User Guide
297
Chapter
10
Rendering
[Edge Height Threshold]: 10. 0 [Variation slope Threshold]: 10. 0 [Blur Range]: 3. 0
[Edge Height Threshold]: 0. 0 [Variation slope Threshold]: 0. 0 [Blur Range]: 0. 5
・ [Blur Range] Adjust the blur range without detecting the outline.
・ [Carry Out Ver. 3 Processing] Perform processing using the Ver. 3.0 algorithms. As the algorithms are slightly
different, the results will also differ slightly.
* The original image is the same as for [Extract Outline 1].
・ [Edge Height Threshold] You can adjust the height of those edges that are extracted as an outline,
reducing the value to obtain the optimum edge height, so that a slight change is detected as being a line.
・ [Variation Slope Threshold] For the amount by which the outline thickness is changed, you can adjust
the continuity of the detected lines. setting a larger value makes shorter lines easier to detect. Good results are obtained by setting a value of around 1/2 to 1/3 of the [Edge Height Threshold].
・ [Extract Outline2] Used when a more delicate representation is required.
[Outline Threshold]: 255 [Detection Direction]: [Top]・ [Right] [Outline Threshold]: 1
[Outline Threshold]: 20 [Detection Direction]: [Top]・ [Right] [Outline Threshold]: 3
[Original Image]
・ [Outline Threshold] Using [Outline Threshold], select the gray density threshold used to extract
outlines. The smaller the value that you set, the wider the area that is taken as an outline, and the greater the number of lines that are detected.
・ [Detection Direction] specify the outline detection direction. For those directions for which the
checkbox is not checked, the outline detection will be weak.
・ [De-noising Intensity] This value can be adjusted when, for example, an excessive number of shadows
are detected.
・ [Extract Outline 1] The first outline extraction method is given below. The use of this method is
usually specified.
Manga Studio
298
[Black Fill Threshold]: (Initial Value)
[Black Fill Threshold]: After changing the threshold
・ [Black Fill Threshold] Use the slider to adjust the threshold of the range to which black fill is applied.
PosterizationMake the settings related to [Posterize] for [2DLT]. While noting the relationship between the different values, move the slider to make this adjustment.
[Original Image]
・ [Posterization] Adjust the posterization that is applied to the gray density of the entire image.
Using the slider, adjust the range threshold.
[Posterization] 2 layers
[Posterization] 4 layers
・ [Match To The Tone Gradation] Placing a check mark in this box when you are setting [Tone Gradation] lets
you simultaneously adjust the settings of [Tone Gradation]. When this box is checked, the [Posterization] slider is disabled.
[Original Image]
Clicking the bottom of the slider causes a △ to appear. The density is set for the position that you click.
Clicking the right end of the slider causes the density to be low, while clicking the left end causes it to be high. To completely erase the shading, drag the 、 outside the slider.
User Guide
299
Chapter
10
Rendering
Prior to 2DLT processing, a partial filter is applied to the images. Refer to "Chapter 9. Filters"( ⇒ p. 255) for filter operation.
Preprocessing Filter
You can edit the size and position of a scene. [Refer to [Move and Transform] ( ⇒ p. 237) for the operation of the [Move and
Transform] tab.
Move and Transform
Make the settings related to [Tone] for [2DLT]. set the image density, number of tone layers to be used, and so on.
・ [Tone Gradation] You can set the tone density.
・ [Tone Lines] Display the settings made with [Tone Gradation]. For the density, clicking
the slider causes an editing box to be displayed, in which you can adjust the numeric settings.
・ [Roughness of Grain] Adjust the "Roughness of Grain" for the tone. setting a larger value makes the
tone grainier. Note that this setting cannot be made when [Match to the Tone Gradation] is checked.
Tone Settings
[Tone Gradation] 2 layers (Initial Value)
[Tone Gradation] 4 layers
[Original Image]
Clicking the bottom of the slider causes a △ to appear. The density is set for the position that you click.
Clicking the top of the slider allows you to adjust the tone density. Clicking the right end of the slider causes the density to be low, while clicking the left end causes it to be high. To completely erase the tone, drag the ▽ outside the slider.
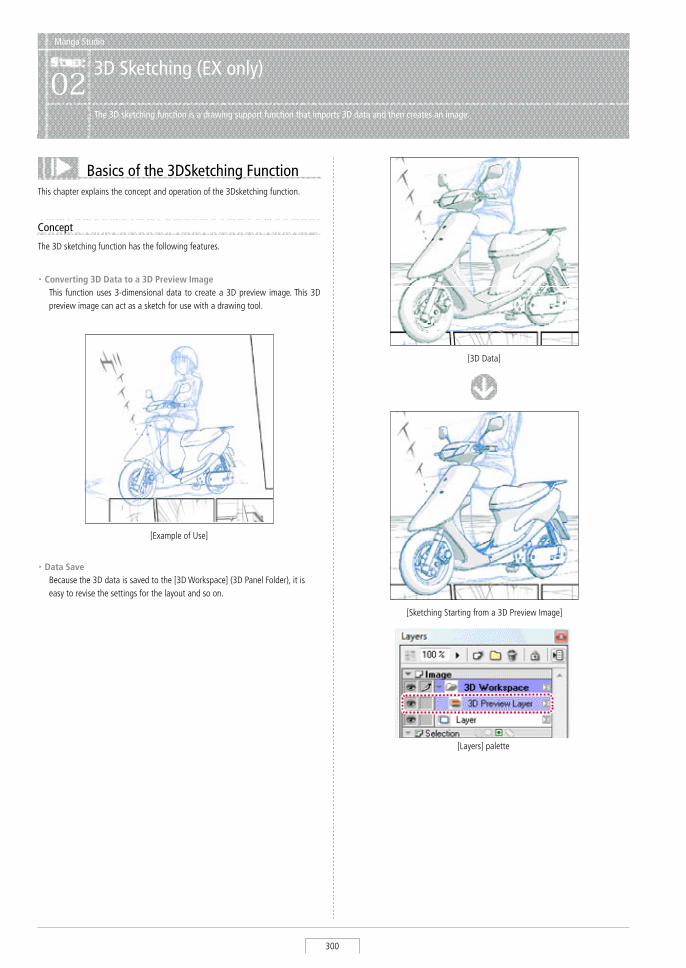
Manga Studio
300
Manga Studio
3D Sketching (EX only)02
The 3D sketching function is a drawing support function that imports 3D data and then creates an image.
This chapter explains the concept and operation of the 3Dsketching function.
[3D Data]
[sketching starting from a 3D Preview Image]
[Layers] palette
Concept
The 3D sketching function has the following features.
・ Data Save Because the 3D data is saved to the [3D Workspace] (3D Panel Folder), it is
easy to revise the settings for the layout and so on.
・ Converting 3D Data to a 3D Preview Image This function uses 3-dimensional data to create a 3D preview image. This 3D
preview image can act as a sketch for use with a drawing tool.
[Example of Use]
Basics of the 3DSketching Function
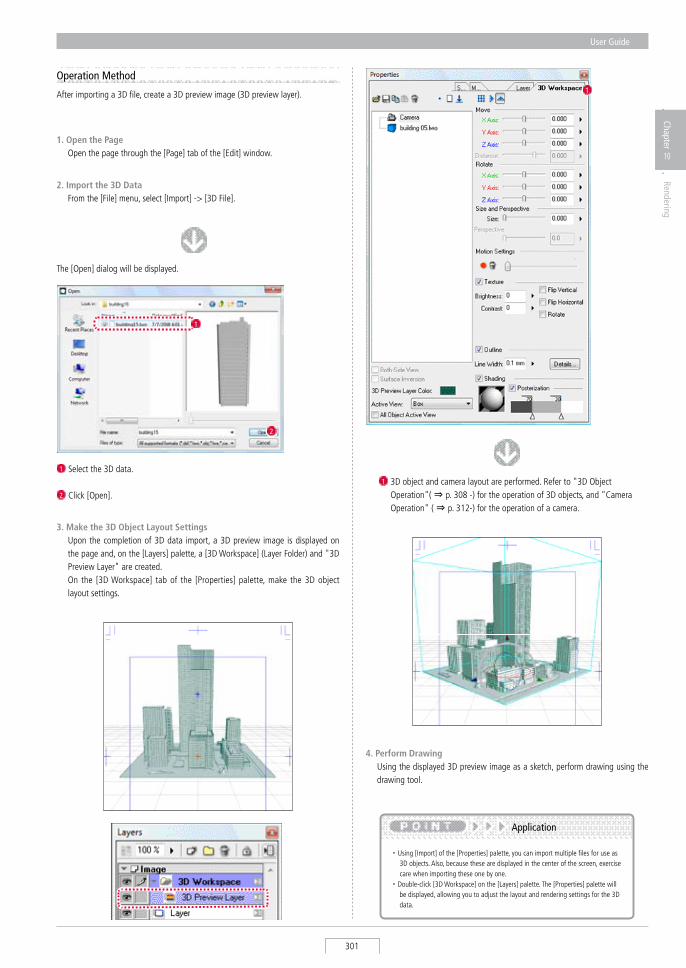
User Guide
301
Chapter
10
Rendering
1 3D object and camera layout are performed. Refer to "3D Object Operation"( ⇒ p. 308 -) for the operation of 3D objects, and "Camera Operation" ( ⇒ p. 312-) for the operation of a camera.
4. Perform Drawing Using the displayed 3D preview image as a sketch, perform drawing using the
drawing tool.
・ Using [Import] of the [Properties] palette, you can import multiple files for use as 3D objects. Also, because these are displayed in the center of the screen, exercise care when importing these one by one.
・ Double-click [3D Workspace] on the [Layers] palette. The [Properties] palette will be displayed, allowing you to adjust the layout and rendering settings for the 3D data.
Application
Operation Method
After importing a 3D file, create a 3D preview image (3D preview layer).
3. Make the 3D Object Layout Settings Upon the completion of 3D data import, a 3D preview image is displayed on
the page and, on the [Layers] palette, a [3D Workspace] (Layer Folder) and "3D Preview Layer" are created.
On the [3D Workspace] tab of the [Properties] palette, make the 3D object layout settings.
1 select the 3D data.
2 Click [Open].
The [Open] dialog will be displayed.
2
1
1. Open the Page Open the page through the [Page] tab of the [Edit] window.
2. Import the 3D Data From the [File] menu, select [Import] -> [3D File].
1
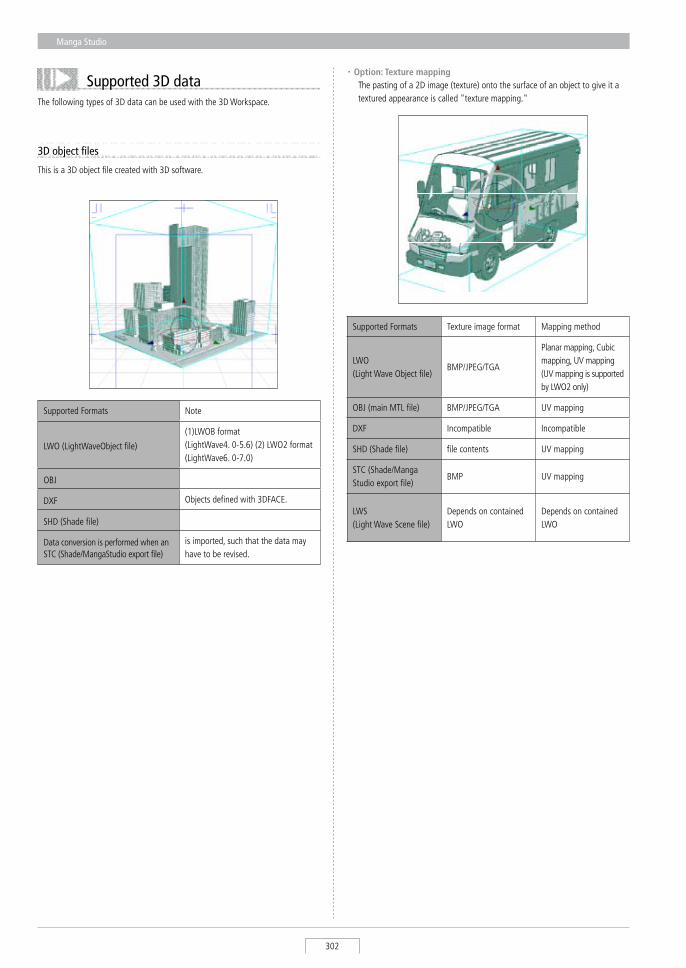
Manga Studio
302
The following types of 3D data can be used with the 3D Workspace.
3D object files
Supported 3D data
This is a 3D object file created with 3D software.
supported Formats Note
LWO (LightWaveObject file)
(1)LWOB format (LightWave4. 0-5.6) (2) LWO2 format (LightWave6. 0-7.0)
OBJ
DXF Objects defined with 3DFACE.
sHD (shade file)
Data conversion is performed when an sTC (shade/Mangastudio export file)
is imported, such that the data may have to be revised.
・ Option: Texture mapping The pasting of a 2D image (texture) onto the surface of an object to give it a
textured appearance is called "texture mapping."
supported Formats Texture image format Mapping method
LWO(Light Wave Object file)
BMP/JPEG/TGA
Planar mapping, Cubic mapping, UV mapping (UV mapping is supported by LWO2 only)
OBJ (main MTL file) BMP/JPEG/TGA UV mapping
DXF Incompatible Incompatible
sHD (shade file) file contents UV mapping
sTC (shade/Manga studio export file)
BMP UV mapping
LWs(Light Wave scene file)
Depends on contained LWO
Depends on contained LWO
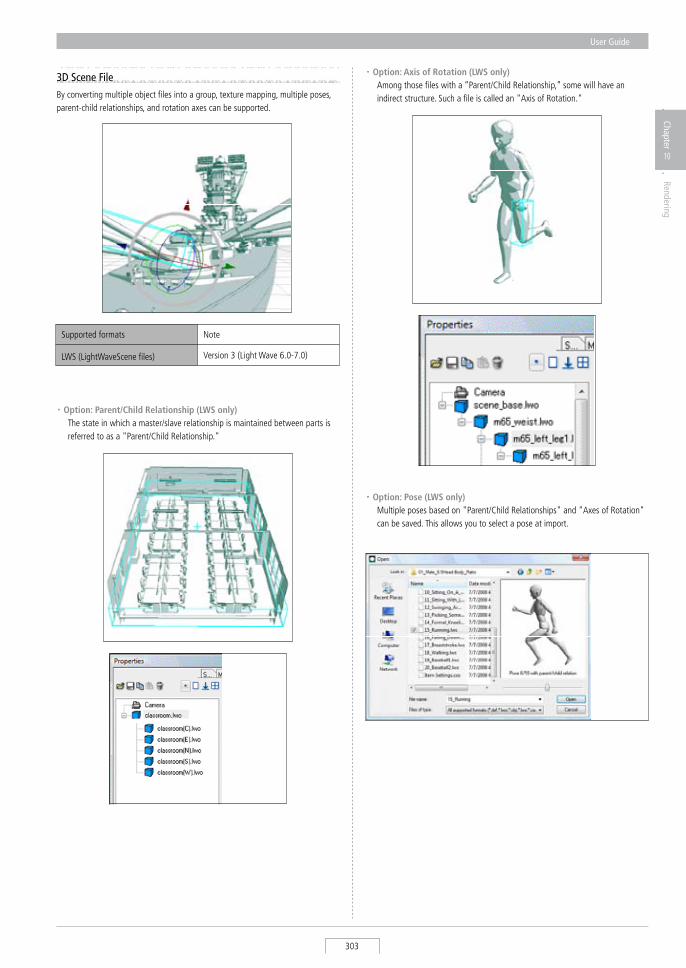
User Guide
303
Chapter
10
Rendering
By converting multiple object files into a group, texture mapping, multiple poses, parent-child relationships, and rotation axes can be supported.
supported formats Note
LWs (LightWavescene files) Version 3 (Light Wave 6.0-7.0)
・ Option: Parent/Child Relationship (LWS only) The state in which a master/slave relationship is maintained between parts is
referred to as a "Parent/Child Relationship."
・ Option: Axis of Rotation (LWS only) Among those files with a “Parent/Child Relationship,” some will have an
indirect structure. such a file is called an "Axis of Rotation."
・ Option: Pose (LWS only) Multiple poses based on "Parent/Child Relationships" and "Axes of Rotation"
can be saved. This allows you to select a pose at import.
3D Scene File
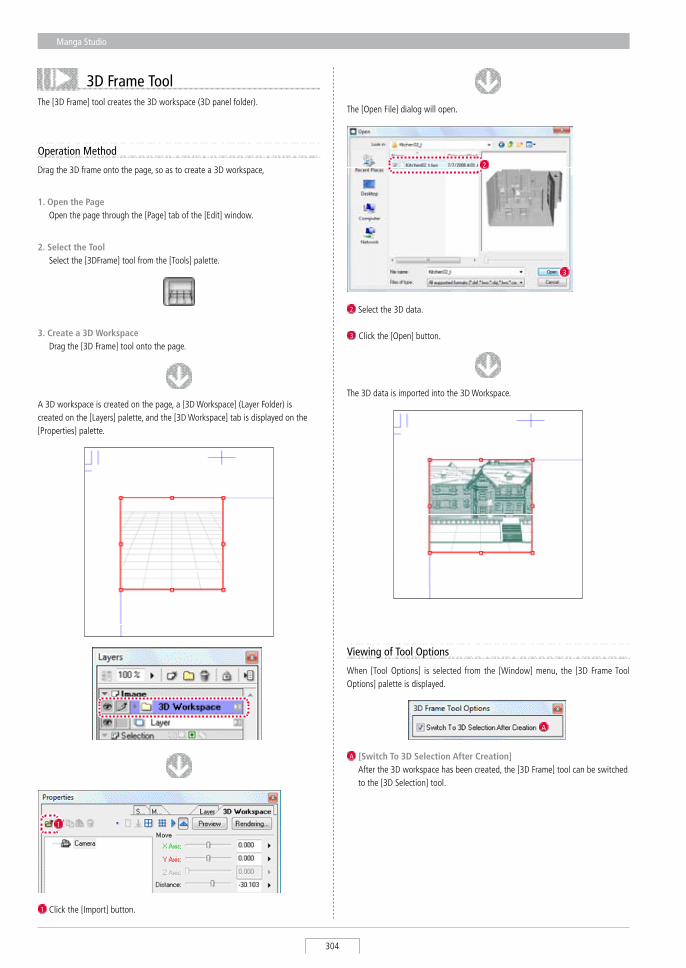
Manga Studio
304
Operation Method
Drag the 3D frame onto the page, so as to create a 3D workspace,
3D Frame Tool
1. Open the Page Open the page through the [Page] tab of the [Edit] window.
The [3D Frame] tool creates the 3D workspace (3D panel folder).
2. Select the Tool select the [3DFrame] tool from the [Tools] palette.
3. Create a 3D Workspace Drag the [3D Frame] tool onto the page.
1 Click the [Import] button.
A 3D workspace is created on the page, a [3D Workspace] (Layer Folder) is created on the [Layers] palette, and the [3D Workspace] tab is displayed on the [Properties] palette.
The [Open File] dialog will open.
2 select the 3D data.
3 Click the [Open] button.
The 3D data is imported into the 3D Workspace.
1
2
3
Viewing of Tool Options
When [Tool Options] is selected from the [Window] menu, the [3D Frame Tool Options] palette is displayed.
A [Switch To 3D Selection After Creation] After the 3D workspace has been created, the [3D Frame] tool can be switched
to the [3D selection] tool.
A
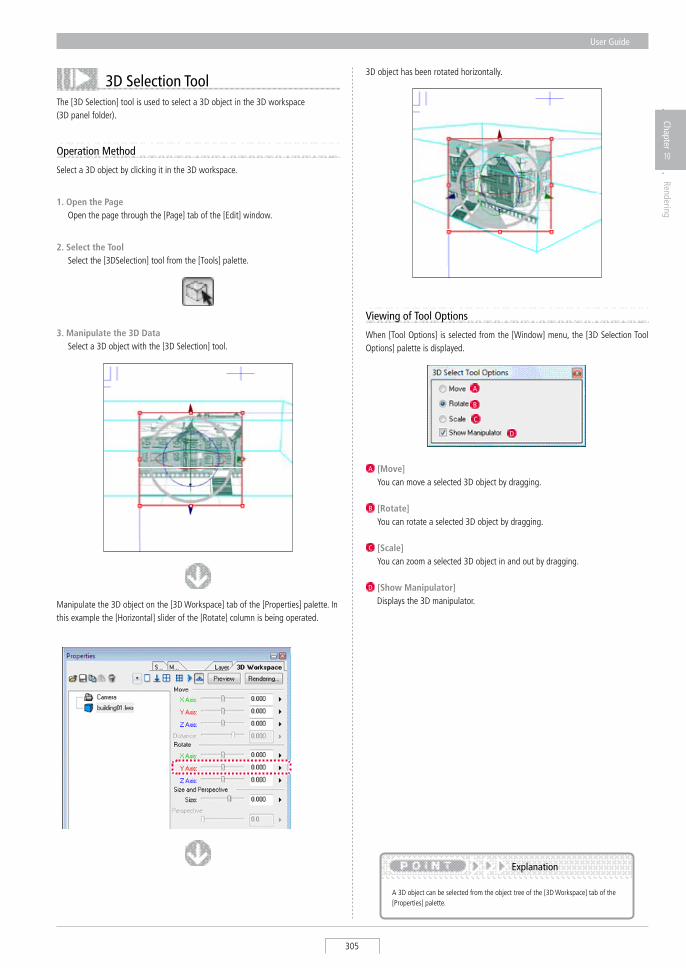
User Guide
305
Chapter
10
Rendering
3D Selection ToolThe [3D selection] tool is used to select a 3D object in the 3D workspace (3D panel folder).
Viewing of Tool Options
When [Tool Options] is selected from the [Window] menu, the [3D selection Tool Options] palette is displayed.
A [Move] You can move a selected 3D object by dragging.
B [Rotate] You can rotate a selected 3D object by dragging.
C [Scale] You can zoom a selected 3D object in and out by dragging.
D [Show Manipulator] Displays the 3D manipulator.
3D object has been rotated horizontally.
Operation Method
select a 3D object by clicking it in the 3D workspace.
1. Open the Page Open the page through the [Page] tab of the [Edit] window.
2. Select the Tool select the [3Dselection] tool from the [Tools] palette.
3. Manipulate the 3D Data select a 3D object with the [3D selection] tool.
Manipulate the 3D object on the [3D Workspace] tab of the [Properties] palette. In this example the [Horizontal] slider of the [Rotate] column is being operated.
A
B
C
D
A 3D object can be selected from the object tree of the [3D Workspace] tab of the [Properties] palette.
Explanation
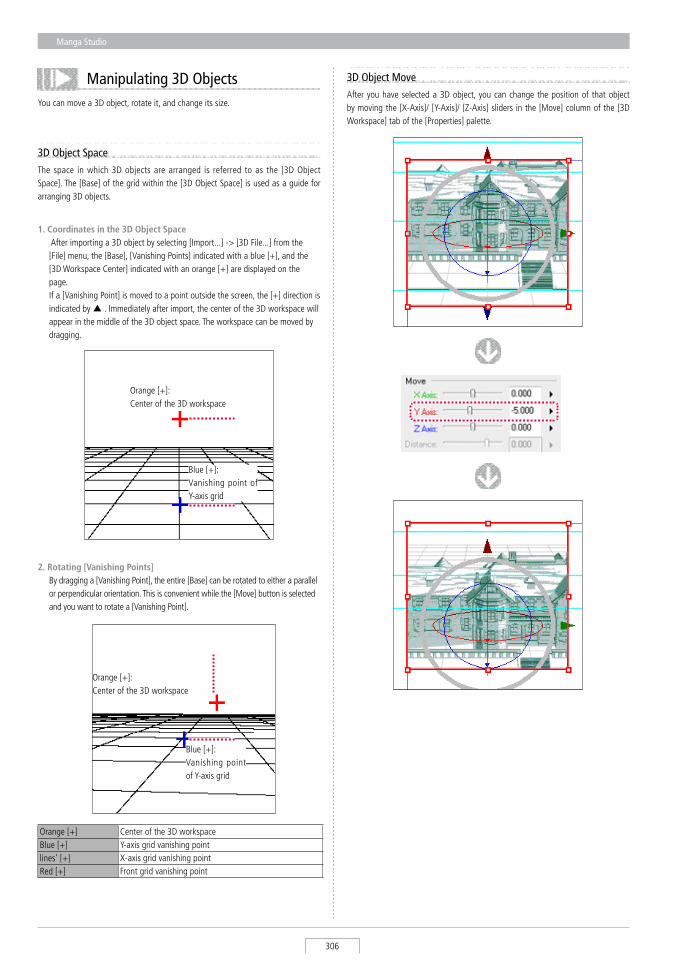
Manga Studio
306
Manipulating 3D ObjectsYou can move a 3D object, rotate it, and change its size.
3D Object SpaceThe space in which 3D objects are arranged is referred to as the [3D Object space]. The [Base] of the grid within the [3D Object space] is used as a guide for arranging 3D objects.
3D Object MoveAfter you have selected a 3D object, you can change the position of that object by moving the [X-Axis]/ [Y-Axis]/ [Z-Axis] sliders in the [Move] column of the [3D Workspace] tab of the [Properties] palette.
1. Coordinates in the 3D Object Space After importing a 3D object by selecting [Import...] -> [3D File...] from the
[File] menu, the [Base], [Vanishing Points] indicated with a blue [+], and the [3D Workspace Center] indicated with an orange [+] are displayed on the page.
If a [Vanishing Point] is moved to a point outside the screen, the [+] direction is indicated by ▲ . Immediately after import, the center of the 3D workspace will appear in the middle of the 3D object space. The workspace can be moved by dragging.
2. Rotating [Vanishing Points] By dragging a [Vanishing Point], the entire [Base] can be rotated to either a parallel
or perpendicular orientation. This is convenient while the [Move] button is selected and you want to rotate a [Vanishing Point].
Orange [+] Center of the 3D workspaceBlue [+] Y-axis grid vanishing pointlines' [+] X-axis grid vanishing pointRed [+] Front grid vanishing point
Orange [+]: Center of the 3D workspace
Blue [+]: Vanishing point of Y-axis grid
Blue [+]: Vanishing point of Y-axis grid
Orange [+]: Center of the 3D workspace
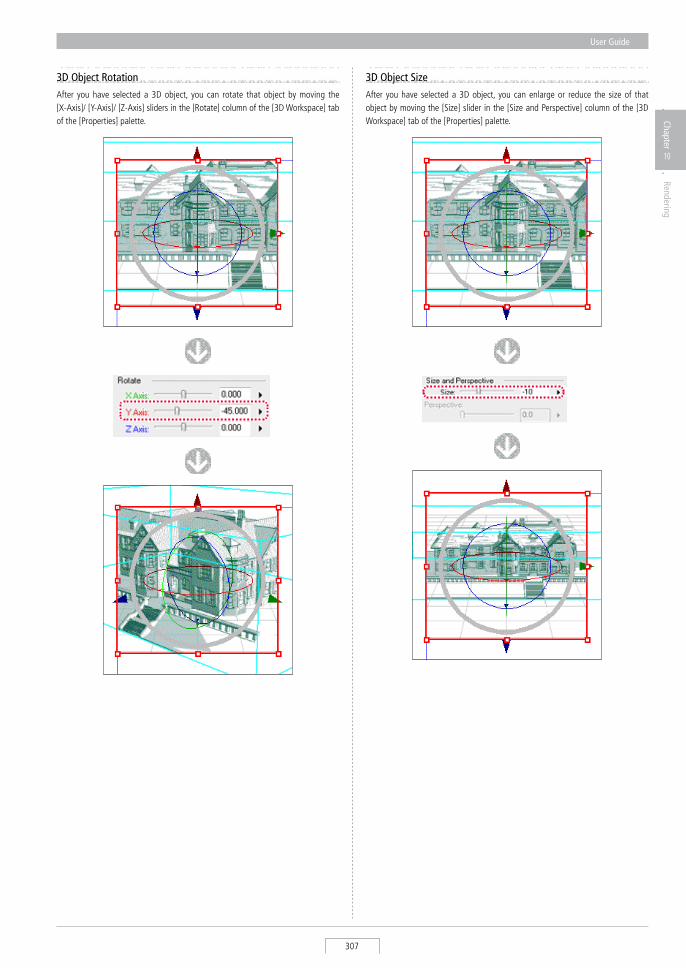
User Guide
307
Chapter
10
Rendering
3D Object RotationAfter you have selected a 3D object, you can rotate that object by moving the [X-Axis]/ [Y-Axis]/ [Z-Axis] sliders in the [Rotate] column of the [3D Workspace] tab of the [Properties] palette.
3D Object SizeAfter you have selected a 3D object, you can enlarge or reduce the size of that object by moving the [size] slider in the [size and Perspective] column of the [3D Workspace] tab of the [Properties] palette.
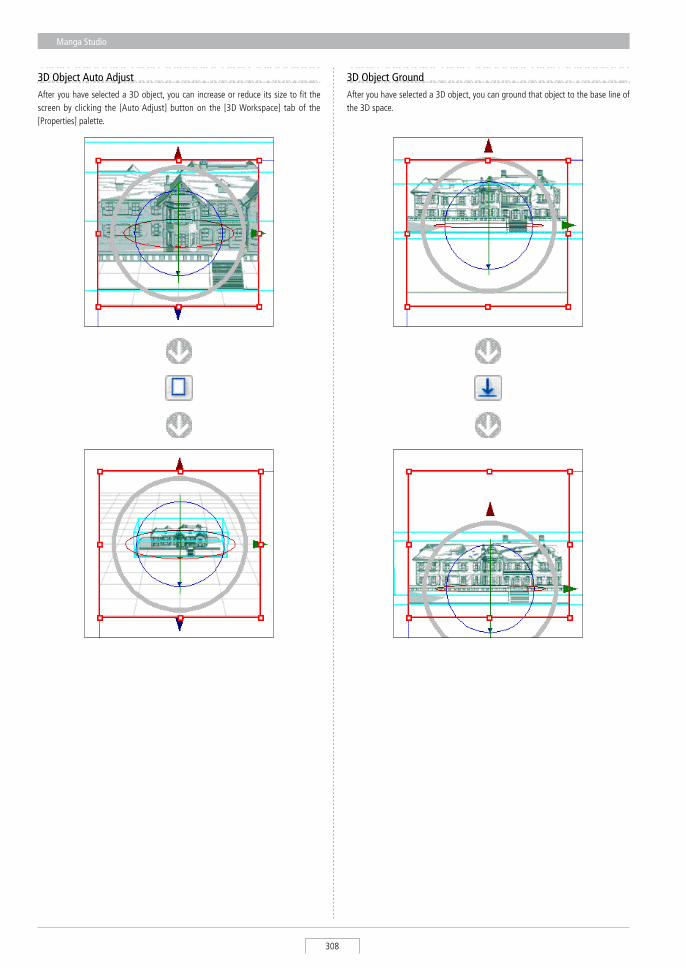
Manga Studio
308
3D Object Auto AdjustAfter you have selected a 3D object, you can increase or reduce its size to fit the screen by clicking the [Auto Adjust] button on the [3D Workspace] tab of the [Properties] palette.
3D Object GroundAfter you have selected a 3D object, you can ground that object to the base line of the 3D space.
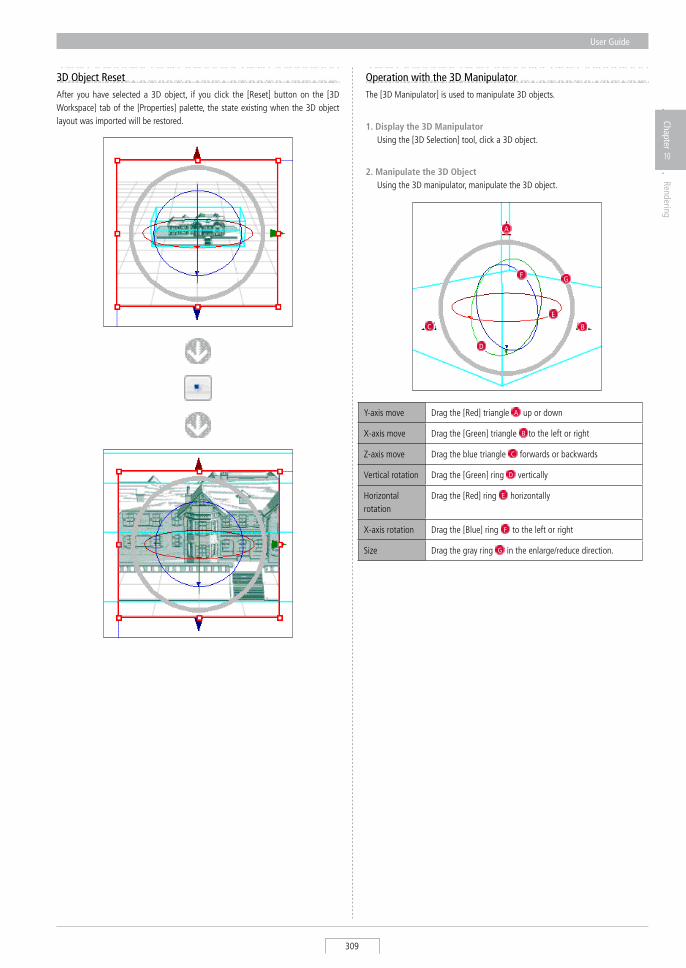
User Guide
309
Chapter
10
Rendering
3D Object ResetAfter you have selected a 3D object, if you click the [Reset] button on the [3D Workspace] tab of the [Properties] palette, the state existing when the 3D object layout was imported will be restored.
Operation with the 3D ManipulatorThe [3D Manipulator] is used to manipulate 3D objects.
1. Display the 3D Manipulator Using the [3D selection] tool, click a 3D object.
2. Manipulate the 3D Object Using the 3D manipulator, manipulate the 3D object.
Y-axis move Drag the [Red] triangle A up or down
X-axis move Drag the [Green] triangle B to the left or right
Z-axis move Drag the blue triangle C forwards or backwards
Vertical rotation Drag the [Green] ring D vertically
Horizontal rotation
Drag the [Red] ring E horizontally
X-axis rotation Drag the [Blue] ring F to the left or right
size Drag the gray ring G in the enlarge/reduce direction.
A
BC
D
E
F G
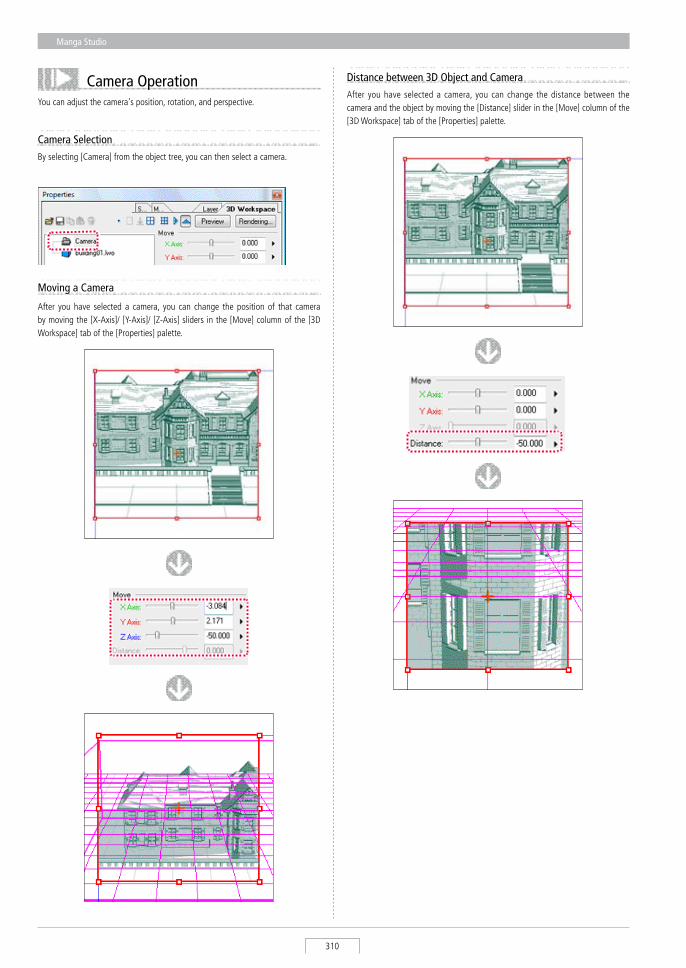
Manga Studio
310
Camera Operation You can adjust the camera's position, rotation, and perspective.
Camera SelectionBy selecting [Camera] from the object tree, you can then select a camera.
Moving a Camera
After you have selected a camera, you can change the position of that camera by moving the [X-Axis]/ [Y-Axis]/ [Z-Axis] sliders in the [Move] column of the [3D Workspace] tab of the [Properties] palette.
Distance between 3D Object and CameraAfter you have selected a camera, you can change the distance between the camera and the object by moving the [Distance] slider in the [Move] column of the [3D Workspace] tab of the [Properties] palette.
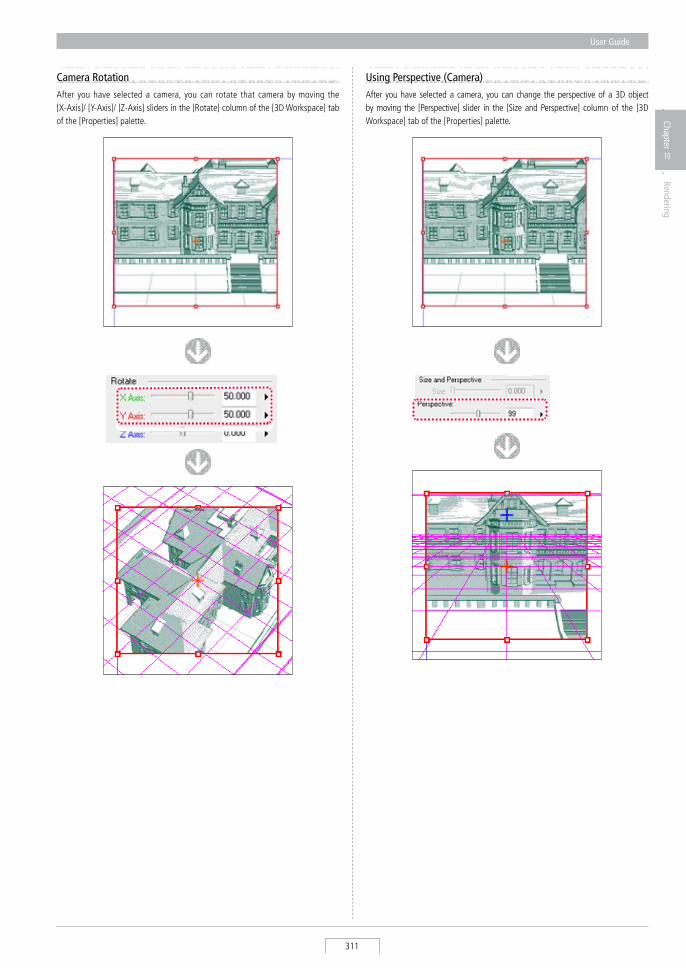
User Guide
311
Chapter
10
Rendering
Camera RotationAfter you have selected a camera, you can rotate that camera by moving the [X-Axis]/ [Y-Axis]/ [Z-Axis] sliders in the [Rotate] column of the [3D Workspace] tab of the [Properties] palette.
Using Perspective (Camera)After you have selected a camera, you can change the perspective of a 3D object by moving the [Perspective] slider in the [size and Perspective] column of the [3D Workspace] tab of the [Properties] palette.
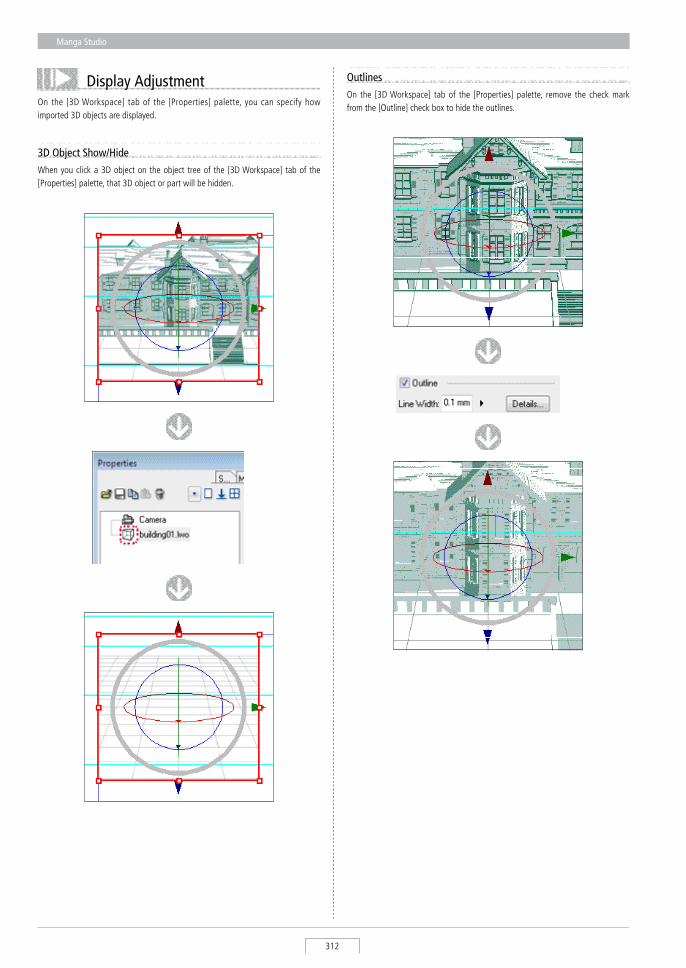
Manga Studio
312
Display AdjustmentOn the [3D Workspace] tab of the [Properties] palette, you can specify how imported 3D objects are displayed.
3D Object Show/HideWhen you click a 3D object on the object tree of the [3D Workspace] tab of the [Properties] palette, that 3D object or part will be hidden.
OutlinesOn the [3D Workspace] tab of the [Properties] palette, remove the check mark from the [Outline] check box to hide the outlines.
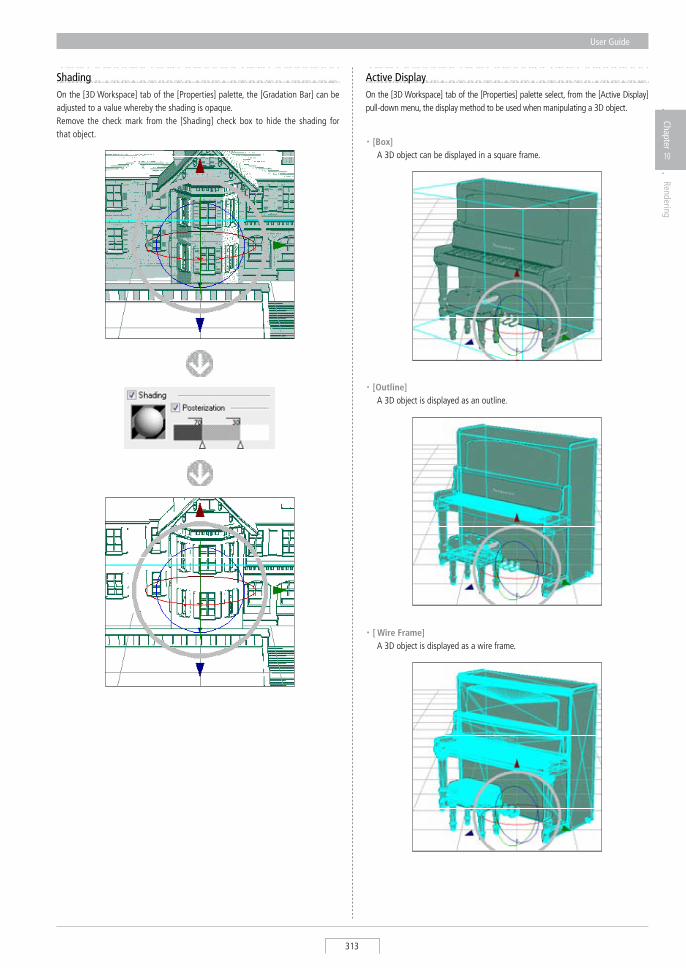
User Guide
313
Chapter
10
Rendering
ShadingOn the [3D Workspace] tab of the [Properties] palette, the [Gradation Bar] can be adjusted to a value whereby the shading is opaque. Remove the check mark from the [shading] check box to hide the shading for that object.
Active DisplayOn the [3D Workspace] tab of the [Properties] palette select, from the [Active Display] pull-down menu, the display method to be used when manipulating a 3D object.
・ [Box] A 3D object can be displayed in a square frame.
・ [Outline] A 3D object is displayed as an outline.
・ [ Wire Frame] A 3D object is displayed as a wire frame.
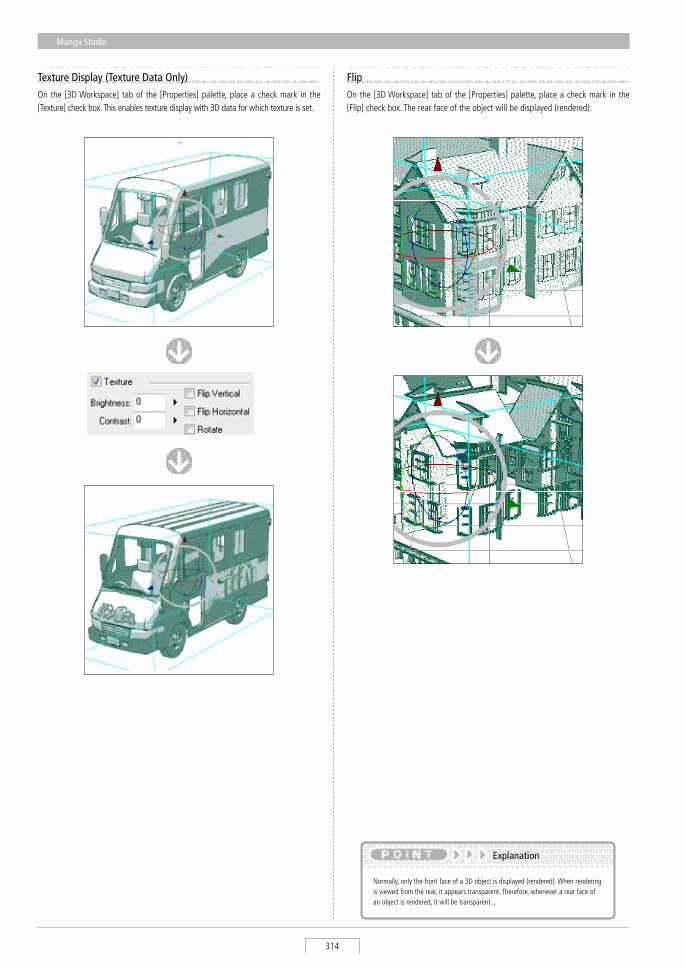
Manga Studio
314
Texture Display (Texture Data Only)On the [3D Workspace] tab of the [Properties] palette, place a check mark in the [Texture] check box. This enables texture display with 3D data for which texture is set.
FlipOn the [3D Workspace] tab of the [Properties] palette, place a check mark in the [Flip] check box. The rear face of the object will be displayed (rendered).
Normally, only the front face of a 3D object is displayed (rendered). When rendering is viewed from the rear, it appears transparent. Therefore, whenever a rear face of an object is rendered, it will be transparent. ,
Explanation
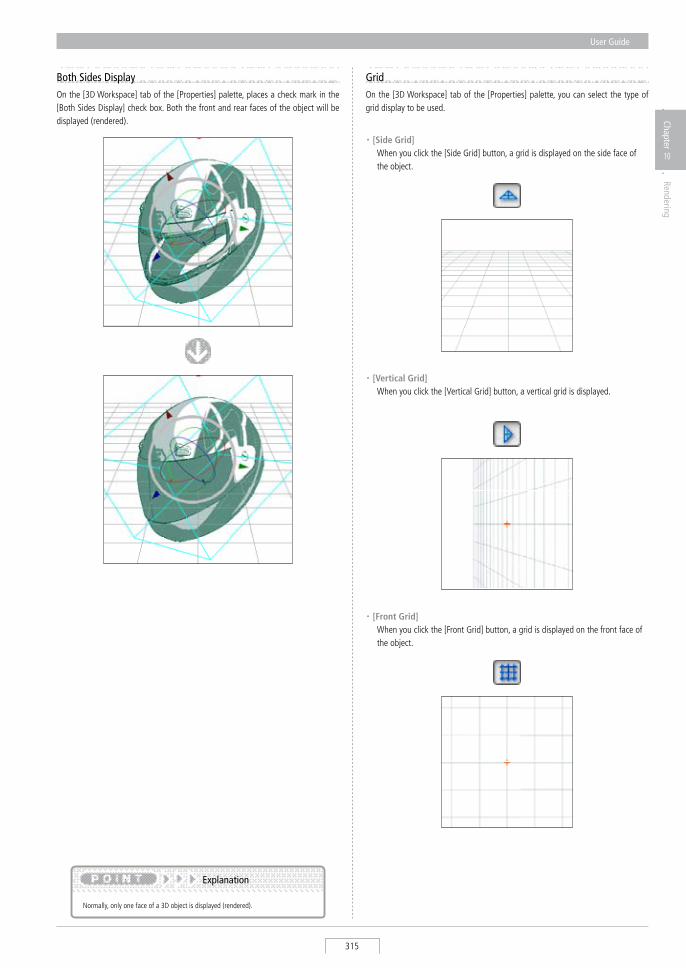
User Guide
315
Chapter
10
Rendering
Both Sides DisplayOn the [3D Workspace] tab of the [Properties] palette, places a check mark in the [Both sides Display] check box. Both the front and rear faces of the object will be displayed (rendered).
Normally, only one face of a 3D object is displayed (rendered).
Explanation
GridOn the [3D Workspace] tab of the [Properties] palette, you can select the type of grid display to be used.
・ [Front Grid] When you click the [Front Grid] button, a grid is displayed on the front face of
the object.
・ [Side Grid] When you click the [side Grid] button, a grid is displayed on the side face of
the object.
・ [Vertical Grid] When you click the [Vertical Grid] button, a vertical grid is displayed.
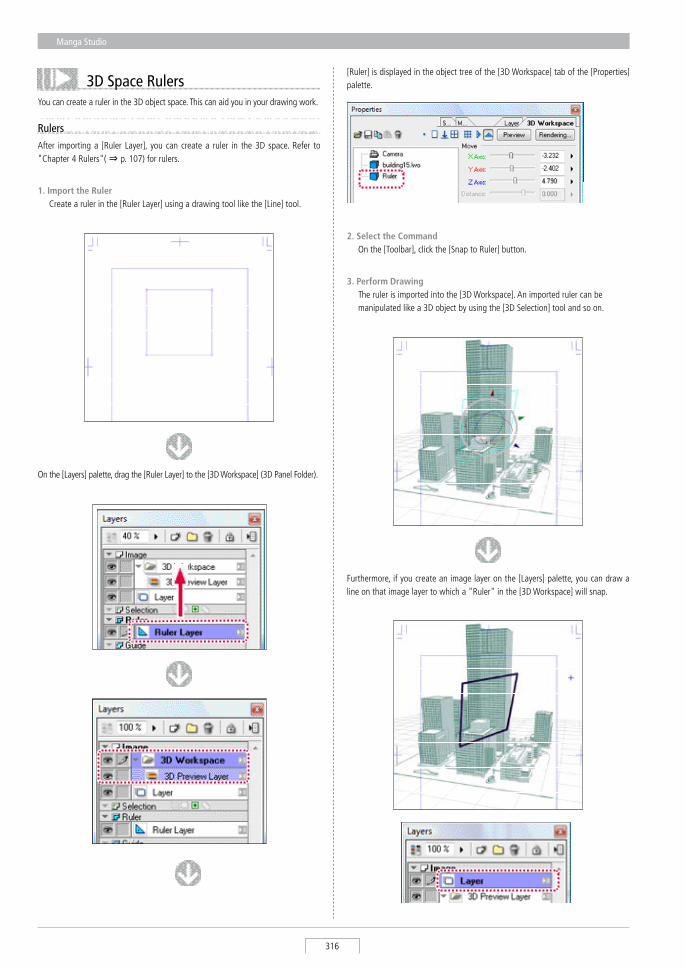
Manga Studio
316
3D Space RulersYou can create a ruler in the 3D object space. This can aid you in your drawing work.
RulersAfter importing a [Ruler Layer], you can create a ruler in the 3D space. Refer to "Chapter 4 Rulers"( ⇒ p. 107) for rulers.
[Ruler] is displayed in the object tree of the [3D Workspace] tab of the [Properties] palette.
2. Select the Command On the [Toolbar], click the [snap to Ruler] button.
3. Perform Drawing The ruler is imported into the [3D Workspace]. An imported ruler can be
manipulated like a 3D object by using the [3D selection] tool and so on.
Furthermore, if you create an image layer on the [Layers] palette, you can draw a line on that image layer to which a "Ruler" in the [3D Workspace] will snap.
1. Import the Ruler Create a ruler in the [Ruler Layer] using a drawing tool like the [Line] tool.
On the [Layers] palette, drag the [Ruler Layer] to the [3D Workspace] (3D Panel Folder).
User Guide
317
Chapter
10
Rendering
Perspective RulerAfter importing the [Image Layer], you can create a perspective ruler in the 3D space. Refer to "Perspective Ruler"( ⇒ p. 123) for the perspective ruler.
1. Import the Image Layer Create a new image layer on the [Layers] palette.
2. Select the Command On the [Toolbar], click the [snap to Perspective Ruler] button.
On the [Layers] palette, drag the [Image Layer] to the [3D Workspace] (3D Panel Folder).
3. Perform Drawing "Camera Focal Point" on the [3D Workspace] tab of the [Properties] palette
can be used as a vanishing point and perspective ruler.
Manga Studio
318
Basics of 3D Human modelsThis chapter explains the concept and operation of 3D human models.
Concept
3D human models have the following features.
1. 3D Human models Among the 3D scene files (LWs), those containing figures are referred to as
"3D human models."
2. Parts Can be Made Movable, Deleted Because the LWs conforms to a "Parent/Child Relationship," for "3D human
models," the perspective can be made movable and deleted.
3. Waist Placed at Center The waist (waist) of a 3D sketch figure is created as a parent part, such that
movement or rotation of the entire figure is centered on the waist of the figure. When you make a figure movable or rotate it, the process progresses from the parent part to the child parts.
[Properties] Palette object tree
[Properties]Palette object tree
User Guide
319
Chapter
10
Rendering
Pose Selection3D human models are saved in a variety of poses, allowing you to select a pose when you import the 3D data. Refer to "3D sketching Function Basics"( ⇒ p. 303) for the import of 3D data.
Using Perspective (Parent/Child Relationship) Each part of a 3D sketch figure is saved with a "Parent/Child Relationship," and each part can be rotated (made movable), placed in a variety of poses, and deleted on a part-by-part basis.
1. Select the Part select a part of a 3D sketch figure using the [3D selection] tool.
2. Rotate the Part Using the various 3D manipulators a selected part can be rotated indirectly. The
slider of the 3D Workspace tab can also be used to perform this operation.
1. Select a Pose Display the [Open] dialog.
1 select the 3D Data.
2 Operate the slider, and then select one frame ("X/X" of the preview indicates the displayed number of poses from which you can make a selection).
3 Click the [Open] button.
2. Import will be complete. The 3D sketch figure has now been imported.
1
3
2
Manga Studio
320
Saving Poses and ScenesYou can save a series of poses, individual poses, and scenes.
Saving Motions (Series of Poses)You can make the parts of a 3D object movable, and also save that movement.
1. Select the Part select a part from the Object tree of the [Properties] palette.
2. Move the Part Move the selected part or 3D object into the pose that you want to save.
4. Check the Movement By moving the slider, you can check each saveed motion key.
3. Save a Pose When you click the [Add Motion Key] button, the motion at that instant is
saveed. The location is also saveed and a stamp placed at that location.
2 I
1 Move the slider to the right.
2 Click the [Add Frame] button to save the frame.
To remove a key frame, move the slider to the position corresponding to the key frame to be removed, and then press the [Delete Frame] button.
Explanation
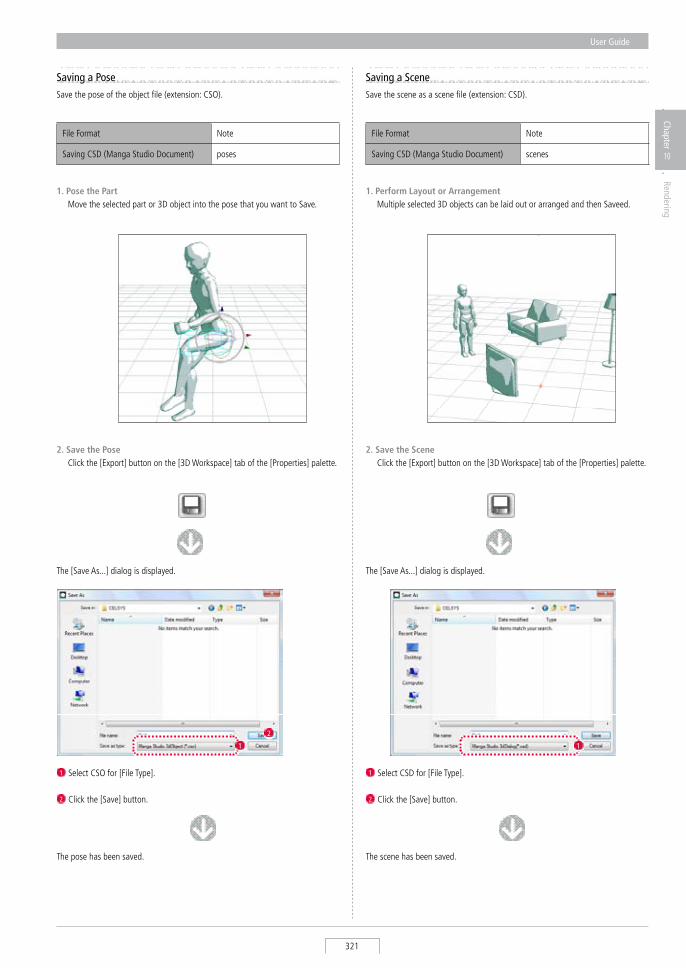
User Guide
321
Chapter
10
Rendering
Saving a Posesave the pose of the object file (extension: CsO).
1. Pose the Part Move the selected part or 3D object into the pose that you want to save.
2. Save the Pose Click the [Export] button on the [3D Workspace] tab of the [Properties] palette.
1 select CsO for [File Type].
2 Click the [save] button.
The [save As...] dialog is displayed.
The pose has been saved.
2
1
Saving a Scenesave the scene as a scene file (extension: CsD).
1. Perform Layout or Arrangement Multiple selected 3D objects can be laid out or arranged and then saveed.
2. Save the Scene Click the [Export] button on the [3D Workspace] tab of the [Properties] palette.
1 select CsD for [File Type].
2 Click the [save] button.
The [save As...] dialog is displayed.
The scene has been saved.
1
File Format Note
saving CsD (Manga studio Document) scenes
File Format Note
saving CsD (Manga studio Document) poses
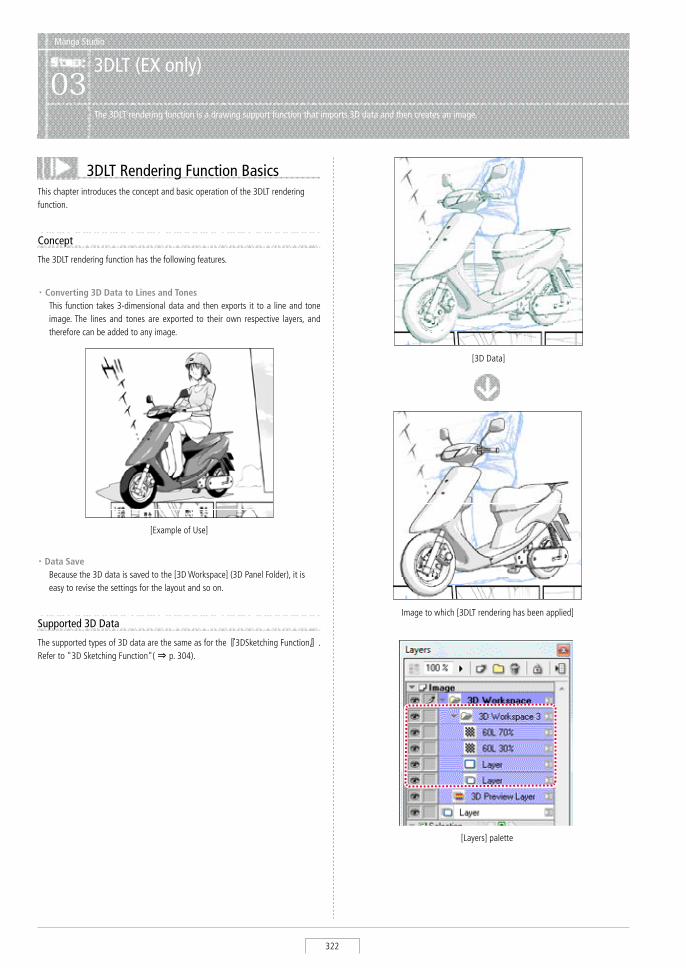
Manga Studio
322
This chapter introduces the concept and basic operation of the 3DLT rendering function.
Concept
The 3DLT rendering function has the following features.
・ Data Save Because the 3D data is saved to the [3D Workspace] (3D Panel Folder), it is
easy to revise the settings for the layout and so on.
・ Converting 3D Data to Lines and Tones This function takes 3-dimensional data and then exports it to a line and tone
image. The lines and tones are exported to their own respective layers, and therefore can be added to any image.
[Example of Use]
3DLT Rendering Function Basics
[Layers] palette
Manga Studio
3DLT (EX only)03
The 3DLT rendering function is a drawing support function that imports 3D data and then creates an image.
Image to which [3DLT rendering has been applied]
[3D Data]
Supported 3D Data
The supported types of 3D data are the same as for the『3Dsketching Function』. Refer to "3D sketching Function"( ⇒ p. 304).
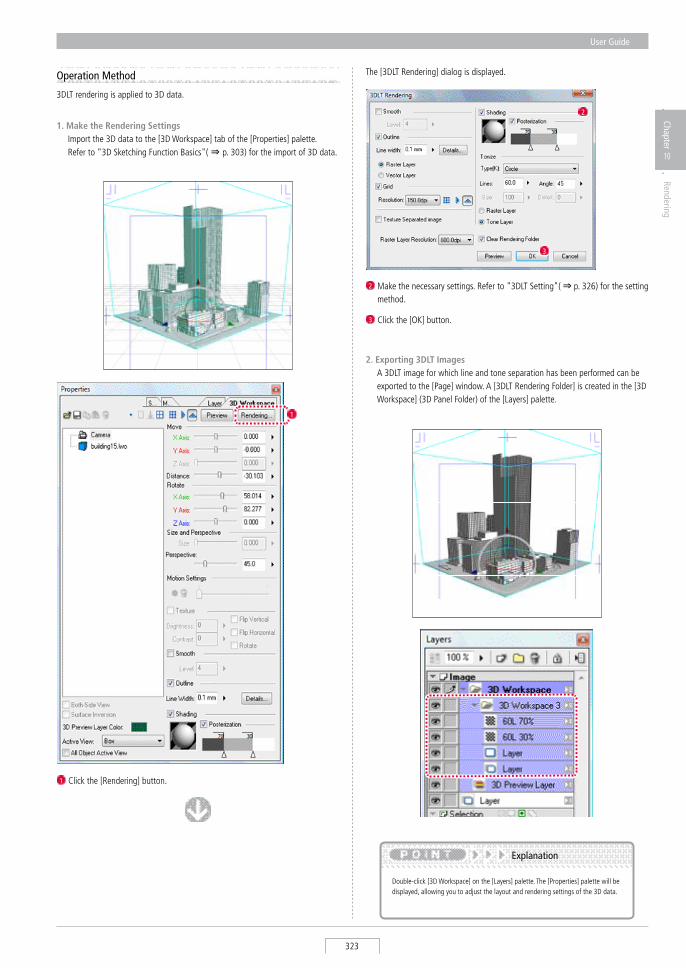
User Guide
323
Chapter
10
Rendering
Operation Method
3DLT rendering is applied to 3D data.
1. Make the Rendering Settings Import the 3D data to the [3D Workspace] tab of the [Properties] palette.
Refer to "3D sketching Function Basics"( ⇒ p. 303) for the import of 3D data.
1 Click the [Rendering] button.
2 Make the necessary settings. Refer to "3DLT setting"( ⇒ p. 326) for the setting method.
The [3DLT Rendering] dialog is displayed.
2
Double-click [3D Workspace] on the [Layers] palette. The [Properties] palette will be displayed, allowing you to adjust the layout and rendering settings of the 3D data.
Explanation
2. Exporting 3DLT Images A 3DLT image for which line and tone separation has been performed can be
exported to the [Page] window. A [3DLT Rendering Folder] is created in the [3D Workspace] (3D Panel Folder) of the [Layers] palette.
1
3
3 Click the [OK] button.
2
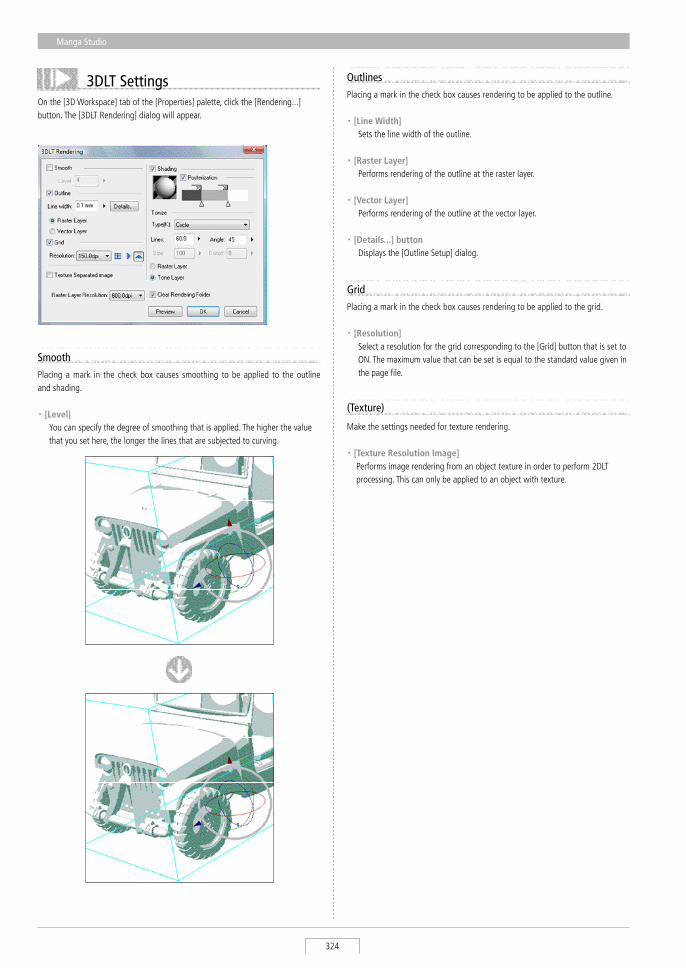
Manga Studio
324
3DLT SettingsOn the [3D Workspace] tab of the [Properties] palette, click the [Rendering...] button. The [3DLT Rendering] dialog will appear.
OutlinesPlacing a mark in the check box causes rendering to be applied to the outline.
・ [Line Width] sets the line width of the outline.
・ [Raster Layer] Performs rendering of the outline at the raster layer.
・ [Vector Layer] Performs rendering of the outline at the vector layer.
・ [Details...] button Displays the [Outline setup] dialog.
GridPlacing a mark in the check box causes rendering to be applied to the grid.
・ [Resolution] select a resolution for the grid corresponding to the [Grid] button that is set to
ON. The maximum value that can be set is equal to the standard value given in the page file.
SmoothPlacing a mark in the check box causes smoothing to be applied to the outline and shading.
・ [Level] You can specify the degree of smoothing that is applied. The higher the value
that you set here, the longer the lines that are subjected to curving.
(Texture)
Make the settings needed for texture rendering.
・ [Texture Resolution Image] Performs image rendering from an object texture in order to perform 2DLT
processing. This can only be applied to an object with texture.
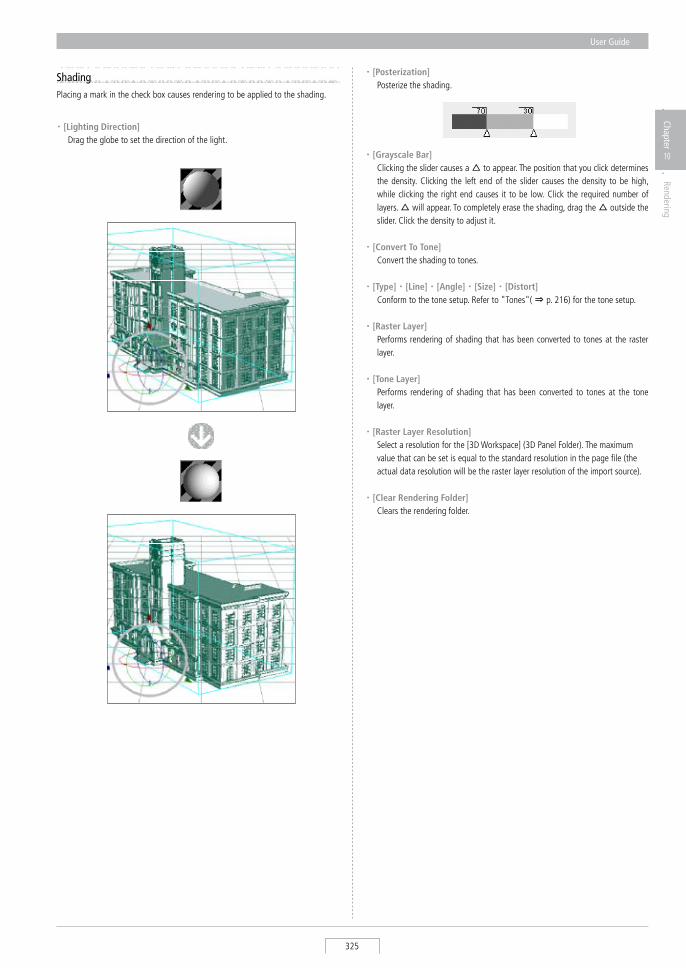
User Guide
325
Chapter
10
Rendering
ShadingPlacing a mark in the check box causes rendering to be applied to the shading.
・ [Lighting Direction] Drag the globe to set the direction of the light.
・ [Posterization] Posterize the shading.
・ [Grayscale Bar] Clicking the slider causes a △ to appear. The position that you click determines
the density. Clicking the left end of the slider causes the density to be high, while clicking the right end causes it to be low. Click the required number of layers. △ will appear. To completely erase the shading, drag the △ outside the slider. Click the density to adjust it.
・ [Convert To Tone] Convert the shading to tones.
・ [Type]・ [Line]・ [Angle]・ [Size]・ [Distort] Conform to the tone setup. Refer to "Tones"( ⇒ p. 216) for the tone setup.
・ [Raster Layer] Performs rendering of shading that has been converted to tones at the raster
layer.
・ [Tone Layer] Performs rendering of shading that has been converted to tones at the tone
layer.
・ [Raster Layer Resolution] select a resolution for the [3D Workspace] (3D Panel Folder). The maximum
value that can be set is equal to the standard resolution in the page file (the actual data resolution will be the raster layer resolution of the import source).
・ [Clear Rendering Folder] Clears the rendering folder.

Manga Studio
326
How to read the [Outline Setting] dialogPerform outline setup.
・ [Line Width] You can set the width of the lines used to draw an outline.
・ [Detection Accuracy[F]] You can set the outline detection quality.
・ [Outside Panel Accentuation[E]] You can set the level of posterization that is applied to the outer lines of an outline.
・ [Depth] You can adjust the depth by manipulating the line width graph. As the
difference between the maximum and minimum values of [Near] and [Far] increases, the lines are drawn to further emphasize the depth. Clicking adds a point to a graph, and the subsequent lines will be fine.
・ [Apply Only To External Panel] The outline stress effect is applied only to the outermost lines.
・ [Reset] Restores the original settings.
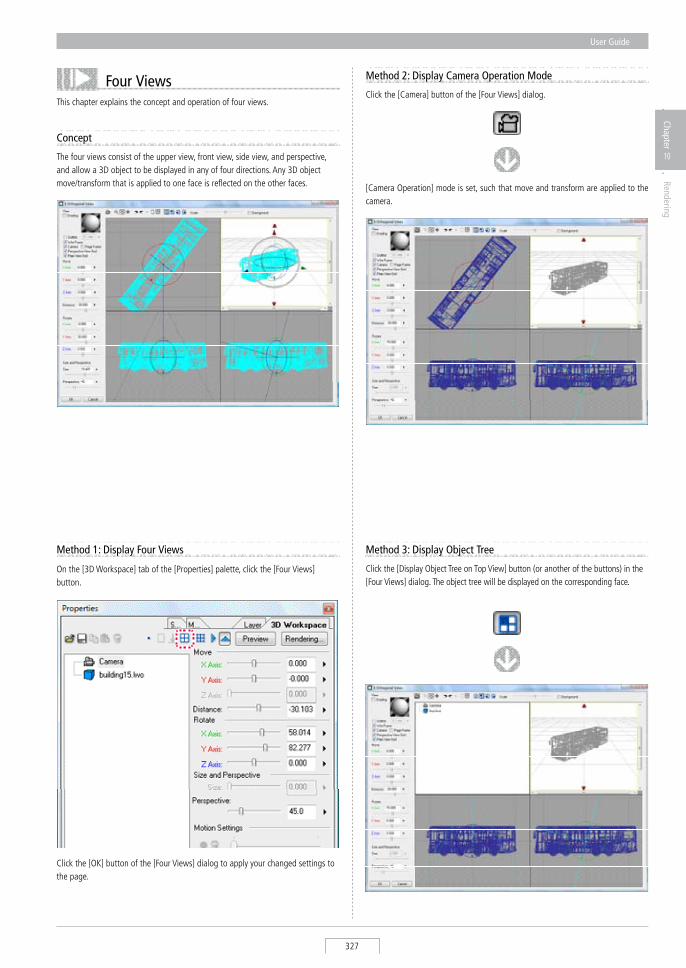
User Guide
327
Chapter
10
Rendering
The four views consist of the upper view, front view, side view, and perspective, and allow a 3D object to be displayed in any of four directions. Any 3D object move/transform that is applied to one face is reflected on the other faces.
On the [3D Workspace] tab of the [Properties] palette, click the [Four Views] button.
Click the [Camera] button of the [Four Views] dialog.
[Camera Operation] mode is set, such that move and transform are applied to the camera.
Click the [OK] button of the [Four Views] dialog to apply your changed settings to the page.
Four Views
Concept
This chapter explains the concept and operation of four views.
Method 1: Display Four Views
Click the [Display Object Tree on Top View] button (or another of the buttons) in the [Four Views] dialog. The object tree will be displayed on the corresponding face.
Method 3: Display Object Tree
Method 2: Display Camera Operation Mode
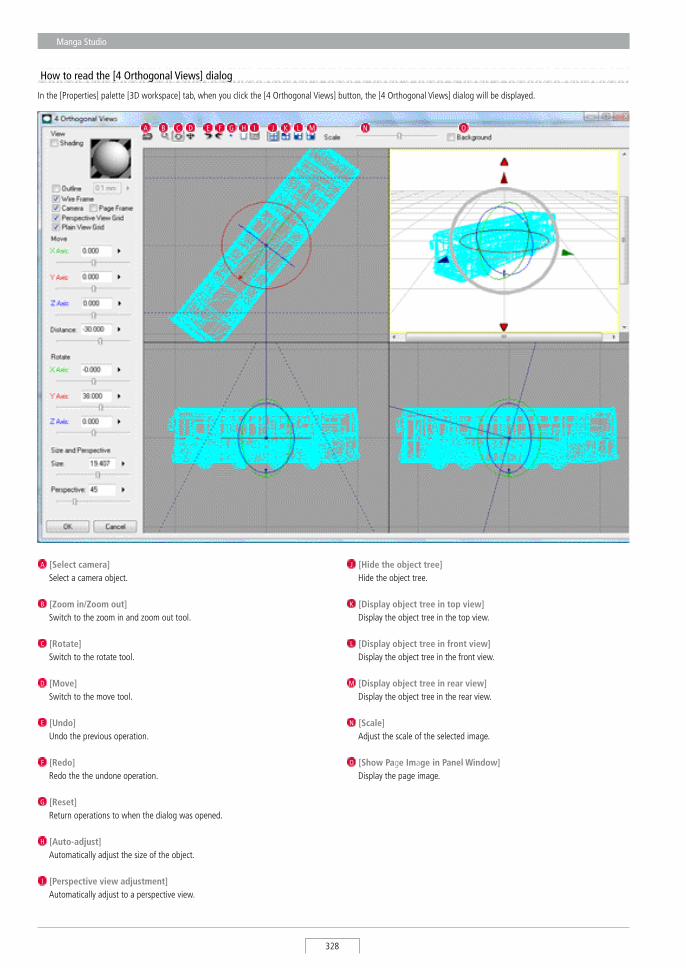
Manga Studio
328
How to read the [4 Orthogonal Views] dialog
In the [Properties] palette [3D workspace] tab, when you click the [4 Orthogonal Views] button, the [4 Orthogonal Views] dialog will be displayed.
A [Select camera] select a camera object.
B [Zoom in/Zoom out] switch to the zoom in and zoom out tool.
C [Rotate] switch to the rotate tool.
D [Move] switch to the move tool.
E [Undo] Undo the previous operation.
F [Redo] Redo the the undone operation.
G [Reset] Return operations to when the dialog was opened.
H [Auto-adjust] Automatically adjust the size of the object.
I [Perspective view adjustment] Automatically adjust to a perspective view.
J [Hide the object tree] Hide the object tree.
K [Display object tree in top view] Display the object tree in the top view.
L [Display object tree in front view] Display the object tree in the front view.
M [Display object tree in rear view] Display the object tree in the rear view.
N [Scale] Adjust the scale of the selected image.
O [Show Page Image in Panel Window] Display the page image.
A B C D F G H I J K L M N OE
Text and Word Balloons
Chapter 11
This chapter deals with text information input and how to create balloons.
Step: 01 Text 332
Step: 02 Balloons 348
Chapter
11
Text and Word Balloons
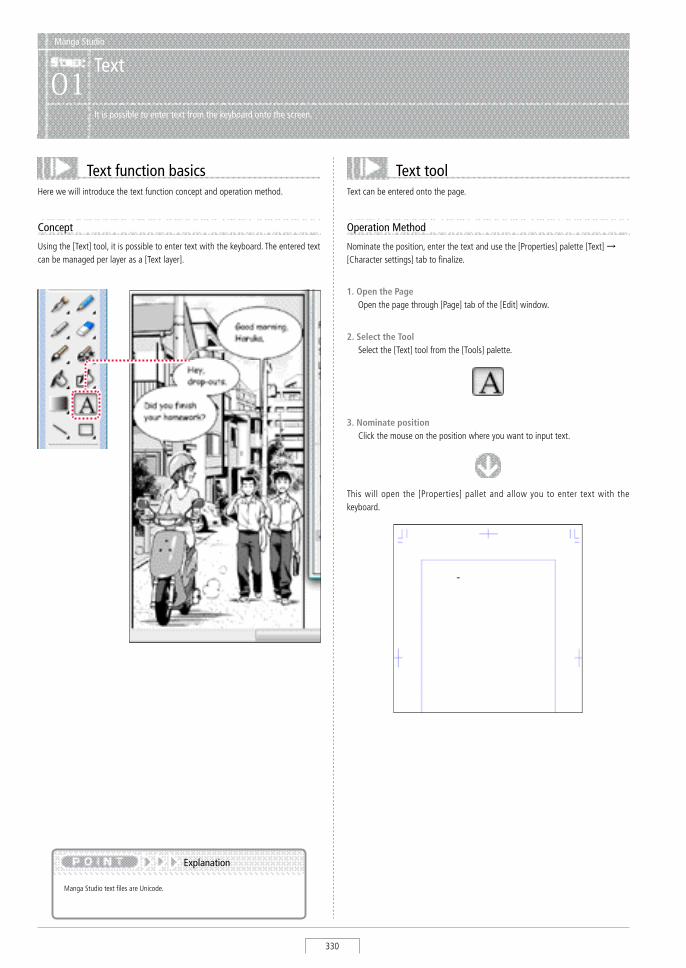
Manga Studio
330
Manga Studio
Text01
It is possible to enter text from the keyboard onto the screen.
Text function basicsHere we will introduce the text function concept and operation method.
Concept
Using the [Text] tool, it is possible to enter text with the keyboard. The entered text can be managed per layer as a [Text layer].
Text toolText can be entered onto the page.
Operation Method
Nominate the position, enter the text and use the [Properties] palette [Text] →[Character settings] tab to finalize.
1. Open the Page Open the page through [Page] tab of the [Edit] window.
2. Select the Tool select the [Text] tool from the [Tools] palette.
3. Nominate position Click the mouse on the position where you want to input text.
This will open the [Properties] pallet and allow you to enter text with the keyboard.
Manga studio text files are Unicode.
Explanation
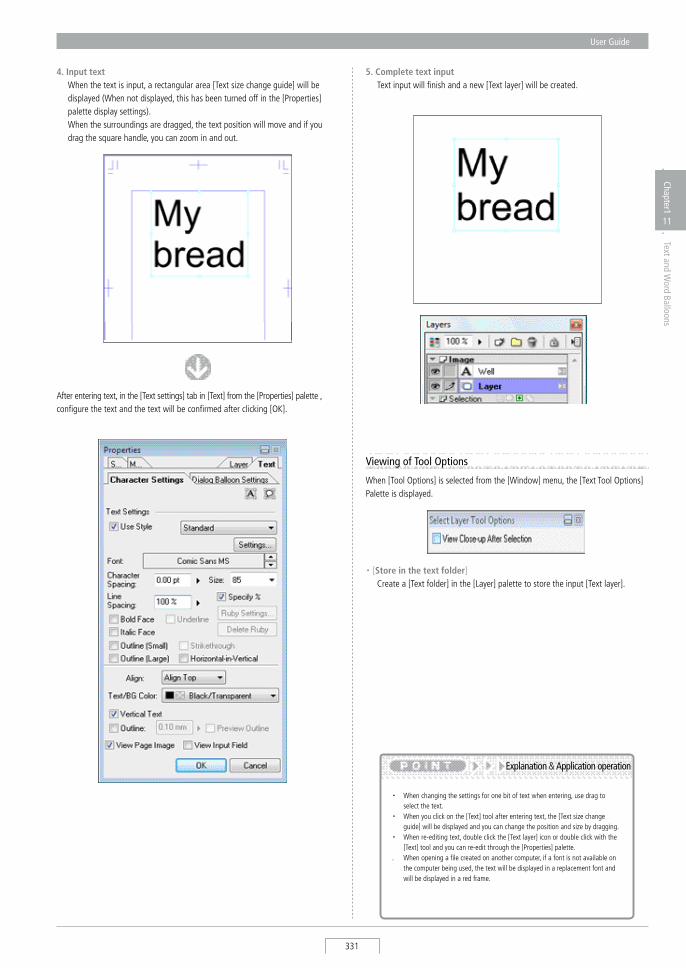
User Guide
331
Chapter1
11
Text and Word Balloons
5. Complete text input Text input will finish and a new [Text layer] will be created.
4. Input text When the text is input, a rectangular area [Text size change guide] will be
displayed (When not displayed, this has been turned off in the [Properties] palette display settings).
When the surroundings are dragged, the text position will move and if you drag the square handle, you can zoom in and out.
・ When changing the settings for one bit of text when entering, use drag to select the text.
・ When you click on the [Text] tool after entering text, the [Text size change guide] will be displayed and you can change the position and size by dragging.
・ When re-editing text, double click the [Text layer] icon or double click with the [Text] tool and you can re-edit through the [Properties] palette.
. When opening a file created on another computer, if a font is not available on the computer being used, the text will be displayed in a replacement font and will be displayed in a red frame.
Explanation & Application operation
When [Tool Options] is selected from the [Window] menu, the [Text Tool Options] Palette is displayed.
Viewing of Tool Options
・ [Store in the text folder] Create a [Text folder] in the [Layer] palette to store the input [Text layer].
After entering text, in the [Text settings] tab in [Text] from the [Properties] palette , configure the text and the text will be confirmed after clicking [OK].
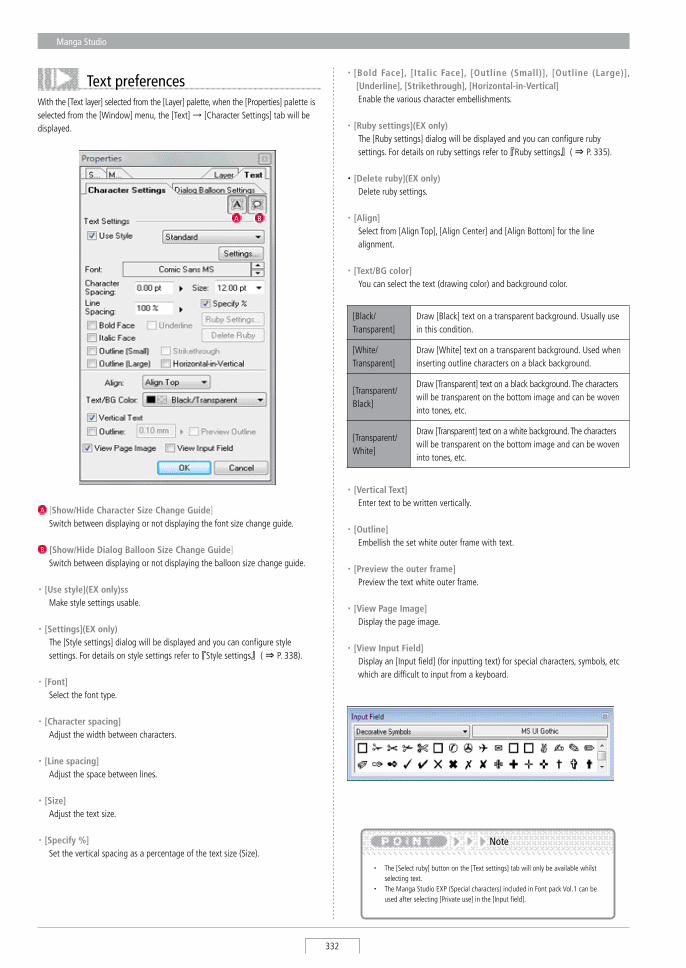
Manga Studio
332
Text preferencesWith the [Text layer] selected from the [Layer] palette, when the [Properties] palette is selected from the [Window] menu, the [Text] → [Character settings] tab will be displayed.
A [Show/Hide Character Size Change Guide] switch between displaying or not displaying the font size change guide.
B [Show/Hide Dialog Balloon Size Change Guide] switch between displaying or not displaying the balloon size change guide.
・ [Use style](EX only)ss Make style settings usable.
・ [Settings](EX only) The [style settings] dialog will be displayed and you can configure style
settings. For details on style settings refer to 『style settings』( ⇒ P. 338).
・ [Font] select the font type.
・ [Character spacing] Adjust the width between characters.
・ [Line spacing] Adjust the space between lines.
・ [Size] Adjust the text size.
・ [Specify %] set the vertical spacing as a percentage of the text size (size).
・ [Bold Face], [Italic Face], [Outline (Small)], [Outline (Large)], [Underline], [Strikethrough], [Horizontal-in-Vertical]
Enable the various character embellishments.
・ [Ruby settings](EX only) The [Ruby settings] dialog will be displayed and you can configure ruby
settings. For details on ruby settings refer to 『Ruby settings』( ⇒ P. 335).
・ [Delete ruby](EX only) Delete ruby settings.
・ [Align] select from [Align Top], [Align Center] and [Align Bottom] for the line
alignment.
・ [Text/BG color] You can select the text (drawing color) and background color.
[Black/Transparent]
Draw [Black] text on a transparent background. Usually use in this condition.
[White/Transparent]
Draw [White] text on a transparent background. Used when inserting outline characters on a black background.
[Transparent/Black]
Draw [Transparent] text on a black background. The characters will be transparent on the bottom image and can be woven into tones, etc.
[Transparent/White]
Draw [Transparent] text on a white background. The characters will be transparent on the bottom image and can be woven into tones, etc.
・ [Vertical Text] Enter text to be written vertically.
・ [Outline] Embellish the set white outer frame with text.
・ [Preview the outer frame] Preview the text white outer frame.
・ [View Page Image] Display the page image.
・ [View Input Field] Display an [Input field] (for inputting text) for special characters, symbols, etc
which are difficult to input from a keyboard.
A B
・ The [select ruby] button on the [Text settings] tab will only be available whilst selecting text.
・ The Manga studio EXP (special characters) included in Font pack Vol.1 can be used after selecting [Private use] in the [Input field].
Note
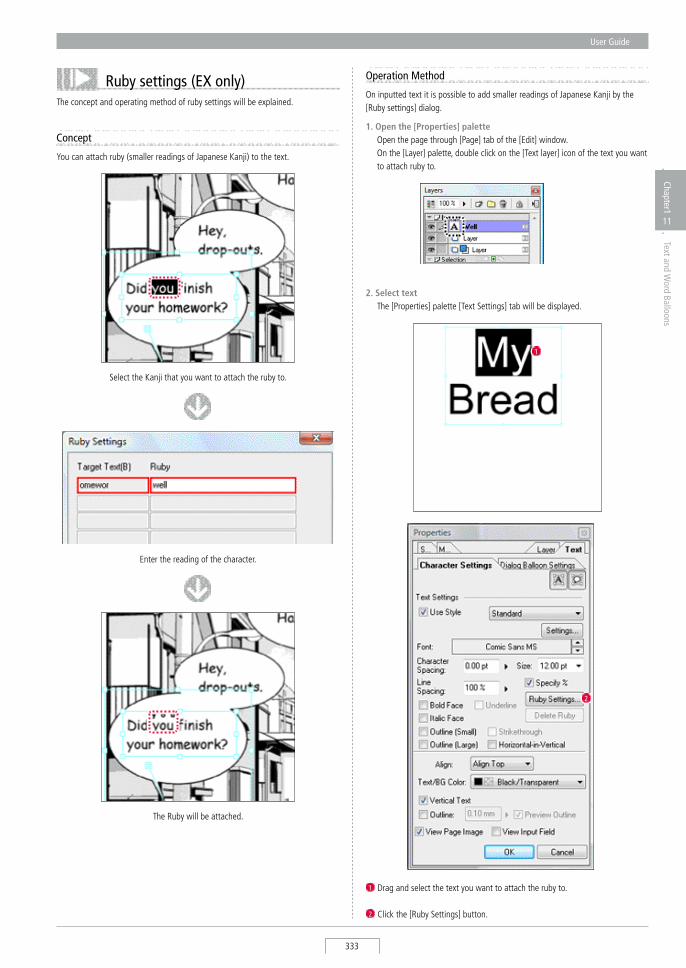
User Guide
333
Chapter1
11
Text and Word Balloons
Operation Method
On inputted text it is possible to add smaller readings of Japanese Kanji by the [Ruby settings] dialog.
Ruby settings (EX only)The concept and operating method of ruby settings will be explained.
Concept
You can attach ruby (smaller readings of Japanese Kanji) to the text.
1. Open the [Properties] palette Open the page through [Page] tab of the [Edit] window. On the [Layer] palette, double click on the [Text layer] icon of the text you want
to attach ruby to.
2. Select text The [Properties] palette [Text settings] tab will be displayed.
1 Drag and select the text you want to attach the ruby to.
2 Click the [Ruby settings] button.
1
2
select the Kanji that you want to attach the ruby to.
Enter the reading of the character.
The Ruby will be attached.
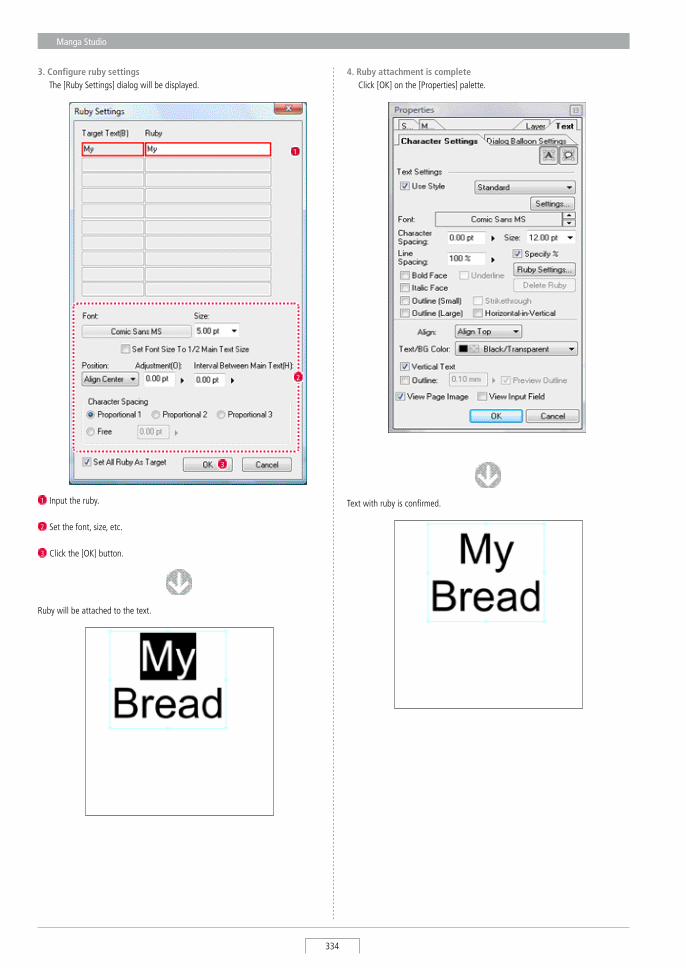
Manga Studio
334
1 Input the ruby.
2 set the font, size, etc.
3 Click the [OK] button.
3. Configure ruby settings The [Ruby settings] dialog will be displayed.
1
3
2
4. Ruby attachment is complete Click [OK] on the [Properties] palette.
Text with ruby is confirmed.
Ruby will be attached to the text.
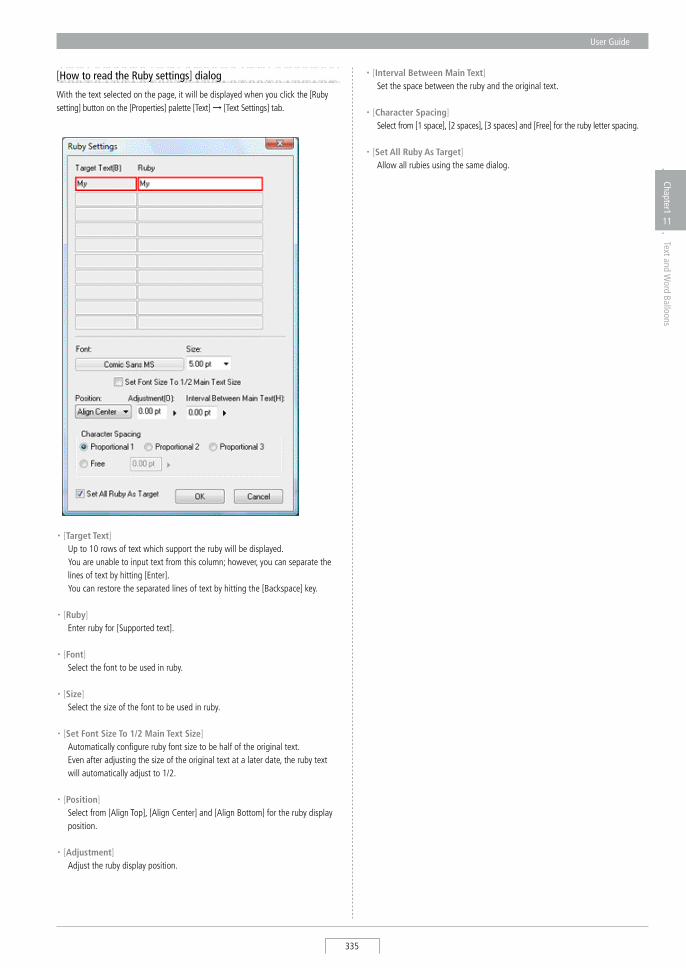
User Guide
335
Chapter1
11
Text and Word Balloons
[How to read the Ruby settings] dialog
With the text selected on the page, it will be displayed when you click the [Ruby setting] button on the [Properties] palette [Text] → [Text settings] tab.
・ [Target Text] Up to 10 rows of text which support the ruby will be displayed. You are unable to input text from this column; however, you can separate the
lines of text by hitting [Enter]. You can restore the separated lines of text by hitting the [Backspace] key.
・ [Ruby] Enter ruby for [supported text].
・ [Font] select the font to be used in ruby.
・ [Size] select the size of the font to be used in ruby.
・ [Set Font Size To 1/2 Main Text Size] Automatically configure ruby font size to be half of the original text. Even after adjusting the size of the original text at a later date, the ruby text
will automatically adjust to 1/2.
・ [Position] select from [Align Top], [Align Center] and [Align Bottom] for the ruby display
position.
・ [Adjustment] Adjust the ruby display position.
・ [Interval Between Main Text] set the space between the ruby and the original text.
・ [Character Spacing] select from [1 space], [2 spaces], [3 spaces] and [Free] for the ruby letter spacing.
・ [Set All Ruby As Target] Allow all rubies using the same dialog.
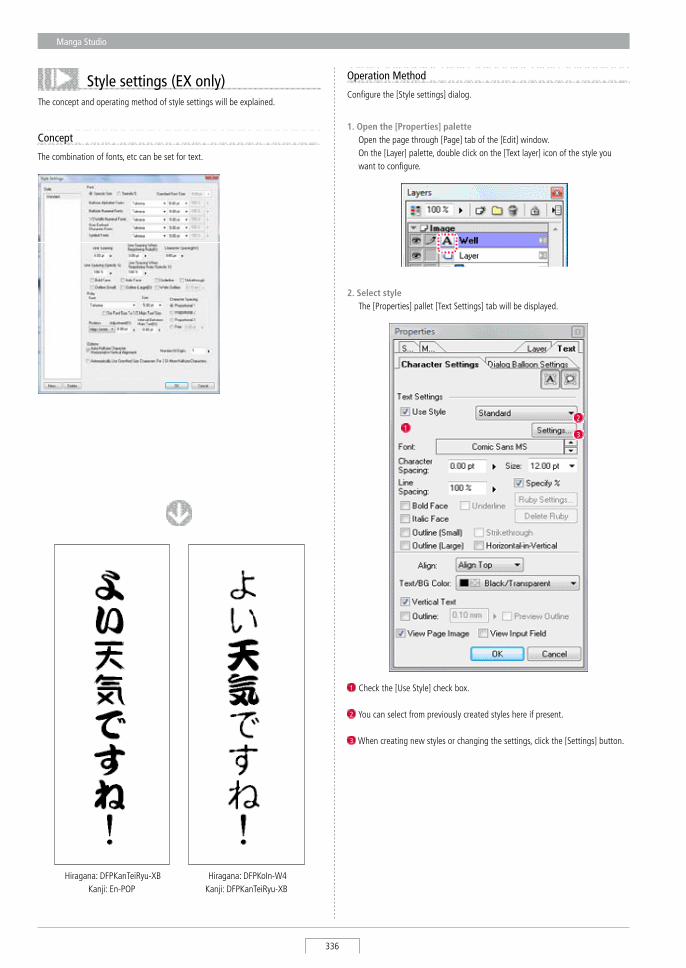
Manga Studio
336
Style settings (EX only)The concept and operating method of style settings will be explained.
Concept
The combination of fonts, etc can be set for text.
Configure the [style settings] dialog.
Operation Method
1. Open the [Properties] palette Open the page through [Page] tab of the [Edit] window. On the [Layer] palette, double click on the [Text layer] icon of the style you
want to configure.
2. Select style The [Properties] pallet [Text settings] tab will be displayed.
Hiragana: DFPKoIn-W4Kanji: DFPKanTeiRyu-XB
Hiragana: DFPKanTeiRyu-XBKanji: En-POP
1 Check the [Use style] check box.
2 You can select from previously created styles here if present.
3 When creating new styles or changing the settings, click the [settings] button.
12
3
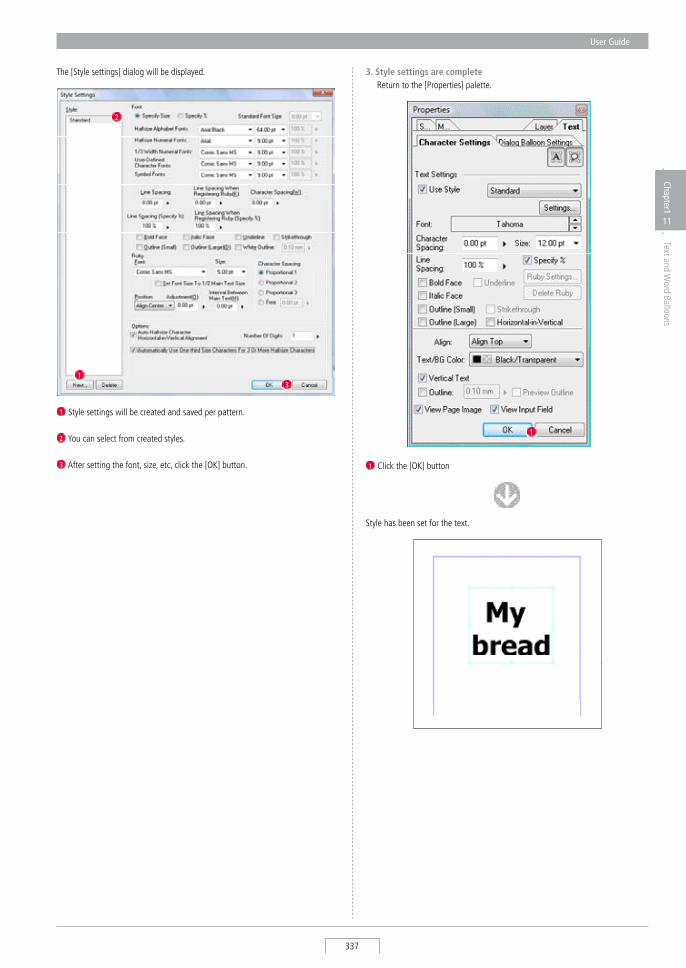
User Guide
337
Chapter1
11
Text and Word Balloons
The [style settings] dialog will be displayed.
1 style settings will be created and saved per pattern.
2 You can select from created styles.
3 After setting the font, size, etc, click the [OK] button.
1
2
3
3. Style settings are complete Return to the [Properties] palette.
style has been set for the text.
1 Click the [OK] button
1
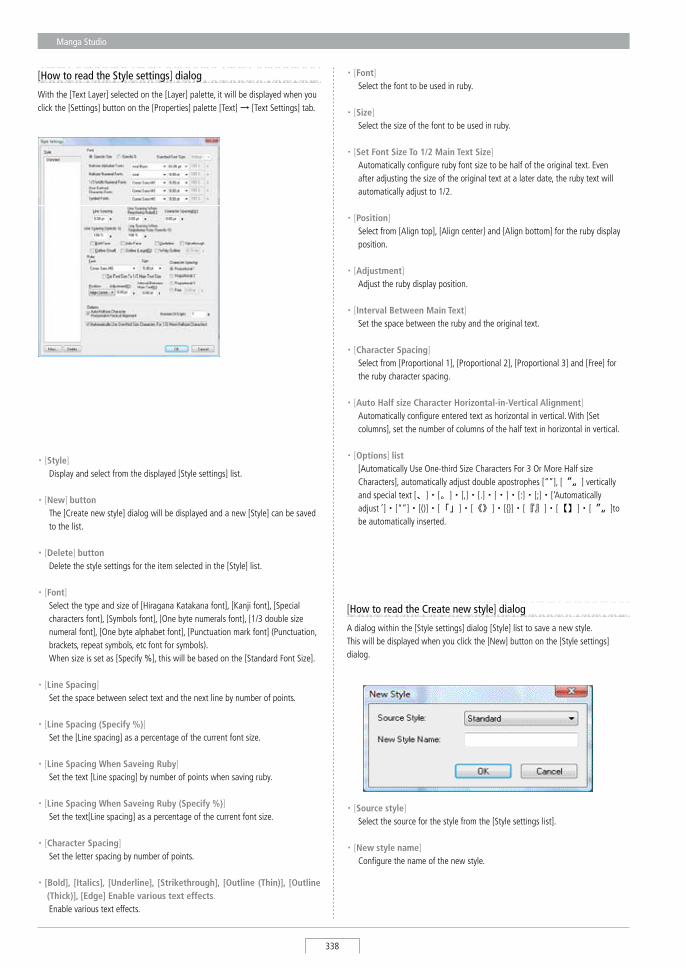
Manga Studio
338
[How to read the Style settings] dialog
With the [Text Layer] selected on the [Layer] palette, it will be displayed when you click the [settings] button on the [Properties] palette [Text] → [Text settings] tab.
・ [Style] Display and select from the displayed [style settings] list.
・ [New] button The [Create new style] dialog will be displayed and a new [style] can be saved
to the list.
・ [Delete] button Delete the style settings for the item selected in the [style] list.
・ [Font] select the type and size of [Hiragana Katakana font], [Kanji font], [special
characters font], [symbols font], [One byte numerals font], [1/3 double size numeral font], [One byte alphabet font], [Punctuation mark font] (Punctuation, brackets, repeat symbols, etc font for symbols).
When size is set as [specify %], this will be based on the [standard Font size].
・ [Line Spacing] set the space between select text and the next line by number of points.
・ [Line Spacing (Specify %)] set the [Line spacing] as a percentage of the current font size.
・ [Line Spacing When Saveing Ruby] set the text [Line spacing] by number of points when saving ruby.
・ [Line Spacing When Saveing Ruby (Specify %)] set the text[Line spacing] as a percentage of the current font size.
・ [Character Spacing] set the letter spacing by number of points.
・ [Bold], [Italics], [Underline], [Strikethrough], [Outline (Thin)], [Outline (Thick)], [Edge] Enable various text effects.
Enable various text effects.
・ [Font] select the font to be used in ruby.
・ [Size] select the size of the font to be used in ruby.
・ [Set Font Size To 1/2 Main Text Size] Automatically configure ruby font size to be half of the original text. Even
after adjusting the size of the original text at a later date, the ruby text will automatically adjust to 1/2.
・ [Position] select from [Align top], [Align center] and [Align bottom] for the ruby display
position.
・ [Adjustment] Adjust the ruby display position.
・ [Interval Between Main Text] set the space between the ruby and the original text.
・ [Character Spacing] select from [Proportional 1], [Proportional 2], [Proportional 3] and [Free] for
the ruby character spacing.
・ [Auto Half size Character Horizontal-in-Vertical Alignment] Automatically configure entered text as horizontal in vertical. With [set
columns], set the number of columns of the half text in horizontal in vertical.
・ [Options] list [Automatically Use One-third size Characters For 3 Or More Half size
Characters], automatically adjust double apostrophes [“”], [〝〟] vertically and special text [、]・ [。]・ [,]・ [.]・ [・]・ [:]・ [;]・ [‘Automatically adjust
,]・ [“”]・ [()]・ [「」]・ [《》]・ [{}]・ [『』]・ [【】]・ [〝〟]to
be automatically inserted.
[How to read the Create new style] dialog
A dialog within the [style settings] dialog [style] list to save a new style. This will be displayed when you click the [New] button on the [style settings] dialog.
・ [Source style] select the source for the style from the [style settings list].
・ [New style name] Configure the name of the new style.
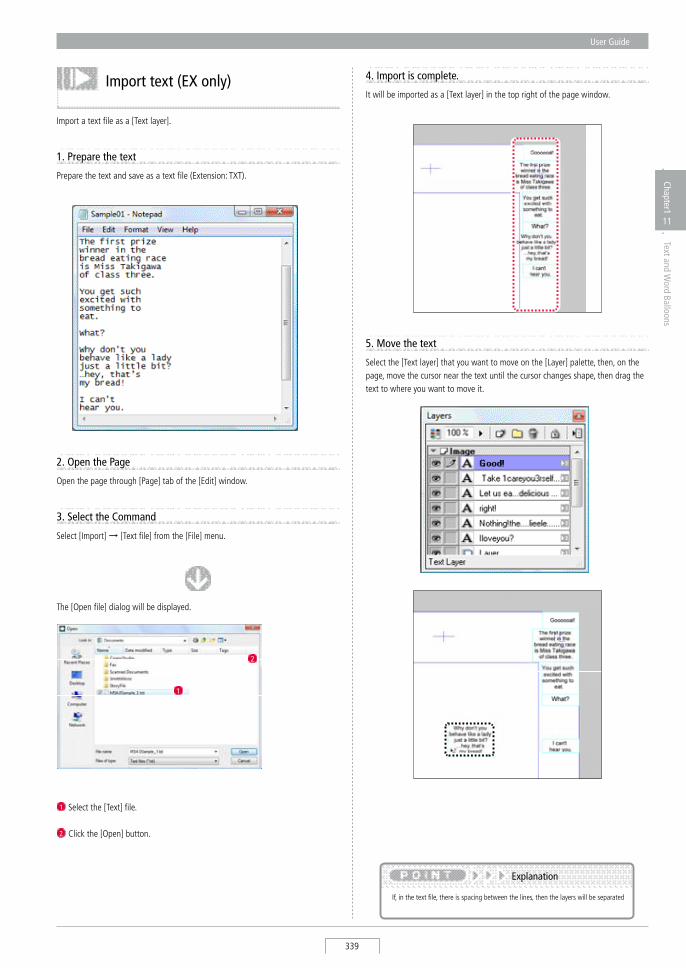
User Guide
339
Chapter1
11
Text and Word Balloons
Import a text file as a [Text layer].
Import text (EX only) 4. Import is complete.
It will be imported as a [Text layer] in the top right of the page window.
If, in the text file, there is spacing between the lines, then the layers will be separated
Explanation
1. Prepare the text
3. Select the Command
select [Import] → [Text file] from the [File] menu.
The [Open file] dialog will be displayed.
1 select the [Text] file.
2 Click the [Open] button.
1
2
2. Open the Page
Open the page through [Page] tab of the [Edit] window.
Prepare the text and save as a text file (Extension: TXT).
5. Move the text
select the [Text layer] that you want to move on the [Layer] palette, then, on the page, move the cursor near the text until the cursor changes shape, then drag the text to where you want to move it.
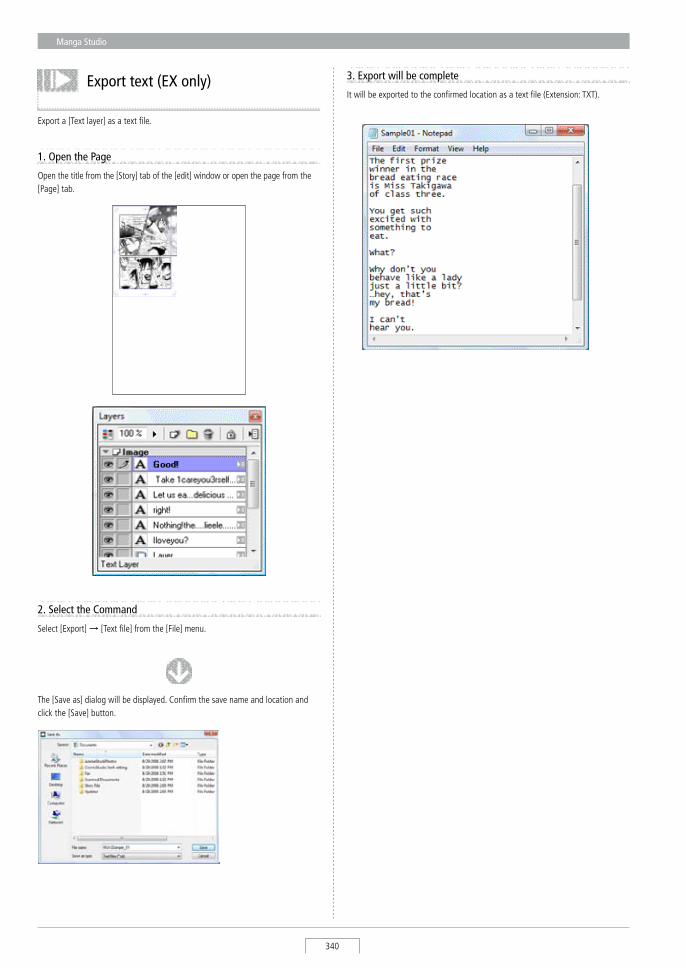
Manga Studio
340
Export a [Text layer] as a text file.
Export text (EX only)
1. Open the Page
Open the title from the [story] tab of the [edit] window or open the page from the [Page] tab.
2. Select the Command
select [Export] → [Text file] from the [File] menu.
The [save as] dialog will be displayed. Confirm the save name and location and click the [save] button.
3. Export will be complete
It will be exported to the confirmed location as a text file (Extension: TXT).

User Guide
341
Chapter1
11
Text and Word Balloons
The concept and operating method of [story editor] will be explained.
Concept
[story editor] is a function to unify the names (characters) inside a story and edit them. search and replace and enter the dialog before drawing the pictures.
Operation Method
In the [story Editor] dialog, enter and edit text.
1. Open the Page Either open the title through [story] tab of the [Edit] window or the page
through the [Page] tab...
2. Select the command select [story editor] through the [story] menu.
Story editor (EX only)
Using the story editor, you can enter dialog for every page.
Dialogue will be imported as a text layer.
Layout the dialog and cut the name.
3. Select text The [story Editor] will be displayed (When there is already text entered, it will
be displayed in separate lines).
1 Click the enter text box to select. When entering new text, select [Double click and add text].
12
2 Click the [Change] button
12
3
4. Edit text The [Text] dialog will be displayed.
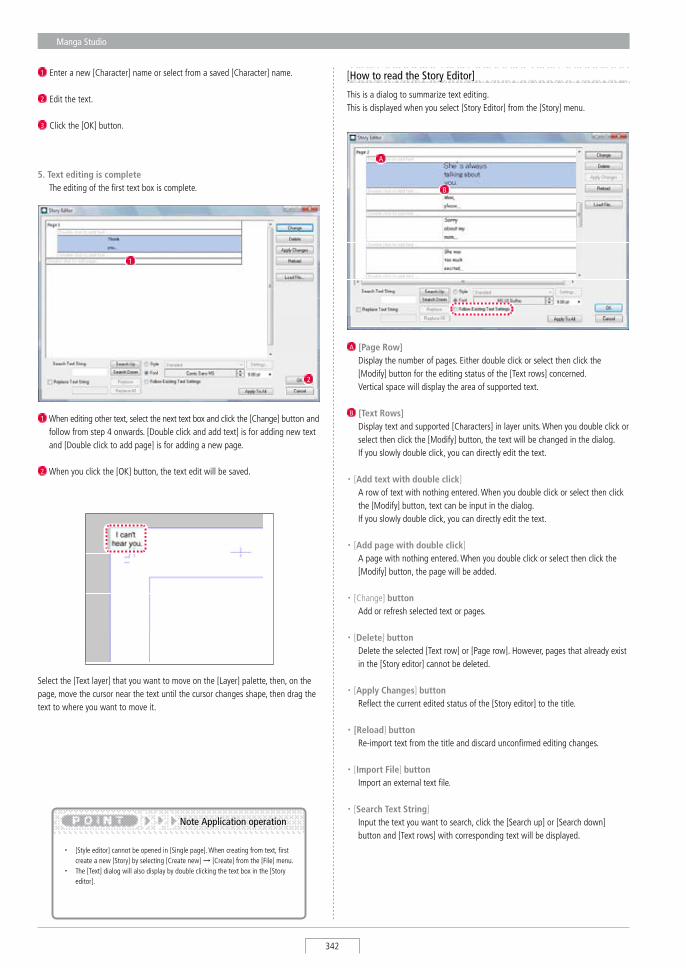
Manga Studio
342
5. Text editing is complete The editing of the first text box is complete.
・ [style editor] cannot be opened in [single page]. When creating from text, first create a new [story] by selecting [Create new] → [Create] from the [File] menu.
・ The [Text] dialog will also display by double clicking the text box in the [story editor].
Note Application operation
1 When editing other text, select the next text box and click the [Change] button and follow from step 4 onwards. [Double click and add text] is for adding new text and [Double click to add page] is for adding a new page.
2 When you click the [OK] button, the text edit will be saved.
1
2
[How to read the Story Editor]
This is a dialog to summarize text editing. This is displayed when you select [story Editor] from the [story] menu.
A [Page Row] Display the number of pages. Either double click or select then click the
[Modify] button for the editing status of the [Text rows] concerned. Vertical space will display the area of supported text.
B [Text Rows] Display text and supported [Characters] in layer units. When you double click or
select then click the [Modify] button, the text will be changed in the dialog. If you slowly double click, you can directly edit the text.
・ [Add text with double click] A row of text with nothing entered. When you double click or select then click
the [Modify] button, text can be input in the dialog. If you slowly double click, you can directly edit the text.
・ [Add page with double click] A page with nothing entered. When you double click or select then click the
[Modify] button, the page will be added.
・ [Change] button Add or refresh selected text or pages.
・ [Delete] button Delete the selected [Text row] or [Page row]. However, pages that already exist
in the [story editor] cannot be deleted.
・ [Apply Changes] button Reflect the current edited status of the [story editor] to the title.
・ [Reload] button Re-import text from the title and discard unconfirmed editing changes.
・ [Import File] button Import an external text file.
・ [Search Text String] Input the text you want to search, click the [search up] or [search down]
button and [Text rows] with corresponding text will be displayed.
select the [Text layer] that you want to move on the [Layer] palette, then, on the page, move the cursor near the text until the cursor changes shape, then drag the text to where you want to move it.
A
B
1 Enter a new [Character] name or select from a saved [Character] name.
2 Edit the text.
3 Click the [OK] button.
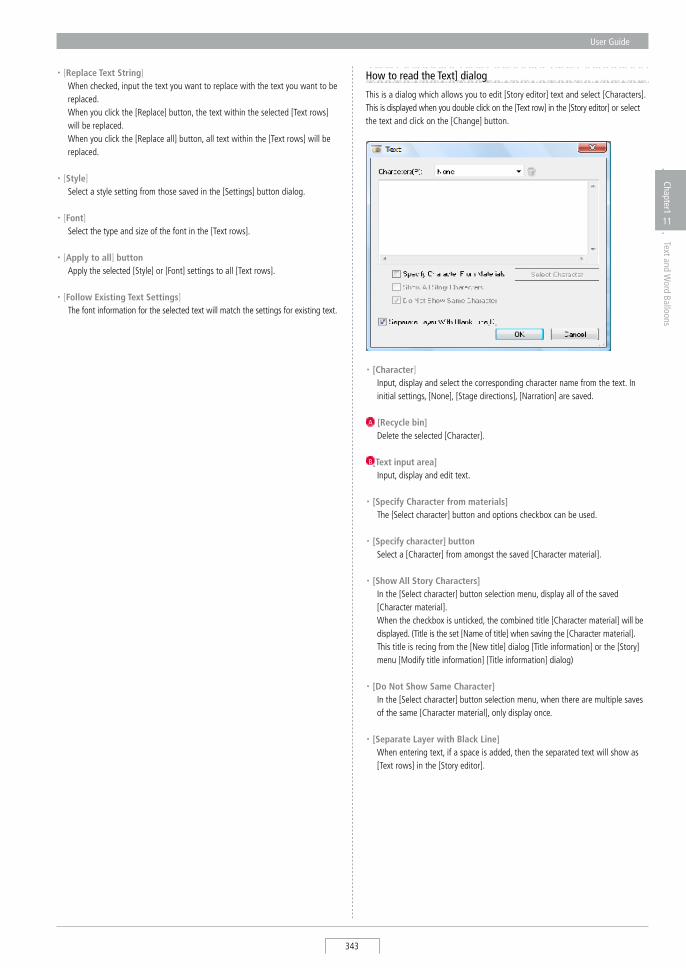
User Guide
343
Chapter1
11
Text and Word Balloons
How to read the Text] dialog
This is a dialog which allows you to edit [story editor] text and select [Characters]. This is displayed when you double click on the [Text row] in the [story editor] or select the text and click on the [Change] button.
・ [Replace Text String] When checked, input the text you want to replace with the text you want to be
replaced. When you click the [Replace] button, the text within the selected [Text rows]
will be replaced. When you click the [Replace all] button, all text within the [Text rows] will be
replaced.
・ [Style] select a style setting from those saved in the [settings] button dialog.
・ [Font] select the type and size of the font in the [Text rows].
・ [Apply to all] button Apply the selected [style] or [Font] settings to all [Text rows].
・ [Follow Existing Text Settings] The font information for the selected text will match the settings for existing text.
・ [Character] Input, display and select the corresponding character name from the text. In
initial settings, [None], [stage directions], [Narration] are saved.
A [Recycle bin] Delete the selected [Character].
・ [Text input area] Input, display and edit text.
・ [Specify Character from materials] The [select character] button and options checkbox can be used.
・ [Specify character] button select a [Character] from amongst the saved [Character material].
・ [Show All Story Characters] In the [select character] button selection menu, display all of the saved
[Character material]. When the checkbox is unticked, the combined title [Character material] will be
displayed. (Title is the set [Name of title] when saving the [Character material]. This title is recing from the [New title] dialog [Title information] or the [story] menu [Modify title information] [Title information] dialog)
・ [Do Not Show Same Character] In the [select character] button selection menu, when there are multiple saves
of the same [Character material], only display once.
・ [Separate Layer with Black Line] When entering text, if a space is added, then the separated text will show as
[Text rows] in the [story editor].
B
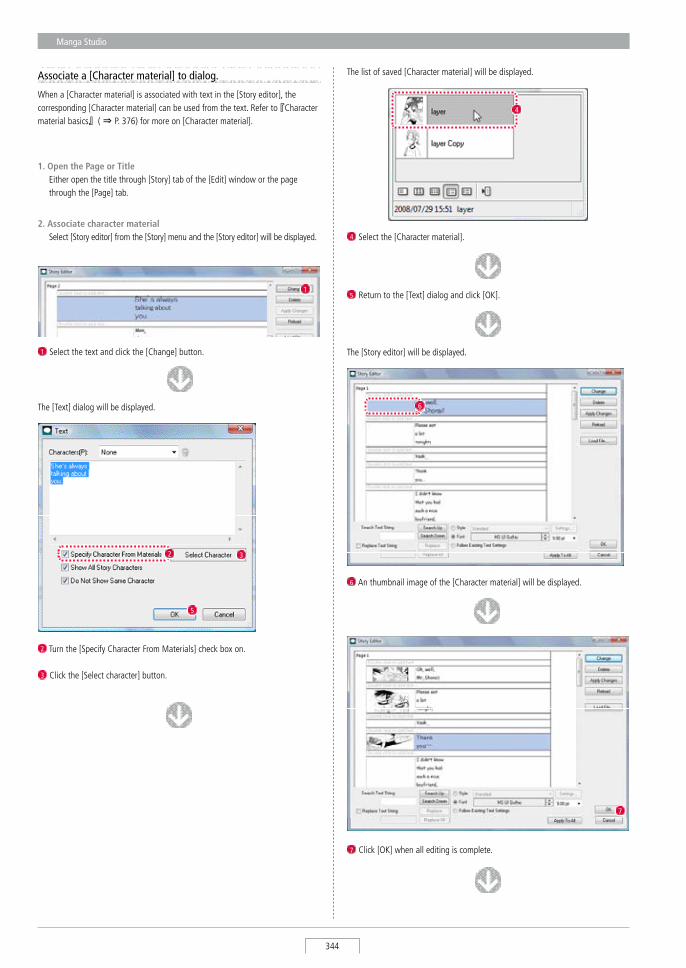
Manga Studio
344
Associate a [Character material] to dialog.
When a [Character material] is associated with text in the [story editor], the corresponding [Character material] can be used from the text. Refer to 『Character material basics』( ⇒ P. 376) for more on [Character material].
2 Turn the [specify Character From Materials] check box on.
3 Click the [select character] button.
2. Associate character material select [story editor] from the [story] menu and the [story editor] will be displayed.
1 select the text and click the [Change] button.
1
1. Open the Page or Title Either open the title through [story] tab of the [Edit] window or the page
through the [Page] tab.
5 Return to the [Text] dialog and click [OK].
The list of saved [Character material] will be displayed.
4 select the [Character material].
2 3
5
4
The [Text] dialog will be displayed.
The [story editor] will be displayed.
7 Click [OK] when all editing is complete.
6 An thumbnail image of the [Character material] will be displayed.
6
7
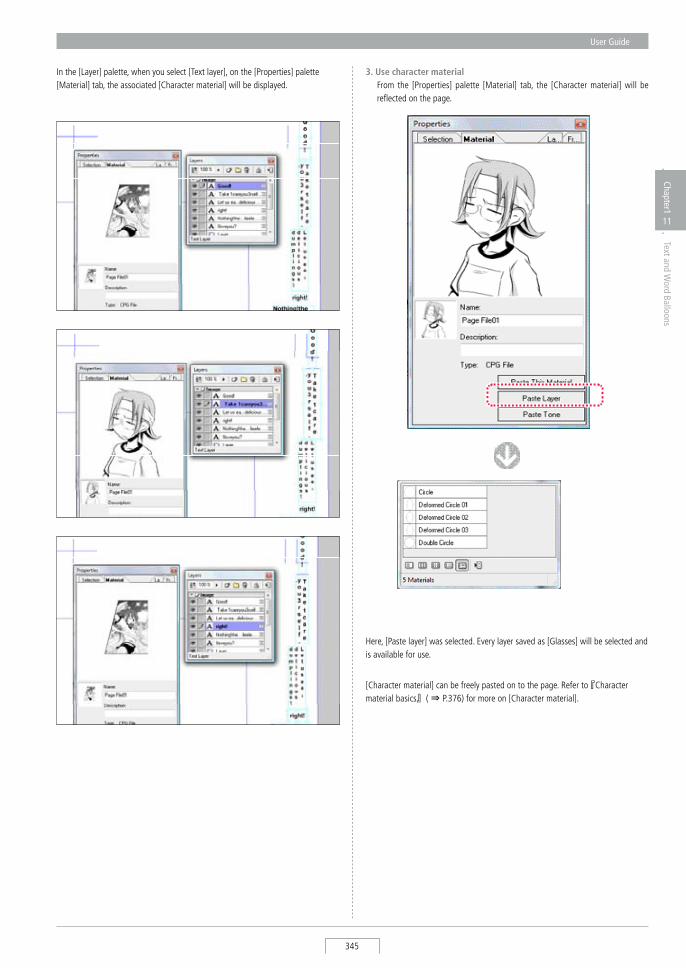
User Guide
345
Chapter1
11
Text and Word Balloons
3. Use character material From the [Properties] palette [Material] tab, the [Character material] will be
reflected on the page.
In the [Layer] palette, when you select [Text layer], on the [Properties] palette [Material] tab, the associated [Character material] will be displayed.
[Character material] can be freely pasted on to the page. Refer to 『Character material basics』( ⇒ P.376) for more on [Character material].
Here, [Paste layer] was selected. Every layer saved as [Glasses] will be selected and is available for use.
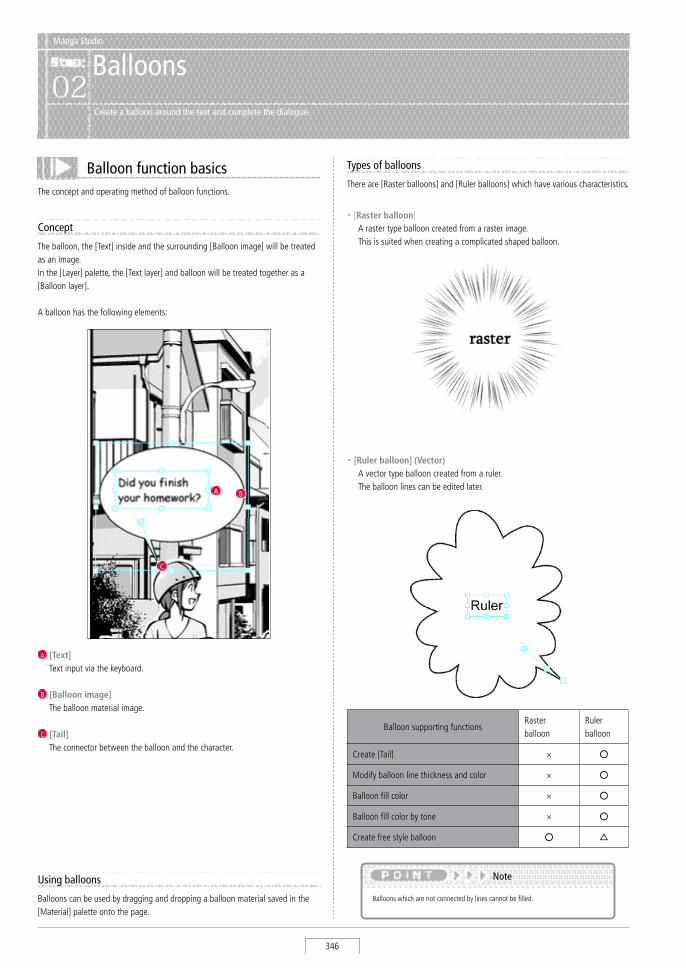
Manga Studio
346
Balloon function basicsThe concept and operating method of balloon functions.
Concept
The balloon, the [Text] inside and the surrounding [Balloon image] will be treated as an image. In the [Layer] palette, the [Text layer] and balloon will be treated together as a [Balloon layer].
A balloon has the following elements:
A [Text] Text input via the keyboard.
B [Balloon image] The balloon material image.
C [Tail] The connector between the balloon and the character.
BA
C
・ [Raster balloon] A raster type balloon created from a raster image. This is suited when creating a complicated shaped balloon.
Types of balloons
There are [Raster balloons] and [Ruler balloons] which have various characteristics.
Balloon supporting functionsRaster balloon
Rulerballoon
Create [Tail] × ○
Modify balloon line thickness and color × ○
Balloon fill color × ○
Balloon fill color by tone × ○
Create free style balloon ○ △
Balloons which are not connected by lines cannot be filled.
NoteUsing balloons
Balloons can be used by dragging and dropping a balloon material saved in the [Material] palette onto the page.
Manga Studio
Balloons02
Create a balloon around the text and complete the dialogue.
・ [Ruler balloon] (Vector) A vector type balloon created from a ruler. The balloon lines can be edited later.
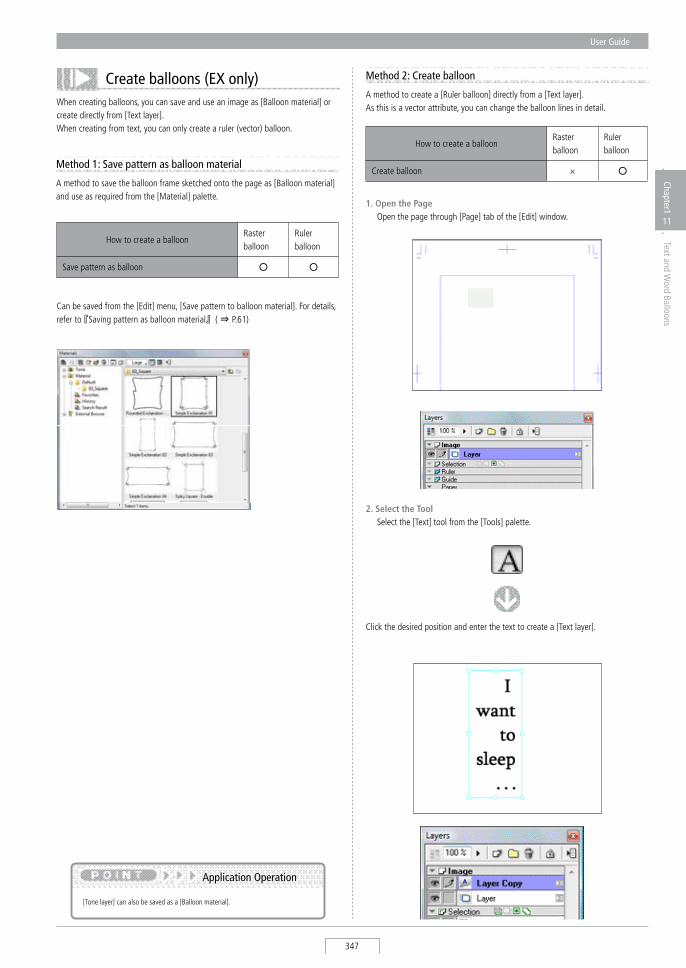
User Guide
347
Chapter1
11
Text and Word Balloons
Create balloons (EX only)When creating balloons, you can save and use an image as [Balloon material] or create directly from [Text layer]. When creating from text, you can only create a ruler (vector) balloon.
Method 1: Save pattern as balloon material
A method to save the balloon frame sketched onto the page as [Balloon material] and use as required from the [Material] palette.
[Tone layer] can also be saved as a [Balloon material].
Application Operation
Method 2: Create balloon
A method to create a [Ruler balloon] directly from a [Text layer].As this is a vector attribute, you can change the balloon lines in detail.
1. Open the Page Open the page through [Page] tab of the [Edit] window.
Click the desired position and enter the text to create a [Text layer].
Can be saved from the [Edit] menu, [save pattern to balloon material]. For details, refer to 『saving pattern as balloon material』( ⇒ P.61)
How to create a balloonRaster balloon
Rulerballoon
save pattern as balloon ○ ○
How to create a balloon Raster balloon
Rulerballoon
Create balloon × ○
2. Select the Tool select the [Text] tool from the [Tools] palette.
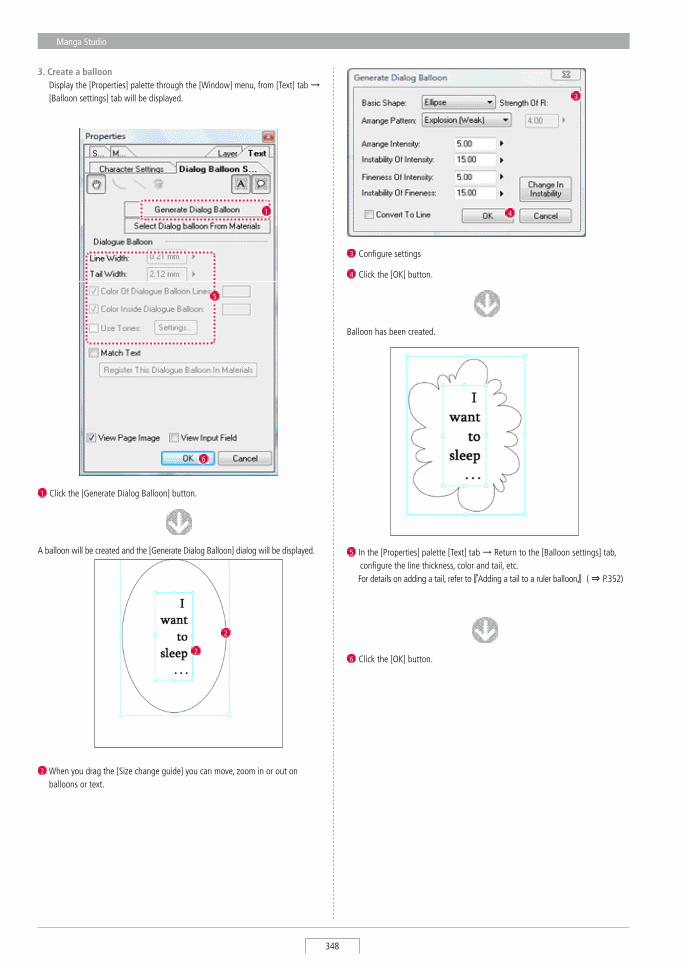
Manga Studio
348
3. Create a balloon Display the [Properties] palette through the [Window] menu, from [Text] tab →
[Balloon settings] tab will be displayed.
A balloon will be created and the [Generate Dialog Balloon] dialog will be displayed.
Balloon has been created.
1 Click the [Generate Dialog Balloon] button.
3 Configure settings
4 Click the [OK] button.
5 In the [Properties] palette [Text] tab → Return to the [Balloon settings] tab, configure the line thickness, color and tail, etc.
For details on adding a tail, refer to 『Adding a tail to a ruler balloon』( ⇒ P.352)
1 4
3
6
5
2
2
2 When you drag the [size change guide] you can move, zoom in or out on balloons or text.
6 Click the [OK] button.
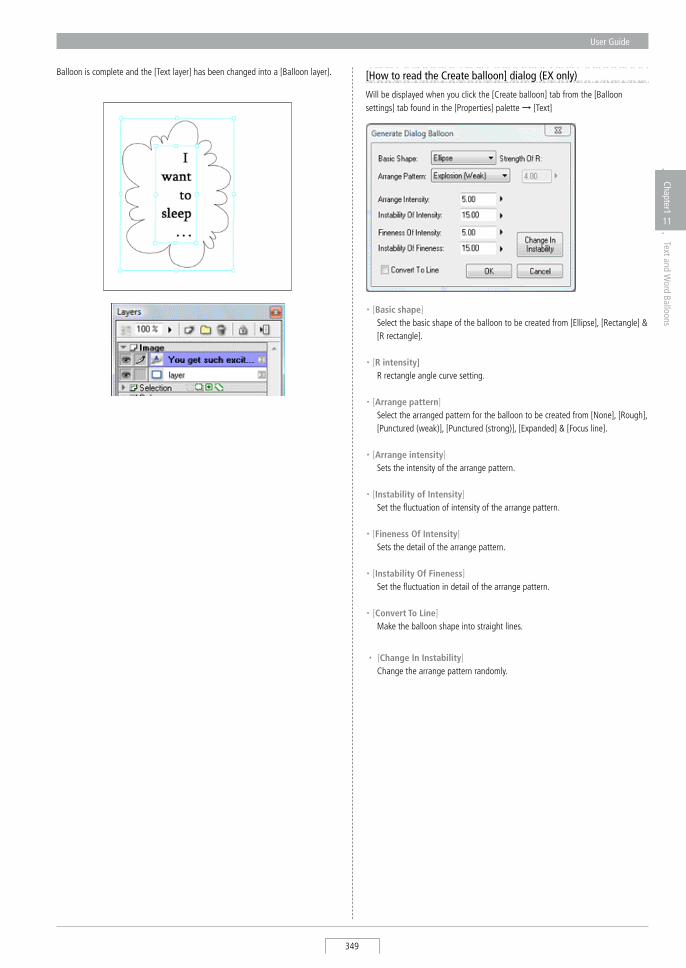
User Guide
349
Chapter1
11
Text and Word Balloons
Balloon is complete and the [Text layer] has been changed into a [Balloon layer]. [How to read the Create balloon] dialog (EX only)
Will be displayed when you click the [Create balloon] tab from the [Balloon settings] tab found in the [Properties] palette → [Text]
・ [Basic shape] select the basic shape of the balloon to be created from [Ellipse], [Rectangle] &
[R rectangle].
・ [R intensity] R rectangle angle curve setting.
・ [Arrange pattern] select the arranged pattern for the balloon to be created from [None], [Rough],
[Punctured (weak)], [Punctured (strong)], [Expanded] & [Focus line]. ・ [Arrange intensity] sets the intensity of the arrange pattern.
・ [Instability of Intensity] set the fluctuation of intensity of the arrange pattern.
・ [Fineness Of Intensity] sets the detail of the arrange pattern.
・ [Instability Of Fineness] set the fluctuation in detail of the arrange pattern.
・ [Convert To Line] Make the balloon shape into straight lines.
・ [Change In Instability] Change the arrange pattern randomly.
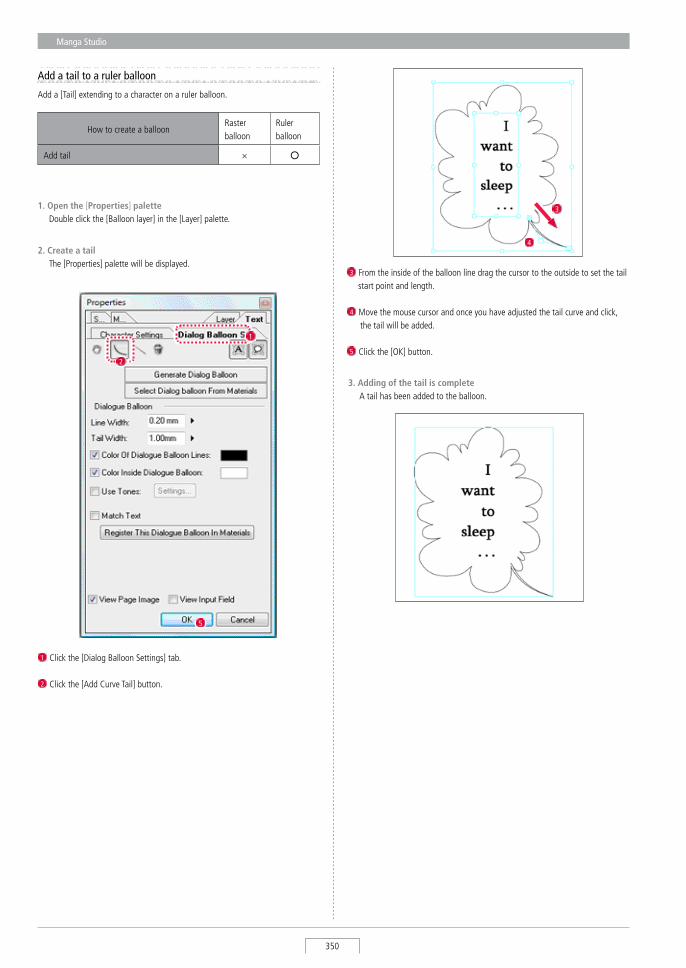
Manga Studio
350
Add a tail to a ruler balloon
Add a [Tail] extending to a character on a ruler balloon.
3 From the inside of the balloon line drag the cursor to the outside to set the tail start point and length.
4 Move the mouse cursor and once you have adjusted the tail curve and click, the tail will be added.
5 Click the [OK] button.
31. Open the [Properties] palette Double click the [Balloon layer] in the [Layer] palette.
2. Create a tail The [Properties] palette will be displayed.
5
2
1
4
3. Adding of the tail is complete A tail has been added to the balloon.
1 Click the [Dialog Balloon settings] tab.
2 Click the [Add Curve Tail] button.
How to create a balloon Raster balloon
Rulerballoon
Add tail × ○
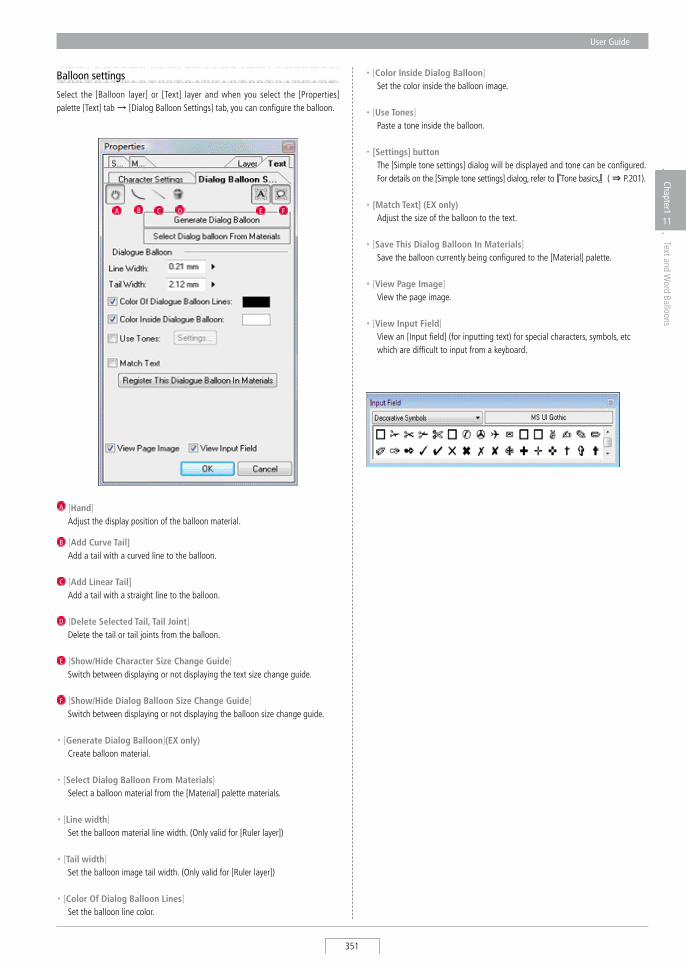
User Guide
351
Chapter1
11
Text and Word Balloons
Balloon settings
select the [Balloon layer] or [Text] layer and when you select the [Properties] palette [Text] tab → [Dialog Balloon settings] tab, you can configure the balloon.
A [Hand] Adjust the display position of the balloon material.
B [Add Curve Tail] Add a tail with a curved line to the balloon.
C [Add Linear Tail] Add a tail with a straight line to the balloon.
D [Delete Selected Tail, Tail Joint] Delete the tail or tail joints from the balloon.
E [Show/Hide Character Size Change Guide] switch between displaying or not displaying the text size change guide.
F [Show/Hide Dialog Balloon Size Change Guide] switch between displaying or not displaying the balloon size change guide.
・ [Generate Dialog Balloon](EX only) Create balloon material.
・ [Select Dialog Balloon From Materials] select a balloon material from the [Material] palette materials.
・ [Line width] set the balloon material line width. (Only valid for [Ruler layer])
・ [Tail width] set the balloon image tail width. (Only valid for [Ruler layer])
・ [Color Of Dialog Balloon Lines] set the balloon line color.
A B E FC
・ [Color Inside Dialog Balloon] set the color inside the balloon image.
・ [Use Tones] Paste a tone inside the balloon.
・ [Settings] button The [simple tone settings] dialog will be displayed and tone can be configured. For details on the [simple tone settings] dialog, refer to 『Tone basics』( ⇒ P.201).
・ [Match Text] (EX only) Adjust the size of the balloon to the text. ・ [Save This Dialog Balloon In Materials] save the balloon currently being configured to the [Material] palette.
・ [View Page Image] View the page image.
・ [View Input Field] View an [Input field] (for inputting text) for special characters, symbols, etc
which are difficult to input from a keyboard.
D


Displays and Windows
Chapter 12
This chapter introduces changes in screen displays.
Step: 01 screen Display 356
Step: 02 show Guidelines 363
Chapter
12
Displays and Window
s
Step: 03 show Information 365
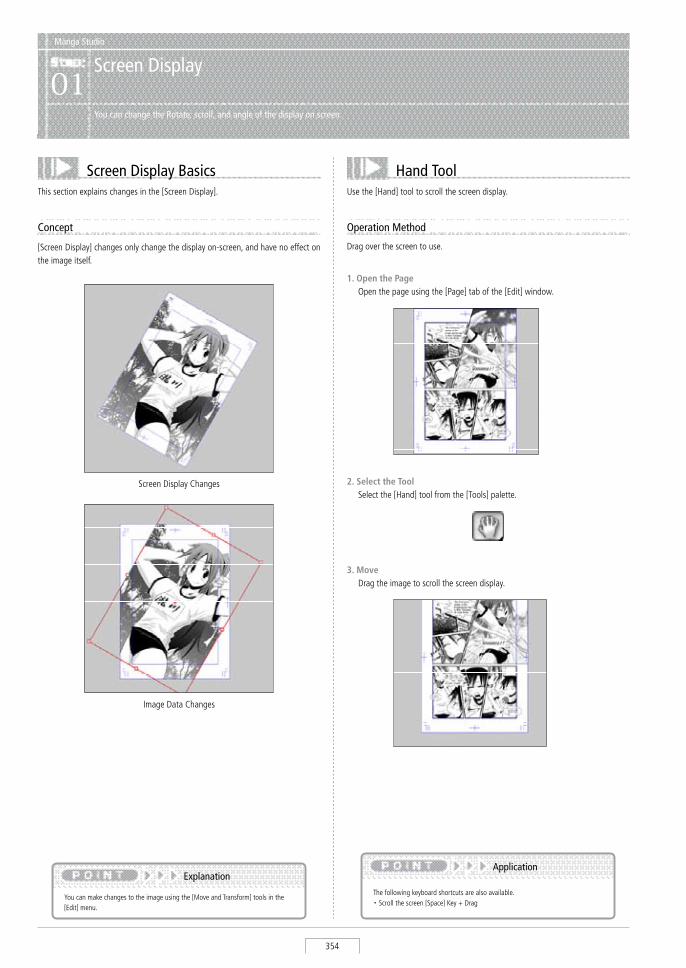
Manga Studio
354
Manga Studio
Screen Display01
You can change the Rotate, scroll, and angle of the display on screen.
Hand ToolUse the [Hand] tool to scroll the screen display.
Operation Method
1. Open the Page Open the page using the [Page] tab of the [Edit] window.
2. Select the Tool select the [Hand] tool from the [Tools] palette.
3. Move Drag the image to scroll the screen display.
Screen Display BasicsThis section explains changes in the [screen Display].
[screen Display] changes only change the display on-screen, and have no effect on the image itself.
Concept
screen Display Changes
Image Data Changes
You can make changes to the image using the [Move and Transform] tools in the [Edit] menu.
Explanation
Drag over the screen to use.
The following keyboard shortcuts are also available. ・ scroll the screen、[space] Key + Drag
Application
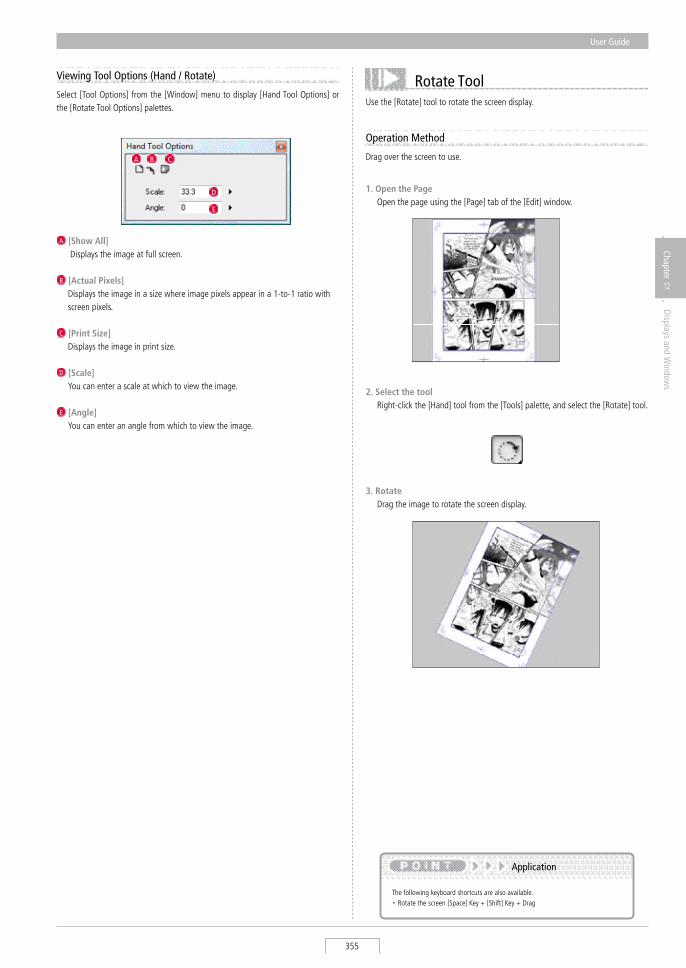
User Guide
355
Chapter
12
Displays and Window
s
Rotate ToolUse the [Rotate] tool to rotate the screen display.
2. Select the tool Right-click the [Hand] tool from the [Tools] palette, and select the [Rotate] tool.
1. Open the Page Open the page using the [Page] tab of the [Edit] window.
3. Rotate Drag the image to rotate the screen display.
select [Tool Options] from the [Window] menu to display [Hand Tool Options] or the [Rotate Tool Options] palettes.
Viewing Tool Options (Hand / Rotate)
A [Show All] Displays the image at full screen.
B [Actual Pixels] Displays the image in a size where image pixels appear in a 1-to-1 ratio with
screen pixels.
C [Print Size] Displays the image in print size.
D [Scale] You can enter a scale at which to view the image.
E [Angle] You can enter an angle from which to view the image.
Operation Method
Drag over the screen to use. A B C
The following keyboard shortcuts are also available. ・ Rotate the screen、[space] Key + [shift] Key + Drag
Application
D
E
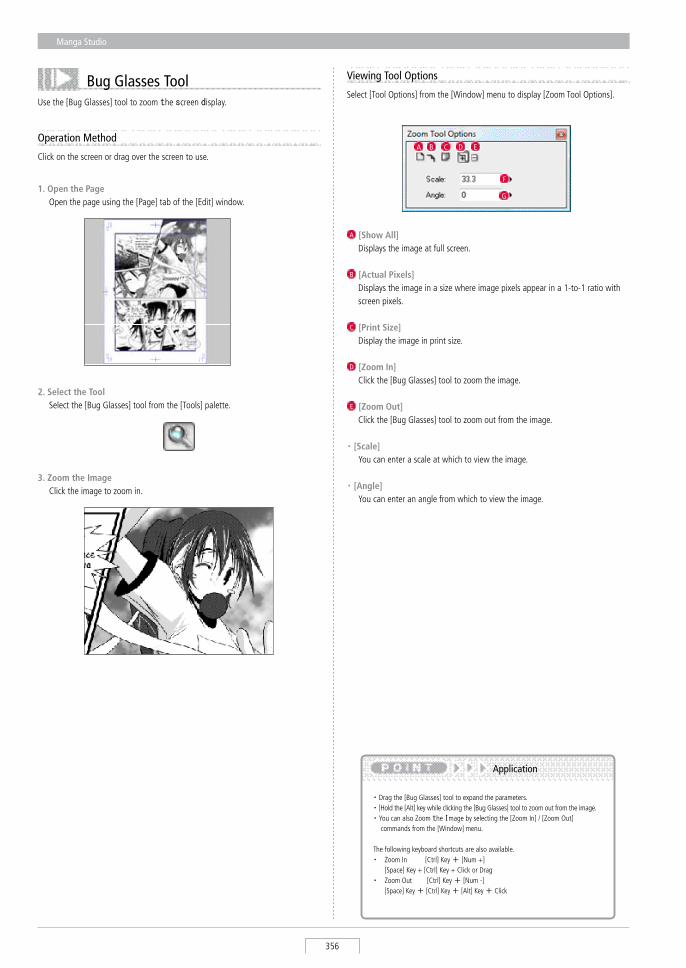
Manga Studio
356
Bug Glasses ToolUse the [Bug Glasses] tool to zoom the screen display.
1. Open the Page Open the page using the [Page] tab of the [Edit] window.
2. Select the Tool select the [Bug Glasses] tool from the [Tools] palette.
3. Zoom the Image Click the image to zoom in.
select [Tool Options] from the [Window] menu to display [Zoom Tool Options].
Viewing Tool Options
A [Show All] Displays the image at full screen.
B [Actual Pixels] Displays the image in a size where image pixels appear in a 1-to-1 ratio with
screen pixels.
C [Print Size] Display the image in print size.
D [Zoom In] Click the [Bug Glasses] tool to zoom the image.
E [Zoom Out] Click the [Bug Glasses] tool to zoom out from the image.
・ [Scale] You can enter a scale at which to view the image.
・ [Angle] You can enter an angle from which to view the image.
・ Drag the [Bug Glasses] tool to expand the parameters. ・ [Hold the [Alt] key while clicking the [Bug Glasses] tool to zoom out from the image. ・ You can also Zoom the Image by selecting the [Zoom In] / [Zoom Out]
commands from the [Window] menu.
The following keyboard shortcuts are also available. ・ Zoom In [Ctrl] Key + [Num +] [space] Key + [Ctrl] Key + Click or Drag ・ Zoom Out [Ctrl] Key + [Num -] [space] Key + [Ctrl] Key + [Alt] Key + Click
Application
Operation Method
Click on the screen or drag over the screen to use. A B C D E
F
G
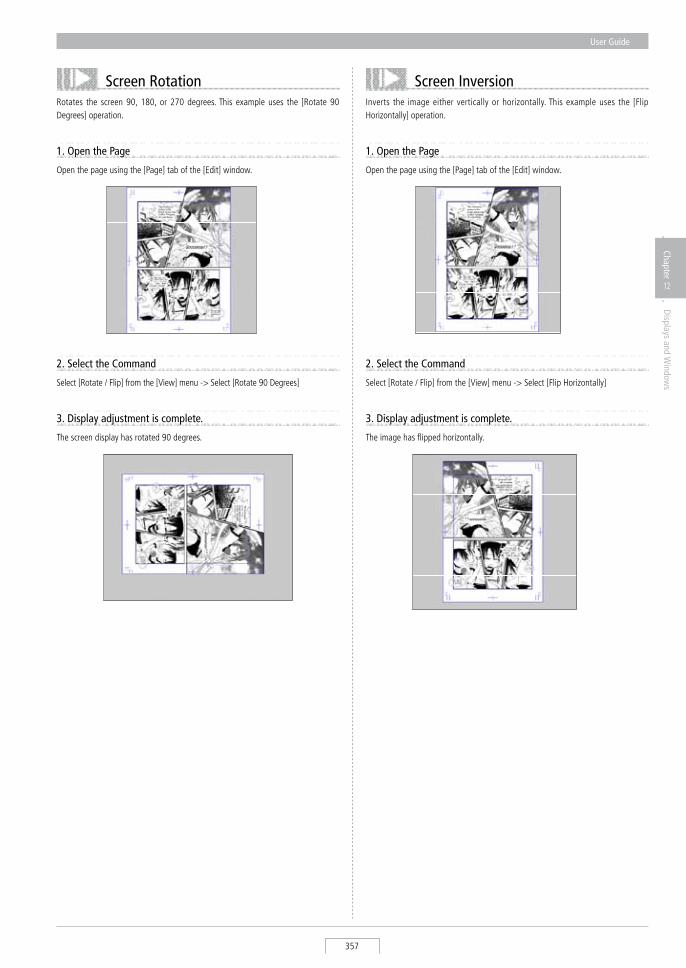
User Guide
357
Chapter
12
Displays and Window
s
Screen RotationRotates the screen 90, 180, or 270 degrees. This example uses the [Rotate 90 Degrees] operation.
1. Open the Page
Open the page using the [Page] tab of the [Edit] window.
2. Select the Command
select [Rotate / Flip] from the [View] menu -> select [Rotate 90 Degrees]
3. Display adjustment is complete.
The screen display has rotated 90 degrees.
Screen InversionInverts the image either vertically or horizontally. This example uses the [Flip Horizontally] operation.
1. Open the Page
Open the page using the [Page] tab of the [Edit] window.
2. Select the Command
select [Rotate / Flip] from the [View] menu -> select [Flip Horizontally]
3. Display adjustment is complete.
The image has flipped horizontally.
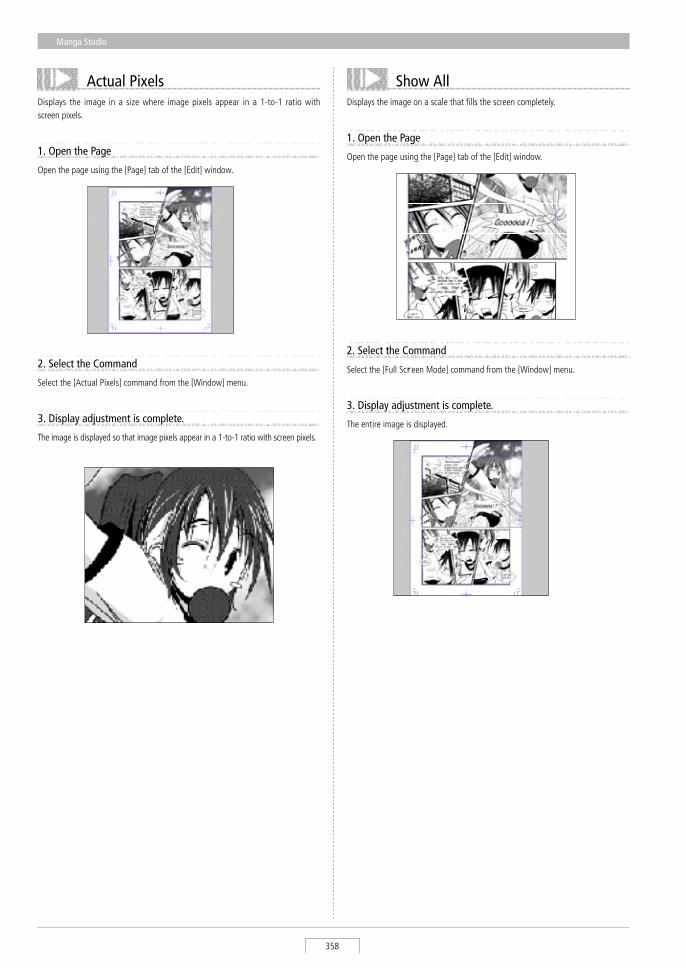
Manga Studio
358
Actual PixelsDisplays the image in a size where image pixels appear in a 1-to-1 ratio with screen pixels.
1. Open the Page
Open the page using the [Page] tab of the [Edit] window.
2. Select the Command
select the [Actual Pixels] command from the [Window] menu.
3. Display adjustment is complete.
The image is displayed so that image pixels appear in a 1-to-1 ratio with screen pixels.
Show AllDisplays the image on a scale that fills the screen completely.
1. Open the Page
Open the page using the [Page] tab of the [Edit] window.
2. Select the Command
select the [Full screen Mode] command from the [Window] menu.
3. Display adjustment is complete.
The entire image is displayed.
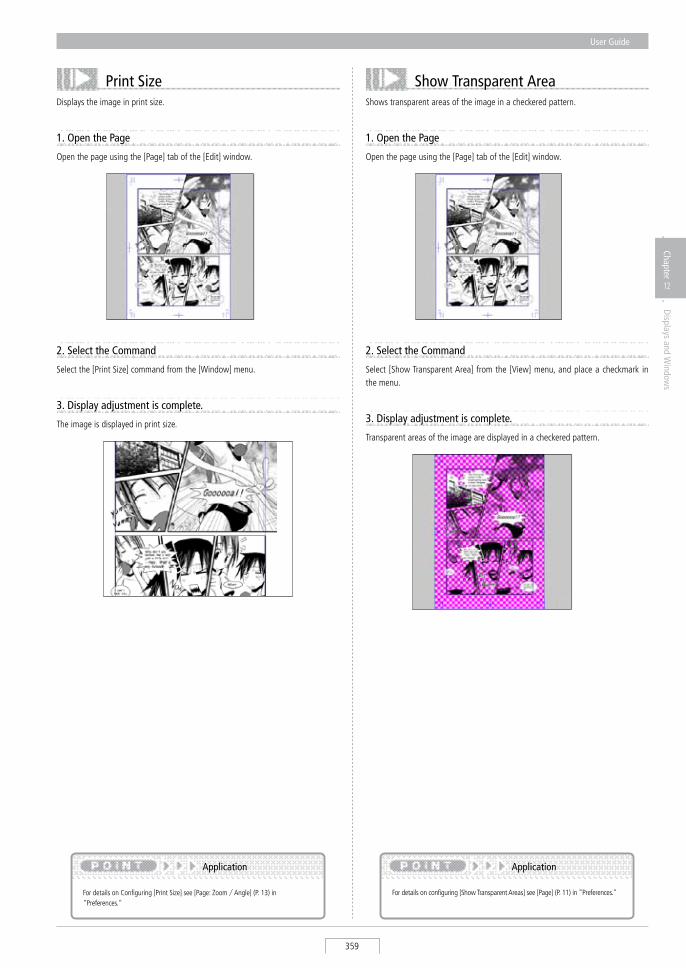
User Guide
359
Chapter
12
Displays and Window
s
Print SizeDisplays the image in print size.
1. Open the Page
Open the page using the [Page] tab of the [Edit] window.
2. Select the Command
3. Display adjustment is complete.
The image is displayed in print size.
select the [Print size] command from the [Window] menu.
Show Transparent Areashows transparent areas of the image in a checkered pattern.
1. Open the Page
Open the page using the [Page] tab of the [Edit] window.
2. Select the Command
select [show Transparent Area] from the [View] menu, and place a checkmark in the menu.
3. Display adjustment is complete.
Transparent areas of the image are displayed in a checkered pattern.
For details on Configuring [Print size] see [Page: Zoom / Angle] (P. 13) in "Preferences."
Application
For details on configuring [show Transparent Areas] see [Page] (P. 11) in "Preferences."
Application
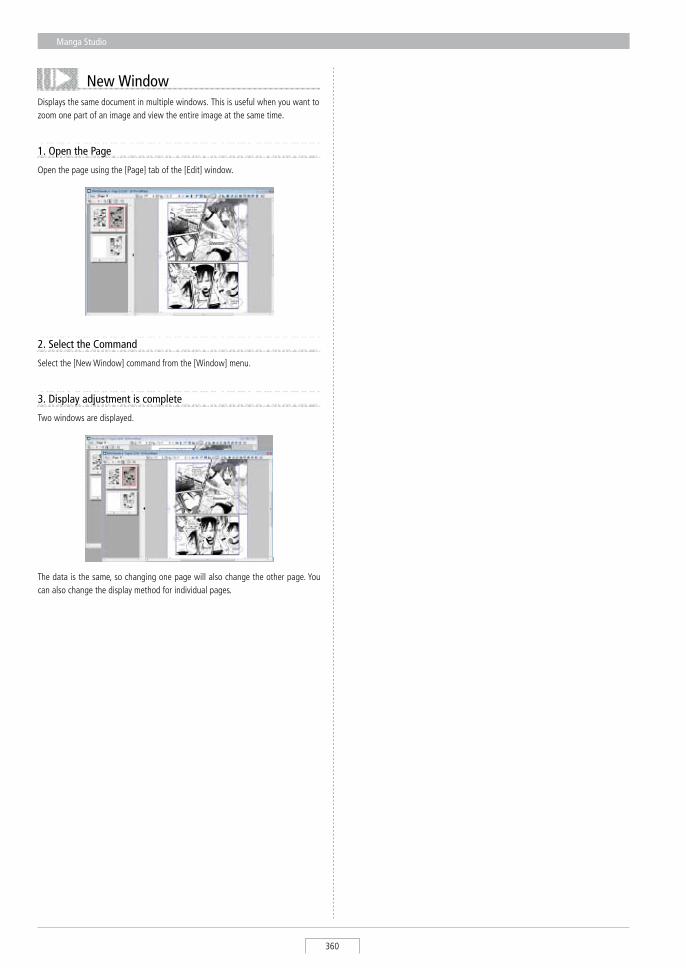
Manga Studio
360
New WindowDisplays the same document in multiple windows. This is useful when you want to zoom one part of an image and view the entire image at the same time.
1. Open the Page
Open the page using the [Page] tab of the [Edit] window.
2. Select the Command
select the [New Window] command from the [Window] menu.
3. Display adjustment is complete
Two windows are displayed.
The data is the same, so changing one page will also change the other page. You can also change the display method for individual pages.
User Guide
361
Chapter
12
Displays and Window
s
Manga Studio
Show Guidelines02
You can toggle the displays of items like rulers, grids, and guides on and off.
Show Print Guide and Basic FrameToggles the display of the print guide and basic frame on and off.
1. Open the Page
Open the page using the [Page] tab of the [Edit] window.
2. Select the Command
select [Drawing Aids] -> [Print Guides / Basic Frame] from the [View] menu, and place a checkmark in the menu.
3. Display adjustment is complete
The print guide / basic frame is no longer displayed.
Show Measurement ScaleToggles the display of the on-screen measurement scale on and off.
1. Open the Page
Open the page using the [Page] tab of the [Edit] window.
2. Select the Command
select [show Measurement scale] from the [View] menu, and place a checkmark in the menu.
3. Display adjustment is complete
The measurement scale is displayed on-screen.
To change print guide / basic frame settings, double click the [Print Guide and Basic Frame] icon, then open the [Print Guide and Basic Frame] tab in the [Properties] Palette.
Application
Manga Studio
362
Show GuideCreates grid lines on-screen, and toggles their display on and off.
1. Open the Page
Open the page using the [Page] tab of the [Edit] window.
4. Display adjustment is complete
The guide lines are created when you click the measurement scale. When no [Guide Layer] is present a new layer is created. You can drag the guide lines to move them.
2. Show the Measurement Scale
select [show Measurement scale] from the [View] menu, and place a checkmark in the menu to display the measurement scale.
Show GridToggles the display of the on-screen measurement grid on and off.
1. Open the Page
Open the page using the [Page] tab of the [Edit] window.
2. Select the Command
select [Drawing Aids] from the [View] menu, select [show Grid], and place a checkmark in the menu.
3. Display adjustment is complete
The grid is displayed on-screen.
To change the [Grid Line] configuration method, double click the [Grid Layer] icon, then open the [Grid] tab in the [Properties] palette.
Application
3. Select a Tool
select the [Object selector] tool from the [Tool] palette.
To change the display of all guidelines created, select [Drawing Aids] from the [View] menu, then select the {show Guide}.
To remove individual guidelines, use the "Object selector" tool, to drag the ruler.
Explanation
User Guide
363
Chapter
12
Displays and Window
s
Manga Studio
Show Information03
You can change settings for story information, author information, and pagination.
Show Story and Author InfoToggles display of the story and author information on and off. select [show story and Author Info] from the [Display] menu and place a checkmark in the menu to display this information.
Show Page NumberToggles the display of the on-screen page numbers on and off. select [show Page Number] from the [Display] menu and place a checkmark in the menu to display this information.
Display PaginationToggles display of pagination on and off. select [show Pagination] from the [Display] menu and place a checkmark in the menu to display this information.
To Change story settingsrmation / author information / page number / pagination settings, open the [story] tab from the [Edit] window, close the [Page] tab, select [Change story settings] from the [story] menu, and change the information in the [story Info] dialog.
Application


Other
Chapter 13
In this chapter we will discuss how to use Materials, how to undo incorrect commands and actions to record work.
Step: 01 Materials (For EX only) 374
Step: 02 Undoing commands 378
Other
Step: 02 Action (EX only) 380
Chapter
13
Manga Studio
366
Manga Studio
Materials (For EX only)01
Manage rulers, balloons; character Materials, etc using the [Materials] palette.
Materials basicsHere we will introduce Materials types and operation method. For saving [Materials] refer to 『saving Materials』( ⇒ P. 58).
・ [Basic frame layer], [Guide layer], [Grid layer] and [sketch layer] cannot be saved to the [Materials] palette.
・ It is possible to save data created in another application. When you double click on the saved data, the application used to create it will startup.
Explanation
Operation method: Using Materials
Drag and drop Materials from the [Materials] palette& onto the page.
1. Open the Page Open the page through [Page] tab of the [Edit] window.
2. Drag &drop From the [Window] menu, select [Materials], and drag & drop from the
[Materials] palette [Materials] → [User] folder onto the page.
3. Complete use The new layer has been created and the Materials have been pasted onto the page.
・ When you drag& drop an importable image file onto the page, the import function or 2DLT function (EX only) will automatically startup.
・ For non-importable files, the associated application will startup after double clicking.
Explanation
Concept
Frequently used Materials in comic production can be called up anytime if saved to the [Materials] palette. The Materials which can be managed in the [Materials] palette are as follows:
The locations where you can save Materials in the [Materials] palette are as follows: ・ [Materials] → [User] folder
PageFrame splitLayerBalloon ruler MaterialsRuler MaterialsCharacter Materials3D MaterialsImage
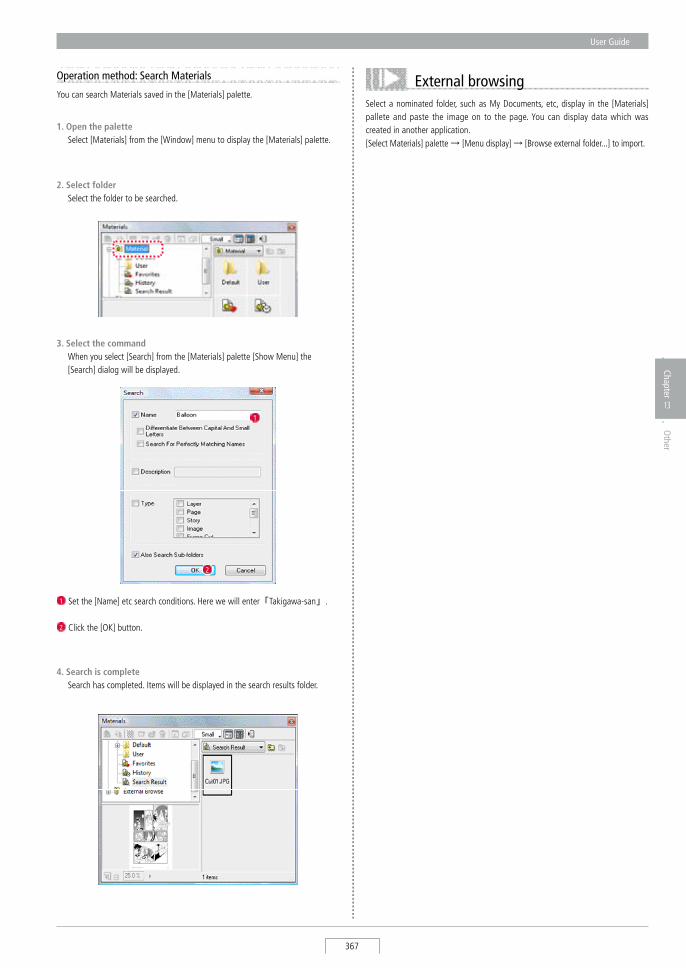
User Guide
367
Chapter
13
Other
Operation method: Search Materials
You can search Materials saved in the [Materials] palette.
1. Open the palette select [Materials] from the [Window] menu to display the [Materials] palette.
3. Select the command When you select [search] from the [Materials] palette [show Menu] the
[search] dialog will be displayed.
1 set the [Name] etc search conditions. Here we will enter「Takigawa-san」.
2 Click the [OK] button.
2. Select folder select the folder to be searched.
4. Search is complete search has completed. Items will be displayed in the search results folder.
1
2
External browsingselect a nominated folder, such as My Documents, etc, display in the [Materials] pallete and paste the image on to the page. You can display data which was created in another application. [select Materials] palette → [Menu display] → [Browse external folder...] to import.
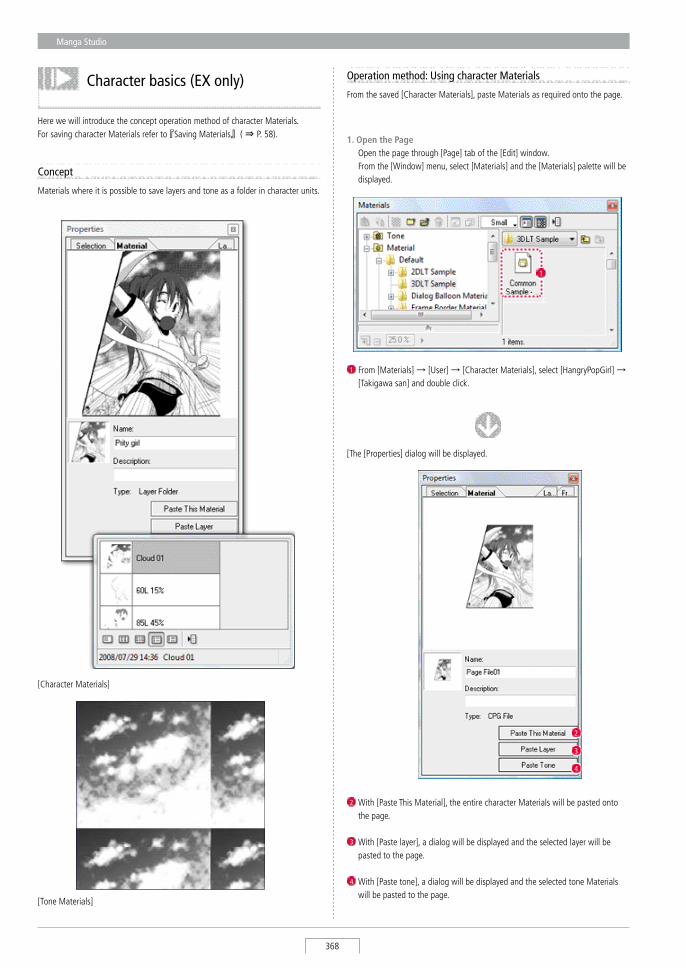
Manga Studio
368
Here we will introduce the concept operation method of character Materials. For saving character Materials refer to 『saving Materials』( ⇒ P. 58).
Concept
Materials where it is possible to save layers and tone as a folder in character units.
[Character Materials]
[Tone Materials]
Operation method: Using character Materials
From the saved [Character Materials], paste Materials as required onto the page.
1. Open the Page Open the page through [Page] tab of the [Edit] window. From the [Window] menu, select [Materials] and the [Materials] palette will be
displayed.
1 From [Materials] → [User] → [Character Materials], select [HangryPopGirl] →[Takigawa san] and double click.
1
2 With [Paste This Material], the entire character Materials will be pasted onto the page.
3 With [Paste layer], a dialog will be displayed and the selected layer will be pasted to the page.
4 With [Paste tone], a dialog will be displayed and the selected tone Materials will be pasted to the page.
[The [Properties] dialog will be displayed.
2
3
4
Character basics (EX only)
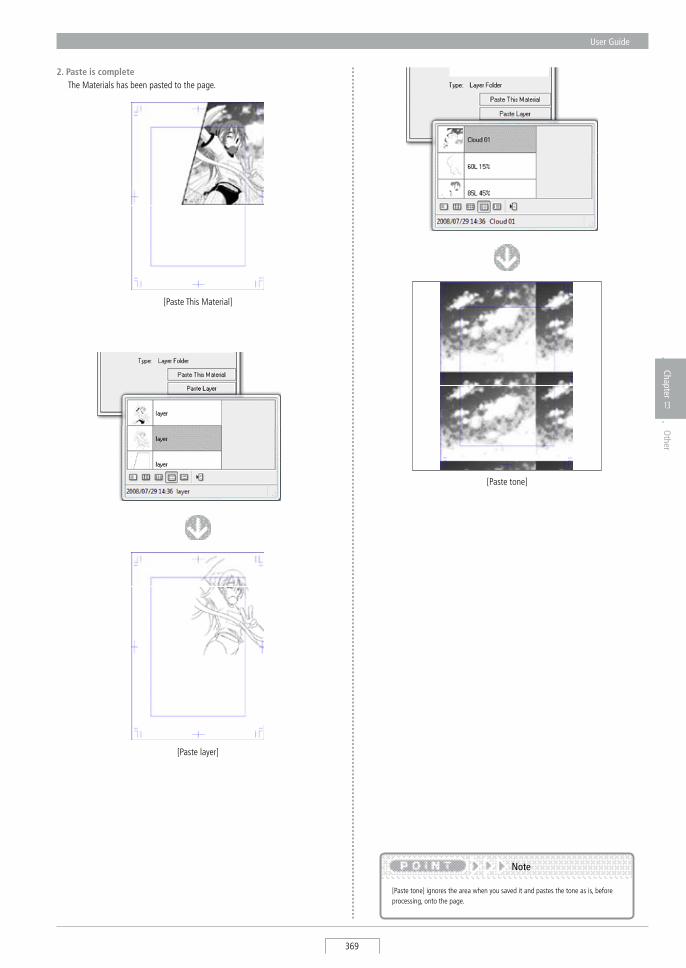
User Guide
369
Chapter
13
Other
2. Paste is complete The Materials has been pasted to the page.
[Paste This Material]
[Paste layer]
[Paste tone]
[Paste tone] ignores the area when you saved it and pastes the tone as is, before processing, onto the page.
Note
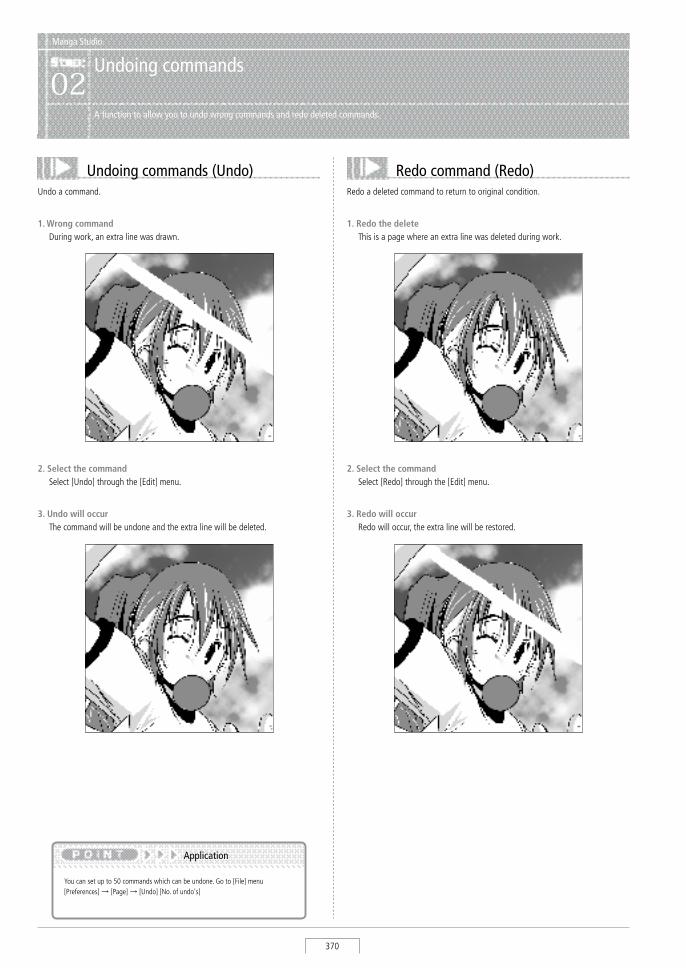
Manga Studio
370
Manga Studio
Undoing commands02
A function to allow you to undo wrong commands and redo deleted commands.
Undoing commands (Undo)Undo a command.
2. Select the command select [Undo] through the [Edit] menu.
You can set up to 50 commands which can be undone. Go to [File] menu [Preferences] → [Page] → [Undo] [No. of undo's]
Application
1. Wrong command During work, an extra line was drawn.
3. Undo will occur The command will be undone and the extra line will be deleted.
Redo command (Redo)Redo a deleted command to return to original condition.
2. Select the command select [Redo] through the [Edit] menu.
1. Redo the delete This is a page where an extra line was deleted during work.
3. Redo will occur Redo will occur, the extra line will be restored.
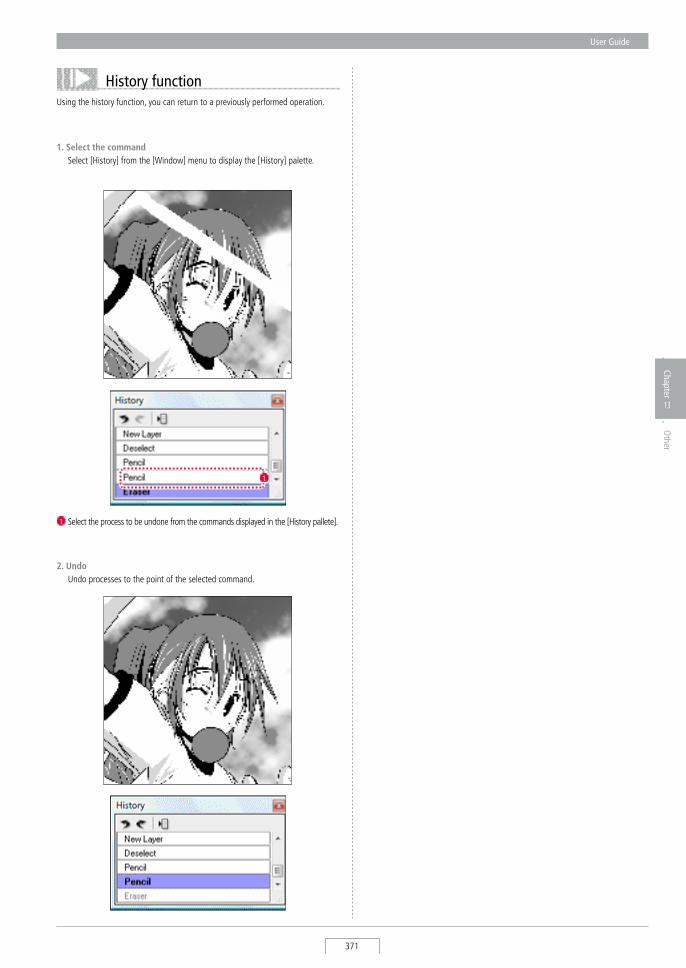
User Guide
371
Chapter
13
Other
History functionUsing the history function, you can return to a previously performed operation.
1. Select the command select [History] from the [Window] menu to display the [History] palette.
2. Undo Undo processes to the point of the selected command.
1
1 select the process to be undone from the commands displayed in the [History pallete].
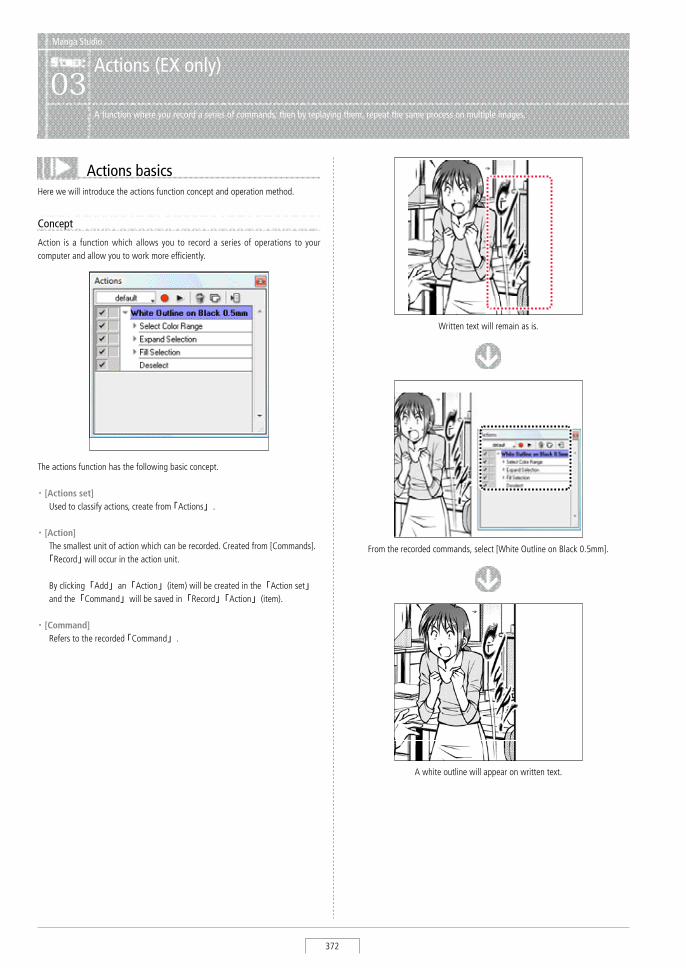
Manga Studio
372
Manga Studio
Actions (EX only)03
A function where you record a series of commands, then by replaying them, repeat the same process on multiple images.
Actions basicsHere we will introduce the actions function concept and operation method.
Concept
Action is a function which allows you to record a series of operations to your computer and allow you to work more efficiently.
The actions function has the following basic concept.
・ [Actions set] Used to classify actions, create from 「Actions」.
・ [Action] The smallest unit of action which can be recorded. Created from [Commands]. 「Record」 will occur in the action unit.
By clicking「Add」an「Action」(item) will be created in the「Action set」 and the「Command」will be saved in「Record」「Action」(item).
・ [Command] Refers to the recorded 「Command」.
Written text will remain as is.
From the recorded commands, select [White Outline on Black 0.5mm].
A white outline will appear on written text.
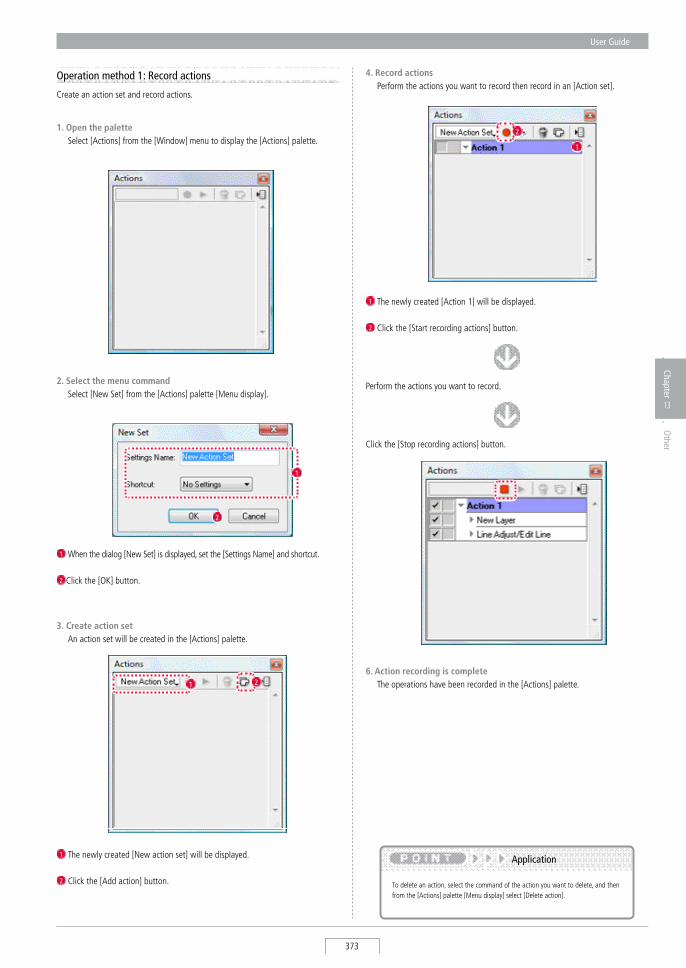
User Guide
373
Chapter
13
Other
Operation method 1: Record actions
Create an action set and record actions.
1. Open the palette select [Actions] from the [Window] menu to display the [Actions] palette.
2. Select the menu command select [New set] from the [Actions] palette [Menu display].
3. Create action set An action set will be created in the [Actions] palette.
4. Record actions Perform the actions you want to record then record in an [Action set].
Perform the actions you want to record.
Click the [stop recording actions] button.
6. Action recording is complete The operations have been recorded in the [Actions] palette.
To delete an action, select the command of the action you want to delete, and then from the [Actions] palette [Menu display] select [Delete action].
Application
1 When the dialog [New set] is displayed, set the [settings Name] and shortcut.
2 Click the [OK] button.
1
2
2
1 The newly created [New action set] will be displayed.
2 Click the [Add action] button.
1
1 The newly created [Action 1] will be displayed.
2 Click the [start recording actions] button.
1
2
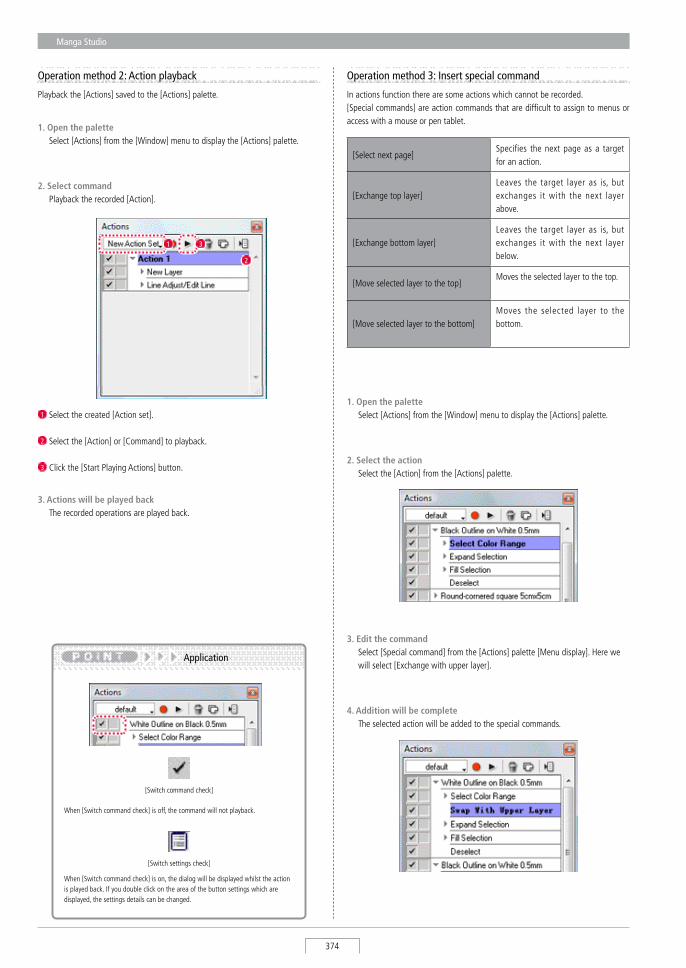
Manga Studio
374
Operation method 3: Insert special command
In actions function there are some actions which cannot be recorded. [special commands] are action commands that are difficult to assign to menus or access with a mouse or pen tablet.
2. Select the action select the [Action] from the [Actions] palette.
3. Edit the command select [special command] from the [Actions] palette [Menu display]. Here we
will select [Exchange with upper layer].
4. Addition will be complete The selected action will be added to the special commands.
[select next page]specifies the next page as a target for an action.
[Exchange top layer]Leaves the target layer as is, but exchanges it with the next layer above.
[Exchange bottom layer]Leaves the target layer as is, but exchanges it with the next layer below.
[Move selected layer to the top]Moves the selected layer to the top.
[Move selected layer to the bottom]Moves the selected layer to the bottom.
Operation method 2: Action playback
Playback the [Actions] saved to the [Actions] palette.
3. Actions will be played back The recorded operations are played back.
2. Select command Playback the recorded [Action].
1. Open the palette select [Actions] from the [Window] menu to display the [Actions] palette.
1. Open the palette select [Actions] from the [Window] menu to display the [Actions] palette.
31
2
1 select the created [Action set].
2 select the [Action] or [Command] to playback.
3 Click the [start Playing Actions] button.
Application
[switch command check]
When [switch command check] is off, the command will not playback.
[switch settings check]
When [switch command check] is on, the dialog will be displayed whilst the action is played back. If you double click on the area of the button settings which are displayed, the settings details can be changed.
User Guide
375
Chapter
13
Other
Note that depending on the command it may not be possible to record the set value for some menu commands.
Note
Commands which cannot be recorded
The following commands cannot be recorded in the action function.
[File] → [Most Recently Used Files]
[File] → [Import] → [select TWAIN device]
[File] → [Import] → [Continuous scan]
[File] → [Page settings]
[File] → [Print settings]
[File] → [Preferences]
[File] → [shortcut settings]
[File] → [Custom tool settings]
[File] → [Install Materials]
[File] → [Quit]
[Edit] → [Undo]
[Edit] → [Redo]
All from [View], [Window] and [Help] menu
When you select [Action settings] from the [Actions] palette → [Menu display], the [Action settings] dialog will be displayed.
・ [Waiting time] set the time to wait before executing a command.
・ [Carry Out Continuous Check Of Loop Play] When loop playback is set, every time the action playback has completed
a continuation confirmation dialog will be displayed.
[How to read the Action settings] dialog
Operation method 4: Insert menu
save a menu bar command directly to an action set. select [Insert menu] from the [Action] palette → [Menu display] to insert.
1. Select the action In the [Action] palette, select the [Action] that you want to save into the
[Action set] palette.
4. Insert menu is complete A new [Command] has been saved to the [Action] palette.
2. Select the menu command When you select [Insert menu] from the [Action] palette [Menu display], the
[Insert menu] dialog will be displayed.
3. Select target menu select the menu command you want to save from the menu bar. select the
[New Layer].
The [New layer] will be saved to the [Insert menu] dialog. Click [OK] when saving is complete.

Features Reference
Chapter 14
This chapter is a reference for Manga Studio's menus, toolbars and windows, and contains a list of keyboard shortcut commands.
Step: 01 Menus 386
Step: 02 Windows & Palettes 398
Chapter
14
Features Reference
Manga Studio
378
Manga Studio
Menus01
This chapter explains all the features available in Manga Studio's menus.
This menu is mostly used for file input and output operations.
・ [Revert...] Revert the contents of the current file to the most
recently saved state.
・ [Save As Template...] save the Page settings of the current [Page] File as
a Page Template.
・ [Save Material] (EX only) save the currently selected [Page], [Page] Layout, or
layer contents on the [Materials] Palette.
・ [Import] → [3D File...] (EX only) Import 3D File into a [Page].
→ [Image File...] Import an image file into a [Page] as a layer.
→ [2DLT...] (EX only) Import an image file into a [Page] and perform
2DLT rendering.
→ [Photoshop File...] (EX only) Import a Photoshop File into a [Page] as a layer.
・ [New] Create a new [story] File or [Page] File for editing.
・ [Open...] Open a previously saved [story] File or [Page] File
for editing.
・ [Most Recently Used Files] show a list of recently used [story] Files and [Page]
Files. select a file to begin editing.
・ [Close] Close the currently open editing window.
・ [Save] save the contents of the [Page] File you're editing
to disk.
・ [Save All] save the contents of all opened [Page] Files to disk.
・ [Save As...] save the contents of the [Page] File you're editing
to disk with a new name.
・ [Save Story As...] save the contents of the [story] File you're editing
to disk with a new name.
File Menu
→ [TWAIN...] Import an image from a TWAIN device into a [Page]
as a layer.
→ [Continuous Scan...] (EX only) scan multiple pages into a [story].
→ [Select TWAIN Device...] select a TWAIN device to use.
→ [Page File...] Import a page file into the current [story].
→ [Layer File...] Import a layer file into the current [Page].
→ [Multiple Layer Files...] Import all layer files contained in the folder you
choose into the current [Page].
→ [Text File...] (EX only) Import a text file into the current [Page] as a new
text layer.
・ [Export] → [Image File (In Pixels)...] Export a [Page] into one of a number of image file
formats by choosing a pixel size.
→ [Image File (Dimensions)...] Export a [Page] into one of a number of image file
formats by choosing its Dimensions.
→ [Export Print Shop Data...] Export a [story] in a data format suitable for
sending to a print shop.
→ [Text File...] (EX only) Export the text from all a [Page]'s text layers into a
text file.
・ [Page Settings...] set the Page size, orientation, etc. for printing.
・ [Print Settings...] set the print range, number of copies, and other
options.
・ [Print...] Print the current [story] or [Page] according to the
print settings.
1 1
2 2
3
3
4
5
4
5

User Guide
379
Chapter
14
Features Reference
Use this to install a materials pack. Exit Manga studio.
・ [Quit] Exit Manga studio.
・ [Preferences...] Choose story and page behavior, printing and
tablet settings, and other preferences.
・ [Shortcut Settings...] (EX only) Edit shortcut settings.
・ [Custom Tool Settings...] (EX only) Edit settings for the [Custom Tools] Palette.
・ [Install Material...]
This menu is mainly used for image editing operations.
・ [Paste White As Transparent] Editing[Pages]Paste the content saved to the
clipboard to the new (page), making the white areas transparent.
・ [Paste Colors As Opaque] Editing[Pages]Paste the content saved to the
clipboard to the new (page), making the color density opaque.
・ [Clear] Delete the content included in the selected area of
the selected layer.
・ [Clear Outside Selection] Delete the content included in the area that has not
been selected of the selected layer. ・ [Fill Selection...] Paint the specified color and settings within the
selected area.
・ [Undo Fill] [Page]Delete operation immediately prior to this
(page).
・ [Redo] [Page]Redo the operation that deleted the (page).
・ [Cut] Cut the selected area, and save to the clipboard.
・ [Copy] Copy the selected area, and save to the clipboard.
・ [Copying to Another Application] Copy the selected area, and save to the clipboard
to be pasted to another application.
・ [Paste] Editing [Pages] Paste the content saved to the
clipboard to the new (page) as a new layer.
Edit Menu
・ [Fill Selection With Foreground Color] (EX only) Paints the currently-selected drawing color on the
target layer within the selected area.
・ [Outline Selection] (EX only) specifies and draws the color and thickness of
the solid lines around the selected area.
・ [Change Line Color to Drawing Color] (EX only) Changes the color of the drawing lines on
the vector layer and the parts that are not transparent within the selected area to the currently-selected drawing color.
・ [Move and Transform] → [Scale…]・[Rotate…]・[Free
Transform…]・[Distort…]・[Perspective…] ・[Flip Horizontal]・[Flip Vertical]
Grasp and drag the handle to transform the image in the selected area.
→ [Mesh Transform…](EX only) Divides the image using a grille to enable each
part to be transformed separately.
・ [Tone Distort](EX only) → [Peripheral Distort…]・[Clear]・[Blur
Distort…]・[Scale…]・[Rotate…]・[Free Transform…]・[Distort…]・[Perspective…] ・ [Flip Horizontal]・[Flip Vertical]・[Mesh Transform…]
Distorts and transforms tones within the selected area. Grasps and drags the handle to distort the image as necessary.
・ [Save Pattern To Tone Material] saves images within the selected area to the
[Materials] palette as pattern tones.
・ [Save Pattern To Dialog Balloon Material]
1
1
2
2
Manga Studio
380
This menu contains actions for the [story] Tab of the [Edit] Window.
・ [Insert New Page] Insert a new page after the page selected in the
[Page List].
・ [Select Paper and Insert...] select the [Page Form], number of pages, and
whether to insert the pages before or after the page selected in the [Page List].
・ [Spread Pages] (EX only) Concatenate adjacent pages selected on the [Page
List] to make a page spread.
・ [Single Pages] (EX only) Detach concatenated pages selected on the [Page
List] to make single pages.
・ [View] → [Page List] Toggle to show or hide the [Page List].
→ [Fit View Scale to View Width] Automatically scale the [Page List] to fit the view
width.
・ [Open Page] Open the selected page from the [Page List] in the
[Page Edit Area] of the current [Edit] Window.
・ [Open Page in New Window] Open the selected page from the [Page List] in a
new [Edit] Window.
・ [Close Page] Close the current page.
・ [Next Page] Go to the next page.
・ [Previous Page] Go to the previous page.
・ [Clear Page] Clear the content from the page selected in the
[Page List] and reset it to its initial state.
・ [Delete Page] Delete the page selected in the [Page List] from the
story.
Story Menu
→ [Page Info] Toggle to show or hide the [Page Info] in the [Edit]
Window.
→ [Print Guide/Basic Frame] Toggle to show or hide the [Print Guide & Basic
Frame] in the [Page List].
→ [Quick View] set the story view state in the [Page List] to Quick View.
→ [High Quality View] set the number of pages in the story, and check the
cover page and pagination in the [Page List].
・ [Change Story Settings...] Change story settings in the [story] File, such as
the Title and author’s name.
・ [Binding Position/ Start Page Changing] Change the binding position and start page
position of your [story].
・ [Change Page Format Guide (All Pages)...] Change the paper guide settings for all pages in
your [story].
・ [Change Page Format Guide (Selective Page)...]
Change the paper guide settings for the selected [Pages].
・ [Edit Memo...] Add a memo for the selected [Page].
・ [Story Editor...] (EX only) Open the [story Editor] to edit all the text used in
your [story].
1 1
(EX only) saves images within the selected area or selected
rulers to the [Materials] palette as word balloons.
・ [Save Pattern To Character Material] (EX only) saves images within the selected area to
[Materials] as characters. ・ [Save Pattern To Brush Material…]
(EX only) saves the images within the selected area as
pattern brushes.
[Join Print Guides] (EX only) Matches left and right print guides on the spread page.
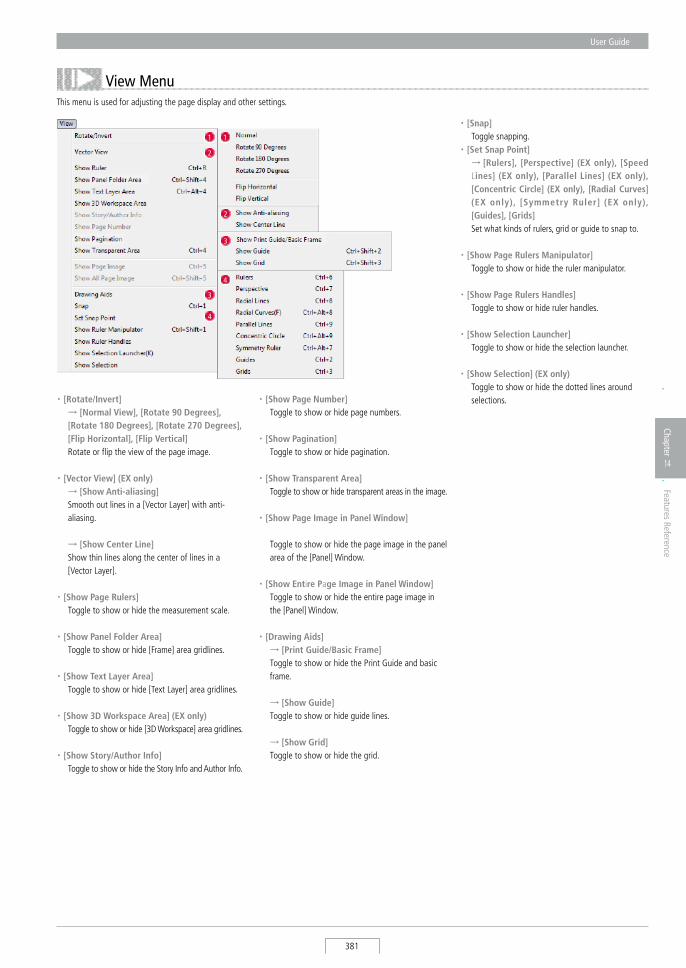
User Guide
381
Chapter
14
Features Reference
This menu is used for adjusting the page display and other settings.
View Menu
・ [Rotate/Invert] → [Normal View], [Rotate 90 Degrees],
[Rotate 180 Degrees], [Rotate 270 Degrees], [Flip Horizontal], [Flip Vertical]
Rotate or flip the view of the page image. ・ [Vector View] (EX only) → [Show Anti-aliasing] smooth out lines in a [Vector Layer] with anti-
aliasing.
→ [Show Center Line] show thin lines along the center of lines in a
[Vector Layer].
・ [Show Page Rulers] Toggle to show or hide the measurement scale.
・ [Show Panel Folder Area] Toggle to show or hide [Frame] area gridlines.
・ [Show Text Layer Area] Toggle to show or hide [Text Layer] area gridlines.
・ [Show 3D Workspace Area] (EX only) Toggle to show or hide [3D Workspace] area gridlines.
・ [Show Story/Author Info] Toggle to show or hide the story Info and Author Info.
・ [Show Page Number] Toggle to show or hide page numbers.
・ [Show Pagination] Toggle to show or hide pagination.
・ [Show Transparent Area] Toggle to show or hide transparent areas in the image.
・ [Show Page Image in Panel Window]
Toggle to show or hide the page image in the panel area of the [Panel] Window.
・ [Show Entire Page Image in Panel Window] Toggle to show or hide the entire page image in
the [Panel] Window.
・ [Drawing Aids] → [Print Guide/Basic Frame] Toggle to show or hide the Print Guide and basic
frame.
→ [Show Guide] Toggle to show or hide guide lines.
→ [Show Grid] Toggle to show or hide the grid.
・ [Snap] Toggle snapping. ・ [Set Snap Point] → [Rulers], [Perspective] (EX only), [Speed
Lines] (EX only), [Parallel Lines] (EX only), [Concentric Circle] (EX only), [Radial Curves] (EX only), [Symmetry Ruler] (EX only), [Guides], [Grids]
set what kinds of rulers, grid or guide to snap to.
・ [Show Page Rulers Manipulator] Toggle to show or hide the ruler manipulator.
・ [Show Page Rulers Handles] Toggle to show or hide ruler handles.
・ [Show Selection Launcher] Toggle to show or hide the selection launcher.
・ [Show Selection] (EX only) Toggle to show or hide the dotted lines around
selections.
1
2
3
4
1
2
3
4
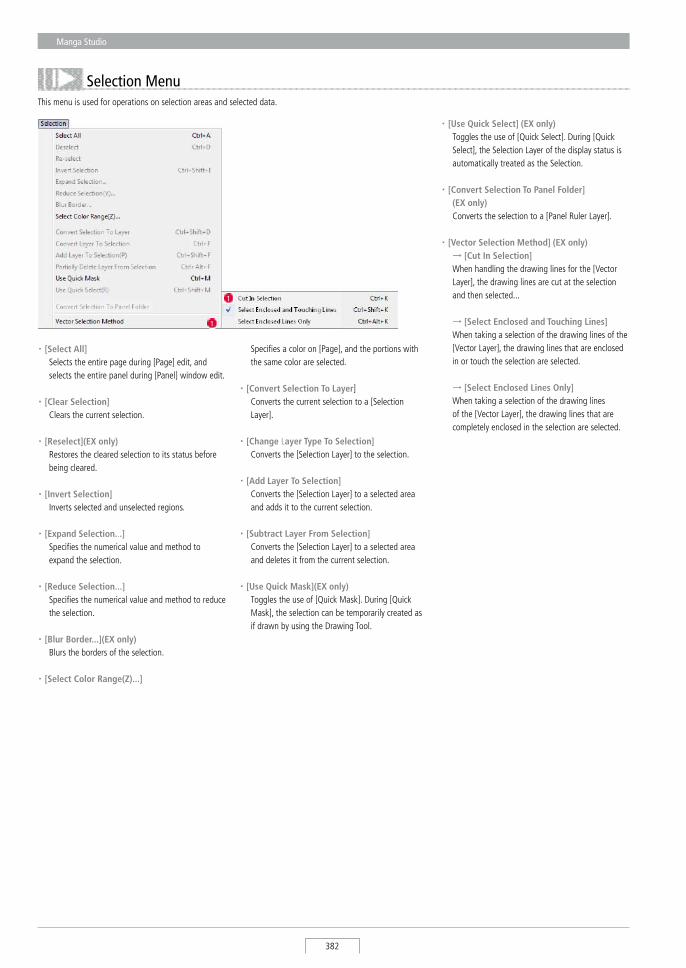
Manga Studio
382
・ [Use Quick Select] (EX only) Toggles the use of [Quick select]. During [Quick
select], the selection Layer of the display status is automatically treated as the selection.
・ [Convert Selection To Panel Folder] (EX only) Converts the selection to a [Panel Ruler Layer].
・ [Vector Selection Method] (EX only) → [Cut In Selection] When handling the drawing lines for the [Vector
Layer], the drawing lines are cut at the selection and then selected...
→ [Select Enclosed and Touching Lines] When taking a selection of the drawing lines of the
[Vector Layer], the drawing lines that are enclosed in or touch the selection are selected.
→ [Select Enclosed Lines Only] When taking a selection of the drawing lines
of the [Vector Layer], the drawing lines that are completely enclosed in the selection are selected.
This menu is used for operations on selection areas and selected data.
Selection Menu
specifies a color on [Page], and the portions with the same color are selected.
・ [Convert Selection To Layer] Converts the current selection to a [selection
Layer].
・ [Change Layer Type To Selection] Converts the [selection Layer] to the selection.
・ [Add Layer To Selection] Converts the [selection Layer] to a selected area
and adds it to the current selection.
・ [Subtract Layer From Selection] Converts the [selection Layer] to a selected area
and deletes it from the current selection.
・ [Use Quick Mask](EX only) Toggles the use of [Quick Mask]. During [Quick
Mask], the selection can be temporarily created as if drawn by using the Drawing Tool.
・ [Select All] selects the entire page during [Page] edit, and
selects the entire panel during [Panel] window edit.
・ [Clear Selection] Clears the current selection.
・ [Reselect](EX only) Restores the cleared selection to its status before
being cleared.
・ [Invert Selection] Inverts selected and unselected regions.
・ [Expand Selection...] specifies the numerical value and method to
expand the selection.
・ [Reduce Selection...] specifies the numerical value and method to reduce
the selection.
・ [Blur Border...](EX only) Blurs the borders of the selection.
・ [Select Color Range(Z)...]
1
1
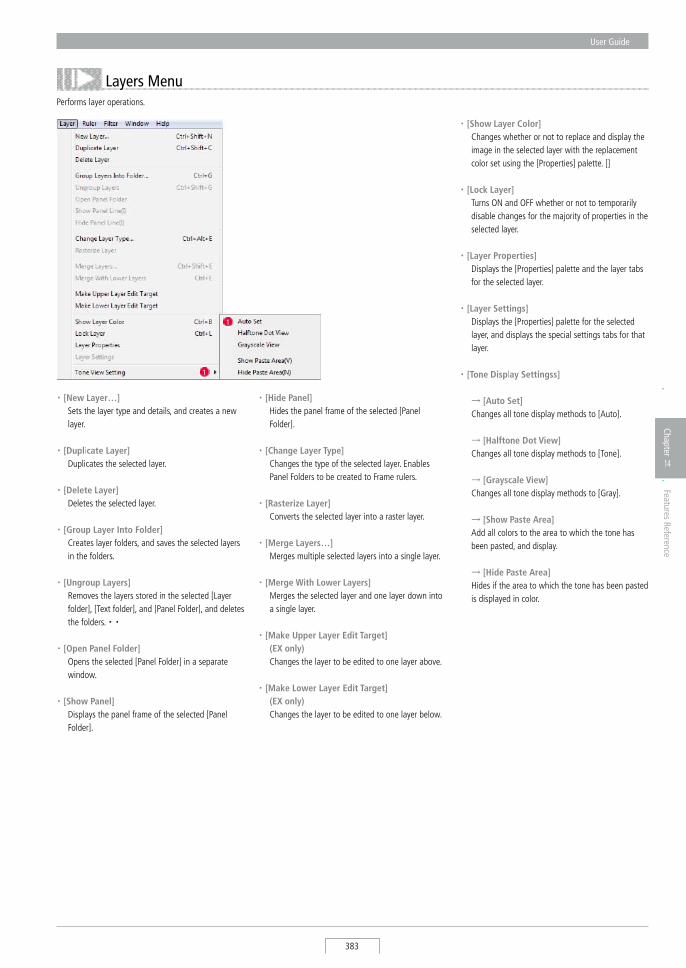
User Guide
383
Chapter
14
Features Reference
Performs layer operations.
・ [New Layer…] sets the layer type and details, and creates a new
layer.
・ [Duplicate Layer] Duplicates the selected layer.
・ [Delete Layer] Deletes the selected layer.
・ [Group Layer Into Folder] Creates layer folders, and saves the selected layers
in the folders.
・ [Ungroup Layers] Removes the layers stored in the selected [Layer
folder], [Text folder], and [Panel Folder], and deletes the folders. ・ ・
・ [Open Panel Folder] Opens the selected [Panel Folder] in a separate
window.
・ [Show Panel] Displays the panel frame of the selected [Panel
Folder].
・ [Hide Panel] Hides the panel frame of the selected [Panel
Folder].
・ [Change Layer Type] Changes the type of the selected layer. Enables
Panel Folders to be created to Frame rulers.
・ [Rasterize Layer] Converts the selected layer into a raster layer.
・ [Merge Layers…] Merges multiple selected layers into a single layer.
・ [Merge With Lower Layers] Merges the selected layer and one layer down into
a single layer.
・ [Make Upper Layer Edit Target] (EX only) Changes the layer to be edited to one layer above.
・ [Make Lower Layer Edit Target] (EX only) Changes the layer to be edited to one layer below.
Layers Menu
・ [Show Layer Color] Changes whether or not to replace and display the
image in the selected layer with the replacement color set using the [Properties] palette. []
・ [Lock Layer] Turns ON and OFF whether or not to temporarily
disable changes for the majority of properties in the selected layer.
・ [Layer Properties] Displays the [Properties] palette and the layer tabs
for the selected layer.
・ [Layer Settings] Displays the [Properties] palette for the selected
layer, and displays the special settings tabs for that layer.
・ [Tone Display Settingss]
→ [Auto Set] Changes all tone display methods to [Auto].
→ [Halftone Dot View] Changes all tone display methods to [Tone].
→ [Grayscale View] Changes all tone display methods to [Gray].
→ [Show Paste Area] Add all colors to the area to which the tone has
been pasted, and display.
→ [Hide Paste Area] Hides if the area to which the tone has been pasted
is displayed in color.
1
1
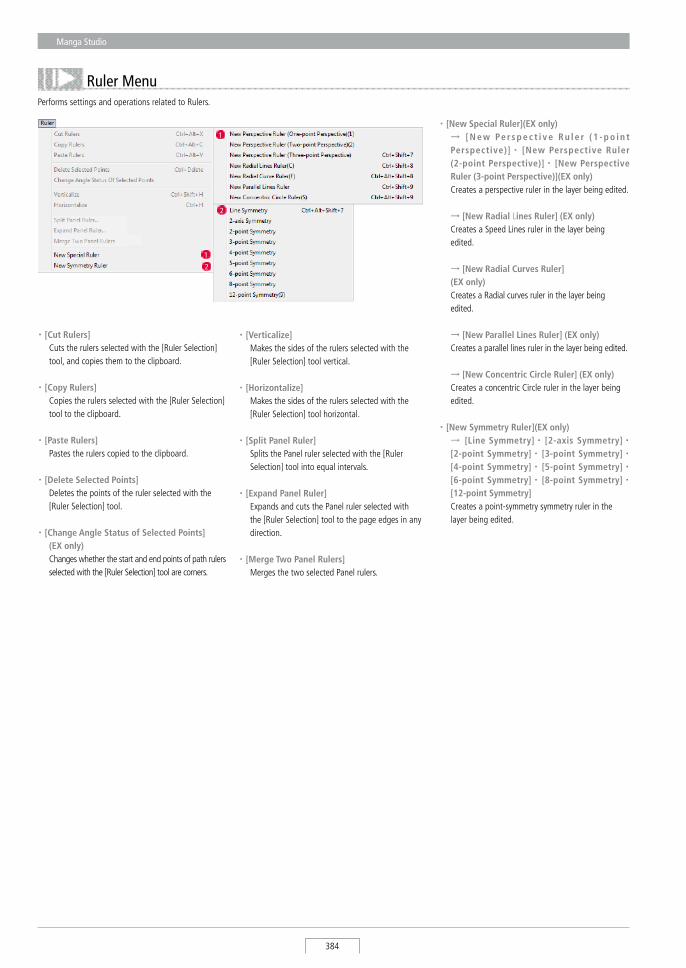
Manga Studio
384
Performs settings and operations related to Rulers.
・ [Verticalize] Makes the sides of the rulers selected with the
[Ruler selection] tool vertical.
・ [Horizontalize] Makes the sides of the rulers selected with the
[Ruler selection] tool horizontal.
・ [Split Panel Ruler] splits the Panel ruler selected with the [Ruler
selection] tool into equal intervals.
・ [Expand Panel Ruler] Expands and cuts the Panel ruler selected with
the [Ruler selection] tool to the page edges in any direction.
・ [Merge Two Panel Rulers] Merges the two selected Panel rulers.
・ [Cut Rulers] Cuts the rulers selected with the [Ruler selection]
tool, and copies them to the clipboard.
・ [Copy Rulers] Copies the rulers selected with the [Ruler selection]
tool to the clipboard.
・ [Paste Rulers] Pastes the rulers copied to the clipboard.
・ [Delete Selected Points] Deletes the points of the ruler selected with the
[Ruler selection] tool.
・ [Change Angle Status of Selected Points] (EX only) Changes whether the start and end points of path rulers
selected with the [Ruler selection] tool are corners.
Ruler Menu
・ [New Special Ruler](EX only) → [ N e w Pe r s p e c t i v e R u l e r ( 1 - p o i n t
Perspective)]・ [New Perspective Ruler (2-point Perspective)]・ [New Perspective Ruler (3-point Perspective)](EX only)
Creates a perspective ruler in the layer being edited.
→ [New Radial Lines Ruler] (EX only) Creates a speed Lines ruler in the layer being
edited.
→ [New Radial Curves Ruler] (EX only) Creates a Radial curves ruler in the layer being
edited.
→ [New Parallel Lines Ruler] (EX only) Creates a parallel lines ruler in the layer being edited.
→ [New Concentric Circle Ruler] (EX only) Creates a concentric Circle ruler in the layer being
edited.
・ [New Symmetry Ruler](EX only) → [Line Symmetry]・ [2-axis Symmetry]・
[2-point Symmetry]・ [3-point Symmetry]・ [4-point Symmetry]・ [5-point Symmetry]・ [6-point Symmetry]・ [8-point Symmetry]・ [12-point Symmetry]
Creates a point-symmetry symmetry ruler in the layer being edited.
1
2
2
1
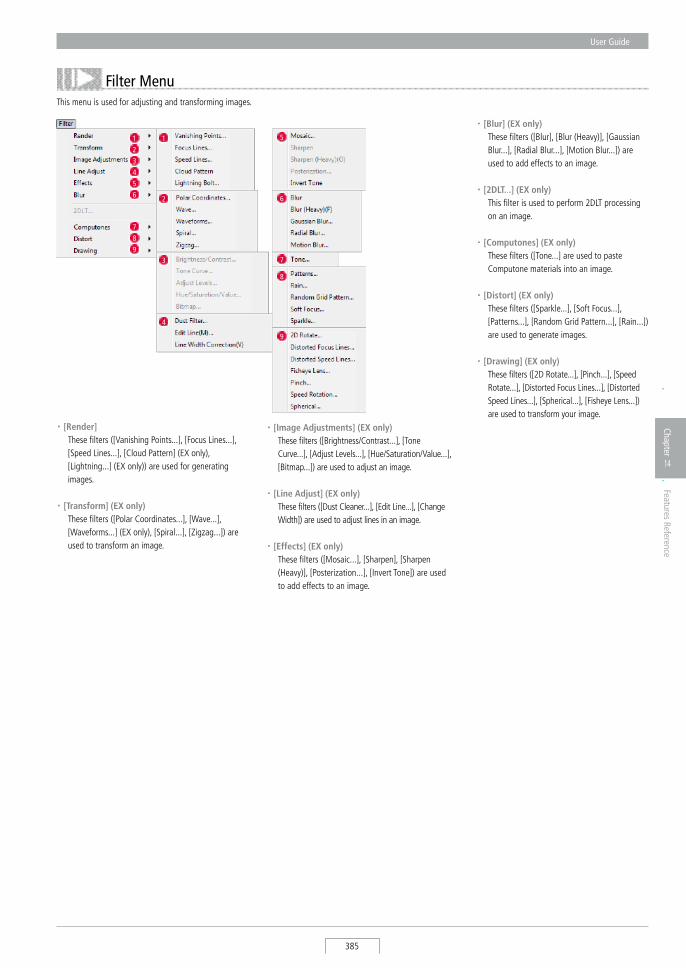
User Guide
385
Chapter
14
Features Reference
This menu is used for adjusting and transforming images.
Filter Menu
・ [Render] These filters ([Vanishing Points...], [Focus Lines...],
[speed Lines...], [Cloud Pattern] (EX only), [Lightning...] (EX only)) are used for generating images.
・ [Transform] (EX only) These filters ([Polar Coordinates...], [Wave...],
[Waveforms...] (EX only), [spiral...], [Zigzag...]) are used to transform an image.
・ [Image Adjustments] (EX only) These filters ([Brightness/Contrast...], [Tone
Curve...], [Adjust Levels...], [Hue/saturation/Value...], [Bitmap...]) are used to adjust an image.
・ [Line Adjust] (EX only) These filters ([Dust Cleaner...], [Edit Line...], [Change
Width]) are used to adjust lines in an image.
・ [Effects] (EX only) These filters ([Mosaic...], [sharpen], [sharpen
(Heavy)], [Posterization...], [Invert Tone]) are used to add effects to an image.
・ [Blur] (EX only) These filters ([Blur], [Blur (Heavy)], [Gaussian
Blur...], [Radial Blur...], [Motion Blur...]) are used to add effects to an image.
・ [2DLT...] (EX only) This filter is used to perform 2DLT processing
on an image.
・ [Computones] (EX only) These filters ([Tone...] are used to paste
Computone materials into an image.
・ [Distort] (EX only) These filters ([sparkle...], [soft Focus...],
[Patterns...], [Random Grid Pattern...], [Rain...]) are used to generate images.
・ [Drawing] (EX only) These filters ([2D Rotate...], [Pinch...], [speed
Rotate...], [Distorted Focus Lines...], [Distorted speed Lines...], [spherical...], [Fisheye Lens...]) are used to transform your image.
1
2
3
4
5
6
7
8
9
1
2
3
4
5
6
7
8
9
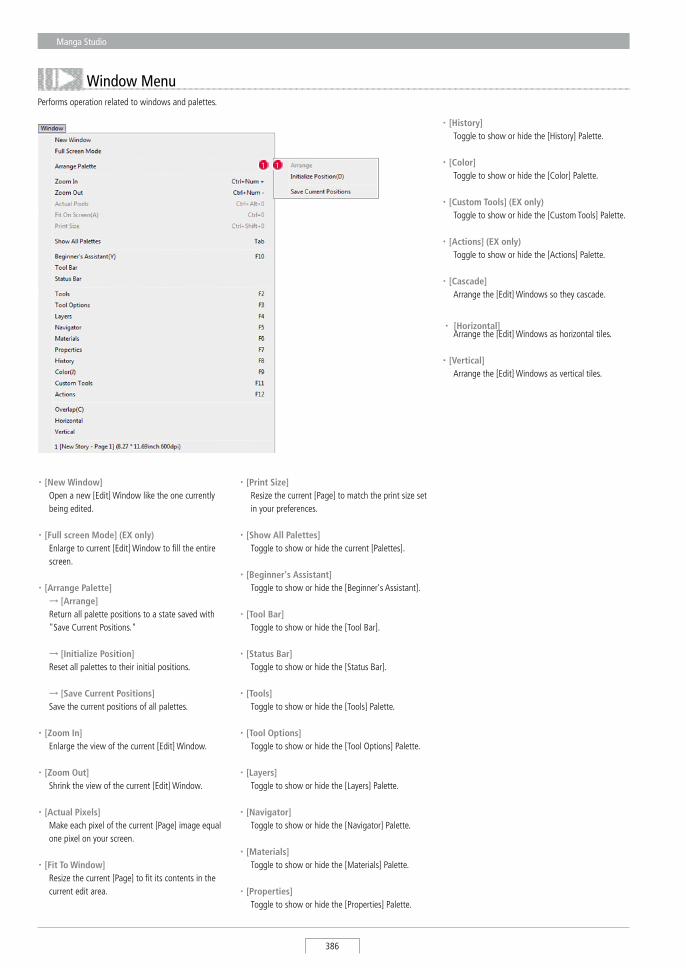
Manga Studio
386
Performs operation related to windows and palettes.
・ [History] Toggle to show or hide the [History] Palette.
・ [Color] Toggle to show or hide the [Color] Palette.
・ [Custom Tools] (EX only) Toggle to show or hide the [Custom Tools] Palette.
・ [Actions] (EX only) Toggle to show or hide the [Actions] Palette.
・ [Cascade] Arrange the [Edit] Windows so they cascade.
・ [Horizontal] Arrange the [Edit] Windows as horizontal tiles.
・ [Vertical] Arrange the [Edit] Windows as vertical tiles.
・ [New Window] Open a new [Edit] Window like the one currently
being edited.
・ [Full screen Mode] (EX only) Enlarge to current [Edit] Window to fill the entire
screen.
・ [Arrange Palette] → [Arrange] Return all palette positions to a state saved with
"save Current Positions."
→ [Initialize Position] Reset all palettes to their initial positions.
→ [Save Current Positions] save the current positions of all palettes.
・ [Zoom In] Enlarge the view of the current [Edit] Window.
・ [Zoom Out] shrink the view of the current [Edit] Window.
・ [Actual Pixels] Make each pixel of the current [Page] image equal
one pixel on your screen.
・ [Fit To Window] Resize the current [Page] to fit its contents in the
current edit area.
・ [Print Size] Resize the current [Page] to match the print size set
in your preferences.
・ [Show All Palettes] Toggle to show or hide the current [Palettes].
・ [Beginner's Assistant] Toggle to show or hide the [Beginner's Assistant].
・ [Tool Bar] Toggle to show or hide the [Tool Bar].
・ [Status Bar] Toggle to show or hide the [status Bar].
・ [Tools] Toggle to show or hide the [Tools] Palette.
・ [Tool Options] Toggle to show or hide the [Tool Options] Palette.
・ [Layers] Toggle to show or hide the [Layers] Palette.
・ [Navigator] Toggle to show or hide the [Navigator] Palette.
・ [Materials] Toggle to show or hide the [Materials] Palette.
・ [Properties] Toggle to show or hide the [Properties] Palette.
Window Menu
1 1
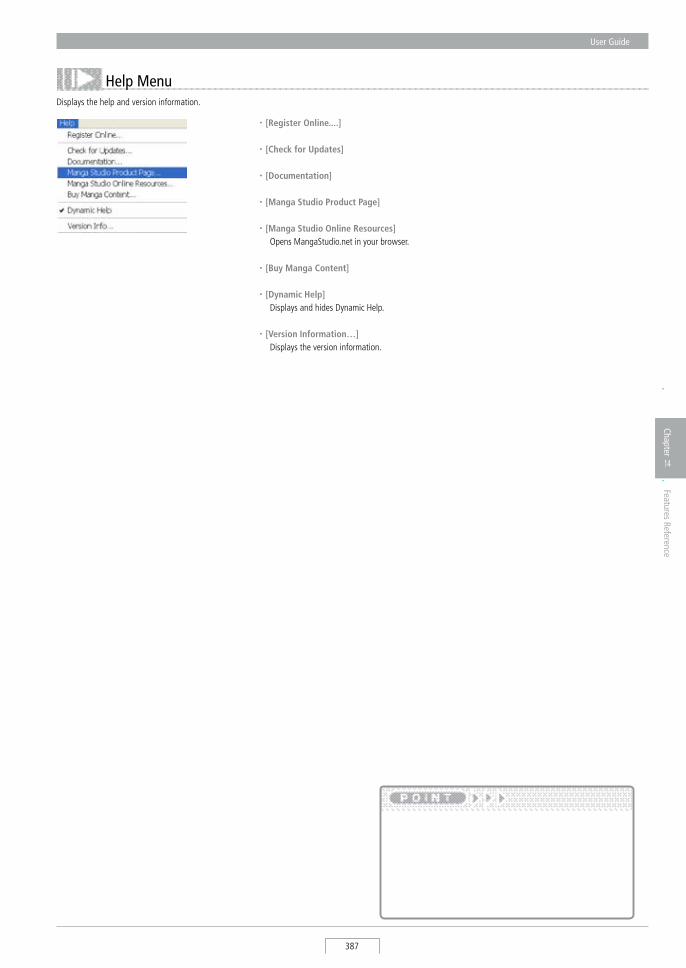
User Guide
387
Chapter
14
Features Reference
Displays the help and version information.
・ [Register Online....]
・ [Check for Updates]
・ [Documentation]
・ [Manga Studio Product Page]
・ [Manga Studio Online Resources] Opens Mangastudio.net in your browser.
・ [Buy Manga Content]
・ [Dynamic Help] Displays and hides Dynamic Help.
・ [Version Information…] Displays the version information.
Help Menu
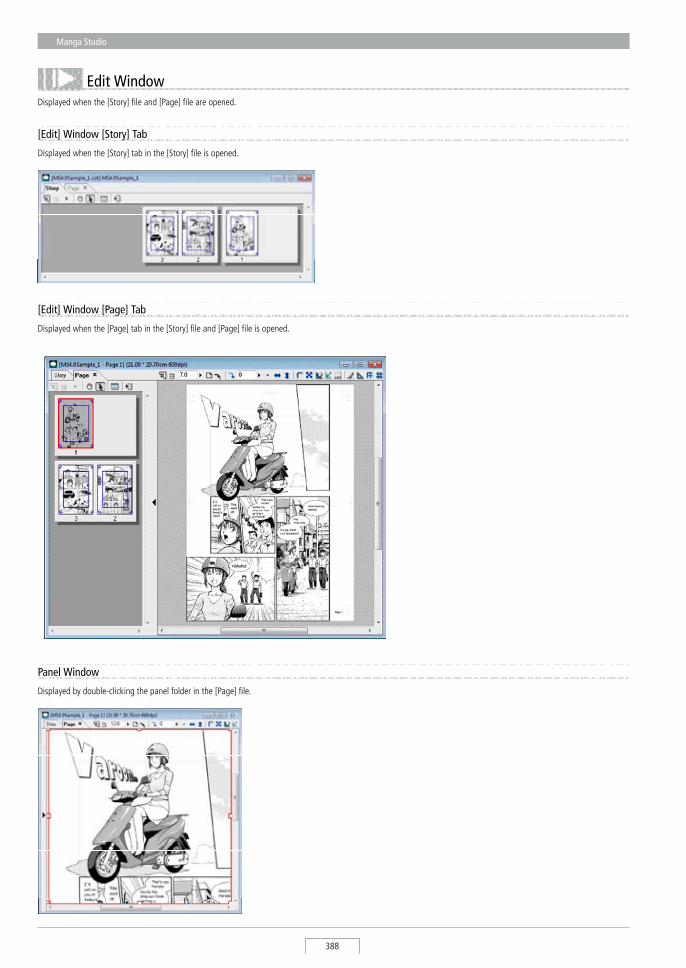
Manga Studio
388
Edit Window
[Edit] Window [Story] Tab
Displayed when the [story] tab in the [story] file is opened.
[Edit] Window [Page] Tab
Displayed when the [Page] tab in the [story] file and [Page] file is opened.
Panel Window
Displayed by double-clicking the panel folder in the [Page] file.
Displayed when the [story] file and [Page] file are opened.

User Guide
389
Chapter
14
Features Reference
[Edit] Window, [Story] Tab Toolbar
This toolbar is on the [story] Tab in the [Edit] Window.
A Zoom InB Zoom OutC scaleD scroll (scrolls the [Page List] on the [story] Tab in the [Edit] Window)E selectF show InfoG show Menu
A B C D E GF
[Edit] Window, [Page] Tab Toolbar
This toolbar is on the [Page] Tab in the [Edit] Window.
A Zoom InB Zoom OutC scaleD Fit To WindowE Actual PixelsF Print sizeG Rotate by specified AngelH AngleI Restore ViewJ Flip Horizontal
K Flip VerticalL show Page RulersM show Transparent AreaN show Page Rulers ManipulatorO show Page Rulers HandlesP show selection LauncherQ show Page Image in Panel WindowR show Entire Page Image in Panel WindowS Change Page Image OpacityT snap
U snap to RulerV snap to Perspective RulerW snap to Radial Line RulerX snap to Radial Curve RulerY snap to Parallel Line RulerZ snap to Concentric Circle Rulera snap to symmetry Rulerb snap to Guidesc snap to Gridsd show Menu
A B C D E F G H I KJ L M N PO
Q R S T U V W X Y Z a b c d
select [Tool Bar] from the [Windows] menu to display or hide the tool bar.
Tool Bar
Main Window Tool Bar
This is the tool bar for the main window, which is displayed when "Manga studio" is started.
A B C D E F G H I KJ L
M N O P Q R S T U V
A New Create/PagesB New story/storyC OpenD saveE save AllF CutG CopyH Paste
I ClearJ UndoK RedoL PrintM Tools (Display Palette) N Tool Options (Display Palette) O Layers (Display Palette) P Navigator (Display Palette)
Q Materials (Display Palette)R Properties (Display Palette) S History (Display Palette) T Color (Display Palette) U Custom Tools (Display Palette) V Actions (Display Palette)
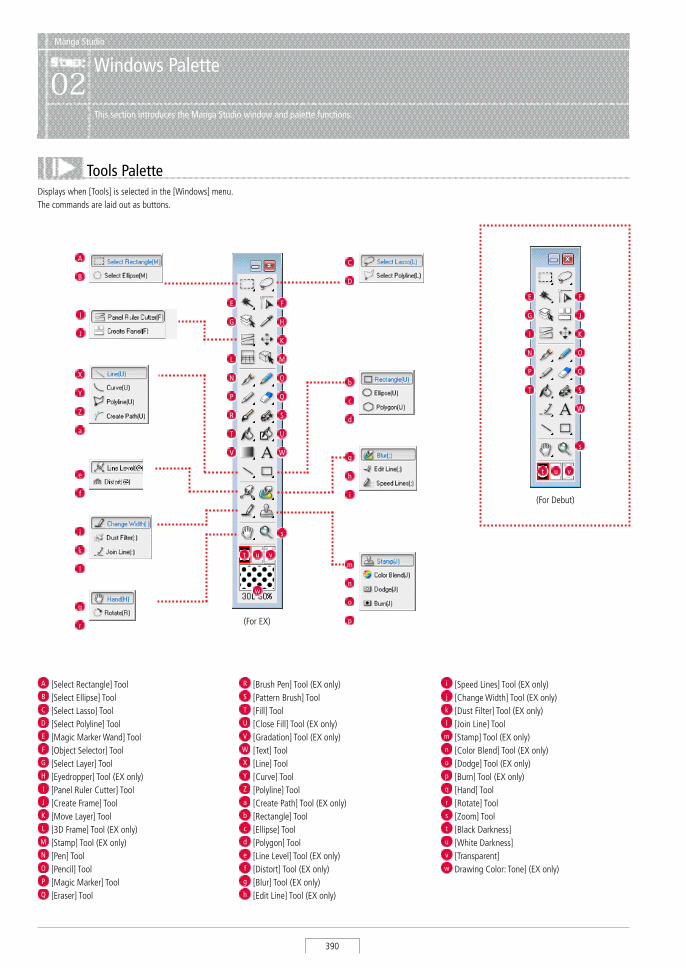
Manga Studio
390
Displays when [Tools] is selected in the [Windows] menu. The commands are laid out as buttons.
Tools Palette
A [select Rectangle] ToolB [select Ellipse] ToolC [select Lasso] ToolD [select Polyline] ToolE [Magic Marker Wand] ToolF [Object selector] ToolG [select Layer] ToolH [Eyedropper] Tool (EX only)I [Panel Ruler Cutter] ToolJ [Create Frame] ToolK [Move Layer] ToolL [3D Frame] Tool (EX only)M [stamp] Tool (EX only)N [Pen] ToolO [Pencil] ToolP [Magic Marker] ToolQ [Eraser] Tool
R [Brush Pen] Tool (EX only)S [Pattern Brush] ToolT [Fill] ToolU [Close Fill] Tool (EX only)V [Gradation] Tool (EX only)W [Text] ToolX [Line] ToolY [Curve] ToolZ [Polyline] Toola [Create Path] Tool (EX only)b [Rectangle] Toolc [Ellipse] Toold [Polygon] Toole [Line Level] Tool (EX only)f [Distort] Tool (EX only)g [Blur] Tool (EX only)h [Edit Line] Tool (EX only)
i [speed Lines] Tool (EX only)j [Change Width] Tool (EX only)k [Dust Filter] Tool (EX only)l [Join Line] Tool
m [stamp] Tool (EX only)n [Color Blend] Tool (EX only)o [Dodge] Tool (EX only)p [Burn] Tool (EX only)q [Hand] Toolr [Rotate] Tools [Zoom] Toolt [Black Darkness]u [White Darkness]v [Transparent]w Drawing Color: Tone] (EX only)
e
f
A
B
a
Z
Y
X
k
j
l
r
q
I
J
Manga Studio
Windows Palette02
This section introduces the Manga Studio window and palette functions.
T
P
N
E
I
G
S
W
s
Q
O
F
K
t u v
J
(For Debut)
m
n
p
o
i
h
g
d
b
c
C
D
P
R
V
N
L
T
E
G
t
s
Q
S
W
O
M
U
F
K
H
u v
w
(For EX)
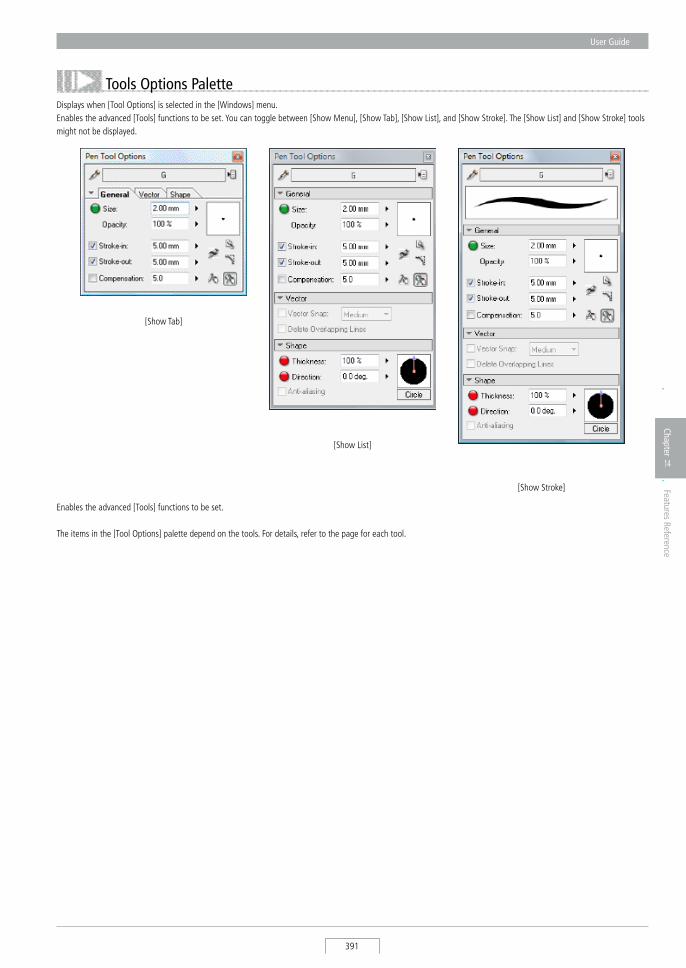
User Guide
391
Chapter
14
Features Reference
Displays when [Tool Options] is selected in the [Windows] menu. Enables the advanced [Tools] functions to be set. You can toggle between [show Menu], [show Tab], [show List], and [show stroke]. The [show List] and [show stroke] tools might not be displayed.
Tools Options Palette
Enables the advanced [Tools] functions to be set.
The items in the [Tool Options] palette depend on the tools. For details, refer to the page for each tool.
[show Tab]
[show List]
[show stroke]
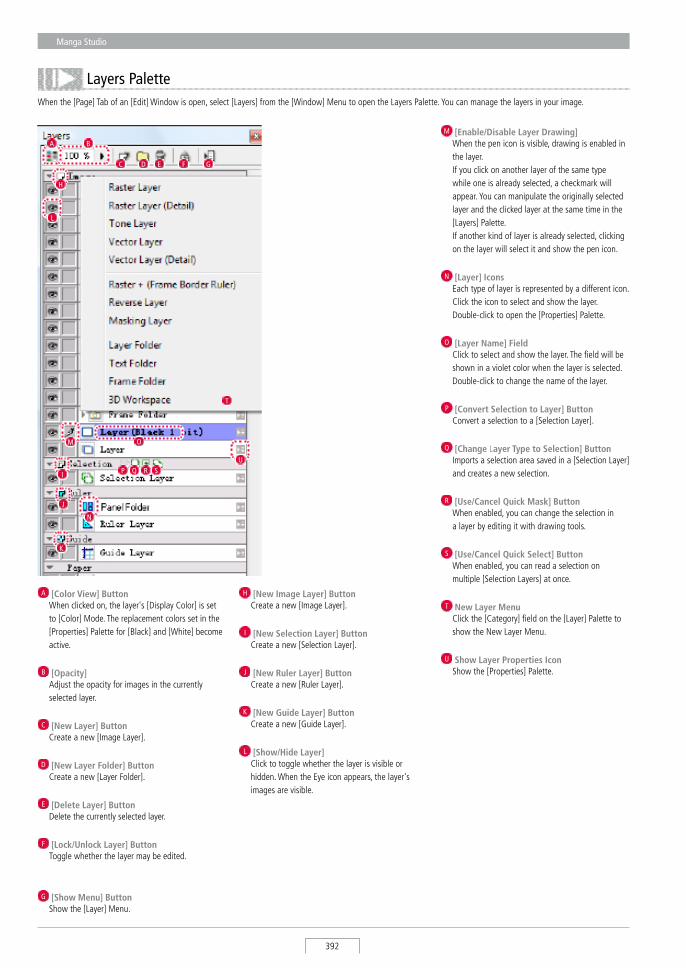
Manga Studio
392
H [New Image Layer] Button Create a new [Image Layer].
I [New Selection Layer] Button Create a new [selection Layer].
J [New Ruler Layer] Button Create a new [Ruler Layer].
K [New Guide Layer] Button Create a new [Guide Layer].
L [Show/Hide Layer] Click to toggle whether the layer is visible or
hidden. When the Eye icon appears, the layer's images are visible.
M [Enable/Disable Layer Drawing] When the pen icon is visible, drawing is enabled in
the layer. If you click on another layer of the same type
while one is already selected, a checkmark will appear. You can manipulate the originally selected layer and the clicked layer at the same time in the [Layers] Palette.
If another kind of layer is already selected, clicking on the layer will select it and show the pen icon.
N [Layer] Icons Each type of layer is represented by a different icon.
Click the icon to select and show the layer. Double-click to open the [Properties] Palette.
O [Layer Name] Field Click to select and show the layer. The field will be
shown in a violet color when the layer is selected. Double-click to change the name of the layer.
P [Convert Selection to Layer] Button Convert a selection to a [selection Layer].
Q [Change Layer Type to Selection] Button Imports a selection area saved in a [selection Layer]
and creates a new selection.
R [Use/Cancel Quick Mask] Button When enabled, you can change the selection in
a layer by editing it with drawing tools.
S [Use/Cancel Quick Select] Button When enabled, you can read a selection on
multiple [selection Layers] at once.
T New Layer Menu Click the [Category] field on the [Layer] Palette to
show the New Layer Menu.
U Show Layer Properties Icon show the [Properties] Palette.
When the [Page] Tab of an [Edit] Window is open, select [Layers] from the [Window] Menu to open the Layers Palette. You can manage the layers in your image.
Layers Palette
FDC GE
P R SQ
A B
L
O
N
H
M
J
K
I
A [Color View] Button When clicked on, the layer's [Display Color] is set
to [Color] Mode. The replacement colors set in the [Properties] Palette for [Black] and [White] become active.
B [Opacity] Adjust the opacity for images in the currently
selected layer.
C [New Layer] Button Create a new [Image Layer].
D [New Layer Folder] Button Create a new [Layer Folder].
E [Delete Layer] Button Delete the currently selected layer.
F [Lock/Unlock Layer] Button Toggle whether the layer may be edited.
G [Show Menu] Button show the [Layer] Menu.
T
U
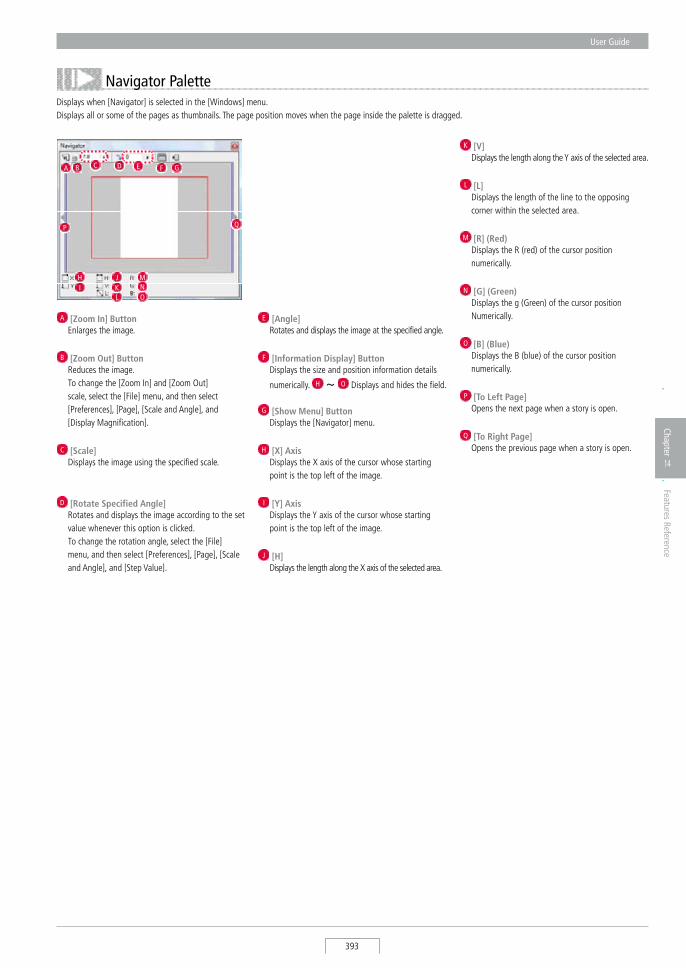
User Guide
393
Chapter
14
Features Reference
Displays when [Navigator] is selected in the [Windows] menu. Displays all or some of the pages as thumbnails. The page position moves when the page inside the palette is dragged.
Navigator Palette
E [Angle] Rotates and displays the image at the specified angle.
F [Information Display] Button Displays the size and position information details
numerically. H ~ O Displays and hides the field.
G [Show Menu] Button Displays the [Navigator] menu.
H [X] Axis Displays the X axis of the cursor whose starting
point is the top left of the image.
I [Y] Axis Displays the Y axis of the cursor whose starting
point is the top left of the image.
J [H] Displays the length along the X axis of the selected area.
K [V] Displays the length along the Y axis of the selected area.
L [L] Displays the length of the line to the opposing
corner within the selected area.
M [R] (Red) Displays the R (red) of the cursor position
numerically.
N [G] (Green) Displays the g (Green) of the cursor position
Numerically.
O [B] (Blue) Displays the B (blue) of the cursor position
numerically.
P [To Left Page] Opens the next page when a story is open.
Q [To Right Page] Opens the previous page when a story is open.
BA
HI
J
GF
LK
EC D
M
ON
A [Zoom In] Button Enlarges the image.
B [Zoom Out] Button Reduces the image. To change the [Zoom In] and [Zoom Out]
scale, select the [File] menu, and then select [Preferences], [Page], [scale and Angle], and [Display Magnification].
C [Scale] Displays the image using the specified scale.
D [Rotate Specified Angle] Rotates and displays the image according to the set
value whenever this option is clicked. To change the rotation angle, select the [File]
menu, and then select [Preferences], [Page], [scale and Angle], and [step Value].
P Q
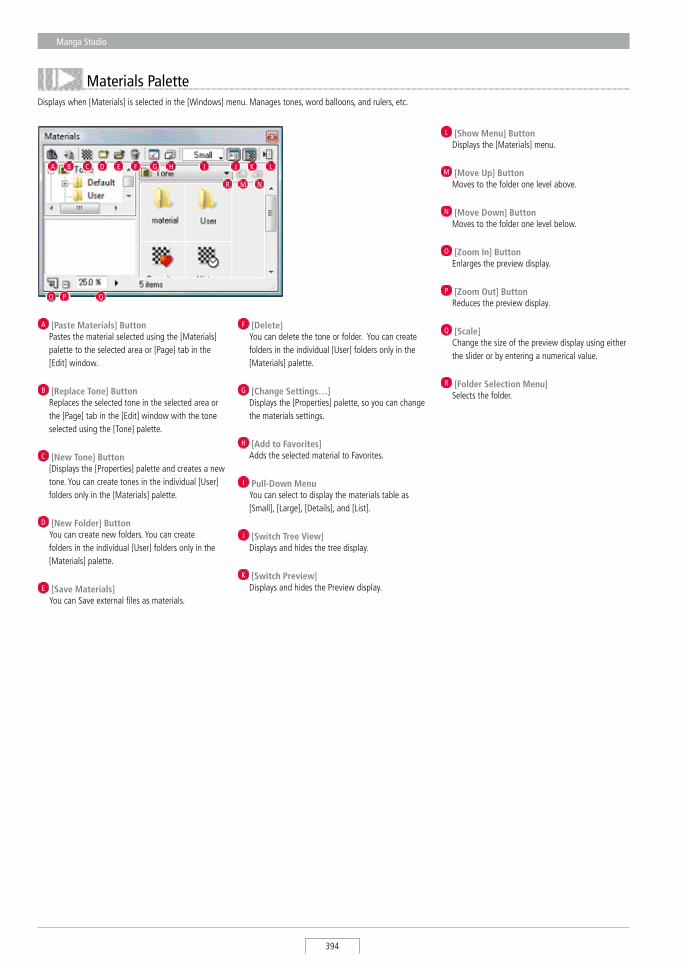
Manga Studio
394
Displays when [Materials] is selected in the [Windows] menu. Manages tones, word balloons, and rulers, etc.
Materials Palette
L [Show Menu] Button Displays the [Materials] menu.
M [Move Up] Button Moves to the folder one level above.
N [Move Down] Button Moves to the folder one level below.
O [Zoom In] Button Enlarges the preview display.
P [Zoom Out] Button Reduces the preview display.
Q [Scale] Change the size of the preview display using either
the slider or by entering a numerical value.
R [Folder Selection Menu] selects the folder.
A FEB DC
NM
LKJIHG
QPO
A [Paste Materials] Button Pastes the material selected using the [Materials]
palette to the selected area or [Page] tab in the [Edit] window.
B [Replace Tone] Button Replaces the selected tone in the selected area or
the [Page] tab in the [Edit] window with the tone selected using the [Tone] palette.
C [New Tone] Button [Displays the [Properties] palette and creates a new
tone. You can create tones in the individual [User] folders only in the [Materials] palette.
D [New Folder] Button You can create new folders. You can create
folders in the individual [User] folders only in the [Materials] palette.
E [Save Materials] You can save external files as materials.
F [Delete] You can delete the tone or folder. You can create
folders in the individual [User] folders only in the [Materials] palette.
G [Change Settings…] Displays the [Properties] palette, so you can change
the materials settings.
H [Add to Favorites] Adds the selected material to Favorites.
I Pull-Down Menu You can select to display the materials table as
[small], [Large], [Details], and [List].
J [Switch Tree View] Displays and hides the tree display.
K [Switch Preview] Displays and hides the Preview display.
R
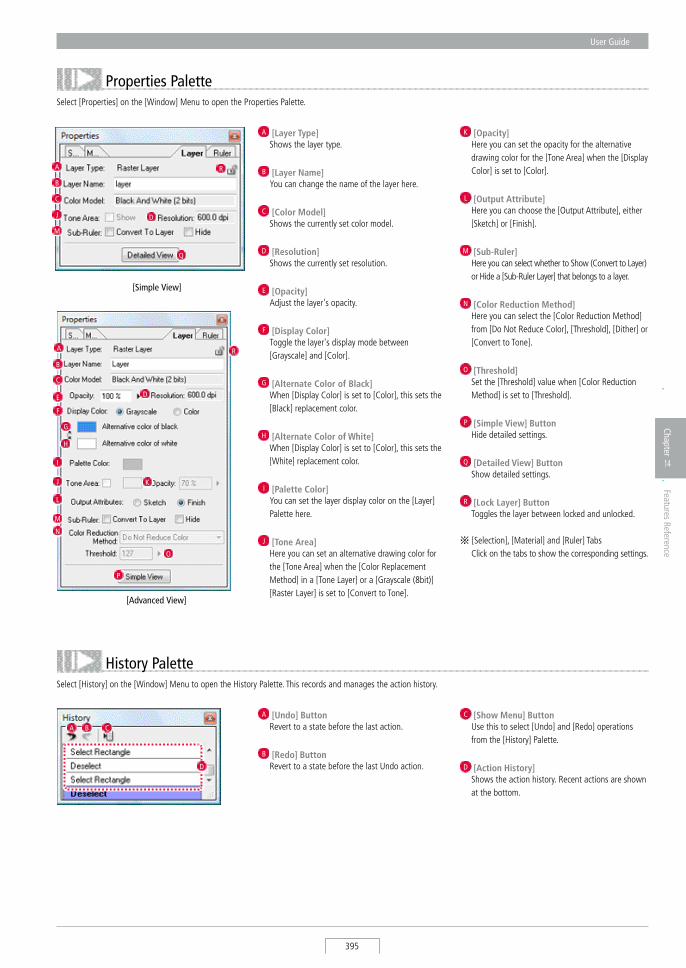
User Guide
395
Chapter
14
Features Reference
select [History] on the [Window] Menu to open the History Palette. This records and manages the action history.
History Palette
A [Undo] Button Revert to a state before the last action.
B [Redo] Button Revert to a state before the last Undo action.
C [Show Menu] Button Use this to select [Undo] and [Redo] operations
from the [History] Palette.
D [Action History] shows the action history. Recent actions are shown
at the bottom.
BA C
D
select [Properties] on the [Window] Menu to open the Properties Palette.
Properties Palette
A [Layer Type] shows the layer type.
B [Layer Name] You can change the name of the layer here.
C [Color Model] shows the currently set color model.
D [Resolution] shows the currently set resolution.
E [Opacity] Adjust the layer's opacity.
F [Display Color] Toggle the layer's display mode between
[Grayscale] and [Color].
G [Alternate Color of Black] When [Display Color] is set to [Color], this sets the
[Black] replacement color.
H [Alternate Color of White] When [Display Color] is set to [Color], this sets the
[White] replacement color.
I [Palette Color] You can set the layer display color on the [Layer]
Palette here.
J [Tone Area] Here you can set an alternative drawing color for
the [Tone Area] when the [Color Replacement Method] in a [Tone Layer] or a [Grayscale (8bit)] [Raster Layer] is set to [Convert to Tone].
K [Opacity] Here you can set the opacity for the alternative
drawing color for the [Tone Area] when the [Display Color] is set to [Color].
L [Output Attribute] Here you can choose the [Output Attribute], either
[sketch] or [Finish].
M [Sub-Ruler] Here you can select whether to show (Convert to Layer)
or Hide a [sub-Ruler Layer] that belongs to a layer.
N [Color Reduction Method] Here you can select the [Color Reduction Method]
from [Do Not Reduce Color], [Threshold], [Dither] or [Convert to Tone].
O [Threshold] set the [Threshold] value when [Color Reduction
Method] is set to [Threshold].
P [Simple View] Button Hide detailed settings.
Q [Detailed View] Button show detailed settings.
R [Lock Layer] Button Toggles the layer between locked and unlocked.
※ [selection], [Material] and [Ruler] Tabs Click on the tabs to show the corresponding settings.
[Simple View]
A
B
C
E
F
G
H
D
I
J
L
M
N
O
P
K
[Advanced View]
A
B
C
DJ
M
Q
R
R
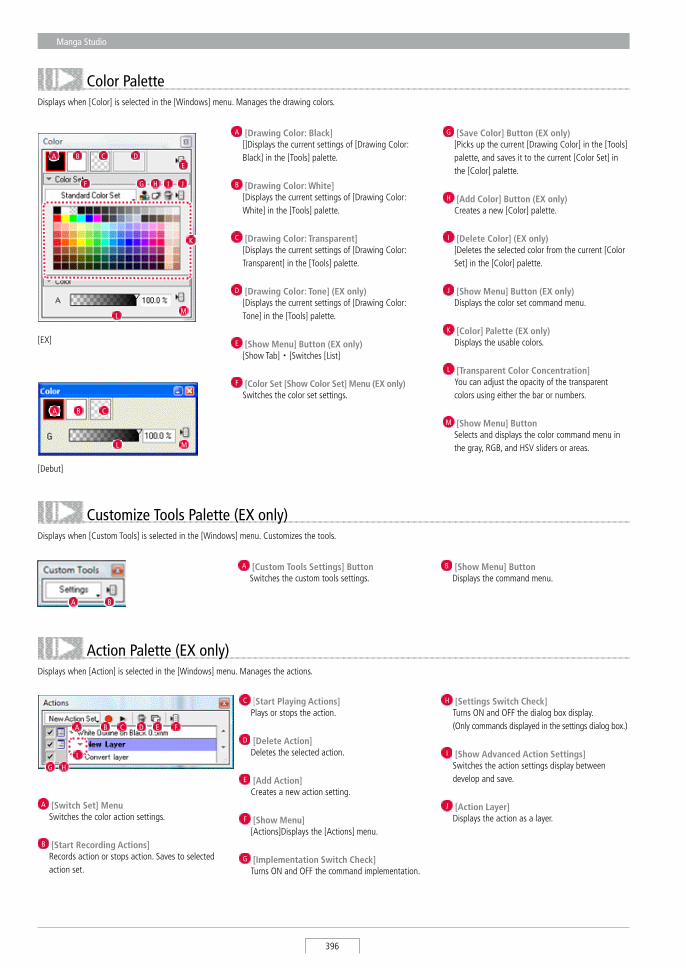
Manga Studio
396
Displays when [Color] is selected in the [Windows] menu. Manages the drawing colors.
G [Save Color] Button (EX only) [Picks up the current [Drawing Color] in the [Tools]
palette, and saves it to the current [Color set] in the [Color] palette.
H [Add Color] Button (EX only) Creates a new [Color] palette.
I [Delete Color] (EX only) [Deletes the selected color from the current [Color
set] in the [Color] palette.
J [Show Menu] Button (EX only) Displays the color set command menu.
K [Color] Palette (EX only) Displays the usable colors.
L [Transparent Color Concentration] You can adjust the opacity of the transparent
colors using either the bar or numbers.
M [Show Menu] Button selects and displays the color command menu in
the gray, RGB, and HsV sliders or areas.
Color Palette
I
BA
JH
DCE
F
ML
G
A [Drawing Color: Black] []Displays the current settings of [Drawing Color:
Black] in the [Tools] palette.
B [Drawing Color: White] [Displays the current settings of [Drawing Color:
White] in the [Tools] palette.
C [Drawing Color: Transparent] [Displays the current settings of [Drawing Color:
Transparent] in the [Tools] palette.
D [Drawing Color: Tone] (EX only) [Displays the current settings of [Drawing Color:
Tone] in the [Tools] palette.
E [Show Menu] Button (EX only) [show Tab]・[switches [List]
F [Color Set [Show Color Set] Menu (EX only) switches the color set settings.
Displays when [Action] is selected in the [Windows] menu. Manages the actions.
Action Palette (EX only)
C [Start Playing Actions] Plays or stops the action.
D [Delete Action] Deletes the selected action.
E [Add Action] Creates a new action setting.
F [Show Menu] [Actions]Displays the [Actions] menu.
G [Implementation Switch Check] Turns ON and OFF the command implementation.
H [Settings Switch Check] Turns ON and OFF the dialog box display.
(Only commands displayed in the settings dialog box.)
I [Show Advanced Action Settings] switches the action settings display between
develop and save.
J [Action Layer] Displays the action as a layer.
A FEB DC
HG
A [Switch Set] Menu switches the color action settings.
B [Start Recording Actions] Records action or stops action. saves to selected
action set.
Displays when [Custom Tools] is selected in the [Windows] menu. Customizes the tools.
Customize Tools Palette (EX only)
A [Custom Tools Settings] Button switches the custom tools settings.
A B
B [Show Menu] Button Displays the command menu.
K
[EX]
BA C
[Debut]
ML
I
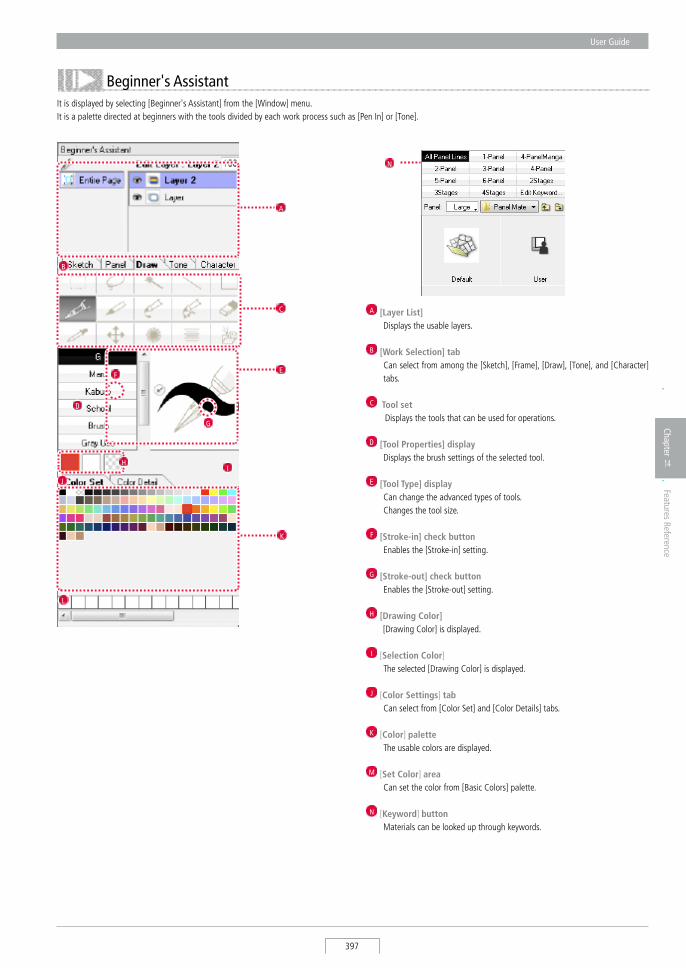
User Guide
397
Chapter
14
Features Reference
It is displayed by selecting [Beginner's Assistant] from the [Window] menu.It is a palette directed at beginners with the tools divided by each work process such as [Pen In] or [Tone].
Beginner's Assistant
C
E
A
B
D
K
L
G
F
I
J
A [Layer List] Displays the usable layers.
B [Work Selection] tab Can select from among the [sketch], [Frame], [Draw], [Tone], and [Character]
tabs.
C Tool set Displays the tools that can be used for operations.
D [Tool Properties] display Displays the brush settings of the selected tool.
E [Tool Type] display Can change the advanced types of tools. Changes the tool size.
F [Stroke-in] check button Enables the [stroke-in] setting.
G [Stroke-out] check button Enables the [stroke-out] setting.
H [Drawing Color] [Drawing Color] is displayed.
I [Selection Color] The selected [Drawing Color] is displayed.
J [Color Settings] tab Can select from [Color set] and [Color Details] tabs.
K [Color] palette The usable colors are displayed.
M [Set Color] area Can set the color from [Basic Colors] palette.
N [Keyword] button Materials can be looked up through keywords.
N
H


Chapter 15
This chapter is a supplement on troubleshooting, as well as computer and manga terminology.
Step: 01 Troubleshooting 408
Step: 02 Glossary 411
Chapter
15
Appendix
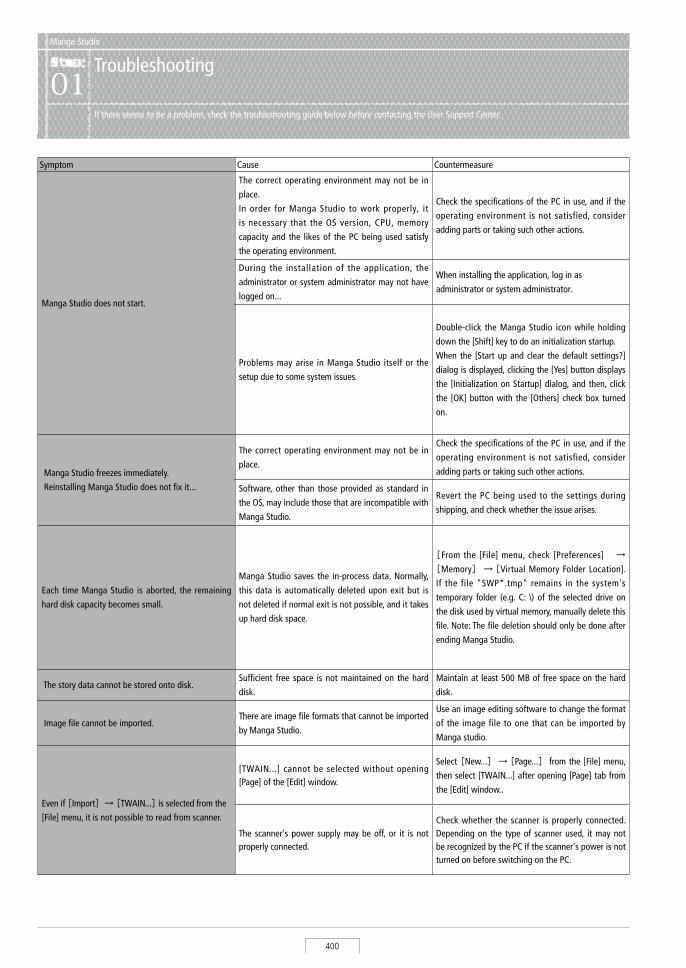
Manga Studio
400
Manga Studio
Troubleshooting01
If there seems to be a problem, check the troubleshooting guide below before contacting the User Support Center.
Symptom Cause Countermeasure
Manga Studio does not start.
The correct operating environment may not be in
place.
In order for Manga Studio to work properly, it
is necessary that the OS version, CPU, memory
capacity and the likes of the PC being used satisfy
the operating environment.
Check the specifications of the PC in use, and if the
operating environment is not satisfied, consider
adding parts or taking such other actions.
During the installation of the application, the
administrator or system administrator may not have
logged on...
When installing the application, log in as
administrator or system administrator.
Problems may arise in Manga Studio itself or the
setup due to some system issues.
Double-click the Manga Studio icon while holding
down the [Shift] key to do an initialization startup.
When the [Start up and clear the default settings?]
dialog is displayed, clicking the [Yes] button displays
the [Initialization on Startup] dialog, and then, click
the [OK] button with the [Others] check box turned
on.
Manga Studio freezes immediately.
Reinstalling Manga Studio does not fix it...
The correct operating environment may not be in
place.
Check the specifications of the PC in use, and if the
operating environment is not satisfied, consider
adding parts or taking such other actions.
Software, other than those provided as standard in
the OS, may include those that are incompatible with
Manga Studio.
Revert the PC being used to the settings during
shipping, and check whether the issue arises.
Each time Manga Studio is aborted, the remaining
hard disk capacity becomes small.
Manga Studio saves the in-process data. Normally,
this data is automatically deleted upon exit but is
not deleted if normal exit is not possible, and it takes
up hard disk space.
[From the [File] menu, check [Preferences] →
[Memory] → [Virtual Memory Folder Location].
If the file "SWP*.tmp" remains in the system's
temporary folder (e.g. C: \) of the selected drive on
the disk used by virtual memory, manually delete this
file. Note: The file deletion should only be done after
ending Manga Studio.
The story data cannot be stored onto disk.Sufficient free space is not maintained on the hard
disk.
Maintain at least 500 MB of free space on the hard
disk.
Image file cannot be imported.There are image file formats that cannot be imported
by Manga Studio.
Use an image editing software to change the format
of the image file to one that can be imported by
Manga studio.
Even if [Import]→ [TWAIN...] is selected from the
[File] menu, it is not possible to read from scanner.
[TWAIN...] cannot be selected without opening [Page] of the [Edit] window.
Select [New...]→ [Page...] from the [File] menu,
then select [TWAIN...] after opening [Page] tab from
the [Edit] window..
The scanner's power supply may be off, or it is not properly connected.
Check whether the scanner is properly connected. Depending on the type of scanner used, it may not be recognized by the PC if the scanner's power is not turned on before switching on the PC.
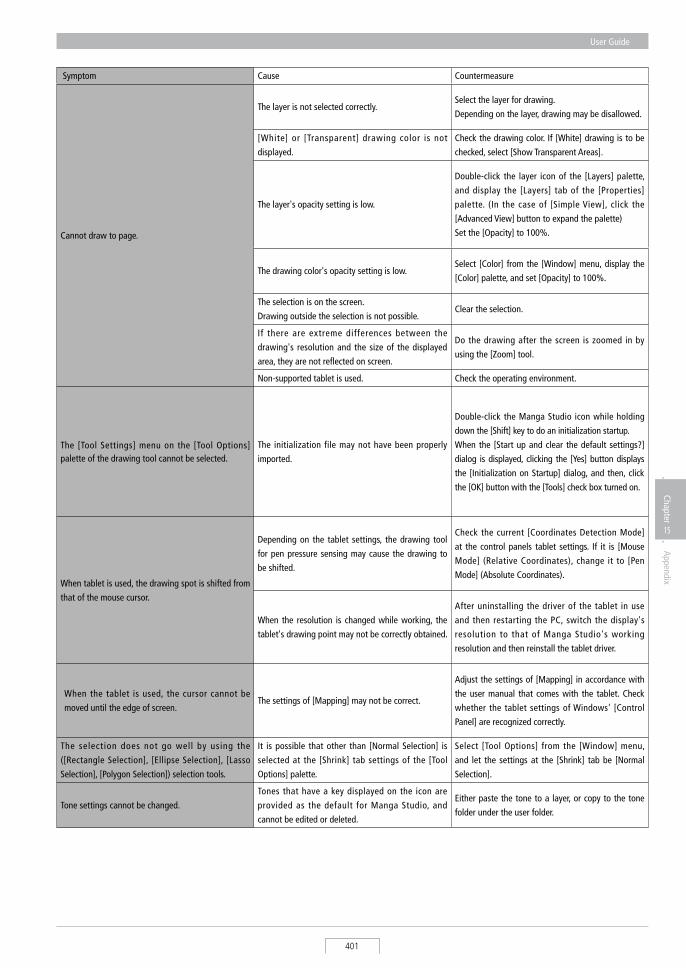
User Guide
401
Chapter
15
Appendix
Symptom Cause Countermeasure
Cannot draw to page.
The layer is not selected correctly.Select the layer for drawing.
Depending on the layer, drawing may be disallowed.
[White] or [Transparent] drawing color is not
displayed.
Check the drawing color. If [White] drawing is to be
checked, select [Show Transparent Areas].
The layer's opacity setting is low.
Double-click the layer icon of the [Layers] palette,
and display the [Layers] tab of the [Properties]
palette. (In the case of [Simple View], click the
[Advanced View] button to expand the palette)
Set the [Opacity] to 100%.
The drawing color's opacity setting is low.Select [Color] from the [Window] menu, display the
[Color] palette, and set [Opacity] to 100%.
The selection is on the screen.
Drawing outside the selection is not possible.Clear the selection.
If there are extreme differences between the
drawing's resolution and the size of the displayed
area, they are not reflected on screen.
Do the drawing after the screen is zoomed in by
using the [Zoom] tool.
Non-supported tablet is used. Check the operating environment.
The [Tool Settings] menu on the [Tool Options] palette of the drawing tool cannot be selected.
The initialization file may not have been properly
imported.
Double-click the Manga Studio icon while holding
down the [Shift] key to do an initialization startup.
When the [Start up and clear the default settings?]
dialog is displayed, clicking the [Yes] button displays
the [Initialization on Startup] dialog, and then, click
the [OK] button with the [Tools] check box turned on.
When tablet is used, the drawing spot is shifted from
that of the mouse cursor.
Depending on the tablet settings, the drawing tool
for pen pressure sensing may cause the drawing to
be shifted.
Check the current [Coordinates Detection Mode]
at the control panels tablet settings. If it is [Mouse
Mode] (Relative Coordinates), change it to [Pen
Mode] (Absolute Coordinates).
When the resolution is changed while working, the
tablet's drawing point may not be correctly obtained.
After uninstalling the driver of the tablet in use
and then restarting the PC, switch the display's
resolution to that of Manga Studio's working
resolution and then reinstall the tablet driver.
When the tablet is used, the cursor cannot be
moved until the edge of screen.The settings of [Mapping] may not be correct.
Adjust the settings of [Mapping] in accordance with
the user manual that comes with the tablet. Check
whether the tablet settings of Windows' [Control
Panel] are recognized correctly.
The selection does not go well by using the
([Rectangle Selection], [Ellipse Selection], [Lasso
Selection], [Polygon Selection]) selection tools.
It is possible that other than [Normal Selection] is
selected at the [Shrink] tab settings of the [Tool
Options] palette.
Select [Tool Options] from the [Window] menu,
and let the settings at the [Shrink] tab be [Normal
Selection].
Tone settings cannot be changed.
Tones that have a key displayed on the icon are
provided as the default for Manga Studio, and
cannot be edited or deleted.
Either paste the tone to a layer, or copy to the tone
folder under the user folder.
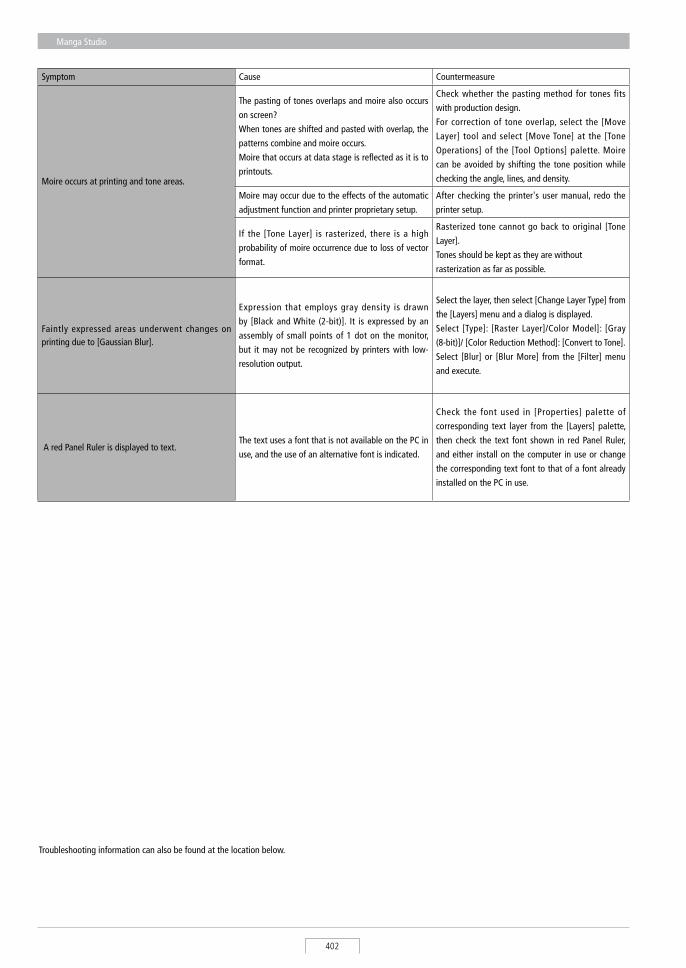
Manga Studio
402
Symptom Cause Countermeasure
Moire occurs at printing and tone areas.
The pasting of tones overlaps and moire also occurs
on screen?
When tones are shifted and pasted with overlap, the
patterns combine and moire occurs.
Moire that occurs at data stage is reflected as it is to
printouts.
Check whether the pasting method for tones fits
with production design.
For correction of tone overlap, select the [Move
Layer] tool and select [Move Tone] at the [Tone
Operations] of the [Tool Options] palette. Moire
can be avoided by shifting the tone position while
checking the angle, lines, and density.
Moire may occur due to the effects of the automatic
adjustment function and printer proprietary setup.
After checking the printer's user manual, redo the
printer setup.
If the [Tone Layer] is rasterized, there is a high
probability of moire occurrence due to loss of vector
format.
Rasterized tone cannot go back to original [Tone
Layer].
Tones should be kept as they are without
rasterization as far as possible.
Faintly expressed areas underwent changes on printing due to [Gaussian Blur].
Expression that employs gray density is drawn
by [Black and White (2-bit)]. It is expressed by an
assembly of small points of 1 dot on the monitor,
but it may not be recognized by printers with low-
resolution output.
Select the layer, then select [Change Layer Type] from
the [Layers] menu and a dialog is displayed.
Select [Type]: [Raster Layer]/Color Model]: [Gray
(8-bit)]/ [Color Reduction Method]: [Convert to Tone].
Select [Blur] or [Blur More] from the [Filter] menu
and execute.
A red Panel Ruler is displayed to text.The text uses a font that is not available on the PC in
use, and the use of an alternative font is indicated.
Check the font used in [Properties] palette of
corresponding text layer from the [Layers] palette,
then check the text font shown in red Panel Ruler,
and either install on the computer in use or change
the corresponding text font to that of a font already
installed on the PC in use.
Troubleshooting information can also be found at the location below.
User Guide
403
Chapter
15
Appendix
Manga Studio
Glossary02
(PC Terminology)
CMYKPronounced as "see-wahy-em-key." It is a color model used in printing expressed by the colors of cyan, magenta, yellow, and black.
DpiPronounced as "dee-pee-ahy." Abbreviation for dots per inch.It determines the quality of screen display and printout. It indicates the resolution of pictures and characters. The higher the number, the finer and more beautiful the display can be.For manga, generally monochrome : 600 dpi, and color : 350 dpi.
FTPPronounced as "ef-tee-pee." Abbreviation for File Transfer Protocol. It is a type of communications method used when transferring files.
FTP passive modeOne of the FTP data transfer modes. The client side (own PC) sends a connection to server and transfers the file(s).
LpiPronounced as "el-pee-ahy." Abbreviation for lines per inch.It determines the printing quality. It indicates the resolution of pictures and characters. The higher the number, the finer and more beautiful the display can be.Commercial printing is generally 100~175 lpi.
OS The basic software that controls the entire computer system.
RGBPronounced as "ahr-jee-bee." It is a color model for screen display used by monitor and scanner, and it is expressed by red, green and blue.
TWAINPronounced as "tweyn."It is a general-purpose input method for image input devices such as scanner and digital camera. If TWAIN is supported, the software can directly import images from the scanner.
Application
Application software that works on top of the OS to achieve the user's objective.
Uninstall
Deletes the software and reverts to the conditions prior to installation.
Install
Copies to PC and sets to ready-to-use conditions.
Cursor(pointer) Mark that indicates the position for user input on the screen.
ResolutionA term that indicates the granularity of the image. A larger value means the image granularity can be expressed more finely.
GradationIt indicates the change in color gradation in numerical value.
Extension In Windows file name, the character string of 3~4 characters that indicates the file type is the rightmost portion separated by '.'(period). Double-clicking the file with the extension starts up a corresponding application that opens the file. The creator in Macintosh has similar roles, and the extension is also found in Macintosh nowadays in order to have file compatibility.
CutIt deletes the contents of the selected area from the window and paste to clipboard.
ClipboardThe place where the copied or cut contents are stored temporarily.
GrayscaleThe expression format of image data with intermediate tones expressed by black and white.
DiffusionA type of dither in which gray is expressed by dot density. It is a conversion method that assigns density errors to surrounding pixels.
CopyReproduction. The [Copy] command, compared to [Cut] and [Paste], pastes the contents of the selected area from the window to the clipboard. The original content that is copied remains on screen.
ThresholdA gradation value that is the reference when converting a gray image to the 2 values of black and white. As it gives rise to reaction, it is a necessary environmental value.
LinesA term that indicates the granularity of printing. A larger value means the printing granularity can be expressed more finely.Dialog 1 inch 1 inch
dpi lpi
Manga Studio
404
A window in conversation format for carrying out installation or respective setups.
Directory A visualized hierarchical structure. The [Root Directory] is the highest hierarchy in the hierarchical structure.
Dither Falsely expressing gray at a fine cluster of black.
Default The initialization settings of the software.
DotA square dot that is the smallest unit forming a digital image. It does not include color or color depth. It may be referred to simply as a "dot".
Driver The software that acts as an intermediary when connecting to hardware.
PastePasting the content of the clipboard to the window that is currently in use.
PixelA square dot that is the smallest unit forming a digital image. It does not include color or color depth.
File A collection of program or data.
FolderA place where files are assembled, grouped, and organized.
Freeze Abnormality occurred in the system, and the screen is not working any more.
Vector imageAlso called drawing image. It is an image shape expressed by point coordinates and the joining line or the plane parameters. Even if the image is transformed by zooming in and out, the image quality fitting the resolution is maintained.
Multi-user OS An OS that allows multiple users without mutual interference. For example, Windows Vista or Mac OS X. The installation of applications can only be done by users with system administrator privilege.
Monochrome binary toneThe expression format of image data without intermediate tones expressed by black and white.
Utility Software that supplements inadequate parts of OS or application.
Raster imageAlso called bitmap image. An image format expressed by a collection of small dots. It is not suitable for scaling and transform since zooming in causes jaggedness (indentation) to be seen on the outline and zooming out causes information to be lost.
Login/logoutFor OS that can be used by multiple users, the input of user name and password to open one's own desktop.
(Main Image Formats)
BMPPronounces as B-M-P. It refers to bitmap image. This is the Windows standard image format. The resolution cannot be set. The extension is BMP.
PICTPronounced as "pikt." One of the standard image formats of Macintosh (Mac OS 9). It is seldom used in recent times. The extension is PCT.
EPSPronounced as "ee-pee-es." Image format that is widely used in the pasting of images for print DTP. It allows fast editing by using low-resolution data on screen and allows high-capability output by using high-resolution data when printing. The extension is EPS.
TIFFPronounced as "tif." Image format that is widely used in the pasting of images for print DTP. The extension is TIF.
TGAPronounced as "tee-jee-ey." Also called TARGA.It is an image format for use in videos. It is possible to specify transparent area. For the image compression method, it supports only lossless compression that can completely restore the original information. The resolution cannot be set.
PDFPronounced as "pee-dee-ef." Document file format for compresses ion to make the file's data space small. The extension is PDF.
PSDPronounced as "pee-es-dee." Image format of Adobe Company's Photoshop graphics software that is practically the global standard for design. It has layer functionality. The extension is PSD.
GIFPronounced as "jee-ahy-ef." Image format that is pervasive in internet use. It is suitable for flat image such as animated picture. The extension is GIF.
JPGPronounced as "jey-pee-jee." Image format that is pervasive in internet use. It is suitable for images that is full of gradation such as a photo. Commonly used at 72 dpi. The extension is JPG.
PNGPronounced as "pee-en-jee." The third image format for use in internet, it combines the merits of GIF and JPG. It is possible to designate transparent area. For the image compression method, it supports lossless compression that can completely restore the original information. The extension is PNG.
User Guide
405
Chapter
15
Appendix
(Printing Terminology)
ICC profilePronounced as "ahy-see-see-proh-fahyl." A file that is created based on the definitions of the International Color Consortium so that colors are reproduced accurately on different devices. It describes the area and reproduction properties of the respective colors that are present.
PostScript fontAn outline font that enables the printing or screen display of beautiful characters without jaggedness even in large sizes. Due to its high price and high resolution, it is mainly directed at and pervasive in commercial use. The font is required in printers.
TrueType fontAn outline font that enables the printing or screen display of beautiful characters without jaggedness even in large sizes. Due to its low price and low resolution, it is mainly directed at and pervasive in personal use. The font is not required in printers.
*Manga Studio can use whichever of the TrueType font or PostScript font as long as the usage environment is present on the computer.
Antigue-Gothic styleA general style common in commercial manga magazines that displays Japanese katakana using the "Antigue style" and Japanese kanji using the "Gothic style."
Gothic styleA style in which the lengthwise and breadth wise strokes that form the characters are generally of uniform width.
Style A character set in which the entire style is of unified design.
Tone jumpAn appearance in which there is no continuity of gradation in the gradation area of the image resulting in a boundary of striped pattern. It is prone to happen in the event of scanner failure or extreme correction.
FontStyle set for computer use.
Meicho styleThe start or end of the lines forming the characters is of stressed form so as to allow for the pen's start of writing or end of writing,
MoireA new pattern arising from the overlap of continuous patterns, and it is also called interference fringe. It occurs due to overlapped pasting of tones or shifting with resolution.
Rendering intentA conversion method for maintaining the synchronization of two different color spaces. There are 4 types, namely [Perceptual], [Saturation], [Relative colorimetric], and [Absolute colorimetric].
(Manga Related)
Handwritten character Not through sound imitation or movable printing, but the character is actually written with ink(pen).
Main line The pen’s stroke-in line.
Script The words spoken by the characters.
White fill Bringing out the white at black-inking area of characters and pictures.
White edge Bringing out white at edge of script or drawn characters.
Screen tone/ tone The sheet where pattern is printed on cellophane. This is cut and pasted to the manga's background.
Bleed The image is drawn until the cutting position (juts out from the cutting line until the bleed-marks line) of the book.
Head and tail bands/ gutter/ thumb edgeThe top part of a manga is the head band while the bottom part is the tail band. The gutter is in the binding direction while the thumb edge is in the opposite direction of binding.
Binding The opening direction of . For normal Japanese manga with the script written vertically... [Right-hand binding] For western manga or numerals, and science-oriented manga with the script written horizontally...[Left-hand binding]
Cover page The beginning page. Also called the title page.
Name Meaning 1: A simple line drawn with pencil as guide prior to putting in the pen. Meaning 2: The script inside a balloon.Meaning 3: Decision on the flow of the entire story.
Pagination Page number or Panel number.
Balloon A script-containing Panel Ruler when characters are talking.
Inking Fill with black.
White Whiten the error location or location to be effectively made white.
Spread Assembling the 2 pages at left and right as one continuous layout (Panel).
Ruby The Japanese furigana cast at Japanese kanji and the likes.

Manga Studio
406

User Guide
407
Chapter
15
Appendix
408
Alphanumeric
1 Line Panel ........................................................................................... 1361 Point Perspective ................................................................................ 1212DLT Rendering Folder .......................................................................... 1502DLT Rendering Function ..................................................................... 2922DLT Settings ....................................................................................... 2952D Rotate .............................................................................................. 2842 Point Perspective ................................................................................ 1212 Point Symmetry Ruler ......................................................................... 1283D Frame Tool ...................................................................................... 3043DLT Rendering Folder .......................................................................... 1503DLT Rendering Function ..................................................................... 3223DLT Settings ....................................................................................... 3243D Object Auto Adjust .......................................................................... 3083D Object Ground ................................................................................ 3083D Object Move ................................................................................... 3063D Object Reset ................................................................................... 3093D Object Rotate .................................................................................. 3073D Object Show/Hide ........................................................................... 3123D Object Size ...................................................................................... 3073D Object Space ................................................................................... 3063D Object Space Rulers ........................................................................ 3163D Preview Layer .................................................................................. 1503D Scene File ........................................................................................ 3033D Selection Tool .................................................................................. 3053D Sketch Figures ................................................................................. 3183D Sketching ........................................................................................ 3003D Sketching Function ......................................................................... 3003D Workspace Folder ............................................................................ 1503 Point Perspective ................................................................................ 1213 Point Symmetry Ruler ......................................................................... 1284 Point Symmetry Ruler ......................................................................... 1285 Point Symmetry Ruler ......................................................................... 1296 Point Symmetry Ruler ......................................................................... 1298-bit Selection ....................................................................................... 1698 Point Symmetry Ruler ......................................................................... 129
A
Action Palette ........................................................................................ 396Actions .................................................................................................. 372Action settings dialog .......................................................................... 375Active Display ...................................................................................... 313Actual Pixels ......................................................................................... 358Add Layer to Selection .......................................................................... 189Adjust by Anchor Point .......................................................................... 119Airbrush .................................................................................................. 91Align Rulers ........................................................................................... 143Anchor Point ......................................................................................... 137
B
balloon .................................................................................................. 405Balloon material ..................................................................................... 59Basic frame .......................................................................................... , 28Beginner's Assistant .................................................................................. 8Bezier Curve Ruler ................................................................................. 115Biaxial Line Symmetry Ruler .................................................................. 128binding .................................................................................................. 405bleed ..................................................................................................... 405Blurring Tool .......................................................................................... 243Blur the Border ...................................................................................... 182BMP ...................................................................................................... 404Border Selection .................................................................................... 177Both-Sides Display ............................................................................... 315
Box ....................................................................................................... 313Browse externally ................................................................................ 367Brush Control .......................................................................................... 81Brush Control Dialog ............................................................................... 77Brush material ........................................................................................ 61Bug Glasses Tool ................................................................................... 356
C
Calligraphy Pen Tool ................................................................................ 88Camera Operation ................................................................................ 310Camera Rotation .................................................................................. 311Camera Selection ................................................................................. 310Center Point(Perspective Ruler) ............................................................. 122Change Brush Shape Menu ..................................................................... 92Change Corner Status of Selected Points .............................................. 140Change Layer Type ................................................................................ 158Change Line Color to Drawing Color .................................................... 186Change Pattern Brush Style ..................................................................... 91Change title information ........................................................................ 38Change Tool Option Settings] Dialog....................................................... 77Changing the Layer Pallette Color ......................................................... 163Changing the Order of Layers ............................................................... 162Character material ......................................................................... 60, 368Classic style ............................................................................................. 14Clear Area Outside Selection ......................................................... 186, 183Clear Page .............................................................................................. 34Clear (Selection) .................................................................................... 186Clear Selection .............................................................................. 186, 182clipboard ............................................................................................... 403Close Curve ........................................................................................... 118Close page ............................................................................................. 33Close Path ............................................................................................... 95Close Selected Ruler .............................................................................. 138CMYK .................................................................................................... 403Color Area Selection .............................................................................. 181Color Mixing Tool .................................................................................. 246Color Mode ........................................................................................... 169Color Palette ........................................................................................ 396Color profile ............................................................................................ 16Color Set ................................................................................................. 75Color setting dialog ................................................................................ 53Color Settings Dialog .............................................................................. 75Compatibility .......................................................................................... 23Compatible 3D Data ............................................................................. 302Concentric Circle Ruler .......................................................................... 127Continuous scan .................................................................................... 48Control Pattern Materials Dialog ............................................................. 92Control Point ......................................................................................... 137Convert Layers to Folder ....................................................................... 157Convert Layer to Selection .................................................................... 189Convert Selection to Panel Folder .......................................................... 182Copy ...................................................................................................... 226Copy and Paste ..................................................................................... 186Copy Rulers ........................................................................................... 137Copy to Another Application ................................................................. 227Correction ............................................................................................... 80cover page ............................................................................................ 405cpg ..............................................................................................................Create a closed curve. ........................................................................... 118Create a continuous curve. .................................................................... 116Create a Curve with a Corner ................................................................ 117Create new dialog (set dimensions) ....................................................... 28Create new → Page (Page template) ..................................................... 26Create new → Page (Set dimensions) .................................................... 26Create new style dialog ....................................................................... 338
409
Create new → Title (Page template) ...................................................... 24Create new → Title (Set dimensions) ..................................................... 24Create New Tone ................................................................................... 186Create Path Tool .................................................................................... 116cursor(pointer) ...................................................................................... 403Cursor(Preferences) ................................................................................. 11Curved Speed Lines Ruler ...................................................................... 125
D
default .................................................................................................. 404Delete Layer .......................................................................................... 156Delete Layer from Selection .................................................................. 189Delete page ............................................................................................ 34Delete Selected Points ........................................................................... 138Delete Vector ........................................................................................... 83diffusion ................................................................................................ 403directory ................................................................................................ 404Display Adjustment .............................................................................. 312Display Screen ....................................................................................... 354Distance Between 3D Object and Camera ............................................ 310Distort ................................................................................................... 237Distortion Tool ....................................................................................... 239Divide Page ............................................................................................. 64Dodging Tool ......................................................................................... 247dot ........................................................................................................ 404Drawing .................................................................................................. 65Drawing Color: Black .............................................................................. 68Drawing Color: Color............................................................................... 73Drawing Color: Gray................................................................................ 70Drawing Color: Transparent ..................................................................... 68Drawing Color: White .............................................................................. 68Drawing Format ...................................................................................... 66
E
Edit Color ................................................................................................ 75Edit Menu ............................................................................................ 379Edit Polygon Dialog ................................................................................. 77Edit Window ......................................................................................... 388Ellipse Selection Tool ............................................................................. 170Ellipse Tool ............................................................................................ 102Eraser Tool ............................................................................................... 82Expand Panel Ruler ............................................................................... 142Expand Selection ................................................................................... 186Export ..................................................................................................... 50extension .............................................................................................. 403
F
file ......................................................................................................... 404File Menu ............................................................................................. 378Files ......................................................................................................... 21Fill Selection .......................................................................................... 183Fill Selection in Drawing Color .............................................................. 184Fill Tool .................................................................................................... 94Filter Menu ........................................................................................... 385Filter settings ......................................................................................... 43Filter settings tab ................................................................................... 45Finish Attribute ...................................................................................... 147Fisheye Lens ......................................................................................... 290Flip Horizontal ....................................................................................... 238Flip Horizontal ...................................................................................... 314Flip Vertical ........................................................................................... 238Focus Line Layer .................................................................................... 147folder .................................................................................................... 404
Folder Path(Preferences) ......................................................................... 16Four Views ............................................................................................ 327freeze .................................................................................................... 404
G
grayscale ............................................................................................... 403Grid ...................................................................................................... 324Grid Layer ............................................................................................. 152
H
handwritten character ........................................................................... 405head and tail bands / gutter / thumb edge ............................................ 405Header ................................................................................................... 28Help Menu ........................................................................................... 387History function .................................................................................... 371History Palette ...................................................................................... 395Horizontal Grid ..................................................................................... 315Horizontalize ......................................................................................... 143How to read the story editor ................................................................ 342
I
IccProfile ........................................................................................... 16, 53ICC profile ............................................................................................. 405Image export dialog ............................................................................... 51Image file (export) ................................................................................. 50Image file (Import) ................................................................................ 42Image Layer .......................................................................................... 147Import .................................................................................................... 40Importing text ...................................................................................... 339In............................................................................................................. 80Infinity ................................................................................................... 123Initialize startup ........................................................................................ 9inking .................................................................................................... 405Inner dimensions .................................................................................... 28Insert menu .......................................................................................... 375Insert new page ..................................................................................... 34Inside Selection ..................................................................................... 176install .................................................................................................... 403Invert Screen ......................................................................................... 357
J
JPEG setting dialog ................................................................................ 53
L
Ley input ................................................................................................. 10Lasso Selection Tool .............................................................................. 171Layer ..................................................................................................... 145Layer Division Display ........................................................................... 163Layer file (Import) .................................................................................. 41Layer Folder........................................................................................... 150Layer Menu .......................................................................................... 383Layer Move Tool .................................................................................... 154Layer Pallette ........................................................................................ 162Layer(Preferences) ................................................................................... 13Layer (Save material) ............................................................................. 57Layer Selection ...................................................................................... 155Layer Selection Tool ............................................................................... 153Layer settings ......................................................................................... 43Layer settings tab ................................................................................... 45Line Edit Tool ......................................................................................... 234Line Joining Tool .................................................................................... 230
410
Line Lever Tool ...................................................................................... 232Line Tool .................................................................................................. 98Line Width Correction Tool .................................................................... 233
M
Magic Marker Tool .................................................................................. 84Magic Wand Tool ................................................................................... 173Magnification Angle(Preferences) .......................................................... 12main line ............................................................................................... 405Make single page ................................................................................... 36Masking Layer ....................................................................................... 149Material ............................................................................................... 366Materials Palette .................................................................................. 394Memory(Preferences) .............................................................................. 15Memory saver mode .............................................................................. 14Merge Down Layer ................................................................................ 161Merge Layers ........................................................................................ 161Merge Selected Vertex Point ................................................................. 139Merge Two Panel Rulers ........................................................................ 143Mesh Transform .................................................................................... 238Mincho style.......................................................................................... 405Modify paper guide ................................................................................ 39moire..................................................................................................... 405Move and Transform ............................................................................. 186Move and Transform ............................................................................ 299Multibrush .............................................................................................. 92
N
New Layer ............................................................................................. 155
O
OBJ ....................................................................................................... 302Offset ..................................................................................................... 25Offset width ........................................................................................... 28Open ...................................................................................................... 32Open file ................................................................................................ 32Open page ............................................................................................. 33Operation with the 3D Manipulator ..................................................... 309Options(Preferences) ............................................................................... 16Outline Selection ................................................................................... 185Outline Setting ..................................................................................... 296
P
Page Bleed ............................................................................................ 142Page File ................................................................................................. 22Page file (Import) ................................................................................... 40Page information .................................................................................... 36Page list ................................................................................................. 36Page number .......................................................................................... 29Page(Preferences) ................................................................................... 10Page (Save material) .............................................................................. 56Page settings .......................................................................................... 62Page settings dialog ............................................................................... 63Page template ........................................................................................ 24Palm Tool ............................................................................................... 354Panel Creation Tool ............................................................................... 166Panel Folder .................................................................................. 132, 135Panel Ruler ............................................................................................ 131Panel Ruler Cut Tool .............................................................................. 136Panel Ruler Divisions ............................................................................. 141Panel Ruler Layer .................................................................................. 132Paper ...................................................................................................... 38
Paper size ............................................................................................... 28Parallel Lines Ruler ................................................................................ 126Parent/Child Relationship ..................................................................... 303paste ..................................................................................................... 404Paste ..................................................................................................... 228Paste Color Opaque .............................................................................. 229Paste Rulers........................................................................................... 137Paste White Transparent ........................................................................ 228Pattern Brush Tool ................................................................................... 90PDF setting dialog .................................................................................. 53Pencil Tool ............................................................................................... 86Pen Pressure ............................................................................................ 81Pen's Gradient ......................................................................................... 81Pen Tool ................................................................................................... 78Perspective ............................................................................................ 237Perspective Operation (Camera) ........................................................... 311Perspective Operation (Parent/Child Relationship) ............................... 319Perspective Ruler ................................................................................... 121Perspective Ruler .................................................................................. 317pff ........................................................................................................... 17Photo Comic ......................................................................................... 132Photoshop file (Import) ......................................................................... 46Photoshop setting dialog ....................................................................... 53pixel ...................................................................................................... 404Point(Units) ............................................................................................. 16Polygon Tool .......................................................................................... 102Polyline Selection Tool ........................................................................... 171Polyline Tool .......................................................................................... 100Pose ..................................................................................................... 303Pose Selection ...................................................................................... 319Position adjustment tab ......................................................................... 44Posterization ........................................................................................ 298Preferences ............................................................................................. 10Previous Filter ...................................................................................... 299
Q
Quick Mask ........................................................................................... 191Quick Select .......................................................................................... 192
R
Raster detailed settings dialog ............................................................... 52Raster Drawing ....................................................................................... 66raster image .......................................................................................... 404Rasterize ............................................................................................... 158Raster Layer .......................................................................................... 147Raster Layer + (Panel Ruler) .................................................................. 131Raster + (Panel Ruler) ........................................................................... 134Rectangle Selection Tool ....................................................................... 170Rectangle Tool ....................................................................................... 102Redo command .................................................................................... 370Reduce Selection ........................................................................... 186, 180Rendering intent ..................................................................................... 16Rendering Settings ............................................................................... 295resolution .............................................................................................. 403Reverse Layer ........................................................................................ 149Ribbon .................................................................................................... 91Rotate ................................................................................................... 237Rotate Pen Axis ....................................................................................... 81Rotate Screen ........................................................................................ 357Rotation Axis ........................................................................................ 303Rotation Tool ......................................................................................... 355Rubi settings ........................................................................................ 333Rubi settings dialog ............................................................................. 335ruby ....................................................................................................... 405
411
Ruler ..................................................................................................... 105Ruler Handles ........................................................................................ 114
S
Save ....................................................................................................... 30Save all .................................................................................................. 32Save as compatible type ........................................................................ 30Save copy ............................................................................................... 30Save page template ............................................................................... 55Save pattern as balloon material ........................................................... 59Save pattern as brush material .............................................................. 61Save pattern as character material ......................................................... 60Save pattern as tone material ................................................................ 57Save title with different name ................................................................ 30Save with different name ....................................................................... 31Saving a Pose ....................................................................................... 321Saving a Scene ..................................................................................... 321Saving Motions (Series of Poses) .......................................................... 320Saving Poses/Scenes ............................................................................ 320Scan ........................................................................................................ 47Scanning (Preferences) .......................................................................... 14screen tone / tone ................................................................................. 405script ..................................................................................................... 405Select Again .......................................................................................... 182Select All ............................................................................................... 182Select and insert page ............................................................................ 35Select Enclosed Lines ............................................................................ 193Selection ............................................................................................... 167Selection Launcher ................................................................................ 186Selection Layer ...................................................................................... 151Selection Menu .................................................................................... 382Shade ................................................................................................... 325Sharpen Angle ......................................................................................... 79Sharpen Selected Vertex Point ............................................................... 139SHD ...................................................................................................... 302Shortcut settings .................................................................................... 18Show All ................................................................................................ 358Show Center Line .................................................................................... 67Show Grid ............................................................................................. 362Show Guide........................................................................................... 362Show/Hide Layer ................................................................................... 162Show Measurement Scale ..................................................................... 361Show Menu .......................................................................................... 381Show Page Numbers ............................................................................. 363Show Pagination ................................................................................... 363Show Print Guide and Basic Frame ....................................................... 361Show Story / Author Info ....................................................................... 363Show Transparent Area ......................................................................... 359Shrink Selection .................................................................................... 176Shutdown .................................................................................................. 8Single Color ............................................................................................. 73Sketch Attribute .................................................................................... 147Sketch layer ............................................................................................ 43Sketch Layer .......................................................................................... 148Smooth ................................................................................................ 324Snap ...................................................................................................... 109Snap to.................................................................................................. 109Special Ruler ......................................................................................... 121Speed Line Layer ................................................................................... 147Speed Lines Ruler .................................................................................. 124Speed Lines Tool .................................................................................... 241spread ................................................................................................... 405Stamp...................................................................................................... 91Stamping Tool ....................................................................................... 244Standard Interface .................................................................................... 8
Standard resolution ................................................................................ 28Startup ...................................................................................................... 8STC ....................................................................................................... 302Stitch position, change start page .......................................................... 38Story editor .......................................................................................... 341Story Menu .......................................................................................... 380style ...................................................................................................... 405Style ........................................................................................................ 91Style settings ........................................................................................ 336
T
Tablet PC ................................................................................................. 15Tablet(Preferences) .................................................................................. 15Text dialog ........................................................................................... 343Text Folder............................................................................................. 150Text functions ....................................................................................... 330Text Layer .............................................................................................. 149Text settings ......................................................................................... 332Text tool ............................................................................................... 330Text units ................................................................................................ 16Texture ................................................................................................. 324Texture Display ..................................................................................... 314Texture Mapping .................................................................................. 302TIFF setting dialog .................................................................................. 53Title file .................................................................................................. 22Title information dialog .......................................................................... 29Tone detailed settings dialog ................................................................. 52tone jump.............................................................................................. 405Tone Layer ............................................................................................. 149Tone material ......................................................................................... 57Tone Settings ........................................................................................ 299To next page .......................................................................................... 33Tool Bar ................................................................................................ 389Tool Options Palette ................................................................................ 76Tool Palette ............................................................................................. 76Tool(Preferences)..................................................................................... 14Tool Settings Menu ................................................................................. 77Tools Options Palette ........................................................................... 391Tools Palette ......................................................................................... 390
U
Undoing commands ............................................................................. 370Undo Levels ............................................................................................ 11uninstall ................................................................................................ 403Unit ........................................................................................................ 28Use character material ......................................................................... 368User data folder ...................................................................................... 16
V
Vanishing Point Layer ............................................................................ 147Vanishing Point(Perspective Ruler) ........................................................ 122Vector Absorption ................................................................................... 79Vector Drawing ....................................................................................... 66vector image ......................................................................................... 404Vector Layer .......................................................................................... 148Vector Layer Change Settings Dialog .................................................... 159Vertical Grid ......................................................................................... 315Verticalize ............................................................................................. 143Virtual memory ....................................................................................... 15
W
white ..................................................................................................... 405

412
white edge ............................................................................................ 405white fill ................................................................................................ 405Window Menu ..................................................................................... 386Wire Frame ........................................................................................... 313Word Balloon Layer ............................................................................... 149
Z
Zoom ..................................................................................................... 237Zoom Out .............................................................................................. 237

413


* For questions regarding Manga studio or our other software products, please contact:
smith Micro software, Inc. 185 Westridge Drive Watsonville, CA 95076 Tel: (831) 768-3615 (Customer service) Fax: (831) 761-6206 Customer service: [email protected] Tech support: [email protected]

Visit Manga studio.net for Online Tutorials and more:http://www.Mangastudio.net/
smith Micro software, Inc. 185 Westridge Drive Watsonville, CA 95076
Manga Studio 4.0 User Guide© 2008 CELSYS, Inc. / Smith Micro Software, Inc.


![Download [3.82 MB]](https://static.fdocuments.in/doc/165x107/58678d281a28abb73f8bd8b6/download-382-mb.jpg)
![Download [14.89 MB]](https://static.fdocuments.in/doc/165x107/586b5bfe1a28ab430d8bac12/download-1489-mb.jpg)