Download (2437Kb) - Open Research Online
38
Open Research Online The Open University’s repository of research publications and other research outputs Moodle 2 for Teaching 4-9 Year Olds Book How to cite: Freear, Nicholas (2011). Moodle 2 for Teaching 4-9 Year Olds. Beginner’s Guide. Birmingham, UK: Packt Publishing. For guidance on citations see FAQs . c 2011 Packt Publishing Version: Not Set Link(s) to article on publisher’s website: http://packtpub.com/moodle-2-for-teaching-4-9-year-olds-beginners-guide/book Copyright and Moral Rights for the articles on this site are retained by the individual authors and/or other copyright owners. For more information on Open Research Online’s data policy on reuse of materials please consult the policies page. oro.open.ac.uk
Transcript of Download (2437Kb) - Open Research Online
Open Research OnlineThe Open University’s repository of research publicationsand other research outputs
Moodle 2 for Teaching 4-9 Year OldsBookHow to cite:
Freear, Nicholas (2011). Moodle 2 for Teaching 4-9 Year Olds. Beginner’s Guide. Birmingham, UK: PacktPublishing.
For guidance on citations see FAQs.
c© 2011 Packt Publishing
Version: Not Set
Link(s) to article on publisher’s website:http://packtpub.com/moodle-2-for-teaching-4-9-year-olds-beginners-guide/book
Copyright and Moral Rights for the articles on this site are retained by the individual authors and/or other copyrightowners. For more information on Open Research Online’s data policy on reuse of materials please consult the policiespage.
oro.open.ac.uk
P U B L I S H I N G
community experience dist i l led
Moodle 2 for Teaching 4-9 Year Olds Beginner's Guide
Nicholas Freear
Chapter No.4
"Spot the Difference"
In this package, you will find: A Biography of the author of the book
A preview chapter from the book, Chapter NO.4 "Spot the Difference"
A synopsis of the book’s content
Information on where to buy this book
About the Author Nicholas Freear got into so ware and educational technology through a series of happy accidents. During research for a PhD in Mechanical Engineering at the University of Birmingham he was thrown in at the deep end, learning to program in C++, using the Windows API, and programming against the interface card for an early digital camera (a "frame grabber", since you ask).
Bizarrely, this didn't put him off . In his next job, he was a programmer at a high-tech startup company helping to create products from voice recognition and speech synthesis software.
For More Information: www.packtpub.com/moodle-2-for-teaching-4-9-year-olds-
beginners-guide/book

However, the World Wide Web was calling. After a character-building stint as a self-employed developer and accessibility consultant, Nicholas joined the team that was working on The Open University's next-genera on e-learning environment. And so, he was introduced to Moodle and the open-source so ware community. Following several fruiful years, Nick joined the Institute of Educational Technology at The OU, where he got to talk to more academics, pursue his accessibility and usability interests, and work on many different education and research projects.
He blogs (http://freear.org.uk), contributes to the Moodle community (http://moodle.org/user/view.php?id=93815), and likes to talk at workshops and conferences despite his stammer.
When he's not trying to understand the mysteries of the Web, Nick likes to sing, cycle, listen to loud music, and learn about all things Chinese. Occasionally all at the same time.
For More Information: www.packtpub.com/moodle-2-for-teaching-4-9-year-olds-
beginners-guide/book
Moodle 2 for Teaching 4-9 Year Olds Beginner's Guide Moodle is a virtual learning environment that is being used in more and more schools worldwide. It is ideal for teaching a younger age group as interactive lessons enable children to learn quicker and with greater ease.
Moodle 2 for Teaching 4-9 Year Olds Beginner's Guide will help you to adapt your existing lesson plans to online Moodle courses and will give you ideas to create new activities, quizzes, and puzzles to make the learning process fun and interactive for young children.
The interactivity of Moodle means that it is perfect for teaching younger children as they can learn by watching, listening, and doing. Learn how to create activities and quizzes that are specially adapted for younger children and are quick and easy for you to incorporate in Moodle. Other highlights include spot-the-difference exercises, games, and embedded puzzles.
Teaching young children has just got easier with the help of Moodle to create fun, interactive, and informative learning activities.
The website for the book can be found at: http://freear.org.uk/moodle
The site contains links to downloads and a forum for discussions with other readers, demonstrations, updates and errata.
Note that links to individual downloads are listed in the book at the point at which they are needed. There is no single code archive.
For More Information: www.packtpub.com/moodle-2-for-teaching-4-9-year-olds-
beginners-guide/book
What This Book Covers Chapter 1, Getting Started; after a brief introduction we step through logging into Moodle. Then we create a course and an alphabet quiz activity based around multiple-choice questions. We add in the third-party SimpleSpeak plugin, and use it to voice sounds and words for the quiz.
Chapter 2, Basic Math in Moodle talks about how the e-learning environment is a great home for basic and more advanced numeracy exercises to cater for a mixed ability class. We set up a math quiz using built-in question types and the contributed Calculated Objects plugin. We use Creative Commons search and learn to embed video.
Chapter 3, Telling Stories lets us harness the creativity and storytelling abilities of children. We create an activity with the Database module to allow the class to collect pictures. Then we set an activity where the students write a story online, inspired by their own or a classmate's picture. We also explore how to record an audio book.
Chapter 4, Spot the Difference, here we will learn how visual activities are a fun way to stimulate your class. We will also learn how to use an open-source, desktop image editor to modify images to form the basis of our exercise. Then we employ the built-in Lesson activity to present simple and trickier spot the difference puzzles.
Chapter 5, Setting Homework, here we create a visual, interactive history timeline using MIT SIMILE and linked to a Moodle Forum. And we learn about using the Assignment module for homework activities.
Chapter 6, Fun Games, here we will use the third-party Game module by Vasilis Daloukas to set up snakes and ladders, and hidden picture puzzles. We integrate the built-in Glossary plugin.
Chapter 7 , Interactive Puzzles, here we integrate various open source Flash games and puzzles from Subtangent including word-search and a jigsaw.
Chapter 8, Stories Revisited, in this chapter we source an ex-copyright children's book from Project Gutenberg, and employ Petr Škoda's Book module to integrate it in Moodle. And we incorporate an external dictionary service.
Chapter 9, Embedding the Web; we incorporate various resources into our course, including activities programmed using MIT Scratch, RSS feeds, PhET science simulations, and an HTML5 jigsaw.
Chapter 10, Administration, here we will look at course and activity backup and restore in Moodle—for your peace of mind. We explore the Gradebook, student notes, and the Moodle community.
For More Information: www.packtpub.com/moodle-2-for-teaching-4-9-year-olds-
beginners-guide/book
4Spot the Difference
In this chapter, we are going to use the Moodle lesson ac vity module to create spot-the-diff erence visual exercises. Younger children fi nd spot-the-diff erence ac vi es fun, and they are a great way to develop the visual, observa onal, and descrip ve skills. We will also explore student enrolment.
In this chapter we will:
Introduce the lesson module and its poten al
Design and create a lesson ac vity
Find suitable images to use as the basis for our spot-the-diff erence ac vity
Install the Inkscape desktop image editor on Windows
Edit our images
Add ques on pages to our lesson, and images to the ques on pages
Add branch tables to our lesson
Enroll students on our course, using diff erent methods
So let's dive in…
For More Information: www.packtpub.com/moodle-2-for-teaching-4-9-year-olds-
beginners-guide/book
Spot the Diff erence
[ 94 ]
Introducing the lesson moduleThe lesson ac vity module shares some similari es with the quiz module, in that it gives the teacher the ability to set ques ons for the pupil to answer. However, there are some diff erences, notably:
While the quiz module is o en used for assessment, the lesson module as the name implies is primarily for learning. That being said, the teacher can decide whether or not to add the score from either to the gradebook.
There is a wider choice of ques on types for the quiz and third-party ques on types can be added. In Moodle 1.9 and 2, a subset of the core ques on types is available in the lesson ac vity. This s ll aff ords us plenty of choices.
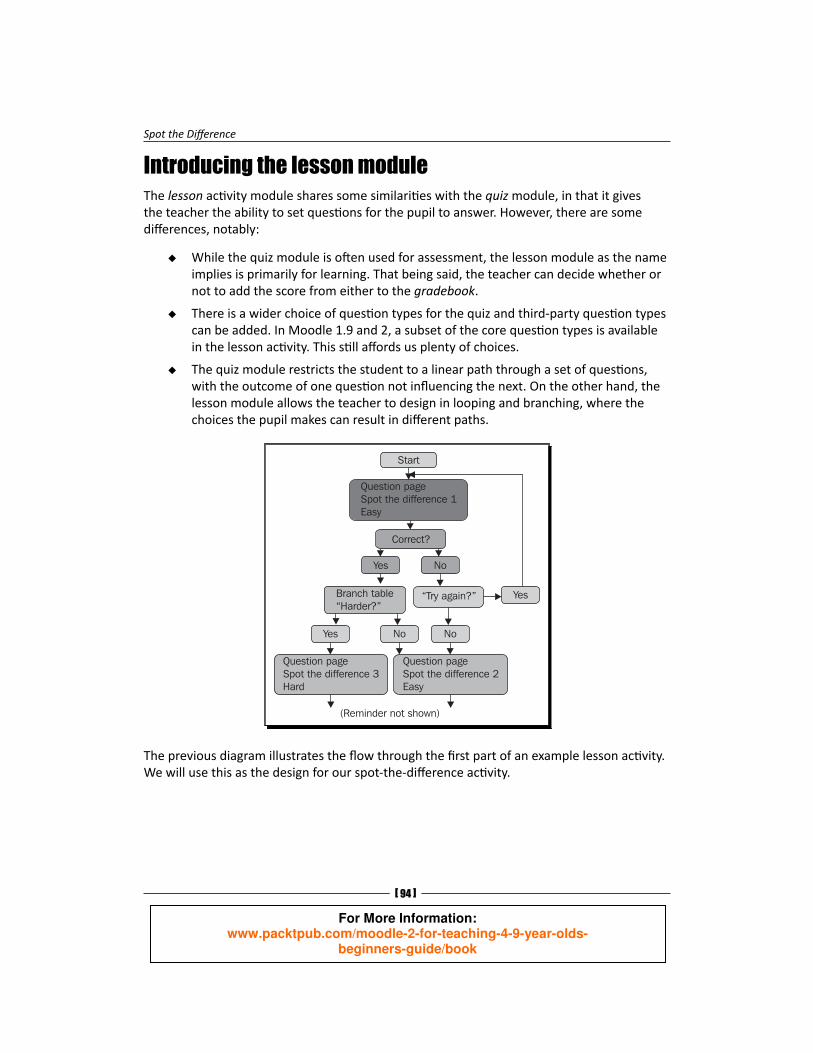
The quiz module restricts the student to a linear path through a set of ques ons, with the outcome of one ques on not infl uencing the next. On the other hand, the lesson module allows the teacher to design in looping and branching, where the choices the pupil makes can result in diff erent paths.
The previous diagram illustrates the fl ow through the fi rst part of an example lesson ac vity. We will use this as the design for our spot-the-diff erence ac vity.
For More Information: www.packtpub.com/moodle-2-for-teaching-4-9-year-olds-
beginners-guide/book
Chapter 4
[ 95 ]
The fl ow is from top to bo om, and the four green boxes represent pages added to the ac vity by the teacher. There are three ques on pages, star ng with an easy spot-the-diff erence ques on, and op onally moving to a harder ques on. If the pupil answers the fi rst ques on correctly, as determined automa cally by the system (the pink boxes), they see a branch table. This allows the pupil to choose an easier or harder ques on based on how well they think they coped. Alterna vely, if the pupil answers the fi rst ques on incorrectly then the system allows them to loop and repeat the ques on.
For simplicity, we are not going to consider the remaining ac on or page types available in the lesson module, but in brief they are as follows:
Cluster – this is used to group a number of ques ons
End of cluster – this is a hidden page that acts as a redirect to another part of the lesson
End of branch – this is an op onal hidden page at the end of a branch, to provide a jump to another part of the lesson
Creating our fi rst lesson activityStart by crea ng a new course in the usual way, with a short name of MY104. We will launch in and add a lesson ac vity.
Time for action – adding a lesson activity To add a lesson ac vity, follow these steps:
1. Select Lesson from the Add an ac vity drop-down menu in your course.
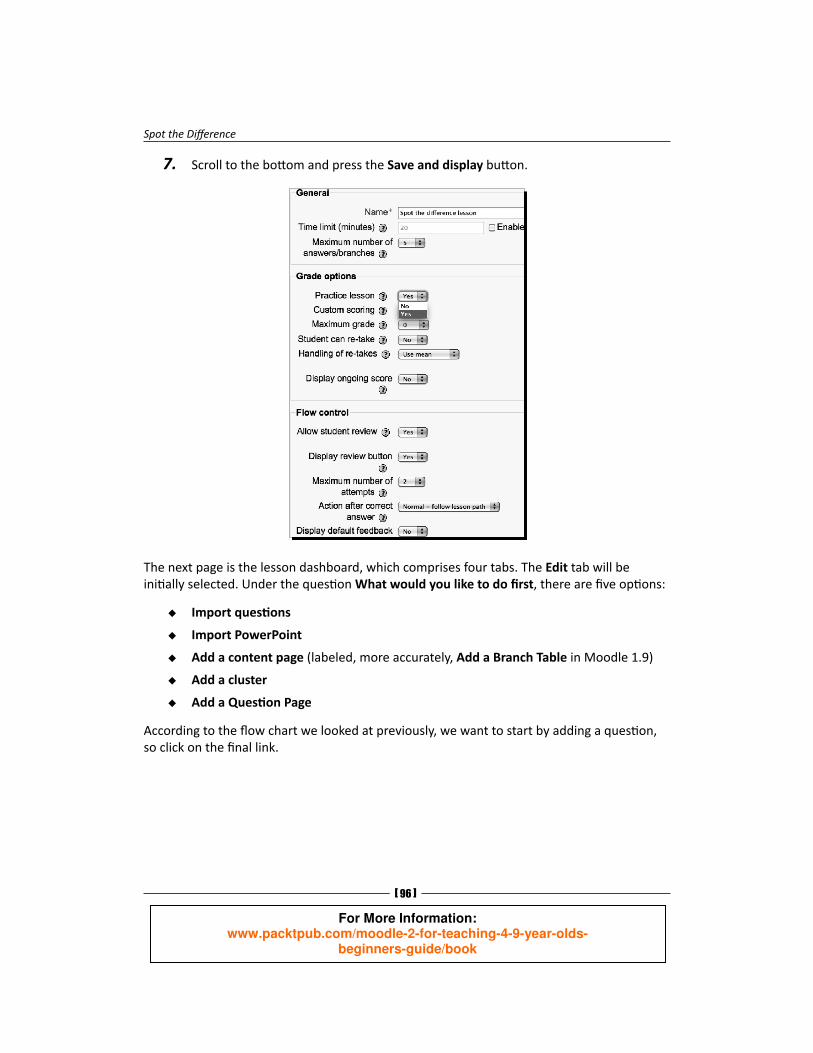
2. The system will present a form like that shown below. Enter a lesson Name, for example, Spot the diff erence lesson.
3. Also in the General sec on, increase the Maximum number of answers/branches from 4 to 5.
4. Then under Grade op ons, set Prac ce lesson to yes – this means that the ac vity will not show up in the gradebook. Leave the defaults for the other items in Grade op ons.
5. In the Flow control sec on choose Yes from the drop-down menu for Allow student review. In Moodle 1.9 choose Yes for Display review bu on.
6. Increase the Maximum number of a empts from 1 to 2. You should then leave the defaults for the rest of the form fi elds. As ever, you will be able to return and adjust these values later should you wish.
For More Information: www.packtpub.com/moodle-2-for-teaching-4-9-year-olds-
beginners-guide/book
Spot the Diff erence
[ 96 ]
7. Scroll to the bo om and press the Save and display bu on.
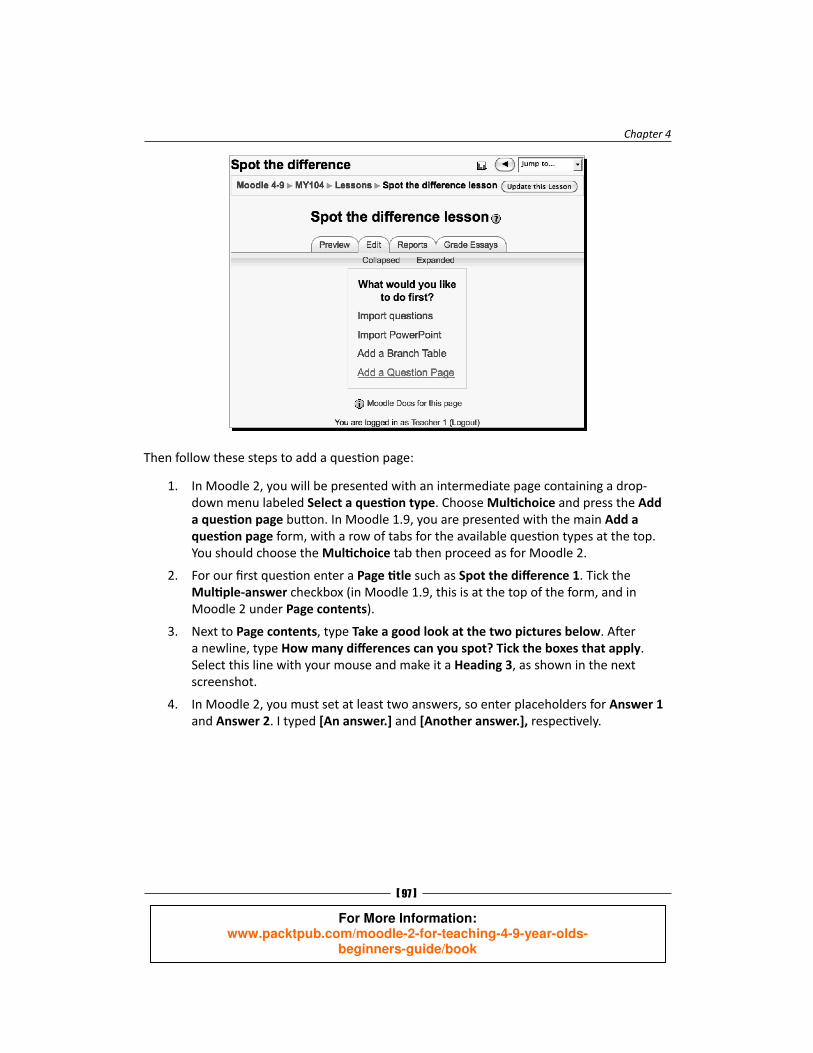
The next page is the lesson dashboard, which comprises four tabs. The Edit tab will be ini ally selected. Under the ques on What would you like to do fi rst, there are fi ve op ons:
Import ques ons
Import PowerPoint
Add a content page (labeled, more accurately, Add a Branch Table in Moodle 1.9)
Add a cluster
Add a Ques on Page
According to the fl ow chart we looked at previously, we want to start by adding a ques on, so click on the fi nal link.
For More Information: www.packtpub.com/moodle-2-for-teaching-4-9-year-olds-
beginners-guide/book
Chapter 4
[ 97 ]
Then follow these steps to add a ques on page:
1. In Moodle 2, you will be presented with an intermediate page containing a drop-down menu labeled Select a ques on type. Choose Mul choice and press the Add a ques on page bu on . In Moodle 1.9, you are presented with the main Add a ques on page form, with a row of tabs for the available ques on types at the top. You should choose the Mul choice tab then proceed as for Moodle 2.
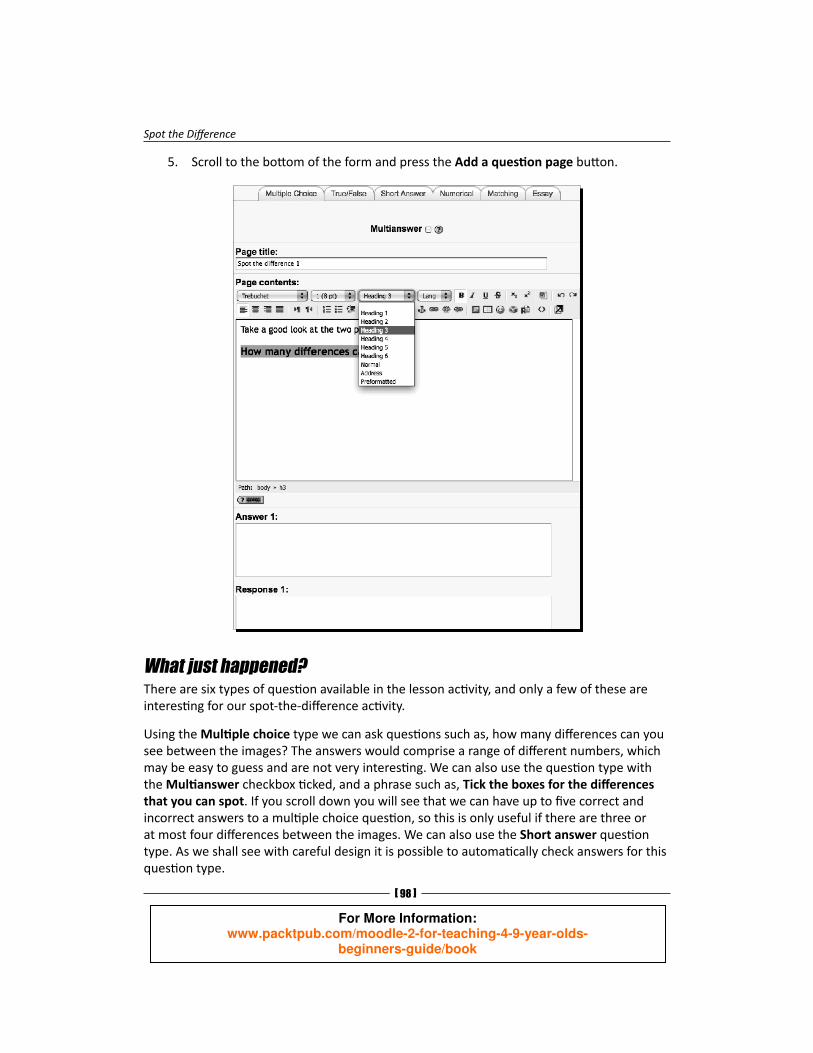
2. For our fi rst ques on enter a Page tle such as Spot the diff erence 1. Tick the Mul ple-answer checkbox (in Moodle 1.9, this is at the top of the form, and in Moodle 2 under Page contents).
3. Next to Page contents, type Take a good look at the two pictures below. A er a newline, type How many diff erences can you spot? Tick the boxes that apply. Select this line with your mouse and make it a Heading 3, as shown in the next screenshot.
4. In Moodle 2, you must set at least two answers, so enter placeholders for Answer 1 and Answer 2. I typed [An answer.] and [Another answer.], respec vely.
For More Information: www.packtpub.com/moodle-2-for-teaching-4-9-year-olds-
beginners-guide/book
Spot the Diff erence
[ 98 ]
5. Scroll to the bo om of the form and press the Add a ques on page bu on.
What just happened?There are six types of ques on available in the lesson ac vity, and only a few of these are interes ng for our spot-the-diff erence ac vity.
Using the Mul ple choice type we can ask ques ons such as, how many diff erences can you see between the images? The answers would comprise a range of diff erent numbers, which may be easy to guess and are not very interes ng. We can also use the ques on type with the Mul answer checkbox cked, and a phrase such as, Tick the boxes for the diff erences that you can spot. If you scroll down you will see that we can have up to fi ve correct and incorrect answers to a mul ple choice ques on, so this is only useful if there are three or at most four diff erences between the images. We can also use the Short answer ques on type. As we shall see with careful design it is possible to automa cally check answers for this ques on type.
For More Information: www.packtpub.com/moodle-2-for-teaching-4-9-year-olds-
beginners-guide/book
Chapter 4
[ 99 ]
The mul ple choice ques on type guides the pupil through the exercise so it is suited to the fi rst ques on, while the short answer ques on requires more thought from the pupil so it is be er for later ques ons.
We created a course and added a lesson ac vity to it, to form the basis of our spot-the-diff erence exercise. We confi gured some parameters related to the lesson fl ow. And a er some discussion about how to apply diff erent ques on types to our exercise, we added our fi rst ques on page. In the next sec on, we will fi nd and edit some images for the exercise.
Finding spot-the-difference images In order to create the spot-the-diff erence exercises we are going to need pairs of similar pictures. So the fi rst ques on is whether we can fi nd suitable images on the Internet. And, the next ques on would be, how do we edit them?
The Open Clip Art Library (OCAL) is a community project started by Jon Phillips and Bryce Harrington in 2004 to publish clip art. Clip art is normally used as components in other works. It can range from obviously synthesized or cartoon-like images to photorealis c images.
Time for action – fi nding images online on OCAL Visit the home of the Open Clip Art Library at http://www.openclipart.org/. We would like three or four images for this exercise, and we should be able to fi nd them using a combina on of search and browsing. Some keywords you can try are man (or person, people), house, animal, and boat (or ship).
I found the following four images, but of course you can choose whatever you think is most suitable:
Dawg (by feraliminal)
Man in suit (by Gerald G/ worldlabel.com)
Nicu's house (crash cchost) (by Nicu and rejon)
Trawler (by Franck Doucet)
For More Information: www.packtpub.com/moodle-2-for-teaching-4-9-year-olds-
beginners-guide/book
Spot the Diff erence
[ 100 ]
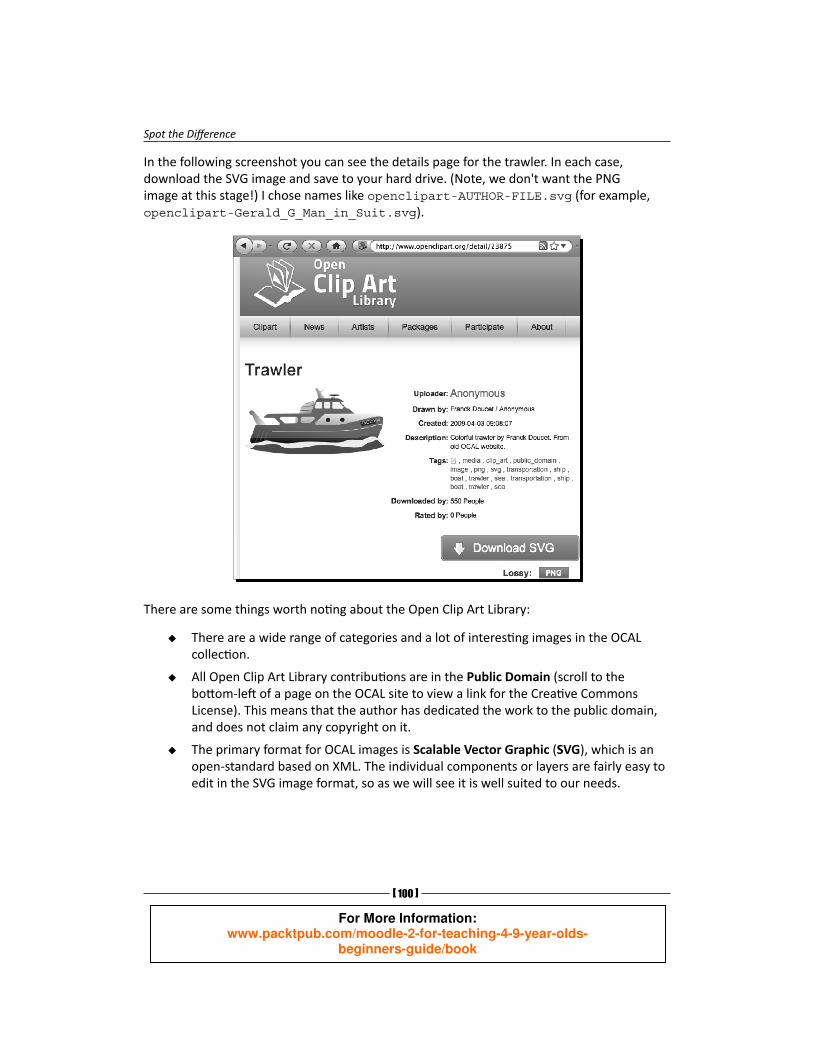
In the following screenshot you can see the details page for the trawler. In each case, download the SVG image and save to your hard drive. (Note, we don't want the PNG image at this stage!) I chose names like openclipart-AUTHOR-FILE.svg (for example, openclipart-Gerald_G_Man_in_Suit.svg).
There are some things worth no ng about the Open Clip Art Library:
There are a wide range of categories and a lot of interes ng images in the OCAL collec on.
All Open Clip Art Library contribu ons are in the Public Domain (scroll to the bo om-le of a page on the OCAL site to view a link for the Crea ve Commons License). This means that the author has dedicated the work to the public domain, and does not claim any copyright on it.
The primary format for OCAL images is Scalable Vector Graphic (SVG) , which is an open-standard based on XML. The individual components or layers are fairly easy to edit in the SVG image format, so as we will see it is well suited to our needs.
For More Information: www.packtpub.com/moodle-2-for-teaching-4-9-year-olds-
beginners-guide/book
Chapter 4
[ 101 ]
The World Wide Web Consor um (W3C) wrote the Scalable Vector Graphic standard (SVG 1.1). Vector graphics diff er from raster or bitmap formats such as JPEG, GIF, and PNG in that the image fi le contains descrip ons for components such as circles and polygons, by specifying their posi on, dimensions, colors, and so on. One benefi t of vector graphic formats such as SVG is that they can be resized without the pixels becoming visible.The W3C is a standards body for the Internet. It is led by Tim Berners-Lee, who wrote the fi rst Web server and browser. It has developed many of the standards we are using in this book, including HTML, CSS, and XML (Hyper-Text Markup Language, Cascading Style Sheets, and Extensible Markup Language respec vely). You can read more about the W3C's important work at http://w3.org/.
Scalable Vector Graphic images can be displayed na vely in a range of browsers, including Mozilla Firefox, Opera, Google Chrome, and Safari (and Microso Internet Explorer 9, in Beta at the me of wri ng). And, they can be converted to the ubiquitous PNG image format.
What just happened?We found a number of images in the Open Clip Art Library for use in our spot-the-diff erence exercise. And we introduced the SVG image format. We will fi nd SVG images fairly easy to edit and well suited to this exercise.
Installing an image editor As SVG is based on XML, simple images can be edited in a text editor. However, to edit images such as the fi shing boat shown previously we will want some dedicated so ware. Inkscape is an open source desktop SVG editor for Windows (Windows XP/Vista/7), Mac OS X, Linux, and Unix-like systems (FreeBSD).
If you are already fairly comfortable with other image edi ng so ware you may be able to achieve similar results using them. However, it is not diffi cult to get started with Inkscape, so it's worth giving it a try. You have the choice!
For More Information: www.packtpub.com/moodle-2-for-teaching-4-9-year-olds-
beginners-guide/book
Spot the Diff erence
[ 102 ]
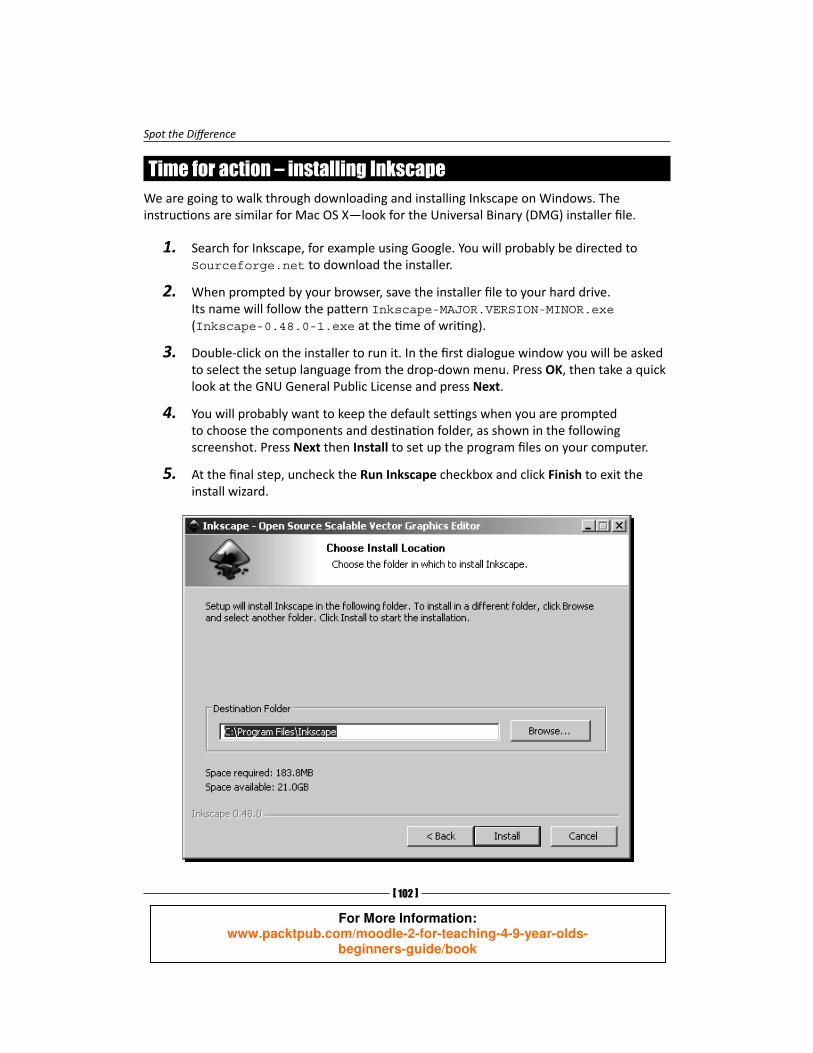
Time for action – installing InkscapeWe are going to walk through downloading and installing Inkscape on Windows. The instruc ons are similar for Mac OS X—look for the Universal Binary (DMG) installer fi le.
1. Search for Inkscape, for example using Google. You will probably be directed to Sourceforge.net to download the installer.
2. When prompted by your browser, save the installer fi le to your hard drive. Its name will follow the pa ern Inkscape-MAJOR.VERSION-MINOR.exe (Inkscape-0.48.0-1.exe at the me of wri ng).
3. Double-click on the installer to run it. In the fi rst dialogue window you will be asked to select the setup language from the drop-down menu. Press OK, then take a quick look at the GNU General Public License and press Next.
4. You will probably want to keep the default se ngs when you are prompted to choose the components and des na on folder, as shown in the following screenshot. Press Next then Install to set up the program fi les on your computer.
5. At the fi nal step, uncheck the Run Inkscape checkbox and click Finish to exit the install wizard.
For More Information: www.packtpub.com/moodle-2-for-teaching-4-9-year-olds-
beginners-guide/book

Chapter 4
[ 103 ]
What just happened? In this sec on, we downloaded and installed Inkscape on Windows. Inkscape is an SVG editor. This will be useful to help us edit the images for our spot-the-diff erence exercise. And this is the topic of the next sec on.
Editing the images It's me to try our hand at edi ng the images for exercise. Let's dive in!
Find one of the SVG fi les on your hard drive—I will demonstrate Inkscape using the Dawg image that we downloaded previously. On Windows and Mac OS X, Inkscape will be associated with fi les with the .svg extension, so double-click on the fi le to launch the editor. You will be presented with a window such as the one shown in the next screenshot.
First, let's orientate ourselves:
The name of the image is displayed at the very top.
Below the tle bar is a fairly standard menu containing items such as File, Edit, and Help. File contains familiar ac ons such as New (image), Open image, Save image, and Quit.
In the middle of the window is our image.
For More Information: www.packtpub.com/moodle-2-for-teaching-4-9-year-olds-
beginners-guide/book
Spot the Diff erence
[ 104 ]
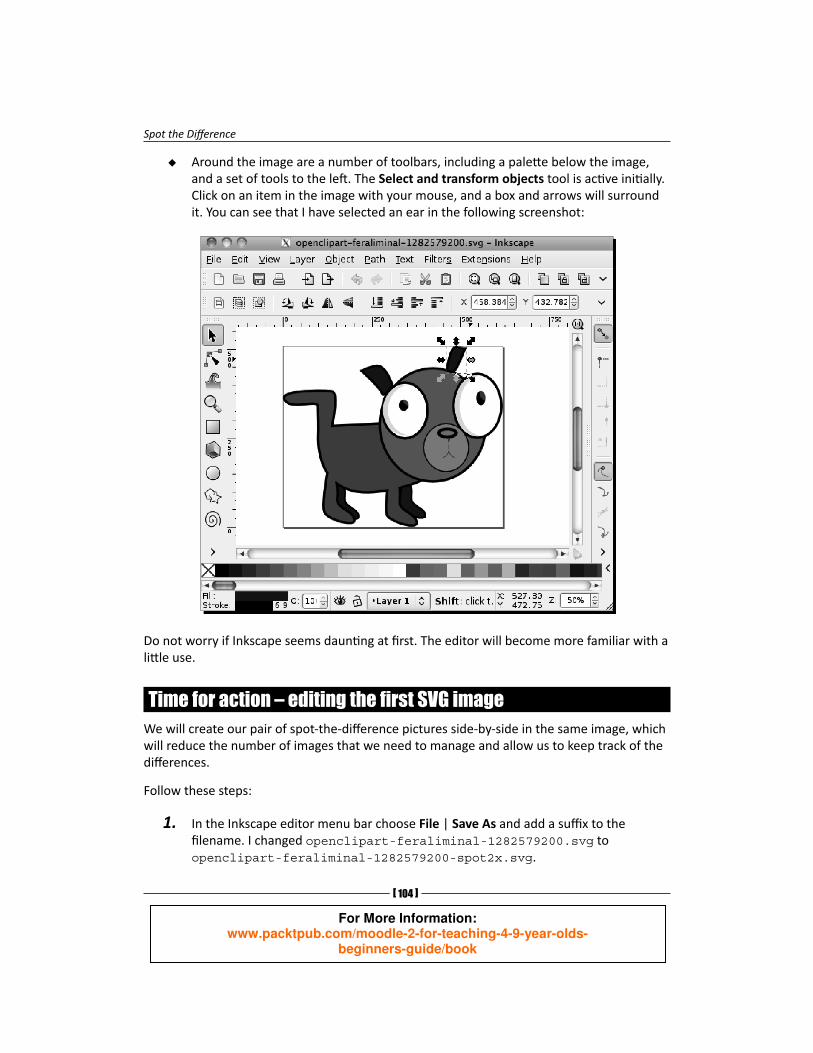
Around the image are a number of toolbars, including a pale e below the image, and a set of tools to the le . The Select and transform objects tool is ac ve ini ally. Click on an item in the image with your mouse, and a box and arrows will surround it. You can see that I have selected an ear in the following screenshot:
Do not worry if Inkscape seems daun ng at fi rst. The editor will become more familiar with a li le use.
Time for action – editing the fi rst SVG imageWe will create our pair of spot-the-diff erence pictures side-by-side in the same image, which will reduce the number of images that we need to manage and allow us to keep track of the diff erences.
Follow these steps:
1. In the Inkscape editor menu bar choose File | Save As and add a suffi x to the fi lename. I changed openclipart-feraliminal-1282579200.svg to openclipart-feraliminal-1282579200-spot2x.svg.
For More Information: www.packtpub.com/moodle-2-for-teaching-4-9-year-olds-
beginners-guide/book
Chapter 4
[ 105 ]
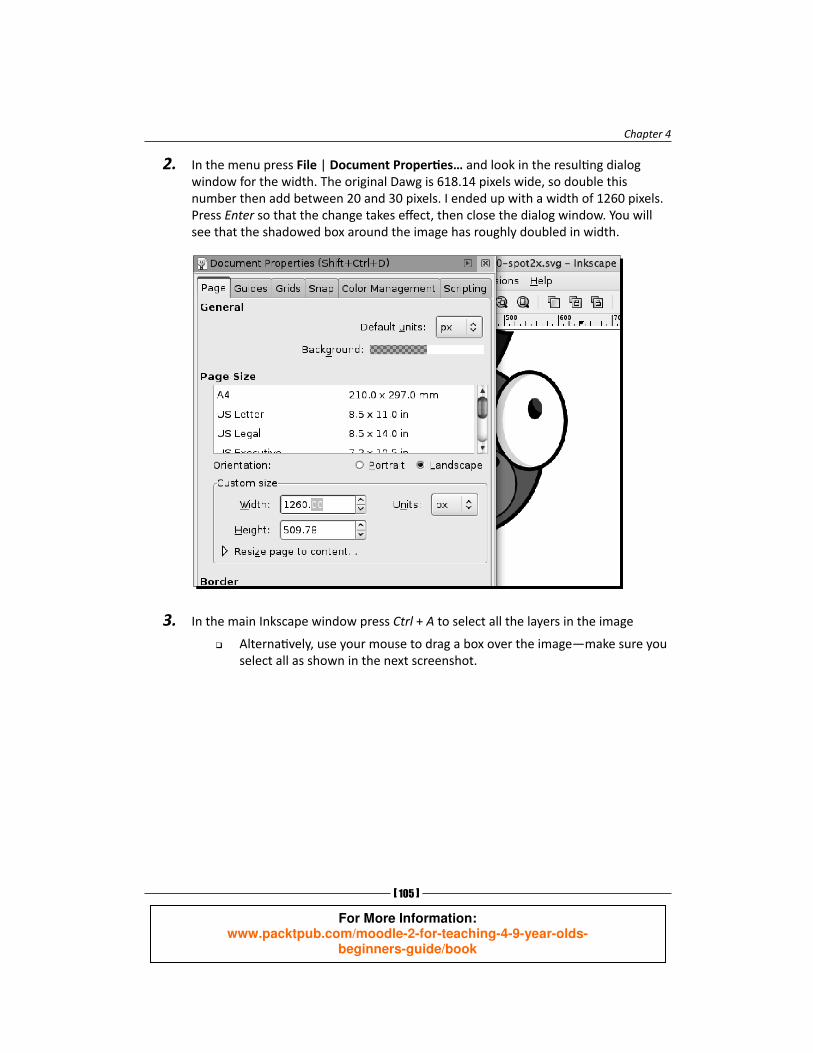
2. In the menu press File | Document Proper es… and look in the resul ng dialog window for the width. The original Dawg is 618.14 pixels wide, so double this number then add between 20 and 30 pixels. I ended up with a width of 1260 pixels. Press Enter so that the change takes eff ect, then close the dialog window. You will see that the shadowed box around the image has roughly doubled in width.
3. In the main Inkscape window press Ctrl + A to select all the layers in the image
Alterna vely, use your mouse to drag a box over the image—make sure you select all as shown in the next screenshot.
For More Information: www.packtpub.com/moodle-2-for-teaching-4-9-year-olds-
beginners-guide/book
Spot the Diff erence
[ 106 ]
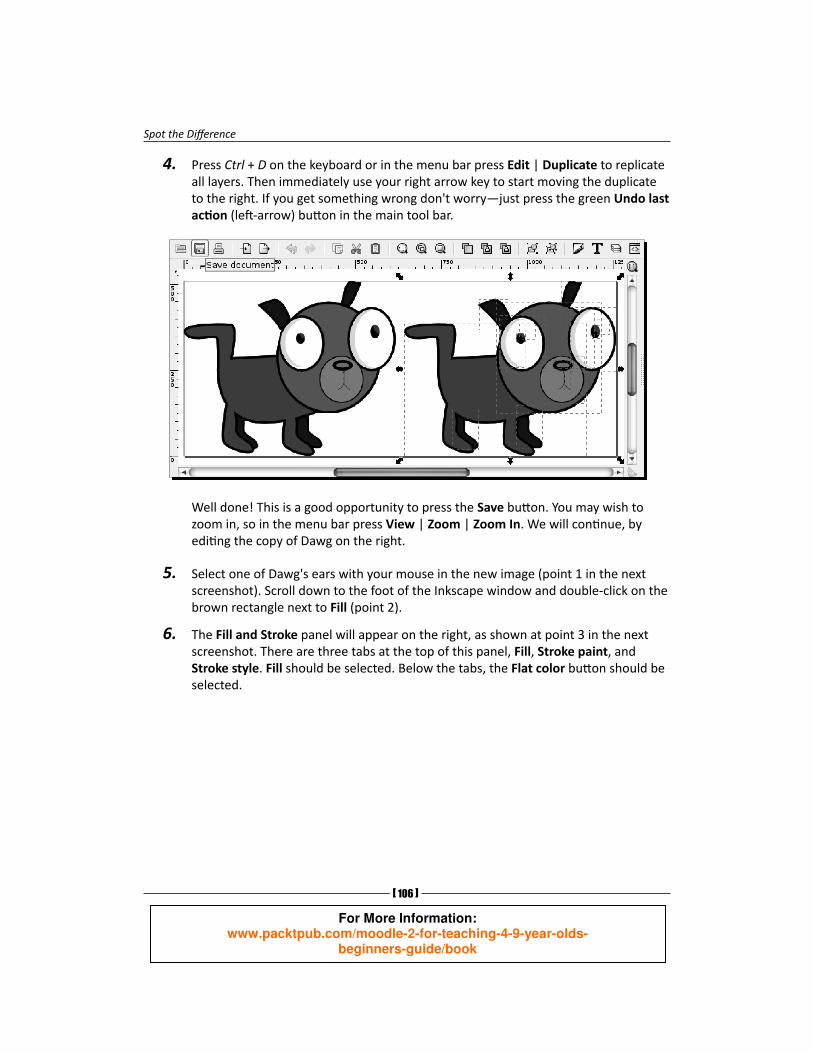
4. Press Ctrl + D on the keyboard or in the menu bar press Edit | Duplicate to replicate all layers. Then immediately use your right arrow key to start moving the duplicate to the right. If you get something wrong don't worry—just press the green Undo last ac on (le -arrow) bu on in the main tool bar.
Well done! This is a good opportunity to press the Save bu on. You may wish to zoom in, so in the menu bar press View | Zoom | Zoom In. We will con nue, by edi ng the copy of Dawg on the right.
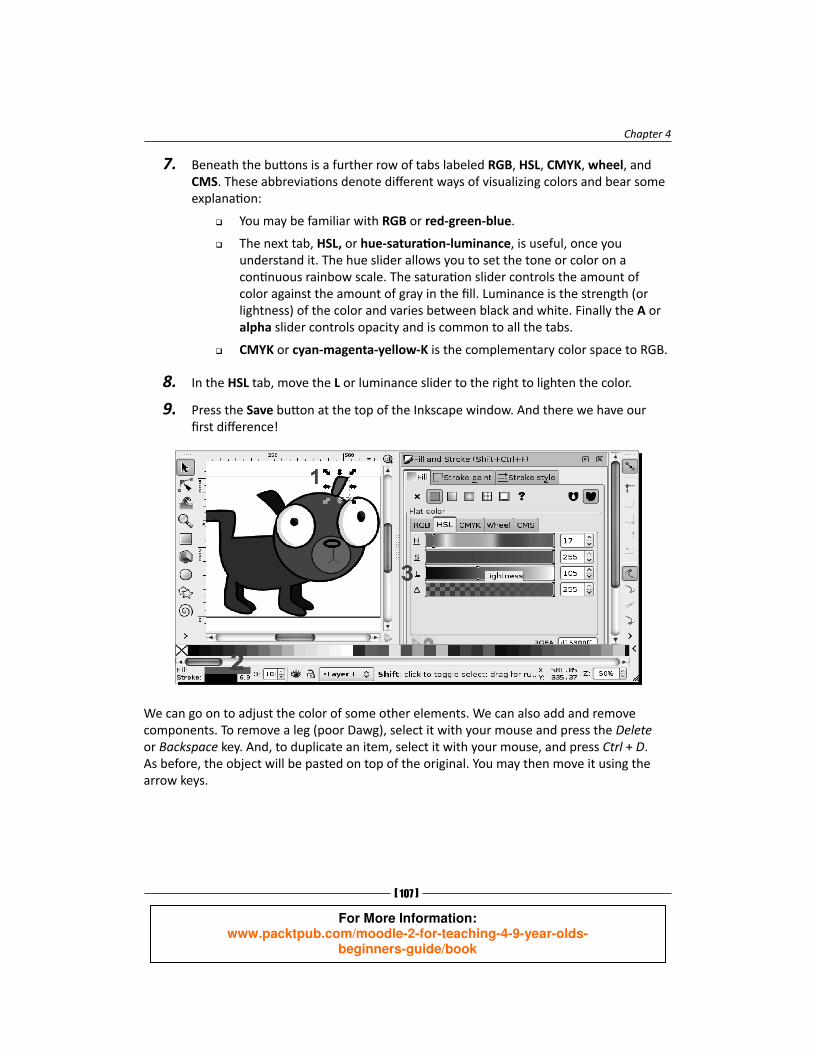
5. Select one of Dawg's ears with your mouse in the new image (point 1 in the next screenshot). Scroll down to the foot of the Inkscape window and double-click on the brown rectangle next to Fill (point 2).
6. The Fill and Stroke panel will appear on the right, as shown at point 3 in the next screenshot. There are three tabs at the top of this panel, Fill, Stroke paint, and Stroke style. Fill should be selected. Below the tabs, the Flat color bu on should be selected.
For More Information: www.packtpub.com/moodle-2-for-teaching-4-9-year-olds-
beginners-guide/book
Chapter 4
[ 107 ]
7. Beneath the bu ons is a further row of tabs labeled RGB, HSL, CMYK, wheel, and CMS. These abbrevia ons denote diff erent ways of visualizing colors and bear some explana on:
You may be familiar with RGB or red-green-blue.
The next tab, HSL, or hue-satura on-luminance , is useful, once you understand it. The hue slider allows you to set the tone or color on a con nuous rainbow scale. The satura on slider controls the amount of color against the amount of gray in the fi ll. Luminance is the strength (or lightness) of the color and varies between black and white. Finally the A or alpha slider controls opacity and is common to all the tabs.
CMYK or cyan-magenta-yellow-K is the complementary color space to RGB.
8. In the HSL tab, move the L or luminance slider to the right to lighten the color.
9. Press the Save bu on at the top of the Inkscape window. And there we have our fi rst diff erence!
We can go on to adjust the color of some other elements. We can also add and remove components. To remove a leg (poor Dawg), select it with your mouse and press the Delete or Backspace key. And, to duplicate an item, select it with your mouse, and press Ctrl + D. As before, the object will be pasted on top of the original. You may then move it using the arrow keys.
For More Information: www.packtpub.com/moodle-2-for-teaching-4-9-year-olds-
beginners-guide/book
Spot the Diff erence
[ 108 ]
When you are edi ng your images, there are two ques ons to bear in mind:
Can the pupil use one or at most two simple keywords to describe a diff erence between the pictures in an unambiguous way? Good keywords are things such as front leg, eyebrow, and curtain. Poor choices include le leg and the door lintel is diff erent. The term le may create confusion—rela ve to whom? And lintel is a fairly advanced word, without an obvious replacement.
If the pupil is asked to describe the diff erences from top to bo om, or possibly le to right, can they do so? This will be signifi cant in formula ng clear ques ons. So, ensure that objects that contain diff erences are clearly at diff erent heights.
It is desirable to make the spot-the-diff erence reasonably accessible to any pupils who may be color blind. A useful rule is if we adjust the hue we also change the luminance or brightness of the color. This will ensure that the diff erences are perceivable to the maximum number of pupils. You can fi nd out more about accessibility in the appendix.
Dawg is a fairly simple picture, and I made only three changes to this image. This makes it suitable for the fi rst ques on page in our exercise.
When you are happy with the new image save the result and then:
1. From the Inkscape menu choose File | Export Bitmap…
2. In the resul ng dialog window ensure that the Drawing bu on is selected, as we don't wish to export just a selec on or the whole page. The Bitmap size will be set for you. The Filename including the des na on folder will be the same as for the SVG original, except that the extension will be .png.
3. Press the Export bu on to create the cross-browser PNG image ready for uploading to Moodle.
What just happened?We used Inkscape to create a copy of the original Dawg SVG image. We then explored how to select and edit components of the image. We tried edi ng colors and adding and removing components.
I went on to make between four and seven changes to the other three images. This will allow us to create spot-the-diff erence pages with a range of diffi cul es. The resul ng exercise will provide a challenge for pupils with a range of abili es. You will end up with four SVG images and four exported PNG images. Each image fi le will contain a pair of pictures.
For More Information: www.packtpub.com/moodle-2-for-teaching-4-9-year-olds-
beginners-guide/book
Chapter 4
[ 109 ]
Bringing it togetherWe have the images for our spot the diff erence exercise, so it's me to return to the lesson we started crea ng. But fi rst, we need to upload our images.
Time for action – adding images to our lessonFollow this procedure in Moodle 1.9 and 2:
1. Go to the main page for the MY104 course, and click on the link for the Spot the diff erence lesson.
2. You will be taken to the Preview tab, so choose the Edit tab and press the update icon next to the Spot the diff erence 1 ques on.
3. Select the Mul ple choice tab if it isn't already selected. And ensure that the Mul answer checkbox is cked.
4. In the Page contents editor add a new line between the two exis ng sentences. Press the insert image icon as shown:
Con nuing in Moodle 2:
5. In the Insert/edit image dialog press the Find or upload an image… bu on. Press the Upload a fi le bu on in the le menu of the File picker dialog.
6. Press the Browse… bu on, and fi nd the Dawg PNG image on your computer. Returning to the File picker in your browser, choose a license if you wish. Press the Upload this fi le bu on, as shown in the next screenshot.
For More Information: www.packtpub.com/moodle-2-for-teaching-4-9-year-olds-
beginners-guide/book
Spot the Diff erence
[ 110 ]
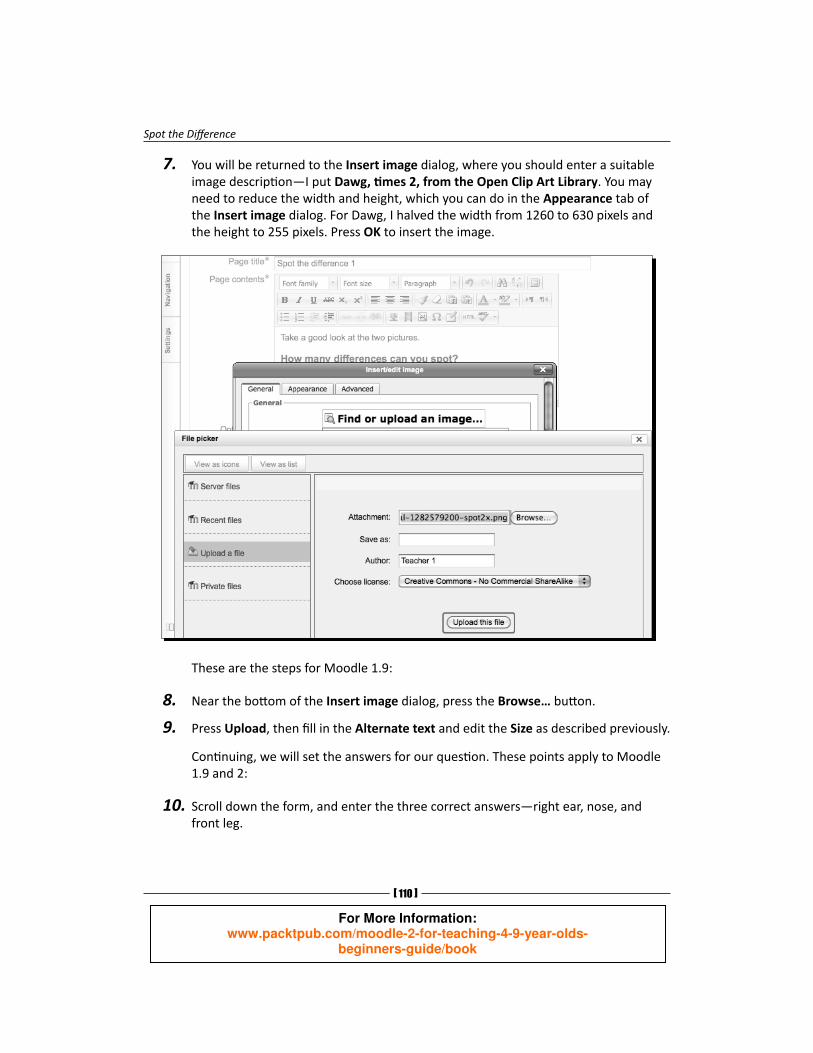
7. You will be returned to the Insert image dialog, where you should enter a suitable image descrip on—I put Dawg, mes 2, from the Open Clip Art Library. You may need to reduce the width and height, which you can do in the Appearance tab of the Insert image dialog. For Dawg, I halved the width from 1260 to 630 pixels and the height to 255 pixels. Press OK to insert the image.
These are the steps for Moodle 1.9:
8. Near the bo om of the Insert image dialog, press the Browse… bu on.
9. Press Upload, then fi ll in the Alternate text and edit the Size as described previously.
Con nuing, we will set the answers for our ques on. These points apply to Moodle 1.9 and 2:
10. Scroll down the form, and enter the three correct answers—right ear, nose, and front leg.
For More Information: www.packtpub.com/moodle-2-for-teaching-4-9-year-olds-
beginners-guide/book

Chapter 4
[ 111 ]
11. For each correct Answer, give a Response, for example Well done, a Score of 1 and for the present set the Jump drop-down menu to Next page.
12. Then enter some incorrect diff erences for the two fi nal answers—I typed eye and tail. Set the Response to Woops, no, the Score to 0, and the Jump to This page. Note that the answers will be shuffl ed before they are presented to the pupil.
13. Scroll to the foot of the form and press the Save page bu on. You will be taken to a summary page. Press Preview to see the student's view. And give it a try.
For More Information: www.packtpub.com/moodle-2-for-teaching-4-9-year-olds-
beginners-guide/book
Spot the Diff erence
[ 112 ]
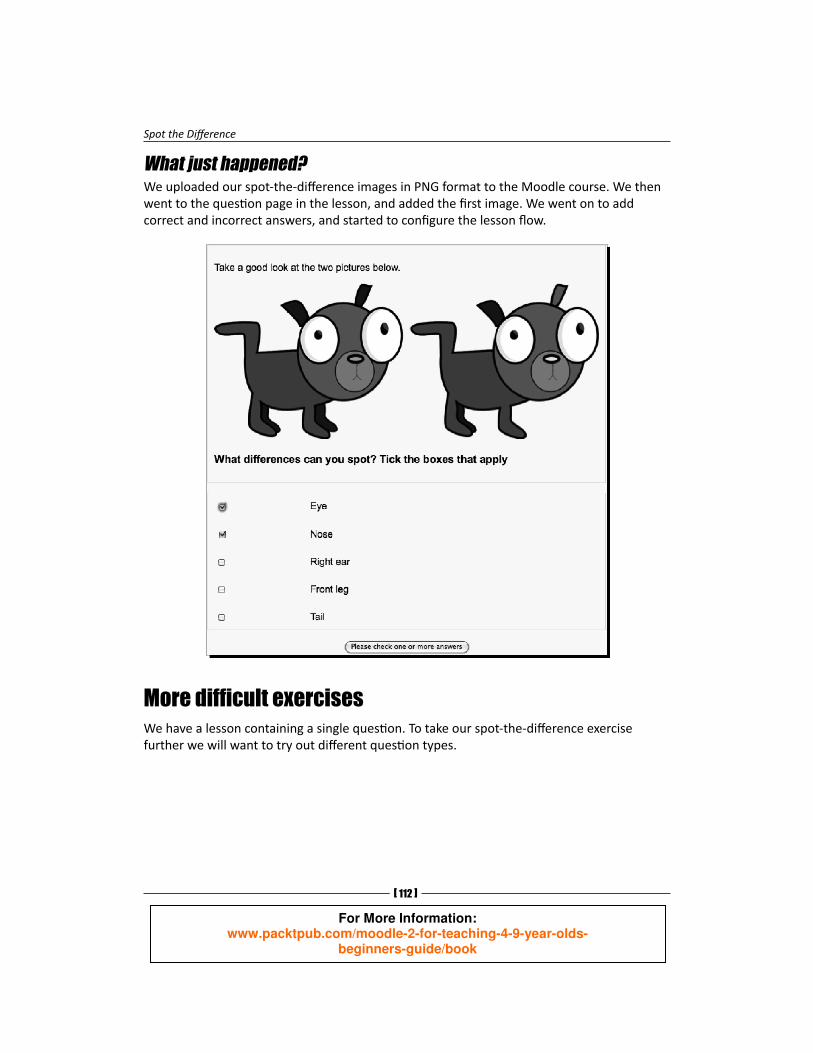
What just happened?We uploaded our spot-the-diff erence images in PNG format to the Moodle course. We then went to the ques on page in the lesson, and added the fi rst image. We went on to add correct and incorrect answers, and started to confi gure the lesson fl ow.
More diffi cult exercisesWe have a lesson containing a single ques on. To take our spot-the-diff erence exercise further we will want to try out diff erent ques on types.
For More Information: www.packtpub.com/moodle-2-for-teaching-4-9-year-olds-
beginners-guide/book
Chapter 4
[ 113 ]
Time for action – adding more questions In order to take our lesson ac vity further we will need two more ques ons. Return to the lesson's Edit tab, scroll to the foot of the page, and click on the link, Add a ques on page here. This will add the new ques on a er our fi rst one. Prepare the picture named Man in Suit for the second ques on. I created four diff erences, so this will s ll be a fairly easy exercise. We can use the same Mul ple choice ques on type, with the Mul answer checkbox cked.
A er you have added the second ques on, again go to the Edit tab. Scroll to the foot of the page and click Add a ques on here. For the third ques on choose the short answer tab below the ques on type label. Then follow these steps in Moodle 1.9 and 2:
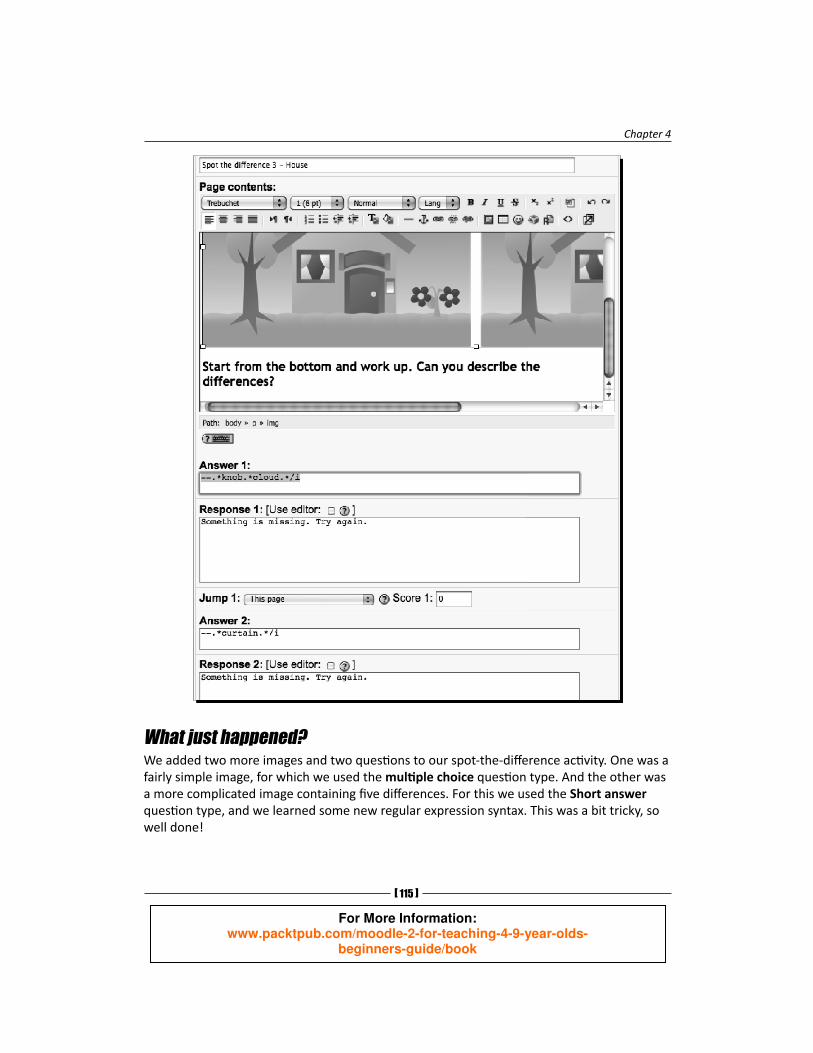
1. Type in a Page tle, for example Spot the diff erence 3 – house.
2. In the Page contents editor, type the text Take a good look at the pictures below. Insert a line break.
3. In the editor, press the Insert image icon. Choose the image based on Nicu's house. Enter a suitable Descrip on/Alternate text, and adjust the width and height using the original ra o. When you are happy, press OK.
4. Insert another line break. Enter the phrase, Start from the bo om and work up. Can you describe the diff erences? Now, select this text and use the drop-down menu in the editor to make it a Heading level 3.
A simple way to express the answer is using the wild card *. You may have come across wild cards in the Windows Explorer search. Try entering *knob* *curtain *window* *chimney* *cloud* in the fi eld labeled Answer 1. This works, as it will match responses such as door knob, curtain missing, extra window, chimney pot, cloud. However, the pupil has to get the answer in precisely the correct order, bo om to top. And they are unlikely to achieve this. Can we improve ma ers?
In the previous steps, I deliberately didn't men on the Use regular expression checkbox. Regular expressions are like wildcards, but they are much more sophis cated. Follow these steps:
1. Tick the checkbox next to Use regular expressions. Leave the Page tle and Page contents fi elds as they are.
2. In this situa on the order of the answers ma ers, so scroll to Answer 5, and enter .*. This is the catch-all for a correct answer. In regular expressions, dot . means match any character and the * means match any number of mes. Next to Response 5, type Correct. Well done! Set Jump 5 to Next page and change Score 5 to 0.
For More Information: www.packtpub.com/moodle-2-for-teaching-4-9-year-olds-
beginners-guide/book
Spot the Diff erence
[ 114 ]
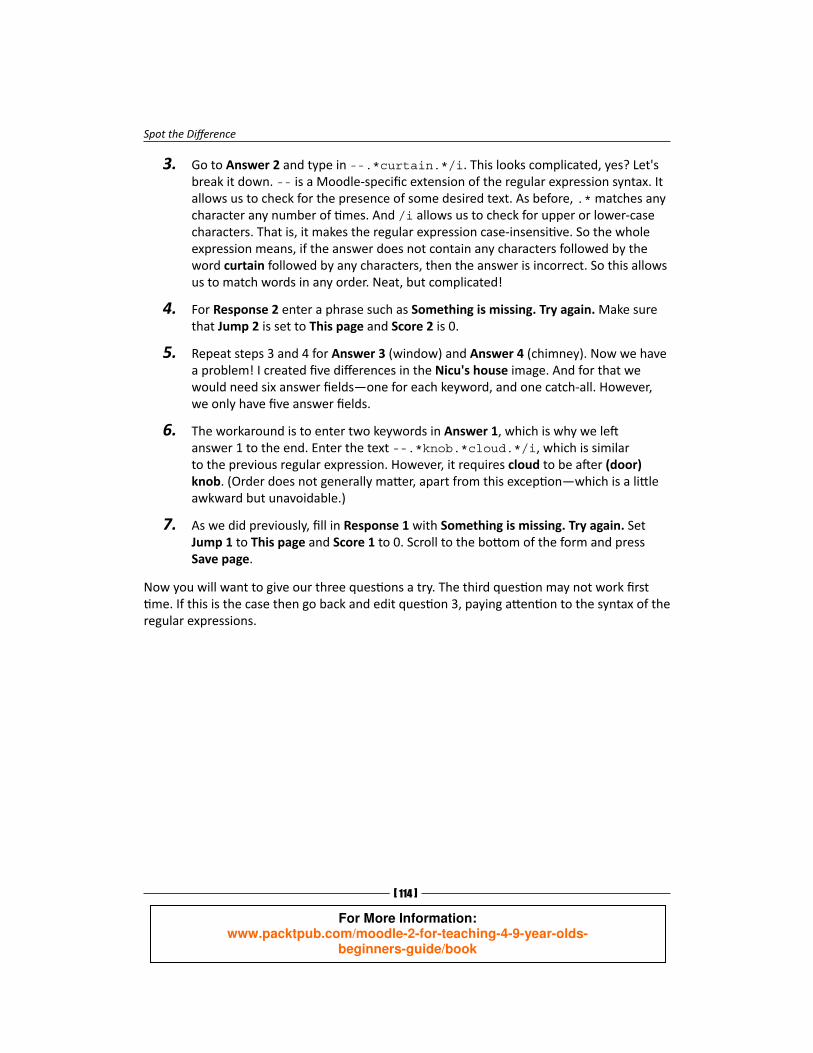
3. Go to Answer 2 and type in --.*curtain.*/i. This looks complicated, yes? Let's break it down. -- is a Moodle-specifi c extension of the regular expression syntax. It allows us to check for the presence of some desired text. As before, .* matches any character any number of mes. And /i allows us to check for upper or lower-case characters. That is, it makes the regular expression case-insensi ve. So the whole expression means, if the answer does not contain any characters followed by the word curtain followed by any characters, then the answer is incorrect. So this allows us to match words in any order. Neat, but complicated!
4. For Response 2 enter a phrase such as Something is missing. Try again. Make sure that Jump 2 is set to This page and Score 2 is 0.
5. Repeat steps 3 and 4 for Answer 3 (window) and Answer 4 (chimney). Now we have a problem! I created fi ve diff erences in the Nicu's house image. And for that we would need six answer fi elds—one for each keyword, and one catch-all. However, we only have fi ve answer fi elds.
6. The workaround is to enter two keywords in Answer 1, which is why we le answer 1 to the end. Enter the text --.*knob.*cloud.*/i, which is similar to the previous regular expression. However, it requires cloud to be a er (door) knob. (Order does not generally ma er, apart from this excep on—which is a li le awkward but unavoidable.)
7. As we did previously, fi ll in Response 1 with Something is missing. Try again. Set Jump 1 to This page and Score 1 to 0. Scroll to the bo om of the form and press Save page.
Now you will want to give our three ques ons a try. The third ques on may not work fi rst me. If this is the case then go back and edit ques on 3, paying a en on to the syntax of the
regular expressions.
For More Information: www.packtpub.com/moodle-2-for-teaching-4-9-year-olds-
beginners-guide/book
Chapter 4
[ 115 ]
What just happened?We added two more images and two ques ons to our spot-the-diff erence ac vity. One was a fairly simple image, for which we used the mul ple choice ques on type. And the other was a more complicated image containing fi ve diff erences. For this we used the Short answer ques on type, and we learned some new regular expression syntax. This was a bit tricky, so well done!
For More Information: www.packtpub.com/moodle-2-for-teaching-4-9-year-olds-
beginners-guide/book
Spot the Diff erence
[ 116 ]
Wrapping up the lessonNow that we have three ques ons in our lesson ac vity, spanning a range of diffi cul es, the fi nal step is to add a branch table. As the fl ow diagram at the start of the chapter shows, this will allow the pupils to decide whether to try a diffi cult spot-the-diff erence exercise a er they have tried a more straigh orward one.
Time for action – adding a branchTo add a branch table, go back to the Edit tab for the lesson ac vity. Then you can follow these steps:
1. Scroll down to the row of links between the fi rst and second spot-the-diff erence exercises.
2. Click on the link labeled Add a branch table.
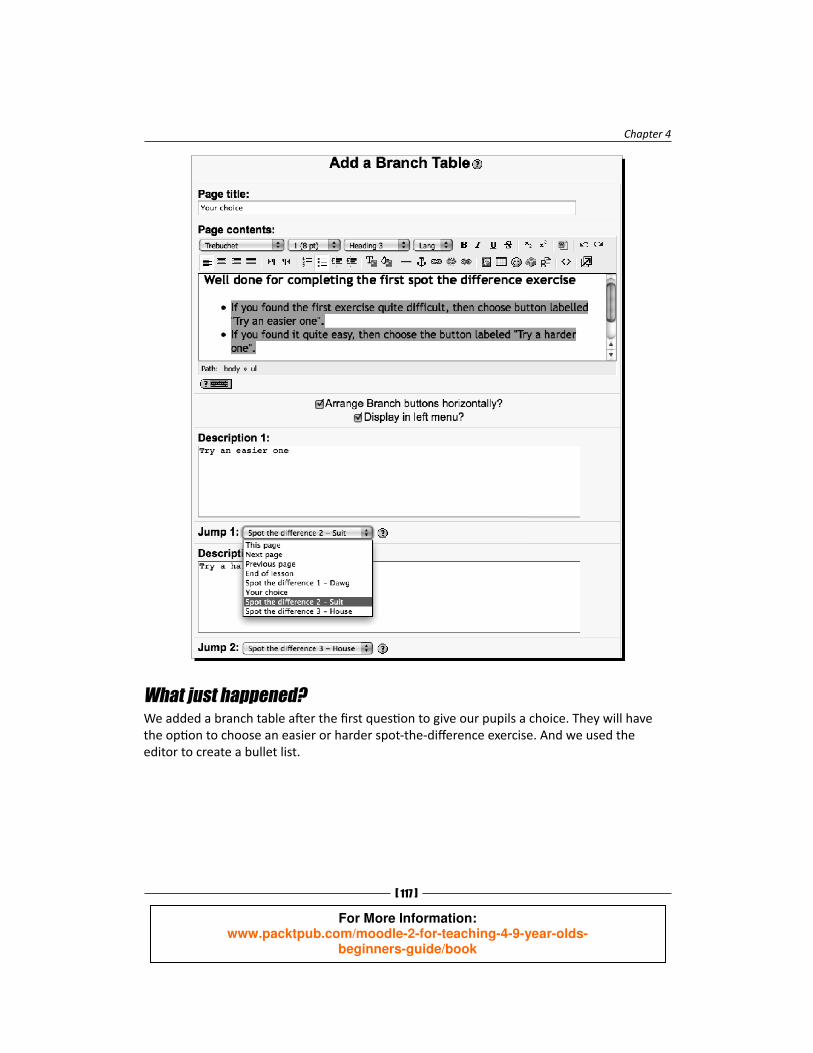
3. Enter a Page tle, for example, Your choice.
4. Enter some explanatory text under Page contents. You will probably want to mark up some of the text as a bulleted or unordered list. I selected the two lines shown in the next screenshot, and pressed the Bulleted list icon as shown here:
5. Enter a short phrase such as Try an easier one for the Descrip on 1 fi eld. This will be used as a label for the bu on. Choose Spot the diff erence 2 - suit from the Jump 1 drop-down menu.
6. And, enter a short phrase such as Try a harder one for the Descrip on 2 fi eld. This will be used as a label for the bu on. Choose spot the diff erence 3 - house from the Jump 2 drop-down menu.
7. Scroll to the bo om of the form and press the Add a branch table bu on.
For More Information: www.packtpub.com/moodle-2-for-teaching-4-9-year-olds-
beginners-guide/book
Chapter 4
[ 117 ]
What just happened?We added a branch table a er the fi rst ques on to give our pupils a choice. They will have the op on to choose an easier or harder spot-the-diff erence exercise. And we used the editor to create a bullet list.
For More Information: www.packtpub.com/moodle-2-for-teaching-4-9-year-olds-
beginners-guide/book
Spot the Diff erence
[ 118 ]
Enrolling students When you launch an online course at your school, you will need to enroll students. There are various ways to achieve this, and we will discuss two possibili es. Which you use, if either, will depend on the age and maturity of your class, and what other systems your school uses. Although as a teacher, you can confi gure some enrolment for your courses yourself, you should probably discuss this with fellow teachers and your friendly IT support person.
Enrolment with an enrolment key is suited to older pupils who can use e-mail and can be trusted to create and remember passwords
Enrolment via user upload can be used for younger pupils, and smaller groups of pupils
We will walk through both methods.
Confi guring an enrolment key As a teacher, you can confi gure an enrolment key for your own courses. First, you should check with your friendly IT support person whether Email-based self-registra on is enabled.
Time for action – creating and using an enrolment key To confi gure an enrolment key for a course in Moodle 2:
1. In the Se ngs side-block, expand Course administra on | Users, and click on the Enrolment methods link.
2. There will be a table containing three enrolment methods: Manual enrolment, Guest access, and Self enrolment (Student). The la er two will ini ally be disabled, and thus grayed out. Click on the Edit (hand) icon for Self enrolment.
3. Moodle will take you to the Self enrolment form. Choose Yes for Allow sel f enrolments.
We wish to create an enrolment key, which is similar to a password. For security, you may want to use a password generator. You can search, for example on Google, for online password generators. I found a useful one at http://maord.com/. As you can see in the next screenshot, I generated and copied an eight-character key containing le ers and numbers, which is fairly strong. Then I pasted it in the Enrolment key fi eld. (Tick Unmask to check what you have copied.)
4. Leave Use group enrolment keys set to No and Assign role set to Student.
For More Information: www.packtpub.com/moodle-2-for-teaching-4-9-year-olds-
beginners-guide/book
Chapter 4
[ 119 ]
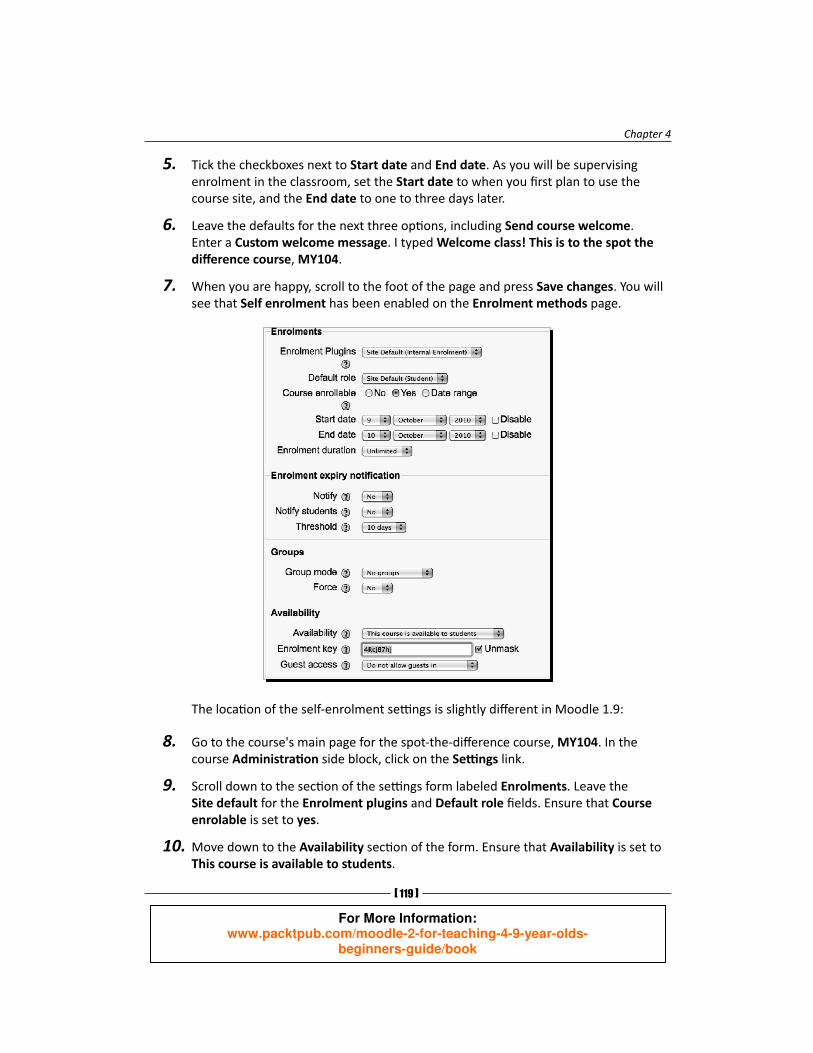
5. Tick the checkboxes next to Start date and End date. As you will be supervising enrolment in the classroom, set the Start date to when you fi rst plan to use the course site, and the End date to one to three days later.
6. Leave the defaults for the next three op ons, including Send course welcome. Enter a Custom welcome message. I typed Welcome class! This is to the spot the diff erence course, MY104.
7. When you are happy, scroll to the foot of the page and press Save changes. You will see that Self enrolment has been enabled on the Enrolment methods page.
The loca on of the self-enrolment se ngs is slightly diff erent in Moodle 1.9:
8. Go to the course's main page for the spot-the-diff erence course, MY104. In the course Administra on side block, click on the Se ngs link.
9. Scroll down to the sec on of the se ngs form labeled Enrolments. Leave the Site default for the Enrolment plugins and Default role fi elds. Ensure that Course enrolable is set to yes.
10. Move down to the Availability sec on of the form. Ensure that Availability is set to This course is available to students.
For More Information: www.packtpub.com/moodle-2-for-teaching-4-9-year-olds-
beginners-guide/book
Spot the Diff erence
[ 120 ]
11. Set the enrolment Start date, End date, and the Enrolment key as detailed in the informa on box under the Moodle 2 instruc ons previously. Scroll to the end of the form and press Save Changes.
To use the enrolment key:
12. In class, put the enrolment key on the whiteboard.
13. The pupils should visit the Moodle homepage for your school; follow the links to Login, then to Create new account. A er they have created a username and password, they should follow the link in the e-mail sent to them to confi rm their account.
14. Then the pupils can visit the homepage again, and click on the course link. It will have a key icon next to it.
15. The pupils should type in the enrolment key when prompted. They will then be enrolled by the system.
What just happened?We confi gured our course to use the built-in self-registra on func onality. This entailed genera ng an enrolment key using an online service. Then we stepped through a procedure that your class can follow to create an account and enroll on the course.
Enrolling via user upload You will need the assistance of your friendly IT support person or site administrator to upload user accounts, unless they give you extra permissions. We will create a text fi le using a basic text editor—Notepad on Windows, or TextEdit on Mac OS X.
Time for action – uploading users To create the upload users text fi le, you can follow these steps:
1. In Windows, go to Start, then fi nd Run. Enter the program name, Notepad and press the OK bu on. A simple text editor will appear.
2. Enter the fi eld names on one line as shown—username, password and so on, with commas between each name. Press Enter to insert a new line.
3. On the new line, start to enter the details for a pupil. You will need to decide on the conven on for the username. You can choose either a pseudo-random password, or a weaker but easier to remember combina on of a dic onary word and a number—think carefully about this.
For More Information: www.packtpub.com/moodle-2-for-teaching-4-9-year-olds-
beginners-guide/book
Chapter 4
[ 121 ]
4. You can use a unique e-mail address for each user, if one is available. Or, some e-mail systems (for example, a Google Mail free account and a Yahoo paid account at the me of wri ng) allow you to add a tag before the @ symbol. And this could be set to the username, as shown below. This will sa sfy Moodle's requirement for a unique e-mail address per user.
5. You fi nish the line with the maildisplay fl ag set to 0 and the shortname for your course, MY104.
6. Repeat the previous three steps for each pupil, ensuring that the username, password, and e-mail address are unique.
7. Save the fi le on your computer with the extension .csv, for comma separated values.
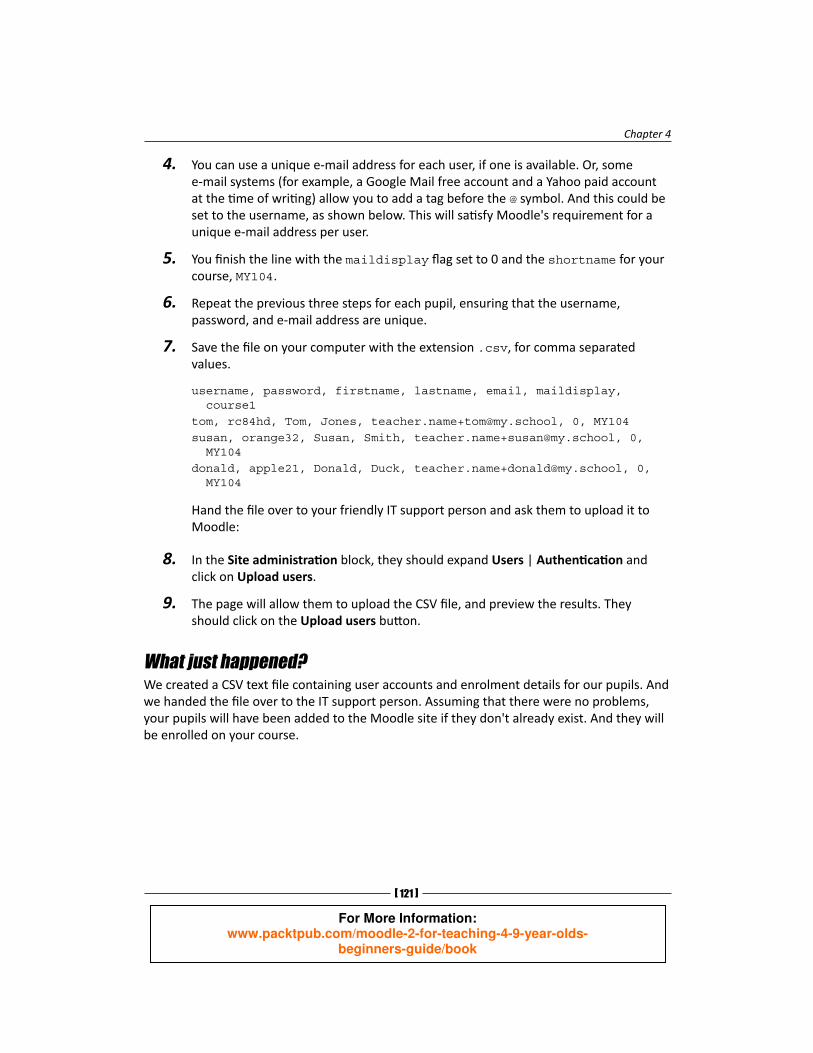
username, password, firstname, lastname, email, maildisplay, course1tom, rc84hd, Tom, Jones, [email protected], 0, MY104susan, orange32, Susan, Smith, [email protected], 0, MY104donald, apple21, Donald, Duck, [email protected], 0, MY104
Hand the fi le over to your friendly IT support person and ask them to upload it to Moodle:
8. In the Site administra on block, they should expand Users | Authen ca on and click on Upload users.
9. The page will allow them to upload the CSV fi le, and preview the results. They should click on the Upload users bu on.
What just happened?We created a CSV text fi le containing user accounts and enrolment details for our pupils. And we handed the fi le over to the IT support person. Assuming that there were no problems, your pupils will have been added to the Moodle site if they don't already exist. And they will be enrolled on your course.
For More Information: www.packtpub.com/moodle-2-for-teaching-4-9-year-olds-
beginners-guide/book
Spot the Diff erence
[ 122 ]
Pop quiz
Here are some quick ques ons to help test your understanding of the chapter. There may be more than one correct answer. Good luck!
1. What are the benefi t(s) of branch tables in the lesson module?
a. They allow students' paths through a lesson to diverge from a point.
b. They allow students' paths to converge to a point.
c. They present choices to the student.
2. In the regular expression syntax available in the short answer ques on type, what does .* mean?
a. Match a dot at least one me.
b. Match any character any number of mes.
c. Match any character at least one me.
3. Which property of Scalable Vector Graphics (SVG) allows them to scale without losing detail or becoming pixelated?
a. That SVG is an open standard developed through the World Wide Web Consor um.
b. That in SVG an object is specifi ed in terms of its a ributes, like dimensions and posi on, instead of storing the color of areas or pixels within the image.
c. That SVG is based on the Extensible Markup Language (XML), which makes it more interoperable.
4. What is the purpose of an enrolment key?
a. They allow all the pupils in a class to share a common password.
b. They allow the teacher to log in on behalf of a student.
c. They allow a teacher to restrict entry to a course.
Have a go hero
In this chapter we used the lesson ac vity module to create spot-the-diff erence exercises. Look back over the previous chapters, and think about which ac vi es could be re-developed in the lesson module, and how.
>> Suggested answer: the alphabet quiz we created in the fi rst chapter could make use of the lesson ac vity. (The maths quiz as developed by the end of Chapter 2 uses a third-party ques on type, which is not available in the lesson module.)
For More Information: www.packtpub.com/moodle-2-for-teaching-4-9-year-olds-
beginners-guide/book
Chapter 4
[ 123 ]
SummaryThe spot-the-diff erence exercises that we have created will be benefi cial to your class in a number of ways:
As visually appealing exercises they will appeal to younger students
Students will have the opportunity to develop their visual and observa onal skills
They will develop their descrip ve and decision making skills
We learned a lot in this chapter about crea ng lesson modules. Specifi cally, we covered:
Represen ng and planning a lesson ac vity as a fl ow diagram
Sourcing editable, reusable vector graphics on the Open Clip Art Library website
Installing Inkscape, a free, cross-pla orm Scalable Vector Grahpics editor
Using Inkscape to edit our spot-the-diff erence images
Adding ques on pages and branch tables to our lesson
Using mul ple choice and short answer ques on types
Enrolling pupils
We also discussed the powerful regular expression syntax available in short answer ques ons.
Now that we've learned about lessons and created a visual exercise, we're ready to look at alterna ve visualiza ons for historic and temporal informa on—which is the topic of the next chapter.
For More Information: www.packtpub.com/moodle-2-for-teaching-4-9-year-olds-
beginners-guide/book
Where to buy this book You can buy Moodle 2 for Teaching 4-9 Year Olds Beginner's Guide from the Packt Publishing website: http://www.packtpub.com/moodle-2-for-teaching-4-9-year-olds-beginners-guide/book.
Free shipping to the US, UK, Europe and selected Asian countries. For more information, please read our shipping policy.
Alternatively, you can buy the book from Amazon, BN.com, Computer Manuals and most internet book retailers.
P U B L I S H I N G
community experience dist i l led
www.PacktPub.com
For More Information: www.packtpub.com/moodle-2-for-teaching-4-9-year-olds-
beginners-guide/book