Double-Take RecoverNow User Guide
316
Double-Take RecoverNow Version 4.0 SP01 User Guide
-
Upload
syed-fahad-ali -
Category
Documents
-
view
89 -
download
21
description
Double Take for AIX
Transcript of Double-Take RecoverNow User Guide

Double-Take RecoverNow
Version 4.0 SP01 User Guide

July, 2012
Double-Take RecoverNow Version 4.0 SP01 User Guide
Copyright Vision Solutions®, Inc. 2003–2012
All rights reserved.
The information in this document is subject to change without notice and is furnished under a license agreement. This document is proprietary to Vision Solutions, Inc., and may be used only as authorized in our license agreement. No portion of this manual may be copied or otherwise reproduced without the express written consent of Vision Solutions, Inc.
Vision Solutions provides no expressed or implied warranty with this manual.
The following are trademarks or registered trademarks of their respective organizations or companies:
• Vision Solutions is a registered trademark and ORION Solutions, Integrator, Director, Data Manager, Vision Suite, ECS/400, OMS/400, ODS/400, SAM/400, Double-Take GeoCluster, Double-Take RecoverNow, Double-Take SHARE, RecoverNow and iTERA HA are trademarks of Vision Solutions, Inc.
• DB2, IBM, i5/OS, iSeries, System i, System i5, Informix, AIX 5L, System p, System x, and System z, and WebSphere—International Business Machines Corporation.
• Adobe and Acrobat Reader—Adobe Systems, Inc.
• Double-Take, GeoCluster, and NSI—NSI Software, Inc.
• HP-UX—Hewlett-Packard Company.
• Teradata—Teradata Corporation.
• Intel—Intel Corporation.
• Java, all Java-based trademarks, and Solaris-Oracle Corporation.
• Linux—Linus Torvalds.
• Microsoft and Windows—Microsoft Corporation.
• Mozilla and Firefox—Mozilla Foundation.
• Netscape—Netscape Communications Corporation.
• Oracle—Oracle Corporation.
• Red Hat—Red Hat, Inc.
• Sybase—Sybase, Inc.
• Symantec and NetBackup—Symantec Corporation.
• UNIX and UNIXWare—the Open Group.
All other brands and product names are trademarks or registered trademarks of their respective owners.
If you need assistance, please contact Vision Solutions’ SCP Certified CustomerCare team at:
CustomerCareVision Solutions, Inc.Telephone: 1.800.337.8214 or 1.949.724.5465Email: [email protected] Site: www.visionsolutions.com/Support/Contact-CustomerCare.aspx
Double-Take RecoverNow v4.0.01.00 User Guide iii
Chapter 1—Overview of Data Replication Concepts . . . . . . . . . . . . . . . . . . . . 15
Introduction . . . . . . . . . . . . . . . . . . . . . . . . . . . . . . . . . . . . . . . . . . . . . . . . . . . . . . . . . . . . . . . . . . . . . . . . . . 15
Overview . . . . . . . . . . . . . . . . . . . . . . . . . . . . . . . . . . . . . . . . . . . . . . . . . . . . . . . . . . . . . . . . . . . . . . . . . . . . 16
Roles in the System Architecture . . . . . . . . . . . . . . . . . . . . . . . . . . . . . . . . . . . . . . . . . . . . . . . . . . . . . . . . . 17
Process and Design Specifics . . . . . . . . . . . . . . . . . . . . . . . . . . . . . . . . . . . . . . . . . . . . . . . . . . . . . . . . . . . . 17
RecoverNow Replication Group and Contexts . . . . . . . . . . . . . . . . . . . . . . . . . . . . . . . . . . . . . . . . . . . 18
RecoverNow File Container . . . . . . . . . . . . . . . . . . . . . . . . . . . . . . . . . . . . . . . . . . . . . . . . . . . . . . . . . . 18
RecoverNow Datatap . . . . . . . . . . . . . . . . . . . . . . . . . . . . . . . . . . . . . . . . . . . . . . . . . . . . . . . . . . . . . . . 19
RecoverNow Journal . . . . . . . . . . . . . . . . . . . . . . . . . . . . . . . . . . . . . . . . . . . . . . . . . . . . . . . . . . . . . . . 20
RecoverNow Agents . . . . . . . . . . . . . . . . . . . . . . . . . . . . . . . . . . . . . . . . . . . . . . . . . . . . . . . . . . . . . . . . . . . 21
LCA Agent . . . . . . . . . . . . . . . . . . . . . . . . . . . . . . . . . . . . . . . . . . . . . . . . . . . . . . . . . . . . . . . . . . . . . . . 21
ABA Agent. . . . . . . . . . . . . . . . . . . . . . . . . . . . . . . . . . . . . . . . . . . . . . . . . . . . . . . . . . . . . . . . . . . . . . . 21
AA Agent . . . . . . . . . . . . . . . . . . . . . . . . . . . . . . . . . . . . . . . . . . . . . . . . . . . . . . . . . . . . . . . . . . . . . . . . 22
RA Agent . . . . . . . . . . . . . . . . . . . . . . . . . . . . . . . . . . . . . . . . . . . . . . . . . . . . . . . . . . . . . . . . . . . . . . . . 22
Replication. . . . . . . . . . . . . . . . . . . . . . . . . . . . . . . . . . . . . . . . . . . . . . . . . . . . . . . . . . . . . . . . . . . . . . . . . . . 23
Journal Configuration . . . . . . . . . . . . . . . . . . . . . . . . . . . . . . . . . . . . . . . . . . . . . . . . . . . . . . . . . . . . . . . . . . 23
Production Journal . . . . . . . . . . . . . . . . . . . . . . . . . . . . . . . . . . . . . . . . . . . . . . . . . . . . . . . . . . . . . . . . . 24
Recovery Journal . . . . . . . . . . . . . . . . . . . . . . . . . . . . . . . . . . . . . . . . . . . . . . . . . . . . . . . . . . . . . . . . . . 24
Recovery Log Sizing. . . . . . . . . . . . . . . . . . . . . . . . . . . . . . . . . . . . . . . . . . . . . . . . . . . . . . . . . . . . 24
Log File Configuration . . . . . . . . . . . . . . . . . . . . . . . . . . . . . . . . . . . . . . . . . . . . . . . . . . . . . . . . . . . . . . . . . 25
Log Size Estimate. . . . . . . . . . . . . . . . . . . . . . . . . . . . . . . . . . . . . . . . . . . . . . . . . . . . . . . . . . . . . . . . . . 25
Number of Logs . . . . . . . . . . . . . . . . . . . . . . . . . . . . . . . . . . . . . . . . . . . . . . . . . . . . . . . . . . . . . . . . . . . 25
RecoverNow Snapshots . . . . . . . . . . . . . . . . . . . . . . . . . . . . . . . . . . . . . . . . . . . . . . . . . . . . . . . . . . . . . . . . . 26
Recovery . . . . . . . . . . . . . . . . . . . . . . . . . . . . . . . . . . . . . . . . . . . . . . . . . . . . . . . . . . . . . . . . . . . . . . . . . . . . 27
Vision Solutions Portal (VSP) . . . . . . . . . . . . . . . . . . . . . . . . . . . . . . . . . . . . . . . . . . . . . . . . . . . . . . . . . . . . 27
RecoverNow with VSP . . . . . . . . . . . . . . . . . . . . . . . . . . . . . . . . . . . . . . . . . . . . . . . . . . . . . . . . . . . . . . . . . 28
RecoverNow with the Command Line Interface . . . . . . . . . . . . . . . . . . . . . . . . . . . . . . . . . . . . . . . . . . . . . . 28
. . . . . . . . . . . . . . . . . . . . . . . . . . . . . . . . . . . . . . . . . . . . . . . . . . . . . . . . . . . . . . . . . . . . . . . . . . . . . . . . . . . . 28
Contents

Contents
iv Double-Take RecoverNow v4.0.01.00 User Guide
Chapter 2—Planning your Environment . . . . . . . . . . . . . . . . . . . . . . . . . . . . . .29
Allocating Space for RecoverNow Logs and Journals . . . . . . . . . . . . . . . . . . . . . . . . . . . . . . . . . . . . . . . . . 29
Guidelines for Production Journal Size . . . . . . . . . . . . . . . . . . . . . . . . . . . . . . . . . . . . . . . . . . . . . . . . . . . . 30
Production Journal Size Estimate 1 . . . . . . . . . . . . . . . . . . . . . . . . . . . . . . . . . . . . . . . . . . . . . . . . . . . . 31
Production Journal Size Estimate 2 . . . . . . . . . . . . . . . . . . . . . . . . . . . . . . . . . . . . . . . . . . . . . . . . . . . . 31
Production Journal Size Estimate 3 . . . . . . . . . . . . . . . . . . . . . . . . . . . . . . . . . . . . . . . . . . . . . . . . . . . . 31
Production Journal Size Best Estimate . . . . . . . . . . . . . . . . . . . . . . . . . . . . . . . . . . . . . . . . . . . . . . . . . 32
Guidelines for Recovery Journal Size . . . . . . . . . . . . . . . . . . . . . . . . . . . . . . . . . . . . . . . . . . . . . . . . . . . . . 32
Recovery Journal Size Estimate 1 . . . . . . . . . . . . . . . . . . . . . . . . . . . . . . . . . . . . . . . . . . . . . . . . . . . . . 32
Recovery Journal Size Estimate 2 . . . . . . . . . . . . . . . . . . . . . . . . . . . . . . . . . . . . . . . . . . . . . . . . . . . . . 32
Recovery Journal Size Estimate 3 . . . . . . . . . . . . . . . . . . . . . . . . . . . . . . . . . . . . . . . . . . . . . . . . . . . . . 32
Guidelines for Selecting Volumes to Be Protected . . . . . . . . . . . . . . . . . . . . . . . . . . . . . . . . . . . . . . . . . . . 33
Guidelines for Snapshot Journal Size . . . . . . . . . . . . . . . . . . . . . . . . . . . . . . . . . . . . . . . . . . . . . . . . . . . . . . 33
Guidelines for Log Size . . . . . . . . . . . . . . . . . . . . . . . . . . . . . . . . . . . . . . . . . . . . . . . . . . . . . . . . . . . . . . . . 33
Determining Storage Requirements . . . . . . . . . . . . . . . . . . . . . . . . . . . . . . . . . . . . . . . . . . . . . . . . . . . . . . . 34
Using Event Markers . . . . . . . . . . . . . . . . . . . . . . . . . . . . . . . . . . . . . . . . . . . . . . . . . . . . . . . . . . . . . . . . . . 35
Event Marker File and the rtmark command. . . . . . . . . . . . . . . . . . . . . . . . . . . . . . . . . . . . . . . . . . . . . 35
Print Available event marks for rollback . . . . . . . . . . . . . . . . . . . . . . . . . . . . . . . . . . . . . . . . . . . . 36
Using the rn_shutdown script . . . . . . . . . . . . . . . . . . . . . . . . . . . . . . . . . . . . . . . . . . . . . . . . . . . . . . . . . . . . 37
Application Information Check List . . . . . . . . . . . . . . . . . . . . . . . . . . . . . . . . . . . . . . . . . . . . . . . . . . . . . . . 38
Database Information Check List . . . . . . . . . . . . . . . . . . . . . . . . . . . . . . . . . . . . . . . . . . . . . . . . . . . . . . . . . 38
Domain Name Server Check List . . . . . . . . . . . . . . . . . . . . . . . . . . . . . . . . . . . . . . . . . . . . . . . . . . . . . . . . . 39
Network Information Check List . . . . . . . . . . . . . . . . . . . . . . . . . . . . . . . . . . . . . . . . . . . . . . . . . . . . . . . . . 39
Storage Information Check List . . . . . . . . . . . . . . . . . . . . . . . . . . . . . . . . . . . . . . . . . . . . . . . . . . . . . . . . . . 39
General Information Checklist . . . . . . . . . . . . . . . . . . . . . . . . . . . . . . . . . . . . . . . . . . . . . . . . . . . . . . . . . . . 41
Chapter 3—Using the Sizing Tool to Calculate LFC Size. . . . . . . . . . . . . . . . .43
Overview of LFC Sizing. . . . . . . . . . . . . . . . . . . . . . . . . . . . . . . . . . . . . . . . . . . . . . . . . . . . . . . . . . . . . . . . 43
System Requirements for the Sizing Tool . . . . . . . . . . . . . . . . . . . . . . . . . . . . . . . . . . . . . . . . . . . . . . . 43
Installing the Sizing Tool . . . . . . . . . . . . . . . . . . . . . . . . . . . . . . . . . . . . . . . . . . . . . . . . . . . . . . . . . . . 44
Running the Sizing Tool from the RecoverNow Sizing Tool GUI . . . . . . . . . . . . . . . . . . . . . . . . . . . . 44
Introduction Tab . . . . . . . . . . . . . . . . . . . . . . . . . . . . . . . . . . . . . . . . . . . . . . . . . . . . . . . . . . . . . . . 44
Config and Run Tab . . . . . . . . . . . . . . . . . . . . . . . . . . . . . . . . . . . . . . . . . . . . . . . . . . . . . . . . . . . . 46
View and Analyze Log Tab . . . . . . . . . . . . . . . . . . . . . . . . . . . . . . . . . . . . . . . . . . . . . . . . . . . . . . 48
View Chart Tab . . . . . . . . . . . . . . . . . . . . . . . . . . . . . . . . . . . . . . . . . . . . . . . . . . . . . . . . . . . . . . . 50
Running the Sizing Tool Script from the Command Line. . . . . . . . . . . . . . . . . . . . . . . . . . . . . . . . . . . 51
sztool script Command Options . . . . . . . . . . . . . . . . . . . . . . . . . . . . . . . . . . . . . . . . . . . . . . . . . . . 54
Contents
Double-Take RecoverNow v4.0.01.00 User Guide v
Chapter 4—Supported Configurations . . . . . . . . . . . . . . . . . . . . . . . . . . . . . . . 55
Local CDP Solution Configuration . . . . . . . . . . . . . . . . . . . . . . . . . . . . . . . . . . . . . . . . . . . . . . . . . . . . . . . . 55
Local CDP Solution with WAN Replicated Configuration. . . . . . . . . . . . . . . . . . . . . . . . . . . . . . . . . . . . . . 56
WAN Replication with No Local CDP Configuration . . . . . . . . . . . . . . . . . . . . . . . . . . . . . . . . . . . . . . . . . 56
Local Bi-directional Replication Configuration . . . . . . . . . . . . . . . . . . . . . . . . . . . . . . . . . . . . . . . . . . . . . . 56
Remote Bi-directional Replication Configuration. . . . . . . . . . . . . . . . . . . . . . . . . . . . . . . . . . . . . . . . . . . . . 57
Chapter 5—Installation Procedures . . . . . . . . . . . . . . . . . . . . . . . . . . . . . . . . . 59
Overview . . . . . . . . . . . . . . . . . . . . . . . . . . . . . . . . . . . . . . . . . . . . . . . . . . . . . . . . . . . . . . . . . . . . . . . . . . . . 59
System Requirements for RecoverNow. . . . . . . . . . . . . . . . . . . . . . . . . . . . . . . . . . . . . . . . . . . . . . . . . . . . . 60
Operating System Requirements . . . . . . . . . . . . . . . . . . . . . . . . . . . . . . . . . . . . . . . . . . . . . . . . . . . . . . 60
Disk Space and Memory Requirements . . . . . . . . . . . . . . . . . . . . . . . . . . . . . . . . . . . . . . . . . . . . . . . . . 60
Archiving Products Supported . . . . . . . . . . . . . . . . . . . . . . . . . . . . . . . . . . . . . . . . . . . . . . . . . . . . . . . . 61
VSP and RecoverNow Portal Application System Requirements. . . . . . . . . . . . . . . . . . . . . . . . . . . . . . . . . 61
RecoverNow Installation Components . . . . . . . . . . . . . . . . . . . . . . . . . . . . . . . . . . . . . . . . . . . . . . . . . . . . . 61
RecoverNow Installation Wizard Prerequisites . . . . . . . . . . . . . . . . . . . . . . . . . . . . . . . . . . . . . . . . . . . 62
Before You Install . . . . . . . . . . . . . . . . . . . . . . . . . . . . . . . . . . . . . . . . . . . . . . . . . . . . . . . . . . . . . . . . . . . . . 62
Request License Keys from AIX or Windows . . . . . . . . . . . . . . . . . . . . . . . . . . . . . . . . . . . . . . . . . . . . . . . 63
AIX Installation . . . . . . . . . . . . . . . . . . . . . . . . . . . . . . . . . . . . . . . . . . . . . . . . . . . . . . . . . . . . . . . . . . . . . . . 64
Install Double-Take RecoverNow, the Vision Solutions Portal and the Double-Take RecoverNow Portal Application . . . . . . . . . . . . . . . . . . . . . . . . . . . . . . . . . . . . . . . . . . . . . . . . . . . . . . . . . . . . . . . . . . . . . . . 64
Install only the Vision Solutions Portal and the Double-Take RecoverNow Portal Application . . . . . 77
User Roles . . . . . . . . . . . . . . . . . . . . . . . . . . . . . . . . . . . . . . . . . . . . . . . . . . . . . . . . . . . . . . . . . . . . 83
Reinstall RecoverNow . . . . . . . . . . . . . . . . . . . . . . . . . . . . . . . . . . . . . . . . . . . . . . . . . . . . . . . . . . . . . . 83
Upgrade RecoverNow . . . . . . . . . . . . . . . . . . . . . . . . . . . . . . . . . . . . . . . . . . . . . . . . . . . . . . . . . . . . . . 92
Use smit to Install RecoverNow . . . . . . . . . . . . . . . . . . . . . . . . . . . . . . . . . . . . . . . . . . . . . . . . . . . . . . . . . 103
Step 1. Request a License . . . . . . . . . . . . . . . . . . . . . . . . . . . . . . . . . . . . . . . . . . . . . . . . . . . . . . . 103
Step 2: Install RecoverNow. . . . . . . . . . . . . . . . . . . . . . . . . . . . . . . . . . . . . . . . . . . . . . . . . . . . . . 103
User Roles . . . . . . . . . . . . . . . . . . . . . . . . . . . . . . . . . . . . . . . . . . . . . . . . . . . . . . . . . . . . . . . . . . . 108
Log Files. . . . . . . . . . . . . . . . . . . . . . . . . . . . . . . . . . . . . . . . . . . . . . . . . . . . . . . . . . . . . . . . . . . . . . . . 108
Run the validate_license command . . . . . . . . . . . . . . . . . . . . . . . . . . . . . . . . . . . . . . . . . . . . . . . . . . . 108
License Expiration . . . . . . . . . . . . . . . . . . . . . . . . . . . . . . . . . . . . . . . . . . . . . . . . . . . . . . . . . . . . . . . . 108
Uninstall RecoverNow on AIX . . . . . . . . . . . . . . . . . . . . . . . . . . . . . . . . . . . . . . . . . . . . . . . . . . . . . . . . . . 110
Use smit to Uninstall RecoverNow . . . . . . . . . . . . . . . . . . . . . . . . . . . . . . . . . . . . . . . . . . . . . . . . . . . . . . . 116
Install the Vision Solutions Portal and Double-Take RecoverNow Portal Application on Windows . . . . 118
Uninstall the Vision Solutions Portal and Double-Take RecoverNow Portal Application Uninstallation Wiz-ard on Windows . . . . . . . . . . . . . . . . . . . . . . . . . . . . . . . . . . . . . . . . . . . . . . . . . . . . . . . . . . . . . . . . . . . . . . . . . 123
Post-Installation Tasks. . . . . . . . . . . . . . . . . . . . . . . . . . . . . . . . . . . . . . . . . . . . . . . . . . . . . . . . . . . . . . . . . 126

Contents
vi Double-Take RecoverNow v4.0.01.00 User Guide
Logging in to Vision Solutions Portal . . . . . . . . . . . . . . . . . . . . . . . . . . . . . . . . . . . . . . . . . . . . . . . . . 127
Increase Your AIX File Limit . . . . . . . . . . . . . . . . . . . . . . . . . . . . . . . . . . . . . . . . . . . . . . . . . . . . . . . 128
Enable Automatic Startup . . . . . . . . . . . . . . . . . . . . . . . . . . . . . . . . . . . . . . . . . . . . . . . . . . . . . . . . . . 128
Chapter 6—Configuring Replication Groups . . . . . . . . . . . . . . . . . . . . . . . . .131
Using VSP to Configure Replication Groups . . . . . . . . . . . . . . . . . . . . . . . . . . . . . . . . . . . . . . . . . . . . . . . 132
Create and Configure a New Replication Group. . . . . . . . . . . . . . . . . . . . . . . . . . . . . . . . . . . . . . . . . 132
Configuration Initialization Progress (New Configuration). . . . . . . . . . . . . . . . . . . . . . . . . . . . . 150
Change a Replication Group Configuration . . . . . . . . . . . . . . . . . . . . . . . . . . . . . . . . . . . . . . . . . . . . 151
Configuration Initialization Progress (Change Configuration) . . . . . . . . . . . . . . . . . . . . . . . . . . 161
Rename a Replication Group. . . . . . . . . . . . . . . . . . . . . . . . . . . . . . . . . . . . . . . . . . . . . . . . . . . . . . . . 164
Delete a Replication Group . . . . . . . . . . . . . . . . . . . . . . . . . . . . . . . . . . . . . . . . . . . . . . . . . . . . . . . . . 166
Using Earlier Versions of RecoverNow to Configure Replication Groups . . . . . . . . . . . . . . . . . 168
Replication Group Configuration Window . . . . . . . . . . . . . . . . . . . . . . . . . . . . . . . . . . . . . . . . . . . . . 169
Using the Command line to Perform Configuration Tasks . . . . . . . . . . . . . . . . . . . . . . . . . . . . . . . . . . . . 169
Initialize a Context. . . . . . . . . . . . . . . . . . . . . . . . . . . . . . . . . . . . . . . . . . . . . . . . . . . . . . . . . . . . . . . . 169
Send partially filled containers automatically . . . . . . . . . . . . . . . . . . . . . . . . . . . . . . . . . . . . . . . . . . . 170
Configurations created prior to RecoverNow Version 4.0. . . . . . . . . . . . . . . . . . . . . . . . . . . . . . 170
Verify your Configuration using the sccfgchk Command. . . . . . . . . . . . . . . . . . . . . . . . . . . . . . . . . . 171
Support for LVM commands when the RecoverNow drivers are loaded. . . . . . . . . . . . . . . . . . . . . . . . . . 172
RecoverNow Default Ports . . . . . . . . . . . . . . . . . . . . . . . . . . . . . . . . . . . . . . . . . . . . . . . . . . . . . . . . . . . . . 174
Adding specific port assignments . . . . . . . . . . . . . . . . . . . . . . . . . . . . . . . . . . . . . . . . . . . . . . . . . . . . 174
Activating syslog Debug. . . . . . . . . . . . . . . . . . . . . . . . . . . . . . . . . . . . . . . . . . . . . . . . . . . . . . . . . . . . . . . 175
Chapter 7—Starting and Stopping . . . . . . . . . . . . . . . . . . . . . . . . . . . . . . . . . .177
Using VSP to Start and Stop RecoverNow. . . . . . . . . . . . . . . . . . . . . . . . . . . . . . . . . . . . . . . . . . . . . . . . . 177
Using VSP to Start RecoverNow. . . . . . . . . . . . . . . . . . . . . . . . . . . . . . . . . . . . . . . . . . . . . . . . . . . . . 177
Using VSP to Stop RecoverNow. . . . . . . . . . . . . . . . . . . . . . . . . . . . . . . . . . . . . . . . . . . . . . . . . . . . . 178
Using the command line to Start and Stop RecoverNow . . . . . . . . . . . . . . . . . . . . . . . . . . . . . . . . . . . . . . 179
Using the command line to Start RecoverNow . . . . . . . . . . . . . . . . . . . . . . . . . . . . . . . . . . . . . . . . . . 179
Monitoring the Log Files . . . . . . . . . . . . . . . . . . . . . . . . . . . . . . . . . . . . . . . . . . . . . . . . . . . . . . . . . . . 180
Using the Command line to Stop RecoverNow. . . . . . . . . . . . . . . . . . . . . . . . . . . . . . . . . . . . . . . . . . 180
Chapter 8—Creating Snapshots . . . . . . . . . . . . . . . . . . . . . . . . . . . . . . . . . . . .183
Overview. . . . . . . . . . . . . . . . . . . . . . . . . . . . . . . . . . . . . . . . . . . . . . . . . . . . . . . . . . . . . . . . . . . . . . . . . . . 183
Using Snapshots to Protect Your Data . . . . . . . . . . . . . . . . . . . . . . . . . . . . . . . . . . . . . . . . . . . . . . . . . . . . 183
Using VSP to Create a Snapshot. . . . . . . . . . . . . . . . . . . . . . . . . . . . . . . . . . . . . . . . . . . . . . . . . . . . . . . . . 184
Using the Command Line to Create a Snapshot . . . . . . . . . . . . . . . . . . . . . . . . . . . . . . . . . . . . . . . . . . . . . 186
Creating Snapshots Based on the Current Redo Log. . . . . . . . . . . . . . . . . . . . . . . . . . . . . . . . . . . . . . 187
Creating Snapshots Based on a Specific Date and Time. . . . . . . . . . . . . . . . . . . . . . . . . . . . . . . . . . . 189

Contents
Double-Take RecoverNow v4.0.01.00 User Guide vii
Verify that the DATEMSK environment variable is defined . . . . . . . . . . . . . . . . . . . . . . . . . . . . 189
Establish the date format for the DATEMSK environment variable . . . . . . . . . . . . . . . . . . . . . . 189
Create Snapshots Based on a Specific Date and Time . . . . . . . . . . . . . . . . . . . . . . . . . . . . . . . . . 190
Creating a Snapshot Based on a Specific LFCID. . . . . . . . . . . . . . . . . . . . . . . . . . . . . . . . . . . . . . . . . 191
Chapter 9—Administrative Tasks. . . . . . . . . . . . . . . . . . . . . . . . . . . . . . . . . . 193
Verify the configuration using the sccfgchk command. . . . . . . . . . . . . . . . . . . . . . . . . . . . . . . . . . . . . . . . 193
Updating the RecoverNow Configuration . . . . . . . . . . . . . . . . . . . . . . . . . . . . . . . . . . . . . . . . . . . . . . . . . . 194
Verifying Available Free Space. . . . . . . . . . . . . . . . . . . . . . . . . . . . . . . . . . . . . . . . . . . . . . . . . . . . . . . . . . 194
Extending a RecoverNow-Protected Filesystem . . . . . . . . . . . . . . . . . . . . . . . . . . . . . . . . . . . . . . . . . . . . . 194
Extending a Protected File System Beyond the State Map Limit . . . . . . . . . . . . . . . . . . . . . . . . . . . . 195
Increasing the Snapshot Journal Space on the Recovery Server . . . . . . . . . . . . . . . . . . . . . . . . . . . . . . . . . 197
Setting up JFS Log Isolation . . . . . . . . . . . . . . . . . . . . . . . . . . . . . . . . . . . . . . . . . . . . . . . . . . . . . . . . . . . . 198
Removing a Filesystem from a RecoverNow Protected jfslog . . . . . . . . . . . . . . . . . . . . . . . . . . . . . . . . . . 199
Setting Up Error Notification . . . . . . . . . . . . . . . . . . . . . . . . . . . . . . . . . . . . . . . . . . . . . . . . . . . . . . . . . . . 199
ODM Commands . . . . . . . . . . . . . . . . . . . . . . . . . . . . . . . . . . . . . . . . . . . . . . . . . . . . . . . . . . . . . . . . . 201
Error Notify Messages . . . . . . . . . . . . . . . . . . . . . . . . . . . . . . . . . . . . . . . . . . . . . . . . . . . . . . . . . . . . . 201
Marking State Maps Dirty and Synchronizing the PVS or one LV in the PVS . . . . . . . . . . . . . . . . . . . . . 204
Alternative Method for Performing Initial Synchronization . . . . . . . . . . . . . . . . . . . . . . . . . . . . . . . . . . . . 205
Using IBM Power Systems Live Partition Mobility with RecoverNow . . . . . . . . . . . . . . . . . . . . . . . . . . . 206
Overview . . . . . . . . . . . . . . . . . . . . . . . . . . . . . . . . . . . . . . . . . . . . . . . . . . . . . . . . . . . . . . . . . . . . . . . 206
Automatically Registering the es_migrate script . . . . . . . . . . . . . . . . . . . . . . . . . . . . . . . . . . . . . . . . . 206
Manually Registering the es_migrate script . . . . . . . . . . . . . . . . . . . . . . . . . . . . . . . . . . . . . . . . . . . . . 207
Before you Migrate a Partition . . . . . . . . . . . . . . . . . . . . . . . . . . . . . . . . . . . . . . . . . . . . . . . . . . . . . . . 208
Migrating a Partition . . . . . . . . . . . . . . . . . . . . . . . . . . . . . . . . . . . . . . . . . . . . . . . . . . . . . . . . . . . 208
. . . . . . . . . . . . . . . . . . . . . . . . . . . . . . . . . . . . . . . . . . . . . . . . . . . . . . . . . . . . . . . . . . . . . . . . . . . . . . . . . . . 209
Chapter 10—Working with RecoverNow Applications . . . . . . . . . . . . . . . . . 211
Overview . . . . . . . . . . . . . . . . . . . . . . . . . . . . . . . . . . . . . . . . . . . . . . . . . . . . . . . . . . . . . . . . . . . . . . . . . . . 211
Database Recovery Operations Scenarios . . . . . . . . . . . . . . . . . . . . . . . . . . . . . . . . . . . . . . . . . . . . . . . . . . 211
Database Resurrection Concept . . . . . . . . . . . . . . . . . . . . . . . . . . . . . . . . . . . . . . . . . . . . . . . . . . . . . . 212
Database Repair Concept . . . . . . . . . . . . . . . . . . . . . . . . . . . . . . . . . . . . . . . . . . . . . . . . . . . . . . . . . . . 213
Performing a Volume Restore . . . . . . . . . . . . . . . . . . . . . . . . . . . . . . . . . . . . . . . . . . . . . . . . . . . . . . . . . . . 213
Step 1: Stop Double-Take RecoverNow on the Production Server . . . . . . . . . . . . . . . . . . . . . . . 214
Step 2: Create New Volumes to Replace Failed Volumes . . . . . . . . . . . . . . . . . . . . . . . . . . . . . . 214
Step 3: Create a Snapshot on the Recovery Server . . . . . . . . . . . . . . . . . . . . . . . . . . . . . . . . . . . . 215
Step 4: Validate the Information Provided by the Snapshot . . . . . . . . . . . . . . . . . . . . . . . . . . . . . 216
Step 5: Destroy the Snapshot . . . . . . . . . . . . . . . . . . . . . . . . . . . . . . . . . . . . . . . . . . . . . . . . . . . . 217

Contents
viii Double-Take RecoverNow v4.0.01.00 User Guide
Step 6: Recreate the Snapshot on the Recovery Server . . . . . . . . . . . . . . . . . . . . . . . . . . . . . . . . 217
Step 7: Copy Volumes on Recovery Server to Replacement Volumes on Production Server. . . 217
Step 8: Restart Double-Take RecoverNow on the Production Server . . . . . . . . . . . . . . . . . . . . . 217
Step 9: rollback the Appropriate Context on the Production Server . . . . . . . . . . . . . . . . . . . . . . 218
Step 10: Mount the Volumes for the Context. . . . . . . . . . . . . . . . . . . . . . . . . . . . . . . . . . . . . . . . 219
Step 11: Destroy the Snapshot . . . . . . . . . . . . . . . . . . . . . . . . . . . . . . . . . . . . . . . . . . . . . . . . . . . 220
Performing a Production Restore . . . . . . . . . . . . . . . . . . . . . . . . . . . . . . . . . . . . . . . . . . . . . . . . . . . . . . . . 220
Using VSP for a Production Restore . . . . . . . . . . . . . . . . . . . . . . . . . . . . . . . . . . . . . . . . . . . . . . . . . . 220
Using the Command Line to Perform a Production Restore . . . . . . . . . . . . . . . . . . . . . . . . . . . . . . . . 223
. . . . . . . . . . . . . . . . . . . . . . . . . . . . . . . . . . . . . . . . . . . . . . . . . . . . . . . . . . . . . . . . . . . . . . . . . . . . . . . . . . 225
Chapter 11—Working with Archived Data . . . . . . . . . . . . . . . . . . . . . . . . . . .227
Overview of Working with Archived Data. . . . . . . . . . . . . . . . . . . . . . . . . . . . . . . . . . . . . . . . . . . . . . . . . 227
Performing a Snapshot-based Backup to Archive Media . . . . . . . . . . . . . . . . . . . . . . . . . . . . . . . . . . . . . . 227
Performing a Production Restore from Archived Logs . . . . . . . . . . . . . . . . . . . . . . . . . . . . . . . . . . . . . . . 228
Chapter 12—Introduction to Disaster Recovery . . . . . . . . . . . . . . . . . . . . . . .231
Introduction. . . . . . . . . . . . . . . . . . . . . . . . . . . . . . . . . . . . . . . . . . . . . . . . . . . . . . . . . . . . . . . . . . . . . . . . . 231
RecoverNow Disaster Recovery Overview . . . . . . . . . . . . . . . . . . . . . . . . . . . . . . . . . . . . . . . . . . . . . . . . 232
RecoverNow Recovery Process. . . . . . . . . . . . . . . . . . . . . . . . . . . . . . . . . . . . . . . . . . . . . . . . . . . . . . 232
How RecoverNow Disaster Recovery Works . . . . . . . . . . . . . . . . . . . . . . . . . . . . . . . . . . . . . . . . . . . 232
RecoverNow Disaster Recovery Management . . . . . . . . . . . . . . . . . . . . . . . . . . . . . . . . . . . . . . . . . . 233
Failover Context Overview . . . . . . . . . . . . . . . . . . . . . . . . . . . . . . . . . . . . . . . . . . . . . . . . . . . . . . . . . 233
Failover Context Specifications. . . . . . . . . . . . . . . . . . . . . . . . . . . . . . . . . . . . . . . . . . . . . . . . . . . . . . 234
Failover Context and Primary Context Relationship . . . . . . . . . . . . . . . . . . . . . . . . . . . . . . . . . . 234
Setup a Failover Context . . . . . . . . . . . . . . . . . . . . . . . . . . . . . . . . . . . . . . . . . . . . . . . . . . . . . . . 234
Failover Context Naming Conventions . . . . . . . . . . . . . . . . . . . . . . . . . . . . . . . . . . . . . . . . . . . . 234
How the Failover Context Works . . . . . . . . . . . . . . . . . . . . . . . . . . . . . . . . . . . . . . . . . . . . . . . . . . . . 234
rtdr Failover Command . . . . . . . . . . . . . . . . . . . . . . . . . . . . . . . . . . . . . . . . . . . . . . . . . . . . . . . . . . . . 235
Syntax . . . . . . . . . . . . . . . . . . . . . . . . . . . . . . . . . . . . . . . . . . . . . . . . . . . . . . . . . . . . . . . . . . . . . . 235
RecoverNow Disaster Recovery Operations . . . . . . . . . . . . . . . . . . . . . . . . . . . . . . . . . . . . . . . . . . . . . . . 236
Failover Process Overview . . . . . . . . . . . . . . . . . . . . . . . . . . . . . . . . . . . . . . . . . . . . . . . . . . . . . . . . . 237
Preparing Before a Failover. . . . . . . . . . . . . . . . . . . . . . . . . . . . . . . . . . . . . . . . . . . . . . . . . . . . . . . . . 237
Setting up a Failover Context . . . . . . . . . . . . . . . . . . . . . . . . . . . . . . . . . . . . . . . . . . . . . . . . . . . . . . . 237
Before Performing Failover Operations . . . . . . . . . . . . . . . . . . . . . . . . . . . . . . . . . . . . . . . . . . . . . . . 238
Validating Data Integrity . . . . . . . . . . . . . . . . . . . . . . . . . . . . . . . . . . . . . . . . . . . . . . . . . . . . . . . 238
Verify Restore Point . . . . . . . . . . . . . . . . . . . . . . . . . . . . . . . . . . . . . . . . . . . . . . . . . . . . . . . . . . . 238
Create a Virtual Restore Snapshot . . . . . . . . . . . . . . . . . . . . . . . . . . . . . . . . . . . . . . . . . . . . . . . . 239
. . . . . . . . . . . . . . . . . . . . . . . . . . . . . . . . . . . . . . . . . . . . . . . . . . . . . . . . . . . . . . . . . . . . . . . . . . . . . . . 239
Contents
Double-Take RecoverNow v4.0.01.00 User Guide ix
Chapter 13—Disaster Recovery Operations . . . . . . . . . . . . . . . . . . . . . . . . . . 241
Using VSP to Perform Failover and Failback . . . . . . . . . . . . . . . . . . . . . . . . . . . . . . . . . . . . . . . . . . . . . . . 241
Run a Procedure . . . . . . . . . . . . . . . . . . . . . . . . . . . . . . . . . . . . . . . . . . . . . . . . . . . . . . . . . . . . . . . . . . 241
Run Planned Failover Procedure . . . . . . . . . . . . . . . . . . . . . . . . . . . . . . . . . . . . . . . . . . . . . . . . . . . . . 242
Run Planned Failover Procedure dialog: Unmount file systems on current production server . . 244
Resume Planned Failover Procedure dialog: Stop replication on current production server . . . . 245
Resume Planned Failover dialog: Failover replication group: Server roles change . . . . . . . . . . . 245
Resume Planned Failover dialog: Start replication on new replicated server. . . . . . . . . . . . . . . . 245
Resume Planned Failover dialog: Start replication on new recovery server. . . . . . . . . . . . . . . . . 245
Resume Planned Failover dialog: Start replication on new production server . . . . . . . . . . . . . . . 245
Run Unplanned Failover Procedure . . . . . . . . . . . . . . . . . . . . . . . . . . . . . . . . . . . . . . . . . . . . . . . . . . . 245
Run Unplanned Failover Procedure dialog: Create snapshot on failover server . . . . . . . . . . . . . 248
Resume Unplanned Failover Procedure dialog: Delete snapshot on failover server . . . . . . . . . . 248
Resume Unplanned Failover Procedure dialog: Rollback failover server . . . . . . . . . . . . . . . . . . 248
Resume Unplanned Failover dialog: Failover replication group: Server roles change. . . . . . . . . 248
Resume Unplanned Failover dialog: Start replication on new replicated server . . . . . . . . . . . . . 249
Resume Unplanned Failover dialog: Start replication on new recovery server . . . . . . . . . . . . . . 249
Resume Unplanned Failover dialog: Start replication on new production server. . . . . . . . . . . . . 249
Run Failback Procedure . . . . . . . . . . . . . . . . . . . . . . . . . . . . . . . . . . . . . . . . . . . . . . . . . . . . . . . . . . . . 249
Run Failback Procedure dialog: Unmount file systems on current production server . . . . . . . . . 251
Resume Failback Procedure dialog: Stop replication on current production server . . . . . . . . . . . 251
Resume Failback Procedure dialog: Failback configured production server . . . . . . . . . . . . . . . . 252
Resume Failback Procedure dialog: Failback configured recovery server . . . . . . . . . . . . . . . . . . 252
Resume Failback Procedure dialog: Failback configured replicated server . . . . . . . . . . . . . . . . . 252
Using the Command line to Perform Failover and Failback . . . . . . . . . . . . . . . . . . . . . . . . . . . . . . . . . . . . 252
Failover Process Overview. . . . . . . . . . . . . . . . . . . . . . . . . . . . . . . . . . . . . . . . . . . . . . . . . . . . . . . . . . 253
Preparing Before a Failover . . . . . . . . . . . . . . . . . . . . . . . . . . . . . . . . . . . . . . . . . . . . . . . . . . . . . . . . . 253
Setting up a Failover Context . . . . . . . . . . . . . . . . . . . . . . . . . . . . . . . . . . . . . . . . . . . . . . . . . . . . . . . . 253
Before Performing Failover Operations . . . . . . . . . . . . . . . . . . . . . . . . . . . . . . . . . . . . . . . . . . . . . . . . 254
Validating Data Integrity. . . . . . . . . . . . . . . . . . . . . . . . . . . . . . . . . . . . . . . . . . . . . . . . . . . . . . . . 254
Verify Restore Point . . . . . . . . . . . . . . . . . . . . . . . . . . . . . . . . . . . . . . . . . . . . . . . . . . . . . . . . . . . 254
Create a Virtual Restore Snapshot . . . . . . . . . . . . . . . . . . . . . . . . . . . . . . . . . . . . . . . . . . . . . . . . 255
Failover Operations . . . . . . . . . . . . . . . . . . . . . . . . . . . . . . . . . . . . . . . . . . . . . . . . . . . . . . . . . . . . . . . 255
Performing a Failover Restore . . . . . . . . . . . . . . . . . . . . . . . . . . . . . . . . . . . . . . . . . . . . . . . . . . . 256
Start the Application . . . . . . . . . . . . . . . . . . . . . . . . . . . . . . . . . . . . . . . . . . . . . . . . . . . . . . . . . . . 256
Performing Resync . . . . . . . . . . . . . . . . . . . . . . . . . . . . . . . . . . . . . . . . . . . . . . . . . . . . . . . . . . . . . . . . 256
Contents
x Double-Take RecoverNow v4.0.01.00 User Guide
Resync with Region Recovery . . . . . . . . . . . . . . . . . . . . . . . . . . . . . . . . . . . . . . . . . . . . . . . . . . . 257
Performing Failback . . . . . . . . . . . . . . . . . . . . . . . . . . . . . . . . . . . . . . . . . . . . . . . . . . . . . . . . . . . 258
Manual Resynchronization Process if production server Data Is Lost. . . . . . . . . . . . . . . . . . . . . 258
Chapter 14—CLI Commands. . . . . . . . . . . . . . . . . . . . . . . . . . . . . . . . . . . . . .261
extend_replica_lv . . . . . . . . . . . . . . . . . . . . . . . . . . . . . . . . . . . . . . . . . . . . . . . . . . . . . . . . . . . . . . . . . . . . 262
Usage . . . . . . . . . . . . . . . . . . . . . . . . . . . . . . . . . . . . . . . . . . . . . . . . . . . . . . . . . . . . . . . . . . . . . . . . . . 262
rtattr. . . . . . . . . . . . . . . . . . . . . . . . . . . . . . . . . . . . . . . . . . . . . . . . . . . . . . . . . . . . . . . . . . . . . . . . . . . . . . . 263
Syntax . . . . . . . . . . . . . . . . . . . . . . . . . . . . . . . . . . . . . . . . . . . . . . . . . . . . . . . . . . . . . . . . . . . . . . . . . 263
Usage . . . . . . . . . . . . . . . . . . . . . . . . . . . . . . . . . . . . . . . . . . . . . . . . . . . . . . . . . . . . . . . . . . . . . . . . . . 263
Example 1 . . . . . . . . . . . . . . . . . . . . . . . . . . . . . . . . . . . . . . . . . . . . . . . . . . . . . . . . . . . . . . . . . . . . . . 263
Example 2 . . . . . . . . . . . . . . . . . . . . . . . . . . . . . . . . . . . . . . . . . . . . . . . . . . . . . . . . . . . . . . . . . . . . . . 264
rtdr. . . . . . . . . . . . . . . . . . . . . . . . . . . . . . . . . . . . . . . . . . . . . . . . . . . . . . . . . . . . . . . . . . . . . . . . . . . . . . . . 264
Syntax . . . . . . . . . . . . . . . . . . . . . . . . . . . . . . . . . . . . . . . . . . . . . . . . . . . . . . . . . . . . . . . . . . . . . . . . . 264
Usage . . . . . . . . . . . . . . . . . . . . . . . . . . . . . . . . . . . . . . . . . . . . . . . . . . . . . . . . . . . . . . . . . . . . . . . . . . 265
rtmark . . . . . . . . . . . . . . . . . . . . . . . . . . . . . . . . . . . . . . . . . . . . . . . . . . . . . . . . . . . . . . . . . . . . . . . . . . . . . 268
Syntax . . . . . . . . . . . . . . . . . . . . . . . . . . . . . . . . . . . . . . . . . . . . . . . . . . . . . . . . . . . . . . . . . . . . . . . . . 268
Usage . . . . . . . . . . . . . . . . . . . . . . . . . . . . . . . . . . . . . . . . . . . . . . . . . . . . . . . . . . . . . . . . . . . . . . . . . . 268
rtmnt . . . . . . . . . . . . . . . . . . . . . . . . . . . . . . . . . . . . . . . . . . . . . . . . . . . . . . . . . . . . . . . . . . . . . . . . . . . . . . 268
Syntax . . . . . . . . . . . . . . . . . . . . . . . . . . . . . . . . . . . . . . . . . . . . . . . . . . . . . . . . . . . . . . . . . . . . . . . . . 268
Parameters . . . . . . . . . . . . . . . . . . . . . . . . . . . . . . . . . . . . . . . . . . . . . . . . . . . . . . . . . . . . . . . . . . . . . . 269
Usage . . . . . . . . . . . . . . . . . . . . . . . . . . . . . . . . . . . . . . . . . . . . . . . . . . . . . . . . . . . . . . . . . . . . . . . . . . 269
See Also . . . . . . . . . . . . . . . . . . . . . . . . . . . . . . . . . . . . . . . . . . . . . . . . . . . . . . . . . . . . . . . . . . . . . . . . 269
rtstart . . . . . . . . . . . . . . . . . . . . . . . . . . . . . . . . . . . . . . . . . . . . . . . . . . . . . . . . . . . . . . . . . . . . . . . . . . . . . . 269
Syntax . . . . . . . . . . . . . . . . . . . . . . . . . . . . . . . . . . . . . . . . . . . . . . . . . . . . . . . . . . . . . . . . . . . . . . . . . 269
Parameters . . . . . . . . . . . . . . . . . . . . . . . . . . . . . . . . . . . . . . . . . . . . . . . . . . . . . . . . . . . . . . . . . . . . . . 269
Usage . . . . . . . . . . . . . . . . . . . . . . . . . . . . . . . . . . . . . . . . . . . . . . . . . . . . . . . . . . . . . . . . . . . . . . . . . . 270
See Also . . . . . . . . . . . . . . . . . . . . . . . . . . . . . . . . . . . . . . . . . . . . . . . . . . . . . . . . . . . . . . . . . . . . . . . . 270
rtstop . . . . . . . . . . . . . . . . . . . . . . . . . . . . . . . . . . . . . . . . . . . . . . . . . . . . . . . . . . . . . . . . . . . . . . . . . . . . . . 270
Syntax . . . . . . . . . . . . . . . . . . . . . . . . . . . . . . . . . . . . . . . . . . . . . . . . . . . . . . . . . . . . . . . . . . . . . . . . . 270
Parameters . . . . . . . . . . . . . . . . . . . . . . . . . . . . . . . . . . . . . . . . . . . . . . . . . . . . . . . . . . . . . . . . . . . . . . 270
Usage . . . . . . . . . . . . . . . . . . . . . . . . . . . . . . . . . . . . . . . . . . . . . . . . . . . . . . . . . . . . . . . . . . . . . . . . . . 270
See Also . . . . . . . . . . . . . . . . . . . . . . . . . . . . . . . . . . . . . . . . . . . . . . . . . . . . . . . . . . . . . . . . . . . . . . . . 270
rtumnt . . . . . . . . . . . . . . . . . . . . . . . . . . . . . . . . . . . . . . . . . . . . . . . . . . . . . . . . . . . . . . . . . . . . . . . . . . . . . 271
Syntax . . . . . . . . . . . . . . . . . . . . . . . . . . . . . . . . . . . . . . . . . . . . . . . . . . . . . . . . . . . . . . . . . . . . . . . . . 271
Parameters . . . . . . . . . . . . . . . . . . . . . . . . . . . . . . . . . . . . . . . . . . . . . . . . . . . . . . . . . . . . . . . . . . . . . . 271
Usage . . . . . . . . . . . . . . . . . . . . . . . . . . . . . . . . . . . . . . . . . . . . . . . . . . . . . . . . . . . . . . . . . . . . . . . . . . 271
See Also . . . . . . . . . . . . . . . . . . . . . . . . . . . . . . . . . . . . . . . . . . . . . . . . . . . . . . . . . . . . . . . . . . . . . . . . 271
sclist . . . . . . . . . . . . . . . . . . . . . . . . . . . . . . . . . . . . . . . . . . . . . . . . . . . . . . . . . . . . . . . . . . . . . . . . . . . . . . 271
Syntax . . . . . . . . . . . . . . . . . . . . . . . . . . . . . . . . . . . . . . . . . . . . . . . . . . . . . . . . . . . . . . . . . . . . . . . . . 271
Contents
Double-Take RecoverNow v4.0.01.00 User Guide xi
Usage . . . . . . . . . . . . . . . . . . . . . . . . . . . . . . . . . . . . . . . . . . . . . . . . . . . . . . . . . . . . . . . . . . . . . . . . . . 273
See Also . . . . . . . . . . . . . . . . . . . . . . . . . . . . . . . . . . . . . . . . . . . . . . . . . . . . . . . . . . . . . . . . . . . . . . . . 273
scconfig . . . . . . . . . . . . . . . . . . . . . . . . . . . . . . . . . . . . . . . . . . . . . . . . . . . . . . . . . . . . . . . . . . . . . . . . . . . . 274
Usage . . . . . . . . . . . . . . . . . . . . . . . . . . . . . . . . . . . . . . . . . . . . . . . . . . . . . . . . . . . . . . . . . . . . . . . . . . 274
Syntax . . . . . . . . . . . . . . . . . . . . . . . . . . . . . . . . . . . . . . . . . . . . . . . . . . . . . . . . . . . . . . . . . . . . . . . . . . 274
See Also . . . . . . . . . . . . . . . . . . . . . . . . . . . . . . . . . . . . . . . . . . . . . . . . . . . . . . . . . . . . . . . . . . . . . . . . 275
scsetup . . . . . . . . . . . . . . . . . . . . . . . . . . . . . . . . . . . . . . . . . . . . . . . . . . . . . . . . . . . . . . . . . . . . . . . . . . . . . 276
Syntax . . . . . . . . . . . . . . . . . . . . . . . . . . . . . . . . . . . . . . . . . . . . . . . . . . . . . . . . . . . . . . . . . . . . . . . . . . 276
Usage . . . . . . . . . . . . . . . . . . . . . . . . . . . . . . . . . . . . . . . . . . . . . . . . . . . . . . . . . . . . . . . . . . . . . . . . . . 277
scrt_ra . . . . . . . . . . . . . . . . . . . . . . . . . . . . . . . . . . . . . . . . . . . . . . . . . . . . . . . . . . . . . . . . . . . . . . . . . . . . . 278
Syntax . . . . . . . . . . . . . . . . . . . . . . . . . . . . . . . . . . . . . . . . . . . . . . . . . . . . . . . . . . . . . . . . . . . . . . . . . . 278
Parameters . . . . . . . . . . . . . . . . . . . . . . . . . . . . . . . . . . . . . . . . . . . . . . . . . . . . . . . . . . . . . . . . . . . . . . 278
Usage . . . . . . . . . . . . . . . . . . . . . . . . . . . . . . . . . . . . . . . . . . . . . . . . . . . . . . . . . . . . . . . . . . . . . . . . . . 279
See Also . . . . . . . . . . . . . . . . . . . . . . . . . . . . . . . . . . . . . . . . . . . . . . . . . . . . . . . . . . . . . . . . . . . . . . . . 279
scrt_rc . . . . . . . . . . . . . . . . . . . . . . . . . . . . . . . . . . . . . . . . . . . . . . . . . . . . . . . . . . . . . . . . . . . . . . . . . . . . . 279
Syntax . . . . . . . . . . . . . . . . . . . . . . . . . . . . . . . . . . . . . . . . . . . . . . . . . . . . . . . . . . . . . . . . . . . . . . . . . . 279
Usage . . . . . . . . . . . . . . . . . . . . . . . . . . . . . . . . . . . . . . . . . . . . . . . . . . . . . . . . . . . . . . . . . . . . . . . . . . 279
Session restore targets . . . . . . . . . . . . . . . . . . . . . . . . . . . . . . . . . . . . . . . . . . . . . . . . . . . . . . . . . . . . . 280
Session Termination . . . . . . . . . . . . . . . . . . . . . . . . . . . . . . . . . . . . . . . . . . . . . . . . . . . . . . . . . . . . . . . 280
Process Overview . . . . . . . . . . . . . . . . . . . . . . . . . . . . . . . . . . . . . . . . . . . . . . . . . . . . . . . . . . . . . . . . . 280
General Procedure . . . . . . . . . . . . . . . . . . . . . . . . . . . . . . . . . . . . . . . . . . . . . . . . . . . . . . . . . . . . . 281
Procedure Notes . . . . . . . . . . . . . . . . . . . . . . . . . . . . . . . . . . . . . . . . . . . . . . . . . . . . . . . . . . . . . . . . . . 281
scrt_vfb . . . . . . . . . . . . . . . . . . . . . . . . . . . . . . . . . . . . . . . . . . . . . . . . . . . . . . . . . . . . . . . . . . . . . . . . . . . . 281
Syntax . . . . . . . . . . . . . . . . . . . . . . . . . . . . . . . . . . . . . . . . . . . . . . . . . . . . . . . . . . . . . . . . . . . . . . . . . . 281
Usage . . . . . . . . . . . . . . . . . . . . . . . . . . . . . . . . . . . . . . . . . . . . . . . . . . . . . . . . . . . . . . . . . . . . . . . . . . 281
Parameters . . . . . . . . . . . . . . . . . . . . . . . . . . . . . . . . . . . . . . . . . . . . . . . . . . . . . . . . . . . . . . . . . . . . . . 282
sccfgd_cron_schedule . . . . . . . . . . . . . . . . . . . . . . . . . . . . . . . . . . . . . . . . . . . . . . . . . . . . . . . . . . . . . . . . . 282
Syntax . . . . . . . . . . . . . . . . . . . . . . . . . . . . . . . . . . . . . . . . . . . . . . . . . . . . . . . . . . . . . . . . . . . . . . . . . . 282
Usage . . . . . . . . . . . . . . . . . . . . . . . . . . . . . . . . . . . . . . . . . . . . . . . . . . . . . . . . . . . . . . . . . . . . . . . . . . 283
Examples . . . . . . . . . . . . . . . . . . . . . . . . . . . . . . . . . . . . . . . . . . . . . . . . . . . . . . . . . . . . . . . . . . . . . . . 283
sccfgd_putcfg. . . . . . . . . . . . . . . . . . . . . . . . . . . . . . . . . . . . . . . . . . . . . . . . . . . . . . . . . . . . . . . . . . . . . . . . 283
Syntax . . . . . . . . . . . . . . . . . . . . . . . . . . . . . . . . . . . . . . . . . . . . . . . . . . . . . . . . . . . . . . . . . . . . . . . . . . 283
Parameters . . . . . . . . . . . . . . . . . . . . . . . . . . . . . . . . . . . . . . . . . . . . . . . . . . . . . . . . . . . . . . . . . . . . . . 283
Usage . . . . . . . . . . . . . . . . . . . . . . . . . . . . . . . . . . . . . . . . . . . . . . . . . . . . . . . . . . . . . . . . . . . . . . . . . . 283
sccfgchk . . . . . . . . . . . . . . . . . . . . . . . . . . . . . . . . . . . . . . . . . . . . . . . . . . . . . . . . . . . . . . . . . . . . . . . . . . . . 283
Syntax . . . . . . . . . . . . . . . . . . . . . . . . . . . . . . . . . . . . . . . . . . . . . . . . . . . . . . . . . . . . . . . . . . . . . . . . . . 283
Parameters . . . . . . . . . . . . . . . . . . . . . . . . . . . . . . . . . . . . . . . . . . . . . . . . . . . . . . . . . . . . . . . . . . . . . . 283
Usage . . . . . . . . . . . . . . . . . . . . . . . . . . . . . . . . . . . . . . . . . . . . . . . . . . . . . . . . . . . . . . . . . . . . . . . . . . 284
sztool . . . . . . . . . . . . . . . . . . . . . . . . . . . . . . . . . . . . . . . . . . . . . . . . . . . . . . . . . . . . . . . . . . . . . . . . . . . . . . 284
Contents
xii Double-Take RecoverNow v4.0.01.00 User Guide
Syntax . . . . . . . . . . . . . . . . . . . . . . . . . . . . . . . . . . . . . . . . . . . . . . . . . . . . . . . . . . . . . . . . . . . . . . . . . 284
Parameters . . . . . . . . . . . . . . . . . . . . . . . . . . . . . . . . . . . . . . . . . . . . . . . . . . . . . . . . . . . . . . . . . . . . . . 284
Usage . . . . . . . . . . . . . . . . . . . . . . . . . . . . . . . . . . . . . . . . . . . . . . . . . . . . . . . . . . . . . . . . . . . . . . . . . . 285
Appendix A—Integration of PowerHA (HACMP) with RecoverNow . . . . . .287
Configuring a Highly Available RecoverNow/PowerHA Production Server Environment . . . . . . . . . . . 287
RecoverNow Configuration Requirements . . . . . . . . . . . . . . . . . . . . . . . . . . . . . . . . . . . . . . . . . . . . . 287
Configuring Highly Available Production Servers . . . . . . . . . . . . . . . . . . . . . . . . . . . . . . . . . . . . . . . 288
RecoverNow/PowerHA Integration requirements. . . . . . . . . . . . . . . . . . . . . . . . . . . . . . . . . . . . . . . . 291
RecoverNow Start Script . . . . . . . . . . . . . . . . . . . . . . . . . . . . . . . . . . . . . . . . . . . . . . . . . . . . . . . 292
RecoverNow Shutdown Script . . . . . . . . . . . . . . . . . . . . . . . . . . . . . . . . . . . . . . . . . . . . . . . . . . . 292
Managing RecoverNow in a HA Production Server Environment . . . . . . . . . . . . . . . . . . . . . . . . . . . 294
Changing the RecoverNow Configuration . . . . . . . . . . . . . . . . . . . . . . . . . . . . . . . . . . . . . . . . . . 294
Managing Failover to the Recovery Server . . . . . . . . . . . . . . . . . . . . . . . . . . . . . . . . . . . . . . . . . . . . . 295
Unplanned Failover . . . . . . . . . . . . . . . . . . . . . . . . . . . . . . . . . . . . . . . . . . . . . . . . . . . . . . . . . . . 295
Planned Failover/Resync/Failback . . . . . . . . . . . . . . . . . . . . . . . . . . . . . . . . . . . . . . . . . . . . . . . . 297
Configuring a Highly Available RecoverNow/PowerHA Recovery Server Environment. . . . . . . . . . . . . 298
RecoverNow Configuration Requirements . . . . . . . . . . . . . . . . . . . . . . . . . . . . . . . . . . . . . . . . . . . . . 299
Configuring Highly Available Recovery Servers . . . . . . . . . . . . . . . . . . . . . . . . . . . . . . . . . . . . . . . . 299
RecoverNow/PowerHA Integration requirements: . . . . . . . . . . . . . . . . . . . . . . . . . . . . . . . . . . . 302
RecoverNow Start Script . . . . . . . . . . . . . . . . . . . . . . . . . . . . . . . . . . . . . . . . . . . . . . . . . . . . . . . 303
RecoverNow Shutdown Script . . . . . . . . . . . . . . . . . . . . . . . . . . . . . . . . . . . . . . . . . . . . . . . . . . . 303
Managing RecoverNow in a HA Recovery Server Environment . . . . . . . . . . . . . . . . . . . . . . . . . . . . 305
Changing the RecoverNow Configuration . . . . . . . . . . . . . . . . . . . . . . . . . . . . . . . . . . . . . . . . . . 305
Managing Failover to the Recovery Server . . . . . . . . . . . . . . . . . . . . . . . . . . . . . . . . . . . . . . . . . . . . . 305
Unplanned Failover . . . . . . . . . . . . . . . . . . . . . . . . . . . . . . . . . . . . . . . . . . . . . . . . . . . . . . . . . . . 306
Planned Failover/Resync/Failback . . . . . . . . . . . . . . . . . . . . . . . . . . . . . . . . . . . . . . . . . . . . . . . . 308
Configuring a RecoverNow/PowerHA Production to Recovery Server Environment. . . . . . . . . . . . . . . . 309
Prerequisites. . . . . . . . . . . . . . . . . . . . . . . . . . . . . . . . . . . . . . . . . . . . . . . . . . . . . . . . . . . . . . . . . . . . . 309
Overview of the Failover Process . . . . . . . . . . . . . . . . . . . . . . . . . . . . . . . . . . . . . . . . . . . . . . . . . . . . 310
Sequence to manually bring the Resource Groups ONLINE: . . . . . . . . . . . . . . . . . . . . . . . . . . . . . . . 311
Sequence to manually bring the Resource Groups OFFLINE: . . . . . . . . . . . . . . . . . . . . . . . . . . . . . . 311
Planned Failover Procedure. . . . . . . . . . . . . . . . . . . . . . . . . . . . . . . . . . . . . . . . . . . . . . . . . . . . . . . . . 311
Unplanned Failover Procedure . . . . . . . . . . . . . . . . . . . . . . . . . . . . . . . . . . . . . . . . . . . . . . . . . . . . . . 311
Failback Procedure . . . . . . . . . . . . . . . . . . . . . . . . . . . . . . . . . . . . . . . . . . . . . . . . . . . . . . . . . . . . . . . 311
PowerHA for AIX Configuration . . . . . . . . . . . . . . . . . . . . . . . . . . . . . . . . . . . . . . . . . . . . . . . . . . . . 312
. . . . . . . . . . . . . . . . . . . . . . . . . . . . . . . . . . . . . . . . . . . . . . . . . . . . . . . . . . . . . . . . . . . . . . . . . . . . . . . . . . 317

Double-Take RecoverNow v4.0.01.00 User Guide 15
Overview of Data Replication Concepts 1
Introduction
The Double-Take RecoverNow User Guide describes how to install, configure, maintain and administer Double-Take RecoverNow (hereafter referred to as RecoverNow), data replication software. The table below shows the chapters in the RecoverNow User Guide.
Chapter Description
Chapter 1, “Overview of Data Replication Concepts” on page 15
Use this chapter to learn about the main concepts related to data replication.
Chapter 2, “Planning your Environment” on page 29
Use this chapter to prepare RecoverNow system for post-installation configuration.
Chapter 3, “Using the Sizing Tool to Calculate LFC Size” on page 43
Use this chapter to learn how to use the Sizing tool to calculate the LFC size.
Chapter 4, “Supported Configurations” on page 55
Use this chapter to learn about the configurations supported by RecoverNow.
Chapter 5, “Installation Procedures” on page 59
Use the procedures in this chapter to install RecoverNow.
Chapter 6, “Configuring Replication Groups” on page 131
Use the Replication Group Configuration Wizard to configure replication groups on your servers.
Chapter 7, “Starting and Stopping” on page 177
Use the procedures in this chapter to start up and shut down both the Production and the recovery servers.
Chapter 8, “Creating Snapshots” on page 183
Use the procedures in this chapter to restore a complete copy of the data on the production server to any time in the past.
Chapter 9, “Administrative Tasks” on page 193
Use the procedures in this chapter to perform data replication and restore operations.

Chapter 1: Overview of Data Replication Concepts
16 Double-Take RecoverNow v4.0.01.00 User Guide
Overview
This chapter describes the organization and architecture of RecoverNow, a continuous data protection system designed for immediate data recovery. RecoverNow is a software only product for IBM servers running on IBM AIX 5L, AIX 6.1, and AIX 7.1 operating systems.
RecoverNow provides these features in enterprise application environments using standard systems hardware, commodity storage components, and common networking infrastructure.
The RecoverNow data replication solution:
• Provides asynchronous data replication
• Includes rapid data rollback with Any Point-in-Time virtualization
• Provides Read/Write data snapshots for off-host processing
• Provides functionality with little or no production application impact
• Minimizes application Recovery Time Objective (RTO) and Recovery Point Objective (RPO) within an Optimized Recovery Window (ORW)
• Is resilient to network, storage, and system failures and outages
• Optimizes for rapid recovery to Any Point-in-Time
Chapter 10, “Working with RecoverNow Applications” on page 211
Use the procedures in this chapter to rollback application data on the production server and restore the data to an earlier point in time.
Chapter 11, “Working with Archived Data” on page 227
Use the procedures in this chapter to create complete copies of the data on archive media such as tape.
Chapter 12, “Introduction to Disaster Recovery” on page 231
Use this chapter to become familiar with disaster recovery concepts.
Chapter 13, “Disaster Recovery Operations” on page 241
Use the procedures in this chapter to perform disaster recovery operations.
Chapter 14, “CLI Commands” on page 261
Use the Command Line Interface (CLI) commands in this chapter to work with RecoverNow.
Appendix A, “Integration of PowerHA (HACMP) with RecoverNow” on page 287
Use the procedures in this appendix to configure RecoverNow in a HA production and recovery server environment.
Chapter Description

Roles in the System Architecture
Double-Take RecoverNow v4.0.01.00 User Guide 17
• Allows for administrative double check before change of production data
• Supports both block and file based applications
• Maintains application write-order fidelity
• Has no proprietary hardware dependencies
• Always looks to supplement, not replace, existing enterprise processes for logical storage management, backup, and high availability
Roles in the System Architecture
A standard RecoverNow system configuration consists of at least two similar servers: a production server and a recovery server. A production server is where the production application resides, and the recovery server is where a data replica is maintained, rapid recoveries of the production data can be initialized, any point-in-time may be virtualized, and enterprise processes may be off-loaded from the production server.
You also have the option to configure one or many replicated server(s); this allows for another data replica which is maintained in a cascaded fashion from the recovery server. The hardware requirements of the replicated server are similar to that of the recovery server. For the purposes of the RecoverNow system architecture, the replicated server role appears exactly as a recovery server. Functionally they are the same with the exception that the production server’s data is never restored from a replicated server, only from the recovery server role.
Process and Design Specifics
RecoverNow is designed to capture every write from an application. This supports application write-order fidelity and ensures that there is no data loss in the face of localized failures, To minimize the effects of latency on the production application, data is transferred from production server to the recovery server asynchronously.
To support the widest array of applications and hardware, the system is designed to appear as an extension to existing logical volume management paradigms. At the block level, both block-based and file-based applications can be protected. Furthermore, this allows for the system and the administrator to take advantage of familiar tools for tuning and monitoring.
To enable any point-in-time to be virtualized and potentially recovered or rolled back, the system needs to maintain a history of all of the writes from the production application in additional storage to the full replica data maintained on the recovery server. Maintaining this journal of all application writes on the recovery server allows for additional optimizations
Chapter 1: Overview of Data Replication Concepts
18 Double-Take RecoverNow v4.0.01.00 User Guide
without impact to the production server. It also enables the trade off of storage capacity for time, which is at the core of the RecoverNow system and the source of its advanced functionality.
RecoverNow Replication Group and Contexts
Configuring RecoverNow replication groups involves defining RecoverNow Contexts for each replication group. A Context is identified by its Context ID. There are two types of RecoverNow contexts:
• Primary context ID—Context ID for the replication group. You configure the Primary context on the production server.
• Failover context ID—Context ID of the failover context. You configure the corresponding Failover context on the recovery and replicated servers.
A RecoverNow context includes:
• The applications and associated files and volumes that you want to protect.
• The production and recovery servers, and optionally, the replicated server.
• Archiving systems.
Related Topics:
• “Using VSP to Configure Replication Groups” on page 132.
• “Initialize a Context” on page 169
RecoverNow File Container
A RecoverNow File Container is a generic term used to describe the storage object that the RecoverNow Context needs to function correctly. While there are different specialized types of File Containers, the most commonly discussed and most necessary to understand is the Log File Container (LFC). A LFC is the logical unit of data movement around the system. When an LFC is filled with data writes on the production server it is fully transferred to the recovery server. Once transferred, it is processed and applied to the data replica. If there is a replicated server in the system then the LFC is transferred to the replicated server; if not it is freed for reuse. You can also send partially filled containers. The Send partially filled containers automatically option enables you to control the frequency of shipping containers (LFCs) to the recovery server during low I/O periods. The “Send partially filled containers automatically” option can be managed in two ways:

Process and Design Specifics
Double-Take RecoverNow v4.0.01.00 User Guide 19
• Use the Replication Group Configuration Wizard. Refer to the New Replication Group Container Options panel, and the field, “Send partially filled containers automatically” on page 170.
• Use the command line using the scconfig command. Refer to “scconfig” on page 274.
RecoverNow Datatap
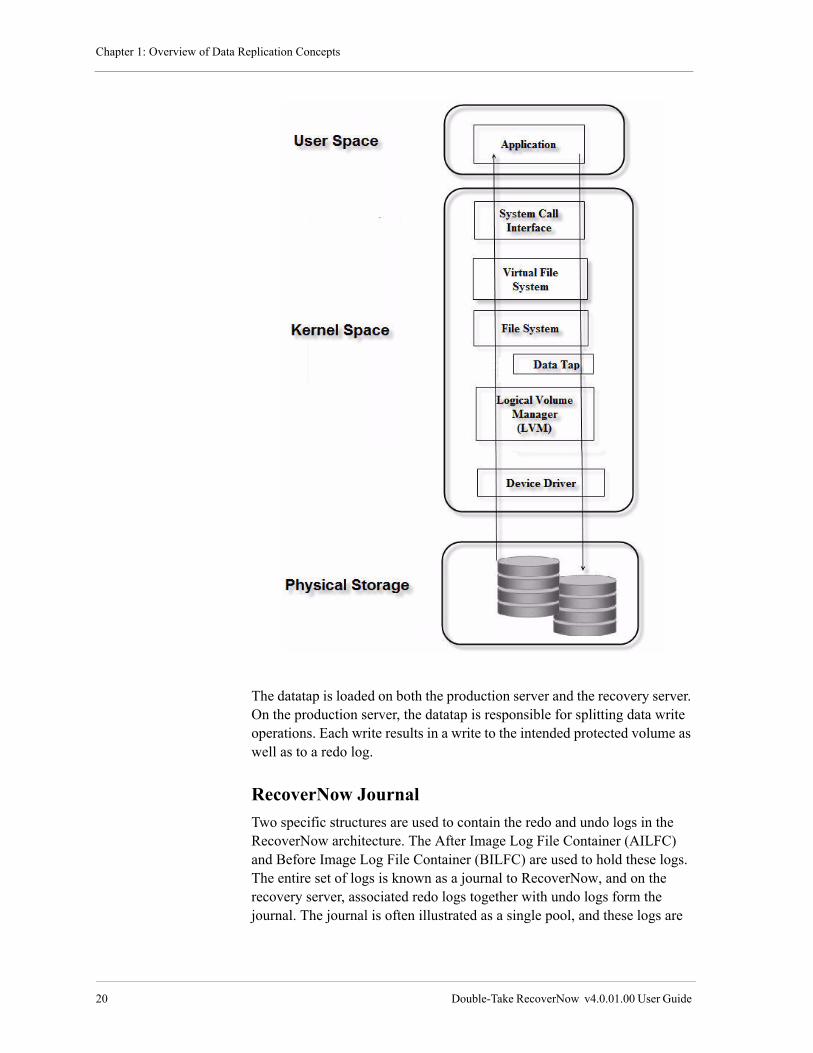
The AIX Logical Volume Manager (LVM) maintains the hierarchy of logical structures that manage disk storage. RecoverNow kernel extensions, or datataps, reside logically above the LVM layer inside the operating system kernel. Furthermore, these datataps are logically below the file system level and handle block level transfers. The datatap receives a buf structure from the file system layer in the case of a file system write operation or from the application in the case of a raw Logical Volume write. Data is then processed and sent onto the LVM (Logical Volume Manager) layer. For read operations from storage, data passes through untouched.
Chapter 1: Overview of Data Replication Concepts
20 Double-Take RecoverNow v4.0.01.00 User Guide
The datatap is loaded on both the production server and the recovery server. On the production server, the datatap is responsible for splitting data write operations. Each write results in a write to the intended protected volume as well as to a redo log.
RecoverNow Journal
Two specific structures are used to contain the redo and undo logs in the RecoverNow architecture. The After Image Log File Container (AILFC) and Before Image Log File Container (BILFC) are used to hold these logs. The entire set of logs is known as a journal to RecoverNow, and on the recovery server, associated redo logs together with undo logs form the journal. The journal is often illustrated as a single pool, and these logs are

RecoverNow Agents
Double-Take RecoverNow v4.0.01.00 User Guide 21
block storage devices that do not interact with resident file systems or their cache buffers.
RecoverNow Agents
RecoverNow uses the following agents:
• Log Creation Agent (LCA)—The primary agent that runs on the production server, called the Log Creation Agent (LCA).
• Assured Backup Agent (ABA)—A primary agent that runs on the recovery server
• Archive Agent (AA)—A primary agent that runs on the recovery server
• Restore Agent (RA)—A primary agent that runs on the recovery server
LCA Agent
Shipping logs from the production server to the recovery server is the responsibility of the LCA. The LCA reads from the journal any redo log information that has been closed, or sealed, and this information is then shipped over one or more IP networks to an agent that runs on the recovery server. Both agents bind and communicate over the same socket. Socket port addresses can either be default addresses or they can be programmatically selected.
ABA Agent
On the other side of the socket and running on the recovery server, the ABA is collecting log information. The ABA receives the redo log information in the time order it was created on the production server, and then stores this information in recovery logs. Remember, these are block storage devices that do not interact with resident file systems. As the ABA receives the data, it dynamically creates optimized State Map Transactions (SMTX). The blocks identified are then sorted in ascending device/block order. Block ordering is a more efficient organization for applying modifications to the replicated data, or replica, on the recovery server.
Before the modifications are applied to the replica, yet another block storage device is written to with information that would allow the replica to step backward in time. This storage device is called the undo log and appears to be nothing more than a logical volume to the volume manager. Once the undo log information is saved on disk, the redo log can be applied to the replica to bring it up to date with the data on the production server.

Chapter 1: Overview of Data Replication Concepts
22 Double-Take RecoverNow v4.0.01.00 User Guide
AA Agent
The AA, or Archive Agent, also runs on the recovery server. It is used to extend RecoverNow’s rollback capabilities by recording redo and undo logs to media. The AA currently works with Tivoli Storage Manager (TSM). The AA uses the TSM API to send archive requests to TSM. When the logs are archived, they are always spooled in pairs. Depending on the TSM configuration the data is stored on media. A redo and an undo log are always together when the AA stores on media. This gives RecoverNow the ability to restore the data to any point in time. By unwinding the data with a course grained undo log, then applying fine grained redo log information to the log, the state of the replicated data can be restored to any point in time.
RA Agent
Restoration is handled by the RA and runs on the recovery server. It does not, however, run continuously like the other agents. It can programmatically be executed from the command line or through the GUI. The RA deals with the following types of restore operations:
• Virtual restores to a specific date and time
• Production restores to a specific date and time
• Virtual restores to a virtual full backup (VFB)
• Production restores to a virtual full backup (VFB)
• Restoring individual protected volumes
Virtual restores occur on the backup server. Production restores are restores in which all volumes defined in a context are rolled back together on the production server.

Replication
Double-Take RecoverNow v4.0.01.00 User Guide 23
Replication
RecoverNow runs automatically on a production server, creating a mirrored copy of protected data on the recovery server. For increased availability, it is recommended that the recovery server be a remote machine. The following illustration shows storage data flow during RecoverNow replication:
On the production server, write operations to storage are split by the datatap. One copy of the data is delivered to the protected volume. The other copy of data is combined with metadata and stored in the redo log. The LCA sweeps through the production journal and reads any log that has been filled, or sealed, then transmits the log file over TCP/IP to the ABA which stores the log file to disk on the recovery server.
NOTE
Data does not pass through the datatap on the recovery server.
The ABA sweeps through the log files in time order and uses the metadata reads from the replica to calculate the amount of change required to apply the working log file and stores this information in the undo log. The ABA then reads from the redo log and applies the modification in block order to the replica.
Journal Configuration
RecoverNow uses the following journals:
Chapter 1: Overview of Data Replication Concepts
24 Double-Take RecoverNow v4.0.01.00 User Guide
• “Production Journal” on page 24
• “Recovery Journal” on page 24
Production Journal
The production journal holds redo log buffers until the logs are transferred to the recovery server. Then the logs are available to receive new application write data. Sizing the journal properly prevents the recovery server from falling so far behind the production server that dynamic recovery must occur for the recovery server to catch up. If the journal is too small, then transfers between the production server and the recovery server are performed more frequently than is efficient. If the journal is too big, then the recovery server may fall so far behind the production server that dynamic recovery must occur.
The appropriate size of the production journal is proportional to the length of network or recovery server downtime that RecoverNow can sustain without falling into dynamic recovery, or the amount of data in write throughput spikes that exceed system bandwidth that RecoverNow can sustain without falling into dynamic recovery.
Recovery Journal
The recovery journal is on the recovery server, and holds redo and undo logs, that act as RecoverNow’s internal rollback window. If you are using external archive media such as tape, then the size of the journal on the recovery server is not critical to the ability to restore data. The larger the recovery journal, the larger the internal rollback window, which implies faster access to redo and undo logs during production restores in that window.
Recovery Log Sizing
If you are not using external archive media, then the size of the recovery journal is critical for data protection. Rollbacks cannot extend beyond the logs that exist on the recovery server. You must estimate average throughput and calculate journal area based on the length of the desired average restore window.
The size of the recovery journal is proportional to write throughput and the required internal rollback window.
The journal on the recovery server should be at least 256MB. Note that this is twice the space recommended for the minimum on the production server, because the recovery server contains both redo logs and undo logs.
Refer to Chapter 2 “Planning your Environment” on page 29 for information and formulas to help you size the journals for your system.

Log File Configuration
Double-Take RecoverNow v4.0.01.00 User Guide 25
Refer to Chapter 3 “Using the Sizing Tool to Calculate LFC Size” on page 43 to automated the process of sizing the journals for your system.
Log File Configuration
All logs are the same size on the production server and the recovery server. The log size affects the amount of data that RecoverNow processes for each transaction.
By increasing the size of the logs, processing is reduced and the elimination of common blocks in the undo logs is more efficient. Decreasing log size results in a more up-to-date replica on the recovery server, because log transfers occur more frequently.
When you determine the best log size, keep these conditions in mind:
• The journal should contain at least eight logs
• Minimum log size is 2MB
• Maximum log size is one-half of the available RAM but not greater than 512 MB
• Typical log size is 16MB
To calculate log size, you need an estimate of average write throughput, and the required processing rate. For the required processing rate, if RecoverNow processes one log every 60 seconds, the replica will be one minute behind the production system.
Log Size Estimatelog size = (average write throughput) / (processing rate)
Number of Logsnumber of logs = (journal size) / (log size)
Even though the calculation for the number of log files appears trivial, keep in mind that the number of log files can affect performance. If enough log files are available on the production server, RecoverNow does not have to rely on state maps during an outage, because it has not run out of log files to take in data. A state map contains information about data changes for each storage device protected by RecoverNow. It can be used to reconstruct data changes if the underlying data is corrupted or lost. During peak usage, when an application is writing data faster than the network can transmit, extra log files enable the system to buffer during these peak periods without having to rely on state maps, eliminating the risk of a restore blackout window. On the recovery server, a sufficient number of log files allows activity to be buffered in the event that the tape drive or library is taken offline.

Chapter 1: Overview of Data Replication Concepts
26 Double-Take RecoverNow v4.0.01.00 User Guide
The Chapter 2 “Planning your Environment” on page 29 contains information and formulas to help you size the logs for your system.
RecoverNow Snapshots
Snapshots use significantly less space and are more efficient than data mirrors. A mirror is an up-to-date copy of data for a logical volume. Two or more complete copies can exist at the same time, although only one copy is seen or used by an application, so mirrors require double or more the amount of disk space than the original data.
A snapshot is a view of data at a specific point in time, much like a photographic image is a snapshot of physical images at a particular point in time. You can use snapshots to validate data before you save it to permanent storage, data mine and generate reports, and retrieve specific data items.
Snapshots are stored in a different location than the replica so that the replica can continue to march along in time. The snapshot, however, is frozen with respect to the replica. Again, using the analogy of a photograph, you can now draw on the photograph and it does not effect the original subject of the photograph. The ability to modify the snapshot is accomplished by using a copy-on-write log file.
Notice from the above figure that data is passing through the datatap on the recovery server in the case of reads and writes to snapshot data. RecoverNow uses a different set of device minor numbers when dealing with snapshots, so that the datatap knows which log files to access in a specific order. For example, when a write operation is directed at the snapshot it is actually written to the copy-on-write (COW) log instead. If the data has not been modified, then a read operation would come from the
Recovery
Double-Take RecoverNow v4.0.01.00 User Guide 27
snapshot. If the data has been modified, then the read would come from the copy-on-write log. Keep in mind that the snapshot is the representation of the application data at a specific point in time.
Related Topics:
• “Using VSP to Create a Snapshot” on page 184.
• “Using the Command Line to Create a Snapshot” on page 186.
Recovery
Generally, there are two types of recovery restorations. A production restore is a rollback in time which takes place in the protected volumes on the production server. The other type of restore, a virtual restore, is a rollback in time which is executed over a read-writable virtual image of the protected volumes which reside on the recovery server.
For a production restore, RecoverNow must have exclusive I/O access to the protected volumes. The application must be stopped, and the file systems must be unmounted. RecoverNow is the only process that should be allowed to write into the protected volumes during a production restore. The control over the protected volumes and the information stored by the RecoverNow process allow an undo of data corruption faster than the corruption occurred.
Production restores are useful for a database “crash” where the database will not come up. By recovering an image of the actual production database to some point in the past directly on the production disk itself, RecoverNow can rollback a crashed database in minutes rather than hours or days for the most disastrous operational situation a database can encounter.
In contrast, a virtual restore is useful for database repair. In this case, an image of the database is rolled back to some point in the past on the snapshot which resides on the recovery server. Select pieces of the data can then be extracted and copied into the production database.
Related Topics:
• “Using VSP to Perform Failover and Failback” on page 241.
• “Using the Command line to Perform Failover and Failback” on page 252.
Vision Solutions Portal (VSP)
Vision Solutions Portal is a server that runs portal applications for Vision Solutions products. VSP enables multiple products and instances to be easily monitored and managed from a browser-based graphical interface in
Chapter 1: Overview of Data Replication Concepts
28 Double-Take RecoverNow v4.0.01.00 User Guide
a single, unified view. VSP also provides services and portlets for performing activities common to products.
Any Vision Solutions product that provides a portal application at a compatible version to VSP can be used. A portal application includes the graphical interface and supporting functionality for the product’s use within VSP.
VSP is quick to configure and easy to customize. Portal connections define how VSP connects to nodes in your enterprise. When configuring an instance of a product, you identify the portal connections the instance will use to connect to, retrieve data from, and perform actions for the product.
RecoverNow with VSP
You use the RecoverNow installation wizard to install RecoverNow, the portal application and VSP. Refer to the section in Chapter 5, “Installation Procedures” on page 59.
To log into VSP, refer to “Logging in to Vision Solutions Portal” on page 127.
For detailed information on working with VSP, refer to Getting Started with Vision Solutions Portal (2.0.05.00_VSP_Getting_Started.pdf) packaged with RecoverNow for AIX.
RecoverNow with the Command Line Interface
You can also use the command line interface to work with RecoverNow. For a list of commands and their usage, refer to Chapter 14 “CLI Commands” on page 261.

Double-Take RecoverNow v4.0.01.00 User Guide 29
Planning your Environment 2
Use this chapter to prepare your RecoverNow system for its initial configuration.
This chapter contains:
• “Allocating Space for RecoverNow Logs and Journals” on page 29
• “Guidelines for Production Journal Size” on page 30
• “Guidelines for Recovery Journal Size” on page 32
• “Guidelines for Selecting Volumes to Be Protected” on page 33
• “Guidelines for Snapshot Journal Size” on page 33
• “Guidelines for Log Size” on page 33
• “Determining Storage Requirements” on page 34
• “Using Event Markers” on page 35
• “Using the rn_shutdown script” on page 37
• “Application Information Check List” on page 38
• “Database Information Check List” on page 38
• “Network Information Check List” on page 39
• “Storage Information Check List” on page 39
• “General Information Checklist” on page 41
Allocating Space for RecoverNow Logs and Journals
RecoverNow records write information into log files. Logs are block storage devices of the same size. Typically, multiple logs are contained in a Logical Volume. The pool of disk storage that contains the logs is called a journal. A production journal exists on the production server and a recovery journal exists on the recovery server.

Chapter 2: Planning your Environment
30 Double-Take RecoverNow v4.0.01.00 User Guide
The production journal is the storage that contains all of the logs. A single log is transferred to the recovery server when that log is filled. For example, if each LFC is 64MB and there are 100 production LFCs, then the production journal is 6400MB. When the current LFC is filled with approximately 64MB of write I/O data (there is some additional metadata), it will be transferred to the recovery server.
All logs in the production journal are redo logs. They contain information that moves the disk image of the application forward through time when the information is applied. This is called rolling forward.
Half of the logs in the recovery journal are redo logs, and half are undo logs. Undo logs contain information that moves a disk image of the application back through time when they are applied. This is called rolling back.
The recovery server also contains the snapshot journal. The snapshot journal is the space on the recovery server where RecoverNow stores copy-on-write information and write-cache data for snapshots.
The following table shows the variables that are used for estimating journal sizes and log sizes. You need these estimates in order to configure RecoverNow:
NOTE
Use a tool such as iostat to estimate throughput. You can also use the Sizing tool to estimate throughput. For more information, refer to “Using the Sizing Tool to Calculate LFC Size” on page 43.
Guidelines for Production Journal Size
The production journal holds redo log buffers until the logs are transferred to the recovery server. Then, the logs are available to receive new application write data.
Concept Meaning
Throughput Disk write rate of the application over a business cycle, typically 24 hours.
Average throughput
Average write rate of the application during a business cycle
Peak throughput Maximum write rate of the application during a business cycle.
Peak duration Average length of time that peak throughput occurs.
Bandwidth Maximum throughput supported by RecoverNow. It is typically limited by the network that connects the production and recovery servers.

Guidelines for Production Journal Size
Double-Take RecoverNow v4.0.01.00 User Guide 31
The goal of sizing the production journal properly is to prevent the recovery server from falling so far behind the production server that dynamic recovery must occur for the recovery server to catch up. If the production journal is too small, then transfers between the production server and the recovery server are performed more frequently than is efficient.
The appropriate size of the production journal is proportional to one of the following:
• No-impact downtime: The length of network or recovery server downtime that RecoverNow can sustain without falling into dynamic recovery.
• The amount of data in throughput spikes that exceed system bandwidth that RecoverNow can sustain without falling into dynamic recovery
Production Journal Size Estimate 1
If you are unable to use a tool such as iostat to estimate write throughput, then allow at least 128 MB for the production journal. You can also use the Sizing tool to estimate write throughput. For more information, refer to “Using the Sizing Tool to Calculate LFC Size” on page 43.
Production Journal Size Estimate 2
This estimate uses the following information:
• An estimate for average write throughput
• The length of no-impact downtime that is required
Calculate production journal size as follows:
production journal size = (average write throughput) x (no-impact downtime)
Production Journal Size Estimate 3
This estimate assumes the following:
• Estimates for peak throughput, peak duration, and bandwidth exist.
• Peak throughput must be greater than bandwidth.
• RecoverNow must not fall into dynamic recovery when write spikes exceed bandwidth.
Calculate production journal size as follows:
production journal size=[(peak write throughput)- bandwidth]x(peak duration)
Chapter 2: Planning your Environment
32 Double-Take RecoverNow v4.0.01.00 User Guide
Production Journal Size Best Estimate
The best estimate for the size of the production journal is the maximum of the above estimates 1, 2, and 3.
Guidelines for Recovery Journal Size
The recovery journal holds redo and undo log buffers, which act as RecoverNow’s internal rollback window. If you are using external archive media such as tape, the size of the recovery journal is not critical to the ability to restore data. However, the larger the recovery journal, the larger the internal rollback window, which implies faster access to redo and undo logs during production restores in that window.
If you are not using external archive media, then the size of the recovery journal is critical for data protection. Rollbacks cannot extend beyond the logs that exist on the recovery server. You must estimate average throughput and calculate recovery journal area based on the length of the desired average restore window.
The size of the recovery journal is proportional to:
• Throughput
• Required internal rollback window
Recovery Journal Size Estimate 1
The recovery journal should be at least 256 MB. Note that this is twice the space recommended for the minimum size of the production journal, because the recovery server contains both redo logs and undo logs.
Recovery Journal Size Estimate 2
This estimate uses the following information:
• Estimate for average throughput
• The internal rollback window is longer than the business cycle.
Calculate recovery journal size as follows:
recovery journal size = 2 x (average write throughput) x (rollback window)
Recovery Journal Size Estimate 3
This estimate uses the following information:
• Estimates for peak throughput and peak duration

Guidelines for Selecting Volumes to Be Protected
Double-Take RecoverNow v4.0.01.00 User Guide 33
• The internal rollback window is shorter than the business cycle.
Calculate recovery journal size as follows:
recovery journal size = 2 x (peak write throughput) x (rollback window)
Guidelines for Selecting Volumes to Be Protected
If a filesystem is protected by RecoverNow and uses jfslog or jfs2log, then that corresponding jfslog and jfs2log must also be protected.
Guidelines for Snapshot Journal Size
The snapshot journal should typically be between 10 and 30 percent of the total size of the protected volumes. Smaller snapshot journals are appropriate when snapshots are not kept for a long time and when production I/O is light. Larger snapshot journals are necessary when you want to keep snapshots for an extended period of time and when heavy production I/O activities are required.
IMPORTANT
You can also use the Sizing tool to calculate write journal pool size. For more information, refer to “Using the Sizing Tool to Calculate LFC Size” on page 43.
Guidelines for Log Size
All logs are the same size on the production server and the recovery server. The log size affects the amount of data that RecoverNow processes for each transaction.
Increasing log size has the following benefits:
• RecoverNow processing is reduced.
• Elimination of common blocks in the undo logs is more efficient.
Decreasing log size results in a more up-to-date replica on the recovery server because log transfers occur more frequently.
When you determine the best log size, keep these conditions in mind:
• The production journal should contain at least 8 logs.
• Minimum log size is 2 MB.

Chapter 2: Planning your Environment
34 Double-Take RecoverNow v4.0.01.00 User Guide
NOTE
Use the following equation to ensure that the space you allocate for LFCs coincides with the physical partition size of the VG where the LFC LVs are allocated. This enables you to utilize all the space in a LV. This is not a requirement, you can elect to not utilize all the available space in a LV.
y = (number of LFCs / number of LFC LVs) * LFC size
Where y
should be evenly divisible by the physical partition size of the VG where the LFC LVs are allocated.
• Maximum log size is one-half of the available RAM on the recovery server.
To calculate log size, you need the following information:
• Estimate of average write throughput
• Required processing rate. For example, if RecoverNow processes one log every 60 seconds, the recovery server will be one minute behind the production server.
Calculate log size as follows:
log size = (average write throughput)/(processing rate)
Calculate the number of logs as follows:
number of logs = (journal size)/(log size)
Determining Storage Requirements
Consider the following guidelines to determine storage requirements:
1. Use the following assumptions to decide on the appropriate storage requirements.
Recovery Window goal = 1 day
Average Aggregate Write I/O per day = 1 GB
Network outage protection = 12 hours
Amount of data and metadata that will fit in an LFC:
– amount of data = .95 of LFC size
– amount of metadata = .05 of LFC size
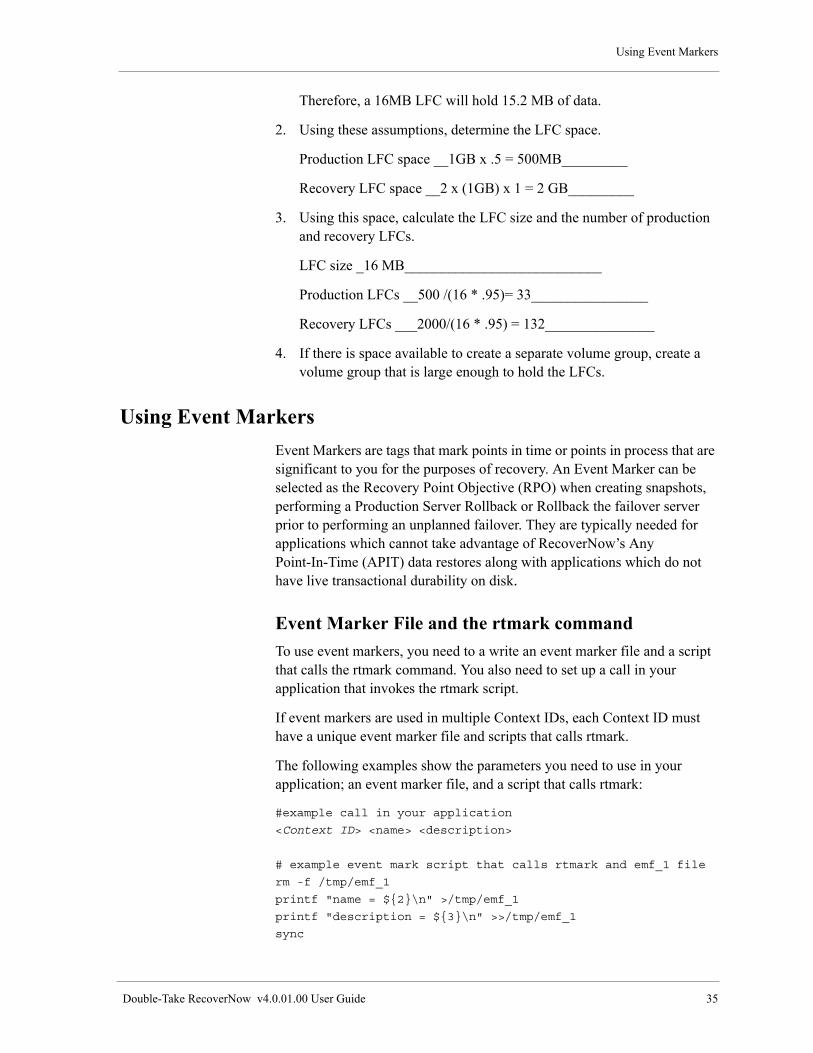
Using Event Markers
Double-Take RecoverNow v4.0.01.00 User Guide 35
Therefore, a 16MB LFC will hold 15.2 MB of data.
2. Using these assumptions, determine the LFC space.
Production LFC space __1GB x .5 = 500MB_________
Recovery LFC space __2 x (1GB) x 1 = 2 GB_________
3. Using this space, calculate the LFC size and the number of production and recovery LFCs.
LFC size _16 MB___________________________
Production LFCs __500 /(16 * .95)= 33________________
Recovery LFCs ___2000/(16 * .95) = 132_______________
4. If there is space available to create a separate volume group, create a volume group that is large enough to hold the LFCs.
Using Event Markers
Event Markers are tags that mark points in time or points in process that are significant to you for the purposes of recovery. An Event Marker can be selected as the Recovery Point Objective (RPO) when creating snapshots, performing a Production Server Rollback or Rollback the failover server prior to performing an unplanned failover. They are typically needed for applications which cannot take advantage of RecoverNow’s Any Point-In-Time (APIT) data restores along with applications which do not have live transactional durability on disk.
Event Marker File and the rtmark command
To use event markers, you need to a write an event marker file and a script that calls the rtmark command. You also need to set up a call in your application that invokes the rtmark script.
If event markers are used in multiple Context IDs, each Context ID must have a unique event marker file and scripts that calls rtmark.
The following examples show the parameters you need to use in your application; an event marker file, and a script that calls rtmark:
#example call in your application
<Context ID> <name> <description>
# example event mark script that calls rtmark and emf_1 file
rm -f /tmp/emf_1
printf "name = ${2}\n" >/tmp/emf_1
printf "description = ${3}\n" >>/tmp/emf_1
sync
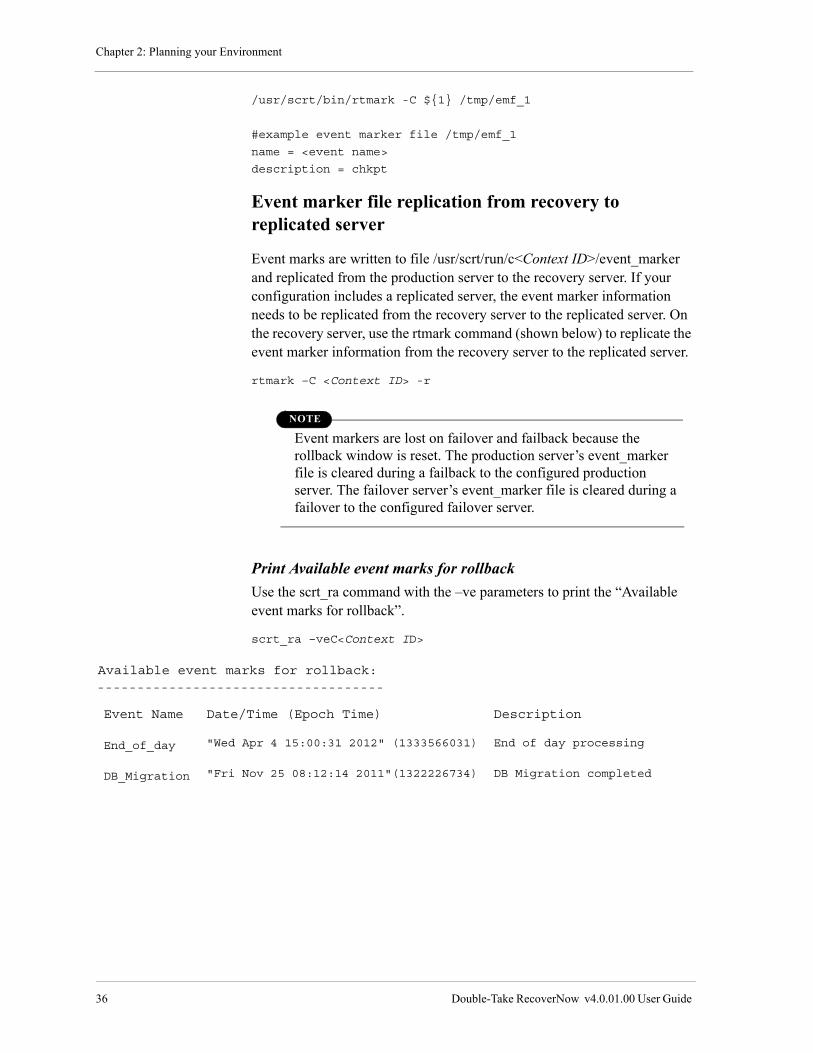
Chapter 2: Planning your Environment
36 Double-Take RecoverNow v4.0.01.00 User Guide
/usr/scrt/bin/rtmark -C ${1} /tmp/emf_1
#example event marker file /tmp/emf_1
name = <event name>
description = chkpt
Event marker file replication from recovery to replicated server
Event marks are written to file /usr/scrt/run/c<Context ID>/event_marker and replicated from the production server to the recovery server. If your configuration includes a replicated server, the event marker information needs to be replicated from the recovery server to the replicated server. On the recovery server, use the rtmark command (shown below) to replicate the event marker information from the recovery server to the replicated server.
rtmark –C <Context ID> -r
NOTE
Event markers are lost on failover and failback because the rollback window is reset. The production server’s event_marker file is cleared during a failback to the configured production server. The failover server’s event_marker file is cleared during a failover to the configured failover server.
Print Available event marks for rollback
Use the scrt_ra command with the –ve parameters to print the “Available event marks for rollback”.
scrt_ra –veC<Context ID>
Available event marks for rollback:------------------------------------
Event Name Date/Time (Epoch Time) Description
End_of_day "Wed Apr 4 15:00:31 2012" (1333566031) End of day processing
DB_Migration "Fri Nov 25 08:12:14 2011"(1322226734) DB Migration completed

Using the rn_shutdown script
Double-Take RecoverNow v4.0.01.00 User Guide 37
Using the rn_shutdown script
The purpose of the rn_shutdown script is to stop and unload the drivers for all Double-Take RecoverNow Context IDs on the system where the AIX “shutdown” command is executed.
Steps performed by the rn_shutdown script
The rn_shutdown script performs the following actions:
• Kills all processes associated with a mounted filesystem that is configured in a Double-Take RecoverNow Context ID.
• Kills all processes associated with a character device that is configured in a Double-Take RecoverNow Context ID.
• Stops RecoverNow and unloads the drivers.
If “rtstop” fails for a Context ID it will be marked failed and then continue to do “rtstop” on any remaining Context IDs. After all the Context IDs are processed the “exit” status will be set to “0”, or a value equal to the number of Context IDs that were previously marked as failed. The reason for failure will be recorded in the “/usr/scrt/log/rn_shutdown.out” file. A non “0” exit will abort the AIX shutdown.
To have “/usr/scrt/bin/rn_shutdown” execute when the AIX “shutdown” command is executed, it must be called from “/etc/rc.shutdown”.
For example, add the following to /etc/rc.shutdown.
#!/bin/ksh
/usr/scrt/bin/rn_shutdown
if(($? != 0))
then
printf "ERROR: rn_shutdown failed aborting.\n"
exit 1
fi
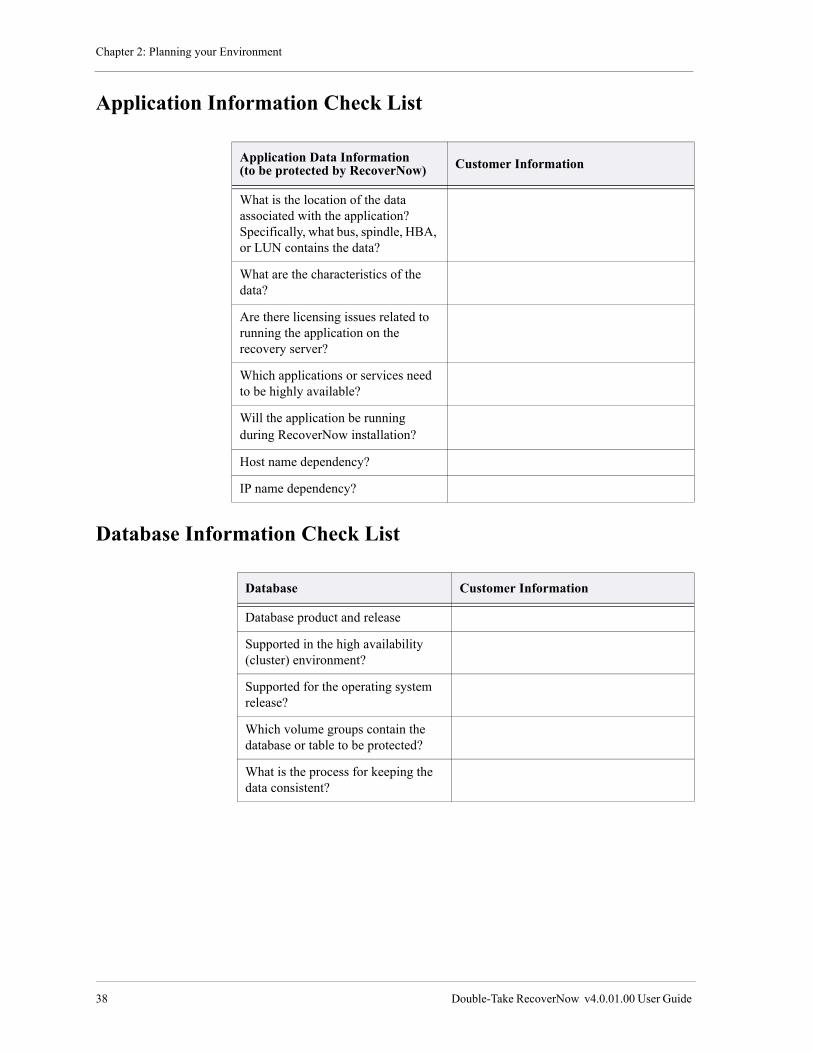
Chapter 2: Planning your Environment
38 Double-Take RecoverNow v4.0.01.00 User Guide
Application Information Check List
Database Information Check List
Application Data Information(to be protected by RecoverNow) Customer Information
What is the location of the data associated with the application?Specifically, what bus, spindle, HBA, or LUN contains the data?
What are the characteristics of the data?
Are there licensing issues related to running the application on the recovery server?
Which applications or services need to be highly available?
Will the application be running during RecoverNow installation?
Host name dependency?
IP name dependency?
Database Customer Information
Database product and release
Supported in the high availability (cluster) environment?
Supported for the operating system release?
Which volume groups contain the database or table to be protected?
What is the process for keeping the data consistent?
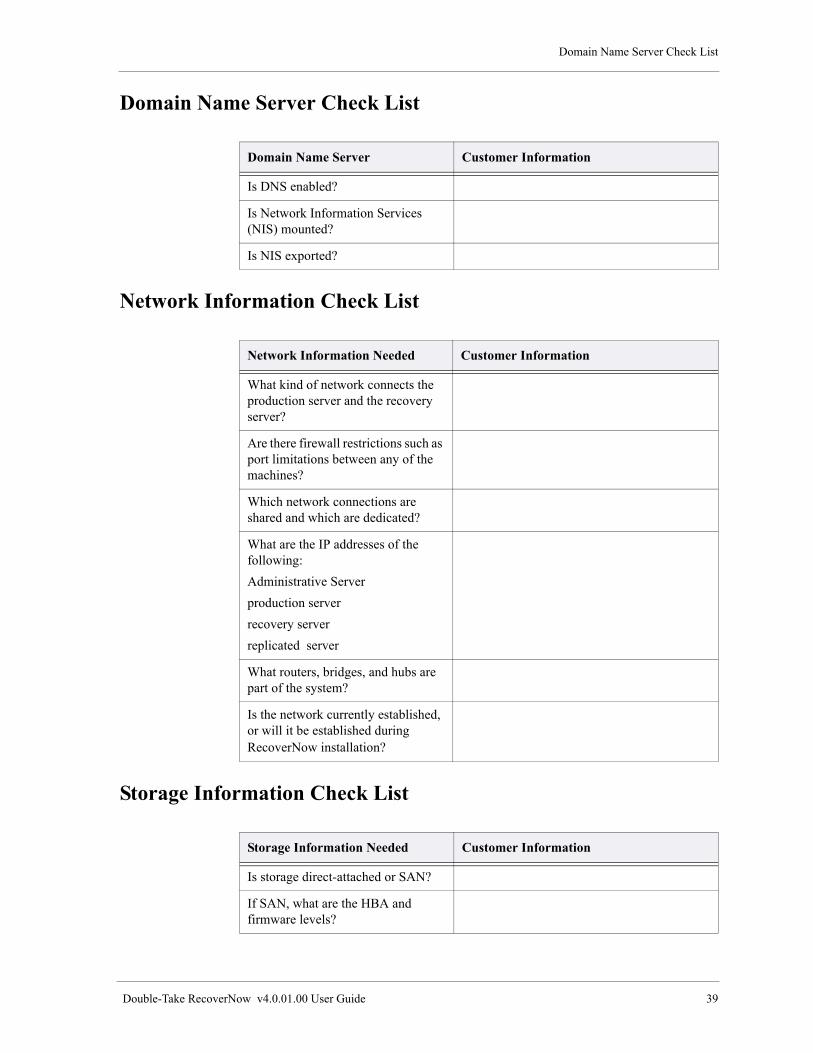
Domain Name Server Check List
Double-Take RecoverNow v4.0.01.00 User Guide 39
Domain Name Server Check List
Network Information Check List
Storage Information Check List
Domain Name Server Customer Information
Is DNS enabled?
Is Network Information Services (NIS) mounted?
Is NIS exported?
Network Information Needed Customer Information
What kind of network connects the production server and the recovery server?
Are there firewall restrictions such as port limitations between any of the machines?
Which network connections are shared and which are dedicated?
What are the IP addresses of the following:
Administrative Server
production server
recovery server
replicated server
What routers, bridges, and hubs are part of the system?
Is the network currently established, or will it be established during RecoverNow installation?
Storage Information Needed Customer Information
Is storage direct-attached or SAN?
If SAN, what are the HBA and firmware levels?
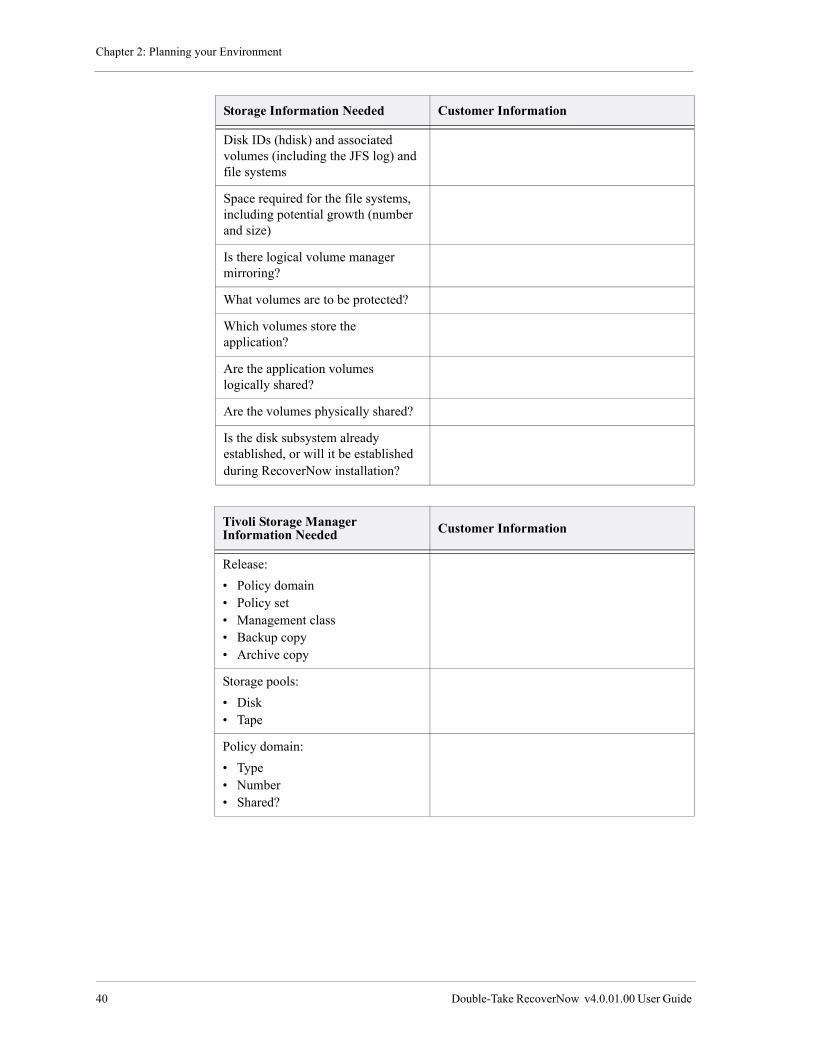
Chapter 2: Planning your Environment
40 Double-Take RecoverNow v4.0.01.00 User Guide
Disk IDs (hdisk) and associated volumes (including the JFS log) and file systems
Space required for the file systems, including potential growth (number and size)
Is there logical volume manager mirroring?
What volumes are to be protected?
Which volumes store the application?
Are the application volumes logically shared?
Are the volumes physically shared?
Is the disk subsystem already established, or will it be established during RecoverNow installation?
Storage Information Needed Customer Information
Tivoli Storage Manager Information Needed Customer Information
Release:
• Policy domain• Policy set• Management class• Backup copy• Archive copy
Storage pools:
• Disk• Tape
Policy domain:
• Type• Number• Shared?

General Information Checklist
Double-Take RecoverNow v4.0.01.00 User Guide 41
General Information Checklist
Additional Information Needed Customer Information
Is FTP available on all servers?
If FTP is not available, are CD-ROM drives available?
Does the application need specific volume or file system names?
Logical volumes to be assigned to RecoverNow
File system names and mount points
Number, size, and location of RecoverNow redo logs. Refer to “Allocating Space for RecoverNow Logs and Journals” on page 29
How much time does the restore window encompass?

Chapter 2: Planning your Environment
42 Double-Take RecoverNow v4.0.01.00 User Guide

Double-Take RecoverNow v4.0.01.00 User Guide 43
Using the Sizing Tool to Calculate LFC Size 3
Overview of LFC Sizing
RecoverNow uses Logical File Containers (LFC) to transfer data from the production Server to recovery server. Before you install RecoverNow, you need to define the number of LFCs for the production and recovery servers. On the recovery server, you must also define the Write Journal (WJ) disk space percentage.
You can use the Sizing Tool to calculate configuration values before RecoverNow is installed. It is also useful to run the tool after RecoverNow is installed to determine if the number of LFCs or WJ percentage needs to be adjusted.
This chapter describes:
• “System Requirements for the Sizing Tool” on page 43
• “Installing the Sizing Tool” on page 44
• “Running the Sizing Tool from the RecoverNow Sizing Tool GUI” on page 44
• “Running the Sizing Tool Script from the Command Line” on page 51
System Requirements for the Sizing Tool
Keep in mind the following system requirements before you run the Sizing tool:
• Can only be run on AIX.
• The sztool_gui requires Java 1.5 or greater.
• The sztool_gui requires Xwindows.

Chapter 3: Using the Sizing Tool to Calculate LFC Size
44 Double-Take RecoverNow v4.0.01.00 User Guide
Installing the Sizing Tool
To install the Sizing tool refer to the following sections in Chapter 5 “Installation Procedures” on page 59:
• “AIX Installation” on page 64
• “Use smit to Install RecoverNow” on page 103
NOTE
The RecoverNow Installation Wizard and the smit installation program provide the sztool command for the command line Sizing Tool and the sztool_gui command you can use to access the RecoverNow Sizing Tool GUI.
Running the Sizing Tool from the RecoverNow Sizing Tool GUI
To access the RecoverNow Sizing Tool GUI, type
/usr/scrt/sztool/sztool_gui from the command line.
The RecoverNow Sizing Tool GUI window displays. The first tab, Introduction displays, by default.
There are four RecoverNow Sizing Tool GUI tabs:
• “Introduction Tab” on page 44
• “Config and Run Tab” on page 46
• “View and Analyze Log Tab” on page 48
• “View Chart Tab” on page 50
Introduction Tab
The Introduction page describes how you use the sizing tool. For detailed information, click Help. This button displays the URL to access the Vision Solutions Support web site. From this site you can download documentation that describes how you use the sizing tool. In addition, you are provided with CustomerCare support email and phone numbers. Click Exit to exit the RecoverNow Sizing Tool GUI.
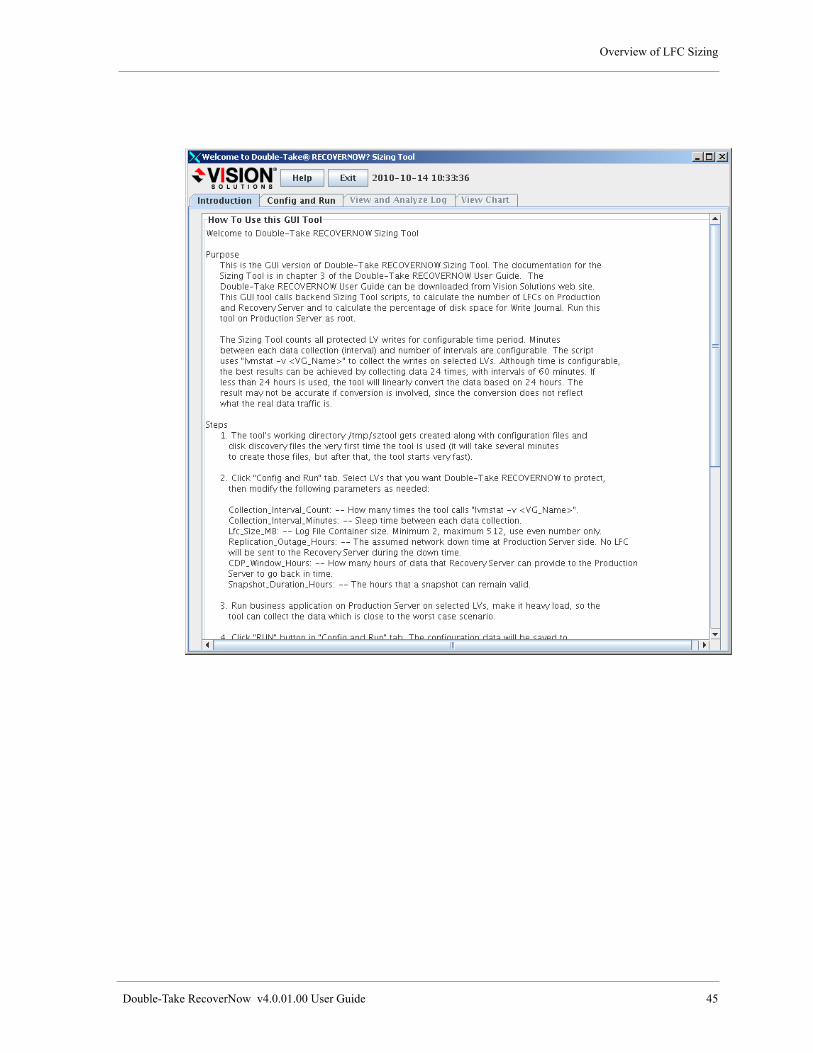
Overview of LFC Sizing
Double-Take RecoverNow v4.0.01.00 User Guide 45

Chapter 3: Using the Sizing Tool to Calculate LFC Size
46 Double-Take RecoverNow v4.0.01.00 User Guide
Config and Run Tab
You use the Config and Run page to configure LVs. Perform the following activities to configure LVs:
• To select individual LVs, use the check box next to the LV, to select the LVs that will be protected by RecoverNow.
• Click the Select all LVs button to select all LVs.
• Click the Run Disk Discovery Again button to re-discover the LVs.
The table below describes the parameters that you can modify:
Parameter Description
Collection Interval Count
Specifies how many times you want to collect data. The default value is 24 hours.
Collection Interval Minutes
Specifies how many minutes to wait between each data collection interval. The default value is 60 minutes.

Overview of LFC Sizing
Double-Take RecoverNow v4.0.01.00 User Guide 47
• The Run button becomes active, when you select an LV(s) and specify values for the LV parameters.
NOTE
Before you click the RUN button, start your application on the selected LVs, and ensure that your application has a heavy load, so the tool collects enough data to reflect the activity for a worst case scenario.
• Click the RUN button to:
– Save the configured data into /tmp/sztool/sztool.cfg file
– Invoke the backend sztool script
– Display the Job Progress Window. This window shows the sztool job status, and enables you to:
• Close the window and re-display it by clicking the Get Job Status button.
• Halt the current running background job
• Exit from sztool and check results
Lfc Size (MB) Specifies the size for the RecoverNow LFC. The default value is 16 MB.
Replication Outage Hours
Specifies the hours that the production server can not send LFCs to the replicated server. When this occurs, the LFCs will begin to backup on the Production Sever, until there are no more LFCs available. Once RecoverNow runs out of LFCs, it marks the regions which require synchronization in the state map as dirty. These dirty regions will automatically be synchronized when the LFCs become available. CDP functionality will resume as soon as the resynchronization completes. More LFCs are required as outage time increases. The default value is 8 hours.
CDP Window Hours
Specifies how many hours the data can go back in time to restore data from the recovery server to the production server. The window size determines the number of LFCs on the recovery server. The default value is 8 hours.
Snapshot Duration Hours
Specifies the number of hours you want to keep a snapshot valid. As the snapshot duration hours increase you need to increase the Write Journals disk space. The default value is 8 hours.
Parameter Description
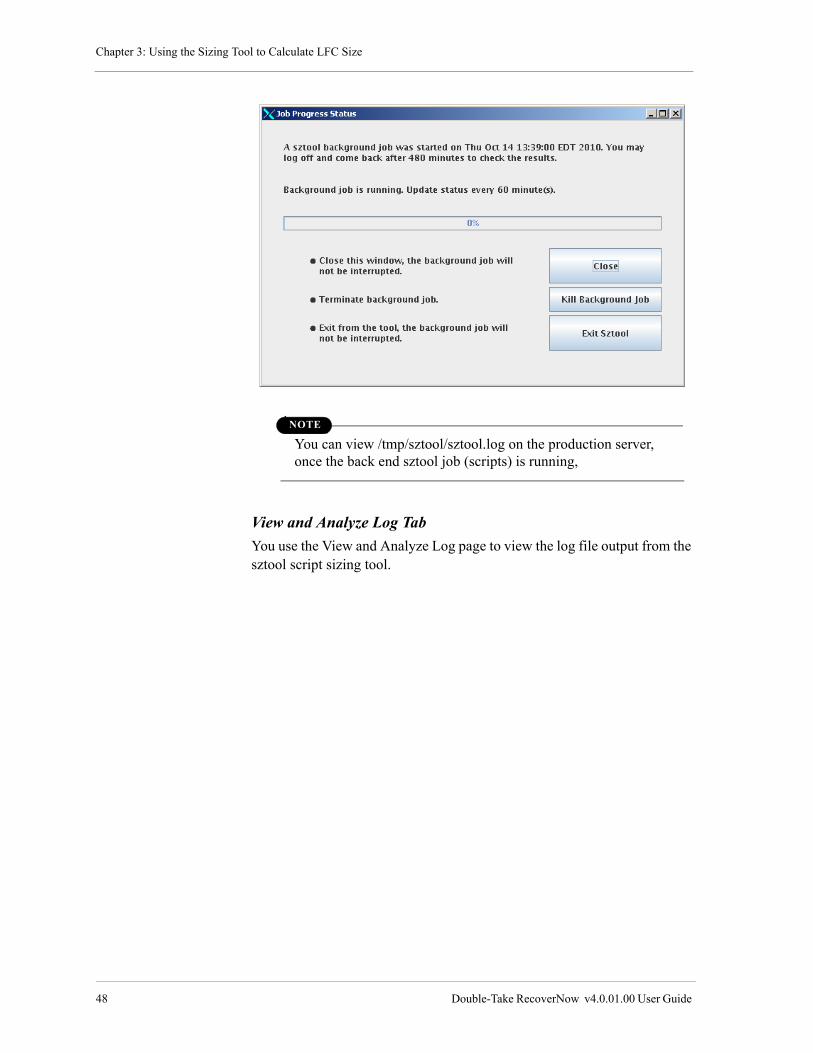
Chapter 3: Using the Sizing Tool to Calculate LFC Size
48 Double-Take RecoverNow v4.0.01.00 User Guide
NOTE
You can view /tmp/sztool/sztool.log on the production server, once the back end sztool job (scripts) is running,
View and Analyze Log Tab
You use the View and Analyze Log page to view the log file output from the sztool script sizing tool.
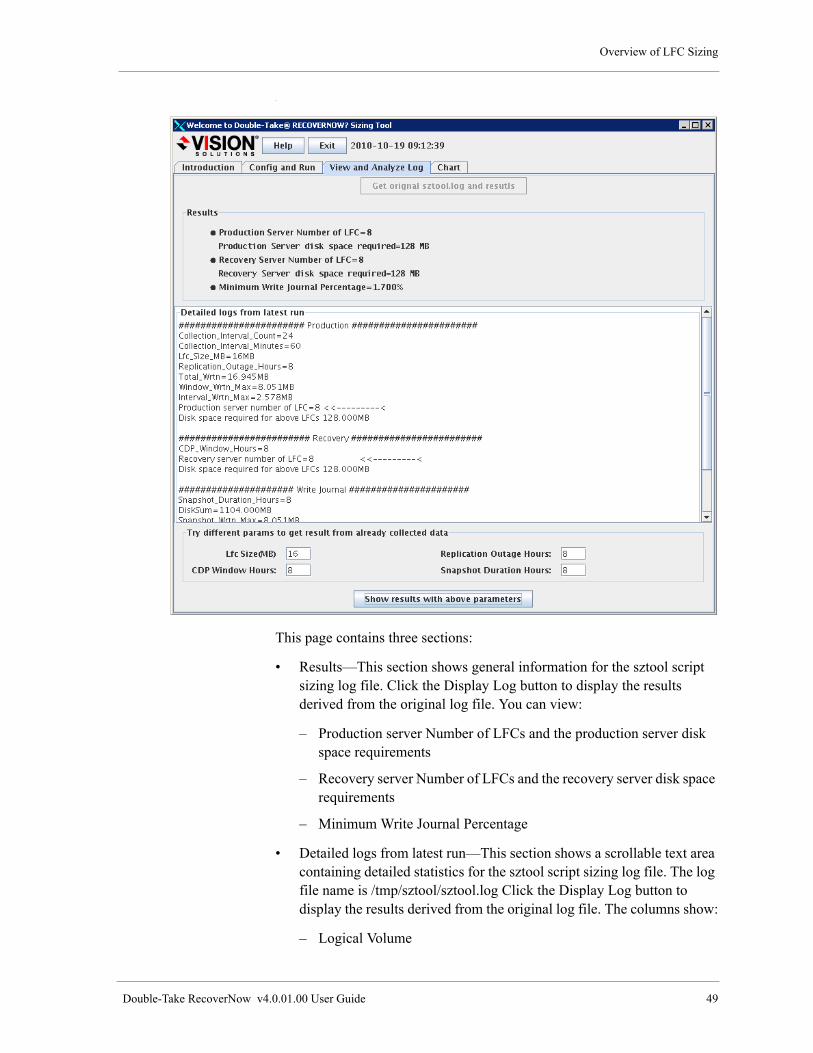
Overview of LFC Sizing
Double-Take RecoverNow v4.0.01.00 User Guide 49
.
This page contains three sections:
• Results—This section shows general information for the sztool script sizing log file. Click the Display Log button to display the results derived from the original log file. You can view:
– Production server Number of LFCs and the production server disk space requirements
– Recovery server Number of LFCs and the recovery server disk space requirements
– Minimum Write Journal Percentage
• Detailed logs from latest run—This section shows a scrollable text area containing detailed statistics for the sztool script sizing log file. The log file name is /tmp/sztool/sztool.log Click the Display Log button to display the results derived from the original log file. The columns show:
– Logical Volume
Chapter 3: Using the Sizing Tool to Calculate LFC Size
50 Double-Take RecoverNow v4.0.01.00 User Guide
– IO Count
– Kb read
– Kb written
– Kbps (kilobit per second)
• Try different parameters to get results from the already collected data. You can edit the parameters shown below to see different log file results.
– Lfc Size (MB) Low. Refer to “Lfc Size (MB)” on page 47.
– CDP Window Hours. Refer to “CDP Window Hours” on page 47.
– Replication Outage Hours. Refer to “Replication Outage Hours” on page 47.
– Snapshot Duration Hours. Refer to “Snapshot Duration Hours” on page 47.
To see different log file results:
1. Change the LFC size and CDP Window Hours.
2. Click the Show results with above parameters button.
The sztool script executes against the collected data to display log file information in the Results section and the Detailed logs from last run section.
NOTE
This output will not overwrite the /tmp/sztool/sztool.log file contents.
3. Click the Display Log button if you wish to re-display the results derived from the original log file.
View Chart Tab
The Chart data represents the time with respect to total disk writes over time, on all selected LVs. You can view data for individual LVs in the sztool.log. The unit of writes is in MB.
NOTE
A pdf version of the Chart is automatically saved in /tmp/sztool/DiskWriteChart.pdf.
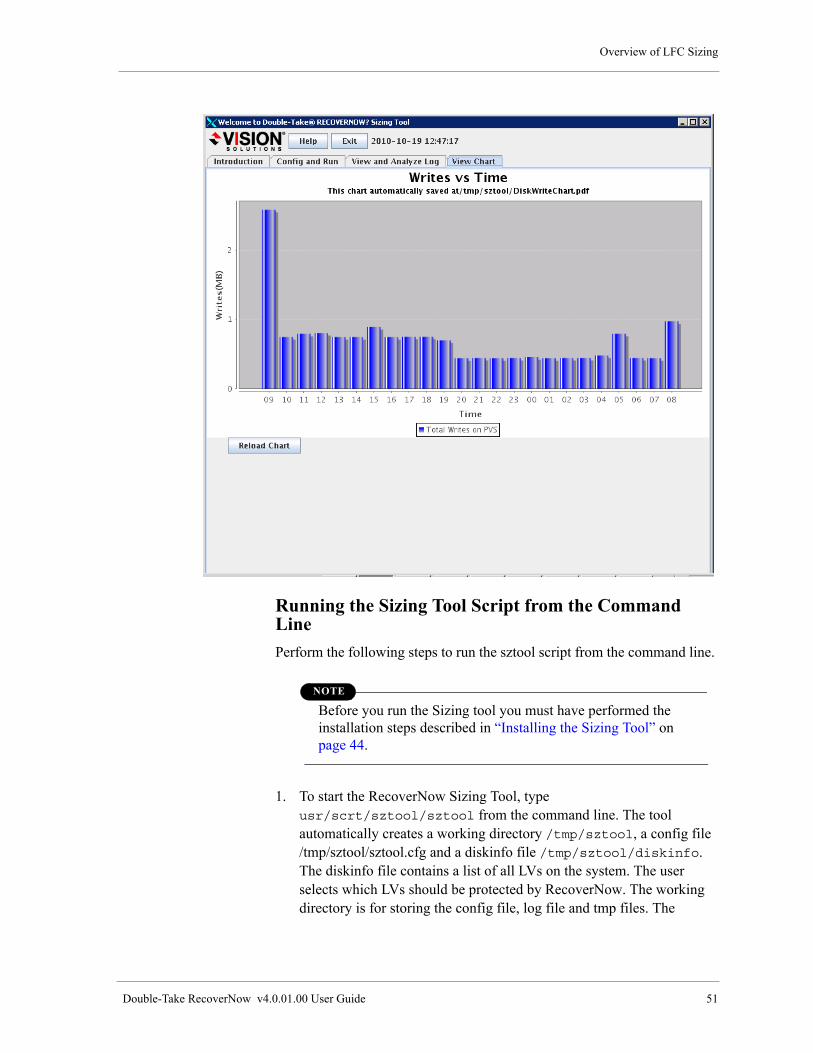
Overview of LFC Sizing
Double-Take RecoverNow v4.0.01.00 User Guide 51
Running the Sizing Tool Script from the Command Line
Perform the following steps to run the sztool script from the command line.
NOTE
Before you run the Sizing tool you must have performed the installation steps described in “Installing the Sizing Tool” on page 44.
1. To start the RecoverNow Sizing Tool, type usr/scrt/sztool/sztool from the command line. The tool automatically creates a working directory /tmp/sztool, a config file /tmp/sztool/sztool.cfg and a diskinfo file /tmp/sztool/diskinfo. The diskinfo file contains a list of all LVs on the system. The user selects which LVs should be protected by RecoverNow. The working directory is for storing the config file, log file and tmp files. The

Chapter 3: Using the Sizing Tool to Calculate LFC Size
52 Double-Take RecoverNow v4.0.01.00 User Guide
configuration file is for user to specify LV names and other run time parameters.
2. Review the diskinfo file and determine which LVs RecoverNow should protect.
3. Modify the parameters in the sztool.cfg configuration file shown below:
LVs_1=testloglv testlv
LVs_2=
LVs_3=
LVs_4=
LVs_5=
LVs_6=
LVs_7=
LVs_8=
LVs_9=
LVs_10=
Collection_Interval_Count=24
Collection_Interval_Minutes=60
Lfc_Size_MB=16
Replication_Outage_Hours=8
CDP_Window_Hours=8
Snapshot_Duration_Hours=8
The table below describes the configuration file parameters that you can modify:
Parameter Description
LVs_1=
LVs_2=
.....
LVs_10=
For example, you can enter LVs_1=LV1 LV2 LV2 LV4, with a space between each LV. Typically, you place three or five LV names per line as appropriate. You can add more LV names for any additional lines. If there are not any additional LV names, leave the remaining LVs lines blank.
Collection_Interval_Count Specifies how many times you want to collect data. The default value is 24 hours.
Collection_Interval_Minutes Specifies how many minutes to wait between each data collection interval. The default value is 60 minutes. Set the Collection_Interval_Count to 24 hours and the Collection_Interval_Minutes to 60 minutes. This is referred to as the 24*60 setting. This is the recommended configuration to use when you execute the sztool script.
Lfc_Size_MB Specifies the size for theRecoverNow LFC.

Overview of LFC Sizing
Double-Take RecoverNow v4.0.01.00 User Guide 53
4. Start your business application on the selected LVs. The load of the businesses application should be as close to the worst case scenario to ensure a meaningful result.
5. Type /usr/scrt/sztool/sztool from the command line to restart the sztool. The sztool runs in background and you can check the results in the /tmp/sztool/sztool.log. Check the /tmp/sztool/sztool.log file to be sure the tool is running, one collection interval is required before LV I/O data is written to the /tmp/sztool/sztool.log. Check the /tmp/sztool/sztool.log after the last collection interval count for the final result. It is safe to log out from the terminal because “sztool” uses “nohup”. The process will take 24 hours with the default collection interval count of 24 and collection interval of 60 minutes.
6. When the tool completes, check the log file or the AIX window. At the bottom of the log file or AIX window, the "<<---------<" lines indicate the production and recovery server number of LFCs, and the percentage of Write Journal (WJ). The log file also contains detailed information for each LV IO statistics for each data collection interval. The standard log file is called sztool.log. An additional copy of the log file is also created, sztool.log-MM_DD_YYYY-HH:MM:SS. For example: sztool.log-02_19_2010-14_22_19, where HH is the 24 hour interval.
Replication_Outage_Hours Specifies the hours that the production server can not send LFCs to the replicated server. When this occurs, the LFCs will begin to backup on the Production Sever, until there are no more LFCs available. Once RecoverNow runs out of LFCs, it marks the regions which require synchronization in the state map as dirty. These dirty regions will automatically be synchronized when the LFCs become available. CDP functionality will resume as soon as the resynchronization completes. More LFCs are required as outage time increases.
CDP_Window_Hours Specifies how many hours the data can go back in time to restore data from the recovery server to the production server. The window size determines the number of LFCs on the recovery server.
Snapshot_Duration_Hours Specifies the number of hours you want to keep a snapshot valid. As the snapshot duration hours increase you need to increase the Write Journals disk space.
Parameter Description
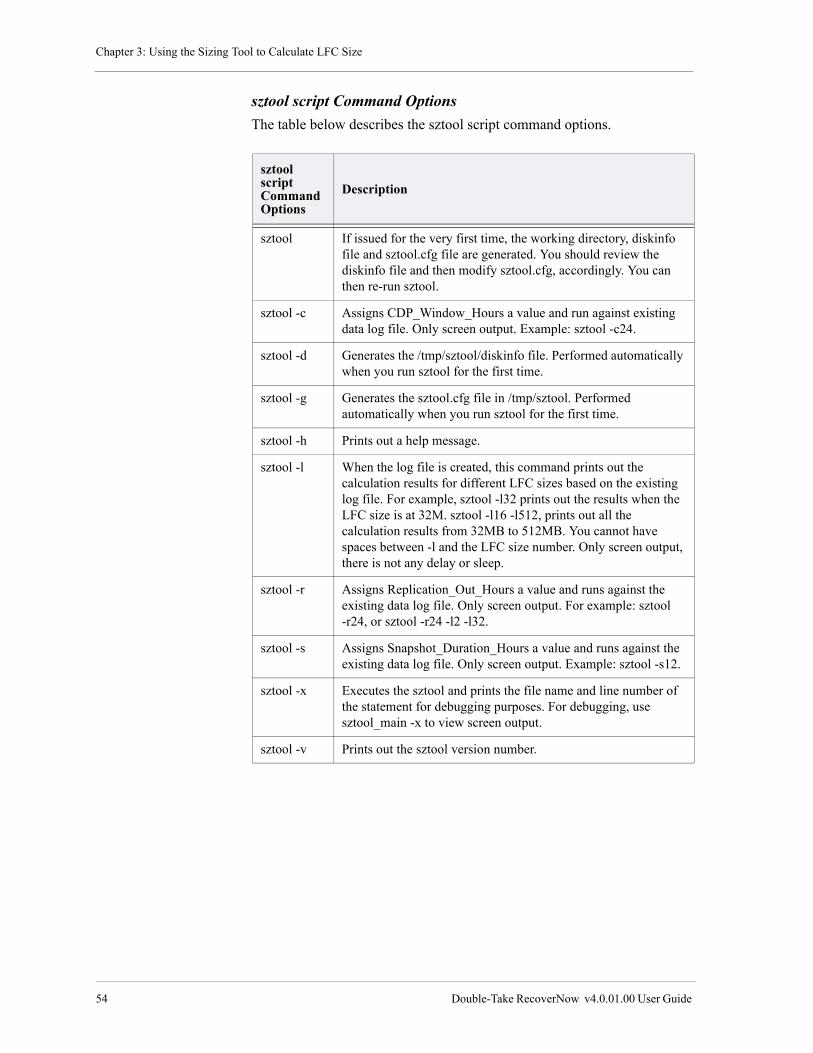
Chapter 3: Using the Sizing Tool to Calculate LFC Size
54 Double-Take RecoverNow v4.0.01.00 User Guide
sztool script Command Options
The table below describes the sztool script command options.
sztool script CommandOptions
Description
sztool If issued for the very first time, the working directory, diskinfo file and sztool.cfg file are generated. You should review the diskinfo file and then modify sztool.cfg, accordingly. You can then re-run sztool.
sztool -c Assigns CDP_Window_Hours a value and run against existing data log file. Only screen output. Example: sztool -c24.
sztool -d Generates the /tmp/sztool/diskinfo file. Performed automatically when you run sztool for the first time.
sztool -g Generates the sztool.cfg file in /tmp/sztool. Performed automatically when you run sztool for the first time.
sztool -h Prints out a help message.
sztool -l When the log file is created, this command prints out the calculation results for different LFC sizes based on the existing log file. For example, sztool -l32 prints out the results when the LFC size is at 32M. sztool -l16 -l512, prints out all the calculation results from 32MB to 512MB. You cannot have spaces between -l and the LFC size number. Only screen output, there is not any delay or sleep.
sztool -r Assigns Replication_Out_Hours a value and runs against the existing data log file. Only screen output. For example: sztool -r24, or sztool -r24 -l2 -l32.
sztool -s Assigns Snapshot_Duration_Hours a value and runs against the existing data log file. Only screen output. Example: sztool -s12.
sztool -x Executes the sztool and prints the file name and line number of the statement for debugging purposes. For debugging, use sztool_main -x to view screen output.
sztool -v Prints out the sztool version number.
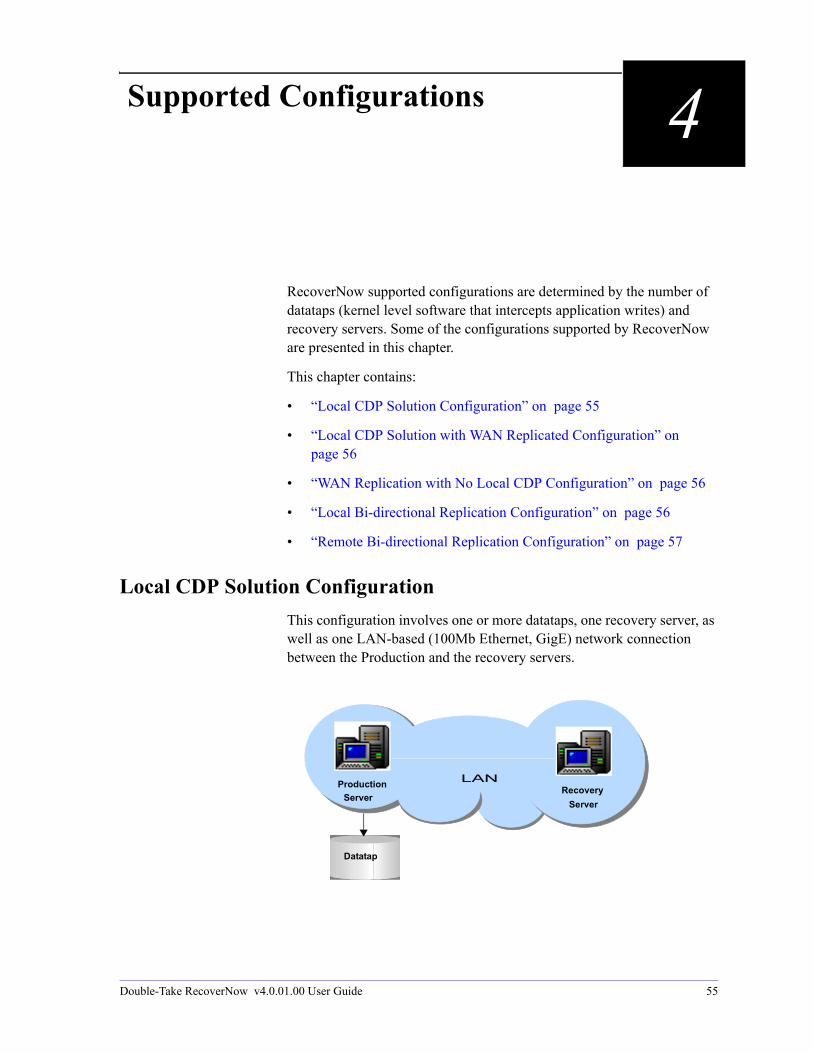
Double-Take RecoverNow v4.0.01.00 User Guide 55
Supported Configurations 4
RecoverNow supported configurations are determined by the number of datataps (kernel level software that intercepts application writes) and recovery servers. Some of the configurations supported by RecoverNow are presented in this chapter.
This chapter contains:
• “Local CDP Solution Configuration” on page 55
• “Local CDP Solution with WAN Replicated Configuration” on page 56
• “WAN Replication with No Local CDP Configuration” on page 56
• “Local Bi-directional Replication Configuration” on page 56
• “Remote Bi-directional Replication Configuration” on page 57
Local CDP Solution Configuration
This configuration involves one or more datataps, one recovery server, as well as one LAN-based (100Mb Ethernet, GigE) network connection between the Production and the recovery servers.
Production
ServerRecovery
Server
Datatap
LAN

Chapter 4: Supported Configurations
56 Double-Take RecoverNow v4.0.01.00 User Guide
Local CDP Solution with WAN Replicated Configuration
This configuration involves one or more datataps, one recovery server, and a WAN connection to the replicated server.
WAN Replication with No Local CDP Configuration
This configuration involves one or more datataps and one recovery server.
When developing Double-Take RecoverNow solution, the WAN bandwidth as well as application peak throughput write I/O rates need to be considered.
Local Bi-directional Replication Configuration
This configuration involves one or more datataps and two recovery servers that are associated through a LAN connection. Two interrelated contexts are created.
The LCA/ABA agents are used in a bi-directional manner. These agents need to be configured before the failover/failback operations are used. For more information about RecoverNow failover/failback operations, refer to Chapter 12 “Introduction to Disaster Recovery” on page 231.
Replicated Server
WANProduction
ServerRecovery
Server
LAN
Remote Recovery
Server
Production
Server
WAN
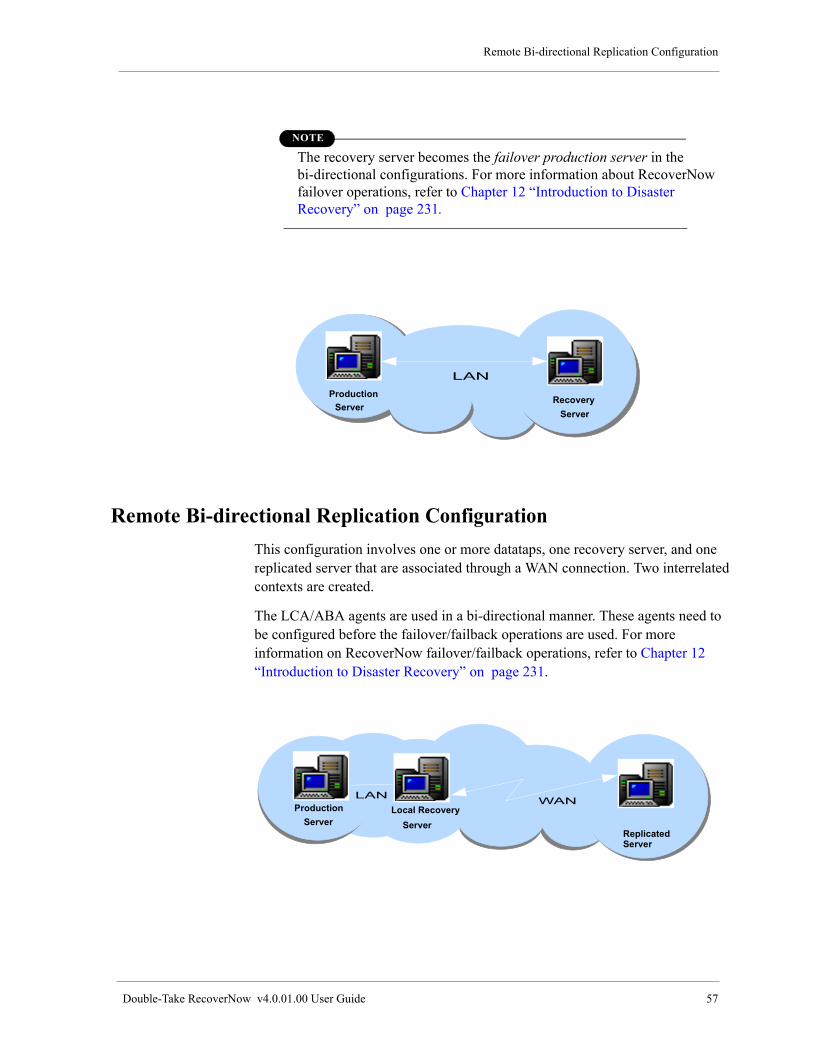
Remote Bi-directional Replication Configuration
Double-Take RecoverNow v4.0.01.00 User Guide 57
NOTE
The recovery server becomes the failover production server in the bi-directional configurations. For more information about RecoverNow failover operations, refer to Chapter 12 “Introduction to Disaster Recovery” on page 231.
Remote Bi-directional Replication Configuration
This configuration involves one or more datataps, one recovery server, and one replicated server that are associated through a WAN connection. Two interrelated contexts are created.
The LCA/ABA agents are used in a bi-directional manner. These agents need to be configured before the failover/failback operations are used. For more information on RecoverNow failover/failback operations, refer to Chapter 12 “Introduction to Disaster Recovery” on page 231.
Production
ServerRecovery
Server
LAN
Replicated
WANProduction
ServerLocal Recovery
Server
LAN
Server

Chapter 4: Supported Configurations
58 Double-Take RecoverNow v4.0.01.00 User Guide

Double-Take RecoverNow v4.0.01.00 User Guide 59
Installation Procedures 5
Overview
This chapter describes RecoverNow, RecoverNow Portal Application and Vision Solutions Portal (VSP) installation procedures.
Before you begin, ensure that you review support information, system requirements, and decide on your preferred configuration. One you have installed the RecoverNow components you can work with VSP. Refer to “Logging in to Vision Solutions Portal” on page 127.
• “VSP and RecoverNow Portal Application System Requirements” on page 61
• “RecoverNow Installation Wizard Prerequisites” on page 62
• “Request License Keys from AIX or Windows” on page 63
• “AIX Installation” on page 64
• “Install Double-Take RecoverNow, the Vision Solutions Portal and the Double-Take RecoverNow Portal Application” on page 64
– “User Roles” on page 83
• “Reinstall RecoverNow” on page 83
• “Upgrade RecoverNow” on page 92
• “Use smit to Install RecoverNow” on page 103
– “User Roles” on page 108
• “Uninstall RecoverNow on AIX” on page 110
• “Use smit to Uninstall RecoverNow” on page 116
• “Install the Vision Solutions Portal and Double-Take RecoverNow Portal Application on Windows” on page 118
• “Uninstall the Vision Solutions Portal and Double-Take RecoverNow Portal Application Uninstallation Wizard on Windows” on page 123

Chapter 5: Installation Procedures
60 Double-Take RecoverNow v4.0.01.00 User Guide
• “Uninstall the Vision Solutions Portal and Double-Take RecoverNow Portal Application Uninstallation Wizard on Windows” on page 123
System Requirements for RecoverNow
RecoverNow requires an IBM System p™ with the AIX operating systems.
NOTE
RecoverNow supports Internet Protocol version 6 (IPv6).
Operating System Requirements
RecoverNow runs on the IBM AIX 5L, AIX 6.1, and AIX 7.1 operating systems. Supported versions include:
• AIX version 7.1
• AIX version 6.1
• AIX 5L version 5.3 TL 4 or greater
• AIX 5L version 5.2 TL 9 or greater
NOTE
AIX 5L version 5.3 TL5 64-bit kernel requires APAR IY92292. It is currently available at the IBM Web site.
Disk Space and Memory Requirements
Review the RecoverNow disk space and memory requirements:
• RecoverNow requires 1 MB in root and 125 MB in /usr. The 125 MB in /usr is for the /usr/scrt directory which contains binaries, libraries, configuration, and logs.
IMPORTANT
The /home/usr/scrt/ directory is created when the scrt user is created in AIX. Do not copy any files to this directory because RecoverNow deletes this directory during the de-installation process.
• The amount of RAM required for the RecoverNow application depends on the size of the protected data (StateMap size) and log size. The maximum log size is one half of RAM.
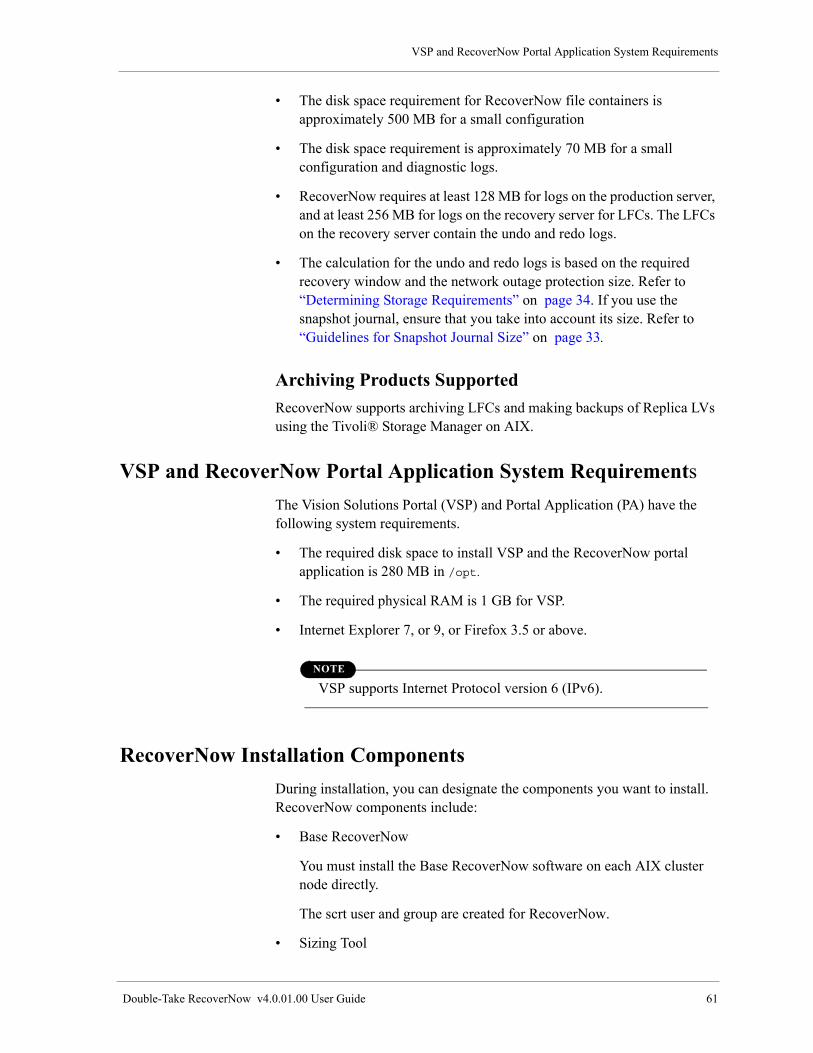
VSP and RecoverNow Portal Application System Requirements
Double-Take RecoverNow v4.0.01.00 User Guide 61
• The disk space requirement for RecoverNow file containers is approximately 500 MB for a small configuration
• The disk space requirement is approximately 70 MB for a small configuration and diagnostic logs.
• RecoverNow requires at least 128 MB for logs on the production server, and at least 256 MB for logs on the recovery server for LFCs. The LFCs on the recovery server contain the undo and redo logs.
• The calculation for the undo and redo logs is based on the required recovery window and the network outage protection size. Refer to “Determining Storage Requirements” on page 34. If you use the snapshot journal, ensure that you take into account its size. Refer to “Guidelines for Snapshot Journal Size” on page 33.
Archiving Products Supported
RecoverNow supports archiving LFCs and making backups of Replica LVs using the Tivoli® Storage Manager on AIX.
VSP and RecoverNow Portal Application System Requirements
The Vision Solutions Portal (VSP) and Portal Application (PA) have the following system requirements.
• The required disk space to install VSP and the RecoverNow portal application is 280 MB in /opt.
• The required physical RAM is 1 GB for VSP.
• Internet Explorer 7, or 9, or Firefox 3.5 or above.
NOTE
VSP supports Internet Protocol version 6 (IPv6).
RecoverNow Installation Components
During installation, you can designate the components you want to install. RecoverNow components include:
• Base RecoverNow
You must install the Base RecoverNow software on each AIX cluster node directly.
The scrt user and group are created for RecoverNow.
• Sizing Tool
Chapter 5: Installation Procedures
62 Double-Take RecoverNow v4.0.01.00 User Guide
You can use the Sizing Tool to calculate configuration values before RecoverNow is installed. However, it is also useful to run the tool after RecoverNow is installed to determine if the number of LFCs or WJ percentage needs to be adjusted. Refer to “Using the Sizing Tool to Calculate LFC Size” on page 43.
• Documentation
Documentation is available as.pdf files.
RecoverNow Installation Wizard Prerequisites
If you use the RecoverNow Installation Wizard the following prerequisites are required on the AIX target system:
• Either ssh and scp or rexec and rcp must be allowed. If ssh fails then rexec and rcp is used.
• If rexec will be used rexecd must be configured in /etc/inetd.conf.
• To use rcp the ~root/.rhosts file must have the local host and user name.
• Check /etc/services to find the ports used by exec and shell and check that those ports are not blocked.
• There is the option available to send a ping to the AIX system to determine if it is reachable.
• This requires that the “echo” port is not blocked. This is usually defined as port 7 in /etc/services
NOTE
If you exit the installation wizard you can view the detailed errors in the RecoverNow_4.n.n.n_Install.log
Before You Install
The installation process involves two steps:
1. Request a license for each node as described in Request License Keys from AIX or Windows.
2. Install RecoverNow as described in “AIX Installation” on page 64.
• Each target node must be connected by the network to the production and recovery server(s). Make sure that host names and IP addresses of RecoverNow servers are accessible from the workstation.

Request License Keys from AIX or Windows
Double-Take RecoverNow v4.0.01.00 User Guide 63
NOTE
If you are installing GeoCluster and RecoverNow, refer to the Double-Take Availability Integration Guide.
Request License Keys from AIX or Windows
You can request license keys for RecoverNow from an AIX machine or a Windows PC:
1. Download the RecoverNow and GeoCluster License Key Wizard from the Vision Extranet (Click Customer/Partner Login at www.visionsolutions.com) under the License Keys menu option.
2. Do one of the following:
a. For AIX, run install.bin.
b. For Windows, click Update License Keys on the Double-Take RecoverNow splash screen.
The Double-Take RecoverNow Welcome screen displays.
3. On the Welcome screen, click Next.
4. On the Specify Node screen, specify a node where you want to apply license keys. The node can be the name or IP address of the local node or a node in the network.
5. Click Next.
6. On the Node Login screen, to obtain new license keys for RecoverNow, log in to the node as root (AIX) or as an administrator (Windows).
7. Click Next.
8. On the Retrieving Installation Information screen, click Next.
9. On the Confirm Node Selection screen, you can add or remove nodes that will be used by the wizard to install or upgrade. To add a node:
a. Specify a node name or IP address
b. Click Add
c. Click Next. On the Node Login screen, provide the User name and password for the node.
d. Click Next

Chapter 5: Installation Procedures
64 Double-Take RecoverNow v4.0.01.00 User Guide
10. On the License Key Locations screen, specify or browse to the location of the license key file for RecoverNow obtained from Vision Solutions for each node.
11. Click Next.
12. On the License Key Check screen, click Next to display the Summary screen.
13. To specify another node click Previous. To cancel, click Cancel.
AIX Installation
This section describes:
• “Install Double-Take RecoverNow, the Vision Solutions Portal and the Double-Take RecoverNow Portal Application” on page 64
• “Install only the Vision Solutions Portal and the Double-Take RecoverNow Portal Application” on page 77
• “Reinstall RecoverNow” on page 83
• “Upgrade RecoverNow” on page 92
Install Double-Take RecoverNow, the Vision Solutions Portal and the Double-Take RecoverNow Portal Application
1. Download the RecoverNow installation program from the:
• Vision Extranet at Customer/Partner Login at www.visionsolutions.com. Proceed to step a.
• Double-Take RecoverNow installation CD. Proceed to step 2.
a. Click Double-Take RecoverNow for AIX in the left-hand pane.
b. Click Product Download in the right-hand pane.
c. Select and download the RecoverNow product zip file.
2. Do one of the following:
a. Click Setup.exe, to display the Double-Take RecoverNow Installation splash screen. Then, click Install Double-Take RecoverNow.
b. Execute install.bin, to run the RecoverNow Installation Wizard.
The Double-Take RecoverNow Welcome screen displays.
c. Run install.exe to install onto a remote AIX machine.
The Double-Take RecoverNow Welcome screen displays.
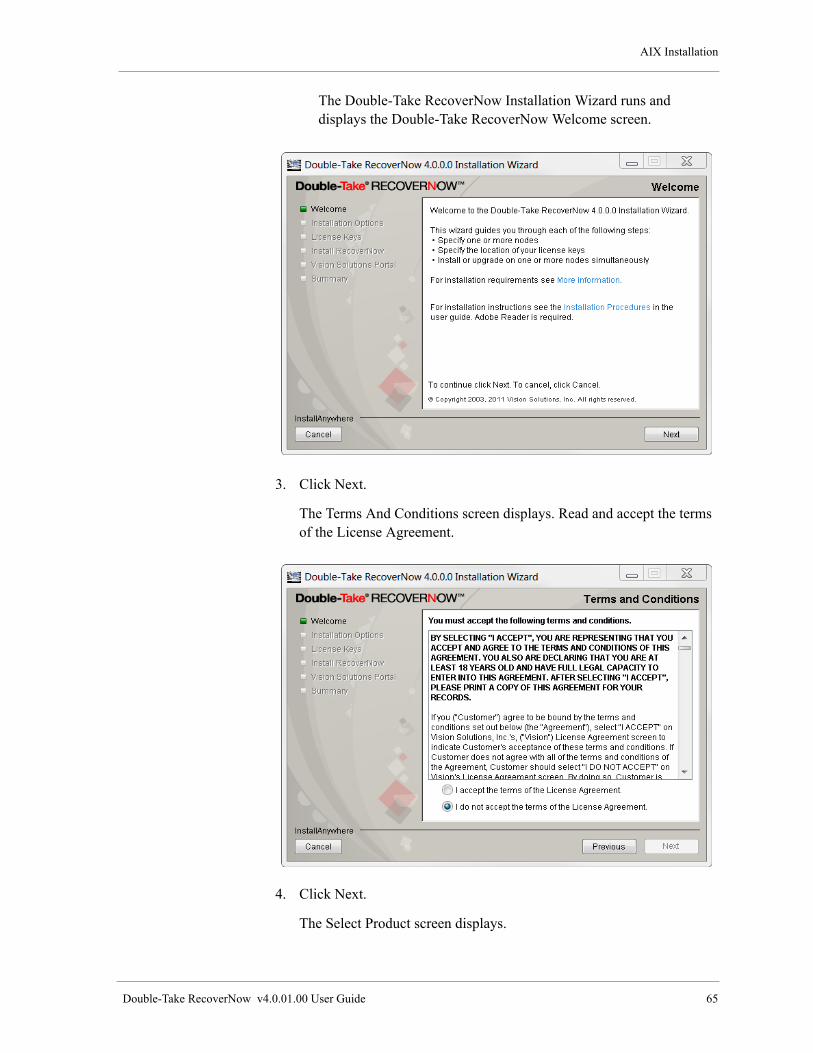
AIX Installation
Double-Take RecoverNow v4.0.01.00 User Guide 65
The Double-Take RecoverNow Installation Wizard runs and displays the Double-Take RecoverNow Welcome screen.
3. Click Next.
The Terms And Conditions screen displays. Read and accept the terms of the License Agreement.
4. Click Next.
The Select Product screen displays.

Chapter 5: Installation Procedures
66 Double-Take RecoverNow v4.0.01.00 User Guide
5. Select either:
• Double-Take RecoverNow and Vision Solutions Portal (recommended) —Installs Double-Take RecoverNow, the portal application, and optionally, the Vision Solutions Portal to each node. Proceed to step 6 on page 66.
• Vision Solutions Portal and the Double-Take RecoverNow portal application—Installs only the portal application and VSP, if necessary. Proceed to “Install only the Vision Solutions Portal and the Double-Take RecoverNow Portal Application” on page 77.
6. Select Double-Take RecoverNow and Vision Solutions Portal (recommended).
7. Click Next.
The Install or Upgrade screen displays.

AIX Installation
Double-Take RecoverNow v4.0.01.00 User Guide 67
8. Select an install, or upgrade or reinstall option.
• Create a new installation —Create a new RecoverNow installation.
• Upgrade or reinstall an existing installation—Upgrade or reinstall an existing RecoverNow installation. To upgrade RecoverNow proceed to “Upgrade RecoverNow” on page 92. To reinstall RecoverNow proceed to “Reinstall RecoverNow” on page 83.
IMPORTANT
The following steps detail how to create a new installation
9. Click Next.
The Specify Node screen displays.

Chapter 5: Installation Procedures
68 Double-Take RecoverNow v4.0.01.00 User Guide
10. Enter the node name—Points the installer to the target node where you want to install RecoverNow. Alternatively, you may enter an IP address.
11. Click Test Connection—A dialog displays indicating whether or not the connection to the node was successful.
12. Click Next.
The Node Login screen displays.

AIX Installation
Double-Take RecoverNow v4.0.01.00 User Guide 69
13. Enter the username and root password.
NOTE
You must log into the node as root.
14. Click Log In to log in to the node.
15. Click Next.
The Retrieving Installation Information screen displays.
16. Click Next.
17. The Specify Nodes screen displays.
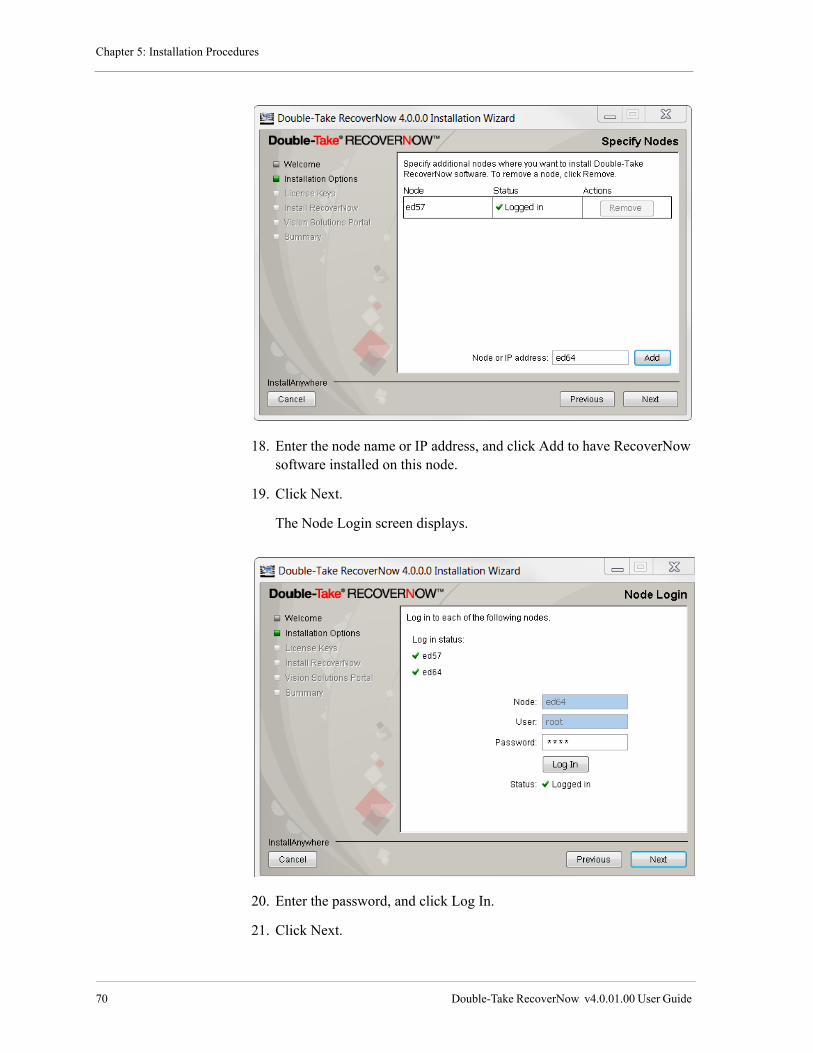
Chapter 5: Installation Procedures
70 Double-Take RecoverNow v4.0.01.00 User Guide
18. Enter the node name or IP address, and click Add to have RecoverNow software installed on this node.
19. Click Next.
The Node Login screen displays.
20. Enter the password, and click Log In.
21. Click Next.
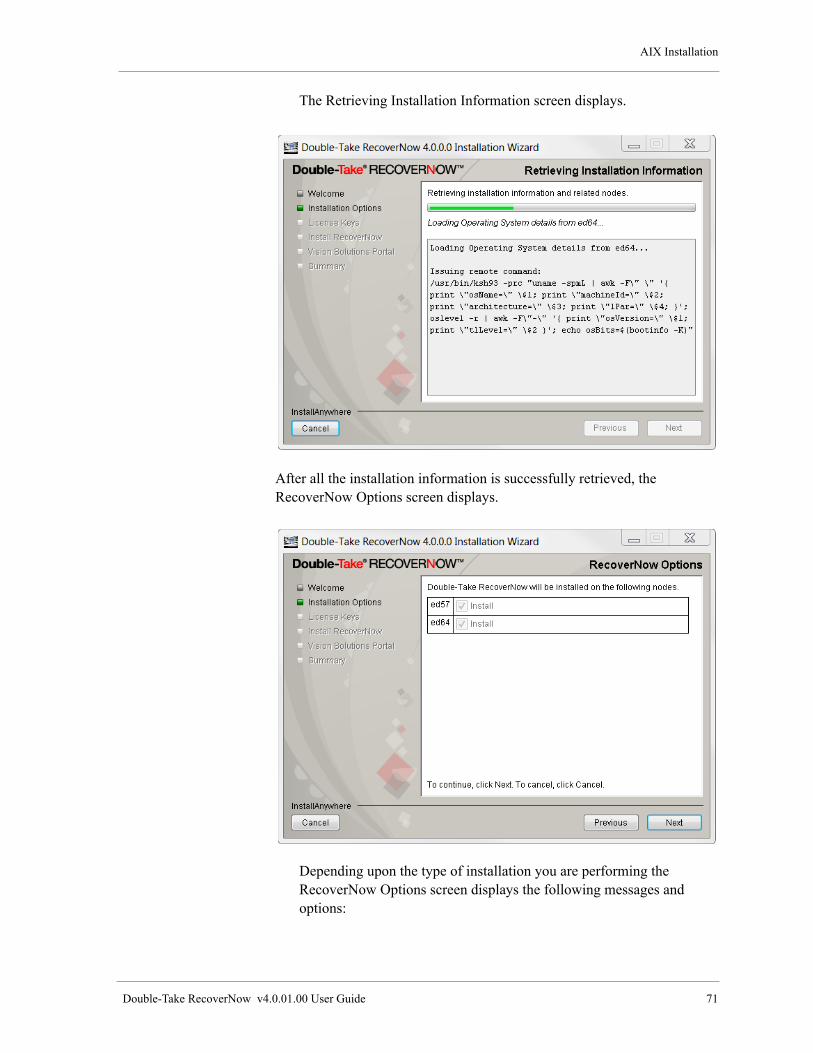
AIX Installation
Double-Take RecoverNow v4.0.01.00 User Guide 71
The Retrieving Installation Information screen displays.
After all the installation information is successfully retrieved, the RecoverNow Options screen displays.
Depending upon the type of installation you are performing the RecoverNow Options screen displays the following messages and options:

Chapter 5: Installation Procedures
72 Double-Take RecoverNow v4.0.01.00 User Guide
• If you are creating a new installation, the RecoverNow Options screen displays a disabled checkbox labeled “Install”, to confirm the nodes on which you will install RecoverNow. The following steps describe how to install RecoverNow.
• If you are reinstalling, the RecoverNow Options screen displays a checkbox labeled “Reinstall”, which enables you to reinstall RecoverNow on nodes where the same version is already installed. Proceed to “Reinstall RecoverNow” on page 83.
• If you are upgrading Displays a a checkbox labeled “Upgrade”, which enables you to upgrade nodes that have earlier versions of RecoverNow installed. Proceed to “Upgrade RecoverNow” on page 92.
• Displays messages for nodes where RecoverNow cannot be installed or upgraded.
22. Click Next
The Documentation Options screen displays.
23. Select the node for which the documentation will be installed.
24. Click Next.
The License Key Location screen displays.

AIX Installation
Double-Take RecoverNow v4.0.01.00 User Guide 73
25. Do one of the following:
a. Click Next, if you have a license key files from Vision Solutions. Proceed to step 26 on page 74.
b. Click Continue Without License Keys.
The Continue Without License Keys screen displays.
• Select Complete the installation without license keys to install RecoverNow without license keys. You can install RecoverNow
Chapter 5: Installation Procedures
74 Double-Take RecoverNow v4.0.01.00 User Guide
without license keys but cannot use it until valid license keys are applied. Proceed to step 26 on page 74.
• Select Contact Vision Solutions to get new license keys and click Next, the Contact Vision Solutions screen displays. Use one of the following methods to procure license keys.
– On the Internet—Log in to your account at:VisionSolutions.com/SupportCentral
– Email—Copy and paste the information on the Contact Vision Solutions screen into your email message. When you contact Customer Accounting to request a license, you will be asked to provide the machine ID (uname -m) of your servers along with the hostname, and your OS. Email your information to Customer Accounting at [email protected] and request a license key. A license file will be generated and emailed to you.
– Telephone—(800) 337-8214
NOTE
Once you procure the license keys from Vision Solutions, click Next on the License Key Location to continue the installation. Proceed to step 26 on page 74
26. Click Next.
NOTE
If you are reinstalling RecoverNow, the Product Shutdown Required screen displays. You must shut down RecoverNow before you reinstall it.
The License Key Check screen briefly displays (not shown) to validate your license keys, then the Installing Double-Take RecoverNow screen displays showing the results of the installation process for the RecoverNow software.

AIX Installation
Double-Take RecoverNow v4.0.01.00 User Guide 75
27. When the RecoverNow installation completes the Install Portal Application screen displays.
28. Click Next.
When the Portal Application installation completes the Installing Vision Solutions Portal screen displays.

Chapter 5: Installation Procedures
76 Double-Take RecoverNow v4.0.01.00 User Guide
When the installation completes, the Installation Complete screen displays.
29. After you have installed RecoverNow, the RecoverNow Portal Application, and the Vision Solutions Portal (VSP) you can log into VSP. You can select one of the highlighted nodes to launch VSP and log into VSP. See “Logging in to Vision Solutions Portal” on page 127.
30. Click Done to exit the installation wizard.

AIX Installation
Double-Take RecoverNow v4.0.01.00 User Guide 77
Install only the Vision Solutions Portal and the Double-Take RecoverNow Portal Application
1. Click Next on the Welcome and Terms and Conditions screens.
The Select Product screen displays.
2. Select Vision Solutions Portal and the Double-Take RecoverNow portal application.
3. Click Next.
The Specify Node screen displays.
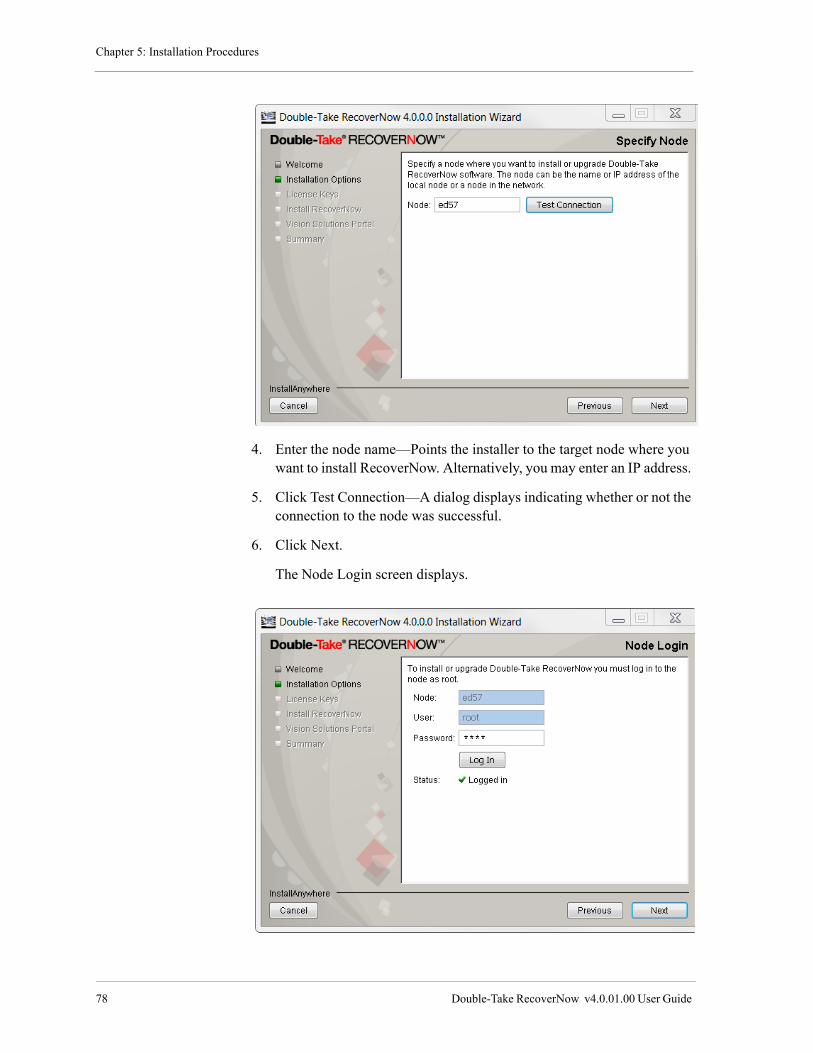
Chapter 5: Installation Procedures
78 Double-Take RecoverNow v4.0.01.00 User Guide
4. Enter the node name—Points the installer to the target node where you want to install RecoverNow. Alternatively, you may enter an IP address.
5. Click Test Connection—A dialog displays indicating whether or not the connection to the node was successful.
6. Click Next.
The Node Login screen displays.
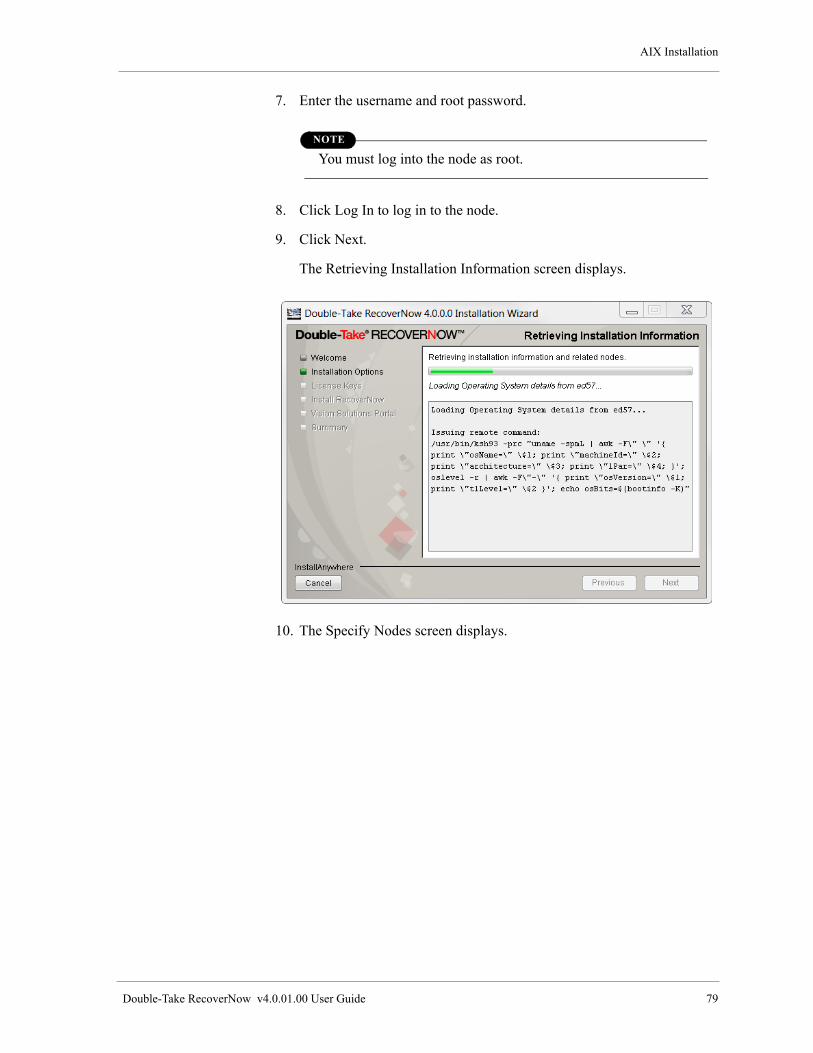
AIX Installation
Double-Take RecoverNow v4.0.01.00 User Guide 79
7. Enter the username and root password.
NOTE
You must log into the node as root.
8. Click Log In to log in to the node.
9. Click Next.
The Retrieving Installation Information screen displays.
10. The Specify Nodes screen displays.
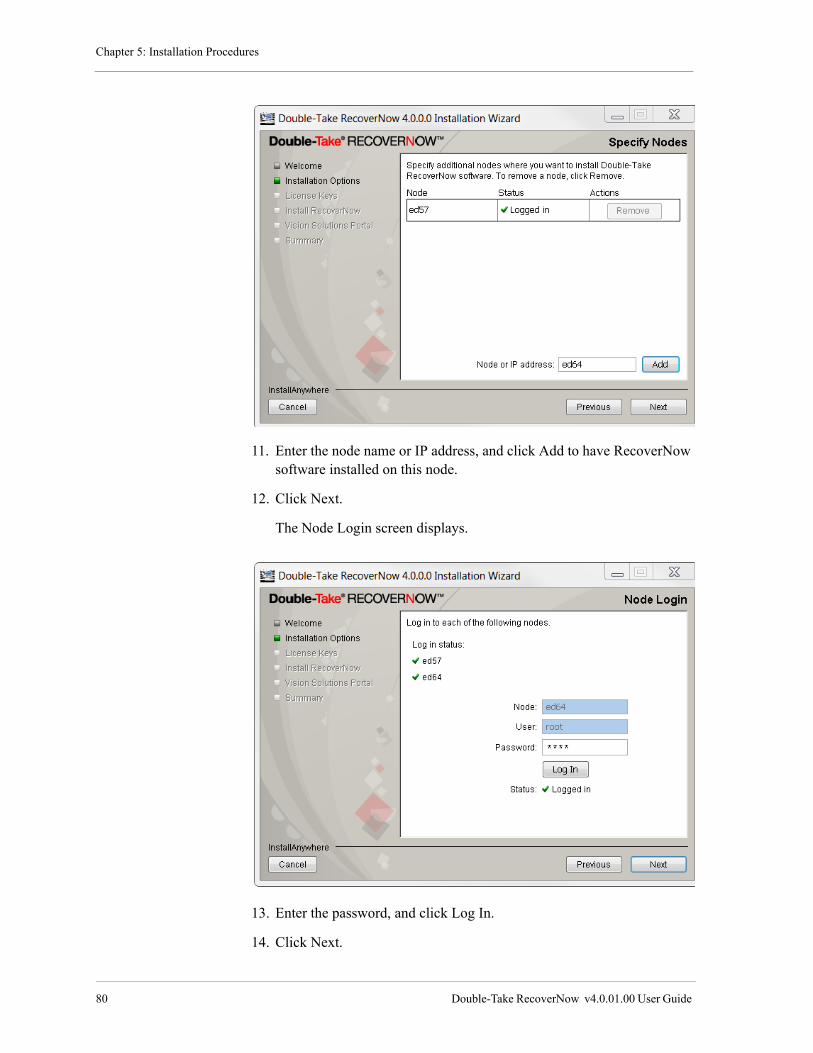
Chapter 5: Installation Procedures
80 Double-Take RecoverNow v4.0.01.00 User Guide
11. Enter the node name or IP address, and click Add to have RecoverNow software installed on this node.
12. Click Next.
The Node Login screen displays.
13. Enter the password, and click Log In.
14. Click Next.

AIX Installation
Double-Take RecoverNow v4.0.01.00 User Guide 81
The Retrieving Installation Information screen displays.
After the installation information is successfully retrieved, the Install Vision Solutions Portal screen displays.
15. Click Next.
The Install Vision Solutions Portal screen displays.

Chapter 5: Installation Procedures
82 Double-Take RecoverNow v4.0.01.00 User Guide
When the installation completes, the Summary screen displays.
16. After you have installed the RecoverNow Portal Application, and the Vision Solutions Portal (VSP) you can log into VSP. You can select one of the highlighted nodes to launch VSP and log into VSP. See “Logging in to Vision Solutions Portal” on page 127.
17. Click Done to exit the installation wizard.

AIX Installation
Double-Take RecoverNow v4.0.01.00 User Guide 83
User Roles
The installation process creates the scrt group in /etc/group, identifying thecategory of users allowed to access the portal application.
IMPORTANT
The root user is always allowed access to the portal application.
Reinstall RecoverNow
Before you reinstall RecoverNow:
• You must stop your application and RecoverNow on the node(s) where RecoverNow is being reinstalled.
• If you have RecoverNow fixes (epkg files) installed they must be uninstalled before you can perform the reinstall. RecoverNow fixes (epkg files) begin with the letters ES.
Use one the following methods to list all installed fixes (epkg files).
a. From the command line: emgr -l
b. From SMIT: use fast path by entering emgr
Use one the following methods to remove installed RecoverNow fixes.
From the command line:
a. From the command line: emgr -rL <LABEL>
b. From SMIT: use fast path by entering emgr
To reinstall RecoverNow:
1. In the section, “Install Double-Take RecoverNow, the Vision Solutions Portal and the Double-Take RecoverNow Portal Application” on page 64, perform step 1 through step 6.
2. From the Select Product screen select, Double-Take RecoverNow and Vision Solutions Portal (recommended) and click Next.
The Install or Upgrade screen displays.
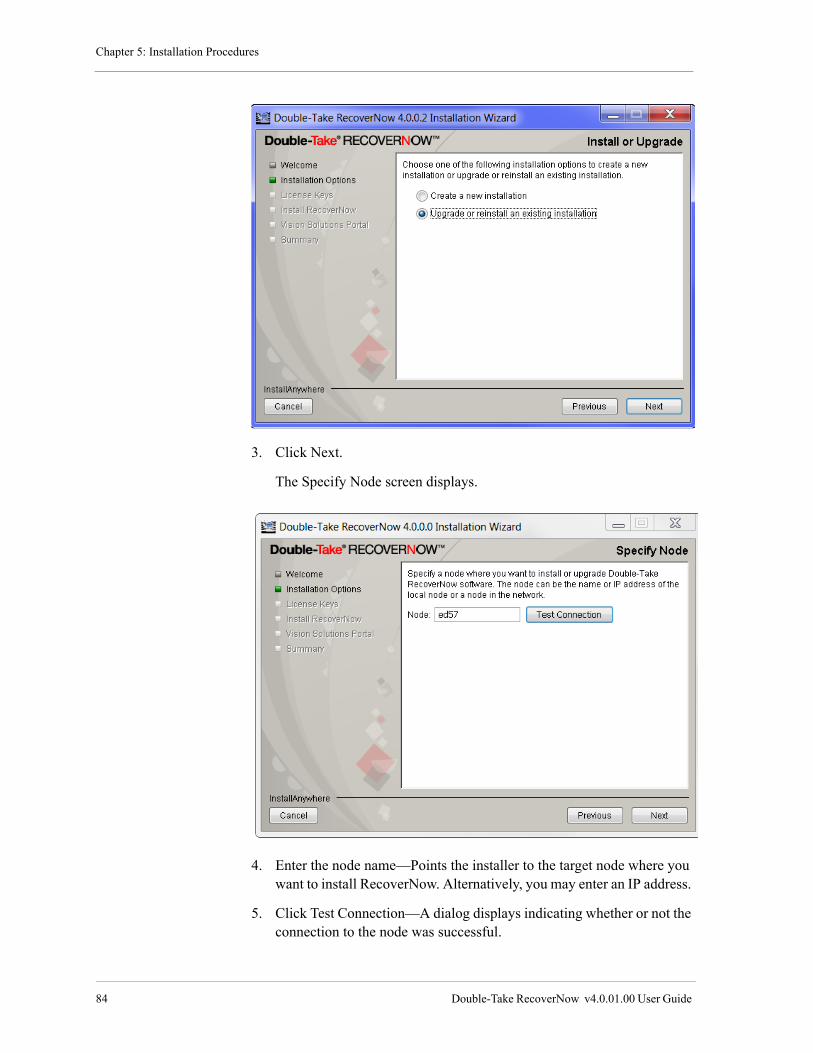
Chapter 5: Installation Procedures
84 Double-Take RecoverNow v4.0.01.00 User Guide
3. Click Next.
The Specify Node screen displays.
4. Enter the node name—Points the installer to the target node where you want to install RecoverNow. Alternatively, you may enter an IP address.
5. Click Test Connection—A dialog displays indicating whether or not the connection to the node was successful.
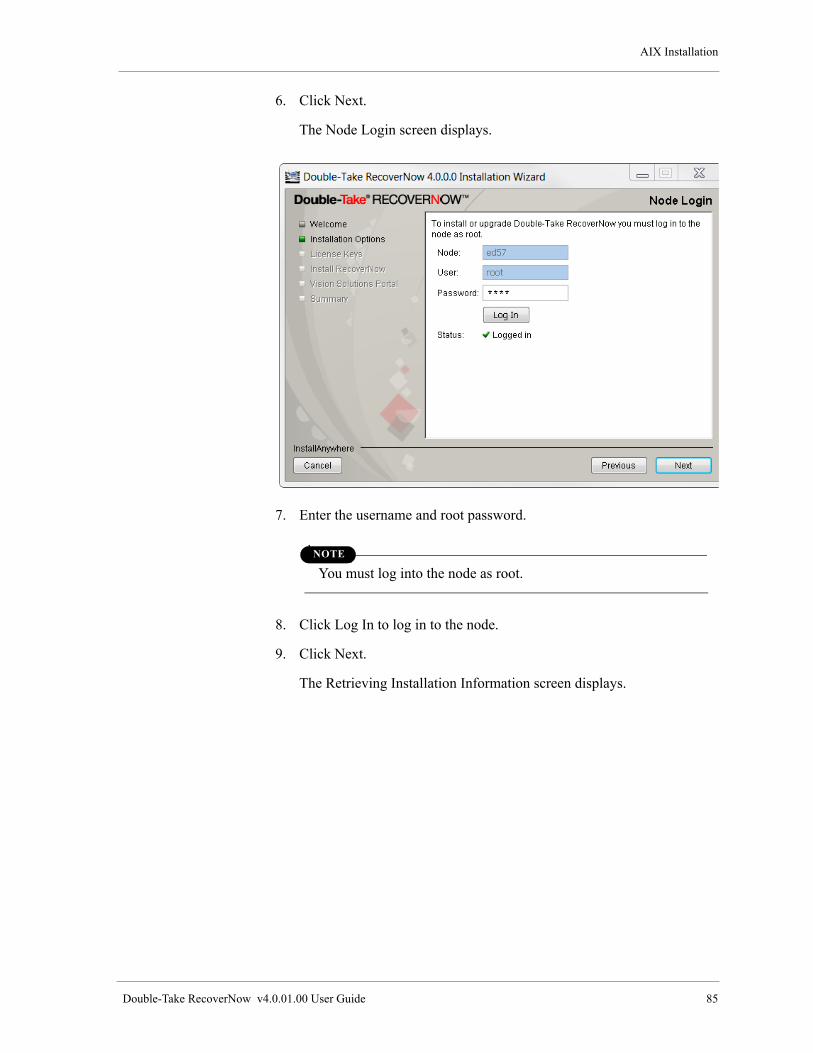
AIX Installation
Double-Take RecoverNow v4.0.01.00 User Guide 85
6. Click Next.
The Node Login screen displays.
7. Enter the username and root password.
NOTE
You must log into the node as root.
8. Click Log In to log in to the node.
9. Click Next.
The Retrieving Installation Information screen displays.

Chapter 5: Installation Procedures
86 Double-Take RecoverNow v4.0.01.00 User Guide
10. Click Next.
The Specify Nodes screen displays.
11. Enter the Node name or IP address and click Add. The node is added to the list.
12. Click Next
The Node Login screen displays.
13. Specify the password and click Log In, then click Next
The Retrieving Installation Information screen displays. After the installation information is successfully retrieved, the RecoverNow Options screen displays.

AIX Installation
Double-Take RecoverNow v4.0.01.00 User Guide 87
14. Click Next to reinstall to each node.
The Documentation Options screen displays.
15. Click Next.
License Key Options screen displays.

Chapter 5: Installation Procedures
88 Double-Take RecoverNow v4.0.01.00 User Guide
You have two options:
• If you select Use existing license keys, the License Key Check screen displays.
• If you select, Specify the location of license keys, the License Key Location screen displays.
16. After you specify license keys and they are validated, click Next.
The Product Shutdown Required screen displays.

AIX Installation
Double-Take RecoverNow v4.0.01.00 User Guide 89
17. You must manually ensure that RecoverNow is shutdown, the wizard does not perform this task. Click Next.
Once the installation wizard has verified that RecoverNow has been shutdown the Shutdown Verification Complete screen displays.
18. Click Next to reinstall RecoverNow.

Chapter 5: Installation Procedures
90 Double-Take RecoverNow v4.0.01.00 User Guide
19. When the RecoverNow reinstall completes, the Install Portal Application screen appears.
20. Click Next to reinstall the portal application and the Vision Solutions portal.
The Shut Down Vision Solutions Portal screen displays.

AIX Installation
Double-Take RecoverNow v4.0.01.00 User Guide 91
21. Select Yes, to shut down the Vision Solutions Portal and install the Vision Solutions Portal and the portal application.
NOTE
You can also decide to skip the Vision Solutions Portal and the portal application reinstall.
The Installing Vision Solutions Portal screen displays.
When the Vision Solutions Portal and the portal application reinstall completes, a screen briefly appears stating that the reinstall was a success. Then the Installation Complete screen displays.
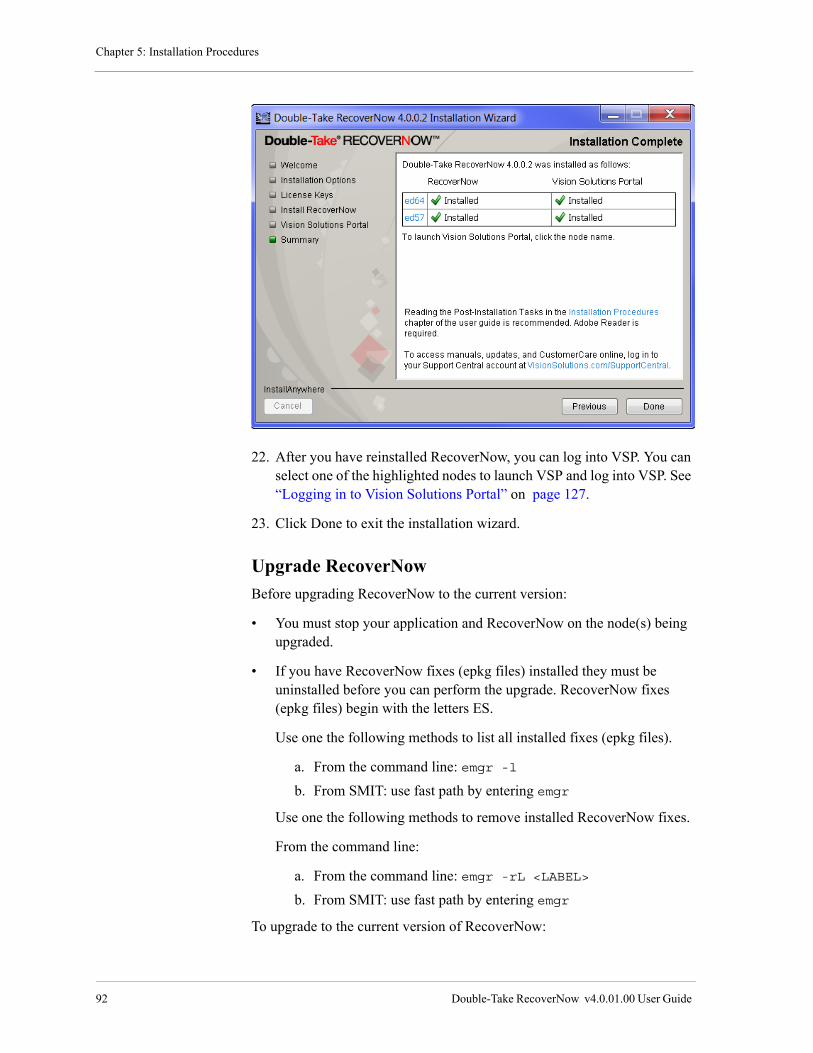
Chapter 5: Installation Procedures
92 Double-Take RecoverNow v4.0.01.00 User Guide
22. After you have reinstalled RecoverNow, you can log into VSP. You can select one of the highlighted nodes to launch VSP and log into VSP. See “Logging in to Vision Solutions Portal” on page 127.
23. Click Done to exit the installation wizard.
Upgrade RecoverNow
Before upgrading RecoverNow to the current version:
• You must stop your application and RecoverNow on the node(s) being upgraded.
• If you have RecoverNow fixes (epkg files) installed they must be uninstalled before you can perform the upgrade. RecoverNow fixes (epkg files) begin with the letters ES.
Use one the following methods to list all installed fixes (epkg files).
a. From the command line: emgr -l
b. From SMIT: use fast path by entering emgr
Use one the following methods to remove installed RecoverNow fixes.
From the command line:
a. From the command line: emgr -rL <LABEL>
b. From SMIT: use fast path by entering emgr
To upgrade to the current version of RecoverNow:
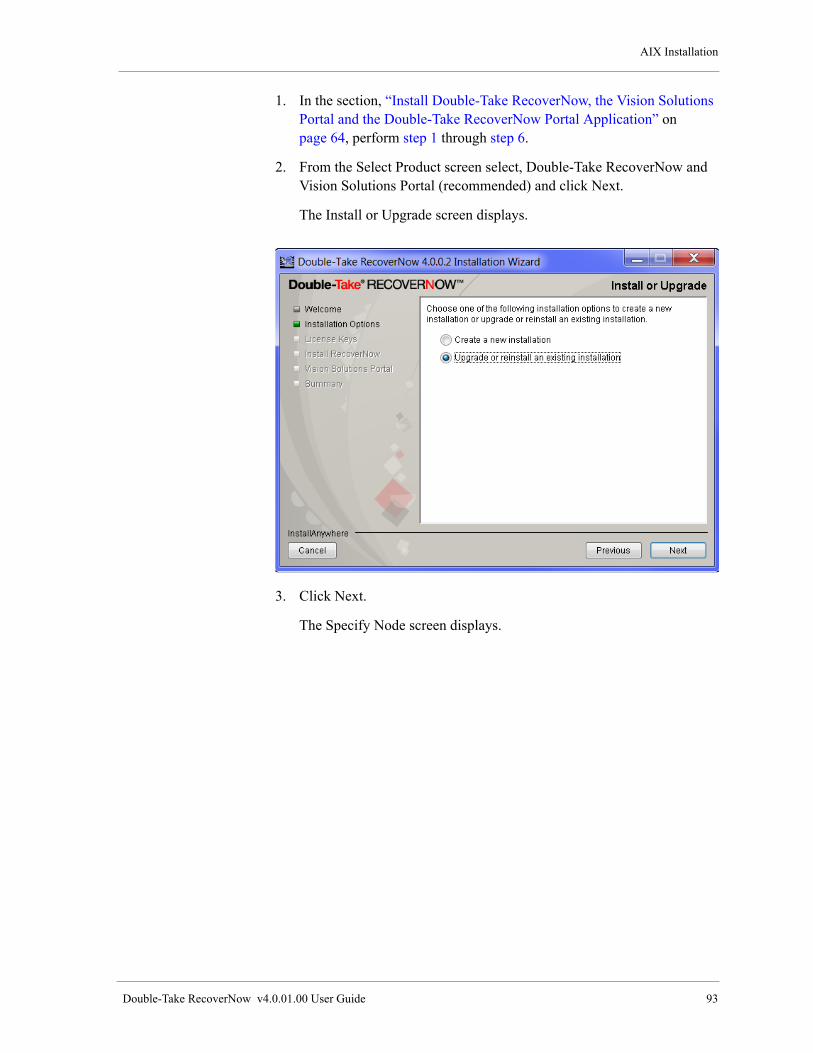
AIX Installation
Double-Take RecoverNow v4.0.01.00 User Guide 93
1. In the section, “Install Double-Take RecoverNow, the Vision Solutions Portal and the Double-Take RecoverNow Portal Application” on page 64, perform step 1 through step 6.
2. From the Select Product screen select, Double-Take RecoverNow and Vision Solutions Portal (recommended) and click Next.
The Install or Upgrade screen displays.
3. Click Next.
The Specify Node screen displays.
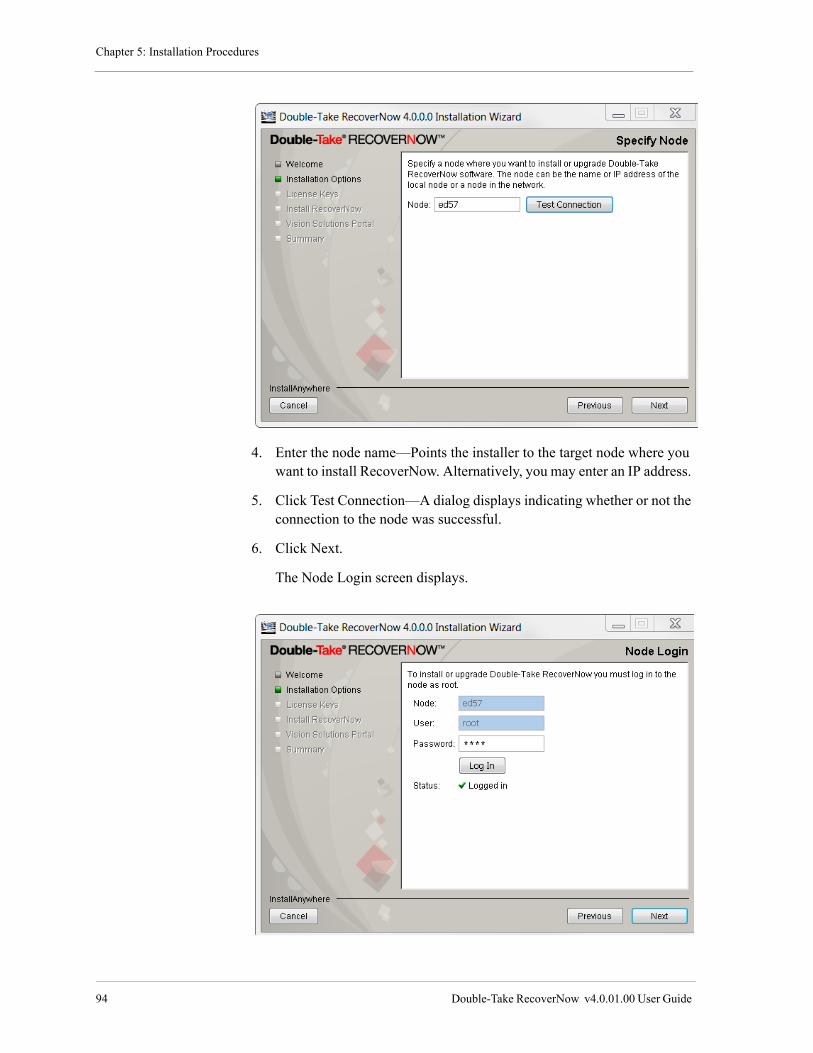
Chapter 5: Installation Procedures
94 Double-Take RecoverNow v4.0.01.00 User Guide
4. Enter the node name—Points the installer to the target node where you want to install RecoverNow. Alternatively, you may enter an IP address.
5. Click Test Connection—A dialog displays indicating whether or not the connection to the node was successful.
6. Click Next.
The Node Login screen displays.
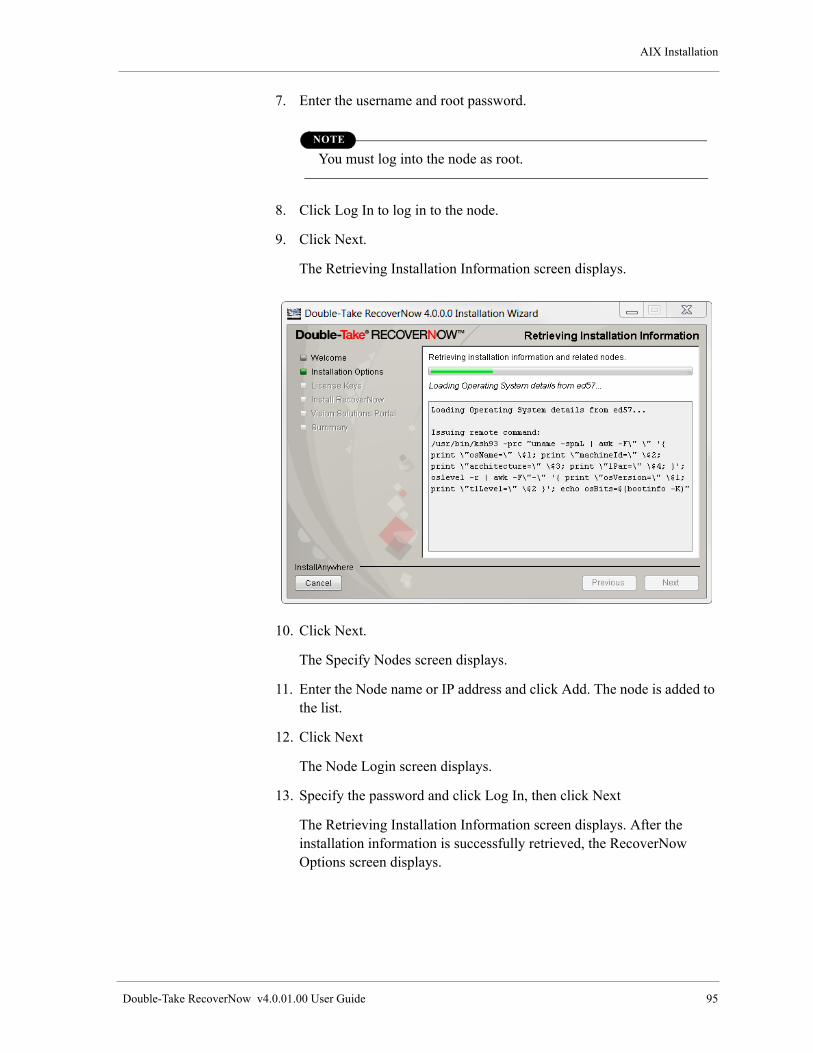
AIX Installation
Double-Take RecoverNow v4.0.01.00 User Guide 95
7. Enter the username and root password.
NOTE
You must log into the node as root.
8. Click Log In to log in to the node.
9. Click Next.
The Retrieving Installation Information screen displays.
10. Click Next.
The Specify Nodes screen displays.
11. Enter the Node name or IP address and click Add. The node is added to the list.
12. Click Next
The Node Login screen displays.
13. Specify the password and click Log In, then click Next
The Retrieving Installation Information screen displays. After the installation information is successfully retrieved, the RecoverNow Options screen displays.
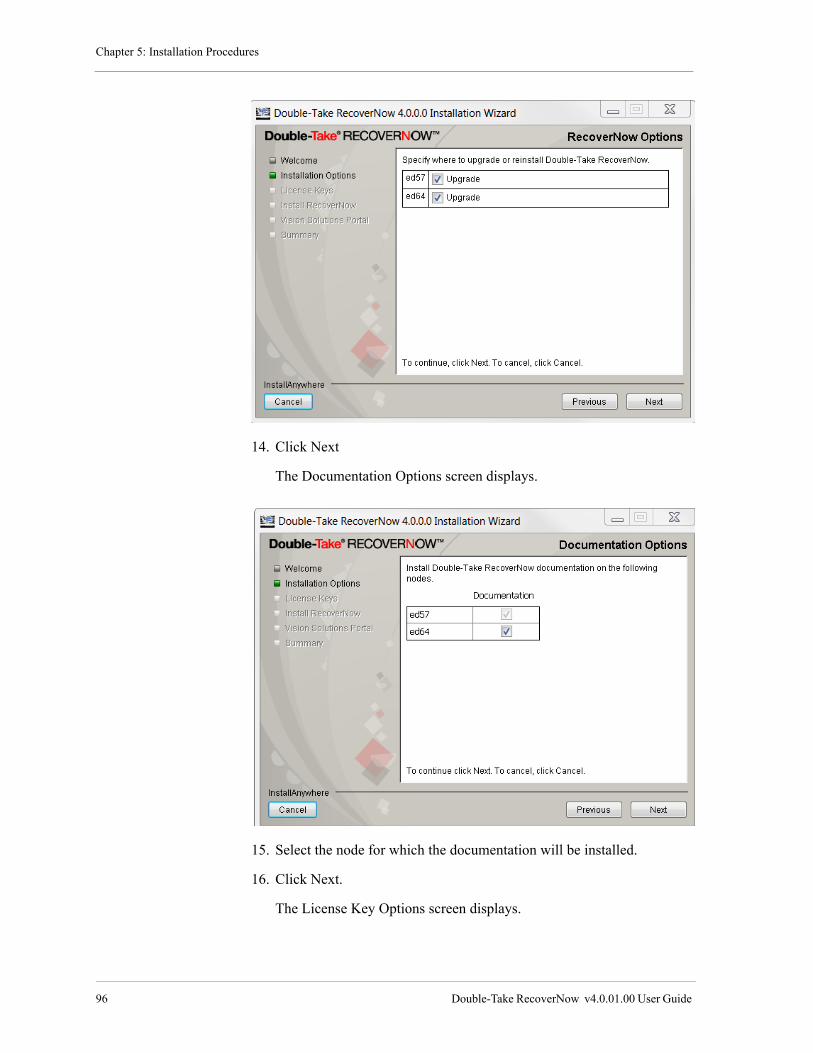
Chapter 5: Installation Procedures
96 Double-Take RecoverNow v4.0.01.00 User Guide
14. Click Next
The Documentation Options screen displays.
15. Select the node for which the documentation will be installed.
16. Click Next.
The License Key Options screen displays.
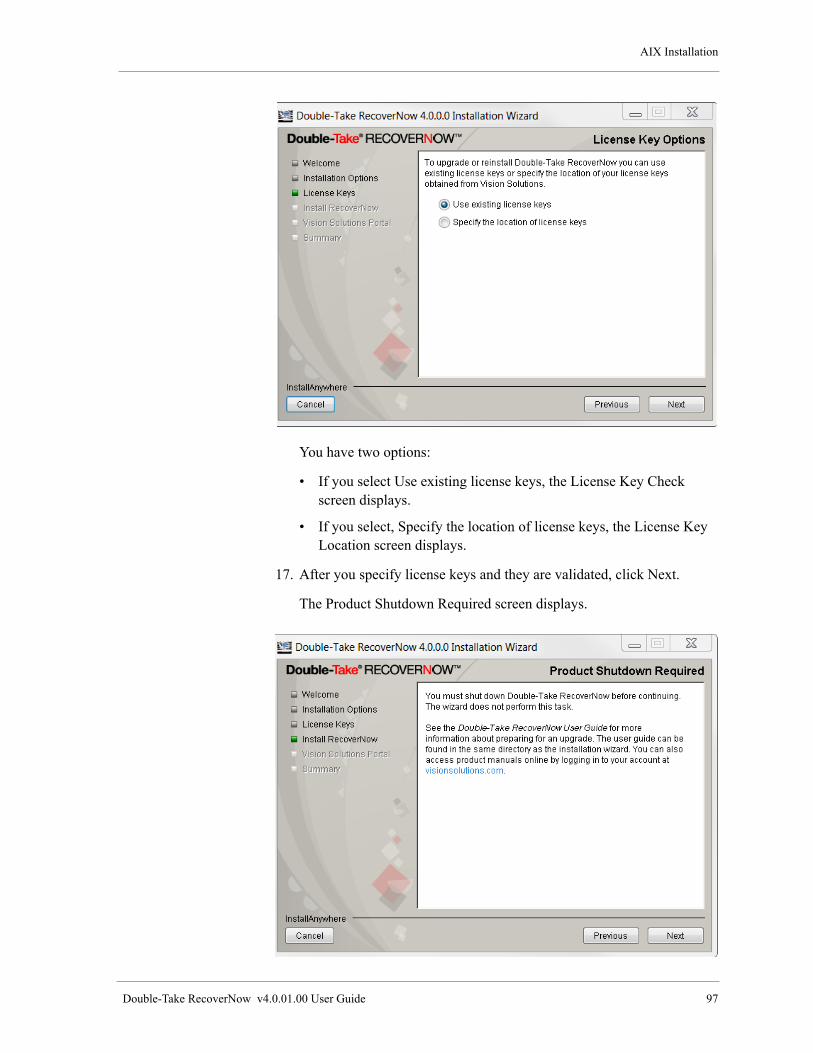
AIX Installation
Double-Take RecoverNow v4.0.01.00 User Guide 97
You have two options:
• If you select Use existing license keys, the License Key Check screen displays.
• If you select, Specify the location of license keys, the License Key Location screen displays.
17. After you specify license keys and they are validated, click Next.
The Product Shutdown Required screen displays.

Chapter 5: Installation Procedures
98 Double-Take RecoverNow v4.0.01.00 User Guide
18. You must manually ensure that RecoverNow is shutdown, the wizard does not perform this task. Click Next.
Once the installation wizard has verified that RecoverNow has been shut down, the Shutdown Verification Complete screen displays.
19. Click Next
If you have efixes, the Fix Removal Required screen displays. You must manually remove the efixes, the wizard does not perform this task. Refer to page 92 for information on how to remove efixes.

AIX Installation
Double-Take RecoverNow v4.0.01.00 User Guide 99
20. After you remove the efixes, click Next
The Verify Fix Removal screen displays.
When the fix verification successfully completes the Fix Removal Verification Complete screen displays.

Chapter 5: Installation Procedures
100 Double-Take RecoverNow v4.0.01.00 User Guide
21. Click Next.
The Installing screen displays.
When the installation completes, the Install Portal Application screen displays.
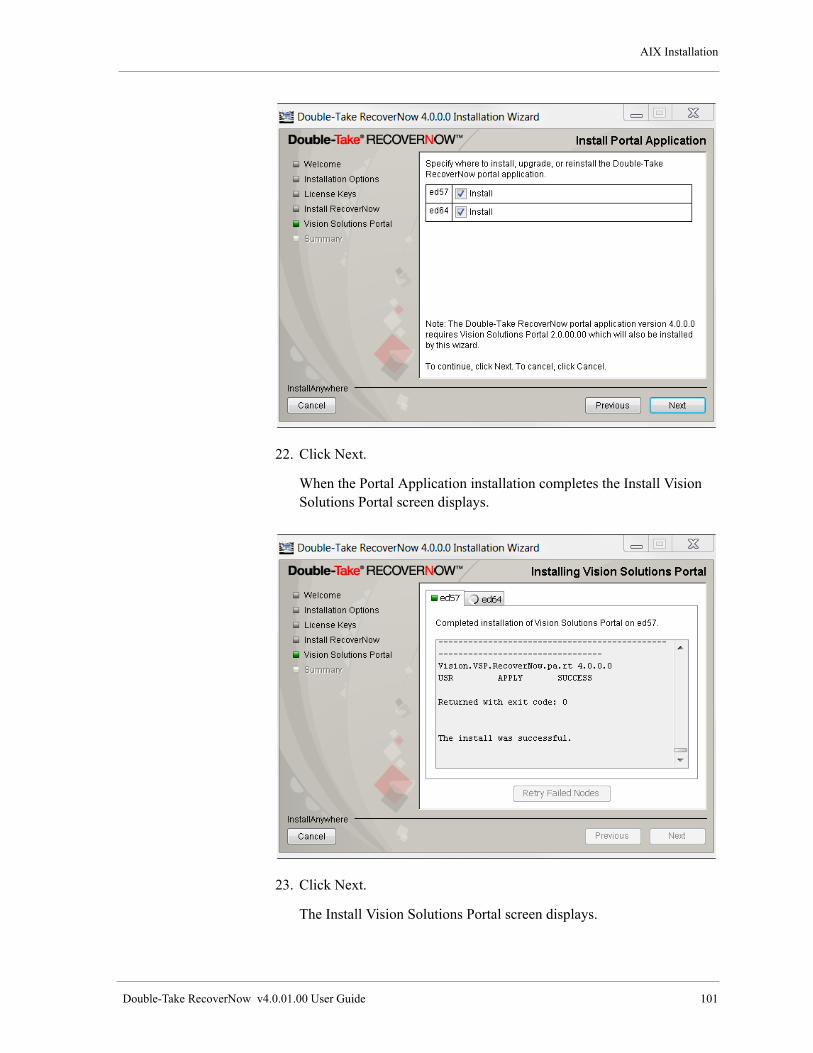
AIX Installation
Double-Take RecoverNow v4.0.01.00 User Guide 101
22. Click Next.
When the Portal Application installation completes the Install Vision Solutions Portal screen displays.
23. Click Next.
The Install Vision Solutions Portal screen displays.
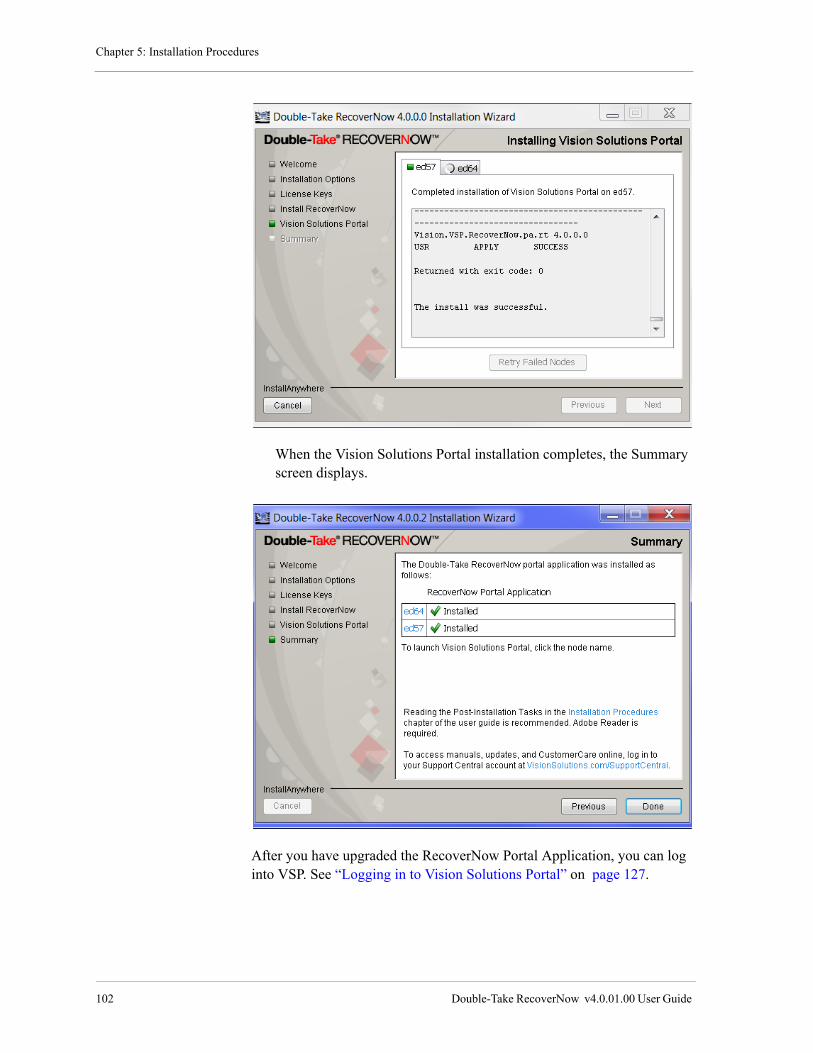
Chapter 5: Installation Procedures
102 Double-Take RecoverNow v4.0.01.00 User Guide
When the Vision Solutions Portal installation completes, the Summary screen displays.
After you have upgraded the RecoverNow Portal Application, you can log into VSP. See “Logging in to Vision Solutions Portal” on page 127.

Use smit to Install RecoverNow
Double-Take RecoverNow v4.0.01.00 User Guide 103
Use smit to Install RecoverNow
To use smitty to install RecoverNow:
• “Step 1. Request a License” on page 103
• “Step 2: Install RecoverNow” on page 103
Step 1. Request a License
1. Identify the Machine ID/Host ID number. From a UNIX prompt, issue the command:
a. Mount the CD
b. Run bin/AIX/machine_id.bin
2. Send the following information in email to Customer Accounting at:
The email should contain the following:
• Company Name
• Product(s) for which you are requesting a license
• Machine ID
• Operating system
• Operating system version
• Node name (hostname)
A license file is generated, attached to an email, and sent back to you.
3. Save the license file in a location of your choice.
Step 2: Install RecoverNow
1. Download the RecoverNow installation program from the Vision Extranet at Customer/Partner Login at www.visionsolutions.com.
2. Extract and copy the appropriate directory and files from your PC to the AIX server. Depending upon your OS and bit-level, choose one of the following directory paths for a 32 or 64 bit kernel:
• esFiles/52/32/
• esFiles/52/64/
• esFiles/53/32/
• esFiles/53/64/
• esFiles/61/64/
• esFiles /71/64

Chapter 5: Installation Procedures
104 Double-Take RecoverNow v4.0.01.00 User Guide
3. Log into the AIX system as root.
4. Navigate to the RecoverNow software for AIX.
5. Navigate to the AIX version: 52 53 61
For example cd 53
6. Choose the directory path for a 32 or 64 bit kernel:
• esFiles/52/32/
• esFiles/52/64/
• esFiles/53/32/
• esFiles/53/64/
• esFiles/61/64/
• esFiles /71/64
7. Enter the following command:
smit
The System Management screen displays.
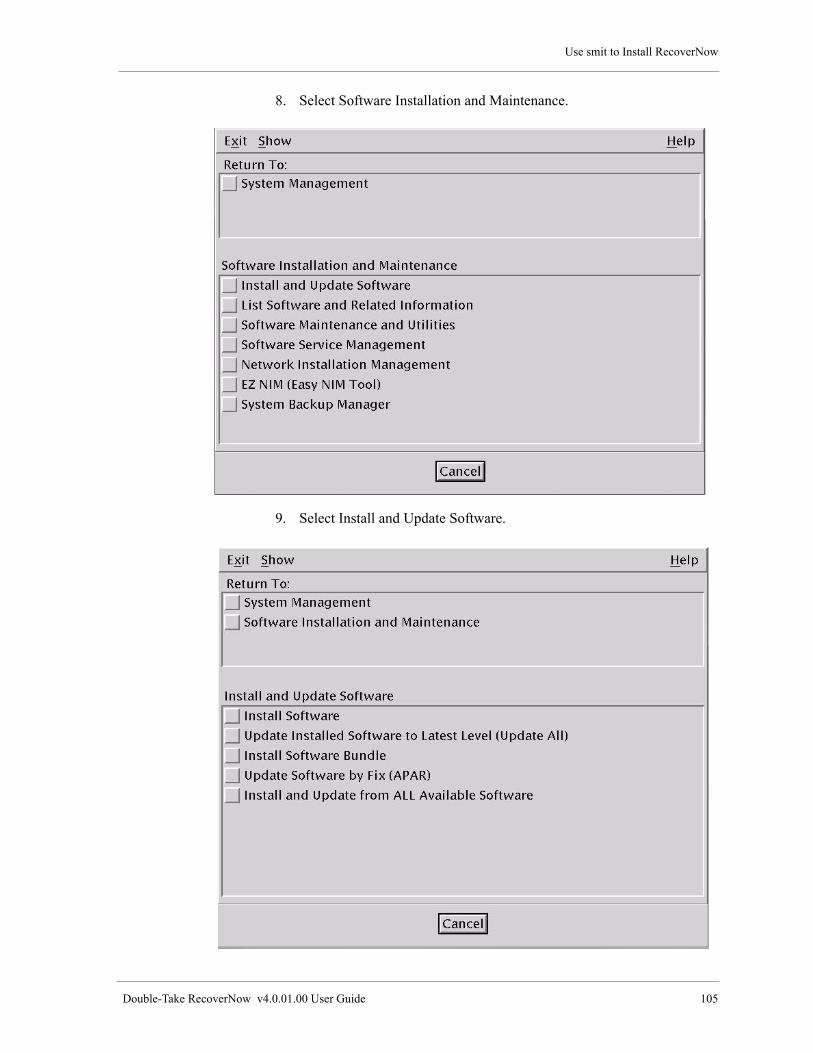
Use smit to Install RecoverNow
Double-Take RecoverNow v4.0.01.00 User Guide 105
8. Select Software Installation and Maintenance.
9. Select Install and Update Software.

Chapter 5: Installation Procedures
106 Double-Take RecoverNow v4.0.01.00 User Guide
10. Select Install Software.
11. Select the current directory as the INPUT device/directory and enter a dot (.).
12. Press OK.
The Software to Install screen displays.

Use smit to Install RecoverNow
Double-Take RecoverNow v4.0.01.00 User Guide 107
13. Click List to the right of SOFTWARE to install.
14. Click to select the components you want to install.
15. After you have made your selections, press OK to initiate smit and install the selected components.
Chapter 5: Installation Procedures
108 Double-Take RecoverNow v4.0.01.00 User Guide
After you have installed RecoverNow, the RecoverNow Portal Application, and the Vision Solitons Portal (VSP) you can log into VSP. See “Logging in to Vision Solutions Portal” on page 127.
User Roles
The installation process creates the scrt group in /etc/group, identifying thecategory of users allowed to access the portal application.
IMPORTANT
The root user is always allowed access to the portal application.
Log Files
There are two types of log files:
• install.log—Stores all user inputs in the directory from which the installer is run if you have copied your inputs to an AIX machine. This log file also stores details of the installation process.
• verifier.log—Stores the details of verification information on the remote or local machine in the directory from which the installer is run.
Run the validate_license command
After you apply the license, run the validate license command:
/usr/scrt/bin/validate_license
A license validation message appears:
License validated or License validation failed
If you receive the License validation failed message ensure that the information specified in license.inf is correct and that the output of the hostname command matches the hostname in license.inf. If the problem persists, email or contact Customer Support. Refer to the readme.txt file for contact information.
License Expiration
When the license expires for RecoverNow, the application on the production server is not affected. However, data replication to the recovery server will be stopped, and you will no longer be able to use the Continuous Data Protection functionality. You can check the license file for the data replication component for information about the expiration of the license. The file is named: /usr/scrt/run/node_license.properties.

Use smit to Install RecoverNow
Double-Take RecoverNow v4.0.01.00 User Guide 109
NOTE
RecoverNow verifies the contents of the license file. Do not alter this file.

Chapter 5: Installation Procedures
110 Double-Take RecoverNow v4.0.01.00 User Guide
Uninstall RecoverNow on AIX
To uninstall Double-Take RecoverNow:
IMPORTANT
You must shutdown RecoverNow and unload the drivers before you run the uninstall program. Use the following command:rtstop -FC <Context ID>
1. Download the Double-Take RecoverNow installation program from the:
• Vision Extranet at Customer/Partner Login at www.visionsolutions.com.
• Double-Take RecoverNow installation CD.
2. Do one of the following:
a. Click Uninstall Double-Take RecoverNow on the Double-Take RecoverNow Installation splash screen or click uninstall.exe.
a. Run uninstall.bin.
3. Run the Uninstall wizard to remove Double-Take RecoverNow from your nodes.
The Double-Take RecoverNow Uninstall Wizard runs and displays the Double-Take RecoverNow Welcome screen.
4. Click Next.

Uninstall RecoverNow on AIX
Double-Take RecoverNow v4.0.01.00 User Guide 111
The Specify Node screen displays.
5. Enter the node name—Points the installer to the target node where you want to uninstall RecoverNow.
6. Click Next.
The Specify Nodes screen displays.
7. Enter the node name or IP address, and click Add to have RecoverNow software uninstalled on this node.
8. Click Next.

Chapter 5: Installation Procedures
112 Double-Take RecoverNow v4.0.01.00 User Guide
The Node Login screen re-displays.
9. Log in to the node that you added, and press Next.
The Specify Nodes screen re-displays.
10. Click Next.
The Retrieving Installation Information screen briefly displays. Then the Uninstall Options screen displays.
11. Select the components you want to uninstall from each node and click Next.

Uninstall RecoverNow on AIX
Double-Take RecoverNow v4.0.01.00 User Guide 113
The Product Shutdown Required screen displays.
12. You must manually ensure that RecoverNow is shutdown, the wizard does not perform this task. Click Next.
Once the uninstall wizard has verified that RecoverNow has been shutdown the Shutdown Verification Complete screen displays.
13. Click Next
If you have efixes, the Fix Removal Required screen displays. You must manually remove the efixes, the wizard does not perform this task.

Chapter 5: Installation Procedures
114 Double-Take RecoverNow v4.0.01.00 User Guide
14. After you remove the efixes, click Next
The Verify Fix Removal screen displays.
15. When the fix verification successfully completes, the Fix Removal Verification Complete screen displays.
16. Click Next to uninstall RecoverNow and VSP.
The Uninstall RecoverNow screen displays.

Uninstall RecoverNow on AIX
Double-Take RecoverNow v4.0.01.00 User Guide 115
When the uninstall process completes, the Uninstall Complete screen displays.

Chapter 5: Installation Procedures
116 Double-Take RecoverNow v4.0.01.00 User Guide
Use smit to Uninstall RecoverNow
To uninstall RecoverNow:
IMPORTANT
You must shutdown RecoverNow and unload the drivers before you run the uninstall program. Use the following command:rtstop -FC <Context ID>
1. Enter smit
The System Management screen displays.
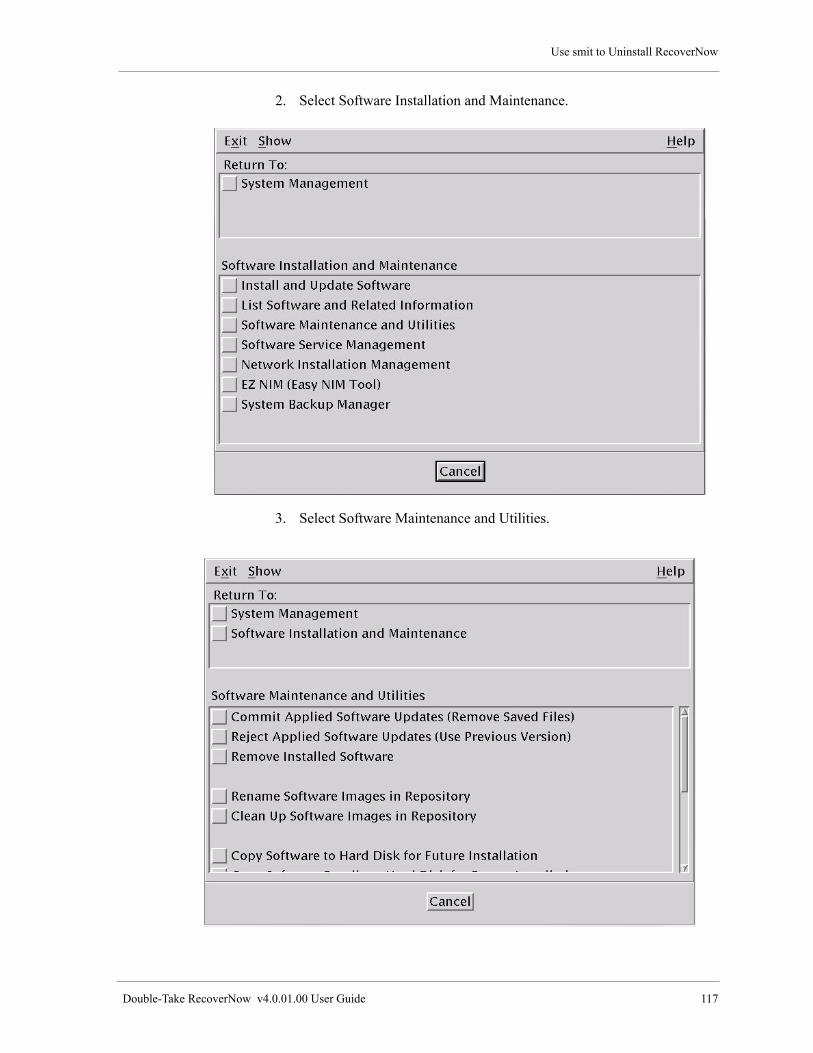
Use smit to Uninstall RecoverNow
Double-Take RecoverNow v4.0.01.00 User Guide 117
2. Select Software Installation and Maintenance.
3. Select Software Maintenance and Utilities.
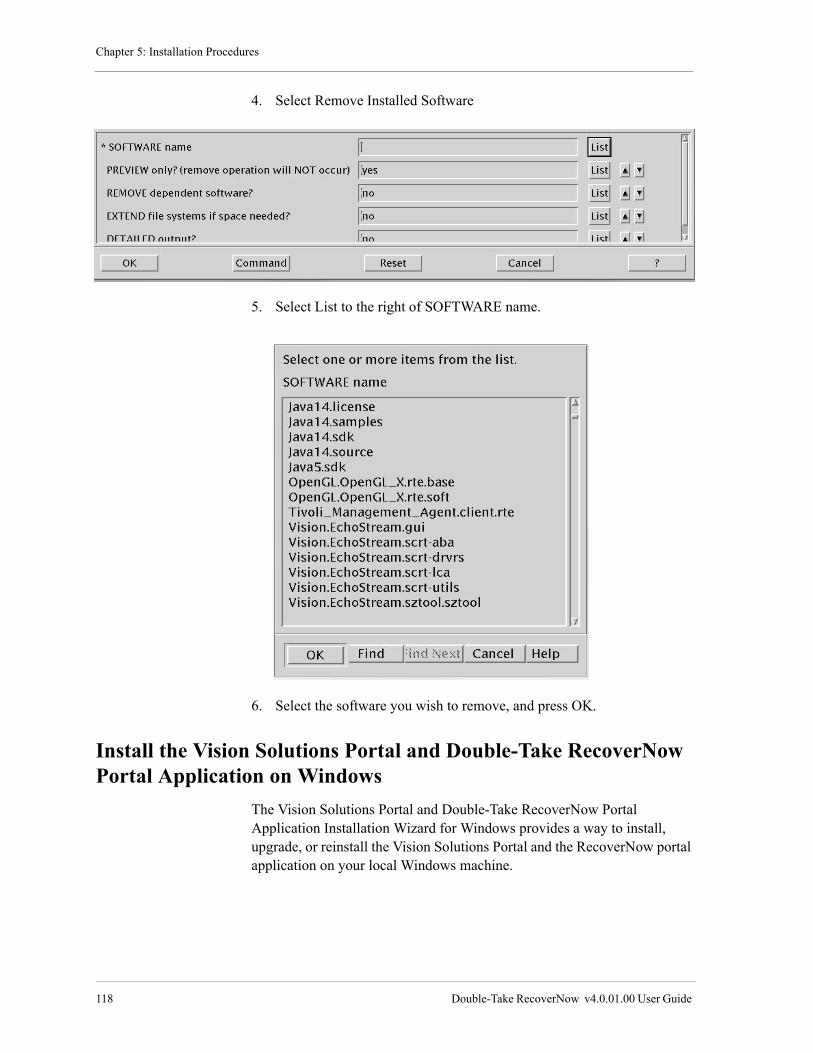
Chapter 5: Installation Procedures
118 Double-Take RecoverNow v4.0.01.00 User Guide
4. Select Remove Installed Software
5. Select List to the right of SOFTWARE name.
6. Select the software you wish to remove, and press OK.
Install the Vision Solutions Portal and Double-Take RecoverNow Portal Application on Windows
The Vision Solutions Portal and Double-Take RecoverNow Portal Application Installation Wizard for Windows provides a way to install, upgrade, or reinstall the Vision Solutions Portal and the RecoverNow portal application on your local Windows machine.
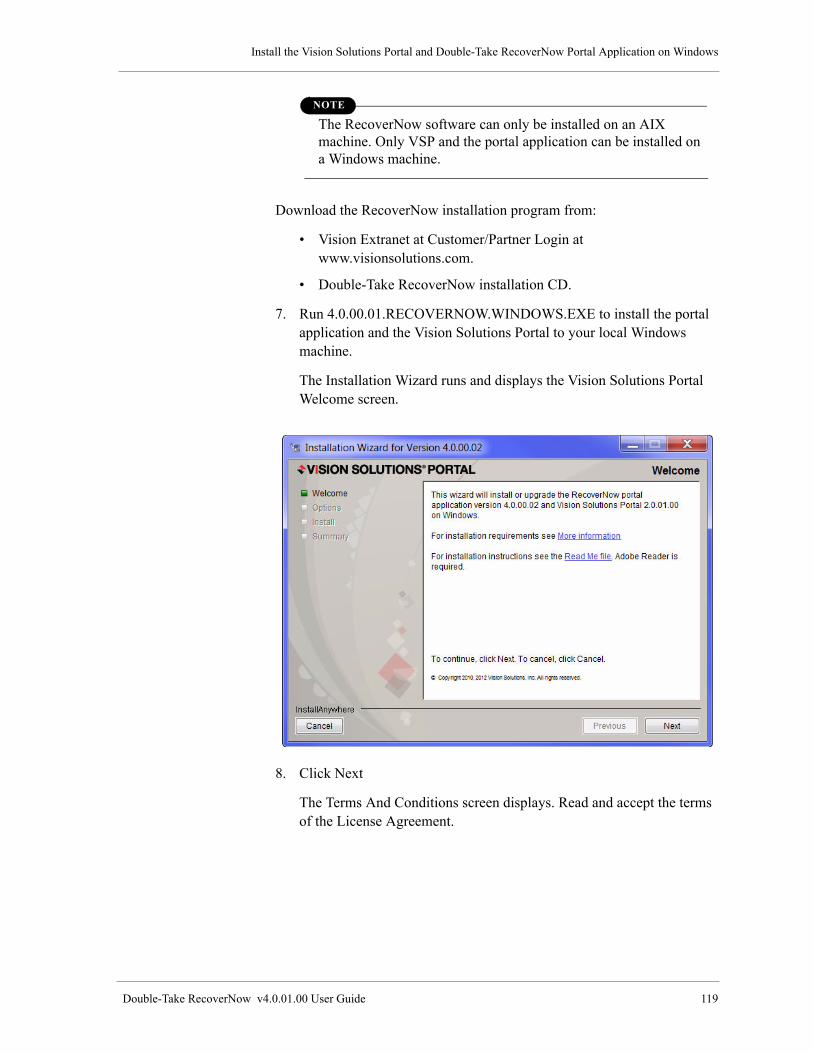
Install the Vision Solutions Portal and Double-Take RecoverNow Portal Application on Windows
Double-Take RecoverNow v4.0.01.00 User Guide 119
NOTE
The RecoverNow software can only be installed on an AIX machine. Only VSP and the portal application can be installed on a Windows machine.
Download the RecoverNow installation program from:
• Vision Extranet at Customer/Partner Login at www.visionsolutions.com.
• Double-Take RecoverNow installation CD.
7. Run 4.0.00.01.RECOVERNOW.WINDOWS.EXE to install the portal application and the Vision Solutions Portal to your local Windows machine.
The Installation Wizard runs and displays the Vision Solutions Portal Welcome screen.
8. Click Next
The Terms And Conditions screen displays. Read and accept the terms of the License Agreement.

Chapter 5: Installation Procedures
120 Double-Take RecoverNow v4.0.01.00 User Guide
9. Click Next.
The Checking Vision Solutions Portal screen displays.
10. Once the VSP and portal application status is verified, the Installation Options screen displays.

Install the Vision Solutions Portal and Double-Take RecoverNow Portal Application on Windows
Double-Take RecoverNow v4.0.01.00 User Guide 121
11. You can decide to start the portal server when Windows starts and after the installation completes.
12. Click Next.
NOTE
If the portal application is currently active, the Shut Down Vision Solutions Portal screen displays. The installation wizard will enable you to shut down VSP.
13. Click Next.

Chapter 5: Installation Procedures
122 Double-Take RecoverNow v4.0.01.00 User Guide
The Installing screen displays, showing the status of the installation.
14. When the installation completes, the Summary screen displays.
15. After you have installed the RecoverNow portal application, you can log into VSP. You can select the highlighted machine-name address to launch VSP and log into VSP. See “Logging in to Vision Solutions Portal” on page 127.
16. Click Done to exit the installation wizard.
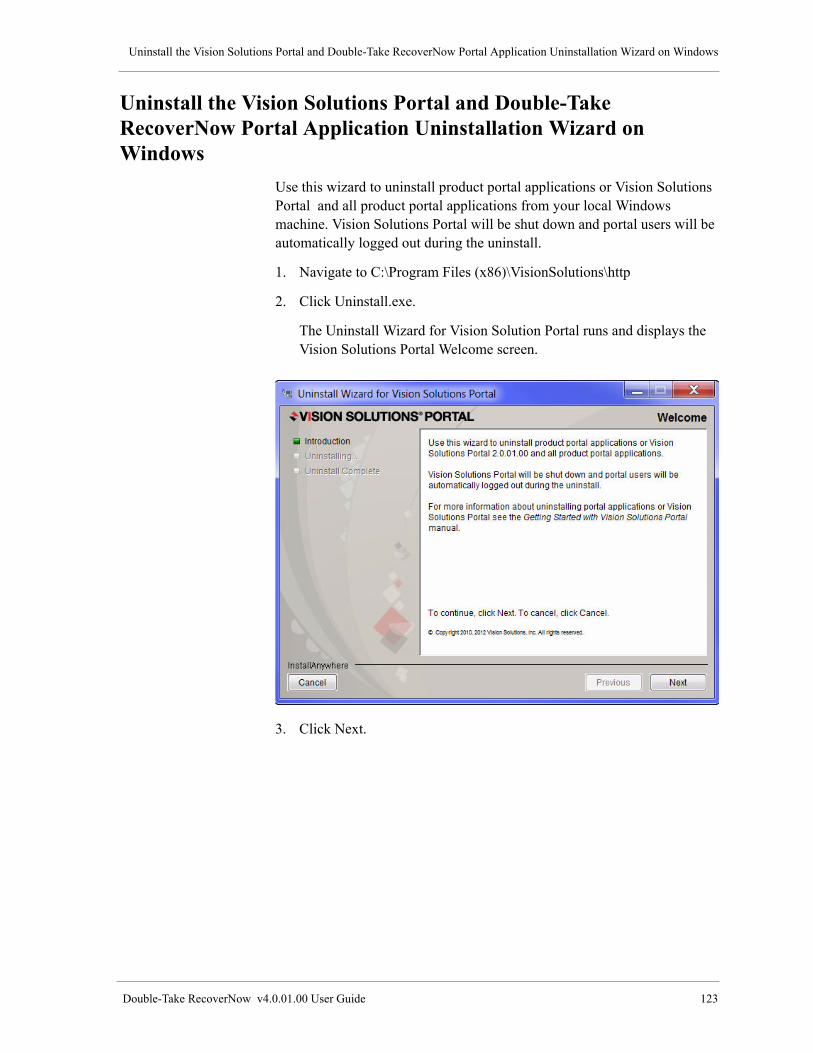
Uninstall the Vision Solutions Portal and Double-Take RecoverNow Portal Application Uninstallation Wizard on Windows
Double-Take RecoverNow v4.0.01.00 User Guide 123
Uninstall the Vision Solutions Portal and Double-Take RecoverNow Portal Application Uninstallation Wizard on Windows
Use this wizard to uninstall product portal applications or Vision Solutions Portal and all product portal applications from your local Windows machine. Vision Solutions Portal will be shut down and portal users will be automatically logged out during the uninstall.
1. Navigate to C:\Program Files (x86)\VisionSolutions\http
2. Click Uninstall.exe.
The Uninstall Wizard for Vision Solution Portal runs and displays the Vision Solutions Portal Welcome screen.
3. Click Next.

Chapter 5: Installation Procedures
124 Double-Take RecoverNow v4.0.01.00 User Guide
The Checking Vision Solutions Portal screen displays.
4. Once the VSP and portal application status is verified, the Options screen displays.
5. Decide which components you wish to uninstall and click Next.
The Shut Down Vision Solutions Portal screen displays.

Uninstall the Vision Solutions Portal and Double-Take RecoverNow Portal Application Uninstallation Wizard on Windows
Double-Take RecoverNow v4.0.01.00 User Guide 125
6. When the shut down of VSP completes, the Ready to Uninstall screen displays.
7. Click Next.
The Preparing to Uninstall screen displays.

Chapter 5: Installation Procedures
126 Double-Take RecoverNow v4.0.01.00 User Guide
8. When the uninstall processing completes, the Summary screen displays.
9. Click Done, to complete the Vision Solutions Portal uninstallation.
Post-Installation Tasks
These sections contain the post-installation tasks:
• “Logging in to Vision Solutions Portal” on page 127

Post-Installation Tasks
Double-Take RecoverNow v4.0.01.00 User Guide 127
• “Increase Your AIX File Limit” on page 128
• “Enable Automatic Startup” on page 128
• “Enable Automatic Startup” on page 128
Logging in to Vision Solutions Portal
You must have a valid user ID and password for the node on which the Vision Solutions Portal (VSP) server is installed. Do the following:
1. Enter the following URL in your web browser:
http://server:port
The server is the IP address or host name for the node on which the VSP server is installed and active. The default port number is 8410. For example, if the VSP server was installed on node vsp-53, you would copy the following url into the address field in your browser window:
http://vsp-53:8410
2. The portal appears showing the Log In page. Log in using your user ID and password. Depending on the platform, the user ID and password may be case-sensitive.
NOTE
If you have a problem logging into VSP refer to the Troubleshooting chapter in Getting Started with Vision Solutions Portal (2.0.00.07_VSP_Getting_Started.pdf) packaged with RecoverNow for AIX.
After you have logged in, the portal opens to the Home page. A default portal connection exists for the node on which you logged in.

Chapter 5: Installation Procedures
128 Double-Take RecoverNow v4.0.01.00 User Guide
For detailed information on working with VSP, refer to Getting Started with Vision Solutions Portal (2.0.00.07_VSP_Getting_Started.pdf) packaged with RecoverNow for AIX.
Increase Your AIX File Limit
If you are using 4,000 or more Log File Containers (LFCs), you need to increase your AIX file limit of 2,000. Make the file limit equal to the number of LFCs in the /etc/security/limits file.
If the number of LFCs in a configuration exceeds 5,000, you may need to increase the default data value in /etc/security/limits to 524288, which can support up to 20,000 LFCs. The default value is 262144.
To determine an exact value:
1. Temporarily set data to -1 in /etc/security/limits.
2. Restart scrt_lca or scrt_aba.
3. Use the following command to monitor the maximum SIZE reached over time:
while true;do ps v <scrt_lca or scrt_aba PID>|awk
'NR>1' >>/tmp/agent_size.out;sleep 60;done&
If this value is inadequate, one of the following will assert or shutdown without reason:
• scsetup -MC <Context ID>
• scrt_lca
• scrt_aba
Enable Automatic Startup
After you install RecoverNow on your Production, Recovery, and Replicated (if available) Servers, you need to enable automatic startup of RecoverNow so that it is started as part of the boot process. RecoverNow needs to be started before the application starts so that it can protect the application data.
1. Using the cat command, determine the entry for the protected application in the /etc/inittab file.
2. Note the entry that precedes it. The identifier for this entry is an argument in the mkitab command. The mkitab command inserts the RecoverNow boot command after the identifier into the /etc/inittab file. This causes RecoverNow to start automatically before the protected application during a reboot.
Post-Installation Tasks
Double-Take RecoverNow v4.0.01.00 User Guide 129
3. Execute the following command from a shell as root:
mkitab -i <identifier> scrt:2:wait:"/usr/scrt/bin/sccfgd_boot
>/var/log/EchoStream/sccfgd_boot.log 2>&1"
This command inserts the sccfgd_boot command after the identifier in the /etc/inittab file.
Related Topics
• Refer to “Configuring Replication Groups” on page 131.
• Refer to “Starting and Stopping” on page 177.

Chapter 5: Installation Procedures
130 Double-Take RecoverNow v4.0.01.00 User Guide
Double-Take RecoverNow v4.0.01.00 User Guide 131
Configuring Replication Groups 6
After you install RecoverNow, VSP and the portal application, you can use the RecoverNow Replication Group Wizard or the Command line to configure new replication groups and change, rename, and delete existing ones.
This chapter contains:
• “Using VSP to Configure Replication Groups” on page 132
• “Create and Configure a New Replication Group” on page 132
• “Configuration Initialization Progress (New Configuration)” on page 150
• “Change a Replication Group Configuration” on page 151
• “Configuration Initialization Progress (Change Configuration)” on page 161
• “Rename a Replication Group” on page 6-164
• “Delete a Replication Group” on page 6-166
• “Replication Group Configuration Window” on page 169
• “Using the Command line to Perform Configuration Tasks” on page 169

Chapter 6: Configuring Replication Groups
132 Double-Take RecoverNow v4.0.01.00 User Guide
Using VSP to Configure Replication Groups
You can use the Replication Group Configuration Wizard to:
• “Create and Configure a New Replication Group” on page 132
• “Change a Replication Group Configuration” on page 151
• “Rename a Replication Group” on page 164
• “Delete a Replication Group” on page 166
Create and Configure a New Replication Group
To create and configure a new replication group, do the following:
1. Navigate to the Replication Group portlet.
2. Click Configuration
The Replication Group Configuration window displays.

Using VSP to Configure Replication Groups
Double-Take RecoverNow v4.0.01.00 User Guide 133
For detailed information refer to the RecoverNow online help.
3. Click New.
This starts the Replication Group Configuration wizard and the New Replication Group Servers panel displays.
The New Replication Group Servers panel contains the following fields:
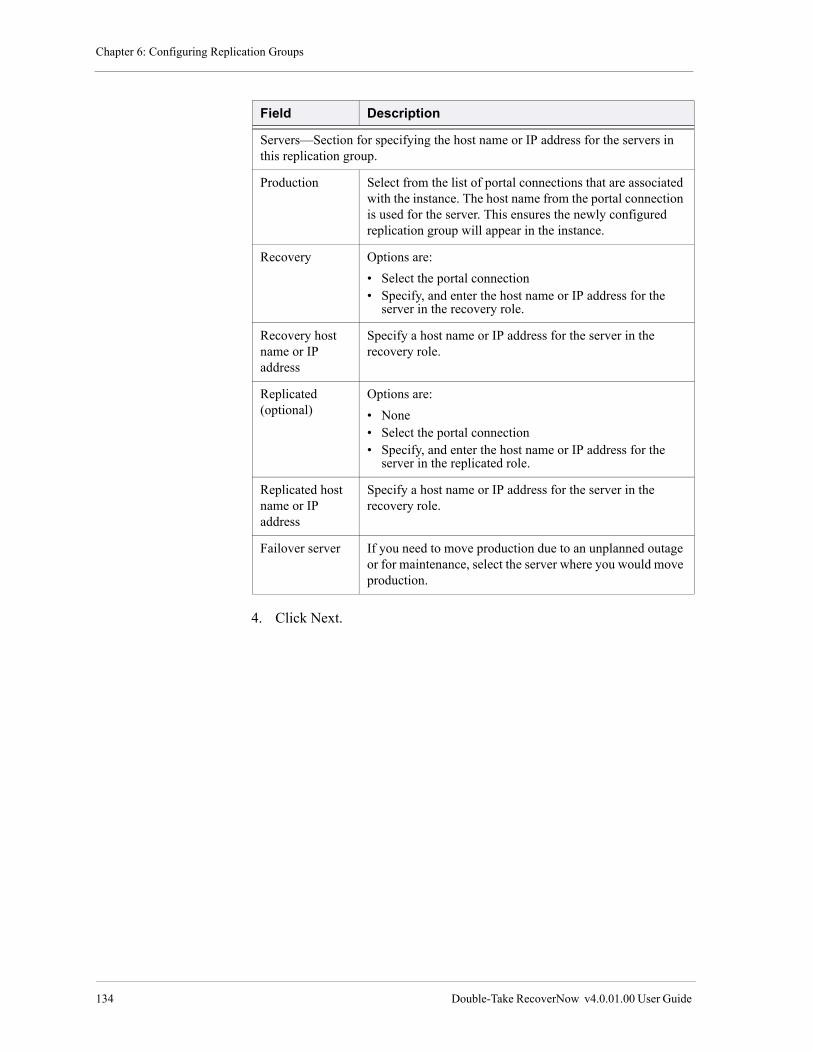
Chapter 6: Configuring Replication Groups
134 Double-Take RecoverNow v4.0.01.00 User Guide
4. Click Next.
Field Description
Servers—Section for specifying the host name or IP address for the servers in this replication group.
Production Select from the list of portal connections that are associated with the instance. The host name from the portal connection is used for the server. This ensures the newly configured replication group will appear in the instance.
Recovery Options are:
• Select the portal connection• Specify, and enter the host name or IP address for the
server in the recovery role.
Recovery host name or IP address
Specify a host name or IP address for the server in the recovery role.
Replicated (optional)
Options are:
• None• Select the portal connection• Specify, and enter the host name or IP address for the
server in the replicated role.
Replicated host name or IP address
Specify a host name or IP address for the server in the recovery role.
Failover server If you need to move production due to an unplanned outage or for maintenance, select the server where you would move production.

Using VSP to Configure Replication Groups
Double-Take RecoverNow v4.0.01.00 User Guide 135
The New Replication Group Servers panel displays. Use this panel to log into the failover server, specified in the previous panel.If you have not already logged in to all of the nodes, this panel displays.
5. Specify the username and password and click Log In. Log in to each server to retrieve information.
NOTE
The user must be either root or a user that is in the scrt group. Passwords cannot be blank
6. Click Log In.
The New Replication Group Servers panel displays.

Chapter 6: Configuring Replication Groups
136 Double-Take RecoverNow v4.0.01.00 User Guide
The New Replication Group login panel contains the following fields:
7. Click Next.
Field Description
Log in Status Displays the list of servers in the replication group and their login status.
Server Displays the name of the server being logged in to. This is the host name from the portal connection if a portal connection was used to specify the server.
User Specify the user ID to log in with. This defaults to the user ID from the portal connection if a portal connection was used to specify the server.
Password Specify a password for the specified user ID.
Log In Click this button to log in to the specified server.
Status Displays the login status for the specified server.
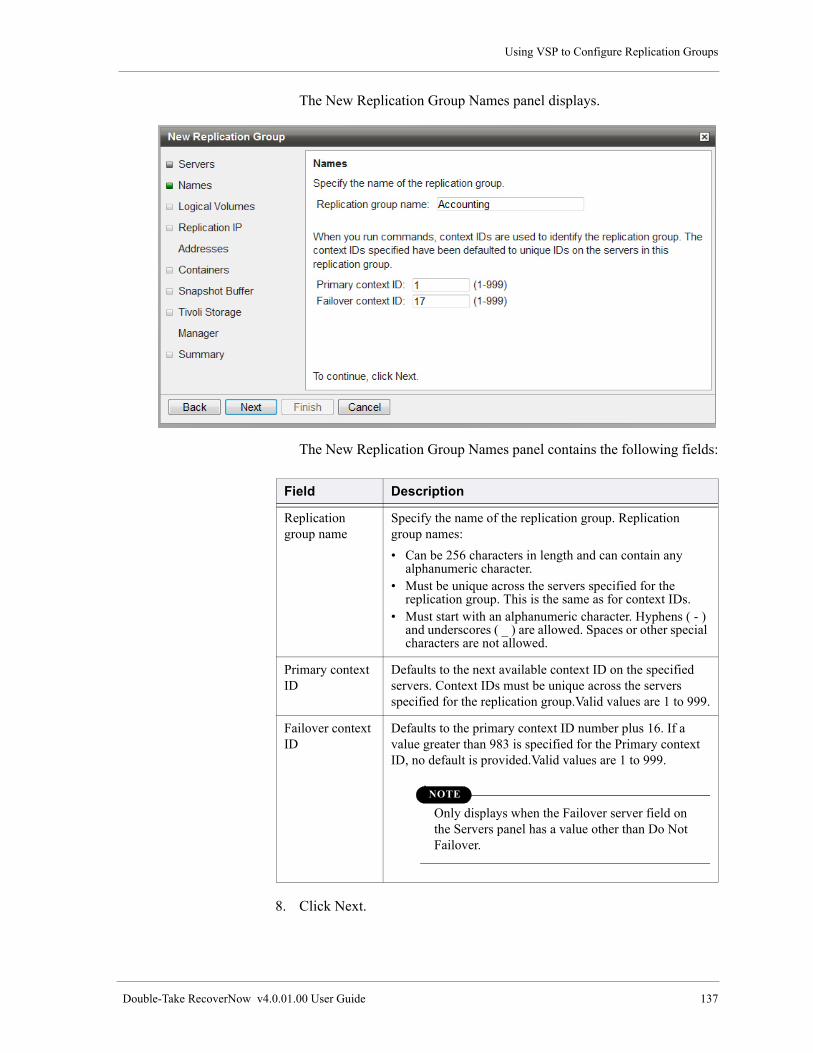
Using VSP to Configure Replication Groups
Double-Take RecoverNow v4.0.01.00 User Guide 137
The New Replication Group Names panel displays.
The New Replication Group Names panel contains the following fields:
8. Click Next.
Field Description
Replication group name
Specify the name of the replication group. Replication group names:
• Can be 256 characters in length and can contain any alphanumeric character.
• Must be unique across the servers specified for the replication group. This is the same as for context IDs.
• Must start with an alphanumeric character. Hyphens ( - ) and underscores ( _ ) are allowed. Spaces or other special characters are not allowed.
Primary context ID
Defaults to the next available context ID on the specified servers. Context IDs must be unique across the servers specified for the replication group.Valid values are 1 to 999.
Failover context ID
Defaults to the primary context ID number plus 16. If a value greater than 983 is specified for the Primary context ID, no default is provided.Valid values are 1 to 999.
NOTE
Only displays when the Failover server field on the Servers panel has a value other than Do Not Failover.
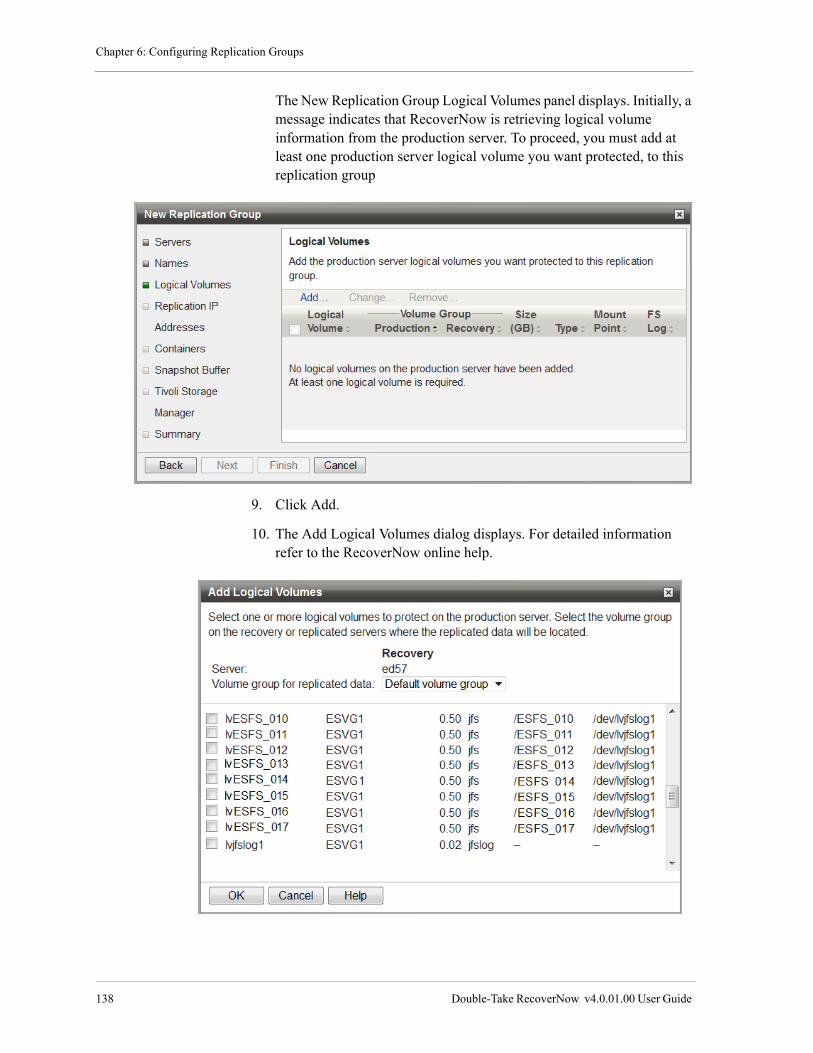
Chapter 6: Configuring Replication Groups
138 Double-Take RecoverNow v4.0.01.00 User Guide
The New Replication Group Logical Volumes panel displays. Initially, a message indicates that RecoverNow is retrieving logical volume information from the production server. To proceed, you must add at least one production server logical volume you want protected, to this replication group
9. Click Add.
10. The Add Logical Volumes dialog displays. For detailed information refer to the RecoverNow online help.

Using VSP to Configure Replication Groups
Double-Take RecoverNow v4.0.01.00 User Guide 139
• Select one or more logical volumes to protect on the production server.
• Select the volume group on the recovery or replicated servers where the replicated data will be located.
• Click OK.
The New Replication Group Logical Volumes panel displays with the selected logical volumes you want protected.
11. Click OK.
The New Replication Group Logical Volumes panel displays. It contains the following columns:
Column Description
Logical Volume Displays the logical volumes configured for this replication group.
Volume Group -
Production
Displays the name of the volume group on the production server for the logical volume being protected.
Volume Group -
Recovery
Displays the name of the volume group on the recovery server where the replica for the logical volume being protected is located. When there is a replicated server, the Volume Group - Recovery and Volume Group - Replicated are set to the Default Volume Group and cannot be changed.

Chapter 6: Configuring Replication Groups
140 Double-Take RecoverNow v4.0.01.00 User Guide
12. Click Next on the New Replication Group Logical Volumes panel.
The New Replication Group Replication IP Addresses panel displays. Use this panel to specify IP labels or addresses that will be used specifically for replication. By default, replication uses the IP addresses of the servers. There are two options:
• If you select, Use server IP addresses for replication, the New Replication Group Replication IP Addresses panel displays in the following format..
Volume Group - Replicated
Displays the name of the volume group on the replicated server where the replica for the logical volume being protected is located. Displayed only if the replication group has a replicated server configured. When there is a replicated server, the Volume Group - Recovery and Volume Group - Replicated are set to the Default Volume Group and cannot be changed.
Size (GB) Displays the size in gigabytes (GB) of the logical volume.
Type Displays the type of logical volume. For example, raw, jfs, jfs2, and jfs2log.
Mount Point Displays the mount point for the logical volume.Typically around 20 characters but can be as long as 2048. If length exceeds 76, the text is truncated with an ellipsis in the middle
FS Log Displays the FS log for the logical volume. If length exceeds 76, the text is truncated with an ellipsis in the middle.
Column Description
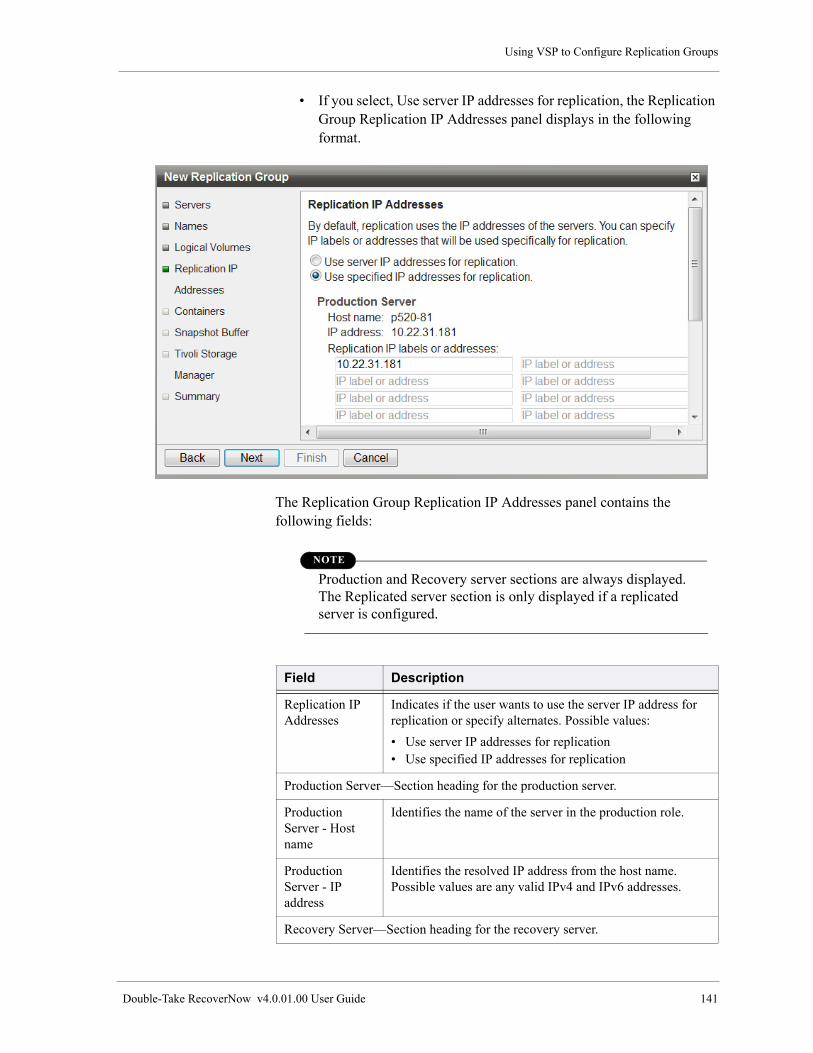
Using VSP to Configure Replication Groups
Double-Take RecoverNow v4.0.01.00 User Guide 141
• If you select, Use server IP addresses for replication, the Replication Group Replication IP Addresses panel displays in the following format.
The Replication Group Replication IP Addresses panel contains the following fields:
NOTE
Production and Recovery server sections are always displayed. The Replicated server section is only displayed if a replicated server is configured.
Field Description
Replication IP Addresses
Indicates if the user wants to use the server IP address for replication or specify alternates. Possible values:
• Use server IP addresses for replication• Use specified IP addresses for replication
Production Server—Section heading for the production server.
Production Server - Host name
Identifies the name of the server in the production role.
Production Server - IP address
Identifies the resolved IP address from the host name. Possible values are any valid IPv4 and IPv6 addresses.
Recovery Server—Section heading for the recovery server.
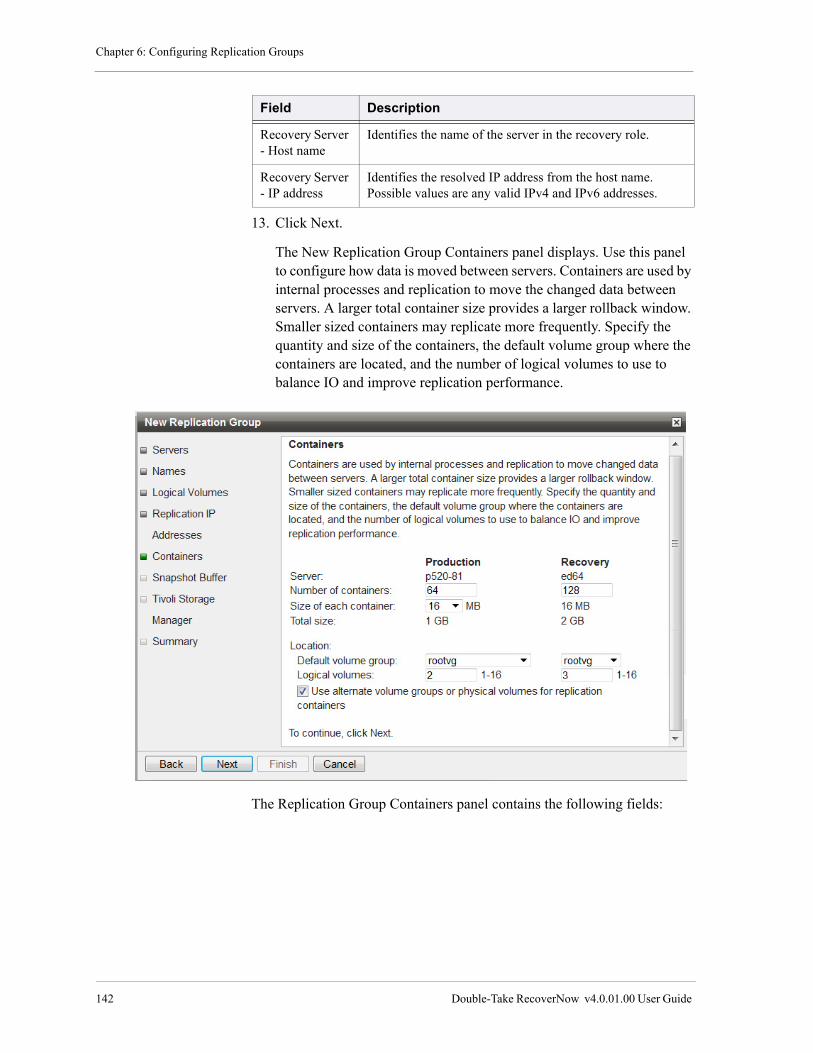
Chapter 6: Configuring Replication Groups
142 Double-Take RecoverNow v4.0.01.00 User Guide
13. Click Next.
The New Replication Group Containers panel displays. Use this panel to configure how data is moved between servers. Containers are used by internal processes and replication to move the changed data between servers. A larger total container size provides a larger rollback window. Smaller sized containers may replicate more frequently. Specify the quantity and size of the containers, the default volume group where the containers are located, and the number of logical volumes to use to balance IO and improve replication performance.
The Replication Group Containers panel contains the following fields:
Recovery Server - Host name
Identifies the name of the server in the recovery role.
Recovery Server - IP address
Identifies the resolved IP address from the host name. Possible values are any valid IPv4 and IPv6 addresses.
Field Description
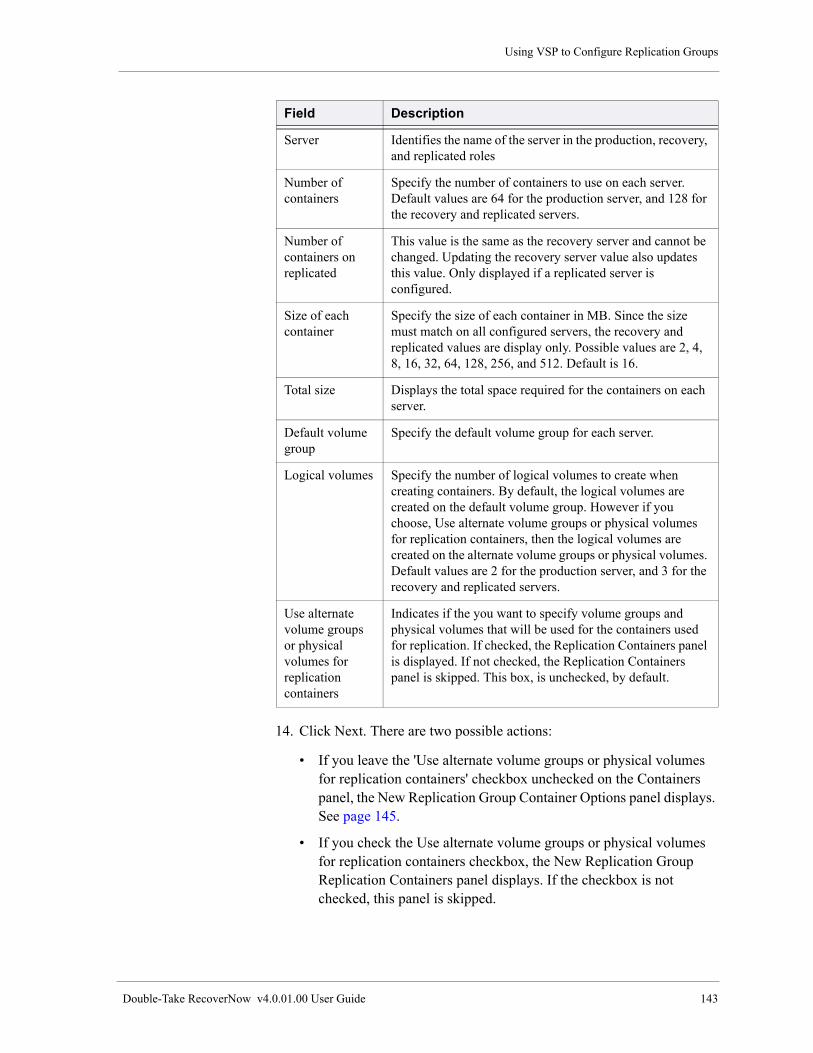
Using VSP to Configure Replication Groups
Double-Take RecoverNow v4.0.01.00 User Guide 143
14. Click Next. There are two possible actions:
• If you leave the 'Use alternate volume groups or physical volumes for replication containers' checkbox unchecked on the Containers panel, the New Replication Group Container Options panel displays. See page 145.
• If you check the Use alternate volume groups or physical volumes for replication containers checkbox, the New Replication Group Replication Containers panel displays. If the checkbox is not checked, this panel is skipped.
Field Description
Server Identifies the name of the server in the production, recovery, and replicated roles
Number of containers
Specify the number of containers to use on each server. Default values are 64 for the production server, and 128 for the recovery and replicated servers.
Number of containers on replicated
This value is the same as the recovery server and cannot be changed. Updating the recovery server value also updates this value. Only displayed if a replicated server is configured.
Size of each container
Specify the size of each container in MB. Since the size must match on all configured servers, the recovery and replicated values are display only. Possible values are 2, 4, 8, 16, 32, 64, 128, 256, and 512. Default is 16.
Total size Displays the total space required for the containers on each server.
Default volume group
Specify the default volume group for each server.
Logical volumes Specify the number of logical volumes to create when creating containers. By default, the logical volumes are created on the default volume group. However if you choose, Use alternate volume groups or physical volumes for replication containers, then the logical volumes are created on the alternate volume groups or physical volumes. Default values are 2 for the production server, and 3 for the recovery and replicated servers.
Use alternate volume groups or physical volumes for replication containers
Indicates if the you want to specify volume groups and physical volumes that will be used for the containers used for replication. If checked, the Replication Containers panel is displayed. If not checked, the Replication Containers panel is skipped. This box, is unchecked, by default.

Chapter 6: Configuring Replication Groups
144 Double-Take RecoverNow v4.0.01.00 User Guide
NOTE
The Production and Recovery server sections are always displayed. The Replicated server section is only displayed if a replicated server is configured.
Use the New Replication Group Replication Containers panel to select the volume groups and physical volumes where you want to locate the containers used specifically for replication
The New Replication Group Replication Containers panel contains the following fields:
Field Description
Production Server—Section heading for each server (production, recovery, and replicated if configured)
Server Displays the name of the server.
Total container size
Displays the total space (in MB) required for the containers on the server.
Volume Group Displays the list of volume groups on the specified server.
Add Use this button to adds the volume group to the list and defaults the physical volume to Any.
Volume Group Displays the name of a selected volume group.

Using VSP to Configure Replication Groups
Double-Take RecoverNow v4.0.01.00 User Guide 145
15. Click Next.
The New Replication Group Container Options panel displays. Use this panel to specify if you want to use compression during replication. Specify if you also want to send partially filled containers after a specified amount of time. Otherwise, containers are sent when they become full.
The New Replication Group Container Options panel contains the following fields:
Physical Volume Displays a list of physical volumes (disks) on the specified volume group.
Remove Removes the volume group from the list. This action is available after you add a volume group.
Field Description
Chapter 6: Configuring Replication Groups
146 Double-Take RecoverNow v4.0.01.00 User Guide
Field Description
Use compression By default, the “Use compression during replication” checkbox contains a checkmark. To disable this option, remove the checkmark from the checkbox. In the Replication Configuration Summary window, possible values are “Yes” (enabled) or “No” (disabled).
LFCs are compressed before being sent to the recovery server, where they are then uncompressed. When you compress LFCs a smaller amount of data is sent across the network. This activity requires additional CPU bandwidth to compress and uncompress the LFC on each server.
Send partially filled containers automatically
By default, the “Send partially filled containers automatically” checkbox contains a checkmark. To disable this option remove the checkmark from the checkbox. In the Replication Configuration Summary window, possible values are “Yes” (enabled) or “No” (disabled).
The Send partially filled containers automatically option enables you to control the frequency of shipping containers (LFCs) to the recovery server during low I/O periods.
The container is examined when the frequency to check value is reached. If at that time the minimum percent filled value has not been reached, the container will not be sent. When the container reaches the minimum percent filled value, containers will not be immediately sent. There is a 5 second delay before the containers are sent. The 5 second delay is provided to account for the possibility that the container could become completely full. When the container is sent, the frequency to check value is reset and the entire process starts again.
Note you can also use the command line to Send partial containers automatically. Refer to “Send partially filled containers automatically” on page 170.
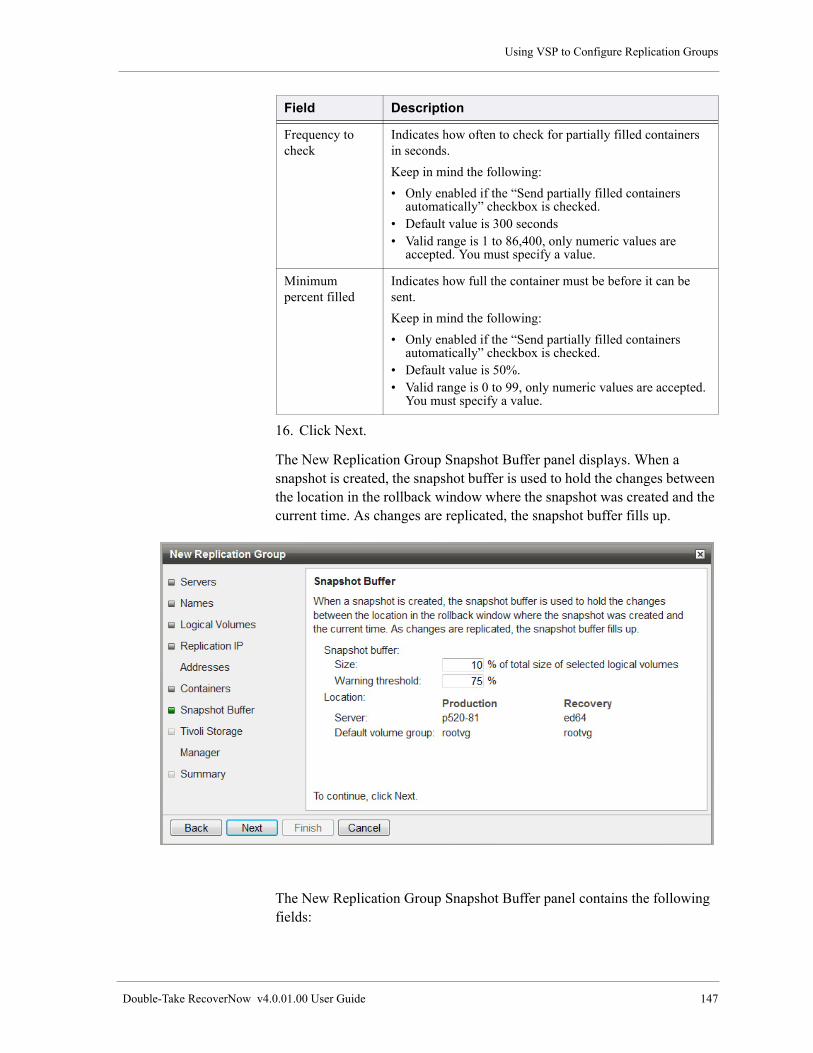
Using VSP to Configure Replication Groups
Double-Take RecoverNow v4.0.01.00 User Guide 147
16. Click Next.
The New Replication Group Snapshot Buffer panel displays. When a snapshot is created, the snapshot buffer is used to hold the changes between the location in the rollback window where the snapshot was created and the current time. As changes are replicated, the snapshot buffer fills up.
The New Replication Group Snapshot Buffer panel contains the following fields:
Frequency to check
Indicates how often to check for partially filled containers in seconds.
Keep in mind the following:
• Only enabled if the “Send partially filled containers automatically” checkbox is checked.
• Default value is 300 seconds• Valid range is 1 to 86,400, only numeric values are
accepted. You must specify a value.
Minimum percent filled
Indicates how full the container must be before it can be sent.
Keep in mind the following:
• Only enabled if the “Send partially filled containers automatically” checkbox is checked.
• Default value is 50%. • Valid range is 0 to 99, only numeric values are accepted.
You must specify a value.
Field Description

Chapter 6: Configuring Replication Groups
148 Double-Take RecoverNow v4.0.01.00 User Guide
17. Click Next.
The New Replication Group Tivoli Storage Manager panel displays. The Tivoli Storage Manager (TSM) can archive containers which allows you to rollback or take snapshots farther back in time. Full backups of the server where the TSM client is running can also be performed.
The New Replication Group Tivoli Storage Manager panel contains the following fields:
Field Description
Snapshot Buffers - Size
Indicates how much space to reserve for the snapshot buffer. The value is a percent of the size of the logical volumes that have been selected to protect. Valid values are integers from 1 to 100. Default is 10.
Warning threshold
Indicates how full the snapshot buffer must be before you are warned that it is filling up.Valid values are integers from 1 to 100. Default is 75.
Location Indicates that the snapshot buffers are located on default volume group of the production, recovery, and replicated servers.
Production Production server information. Only displayed if a failover server is configured.
Replicated Replicated server information. Only displayed if a replicated server is configured.

Using VSP to Configure Replication Groups
Double-Take RecoverNow v4.0.01.00 User Guide 149
18. Click Next.
Field Description
Enable Tivoli Storage Manager (TSM)
Indicates if Tivoli Storage Manager is enabled for this replication group. Checkbox is unchecked by default.
TSM client - Server
Displays the name of the server where the TSM client is running. This is always the recovery server. Enabled only when Enable Tivoli Storage Manager (TSM) is checked.
TSM client - User ID
Specify the user ID for TSM to use to log into the server where the TSM client is running. Enabled only when Enable Tivoli Storage Manager (TSM) is checked.
TSM client - Password
Specify the password for TSM to use to log into the server where the TSM client is running. Enabled only when Enable Tivoli Storage Manager (TSM) is checked.
TSM client - Options file
Specify the location of the TSM options file on the TSM client server. The default location is /usr/tivoli/tsm/client/ba/bin/dsm.opt. You can specify any valid path and file name. Enabled only when Enable Tivoli Storage Manager (TSM) is checked.
TSM client - Domain
Specify the domain for TSM to use. Enabled only when Enable Tivoli Storage Manager (TSM) is checked.
TSM server Specify the host name or IP address of the server where the TSM server software is running. Valid values are any valid IPv4 and IPv6 addresses or host name. Enabled only when Enable Tivoli Storage Manager (TSM) is checked.
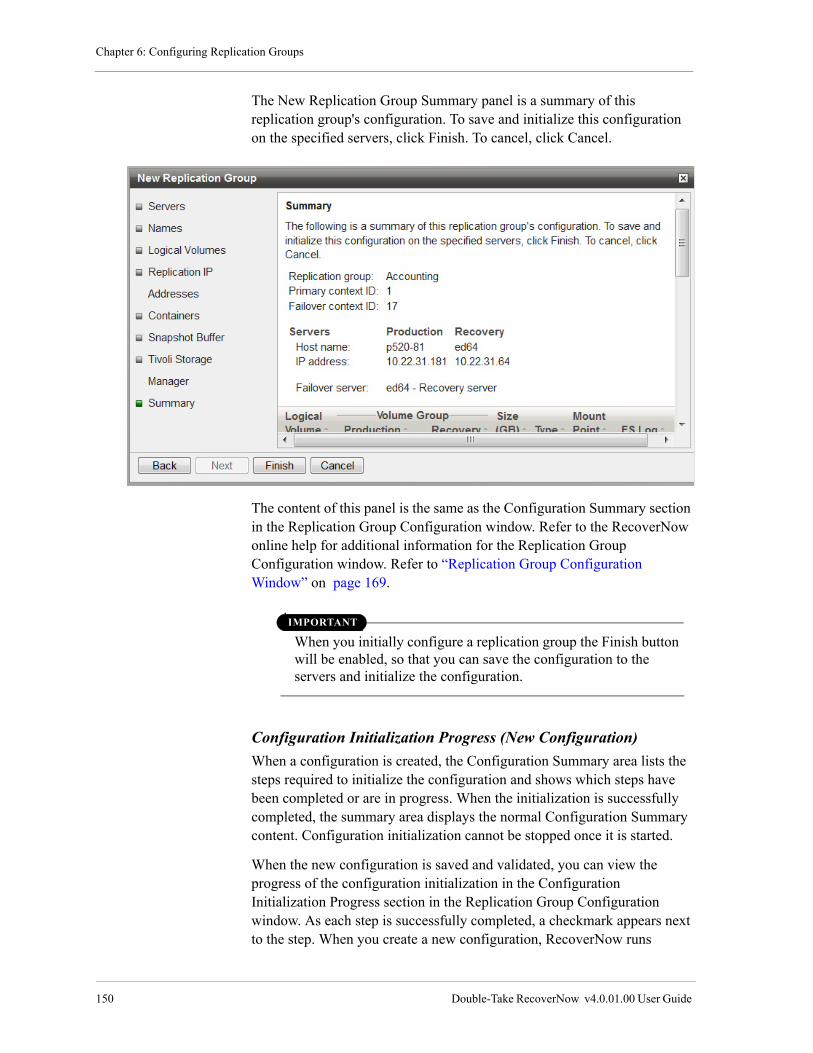
Chapter 6: Configuring Replication Groups
150 Double-Take RecoverNow v4.0.01.00 User Guide
The New Replication Group Summary panel is a summary of this replication group's configuration. To save and initialize this configuration on the specified servers, click Finish. To cancel, click Cancel.
The content of this panel is the same as the Configuration Summary section in the Replication Group Configuration window. Refer to the RecoverNow online help for additional information for the Replication Group Configuration window. Refer to “Replication Group Configuration Window” on page 169.
IMPORTANT
When you initially configure a replication group the Finish button will be enabled, so that you can save the configuration to the servers and initialize the configuration.
Configuration Initialization Progress (New Configuration)
When a configuration is created, the Configuration Summary area lists the steps required to initialize the configuration and shows which steps have been completed or are in progress. When the initialization is successfully completed, the summary area displays the normal Configuration Summary content. Configuration initialization cannot be stopped once it is started.
When the new configuration is saved and validated, you can view the progress of the configuration initialization in the Configuration Initialization Progress section in the Replication Group Configuration window. As each step is successfully completed, a checkmark appears next to the step. When you create a new configuration, RecoverNow runs
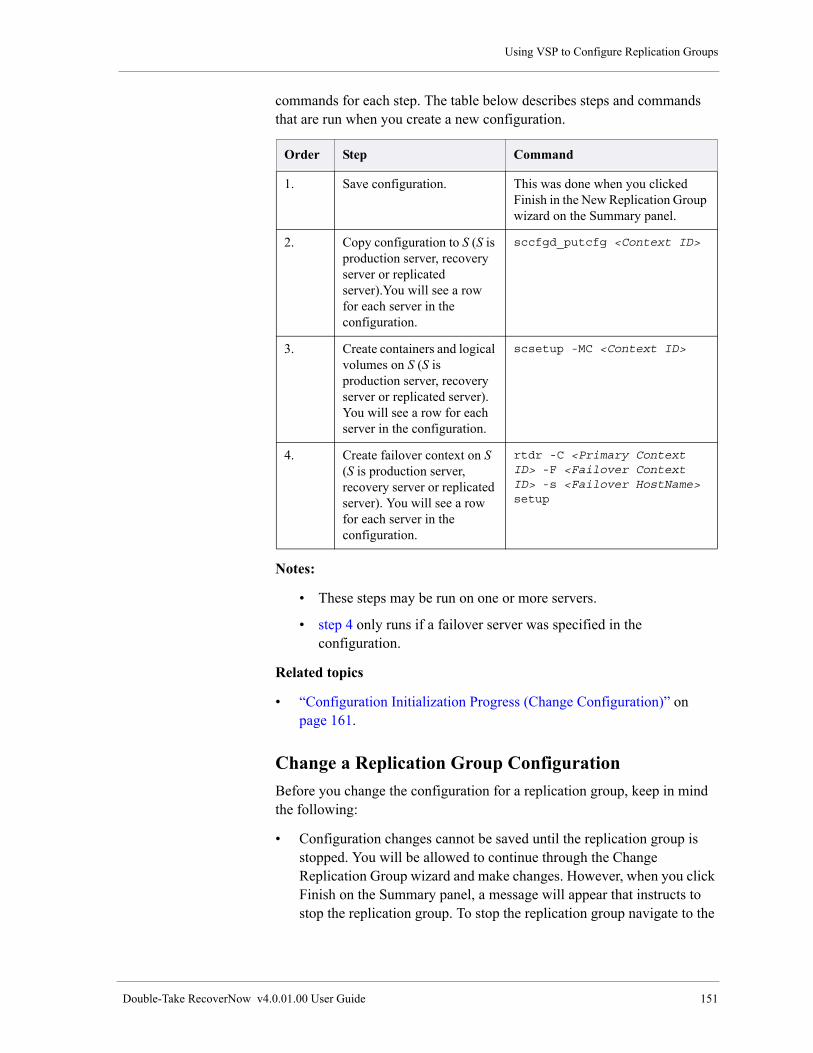
Using VSP to Configure Replication Groups
Double-Take RecoverNow v4.0.01.00 User Guide 151
commands for each step. The table below describes steps and commands that are run when you create a new configuration.
Notes:
• These steps may be run on one or more servers.
• step 4 only runs if a failover server was specified in the configuration.
Related topics
• “Configuration Initialization Progress (Change Configuration)” on page 161.
Change a Replication Group Configuration
Before you change the configuration for a replication group, keep in mind the following:
• Configuration changes cannot be saved until the replication group is stopped. You will be allowed to continue through the Change Replication Group wizard and make changes. However, when you click Finish on the Summary panel, a message will appear that instructs to stop the replication group. To stop the replication group navigate to the
Order Step Command
1. Save configuration. This was done when you clicked Finish in the New Replication Group wizard on the Summary panel.
2. Copy configuration to S (S is production server, recovery server or replicated server).You will see a row for each server in the configuration.
sccfgd_putcfg <Context ID>
3. Create containers and logical volumes on S (S is production server, recovery server or replicated server). You will see a row for each server in the configuration.
scsetup -MC <Context ID>
4. Create failover context on S (S is production server, recovery server or replicated server). You will see a row for each server in the configuration.
rtdr -C <Primary Context ID> -F <Failover Context ID> -s <Failover HostName> setup

Chapter 6: Configuring Replication Groups
152 Double-Take RecoverNow v4.0.01.00 User Guide
Replication Groups portlet in the Vision Solutions Portal window and stop the replication group.
• You cannot change the replication group name or context ID with the Change Replication Group wizard.
• A replication group cannot be changed if the production, recovery, and replicated servers are not at version v4.0.01.00.
To change a replication group, do the following:
1. Navigate to the Replication Group portlet.
2. Click Configuration.
The Replication Group Configuration window displays. For detailed information refer to the RecoverNow online help.
3. Click Change from the Actions dropdown. There are two possible results:
a. The Change Replication Group dialog displays with a warning:

Using VSP to Configure Replication Groups
Double-Take RecoverNow v4.0.01.00 User Guide 153
“Replication group cannot be changed because it is either failed over over or the partition has been migrated using Live Partition Mobility.”
b. The Change Replication Group Servers panel displays with a warning.
“Replication group is currently active. Configuration changes cannot be saved until the replication group is stopped.”
Configuration changes cannot be saved until the replication group is stopped. However, when you click Finish on the Summary panel, a message will appear that instructs you to stop the replication group. To stop the replication group, navigate to the Replication Groups portlet in the Vision Solutions Portal window and stop the replication group.
4. Click Next.

Chapter 6: Configuring Replication Groups
154 Double-Take RecoverNow v4.0.01.00 User Guide
The Change Replication Group Servers panel displays. Use this panel to log into the failover server, specified in the previous panel. This panel displays if you are not logged in.
5. Specify the username and password and click Log In. Log in to each server to retrieve information When you run commands, context IDs are used to identify the replication group. The context IDs specified have been defaulted to unique IDs on the servers in this replication group.
6. Click Next.
The Change Replication Group Servers panel displays.
7. Click Next.

Using VSP to Configure Replication Groups
Double-Take RecoverNow v4.0.01.00 User Guide 155
The Change Replication Group Names panel displays.
8. Click Next.
The Change Replication Group Logical Volumes panel displays.
• Click Add to add a logical volume. For details refer to step 10 on page 138.
• Select the logical volume you wish to change or remove for this replication group and click Next.

Chapter 6: Configuring Replication Groups
156 Double-Take RecoverNow v4.0.01.00 User Guide
Use the Change Logical Volumes dialog, shown below, to choose a different volume group for the replica logical volumes, on the recovery or replicated servers. By default, the default volume group specified is used for this purpose. For detailed information refer to the RecoverNow online help.
Use the Remove Logical Volumes dialog, shown below, to remove the selected logical volumes from the replication group. These logical volumes will no longer be protected. For detailed information refer to the RecoverNow online help.
9. Click OK on either the Change or Remove Logical Volumes dialogs.
The Change Replication Group Logical Volumes panel displays.
10. Click Next.
The Change Replication Group Replication IP Addresses panel displays. By default, replication uses the IP addresses of the servers. You can specify IP labels or addresses that will be used specifically for replication. There are two options:
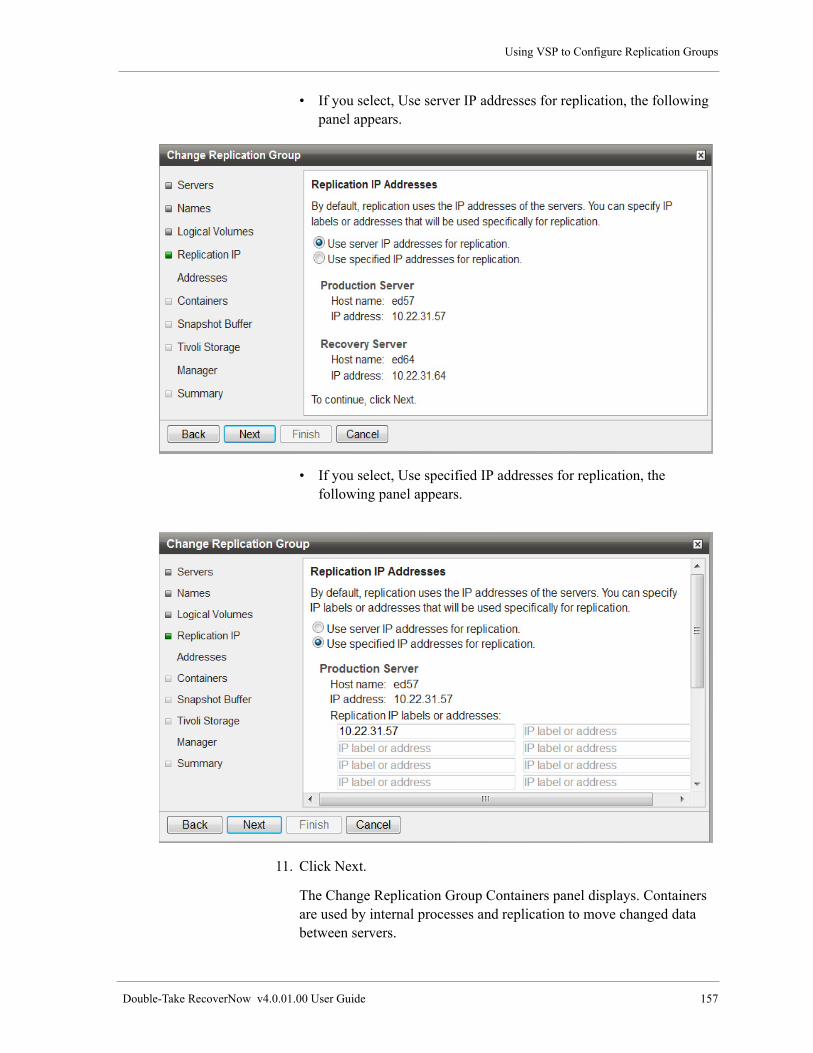
Using VSP to Configure Replication Groups
Double-Take RecoverNow v4.0.01.00 User Guide 157
• If you select, Use server IP addresses for replication, the following panel appears.
• If you select, Use specified IP addresses for replication, the following panel appears.
11. Click Next.
The Change Replication Group Containers panel displays. Containers are used by internal processes and replication to move changed data between servers.

Chapter 6: Configuring Replication Groups
158 Double-Take RecoverNow v4.0.01.00 User Guide
IMPORTANT
If you make configuration changes on the Container panel you could lose CDP. For example, if you change the Size of each container field, you will lose CDP. This will be reflected in the Change Replication Group Summary panel displays, as shown page 161.
12. Click Next.
The Change Replication Group Container Options panel displays. Specify if you want to use compression during replication. Specify if you also want to send partially filled containers after a specified amount of time. Otherwise, containers are sent when they become full.
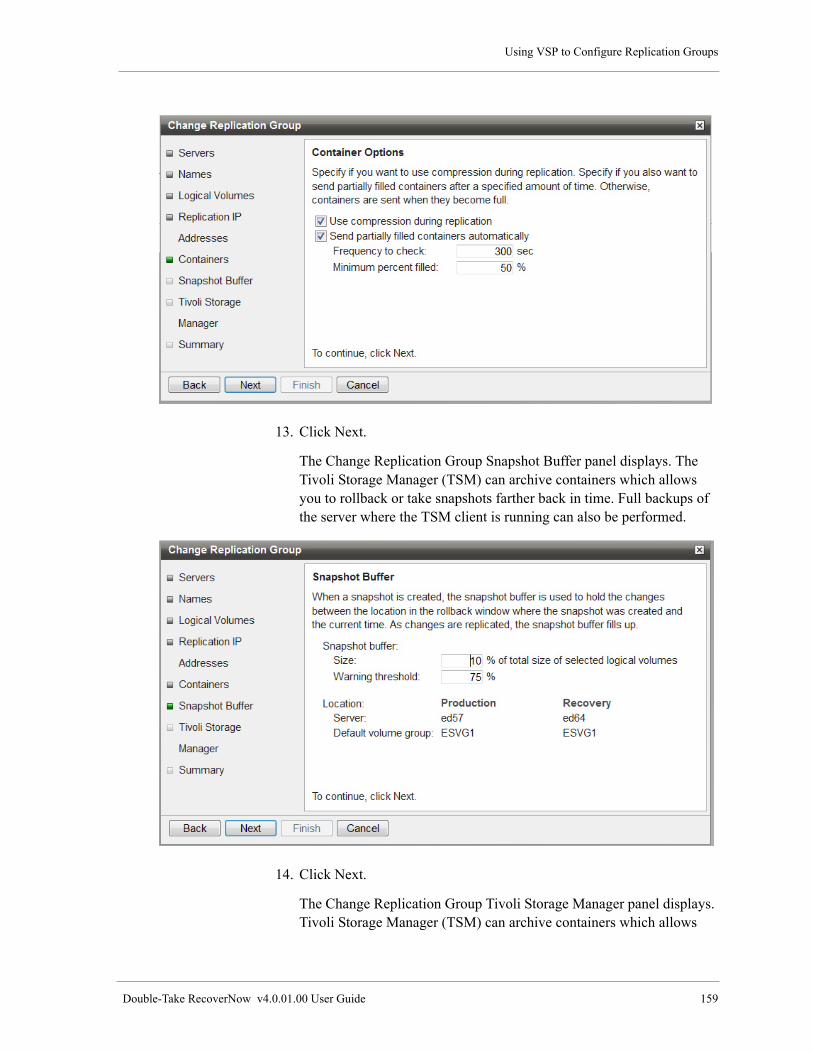
Using VSP to Configure Replication Groups
Double-Take RecoverNow v4.0.01.00 User Guide 159
13. Click Next.
The Change Replication Group Snapshot Buffer panel displays. The Tivoli Storage Manager (TSM) can archive containers which allows you to rollback or take snapshots farther back in time. Full backups of the server where the TSM client is running can also be performed.
14. Click Next.
The Change Replication Group Tivoli Storage Manager panel displays. Tivoli Storage Manager (TSM) can archive containers which allows

Chapter 6: Configuring Replication Groups
160 Double-Take RecoverNow v4.0.01.00 User Guide
you to rollback or take snapshots farther back in time. Full backups of the server where the TSM client is running can also be performed.
15. Click Next.
The Change Replication Group Summary panel displays and shows a summary of this replication group's configuration. If you have made configuration changes on the Containers panel (see page 158), proceed to “Configuration changes will reset the rollback window (CDP is lost)” on page 161.

Using VSP to Configure Replication Groups
Double-Take RecoverNow v4.0.01.00 User Guide 161
IMPORTANT
When you decide to make configuration changes to the replication group, they can only be saved if the replication group is stopped. Use the Replication Group portlet on the Replication page to stop the replication group.
16. To save and initialize this configuration on the specified servers, click Finish. To cancel, click Cancel. To view a summary of the changes you made, refer to “Replication Group Configuration Window” on page 169. The content of this panel is the same as the Configuration Summary section in the Replication Group Configuration window. Refer to the RecoverNow online help for additional information for the Replication Group Configuration window. Refer to “Replication Group Configuration Window” on page 169.
Configuration changes will reset the rollback window (CDP is lost)
If you have made configuration changes on the Containers panel (see page 158), the Change Replication Group Summary panel displays with the warning: Configuration changes will reset the rollback window. This means you will lose CDP.
Configuration Initialization Progress (Change Configuration)
When a configuration has been changed, the Configuration Summary area lists the steps required to initialize the configuration and shows which steps have been completed or are in progress. When the initialization is successfully completed, the summary area displays the normal
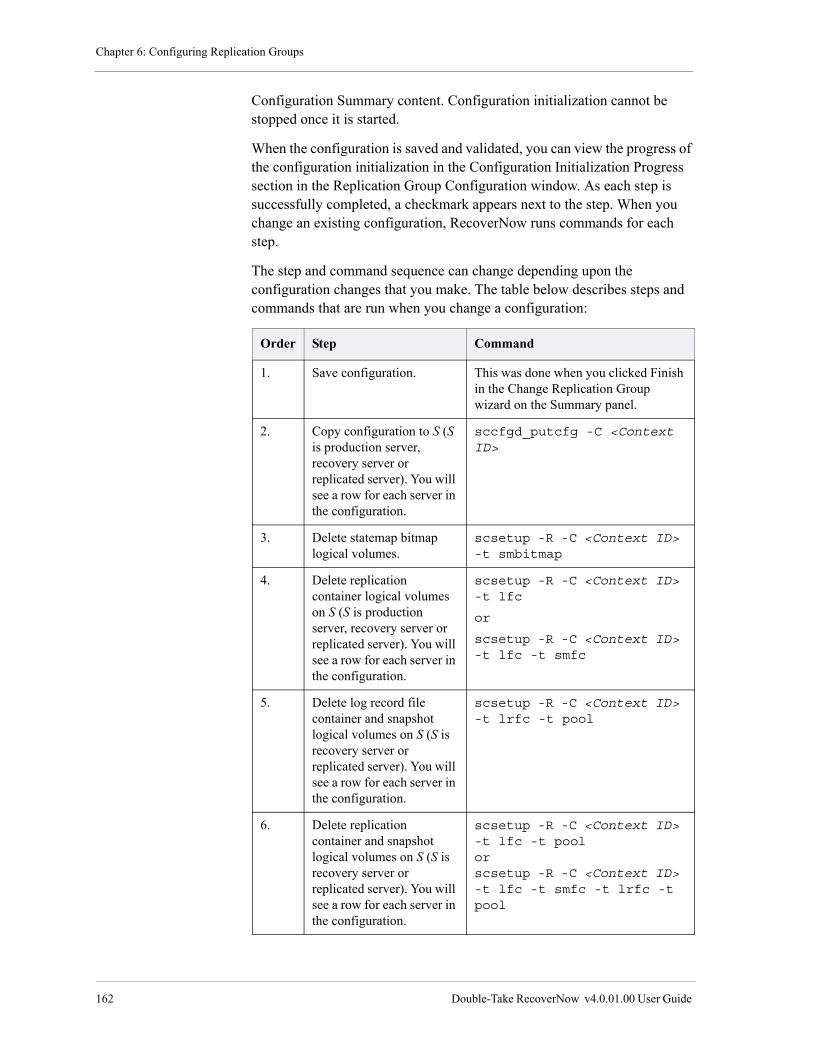
Chapter 6: Configuring Replication Groups
162 Double-Take RecoverNow v4.0.01.00 User Guide
Configuration Summary content. Configuration initialization cannot be stopped once it is started.
When the configuration is saved and validated, you can view the progress of the configuration initialization in the Configuration Initialization Progress section in the Replication Group Configuration window. As each step is successfully completed, a checkmark appears next to the step. When you change an existing configuration, RecoverNow runs commands for each step.
The step and command sequence can change depending upon the configuration changes that you make. The table below describes steps and commands that are run when you change a configuration:
Order Step Command
1. Save configuration. This was done when you clicked Finish in the Change Replication Group wizard on the Summary panel.
2. Copy configuration to S (S is production server, recovery server or replicated server). You will see a row for each server in the configuration.
sccfgd_putcfg -C <Context ID>
3. Delete statemap bitmap logical volumes.
scsetup -R -C <Context ID> -t smbitmap
4. Delete replication container logical volumes on S (S is production server, recovery server or replicated server). You will see a row for each server in the configuration.
scsetup -R -C <Context ID> -t lfc
or
scsetup -R -C <Context ID> -t lfc -t smfc
5. Delete log record file container and snapshot logical volumes on S (S is recovery server or replicated server). You will see a row for each server in the configuration.
scsetup -R -C <Context ID> -t lrfc -t pool
6. Delete replication container and snapshot logical volumes on S (S is recovery server or replicated server). You will see a row for each server in the configuration.
scsetup -R -C <Context ID> -t lfc -t poolorscsetup -R -C <Context ID> -t lfc -t smfc -t lrfc -t pool
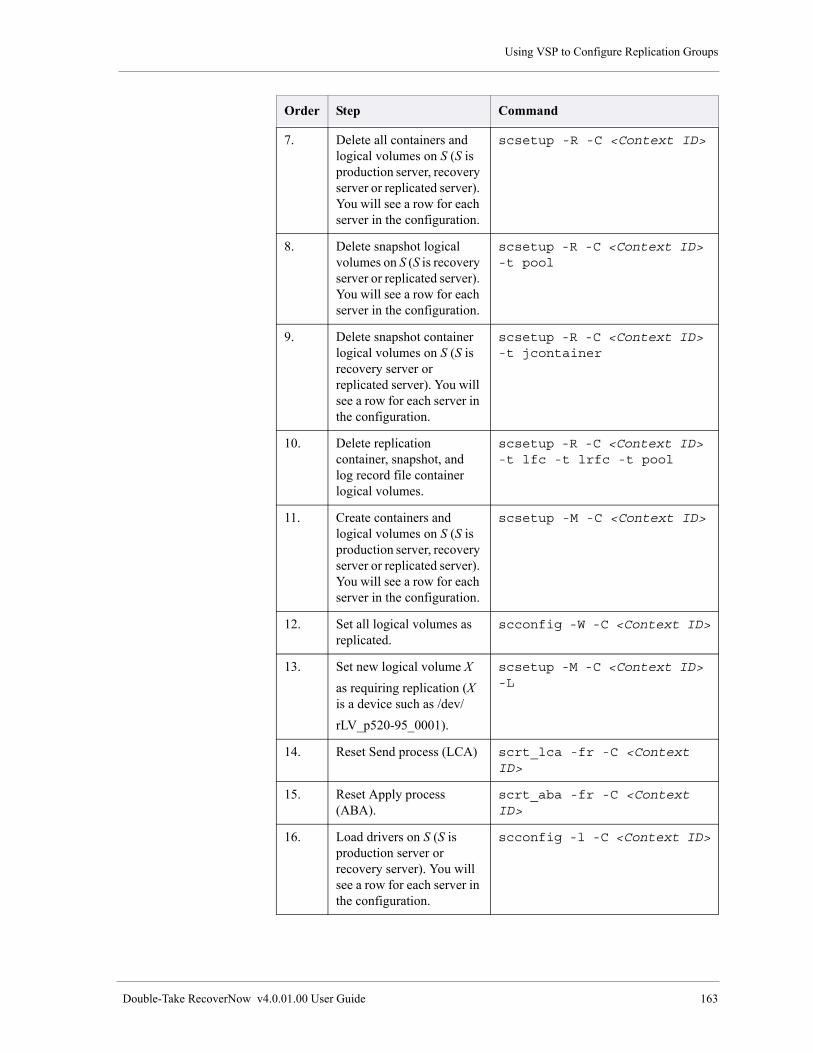
Using VSP to Configure Replication Groups
Double-Take RecoverNow v4.0.01.00 User Guide 163
7. Delete all containers and logical volumes on S (S is production server, recovery server or replicated server). You will see a row for each server in the configuration.
scsetup -R -C <Context ID>
8. Delete snapshot logical volumes on S (S is recovery server or replicated server). You will see a row for each server in the configuration.
scsetup -R -C <Context ID> -t pool
9. Delete snapshot container logical volumes on S (S is recovery server or replicated server). You will see a row for each server in the configuration.
scsetup -R -C <Context ID> -t jcontainer
10. Delete replication container, snapshot, and log record file container logical volumes.
scsetup -R -C <Context ID> -t lfc -t lrfc -t pool
11. Create containers and logical volumes on S (S is production server, recovery server or replicated server). You will see a row for each server in the configuration.
scsetup -M -C <Context ID>
12. Set all logical volumes as replicated.
scconfig -W -C <Context ID>
13. Set new logical volume X
as requiring replication (X is a device such as /dev/
rLV_p520-95_0001).
scsetup -M -C <Context ID> -L
14. Reset Send process (LCA) scrt_lca -fr -C <Context ID>
15. Reset Apply process (ABA).
scrt_aba -fr -C <Context ID>
16. Load drivers on S (S is production server or recovery server). You will see a row for each server in the configuration.
scconfig -l -C <Context ID>
Order Step Command

Chapter 6: Configuring Replication Groups
164 Double-Take RecoverNow v4.0.01.00 User Guide
NOTE
The steps that are run depend on what is changed in the configuration.
Related Topic:
“Configuration Initialization Progress (New Configuration)” on page 150
Rename a Replication Group
To rename a replication group, do the following:
1. Navigate to the Replication Group portlet.
2. Click Configuration.
17. Delete logical volume device special files on S (S is production server, recovery server or replicated server). You will see a row for each server in the configuration.
scsetup -X -C <Context ID>
18. Create failover context on S (S is production server, recovery server or replicated server). You will see a row for each server in the configuration.
rtdr -C <Primary Context ID> -F <Failover Context ID> -s <Failover HostName> setup
19. Delete failover context on S (S is production server, recovery server or replicated server). You will see a row for each server in the configuration.
sccfgd_delcfg <Failover Context ID>
Order Step Command
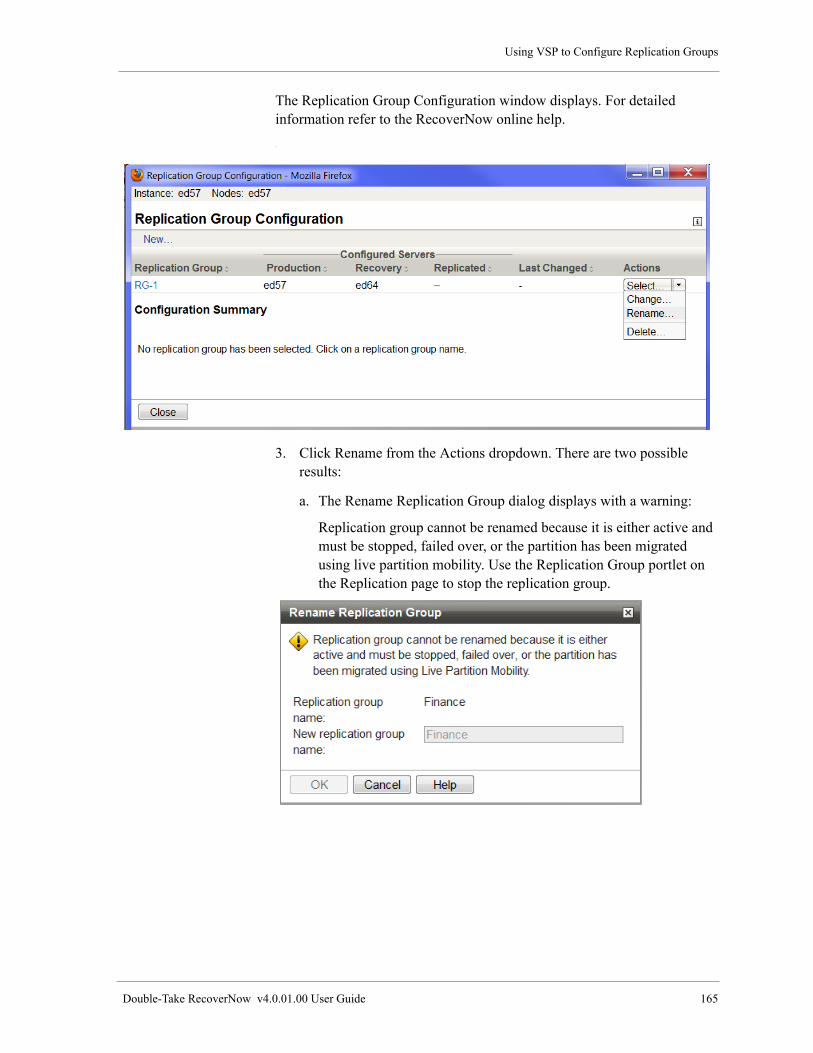
Using VSP to Configure Replication Groups
Double-Take RecoverNow v4.0.01.00 User Guide 165
The Replication Group Configuration window displays. For detailed information refer to the RecoverNow online help.
.
3. Click Rename from the Actions dropdown. There are two possible results:
a. The Rename Replication Group dialog displays with a warning:
Replication group cannot be renamed because it is either active and must be stopped, failed over, or the partition has been migrated using live partition mobility. Use the Replication Group portlet on the Replication page to stop the replication group.

Chapter 6: Configuring Replication Groups
166 Double-Take RecoverNow v4.0.01.00 User Guide
b. The Rename Replication Group displays:
• Specify the new replication group name, and press OK. To view a summary of the changes you made, refer to “Replication Group Configuration Window” on page 169.
Delete a Replication Group
To delete a replication group, do the following:
1. Navigate to the Replication Group portlet.
2. Click Configuration.
The Replication Group Configuration window displays. For detailed information refer to the RecoverNow online help.
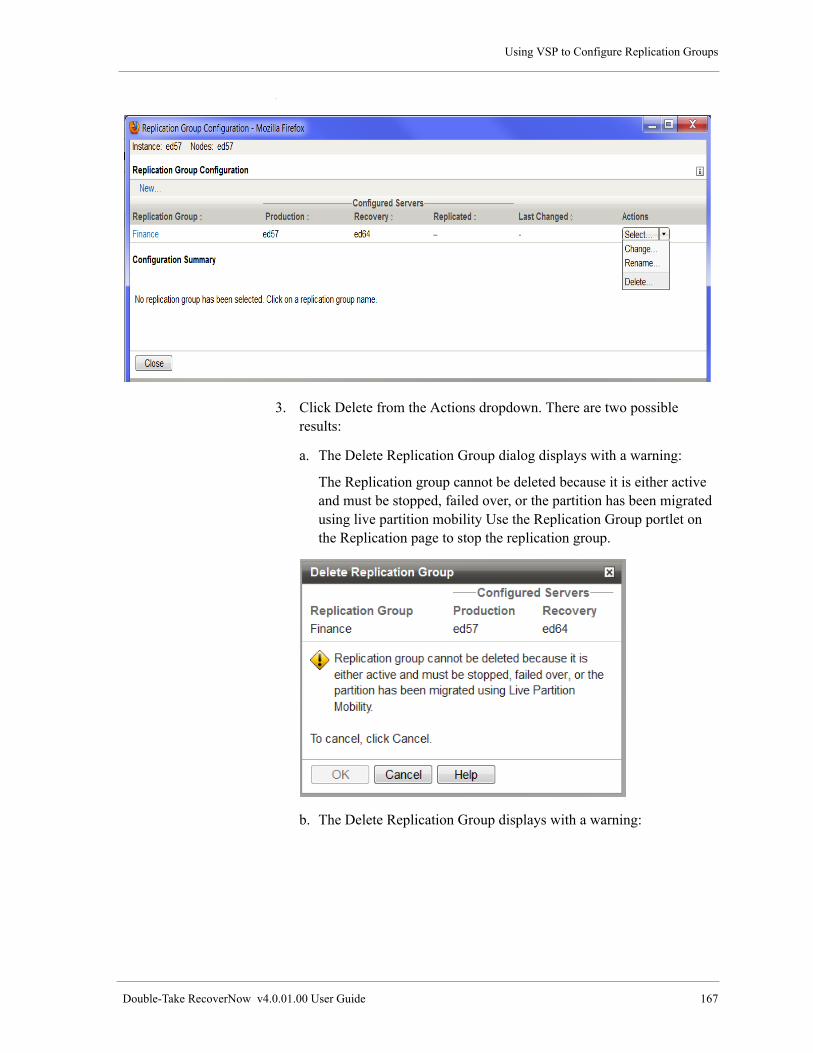
Using VSP to Configure Replication Groups
Double-Take RecoverNow v4.0.01.00 User Guide 167
.
3. Click Delete from the Actions dropdown. There are two possible results:
a. The Delete Replication Group dialog displays with a warning:
The Replication group cannot be deleted because it is either active and must be stopped, failed over, or the partition has been migrated using live partition mobility Use the Replication Group portlet on the Replication page to stop the replication group.
b. The Delete Replication Group displays with a warning:

Chapter 6: Configuring Replication Groups
168 Double-Take RecoverNow v4.0.01.00 User Guide
The Logical volumes configured in this replication group will no longer be protected.
• Click OK to delete the replication group. To view a summary of the changes you made, refer to “Replication Group Configuration Window” on page 169.
Using Earlier Versions of RecoverNow to Configure Replication Groups
If you configured replication groups with a previous version of RecoverNow, if the context ID is 1 then the replication group appears in VSP as RG-1.
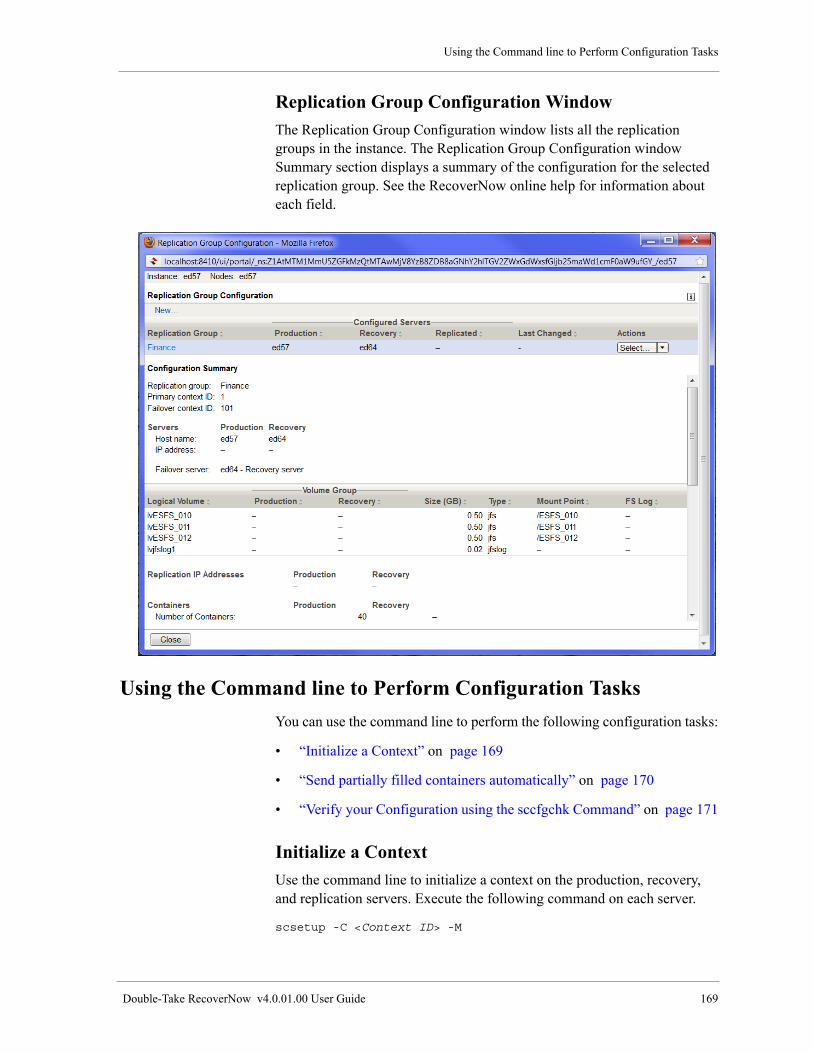
Using the Command line to Perform Configuration Tasks
Double-Take RecoverNow v4.0.01.00 User Guide 169
Replication Group Configuration Window
The Replication Group Configuration window lists all the replication groups in the instance. The Replication Group Configuration window Summary section displays a summary of the configuration for the selected replication group. See the RecoverNow online help for information about each field.
Using the Command line to Perform Configuration Tasks
You can use the command line to perform the following configuration tasks:
• “Initialize a Context” on page 169
• “Send partially filled containers automatically” on page 170
• “Verify your Configuration using the sccfgchk Command” on page 171
Initialize a Context
Use the command line to initialize a context on the production, recovery, and replication servers. Execute the following command on each server.
scsetup -C <Context ID> -M
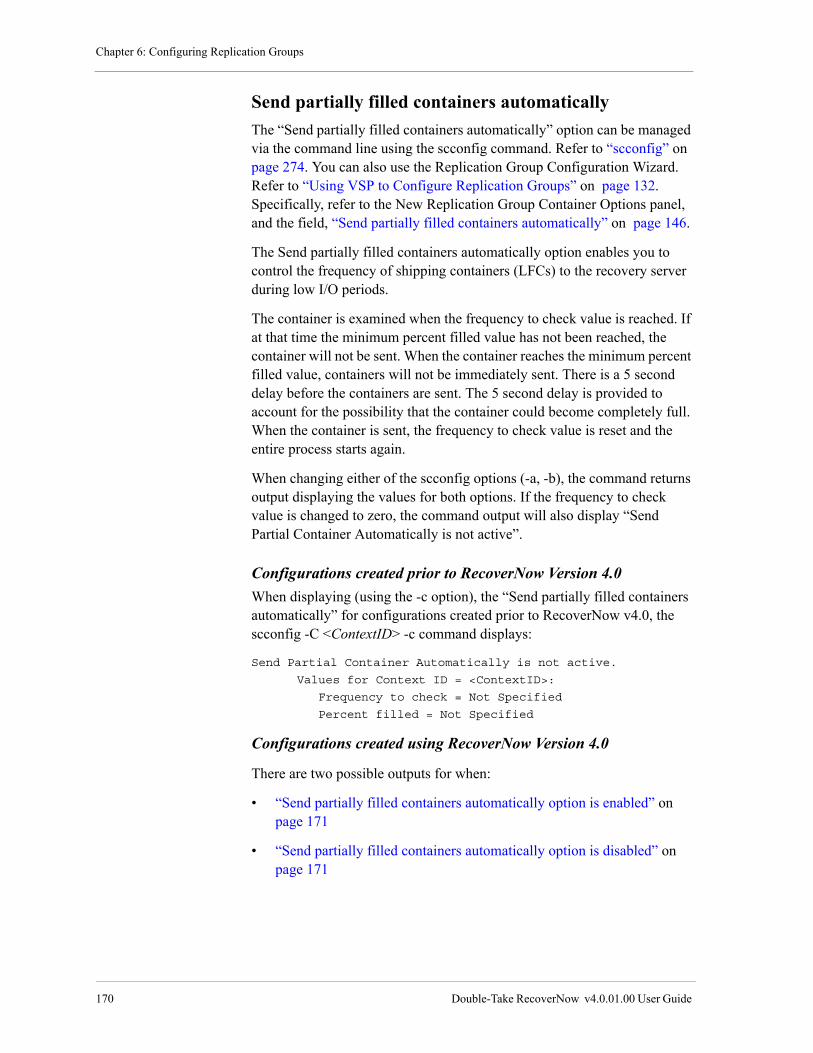
Chapter 6: Configuring Replication Groups
170 Double-Take RecoverNow v4.0.01.00 User Guide
Send partially filled containers automatically
The “Send partially filled containers automatically” option can be managed via the command line using the scconfig command. Refer to “scconfig” on page 274. You can also use the Replication Group Configuration Wizard. Refer to “Using VSP to Configure Replication Groups” on page 132. Specifically, refer to the New Replication Group Container Options panel, and the field, “Send partially filled containers automatically” on page 146.
The Send partially filled containers automatically option enables you to control the frequency of shipping containers (LFCs) to the recovery server during low I/O periods.
The container is examined when the frequency to check value is reached. If at that time the minimum percent filled value has not been reached, the container will not be sent. When the container reaches the minimum percent filled value, containers will not be immediately sent. There is a 5 second delay before the containers are sent. The 5 second delay is provided to account for the possibility that the container could become completely full. When the container is sent, the frequency to check value is reset and the entire process starts again.
When changing either of the scconfig options (-a, -b), the command returns output displaying the values for both options. If the frequency to check value is changed to zero, the command output will also display “Send Partial Container Automatically is not active”.
Configurations created prior to RecoverNow Version 4.0
When displaying (using the -c option), the “Send partially filled containers automatically” for configurations created prior to RecoverNow v4.0, the scconfig -C <ContextID> -c command displays:
Send Partial Container Automatically is not active.
Values for Context ID = <ContextID>:
Frequency to check = Not Specified
Percent filled = Not Specified
Configurations created using RecoverNow Version 4.0
There are two possible outputs for when:
• “Send partially filled containers automatically option is enabled” on page 171
• “Send partially filled containers automatically option is disabled” on page 171

Using the Command line to Perform Configuration Tasks
Double-Take RecoverNow v4.0.01.00 User Guide 171
Send partially filled containers automatically option is enabled
When displaying (using the -c option), the “Send partially filled containers automatically” for configurations created using RecoverNow v4.0 and the Send partially filled containers automatically option enabled, the scconfig -C <ContextID> -c command displays:
Send Partial Container Automatically is active.
Values for Context ID = <ContextID>:
Frequency to check = 300
Percent filled = 50
Send partially filled containers automatically option is disabled
When displaying (using the -c option), the “Send partially filled containers automatically” for configurations created using RecoverNow version 4.0 and the Send partially filled containers automatically option disabled the scconfig -C <ContextID> -c command displays:
Send Partial Container Automatically is not active.
Values for Context ID = <ContextID>:
Frequency to check = 0
Percent filled = 0
Verify your Configuration using the sccfgchk Command
Execute the following command on each node after the configuration has been initialized. For information on the command syntax, refer to “sccfgchk” on page 283.
sccfgchk -C <Context ID>

Chapter 6: Configuring Replication Groups
172 Double-Take RecoverNow v4.0.01.00 User Guide
Support for LVM commands when the RecoverNow drivers are loaded
The AIX Logical Volume Manager (LVM) manages Logical Volumes (LVs) that RecoverNow protects.
Because RecoverNow manages Logical Volumes, not all the AIX LVM commands are supported. The table below shows the LVM commands supported when the RecoverNow drivers are loaded.
LCM Command Status
chlv OK
chlvcopy OK
chvg OK
cplv OK. LV must be closed
defragfs OK
exportvg OK
extendlv OK
extendvg OK
fileplace Not supported. DSI
importvg OK
joinvg Not supported. Unable to synchronize logical volumes.
lslv OK
lsvg OK
lvmstat Not supported. Cannot enable Statistics collection.
migratepv Not supported. Uses mirror and syncvg
mirrorvg OK. But it will not begin sync when the drivers are loaded.
mirscan OK
mklv OK
mklvcopy Not supported. Unable to synchronize logical volume.
mkvg OK
readlvcopy OK

Support for LVM commands when the RecoverNow drivers are loaded
Double-Take RecoverNow v4.0.01.00 User Guide 173
redefinevg OK
reducevg OK
reorgvg Not supported. Unable to synchronize logical volumes.
rmlv OK, if the LV is not in PVS.
rmlvcopy OK
snapshot Not supported
splitlvcopy OK
splitvg OK
syncvg Not supported. Unable to synchronize logical volumes
synclvodm OK
unmirrorvg OK
varyoffvg OK. All LVs must be closed
varyonvg OK
LCM Command Status

Chapter 6: Configuring Replication Groups
174 Double-Take RecoverNow v4.0.01.00 User Guide
RecoverNow Default Ports
RecoverNow always checks the /etc/services file for port assignments to be used by a Context ID. If no port assignments are found in the /etc/services file, RecoverNow will use the default ports listed below. If the default port assignments are in use by another application, then specific port assignments must be added to the /etc/services file for a Context ID.
The default port assignments shown are not added to the/etc/services file when RecoverNow is installed.
sc<Context ID>aa_channel 5747/tcp # Archive Agent
sc<Context ID>ra_channel 5748/tcp # Restore Agent (scrt_rs)
sc<Context ID>ca_channel 5749/tcp # Restore Client Agent
sc<Context ID>aba_dchannel 5750/tcp # Assured Backup Agent
sc<Context ID>lca_dchannel 5751/tcp # Log Control Agent
sc<Context ID>aa_achannel 5752/tcp # Archive Agent
sc<Context ID>aba_channel 5753/tcp # Assured Backup Agent
sc<Context ID>lca_channel 5754/tcp # Log Control Agent
Adding specific port assignments
If multiple Context IDs are configured, each Context ID must have a unique port assignment. Port assignments for Primary and Failover Context IDs must also be unique.
For example, if the Primary Context ID is 25 and the Failover Context ID is 250, add the following entries to the /etc/services file on all servers.
sc25aba_channel 6901/tcp # Assured Backup Agent
sc25lca_channel 6902/tcp # Log Control Agent
sc25aa_channel 6903/tcp # Archive Agent
sc25ra_channel 6904/tcp # Restore Agent (scrt_rs)
sc25ca_channel 6905/tcp # Restore Client Agent
sc25aba_dchannel 6906/tcp # Assured Backup Agent
sc25lca_dchannel 6907/tcp # Log Control Agent
sc25aa_achannel 6908/tcp # Archive Agent
sc250aba_channel 6909/tcp # Assured Backup Agent
sc250lca_channel 6910/tcp # Log Control Agent
sc250aa_channel 6911/tcp # Archive Agent
sc250ra_channel 6912/tcp # Restore Agent (scrt_rs)
sc250ca_channel 6913/tcp # Restore Client Agent
sc250aba_dchannel 6914/tcp # Assured Backup Agent
sc250lca_dchannel 6915/tcp # Log Control Agent
sc250aa_achannel 6916/tcp # Archive Agent
The default port assignment shown below for the Configuration Daemon is added to the/etc/services file when RecoverNow is installed.
scconfigd 7835/tcp

Activating syslog Debug
Double-Take RecoverNow v4.0.01.00 User Guide 175
If the default port assignment for the configuration daemon is in use by another application, then the port number used by the configuration daemon must be changed.
To change the port number used by the Configuration Daemon:
• Use stopsrc to stop the Configuration Daemon on all servers
stopsrc –cs scrt_scconfigd
• Change the port number for the scconfigd entry in the /etc/services file on all servers to an unused port number.
• Use startsrc to start the Configuration Daemon on all servers
startsrc –s scrt_scconfigd
Activating syslog Debug
1. During the installation process, the following debug line is automatically added to /etc/syslog.conf.
*.debug var/log/EchoStream/es_syslog.out rotate size
10m files 7 compress # EchoStream
2. tail –f var/log/EchoStream/es_syslog.out
After you complete the RecoverNow post-installation tasks, refer to “Starting and Stopping” on page 177 for information on how to start and stop RecoverNow.

Chapter 6: Configuring Replication Groups
176 Double-Take RecoverNow v4.0.01.00 User Guide
Double-Take RecoverNow v4.0.01.00 User Guide 177
Starting and Stopping 7
RecoverNow provides capabilities to start up and shut down both the production and the recovery servers.
This chapter contains:
• “Using VSP to Start and Stop RecoverNow” on page 177
• “Using the command line to Start and Stop RecoverNow” on page 179
Using VSP to Start and Stop RecoverNow
This topic contains two sections:
• “Using VSP to Start RecoverNow” on page 177
• “Using VSP to Stop RecoverNow” on page 178
Using VSP to Start RecoverNow
The start action takes any necessary actions to get replication started. This includes starting the processes and loading the drivers. For detailed information refer to the RecoverNow online help.
To start RecoverNow:
1. Log in to VSP. See “Logging in to Vision Solutions Portal” on page 127.
2. Navigate to the Replication Group portlet.
3. Do one of the following for a specific replication group:
• Click Start from the Action toolbar.
• Select Start from the Actions dropdown.

Chapter 7: Starting and Stopping
178 Double-Take RecoverNow v4.0.01.00 User Guide
The Start Replication Group dialog displays:
4. Click OK, to start the replication group for the selected servers.
The Start Replication Group dialog remains displayed until the action completes successfully.
Using VSP to Stop RecoverNow
The start action takes any necessary actions to get replication started. This includes starting the processes and loading the drivers. For detailed information refer to the RecoverNow online help.
NOTE
Applications must be stopped before stopping replication. File systems are unmounted and data is no longer protected when replication is stopped.
To stop RecoverNow:
1. Log in to VSP. See “Logging in to Vision Solutions Portal” on page 127.
2. Navigate to the Replication Group portlet.
3. Do one of the following for a specific replication group:
• Click Stop from the Action toolbar.
• Select Stop from the Actions dropdown.

Using the command line to Start and Stop RecoverNow
Double-Take RecoverNow v4.0.01.00 User Guide 179
The Stop Replication Group dialog displays:
4. Click OK, to stop the replication group for the selected servers.
The Stop Replication Group dialog remains displayed until the action completes successfully.
Using the command line to Start and Stop RecoverNow
This topic contains two sections:
• “Using the command line to Start RecoverNow” on page 179
• “Using the Command line to Stop RecoverNow” on page 180
Using the command line to Start RecoverNow
On the production server, start RecoverNow:
NOTE
Steps 1 and 2 are done for the first start after RecoverNow is configured.
1. Stop any applications that are using the RecoverNow PVS (Production Volume Set) LVs (Logical Volumes).
2. Make sure that any filesystems associated with the PVS LVs are unmounted. Use the AIX “umount” command.
rtumnt -C <Context ID>

Chapter 7: Starting and Stopping
180 Double-Take RecoverNow v4.0.01.00 User Guide
3. Start RecoverNow. Enter the following command:
rtstart -C <Context ID>
The following output will display:
# rtstart -C 34
Loading Double-Take Recover Now Production drivers
Starting scrt_lca
fsck -F vxfs -o p -y /dev/vx/rdsk/rootvg/vol2
/dev/vx/rdsk/rootvg/vol2:file system is clean - log replay
is not required
Mounting /dev/vx/dsk/rootvg/vol2 on /vol2...
fsck -F vxfs -o p -y /dev/vx/rdsk/rootvg/vol1
/dev/vx/rdsk/rootvg/vol1:file system is clean - log replay
is not required
Mounting /dev/vx/dsk/rootvg/vol1 on /vol1...
4. Start the application.
On the recovery and replicated servers, start RecoverNow by performing the following steps:
5. Start RecoverNow.
rtstart -C <Context ID>
This displays:
# rtstart -C 34
Loading Double-Take RecoverNow Recovery Server Drivers
Starting scrt_aba
Monitoring the Log Files
Use the tail command to check the log files on all servers to check that processes are running properly.
1. Examine log files on the production server.
tail –f /var/log/EchoStream/scrt_lca-<ContextID>.out
2. Examine log files on the recovery and replicated servers.
tail –f /var/log/EchoStream/scrt_aba-<ContextID>.out
Using the Command line to Stop RecoverNow
On the production server, stop RecoverNow.
1. Stop the application.
2. Unmount the protected volumes.

Using the command line to Start and Stop RecoverNow
Double-Take RecoverNow v4.0.01.00 User Guide 181
rtumnt -C <Context ID>
3. Stop RecoverNow, synchronize data, and unload the drivers on the production server.
rtstop -FSC <Context ID>
4. On the recovery and replicated servers, stop RecoverNow and unload the drivers:
rtstop -FC <Context ID>

Chapter 7: Starting and Stopping
182 Double-Take RecoverNow v4.0.01.00 User Guide

Double-Take RecoverNow v4.0.01.00 User Guide 183
Creating Snapshots 8
Overview
RecoverNow enables you to restore a complete copy of the data on the production server to any time in the past. You can quickly restore a database that has crashed and rollback the data to a point before a logical corruption occurred.
This chapter contains:
• “Using Snapshots to Protect Your Data” on page 183
• “Using VSP to Create a Snapshot” on page 184
• “Using the Command Line to Create a Snapshot” on page 186
Using Snapshots to Protect Your Data
If damage to your data is limited to a single volume or group of volumes, you can choose to rollback the affected volume(s). You do not have to restore the entire data set.
RecoverNow lets you create and use snapshots for production restores and snapshot-based backups to media such as tape. You can also create a snapshot when you want to use a copy of the data on the recovery server. Having a snapshot—a read or write copy of the data—on the recovery server enables you to investigate and use the data without affecting the operation of the production server. For example, you can:
• Perform data mining without affecting performance on the production server.
• Repair individual objects such as files, tables, and records on the production server without stopping the application or replacing all of the application files.
• Test whether the snapshot is the correct one to use for rolling back the data on the production server.
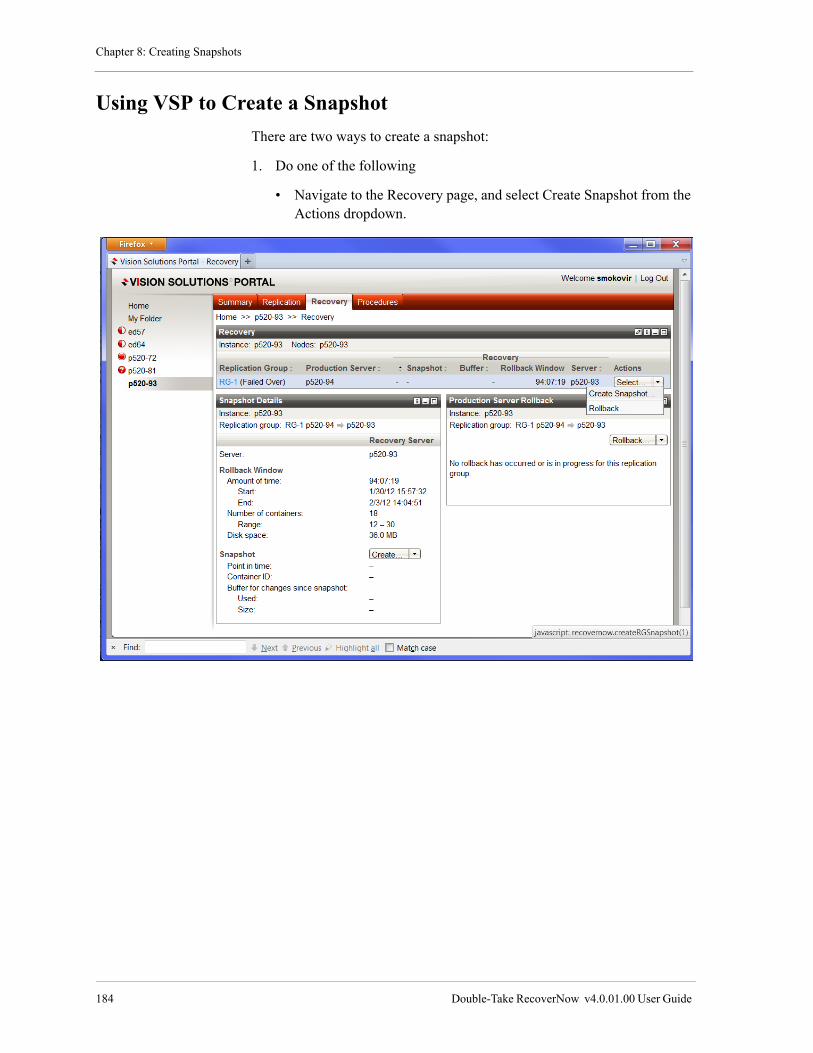
Chapter 8: Creating Snapshots
184 Double-Take RecoverNow v4.0.01.00 User Guide
Using VSP to Create a Snapshot
There are two ways to create a snapshot:
1. Do one of the following
• Navigate to the Recovery page, and select Create Snapshot from the Actions dropdown.
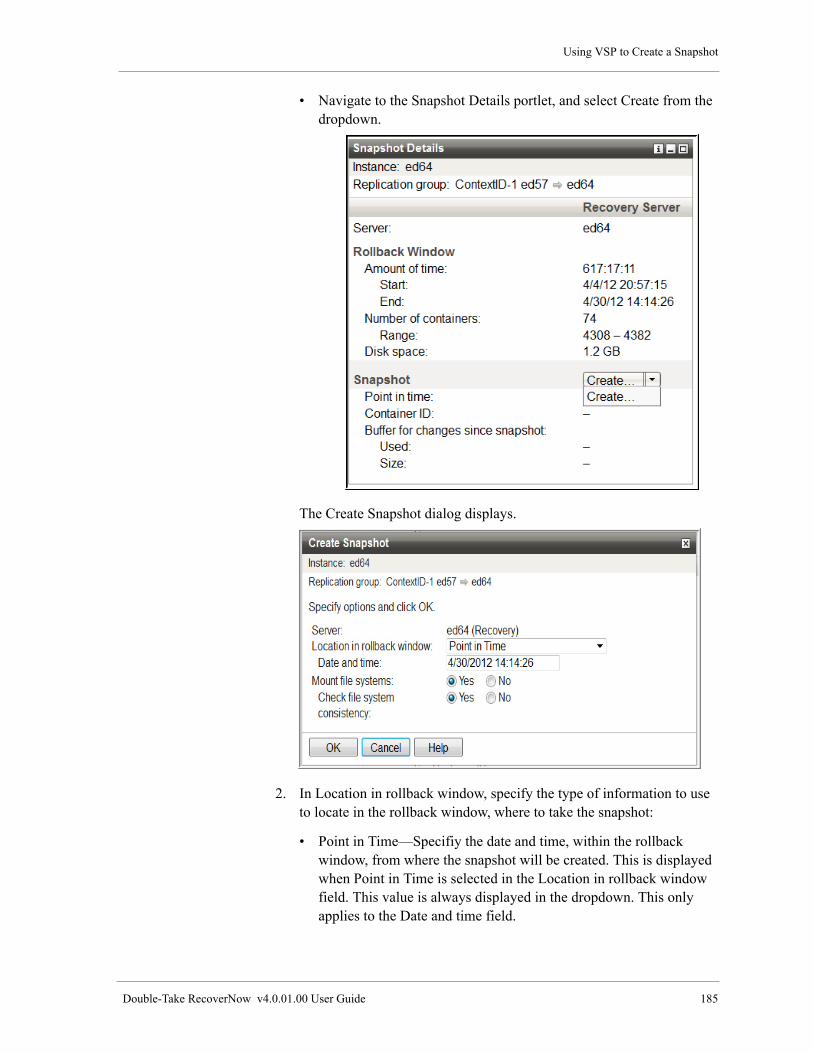
Using VSP to Create a Snapshot
Double-Take RecoverNow v4.0.01.00 User Guide 185
• Navigate to the Snapshot Details portlet, and select Create from the dropdown.
The Create Snapshot dialog displays.
2. In Location in rollback window, specify the type of information to use to locate in the rollback window, where to take the snapshot:
• Point in Time—Specifiy the date and time, within the rollback window, from where the snapshot will be created. This is displayed when Point in Time is selected in the Location in rollback window field. This value is always displayed in the dropdown. This only applies to the Date and time field.
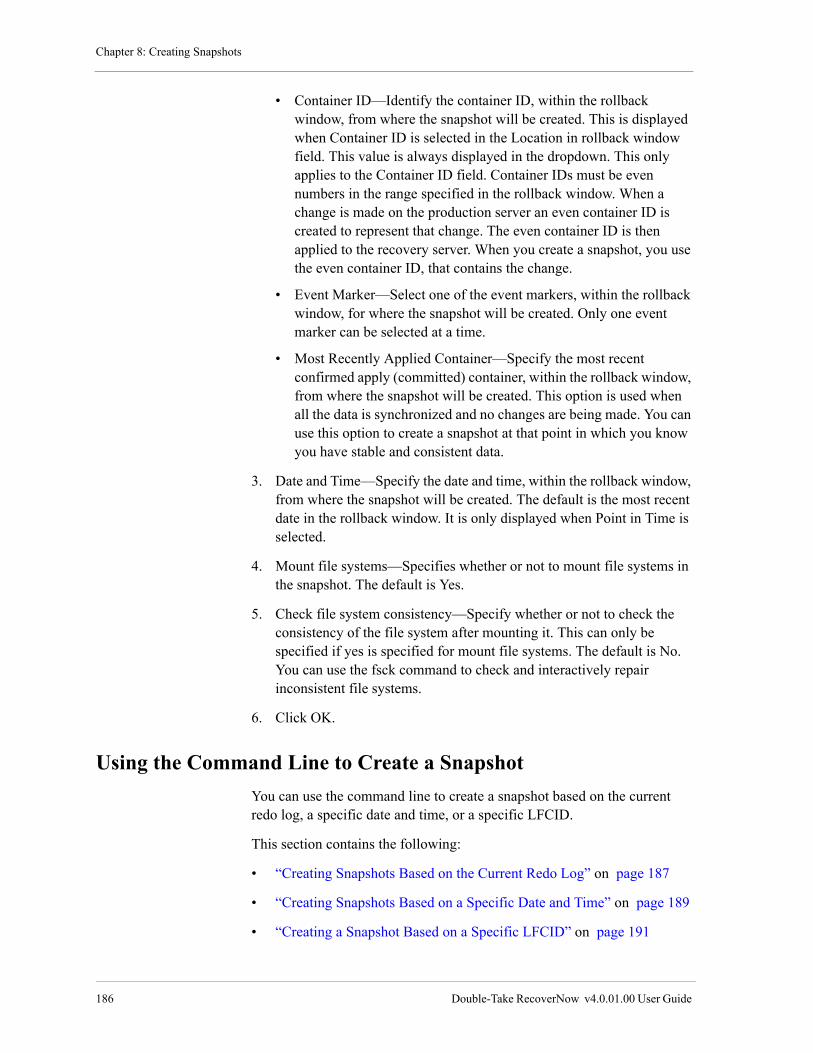
Chapter 8: Creating Snapshots
186 Double-Take RecoverNow v4.0.01.00 User Guide
• Container ID—Identify the container ID, within the rollback window, from where the snapshot will be created. This is displayed when Container ID is selected in the Location in rollback window field. This value is always displayed in the dropdown. This only applies to the Container ID field. Container IDs must be even numbers in the range specified in the rollback window. When a change is made on the production server an even container ID is created to represent that change. The even container ID is then applied to the recovery server. When you create a snapshot, you use the even container ID, that contains the change.
• Event Marker—Select one of the event markers, within the rollback window, for where the snapshot will be created. Only one event marker can be selected at a time.
• Most Recently Applied Container—Specify the most recent confirmed apply (committed) container, within the rollback window, from where the snapshot will be created. This option is used when all the data is synchronized and no changes are being made. You can use this option to create a snapshot at that point in which you know you have stable and consistent data.
3. Date and Time—Specify the date and time, within the rollback window, from where the snapshot will be created. The default is the most recent date in the rollback window. It is only displayed when Point in Time is selected.
4. Mount file systems—Specifies whether or not to mount file systems in the snapshot. The default is Yes.
5. Check file system consistency—Specify whether or not to check the consistency of the file system after mounting it. This can only be specified if yes is specified for mount file systems. The default is No. You can use the fsck command to check and interactively repair inconsistent file systems.
6. Click OK.
Using the Command Line to Create a Snapshot
You can use the command line to create a snapshot based on the current redo log, a specific date and time, or a specific LFCID.
This section contains the following:
• “Creating Snapshots Based on the Current Redo Log” on page 187
• “Creating Snapshots Based on a Specific Date and Time” on page 189
• “Creating a Snapshot Based on a Specific LFCID” on page 191
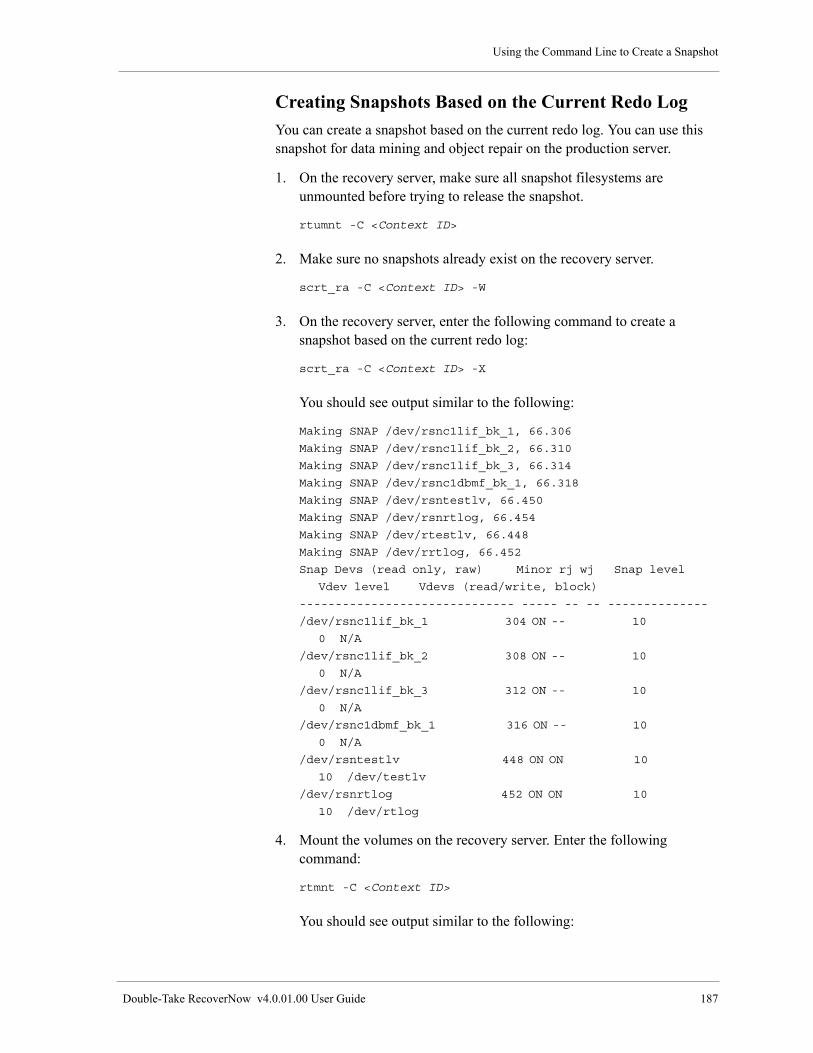
Using the Command Line to Create a Snapshot
Double-Take RecoverNow v4.0.01.00 User Guide 187
Creating Snapshots Based on the Current Redo Log
You can create a snapshot based on the current redo log. You can use this snapshot for data mining and object repair on the production server.
1. On the recovery server, make sure all snapshot filesystems are unmounted before trying to release the snapshot.
rtumnt -C <Context ID>
2. Make sure no snapshots already exist on the recovery server.
scrt_ra -C <Context ID> -W
3. On the recovery server, enter the following command to create a snapshot based on the current redo log:
scrt_ra -C <Context ID> -X
You should see output similar to the following:
Making SNAP /dev/rsnc1lif_bk_1, 66.306
Making SNAP /dev/rsnc1lif_bk_2, 66.310
Making SNAP /dev/rsnc1lif_bk_3, 66.314
Making SNAP /dev/rsnc1dbmf_bk_1, 66.318
Making SNAP /dev/rsntestlv, 66.450
Making SNAP /dev/rsnrtlog, 66.454
Making SNAP /dev/rtestlv, 66.448
Making SNAP /dev/rrtlog, 66.452
Snap Devs (read only, raw) Minor rj wj Snap level
Vdev level Vdevs (read/write, block)
------------------------------ ----- -- -- --------------
/dev/rsnc1lif_bk_1 304 ON -- 10
0 N/A
/dev/rsnc1lif_bk_2 308 ON -- 10
0 N/A
/dev/rsnc1lif_bk_3 312 ON -- 10
0 N/A
/dev/rsnc1dbmf_bk_1 316 ON -- 10
0 N/A
/dev/rsntestlv 448 ON ON 10
10 /dev/testlv
/dev/rsnrtlog 452 ON ON 10
10 /dev/rtlog
4. Mount the volumes on the recovery server. Enter the following command:
rtmnt -C <Context ID>
You should see output similar to the following:

Chapter 8: Creating Snapshots
188 Double-Take RecoverNow v4.0.01.00 User Guide
Determining Filesystems to mount...
fsck -fp -y /dev/rtestlv
log redo processing for /dev/rtestlv
syncpt record at 7028
end of log 7028
syncpt record at 7028
syncpt address 7028
number of log records = 1
number of do blocks = 0
number of nodo blocks = 0
/dev/rtestlv (/test): ** Unmounted cleanly - Check
suppressed
Mounting /test...
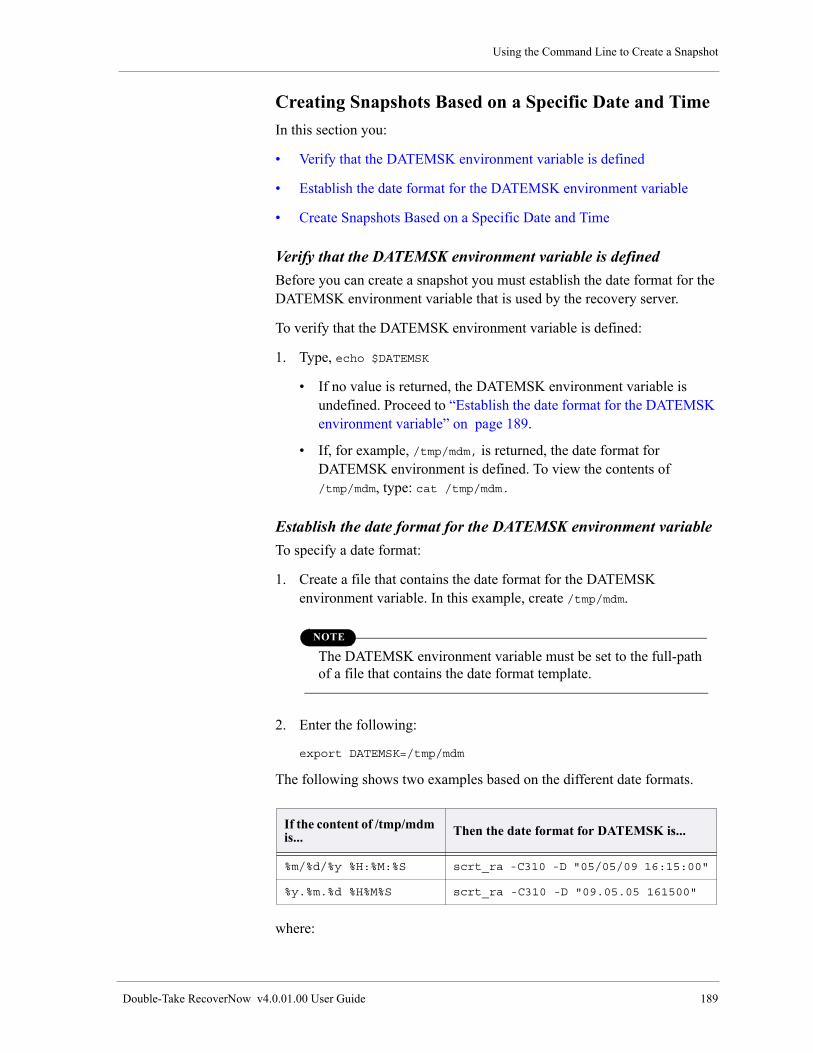
Using the Command Line to Create a Snapshot
Double-Take RecoverNow v4.0.01.00 User Guide 189
Creating Snapshots Based on a Specific Date and Time
In this section you:
• Verify that the DATEMSK environment variable is defined
• Establish the date format for the DATEMSK environment variable
• Create Snapshots Based on a Specific Date and Time
Verify that the DATEMSK environment variable is defined
Before you can create a snapshot you must establish the date format for the DATEMSK environment variable that is used by the recovery server.
To verify that the DATEMSK environment variable is defined:
1. Type, echo $DATEMSK
• If no value is returned, the DATEMSK environment variable is undefined. Proceed to “Establish the date format for the DATEMSK environment variable” on page 189.
• If, for example, /tmp/mdm, is returned, the date format for DATEMSK environment is defined. To view the contents of /tmp/mdm, type: cat /tmp/mdm.
Establish the date format for the DATEMSK environment variable
To specify a date format:
1. Create a file that contains the date format for the DATEMSK environment variable. In this example, create /tmp/mdm.
NOTE
The DATEMSK environment variable must be set to the full-path of a file that contains the date format template.
2. Enter the following:
export DATEMSK=/tmp/mdm
The following shows two examples based on the different date formats.
where:
If the content of /tmp/mdm is... Then the date format for DATEMSK is...
%m/%d/%y %H:%M:%S scrt_ra -C310 -D "05/05/09 16:15:00"
%y.%m.%d %H%M%S scrt_ra -C310 -D "09.05.05 161500"
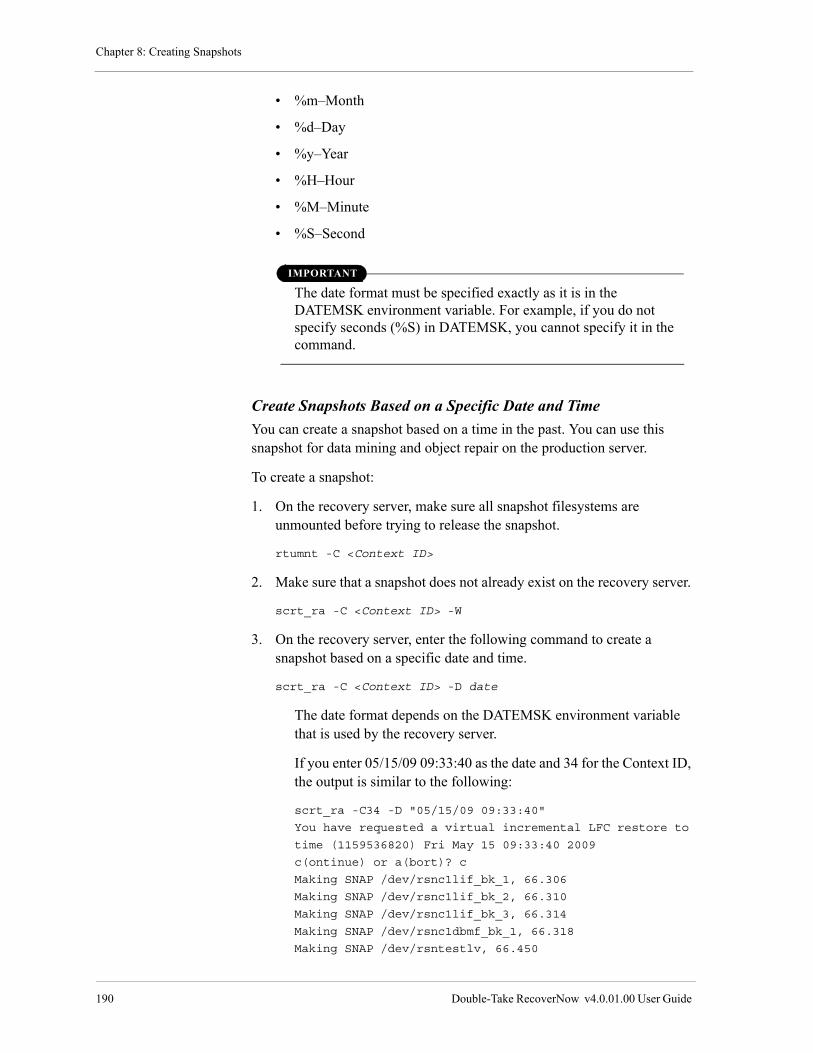
Chapter 8: Creating Snapshots
190 Double-Take RecoverNow v4.0.01.00 User Guide
• %m–Month
• %d–Day
• %y–Year
• %H–Hour
• %M–Minute
• %S–Second
IMPORTANT
The date format must be specified exactly as it is in the DATEMSK environment variable. For example, if you do not specify seconds (%S) in DATEMSK, you cannot specify it in the command.
Create Snapshots Based on a Specific Date and Time
You can create a snapshot based on a time in the past. You can use this snapshot for data mining and object repair on the production server.
To create a snapshot:
1. On the recovery server, make sure all snapshot filesystems are unmounted before trying to release the snapshot.
rtumnt -C <Context ID>
2. Make sure that a snapshot does not already exist on the recovery server.
scrt_ra -C <Context ID> -W
3. On the recovery server, enter the following command to create a snapshot based on a specific date and time.
scrt_ra -C <Context ID> -D date
The date format depends on the DATEMSK environment variable that is used by the recovery server.
If you enter 05/15/09 09:33:40 as the date and 34 for the Context ID, the output is similar to the following:
scrt_ra -C34 -D "05/15/09 09:33:40"
You have requested a virtual incremental LFC restore to
time (1159536820) Fri May 15 09:33:40 2009
c(ontinue) or a(bort)? c
Making SNAP /dev/rsnc1lif_bk_1, 66.306
Making SNAP /dev/rsnc1lif_bk_2, 66.310
Making SNAP /dev/rsnc1lif_bk_3, 66.314
Making SNAP /dev/rsnc1dbmf_bk_1, 66.318
Making SNAP /dev/rsntestlv, 66.450
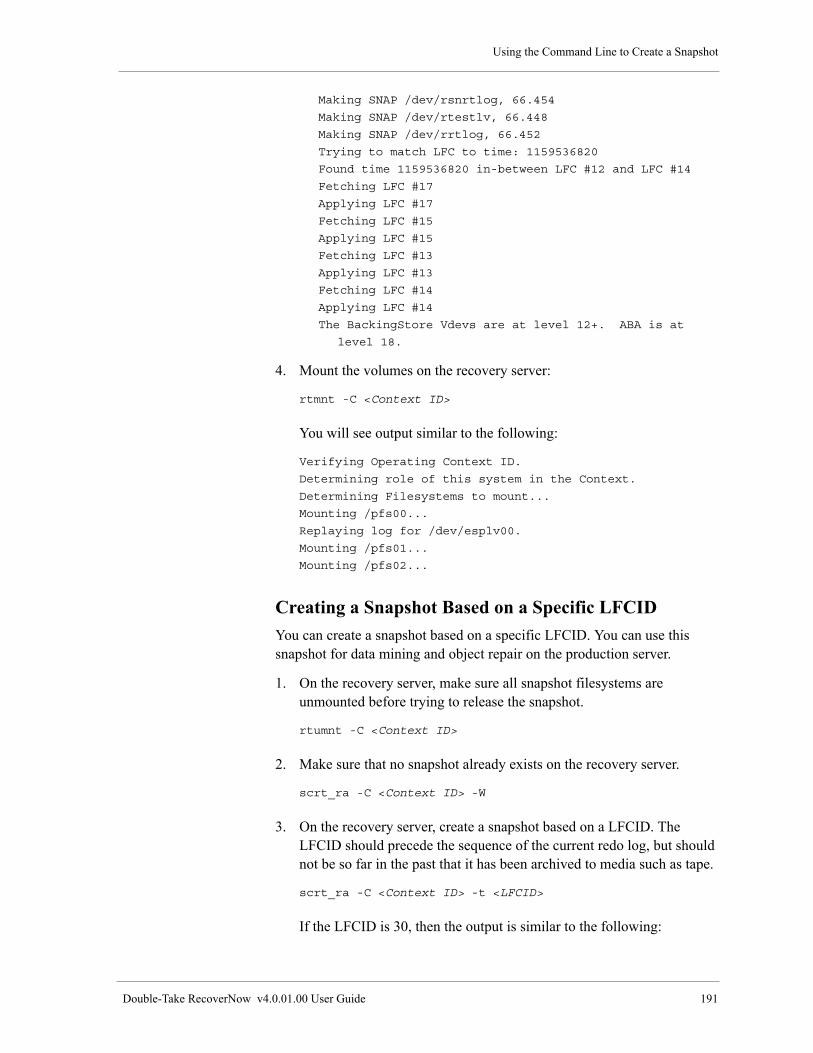
Using the Command Line to Create a Snapshot
Double-Take RecoverNow v4.0.01.00 User Guide 191
Making SNAP /dev/rsnrtlog, 66.454
Making SNAP /dev/rtestlv, 66.448
Making SNAP /dev/rrtlog, 66.452
Trying to match LFC to time: 1159536820
Found time 1159536820 in-between LFC #12 and LFC #14
Fetching LFC #17
Applying LFC #17
Fetching LFC #15
Applying LFC #15
Fetching LFC #13
Applying LFC #13
Fetching LFC #14
Applying LFC #14
The BackingStore Vdevs are at level 12+. ABA is at
level 18.
4. Mount the volumes on the recovery server:
rtmnt -C <Context ID>
You will see output similar to the following:
Verifying Operating Context ID.
Determining role of this system in the Context.
Determining Filesystems to mount...
Mounting /pfs00...
Replaying log for /dev/esplv00.
Mounting /pfs01...
Mounting /pfs02...
Creating a Snapshot Based on a Specific LFCID
You can create a snapshot based on a specific LFCID. You can use this snapshot for data mining and object repair on the production server.
1. On the recovery server, make sure all snapshot filesystems are unmounted before trying to release the snapshot.
rtumnt -C <Context ID>
2. Make sure that no snapshot already exists on the recovery server.
scrt_ra -C <Context ID> -W
3. On the recovery server, create a snapshot based on a LFCID. The LFCID should precede the sequence of the current redo log, but should not be so far in the past that it has been archived to media such as tape.
scrt_ra -C <Context ID> -t <LFCID>
If the LFCID is 30, then the output is similar to the following:

Chapter 8: Creating Snapshots
192 Double-Take RecoverNow v4.0.01.00 User Guide
Making SNAP /dev/vx/rdsk/rootdg/snvol2, 215.6
Making SNAP /dev/vx/rdsk/rootdg/snvol1, 215.10
Making SNAP /dev/vx/rdsk/rootdg/snc34lif_bk_1, 215.14
Making SNAP /dev/vx/rdsk/rootdg/snc34lif_bk_2, 215.18
Making SNAP /dev/vx/rdsk/rootdg/snc34lif_bk_3, 215.22
Making SNAP /dev/vx/rdsk/rootdg/snc34dbmf_bk_1, 215.26
Making SNAP /dev/vx/rdsk/rootdg/snc34dbmf_bk_2, 215.30
Making SNAP /dev/vx/rdsk/rootdg/snc34dbmf_bk_3, 215.34
Making SNAP /dev/vx/rdsk/rootdg/vol2, 215.4
Making SNAP /dev/vx/rdsk/rootdg/vol1, 215.8
Fetching LFC #33
Applying LFC #33
Fetching LFC #31
Applying LFC #31
The BackingStore Vdevs are at level 30. ABA is at level
34.
4. Mount the volumes on the recovery server.
rtmnt -C <Context ID> -f
You should see output similar to the following:
log redo processing for /dev/rtestlv
syncpt record at 9028
end of log 9028
syncpt record at 9028
syncpt address 9028
number of log records = 1
number of do blocks = 0
number of nodo blocks = 0
/dev/rtestlv (/test): ** Unmounted cleanly - Check
suppressed
Mounting /test...
For information on database repair and database resurrection, refer to Chapter 10, “Working with RecoverNow Applications” on page 211.

Double-Take RecoverNow v4.0.01.00 User Guide 193
Administrative Tasks 9
This chapter describes RecoverNow administrative tasks:
• “Verify the configuration using the sccfgchk command” on page 193
• “Updating the RecoverNow Configuration” on page 194
• “Verifying Available Free Space” on page 194
• “Extending a RecoverNow-Protected Filesystem” on page 194
• “Increasing the Snapshot Journal Space on the Recovery Server” on page 197
• “Setting up JFS Log Isolation” on page 198
• “Removing a Filesystem from a RecoverNow Protected jfslog” on page 199
• “Setting Up Error Notification” on page 199
• “Marking State Maps Dirty and Synchronizing the PVS or one LV in the PVS” on page 204
• “Alternative Method for Performing Initial Synchronization” on page 205
• “Using IBM Power Systems Live Partition Mobility with RecoverNow” on page 206
Verify the configuration using the sccfgchk command
Use the sccfgchk command to check a configuration before you start RecoverNow. Execute the following command on each node after the configuration has been initialized. For information on the command syntax, refer to “sccfgchk” on page 283.
sccfgchk -C <Context ID>

Chapter 9: Administrative Tasks
194 Double-Take RecoverNow v4.0.01.00 User Guide
Updating the RecoverNow Configuration
If you update the RecoverNow configuration you must stop RecoverNow processes and unload the RecoverNow drivers on the production site. This means that you must also stop the production application and close and unmount the production data.
After you install RecoverNow, VSP and the portal application, you can use the RecoverNow Replication Group Wizard or the command line to configure new replication groups and change, rename, and delete existing ones. Refer to “Configuring Replication Groups” on page 131.
Verifying Available Free Space
Anytime a protected filesystem needs to be extended always check:
• The State map limit is not exceeded.
• On the production server, the protected Logical Volumes (LV)V “MAX LPs:” size is not exceeded.
• On the recovery server, the replica LV (“pt” LV) “MAX LPs:” size is not exceeded.
• On the protected and replica Volume Groups (VGs), there is enough free space.
Refer to “Extending a RecoverNow-Protected Filesystem” on page 194 for additional information.
Extending a RecoverNow-Protected Filesystem
RecoverNow-protected filesystems can be extended when RecoverNow is active using the smit chfs command. When the filesystem is extended:
• On the production server, the replica (“pt” LV) is automatically extended when data is written to the expanded area.
NOTE
To manually extend the replica (“pt” LV), use the extend_replica_lv command to force the expansion of a Replica LV (Logical Volume):
extend_replica_lv -C <Context ID> -L <PVS LV>
• On the recovery server, the write journal associated with the file system is not extended.
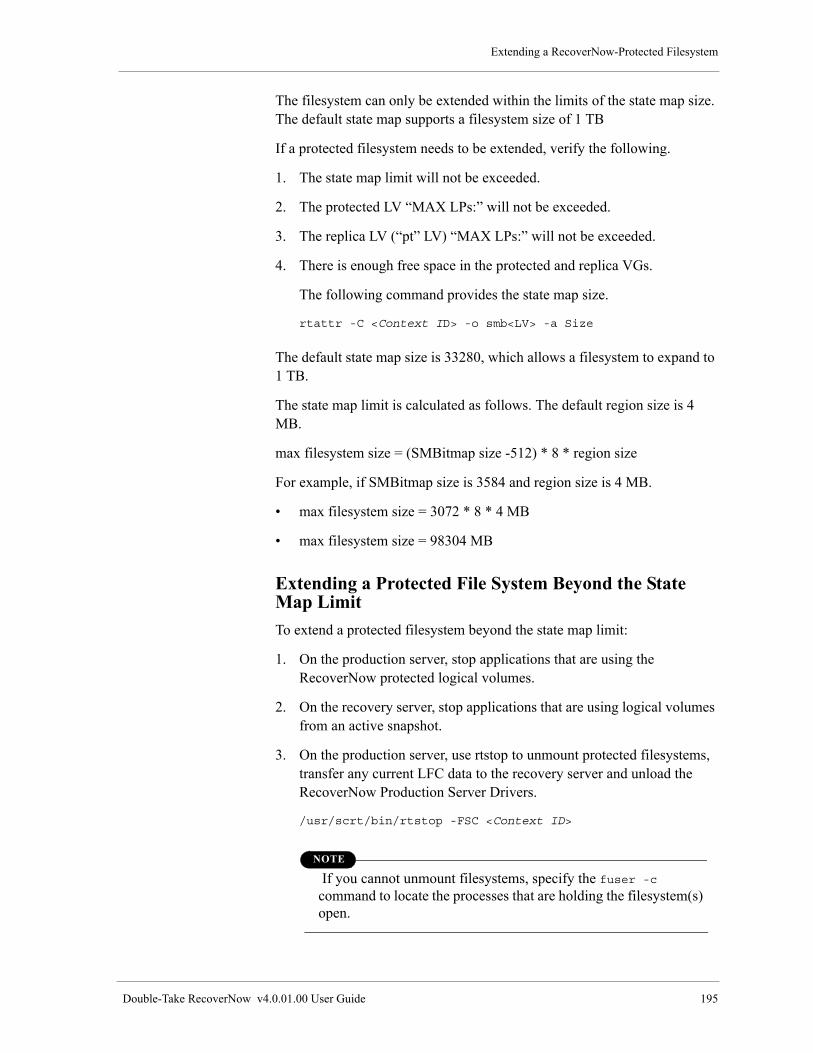
Extending a RecoverNow-Protected Filesystem
Double-Take RecoverNow v4.0.01.00 User Guide 195
The filesystem can only be extended within the limits of the state map size. The default state map supports a filesystem size of 1 TB
If a protected filesystem needs to be extended, verify the following.
1. The state map limit will not be exceeded.
2. The protected LV “MAX LPs:” will not be exceeded.
3. The replica LV (“pt” LV) “MAX LPs:” will not be exceeded.
4. There is enough free space in the protected and replica VGs.
The following command provides the state map size.
rtattr -C <Context ID> -o smb<LV> -a Size
The default state map size is 33280, which allows a filesystem to expand to 1 TB.
The state map limit is calculated as follows. The default region size is 4 MB.
max filesystem size = (SMBitmap size -512) * 8 * region size
For example, if SMBitmap size is 3584 and region size is 4 MB.
• max filesystem size = 3072 * 8 * 4 MB
• max filesystem size = 98304 MB
Extending a Protected File System Beyond the State Map Limit
To extend a protected filesystem beyond the state map limit:
1. On the production server, stop applications that are using the RecoverNow protected logical volumes.
2. On the recovery server, stop applications that are using logical volumes from an active snapshot.
3. On the production server, use rtstop to unmount protected filesystems, transfer any current LFC data to the recovery server and unload the RecoverNow Production Server Drivers.
/usr/scrt/bin/rtstop -FSC <Context ID>
NOTE
If you cannot unmount filesystems, specify the fuser -c command to locate the processes that are holding the filesystem(s) open.

Chapter 9: Administrative Tasks
196 Double-Take RecoverNow v4.0.01.00 User Guide
4. On the recovery server, use rtstop to unmount any snapshot filesystems and unload the RecoverNow recovery server drivers.
/usr/scrt/bin/rtstop -FC <Context ID>
NOTE
If you cannot unmount filesystems, specify the fuser -c command to locate the processes that are holding the filesystem(s) open.
5. On the production and recovery servers, use rtattr to change the state map size. The new size must be a multiple of 512.
rtattr -C <Context ID> -o smb<LV> -a Size -v <new size>
6. On the production and recovery servers, use scsetup to delete device special files from /dev.
scsetup -XC <Context ID>
7. On the production and recovery servers, use scsetup to remove configured RecoverNow LV's:
scsetup -RC <Context ID>
8. On the production and recovery servers, use sccfgd_delcfg to delete the Failover Context ID if one was configured.
sccfgd_delcfg <Failover Context ID>
9. On the production and recovery servers, use scsetup to create new configured logical volumes.
scsetup -MC <Context ID>
10. On the production and recovery servers, use rtdr to create a failover context if one was configured.
rtdr -C <Primary Context ID> -F <Failover Context ID>
setup
11. On the production server, use scconfig to wipe the state maps clean (0.000% dirty).
scconfig -WC <Context ID>
12. On the Production and Recover Servers, use rtstart to start RecoverNow.
rtstart -C <Context ID>

Increasing the Snapshot Journal Space on the Recovery Server
Double-Take RecoverNow v4.0.01.00 User Guide 197
13. On the production server, use “smit chfs” command to extend the filesystem.
Increasing the Snapshot Journal Space on the Recovery Server
The snapshot journal space can be increased on the recovery server without impacting the production environment. To increase the Snapshot Journal space on the recovery server:
1. Stop RecoverNow on the recovery server.
2. Unmount any snapshot filesystems.
/usr/scrt/bin/rtumnt -C <Context ID>
3. Release a snapshot if it exists.
/usr/scrt/bin/scrt_ra -C <Context ID> -W
4. Stop RecoverNow.
/usr/scrt/bin/rtstop -C <Context ID> -Fk
5. Use rtattr to increase the size of an existing snapshot journal volume.
NOTE
Any snapshot journal can be increased in size since all snapshot volumes are available for use during snapshot creation/use.
6. Determine the name of the snapshot journal to increase.
7. Use the following command to find the snapshot journal volume sizes:
/usr/scrt/bin/rtattr -C <Context ID> -t
SCRT/containers/WJournal -a Size
The ObjectName of a snapshot volume that you want to increase.
8. Select one of the snapshot journals and increase the size of the volume.
/usr/scrt/bin/rtattr -C <Context ID> -o <ObjectName>
-a Size -v <new size value in bytes>
9. Find the logical volume name for the snapshot journal.
rtattr -C <Context ID> -o <ObjectName from step 8 on
page 197>
-t SCRT/containers/WJournal -a FileName
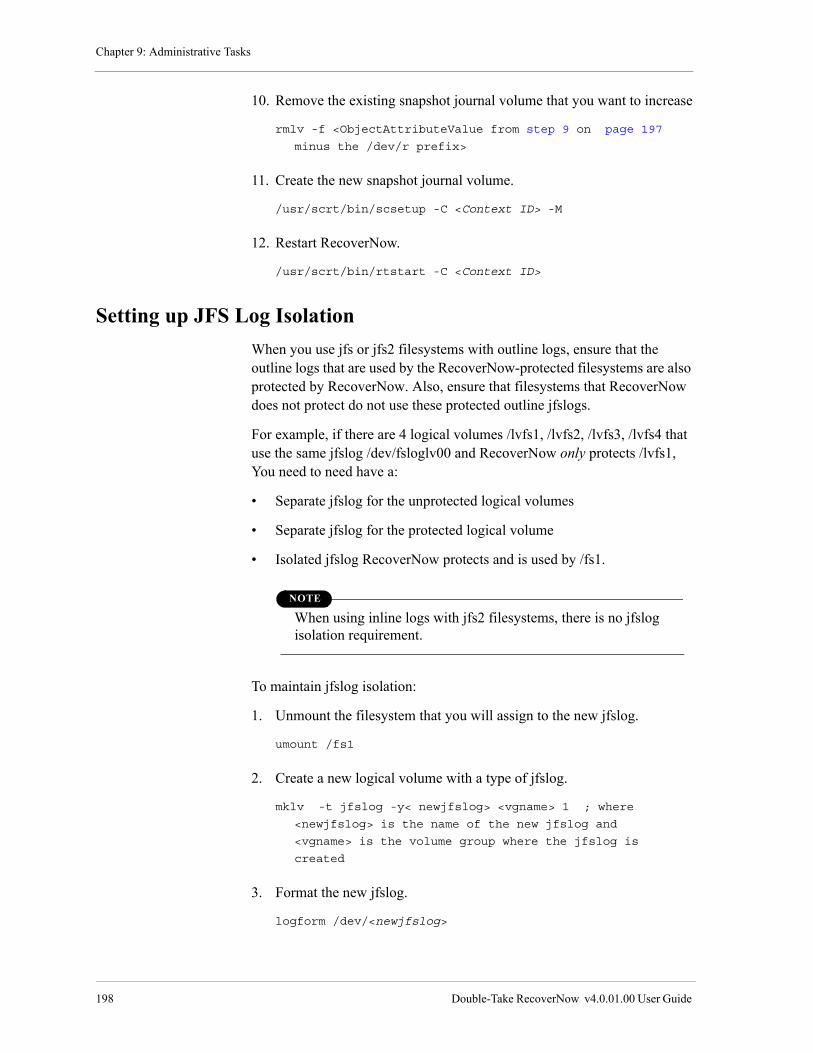
Chapter 9: Administrative Tasks
198 Double-Take RecoverNow v4.0.01.00 User Guide
10. Remove the existing snapshot journal volume that you want to increase
rmlv -f <ObjectAttributeValue from step 9 on page 197
minus the /dev/r prefix>
11. Create the new snapshot journal volume.
/usr/scrt/bin/scsetup -C <Context ID> -M
12. Restart RecoverNow.
/usr/scrt/bin/rtstart -C <Context ID>
Setting up JFS Log Isolation
When you use jfs or jfs2 filesystems with outline logs, ensure that the outline logs that are used by the RecoverNow-protected filesystems are also protected by RecoverNow. Also, ensure that filesystems that RecoverNow does not protect do not use these protected outline jfslogs.
For example, if there are 4 logical volumes /lvfs1, /lvfs2, /lvfs3, /lvfs4 that use the same jfslog /dev/fsloglv00 and RecoverNow only protects /lvfs1, You need to need have a:
• Separate jfslog for the unprotected logical volumes
• Separate jfslog for the protected logical volume
• Isolated jfslog RecoverNow protects and is used by /fs1.
NOTE
When using inline logs with jfs2 filesystems, there is no jfslog isolation requirement.
To maintain jfslog isolation:
1. Unmount the filesystem that you will assign to the new jfslog.
umount /fs1
2. Create a new logical volume with a type of jfslog.
mklv -t jfslog -y< newjfslog> <vgname> 1 ; where
<newjfslog> is the name of the new jfslog and
<vgname> is the volume group where the jfslog is
created
3. Format the new jfslog.
logform /dev/<newjfslog>

Removing a Filesystem from a RecoverNow Protected jfslog
Double-Take RecoverNow v4.0.01.00 User Guide 199
4. Respond yes to allow the jfslog to be formatted.
5. Assign the new jfslog to the filesystem.
chfs -a log=/dev/<newjfslog> /fs1
Removing a Filesystem from a RecoverNow Protected jfslog
When you decide to remove a filesystem from a PVS, this filesystem needs to use a different jfslog from the RecoverNow protected jfslog. Follow the steps below to associate the newly removed filesystem with a non-protected jfslog.
Assumption: The filesystem /jfsold is being removed from the RecoverNow PVS. The RecoverNow protected filesystems are unmounted, the RecoverNow processes are stopped and the RecoverNow data tap is unloaded.
1. If a jfslog exists in the volume group that is not currently part of the PVS, you can assign that jfslog to the filesystem that is being removed from the PVS.
umount /jfsold
chfs -a log=/dev/<nonrtjfslog> /jfsold
where nonrtjfslog is a jfslog that exists in the volume group but is not part the PVS.
2. If a jfslog does not exist in the volume group:
mklv -t jfslog -y< newjfslog> <vgname> 1
where <newjfslog> is the name of the jfslog that you are creating for the non-protected filesystem to use
3. Format the jfslog.
logform /dev/<newjfslog>
4. Assign the jfslog to the non-protected filesystem
chfs -a log=/dev/<newjfslog> /jfsold
Setting Up Error Notification
Use the AIX Error Notification feature to notify the administrator via email or take action when certain errors are recorded in the AIX error log.

Chapter 9: Administrative Tasks
200 Double-Take RecoverNow v4.0.01.00 User Guide
The following example script /home/scrt/enm_1 can be used to record this information in /tmp/enm_1.out and notify the administrator via email when certain errors occur.
#!/bin/ksh
PROGNAME=${0##*/}
exec 1>> /tmp/${PROGNAME}.out
exec 2>&1
printf "error notify method\n"
errpt -Al ${1}
errpt -Al ${1} | mail -s Error root
To enable AIX Error Notification for one or more of the RecoverNow errors, you must add a stanza to the errnotify ODM. When the error is logged, the error notification daemon will call the notify method specified in the errnotify ODM stanza. The errnotify ODM is located in the /etc/objrepos directory.
For example, the following errnotify stanzas are added to file /tmp/ern_1.add for error labels SCRT_LFC_READ_ERROR, SCRT_LFC_WRITE_ERROR, "SCRT_NETWORK_ERROR" and "SCRT_ABORT_ERROR.
errnotify:
en_name = "SCRT_LFC_READ_ERROR"
en_class = "S"
en_type = "PERM"
en_method = "/home/scrt/enm_1 $1"
errnotify:
en_name = "SCRT_LFC_WRITE_ERROR"
en_class = "S"
en_type = "PERM"
en_method = "/home/scrt/enm_1 $1"
errnotify:
en_name = "SCRT_NETWORK_ERROR"
en_class = "S"
en_type = "PERM"
en_method = "/home/scrt/enm_1 $1"
errnotify:
en_name = "SCRT_ABORT_ERROR"
en_class = "S"
en_type = "PERM"
en_method = "/home/scrt/enm_1 $1"

Setting Up Error Notification
Double-Take RecoverNow v4.0.01.00 User Guide 201
ODM Commands
The errnotify stanzas are added to the errnotify ODM using the following command.
odmadd /tmp/ern_1
To list the “errnotif stanzas added for RecoverNow errors do the following command.
odmget -q"en_name LIKE SCRT_*" errnotify|more
To delete all the errnotify stanzas added for RecoverNow errors:
odmdelete -q"en_name LIKE SCRT_*" -o errnotify
To delete a particular stanza:"SCRT_LFC_WRITE_ERROR" "errnotify" stanzas:
odmdelete -qen_name=SCRT_LFC_WRITE_ERROR -o errnotify
Error Notify Messages
Table 1shows the Error Notify Messages that are written to the AIX error log.
Table 1: Error Notify Messages
Error Description
SCRT_AAGENT_ABORTED_ERROR: PERM S Archive Agent Aborted Operation
SCRT_AAGENT_API_ERROR: PERM S Error conversing with Archive Program
SCRT_ABORT_ERROR: PERM S Generic/Fatal RealTime Error
SCRT_ARCHIVEMGR_ERROR: PERM S Archive Manager Error
SCRT_BSFC_READ_ERROR: PERM S Read error from replicated store
SCRT_BSFC_WRITE_ERROR: PERM S Write Error to replicated store
SCRT_CONFIG_ERROR: PERM S Configuration Error
SCRT_CONFIG_UPDATE_ERROR: TEMP S Configuration update failure
SCRT_DBMFC_APPLY_ERROR: PERM S Logical error applying LFC to DBMFC
SCRT_DBMFC_READ_ERROR: PERM S Reading from DevBlockMap failed
SCRT_DBMFC_WRITE_ERROR: PERM S Writing to DevBlockMap failed
SCRT_DEVREAD_ERROR: PERM S Failure to read to required device

Chapter 9: Administrative Tasks
202 Double-Take RecoverNow v4.0.01.00 User Guide
SCRT_DEVWRITE_ERROR: PERM S Failure to write to required device
SCRT_LFC_READ_ERROR: PERM S Read error on an LFC
SCRT_LFC_WRITE_ERROR: PERM S Write error on an LFC
SCRT_LIFC_FULL_ERROR: TEMP S LIFC is full
SCRT_LIFC_READ_ERROR: PERM S Read of LIFC failed
SCRT_LIFC_WRITE_ERROR: PERM S Write of Log Record to LIFC failed
SCRT_LRFC_READ_ERROR: PERM S Read of LogRecord from LRFC failed
SCRT_LRFC_WRITE_ERROR: PERM S Writing of LogRecord to LRFC failed
SCRT_NETWORK_ERROR: PERM S Cannot connect to peer process over network
SCRT_POOL_EMPTY: TEMP S Storage pool empty
SCRT_POOL_HWM: TEMP S Storage pool usage at/above high water mark
SCRT_SCJ_COWREAD_ERROR: PERM S Copy-On-Write read failed
SCRT_SCJ_COWWRITE_ERROR: PERM S Journal Copy-On-Write write failed
SCRT_SCJ_FULL_ERROR: PERM S Journal Copy-On-Write log is full
SCRT_SCLM_WANCHORCB_ERROR PERM S Log anchor write call back failed
SCRT_SCLM_WANCHOR_ERROR: PERM S Log anchor write failed
SCRT_SCSM_BMWRITE: PERM S Write to statemap bitmap device failed
SCRT_SCSM_LOGWRITE: PERM S Write to statemap log device failed
SCRT_SHAREDD_EXPORT_ERROR: PERM S Failure to export shared disk
SCRT_SHAREDD_IMPORT_ERROR PERM S Failure to import shared disk
SCRT_SMFC_READ_ERROR PERM S StateMap File Container Read Error
SCRT_SMFC_WRITE_ERROR PERM S StateMap File Container Write Error
SCRT_SM_ERROR PERM S StateMap creation error
Table 1: Error Notify Messages
Error Description

Setting Up Error Notification
Double-Take RecoverNow v4.0.01.00 User Guide 203
SCRT_SNAP_OFF: PERM O Snapshots taken down
SCRT_SRC_ERROR PERM S System Resource Controller Error
Table 1: Error Notify Messages
Error Description

Chapter 9: Administrative Tasks
204 Double-Take RecoverNow v4.0.01.00 User Guide
Marking State Maps Dirty and Synchronizing the PVS or one LV in the PVS
Use the scconfig command to:
• Mark state map bitmaps dirty for all devices or specified devices while RecoverNow is active.
• Perform a full synchronization of the Production Volume Set or one LV in the Production Volume Set. Refer to Chapter 14 “CLI Commands” on page 261 for more information.
scconfig -C <Context ID> -B
Where -C is the context
Context ID is the context ID number
-B marks statemap bitmaps dirty for all devices or specified devices while RecoverNow is active and performs a full synchronization of the Production Volume Set or one LV in the Production Volume Set.

Alternative Method for Performing Initial Synchronization
Double-Take RecoverNow v4.0.01.00 User Guide 205
Alternative Method for Performing Initial Synchronization
To optimize the time to transfer the PVS data onto a remote recovery server at a remote site:
NOTE
You can also use the -L option with the scconfig command for specific logical volumes to mark the state map zero percent dirty.
1. On the production server:
– Stop any application(s)
– Stop RecoverNow and unload the drivers:
rtstop -FC <Context ID>
2. On the recovery server
– Stop any application(s) that are using a snapshot
– Unmount the filesystems on a snapshot
rtumnt -C <Context ID>
– Release any snapshots
scrt_ra -WC <Context ID>
– Stop RecoverNow and unload the drivers.
rtstop -FC <Context ID>
3. Save the protected data on the production server to tape or disk. You must save at the LV level in block sequence.
– Save to tape:
dd if=/dev/db2 of=/dev/rmt0 bs=1024
– Save to disk:
dd if=/dev/db2 of=/dev/db2bu bs=16m
4. Clean the state map on the production server.
scconfig -WC <Context ID>
5. Start RecoverNow on the production server.
rtstart -C <Context ID>
6. Restore the data from tape or disk to the Replica on the recovery server.
NOTE
The restore must be done to the pt LVs.

Chapter 9: Administrative Tasks
206 Double-Take RecoverNow v4.0.01.00 User Guide
– Restore data from tape:
dd of=/dev/ptdb2 if=/dev/rmt0 bs=1024
– Restore data from disk:
dd of=/dev/ptdb2 if=/dev/db2bu bs=16m
7. Start RecoverNow on the recovery server. The changes made after the save to tape or disk synchronize to the recovery server.
rtstart -C <Context ID>
Using IBM Power Systems Live Partition Mobility with RecoverNow
This section contains:
• “Overview” on page 206
• “Automatically Registering the es_migrate script” on page 206
• “Manually Registering the es_migrate script” on page 207
• “Before you Migrate a Partition” on page 208
• “Migrating a Partition” on page 208
Overview
RecoverNow supports Live Partition Mobility for partitions running AIX 5300-07 or later or AIX 6.1 or later or AIX 7.1 or later on POWER6 or POWER7 technology-based systems. Live Partition Mobility allows a partition that is replicating with RecoverNow to be migrated to another system without interrupting replication.
Automatically Registering the es_migrate script
To support IBM Power Systems Live Partition Mobility, RecoverNow must be Migration-aware.
To make RecoverNow Migration-aware, when you install RecoverNow, the es_migrate script is automatically registered on systems capable of Live Partition Mobility, with the Dynamic Logical Partition (DLPAR) function of AIX.

Using IBM Power Systems Live Partition Mobility with RecoverNow
Double-Take RecoverNow v4.0.01.00 User Guide 207
IMPORTANT
The es_migrate script is registered at installation time if the partition is capable of migration. In which case you do not have to register the es_migrate script. You should initially verify if it is registered, if not, proceed to register the es_migrate script.
Manually Registering the es_migrate script
If you have installed RecoverNow when the partition was not migration-capable, and then upgraded so the partition is migration-capable, you must manually register the es_migrate script to make the node capable of Live Partition Mobility.
To register the es_migrate script, execute the following command:
/usr/sbin/drmgr -f -i /usr/scrt/bin/es_migrate
The command output displays:
DR script file /usr/scrt/bin/es_migrate installed successfully

Chapter 9: Administrative Tasks
208 Double-Take RecoverNow v4.0.01.00 User Guide
Before you Migrate a Partition
Before you migrate a partition, use the drmgr –l command to verify the existence of the following stanza:
# /usr/sbin/drmgr -l
DR Install Root Directory: /usr/lib/dr/scripts
Syslog ID: DRMGR-
Migrating a Partition
Each time you migrate a partition, RecoverNow is licensed to run on the migrated partition for up to 30 consecutive days. If the license is valid for less than 30 days, RecoverNow will be licensed to run on the number of days remaining on the original partition. When you migrate back to original partition the license expiration date is returned to its original value.
IMPORTANT
Vision Solution recommends that you do not make changes to the RecoverNow configuration when the partition has been migrated. If the partition has been migrated, and configuration changes are necessary, you must load and work with the configuration from the migrated partition. When you change a configuration where one or more nodes have been migrated, always rediscover the Host ID after loading the configuration.MPORTANT

Double-Take RecoverNow v4.0.01.00 User Guide 209

Chapter 9: Administrative Tasks
210 Double-Take RecoverNow v4.0.01.00 User Guide
Double-Take RecoverNow v4.0.01.00 User Guide 211
Working with RecoverNow Applications 10
This chapter describes working with RecoverNow applications.
This chapter contains:
• “Overview” on page 211
• “Database Recovery Operations Scenarios” on page 211
– “Database Resurrection Concept” on page 212
– “Database Repair Concept” on page 213
• “Performing a Volume Restore” on page 213
• “Performing a Production Restore” on page 220
• “Using VSP for a Production Restore” on page 220
• “Using the Command Line to Perform a Production Restore” on page 223
Overview
You can apply the redo and undo logs from the recovery server to rollback application data on the production server and restore the data to an earlier point in time. When you rollback the application data the information is synchronized with the replica on the recovery server similar to any other write action.
Database Recovery Operations Scenarios
This section describes two database recovery scenarios that demonstrate how to utilize RecoverNow's production and virtual restore capabilities. These two recovery scenarios are database resurrection and database repair.
• Database resurrection is a restore from a database "crash and burn" scenario, where the database could not come up.

Chapter 10: Working with RecoverNow Applications
212 Double-Take RecoverNow v4.0.01.00 User Guide
• Database repair is a restore of a burning, but living database with corrupted data.
Keep in mind that the majority of all database recovery operations require database repairs that are typically performed by DataBase Administrators (DBAs). Also, the remaining minority of recovery operations need database resurrections that are done by IT administrators. In the burning repair scenario, for example, RecoverNow makes the DBA's job more precise.
Database Resurrection Concept
To perform a database resurrection, you may use RecoverNow's production restore operation to recover an image of the actual production database to some point in the past directly on the production disk itself (not a snapshot image of the data).
In the resurrection scenario, the database is crashed and will not be coming back up. If you need to rollback to 55 seconds, you do not need to restore last day’s full backup and replay a full week of database redo (roll forward) logs. In this case, RecoverNow can rollback a totally crashed and burned database in a matter of moments—many orders of magnitude faster.
Keep in mind that during a production restore, you do not need the database instance up. In fact, the database cannot be up while RecoverNow rolls its image around on disk. By definition, the database is down since it crashed. As a result, the best and fastest way to restore your database is while it is
Production
Server
RecoveryServer
LAN
Replica Storage
Data tap
Application
Data Storage
Logs
Undo
Logs
Undo
Data tap

Performing a Volume Restore
Double-Take RecoverNow v4.0.01.00 User Guide 213
still down. The RecoverNow production restore operation provides this capability.
Database Repair Concept
To perform a database repair, you may use the RecoverNow's “virtual restore” operation, recovering a snapshot image of the database to some point in the past on the writable snapshot, and then a “pick and pull” operation to extract pieces of data from that snapshot for reinsertion into the production database.
In this repair scenario, only some pieces of data are corrupted but the production database is still running. After you restore a historical, non-burning image of the database on the snapshot, you can pull pieces out of it and put them back into the live production database to repair the bad pieces of data. You can put out the fire with information. RecoverNow restores automatically on the back-end snapshot.
Using the RecoverNow snapshot to visualize complete historical images of the database enables DBAs to forgo spending time on a daily basis saving pieces of database for possible use at a later time. Also, DBAs have access to the exact historical image they want (typically by reviewing logs, etc.).
Performing a Volume Restore
You can restore failed production volumes without having to do a full production restore by doing the following tasks:
Production
Server
RecoveryServer
LAN
Replica
Storage
Data tap
COW
Data tap
Application
Data Storage
Log File
Containers
Snapshot
Log File
Containers

Chapter 10: Working with RecoverNow Applications
214 Double-Take RecoverNow v4.0.01.00 User Guide
• “Step 1: Stop Double-Take RecoverNow on the Production Server” on page 214
• “Step 2: Create New Volumes to Replace Failed Volumes” on page 214
• “Step 3: Create a Snapshot on the Recovery Server” on page 215
• “Step 4: Validate the Information Provided by the Snapshot” on page 216
• “Step 5: Destroy the Snapshot” on page 217
• “Step 6: Recreate the Snapshot on the Recovery Server” on page 217
• “Step 7: Copy Volumes on Recovery Server to Replacement Volumes on Production Server” on page 217
• “Step 8: Restart Double-Take RecoverNow on the Production Server” on page 217
• “Step 9: rollback the Appropriate Context on the Production Server” on page 218
• “Step 10: Mount the Volumes for the Context” on page 219
• “Step 11: Destroy the Snapshot” on page 220
These tasks are described in detail in the subsequent sections.
Step 1: Stop Double-Take RecoverNow on the Production Server
Stop RecoverNow on the production server by executing the following command:
rtstop –C <Context ID> -F
Step 2: Create New Volumes to Replace Failed Volumes
The new volumes must have the same names, be in the same volume group, and be of the same size as the original volumes. Execute the following command on the production server to display this information:
sclist –C <Context ID> –t pdfc
EXAMPLE:
In this example, the Context ID is 1. The volume that needs to be replaced is /dev/rrtctx1. Display information about the volume.
sclist –C 1 –t pdfc
The output shows that /dev/rrtctx1 belongs to volume group rtvg1. The volume size is shown in bytes (1073741824).
Object: <loglv00>, Type: <SCRT/containers/PDFC>, Serial <355>:

Performing a Volume Restore
Double-Take RecoverNow v4.0.01.00 User Guide 215
HostName (string) = <production> (No Default)
FileName (string) = </dev/rloglv00> (No Default)
HeaderFileName (string) = </usr/scrt/loglv00.hdr> (No Default)
Size (longlong) = <16777216> (No Default)
DiskGroupHint (string) = <rtvg1> (No Default)
Type (string) = <jfslog> (raw)
Location (string) = <No Value> (No Default)
AccessGroupID (int) = <0> (0)
Object: <rtlv2>, Type: <SCRT/containers/PDFC>, Serial <362>
HostName (string) = <production> (No Default)
FileName (string) = </dev/rrtlv2> (No Default)
HeaderFileName (string) = </usr/scrt/rtlv2.hdr> (No Default
Size (longlong) = <1073741824> (No Default)
DiskGroupHint (string) = <rtvg1> (No Default)
Type (string) = <jfs> (raw)
Location (string) = </ctx12> (No Default)
AccessGroupID (int) = <0> (0)
Object: <rtctx1>, Type: <SCRT/containers/PDFC>, Serial <369>:
HostName (string) = <production> (No Default)
FileName (string) = </dev/rrtctx1> (No Default)
HeaderFileName (string) = </usr/scrt/rtctx1.hdr>(No Default)
Size (longlong) = <1073741824> (No Default)
DiskGroupHint (string) = <rtvg1> (No Default)
Type (string) = <jfs> (raw)
Location (string) = </ctx1> (No Default)
AccessGroupID (int) = <0> (0)
Step 3: Create a Snapshot on the Recovery Server
Create a snapshot on the recovery server that contains a copy of each volume to be restored. The snapshot provides the data to be copied to the replacement volumes. Select a time for the snapshot that is before the time that the disk failed. To determine the time at which the disk failed, you need to inspect the system logs.
To create the snapshot, enter one of the following commands on the recovery server:
scrt_ra –C <Context ID> –D <time>
or
scrt_ra –C <Context ID> –t <LFCID>
The allowable formats for times entered with the –D option are specified in the file identified by the DATEMSK environment variable.
EXAMPLE:
In this example, the LFCID is 158. The Context ID is 1.
scrt_ra –C 1 -t 158

Chapter 10: Working with RecoverNow Applications
216 Double-Take RecoverNow v4.0.01.00 User Guide
The following output results.
Making SNAP /dev/rsnloglv00, 41.6
Making SNAP /dev/rsnrtlv2, 41.10
Making SNAP /dev/rsnrtctx1, 41.14
Making SNAP /dev/rsnc1lif_bk_1, 41.18
Making SNAP /dev/rsnc1lif_bk_2, 41.22
Making SNAP /dev/rsnc1lif_bk_3, 41.26
Making SNAP /dev/rsnc1dbmf_bk_1, 41.30
Making SNAP /dev/rsnc1dbmf_bk_2, 41.34
Making SNAP /dev/rsnc1dbmf_bk_3, 41.38
Making SNAP /dev/rloglv00, 41.4
Making SNAP /dev/rrtlv2, 41.8
Making SNAP /dev/rrtctx1, 41.12
Fetching LFC #173
Applying LFC #173
Fetching LFC #171
Applying LFC #171
Fetching LFC #169
Applying LFC #169
Fetching LFC #167
Applying LFC #167
Fetching LFC #165
Applying LFC #165
Fetching LFC #163
Applying LFC #163
Fetching LFC #161
Applying LFC #161
Fetching LFC #159
Applying LFC #159
The BackingStore Vdevs are at level 158. ABA is at level 174.
Step 4: Validate the Information Provided by the Snapshot
Validate the information provided by the snapshot by running the application on the recovery server.
IMPORTANT
Do not try to validate the information by running the application on the production server after the data is restored. If the data turns out to be incorrect, you need to rollback the data included in all previous attempts to restore data.
If the data is valid, stop the application. Note the Context ID and the time or LFCID used to create the snapshot.
If the data is not valid, then stop the application and create the snapshot again as described in “Step 3: Create a Snapshot on the Recovery Server” on page 215. Continue until you have a snapshot with valid data.

Performing a Volume Restore
Double-Take RecoverNow v4.0.01.00 User Guide 217
Step 5: Destroy the Snapshot
Verifying the data in the snapshot may involve mounting the snapshot on the recovery server and incurring I/O or other causing other changes to the snapshot. Thus, you need to destroy and recreate the snapshot before you use it for recovery.
Destroy the snapshot by using the following command:
scrt_ra –C <Context ID> -W
EXAMPLE:
The Context ID in this example is 1. Enter the following command:
scrt_ra -C 1 –W
This results in output similar to the following:
Snap Devs (read only, raw) Minor rj wj Snap level Vdev level Vdevs(read/write, block)-------------------------- ----------- ---------- ---------- -----------------------/dev/rsnloglv00 4 -- -- 0 0 /dev/loglv00/dev/rsnrtlv2 8 -- -- 0 0 /dev/rtlv2/dev/rsnrtctx1 12 -- -- 0 0 /dev/rtctx1/dev/rsnc1lif_bk_1 16 -- -- 0 0 N/A/dev/rsnc1lif_bk_2 20 -- -- 0 0 N/A/dev/rsnc1lif_bk_3 24 -- -- 0 0 N/A/dev/rsnc1dbmf_bk_1 28 -- -- 0 0 N/A/dev/rsnc1dbmf_bk_2 32 -- -- 0 0 N/A/dev/rsnc1dbmf_bk_3 36 -- -- 0 0 N/A
Step 6: Recreate the Snapshot on the Recovery Server
Recreate the snapshot on the recovery server using the same command that you used before.
scrt_ra –C <Context ID> –D <time>
or
scrt_ra –C <Context ID> –t <LFCID>
Step 7: Copy Volumes on Recovery Server to Replacement Volumes on Production Server
If you have rsh enabled on the production server, then you can use the dd command to copy the data.
EXAMPLE:
dd if=/dev/rrtctx1 ibs=1024k |
rsh production_server_name -l root dd of=/dev/rrtctx1
obs=1024k
Step 8: Restart Double-Take RecoverNow on the Production Server
Use the following command to restart RecoverNow:
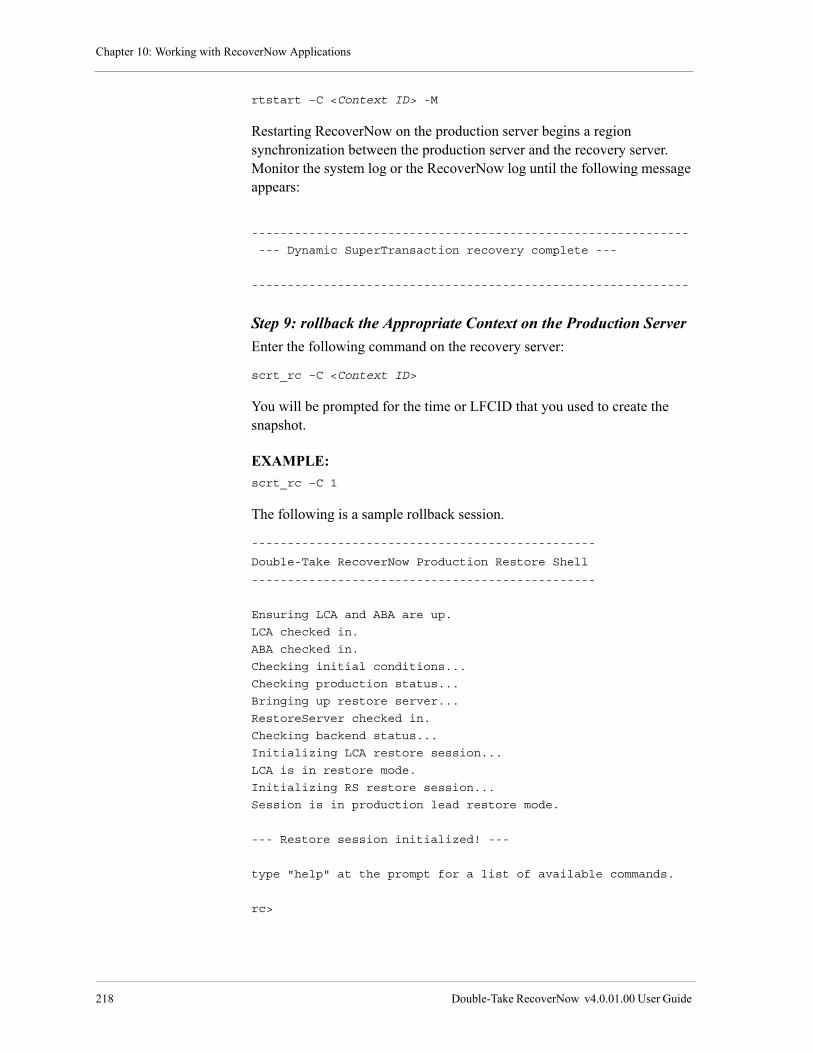
Chapter 10: Working with RecoverNow Applications
218 Double-Take RecoverNow v4.0.01.00 User Guide
rtstart –C <Context ID> -M
Restarting RecoverNow on the production server begins a region synchronization between the production server and the recovery server. Monitor the system log or the RecoverNow log until the following message appears:
-------------------------------------------------------------
--- Dynamic SuperTransaction recovery complete ---
-------------------------------------------------------------
Step 9: rollback the Appropriate Context on the Production Server
Enter the following command on the recovery server:
scrt_rc –C <Context ID>
You will be prompted for the time or LFCID that you used to create the snapshot.
EXAMPLE:
scrt_rc –C 1
The following is a sample rollback session.
------------------------------------------------
Double-Take RecoverNow Production Restore Shell
------------------------------------------------
Ensuring LCA and ABA are up.
LCA checked in.
ABA checked in.
Checking initial conditions...
Checking production status...
Bringing up restore server...
RestoreServer checked in.
Checking backend status...
Initializing LCA restore session...
LCA is in restore mode.
Initializing RS restore session...
Session is in production lead restore mode.
--- Restore session initialized! ---
type "help" at the prompt for a list of available commands.
rc>

Performing a Volume Restore
Double-Take RecoverNow v4.0.01.00 User Guide 219
At this prompt, enter restore.
rc> restore
Restore target type:
t - time
e - event marker
l - lfc
a - abort
At this prompt, enter l for LFCID or t for “time.” Use the same information that you used to create the snapshot in “Step 3: Create a Snapshot on the Recovery Server” on page 215.
> l
LFC target >158
You have requested an incremental LFC restore
from Tue May 12 08:16:24 2009 (1080058584)
to Mon May 10 11:17:29 2009 (1079983049),
LFCIDs 250+ to 158.
c(ontinue) or a(bort)? c
Rolling LFC restore status.
---------------------------
Production at LFCID 248.
Production at LFCID 246.
Production at LFCID 244.
Production at LFCID 242.
Production at LFCID 240.
...
Production at LFCID 160.
Production at LFCID 158.
Production restored to LFCID 158.
Backingstore remains stable at LFCID 250.
rc> commit
committing...
RestoreServer is down, exit code 0.
Restore Client session complete.
Step 10: Mount the Volumes for the Context
On the production server, enter the following command to mount the volumes for the context:
rtmnt –C <Context ID>
You may need to use fsck on the file systems before they can be mounted. If this is necessary, then unmount the volumes using the rtumnt command, run fsck, and then mount the volumes using the rtumnt command shown above.

Chapter 10: Working with RecoverNow Applications
220 Double-Take RecoverNow v4.0.01.00 User Guide
Step 11: Destroy the Snapshot
On the recovery server, use the following command to destroy the snapshot:
scrt_ra –C <Context ID> –W
Performing a Production Restore
RecoverNow’s production restore operation allows you to rollback the protected volumes on the production server. You can roll them back to a specific LFCID or to a specific time. Before you commit the rollback, however, you need to verify that you have chosen the correct time or LFCID to rollback to.
NOTE
Even if you decide later that you would like to pick a better time or a LFCID, you can roll forward or rollback to that point. This is possible because RecoverNow keeps all of the change information on the recovery server.
Using VSP for a Production Restore
Use the Rollback Production Server wizard to rollback the production server to a specific location in the rollback window. For rollback progress, see the Production Server Rollback portlet on the Recovery page.
Before starting the rollback, validate the rollback location using a snapshot and stop all applications that are using the logical volumes. Use the Replication Group portlet on the Replication page to stop the replication group. During the rollback, file systems must be unmounted. For rollback progress, see the Production Server Rollback portlet on the Recovery page.
NOTE
Data changed on the production server between the rollback location and your most recent changes will be lost.
To start a production server rollback:
1. Select a replication group in the Recovery portlet.
2. Do one of the following:
• Select Rollback, from the Action dropdown menu on the Recovery portlet.
• Click Rollback on the Production Server Rollback portlet.
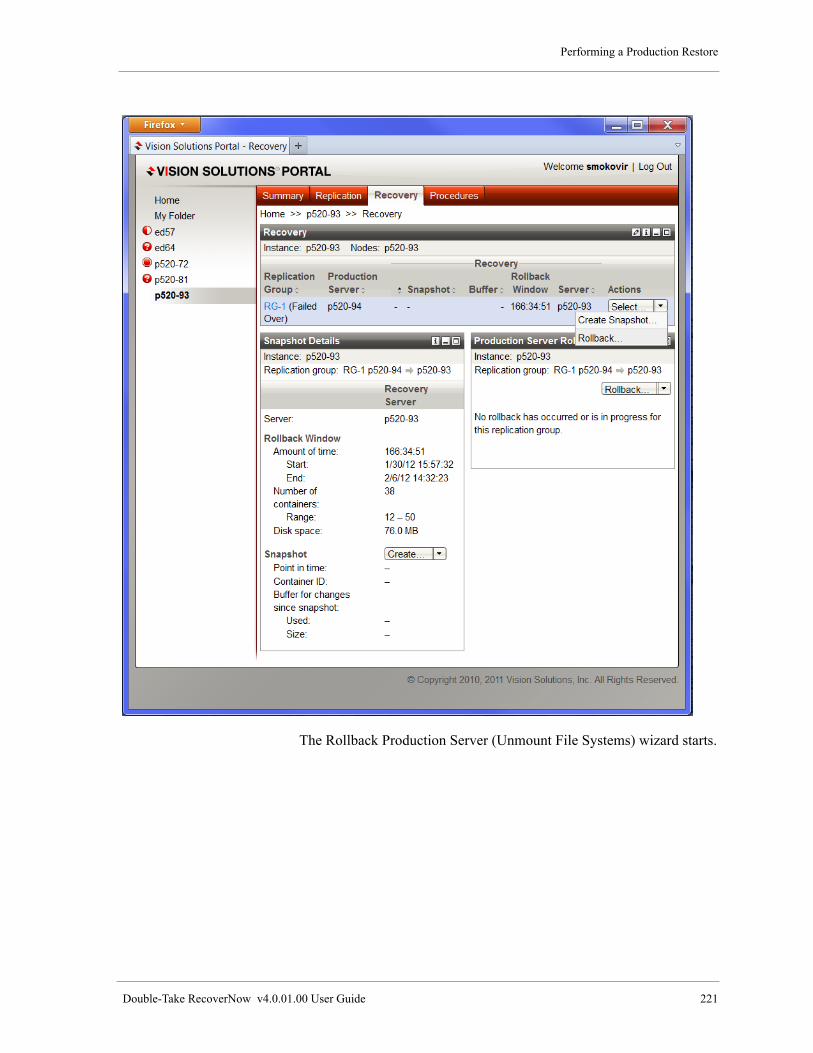
Performing a Production Restore
Double-Take RecoverNow v4.0.01.00 User Guide 221
The Rollback Production Server (Unmount File Systems) wizard starts.

Chapter 10: Working with RecoverNow Applications
222 Double-Take RecoverNow v4.0.01.00 User Guide
3. Unmount file systems—Specify whether to automatically or manually unmount the file systems. During the rollback, file systems must be unmounted. For rollback progress, see the Production Server Rollback portlet on the Recovery page.
4. Click Next
The Rollback Production Server (Start Rollback) wizard displays.
5. Use the Location in rollback section, to specify the type of information to use to locate in the rollback window, where the production server will

Performing a Production Restore
Double-Take RecoverNow v4.0.01.00 User Guide 223
be rolled back to. Select either Point in Time, Container ID, or Event Marker:
• Point in Time—Specify the date and time, within the rollback window, where the production server will be rolled back to.
• Container ID—Specify the container ID, within the rollback window, where the production server will be rolled back to.
• Event Marker—Specify the event marker, within the rollback window, where the production server will be rolled back to.
6. Mount file systems—Specify whether to automatically or manually unmount and mount and the file systems.
7. Click Finish to start the rollback.
The Production Server Rollback portlet shows the progress of the rollback.
Using the Command Line to Perform a Production Restore
To perform a production restore, complete the following tasks:
1. Stop the application on the production server.
2. Unmount the protected volumes on the production server. Enter the following command:
rtumnt -C <Context ID>
You should see output similar to the following:
rtumnt -C <Context ID>
Determining Filesystems to unmount...
Unmounting /dev/testlv from /test...
Sync: transferring current LFC to Recovery Server.
Waiting for synchronization of data to complete.
All data has been synchronized to the Recovery Server.
3. On the recovery server, start the production restore shell.
scrt_rc -C <Context ID>
This should result in output similar to the following:
------------------------------------------------
Double-Take RecoverNow Production Restore Shell
------------------------------------------------
Ensuring LCA and ABA are up.
LCA checked in.
ABA checked in.
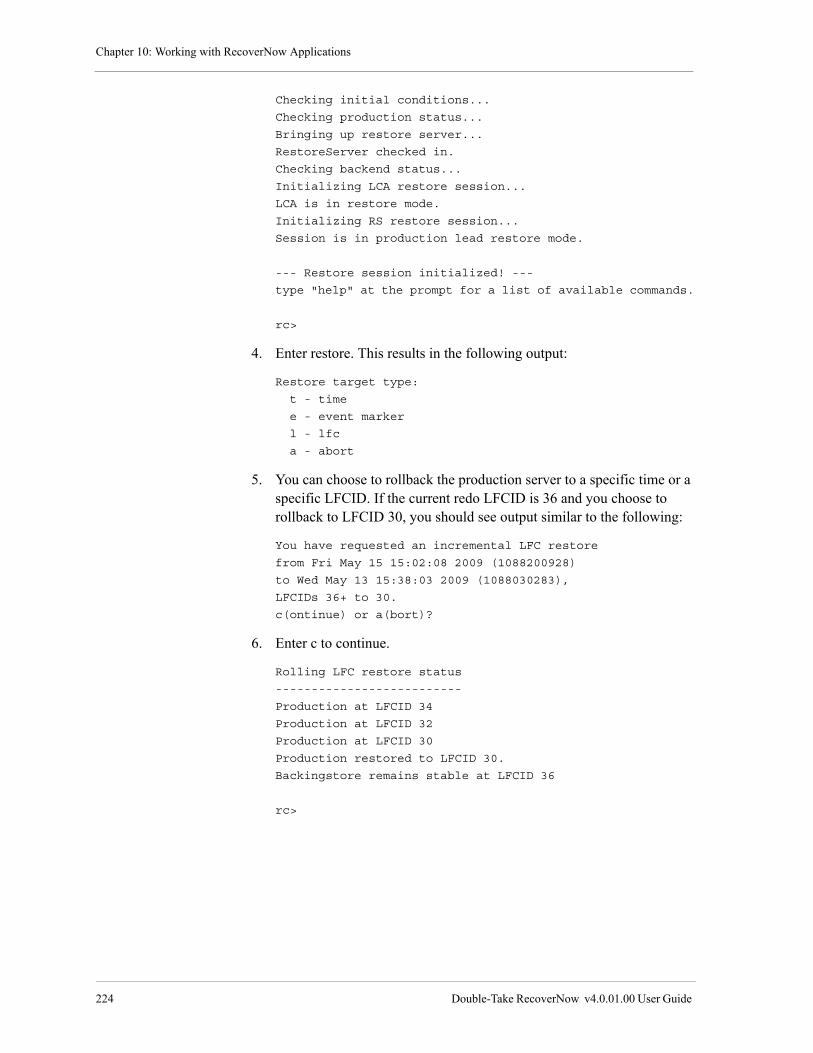
Chapter 10: Working with RecoverNow Applications
224 Double-Take RecoverNow v4.0.01.00 User Guide
Checking initial conditions...
Checking production status...
Bringing up restore server...
RestoreServer checked in.
Checking backend status...
Initializing LCA restore session...
LCA is in restore mode.
Initializing RS restore session...
Session is in production lead restore mode.
--- Restore session initialized! ---
type "help" at the prompt for a list of available commands.
rc>
4. Enter restore. This results in the following output:
Restore target type:
t - time
e - event marker
l - lfc
a - abort
5. You can choose to rollback the production server to a specific time or a specific LFCID. If the current redo LFCID is 36 and you choose to rollback to LFCID 30, you should see output similar to the following:
You have requested an incremental LFC restore
from Fri May 15 15:02:08 2009 (1088200928)
to Wed May 13 15:38:03 2009 (1088030283),
LFCIDs 36+ to 30.
c(ontinue) or a(bort)?
6. Enter c to continue.
Rolling LFC restore status
--------------------------
Production at LFCID 34
Production at LFCID 32
Production at LFCID 30
Production restored to LFCID 30.
Backingstore remains stable at LFCID 36
rc>
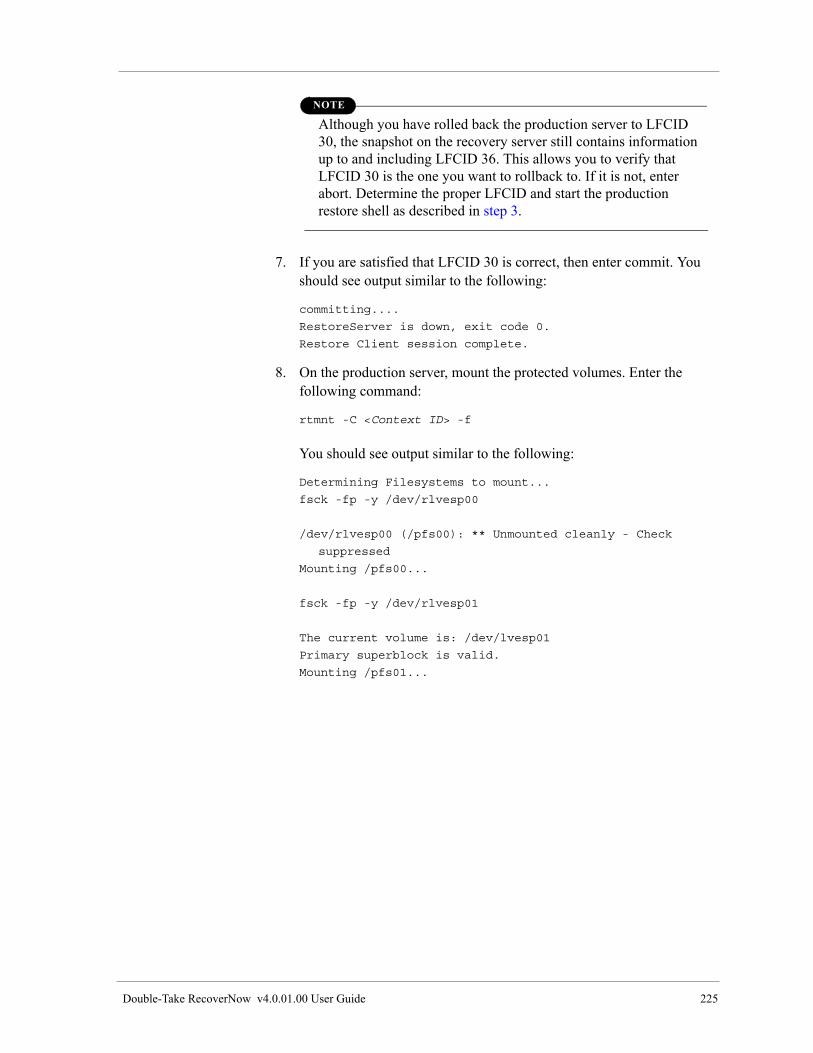
Double-Take RecoverNow v4.0.01.00 User Guide 225
NOTE
Although you have rolled back the production server to LFCID 30, the snapshot on the recovery server still contains information up to and including LFCID 36. This allows you to verify that LFCID 30 is the one you want to rollback to. If it is not, enter abort. Determine the proper LFCID and start the production restore shell as described in step 3.
7. If you are satisfied that LFCID 30 is correct, then enter commit. You should see output similar to the following:
committing....
RestoreServer is down, exit code 0.
Restore Client session complete.
8. On the production server, mount the protected volumes. Enter the following command:
rtmnt -C <Context ID> -f
You should see output similar to the following:
Determining Filesystems to mount...
fsck -fp -y /dev/rlvesp00
/dev/rlvesp00 (/pfs00): ** Unmounted cleanly - Check
suppressed
Mounting /pfs00...
fsck -fp -y /dev/rlvesp01
The current volume is: /dev/lvesp01
Primary superblock is valid.
Mounting /pfs01...

Chapter 10: Working with RecoverNow Applications
226 Double-Take RecoverNow v4.0.01.00 User Guide
Double-Take RecoverNow v4.0.01.00 User Guide 227
Working with Archived Data 11
RecoverNow supports media management products such as Tivoli Storage Manager on AIX platforms. This chapter contains:
• “Overview of Working with Archived Data” on page 227
• “Performing a Snapshot-based Backup to Archive Media” on page 227
• “Performing a Production Restore from Archived Logs” on page 228
Overview of Working with Archived Data
You can have additional data protection by keeping complete copies of the data on archive media such as tape. To create copies on the archive media use snapshots from the recovery server.
Archived copies of the data are useful to:
• Perform a production restore on the production server. You may want to do this if the data on the recovery server is unavailable or if you need to rollback to a point in the data that is no longer stored on the recovery server.
• Create a snapshot on the recovery server. You may want to do this if you need to restore the data on the recovery server or if you want additional copies of the data for data mining.
• Create additional copies of the data on alternate devices, such as, logical volumes.
Performing a Snapshot-based Backup to Archive Media
This section explains how to put a complete copy of your protected data on archive media. You may back up your data to archive media as often as you like.
On the recovery server, enter the following command:
scrt_vfb -C <Context ID>
Chapter 11: Working with Archived Data
228 Double-Take RecoverNow v4.0.01.00 User Guide
Performing a Production Restore from Archived Logs
You can perform a production restore from archived LFCs when the LFCs on the recovery server do not go back far enough or when they are unavailable. Like any other production restore, you must stop the application on the Production Server and unmount the protected volumes before you roll them back.
To perform a production restore from archived LFCIDs, do the following:
1. Stop the application on the production server.
2. Unmount the protected volumes on the production server. Enter the following command:
rtumnt -C <Context ID><Context ID>
You should see output similar to the following:
rtumnt -C <Context ID>
Determining Filesystems to unmount...
Unmounting /dev/testlv from /test...
Sync: transferring current LFC to Recovery Server
Waiting for synchronization of data to complete.
All data has been synchronized to the Recovery Server.
3. On the recovery server, start the production restore shell. Enter the following command:
scrt_rc -C <Context ID>
This results in output similar to the following:
------------------------------------------------
Double-Take RecoverNow Production Restore Shell
------------------------------------------------
Ensuring LCA and ABA are up.
LCA checked in.
ABA checked in.
Checking initial conditions...
Checking production status...
Bringing up restore server...
RestoreServer checked in.
Checking backend status...
Initializing LCA restore session...
LCA is in restore mode.
Initializing RS restore session...
Session is in production lead restore mode.
--- Restore session initialized! ---
type "help" at the prompt for a list of available commands.
Performing a Production Restore from Archived Logs
Double-Take RecoverNow v4.0.01.00 User Guide 229
rc>
4. To display available restore target windows. Enter targets.
This should result in output similar to the following:
Current Snap Time:
1201274570 (LFCID: 1466): Fri Jan 25 10:22:50 2008
Available internal & external (tape) rollback windows:
--------------------------------------------------------
Start: 1201274570 (LFCID: 1466): Fri Jan 25 10:22:50 2008
End: 1201273198 (LFCID: 1352): Fri Jan 25 09:59:58 2008
Available VFBs:
--------------------------------------------------------
1201269025 (LFCID: 1342): Fri Jan 25 08:50:25 2008
1193078943 (LFCID: 1986): Mon Oct 22 14:49:03 2007
1192817678 (LFCID: 1456): Fri Oct 19 14:14:38 2007
rc>
5. Enter restore. This results in the following output:
Restore target type:
t - time
e - event marker
l - lfc
a - abort
>
6. Choose l for Log File Container.
This results in the following output:
LFC target >
If you are restoring from archived data, then the LFCID that you choose identifies data that is no longer stored on the recovery server.
7. Enter a LFCID <example 1360>
This results in the following output:
You have requested an incremental LFC restore
from Fri Jan 23 10:22:50 2009 (1201274570)
to Fri Jan 23 10:01:26 2009 (1201273286),
LFCID’s 1466+ to 1360.
c(ontinue) or a(bort)?
8. Enter c to continue.

Chapter 11: Working with Archived Data
230 Double-Take RecoverNow v4.0.01.00 User Guide
This should result in output similar to the following:
Rolling LFC restore status.
---------------------------
Production at LFCID 1464.
Production at LFCID 1462.
Production at LFCID 1460.
Production at LFCID 1458.
Production restored to LFCID 1360.
Backingstore remains stable at LFCID 1466.
rc>
NOTE
Although you have rolled back the production server to LFCID 1360, the snapshot on the recovery server still contains information up to and including LFCID 1464. This allows you to verify that LFCID 1360 is the one you want to rollback to. If it is not, enter abort. Determine the proper LFCID and start the production restore shell as described in step 3 on page 228.
9. If you are satisfied that LFCID 1360 is correct, enter commit.
You will see output similar to the following:
committing...
RestoreServer is down, exit code 0.
Restore Client session complete.
10. On the production server, mount the protected volumes. Enter the following command:
rtmnt -C <Context ID> -f
You should see output similar to the following:
Determining Filesystems to mount...
fsck -fp -y /dev/rtestlv
The current volume is: /dev/testlv
Primary superblock is valid.
J2_LOGREDO:log redo processing for /dev/testlv
Primary superblock is valid.
Mounting /test...
Double-Take RecoverNow v4.0.01.00 User Guide 231
Introduction to Disaster Recovery 12
This chapter contains:
• “Introduction” on page 231
• “RecoverNow Disaster Recovery Overview” on page 232
• “RecoverNow Disaster Recovery Management” on page 233
Introduction
RecoverNow provides highly available data recovery and protection through failover, resync, and failback operations on both local and remote recovery servers, providing solutions for local failovers, as well as remote failovers.
In a local failover operation, the production server fails over to a local (on-site) recovery server, whereas in a remote failover operation, the production server fails over to a remote (off-site) recovery server. Failing over to a remote server is defined as Disaster Recovery, since it applies to the situation where an entire site is lost due to a disaster such as a flood or hurricane. Disaster recovery is also used for situations where failing over to a local server is adequate for keeping data available and applications running.

Chapter 12: Introduction to Disaster Recovery
232 Double-Take RecoverNow v4.0.01.00 User Guide
RecoverNow Disaster Recovery Overview
The RecoverNow disaster recovery capability is the process of switching the production server to a recovery server that is located either locally or remotely from the production server. The failover operation could be due to a system hardware or software failure, a scheduled maintenance period, or a disaster at your production or local site.
This section contains:
• “RecoverNow Recovery Process” on page 232
• “How RecoverNow Disaster Recovery Works” on page 232
RecoverNow Recovery Process
The RecoverNow disaster recovery process consists of three operations:
• failover—swapping from the production server to the recovery server
• resync— bring the production server data up to date with the recovery server data
• failback—swapping back to the production server from a local or a remote recovery server.
A failover operation is typically followed by a resync and then a failback operation, which is the process of returning the role of production server to its original location after a system failover or a disaster has taken place.
These operations use remote mirror Backing Store File Container (BSFC) replicas as the “failover-production” data. This requires only a configuration change and no data movement, resulting in reducing the time that is required to resync the volumes after switching sites.
Use of the statemap tracking mechanism increases the efficiency of the data resync, as it minimizes the amount of data transfer that must take place. The Production application continues to run during the resync operation.
How RecoverNow Disaster Recovery Works
The resync operation eliminates the need to perform a full volume resync copy from your recovery server to the production server. This reduce the time required to resume operations at your production site.
Since the failover process puts the volumes into a suspended state, changes are tracked within a statemap. Assuming that recording these changes is enabled, only the changed data is sent to the production site to synchronize the volumes. This reduces the time required to complete the failback operation.

RecoverNow Disaster Recovery Overview
Double-Take RecoverNow v4.0.01.00 User Guide 233
RecoverNow Disaster Recovery Management
NOTE
Although the production application must be down during the failover operation, this transition is usually very fast.
This section contains:
• “Failover Context Overview” on page 233
• “Failover Context Specifications” on page 234
• “How the Failover Context Works” on page 234
• “rtdr Failover Command” on page 235
Failover Context Overview
If the production server fails, you can temporarily run the production systems on the recovery server or the replicated server through the failover operation.
NOTE
You can choose to configure the recovery server or a replicated server, if you have one in your configuration, as the failover server where you temporarily run the production system.
This transition requires that the configuration of the failover operation is specified in a failover context. You create a failover context to configure a context that is specific to your failover operations.
The failover context provides RecoverNow with the configuration information used to operate as if the original recovery or replicated server was actually a production server, and the original production server, when it comes back on-line, was actually the recovery or replicated server.
You set up the failover context in association with the primary context for the production server. This failover context enables you to perform the system failover and failback operations, including managing all the required transitions from the Production environment to the recovery or replicated server.
To accomplish this, RecoverNow uses the block-ordered replica maintained on the recovery and replicated servers as the failover disk, on which it brings up the production server.
Chapter 12: Introduction to Disaster Recovery
234 Double-Take RecoverNow v4.0.01.00 User Guide
Failover Context Specifications
To configure a context, specify:
• Sizes, names, locations of all raw logical volumes (LVs)
• Names of all special files associated with devices (access points to LVs)
• Filesystem information
• Host information (host name, host ID, and IP addresses
• Information about relationships between a production volume and its associated replica logical volume, as well as the designated production server, and recovery server
• All of this information is identified with a single Context ID
Failover Context and Primary Context Relationship
Although closely related to the primary context, a failover context has all of its own attributes for handling a failover and needs its own content identifier or Context ID.
A failover context is the same as its associated primary context, where all relationships and flows are reversed. Many of the logical volumes used by the primary context, such as LFCs, are shared with the failover context. However, some of the volumes are not shared and therefore may be in different locations depending on which server the production is operating on. For example, on the production server during normal operations, or on the recovery or replicated server during failover operations.
Setup a Failover Context
After you setup a failover context by using the rtdr command, all other attributes used with the rtdr command can then take the primary Context ID. This provides an environment in which it appears as if you are dealing with one context, either in a primary or a failover mode. The underlying configurations are really two different, tightly related, contexts. You only need to remember the primary Context ID to failover, resync, and failback.
Failover Context Naming Conventions
A primary or a failover context can be up to three digits long (1 - 999). You can assign a number as a primary Context ID, for example 100. You can then add “1” to the ID to identify the failover Context ID; for example, 101.
How the Failover Context Works
The primary context has all the information for the servers in a Production-recovery server configuration, as well as in a production-recovery-replicated server configuration.

RecoverNow Disaster Recovery Overview
Double-Take RecoverNow v4.0.01.00 User Guide 235
Similar to a primary context, the failover context has all the information for all the servers in a configuration. However, the difference is that the configuration settings the failover context contains are derived from the primary context and that it shares several attributes with the primary context.
NOTE
You must setup one Failover Context for each additional server in a configuration where you need to create only one Primary Context for your production server.
By default, in a replicated configuration (Production, Recovery, Replicated), the recovery server becomes the failover server. In a failover event, it becomes the production server. All three servers will still be connected when a resync operation is active.
In the same replicated configuration, to change the failover server to the replicated server, change the configuration associated with the failover context by specifying the hostname of the replicated server in the following command:
rtdr -C <Primary Context ID> -F <Failover Context ID> setup
rtdr Failover Command
This section describes the RecoverNow Disaster Recovery failover command rtdr and its associated attributes.
Use the RecoverNow disaster recovery and failover rtdr command to:
• Setup a failover context
• Validate data integrity prior to a failover
• Perform failover, resynchronize, and failback operations.
Syntaxrtdr -C <ID> -fhmnqv failover | resync | failback
rtdr -C <ID> -F <ID> [-s <hostname>] [-fhmnv] setup
-C Primary Context ID of Production, Recovery, Remote
Replica servers
-F Failover Context ID
-f Forced execution *
-h Help, prints usage
-m Man style help
-n No execution, just print commands
-q quiet, do not ask for confirmation
Chapter 12: Introduction to Disaster Recovery
236 Double-Take RecoverNow v4.0.01.00 User Guide
-s Select failover site server from multiple Recovery
Servers (default is the first replication hop's server).
<hostname> must be a configured SCRT/info/host HostName
attribute.
-v Verbose output
IMPORTANT
Use the -f attribute with the rtdr command with caution. If you do not resync, this attribute forces a failback and leaves the Production Volume Set (PVS) file systems and replica out of sync.
RecoverNow Disaster Recovery Operations
The previous section contains an overview of the RecoverNow Disaster capability and its associated failover context and commands. In the event of a failover, follow the procedures described in the following sections.
This section contains:
• “Failover Process Overview” on page 237
• “Preparing Before a Failover” on page 237
• “Before Performing Failover Operations” on page 238

RecoverNow Disaster Recovery Operations
Double-Take RecoverNow v4.0.01.00 User Guide 237
Failover Process Overview
The failover process involves:
1. Creating a primary context using the procedures described in the Chapter 6 “Configuring Replication Groups” on page 131.
NOTE
If you have changed a primary context you must delete the corresponding failover context and recreate the failover context.
rtdr -C <Primary Context ID> -F <Failover Context ID>
setup
2. Creating a failover context using the rtdr command. This command creates a failover context definition associated with the primary context. Refer to “Preparing Before a Failover” on page 237.
3. Validating data integrity of the replica prior to a failover. If necessary, perform a failover restore, as shown in “Before Performing Failover Operations” on page 238.
4. Performing the following operations after you validate the replica:
• Failover
• Resync
• Failback
Refer to “Disaster Recovery Operations” on page 241 for instructions on how to perform these operations.
Preparing Before a Failover
To prepare for a potential system failure, you set up a failover context so that your production server can switch operations to the designated recovery or replicated server.
Setting up a Failover Context
You must create a failover context to be associated with a configured primary context prior to a system failover. The Failover Context ID must be unique on the associated servers. Refer to “Failover Context Naming Conventions” on page 234 for information on valid Failover Context ID names.
To create a failover context associated with the primary context:
On the production and target servers execute:

Chapter 12: Introduction to Disaster Recovery
238 Double-Take RecoverNow v4.0.01.00 User Guide
rtdr -C <Primary Context ID> -F <Failover Context ID> setup
where:
<Primary Context ID> is the primary context on the production server, and <Failover Context ID> is the failover context on the recovery server.
NOTE
If there is more than one target server and you do not want to use the default for the Failover Server, then use the -s <Hostname> option on the rtdr command to specify the Failover Server. Refer to “Syntax” on page 235 for the rtdr command.
Before Performing Failover Operations
Do not perform a failover restore on a restore target that has not been validated. After a system failover occurs, RecoverNow cannot rollback to a point in time before the failover.
This section provides guidelines to execute before performing failover operations:
Validating Data Integrity
Validating the data integrity of the replica is critical. Prior to performing the failover operations, validate the data integrity of the replica on the recovery server and restore it. To validate the data, first create a snapshot of the replica and then analyze it with the application itself.
Verify Restore Point
On the recovery or replicated server execute:
1. Create the snapshot:
scrt_ra -C <Primary Context ID> -X
2. Mount filesystems:
rtmnt -C <Context ID>
3. Check the data.
4. Unmount filesystems:
rtumnt -C <Context ID>
5. Remove the snapshot:
scrt_ra -WC <Context ID>

RecoverNow Disaster Recovery Operations
Double-Take RecoverNow v4.0.01.00 User Guide 239
Create a Virtual Restore Snapshot
Once you create a snapshot of the replica, you can analyze the integrity of the data. If analysis indicates data corruption, remove the snapshot and use a virtual restore to locate and validate an optimal restore point. A virtual restore leaves a snapshot in place for analysis at the restored point in time.
1. To perform a virtual restore on the recovery server:
scrt_ra -C <Primary Context ID> -t|-D|-S
For example, to make a restore snapshot to October 27, 2008 at 17:21:57:
scrt_ra -C <Context ID> -D "10/27/08 17:21:57"
2. Mount filesystems:
rtmnt -C <Context ID>
3. Check the data.
4. Unmount filesystems:
rtumnt -C <Context ID>
5. Remove the snapshot:
scrt_ra -WC <Context ID>
You can perform failover operations after you validate the replica.

Chapter 12: Introduction to Disaster Recovery
240 Double-Take RecoverNow v4.0.01.00 User Guide
Double-Take RecoverNow v4.0.01.00 User Guide 241
Disaster Recovery Operations 13
This chapter describes:
• “Using VSP to Perform Failover and Failback” on page 241
• “Using the Command line to Perform Failover and Failback” on page 252
Using VSP to Perform Failover and Failback
The following steps show how to perform a failover (planned or unplanned) or failback procedure. Refer to the RecoverNow online help for specific information for each dialog. The following sections describe:
• “Run a Procedure” on page 241
• “Run Planned Failover Procedure” on page 242
• “Run Unplanned Failover Procedure” on page 245
• “Run Failback Procedure” on page 249
Run a Procedure
The Procedures portlet and Steps portlet on the Procedures page will guide you through each step.
1. Use one of the following methods to run a procedure. Use the method that is most convenient for you based on the page you are currently on:
• From the Replication Group portlet, select Planned Failover, Unplanned Failover, or Failback from the Actions dropdown for a replication group.
• From the Procedures portlet, select Run from the Actions dropdown for a specific replication group.
• From the Procedures portlet, select the Procedure name (Planned Failover, Unplanned Failover, or Failback) and select Run from the Action toolbar on the Steps portlet.
Chapter 13: Disaster Recovery Operations
242 Double-Take RecoverNow v4.0.01.00 User Guide
2. Use one of the following methods to run the next step in the procedure or retry a failed step:
• From the Replication Group portlet, select Resume Procedure from the Actions dropdown for a specific replication group.
• From the Procedures portlet, select Resume from the Actions dropdown for a specific procedure and replication group.
• From the Steps portlet, select Resume from the Action toolbar.
Run Planned Failover Procedure
Use the planned failover procedure to switch the roles of the production and failover server when both production and recovery servers are available. Refer to the RecoverNow online help for details for each portlet and dialog.
NOTE
Before failing over, all applications using the logical volumes must be stopped. You may want to validate that your applications run properly on the failover server by using a snapshot and running your applications with the snapshot.
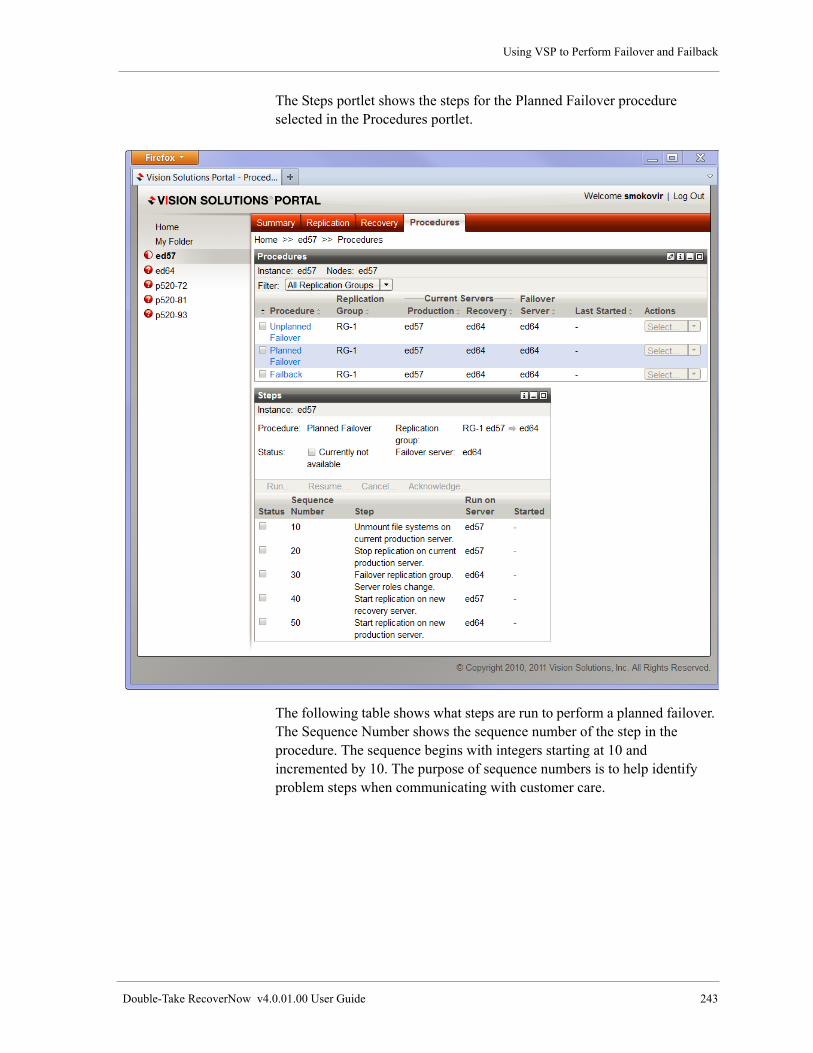
Using VSP to Perform Failover and Failback
Double-Take RecoverNow v4.0.01.00 User Guide 243
The Steps portlet shows the steps for the Planned Failover procedure selected in the Procedures portlet.
The following table shows what steps are run to perform a planned failover. The Sequence Number shows the sequence number of the step in the procedure. The sequence begins with integers starting at 10 and incremented by 10. The purpose of sequence numbers is to help identify problem steps when communicating with customer care.

Chapter 13: Disaster Recovery Operations
244 Double-Take RecoverNow v4.0.01.00 User Guide
NOTE
When the procedure completes, and you are ready to move production back to the configured production server, run the Failback procedure.
Run Planned Failover Procedure dialog: Unmount file systems on current production server
This step unmounts the file systems on the current production server. You requested to move production to the failover server. Before running this procedure, all applications using the logical volumes in this replication group must be stopped. Applications are not available until this procedure completes.
Table 2. Run Planned Failover
Sequence Number Step Dialog for this step Command for this step
10 Unmount the file systems on the current production server
“Run Planned Failover Procedure dialog: Unmount file systems on current production server” on page 244
rtumnt -C <Context id>
20 Stop replication on the current production server
“Resume Planned Failover Procedure dialog: Stop replication on current production server” on page 245
rtstop -C <Context id> -F -S
30 Failover the replication group. Server roles change
“Resume Planned Failover dialog: Failover replication group: Server roles change” on page 245
rtdr -C <Context id> -q failover
40 Start replication on the new replicated server (Only displayed if the replication group has a replicated server configured.)
“Resume Planned Failover dialog: Start replication on new replicated server” on page 245
rtdr -C <Context id> -q resync
50 Start replication on the new recovery server
“Resume Planned Failover dialog: Start replication on new recovery server” on page 245
rtdr -C <Context id> -q resync
60 Start replication on the new production server
“Resume Planned Failover dialog: Start replication on new production server” on page 245
rtdr -C <Context id> -q resync
Using VSP to Perform Failover and Failback
Double-Take RecoverNow v4.0.01.00 User Guide 245
Resume Planned Failover Procedure dialog: Stop replication on current production server
This step stops replication on the current production server. Replication stops after all data in the backlog has been replicated. After replication stops and before you continue, it is recommended that you create a snapshot on the failover server and validate that your applications run properly.
Resume Planned Failover dialog: Failover replication group: Server roles change
This step changes the roles of the servers in the replication group. Data is not replicated and failback is not available until you complete the remaining steps in this procedure.
Resume Planned Failover dialog: Start replication on new replicated server
This step starts replication processes on the replicated server. Data is not replicated and failback is not available until you complete the remaining steps in this procedure.
Resume Planned Failover dialog: Start replication on new recovery server
This step starts replication processes on the recovery server. Data is not replicated and failback is not available until you complete the remaining steps in this procedure.
NOTE
If a replicated server is not configured for this replication group, and this is the last step in the procedure, when this step completes, applications can be started on the production server.
Resume Planned Failover dialog: Start replication on new production server
This steps starts replication processes on the new production server. Data can start replicating. When the step completes, and you are ready to move production back to the configured production server, run the Failback procedure. You can also start your applications.
Run Unplanned Failover Procedure
An unplanned failover could be due to a hardware or software failure or power outage with the production server. Because the production server is not available, you may need to fail over to the failover server. This procedure guides you through the failover, including validating the rollback location, using a snapshot. Refer to the RecoverNow online help for details for each portlet and dialog.

Chapter 13: Disaster Recovery Operations
246 Double-Take RecoverNow v4.0.01.00 User Guide
The Steps portlet shows the steps for the Unplanned Failover procedure selected in the Procedures portlet.
The following table shows what steps are run to perform an unplanned failover. The Sequence Number shows the sequence number of the step in the procedure. The sequence begins with integers starting at 10 and

Using VSP to Perform Failover and Failback
Double-Take RecoverNow v4.0.01.00 User Guide 247
incremented by 10. The purpose of sequence numbers are to help identify problem steps when communicating with customer care.
Table 3. Run Unplanned Failover
Sequence number Step Dialog for this step Command for this step
10 Create a snapshot on failover server.
“Run Unplanned Failover Procedure dialog: Create snapshot on failover server” on page 248
scrt_ra -C <Context id> -S timestamp (if by Point in Time or Event Marker)
orscrt_ra -C <Context id> -t Container ID (if by Container ID ), followed by rtmnt -C <Context id> -f
20 Delete a snapshot on failover server.
“Resume Unplanned Failover Procedure dialog: Delete snapshot on failover server” on page 248
scrt_ra -C <Context id> -W
30 Rollback the failover server
“Resume Unplanned Failover Procedure dialog: Rollback failover server” on page 248
scrt_rc -C <Context id> -S timestamp (if by Point in Time or Event Marker)
or
scrt_ra -C <Context id> -t Container ID (if by Container ID )
40 Failover the replication group. Server roles change.
“Resume Unplanned Failover dialog: Failover replication group: Server roles change” on page 248
rtdr -C <Context id> -q failover
50 Start replication on the new replicated server.(Only displayed if the replication group has a replicated server configured.)
“Resume Unplanned Failover dialog: Start replication on new replicated server” on page 249
rtdr -C <Context id> -q resync
60 Start replication on the new recovery server.
“Resume Unplanned Failover dialog: Start replication on new recovery server” on page 249
rtdr -C <Context id> -q resync
70 Start replication on the new production server
“Resume Planned Failover dialog: Start replication on new production server” on page 245
rtdr -C <Context id> -q resync

Chapter 13: Disaster Recovery Operations
248 Double-Take RecoverNow v4.0.01.00 User Guide
Run Unplanned Failover Procedure dialog: Create snapshot on failover server
Because the production server is not available, you may need to rollback the failover server before failing over. Validating the rollback location using a snapshot is recommended. To create a snapshot:
1. Specify a location in the Location in failover server rollback window.
2. Click OK, to confirm the snapshot location and to the start the unplanned failover.
3. Run your applications with the snapshot to validate the rollback location.
4. You may need to use more than one snapshot to find a valid location.
Resume Unplanned Failover Procedure dialog: Delete snapshot on failover server
This step deletes the snapshot on the failover server that was used to validate the rollback location. All applications using the snapshot must be stopped. File systems are unmounted when the snapshot is deleted.
You can decide whether or not you have a validated rollback location and how to proceed. If the you decide to create another snapshot, the procedure returns to the Create snapshot step and waits for you to resume the procedure. The dialog for this step is the Resume - Create Snapshot dialog and not the Run Procedure dialog.
In the section, Do you have a validated rollback location?
You can
• Select Yes. Continue to next step. If selected, click OK to delete the snapshot and go to the next step in the procedure. Note, that you will need to use the Resume action.
• Select No. Return to previous step and create another snapshot with a different rollback location. Note, that you will need to use the Run action.
Resume Unplanned Failover Procedure dialog: Rollback failover server
This step will rollback the failover server to the location you specify. If you do not want to rollback the failover server, select Do Not Rollback from the Location to rollback failover server field.
Resume Unplanned Failover dialog: Failover replication group: Server roles change
This step changes the roles of the servers in the replication group. Data is not replicated and failback is not available until you complete the remaining

Using VSP to Perform Failover and Failback
Double-Take RecoverNow v4.0.01.00 User Guide 249
steps in this procedure. Applications can be started when this step completes.
Resume Unplanned Failover dialog: Start replication on new replicated server
This step starts replication processes on the replicated server. Data is not replicated and failback is not available until you complete the remaining steps in this procedure.
NOTE
The servers in the replication group name have changed now that the replication group has failed over.
Resume Unplanned Failover dialog: Start replication on new recovery server
This step starts replication processes on the recovery server. Data is not replicated and failback is not available until you complete the remaining steps in this procedure.
NOTE
If a replicated server is not configured for this replication group, and this is the last step in the procedure, when this step completes, applications can be started on the production server.
Resume Unplanned Failover dialog: Start replication on new production server
This steps starts replication processes on the new production server. Data can start replicating. When the step completes, and you are ready to move production back to the configured production server, run the Failback procedure. You can also start your applications.
Run Failback Procedure
The failback procedure is used to move production back to the configured production server. The failback procedure is only available when the replication group is in a failed over state.

Chapter 13: Disaster Recovery Operations
250 Double-Take RecoverNow v4.0.01.00 User Guide
The Steps portlet shows the steps for the Failback procedure selected in the Procedures portlet.
The following table shows what steps are run to perform a failback. The Sequence Number shows the sequence number of the step in the procedure. The sequence begins with integers starting at 10 and incremented by 10. The purpose of sequence numbers are to help identify problem steps when
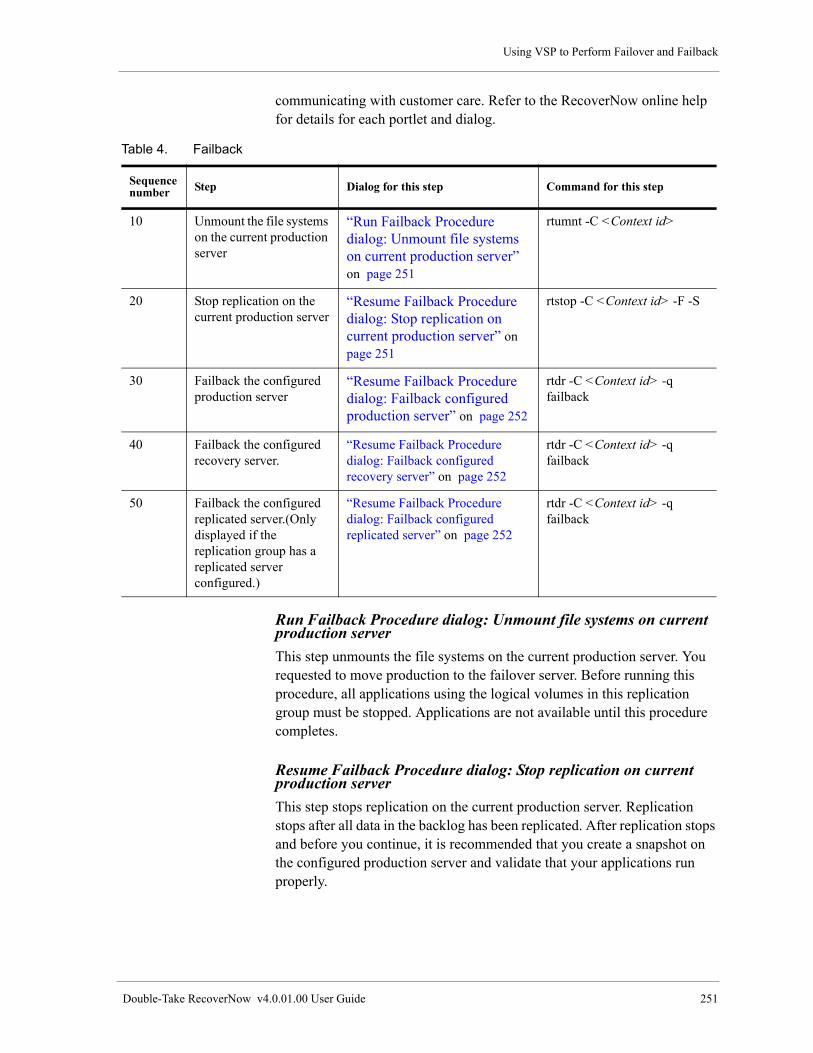
Using VSP to Perform Failover and Failback
Double-Take RecoverNow v4.0.01.00 User Guide 251
communicating with customer care. Refer to the RecoverNow online help for details for each portlet and dialog.
Run Failback Procedure dialog: Unmount file systems on current production server
This step unmounts the file systems on the current production server. You requested to move production to the failover server. Before running this procedure, all applications using the logical volumes in this replication group must be stopped. Applications are not available until this procedure completes.
Resume Failback Procedure dialog: Stop replication on current production server
This step stops replication on the current production server. Replication stops after all data in the backlog has been replicated. After replication stops and before you continue, it is recommended that you create a snapshot on the configured production server and validate that your applications run properly.
Table 4. Failback
Sequence number Step Dialog for this step Command for this step
10 Unmount the file systems on the current production server
“Run Failback Procedure dialog: Unmount file systems on current production server” on page 251
rtumnt -C <Context id>
20 Stop replication on the current production server
“Resume Failback Procedure dialog: Stop replication on current production server” on page 251
rtstop -C <Context id> -F -S
30 Failback the configured production server
“Resume Failback Procedure dialog: Failback configured production server” on page 252
rtdr -C <Context id> -q failback
40 Failback the configured recovery server.
“Resume Failback Procedure dialog: Failback configured recovery server” on page 252
rtdr -C <Context id> -q failback
50 Failback the configured replicated server.(Only displayed if the replication group has a replicated server configured.)
“Resume Failback Procedure dialog: Failback configured replicated server” on page 252
rtdr -C <Context id> -q failback
Chapter 13: Disaster Recovery Operations
252 Double-Take RecoverNow v4.0.01.00 User Guide
Resume Failback Procedure dialog: Failback configured production server
This step returns the production server role to the configured production server and starts the replication processes. Data is not replicated until the remaining steps in this procedure are completed.
NOTE
After this step completes, applications can be started on the configured production server.
Resume Failback Procedure dialog: Failback configured recovery server
This step returns the recovery server role to the configured recovery server and starts the replication processes. Data can replicate from the production server to the recovery server.
Resume Failback Procedure dialog: Failback configured replicated server
This step will failback the configured replicated server from whatever role it is currently in to the replicated server role. Data can replicate from the recovery server to the replicated server.
Using the Command line to Perform Failover and Failback
In the event of a failover, follow the procedures described in the following sections.
This section contains:
• Failover Process Overview
• Preparing Before a Failover
• Before Performing Failover Operations
• Failover Operations
Using the Command line to Perform Failover and Failback
Double-Take RecoverNow v4.0.01.00 User Guide 253
Failover Process Overview
The failover process involves:
1. Creating a primary context using the procedures described in the Chapter 6 “Configuring Replication Groups” on page 131.
NOTE
If you have changed a primary context you must delete the corresponding failover context and recreate the failover context.
rtdr -C <Primary Context ID> -F <Failover Context ID>
setup
2. Creating a failover context using the rtdr command. This command creates a failover context definition associated with the primary context. Refer to “Preparing Before a Failover” on page 253.
3. Validating data integrity of the replica prior to a failover. If necessary, perform a failover restore, as shown in “Before Performing Failover Operations” on page 254.
4. Performing the following operations after you validate the replica:
• Failover
• Resync
• Failback
Refer to “Failover Operations” on page 255 for instructions on how to perform these three operations.
Preparing Before a Failover
To prepare for a potential system failure, you set up a failover context so that your production server can switch operations to the designated recovery or replicated server.
Setting up a Failover Context
You must create a failover context to be associated with a configured primary context prior to a system failover. The Failover Context ID must be unique on the associated servers. Refer to “Failover Context Naming Conventions” on page 234 for information on valid Failover Context ID names.
To create a failover context associated with the primary context:
On the production and target servers execute:
Chapter 13: Disaster Recovery Operations
254 Double-Take RecoverNow v4.0.01.00 User Guide
rtdr -C <Primary Context ID> -F <Failover Context ID> setup
where:
<Primary Context ID> is the primary context on the production server, and <Failover Context ID> is the failover context on the recovery server.
NOTE
If there is more than one target server and you do not want to use the default for the Failover Server, then use the -s <Hostname> option on the rtdr command to specify the Failover Server. Refer to “rtdr” on page 264 for the rtdr command.
Before Performing Failover Operations
Do not perform a failover restore on a restore target that has not been validated. After a system failover occurs, RecoverNow cannot rollback to a point in time before the failover.
This section provides guidelines to execute before performing your failover operations:
Validating Data Integrity
Validating the data integrity of the replica is critical. Prior to performing the failover operations, validate the data integrity of the replica on the recovery server and restore it. To validate the data, first create a snapshot of the replica and then analyze it with the application itself.
Verify Restore Point
On the recovery or replicated server execute:
1. Create the snapshot:
scrt_ra -C <Primary Context ID> -X
2. Mount filesystems:
rtmnt -C <Context ID>
3. Check the data.
4. Unmount filesystems:
rtumnt -C <Context ID>
5. Remove the snapshot:
scrt_ra -WC <Context ID>

Using the Command line to Perform Failover and Failback
Double-Take RecoverNow v4.0.01.00 User Guide 255
Create a Virtual Restore Snapshot
Once you create a snapshot of the replica, you can analyze the integrity of the data. If analysis indicates data corruption, remove the snapshot and use a virtual restore to locate and validate an optimal restore point. A virtual restore leaves a snapshot in place for analysis at the restored point in time.
1. To perform a virtual restore on the recovery server:
scrt_ra -C <Primary Context ID> -t|-D|-S
For example, to make a restore snapshot to October 27, 2008 at 17:21:57:
scrt_ra -C <Context ID> -D "10/27/08 17:21:57"
2. Mount filesystems:
rtmnt -C <Context ID>
3. Check the data.
4. Unmount filesystems:
rtumnt -C <Context ID>
5. Remove the snapshot:
scrt_ra -WC <Context ID>
You can perform failover operations after you validate the replica.
Failover Operations
This section describes how to perform the failover operations from the production server to the recovery or replicated server when the production server has failed.
• “Performing a Failover Restore” on page 256
• “Performing Resync” on page 256
• “Performing Failback” on page 258
• “Manual Resynchronization Process if production server Data Is Lost” on page 258
IMPORTANT
Do not perform a failover restore on an invalidated restore target. After validating the replica, the failover procedures are failover, resync, and failback.

Chapter 13: Disaster Recovery Operations
256 Double-Take RecoverNow v4.0.01.00 User Guide
Performing a Failover Restore
You can now use a failover restore to roll the data back. You can:
• “rollback to the Actual Data Replica” on page 256
• “Failover to the Latest Point in the Data” on page 256
rollback to the Actual Data Replica
To rollback to the actual data replica, not a snapshot of the replica, to a validated point in time and then failover:
scrt_ra -C <Primary Context ID> -F [-t | -D | -S]
NOTE
Do not do execute scrt_ra -X -F if you want to failover to the latest point in time.
For example, to restore the replica to a previously validated target time (1169584788 seconds from Jan. 1, 1970):
scrt_ra -C <Primary Context ID> -F -S 1169584788
Failover to the Latest Point in the Data
To failover to the recovery server, on the recovery server execute:
rtdr -C <Primary Context ID> failover
NOTE
This stops the aba for the primary context.
Start the Application
After performing the failover restore procedure, start the application on the recovery or replicated server. At this point, the application operates in the production environment until the failback operation takes place. Next, the resynch operation tracks all data modification and sends them back to the the original production server.
Performing Resync
A resync operation is required when the Production Volumes and Recovery Replica Volumes diverge. This occurs after a failure of the production server and a failover to the recovery or replicated server. When the application is started on the recovery or replicated server the updates result in a divergence from the data on the production server.

Using the Command line to Perform Failover and Failback
Double-Take RecoverNow v4.0.01.00 User Guide 257
After restoring the original production server, use the resync operation to ensure that the production server data is current with the recovery server data.
To resynchronize the revived production server from the recovery or replicated server, on all servers (Production, Recovery, and Replicated):
rtdr -qC <Primary Context ID> resync
This command takes the following actions:
• On the replicated server:
start aba for failover context
• On the production server:
start aba for failover context
start lca for failover context if there is a replicated
server
• On recovery server:
start lca for failover context
IMPORTANT
The resync operation assumes the original production data was not lost, and is available in its entirety after the production server is revived. If the production data is lost, the statemap on the recovery or replicated server must be marked as dirty prior to resync. This forces a complete region recovery and initializes the production data.
Resync with Region Recovery
This procedure marks statemap bitmaps as dirty for all devices in the failover context.
On the recovery or replicated server, which is now the acting production server, execute:
rtstop -C <Failover Context ID> -F
scconfig -C <Failover Context ID> -M
rtstart -C <Failover Context ID> -M
Wait for the region recovery completes before performing the failback procedure, as described in “Performing Failback” on page 258.

Chapter 13: Disaster Recovery Operations
258 Double-Take RecoverNow v4.0.01.00 User Guide
NOTE
Performing a complete region recovery should be avoided since this will require production down time and significant network resources.
You can mark only specific state maps dirty, using the -L option of the scconfig command. Refer to the RecoverNow Chapter 14 “CLI Commands” on page 261for more information.
Performing Failback
IMPORTANT
Before you failback ensure that you stop the application on the recovery server.
After a resync operation completes, failback to return to the original production, recovery, and replicated server roles. All servers must be active and running to execute resync and failback operations.
To initiate failback to the original production server, on the Recovery or Replicated and production servers execute:
rtdr -qC <Primary Context ID> failback
Manual Resynchronization Process if production server Data Is Lost
If the failover from the production server to the recovery server was necessary because all protected data was lost on the production server, then the data must be restored to the production server before doing a failback. This data loss could occur if a disk or disk subsystem failed or was destroyed on the production server.
The data can be restored to the production server from the recovery or the replicated server using the following procedure after the necessary volume groups and logical volumes have been recreated.
1. On the recovery or replicated server stop the application.
2. On the production server execute the following command which will start scrt_aba:
rtdr -qC <Failover Context> resync
3. On the recovery or replicated server execute the following command which will unmount any filesystems if the context has filesystems and unload the drivers.
rtstop -FC <failover context>

Using the Command line to Perform Failover and Failback
Double-Take RecoverNow v4.0.01.00 User Guide 259
4. On the recovery or replicated server execute the following command which will mark the state maps dirty.
scconfig -MC <failover context>
5. On the recovery server execute the following command which will synchronize the data to the production server.
rtdr -qC <Failover Context ID> resync
6. On the recovery server execute the following command which will show the state maps.
scconfig -PC <failover context>
7. If the state maps are not clean on the recovery server wait until all the data is synchronized to the production server.
8. On the production server execute the following command which will create a snapshot to allow the integrity of the data to be checked.
scrt_ra -XC <failover context>
9. On the production server execute the following command if the context has filesystems. This command will mount the filesystems.
rtmnt -C <failover context>
10. On the production server verify the validity of the data.
11. On the production server execute the following command which will unmount any filesystems which were mounted in step 9.
rtumnt -C <failover context>
12. On the production server execute the following command which will remove the snapshot created in step 8.
scrt_ra -WC <failover context>
13. On the recovery and replicated server execute the following command which will failback to the primary context.
rtdr -qC <Failover Context ID> failback
14. On the production server execute the following command which will failback to the primary context.
rtdr -qC <Failover Context ID> failback

Chapter 13: Disaster Recovery Operations
260 Double-Take RecoverNow v4.0.01.00 User Guide

Double-Take RecoverNow v4.0.01.00 User Guide 261
CLI Commands 14
RecoverNow provides a comprehensive list of Command Line Interface (CLI) commands:
• “extend_replica_lv” on page 262
• “rtattr” on page 263
• “rtdr” on page 264
• “rtmark” on page 268
• “rtmnt” on page 268
• “rtstart” on page 269
• “rtstop” on page 270
• “rtumnt” on page 271
• “sclist” on page 271
• “scconfig” on page 274
• “scsetup” on page 276
• “scrt_ra” on page 278
• “scrt_rc” on page 279
• “scrt_vfb” on page 281
• “sccfgd_cron_schedule” on page 282
• “sccfgd_putcfg” on page 283
• “sccfgchk” on page 283
• “sztool” on page 284
Chapter 14: CLI Commands
262 Double-Take RecoverNow v4.0.01.00 User Guide
extend_replica_lv
Usage
You can use the extend_replica_lv command to force the expansion of a Replica LV (Logical Volume) that is associated with a specified PVS (Production Volume Set) LV, so that the Replica LV will be equal in size to the PVS LV. This command will only run on the production server and the LCA must be active.
Syntax
extend_replica_lv -C <Context ID> -L <PVS LV>
extend_replica_lv -h help
-C <Context ID>
-L <PVS LV>
-h Help, prints this usage
NOTE
This command is only required for PVS LVs that are extended and have no associated filesystem, or PVS LVs that have an associated filesystem with an outline log and the filesystem is extended.

rtattr
Double-Take RecoverNow v4.0.01.00 User Guide 263
rtattr
Syntaxrtattr -C ID [-a attribute] [-o object] [-t type]
rtattr -C ID -a attribute -v value {-o object | -t type}
rtattr -h
-a Attribute for query/edit (ObjectAttributeName)
-C <Context ID>
-h Help, prints this usage
-o Object for query/edit (ObjectName)
-t Type for query/edit (ObjectType)
-v Value for edit (ObjectAttributeValue)
You can use the –v parameter with the commands to edit. If you do not specify the –v parameter only query is available.
Usage
Use this command to query and change attributes in the RecoverNow ODM (Object Data Manager) files:
• SCCuAttr
• SCCuObj
• SCCuRel
Example 1
View all the machine hostids:
rtattr -C <Context ID> -a HostId
SCCuAttr:
ObjectName = "backup"
ConfigObjectSerial = 4
ObjectType = "SCRT/info/host"
ObjectAttributeName = "HostId"
ObjectAttributeValue = "0xc0a801f7"
ObjectAttributeType = "ulong"
SerialNumber = 4006
ObjectNlsIndex = 0
SC_reserved = 0
ContextID = 1
SCCuAttr:
ObjectName = "replica"
ConfigObjectSerial = 8
ObjectType = "SCRT/info/host"
ObjectAttributeName = "HostId"
ObjectAttributeValue = "0xc0a801f2"
ObjectAttributeType = "ulong"

Chapter 14: CLI Commands
264 Double-Take RecoverNow v4.0.01.00 User Guide
SerialNumber = 8006
ObjectNlsIndex = 0
SC_reserved = 0
ContextID = 1
SCCuAttr:
ObjectName = "production"
ConfigObjectSerial = 16
ObjectType = "SCRT/info/host"
ObjectAttributeName = "HostId"
ObjectAttributeValue = "0xc0a801f3"
ObjectAttributeType = "ulong"
SerialNumber = 16006
ObjectNlsIndex = 0
SC_reserved = 0
ContextID = 1
Example 2
View only the production server’s hostid:
rtattr -C <Context ID> -o production -a HostId
SCCuAttr:
ObjectName = "production"
ConfigObjectSerial = 16
ObjectType = "SCRT/info/host"
ObjectAttributeName = "HostId"
ObjectAttributeValue = "0xc0a801f3"
ObjectAttributeType = "ulong"
SerialNumber = 16006
ObjectNlsIndex = 0
SC_reserved = 0
ContextID = 1
rtdr
Syntaxrtdr -C <ID> [-fhmnqv] failover | resync | failback
rtdr -C <ID> -F <ID> [-s <hostname>] [-fhmnv] setup
-C Context ID (of the "primary" context)
-F Failover Context ID
-f Forced execution (use with caution)
-h Help, prints usage
-m Man style help
-n No execution, just print commands
-q quiet, do not ask for confirmation
-s Select failover site server from multiple recovery
servers (default is first replication hop's server.)
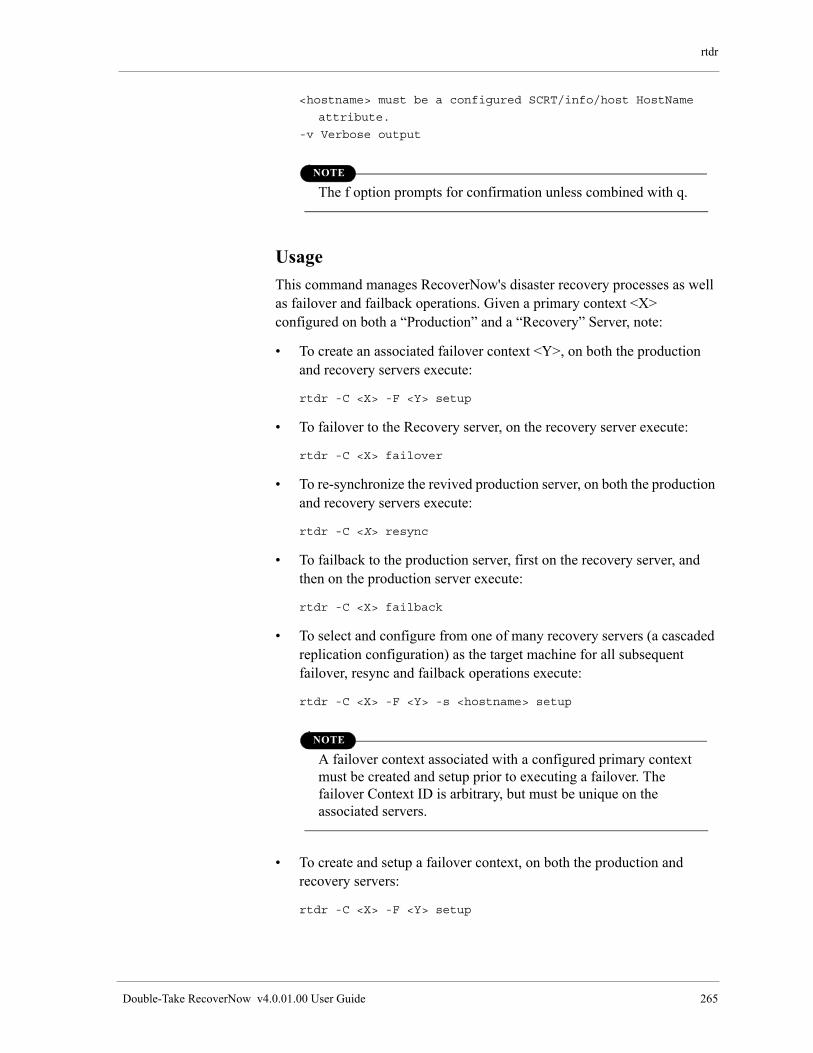
rtdr
Double-Take RecoverNow v4.0.01.00 User Guide 265
<hostname> must be a configured SCRT/info/host HostName
attribute.
-v Verbose output
NOTE
The f option prompts for confirmation unless combined with q.
Usage
This command manages RecoverNow's disaster recovery processes as well as failover and failback operations. Given a primary context <X> configured on both a “Production” and a “Recovery” Server, note:
• To create an associated failover context <Y>, on both the production and recovery servers execute:
rtdr -C <X> -F <Y> setup
• To failover to the Recovery server, on the recovery server execute:
rtdr -C <X> failover
• To re-synchronize the revived production server, on both the production and recovery servers execute:
rtdr -C <X> resync
• To failback to the production server, first on the recovery server, and then on the production server execute:
rtdr -C <X> failback
• To select and configure from one of many recovery servers (a cascaded replication configuration) as the target machine for all subsequent failover, resync and failback operations execute:
rtdr -C <X> -F <Y> -s <hostname> setup
NOTE
A failover context associated with a configured primary context must be created and setup prior to executing a failover. The failover Context ID is arbitrary, but must be unique on the associated servers.
• To create and setup a failover context, on both the production and recovery servers:
rtdr -C <X> -F <Y> setup

Chapter 14: CLI Commands
266 Double-Take RecoverNow v4.0.01.00 User Guide
• Prior to failover, you should validate the data integrity of the Replica, and if necessary, validate the data if necessary.
To validate data integrity of the Replica, create a snapshot of the replica, then analyze it with the application itself. To create the snapshot, on the recovery server:
scrt_ra -C <X> -X
• If your analysis indicates data corruption, use a virtual restore to locate and validate an optimal restore point. A virtual restore leaves a snapshot in place for analysis at the restored point in time. To perform a virtual restore, on the recovery server:
scrt_ra -C <X> [-D | -S | -t]
• Given a corrupt replica, and a validated restore point in time, use a failover restore to roll the actual data replica, not a snapshot of the replica, back to the validated point in time. To perform a failover restore, on the recovery server execute:
scrt_ra -C <X> -F [-D | -S | -t]
NOTE
Do not perform a failover restore on an invalidated restore target. After validating the replica, the disaster recovery procedure is failover, resync, then failback.
After failover, start the application on the recovery server. It will be the acting production environment until failback. All data modifications will be tracked and shipped back to the original production server by resync.
After reviving the original production server, use resync to bring the production server data up to date with the recovery server data.
After the resync completes, use failback to return to the original production and recovery server roles. Both the production and recovery servers must be live to execute resync and failback.
NOTE
Resync assumes the original production data was not lost, and is available in its entirety after the production server is revived. In the event that production data was lost, statemap on the recovery server must be dirtied prior to resync to force a complete region recovery, and re-initialize the production data.

rtdr
Double-Take RecoverNow v4.0.01.00 User Guide 267
• To dirty all statemaps, in the failover context on the recovery server (the acting production server):
rtstop -C <X> -F
scconfig -C <X> -M
NOTE
Do not perform a failover restore on an invalidated restore target.
After validating the replica, the disaster recovery procedure is to failover, resync, then failback.
After failover, start the application on the recovery server. It will be the acting production environment until failback. All data modifications will be tracked and shipped back to the original production server by resync.
After reviving the original production server, use resync to bring the production server data up to date with the recovery server data.
After resync completes, use failback to return to the original production and recovery server roles. Both the production and recovery servers must be live to execute resync and failback.
NOTE
Resync assumes the original production data was not lost, and is available in its entirety after the production server is revived. In the event that production data was lost, statemap on the recovery server must be dirtied prior to resync to force a complete region recovery, and re-initialize the production data.
• To dirty all statemaps, in the failover context on the recovery server (the acting production server):
rtstop -C <X> -F
scconfig -C <X> -M
rtstart -C <X>
After a system failover, RecoverNow cannot rollback to a point in time before the failover. Likewise, after a system failback, RecoverNow cannot rollback to a point in time before the failback. For this reason, replica data integrity should be validated with a snapshot prior to executing a failover.
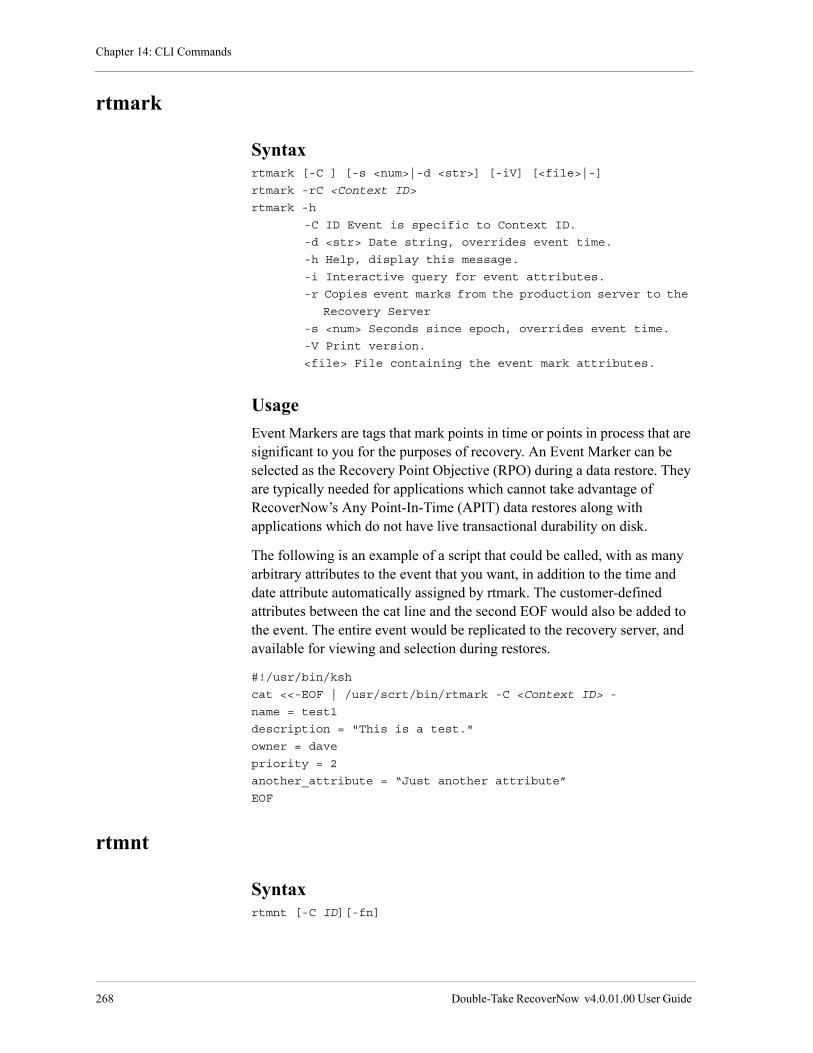
Chapter 14: CLI Commands
268 Double-Take RecoverNow v4.0.01.00 User Guide
rtmark
Syntaxrtmark [-C ] [-s <num>|-d <str>] [-iV] [<file>|-]
rtmark -rC <Context ID>
rtmark -h
-C ID Event is specific to Context ID.
-d <str> Date string, overrides event time.
-h Help, display this message.
-i Interactive query for event attributes.
-r Copies event marks from the production server to the
Recovery Server
-s <num> Seconds since epoch, overrides event time.
-V Print version.
<file> File containing the event mark attributes.
Usage
Event Markers are tags that mark points in time or points in process that are significant to you for the purposes of recovery. An Event Marker can be selected as the Recovery Point Objective (RPO) during a data restore. They are typically needed for applications which cannot take advantage of RecoverNow’s Any Point-In-Time (APIT) data restores along with applications which do not have live transactional durability on disk.
The following is an example of a script that could be called, with as many arbitrary attributes to the event that you want, in addition to the time and date attribute automatically assigned by rtmark. The customer-defined attributes between the cat line and the second EOF would also be added to the event. The entire event would be replicated to the recovery server, and available for viewing and selection during restores.
#!/usr/bin/ksh
cat <<-EOF | /usr/scrt/bin/rtmark -C <Context ID> -
name = test1
description = "This is a test."
owner = dave
priority = 2
another_attribute = “Just another attribute”
EOF
rtmnt
Syntaxrtmnt [-C ID][-fn]

rtstart
Double-Take RecoverNow v4.0.01.00 User Guide 269
Parameters
Usage
This command is used to mount all file systems associated with the context specified.
See Also
rtumnt, sccfgd_putcfg
rtstart
Syntaxrtstart [-C ID][-BMnNp]
Parameters
Parameter Description
-C ID Context ID. It must be specified if more than one context is defined.
-f Perform fsck of file systems before mounting
-h Display help message
-n Do not mount file systems. Give present status.
-p Halt on errors instead of undoing (partial)
Parameter Description
-C ID Context ID. It must be specified if more than one context is defined.
-B Boot/Autostart - used to ONLY during system startup
-h Displays help message
-n Does not actually start anything just to give present status.
-M (production server only) Disable, mount, and perform fsck of production volume set (PVS) file systems
-N (production server only) Disable and perform fsck of production volume set file systems
-p Halts on errors instead of undoing (partial)
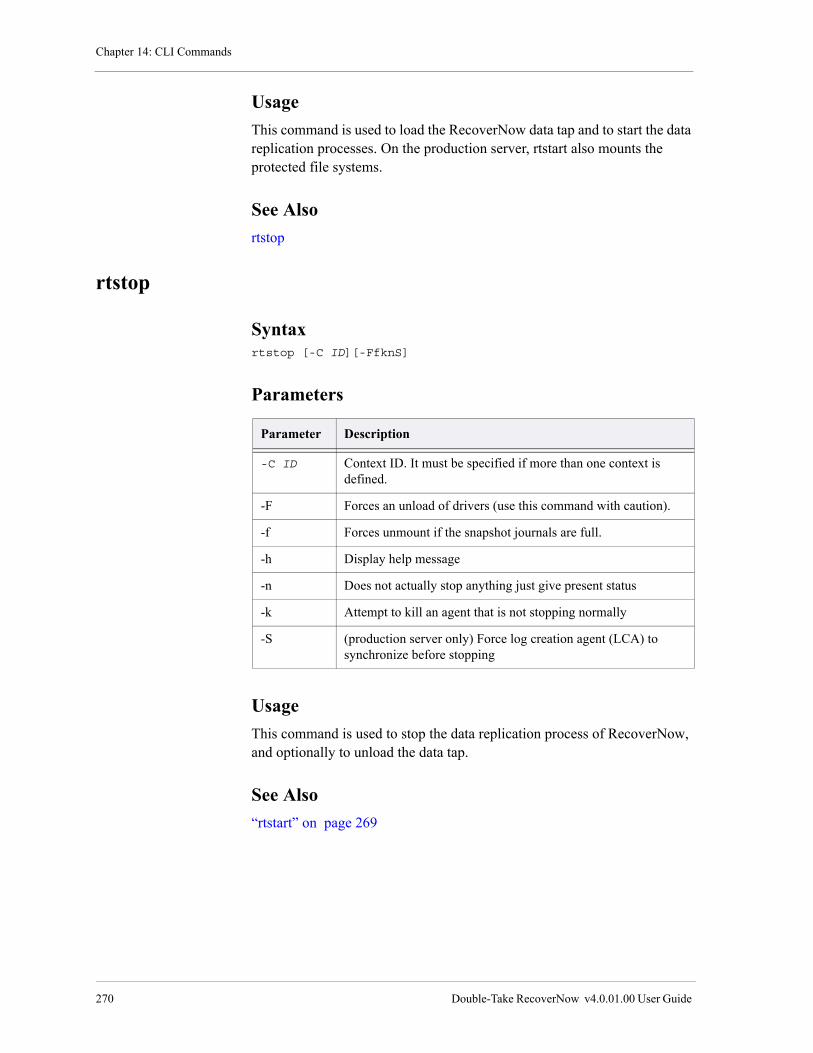
Chapter 14: CLI Commands
270 Double-Take RecoverNow v4.0.01.00 User Guide
Usage
This command is used to load the RecoverNow data tap and to start the data replication processes. On the production server, rtstart also mounts the protected file systems.
See Also
rtstop
rtstop
Syntaxrtstop [-C ID][-FfknS]
Parameters
Usage
This command is used to stop the data replication process of RecoverNow, and optionally to unload the data tap.
See Also
“rtstart” on page 269
Parameter Description
-C ID Context ID. It must be specified if more than one context is defined.
-F Forces an unload of drivers (use this command with caution).
-f Forces unmount if the snapshot journals are full.
-h Display help message
-n Does not actually stop anything just give present status
-k Attempt to kill an agent that is not stopping normally
-S (production server only) Force log creation agent (LCA) to synchronize before stopping

rtumnt
Double-Take RecoverNow v4.0.01.00 User Guide 271
rtumnt
Syntaxrtumnt [-C ID][-Dfn]
Parameters
Usage
This command is used to unmount all the volumes associated with the specified context.
See Also
“rtmnt” on page 268 and “sccfgd_putcfg” on page 283
sclist
Syntaxsclist -t TYPE [-bR] [-A ATTR [ ... ]] [-R] [-C ID] [-d X]
sclist -t TYPE -o ATTR=VALUE [-bR] [-A ATTR [ ... ]] [-C ID]
[-d X]
sclist -a [-A ATTR [ ... ]] [-C ID] [-d X]
sclist -r SERIAL [-r SERIAL ...] [-b | -c] [-C ID] [-d X]
sclist -O SERIAL [-O SERIAL ...] [-C ID] [-d X]
sclist [-BeiIjJlLmMpPstSTvVX] [-I] [-D[D]] [-C ID] [-d X]
sclist -h [-z]
sclist -fZ
-a Query all objects
-A ATTR Query specific attribute (repeatable)
-b Be Brief, useful for scripting output
-B List of StateMap bitmap devices
-c Expansive, if possible, expand on output.
-C ID Operate on Context ID.
Parameter Description
-C ID Context ID. It must be specified if more than one context is defined.
-D (production server only prevent log creation agent (LCA) from synchronizing after unmounting.
-f Forces unmount if the snapshot journals are full.
-h Display help message.
-n Do not unmount. Give present status.
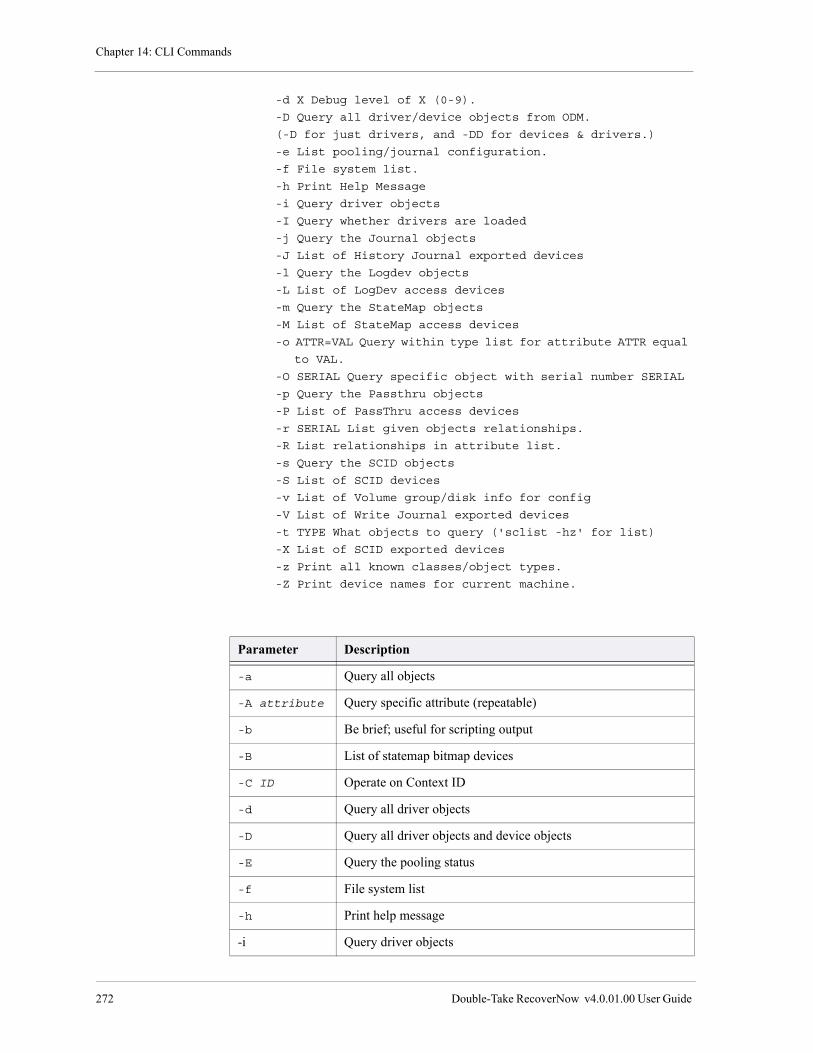
Chapter 14: CLI Commands
272 Double-Take RecoverNow v4.0.01.00 User Guide
-d X Debug level of X (0-9).
-D Query all driver/device objects from ODM.
(-D for just drivers, and -DD for devices & drivers.)
-e List pooling/journal configuration.
-f File system list.
-h Print Help Message
-i Query driver objects
-I Query whether drivers are loaded
-j Query the Journal objects
-J List of History Journal exported devices
-l Query the Logdev objects
-L List of LogDev access devices
-m Query the StateMap objects
-M List of StateMap access devices
-o ATTR=VAL Query within type list for attribute ATTR equal
to VAL.
-O SERIAL Query specific object with serial number SERIAL
-p Query the Passthru objects
-P List of PassThru access devices
-r SERIAL List given objects relationships.
-R List relationships in attribute list.
-s Query the SCID objects
-S List of SCID devices
-v List of Volume group/disk info for config
-V List of Write Journal exported devices
-t TYPE What objects to query ('sclist -hz' for list)
-X List of SCID exported devices
-z Print all known classes/object types.
-Z Print device names for current machine.
Parameter Description
-a Query all objects
-A attribute Query specific attribute (repeatable)
-b Be brief; useful for scripting output
-B List of statemap bitmap devices
-C ID Operate on Context ID
-d Query all driver objects
-D Query all driver objects and device objects
-E Query the pooling status
-f File system list
-h Print help message
-i Query driver objects

sclist
Double-Take RecoverNow v4.0.01.00 User Guide 273
Usage
This command provides information about containers used in RecoverNow.
See Also
“sccfgd_putcfg” on page 283
-I Query whether drivers are loaded
-j Query the journal objects
-J List of history journal exported devices
-l Query the Logdev objects
-L List of LogDev access devices
-m Query the StateMap objects
-M List of statemap access devices
-o ATTR=val Query within type list for attribute ATTR equal to val
-O serial Query specific object with serial number serial
-p Query the Passthru objects
-P List of PassThru access devices
-r serial List relationships of object with specified serial number
-R List relationships in attribute list
-s Query the SCID objects
-S List SCID devices
-v List volume group information for configuration
-V List write journal exported devices
-t type Type of object to query (enter sclist –hz for list of object types)
-X List of SCID exported devices
-z Print all known object types
-Z Print device names for current machine
Parameter Description

Chapter 14: CLI Commands
274 Double-Take RecoverNow v4.0.01.00 User Guide
scconfig
Usage
Use this command to manage DataTap devices and drivers.
Syntaxscconfig -l [-cfinERtv] [-C ID] [-d X] [-I name]
scconfig -u | -U [-finEv] [-C ID] [-d X] [-I name]
scconfig -r [-nv] [-L name ...] [-C ID] [-d X] [-I name]
scconfig -M | -W | -P | -B [-nv] [-L name ...] [-C ID] [-d X]
scconfig -S [-C ID] [-d X] [-nv]
scconfig -s [-C ID] [-d X]
scconfig -t | -q | -Q | -h
scconfig -C ID -a seconds [-b percent]
scconfig -V
Parameter Description
-a seconds Send Partial Container Automatically. Frequency to check in seconds (0-86400).
-b percent Send Partial Container Automatically. Percent filled (0-99).
-c Send Partial Container Automatically display current values.
-C ID Operate on Context ID.
-d X Debug level of X (0-9).
-E Exported, defers device export to scsetup.
-f Create the filter special devices.
-h Print help message.
-i Ignore errors and continue.
-I name Operate on named context instance {prod | backup}. Only useful in single system configuration.
-l Load/configure Double-Take RecoverNow kernel drivers and devices
-L name Select a device for operations. Use sclist –Z to list names of the devices.
-M Mark statemap bitmaps dirty for all or specified devs (see -L).
-n Don't execute, just echo commands.
-P Print statemap bitmaps for all or specified devices.

scconfig
Double-Take RecoverNow v4.0.01.00 User Guide 275
NOTE
The functionality to send partial containers automatically is also provided by the Replication Group Configuration Wizard on the Replication Group Container Options panels page 145 and page 157 in the section “Send partially filled containers automatically.” For additional details, refer to “Send partially filled containers automatically” on page 146.
See Also
“sccfgd_putcfg” on page 283
-B Resync data for all or specified devices.
Warning: Keep in mind the following while scconfig -B is running:
• Do not cycle RecoverNow and the server.• Ensure that you do not lose your terminal session (nohup
scconfig -B &).
-Q Query kernel statemaps for system synchronization. Returns "true" if replica is synchronized with production, "false" if not.
-q Query for a list of installed contexts.
-r Replay statemap logs ONLY.
-R Skip replay of statemap logs during log.
-s Status of kernel devices.
-S Send Partial Container.
-t Trace kernel extensions (using this option twice enables tracing on all kernel drivers).
-u Unload/unconfigure Double-Take RecoverNow kernel devices.
-U Unload Double-Take RecoverNow kernel shared drivers. All other local contexts must be unconfigured (see -u).
-v Be verbose or display version when only option.
-V Display version.
-W Wipe statemap bitmaps clean for all devices or the specified devices (see -L).
Parameter Description

Chapter 14: CLI Commands
276 Double-Take RecoverNow v4.0.01.00 User Guide
scsetup
Makes or removes the Logical Volumes (LVs) used by RecoverNow in a specific protection context, such as LFCs. Note however that scsetup will not remove production LVs in the PVS or their associated replica LVs. Run this command after defining and saving a context configuration using the RecoverNow Replication Group Wizard.
After you have defined a context, scsetup creates a log file and containers (logical volumes) in the specified volume group.
Syntax scsetup -M [-ijlnprsv] [-C ID] [-d X] [-o role] [ -t TYPE ]
scsetup -R [-inv] [-C ID] [-d X] [-o role] [ -t TYPE ]
scsetup -E [-cinv] [-C ID] [-d X] [-o role]
scsetup -I [-cinv] [-C ID] [-d X] [-o role]
scsetup -L [-inv] [-C ID] [-d X]
scsetup -X [-inv] [-C ID] [-d X]
scsetup -F [-inv] [-C ID] [-d X]
scsetup -h
-C ID Operate on Context ID.
-c Clear destination device files prior to export/import.
-d X Debug level of X (0-9).
-E Export production volumes.
Parameter Description
-c Clean destination special device file before it is moved
-C ID Operate on Context ID
-i Initialize devices (fill with zeros)
-j Initialize journal containers (fill with zeros)
-L Perform a logform operation on the statemap log
-l Skip forming statemap log (if one exists)
-m Do not spread volume layout if disks are not specified
-M Create new configured logical volumes
-n Do not execute commands. Print commands.
-o Override the volume group or disk group hints in the configuration with the configured default volume group or disk group
-R Remove configured logical volumes (except PDFCs and BSFCs). Any logical volume with true or replicated production data will not be destroyed.
-s Skip setting or clearing bitmaps for statemap (if there are any)

scsetup
Double-Take RecoverNow v4.0.01.00 User Guide 277
Usage
Preparation for RecoverNow data protection.
-F Failover preparation. PDFC LV names are moved to BSFC LV
names, and vice versa.
-i Ignore volume manager errors.
-I Import production volumes.
Removes RecoverNow data protection, allowing direct access to production data.
-j Initialize COW journal containers (fill with zeros).
-L Perform a logform on the statemap log
(implied with -M operation).
-l Skip forming statemap log (if one exists).
-M Make configured LV's from scratch.
-n Don't execute, just print commands.
-o role Operate on specific role { prod | back }.
Only necessary in a single server configuration.
-p Post processing during make (-M), skips volume creation.
-r Re-initialize devices (fill with zeros).
-R Remove configured LV's (all except PDFCs and BSFCs).
Any LV with true or replicated production data will not be destroyed.
-s Skip setting/clearing bitmaps for statemap
filters (if there are any).
-t TYPE An exclusive container type to operate on.
Multiple -t specifications are allowed.
NOTE
Type must be of SCRT/container/*, and specified as the associated “Class” name (see “sclist -hz” for a list).
-v Verbose mode (using this option twice increases verbosity).
-X Delete/Clean-up device special files from /dev.
-v Verbose mode (using this option twice increases verbosity)
-X Delete or clean up device special files from the /dev directory
Parameter Description
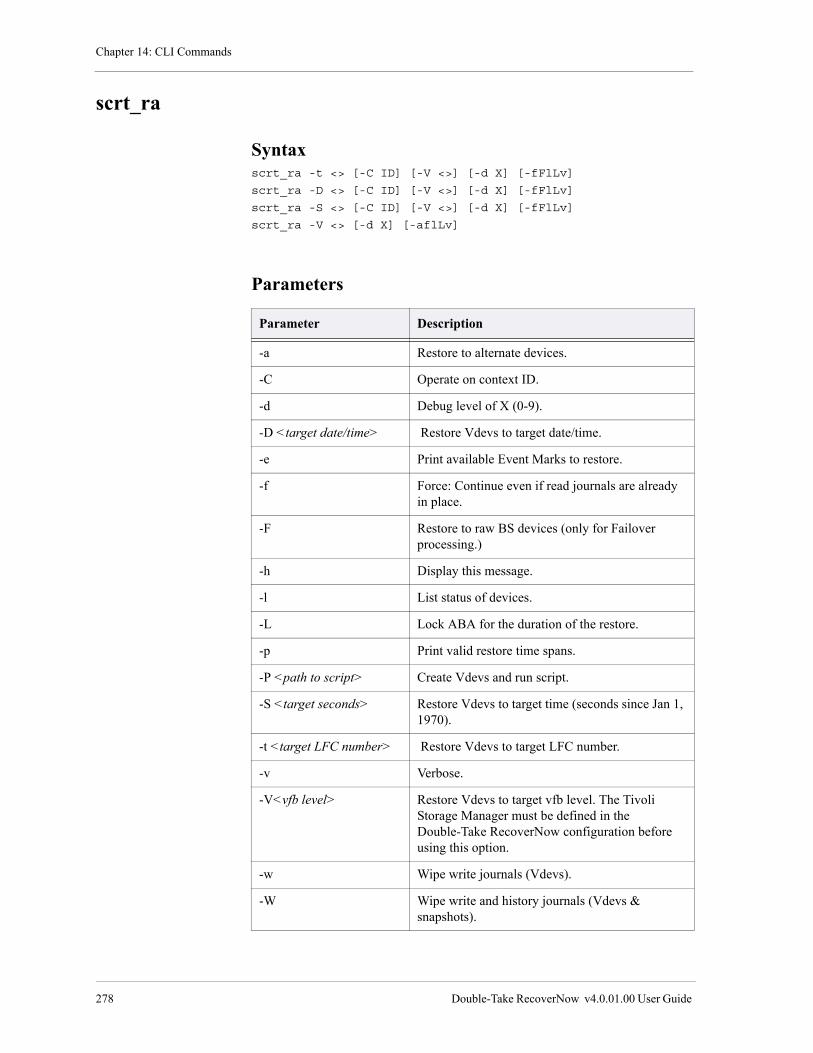
Chapter 14: CLI Commands
278 Double-Take RecoverNow v4.0.01.00 User Guide
scrt_ra
Syntaxscrt_ra -t <> [-C ID] [-V <>] [-d X] [-fFlLv]
scrt_ra -D <> [-C ID] [-V <>] [-d X] [-fFlLv]
scrt_ra -S <> [-C ID] [-V <>] [-d X] [-fFlLv]
scrt_ra -V <> [-d X] [-aflLv]
Parameters
Parameter Description
-a Restore to alternate devices.
-C Operate on context ID.
-d Debug level of X (0-9).
-D <target date/time> Restore Vdevs to target date/time.
-e Print available Event Marks to restore.
-f Force: Continue even if read journals are already in place.
-F Restore to raw BS devices (only for Failover processing.)
-h Display this message.
-l List status of devices.
-L Lock ABA for the duration of the restore.
-p Print valid restore time spans.
-P <path to script> Create Vdevs and run script.
-S <target seconds> Restore Vdevs to target time (seconds since Jan 1, 1970).
-t <target LFC number> Restore Vdevs to target LFC number.
-v Verbose.
-V<vfb level> Restore Vdevs to target vfb level. The Tivoli Storage Manager must be defined in the Double-Take RecoverNow configuration before using this option.
-w Wipe write journals (Vdevs).
-W Wipe write and history journals (Vdevs & snapshots).
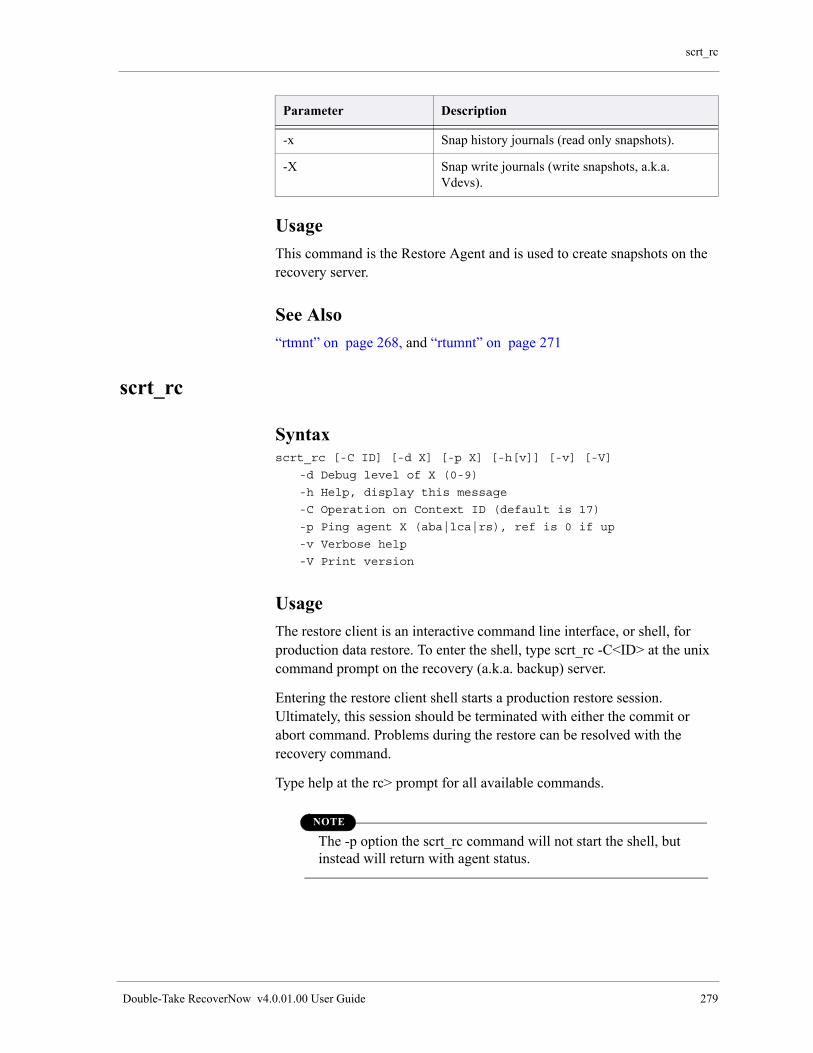
scrt_rc
Double-Take RecoverNow v4.0.01.00 User Guide 279
Usage
This command is the Restore Agent and is used to create snapshots on the recovery server.
See Also
“rtmnt” on page 268, and “rtumnt” on page 271
scrt_rc
Syntaxscrt_rc [-C ID] [-d X] [-p X] [-h[v]] [-v] [-V]
-d Debug level of X (0-9)
-h Help, display this message
-C Operation on Context ID (default is 17)
-p Ping agent X (aba|lca|rs), ref is 0 if up
-v Verbose help
-V Print version
Usage
The restore client is an interactive command line interface, or shell, for production data restore. To enter the shell, type scrt_rc -C<ID> at the unix command prompt on the recovery (a.k.a. backup) server.
Entering the restore client shell starts a production restore session. Ultimately, this session should be terminated with either the commit or abort command. Problems during the restore can be resolved with the recovery command.
Type help at the rc> prompt for all available commands.
NOTE
The -p option the scrt_rc command will not start the shell, but instead will return with agent status.
-x Snap history journals (read only snapshots).
-X Snap write journals (write snapshots, a.k.a. Vdevs).
Parameter Description

Chapter 14: CLI Commands
280 Double-Take RecoverNow v4.0.01.00 User Guide
Session restore targets
You can restore to three types of targets during a session with the restore command. These targets are:
• LFC level
• Date/Time
• Seconds since epoch (Jan 1, 1970)
Session Termination
A restore session may be terminated either with an abort or a commit command. When aborted, all restored devices are brought back to pre-session levels. When committed, all restored devices remain at the last target of the session.
A commit does not remove any forward or reverse incremental data from the RecoverNow time line which allows for a subsequent restore to a time after the committed target, if necessary. In fact, the restore itself is included in the time line which allows it to be undone.
Process Overview
RecoverNow performs a production data restore by writing reverse block incremental data directly into the raw Logical Volumes (LVs) of the Production Volume Set (PVS), rolling those LVs back in time as a single consistency group. The PVS is treated as a consistency group since it encapsulates the entire storage footprint of the protected application. The application's referential data integrity is always maintained.
All block I/O during the restore occurs at the Logical Volume Manager (LVM) layer, below all file systems and/or databases associated with the protected application. In RecoverNow, the reverse block incremental data is recorded in odd numbered LFCs, the Before Image Log File.
Containers (BILFCs), which are also raw LVs and reside on the backup/recovery server, or in external tape archives, if any.
The length of the restore window is a function of how many BILFCs are available to RecoverNow, the size of the BILFC, and the average application write rate. Tape archives are used to extend the restore window.
During a restore, the PVS LVs must be opened exclusively for writing by RecoverNow. No other application may have the LVs opened for writing. All associated databases and file systems must be unmounted.
Two agent daemons work together to perform a production restore. On the production server, the Log Creation Agent (LCA) receives BILFC transmissions and makes the BILFC writes to the PVS. On the

scrt_vfb
Double-Take RecoverNow v4.0.01.00 User Guide 281
backup/recovery server, the Restore Server (RS) handles the extraction of LFCs from either the Assured Backup Agent (ABA) or the Archive Agent (AA) if available, and the transmission of those BILFCs to LCA.
Prior to a production restore, LCA (scrt_lca) and ABA (scrt_aba) must be running in daemon mode. If external tape archiving is enabled, AA (scrt_aa) should also be running in daemon mode. RC (scrt_rc) will spawn RS (scrt_rs) automatically, and stop RS automatically at the conclusion of the restore.
General Procedure
1. Ensure required agent daemons are running.
2. On the production server - Stop/Unmount the corrupted production application
3. On the production server - Unmount file systems [rtumnt -Cx]
4. On the production server - Sync RecoverNow [scconfig -Cx -S]
5. On the recovery server - Execute RC [scrt_rc -Cx]
6. On the production server - Mount file systems [rtmnt -Cx]
7. On the production server - Start/Mount production database
Procedure Notes
1. The rtumnt -Cx command will perform a switch [scconfig -Cx -S] automatically.
2. One After Image Log File Container (AILFC) may be sent during the restore to fine tune to the nearest second. BILFCs are optimized for I/O throughput, while AILFCs maintain individual write fidelity.
3. Backup and recovery server are synonymous.
scrt_vfb
The Tivoli Storage Manager must be defined in the RecoverNow configuration before using this command.
Syntaxscrt_vfb [-bdDflLnUVrR] [-s <path to validation script>] [ -C ID ]
Usage
This command is used to create a virtual full backup.

Chapter 14: CLI Commands
282 Double-Take RecoverNow v4.0.01.00 User Guide
Parameters
sccfgd_cron_schedule
This command manages entries in cron for RecoverNow Virtual Full Backups (VFB). The Tivoli Storage Manager must be defined in the RecoverNow configuration before using this command.
Syntaxsccfgd_cron_schedule <Op> <Context_id> [<sched_type>]
[<cron_info>] [<vfb_opts>]
where:
Op -[a|q|d] for (add|query|delete respectively)
sched_type [once|daily|weekly|monthly]
cron_info mm:hh:DoM:MoY:DoW (see man crontab)
where: mm (minutes) 0-59
hh (hours) 0-23
DoM (Day of Month) 1-31
MoY (Month of Year) 1-12
DoW (Day of Week) 0-6 (0=Sun,6=Sat)
vfb_opts scrt_vfb command options:
[-bdDflLnUVrR] [-s <path to validation script>]
see scrt_vfb command documentation
Parameter Description
-b Backup from backing store devices.
-C Operate on Context ID.
-D Don't backup (useful with -d).
-f Force use of existing snaps.
-h Help.
-l Leave snaps/VDevs up when completed.
-L Lock ABA for entire backup.
-U Unlock ABA (If VFB crashed leaving ABA frozen).
-R Release read devices as they complete.
-s Run validation script prior to backup.
-V Create VDevs.
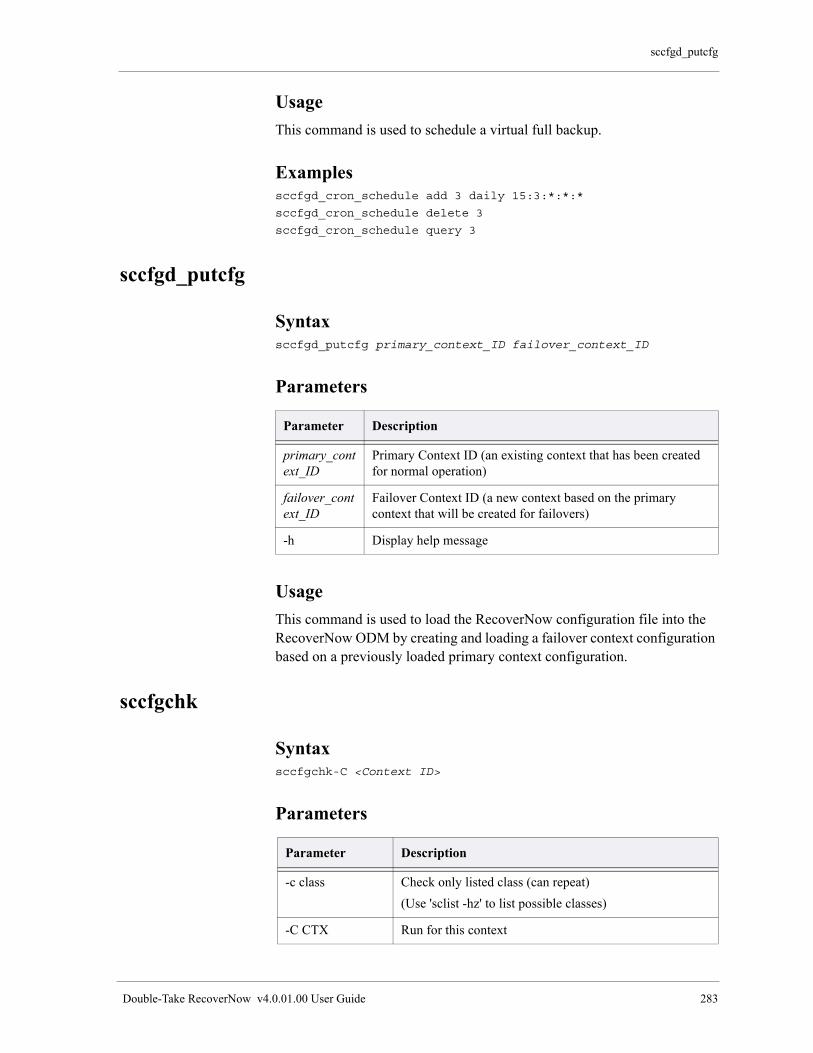
sccfgd_putcfg
Double-Take RecoverNow v4.0.01.00 User Guide 283
Usage
This command is used to schedule a virtual full backup.
Examplessccfgd_cron_schedule add 3 daily 15:3:*:*:*
sccfgd_cron_schedule delete 3
sccfgd_cron_schedule query 3
sccfgd_putcfg
Syntaxsccfgd_putcfg primary_context_ID failover_context_ID
Parameters
Usage
This command is used to load the RecoverNow configuration file into the RecoverNow ODM by creating and loading a failover context configuration based on a previously loaded primary context configuration.
sccfgchk
Syntaxsccfgchk-C <Context ID>
Parameters
Parameter Description
primary_context_ID
Primary Context ID (an existing context that has been created for normal operation)
failover_context_ID
Failover Context ID (a new context based on the primary context that will be created for failovers)
-h Display help message
Parameter Description
-c class Check only listed class (can repeat)
(Use 'sclist -hz' to list possible classes)
-C CTX Run for this context
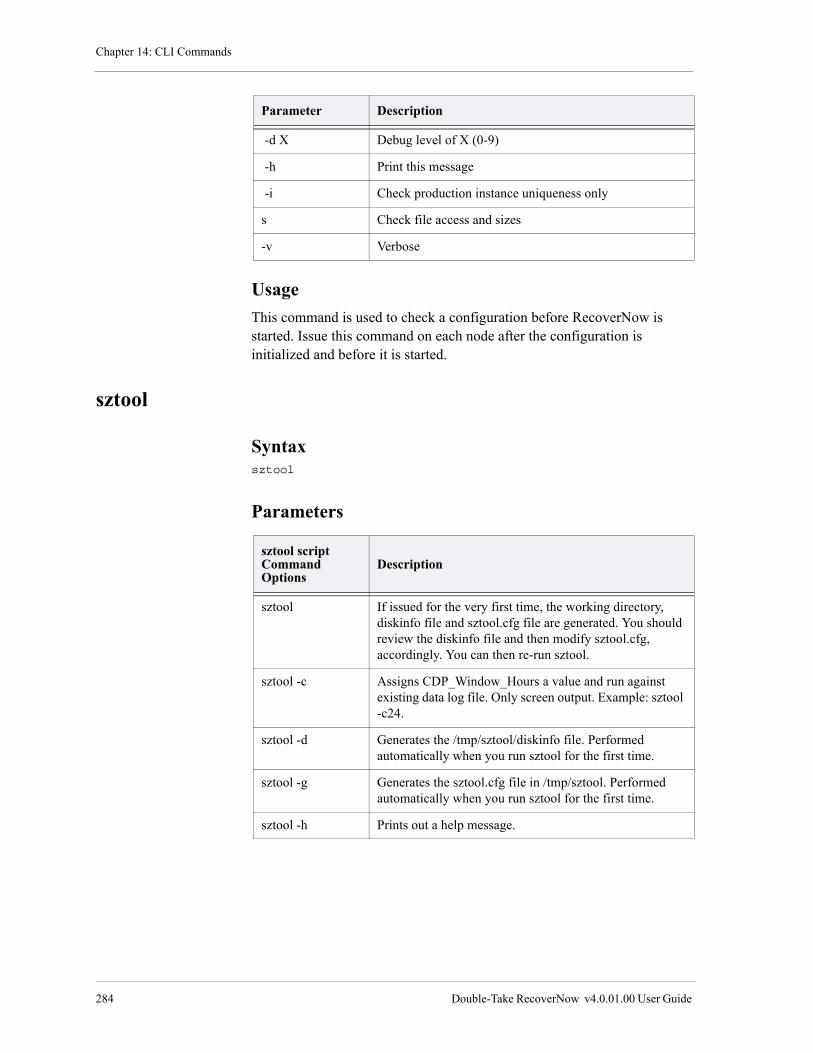
Chapter 14: CLI Commands
284 Double-Take RecoverNow v4.0.01.00 User Guide
Usage
This command is used to check a configuration before RecoverNow is started. Issue this command on each node after the configuration is initialized and before it is started.
sztool
Syntaxsztool
Parameters
-d X Debug level of X (0-9)
-h Print this message
-i Check production instance uniqueness only
s Check file access and sizes
-v Verbose
Parameter Description
sztool script CommandOptions
Description
sztool If issued for the very first time, the working directory, diskinfo file and sztool.cfg file are generated. You should review the diskinfo file and then modify sztool.cfg, accordingly. You can then re-run sztool.
sztool -c Assigns CDP_Window_Hours a value and run against existing data log file. Only screen output. Example: sztool -c24.
sztool -d Generates the /tmp/sztool/diskinfo file. Performed automatically when you run sztool for the first time.
sztool -g Generates the sztool.cfg file in /tmp/sztool. Performed automatically when you run sztool for the first time.
sztool -h Prints out a help message.

sztool
Double-Take RecoverNow v4.0.01.00 User Guide 285
Usage
You can use the Sizing Tool (sztool) to calculate configuration values before RecoverNow is installed. It is also useful to run the tool after RecoverNow is installed to determine if the number of LFCs or WJ percentage needs to be adjusted. For more information, refer to Chapter 3, “Using the Sizing Tool to Calculate LFC Size” on page 43.
sztool -l When the log file is created, this command prints out the calculation results for different LFC sizes based on the existing log file. For example, sztool -l32 prints out the results when the LFC size is at 32M. sztool -l16 -l512, prints out all the calculation results from 32MB to 512MB. You cannot have spaces between -l and the LFC size number. Only screen output, there is not any delay or sleep.
sztool -r Assigns Replication_Out_Hours a value and runs against the existing data log file. Only screen output. For example: sztool -r24, or sztool -r24 -l2 -l32.
sztool script CommandOptions
Description

Chapter 14: CLI Commands
286 Double-Take RecoverNow v4.0.01.00 User Guide

Double-Take RecoverNow v4.0.01.00 User Guide 287
Integration of PowerHA (HACMP) with RecoverNow A
This chapter describes:
• “Configuring a Highly Available RecoverNow/PowerHA Production Server Environment” on page 287
• “Configuring a Highly Available RecoverNow/PowerHA Recovery Server Environment” on page 298
• “Configuring a RecoverNow/PowerHA Production to Recovery Server Environment” on page 309
Configuring a Highly Available RecoverNow/PowerHA Production Server Environment
A RecoverNow Highly Available (HA) production server configuration is supported with PowerHA (HACMP). This section describes how you configure RecoverNow in a HA production server Environment.
In this mode:
• There are two production nodes with shared disks between them.
• Replication is to a third node that lies outside the cluster.
• A Resource Group can only be moved between the two production nodes, and the RecoverNow roles of the nodes never changes.
RecoverNow Configuration Requirements
Review these guidelines before you configure RecoverNow:
• The filesystems protected by RecoverNow should not be automatically mounted at system restart.
• Do not enable automatic startup for RecoverNow in a HA environment.
• RecoverNow software must be installed on both PowerHA Production nodes and the Recovery node.

Chapter A:
288 Double-Take RecoverNow v4.0.01.00 User Guide
• All volume groups associated with a RecoverNow configuration must be enhanced concurrent mode volume groups on both PowerHA Production nodes. Use C-SPOC to create/change the volume group(s), selecting Fast Disk Takeover or Disk Heart Beat for the Enable Fast Disk Takeover or Concurrent Access option.
• The Highly Available production server RecoverNow File Containers and the RecoverNow configuration filesystems /usr/scrt/run/c<Primary Context ID> and /usr/scrt/run/c<Failover ContextID> can co-exist on the same enhanced concurrent mode volume group(s) that are part of the RecoverNow configuration. By default the RecoverNow File Containers are created on the Default VG, defined using the RecoverNow Replication Group Wizard, unless otherwise specified. The filesystems need to be at least 128MB in size and must have a separate jfslog, jfs2log, or jfs2 inline log since they will not be part of the PVS.
• RecoverNow must be configured with a Service IP address (an alias address that follows the application when it is moved between nodes) so that the recovery server can connect to either production server. To configure a Service IP Address, change the production servers Initial host adapter IP Address to the Service IP address used by your application. If your application did not use a Service IP address, create one. The /etc/hosts file on all nodes must contain the Service IP Address and associated IP label.
Configuring Highly Available Production Servers
To configure Highly Available production servers:
1. On the primary production server and recovery server, varyonvg all volume group(s) associated with the RecoverNow configuration.
2. On the primary production server, mount the filesystems associated with the RecoverNow configuration.
c. mount /usr/scrt/run/c<Primary Context ID>
d. mount /usr/scrt/run/c<Failover ContextID>
3. Use the RecoverNow Replication Group Wizard to configure the Primary Context.
Refer to the section Chapter 6, “Configuring Replication Groups” on page 131.
4. On the primary production server, initialize the context.
scsetup -C <Primary Context ID> -M

Configuring a Highly Available RecoverNow/PowerHA Production Server Environment
Double-Take RecoverNow v4.0.01.00 User Guide 289
5. On the primary production server, create the Failover Context ID.
rtdr -C <Primary Context ID> -F <Failover Context ID>
setup
6. On the recovery server, initialize the context.
scsetup -C <Primary Context ID> -M
7. On the recovery server, create the Failover Context ID.
rtdr -C <Primary Context ID> -F <Failover Context ID>
setup
NOTE
You must manually copy and load the RecoverNow configuration onto the failover production server.
8. On the primary production server, create a file with the Primary Context ID configuration.
• odmget -q ContextID=<Primary Context ID> SCCuObj
SCCuAttr SCCuRel >/tmp/C<Primary Context ID>.cfg
• Copy this configuration file to /tmp on the Failover Production Server.
9. On the primary production server, create a file with the Failover Context ID configuration.
• odmget -q ContextID=<Failover Context ID> SCCuObj
SCCuAttr SCCuRel >/tmp/C<Failover Context ID>.cfg
• Copy this configuration file to /tmp on the Failover Production Server.
10. On the failover production server use rthostid to obtain its “HostId”.
/usr/scrt/bin/rthostid
11. On the failover production server edit the production HostId stanza in the /tmp/C<Primary Context ID>.cfg file. Replace the contents of the “ObjectAttributeValue” field with the output from the "rthostid" command.
SCCuAttr:
ObjectName = "production"
ConfigObjectSerial = 15
ObjectType = "SCRT/info/host"
ObjectAttributeName = "HostId"
ObjectAttributeValue = "6CABA7DF"
ObjectAttributeType = "ulong"

Chapter A:
290 Double-Take RecoverNow v4.0.01.00 User Guide
SerialNumber = 15006
ObjectNlsIndex = 0
SC_reserved = 0
ContextID = 1
12. On the failover production server edit the backup HostId stanza in the /tmp/C<Failover Context ID>.cfg file replacing the content of the “ObjectAttributeValue” field with the output from the “rthostid” command.
SCCuAttr:
ObjectName = "backup"
ConfigObjectSerial = 4
ObjectType = "SCRT/info/host"
ObjectAttributeName = "HostId"
ObjectAttributeValue = "5FBBC3EF"
ObjectAttributeType = "ulong"
SerialNumber = 4006
ObjectNlsIndex = 0
SC_reserved = 0
ContextID = 11
13. On the failover production server, use sccfgd_putcfg to load the configurations onto the node.
• sccfgd_putcfg <Primary Context ID> /tmp/C<Primary Context ID>.cfg
• sccfgd_putcfg <Failover Context ID>
/tmp/C<Failover Context ID>.cfg
14. On the primary production server, use /usr/sbin/lvlstmajor to obtain a list of unused device major numbers:
lvlstmajor
46,50,54,57,64,67,70,73..75,82..93,95...
15. On the failover production server, use /usr/sbin/lvlstmajor to obtain a list of unused device major numbers:
lvlstmajor
51,54,57,61,65,69,82...
16. On the primary production server, use es_ha_config to configure a device major number for the Primary Context ID. Choose a device major number that is the same on both production servers.
es_ha_config <Primary ContextID> [NewMajorNumber]
For example, when you execute:
Configuring a Highly Available RecoverNow/PowerHA Production Server Environment
Double-Take RecoverNow v4.0.01.00 User Guide 291
es_ha_config 1 82
The Primary Context ID is 1, and the new device major number 82, is available on both production servers.
17. On the failover production server, use es_ha_config to configure a device major number for the Primary Context ID. Choose a device major number that is the same on both production servers.
es_ha_config <Primary ContextID> [NewMajorNumber]
For example, when you execute
es_ha_config 1 82
The Primary Context ID is 1, and the new device major number 82, is available on both production servers.
18. On the primary production server, unmount the filesystems associated with the RecoverNow configuration.
• unmount /usr/scrt/run/c<Primary Context ID>
• unmount /usr/scrt/run/c<Failover Context ID>
19. On the primary production server, varyoff all volume group(s) associated with the RecoverNow configuration.
20. On both production servers, the filesystems protected by RecoverNow should not be automatically mounted at system restart. Change the auto-mount attribute to “no”.
21. Before starting RecoverNow on the production server, you must stop your application and unmount the protected filesystems.
22. The Initial Replica Synchronization can be performed several ways.
• Use RecoverNow to synchronize the data to the recovery server.
• Save the protected data on the production server to tape or portable disk. Refer to section “Alternative Method for Performing Initial Synchronization” on page 205.
• Copy the data over the network to the recovery server. Refer to section “Alternative Method for Performing Initial Synchronization” on page 205.
RecoverNow/PowerHA Integration requirements
Keep in mind the following RecoverNow/PowerHA integration requirements:
1. Application Server—If there are multiple Resource Groups that can failover independently, there must be multiple RecoverNow ContextIDs

Chapter A:
292 Double-Take RecoverNow v4.0.01.00 User Guide
created, one for each Resource Group. Likewise, each of these Resource Groups requires scripts to manage the startup and shutdown of each RecoverNow ContextID. The RecoverNow start script (see “RecoverNow Start Script” on page 292) needs to be placed at the beginning of the application start script. The RecoverNow stop script (“RecoverNow Shutdown Script” on page 292) needs to be executed after the application has been shutdown gracefully.
RecoverNow Start Script
This section shows a sample RecoverNow start script. The start script needs to be placed at the beginning of the application server startup sequence, before applications are started.
Sample RecoverNow Start script
#!/bin/ksh
DATE_CMD=$(date +"%Y-%m-%d %T")
CID=1
RTSTARTLOG=/usr/scrt/log/rtstartupc$CID.log
/usr/scrt/bin/rtattr -C${CID} -o production -a HostId -v
$(/usr/scrt/bin/rthostid)
if ! /usr/scrt/bin/rtstart -C${CID} ;
then
echo ${DATE_CMD}: "RecoverNow startup failed" >$RTSTARTLOG 2>&1
exit 1
fi
echo "${DATE_CMD}: RecoverNow startup successful" >$RTSTARTLOG 2>&1
-> Insert application start script here <-exit 0
RecoverNow Shutdown Script
This section shows a sample RecoverNow shutdown script. The shutdown script needs to be executed at the end of the application server shutdown sequence, after all applications have been stopped gracefully.
Sample RecoverNow Shutdown script
#!/bin/ksh93
-> Insert application stop script here <-DATE_CMD=$(date +"%Y-%m-%d %T")
CID=1
RTSTOPLOG=/usr/scrt/log/rtshutdownc${CID}.log
if ! /usr/scrt/bin/rtumnt -C${CID} ;
then
echo "${DATE_CMD}: rtumnt failed" >$RTSTOPLOG 2>&1
for i in `/usr/scrt/bin/sclist -C${CID} -f`
do
fuser -k $i
done
if ! /usr/scrt/bin/rtumnt -C${CID} ;
then
Configuring a Highly Available RecoverNow/PowerHA Production Server Environment
Double-Take RecoverNow v4.0.01.00 User Guide 293
echo "${DATE_CMD}: rtumnt failure" >$RTSTOPLOG 2>&1
exit 1
fi
fi
if ! /usr/scrt/bin/rtstop -C ${CID} -kFv ;
then
echo "${DATE_CMD}: RecoverNow shutdown failed" >$RTSTOPLOG 2>&1
exit 1
fi
echo "${DATE_CMD}: RecoverNow shutdown successful" >$RTSTOPLOG 2>&1
exit 0
2. Configure a Service IP Label/Address if one does not already exist.
• Configure HACMP Service IP Labels/Addresses.
– Add a Service IP Label/Address
– Configurable on Multiple Nodes
• Use the IP Label/Address that was used by the RecoverNow Replication Group Wizard.
3. Application Resource Group Changes
• Enter the Service IP Labels/Addresses
• Enter the names of all volume groups associated with the RecoverNow <Primary ContextID> to be varied on when the resource is initially acquired.
IMPORTANT
The RecoverNow drivers must be loaded before the RecoverNow protected filesystems are mounted or written to. This is managed during the execution of the RecoverNow startup process. PowerHA determines which filesystems to mount based on the information provided in the Resource Group configuration. If no filesystems are specified, PowerHA will mount all filesystems in all Volume Groups that defines in the resource group. This scenario is not preferred for a RecoverNow environment since RecoverNow will not be started before the filesystems are mounted.
• Enter the filesystem mount points /usr/scrt/run/c<Primary Context ID> and /usr/scrt/run/c<Failover Context
ID>. This will force only these filesystems to be mounted when the resource group is acquired.
4. Run HACMP Extended Verification and Synchronization.
5. On the recovery server use rtstart to manually start the RecoverNow Primary Context ID.
Chapter A:
294 Double-Take RecoverNow v4.0.01.00 User Guide
/usr/scrt/bin/rtstart -C<PrimaryContextID>.
6. Start Cluster Services on both Production nodes:
• Verify that the volume groups defined in the Resource Group are online in concurrent mode.
• Verify that the /usr/scrt/run/c<Primary Context ID> and /usr/scrt/run/c<Failover Context ID> filesystems are mounted.
• Verify that all of the RecoverNow protected filesystems are mounted.
• Verify that the Service IP Address is aliased on the Ethernet Network Interface.
• Verify that RecoverNow is replicating to the recovery server. View the log files: /var/log/EchoStream/scrt_lca-<Primary Context ID>.out on the production server and /var/log/EchoStream/scrt_aba-<Primary Context ID>.out on the recovery server.
Managing RecoverNow in a HA Production Server Environment
Keep in mind the following when you manage RecoverNow in a HA production server environment:
• “Changing the RecoverNow Configuration” on page 294
• “Managing Failover to the Recovery Server” on page 295
Changing the RecoverNow Configuration
Changes that you make to a RecoverNow configuration do not automatically propagate to the failover production server. If you make any changes to the configuration, you must:
1. On the primary production server, delete the Failover Context. Refer to the section “Deleting a Context” on page 146.
2. On the failover production server, delete the Primary and Failover Contexts. Refer to the section “Deleting a Context” on page 146
3. Perform the steps in “Configuring Highly Available Production Servers” on page 288 to update the Primary and failover production server with the current configuration information.
Configuring a Highly Available RecoverNow/PowerHA Production Server Environment
Double-Take RecoverNow v4.0.01.00 User Guide 295
Managing Failover to the Recovery Server
There are two scenarios for failover from a HA production server to therecovery server:
• “Unplanned Failover” on page 295
• “Planned Failover/Resync/Failback” on page 297
NOTE
Both scenarios require that you manually perform Failover operations.
Unplanned Failover
In this scenario, both Highly Available Production servers are unavailable due to a disaster. For example, an entire site is lost due to a disaster such as a flood or hurricane.
Before Performing Failover Operations
Do not perform a failover until you have validated the integrity of the data on the recovery server. After performing a failover, RecoverNow cannot be rolled back to a point in time before the failover. This section provides guidelines to execute before performing your failover operations.
Validating Data Integrity
Validating the data integrity of the replica is critical. Prior to performing the failover operations, validate the data integrity of the replica on the recovery server and restore it if necessary. To validate the data, first create a snapshot of the replica and then analyze it with the application itself.
1. On the recovery server, create a Snapshot based on the current redo log and validate the data integrity: Refer to Chapter 8, “Creating Snapshots” on page 183.
If analysis indicates data corruption, remove the snapshot and create a Snapshot based on a Specific LFCID or a Specific Date and Time to locate and validate an optimal restore point.
2. On the recovery server, create a Snapshot based on a Specific LFCID or a Specific Date and Time and validate the data integrity. Refer to Chapter 8, “Creating Snapshots” on page 183.
• Use scrt_ra to print valid restore time spans
/usr/scrt/bin/scrt_ra –vpC<Primary ContextID>
Current Snap Time:
1300122094 (LFCID: 305000): Mon Mar 14 13:01:34 2011
Available internal rollback windows:

Chapter A:
296 Double-Take RecoverNow v4.0.01.00 User Guide
--------------------------------------------------Start: 1300122094 (LFCID: 305000): Mon Mar 14 13:01:34 2011End: 1300112259 (LFCID: 304502): Mon Mar 14 10:17:39 2011
Available VFBs:
-------------------------------------------------------
No recorded VFBs.
Once you have located an optimal restore point, remove the snapshot. Proceed to step 3 to Backup the replica or to step 4 to perform a failover restore or a Failover to the Latest Point in the Data.
3. On the recovery server, if you have TSM or SysBack, backup the replica. This provides additional data protection by keeping complete copies of the data on archive media such as tape. Refer to Chapter 11, “Working with Archived Data” on page 227.
4. On the recovery server, perform a failover restore to rollback the replica to the validated point in time from step 2 or a Failover to the Latest Point in the Data.
• To perform a failover restore, refer to “Performing a Failover Restore” on page 256.
• To perform a Failover to the Latest Point in the Data, refer to “Failover to the Latest Point in the Data” on page 256.
5. On the recovery server, start your application.
Recovery of the Failed Production Server(s)
Cluster services should not be running on these nodes. Recreate the RecoverNow production environment when one or both production servers have been recovered, the steps will depend on the extent of the damage to the production servers.
Managing Resynchronization to the Production Server
If the failover from the production server to the recovery server was necessary because all protected data was lost on the production server, then the data must be restored to the production server before doing a failback. This data loss could occur if a disk or disk subsystem failed or was destroyed on the production server. Refer to “Manual Resynchronization Process if production server Data Is Lost” on page 258.
If none of the protected data was lost on the production server, refer to A resync operation is required when the Production Volumes and Recovery
Replica Volumes diverge.
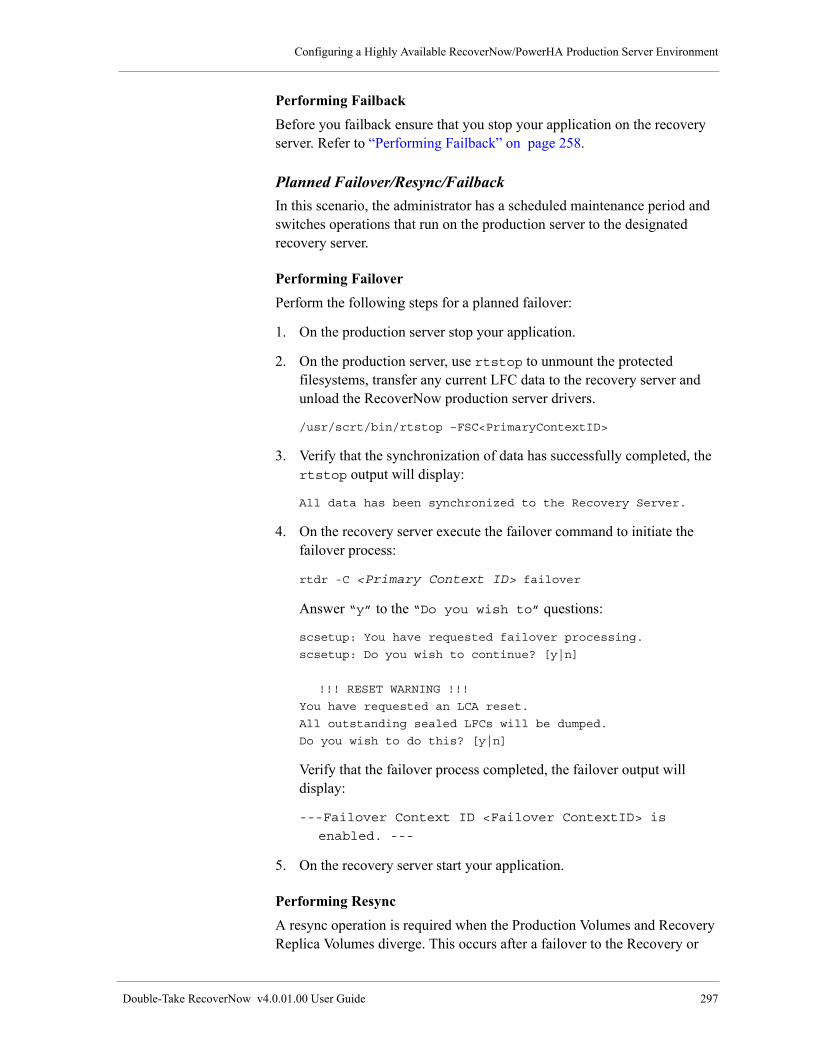
Configuring a Highly Available RecoverNow/PowerHA Production Server Environment
Double-Take RecoverNow v4.0.01.00 User Guide 297
Performing Failback
Before you failback ensure that you stop your application on the recovery server. Refer to “Performing Failback” on page 258.
Planned Failover/Resync/Failback
In this scenario, the administrator has a scheduled maintenance period and switches operations that run on the production server to the designated recovery server.
Performing Failover
Perform the following steps for a planned failover:
1. On the production server stop your application.
2. On the production server, use rtstop to unmount the protected filesystems, transfer any current LFC data to the recovery server and unload the RecoverNow production server drivers.
/usr/scrt/bin/rtstop –FSC<PrimaryContextID>
3. Verify that the synchronization of data has successfully completed, the rtstop output will display:
All data has been synchronized to the Recovery Server.
4. On the recovery server execute the failover command to initiate the failover process:
rtdr -C <Primary Context ID> failover
Answer “y” to the “Do you wish to” questions:
scsetup: You have requested failover processing.
scsetup: Do you wish to continue? [y|n]
!!! RESET WARNING !!!
You have requested an LCA reset.
All outstanding sealed LFCs will be dumped.
Do you wish to do this? [y|n]
Verify that the failover process completed, the failover output will display:
---Failover Context ID <Failover ContextID> is
enabled. ---
5. On the recovery server start your application.
Performing Resync
A resync operation is required when the Production Volumes and Recovery Replica Volumes diverge. This occurs after a failover to the Recovery or

Chapter A:
298 Double-Take RecoverNow v4.0.01.00 User Guide
replicated server. When the application is started on the Recovery or replicated server the updates to the Replica Volumes result in a divergence from the data on the production server. Refer to “Performing Resync” on page 256.
Performing Failback
Before you failback ensure that you stop your application on the recovery server.
6. Verify that the resync operation has completed, use esmon to check the LFC usage count
esmon <FailoverContextID>
Example:
esmon 740
Mar 22 17:13:11 Total LFC Size=3025M, Free size=3014M,
Used Size=11M, Usage=1/100
Used Size=11M - 11 megabytes of data has not
been sent to the Production Server
Usage=1/100 – 1 LFC is in use
The failback process will transfer the used LFCs to the production server.
7. On the recovery server failback, wait for failback to successfully complete before performing failback on the production server. Refer to “Performing Failback” on page 258.
8. On the production server failback, wait for failback to successfully complete before starting your application Refer to “Performing Failback” on page 258.
Configuring a Highly Available RecoverNow/PowerHA Recovery Server Environment
A RecoverNow Highly Available (HA) recovery server configuration is supported with PowerHA (HACMP). This section describes how you configure RecoverNow in a HA recovery server environment.
In this mode:
• There are two recovery nodes with shared disks between them.
• Replication is from a third node that lies outside the cluster.
• A Resource Group can only be moved between the two recovery nodes, and the RecoverNow roles of the nodes never changes.

Configuring a Highly Available RecoverNow/PowerHA Recovery Server Environment
Double-Take RecoverNow v4.0.01.00 User Guide 299
RecoverNow Configuration Requirements
Review these guidelines before you configure RecoverNow:
• Do not enable automatic startup for RecoverNow in a HA environment.
• RecoverNow software must be installed on both PowerHA recovery server nodes and the production server node
• All volume groups associated with a RecoverNow configuration must be enhanced concurrent mode volume groups on both PowerHA recovery server nodes. Use C-SPOC to create/change the volume group(s), selecting Fast Disk Takeover or Disk Heart Beat for the Enable Fast Disk Takeover or Concurrent Access option.
• The Highly Available recovery server RecoverNow File Containers and the RecoverNow configuration filesystems /usr/scrt/run/c<Primary Context ID> and
/usr/scrt/run/c<Failover Context ID> can co-exist on the same enhanced concurrent mode volume group(s) that are part of the RecoverNow configuration. By default the RecoverNow File Containers are created on the Default VG, defined using the RecoverNow Replication Group Wizard. The filesystems need to be at least 128MB in size and must have a separate jfslog, jfs2log, or jfs2 inline log since they will not be part of the PVS.
• RecoverNow must be configured with a Service IP address (an alias address that follows the application when it is moved between nodes). To configure a Service IP Address, change the recovery servers Initial host adapter IP Address to the address you choose to use. The /etc/hosts file on all nodes must contain the Service IP Address and associated IP label.
Configuring Highly Available Recovery Servers
To configure Highly Available recovery servers:
1. On the production server and primary recovery server, varyonvg all volume group(s) associated with the RecoverNow configuration.
2. On the primary recovery server, mount the filesystems associated with the RecoverNow configuration
• mount /usr/scrt/run/c<Primary Context ID>
• mount /usr/scrt/run/c<Failover Context ID>
3. Use the RecoverNow Replication Group Wizard to configure the Primary Context. Refer to the Chapter 6, “Configuring Replication Groups” on page 131
4. On the production server, initialize the context.
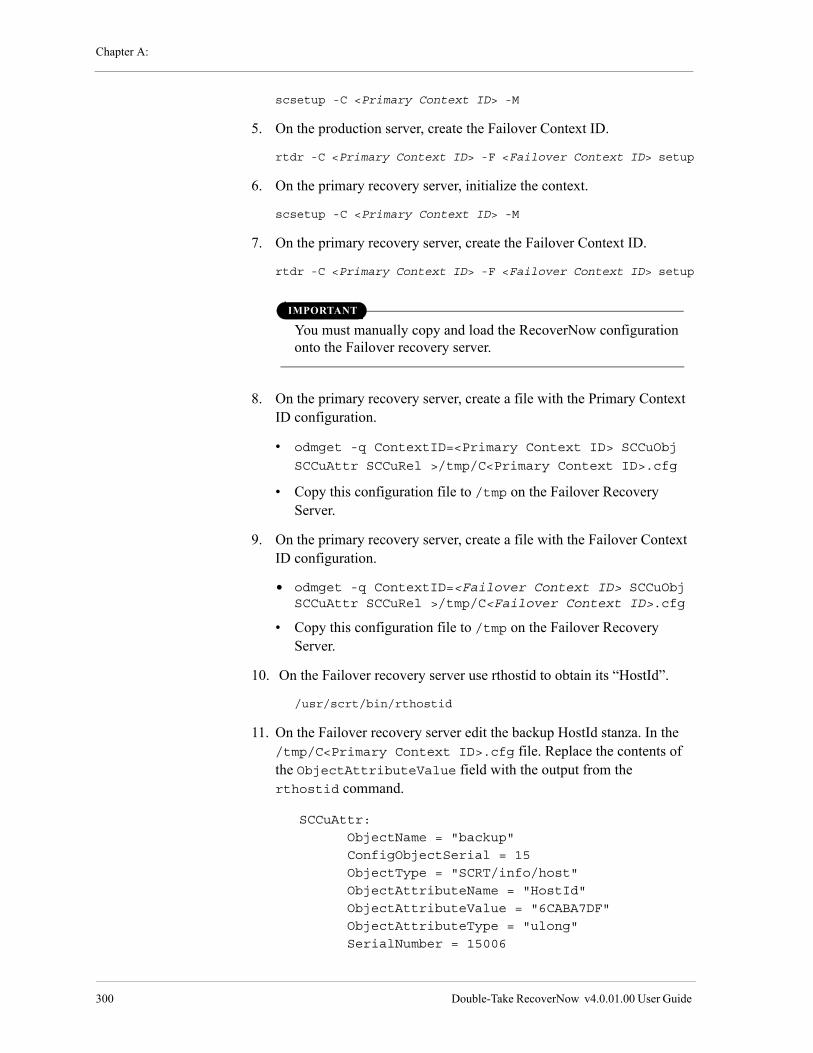
Chapter A:
300 Double-Take RecoverNow v4.0.01.00 User Guide
scsetup -C <Primary Context ID> -M
5. On the production server, create the Failover Context ID.
rtdr -C <Primary Context ID> -F <Failover Context ID> setup
6. On the primary recovery server, initialize the context.
scsetup -C <Primary Context ID> -M
7. On the primary recovery server, create the Failover Context ID.
rtdr -C <Primary Context ID> -F <Failover Context ID> setup
IMPORTANT
You must manually copy and load the RecoverNow configuration onto the Failover recovery server.
8. On the primary recovery server, create a file with the Primary Context ID configuration.
• odmget -q ContextID=<Primary Context ID> SCCuObj
SCCuAttr SCCuRel >/tmp/C<Primary Context ID>.cfg
• Copy this configuration file to /tmp on the Failover Recovery Server.
9. On the primary recovery server, create a file with the Failover Context ID configuration.
• odmget -q ContextID=<Failover Context ID> SCCuObj SCCuAttr SCCuRel >/tmp/C<Failover Context ID>.cfg
• Copy this configuration file to /tmp on the Failover Recovery Server.
10. On the Failover recovery server use rthostid to obtain its “HostId”.
/usr/scrt/bin/rthostid
11. On the Failover recovery server edit the backup HostId stanza. In the /tmp/C<Primary Context ID>.cfg file. Replace the contents of the ObjectAttributeValue field with the output from the rthostid command.
SCCuAttr:
ObjectName = "backup"
ConfigObjectSerial = 15
ObjectType = "SCRT/info/host"
ObjectAttributeName = "HostId"
ObjectAttributeValue = "6CABA7DF"
ObjectAttributeType = "ulong"
SerialNumber = 15006

Configuring a Highly Available RecoverNow/PowerHA Recovery Server Environment
Double-Take RecoverNow v4.0.01.00 User Guide 301
ObjectNlsIndex = 0
SC_reserved = 0
ContextID = 1
12. On the Failover recovery server edit the production HostId stanza in the /tmp/C<Failover Context ID>.cfg file replacing the contents of the ObjectAttributeValue field with the output from the rthostid command.
SCCuAttr:
ObjectName = "production"
ConfigObjectSerial = 4
ObjectType = "SCRT/info/host"
ObjectAttributeName = "HostId"
ObjectAttributeValue = "5FBBC3EF"
ObjectAttributeType = "ulong"
SerialNumber = 4006
ObjectNlsIndex = 0
SC_reserved = 0
ContextID = 11
13. On the Failover recovery server, use sccfgd_putcfg to load the configurations onto the node.
• sccfgd_putcfg <Primary Context ID> /tmp/C<Primary
Context ID>.cfg
• sccfgd_putcfg <Failover Context ID>
/tmp/C<Failover Context ID>.cfg
14. On the primary recovery server, use /usr/sbin/lvlstmajor to obtain a list of unused device major numbers:
lvlstmajor
46,50,54,57,64,67,70,73..75,82..93,95...
15. On the Failover recovery server, use /usr/sbin/lvlstmajor to obtain a list of unused device major numbers:
lvlstmajor
51,54,57,61,65,69,82...
16. On the primary recovery server, use es_ha_config to configure a device major number for the Primary Context ID. Choose a device major number that is the same on both recovery servers.
es_ha_config <Primary ContextID> [NewMajorNumber]
For example, when you execute
es_ha_config 1 82

Chapter A:
302 Double-Take RecoverNow v4.0.01.00 User Guide
The Primary Context ID is 1, and the new device major number 82 is available on both recovery servers.
17. On the Failover recovery server, use es_ha_config to configure a device major number for the Primary Context ID. Choose a device major number that is the same on both recovery servers.
es_ha_config <Primary ContextID> [NewMajorNumber]
For example, when you execute
es_ha_config 1 82
The Primary Context ID is 1, and the new device major number 82 is available on both recovery servers.
18. On the primary recovery server, unmount the filesystems associated with the RecoverNow configuration.
• unmount /usr/scrt/run/c<Primary Context ID>
• unmount /usr/scrt/run/c<Failover Context ID>
19. On the primary recovery server, varyoff all volume group(s) associated with the RecoverNow configuration.
20. On both recovery servers, the filesystems protected by RecoverNow should not be automatically mounted at system restart. Change the auto-mount attribute to “no”.
21. The Initial Replica Synchronization can be performed several ways:
• Use RecoverNow to synchronize the data to the recovery server.
• Save the protected data on the production server to tape or portable disk. Refer to section “Alternative Method for Performing Initial Synchronization” on page 205.
• Copy the data over the network to the recovery server. Refer to section “Alternative Method for Performing Initial Synchronization” on page 205.
RecoverNow/PowerHA Integration requirements:
Keep in mind the following RecoverNow/PowerHA integration requirements:
1. Application Server—If there are multiple Resource Groups that can failover independently, there must be multiple RecoverNow ContextIDs created, one for each Resource Group. Likewise, each of these Resource Groups requires scripts to manage the startup and shutdown of each RecoverNow ContextID. The RecoverNow start script (see “RecoverNow Start Script” on page 303) needs to be placed at the beginning of the application start script. The RecoverNow stop script
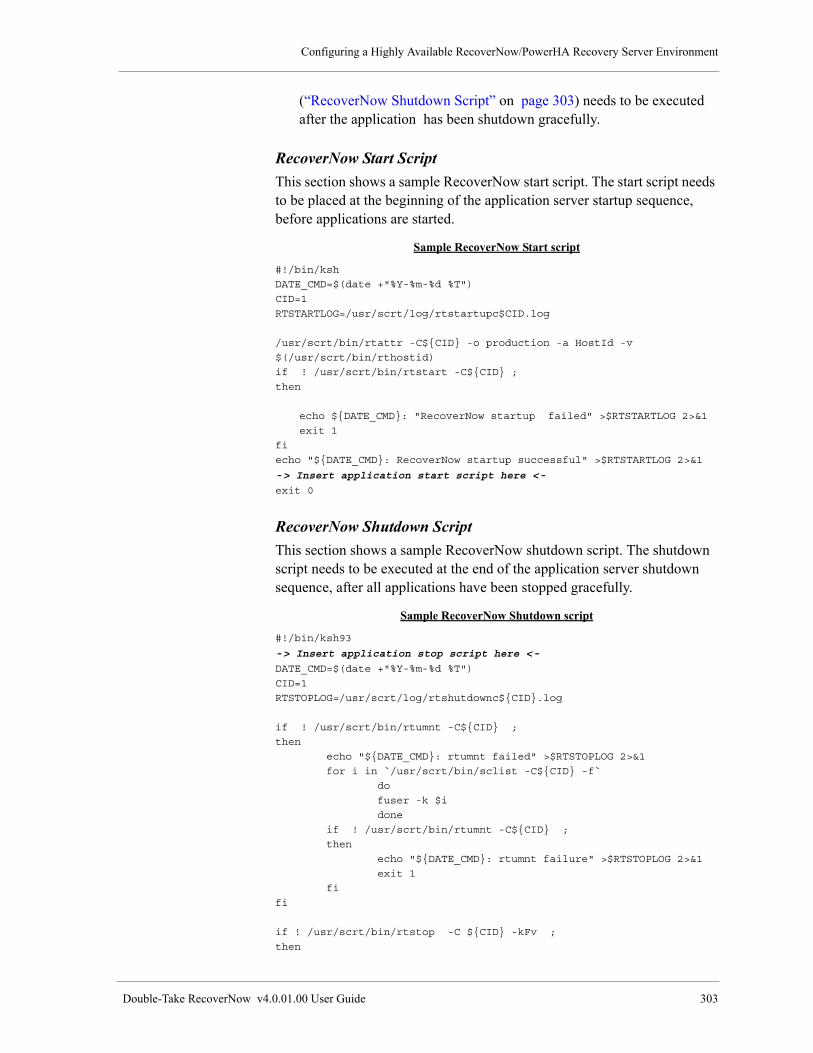
Configuring a Highly Available RecoverNow/PowerHA Recovery Server Environment
Double-Take RecoverNow v4.0.01.00 User Guide 303
(“RecoverNow Shutdown Script” on page 303) needs to be executed after the application has been shutdown gracefully.
RecoverNow Start Script
This section shows a sample RecoverNow start script. The start script needs to be placed at the beginning of the application server startup sequence, before applications are started.
Sample RecoverNow Start script
#!/bin/ksh
DATE_CMD=$(date +"%Y-%m-%d %T")
CID=1
RTSTARTLOG=/usr/scrt/log/rtstartupc$CID.log
/usr/scrt/bin/rtattr -C${CID} -o production -a HostId -v
$(/usr/scrt/bin/rthostid)
if ! /usr/scrt/bin/rtstart -C${CID} ;
then
echo ${DATE_CMD}: "RecoverNow startup failed" >$RTSTARTLOG 2>&1
exit 1
fi
echo "${DATE_CMD}: RecoverNow startup successful" >$RTSTARTLOG 2>&1
-> Insert application start script here <-exit 0
RecoverNow Shutdown Script
This section shows a sample RecoverNow shutdown script. The shutdown script needs to be executed at the end of the application server shutdown sequence, after all applications have been stopped gracefully.
Sample RecoverNow Shutdown script
#!/bin/ksh93
-> Insert application stop script here <-DATE_CMD=$(date +"%Y-%m-%d %T")
CID=1
RTSTOPLOG=/usr/scrt/log/rtshutdownc${CID}.log
if ! /usr/scrt/bin/rtumnt -C${CID} ;
then
echo "${DATE_CMD}: rtumnt failed" >$RTSTOPLOG 2>&1
for i in `/usr/scrt/bin/sclist -C${CID} -f`
do
fuser -k $i
done
if ! /usr/scrt/bin/rtumnt -C${CID} ;
then
echo "${DATE_CMD}: rtumnt failure" >$RTSTOPLOG 2>&1
exit 1
fi
fi
if ! /usr/scrt/bin/rtstop -C ${CID} -kFv ;
then
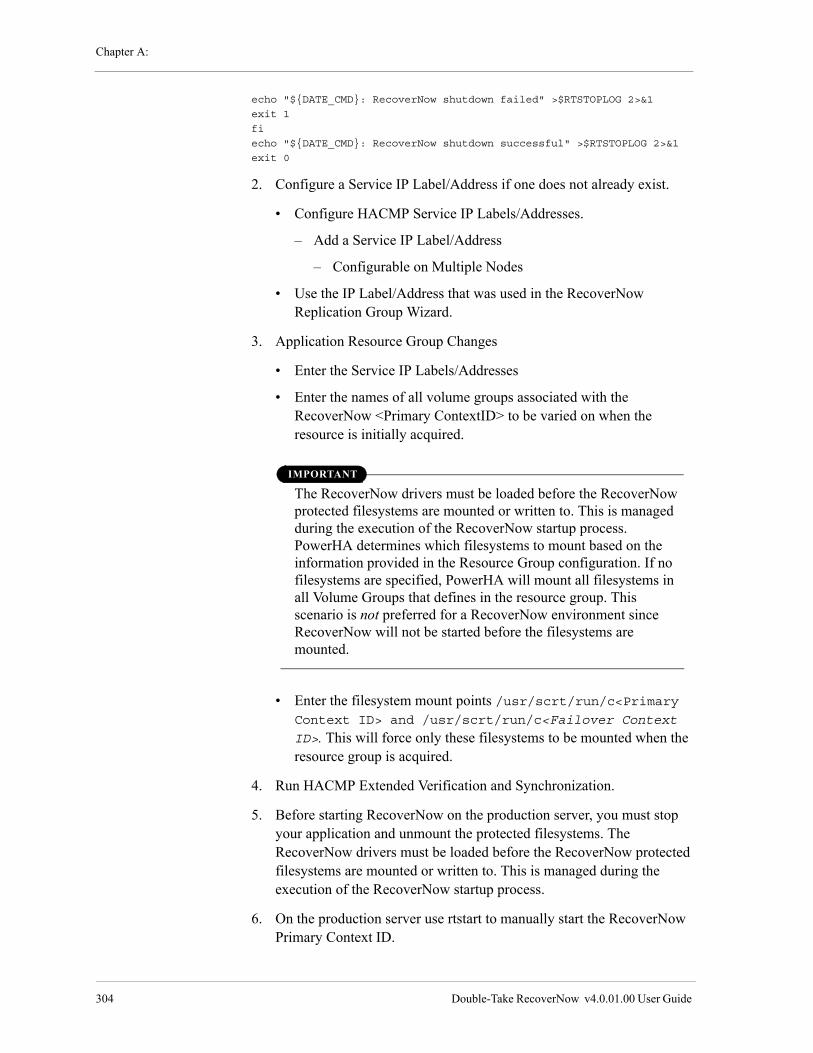
Chapter A:
304 Double-Take RecoverNow v4.0.01.00 User Guide
echo "${DATE_CMD}: RecoverNow shutdown failed" >$RTSTOPLOG 2>&1
exit 1
fi
echo "${DATE_CMD}: RecoverNow shutdown successful" >$RTSTOPLOG 2>&1
exit 0
2. Configure a Service IP Label/Address if one does not already exist.
• Configure HACMP Service IP Labels/Addresses.
– Add a Service IP Label/Address
– Configurable on Multiple Nodes
• Use the IP Label/Address that was used in the RecoverNow Replication Group Wizard.
3. Application Resource Group Changes
• Enter the Service IP Labels/Addresses
• Enter the names of all volume groups associated with the RecoverNow <Primary ContextID> to be varied on when the resource is initially acquired.
IMPORTANT
The RecoverNow drivers must be loaded before the RecoverNow protected filesystems are mounted or written to. This is managed during the execution of the RecoverNow startup process. PowerHA determines which filesystems to mount based on the information provided in the Resource Group configuration. If no filesystems are specified, PowerHA will mount all filesystems in all Volume Groups that defines in the resource group. This scenario is not preferred for a RecoverNow environment since RecoverNow will not be started before the filesystems are mounted.
• Enter the filesystem mount points /usr/scrt/run/c<Primary Context ID> and /usr/scrt/run/c<Failover Context
ID>. This will force only these filesystems to be mounted when the resource group is acquired.
4. Run HACMP Extended Verification and Synchronization.
5. Before starting RecoverNow on the production server, you must stop your application and unmount the protected filesystems. The RecoverNow drivers must be loaded before the RecoverNow protected filesystems are mounted or written to. This is managed during the execution of the RecoverNow startup process.
6. On the production server use rtstart to manually start the RecoverNow Primary Context ID.
Configuring a Highly Available RecoverNow/PowerHA Recovery Server Environment
Double-Take RecoverNow v4.0.01.00 User Guide 305
/usr/scrt/bin/rtstart -C<PrimaryContextID>
7. Start Cluster Services on both Recovery nodes:
• Verify that the volume groups defined in the Resource Group are online in concurrent mode.
• Verify that the /usr/scrt/run/c<Primary Context ID> and /usr/scrt/run/c<Failover Context ID> filesystems are mounted
• Verify that the Service IP Address is aliased on the Ethernet Network Interface.
• Verify that RecoverNow is replicating to the recovery server, view log file /var/log/EchoStream/scrt_lca-<Primary Context ID>.out on the production server and /var/log/EchoStream/scrt_aba-<Primary Context
ID>.out on the recovery server.
Managing RecoverNow in a HA Recovery Server Environment
Keep in mind the following when you manage RecoverNow in a HA production server environment:
• “Changing the RecoverNow Configuration” on page 294
• “Managing Failover to the Recovery Server” on page 305
Changing the RecoverNow Configuration
Changes that you make to a RecoverNow configuration do not automatically propagate to the Failover recovery server. If you make any changes to the configuration, you must:
1. On the primary recovery server, delete the Failover Context. Refer to the section “Deleting a Context” on page 146.
2. On the Failover recovery server, delete the Primary and Failover Contexts. Refer to the section “Deleting a Context” on page 146.
3. Perform the steps in “Configuring Highly Available Recovery Servers” on page 299 to update the Primary and Failover recovery server with the current configuration information.
Managing Failover to the Recovery Server
There are two scenarios for failover from a HA production server to aRecovery server:
• “Unplanned Failover” on page 306
Chapter A:
306 Double-Take RecoverNow v4.0.01.00 User Guide
• “Planned Failover/Resync/Failback” on page 297
NOTE
Both scenarios require that you manually perform Failover operations.
Unplanned Failover
In this scenario, the production server is unavailable due to a disaster. For example, an entire site is lost due to a disaster such as a flood or hurricane.
Before Performing Failover Operations
Do not perform a failover until you have validated the integrity of the data on the active recovery server. After performing a failover, RecoverNow cannot be rolled back to a point in time before the failover. This section provides guidelines to execute before performing your failover operations:
Validating Data Integrity
Validating the data integrity of the replica is critical. Prior to performing the failover operations, validate the data integrity of the replica on the active recovery server and restore it if necessary. To validate the data, first create a snapshot of the replica and then analyze it with the application itself.
1. On the active recovery server, create a Snapshot based on the current redo log and validate the data integrity: Refer to Chapter 8, “Creating Snapshots” on page 183.
If analysis indicates data corruption, remove the snapshot and create a Snapshot based on a Specific LFCID or a Specific Date and Time to locate and validate an optimal restore point.
2. On the active recovery server, create a Snapshot based on a Specific LFCID or a Specific Date and Time and validate the data integrity: Refer to Chapter 8, “Creating Snapshots” on page 183.
• Use scrt_ra to print valid restore time spans
/usr/scrt/bin/scrt_ra –vpC<Primary ContextID>
Current Snap Time:
1300122094 (LFCID: 305000): Mon Mar 14 13:01:34
2011
Available internal rollback windows:
-------------------------------------------------------Start: 1300122094 (LFCID: 305000): Mon Mar 14 13:01:34 2011
End: 1300112259 (LFCID: 304502): Mon Mar 14 10:17:39 2011
Configuring a Highly Available RecoverNow/PowerHA Recovery Server Environment
Double-Take RecoverNow v4.0.01.00 User Guide 307
Available VFBs:-------------------------------------------------------No recorded VFBs.
Once you have located an optimal restore point, remove the snapshot. Proceed to step 3 to Backup the replica, or to step 4 to perform a failover restore or a failover to the Latest Point in the Data.
3. On the active recovery server, if you have TSM or SysBack, backup the replica. This provides additional data protection by keeping complete copies of the data on archive media such as tape. Refer to Chapter 11, “Working with Archived Data” on page 227.
4. On the active recovery server, perform a failover restore to rollback the replica to the validated point in time from step 2 or a Failover to the Latest Point in the Data.
• To perform a failover restore, refer to “Performing a Failover Restore” on page 256.
• To perform a Failover to the Latest Point in the Data, refer to “Failover to the Latest Point in the Data” on page 256.
5. On the active recovery server, start your application.
Recovery of the Failed Production Server
Recreate the RecoverNow production environment when the production server has been recovered, the steps will depend on the extent of the damage to the production server.
Managing Resynchronization to the Production Server
If the failover from the production server to the recovery server was necessary because all protected data was lost on the production server, then the data must be restored to the production server before doing a failback. This data loss could occur if a disk or disk subsystem failed or was destroyed on the production server. Refer to “Manual Resynchronization Process if production server Data Is Lost” on page 258.
If none of the protected data was lost on the production server, refer to “Performing Resync” on page 256.
Performing Failback
Before you failback ensure that you stop your application on the active recovery server. Refer to “Performing Failback” on page 258.
Chapter A:
308 Double-Take RecoverNow v4.0.01.00 User Guide
Planned Failover/Resync/Failback
In this scenario, the administrator has a scheduled maintenance period and switches operations that run on the production server to the active recovery server.
Performing Failover
1. On the production server stop your application.
2. On the production server, use rtstop to unmount the protected filesystems, transfer any current LFC data to the recovery server and unload the RecoverNow production server drivers.
/usr/scrt/bin/rtstop –FSC<PrimaryContextID>
3. Verify that the synchronization of data has successfully completed, the rtstop output will display:
All data has been synchronized to the Recovery Server.
4. On the active recovery server execute the failover command to initiate the failover process:
rtdr -C <Primary Context ID> failover
Answer “y” to the “Do you wish to” questions:
scsetup: You have requested failover processing.
scsetup: Do you wish to continue? [yen]
!!! RESET WARNING !!!
You have requested an LCA reset.
All outstanding sealed LFCs will be dumped.
Do you wish to do this? [y|n]
Verify that the failover process completed, the failover output will display:
---Failover Context ID <Failover ContextID> is
enabled. ---
5. On the active recovery server start your application.
Performing Resync
A resync operation is required when the Production Volumes and Recovery Replica Volumes diverge. This occurs after a failover to the recovery or replicated server. When the application is started on the Recovery or replicated server the updates to the Replica Volumes result in a divergence from the data on the production server. Refer to “Performing Resync” on page 256.
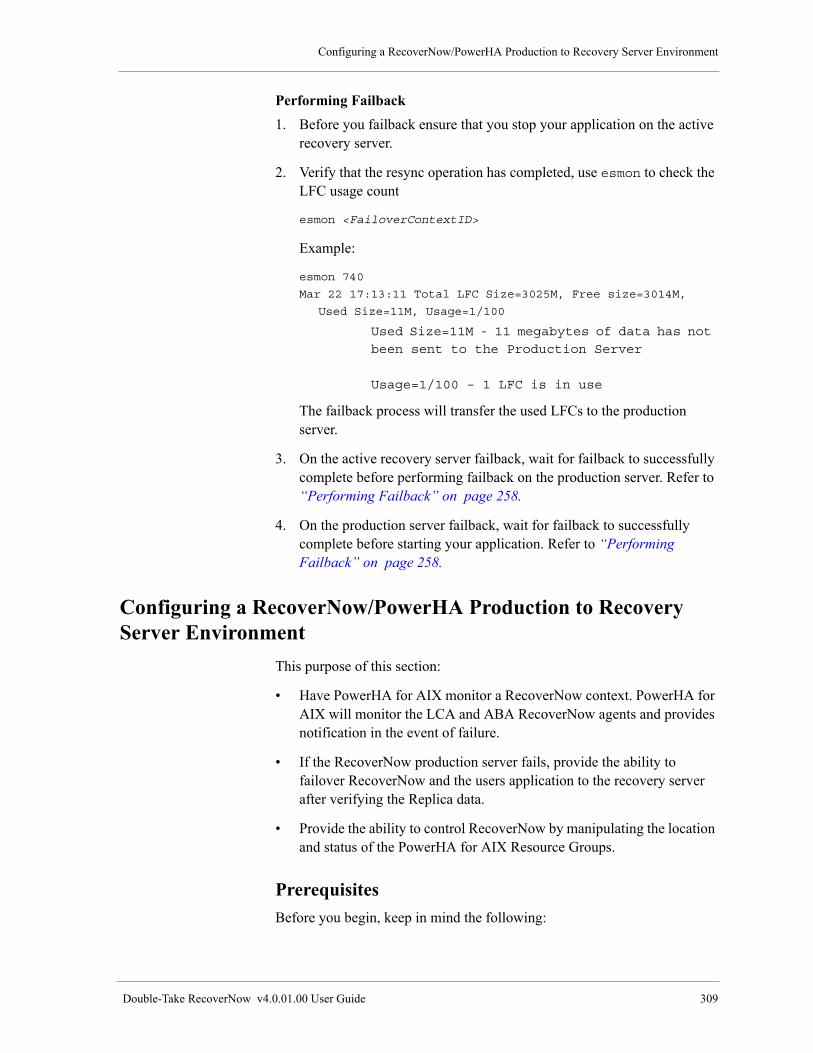
Configuring a RecoverNow/PowerHA Production to Recovery Server Environment
Double-Take RecoverNow v4.0.01.00 User Guide 309
Performing Failback
1. Before you failback ensure that you stop your application on the active recovery server.
2. Verify that the resync operation has completed, use esmon to check the LFC usage count
esmon <FailoverContextID>
Example:
esmon 740
Mar 22 17:13:11 Total LFC Size=3025M, Free size=3014M,
Used Size=11M, Usage=1/100
Used Size=11M - 11 megabytes of data has not
been sent to the Production Server
Usage=1/100 – 1 LFC is in use
The failback process will transfer the used LFCs to the production server.
3. On the active recovery server failback, wait for failback to successfully complete before performing failback on the production server. Refer to “Performing Failback” on page 258.
4. On the production server failback, wait for failback to successfully complete before starting your application. Refer to “Performing Failback” on page 258.
Configuring a RecoverNow/PowerHA Production to Recovery Server Environment
This purpose of this section:
• Have PowerHA for AIX monitor a RecoverNow context. PowerHA for AIX will monitor the LCA and ABA RecoverNow agents and provides notification in the event of failure.
• If the RecoverNow production server fails, provide the ability to failover RecoverNow and the users application to the recovery server after verifying the Replica data.
• Provide the ability to control RecoverNow by manipulating the location and status of the PowerHA for AIX Resource Groups.
Prerequisites
Before you begin, keep in mind the following:
Chapter A:
310 Double-Take RecoverNow v4.0.01.00 User Guide
• RecoverNow must be operational and configured with Primary and Failover contexts.
• scconfigd must be running on the RecoverNow production and recovery servers.
• Starting RecoverNow and the associated user applications in "/etc/inittab" is not recommended. If the production server fails and the user applications are brought up on the recovery server, it would not be desirable to have them start when the production server is restored to service.
Overview of the Failover Process
If the Production_Server Resource Group fails it will not automatically move to the Recovery node because it is anti-collocated, low priority with the Recovery_Server Resource Group.
Not doing a automatic Failover allows the creation of a snapshot to validate the Replica data and to restore the Replica to a point in time if required. The Recovery_Server Resource Group will have to be brought offline before the Production_Server Resource Group can be brought online on the recovery server.
When the Production_Server Resource Group is brought online on the Recovery node it executes the rtdr -C <Primary Context ID> failover command. When the Production_Server Resource Group is brought offline (on the recovery server), after the Production node becomes available, it will send the rtdr -C <Primary Context ID> resync command to the Production node before stopping.
There may be special cases where you would delay bringing the Production_Server Resource Group offline on the recovery server. Normally, this would mean that no data is being synchronized to the production server. In that case, you can manually execute the rtdr -C <Primary Context ID> resync command on the production server. This starts the ABA but it will not be monitored by PowerHA for AIX.
If the Recovery_Server Resource Group fails it will not move, because there is only one node in the participating node list.
Ensure that you have the Recovery_Server Resource Group online to prevent an automatic failover of the Production_Server Resource Group to the recovery server.
Configuring a RecoverNow/PowerHA Production to Recovery Server Environment
Double-Take RecoverNow v4.0.01.00 User Guide 311
Sequence to manually bring the Resource Groups ONLINE:
1. Bring the Recovery_Server Resource Group online on the Recovery node.
2. Bring the Production_Server Resource Group online on the Production node.
Sequence to manually bring the Resource Groups OFFLINE:
1. Bring the Production_Server Resource Group offline on the Production node.
2. Bring the Recovery_Server Resource Group offline on the Recovery node.
Planned Failover Procedure
1. Bring the Production_Server Resource Group offline on the Production node.
2. Bring the Recovery_Server Resource Group offline on the Recovery node.
3. Bring the Production_Server Resource Group online on the Recovery node.
Unplanned Failover Procedure
1. Create a snapshot to validate the Replica data and restore the Replica to a validated point in time, if required. Refer to “Creating Snapshots Based on a Specific Date and Time” on page 189 for information on creating snapshots. Refer to “Performing a Failover Restore” on page 256 for information on how to restore the Replica to a validated point in time.
2. Bring the Recovery_Server Resource Group offline on the Recovery node.
3. Bring the Production_Server Resource Group online on the Recovery node.
Failback Procedure
1. Move the Production_Server Resource Group to the Production node.
2. Bring the Recovery_Server Resource Group online on the Recovery node.

Chapter A:
312 Double-Take RecoverNow v4.0.01.00 User Guide
PowerHA for AIX Configuration
Note the following for the example RecoverNow configuration:
• Performed using PowerHA for AIX 6.1.0.7
• Names used such as, Cluster Nodes, Resource Groups are arbitrary. The integrator can choose to use any names.
• Topology configuration for networks, communication interfaces and devices is not shown in this example because it is environment specific.
• Notification scripts are not provided and are the responsibility of the integrator.
• The implementation of the user application in this example is a suggestion and could be done differently at the integrator’s preference.
• Has a Primary Context ID of 85 and Failover Context ID of 850.
The following RecoverNow scripts are provided for the PowerHA for AIX configuration. These scripts require parameters -C <Primary Context ID> and for the first two scripts optionally -P if called from the Production_Server Resource Group. These scripts will log to "/usr/scrt/log" if the "HACMP Log File Parameters" have "Debug Level" set to "high".
/usr/scrt/bin/production_failback_acquire
/usr/scrt/bin/production_failover_release
/usr/scrt/bin/ABA_Monitor
/usr/scrt/bin/LCA_Monitor

Configuring a RecoverNow/PowerHA Production to Recovery Server Environment
Double-Take RecoverNow v4.0.01.00 User Guide 313
Sample PowerHA Configuration
Configure HACMP Nodes:
Production
Recovery
Configure Resource Groups:
Resource Group Name
Participating Nodes
Startup Policy
Fallover Policy
Fallback Policy
Production_Server
Production Recovery]
Online On Home Node Only
Fallover To Next Priority Node In The List
Never Fallback
Resource Group Name Recovery_Server
Participating Nodes [Recovery]
Startup Policy Online On Home Node Only
Fallover Policy Fallover To Next Priority Node In The List
Fallback Policy Never Fallback
Configure Online on Different Nodes Dependency
High Priority Resource Group(s) [Recovery_Server]
Low Priority Resource Group(s) [Production_Server]
Configure HACMP Application Servers
Server Name Production_85
Start Script [/users_path_name/Production_Server_Start]
Stop Script [/users_path_name/Production_Server_Stop]
Application Monitor LCA_Monitor_85 Monitor_85
Server Name Recovery_85
Start Script [/usr/scrt/bin/production_failback_acquire -C <Primary Context ID>]
Stop Script [/usr/scrt/bin/production_failover_release -C <Primary Context ID>]
Application Monitor ABA_Monitor_85

Chapter A:
314 Double-Take RecoverNow v4.0.01.00 User Guide
Example for Production_Server_Start script
#!/bin/ksh
###############################################################################
#
# Name: Production_Server_Start
#
# Arguments: None
#
# Returns: 0 - success
#
# Environment: None
###############################################################################
###############################################################################
# Main Entry Point
################################################################################
PROGNAME=${0##*/}
[[ ${VERBOSE_LOGGING} == high ]] &&
{
rm -f /tmp/${PROGNAME}.out
exec 1> /tmp/${PROGNAME}.out
exec 2>&1
PS4='[${PROGNAME}][${LINENO}]'
set -x
}
printf "$(date) ******** Begin ${PROGNAME} ********\n"
/usr/scrt/bin/production_failback_acquire -C <Primary Context ID> -P
if ((${?}!=0))
then
printf "$(date) Production Server start failed.\n"
exit 1
fi
printf "$(date) Production Server start successful.\n"
-> Insert application start script here <-
if ((${?}!=0))
then
printf "$(date) Double-Take_RecoverNow_85_Application_Start failed.\n"
exit 1
fi
printf "$(date) Double-Take_RecoverNow_85_Application_Start successful.\n"
################################################################################
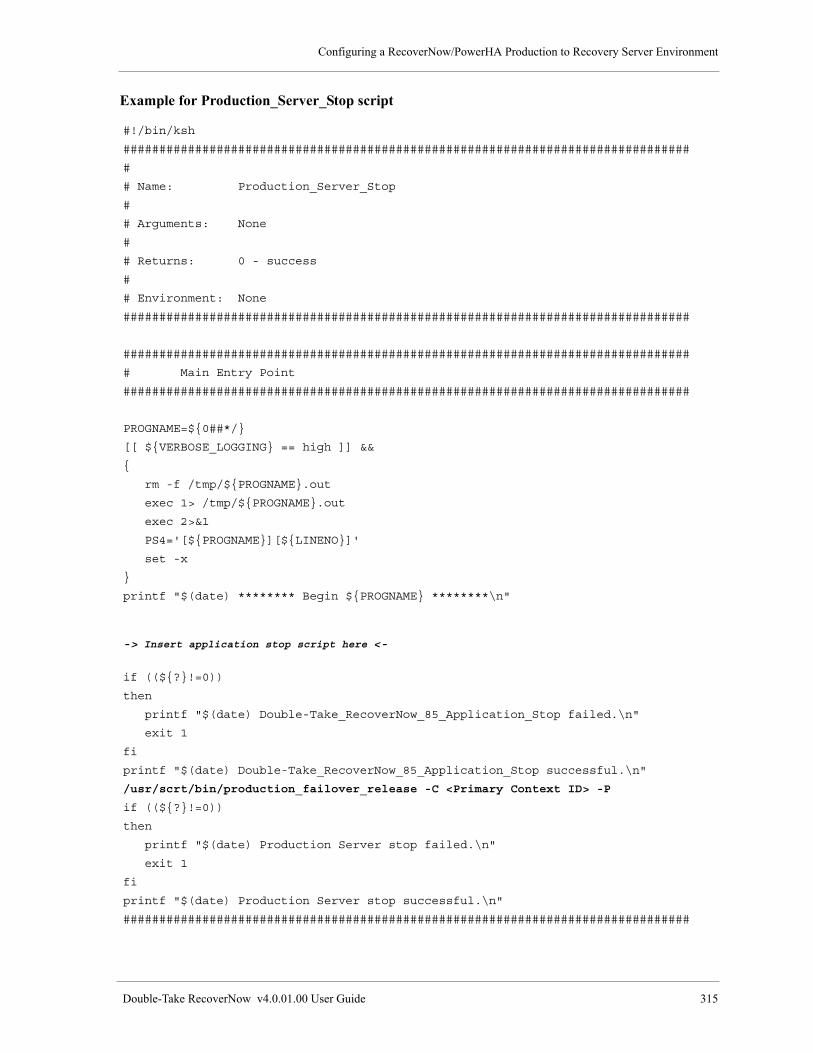
Configuring a RecoverNow/PowerHA Production to Recovery Server Environment
Double-Take RecoverNow v4.0.01.00 User Guide 315
Example for Production_Server_Stop script
#!/bin/ksh
###############################################################################
#
# Name: Production_Server_Stop
#
# Arguments: None
#
# Returns: 0 - success
#
# Environment: None
###############################################################################
###############################################################################
# Main Entry Point
###############################################################################
PROGNAME=${0##*/}
[[ ${VERBOSE_LOGGING} == high ]] &&
{
rm -f /tmp/${PROGNAME}.out
exec 1> /tmp/${PROGNAME}.out
exec 2>&1
PS4='[${PROGNAME}][${LINENO}]'
set -x
}
printf "$(date) ******** Begin ${PROGNAME} ********\n"
-> Insert application stop script here <-
if ((${?}!=0))
then
printf "$(date) Double-Take_RecoverNow_85_Application_Stop failed.\n"
exit 1
fi
printf "$(date) Double-Take_RecoverNow_85_Application_Stop successful.\n"
/usr/scrt/bin/production_failover_release -C <Primary Context ID> -P
if ((${?}!=0))
then
printf "$(date) Production Server stop failed.\n"
exit 1
fi
printf "$(date) Production Server stop successful.\n"
###############################################################################
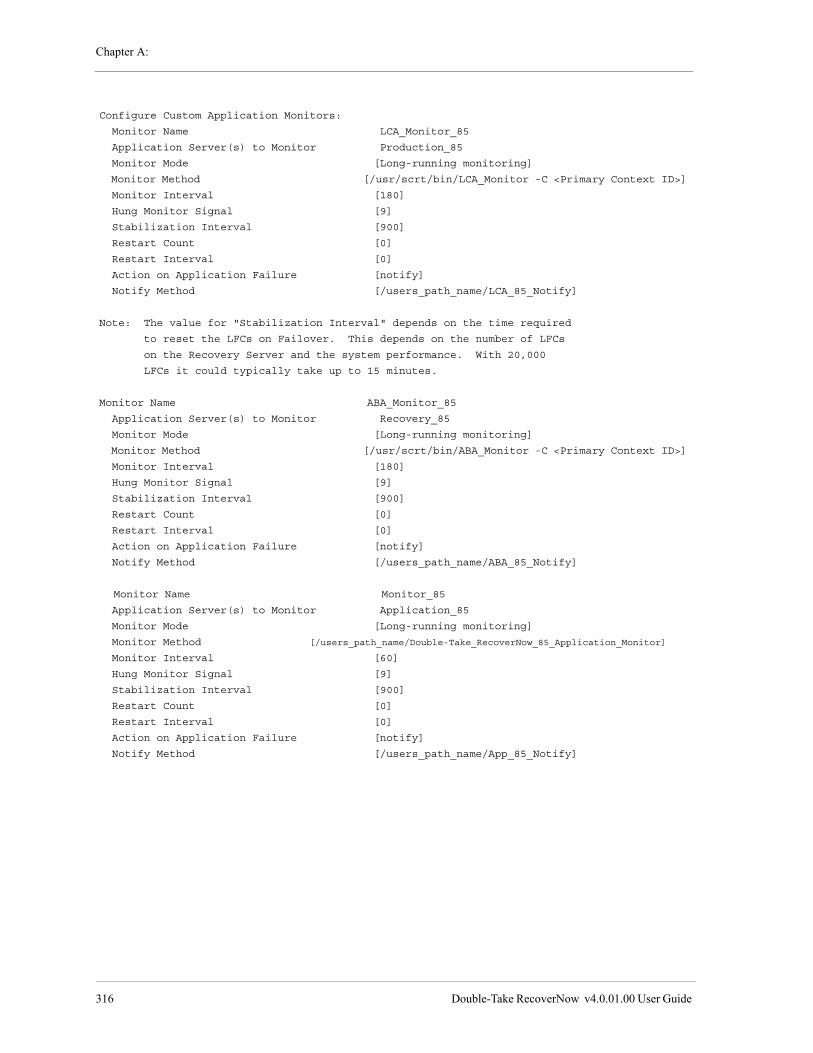
Chapter A:
316 Double-Take RecoverNow v4.0.01.00 User Guide
Configure Custom Application Monitors:
Monitor Name LCA_Monitor_85
Application Server(s) to Monitor Production_85
Monitor Mode [Long-running monitoring]
Monitor Method [/usr/scrt/bin/LCA_Monitor -C <Primary Context ID>]
Monitor Interval [180]
Hung Monitor Signal [9]
Stabilization Interval [900]
Restart Count [0]
Restart Interval [0]
Action on Application Failure [notify]
Notify Method [/users_path_name/LCA_85_Notify]
Note: The value for "Stabilization Interval" depends on the time required
to reset the LFCs on Failover. This depends on the number of LFCs
on the Recovery Server and the system performance. With 20,000
LFCs it could typically take up to 15 minutes.
Monitor Name ABA_Monitor_85
Application Server(s) to Monitor Recovery_85
Monitor Mode [Long-running monitoring]
Monitor Method [/usr/scrt/bin/ABA_Monitor -C <Primary Context ID>]
Monitor Interval [180]
Hung Monitor Signal [9]
Stabilization Interval [900]
Restart Count [0]
Restart Interval [0]
Action on Application Failure [notify]
Notify Method [/users_path_name/ABA_85_Notify]
Monitor Name Monitor_85
Application Server(s) to Monitor Application_85
Monitor Mode [Long-running monitoring]
Monitor Method [/users_path_name/Double-Take_RecoverNow_85_Application_Monitor]
Monitor Interval [60]
Hung Monitor Signal [9]
Stabilization Interval [900]
Restart Count [0]
Restart Interval [0]
Action on Application Failure [notify]
Notify Method [/users_path_name/App_85_Notify]
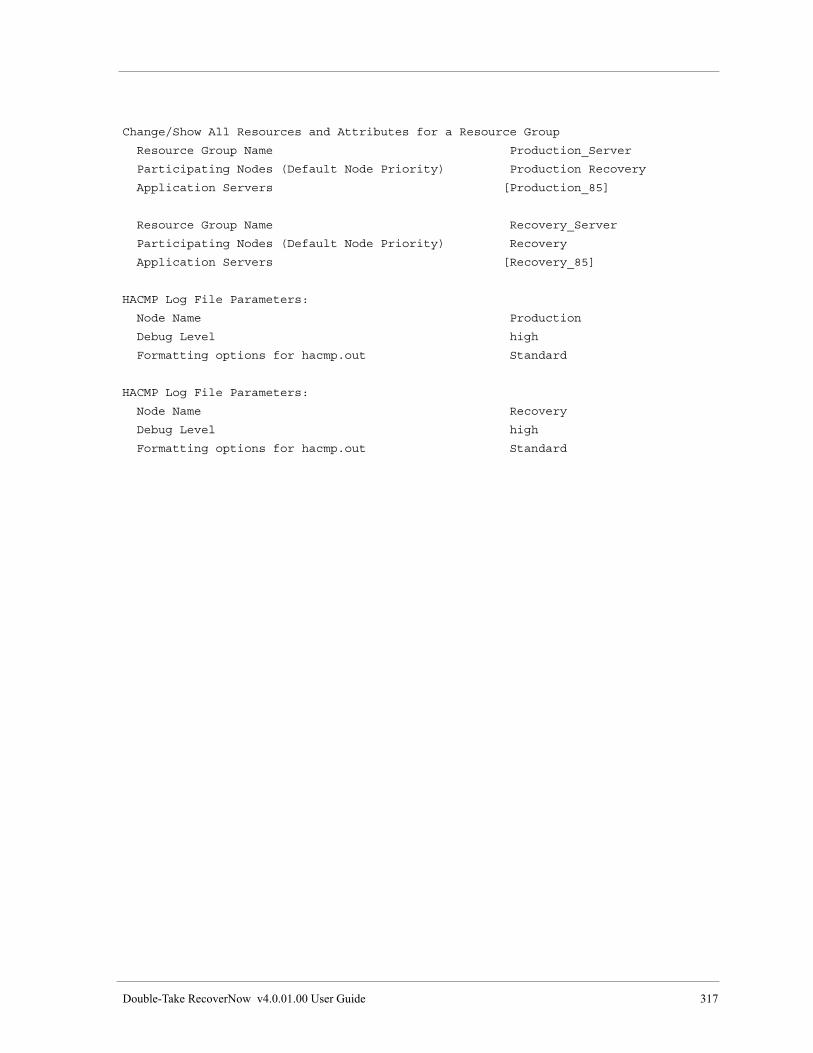
Double-Take RecoverNow v4.0.01.00 User Guide 317
Change/Show All Resources and Attributes for a Resource Group
Resource Group Name Production_Server
Participating Nodes (Default Node Priority) Production Recovery
Application Servers [Production_85]
Resource Group Name Recovery_Server
Participating Nodes (Default Node Priority) Recovery
Application Servers [Recovery_85]
HACMP Log File Parameters:
Node Name Production
Debug Level high
Formatting options for hacmp.out Standard
HACMP Log File Parameters:
Node Name Recovery
Debug Level high
Formatting options for hacmp.out Standard

Chapter A:
318 Double-Take RecoverNow v4.0.01.00 User Guide