Doing Inventory Control Rightinventory control: • Inventory control is required. Pursuant to Rule...
19
Rhode Island Office of October 2008 Department of Waste Management Environmental Management UST Program Doing Inventory Control Right For Underground Storage Tanks
Transcript of Doing Inventory Control Rightinventory control: • Inventory control is required. Pursuant to Rule...

Rhode Island Office of October 2008 Department of Waste Management Environmental Management UST Program
Doing Inventory Control Right For Underground Storage Tanks

Why You Should Read This Booklet If You Use Inventory
Control The Rhode Island Department of Environmental Management's ("DEM") Rules and Regulations For Underground Storage Facilities Used For Petroleum Products and Hazardous Materials ("Regulations") require underground storage tanks ("USTs") to comply with leak detection requirements. If your facility is not in compliance with leak detection, then you may be cited for violations and fined. Leak detection violations can also keep you from getting legally required insurance coverage and reimbursement for cleanup costs. Without leak detection, you constantly risk discovering a leak only after it becomes a major financial burden for yourself and an environmental problem for everyone. Inventory control, while it should not be used in place of precision testing or continuous monitoring devices, must be used to supplement those leak detection methods. Since inventory control is required in the Regulations, this booklet is designed to help you make sure you do inventory control correctly. Inspections that have been conducted indicate that most people who think they are doing inventory control properly are not doing it in a way that is likely to find leaks and meet the law's requirements for leak detection. So even if you are SURE you are doing inventory control right, read this booklet carefully – it could save you a lot of grief and money. If you need information on leak detection requirements, then please refer to the Regulations or call DEM at (401) 222-2797.

How Does Inventory Control Work?
This booklet helps you use inventory control to meet regulatory leak detection requirements by showing you how to do three important tasks:
• Good sticking
• Good math
• Good recordkeeping Without these three, you may fail to meet the leak detection requirements. To do inventory control right, you have to spend time to make sure that you consistently measure the tank's contents correctly, that you don't let math errors creep into your daily and monthly calculations, and that you keep complete, easy-to-read records on file for three years, or the life of the facility, whichever is greater. Basically, inventory control requires daily measurements of tank contents and math calculations that let you compare your "stick" inventory (what you've measured) to your "book" inventory (what your recordkeeping indicates you should have). Some people call this process "inventory reconciliation." If the difference between your "stick" and "book" inventory is too large, then your tank may be leaking. Be sure you read about several important conditions about the use of inventory control that are described on the next page. To use INVENTORY CONTROL correctly, follow Steps 1 – 5 starting on page 6.

Please note these important conditions about the use of inventory control:
• Inventory control is required. Pursuant to Rule 11.02(B) of the Regulations, you are required to keep records of the results of your daily and monthly inventory control for a minimum period of three (3) years from the date made.
• Inventory control can never be used alone. Inventory control must always be
used in combination with tank tightness-testing or a continuous monitoring device and is not an acceptable substitute to meet the Regulations’ requirements for tightness-testing and continuous monitoring. A single-walled tank must be tightness-tested upon installation, at its fifth, eight, eleventh and thirteenth year, and then annually thereafter. Tanks with continuous monitoring must be tested every 5 years for the first twenty years, and then every two years after that.
• Inventory control may be used TEMPORARILY as part of a leak detection
method. In accordance with Rule 8.08(C)(5) of the Regulations, tightness-testing, in conjunction with inventory control, is a permissible leak detection method for USTs upgraded with cathodic protection or an interior lining for ten years after the date of the upgrade. After that 10-year period, you must use a leak detection method that provides for continuous monitoring.
If you don't pay careful attention to these restrictions, you will fail to meet the leak detection requirements.
Do You Have The Right Equipment?
Gauge Stick Or Other Gauges
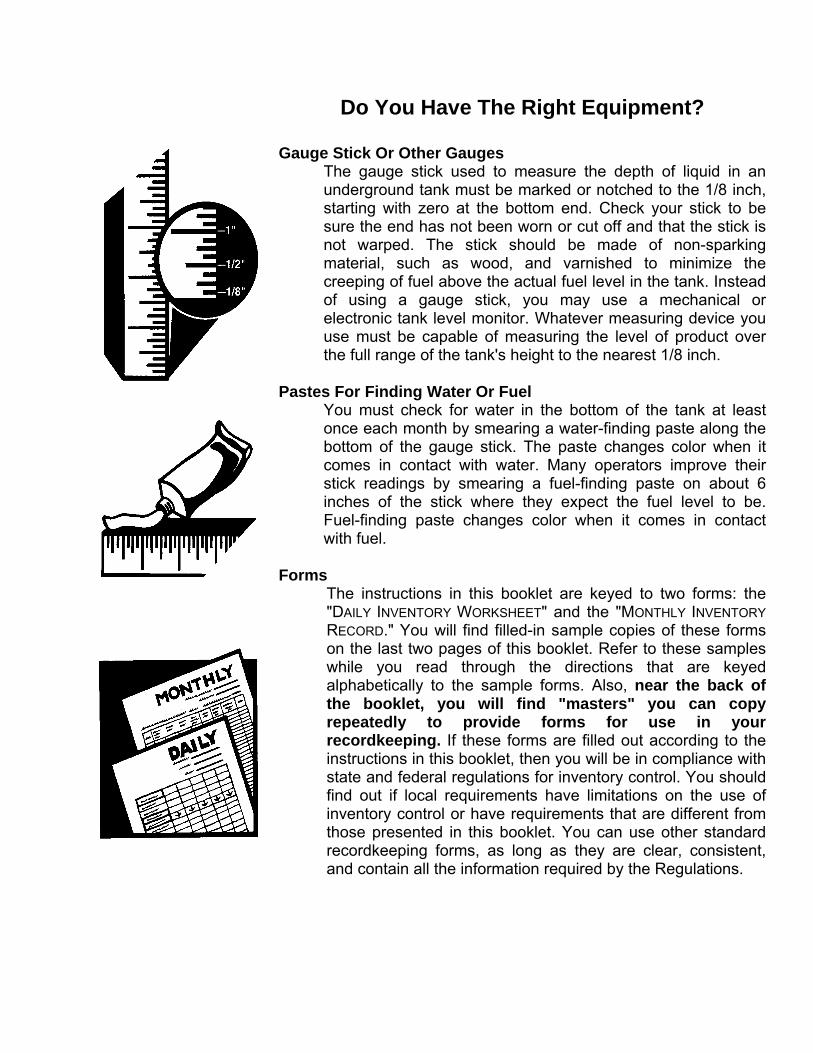
The gauge stick used to measure the depth of liquid in an underground tank must be marked or notched to the 1/8 inch, starting with zero at the bottom end. Check your stick to be sure the end has not been worn or cut off and that the stick is not warped. The stick should be made of non-sparking material, such as wood, and varnished to minimize the creeping of fuel above the actual fuel level in the tank. Instead of using a gauge stick, you may use a mechanical or electronic tank level monitor. Whatever measuring device you use must be capable of measuring the level of product over the full range of the tank's height to the nearest 1/8 inch.
Pastes For Finding Water Or Fuel
You must check for water in the bottom of the tank at least once each month by smearing a water-finding paste along the bottom of the gauge stick. The paste changes color when it comes in contact with water. Many operators improve their stick readings by smearing a fuel-finding paste on about 6 inches of the stick where they expect the fuel level to be. Fuel-finding paste changes color when it comes in contact with fuel.
Forms
The instructions in this booklet are keyed to two forms: the "DAILY INVENTORY WORKSHEET" and the "MONTHLY INVENTORY RECORD." You will find filled-in sample copies of these forms on the last two pages of this booklet. Refer to these samples while you read through the directions that are keyed alphabetically to the sample forms. Also, near the back of the booklet, you will find "masters" you can copy repeatedly to provide forms for use in your recordkeeping. If these forms are filled out according to the instructions in this booklet, then you will be in compliance with state and federal regulations for inventory control. You should find out if local requirements have limitations on the use of inventory control or have requirements that are different from those presented in this booklet. You can use other standard recordkeeping forms, as long as they are clear, consistent, and contain all the information required by the Regulations.

Tank Chart A tank chart is a table that converts the number of inches of liquid in the tank into the number of gallons. You need a tank chart that exactly matches your storage tank (tank manufacturers usually provide charts for their tanks). If you have more than one tank, then you will need a chart for each tank unless the tanks are identical. The tank chart must show conversion to gallons for each 1/8 inch stick reading. If your tank chart does not convert each 1/8 inch reading into gallons then contact the tank manufacturer or, if you have a steel tank, the Steel Tank Institute (800-275-1300) to get an appropriate chart.
You always need to convert inches into gallons in order to fill out the forms correctly and to do the necessary math. To convert inches into gallons, find your stick's reading to the nearest 1/8 inch on the tank chart, then simply read across to the gallons column to find the number of gallons. If you cannot get a tank chart showing conversion to gallons for each 1/8 inch reading, then you must do the additional math explained on page 9. Drop Tube The fill pipe through which the fuel is delivered into the tank must have a drop tube extending to within six (6) inches of the bottom of the tank. Stick measurements should be made through a drop tube in the fill pipe or gauging port. If your fill pipe does not have a drop tube, then call your petroleum equipment supplier to have one installed. Calibrated Dispensing Meters Meters must be calibrated according to local standards. Manifolded Tanks If you have manifolded tanks or dispensers that blend fuel, then consider these tanks as one tank system if they share a common inventory of stored fuel. As you follow the directions on the following pages, you will need to combine your measurements and calculations for all the tanks manifolded into one system.

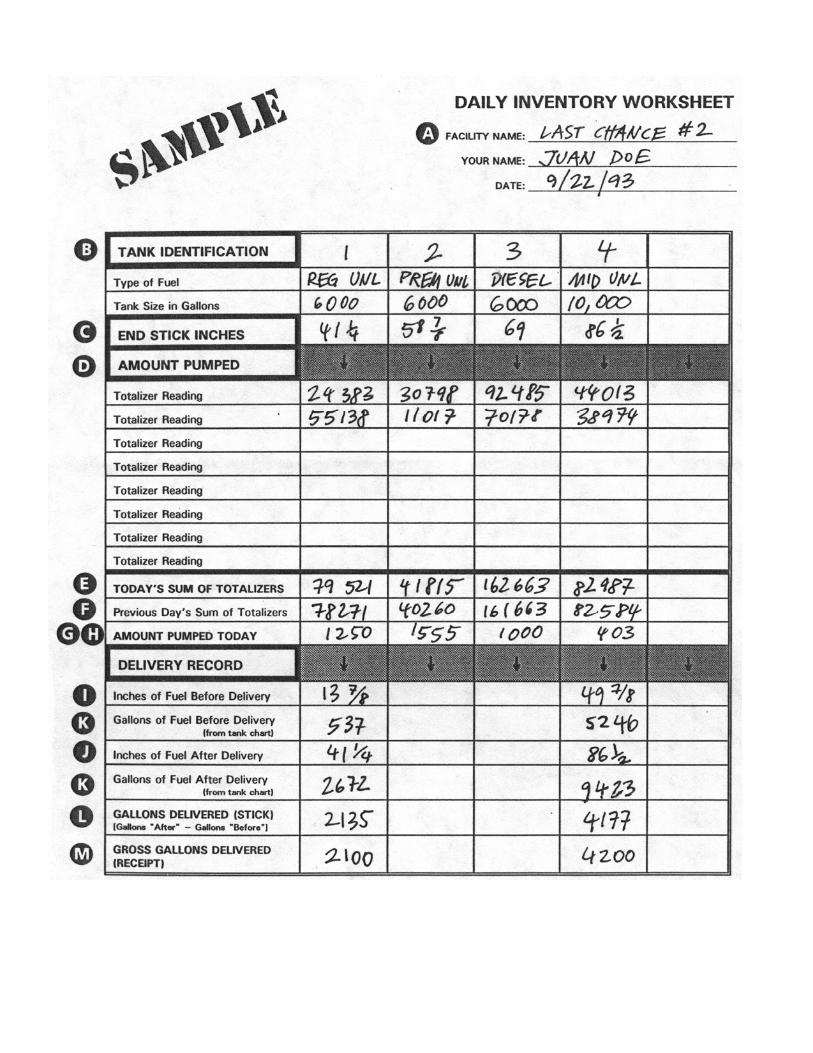
Use the sample "DAILY INVENTORY WORKSHEET" from the last two pages of the booklet to see where you put the information from letters "A" through "M" in the following directions.
Step 1 – Measure The Tank's Contents You must measure the tank every day that the facility is in operation. You may take measurements using a gauge stick or a mechanical or electronic tank level monitor. No fuel can be added or removed from the tank while you are performing Step 1 or Step 2. Every day you measure the tank, you should fill out a "DAILY INVENTORY WORKSHEET." As you go through the following directions, refer to the sample DAILY INVENTORY WORKSHEET that you will find on the last pages of this booklet. Also, near the back of the booklet is a "master copy" of the DAILY INVENTORY WORKSHEET that you can copy repeatedly for your recordkeeping.
A. Fill in the identifying information at the top of the worksheet.
B. Next to the "TANK IDENTIFICATION" box are empty vertical columns. Each column represents one tank – consistently enter all information on that one tank in the same vertical column. NOTE: Once you have filled in the tank identification boxes, make copies of the worksheet so you won't have to repeatedly enter the same information.
USE GOOD STICKING PRACTICES: Slowly lower the gauge stick to the tank's bottom. Let the stick gently touch the bottom, and then quickly bring it back up. Read the depth of fuel indicated by the wet mark to the closest 1/8 inch division on the stick. Use of fuel-finding paste will make your stick readings more accurate.
C. Write your measurement in the box labeled "END STICK
INCHES" for the tank you measured. NOTE: If your tank is equipped with an automatic tank gauge (ATG), then you may record the inches of product and gallons of product directly from the ATG's printed tape or simply staple the tape with this information to the worksheet.

Step 2 – Record The Amount Pumped At the same time you measure the tank contents (Step 1), you must record on the DAILY INVENTORY WORKSHEET the amount of fuel pumped. No fuel can be added or removed from the tank while you are sticking the tank and recording the amount pumped.
D. Locate the box labeled "AMOUNT PUMPED" on the left side of
the worksheet. Copy the numbers from each dispenser's totalizer onto the worksheet. Be very careful that you write all the meter readings for a tank in the same column. You may have several dispensers and totalizers for one tank, so the worksheet provides boxes in which you can enter several readings in any order.
E. Add up the totalizer meter readings in each column and write
the result in the box labeled "TODAY’S SUM OF TOTALIZERS."
F. Find the last DAILY INVENTORY WORKSHEET you completed. Copy "TODAY’S SUM OF TOTALIZERS" from that worksheet into the "Previous Day's Sum of Totalizers" box of the worksheet you are working on today.
G. On today's worksheet, subtract "Previous Day's Sum of Totalizers" from "TODAY’S SUM OF TOTALIZERS" and write the result in the box labeled "AMOUNT PUMPED TODAY."
You may have an alternative to reading totalizers. If you have a self-service fueling operation where the cashier can authorize fuel sales from inside the facility, then you can probably print out a daily report that gives you the total sales for each type of fuel. NOTE: You can use the sales volumes from this report instead of reading your totalizer meters only if no fuel sales are made between the time you print the report from the cash register and the time you measure your tanks (Step 1).
H. If you are using cash register reports to record the amount pumped, then enter the amount of each type of fuel pumped in the box labeled "AMOUNT PUMPED TODAY" or staple the printout to the worksheet.
If you pumped fuel through a dispenser and back into a tank, for example during a test, subtract the number of gallons you pumped from "AMOUNT PUMPED TODAY."

An automatic tank gauge (ATG) can usually print a delivery report. If your tank has an ATG that prints such a report, you may simply staple the ATG's delivery report to the DAILY INVENTORY WORKSHEET.
Step 3 – Record Fuel Deliveries You must check how much fuel has been delivered every time any amount of fuel is delivered to your tank. NOTE: You should not pump any fuel during the time it takes to do items "I" and "J" below. Before the delivery begins, the liquid level in the tank must be measured. Always use good sticking practices: slowly lower the gauge stick, gently touch the stick to the bottom of the tank, and then quickly bring the stick back up. Read the depth of fuel indicated by the wet mark to the nearest 1/8 inch division on the stick.
I. Write your measurement in the box labeled "Inches of Fuel
Before Delivery" for each tank you measured.
The delivery person can now deliver fuel into the tank. After the delivery, wait at least 5 minutes for the fuel level in the tank to stabilize and then measure again as described above
J. Record fuel level in the box labeled "Inches of Fuel After
Delivery." K. Using your tank chart with 1/8 inch readings, convert both
delivery readings to the correct number of gallons. Record these numbers in the boxes labeled "Gallons of Fuel Before Delivery" and "Gallons of Fuel After Delivery." (If necessary, see page 9 on converting inches into gallons.)
L. Subtract "Gallons of Fuel Before Delivery" from "Gallons of
Fuel After Delivery." Record the result in the box labeled "GALLONS DELIVERED (STICK)."
Now look at the delivery receipt and find the volume of each type of product that was delivered. If two volumes are given, one labeled "net" and the other "gross," then use the gross gallons as the volume of product delivered.
M. For each type of fuel delivered, copy the gross gallons
delivered from the delivery receipt onto the worksheet in the box labeled "GROSS GALLONS DELIVERED (RECEIPT)." The gallons in items "L" and "M" should roughly match. If they don't, then contact your supplier.

Using Tank Charts Without 1/8 Inch Conversions If your tank chart does not list direct conversions from inches to gallons for every 1/8 inch, then you must do the additional math described below every time you stick your tank. The easiest way to explain this procedure is with an example. Let's say you have a stick reading of 43 ⅜ inches and you need to figure how many gallons are in your tank. 1. Look on your tank chart and find the inch measurements that are
just above and below your stick reading and write down the number of gallons for these inch readings. Subtract the gallon readings to find the difference between the two readings:
Chart reading at 44 inches: 3,585 gallons Chart reading at 43 inches: 3,480 gallons Difference: 105 gallons
2. Dividing 105 by 8 will give you the number of gallons per 1/8 inch,
which in this example is 13. (More exactly it is 13.125, but do round off the number to the nearest whole number.) Because your fraction is 3/8, multiply 13 gallons by 3, which gives you 39 gallons as the volume represented by 3/8 inch.
CAUTION: The gallons represented by each 1/8 inch will vary from top to bottom of the tank and must be calculated for each conversion.
3. Take the number of gallons you have just calculated and add it to
the inch reading just below your actual stick reading:
Chart reading at 43 inches: 3,480 gallons Gallons at 1/8 inch: + 39 gallons Sum: 3,519 gallons
Thus, your stick reading of 43 ⅜ inches converts to 3,519 gallons. NOTE: If your tank chart is in half or quarter inches, then you must still use this procedure so that your gallon readings are accurate to 1/8 inch. After all of this math, you can see why it pays to have the correct tank chart that indicates gallons for each 1/8 inch.

Use the sample "MONTHLY INVENTORY RECORD" from the last two pages of the booklet to see where you put the information from letters "N" through "Z" in the following directions.
Step 4 – Calculate Daily Changes In Inventory In this step, you will copy information from the DAILY INVENTORY WORKSHEET onto the MONTHLY INVENTORY WORKSHEET. You will then do some math to determine your daily inventory. You need one MONTHLY INVENTORY RECORD for each tank that you have. As you go through the following directions, refer to the sample MONTHLY INVENTORY RECORD that you will find on the reverse side of the DAILY INVENTORY WORKSHEET sample you have already been using. Also, near the back of the booklet is a "master copy" of the MONTHLY INVENTORY RECORD that you can copy repeatedly for your recordkeeping.
N. Fill in the identifying information at the top of the MONTHLY
INVENTORY RECORD. If this is the very first day of your inventory recordkeeping, then convert the "END STICK INCHES" from the DAILY WORKSHEET into gallons and enter on the MONTHLY RECORD under "END STICK INVENTORY (GALLONS)" for that starting date. (If necessary, see page 9 on converting inches into gallons.) This is all you can do today. Starting tomorrow, follow all of the instructions listed below.
O. Find the line in the left column on the MONTHLY RECORD with
today's date listed. Copy the previous day's "END STICK INVENTORY (GALLONS)" number into the box for today's "START STICK INVENTORY (GALLONS)."
P. Enter the amount of fuel delivered from the DAILY INVENTORY
WORKSHEET. If you were NOT pumping fuel during the time when the delivery was taking place, then use the " GALLONS DELIVERED (STICK)" number. However, if you had to pump fuel while the delivery was taking place, then use the "GROSS GALLONS DELIVERED (RECEIPT)" number as your delivery amount.
Q. Copy the "AMOUNT PUMPED TODAY" number from the DAILY
INVENTORY WORKSHEET into the "GALLONS PUMPED" column of the MONTHLY INVENTORY RECORD.

R. Add the "START STICK INVENTORY (GALLONS)" and the
"GALLONS DELIVERED" columns; then subtract the "GALLONS PUMPED" column. Enter the result in the column labeled "BOOK INVENTORY (GALLONS)."
S. Copy the "END STICK INCHES" number from the DAILY
WORKSHEET into the column labeled "END STICK INVENTORY (INCHES) on the MONTHLY RECORD. Convert inches into gallons and enter the result in the column on the MONTHLY RECORD labeled "END STICK INVENTORY (GALLONS)." (If necessary, see page 9 on converting inches into gallons.)
T. Subtract the "BOOK INVENTORY (GALLONS)" from the "END
STICK INVENTORY (GALLONS)." Enter the difference into today's "DAILY OVER OR SHORT" box. This number will usually be a positive or negative number (only rarely will it be zero).
U. Enter your initials to show who entered today's information.
At least once each month, you must also measure for water in the tank. Smear water-finding paste on the bottom few inches of the gauge stick. Open the fill pipe and slowly lower the stick to the tank's bottom. Hold the stick on the bottom for 10 seconds for gasoline (30 seconds for diesel). Then remove the stick. If there is water in the bottom of the tank, then the water-finding paste will change color. Read the depth of water indicated by the line where the water-finding paste has changed color to the closest 1/8 inch division on the stick. Do not use this stick reading to measure the amount of fuel in the tank, because the fuel will creep up the stick and will give you an inaccurate reading.
V. If you checked the tank for water today, then enter the
number of inches of water in the tank on the line under "Facility Name" at the top of the monthly record. If there is no water present, then enter a zero to indicate that you in fact checked for water but found none. If you find more than 1 inch of water, then you should arrange for its immediate removal, notify the product supplier, and conduct further tests to ensure that the tank is not leaking.
GOOD ADVICE: If you are "over" for 5 days in a row (or "under" for 5 days in a row), you should check for problems with your math and your UST.

NOTE: Keep your inventory control records on file for at least 3 years, or for the life of the facility, whichever is greater.
Step 5 – Calculate Monthly Changes In Inventory At the end of each month, follow the directions below to see if the difference between "stick" and "book" inventory indicates a possible leak.
W. Add all of the month's "GALLONS PUMPED" numbers and write
this total at the bottom of the column in the box labeled "TOTAL GALLONS PUMPED."
X. Add all the month's "DAILY OVER OR SHORT" numbers: pay
careful attention to positive and negative numbers to get an accurate total. For example, adding +4 and +3 and -2 should equal +5. Enter the total at the bottom of the column in the box labeled "TOTAL GALLONS OVER OR SHORT."
Y. Fill out the "LEAK CHECK" line at the bottom of the MONTHLY
INVENTORY RECORD as follows:
• Take the "TOTAL GALLONS PUMPED" number and drop the last two digits to get 1% (for example: 6594 becomes 65).
• Add 130 (for example: 65 + 130 = 195).
Enter the result of this calculation at the end of the "LEAK CHECK" line. This number is the maximum change in inventory allowed by federal regulations (1% of throughput plus 130 gallons).
Z. At the bottom of the MONTHLY INVENTORY RECORD, circle
"YES" or "NO" to show whether your "TOTAL GALLONS OVER OR SHORT" number is LARGER than the "LEAK CHECK number you identified in the previous item. Even if your "TOTAL GALLONS OVER OR SHORT" is a negative number, treat it as a positive number for the purpose of this comparison. For example, -74 would become +74.
If you circle "YES," then you must notify DEM immediately (401-222-2797) that your tank may be leaking. For more information about leak and spill response requirements, please refer to Rule 12 of the Regulations.


>>>Copy and post this reminder where employees
who measure tanks can see it!<<<
GET GOOD INVENTORY CONTROL MEASUREMENTS!
• Measure each tank every operating day • Use gauge sticks that are √ Marked to the 1/8 inch √ Not cut off or worn off at the “0” end √ Varnished and not warped
• Measure through the same drop tube each time • Use good sticking practices √ SLOWLY lower stick √ GENTLY touch stick on tank bottom √ QUICKLY pull stick out
• Measure just before each delivery • Wait at least 5 minutes after delivery, then measure again • Read and record totalizer meters carefully • Check for water at least once a month using water-finding
paste

Developed in cooperation with…