DocuWorks Setup Guide - Fujifilm
67
Setup Guide DocuWorks 9
Transcript of DocuWorks Setup Guide - Fujifilm

Setup Guide
DocuWorks 9

This software includes ABBYY® FineReader® Engine recognition technologies© 2017, ABBYY.ABBYY, FINEREADER and ABBYY FineReader are either registered trademarks or trademarks of ABBYYSoftware Ltd.Microsoft, Windows, Internet Explorer, and Visual C++ are registered trademarks or trademarks of MicrosoftCorporation in the United States and/or other countries.All product/brand names are trademarks or registered trademarks of the respective holders.Microsoft product screen shot(s) reprinted with permission from Microsoft Corporation.
Xerox, Xerox and Design, as well as Fuji Xerox and Design are registered trademarks or trademarks of XeroxCorporation in Japan and/or other countries.DocuWorks is a registered trademarks of Fuji Xerox Co., Ltd.
Fuji Xerox is not responsible for any breakdown of machines due to infection of computer virus or computerhacking.
Important1. This manual is copyrighted with all rights reserved. Under the copyright laws, this manual may not be
copied or modified in whole or part, without the written consent of the publisher.2. Parts of this manual are subject to change without prior notice.3. We welcome any comments on ambiguities, errors, or omissions, or missing pages.

3
Preface
Thank you for using DocuWorks.
DocuWorks document handling software provides you with a uniform way to handle data in a wide variety ofoffice situations.With DocuWorks, you can handle both documents created by PC (personal computer) applications and dataacquired by scanning as DocuWorks format data. This data can also be sent as e-mail or printed on a printer.
This manual describes how to install the software from the DocuWorks 9 installation media. Be sure to read thismanual before using DocuWorks.For the details of the functions of DocuWorks, refer to Help.
The description of this manual assumes that the user is familiar with the basic operations of Microsoft Windows.
Fuji Xerox provides a wide variety of information related to DocuWorks on its web pages.We hope you will find it useful.http://www.fxap.com.sg/docuworks/
4
Types of Manuals
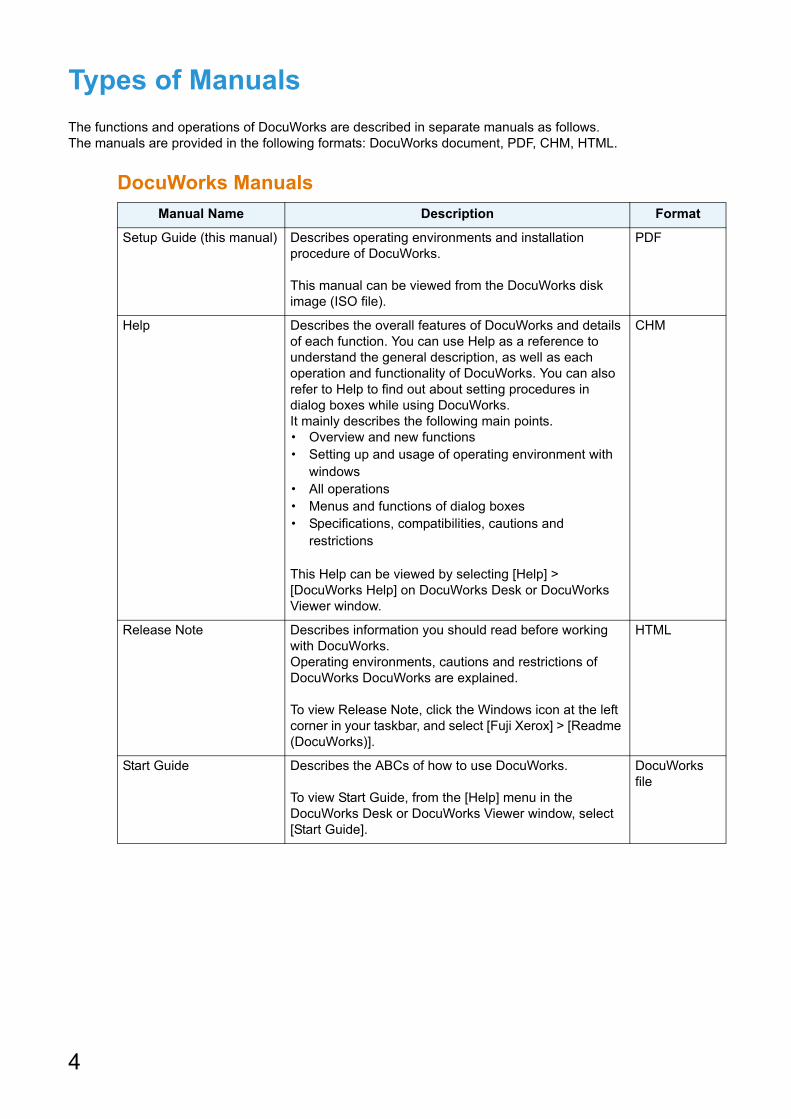
The functions and operations of DocuWorks are described in separate manuals as follows.The manuals are provided in the following formats: DocuWorks document, PDF, CHM, HTML.
DocuWorks Manuals
Manual Name Description Format
Setup Guide (this manual) Describes operating environments and installation procedure of DocuWorks.
This manual can be viewed from the DocuWorks disk image (ISO file).
Help Describes the overall features of DocuWorks and details of each function. You can use Help as a reference to understand the general description, as well as each operation and functionality of DocuWorks. You can also refer to Help to find out about setting procedures in dialog boxes while using DocuWorks.It mainly describes the following main points.・ Overview and new functions・ Setting up and usage of operating environment with
windows・ All operations・ Menus and functions of dialog boxes・ Specifications, compatibilities, cautions and
restrictions
This Help can be viewed by selecting [Help] > [DocuWorks Help] on DocuWorks Desk or DocuWorks Viewer window.
CHM
Release Note Describes information you should read before working with DocuWorks.Operating environments, cautions and restrictions of DocuWorks DocuWorks are explained.
To view Release Note, click the Windows icon at the left corner in your taskbar, and select [Fuji Xerox] > [Readme (DocuWorks)].
HTML
Start Guide Describes the ABCs of how to use DocuWorks.
To view Start Guide, from the [Help] menu in the DocuWorks Desk or DocuWorks Viewer window, select [Start Guide].
DocuWorks file

5
Using This Guide
This manual explains operating environments and installation procedure of DocuWorks.
Organization of This GuideThis manual consists of the following chapters.
1 Before You Install DocuWorksBefore installing DocuWorks, this section describes requirements for operating environments andinstallation settings.
2 Installing SoftwareThis section describes how to install each of the software components for DocuWorks.
3 Executing the Configuring of Personal SettingsThis section describes how to configure the required personal settings when using DocuWorks forthe first time.
4 Activating Your LicenseThis chapter describes how to activate your DocuWorks license, how to upgrade from the trialversion to the licensed version, and how to deactivate the license.
5 Uninstalling SoftwareThis section describes procedures to uninstall application software.

6
Conventions• The following symbols and conventions are used in this manual.
• This manual describes the DocuWorks screens and operations taking Windows 10 as an example. For those who use operating systems other than Windows 10, please read information according to the respective environment.
• This manual refers to Microsoft Windows Operating System as "Windows".• The term, "select" used in this manual refers to an operation to choose the menu items or items
in the dialog box. The term, "click" refers to an operation to place a cursor over a button in the dialog box and press the left button of the mouse.
• The following terms may be abbreviated in some cases:•"DocuWorks Desk" may be abbreviated as "Desk".•"DocuWorks Viewer" may be abbreviated as "Viewer".•"[DocuWorks Desk] window" may be abbreviated as "Desk window".•"[DocuWorks Viewer] window" may be abbreviated as "Viewer window".
• A "DocuWorks document", a "DocuWorks binder", and a "DocuWorks container" together may be called "DocuWorks file" collectively.
• "Microsoft .NET Framework" is referred to as ".NET Framework".
[ ] Menu, button, tab, and item names displayed in the screen are enclosed with square brackets.Example: Click the [Apply] tab.
{ } Values to be changed depending on the operations such as user name or server name are enclosed with curly brackets.Example: Click [{user name}].
> The less than symbol indicates the hierarchy in menus or trees.Example: For example, click the Windows icon at the left corner in your taskbar, and select [Fuji Xerox] > [DocuWorks].
" " Indicates references within the manual or other reference manuals.Messages and terms to be emphasized are also enclosed with double quotations.Example: Refer to "1 Before Using DocuWorks".
The message "Specify the name." is displayed.
Indicates important information you should know.
Indicates supplemental information about functions and operations.
Indicates references.
Important
Note
Reference
7
Contents
Preface.................................................................................................................................................................. 3
Types of Manuals .................................................................................................................................................. 4
Using This Guide................................................................................................................................................... 5
Contents................................................................................................................................................................ 7
1 Before You Install DocuWorks1.1 What to Check Before Installation.................................................................................10
Operating Environment.............................................................................................................. 10
User Privileges .......................................................................................................................... 10
Registration User with Fuji Xerox Direct .................................................................................... 11
1.2 Downloading the Installer ..............................................................................................12Downloading the installation file ................................................................................................ 12
Downloading the disk image...................................................................................................... 12
Mounting the disk image............................................................................................................ 12
Menu Screen ............................................................................................................................. 14
1.3 Installation Overview ......................................................................................................15
New Installation or Upgrading an Earlier Version of DocuWorks .............................................. 15
Flow of Installing DocuWorks 9 ................................................................................................. 16
Flow of Personal Settings.......................................................................................................... 17
Customizing Installation............................................................................................................. 17
2 Installing Software2.1 Installing DocuWorks 9 ..................................................................................................20
2.2 Installing DocuWorks Viewer Light 9 ............................................................................27How to Install DocuWorks Viewer Light 9.................................................................................. 27
3 Executing the Configuring of Personal Settings3.1 Executing the Configuring of Personal Settings .........................................................32
3.2 Changing the Personal Settings....................................................................................38
4 Activating Your License4.1 Activating Your License .................................................................................................42
Starting and Exiting License Activator ....................................................................................... 42
Activating Your License via the Internet .................................................................................... 43
Activating Your License with File............................................................................................... 46
4.2 Deactivating Your License .............................................................................................53
Deactivating Your License via the Internet ................................................................................ 53
Deactivating Your License with File........................................................................................... 55
4.3 Upgrading from Trial to Licensed Version ...................................................................60

8
4.4 Transferring the License to Another PC .......................................................................61
5 Uninstalling Software5.1 Uninstalling DocuWorks Extended Folder for Working Folder ..................................64
5.2 Uninstalling DocuWorks 9..............................................................................................65
5.3 Uninstalling DocuWorks Viewer Light 9 .......................................................................66

1 Before You Install DocuWorks
Before installing DocuWorks, this section describes requirements for operating environments and installation settings.

10
1 Before You Install DocuWorks
1.1 What to Check Before Installation
Check the operating environment before installation.
Operating Environment
To use DocuWorks 9, the hardware must meet the following requirements:
*1: For the latest information on the supported operating systems, refer to our website.
*2: According to the recommended values for OS you use.
*3: If .NET Framework 3.5 Service Pack 1 has not been installed on the computer, additional 500 MB or more free space is required. Also, if .NET Framework 4 has not been installed on the computer, additional 4.5 GB or more free space is required.
*4: The following information is required at user registration: E-mail address, name, address and phone number. In addition to these, organization name and department name for corporate users.
User Privileges
The user who will install DocuWorks must have Administrator privileges. Check whether the user who will installthe DocuWorks belongs to the Administrator group.
Item Description
Operation System *1
(OS)Windows 10 (32-bit)Windows 10 (64-bit)Windows 8.1 Update (32-bit)Windows 8.1 Update (64-bit)
CPU *2 1 GHz or above 32-bit (x86) or 64-bit (x64) processor
Hard disk capacity *2 1.5 GB or more free space is required for installation. *3
Additional 200 MB or more free space is recommended for actual operation.
Memory capacity *2 For 32-bit OS, 1 GB or moreFor 64-bit OS, 2 GB or more
Display *2 1280 x 768 pixels or more, full colors
Web browser Internet Explorer 11
Required hardware DVD-ROM drive is required when installing from the installation media.
Compatible scanners TWAIN32 compliant
Others User registration with Fuji Xerox Direct*4 is required to download installation files or the disk image and authenticate your license. Also, you will need an internet connection for license activation.
1.1 What to Check Before Installation
11
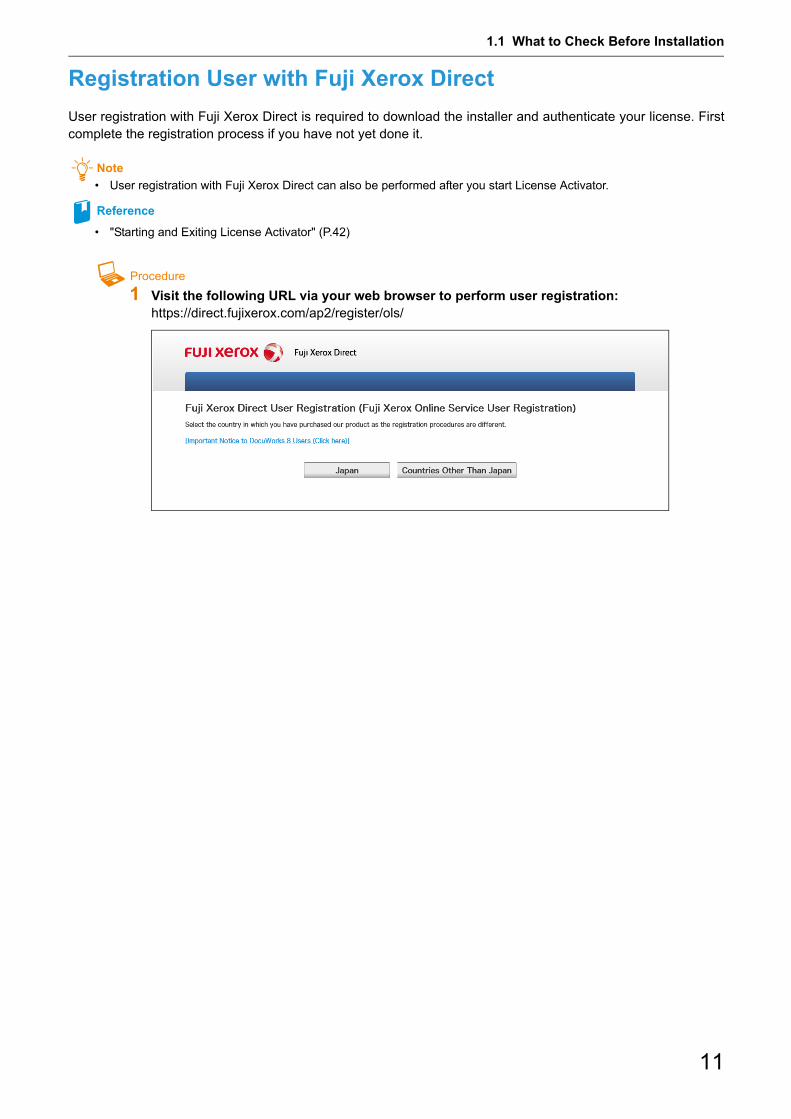
Registration User with Fuji Xerox Direct
User registration with Fuji Xerox Direct is required to download the installer and authenticate your license. Firstcomplete the registration process if you have not yet done it.
Note• User registration with Fuji Xerox Direct can also be performed after you start License Activator.
Reference
• "Starting and Exiting License Activator" (P.42)
Procedure
1 Visit the following URL via your web browser to perform user registration:https://direct.fujixerox.com/ap2/register/ols/

12
1 Before You Install DocuWorks
1.2 Downloading the Installer
Fuji Xerox Direct provides two type of installers:
• Installation file• Disk image (ISO file)You can download either of them for installation.
Downloading the installation file
Procedure
1 Use your web browser to access the Fuji Xerox Direct page, and from Download, click[Download Softwares].
Note
• You need to log in to Fuji Xerox Direct.
2 From the Download page, download "DocuWorks 9 Trial Edition · Licenced Edition / Subscription".
3 Decompress the file you have downloaded.
Downloading the disk image
Fuji Xerox Direct offers the disk image as ISO file.
Follow the steps below to download the ISO file and install the software.
Procedure
1 Use your web browser to access the Fuji Xerox Direct page, and from Download, click[Download Softwares (ISO File)].
Note
• You need to log in to Fuji Xerox Direct.
2 From the Download page, download "DocuWorks 9/Tray 2 Trial Edition/Activation Edition/Subscription".
Mounting the disk image
The disk image you obtained must be mounted before you can use it.
Note• Instead of mounting the disk image, you could write the ISO to DVD media for installation.
For information on how to write ISO file to DVD media, see the documentation for your operating system.
Procedure
1 Mount the ISO file you have downloaded. For example, If your computer is running Microsoft Windows 10, right-click the ISO file, andselect [Mount]. A virtual drive appears.

1.2 Downloading the Installer
13
2 Open the "autorun" folder in the virtual drive, and double-click "autorun.exe".The menu screen appears.
Note
• To close the virtual drive, right-click the virtual drive and select [Eject].
Reference
• "Menu Screen" (P.14)
14
1 Before You Install DocuWorks
Menu Screen
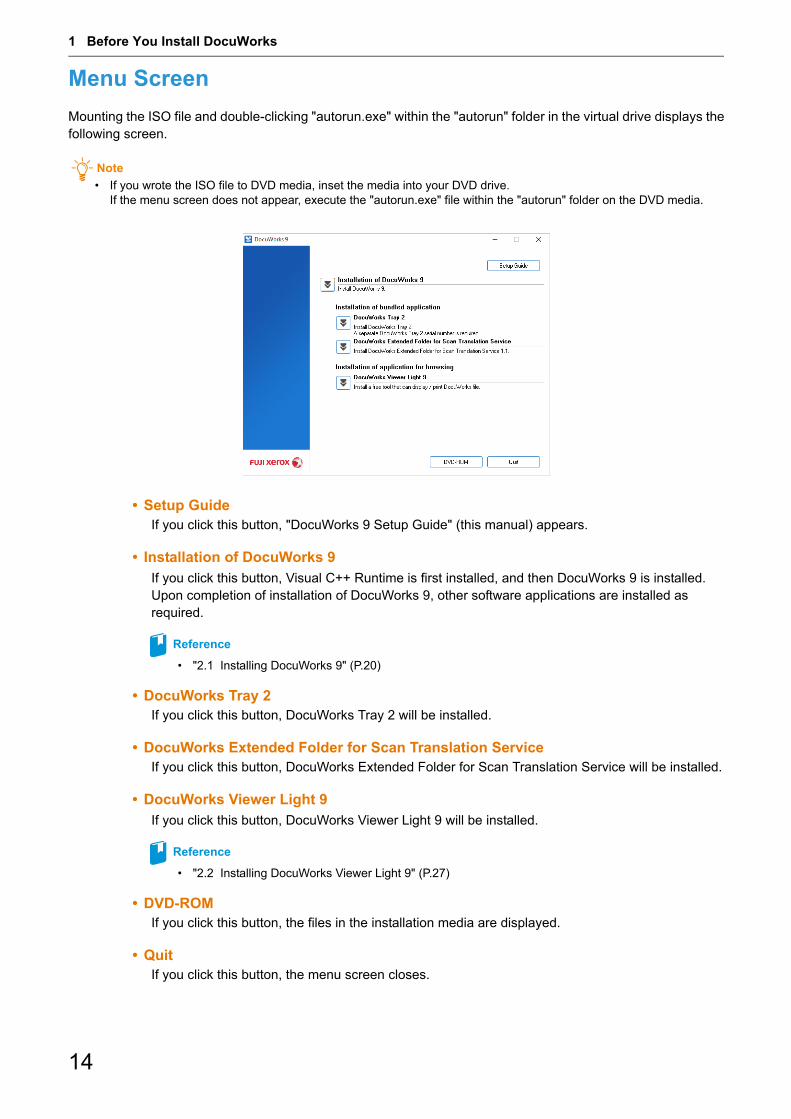
Mounting the ISO file and double-clicking "autorun.exe" within the "autorun" folder in the virtual drive displays thefollowing screen.
Note• If you wrote the ISO file to DVD media, inset the media into your DVD drive.
If the menu screen does not appear, execute the "autorun.exe" file within the "autorun" folder on the DVD media.
• Setup GuideIf you click this button, "DocuWorks 9 Setup Guide" (this manual) appears.
• Installation of DocuWorks 9
If you click this button, Visual C++ Runtime is first installed, and then DocuWorks 9 is installed. Upon completion of installation of DocuWorks 9, other software applications are installed as required.
Reference
• "2.1 Installing DocuWorks 9" (P.20)
• DocuWorks Tray 2If you click this button, DocuWorks Tray 2 will be installed.
• DocuWorks Extended Folder for Scan Translation ServiceIf you click this button, DocuWorks Extended Folder for Scan Translation Service will be installed.
• DocuWorks Viewer Light 9If you click this button, DocuWorks Viewer Light 9 will be installed.
Reference
• "2.2 Installing DocuWorks Viewer Light 9" (P.27)
• DVD-ROMIf you click this button, the files in the installation media are displayed.
• QuitIf you click this button, the menu screen closes.
1.3 Installation Overview
15
1.3 Installation Overview
To use DocuWorks 9, you must install DocuWorks 9 on your computer and then configure "Personal Settings".
Once the installation is complete, the necessary files are copied to your computer. By using Personal Settings,you can configure the DocuWorks environment for each user.
New Installation or Upgrading an Earlier Version of DocuWorks
DocuWorks 9 has installation methods as described below.
• New InstallationUsed to newly install the DocuWorks 9 New Purchase/Upgrade package on a computer where no DocuWorks is installed.
• Upgrading an Earlier Version of DocuWorksUsed to install the DocuWorks 9 New Purchase/Upgrade package on a computer where DocuWorks is installed.
If your computer has DocuWorks 7.x or DocuWorks 8.x installed, the DocuWorks 7.x or DocuWorks 8.x will be uninstalled automatically before proceeding with installation of DocuWorks 9.
If your computer has DocuWorks 7.x or earlier installed, the DocuWorks 7.x or earlier will not be uninstalled automatically. You must uninstall it manually in advance.
If you have the serial number for DocuWorks 7.x or DocuWorks 8.x, you can also install DocuWorks 9 by using the serial number for upgrading the existing DocuWorks to DocuWorks 9.

16
1 Before You Install DocuWorks
Flow of Installing DocuWorks 9
The installation flow of DocuWorks 9 is as follows:
*1: This screen does not appear if you have selected Subscription as the activation method.
*2: You can upgrade from the Trial to the Licensed Edition later. In this case, refer to "4 Activating Your License" (P.41) to activate the license.
[Standard]All the items are set as the default.
Exit the running applications
Double-click "autorun.exe" within the "autorun" folder in the virtual drive
Select the setup type
Installation of DocuWorks is complete
Select language for the installer
Select installing DocuWorks 9
Select trial or licensed edition*1
Licensed EditionTrial Edition*2
The products are installed as trial edition.
Activate the licenseEnter the serial number, and a user ID and
password for Fuji Xerox Direct.
User Registration with Fuji Xerox Direct
Selecting the activation method
[Custom]Select every item sequentially: ・ Installation destination folder ・ Whether to use DocuWorks Viewer
Control ・ Shortcut to DoduWorks Desk
Download the disk image and mount it

1.3 Installation Overview
17
Flow of Personal Settings
When you use DocuWorks for the first time, you must configure Personal Settings.
The flow of Personal Settings is as follows:
*1: For upgrade installation
Customizing Installation
Administrators may want to customize installation, for example, when installing DocuWorks on multiplecomputers.
Disabling the "Neighborhood Desks" Feature
If you do not want to install the "Neighborhood Desks" feature, follow the steps below to customize installation.
Procedure
1 Copy the "dw" folder within the virtual drive to a hard drive on your computer.
2 Open the "dw" folder copied on your hard drive.
3 Create a text file named "dw.ini" in the "dw" folder.
Note
• The "dw.ini" template is located in the "Tools" folder.
4 Add the following lines in the "dw.ini" file. [OptionFile]NeighborhoodDesks=N
5 Save the "dw.ini" file. Then you can run installation according to the "dw.ini" file, by double-clicking the "setup.exe" file in the "dw" folder copied on your hard drive. Besides [OptionFile], you can use the "dw.ini" to customize the settings. For details, after installing DocuWorks, refer to Help [Customize DocuWorks] > [Customize Installation].
Select install method
[Customize settings]Select every item sequentially: ・ Location of Desk folder・ Location of folder for temporary files・ Whether to inherit the existing Desk
Toolbar *1
・ Whether to inherit the existing annotation tools *1
・ Select Office applications・ Select shortcut menus・ Operation log record・ Linkage with cloud service
[Standard settings]All the items are set as the default.

18
1 Before You Install DocuWorks
Silent Installation
Although the DocuWorks installer gives you an option to proceed installation without dialog boxes, the "Silent Installation" function, whenever you attempt to install DocuWorks requiring license activation, a dialog box where you must enter the serial number and activate your license appears. Therefore, it is not advisable to use silent installation for DocuWorks requiring license activation.
Note
• Describing activation information in the "dw.ini" file enables you to perform silent installation of even DocuWorks for which license activation is required.
2 Installing Software
This section describes how to install each of the software components for DocuWorks.
20
2 Installing Software
2.1 Installing DocuWorks 9
This section explains how to newly install DocuWorks 9 or upgrade an earlier version.
After the installation, configure Personal Settings by referring to "3.1 Executing the Configuring of Personal Settings" (P.32).
Important
• Installation may fail with an error message if the full path for the extracted installation files folder or the folder which stores the installer contains characters of a language other than the default language of the operating system running on the computer. The following information is required in order to install DocuWorks 9 as the licensed version: - The serial number, which is printed on the license certificate enclosed in the product package. - Your user ID (e-mail address) and password that are registered with Fuji Xerox Direct.
Procedure
1 Exit any running applications.
2 Perform one of the following steps:
For installation file
(1) Double-click "Setup.exe" in the decompressed installation file.
(2) Select the language for the installation, and click [OK].
Note
• If the [User Account Control] dialog box appears, click [Yes].
Microsoft Visual C++ Runtime is installed.
For disk image
(1) Double-click "autorun.exe" in the "autorun" folder on the virtual drive. The language selection screen appears.
(2) Select the language for the installation, and click [OK].
(3) Click the button on the left of [Installation of DocuWorks 9].
3 If your computer has DocuWorks 7.x/8.x installed, a confirmation dialog box is displayed to check whether to uninstall DocuWorks 7.x/8.x. When you click [Yes], DocuWorks 7.x/8.x is uninstalled, and then the dialog box for step 5 is displayed. When you click [No], the installation is cancelled.
Note
• If your computer has DocuWorks 7.x or earlier installed, the installation is interrupted with an error message. You need to uninstall DocuWorks 7.x or earlier in advance.

2.1 Installing DocuWorks 9
21
4 Click [Next].
The [License Agreement] dialog box appears.
5 Verify the information displayed in the DocuWorks licensing agreement. If you agree to the licensing conditions, select [I accept the terms in the license agreement], and then click [Next].
6 Select the activation method, and click [Next]. The default is [Serial Number].
• Serial NumberUse the serial number for activation.
• SubscriptionLog in with your Fuji Xerox Direct account for activation. Subscription version is released only in specific regions.

22
2 Installing Software
7 Select the setup type, and click [Next].The default is [Standard].
• [Standard]Install items as the default settings. Proceed to Step 11.
• [Custom]Install items changing the default settings. Proceed to Step 8.
8 Select the installation destination folder, and click [Next].
Important• Do not install DocuWorks to the following locations. Otherwise, the software may
malfunction.
- Network folder- Directly under the drive such as "C:\"- Removal media such as CD-R/RW, MO, or memory card
Note
• For a new installation in 32-bit operating system, the default is "C:\Program Files\Fuji Xerox\DocuWorks". When upgrading an earlier version, the default is the folder where an earlier version of DocuWorks has been installed.

2.1 Installing DocuWorks 9
23
9 Select whether or not to use DocuWorks Viewer Control, and click [Next].If you select [Use], you can edit the DocuWorks files displayed on a web browser such as by pasting annotations or changing attributes, and save it.
10 Select whether or not to create the shortcut to Desk on the desktop, and click [Next].
11 Confirm the settings, and click [Install].

24
2 Installing Software
12 Click [Finish].
The installation of individual software components that are required to run DocuWorks automatically starts.
13 Select either of the following options, and click [Next].
• [Install trial version.] DocuWorks will be installed as trial edition. Proceed to Step 15.
• [Enter the serial number to install the licensed version.] The serial number is the number printed on the license certificate that is enclosed in the product package. The serial number is checked for validity. Proceed to Step 14.
Important• If you click [Cancel], a dialog box is displayed to confirm whether you want to cancel
the license activation. Clicking [No] returns you to the dialog box for step 13. Clicking [Yes] moves you to step 15 and installs DocuWorks as trial edition.
Note
• If you enter the serial number for upgrading to DocuWorks 9 in an environment where no DocuWorks 7.x/8.x is installed, then the window appears prompting you to enter the serial number for the product you want to upgrade. Enter the serial number for DocuWorks 7.x/8.x and click [Next].
2.1 Installing DocuWorks 9
25
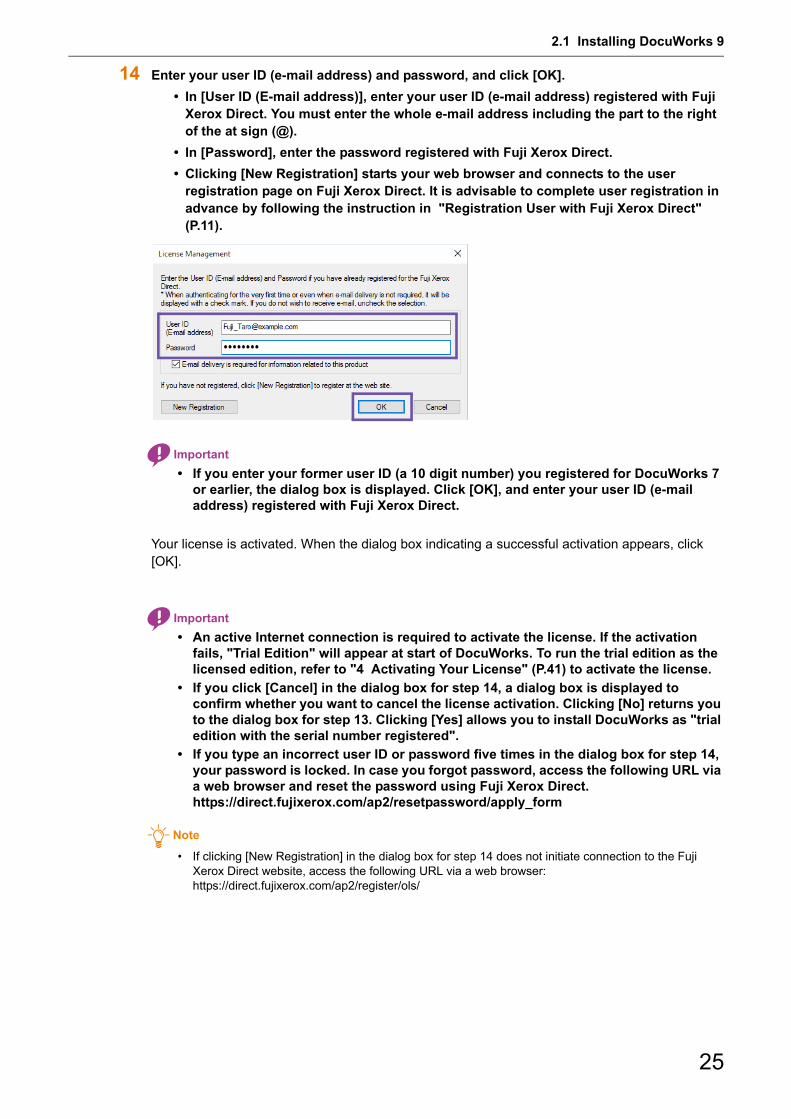
14 Enter your user ID (e-mail address) and password, and click [OK].
• In [User ID (E-mail address)], enter your user ID (e-mail address) registered with Fuji Xerox Direct. You must enter the whole e-mail address including the part to the right of the at sign (@).
• In [Password], enter the password registered with Fuji Xerox Direct.
• Clicking [New Registration] starts your web browser and connects to the user registration page on Fuji Xerox Direct. It is advisable to complete user registration in advance by following the instruction in "Registration User with Fuji Xerox Direct" (P.11).
Important• If you enter your former user ID (a 10 digit number) you registered for DocuWorks 7
or earlier, the dialog box is displayed. Click [OK], and enter your user ID (e-mail address) registered with Fuji Xerox Direct.
Your license is activated. When the dialog box indicating a successful activation appears, click [OK].
Important• An active Internet connection is required to activate the license. If the activation
fails, "Trial Edition" will appear at start of DocuWorks. To run the trial edition as the licensed edition, refer to "4 Activating Your License" (P.41) to activate the license.
• If you click [Cancel] in the dialog box for step 14, a dialog box is displayed to confirm whether you want to cancel the license activation. Clicking [No] returns you to the dialog box for step 13. Clicking [Yes] allows you to install DocuWorks as "trial edition with the serial number registered".
• If you type an incorrect user ID or password five times in the dialog box for step 14, your password is locked. In case you forgot password, access the following URL via a web browser and reset the password using Fuji Xerox Direct.https://direct.fujixerox.com/ap2/resetpassword/apply_form
Note
• If clicking [New Registration] in the dialog box for step 14 does not initiate connection to the Fuji Xerox Direct website, access the following URL via a web browser: https://direct.fujixerox.com/ap2/register/ols/

26
2 Installing Software
15 Install the individual software components that are required to run DocuWorks.
• When the screen prompting you to restart your computer appearsRestart your computer and log in using the same user account that was used during the installation. Perform steps 1 through 2 again, and click [Cancel] on the [Welcome to DocuWorks 9 Setup Wizard] screen. After clicking [Finish] on the [DocuWorks 9 Setup has been aborted.] screen, the installation of the next software component automatically starts.
• When the screen prompting you to restart your computer does not appearThe installation of the next software component automatically starts.
Important• The screen prompting you to restart the computer appears when there is a file that
cannot be overwritten. However, the installation can be completed if you restart the computer accordingly.
The installation of DocuWorks has now been completed. Go to "3.1 Executing the Configuring of Personal Settings" (P.32).

2.2 Installing DocuWorks Viewer Light 9
27
2.2 Installing DocuWorks Viewer Light 9
DocuWorks Viewer Light is free software to view DocuWorks files. This application enables you to view the DocuWorks files even in an environment that does not have DocuWorks installed.
Note• You do not have to install DocuWorks Viewer Light on a PC which has DocuWorks installed. • You can install the software using the disk image.
You can view and print DocuWorks files, search and copy a character string, jump by using the link annotation, extract original data, and view DocuWorks files on a web browser. However, you cannot edit DocuWorks files.
Important
• If DocuWorks Viewer Light for Web 5.x has been installed, do not uninstall it. Just overwrite it with DocuWorks Viewer Light 9.
Note• DocuWorks Viewer Light for Web is software provided with the earlier versions of DocuWorks. In this version, the
functions of DocuWorks Viewer Light for Web have been integrated into those of DocuWorks Viewer Light.
How to Install DocuWorks Viewer Light 9
Procedure
1 Exit any running applications.
2 Double-click "autorun.exe" within the "autorun" folder in the virtual drive.The language selection screen appears.
3 Select the language for the installation, and click [OK].
4 Click the button on the left of [DocuWorks Viewer Light 9].
Note
• If the [User Account Control] dialog box appears, click [Continue].
28
2 Installing Software
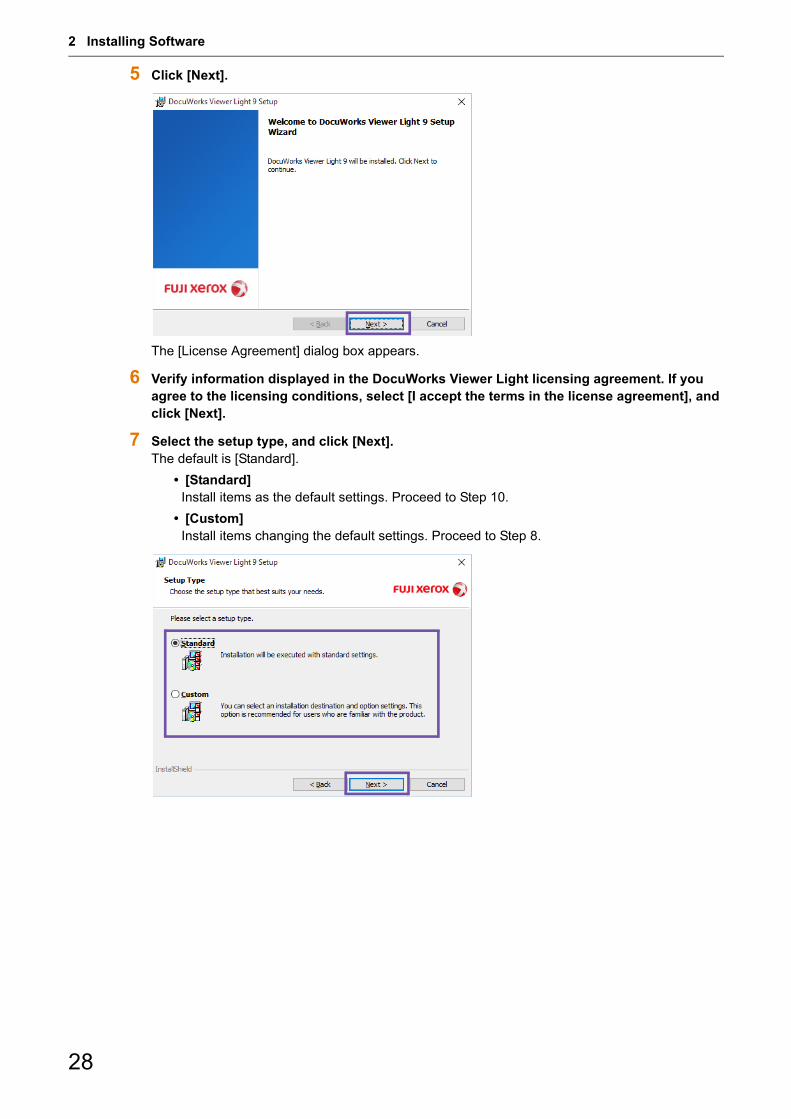
5 Click [Next].
The [License Agreement] dialog box appears.
6 Verify information displayed in the DocuWorks Viewer Light licensing agreement. If you agree to the licensing conditions, select [I accept the terms in the license agreement], and click [Next].
7 Select the setup type, and click [Next].The default is [Standard].
• [Standard]Install items as the default settings. Proceed to Step 10.
• [Custom]Install items changing the default settings. Proceed to Step 8.

2.2 Installing DocuWorks Viewer Light 9
29
8 Select the installation destination folder, and click [Next].
Note
• It is recommended to set the same folder as that of the installation destination of DocuWorks 9.
9 Select the browser with which you want to display DocuWorks documents, and click [Next].
10 Confirm the settings, and click [Install].

30
2 Installing Software
11 Click [Finish].
Important• When the screen prompting you to restart your computer appears, make sure to
restart your computer, and log in using the same user account that was used during the installation. The screen prompting you to restart your computer appears when there is a file that cannot be overwritten. However, the installation can be completed if you restart the computer accordingly.

3 Executing the Configuring of Personal Settings
This section describes how to configure the required personal settings when using DocuWorks for the first time.
32
3 Executing the Configuring of Personal Settings
3.1 Executing the Configuring of Personal Settings
When using DocuWorks for the first time, you need to individually specify the location of the Desk folder, andlocation of the folder for temporary files to be used for each Windows user account. You can use DocuWorksonly after Personal Settings are complete. The contents of the Personal Settings can be changed later.
Note• When you run DocuWorks for the first time after installation, the DocuWorks Personal Settings Tool starts
automatically, and the screen shown in step 2 appears.
Procedure
1 Click the Windows icon at the left corner in your taskbar, and select [Fuji Xerox] > [DocuWorks Personal Settings Tool].
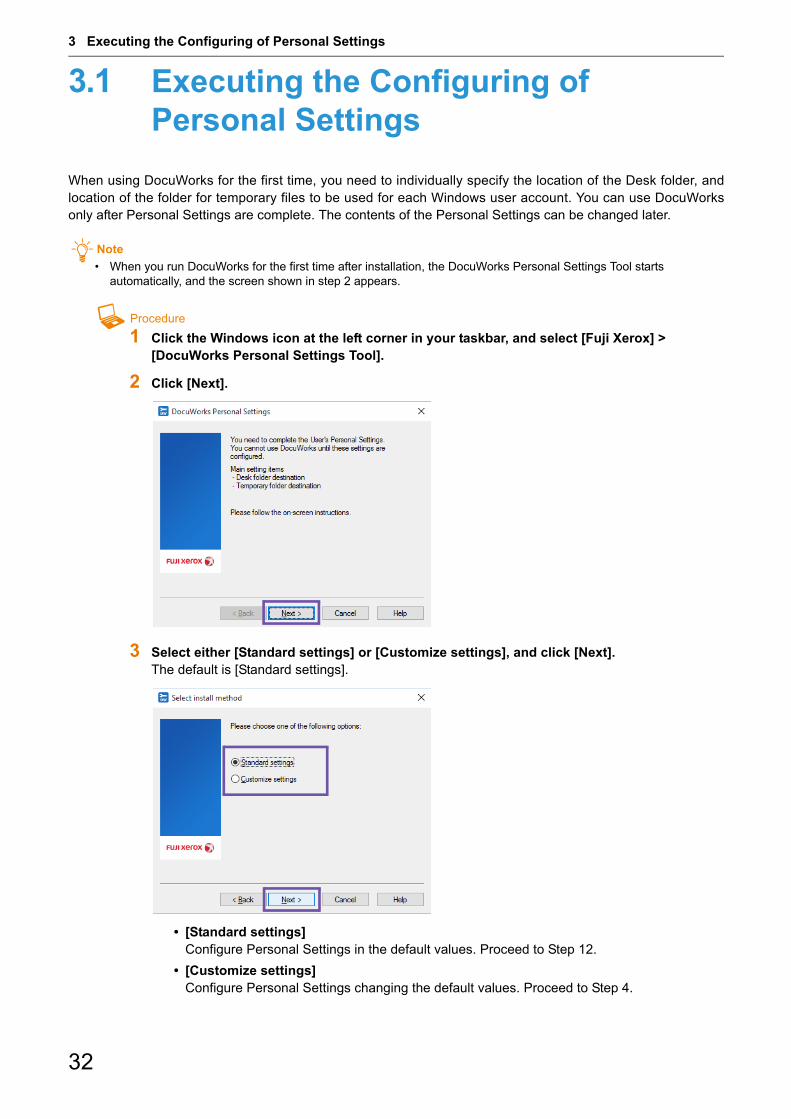
2 Click [Next].
3 Select either [Standard settings] or [Customize settings], and click [Next].The default is [Standard settings].
• [Standard settings]Configure Personal Settings in the default values. Proceed to Step 12.
• [Customize settings]Configure Personal Settings changing the default values. Proceed to Step 4.

3.1 Executing the Configuring of Personal Settings
33
4 Select a location to create a Desk folder, and click [Next].This is the folder where the user folders to be used on Desk will be created. Sufficient free spaceis required since the user data will be stored here.The default is "<Personal folder>\Fuji Xerox\DocuWorks\DWFolders".
Note
• The location of the <Personal folder> is as follows:- C:\Users\user name\Documents
• If you specify Personal Settings for the first time after upgrading an earlier version, a Desk folder is, by default, in the location where the Desk folder of the earlier version was stored.
5 Select a location to create a temporary file folder, and click [Next].This is the folder that DocuWorks program uses temporarily during operation.The default is "<Local Application Data folder>\Fuji Xerox\DocuWorks\DWTemp".
Important• Do not install DocuWorks to the following locations. Otherwise the software may
malfunction.
- Directly under the drive such as "C:\"- Removal media such as CD-R/RW, MO, or memory card
• If you specify a network folder, it cannot be shared between two or more users.
Note
• The location of the <Local Application Data folder> is as follows: - C:\Users\user name\AppData\Local

34
3 Executing the Configuring of Personal Settings
6 For upgrade installation, set whether to keep using the existing DocuWorks Desk settings. To continue to use the settings for the toolbars you customized prior to the upgrading, leave the [Continue to use] check box selected. *1
To replace them with the standard toolbars for this version, clear the check box. Click [Next]. By default, both check boxes are selected.
*1 To add new tabs from DocuWorks 9 to your Task Toolbar, leave the [Register DocuWorks 9 New Tab in Task Toolbar] check box selected. Not to add new tabs to your Task Toolbar, clear the check box.
7 For upgrade installation, set whether to keep using the existing Annotations settings. To continue to use the annotation tools, Template tool, and Drawing tool that you customized prior to the upgrading, leave the [Continue to use] check box selected. To replace them with the standard plug-ins for this version, clear the check box. Click [Next]. By default, this check box is selected.

3.1 Executing the Configuring of Personal Settings
35
8 Select the Office application in which the DocuWorks Creator for Microsoft Office isenabled, and then click [Next].If you enable the DocuWorks Creator for Microsoft Office, the [Convert to DocuWorks] button willbe created on the toolbar of the selected Microsoft Office application.By default, all of them are checked.
9 Select the shortcut to be created, and click [Next].If selecting [[Send To] menu], DocuWorks Printer will be added on the [Send To] menu displayedwhen right-clicking on Windows Explorer.If selecting [Quick Launch toolbar], [Starting DocuWorks Desk] will be added on the Quick Launchitems displayed on Windows Taskbar.By default, all of them are checked.

36
3 Executing the Configuring of Personal Settings
10 Select whether to log DocuWorks operations, and click [Next]. If you select [Record Application Operation Log], the [Log] folder will be automatically created under the [Desk] folder, and DocuWorks operations will be recorded. By default, this check box is selected.
11 Select whether to link with cloud service, and click [Next]. When linking with a cloud service, select the check box, and then select the link destination and set details. By default, this check box is cleared.
12 Confirm the settings, and click [Next].
3.1 Executing the Configuring of Personal Settings
37
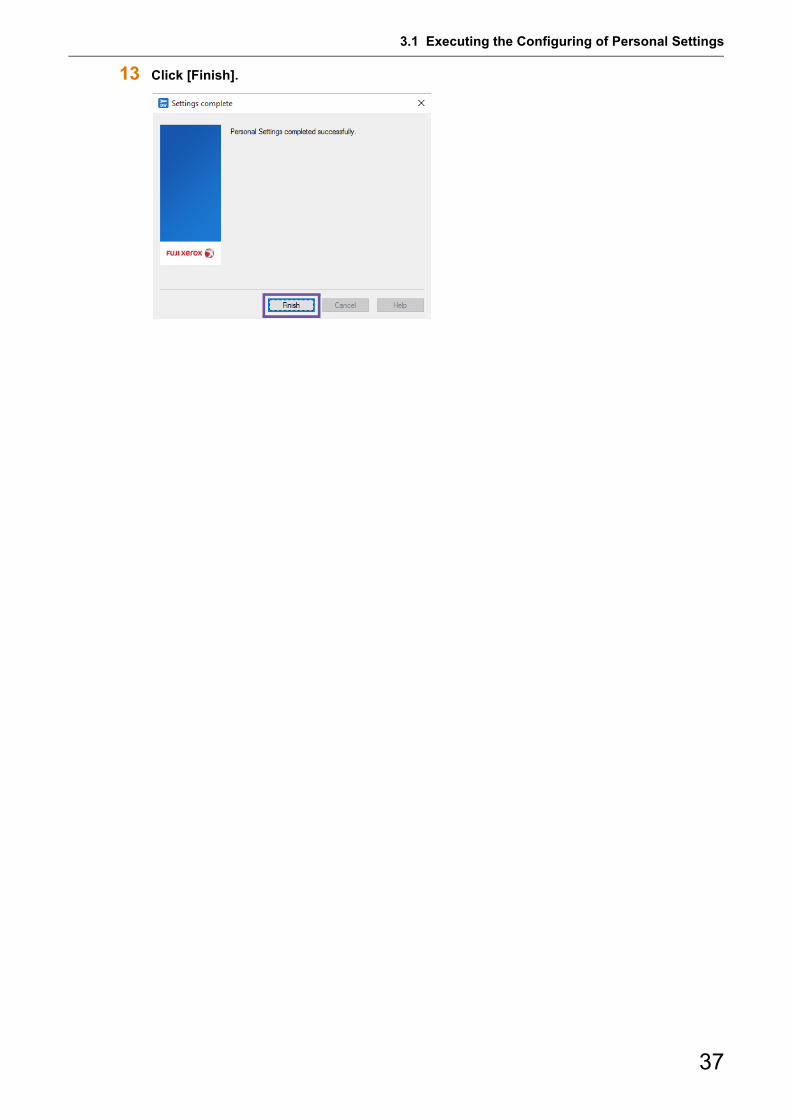
13 Click [Finish].
38
3 Executing the Configuring of Personal Settings
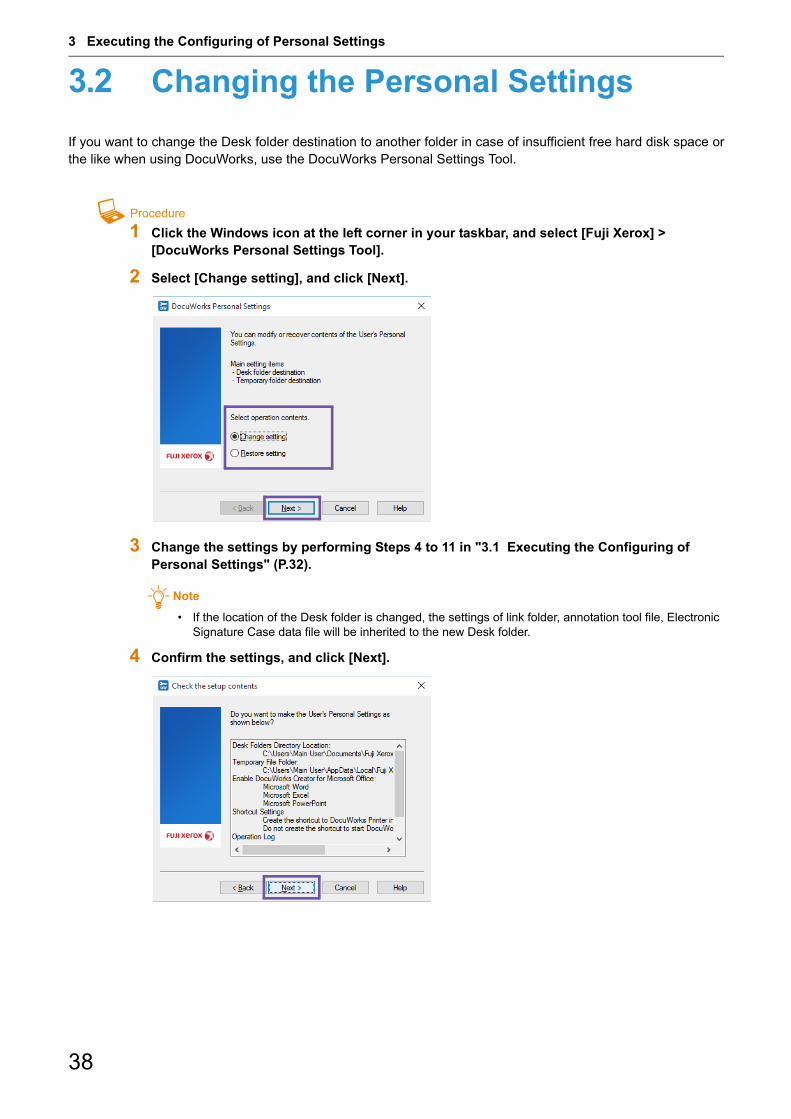
3.2 Changing the Personal Settings
If you want to change the Desk folder destination to another folder in case of insufficient free hard disk space orthe like when using DocuWorks, use the DocuWorks Personal Settings Tool.
Procedure
1 Click the Windows icon at the left corner in your taskbar, and select [Fuji Xerox] > [DocuWorks Personal Settings Tool].
2 Select [Change setting], and click [Next].
3 Change the settings by performing Steps 4 to 11 in "3.1 Executing the Configuring of Personal Settings" (P.32).
Note
• If the location of the Desk folder is changed, the settings of link folder, annotation tool file, Electronic Signature Case data file will be inherited to the new Desk folder.
4 Confirm the settings, and click [Next].
3.2 Changing the Personal Settings
39
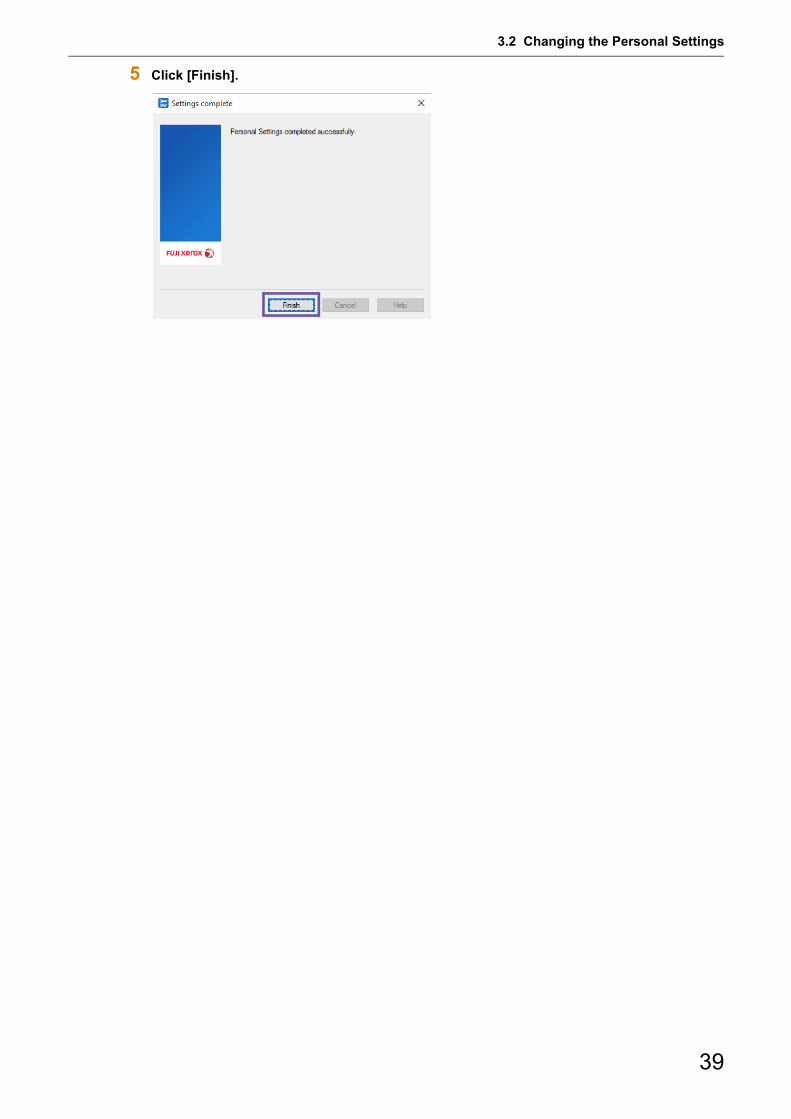
5 Click [Finish].

40
3 Executing the Configuring of Personal Settings

4 Activating Your License
This chapter describes how to activate your DocuWorks license, how to upgrade from the trial version to the licensed version, and how to deactivate the license.

42
4 Activating Your License
4.1 Activating Your License
Before you can start using DocuWorks as a licensed version, you must first authenticate your license to activateit.
You will need the serial number to activate your license. The serial number is printed on the license certificatethat is enclosed in the product package. If you do not have the serial number, you must first purchase a licenseby referring to "4.3 Upgrading from Trial to Licensed Version" (P.60)
Starting and Exiting License Activator
A license activation tool "License Activator" is used to activate your DocuWorks license.
Starting License Activator
Procedure
1 Click the Windows icon at the left corner in your taskbar, and select [Fuji Xerox] > [LicenseManagement Screen].The License Activator screen appears.
Exiting License Activator
Procedure
1 Click [Exit] on the License Activator screen.A message appears to confirm that you want to exit License Activator.
2 Click [Yes].

4.1 Activating Your License
43
Activating Your License via the Internet
When your PC has Internet connection and is able to communicate with the Fuji Xerox license activation servervia https protocol (SSL), you can activate your license via the Internet.
Procedure
1 Perform the steps in "Starting License Activator" (P.42) to start License Activator.
2 Click [Register License].
3 Perform the following steps:
When entering the serial number manually
(1) Select [Serial Number (Enter Text)].
(2) Enter the serial number.The serial number is printed on the license certificate that is enclosed in the product package.
(3) Click [Add].The serial number you entered is added to the list.
(4) Click [Next].
(1)(3)
(4)
(2)

44
4 Activating Your License
When entering the serial number from a fileBy saving the serial number to a file in advance, you can load it into License Activator from the file.To describe multiple serial numbers in the file, make sure each of the four-digits is delimited by ahyphen (-), and each serial number is located on a separate line, delimited by a line break, asshown below.
1111-2222-3333-4444-5555-6666
2222-3333-4444-5555-6666-7777
(1) Select [Serial Number (Import File)].
(2) Click [Browse] to select the file.
Note
• You can also manually enter the path to the file where serial numbers are described.
(3) Click [Next].
4 Perform the following steps:
(1) Select [Use the Internet to Activate License (Recommended)].
(2) Click [Next].
(1) (2)
(3)
(1)
(2)
4.1 Activating Your License
45
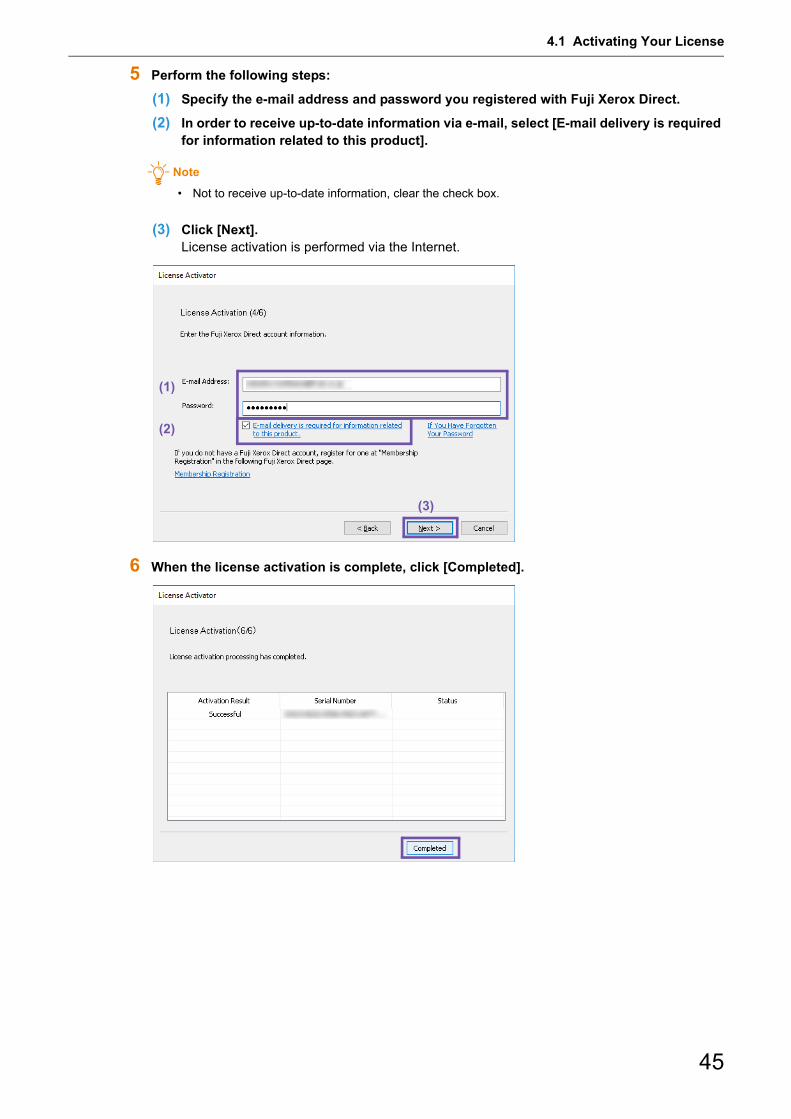
5 Perform the following steps:
(1) Specify the e-mail address and password you registered with Fuji Xerox Direct.
(2) In order to receive up-to-date information via e-mail, select [E-mail delivery is required for information related to this product].
Note
• Not to receive up-to-date information, clear the check box.
(3) Click [Next].License activation is performed via the Internet.
6 When the license activation is complete, click [Completed].
(1)
(3)
(2)
46
4 Activating Your License
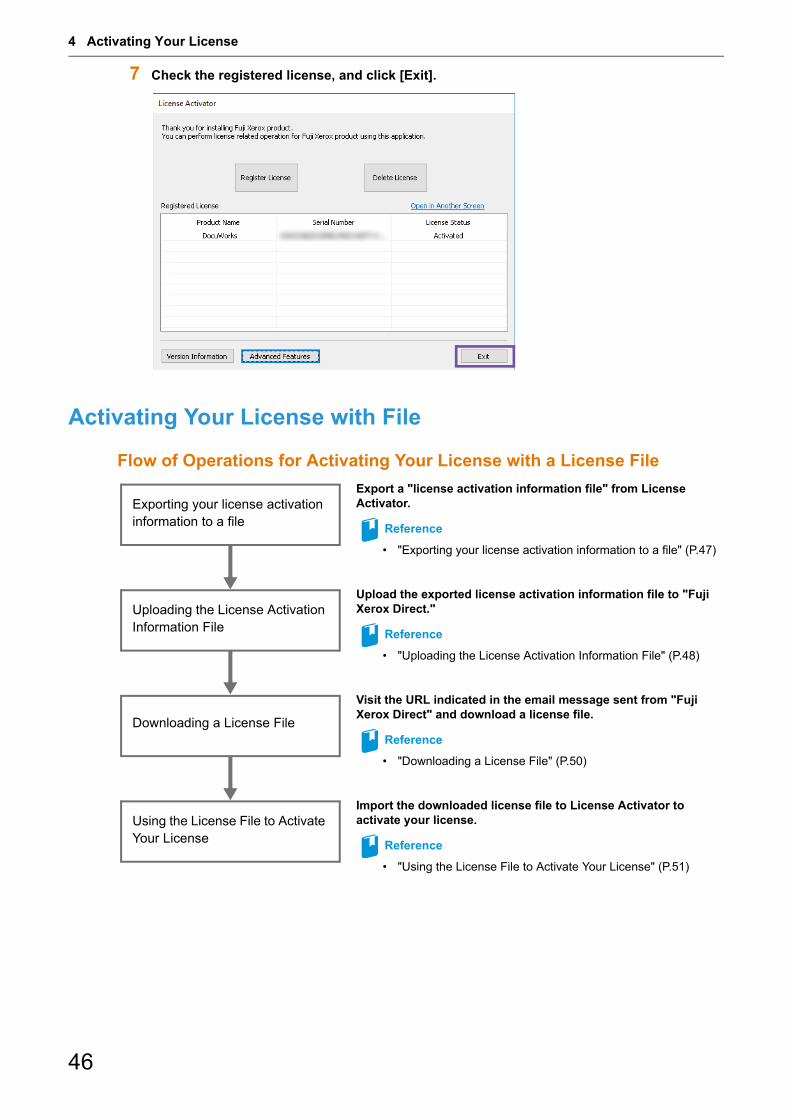
7 Check the registered license, and click [Exit].
Activating Your License with File
Flow of Operations for Activating Your License with a License File
Uploading the License Activation Information File
Upload the exported license activation information file to "Fuji Xerox Direct."
Reference
• "Uploading the License Activation Information File" (P.48)
Using the License File to Activate Your License
Exporting your license activation information to a file
Export a "license activation information file" from License Activator.
Reference
• "Exporting your license activation information to a file" (P.47)
Import the downloaded license file to License Activator to activate your license.
Reference
• "Using the License File to Activate Your License" (P.51)
Downloading a License File
Visit the URL indicated in the email message sent from "Fuji Xerox Direct" and download a license file.
Reference
• "Downloading a License File" (P.50)
4.1 Activating Your License
47
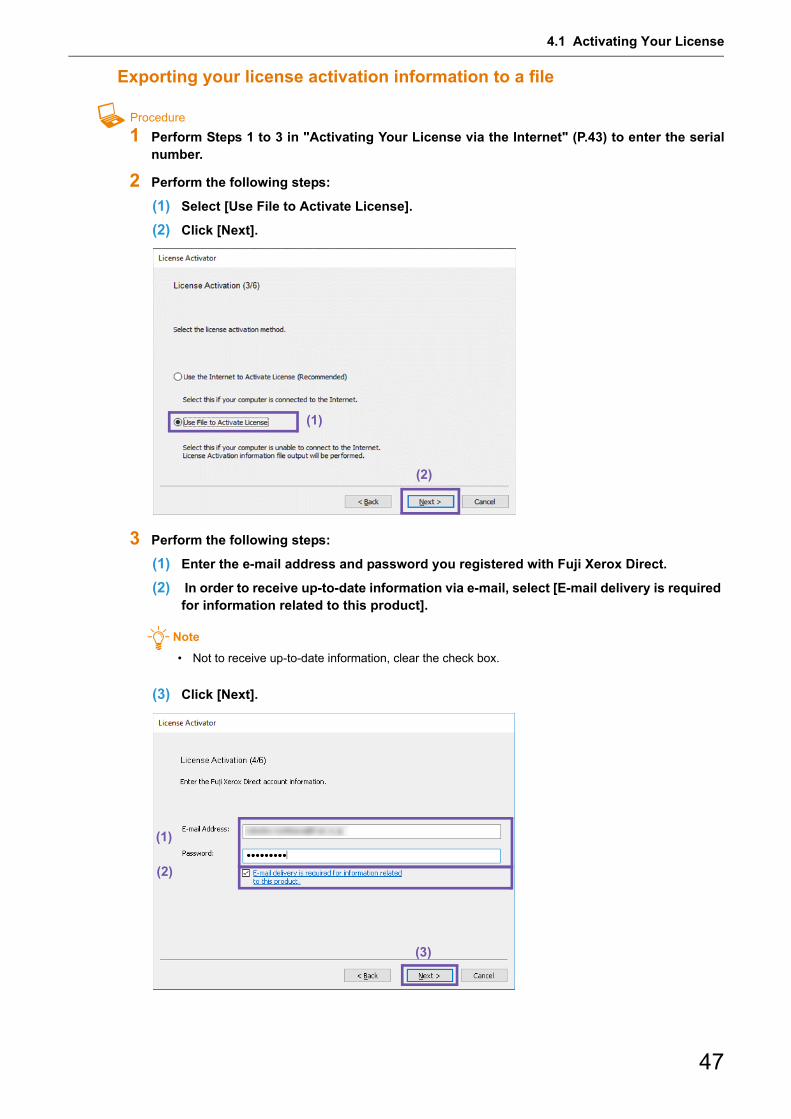
Exporting your license activation information to a file
Procedure
1 Perform Steps 1 to 3 in "Activating Your License via the Internet" (P.43) to enter the serialnumber.
2 Perform the following steps:
(1) Select [Use File to Activate License].
(2) Click [Next].
3 Perform the following steps:
(1) Enter the e-mail address and password you registered with Fuji Xerox Direct.
(2) In order to receive up-to-date information via e-mail, select [E-mail delivery is required for information related to this product].
Note
• Not to receive up-to-date information, clear the check box.
(3) Click [Next].
(1)
(2)
(1)
(3)
(2)
48
4 Activating Your License
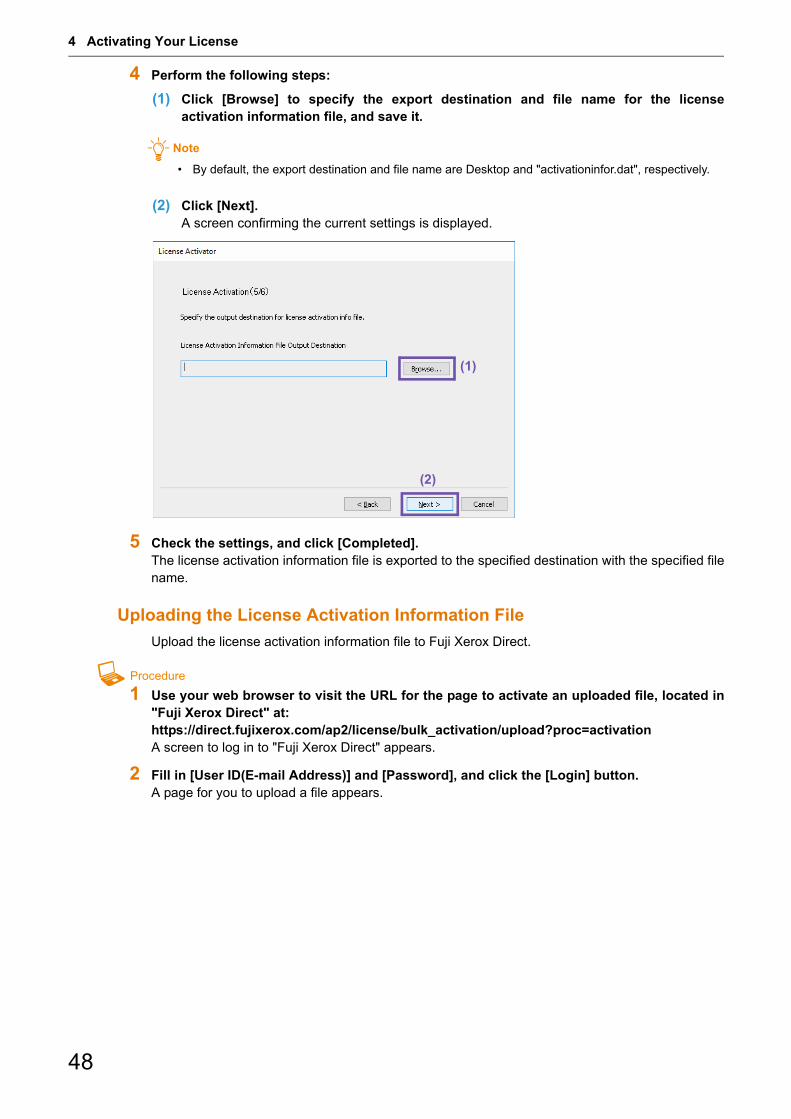
4 Perform the following steps:
(1) Click [Browse] to specify the export destination and file name for the licenseactivation information file, and save it.
Note
• By default, the export destination and file name are Desktop and "activationinfor.dat", respectively.
(2) Click [Next].A screen confirming the current settings is displayed.
5 Check the settings, and click [Completed].The license activation information file is exported to the specified destination with the specified filename.
Uploading the License Activation Information File
Upload the license activation information file to Fuji Xerox Direct.
Procedure
1 Use your web browser to visit the URL for the page to activate an uploaded file, located in"Fuji Xerox Direct" at: https://direct.fujixerox.com/ap2/license/bulk_activation/upload?proc=activationA screen to log in to "Fuji Xerox Direct" appears.
2 Fill in [User ID(E-mail Address)] and [Password], and click the [Login] button. A page for you to upload a file appears.
(1)
(2)

4.1 Activating Your License
49
3 Check that the [Activate] tab is selected, and click the [Browse] button.
4 Select the exported license activation information file, and click the [##Open##] button.
Note
• You can also drag and drop the license activation information file directly to upload it.
5 Check that the file name is displayed in the File field, and click the [Send] button.
The message "Received file processing request." appears.

50
4 Activating Your License
Downloading a License File
When you receive an email notifying you of the completion of the license activation processing,download a license file from "Fuji Xerox Direct."
Procedure
1 You will receive an email sent from "Fuji Xerox Direct" notifying you of the completion ofthe license activation processing.
2 Click the URL for the [Processing Result List] screen indicated in the email message todisplay the Fuji Xerox Direct [Processing Result List] screen in your web browser.
3 Check that the [Result] column corresponding to the receipt number shown in the emailmessage indicates "OK," and click [Download].
Your license file is downloaded.
4.1 Activating Your License
51
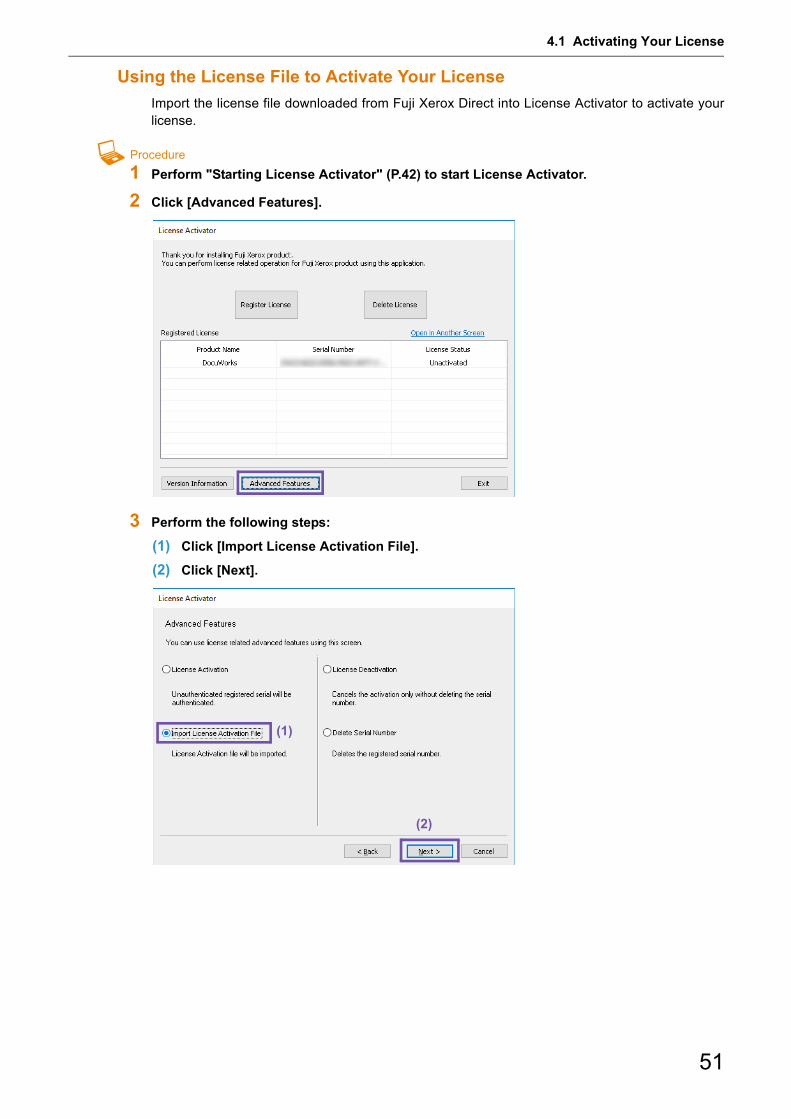
Using the License File to Activate Your License
Import the license file downloaded from Fuji Xerox Direct into License Activator to activate yourlicense.
Procedure
1 Perform "Starting License Activator" (P.42) to start License Activator.
2 Click [Advanced Features].
3 Perform the following steps:
(1) Click [Import License Activation File].
(2) Click [Next].
(1)
(2)

52
4 Activating Your License
4 Perform the following steps:
(1) Click [Browse] to specify the license file downloaded from Fuji Xerox Direct.
(2) Click [Next].Your license is activated.
(1)
(2)
4.2 Deactivating Your License
53
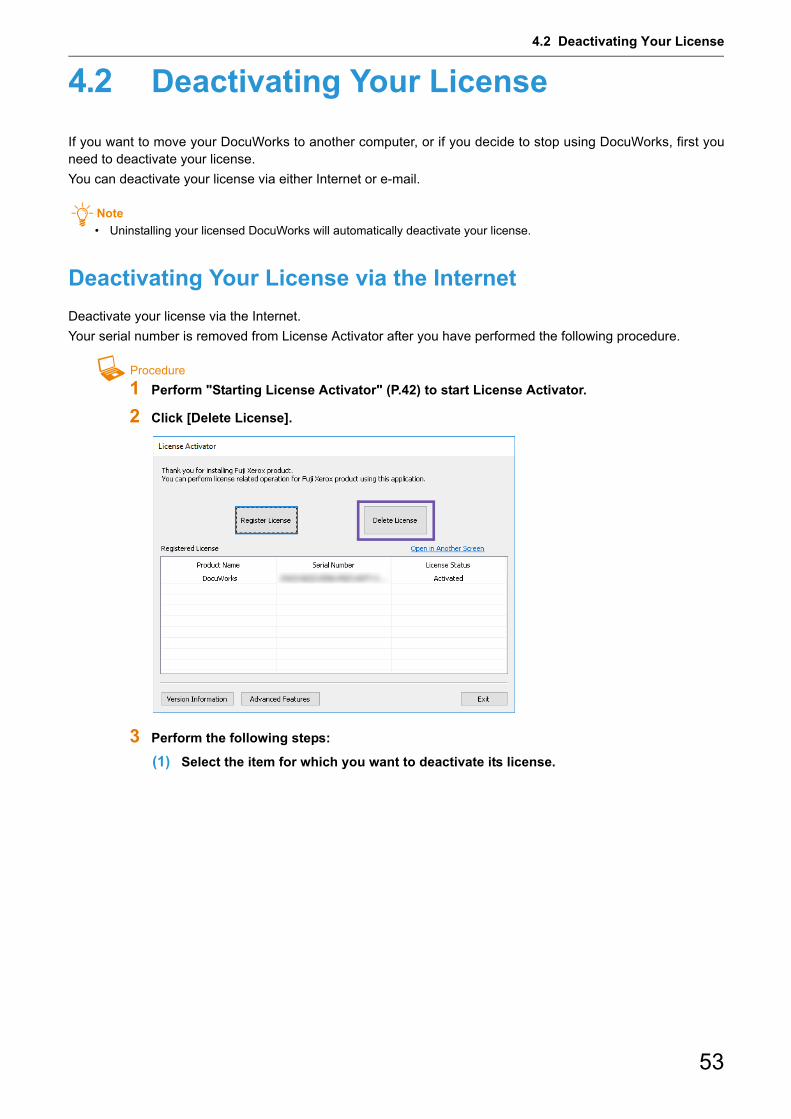
4.2 Deactivating Your License
If you want to move your DocuWorks to another computer, or if you decide to stop using DocuWorks, first youneed to deactivate your license.
You can deactivate your license via either Internet or e-mail.
Note• Uninstalling your licensed DocuWorks will automatically deactivate your license.
Deactivating Your License via the Internet
Deactivate your license via the Internet.
Your serial number is removed from License Activator after you have performed the following procedure.
Procedure
1 Perform "Starting License Activator" (P.42) to start License Activator.
2 Click [Delete License].
3 Perform the following steps:
(1) Select the item for which you want to deactivate its license.

54
4 Activating Your License
(2) Click [Next].
4 Perform the following steps:
(1) Select [Use the Internet to Cancel License Activation (Recommended)].
(2) Click [Next].This starts the deactivation process of the software license.
(1)
(2)
(1)
(2)

4.2 Deactivating Your License
55
5 Check the results, and click [Completed].
Deactivating Your License with File
This section describes how to remove your license by using a file to cancel activated license.
Your serial number is removed from License Activator after you have performed the following procedure.
Flow of Operations for Removing Your License with File
Uploading the License Activation Cancellation File
Upload the exported license activation cancellation file to "Fuji Xerox Direct."
Reference
• "Uploading the License Activation Cancellation File" (P.57)
Exporting the License Activation Cancellation File
From License Activator, click the [Cancel Activation] button to export the "license activation cancellation file."
Reference
• "Exporting the License Activation Cancellation File" (P.56)

56
4 Activating Your License
Exporting the License Activation Cancellation File
Procedure
1 Perform "Starting License Activator" (P.42) to start License Activator.
2 Click [Delete License].
3 Perform the following steps:
(1) Select the application for which you want to deactivate its license.
(2) Click [Next].
4 Perform the following steps:
(1) Select [Use File to Cancel License Activation].
(2) Click [Browse] to specify the export destination and file name for the license deactivation file, and save it.
Note
• By default, the export destination and file name are Desktop and "LRT.dat", respectively.
(1)
(2)

4.2 Deactivating Your License
57
(3) Click [Next].A screen confirming the current settings is displayed.
5 Check the settings, and click [Completed].The license deactivation file is exported to the specified destination with the specified file name.
Uploading the License Activation Cancellation File
Procedure
1 Use your web browser to visit the URL for the page to deactivate an uploaded file, locatedin "Fuji Xerox Direct" at: https://direct.fujixerox.com/ap2/license/bulk_activation/upload?proc=deactivationA screen to log in to "Fuji Xerox Direct" appears.
2 Fill in [User ID(E-mail Address)] and [Password], and click the [Login] button.A page for you to upload a file appears.
3 Check that the [Cancel Activation] tab is displayed, and click the [Browse] button.
(3)
(2)
(1)

58
4 Activating Your License
4 Select the exported license activation cancellation file, and click the [Open] button.
Note
• You can also drag and drop the license activation cancellation file directly.
5 Check that the file name is displayed in the File field, and click the [Send] button.
The message "Received file processing request." appears.
6 You will receive an email sent from "Fuji Xerox Direct" notifying you of the completion ofthe license deactivation processing.
7 Click the URL for the [Processing Result List] screen indicated in the email message todisplay the Fuji Xerox Direct [Processing Result List] screen in your web browser.

4.2 Deactivating Your License
59
8 Check that the [Result] column corresponding to the receipt number shown in the emailmessage indicates "OK."

60
4 Activating Your License
4.3 Upgrading from Trial to Licensed Version
DocuWorks trial version offers a 60-day trial period. When the trial period expires, DocuWorks trial version willno longer start up. Upgrading from the trial to the licensed version of DocuWorks allows you to continue usingDocuWorks.
To upgrade from the trial to the licensed version of DocuWorks, first purchase a license.
Procedure
1 Perform the following steps to purchase a license.
Before trial period expires
(1) Start DocuWorks Desk or DocuWorks Viewer, and from the [Help] menu, select [BuyLicense] under [License Management].
After trial period expired
(1) A dialog box appears, indicating that you cannot run the application because thelicense has not yet activated. You need to click [Buy License].
Your web browser starts and displays a page to guide you on how to purchase DocuWorks.
2 Read the guidance and proceed to purchasing the DocuWorks licensed product.Once you receive the DocuWorks licensed product from Fuji Xerox, perform the proceduredescribed in "4.1 Activating Your License" (P.42).
Note
• Be sure to keep the license certificate, which is enclosed in the DocuWorks licensed product package, in a safe place.
4.4 Transferring the License to Another PC
61
4.4 Transferring the License to Another PC
This section describes how to move the DocuWorks license to another computer.
Procedure
1 Perform"Deactivating Your License" (P.53) to disable the currently used software license.
2 Install DocuWorks on the computer to which you want to move the license.
3 Perform "4.1 Activating Your License" (P.42) to enable the license.

62
4 Activating Your License
5 Uninstalling Software
This section describes procedures to uninstall application software.
64
5 Uninstalling Software
5.1 Uninstalling DocuWorks Extended Folder for Working Folder
You must uninstall DocuWorks Extended Folder for Working Folder before uninstalling DocuWorks.
Note• Uninstalling DocuWorks does not uninstall DocuWorks Extended Folder for Working Folder. You must uninstall them
separately.
Procedure
1 Click the Windows icon at the left corner in your taskbar, select [Windows System] > [Control Panel], and then click [Uninstall a program] in Control Panel.
2 Select [Fuji Xerox DocuWorks Extended Folder for Working Folder (version number)] fromthe list of program names, and then click [Uninstall].
3 Click [Yes] in the dialog box confirming uninstallation.
Note
• If the [User Account Control] dialog box appears, click [Yes].
4 Follow the on-screen instructions to uninstall the application.
Important• When the screen prompting you to restart your computer appears, restart your
computer. The screen prompting you to restart the computer appears when there is a file that cannot be deleted during uninstallation. However, the uninstallation can be completed if you restart the computer accordingly.
5.2 Uninstalling DocuWorks 9
65
5.2 Uninstalling DocuWorks 9
Note• Uninstall DocuWorks does not automatically remove the Personal Settings. You must uninstall your own Personal
Settings after uninstalling DocuWorks 9. • Uninstalling DocuWorks does not uninstall DocuWorks Extended Folder for Working Folder. You must uninstall them
separately.
Reference
• For more information on customizing personal settings, refer to [Customize DocuWorks] > [Customize Personal Settings] > [Setup Personal Settings] in Help.
Procedure
1 Click the Windows icon at the left corner in your taskbar, select [Windows System] > [Control Panel], and then click [Uninstall a program] in Control Panel.
2 Select [Fuji Xerox DocuWorks 9] from the list of program names, and then click [Uninstall].
3 Click [Yes] in the dialog box confirming uninstallation.
Note
• If the [User Account Control] dialog box appears, click [Yes].
4 Select [Fuji Xerox DocuWorks 9 LangPack] from the list of program names, and then click[Uninstall].
5 Click [Yes] in the dialog box confirming uninstallation.
Note
• If the [User Account Control] dialog box appears, click [Yes].
6 Follow the on-screen instructions to uninstall the application.
Important• When the screen prompting you to restart your computer appears, restart your
computer. The screen prompting you to restart the computer appears when there is a file that cannot be deleted during uninstallation. However, the uninstallation can be completed if you restart the computer accordingly.
66
5 Uninstalling Software
5.3 Uninstalling DocuWorks Viewer Light 9
Procedure
1 Click the Windows icon at the left corner in your taskbar, select [Windows System] > [Control Panel], and then click [Uninstall a program] in Control Panel.
2 Select [Fuji Xerox DocuWorks Viewer Light 9] from the list of program names, and thenclick [Uninstall].
3 Click [Yes] in the dialog box confirming uninstallation.
Note
• If the [User Account Control] dialog box appears, click [Yes].
4 Follow the on-screen instructions to uninstall the application.
Important• When the screen prompting you to restart your computer appears, restart your
computer. The screen prompting you to restart the computer appears when there is a file that cannot be deleted during uninstallation. However, the uninstallation can be completed if you restart the computer accordingly.

DocuWorks 9 Setup Guide
Author ― Fuji Xerox Co., Ltd. Edition 1 April 2020
Publisher ― Fuji Xerox Co., Ltd.
ME8879E2-3