Documentum Composer 6.5 SP2 Building a Documentum Application Tutorial
27
EMC ® Documentum ® Composer Version 6.5 SP2 Building a Documentum Application Tutorial P/N 300-009-464 A01 EMC Corporation Corporate Headquarters: Hopkinton, MA 01748-9103 1-508-435-1000 www.EMC.com
-
Upload
bhuphender -
Category
Documents
-
view
46 -
download
10
description
documentum
Transcript of Documentum Composer 6.5 SP2 Building a Documentum Application Tutorial

EMC® Documentum®
ComposerVersion 6.5 SP2
Building a Documentum Application Tutorial
P/N 300-009-464 A01
EMC CorporationCorporate Headquarters:
Hopkinton, MA 01748-91031-508-435-1000www.EMC.com

Copyright© 2009 EMC Corporation. All rights reserved.
Published June 2009
EMC believes the information in this publication is accurate as of its publication date. The information is subject to changewithout notice.
THE INFORMATION IN THIS PUBLICATION IS PROVIDED AS IS. EMC CORPORATION MAKES NO REPRESENTATIONSOR WARRANTIES OF ANY KINDWITH RESPECT TO THE INFORMATION IN THIS PUBLICATION, AND SPECIFICALLYDISCLAIMS IMPLIED WARRANTIES OF MERCHANTABILITY OR FITNESS FOR A PARTICULAR PURPOSE.
Use, copying, and distribution of any EMC software described in this publication requires an applicable software license.
For the most up-to-date listing of EMC product names, see EMC Corporation Trademarks on EMC.com.
All other trademarks used herein are the property of their respective owners.
Table of Contents
Chapter Creating the insurance claims application .................................................. 5Prerequisites .................................................................................................... 5Configuring the connection broker in dfc.properties ....................................... 5
Creating the Composer project .......................................................................... 6Creating the type .............................................................................................. 7Creating the installation parameters .................................................................. 12Creating the alias set......................................................................................... 13Creating the permission sets.............................................................................. 15Creating the lifecycle ........................................................................................ 17Installing the project to a repository ................................................................... 20Testing your Documentum application in Webtop .............................................. 22
Building a Documentum application tutorial 3
Table of Contents
4 Building a Documentum application tutorial
Creating the insurance claimsapplication
This tutorial describes how to build a sample Documentum application in Composer, install it to arepository, and use the custom artifacts within Webtop. The following list describes the artifacts thatyou will create when going through the tutorial:• A custom type, insurance_claim, represents an insurance claim form.
• A lifecycle, claim_lifecycle, contains the states that support a typical insurance claim process.Objects of type insurance_claim are attached to this lifecycle.
• Two permission set templates, claim_processors and claim_adjudicators, that define users whocan process and approve the insurance claims that are attached to the claim_lifecycle lifecycle.
• An alias set, claim_aliasset, is used in conjunction with the two permission sets, so that theapplication does not have to define specific users during design time.
• Two installation parameters, processing_parameter and adjudication_parameter, allow you tospecify the values for the aliases in the alias set at installation time.
PrerequisitesThis tutorial is tested and verified only in a version 6.5 SP2 environment. Before beginning thetutorial, make sure you have completed the following tasks:
• Obtain access to a Documentum 6.5 repository.
• Obtain access to a Webtop installation that is connected to the Documentum 6.5 repository.
• Install Composer 6.5 SP2 on your system.
• Configure the connection broker in dfc.properties for your Composer installation.
Configuring the connection broker in dfc.properties
Configuring the connection brokerRepository access is handled by the Documentum connection broker. Before you start Composer forthe first time, you need to specify the IP address for the connect broker.
To configure the connection broker:
Building a Documentum application tutorial 5
Creating the insurance claims application
1. Edit the dfc.properties file in the <Composer_root>\plugins\com.emc.ide.external.dfc_1.00\documentum.config directory and specify the host or IP address for the dfc.docbroker.host[0]property. For example:dfc.docbroker.host[0]=123.45.6.789
2. Save your changes.
Creating the Composer projectA Composer project contains a logical set of artifacts that function together to fulfill a business need.You must create a project before creating the artifacts.
To create the Composer project:
1. Start Composer and select a workspace.
2. Start a new project by clicking the File > New > Project... menu item. The New Project wizardappears.
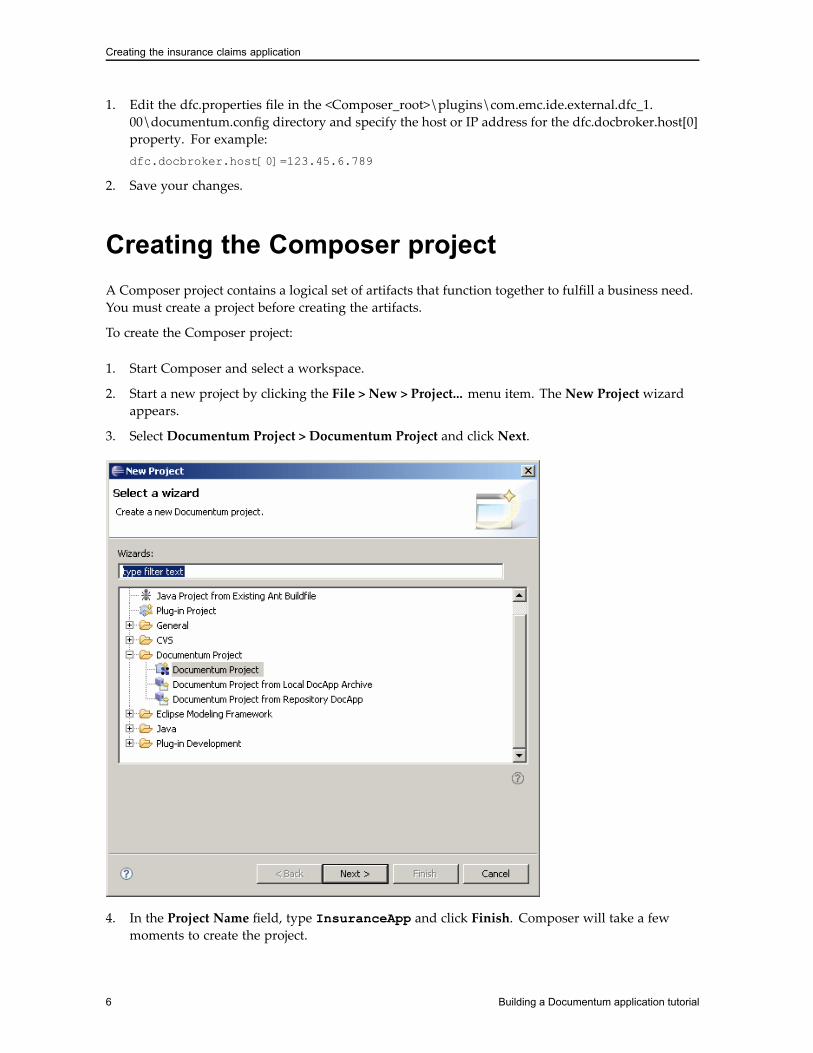
3. Select Documentum Project > Documentum Project and click Next.
4. In the Project Name field, type InsuranceApp and click Finish. Composer will take a fewmoments to create the project.
6 Building a Documentum application tutorial
Creating the insurance claims application
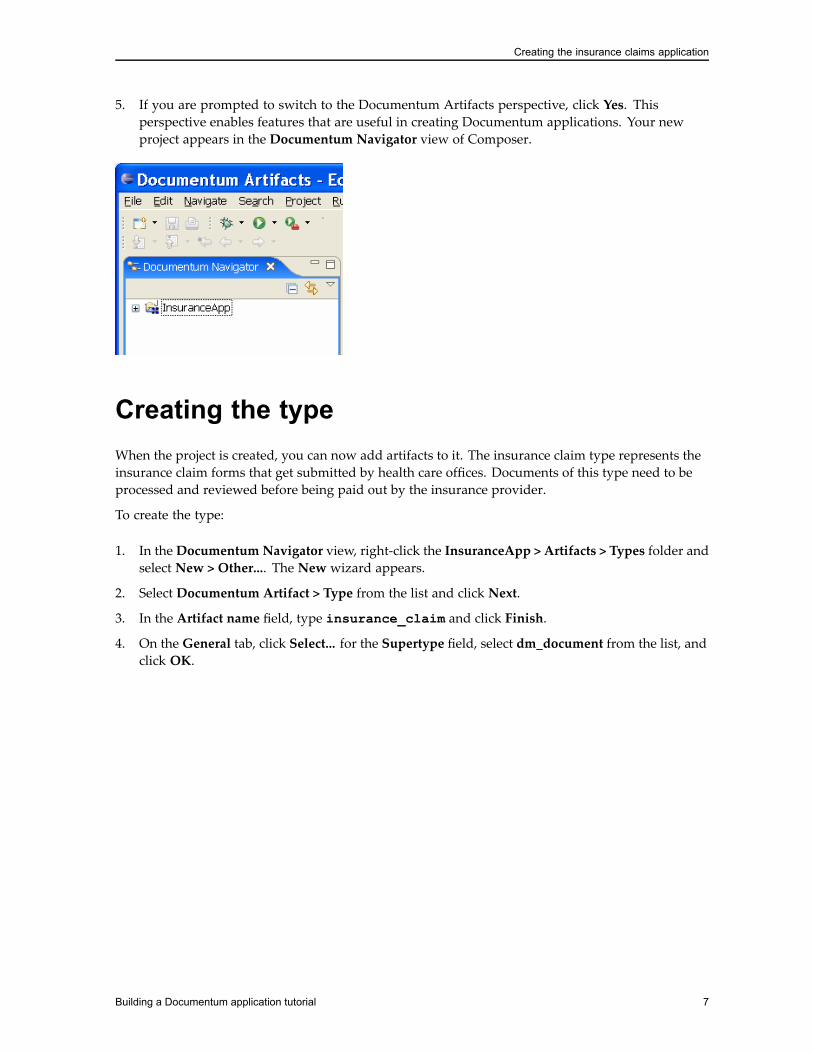
5. If you are prompted to switch to the Documentum Artifacts perspective, click Yes. Thisperspective enables features that are useful in creating Documentum applications. Your newproject appears in the Documentum Navigator view of Composer.
Creating the typeWhen the project is created, you can now add artifacts to it. The insurance claim type represents theinsurance claim forms that get submitted by health care offices. Documents of this type need to beprocessed and reviewed before being paid out by the insurance provider.
To create the type:
1. In theDocumentum Navigator view, right-click the InsuranceApp > Artifacts > Types folder andselect New > Other.... The New wizard appears.
2. Select Documentum Artifact > Type from the list and click Next.
3. In the Artifact name field, type insurance_claim and click Finish.
4. On the General tab, click Select... for the Supertype field, select dm_document from the list, andclick OK.
Building a Documentum application tutorial 7

Creating the insurance claims application
5. On the Attributes tab, click New and select newattribute1 from the list on the left.
6. In the Structure section, specify the following values for the fields:• Name — status
• Data type — STRING
• Length — 20
8 Building a Documentum application tutorial

Creating the insurance claims application
7. Expand the status attribute node and click on Value mapping. The Conditional Assistance andValue Mapping Table sections appear on the right side.
8. In the Conditional Assistance section, click on New....
9. Click on the Fixed List radio button and typeSubmitted,Processing,Adjudication,Paid,Denied for the Values field. This listpopulates a drop down menu where the user can select the status during the creation of aninsurance claim document in Webtop.
Building a Documentum application tutorial 9

Creating the insurance claims application
10. Select the List is complete checkbox and click OK. This prevents any custom input to be enteredfor the status attribute.
11. Click the New button four more times and specify attribute properties for each newattribute itemin the list according to the information below:newattribute2
• Name — date_of_service
• Data type — TIME
newattribute3
• Name — physician_name
• Data type — STRING
• Length — 50
newattribute4
• Name — patient_name
• Data type — STRING
• Length — 50
newattribute5
• Name — procedure_code
• Data type — INTEGER
12. In the Display configuration list section of the Display tab, click New.... The DisplayConfiguration window appears. This window lets you configure a new view in Webtop so thecustom attributes are displayed when an insurance_claim object’s properties are viewed.
13. In the Configuration Label field, type Insurance claim attributes. This will be the nameof the tab as displayed in Webtop.
10 Building a Documentum application tutorial

Creating the insurance claims application
14. Select theCustomAttributes only check box. The list displays only the attributes that you created.
15. Select all of the attributes in the list (date_of_service, patient_name, physician_name,procedure_code, status) and click Add, then OK.
16. In the Application Interface Display section, type Insurance claim for the Type Label field. Thistext is displayed in the drop down menu when selecting a type for a new document in Webtop.
17. Save the type.
Building a Documentum application tutorial 11

Creating the insurance claims application
18. Check the Problems tab to see if there are any errors with the type. If there are errors, make sureyou have completed all of the necessary steps above.
Creating the installation parametersYou need to create two installation parameters for the two aliases in the alias set that you will createlater in this tutorial. The two aliases allow you to specify users who have the rights to process andapprove insurance claims. With installation parameters, you can specify the values for the aliasesduring the installation of the application.
To create the installation parameters:
1. In the Documentum Navigator view, right-click the InsuranceApp > Artifacts > InstallationParameters folder and select New > Other....
2. In the New wizard, select Documentum Artifact > Installation Parameter and click Next.
3. In the Artifact name field, type processing_parameter and click Next.
4. Select User Installation Parameter from the Parameter Type drop down menu.
5. In the Description field, type This parameter represents the user that specifiesthe processor.
12 Building a Documentum application tutorial
Creating the insurance claims application
6. Click Finish.
7. Save the installation parameter.
8. Create another installation parameter with the following settings:• Artifact name — adjudication_parameter
• Parameter Type — User Installation Parameter
• Description — This parameter represents the user that specifies the adjudicator.
9. Check the Problems tab to see if there are any errors with the installation parameters. If there areerrors, make sure you have completed all of the necessary steps above.
Creating the alias setThis alias set is used by the permission set that you will create later in this tutorial. The alias setallows you to set approved reviewers of the insurance claim during installation time instead of atdesign time. This allows more flexibility for the application to run in different environments andscenarios. The alias set contains the following aliases:• processing_user — This alias represents a person who is authorized to review submitted claimsand check them for completed information.
• adjudication_user — This alias represents a person who is authorized to approve or denyprocessed claims.
To create the alias set:
1. In the Documentum Navigator view, right-click the InsuranceApp > Artifacts > Alias Sets folderand select New > Other....
2. In the New wizard, select Documentum Artifact > Alias Set and click Next.
3. In the Artifact name field, enter claim_aliasset and click Finish. The Alias Set pane appearsin Composer.
4. In the Description field of the General section, type Alias set for claim_processorsand claim_adjudicators permission sets.
5. In the Aliases section, click on Add. The New Alias window appears.
6. Specify the following information for the fields and click OK:• Name — processing_user
• Type — User
The alias is added to the aliases list.
7. Ensure that the alias that you just created is highlighted and click on the Parameter radio buttonin the Value section.
8. Click on the Select button for the Parameter field and select the processing_parameterinstallation parameter from the list.
9. Specify the following text for the Description field: A user authorized to processsubmitted claims.
Building a Documentum application tutorial 13

Creating the insurance claims application
10. Add another alias to the alias set with the following information:• Name — adjudication_user
• Type — User
• Description — A user authorized to approve or deny claims.
• Parameter — select the radio button and choose adjudication_parameter
11. Save the alias set.
12. Check the Problems tab to see if there are any errors with the alias set. If there are errors, makesure you have completed all of the necessary steps above.
14 Building a Documentum application tutorial

Creating the insurance claims application
Creating the permission setsPermission sets or ACLs (access control lists) allow you to set permissions for objects in the repository.The permission sets that you will create allow you to specify who can access the documents that areattached to the lifecycle and who can change the states of the document. The alias set that is used inconjunction with these permission sets let you specify these users at installation time.
To specify the permission sets:
1. In the Documentum Navigator view, right-click the InsuranceApp > Artifacts > PermissionSets folder and select New > Other....
2. In the New wizard, select Documentum Artifact > Permission Set and click Next.
3. Fill in the fields with the following information and click Finish:• Artifact name — claim_processors
• ACL Class — Template
The Permission Set Template pane appears in Composer.
4. In the Description field of the General section, type Authorized insurance claimprocessors.
Building a Documentum application tutorial 15

Creating the insurance claims application
5. In the All Users and Groups section, click on the Add Alias button. The ACL Entry Detailssection appears on the right side.
6. Click Select... for the Owner Alias field. The Documentum AliasSet Artifact window appears.
7. Select claim_aliasset.processing_user from the list and click OK.
8. SelectWrite (includes Browse, Read, Relate, and Version) from the Permissions drop downmenu.
9. Select the following check boxes from the extended permissions table:• Change Location
• Change State
• Change Permissions
16 Building a Documentum application tutorial

Creating the insurance claims application
10. Save the permission set.
11. Create another permission set named “claim_adjudicators” by using the “adjudication_user”alias. SpecifyWrite permissions and select the Change Location, Change State, and ChangePermissions check boxes.
12. Check the Problems tab to see if there are any errors with the permission set. If there are errors,make sure you have completed all of the necessary steps above.
Creating the lifecycleWhen you have completed creating the type, alias set, and permission sets, you can now create thelifecycle that objects of type insurance_claim can be attached to. The lifecycle represents the statesthat an insurance claim can be in:• Submitted — This state represents the claim being submitted for approval. Upon entry of thisstate, the permission set is set to “claim_processors” so that only users that are part of thispermission set have the ability to change the state of the document.
• Processing — This state represents the claim being processed and checked for completeness.
• Adjudication— This state represents the claim being reviewed and verified. Upon entry of thisstate, the permission set is set to “claim_adjudicators” so that only users that are part of thispermission set have the ability to change the state of the document.
• Paid — This state represents the insurance claim being paid.
• Denied— This exception state represents the insurance claim being denied.
To create the lifecycle:
1. In the Documentum Navigator view, right-click the InsuranceApp > Artifacts > Lifecycles folderand select New > Other....
2. In the New wizard, select Lifecycle and click Next.
3. In the Artifact name field, enter claim_lifecycle and click Finish.The claim_lifecycle artifact is added to the Lifecycles folder in your project. When the lifecycle isadded, the Properties tab containing a General tab appears on the bottom frame of Composer.Settings that you change in the General tab apply to the entire lifecycle. If you do not see the
Properties tab, click on the Show Properties icon on the toolbar.
4. In the General tab, click Select... for the Primary type field and select insurance_claim in thelist that appears.
5. Click on Add... in the Alias sets section, select claim_aliasset from the list, and click OK
6. Click on the Normal State button and click on the white canvas to add a new state. When thestate is added and selected, the Properties tab is populated with more sections: Overview, EntryCriteria, Actions, Post Change, and Attributes. Changes that you make in these sections applyto the state itself and not the entire lifecycle.
Building a Documentum application tutorial 17

Creating the insurance claims application
7. In the Overview section, fill in the fields with the following information:• Name — Submitted
• Description — Claims in this state have been submitted by an insurance customer
• Allow attachments directly to this state and Allow scheduled transitions from this state —select the check boxes.
8. In the Actions section, click on Set attribute. The Set Attribute window appears.
9. Select the status attribute from the Attribute drop down menu.
10. Select the Specify a value radio button, type Submitted for the field, and click OK.
11. In the Actions section, click on Set permission set. The Permission Set window appears.
12. Click on the Select... button, select claim_processors from the list, and click OK.
13. Click OK.
14. Add four more states specifying the following information for each state:
18 Building a Documentum application tutorial

Creating the insurance claims application
The Processing state• Overview section— Name — Processing
— Description — Claims in this state are ready to be verified to have complete and accurateinformation.
— Allow demotion to previous state — select the check box
• Actions section
— Set Attribute — select the “status” attribute from the attribute drop down menu andspecify Processing for the value
The Adjudication state• Overview section— Name — Adjudication
— Description — Claims in this state are being investigated for validity.
— Allow demotion to previous state — select the check boxes
• Actions section
— Set Attribute — select the “status” attribute from the attribute drop down menu andspecify Adjudication for the value
— Set permission set— select the “claim_adjudicators” permission set from the list
The Paid state• Overview section— Name — Paid
— Description — Claims in this state have been approved and paid out to the insuranceclaimer.
— Allow demotion to previous state — select the check boxes
• Actions section
— Set Attribute — select the “status” attribute from the attribute drop down menu andspecify Paid for the value
The Denied state (create an Exception State instead of Normal State)• Overview section— Name — Denied
— Description — Claims in this state have been denied through findings from theadjudication process
• Actions section
— Set Attribute — select the “status” attribute from the attribute drop down menu andspecify Denied for the value
15. Click on the Connection button to create connections between the states in the following manner:• Connect Submitted to Processing.
• Connect Processing to Adjudication.
Building a Documentum application tutorial 19
Creating the insurance claims application
• Connect Adjudication to Paid.
• Connect Adjudication to Denied.
16. Save the lifecycle.
17. Check the Problems tab to see if there are any errors with the lifecycle. If there are errors, makesure you have completed all of the necessary steps above.
Installing the project to a repositoryYour Composer project is now complete, so you need to install the project to a repository to use it.
To install the project to a repository:
1. In the Documentum Navigator view, right-click the InsuranceApp project and click InstallDocumentum Project.... The Install Wizard appears.
2. Fill in the fields with the following information:• Repository name — Select the repository that you want to install the artifacts to. This shouldbe a development repository where your artifacts won’t affect production repositories. Ifyou cannot select a repository, then you did not specify a valid connection broker in yourdfc.properties file as described in Configuring the connection broker in dfc.properties, page 5
• User name — The user name to login to the connection broker
• Password — The password to login to the connection broker
You can accept the default values for the rest of the fields.
20 Building a Documentum application tutorial

Creating the insurance claims application
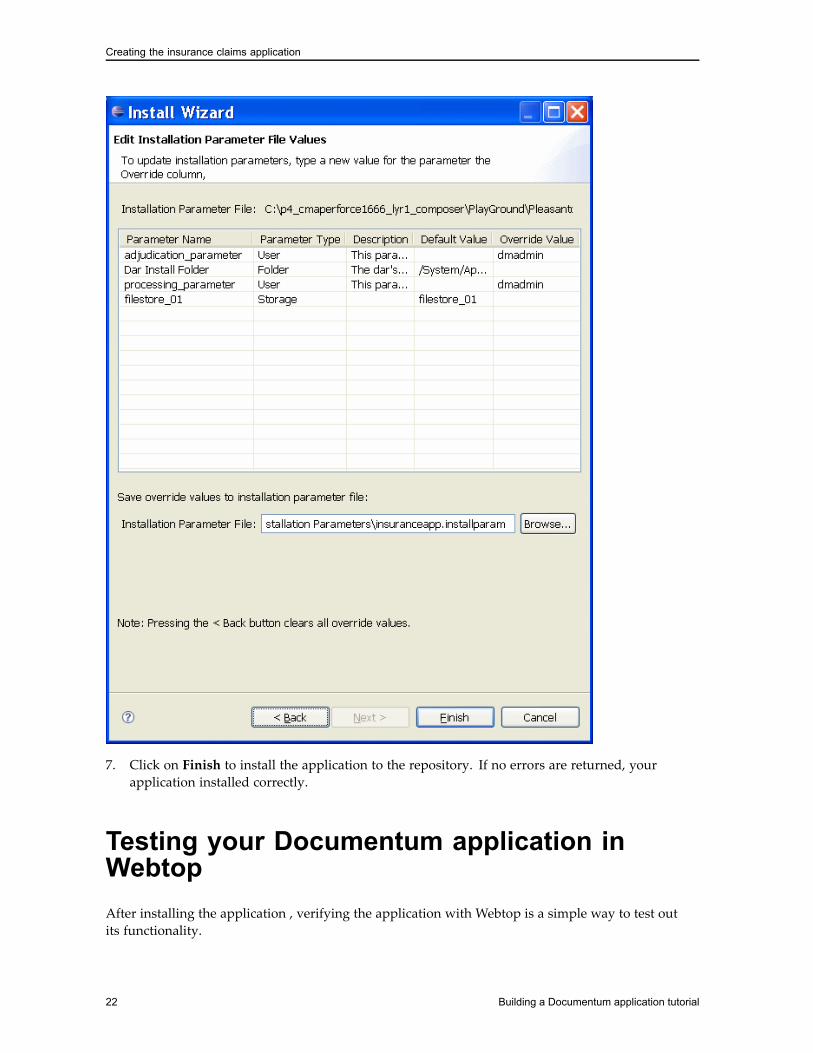
3. Click Login. If your login is successful, the Next button is enabled. If the Next button is notenabled, verify your login credentials and try again. Click Next. The Edit Installation ParameterFile Values window appears.
4. For the processing_parameter row, specify a user that is in the repository for the Override Valuecolumn. This will assign the appropriate person to be able to process the insurance claims. Forsimplicity, specify the username that will install this project.
5. For the adjudication_parameter row, specify a user that is in the repository for theOverride Valuecolumn. This will assign the appropriate person to be able to approve or reject the insuranceclaims. For simplicity, specify the username that will install this project.
6. Enter a filename in the Installation Parameter File field to save the parameter values for a futureinstallation.
Building a Documentum application tutorial 21
Creating the insurance claims application
7. Click on Finish to install the application to the repository. If no errors are returned, yourapplication installed correctly.
Testing your Documentum application inWebtopAfter installing the application , verifying the application with Webtop is a simple way to test outits functionality.
22 Building a Documentum application tutorial
Creating the insurance claims application
To test your Documentum application in Webtop:
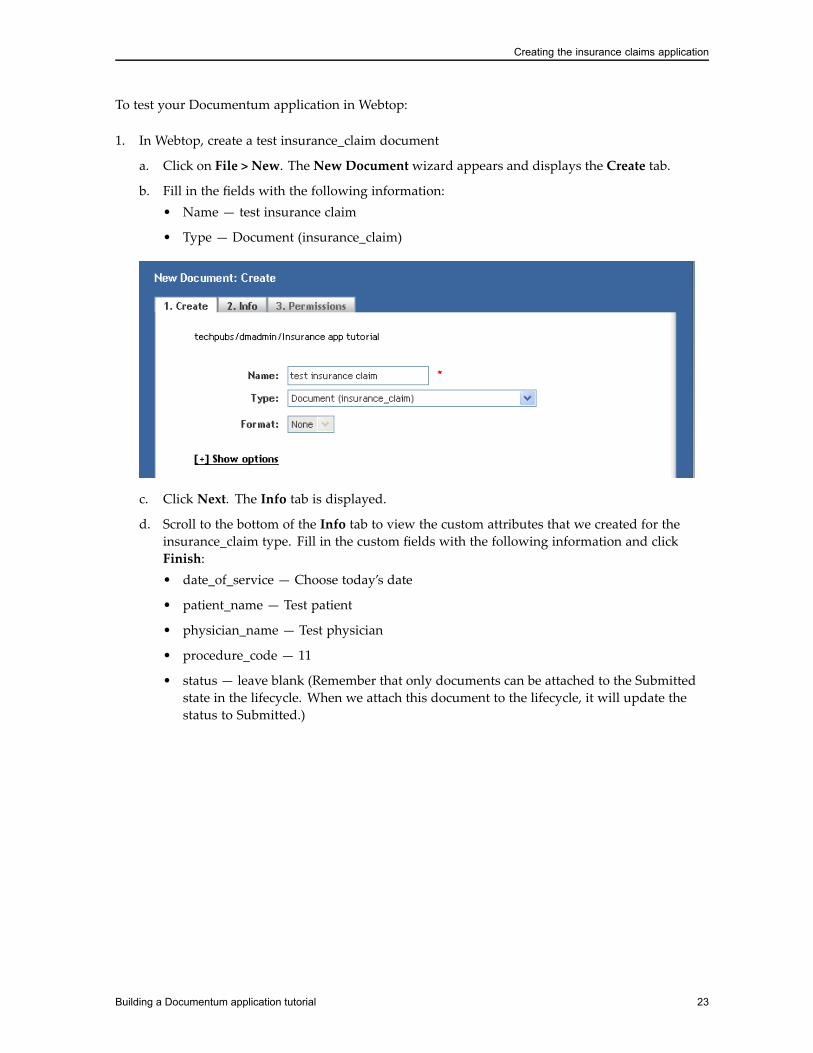
1. In Webtop, create a test insurance_claim document
a. Click on File > New. The New Document wizard appears and displays the Create tab.
b. Fill in the fields with the following information:• Name — test insurance claim
• Type — Document (insurance_claim)
c. Click Next. The Info tab is displayed.
d. Scroll to the bottom of the Info tab to view the custom attributes that we created for theinsurance_claim type. Fill in the custom fields with the following information and clickFinish:• date_of_service — Choose today’s date
• patient_name — Test patient
• physician_name — Test physician
• procedure_code — 11
• status — leave blank (Remember that only documents can be attached to the Submittedstate in the lifecycle. When we attach this document to the lifecycle, it will update thestatus to Submitted.)
Building a Documentum application tutorial 23

Creating the insurance claims application
2. Right-click the newly created test insurance claim document and select Lifecycle > Apply. TheApply Lifecycle screen appears.
3. Select the claim_lifecycle from the list and click OK. The document is now attached to thelifecycle.
4. Right-click the test insurance claim document and click on Properties. It will display that thedocument is attached to the claim_lifecycle and that the state is set to submitted.
24 Building a Documentum application tutorial

Creating the insurance claims application
5. Click on the Insurance claim attributes tab to view the document’s properties. The status of thedocument has been set to submitted by the lifecycle.
Building a Documentum application tutorial 25

Creating the insurance claims application
6. Click OK to leave the Properties view.
7. Right-click the document in Webtop and select Lifecycle > Promote to promote the document tothe Processing state.
8. Right-click the document in Webtop and select Properties. You should see that the Current Stateof the document has been updated to Processing.
Congratulations! In this tutorial, you have successfully:• Created a type.
• Created an alias set with two aliases.
• Created two permission set templates.
• Created a lifecycle.
• Installed the artifacts into a repository.
26 Building a Documentum application tutorial

Creating the insurance claims application
• Attached a document to a lifecycle.
• Promoted the document to the next state in the lifecycle
Building a Documentum application tutorial 27