DOCUMENTATION - JMC Inc. · Online Course Registration ... to the general public and inform them of...
81
JMC Online Software Page 1 of 81 Last update on 7/17/08 J J M M C C I I N N C C . . "Bringing computing ease to your student record needs" DOCUMENTATION ~ONLINE SOFTWARE~ Includes: Online Parent Access Online Student Access Online Course Registration Online Attendance Online GradeBook Online Office Online Homeroom JMC Inc PO Box 328 Lake City, MN 55041 Telephone: 1-800-524-8182 Fax: 1-651-345-2215 Web: http://www.jmcinc.com Email: [email protected] or [email protected] Documentation and program copyright © 2008
-
Upload
truongkhue -
Category
Documents
-
view
218 -
download
0
Transcript of DOCUMENTATION - JMC Inc. · Online Course Registration ... to the general public and inform them of...
JMC Online Software Page 1 of 81 Last update on 7/17/08
JJJMMMCCCIIINNNCCC..."Bringing computing ease to your student record
needs"
DOCUMENTATION~ONLINE SOFTWARE~
Includes:Online Parent AccessOnline Student AccessOnline Course RegistrationOnline AttendanceOnline GradeBookOnline OfficeOnline Homeroom
JMC IncPO Box 328Lake City, MN 55041
Telephone: 1-800-524-8182Fax: 1-651-345-2215
Web: http://www.jmcinc.comEmail: [email protected] or [email protected]
Documentation and program copyright © 2008

JMC Online Software Page 2 of 81 Last update on 7/17/08
Table of ContentsOverview …………………………………………………..……………………………… 4
Installing the Online Software on a Web Server …………….…………………. 5Online Settings …………………………………………………………………... 6
CAE ……………………………………………………………………. 6Course Registration …………………………………………………… 7Parent Access ………………………………………………………….. 7Student Access ………………………………………………………… 8
Online Parent Access ……………………………………………………………. 9In the Office …………………………………………………………… 9Accessing via the Internet …………………………………………… 10
Online Student Access ………………………………………………………… 11In the Office ………………………………………………………….. 11Accessing via the Internet …………………………………………… 11
Online Course Registration ……………………………………………………. 12In the Office ………………………………………………………….. 12Registering for Courses ...……………………………………………. 12
Online Attendance ……………………………………………………………… 13In the Office ………………………………………………………….. 13Submitting Attendance ...…………………………………………….. 13
Online GradeBook ……………………………………………………………... 14In the Office ………………………………………………………….. 14In the GradeBook …………………………………………………….. 14
Online Office …………………………………………………………………… 15In the Office ………………………………………………………….. 15Accessing via the Internet …………………………………………… 15
Online Homeroom ……………………………………………………………… 16In the Office ………………………………………………………….. 16Accessing via the Internet ……………………………………………. 16
Technical Issues and Installation Instructions ……………………………………….. 17Background Information ……………………………………………………….. 17
Web Serving Software ……………………………………………….. 17Network Considerations ……………………………………………… 18Public IP Address or Private IP Address ……………….…………… 18Web Browser Requirements …………………………………………. 18SSL …………………………………………………………………….19
Installation Instructions for Mac OS ………………………………………….. 20ACGI …………………………………………………………………. 20Special Instructions for District ACGI Setups ……………………… 21Online Server (CGI) - Apache ………………………………………. 22
Web Server Setup ………………………………………….. 22Online Server Setup ………………………………………… 23
Online Server (CGI) - WebSTAR……………………………………. 26Web Server Setup ………………………………………….. 26Online Server Setup ………………………………………... 27
Special Instructions for District CGI Setups ………………………... 30Installation Instructions for Windows …………………………………………. 31
Windows NT Server (IIS4) ………………………………………….. 31Windows 2000 Server (IIS5) ………………………………………… 33Windows 2003 Server (IIS6) ………………………………………… 37Verifying Installation of Online Software …………………………… 44Special Instructions for District Online Setups ……………………... 45
Accessing the Online Software Modules ……………………………………… 46
JMC Online Software Page 3 of 81 Last update on 7/17/08
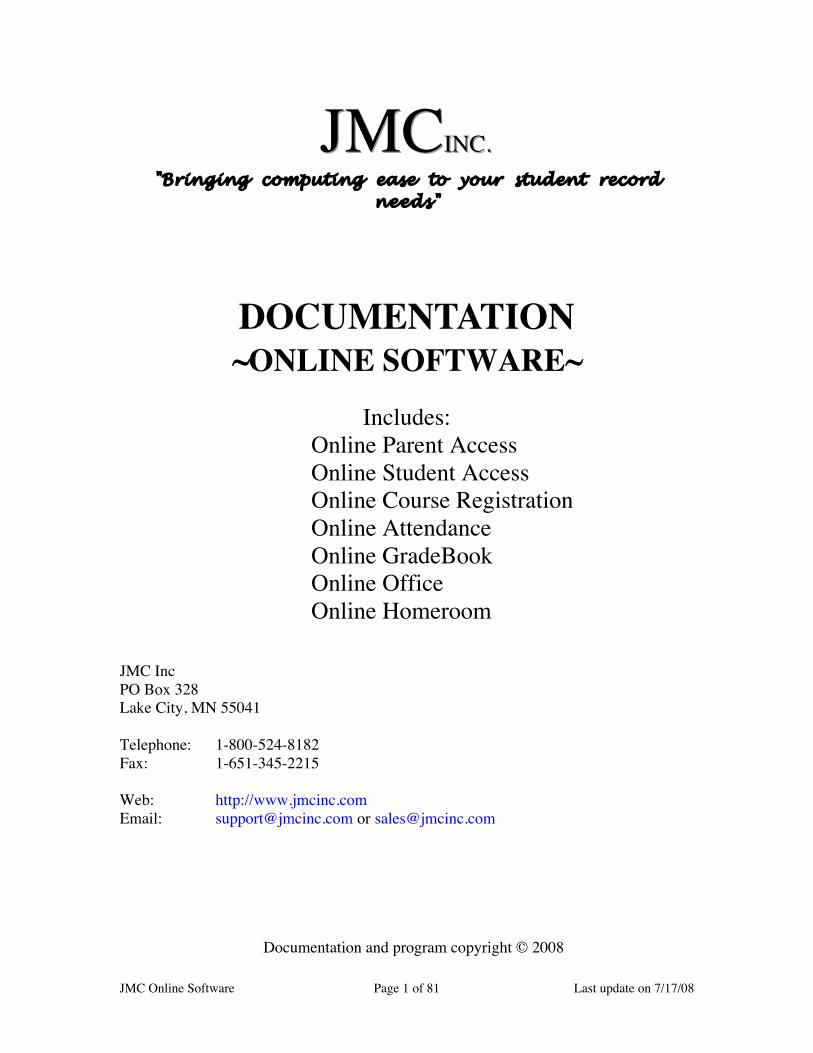
Online Parent Access Module ………………………………………………………….. 47In the Office ……………………………………………………………………. 47
Setting Up Parent Accounts and Passwords ………………………… 47Editing or Entering the Password for the Parent(s) …..…………….. 47Editing the Parent/Child Relationship ………………………………. 48Processing Contact Update Requests From Parents ……………….. 49
Accessing from Home or Office via the Internet …………………………….. 51
Online Student Access Module ………………………………………………………… 56In the Office ……………………………………………………………………. 56
Setting Up Student Accounts and Passwords ………………………. 56Editing or Entering the Password for the Student …..………………. 56
Accessing from Home or Office via the Internet …………………………….. 57
Online Course Registration Module …………………………………………………. 60In the Office ……………………………………………………………………. 60
Setting Up Student Accounts ……………………………………….. 60Opening and Closing Course Registration …..……………………… 60Finishing the Remainder of the Scheduling Process ……………….. 61
Registering for Courses ……………………………………………………….. 62
Online Classroom Attendance Module ………………………………………………. 66In the Office ……………………………………………………………………. 66
Setting Up Student Accounts ……………………………………….. 66Setting Up Student Schedules ………………………….…………… 67Setting Up Course Data ……………………………………………… 68Setting Up Teacher Accounts and Passwords ………….…………… 69Setting Up Lunch Count Information ………………….……………. 70
Submitting Attendance from the Classroom …………………………………. 71
Online GradeBook Module ……………………………………………………………. 74In the Office ……………………………………………………………………. 74
Setting Up Teacher Accounts and Passwords ………………………. 74Processing Teacher Grade Submissions ………….......…………….. 74Processing Teacher Progress Report Submissions …...…………….. 74Making Backups of Teacher GradeBooks …………......…………… 74
Online Office Module ……………………………………………………………………75In the Office ……………………………………………………………………..75
Setting Up Office Staff Accounts and Passwords …………………… 75Editing or Entering the Password for the Office Staff …..………….. 75
Accessing Office Data via the Internet ………………………………………… 75Online Office – Student Data ………………………………………… 77Online Office – Teacher Data ………………………………………... 78
Online HomeRoom Module ……………………………………………………………. 79In the Office ……………………………………………………………………. 79
Setting Up Advisor (Teacher) Accounts and Passwords …………… 79Accessing Advisee Data via the Internet ……………………………………… 79

JMC Online Software Page 4 of 81 Last update on 7/17/08
OverviewJMC offers several web-based applications as part of the JMC Application Suite. Currentonline offerings include parent access, student access, office, course registration,attendance, and teacher GradeBooks. These options open up new avenues for variousaudiences to exchange information with the JMC database from their web browsers or IPapplications.
Parents can access various information about their children from their home or officeInternet connection at any time of the day or night.
Students can submit course registration requests for the guidance office to processelectronically. Students may also view attendance, lunch account, report card, progressreport, and lesson plan information.
Teachers can submit attendance from any classroom that has access to the Internet orschool intranet and can also view online attendance reports. Teachers can also work withtheir GradeBook from any computer with access to the Internet or school intranet.
Administrators and homeroom teachers can view various student information online,such as demographic data, schedules, and progress reports. Administrators may alsoview online information about teachers’ class lists and lesson plans.
JMC Online Software Page 5 of 81 Last update on 7/17/08
Installing the JMC Online Software on a Web ServerThe JMC Online Software must be installed on the school's web server in order for JMCdata to be available for viewing and/or editing over the Internet/intranet. The followingis a brief description of the steps involved:
- selecting the server(s) (hardware and software) that will be used in conjunctionwith the JMC Online Software
- assigning the appropriate private or public IP address to the web server- installing the JMC Online Software- configuring the server(s) to allow appropriate access to the JMC Online
Software- temporarily installing and running a JMC Office Application (one time - for
configuration purposes)- configuring the online modules using the Online Settings option in the JMC
Office Application- creating and publishing the web links for the various online modules- editing user accounts for parents, students, and or teachers as appropriate
Technical issues and detailed installation instructions can be found later in this document.
For more detail regarding the server and network setup of the JMC Online Software,please contact JMC technical support at 800-524-8182 or by email [email protected].
Once the JMC Online Software is installed and running properly, parents, staff, teachers,and students can begin processing transactions over the Internet or school intranet. Theschool may wish to set up a link on the school's web page to use for logging into thevarious JMC online modules. Also, if your school is using the Parent Access or StudentAccess modules of the JMC Online Software, you may wish to publicize (school's website, cable TV channel, mailing, newspaper article, student handbook, other) the web linkto the general public and inform them of the steps involved in accessing the system.Documentation for parents and/or teachers can be downloaded from JMC's web site atwww.jmcinc.com; however, additional information such as the web link addresses willneed to be provided to parents, students, and teachers by your school.
JMC Online Software Page 6 of 81 Last update on 7/17/08
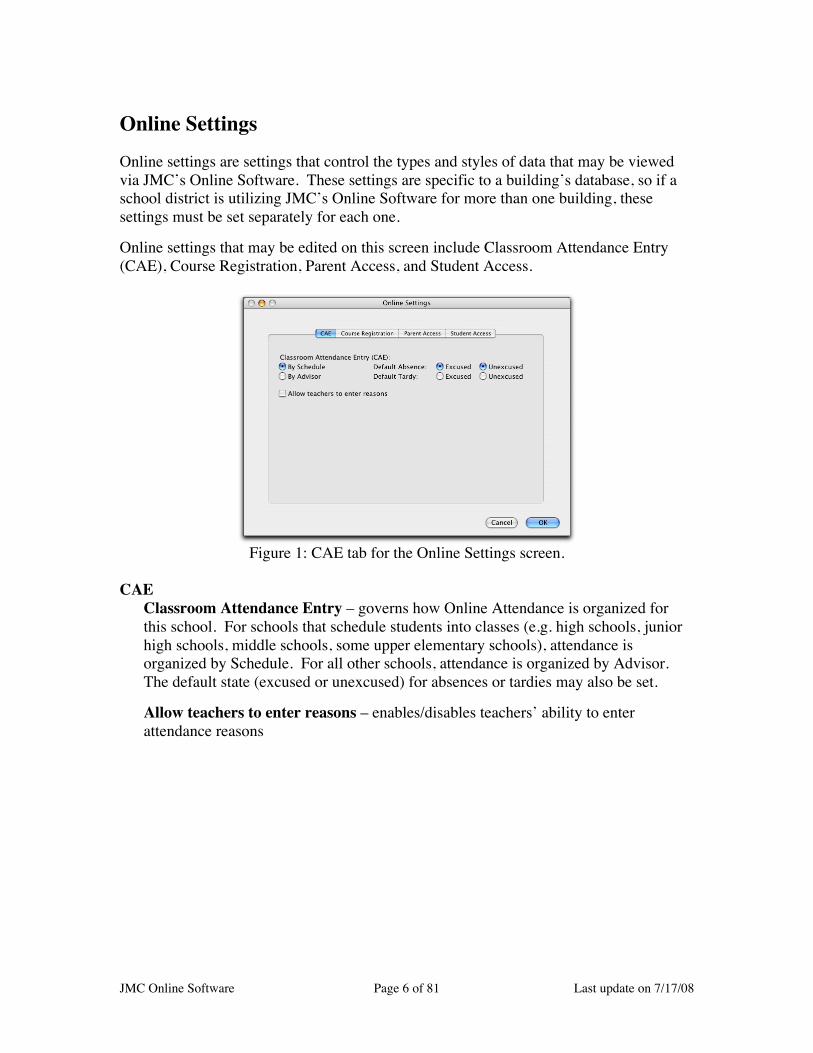
Online Settings
Online settings are settings that control the types and styles of data that may be viewedvia JMC’s Online Software. These settings are specific to a building’s database, so if aschool district is utilizing JMC’s Online Software for more than one building, thesesettings must be set separately for each one.
Online settings that may be edited on this screen include Classroom Attendance Entry(CAE), Course Registration, Parent Access, and Student Access.
Figure 1: CAE tab for the Online Settings screen.
CAEClassroom Attendance Entry – governs how Online Attendance is organized forthis school. For schools that schedule students into classes (e.g. high schools, juniorhigh schools, middle schools, some upper elementary schools), attendance isorganized by Schedule. For all other schools, attendance is organized by Advisor.The default state (excused or unexcused) for absences or tardies may also be set.
Allow teachers to enter reasons – enables/disables teachers’ ability to enterattendance reasons
JMC Online Software Page 7 of 81 Last update on 7/17/08
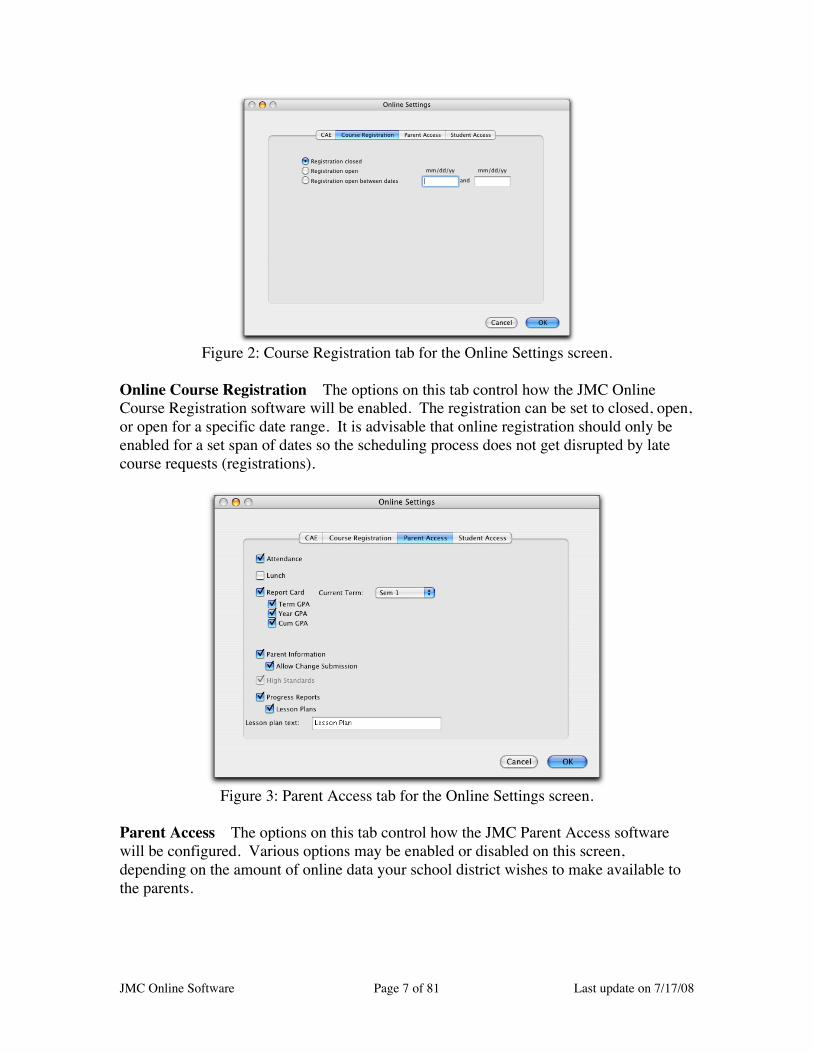
Figure 2: Course Registration tab for the Online Settings screen.
Online Course Registration The options on this tab control how the JMC OnlineCourse Registration software will be enabled. The registration can be set to closed, open,or open for a specific date range. It is advisable that online registration should only beenabled for a set span of dates so the scheduling process does not get disrupted by latecourse requests (registrations).
Figure 3: Parent Access tab for the Online Settings screen.
Parent Access The options on this tab control how the JMC Parent Access softwarewill be configured. Various options may be enabled or disabled on this screen,depending on the amount of online data your school district wishes to make available tothe parents.

JMC Online Software Page 8 of 81 Last update on 7/17/08
Figure 4: Student Access tab for the Online Settings screen.
Student Access The options on this tab control how the JMC Student Access softwarewill be configured. Various options may be enabled or disabled on this screen,depending on the amount of online data your school district wishes to make available tothe students.
JMC Online Software Page 9 of 81 Last update on 7/17/08
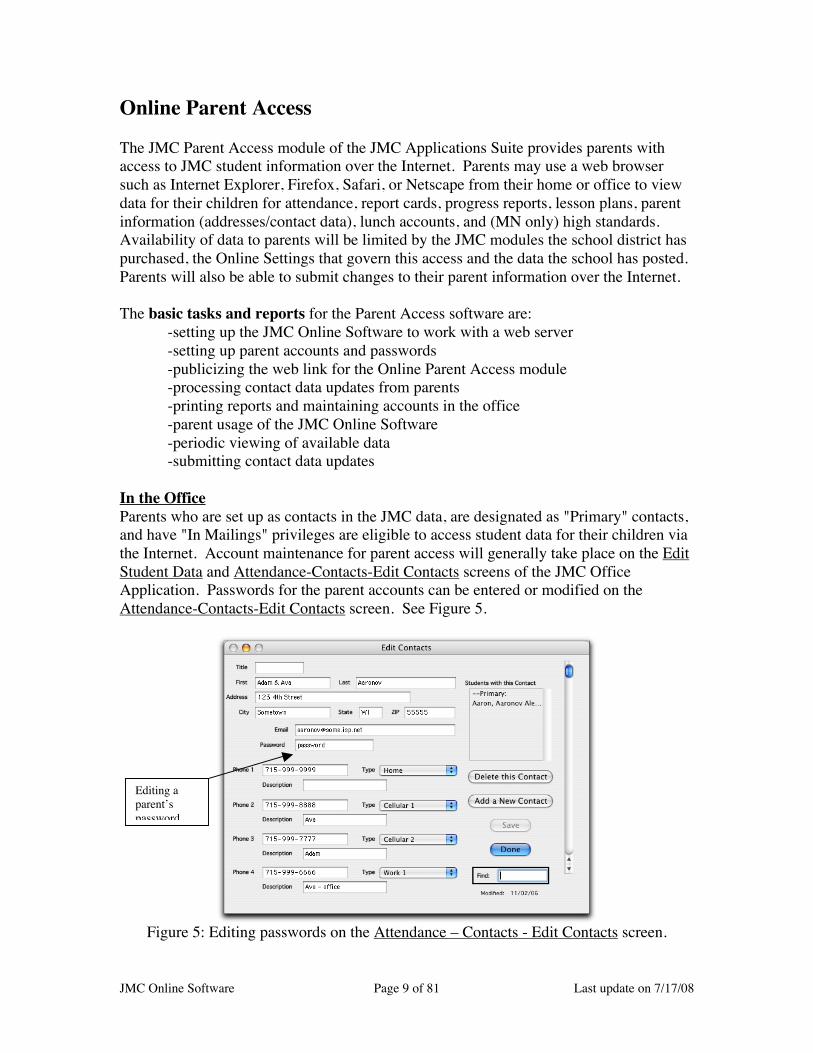
Online Parent Access
The JMC Parent Access module of the JMC Applications Suite provides parents withaccess to JMC student information over the Internet. Parents may use a web browsersuch as Internet Explorer, Firefox, Safari, or Netscape from their home or office to viewdata for their children for attendance, report cards, progress reports, lesson plans, parentinformation (addresses/contact data), lunch accounts, and (MN only) high standards.Availability of data to parents will be limited by the JMC modules the school district haspurchased, the Online Settings that govern this access and the data the school has posted.Parents will also be able to submit changes to their parent information over the Internet.
The basic tasks and reports for the Parent Access software are:-setting up the JMC Online Software to work with a web server-setting up parent accounts and passwords-publicizing the web link for the Online Parent Access module-processing contact data updates from parents-printing reports and maintaining accounts in the office-parent usage of the JMC Online Software-periodic viewing of available data-submitting contact data updates
In the OfficeParents who are set up as contacts in the JMC data, are designated as "Primary" contacts,and have "In Mailings" privileges are eligible to access student data for their children viathe Internet. Account maintenance for parent access will generally take place on the EditStudent Data and Attendance-Contacts-Edit Contacts screens of the JMC OfficeApplication. Passwords for the parent accounts can be entered or modified on theAttendance-Contacts-Edit Contacts screen. See Figure 5.
Figure 5: Editing passwords on the Attendance – Contacts - Edit Contacts screen.
Editing aparent’spassword

JMC Online Software Page 10 of 81 Last update on 7/17/08
Designating parents as "Primary" contacts and "In Mailings" can be accomplished on theEdit Student Data screen for each student for whom the parent(s) is/are responsible. SeeFigure 6.
Figure 6: Edit Student Data screen
Accessing from Home or Office via the InternetOnce the JMC Online Software is correctly installed and configured and the passwordsand accounts are established, parents with web access in their home or office can beginviewing data about their children and submitting contact information updates to theschool office. The school will need to provide a web link for parents to access the onlinesoftware.
Settings forcontrollingparent access
JMC Online Software Page 11 of 81 Last update on 7/17/08
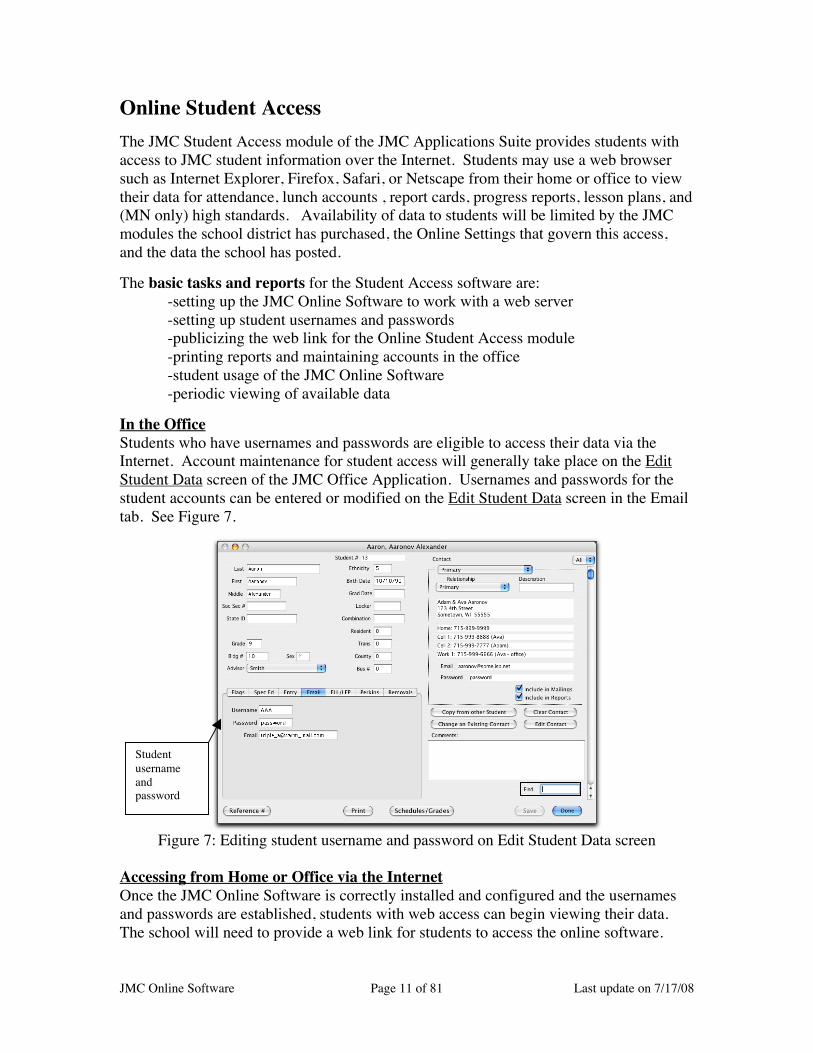
Online Student AccessThe JMC Student Access module of the JMC Applications Suite provides students withaccess to JMC student information over the Internet. Students may use a web browsersuch as Internet Explorer, Firefox, Safari, or Netscape from their home or office to viewtheir data for attendance, lunch accounts , report cards, progress reports, lesson plans, and(MN only) high standards. Availability of data to students will be limited by the JMCmodules the school district has purchased, the Online Settings that govern this access,and the data the school has posted.
The basic tasks and reports for the Student Access software are:-setting up the JMC Online Software to work with a web server-setting up student usernames and passwords-publicizing the web link for the Online Student Access module-printing reports and maintaining accounts in the office-student usage of the JMC Online Software-periodic viewing of available data
In the OfficeStudents who have usernames and passwords are eligible to access their data via theInternet. Account maintenance for student access will generally take place on the EditStudent Data screen of the JMC Office Application. Usernames and passwords for thestudent accounts can be entered or modified on the Edit Student Data screen in the Emailtab. See Figure 7.
Figure 7: Editing student username and password on Edit Student Data screen
Accessing from Home or Office via the InternetOnce the JMC Online Software is correctly installed and configured and the usernamesand passwords are established, students with web access can begin viewing their data.The school will need to provide a web link for students to access the online software.
Studentusernameandpassword
JMC Online Software Page 12 of 81 Last update on 7/17/08
Online Course Registration
The JMC Online Course Registration module of the JMC Applications Suite providesstudents with the ability to submit course requests electronically to the guidance office.Students may use a web browser such as Internet Explorer, Firefox, Safari, or Netscape torequest courses over the Internet.
The basic tasks and reports for the online course registration software are:-setting up the JMC Online Software to work with a web server-setting up student accounts-providing the web link for the Online Course Registration module-enabling the registration process in the JMC Office Application-disabling online registration once students have submitted their course requests-working through remainder of the scheduling process in the guidance office-maintaining student accounts in the office
In the OfficeStudents must be set up in the JMC student database in order to log into the JMC CourseRegistration software. Students will need to know their student number at login time.Course Registration can be opened for a span of dates or can be manually opened andclosed.
Registering for CoursesAny students who are set up in the JMC student database can log into the Online CourseRegistration software from a computer that can access the Internet or school intranet.Students will need to enter their first name, last name, and student number at the loginscreen. Students can generate a list of course requests that will be processedautomatically by the guidance counselor's office.
JMC Online Software Page 13 of 81 Last update on 7/17/08
Online AttendanceThe JMC Online Attendance module of the JMC Applications Suite provides teacherswith the ability to submit attendance electronically to the office. Teachers may use a webbrowser such as Internet Explorer, Firefox, Safari, or Netscape to submit attendance overthe Internet or school intranet. Teachers may also print out various attendance reportsfrom their computers.
The basic tasks and reports for the online attendance software options are:-setting up the JMC Online Software to work with a web server-setting up teacher accounts and passwords-providing the web link for the Online Attendance module-receiving attendance submissions from teachers and processing them in the office-processing the attendance submissions is done automatically-editing attendance as necessary (excused/unexcused, reasons, other)-printing attendance reports-maintaining teacher accounts and passwords and student scheduling changes inthe office
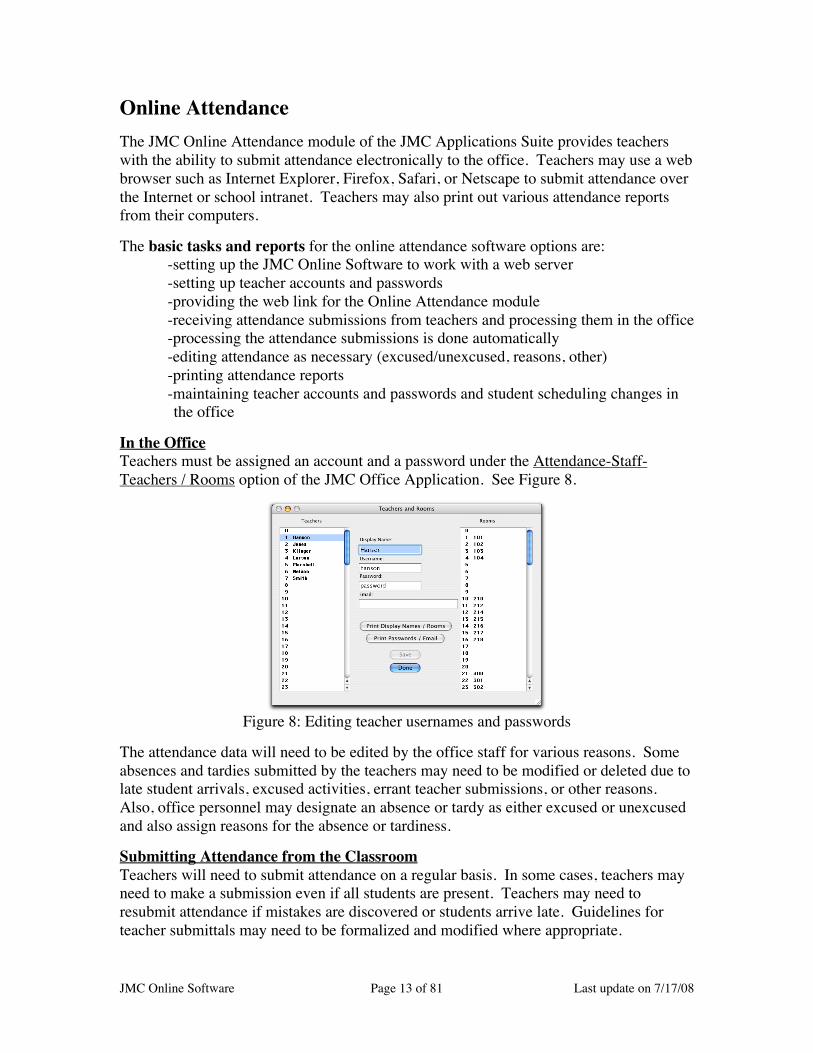
In the OfficeTeachers must be assigned an account and a password under the Attendance-Staff-Teachers / Rooms option of the JMC Office Application. See Figure 8.
Figure 8: Editing teacher usernames and passwords
The attendance data will need to be edited by the office staff for various reasons. Someabsences and tardies submitted by the teachers may need to be modified or deleted due tolate student arrivals, excused activities, errant teacher submissions, or other reasons.Also, office personnel may designate an absence or tardy as either excused or unexcusedand also assign reasons for the absence or tardiness.
Submitting Attendance from the ClassroomTeachers will need to submit attendance on a regular basis. In some cases, teachers mayneed to make a submission even if all students are present. Teachers may need toresubmit attendance if mistakes are discovered or students arrive late. Guidelines forteacher submittals may need to be formalized and modified where appropriate.

JMC Online Software Page 14 of 81 Last update on 7/17/08
Online GradeBook
The JMC Online GradeBook provides teachers with the ability to maintain an electronicGradeBook completely over an IP network such as the Internet. Teachers may use theJMC’s standalone IP GradeBook or use a web browser such as Internet Explorer, Firefox,Safari, or Netscape to work with their Online GradeBooks over the Internet or schoolintranet. All the traditional JMC GradeBook features are present, from automatic classlists, easy assignment scoring, letter grade calculation, to reporting final term gradesimmediately to the office.
The basic tasks for the IP GradeBook software options are:-setting up the JMC Online Software to work with a web server-setting up teacher accounts and passwords-installing the IP GradeBook application on teacher computers-establishing access to the web server from the IP GradeBook-receiving grade submissions from teachers and processing them in the office
The basic tasks for the Online GradeBook software options are:-setting up the JMC Online Software to work with a web server-setting up teacher accounts and passwords-providing the web link for the Online GradeBook module-receiving grade submissions from teachers and processing them in the office
In the Office
Teachers must be assigned an account and a password under the Attendance-Staff-Teachers / Rooms option of the JMC Office Application. See Figure 8.
At the end of each term teachers post student grades much like they do with thetraditional JMC GradeBook. Office staff use the Grades-Entry-TGE/GradeBook Entryoption to process these grades. From the TGE/GradeBook Entry screen use the Teacherto Office - Online to automatically process submissions from Online GradeBooks.Process these grade files just as you would process grade files from a network GradesDrop folder.
In the GradeBook
Teachers can assess students in a variety of ways using JMC’s IP GradeBook. Theseassessments may be submitted to the office for reporting purposes. For more informationon JMC’s IP GradeBook, select the correct version from the download page of the JMCwebsite: http://jmcinc.com/software/jmcdl.html
JMC Online Software Page 15 of 81 Last update on 7/17/08
Online Office
The JMC Online Office module of the JMC Applications Suite provides office staff withthe ability to access a student's progress report information in real time via a webbrowser.
The basic tasks and reports for the online office software options are:-setting up the JMC Online Software to work with a web server-setting up office users and passwords-providing the web link for the Online Office module-updating progress reports by teachers-printing and/or viewing progress reports that have been posted by teachers
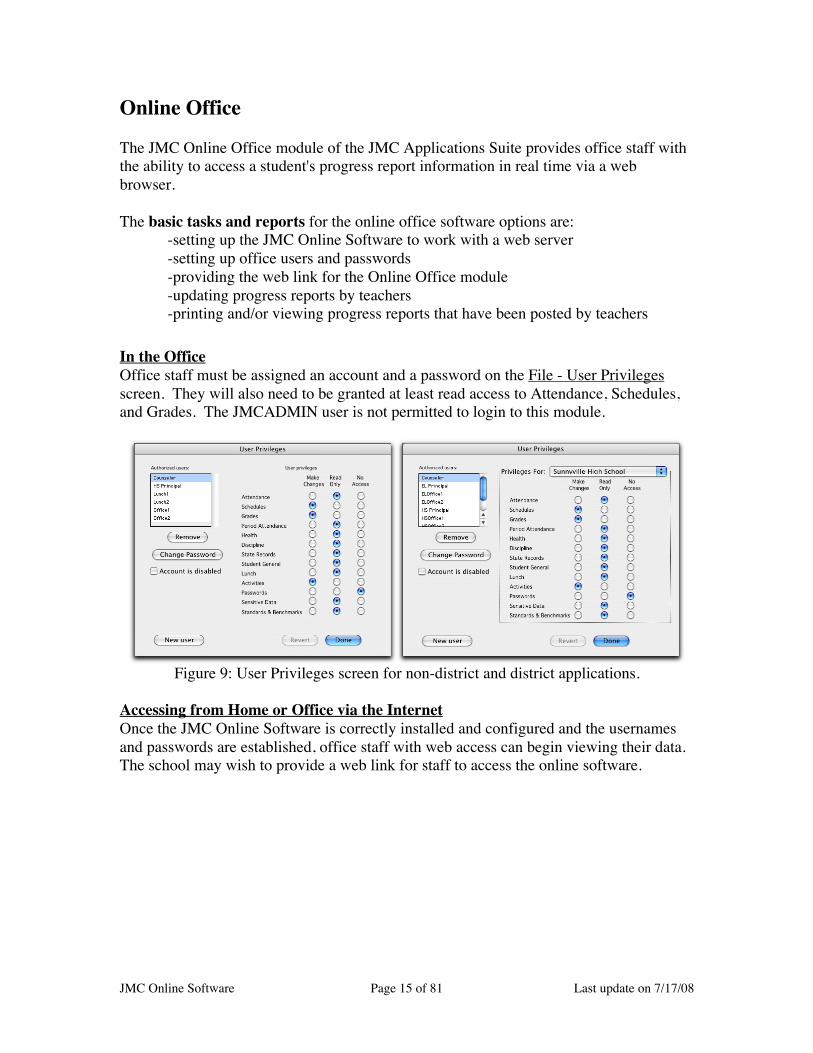
In the OfficeOffice staff must be assigned an account and a password on the File - User Privilegesscreen. They will also need to be granted at least read access to Attendance, Schedules,and Grades. The JMCADMIN user is not permitted to login to this module.
Figure 9: User Privileges screen for non-district and district applications.
Accessing from Home or Office via the InternetOnce the JMC Online Software is correctly installed and configured and the usernamesand passwords are established, office staff with web access can begin viewing their data.The school may wish to provide a web link for staff to access the online software.

JMC Online Software Page 16 of 81 Last update on 7/17/08
Online Homeroom
The JMC Online Attendance module of the JMC Applications Suite provides teacherswith the ability to access any of their advisee's progress report information in real timevia a web browser. They can also view/download a pdf file of missing assignments fortheir advisees.
The basic tasks and reports for the online homeroom software options are:-setting up the JMC Online Software to work with a web server-setting up teacher accounts and passwords-providing the web link for the Online Homeroom module-updating progress reports, assignments, and scores by teachers-printing and/or viewing progress reports-printing and/or viewing missing assignment reports
In the OfficeHomeroom teachers must be assigned as advisors to their homeroom students (advisees).This is accomplished in one of two ways; individually by selecting Edit – Edit StudentData and using the advisor menu OR for multiple students by selecting Attendance –Staff – Assign Advisees.
Accessing from Home or Office via the InternetOnce the JMC Online Software is correctly installed and configured and the usernamesand passwords are established, advisors with web access can begin viewing their data.The school may wish to provide a web link for advisors to access the online software.

JMC Online Software Page 17 of 81 Last update on 7/17/08
Technical Issues and Installation Instructions
This section is intended mainly for the technology coordinator or similar computerprofessional at the school district to help them get the web server and JMC OnlineSoftware running properly for the various online modules.
Background Information
Web serving softwareWe provide the JMC Online software to work with your choice of web serving software.You may be able to use the JMC Online software with your school's existing web server,however this is not required. It is easy to set up a computer with web serving softwarededicated to working with the JMC Online software. Two versions of the Onlinesoftware are available:
MacOSACGI: The original MacOS version of the Online software is delivered as anACGI (Asynchronous Common Gateway Interface) and works with most MacOSweb server software. Two commonly used MacOS web server software packagesare WebSTAR (commercial) and Quid Pro Quo (freeware).
CGI: As of 2006, a different version of the MacOS Online software is alsoavailable. In this setting, the ACGI is replaced by two new pieces of software: thesmall CGI and the Online Server software. These two new pieces of software willwork with your web server (Apache or WebSTAR) in the following way:
1. The user http request comes into the web server.2. The web server passes the request to the CGI.3. The CGI packages up the request in the SCGI protocol and
communicates with the JMC Online Server software program (runningon the same or on a different computer/server). This communication isover standard TCP/IP (you can choose the port number).
4. The Online Server software has all of the JMC business logic andhandles the request. It prepares an HTML response and returns it tothe CGI.
5. The CGI hands the response back over to the web server.6. The web server returns the response to the user.
Advantages of CGI over ACGI:1. The CGI works with Apache or WebSTAR (or any other CGI-capable
webserver) without additional software.2. The CGI can direct its SCGI-wrapped request to the Online Server
running on the same OR different machine. When using ACGI, thewebserver machine needs network file-sharing access to the JMC dataserver. With CGI, this is no longer necessary. The web server andCGI simply need TCP/IP access to the machine running the OnlineServer. The Online Server machine is the only machine needing

JMC Online Software Page 18 of 81 Last update on 7/17/08
network file-sharing access to the JMC data server. So feasibly youcan have the JMC Online Server inside the firewall and thewebserver/CGI outside the firewall and poke just a hole for incomingSCGI traffic on one port number. No file-sharing access is neededfrom outside the firewall (or DMZ), which neatly separates the webserving task from the application server task -- there is just the SCGItraffic over that TCP/IP port linking the tasks.
3. The CGI is scalable - you could put the CGI on multiple webserversand point them all at the same Online Server. In this way you canrelieve overworked web servers.
4. We are developing a Windows and Linux version of the CGI. Thiswould allow you to use any platform for your web server and still usea Mac for your Online Server.
WindowsThe Windows version of the Online software is an ISAPI server applicationimplemented as a Dynamic Link Library (DLL). This Internet Server Application(ISA) will work with the Internet Information Server (IIS) version 4 or higherbuilt into WindowsNT, Windows2000, and Windows2003 Server and shouldwork with any other ISAPI-compliant web server software.
Network ConsiderationsThe Online software resides on the web server. If the JMC data and Transcripts foldersare not on the web-server computer then the Online software requires network access tothe JMC data and Transcripts folders.
Public IP address or Private IP addressIf you want to use the Parent Access module you need a public IP address for your webserver so it will be visible on the Internet. If you don't want Parent Access or don'totherwise require public access to the Online software then you may choose to use aprivate or public IP address.
Web Browser RequirementsMost web browsers, such as Internet Explorer, Firefox, Safari, or Netscape can be usedfor accessing the JMC Online software. Version 3.0 of either Netscape or InternetExplorer web browsers should be acceptable; however, version 4.0 or higher isrecommended. Other browsers such as AOL or CompuServe may work, as well,depending on the version being used.
Note: The Online GradeBook uses Java and may require a newer browserversion. If you experience problems running the Online GradeBook werecommend updating your browser to a newer version. We have successfullytested the software back to version 4.76 of Netscape and version 4.5 of InternetExplorer.
JMC Online Software Page 19 of 81 Last update on 7/17/08
SSL in JMCSSL, short for Secure Sockets Layer, is a protocol for transmitting private documents viathe Internet.
To use SSL with you JMC Online Software you must first make your web server to becapable of supporting SSL. There are many ways this can be accomplished and chancesare that if you are reading this you have already taken care of this step. Otherwise,contact the technician or company that supports your server(s) for help with this step.
Once your web server supports SSL, you may utilize this protocol by modifying the URLyou use to login to the JMC Online Software. By convention, URLs that utilize an SSLconnection start with https:// instead of the http;//
For example, to access Online Parent Access using SSL, a parent might typehttps://192.168.1.1/JMC_CGI_XXYY.acgi?module=Parent
As another example, to access Online Attendance, a teacher might typehttps://192.168.1.1/JMC_CGI_XXYY.acgi
Note: In these examples, XXYY is the school year, such as 0607.
Similarly, if your school provides links for JMC Online Software on your school’swebsite, you may wish to provide a link for logging in using SSL.
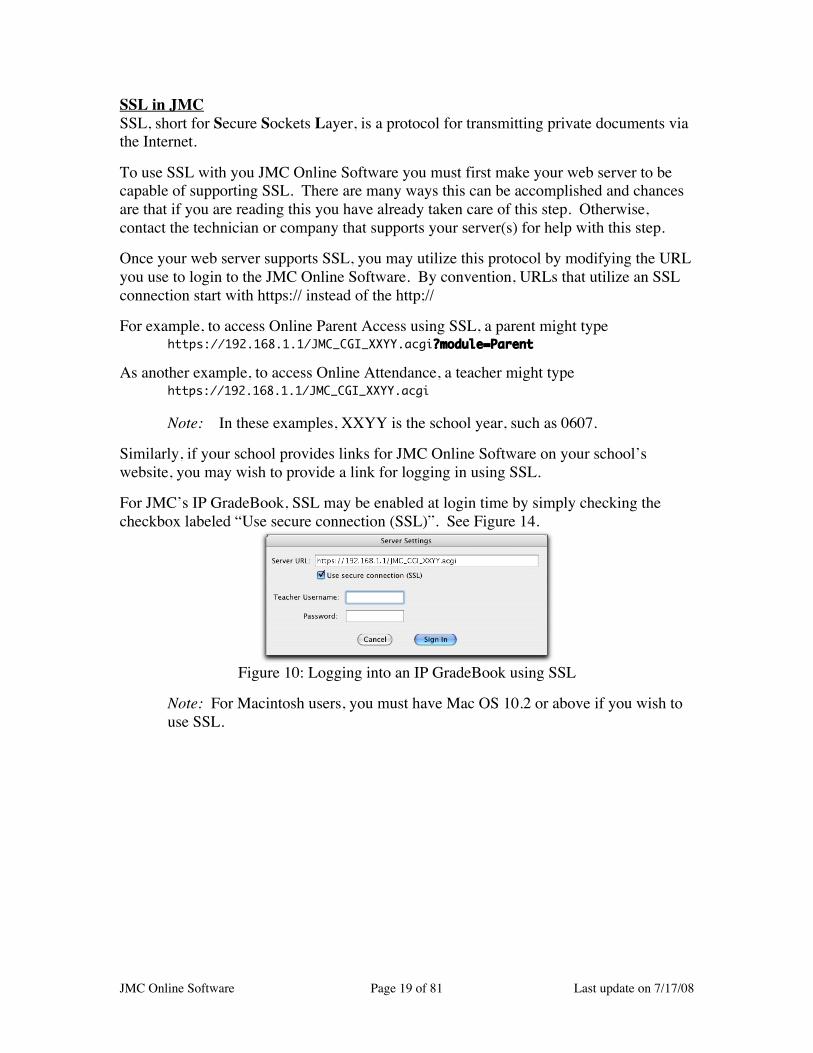
For JMC’s IP GradeBook, SSL may be enabled at login time by simply checking thecheckbox labeled “Use secure connection (SSL)”. See Figure 14.
Figure 10: Logging into an IP GradeBook using SSL
Note: For Macintosh users, you must have Mac OS 10.2 or above if you wish touse SSL.
JMC Online Software Page 20 of 81 Last update on 7/17/08
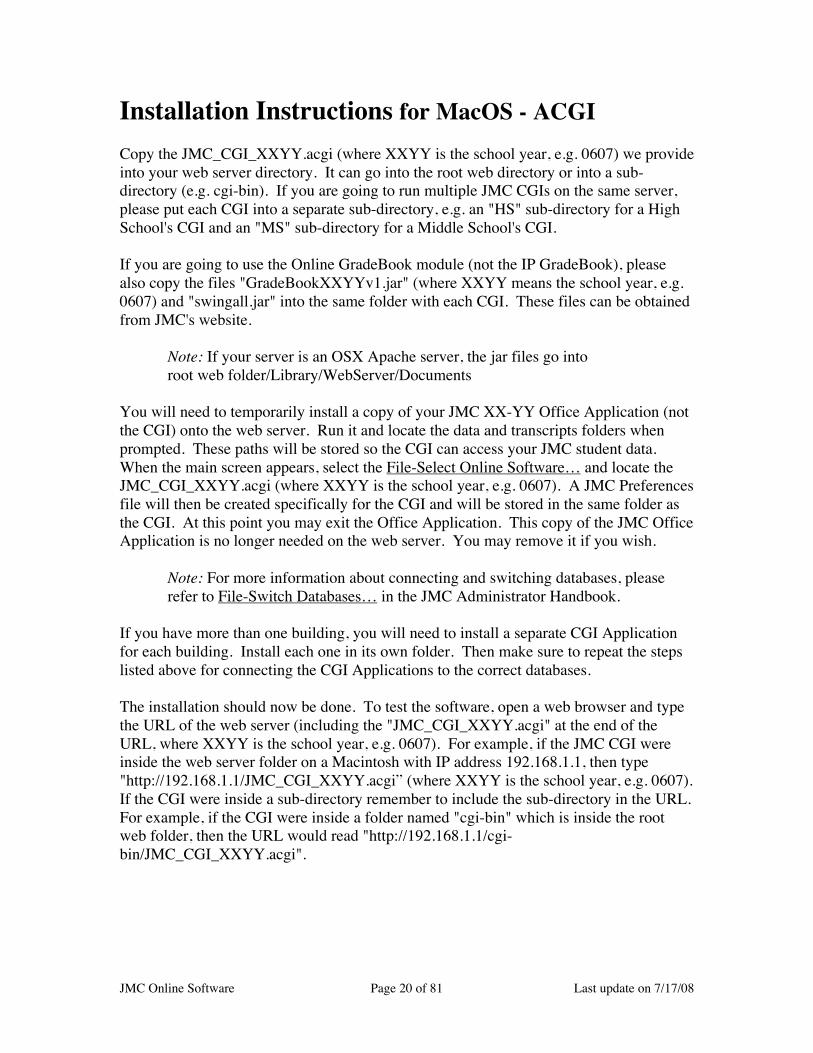
Installation Instructions for MacOS - ACGICopy the JMC_CGI_XXYY.acgi (where XXYY is the school year, e.g. 0607) we provideinto your web server directory. It can go into the root web directory or into a sub-directory (e.g. cgi-bin). If you are going to run multiple JMC CGIs on the same server,please put each CGI into a separate sub-directory, e.g. an "HS" sub-directory for a HighSchool's CGI and an "MS" sub-directory for a Middle School's CGI.
If you are going to use the Online GradeBook module (not the IP GradeBook), pleasealso copy the files "GradeBookXXYYv1.jar" (where XXYY means the school year, e.g.0607) and "swingall.jar" into the same folder with each CGI. These files can be obtainedfrom JMC's website.
Note: If your server is an OSX Apache server, the jar files go intoroot web folder/Library/WebServer/Documents
You will need to temporarily install a copy of your JMC XX-YY Office Application (notthe CGI) onto the web server. Run it and locate the data and transcripts folders whenprompted. These paths will be stored so the CGI can access your JMC student data.When the main screen appears, select the File-Select Online Software… and locate theJMC_CGI_XXYY.acgi (where XXYY is the school year, e.g. 0607). A JMC Preferencesfile will then be created specifically for the CGI and will be stored in the same folder asthe CGI. At this point you may exit the Office Application. This copy of the JMC OfficeApplication is no longer needed on the web server. You may remove it if you wish.
Note: For more information about connecting and switching databases, pleaserefer to File-Switch Databases… in the JMC Administrator Handbook.
If you have more than one building, you will need to install a separate CGI Applicationfor each building. Install each one in its own folder. Then make sure to repeat the stepslisted above for connecting the CGI Applications to the correct databases.
The installation should now be done. To test the software, open a web browser and typethe URL of the web server (including the "JMC_CGI_XXYY.acgi" at the end of theURL, where XXYY is the school year, e.g. 0607). For example, if the JMC CGI wereinside the web server folder on a Macintosh with IP address 192.168.1.1, then type"http://192.168.1.1/JMC_CGI_XXYY.acgi” (where XXYY is the school year, e.g. 0607).If the CGI were inside a sub-directory remember to include the sub-directory in the URL.For example, if the CGI were inside a folder named "cgi-bin" which is inside the rootweb folder, then the URL would read "http://192.168.1.1/cgi-bin/JMC_CGI_XXYY.acgi".

JMC Online Software Page 21 of 81 Last update on 7/17/08
Special Instructions for District-Level Online ACGI Setups
If you are using a JMC District Application and you have more than one building to setup online, make folders for each building in the JMC folder on your web server and thenput a copy of the district application CGI into each of the folders.
For example, if you wish to have online access for a junior high and senior high, createtwo folders in the cgi-bin folder called JH and SH. Copy the JMC_CGI_XXYY.acgi(where XXYY is the school year, e.g. 0607) into both folders.
Then, use the JMC District Application to attach each of these CGIs to the correct JMC“database”. First, log into the District Application for the senior high, then select File –Select Online Software… and navigate to the copy of the JMC_CGI_XXYY.acgi in theSH folder and select it. Do the same types of steps for the junior high by logging into theJMC District Application for the junior high and then selecting File – Select OnlineSoftware… to navigate to the copy of the JMC_CGI_XXYY.acgi in the JH folder.
Your users will then need to log in to the JMC Online software using slightly longerURLs. For example, the URL for the high school might look something likehttp://192.168.1.1/cgi-bin/SH/JMC_CGI_XXYY.acgi (where XXYY is the school year,e.g. 0607).
Note theadditional SHlevel in thepathname.
JMC Online Software Page 22 of 81 Last update on 7/17/08
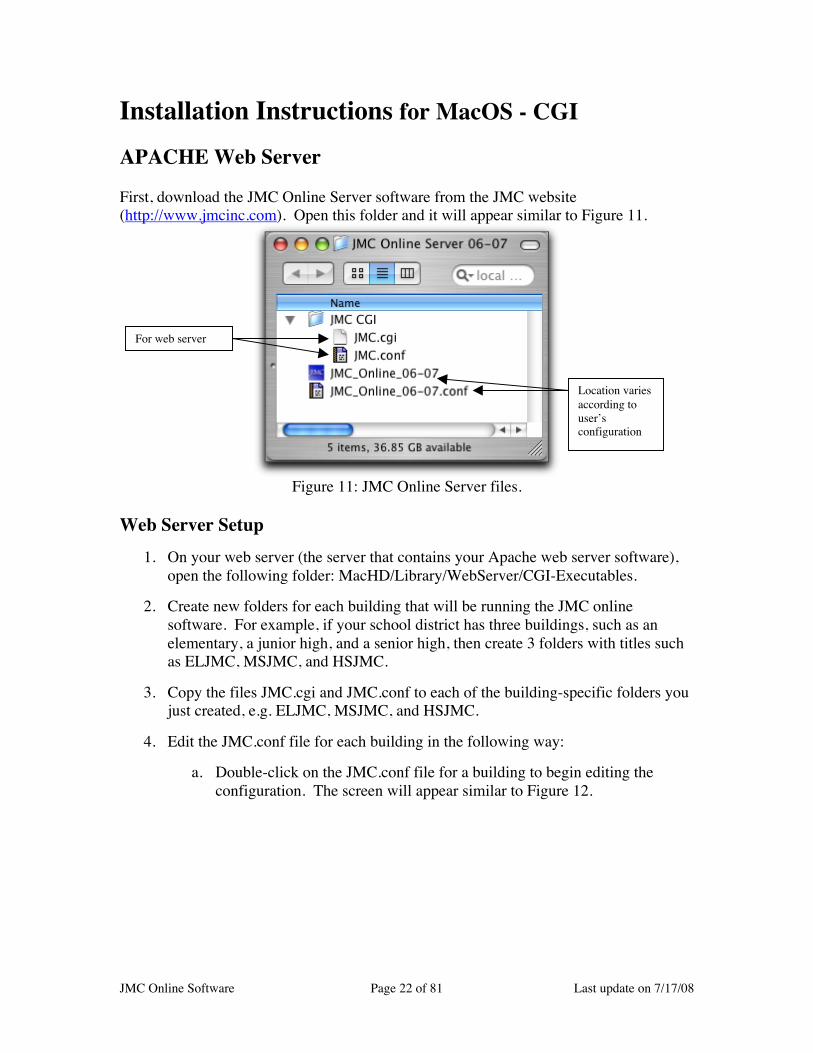
Installation Instructions for MacOS - CGI
APACHE Web Server
First, download the JMC Online Server software from the JMC website(http://www.jmcinc.com). Open this folder and it will appear similar to Figure 11.
Figure 11: JMC Online Server files.
Web Server Setup1. On your web server (the server that contains your Apache web server software),
open the following folder: MacHD/Library/WebServer/CGI-Executables.
2. Create new folders for each building that will be running the JMC onlinesoftware. For example, if your school district has three buildings, such as anelementary, a junior high, and a senior high, then create 3 folders with titles suchas ELJMC, MSJMC, and HSJMC.
3. Copy the files JMC.cgi and JMC.conf to each of the building-specific folders youjust created, e.g. ELJMC, MSJMC, and HSJMC.
4. Edit the JMC.conf file for each building in the following way:
a. Double-click on the JMC.conf file for a building to begin editing theconfiguration. The screen will appear similar to Figure 12.
For web server
Location variesaccording touser’sconfiguration
JMC Online Software Page 23 of 81 Last update on 7/17/08
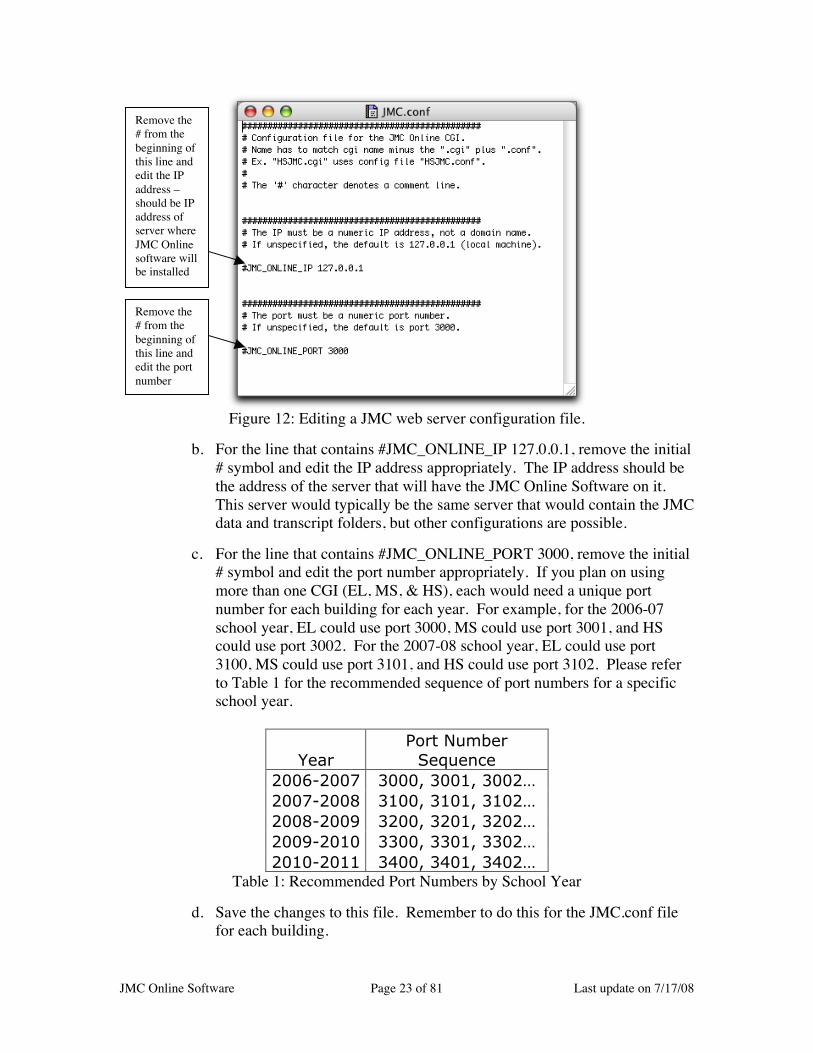
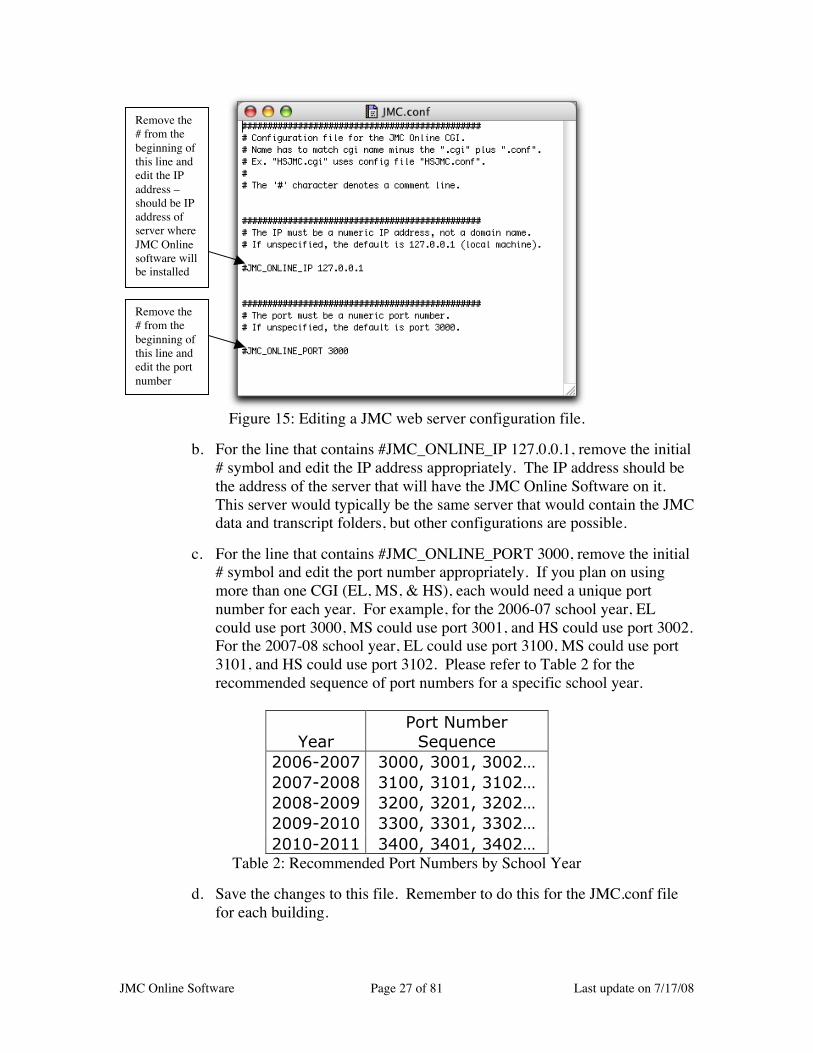
Figure 12: Editing a JMC web server configuration file.
b. For the line that contains #JMC_ONLINE_IP 127.0.0.1, remove the initial# symbol and edit the IP address appropriately. The IP address should bethe address of the server that will have the JMC Online Software on it.This server would typically be the same server that would contain the JMCdata and transcript folders, but other configurations are possible.
c. For the line that contains #JMC_ONLINE_PORT 3000, remove the initial# symbol and edit the port number appropriately. If you plan on usingmore than one CGI (EL, MS, & HS), each would need a unique portnumber for each building for each year. For example, for the 2006-07school year, EL could use port 3000, MS could use port 3001, and HScould use port 3002. For the 2007-08 school year, EL could use port3100, MS could use port 3101, and HS could use port 3102. Please referto Table 1 for the recommended sequence of port numbers for a specificschool year.
YearPort Number
Sequence2006-2007 3000, 3001, 3002…2007-2008 3100, 3101, 3102…2008-2009 3200, 3201, 3202…2009-2010 3300, 3301, 3302…2010-2011 3400, 3401, 3402…
Table 1: Recommended Port Numbers by School Year
d. Save the changes to this file. Remember to do this for the JMC.conf filefor each building.
Remove the# from thebeginning ofthis line andedit the IPaddress –should be IPaddress ofserver whereJMC Onlinesoftware willbe installed
Remove the# from thebeginning ofthis line andedit the portnumber

JMC Online Software Page 24 of 81 Last update on 7/17/08
Online Server Setup1. On your online server (the machine that is to have the Online Server software
running on it – needs to stay running all of the time), open the following folder:Mac HD – Applications.
2. Create new folders for each building that will be running the JMC onlinesoftware. For example, if your school district has three buildings, such as anelementary school, a middle school, and a high school, then create 3 folders withtitles such as ELJMC, MSJMC, and HSJMC.
3. Copy the files JMC_Online_XX-YY and JMC_Online_XX-YY.conf (where XX-YY is the school year, e.g. 06-07) to each of the building-specific folders you justcreated, e.g. ELJMC, MSJMC, and HSJMC.
4. Edit the JMC_Online_XX-YY.conf file for each building in the following way:
a. Double-click on the JMC_Online_XX-YY.conf file for a building to beginediting the configuration. The screen will appear similar to Figure 13.
Figure 13: Editing a JMC Online server configuration file.
b. For the line that contains #JMC_ONLINE_PORT 3000, remove the initial# symbol and edit the port number appropriately. If you plan on usingmore than one CGI (EL, MS, & HS), you would need to use a unique portnumber for each building for each year. Please refer to Table 1 for therecommended port numbers for each school year.
Note: It is critical that the port numbers specified in theJMC_Online_XX-YY.conf match up with the port numbers in theJMC.conf files for the corresponding buildings. For example, if theport number in the JMC_Online_XX-YY.conf file the MS building is3001, then the port number in the JMC.conf file for the MS buildingmust also be 3001. If these port numbers do not match up correctly,the web server may end up serving up data for the wrong building.
c. Save the changes to this file. Remember to do this for theJMC_Online_XX-YY.conf file for each building.
Remove the# from thebeginning ofthis line andedit the portnumber

JMC Online Software Page 25 of 81 Last update on 7/17/08
5. To create and configure a preferences file for each JMC_Online_XX-YYapplication:
a. Temporarily install a copy of your JMC XX-YY Office Application (not theCGI or Online software) onto the JMC Online server.
b. Run the JMC Office Application and locate the data and transcripts folderswhen prompted. These paths will be stored so the JMC Online software canaccess your JMC student data.
Note: For more information about connecting and switching databases, seeFile-Switch Databases… in the JMC Administrator Handbook.
c. When the main screen appears, select the File-Select Online Software… andlocate the JMC_Online_XXYY (where XXYY is the school year, e.g.0607). A JMC Preferences file will then be created specifically for the JMCOnline software and will be stored in the same folder as the JMC Onlinesoftware.
d. At this point you may exit the JMC Office Application. This copy of theJMC Office Application is no longer needed on the JMC Online server.You may remove it if you wish.
6. If you are going to use the Online GradeBook module (not the IP GradeBook),please also copy the files "GradeBookXXYYv1.jar" (where XXYY means theschool year, e.g. 0607) and "swingall.jar" into the root webfolder/Library/WebServer/Documents. These files can be obtained from sameOnline Software folder that you just downloaded – the same folder that containedthe CGI. Occasionally, these files will not be present in your download – restassured that they will be available in a future download. Check with JMC foravailability.
7. To verify the Online Software and CGI setup for a specific building, you may runthe JMC Online XX-YY application. Once it is running, the name of the schoolbuilding for the attached database will be displayed at the top of the main screenof the JMC Online XX-YY software.
8. To verify web browser access to the data for a specific building, type in the webserver IP address and pathname as follows:
http://AAA.BBB.CCC.DDD/cgi-bin/MSJMC/JMC0809.cgiwhere AAA.BBB.CCC.DDD is the IP address of the web server and the MSJMCis specified for the MS login (must include the folder for the appropriate buildingin the pathname).
Note: IMPORTANT – The JMC Online XX-YY software must stay runningin order for it to handle user requests. It may be added to the startup items fora computer or server to help ensure that the software gets started up everytime the machine is booted up.
JMC Online Software Page 26 of 81 Last update on 7/17/08
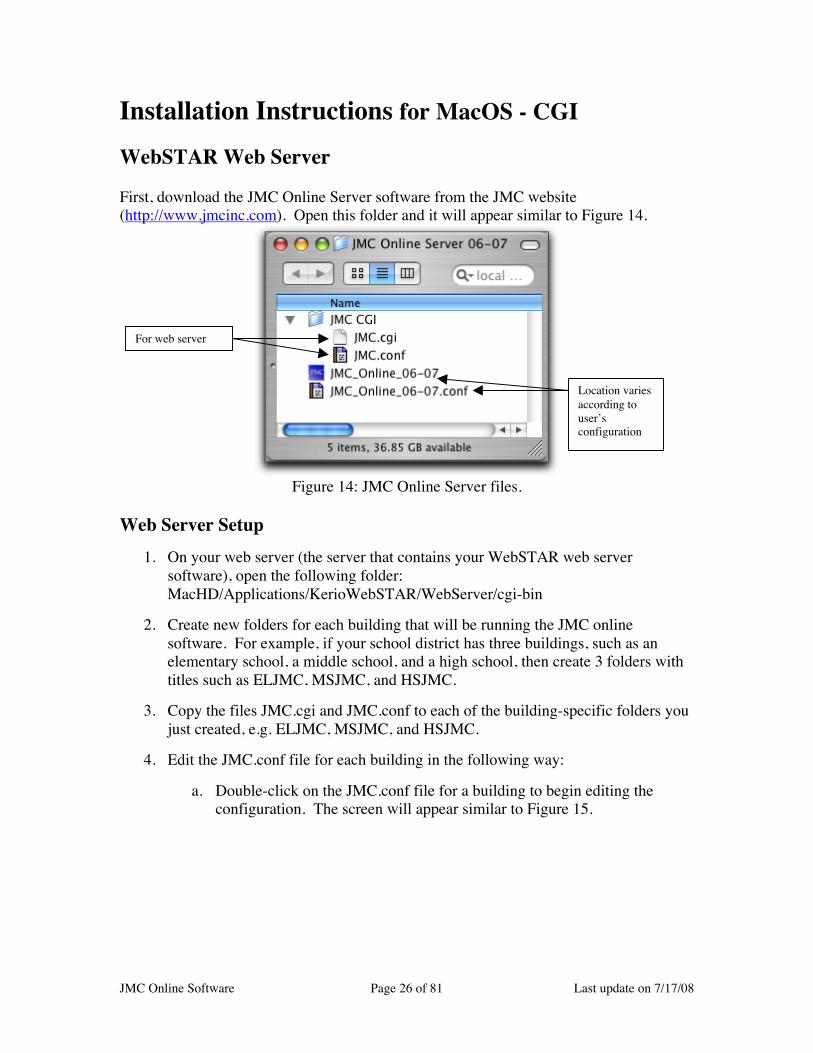
Installation Instructions for MacOS - CGI
WebSTAR Web Server
First, download the JMC Online Server software from the JMC website(http://www.jmcinc.com). Open this folder and it will appear similar to Figure 14.
Figure 14: JMC Online Server files.
Web Server Setup1. On your web server (the server that contains your WebSTAR web server
software), open the following folder:MacHD/Applications/KerioWebSTAR/WebServer/cgi-bin
2. Create new folders for each building that will be running the JMC onlinesoftware. For example, if your school district has three buildings, such as anelementary school, a middle school, and a high school, then create 3 folders withtitles such as ELJMC, MSJMC, and HSJMC.
3. Copy the files JMC.cgi and JMC.conf to each of the building-specific folders youjust created, e.g. ELJMC, MSJMC, and HSJMC.
4. Edit the JMC.conf file for each building in the following way:
a. Double-click on the JMC.conf file for a building to begin editing theconfiguration. The screen will appear similar to Figure 15.
For web server
Location variesaccording touser’sconfiguration
JMC Online Software Page 27 of 81 Last update on 7/17/08
Figure 15: Editing a JMC web server configuration file.
b. For the line that contains #JMC_ONLINE_IP 127.0.0.1, remove the initial# symbol and edit the IP address appropriately. The IP address should bethe address of the server that will have the JMC Online Software on it.This server would typically be the same server that would contain the JMCdata and transcript folders, but other configurations are possible.
c. For the line that contains #JMC_ONLINE_PORT 3000, remove the initial# symbol and edit the port number appropriately. If you plan on usingmore than one CGI (EL, MS, & HS), each would need a unique portnumber for each year. For example, for the 2006-07 school year, ELcould use port 3000, MS could use port 3001, and HS could use port 3002.For the 2007-08 school year, EL could use port 3100, MS could use port3101, and HS could use port 3102. Please refer to Table 2 for therecommended sequence of port numbers for a specific school year.
YearPort Number
Sequence2006-2007 3000, 3001, 3002…2007-2008 3100, 3101, 3102…2008-2009 3200, 3201, 3202…2009-2010 3300, 3301, 3302…2010-2011 3400, 3401, 3402…
Table 2: Recommended Port Numbers by School Year
d. Save the changes to this file. Remember to do this for the JMC.conf filefor each building.
Remove the# from thebeginning ofthis line andedit the IPaddress –should be IPaddress ofserver whereJMC Onlinesoftware willbe installed
Remove the# from thebeginning ofthis line andedit the portnumber

JMC Online Software Page 28 of 81 Last update on 7/17/08
Online Server Setup1. On your online server (the machine that is to have the Online Server software
running on it – needs to stay running all of the time), open the following folder:Mac HD – Applications.
2. Create new folders for each building that will be running the JMC onlinesoftware. For example, if your school district has three buildings, such as anelementary school, a middle school, and a high school, then create 3 folders withtitles such as ELJMC, MSJMC, and HSJMC.
3. Copy the files JMC_Online_XX-YY and JMC_Online_XX-YY.conf (where XX-YY is the school year, e.g. 06-07) to each of the building-specific folders you justcreated, e.g. ELJMC, MSJMC, and HSJMC.
4. Edit the JMC_Online_XX-YY.conf file for each building in the following way:
a. Double-click on the JMC_Online_XX-YY.conf file for a building to beginediting the configuration. The screen will appear similar to Figure 16.
Figure 16: Editing a JMC Online server configuration file.
b. For the line that contains #JMC_ONLINE_PORT 3000, remove the initial# symbol and edit the port number appropriately. If you plan on usingmore than one CGI (EL, MS, & HS), you would need to use a unique portnumber for each building for each year. Please refer to Table 2 for therecommended port numbers for each school year.
Note: It is critical that the port numbers specified in theJMC_Online_XX-YY.conf match up with the port numbers in theJMC.conf files for the corresponding buildings. For example, if theport number in the JMC_Online_XX-YY.conf file the MS building is3001, then the port number in the JMC.conf file for the MS buildingmust also be 3001. If these port numbers do not match up correctly,the web server may end up serving up data for the wrong building.
c. Save the changes to this file. Remember to do this for theJMC_Online_XX-YY.conf file for each building.
Remove the# from thebeginning ofthis line andedit the portnumber
JMC Online Software Page 29 of 81 Last update on 7/17/08
5. To create and configure a preferences file for each JMC_Online_XX-YYapplication:
a. Temporarily install a copy of your JMC XX-YY Office Application (notthe CGI or Online software) onto the JMC Online server.
b. Run the JMC Office Application and locate the data and transcripts folderswhen prompted. These paths will be stored so the JMC Online softwarecan access your JMC student data.
Note: For more information about connecting and switching databases,see File-Switch Databases… in the JMC Administrator Handbook.
c. When the main screen appears, select the File-Select Online Software…and locate JMC_Online_XXYY (where XXYY is the school year, e.g.0607) in the appropriate folder within the Applications folder on yourOnline Server’s hard drive. A JMC Preferences file will then be createdspecifically for the specified copy of the JMC Online software and will bestored in the same folder as the JMC Online software.
d. At this point you may exit the JMC Office Application. This copy of theJMC Office Application is no longer needed on the JMC Online server.You may remove it if you wish.
6. If you are going to use the Online GradeBook module (not the IP GradeBook),please also copy the files "GradeBookXXYYv1.jar" (where XXYY means theschool year, e.g. 0607) and "swingall.jar" into the same folder with each CGI onthe web server. These files can be obtained from same Online Software folderthat you just downloaded – the same folder that contained the CGI. Occasionally,these files will not be present in your download – rest assured that they will beavailable in a future download. Check with JMC for availability.
7. To verify the Online Software and CGI setup for a specific building, you may runthe JMC Online XX-YY application. Once it is running, the name of the schoolbuilding for the attached database will be displayed at the top of the main screenof the JMC Online XX-YY software.
8. To verify web browser access to the data for a specific building, type in the webserver IP address and pathname as follows:
http://AAA.BBB.CCC.DDD/cgi-bin/MSJMC/JMC.cgi
where AAA.BBB.CCC.DDD is the IP address of the web server and the MSJMCis specified for the MS login (must include the folder for the appropriate buildingin the pathname).
Note: IMPORTANT – The JMC Online XX-YY software must stayrunning in order for it to handle user requests. It may be added to thestartup items for a Macintosh computer or server to help ensure that thesoftware gets started up every time the machine is booted up.
JMC Online Software Page 30 of 81 Last update on 7/17/08
Special Instructions for District-Level Online CGI Setups
If you are using a JMC District Application and you have more than one building to setup online, make folders for each building in the JMC folder on your web server and thenput a copy of the district application CGI into each of the folders.
For example, if you wish to have online access for an elementary, middle school, andhigh school, create three folders in the cgi-bin folder called ELJMC, MSJMC, & HSJMC.Copy the JMC_Online_XXYY (where XXYY is the school year, e.g. 0607) into eachfolder.
Then, use the JMC District Application to attach each of these programs to the correctJMC “database”. First, log into the District Application for the elementary school, thenselect File – Select Online Software… and navigate to the copy of theJMC_Online_XXYY in the ELJMC folder and select it. Do the same types of steps forthe other buildings by logging into the JMC District Application for each building andthen selecting File – Select Online Software… to navigate to the copy of theJMC_Online_XXYY in the appropriate folder.
Your users will then need to log in to the JMC Online software using slightly longerURLs. For example, the URL for the middle school might look something like
http://AAA.BBB.CCC.DDD/cgi-bin/MSJMC/JMC.cgi
where AAA.BBB.CCC.DDD is the IP addressof the web server and the MSJMC is specifiedfor the MS login (must include the folder for theappropriate building in the pathname).
With either the district or non-district databases, the port numbers must be set in theconfiguration files for each building and these port numbers must match in thecorresponding configuration files for each building. Please refer to the previous sectionsfor setting port numbers in the configuration files (Figures 2 & 3 for Apache servers,Figures 5 & 6 for WebSTAR servers).
Note theadditionalMSJMC level inthe pathname.
JMC Online Software Page 31 of 81 Last update on 7/17/08
Installation Instructions for Windows
IIS 4 (WindowsNT server)From JMC’s website, download the Online Software for the appropriate school year.Included in this download will be the JMC_CGI_XXYY.dll (where XXYY is the schoolyear, e.g. 0607). We will refer to this file henceforth as the DLL.
Copy the DLL into your web server directory. To do this, go to the Start Menu on yourweb server computer and select My Computer, then navigate to C:/InetPub/wwwroot.Inside this subdirectory, create a folder and title it JMC, then copy the DLL file into theJMC directory. This new JMC folder this will be a root web directory or subdirectory.
If you are going to run multiple JMC DLLs on the same server, you will want to put eachDLL into a separate subdirectory. For example, an "HS" subdirectory for a High School'sDLL, an "MS" subdirectory for a Middle School's DLL, etc. The pathname for the HighSchool’s DLL would therefore be C:/InetPub/wwwroot/JMC/HS/JMC_CGI_XXYY.dll(where XXYY is the school year, e.g. 0607).
If you are going to use the Online GradeBook module (not the IP GradeBook), pleasealso copy the files "GradeBookXXYYv1.jar" (where XXYY means the school year, e.g.0607) and "swingall.jar" into the same folder with each DLL. These files can be obtainedfrom same Online Software folder that you just downloaded – the same folder thatcontained the DLL. Occasionally, these files will not be present in your download – restassured that they will be available in a future download. Check with JMC foravailability.
You will need to temporarily install a copy of your JMC XX-YY Office Application (notthe DLL) onto the web server. Run it and locate the data and transcripts folders whenprompted (DO NOT USE MAPPED DRIVES). These paths will be stored so the DLLcan access your JMC student data. When the main screen appears, select the File-SelectOnline Software… and locate the JMC_CGI_XXYY.dll (where XXYY is the schoolyear, e.g. 0607) in the subdirectory that you just created. A JMC Preferences file willthen be created specifically for this DLL and will be stored in the same subdirectory asthe DLL.
Note: If your JMC data folder is on a machine other than the web server, you willneed to point the temporary copy of the JMC XX-YY Office Application (not theDLL) to this folder by mapping a network drive or through My Network Place.To do this it is necessary to create a matching username and password on eachmachine with read-write access to the JMC data folder and the DLL. Werecommend that you create a new user specifically for JMC for this purpose
At this point you may exit the Office Application. This copy of the JMC OfficeApplication is no longer needed on the web server. You may remove it if you wish.
Note: For more information about connecting and switching databases, pleaserefer to File-Switch Databases… in the JMC Administrator Handbook.
JMC Online Software Page 32 of 81 Last update on 7/17/08
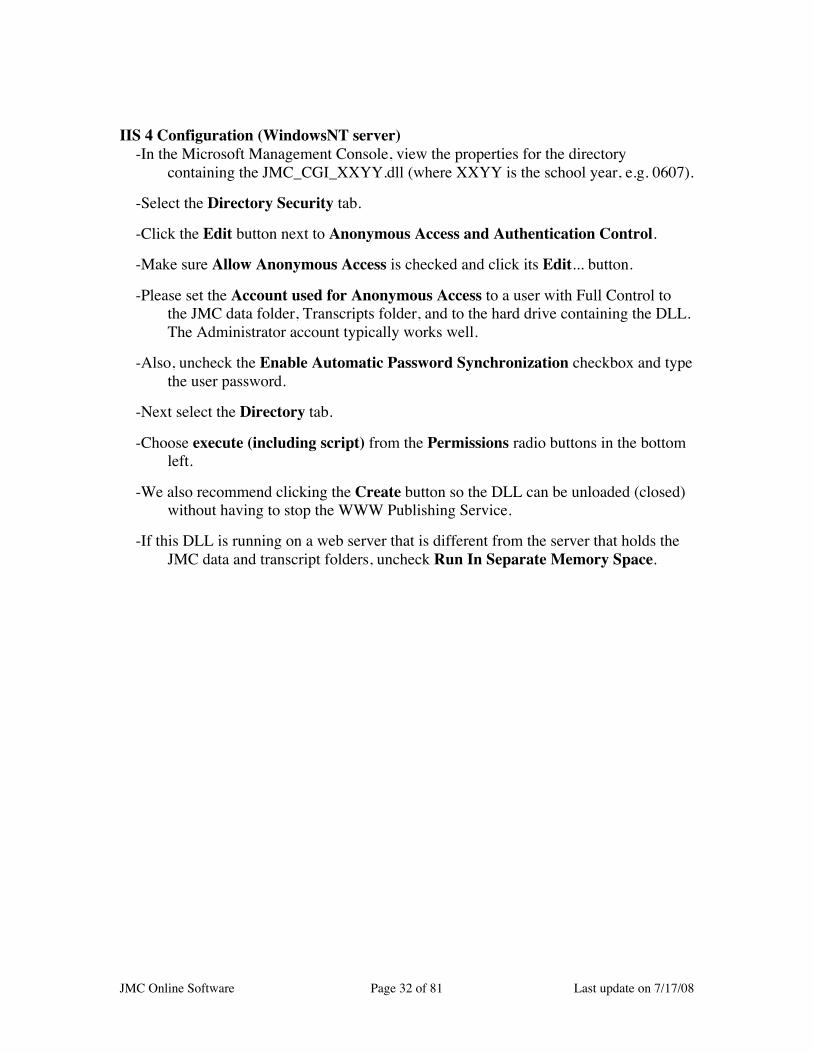
IIS 4 Configuration (WindowsNT server)-In the Microsoft Management Console, view the properties for the directory
containing the JMC_CGI_XXYY.dll (where XXYY is the school year, e.g. 0607).
-Select the Directory Security tab.
-Click the Edit button next to Anonymous Access and Authentication Control.
-Make sure Allow Anonymous Access is checked and click its Edit... button.
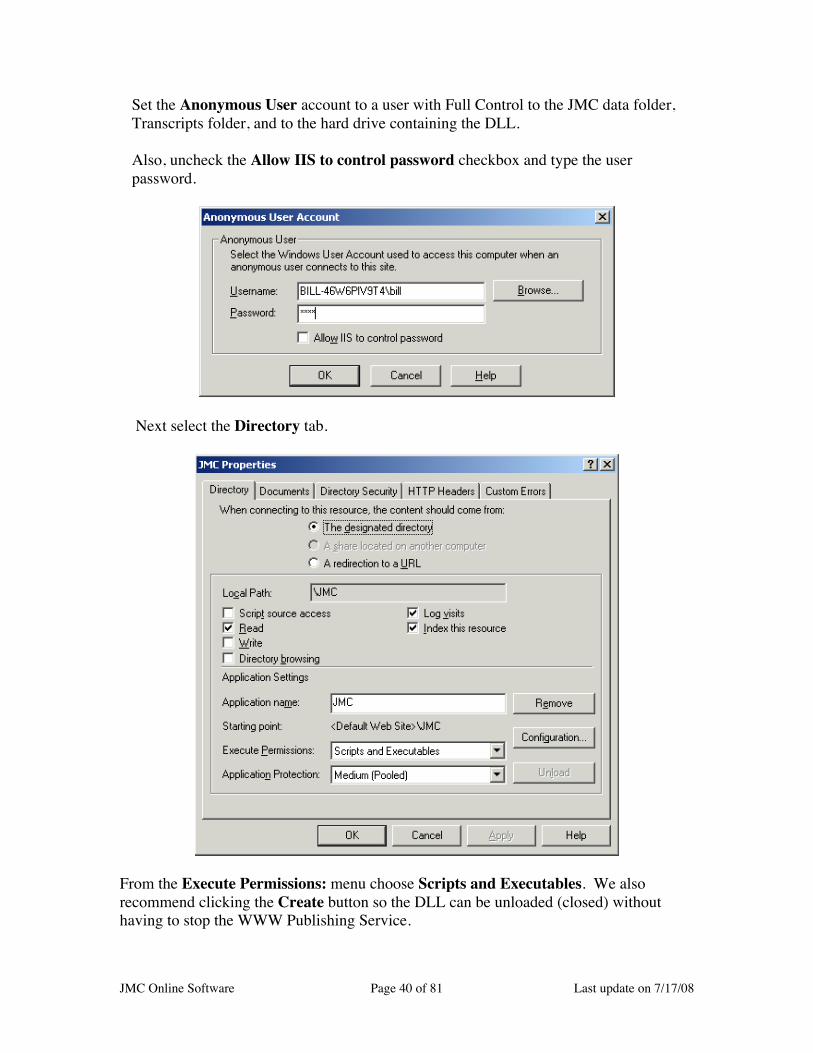
-Please set the Account used for Anonymous Access to a user with Full Control tothe JMC data folder, Transcripts folder, and to the hard drive containing the DLL.The Administrator account typically works well.
-Also, uncheck the Enable Automatic Password Synchronization checkbox and typethe user password.
-Next select the Directory tab.
-Choose execute (including script) from the Permissions radio buttons in the bottomleft.
-We also recommend clicking the Create button so the DLL can be unloaded (closed)without having to stop the WWW Publishing Service.
-If this DLL is running on a web server that is different from the server that holds theJMC data and transcript folders, uncheck Run In Separate Memory Space.

JMC Online Software Page 33 of 81 Last update on 7/17/08
IIS 5 (Windows2000 Server)
From JMC’s website, download the Online Software for the appropriate school year.Included in this download will be the JMC_CGI_XXYY.dll (where XXYY is the schoolyear, e.g. 0607). We will refer to this file henceforth as the DLL.
Copy the DLL into your web server directory. To do this, go to the Start Menu on yourweb server computer and select My Computer, then navigate to C:/InetPub/wwwroot.Inside this subdirectory, create a folder and title it JMC, then copy the DLL file into theJMC directory. This new JMC folder this will be a root web directory or subdirectory.
If you are going to run multiple JMC DLLs on the same server, you will want to put eachDLL into a separate subdirectory. For example, an "HS" subdirectory for a High School'sDLL, an "MS" subdirectory for a Middle School's DLL, etc. The pathname for the HighSchool’s DLL would therefore be C:/InetPub/wwwroot/JMC/HS/JMC_CGI_XXYY.dll(where XXYY is the school year, e.g. 0607).
If you are going to use the Online GradeBook module (not the IP GradeBook), pleasealso copy the files "GradeBookXXYYv1.jar" (where XXYY means the school year, e.g.0607) and "swingall.jar" into the same folder with each DLL. . These files can beobtained from same Online Software folder that you just downloaded – the same folderthat contained the DLL. Occasionally, these files will not be present in your download –rest assured that they will be available in a future download. Check with JMC foravailability.
You will need to temporarily install a copy of your JMC XX-YY Office Application (notthe DLL) onto the web server. Run it and locate the data and transcripts folders whenprompted (DO NOT USE MAPPED DRIVES). These paths will be stored so the DLLcan access your JMC student data. When the main screen appears, select the File-SelectOnline Software… and locate the JMC_CGI_XXYY.dll (where XXYY is the schoolyear, e.g. 0607) in the subdirectory that you just created. A JMC Preferences file willthen be created specifically for this DLL and will be stored in the same subdirectory asthe DLL.
Note: If your JMC data folder is on a machine other than the web server, you willneed to point the temporary copy of the JMC XX-YY Office Application (not theDLL) to this folder by mapping a network drive or through My Network Place.To do this it is necessary to create a matching username and password on eachmachine with read-write access to the JMC data folder and the DLL. Werecommend that you create a new user specifically for JMC for this purpose
At this point you may exit the Office Application. This copy of the JMC OfficeApplication is no longer needed on the web server. You may remove it if you wish.
Note: For more information about connecting and switching databases, pleaserefer to File-Switch Databases… in the JMC Administrator Handbook.
JMC Online Software Page 34 of 81 Last update on 7/17/08
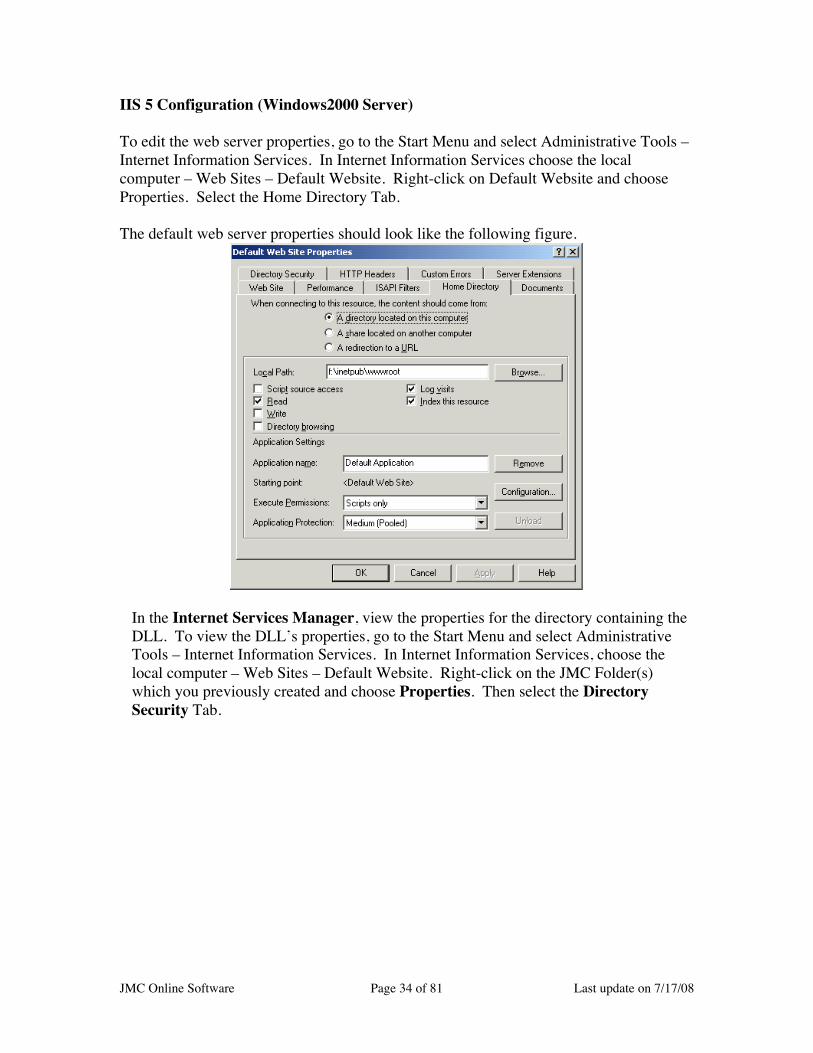
IIS 5 Configuration (Windows2000 Server)
To edit the web server properties, go to the Start Menu and select Administrative Tools –Internet Information Services. In Internet Information Services choose the localcomputer – Web Sites – Default Website. Right-click on Default Website and chooseProperties. Select the Home Directory Tab.
The default web server properties should look like the following figure.
In the Internet Services Manager, view the properties for the directory containing theDLL. To view the DLL’s properties, go to the Start Menu and select AdministrativeTools – Internet Information Services. In Internet Information Services, choose thelocal computer – Web Sites – Default Website. Right-click on the JMC Folder(s)which you previously created and choose Properties. Then select the DirectorySecurity Tab.

JMC Online Software Page 35 of 81 Last update on 7/17/08
Click the Edit button next to Anonymous access and authentication control.
Make sure Anonymous access is checked and click its Edit... button.
Set the Anonymous User account to a user with Full Control to the JMC data folder,Transcripts folder, and to the hard drive containing the DLL.
JMC Online Software Page 36 of 81 Last update on 7/17/08
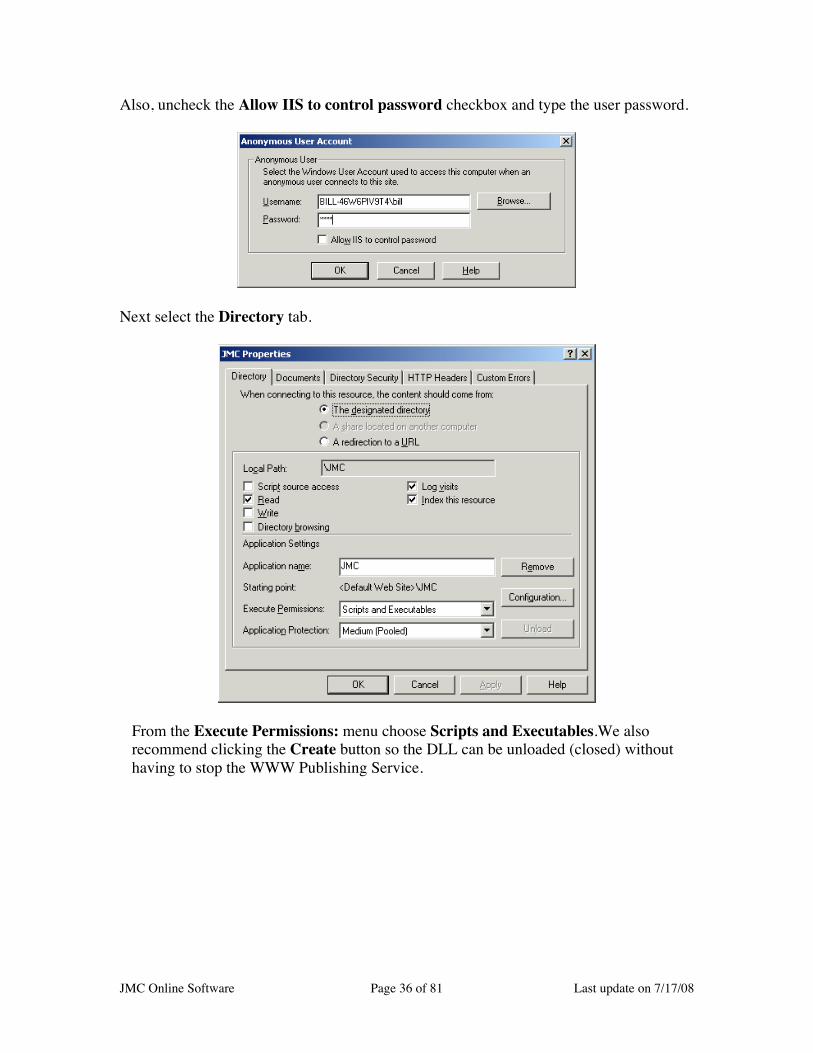
Also, uncheck the Allow IIS to control password checkbox and type the user password.
Next select the Directory tab.
From the Execute Permissions: menu choose Scripts and Executables.We alsorecommend clicking the Create button so the DLL can be unloaded (closed) withouthaving to stop the WWW Publishing Service.
JMC Online Software Page 37 of 81 Last update on 7/17/08
IIS 6 (Windows2003 Server)
From JMC’s website, download the Online Software for the appropriate school year.Included in this download will be the JMC_CGI_XXYY.dll (where XXYY is the schoolyear, e.g. 0607). We will refer to this file henceforth as the DLL.
Copy the DLL into your web server directory. To do this, go to the Start Menu on yourweb server computer and select My Computer, then navigate to C:/InetPub/wwwroot.Inside this subdirectory, create a folder and title it JMC, then copy the DLL file into theJMC directory. This new JMC folder this will be a root web directory or subdirectory.
If you are going to run multiple JMC DLLs on the same server, you will want to put eachDLL into a separate subdirectory. For example, an "HS" subdirectory for a High School'sDLL, an "MS" subdirectory for a Middle School's DLL, etc. The pathname for the HighSchool’s DLL would therefore be C:/InetPub/wwwroot/JMC/HS/JMC_CGI_XXYY.dll(where XXYY is the school year, e.g. 0607).
If you are going to use the Online GradeBook module (not the IP GradeBook), pleasealso copy the files "GradeBookXXYYv1.jar" (where XXYY means the school year, e.g.0607) and "swingall.jar" into the same folder with each DLL. These files can be obtainedfrom same Online Software folder that you just downloaded – the same folder thatcontained the DLL.
You will need to temporarily install a copy of your JMC XX-YY Office Application (notthe DLL) onto the web server. Run it and locate the data and transcripts folders whenprompted (DO NOT USE MAPPED DRIVES). These paths will be stored so the DLLcan access your JMC student data. When the main screen appears, select the File-SelectOnline Software… and locate the JMC_CGI_XXYY.dll (where XXYY is the schoolyear, e.g. 0607) in the subdirectory that you just created. A JMC Preferences file willthen be created specifically for this DLL and will be stored in the same subdirectory asthe DLL.
Note: If your JMC data folder is on a machine other than the web server, you willneed to point the temporary copy of the JMC XX-YY Office Application (not theDLL) to this folder by mapping a network drive or through My Network Place.To do this it is necessary to create a matching username and password on eachmachine with read-write access to the JMC data folder and the DLL. Werecommend that you create a new user specifically for JMC for this purpose
At this point you may exit the Office Application. This copy of the JMC OfficeApplication is no longer needed on the web server. You may remove it if you wish.
Note: For more information about connecting and switching databases, pleaserefer to File-Switch Databases… in the JMC Administrator Handbook.

JMC Online Software Page 38 of 81 Last update on 7/17/08
IIS 6 Configuration (Windows2003 Server)
To edit the web server properties, go to the Start Menu and select Administrative Tools –Internet Information Services. In Internet Information Services choose the localcomputer – Web Sites – Default Website. Right-click on Default Website and chooseProperties. Select the Home Directory Tab.
The default web server properties should look like the following figure.
In the Internet Services Manager, view the properties for the directory containing theDLL. To view the DLL’s properties, go to the Start Menu and select AdministrativeTools – Internet Information Services. In Internet Information Services, choose thelocal computer – Web Sites – Default Website. Right-click on the JMC Folder(s)which you previously created and choose Properties. Then select the DirectorySecurity Tab.

JMC Online Software Page 39 of 81 Last update on 7/17/08
Click the Edit button next to Anonymous access and authentication control.
Make sure Anonymous access is checked and click its Edit... button.
JMC Online Software Page 40 of 81 Last update on 7/17/08
Set the Anonymous User account to a user with Full Control to the JMC data folder,Transcripts folder, and to the hard drive containing the DLL.
Also, uncheck the Allow IIS to control password checkbox and type the userpassword.
Next select the Directory tab.
From the Execute Permissions: menu choose Scripts and Executables. We alsorecommend clicking the Create button so the DLL can be unloaded (closed) withouthaving to stop the WWW Publishing Service.

JMC Online Software Page 41 of 81 Last update on 7/17/08
Next, open IIS Manager and the server (e.g. MS1). Select Web Service Extensions. Adda new Web Service Extension.
Name the extension JMC and click Add…
Adding anew webserviceextension
JMC Online Software Page 42 of 81 Last update on 7/17/08
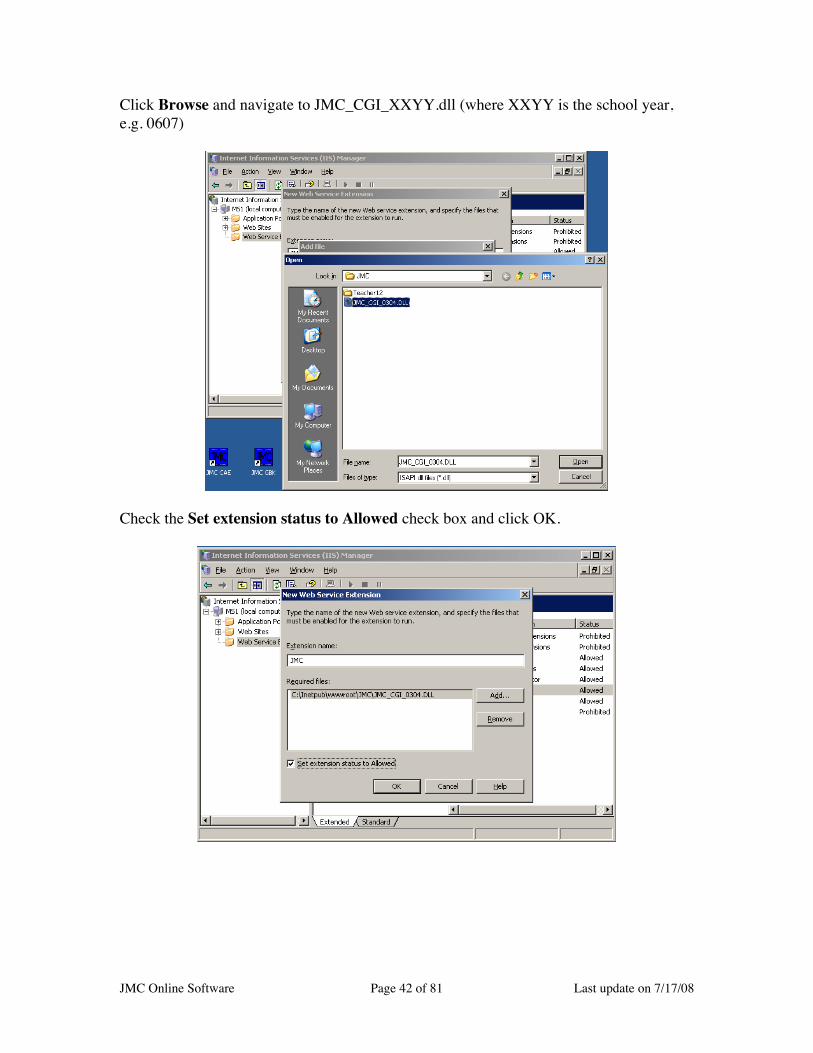
Click Browse and navigate to JMC_CGI_XXYY.dll (where XXYY is the school year,e.g. 0607)
Check the Set extension status to Allowed check box and click OK.
JMC Online Software Page 43 of 81 Last update on 7/17/08
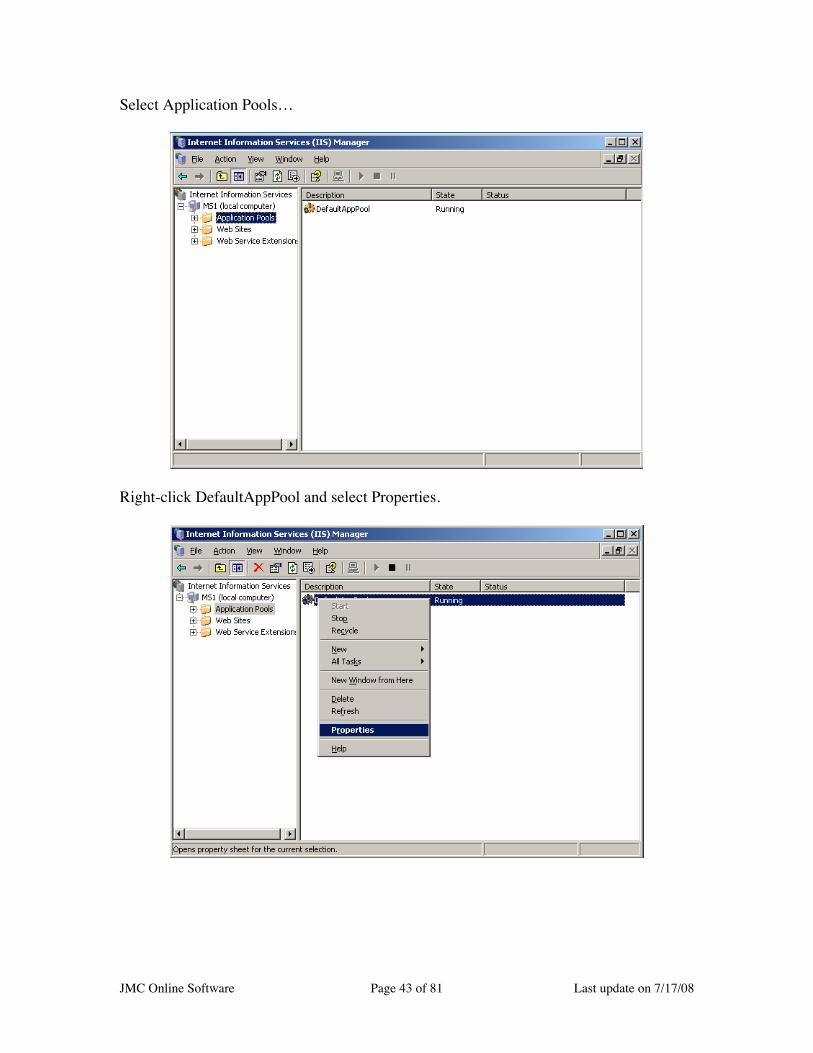
Select Application Pools…
Right-click DefaultAppPool and select Properties.

JMC Online Software Page 44 of 81 Last update on 7/17/08
Select the Identity tab and change the Predefined security account to use Local System.
Verifying Installation of Online SoftwareThe installation should now be done. To test the software, open a web browser and typethe URL of the web server (including the "JMC_CGI_XXYY.dll" at the end of the URL).For example, if the JMC DLL were inside the web server folder and the web server's IPaddress is 192.168.1.1, then type "http://192.168.1.1/JMC_CGI_XXYY.dll". If the DLLwere inside a sub-directory remember to include the sub-directory in the URL. Forexample, if the DLL were inside a folder named "cgi-bin" which is inside the root webfolder, then the URL would read "http://192.168.1.1/cgi-bin/JMC_CGI_XXYY.dll".
JMC Online Software Page 45 of 81 Last update on 7/17/08
Special Instructions for District-Level Online Setups
If you are using a JMC District Application and you have more than one building to setup online, make folders for each building in the JMC folder on your web server and thenput a copy of the district application DLL into each of the folders.
For example, if you wish to have online access for a junior high and senior high, createtwo folders in the cgi-bin folder called JH and SH. Copy the JMC_CGI_XXYY.dll(where XXYY is the school year, e.g. 0607) into both folders.
Then, use the JMC District Application to attach each of these CGIs to the correct JMC“database”. First, log into the District Application for the senior high, then select File –Select Online Software… and navigate to the copy of the JMC_CGI_XXYY.dll (whereXXYY is the school year, e.g. 0607) in the SH folder and select it. Do the same types ofsteps for the junior high by logging into the JMC District Application for the junior highand then selecting File – Select Online Software… to navigate to the copy of theJMC_CGI_XXYY.dll (where XXYY is the school year, e.g. 0607) in the JH folder.
Your users will then need to log in to the JMC Online software using slightly longerURLs. For example, the URL for the high school might look something likehttp://192.168.1.1/cgi-bin/HS/JMC_CGI_XXYY.dll (where XXYY is the school year,e.g. 0607).
Note theadditional HSlevel in thepathname.

JMC Online Software Page 46 of 81 Last update on 7/17/08
Accessing the Online Software ModulesTo gain access to the different modules within the CGI you use slightly varying URLs.At the end of the URL you specify a module parameter. To select the Parent Accessmodule, the parameter "?module=Parent" is appended to the URL. For CourseRegistration, "?module=CourseReg" is appended. For the Online Office,"?module=office" is appended. For the Online Homeroom, "?module=homeroom" isappended. For the Online GradeBook, "?module=GBK" is appended. OnlineAttendance is the default module thus no module parameter is necessary, although"?module=CAE" will work.
You can have users type the URLs directly into a web browser and then bookmark thepage, or you can place hyperlinks from your school's web site to each of the modules.
The following are examples of URLs a user might type directly into a web browser:To access Online Attendance, a teacher might type
http://192.168.1.1/JMC_CGI_XXYY.acgi (where XXYY is the schoolyear, e.g. 0607)
To access Online GradeBook, a teacher might typehttp://192.168.1.1/JMC_CGI_XXYY.acgi?module=GBK
To access Online Parent Access, a parent might typehttp://192.168.1.1/JMC_CGI_XXYY.acgi?module=Parent
To access Online Student Access, a parent might typehttp://192.168.1.1/JMC_CGI_XXYY.acgi?module=Student
To access Online Course Registration, a student might typehttp://192.168.1.1/JMC_CGI_XXYY.acgi?module=CourseReg
To access Online Office, an administrator might typehttp://192.168.1.1/JMC_CGI_XXYY.acgi?module=Office
To access Online Homeroom, a teacher might typehttp://192.168.1.1/JMC_CGI_XXYY.acgi?module=Homeroom
The following are examples of HTML hyperlinks you might create on your school's website. Please note that the XXYY in the filename JMC_CGI_XXYY.acgi refers to a schoolyear. For example, for the 2006-2007 school year, the filename would actually beJMC_CGI_0607.acgi:
<a href="http://192.168.1.1/JMC_CGI_XXYY.acgi">Click here for OnlineAttendance</a><a href="http://192.168.1.1/JMC_CGI_XXYY.acgi?module=GBK">Click here forthe Online GradeBook</a><a href="http://192.168.1.1/JMC_CGI_XXYY.acgi?module=STUDENT">Click herefor Online Student Access</a><a href="http://192.168.1.1/JMC_CGI_XXYY.acgi?module=PARENT">Click herefor Online Parent Access</a><a href="http://192.168.1.1/JMC_CGI_XXYY.acgi?module=COURSEREG">Clickhere for Online Course Registration</a><a href="http://192.168.1.1/JMC_CGI_XXYY.acgi?module=OFFICE">Click herefor Online Office</a><a href="http://192.168.1.1/JMC_CGI_XXYY.acgi?module=HOMEROOM">Click herefor Online Homeroom</a>
JMC Online Software Page 47 of 81 Last update on 7/17/08
Online Parent Access Module
In the Office
Setting Up Parent Accounts and PasswordsOnly parents who are set up as contacts in the JMC database, are designated as "Primary"contacts, and have "In Mailings" privileges are eligible to access data about their childrenvia the Internet.
The account setup in the office can be quite simple. In many cases it may only requirethat a password be entered for each parent who is already designated as the "Primary"contact and "In Mailings". In some cases, however, the relationship between the childand the parent(s) must be clarified and modified on the Edit Student Data screen beforesuch access can be granted.
Editing or Entering the Password for the Parent(s)
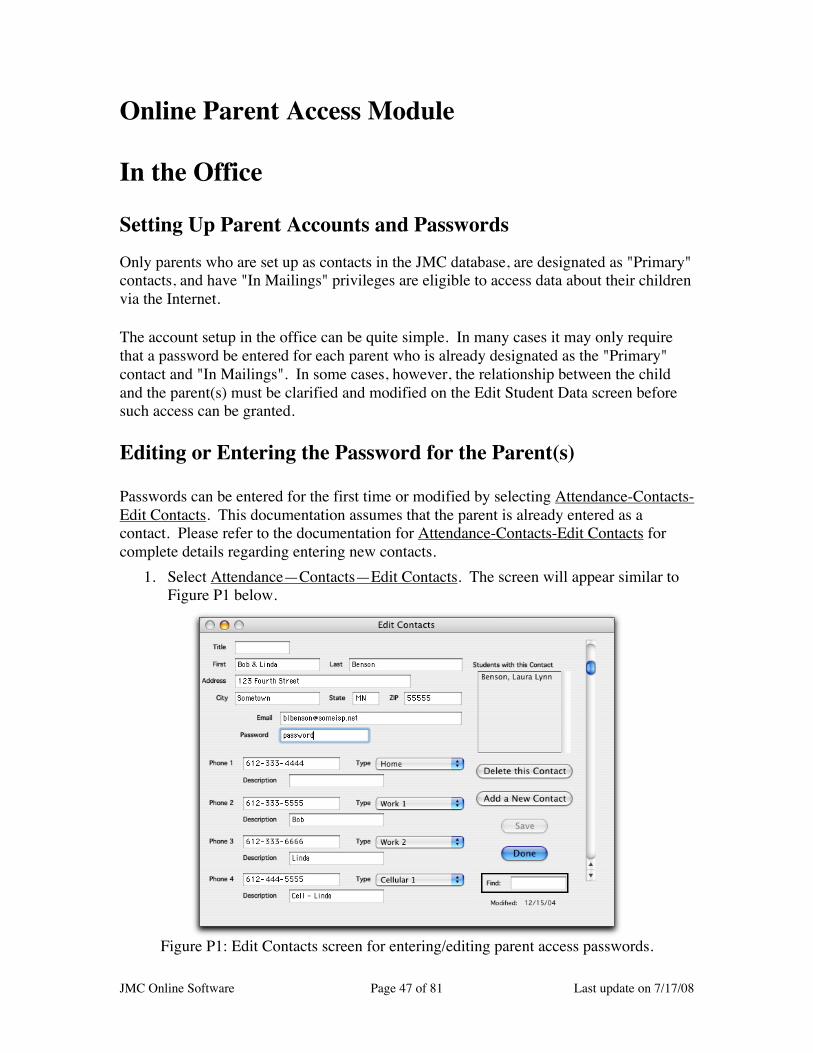
Passwords can be entered for the first time or modified by selecting Attendance-Contacts-Edit Contacts. This documentation assumes that the parent is already entered as acontact. Please refer to the documentation for Attendance-Contacts-Edit Contacts forcomplete details regarding entering new contacts.
1. Select Attendance—Contacts—Edit Contacts. The screen will appear similar toFigure P1 below.
Figure P1: Edit Contacts screen for entering/editing parent access passwords.
JMC Online Software Page 48 of 81 Last update on 7/17/08
Note: You must be logged into the JMC Office Application as the JMCAdministrator in order to view or edit passwords.
2. Click in the center of this screen on the box labeled Password and enter a newpassword. If there is an existing password in this box you may delete it firstbefore entering the new password. In Figure P1, the password is currently set to"password".
3. Click on the Save button to save the new password.
Editing the Parent/Child Relationship
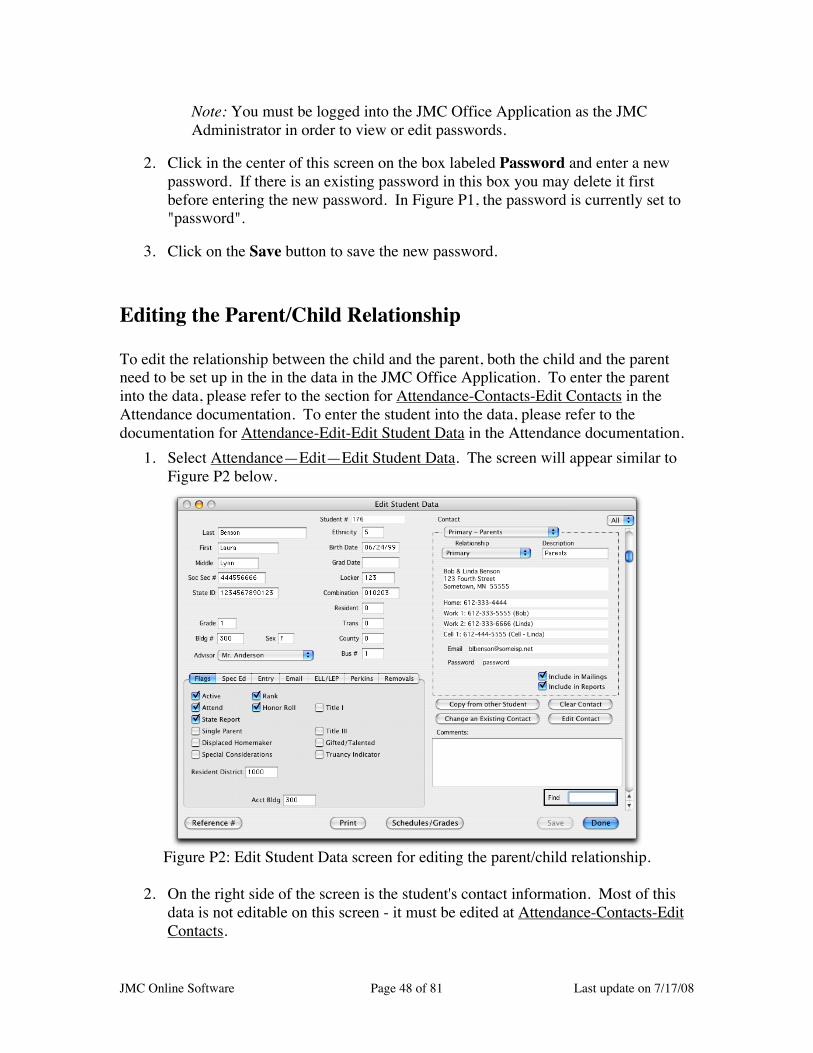
To edit the relationship between the child and the parent, both the child and the parentneed to be set up in the in the data in the JMC Office Application. To enter the parentinto the data, please refer to the section for Attendance-Contacts-Edit Contacts in theAttendance documentation. To enter the student into the data, please refer to thedocumentation for Attendance-Edit-Edit Student Data in the Attendance documentation.
1. Select Attendance—Edit—Edit Student Data. The screen will appear similar toFigure P2 below.
Figure P2: Edit Student Data screen for editing the parent/child relationship.
2. On the right side of the screen is the student's contact information. Most of thisdata is not editable on this screen - it must be edited at Attendance-Contacts-EditContacts.
JMC Online Software Page 49 of 81 Last update on 7/17/08
3. To edit the parent/child relationship, first select the parent from the Contactmenu. If the parent of interest is not listed as a contact for this student, you mayneed to add them to the list. Please refer to Attendance-Edit-Edit Student Data formore details on adding contacts for a student.
Note: A parent may have a different contact type for different students. Thismay need to be edited for each of the parents' children.
4. To designate a parent as a primary contact, click on the Relationship menu andselect Primary.
5. The checkbox labeled Include in Mailings must be checked for this parent to beable to access on-line data for this student.
6. Click on the Save button to save any changes made to the parent/childrelationship.
Processing Contact Update Requests From Parents
Parents may periodically submit update requests for their contact data. The request maybe as simple as adding a phone number for a new cell phone. In other cases the requestcould be on a larger scale, such as a family moving to a new location.
Office personnel will periodically need to process or "merge" these submissions. Theoffice personnel will have the capability of completely or selectively accepting orrejecting each update submission as they process the requests.
1. Select Attendance—Contact—Merge Contact Submissions. The screen willappear similar to Figure P3.
Note: Merging contact submissions will require the user to have Read/Writeaccess permission to Student General Data.
2. A contact request will appear on the screen. Click on one of the three buttons totake the appropriate action.
Stop button To stop processing contact update requests and return to themain screen of the JMC Office Application, click on the Stop button.
Reject button To reject the currently displayed update request, click on theReject button. If there are further pending submissions, the next pendingupdate request will then be displayed on the screen.

JMC Online Software Page 50 of 81 Last update on 7/17/08
Accept button To accept all changes from the currently displayed updaterequest, click on the Accept button. If there are further pending submissions,the next pending update request will then be displayed o the screen.
Note: Individual updates within a parent's submission may be checked orunchecked to designate them as being included before the Accept button isclicked.
Figure P3: Merge Contact Submissions screen.

JMC Online Software Page 51 of 81 Last update on 7/17/08
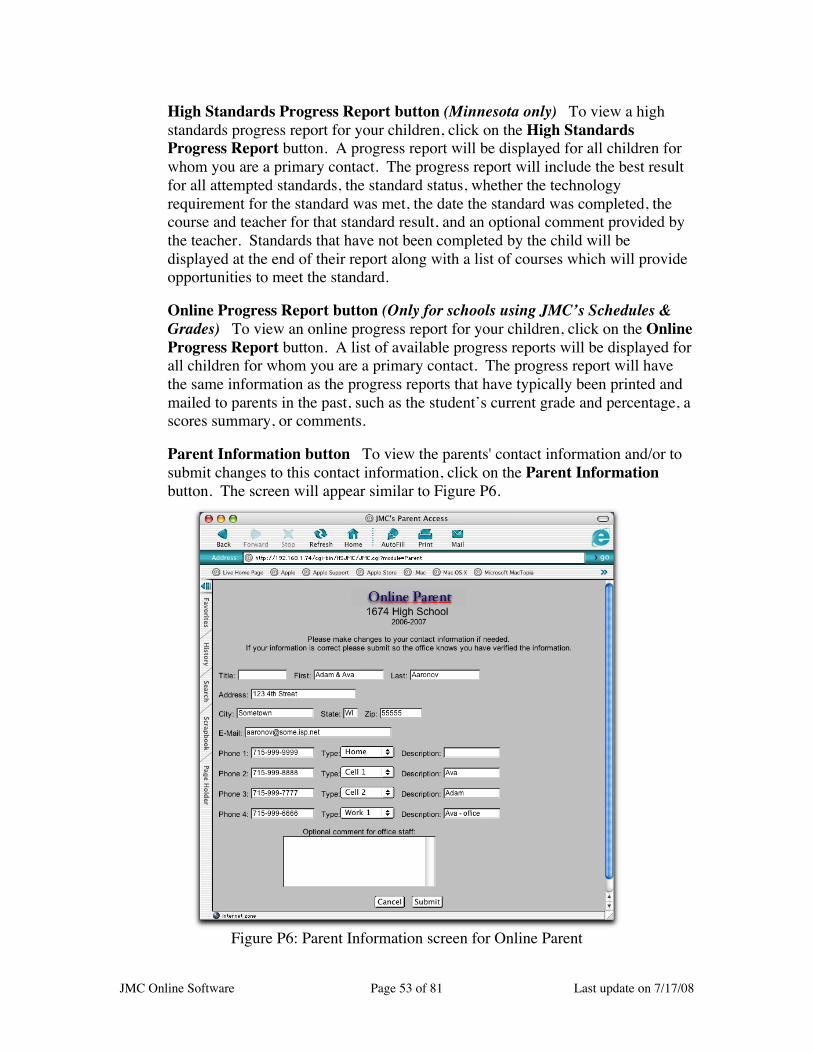
Accessing from Home or Office via the InternetBy using a web browser, parents can log into the JMC Parent Access module to view datafor their children for attendance, report cards, parent information (addresses/contactdata), lunch accounts, and (MN only) high standards. Parents will also be able to submitchanges to their parent information over the Internet.
Only parents who are set up as contacts in the JMC database, are designated as "Primary"contacts, and have "In Mailings" privileges are eligible to access data about their childrenvia the Internet.
Once the parent has been set up in the JMC Office Application for parent access, theparent can then log into the JMC Parent Access module using a web link provided by theschool. Please contact your school for details regarding this web link.
Note: Any browser such as Internet Explorer, Firefox, Safari, or Netscape can beused for parent access. Version 3.0 of Internet Explorer or Netscape should beacceptable; however, version 4.0 or higher is recommended. Other browsers such asAOL or CompuServe may work, as well, depending on the version being used.
1. Connect to the Parent Access screen using the web link provided by your school.The screen should appear similar to Figure P4 below; however, the web addresswill be the web link as provided by your school.
Figure 4: Parent Access login screen.
2. Enter your last name for the Parent Username.
3. Enter the password that was assigned to you by the school office. Contact yourschool office to acquire or change your password.
JMC Online Software Page 52 of 81 Last update on 7/17/08
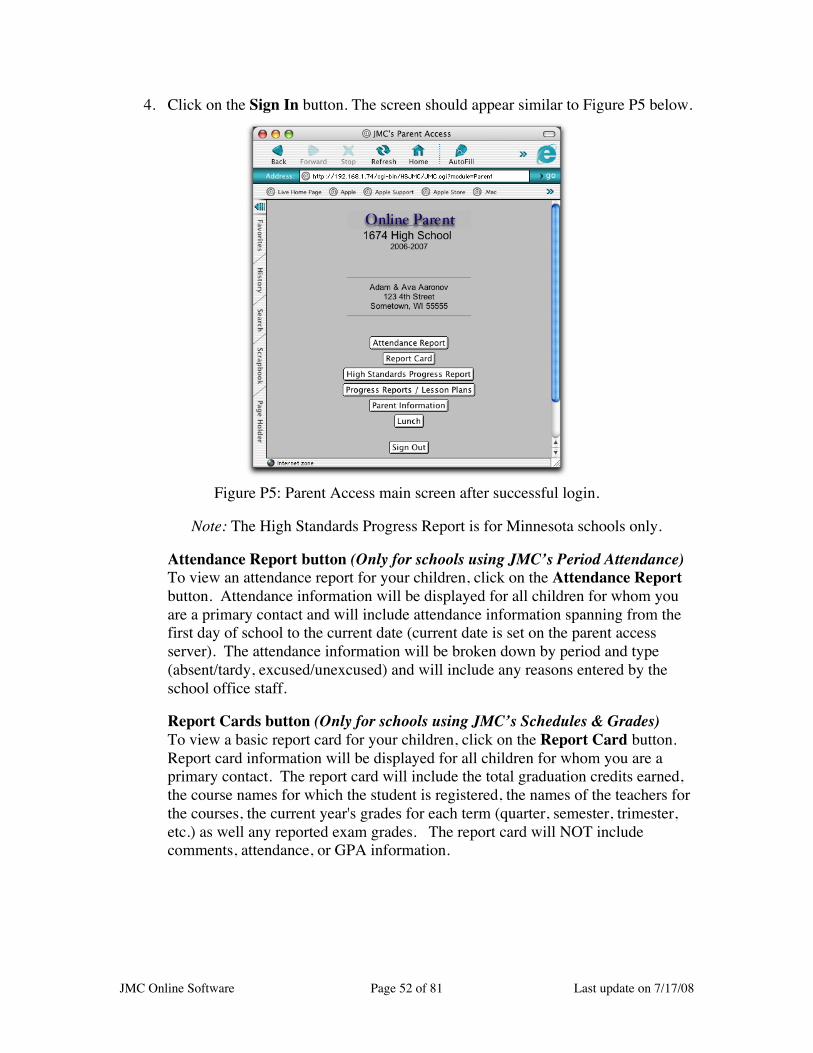
4. Click on the Sign In button. The screen should appear similar to Figure P5 below.
Figure P5: Parent Access main screen after successful login.
Note: The High Standards Progress Report is for Minnesota schools only.
Attendance Report button (Only for schools using JMC’s Period Attendance)To view an attendance report for your children, click on the Attendance Reportbutton. Attendance information will be displayed for all children for whom youare a primary contact and will include attendance information spanning from thefirst day of school to the current date (current date is set on the parent accessserver). The attendance information will be broken down by period and type(absent/tardy, excused/unexcused) and will include any reasons entered by theschool office staff.
Report Cards button (Only for schools using JMC’s Schedules & Grades)To view a basic report card for your children, click on the Report Card button.Report card information will be displayed for all children for whom you are aprimary contact. The report card will include the total graduation credits earned,the course names for which the student is registered, the names of the teachers forthe courses, the current year's grades for each term (quarter, semester, trimester,etc.) as well any reported exam grades. The report card will NOT includecomments, attendance, or GPA information.
JMC Online Software Page 53 of 81 Last update on 7/17/08
High Standards Progress Report button (Minnesota only) To view a highstandards progress report for your children, click on the High StandardsProgress Report button. A progress report will be displayed for all children forwhom you are a primary contact. The progress report will include the best resultfor all attempted standards, the standard status, whether the technologyrequirement for the standard was met, the date the standard was completed, thecourse and teacher for that standard result, and an optional comment provided bythe teacher. Standards that have not been completed by the child will bedisplayed at the end of their report along with a list of courses which will provideopportunities to meet the standard.
Online Progress Report button (Only for schools using JMC’s Schedules &Grades) To view an online progress report for your children, click on the OnlineProgress Report button. A list of available progress reports will be displayed forall children for whom you are a primary contact. The progress report will havethe same information as the progress reports that have typically been printed andmailed to parents in the past, such as the student’s current grade and percentage, ascores summary, or comments.
Parent Information button To view the parents' contact information and/or tosubmit changes to this contact information, click on the Parent Informationbutton. The screen will appear similar to Figure P6.
Figure P6: Parent Information screen for Online Parent

JMC Online Software Page 54 of 81 Last update on 7/17/08
Parents can view and submit changes for the following information:- first name(s) - address- last name(s) - city- title - state- email address - zip code- phone numbers, descriptions, and types (home, work, cell, fax, other)- an optional comment for the office staff
Parents may make changes to any of the information on this screen and then clickthe Submit button at the bottom of the screen to send the changes to the school.Later, the school office will process parent information update requests. Anexample of submitting an update request for parent contact information is shownin Figure P7.
Figure P7: Submitting an update request for parent contact information.
Note: Including a comment with your submission may be very helpful to theoffice staff as they process update requests.

JMC Online Software Page 55 of 81 Last update on 7/17/08
Note: Parent Information update submissions are not processed immediately.Office staff must pull in the updates using Attendance—Contact—MergeContact Submissions. If parents complain that their update submissions arenot being processed, they may need to contact the office staff and request thatthey process these submissions.
Note: If the Submit button is not available on this screen, it is likely that thisoption has been disabled in the office. Please check the checkbox for AllowChange Submission on the Online Parent Tab of the Online Settings screen toenable this option.
Lunch (Only for schools using JMC’s Lunch) To view lunch account balancesand transactions for your children’s accounts and your family account, click onthe Lunch button. The first screen will display the account balances for yourfamily account and for student accounts for all students who have this parentdesignated as either a primary or a lunch contact. Click on the button to the rightof any of the account balances and a list of all transactions for that account will bedisplayed.
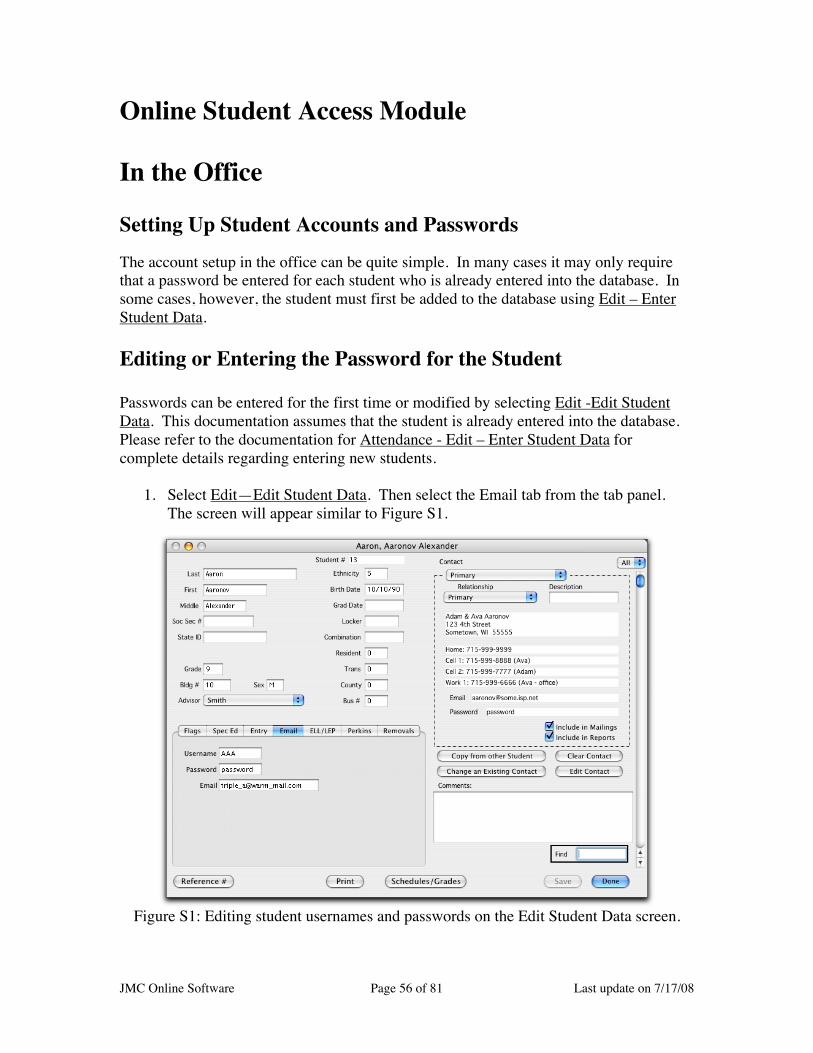
JMC Online Software Page 56 of 81 Last update on 7/17/08
Online Student Access Module
In the Office
Setting Up Student Accounts and PasswordsThe account setup in the office can be quite simple. In many cases it may only requirethat a password be entered for each student who is already entered into the database. Insome cases, however, the student must first be added to the database using Edit – EnterStudent Data.
Editing or Entering the Password for the Student
Passwords can be entered for the first time or modified by selecting Edit -Edit StudentData. This documentation assumes that the student is already entered into the database.Please refer to the documentation for Attendance - Edit – Enter Student Data forcomplete details regarding entering new students.
1. Select Edit—Edit Student Data. Then select the Email tab from the tab panel.The screen will appear similar to Figure S1.
Figure S1: Editing student usernames and passwords on the Edit Student Data screen.

JMC Online Software Page 57 of 81 Last update on 7/17/08
Accessing Student Data via the InternetBy using a web browser, students can log into the JMC Student Access module to viewtheir data for attendance, report cards, lunch accounts, and (MN only) high standards.
Only students who have been assigned a username and password in the JMC database areeligible to access their data via the Internet.
Once the student has been set up in the JMC Office Application for student access, theycan then log into the JMC Student Access module using a web link provided by theschool. Please contact your school for details regarding this web link.
Note: Any browser such as Internet Explorer, Firefox, Safari, or Netscape can beused for student access. Version 3.0 of Internet Explorer or Netscape should beacceptable; however, version 4.0 or higher is recommended. Other browsers such asAOL or CompuServe may work, as well, depending on the version being used.
1. Connect to the Student Access screen using the web link provided by your school.The screen should appear similar to Figure S2 below; however, the web addresswill be the web link as provided by your school.
Figure S2: Login screen for Online Student2. Enter the username and password that was assigned to you by the school office.
Contact your school office to acquire or change your password.
3. Click on the Sign In button. The screen should appear similar to Figure S3 below.
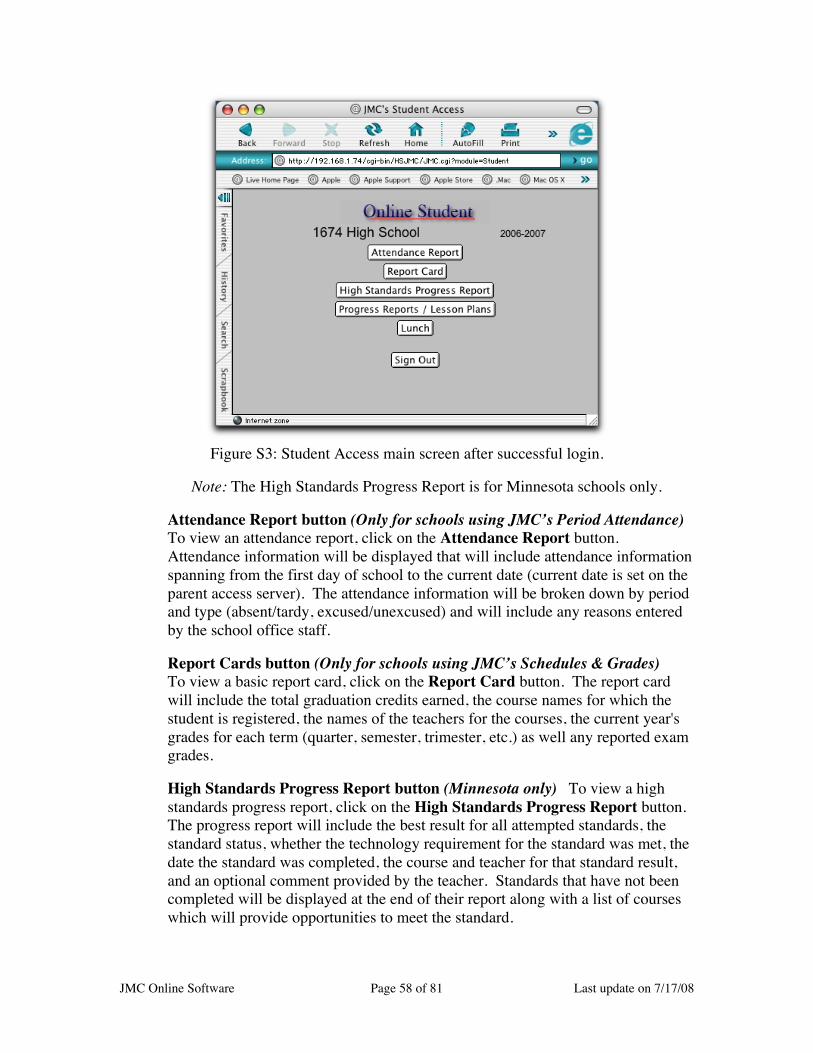
JMC Online Software Page 58 of 81 Last update on 7/17/08
Figure S3: Student Access main screen after successful login.
Note: The High Standards Progress Report is for Minnesota schools only.
Attendance Report button (Only for schools using JMC’s Period Attendance)To view an attendance report, click on the Attendance Report button.Attendance information will be displayed that will include attendance informationspanning from the first day of school to the current date (current date is set on theparent access server). The attendance information will be broken down by periodand type (absent/tardy, excused/unexcused) and will include any reasons enteredby the school office staff.
Report Cards button (Only for schools using JMC’s Schedules & Grades)To view a basic report card, click on the Report Card button. The report cardwill include the total graduation credits earned, the course names for which thestudent is registered, the names of the teachers for the courses, the current year'sgrades for each term (quarter, semester, trimester, etc.) as well any reported examgrades.
High Standards Progress Report button (Minnesota only) To view a highstandards progress report, click on the High Standards Progress Report button.The progress report will include the best result for all attempted standards, thestandard status, whether the technology requirement for the standard was met, thedate the standard was completed, the course and teacher for that standard result,and an optional comment provided by the teacher. Standards that have not beencompleted will be displayed at the end of their report along with a list of courseswhich will provide opportunities to meet the standard.

JMC Online Software Page 59 of 81 Last update on 7/17/08
Online Progress Report button (Only for schools using JMC’s Schedules &Grades) To view an online progress report, click on the Online ProgressReport button. A list of available progress reports will be displayed. Theprogress report will have the same information as the progress reports that havetypically been printed and mailed to parents in the past, such as the current gradeand percentage, a scores summary, or comments.
Lunch (Only for schools using JMC’s Lunch) To view lunch account balancesand transactions for your account and your family account (if you have familyaccounts established), click on the Lunch button. The screen will display thestudent and family account balances. Click on the button to the right of any of theaccount balances and a list of all transactions for that account will be displayed.
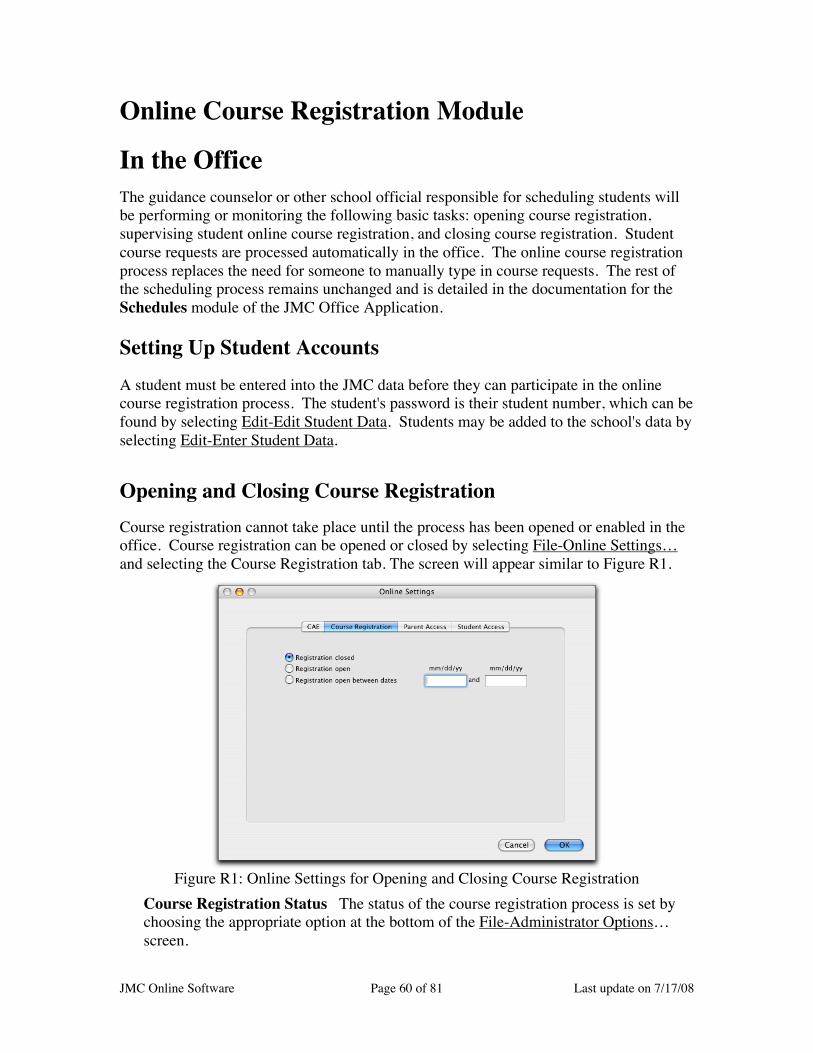
JMC Online Software Page 60 of 81 Last update on 7/17/08
Online Course Registration Module
In the OfficeThe guidance counselor or other school official responsible for scheduling students willbe performing or monitoring the following basic tasks: opening course registration,supervising student online course registration, and closing course registration. Studentcourse requests are processed automatically in the office. The online course registrationprocess replaces the need for someone to manually type in course requests. The rest ofthe scheduling process remains unchanged and is detailed in the documentation for theSchedules module of the JMC Office Application.
Setting Up Student AccountsA student must be entered into the JMC data before they can participate in the onlinecourse registration process. The student's password is their student number, which can befound by selecting Edit-Edit Student Data. Students may be added to the school's data byselecting Edit-Enter Student Data.
Opening and Closing Course RegistrationCourse registration cannot take place until the process has been opened or enabled in theoffice. Course registration can be opened or closed by selecting File-Online Settings…and selecting the Course Registration tab. The screen will appear similar to Figure R1.
Figure R1: Online Settings for Opening and Closing Course RegistrationCourse Registration Status The status of the course registration process is set bychoosing the appropriate option at the bottom of the File-Administrator Options…screen.
JMC Online Software Page 61 of 81 Last update on 7/17/08
Opening Course Registration Course registration can be declared open in one oftwo ways: registration can be manually opened and then later manually closed, or itmay be opened for a specific date span.
Closing Course Registration Course Registration should be closed at the point intime where the guidance counselor's office has deemed appropriate. After that pointin time, individual schedule changes can be accomplished by editing the student'sschedule in the office on the Schedule-Student-Edit Schedules screen.
Finishing the Remainder of the Scheduling ProcessStudent course requests will be added to the student's schedule but will not be assigned aterm or period. The remainder of the scheduling process will need to be completed asusual. The only part of the scheduling process that has changed due to the Online CourseRegistration is that student course requests do not have to be manually entered into theJMC database.
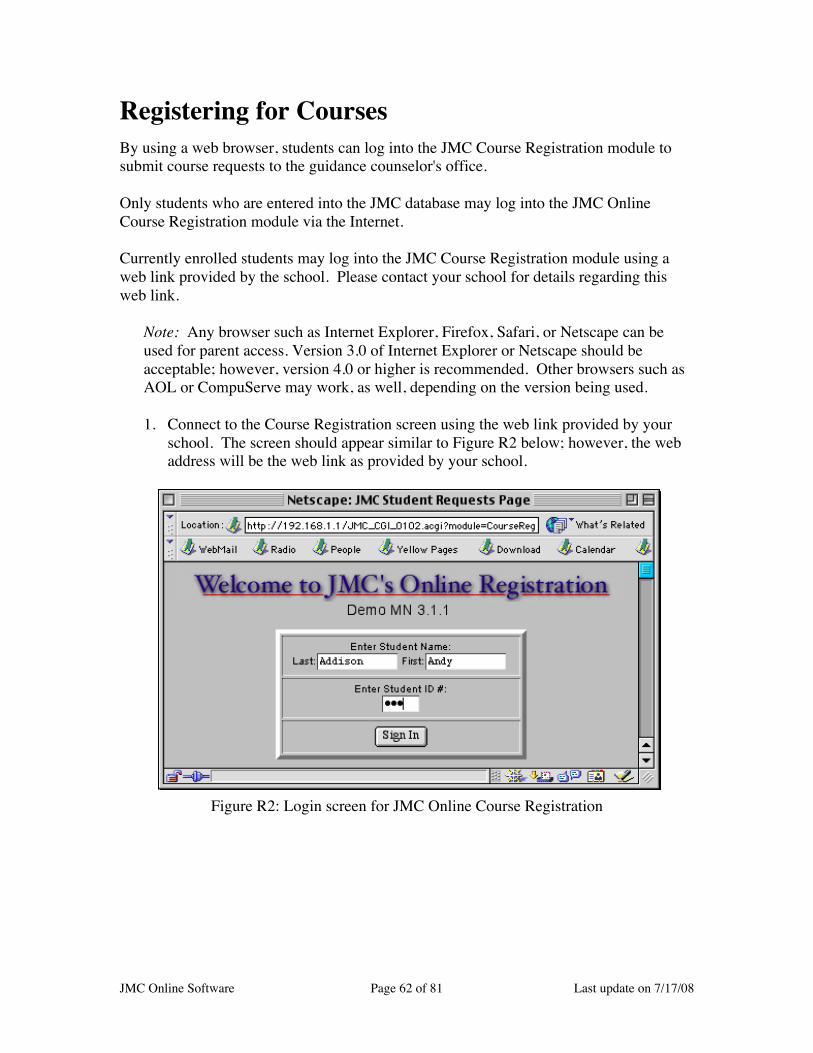
JMC Online Software Page 62 of 81 Last update on 7/17/08
Registering for CoursesBy using a web browser, students can log into the JMC Course Registration module tosubmit course requests to the guidance counselor's office.
Only students who are entered into the JMC database may log into the JMC OnlineCourse Registration module via the Internet.
Currently enrolled students may log into the JMC Course Registration module using aweb link provided by the school. Please contact your school for details regarding thisweb link.
Note: Any browser such as Internet Explorer, Firefox, Safari, or Netscape can beused for parent access. Version 3.0 of Internet Explorer or Netscape should beacceptable; however, version 4.0 or higher is recommended. Other browsers such asAOL or CompuServe may work, as well, depending on the version being used.
1. Connect to the Course Registration screen using the web link provided by yourschool. The screen should appear similar to Figure R2 below; however, the webaddress will be the web link as provided by your school.
Figure R2: Login screen for JMC Online Course Registration

JMC Online Software Page 63 of 81 Last update on 7/17/08
2. Upon successfully logging into the Online Course Registration, the screen willappear similar to Figure R3 shown below.
Figure R3: Student is logged in and ready to place course requests.
3. Course requests may be generated using the buttons and course list on the screenshown in Figure R3.
Selecting a Course Selecting a course can be accomplished by eitherscrolling to display the course and then clicking on the course title or byentering the course number in the box labeled Type a course number.Various key combinations such as shift-click, control-click, or command-click may allow you to select multiple courses to add at a time, dependingupon your operating system and browser.
Add button A course may be added to the list of registered courses onthe right side of the screen by first selecting the course on the left side ofthe screen and then clicking on the Add button in the lower left corner ofthe screen.
Modify button Courses may be removed from the registered courses liston the right side of the screen by first removing the check mark from infront of the requested course and then clicking on the Modify button. SeeFigure R4 on the next page for more details.
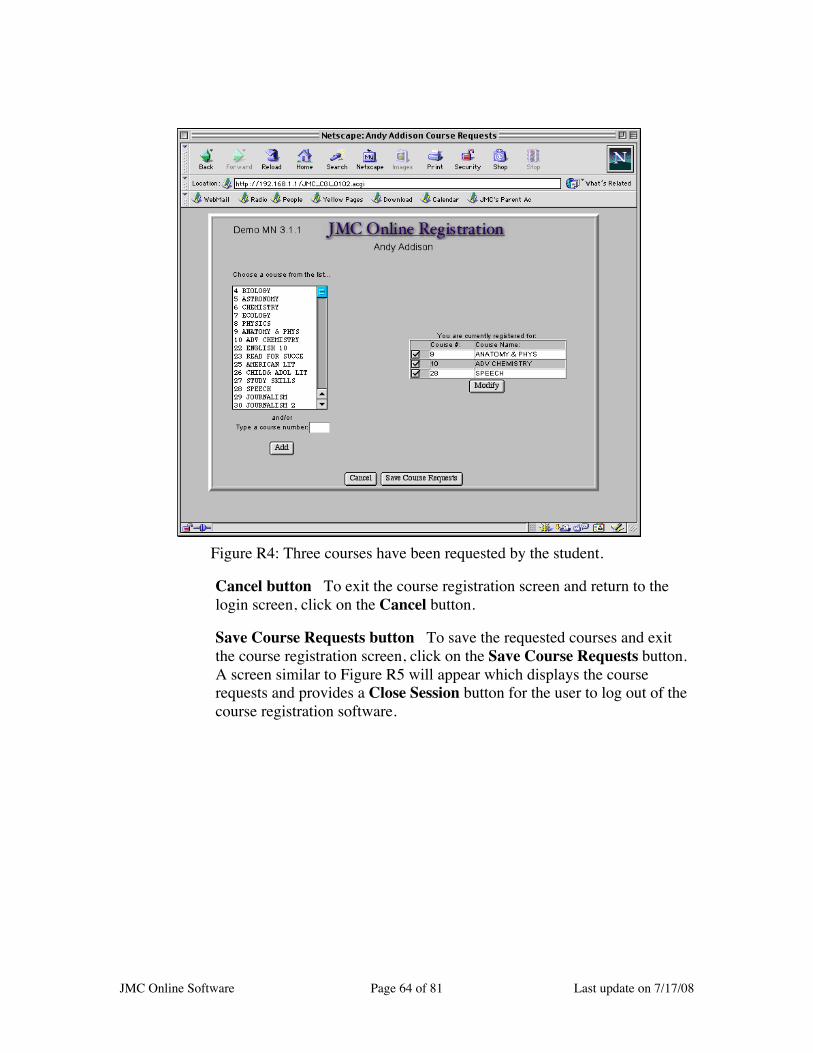
JMC Online Software Page 64 of 81 Last update on 7/17/08
Figure R4: Three courses have been requested by the student.
Cancel button To exit the course registration screen and return to thelogin screen, click on the Cancel button.
Save Course Requests button To save the requested courses and exitthe course registration screen, click on the Save Course Requests button.A screen similar to Figure R5 will appear which displays the courserequests and provides a Close Session button for the user to log out of thecourse registration software.
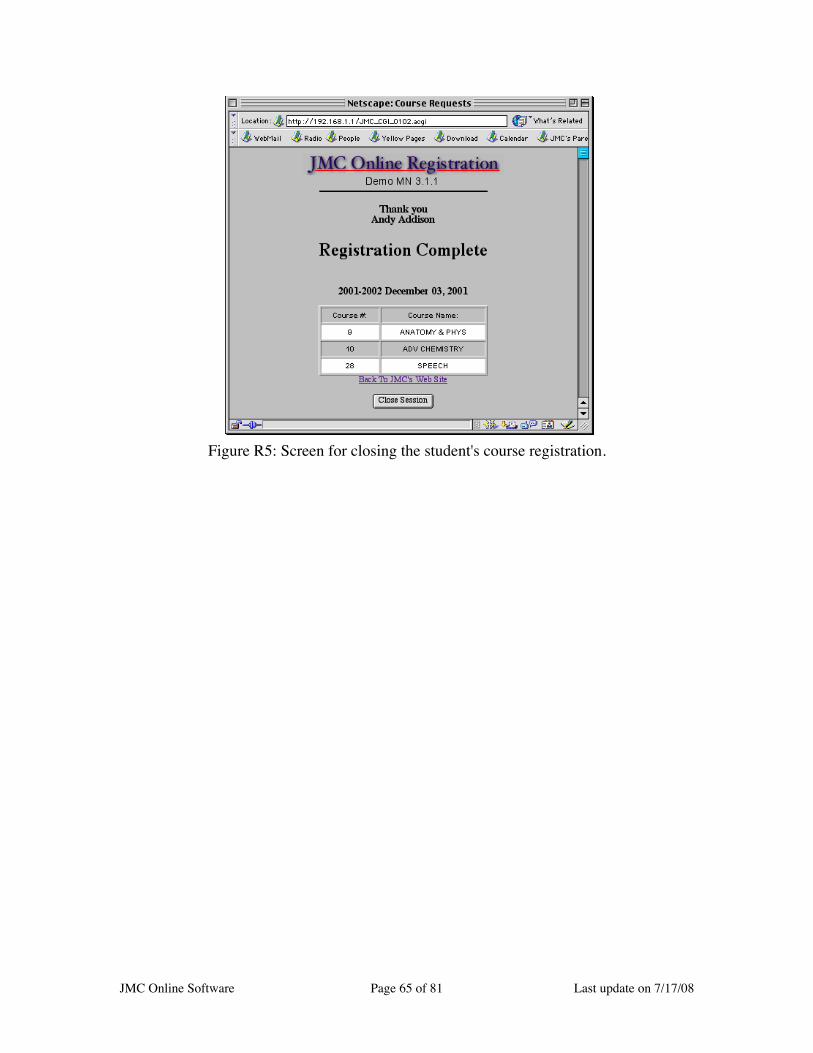
JMC Online Software Page 65 of 81 Last update on 7/17/08
Figure R5: Screen for closing the student's course registration.
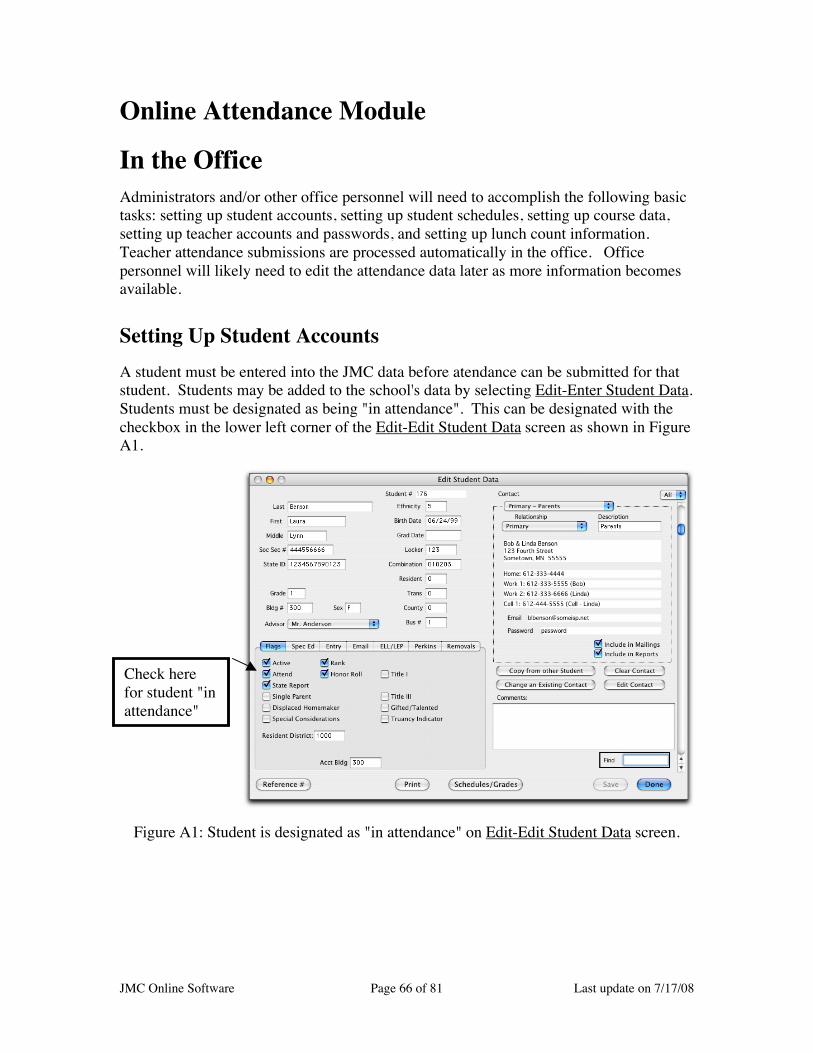
JMC Online Software Page 66 of 81 Last update on 7/17/08
Online Attendance Module
In the OfficeAdministrators and/or other office personnel will need to accomplish the following basictasks: setting up student accounts, setting up student schedules, setting up course data,setting up teacher accounts and passwords, and setting up lunch count information.Teacher attendance submissions are processed automatically in the office. Officepersonnel will likely need to edit the attendance data later as more information becomesavailable.
Setting Up Student AccountsA student must be entered into the JMC data before atendance can be submitted for thatstudent. Students may be added to the school's data by selecting Edit-Enter Student Data.Students must be designated as being "in attendance". This can be designated with thecheckbox in the lower left corner of the Edit-Edit Student Data screen as shown in FigureA1.
Figure A1: Student is designated as "in attendance" on Edit-Edit Student Data screen.
Check herefor student "inattendance"
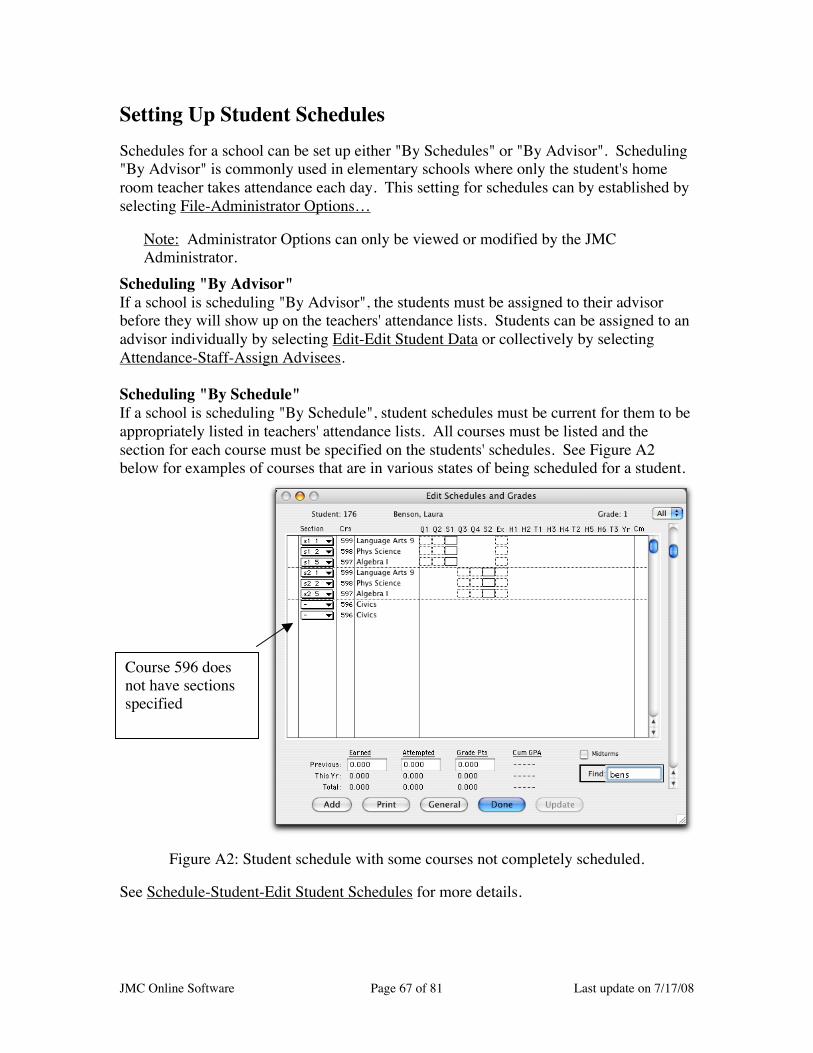
JMC Online Software Page 67 of 81 Last update on 7/17/08
Setting Up Student SchedulesSchedules for a school can be set up either "By Schedules" or "By Advisor". Scheduling"By Advisor" is commonly used in elementary schools where only the student's homeroom teacher takes attendance each day. This setting for schedules can by established byselecting File-Administrator Options…
Note: Administrator Options can only be viewed or modified by the JMCAdministrator.
Scheduling "By Advisor"If a school is scheduling "By Advisor", the students must be assigned to their advisorbefore they will show up on the teachers' attendance lists. Students can be assigned to anadvisor individually by selecting Edit-Edit Student Data or collectively by selectingAttendance-Staff-Assign Advisees.
Scheduling "By Schedule"If a school is scheduling "By Schedule", student schedules must be current for them to beappropriately listed in teachers' attendance lists. All courses must be listed and thesection for each course must be specified on the students' schedules. See Figure A2below for examples of courses that are in various states of being scheduled for a student.
Figure A2: Student schedule with some courses not completely scheduled.
See Schedule-Student-Edit Student Schedules for more details.
Course 596 doesnot have sectionsspecified

JMC Online Software Page 68 of 81 Last update on 7/17/08
Setting Up Course Data
Teachers and courses must be correctly linked for class lists to be available to the teacherfor attendance purposes. The teacher must be listed for the course for each period theyteach that course. The course must also have a grading scheme, terms, days, and periodsselected. All of these can be edited by selecting Schedules-Course-Edit Course Data.Figure A3 below shows the settings for an Algebra course for 2 teachers.
Figure A3: Edit Course Data screen.
For further details on editing course data, please refer to the Schedules documentation forthe JMC Office Application.

JMC Online Software Page 69 of 81 Last update on 7/17/08
Setting Up Teacher Accounts and PasswordsTeacher accounts and passwords can be set up by selecting Attendance-Staff-Teachers /Rooms as shown in Figure A4.
Figure A4: Setting up a teacher's username and password for Online Attendance.
1. Select Attendance-Staff-Teachers / Rooms.
2. Select the teacher from the list of teachers. If the teacher's name is not listed, theteacher can be added by locating an empty slot in the teacher list and entering theteacher's name in that slot.
Note: Teachers' names will not necessarily appear in alphabetical order on thisscreen. Also, teachers' names should not be moved within this list oncescheduling has begun for the school year.
3. Enter a username and password for the teacher in the appropriate boxes in the uppermiddle section of the screen.
Note: Usernames may be up to 16 characters long and passwords may be up to 8characters long.
4. Click the Save button to save changes for an individual teacher.
5. Click on the Done button when you are finished entering and editing usernames andpasswords for all teachers.

JMC Online Software Page 70 of 81 Last update on 7/17/08
Setting Up Lunch Count InformationLunch count criteria for a school must be set up by selecting Period Attendance-Data-Classroom Attendance. The number of counts and names for each count should be setappropriately on this screen. Please refer to Figure A5 below.
Figure A5: Period Attendance settings for Lunch Counts.

JMC Online Software Page 71 of 81 Last update on 7/17/08
Submitting Attendance from the ClassroomTeachers can log into the JMC Online Attendance module to submit period attendance tothe office from any computer with a web browser and access to the Internet or schoolintranet. Teachers must have a username and password set up in the JMC OfficeApplication in order to login to the Online Attendance module.
Scheduling must be designated as either "By Schedule" or "By Advisor" on the File-Administrator Options… screen.
If scheduling is set to "By Advisor", students must be assigned to their advisors beforethey will show up in the attendance lists for teachers.
If scheduling is set to "By Schedule", teachers must be designated as teaching a coursefor every period of every course they teach. This can be accomplished for each course onthe Schedules-Course-Edit Course Data screen. Also, all students must be correctlyscheduled into a their courses before they will show up properly in the teachers'attendance lists.
Teachers may log into the JMC Online Attendance module using a web link provided bythe school. Please contact your school for details regarding this web link.
Note: Any browser such as Internet Explorer, Firefox, Safari, or Netscape can beused for parent access. Version 3.0 of Internet Explorer or Netscape should beacceptable; however, version 4.0 or higher is recommended. Other browsers such asAOL or CompuServe may work, as well, depending on the version being used.
1. Connect to the Online Attendance screen using the web link provided by yourschool. The screen should appear similar to Figure A6 below; however, the webaddress will be the web link as provided by your school.
Figure A6: Login screen for Online Attendance
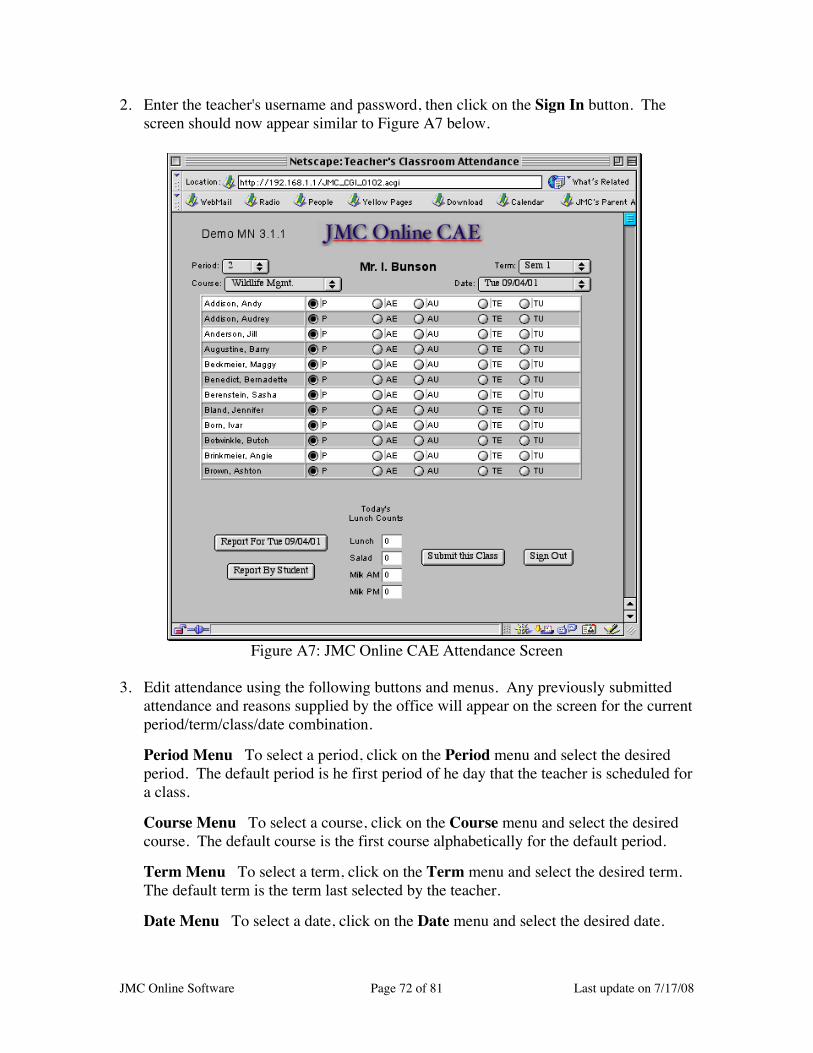
JMC Online Software Page 72 of 81 Last update on 7/17/08
2. Enter the teacher's username and password, then click on the Sign In button. Thescreen should now appear similar to Figure A7 below.
Figure A7: JMC Online CAE Attendance Screen
3. Edit attendance using the following buttons and menus. Any previously submittedattendance and reasons supplied by the office will appear on the screen for the currentperiod/term/class/date combination.
Period Menu To select a period, click on the Period menu and select the desiredperiod. The default period is he first period of he day that the teacher is scheduled fora class.
Course Menu To select a course, click on the Course menu and select the desiredcourse. The default course is the first course alphabetically for the default period.
Term Menu To select a term, click on the Term menu and select the desired term.The default term is the term last selected by the teacher.
Date Menu To select a date, click on the Date menu and select the desired date.
JMC Online Software Page 73 of 81 Last update on 7/17/08
The default date will be the determined by the server's clock and the Day Names asdefined in the office.
P (Present) button Each student will have a button labeled "P" immediately to theright of their name. Students listed on the Online Attendance screen are considered tobe present by default.
AE (Absent Excused) button To mark a student as being absent/excused, click onthe AE button to the right of the student's name.
AU (Absent Unexcused) button To mark a student as being absent/unexcused,click on the AU button to the right of the student's name.
TE (Tardy Excused) button To mark a student as being tardy/excused, click on theTE button to the right of the student's name.
TU (Tardy Unexcused) button To mark a student as being tardy/unexcused, clickon the TU button to the right of the student's name.
Note: Your school may have a policy about reporting students as absent or tardy,excused or unexcused. Please refer to your teacher's handbook or otherauthoritative source for attendance reporting guidelines for your school.
Report For (today's day and date) button To generate an attendance report for allstudents for the currently listed date, click on the Report For (today's day and date)button. The report will consist of a list of all students reported as either absent ortardy for the current date, any reasons supplied by the office for the absences ortardies, and the students' primary contact phone numbers. To change the date for thereport, select the desired date from the Date menu in the top right corner of thescreen.
Report For A Student button To generate an attendance report for a specificstudent, click on the Report For A Student button. A subsequent screen will allowyou to select the student and the range of dates for the report and then click on theOK button to generate the report. The report will consist of all reported absencesand/or tardies for the requested student in the requested date range.
Today's Lunch Count boxes Up to four lunch count boxes will appear on thescreen for you to submit the various lunch counts as defined by your school. Click onthe box you wish to edit and type in the appropriate lunch count.
Submit This Class button To submit attendance for the currently listedperiod/term/course/date combination, click on he Submit This Class button. Yourattendance and lunch counts will be submitted and the next class will appear on thescreen.
Sign Out button To sign out of the Online Attendance software, click on the SignOut button. This will bring you back to the Online Attendance login screen.
JMC Online Software Page 74 of 81 Last update on 7/17/08
Online GradeBook Module
In the OfficeSetting Up Teacher Accounts and PasswordsAdministrators and/or other office personnel will need to set up teacher accounts andpasswords. This is the same process as for Online Attendance. Please refer to the OnlineAttendance section "Setting Up Teacher Accounts and Passwords" for details on howto set teacher user names and passwords.
Processing Teacher Progress Report SubmissionsPeriodically teachers may submit student progress reports to the office. Office staff mayprint these reports in various ways, such as for a grade level or individual student, byusing Grades-Reports-Print Progress Reports .
Processing Teacher Grade SubmissionsAt the end of each term teachers post student grades much like they do with thetraditional JMC GradeBook. Office staff use the Grades-Entry-TGE/GradeBook Entryoption to process these grades. From the TGE/GradeBook Entry screen use the Teacherto Office via Drop Folder option and navigate to the JMC data folder. Inside the datafolder is a folder named "GRBK_Grades". This folder contains any grades posted byteachers through the Online GradeBook. Process these grade files just as you wouldprocess grade files from a network Grades Drop folder.
Making Backups of Teacher GradeBooks
Since all teacher GradeBook information is stored on the web server it is veryimportant to make proper backups of the Online GradeBook files!
Each teacher's GradeBook data is stored in a Teacher folder in the same directory as theJMC Online software (CGI or DLL). Each Teacher folder is named "TeacherXX", whereXX is the JMC teacher number. To make a backup, please copy ALL the foldersbeginning with the word "Teacher".
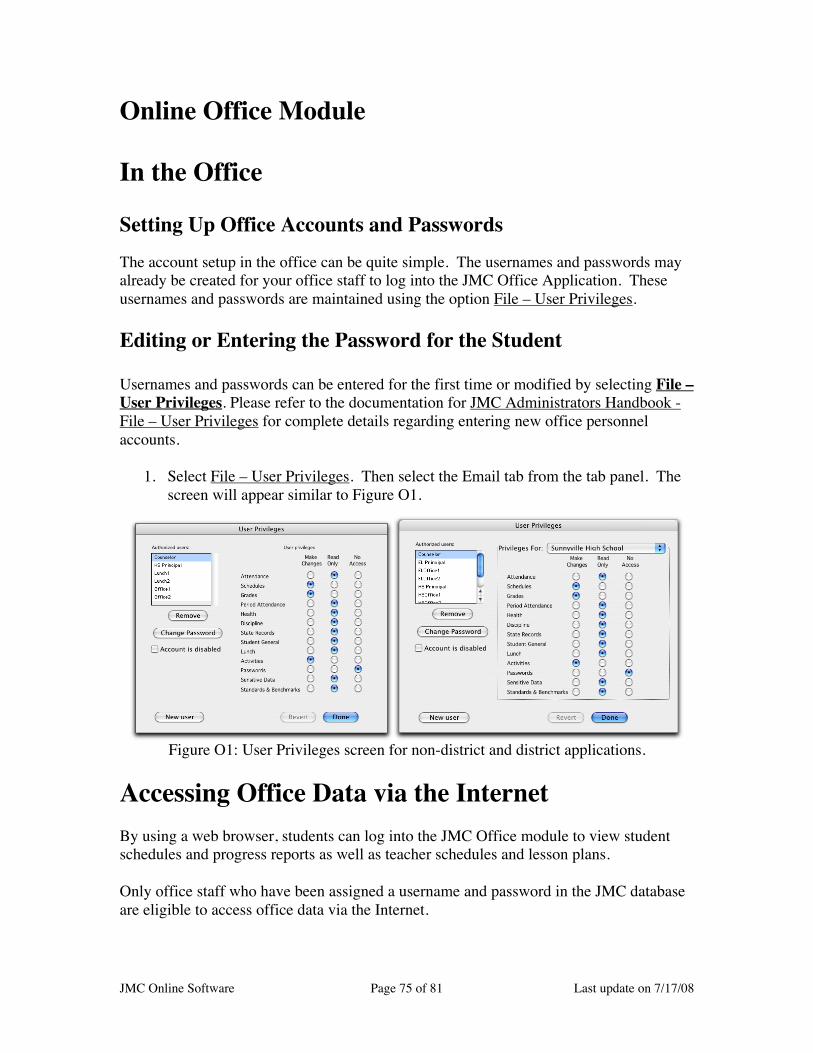
JMC Online Software Page 75 of 81 Last update on 7/17/08
Online Office Module
In the Office
Setting Up Office Accounts and PasswordsThe account setup in the office can be quite simple. The usernames and passwords mayalready be created for your office staff to log into the JMC Office Application. Theseusernames and passwords are maintained using the option File – User Privileges.
Editing or Entering the Password for the Student
Usernames and passwords can be entered for the first time or modified by selecting File –User Privileges. Please refer to the documentation for JMC Administrators Handbook -File – User Privileges for complete details regarding entering new office personnelaccounts.
1. Select File – User Privileges. Then select the Email tab from the tab panel. Thescreen will appear similar to Figure O1.
Figure O1: User Privileges screen for non-district and district applications.
Accessing Office Data via the InternetBy using a web browser, students can log into the JMC Office module to view studentschedules and progress reports as well as teacher schedules and lesson plans.
Only office staff who have been assigned a username and password in the JMC databaseare eligible to access office data via the Internet.

JMC Online Software Page 76 of 81 Last update on 7/17/08
Once the office staff person has been set up in the JMC Office Application for userprivileges, they can then log into the JMC Office module using a web link provided bythe school. Please contact your school for details regarding this web link.
Note: Any browser such as Internet Explorer, Firefox, Safari, or Netscape can beused for student access. Version 3.0 of Internet Explorer or Netscape should beacceptable; however, version 4.0 or higher is recommended. Other browsers such asAOL or CompuServe may work, as well, depending on the version being used.
1. Connect to the Online Office screen using the web link provided by your school.The screen should appear similar to Figure O2; however, the web address will bethe web link as provided by your school.
Figure O2: Login screen for Online Office2. Enter the username and password that was assigned in the office under File – User
Privileges.
3. Click Sign In. The screen should appear similar to Figure O3.
Figure O3: Online Office main screen after successful login.
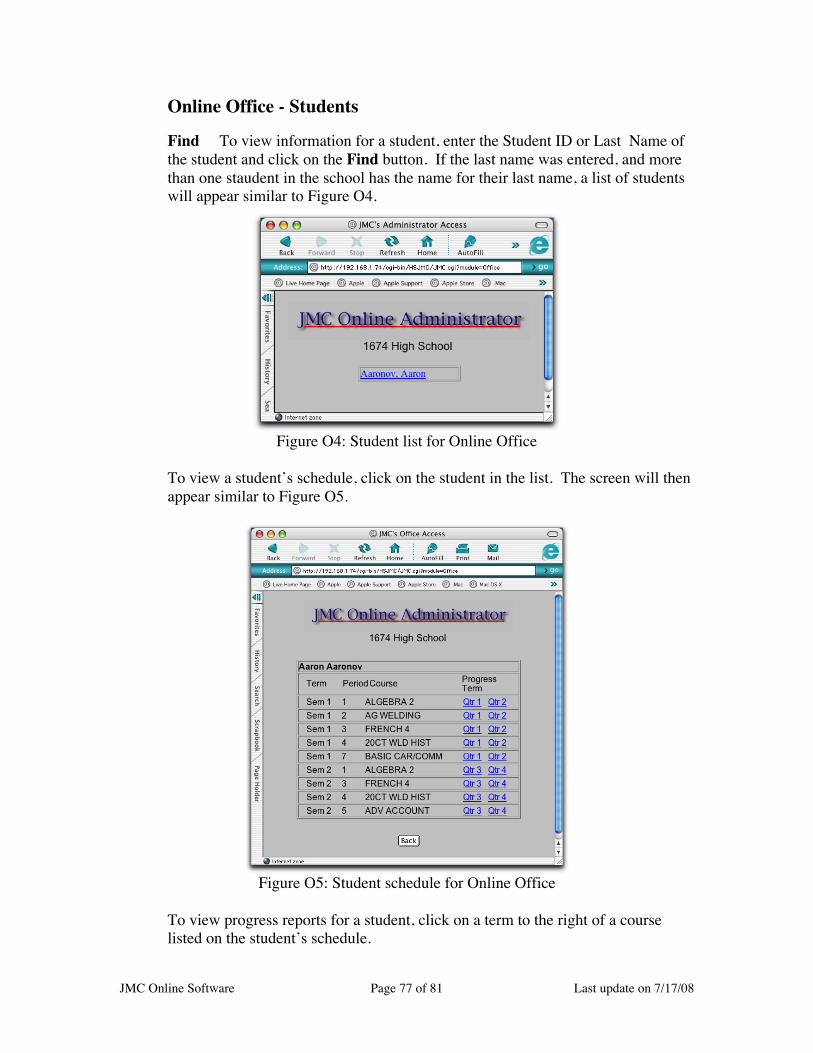
JMC Online Software Page 77 of 81 Last update on 7/17/08
Online Office - Students
Find To view information for a student, enter the Student ID or Last Name ofthe student and click on the Find button. If the last name was entered, and morethan one staudent in the school has the name for their last name, a list of studentswill appear similar to Figure O4.
Figure O4: Student list for Online Office
To view a student’s schedule, click on the student in the list. The screen will thenappear similar to Figure O5.
Figure O5: Student schedule for Online Office
To view progress reports for a student, click on a term to the right of a courselisted on the student’s schedule.

JMC Online Software Page 78 of 81 Last update on 7/17/08
Online Office - TeachersBy Teacher To view information for a teacher, click on the By Teacher buttonon the Find screen - Figure O3. The screen will then appear similar to Figure O6.
Figure O6: Online Office by Teacher – Teacher List
Get Teacher Schedule To view information for a teacher, select the teacher inthe list and then click Get Teacher Schedule. The screen will then appear similarto Figure O7.
Figure O7: Online Office by Teacher – Teacher Schedule
To view lesson plans for this teacher, click on the View button to the right of acourse in the list.
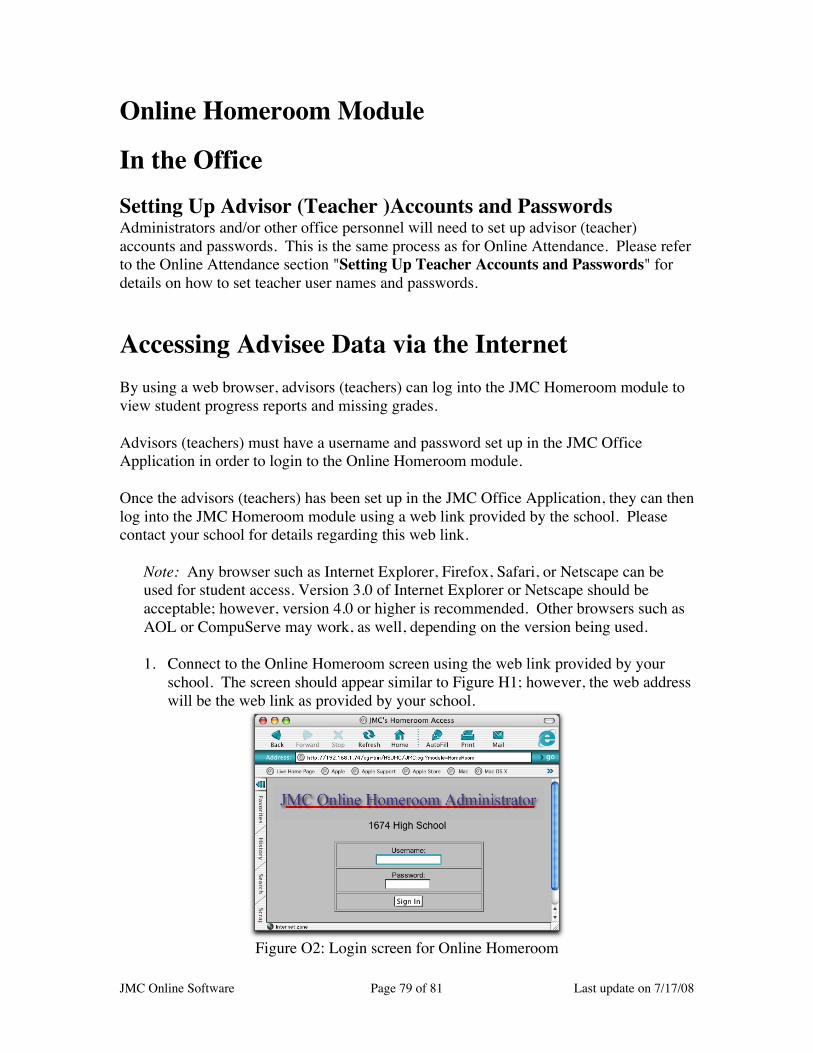
JMC Online Software Page 79 of 81 Last update on 7/17/08
Online Homeroom Module
In the OfficeSetting Up Advisor (Teacher )Accounts and PasswordsAdministrators and/or other office personnel will need to set up advisor (teacher)accounts and passwords. This is the same process as for Online Attendance. Please referto the Online Attendance section "Setting Up Teacher Accounts and Passwords" fordetails on how to set teacher user names and passwords.
Accessing Advisee Data via the InternetBy using a web browser, advisors (teachers) can log into the JMC Homeroom module toview student progress reports and missing grades.
Advisors (teachers) must have a username and password set up in the JMC OfficeApplication in order to login to the Online Homeroom module.
Once the advisors (teachers) has been set up in the JMC Office Application, they can thenlog into the JMC Homeroom module using a web link provided by the school. Pleasecontact your school for details regarding this web link.
Note: Any browser such as Internet Explorer, Firefox, Safari, or Netscape can beused for student access. Version 3.0 of Internet Explorer or Netscape should beacceptable; however, version 4.0 or higher is recommended. Other browsers such asAOL or CompuServe may work, as well, depending on the version being used.
1. Connect to the Online Homeroom screen using the web link provided by yourschool. The screen should appear similar to Figure H1; however, the web addresswill be the web link as provided by your school.
Figure O2: Login screen for Online Homeroom
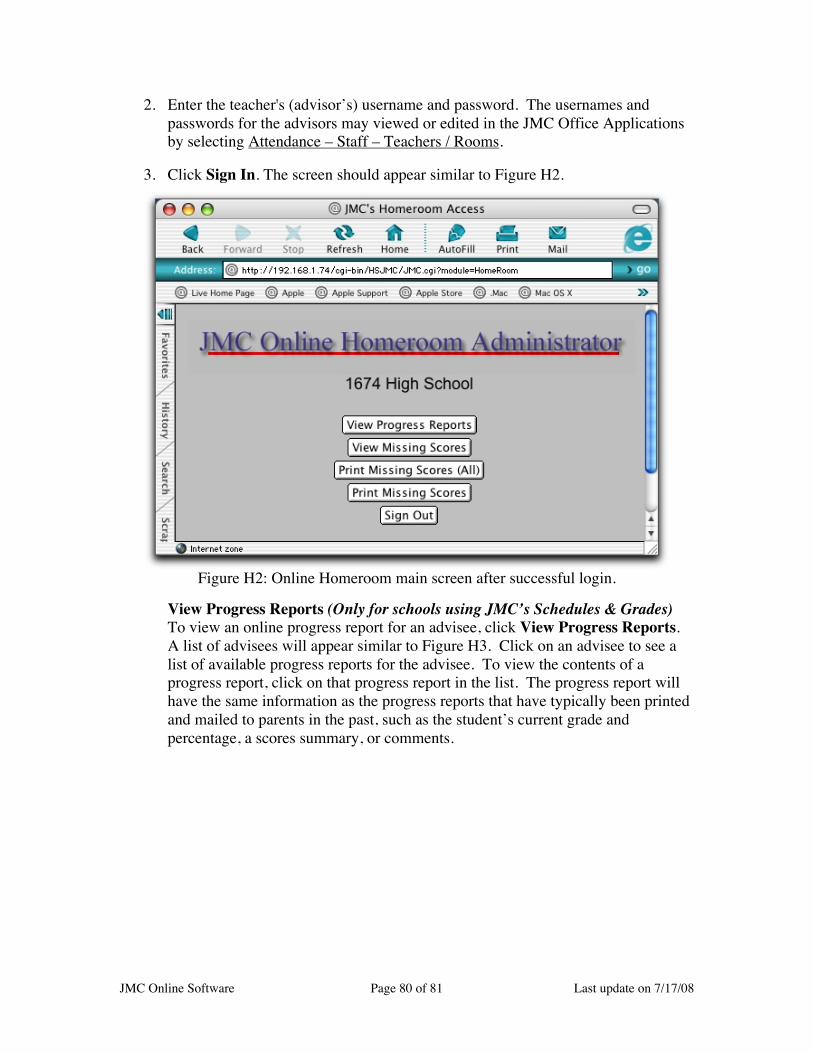
JMC Online Software Page 80 of 81 Last update on 7/17/08
2. Enter the teacher's (advisor’s) username and password. The usernames andpasswords for the advisors may viewed or edited in the JMC Office Applicationsby selecting Attendance – Staff – Teachers / Rooms.
3. Click Sign In. The screen should appear similar to Figure H2.
Figure H2: Online Homeroom main screen after successful login.
View Progress Reports (Only for schools using JMC’s Schedules & Grades)To view an online progress report for an advisee, click View Progress Reports.A list of advisees will appear similar to Figure H3. Click on an advisee to see alist of available progress reports for the advisee. To view the contents of aprogress report, click on that progress report in the list. The progress report willhave the same information as the progress reports that have typically been printedand mailed to parents in the past, such as the student’s current grade andpercentage, a scores summary, or comments.
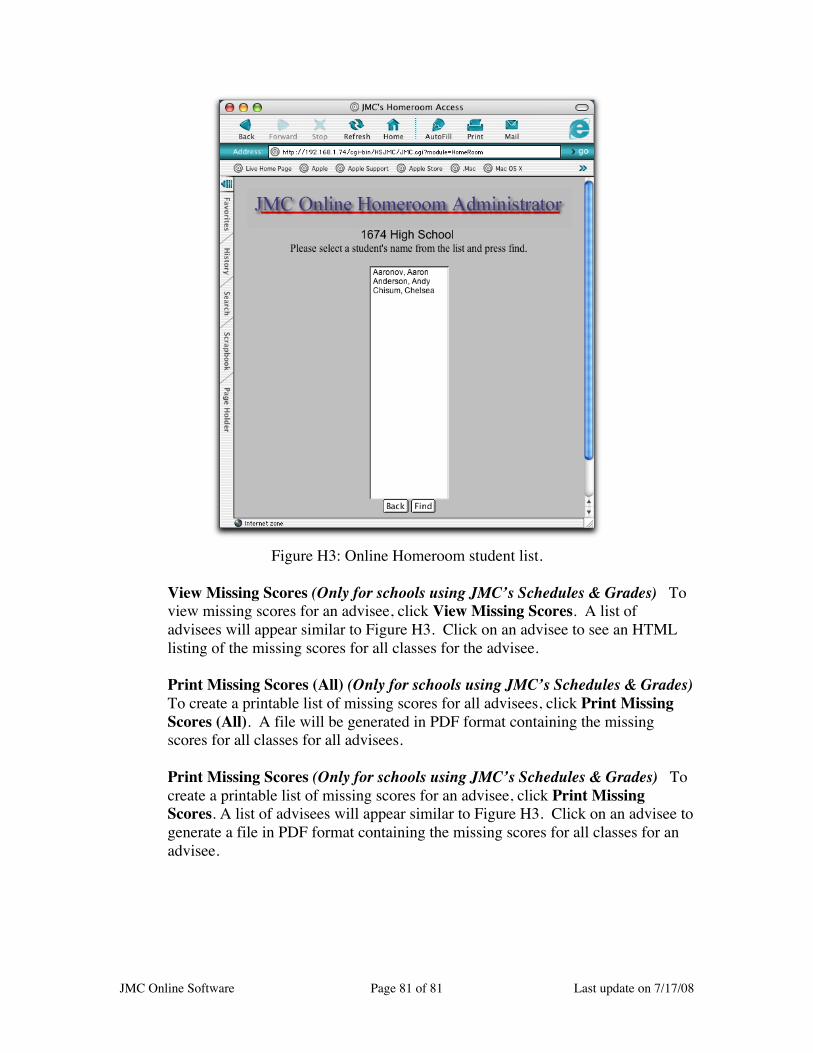
JMC Online Software Page 81 of 81 Last update on 7/17/08
Figure H3: Online Homeroom student list.
View Missing Scores (Only for schools using JMC’s Schedules & Grades) Toview missing scores for an advisee, click View Missing Scores. A list ofadvisees will appear similar to Figure H3. Click on an advisee to see an HTMLlisting of the missing scores for all classes for the advisee.
Print Missing Scores (All) (Only for schools using JMC’s Schedules & Grades)To create a printable list of missing scores for all advisees, click Print MissingScores (All). A file will be generated in PDF format containing the missingscores for all classes for all advisees.
Print Missing Scores (Only for schools using JMC’s Schedules & Grades) Tocreate a printable list of missing scores for an advisee, click Print MissingScores. A list of advisees will appear similar to Figure H3. Click on an advisee togenerate a file in PDF format containing the missing scores for all classes for anadvisee.


![Master of Arts (Journalism and Mass Communication) [MA (JMC)]€¦ · JMC JR 2 Business Journalism 02 25 25 50 JMC JR 3 Crime Journalism 02 25 25 50 JMC JR 4 Culture Journalism 02](https://static.fdocuments.in/doc/165x107/5f8d3bbb01dcc959580d2aa2/master-of-arts-journalism-and-mass-communication-ma-jmc-jmc-jr-2-business.jpg)