phs.pusdk12.orgphs.pusdk12.org/subsites/Kim-Jones/documents/Biology/Unit 8... · Web viewThe penis...
14
Biology Jones Fetal Pig Dissection Guide Introduction Fetal Pigs are unborn animals. In processing the sows (mature female swine) for human consumption, unborn litters of pigs are often revealed. Rather than be discarded, they are removed and made available for study for students like you. The internal organ systems are very much like yours! Your fetal pig was once a living organism and deserves your respect! Anyone failing to act properly will be removed from the dissection and will receive a loss of points. You will not be allowed to take the test with the rest of the class; a pencil paper test will be provided to you on the scheduled test make-up day. You will be allowed to return to class once the dissection component of the lesson is complete. The pencil-paper test is a much more difficult test, so act properly and make sure you show up on Pig Test Day! There are four different Dissection sections in this guide that will be covered in 5 days of dissection. Each group may work at their own pace, but do not fall behind! - Use the materials provided (explained below) AND your lecture notes to quiz each other daily about the content covered. What are you going to be responsible for? How do you use the materials provided to be successful? Each person in a group of 3 or 4 needs to follow the dissection guide. You will be responsible for all the bold-face terms listed within each section of this Guide . These bold-face terms correspond to your “List of Terms” provided to you. The “List of Terms” is not an assignment and will not be collected . But, if you don’t do this you will pay in a big painful way on your unit test! Within this Dissection Guide, pay attention to the italicized words. The italicized information may not have been discussed in lectures, but will be considered testable material. Therefore, you need to record this information on your “List of Terms” for study. - One person in your group should be reading the Dissection Guide to your group as you progress through each dissection. - A second (and third) person should be writing down the italicized information in this Guide AND any additional information given in lecture on the “List of Terms” to have a study tool for the test day. - Another person does the dissection while the person reading the dissection guide is providing the dissection instructions. o This symbol ( ) represents an incision is required. - Your group needs to decide how to share the information written down on the “List of Terms” with each other; remember, the person doing the actual dissection won’t be able to write anything down but will need the written information recorded. You will also be provided with a Dissection Study Guide ; this is your second study tool and is a more comprehensive. These questions are designed to remind you that you need to know more than just the names and locations of the organs. Each night you should do the section of questions that correspond to the dissection done that day. This is an assignment and will be collected on the day of the test .
-
Upload
phamnguyet -
Category
Documents
-
view
216 -
download
1
Transcript of phs.pusdk12.orgphs.pusdk12.org/subsites/Kim-Jones/documents/Biology/Unit 8... · Web viewThe penis...

Biology JonesFetal Pig Dissection Guide
Introduction Fetal Pigs are unborn animals. In processing the sows (mature female swine) for human
consumption, unborn litters of pigs are often revealed. Rather than be discarded, they are removed and made available for study for students like you. The internal organ systems are very much like yours!
Your fetal pig was once a living organism and deserves your respect! Anyone failing to act properly will be removed from the dissection and will receive a loss of points. You will not be allowed to take the test with the rest of the class; a pencil paper test will be provided to you on the scheduled test make-up day. You will be allowed to return to class once the dissection component of the lesson is complete. The pencil-paper test is a much more difficult test, so act properly and make sure you show up on Pig Test Day!
There are four different Dissection sections in this guide that will be covered in 5 days of dissection. Each group may work at their own pace, but do not fall behind!- Use the materials provided (explained below) AND your lecture notes to quiz each other daily
about the content covered.
What are you going to be responsible for? How do you use the materials provided to be successful?
Each person in a group of 3 or 4 needs to follow the dissection guide. You will be responsible for all the bold-face terms listed within each section of this Guide . These bold-face terms correspond to your “List of Terms” provided to you. The “List of Terms” is not an assignment and will not be collected. But, if you don’t do this you will pay in a big painful way on your unit test!
Within this Dissection Guide, pay attention to the italicized words. The italicized information may not have been discussed in lectures, but will be considered testable material. Therefore, you need to record this information on your “List of Terms” for study.- One person in your group should be reading the Dissection Guide to your group as you
progress through each dissection. - A second (and third) person should be writing down the italicized information in this Guide
AND any additional information given in lecture on the “List of Terms” to have a study tool for the test day.
- Another person does the dissection while the person reading the dissection guide is providing the dissection instructions.
o This symbol ( ) represents an incision is required. - Your group needs to decide how to share the information written down on the “List of Terms”
with each other; remember, the person doing the actual dissection won’t be able to write anything down but will need the written information recorded.
You will also be provided with a Dissection Study Guide; this is your second study tool and is a more comprehensive. These questions are designed to remind you that you need to know more than just the names and locations of the organs. Each night you should do the section of questions that correspond to the dissection done that day. This is an assignment and will be collected on the day of the test.
At the end of each dissection, all members of your group are responsible for proper clean up at the end of each day.
- Rinse and DRY your dissection tool kit. The tools and the container. NO RESIDUAL WATER!
- Your Dissection Guide and tool kit will be assigned to your group by number. Return both of them, together, for inspection before leaving the class period.
- Clean your table area with the cleaning supplies provided.- Return your pig in its Zip Lock bag and put it in the box labeled for your class period.- Place any large tissue, from your dissection pan, in the garbage. NOT DOWN THE SINK!
Rinse your dissection pan and turn it upside down on the counter to drain.Dissection 1
External Features & Oral Cavity

OK, here we go! Start with the beginning, read every word - DON”T skip over anything. Be thorough & focus!
External Features SNOUT ~ the snout of the pig has a blunt tip, ending with a disc-like, pliable, but firm structure
composed of cartilage. The tip of the nose is also strengthened by bone.
EXTERNAL NARES ~ these are the nostril openings in the snout. Thy open in the nasal cavity. When the air enters the external nares, it is warmed, filtered, and humidified.
PNNAE ~ the external ears. They are composed of cartilage, just like ours.
EYES ~ Do you really need an explanation? - Spread the upper and lower eyelids. In the inner corner of the eye, locate the third lid-
like structure. This is the nictitating membrane. During the Evolution Unit you learned that this is a vestigial structure in the corner of the human eye. (Do you remember what vestigial structures are?) Try to locate a lab partner’s nictitating membrane!
MAMMARY PAPILLAE ~ (pronounced pap-ill-ay; meaning “a bump” on an organ) both male and female pigs have mammary papillae. In mature females, these become the nipples by which the young receive milk. How many mammary papillae does your pig have? What about the pig in the group next to you? Why do you think males have mammary papillae?
UMBILICAL CORD ~ this structure, more than any other, identifies the animal as a fetus. It extends from the mother’s placenta and provides for:
- The passage of food and oxygen from the mother to the fetus.- The movement of wastes from the fetus to the mother through an umbilical vein. You
will see the umbilical vein during Dissection 2.
Sexing the Pig Female ~ Females are identified by the UROGENTIAL PAPILLA. This is a small fleshy, cone-
shaped projection below the anus. The female’s external genital opening is at the base of the urogenital papilla. The term urogenital indicates that this is the external opening for both urinary wastes and reproduction.
- This is one difference between a female human and female pig. Humans have separate openings/locations; one each for the removal of urine and reproduction.
Male ~ the male’s TESTES (singular = testis) lie in the SCROTUM; a double pouch structure below the tail. The UROGENITAL OPENING in males is located on the mid-belly region, just above the umbilical cord. It is the opening to the PENIS. The penis is internal, but may be detected under the skin by pressing with your fingertip along the mid-belly line moving towards the scrotum.
YOU WILL BE RESPONSIBLE FOR BOTH MALE AND FEMALE STRUCTURES ON THE TEST! FIND ANOTHER GROUP WITH A PIG OF THE OPPOSITE SEX OF YOUR PIG AND HAVE THOSE GROUP MEMBERS EXPLAIN THE IDENTIFIED STRUCTURES!
SALIVARY GLANDS Turn you pig on its side.- Using your fingers or your tweezers and grab a pinch of skin in the cheek area and pull it
up.- Using the scissors, nick the skin creating a small hole at the cheek area below the ear.- Without jabbing the scissors downward, cut a rectangle shaped flap. See Figure 1.- Using your fingers or your tweezers, pinch an edge of the flap of skin and gently pull up.- You will see whitish connective tissue under the skin. Using the sharp probe, gently
tease away the connective tissue while pulling up on the skin flap.
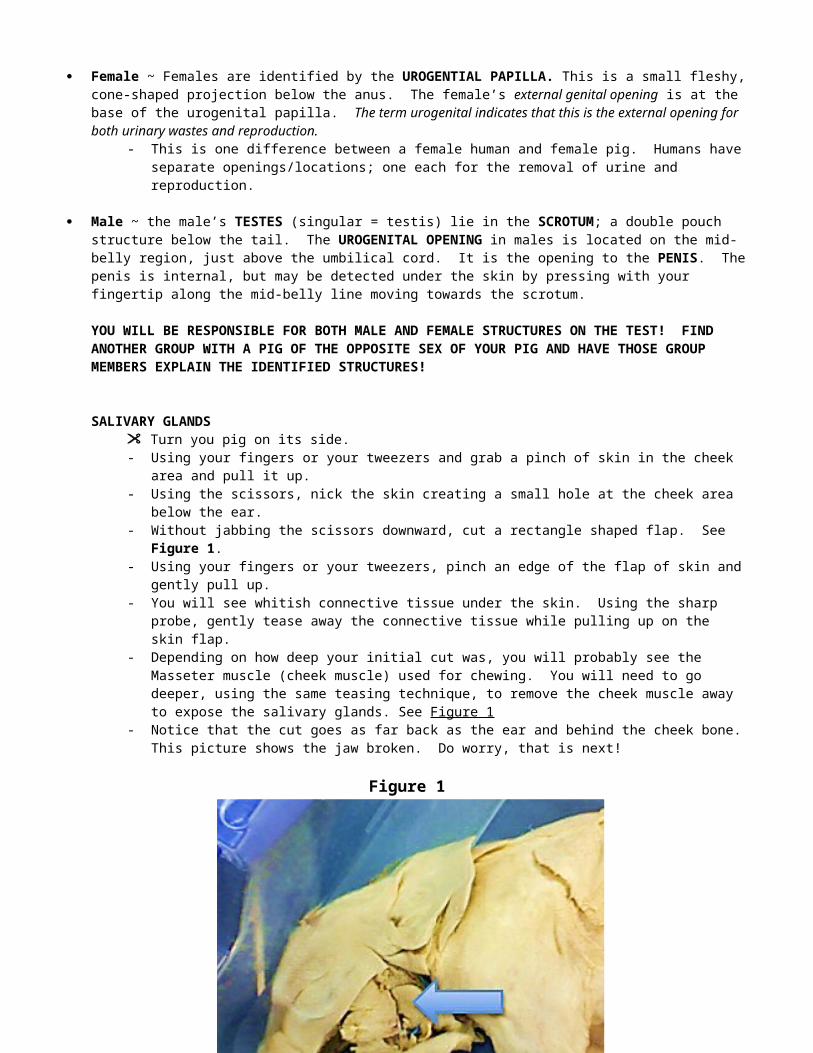
- Depending on how deep your initial cut was, you will probably see the Masseter muscle (cheek muscle) used for chewing. You will need to go deeper, using the same teasing technique, to remove the cheek muscle away to expose the salivary glands. See Figure 1
- Notice that the cut goes as far back as the ear and behind the cheek bone. This picture shows the jaw broken. Do worry, that is next!
Figure 1
There are two salivary glands you will reveal. They can be described and looking “choppy” and “lobed”.
- Parotid gland = triangular shaped- Submandibular gland = usually darker than the parotid (and under it), compact, and
oval.- You will not be responsible for distinguishing between the two.
Oral Cavity Oral Cavity ~ the part of the mouth behind the teeth and gums that is bounded above by the
hard and soft palates and below by the tongue.
Cut through the corner of the mouth on each outside towards the joint in the jaw. Cut through the angle of the jaw through the joint. Place both thumbs, back to back (your nails will be touching), in the back in the pharynx region. One thumb will be on the roof of the mouth; the other will be on the back of the tongue. With controlled pressure, separate the bottom jaw from the top while pulling your thumbs apart. You will need to go deep enough so the mouth lies completely open like Figure 2
Figure 2

Tongue ~ a muscular structure on the floor of the oral cavity. It is attached to the base of the oral cavity by a thin membrane, the lingual frenulum. The surface of the tongue is covered by variously shaped projections known as sensory papillae. Many of these papillae contain taste buds. The greatest number of large fibrous sensory papillae can be seen at the edges of the tongue.
Palate ~ the roof of the mouth. It separates the oral cavity from the nasal cavity.- Hard palate ~ the bony ridged portion towards the “snout end”.- Soft palate ~ the soft muscular portion toward the throat (pharynx) region. Thank goodness
this part is soft; we might choke when taking too big of a bite!
Epiglottis ~ this is a cone-shaped flap of cartilage and is connected to the back of the tongue in the pharynx. You may need to separate the jaw more to see this structure.
Esophagus ~ you will be responsible for locating the opening of this organ from the pharynx region. Using your blunt probe, locate the entrance to the esophagus behind the epiglottis; insert the tip of the blunt probe into the opening.
Trachea ~ you will be responsible for locating the opening of this organ from the pharynx region. Using your blunt probe, locate the entrance to the trachea; the epiglottis surrounds this opening. Insert the tip of the blunt probe into the opening.
You will also locate the esophagus and trachea again during Dissection 3 of the Thoracic Cavity.
Dissection 2Abdominal Cavity
Abdominal Cavity ~ the cavity within the abdomen that contains the digestive and other organs.
Pay very close attention to the dissection instructions. Read all () instructions BEFORE starting.
The numbered lines on Figure 3 represent incisions () you will be making for Dissection 2 and Dissection 3.
Figure 3
DO NOT cut incision #1 for
Dissection 2 START HERE , with incision #3 Incision #1 is for Dissection 3 for Dissection 2

With your fingertips, locate the lower edge of the ribs. Use your fingertips to trace and arc as shown in Figure 3, incision #3.
Use your scissors to nick the skin at the center of incision #3 . Cut the musculature along the line #3 you just traced with your finger. DO NOT CUT TOO DEEPLY. The skin and muscles are very thin and you could cut important organs. Continue with incision #2 and then incision #4. Notice that for incision #2, the cut starts at the top of the umbilical cord making an arc and angling down towards the “hip area” to incision #4. DO NOT CUT DIRECTLY BELOW THE UMBILICAL CORD! You will cut the urinary bladder and the penis, if it is a male. After the muscle layers have been cut, you will find a fine membrane called the peritoneum which lines the abdominal cavity. Carefully cut through the peritoneum. You will notice that the muscular wall below the umbilical cord cannot be lifted. This is because the umbilical vein, which runs into the liver, is still connected. After you observe the umbilical vein you can cut it. Now you can fold back the flaps, created from incision #2, #3, and #4, exposing the organs below.
Now you can start exploring! Use Figure 4 to help you identify the structures.Dissection Overview ~ Figure 4
Use this diagram for Dissection 2 and Dissection 3
For Dissection 3

ForDissection 2
Identifying the Organs of the Digestive System in the Abdominal Cavity The italicized information is not all inclusive of what you are responsible for. Make sure to review
your notes on each organ discussed in class! Diaphragm ~ This dome shaped muscular wall separates the thoracic cavity (chest cavity) from
the abdominal cavity. Three major vessels/tubes pass through the diaphragm: aorta, inferior vena cava, and the esophagus. The diaphragm functions in breathing. (More on this structure in Dissection 3)
Liver ~ This dark brown/red organ dominates the upper abdomen. Five lobes of the liver can be seen. The liver is a very busy organ and has many functions. We will focus on: the liver aids in regulating sugars by removing, storing, and releasing sugars to and from the blood stream. It makes bile and also detoxifies the blood by making chemical changes to toxins in the blood stream.
Gall Bladder ~ Lift the right central lobe of the liver to expose the gall bladder embedded in a depression in under-surface of the liver. It looks like a small green (may be brown) bag. It stores bile that the liver made. Locate the bile duct; the small tube connected to the bottom of the Gall Bladder. Notice how the bile duct empties into the duodenum.
Stomach ~ The muscular pouch lies on the left side of the upper abdomen. Find the esophagus and locate where it pierces the diaphragm to join the stomach.
Open the stomach with your scissors by cutting along the greater curvature (length wise) of the stomach to lay it open somewhat flat. You may take your pig to the sink and wash out any stomach contents. Look at the small stomach folds called rugae. Rugae helps to increase the surface area of the stomach. Locate the pyloric and esophageal sphincters. The pyloric sphincter will be an O-ring-like structure at the bottom of the stomach; palpate (squeeze) it with your fingers and then find the opening of it looking from the inside view of the stomach. The esophageal sphincter can be found, looking into the stomach, as a big round opening at the top of the stomach. Small Intestine ~ This is the first site of absorption of nutrients. The first portion of the small
intestine is called the Duodenum. It is a short U-shaped tube about 1 cm long. It receives digestive juices from the pancreas, liver and the stomach. Most of digestion takes place here! Make sure you fully understand the role of the duodenum; there are many questions about this structure on your test, so review your notes! Do not cut the mesentery (epithelial tissue) that holds the intestines together.
Large intestine (colon) ~ At the end of the small intestine, this tube swells to form the large intestine. The primary function of the large intestine is to absorb water from waste to reclaim that water back into the body. The reclaimed water contains micronutrients such as vitamins and minerals. Towards the lower left side, you will see a large pouch hanging off the large intestine called the cecum. It houses bacteria that have enzymes that aid the pig in digesting the cellulose (cell wall) in plant matter. All animals that have a diet of plant matter (herbivores) all have a fully developed cecum. The cecum in you is called an appendix. The appendix is a vestigial structure

in humans and, therefore, no longer is a functioning organ and is not necessary for our survival. So why do we have an appendix?
Pancreas ~ Move the main portion of the small intestine to the right side and lift up the stomach to observe the pancreas. It is a lobed, whitish, grainy structure that lays adjacent to the duodenum. This is another busy organ so review those notes!
Spleen ~ the spleen looks like a tongue-like structure that lies on top of the greater curvature of the stomach. It functions as an emergency red blood cell reservoir and one of the white blood cell factories.
Dissection 3Thoracic Cavity
Thoracic Cavity ~ contains the heart and lungs. Refer to Figure 4 to help you identify the structures within this cavity and the pharynx region.
Begin your dissection of the thoracic cavity by making an incision with your scissors at the base of the ribcage in the middle. See Figure 4, incision # 1 (purple lines)
- Be very careful not to cut too deep when getting to the pharynx region . The thyroid gland is below the surface of the musculature in the pharynx region. It lays on top of the larynx (voice box)
Thoracic Cavity: Using your sharp probe, tease away the peritoneum (connective tissue) connecting the wall of the thoracic cavity to the diaphragm. You should have 2 skin flaps that you can pin to the tray to help you see the organs in the thoracic cavity. Bending these flaps back to break a few ribs helps too. If you haven’t cut it yet, you will need to use your scissors to cut away the pericardium (sac that surrounds the heart) to fully expose the heart.
Let’s explore! Use Figure 4 to help you identify the structures.
Lungs ~ examine the pink lungs on either side of the heart. Note that they are firm and spongy. The lungs are where gases are exchanged in the pulmonary circuit in tiny little sacs called alveoli.
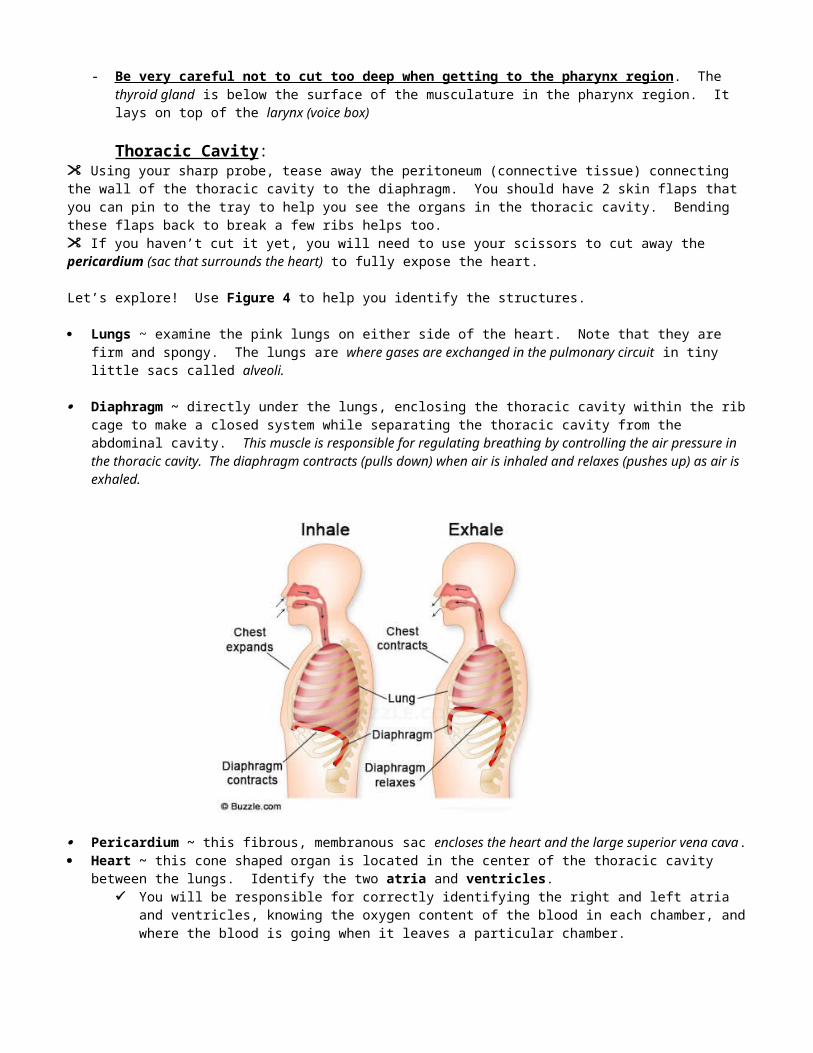
Diaphragm ~ directly under the lungs, enclosing the thoracic cavity within the rib cage to make a closed system while separating the thoracic cavity from the abdominal cavity. This muscle is responsible for regulating breathing by controlling the air pressure in the thoracic cavity. The diaphragm contracts (pulls down) when air is inhaled and relaxes (pushes up) as air is exhaled.

Pericardium ~ this fibrous, membranous sac encloses the heart and the large superior vena cava.
Heart ~ this cone shaped organ is located in the center of the thoracic cavity between the lungs. Identify the two atria and ventricles.
You will be responsible for correctly identifying the right and left atria and ventricles, knowing the oxygen content of the blood in each chamber, and where the blood is going when it leaves a particular chamber.
Pulmonary Artery ~ leaves the right ventricle and extends toward the left side before branching into the lungs. What is the oxygen content of the blood in this vessel?
Aorta (Aortic Arch) ~ Located BEHIND the pulmonary artery, this vessel leaves the heart (left ventricle) and also extends towards the left side down into the abdominal cavity. All your arteries branch off this main artery. What is the oxygen content of the blood in this vessel?
You will be responsible for identifying the aorta coming directly off the heart AND in the abdominal cavity. When looking for the aorta (white-strappy flat tube) in the abdominal cavity, don’t get it mixed up with the colon (green tube on top of the aorta).
Inferior Vena Cava ~ using your finger, rotate the heart to expose the back of the right side. Notice this extremely large tube entering the right atrium from below. What is the oxygen content of the blood in this vessel?
- Note: The Superior Vena Cava has a big hole cut in it making it difficult to identify. This hole was made during the preparation of the pig for dissection; for draining the blood from the pig.
Pharynx Region: Once you have cut the musculature in the pharynx region, use your sharp probe, and gently tease away the connective tissue to expose the thyroid gland. BE CAREFUL NOT TO CUT OR POKE THE THYROID. Continue your incision at the collar bone and cut towards the tray. Do the same on the other side.
Thymus gland ~ this is a whitish glandular structure that will fan out around the trachea and esophagus; it can also be found lying on top of the heart. This gland is enlarged in young mammals for an extra immune response. It becomes reduced as the animal matures.
Thyroid gland ~ this dark oval-shaped gland is located above the trachea lying on top of the larynx (voice box). It is responsible for secreting hormones that regulate metabolism.
Trachea ~ commonly called the windpipe. This structure is held open by cartilage rings. It branches into two tubes called bronchiole tubes which extend into the lungs.
Larynx ~ the voice box. This is a hard, bulbous structure located at the top of the trachea. You can find the opening to the larynx (where the sound waves escape) by gently probing the lower portion with your sharp probe.
Esophagus ~ this will be a soft muscular structure behind the trachea.
Using your sharp probe, gently tease between the trachea and esophagus to separate these two tubes.
Dissection 4Urogenital System
Excretory (Urinary) System : First, push the small intestine to a side to expose the two large kidneys, shaped like beans. The kidneys are retro-peritoneal (behind the peritoneum that lines the abdominal cavity). Using your scissors, remove this thin membrane to expose the kidneys and the ureters that lead to urinary bladder. See Figures 5 & 6
Kidney ~ The kidneys filter out the toxins from your blood (that the liver detoxified) and help maintain osmotic homeostasis (water balance) of your cells. In the process of filtering the toxins out of blood, the kidneys produce urine.
Ureter ~ Carries urine from the kidneys to the urinary bladder.
Urinary bladder ~ Stores urine. In the fetal pig, the urinary bladder is an elongated sac in the lower abdominal cavity. It lies between the umbilical arteries and can be seen on the flap that contains the umbilical cord that folded down between the legs during the abdominal cavity dissection.
Urethra ~ This structure carries urine from the urinary bladder to the urogenital opening (males) / urogenital papillae (females) to exit the body. Though both sexes have a urethra, we will only be locating this in the male pig.
If you have a female pig, we will not be dissecting out the urethra. Find a group with a male pig to identify this structure.
If you have a male pig, follow the dissection instruction when dissecting the reproductive system.
Reproductive system: YOU ARE RESPONSIBLE FOR KNOWING THE EXTERNAL AND INTERNAL ORGANS FOR BOTH THE FEMALE AND MALE PIGS! FIND ANOTHER GROUP THAT HAS THE OPPOSITE SEX OF YOUR PIG AND STUDY!
In a female, there is no need to cut; everything is right there in plain view. See Figure 5 for help locating these structures. The ovaries are very small bean-like structures lying below the kidneys. The oviducts or fallopian tubes are extremely narrow, curly-like tubes extending off of the ovaries that connect to the uterus (The V-like shaped area where the oviducts connect at the top, and somewhat behind, the urinary bladder. You may need to take your blunt probe and lay it on the urinary bladder. Slightly pull down on the urinary bladder with your probe to look behind it to really see this V-shaped uterus.)
Based on the description above, locate the structures on the cartoon drawing to the right before trying it on the pig.
Ovaries ~ Makes female hormones (estrogens) and ovum (eggs).
Oviducts / Fallopian Tubes ~ Carries eggs from the ovaries to the uterus.
Uterus ~ The “womb”; organ where the fetus develops. THIS IS A THIS IS A DIFFICULT DISSECTION FOR MALES! If you have a male pig, you may notice that Mrs. Jones has already done your dissection for you to ensure that there are some males with all their parts still intact for your test. TAKE YOUR TIME, BE VERY CAREFUL, AND ASK FOR HELP! If you are waiting for help, come on over to the pig where Mrs. Jones is to observe and listen. If not, study previous dissections while you wait. See Figure 6; noting that this figure does not show the full dissection.

Start with locating the urogenital opening and palpate (feel) the outer tissue below this opening moving down towards the tail end towards the scrotum. Sometimes the skin is translucent enough to see this long white tube. Using your scissors, make a nick in the skin towards the top of the penis below the urogenital opening. Insert the scissors into the nick and cut down and along the side of the penis moving towards the tail end stopping at the scrotum. CAREFUL NOT TO GO TO DEEP; YOU DON’T WANT TO CUT INTO THE URINARY BLADDER ON THE OTHER SIDE! Do the same on the other side of the penis. Using your scissors and/or your sharp probe tease away the tissue around the penis without cutting it! Keep removing this tissue until the penis is exposed.
Next, with the same technique you used above to dissect the penis, you will remove the testicles from the scrotum pouch. Insert your scissors in the top of the scrotum at the base of the penis. WITHOUT going too deep, use your sharp probe to tease away tissue inside the scrotum until you see a white, gelatinous-ball-like structure. Don’t worry about destroying the scrotum. This will be the testicle, but you’re not quite there yet. Keep teasing the tissue until you can “pop” out this structure. Once the testicle is out of the scrotum, you will notice a blob of tissue at the end. Cut this off using your scissors until you can see, at the tip of the testis inside the membrane that surrounds it. Using your scissors, VERY CAREFULLY, cut off the membrane to expose the testicle.
Note: Sometimes the testes have not yet descended into the scrotum in the fetal pig. After all, they have not been born. If this is the case, Mrs. Jones will help you locate them in the abdominal cavity.
The rest is too difficult. Wait for Mrs. Jones to help with dissection out the vas deferens and urethra!
Testes ~ Makes male hormones (testosterone) and sperm.
Epididymis ~ This is an extremely coiled structure on the top of the testes. After the sperm are made in the testes, they go here to mature as they move through these tubes before being released.
Vas Deferens ~ Carries sperm from the epididymis to the urethra. There are three glands that produce the semen that sperm cells swim in to exit the body. These glands are the seminal vesicles, prostate gland, and Cowper’s gland.
Penis ~ Male sex organ. The urethra runs through the center of the penis for the release of urine and gametes.
Figure 5Just focus on structures indicated on the dissection guide and list of terms

Figure 6 Just focus on structures indicated on the dissection guide and list of
terms.This diagram does not show the whole dissection; pay attention to Mrs.
Jones’ tutorial!