DocOut for Windows - MPI Tech for Windows Installation and Operator’s Guide 2 Features of DocOut...
68
DocOut for Windows Installation and Operator’s Guide D60363-13 September 2011 MPI Tech A/S Vadstrupvej 35 2880 Bagsvaerd Denmark Tel: +45 44 36 60 00 Fax: +45 44 36 61 11 www.mpitech.com
Transcript of DocOut for Windows - MPI Tech for Windows Installation and Operator’s Guide 2 Features of DocOut...

DocOut for Windows Installation and Operator’s Guide
D60363-13
September 2011
MPI Tech A/S Vadstrupvej 35
2880 Bagsvaerd Denmark
Tel: +45 44 36 60 00 Fax: +45 44 36 61 11
www.mpitech.com

DocOut™ for Windows Installation and Operator’s Guide
Table of contents
Introduction to DocOut for Windows........................................................4 1.1 Product features .............................................................................5 1.2 Related manuals .............................................................................5 1.3 Requirements .................................................................................5
1.3.1 PC / Server system requirements.................................................5 1.3.2 Host system requirements ..........................................................6
2 Features of DocOut for Windows ........................................................7 2.1 Overview of DocOut for Windows.......................................................7 2.2 End to end control...........................................................................7
3 How to purchase and register DocOut ................................................8 3.1 How to purchase DocOut..................................................................8 3.2 Updating DocOut.............................................................................8
4 Installation.........................................................................................9 4.1 Pre-installation requirements ............................................................9 4.2 Getting started ...............................................................................9 4.3 Installation.....................................................................................9 4.4 PrintGuide.................................................................................... 10 4.5 Getting Started............................................................................. 10
4.5.1 Create a Windows spool............................................................ 10 4.5.2 Install DocOut ......................................................................... 11 4.5.3 Install PrintGuide..................................................................... 11 4.5.4 Define logical Printer in DocOut ................................................. 12
4.6 How to authorize DocOut................................................................ 13 4.6.1 Request your License key ......................................................... 14 4.6.2 Install obtained License Key ...................................................... 14
4.7 Configuration................................................................................ 15 4.8 Stop and start DocOut ................................................................... 15
4.8.1 To stop and start DocOut for Windows XP Pro .............................. 15 4.8.2 To stop and start DocOut for Windows Server 2003 ...................... 16 4.8.3 To stop and start DocOut for Windows Server 2008 ...................... 16
4.9 How long time does it take to upload configurations to PrintGuide ........ 17 4.10 How to assign a local spool queue................................................. 17
5 Operating DocOut .............................................................................18 5.1.1 Creating PDF Documents .......................................................... 18 5.1.2 Printing PDF Documents ........................................................... 19
5.2 Backup of Configuration ................................................................. 20 5.3 Restore Backup configuration to DocOut........................................... 20 5.4 Configuration Options .................................................................... 21
5.4.1 PPD ....................................................................................... 21 5.4.2 IPDS...................................................................................... 21 5.4.3 Physical Printer ....................................................................... 23 5.4.4 Strings................................................................................... 23 5.4.5 Output Driver.......................................................................... 24
6 Set-up in mainframe TCP/IP environment........................................25 6.1 PSF/MVS AFP/IPDS printing ............................................................ 25
6.1.1 PSF/MVS start-up procedure ..................................................... 25 6.2 PSS/MVS AFP/ICDS printing ........................................................... 26 6.3 PSS printer profile using TCP/IP attachment...................................... 27 6.4 PSS/VM AFP printing using TCP/IP ................................................... 28
6.4.1 Sample PSS VM printer profile definition using TCP/IP................... 28 7 Set-up in mainframe SNA environment.............................................29
7.1 Set-up of mainframe for AFP/IPDS (PSF) .......................................... 29
© Copyright 2011 MPI Tech 2
DocOut™ for Windows Installation and Operator’s Guide
7.1.1 PSF/MVS AFP printing using SNA................................................ 29 7.1.2 PSF/VM AFP printing using SNA ................................................. 30
7.2 Set-up of mainframe for AFP/ICDS (PSS).......................................... 30 7.2.1 PSS/MVS AFP/ICDS printing using SNA ....................................... 30 7.2.2 PSS/VM AFP/ICDS printing using SNA......................................... 30
8 PSF/400 AFP Printing Using TCP/IP.................................................31 8.1 AS/400 Settings for Version 3.7, 4.X and 5.X .................................... 31
8.1.1 Creating the PSF configuration................................................... 31 8.1.2 Creating the Printer Device Description ....................................... 32
9 Set-up in AS/400 SNA environment..................................................34 9.1 Creating APPC device description..................................................... 34 9.2 Creating printer device description................................................... 35 9.3 Updating APPN remote location list .................................................. 35 9.4 Sample controller definition ............................................................ 37
10 SNA server set-up..........................................................................38 10.1 Mainframe SNA LU 6.2 ................................................................ 38
10.1.1 Mainframe APPC/LU6.2 Wizard................................................ 38 10.1.2 Additional printers................................................................. 39 10.1.3 DocOut settings .................................................................... 39
10.2 Mainframe SNA LUA/LU1 ............................................................. 40 10.2.1 Setting up a connection ......................................................... 40
10.3 AS/400 SNA LU 6.2 .................................................................... 45 10.3.1 Important information ........................................................... 45 10.3.2 AS/400 Wizard ..................................................................... 45 10.3.3 Adjust connection properties .................................................. 45 10.3.4 Insert APPC mode definition ................................................... 46 10.3.5 Add printer .......................................................................... 46 10.3.6 DocOut settings .................................................................... 46
10.4 Insert Link Service...................................................................... 46 10.5 Insert local LU ........................................................................... 46 10.6 Insert APPC mode definition......................................................... 47
10.6.1 Insert APPC mode definition ................................................... 47 10.7 Add printer to AS/400 (LU 6.2/APPC) ............................................ 48
10.7.1 CRTDEVAPPC - create an APPC device description...................... 48 10.7.2 CRTDEVPRT - create a printer description ................................. 48 10.7.3 CHGCFGL - change configuration list........................................ 48
11 SCS/DCA printing using TN3270e/TN5250e ..................................49 11.1 TN3270e setup using OS/390 communication server ....................... 49
11.1.1 Mainframe TCPIP profile definitions: ........................................ 49 11.1.2 SNA definitions:.................................................................... 49
11.2 TN3270e set-up using MS SNA server ........................................... 50 11.3 TN5250e set-up ......................................................................... 54
11.3.1 Auto-configuration of devices.................................................. 55 11.3.2 Manual Configuration of Devices.............................................. 55
12 Troubleshooting.............................................................................59 12.1 Using print with Acrobat Reader ................................................... 59 12.2 DocOut Service does not start ...................................................... 59
12.2.1 How to setup the firewall. ...................................................... 59 12.3 Log settings............................................................................... 62 12.4 Event Viewer ............................................................................. 62
12.4.1 Examples of event log messages:............................................ 63 12.4.2 Trace Facility........................................................................ 66
© Copyright 2011 MPI Tech 3
DocOut™ for Windows Installation and Operator’s Guide
Introduction to DocOut for Windows Printing host data on an inexpensive LAN-based printer used to require expensive hardware and complicated programming in order to eliminate the incompatibilities between the two environments. Now, thanks to DocOut, your LAN-based printers can receive host print data using any existing Microsoft SNA server or standard TCP/IP host attachments. One of the key elements in DocOut for Windows is the ability to support multiple print sessions, or logical host printers simultaneously. Similar to a physical printer, each logical printer can have its own set of attributes (e.g. network connection, print protocol, print transform options and output device). High speed options, full colour support and generation of PDF require separate license. Quite simply, DocOut converts host print data to a format that is understood by LAN printers and passes the data along to existing LAN print devices. Moreover, DocOut provides several additional facilities, including viewing, archiving, and reprint. Not only do these facilities extend your ability to manage and control host output, they also provide greatly increased print flexibility. DocOut provides conversion of IPDS, ICDS, SCS and DCA host data streams into PCL5/5c, PostScript, Epson, ProPrinter or PDF languages. The DocOut software can be easily installed on any Windows server (Intel) to couple multiple host and mid-range systems for network printing—the ideal solution for companies with mixed print environments. Input data can be received from all IBM PSF versions, PSS and EPM mainframe software and all LU1/LU6.2/SCS applications. Both TCP/IP and SNA inbound communication is supported. DocOut offers multiple data stream inputs, multiple network protocol support and output to multiple printer types, lasers as well as inkjet and matrix. DocOut is a cost effective and flexible solution for host output in the network. This manual describes how to install the DocOut for Windows and how to configure the system for the DocOut TCP/IP and SNA sessions and associated programs. It also describes the prerequisite hardware and software to run the DocOut for Windows and how to operate it. The system-support personnel must be familiar with these specific installation environments. The reader must have basic knowledge of operating a Microsoft Windows server.
© Copyright 2011 MPI Tech 4
DocOut™ for Windows Installation and Operator’s Guide
1.1 Product features The DocOut for Windows features the following: TCP/IP, LU 6.2 and LU1 sessions - SCS/DCA with FSL support - IPDS printer emulation (IP40, 4028, 3812, 3816, 4247(matrix)) - PCL, PostScript, Epson, ProPrinter and PDF, PDF/A output - supports disk resident resources - operates in Windows Server environments TCP/IP session
- operates in conjunction with Windows TCP/IP - provides bi-directional communication between host and Windows
workstation/server LU 6.2 and LU1 sessions
- operates in conjunction with Microsoft SNA server or Microsoft Host Integration Server
1.2 Related manuals • Getting Started with PrintGuide, doc. no. D60364 • DocOut Licensing Server, Installation and Operator’s Guide D10564 • Host Print Setup Guide, doc. no. D60425 • FSL Reference, doc. no. D60313 • PSS MVS, Product Installation Guide, doc. no. D13052 • PSS VM, Installation Guide, doc. no D13055 • EPM Product Guide, doc. no. D13070
1.3 Requirements This section describes the hardware and software requirements needed for operating DocOut. For specifications on MPI Tech host-operating system requirements and installation, please see:
• PSS MVS Product Installation Guide, document no. D13052 • PSS VM Product Installation Guide, document no. D13055 • EPM MVS Product Guide, document no. D13070
1.3.1 PC / Server system requirements
Hardware: • PC / Server with LAN adapter able to run Windows with the software mentioned
below.
Software: • Windows 2000, Windows XP professional, Windows Server 2003, Windows
Vista, Windows 7 or Windows Server 2008. See the Windows, System Guide for details.
© Copyright 2011 MPI Tech 5
DocOut™ for Windows Installation and Operator’s Guide
• Microsoft SNA server version 3.0 with service pack 2 or higher (LU 6.2 and LU1 support) or Microsoft Host Integration Server (32 bit only). (required for SNA support only)
1.3.2 Host system requirements
Mainframe MVS • IBM PSF ver 2.1 or higher • PSS/MVS Either PSS ver. 6.01 or higher, or EPM • ACF/VTAM ver. 3.1 or higher is required • IBM TCP/IP ver. 2.1 or higher or Interlink TCP/Access ver.3.1 or higher.
Mainframe VM • IBM PSF ver. 2.1 or higher (only VTAM connection) • PSS VM ver. 6.01 or higher • ACF/VTAM ver. 3.1 or higher • IBM TCP/IP ver. 2.1 or higher
Mainframe VSE • PSF/VSE • ACF VTAM
AS/400 • OS/400 V3 R1 (incl. PTFs) or higher • PSF/400
© Copyright 2011 MPI Tech 6

DocOut™ for Windows Installation and Operator’s Guide
2 Features of DocOut for Windows The software PrintServer DocOut for Windows is either downloaded from www.mpitech.com or supplied on a CD, which includes all set-up files and instructions for DocOut and PrintGuide. The Installation and Operator’s Guide and a copy of Acrobat Reader are also included on the CD. Please check http://get.adobe.com/reader/ for any updates of Acrobat Reader.
2.1 Overview of DocOut for Windows The DocOut for Windows is a software print server designed to operate on a Windows server. DocOut for Windows can connect to multiple host and midrange systems and process host print input to address the needs of heterogeneous print environments. It provides a method to receive host print data via SNA (using Microsoft’s SNA server) and TCP/IP host attachments, convert host print data to a format that can be printed on LAN printers, and redistribute output to existing LAN print devices. DocOut provides conversion of IPDS, ICDS and SCS/DCA host data streams into PCL5/5c, PostScript, Epson, ProPrinter or PDF languages. One of the key design elements used in DocOut for Windows is the ability to support multiple print sessions, or logical host printers simultaneously. Similar to a physical printer, each logical printer can have its own set of attributes (e.g. network connection, print protocol, print transform options and output device). High speed options, full colour support and generation of PDF require separate license. DocOut is licensed to meet the requirements of the actual installation. A License system is monitoring the usage of the installation. This License System can either reside on the same server as the DocOut installation (Single Server System) as an integrated part of the software. This option does not require installation of a separate License System. The License System may also reside on a separate server as a central or separate installation (Multiple Server System) serving multiple DocOut servers. Installing the DocOut License Server System will allow multiple DocOut installations to connect to the central server herewith allowing a flexible and dynamic sharing of the total license purchased. PrintGuide is used to discover, monitor and configure MPI Tech print servers, including the software PrintServer DocOut. Please note that PrintGuide is required for monitoring, configuring and activating DocOut.
2.2 End to end control Using direct TCP/IP port 9100 connection with the printer will allow enhanced end to end control with DocOut. This means that DocOut receives status feedback from the printer and sends the true page count to the AS/400 or mainframe S/390 host system. Thus, the number of printed pages reported back to the mainframe will always be the number of printed pages in the printer's output bin.
© Copyright 2011 MPI Tech 7

DocOut™ for Windows Installation and Operator’s Guide
3 How to purchase and register DocOut
3.1 How to purchase DocOut You can download a trial version of DocOut from MPI Tech's web site at www.mpitech.com/docout/index.htm. Please note that the trial version expires 30 days after it has been received. All options and features are available, but the trial version contains a limited number of printer sessions of each type and is limited in output speed. Please contact your MPI Tech office or reseller in case you need additional printer sessions and/or higher speed. If you want to purchase DocOut, please contact your MPI Tech reseller, where you can obtain a copy of the DocOut CD and a licence key. The downloaded trial version may be converted into a fully licensed version simply by applying the license key to the installation. For further information, please refer to our web site.
3.2 Updating DocOut Updates for DocOut will be available on the MPI Tech support web site. Provided you are updating to a newer release within the same version of DocOut, you will not need a new licence key. Upgrade to a newer version of DocOut (e.g. from version 6 to version 7), increase of printer sessions, additional options etc. require issue of a new license key based on the PC/Server parameters. Upgrades to more printers, PDF capabilities, Full Colour support etc. within the same version do not require re-installation/update of DocOut.
© Copyright 2011 MPI Tech 8
DocOut™ for Windows Installation and Operator’s Guide
4 Installation
4.1 Pre-installation requirements Windows and TCP/IP must be installed on the computer. If SNA service is required, Microsoft SNA server or Microsoft Host Integration Server must also be installed. All LAN adapters must be installed with the relevant protocols.
4.2 Getting started Upon registration and download of your DocOut software at www.mpitech.com/docout/index.htm, a temporary license is included with the initial installation of the software. Please note that the temporary license expires 30 days after it has been received. To verify the current status, the PrintGuide ‘License Manager’ indicates the current licence status. An extension of the trial period can be requested at your local dealer or your local MPI Tech office.
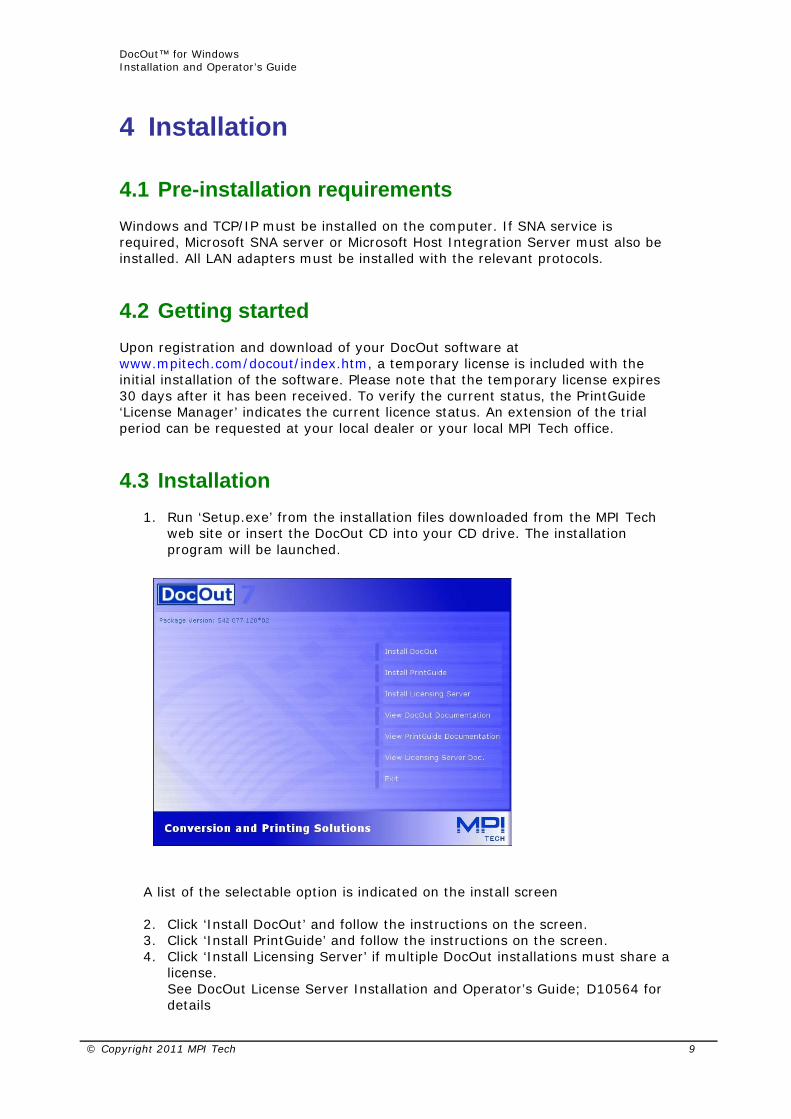
4.3 Installation 1. Run ‘Setup.exe’ from the installation files downloaded from the MPI Tech
web site or insert the DocOut CD into your CD drive. The installation program will be launched.
A list of the selectable option is indicated on the install screen
2. Click ‘Install DocOut’ and follow the instructions on the screen. 3. Click ‘Install PrintGuide’ and follow the instructions on the screen. 4. Click ‘Install Licensing Server’ if multiple DocOut installations must share a
license. See DocOut License Server Installation and Operator’s Guide; D10564 for details
© Copyright 2011 MPI Tech 9
DocOut™ for Windows Installation and Operator’s Guide
4.4 PrintGuide PrintGuide must be installed prior to activating DocOut. PrintGuide can be installed on the same PC as DocOut, or on another PC on the same network. PrintGuide Version S42 065.450 or higher must be used in connection with DocOut version S82 066.xxx
4.5 Getting Started
4.5.1 Create a Windows spool
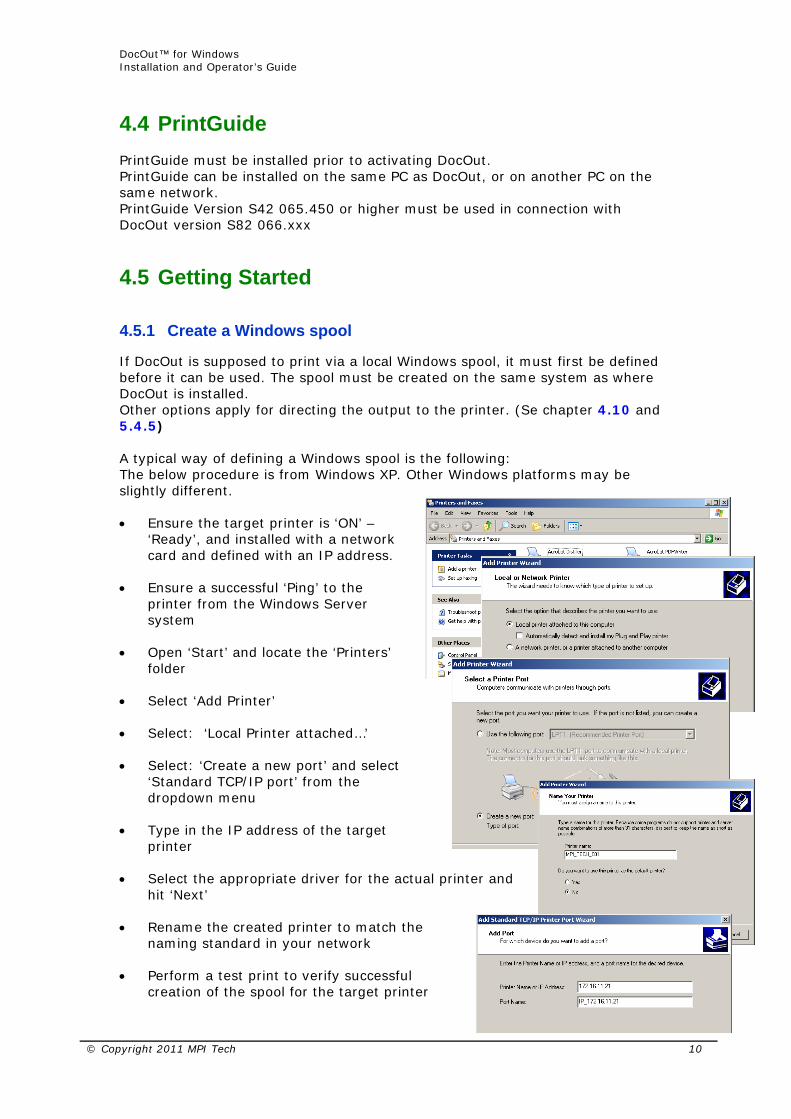
If DocOut is supposed to print via a local Windows spool, it must first be defined before it can be used. The spool must be created on the same system as where DocOut is installed. Other options apply for directing the output to the printer. (Se chapter 4.10 and 5.4.5) A typical way of defining a Windows spool is the following: The below procedure is from Windows XP. Other Windows platforms may be slightly different. • Ensure the target printer is ‘ON’ –
‘Ready’, and installed with a network card and defined with an IP address.
• Ensure a successful ‘Ping’ to the
printer from the Windows Server system
• Open ‘Start’ and locate the ‘Printers’
folder • Select ‘Add Printer’ • Select: ‘Local Printer attached…’ • Select: ‘Create a new port’ and select
‘Standard TCP/IP port’ from the dropdown menu
• Type in the IP address of the target
printer • Select the appropriate driver for the actual printer and
hit ‘Next’ • Rename the created printer to match the
naming standard in your network • Perform a test print to verify successful
creation of the spool for the target printer
© Copyright 2011 MPI Tech 10

DocOut™ for Windows Installation and Operator’s Guide
• Modify the driver parameters to match the options installed in the printer (if required)
4.5.2 Install DocOut
A windows spool must be defined prior to installing DocOut. DocOut is received either as a file or on a CD ROM: • Select either ‘Install DocOut’ from the menu
(chapter 4.3) or follow the below procedure: • Locate the folder of the ‘Setup.exe’ • Run ‘Setup.exe’ and follow the instructions • Select ‘Custom’ for selecting the folder for the
program files. ‘Complete’ will select default folder. • Select ‘Start DocOut Service’ and select ‘Finish’
4.5.3 Install PrintGuide
PrintGuide is required to manage and configure DocOut PrintGuide is supplied along with DocOut on a CD ROM or can be downloaded from www.mpitech.com PrintGuide can be installed on any Windows PC in your network and is able to browse and configure various MPI Tech software and hardware products connected to your network. • Select either ‘Install PrintGuide’ from the menu (chapter 4.3) or follow the
below procedure: • Locate the library of the ‘Setup.exe’ • Run ‘Setup.exe’ and follow the instructions • Select ‘Start PrintGuide’ and select ‘Finish’ • Restart the system
Note: When installing DocOut or PrintGuide under Windows XP, Server 2003, Windows Vista or Windows Server 2008 please ensure the following: • Windows Firewall service must be running
(Required for DocOut) • If Firewall is enabled you must ensure that DocOut (Pserver.exe) and
PrintGuide (printguide.exe) are listed in the list of ‘Programs and Services’ in the ‘Exceptions’ list for the Firewall options. See chapter 12.2 for further information
© Copyright 2011 MPI Tech 11
DocOut™ for Windows Installation and Operator’s Guide
4.5.4 Define logical Printer in DocOut
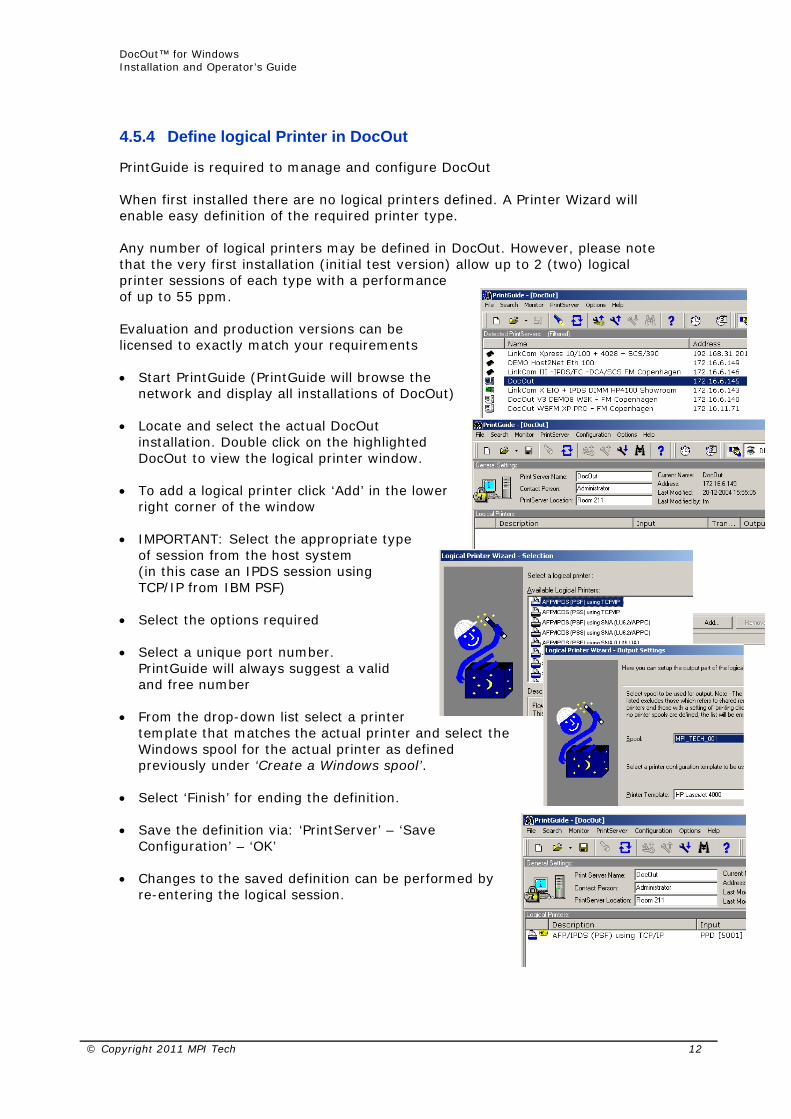
PrintGuide is required to manage and configure DocOut When first installed there are no logical printers defined. A Printer Wizard will enable easy definition of the required printer type. Any number of logical printers may be defined in DocOut. However, please note that the very first installation (initial test version) allow up to 2 (two) logical printer sessions of each type with a performance of up to 55 ppm.
Evaluation and production versions can be licensed to exactly match your requirements • Start PrintGuide (PrintGuide will browse the
network and display all installations of DocOut) • Locate and select the actual DocOut
installation. Double click on the highlighted DocOut to view the logical printer window.
• To add a logical printer click ‘Add’ in the lower
right corner of the window • IMPORTANT: Select the appropriate type
of session from the host system (in this case an IPDS session using TCP/IP from IBM PSF)
• Select the options required • Select a unique port number.
PrintGuide will always suggest a valid and free number
• From the drop-down list select a printer
template that matches the actual printer and select the Windows spool for the actual printer as defined previously under ‘Create a Windows spool’.
• Select ‘Finish’ for ending the definition. • Save the definition via: ‘PrintServer’ – ‘Save
Configuration’ – ‘OK’ • Changes to the saved definition can be performed by
re-entering the logical session.
© Copyright 2011 MPI Tech 12
DocOut™ for Windows Installation and Operator’s Guide
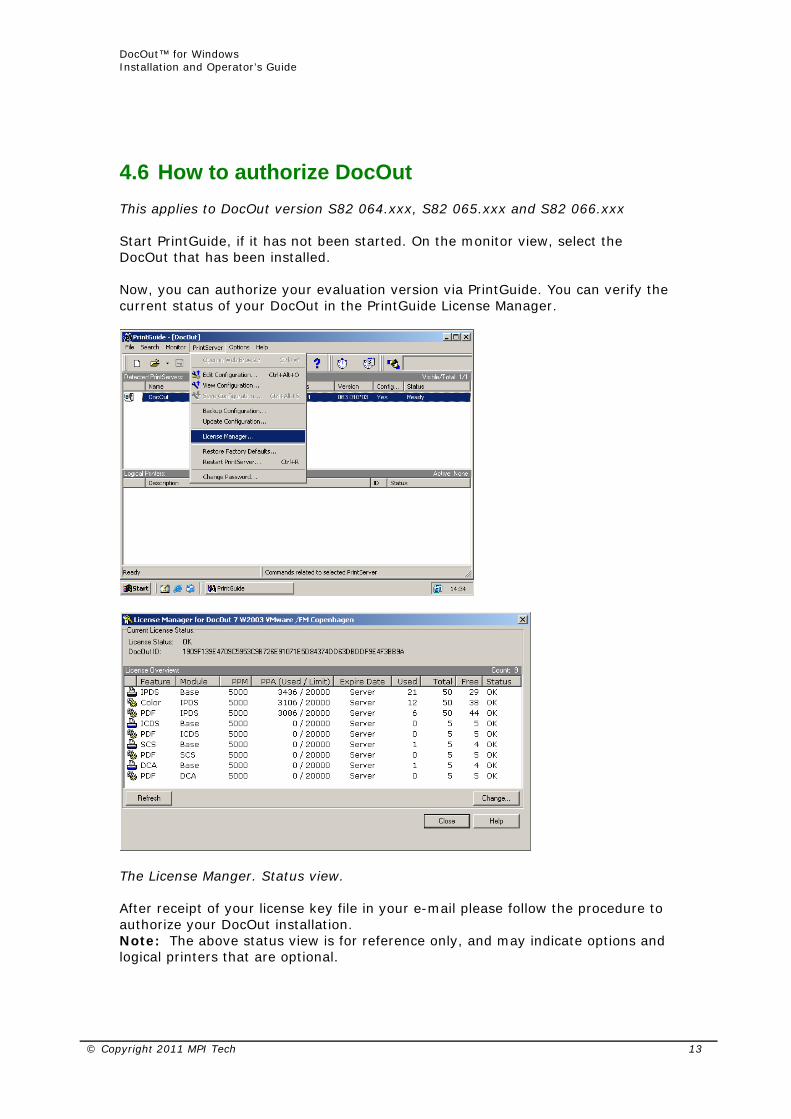
4.6 How to authorize DocOut This applies to DocOut version S82 064.xxx, S82 065.xxx and S82 066.xxx Start PrintGuide, if it has not been started. On the monitor view, select the DocOut that has been installed. Now, you can authorize your evaluation version via PrintGuide. You can verify the current status of your DocOut in the PrintGuide License Manager.
The License Manger. Status view. After receipt of your license key file in your e-mail please follow the procedure to authorize your DocOut installation. Note: The above status view is for reference only, and may indicate options and logical printers that are optional.
© Copyright 2011 MPI Tech 13
DocOut™ for Windows Installation and Operator’s Guide
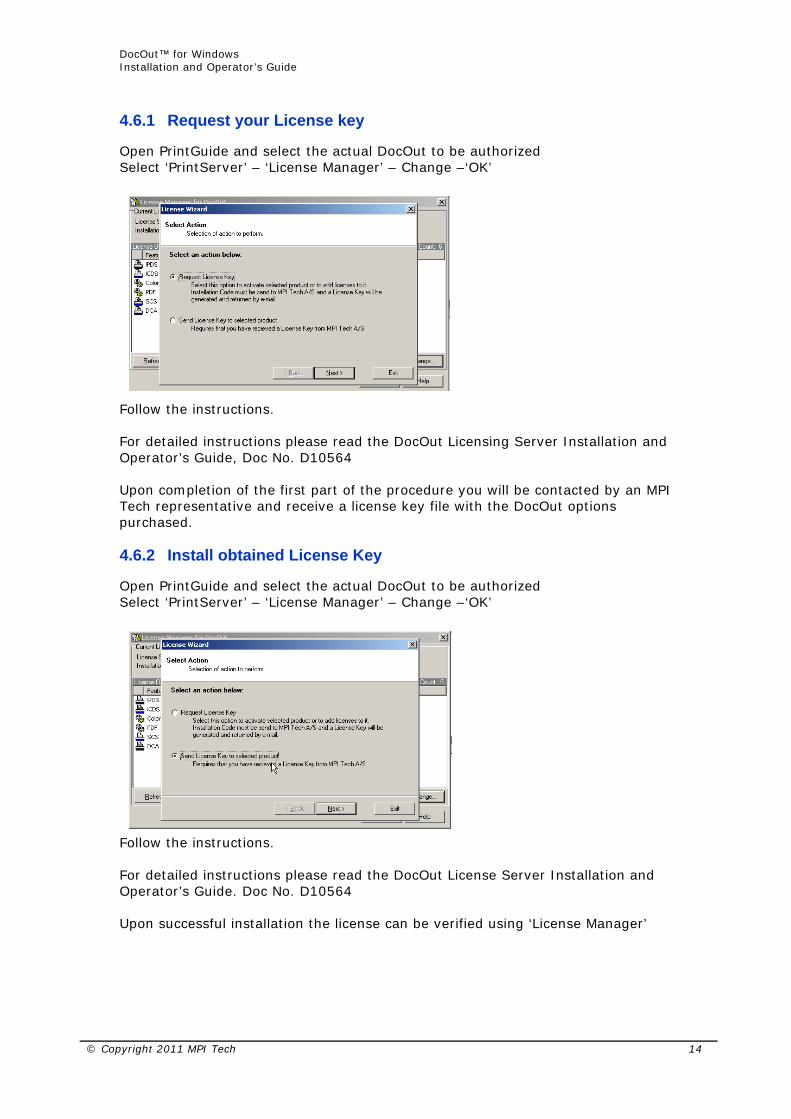
4.6.1 Request your License key
Open PrintGuide and select the actual DocOut to be authorized Select ‘PrintServer’ – ‘License Manager’ – Change –‘OK’
Follow the instructions. For detailed instructions please read the DocOut Licensing Server Installation and Operator’s Guide, Doc No. D10564 Upon completion of the first part of the procedure you will be contacted by an MPI Tech representative and receive a license key file with the DocOut options purchased.
4.6.2 Install obtained License Key
Open PrintGuide and select the actual DocOut to be authorized Select ‘PrintServer’ – ‘License Manager’ – Change –‘OK’
Follow the instructions. For detailed instructions please read the DocOut License Server Installation and Operator’s Guide. Doc No. D10564 Upon successful installation the license can be verified using ‘License Manager’
© Copyright 2011 MPI Tech 14

DocOut™ for Windows Installation and Operator’s Guide
4.7 Configuration Changes to the initial configuration of DocOut can be made by using PrintGuide, as described in the separate manual, Getting Started with PrintGuide, doc. no. 60364. Additional information can be found on our web site or on the CD supplied with DocOut.
4.8 Stop and start DocOut The DocOut service starts automatically after a Windows reboot, but it can also be stopped and started manually.
4.8.1 To stop and start DocOut for Windows XP Pro
Click the Start menu, point to Control Panel and click the Administrative Tools. Double-click the Services icon.
Select the DocOut service and click the Stop symbol. Select the DocOut service and click the Start symbol. Alternatively press the restart symbol.
© Copyright 2011 MPI Tech 15
DocOut™ for Windows Installation and Operator’s Guide
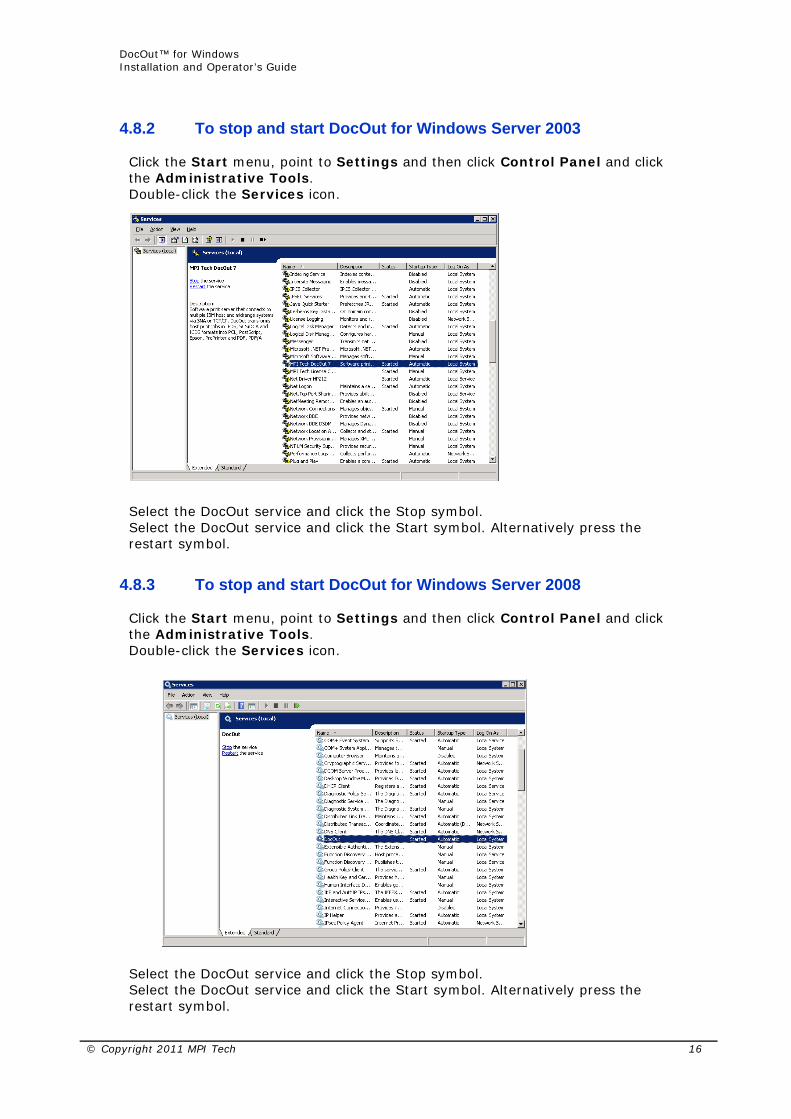
4.8.2 To stop and start DocOut for Windows Server 2003
Click the Start menu, point to Settings and then click Control Panel and click the Administrative Tools. Double-click the Services icon.
Select the DocOut service and click the Stop symbol. Select the DocOut service and click the Start symbol. Alternatively press the restart symbol.
4.8.3 To stop and start DocOut for Windows Server 2008
Click the Start menu, point to Settings and then click Control Panel and click the Administrative Tools. Double-click the Services icon.
Select the DocOut service and click the Stop symbol. Select the DocOut service and click the Start symbol. Alternatively press the restart symbol.
© Copyright 2011 MPI Tech 16

DocOut™ for Windows Installation and Operator’s Guide
4.9 How long time does it take to upload configurations to PrintGuide
The time it takes to upload the configuration from DocOut to PrintGuide is proportional to the number of defined logical printers. The more logical printers the longer it will take to upload a configuration. A large configuration with more than 100 logical printers could take half a minute or more. The time is affected by other factors as well, such as network traffic, etc.
4.10 How to assign a local spool queue DocOut support printers in three different ways:
• Using a local spool on the same server (Se chapter 5.4.5) • Using a direct TCP/IP connection to the target printer (Se chapter 5.4.5) • Using a spool on a remote server (se below)
Printers that are configured to direct print or LAN Manager printers are not shown in the selection list for a Logical Printer spool in the PrintGuide configuration tool. DocOut support local spool printers when using the option Spool Driver (See Getting Started with PrintGuide, doc. no. D60364). The procedure for defining a remote spool is shown below.
1. Click the Start menu, Point to Programs, and click Command Prompt. 2. Type 'net use' in the Command Prompt window to see information
about your computer connections. Refer to Microsoft Windows Help for information on the net use command. For example to assign the lpt2: port to the LAN Manager printer \\ida00483a\p1_printer_1 you should type:
net use lpt2: \\ida00483a\p1_printer_1
3. Click the Start menu, Point to Settings, and click Printers. 4. Right-click a printer, and click Properties. 5. Click the Ports pane, and check the Port (lpt2:).
© Copyright 2011 MPI Tech 17
DocOut™ for Windows Installation and Operator’s Guide
5 Operating DocOut
5.1.1 Creating PDF Documents
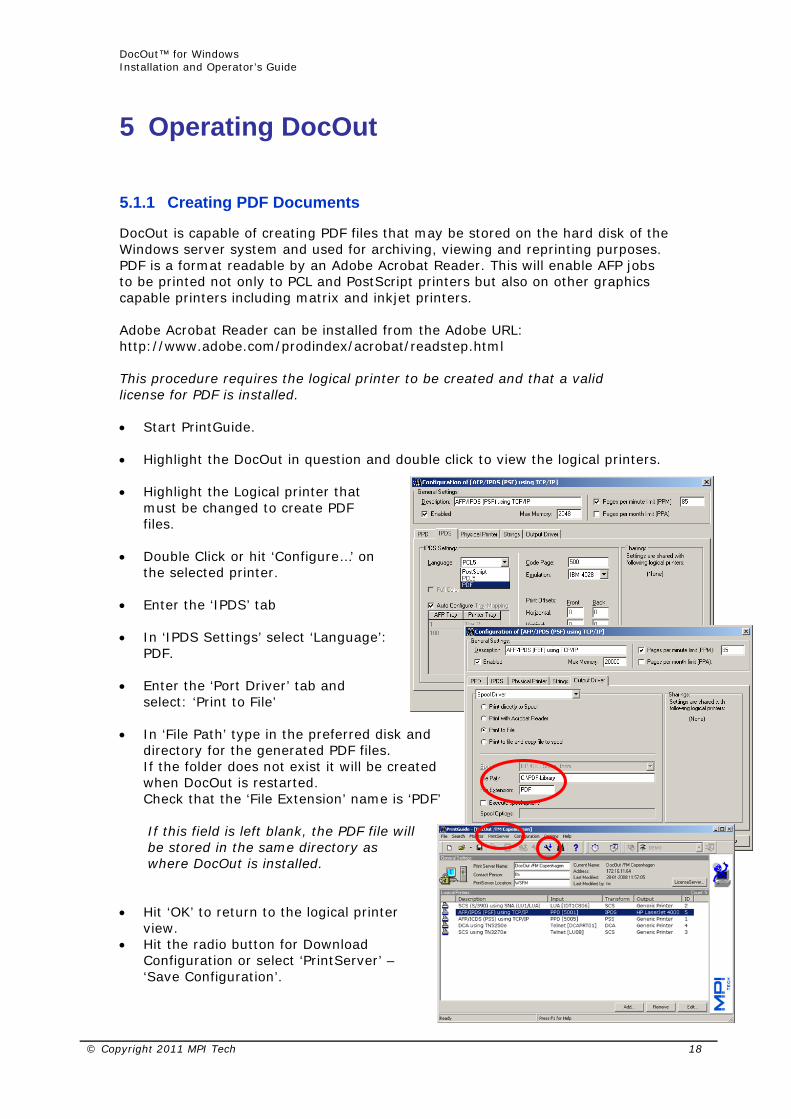
DocOut is capable of creating PDF files that may be stored on the hard disk of the Windows server system and used for archiving, viewing and reprinting purposes. PDF is a format readable by an Adobe Acrobat Reader. This will enable AFP jobs to be printed not only to PCL and PostScript printers but also on other graphics capable printers including matrix and inkjet printers. Adobe Acrobat Reader can be installed from the Adobe URL: http://www.adobe.com/prodindex/acrobat/readstep.html This procedure requires the logical printer to be created and that a valid license for PDF is installed. • Start PrintGuide. • Highlight the DocOut in question and double click to view the logical printers.
• Highlight the Logical printer that must be changed to create PDF files.
• Double Click or hit ‘Configure…’ on
the selected printer. • Enter the ‘IPDS’ tab
• In ‘IPDS Settings’ select ‘Language’: PDF.
• Enter the ‘Port Driver’ tab and
select: ‘Print to File’
• In ‘File Path’ type in the preferred disk and directory for the generated PDF files. If the folder does not exist it will be created when DocOut is restarted. Check that the ‘File Extension’ name is ‘PDF’ If this field is left blank, the PDF file will be stored in the same directory as where DocOut is installed.
• Hit ‘OK’ to return to the logical printer
view. • Hit the radio button for Download
Configuration or select ‘PrintServer’ – ‘Save Configuration’.
© Copyright 2011 MPI Tech 18
DocOut™ for Windows Installation and Operator’s Guide
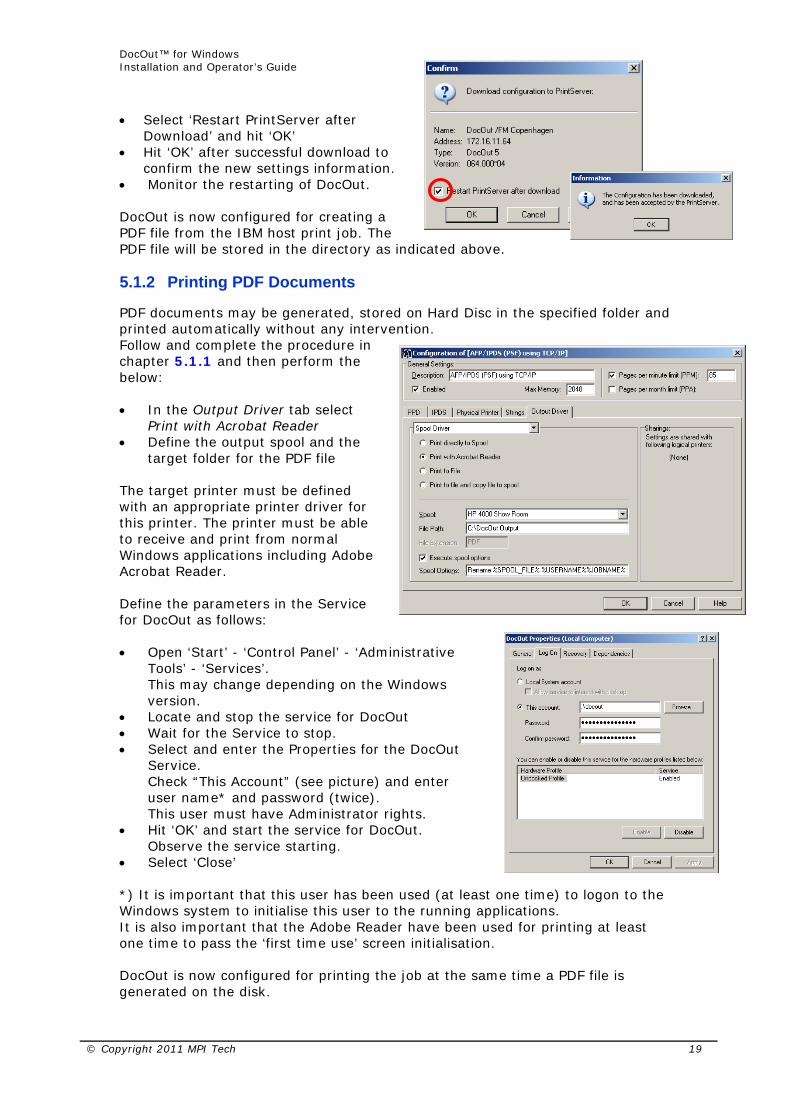
• Select ‘Restart PrintServer after
Download’ and hit ‘OK’ • Hit ‘OK’ after successful download to
confirm the new settings information.
• Monitor the restarting of DocOut. DocOut is now configured for creating a PDF file from the IBM host print job. The PDF file will be stored in the directory as indicated above.
5.1.2 Printing PDF Documents
PDF documents may be generated, stored on Hard Disc in the specified folder and printed automatically without any intervention. Follow and complete the procedure in chapter 5.1.1 and then perform the below: • In the Output Driver tab select
Print with Acrobat Reader • Define the output spool and the
target folder for the PDF file The target printer must be defined with an appropriate printer driver for this printer. The printer must be able to receive and print from normal Windows applications including Adobe Acrobat Reader. Define the parameters in the Service for DocOut as follows: • Open ‘Start’ - ‘Control Panel’ - ‘Administrative
Tools’ - ‘Services’. This may change depending on the Windows version.
• Locate and stop the service for DocOut • Wait for the Service to stop. • Select and enter the Properties for the DocOut
Service. Check “This Account” (see picture) and enter user name* and password (twice). This user must have Administrator rights.
• Hit ‘OK’ and start the service for DocOut. Observe the service starting.
• Select ‘Close’ *) It is important that this user has been used (at least one time) to logon to the Windows system to initialise this user to the running applications. It is also important that the Adobe Reader have been used for printing at least one time to pass the ‘first time use’ screen initialisation. DocOut is now configured for printing the job at the same time a PDF file is generated on the disk.
© Copyright 2011 MPI Tech 19
DocOut™ for Windows Installation and Operator’s Guide
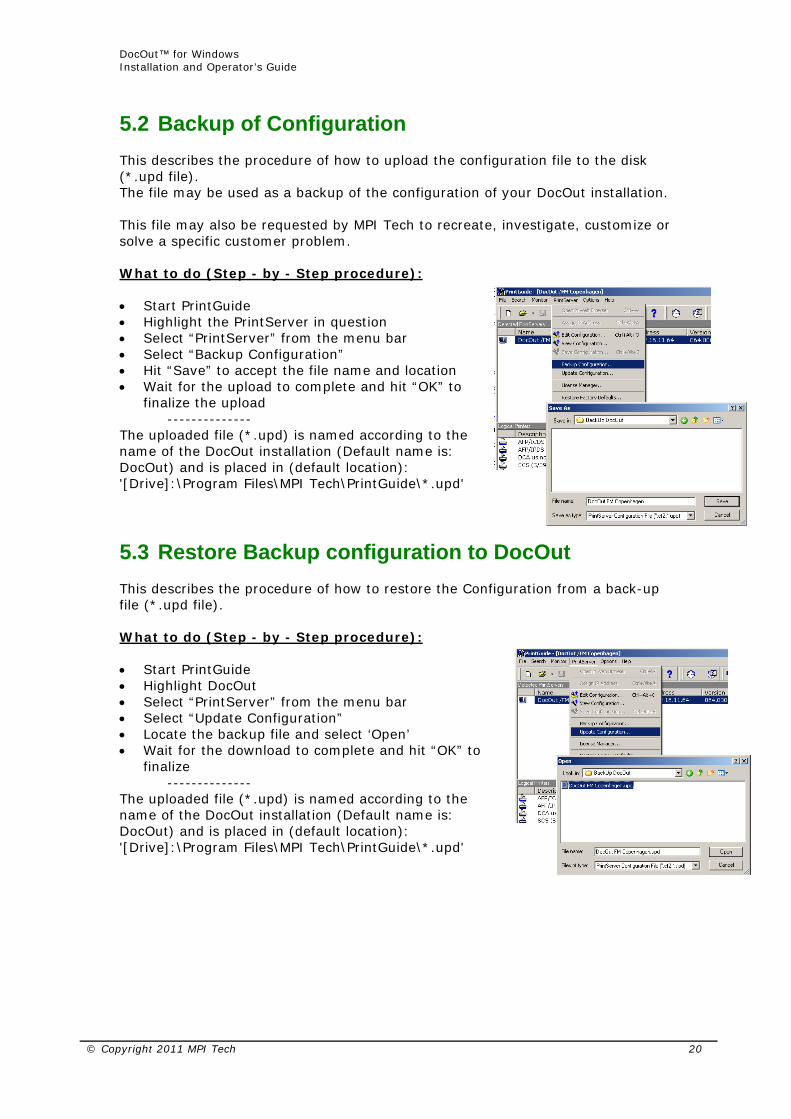
5.2 Backup of Configuration This describes the procedure of how to upload the configuration file to the disk (*.upd file). The file may be used as a backup of the configuration of your DocOut installation. This file may also be requested by MPI Tech to recreate, investigate, customize or solve a specific customer problem. What to do (Step - by - Step procedure):
• Start PrintGuide • Highlight the PrintServer in question • Select “PrintServer” from the menu bar • Select “Backup Configuration” • Hit “Save” to accept the file name and location • Wait for the upload to complete and hit “OK” to
finalize the upload
-------------- The uploaded file (*.upd) is named according to the name of the DocOut installation (Default name is: DocOut) and is placed in (default location): '[Drive]:\Program Files\MPI Tech\PrintGuide\*.upd'
5.3 Restore Backup configuration to DocOut This describes the procedure of how to restore the Configuration from a back-up file (*.upd file). What to do (Step - by - Step procedure):
• Start PrintGuide • Highlight DocOut • Select “PrintServer” from the menu bar • Select “Update Configuration” • Locate the backup file and select ‘Open’ • Wait for the download to complete and hit “OK” to
finalize
-------------- The uploaded file (*.upd) is named according to the name of the DocOut installation (Default name is: DocOut) and is placed in (default location): '[Drive]:\Program Files\MPI Tech\PrintGuide\*.upd'
© Copyright 2011 MPI Tech 20
DocOut™ for Windows Installation and Operator’s Guide
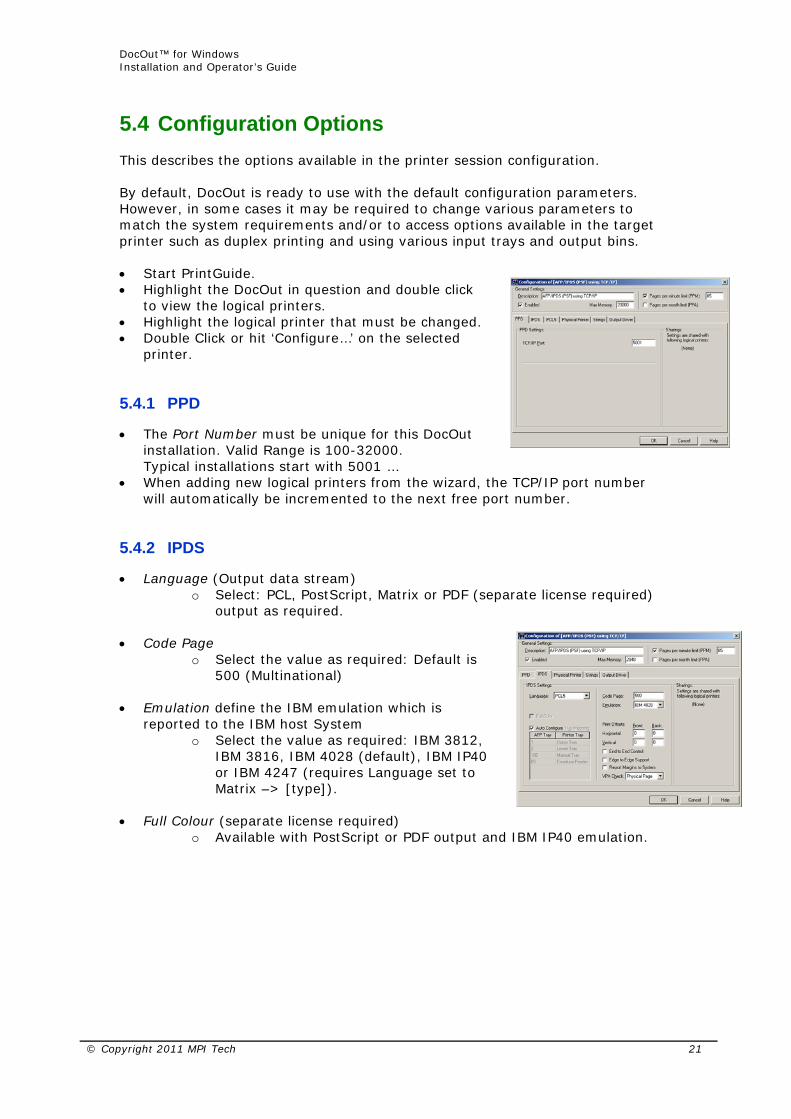
5.4 Configuration Options This describes the options available in the printer session configuration. By default, DocOut is ready to use with the default configuration parameters. However, in some cases it may be required to change various parameters to match the system requirements and/or to access options available in the target printer such as duplex printing and using various input trays and output bins. • Start PrintGuide.
• Highlight the DocOut in question and double click to view the logical printers.
• Highlight the logical printer that must be changed. • Double Click or hit ‘Configure…’ on the selected
printer.
5.4.1 PPD
• The Port Number must be unique for this DocOut installation. Valid Range is 100-32000. Typical installations start with 5001 …
• When adding new logical printers from the wizard, the TCP/IP port number will automatically be incremented to the next free port number.
5.4.2 IPDS
• Language (Output data stream) o Select: PCL, PostScript, Matrix or PDF (separate license required)
output as required.
• Code Page o Select the value as required: Default is
500 (Multinational) • Emulation define the IBM emulation which is
reported to the IBM host System o Select the value as required: IBM 3812,
IBM 3816, IBM 4028 (default), IBM IP40 or IBM 4247 (requires Language set to Matrix –> [type]).
• Full Colour (separate license required)
o Available with PostScript or PDF output and IBM IP40 emulation.
© Copyright 2011 MPI Tech 21

DocOut™ for Windows Installation and Operator’s Guide
• Print Offsets is used to adjust the output on the page. Print Offsets will move
the entire printed image on the page. Valid range is -999 to 999 using in units of 1/300 inch. I.e. a value of 300 will create an offset of 1 inch or appx 2.54 cm. Decimals are not allowed. Offsets are always calculated using a portrait page, even if the print is landscape.
Examples: Horizontal 150: ½ inch moving to the right ( ) Horizontal -100: 1/3 inch to the left ( ) Vertical 30: 1/10 inch down ( ) Vertical -60: 1/5 inch up ( )
• AFP Tray Mapping is by default set to ‘Auto
Configuration’. The available trays are automatically imported from the trays defined in the Physical Printer definitions. Trays may be re-mapped by disabling the ‘Automatic Configuration’ and click on the tray name and select the required tray from the list. Only the tray type can be remapped.
© Copyright 2011 MPI Tech 22

DocOut™ for Windows Installation and Operator’s Guide
5.4.3 Physical Printer
• These parameters are predefined when selecting the Printer Template (chapter 4.5.4). The Printer Template defines the target printer in the basic version. Before any additional options installed in the printer can be accessed, these must be enabled or defined via the below panels.
• General Printer parameters
describe the basic options of the printer: Description and Printer name and printer memory. Colour, Duplex and Offset capabilities may be enabled if supported by the printer.
• Trays/Bins describe and configure the
input trays and output bins of the target printer. Please refer to the printers technical manual for configuration of PCL / PostScript ID’s.
• Finishing define the stapling option and is
configurable if the Printer Template contain a field for Finishing. Enable stapling for the actual option and consult the printer’s technical manual for the PJL command to use.
5.4.4 Strings
• Strings may be used to send data to the printer before the job (Pre String Settings), after the job (Post String Settings) or can be used to replace data send to the printer (Replace String Settings). Both ACSII data and Hex data can be used. Example of Hex data format:
‘0x1B&l1H’
© Copyright 2011 MPI Tech 23

DocOut™ for Windows Installation and Operator’s Guide
5.4.5 Output Driver
• Output data from DocOut may be handled in various ways. Using the default setup, the data is send to the output spool defined during the initial definition of the printer session Change of target printer may be performed in two ways: 1) Selecting another printer spool in the pull-down menu 2) Pull down the menu with the Spool Driver option, select TCP/IP Network Port Driver and type in the IP address of the target printer. Only port type 9100 is supported. Valid Range is 100 - 32000
• PDF output may be printed directly without manual intervention by enabling Print with Acrobat Reader. Please refer to chapter 5.1.2 for details.
• Output data may be stored directly on the
hard disc (Print to File) and may be stored on the hard disc and printed simultaneously (Print to file and copy to spool). Define the folder in the File Path for the stored output data files.
• Output file names will by default be named
after the host job name + a running number starting with 0001. Any subsequent jobs containing the same host job name will increase the running number by 1 hereby adding the new file to the folder. Example of default file naming: IBERAGEN0001.PDF, IBERAGEN0002.PDF
• By enabling Execute Spool Options file names
may be customized to contain various parameters. Example: Rename output file to contain the User Name, Job Name and device name of the host: ‘Rename %SPOOL_FILE% %USERNAME%-%JOBNAME%-%DEVNAME%.PDF’ Parameters are typed in or imported into the text field using right click in the text field -> Insert Tag -> select appropriate parameter. This function will automatically extract the appropriate parameters from the IPDS data stream from the IBM host and insert as defined above. Example of customized file naming: QSPLJOB-QPJOBLOG-FMIPDS.PDF In case of duplicate file names in the target folder, the later files will get the default DocOut naming standard: “Job name/seq number”
© Copyright 2011 MPI Tech 24

DocOut™ for Windows Installation and Operator’s Guide
6 Set-up in mainframe TCP/IP environment
6.1 PSF/MVS AFP/IPDS printing This section provides you with the PSF Startup Procedures Once these parameters have been configured, and the basic TCP/IP installation of the DocOut has been completed, direct AFP / IPDS from PSF / MVS will be possible. Requirements:
• PSF/MVS version 2.2.0 with PTF level UW21345 • TCP/IP ver. 2, Rel. 1 • Interlink TCP/Access Ver.3.1 or higher
MTU size
• The Maximum Transmission Unit (MTU) of the IP packet for the MVS system is recommended to be set up to 2000. NOTE: The MTU size should not exceed the maximum size sent through the control unit. Failure may lead to transmission problems.
6.1.1 PSF/MVS start-up procedure
000001 //PSF4 PROC 000002 //STEP01 EXEC PGM=APSPPIEP,REGION=1750K . . . 000034 //****************************************************************** 000035 //* STANDARD PRINTDEV */ 000036 //***************************************************************** 000037 //PRT420 CNTL 000038 //PRT420 PRINTDEV FONTDD=*.FONT01, /* FONT LIBRARY DD */ . . . 000058 // IPADDR=‘192.0.110.21’ /* IP ADDRESS */ 000059 // PORTNO=5001 /* PORT NUMBER */ 000060 //PRT420 ENDCNTL Using IP address 192.0.110.21 and port number 5001 The IP address of the DocOut server should be programmed in the IP-address (IPADDR=‘192.0.110.21’). The port number (PORTNO=5001) is the default port number of the first IPDS port in the DocOut.
© Copyright 2011 MPI Tech 25
DocOut™ for Windows Installation and Operator’s Guide
6.2 PSS/MVS AFP/ICDS printing This section provides:
PSS Start-up Procedure PSS Printer Profile
Once these parameters have been configured and the basic TCP/IP installation of the DocOut has been completed, direct AFP / ICDS from PSS / MVS will be possible. Requirements:
• PSS, version 6.01 or higher • TCP/IP for MVS, version 2, release 1 or higher • Interlink TCP/Access Ver.3.1 or higher
MTU size Gateway statement for TCP/IP profile
• The Maximum Transmission Unit (MTU) of the IP packet for the MVS system is recommended to be set up to 2000. NOTE: The MTU size should not exceed the maximum size sent through the control unit. Failure may lead to transmission problems.
© Copyright 2011 MPI Tech 26
DocOut™ for Windows Installation and Operator’s Guide
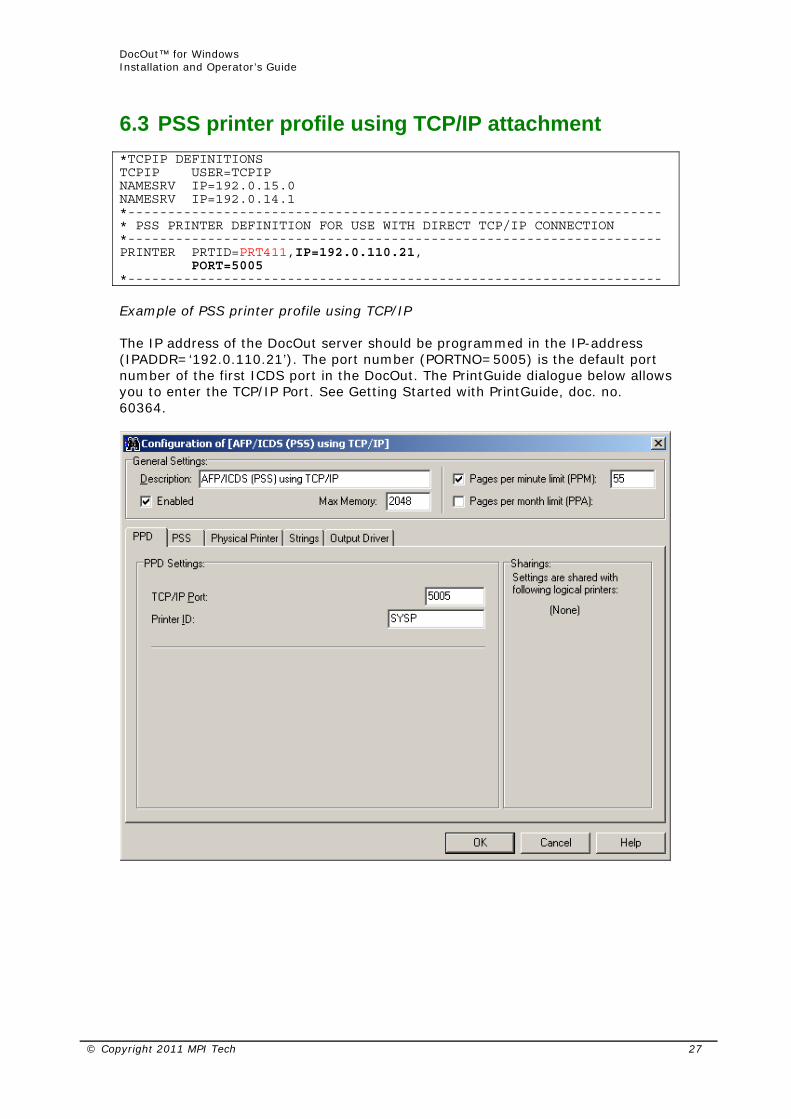
6.3 PSS printer profile using TCP/IP attachment *TCPIP DEFINITIONS TCPIP USER=TCPIP NAMESRV IP=192.0.15.0 NAMESRV IP=192.0.14.1 *------------------------------------------------------------------- * PSS PRINTER DEFINITION FOR USE WITH DIRECT TCP/IP CONNECTION *------------------------------------------------------------------- PRINTER PRTID=PRT411,IP=192.0.110.21, PORT=5005 *------------------------------------------------------------------- Example of PSS printer profile using TCP/IP The IP address of the DocOut server should be programmed in the IP-address (IPADDR=‘192.0.110.21’). The port number (PORTNO=5005) is the default port number of the first ICDS port in the DocOut. The PrintGuide dialogue below allows you to enter the TCP/IP Port. See Getting Started with PrintGuide, doc. no. 60364.
© Copyright 2011 MPI Tech 27
DocOut™ for Windows Installation and Operator’s Guide
6.4 PSS/VM AFP printing using TCP/IP This section provides: PSS VM printer profile statements Once these parameters have been configured, and the basic TCP/IP installation of the DocOut has been completed, direct AFP / ICDS from PSS / VM will be possible. Requirements:
• PSS, version 6.01 or higher • TCP/IP for VM, version 2, release 2.1 or higher
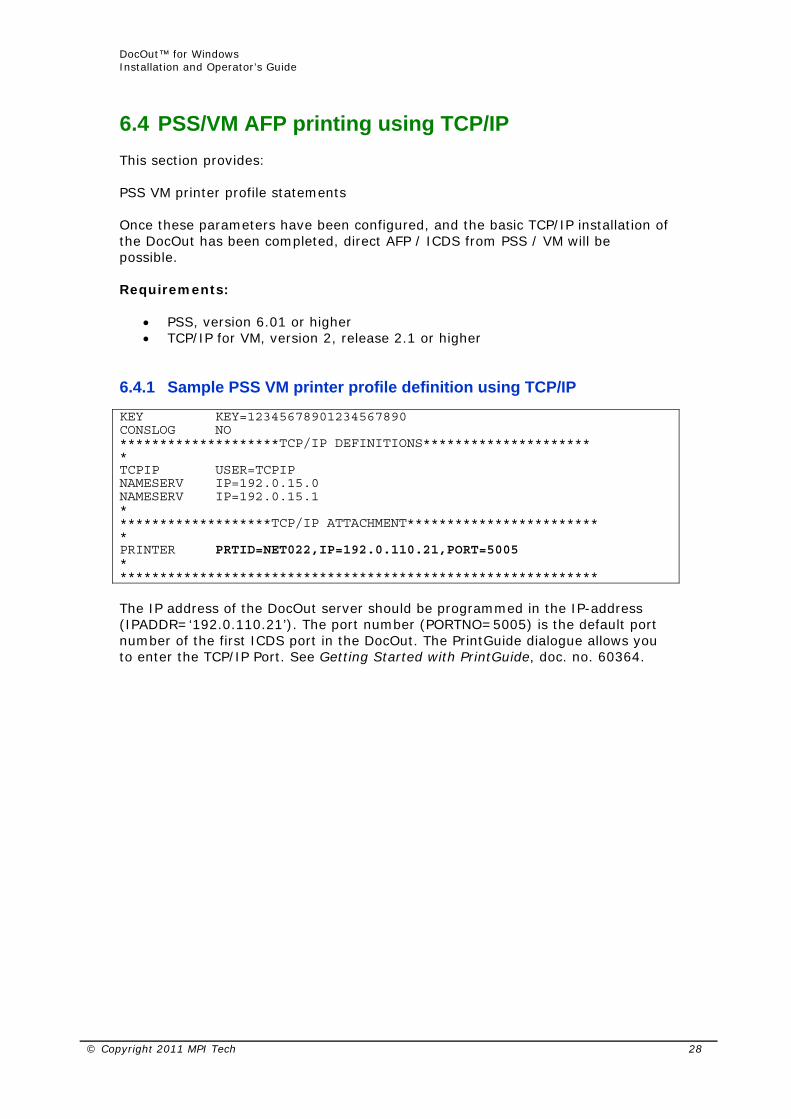
6.4.1 Sample PSS VM printer profile definition using TCP/IP
KEY KEY=12345678901234567890 CONSLOG NO ********************TCP/IP DEFINITIONS********************* * TCPIP USER=TCPIP NAMESERV IP=192.0.15.0 NAMESERV IP=192.0.15.1 * *******************TCP/IP ATTACHMENT************************ * PRINTER PRTID=NET022,IP=192.0.110.21,PORT=5005 * ************************************************************ The IP address of the DocOut server should be programmed in the IP-address (IPADDR=‘192.0.110.21’). The port number (PORTNO=5005) is the default port number of the first ICDS port in the DocOut. The PrintGuide dialogue allows you to enter the TCP/IP Port. See Getting Started with PrintGuide, doc. no. 60364.
© Copyright 2011 MPI Tech 28
DocOut™ for Windows Installation and Operator’s Guide
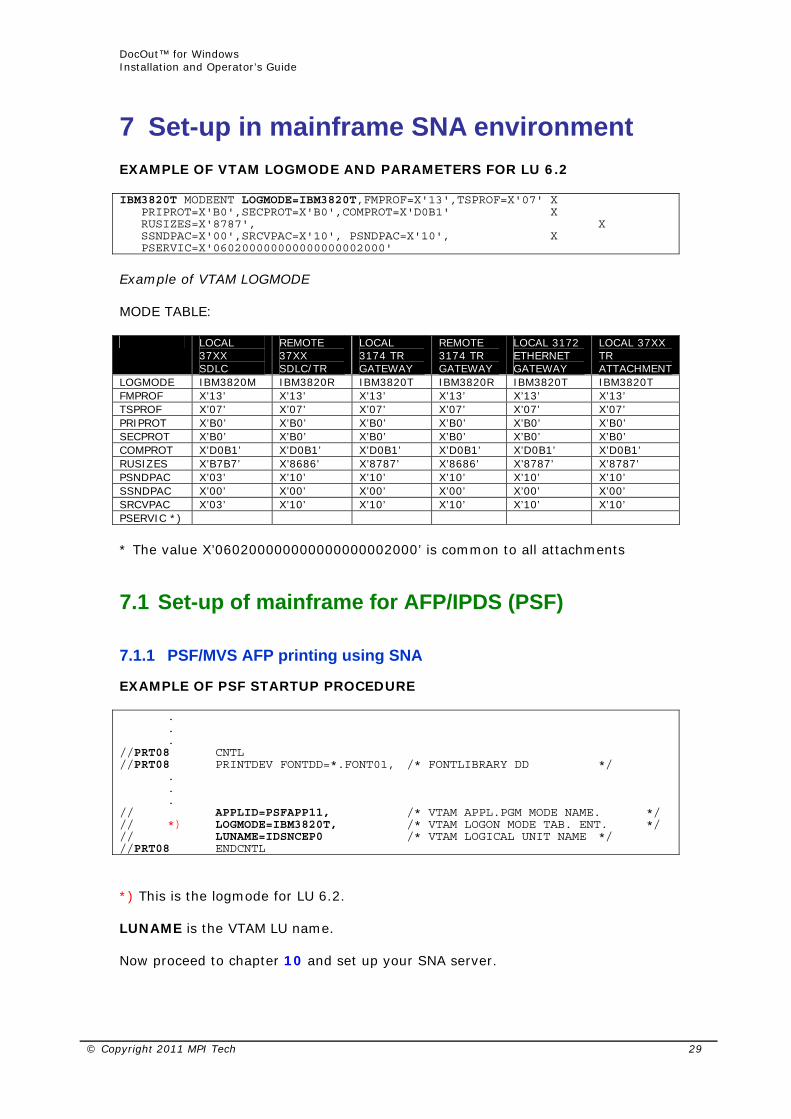
7 Set-up in mainframe SNA environment EXAMPLE OF VTAM LOGMODE AND PARAMETERS FOR LU 6.2 IBM3820T MODEENT LOGMODE=IBM3820T,FMPROF=X'13',TSPROF=X'07' X PRIPROT=X'B0',SECPROT=X'B0',COMPROT=X'D0B1' X RUSIZES=X'8787', X SSNDPAC=X'00',SRCVPAC=X'10', PSNDPAC=X'10', X PSERVIC=X'060200000000000000002000' Example of VTAM LOGMODE MODE TABLE: LOCAL
37XX SDLC
REMOTE 37XX SDLC/TR
LOCAL 3174 TR GATEWAY
REMOTE 3174 TR GATEWAY
LOCAL 3172 ETHERNET GATEWAY
LOCAL 37XX TR ATTACHMENT
LOGMODE IBM3820M IBM3820R IBM3820T IBM3820R IBM3820T IBM3820T FMPROF X’13’ X’13’ X’13’ X’13’ X’13’ X’13’ TSPROF X’07’ X’07’ X’07’ X’07’ X’07’ X’07’ PRIPROT X’B0’ X’B0’ X’B0’ X’B0’ X’B0’ X’B0’ SECPROT X’B0’ X’B0’ X’B0’ X’B0’ X’B0’ X’B0’ COMPROT X’D0B1’ X’D0B1’ X’D0B1’ X’D0B1’ X’D0B1’ X’D0B1’ RUSIZES X’B7B7’ X’8686’ X’8787’ X’8686’ X’8787’ X’8787’ PSNDPAC X’03’ X’10’ X’10’ X’10’ X’10’ X’10’ SSNDPAC X’00’ X’00’ X’00’ X’00’ X’00’ X’00’ SRCVPAC X’03’ X’10’ X’10’ X’10’ X’10’ X’10’ PSERVIC *)
* The value X’060200000000000000002000’ is common to all attachments
7.1 Set-up of mainframe for AFP/IPDS (PSF)
7.1.1 PSF/MVS AFP printing using SNA
EXAMPLE OF PSF STARTUP PROCEDURE . . . //PRT08 CNTL //PRT08 PRINTDEV FONTDD=*.FONT01, /* FONTLIBRARY DD */ . . . // APPLID=PSFAPP11, /* VTAM APPL.PGM MODE NAME. */ // *) LOGMODE=IBM3820T, /* VTAM LOGON MODE TAB. ENT. */ // LUNAME=IDSNCEP0 /* VTAM LOGICAL UNIT NAME */ //PRT08 ENDCNTL *) This is the logmode for LU 6.2. LUNAME is the VTAM LU name. Now proceed to chapter 10 and set up your SNA server.
© Copyright 2011 MPI Tech 29
DocOut™ for Windows Installation and Operator’s Guide
7.1.2 PSF/VM AFP printing using SNA
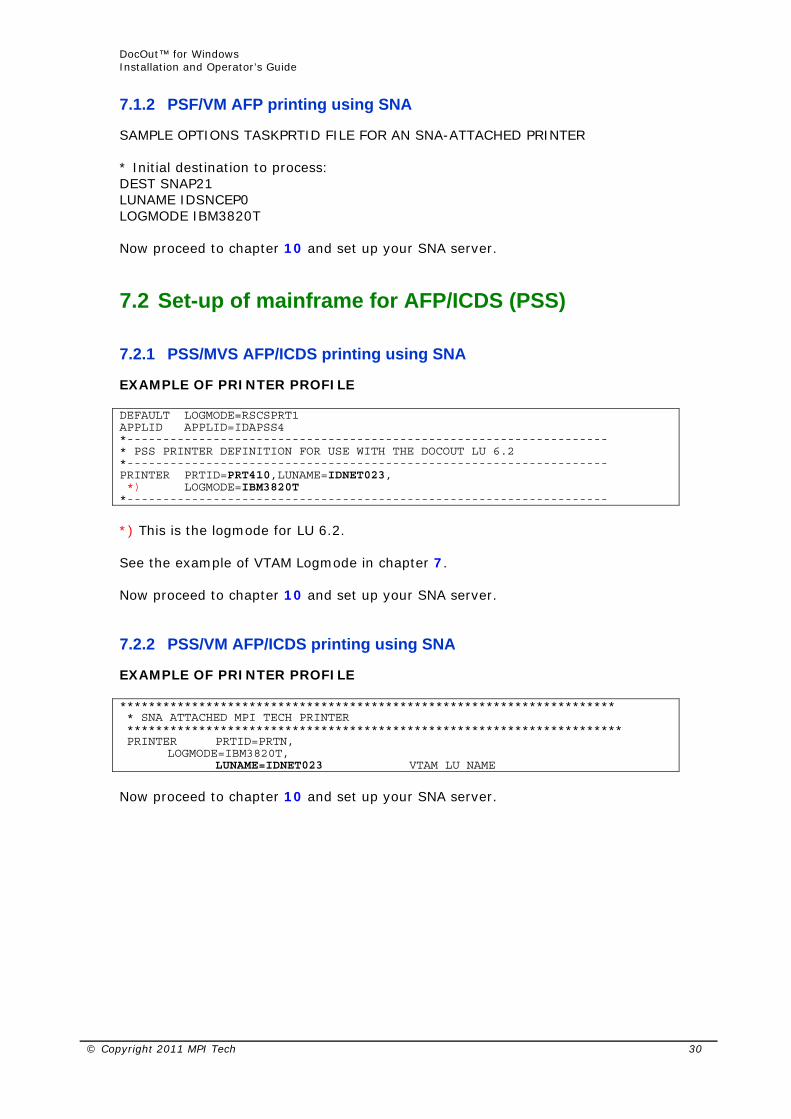
SAMPLE OPTIONS TASKPRTID FILE FOR AN SNA-ATTACHED PRINTER * Initial destination to process: DEST SNAP21 LUNAME IDSNCEP0 LOGMODE IBM3820T Now proceed to chapter 10 and set up your SNA server.
7.2 Set-up of mainframe for AFP/ICDS (PSS)
7.2.1 PSS/MVS AFP/ICDS printing using SNA
EXAMPLE OF PRINTER PROFILE DEFAULT LOGMODE=RSCSPRT1 APPLID APPLID=IDAPSS4 *------------------------------------------------------------------- * PSS PRINTER DEFINITION FOR USE WITH THE DOCOUT LU 6.2 *------------------------------------------------------------------- PRINTER PRTID=PRT410,LUNAME=IDNET023, *) LOGMODE=IBM3820T *------------------------------------------------------------------- *) This is the logmode for LU 6.2. See the example of VTAM Logmode in chapter 7. Now proceed to chapter 10 and set up your SNA server.
7.2.2 PSS/VM AFP/ICDS printing using SNA
EXAMPLE OF PRINTER PROFILE ********************************************************************* * SNA ATTACHED MPI TECH PRINTER ********************************************************************* PRINTER PRTID=PRTN, LOGMODE=IBM3820T, LUNAME=IDNET023 VTAM LU NAME Now proceed to chapter 10 and set up your SNA server.
© Copyright 2011 MPI Tech 30
DocOut™ for Windows Installation and Operator’s Guide
8 PSF/400 AFP Printing Using TCP/IP This chapter provides configuration guidelines for AS/400 IPDS Printing over TCI/IP. These guidelines are applicable for OS/400 version 3.7, 4.X and 5.X. The examples of completed screens given are for OS/400 version 4.X and 5.X and may contain some additional parameters not seen in version 3.7, these may be ignored. Requirements: Before IPDS printing using TCP/IP can be accomplished, the following points need to be checked:
• TCP/IP is installed and enabled
• IBM Print Services Facility/400 (PSF) is installed.
8.1 AS/400 Settings for Version 3.7, 4.X and 5.X To configure IPDS printing on OS/400 3.7, V4RX and V5RX, it is necessary to create a Printer Device Description. It is also highly recommended to create a PSF configuration as this includes additional printer settings and e.g. media size information used with matrix printers. These are created using the following commands:
• CRTPSFCFG • CRTDEVPRT
8.1.1 Creating the PSF configuration
On the AS/400 command line, enter a command in the form: CRTPSFCFG PSFCFG(AFP/NETWRKPRT) IPDSPASTHR(*YES) RLSTMR(*SEC15) TEXT('<Optional Text description> ') Where: AFP is the name an existing library in which the PSF configuration is to be located and NETWRKPRT is the name given to the PSF configuration object. Any existing library and a name of choice for the object can be substituted here but the same values must be used in the creation of the Printer Device Description in the next step. <Optional Text description> is an optional text description for the PSF configuration object.
© Copyright 2011 MPI Tech 31
DocOut™ for Windows Installation and Operator’s Guide
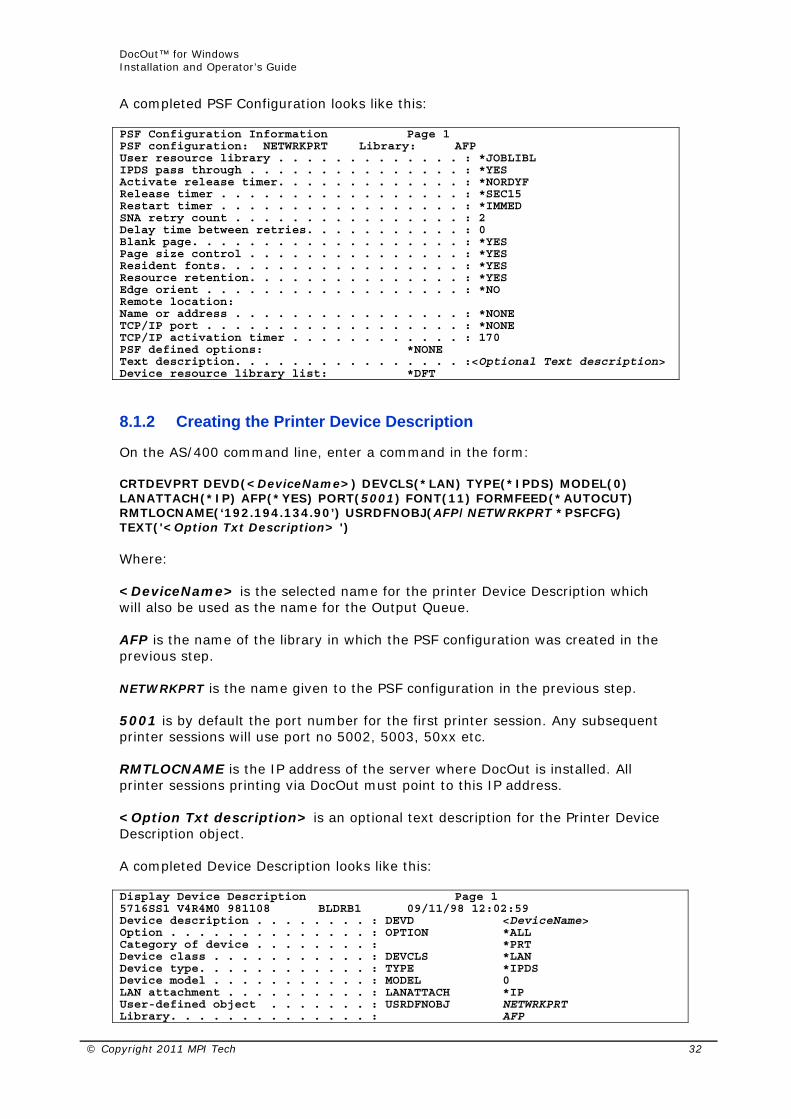
A completed PSF Configuration looks like this: PSF Configuration Information Page 1 PSF configuration: NETWRKPRT Library: AFP User resource library . . . . . . . . . . . . . : *JOBLIBL IPDS pass through . . . . . . . . . . . . . . . : *YES Activate release timer. . . . . . . . . . . . . : *NORDYF Release timer . . . . . . . . . . . . . . . . . : *SEC15 Restart timer . . . . . . . . . . . . . . . . . : *IMMED SNA retry count . . . . . . . . . . . . . . . . : 2 Delay time between retries. . . . . . . . . . . : 0 Blank page. . . . . . . . . . . . . . . . . . . : *YES Page size control . . . . . . . . . . . . . . . : *YES Resident fonts. . . . . . . . . . . . . . . . . : *YES Resource retention. . . . . . . . . . . . . . . : *YES Edge orient . . . . . . . . . . . . . . . . . . : *NO Remote location: Name or address . . . . . . . . . . . . . . . . : *NONE TCP/IP port . . . . . . . . . . . . . . . . . . : *NONE TCP/IP activation timer . . . . . . . . . . . . : 170 PSF defined options: *NONE Text description. . . . . . . . . . . . . . . . :<Optional Text description> Device resource library list: *DFT
8.1.2 Creating the Printer Device Description
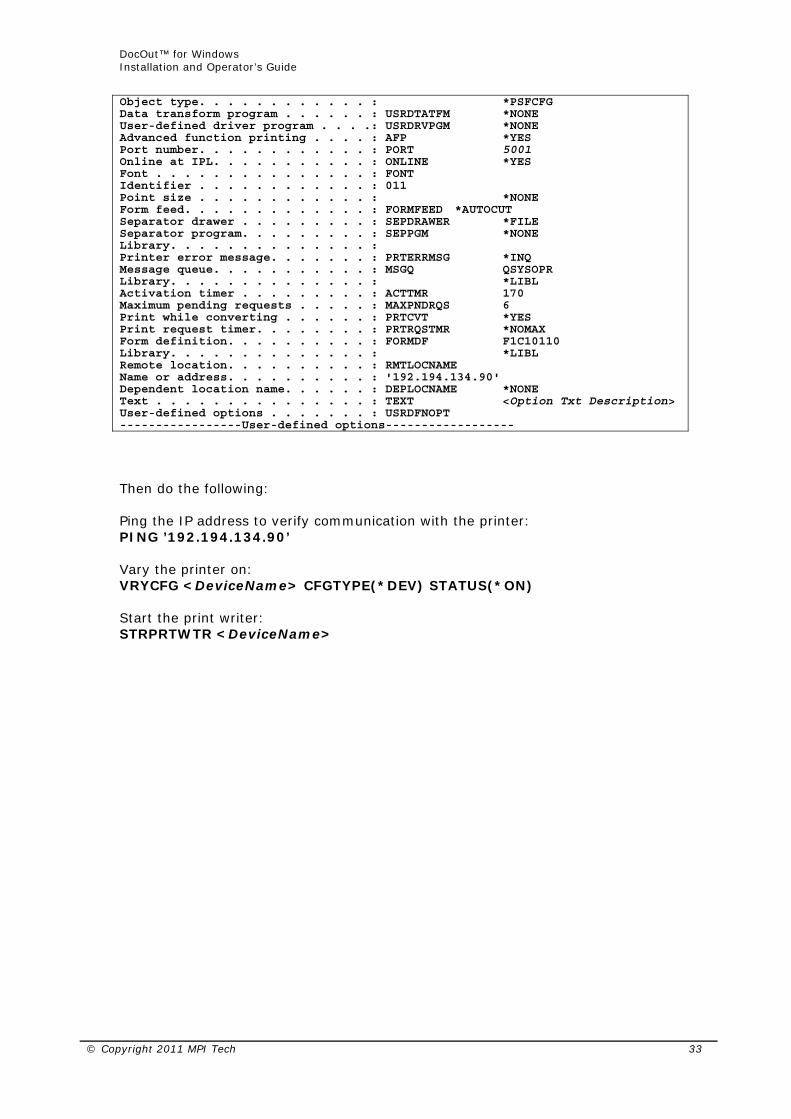
On the AS/400 command line, enter a command in the form: CRTDEVPRT DEVD(<DeviceName>) DEVCLS(*LAN) TYPE(*IPDS) MODEL(0) LANATTACH(*IP) AFP(*YES) PORT(5001) FONT(11) FORMFEED(*AUTOCUT) RMTLOCNAME(‘192.194.134.90’) USRDFNOBJ(AFP/NETWRKPRT *PSFCFG) TEXT('<Option Txt Description> ') Where: <DeviceName> is the selected name for the printer Device Description which will also be used as the name for the Output Queue. AFP is the name of the library in which the PSF configuration was created in the previous step. NETWRKPRT is the name given to the PSF configuration in the previous step. 5001 is by default the port number for the first printer session. Any subsequent printer sessions will use port no 5002, 5003, 50xx etc. RMTLOCNAME is the IP address of the server where DocOut is installed. All printer sessions printing via DocOut must point to this IP address. <Option Txt description> is an optional text description for the Printer Device Description object. A completed Device Description looks like this: Display Device Description Page 1 5716SS1 V4R4M0 981108 BLDRB1 09/11/98 12:02:59 Device description . . . . . . . . : DEVD <DeviceName> Option . . . . . . . . . . . . . . : OPTION *ALL Category of device . . . . . . . . : *PRT Device class . . . . . . . . . . . : DEVCLS *LAN Device type. . . . . . . . . . . . : TYPE *IPDS Device model . . . . . . . . . . . : MODEL 0 LAN attachment . . . . . . . . . . : LANATTACH *IP User-defined object . . . . . . . : USRDFNOBJ NETWRKPRT Library. . . . . . . . . . . . . . : AFP
© Copyright 2011 MPI Tech 32
DocOut™ for Windows Installation and Operator’s Guide
Object type. . . . . . . . . . . . : *PSFCFG Data transform program . . . . . . : USRDTATFM *NONE User-defined driver program . . . .: USRDRVPGM *NONE Advanced function printing . . . . : AFP *YES Port number. . . . . . . . . . . . : PORT 5001 Online at IPL. . . . . . . . . . . : ONLINE *YES Font . . . . . . . . . . . . . . . : FONT Identifier . . . . . . . . . . . . : 011 Point size . . . . . . . . . . . . : *NONE Form feed. . . . . . . . . . . . . : FORMFEED *AUTOCUT Separator drawer . . . . . . . . . : SEPDRAWER *FILE Separator program. . . . . . . . . : SEPPGM *NONE Library. . . . . . . . . . . . . . : Printer error message. . . . . . . : PRTERRMSG *INQ Message queue. . . . . . . . . . . : MSGQ QSYSOPR Library. . . . . . . . . . . . . . : *LIBL Activation timer . . . . . . . . . : ACTTMR 170 Maximum pending requests . . . . . : MAXPNDRQS 6 Print while converting . . . . . . : PRTCVT *YES Print request timer. . . . . . . . : PRTRQSTMR *NOMAX Form definition. . . . . . . . . . : FORMDF F1C10110 Library. . . . . . . . . . . . . . : *LIBL Remote location. . . . . . . . . . : RMTLOCNAME Name or address. . . . . . . . . . : '192.194.134.90' Dependent location name. . . . . . : DEPLOCNAME *NONE Text . . . . . . . . . . . . . . . : TEXT <Option Txt Description> User-defined options . . . . . . . : USRDFNOPT -----------------User-defined options------------------ Then do the following: Ping the IP address to verify communication with the printer: PING ’192.194.134.90’ Vary the printer on: VRYCFG <DeviceName> CFGTYPE(*DEV) STATUS(*ON) Start the print writer: STRPRTWTR <DeviceName>
© Copyright 2011 MPI Tech 33

DocOut™ for Windows Installation and Operator’s Guide
9 Set-up in AS/400 SNA environment This requires an MS SNA server on Windows.
9.1 Creating APPC device description Type: CRTDEVAPPC Prompts: Parameter and values in parentheses Device description: DEVD(DOCOUT) Remote location name: RMTLOCNAME(DOCO1) This value must match the remote location
name (RMTLOCNAME) parameter in the CRTDEVPRT (Create Device Description Printer) command description. This value must be unique within a network.
Remote networkidentifier RMTNETID (DKIDTN01)Enter the name of
the network in which your partner logical unit is located.
Attached controller: CTL(MPI TECH1)This name matches the
local Node name in the local Node characteristics panelof the Communications Manager SNA Network Definitions.
Mode MODE(QSPWTR)QSPWTR is an IBM supplied
mode. APPN capable APPN (*YES) Single session SNGSNN (*NO) Text 'description' TEXT('APPC device for DOCOUT')
© Copyright 2011 MPI Tech 34

DocOut™ for Windows Installation and Operator’s Guide
9.2 Creating printer device description Type: CRTDEVPRT Prompts: Parameter and values in parentheses Device description DEVD(DOCOUTPRT) Device class DEVCLS(*RMT) Device model MODEL(0) Device type Type (*IPDS) Advanced function printing AFP (*YES) The default for this parameter is NO.
However, for AFP printing this parameter must be *YES.
AFP attachment AFPATTACH(*APPC) Font identifier FONT (011) Form Feed FORMFEED(*AUTOCUT) Remote location name: This name matches the AS/400
RMTLOCNAME parameter value in the CRTDEVAPPC command. In this example, the value is DOCO1.The value must be unique within the network.
Remote networkidentifier RMTNETID (DKIDTN01)Enter the name of
the network in which your partner LU is located.
Mode MODE(QSPWTR)QSPWTR is an IBM
supplied mode TEXT 'description' TEXT ('PRT DEVICE FOR DOCO1')
9.3 Updating APPN remote location list (SNA connections only) The APPN location lists, which are only used for APPN configurations (i.e. when APPN /*YES) is specified in the controller description, define special characteristics of remote locations. The CRTFGL (Create Configuration List) command is used to define a list of remote locations for APPN.
1. If you do not have a remote location list, type: CRTCFGL or, if you have a remote location list, type: CHGCFGL (change configuration list)
© Copyright 2011 MPI Tech 35

DocOut™ for Windows Installation and Operator’s Guide
2. Press F4 to get prompts.
3. Type APPNRMT for the “Configuration list type” field and press the ENTER
key twice. Remote Location Name (DOCO1) Specifies the name that must match the following:
• RMTLOCNAME in the printer device description This value must be unique within a network. Remote Network Identifier (DKIDTN01) Specifies the name that must match the following:
• RMTNETID in the controller description • RMTNETID in the printer device description • PC's network name in Communications Manager SNA Base Profile
Local Location Name (S4450327) The local location name is the name defined in the network attributes. The value for Local Location Name can be obtained by using the DSPNETA value. This value must match the following:
• LCLLOCNAME in the printer device description • PC's Partner LU name
Remote Control Point Name Specifies the name that must match the following:
• CTL in the APPC device controller • Local Node Name in Communications Manager
Control Point Network Identifier Specify *NETATR Specify loc: (*NO) Single session: (*NO) Number of conversations: 10 Local Control Point: (*NO) Pre-established session: (*NO) NOTE: Use the WRKCFGL (Work Configuration List) command to view these parameters and their assigned values.
© Copyright 2011 MPI Tech 36

DocOut™ for Windows Installation and Operator’s Guide
9.4 Sample controller definition Controller description.................. * MPI TECH1 Option.......................................... * BASIC Category of controller.................. * APPC Link type...................................... * LAN Online at IPL................................ * NO Active switched line..................... TRNLINE Character code............................ * EBCDIC Maximum frame size.................... *LINKTYPE Remote network identifier............ DKIDTN01 Remote control point.................... MPI TECH1 Initial connection.......................... * DIAL Dial initiation................................ * LINKTYPE Switched disconnect.................... *YES Data link role............................... * NEG LAN remote adapter address...... 40005A0000CE Option.......................................... * BASIC Category of controllers................ * APPC LAN DSAP.................................. * 04 LAN SSAP.................................. * 04 Text.............................................. * AUTOMATICALLY CREATED BY QLUS
© Copyright 2011 MPI Tech 37
DocOut™ for Windows Installation and Operator’s Guide
10 SNA server set-up
10.1 Mainframe SNA LU 6.2 This section is based on the use of Microsoft SNA server version 4.0. You may find the hints useful, even if you have an older version of the SNA server. Refer to the Microsoft SNA server online help for additional information.
10.1.1 Mainframe APPC/LU6.2 Wizard
The wizard consists of two parts. In part 1, the wizard will help you collect preliminary information about your host environment. In part 2 it will create an Application Program to Program Communication (APPC) mainframe connection if necessary. It will also create a Remote LU Name, Local LU Name, and Mode. A Link Service must be installed on the SNA server Service before you can use the Wizard. Refer to chapter 10.4 Insert Link Service. Part 1
1. Start the Microsoft SNA Server Manager. 2. On the Tools menu, click Mainframe APPC/LU6.2 Wizard. 3. Click Next, and select Third-party or custom APPC application as the
APPC application. Click Next. 4. Select Other or unknown as host environment. Click Next. 5. Select the SNA Server Service you want to configure. Click Next. 6. Enter new connection name (or select existing). Click Next. 7. Answer Yes or No to if you are connecting through an IBM 3174/3172
controller. Click Next. 8. Select Independent LU6.2 Connection. Click Next. 9. Click Work sheets and print the resulting worksheets in landscape and
distribute them to mainframe personnel if necessary. Click Next to continue with part 2 if you have the information ready.
Part 2
1. Enter Network Address. Click Next. 2. Enter Network Name and Local Control Point Name. If you are not
connecting through an IBM 3174/3172 controller, then you must also enter Local Node ID (XID or Exchange ID). Click Next.
3. Select Local LU Name or enter a unique name to create a new one. Click Next.
4. Select Remote LU Name or enter a unique name to create a new one. Click Next.
5. Create a new MODE62 mode with 128 as Parallel Session Limit. Click Next.
6. Read the summary and click Finish to complete the configuration.
© Copyright 2011 MPI Tech 38
DocOut™ for Windows Installation and Operator’s Guide
10.1.2 Additional printers
If you wish to add more printers than the one created by the Mainframe APPC/LU6.2 Wizard, then you must:
• Insert local LUs for each additional printer. • The mainframe's PSF Startup Procedure (IPDS name) or PSS Printer
Profile (ICDS name) must contain corresponding printer definitions that include LUNAME.
• Add the corresponding Logical Printers in DocOut (using the Logical Printer Wizard).
10.1.3 DocOut settings
• The Mainframe APPC/LU6.2 Wizard takes the value of the Local LU Name (Part 2, step 3) and reuses it for the LU Alias, thus making them identical. The LU Alias must match the LU 6.2 Alias used in the Logical Printer Wizard and PrintGuide's LU 6.2 (APPC) configuration tab.
• Use $DPF (IPDS name) or IDAPSS (ICDS name) as the Transaction Program Name in the Logical Printer Wizard and PrintGuide's LU 6.2 (APPC) configuration tab.
© Copyright 2011 MPI Tech 39
DocOut™ for Windows Installation and Operator’s Guide
10.2 Mainframe SNA LUA/LU1 This section is based on the use of Microsoft SNA server version 4.0. You may find the hints useful, even if you have an older version of the SNA server. Refer to the Microsoft SNA server online help for additional information.
10.2.1 Setting up a connection
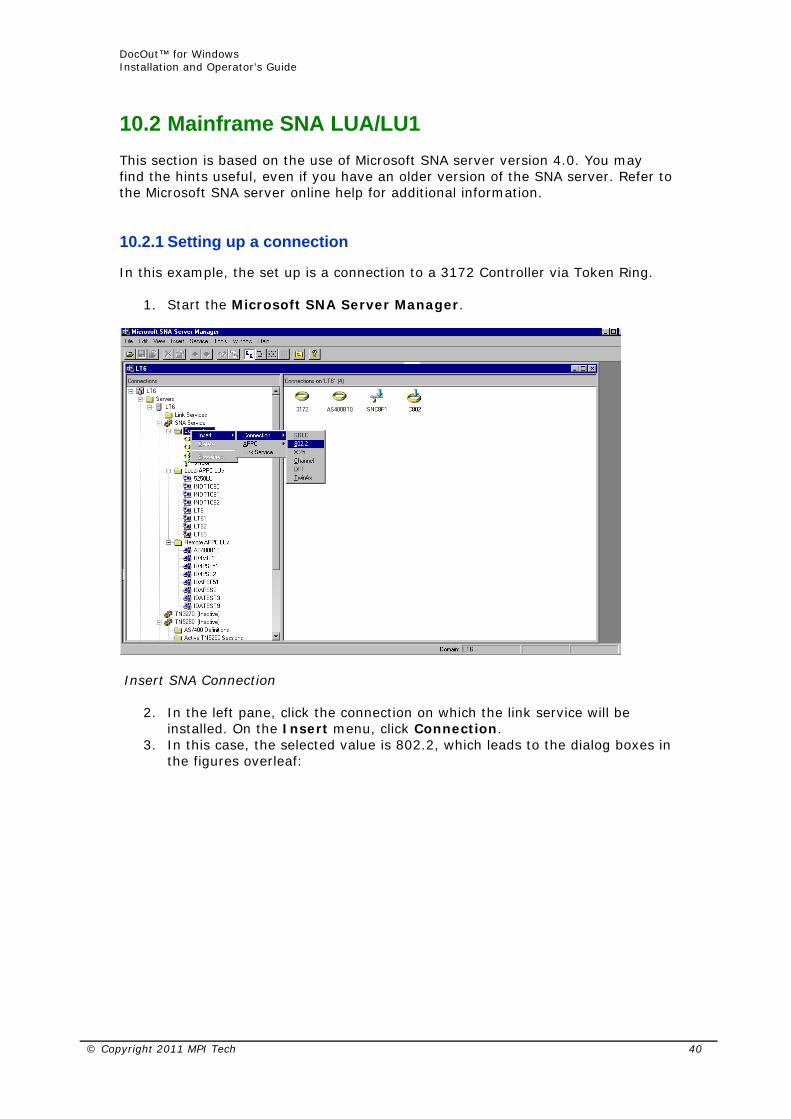
In this example, the set up is a connection to a 3172 Controller via Token Ring.
1. Start the Microsoft SNA Server Manager.
Insert SNA Connection
2. In the left pane, click the connection on which the link service will be installed. On the Insert menu, click Connection.
3. In this case, the selected value is 802.2, which leads to the dialog boxes in the figures overleaf:
© Copyright 2011 MPI Tech 40
DocOut™ for Windows Installation and Operator’s Guide
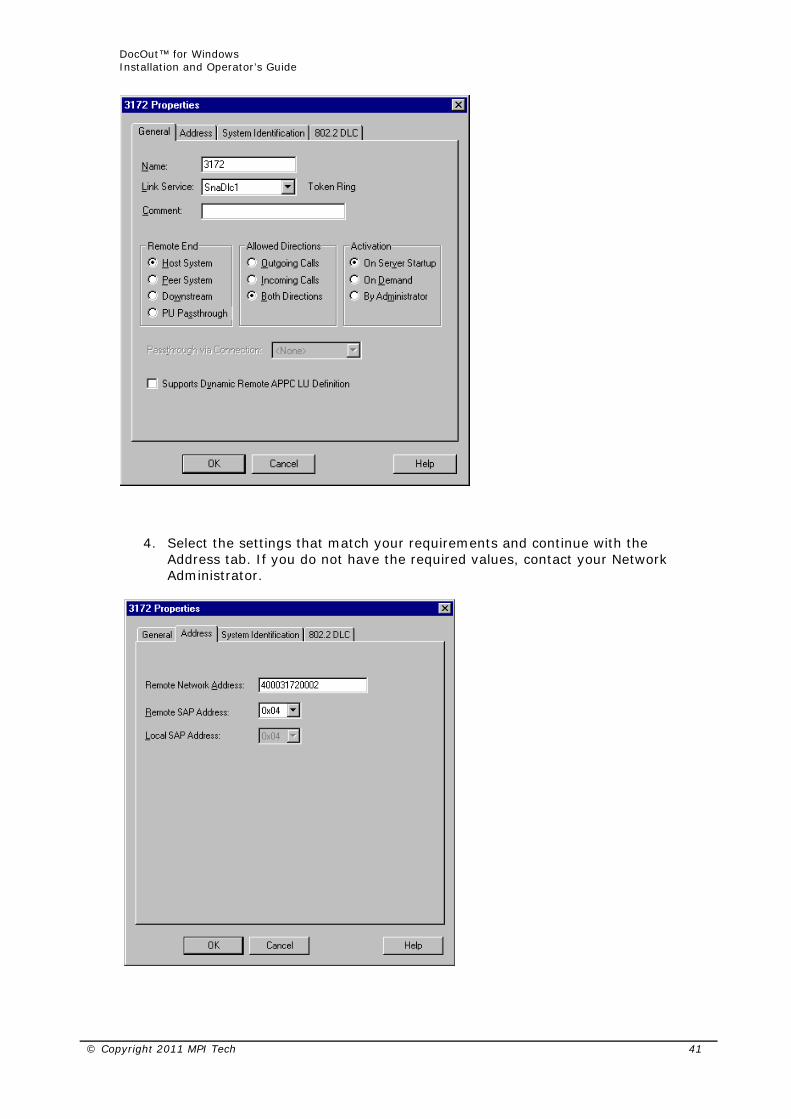
4. Select the settings that match your requirements and continue with the Address tab. If you do not have the required values, contact your Network Administrator.
© Copyright 2011 MPI Tech 41
DocOut™ for Windows Installation and Operator’s Guide
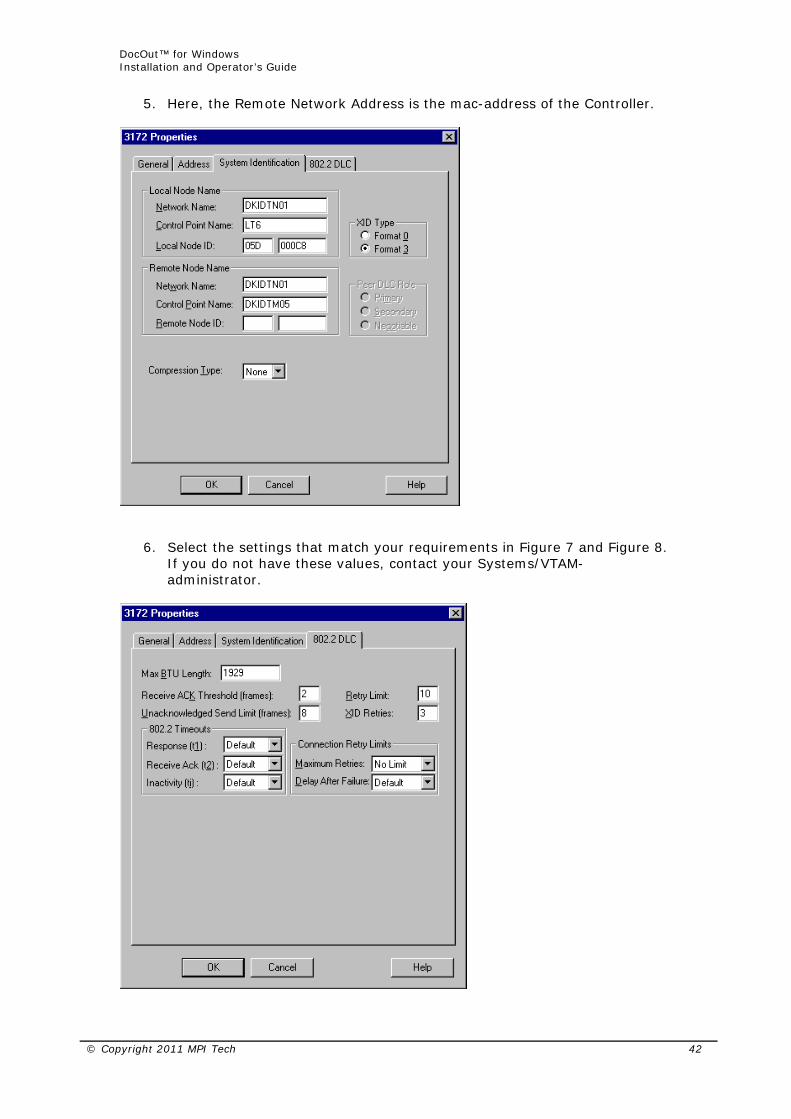
5. Here, the Remote Network Address is the mac-address of the Controller.
6. Select the settings that match your requirements in Figure 7 and Figure 8. If you do not have these values, contact your Systems/VTAM-administrator.
© Copyright 2011 MPI Tech 42
DocOut™ for Windows Installation and Operator’s Guide
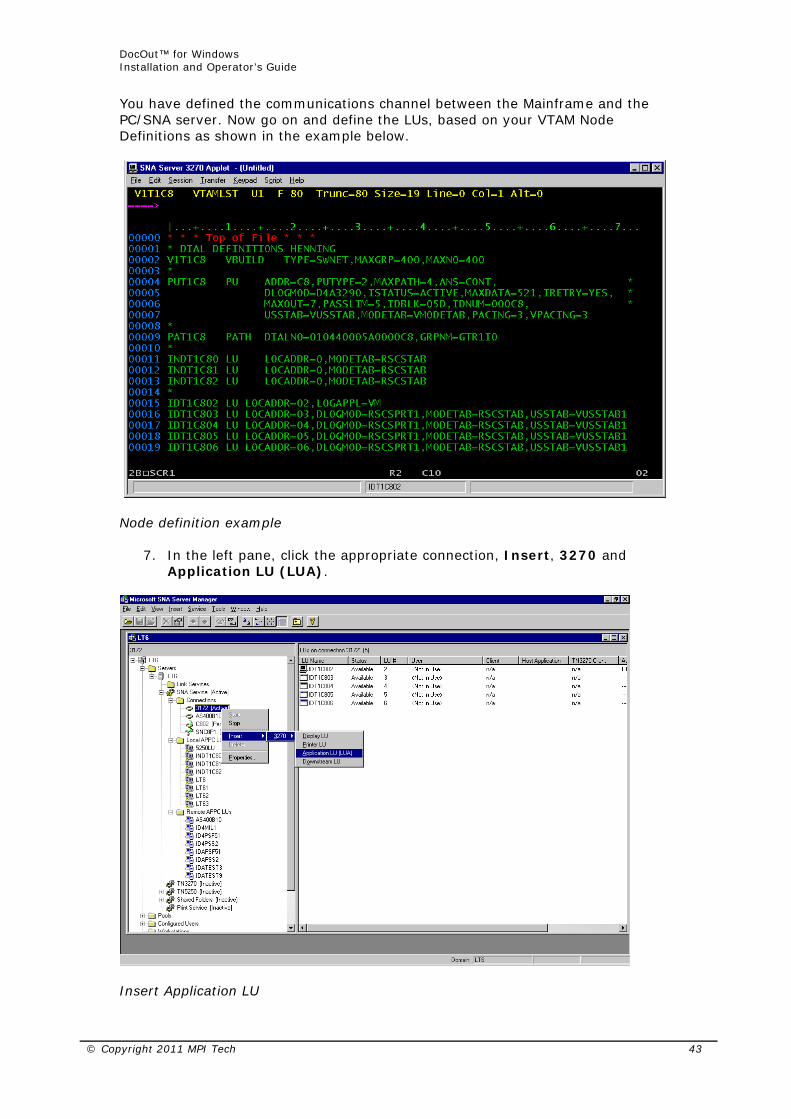
You have defined the communications channel between the Mainframe and the PC/SNA server. Now go on and define the LUs, based on your VTAM Node Definitions as shown in the example below.
Node definition example
7. In the left pane, click the appropriate connection, Insert, 3270 and Application LU (LUA).
Insert Application LU
© Copyright 2011 MPI Tech 43
DocOut™ for Windows Installation and Operator’s Guide
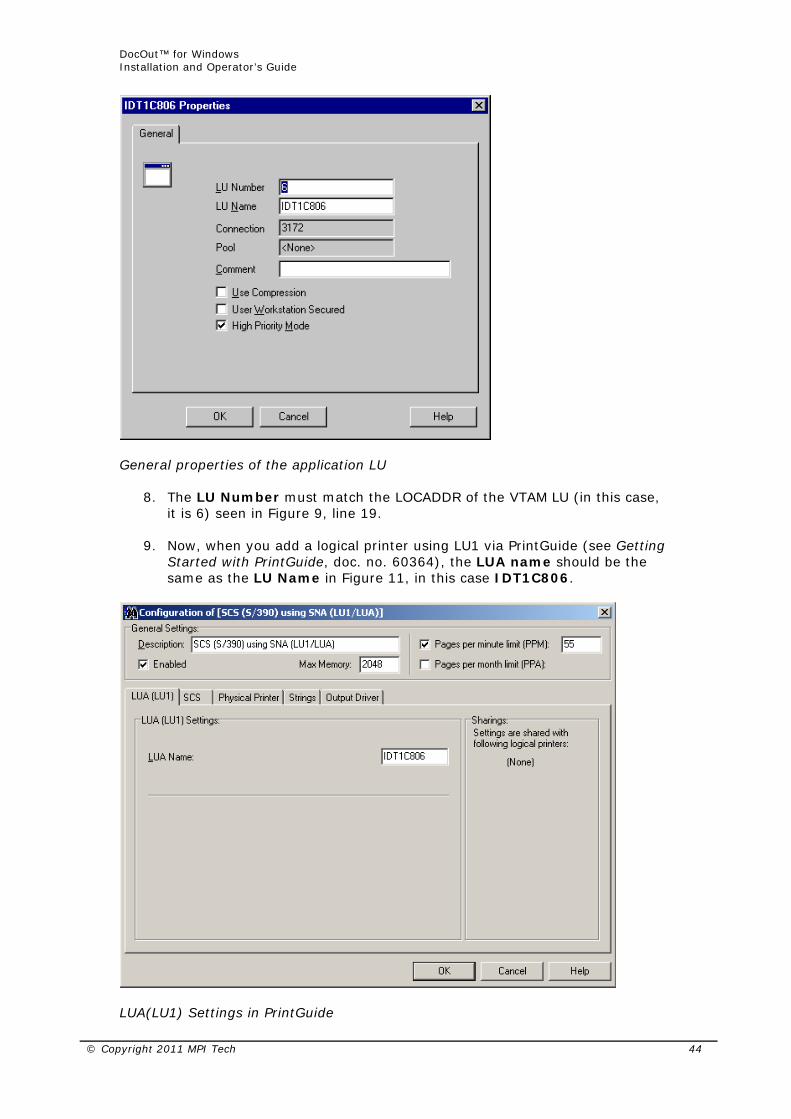
General properties of the application LU
8. The LU Number must match the LOCADDR of the VTAM LU (in this case, it is 6) seen in Figure 9, line 19.
9. Now, when you add a logical printer using LU1 via PrintGuide (see Getting
Started with PrintGuide, doc. no. 60364), the LUA name should be the same as the LU Name in Figure 11, in this case IDT1C806.
LUA(LU1) Settings in PrintGuide
© Copyright 2011 MPI Tech 44
DocOut™ for Windows Installation and Operator’s Guide
10.3 AS/400 SNA LU 6.2 This section is based on the use of Microsoft SNA server version 4.0. You may find the hints useful, even if you have an older version of the SNA server. Refer to the Microsoft SNA server online help for additional information.
10.3.1 Important information
The AS/400 parameter names are written in italics and the Microsoft SNA server Manager parameter names are written in bold: Use the Display Network Attributes (DSPNETA) command on the AS/400 to find the correct values for:
• Local Network ID = Network Name • Local Control Point = Control Point Name and Remote APPC LU
Use the Display Line Description (DSPLIND) command on the AS/400 to find the correct parameter for:
• Local Adapter Address = Network Address (MAC address, e.g. 020000000000)
• XID or Exchange ID = Remote Node ID (e.g. 056 DD973)
10.3.2 AS/400 Wizard
The wizard will help you create an AS/400 connection, a Remote APPC LU for the connection, and a Local APPC LU if necessary. A Link Service must be installed on the SNA Server Service before you can use the Wizard. Refer to chapter 10.4 Insert Link Service.
1. Start the Microsoft SNA Server Manager. 2. On the Tools menu, click AS/400 Wizard. Click Next. 3. Select the SNA server machine for which you want to configure the
connection to your AS/400. Click Next. 4. Type a Connection Name for your AS/400 connection. The connection is
identified by this name in the Connections folder. Click Next. 5. Select an SNA server Link Service on which to configure the connection to
your AS/400. Click Next. 6. Enter Network Name (Local Network ID) and Control Point Name (Local
Control Point). The Control Point Name is also used as the name for the Remote APPC LU. Click Next.
7. Enter the Network Address (Local Adapter Address on AS/400). Leave Remote SAP Address and Local SAP Address at their default (04). Click Next.
8. Click Finish to complete the configuration.
10.3.3 Adjust connection properties
1. In the Microsoft SNA Server Manager right-click the connection and click Properties.
2. In the General tab, ensure that Allowed Directions is set to Both Directions.
3. Click System Identification tab. In the Remote Node Name group you must fill in:
© Copyright 2011 MPI Tech 45

DocOut™ for Windows Installation and Operator’s Guide
• Network Name (Local Network ID) • Control Point Name (Local Control Point) • Remote Node ID (XID or Exchange ID)
4. Click OK
10.3.4 Insert APPC mode definition
Since the Microsoft SNA server does not include the QSPWTR mode needed for LU 6.2 - IPDS printing, you must create it. See chapter 10.6 Insert APPC mode definition.
10.3.5 Add printer
Insert local LU for the printer. Add Printer on AS/400. Add the corresponding Logical Printer in DocOut (using the Logical Printer Wizard).
10.3.6 DocOut settings
The AS/400 Wizard takes the value of the Local LU Name and reuses it for the LU Alias, thus making them identical. The LU Alias must match the LU 6.2 Alias used in the Logical Printer Wizard and PrintGuide's LU 6.2 (APPC) configuration tab. Use $DPF as the Transaction Program Name in the Logical Printer Wizard and PrintGuide's LU 6.2 (APPC) configuration tab.
10.4 Insert Link Service The Link Service allows the SNA server to communicate with host, peer, or downstream computers over Token Ring and Ethernet LANs.
1. Start the Microsoft SNA Server Manager. 2. In the left pane click the server on which the link service will be installed.
On the Insert menu, click Link Service. 3. In the Insert Link Service dialog select Link Service i.e. DLC 802.2 Link
Service and click Add. 4. In the Title box you can use the default title or type your own. 5. In the Adapter box, select the adapter card you are using. 6. Leave the remaining properties at their defaults or click Help for additional
information. 7. Click OK and then click Finish in the Insert Link Service dialog.
10.5 Insert local LU You need to configure a Local LU for each printer you intend to use with DocOut.
1. In the left pane of the Microsoft SNA Server Manager click SNA Service. On the Insert menu, point to APPC, and click Local LU.
© Copyright 2011 MPI Tech 46

DocOut™ for Windows Installation and Operator’s Guide
2. Enter LU Alias (used in DocOut) and LU Name (used on host). We recommend that you use identical names. Network Name of SNA server machine is filled automatically (default is APPN). Comment is optional.
3. Click the Advanced tab. Implicit Incoming Remote LU should be changed from <None> to the Remote APPC LU. Set LU 6.2 Type to Independent.
4. Click OK.
10.6 Insert APPC mode definition Since the Microsoft SNA server does not include the QSPWTR mode needed for LU 6.2 - IPDS printing, we will describe how to create it.
10.6.1 Insert APPC mode definition
1. Start the Microsoft SNA Server Manager. 2. On the Insert menu, point to APPC and click Mode Definition. 3. Type QSPWTR as Mode Name. Comment is optional, but we
recommend you write Mode for LU 6.2 Printers. 4. Click the Limits tab. Enter the values below:
• Parallel Session Limit: 8 • Minimum Contention Winner Limit: 0 • Partner Min. Contention Winner Limit: 0 • Automatic Activation Limit: 0
5. Click the Characteristics tab. Enter the values below: • Pacing Send Count: 63 • Pacing Receive Count: 63 • Max Send RU Size: 1024 • Max Receive RU Size: 1024 • Check High Priority Mode
6. Click OK to complete the insertion of the new mode.
© Copyright 2011 MPI Tech 47

DocOut™ for Windows Installation and Operator’s Guide
10.7 Add printer to AS/400 (LU 6.2/APPC) How to add a printer to your AS/400: Refer to your AS/400 Documentation for detailed information.
10.7.1 CRTDEVAPPC - create an APPC device description
Keyword / Prompt Value DEVDDevice Description RMTLOCNAME Remote Location Name
Must match the LU Name used on SNA server
RMTNETID Remote Network Identifier
Must match SNA server Network Name (default is APPN).
CTLControl Unit Must match Control Point Name (Remote APPC LU). MODEMode Name QSPWTR APPNAPPN Capable *YES
10.7.2 CRTDEVPRT - create a printer description
Keyword / Prompt Value DEVDDevice Description DEVCLSDevice Class *RMT TYPEDevice Type *IPDS MODELDevice Model 0 AFPAdvanced Function Presentation *YES AFPATTACHAFP Attachment *APPC FONTFont Identifier 11 FORMFEEDForm Feed *AUTOCUT
10.7.3 CHGCFGL - change configuration list
It is recommended to add an entry for each printer in the APPN Remote Configuration List. Type:
CHGCFGL TYPE (*APPNRMT) CFGL(QAPPNRMT) If you do not have a Remote Configuration List, then you can use the CRTCFGL command to create one.
© Copyright 2011 MPI Tech 48

DocOut™ for Windows Installation and Operator’s Guide
11 SCS/DCA printing using TN3270e/TN5250e
This chapter provides examples of how to set up SCS/DCA printing using TN3270e and TN5250e protocols.
11.1 TN3270e setup using OS/390 communication server
The IBM OS/390 ver. 2.8 is capable of supporting TN3270e sessions communicating directly. The following describes the required mainframe definitions for a LinkCom or DocOut. It is assumed that the TN3270e service is already active on the mainframe.
11.1.1 Mainframe TCPIP profile definitions:
PRTGROUP PRTGRP1 LU08 TCPPRT01 TCPPRT02 TCPPRT03 TCPPRT04 TCPPRT05 TCPPRT06 TCPPRT07 TCPPRT08 TCPPRT09 TCPPRT10 TCPPRT11 TCPPRT12 TCPPRT13 TCPPRT14 TCPPRT15 ENDPRTGROUP IPGROUP IPGRP1 255.255.0.0:128.0.0.0 ENDIPGROUP LUMAP LUGRP1 IPGRP1 SPECIFIC PRTGRP1 PRTMAP PRTGRP1 IPGRP1 ************
11.1.2 SNA definitions:
TCP VBUILD TYPE=APPL LU08 APPL EAS=1, ESTIMATED CONCURRENT SESSIONS * AUTH=ACQ, * VPACING=3, * MODETAB=RSCSTAB, * SESSLIM=YES TCPPRT* APPL EAS=1, ESTIMATED CONCURRENT SESSIONS * AUTH=ACQ, * VPACING=3, * MODETAB=RSCSTAB, * SESSLIM=YES
© Copyright 2011 MPI Tech 49

DocOut™ for Windows Installation and Operator’s Guide
11.2 TN3270e set-up using MS SNA server There are many different programs that can generate TN3270e protocol. For example, the current level of RSCS on VM supports this data stream directly. This section provides an example of how to set up TN3270e printing using the MS SNA server.
1. Open the MS SNA Server Manager, right-click a Connection (in this example GATE1C1), and click Insert, 3270 and Application LU (LUA).
2. The dialogue in Figure 14, 3270 LU Properties will be displayed. Enter the LU Name (in this example it is LU08, but you can choose whatever name suits your environment).
3. Assign the new LU as a TN3270 service by highlighting it and right-clicking the mouse. Select Assign to, TN3270 Service on, and your chosen workstation. In this case it is JENSKOCHPC.
© Copyright 2011 MPI Tech 50
DocOut™ for Windows Installation and Operator’s Guide
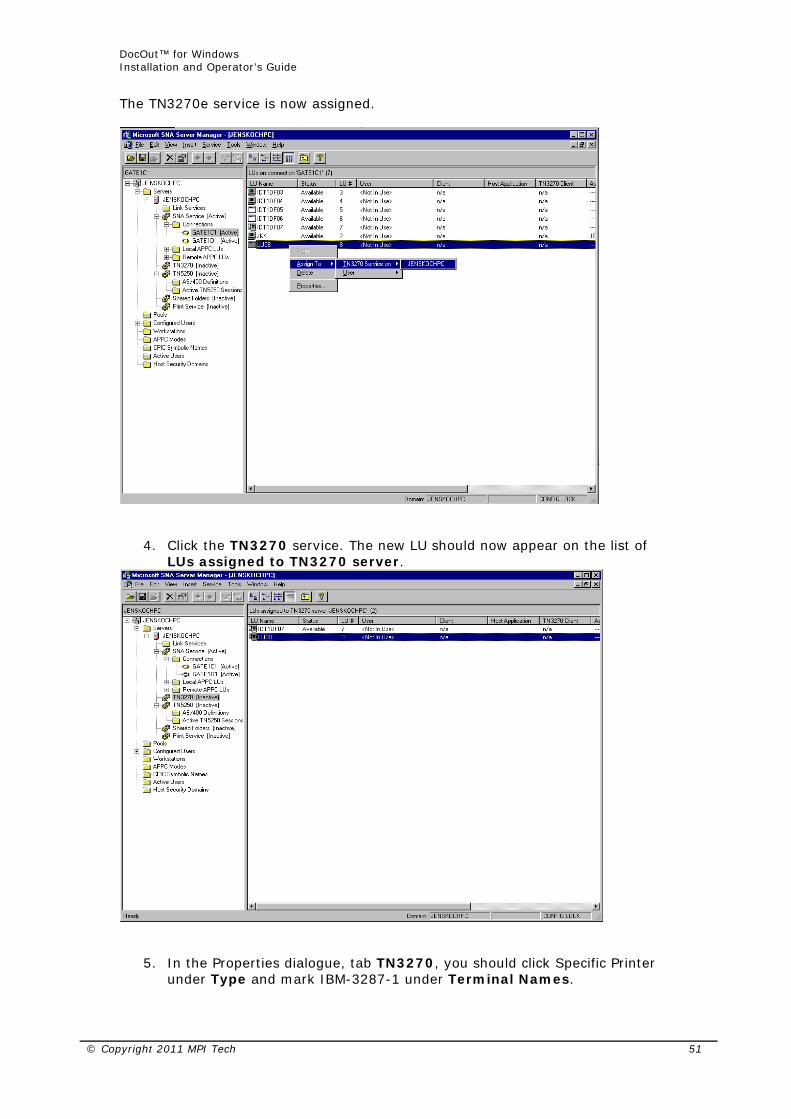
The TN3270e service is now assigned.
4. Click the TN3270 service. The new LU should now appear on the list of LUs assigned to TN3270 server.
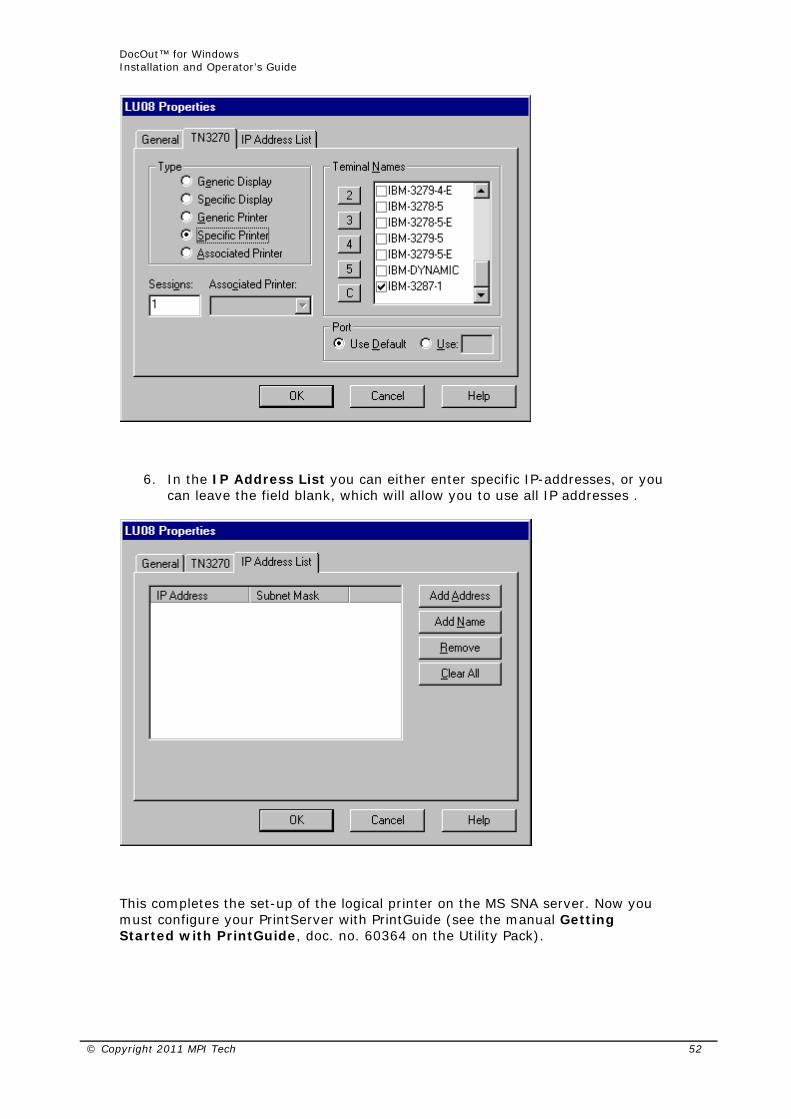
5. In the Properties dialogue, tab TN3270, you should click Specific Printer under Type and mark IBM-3287-1 under Terminal Names.
© Copyright 2011 MPI Tech 51
DocOut™ for Windows Installation and Operator’s Guide
6. In the IP Address List you can either enter specific IP-addresses, or you can leave the field blank, which will allow you to use all IP addresses .
This completes the set-up of the logical printer on the MS SNA server. Now you must configure your PrintServer with PrintGuide (see the manual Getting Started with PrintGuide, doc. no. 60364 on the Utility Pack).
© Copyright 2011 MPI Tech 52

DocOut™ for Windows Installation and Operator’s Guide
Specific for TN3270e/TN5250e is that you have to enter the Connection Type (TN3270e) and the LUNAME on the tab Telnet Print.
Once this configuration has been done, you should follow the appropriate steps in the chapter on Mainframe Printing Using SNA in order to perform direct SCS printing.
© Copyright 2011 MPI Tech 53

DocOut™ for Windows Installation and Operator’s Guide
11.3 TN5250e set-up To set up TN5250, configure DocOut using PrintGuide please follow the below procedure Using PrintGuide’s Wizard, add a Telnet session as follows:
1. Click ‘Add…’ in the lower right corner of the window.
Select ‘DCA using TN5250e’ Select the Logical Printer as required (DCA)
Type in the Device Name and the IP address of the iSeries / AS/400 system Select printer spool and target printer type The spool may be changed via PrintGuide if required and the printer selection may be customised to exactly match the target printer. Select ‘Next’ and Save configuration and restart DocOut
© Copyright 2011 MPI Tech 54

DocOut™ for Windows Installation and Operator’s Guide
On many AS/400 installations, a device is automatically set up on the AS/400 when DocOut is booted. For this to happen, the following conditions apply:
• Telnet must be started. • The correct PTFs must be installed. See APAR II10918 on IBM's support
page for a list of PTFs to be installed for the different versions of AS/400 for TN5250e printing support. http://www.as400.ibm.com/clientaccess/caiixd1.htm.
• The QUATOVRT SYSVAL parameter must be set to a value that is higher than the number of auto-configured virtual controllers currently running on the system. See section 10.3.1 for this procedure.
On some installations, the QAUTOVRT SYSVAL parameter is set to 0. This prevents any virtual controllers being auto-created. In cases where QAUTOVRT SYSVAL cannot be changed from 0, devices must be configured manually. See section 10.3.2
11.3.1 Auto-configuration of devices
How to set up your AS/400 to auto-configure devices: Issue the command: WRKCTLD *VWS This will determine the number of auto-configured Virtual Controllers on the system. Issue the command: DSPSYSVAL QAUTOVRT If the system value of QAUTOVRT is zero, then use the procedure outlined in section 10.3.2 If the system value of QAUTOVRT is equal to the number of auto-configured Virtual Controllers, the QAUTOVRT value should be increased by the number of devices that will be configured.
11.3.2 Manual Configuration of Devices
This section describes how to create printer definitions on AS/400s that have the QAUTOVRT SYSVAL parameter set to 0. Prerequisites:
• AS/400 is configured and running TCP/IP • AS/400 PTF level is at the levels described in APAR II10918. Check IBM's
support page for a list of PTFs to be installed for the different versions of AS/400 for TN5250e printing support. http://www.as400.ibm.com/clientaccess/caiixd1.htm
• Firmware level* on the interface is at least S80 xxx.360 • Release of PrintGuide* being used is at least S42 065.100
* Latest versions can be obtained from the MPI Tech web page
© Copyright 2011 MPI Tech 55

DocOut™ for Windows Installation and Operator’s Guide
Check the configuration via PrintGuide:
Device Name. This must be a unique name on the AS/400 that you wish to connect to. It can have up to 10 characters. Host IP Address This is the IP address of the iSeries / AS/400 you wish to connect to. Host Port number 23 is the Telnet port used for the Host Port and is predefined. Click OK and save the settings to the PrintServer, selecting the option to restart the server.
2. Configure AS/400. Start TCP/IP if not already started by typing STRTCP on the command line.
Method 1: Using the Command Line Create the device from the Command Line by typing: CRTDEVPRT DEVD(DEVXXXX) DEVCLS(*VRT) TYPE(3812) MODEL(1) CTL(QVIRCD0001) FONT(87) TEXT(‘MANUAL CREATION OF VIRTUAL DEVICE DEVXXXX’) The value for DEVD should match the Device Name given in step 2. The value of CTL should match the virtual controller on the system (Normally QVIRCD0001) The value for TEXT is optional.
© Copyright 2011 MPI Tech 56
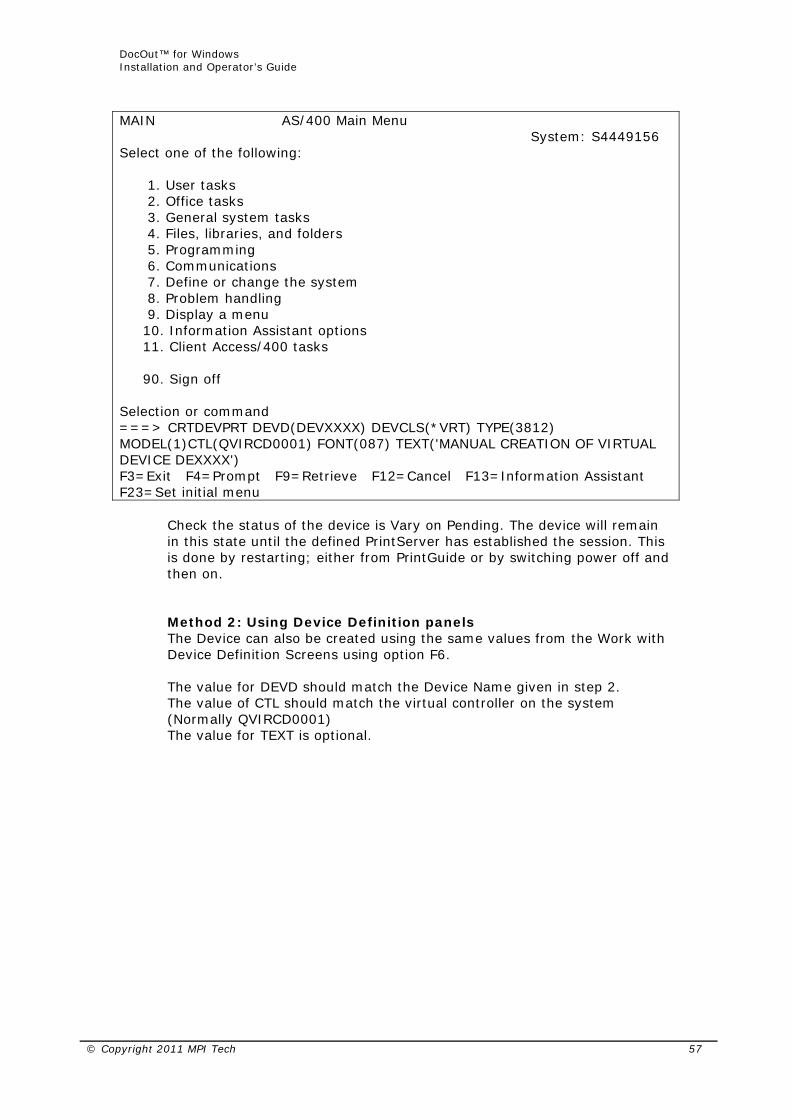
DocOut™ for Windows Installation and Operator’s Guide
MAIN AS/400 Main Menu System: S4449156 Select one of the following: 1. User tasks 2. Office tasks 3. General system tasks 4. Files, libraries, and folders 5. Programming 6. Communications 7. Define or change the system 8. Problem handling 9. Display a menu 10. Information Assistant options 11. Client Access/400 tasks 90. Sign off Selection or command ===> CRTDEVPRT DEVD(DEVXXXX) DEVCLS(*VRT) TYPE(3812) MODEL(1)CTL(QVIRCD0001) FONT(087) TEXT('MANUAL CREATION OF VIRTUAL DEVICE DEXXXX') F3=Exit F4=Prompt F9=Retrieve F12=Cancel F13=Information Assistant F23=Set initial menu
Check the status of the device is Vary on Pending. The device will remain in this state until the defined PrintServer has established the session. This is done by restarting; either from PrintGuide or by switching power off and then on.
Method 2: Using Device Definition panels The Device can also be created using the same values from the Work with Device Definition Screens using option F6. The value for DEVD should match the Device Name given in step 2. The value of CTL should match the virtual controller on the system (Normally QVIRCD0001) The value for TEXT is optional.
© Copyright 2011 MPI Tech 57
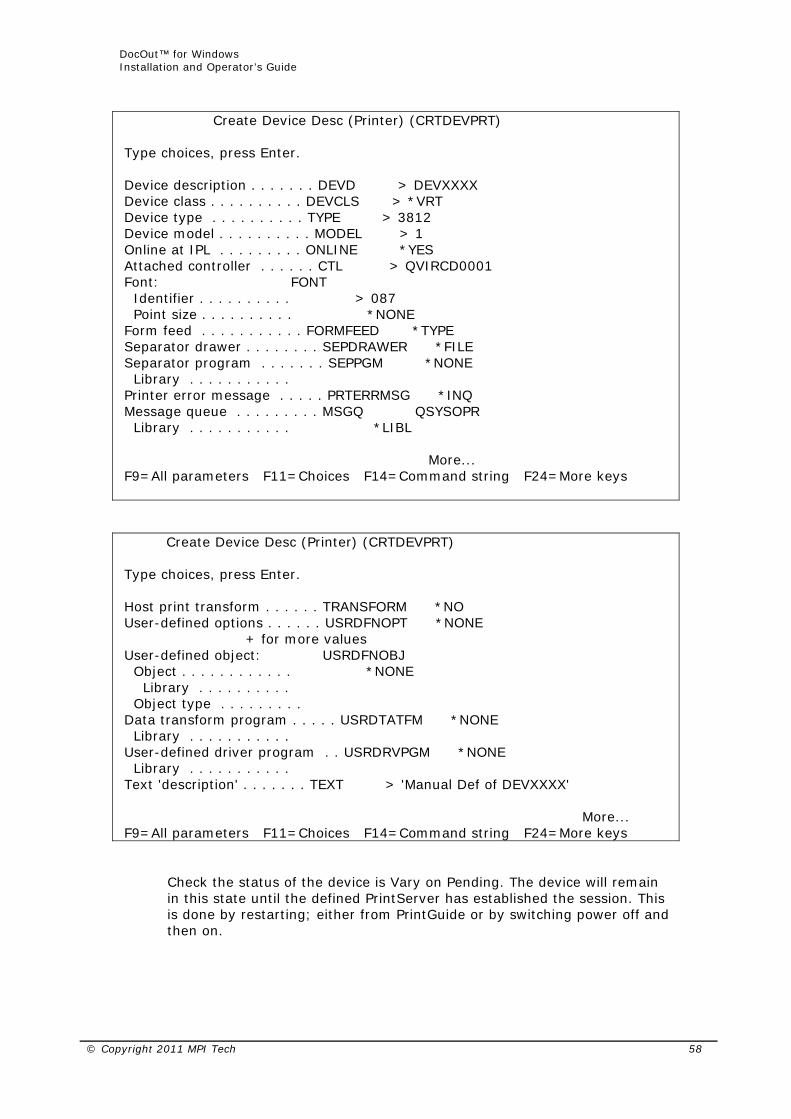
DocOut™ for Windows Installation and Operator’s Guide
Create Device Desc (Printer) (CRTDEVPRT) Type choices, press Enter. Device description . . . . . . . DEVD > DEVXXXX Device class . . . . . . . . . . DEVCLS > *VRT Device type . . . . . . . . . . TYPE > 3812 Device model . . . . . . . . . . MODEL > 1 Online at IPL . . . . . . . . . ONLINE *YES Attached controller . . . . . . CTL > QVIRCD0001 Font: FONT Identifier . . . . . . . . . . > 087 Point size . . . . . . . . . . *NONE Form feed . . . . . . . . . . . FORMFEED *TYPE Separator drawer . . . . . . . . SEPDRAWER *FILE Separator program . . . . . . . SEPPGM *NONE Library . . . . . . . . . . . Printer error message . . . . . PRTERRMSG *INQ Message queue . . . . . . . . . MSGQ QSYSOPR Library . . . . . . . . . . . *LIBL More... F9=All parameters F11=Choices F14=Command string F24=More keys Create Device Desc (Printer) (CRTDEVPRT) Type choices, press Enter. Host print transform . . . . . . TRANSFORM *NO User-defined options . . . . . . USRDFNOPT *NONE + for more values User-defined object: USRDFNOBJ Object . . . . . . . . . . . . *NONE Library . . . . . . . . . . Object type . . . . . . . . . Data transform program . . . . . USRDTATFM *NONE Library . . . . . . . . . . . User-defined driver program . . USRDRVPGM *NONE Library . . . . . . . . . . . Text 'description' . . . . . . . TEXT > 'Manual Def of DEVXXXX' More... F9=All parameters F11=Choices F14=Command string F24=More keys
Check the status of the device is Vary on Pending. The device will remain in this state until the defined PrintServer has established the session. This is done by restarting; either from PrintGuide or by switching power off and then on.
© Copyright 2011 MPI Tech 58
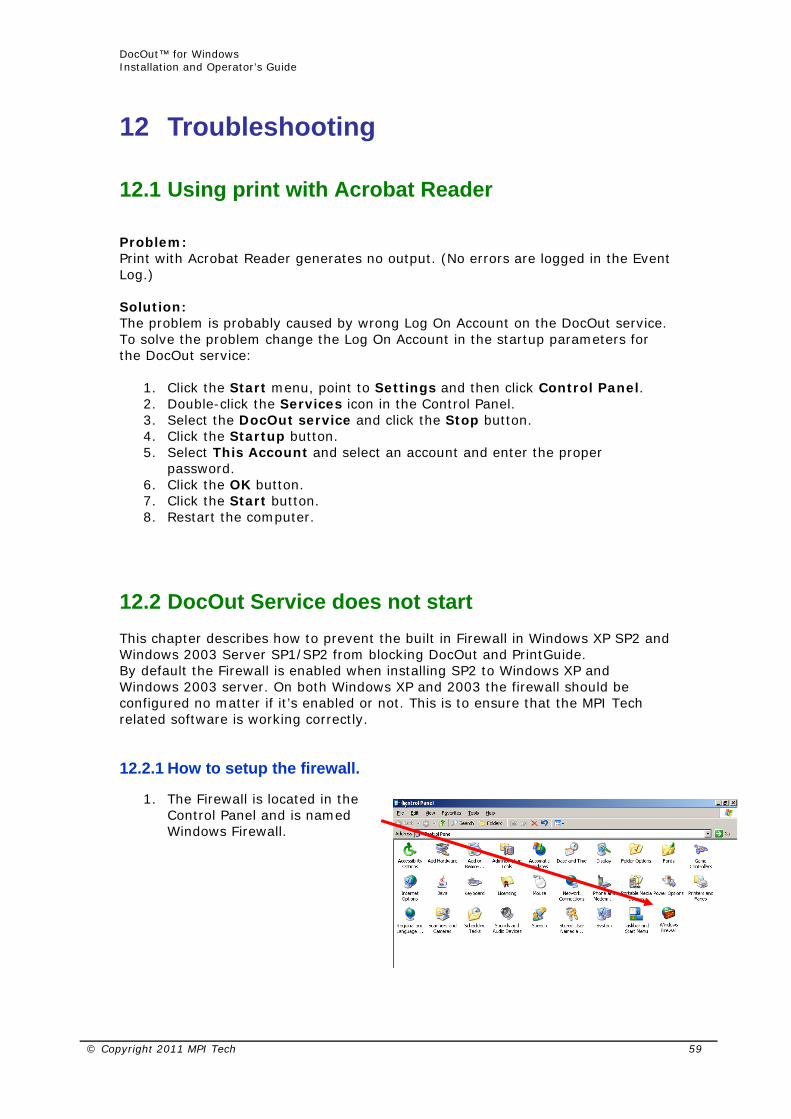
DocOut™ for Windows Installation and Operator’s Guide
12 Troubleshooting
12.1 Using print with Acrobat Reader Problem: Print with Acrobat Reader generates no output. (No errors are logged in the Event Log.) Solution: The problem is probably caused by wrong Log On Account on the DocOut service. To solve the problem change the Log On Account in the startup parameters for the DocOut service:
1. Click the Start menu, point to Settings and then click Control Panel. 2. Double-click the Services icon in the Control Panel. 3. Select the DocOut service and click the Stop button. 4. Click the Startup button. 5. Select This Account and select an account and enter the proper
password. 6. Click the OK button. 7. Click the Start button. 8. Restart the computer.
12.2 DocOut Service does not start This chapter describes how to prevent the built in Firewall in Windows XP SP2 and Windows 2003 Server SP1/SP2 from blocking DocOut and PrintGuide. By default the Firewall is enabled when installing SP2 to Windows XP and Windows 2003 server. On both Windows XP and 2003 the firewall should be configured no matter if it’s enabled or not. This is to ensure that the MPI Tech related software is working correctly.
12.2.1 How to setup the firewall.
1. The Firewall is located in the Control Panel and is named Windows Firewall.
© Copyright 2011 MPI Tech 59

DocOut™ for Windows Installation and Operator’s Guide
Opening the Firewall displays if the firewall is turned on or not, MPI Tech advices to add the MPI Tech related Software, even if the Firewall is turned OFF. Open the exceptions menu. In this menu you will probably see several exceptions added. You can add both port numbers and software to the Exceptions, MPI Tech advises to add the *.exe file of the software, then all used ports by the software is added to the exceptions. This is done using the Add Program wizard. The files to add are: DocOut = Pserver.exe PrintGuide = PGuide.exe The exe files are located in the folder where the application is installed.
© Copyright 2011 MPI Tech 60
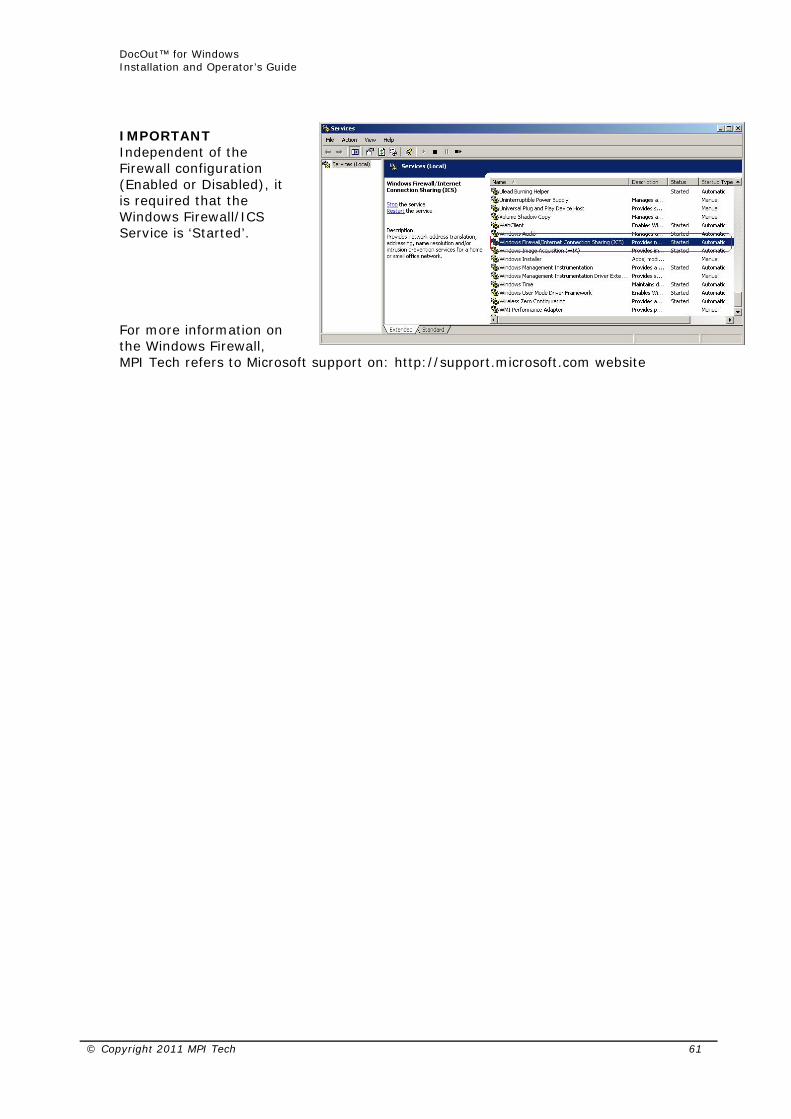
DocOut™ for Windows Installation and Operator’s Guide
IMPORTANT Independent of the Firewall configuration (Enabled or Disabled), it is required that the Windows Firewall/ICS Service is ‘Started’. For more information on the Windows Firewall, MPI Tech refers to Microsoft support on: http://support.microsoft.com website
© Copyright 2011 MPI Tech 61
DocOut™ for Windows Installation and Operator’s Guide
12.3 Log settings You can choose between seeing messages in the Event Viewer or logging messages to a file. This is set up in the PrintGuide, and is described in Getting Started with PrintGuide, doc no. 60364.
12.4 Event Viewer If you want to view error messages in the Event Viewer, do the following:
1. From the Start menu, point to Programs. 2. Click Administrative Tools on the Programs menu. 3. Double-click Event Viewer to display the Event Log. 4. Click Log and click Application Log if not already selected.
Event categories:
• System(1) The System category contains messages that relates to the interfacing between the DocOut and other components
• Setup(3) The Setup category contains messages that relate to problems and changes in the configuration of the DocOut.
Event types:
• Error The Error type indicates a problem that has to be corrected for the DocOut to work properly.
• Warning The Warning type indicates that a minor problem exists that has no influence on the functionality of the DocOut.
• Information The Information type indicates that this is a completely normal situation and is used to keep the user informed about what the DocOut is doing.
© Copyright 2011 MPI Tech 62
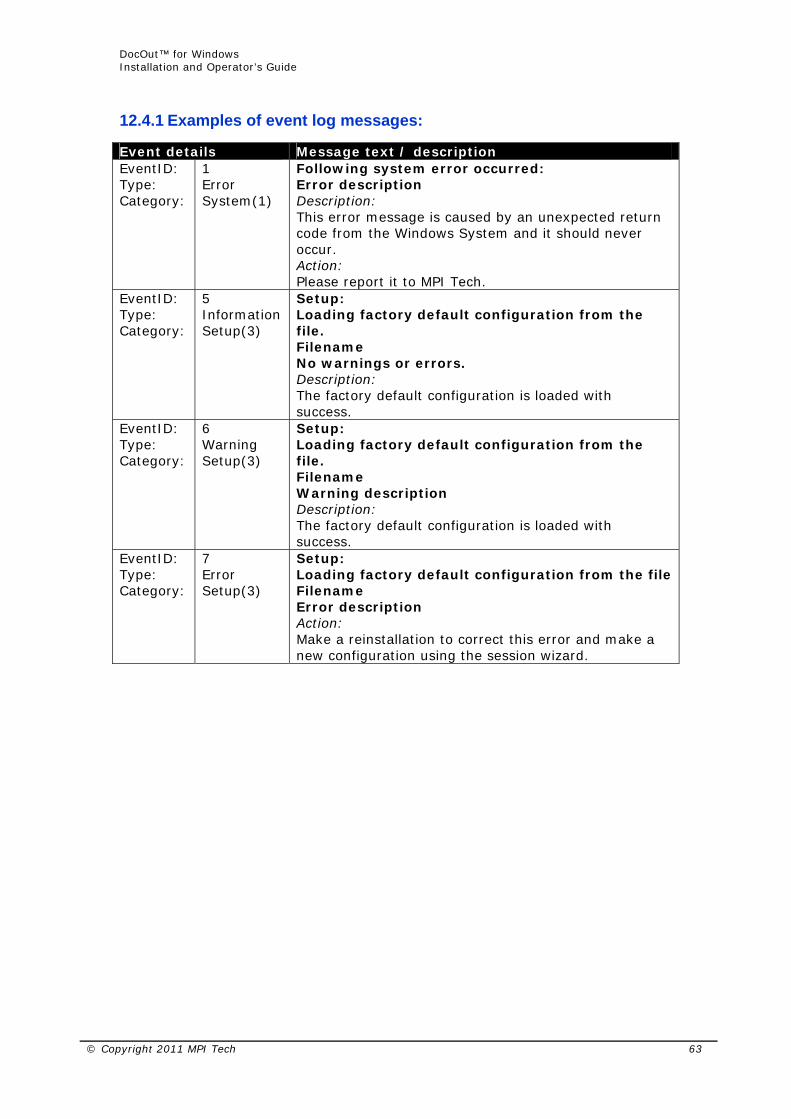
DocOut™ for Windows Installation and Operator’s Guide
12.4.1 Examples of event log messages:
Event details Message text / description EventID: Type: Category:
1 Error System(1)
Following system error occurred: Error description Description: This error message is caused by an unexpected return code from the Windows System and it should never occur. Action: Please report it to MPI Tech.
EventID: Type: Category:
5 Information Setup(3)
Setup: Loading factory default configuration from the file. Filename No warnings or errors. Description: The factory default configuration is loaded with success.
EventID: Type: Category:
6 Warning Setup(3)
Setup: Loading factory default configuration from the file. Filename Warning description Description: The factory default configuration is loaded with success.
EventID: Type: Category:
7 Error Setup(3)
Setup: Loading factory default configuration from the file Filename Error description Action: Make a reinstallation to correct this error and make a new configuration using the session wizard.
© Copyright 2011 MPI Tech 63
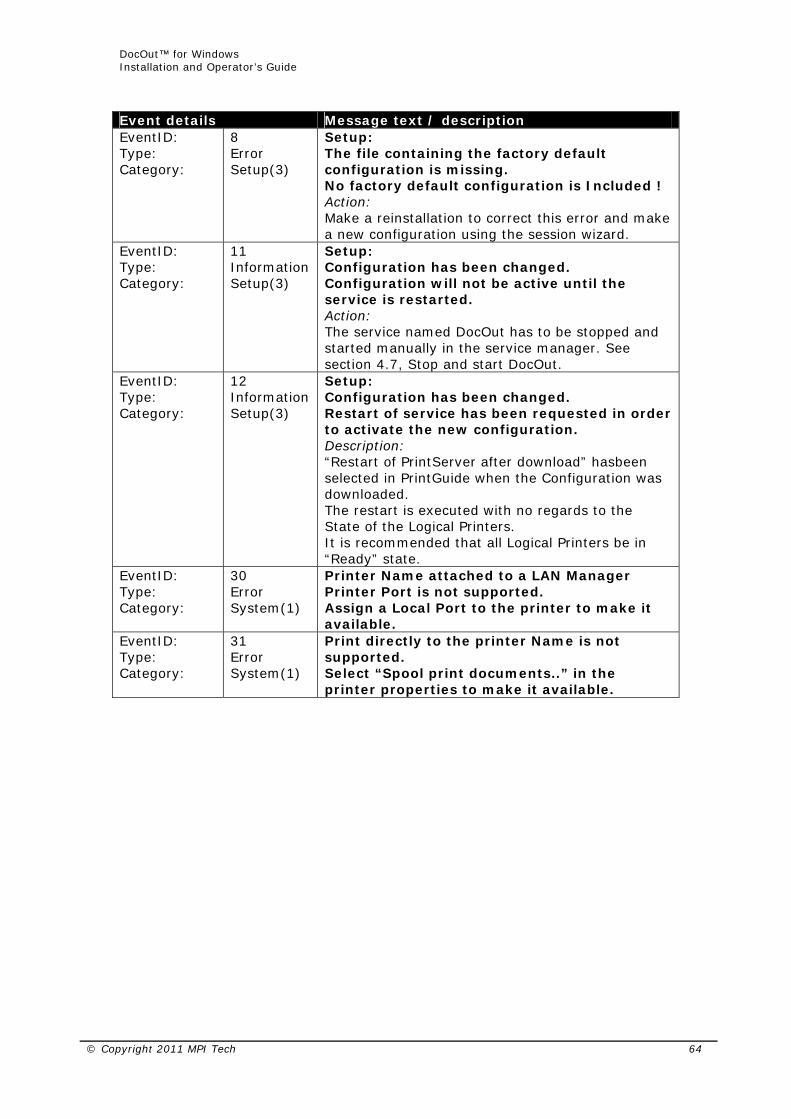
DocOut™ for Windows Installation and Operator’s Guide
Event details Message text / description EventID: Type: Category:
8 Error Setup(3)
Setup: The file containing the factory default configuration is missing. No factory default configuration is Included ! Action: Make a reinstallation to correct this error and make a new configuration using the session wizard.
EventID: Type: Category:
11 Information Setup(3)
Setup: Configuration has been changed. Configuration will not be active until the service is restarted. Action: The service named DocOut has to be stopped and started manually in the service manager. See section 4.7, Stop and start DocOut.
EventID: Type: Category:
12 Information Setup(3)
Setup: Configuration has been changed. Restart of service has been requested in order to activate the new configuration. Description: “Restart of PrintServer after download” hasbeen selected in PrintGuide when the Configuration was downloaded. The restart is executed with no regards to the State of the Logical Printers. It is recommended that all Logical Printers be in “Ready” state.
EventID: Type: Category:
30 Error System(1)
Printer Name attached to a LAN Manager Printer Port is not supported. Assign a Local Port to the printer to make it available.
EventID: Type: Category:
31 Error System(1)
Print directly to the printer Name is not supported. Select “Spool print documents..” in the printer properties to make it available.
© Copyright 2011 MPI Tech 64
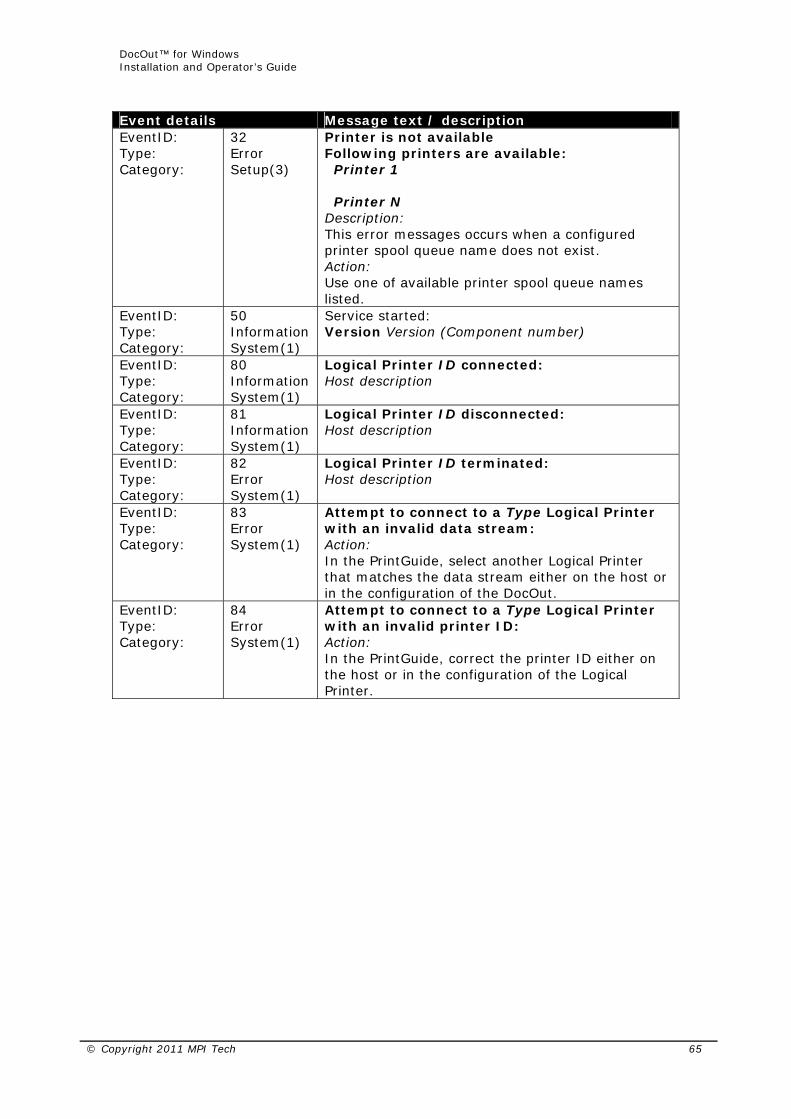
DocOut™ for Windows Installation and Operator’s Guide
Event details Message text / description EventID: Type: Category:
32 Error Setup(3)
Printer is not available Following printers are available: Printer 1 Printer N Description: This error messages occurs when a configured printer spool queue name does not exist. Action: Use one of available printer spool queue names listed.
EventID: Type: Category:
50 Information System(1)
Service started: Version Version (Component number)
EventID: Type: Category:
80 Information System(1)
Logical Printer ID connected: Host description
EventID: Type: Category:
81 Information System(1)
Logical Printer ID disconnected: Host description
EventID: Type: Category:
82 Error System(1)
Logical Printer ID terminated: Host description
EventID: Type: Category:
83 Error System(1)
Attempt to connect to a Type Logical Printer with an invalid data stream: Action: In the PrintGuide, select another Logical Printer that matches the data stream either on the host or in the configuration of the DocOut.
EventID: Type: Category:
84 Error System(1)
Attempt to connect to a Type Logical Printer with an invalid printer ID: Action: In the PrintGuide, correct the printer ID either on the host or in the configuration of the Logical Printer.
© Copyright 2011 MPI Tech 65

DocOut™ for Windows Installation and Operator’s Guide
12.4.2 Trace Facility
Should any specific problems arise, a trace of the data sent to DocOut can be generated by following the instructions below: • Stop the service for DocOut • Stop the Writer/Printer for the actual printer on the AS/400 or S/390 • Start the service for DocOut • Enable the trace on the Windows Server as follows:
From a DOS-prompt, go to where DocOut is installed (Default is C:\Program Files\MPI Tech\DocOut) Type: ‘pcontrol -logtrc on’ <ENTER>
• Start the Printer Writer for the
specific printer on the system • Send the job and leave sufficient
time for the system to finish the job (The job will be printed during the trace)
• IMPORTANT: Stop the trace on
the Windows server as follows: (using a DOS Prompt):
• Enter the library: C:\Program Files\MPI Tech\DocOut
Type: ‘Pcontrol -logtrc off’ <ENTER>
The trace is placed in: (default location) '[Drive]:\Program Files\MPI Tech\DocOut\traces\log.trc' If more than one trace is performed, please move the file to a different location or rename the trace file in ...\traces\log.trc to a different name. The trace will always use the name 'log.trc' hereby overwriting any existing trace file with the same name. Forward the trace(s) via e-mail, in compressed format, to the person requesting the trace
© Copyright 2011 MPI Tech 66

DocOut™ for Windows Installation and Operator’s Guide
This page intentionally left blank
© Copyright 2011 MPI Tech 67

DocOut™ for Windows Installation and Operator’s Guide
About MPI Tech MPI Tech, formerly i-data Printing Systems is a global vendor of workflow and output management solutions with distribution worldwide. MPI Tech develops and markets a world-leading portfolio of technologies and products for unique Document Managing and Printing solutions. With offices located in France, Denmark, Germany, UK and USA, MPI Tech operates in most of the world through sales and support offices and partners. Our partners include Hewlett-Packard, IBM, Ricoh, Xerox, Konica Minolta and Dascom. More information is available at www.mpitech.com Trademarks: Company and product names mentioned in this manual are trademarks or registered trademarks of their respective owners. MPI Tech cannot be held responsible for any technical or typographical errors and reserves the right to make changes to products and documentation without prior notification.
© Copyright 2011 MPI Tech 68