Effective Practices for Description of Science Content within Digital Talking Books

Creating Digital Talking Books using Low Complexity Mastering (LCM)
File maintenance: A number of file folders are required to keep track of files as they go through the markup process. Your needs may differ depending on your IT department and computer network, but the overall file folders needed on your computer to get started are:--a “Working files for SoundForge” folder (or whatever audio editor you use)--an “A Directory of Digital Talking Book Projects” folder--a “Protected Books” shortcut (where the dropprotect.bat program will put books that have been encrypted)--a “Protect Log” shortcut (where reports from the dropprotect.bat program can be found—you’re looking for return codes of 0 (zero) on finished books that are built to spec)--destination folders for storing/searching finished DTBs--backup locations elsewhere on your network, on a portable drive, etc--other files that might be useful for copy/paste issues into files can also be collected near your DTB folders. Examples might be generic recordings of info like “This book contains markers allowing direct access to major portions of the book.”
Here are some of the files mentioned as they appear in my setup:
Audio files: get a copy of the book or magazine’s audio files that you wish to convert to a DTB, and copy it to the “Working Files for SoundForge” folder. We’ll only keep the files for one project at a time in this folder—when the book is done and passes testing, delete these files to make room for the next project.

File formats: the audio files need to be named (or re-named) in the following formats in order to work with LCM: for books, save the files in the XXXXXsnn format, where XXXXX is the 5-digit book number (using zeros at the beginning for our numbers), “s” represents “side,” and “nn” represents the side number. For the first two sides of RC 1046, for example, they would be named 01046s01.wav and 01046s02.wav. You can leave off the leading zero if you want as well, which would make those files 1046s01 and 1046s02.
For magazine files, I’m using (magazine code in lower case)YYYY-MMsnn. In the case of Big Red Report magazine for May 2010, I name the files brr2010-05s01 and brr2010-05s02.
Using Sound Forge, edit side 1 of your cassette audio file—if it’s an older recording in cassette format, it needs to be split into two files: “XXXXXs01.wav” and “announcement.wav” where the “announcement” file contains audio at the beginning of the book or magazine—opening announcement, table of contents, preface, acknowledgements, etc—everything before chapter one for books, or first article for magazines. Also make a copy of the title audio and save as “title.wav,” and make a copy of the author audio and save as “author.wav.” For magazines, save the copyright info audio as the “author.wav.” These files don’t need any reference to the actual book or magazine title in their names—just title.wav, author.wav, and announcement.wav. And they have to be named exactly like that for LCM to handle them properly—“announcementS.wav,” for example, won’t work.
For older books or magazines, you may also need to record and insert some audio into the announcement.wav file regarding digital navigation—something along the lines of, “this book contains markers allowing direct access to chapters at level one,” or “this book contains a marker allowing direct access to the beginning of the book,” etc—something relevant to that particular book’s structure.
--no exclude markers can be used in the announcement.wav file for markup in LCM—edit the audio so that it needs no exclude markers in that file. This means removing any blank space at the beginning of the audio, and any references to cassettes such as the number of sides, references to cassette sides and tone numbers within the table of contents, etc. For subsequent side files, however, there is no need to edit out side changes—these will be taken out using the “exclude” markers later. Once you’re all digital, you won’t have anything left to exclude since you won’t record those in the future.
--Older books or magazines may also require a slight change to the closing announcement on the last side of your audio—you can remove the references to cassette in the close, substituting something like, “if you experience any difficulty with your copy of this recording, please contact your library” instead.
Start a new project in LCM—Click on the LCM icon, then File/New Project. In the “title” field, enter book or magazine title (include magazine date after title, like “Big Red Report May 2010”). In the “author” field, put the author’s name if you’re making a book, or the publisher’s name if you’re doing a magazine. In the “publisher” field, put exactly the following (without the quotes): “National Library Service for the Blind and Physically Handicapped, Library of Congress”—NLS has designed the playback of the books so that this field triggers several

playback issues in the software of the DTB players, so it’s critical to have this field filled out exactly that way. In the “narrator” field, either type in the name of your narrator, or see if it already exists in the drop-down list on the right of the box (this drop-down retains names of previous DTB project narrators). For magazines, use “various” if multiple narrators recorded the magazine. Under the “package identity” section, put “us” and “ntwk” in the “country” and “agency” fields (they’ll be auto-filled after the first time you create a book or magazine). For the identification number field, use your library code (“ne1a” for Nebraska), followed by “db,” and then the book number. For RC 1046 example above, this would become ne1adb01046. For magazines, this will be similar to the formula for the audio side files: all lower-case, use (magazine code)YYYY-MM. For the Big Red Report 5-10 example above, this will be brr2010-05. In the “directory” field, click on “browse”—this is where we’ll create our working project folder.
We’ll have to create a subfolder in the “A directory of digital talking books” folder. Single-click on the “directory” folder, make a new folder, name it something relevant like the book or magazine title (we’ll re-name it for the final version later after export and encryption), and select it. Now you can click “OK.” The program will ask you if you want to use the identification number as the base file name—choose yes.

Now we need to add the actual audio side files to the new project we’ve created. To do this, control-S to save, close LCM, and copy the relevant audio files to the project folder (from the “Working Files for SoundForge” folder). Re-open LCM and select File/Open Project, navigate to your new project’s folder, then double-click on the .topf file named for your new project. In the screen that appears here, click on the “add” button to add the files you need. All of the files you just copy/pasted into the project folder should appear here. Add title and author.wav, announcement.wav, and the audio side files. Order should be announcement first (this part should be automatic), then sides in numerical order—if these aren’t in order before you start to add navigation markers, the book won’t play properly. Note—you won’t see the title.wav and author.wav files in your list—they get added, but they don’t show up in your list. If needed, you can move files around after they’ve been added by single-clicking on them and using the “up” and “down” buttons. Once the files are added and placed in the correct order, click on the “announcement” file in the list and open it.

Now we need to define navigation markers to use in the project. A “title/author” marker must be added to the beginning of the announcement audio around the title and author (or title/date/copyright for magazines). Configure other markers as needed for the particular book, choosing markers from the “class attributes” table button, picking a color (or going with the default green) and a keyboard key to use for implementing them. The keys that can be used are 1, 2, 3, 4, 5, 6, 7, 8, 9, i, o, p, r, t, u, and y. Note: that’s according to the Telex manual—I’ve also found that the “e” key works, and I assign that to be the “exclude” secondary marker, which we’ll investigate in a few paragraphs.
To finish adding the markers, once you’ve found the one you want using the “class attributes” button and picking a color if desired, you have to click the “add pointer” button. Then you can add more as needed by going back to “class attributes.” When applying these “primary navigation” markers in your audio files, all of them are placed in pairs, with the pair surrounding the corresponding type of element’s spoken depiction, like “preface,” “chapter 1,” “End of (title) by (author),” etc. For most books, class attribute markers like “chapter,” “table of contents,” “foreword, “acknowledgements,” and “close” should be fine.
You might occasionally need “nested” pointers, which reside below the main “level one” pointers. For example, a book may be divided into parts, which themselves are divided into chapters. To configure “nested” pointers, single-click on the pointer under which you want to nest more markers, such as “part,” and then add your next pointer. You’ll see your new set of pointers stemming off this first pointer once added. To go back to adding top-level pointers, single-click somewhere below the list, and they’ll start going back to the top level.

Next we’ll deal with secondary markers. We just use exclude markers when needed. Exclude markers will go in pairs around any audio (or passages of silence) you don’t want to hear (but as mentioned above, don’t use this in the .announcement.wav file). For example, references to cassettes at the beginning and ending of sides, references to cassettes in the closing announcements, unwanted blank space in the audio such at beginnings and ends of sides, etc.
We don’t record annotations for our books, but if you do need to use the “annotation” markers, these work together in a weird way—the “location” marker is a single marker before the annotation section starts. The “reference” is a pair that goes around the spoken reference to the annotation, such as “Library of Congress Annotation” in the NLS books. Finally, the “contents” is a pair that goes around the whole audio section of the annotation itself (starting after the “reference” pair ends).
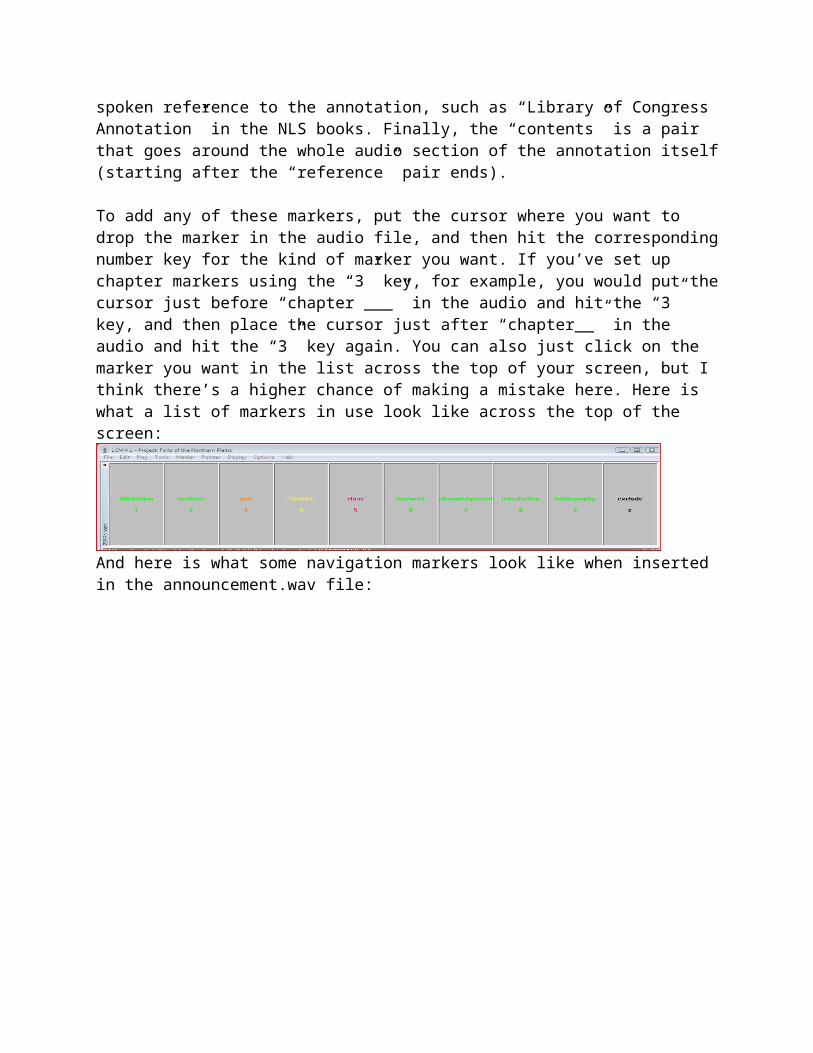
To add any of these markers, put the cursor where you want to drop the marker in the audio file, and then hit the corresponding number key for the kind of marker you want. If you’ve set up chapter markers using the “3” key, for example, you would put the cursor just before “chapter ___” in the audio and hit the “3” key, and then place the cursor just after “chapter__” in the audio and hit the “3” key again. You can also just click on the marker you want in the list across the top of your screen, but I think there’s a higher chance of making a mistake here. Here is what a list of markers in use look like across the top of the screen:
And here is what some navigation markers look like when inserted in the announcement.wav file:

When I start adding navigation points in LCM, I also open another copy of the corresponding file in SoundForge (the copies from the “working files for soundforge” folder). I already have SoundForge metadata markers for contents, chapters, etc, in these files, which originate from our studio, so I can use control plus left and right arrows to navigate between these markers in SoundForge to quickly find the locations for my markers in the LCM audio. Once I find that a marker goes near 26:18 in my file open in SoundForge, for example, I can go back to my LCM screen, navigate to that point in the timeline, and place the correct navigational marker pairs around the audio element found there. If you already have metadata/markers of some kind in your studio audio files, this has the potential to save a lot of time that might be wasted simply looking for the appropriate places to put markers.
Here are a couple of shots of part and chapter markers (which are nested) in use in the book. Note that the markers surround the corresponding audio for each time of nav point:

Once you’ve inserted all of the markers you want in the announcement file, go to File/Save. To move to other sides of the book or magazine, go to File/Open Project, select the .topf file for your project, and then choose the side file you want to work on next from your project file list. This will close the file you’ve been working on and open the next audio file (which will open at the end of the audio), and then you can add your markers, save, open the next audio file side, etc.
Export. Once all of the markers are in place, it’s time to export the book. Go to File/Export Project/Conversion to start this process. Click “OK” on the “export Navigation Options” box that pops up first. The next box that pops up is a large list of metadata related to the book. You can leave these fields alone and the book will play properly, but you can fill them in if you’d like. Then click “OK.” On the next screen, per the NLS screen capture in Network Guideline NG03:2008, make your “media unit size” 476 mb, and limit your SMIL file size to 100 kb. Input settings should match your audio (normally 44,100/1 channel), and output settings should be AMRWB+ with a Frame Type of 23 and ISF Index of 8. Click OK again. At this point, it will take some time for the book to be converted and created. For most books, at least 20 minutes will pass, and possibly a lot more if your book or magazine is large with multiple audio side files (it
depends on the size of the project). Once done, you can click on the “OK” box that pops up indicating that export is done, and then close LCM.
Encryption and archiving: The finished book will be in its own subfolder within your book or magazine’s project folder. Navigate to the “A Directory of Digital Talking Books” folder, click into your project’s folder, and then copy/paste the folder with your book or magazine name found here to your desktop. Drag and drop the desktop copy onto the “DropProtect.bat” program also found on the desktop. You will have to choose “continue” when a warning box appears on your screen (at least for me—this is related to network administrative settings in Windows Vista needed by Nebraska’s computer dept). After that, the book will be checked and encrypted (and a bug fix because of a problem in LCM will run), and the finished and encrypted book will appear in the “Protected Books” folder on the desktop. To make sure the book is okay, open the “ProtectLog” folder on your desktop, and double-click on the log file for your book or magazine. You want to see a final return code=0 at the end of this document. If it’s not zero, something is wrong and the book might not play back properly.

Here’s a successful log:
If it is zero, go back to the new book or magazine within the “Protected Books” folder, and you can re-name the folder to match other books and magazines from BARD. For books, the naming formula is DB-(Authorlast, Authorfirst)-(Book title)-DB(book number). For our DB 1046 Heart of a Husker example, this should become DB-Babcock, Mike-Heart of a Husker-DB01046. For magazines, I’m using the formula dm-(magazinecode)YYYY-MM. For our Big Red Report 5-10 example, this would become dm-brr2010-05.
For duplication (and for archiving on our servers), once you’ve named this folder properly, right click on it and choose “send to/compressed (zipped) folder.” This will make a zip file folder of the book or magazine. We drag and drop the zipped folder to folders retained on our servers called “Author A-K,” “Authors L-Z,” or “MagsFolder,” where files are retained along with a copy of BARD materials similarly divided by author.
Here is the book used in these screen caps sitting in its final resting place, renamed and zipped:

Any questions? Feel free to contact me at the Nebraska Library Commission, and I’ll be glad to help.
Scott Scholz