DocAve 6 Migrator
406
1 DocAve 6: Migrator User Guide DocAve ® 6 Migrator Service Pack 3, Cumulative Update 3 Revision N Issued March 2014
Transcript of DocAve 6 Migrator
1
DocAve 6: Migrator
User Guide
DocAve® 6 Migrator
Service Pack 3, Cumulative Update 3
Revision N Issued March 2014
2
DocAve 6: Migrator
Table of Contents
About Migrator ........................................................................................................................................... 12
Complementary Products ....................................................................................................................... 12
Submitting Documentation Feedback to AvePoint .................................................................................... 13
Before You Begin ......................................................................................................................................... 14
Configurations ......................................................................................................................................... 14
Agents ..................................................................................................................................................... 14
Required Permissions ............................................................................................................................. 14
File System Migrator ........................................................................................................................... 14
SharePoint Migrator............................................................................................................................ 16
Lotus Notes Migrator .......................................................................................................................... 20
Quickr Migrator ................................................................................................................................... 21
eRoom Migrator .................................................................................................................................. 23
Livelink Migrator ................................................................................................................................. 24
Exchange Public Folder Migrator ........................................................................................................ 25
EMC Documentum Migrator ............................................................................................................... 26
Local System Permissions ................................................................................................................... 28
Migration Speed Considerations............................................................................................................. 28
Getting Started ............................................................................................................................................ 30
Launching DocAve Migrator.................................................................................................................... 30
About Online Migration Settings ................................................................................................................ 31
Creating Containers .................................................................................................................................... 32
Creating a Site Collection ........................................................................................................................ 33
Creating a Site ......................................................................................................................................... 33
Creating a List/Library ............................................................................................................................. 34
About Export Locations (Offline Jobs Only) ................................................................................................ 35
Managing Export Location ...................................................................................................................... 35
Creating and Editing Export Locations .................................................................................................... 36
Export Mode ....................................................................................................................................... 36
Import Mode ....................................................................................................................................... 37
3
DocAve 6: Migrator
Configuring Migration Databases ............................................................................................................... 38
File System Migrations ................................................................................................................................ 39
Pre-migration Configurations ................................................................................................................. 39
Managing File System Connections .................................................................................................... 39
Creating and Editing File System Connections .................................................................................... 40
Configuring a File System Migration ....................................................................................................... 41
About Filter Policies ............................................................................................................................ 41
Creating Filter Policies ......................................................................................................................... 42
About Mapping Settings ..................................................................................................................... 50
Domain Mapping................................................................................................................................. 50
User Mapping ...................................................................................................................................... 50
Group Mapping ................................................................................................................................... 51
About Permission Mapping ................................................................................................................. 51
Creating and Editing Permission Mappings ........................................................................................ 52
About SharePoint Permission Levels .................................................................................................. 53
Creating SharePoint Permission Levels ............................................................................................... 54
About Dynamic Rules .......................................................................................................................... 55
Setting Up File System Migration Profiles........................................................................................... 56
Performing a File System Migration ....................................................................................................... 61
Select the Source and Destination Nodes ........................................................................................... 61
Configuring the Run Now Interface .................................................................................................... 62
Configuring the Save As New Plan Interface ....................................................................................... 63
Metadata Excel File ............................................................................................................................. 68
SharePoint Online Migrations ..................................................................................................................... 71
Configuring SharePoint Online Migration Profiles .................................................................................. 71
Source Component Options ................................................................................................................ 71
Mapping Options ................................................................................................................................ 72
Advanced Options ............................................................................................................................... 73
Configuring Dynamic Rules ................................................................................................................. 75
Editing the XML File ............................................................................................................................ 76
Performing a SharePoint Online Migration ............................................................................................ 77
Selecting the Source and Destination Nodes ...................................................................................... 78
4
DocAve 6: Migrator
Configuring the Run Now Interface .................................................................................................... 79
Configuring the Save As New Plan Interface ....................................................................................... 80
SharePoint Offline Migrations .................................................................................................................... 84
Configuring SharePoint Offline Migration Profiles ................................................................................. 84
Configuring Storage Policies ............................................................................................................... 84
Setting Up an Export Profile ................................................................................................................ 84
Setting Up an Import Profile ............................................................................................................... 85
Importing Data Exported from Other Managers ................................................................................ 89
Editing a Metadata File ....................................................................................................................... 89
Editing the SP2010GranularBackupRestore.cfg File ........................................................................... 90
Performing a SharePoint Offline Migration ............................................................................................ 90
Exporting Data .................................................................................................................................... 91
Importing Data .................................................................................................................................... 94
Supported and Unsupported Elements for SharePoint 2007/2010 to 2013 Migration ............................. 99
Supported and Unsupported Elements for SharePoint 2007/2010 to SharePoint Online Migration ...... 123
Lotus Notes Online Migrations ................................................................................................................. 144
Pre-migration Configurations ............................................................................................................... 144
Managing Lotus Notes Connections ................................................................................................. 144
Creating and Editing Lotus Notes Connections ................................................................................. 145
Configuring Lotus Notes Online Migration ........................................................................................... 146
About Filter Policies .......................................................................................................................... 146
Creating Filter Policies ....................................................................................................................... 147
About Mapping Settings ................................................................................................................... 148
User Mapping .................................................................................................................................... 148
Group Mapping ................................................................................................................................. 148
About Permission Mappings ............................................................................................................. 148
About SharePoint Permission Levels ................................................................................................ 150
Creating SharePoint Permission Levels ............................................................................................. 151
About Dynamic Rules ........................................................................................................................ 152
Setting Up Lotus Notes Online Migration Profiles ............................................................................ 153
Performing a Lotus Notes Online Migration ......................................................................................... 160
Select the Source and Destination Nodes ......................................................................................... 160
5
DocAve 6: Migrator
Configuring the Run Now Interface .................................................................................................. 162
Configuring the Save As New Plan Interface ..................................................................................... 162
Configuring the Add Schedule Interface ........................................................................................... 164
Lotus Notes Offline Migrations ................................................................................................................. 166
Configuring a Lotus Notes Offline Migration ........................................................................................ 166
Setting Up an Export Profile .............................................................................................................. 166
Setting Up an Import Profile ............................................................................................................. 166
Performing a Lotus Notes Offline Migration ......................................................................................... 167
Export ................................................................................................................................................ 167
Import ............................................................................................................................................... 170
Supported and Unsupported Elements in Lotus Notes Migrator ............................................................. 174
Supported and Unsupported Lotus Notes Document Elements .............................................................. 177
Quickr Migration ....................................................................................................................................... 179
Pre-migration Configurations ............................................................................................................... 179
Managing Quickr Connections .......................................................................................................... 179
Creating and Editing Quickr Connections ......................................................................................... 180
Configuring Quickr Migration ............................................................................................................... 181
About Filter Policies .......................................................................................................................... 181
Creating and Editing Filter Policies ................................................................................................... 182
About Mapping Settings ................................................................................................................... 182
User Mapping .................................................................................................................................... 183
Group Mapping ................................................................................................................................. 183
About Permission Mappings ............................................................................................................. 183
Managing Permission Mappings ....................................................................................................... 184
Configuring Permission Mappings .................................................................................................... 185
About SharePoint Permission Levels ................................................................................................ 185
Creating SharePoint Permission Levels ............................................................................................. 186
About Dynamic Rules ........................................................................................................................ 187
Setting Up Quickr Migration Profiles ................................................................................................ 188
Performing a Quickr Migration ............................................................................................................. 194
Select the Source and Destination Nodes ......................................................................................... 194
Configuring the Run Now Interface .................................................................................................. 195
6
DocAve 6: Migrator
Configuring the Save As New Plan Interface ..................................................................................... 196
Configuring the Add Schedule Interface ........................................................................................... 198
Supported and Unsupported Elements in Quickr Migrator ...................................................................... 199
eRoom Online Migrations ......................................................................................................................... 200
Configuring an eRoom Online Migration .............................................................................................. 200
About Filter Policies .......................................................................................................................... 200
Creating Filter Policies ....................................................................................................................... 201
About Mapping Settings ................................................................................................................... 203
Domain Mapping............................................................................................................................... 203
User Mapping .................................................................................................................................... 204
Group Mapping ................................................................................................................................. 204
About Dynamic Rules ........................................................................................................................ 204
Setting Up eRoom Online Migration Profiles .................................................................................... 206
Performing an eRoom Online Migration............................................................................................... 216
Selecting the Source and Destination Nodes .................................................................................... 216
Configuring the Run Now Interface .................................................................................................. 217
Configuring the Save As New Plan Interface ..................................................................................... 217
Conflict Resolution ............................................................................................................................ 219
eRoom Offline Migrations ......................................................................................................................... 220
Configuring an eRoom Offline Migration .............................................................................................. 220
Setting Up an Export Profile .............................................................................................................. 220
Setting Up an Import Profile ............................................................................................................. 221
Performing an eRoom Offline Migration .............................................................................................. 221
Export ................................................................................................................................................ 221
Import ............................................................................................................................................... 223
eRoom Migration Column Type Mapping Table ....................................................................................... 226
Supported and Unsupported Elements for eRoom Migrator ................................................................... 227
Livelink Online Migrations ........................................................................................................................ 229
Pre-migration Configurations ............................................................................................................... 229
Managing Livelink Connections ........................................................................................................ 229
Creating and Editing Livelink Connections ........................................................................................ 230
Configuring a Livelink Online Migration................................................................................................ 233
7
DocAve 6: Migrator
About Filter Policies .......................................................................................................................... 233
Creating and Editing Filter Policies ................................................................................................... 234
About Mapping Settings ................................................................................................................... 235
Domain Mapping............................................................................................................................... 235
User Mapping .................................................................................................................................... 236
Group Mapping ................................................................................................................................. 236
About Permission Mapping ............................................................................................................... 236
Creating and Editing Permission Mappings ...................................................................................... 238
About Livelink Privilege ..................................................................................................................... 239
Creating Livelink Privileges ................................................................................................................ 240
About SharePoint Group ................................................................................................................... 241
Creating SharePoint Groups .............................................................................................................. 242
About SharePoint Permission Level .................................................................................................. 242
Creating SharePoint Permission Levels ............................................................................................. 243
Dynamic Rules ................................................................................................................................... 243
Setting Up Livelink Online Migration Profiles ....................................................................................... 245
Performing a Livelink Online Migration ................................................................................................ 253
Selecting the Source and Destination Nodes .................................................................................... 253
Livelink Offline Migrations ........................................................................................................................ 257
Configuring a Livelink Offline Migration ............................................................................................... 257
Setting Up an Export Profile .............................................................................................................. 257
Setting Up an Import Profile ............................................................................................................. 259
Performing a Livelink Offline Migration ................................................................................................ 260
Exporting Data .................................................................................................................................. 260
Importing Data .................................................................................................................................. 262
Supported and Unsupported Elements for Livelink Migrator .................................................................. 265
Exchange Public Folder Migrations ........................................................................................................... 267
Pre-migration Configurations ............................................................................................................... 267
Managing Exchange Public Folder Connections ............................................................................... 267
Configuring Exchange Public Folder Connections ............................................................................. 268
Configuring Exchange Public Folder Migration ..................................................................................... 269
About Filter Policies .......................................................................................................................... 269
8
DocAve 6: Migrator
Creating Filter Policies ....................................................................................................................... 270
About Mapping Settings ................................................................................................................... 271
Domain Mapping............................................................................................................................... 271
User Mapping .................................................................................................................................... 272
Group Mapping ................................................................................................................................. 272
About Permission Mapping ............................................................................................................... 272
Creating Permission Mappings ......................................................................................................... 274
About SharePoint Permission Levels ................................................................................................ 274
Creating SharePoint Permission Levels ............................................................................................. 275
About Dynamic Rules ........................................................................................................................ 276
Setting Up Exchange Public Folder Migration Profiles ...................................................................... 277
Performing an Exchange Public Folder Migration ................................................................................ 286
Select the Source and Destination Nodes ......................................................................................... 286
Configuring the Run Now Interface .................................................................................................. 287
Configuring the Save As New Plan Interface ..................................................................................... 288
Supported List/Library for Different Exchange Folder Types.................................................................... 291
EMC Documentum Migrations ................................................................................................................. 293
Pre-migration Configurations ............................................................................................................... 293
Managing EMC Documentum Connections ...................................................................................... 293
Creating and Editing EMC Documentum Connections ..................................................................... 294
Configuring EMC Documentum Online Migration ................................................................................ 296
About Filter Policies .......................................................................................................................... 296
Creating Filter Policies ....................................................................................................................... 297
About Mapping Settings ................................................................................................................... 301
Domain Mapping............................................................................................................................... 301
User Mapping .................................................................................................................................... 301
Group Mapping ................................................................................................................................. 302
About Permission Mapping ............................................................................................................... 302
Creating and Editing Permission Mappings ...................................................................................... 303
About EMC Documentum Permissions ............................................................................................. 304
Creating EMC Documentum Permissions ......................................................................................... 305
About SharePoint Group ................................................................................................................... 306
9
DocAve 6: Migrator
Creating SharePoint Groups .............................................................................................................. 307
About SharePoint Permission Levels ................................................................................................ 307
Creating SharePoint Permission Levels ............................................................................................. 308
About Dynamic Rules ........................................................................................................................ 309
Setting Up EMC Documentum Migration Profiles ............................................................................ 310
Performing an EMC Documentum Migration ....................................................................................... 317
Configuring the Run Now Interface .................................................................................................. 319
Configuring the Save As New Plan Interface ..................................................................................... 320
Supported SharePoint Object Levels for Different EMC Documentum Object Levels ............................. 323
Managing Sub-profiles .............................................................................................................................. 324
Editing an Existing Sub-profile .............................................................................................................. 324
Deleting an Existing Sub-profile ............................................................................................................ 324
Uploading a Previously-configured Sub-profile .................................................................................... 324
Downloading an Existing Sub-profile .................................................................................................... 324
Managing Plans ......................................................................................................................................... 325
Migrator Tools ........................................................................................................................................... 327
Accessing Migrations Hot Key Mode ........................................................................................................ 328
File System Migration ........................................................................................................................... 328
Home Page ........................................................................................................................................ 329
Plan Manager .................................................................................................................................... 330
SharePoint Migration ............................................................................................................................ 331
Home Page ........................................................................................................................................ 332
SharePoint Online Migration ............................................................................................................ 332
Profile Settings .................................................................................................................................. 332
Migration Database .......................................................................................................................... 333
Plan Manager Page ........................................................................................................................... 333
Exchange Public Folder Migration ........................................................................................................ 334
Home Page ........................................................................................................................................ 334
Plan Manager Page ........................................................................................................................... 336
Lotus Notes Migration .......................................................................................................................... 337
Home Page ........................................................................................................................................ 337
Plan Manager Page ........................................................................................................................... 340
10
DocAve 6: Migrator
eRoom Migrator .................................................................................................................................... 341
Home Page ........................................................................................................................................ 341
Plan Manager Page ........................................................................................................................... 342
Livelink Migration ................................................................................................................................. 343
Job Monitor ....................................................................................................................................... 344
Scheduled Job Monitor ..................................................................................................................... 344
Plan Group ........................................................................................................................................ 344
Home Page ........................................................................................................................................ 345
Migration Database .......................................................................................................................... 346
Configure Connection ....................................................................................................................... 346
Livelink Online Migration .................................................................................................................. 346
Export ................................................................................................................................................ 347
Create Profile .................................................................................................................................... 347
Permission Mapping ......................................................................................................................... 348
Plan Manager Page ........................................................................................................................... 348
EMC Documentum Migration ............................................................................................................... 349
Home Page ........................................................................................................................................ 350
Plan Manager Page ........................................................................................................................... 352
Quickr Migration ................................................................................................................................... 353
Home Page ........................................................................................................................................ 353
Plan Manager Page ........................................................................................................................... 355
Appendix A: Migration Database Information .......................................................................................... 357
Job Detail ............................................................................................................................................... 357
Job Notification ..................................................................................................................................... 361
Job Statistic ........................................................................................................................................... 362
Object Type ........................................................................................................................................... 367
Livelink .............................................................................................................................................. 367
Exchange Public Folder ..................................................................................................................... 368
Lotus Notes ....................................................................................................................................... 368
Quickr ................................................................................................................................................ 368
EMC Documentum ............................................................................................................................ 368
Appendix B: Customization Support Tables .............................................................................................. 369
11
DocAve 6: Migrator
Lotus Notes Migrator Customization Support Table ............................................................................ 369
Quickr Migrator Customization Support Table ..................................................................................... 379
eRoom Migrator Customization Table .................................................................................................. 383
Exchange Public Folder Migrator Customization Support Table .......................................................... 385
EMC Documentum Migrator Customization Table ............................................................................... 387
Appendix C: Advanced Settings in Configuration Files ............................................................................. 389
File System Migrator Configuration Files .............................................................................................. 389
FileMigrationConfiguration.xml ........................................................................................................ 389
eRoom Migrator Configuration Files .................................................................................................... 389
eRoomMigrationConfiguration.xml .................................................................................................. 390
Exchange Public Folder Migration Configuration File ........................................................................... 391
EMC Documentum Migrator Configuration Files ................................................................................. 393
SharePoint Migrator Configuration Files .............................................................................................. 394
Source Configuration File .................................................................................................................. 394
Destination Configuration File .......................................................................................................... 394
Livelink Migrator Configuration File ..................................................................................................... 395
Lotus Notes Migrator Configuration File .............................................................................................. 400
SP2010LotusNotesMigrationWorker.xml ......................................................................................... 400
Quickr Migrator Configuration File ....................................................................................................... 403
SP2010QuickrMigrationWorker.xml ................................................................................................. 403
Appendix D: Conflict Resolution ............................................................................................................... 405
Container Level Conflict Resolution ...................................................................................................... 405
Content Level Conflict Resolution ......................................................................................................... 405
12
DocAve 6: Migrator
About Migrator Demand for migration to Microsoft SharePoint 2010 and SharePoint 2013 continues to grow as the platform rapidly becomes the standard for organizations seeking a centralized knowledge repository and collaborative workspace. Minimize the time and effort required to transfer enterprise-wide content to SharePoint by utilizing DocAve's seamless, fully mapped transfer of content from more than 14 legacy systems to SharePoint 2010 and SharePoint 2013.
SharePoint migration projects are usually defined by business disruption and end-user confusion. With DocAve, this is no longer the case.
• Enable SharePoint administrators to easily automate the process of consolidating multiple content sources into SharePoint
• Maximize return on investment for content residing in legacy repositories
• Granularly migrate content down to individual SharePoint items in real-time, or through dynamic scheduling
• Retain all associated metadata and permissions throughout the migration process
Organizations can further minimize business disruption and time-to-value by leveraging AvePoint Partner Services (APPS) to perform detailed data analysis, content and application migrations, and post-migration verifications.
As with all AvePoint software, our SharePoint Migration tools leverage only fully supported Microsoft methodologies and APIs.
Complementary Products Many products and product suites on the DocAve 6 platform work in conjunction with one another. The following products are recommended for use with DocAve Migrator:
• DocAve Content Manager for SharePoint for restructuring or moving SharePoint content.
• DocAve Report Center for SharePoint to examine pain points in the SharePoint infrastructure and report on SharePoint user behavior and changes.
• DocAve Data Protection for setting backup and recovery points prior to adjusting SharePoint governance policies in this product.
• DocAve Replicator to perform live or event-driven, as well as scheduled or offline replication. Synchronization and management of all content, configurations, and securities is performed with full fidelity.
13
DocAve 6: Migrator
Submitting Documentation Feedback to AvePoint AvePoint encourages customers to provide feedback regarding our product documentation. You can Submit Your Feedback on our website.
14
DocAve 6: Migrator
Before You Begin Refer to the sections for system and farm requirements that must be in place prior to installing and using DocAve Migrator.
Configurations In order to use DocAve Migrator, the DocAve 6 platform must be installed and configured properly on your farm. DocAve Migrator will not function without DocAve 6 present on the farm.
To review a list of migration source versions and systems supported by DocAve Migrator, refer to Appendix C – Migration Source Environment in the DocAve 6 Installation Guide.
Agents DocAve Agents are responsible for running DocAve jobs and interacting with the SharePoint object model. DocAve Agents enable DocAve Manager to communicate with the respective servers, allowing for DocAve Migrator commands to function properly.
*Note: The use of system resources on a server increases when the installed agent is performing actions. This may affect server performance. However, if the agent installed on a server is not being used, the use of system resources is very low and, therefore, the effect on server performance is negligible.
For instructions on installing the DocAve Platform, DocAve Manager, and DocAve Agents, see the DocAve 6 Installation Guide.
Required Permissions
File System Migrator To install and use DocAve File System Migrator properly, ensure that the Agent account has the following permissions.
Local System Permissions: The permissions are automatically configured by DocAve during 1.installation. Refer to Local System Permissions for a list of the permissions automatically configured upon installation.
*Note: Operations of files on the file system require local administration permission. Therefore, you must make sure that the Agent account is in the local Administrators group.
15
DocAve 6: Migrator
SharePoint Permissions: These permissions must be manually configured prior to using DocAve 2.6 File System Migrator; they are not automatically configured.
• SharePoint on-premises permissions:
User is a member of the Farm Administrators group. Since Administrator works oacross farms and on all SharePoint settings and configurations, this account is needed in order to provide the best and most complete quality of service.
Full Control to all zones of all Web applications via User Policy for Web oapplications.
Managed Metadata Service – Term Store Administrator o
Other permissions required o
Managed Metadata Service – Full Control
Managed Metadata Service – Administrator
• SharePoint Online permissions:
The user who registers the SharePoint sites has Full Control permission to the osites.
SQL Permissions: These permissions must be manually configured prior to using DocAve 6 File 3.System Migrator; they are not automatically configured.
• Member has a Database Role of db_owner for all of the databases related to SharePoint, including Content Databases, SharePoint Configuration Database, and Central Admin Database.
• Creator and Security Admin permission to SQL Server.
*Note: If a Web application enables the forms based authentication and uses database as the method of forms based authentication, ensure at least one of the following conditions is met:
• The Agent account has a Database Role of db_owner to this database.
• Specify a user in the connectionString node in this Web application’s web.config profile that has the access to this database. For details, refer to the instructions below.
i. Navigate to Start > Administrative Tools > Server Manager > Roles > Web Server (IIS) > Internet Information Services (IIS) Manager, find the desired Web application in the Sites list.
ii. Right-click the desired Web application and select Explore.
iii. Find the web.config file in the pop-up window.
iv. Open the web.config file with Notepad.
v. Find the connectionString node and specify a user that has access to the database that stores FBA security information.
16
DocAve 6: Migrator
SharePoint Migrator To use and install SharePoint Migrator properly, ensure that the Agent accounts in your source and destination SharePoint environments have enough permission.
*Note: For the destination node, if a Web application enables the forms based authentication and uses database as the method of forms based authentication, ensure at least one of the following conditions is met:
• The Agent account has a Database Role of db_owner to this database.
• Specify a user in the connectionString node in this Web application’s web.config profile that has the access to this database. For details, refer to the instructions below.
i. Navigate to Start > Administrative Tools > Server Manager > Roles > Web Server (IIS) > Internet Information Services (IIS) Manager, find the desired Web application in the Sites list.
ii. Right-click the desired Web application and select Explore.
iii. Find the web.config file in the pop-up window.
iv. Open the web.config file with Notepad.
v. Find the connectionString node and specify a user that has access to the database that stores FBA security information.
SharePoint 2007 to 2010 Migration To install and use SharePoint 2007 to 2010 Migration properly, ensure that the Agent accounts in your SharePoint 2007 and 2010 environments have the following permissions:
Local System Permissions: These permissions are automatically configured by DocAve during 1.installation. Refer to Local System Permissions for a list of the permissions automatically configured upon installation. If there are no strict limitations within your organization on the permissions that can be applied, you can simply add the DocAve Agent Account to the local Administrators group to apply all of the required permissions.
SharePoint Permissions: These permissions must be manually configured prior to using 2.SharePoint 2007 to 2010 Migration; they are not automatically configured.
• SharePoint 2007 permissions:
User is a member of the Farm Administrators group. Since Administrator works oacross farms and on all SharePoint settings and configurations, this account is needed in order to provide the best and most complete quality of service.
Policy for Web Application: Full Read o
Personalization Services Permission: All of the granular permissions of the odefault Shared Service Provider
17
DocAve 6: Migrator
• SharePoint 2010 permissions:
User is a member of the Farm Administrators group. Since Administrator works oacross farms and on all SharePoint settings and configurations, this account is needed in order to provide the best and most complete quality of service.
Policy for Web Application: Full Control o
User Profile Service Application Permissions: o
Use Personal Features
Create Personal Site
Use Social Features
Full Control
Managed Metadata Service: Term Store Administrator o
SQL Permissions: These permissions must be manually configured prior to using SharePoint 2007 3.to 2010 Migration; they are not automatically configured.
• SharePoint 2007 permissions:
Database Role of db_owner for all the databases related with SharePoint, oincluding Content Databases, Configuration Database, and Nintex Workflow Database
• SharePoint 2010 permissions:
Database Role of db_owner for all the databases related with SharePoint, oincluding Content Databases, Configuration Database, Central Admin Database, and Nintex Workflow Database
SharePoint 2007 to 2013/SharePoint Online Migration To install and use SharePoint 2007 to 2013/SharePoint Online Migration properly, ensure that 1.
the Agent accounts in your SharePoint 2007, 2013, and SharePoint Online environments have the following permissions. Local System Permissions: These permissions are automatically configured by DocAve during installation. Refer to Local System Permissions for a list of the permissions automatically configured upon installation. If there are no strict limitations within your organization on the permissions that can be applied, you can simply add the DocAve Agent Account to the local Administrators group to apply all of the required permissions.
SharePoint Permissions: These permissions must be manually configured prior to using 2.SharePoint 2007 to 2013/SharePoint Online Migration; they are not automatically configured.
• SharePoint 2007 permissions:
User is a member of the Farm Administrators group. Since Administrator works oacross farms and on all SharePoint settings and configurations, this account is needed in order to provide the best and most complete quality of service.
Policy for Web Application: Full Read o
18
DocAve 6: Migrator
Personalization Services Permission: All of the granular permissions of the odefault Shared Service Provider
• SharePoint 2013 permissions:
User is a member of the Farm Administrators group. Since Administrator works oacross farms and on all SharePoint settings and configurations, this account is needed in order to provide the best and most complete quality of service.
Policy for Web Application: Full Control o
User Profile Service Application permissions: o
Use Personal Features
Create Personal Site
Use Social Features
Full Control
Managed Metadata Service: Term Store Administrator o
• SharePoint Online permissions:
The user who registers the SharePoint sites has Full Control permission to the osites.
Users must have, at a minimum, site collection Administrator permissions in oorder to run jobs on registered site collections.
SQL Permissions: These permissions must be manually configured prior to using SharePoint 2007 3.to 2013 Migration; they are not automatically configured.
• SharePoint 2007 permissions:
Database Role of db_owner for all the databases related with SharePoint, oincluding Content Databases, Configuration Database, and Nintex Workflow Database
• SharePoint 2013/Online permissions:
Database Role of db_owner for all the databases related with SharePoint, oincluding Content Databases, Configuration Database, Central Admin Database, and Nintex Workflow Database
SharePoint 2010 to 2013/SharePoint Online Migration To install and use SharePoint 2010 to 2013/SharePoint Online Migration properly, ensure that the Agent account of the SharePoint 2010, 2013, and SharePoint Online environments have the following permissions.
Local System Permissions: These permissions are automatically configured by DocAve during 1.installation. Refer to Local System Permissions for a list of the permissions automatically configured upon installation. If there are no strict limitations within your organization on the permissions that can be applied, you can simply add the DocAve Agent Account to the local Administrators group to apply all of the required permissions.
19
DocAve 6: Migrator
SharePoint Permissions: These permissions must be manually configured prior to using 2.SharePoint 2010 to 2013 Migration; they are not automatically configured.
• SharePoint 2010 permissions:
User is a member of the Farm Administrators group. Since Administrator works oacross farms and on all SharePoint settings and configurations, this account is needed in order to provide the best and most complete quality of service.
Policy for Web Application: Full Read o
User Profile Service Application permissions: o
Use Personal Features
Use Social Features
Managed Metadata Service: Term Store Administrator o
Business Data Connectivity Service: Full Control o
Search Service: Full Control o
• SharePoint 2013 permissions:
User is a member of the Farm Administrators group. Since Administrator works oacross farms and on all SharePoint settings and configurations, this account is needed in order to provide the best and most complete quality of service.
Policy for Web Application: Full Control o
User Profile Service Application permissions: o
Use Personal Features
Create Personal Site
Use Social Features
Full Control
Managed Metadata Service: Term Store Administrator o
Business Data Connectivity Service: Full Control o
Search Service: Full Control o
• SharePoint Online permissions:
The user who registers the SharePoint sites has Full Control permission to the osites.
SQL Permissions: These permissions must be manually configured prior to using SharePoint 3.2010 to 2013 Migration; they are not automatically configured.
• SharePoint 2010 permissions:
Database Role of db_owner for all the databases related with SharePoint, oincluding Content Databases, Configuration Database, and Nintex Workflow Database
20
DocAve 6: Migrator
• SharePoint 2013/Online permissions:
Database Role of db_owner for all the databases related with SharePoint, oincluding Content Databases, Configuration Database, Central Admin Database, and Nintex Workflow Database.
Migration Database for SharePoint Migration To use migration databases in SharePoint Migrator properly, ensure that the following accounts have the following permissions:
• If you select to use Windows Authentication:
Source and Destination Agent Accounts: Database Role of db_owner for the omigration database
Application Pool Account: Server Role of dbcreator for the SQL Server where the omigration database resides.
• If you select to use Windows Authentication and select the Specify a Windows account checkbox, one of the following conditions must be met:
The accounts meet the requirements: o
Application Pool Account: Server Role of dbcreator for the SQL Server where the migration database resides.
The specified Windows Account: Database Role of db_owner for the migration database.
The specified Windows Account: Server Role of dbcreator for the SQL Server owhere the migration database resides.
• If you select to use SQL Authentication:
SQL Server login user: Server Role of dbcreator for the SQL Server where the omigration database resides.
Lotus Notes Migrator To install and use DocAve Lotus Notes Migrator properly, ensure that the Agent account has the following permissions:
Local System Permissions: The permissions are automatically configured by DocAve during 1.installation. Refer to Local System Permissions for a list of the permissions automatically configured upon installation. If there are no strict limitations within your organization on the permissions that can be applied, you can simply add the DocAve Agent Account to the local Administrators group to apply all of the required permissions.
21
DocAve 6: Migrator
SharePoint Permissions: These permissions must be manually configured prior to using DocAve 2.6 Lotus Notes Migrator; they are not automatically configured.
• Member of the Farm Administrators group
Full Control to all zones of all Web applications via User Policy for Web oapplications
Managed Metadata Service – Term Store Administrator o
• Other permissions required
Managed Metadata Service – Full Control o
Managed Metadata Service – Administrator o
SQL Permissions: These permissions must be manually configured prior to using DocAve 6 Lotus 3.Notes Migrator; they are not automatically configured.
• Member has a Database Role of db_owner for all of the databases related to SharePoint, including Content Databases, SharePoint Configuration Database, and Central Admin Database.
*Note: If forms based authentication (FBA) is selected as a Web application’s claims authentication type, ensure at least one of the following conditions is in place:
• The Agent account must be a member who has a Database Role of db_owner for the FBA database.
• Add the Agent account in the connectionStrings node in this Web application’s web.config file to make the Agent account have the permission to the FBA database. For details, refer to the instructions below:
i. Navigate to Start > Administrative Tools > Server Manager > Roles > Web Server (IIS) > Internet Information Services (IIS) Manager, find the desired Web application in the Sites list.
ii. Right-click the Web application and select Explore.
iii. A window pops up and you can find the web.config file in it.
iv. Open the web.config file with Notepad.
v. Find the connectionStrings node and specify a user that has access to the database that stores FBA security information.
Quickr Migrator To install and use DocAve Quickr Migrator properly, ensure that the Agent account has the following permissions.
Local System Permissions: The permissions are automatically configured by DocAve during 1.installation. Refer to Local System Permissions for a list of the permissions automatically configured upon installation. If there are no strict limitations within your organization on the
22
DocAve 6: Migrator
permissions that can be applied, you can simply add the DocAve Agent Account to the local Administrators group to apply all of the required permissions.
Other permissions: Full Control to Lotus Notes installation path
SharePoint Permissions: These permissions must be manually configured prior to using DocAve 2.6 Quickr Migrator; they are not automatically configured.
• Member of the Farm Administrators group
Full control to all zones of all Web applications via User Policy for Web oapplications
Managed Metadata Service – Term Store Administrator o
• Other permissions required
Managed Metadata Service – Full Control o
Managed Metadata Service – Administrator o
SQL Permissions: These permissions must be manually configured prior to using DocAve 6 3.Quickr Migrator; they are not automatically configured.
• Member has a Database Role of db_owner for all of the databases related to SharePoint, including Content Databases, SharePoint Configuration Database, and Central Admin Database.
*Note: If forms based authentication (FBA) is selected as a Web application’s claims authentication type, ensure at least one of the following conditions is in place:
• The Agent account must be a member who has a Database Role of db_owner for the FBA database.
• Add the Agent account in the connectionStrings node in this Web application’s web.config file to make the Agent account have the permission to the FBA database. For details, refer to the instructions below:
i. Navigate to Start > Administrative Tools > Server Manager > Roles > Web Server (IIS) > Internet Information Services (IIS) Manager, find the desired Web application in the Sites list.
ii. Right-click the Web application and select Explore.
iii. A window pops up and you can find the web.config file in it.
iv. Open the web.config file with Notepad.
v. Find the connectionStrings node and specify a user that has access to the database that stores FBA security information.
23
DocAve 6: Migrator
eRoom Migrator To install and use DocAve eRoom Migrator properly, ensure that the Agent account has the following permissions:
Local System Permissions: The permissions are automatically configured by DocAve during 1.installation. Refer to Local System Permissions for a list of the permissions automatically configured upon installation. If there are no strict limitations within your organization on the permissions that can be applied, you can simply add the DocAve Agent Account to the local Administrators group to apply all of the required permissions.
*Note: Operations of files on the file server that is connected by the UNC path require the Read permission at least.
SharePoint Permissions: These permissions must be manually configured prior to using DocAve 2.6 eRoom Migrator; they are not automatically configured.
• User is a member of the Farm Administrators group. Since Administrator works across farms and on all SharePoint settings and configurations, this account is needed in order to provide the best and most complete quality of service.
• Full control to all Web applications via User Policy for Web applications
• Managed Metadata Service
Term Store Administrator o
Managed Metadata Administrator with Full Control Permission o
SQL Permissions: These permissions must be manually configured prior to using DocAve 6 3.eRoom Migrator; they are not automatically configured.
• Member has a Database Role of db_owner for all of the databases related to SharePoint, including Content Databases, SharePoint Configuration Database, Central Admin Database, and DocAve Migration Database.
• dbcreator and securityadmin Server Roles to SQL server
If a Web application enables the forms based authentication and uses database as the method of forms based authentication, ensure at least one of the following conditions is met:
• The Agent account has a Database Role of db_owner to this database.
• Specify a use in the connectionString node in this Web application’s web.config profile that has the access to this database. For details, refer to the instructions below:
i. Navigate to Start > Administrative Tools > Server Manager > Roles > Web Server (IIS) > Internet Information Services (IIS) Manager, find the desired Web application in the Sites list.
ii. Right-click the desired Web application and select Explore.
iii. Find the web.config file in the pop-up window.
24
DocAve 6: Migrator
iv. Open the web.config file with Notepad.
v. Find the connectionString node and specify a user that has access to the database that stores FBA security information.
Migration Source Permissions: These permissions must be manually configured prior to using 4.DocAve 6 eRoom Migrator; they are not automatically configured.
• Full control to eRoom file server
Livelink Migrator To install and use DocAve Livelink Migrator properly, ensure that the agent account has the following permissions.
Local System Permissions: The permissions are automatically configured by DocAve during 1.installation. Refer to Local System Permissions for a list of the permissions automatically configured upon installation. If there are no strict limitations within your organization on the permissions that can be applied, you can simply add the DocAve Agent Account to the local Administrators group to apply all of the required permissions.
SharePoint Permissions: These permissions must be manually configured prior to using DocAve 2.6 Livelink Migrator; they are not automatically configured.
• User is a member of the Farm Administrators group. Since Administrator works across farms and on all SharePoint settings and configurations, this account is needed in order to provide the best and most complete quality of service.
• Full control to all zones of all Web applications via User Policy for Web applications
• User Profile Service Application permissions:
Use Personal Features o
Create Personal Site o
Use Social Features o
• Managed Metadata Service – Term Store Administrator
• Other permissions required
Managed Metadata Service – Full Control o
Managed Metadata Service – Administrator o
SQL Permissions: These permissions must be manually configured prior to using DocAve 6 3.Livelink Migrator; they are not automatically configured.
• Member has a Database Role of db_owner for all of the databases related to SharePoint, including Content Databases, SharePoint Configuration Database, and Central Admin Database.

25
DocAve 6: Migrator
If forms based authentication (FBA) is selected as a Web application’s claims authentication type, ensure at least one of the following conditions is in place:
• The Agent account must be a member who has a Database Role of db_owner for the FBA database.
• Add the Agent account in the connectionStrings node in this Web application’s web.config file to make the Agent account have the permission to the FBA database. For details, refer to the instructions below:
i. Navigate to Start > Administrative Tools > Server Manager > Roles > Web Server (IIS) > Internet Information Services (IIS) Manager, find the desired Web application in the Sites list.
ii. Right-click the desired Web application and select Explore.
iii. Find the web.config file in the pop-up window.
iv. Open the web.config file with Notepad.
v. Find the connectionString node and specify a user that has access to the database that stores FBA security information.
Exchange Public Folder Migrator To install and use DocAve Exchange Public Folder Migrator properly, ensure that the Agent account has the following permissions:
Local System Permissions: The permissions are automatically configured by DocAve during 1.installation. Refer to Local System Permissions for a list of the permissions automatically configured upon installation. If there are no strict limitations within your organization on the permissions that can be applied, you can simply add the DocAve Agent Account to the local Administrators group to apply all of the required permissions.
SharePoint Permissions: These permissions must be manually configured prior to using DocAve 2.6 Exchange Public Folder Migrator; they are not automatically configured.
• User is a member of the Farm Administrators group. Since Administrator works across farms and on all SharePoint settings and configurations, this account is needed in order to provide the best and most complete quality of service.
• Full control to all zones of all Web applications via User Policy for Web applications
• Managed Metadata Service
Term Store Administrator o
Managed Metadata Service Administrator with Full Control Permission o
26
DocAve 6: Migrator
SQL Permissions: These permissions must be manually configured prior to using DocAve 6 3.Exchange Public Folder Migrator; they are not automatically configured.
• Member has a Database Role of db_owner for all of the databases related to SharePoint, including Content Databases, SharePoint Configuration Database, and Central Admin Database.
• Member has the Server Roles of dbcreator and securityadmin to SQL server.
If a Web application enables the forms based authentication and uses database as the method of forms based authentication, ensure at least one of the following conditions is met:
• The Agent account has a Database Role of db_owner to this database.
• Specify a use in the connectionString node in this Web application’s web.config profile that has the access to this database. For details, refer to the instructions below:
i. Navigate to Start > Administrative Tools > Server Manager > Roles > Web Server (IIS) > Internet Information Services (IIS) Manager, find the desired Web application in the Sites list.
ii. Right-click the desired Web application and select Explore.
iii. Find the web.config file in the pop-up window.
iv. Open the web.config file with Notepad.
v. Find the connectionString node and specify a user that has access to the database that stores FBA security information in the User ID and Password attributes.
EMC Documentum Migrator To install and use DocAve EMC Documentum Migrator properly, ensure that the Agent account has the following permissions:
Local System Permissions: The permissions are automatically configured by DocAve during the 1.installation. Refer to Local System Permissions for a list of the permissions automatically configured upon installation. If there are no strict limitations within your organization on the permissions that can be applied, you can simply add the DocAve Agent Account to the local Administrators group to apply all of the required permissions.
SharePoint Permissions: These permissions must be manually configured prior to using DocAve 2.6 EMC Documentum Migrator; they are not automatically configured.
• User is a member of the Farm Administrators group. Since Administrator works across farms and on all SharePoint settings and configurations, this account is needed in order to provide the best and most complete quality of service.
• Full Control to all zones of all Web applications via User Policy for Web applications
27
DocAve 6: Migrator
• Managed Metadata Service:
Term Store Administrator o
Managed Metadata Service Administrator with Full Control Permission o
SQL Permissions: These permissions must be manually configured prior to using DocAve 6 EMC 3.Documentum Migrator; they are not automatically configured.
• Member has a Database Role of db_owner for all of the databases related to SharePoint, including Content Databases, SharePoint Configuration Database, and Central Admin Database.
• Member has the Server Roles of dbcreator and securityadmin to SQL server.
If a Web application enables the forms based authentication and uses database as the method of forms based authentication, ensure at least one of the following conditions is met:
• The Agent account has a Database Role of db_owner to this database.
• Specify a use in the connectionString node in this Web application’s web.config profile that has the access to this database. For details, refer to the instructions below:
i. Navigate to Start > Administrative Tools > Server Manager > Roles > Web Server (IIS) > Internet Information Services (IIS) Manager, find the desired Web application in the Sites list.
ii. Right-click the desired Web application and select Explore.
iii. Find the web.config file in the pop-up window.
iv. Open the web.config file with Notepad.
v. Find the connectionString node and specify a user that has access to the database that stores FBA security information.
Migration Source Permissions: These permissions must be manually configured prior to using 4.DocAve 6 eRoom Migrator; they are not automatically configured.
• Read to EMC Documentum content
If the DocAve Agent is installed in the machine with the Documentum DFC Runtime Environment program installed, ensure the Agent account has the following permissions:
• Full Control permission to the installation directory of the Documentum DFC Runtime Environment program.
• Add the Agent account to the local Administrators group.
28
DocAve 6: Migrator
Local System Permissions The following Local System Permissions are automatically configured during DocAve 6 installation:
• User is a member of the following local groups:
IIS WPG (for IIS 6.0) or IIS IUSRS (for IIS 7.0) o
Performance Monitor Users o
DocAve Users (the group is created by DocAve automatically; it has the ofollowing permissions):
Full Control to the Registry of HKEY_LOCAL_MACHINE\SOFTWARE\AvePoint\DocAve6
Full Control to the Registry of HKEY_LOCAL_MACHINE\System\CurrentControlSet\Services\eventlog
Full Control to the Communication Certificate
Permission of Log on as a batch job (it can be found within Control Panel > Administrative Tools > Local Security Policy > Security Settings > Local Policies > User Rights Assignment)
Full Control Permission for DocAve Agent installation directory
Migration Speed Considerations Speed is a very important factor when migrating content. To set expectations for how long your migration plans will take (in order to better inform stakeholders), the following are some key factors that should be taken into consideration prior to running your migration plans.
• Network bandwidth between the two SharePoint environments
• SQL I/O and memory
• Memory on Web front-end servers
• Memory on the server hosting the DocAve Media service
• Number of CPUs on Web front-end servers
• Source environment deployment
Number of objects in source o
Divide database and folder structures into small data sets before running the migration. Consider a granular migration approach.
Size of objects in source o
A single 1 GB file will migrate far quicker than a million files that have a sum of 1 GB.
29
DocAve 6: Migrator
Complexity of folders and sites o
Prioritize content to be migrated into SharePoint, and utilize tools to establish co-existence throughout the course of the migration project to slowly roll-out SharePoint to users as their content becomes available.
Whether DocAve has to create site collections during migration o
Use folders to break up large document libraries or data subsets to manage library size, consider utilizing filtering to migrate a sub-set of the data at a time.
Whether securities are included in the plan (including mappings) o
Permissions can be configured to be migrated in the migration plans.
Whether metadata is included in the plan o
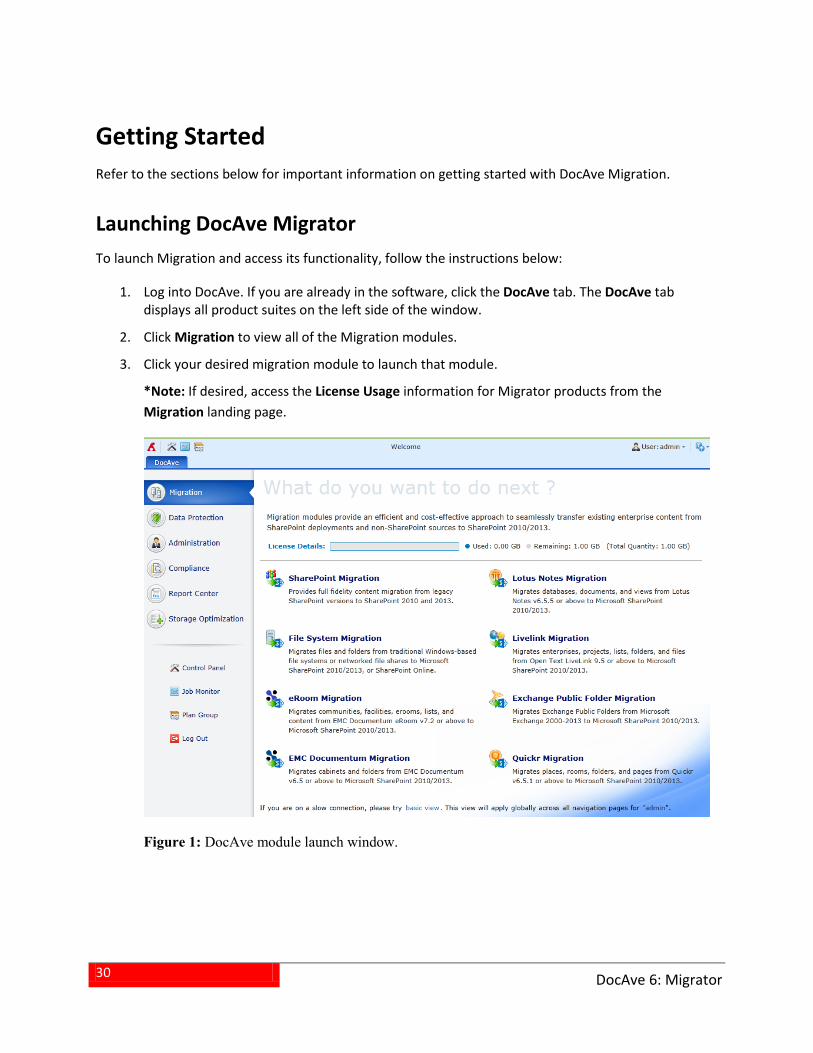
30
DocAve 6: Migrator
Getting Started Refer to the sections below for important information on getting started with DocAve Migration.
Launching DocAve Migrator To launch Migration and access its functionality, follow the instructions below:
Log into DocAve. If you are already in the software, click the DocAve tab. The DocAve tab 1.displays all product suites on the left side of the window.
Click Migration to view all of the Migration modules. 2.
Click your desired migration module to launch that module. 3.
*Note: If desired, access the License Usage information for Migrator products from the Migration landing page.
Figure 1: DocAve module launch window.
31
DocAve 6: Migrator
About Online Migration Settings An Online Migration job migrates content, configurations, securities, and users from a source environment to a destination SharePoint environment when a network between the source and destination is available.
While it is theoretically possible to run an Online Migration job without configuring the settings described in the sections below, it is strongly recommended that you configure these settings in order to ensure appropriate content management during migration.
See the sections below for instructions on configuring Online Migration Settings for different types of migrators.
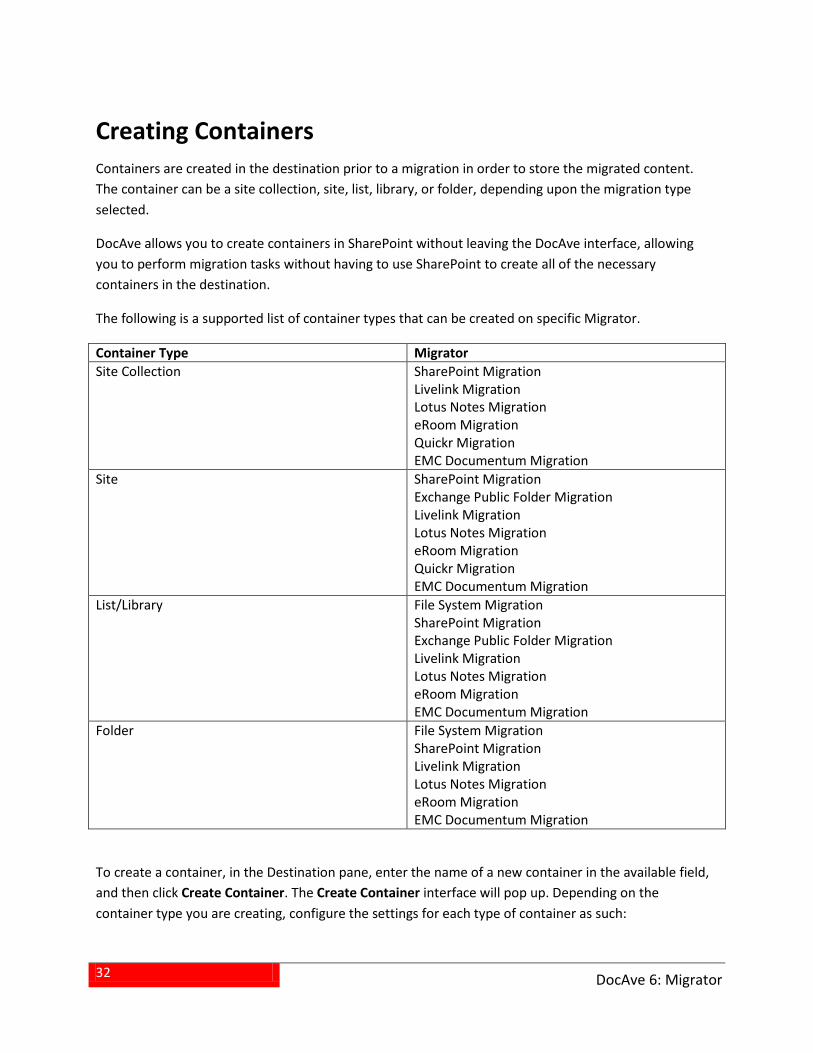
32
DocAve 6: Migrator
Creating Containers Containers are created in the destination prior to a migration in order to store the migrated content. The container can be a site collection, site, list, library, or folder, depending upon the migration type selected.
DocAve allows you to create containers in SharePoint without leaving the DocAve interface, allowing you to perform migration tasks without having to use SharePoint to create all of the necessary containers in the destination.
The following is a supported list of container types that can be created on specific Migrator.
Container Type Migrator Site Collection SharePoint Migration
Livelink Migration Lotus Notes Migration eRoom Migration Quickr Migration EMC Documentum Migration
Site SharePoint Migration Exchange Public Folder Migration Livelink Migration Lotus Notes Migration eRoom Migration Quickr Migration EMC Documentum Migration
List/Library File System Migration SharePoint Migration Exchange Public Folder Migration Livelink Migration Lotus Notes Migration eRoom Migration EMC Documentum Migration
Folder File System Migration SharePoint Migration Livelink Migration Lotus Notes Migration eRoom Migration EMC Documentum Migration
To create a container, in the Destination pane, enter the name of a new container in the available field, and then click Create Container. The Create Container interface will pop up. Depending on the container type you are creating, configure the settings for each type of container as such:
33
DocAve 6: Migrator
*Note: When creating a folder, no settings need to be configured, and clicking Create Container at folder level will create a folder immediately.
Creating a Site Collection Configure these settings in the Create Site Collection page:
• Title and Description – Enter the Title of the new site collection and a Description for future references.
• Template Selection – Select the desired language from the Select a language drop-down list. Then select a site template for this new site collection. Click on a tab to access the templates listed in that category, or click on the Custom tab and select Select Template Later… to not choose a template upon creation.
• Primary Site Collection Administrator – Enter the Username of the primary
administrator for this site collection. Then click to check whether the user is valid, or click to select people and groups in a new page.
• Secondary Site Collection Administrator – Enter the Username of the secondary administrator for this site collection.
• Quota Template – Select the storage quota template to apply to this site collection.
• Content Database – Select the Content Database for this site collection
Click OK to create the new site collection, or click Cancel to close the Create Container interface.
Creating a Site Configure these settings in the Create Site page:
• Title and Description –Enter the Title of the new site and a Description for future references.
• Template Selection – Select the desired language from the Select a language drop-down list. Then select a site template for this new site. Click on a tab to access the templates listed in that category.
• Permissions – Select Use unique permissions to allow a unique set of users access to this new site. Select Use same permissions as parent site to allow the same users who can access the parent site access to this new site.
• Navigation – Select the Yes radio button if you want a link to this site to appear in the Quick Launch and top link bar of the parent site.
• Navigation Inheritance – Select Yes to use the top link bar from the parent site.
Click OK to create the new site, or click Cancel to close the Create Container interface.
34
DocAve 6: Migrator
Creating a List/Library Configure these settings in the Create List page:
• Object Type – Choose whether you wish to create a List or Library by selecting the corresponding radio button.
• Category – Select the category for the new list or library.
• Navigation – Select Yes if you want to display the library/list on the Quick Launch.
• Document Template (for Library only) – For a new library, select a document template from the drop-down list to determine the default for all new files created in this document library.
• Document Version History (for Document Library, Form Library) – Select Yes to create a version each time you edit a file in this library.
• Picture Version History (for Picture Library only) – Select Yes to create a version each time you edit a file in this picture library.
• Data Connection Version History (for Data Connection Library only) – Select Yes to create a version each time you edit a file in this data connection library.
• Item Version History (for Report Library and Asset Library) – Select Yes to create a version each time you edit a file in this list.
Click OK to create the new list or library, or click Cancel to close the Create Container interface.
35
DocAve 6: Migrator
About Export Locations (Offline Jobs Only) The Export Location feature is a mandatory step for exporting or importing data in an offline eRoom Migrator, Lotus Notes Migrator, or Livelink Migrator job. There are two export location modes: Export Mode and Import Mode. Export Mode is used to set up an export location where you will store offline migration data, while Import Mode migrates exported data to the destination farm.
To access Export Location settings, follow the steps below.
1. Click Export or Import in the Plan Management group on the ribbon to enter Export mode or Import mode.
2. Click Export Location in the Settings group on the ribbon; the Export Location interface appears.
Managing Export Location In both Export Mode and Import Mode in the Export Location interface, all previously-created export locations are displayed in the main display pane.
In this interface, you can change the number of export locations displayed per page and the order in which they are displayed. To change the number of export locations displayed per page, select the desired number from the Show rows drop-down menu in the lower right-hand corner. To sort the export locations for Export Mode, click on a column heading such as Export Location Name, Agent, and Last Modified Time. To sort the export location for Import Mode, click on a column heading such as Import Location Name, Farm, and Last Modified Time.
Customize how these export locations displayed in a number of different ways:
• Search – Allows you to filter Export Locations displayed by the keyword you designate. The keyword must be contained in a column value. At the top of the Export Location viewing pane, enter the keyword for the Export Locations you wish to display. You can select Search all pages or Search current page to define the search scope. Search all pages means that the Export Locations in all of the pages whose names and descriptions contain the keywords will be displayed; while Search current page means that only the Export Locations in the current page whose names and descriptions contain the keywords will be displayed. Note that the search function is not case sensitive.
• – You can manage which columns are displayed in the list so that only information you want to see is shown. Click , and then check the checkbox next to the column name to have that column shown in the list.
• – This allows you to hide the column. Click of the column you want to hide, the column is hidden.
• – This allows you to filter Agent. Click of the column of Agent, and then check the checkbox next to the Agent name to have that Agent shown.
36
DocAve 6: Migrator
Perform the following actions in the Export Location interface:
• Create – Click Create on the ribbon to create a new export location. For details on creating a new export location, see Creating and Editing Export Locations.
• View Details – Click View Details on the ribbon and you will see the previously configured settings for this export location. Here you can also click Edit on the ribbon to make changes to the export location’s settings. You will be brought to the Edit Export Location page where you can change the settings of this export location.
• Edit – Click Edit on the ribbon to change the configurations for this export location. For details on editing configurations for an export location, refer to Creating and Editing Export Locations.
• Delete – Click Delete on the ribbon. A confirmation window appears, confirming that you want to proceed with the deletion. Click OK to delete the selected export locations, or click Cancel to return to the Export Location interface without deleting the selected export locations.
Creating and Editing Export Locations To create a new export location, click Create on the ribbon. To modify a previously-configured export location, select the export location, and then click Edit on the ribbon.
Export Mode In the Create Export Location for Export Mode or Edit Export Location for Export Mode interface, configure the following settings:
Name and Description – Enter a Name for the export location that you are about to create. 1.Then enter an optional Description for future reference.
Agent and Path – Configure the following settings to specify an export location to store the 2.offline migration data.
• Agent – Select your desired DocAve Agent installed in the source environment for this export location that you are about to create from the drop-down list.
• UNC Path – Enter a Universal Naming Convention (UNC) path as the location where the exported data will be stored in the UNC path text box. For example, \\admin-PC\c$\data or \\admin-PC\shared folder
• Username and Password – Enter the username and password that are available to the UNC path in the corresponding text boxes. Then click Validation Test and DocAve will test the path to make sure they are valid.
Click OK to complete the configuration of the export location for Export Mode. 3.
37
DocAve 6: Migrator
Import Mode In the Create Export Location for Import Mode or Edit Export Location for Import Mode interface, configure the following settings:
Name and Description – Enter a Name for the export location that you are about to create. 1.Then enter an optional description for future reference.
Farm and Path – Configure the following settings to designate the export location where to 2.retrieve the exported data and specify a farm where you wish the exported data to be migrated to.
• Farm – Select your desired destination farm which the exported data will be imported to from the Farm drop-down list.
• UNC Path – Enter the UNC path which has been configured in Export Location for Export Mode and has stored the exported data to get the data.
• Username and Password – Enter the username and password that are available to the UNC path in the corresponding text boxes. Then click Validation Test and DocAve will test the path to make sure they are valid.
Click OK to complete the configuration of the export location for Import Mode. 3.
38
DocAve 6: Migrator
Configuring Migration Databases In order to use eRoom Migrator, Livelink Migrator, Quickr Migrator, or Lotus Notes Migrator, you must configure a dedicated migration database to store links and detailed job information in SQL for every farm that will be using these migrators.
Configuring a migration database is not mandatory for File System /Exchange Public Folder/SharePoint/EMC Documentum Migrators unless you want to store detailed job information such as the status and type of the job, the user who run the job, the start and end time of the job, plan information, agent information, etc. For detailed information on the Migration database schema, refer to Appendix A: Migration Database Information.
*Note: The version of SQL Server required to create a migration database must be SQL Server 2005 SP1 or higher.
1. On the Home tab, in the Settings group, click Migration Database. The Migration Database page appears.
2. Select the farm that will be using at least one of these migrators (eRoom, Livelink, Lotus Notes, or Quickr). Each farm using migrators (eRoom, Livelink, Lotus Notes, or Quickr) requires the following steps.
3. Click Configure in the Edit column. The Configure page appears.
4. Configure the following settings for the database that will store migration job data:
Configure Migration Database –Specify a migration database. Enter a new Database a.Server and a Database Name in the corresponding fields.
Authentication – Select the authentication mode for the migration database. If you a.select SQL authentication, the necessary information must be specified in the Account and Password fields. You can also validate the SQL database account by clicking Validation Test.
Failover Database Server (optional) – Specify a failover database server. In the event b.that the specified migration database collapses, the data stored in the Migration database can be transferred to this standby database.
Alternatively, you can specify a Migration Database in the Advanced settings by entering a connection string instead of configuring the settings in Step 3. Click Advanced; the Connection String section appears. Check the Edit Connection String directly checkbox to activate this feature, and then enter the connection string according to the example listed in the left pane. For more information about how to configure the connection string, refer to Microsoft SQL Server Help Document.
5. Click OK to finish and save the configuration, or click Cancel to return to the Migration Database page without saving any configurations.
39
DocAve 6: File System Migrations
File System Migrations Migrate the files or folders from a Windows-based file system or networked file share to Microsoft SharePoint 2010 on-premises, SharePoint 2013 on-premises, or SharePoint Online. Refer to the sections below to use File System Migrator.
Pre-migration Configurations To use File System Migrator, first configure the connection so that the DocAve Agents can connect to the file system servers, which allows the File System Migrator to function. From the Migrator Home tab, click Configure Connection on the ribbon. The File System Connection interface appears.
*Note: DocAve Agents are not required to be installed directly on the file share server, but they do need to be able to connect to the server via a UNC path.
Managing File System Connections A file system connection connects a DocAve Agent to your file system server. In order to work properly, the DocAve Agent must be able to connect to the file system server that contains the contents you want to migrate to SharePoint (see the *Note in the Pre-migration Configurations section). Created connections are displayed on the source pane, showing the contents for the file system migration job. The File System Connection interface displays any file system connections that you have previously created.
In this interface, you can change the number of file system connections displayed per page and the order in which they are displayed. To change the number of file system connections displayed per page, select the desired number from the Show rows drop-down menu in the lower right-hand corner. To sort the file system connections, click on a column heading such as Name, Agent and Last Modified Time.
You can customize how these connections are displayed in a number of different ways:
• Search – Allows you to filter the file system connections by the keyword you enter. The keyword must be contained in a column value. At the top of the File System Connection viewing pane, enter the keyword for the file system connections you wish to display. You can select Search all pages or Search current page to define the search scope. Search all pages means that the connections in all of the pages whose names and descriptions contain the keywords will be displayed, while Search current page means that only the connections in the current page whose names and descriptions contain the keywords will be displayed. Note that the search function is not case sensitive.
• – You can manage which columns are displayed in the list so that only information you want to see is shown. Click , and then check the checkbox next to the column name to have that column shown in the list.
40
DocAve 6: File System Migrations
• – This allows you to hide the column. Click of the column you want to hide, the column is hidden.
• – This allows you to filter the Agent. Click on the Agent column, and then check the checkbox next to the Agent name to have that Agent shown.
Perform the following actions in the File System Connection interface:
• Click Create on the ribbon to create a new file system connection. For details on creating a new file system connection, see Creating and Editing File System Connections.
• Click View Details on the ribbon and you will see the previously-configured settings for this file system connection. Here you can also click Edit on the ribbon to make changes to the file system connection’s settings. You will be brought to the Edit File System Connection page where you can change the settings of this file system connection.
• Click Edit on the ribbon to change the configurations for this file system connection. For details on editing configurations for a file system connection, see Creating and Editing File System Connections.
• Click Delete on the ribbon. A confirmation window appears. Click OK to delete the selected file system connections, or click Cancel to return to the file system connection interface without deleting the selected file system connections.
Creating and Editing File System Connections To create a new file system connection, click Create on the ribbon. To modify a previously-configured file system connection, select the file system connection, and then click Edit on the ribbon.
In the Create File System Connection or Edit File System Connection interface, configure the following settings:
• File System Connection Name – Enter a Name for the file system connection. Then enter an optional Description for this file system connection for future reference.
• Connection – Configure the following settings to connect the file system server to the DocAve Agent.
Agent – Select an Agent where you wish the file system server to connect from othe drop-down menu.
UNC path – Enter the UNC Path in the following format: o
\\admin-PC\c$\data or \\admin-PC\shared folder
Username and Password – Enter a Username and corresponding Password for oaccessing the file system server.
Click Validation Test to verify whether the connection is available. o
Click OK to save the configurations and return to the File System Connection interface, or click Cancel to return to the File System Connection interface without saving any changes.
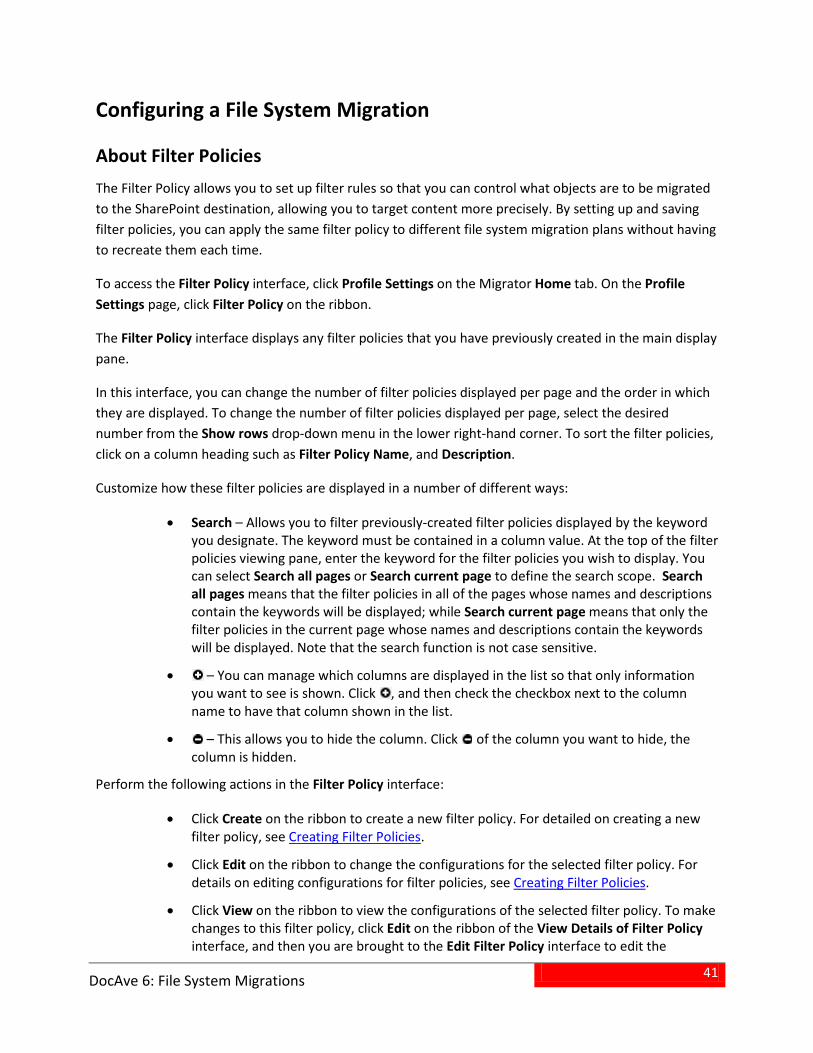
41
DocAve 6: File System Migrations
Configuring a File System Migration
About Filter Policies The Filter Policy allows you to set up filter rules so that you can control what objects are to be migrated to the SharePoint destination, allowing you to target content more precisely. By setting up and saving filter policies, you can apply the same filter policy to different file system migration plans without having to recreate them each time.
To access the Filter Policy interface, click Profile Settings on the Migrator Home tab. On the Profile Settings page, click Filter Policy on the ribbon.
The Filter Policy interface displays any filter policies that you have previously created in the main display pane.
In this interface, you can change the number of filter policies displayed per page and the order in which they are displayed. To change the number of filter policies displayed per page, select the desired number from the Show rows drop-down menu in the lower right-hand corner. To sort the filter policies, click on a column heading such as Filter Policy Name, and Description.
Customize how these filter policies are displayed in a number of different ways:
• Search – Allows you to filter previously-created filter policies displayed by the keyword you designate. The keyword must be contained in a column value. At the top of the filter policies viewing pane, enter the keyword for the filter policies you wish to display. You can select Search all pages or Search current page to define the search scope. Search all pages means that the filter policies in all of the pages whose names and descriptions contain the keywords will be displayed; while Search current page means that only the filter policies in the current page whose names and descriptions contain the keywords will be displayed. Note that the search function is not case sensitive.
• – You can manage which columns are displayed in the list so that only information you want to see is shown. Click , and then check the checkbox next to the column name to have that column shown in the list.
• – This allows you to hide the column. Click of the column you want to hide, the column is hidden.
Perform the following actions in the Filter Policy interface:
• Click Create on the ribbon to create a new filter policy. For detailed on creating a new filter policy, see Creating Filter Policies.
• Click Edit on the ribbon to change the configurations for the selected filter policy. For details on editing configurations for filter policies, see Creating Filter Policies.
• Click View on the ribbon to view the configurations of the selected filter policy. To make changes to this filter policy, click Edit on the ribbon of the View Details of Filter Policy interface, and then you are brought to the Edit Filter Policy interface to edit the
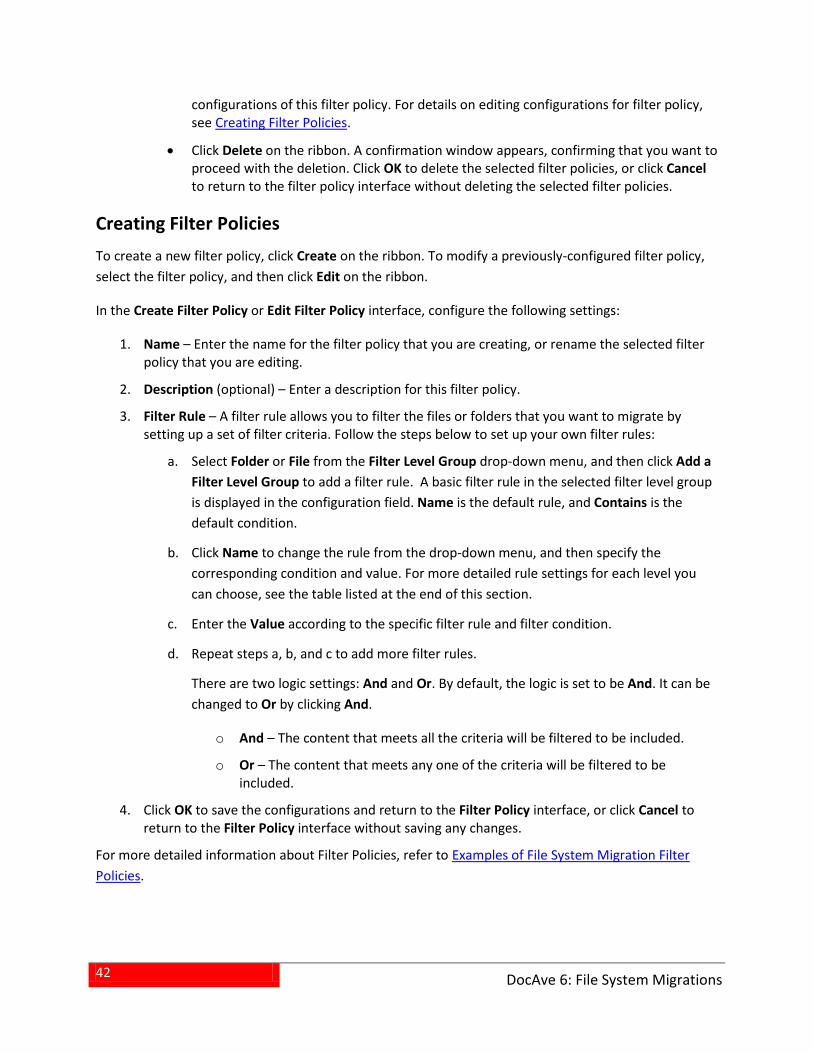
42
DocAve 6: File System Migrations
configurations of this filter policy. For details on editing configurations for filter policy, see Creating Filter Policies.
• Click Delete on the ribbon. A confirmation window appears, confirming that you want to proceed with the deletion. Click OK to delete the selected filter policies, or click Cancel to return to the filter policy interface without deleting the selected filter policies.
Creating Filter Policies To create a new filter policy, click Create on the ribbon. To modify a previously-configured filter policy, select the filter policy, and then click Edit on the ribbon.
In the Create Filter Policy or Edit Filter Policy interface, configure the following settings:
Name – Enter the name for the filter policy that you are creating, or rename the selected filter 1.policy that you are editing.
Description (optional) – Enter a description for this filter policy. 2.
Filter Rule – A filter rule allows you to filter the files or folders that you want to migrate by 3.setting up a set of filter criteria. Follow the steps below to set up your own filter rules:
Select Folder or File from the Filter Level Group drop-down menu, and then click Add a a.Filter Level Group to add a filter rule. A basic filter rule in the selected filter level group is displayed in the configuration field. Name is the default rule, and Contains is the default condition.
Click Name to change the rule from the drop-down menu, and then specify the b.corresponding condition and value. For more detailed rule settings for each level you can choose, see the table listed at the end of this section.
Enter the Value according to the specific filter rule and filter condition. c.
Repeat steps a, b, and c to add more filter rules. d.
There are two logic settings: And and Or. By default, the logic is set to be And. It can be changed to Or by clicking And.
And – The content that meets all the criteria will be filtered to be included. o
Or – The content that meets any one of the criteria will be filtered to be oincluded.
Click OK to save the configurations and return to the Filter Policy interface, or click Cancel to 4.return to the Filter Policy interface without saving any changes.
For more detailed information about Filter Policies, refer to Examples of File System Migration Filter Policies.
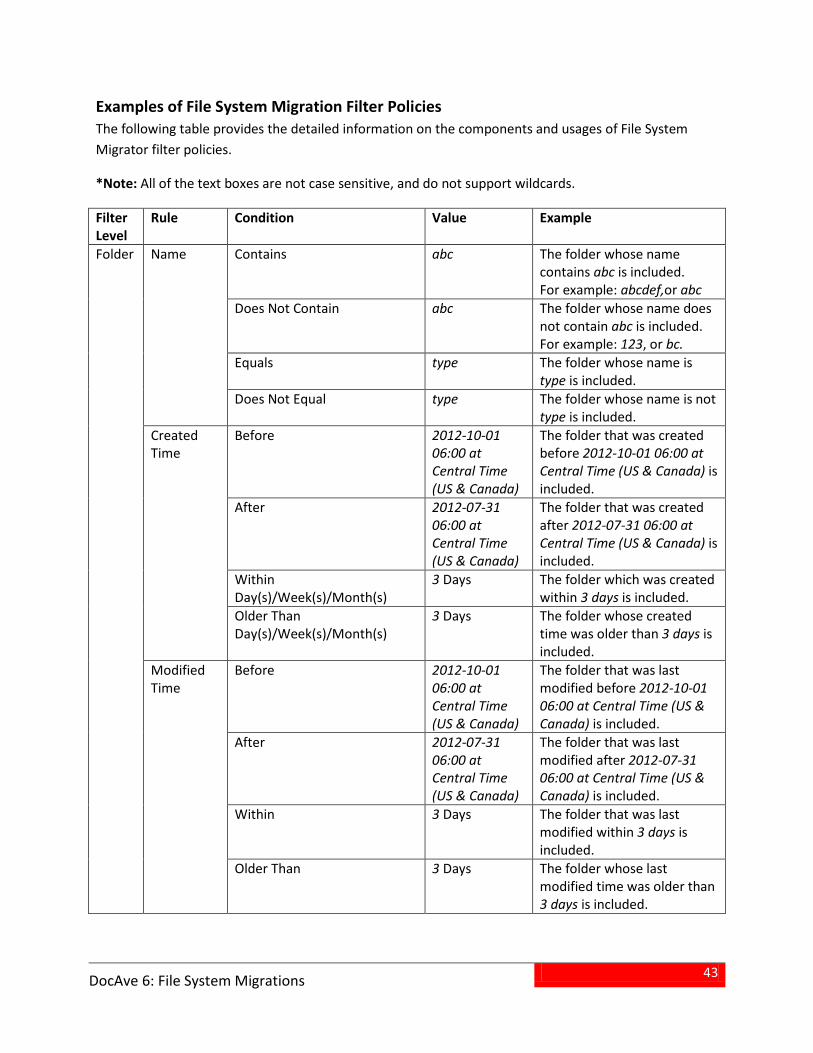
43
DocAve 6: File System Migrations
Examples of File System Migration Filter Policies The following table provides the detailed information on the components and usages of File System Migrator filter policies.
*Note: All of the text boxes are not case sensitive, and do not support wildcards.
Filter Level
Rule Condition Value Example
Folder
Name Contains abc The folder whose name contains abc is included. For example: abcdef,or abc
Does Not Contain abc The folder whose name does not contain abc is included. For example: 123, or bc.
Equals type The folder whose name is type is included.
Does Not Equal type The folder whose name is not type is included.
Created Time
Before 2012-10-01 06:00 at Central Time (US & Canada)
The folder that was created before 2012-10-01 06:00 at Central Time (US & Canada) is included.
After 2012-07-31 06:00 at Central Time (US & Canada)
The folder that was created after 2012-07-31 06:00 at Central Time (US & Canada) is included.
Within Day(s)/Week(s)/Month(s)
3 Days The folder which was created within 3 days is included.
Older Than Day(s)/Week(s)/Month(s)
3 Days The folder whose created time was older than 3 days is included.
Modified Time
Before 2012-10-01 06:00 at Central Time (US & Canada)
The folder that was last modified before 2012-10-01 06:00 at Central Time (US & Canada) is included.
After 2012-07-31 06:00 at Central Time (US & Canada)
The folder that was last modified after 2012-07-31 06:00 at Central Time (US & Canada) is included.
Within 3 Days The folder that was last modified within 3 days is included.
Older Than 3 Days The folder whose last modified time was older than 3 days is included.
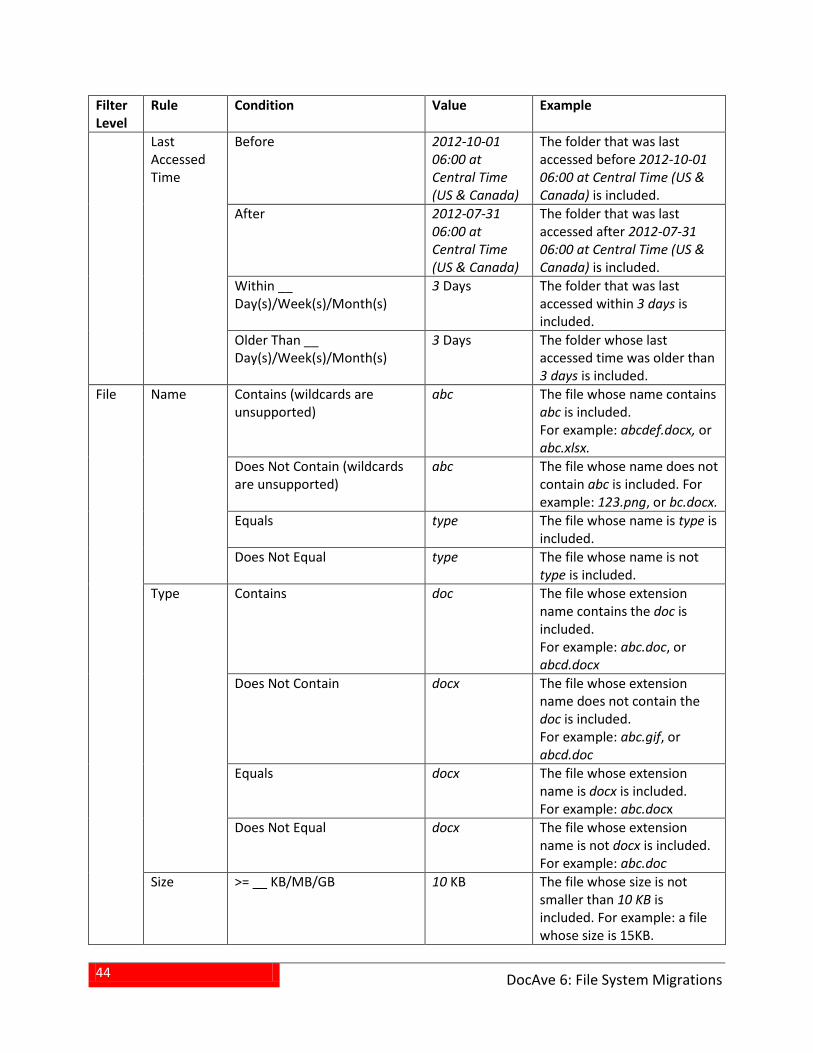
44
DocAve 6: File System Migrations
Filter Level
Rule Condition Value Example
Last Accessed Time
Before 2012-10-01 06:00 at Central Time (US & Canada)
The folder that was last accessed before 2012-10-01 06:00 at Central Time (US & Canada) is included.
After 2012-07-31 06:00 at Central Time (US & Canada)
The folder that was last accessed after 2012-07-31 06:00 at Central Time (US & Canada) is included.
Within __ Day(s)/Week(s)/Month(s)
3 Days The folder that was last accessed within 3 days is included.
Older Than __ Day(s)/Week(s)/Month(s)
3 Days The folder whose last accessed time was older than 3 days is included.
File Name Contains (wildcards are unsupported)
abc The file whose name contains abc is included. For example: abcdef.docx, or abc.xlsx.
Does Not Contain (wildcards are unsupported)
abc The file whose name does not contain abc is included. For example: 123.png, or bc.docx.
Equals type The file whose name is type is included.
Does Not Equal type The file whose name is not type is included.
Type Contains doc The file whose extension name contains the doc is included. For example: abc.doc, or abcd.docx
Does Not Contain docx The file whose extension name does not contain the doc is included. For example: abc.gif, or abcd.doc
Equals docx The file whose extension name is docx is included. For example: abc.docx
Does Not Equal docx The file whose extension name is not docx is included. For example: abc.doc
Size >= __ KB/MB/GB 10 KB The file whose size is not smaller than 10 KB is included. For example: a file whose size is 15KB.
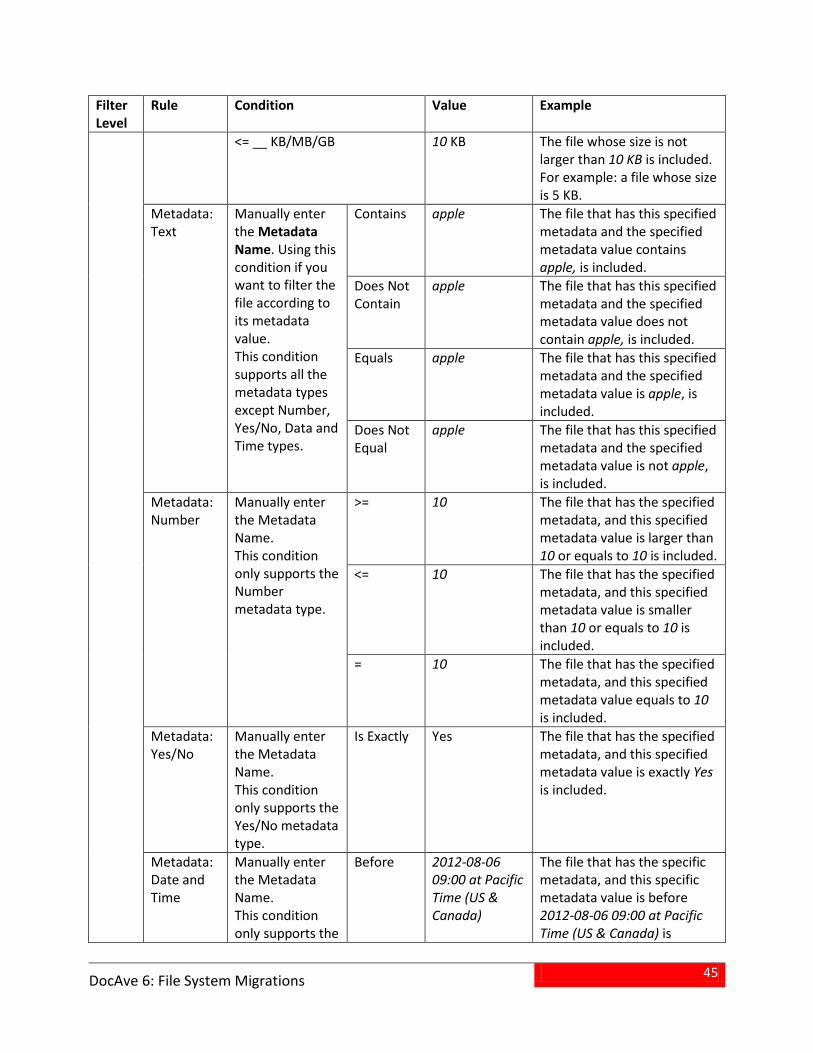
45
DocAve 6: File System Migrations
Filter Level
Rule Condition Value Example
<= __ KB/MB/GB 10 KB The file whose size is not larger than 10 KB is included. For example: a file whose size is 5 KB.
Metadata: Text
Manually enter the Metadata Name. Using this condition if you want to filter the file according to its metadata value. This condition supports all the metadata types except Number, Yes/No, Data and Time types.
Contains apple The file that has this specified metadata and the specified metadata value contains apple, is included.
Does Not Contain
apple The file that has this specified metadata and the specified metadata value does not contain apple, is included.
Equals apple The file that has this specified metadata and the specified metadata value is apple, is included.
Does Not Equal
apple The file that has this specified metadata and the specified metadata value is not apple, is included.
Metadata: Number
Manually enter the Metadata Name. This condition only supports the Number metadata type.
>= 10 The file that has the specified metadata, and this specified metadata value is larger than 10 or equals to 10 is included.
<= 10 The file that has the specified metadata, and this specified metadata value is smaller than 10 or equals to 10 is included.
= 10 The file that has the specified metadata, and this specified metadata value equals to 10 is included.
Metadata: Yes/No
Manually enter the Metadata Name. This condition only supports the Yes/No metadata type.
Is Exactly Yes The file that has the specified metadata, and this specified metadata value is exactly Yes is included.
Metadata: Date and Time
Manually enter the Metadata Name. This condition only supports the
Before 2012-08-06 09:00 at Pacific Time (US & Canada)
The file that has the specific metadata, and this specific metadata value is before 2012-08-06 09:00 at Pacific Time (US & Canada) is
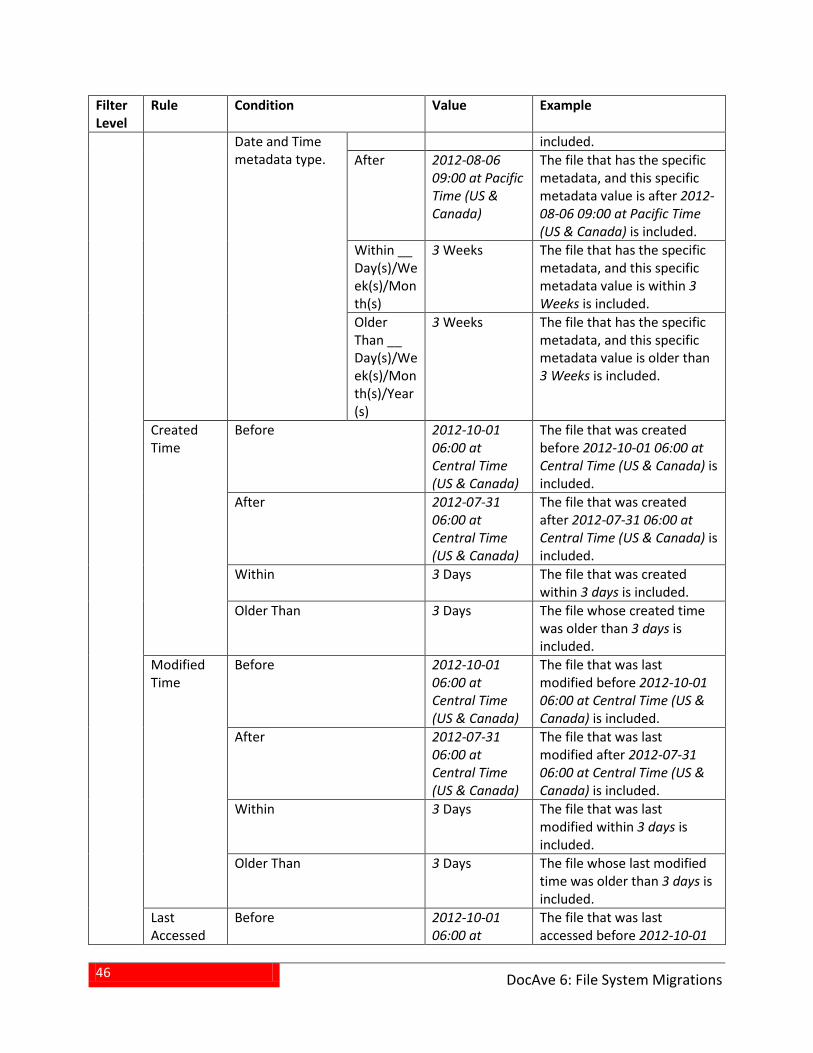
46
DocAve 6: File System Migrations
Filter Level
Rule Condition Value Example
Date and Time metadata type.
included. After 2012-08-06
09:00 at Pacific Time (US & Canada)
The file that has the specific metadata, and this specific metadata value is after 2012-08-06 09:00 at Pacific Time (US & Canada) is included.
Within __ Day(s)/Week(s)/Month(s)
3 Weeks The file that has the specific metadata, and this specific metadata value is within 3 Weeks is included.
Older Than __ Day(s)/Week(s)/Month(s)/Year(s)
3 Weeks The file that has the specific metadata, and this specific metadata value is older than 3 Weeks is included.
Created Time
Before 2012-10-01 06:00 at Central Time (US & Canada)
The file that was created before 2012-10-01 06:00 at Central Time (US & Canada) is included.
After 2012-07-31 06:00 at Central Time (US & Canada)
The file that was created after 2012-07-31 06:00 at Central Time (US & Canada) is included.
Within 3 Days The file that was created within 3 days is included.
Older Than 3 Days The file whose created time was older than 3 days is included.
Modified Time
Before 2012-10-01 06:00 at Central Time (US & Canada)
The file that was last modified before 2012-10-01 06:00 at Central Time (US & Canada) is included.
After 2012-07-31 06:00 at Central Time (US & Canada)
The file that was last modified after 2012-07-31 06:00 at Central Time (US & Canada) is included.
Within 3 Days The file that was last modified within 3 days is included.
Older Than 3 Days The file whose last modified time was older than 3 days is included.
Last Accessed
Before 2012-10-01 06:00 at
The file that was last accessed before 2012-10-01
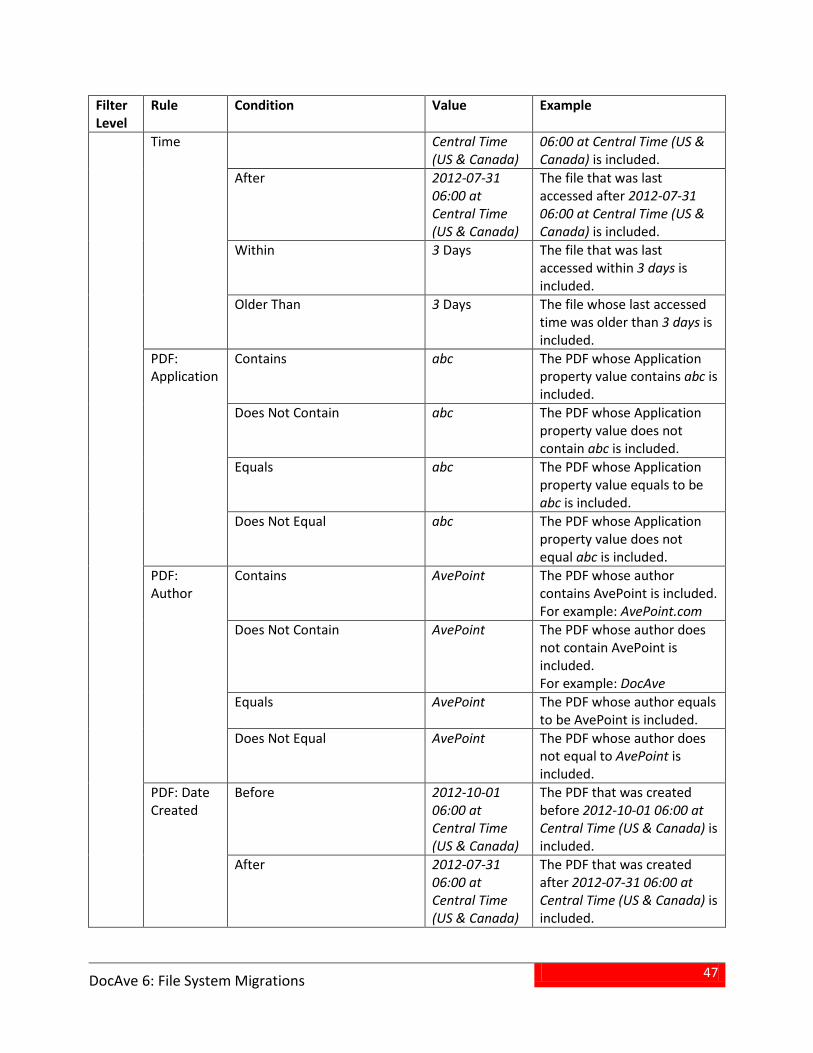
47
DocAve 6: File System Migrations
Filter Level
Rule Condition Value Example
Time Central Time (US & Canada)
06:00 at Central Time (US & Canada) is included.
After 2012-07-31 06:00 at Central Time (US & Canada)
The file that was last accessed after 2012-07-31 06:00 at Central Time (US & Canada) is included.
Within 3 Days The file that was last accessed within 3 days is included.
Older Than 3 Days The file whose last accessed time was older than 3 days is included.
PDF: Application
Contains abc The PDF whose Application property value contains abc is included.
Does Not Contain abc The PDF whose Application property value does not contain abc is included.
Equals abc The PDF whose Application property value equals to be abc is included.
Does Not Equal abc The PDF whose Application property value does not equal abc is included.
PDF: Author
Contains AvePoint The PDF whose author contains AvePoint is included. For example: AvePoint.com
Does Not Contain AvePoint The PDF whose author does not contain AvePoint is included. For example: DocAve
Equals AvePoint The PDF whose author equals to be AvePoint is included.
Does Not Equal AvePoint The PDF whose author does not equal to AvePoint is included.
PDF: Date Created
Before 2012-10-01 06:00 at Central Time (US & Canada)
The PDF that was created before 2012-10-01 06:00 at Central Time (US & Canada) is included.
After 2012-07-31 06:00 at Central Time (US & Canada)
The PDF that was created after 2012-07-31 06:00 at Central Time (US & Canada) is included.
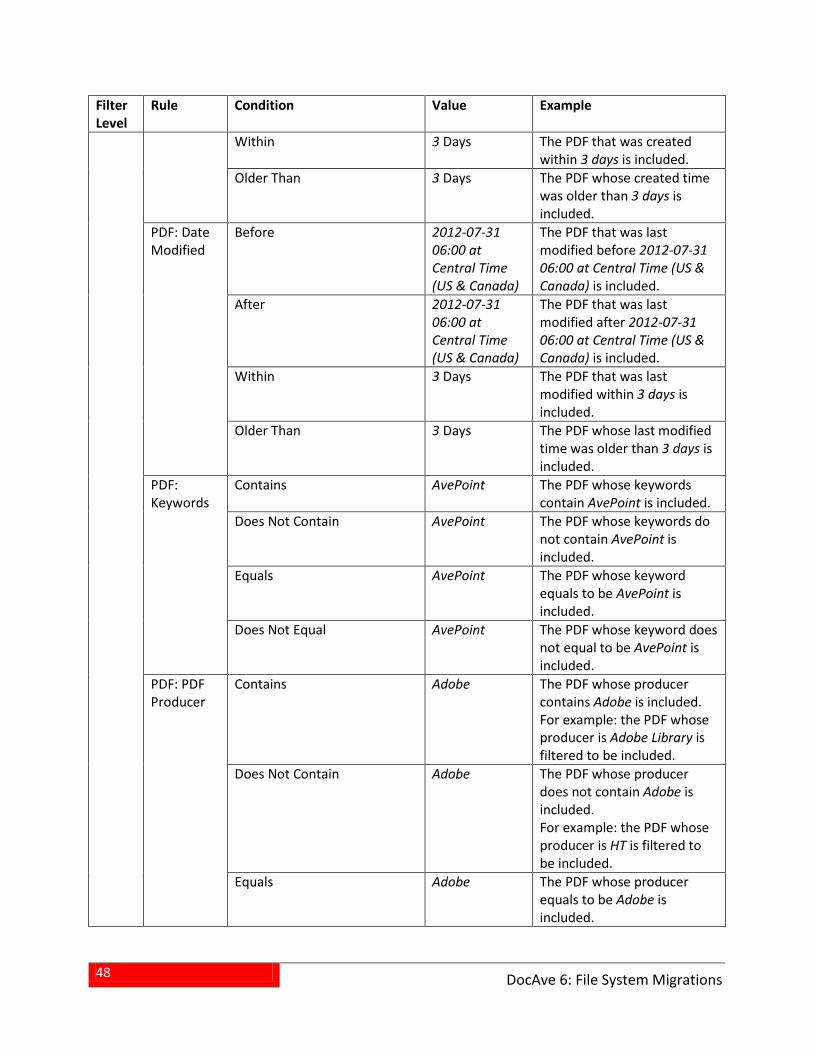
48
DocAve 6: File System Migrations
Filter Level
Rule Condition Value Example
Within 3 Days The PDF that was created within 3 days is included.
Older Than 3 Days The PDF whose created time was older than 3 days is included.
PDF: Date Modified
Before 2012-07-31 06:00 at Central Time (US & Canada)
The PDF that was last modified before 2012-07-31 06:00 at Central Time (US & Canada) is included.
After 2012-07-31 06:00 at Central Time (US & Canada)
The PDF that was last modified after 2012-07-31 06:00 at Central Time (US & Canada) is included.
Within 3 Days The PDF that was last modified within 3 days is included.
Older Than 3 Days The PDF whose last modified time was older than 3 days is included.
PDF: Keywords
Contains AvePoint The PDF whose keywords contain AvePoint is included.
Does Not Contain AvePoint The PDF whose keywords do not contain AvePoint is included.
Equals AvePoint The PDF whose keyword equals to be AvePoint is included.
Does Not Equal AvePoint The PDF whose keyword does not equal to be AvePoint is included.
PDF: PDF Producer
Contains Adobe The PDF whose producer contains Adobe is included. For example: the PDF whose producer is Adobe Library is filtered to be included.
Does Not Contain Adobe The PDF whose producer does not contain Adobe is included. For example: the PDF whose producer is HT is filtered to be included.
Equals Adobe The PDF whose producer equals to be Adobe is included.
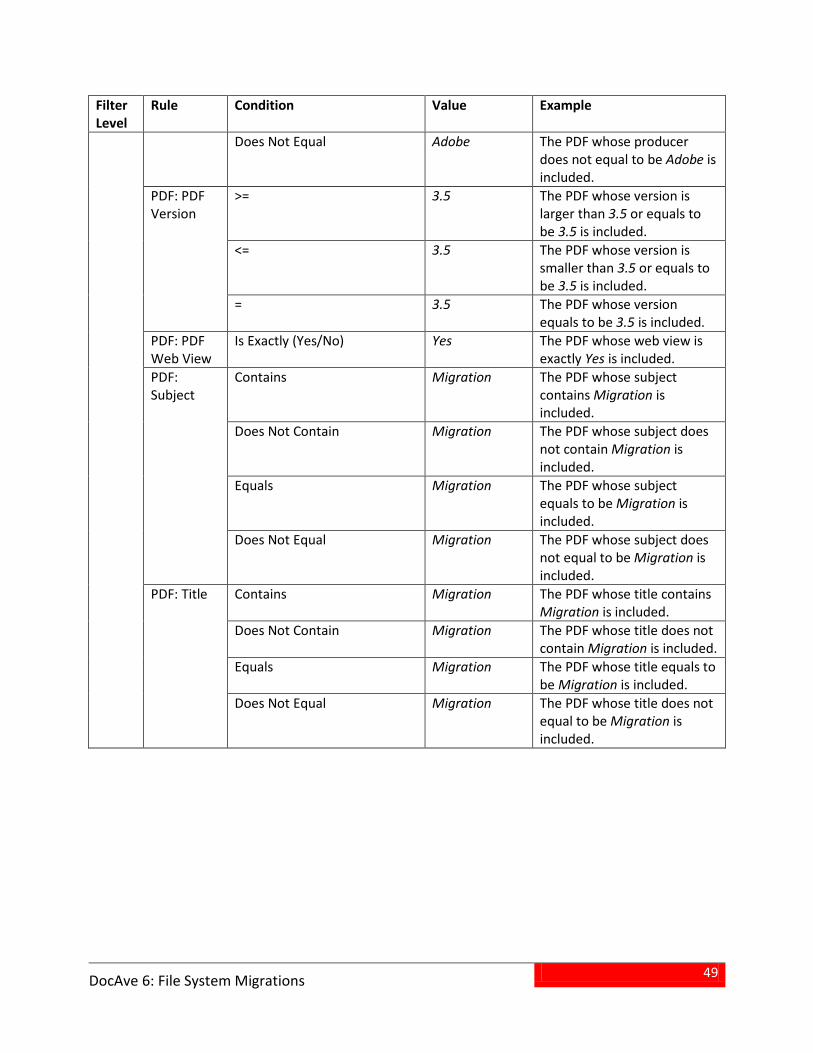
49
DocAve 6: File System Migrations
Filter Level
Rule Condition Value Example
Does Not Equal Adobe The PDF whose producer does not equal to be Adobe is included.
PDF: PDF Version
>= 3.5 The PDF whose version is larger than 3.5 or equals to be 3.5 is included.
<= 3.5 The PDF whose version is smaller than 3.5 or equals to be 3.5 is included.
= 3.5 The PDF whose version equals to be 3.5 is included.
PDF: PDF Web View
Is Exactly (Yes/No) Yes The PDF whose web view is exactly Yes is included.
PDF: Subject
Contains Migration The PDF whose subject contains Migration is included.
Does Not Contain Migration The PDF whose subject does not contain Migration is included.
Equals Migration The PDF whose subject equals to be Migration is included.
Does Not Equal Migration The PDF whose subject does not equal to be Migration is included.
PDF: Title Contains Migration The PDF whose title contains Migration is included.
Does Not Contain Migration The PDF whose title does not contain Migration is included.
Equals Migration The PDF whose title equals to be Migration is included.
Does Not Equal Migration The PDF whose title does not equal to be Migration is included.
50
DocAve 6: File System Migrations
About Mapping Settings Before performing a file system migration job, you may want to define optional Domain Mapping, User Mapping, Group Mapping, Permission Mapping, and Dynamic Mapping settings. Default mapping settings are provided in the event that you do not want to customize the mappings.
Refer to the following sections to decide whether to configure the mapping settings, and learn how to configure the mapping settings.
Domain Mapping If there are users with the same name but with different domains in the source and destination respectively, you can map a source domain name to a SharePoint domain name in the destination by using domain mapping. During migration, Migrator will change the source domain name to your specified domain name in the destination node. For example, the source user summer\user1 can be mapped to SharePoint domain user may\user1 through domain mapping.
*Note: File System Migration Domain Mapping does not work on Active Directory Groups in SharePoint Online site collections.
To access Domain Mapping, click Profile Settings on the ribbon of Home tab. The Profile 1.Settings tab appears.
Click Mappings on the ribbon, and then select Domain Mapping from the drop-down menu. The 2.Control Panel Mapping Manager interface appears.
Click Create on the ribbon to create a new domain mapping rule. 3.
For specific instructions on setting up domain mapping, refer to the Control Panel Reference Guide.
User Mapping User mapping enables you to map an existing source node username to an existing SharePoint user name in the destination. During migration, Migrator will replace the source username with the specified username in the destination node.
To access Domain Mapping, click Profile Settings on the ribbon of Home tab. The Profile 1.Settings tab appears.
Click Mappings on the ribbon, and then select User Mapping from the drop-down menu. The 2.Control Panel Mapping Manager interface appears.
Click Create on the ribbon to create a new user mapping rule. 3.
*Note: If you configure the user mapping to map the user of Modified by to a destination SharePoint user, make sure that you enter the user’s display name in the text box of Source Username column.
51
DocAve 6: File System Migrations
For specific instructions on setting up user mapping, refer to the Control Panel Reference Guide.
Group Mapping Use group mapping to map an existing source group name to a SharePoint group. During the migration, Migrator will replace the source group name with your specified group name in the destination node.
To access Group Mapping, click Profile Settings on the ribbon of Home tab. The Profile Settings 1.tab appears.
Click Mappings on the ribbon, and then select Group Mapping from the drop-down menu. The 2.Control Panel Mapping Manager interface appears.
Click Create on the ribbon to create a new group mapping rule. 3.
For specific instructions on setting up user mapping, refer to the Control Panel Reference Guide.
About Permission Mapping Permission mapping allows you to map permissions in the source to SharePoint permissions in the destination. During the migration, Migrator will replace the source permission with your specified permission name in the destination node. File System Migration provides you a Default Permission Mapping rule to migrate the file system permissions to the SharePoint permissions, which is contained as default permission mapping rule in the default main profile, when running a quick mode job.
*Note: If you have configured both user mapping and permission mapping in the Mapping Options profile with Merge as the Container level conflict resolution and New Version as the Content level conflict resolution, the source user’s mapping permissions in SharePoint will be merged with the mapped destination user’s permissions.
*Note: If you configure the permission mapping profile in the Details of permission entry mode and a user in file system has multiple detailed file system permissions mapped to SharePoint, the user mapped to SharePoint will only be granted the highest SharePoint permissions. For example, if a user has Read Attributes and Write Attributes permissions in the file system (the Read Attributes permission in file system is mapped to the Read permission in SharePoint; the Write Attributes permission in file system is mapped to the Contribute permission in SharePoint), the user mapped to the SharePoint destination will have Contribute permission only.
To access Permission Mapping, click Profile Settings on the ribbon of Home tab. The Profile 1.Settings tab appears.
Click Mappings on the ribbon, and then select Permission Mapping from the drop-down menu. 2.The Permission Mapping interface appears.
The Permission Mapping interface displays all previously-configured permission mappings.
In this interface, you can change the number of permission mappings displayed per page and the order in which they are displayed. To change the number of permission mappings displayed per page, select

52
DocAve 6: File System Migrations
the desired number from the Show rows drop-down menu in the lower right-hand corner. To sort the permission mappings, click on a column heading such as Permission Mapping Name, and Description.
Customize how these permission mappings are displayed in a number of different ways:
• Search – Allows you to filter permission mappings displayed by the keyword you designate. The keyword must be contained in a column value. At the top of the Permission Mapping viewing pane, enter the keyword for the permission mappings you wish to display. You can select Search all pages or Search current page to define the search scope. Search all pages means that the permission mappings in all of the pages whose names and descriptions contain the keywords will be displayed; while Search current page means that only the permission mappings in the current page whose names and descriptions contain the keywords will be displayed. Note that the search function is not case sensitive.
• – You can manage which columns are displayed in the list so that only information you want to see is shown. Click , and then check the checkbox next to the column name to have that column shown in the list.
• – This allows you to hide the column. Click in the column title to hide the column.
You may perform the following actions to a permission mapping:
• Click Create on the ribbon to create a new permission mapping rule. For detailed on creating a new permission mapping, see Creating and Editing Permission Mappings.
• Click View Details on the ribbon and you will see the previously-configured settings for this permission mapping. Here you can also click Edit on the ribbon to make changes to the permission mapping’s settings. You will be brought to the Edit Permission Mapping page where you can change this permission mapping.
• Click Edit on the ribbon to change the configuration of this permission mapping. For details on editing permission mapping, see Creating and Editing Permission Mappings.
• Click Delete on the ribbon. A confirmation window appears, confirming that you want to proceed with the deletion. Click OK to delete the selected permission mappings, or click Cancel to return to the Permission Mapping interface without deleting the selected permission mappings.
Creating and Editing Permission Mappings To create a new permission mapping, click Create on the ribbon. To edit a previously-configured permission mapping, select the permission mapping and then click Edit on the ribbon.
In the Create or Edit Permission Mapping interface, configure the following settings:
Permission Mapping Name – Enter a Permission Mapping Name for the permission mapping 1.that you are about to create or edit. Then enter an optional Description for this permission mapping for future reference.
53
DocAve 6: File System Migrations
Permission Mapping – Allows you to set up the mapping of file system permissions to 2.SharePoint permissions. It provides you two modes of the permission mapping. The Permission Entry Mode enables you to configure the mappings of five file system permission levels to SharePoint Permission Levels. The Details of the Permission Entry Mode enables you to configure the detailed permission mappings from file system to SharePoint Permission Levels. To map the file system permission to SharePoint, you can choose the default SharePoint Permission Levels, or previously-created SharePoint Permission Levels, or you can directly create a new SharePoint Permission Level by clicking New SharePoint Permission Level from the drop-down menu.
For more information on creating a new SharePoint Permission Level, refer to Creating SharePoint Permission Levels section below.
Click OK to save the configurations and return to the Permission Mapping interface, or click 3.Cancel to return to Permission Mapping interface without saving any changes.
About SharePoint Permission Levels You can manage SharePoint permission levels by creating a new SharePoint permission level, viewing details of a previously-configured SharePoint permission level, editing a previously-configured SharePoint permission level, or deleting a previously-configured SharePoint permission level.
To access Manage SharePoint Permission Level interface, click Profile Settings on the Home tab > Mappings > Permission Mapping > Manage SharePoint Permission Level. The Manage SharePoint Permission Level interface appears, and you will see a list of provided or previously-configured SharePoint permission levels.
In this interface, you can change the number of SharePoint Permission Levels displayed per page and the order in which they are displayed. To change the number of SharePoint Permission Levels displayed per page, select the desired number from the Show rows drop-down menu in the lower right-hand corner. To sort the SharePoint Permission Levels, click on a column heading such as SharePoint Permission Level Name, and Description.
Customize how these SharePoint permission levels are displayed in a number of different ways:
• Search – Allows you to filter SharePoint Permission Levels displayed by the keyword you designate. The keyword must be contained in a column value. At the top of the SharePoint Permission Level viewing pane, enter the keyword for the SharePoint Permission Levels you wish to display. You can select Search all pages or Search current page to define the search scope. Search all pages means that the SharePoint Permission Levels in all of the pages whose names and descriptions contain the keywords will be displayed; while Search current page means that only the SharePoint Permission Levels in the current page whose names and descriptions contain the keywords will be displayed. Note that the search function is not case sensitive.
• – You can manage which columns are displayed in the list so that only information you want to see is shown. Click , and then check the checkbox next to the column name to have that column shown in the list.

54
DocAve 6: File System Migrations
• – This allows you to hide the column. Click in the column title to hide the column.
Perform the following actions in the Manage SharePoint Permission Level page.
• Click Create on the ribbon to create a new SharePoint Permission Level. For detailed instructions on creating a new SharePoint Permission Level, see Creating SharePoint Permission Levels.
• Click View Details on the ribbon and you will see the previously-configured settings for this SharePoint Permission Level. Here you can also click Edit on the ribbon to make changes to the SharePoint Permission Level’s settings. You will be brought to the Edit SharePoint Permission Level page where you can change its settings.
• Click Edit on the ribbon to change the configurations for this SharePoint Permission Level. Note that the pre-defined SharePoint Permission levels including Contribute, Design, Full Control, Read, and View Only, are not editable. For details on editing configurations for a SharePoint Permission Level, see Creating SharePoint Permission Levels.
• Click Delete on the ribbon. A confirmation window appears, confirming that you want to proceed with the deletion. Click OK to delete the selected SharePoint Permission Levels, or click Cancel to return to the Manage SharePoint Permission Level interface without deleting the selected SharePoint Permission Levels. Note that the pre-defined SharePoint Permission levels including Contribute, Design, Full Control, Read, and View Only cannot be deleted.
Creating SharePoint Permission Levels To create a new SharePoint permission level, click Create on the ribbon. To modify a previously-configured customized SharePoint permission level, select the SharePoint Permission Level, and then click Edit on the ribbon.
In the Create SharePoint Permission Level or Edit SharePoint Permission Level interface, configure the following settings:
1. Name and Description – Enter a Name for this permission level that you are about to create or edit. Then enter an optional Description for future references.
2. Permissions – Choose which permissions to include in this permission level. You can select specified permissions of List Permissions, Site Permissions, and Personal Permissions by checking the checkbox before a specified permission. Check the Select All checkbox to select or clear all permissions.
3. Click OK to save the configurations and return to the Manage SharePoint Permission Level interface, or click Cancel to return to the Manage SharePoint Permission Level interface without saving any changes.
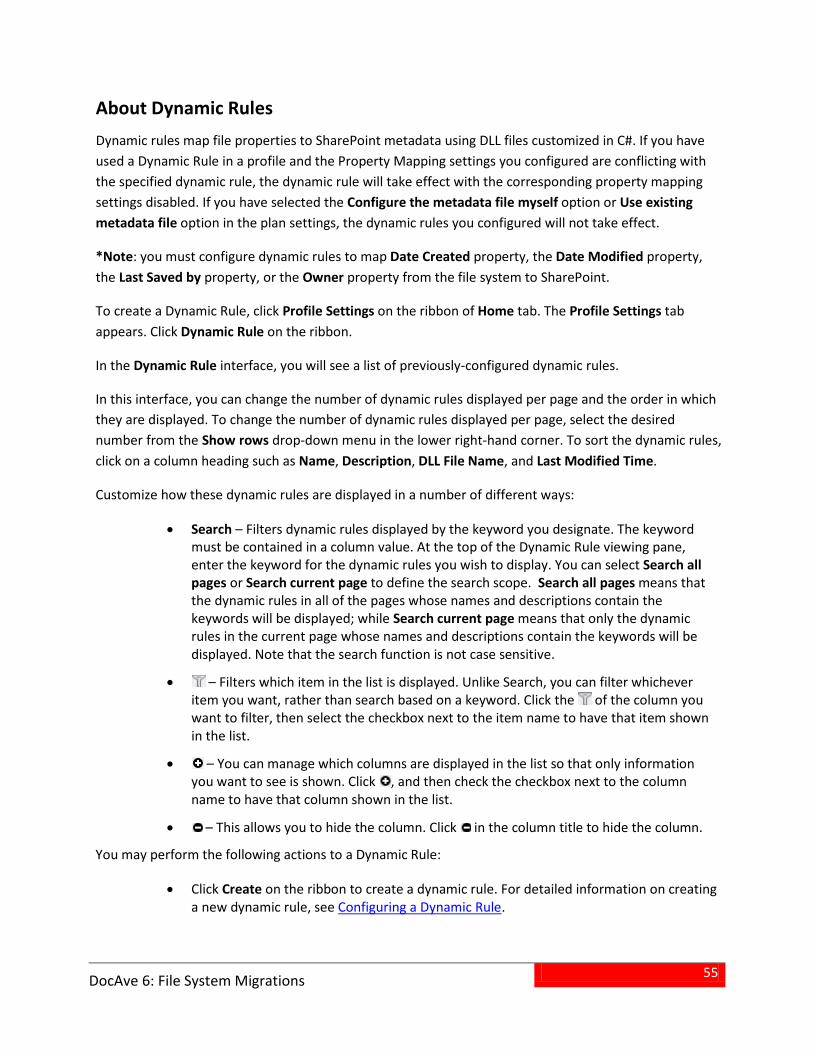
55
DocAve 6: File System Migrations
About Dynamic Rules Dynamic rules map file properties to SharePoint metadata using DLL files customized in C#. If you have used a Dynamic Rule in a profile and the Property Mapping settings you configured are conflicting with the specified dynamic rule, the dynamic rule will take effect with the corresponding property mapping settings disabled. If you have selected the Configure the metadata file myself option or Use existing metadata file option in the plan settings, the dynamic rules you configured will not take effect.
*Note: you must configure dynamic rules to map Date Created property, the Date Modified property, the Last Saved by property, or the Owner property from the file system to SharePoint.
To create a Dynamic Rule, click Profile Settings on the ribbon of Home tab. The Profile Settings tab appears. Click Dynamic Rule on the ribbon.
In the Dynamic Rule interface, you will see a list of previously-configured dynamic rules.
In this interface, you can change the number of dynamic rules displayed per page and the order in which they are displayed. To change the number of dynamic rules displayed per page, select the desired number from the Show rows drop-down menu in the lower right-hand corner. To sort the dynamic rules, click on a column heading such as Name, Description, DLL File Name, and Last Modified Time.
Customize how these dynamic rules are displayed in a number of different ways:
• Search – Filters dynamic rules displayed by the keyword you designate. The keyword must be contained in a column value. At the top of the Dynamic Rule viewing pane, enter the keyword for the dynamic rules you wish to display. You can select Search all pages or Search current page to define the search scope. Search all pages means that the dynamic rules in all of the pages whose names and descriptions contain the keywords will be displayed; while Search current page means that only the dynamic rules in the current page whose names and descriptions contain the keywords will be displayed. Note that the search function is not case sensitive.
• – Filters which item in the list is displayed. Unlike Search, you can filter whichever item you want, rather than search based on a keyword. Click the of the column you want to filter, then select the checkbox next to the item name to have that item shown in the list.
• – You can manage which columns are displayed in the list so that only information you want to see is shown. Click , and then check the checkbox next to the column name to have that column shown in the list.
• – This allows you to hide the column. Click in the column title to hide the column.
You may perform the following actions to a Dynamic Rule:
• Click Create on the ribbon to create a dynamic rule. For detailed information on creating a new dynamic rule, see Configuring a Dynamic Rule.
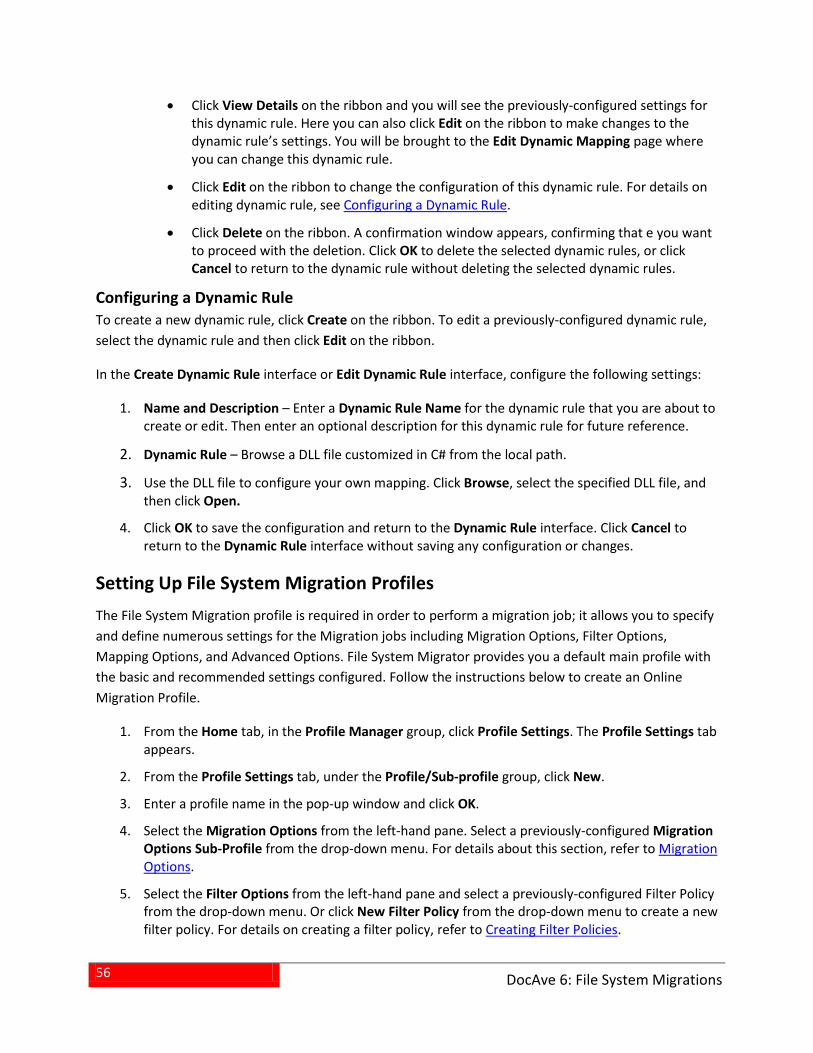
56
DocAve 6: File System Migrations
• Click View Details on the ribbon and you will see the previously-configured settings for this dynamic rule. Here you can also click Edit on the ribbon to make changes to the dynamic rule’s settings. You will be brought to the Edit Dynamic Mapping page where you can change this dynamic rule.
• Click Edit on the ribbon to change the configuration of this dynamic rule. For details on editing dynamic rule, see Configuring a Dynamic Rule.
• Click Delete on the ribbon. A confirmation window appears, confirming that e you want to proceed with the deletion. Click OK to delete the selected dynamic rules, or click Cancel to return to the dynamic rule without deleting the selected dynamic rules.
Configuring a Dynamic Rule To create a new dynamic rule, click Create on the ribbon. To edit a previously-configured dynamic rule, select the dynamic rule and then click Edit on the ribbon.
In the Create Dynamic Rule interface or Edit Dynamic Rule interface, configure the following settings:
1. Name and Description – Enter a Dynamic Rule Name for the dynamic rule that you are about to create or edit. Then enter an optional description for this dynamic rule for future reference.
2. Dynamic Rule – Browse a DLL file customized in C# from the local path.
3. Use the DLL file to configure your own mapping. Click Browse, select the specified DLL file, and then click Open.
4. Click OK to save the configuration and return to the Dynamic Rule interface. Click Cancel to return to the Dynamic Rule interface without saving any configuration or changes.
Setting Up File System Migration Profiles The File System Migration profile is required in order to perform a migration job; it allows you to specify and define numerous settings for the Migration jobs including Migration Options, Filter Options, Mapping Options, and Advanced Options. File System Migrator provides you a default main profile with the basic and recommended settings configured. Follow the instructions below to create an Online Migration Profile.
1. From the Home tab, in the Profile Manager group, click Profile Settings. The Profile Settings tab appears.
2. From the Profile Settings tab, under the Profile/Sub-profile group, click New.
3. Enter a profile name in the pop-up window and click OK.
4. Select the Migration Options from the left-hand pane. Select a previously-configured Migration Options Sub-Profile from the drop-down menu. For details about this section, refer to Migration Options.
5. Select the Filter Options from the left-hand pane and select a previously-configured Filter Policy from the drop-down menu. Or click New Filter Policy from the drop-down menu to create a new filter policy. For details on creating a filter policy, refer to Creating Filter Policies.
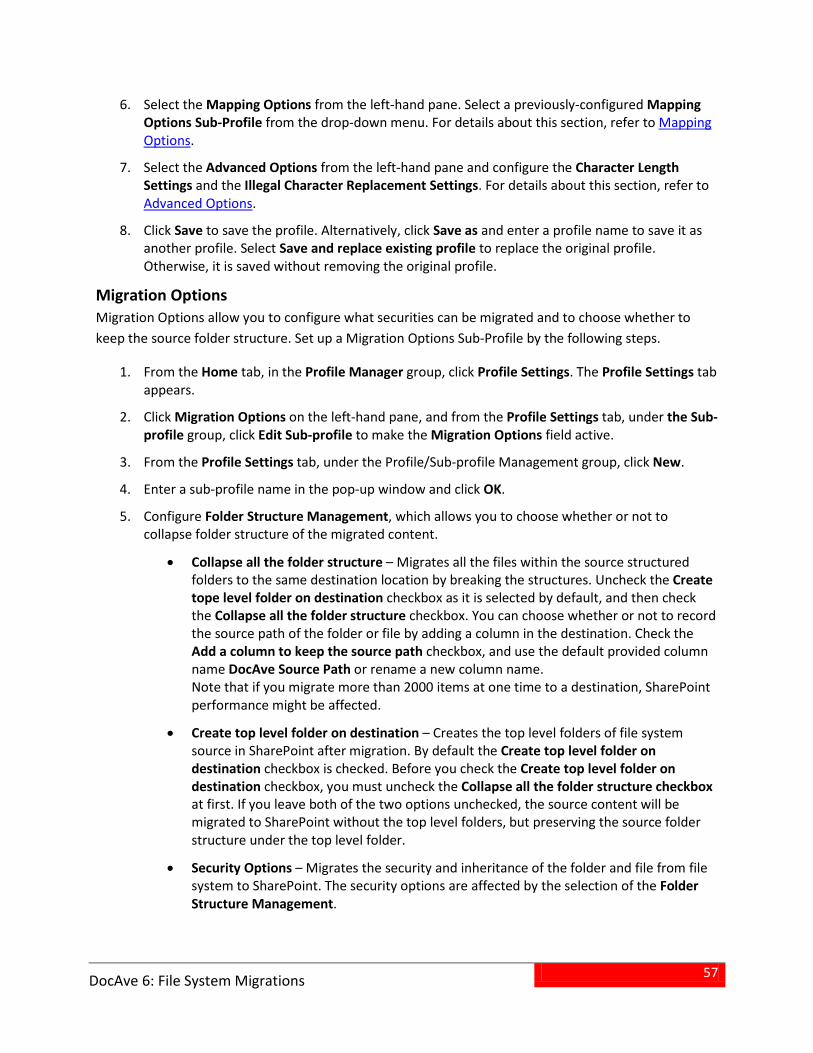
57
DocAve 6: File System Migrations
6. Select the Mapping Options from the left-hand pane. Select a previously-configured Mapping Options Sub-Profile from the drop-down menu. For details about this section, refer to Mapping Options.
7. Select the Advanced Options from the left-hand pane and configure the Character Length Settings and the Illegal Character Replacement Settings. For details about this section, refer to Advanced Options.
8. Click Save to save the profile. Alternatively, click Save as and enter a profile name to save it as another profile. Select Save and replace existing profile to replace the original profile. Otherwise, it is saved without removing the original profile.
Migration Options Migration Options allow you to configure what securities can be migrated and to choose whether to keep the source folder structure. Set up a Migration Options Sub-Profile by the following steps.
1. From the Home tab, in the Profile Manager group, click Profile Settings. The Profile Settings tab appears.
2. Click Migration Options on the left-hand pane, and from the Profile Settings tab, under the Sub-profile group, click Edit Sub-profile to make the Migration Options field active.
3. From the Profile Settings tab, under the Profile/Sub-profile Management group, click New.
4. Enter a sub-profile name in the pop-up window and click OK.
5. Configure Folder Structure Management, which allows you to choose whether or not to collapse folder structure of the migrated content.
• Collapse all the folder structure – Migrates all the files within the source structured folders to the same destination location by breaking the structures. Uncheck the Create tope level folder on destination checkbox as it is selected by default, and then check the Collapse all the folder structure checkbox. You can choose whether or not to record the source path of the folder or file by adding a column in the destination. Check the Add a column to keep the source path checkbox, and use the default provided column name DocAve Source Path or rename a new column name. Note that if you migrate more than 2000 items at one time to a destination, SharePoint performance might be affected.
• Create top level folder on destination – Creates the top level folders of file system source in SharePoint after migration. By default the Create top level folder on destination checkbox is checked. Before you check the Create top level folder on destination checkbox, you must uncheck the Collapse all the folder structure checkbox at first. If you leave both of the two options unchecked, the source content will be migrated to SharePoint without the top level folders, but preserving the source folder structure under the top level folder.
• Security Options – Migrates the security and inheritance of the folder and file from file system to SharePoint. The security options are affected by the selection of the Folder Structure Management.
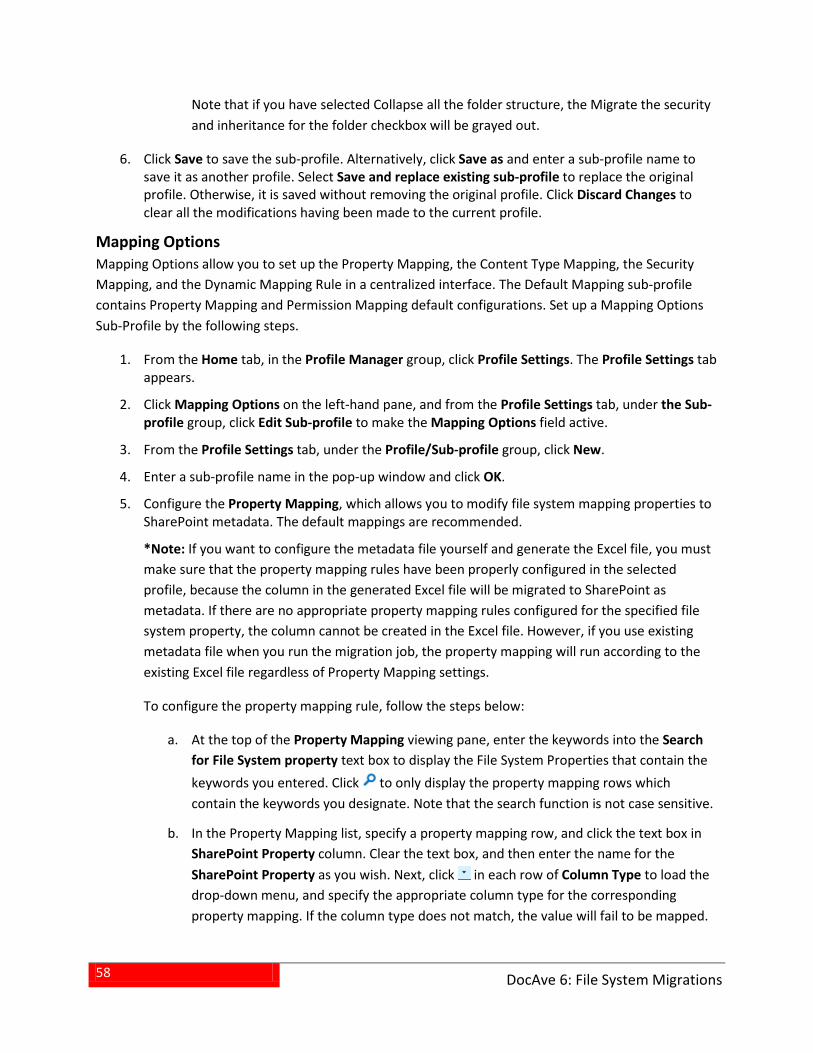
58
DocAve 6: File System Migrations
Note that if you have selected Collapse all the folder structure, the Migrate the security and inheritance for the folder checkbox will be grayed out.
6. Click Save to save the sub-profile. Alternatively, click Save as and enter a sub-profile name to save it as another profile. Select Save and replace existing sub-profile to replace the original profile. Otherwise, it is saved without removing the original profile. Click Discard Changes to clear all the modifications having been made to the current profile.
Mapping Options Mapping Options allow you to set up the Property Mapping, the Content Type Mapping, the Security Mapping, and the Dynamic Mapping Rule in a centralized interface. The Default Mapping sub-profile contains Property Mapping and Permission Mapping default configurations. Set up a Mapping Options Sub-Profile by the following steps.
1. From the Home tab, in the Profile Manager group, click Profile Settings. The Profile Settings tab appears.
2. Click Mapping Options on the left-hand pane, and from the Profile Settings tab, under the Sub-profile group, click Edit Sub-profile to make the Mapping Options field active.
3. From the Profile Settings tab, under the Profile/Sub-profile group, click New.
4. Enter a sub-profile name in the pop-up window and click OK.
5. Configure the Property Mapping, which allows you to modify file system mapping properties to SharePoint metadata. The default mappings are recommended.
*Note: If you want to configure the metadata file yourself and generate the Excel file, you must make sure that the property mapping rules have been properly configured in the selected profile, because the column in the generated Excel file will be migrated to SharePoint as metadata. If there are no appropriate property mapping rules configured for the specified file system property, the column cannot be created in the Excel file. However, if you use existing metadata file when you run the migration job, the property mapping will run according to the existing Excel file regardless of Property Mapping settings.
To configure the property mapping rule, follow the steps below:
At the top of the Property Mapping viewing pane, enter the keywords into the Search a.for File System property text box to display the File System Properties that contain the keywords you entered. Click to only display the property mapping rows which contain the keywords you designate. Note that the search function is not case sensitive.
In the Property Mapping list, specify a property mapping row, and click the text box in b.SharePoint Property column. Clear the text box, and then enter the name for the SharePoint Property as you wish. Next, click in each row of Column Type to load the drop-down menu, and specify the appropriate column type for the corresponding property mapping. If the column type does not match, the value will fail to be mapped.
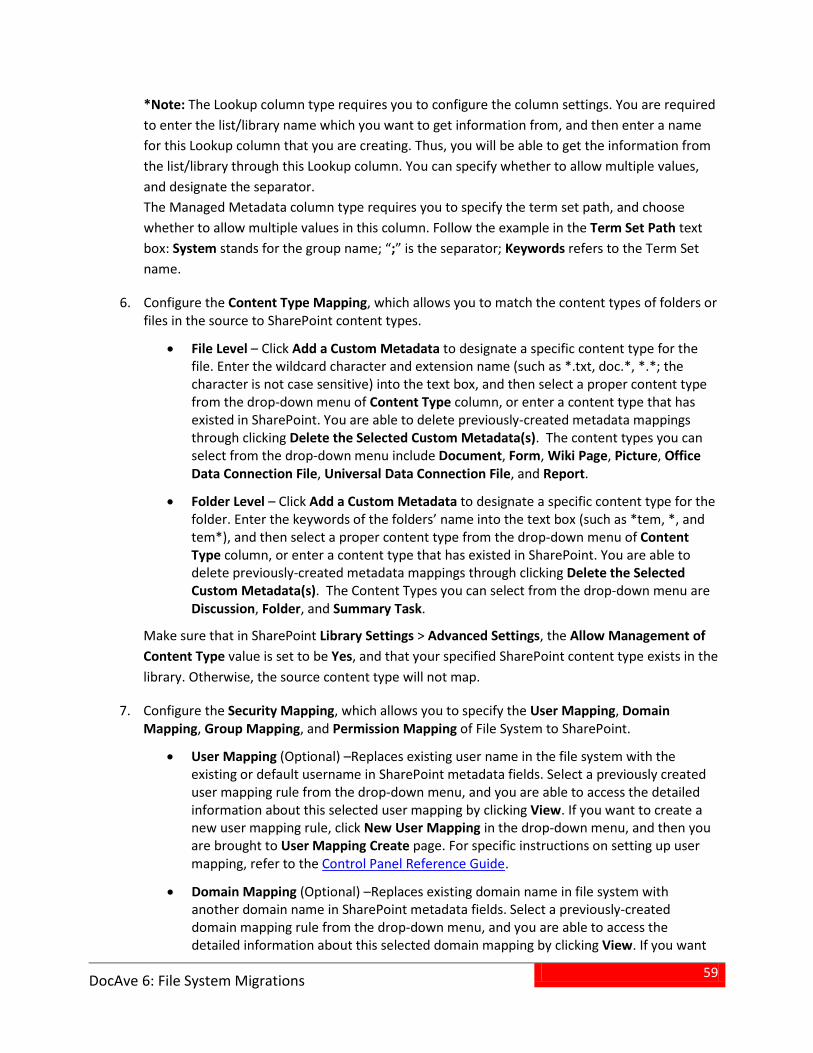
59
DocAve 6: File System Migrations
*Note: The Lookup column type requires you to configure the column settings. You are required to enter the list/library name which you want to get information from, and then enter a name for this Lookup column that you are creating. Thus, you will be able to get the information from the list/library through this Lookup column. You can specify whether to allow multiple values, and designate the separator. The Managed Metadata column type requires you to specify the term set path, and choose whether to allow multiple values in this column. Follow the example in the Term Set Path text box: System stands for the group name; “;” is the separator; Keywords refers to the Term Set name.
6. Configure the Content Type Mapping, which allows you to match the content types of folders or files in the source to SharePoint content types.
• File Level – Click Add a Custom Metadata to designate a specific content type for the file. Enter the wildcard character and extension name (such as *.txt, doc.*, *.*; the character is not case sensitive) into the text box, and then select a proper content type from the drop-down menu of Content Type column, or enter a content type that has existed in SharePoint. You are able to delete previously-created metadata mappings through clicking Delete the Selected Custom Metadata(s). The content types you can select from the drop-down menu include Document, Form, Wiki Page, Picture, Office Data Connection File, Universal Data Connection File, and Report.
• Folder Level – Click Add a Custom Metadata to designate a specific content type for the folder. Enter the keywords of the folders’ name into the text box (such as *tem, *, and tem*), and then select a proper content type from the drop-down menu of Content Type column, or enter a content type that has existed in SharePoint. You are able to delete previously-created metadata mappings through clicking Delete the Selected Custom Metadata(s). The Content Types you can select from the drop-down menu are Discussion, Folder, and Summary Task.
Make sure that in SharePoint Library Settings > Advanced Settings, the Allow Management of Content Type value is set to be Yes, and that your specified SharePoint content type exists in the library. Otherwise, the source content type will not map.
7. Configure the Security Mapping, which allows you to specify the User Mapping, Domain Mapping, Group Mapping, and Permission Mapping of File System to SharePoint.
• User Mapping (Optional) –Replaces existing user name in the file system with the existing or default username in SharePoint metadata fields. Select a previously created user mapping rule from the drop-down menu, and you are able to access the detailed information about this selected user mapping by clicking View. If you want to create a new user mapping rule, click New User Mapping in the drop-down menu, and then you are brought to User Mapping Create page. For specific instructions on setting up user mapping, refer to the Control Panel Reference Guide.
• Domain Mapping (Optional) –Replaces existing domain name in file system with another domain name in SharePoint metadata fields. Select a previously-created domain mapping rule from the drop-down menu, and you are able to access the detailed information about this selected domain mapping by clicking View. If you want
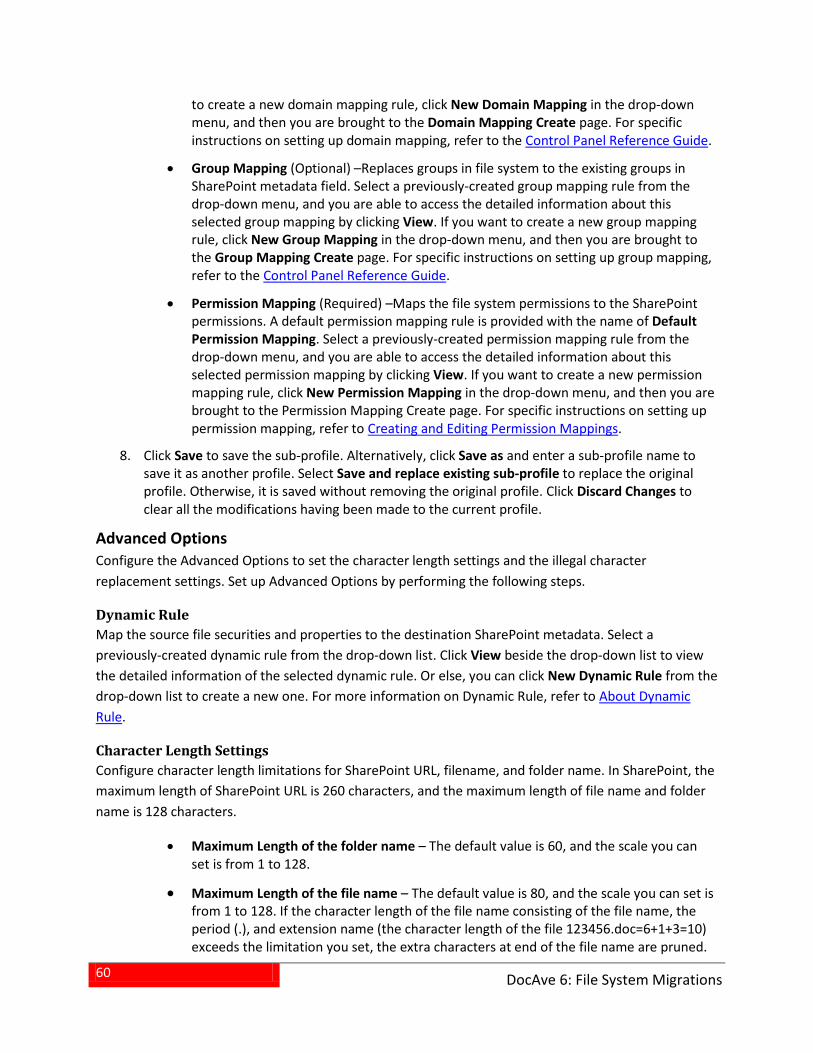
60
DocAve 6: File System Migrations
to create a new domain mapping rule, click New Domain Mapping in the drop-down menu, and then you are brought to the Domain Mapping Create page. For specific instructions on setting up domain mapping, refer to the Control Panel Reference Guide.
• Group Mapping (Optional) –Replaces groups in file system to the existing groups in SharePoint metadata field. Select a previously-created group mapping rule from the drop-down menu, and you are able to access the detailed information about this selected group mapping by clicking View. If you want to create a new group mapping rule, click New Group Mapping in the drop-down menu, and then you are brought to the Group Mapping Create page. For specific instructions on setting up group mapping, refer to the Control Panel Reference Guide.
• Permission Mapping (Required) –Maps the file system permissions to the SharePoint permissions. A default permission mapping rule is provided with the name of Default Permission Mapping. Select a previously-created permission mapping rule from the drop-down menu, and you are able to access the detailed information about this selected permission mapping by clicking View. If you want to create a new permission mapping rule, click New Permission Mapping in the drop-down menu, and then you are brought to the Permission Mapping Create page. For specific instructions on setting up permission mapping, refer to Creating and Editing Permission Mappings.
8. Click Save to save the sub-profile. Alternatively, click Save as and enter a sub-profile name to save it as another profile. Select Save and replace existing sub-profile to replace the original profile. Otherwise, it is saved without removing the original profile. Click Discard Changes to clear all the modifications having been made to the current profile.
Advanced Options Configure the Advanced Options to set the character length settings and the illegal character replacement settings. Set up Advanced Options by performing the following steps.
Dynamic Rule Map the source file securities and properties to the destination SharePoint metadata. Select a previously-created dynamic rule from the drop-down list. Click View beside the drop-down list to view the detailed information of the selected dynamic rule. Or else, you can click New Dynamic Rule from the drop-down list to create a new one. For more information on Dynamic Rule, refer to About Dynamic Rule.
Character Length Settings Configure character length limitations for SharePoint URL, filename, and folder name. In SharePoint, the maximum length of SharePoint URL is 260 characters, and the maximum length of file name and folder name is 128 characters.
• Maximum Length of the folder name – The default value is 60, and the scale you can set is from 1 to 128.
• Maximum Length of the file name – The default value is 80, and the scale you can set is from 1 to 128. If the character length of the file name consisting of the file name, the period (.), and extension name (the character length of the file 123456.doc=6+1+3=10) exceeds the limitation you set, the extra characters at end of the file name are pruned.
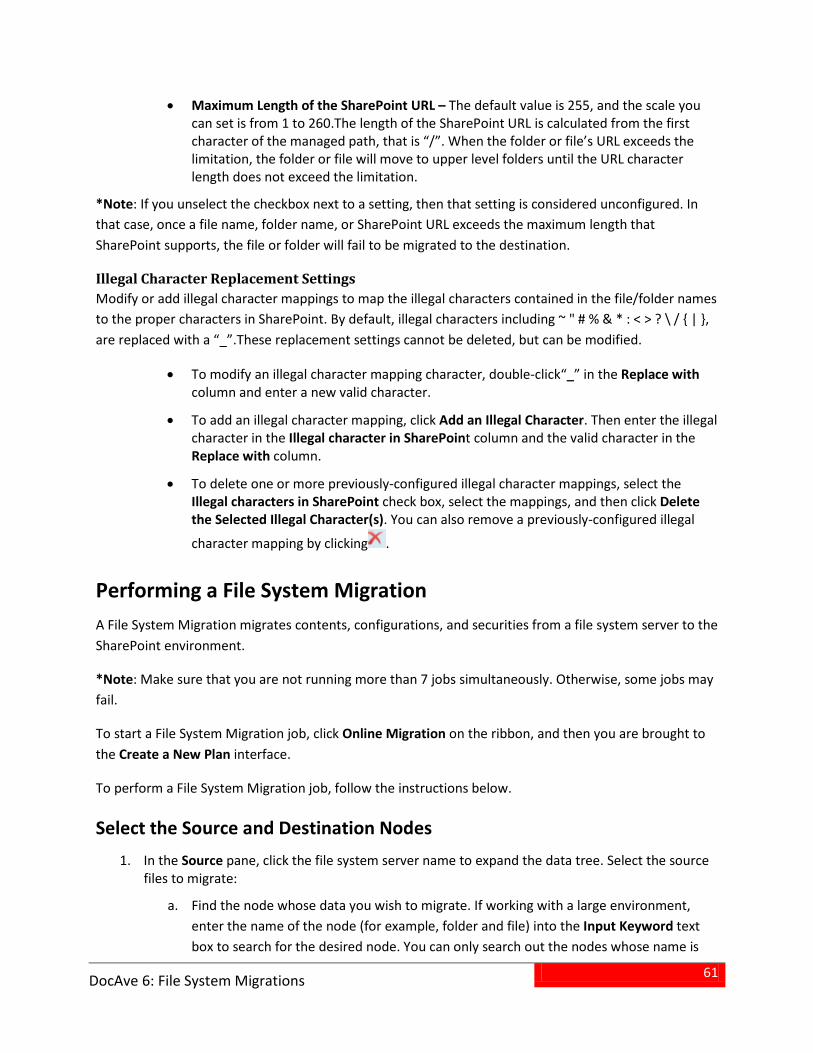
61
DocAve 6: File System Migrations
• Maximum Length of the SharePoint URL – The default value is 255, and the scale you can set is from 1 to 260.The length of the SharePoint URL is calculated from the first character of the managed path, that is “/”. When the folder or file’s URL exceeds the limitation, the folder or file will move to upper level folders until the URL character length does not exceed the limitation.
*Note: If you unselect the checkbox next to a setting, then that setting is considered unconfigured. In that case, once a file name, folder name, or SharePoint URL exceeds the maximum length that SharePoint supports, the file or folder will fail to be migrated to the destination.
Illegal Character Replacement Settings Modify or add illegal character mappings to map the illegal characters contained in the file/folder names to the proper characters in SharePoint. By default, illegal characters including ~ " # % & * : < > ? \ / { | }, are replaced with a “_”.These replacement settings cannot be deleted, but can be modified.
• To modify an illegal character mapping character, double-click“_” in the Replace with column and enter a new valid character.
• To add an illegal character mapping, click Add an Illegal Character. Then enter the illegal character in the Illegal character in SharePoint column and the valid character in the Replace with column.
• To delete one or more previously-configured illegal character mappings, select the Illegal characters in SharePoint check box, select the mappings, and then click Delete the Selected Illegal Character(s). You can also remove a previously-configured illegal
character mapping by clicking .
Performing a File System Migration A File System Migration migrates contents, configurations, and securities from a file system server to the SharePoint environment.
*Note: Make sure that you are not running more than 7 jobs simultaneously. Otherwise, some jobs may fail.
To start a File System Migration job, click Online Migration on the ribbon, and then you are brought to the Create a New Plan interface.
To perform a File System Migration job, follow the instructions below.
Select the Source and Destination Nodes 1. In the Source pane, click the file system server name to expand the data tree. Select the source
files to migrate:
Find the node whose data you wish to migrate. If working with a large environment, a.enter the name of the node (for example, folder and file) into the Input Keyword text box to search for the desired node. You can only search out the nodes whose name is
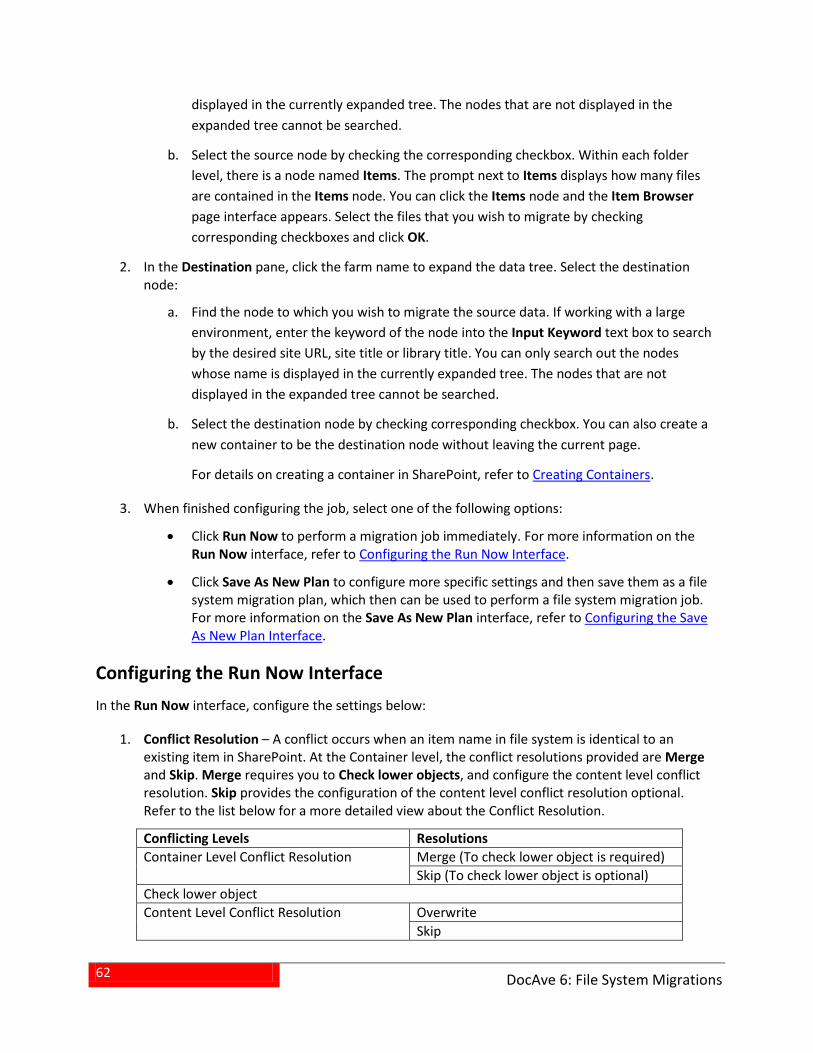
62
DocAve 6: File System Migrations
displayed in the currently expanded tree. The nodes that are not displayed in the expanded tree cannot be searched.
Select the source node by checking the corresponding checkbox. Within each folder b.level, there is a node named Items. The prompt next to Items displays how many files are contained in the Items node. You can click the Items node and the Item Browser page interface appears. Select the files that you wish to migrate by checking corresponding checkboxes and click OK.
2. In the Destination pane, click the farm name to expand the data tree. Select the destination node:
Find the node to which you wish to migrate the source data. If working with a large a.environment, enter the keyword of the node into the Input Keyword text box to search by the desired site URL, site title or library title. You can only search out the nodes whose name is displayed in the currently expanded tree. The nodes that are not displayed in the expanded tree cannot be searched.
Select the destination node by checking corresponding checkbox. You can also create a b.new container to be the destination node without leaving the current page.
For details on creating a container in SharePoint, refer to Creating Containers.
3. When finished configuring the job, select one of the following options:
• Click Run Now to perform a migration job immediately. For more information on the Run Now interface, refer to Configuring the Run Now Interface.
• Click Save As New Plan to configure more specific settings and then save them as a file system migration plan, which then can be used to perform a file system migration job. For more information on the Save As New Plan interface, refer to Configuring the Save As New Plan Interface.
Configuring the Run Now Interface In the Run Now interface, configure the settings below:
Conflict Resolution – A conflict occurs when an item name in file system is identical to an 1.existing item in SharePoint. At the Container level, the conflict resolutions provided are Merge and Skip. Merge requires you to Check lower objects, and configure the content level conflict resolution. Skip provides the configuration of the content level conflict resolution optional. Refer to the list below for a more detailed view about the Conflict Resolution.
Conflicting Levels Resolutions Container Level Conflict Resolution Merge (To check lower object is required)
Skip (To check lower object is optional) Check lower object Content Level Conflict Resolution Overwrite
Skip
63
DocAve 6: File System Migrations
Conflicting Levels Resolutions Append New version
Profile Selection – Configure the related migration options and mappings for the migration job. 2.Select a previously-created migration profile from the drop-down menu. File system Migration provides a default main profile named Default Profile.
Migration Database – Choose whether to specify a migration database to store detailed job 3.information in SQL Server for each farm. For detailed information about configuring a Migration Database, refer to Configuring Migration Databases.
Notification – Select the e-mail Notification profile for sending the notification report. For more 4.information on working with notification policies, refer to Control Panel Reference Guide.
Job Status Option – Specify whether or not to take the metadata/security exceptions into 5.consideration for the file system migration job status. If only the content metadata or security fails to migrate and you select Ignore metadata/security exceptions checkbox, the migration job status will be Finished. Otherwise, the job status will be Finished with Exception.
Configuring the Save As New Plan Interface In the Save As New Plan interface, configure the following settings to build a migration plan.
Plan Name – Enter a name in the text box for the plan you are about to create. It is optional to 1.enter the description for the plan.
Profile Selection – Configure the related migration options and mappings for the migration job. 2.
• Select a previously-created main profile from the drop-down menu. File system Migration provides you a default main profile named Default Profile.
• Click New Profile to create a new profile. The Profile Settings interface appears. For detailed instructions on configuring the main profile, see Setting Up File System Migration Profiles.
Source File Management – Configure settings for file system content upon migration job 3.completion.
• Copy to the destination –Copies the content from the source to the destination. After the job is finished, the content can be accessed from both file system and SharePoint.
• Move to the destination –Moves the content from the source to the destination. After the job is finished, the content in the source has been deleted, and you can only access the content from SharePoint.
• Move to another location once the job is completed –Moves the content to another location once the job is complete, and deletes the content from the source. You must enter the UNC path, Username and Password to connect to the specific location where you want to store the content once the job is finished. To check the validation of your path, click Validation Test.

64
DocAve 6: File System Migrations
*Note: The Username must follow the format of domain\user, or [email protected].
*Note: If a folder with the same name already exists in the specified location, the contents in the source folder will be merged to the destination folder of the same name. If a file with the same name already exists in the specified location, the file will not be moved to the specified location; it stays in the original source path.
Metadata Source – Specify the metadata that will be migrated with the content to the 4.destination. You may choose to use the file system metadata, configure your own metadata file yourself, or use the existing metadata file.
• Use the metadata of the file system –Uses the source file system metadata information with no need to configure the metadata.
• Configure the metadata file myself –Generates a metadata Excel file to customize your own metadata. If you check the Configure metadata file myself checkbox, you are required to generate Excel at first before you run the migration job. Refer to Customized Metadata File for more detailed instructions on configuring the metadata file.
• Use the existing metadata file –Uses the former created metadata files that exist in the source. If you check the Use the existing metadata file checkbox, make sure that the metadata files exist in the source before you perform the file system migration job. Refer to Existing Metadata File for more detailed instructions on using the existing metadata file.
Schedule Selection – In the schedule configuration area, choose one of the following: 5.
• No Schedule – Select this option to apply the rules of this plan, and then you must run the job manually.
• Configure the schedule myself – Select this option to configure the specific time you want to collect the data of this profile. The Schedule Settings area appears when you select this option.
Click Add Schedule, and then the Add Schedule interface appears. For more information on the Add Schedule interface, refer to Configuring the Add Schedule Interface.
Notification – Select the e-mail Notification profile for sending the notification report. For more 6.information on working with notification policies, refer to the Control Panel Reference Guide.
Associated Plan Group – Select an associated plan groups or create a new plan group in the 7.Associated plan group(s) drop-down list in order to make the plan run according to the selected plan group settings. For more information on plan groups, refer to the Control Panel Reference Guide.
Migration Database –Specify a migration database to store detailed job information in SQL 8.Server for each farm. For detailed information about the Migration Database, refer to the Configuring Migration Databases.
When finished configuring the plan, select one of the following options: 9.
• Click Save, then select Save to save the plan you have configured. The Plan Manager interface appears. For more information, refer to Managing Plans.
65
DocAve 6: File System Migrations
• Click Save, then select Save and Run Now to save the plan you have configured. The Run Now interface appears. Configure the following settings:
Options – Select a type of migration for this migration job. o
Full migration – Migrates with all contents from the source to the destination according to the settings of the profile.
Incremental migration – Migrates the newly-created or updated contents in the source node since the last migration job.
*Note: If you select the Incremental migration option, the Remigrate the objects whose metadata/securities failed to be migrated in the last migration job option in the Conflict Resolution section will be enabled, and you are required to decide whether or not to remigrate the objects whose metadata/securities failed to be migrated in the last migration job.
Conflict Resolution –Specify the conflict resolution action that occurs when the oitem names in file system conflicts with an existing item in SharePoint. For the Container level, the conflict resolutions provided are Merge and Skip. Merge requires you to check the lower objects, and configure the content level conflict resolution. Skip provides the configuration of the content level conflict resolution optional. For more detailed information of Conflict Resolution, refer to Appendix D: Conflict Resolution.
Job Status Option – Specify whether or not to take the metadata/security oexceptions into consideration for the file system migration job status. If the content metadata or security fails to migrate and you select Ignore metadata/security exceptions checkbox, the migration job status will be finished. Otherwise, the job status will be Finished with Exceptions.
Click OK to run the file system migration job. Click Cancel to go back to the Plan oManager interface.
Customized Metadata File Customized Metadata File ‒ This section is only available when the Configure the metadata file myself checkbox is checked. Since you have this option selected, after the configurations of this plan, you are required to generate an Excel file before running the migration job. Refer to Metadata Excel File for more detailed information.
• Generate only one metadata file –Generates only one metadata file in the source. This metadata file is stored in the top level folder or the foremost selected folder in the source tree.
Create a new version of the migrated file in the destination – File Version and oNew File Name column will be automatically added in the metadata file. If you select the Collapse all the folder structure option or Customize the folder structure of the migrated file in the destination option there may be files
66
DocAve 6: File System Migrations
sharing the same name in the same path. Selecting this option allows you to specify the different versions for these files under the new file name.
*Note: This option offers a specific solution: if you want to migrate the files in the different names to SharePoint as the different versions under a specific file name, select this option, and then customize your own metadata in the generated Excel.
Customize the folder structure of the migrated file in the destination – The oCustom Folder column will be automatically added in the metadata file. Once this column is created, the folder structure of the contents in the source will be collapsed. You can customize the file path in the Custom Folder column. The folder structure in the destination will be migrated according to the Custom Folder column.
*Note: If you do not check Generate only one metadata file checkbox, the metadata files will be generated in each selected folder of the source, and the customized columns will be added to each metadata file.
• Rename the migrated content in the destination – Renames the content to be migrated in the generated Excel. This option will automatically add the New File Name” column in the metadata files.
*Note: If you select Generate only one metadata file and Rename the migrated content in the destination at the same time, you can generate only one metadata file in the source with an added column named New File Name.
• Add a new column to the metadata file – Automatically adds the customized column in the metadata file. Through configuring the column value in the metadata file, you are able to create your desired column for the source content in SharePoint. Click Add a column, and then the configuration field appears. Enter a column name in the Column name column, and select a content type from the drop-down menu of content type column. Repeat the actions to add more columns. If you want to delete a previously-created column, check the checkbox ahead of the column name and then click Delete the Selected Column(s).
Existing Metadata File Existing Metadata File ‒ This selection is only available only when the Use the existing metadata file checkbox is checked. You must make sure that the Excel file has been placed in the source, and the columns you want to use have been added in the Excel file. Refer to Metadata Excel File for a more detailed instruction.
• Use only one metadata file –Uses only one existing metadata file for the migrated content.
Create a new version of the migrated file in the destination – For this feature oto function properly, make sure File Version and New File Name columns have been added in the metadata file. You may have selected the Collapse all the folder structure option, or you may have selected the Customize the folder
67
DocAve 6: File System Migrations
structure of the migrated file in the destination option with the Custom Folder column created, which may lead to the fact that multiple files are using the same name in the same path. If there are multiple files sharing the same name in the same path, selecting this option will allow you to create different versions for these files under the new file.
*Note: this option can realize a specific functionality: if you want to migrate the files in different names to SharePoint as the different versions under a specific file name, select this option, and then customize your own metadata in the existing metadata file.
Customize the folder structure of the migrated file in the destination – For this ofeature to function properly, make sure the Custom Folder column has been added in the existing metadata file. Once this column is created, and the folder structure of the contents in the source will be collapsed. You can customize the file path in the Custom Folder column. The folder structure in the destination will be migrated according to the Custom Folder column.
• Rename the migrated content in the destination – For this option to function properly, make sure the “New File Name” column has been added to the existing metadata file.
Configuring the Add Schedule Interface Follow the instructions below to configure the schedule settings.
Options – Select a type of migration for this schedule. 1.
• Full migration – Migrates with all contents from the source to the destination according to the settings of the profile.
• Incremental migration – Migrates the newly-created or updated contents in the source node since the last migration job.
*Note: If you select the Incremental migration option, the Remigrate the objects whose metadata/securities failed to be migrated in the last migration job option in the Conflict Resolution section will be enabled, and you are required to decide whether or not to remigrate the objects whose metadata/securities failed to be migrated in the last migration job.
Conflict Resolution –Specify the conflict resolution action that occurs when the item names in 2.file system conflicts with an existing item in SharePoint. For the Container level, the conflict resolutions provided are Merge and Skip. Merge requires you to check the lower objects, and configure the content level conflict resolution. Skip provides the configuration of the content level conflict resolution optional. For more detailed information of Conflict Resolution, refer to Appendix D: Conflict Resolution.
Schedule Settings – Specify the frequency to run this recurring schedule. Enter an integer into 3.the text box, and select Minute(s), Hour(s), Day(s), Week(s), Month(s) from the drop-down menu.
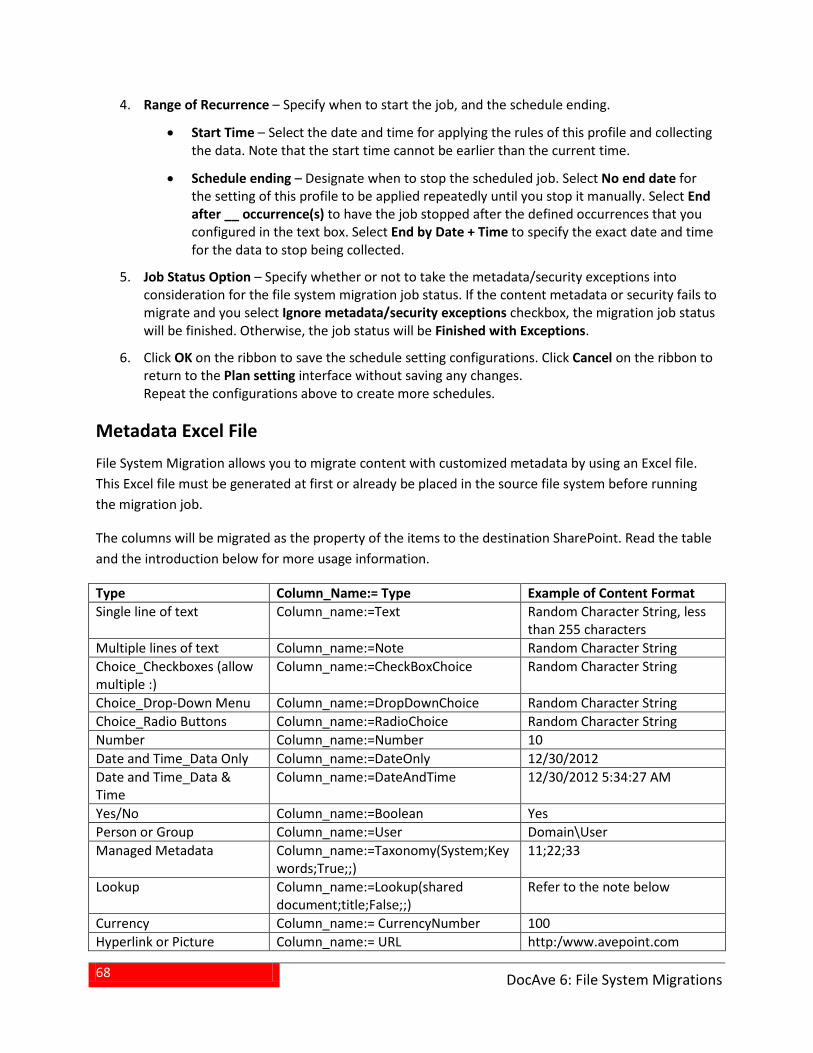
68
DocAve 6: File System Migrations
Range of Recurrence – Specify when to start the job, and the schedule ending. 4.
• Start Time – Select the date and time for applying the rules of this profile and collecting the data. Note that the start time cannot be earlier than the current time.
• Schedule ending – Designate when to stop the scheduled job. Select No end date for the setting of this profile to be applied repeatedly until you stop it manually. Select End after __ occurrence(s) to have the job stopped after the defined occurrences that you configured in the text box. Select End by Date + Time to specify the exact date and time for the data to stop being collected.
Job Status Option – Specify whether or not to take the metadata/security exceptions into 5.consideration for the file system migration job status. If the content metadata or security fails to migrate and you select Ignore metadata/security exceptions checkbox, the migration job status will be finished. Otherwise, the job status will be Finished with Exceptions.
Click OK on the ribbon to save the schedule setting configurations. Click Cancel on the ribbon to 6.return to the Plan setting interface without saving any changes. Repeat the configurations above to create more schedules.
Metadata Excel File File System Migration allows you to migrate content with customized metadata by using an Excel file. This Excel file must be generated at first or already be placed in the source file system before running the migration job.
The columns will be migrated as the property of the items to the destination SharePoint. Read the table and the introduction below for more usage information.
Type Column_Name:= Type Example of Content Format Single line of text Column_name:=Text Random Character String, less
than 255 characters Multiple lines of text Column_name:=Note Random Character String Choice_Checkboxes (allow multiple :)
Column_name:=CheckBoxChoice Random Character String
Choice_Drop-Down Menu Column_name:=DropDownChoice Random Character String Choice_Radio Buttons Column_name:=RadioChoice Random Character String Number Column_name:=Number 10 Date and Time_Data Only Column_name:=DateOnly 12/30/2012 Date and Time_Data & Time
Column_name:=DateAndTime 12/30/2012 5:34:27 AM
Yes/No Column_name:=Boolean Yes Person or Group Column_name:=User Domain\User Managed Metadata Column_name:=Taxonomy(System;Key
words;True;;) 11;22;33
Lookup Column_name:=Lookup(shared document;title;False;;)
Refer to the note below
Currency Column_name:= CurrencyNumber 100 Hyperlink or Picture Column_name:= URL http:/www.avepoint.com
69
DocAve 6: File System Migrations
• Single line of text – Allows random character string less than 255 characters. If you do not follow the corresponding column type format to customize the specific column, the column values you have added in the metadata file will be migrated to SharePoint in the single line of text.
• Multiple lines of text – Allows random character string.
• Choice_Checkboxes (allow multiple :) – Allows you to specify multiple values in the column cell and these values will be migrated to destination SharePoint as Choices. The format is aaa;#bbb;#ccc.
• Choice_Drop-Down Menu/Choice_Radio Buttons –Migrates the specified values in the column cells as Choices. The format is aaa.
• Number – The column value can be any number larger than 1 or equal to 1, such as 1.1 or 11.
• Date and Time_Date Only/Date and Time_Date & Time – Make sure the value is in the same format as that in SharePoint. The values in Date and Time_Data & Time column, and Date and Time_Data Only column, will be automatically converted into the corresponding time, according to the time zone that the SharePoint Server is using.
• Yes/No – If you enter yes/true or any character as the column value into this column, after the migration job, in the destination SharePoint the value in the file/folder’s Yes/No column is Yes. If you enter no/false into the column or you do not enter any character into the column, in the destination SharePoint the value in the file/folder’s Yes/No column is No. Note that this column is not case-sensitive.
• Person or Group – Allows you to assign SharePoint users, SharePoint groups, and domain groups for the file/folder when migrated to SharePoint destination.
*Note: If you want to enter multiple values, please specify the column header in the format: Column_name:=User(true). Then, enter multiple values into the column cell, for example summer\user1;#summer\user2;#summer\user3.
• Managed Metadata – The field type is taxonomy which represents fixed character strings. You are allowed to specify four values, respectively the group name, term name, whether to allow multiple values, and the separator you want to use. If there is already a column with the same name but in a different type existing in the destination, the assignment for this column will be invalid; and if there is no column with the same name in the destination, a Managed Metadata column will be created. You can enter nested terms in this column such as a<b<c<d, make sure the multiple terms are separated by the separator you set up.
• Lookup – The field type is lookup which represents fixed character strings. You are allowed to specify two values. First one is the name of the list or library where it gets information from. The second one is the name of column which it points to. Note that the list or library must exist, the corresponding values of this column it points to must exist, and the second value is case-sensitive.
70
DocAve 6: File System Migrations
• Currency – The value can be any number or the number with the currency unit, such as 100.
*Note: In the generated metadata file, by default the Full Path column is the first row. If you delete the entire Full Path column or clear the values of the specific files in the Full Path column, the specific files will not be migrated to the destination. In the following situations, the metadata will not be migrated to the destination:
• If the column value does not match with the column type, the column value will not be migrated to destination.
• If there were a column in the destination with the same name but in different types, the column will not be created.
• If there is no value in an entire column, this column will not be created in the destination.
71
DocAve 6: SharePoint Migrations
SharePoint Online Migrations SharePoint Online Migrations includes: SharePoint 2007 to 2010 on-premises Migration, SharePoint 2007 to 2013 on-premises Migration, SharePoint 2010 to 2013 on-premises Migration, SharePoint 2007 to SharePoint Online Migration, and SharePoint 2010 to SharePoint Online Migration. Refer to the sections below to use SharePoint Migrator.
Configuring SharePoint Online Migration Profiles The Online Migration Profile allows you to specify and define numerous settings for the migration jobs including Source Component Options, Mapping Options, and Advanced Options. Follow the instructions below to create an online migration profile.
1. From the Home tab, in the Profile group, click Profile Settings. The Profile Settings tab appears.
2. From the Profile Settings tab, in the Options group, ensure Online Profile is highlighted.
3. From the Profile Settings tab, under the Profile Management group, click New.
4. Enter a profile name in the pop-up window and click OK.
5. Select the Source Component Options from the left-hand pane and configure the settings described in the following section.
Source Component Options To configure the Source Component Options, complete the following steps:
Filter Policy – Select specific object or data within each SharePoint level (Web application down 1.to item level). The default filter policy is set to be none. You may select a previously-created filter policy from the drop-down menu. Or click New Filter Policy to create a new filter policy. For more detailed information about the filter policy, refer to the DocAve 6 Control Panel Reference Guide.
Alerts – Migrate the alerts of different levels in the source to the destination SharePoint 2.environment by selecting the Migrate alert of the list, library, folder, item and document level checkbox.
Workflow – Select the Include workflow definition checkbox to migrate the definition of 3.existing workflows for the selected content from the source node to the destination node. Select the Include workflow instance checkbox to migrate the state, history, and tasks of existing workflows for the selected content from the source node to the destination node. The following checkboxes are selectable only if you select the Include workflow instance checkbox:
• Include completed workflows – Migrates the state, history, and tasks of completed workflows for the selected content from the source node to the destination node.
72
DocAve 6: SharePoint Migrations
• Include running workflows – Migrates the state, history, and tasks of running workflows for the selected content from the source node to the destination node. This checkbox is optional. If you select this checkbox, the following radio buttons are available:
Cancel the running workflows after migration jobs – Cancels the running oworkflows for the selected source content in the destination after the migration jobs. By default, this radio button is selected.
Restart the canceled workflows after migration jobs – Cancels the running oworkflows for the selected source content in the destination after the migration jobs. And then restarts the canceled workflows.
*Note: If you select the SharePoint Online farm as the destination and select to migrate both the workflow definition and workflow instance, only the workflow definition is migrated to the destination SharePoint Online farm.
Empty Lists – Migrate the source empty lists and libraries that have no items in SharePoint to 4.the destination SharePoint environment by selecting the Include empty lists and libraries checkbox. By default, this checkbox is selected.
*Note: If you uncheck this checkbox, the empty lists and libraries will not be migrated to the destination even if they meet the rules defined in the selected filter policy of the profile.
When finished, select the Mapping Options from the left-hand pane and configure the 5.mappings described in the following section.
Mapping Options To configure the Mapping Options, complete the following steps:
Column Mapping – Replaces source columns with destination columns. According to the column 1.type, the source column and the destination column can be the same or different. The column can also be changed to Managed Metadata or Lookup. The default column mapping is set to be none. You may select a previously-created column mapping from the drop-down menu, or click New Column Mapping from the drop-down menu to create a new one. For information on creating a column mapping, see the DocAve 6 Control Panel Reference Guide.
*Note: If you choose to change a column to a lookup column, make sure that the lookup column can only be associated with the list or list column that exists in the destination.
Content Type Mapping – Replaces source content types with destination content types 2.according to the condition that you set up. The default content type mapping is set to be none. You may select a previously-created content type mapping from the drop-down menu, or click New Content Type Mapping from the drop-down menu to create a new one. For information on creating a content type mapping, see the DocAve 6 Control Panel Reference Guide.
Template Mapping – Replaces site templates and list templates. By inputting or selecting 3.Template ID, the source template is changed to the destination template. The default template mapping is set to be none. You may select a previously-created template mapping from the drop-down menu, or click New Template Mapping from the drop-down menu to create a new
73
DocAve 6: SharePoint Migrations
one. For information on creating a template mapping, see the DocAve 6 Control Panel Reference Guide.
User Mapping – Replaces an existing source node username with an existing destination node 4.username or a default username in destination. The default user mapping is set to be none. You may select a previously-created user mapping from the drop-down menu, or click New User Mapping from the drop-down menu to create a new one. For information on creating a user mapping, see the DocAve 6 Control Panel Reference Guide.
Domain Mapping – Maps a domain name in the source to a domain name in the destination. 5.The default domain mapping is set to be none. You may select a previously-created domain mapping from the drop-down menu, or click New Domain Mapping from the drop-down menu to create a new one. For information on creating a domain mapping, see the DocAve 6 Control Panel Reference Guide.
Language Mapping – Displays the destination node in a different language from the source node 6.after the plan has been executed. The default language mapping is set to be none. You may select a previously-created language mapping from the drop-down menu, or click New Language Mapping from the drop-down menu to create a new one. For information on creating a language mapping, see the DocAve 6 Control Panel Reference Guide.
List Name Mapping – Maps the lists in the source to the specified lists in the destination, or 7.changes the list name to another one. Conditions configured in the list name mapping are optional. The default list name mapping is set to be none. You may select a previously-created list name mapping from the drop-down menu, or click New List Name Mapping from the drop-down menu to create a new one. For information on creating a list name mapping, see the DocAve 6 Control Panel Reference Guide.
By default, DocAve maps the SharePoint 2007/2010 Shared Documents and Documents libraries to the SharePoint 2013 Documents library with the Shared Documents in the URL. To disable this default mapping, refer to Editing the XML File.
When finished, select the Advanced Options from the left-hand pane and configure the settings 8.described in the following section.
*Note: If the authentication of the source and destination are different, make sure that you have configured the user mapping or domain mapping to ensure that the source users are available in the destination.
Advanced Options To configure the Advanced Options, complete the following steps:
Preserve the Null Column Values – Choose whether or not to preserve the null value of item 1.columns in the source. Some values of the newly-created columns may be null for previous items, and this option allows you to choose whether to replace the null value with the default value in the destination.
• If you select the Yes radio button, the null values of item columns (such as newly-created columns) are preserved. By default, the Yes radio button is selected.
74
DocAve 6: SharePoint Migrations
• If you select the No radio button, the null values of item columns (such as newly-created columns) are replaced with default values in the destination node.
Change Site Look and Feel – Choose whether to change or preserve the look and feel of the 2.SharePoint sites in the destination. Normally, the manually input site or site collection is used as the destination node.
• Change existing SharePoint sites to use the new user experience ‒ Uses the destination look and feel for the migrated site collections or sites. Administrators of the destination site can control the user experience for end users.
*Note: If you choose this option, the property of the source site must be migrated to the destination in SharePoint 2007 to 2010 Migration jobs. Make sure that in the source tree the Property checkbox behind the source site is selected.
Preserve customized pages, but update template and application pages to use othe new UI ‒ Preserves the content of the customized pages and uses the destination template and application pages after the migration.
Reset all customized pages to their original templates ‒ Deletes all customized opages and deletes modifications from customized pages. This cannot be undone.
• Preserve the look and feel of existing SharePoint sites, and allow end users to update their sites' user experience ‒ Preserves the source look and feel for the migrated site collections and sites after the migration. The end user can still update the look and feel of the SharePoint sites in the source to that of the SharePoint sites in the destination, but it is irreversible.
*Note: This function is only available for SharePoint 2007 to 2010 Migration and SharePoint 2010 to 2013 Migration.
Folder Structure Management – Choose whether or not to collapse the folder structure of the 3.source SharePoint content. If you select the Collapse folder structure checkbox, all levels of the folder structure of the source content will be collapsed. All files within the folders will be migrated to the library and merged to the same path in the destination. With this option selected, you can further choose to add a column to display the source path of the files in the destination. Select the Add column to keep source path checkbox. DocAve Source Path is provided as the default name of the column and you can also customize the name by entering a column name in the text box.
Character Length Settings – This is used to set character length limitations for SharePoint URL, 4.folder name, and file name.
• Maximum length of the SharePoint URL – The default value is 255 and you can define the value from 1 to 260. The length of the SharePoint URL is calculated from the first character of the managed path, that is /. When the folder or file’s URL exceeds the limitation, the migration results are as follows:
If the folder URL exceeds the limitation, the folder name will be pruned oaccording to the value which is set in Maximum length of the folder name first. If the folder URL still exceeds the limitation, the folder and its content will be
75
DocAve 6: SharePoint Migrations
migrated to the root folder of the destination list. If there is a file whose URL exceeds the limitation within a folder, the file name will be pruned according to the value which is set in Maximum length of the file name first. If the file URL still exceeds the limitation, it will be migrated to the root folder of the destination list.
If the file URL exceeds the limitation, the file name will be pruned according to othe value which is set in Maximum length of the file name first. If the file URL still exceeds the limitation, it will be migrated to the root folder of the destination list.
• Maximum length of the folder name – The default value is 128 and you can define the value from 1 to 128. If the folder name exceeds the limitation, the extra characters will be pruned from the end. For example, a folder is named abcdef in the source and the value that you set here is 5. The folder will be named abcde after the migration.
• Maximum length of the file name – The default value is 128 and you can define the value from 1 to 128. If the file name, including the file extension, exceeds the limitation, the extra characters will be pruned from the end. For example, a file is named abcdef.txt in the source and the value that you set here is 5. The file will be named a_0.txt after the migration. _0 is used to mark that the file name is pruned.
Dynamic Rule – Allows you to configure your own mappings and filter policies using C #. The 5.default dynamic rule is set to be none. You may select a previously-created dynamic rule from the drop-down menu, or click New Dynamic Rule from the drop-down menu to create a new one. For information on creating a new dynamic rule, see the Configuring Dynamic Rules section of this guide.
When finished configuring all options, click Save to save the profile. Alternatively, click Save as 6.and enter a profile name to save it as another profile.
Configuring Dynamic Rules The Dynamic Rule allows you to specify and define your own mappings (column mappings and content type mappings) and filter policies by using DLL files customized in C#. Follow the instructions below to create a dynamic rule.
1. From the Home tab, in the Profile group, click Profile Settings. The Profile Settings tab appears.
2. From the Profile Settings tab, in the Settings group, click Dynamic Rule on the ribbon. The Dynamic Rule window pops up.
3. From the Dynamic Rule window, in the Manage group, click Create.
4. Configure the settings below:
• Name and Description – Choose a name for the dynamic rule that you are about to create. Then enter an optional Description for future references.
• Upload a DLL File – Upload a customized DLL file for this dynamic rule.
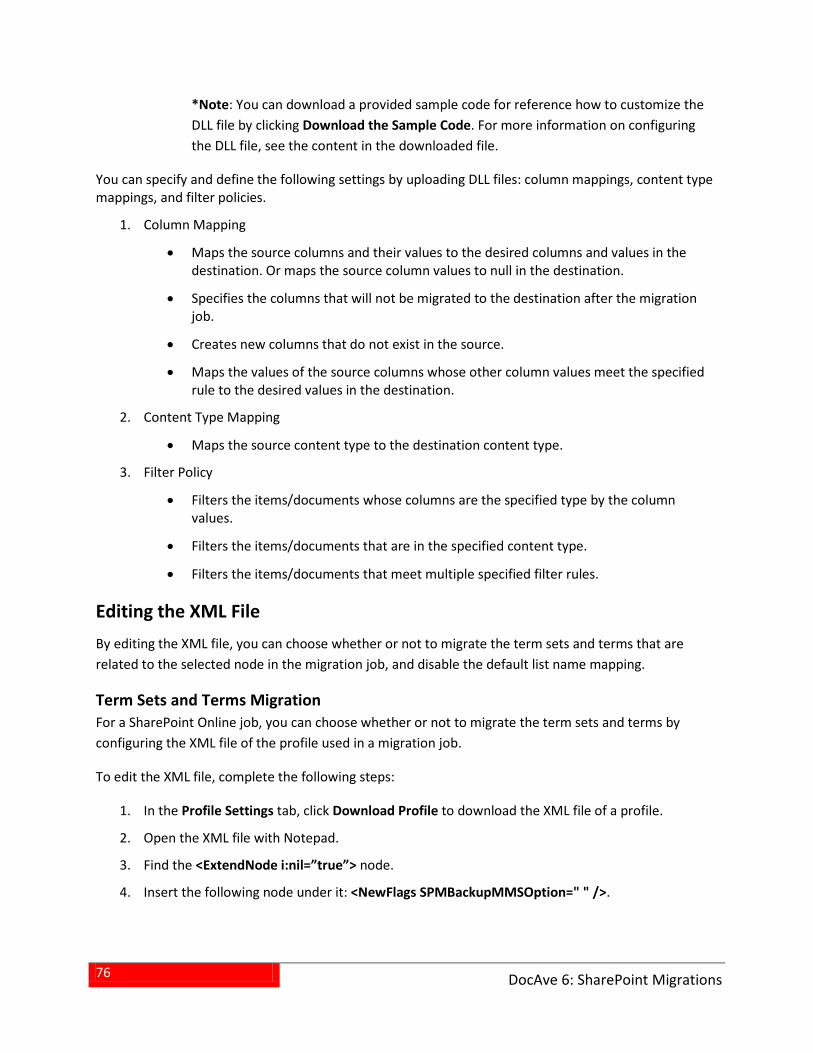
76
DocAve 6: SharePoint Migrations
*Note: You can download a provided sample code for reference how to customize the DLL file by clicking Download the Sample Code. For more information on configuring the DLL file, see the content in the downloaded file.
You can specify and define the following settings by uploading DLL files: column mappings, content type mappings, and filter policies.
1. Column Mapping
• Maps the source columns and their values to the desired columns and values in the destination. Or maps the source column values to null in the destination.
• Specifies the columns that will not be migrated to the destination after the migration job.
• Creates new columns that do not exist in the source.
• Maps the values of the source columns whose other column values meet the specified rule to the desired values in the destination.
2. Content Type Mapping
• Maps the source content type to the destination content type.
3. Filter Policy
• Filters the items/documents whose columns are the specified type by the column values.
• Filters the items/documents that are in the specified content type.
• Filters the items/documents that meet multiple specified filter rules.
Editing the XML File By editing the XML file, you can choose whether or not to migrate the term sets and terms that are related to the selected node in the migration job, and disable the default list name mapping.
Term Sets and Terms Migration For a SharePoint Online job, you can choose whether or not to migrate the term sets and terms by configuring the XML file of the profile used in a migration job.
To edit the XML file, complete the following steps:
1. In the Profile Settings tab, click Download Profile to download the XML file of a profile.
2. Open the XML file with Notepad.
3. Find the <ExtendNode i:nil=”true”> node.
4. Insert the following node under it: <NewFlags SPMBackupMMSOption=" " />.
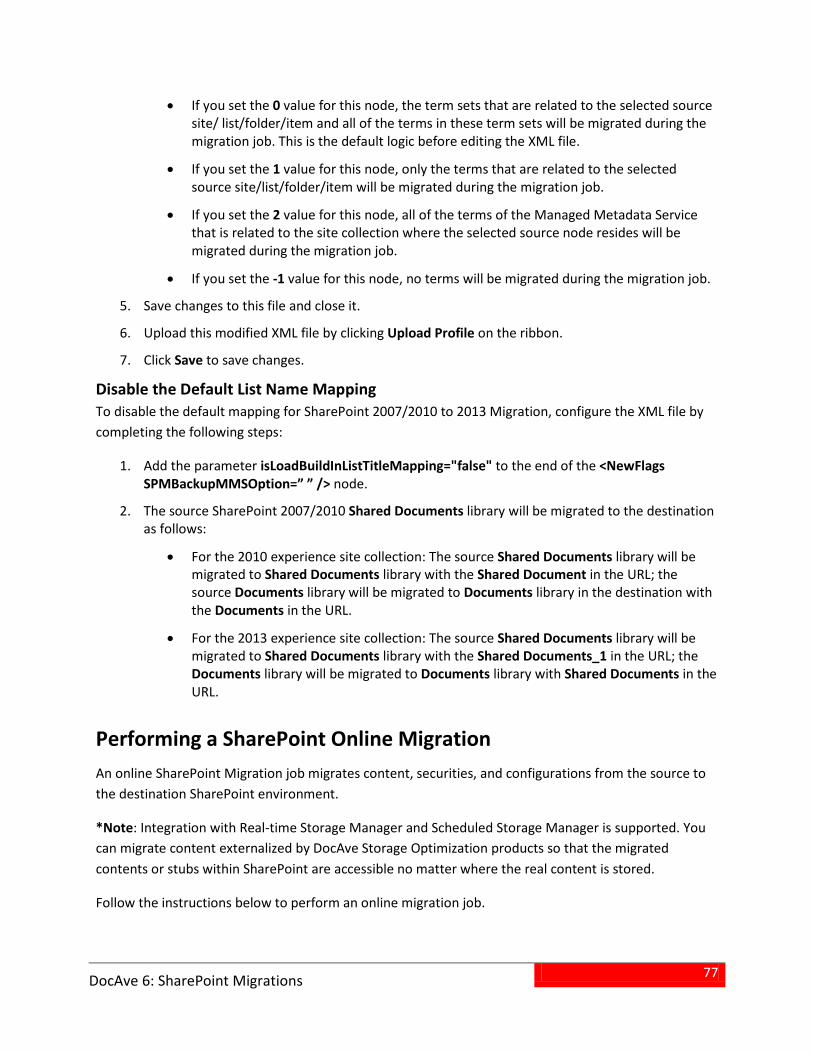
77
DocAve 6: SharePoint Migrations
• If you set the 0 value for this node, the term sets that are related to the selected source site/ list/folder/item and all of the terms in these term sets will be migrated during the migration job. This is the default logic before editing the XML file.
• If you set the 1 value for this node, only the terms that are related to the selected source site/list/folder/item will be migrated during the migration job.
• If you set the 2 value for this node, all of the terms of the Managed Metadata Service that is related to the site collection where the selected source node resides will be migrated during the migration job.
• If you set the -1 value for this node, no terms will be migrated during the migration job.
5. Save changes to this file and close it.
6. Upload this modified XML file by clicking Upload Profile on the ribbon.
7. Click Save to save changes.
Disable the Default List Name Mapping To disable the default mapping for SharePoint 2007/2010 to 2013 Migration, configure the XML file by completing the following steps:
Add the parameter isLoadBuildInListTitleMapping="false" to the end of the <NewFlags 1.SPMBackupMMSOption=” ” /> node.
The source SharePoint 2007/2010 Shared Documents library will be migrated to the destination 2.as follows:
• For the 2010 experience site collection: The source Shared Documents library will be migrated to Shared Documents library with the Shared Document in the URL; the source Documents library will be migrated to Documents library in the destination with the Documents in the URL.
• For the 2013 experience site collection: The source Shared Documents library will be migrated to Shared Documents library with the Shared Documents_1 in the URL; the Documents library will be migrated to Documents library with Shared Documents in the URL.
Performing a SharePoint Online Migration An online SharePoint Migration job migrates content, securities, and configurations from the source to the destination SharePoint environment.
*Note: Integration with Real-time Storage Manager and Scheduled Storage Manager is supported. You can migrate content externalized by DocAve Storage Optimization products so that the migrated contents or stubs within SharePoint are accessible no matter where the real content is stored.
Follow the instructions below to perform an online migration job.
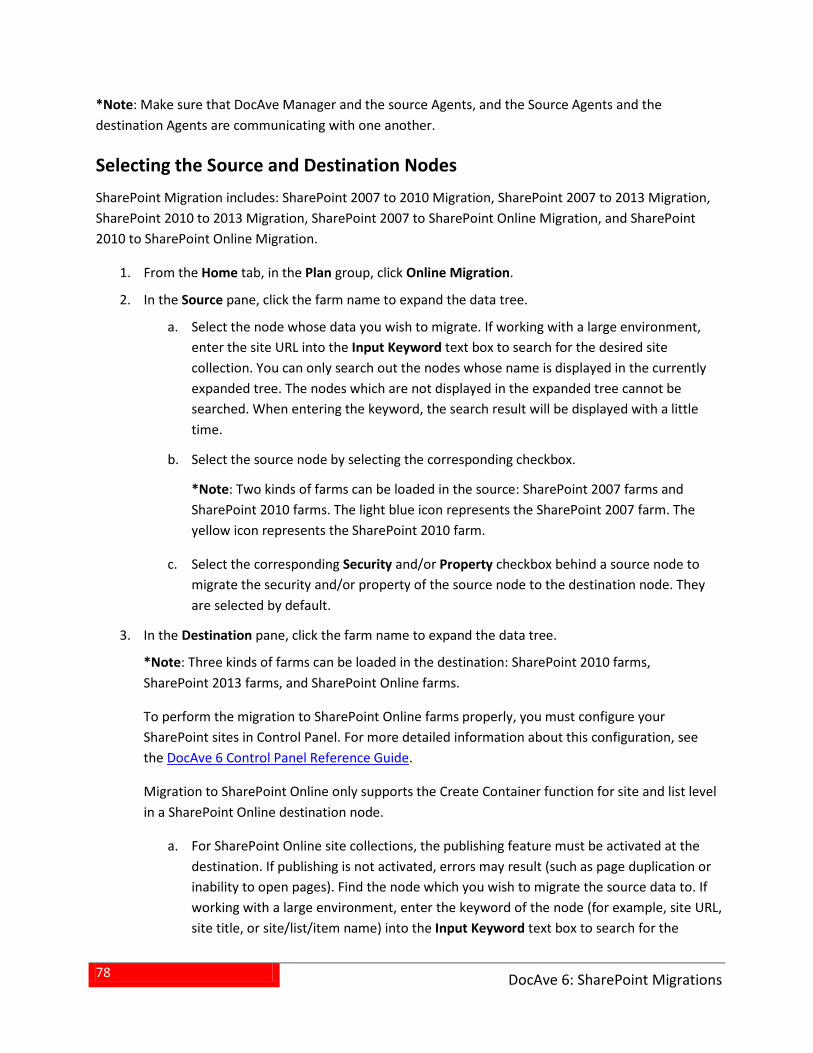
78
DocAve 6: SharePoint Migrations
*Note: Make sure that DocAve Manager and the source Agents, and the Source Agents and the destination Agents are communicating with one another.
Selecting the Source and Destination Nodes SharePoint Migration includes: SharePoint 2007 to 2010 Migration, SharePoint 2007 to 2013 Migration, SharePoint 2010 to 2013 Migration, SharePoint 2007 to SharePoint Online Migration, and SharePoint 2010 to SharePoint Online Migration.
From the Home tab, in the Plan group, click Online Migration. 1.
In the Source pane, click the farm name to expand the data tree. 2.
Select the node whose data you wish to migrate. If working with a large environment, a.enter the site URL into the Input Keyword text box to search for the desired site collection. You can only search out the nodes whose name is displayed in the currently expanded tree. The nodes which are not displayed in the expanded tree cannot be searched. When entering the keyword, the search result will be displayed with a little time.
Select the source node by selecting the corresponding checkbox. b.
*Note: Two kinds of farms can be loaded in the source: SharePoint 2007 farms and SharePoint 2010 farms. The light blue icon represents the SharePoint 2007 farm. The yellow icon represents the SharePoint 2010 farm.
Select the corresponding Security and/or Property checkbox behind a source node to c.migrate the security and/or property of the source node to the destination node. They are selected by default.
In the Destination pane, click the farm name to expand the data tree. 3.
*Note: Three kinds of farms can be loaded in the destination: SharePoint 2010 farms, SharePoint 2013 farms, and SharePoint Online farms.
To perform the migration to SharePoint Online farms properly, you must configure your SharePoint sites in Control Panel. For more detailed information about this configuration, see the DocAve 6 Control Panel Reference Guide.
Migration to SharePoint Online only supports the Create Container function for site and list level in a SharePoint Online destination node.
For SharePoint Online site collections, the publishing feature must be activated at the a.destination. If publishing is not activated, errors may result (such as page duplication or inability to open pages). Find the node which you wish to migrate the source data to. If working with a large environment, enter the keyword of the node (for example, site URL, site title, or site/list/item name) into the Input Keyword text box to search for the
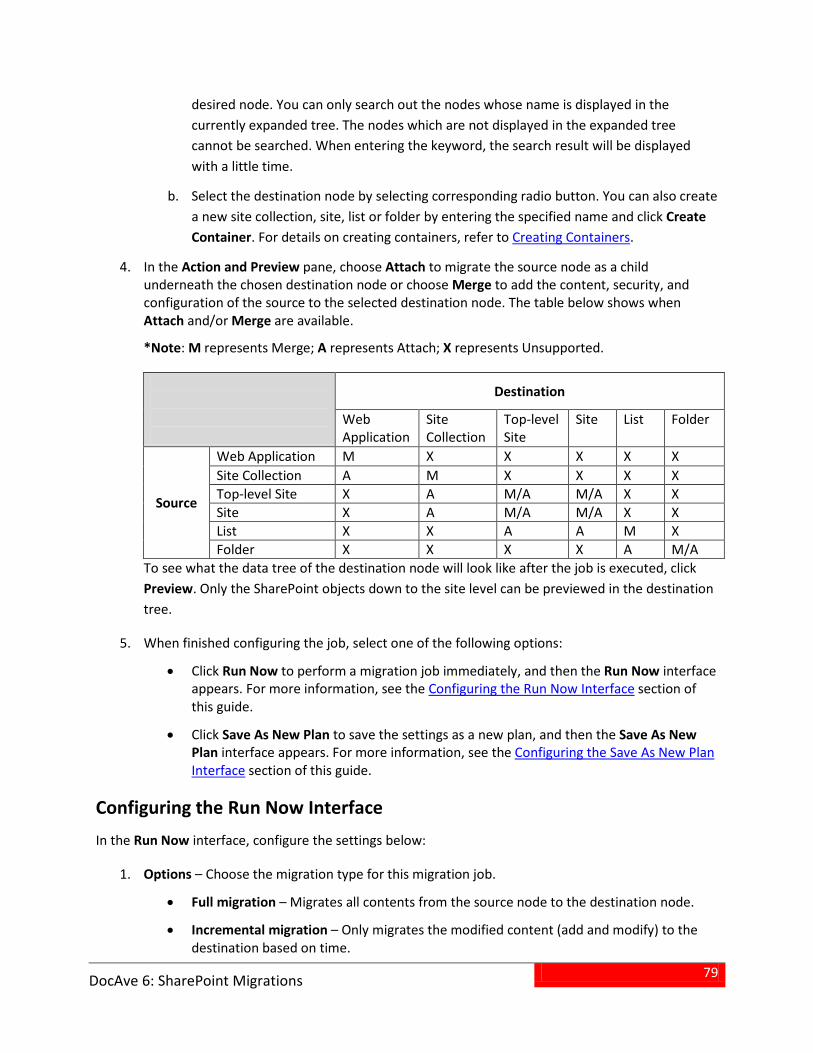
79
DocAve 6: SharePoint Migrations
desired node. You can only search out the nodes whose name is displayed in the currently expanded tree. The nodes which are not displayed in the expanded tree cannot be searched. When entering the keyword, the search result will be displayed with a little time.
Select the destination node by selecting corresponding radio button. You can also create b.a new site collection, site, list or folder by entering the specified name and click Create Container. For details on creating containers, refer to Creating Containers.
In the Action and Preview pane, choose Attach to migrate the source node as a child 4.underneath the chosen destination node or choose Merge to add the content, security, and configuration of the source to the selected destination node. The table below shows when Attach and/or Merge are available.
*Note: M represents Merge; A represents Attach; X represents Unsupported.
Destination
Web Application
Site Collection
Top-level Site
Site List Folder
Source
Web Application M X X X X X Site Collection A M X X X X Top-level Site X A M/A M/A X X Site X A M/A M/A X X List X X A A M X Folder X X X X A M/A
To see what the data tree of the destination node will look like after the job is executed, click Preview. Only the SharePoint objects down to the site level can be previewed in the destination tree.
When finished configuring the job, select one of the following options: 5.
• Click Run Now to perform a migration job immediately, and then the Run Now interface appears. For more information, see the Configuring the Run Now Interface section of this guide.
• Click Save As New Plan to save the settings as a new plan, and then the Save As New Plan interface appears. For more information, see the Configuring the Save As New Plan Interface section of this guide.
Configuring the Run Now Interface In the Run Now interface, configure the settings below:
Options – Choose the migration type for this migration job. 1.
• Full migration – Migrates all contents from the source node to the destination node.
• Incremental migration – Only migrates the modified content (add and modify) to the destination based on time.

80
DocAve 6: SharePoint Migrations
Specify the time range in the Incremental Type field, and only the changes within the specified time range will be migrated. Enter an integer into the text box and select Minute(s), Hour(s), Day(s), Week(s) or Month(s) from the drop-down list.
*Note: To perform an incremental migration job, DocAve obtains data from the SharePoint change log. Before you run an incremental migration job, AvePoint recommends you verify the validity and last truncation date (if any) of the relevant change log. For more information, see the MSDN article Using the Change Log.
Conflict Resolution – Specify the conflict resolution when the item name in the source 2.SharePoint environment conflicts with an existing item name in the destination SharePoint environment. For the Container Level, the conflict resolutions provided are Merge and Skip. Merge required you to check the lower objects for conflicts, and configure the Content Level conflict resolution. Skip provides the configuration of the content level conflict resolution optional. For more detailed information of Conflict Resolution, refer to Appendix D: Conflict Resolution.
Profile Selection – Configure the related source component options, mapping options, and 3.advanced options for the migration job. Select a previously-configured profile from the drop-down list. SharePoint Migration provides you a default profile named Default Profile.
Agent Group – Select a source Agent group and a destination Agent group for this migration 4.plan from the drop-down list. For details on creating an Agent group, refer to the DocAve 6 Control Panel Reference Guide.
Notification – Designate DocAve users to receive e-mail notifications containing reports. Select a 5.previously-configured notification profile from the drop-down list, or click New Notification Profile from the drop-down list to create a new one. For more information on working with notification profiles, refer to the DocAve 6 Control Panel Reference Guide.
Migration Database – Choose whether to use specified migration database to store the job data 6.in SQL Server for each farm. For detailed information on configuring a Migration Database, refer to the Configuring Migration Databases section of this guide.
*Note: The migration database is not supported in the migration job that selects the SharePoint Online farm as the destination, and this Migration Database field will be hidden.
Job Report – Select the level of the Job Report. Simplified creates a summary of the content 7.migrated to the destination SharePoint environment. Detailed creates a full list of all objects migrated to the destination SharePoint environment at the cost of performance.
Click OK to run the job immediately or click Cancel to return to the Home page of Online Migration.
Configuring the Save As New Plan Interface In the Save As New Plan interface, configure the following settings:
Plan Name – Enter a name for the plan that you are about to create. Then enter an optional 1.Description for future references.
81
DocAve 6: SharePoint Migrations
Profile Selection – Configure the related source component options, mapping options, and 2.advanced options for the online migration job. Select a previously-configured profile from the drop-down list to apply the migration settings to the migration job. SharePoint Migration provides you a default profile named Default Profile.
Agent Group – Select a source Agent group and a destination Agent group for this migration 3.plan from the drop-down list. For details on creating an Agent group, refer to the DocAve 6 Control Panel Reference Guide.
Schedule Selection – Select one type of schedule to run the plan. 4.
• No schedule – Select this option to run the plan manually.
• Configure the schedule myself – Select this option and the Schedule Settings section appears under the Schedule Selection section.
Click Add Schedule and the Add Schedule interface appears. For more information, see the Configuring the Add Schedule Interface section of this guide.
Notification – Designate DocAve users to receive e-mail notifications containing reports. Select a 5.previously-configured notification profile from the drop-down list, or click New Notification Profile from the drop-down list to create a new one. For more information on working with notification profiles, refer to the DocAve 6 Control Panel Reference Guide.
Associated Plan Group – Select associated plan groups or create a new plan group in the 6.Associated plan group(s) drop-down list in order to make the plan run according to the selected plan group settings. For more information on plan groups, refer to the DocAve 6 Control Panel Reference Guide.
Migration Database – Choose whether to use specified migration database to store the job data 7.in SQL Server for each farm. For detailed information on configuring a Migration Database, refer to the Configuring Migration Databases section of this guide.
*Note: The Migration Database field is hidden when configuring jobs with a SharePoint Online farm as the destination.
When finished configuring the plan, select one of the following options: 8.
• Click Save to select Save to save the plan you have configured. To save the plan and execute it right away.
• Click Save to select Save and Run Now to save the plan you have configured, then the Run Now interface appears. For detailed information on the Run Now interface, refer to the Configuring the Run Now Interface section of this guide.
Configuring the Add Schedule Interface Click Add Schedule and the Add Schedule interface appears. Configure the following settings:
Options – Select a type of migration for the customized schedule. 1.
• Choose Full migration to migrate all contents from the source node to the destination node according to the profile.
82
DocAve 6: SharePoint Migrations
• Choose Incremental migration to only migrate the modified content (add and modify) to the destination based on content or time.
If you choose to migrate the modified content based on content, make sure that oyou have run a full migration job and select the Incremental migration radio button only.
If you choose to migrate the modified content based on time, select the Migrate ochanges within checkbox to specify the time range, and only the changes within the specified time range will be migrated. Enter an integer into the text box and select Minute(s), Hour(s), Day(s), Week(s) or Month(s) from the drop-down list.
*Note: To perform an incremental migration job, DocAve obtains data from the SharePoint change log. Before you run an incremental migration job, AvePoint recommends you verify the validity and last truncation date (if any) of the relevant change log. For more information, see the MSDN article Using the Change Log.
Conflict Resolution – Specify the conflict resolution when the item name in the source 2.SharePoint environment conflicts with an existing item name in the destination SharePoint environment. For the Container Level, the conflict resolutions provided are Merge and Skip. Merge requires you to check lower objects for conflicts, and configure content level conflict resolution. Skip provides the configuration of the Content Level resolution optional. For more detailed information of Conflict Resolution, refer to Appendix D: Conflict Resolution.
Schedule Settings – Specify the frequency to run the recurring schedule. Enter an integer into 3.the text box and select Minute(s), Hour(s), Day(s), Week(s) or Month(s) from the drop-down list.
Range of Recurrence – Specify when to start and end the running recurring schedule. 4.
Start time – Set up the time to start the plan and Time Zone can be changed under the a.Start time. Note that the start time cannot be earlier than the current time.
No end date – Select this option to repeat running the plan until being stopped b.manually.
End after specified occurrence(s) – Select this option to stop the plan after specified c.occurrences that you configure in the text box.
End by – Set up the time to end the recurrence of plans. d.
*Note: Options b, c and d above are radio buttons. You can only select one of these methods to finish this schedule.
Click OK to save the configuration of schedule, or click Cancel to return to the Save As New Plan 5.interface without saving any changes.
Click Calendar View to preview the previously-configured schedule in a calendar. 6.
You can delete a previously-configured schedule by clicking behind a corresponding schedule. 7.
Configuring the Run Now Interface In the Run Now interface, configure the settings below:
83
DocAve 6: SharePoint Migrations
Options – Choose the migration type for this migration job. 1.
• Full migration – Migrates all contents from the source node to the destination node.
• Incremental migration – Only migrate the modified content (add and modify) to the destination based on content or time.
If you choose to migrate the modified content based on content, make sure that oyou have run a full migration job and select the Incremental migration radio button only.
If you choose to migrate the modified content based on time, select the Migrate ochanges within checkbox to specify the time range, and only the changes within the specified time range will be migrated. Enter an integer into the text box and select Minute(s), Hour(s), Day(s), Week(s) or Month(s) from the drop-down list.
*Note: To perform an incremental migration job, DocAve obtains data from the SharePoint change log. Before you run an incremental migration job, AvePoint recommends you verify the validity and last truncation date (if any) of the relevant change log. For more information, see the MSDN article Using the Change Log.
Conflict Resolution – Specify the conflict resolution when the item name in the source 2.SharePoint environment conflicts with an existing item name in the destination SharePoint environment. For the Container Level, the conflict resolutions provided are Merge and Skip. Merge required you to check the lower objects for conflicts, and configure the Content Level conflict resolution. Skip provides the configuration of the content level conflict resolution optional. For more detailed information of Conflict Resolution, refer to Appendix D: Conflict Resolution.
Job Report – Select the level of the Job Report. Simplified creates a summary of the content 3.migrated to the destination SharePoint environment. Detailed creates a full list of all the objects migrated to the destination SharePoint environment at the cost of performance.
Click OK to run the migration job immediately or click Cancel to return to the Save As New Plan 4.interface without saving any changes.

84
DocAve 6: SharePoint Migrations
SharePoint Offline Migrations Refer to the sections below to use SharePoint Offline Migrator.
*Note: SharePoint Offline Migrator supports SharePoint 2007, 2010, and 2013 on-premises.
Configuring SharePoint Offline Migration Profiles To use Export Profile or Import Profile, you must configure storage policies first. For information on configuring storage policies, see the Configuring Storage Policies section of this guide.
Configuring Storage Policies In order to perform a SharePoint offline migration job, you must set up a Storage Policy to choose a physical device to store the exported data.
To access Storage Policy, from the Home tab, click Storage Policy in the Settings group. Then you will be brought to the Storage Configuration interface of Control Panel.
For specific instructions on setting up a storage policy, refer to the DocAve 6 Control Panel Reference Guide.
Setting Up an Export Profile Create an Export Profile for SharePoint Migrator offline jobs to configure the source component options.
From the Home tab, in the Profile group, click Profile Settings. The Profile Settings tab appears. 1.
In Options group, click Export Profile. 2.
In the Profile Management group, click New. 3.
Enter a profile name in the pop-up window and click OK. 4.
Click Source Component Options on the left-hand pane. 5.
Filter Policy – Select specific object or data within each SharePoint level (Web a.application down to item level). The default filter policy is set to be none. You may select a previously-created filter policy from the drop-down menu. Or click New Filter Policy to create a new filter policy. For more detailed information about the filter policy, refer to the DocAve 6 Control Panel Reference Guide.
Generate Metadata File – Generates Excel files with metadata for each list. You can b.modify the metadata file to add, edit, or delete the metadata of items in batch based on your specified needs. The item and its metadata file can also be deleted.
85
DocAve 6: SharePoint Migrations
Check the Generate metadata file checkbox and the Destination section appears. Enter a Universal Naming Convention (UNC) path as the location where the metadata file will be stored in the UNC path text box. For example, \\admin-PC\c$\data or \\admin-PC\shared folder. Then enter the username and password that are available to the UNC path in the corresponding text boxes. Click Validation Test and DocAve will test the path to make sure they are valid.
For details on modifying the metadata file, refer to the Editing a Metadata File section of this guide.
Empty Lists – Migrate the source empty lists and libraries that have no items in c.SharePoint to the destination SharePoint environment by selecting the Include empty lists and libraries checkbox. By default, this checkbox is selected.
*Note: If you uncheck this checkbox, the empty lists and libraries will not be migrated to the destination even if they meet the rules defined in the selected filter policy of the profile.
Setting Up an Import Profile Create an Import Profile for SharePoint Migrator offline jobs to configure source component options, mapping options and advanced options.
From the Home tab, in the Profile group, click Profile Settings. The Profile Settings tab appears. 1.
In Options group, click Import Profile. 2.
In the Profile Management group, click New. 3.
Enter a profile name in the pop-up window and click OK. 4.
Select the Source Component Options from the left-hand pane. 5.
• Alerts – Migrate the source SharePoint 2007/2010 alters of different levels to the destination SharePoint 2010/2013 environment by selecting the Migrate alert of the list, library, folder, item and document level checkbox.
• Workflow – Select the Include workflow definition checkbox to migrate the definition of existing workflows for the selected content from the source node to the destination node. Select the Include workflow instance checkbox to also migrate the state, history and tasks of existing workflows for the selected content from the source node to the destination node. The following checkboxes are selectable only if you select this checkbox:
Include completed workflows – Migrates the state, history, and tasks of ocompleted workflows for the selected content from the source node to the destination node.
Include running workflows – Migrates the state, history, and tasks of running oworkflows for the selected content from the source node to the destination
86
DocAve 6: SharePoint Migrations
node. This checkbox is optional. If you select this checkbox, the following radio buttons are available:
Cancel the running workflows after migration jobs – Cancels the running workflows for the selected source content in the destination after the migration jobs. By default, this radio button is selected.
Restart the canceled workflows after migration jobs – Cancels the running workflows for the selected source content in the destination after the migration jobs. And then restarts the canceled workflows.
Select the Mapping Options from the left-hand pane and configure the following mappings. 6.
• Column Mapping – Replaces source columns with destination columns.
Use column mapping – According to the column type, the source column and othe destination column can be the same or different. The column can also be changed to Managed Metadata or Lookup. The default column mapping is set to be none. You may select a previously-created column mapping from the drop-down menu, or click New Column Mapping from the drop-down menu to create a new one. For information on creating a column mapping, see the DocAve 6 Control Panel Reference Guide.
Use existing metadata file – Apply an existing metadata file which has been oediting.
• Content Type Mapping – Replaces source content types with destination content types according to the condition that you set up. The default content type mapping is set to be none. You may select a previously-created content type mapping from the drop-down menu, or click New Content Type Mapping from the drop-down menu to create a new one. For information on creating a content type mapping, see the DocAve 6 Control Panel Reference Guide.
• Template Mapping – Replaces site templates and list templates. By inputting or selecting Template ID, the source template is changed to the destination template. The default template mapping is set to be none. You may select a previously-created template mapping from the drop-down menu, or click New Template Mapping from the drop-down menu to create a new one. For information on creating a template mapping, see the DocAve 6 Control Panel Reference Guide.
• User Mapping –Replaces existing source node username with existing destination node username or a default username in the destination. The default user mapping is set to be none. You may select a previously-created user mapping from the drop-down menu, or click New User Mapping from the drop-down menu to create a new one. For information on creating a user mapping, see the DocAve 6 Control Panel Reference Guide.
• Domain Mapping –Maps a domain name in the source to a domain name in the destination. The default domain mapping is set to be none. You may select a previously-created domain mapping from the drop-down menu, or click New Domain Mapping from the drop-down menu to create a new one. For information on creating a domain mapping, see the DocAve 6 Control Panel Reference Guide.
87
DocAve 6: SharePoint Migrations
• Language Mapping –Displays the destination node in a different language from the source node after the plan has been executed. The default language mapping is set to be none. You may select a previously-created language mapping from the drop-down menu, or click New Language Mapping from the drop-down menu to create a new one. For information on creating a language mapping, see the DocAve 6 Control Panel Reference Guide.
• List Name Mapping – Maps the lists in the source to the specified lists in the destination, or changes the list name to another one. Conditions configured in the list name mapping are optional. The default list name mapping is set to be none. You may select a previously-created list name mapping from the drop-down menu, or click New List Name Mapping from the drop-down menu to create a new one. For information on creating a list name mapping, see the DocAve 6 Control Panel Reference Guide.
*Note: If the authentication of the source and destination are different, make sure that you have configured the user mapping or domain mapping to ensure the source users are available in the destination.
Select the Advanced Options from the left-hand pane and configure the following settings. 7.
• Preserve the Null Column Values – Choose whether or not to preserve the null value of item columns in the source. Some values of the newly-created columns may be null for previous items, and this option allows you to choose whether to replace the null value with the default value in the destination.
If you select the Yes radio button, the null values of item columns (such as onewly-created columns) are preserved. By default, the Yes radio button is selected.
If you select the No radio button, the null values of item columns (such as onewly-created columns) are replaced with default values in the destination node.
• Change Site Look and Feel –Change or preserve the look and feel of the destination sites after migrating SharePoint 2007/2010 sites or site collections to SharePoint 2010/2013 sites or site collections. Normally, the manually input site or site collection is used as the destination node.
If you choose Change existing SharePoint sites to use the new user experience, othe look and feel of the existing destination sites will be changed and replaced by that of the source sites after completing the migration job and administrators of the destination site can control the user experience for end users. With this option chosen, one of the following options needs to be selected.
* Note: If you choose this option, the property of the source site must be migrated to the destination in SharePoint 2007 to 2010 Offline Migration jobs. Make sure that in the source tree the Property checkbox behind the source site is selected.
Preserve customized pages, but update template and application pages to use the new UI (User Interface).
88
DocAve 6: SharePoint Migrations
Reset all customized pages to their original templates. This option will delete modifications from customized pages and cannot be undone.
If you choose Preserve the look and feel of existing SharePoint sites, and allow oend users to update their sites' user experience, the look and feel of the existing destination sites will be kept after completing the migration job and the end users are allowed to update their sites’ user experience in the destination.
• Folder Structure Management – Choose whether or not to collapse the folder structure of the source SharePoint 2007/2010 content. If you select the Collapse folder structure checkbox, all levels of the folder structure of the source content will be collapsed. All files within the folders will be migrated to the library and merged to the same path in the destination. With this option selected, you can further choose to add a column to display the source path of the files in the destination. Select the Add column to keep source path checkbox. DocAve Source Path is provided as the default name of the column, and you can also customize the name by entering a column name in the text box.
• Character Length Settings – This is used to set character length limitations for SharePoint URL, folder name, and file name.
Maximum length of the SharePoint URL – The default value is 255 and you can odefine the value from 1 to 260. The length of the SharePoint URL is calculated from the first character of the managed path, that is /. When the folder or file’s URL exceeds the limitation, the migration results are as follows:
If the folder URL exceeds the limitation, the folder name will be pruned according to the value which is set in Maximum length of the folder name first. If the folder URL still exceeds the limitation, the folder and its content will be migrated to the root folder of the destination list. If there is a file whose URL exceeds the limitation within a folder, the file name will be pruned according to the value which is set in Maximum length of the file name first. If the file URL still exceeds the limitation, it will be migrated to the root folder of the destination list.
If the file URL exceeds the limitation, the file name will be pruned according to the value which is set in Maximum length of the file name first. If the file URL still exceeds the limitation, it will be migrated to the root folder of the destination list.
Maximum length of the folder name – The default value is 128 and you can odefine the value from 1 to 128. If the folder name exceeds the limitation, the extra characters will be pruned from the end. For example, a folder migrated from SharePoint 2007 is named abcdef in the source and the value that you set here is 5. The folder will be named abcde after the migration.
Maximum length of the file name – The default value is 128 and you can define othe value from 1 to 128. If the file name, including the file extension, exceeds the limitation, the extra characters will be pruned from the end. For example, a file is named abcdef.txt in the source and the value that you set here is 5. The file will be named a_0.txt after the migration. _0 is used to mark that the file name is pruned.
89
DocAve 6: SharePoint Migrations
Importing Data Exported from Other Managers SharePoint Migrator allows you to import data that is exported from other DocAve 6 Managers.
• If you have run an export job using the current Manager, the folder named data_granular will be generated in the specified location of the corresponding storage policy. You must move the desired exported data of other DocAve 6 Managers to the data_granular folder in farm level.
• If you run an export job using the current Manager for the first time, create a new storage policy to store the desired exported data of other DocAve 6 Managers.
In the specified location of the storage policy, create a folder named odata_granular. And then move the desired exported data of other DocAve 6 Managers to the newly-created data_granular folder in farm level.
Move the data_granular folder of other DocAve 6 Managers’ export jobs to the ospecified location of the storage policy.
After importing the exported data of other DocAve 6 Managers to the current Manager, you can configure and run an import job. For detailed information, see the DocAve 6 Control Panel Reference Guide.
Editing a Metadata File You can add, edit, or delete the metadata file, or perform these actions on metadata files in batch. Follow the steps below to edit the metadata file.
In the UNC path where the metadata file is stored, each list generates an Excel file. Open the 1.Excel file named by a list path. Columns, items and their corresponding column values of a list are displayed in the Excel file.
You can add, edit, and delete the metadata file in the Excel file. 2.
• Add the metadata. Add a column, specify its column type and set a value for the item in the Excel file.
For example, add a new column next to the existing column on the first row, enter Comments: = Multiple lines of text and set the value of an item as It needs to be updated. Here Comments is the column name; Multiple lines of text is the column type; It needs to be updated is the corresponding value for the item. After the import job, the column Comments and the value will be added as new metadata for the item.
• Edit the metadata. Edit the column name, column type of an item and modify the corresponding value in the Excel file.
For example, in the Excel file, the column name, column type of an item is Name: = File and the corresponding value is Document A. You can modify the item name by modifying the value Document A to Document B. After the import job, the item name will be displayed as Document B in the destination.
90
DocAve 6: SharePoint Migrations
• Delete the metadata. Delete the column name, column type of an item and the corresponding value in the Excel file.
For example, in the Excel file, the column name, column type of an item is Title: = Single line of text and the corresponding value is Custom List. If you do not wish this column Title and the value for this item to be associated with the item in the destination after being imported, delete the column name, column type and the corresponding value from the cells.
Editing the SP2010GranularBackupRestore.cfg File For the SharePoint 2007/2010 Export job, you can choose whether or not to migrate the term sets and terms by configuring the SP2010GranularBackupRestore.cfg file.
To edit the file, complete the following steps:
1. Navigate to the …\AvePoint\DocAve6\Agent\data\SP2010\Item directory, and find the SP2010GranularBackupRestore.cfg file.
2. Open the CFG file with Notepad.
3. Find the <itemBackup excludeOrphanedSites="true" backupDocumentTag="false" backupDocumentComment="false" backupSearchScope="false" skipGlobalTermGroup="false" backupSOData="BackupStubsAndContent"/> node.
4. Insert the following parameter to the end of it: SPMBackupMMSOption=" ".
• If you set the 0 value for this node, the term sets that are related to the selected source site/ list/folder/item and all of the terms in these term sets will be migrated during the migration job. This is the default logic before editing the XML file.
• If you set the 1 value for this node, only the terms that are related to the selected source site/list/folder/item will be migrated during the migration job.
• If you set the 2 value for this node, all of the terms of the Managed Metadata Service that is related to the site collection where the selected source node resides will be migrated during the migration job.
• If you set the -1 value for this node, no terms will be migrated during the migration job.
5. Save changes to this file and close it.
Performing a SharePoint Offline Migration SharePoint Migrator allows you to migrate the SharePoint 2007/2010 data to an offline destination by exporting your desired source SharePoint 2007/2010 data to a physical device, and then import the exported data to the specified SharePoint 2010/2013 node.
91
DocAve 6: SharePoint Migrations
Exporting Data The following instructions describe how to export data to the Storage Policy in order to perform an offline migration job.
1. From the Home tab, in the Plan group, click Export.
2. In the Source pane, click the farm name to expand the data tree.
Find the node whose data you wish to migrate. If working with a large environment, a.enter the keyword of the node (for example, site URL, site title, or site/list/item name) into the Input Keyword text box to search for the desired node. You can only search out the nodes whose name is displayed in the currently expanded tree. The nodes which are not displayed in the expanded tree cannot be searched. When entering the keyword, the search result will be displayed with a little time.
Select the source node by selecting the corresponding checkbox. b.
Select the corresponding Security and/or Property checkbox behind a source node to c.migrate the security and/or property of the source node to the destination node.
3. In the Destination pane, select a previously-configured storage policy from the drop-down list or click New Storage Policy to create a new one. For details on creating a storage policy, refer to Configuring Storage Policies.
4. When finished selecting the nodes, select one of the following options:
• Click Run Now to perform a migration job immediately, and then the Run Now interface appears. For more information, see the Configuring the Run Now Interface section of this guide.
• Click Save As New Plan to save the settings as a new plan, and then the Save As New Plan interface appears. For more information, see the Configuring the Save As New Plan Interface section of this guide.
Configuring the Run Now Interface In the Run Now interface, configure the settings below:
1. Options – Choose the migration mode for this migration job.
• Full migration – Exports all contents from the source node to the Storage Policy.
• Incremental migration –Only exports the modified content (add and modify) to the Storage Policy based on time.
To migrate the modified content based on time, specify the time range in the Incremental Type field, and only the changes within the specified time range will be exported. Enter an integer into the text box and select Minute(s), Hour(s), Day(s), Week(s) or Month(s) from the drop-down list.
92
DocAve 6: SharePoint Migrations
*Note: To perform an incremental migration job, DocAve obtains data from the SharePoint change log. Before you run an incremental migration job, AvePoint recommends you verify the validity and last truncation date (if any) of the relevant change log. For more information, see the MSDN article Using the Change Log.
2. Profile Selection – Configure the source component options for the export job. Select a previously-configured profile from the drop-down list. SharePoint Migration provides you a default profile named Default Profile.
3. Agent Group – Select a source Agent group for this offline migration plan from the drop-down list. For details on creating an Agent group, refer to the DocAve 6 Control Panel Reference Guide.
4. Notification –Designate DocAve users to receive e-mail notifications containing reports. Select a previously-configured notification profile from the drop-down list, or click New Notification Profile from the drop-down list to create a new one. For more information on working with notification profiles, refer to the DocAve 6 Control Panel Reference Guide.
5. Job Report – Select the level of the Job Report. Simplified creates a summary of the content migrated to the destination SharePoint environment. Detailed creates a full list of all the objects migrated to the destination SharePoint environment at the cost of performance.
6. Click OK to run the job immediately or click Cancel to return to the Home page of Export.
Configuring the Save As New Plan Interface In the Save As New Plan interface, configure the following settings:
1. Plan Name – Enter a name for the plan that you are about to create. Then enter an optional Description for future references.
2. Profile Selection – Configure source component options for the export job. Select a previously-configured profile from the drop-down list. SharePoint Migration provides you a default profile named Default Profile.
3. Agent Group – Select a source Agent group for this offline migration plan from the drop-down list. For details regarding creating an Agent group, refer to the DocAve 6 Control Panel Reference Guide.
4. Schedule Selection – Select one type of schedule to run the plan.
• No schedule – Select this option to run the plan manually.
• Configure the schedule myself – Select this option and the Schedule Settings section appears under the Schedule Selection section.
For more information, see the Configuring the Add Schedule Interface section of this guide.
5. Notification – Designate DocAve users to receive e-mail notifications containing reports. Select a previously-configured notification profile from the drop-down list, or click New Notification Profile from the drop-down list to create a new one. For more information on working with notification profiles, refer to the DocAve 6 Control Panel Reference Guide.
93
DocAve 6: SharePoint Migrations
6. Associated Plan Group – Select associated plan groups or create a new plan group in the Associated plan group(s) drop-down list in order to make the plan run according to the selected plan group settings. For more information on plan groups, refer to the DocAve 6 Control Panel Reference Guide.
7. When finished configuring the plan, select one of the following options:
• Click Save and then select Save to save the plan.
• Click Save and then select Save and Run Now to save the plan and execute it right away. And the Run Now interface appears. For detailed information on configuring the Run Now interface, refer to the Configuring the Run Now Interface section of this guide.
Configuring the Add Schedule Interface Click Add Schedule and the Add Schedule interface appears. Configure the following settings:
1. Options – Select a type of migration for the customized schedule.
• Choose Full migration to export all contents from the source node to the Storage Policy according to the profile.
• Choose Incremental migration to only export the modified content (add and modify) to the Storage Policy based on content or time.
If you choose to export the modified content based on content, make sure that oyou have run a full migration job and select the Incremental migration radio button only.
If you choose to export the modified content based on time, select the Migrate ochanges within checkbox to specify the time range, and only the changes within the specified time range will be migrated. Enter an integer into the text box and select Minute(s), Hour(s), Day(s), Week(s) or Month(s) from the drop-down list.
*Note: To perform an incremental migration job, DocAve obtains data from the SharePoint change log. Before you run an incremental migration job, AvePoint recommends you verify the validity and last truncation date (if any) of the relevant change log. For more information, see the MSDN article Using the Change Log.
2. Schedule Settings – Specify the frequency to run the recurring schedule. Enter an integer into the text box and select Minute(s), Hour(s), Day(s), Week(s) or Month(s) from the drop-down list.
3. Range of Recurrence – Specify when to start and end the running recurring schedule.
Start time – Set up the time to start the plan and Time Zone can be changed under the a.Start time. Note that the start time cannot be earlier than the current time.
No end date – Select this option to repeat running the plan until being stopped b.manually.
End after specified occurrence(s) – Select this option to stop the plan after specified c.occurrences that you configure in the text box.
End by – Set up the time to end the recurrence of plans. d.
94
DocAve 6: SharePoint Migrations
*Note: Options b, c, and d above are radio buttons. You can only select one of these methods to finish this schedule.
4. Click OK to save the configuration of schedule, or click Cancel to return to the Save As New Plan interface without saving any change.
5. Click Calendar View to preview the previously-configured schedule in a calendar.
6. You can delete a previously-configured schedule by clicking behind a corresponding schedule.
Configuring the Run Now Interface In the Run Now interface, configure the settings below:
Options – Choose the migration mode for this migration job. 1.
• Full migration – Exports all contents from the source node to the Storage Policy.
• Incremental migration –Only exports the modified content (add and modify) to the Storage Policy based on content or time.
If you choose to export the modified content based on content, make sure that oyou have run a full migration job and select the Incremental migration radio button only.
If you choose to export the modified content based on time, select the Migrate ochanges within checkbox to specify the time range, and only the changes within the specified time range will be migrated. Enter an integer into the text box and select Minute(s), Hour(s), Day(s), Week(s) or Month(s) from the drop-down list.
*Note: To perform an incremental migration job, DocAve obtains data from the SharePoint change log. Before you run an incremental migration job, AvePoint recommends you verify the validity and last truncation date (if any) of the relevant change log. For more information, see the MSDN article Using the Change Log.
Job Report – Select the level of the Job Report. Simplified creates a summary of the content 2.migrated to the destination SharePoint environment. Detailed creates a full list of all the objects migrated to the destination SharePoint environment at the cost of performance.
Click OK to run the export migration job, or click Cancel to return to the Save As New Plan 3.interface without saving any change.
Importing Data The following instructions describe how to import the exported data to the destination SharePoint 2010/2013 node.
1. From the Home tab, in the Plan group, click Import.
2. In the Source pane, follow the steps below to select the source node whose data you wish to import.
On the Browse tab, click the farm from which you have exported the data. a.
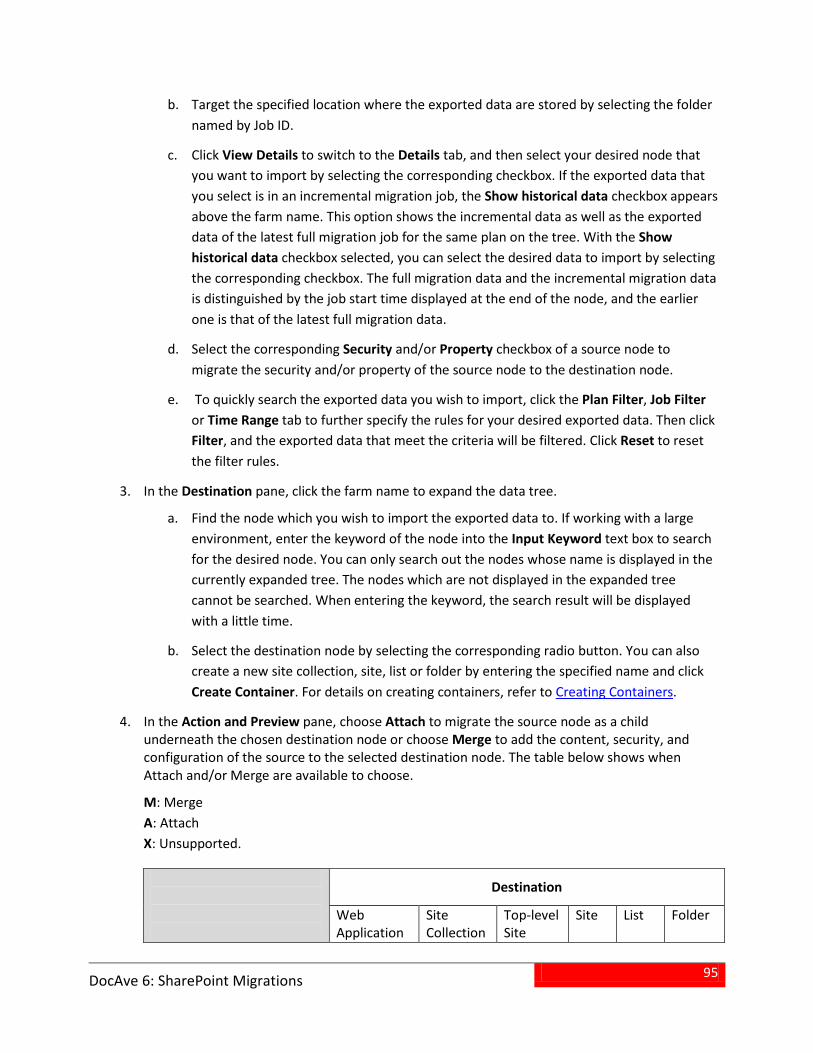
95
DocAve 6: SharePoint Migrations
Target the specified location where the exported data are stored by selecting the folder b.named by Job ID.
Click View Details to switch to the Details tab, and then select your desired node that c.you want to import by selecting the corresponding checkbox. If the exported data that you select is in an incremental migration job, the Show historical data checkbox appears above the farm name. This option shows the incremental data as well as the exported data of the latest full migration job for the same plan on the tree. With the Show historical data checkbox selected, you can select the desired data to import by selecting the corresponding checkbox. The full migration data and the incremental migration data is distinguished by the job start time displayed at the end of the node, and the earlier one is that of the latest full migration data.
Select the corresponding Security and/or Property checkbox of a source node to d.migrate the security and/or property of the source node to the destination node.
To quickly search the exported data you wish to import, click the Plan Filter, Job Filter e.or Time Range tab to further specify the rules for your desired exported data. Then click Filter, and the exported data that meet the criteria will be filtered. Click Reset to reset the filter rules.
3. In the Destination pane, click the farm name to expand the data tree.
Find the node which you wish to import the exported data to. If working with a large a.environment, enter the keyword of the node into the Input Keyword text box to search for the desired node. You can only search out the nodes whose name is displayed in the currently expanded tree. The nodes which are not displayed in the expanded tree cannot be searched. When entering the keyword, the search result will be displayed with a little time.
Select the destination node by selecting the corresponding radio button. You can also b.create a new site collection, site, list or folder by entering the specified name and click Create Container. For details on creating containers, refer to Creating Containers.
4. In the Action and Preview pane, choose Attach to migrate the source node as a child underneath the chosen destination node or choose Merge to add the content, security, and configuration of the source to the selected destination node. The table below shows when Attach and/or Merge are available to choose.
M: Merge A: Attach X: Unsupported.
Destination
Web Application
Site Collection
Top-level Site
Site List Folder
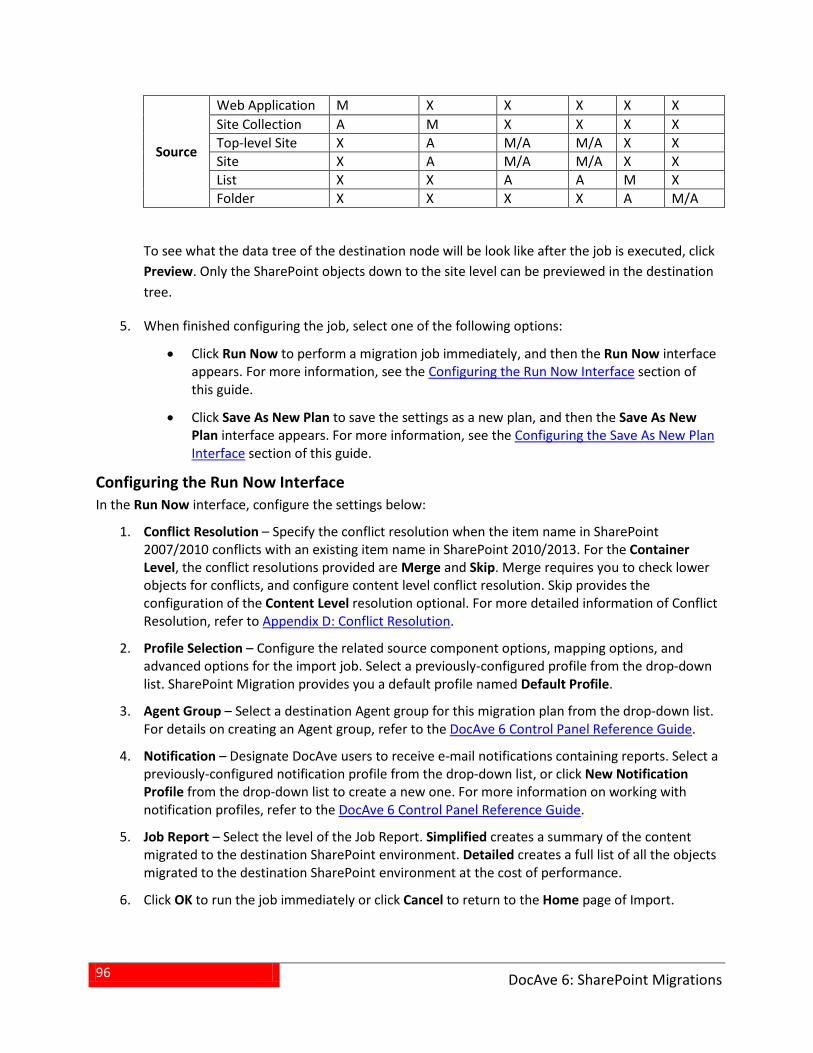
96
DocAve 6: SharePoint Migrations
Source
Web Application M X X X X X Site Collection A M X X X X Top-level Site X A M/A M/A X X Site X A M/A M/A X X List X X A A M X Folder X X X X A M/A
To see what the data tree of the destination node will be look like after the job is executed, click Preview. Only the SharePoint objects down to the site level can be previewed in the destination tree.
5. When finished configuring the job, select one of the following options:
• Click Run Now to perform a migration job immediately, and then the Run Now interface appears. For more information, see the Configuring the Run Now Interface section of this guide.
• Click Save As New Plan to save the settings as a new plan, and then the Save As New Plan interface appears. For more information, see the Configuring the Save As New Plan Interface section of this guide.
Configuring the Run Now Interface In the Run Now interface, configure the settings below:
1. Conflict Resolution – Specify the conflict resolution when the item name in SharePoint 2007/2010 conflicts with an existing item name in SharePoint 2010/2013. For the Container Level, the conflict resolutions provided are Merge and Skip. Merge requires you to check lower objects for conflicts, and configure content level conflict resolution. Skip provides the configuration of the Content Level resolution optional. For more detailed information of Conflict Resolution, refer to Appendix D: Conflict Resolution.
2. Profile Selection – Configure the related source component options, mapping options, and advanced options for the import job. Select a previously-configured profile from the drop-down list. SharePoint Migration provides you a default profile named Default Profile.
3. Agent Group – Select a destination Agent group for this migration plan from the drop-down list. For details on creating an Agent group, refer to the DocAve 6 Control Panel Reference Guide.
4. Notification – Designate DocAve users to receive e-mail notifications containing reports. Select a previously-configured notification profile from the drop-down list, or click New Notification Profile from the drop-down list to create a new one. For more information on working with notification profiles, refer to the DocAve 6 Control Panel Reference Guide.
5. Job Report – Select the level of the Job Report. Simplified creates a summary of the content migrated to the destination SharePoint environment. Detailed creates a full list of all the objects migrated to the destination SharePoint environment at the cost of performance.
6. Click OK to run the job immediately or click Cancel to return to the Home page of Import.
97
DocAve 6: SharePoint Migrations
Configuring the Save As New Plan Interface In the Save As New Plan interface, configure the following settings:
Plan Name – Enter a name for the plan that you are about to create. Then enter an optional 1.Description for future references.
Profile Selection – Configure the related source component options, mapping options, and 2.advanced options for the import job .Select a previously-configured profile from the drop-down list to apply the migration settings to the migration job. SharePoint Migration provides you a default profile named Default Profile.
Agent Group – Select a destination Agent group for this migration plan from the drop-down list. 3.For details regarding creating an Agent group, refer to the DocAve 6 Control Panel Reference Guide.
Schedule Selection – Select one type of schedule to run the plan. 4.
• No schedule – Select this option to run the plan manually.
• Configure the schedule myself – Select this option and the Schedule Settings section appears under the Schedule Selection section.
For more information, see the Configuring the Add Schedule Interface section of this guide.
Notification – Designate DocAve users to receive e-mail notifications containing reports. Select a 5.previously-configured notification profile from the drop-down list, or click New Notification Profile from the drop-down list to create a new one. For more information on working with notification profiles, refer to the DocAve 6 Control Panel Reference Guide.
Associated Plan Group – Select associated plan groups or create a new plan group in the 6.Associated plan group(s) drop-down list in order to make the plan run according to the selected plan group settings. For more information on plan groups, refer to the DocAve 6 Control Panel Reference Guide.
When finished configuring the plan, select one of the following options: 7.
• Click Save and then select Save to save the plan.
• Click Save and then select Save and Run Now to save the plan and execute it right away. And the Run Now interface appears. For detailed information on configuring the Run Now interface, refer to the Configuring the Run Now Interface section of this guide.
Configuring the Add Schedule Interface Click Add Schedule and the Add Schedule interface pops up. Configure the following settings.
Conflict Resolution – Specify the conflict resolution when the item name in SharePoint 1.2007/2010 conflicts with an existing item name in SharePoint 2010/2013. For the Container Level, the conflict resolutions provided are Merge and Skip. Merge requires you to check lower objects for conflicts, and configure content level conflict resolution. Skip provides the configuration of the Content Level resolution optional. For more detailed information of Conflict Resolution, refer to Appendix D: Conflict Resolution.
98
DocAve 6: SharePoint Migrations
Schedule Settings – Specify the frequency to run the recurring schedule. Enter an integer into 2.the text box and select Minute(s), Hour(s), Day(s), Week(s) or Month(s) from the drop-down list.
Range of Recurrence – Specify when to start and end the running recurring schedule. 3.
Start time – Set up the time to start the plan and Time Zone can be changed under the a.Start time. Note that the start time cannot be earlier than the current time.
No end date – Select this option to repeat running the plan until being stopped b.manually.
End after specified occurrence(s) – Select this option to stop the plan after specified c.occurrences that you configure in the text box.
End by – Set up the time to end the recurrence of plans. d.
*Note: Options b, c, and d above are radio buttons. You can only select one of these methods to finish this schedule.
Click OK to save the configuration of schedule, or click Cancel to return to the Save As New Plan 4.interface without saving any change.
Click Calendar View to preview the previously-configured schedule in a calendar. 5.
You can delete a previously-configured schedule by clicking behind a corresponding schedule. 6.
Configuring the Run Now Interface In the Run Now interface, configure the settings below:
Conflict Resolution – Specify the conflict resolution when the item name in SharePoint 1.2007/2010 conflicts with an existing item name in SharePoint 2010/2013. For the Container Level, the conflict resolutions provided are Merge and Skip. Merge requires you to check lower objects for conflicts, and configure content level conflict resolution. Skip provides the configuration of the Content Level resolution optional. For more detailed information of Conflict Resolution, refer to Appendix D: Conflict Resolution.
Job Report – Select the level of the Job Report. Simplified creates a summary of the content 2.migrated to the destination SharePoint environment. Detailed creates a full list of all the objects migrated to the destination SharePoint environment at the cost of performance.
Click OK to run the import migration job, or click Cancel to return to the Save As New Plan 3.interface without saving any change.
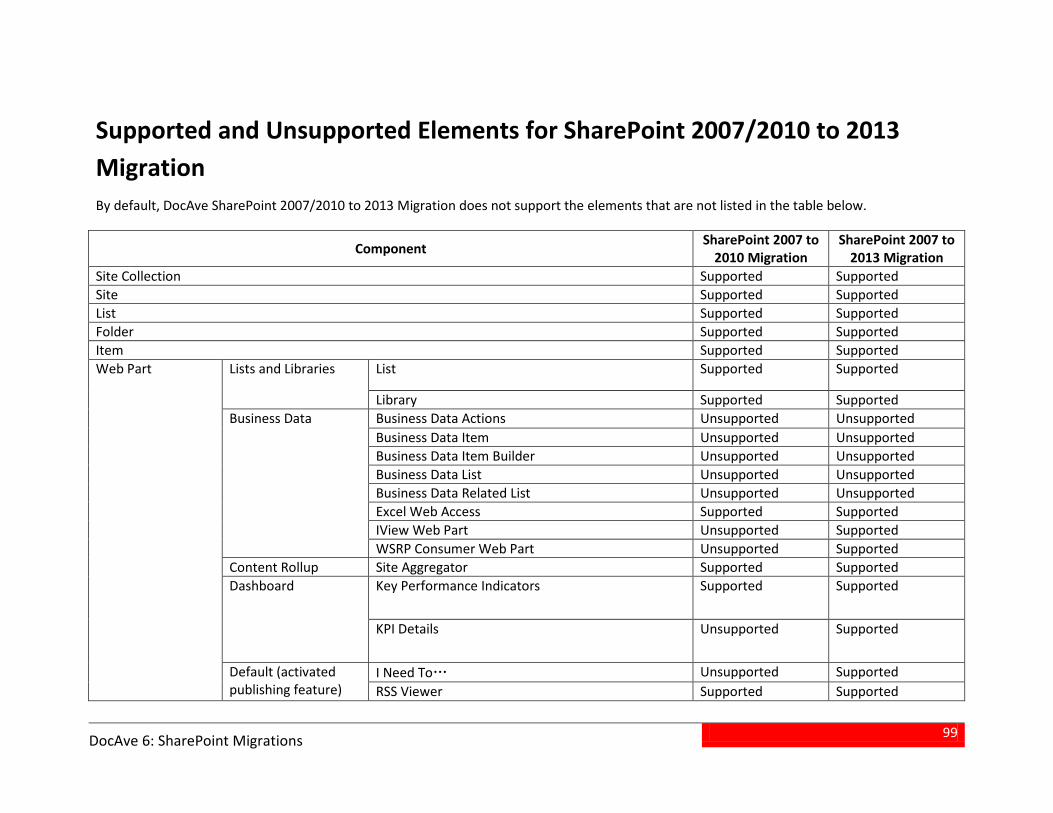
99
DocAve 6: SharePoint Migrations
Supported and Unsupported Elements for SharePoint 2007/2010 to 2013 Migration By default, DocAve SharePoint 2007/2010 to 2013 Migration does not support the elements that are not listed in the table below.
Component SharePoint 2007 to 2010 Migration
SharePoint 2007 to 2013 Migration
Site Collection Supported Supported Site Supported Supported List Supported Supported Folder Supported Supported Item Supported Supported Web Part Lists and Libraries List Supported Supported
Library Supported Supported Business Data Business Data Actions Unsupported Unsupported
Business Data Item Unsupported Unsupported Business Data Item Builder Unsupported Unsupported Business Data List Unsupported Unsupported Business Data Related List Unsupported Unsupported Excel Web Access Supported Supported IView Web Part Unsupported Supported WSRP Consumer Web Part Unsupported Supported
Content Rollup Site Aggregator Supported Supported Dashboard Key Performance Indicators Supported Supported
KPI Details Unsupported Supported
Default (activated publishing feature)
I Need To… Unsupported Supported RSS Viewer Supported Supported
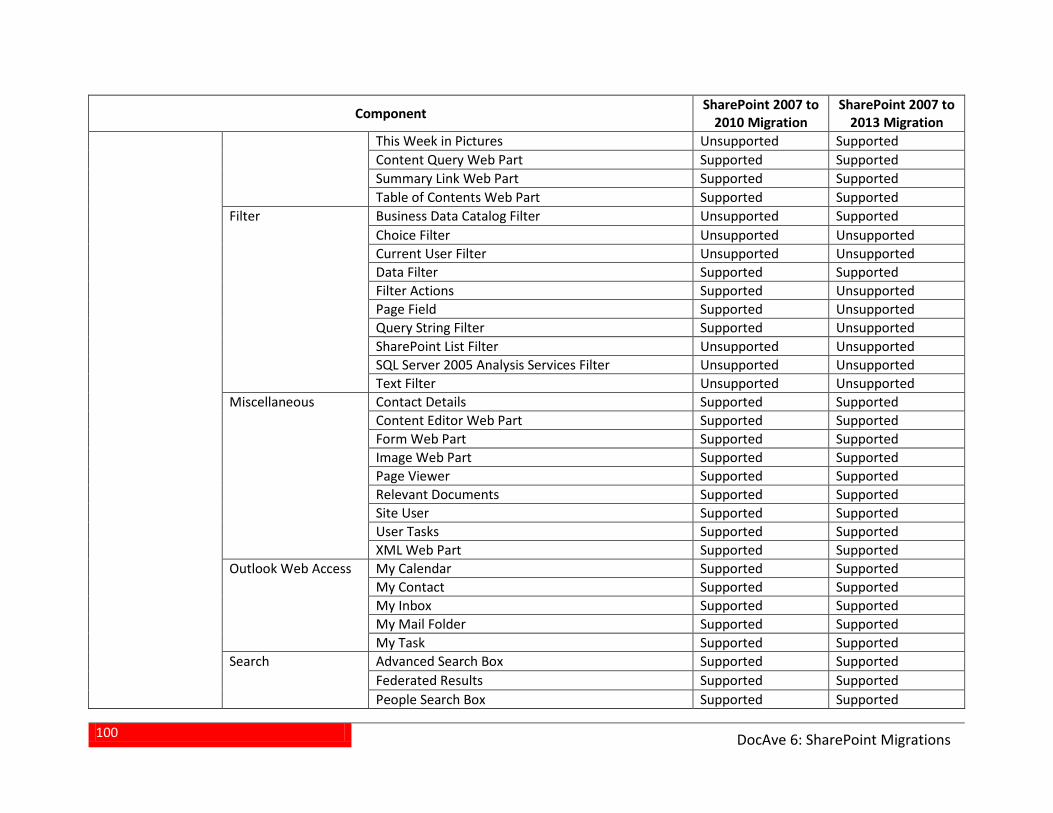
100
DocAve 6: SharePoint Migrations
Component SharePoint 2007 to 2010 Migration
SharePoint 2007 to 2013 Migration
This Week in Pictures Unsupported Supported Content Query Web Part Supported Supported Summary Link Web Part Supported Supported Table of Contents Web Part Supported Supported
Filter Business Data Catalog Filter Unsupported Supported Choice Filter Unsupported Unsupported Current User Filter Unsupported Unsupported Data Filter Supported Supported Filter Actions Supported Unsupported Page Field Supported Unsupported Query String Filter Supported Unsupported SharePoint List Filter Unsupported Unsupported SQL Server 2005 Analysis Services Filter Unsupported Unsupported Text Filter Unsupported Unsupported
Miscellaneous Contact Details Supported Supported Content Editor Web Part Supported Supported Form Web Part Supported Supported Image Web Part Supported Supported Page Viewer Supported Supported Relevant Documents Supported Supported Site User Supported Supported User Tasks Supported Supported XML Web Part Supported Supported
Outlook Web Access My Calendar Supported Supported My Contact Supported Supported My Inbox Supported Supported My Mail Folder Supported Supported My Task Supported Supported
Search Advanced Search Box Supported Supported Federated Results Supported Supported People Search Box Supported Supported

101
DocAve 6: SharePoint Migrations
Component SharePoint 2007 to 2010 Migration
SharePoint 2007 to 2013 Migration
People Search Core Results Supported Supported Search Action Links Supported Supported Search Best Bets Supported Supported Search Box Supported Supported Search Core Results Supported Supported Search High Confidence Results Supported Supported Search Paging Supported Supported Search Statistics Supported Supported Search Summary Supported Supported Top Federated Results Supported Supported
Site Directory Categories Supported Supported Site in Category Unsupported Unsupported Top Sites Supported Supported
Column Site Column Single line of text Supported Supported Multiple lines of text Supported Supported Choice (Drop-Down Menu, Radio Buttons, Checkboxes )
Supported Supported
Number Supported Supported Currency Supported Supported Date and Time Supported Supported Lookup (more than 10 columns) Supported Supported Lookup Supported Supported Yes/No Supported Supported Person or Group Supported Supported Hyperlink or Picture Supported Supported Calculated Supported Supported Full HTML content with formatting and constraints for publishing
Supported Supported
Image with formatting and constraints for publishing
Supported Supported
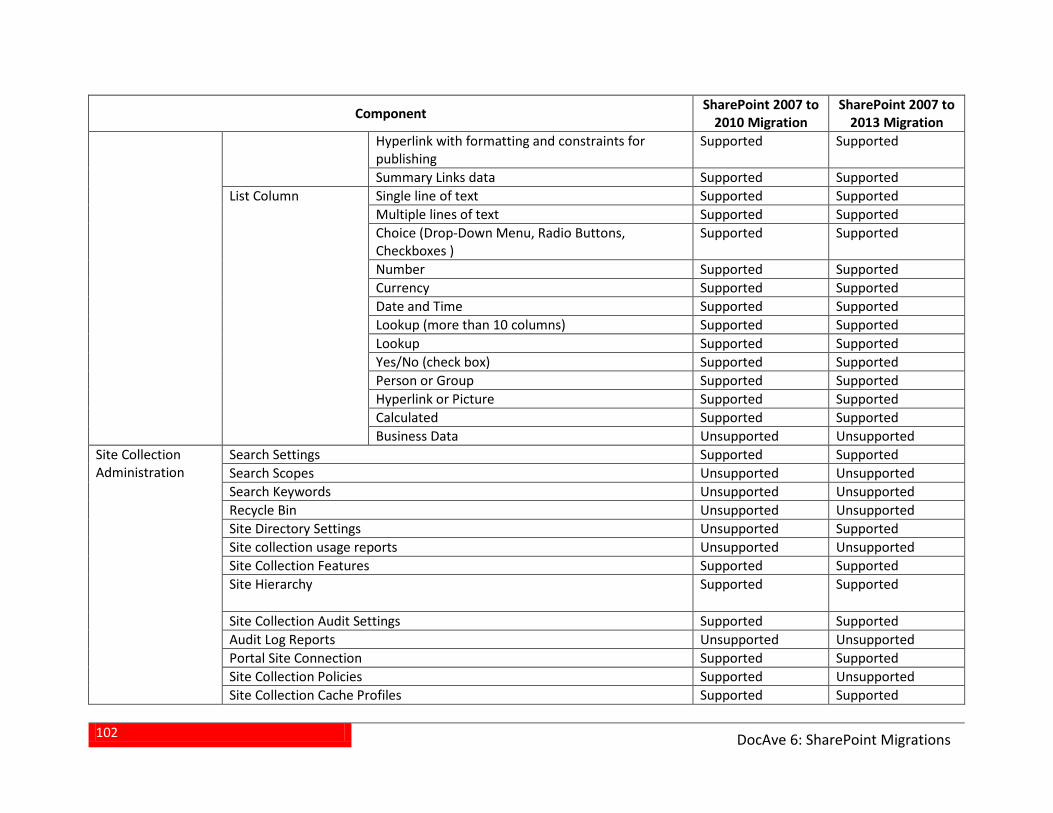
102
DocAve 6: SharePoint Migrations
Component SharePoint 2007 to 2010 Migration
SharePoint 2007 to 2013 Migration
Hyperlink with formatting and constraints for publishing
Supported Supported
Summary Links data Supported Supported List Column Single line of text Supported Supported
Multiple lines of text Supported Supported Choice (Drop-Down Menu, Radio Buttons, Checkboxes )
Supported Supported
Number Supported Supported Currency Supported Supported Date and Time Supported Supported Lookup (more than 10 columns) Supported Supported Lookup Supported Supported Yes/No (check box) Supported Supported Person or Group Supported Supported Hyperlink or Picture Supported Supported Calculated Supported Supported Business Data Unsupported Unsupported
Site Collection Administration
Search Settings Supported Supported Search Scopes Unsupported Unsupported Search Keywords Unsupported Unsupported Recycle Bin Unsupported Unsupported Site Directory Settings Unsupported Supported Site collection usage reports Unsupported Unsupported Site Collection Features Supported Supported Site Hierarchy Supported Supported
Site Collection Audit Settings Supported Supported Audit Log Reports Unsupported Unsupported Portal Site Connection Supported Supported Site Collection Policies Supported Unsupported Site Collection Cache Profiles Supported Supported
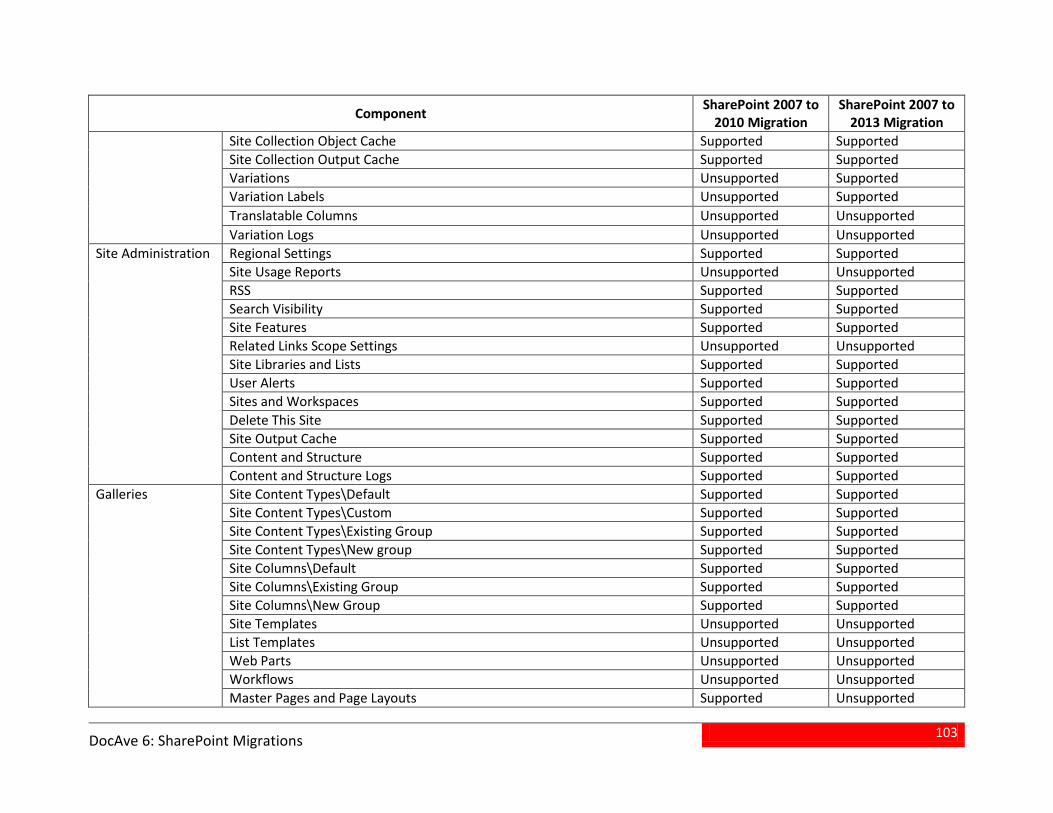
103
DocAve 6: SharePoint Migrations
Component SharePoint 2007 to 2010 Migration
SharePoint 2007 to 2013 Migration
Site Collection Object Cache Supported Supported Site Collection Output Cache Supported Supported Variations Unsupported Supported Variation Labels Unsupported Supported Translatable Columns Unsupported Unsupported Variation Logs Unsupported Unsupported
Site Administration Regional Settings Supported Supported Site Usage Reports Unsupported Unsupported RSS Supported Supported Search Visibility Supported Supported Site Features Supported Supported Related Links Scope Settings Unsupported Unsupported Site Libraries and Lists Supported Supported User Alerts Supported Supported Sites and Workspaces Supported Supported Delete This Site Supported Supported Site Output Cache Supported Supported Content and Structure Supported Supported Content and Structure Logs Supported Supported
Galleries Site Content Types\Default Supported Supported Site Content Types\Custom Supported Supported Site Content Types\Existing Group Supported Supported Site Content Types\New group Supported Supported Site Columns\Default Supported Supported Site Columns\Existing Group Supported Supported Site Columns\New Group Supported Supported Site Templates Unsupported Unsupported List Templates Unsupported Unsupported Web Parts Unsupported Unsupported Workflows Unsupported Unsupported Master Pages and Page Layouts Supported Unsupported
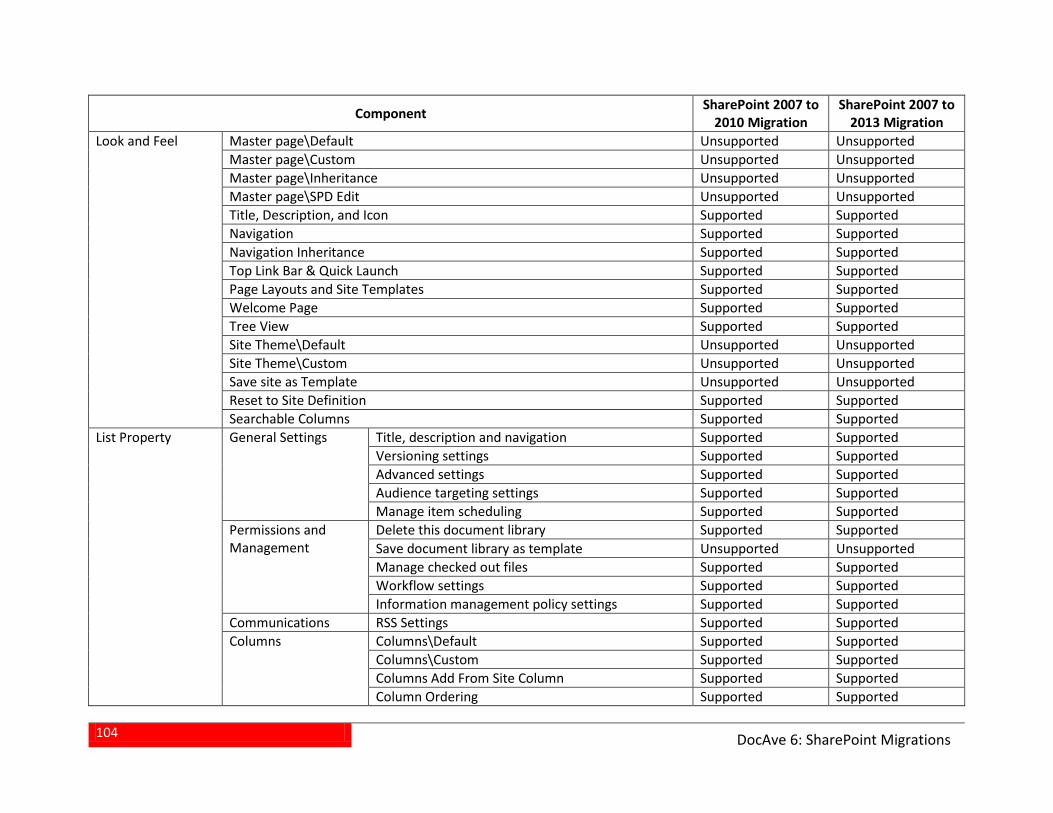
104
DocAve 6: SharePoint Migrations
Component SharePoint 2007 to 2010 Migration
SharePoint 2007 to 2013 Migration
Look and Feel Master page\Default Unsupported Unsupported Master page\Custom Unsupported Unsupported Master page\Inheritance Unsupported Unsupported Master page\SPD Edit Unsupported Unsupported Title, Description, and Icon Supported Supported Navigation Supported Supported Navigation Inheritance Supported Supported Top Link Bar & Quick Launch Supported Supported Page Layouts and Site Templates Supported Supported Welcome Page Supported Supported Tree View Supported Supported Site Theme\Default Unsupported Unsupported Site Theme\Custom Unsupported Unsupported Save site as Template Unsupported Unsupported Reset to Site Definition Supported Supported Searchable Columns Supported Supported
List Property General Settings Title, description and navigation Supported Supported Versioning settings Supported Supported Advanced settings Supported Supported Audience targeting settings Supported Supported Manage item scheduling Supported Supported
Permissions and Management
Delete this document library Supported Supported Save document library as template Unsupported Unsupported Manage checked out files Supported Supported Workflow settings Supported Supported Information management policy settings Supported Supported
Communications RSS Settings Supported Supported Columns Columns\Default Supported Supported
Columns\Custom Supported Supported Columns Add From Site Column Supported Supported Column Ordering Supported Supported
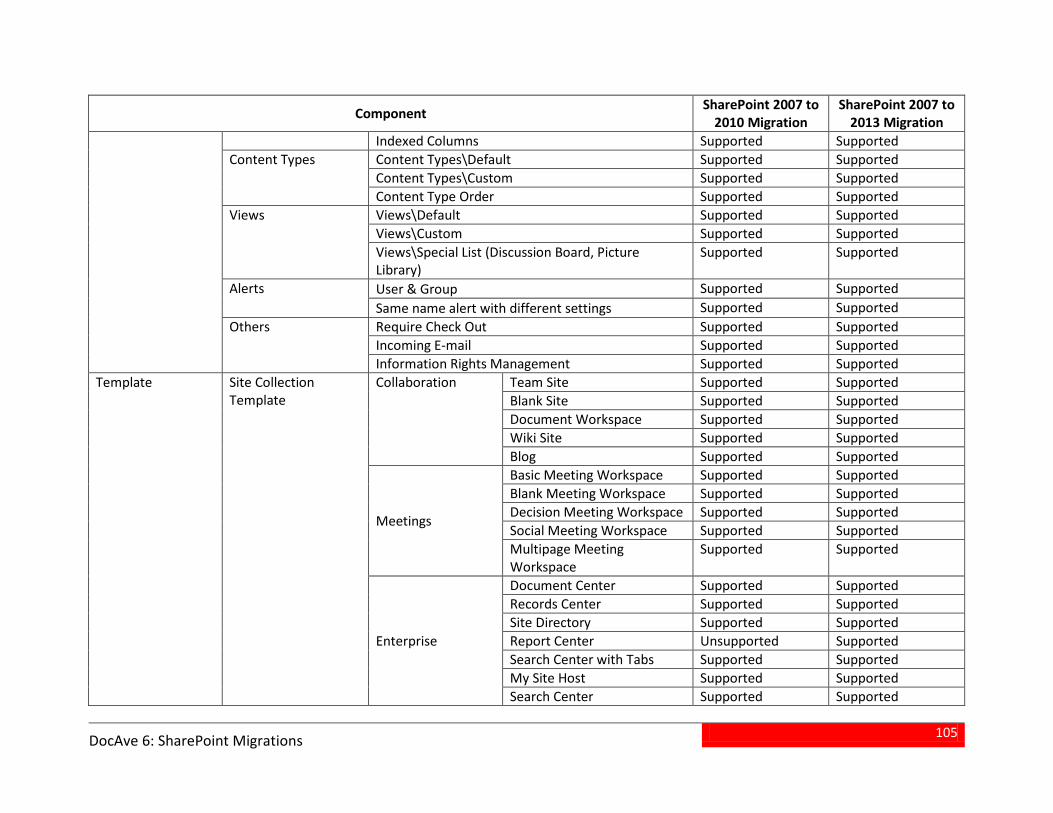
105
DocAve 6: SharePoint Migrations
Component SharePoint 2007 to 2010 Migration
SharePoint 2007 to 2013 Migration
Indexed Columns Supported Supported Content Types Content Types\Default Supported Supported
Content Types\Custom Supported Supported Content Type Order Supported Supported
Views Views\Default Supported Supported Views\Custom Supported Supported Views\Special List (Discussion Board, Picture Library)
Supported Supported
Alerts User & Group Supported Supported Same name alert with different settings Supported Supported
Others Require Check Out Supported Supported Incoming E-mail Supported Supported Information Rights Management Supported Supported
Template Site Collection Template
Collaboration Team Site Supported Supported Blank Site Supported Supported Document Workspace Supported Supported Wiki Site Supported Supported Blog Supported Supported
Meetings
Basic Meeting Workspace Supported Supported Blank Meeting Workspace Supported Supported Decision Meeting Workspace Supported Supported Social Meeting Workspace Supported Supported Multipage Meeting Workspace
Supported Supported
Enterprise
Document Center Supported Supported Records Center Supported Supported Site Directory Supported Supported Report Center Unsupported Supported Search Center with Tabs Supported Supported My Site Host Supported Supported Search Center Supported Supported
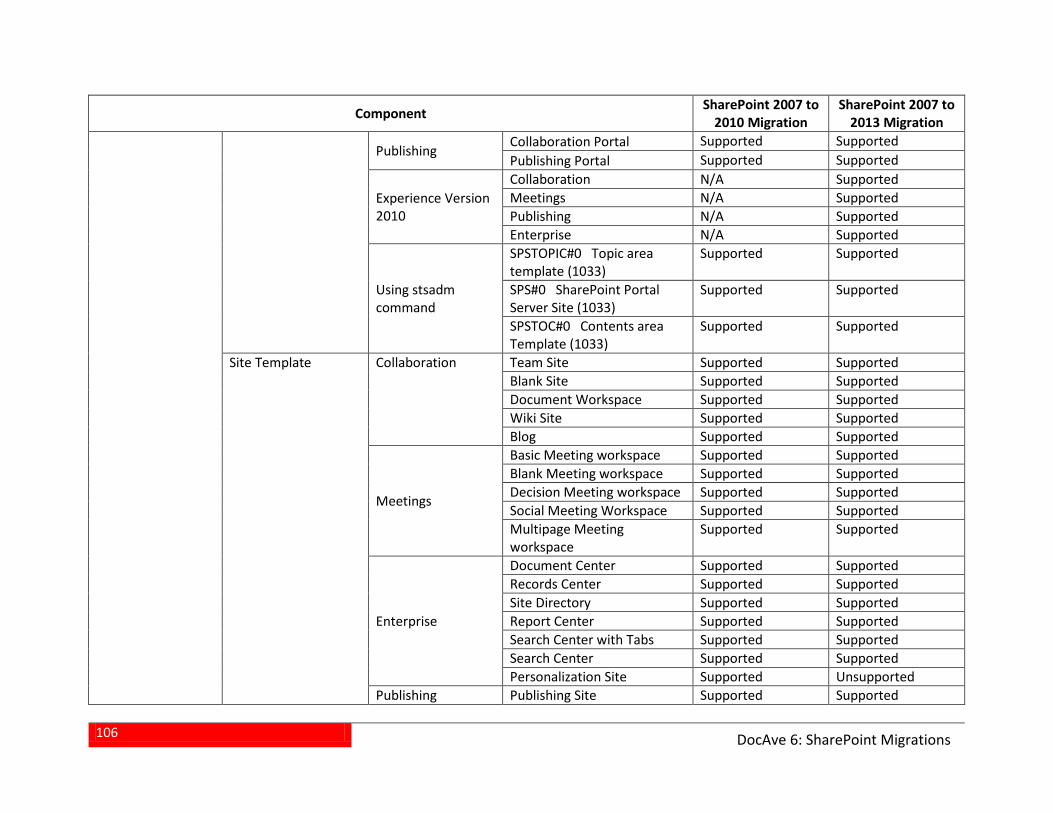
106
DocAve 6: SharePoint Migrations
Component SharePoint 2007 to 2010 Migration
SharePoint 2007 to 2013 Migration
Publishing Collaboration Portal Supported Supported Publishing Portal Supported Supported
Experience Version 2010
Collaboration N/A Supported Meetings N/A Supported Publishing N/A Supported Enterprise N/A Supported
Using stsadm command
SPSTOPIC#0 Topic area template (1033)
Supported Supported
SPS#0 SharePoint Portal Server Site (1033)
Supported Supported
SPSTOC#0 Contents area Template (1033)
Supported Supported
Site Template Collaboration Team Site Supported Supported Blank Site Supported Supported Document Workspace Supported Supported Wiki Site Supported Supported Blog Supported Supported
Meetings
Basic Meeting workspace Supported Supported Blank Meeting workspace Supported Supported Decision Meeting workspace Supported Supported Social Meeting Workspace Supported Supported Multipage Meeting workspace
Supported Supported
Enterprise
Document Center Supported Supported Records Center Supported Supported Site Directory Supported Supported Report Center Supported Supported Search Center with Tabs Supported Supported Search Center Supported Supported Personalization Site Supported Unsupported
Publishing Publishing Site Supported Supported
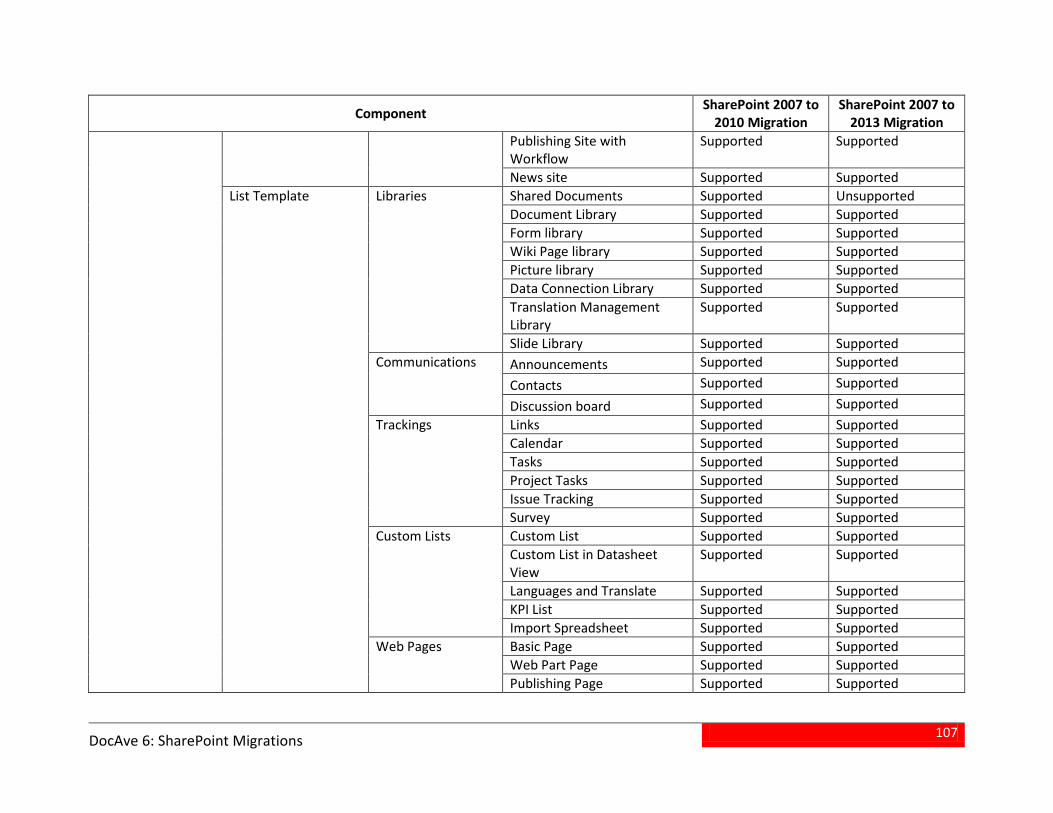
107
DocAve 6: SharePoint Migrations
Component SharePoint 2007 to 2010 Migration
SharePoint 2007 to 2013 Migration
Publishing Site with Workflow
Supported Supported
News site Supported Supported List Template Libraries Shared Documents Supported Unsupported
Document Library Supported Supported Form library Supported Supported Wiki Page library Supported Supported Picture library Supported Supported Data Connection Library Supported Supported Translation Management Library
Supported Supported
Slide Library Supported Supported Communications Announcements Supported Supported
Contacts Supported Supported
Discussion board Supported Supported Trackings Links Supported Supported
Calendar Supported Supported Tasks Supported Supported Project Tasks Supported Supported Issue Tracking Supported Supported Survey Supported Supported
Custom Lists Custom List Supported Supported Custom List in Datasheet View
Supported Supported
Languages and Translate Supported Supported KPI List Supported Supported Import Spreadsheet Supported Supported
Web Pages Basic Page Supported Supported Web Part Page Supported Supported Publishing Page Supported Supported
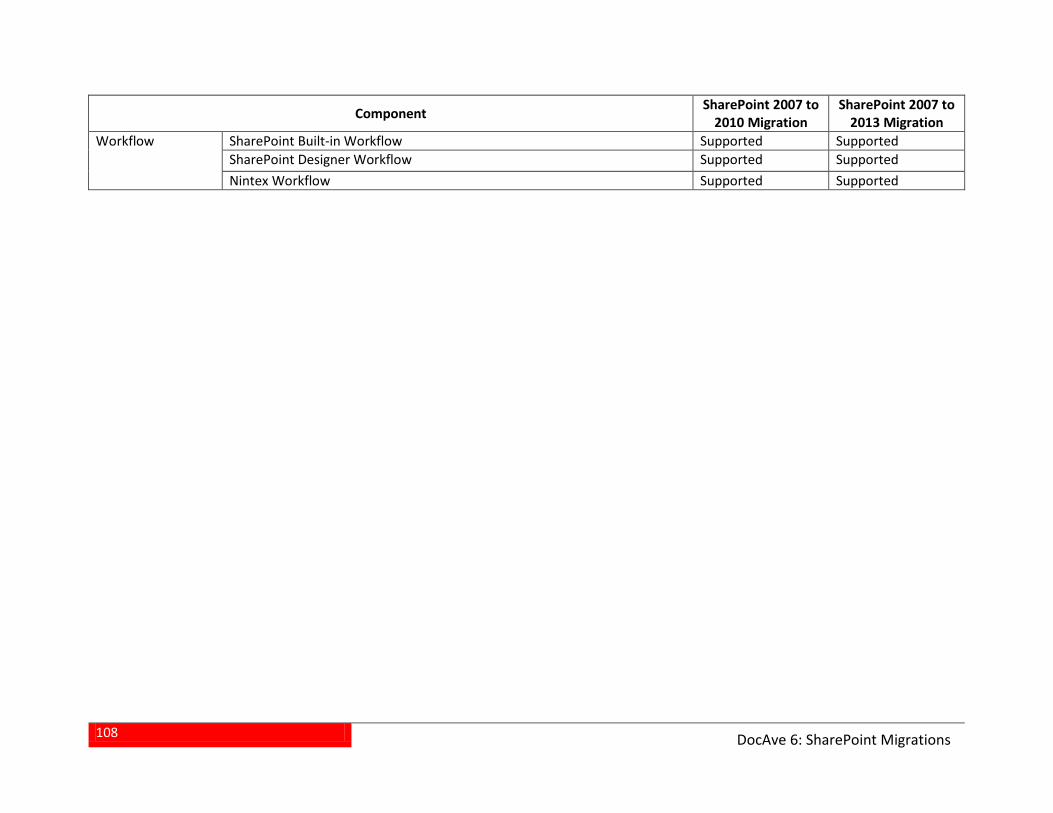
108
DocAve 6: SharePoint Migrations
Component SharePoint 2007 to 2010 Migration
SharePoint 2007 to 2013 Migration
Workflow SharePoint Built-in Workflow Supported Supported SharePoint Designer Workflow Supported Supported Nintex Workflow Supported Supported
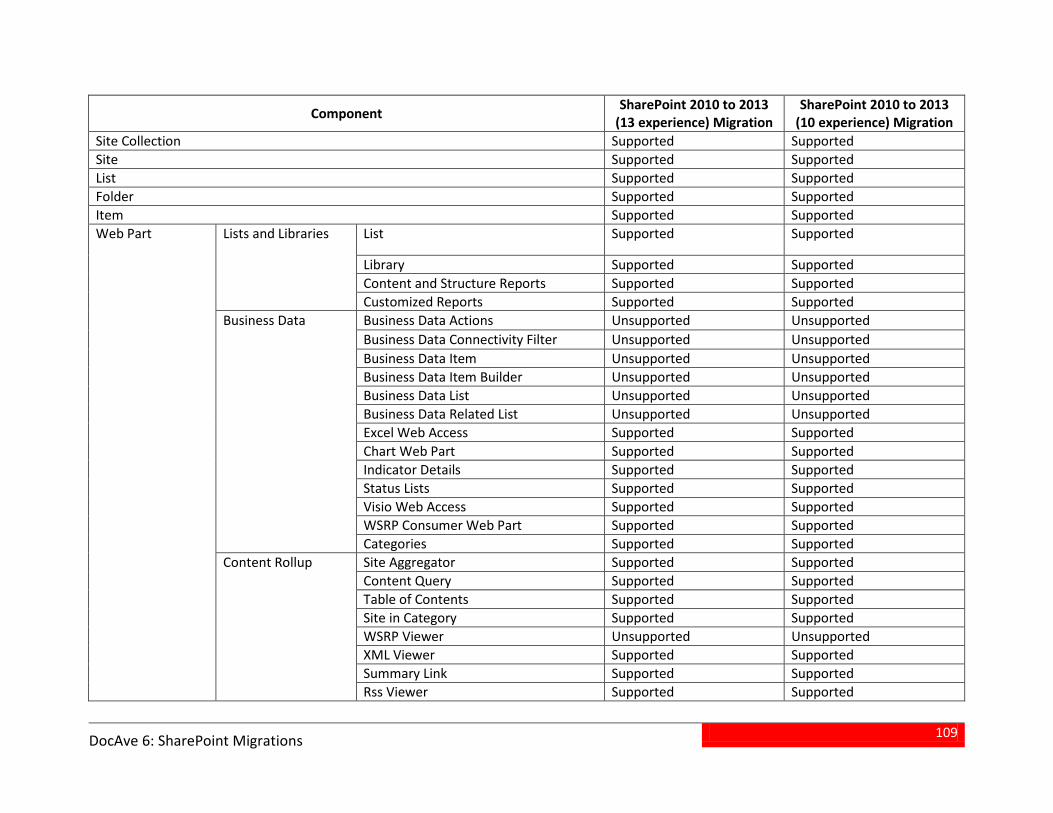
109
DocAve 6: SharePoint Migrations
Component SharePoint 2010 to 2013 (13 experience) Migration
SharePoint 2010 to 2013 (10 experience) Migration
Site Collection Supported Supported Site Supported Supported List Supported Supported Folder Supported Supported Item Supported Supported Web Part Lists and Libraries List Supported Supported
Library Supported Supported Content and Structure Reports Supported Supported Customized Reports Supported Supported
Business Data Business Data Actions Unsupported Unsupported Business Data Connectivity Filter Unsupported Unsupported Business Data Item Unsupported Unsupported Business Data Item Builder Unsupported Unsupported Business Data List Unsupported Unsupported Business Data Related List Unsupported Unsupported Excel Web Access Supported Supported Chart Web Part Supported Supported Indicator Details Supported Supported Status Lists Supported Supported Visio Web Access Supported Supported WSRP Consumer Web Part Supported Supported Categories Supported Supported
Content Rollup Site Aggregator Supported Supported Content Query Supported Supported Table of Contents Supported Supported Site in Category Supported Supported WSRP Viewer Unsupported Unsupported XML Viewer Supported Supported Summary Link Supported Supported Rss Viewer Supported Supported
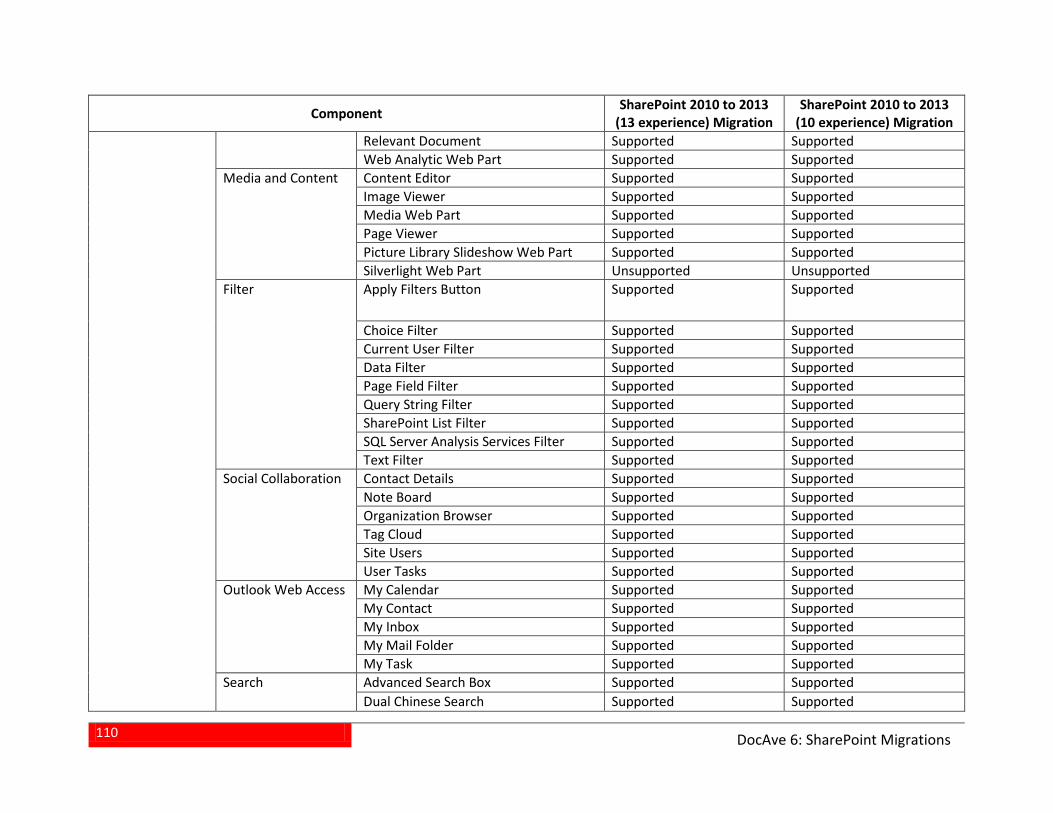
110
DocAve 6: SharePoint Migrations
Component SharePoint 2010 to 2013 (13 experience) Migration
SharePoint 2010 to 2013 (10 experience) Migration
Relevant Document Supported Supported Web Analytic Web Part Supported Supported
Media and Content Content Editor Supported Supported Image Viewer Supported Supported Media Web Part Supported Supported Page Viewer Supported Supported Picture Library Slideshow Web Part Supported Supported Silverlight Web Part Unsupported Unsupported
Filter Apply Filters Button Supported Supported
Choice Filter Supported Supported Current User Filter Supported Supported Data Filter Supported Supported Page Field Filter Supported Supported Query String Filter Supported Supported SharePoint List Filter Supported Supported SQL Server Analysis Services Filter Supported Supported Text Filter Supported Supported
Social Collaboration Contact Details Supported Supported Note Board Supported Supported Organization Browser Supported Supported Tag Cloud Supported Supported Site Users Supported Supported User Tasks Supported Supported
Outlook Web Access My Calendar Supported Supported My Contact Supported Supported My Inbox Supported Supported My Mail Folder Supported Supported My Task Supported Supported
Search Advanced Search Box Supported Supported Dual Chinese Search Supported Supported
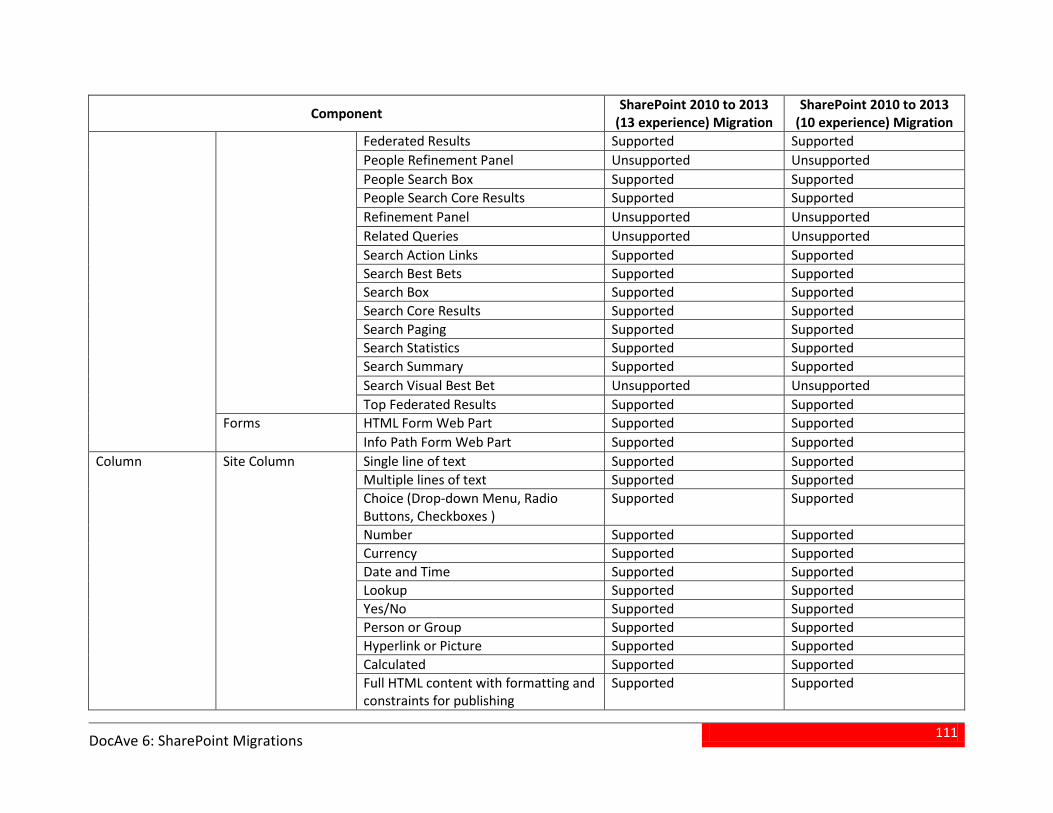
111
DocAve 6: SharePoint Migrations
Component SharePoint 2010 to 2013 (13 experience) Migration
SharePoint 2010 to 2013 (10 experience) Migration
Federated Results Supported Supported People Refinement Panel Unsupported Unsupported People Search Box Supported Supported People Search Core Results Supported Supported Refinement Panel Unsupported Unsupported Related Queries Unsupported Unsupported Search Action Links Supported Supported Search Best Bets Supported Supported Search Box Supported Supported Search Core Results Supported Supported Search Paging Supported Supported Search Statistics Supported Supported Search Summary Supported Supported Search Visual Best Bet Unsupported Unsupported Top Federated Results Supported Supported
Forms HTML Form Web Part Supported Supported Info Path Form Web Part Supported Supported
Column Site Column Single line of text Supported Supported Multiple lines of text Supported Supported Choice (Drop-down Menu, Radio Buttons, Checkboxes )
Supported Supported
Number Supported Supported Currency Supported Supported Date and Time Supported Supported Lookup Supported Supported Yes/No Supported Supported Person or Group Supported Supported Hyperlink or Picture Supported Supported Calculated Supported Supported Full HTML content with formatting and constraints for publishing
Supported Supported
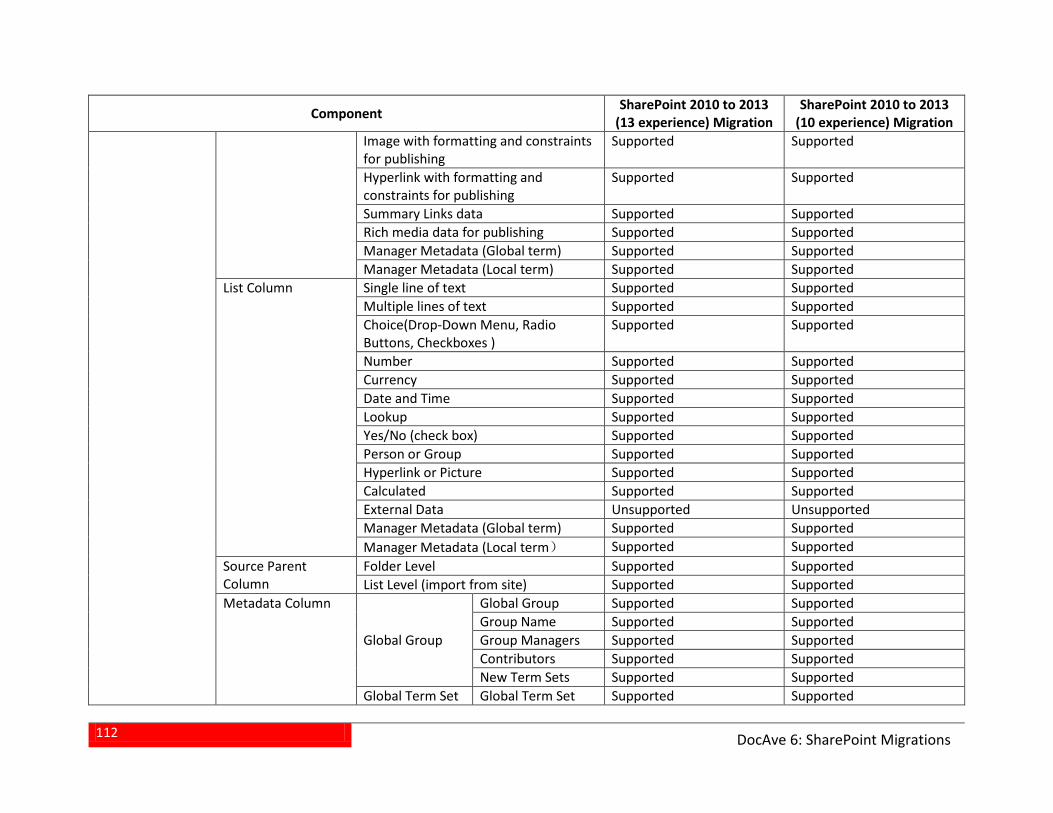
112
DocAve 6: SharePoint Migrations
Component SharePoint 2010 to 2013 (13 experience) Migration
SharePoint 2010 to 2013 (10 experience) Migration
Image with formatting and constraints for publishing
Supported Supported
Hyperlink with formatting and constraints for publishing
Supported Supported
Summary Links data Supported Supported Rich media data for publishing Supported Supported Manager Metadata (Global term) Supported Supported Manager Metadata (Local term) Supported Supported
List Column Single line of text Supported Supported Multiple lines of text Supported Supported Choice(Drop-Down Menu, Radio Buttons, Checkboxes )
Supported Supported
Number Supported Supported Currency Supported Supported Date and Time Supported Supported Lookup Supported Supported Yes/No (check box) Supported Supported Person or Group Supported Supported Hyperlink or Picture Supported Supported Calculated Supported Supported External Data Unsupported Unsupported Manager Metadata (Global term) Supported Supported Manager Metadata (Local term) Supported Supported
Source Parent Column
Folder Level Supported Supported List Level (import from site) Supported Supported
Metadata Column
Global Group
Global Group Supported Supported Group Name Supported Supported Group Managers Supported Supported Contributors Supported Supported New Term Sets Supported Supported
Global Term Set Global Term Set Supported Supported
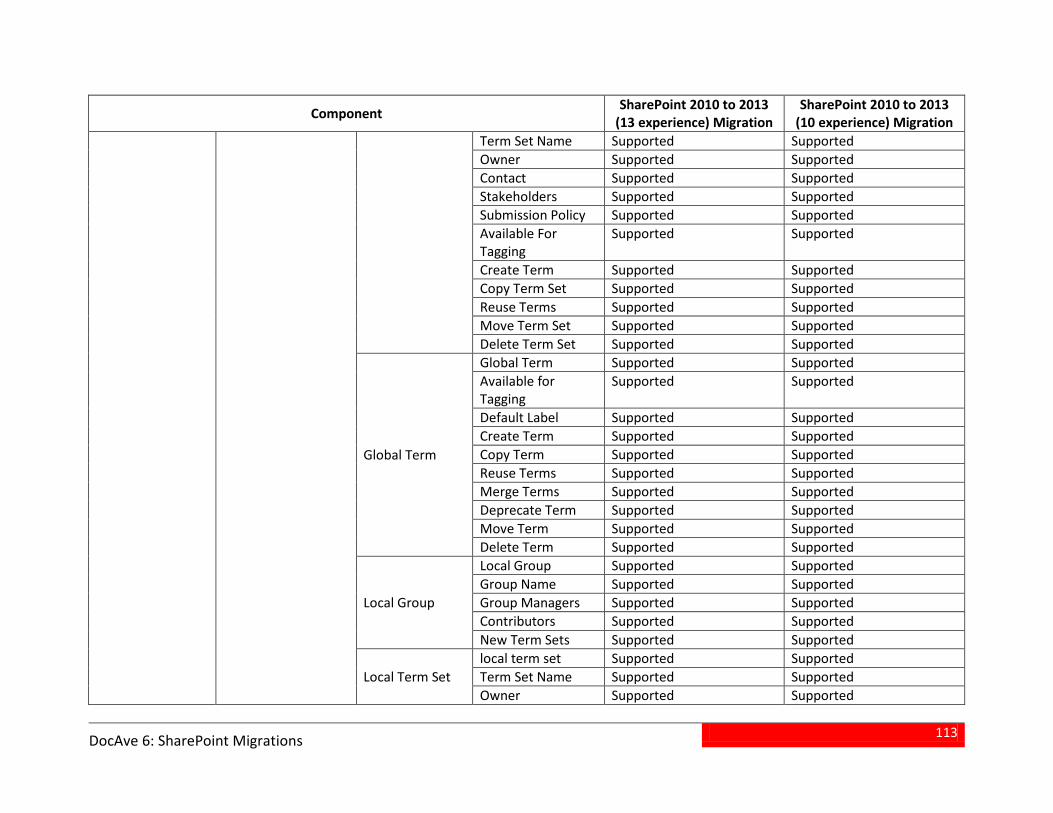
113
DocAve 6: SharePoint Migrations
Component SharePoint 2010 to 2013 (13 experience) Migration
SharePoint 2010 to 2013 (10 experience) Migration
Term Set Name Supported Supported Owner Supported Supported Contact Supported Supported Stakeholders Supported Supported Submission Policy Supported Supported Available For Tagging
Supported Supported
Create Term Supported Supported Copy Term Set Supported Supported Reuse Terms Supported Supported Move Term Set Supported Supported Delete Term Set Supported Supported
Global Term
Global Term Supported Supported Available for Tagging
Supported Supported
Default Label Supported Supported Create Term Supported Supported Copy Term Supported Supported Reuse Terms Supported Supported Merge Terms Supported Supported Deprecate Term Supported Supported Move Term Supported Supported Delete Term Supported Supported
Local Group
Local Group Supported Supported Group Name Supported Supported Group Managers Supported Supported Contributors Supported Supported New Term Sets Supported Supported
Local Term Set local term set Supported Supported Term Set Name Supported Supported Owner Supported Supported
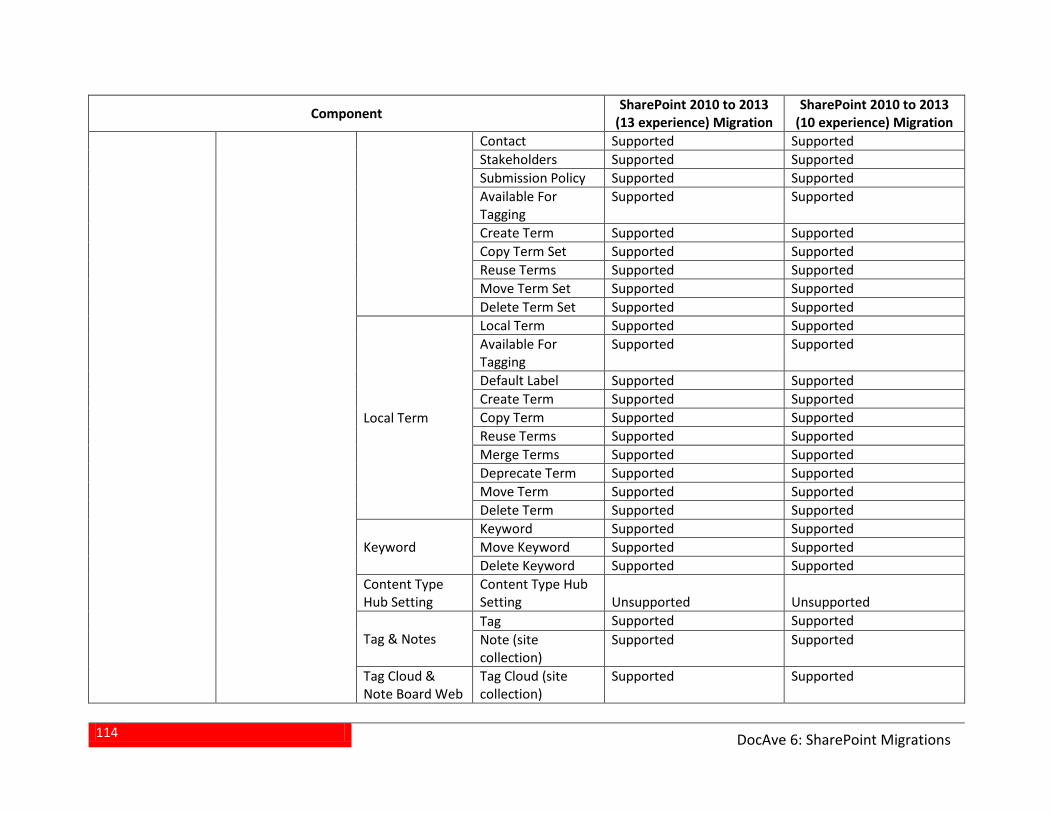
114
DocAve 6: SharePoint Migrations
Component SharePoint 2010 to 2013 (13 experience) Migration
SharePoint 2010 to 2013 (10 experience) Migration
Contact Supported Supported Stakeholders Supported Supported Submission Policy Supported Supported Available For Tagging
Supported Supported
Create Term Supported Supported Copy Term Set Supported Supported Reuse Terms Supported Supported Move Term Set Supported Supported Delete Term Set Supported Supported
Local Term
Local Term Supported Supported Available For Tagging
Supported Supported
Default Label Supported Supported Create Term Supported Supported Copy Term Supported Supported Reuse Terms Supported Supported Merge Terms Supported Supported Deprecate Term Supported Supported Move Term Supported Supported Delete Term Supported Supported
Keyword Keyword Supported Supported Move Keyword Supported Supported Delete Keyword Supported Supported
Content Type Hub Setting
Content Type Hub Setting Unsupported Unsupported
Tag & Notes Tag Supported Supported Note (site collection)
Supported Supported
Tag Cloud & Note Board Web
Tag Cloud (site collection)
Supported Supported
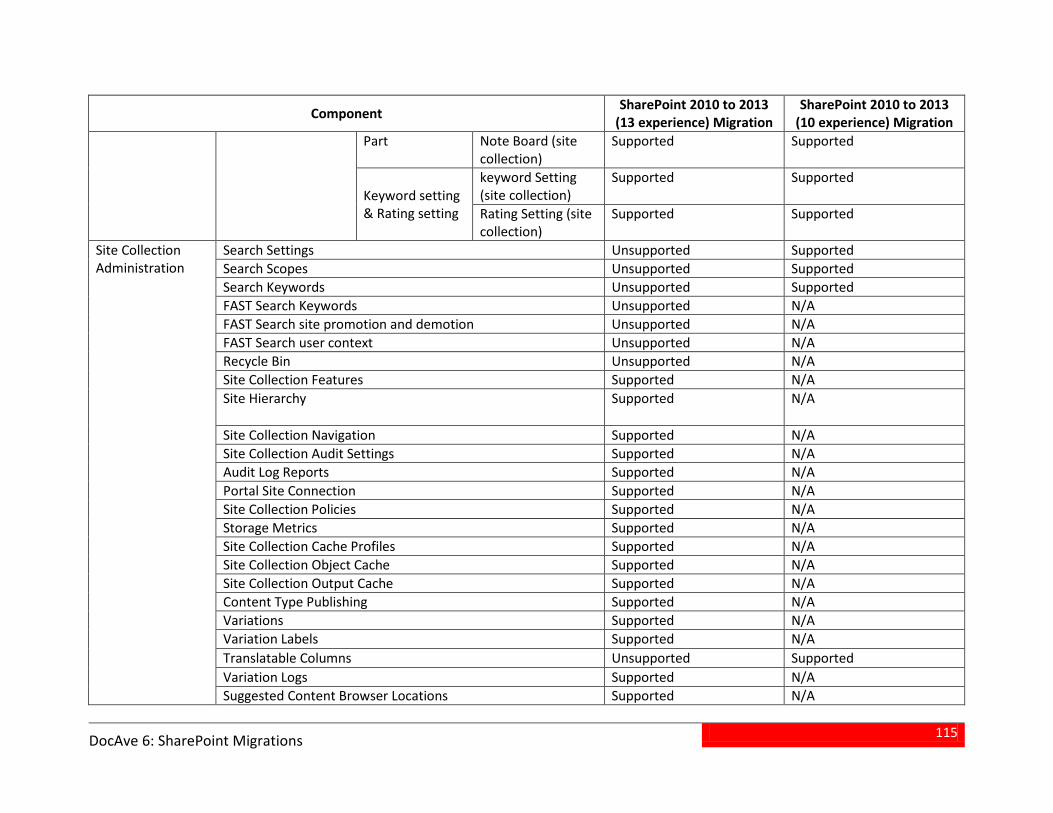
115
DocAve 6: SharePoint Migrations
Component SharePoint 2010 to 2013 (13 experience) Migration
SharePoint 2010 to 2013 (10 experience) Migration
Part Note Board (site collection)
Supported Supported
Keyword setting & Rating setting
keyword Setting (site collection)
Supported Supported
Rating Setting (site collection)
Supported Supported
Site Collection Administration
Search Settings Unsupported Supported Search Scopes Unsupported Supported Search Keywords Unsupported Supported FAST Search Keywords Unsupported N/A FAST Search site promotion and demotion Unsupported N/A FAST Search user context Unsupported N/A Recycle Bin Unsupported N/A Site Collection Features Supported N/A Site Hierarchy Supported N/A
Site Collection Navigation Supported N/A Site Collection Audit Settings Supported N/A Audit Log Reports Supported N/A Portal Site Connection Supported N/A Site Collection Policies Supported N/A Storage Metrics Supported N/A Site Collection Cache Profiles Supported N/A Site Collection Object Cache Supported N/A Site Collection Output Cache Supported N/A Content Type Publishing Supported N/A Variations Supported N/A Variation Labels Supported N/A Translatable Columns Unsupported Supported Variation Logs Supported N/A Suggested Content Browser Locations Supported N/A
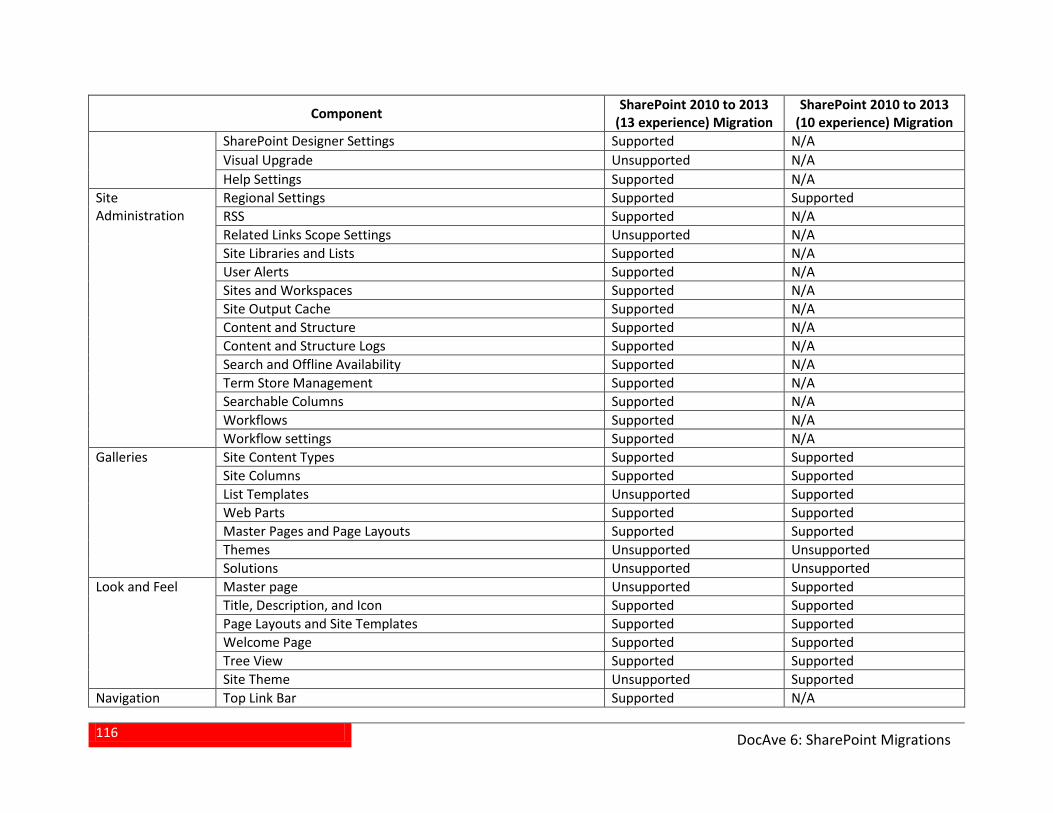
116
DocAve 6: SharePoint Migrations
Component SharePoint 2010 to 2013 (13 experience) Migration
SharePoint 2010 to 2013 (10 experience) Migration
SharePoint Designer Settings Supported N/A Visual Upgrade Unsupported N/A Help Settings Supported N/A
Site Administration
Regional Settings Supported Supported RSS Supported N/A Related Links Scope Settings Unsupported N/A Site Libraries and Lists Supported N/A User Alerts Supported N/A Sites and Workspaces Supported N/A Site Output Cache Supported N/A Content and Structure Supported N/A Content and Structure Logs Supported N/A Search and Offline Availability Supported N/A Term Store Management Supported N/A Searchable Columns Supported N/A Workflows Supported N/A Workflow settings Supported N/A
Galleries Site Content Types Supported Supported Site Columns Supported Supported List Templates Unsupported Supported Web Parts Supported Supported Master Pages and Page Layouts Supported Supported Themes Unsupported Unsupported Solutions Unsupported Unsupported
Look and Feel Master page Unsupported Supported Title, Description, and Icon Supported Supported Page Layouts and Site Templates Supported Supported Welcome Page Supported Supported Tree View Supported Supported Site Theme Unsupported Supported
Navigation Top Link Bar Supported N/A
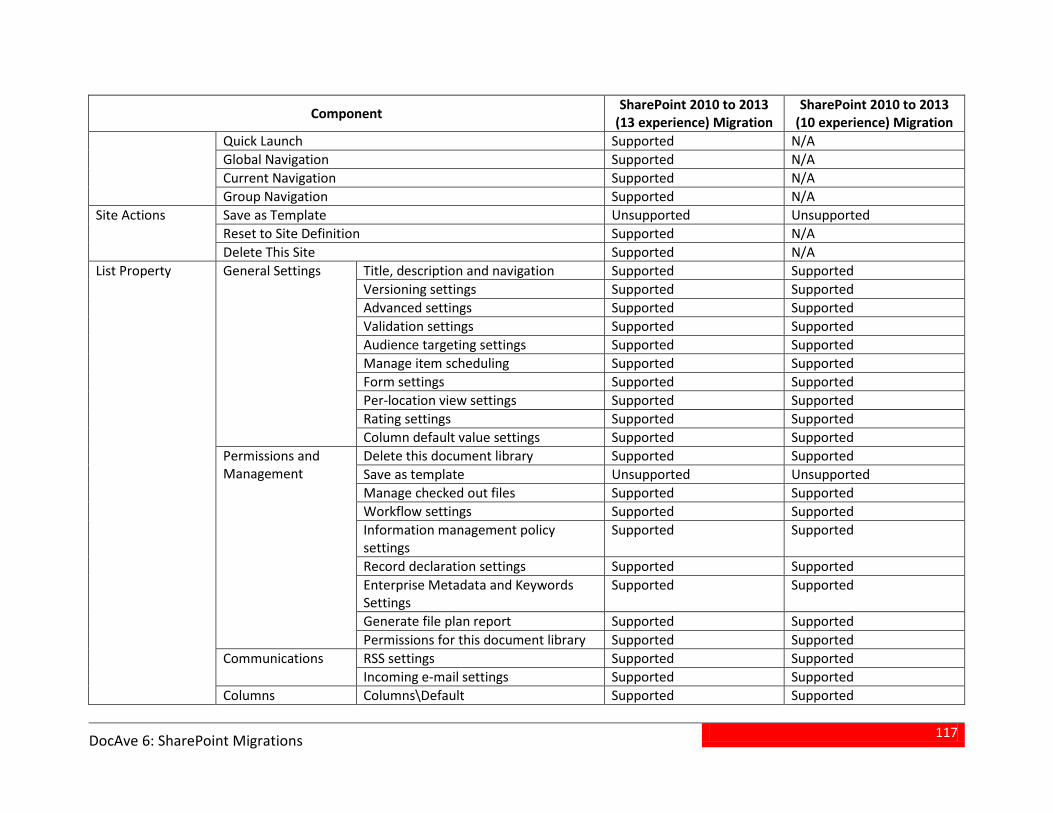
117
DocAve 6: SharePoint Migrations
Component SharePoint 2010 to 2013 (13 experience) Migration
SharePoint 2010 to 2013 (10 experience) Migration
Quick Launch Supported N/A Global Navigation Supported N/A Current Navigation Supported N/A Group Navigation Supported N/A
Site Actions Save as Template Unsupported Unsupported Reset to Site Definition Supported N/A Delete This Site Supported N/A
List Property General Settings Title, description and navigation Supported Supported Versioning settings Supported Supported Advanced settings Supported Supported Validation settings Supported Supported Audience targeting settings Supported Supported Manage item scheduling Supported Supported Form settings Supported Supported Per-location view settings Supported Supported Rating settings Supported Supported Column default value settings Supported Supported
Permissions and Management
Delete this document library Supported Supported Save as template Unsupported Unsupported Manage checked out files Supported Supported Workflow settings Supported Supported Information management policy settings
Supported Supported
Record declaration settings Supported Supported Enterprise Metadata and Keywords Settings
Supported Supported
Generate file plan report Supported Supported Permissions for this document library Supported Supported
Communications RSS settings Supported Supported Incoming e-mail settings Supported Supported
Columns Columns\Default Supported Supported
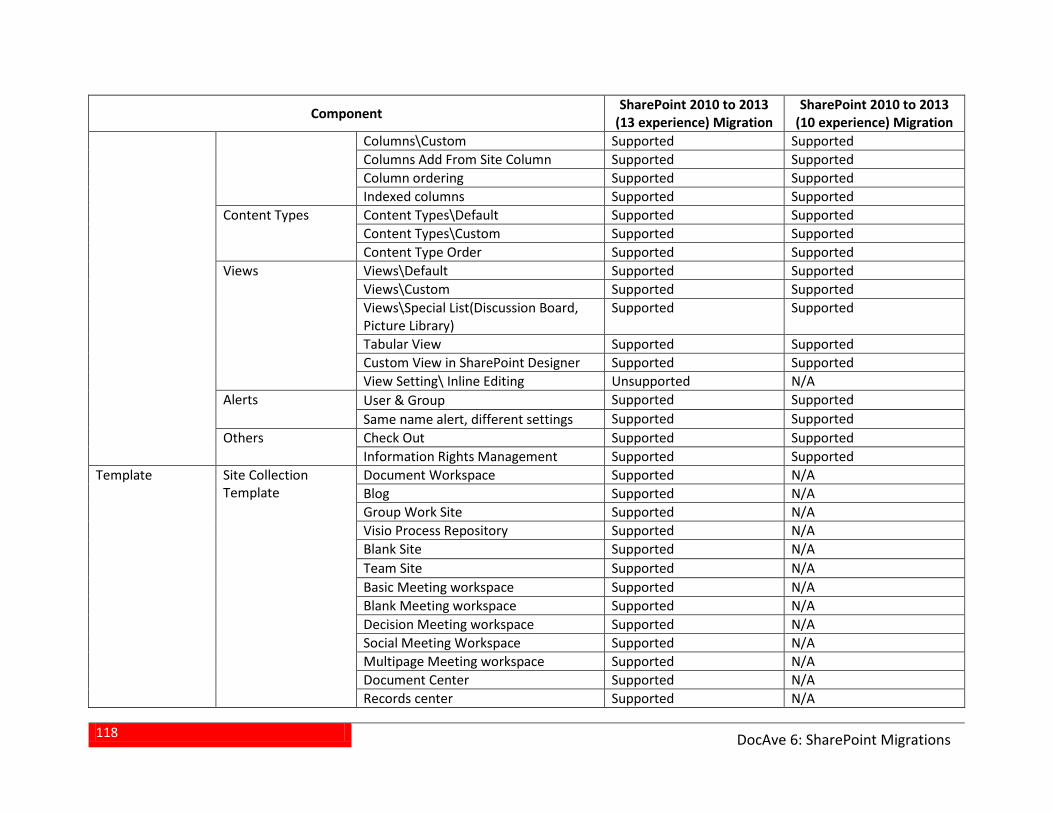
118
DocAve 6: SharePoint Migrations
Component SharePoint 2010 to 2013 (13 experience) Migration
SharePoint 2010 to 2013 (10 experience) Migration
Columns\Custom Supported Supported Columns Add From Site Column Supported Supported Column ordering Supported Supported Indexed columns Supported Supported
Content Types Content Types\Default Supported Supported Content Types\Custom Supported Supported Content Type Order Supported Supported
Views Views\Default Supported Supported Views\Custom Supported Supported Views\Special List(Discussion Board, Picture Library)
Supported Supported
Tabular View Supported Supported Custom View in SharePoint Designer Supported Supported View Setting\ Inline Editing Unsupported N/A
Alerts User & Group Supported Supported Same name alert, different settings Supported Supported
Others Check Out Supported Supported Information Rights Management Supported Supported
Template Site Collection Template
Document Workspace Supported N/A Blog Supported N/A Group Work Site Supported N/A Visio Process Repository Supported N/A Blank Site Supported N/A Team Site Supported N/A Basic Meeting workspace Supported N/A Blank Meeting workspace Supported N/A Decision Meeting workspace Supported N/A Social Meeting Workspace Supported N/A Multipage Meeting workspace Supported N/A Document Center Supported N/A Records center Supported N/A
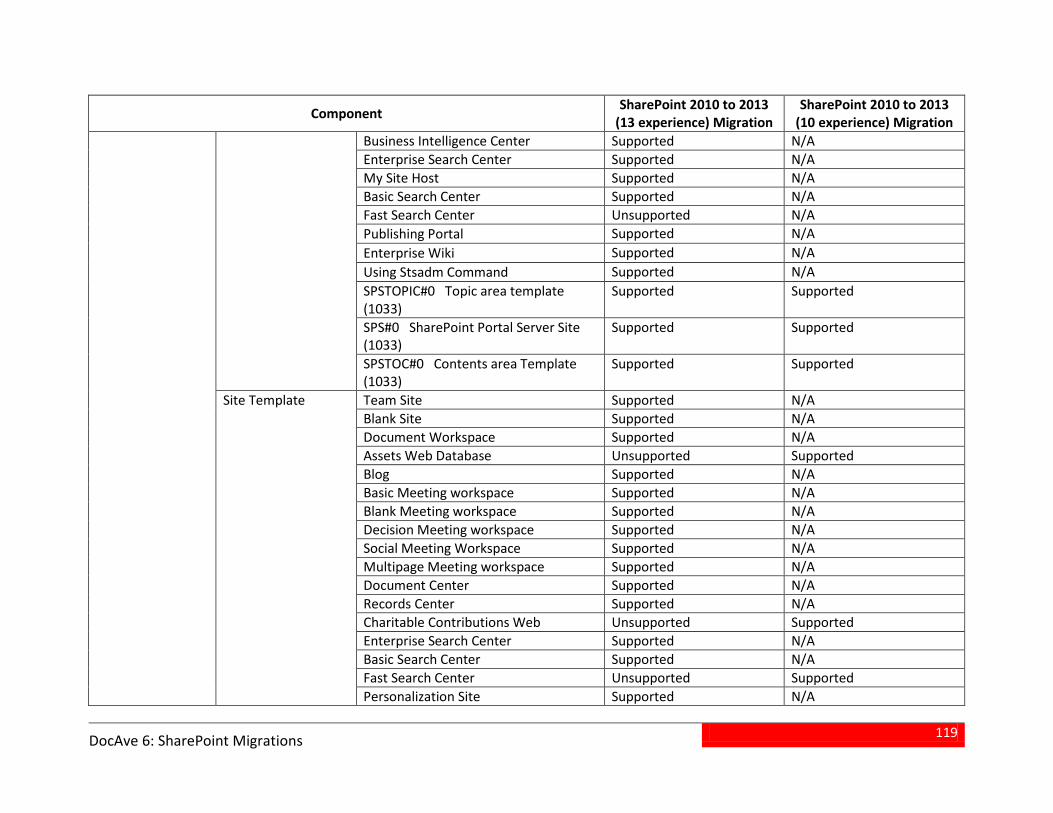
119
DocAve 6: SharePoint Migrations
Component SharePoint 2010 to 2013 (13 experience) Migration
SharePoint 2010 to 2013 (10 experience) Migration
Business Intelligence Center Supported N/A Enterprise Search Center Supported N/A My Site Host Supported N/A Basic Search Center Supported N/A Fast Search Center Unsupported N/A Publishing Portal Supported N/A Enterprise Wiki Supported N/A Using Stsadm Command Supported N/A SPSTOPIC#0 Topic area template (1033)
Supported Supported
SPS#0 SharePoint Portal Server Site (1033)
Supported Supported
SPSTOC#0 Contents area Template (1033)
Supported Supported
Site Template Team Site Supported N/A Blank Site Supported N/A Document Workspace Supported N/A Assets Web Database Unsupported Supported Blog Supported N/A Basic Meeting workspace Supported N/A Blank Meeting workspace Supported N/A Decision Meeting workspace Supported N/A Social Meeting Workspace Supported N/A Multipage Meeting workspace Supported N/A Document Center Supported N/A Records Center Supported N/A Charitable Contributions Web Unsupported Supported Enterprise Search Center Supported N/A Basic Search Center Supported N/A Fast Search Center Unsupported Supported Personalization Site Supported N/A
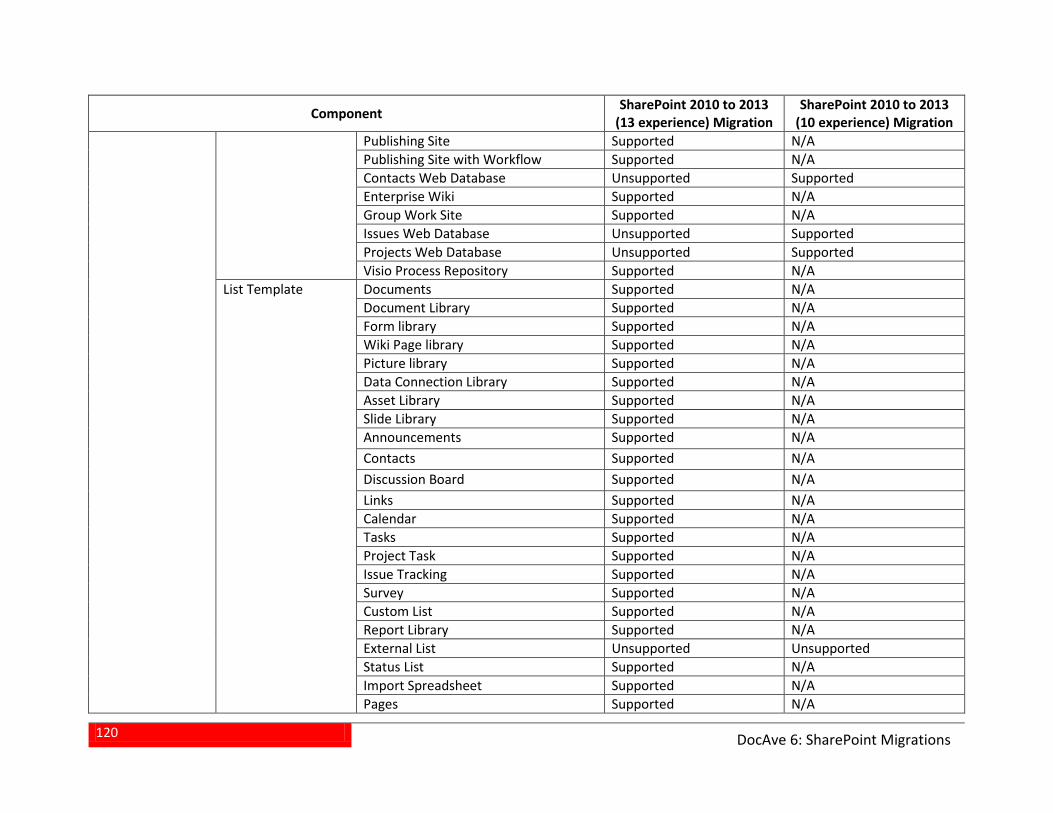
120
DocAve 6: SharePoint Migrations
Component SharePoint 2010 to 2013 (13 experience) Migration
SharePoint 2010 to 2013 (10 experience) Migration
Publishing Site Supported N/A Publishing Site with Workflow Supported N/A Contacts Web Database Unsupported Supported Enterprise Wiki Supported N/A Group Work Site Supported N/A Issues Web Database Unsupported Supported Projects Web Database Unsupported Supported Visio Process Repository Supported N/A
List Template Documents Supported N/A Document Library Supported N/A Form library Supported N/A Wiki Page library Supported N/A Picture library Supported N/A Data Connection Library Supported N/A Asset Library Supported N/A Slide Library Supported N/A Announcements Supported N/A Contacts Supported N/A Discussion Board Supported N/A Links Supported N/A Calendar Supported N/A Tasks Supported N/A Project Task Supported N/A Issue Tracking Supported N/A Survey Supported N/A Custom List Supported N/A Report Library Supported N/A External List Unsupported Unsupported Status List Supported N/A Import Spreadsheet Supported N/A Pages Supported N/A
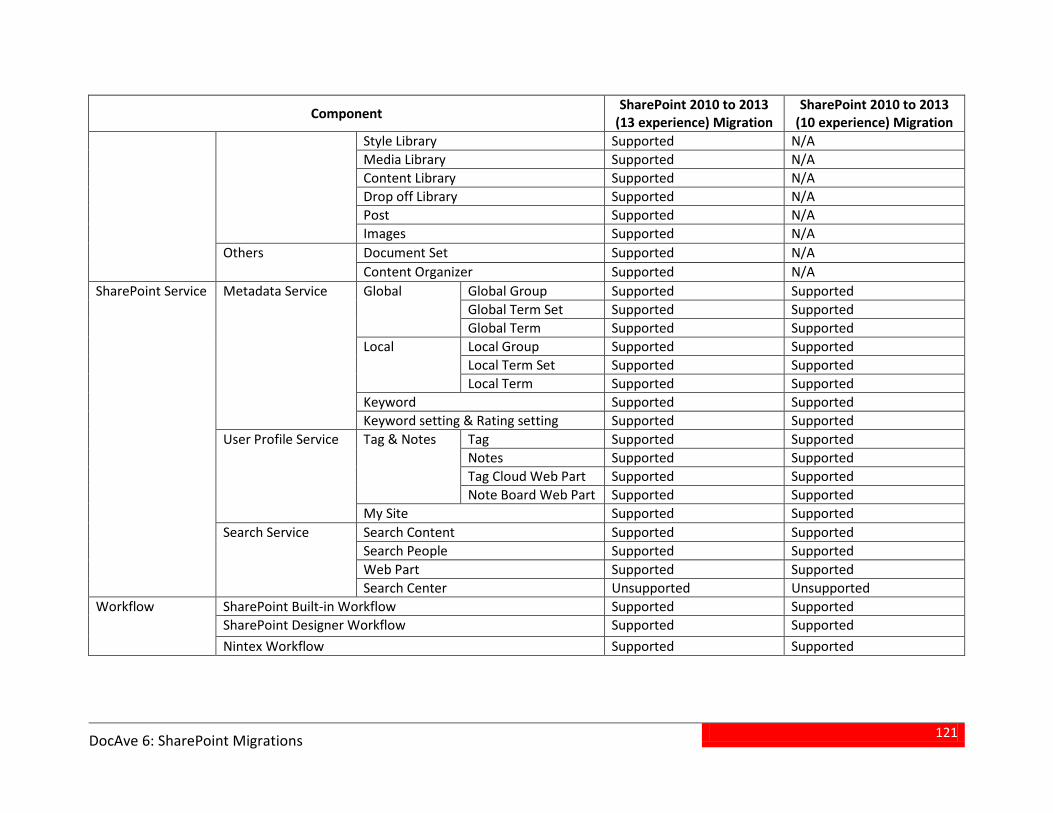
121
DocAve 6: SharePoint Migrations
Component SharePoint 2010 to 2013 (13 experience) Migration
SharePoint 2010 to 2013 (10 experience) Migration
Style Library Supported N/A Media Library Supported N/A Content Library Supported N/A Drop off Library Supported N/A Post Supported N/A Images Supported N/A
Others Document Set Supported N/A Content Organizer Supported N/A
SharePoint Service Metadata Service Global Global Group Supported Supported Global Term Set Supported Supported Global Term Supported Supported
Local Local Group Supported Supported Local Term Set Supported Supported Local Term Supported Supported
Keyword Supported Supported Keyword setting & Rating setting Supported Supported
User Profile Service Tag & Notes Tag Supported Supported Notes Supported Supported Tag Cloud Web Part Supported Supported Note Board Web Part Supported Supported
My Site Supported Supported Search Service Search Content Supported Supported
Search People Supported Supported Web Part Supported Supported Search Center Unsupported Unsupported
Workflow SharePoint Built-in Workflow Supported Supported SharePoint Designer Workflow Supported Supported Nintex Workflow Supported Supported

122
DocAve 6: SharePoint Migrations
*Note: If you select the SharePoint 2010 site collection that is the Content Type hub as the source, and select the SharePoint 2013 site collection that is the Content Type hub as the destination to run the migration job, the source published content types remain the published status but are not subscribed successfully. If desired, republish the content types manually in the destination.
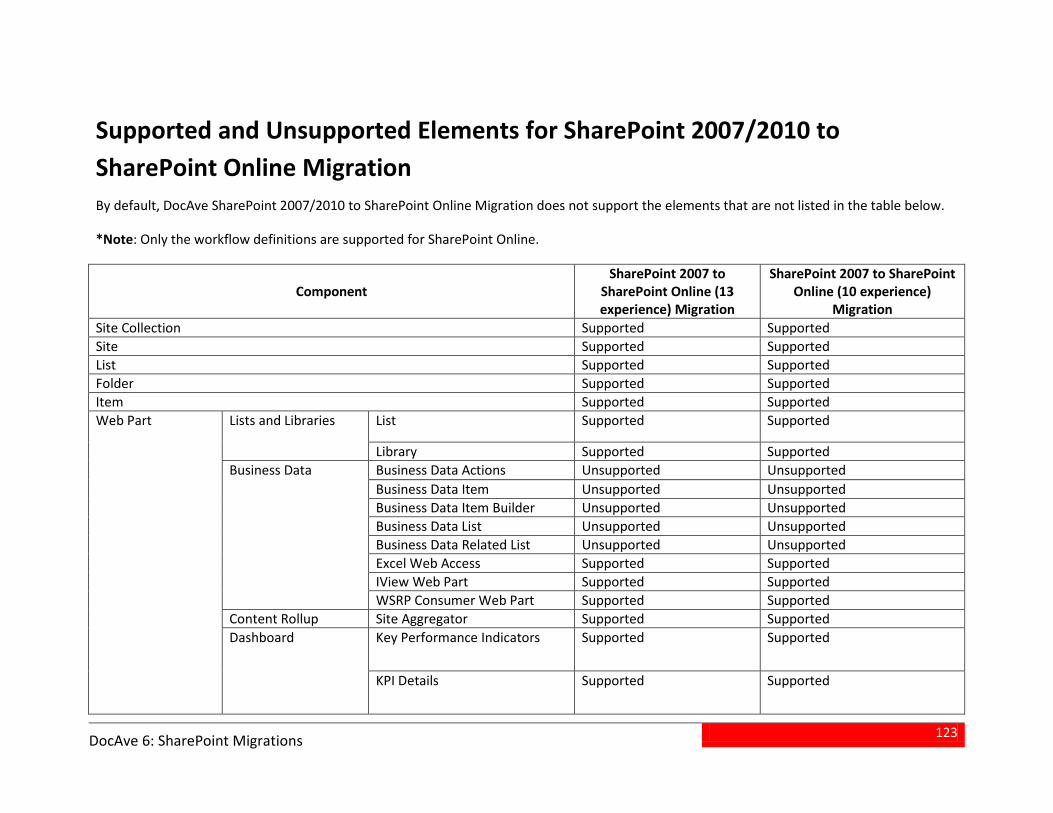
123
DocAve 6: SharePoint Migrations
Supported and Unsupported Elements for SharePoint 2007/2010 to SharePoint Online Migration By default, DocAve SharePoint 2007/2010 to SharePoint Online Migration does not support the elements that are not listed in the table below.
*Note: Only the workflow definitions are supported for SharePoint Online.
Component SharePoint 2007 to
SharePoint Online (13 experience) Migration
SharePoint 2007 to SharePoint Online (10 experience)
Migration Site Collection Supported Supported Site Supported Supported List Supported Supported Folder Supported Supported Item Supported Supported Web Part Lists and Libraries List Supported Supported
Library Supported Supported Business Data Business Data Actions Unsupported Unsupported
Business Data Item Unsupported Unsupported Business Data Item Builder Unsupported Unsupported Business Data List Unsupported Unsupported Business Data Related List Unsupported Unsupported Excel Web Access Supported Supported IView Web Part Supported Supported WSRP Consumer Web Part Supported Supported
Content Rollup Site Aggregator Supported Supported Dashboard Key Performance Indicators Supported Supported
KPI Details Supported Supported
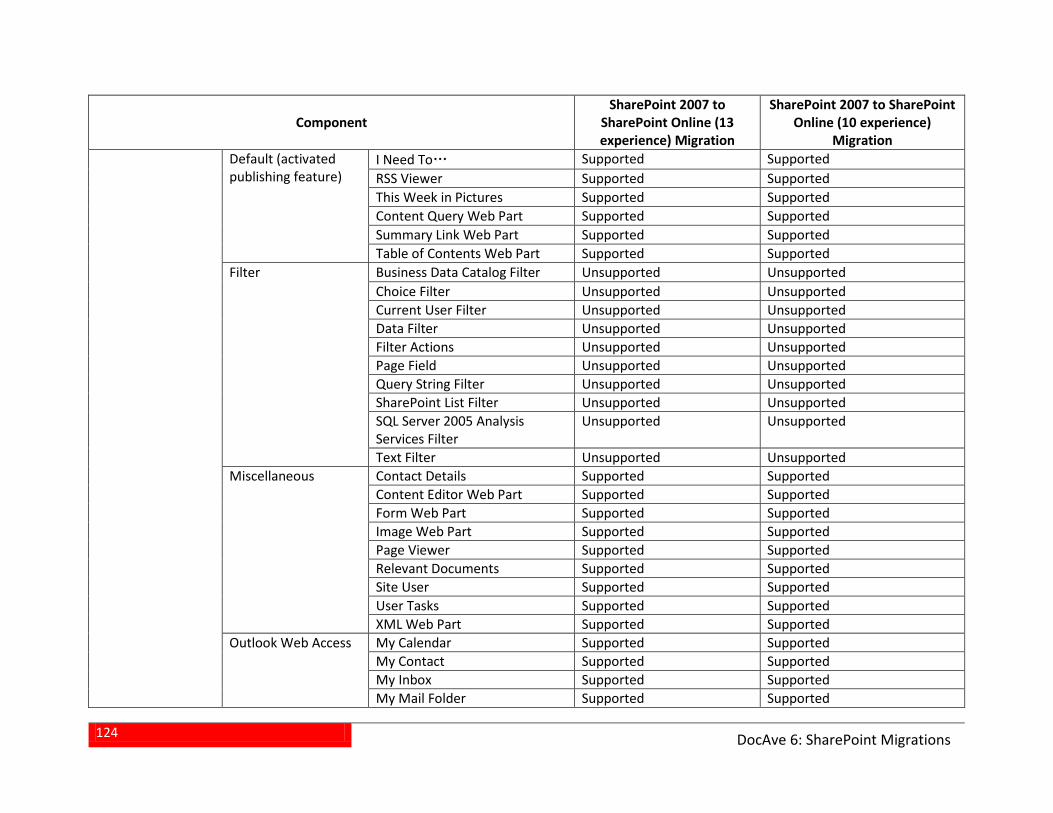
124
DocAve 6: SharePoint Migrations
Component SharePoint 2007 to
SharePoint Online (13 experience) Migration
SharePoint 2007 to SharePoint Online (10 experience)
Migration Default (activated publishing feature)
I Need To… Supported Supported RSS Viewer Supported Supported This Week in Pictures Supported Supported Content Query Web Part Supported Supported Summary Link Web Part Supported Supported Table of Contents Web Part Supported Supported
Filter Business Data Catalog Filter Unsupported Unsupported Choice Filter Unsupported Unsupported Current User Filter Unsupported Unsupported Data Filter Unsupported Unsupported Filter Actions Unsupported Unsupported Page Field Unsupported Unsupported Query String Filter Unsupported Unsupported SharePoint List Filter Unsupported Unsupported SQL Server 2005 Analysis Services Filter
Unsupported Unsupported
Text Filter Unsupported Unsupported Miscellaneous Contact Details Supported Supported
Content Editor Web Part Supported Supported Form Web Part Supported Supported Image Web Part Supported Supported Page Viewer Supported Supported Relevant Documents Supported Supported Site User Supported Supported User Tasks Supported Supported XML Web Part Supported Supported
Outlook Web Access My Calendar Supported Supported My Contact Supported Supported My Inbox Supported Supported My Mail Folder Supported Supported
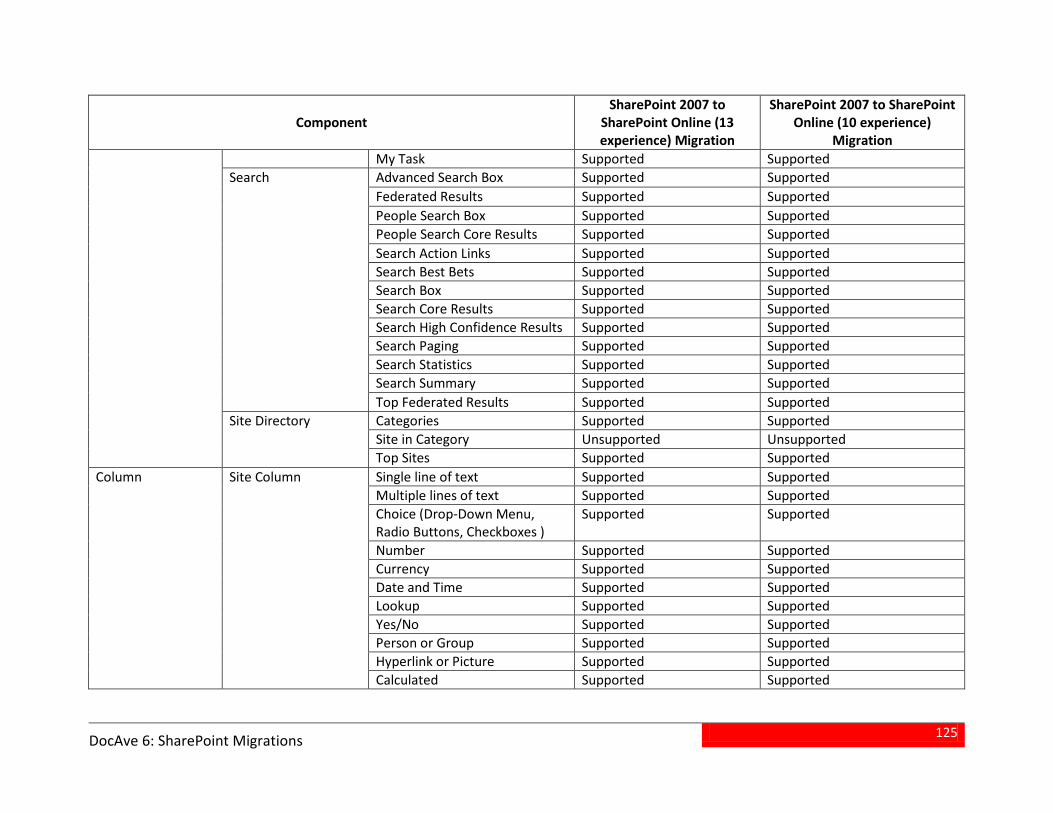
125
DocAve 6: SharePoint Migrations
Component SharePoint 2007 to
SharePoint Online (13 experience) Migration
SharePoint 2007 to SharePoint Online (10 experience)
Migration My Task Supported Supported
Search Advanced Search Box Supported Supported Federated Results Supported Supported People Search Box Supported Supported People Search Core Results Supported Supported Search Action Links Supported Supported Search Best Bets Supported Supported Search Box Supported Supported Search Core Results Supported Supported Search High Confidence Results Supported Supported Search Paging Supported Supported Search Statistics Supported Supported Search Summary Supported Supported Top Federated Results Supported Supported
Site Directory Categories Supported Supported Site in Category Unsupported Unsupported Top Sites Supported Supported
Column Site Column Single line of text Supported Supported Multiple lines of text Supported Supported Choice (Drop-Down Menu, Radio Buttons, Checkboxes )
Supported Supported
Number Supported Supported Currency Supported Supported Date and Time Supported Supported Lookup Supported Supported Yes/No Supported Supported Person or Group Supported Supported Hyperlink or Picture Supported Supported Calculated Supported Supported
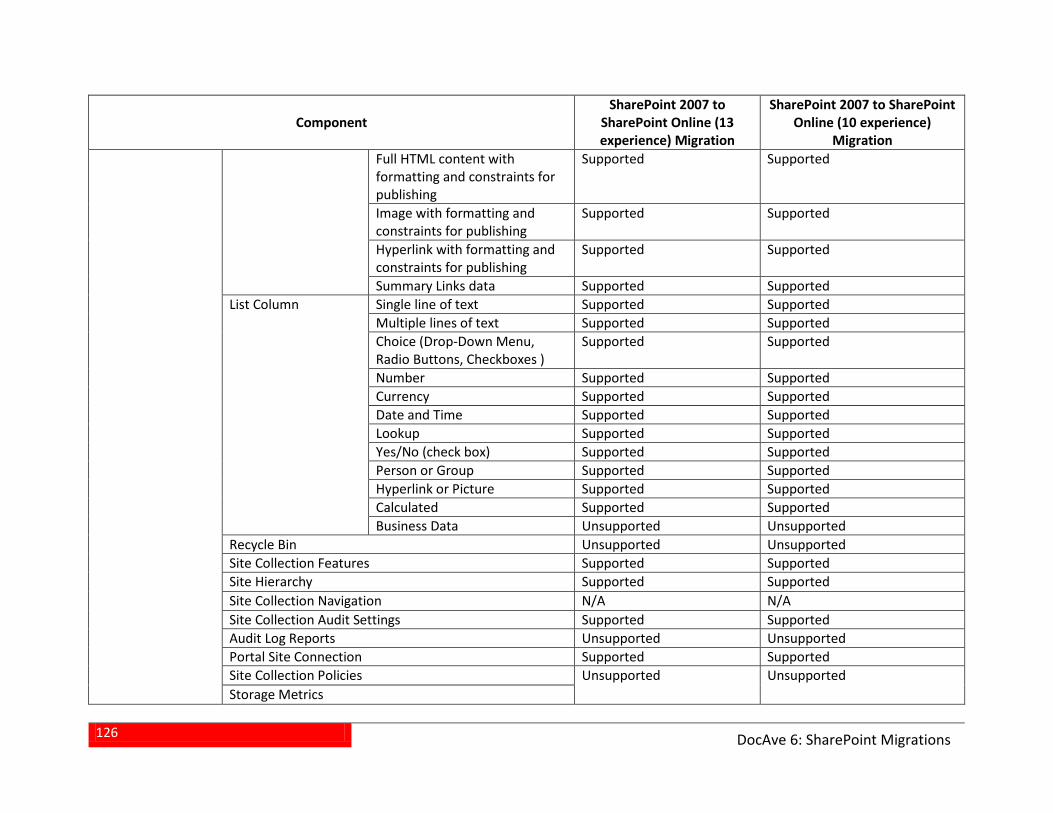
126
DocAve 6: SharePoint Migrations
Component SharePoint 2007 to
SharePoint Online (13 experience) Migration
SharePoint 2007 to SharePoint Online (10 experience)
Migration Full HTML content with formatting and constraints for publishing
Supported Supported
Image with formatting and constraints for publishing
Supported Supported
Hyperlink with formatting and constraints for publishing
Supported Supported
Summary Links data Supported Supported List Column Single line of text Supported Supported
Multiple lines of text Supported Supported Choice (Drop-Down Menu, Radio Buttons, Checkboxes )
Supported Supported
Number Supported Supported Currency Supported Supported Date and Time Supported Supported Lookup Supported Supported Yes/No (check box) Supported Supported Person or Group Supported Supported Hyperlink or Picture Supported Supported Calculated Supported Supported Business Data Unsupported Unsupported
Recycle Bin Unsupported Unsupported Site Collection Features Supported Supported Site Hierarchy Supported Supported Site Collection Navigation N/A N/A Site Collection Audit Settings Supported Supported Audit Log Reports Unsupported Unsupported Portal Site Connection Supported Supported Site Collection Policies Unsupported Unsupported Storage Metrics

127
DocAve 6: SharePoint Migrations
Component SharePoint 2007 to
SharePoint Online (13 experience) Migration
SharePoint 2007 to SharePoint Online (10 experience)
Migration Site Collection Cache Profiles Supported Supported Site Collection Object Cache Supported Supported Site Collection Output Cache Supported Supported Content Type Publishing N/A N/A Variations Supported Supported Variation Labels Supported Supported Variation Logs Unsupported Unsupported Suggested Content Browser Locations N/A N/A SharePoint Designer Settings N/A N/A Help Settings N/A N/A
Site Administration Regional Settings Supported Supported Site Usage Reports Unsupported Unsupported RSS Supported Supported Search Visibility Supported Supported Site Features Supported Supported Related Links Scope Settings Unsupported Supported Site Libraries and Lists Supported Supported User Alerts Supported Supported Sites and Workspaces Supported Supported Delete This Site Supported Supported Site Output Cache Supported Supported Content and Structure Supported Supported Content and Structure Logs Unsupported Unsupported
Galleries Site Content Types\Default Supported Supported Site Content Types\Custom Supported Supported Site Content Types\Existing Group Supported Supported Site Content Types\New group Supported Supported Site Columns\Default Supported Supported Site Columns\Existing Group Supported Supported Site Columns\New Group Supported Supported
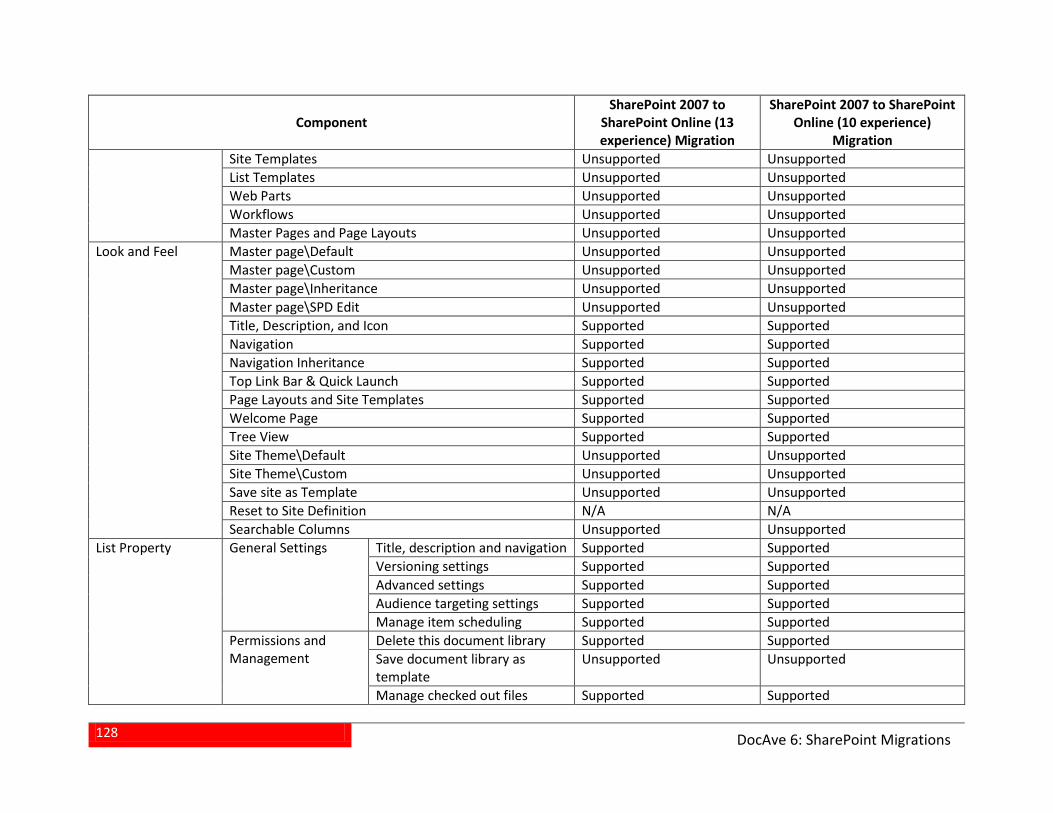
128
DocAve 6: SharePoint Migrations
Component SharePoint 2007 to
SharePoint Online (13 experience) Migration
SharePoint 2007 to SharePoint Online (10 experience)
Migration Site Templates Unsupported Unsupported List Templates Unsupported Unsupported Web Parts Unsupported Unsupported Workflows Unsupported Unsupported Master Pages and Page Layouts Unsupported Unsupported
Look and Feel Master page\Default Unsupported Unsupported Master page\Custom Unsupported Unsupported Master page\Inheritance Unsupported Unsupported Master page\SPD Edit Unsupported Unsupported Title, Description, and Icon Supported Supported Navigation Supported Supported Navigation Inheritance Supported Supported Top Link Bar & Quick Launch Supported Supported Page Layouts and Site Templates Supported Supported Welcome Page Supported Supported Tree View Supported Supported Site Theme\Default Unsupported Unsupported Site Theme\Custom Unsupported Unsupported Save site as Template Unsupported Unsupported Reset to Site Definition N/A N/A Searchable Columns Unsupported Unsupported
List Property General Settings Title, description and navigation Supported Supported Versioning settings Supported Supported Advanced settings Supported Supported Audience targeting settings Supported Supported Manage item scheduling Supported Supported
Permissions and Management
Delete this document library Supported Supported Save document library as template
Unsupported Unsupported
Manage checked out files Supported Supported
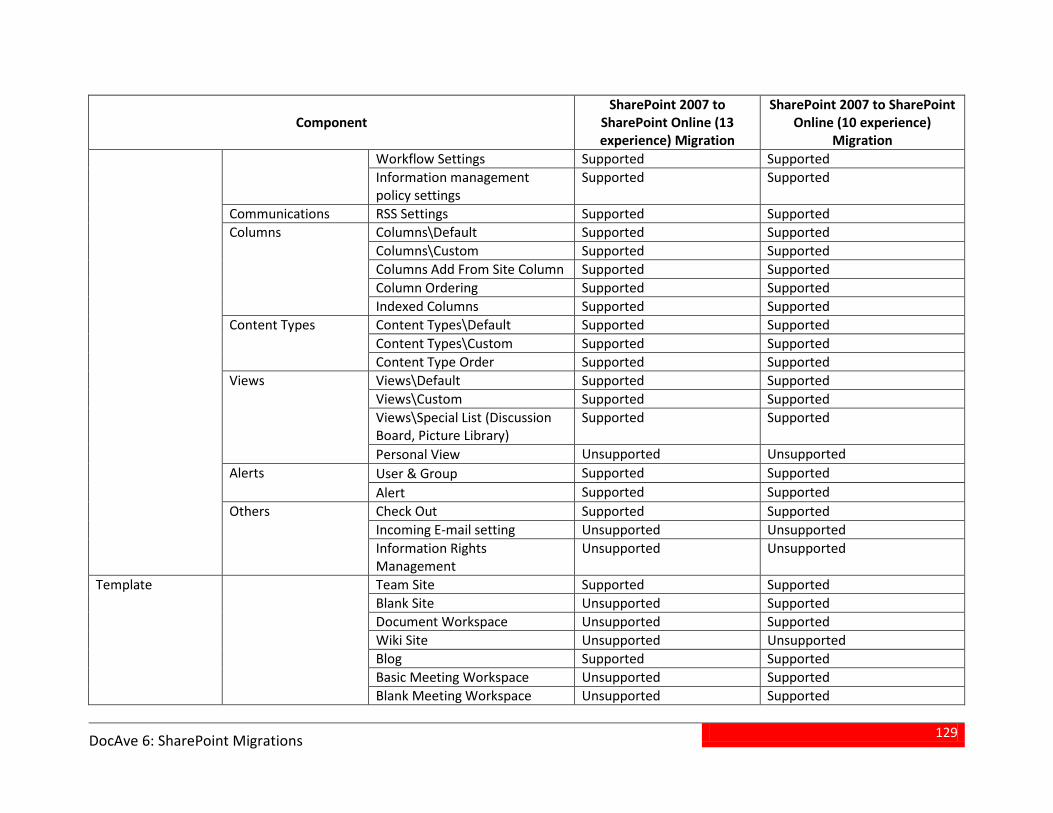
129
DocAve 6: SharePoint Migrations
Component SharePoint 2007 to
SharePoint Online (13 experience) Migration
SharePoint 2007 to SharePoint Online (10 experience)
Migration Workflow Settings Supported Supported Information management policy settings
Supported Supported
Communications RSS Settings Supported Supported Columns Columns\Default Supported Supported
Columns\Custom Supported Supported Columns Add From Site Column Supported Supported Column Ordering Supported Supported Indexed Columns Supported Supported
Content Types Content Types\Default Supported Supported Content Types\Custom Supported Supported Content Type Order Supported Supported
Views Views\Default Supported Supported Views\Custom Supported Supported Views\Special List (Discussion Board, Picture Library)
Supported Supported
Personal View Unsupported Unsupported Alerts User & Group Supported Supported
Alert Supported Supported Others Check Out Supported Supported
Incoming E-mail setting Unsupported Unsupported Information Rights Management
Unsupported Unsupported
Template Team Site Supported Supported Blank Site Unsupported Supported Document Workspace Unsupported Supported Wiki Site Unsupported Unsupported Blog Supported Supported Basic Meeting Workspace Unsupported Supported Blank Meeting Workspace Unsupported Supported
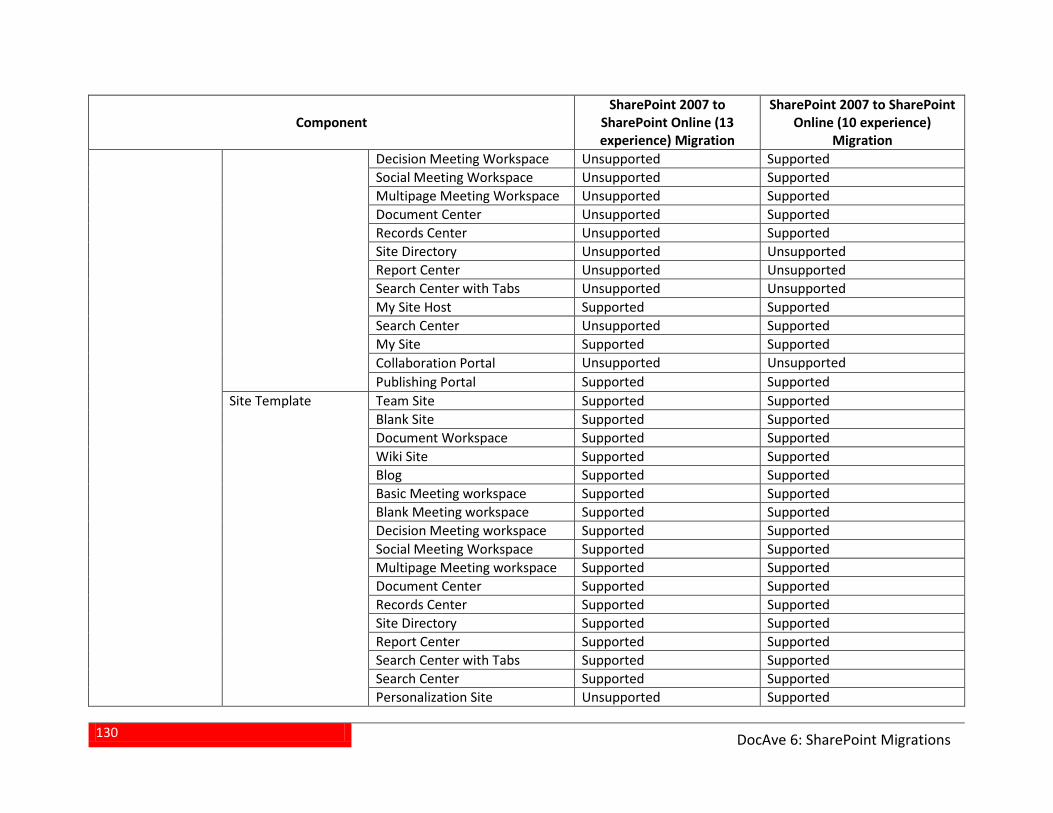
130
DocAve 6: SharePoint Migrations
Component SharePoint 2007 to
SharePoint Online (13 experience) Migration
SharePoint 2007 to SharePoint Online (10 experience)
Migration Decision Meeting Workspace Unsupported Supported Social Meeting Workspace Unsupported Supported Multipage Meeting Workspace Unsupported Supported Document Center Unsupported Supported Records Center Unsupported Supported Site Directory Unsupported Unsupported Report Center Unsupported Unsupported Search Center with Tabs Unsupported Unsupported My Site Host Supported Supported Search Center Unsupported Supported My Site Supported Supported Collaboration Portal Unsupported Unsupported Publishing Portal Supported Supported
Site Template Team Site Supported Supported Blank Site Supported Supported Document Workspace Supported Supported Wiki Site Supported Supported Blog Supported Supported Basic Meeting workspace Supported Supported Blank Meeting workspace Supported Supported Decision Meeting workspace Supported Supported Social Meeting Workspace Supported Supported Multipage Meeting workspace Supported Supported Document Center Supported Supported Records Center Supported Supported Site Directory Supported Supported Report Center Supported Supported Search Center with Tabs Supported Supported Search Center Supported Supported Personalization Site Unsupported Supported
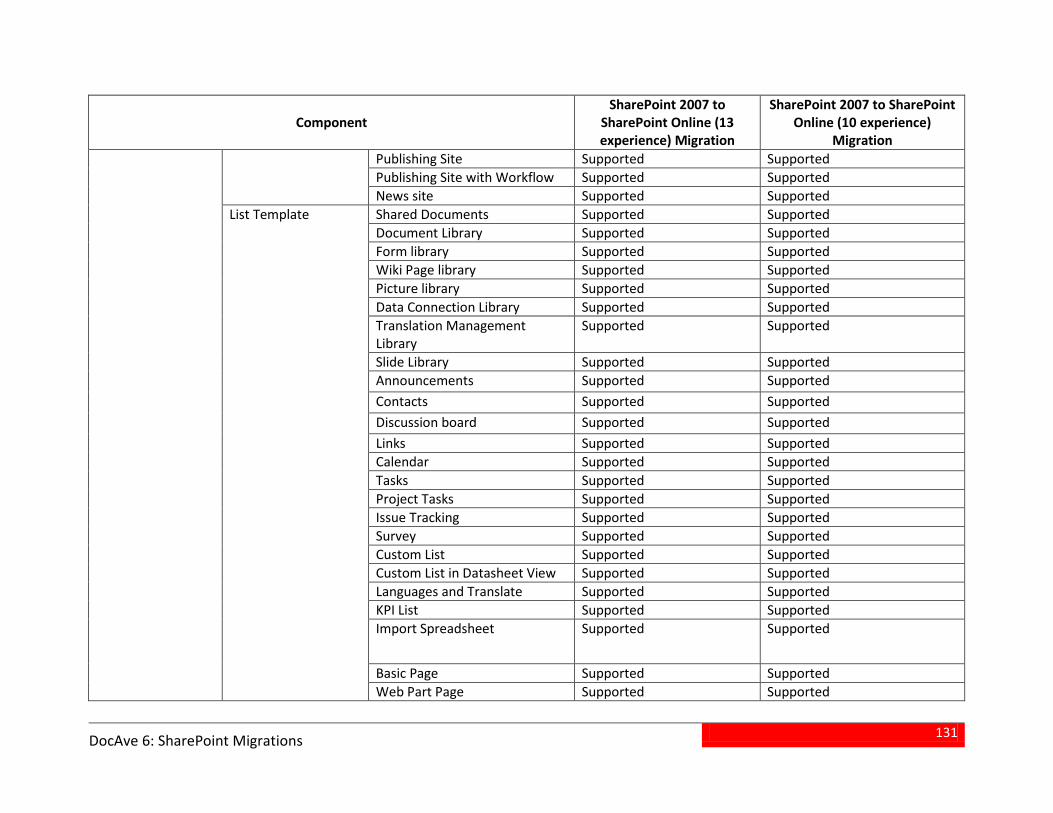
131
DocAve 6: SharePoint Migrations
Component SharePoint 2007 to
SharePoint Online (13 experience) Migration
SharePoint 2007 to SharePoint Online (10 experience)
Migration Publishing Site Supported Supported Publishing Site with Workflow Supported Supported News site Supported Supported
List Template Shared Documents Supported Supported Document Library Supported Supported Form library Supported Supported Wiki Page library Supported Supported Picture library Supported Supported Data Connection Library Supported Supported Translation Management Library
Supported Supported
Slide Library Supported Supported Announcements Supported Supported Contacts Supported Supported Discussion board Supported Supported Links Supported Supported Calendar Supported Supported Tasks Supported Supported Project Tasks Supported Supported Issue Tracking Supported Supported Survey Supported Supported Custom List Supported Supported Custom List in Datasheet View Supported Supported Languages and Translate Supported Supported KPI List Supported Supported Import Spreadsheet Supported Supported
Basic Page Supported Supported Web Part Page Supported Supported
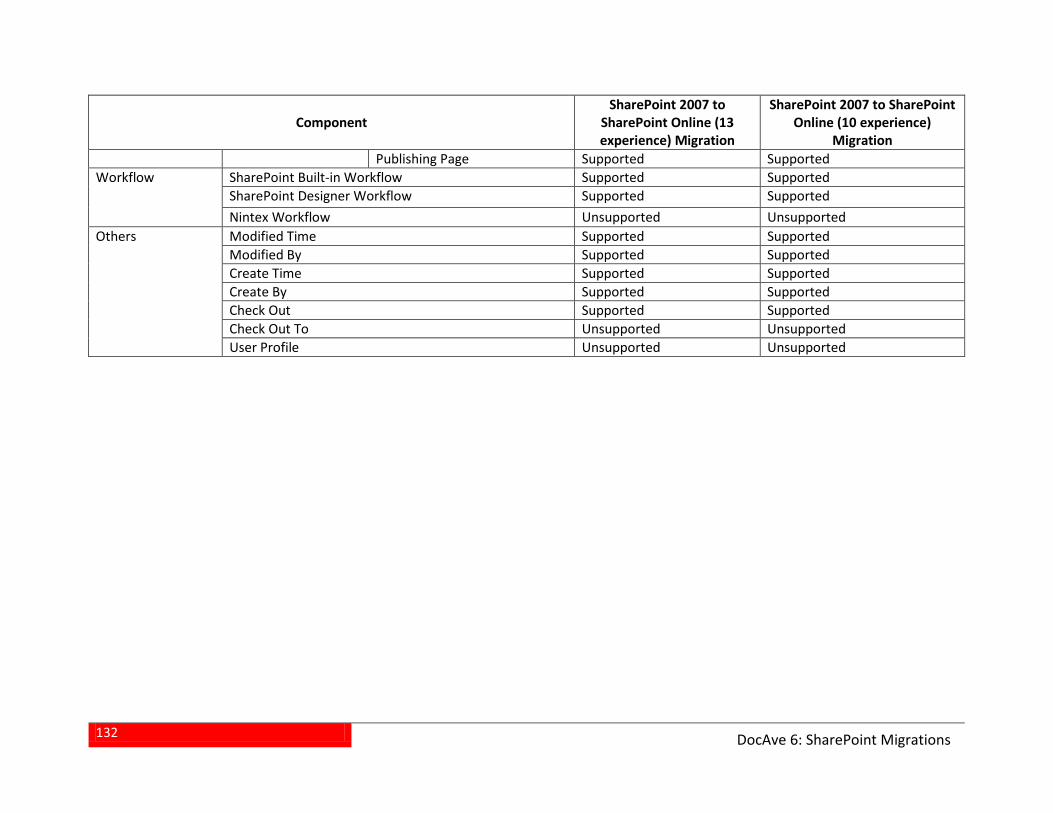
132
DocAve 6: SharePoint Migrations
Component SharePoint 2007 to
SharePoint Online (13 experience) Migration
SharePoint 2007 to SharePoint Online (10 experience)
Migration Publishing Page Supported Supported
Workflow SharePoint Built-in Workflow Supported Supported SharePoint Designer Workflow Supported Supported Nintex Workflow Unsupported Unsupported
Others Modified Time Supported Supported Modified By Supported Supported Create Time Supported Supported Create By Supported Supported Check Out Supported Supported Check Out To Unsupported Unsupported User Profile Unsupported Unsupported
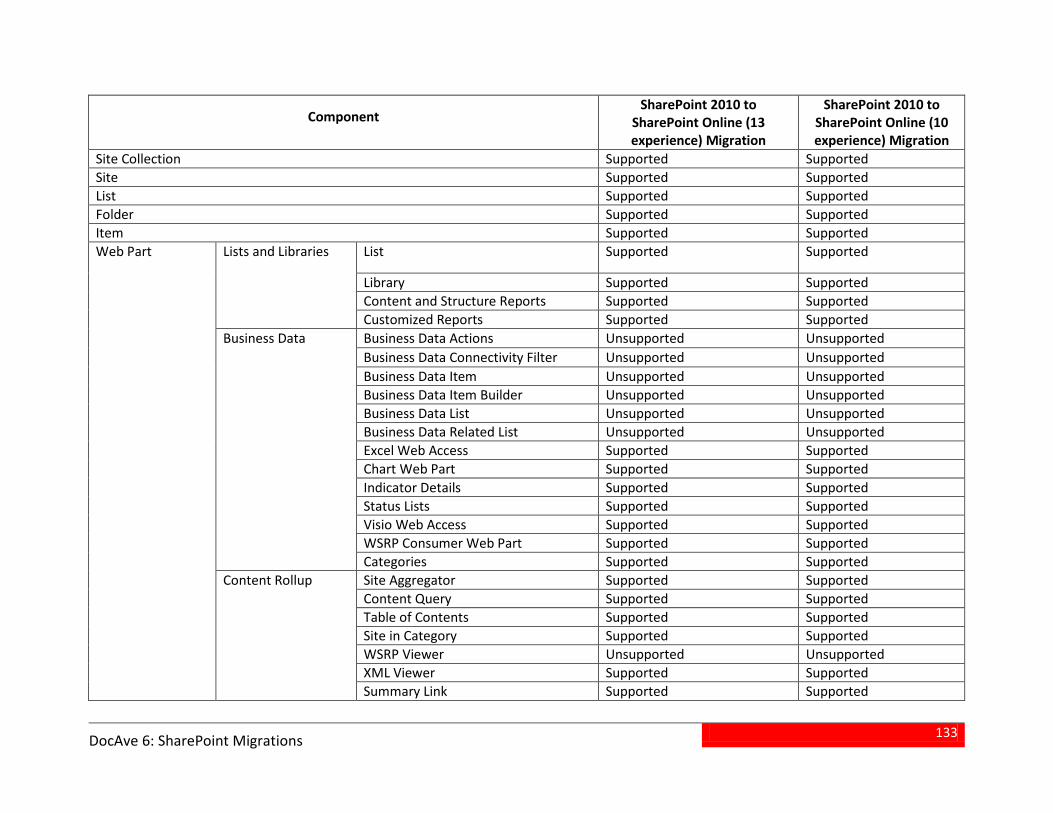
133
DocAve 6: SharePoint Migrations
Component SharePoint 2010 to
SharePoint Online (13 experience) Migration
SharePoint 2010 to SharePoint Online (10 experience) Migration
Site Collection Supported Supported Site Supported Supported List Supported Supported Folder Supported Supported Item Supported Supported Web Part Lists and Libraries List Supported Supported
Library Supported Supported Content and Structure Reports Supported Supported Customized Reports Supported Supported
Business Data Business Data Actions Unsupported Unsupported Business Data Connectivity Filter Unsupported Unsupported Business Data Item Unsupported Unsupported Business Data Item Builder Unsupported Unsupported Business Data List Unsupported Unsupported Business Data Related List Unsupported Unsupported Excel Web Access Supported Supported Chart Web Part Supported Supported Indicator Details Supported Supported Status Lists Supported Supported Visio Web Access Supported Supported WSRP Consumer Web Part Supported Supported Categories Supported Supported
Content Rollup Site Aggregator Supported Supported Content Query Supported Supported Table of Contents Supported Supported Site in Category Supported Supported WSRP Viewer Unsupported Unsupported XML Viewer Supported Supported Summary Link Supported Supported
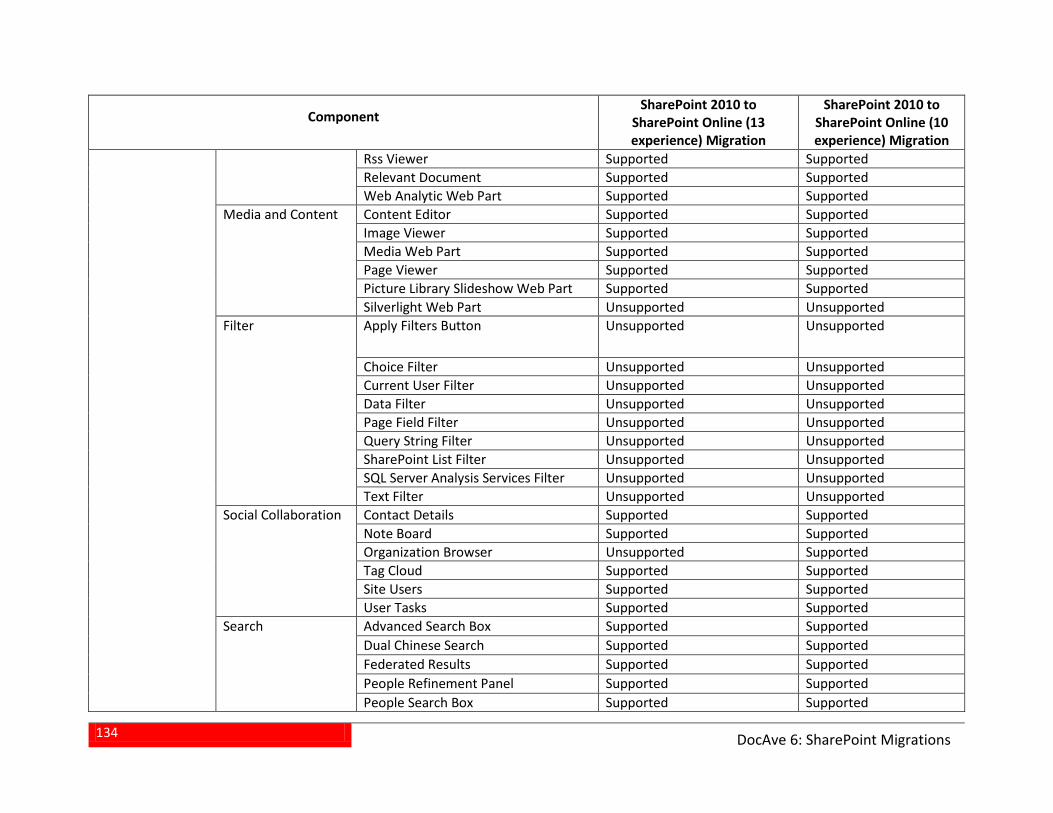
134
DocAve 6: SharePoint Migrations
Component SharePoint 2010 to
SharePoint Online (13 experience) Migration
SharePoint 2010 to SharePoint Online (10 experience) Migration
Rss Viewer Supported Supported Relevant Document Supported Supported Web Analytic Web Part Supported Supported
Media and Content Content Editor Supported Supported Image Viewer Supported Supported Media Web Part Supported Supported Page Viewer Supported Supported Picture Library Slideshow Web Part Supported Supported Silverlight Web Part Unsupported Unsupported
Filter Apply Filters Button Unsupported Unsupported
Choice Filter Unsupported Unsupported Current User Filter Unsupported Unsupported Data Filter Unsupported Unsupported Page Field Filter Unsupported Unsupported Query String Filter Unsupported Unsupported SharePoint List Filter Unsupported Unsupported SQL Server Analysis Services Filter Unsupported Unsupported Text Filter Unsupported Unsupported
Social Collaboration Contact Details Supported Supported Note Board Supported Supported Organization Browser Unsupported Supported Tag Cloud Supported Supported Site Users Supported Supported User Tasks Supported Supported
Search Advanced Search Box Supported Supported Dual Chinese Search Supported Supported Federated Results Supported Supported People Refinement Panel Supported Supported People Search Box Supported Supported
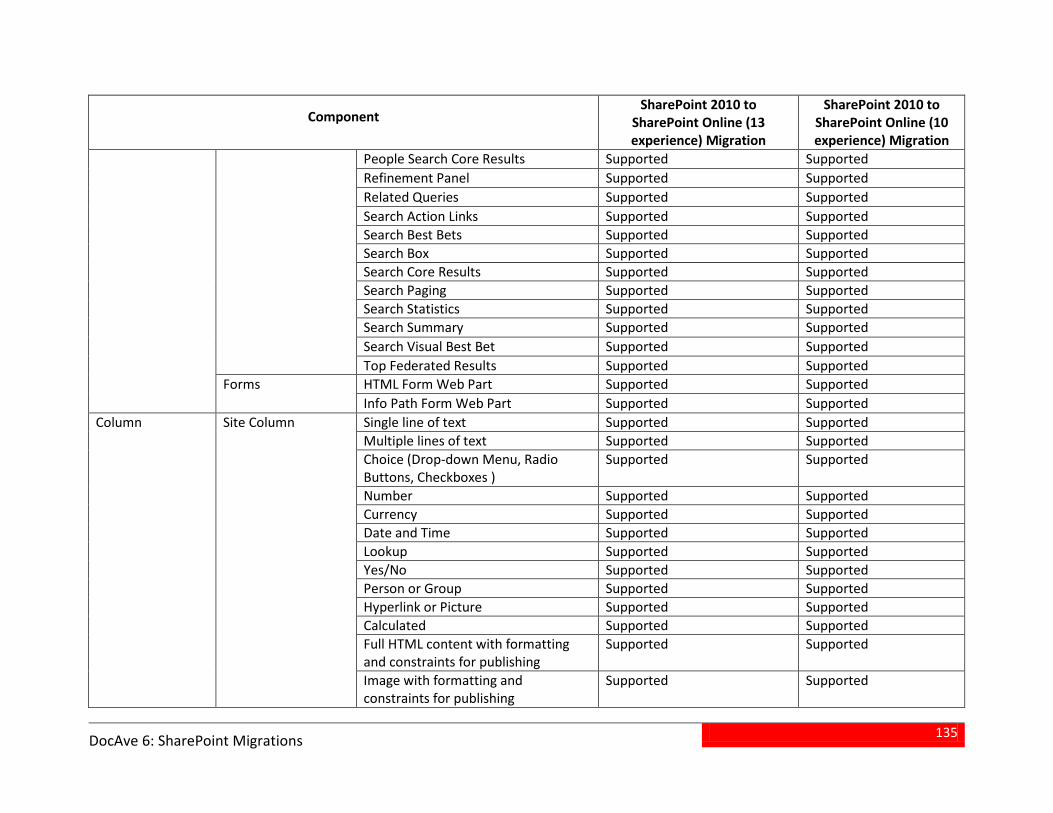
135
DocAve 6: SharePoint Migrations
Component SharePoint 2010 to
SharePoint Online (13 experience) Migration
SharePoint 2010 to SharePoint Online (10 experience) Migration
People Search Core Results Supported Supported Refinement Panel Supported Supported Related Queries Supported Supported Search Action Links Supported Supported Search Best Bets Supported Supported Search Box Supported Supported Search Core Results Supported Supported Search Paging Supported Supported Search Statistics Supported Supported Search Summary Supported Supported Search Visual Best Bet Supported Supported Top Federated Results Supported Supported
Forms HTML Form Web Part Supported Supported Info Path Form Web Part Supported Supported
Column Site Column Single line of text Supported Supported Multiple lines of text Supported Supported Choice (Drop-down Menu, Radio Buttons, Checkboxes )
Supported Supported
Number Supported Supported Currency Supported Supported Date and Time Supported Supported Lookup Supported Supported Yes/No Supported Supported Person or Group Supported Supported Hyperlink or Picture Supported Supported Calculated Supported Supported Full HTML content with formatting and constraints for publishing
Supported Supported
Image with formatting and constraints for publishing
Supported Supported
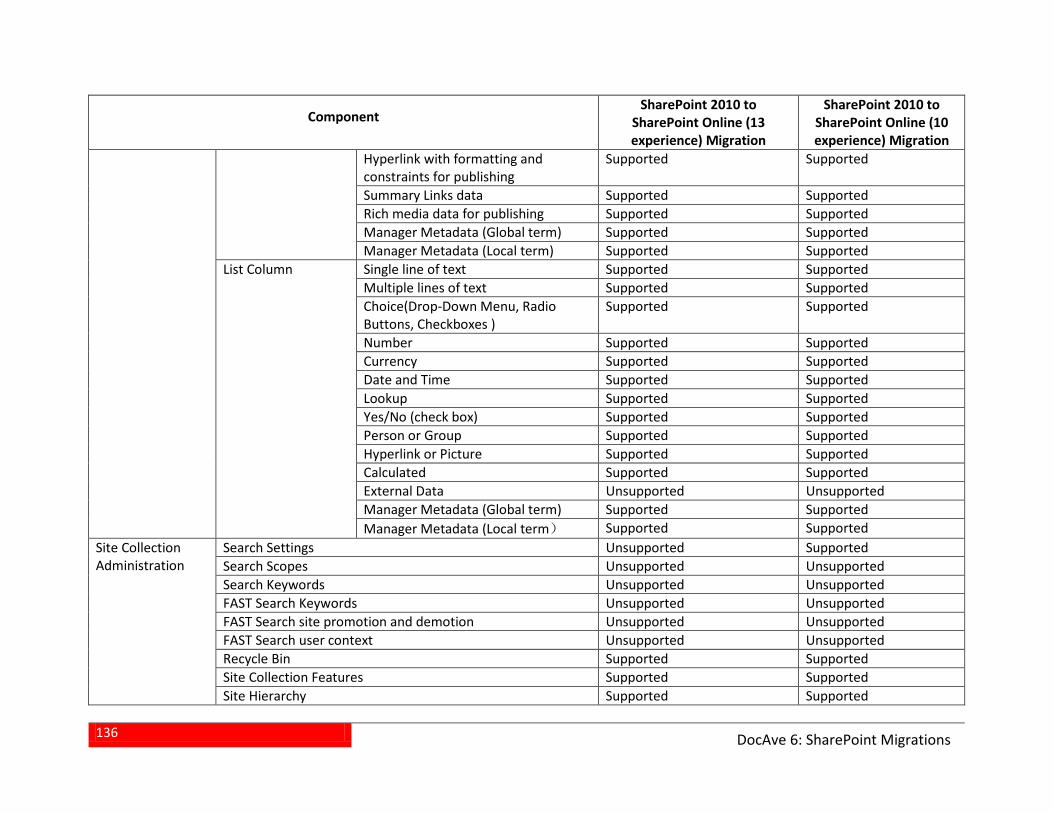
136
DocAve 6: SharePoint Migrations
Component SharePoint 2010 to
SharePoint Online (13 experience) Migration
SharePoint 2010 to SharePoint Online (10 experience) Migration
Hyperlink with formatting and constraints for publishing
Supported Supported
Summary Links data Supported Supported Rich media data for publishing Supported Supported Manager Metadata (Global term) Supported Supported Manager Metadata (Local term) Supported Supported
List Column Single line of text Supported Supported Multiple lines of text Supported Supported Choice(Drop-Down Menu, Radio Buttons, Checkboxes )
Supported Supported
Number Supported Supported Currency Supported Supported Date and Time Supported Supported Lookup Supported Supported Yes/No (check box) Supported Supported Person or Group Supported Supported Hyperlink or Picture Supported Supported Calculated Supported Supported External Data Unsupported Unsupported Manager Metadata (Global term) Supported Supported Manager Metadata (Local term) Supported Supported
Site Collection Administration
Search Settings Unsupported Supported Search Scopes Unsupported Unsupported Search Keywords Unsupported Unsupported FAST Search Keywords Unsupported Unsupported FAST Search site promotion and demotion Unsupported Unsupported FAST Search user context Unsupported Unsupported Recycle Bin Supported Supported Site Collection Features Supported Supported Site Hierarchy Supported Supported
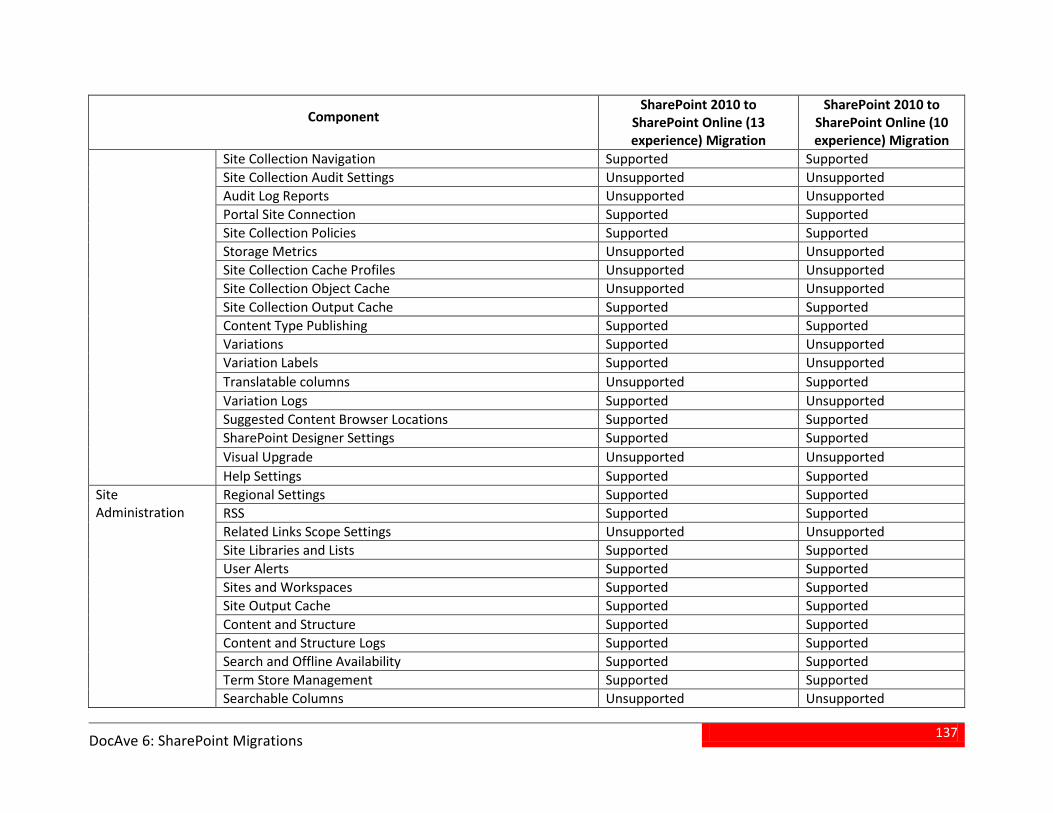
137
DocAve 6: SharePoint Migrations
Component SharePoint 2010 to
SharePoint Online (13 experience) Migration
SharePoint 2010 to SharePoint Online (10 experience) Migration
Site Collection Navigation Supported Supported Site Collection Audit Settings Unsupported Unsupported Audit Log Reports Unsupported Unsupported Portal Site Connection Supported Supported Site Collection Policies Supported Supported Storage Metrics Unsupported Unsupported Site Collection Cache Profiles Unsupported Unsupported Site Collection Object Cache Unsupported Unsupported Site Collection Output Cache Supported Supported Content Type Publishing Supported Supported Variations Supported Unsupported Variation Labels Supported Unsupported Translatable columns Unsupported Supported Variation Logs Supported Unsupported Suggested Content Browser Locations Supported Supported SharePoint Designer Settings Supported Supported Visual Upgrade Unsupported Unsupported Help Settings Supported Supported
Site Administration
Regional Settings Supported Supported RSS Supported Supported Related Links Scope Settings Unsupported Unsupported Site Libraries and Lists Supported Supported User Alerts Supported Supported Sites and Workspaces Supported Supported Site Output Cache Supported Supported Content and Structure Supported Supported Content and Structure Logs Supported Supported Search and Offline Availability Supported Supported Term Store Management Supported Supported Searchable Columns Unsupported Unsupported
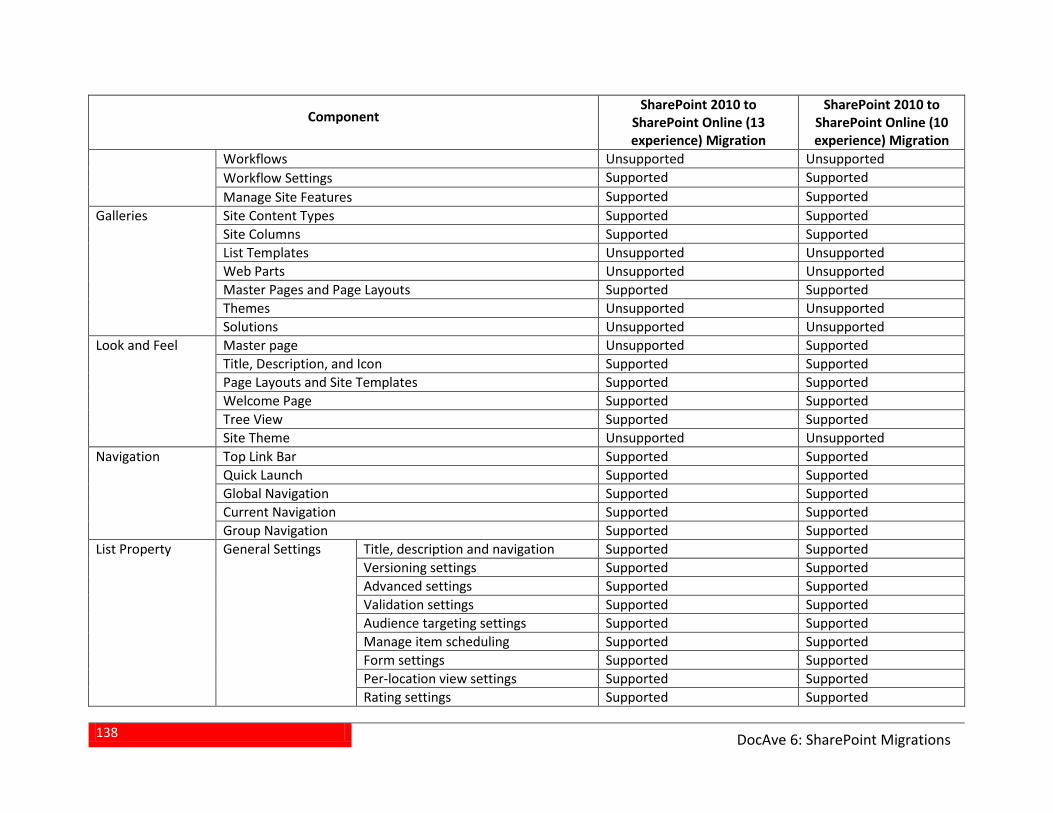
138
DocAve 6: SharePoint Migrations
Component SharePoint 2010 to
SharePoint Online (13 experience) Migration
SharePoint 2010 to SharePoint Online (10 experience) Migration
Workflows Unsupported Unsupported Workflow Settings Supported Supported Manage Site Features Supported Supported
Galleries Site Content Types Supported Supported Site Columns Supported Supported List Templates Unsupported Unsupported Web Parts Unsupported Unsupported Master Pages and Page Layouts Supported Supported Themes Unsupported Unsupported Solutions Unsupported Unsupported
Look and Feel Master page Unsupported Supported Title, Description, and Icon Supported Supported Page Layouts and Site Templates Supported Supported Welcome Page Supported Supported Tree View Supported Supported Site Theme Unsupported Unsupported
Navigation Top Link Bar Supported Supported Quick Launch Supported Supported Global Navigation Supported Supported Current Navigation Supported Supported Group Navigation Supported Supported
List Property General Settings Title, description and navigation Supported Supported Versioning settings Supported Supported Advanced settings Supported Supported Validation settings Supported Supported Audience targeting settings Supported Supported Manage item scheduling Supported Supported Form settings Supported Supported Per-location view settings Supported Supported Rating settings Supported Supported
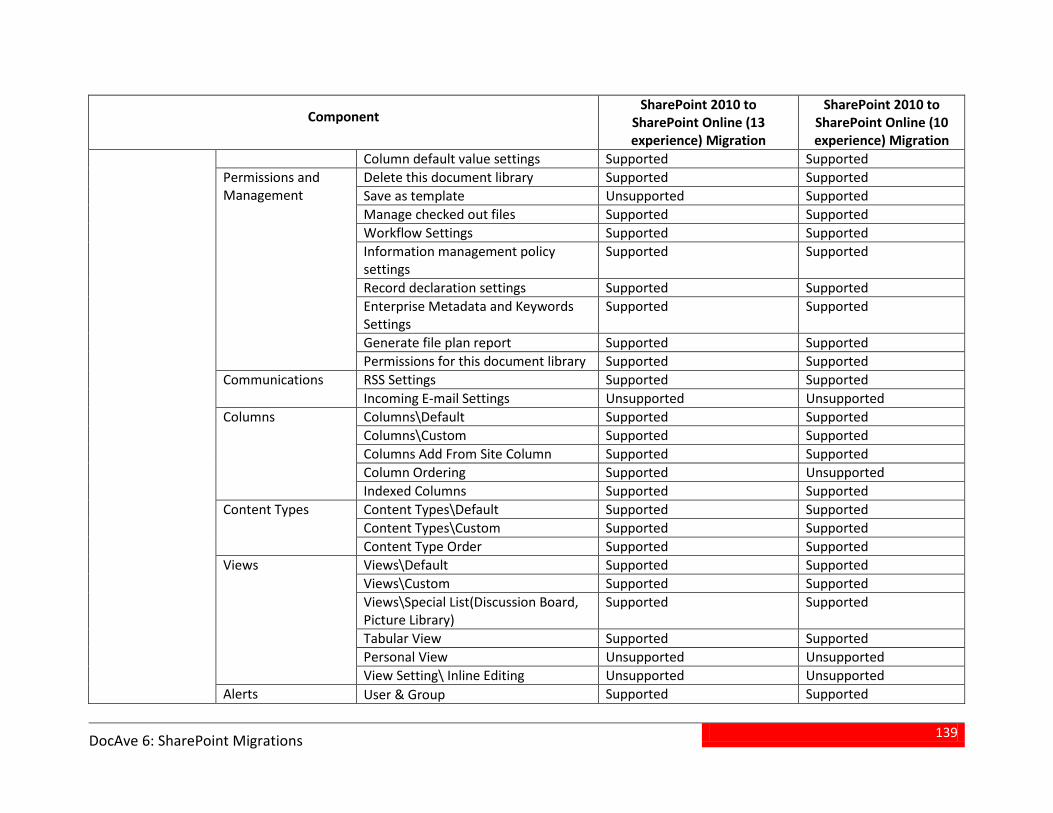
139
DocAve 6: SharePoint Migrations
Component SharePoint 2010 to
SharePoint Online (13 experience) Migration
SharePoint 2010 to SharePoint Online (10 experience) Migration
Column default value settings Supported Supported Permissions and Management
Delete this document library Supported Supported Save as template Unsupported Supported Manage checked out files Supported Supported Workflow Settings Supported Supported Information management policy settings
Supported Supported
Record declaration settings Supported Supported Enterprise Metadata and Keywords Settings
Supported Supported
Generate file plan report Supported Supported Permissions for this document library Supported Supported
Communications RSS Settings Supported Supported Incoming E-mail Settings Unsupported Unsupported
Columns Columns\Default Supported Supported Columns\Custom Supported Supported Columns Add From Site Column Supported Supported Column Ordering Supported Unsupported Indexed Columns Supported Supported
Content Types Content Types\Default Supported Supported Content Types\Custom Supported Supported Content Type Order Supported Supported
Views Views\Default Supported Supported Views\Custom Supported Supported Views\Special List(Discussion Board, Picture Library)
Supported Supported
Tabular View Supported Supported Personal View Unsupported Unsupported View Setting\ Inline Editing Unsupported Unsupported
Alerts User & Group Supported Supported
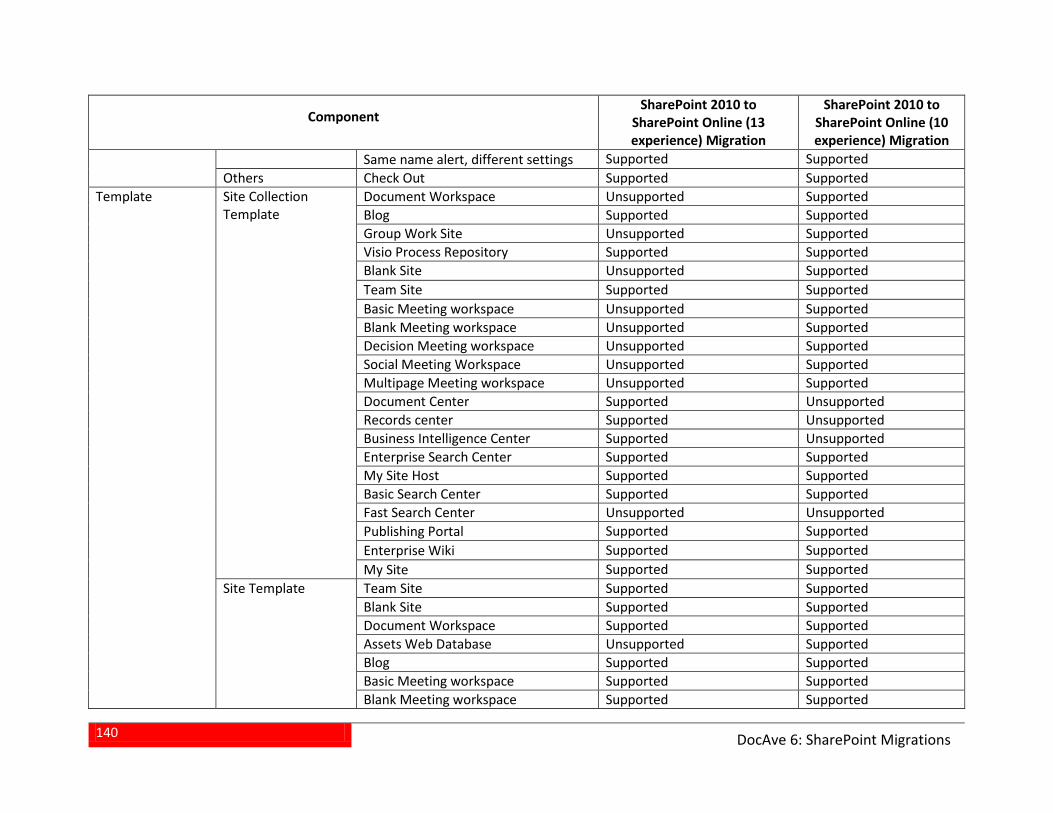
140
DocAve 6: SharePoint Migrations
Component SharePoint 2010 to
SharePoint Online (13 experience) Migration
SharePoint 2010 to SharePoint Online (10 experience) Migration
Same name alert, different settings Supported Supported Others Check Out Supported Supported
Template Site Collection Template
Document Workspace Unsupported Supported Blog Supported Supported Group Work Site Unsupported Supported Visio Process Repository Supported Supported Blank Site Unsupported Supported Team Site Supported Supported Basic Meeting workspace Unsupported Supported Blank Meeting workspace Unsupported Supported Decision Meeting workspace Unsupported Supported Social Meeting Workspace Unsupported Supported Multipage Meeting workspace Unsupported Supported Document Center Supported Unsupported Records center Supported Unsupported Business Intelligence Center Supported Unsupported Enterprise Search Center Supported Supported My Site Host Supported Supported Basic Search Center Supported Supported Fast Search Center Unsupported Unsupported Publishing Portal Supported Supported Enterprise Wiki Supported Supported My Site Supported Supported
Site Template Team Site Supported Supported Blank Site Supported Supported Document Workspace Supported Supported Assets Web Database Unsupported Supported Blog Supported Supported Basic Meeting workspace Supported Supported Blank Meeting workspace Supported Supported
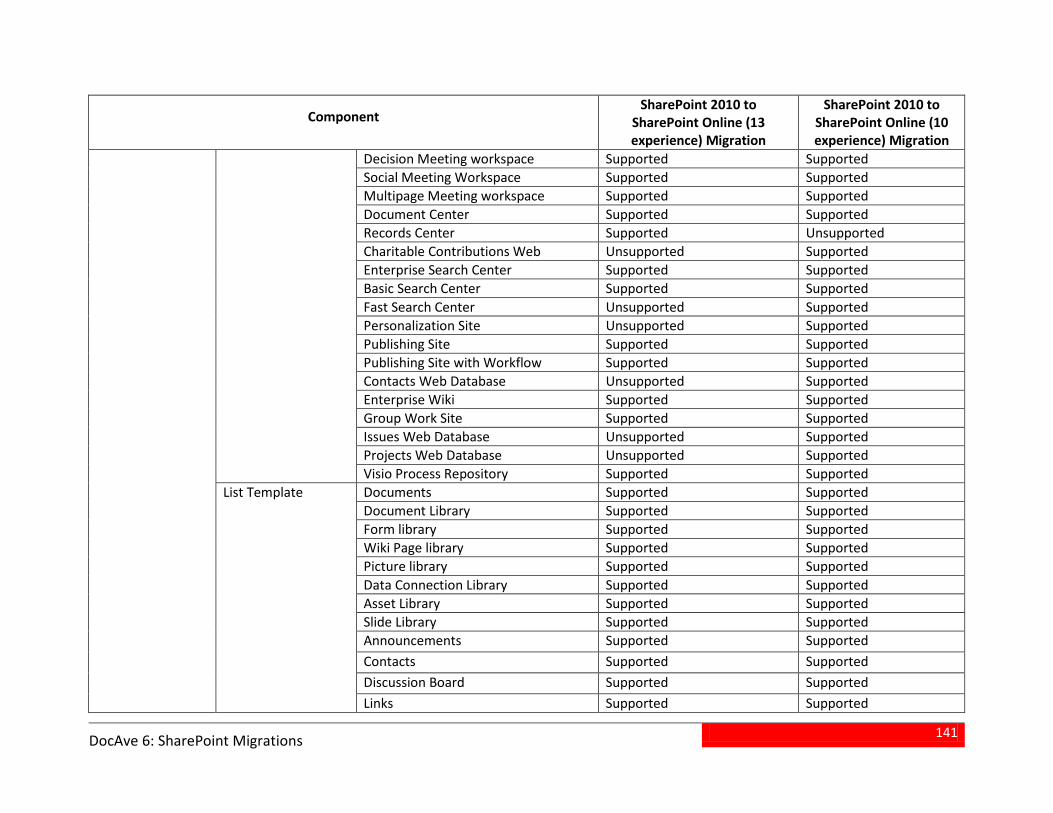
141
DocAve 6: SharePoint Migrations
Component SharePoint 2010 to
SharePoint Online (13 experience) Migration
SharePoint 2010 to SharePoint Online (10 experience) Migration
Decision Meeting workspace Supported Supported Social Meeting Workspace Supported Supported Multipage Meeting workspace Supported Supported Document Center Supported Supported Records Center Supported Unsupported Charitable Contributions Web Unsupported Supported Enterprise Search Center Supported Supported Basic Search Center Supported Supported Fast Search Center Unsupported Supported Personalization Site Unsupported Supported Publishing Site Supported Supported Publishing Site with Workflow Supported Supported Contacts Web Database Unsupported Supported Enterprise Wiki Supported Supported Group Work Site Supported Supported Issues Web Database Unsupported Supported Projects Web Database Unsupported Supported Visio Process Repository Supported Supported
List Template Documents Supported Supported Document Library Supported Supported Form library Supported Supported Wiki Page library Supported Supported Picture library Supported Supported Data Connection Library Supported Supported Asset Library Supported Supported Slide Library Supported Supported Announcements Supported Supported Contacts Supported Supported Discussion Board Supported Supported Links Supported Supported
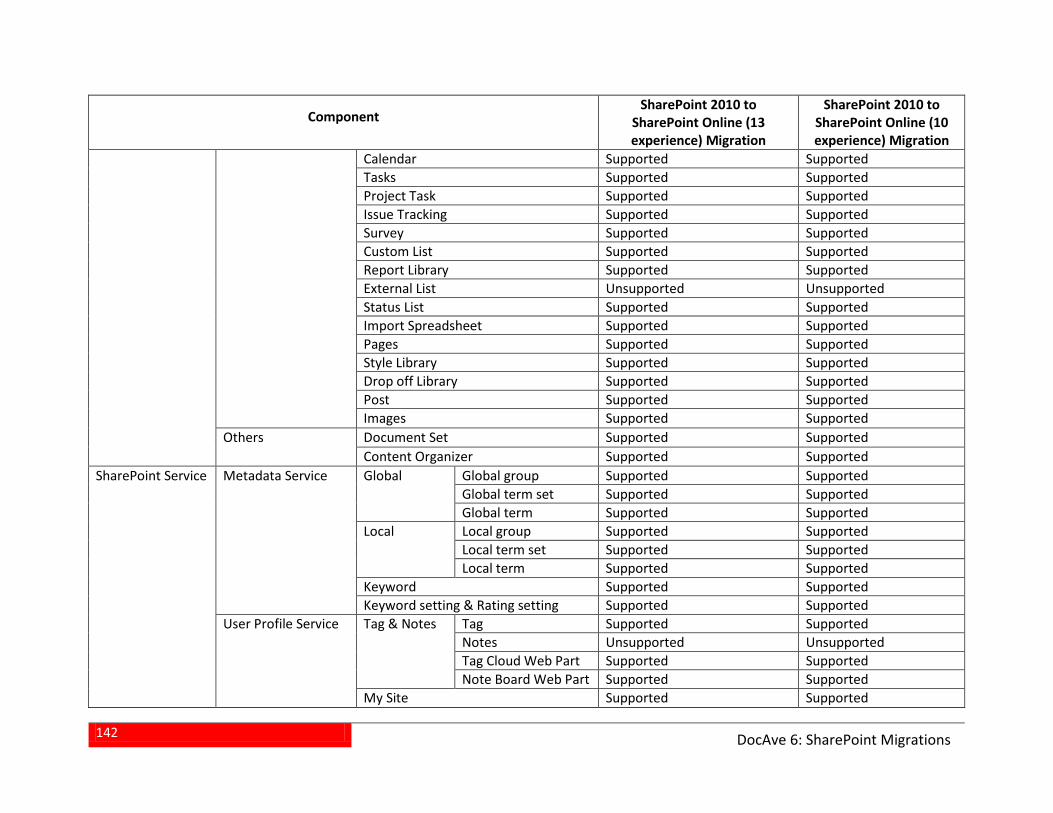
142
DocAve 6: SharePoint Migrations
Component SharePoint 2010 to
SharePoint Online (13 experience) Migration
SharePoint 2010 to SharePoint Online (10 experience) Migration
Calendar Supported Supported Tasks Supported Supported Project Task Supported Supported Issue Tracking Supported Supported Survey Supported Supported Custom List Supported Supported Report Library Supported Supported External List Unsupported Unsupported Status List Supported Supported Import Spreadsheet Supported Supported Pages Supported Supported Style Library Supported Supported Drop off Library Supported Supported Post Supported Supported Images Supported Supported
Others Document Set Supported Supported Content Organizer Supported Supported
SharePoint Service Metadata Service Global Global group Supported Supported Global term set Supported Supported Global term Supported Supported
Local Local group Supported Supported Local term set Supported Supported Local term Supported Supported
Keyword Supported Supported Keyword setting & Rating setting Supported Supported
User Profile Service Tag & Notes Tag Supported Supported Notes Unsupported Unsupported Tag Cloud Web Part Supported Supported Note Board Web Part Supported Supported
My Site Supported Supported
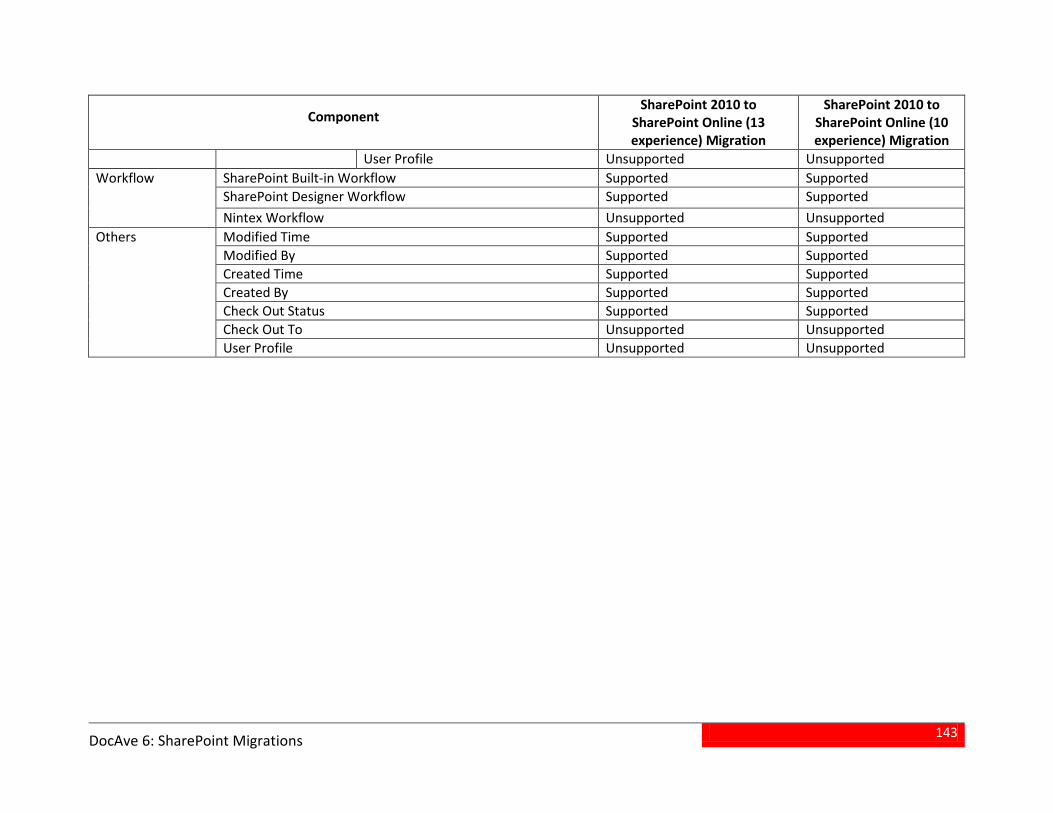
143
DocAve 6: SharePoint Migrations
Component SharePoint 2010 to
SharePoint Online (13 experience) Migration
SharePoint 2010 to SharePoint Online (10 experience) Migration
User Profile Unsupported Unsupported Workflow SharePoint Built-in Workflow Supported Supported
SharePoint Designer Workflow Supported Supported Nintex Workflow Unsupported Unsupported
Others Modified Time Supported Supported Modified By Supported Supported Created Time Supported Supported Created By Supported Supported Check Out Status Supported Supported Check Out To Unsupported Unsupported User Profile Unsupported Unsupported

144
DocAve 6: Lotus Notes Migration
Lotus Notes Online Migrations Migrate databases, documents, and views from Lotus Notes to Microsoft SharePoint 2010 on-premises and SharePoint 2013 on-premises. Refer to the sections below to use Lotus Notes Migrator.
Pre-migration Configurations To use Lotus Notes Migrator, you must first configure the Lotus Notes connection so that the DocAve Agents can connect to the Lotus Domino Servers. In the Home tab, click Configure Connection on the ribbon. The Lotus Notes Connection interface appears.
Managing Lotus Notes Connections The Lotus Notes Connection interface displays any Lotus Notes connections that you have previously created.
In this interface, you can change the number of Lotus Notes connections displayed per page and the order in which they are displayed. To change the number of Lotus Notes connections displayed per page, select the desired number from the Show rows drop-down menu in the lower right-hand corner. To sort the Lotus Notes connections, click on a column heading such as Name, Agent, Notes .INI File Path, and Last Modified Time.
You can customize how these connections are displayed in a number of different ways:
• Search – Filters Lotus Notes connections displayed by the keyword you designate. The keyword must be contained in a column value. At the top of the viewing pane, type in the keyword for the Lotus Notes connection you wish displayed. You can select Search all pages or Search current page to define the search scope. Select all pages means that the connections in all of the pages whose names and descriptions contain the keywords will be displayed; while Search current page means that only the connections in the current page whose names and descriptions contain the keywords will be displayed. Note that the search function is not case sensitive.
• – You can manage which columns are displayed in the list so that only information you want to see is shown. Click , and then check the checkbox next to the column name to have that column shown in the list.
• – This allows you to hide the column. Click of the column you want to hide, the column is hidden.
• – This allows you to filter Agent. Click of the column of Agent, and then check the checkbox next to the Agent name to have that Agent shown.
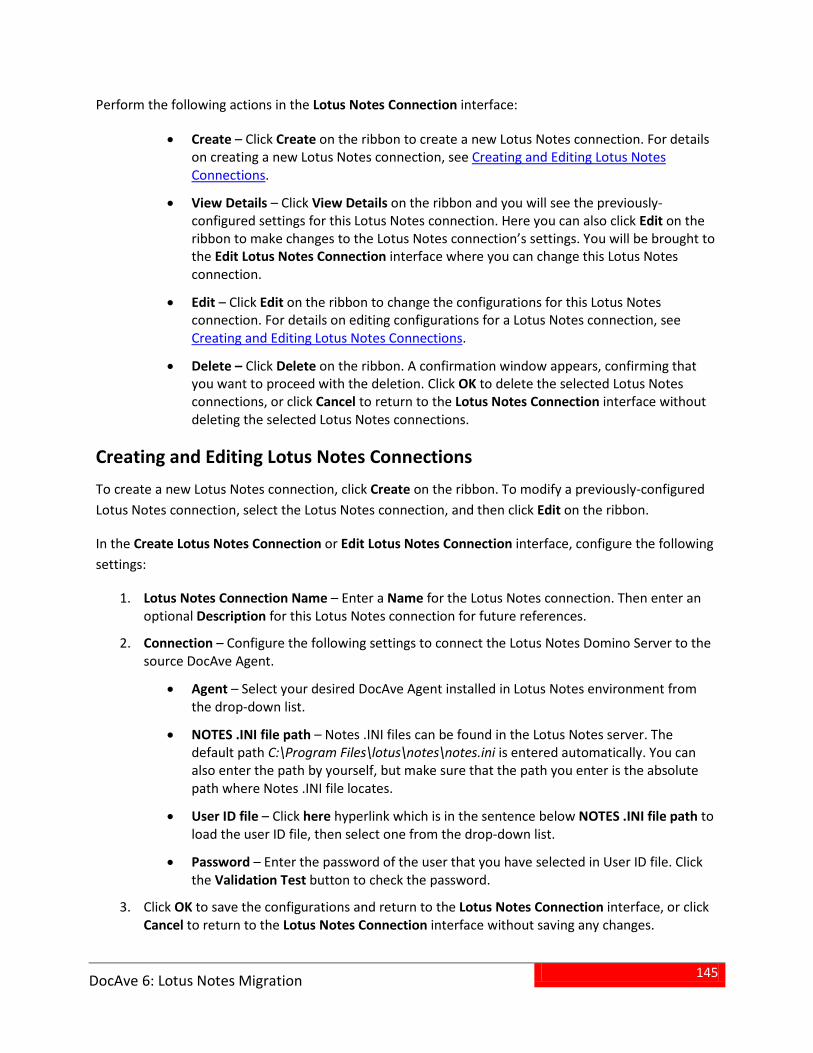
145
DocAve 6: Lotus Notes Migration
Perform the following actions in the Lotus Notes Connection interface:
• Create – Click Create on the ribbon to create a new Lotus Notes connection. For details on creating a new Lotus Notes connection, see Creating and Editing Lotus Notes Connections.
• View Details – Click View Details on the ribbon and you will see the previously-configured settings for this Lotus Notes connection. Here you can also click Edit on the ribbon to make changes to the Lotus Notes connection’s settings. You will be brought to the Edit Lotus Notes Connection interface where you can change this Lotus Notes connection.
• Edit – Click Edit on the ribbon to change the configurations for this Lotus Notes connection. For details on editing configurations for a Lotus Notes connection, see Creating and Editing Lotus Notes Connections.
• Delete – Click Delete on the ribbon. A confirmation window appears, confirming that you want to proceed with the deletion. Click OK to delete the selected Lotus Notes connections, or click Cancel to return to the Lotus Notes Connection interface without deleting the selected Lotus Notes connections.
Creating and Editing Lotus Notes Connections To create a new Lotus Notes connection, click Create on the ribbon. To modify a previously-configured Lotus Notes connection, select the Lotus Notes connection, and then click Edit on the ribbon.
In the Create Lotus Notes Connection or Edit Lotus Notes Connection interface, configure the following settings:
1. Lotus Notes Connection Name – Enter a Name for the Lotus Notes connection. Then enter an optional Description for this Lotus Notes connection for future references.
2. Connection – Configure the following settings to connect the Lotus Notes Domino Server to the source DocAve Agent.
• Agent – Select your desired DocAve Agent installed in Lotus Notes environment from the drop-down list.
• NOTES .INI file path – Notes .INI files can be found in the Lotus Notes server. The default path C:\Program Files\lotus\notes\notes.ini is entered automatically. You can also enter the path by yourself, but make sure that the path you enter is the absolute path where Notes .INI file locates.
• User ID file – Click here hyperlink which is in the sentence below NOTES .INI file path to load the user ID file, then select one from the drop-down list.
• Password – Enter the password of the user that you have selected in User ID file. Click the Validation Test button to check the password.
3. Click OK to save the configurations and return to the Lotus Notes Connection interface, or click Cancel to return to the Lotus Notes Connection interface without saving any changes.
146
DocAve 6: Lotus Notes Migration
Configuring Lotus Notes Online Migration
About Filter Policies Filter Policy allows you to set up filter rules so that you can control what documents within Lotus Notes databases appear, then you can target content more precisely. By setting up and saving filter policies, you can apply the same filter policies to different Lotus Notes migration plans without having to recreate them each time.
To access Filter Policy, click Profile Settings on the ribbon in the Home tab. On the Profile Settings page, click Filter Policy on the ribbon.
The Filter Policy interface displays any Filter policies that you have previously configured.
In this interface, you can change the number of filter policies displayed per page and the order in which they are displayed. To change the number of filter policies displayed per page, select the desired number from the Show rows drop-down menu in the lower right-hand corner. To sort the filter policies, click on a column heading such as Filter Policy Name, and Description.
You can customize how these filter policies are displayed in a number of different ways:
• Search – Filters the filter policies displayed by the keyword you designate. The keyword must be contained in a column value. At the top of the viewing pane, type in the keyword for the filter policy you wish to display. You can select Search all pages or Search current page to define the search scope. Search all pages means that the filter policies in all of the pages whose name and descriptions contain the keywords will be displayed; while Search current page means that only the filter policies in the current page whose names and descriptions contain the keywords will be displayed. Note that the search function is not case sensitive.
• – You can manage which columns are displayed in the list so that only information you want to see is shown. Click , then check the checkbox next to the column name to have that column shown in the list.
• – This allows you to hide the column. Click in the column title to hide the column.
Perform the following actions in the Filter Policy interface:
• Create – Click Create on the ribbon to create a new filter policy. For details on creating a new filter policy, see Creating Filter Policies.
• Edit – Click Edit on the ribbon to change the configurations for this filter policy. For details on editing configurations for a filter policy, see Creating Filter Policies.
• Delete – Click Delete on the ribbon. A confirmation window appears, confirming that you want to proceed with the deletion. Click OK to delete the selected filter policies, or click Cancel to return to the Filter Policy interface without deleting the selected filter policies.
147
DocAve 6: Lotus Notes Migration
Creating Filter Policies To create a new filter policy, click Create on the ribbon. To modify a previously-configured filter policy, select the filter policy, and then click Edit on the ribbon.
In the Create Filter Policy or Edit Filter Policy interface, configure the following settings:
1. Name – Enter a Name for this filter policy.
2. Description – Enter an optional Description for future references.
3. Filter Rule – Filters content that you want to migrate by setting up a set of filter criteria. Follow the steps below to set up your own filter rules.
Select Time Range or Attachment as the filter criteria. a.
If you choose Time Range, Lotus Notes documents are filtered according to the ocreated time or modified time.
If you choose Attachment, the attachments within Lotus Notes documents are ofiltered according to the size of attachments.
Click Add a Filter Level Group to add a filter rule. The filter rule configuration field b.appears.
For Time Range – Select Created Time or Modified Time from the drop-down omenu. In the Condition column, select Before, After, Within, or Older Than. Set up Time Zone and the exact time in the Value column.
For Attachment – In the Condition column, select > = or < =, and then enter oyour desired value in the Value column. Then choose KB, MB, or GB.
Click to delete the specified criterion or filter level. You can change the logical c.relationship between the criterions.
Repeat step a and b to add more filter rules. d.
The logic options And and Or are selectable. By default, the logic is set to And. If desired, change the logic to Or by selecting it from the drop-down list.
• And – The content which meets all the criterions will be filtered to be included.
• Or –The content which meets any one of the criterions will be filtered to be included.
Basic Filter Conditions – View the logical relationship of the filter rules in this area.
For example, if the logical relationship is ((1 And 2) Or 3) in the Basic Filter Condition area, the content that meets both filter rule 1 and filter rule 2, or that meets the filter rule 3, will be included.
4. Click OK to save the configurations and return to the Filter Policy interface, or click Cancel to return to the Filter Policy interface without saving any changes.
148
DocAve 6: Lotus Notes Migration
About Mapping Settings Before performing a Lotus Notes migration job, you may want to define optional User Mapping, Group Mapping, and Permission Mapping. Refer to the following sections to decide whether to configure the mapping settings, and learn how to configure the mapping settings.
User Mapping Use user mapping if you wish to map an existing source node username to SharePoint user in the destination. During migration, Migrator will replace the source username with your specified username in the destination.
To access User Mapping, click Profile Settings on the ribbon in the Home tab. Then in the Profile Settings interface, click Mappings and select User Mapping on the ribbon. The Control Panel appears.
For specific instruction on setting up user mapping, refer to the DocAve 6 Control Panel Reference Guide. Make sure that the source username that you input in the column of Source Username is one of the following formats; otherwise the user mapping will fail.
• username/orgname
• username/orgname/orgname
• username/orgname/orgname/orgname
The organization in Lotus Notes can be multilevel and here the orgname you enter can also be multilevel.
Group Mapping Use group mapping if you wish to map an existing source group name a SharePoint group. During the migration, Migrator will replace the source group name with your specified group name in the destination node.
To access Group Mapping, click Profile Settings on the ribbon in the Home tab. Then in the Profile Settings interface, click Mappings and select Group Mapping on the ribbon. The Control Panel appears.
For specific instruction on setting up user mapping, refer to the DocAve 6 Control Panel Reference Guide.
About Permission Mappings Permission mapping allows you to map permissions in the source to SharePoint permissions in the destination. During the migration, Migrator will replace the source permission with SharePoint permission levels of Default Permission Mapping or your specified permission levels in the destination node.
149
DocAve 6: Lotus Notes Migration
*Note: If a user mapping and a permission mapping are combined, the permission of the destination user is the merged result of the mapped user’s permission and the mapped permission.
For example, there is User A who has the permission of Read in the source Lotus Notes and User B who has the permission of Design in the destination SharePoint. In User Mapping, you map User A to User B. In Permission Mapping, you map Read to Contribute. After the migration job is finished, the permission of User B is Design + Contribute.
To access Permission Mapping, click Profile Settings on the ribbon in the Home tab. Then in the Profile Settings interface, click Mappings and select Permission Mapping on the ribbon. In the Permission Mapping interface, any permission mappings that you have previously created are displayed in the main display pane.
Managing Permission Mappings In this interface, you can change the number of permission mappings displayed per page and the order in which they are displayed. To change the number of permission mappings displayed per page, select the desired number from the Show rows drop-down list in the lower right-hand corner. To sort the permission mappings, click on a column heading such as Name and Description.
You can customize how these permission mappings are displayed in a number of different ways:
• Search – Filters the SharePoint Permission Level displayed by the keyword you designate. The keyword must be contained in a column value. At the top of the viewing pane, type in the keyword for the SharePoint Permission Level you wish displayed. You can select Search all pages or Search current page to define the search scope. Select all pages means that the permission mappings in all of the pages whose names and descriptions contain the keywords will be displayed; while Search current page means that only the permission mappings in the current page whose name and descriptions contain the keywords will be displayed. Note that the search function is not case sensitive.
• – You can manage which columns are displayed in the list so that only information you want to see is shown. Click , and then check the checkbox next to the column name to have that column shown in the list.
• – This allows you to hide the column. Click in the column title to hide the column.
Perform one of the following actions on a selected permission mapping:
• Create – Click Create on the ribbon to create a new Permission Mapping. For details on creating a new Permission Mapping, see Configuring Permission Mappings.
• View Details – Click View Details on the ribbon and you will see the previously-configured settings for this permission mapping. Here you can also click Edit on the ribbon to make changes to the permission mapping’s settings. You will be brought to the Edit Permission Mapping page where you can change this permission mapping.
• Edit – Click Edit on the ribbon to change the configuration of this permission mapping. For details on editing permission mapping, see Configuring Permission Mappings.
150
DocAve 6: Lotus Notes Migration
• Delete – Click Delete on the ribbon. A confirmation window appears, confirming that you want to proceed with the deletion. Click OK to delete the selected permission mappings, or click Cancel to return to the Permission Mapping without deleting the selected permission mappings.
Configuring Permission Mappings To create a new permission mapping, click Create on the ribbon. To edit a previously-configured permission mapping, select the permission mapping and then click Edit on the ribbon.
In the Create or Edit Permission Mapping interface, configure the following settings:
1. Permission Mapping Name – Enter a Name for the permission mapping that you are about to create or edit. Then enter an optional Description for this permission mapping for future reference.
2. Permission Mapping – Set up the mapping of Lotus Notes permissions to SharePoint permissions. Choose one previously-configured SharePoint permission level from the SharePoint Permission Level drop-down list. We do not recommend changing the default permission mapping. If there is no SharePoint permission level meets your requirements, you can use the customized SharePoint permission level by clicking New SharePoint Permission Level from the drop-down list to create a new one. For details on creating a new SharePoint permission level, refer to About SharePoint Permission Level.
About SharePoint Permission Levels You can manage SharePoint Permission Levels by creating a new SharePoint Permission Level, viewing details of a previously-configured SharePoint Permission Level, editing a previously-configured SharePoint Permission Level, or deleting a previously-configured SharePoint Permission Level.
To access Manage SharePoint Permission Level, click Profile Settings on the ribbon in the Home tab. Then in the Profile Settings interface, click Mappings and select Permission Mapping on the ribbon. In the Permission Mapping interface, click Manage SharePoint Permission Level on the ribbon.
The Manage SharePoint Permission Level interface displays any permission levels that you have previously created.
In this interface, you can change the number of SharePoint Permission Levels displayed per page and the order in which they are displayed. To change the number of SharePoint Permission Levels displayed per page, select the desired number from the Show rows drop-down list in the lower right-hand corner. To sort the SharePoint Permission Levels, click on a column heading such as Name and Description.
You can customize how these SharePoint Permission Levels are displayed in a number of different ways:
• Search – Search allows you to filter the SharePoint Permission Level displayed by the keyword you designate. The keyword must be contained in a column value. At the top of the viewing pane, type in the keyword for the SharePoint Permission Level you wish displayed. You can select for search to Search all pages or Search current page. Note that the search function is not case sensitive.

151
DocAve 6: Lotus Notes Migration
• – You can manage which columns are displayed in the list so that only information you want to see is shown. Click , then check the checkbox next to the column name to have that column shown in the list.
• – This allows you to hide the column. Click in the column title to hide the column.
Perform the following actions in the Manage SharePoint Permission Level page.
• Create– Click Create on the ribbon to create a new SharePoint Permission Level, for details on creating a new SharePoint Permission Level, see Creating SharePoint Permission Levels.
• View Details – Click View Details on the ribbon and you will see the previously-configured settings of a customized permission level or the default setting of a default SharePoint Permission Level.
• Edit – Click Edit on the ribbon to change the configurations for this SharePoint Permission Level. For details on editing configurations for a SharePoint Permission Level, refer to Creating SharePoint Permission Levels.
*Note: Default SharePoint Permission Levels are displayed as default, including Contribute, Design, Full Control, Read, and View Only. They are not editable.
• Delete – Click Delete on the ribbon. A confirmation window appears, confirming that you want to proceed with the deletion. Click OK to delete the selected SharePoint Permission Levels, or click Cancel to return to the Manage SharePoint Permission Level interface without deleting the selected SharePoint permission levels.
Creating SharePoint Permission Levels To create a new SharePoint Permission Level, click Create on the ribbon. To modify a previously-configured customized SharePoint Permission Level, select the SharePoint Permission Level, and then click Edit on the ribbon.
In the Create SharePoint Permission Level or Edit SharePoint Permission Level interface, configure the following settings:
1. Name and Description – Enter a Name for this permission level that you are about to create or edit. Then enter an optional Description for future references.
2. Permissions – Choose which permissions to include in this permission level. You can select specified permissions of List Permissions, Site Permissions, and Personal Permissions by checking the checkbox before a specified permission. Check the Select All checkbox to select or clear all permissions.
3. Click OK to save the configuration and return to the Manage SharePoint Permission Level interface, or click Cancel to return to the Manage SharePoint Permission Level interface without saving any change.

152
DocAve 6: Lotus Notes Migration
About Dynamic Rules Dynamic rules map the Lotus Notes field names and the corresponding values to SharePoint column names and column values using the DLL files customized in C#.
To access Dynamic Rule, click Profile Settings on the ribbon of Home tab. In the Profile Settings tab, click Dynamic Rule on the ribbon.
In the Dynamic Rule interface, you will see a list of previously-configured dynamic rules.
In this interface, you can change the number of dynamic rules displayed per page and the order in which they are displayed. To change the number of dynamic rules displayed per page, select the desired number from the Show rows drop-down menu in the lower right-hand corner. To sort the dynamic rules, click on a column heading such as Name, Description, DLL File Name, and Last Modified Time.
Customize how these dynamic rules are displayed in a number of different ways:
• Search – Filters dynamic rules displayed by the keyword you designate. The keyword must be contained in a column value. At the top of the Dynamic Rule viewing pane, enter the keyword for the dynamic rules you wish to display. You can select Search all pages or Search current page to define the search scope. Search all pages means that the dynamic rules in all of the pages whose names and descriptions contain the keywords will be displayed; while Search current page means that only the dynamic rules in the current page whose names and descriptions contain the keywords will be displayed. Note that the search function is not case sensitive.
• – You can manage which columns are displayed in the list so that only information you want to see is shown. Click , and then check the checkbox next to the column name to have that column shown in the list.
• – This allows you to hide the column. Click in the column title to hide the column.
You may perform the following actions to a Dynamic Rule:
• Create – Click Create on the ribbon to create a dynamic rule. For detailed on creating a new dynamic rule, see Configuring a Dynamic Rule.
• View Details – Click View Details on the ribbon and you will see the previously-configured settings for this dynamic rule. Here you can also click Edit on the ribbon to make changes to the dynamic rule’s settings. You will be brought to the Edit dynamic rule page where you can change this dynamic rule.
• Edit – Click Edit on the ribbon to change the configuration of this dynamic rule. For details on editing dynamic rule, see Configuring a Dynamic Rule.
• Delete – Click Delete on the ribbon. A confirmation window appears, confirming that you want to proceed with the deletion. Click OK to delete the selected dynamic rule, or click Cancel to return to the dynamic rule without deleting the selected dynamic rules.
153
DocAve 6: Lotus Notes Migration
Configuring a Dynamic Rule To create a new dynamic rule, click Create on the ribbon. To edit a previously-configured dynamic rule, select the dynamic rule and then click Edit on the ribbon.
In the Create Dynamic Rule interface or Edit Dynamic Rule interface, configure the following settings:
1. Name and Description – Enter a Dynamic Rule Name for the dynamic rule that you are about to create or edit. Then enter an optional description for this dynamic rule for future reference.
2. Upload a DLL File – Browse a dynamic rule of DLL file customized in C# from the local path. A DLL file enables you to configure your own mapping. Click Browse…, and then navigate to the DLL file you want to use. Select the specified DLL file and then click Open.
3. Click OK to save the configuration and return to the Dynamic Rule interface. Click Cancel to return to the Dynamic Rule interface without saving any configuration or changes.
Setting Up Lotus Notes Online Migration Profiles The Online Migration Profile allows you to specify and define numerous settings for the migration jobs including Migration Options, Filter Options, Mapping Options, and Advanced Options. Follow the instructions below to create an Online Migration Profile.
From the Home tab, in the Profile Manager group, click Profile Settings. The Profile Settings 1.tab appears.
On the Profile Settings tab, in the Plan Mode group, ensure Online Mode is highlighted. 2.
From the Profile Settings tab, under the Profile/Sub-profile group, click New. 3.
Enter a profile name in the pop-up window and click OK. 4.
Select the Migration Options from the left-hand pane. Select a previously-configured Migration 5.Options Sub-Profile from the drop-down list. For details about this section, refer to Migration Options.
Select the Filter Options from the left-hand pane and select a previously-configured Filter 6.Policy from the drop-down list. Or click New Filter Policy from the drop-down list to create a new filter policy. For details on creating a filter policy, refer to Creating Filter Policies.
Select the Mapping Options from the left-hand pane. Select a previously-configured Mapping 7.Options Sub-Profile from the drop-down list. For details about this section, refer to Mapping Options.
Select the Advanced Options from the left-hand pane and configure the Dynamic Rule, the 8.Character Length Settings and the Illegal Character Replacement Settings. For details about this section, refer to Advanced Options.
Click Save to save the profile. Alternatively, click Save As and enter a profile name to save it as 9.another profile. Select Save and replace existing profile to replace the original profile. Otherwise, it is saved without removing the original profile.
154
DocAve 6: Lotus Notes Migration
Migration Options Migration options allow you to configure which content settings and security settings can be migrated. Set up a Migration Options Sub-Profile by the following steps.
From the Home tab, in the Profile Manager group, click Profile Settings. The Profile Settings 1.tab appears.
From the Profile Settings tab, in the Plan Mode group, ensure Online Mode is highlighted. 2.
Click Migration Options on the left-hand pane. 3.
In the Sub-profile group, click Edit Sub-profile to make the Migration Options field active. 4.
From the Profile Settings tab, under the Profile/Sub-profile group, click New. 5.
Enter a sub-profile name in the pop-up window and click OK. 6.
Click the Content tab to configure common settings for this Migration Options. You can 7.configure the following settings:
• Document Format Option – This is used to specify the document type that the Lotus Notes document will be converted to after the migration. Check the Convert Lotus Notes documents to checkbox and select one kind of document format from the drop-down list. There are six types which you can choose to convert the Lotus Notes document to: docx, doc, InfoPath, pdf, aspx, and html. If you choose a library as the destination node, the converted document will be generated in the library as a file. If you choose a list as the destination node, the converted document will be added as an attachment of the item which is generated from the Lotus Notes document.
If do not select the Convert Lotus Notes documents to checkbox, the Lotus Notes document will generate an item only after the migration.
*Note: DocAve supports converting Lotus Notes documents to Microsoft Office InfoPath. You need configure Notes-InfoPath Template and Mapping Generation by Migrator Tool. If you select InfoPath, make sure that you have generated the InfoPath mapping and publish the InfoPath template by Migrator Tool.
• Category Option – This is used to classify the items generated from Lotus Notes documents in a list by putting these items into folders named by specified fields. Check the Migrate Lotus Notes documents into folders named by category field(s) checkbox. You can choose Specify all category field(s) to migrate documents into folders which are named by category fields of documents in Lotus Notes, or choose Specify category field(s) myself and enter the category fields to migrate documents into folders which are named by category fields customized by yourself. Note that you can enter multiple category fields separated with “;”.
• Item Number Limitation – Limit the number of items in a list or library in SharePoint by checking the Create multiple lists/libraries during migration when the number of list/library items exceeds checkbox. The default number is 5000. You can change the number to decide how many items a list or library can contain by entering a number by yourself. If you specify a limit, additional lists or libraries are created when the number
155
DocAve 6: Lotus Notes Migration
of items in a list or library exceeds your specified number. 1, 2, 3… will be added as a suffix of additional lists’ or libraries’ name.
• Image Option – Normally if you select a list as the destination, embedded images in Lotus Notes documents are added as attachments of items which are generated from Notes documents. If you select a document library as the destination, embedded images in Lotus Notes documents are migrated to the document library, along with the items which are generated from Notes documents. To extract the embedded images from the list or document library and collect them in a picture library in SharePoint, check the Extract embedded images into Picture Library checkbox. Lotus Notes Picture Library is provided as the default name of the picture library where you wish the embedded images to be migrated. You can also customize the name by entering a picture library name in the text box.
• Link Tracking Option – Select this option to prevent broken links. Broken links occur when the source DocLinks are migrated to the destination, but the objects that the DocLink points to are not migrated to the destination. When you select the Redirect to the Lotus Notes Link Tracking Page for the DocLinks pointing to a migrated object checkbox, the DocLinks that point to the migrated objects are directed to the Link Tracking Page, which will redirect to the objects in SharePoint. If this option is unselected, the DocLinks that point to a successfully-migrated object are directed to the destination object URLs in SharePoint. When the DocLinks point to objects that are not migrated to the destination, no matter which option is selected, the viewer is directed to the Link Tracking Page.
*Note: To select this option, make sure that you have deployed the LotusNotesLinkTracking Solution in Control Panel > Solution Manager.
• Lotus Notes Attachment Migration Option – Places Lotus Notes document attachments in a separated document library in SharePoint. Check the Migrate attachment to a separated Document Library checkbox. Lotus Notes Attachment Library is provided as the default name of the destination document library. You can also customize the name by entering a document library name in the text box.
• Folder Creation Option (Only for migrating to document library) – This is used to classify items generated from Notes documents in a document library by putting these items into folders generated by DocAve. Folders are named by the source subject. Check the Create folder for the migrated documents in destination checkbox and the document, response, and response to response with the same subject will be migrated into the folder. With this option checked, you can further check Migrate reply documents into sub-folder of main topic checkbox to migrate response and response to response of Notes documents into the sub-folder of the folder named by the subject.
• Document Set Option (Only for migrating to document library) – This option allows you to migrate Lotus Notes documents to SharePoint document sets. Select the Migrate Lotus Notes documents to SharePoint Document Set checkbox and the property and security of the source data are kept during the migration. The attachments within the Lotus Notes documents are migrated to the document set within the document library and you can manage the property and security in destination.
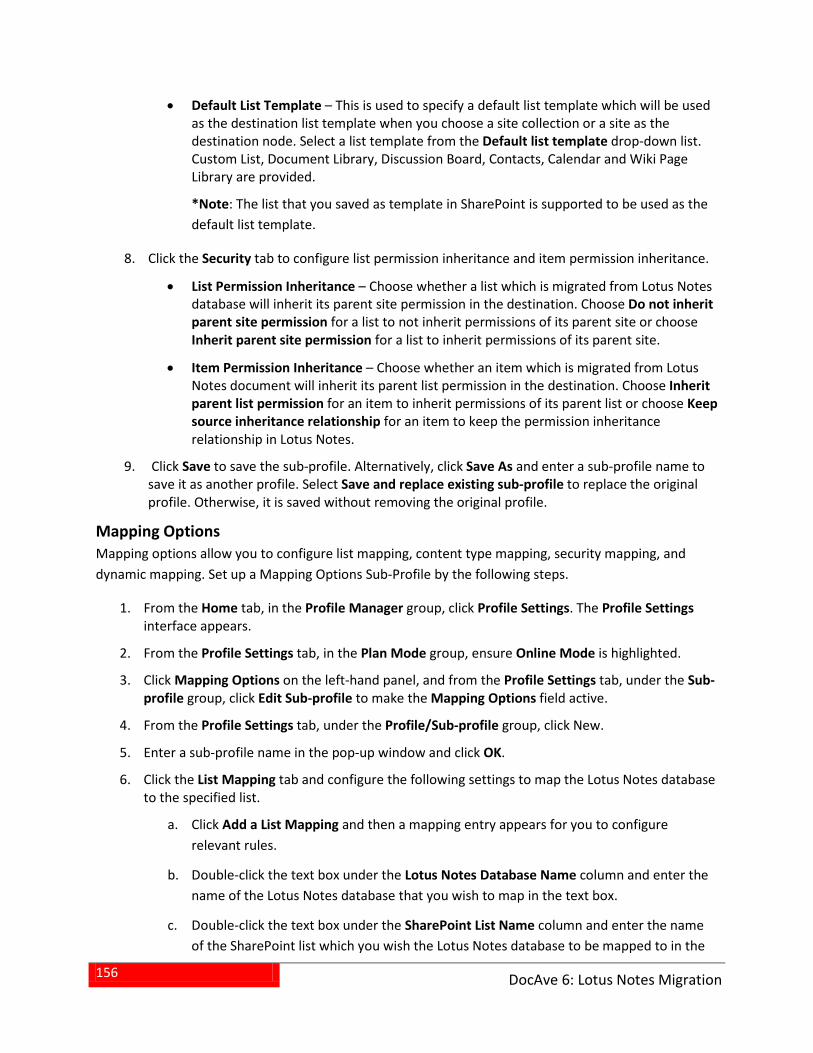
156
DocAve 6: Lotus Notes Migration
• Default List Template – This is used to specify a default list template which will be used as the destination list template when you choose a site collection or a site as the destination node. Select a list template from the Default list template drop-down list. Custom List, Document Library, Discussion Board, Contacts, Calendar and Wiki Page Library are provided.
*Note: The list that you saved as template in SharePoint is supported to be used as the default list template.
Click the Security tab to configure list permission inheritance and item permission inheritance. 8.
• List Permission Inheritance – Choose whether a list which is migrated from Lotus Notes database will inherit its parent site permission in the destination. Choose Do not inherit parent site permission for a list to not inherit permissions of its parent site or choose Inherit parent site permission for a list to inherit permissions of its parent site.
• Item Permission Inheritance – Choose whether an item which is migrated from Lotus Notes document will inherit its parent list permission in the destination. Choose Inherit parent list permission for an item to inherit permissions of its parent list or choose Keep source inheritance relationship for an item to keep the permission inheritance relationship in Lotus Notes.
Click Save to save the sub-profile. Alternatively, click Save As and enter a sub-profile name to 9.save it as another profile. Select Save and replace existing sub-profile to replace the original profile. Otherwise, it is saved without removing the original profile.
Mapping Options Mapping options allow you to configure list mapping, content type mapping, security mapping, and dynamic mapping. Set up a Mapping Options Sub-Profile by the following steps.
From the Home tab, in the Profile Manager group, click Profile Settings. The Profile Settings 1.interface appears.
From the Profile Settings tab, in the Plan Mode group, ensure Online Mode is highlighted. 2.
Click Mapping Options on the left-hand panel, and from the Profile Settings tab, under the Sub-3.profile group, click Edit Sub-profile to make the Mapping Options field active.
From the Profile Settings tab, under the Profile/Sub-profile group, click New. 4.
Enter a sub-profile name in the pop-up window and click OK. 5.
Click the List Mapping tab and configure the following settings to map the Lotus Notes database 6.to the specified list.
Click Add a List Mapping and then a mapping entry appears for you to configure a.relevant rules.
Double-click the text box under the Lotus Notes Database Name column and enter the b.name of the Lotus Notes database that you wish to map in the text box.
Double-click the text box under the SharePoint List Name column and enter the name c.of the SharePoint list which you wish the Lotus Notes database to be mapped to in the

157
DocAve 6: Lotus Notes Migration
text box. If the specified list does not exist in the destination, a new list with the specified name will be created automatically during the migration. If you enter an existing list, make sure the list template you select in step d is the same as that of the existing one; otherwise the migration job will fail.
Select a template for your specified SharePoint list from the SharePoint List Template d.drop-down list. Custom List, Document Library, Discussion Board, Contacts, Calendar, and Wiki Page Library are provided, or enter a specified SharePoint list template name or list template ID.
*Note: The list that you saved as template in SharePoint is supported to be used as the list template.
Repeat the steps above to add more mappings. e.
To delete one or more previously-configured list mappings, select them and then click f.
Delete the Selected List Mapping(s). You can also click to remove a previously-configured list mapping.
Configure the Content Type Mapping. You can choose to configure content type mapping, 7.specify an item title, and configure column mapping. Click Content Type Mapping on the tab to use the content type mapping that is created by the Migrator Tool or to configure the content type mapping manually.
• Choose Use the content type mapping generated by the Migrator Tool to automatically apply the content type mapping that you previously-created with the Migrator Tool during the migration.
*Note: If you choose to use the content type mapping generated by the Migrator Tool but have never configured the mapping using the tool, the default content type mapping will be automatically generated for use during the migration.
• To configure the content type mapping in this page by yourself, check the Manually configure the content type mapping option and the Rule appears. Configure the following settings to set up a rule:
Content Type Mapping – This is used to map the Lotus Notes form to the ospecified SharePoint content type. Enter the name of a Lotus Notes form in the column of Lotus Notes Form and the name of a specified SharePoint content type on the column of SharePoint Content Type. If the SharePoint content type does not exist in the destination, a new content type with the specified name will be created automatically during the migration. If you enter an existing content type in SharePoint, you need to enable Update Content Type in configuration file. On the destination DocAve Agent server, navigate to …\AvePoint\DocAve6\Agent\data\SP2010\LotusNotesMigration to open SP2010LotusNotesMigrationWorker.xml with Notepad and change the value of <ContentTypeConfig UpdateContentType=“False”> to True.
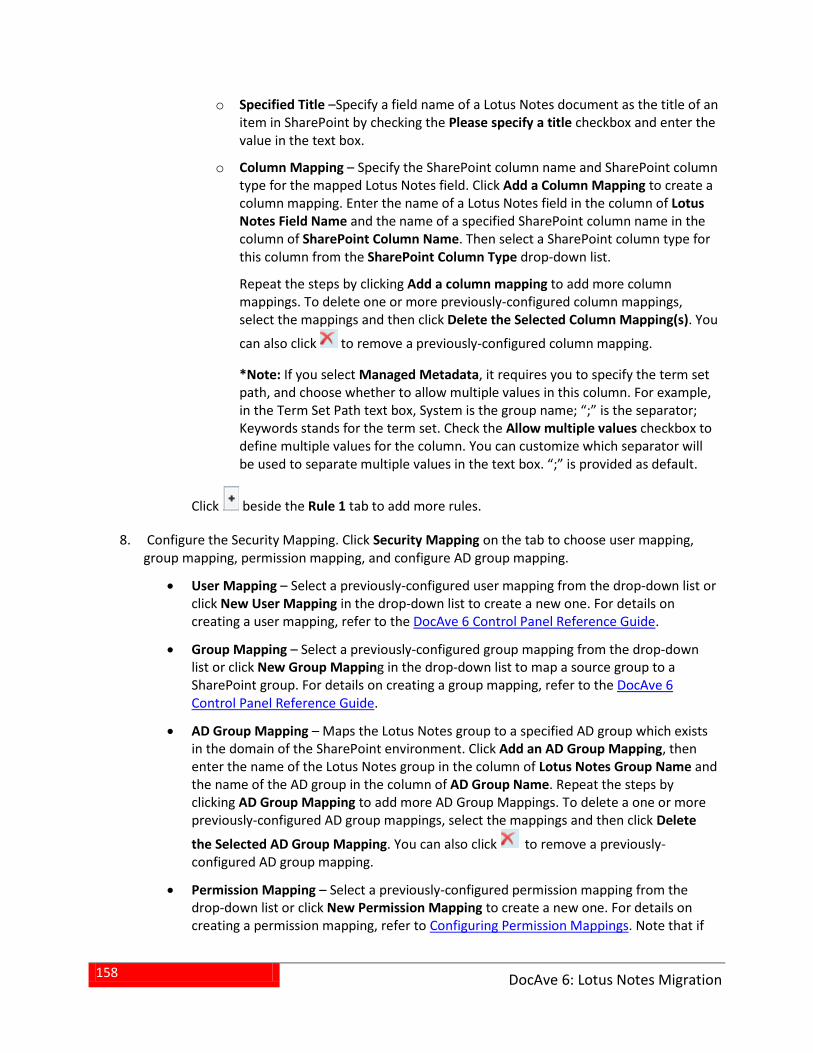
158
DocAve 6: Lotus Notes Migration
Specified Title –Specify a field name of a Lotus Notes document as the title of an oitem in SharePoint by checking the Please specify a title checkbox and enter the value in the text box.
Column Mapping – Specify the SharePoint column name and SharePoint column otype for the mapped Lotus Notes field. Click Add a Column Mapping to create a column mapping. Enter the name of a Lotus Notes field in the column of Lotus Notes Field Name and the name of a specified SharePoint column name in the column of SharePoint Column Name. Then select a SharePoint column type for this column from the SharePoint Column Type drop-down list.
Repeat the steps by clicking Add a column mapping to add more column mappings. To delete one or more previously-configured column mappings, select the mappings and then click Delete the Selected Column Mapping(s). You
can also click to remove a previously-configured column mapping.
*Note: If you select Managed Metadata, it requires you to specify the term set path, and choose whether to allow multiple values in this column. For example, in the Term Set Path text box, System is the group name; “;” is the separator; Keywords stands for the term set. Check the Allow multiple values checkbox to define multiple values for the column. You can customize which separator will be used to separate multiple values in the text box. “;” is provided as default.
Click beside the Rule 1 tab to add more rules.
Configure the Security Mapping. Click Security Mapping on the tab to choose user mapping, 8.group mapping, permission mapping, and configure AD group mapping.
• User Mapping – Select a previously-configured user mapping from the drop-down list or click New User Mapping in the drop-down list to create a new one. For details on creating a user mapping, refer to the DocAve 6 Control Panel Reference Guide.
• Group Mapping – Select a previously-configured group mapping from the drop-down list or click New Group Mapping in the drop-down list to map a source group to a SharePoint group. For details on creating a group mapping, refer to the DocAve 6 Control Panel Reference Guide.
• AD Group Mapping – Maps the Lotus Notes group to a specified AD group which exists in the domain of the SharePoint environment. Click Add an AD Group Mapping, then enter the name of the Lotus Notes group in the column of Lotus Notes Group Name and the name of the AD group in the column of AD Group Name. Repeat the steps by clicking AD Group Mapping to add more AD Group Mappings. To delete a one or more previously-configured AD group mappings, select the mappings and then click Delete
the Selected AD Group Mapping. You can also click to remove a previously-configured AD group mapping.
• Permission Mapping – Select a previously-configured permission mapping from the drop-down list or click New Permission Mapping to create a new one. For details on creating a permission mapping, refer to Configuring Permission Mappings. Note that if
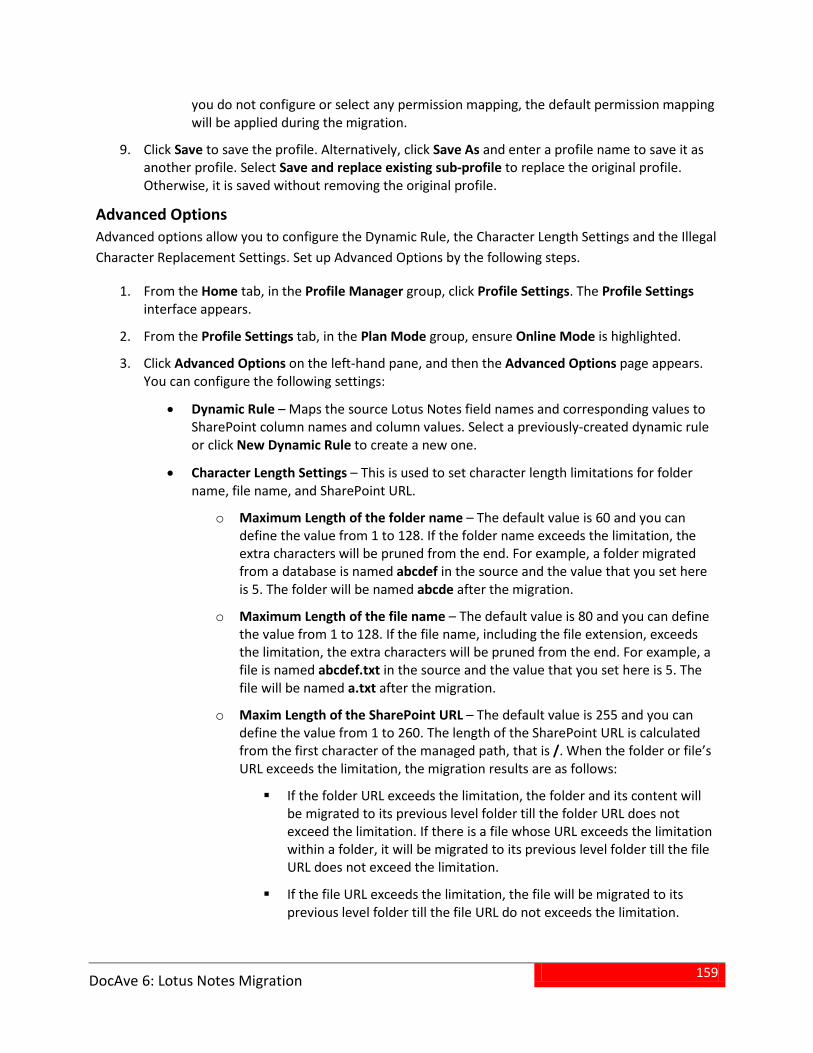
159
DocAve 6: Lotus Notes Migration
you do not configure or select any permission mapping, the default permission mapping will be applied during the migration.
Click Save to save the profile. Alternatively, click Save As and enter a profile name to save it as 9.another profile. Select Save and replace existing sub-profile to replace the original profile. Otherwise, it is saved without removing the original profile.
Advanced Options Advanced options allow you to configure the Dynamic Rule, the Character Length Settings and the Illegal Character Replacement Settings. Set up Advanced Options by the following steps.
From the Home tab, in the Profile Manager group, click Profile Settings. The Profile Settings 1.interface appears.
From the Profile Settings tab, in the Plan Mode group, ensure Online Mode is highlighted. 2.
Click Advanced Options on the left-hand pane, and then the Advanced Options page appears. 3.You can configure the following settings:
• Dynamic Rule – Maps the source Lotus Notes field names and corresponding values to SharePoint column names and column values. Select a previously-created dynamic rule or click New Dynamic Rule to create a new one.
• Character Length Settings – This is used to set character length limitations for folder name, file name, and SharePoint URL.
Maximum Length of the folder name – The default value is 60 and you can odefine the value from 1 to 128. If the folder name exceeds the limitation, the extra characters will be pruned from the end. For example, a folder migrated from a database is named abcdef in the source and the value that you set here is 5. The folder will be named abcde after the migration.
Maximum Length of the file name – The default value is 80 and you can define othe value from 1 to 128. If the file name, including the file extension, exceeds the limitation, the extra characters will be pruned from the end. For example, a file is named abcdef.txt in the source and the value that you set here is 5. The file will be named a.txt after the migration.
Maxim Length of the SharePoint URL – The default value is 255 and you can odefine the value from 1 to 260. The length of the SharePoint URL is calculated from the first character of the managed path, that is /. When the folder or file’s URL exceeds the limitation, the migration results are as follows:
If the folder URL exceeds the limitation, the folder and its content will be migrated to its previous level folder till the folder URL does not exceed the limitation. If there is a file whose URL exceeds the limitation within a folder, it will be migrated to its previous level folder till the file URL does not exceed the limitation.
If the file URL exceeds the limitation, the file will be migrated to its previous level folder till the file URL do not exceeds the limitation.
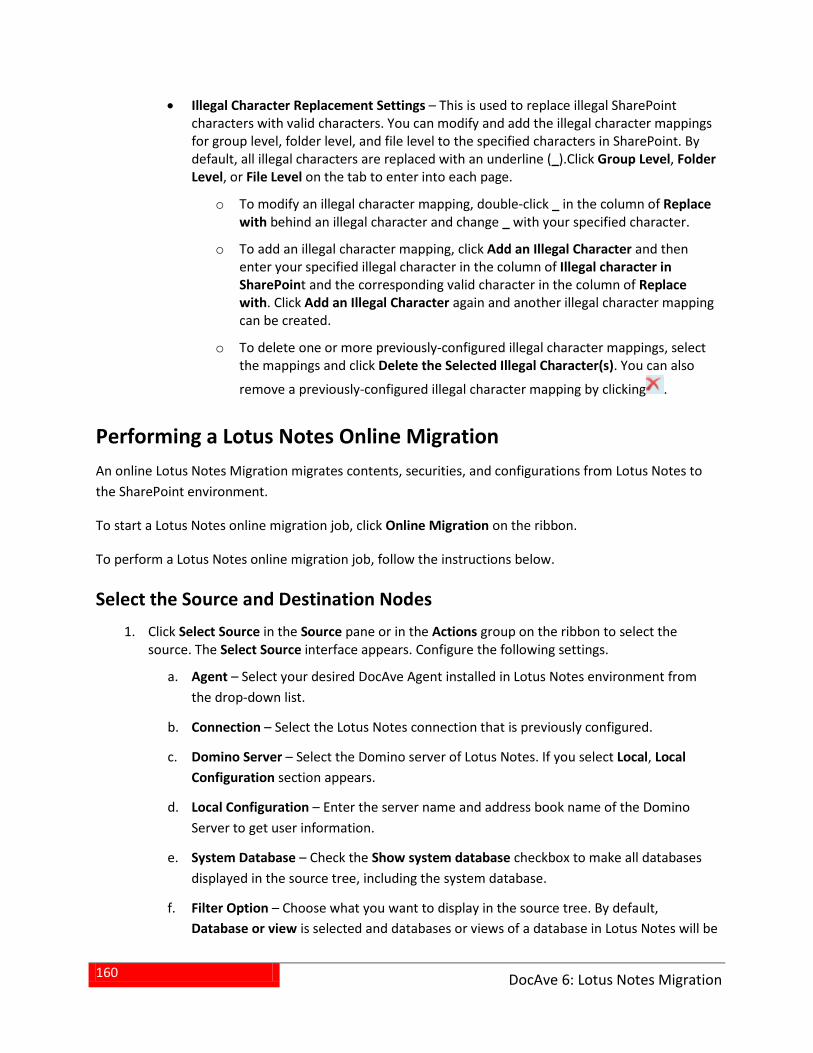
160
DocAve 6: Lotus Notes Migration
• Illegal Character Replacement Settings – This is used to replace illegal SharePoint characters with valid characters. You can modify and add the illegal character mappings for group level, folder level, and file level to the specified characters in SharePoint. By default, all illegal characters are replaced with an underline (_).Click Group Level, Folder Level, or File Level on the tab to enter into each page.
To modify an illegal character mapping, double-click _ in the column of Replace owith behind an illegal character and change _ with your specified character.
To add an illegal character mapping, click Add an Illegal Character and then oenter your specified illegal character in the column of Illegal character in SharePoint and the corresponding valid character in the column of Replace with. Click Add an Illegal Character again and another illegal character mapping can be created.
To delete one or more previously-configured illegal character mappings, select othe mappings and click Delete the Selected Illegal Character(s). You can also
remove a previously-configured illegal character mapping by clicking .
Performing a Lotus Notes Online Migration An online Lotus Notes Migration migrates contents, securities, and configurations from Lotus Notes to the SharePoint environment.
To start a Lotus Notes online migration job, click Online Migration on the ribbon.
To perform a Lotus Notes online migration job, follow the instructions below.
Select the Source and Destination Nodes Click Select Source in the Source pane or in the Actions group on the ribbon to select the 1.
source. The Select Source interface appears. Configure the following settings.
Agent – Select your desired DocAve Agent installed in Lotus Notes environment from a.the drop-down list.
Connection – Select the Lotus Notes connection that is previously configured. b.
Domino Server – Select the Domino server of Lotus Notes. If you select Local, Local c.Configuration section appears.
Local Configuration – Enter the server name and address book name of the Domino d.Server to get user information.
System Database – Check the Show system database checkbox to make all databases e.displayed in the source tree, including the system database.
Filter Option – Choose what you want to display in the source tree. By default, f.Database or view is selected and databases or views of a database in Lotus Notes will be
161
DocAve 6: Lotus Notes Migration
available for selection in the source tree. If you want to filter a document, response or response to response as the source node, select Document by Notes Formula and enter a formula in the text box below Define a formula to filter the documents. Make sure that the formula you enter is in the format, for example, Categories=“”, readers=“” |From=“” & Categories=“”! Form=“”. “|”, “&”, and “!” are supported in the criteria rule. “|” stands for “or”. “&” stands for “and”. “!” stands for “not”.
Click OK to complete configuration of selecting source. To change the source, click g.Change Source in the source pane or in the Actions group on the ribbon. Then repeat the steps described above.
Select the node whose data you wish to migrate. If working with a large environment, h.enter the name of the node (for example, database, view and item) into the Input Keyword text box to search for the desired node. You can only search out the nodes whose name is displayed in the currently expanded tree. The nodes which are not displayed in the expanded tree cannot be search out. When entering the keyword, the search result will be displayed with a little time.
Select the source node by checking the corresponding checkbox. i.
*Note: For detailed information about what kinds of source contents are supported and unsupported in the migration, refer to Supported and Unsupported Elements in Lotus Notes Migrator and Supported and Unsupported Lotus Notes Document Elements.
In the Destination pane, click the farm name to expand the data tree. To select the destination 2.node:
*Note: Make sure that you have configured the migration database; otherwise the destination farm is unavailable. For details on configuring a migration database, refer to Configuring Migration Databases.
Find the node which you wish to migrate the source data to. If working with a large a.environment, enter the keyword of the node (for example, site URL, site title, or site/list/folder name) into the Input Keyword text box to search for the desired node. You can only search out the nodes whose name is displayed in the currently expanded tree. The nodes which are not displayed in the expanded tree cannot be search out. When entering the keyword, the search result will be displayed with a little time.
Select the destination node by clicking corresponding radio button. You can also create b.a new site collection, site, list or folder by entering the specified name and click Create Container. For details on creating containers, refer to Creating Containers.
*Note: When creating a library or list, the list that you saved as template in SharePoint can be loaded in the Category drop-down list. You can select it as the template to create a library or list. Only the list template with the type of Custom List, Document Library, Discussion Board, Contacts, Calendar, and Wiki Page Library can be loaded.
162
DocAve 6: Lotus Notes Migration
There are two methods to saving and/or running this job: 3.
• Click Run Now to perform a migration job immediately, and then the Run Now interface appears. For more information on how to configure the Run Now interface, refer to Configuring the Run Now Interface.
• Click Save As New Plan, and then you are brought to the Save As New Plan interface. For more information on how to configure the Save As New Plan interface, refer to Configuring the Save As New Plan Interface.
Configuring the Run Now Interface In the Run Now interface, configure the following settings to perform a migration job immediately:
Conflict Resolution – Specify the conflict resolution when the item name in the Lotus Notes 1.conflicts with an existing item in the SharePoint. For the Container Level, the conflict resolutions provided are Merge and Skip. Merge required you to check the lower objects, and configure the Content Level conflict resolution. Skip provides the configuration of the content level conflict resolution optional. For details about conflict resolution, refer to Appendix D: Conflict Resolution.
Profile Selection – Configure the related migration options, mapping options and advanced 2.options for the migration job. Select a previously-configured profile from the drop-down list. Lotus Notes Migration provides you a default main profile named Default Profile.
Migration Database – Check whether the migration database that you previously configured is 3.available by clicking Test. After the testing is completed, click Details. The Agent Name and Status are displayed. Ensure that the database is available; otherwise the migration job will fail.
Notification – Select the e-mail notification profile for sending the notification report. For more 4.information on working with notification policies, refer to the DocAve 6 Control Panel Reference Guide.
Job Status Option – Choose whether to take the metadata/security exceptions into 5.consideration for the Lotus Notes migration job status. If the content metadata or security fails to be migrated and you select the Ignore metadata/security exceptions checkbox, the migration job status will be Finished. Otherwise, the job status will be Finished with Exceptions.
Click OK to run the job immediately or click Cancel to return to the Home page of Online 6.Migration.
Configuring the Save As New Plan Interface In the Save As New Plan interface, configure the following settings to create a new migration plan.
1. Plan Name – Enter a name for the plan that you are about to create. Then enter an optional Description for future references.
2. Profile Selection – Configure the related migration options, mapping options and advanced options for the migration job. Select a previously-configured profile from the drop-down list to apply the migration settings to the migration job. Lotus Notes Migration provides you a default main profile named Default Profile.
163
DocAve 6: Lotus Notes Migration
3. Schedule Selection – Select one type of schedule to run the plan.
• No schedule – Select this option to run the plan manually.
• Configure the schedule myself – Select this option and the Schedule Settings section appears under Schedule Selection.
*Note: If the Domino Admin, Lotus Notes, Domino Designer, or Migrator Tool is being used while the job is running, the job may fail. Ensure that none are being used while the job is running.
4. Schedule Settings (this section only appears when you choose Configure the schedule myself) – Click Add Schedule to create a new schedule. For details about configuring a schedule, refer to Configuring the Add Schedule Interface. To preview a configured schedule, select the schedule and click Calendar View to view it in a calendar. You can delete a previously-configured schedule by clicking behind a corresponding schedule.
5. Notification – Select the e-mail notification profile for sending the notification report. For more information on working with notification policies, refer to the DocAve 6 Control Panel Reference Guide when a certain triggering event occurs.
6. Associated Plan Group – Select an associated plan groups or create a new plan group in the Associated plan group(s) drop-down list in order to make the plan run according to the selected plan group settings. For more information on plan groups, refer to the DocAve 6 Control Panel Reference Guide.
7. Migration Database – Check whether the migration database that you previously configured is available by clicking Test. After the testing is completed, click Details. The Agent Name and Status are displayed. Ensure that the database is available; otherwise the migration job will fail.
8. When finished configuring the plan, select one of the following options:
• Click Save to save the plan you have configured. The Plan Manager interface appears. For more information, refer to Managing Plans.
• Click the triangle next to Save, then select Save and Run Now to save the plan and execute it right now. The Run Now interface appears. Configure the following settings:
Options – Select a type of migration for this migration job. o
Full migration – Choose this option to migrate all contents from the source node to the destination node according to the profile.
Incremental migration – Choose this option to only migrate the source node content that has been modified since the last migration job and the content that failed to be migrated in the last migration job.
Conflict Resolution – Specify the conflict resolution when the item name in oLotus Notes conflicts with an existing item in SharePoint. For Container Level, the conflict resolutions provided are Merge and Skip. Merge requires you to check lower objects, and configure the Content Level conflict resolution. Skip provides the configuration of content level resolution optional. If you select Incremental migration in Options and do not select Skip as Content Level
164
DocAve 6: Lotus Notes Migration
conflict resolution, you can also choose whether to remigrate the objects whose metadata/securities failed to be migrated in the last migration job. For details about conflict resolution, refer to Appendix D: Conflict Resolution.
Job Status Option– Choose whether to take the metadata/security exceptions ointo consideration for the Lotus Notes migration job status. If the content metadata or security fails to be migrated and you have selected the Ignore metadata/security exceptions checkbox, the migration job status will be Finished. Otherwise, the job status will be Finished with Exceptions.
9. Click OK to run the online migration job.
Configuring the Add Schedule Interface In the Add Schedule interface, configure the following settings to add a schedule:
1. Options – Select a type of migration for the customized schedule. Choose Full migration to migrate all contents from the source node to the destination node according to the profile. Choose Incremental migration to only migrate the source node content that has been modified (Add and Modify) since the last migration job and the content that failed to be migrated in the last migration job.
2. Conflict Resolution – Specify the conflict resolution when the item name in Lotus Notes conflicts with an existing item in SharePoint. For the Container Level, the conflict resolutions provided are Merge and Skip. Merge requires you to check lower objects, and configure content level conflict resolution. Skip provides the configuration of the Content Level resolution optional. If you select Incremental migration in Options and do not select Skip as Content Level conflict resolution, you can also choose whether to remigrate the objects whose metadata/securities failed to be migrated in the last migration job. For details about conflict resolution, refer to Appendix D: Conflict Resolution.
3. Schedule Settings – Specify the frequency to run the recurring schedule. Enter an integer into the text box and select Minute(s), Hour(s), Day(s), Week(s) or Month(s) from the drop-down list.
4. Range of Recurrence – Specify when to start and end the running recurring schedule.
• Start time – Set up the time to start the plan and Time Zone can be changed under the Start time. Note that the start time cannot be earlier than the current time.
• No end date – Select this option to repeat running the plan until being stopped manually.
• End after specified occurrence(s) – Select this option to stop the plan after specified occurrences that you configure in the text box.
• End by – Set up the time to end the recurrence of plans.
5. Job Status Option– Choose whether to take the metadata/security exceptions into consideration for the Lotus Notes migration job status. If the content metadata or security fails to be migrated and you have selected the Ignore metadata/security exceptions checkbox, the migration job status will be Finished. Otherwise, the job status will be Finished with Exceptions.

165
DocAve 6: Lotus Notes Migration
6. Click OK to save the configuration of schedule, or click Cancel to return to the Save As New Plan interface without saving any change.
166
DocAve 6: Lotus Notes Migration
Lotus Notes Offline Migrations Lotus Notes offline migration exports the source data to an export location first, and then imports the exported data to the SharePoint destination.
Lotus Notes offline migration supports SharePoint 2010 on-premises and SharePoint 2013 on-premises.
Refer to the sections below to use Lotus Notes Migrator.
Configuring a Lotus Notes Offline Migration The corresponding Lotus Notes export profile and import profile must be in place prior to running an offline migration. Refer to the sections below to set up an export profile and an import profile.
Setting Up an Export Profile Create an Export Profile to configure Lotus Notes Migrator filter options and mapping options.
From the Home tab, in the Profile Manager group, click Profile Settings. The Profile Settings tab 1.appears.
In Plan Mode group, click Export Mode. 2.
In the Profile/Sub-profile group, click New. 3.
Enter a profile name in the pop-up window and click OK. 4.
Click Filter Options on the left-hand pane. Select a previously-configured filter policy from the 5.drop-down list or click New Filter Policy to create a filter policy. For details on creating a filter policy, refer to the DocAve 6 Control Panel Reference Guide.
Select the Mapping Options. For details about this section, refer to Mapping Options. It may 6.differ in the type of mappings.
Click Save beside Main Profile name to save the configuration of the main profile, or click Cancel 7.to go back to the default Profile Settings page without saving any change.
Setting Up an Import Profile Create an Import Profile to configure Lotus Notes Migrator migration options, mapping options, and other customized settings.
From the Home tab, in the Profile Manager group, click Profile Settings. The Profile Settings tab 1.appears.
In Plan Mode group, click Export Mode. 2.
In the Profile/Sub-profile group, click New. 3.
Enter a profile name in the pop-up window and click OK. 4.
167
DocAve 6: Lotus Notes Migration
Click Migration Options on the left-hand pane. For details on configuring a sub-profile of 5.Migration Options, refer to Migration Options.
Select Mapping Options. For details about this section, refer to Mapping Options. 6.
Click Advanced Options on the left-hand pane, and then the Advanced Options page appears. 7.For details on configuring Advanced Options, refer to Advanced Options.
Click Save beside Main Profile name to save the configuration of the main profile, or click Cancel 8.to go back to the default Profile Settings page without saving any change.
Performing a Lotus Notes Offline Migration An offline Lotus Notes Migration migrate content from an offline source to an offline destination. The process includes setting up an export location for export mode, exporting the data to the export location, setting up an export location for import mode, and then importing the data to the destination location.
Export The following instructions describe how to export data to the export location in order to perform an offline migration job.
From the Home tab, in the Plan group, click Export. 1.
Click Select Source in the Source pane or in the Actions group on the ribbon to select the source 2.data. The Select Source interface pops up. Configure the following settings.
Agent – Select your desired DocAve Agent installed in Lotus Notes environment from a.the drop-down list.
Connection – Select the Lotus Notes connection that is previously configured. b.
Domino Server – Select the Domino server of Lotus Notes. If you select Local, Local c.Configuration section appears.
Local Configuration – Enter the server name and address book name of the Domino d.server to get user information.
System Database – Check the Show system database checkbox to make all database e.displayed in the source tree, including the system database.
Filter Option – Choose what you want to display in the source tree. By default, f.Database or view is selected and databases or views of a database in Lotus Notes will be available for selection in the source tree. If you want to filter a document as the source node, select Document by Notes Formula and enter a formula in the text box below Define a formula to filter the documents. Make sure that the formula you enter is in the format, for example, Categories=“”, readers=“” |From=“”& Categories=“”! Form=””. “|”, “&”, and “!” are supported in the criteria rule. “|” stands for “or”. “&” stands for “and”. “!” stands for “not”.
168
DocAve 6: Lotus Notes Migration
Click OK to complete configuration of selecting source. To change the source, click g.Change Source in the source pane or in the Actions group on the ribbon. Then repeat the steps described above.
Select the node whose data you wish to migrate. If working with a large environment, h.enter the name of the node (for example, database, view or item) into the Input Keyword text box to search for the desired node. You can only search out the nodes whose name is displayed in the currently expanded tree. The nodes which are not displayed in the expanded tree cannot be search out. When entering the keyword, the search result will be displayed with a little time.
Select the source node by checking the corresponding checkbox. i.
*Note: For detailed information about what kinds of source contents are supported and unsupported in the migration, refer to Supported and Unsupported Elements in Lotus Notes Migrator and Supported and Unsupported Lotus Notes Document Elements.
In the Destination pane, select a previously-configured export location from the drop-down list 3.or click New Export Location to create a new one. For details on creating an export location for export mode, refer to About Export Locations (Offline Jobs Only).
Click Save As New Plan to save the settings as a new plan. To configure the Save As New Plan 4.interface, refer to Configuring the Save As New Plan Interface.
Configuring the Save As New Plan Interface In the Save As New Plan interface, configure the following settings to build a migration plan:
Plan Name – Enter a name for the plan that you are about to create. Then enter an optional 1.Description for future references.
Profile Selection – Configure the related migration options, mapping options and advanced 2.options for the migration job. Select a previously-configured profile from the drop-down list to apply the migration settings to the migration job. Lotus Notes Migration provides you a default main profile named Default Profile.
Schedule Selection – Select one type of schedule to run the plan. 3.
• No schedule – Select this option to run the plan manually.
• Configure the schedule myself – Select this option and the Schedule Settings section appears under Schedule Selection.
*Note: If any of the Domino Admin, Lotus Notes, Domino Designer, and AvePoint Migrator Tool is being used while the job is running, the job may fail. Make sure none of them is being used while the job is running.
Schedule Settings (This section only appears when you choose Configure the schedule myself) – 4.Click Add Schedule to create a new schedule. For details about configuring a schedule, refer to Configuring the Add Schedule Interface. To preview a configured schedule, select the schedule
169
DocAve 6: Lotus Notes Migration
and click Calendar View to view it in a calendar. You can delete a previously-configured
schedule by clicking behind a corresponding schedule.
Notification – Select the e-mail Notification profile for sending the notification report. For more 5.information on working with notification policies, refer to the DocAve 6 Control Panel Reference Guide.
Associated Plan Group – Select an associated plan groups or create a new plan group in the 6.Associated plan group(s) drop-down list in order to make the plan run according to the selected plan group settings. For more information on plan groups, refer to the DocAve 6 Control Panel Reference Guide.
When finished configuring the plan, select one of the following options: 7.
• Click Save to save the plan you have configured. The Plan Manager interface appears. For more information, refer to Managing Plans.
• Click the triangle next to Save, then select Save and Run Now to save the plan and execute it right now. The Run Now interface appears. Configure the following settings.
Options – Select a type of migration for this migration job. o
Full migration – Choose this option to export all contents from the source node to the export location according to the profile.
Incremental migration –Choose this option to only export the source node content that has been modified (Add and Modify) of since the last migration job and the content that failed to be migrated in the last migration job.
Job Status Option – Choose whether to take the metadata/security exceptions ointo consideration for the Lotus Notes migration job status. If the content metadata or security fails to migrate and you select the Ignore metadata/security exceptions checkbox, the migration job status will be Finished. Otherwise, the job status will be Finished with Exceptions.
Click OK to run the export job. 8.
Configuring the Add Schedule Interface In the Add Schedule interface, configure the following settings to add a schedule:
Options – Select a type of migration for the customized schedule. Choose Full migration to 1.migrate all contents from the source node to the export location according to the profile. Choose Incremental migration to only export the source node content that has been modified (Add and Modify) since the last migration job and the content that failed to be migrated in the last migration job.
Schedule Settings – Specify the frequency to run the recurring schedule. Enter an integer into 2.the text box and select Minute(s), Hour(s), Day(s), Week(s) or Month(s) from the drop-down list.
Range of Recurrence – Specify when to start and end the running recurring schedule. 3.
• Start time – Set up the time to start the plan and Time Zone can be changed under the Start time. Note that the start time cannot be earlier than the current time.
170
DocAve 6: Lotus Notes Migration
• No end date – Select this option to repeat running the plan until being stopped manually.
• End after specified occurrence(s) – Select this option to stop the plan after specified occurrences that you configure in the text box.
• End by – Set up the time to end the recurrence of plans.
Job Status Option – Choose whether to take the metadata/security exceptions into 4.consideration for the Lotus Notes migration job status. If the content metadata or security fails to migrate and you select the Ignore metadata/security exceptions checkbox, the migration job status will be Finished. Otherwise, the job status will be Finished with Exceptions.
Click OK to save the configuration of schedule, or click Cancel to return to the Save As New Plan 5.interface without saving any change.
Import The following instructions describe how to import data from the export location to SharePoint in order to perform an offline migration job.
From the Home tab, in the Plan group, click Import. 1.
In the Source pane, on the Browse tab, click the farm that you have configured in Export 2.Location for Import Mode and the Import Mode Export Location is loaded. Click the export location to load the Lotus Notes Exported Data folder in the UNC path. Then select the exported data which is named by the plan name. To see details of the exported data in the source tree, click the Details tab.
*Note: If you cannot find the data you wish to import in the source, click Export Location to specify the location where you have stored the data.
In the Destination pane, click the farm name to expand the data tree. Select the destination 3.node:
Locate the node into which the exported data will be imported. If working with a large a.environment, enter the keyword of the node into the Input Keyword text box to search for the desired node. You can only search the nodes whose name is displayed in the currently expanded tree. The nodes which are not displayed in the expanded tree cannot be search. When entering the keyword, the search result will be displayed with a little time.
Select the destination node by clicking the corresponding radio button. You can also b.create a new site collection, site, list or folder by entering the specified name and click Create Container. For details on creating containers, refer to Creating Containers.
Click Save As New Plan to save your settings as a new plan. To configure the settings of the 4.Save As New Plan interface, refer to Configuring the Save As New Plan Interface.
171
DocAve 6: Lotus Notes Migration
Configuring the Save As New Plan Interface In the Save As New Plan interface, configure the following settings to build up a migration plan:
Plan Name – Enter a name for the plan that you are about to create. Then enter an optional 1.Description for future references.
Profile Selection – Configure the related migration options, mapping options and advanced 2.options for the migration job. Select a previously-configured profile from the drop-down list to apply the migration settings to the migration job. Lotus Notes Migration provides you a default main profile named Default Profile.
Schedule Selection – Select one type of schedule to run the plan. 3.
• No schedule – Select this option to run the plan manually.
• Configure the schedule myself – Select this option to configure the schedule. The Schedule Settings section appears under Schedule Selection.
*Note: If any of the Domino Admin, Lotus Notes, Domino Designer, and Migrator Tool is being used while the job is running, the job may fail. Make sure none of them is being used while the job is running.
Schedule Settings (This section only appears when you choose Configure the schedule myself) 4.– Click Add Schedule to create a new schedule. For details about configuring a schedule, refer to Configuring the Add Schedule Interface. To preview a configured schedule, select the schedule and click Calendar View to view it in a calendar. You can delete a previously-configured schedule by clicking behind a corresponding schedule.
Notification – Select the e-mail notification profile for sending the notification report. For more 5.information on working with notification policies, refer to the DocAve 6 Control Panel Reference Guide.
Associated Plan Group – Select an associated plan group(s) or create a new plan group in the 6.Associated plan group(s) drop-down list in order to make the plan run according to the selected plan group settings. For more information on plan groups, refer to the DocAve 6 Control Panel Reference Guide.
Migration Database – Check whether the migration database that you previously configured is 7.available by clicking Test. After the testing is completed, click Details. The Agent Name and Status are displayed. Ensure that the database is available; otherwise the migration job will fail.
When finished configuring the plan, select one of the following options: 8.
• Click Save to save the plan you have configured. The Plan Manager interface appears. For more information, refer to Managing Plans.
• Click the triangle next to Save, then select Save and Run Now to save the plan and execute it right away. The Run Now interface appears. Configure the following settings.
Options –Select a type of migration for the import job. o
Full migration – Choose this option to import all contents from the export location to the destination node according to the profile.
172
DocAve 6: Lotus Notes Migration
Incremental migration – Choose this option to only import the export location content that has been modified (Add and Modify) since the last migration job and the content that failed to migrate in the last migration job.
Conflict Resolution – Specify the conflict resolution when the item name in oLotus Notes conflicts with an existing item in SharePoint. For Container Level, the conflict resolutions provided are Merge and Skip. Merge requires you to check lower objects, and configure the Content Level conflict resolution. Skip provides the configuration of content level resolution optional. For details about conflict resolution, refer to Appendix D: Conflict Resolution.
Job Status Option – Choose whether to take the metadata/security exceptions ointo consideration for the Lotus Notes migration job status. If the content metadata or security fails to migrate and you select the Ignore metadata/security exceptions checkbox, the migration job status will be Finished. Otherwise, the job status will be Finished with Exceptions.
Click OK to run the import job. 9.
Configuring the Add Schedule Interface In the Add Schedule interface, configure the following settings to add a schedule:
Options – Select a type of migration for the customized schedule. Choose Full migration to 1.import all contents from the export location to the destination node according to the profile. Choose Incremental migration to only import the modified content (Add and Modify) from the export location since the last migration job.
Conflict Resolution –Specify the conflict resolution when the item name in Lotus Notes conflicts 2.with an existing item in SharePoint. For Container Level, the conflict resolutions provided are Merge and Skip. Merge requires you to check Check lower objects for conflicts, and configure the Content Level conflict resolution. Skip provides the configuration of content level resolution optional. For details about conflict resolution, refer to Appendix D: Conflict Resolution.
Schedule Settings – Specify the frequency to run the recurring schedule. Enter an integer into 3.the text box and select Minute(s), Hour(s), Day(s), Week(s) or Month(s) from the drop-down list.
Range of Recurrence – Specify when to start and end the running recurring schedule. 4.
• Start time – Set up the time to start the plan and Time Zone can be changed under the Start time. Note that the start time cannot be earlier than the current time.
• No end date – Select this option to repeat running the plan until being stopped manually.
• End after specified occurrence(s) – Select this option to stop the plan after specified occurrences that you configure in the text box.
• End by – Set up the time to end the recurrence of plans.
Job Status Option – Choose whether to take the metadata/security exceptions into 5.consideration for the Lotus Notes migration job status. If the content metadata or security fails
173
DocAve 6: Lotus Notes Migration
to migrate and you select the Ignore metadata/security exceptions checkbox, the migration job status will be Finished. Otherwise, the job status will be Finished with Exceptions.
Click OK to save the configuration of schedule, or click Cancel to return to the Save As New Plan 6.interface without saving any change.
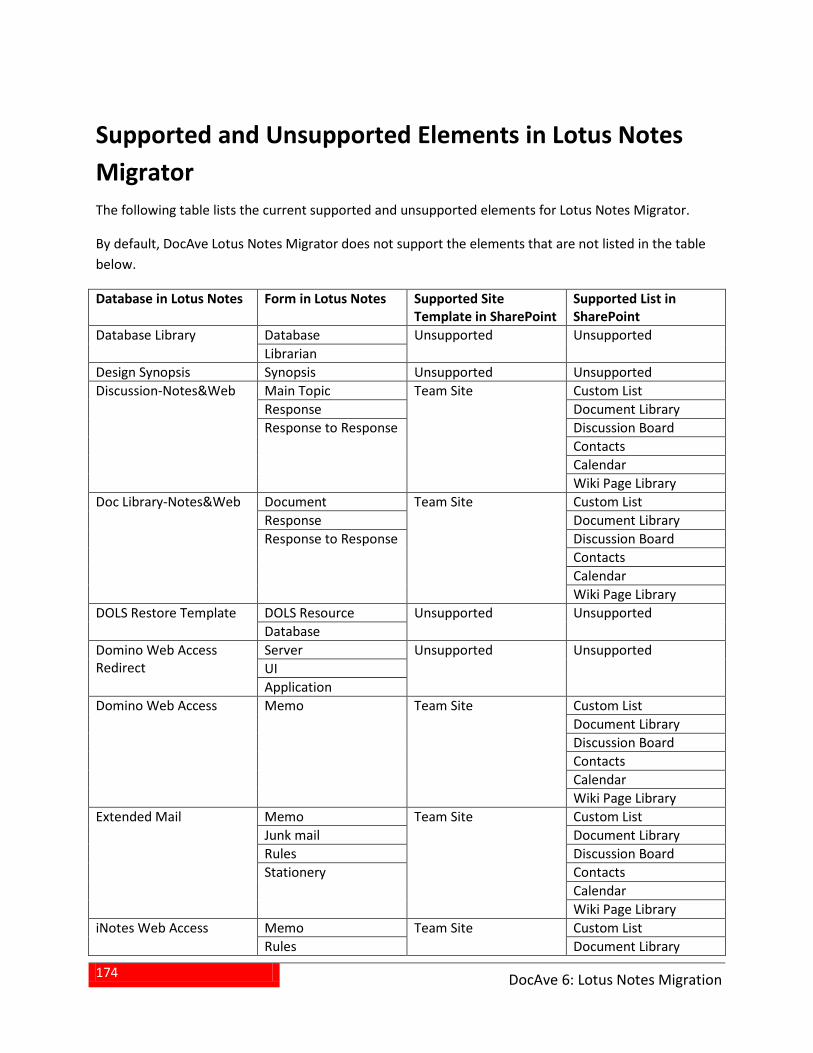
174
DocAve 6: Lotus Notes Migration
Supported and Unsupported Elements in Lotus Notes Migrator The following table lists the current supported and unsupported elements for Lotus Notes Migrator.
By default, DocAve Lotus Notes Migrator does not support the elements that are not listed in the table below.
Database in Lotus Notes Form in Lotus Notes Supported Site Template in SharePoint
Supported List in SharePoint
Database Library Database Unsupported Unsupported Librarian
Design Synopsis Synopsis Unsupported Unsupported Discussion-Notes&Web Main Topic Team Site Custom List
Response Document Library Response to Response Discussion Board
Contacts Calendar Wiki Page Library
Doc Library-Notes&Web Document Team Site Custom List Response Document Library Response to Response Discussion Board
Contacts Calendar Wiki Page Library
DOLS Restore Template DOLS Resource Unsupported Unsupported Database
Domino Web Access Redirect
Server Unsupported Unsupported UI Application
Domino Web Access Memo Team Site Custom List Document Library Discussion Board Contacts Calendar Wiki Page Library
Extended Mail Memo Team Site Custom List Junk mail Document Library Rules Discussion Board Stationery Contacts
Calendar Wiki Page Library
iNotes Web Access Memo Team Site Custom List Rules Document Library
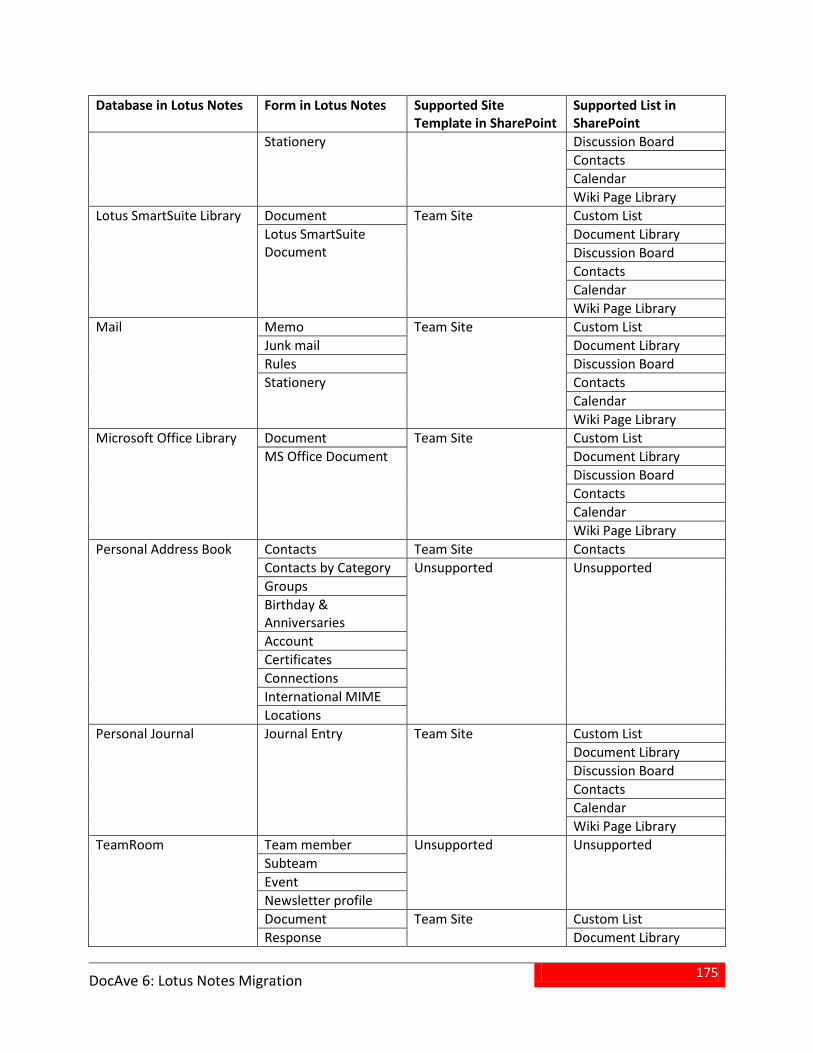
175
DocAve 6: Lotus Notes Migration
Database in Lotus Notes Form in Lotus Notes Supported Site Template in SharePoint
Supported List in SharePoint
Stationery Discussion Board Contacts Calendar Wiki Page Library
Lotus SmartSuite Library Document Team Site Custom List Lotus SmartSuite Document
Document Library Discussion Board Contacts Calendar Wiki Page Library
Mail Memo Team Site Custom List Junk mail Document Library Rules Discussion Board Stationery Contacts
Calendar Wiki Page Library
Microsoft Office Library Document Team Site Custom List MS Office Document Document Library
Discussion Board Contacts Calendar Wiki Page Library
Personal Address Book Contacts Team Site Contacts Contacts by Category Unsupported Unsupported Groups Birthday & Anniversaries Account Certificates Connections International MIME Locations
Personal Journal Journal Entry Team Site Custom List Document Library Discussion Board Contacts Calendar Wiki Page Library
TeamRoom Team member Unsupported Unsupported Subteam Event Newsletter profile Document Team Site Custom List Response Document Library
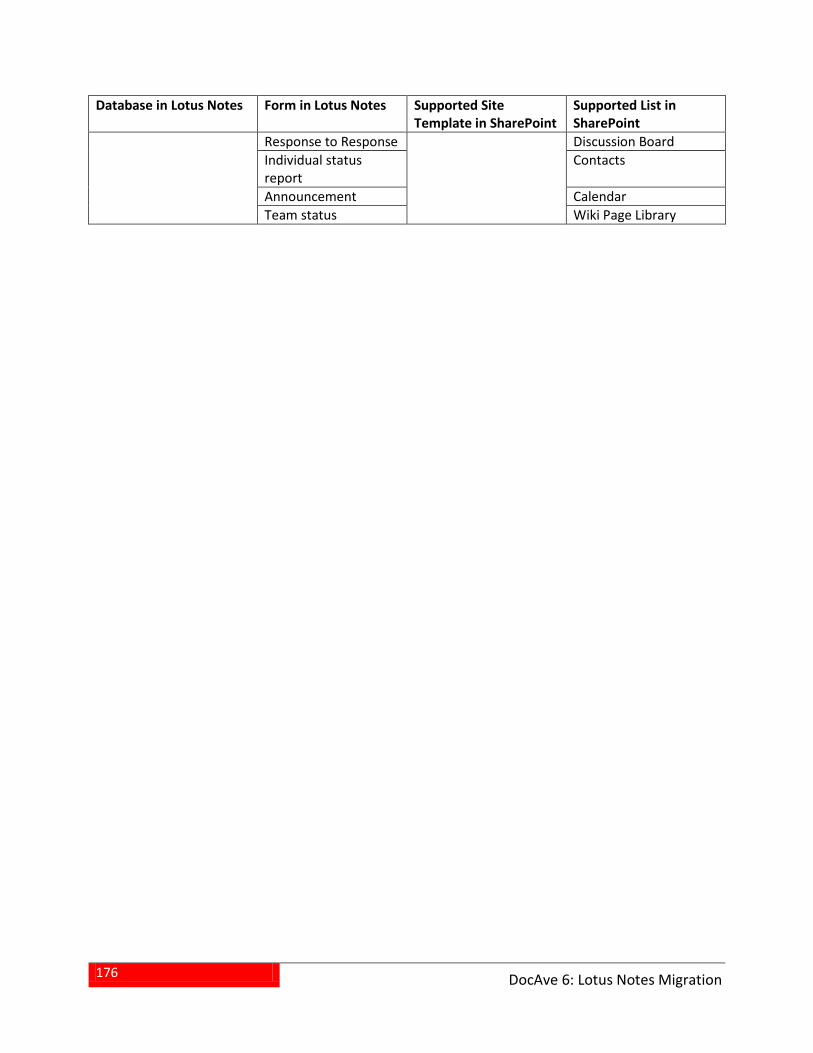
176
DocAve 6: Lotus Notes Migration
Database in Lotus Notes Form in Lotus Notes Supported Site Template in SharePoint
Supported List in SharePoint
Response to Response Discussion Board Individual status report
Contacts
Announcement Calendar Team status Wiki Page Library
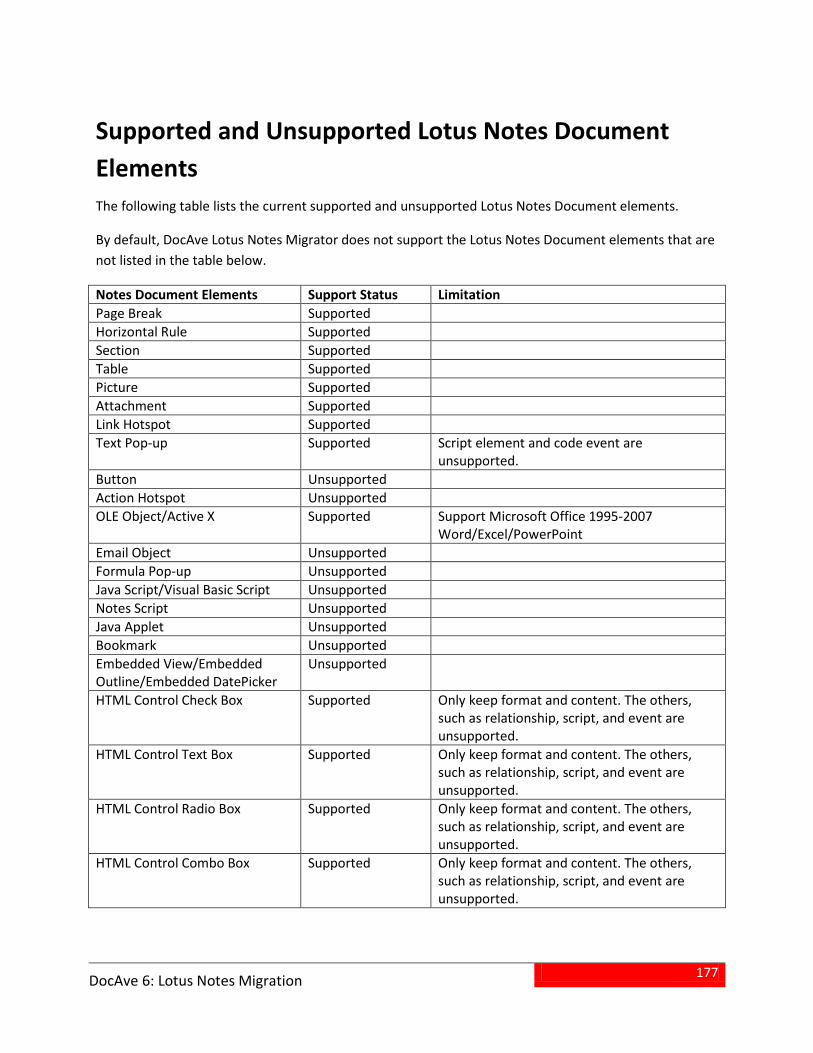
177
DocAve 6: Lotus Notes Migration
Supported and Unsupported Lotus Notes Document Elements The following table lists the current supported and unsupported Lotus Notes Document elements.
By default, DocAve Lotus Notes Migrator does not support the Lotus Notes Document elements that are not listed in the table below.
Notes Document Elements Support Status Limitation Page Break Supported Horizontal Rule Supported Section Supported Table Supported Picture Supported Attachment Supported Link Hotspot Supported Text Pop-up Supported Script element and code event are
unsupported. Button Unsupported Action Hotspot Unsupported OLE Object/Active X Supported Support Microsoft Office 1995-2007
Word/Excel/PowerPoint Email Object Unsupported Formula Pop-up Unsupported Java Script/Visual Basic Script Unsupported Notes Script Unsupported Java Applet Unsupported Bookmark Unsupported Embedded View/Embedded Outline/Embedded DatePicker
Unsupported
HTML Control Check Box Supported Only keep format and content. The others, such as relationship, script, and event are unsupported.
HTML Control Text Box Supported Only keep format and content. The others, such as relationship, script, and event are unsupported.
HTML Control Radio Box Supported Only keep format and content. The others, such as relationship, script, and event are unsupported.
HTML Control Combo Box Supported Only keep format and content. The others, such as relationship, script, and event are unsupported.
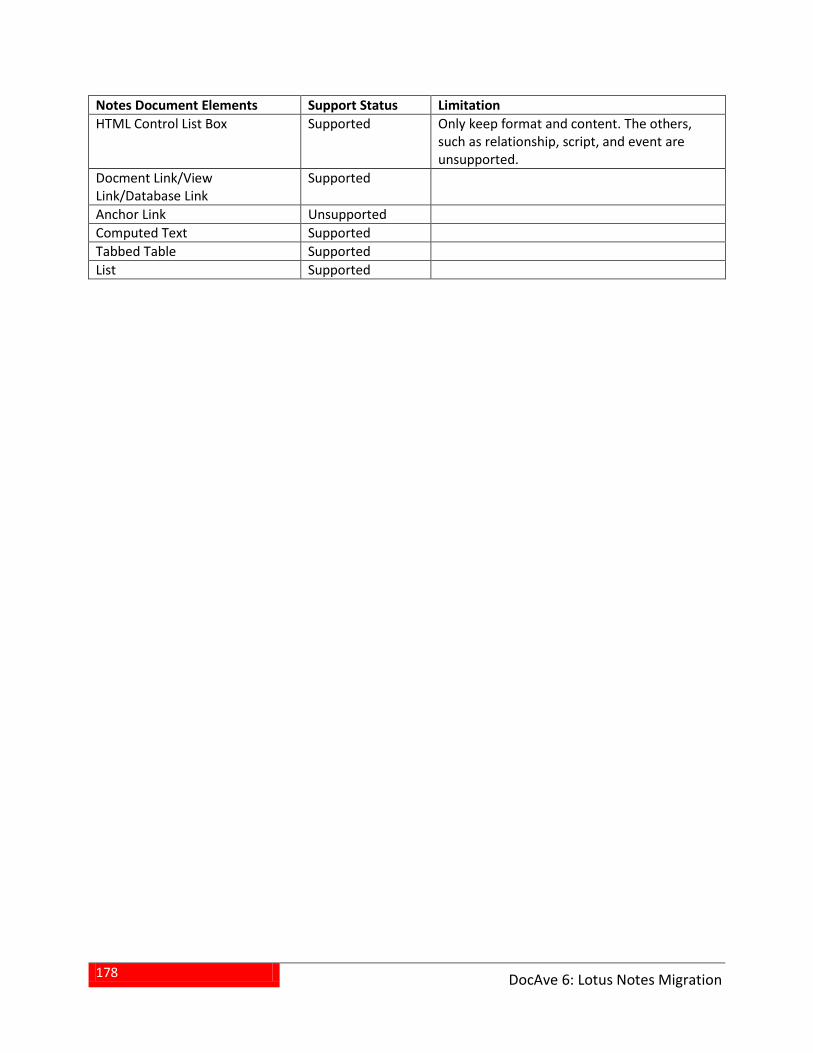
178
DocAve 6: Lotus Notes Migration
Notes Document Elements Support Status Limitation HTML Control List Box Supported Only keep format and content. The others,
such as relationship, script, and event are unsupported.
Docment Link/View Link/Database Link
Supported
Anchor Link Unsupported Computed Text Supported Tabbed Table Supported List Supported
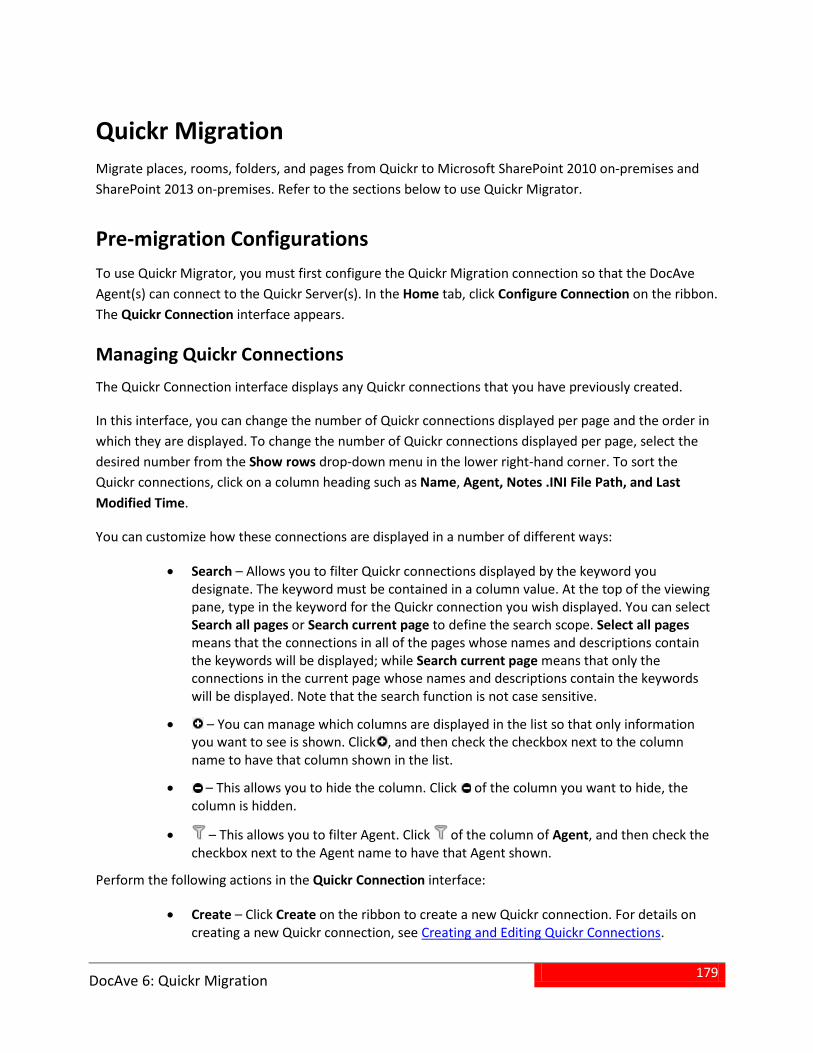
179
DocAve 6: Quickr Migration
Quickr Migration Migrate places, rooms, folders, and pages from Quickr to Microsoft SharePoint 2010 on-premises and SharePoint 2013 on-premises. Refer to the sections below to use Quickr Migrator.
Pre-migration Configurations To use Quickr Migrator, you must first configure the Quickr Migration connection so that the DocAve Agent(s) can connect to the Quickr Server(s). In the Home tab, click Configure Connection on the ribbon. The Quickr Connection interface appears.
Managing Quickr Connections The Quickr Connection interface displays any Quickr connections that you have previously created.
In this interface, you can change the number of Quickr connections displayed per page and the order in which they are displayed. To change the number of Quickr connections displayed per page, select the desired number from the Show rows drop-down menu in the lower right-hand corner. To sort the Quickr connections, click on a column heading such as Name, Agent, Notes .INI File Path, and Last Modified Time.
You can customize how these connections are displayed in a number of different ways:
• Search – Allows you to filter Quickr connections displayed by the keyword you designate. The keyword must be contained in a column value. At the top of the viewing pane, type in the keyword for the Quickr connection you wish displayed. You can select Search all pages or Search current page to define the search scope. Select all pages means that the connections in all of the pages whose names and descriptions contain the keywords will be displayed; while Search current page means that only the connections in the current page whose names and descriptions contain the keywords will be displayed. Note that the search function is not case sensitive.
• – You can manage which columns are displayed in the list so that only information you want to see is shown. Click , and then check the checkbox next to the column name to have that column shown in the list.
• – This allows you to hide the column. Click of the column you want to hide, the column is hidden.
• – This allows you to filter Agent. Click of the column of Agent, and then check the checkbox next to the Agent name to have that Agent shown.
Perform the following actions in the Quickr Connection interface:
• Create – Click Create on the ribbon to create a new Quickr connection. For details on creating a new Quickr connection, see Creating and Editing Quickr Connections.
180
DocAve 6: Quickr Migration
• View Details – Click View Details on the ribbon and you will see the previously-configured settings for this Quickr connection. Here you can also click Edit on the ribbon to make changes to the Quickr connection’s settings. You will be brought to the Edit Quickr Connection interface where you can change this Quickr connection.
• Edit – Click Edit on the ribbon to change the configurations for this Quickr connections. For details on editing configurations for a Quickr connection, see Creating and Editing Quickr Connections.
• Delete – Click Delete on the ribbon. A confirmation window appears, confirming that you want to proceed with the deletion. Click OK to delete the selected Quickr connections, or click Cancel to return to the Quickr Connection interface without deleting the selected Quickr connections.
Creating and Editing Quickr Connections To create a new Quickr connection, click Create in the ribbon. To modify a previously-configured Quickr connection, select the Quickr connection, and then click Edit on the ribbon.
In the Create Quickr Connection or Edit Quickr Connection interface, configure the following settings.
Quickr Connection Name – Enter a name for the Quickr connection. Then enter an optional 1.description for this Quickr connection for future references.
Connection – Configure the following settings to connect the Quickr Server to the source 2.DocAve Agent.
Agent – Select your desired DocAve Agent installed in Quickr environment from the a.drop-down list.
NOTES.INI configuration file path – NOTES.INI file can be found in the Quickr server. b.The default path C:\Program Files\lotus\notes\notes.ini is entered automatically. You can also enter the path by yourself, but make sure that the path you enter is the absolute path where NOTES.INI file locates.
User ID file – Click here link which is in the sentence below NOTES.INI configuration file c.path to load the user ID file, then select one from the drop-down list.
Password – Enter the password of the user that you have selected in User ID file. d.
Quickr Version – Select the version of your Quickr from the drop-down list. Click the e.Validation Test button to check the password.
Click OK to save the configurations and return to the Quickr Connection interface, or click 3.Cancel to return to the Quickr Connection interface without saving any changes.
181
DocAve 6: Quickr Migration
Configuring Quickr Migration
About Filter Policies Filter Policy allows you to set up filter rules so that you can control what pages within Quickr appear, then you can target content more precisely. By setting up and saving filter policies, you can apply the same filter policies to different Quickr migration plans without having to recreate them each time.
To access Filter Policy, click Profile Settings on the ribbon in the Home tab. On the Profile Settings page, click Filter Policy on the ribbon.
The Filter Policy interface displays any filter policies that you have previously configured.
In this interface, you can change the number of filter policies displayed per page and the order in which they are displayed. To change the number of filter policies displayed per page, select the desired number from the Show rows drop-down menu in the lower right-hand corner. To sort the filter policies, click on a column heading such as Filter Policy Name, and Description.
You can customize how these filter policies are displayed in a number of different ways:
• Search – Allows you to filter the filter policies displayed by the keyword you designate. The keyword must be contained in a column value. At the top of the viewing pane, type in the keyword for the filter policy you wish to display. You can select Search all pages or Search current page to define the search scope. Search all pages means that the filter policies in all of the pages whose name and descriptions contain the keywords will be displayed; while Search current page means that only the filter policies in the current page whose names and descriptions contain the keywords will be displayed. Note that the search function is not case sensitive.
• – You can manage which columns are displayed in the list so that only information you want to see is shown. Click , then check the checkbox next to the column name to have that column shown in the list.
• – This allows you to hide the column. Click in the column title to hide the column.
Perform the following actions in the Filter Policy interface:
• Create – Click Create on the ribbon to create a new filter policy. For details on creating a new filter policy, see Creating and Editing Filter Policies.
• View – Click View on the ribbon to view detailed settings of a selected filter policy.
• Edit – Click Edit on the ribbon to change the configurations for this filter policy. For details on editing configurations for a filter policy, see Creating and Editing Filter Policies.
• Delete – Click Delete on the ribbon. A confirmation window appears, confirming that you want to proceed with the deletion. Click OK to delete the selected filter policies, or
182
DocAve 6: Quickr Migration
click Cancel to return to the Filter Policy interface without deleting the selected filter policies.
Creating and Editing Filter Policies To create a new filter policy, click Create on the ribbon. To modify a previously-configured filter policy, select the filter policy, and then click Edit on the ribbon.
In the Create Filter Policy or Edit Filter Policy interface, configure the following settings:
Name – Enter a Name for this filter policy. 1.
Description – Enter an optional Description for future references. 2.
Filter Rule – A filter rule allows you to filter pages that you want to migrate by setting up a set of 3.filter criteria. Follow the steps below to set up your own filter rules.
Click Add a Filter Level Group to create a Time Range filter level. The default rule is a.Created Time and you can select Modified Time from the drop-down list.
In the Condition column, time condition can be selected from Before, After, Within, and b.Older Than. Set up Time Zone and the exact time in the Value column.
Click to delete the specified filter rule. You can change the logical relationship c.between filter rules.
Repeat step a and step b to add more filter rules. d.
There are two logics currently. And and Or. By default, the logic is set to And. If desired, change the logic to Or by selecting it from the drop-down list.
And – The content which meets all the filter rules will be filtered to be included. o
Or – The content which meets any one of the filter rules will be filtered to be oincluded.
Basic Filter Conditions – View the logical relationship of the filter rules in this area.
Click OK to save the configurations and return to the Filter Policy interface, or click Cancel to 4.return to the Filter Policy interface without saving any changes.
About Mapping Settings Before performing a Quickr migration job, you may want to define optional User Mapping, Group Mapping, Permission Mapping, and Dynamic Mapping. Refer to the following sections to decide whether to configure the mapping settings, and learn how to configure the mapping settings.
183
DocAve 6: Quickr Migration
User Mapping Use user mapping if you wish to map an existing source node username to SharePoint user in the destination. During migration, Migrator will replace the source username with your specified username in the destination.
To access User Mapping, click Profile Settings on the ribbon in the Home tab. Then in the Profile Settings interface, click Mappings and select User Mapping on the ribbon. The Control Panel appears.
For specific instruction on setting up user mapping, refer to the DocAve 6 Control Panel Reference Guide. Make sure that the source username that you input in the column of Source Username is one of the following formats; otherwise the user mapping will fail.
• Format one: username
• Format two:
username/orgname o
username/orgname/orgname o
username/orgname/orgname/orgname o
The organization in Quickr can be multilevel and here the orgname you enter can also be multilevel.
Group Mapping Use group mapping if you wish to map an existing source group name a SharePoint group. During the migration, Migrator will replace the source group name with your specified group name in the destination node.
To access Group Mapping, click Profile Settings on the ribbon in the Home tab. Then in the Profile Settings interface, click Mappings and select Group Mapping on the ribbon. The Control Panel appears.
For specific instruction on setting up group mapping, refer to the DocAve 6 Control Panel Reference Guide.
About Permission Mappings Permission mapping allows you to map permissions in the source to SharePoint permissions in the destination. During the migration, Migrator will replace the source permission with SharePoint permission levels of Default Permission Mapping or your specified permission levels in the destination node.
*Note: If a user mapping and a permission mapping are combined, the permission of the destination user is the merged result of the mapped user’s permission and the mapped permission.
To access Permission Mapping, click Profile Settings on the ribbon in the Home tab. Then in the Profile Settings interface, click Mappings and select Permission Mapping on the ribbon. In the Permission
184
DocAve 6: Quickr Migration
Mapping interface, any permission mappings that you have previously created are displayed in the main display pane.
Managing Permission Mappings In this interface, you can change the number of permission mappings displayed per page and the order in which they are displayed. To change the number of permission mappings displayed per page, select the desired number from the Show rows drop-down list in the lower right-hand corner. To sort the permission mappings, click on a column heading such as Name and Description.
You can customize how these permission mappings are displayed in a number of different ways:
• Search – Allows you to filter the SharePoint Permission Level displayed by the keyword you designate. The keyword must be contained in a column value. At the top of the viewing pane, type in the keyword for the SharePoint Permission Level you wish displayed. You can select Search all pages or Search current page to define the search scope. Select all pages means that the permission mappings in all of the pages whose names and descriptions contain the keywords will be displayed; while Search current page means that only the permission mappings in the current page whose name and descriptions contain the keywords will be displayed. Note that the search function is not case sensitive.
• – You can manage which columns are displayed in the list so that only information you want to see is shown. Click , and then check the checkbox next to the column name to have that column shown in the list.
• – This allows you to hide the column. Click in the column title to hide the column.
Perform one of the following actions on a selected permission mapping:
• Create – Click Create on the ribbon to create a new Permission Mapping. For details on creating a new Permission Mapping, see Configuring Permission Mappings.
• View Details – Click View Details on the ribbon and you will see the previously-configured settings for this permission mapping. Here you can also click Edit on the ribbon to make changes to the permission mapping’s settings. You will be brought to the Edit Permission Mapping page where you can change this permission mapping.
• Edit – Click Edit on the ribbon to change the configuration of this permission mapping. For details on editing permission mapping, see Configuring Permission Mappings.
• Delete – Click Delete on the ribbon. A confirmation window appears, confirming that you want to proceed with the deletion. Click OK to delete the selected permission mappings, or click Cancel to return to the Permission Mapping without deleting the selected permission mappings.
185
DocAve 6: Quickr Migration
Configuring Permission Mappings To create a new permission mapping, click Create on the ribbon. To edit a previously-configured permission mapping, select the permission mapping and then click Edit on the ribbon.
In the Create or Edit Permission Mapping interface, configure the following settings:
• Permission Mapping Name – Enter a Name for the permission mapping that you are about to create or edit. Then enter an optional Description for this permission mapping for future reference.
• Permission Mapping – Set up the mapping of Quickr permissions to SharePoint permissions. Choose a default or previously-configured SharePoint permission level from the SharePoint Permission Level drop-down list. We do not recommend changing the default permission mapping. If there is no SharePoint permission level meets your requirements, you can use the customized SharePoint permission level by clicking New SharePoint Permission Level from the drop-down list to create a new one. For details on creating a new SharePoint permission level, refer to About SharePoint Permission Levels.
About SharePoint Permission Levels You can manage SharePoint Permission Levels by creating a new SharePoint Permission Level, viewing details of a previously-configured SharePoint Permission Level, editing a previously-configured SharePoint Permission Level, or deleting a previously-configured SharePoint Permission Level.
To access Manage SharePoint Permission Level, click Profile Settings on the ribbon in the Home tab. Then in the Profile Settings interface, click Mappings and select Permission Mapping on the ribbon. In the Permission Mapping interface, click Manage SharePoint Permission Level on the ribbon.
The Manage SharePoint Permission Level interface displays any permission levels that you have previously created.
In this interface, you can change the number of SharePoint Permission Levels displayed per page and the order in which they are displayed. To change the number of SharePoint Permission Levels displayed per page, select the desired number from the Show rows drop-down list in the lower right-hand corner. To sort the SharePoint Permission Levels, click on a column heading such as Name and Description.
You can customize how these SharePoint Permission Levels are displayed in a number of different ways:
• Search – Search allows you to filter the SharePoint Permission Level displayed by the keyword you designate. The keyword must be contained in a column value. At the top of the viewing pane, type in the keyword for the SharePoint Permission Level you wish displayed. You can select for search to Search all pages or Search current page. Note that the search function is not case sensitive.
186
DocAve 6: Quickr Migration
• – You can manage which columns are displayed in the list so that only information you want to see is shown. Click , then check the checkbox next to the column name to have that column shown in the list.
• – This allows you to hide the column. Click in the column title to hide the column.
Perform the following actions in the Manage SharePoint Permission Level page:
• Create– Click Create on the ribbon to create a new SharePoint Permission Level, for details on creating a new SharePoint Permission Level, see Creating SharePoint Permission Levels .
• View Details – Click View Details on the ribbon and you will see the previously-configured settings of a customized permission level or the default setting of a default SharePoint Permission Level.
• Edit – Click Edit on the ribbon to change the configurations for this SharePoint Permission Level. For details on editing configurations for a SharePoint Permission Level, refer to Creating SharePoint Permission Levels.
*Note: Default SharePoint Permission Levels are displayed as default, including Contribute, Design, Full Control, Read, and View Only. They are not editable.
• Delete – Click Delete on the ribbon. A confirmation window appears, confirming that you want to proceed with the deletion. Click OK to delete the selected SharePoint permission levels, or click Cancel to return to the Manage SharePoint Permission Level interface without deleting the selected SharePoint permission levels.
Creating SharePoint Permission Levels To create a new SharePoint Permission Level, click Create on the ribbon. To modify a previously-configured customized SharePoint Permission Level, select the SharePoint Permission Level, and then click Edit on the ribbon.
In the Create SharePoint Permission Level or Edit SharePoint Permission Level interface, configure the following settings:
Name and Description – Enter a Name for this permission level that you are about to create or 1.edit. Then enter an optional Description for future references.
Permissions – Choose which permissions to include in this permission level. You can select 2.specified permissions of List Permissions, Site Permissions, and Personal Permissions by selecting the checkbox before a specified permission. Select the Select All checkbox to select or clear all permissions.
Click OK to save the configuration and return to the Manage SharePoint Permission Level 3.interface, or click Cancel to return to the Manage SharePoint Permission Level interface without saving any change.
187
DocAve 6: Quickr Migration
About Dynamic Rules Dynamic rule maps the Quickr field names and the corresponding values to SharePoint column names and column values using the DLL files customized in C#.
To access Dynamic Mapping, click Profile Settings on the ribbon of Home tab. In the Profile Settings tab, click Dynamic Rule on the ribbon. The Dynamic Rule interface appears.
In the Dynamic Rule interface, you will see a list of previously-configured dynamic rules.
In this interface, you can change the number of dynamic rules displayed per page and the order in which they are displayed. To change the number of dynamic rules displayed per page, select the desired number from the Show rows drop-down menu in the lower right-hand corner. To sort the dynamic rules, click on a column heading such as Name, Description, DLL File Name, and Last Modified Time.
Customize how these dynamic rules are displayed in a number of different ways:
• Search – Filters dynamic rules displayed by the keyword you designate. The keyword must be contained in a column value. At the top of the Dynamic Rule viewing pane, enter the keyword for the dynamic rules you wish to display. You can select Search all pages or Search current page to define the search scope. Search all pages means that the dynamic rules in all of the pages whose names and descriptions contain the keywords will be displayed; while Search current page means that only the dynamic rules in the current page whose names and descriptions contain the keywords will be displayed. Note that the search function is not case sensitive.
• – You can manage which columns are displayed in the list so that only information you want to see is shown. Click , and then check the checkbox next to the column name to have that column shown in the list.
• – This allows you to hide the column. Click in the column title to hide the column.
You may perform the following actions to a Dynamic Rule:
• Create – Click Create on the ribbon to create a dynamic rule. For detailed on creating a new dynamic rule, see Configuring Dynamic Rules.
• View Details – Click View Details on the ribbon and you will see the previously-configured settings for this dynamic rule. Here you can also click Edit on the ribbon to make changes to the dynamic rule’s settings. You will be brought to the Edit dynamic rule page where you can change this dynamic rule.
• Edit – Click Edit on the ribbon to change the configuration of this dynamic rule. For details on editing dynamic rule, see Configuring Dynamic Rules.
• Delete – Click Delete on the ribbon. A confirmation window appears, confirming that you want to proceed with the deletion. Click OK to delete the selected dynamic rule, or click Cancel to return to the dynamic rule without deleting the selected dynamic rules.
188
DocAve 6: Quickr Migration
Configuring Dynamic Rules To create a new dynamic rule, click Create on the ribbon. To edit a previously-configured dynamic rule, select the dynamic rule and then click Edit on the ribbon.
In the Create Dynamic Rule interface or Edit Dynamic Rule interface, configure the following settings:
1. Name and Description – Enter a Dynamic Rule Name for the dynamic rule that you are about to create or edit. Then enter an optional description for this dynamic rule for future reference.
2. Upload a DLL File – Browse a dynamic rule of DLL file customized in C# from the local path. A DLL file enables you to configure your own mappings. Click Browse…, and then navigate to the DLL file you want to use. Select the specified DLL file and then click Open.
3. Click OK to save the configuration and return to the Dynamic Rule interface. Click Cancel to return to the Dynamic Rule interface without saving any configuration or changes.
Setting Up Quickr Migration Profiles The migration profile allows you to specify and define numerous settings for the migration jobs, including Migration Options, Filter Options, Mapping Options, and Advanced Options. Follow the instructions below to create a migration profile.
From the Home tab, in the Profile group, click Profile Settings. The Profile Settings tab appears. 1.
From the Profile Settings tab, under the Profile/Sub-profile group, click New. 2.
Enter a profile name in the pop-up window and click OK. 3.
Select the Migration Options from the left-hand pane. Select a previously-configured Migration 4.Options sub-profile from the drop-down list. For details about this section, refer to Migration Options.
Select the Filter Options from the left-hand pane and select a previously-configured filter policy 5.from the drop-down list. Or click New Filter Policy from the drop-down list to create a new filter policy. For details on creating a filter policy, refer to Creating and Editing Filter Policies.
Select the Mapping Options from the left-hand pane. Select a previously-configured Mapping 6.Options sub-profile from the drop-down list. For details about this section, refer to Mapping Options.
Select the Advanced Options from the left hand pane and configure the Dynamic Rule, the 7.Character Length Settings, and the Illegal Character Replacement Settings. For details about this section, refer to Advanced Options.
Click Save to save the profile. Alternatively, click Save As and enter a profile name to save it as 8.another profile. Select Save and replace existing main profile to replace the original profile. Otherwise, it is saved without removing the original profile. Click Discard Changes to clear all the modifications having been made to the current main profile.
189
DocAve 6: Quickr Migration
Migration Options Migration options allow you to configure which content settings and security settings can be migrated. Set up a Migration Options Sub-Profile by completing the following steps.
From the Home tab, in the Profile group, click Profile Settings. The Profile Settings tab appears. 1.
Click Migration Options on the left-hand pane. 2.
In the Sub-profile group, click Edit Sub-profile to make the Migration Options field active. 3.
From the Profile Settings tab, under the Profile/Sub-profile group, click New. 4.
Enter a sub-profile name in the pop-up window and click OK. 5.
Click the Content tab to configure common settings for this Migration Options. You can 6.configure the following settings:
• Managed Path – When choosing a Web application/site collection/site as the destination node, a site collection/site/child site will be created automatically during the migration job. Here you can specify the managed path, the site template, and the site language for the created site collection/site/child site.
Customize a managed path – Enter a customized managed path in the textbox. oSites is provided as default.
Site template – Select a site template from the drop-down list. By default, Team oSite is selected.
Site language – Select a site language from the drop-down list. English is oselected by default.
*Note: If the selected site language does not exist in the destination, the site collection or site cannot be created successfully and the source place and room cannot be migrated to the destination.
• Navigation Options – Choose navigation design options for destination sites that are generated from a Quickr place or room.
Display the site on the top link bar of the parent site when creating a site o
Display the site on the Quick Launch of the parent site when creating a site o
Inherit top link bar of the parent site when creating a site o
• Root Page Option – Specify the name of the library or list that the source root pages are migrated to. Enter your desired library or list name in the textbox. Root is provided as the default name.
*Note: The library or list template is determined by what you select in Default List Template.
• Image Options – Normally the embedded images in the source Quickr pages are added as attachments of items which are generated from the pages. To extract the embedded images from the items and collect them in a picture library in SharePoint, select the
190
DocAve 6: Quickr Migration
Extract embedded images from Quickr into Picture Library checkbox. Quickr Picture Library is provided as the default name of the picture library where you wish the embedded images to be migrated. You can also customize the name by entering a picture library name in the text box.
• Attachment Migration Options – Allows you to collect the attachments which are normally migrated as attachments of the items generated from Quickr pages to a separated document library in SharePoint. Select the Migrate attachments to separated Document Library checkbox. Quickr Attachment Library is provided as the default name of the document library where you wish the attachments to be migrated. You can also customize the name by entering a document library name in the text box.
• Folder Structure Management – Choose whether to collapse the folder structure of the migrated content.
Collapse all the folder structure – Migrates all of the pages of the nested folders oto a same library or list by breaking the source folder structure. Select the Add a column to keep the source path checkbox to keep the source path of pages and specify the column name in the textbox. By default, DocAve Source Path is provided. Note that if you migrate more than 2000 items at one time to a destination, SharePoint performance might be affected.
*Note: If you have configured a list mapping for the source top-level folder, the library or list template is determined by what you defined in the list mapping. If no list mapping is configured for the source top-level folder, the library or list template is determined by what you selected in Default List Template.
• Default List Template – This is used to specify a default list template which will be used as the template of the lists which are generated from the source top-level folders.
Click the Security tab to configure Permission Inheritance which allows you to choose whether 7.the site generated from the source place or room will inherit its parent site permission.
Click Save to save the profile. Alternatively, click Save As and enter a profile name to save it as 8.another profile. Select Save and replace existing sub-profile to replace the original profile. Otherwise, it is saved without removing the original profile. Click Discard Changes to clear all the modifications having been made to the current sub-profile.
Mapping Options Mapping options allow you to configure list mapping, content type mapping, and security mapping. Set up a Mapping Options Sub-Profile by the following steps.
From the Home tab, in the Profile Manager group, click Profile Settings. The Profile Settings 1.interface appears.
Click Mapping Options on the left-hand panel, and from the Profile Settings tab, under the 2.Sub-profile group, click Edit Sub-profile to make the Mapping Options field active.
From the Profile Settings tab, under the Profile/Sub-profile group, click New. 3.
Enter a sub-profile name in the pop-up window and click OK. 4.
191
DocAve 6: Quickr Migration
Click the List Mapping tab and configure the following settings to map the Quickr folder to the 5.specified SharePoint list.
Click Add a List Mapping and then a mapping entry appears for you to configure a.relevant rules.
Double-click the text box under the Quickr Place/Room Name column and enter the b.name of the Quickr place or room where the Quickr folder you wish to map resides.
Double-click the textbox under the Quickr Folder Name column and enter the name of c.the Quickr folder that you wish to map in the textbox.
Double-click the text box under the SharePoint List Name column and enter the name d.of the SharePoint list which you wish the Quickr folder to be mapped to in the text box. If the specified list does not exist in the destination, a new list with the specified name will be created automatically during the migration. If you enter an existing list, make sure the list template you select in step e is the same as that of the existing one; otherwise the list and the items within it will not be migrated.
Select or enter a template for your specified SharePoint list from the SharePoint List e.Template drop-down list. Custom List, Document Library, and Wiki Page Library are provided.
Repeat the steps above to add more mappings. f.
To delete one or more previously-configured list mappings, select them and then click g.
Delete the Selected List Mapping(s). You can also click to remove a previously-configured list mapping.
*Note: The source folder Calendar, Tasks, Index, and Root are not supported for List Mapping.
Configure the Content Type Mapping. You can choose to configure content type mapping and 6.configure column mapping. Click Content Type Mapping on the tab to use the content type mapping that is created by the Migrator Tool or to configure the content type mapping manually.
• Choose Use the content type mapping generated by the Migrator Tool to automatically apply the content type mapping that you previously-created with the Migrator Tool during the migration.
*Note: If you choose this option, make sure that you have generated the content type mapping by Migrator Tool; otherwise the metadata of the source pages will not be migrated to the destination.
• To configure the content type mapping in this page by yourself, check the Manually configure the content type mapping option and the Rule appears. Configure the following settings to set up a rule:
Content Type Mapping – This is used to map the Quickr form to the specified oSharePoint content type. Enter the name of a Quickr form in the column of
192
DocAve 6: Quickr Migration
Quickr Form and the name of a specified SharePoint content type on the column of SharePoint Content Type. If the SharePoint content type does not exist in the destination, a new content type with the specified name will be created automatically during the migration. If you enter an existing content type in SharePoint, by default, the content type will be updated. If you do not wish to update this content type, you need to disable Update Content Type in configuration file. On the destination DocAve Agent server, navigate to …\AvePoint\DocAve6\Agent\data\SP2010\QuickrMigration to open SP2010QuickrMigrationWorker.xml with Notepad and change the value of <ContentTypeConfig UpdateContentType=“True”> to False.
Column Mapping – Allows you to specify the SharePoint column name and oSharePoint column type for the mapped Quickr field. Click Add a Column Mapping to create a column mapping. Enter the name of a Quickr field in the column of Quickr Field Name and the name of a specified SharePoint column name in the column of SharePoint Column Name. Then select a SharePoint column type for this column from the SharePoint Column Type drop-down list.
Repeat the steps by clicking Add a Column Mapping to add more column mappings. To delete one or more previously-configured column mappings, select the mapping(s) and then click Delete the Selected Column Mapping(s).
You can also click to remove a previously-configured column mapping.
*Note: If you select Managed Metadata, it requires you to specify the term set path, and choose whether to allow multiple values in this column. For example, in the Term Set Path text box, System is the group name; “;” is the separator; Keywords stands for the term set. Select the Allow multiple values checkbox to define multiple values for the column. You can customize which separator will be used to separate multiple values in the text box. “;” is provided as default.
Click beside the Rule 1 tab to add more rules.
Configure the Security Mapping. Click Security Mapping on the tab to choose user mapping, 7.group mapping, permission mapping, and configure AD group mapping.
• User Mapping – Select a previously-configured user mapping from the drop-down list or click New User Mapping in the drop-down list to create a new one. For details on creating a user mapping, refer to the DocAve 6 Control Panel Reference Guide.
• Group Mapping – Select a previously-configured group mapping from the drop-down list or click New Group Mapping in the drop-down list to map a source group to a SharePoint group. For details on creating a group mapping, refer to the DocAve 6 Control Panel Reference Guide.
• AD Group Mapping – Allows you to map the Quickr group to a specified AD group which exists in the domain of the SharePoint environment. Click Add an AD Group Mapping, then enter the name of the Quickr group in the column of Quickr Group Name and the name of the AD group in the column of AD Group Name. Repeat the steps by clicking
193
DocAve 6: Quickr Migration
AD Group Mapping to add more AD Group Mappings. To delete a one or more previously-configured AD group mappings, select the mappings and then click Delete
the Selected AD Group Mapping. You can also click to remove a previously-configured AD group mapping.
• Permission Mapping – Select a previously-configured permission mapping from the drop-down list or click New Permission Mapping to create a new one. For details on creating a permission mapping, refer to Configuring Permission Mappings. Note that if you do not configure or select any permission mapping, the default permission mapping will be applied during the migration.
Click Save to save the profile. Alternatively, click Save As and enter a profile name to save it as 8.another profile. Select Save and replace existing sub-profile to replace the original profile. Otherwise, the new profile is saved without removing the original profile. Click Discard Changes to clear all the modifications having been made to the current sub-profile.
Advanced Options Advanced options allow you to configure Dynamic Rule, Character Length Settings and Illegal Character Replacement Settings. Set up Advanced Options by the following steps.
From the Home tab, in the Profile Manager group, click Profile Settings. The Profile Settings 1.interface appears.
Click Advanced Options on the left-hand pane, and then the Advanced Options page appears. 2.You can configure the following settings:
• Dynamic Rule – Maps the source Quickr field names and the corresponding values to SharePoint column names and column values. Select a previously-created dynamic rule from the drop-down list or click New Dynamic Rule to create a new one. For details on creating a dynamic rule, refer to Configuring Dynamic Rules.
• Character Length Settings – This is used to set character length limitations for folder name, file name, and SharePoint URL.
Maximum Length of the folder name – The default value is 60 and you can odefine the value from 1 to 128. If the folder name exceeds the limitation, the extra characters will be pruned from the end. For example, a folder migrated from a database is named abcdef in the source and the value that you set here is 5. The folder will be named abcde after the migration.
Maximum Length of the file name – The default value is 80 and you can define othe value from 1 to 128. If the file name, including the file extension, exceeds the limitation, the extra characters will be pruned from the end. For example, a file is named abcdef.txt in the source and the value that you set here is 5. The file will be named a.txt after the migration.
Maximum Length of the SharePoint URL – The default value is 255 and you can odefine the value from 1 to 260. The length of the SharePoint URL is calculated from the first character of the managed path, that is /. When the folder or file’s URL exceeds the limitation, the migration results are as follows:
194
DocAve 6: Quickr Migration
If the folder URL exceeds the limitation, the folder and its content will be migrated to its previous level folder till the folder URL does not exceed the limitation. If there is a file whose URL exceeds the limitation within a folder, it will be migrated to its previous level folder till the file URL does not exceed the limitation.
If the file URL exceeds the limitation, the file will be migrated to its previous level folder till the file URL do not exceeds the limitation.
• Illegal Character Replacement Settings – This is used to replace illegal SharePoint characters with valid characters. You can modify and add the illegal character mappings for group level, folder level, and file level to the specified characters in SharePoint. By default, all illegal characters are replaced with an underline (_).Click Group Level, Folder Level, or File Level on the tab to enter into each page.
To modify an illegal character mapping, double-click _ in the column of Replace owith behind an illegal character and change _ with your specified character.
To add an illegal character mapping, click Add an Illegal Character and then oenter your specified illegal character in the column of Illegal character in SharePoint and the corresponding valid character in the column of Replace with. Click Add an Illegal Character again and another illegal character mapping can be created.
To delete one or more previously-configured illegal character mappings, select othe mappings and click Delete the Selected Illegal Character(s). You can also
remove a previously-configured illegal character mapping by clicking .
Performing a Quickr Migration A Quickr Migration migrates contents, securities, and configurations from Quickr to the SharePoint environment.
To start a Quickr migration job, click Online Migration on the ribbon.
To perform a Quickr migration job, follow the instructions below.
Select the Source and Destination Nodes Click Select Source in the Source pane or in the Actions group on the ribbon to select the 1.
source. The Select Source interface appears. Configure the following settings.
Agent – Select your desired DocAve Agent installed in Quickr environment from the a.drop-down list.
Connection – Select the Quickr connection that is previously configured. b.
Quickr Server – Select the source Quickr server from the drop-down list. c.
195
DocAve 6: Quickr Migration
Click OK to complete configuration of selecting source. To change the source, click d.Change Source in the source pane or in the Actions group on the ribbon. Then repeat the steps described above.
Select the node whose data you wish to migrate. If working with a large environment, e.enter the name of the node (for example, place and room) into the Input Keyword text box to search for the desired node. You can only search the nodes whose name is displayed in the currently expanded tree. The nodes which are not displayed in the expanded tree cannot be search. When entering the keyword, the search result will be displayed with a little time.
Select the source node by checking the corresponding checkbox. f.
In the Destination pane, click the farm name to expand the data tree. To select the destination 2.node:
*Note: Make sure that you have configured the migration database; otherwise the destination farm is unavailable. For details on configuring a migration database, refer to Configuring Migration Databases.
Find the node which you wish to migrate the source data to. If working with a large a.environment, enter the keyword of the node (for example, site URL, site title, or site/list name) into the Input Keyword text box to search for the desired node. You can only search the nodes whose name is displayed in the currently expanded tree. The nodes which are not displayed in the expanded tree cannot be search. When entering the keyword, the search result will be displayed with a little time.
Select the destination node by clicking corresponding radio button. You can also create b.a new site collection or site by entering the specified name and click Create Container. For details on creating containers, refer to Creating Containers.
There are two methods to saving and/or running this job: 3.
• Click Run Now to perform a migration job immediately, and then the Run Now interface appears. For more information on how to configure the Run Now interface, refer to Configuring the Run Now Interface.
• Click Save As New Plan, and then you are brought to the Save As New Plan interface. For more information on how to configure the Save As New Plan interface, refer to Configuring the Save As New Plan Interface.
Configuring the Run Now Interface In the Run Now interface, configure the following settings to perform a migration immediately:
Conflict Resolution – Specify the conflict resolution when the item name in the Quickr conflicts 1.with an existing item in the SharePoint. For the Container Level, the conflict resolutions provided are Merge and Skip. Merge required you to check the lower objects, and configure the Content Level conflict resolution. Skip provides the configuration of the content level conflict
196
DocAve 6: Quickr Migration
resolution optional. For details about conflict resolution, refer to Appendix D: Conflict Resolution.
Profile Selection – Configure the related migration options, filter options, mapping options and 2.advanced options for the migration job. Select a previously-configured profile from the drop-down list. Quickr Migration provides you a default main profile named Default Profile.
Migration Database – Check whether the migration database that you previously configured is 3.available by clicking Test. After the testing is completed, click Details, Agent Name and Status are displayed.
Notification – Select the e-mail notification profile for sending the notification report. For more 4.information on working with notification policies, refer to the DocAve 6 Control Panel Reference Guide.
Job Status Option – Choose whether to take the metadata/security exceptions into 5.consideration for the Quickr migration job status. If the content metadata or security fails to migrate and you select the Ignore metadata/security exceptions checkbox, the migration job status will be Finished. Otherwise, the job status will be Finished with Exceptions.
Click OK to run the job immediately or click Cancel to return to the Home page of Online 6.Migration.
Configuring the Save As New Plan Interface In the Save As New Plan interface, configure the following settings to build up a migration plan:
Plan Name – Enter a name for the plan that you are about to create. Then enter an optional 1.Description for future references.
Profile Selection – Configure the related migration options, mapping options and advanced 2.options for the migration job. Select a previously-configured profile from the drop-down list to apply the migration settings to the migration job. Quickr Migration provides you a default main profile named Default Profile.
Schedule Selection – Select one type of schedule to run the plan. 3.
• No schedule – Select this option to run the plan manually.
• Configure the schedule myself – Select this option and the Schedule Settings section appears under Schedule Selection.
*Note: If any of the Domino Admin, Lotus Notes, Domino Designer, and Migrator Tool is being used while the job is running, the job may fail. Make sure none of them is being used while the job is running.
Schedule Settings (This section only appears when you choose Configure the schedule myself) – 4.Click Add Schedule to create a new schedule. For details about configuring a schedule, refer to Configuring the Add Schedule Interface. To preview a configured schedule, select the schedule and click Calendar View to view it in a calendar. You can delete a previously-configured schedule by clicking behind a corresponding schedule.

197
DocAve 6: Quickr Migration
Notification – Select the e-mail notification profile for sending the notification report. For more 5.information on working with notification policies, refer to the DocAve 6 Control Panel Reference Guide when a certain triggering event occurs.
Associated Plan Group – Select an associated plan groups or create a new plan group in the 6.Associated plan group(s) drop-down list in order to make the plan run according to the selected plan group settings. For more information on plan groups, refer to the DocAve 6 Control Panel Reference Guide.
Migration Database – Check whether the migration database that you previously configured is 7.available by clicking Test. After the testing is completed, click Details, Agent Name and Status are displayed.
When finished configuring the plan, select one of the following options: 8.
• Click Save to save the plan you have configured. The Plan Manager interface appears. For more information, refer to Managing Plans.
• Click the triangle next to Save, then select Save and Run Now to save the plan and execute it right away. Then the Run Now interface appears. Configure the following settings:
Options – Select a type of migration for this migration job. o
Full migration – Choose this option to migrate all contents from the source node to the destination node according to the profile.
Incremental migration – Choose this option to only migrate the source node content that has been modified (Add and Modify) since the last migration job and the content that failed to be migrated in the last migration job.
Conflict Resolution – Specify the conflict resolution when the item name in oQuickr conflicts with an existing item in SharePoint. For Container Level, the conflict resolutions provided are Merge and Skip. Merge requires you to check lower objects, and configure the Content Level conflict resolution. Skip provides the configuration of Content Level conflict resolution optional. If you select Incremental migration in Options and do not select Skip as Content level conflict resolution, you can also choose whether to Remigrate the objects whose metadata/securities failed to be migrated in the last migration job. For details about conflict resolution, refer to Appendix D: Conflict Resolution.
Job Status Option – Choose whether to take the metadata/security exceptions ointo consideration for the Quickr migration job status. If the content metadata or security fails to migrate and you select the Ignore metadata/security exceptions checkbox, the migration job status will be Finished. Otherwise, the job status will be Finished with Exceptions.
Click OK to run the online migration job. 9.
198
DocAve 6: Quickr Migration
Configuring the Add Schedule Interface In the Add Schedule interface, configure the following settings to add a schedule:
Options – Select a type of migration for the customized schedule. Choose Full migration to 1.migrate all contents from the source node to the destination node according to the profile. Choose Incremental migration to only migrate the modified content (Add and Modify) and the failed content of the source node since the last migration job.
Conflict Resolution – Allows you to specify the conflict resolution when the item name in Quickr 2.conflicts with an existing item in SharePoint. For the Container Level, the conflict resolutions provided are Merge and Skip. Merge requires you to check lower objects for conflicts, and configure content level conflict resolution. Skip provides the configuration of the Content Level resolution optional. If you select Incremental migration in Options and do not select Skip as Content level conflict resolution, you can also choose whether to Remigrate the objects whose metadata/securities failed to be migrated in the last migration job. For details about conflict resolution, refer to Appendix D: Conflict Resolution.
Schedule Settings – Specify the frequency to run the recurring schedule. Enter an integer into 3.the text box and select Minute(s), Hour(s), Day(s), Week(s) or Month(s) from the drop-down list.
Range of Recurrence – Specify when to start and end the running recurring schedule. 4.
• Start time – Set up the time to start the plan and Time Zone can be changed under the Start time. Note that the start time cannot be earlier than the current time.
• No end date – Select this option to repeat running the plan until being stopped manually.
• End after specified occurrence(s) – Select this option to stop the plan after specified occurrence(s) that you configure in the text box.
• End by – Set up the time to end the recurrence of plans.
Click OK to save the configuration of schedule, or click Cancel to return to the Save As New Plan 5.interface without saving any change.
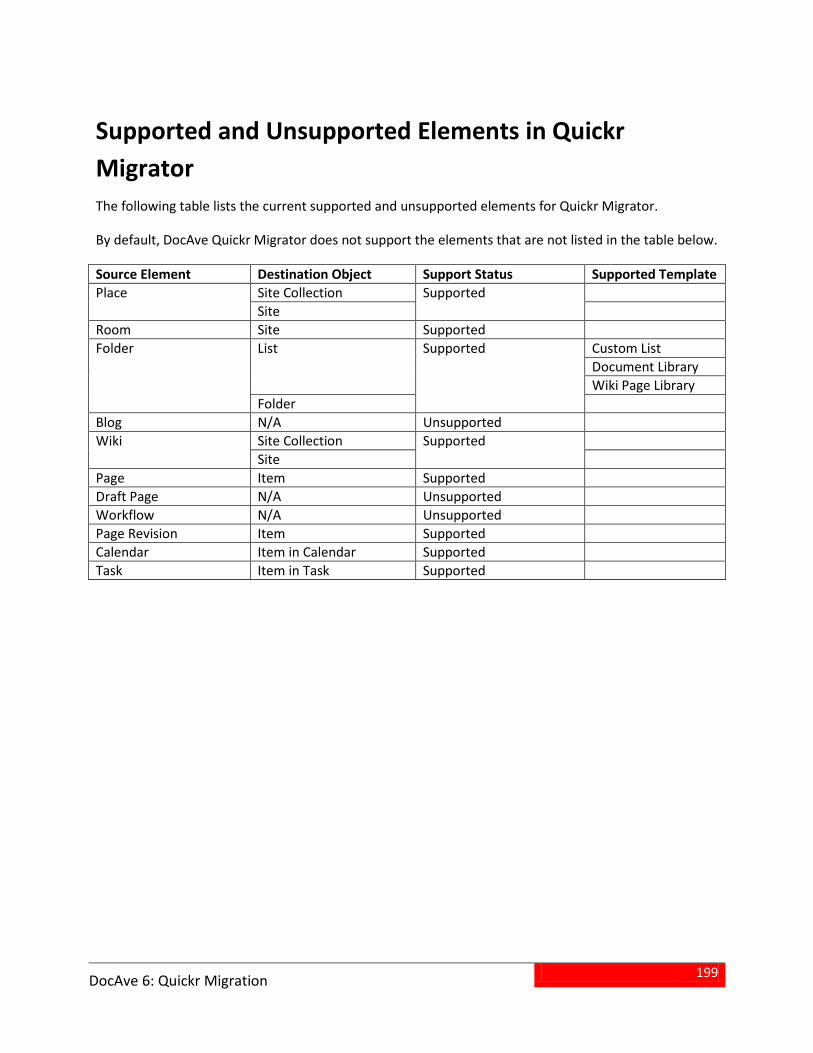
199
DocAve 6: Quickr Migration
Supported and Unsupported Elements in Quickr Migrator The following table lists the current supported and unsupported elements for Quickr Migrator.
By default, DocAve Quickr Migrator does not support the elements that are not listed in the table below.
Source Element Destination Object Support Status Supported Template Place Site Collection Supported
Site Room Site Supported Folder List
Supported Custom List Document Library Wiki Page Library
Folder Blog N/A Unsupported Wiki
Site Collection Supported Site
Page Item Supported Draft Page N/A Unsupported Workflow N/A Unsupported Page Revision Item Supported Calendar Item in Calendar Supported Task Item in Task Supported
200
DocAve 6: eRoom Migrations
eRoom Online Migrations Use eRoom Migrator to migrate communities, facilities, eRooms, lists, and content from EMC Documentum eRoom to Microsoft SharePoint 2010/2013 on-premises. Refer to the sections below to user eRoom Migrator.
Configuring an eRoom Online Migration
About Filter Policies Filter policy allows you to set up filter rules so that you can control which files in the eRoom will be migrated. By setting up and saving filter policies, you can apply the same filter policy to different eRoom migration plans without having to recreate them each time.
To access Filter Policy, click Profile Settings on the ribbon in the Home tab. On the Profile Settings page, click Filter Policy on the ribbon.
In the Filter Policy interface, all the previously-created filter policies are displayed.
In this interface, you can change the number of filter policies displayed per page and the order in which they are displayed. To change the number of filter policies displayed per page, select the desired number from the Show rows drop-down menu in the lower right-hand corner. To sort the filter policies, click on a column heading such as Filter Policy Name, and Description.
You can search the desired filter policy and define which filter policy information is displayed in the Filter Policy interface in the following way:
• Search – Allows you to filter the previously-created filter policies displayed by the keyword you designate. The keyword must be contained in a column value. At the top of the filter policies viewing pane, enter the keyword for the filter policies you wish to display. You can select Search all pages or Search current page to define the search scope. Search all pages means that the filter policies in all of the pages whose names and descriptions contain the keywords will be displayed; while Search current page means that only the filter policies in the current page whose names and descriptions contain the keywords will be displayed. Note that the search function is not case sensitive.
• – You can manage which columns are displayed in the list so that only information you want to see is shown. Click the plus ( ), and then check the checkbox next to the column name to have that column shown in the list.
• – This allows you to hide the column. Click the minus ( ) of the column you want to hide, the column is hidden.
201
DocAve 6: eRoom Migrations
Perform the following actions in the Filter Policy interface:
• Click Create in the Manage group to create a new filter policy. For detailed on creating a new filter policy, see Creating Filter Policies.
• Click Edit in the Manage group to change the configurations for the selected filter policy. For details on editing configurations for filter policies, see Creating Filter Policies.
• Click Delete in the Manage group. A confirmation window appears, confirming that you want to proceed with the deletion. Click OK to delete the selected filter policies, or click Cancel to return to the Filter Policy interface without deleting the selected filter policies.
Creating Filter Policies To create a new filter policy, click Create on the ribbon. To modify a previously-configured filter policy, select the filter policy, and then click Edit on the ribbon.
In the Create Filter Policy or Edit Filter Policy interface, configure the following settings:
Name – Enter the name for the filter policy that you are creating, or rename the selected filter 1.policy that you are editing.
Description (optional) – Enter a description for this filter policy. 2.
Filter Rule ─ A filter rule allows you to filter the files that you want to migrate by setting up a set 3.of filter criteria. Follow the steps below to set up your own filter rules:
Click Add a Filter Level Group to add a filter rule. The File filter rule configuration field a.appears. The default filter rule is Name and default filter condition is Contains. Click Name and Contains respectively to change a filter rule and a filter condition from the corresponding drop-down list.
Enter a value in in the Value column according to the specified filter rule and filter b.condition.
Repeat the steps above to add more filter rules. c.
There are two logic settings: And and Or. By default, the logic is set to And. If desired, change the logic to Or by selecting it from the drop-down list.
And – The content which meets all the criteria will be filtered to be included. o
Or – The content which meets any one of the criteria will be filtered to be oincluded.
Click OK to save the configurations and return to the Filter Policy interface, or click Cancel to 4.return to the Filter Policy interface without saving any changes.
For more detailed information about Filter Policies, refer to Examples of eRoom Migrator Filter Policies.
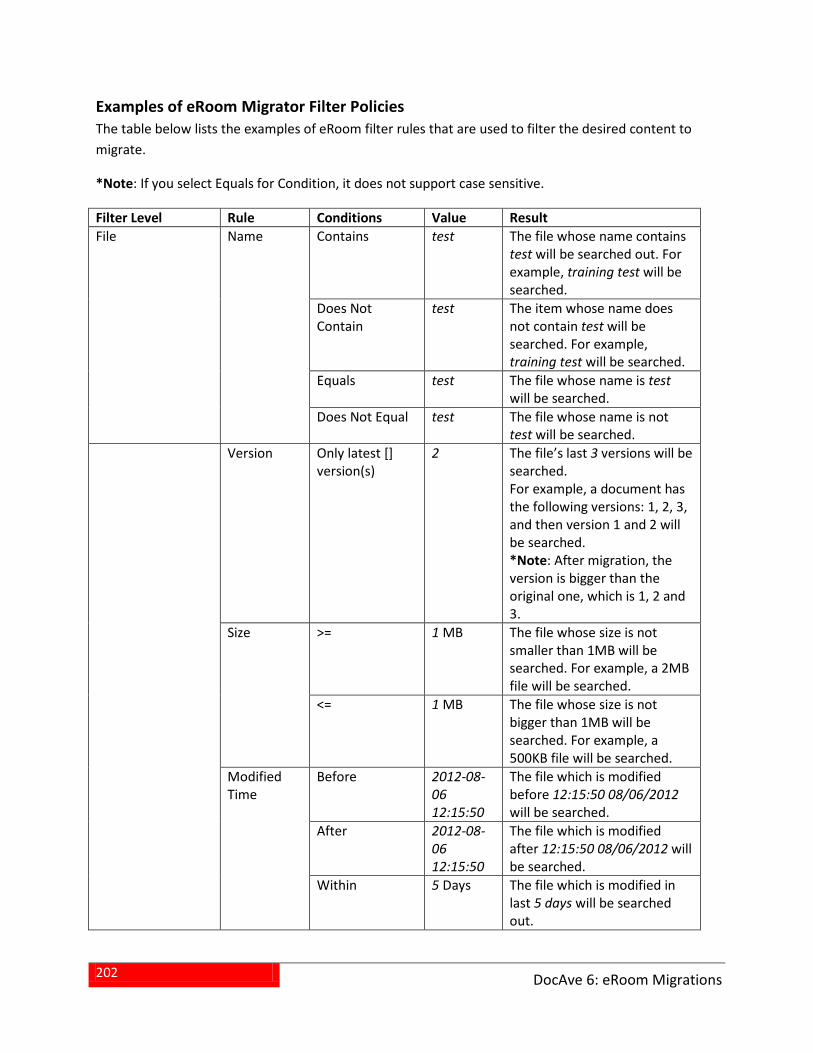
202
DocAve 6: eRoom Migrations
Examples of eRoom Migrator Filter Policies The table below lists the examples of eRoom filter rules that are used to filter the desired content to migrate.
*Note: If you select Equals for Condition, it does not support case sensitive.
Filter Level Rule Conditions Value Result File
Name Contains test The file whose name contains test will be searched out. For example, training test will be searched.
Does Not Contain
test The item whose name does not contain test will be searched. For example, training test will be searched.
Equals test The file whose name is test will be searched.
Does Not Equal test The file whose name is not test will be searched.
Version Only latest [] version(s)
2 The file’s last 3 versions will be searched. For example, a document has the following versions: 1, 2, 3, and then version 1 and 2 will be searched. *Note: After migration, the version is bigger than the original one, which is 1, 2 and 3.
Size
>= 1 MB The file whose size is not smaller than 1MB will be searched. For example, a 2MB file will be searched.
<= 1 MB The file whose size is not bigger than 1MB will be searched. For example, a 500KB file will be searched.
Modified Time
Before 2012-08-06 12:15:50
The file which is modified before 12:15:50 08/06/2012 will be searched.
After 2012-08-06 12:15:50
The file which is modified after 12:15:50 08/06/2012 will be searched.
Within 5 Days The file which is modified in last 5 days will be searched out.
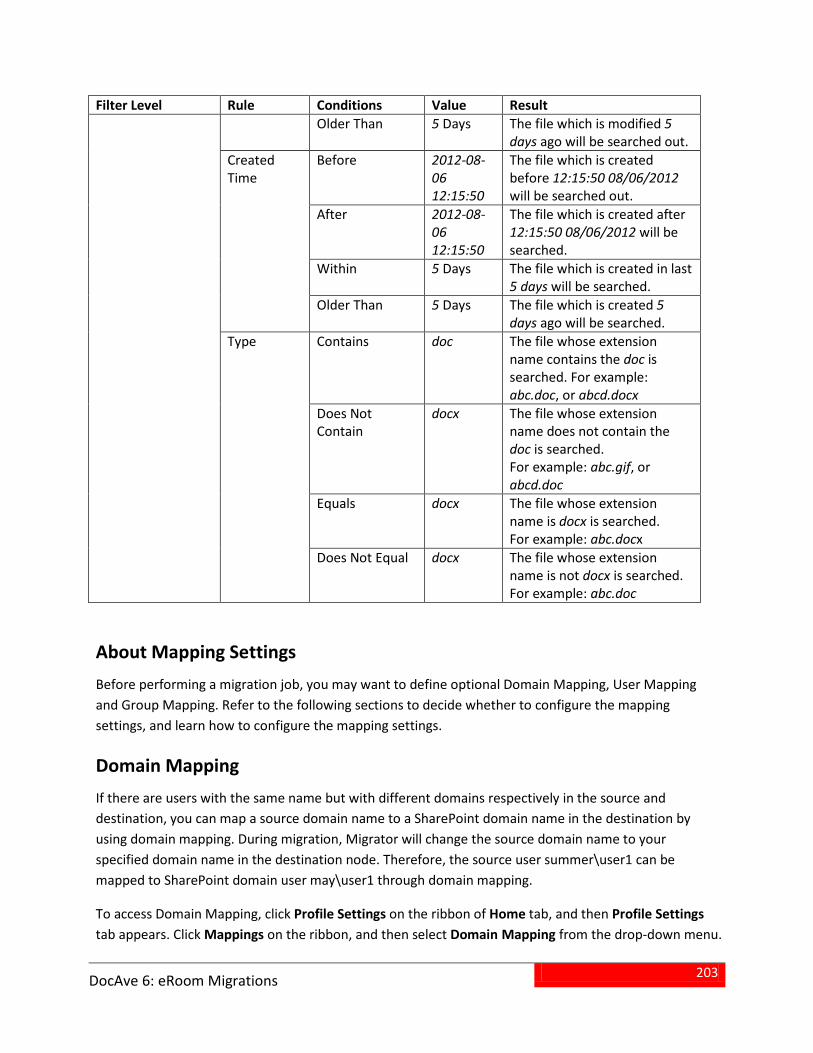
203
DocAve 6: eRoom Migrations
Filter Level Rule Conditions Value Result Older Than 5 Days The file which is modified 5
days ago will be searched out. Created Time
Before 2012-08-06 12:15:50
The file which is created before 12:15:50 08/06/2012 will be searched out.
After 2012-08-06 12:15:50
The file which is created after 12:15:50 08/06/2012 will be searched.
Within 5 Days The file which is created in last 5 days will be searched.
Older Than 5 Days The file which is created 5 days ago will be searched.
Type
Contains doc The file whose extension name contains the doc is searched. For example: abc.doc, or abcd.docx
Does Not Contain
docx The file whose extension name does not contain the doc is searched. For example: abc.gif, or abcd.doc
Equals docx The file whose extension name is docx is searched. For example: abc.docx
Does Not Equal docx The file whose extension name is not docx is searched. For example: abc.doc
About Mapping Settings Before performing a migration job, you may want to define optional Domain Mapping, User Mapping and Group Mapping. Refer to the following sections to decide whether to configure the mapping settings, and learn how to configure the mapping settings.
Domain Mapping If there are users with the same name but with different domains respectively in the source and destination, you can map a source domain name to a SharePoint domain name in the destination by using domain mapping. During migration, Migrator will change the source domain name to your specified domain name in the destination node. Therefore, the source user summer\user1 can be mapped to SharePoint domain user may\user1 through domain mapping.
To access Domain Mapping, click Profile Settings on the ribbon of Home tab, and then Profile Settings tab appears. Click Mappings on the ribbon, and then select Domain Mapping from the drop-down menu.
204
DocAve 6: eRoom Migrations
The Control Panel Mapping Manager interface appears. Click Create on the ribbon to create a new Domain Mapping rule.
For specific instructions on setting up domain mapping, refer to the DocAve 6 Control Panel Reference Guide.
User Mapping Use User Mapping if you wish to map an existing source node username to an existing SharePoint user name in the destination. During migration, Migrator will replace the source username with your specified username in the destination node.
To access User Mapping, click Profile Settings on the ribbon of Home tab, and then Profile Settings tab appears. Click Mappings on the ribbon, and then select User Mapping from the drop-down menu. The Control Panel Mapping Manager interface appears. Click Create on the ribbon to create a new User Mapping rule.
For specific instructions on setting up user mapping, refer to the DocAve 6 Control Panel Reference Guide.
Group Mapping Use Group Mapping if you wish to map an existing source group name a SharePoint group. During the migration, Migrator will replace the source group name with your specified group name in the destination node.
To access Group Mapping, click Profile Settings on the ribbon of Home tab, and then Profile Settings tab appears. Click Mappings on the ribbon, and then select Group Mapping from the drop-down menu. The Control Panel Mapping Manager interface appears. Click Create on the ribbon to create a new Group Mapping rule. For specific instructions on setting up user mapping, refer to the DocAve 6 Control Panel Reference Guide.
About Dynamic Rules Dynamic rules map eRoom fields to SharePoint metadata using DLL files customized in C#. In a migration profile, if dynamic rules conflict with the configured column mapping, dynamic rules take over the role of column mapping.
To use the dynamic rule feature, click Profile Settingson the ribbon of Home tab. The Profile Settings tab appears. Click Dynamic Rule on the ribbon.
In the Dynamic Rule interface, you will see a list of previously-configured dynamic rules.
In this interface, you can change the number of dynamic rules displayed per page and the order in which they are displayed. To change the number of dynamic rules displayed per page, select the desired
205
DocAve 6: eRoom Migrations
number from the Show rows drop-down menu in the lower right-hand corner. To sort the dynamic rules, click on a column heading such as Name, Description, DLL File Name, and Last Modified Time.
Customize how these dynamic rules are displayed in a number of different ways:
• Search – Filters dynamic rules displayed by the keyword you designate. The keyword must be contained in a column value. At the top of the Dynamic Rule viewing pane, enter the keyword for the dynamic rules you wish to display. You can select Search all pages or Search current page to define the search scope. Search all pages means that the dynamic rules in all of the pages whose names and descriptions contain the keywords will be displayed; while Search current page means that only the dynamic rules in the current page whose names and descriptions contain the keywords will be displayed. Note that the search function is not case sensitive.
• – You can manage which columns are displayed in the list so that only information you want to see is shown. Click the plus ( ), and then check the checkbox next to the column name to have that column shown in the list.
• – This allows you to hide the column. Click the minus ( ) in the column title to hide the column.
You may perform the following actions to a Dynamic Rule:
• Click Create on the ribbon to create a dynamic rule. For detailed information on creating a new dynamic rule, see Configuring a Dynamic Rule.
• Click View Details on the ribbon and you will see the previously-configured settings for this dynamic rule. Here you can also click Edit on the ribbon to make changes to the dynamic rule’s settings. You will be brought to the Edit Dynamic Mapping page where you can change this dynamic rule.
• Click Edit on the ribbon to change the configuration of this dynamic rule. For details on editing dynamic rule, see Configuring a Dynamic Rule.
• Click Delete on the ribbon. A confirmation window appears, confirming that you want to proceed with the deletion. Click OK to delete the selected dynamic rules, or click Cancel to return to the dynamic rule without deleting the selected dynamic rules.
Configuring a Dynamic Rule To create a new dynamic rule, click Create on the ribbon. To edit a previously-configured dynamic rule, select the dynamic rule and then click Edit on the ribbon.
In the Create Dynamic Rule interface or Edit Dynamic Rule interface, configure the following settings:
1. Name and Description – Enter a Dynamic Rule Name for the dynamic rule that you are about to create or edit. Then enter an optional description for this dynamic rule for future reference.
2. Upload a DLL File – Upload a DLL file customized in C# from the local path. This file contains your configured mapping settings.
3. Click OK to save the configuration and return to the Dynamic Rule interface. Click Cancel to return to the Dynamic Rule interface without saving any configuration or changes.
206
DocAve 6: eRoom Migrations
Setting Up eRoom Online Migration Profiles The Online eRoom Migrator Profile allows you to define numerous settings including Migration Options, Filter Options, Mapping Options and Advanced Options. Follow the instructions below to create an eRoom Online Migration Profile.
On the Home tab, in the Profile Manager group, click Profile Settings. The Profile Settings page 1.appears where you can configure the profile settings.
On the Profile Settings tab, in the Plan Mode group, ensure Online Mode is highlighted. 2.
On the Profile Settings tab, under the Profile/Sub-profile group, click New. 3.
Enter a profile name in the pop-up window and click OK. 4.
Select the Migration Options from the left-hand pane. Select a previously-configured Migration 5.Options Sub-Profile from the drop-down menu. For details about this section, refer to Migration Options.
Select the Filter Options from the left-hand pane and select a previously-configured filter policy 6.from the drop-down menu. Or click New Filter Policy from the drop-down menu to create a new filter policy. For details on creating a filter policy, refer to Creating Filter Policies.
After configuring the filter options, select Mapping Options from the left-hand pane. Select a 7.previously-configured Mapping Options Sub-Profile from the drop-down menu. For more details about this section, refer to Mapping Options.
Select the Advanced Options from the left-hand pane and configure the Dynamic Rule, 8.Character Length Settings and the Illegal Character Replacement Settings. For details about this section, refer to Advanced Options.
Click Save in the Main Profile row to save the profile. Alternatively, click Save As and enter a 9.profile name to save it as another profile. Select Save and replace existing main profile to replace the original profile. Otherwise, it is saved without removing the original profile.
Migration Options Migration options allow you to define how the eRoom content and security are migrated to SharePoint. Follow the steps below to set up a sub-profile for eRoom migration options.
On the Home tab, in the Profile Manager group, click Profile Settings. The Profile Settings page 1.appears where you can configure the profile settings.
On the Profile Settings tab, in the Plan Mode group, ensure Online Mode is highlighted. 2.
Click Migration Options on the left-hand panel, and from the Profile Settings tab, under the 3.Sub-profile group, click Edit Sub-profile to make the Migration Options field active.
From the Profile Settings tab, under the Profile/Sub-profile group, click New. 4.
Enter a profile name in the pop-up window and click OK. 5.
207
DocAve 6: eRoom Migrations
Click the Content tab. Configure the following settings: 6.
• Managed Path ─ If the destination node is a Web application, the corresponding site collections will be created under this Web application for migrating the source rooms. Configure the following settings:
Customize path ─ Enter the managed path you want to use for the site ocollection.
Site template ─ Select a site template for the site collection from the drop-down olist. You are also allowed to enter a template name in the textbox. Customized site templates are supported.
*Note: If the template you entered cannot be found while migrating, the job will fail.
Site language ─ Select the language from the drop-down list that you want the osite collection to use. Ensure that the selected language pack is installed in SharePoint.
*Note: By default, a top link bar and quick launch for the migrated site will be automatically added to its corresponding parent site after migration.
• Navigation Options – Choose navigation design options for destination sites that are created during the migration.
Display the site on the top link bar of the parent site when creating a site o
Display the site on the Quick Launch of the parent site when creating a site o
Inherit top link bar of the parent site when creating a site o
• Owner Column ─ Check the Migrate owner column checkbox to choose how the eRoom owner column is migrated. Migrate the eRoom owner column either to the SharePoint person/group column or the single line of text column by clicking the corresponding radio button.
As person or group column ─ A person or group column will be created at the odestination for migrating the eRoom owner column. The user or the group under the source eRoom owner column will be migrated to the corresponding user or group under the person or group column.
As single line of text column ─ A single line of text column will be created at the odestination for migrating the eRoom owner column. The user or the group under the source eRoom owner column will be migrated to the corresponding character string indicating the user or group under the single line of text column.
• Comment ─ Check the Migrate comment checkbox to choose how the eRoom comment is migrated. Migrate the eRoom comment either to the SharePoint discussion topic or the enhanced rich text.
If you select As discussion topic, a list of the Discussion Board type will be oautomatically created at the destination for migrating the comments. The
208
DocAve 6: eRoom Migrations
comment will be migrated to the subject of the Discussion Board list and the corresponding reply of the eRoom comment is also migrated to the corresponding reply of the subject. The newly created Discussion Board list will be named as list/folder/item name: Discussion.
*Note: If the list has comments in it and the items under this list also have comments in them, the items’ comments will be migrated along with the list. All of the items’ comments will be migrated to the subjects in the newly created Discussion Board list whose name is Listname: Discussion.
Suppose that you choose to restore a list named Training who has comments in it, with this option selected, after migration, a Discussion Board list named Training: Discussion is created and the comment will be the subject of this Discussion Board list.
If you select As enhanced rich text, a column of the enhanced rich text type will obe created and the comments will be migrated to the values of the created columns.
*Note: The list’s comment is not supported to migrate as enhanced rich text, refer to eRoomMigrationConfiguration.xml to migrate the list’s comment when As enhanced rich text is selected.
• Vote ─ Check the Migrate vote as survey checkbox to migrate the eRoom vote. A Survey list will be automatically created at the destination and the questions are also migrated to the SharePoint survey. If not checked, the added eRoom votes will not be migrated.
• Folder Settings ─ Check the Create content type for the folders to migrate folder’s descriptions to configure the settings for migrating eRoom folder’s descriptions. Enter the Content type name and the Column name in the corresponding textbox. The corresponding content type will be created for migrating the eRoom folders and the description of the folder will be migrated as values of the created column.
*Note: When the description of Event is migrated to SharePoint, the text format of the description may be different, and the pictures contained in the description are not supported to be migrated.
• Link Settings ─ Link Settings allow you to define how the eRoom links are migrated. The migration job can only migrate the link under the Room. That is, only when the selected source node is Room, the links under the Room can be migrated. For each link, if DocAve discovers that only one of the two linked objects is contained in the current migration scope, the migration job will not migrate this link.
Link Type Settings ─ Choose how the eRoom link types are migrated by clicking othe corresponding radio button. Content Type(Link to document) migrates the eRoom links to the destination as the corresponding items and the content type of these items are Link to document. Column migrates the eRoom links to the destination as the corresponding columns; a column name must be defined in the Back Link Settings field if you select this option.
209
DocAve 6: eRoom Migrations
*Note: The link type settings work only when the source node where the links locate can be migrated to library in the destination.
Back Link Settings ─ By default, if you select to migrate eRoom links to columns, oLinks will be the column name. Enter a column name in the textbox if you want to change the default column name.
• Advanced Settings ─Click Advanced to configure the advanced settings for migrating eRoom content according to the information below:
Inbox Mail Page ─ Allows you to migrate eRoom Inbox Mail Page to SharePoint odocument library by checking the Covert inbox into document library checkbox. You can also select the Migrate mail page attachment as .eml attachment checkbox, and then the files in the source eRoom Inbox Mail Page will be migrated to the destination as the attachments in the format of .eml.
Notification ─ Select whether or not to migrate the eRoom notification settings oto be SharePoint alert settings. eRoom Migration supports to migrate the notification settings at the top-level folder level, subfolder level, list level, attachment level, and attachment folder level.
Grouping View ─ Choose whether to migrate the source database’s grouping oview. If selected, a grouping view of the source database will also be migrated to the destination. That is to say a grouping view will be created for the destination’s database. If do not select this option, the grouping view of the database will not be migrated.
Folder Structure Management ─ Choose a method to handle the folder ostructure while migrating eRoom folders to SharePoint.
If you select Collapse all the folder structure, after migration, all levels of the folder structure of the source content will be collapsed. All files within the folders will be migrated to the library. No sub-folder exists in the destination. If you want to track the original folder structure, you can check the Add a column to keep the source path option to add a column for the migrated items. The value of the column will be the source path of the corresponding item.
*Note: If the selected source node will be migrated to a site in the destination, the top level folder in the source will be migrated to a list in the destination that is automatically created with the same name of the top-level folder and all the items in the sub folders will be migrated to this list.
If you select Create top level folder on destination, a top level folder will be generated at the destination, and the source folder including all of the sub folders under it along with the folder structure will be migrated as a whole to this top-level folder. Thus the folder structure will be kept after migration.
210
DocAve 6: eRoom Migrations
Click the Security tab, configure the following settings: 7.
• User ─ Choose whether to migrate eRoom users. If selected, all of the active Room users will be migrated to the destination site. The user will be added to the corresponding migrated SharePoint group depending on source group that the user belongs to. If the source user does not belong to any group, after migration, the user will be added to one of the built-in group according to the base role group mapping configured in the Mapping Options.
By default the deactivated eRoom users will not be migrated unless you select the Migrate deactivated user. After migration, the deactivated users will be migrated to the SharePoint site without any permission.
*Note: If an eRoom user is deleted, but the user still has some permission for an eRoom list, this kind of user will also be migrated to the destination.
• Security ─ Choose whether to migrate the user’s security. If selected, the security will be migrated according to mappings configured in the Mapping Options.
• eRoom Role ─ Choose whether to migrate the eRoom roles to the SharePoint groups. If selected, the corresponding SharePoint group will be created with the same name of eRoom role at the destination after migration. The permission that the migrated groups will have is based on the configured eRoom role permission mapping in the Mapping Options.
Click Save in the Profile/Sub-profile group to save the profile. Alternatively, click Save As and 8.enter a profile name to save it as another profile. Select Save and replace the existing sub-profile to replace the original profile. Otherwise, it is saved without removing the original profile.
Mapping Options Mapping options allow you to configure the list mapping and the security mapping to migrate eRoom lists and securities. Follow the steps below to set up a sub-profile for eRoom mapping options.
On the Home tab, in the Profile Manager group, click Profile Settings. The Profile Settings page 1.appears where you can configure the profile settings.
On the Profile Settings tab, in the Plan Mode group, ensure Online Mode is highlighted. 2.
Click Mapping Options on the left-hand panel, and from the Profile Settings tab, under the 3.Sub-profile group, click Edit Sub-profile to make the Mapping Options field active.
From the Profile Settings tab, under the Profile/Sub-profile group, click New. 4.
Enter a profile name in the pop-up window and click OK. 5.
Click the List Mapping tab. Configure the following settings: 6.
List Mapping – Configure the list mapping settings when you want to change the eRoom a.list name after migration. Click Add a List Mapping, enter the source eRoom list name in the eRoom List Name text box, and then enter a new destination SharePoint list name
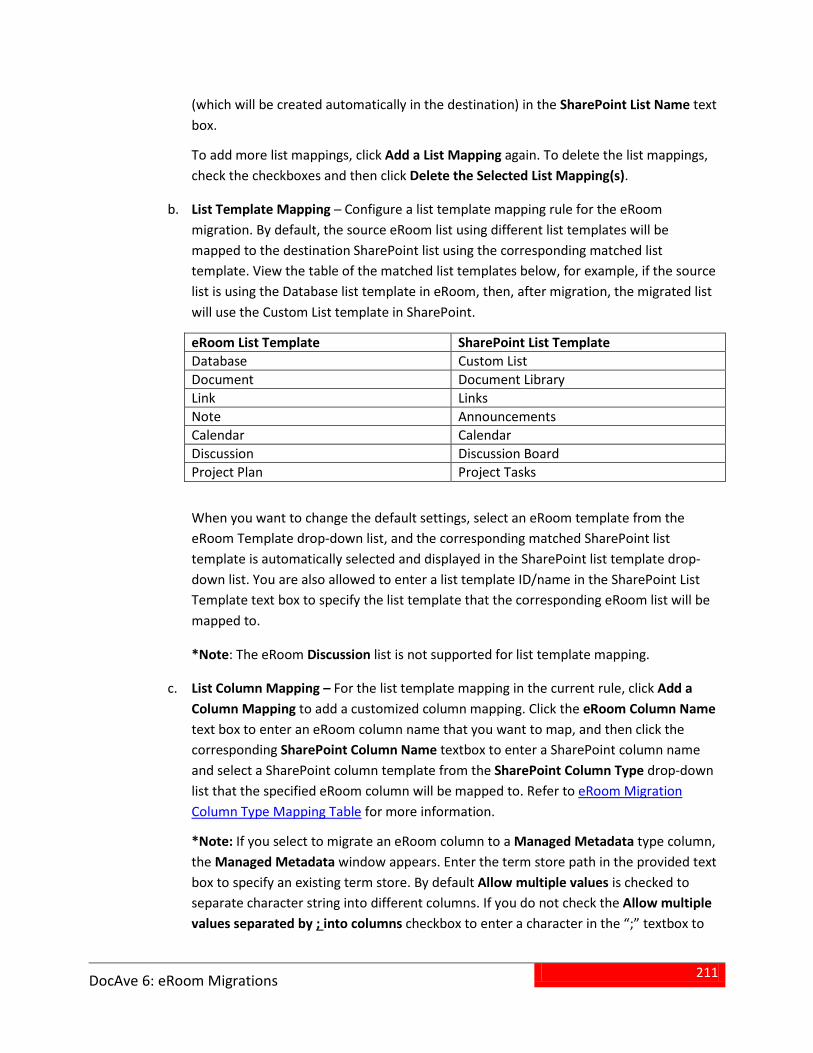
211
DocAve 6: eRoom Migrations
(which will be created automatically in the destination) in the SharePoint List Name text box.
To add more list mappings, click Add a List Mapping again. To delete the list mappings, check the checkboxes and then click Delete the Selected List Mapping(s).
List Template Mapping ─ Configure a list template mapping rule for the eRoom b.migration. By default, the source eRoom list using different list templates will be mapped to the destination SharePoint list using the corresponding matched list template. View the table of the matched list templates below, for example, if the source list is using the Database list template in eRoom, then, after migration, the migrated list will use the Custom List template in SharePoint.
eRoom List Template SharePoint List Template Database Custom List Document Document Library Link Links Note Announcements Calendar Calendar Discussion Discussion Board Project Plan Project Tasks
When you want to change the default settings, select an eRoom template from the eRoom Template drop-down list, and the corresponding matched SharePoint list template is automatically selected and displayed in the SharePoint list template drop-down list. You are also allowed to enter a list template ID/name in the SharePoint List Template text box to specify the list template that the corresponding eRoom list will be mapped to.
*Note: The eRoom Discussion list is not supported for list template mapping.
List Column Mapping – For the list template mapping in the current rule, click Add a c.Column Mapping to add a customized column mapping. Click the eRoom Column Name text box to enter an eRoom column name that you want to map, and then click the corresponding SharePoint Column Name textbox to enter a SharePoint column name and select a SharePoint column template from the SharePoint Column Type drop-down list that the specified eRoom column will be mapped to. Refer to eRoom Migration Column Type Mapping Table for more information.
*Note: If you select to migrate an eRoom column to a Managed Metadata type column, the Managed Metadata window appears. Enter the term store path in the provided text box to specify an existing term store. By default Allow multiple values is checked to separate character string into different columns. If you do not check the Allow multiple values separated by ; into columns checkbox to enter a character in the “;” textbox to
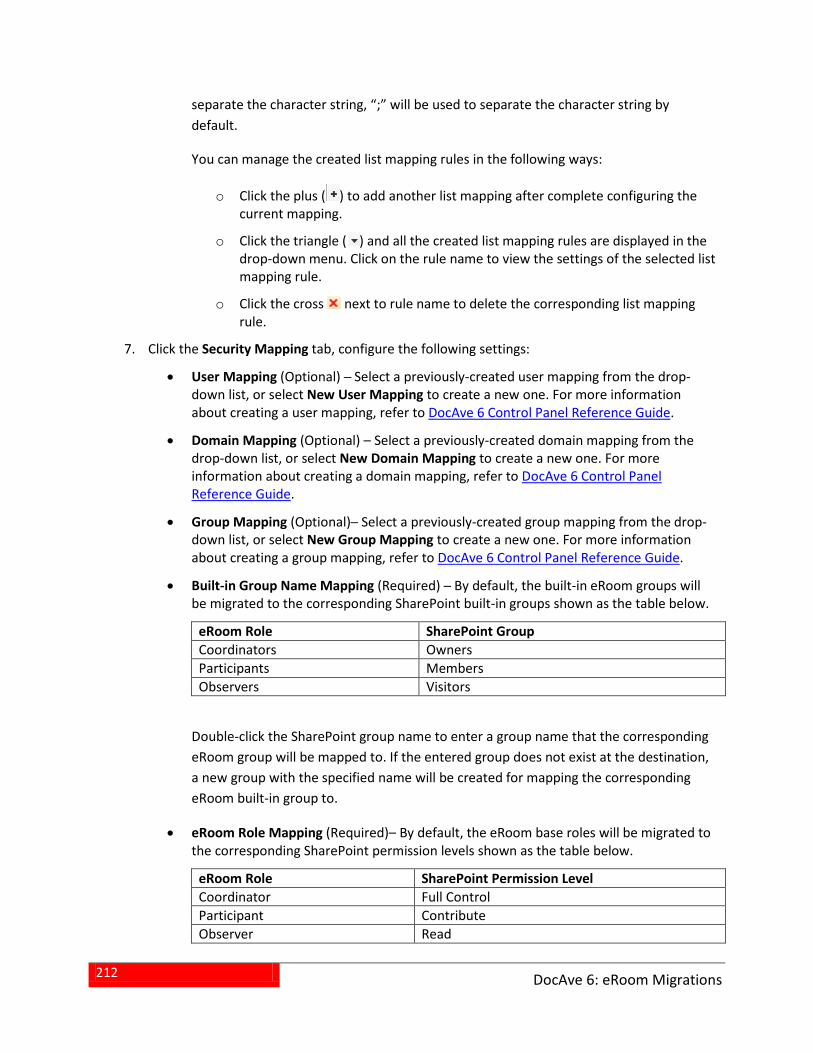
212
DocAve 6: eRoom Migrations
separate the character string, “;” will be used to separate the character string by default.
You can manage the created list mapping rules in the following ways:
Click the plus ( ) to add another list mapping after complete configuring the ocurrent mapping.
Click the triangle ( ) and all the created list mapping rules are displayed in the odrop-down menu. Click on the rule name to view the settings of the selected list mapping rule.
Click the cross next to rule name to delete the corresponding list mapping orule.
Click the Security Mapping tab, configure the following settings: 7.
• User Mapping (Optional) ─ Select a previously-created user mapping from the drop-down list, or select New User Mapping to create a new one. For more information about creating a user mapping, refer to DocAve 6 Control Panel Reference Guide.
• Domain Mapping (Optional) – Select a previously-created domain mapping from the drop-down list, or select New Domain Mapping to create a new one. For more information about creating a domain mapping, refer to DocAve 6 Control Panel Reference Guide.
• Group Mapping (Optional)─ Select a previously-created group mapping from the drop-down list, or select New Group Mapping to create a new one. For more information about creating a group mapping, refer to DocAve 6 Control Panel Reference Guide.
• Built-in Group Name Mapping (Required) ─ By default, the built-in eRoom groups will be migrated to the corresponding SharePoint built-in groups shown as the table below.
eRoom Role SharePoint Group Coordinators Owners Participants Members Observers Visitors
Double-click the SharePoint group name to enter a group name that the corresponding eRoom group will be mapped to. If the entered group does not exist at the destination, a new group with the specified name will be created for mapping the corresponding eRoom built-in group to.
• eRoom Role Mapping (Required)– By default, the eRoom base roles will be migrated to the corresponding SharePoint permission levels shown as the table below.
eRoom Role SharePoint Permission Level Coordinator Full Control Participant Contribute Observer Read
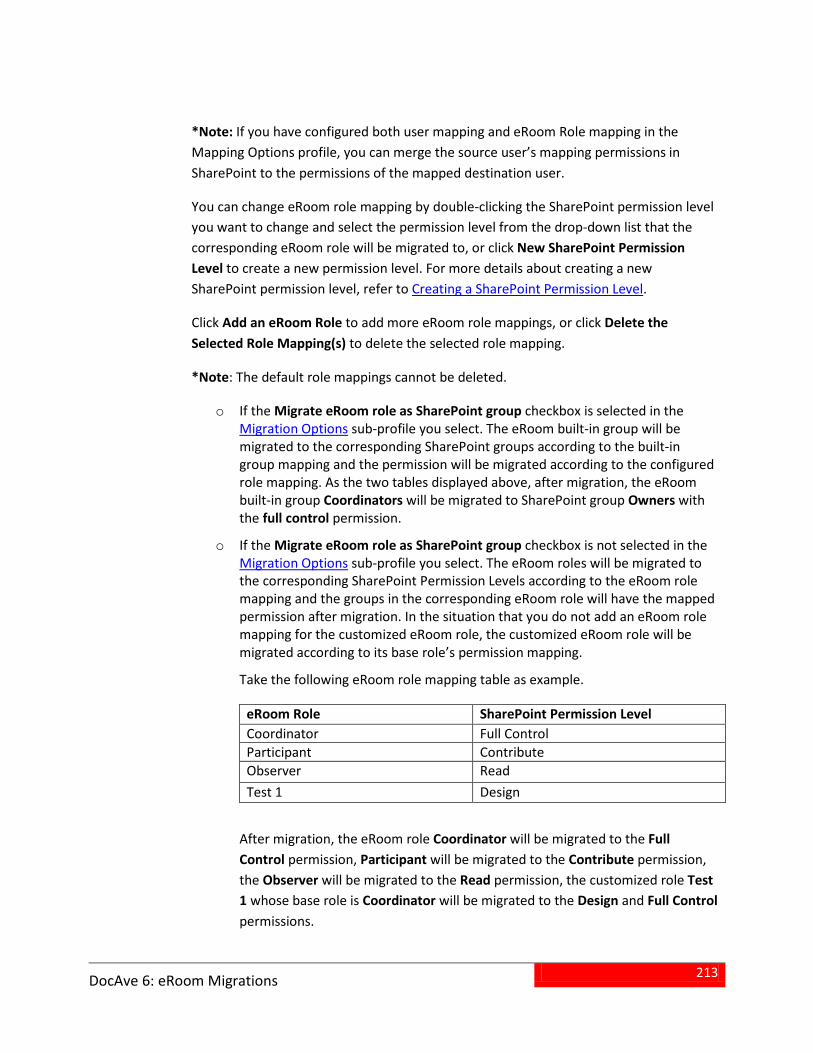
213
DocAve 6: eRoom Migrations
*Note: If you have configured both user mapping and eRoom Role mapping in the Mapping Options profile, you can merge the source user’s mapping permissions in SharePoint to the permissions of the mapped destination user.
You can change eRoom role mapping by double-clicking the SharePoint permission level you want to change and select the permission level from the drop-down list that the corresponding eRoom role will be migrated to, or click New SharePoint Permission Level to create a new permission level. For more details about creating a new SharePoint permission level, refer to Creating a SharePoint Permission Level.
Click Add an eRoom Role to add more eRoom role mappings, or click Delete the Selected Role Mapping(s) to delete the selected role mapping.
*Note: The default role mappings cannot be deleted.
If the Migrate eRoom role as SharePoint group checkbox is selected in the oMigration Options sub-profile you select. The eRoom built-in group will be migrated to the corresponding SharePoint groups according to the built-in group mapping and the permission will be migrated according to the configured role mapping. As the two tables displayed above, after migration, the eRoom built-in group Coordinators will be migrated to SharePoint group Owners with the full control permission.
If the Migrate eRoom role as SharePoint group checkbox is not selected in the oMigration Options sub-profile you select. The eRoom roles will be migrated to the corresponding SharePoint Permission Levels according to the eRoom role mapping and the groups in the corresponding eRoom role will have the mapped permission after migration. In the situation that you do not add an eRoom role mapping for the customized eRoom role, the customized eRoom role will be migrated according to its base role’s permission mapping.
Take the following eRoom role mapping table as example.
eRoom Role SharePoint Permission Level Coordinator Full Control Participant Contribute Observer Read Test 1 Design
After migration, the eRoom role Coordinator will be migrated to the Full Control permission, Participant will be migrated to the Contribute permission, the Observer will be migrated to the Read permission, the customized role Test 1 whose base role is Coordinator will be migrated to the Design and Full Control permissions.
214
DocAve 6: eRoom Migrations
Advanced Options Advanced options allow you to configure character length settings and illegal character replacement settings. Set up Advanced Options by the following steps.
From the Home tab, in the Profile Manager group, click Profile Settings. The Profile Settings 1.interface appears.
From the Profile Settings tab, in the Plan Mode group, ensure Online Mode is highlighted. 2.
Click Advanced Options on the left-hand pane, and then the Advanced Options page appears. 3.You can configure the following settings:
• Dynamic Rule – Map the source eRoom field names and the corresponding values to SharePoint column names and column values. Select a previously-created dynamic rule or click New Dynamic Rule to create a new one.
• Character Length Settings – This is used to set character length limitations for folder name, file name, and SharePoint URL.
Maximum length of the folder name – The default value is 60 and you can odefine the value from 1 to 128. If the folder name exceeds the limitation, the extra characters will be pruned from the end. For example, a folder migrated from a database is named abcdef in the source and the value that you set here is 5. The folder will be named abcde after the migration.
Maximum length of the file name – The default value is 80 and you can define othe value from 1 to 128. If the file name, including the file extension, exceeds the limitation, the extra characters will be pruned from the end. For example, a file is named abcdef.txt in the source and the value that you set here is 5. The file will be named a.txt after the migration.
Maximum length of the SharePoint URL – The default value is 255 and you can odefine the value from 1 to 260. The length of the SharePoint URL is calculated from the first character of the managed path after /. When the folder or file’s URL exceeds the limitation, the migration results are as follows:
If a folder URL exceeds the limitation and no file is in this folder, this folder is migrated to the upper-level folder till this folder URL does not exceed the limitation.
If the file URL in a folder exceeds the limitation, this folder and all files in in it are migrated to the upper-level folder till the file URL does not exceed the limitation.
• Illegal Character Replacement Settings – This is used to replace illegal SharePoint characters with valid characters. You can modify and add illegal character mapping for Group/Role Level, Folder level, and File level to the specified characters in SharePoint. By default, all illegal characters are replaced with an underline (_).Click Group/Role Level, Folder Level, or File Level on the tab to enter into each page.
215
DocAve 6: eRoom Migrations
To modify an illegal character mapping, double-click “_” in the column of oReplace with behind an illegal character and change _ with your specified character.
To add an illegal character mapping, click Add an Illegal Character and then oenter your specified illegal character in the column of Illegal character in SharePoint and the corresponding valid character in the column of Replace with. Click Add an Illegal Character again and another illegal character mapping can be created.
To delete one or more previously-configured illegal character mappings, select othe mappings and click Delete the Selected Illegal Character(s). You can also
remove a previously-configured illegal character mapping by clicking .
*Note: The default illegal character mappings cannot be deleted.
Creating a SharePoint Permission Level When configuring eRoom Role Mapping settings, after clicking New SharePoint Permission Level, the Create a SharePoint Permission Level interface appears. Refer to the steps below to create a permission level:
Name and Description ─ Enter a name and an optional description for the SharePoint 1.Permission Level you are about to create, which is used to locate the permission level while configuring the eRoom role mapping.
*Note: If the permission level you are about to create already exists in SharePoint, the newly created permission level will not replace the existing one.
Permissions ─ Select the permissions you want to add to this permission level by clicking the 2.corresponding checkboxes in this field. Check the Select All checkbox to add all of the permissions into this permission level.
Click OK in the Commit group to save your changes or click Cancel to return to the Manage 3.SharePoint Permission Level page without saving any configurations.
216
DocAve 6: eRoom Migrations
Performing an eRoom Online Migration An online eRoom Migrator job migrates the selected eRoom content to SharePoint keeping the source eRoom intact by configuring various migration settings.
To start an eRoom migration job, click Online Migration on the ribbon, and then you are brought to the Create a New Plan interface.
Follow the steps blow to run an online eRoom migration job:
Selecting the Source and Destination Nodes In the Source pane, click the agent name to expand the eRoom data tree from the community 1.
level down to the item level.
Find the eRoom data that you want to migrate. Enter the name of community, facility, a.eRoom, folder or the item into the Input Keyword text box to search the desired content as the source. You can only search the nodes whose name is displayed in the currently expanded tree. The nodes which are not displayed in the expanded tree cannot be search. When entering the keyword, the search result will be displayed with a little time.
Select the source node by checking the corresponding checkbox. With each folder level, b.there is a node named Items to display how many objects (including the files and items) are contained in the Items node. You can click the Items node and the Item Browser interface appears. Select the files/items that you wish to migrate by checking corresponding checkboxes and click OK.
*Note: For source contents that are supported and unsupported in the migration, refer to Supported and Unsupported Elements for eRoom Migrator.
In the Destination pane, click the farm name to expand the SharePoint data tree. 2.
Find the destination location where the selected source data will be migrated. If working a.with a large environment, enter the site collection URL into the Input Keyword textbox to search for the desired site collection. You can only search the nodes whose name is displayed in the currently expanded tree. The nodes which are not displayed in the expanded tree cannot be search. When entering the keyword, the search result will be displayed with a little time.
Select the destination node by clicking the corresponding radio button. You can also b.create a new site collection, site, list or folder by entering the specified name and click Create Container. For details on creating containers, refer to Creating Containers.
When finished configuring the job, select one of the following options: 3.
• Click Run Now to perform a migration job immediately. For more information on the Run Now interface, refer to Configuring the Run Now Interface.
217
DocAve 6: eRoom Migrations
• Click Save As New Plan to configure more specific settings and then save them as a eRoom migration plan, which then can be used to perform a file system migration job. For more information on the Save As New Plan interface, refer to Configuring the Save As New Plan .
Configuring the Run Now Interface In the Run Now interface, configure the settings below:
Conflict Resolution –Specify a conflict resolution to handle the conflicts occurred when 1.migrating eRoom content to the destination. For more information about conflict resolution, refer to Appendix D: Conflict Resolution.
Profile Selection – Configure the related migration options, mapping options and advanced 2.options for the migration job. Select a previously-configured profile from the drop-down list. eRoom migration provides you a default main profile named Default Profile (default).
Migration Database – Check whether the migration database that you previously-configured is 3.available by clicking Test. After the testing is completed, you can click Details to view the information of all agents and the connected status. To use the migration database to store the job data, select Also use Specified Database to store the job data.
Notification – Designate DocAve users to receive e-mail notification containing reports when a 4.certain triggering event occurs. Select a previously- configured notification profile from the drop-down list, or click New Notification Profile in the drop-down list to create a new one. For details on creating a notification profile, refer to the DocAve 6 Control Panel Reference Guide.
Job Status Option – Specify whether or not to take the metadata/security exceptions into 5.consideration for the eRoom migration job status. If only the content metadata or security fails to migrate and you select Ignore Metadata/Security exceptions checkbox, the migration job status will be Finished. Otherwise, the job status will be Finished with Exceptions.
Click OK to run the job immediately or click Cancel to return to the Home page of Online 6.Migration.
Configuring the Save As New Plan Interface In the Save As New Plan interface, configure the following settings to build a migration plan.
Plan Name ─ Enter a name for the plan and add an optional description for the plan. 1.
Profile Selection ─ Allows you to configure the related migration options, mapping options and 2.advanced options for the migration job. Select a previously-configured profile from the drop-down list or click New Profile to configure a new one. eRoom migration provides you a default main profile named Default Profile (default).
Schedule Selection ─ Choose whether to run the plan on schedule by clicking the corresponding 3.radio button.
• No Schedule – The plan will not run until you manually start it.
218
DocAve 6: eRoom Migrations
• Configure the schedule myself – Configure a customized schedule, and run the plan by the schedule. The Schedule Settings section appears after clicking Configure the schedule myself. Click Add Schedule, and then the Add Schedule interface appears. For more information on the Add Schedule interface, refer to Configuring Schedule Settings in the Add Schedule Interface.
Notification ─ Select the e-mail Notification profile for sending the notification report. For more 4.information on working with notification policies, refer to the DocAve 6 Control Panel Reference Guide.
Associated Plan Group ─ Select an associated plan groups or create a new plan group in the 5.Associated plan group(s) drop-down list in order to make the plan run according to the selected plan group settings. For more information on plan groups, refer to the DocAve 6 Control Panel Reference Guide.
Migration Database ─ Check whether the migration database that you previously-configured is 6.available by clicking Test. After the testing is completed, you can click Details to view the information of all agents and the connection status. To use the migration database to store the job data, select Also use Specified Database to store the job data.
When finished configuring the plan, select one of the following options: 7.
• Click Save to save the plan you have configured. The Plan Manager interface appears. For more information, refer to Managing Plans.
• Click the triangle next to Save, then select Save and Run Now to save the plan you have configured. The Run Now interface appears. For detailed information on the options in the Run Now interface, refer to the Configuring the Run Now Interface.
Configuring Schedule Settings in the Add Schedule Interface Follow the instructions below to configure the schedule settings.
1. Options ─ Choose a migration mode for this plan. Choose Full migration to migrate all the specified eRoom content to SharePoint. Choose Incremental migration to only migrate the source node content that has been modified (Add and Modify) since the last migration job and the content that failed to be migrated in the last migration job.
*Note: If you select the Incremental migration option, the Remigrate the objects whose metadata/securities failed to be migrated in the last migration job option in the Conflict Resolution section will be enabled, and you are required to decide whether or not to remigrate the objects whose metadata/securities failed to be migrated in the last migration job.
2. Conflict Resolution ─ Select a conflict resolution for the container level and the content level separately to hand the conflicts occurred during migration. For more information about this, refer to Appendix D: Conflict Resolution.
3. Schedule Settings ─ Specify the running frequency for this plan by entering an integer in the textbox.
4. Range of Recurrence ─ Specify the start time and end time for this plan in the provided field.
219
DocAve 6: eRoom Migrations
5. Job Status Option – Specify whether or not to take the metadata/security exceptions into consideration for the file system migration job status. If only the content metadata or security fails to migrate and you select Ignore Metadata/Security exceptions checkbox, the migration job status will be Finished. Otherwise, the job status will be Finished with Exceptions.
6. Click OK on the ribbon to save the schedule setting configurations. Click Cancel on the ribbon to return to the Plan setting interface without saving any changes. You can repeat the configurations above to create more schedules.
Conflict Resolution Conflicts occur while migrating the selected eRoom content to the specified destination in the event that there is a same named item in the destination. Refer to the information below to handle the Container and Content levels’ conflicts. For more detailed information of Conflict Resolution, refer to Appendix D: Conflict Resolution.
• Container Level ─ A container conflict occurs in the event that the name of the source eRoom container that you want to migrate is the same as that of a destination container. Two conflict resolutions are available: Merge and Skip. Merge adds the content in the source container to the conflict destination container. If you select Merge, the conflict resolution for the content level must be defined to handle the content conflicts. Skip ignores the conflicting containers and takes no action on the source and destination. If you select Skip, the Check lower objects for conflict checkbox is checked by default, which means that the lower containers under the specified container will also be checked, if conflicts occur, the lower containers will also be ignored during migration. The content in the lower containers will be migrated according to the configured content conflict resolution.
• Content Level ─ A content level conflict occurs in the event that the ID of the source eRoom item that you want to migrate is the same as that of a destination item. Three conflict resolutions are available: Overwrite, Skip and Append.
Overwrite replaces the destination item by the source same named item. Skip ignores the conflicting items and takes on action on them. Append adds the source item to the destination with a “_” and an integer added in the item name.
220
DocAve 6: eRoom Migrations
eRoom Offline Migrations eRoom Offline Migration can export source content to an storage and then import the exported data from the storage to the destination. Therefore, using these two jobs migrates the source content to the destination. Refer to the sections below to use eRoom Offline Migration.
*Note: eRoom Offline Migration supports SharePoint 2010 on-premises and SharePoint 2013 on-premises.
Configuring an eRoom Offline Migration The corresponding eRoom export profile and import profile must be in place prior to running an offline eRoom migration job. The section below instructs the steps to set up an export profile and an import profile.
Setting Up an Export Profile An eRoom export profile contains settings of Migration Options and Filter Options that are used to import the selected eRoom content to the specified export location.
To create an eRoom export profile, refer to the instructions below:
On the Home tab, in the Profile Manager group, click Profile Settings. The Profile Settings page 1.appears where you can configure the profile settings.
On the Profile Settings tab, in the Plan Mode group, ensure Export Mode is highlighted. 2.
On the Profile Settings tab, under the Profile/Sub-profile group, click New. 3.
Enter a profile name in the pop-up window and click OK. 4.
Select the Migration Options. For details about this section, refer to Migration Options. 5.
*Note: The Managed Path setting is not supported for the export mode.
After selecting the migration options, select the Filter Options. 6.
In the Filter Policy field, select a previously-created filter policy from the drop-down list. If there 7.is no existing filter policy, select New Filter Policy to create a new one. For detailed information about creating a filter policy, refer to Creating Filter Policies.
Click Save next to the Main Profile textbox to save the profile. Alternatively, click Save As and 8.enter a profile name to save it as another profile. Select Save and replace the existing main profile to replace the original profile. Otherwise, it is saved without removing the original profile.
221
DocAve 6: eRoom Migrations
Setting Up an Import Profile An eRoom import profile contains settings of Migration Options, Mapping Options and Advanced Settings that are used to import the eRoom content from an export location into SharePoint.
To create an eRoom import profile, complete the following steps:
On the Home tab, in the Profile Manager group, click Profile Settings. The Profile Settings page 1.appears where you can configure the profile settings.
On the Profile Settings tab, in the Plan Mode group, ensure Import Mode is highlighted. 2.
On the Profile Settings tab, under the Profile/Sub-profile group, click New. 3.
Enter a profile name in the pop-up window and click OK. 4.
Select Migration Options. For details about this section, refer to Migration Options. 5.
Select Mapping Options. For more details about this section, refer to Mapping Options. 6.
Configure the Advanced Options. For more details about this section, refer to Advanced 7.Options.
Click Save next to the Main Profile textbox to save the profile. Alternatively, click Save As and 8.enter a profile name to save it as another profile. Select Save and replace the existing main profile to replace the original profile. Otherwise, it is saved without removing the original profile.
Performing an eRoom Offline Migration eRoom Migrator allows you to migrate the eRoom data from an offline source to an offline destination by exporting the eRoom data that you want to migrate to an export location, then import the exported eRoom data to from the export location to the destination. An export location must be configured before running an offline eRoom Migrator job. For more details about creating an export location, refer to About Export Locations (Offline Jobs Only).
Export Follow the steps blow to export the eRoom data to an export location in order to perform the offline eRoom migration job:
On the Home tab, ensure the eRoom Migration is selected in the Module group. 1.
Click Export in the Plan group. 2.
In the Source pane, click the agent name to expand the eRoom data tree. 3.
Find the eRoom data that you want to migrate. Enter the name of community, facility, a.eRoom, folder or the item into the Input Keyword text box to search the desired content as the source. You can only search the nodes whose name is displayed in the currently expanded tree. The nodes which are not displayed in the expanded tree
222
DocAve 6: eRoom Migrations
cannot be search. When entering the keyword, the search result will be displayed with a little time.
Select the source node by checking the corresponding checkbox. With each folder level, b.there is a node named Items to display how many objects (including the files and items) are contained in the Items node. You can click the Items node and the Item Browser interface appears. Select the files/items that you wish to migrate by checking corresponding checkboxes and click OK.
*Note: For what kinds of source contents are supported and unsupported in the migration, refer to Supported and Unsupported Elements for eRoom Migrator.
In the Destination pane, select a previously-created export location to store the exported data, 4.or click New Export Location to create a new one. For more details about this, refer to About Export Locations (Offline Jobs Only).
Click Save As New Plan in the Commit group. The Save As New Plan interface appears. 5.
Plan Name ─ Enter a name for the pan and add an optional description for the plan. a.
Profile Selection ─ Configure the related migration options and filter options for the b.migration job. Select a previously-configured profile from the drop-down list or click New Profile to configure a new one. For more details about creating an online profile, refer to Setting Up an Export Profile. eRoom migration provides you a default main profile named Default Profile (default).
Schedule Selection ─ Choose whether to run the plan on schedule by clicking the c.corresponding radio button.
No Schedule – The plan will not run until you manually start it. o
Configure the schedule myself – Configure a customized schedule, and run the oplan by schedule. The Schedule Settings field appears after clicking Configure the schedule myself. Click Add Schedule to add a customized schedule and configure the following settings in the pop-up window:
Options ─ Choose a migration mode for this plan. Full migration migrates all the specified eRoom content to the specified export location while the Incremental migration only migrates the updates since the last migration job.
Conflict Resolution ─ Select a conflict resolution for the container level and the content level separately to hand the conflicts occurred during migration. For more information about this, refer to Appendix D: Conflict Resolution.
Schedule Settings ─ Specify the running frequency for this plan by entering an integer in the textbox.
Range of Recurrence ─ Specify the start time and end time for this plan in the provided field.
223
DocAve 6: eRoom Migrations
Job Status Option – Specify whether or not to take the metadata/security exceptions into consideration for the eRoom migration job status. If only the content metadata or security fails to migrate and you select Ignore Metadata/Security exceptions checkbox, the migration job status will be Finished. Otherwise, the job status will be Finished with Exceptions.
Click OK to save the schedule.
Notification ─ Select the e-mail notification profile for sending the notification report. d.For more information on working with notification policies, refer to the DocAve 6 Control Panel Reference Guide.
Associated Plan Group ─ Select an associated plan groups or create a new plan group in e.the Associated plan group(s) drop-down list in order to make the plan run according to the selected plan group settings. For more information on plan groups, refer to the DocAve 6 Control Panel Reference Guide.
Click Save to save this plan or click Save and Run Now to run the plan immediately. 6.
The Run Now window pops up after clicking Save and Run Now. Configure the Options setting and Job Status Option settings. Then, click OK to start the job.
eRoom Migrator contains a Job Monitor button where users can view the status of the running jobs as well as the detailed job information. This is useful for monitoring jobs or troubleshooting for errors.
Refer to the DocAve 6 Job Monitor Reference Guide for more information.
Import Follow the steps blow to import the eRoom data to a SharePoint destination location in order to perform the offline eRoom migration job:
On the Home tab, ensure the eRoom Migration is selected in the Module group. 1.
Click Import in the Plan group. 2.
In the Source pane, click the farm name to expand the export location. Select the backed up 3.data you want to import. Click the Details tab to view the content of the backup data.
In the Destination pane, click on the farm name to expand the data tree. 4.
Find the destination location where the selected backup data will be imported. If a.working with a large environment, enter the site collection URL into the Input Keyword textbox to search for the desired site collection. You can only search the nodes whose name is displayed in the currently expanded tree. The nodes which are not displayed in the expanded tree cannot be search. When entering the keyword, the search result will be displayed with a little time.
224
DocAve 6: eRoom Migrations
Select the destination node by clicking the corresponding radio button. You can also b.create a new site collection, site, list or folder by entering the specified name and click Create Container. For details on creating containers, refer to Creating Containers.
Click Save As New Plan in the Commit group. The Save As New Plan interface appears. 5.
Plan Name ─ Enter a name for the plan and add an optional description for the plan. a.
Profile Selection ─ Allows you to configure the related migration options, mapping b.options and advanced options for the migration job. Select a previously-configured profile from the drop-down list or click New Profile to configure a new one. For more details about creating an online profile, refer to Setting Up an Import Profile. eRoom migration provides you a default main profile named Default Profile (default).
Schedule Selection ─ Choose whether to run the plan on schedule by clicking the c.corresponding radio button.
No Schedule – The plan will not run until you manually start it. o
Configure the schedule myself – Configure a customized schedule, and run the oplan by schedule. The Schedule Settings field appears after clicking Configure the schedule myself. Click Add Schedule to add a customized schedule and configure the following settings in the pop-up window:
Options ─ Choose a migration mode for this plan. Full migration migrates all the specified eRoom content to SharePoint while the Incremental migration only migrates the updates since the last migration.
Conflict Resolution ─ Select a conflict resolution for the container level and the content level separately to hand the conflicts occurred during migration. For more information about this, refer to Appendix D: Conflict Resolution.
Schedule Settings ─ Specify the running frequency for this plan by entering an integer in the textbox.
Range of Recurrence ─ Specify the start time and end time for this plan in the provided field.
Job Status Option – Specify whether or not to take the metadata/security exceptions into consideration for the eRoom migration job status. If only the content metadata or security fails to migrate and you select Ignore Metadata/Security exceptions checkbox, the migration job status will be Finished. Otherwise, the job status will be Finished with Exceptions.
Click OK to save the schedule.
Notification ─ Select the e-mail Notification profile for sending the notification report. d.For more information on working with notification policies, refer to the DocAve 6 Control Panel Reference Guide.
225
DocAve 6: eRoom Migrations
Associated Plan Group ─ Select an associated plan groups or create a new plan group in e.the Associated plan group(s) drop-down list in order to make the plan run according to the selected plan group settings. For more information on plan groups, refer to the DocAve 6 Control Panel Reference Guide.
Migration Database – Check whether the migration database that you previously-f.configured is available by clicking Test. After the testing is completed, you can click Details to view the information of all agents and the connected status. To use the migration database to store the job data, select Also use Specified Database to store the job data.
Click Save to save this plan or click Save and Run Now to run the plan immediately. 6.
The Run Now window pops up after clicking Save and Run Now. Configure Option settings, Conflict Resolution settings, and Job Status Option settings.
eRoom Migrator contains a Job Monitor button where users can view the status of the running jobs as well as the detailed job information. This is useful for monitoring jobs or troubleshooting for errors.
Refer to the DocAve 6 Job Monitor Reference Guide for more information.
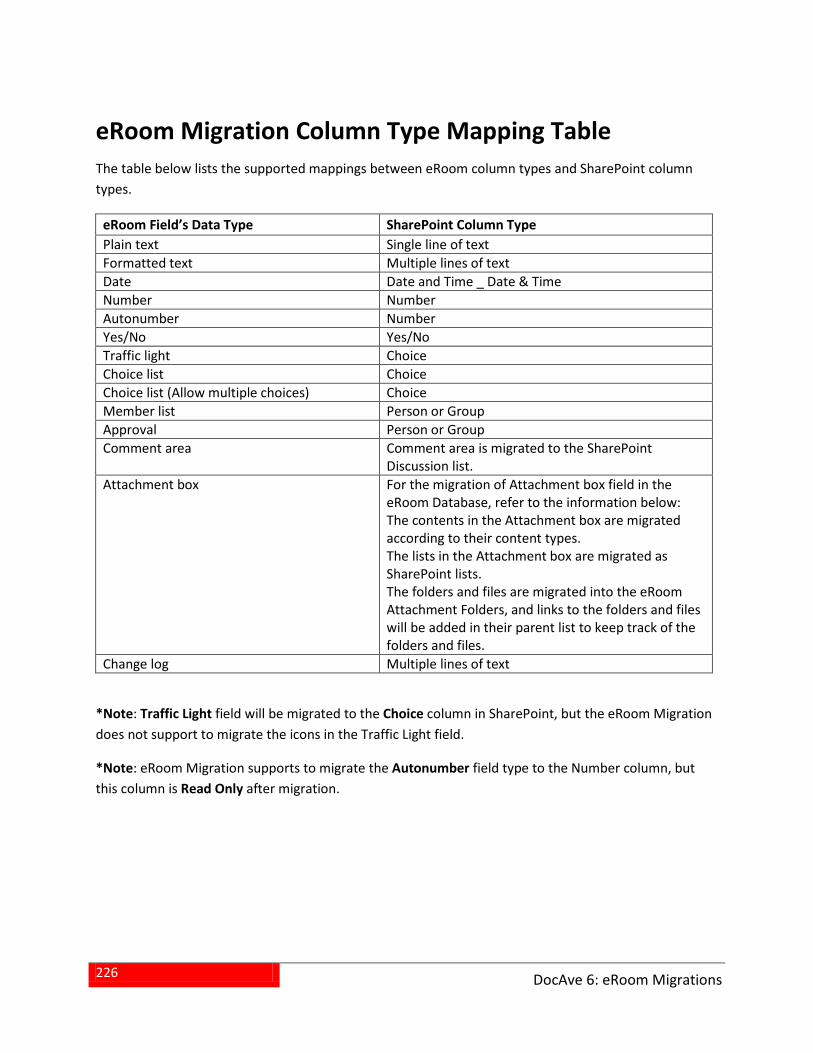
226
DocAve 6: eRoom Migrations
eRoom Migration Column Type Mapping Table The table below lists the supported mappings between eRoom column types and SharePoint column types.
eRoom Field’s Data Type SharePoint Column Type Plain text Single line of text Formatted text Multiple lines of text Date Date and Time _ Date & Time Number Number Autonumber Number Yes/No Yes/No Traffic light Choice Choice list Choice Choice list (Allow multiple choices) Choice Member list Person or Group Approval Person or Group Comment area Comment area is migrated to the SharePoint
Discussion list. Attachment box For the migration of Attachment box field in the
eRoom Database, refer to the information below: The contents in the Attachment box are migrated according to their content types. The lists in the Attachment box are migrated as SharePoint lists. The folders and files are migrated into the eRoom Attachment Folders, and links to the folders and files will be added in their parent list to keep track of the folders and files.
Change log Multiple lines of text
*Note: Traffic Light field will be migrated to the Choice column in SharePoint, but the eRoom Migration does not support to migrate the icons in the Traffic Light field.
*Note: eRoom Migration supports to migrate the Autonumber field type to the Number column, but this column is Read Only after migration.
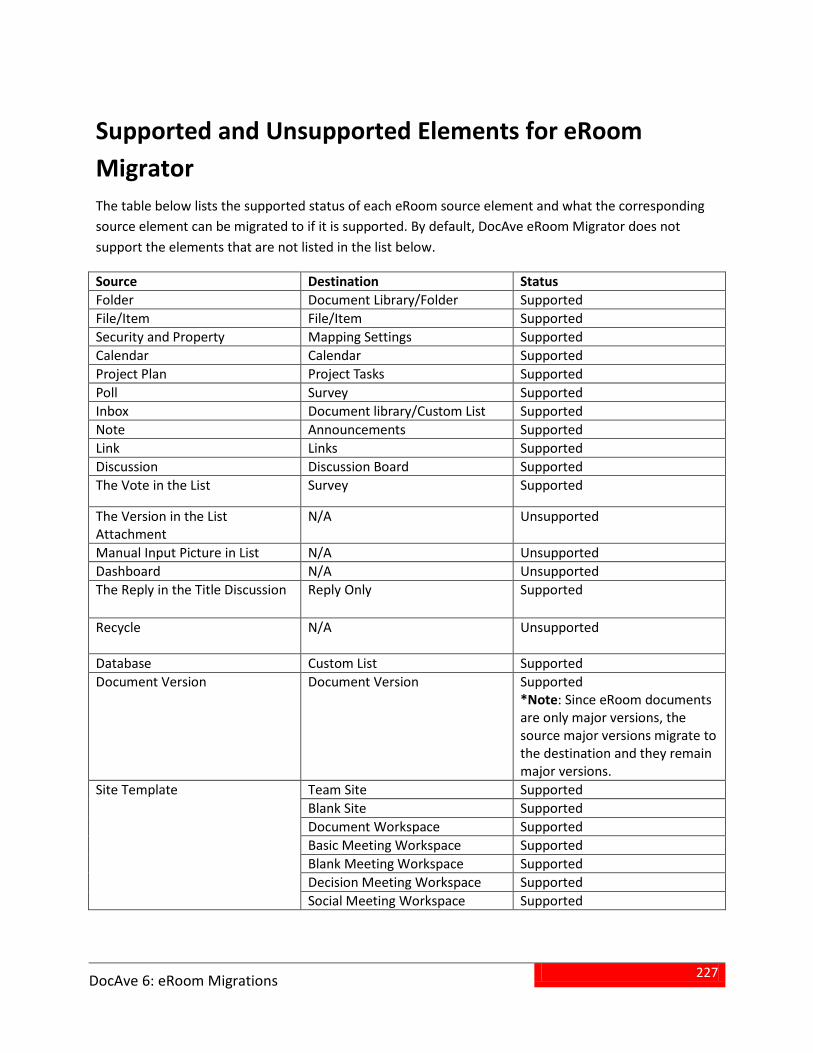
227
DocAve 6: eRoom Migrations
Supported and Unsupported Elements for eRoom Migrator The table below lists the supported status of each eRoom source element and what the corresponding source element can be migrated to if it is supported. By default, DocAve eRoom Migrator does not support the elements that are not listed in the list below.
Source Destination Status Folder Document Library/Folder Supported File/Item File/Item Supported Security and Property Mapping Settings Supported Calendar Calendar Supported Project Plan Project Tasks Supported Poll Survey Supported Inbox Document library/Custom List Supported Note Announcements Supported Link Links Supported Discussion Discussion Board Supported The Vote in the List Survey Supported
The Version in the List Attachment
N/A Unsupported
Manual Input Picture in List N/A Unsupported Dashboard N/A Unsupported The Reply in the Title Discussion Reply Only Supported
Recycle N/A Unsupported
Database Custom List Supported Document Version Document Version Supported
*Note: Since eRoom documents are only major versions, the source major versions migrate to the destination and they remain major versions.
Site Template Team Site Supported Blank Site Supported Document Workspace Supported Basic Meeting Workspace Supported Blank Meeting Workspace Supported Decision Meeting Workspace Supported Social Meeting Workspace Supported
228
DocAve 6: eRoom Migrations
*Note: The view of the eRoom database is not supported to migrate. The Migration job can migrate the content of Issues (approval process), RFP Process (approval process), and T&E Processing (approval process) to SharePoint but the workflow status cannot be kept. The Database Steps are migrated to the Choice column in SharePoint, and attachments contained in the Database Steps and entries are migrated to the eRoom Attachment Folders in the destination. You can only change the Steps in the Choice column of the custom list manually.
229
DocAve 6: Livelink Migrations
Livelink Online Migrations Livelink Migrator protects your data through lossless migration of Livelink content and provides you with simplified migration management through an intuitive administration console. Using Livelink Online Migration migrates content from the source to the destination directly within one job.
Livelink Online Migration supports SharePoint 2010 on-premises and SharePoint 2013 on-premises.
Refer to the sections below to use Livelink Online Migration.
Pre-migration Configurations To use Livelink Migrator, you must first configure the Livelink connection so that DocAve Agents can connect to the Livelink server. In the Home tab, click Configure Connection on the ribbon, and then the Livelink Connection interface appears.
Managing Livelink Connections The Livelink Connection interface displays any Livelink connections that you have previously created.
In this interface, you can change the number of Livelink connections displayed per page and the order in which they are displayed. To change the number of Livelink connections displayed per page, select the desired number from the Show rows drop-down menu in the lower right-hand corner. To sort the Livelink connections, click on a column heading such as Name, Agent and Last Modified Time.
Customize how these connections are displayed in a number of different ways:
• Search – Filters Livelink connections displayed by the keyword you designate. The keyword must be contained in a column value. At the top of the Livelink connection viewing pane, enter the keyword for the Livelink connections you wish to display. You can select Search all pages or Search current page to define the search scope. Search all pages means that the connections in all of the pages whose names and descriptions contain the keywords will be displayed; while Search current page means that only the connections in the current page whose names and descriptions contain the keywords will be displayed. Note that the search function is not case sensitive.
• – Manages which columns are displayed in the list so that only information you want to see is shown. Click , and then select the checkbox next to the column name to have that column shown in the list.
• – Hides the column. Click of the column you want to hide, the column is hidden.
• – Filters the agents. Click on the column of Agents, and then select the checkbox next to the agent name to have that agent shown.
230
DocAve 6: Livelink Migrations
Perform the following actions in the Livelink Connection interface:
• Click Create on the ribbon to create a new Livelink connection. For details on creating a new Livelink connection, see Creating and Editing Livelink Connections.
• Click View Details on the ribbon and you will see the previously-configured settings for this Livelink connection. Here you can also click Edit on the ribbon to make changes to the Livelink connection’s settings. You will be brought to the Edit Livelink Connection page where you can change the settings of this Livelink connection.
• Click Edit on the ribbon to change the configurations for this Livelink connection. For details on editing configurations for a Livelink connection, see Creating and Editing Livelink Connections.
• Click Delete on the ribbon. A confirmation window appears, confirming that you want to proceed with the deletion. Click OK to delete the selected Livelink connections, or click Cancel to return to the Livelink Connection interface without deleting the selected Livelink connections.
Creating and Editing Livelink Connections To create a new Livelink connection, click Create on the ribbon. To modify a previously-configured Livelink connection, select the Livelink connection, and then click Edit on the ribbon.
In the Create Livelink Connection or Edit Livelink Connection interface, configure the following settings:
1. Livelink Connection Name – Enter a Name for the Livelink connection. Then enter an optional Description for the Livelink connection for further reference.
2. Agent – Select a Source DocAve Agent from the drop-down menu that will be used to connect to the Livelink server.
3. HTTP Tunneling – HTTP tunneling is a method to connect to Livelink. According to your configurations of Livelink, select whether to use Http tunneling for the communication with Livelink. Select the Use Http tunneling checkbox to use it.
4. Livelink Server Settings – Configure the following settings depending on your selection in the HTTP Tunneling field.
If the Use HTTP tunneling checkbox is selected, configure the settings below. If the Use HTTP tunneling checkbox is not selected, proceed to step 4.
Proxy Option – Select to use Proxy server or Web server to access to Livelink. a.
Web server – If you select Web Server as the Proxy Option, then specify the ohostname or IP address of the Web server.
Proxy Server – If you select Proxy Server as the Proxy Option, then specify the ohostname or IP address of the Proxy Server.
Port – Enter the port number of the Livelink server to get the connection with Livelink b.server. By default, the port number is 80.
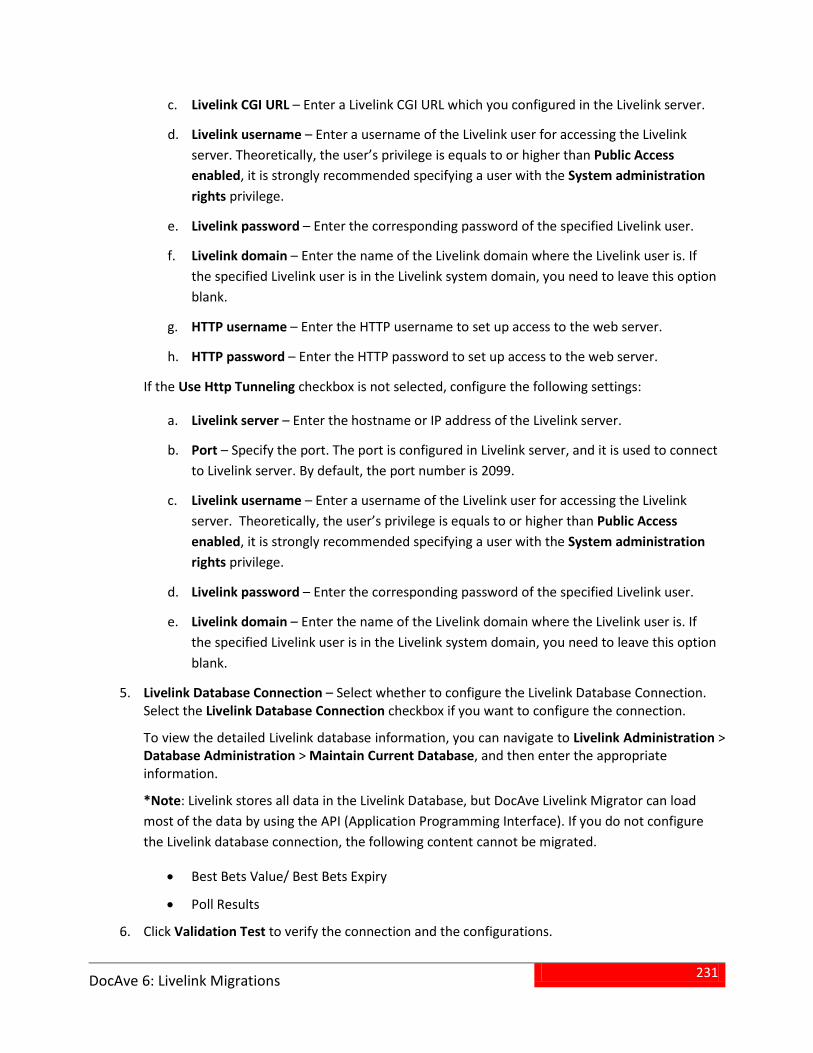
231
DocAve 6: Livelink Migrations
Livelink CGI URL – Enter a Livelink CGI URL which you configured in the Livelink server. c.
Livelink username – Enter a username of the Livelink user for accessing the Livelink d.server. Theoretically, the user’s privilege is equals to or higher than Public Access enabled, it is strongly recommended specifying a user with the System administration rights privilege.
Livelink password – Enter the corresponding password of the specified Livelink user. e.
Livelink domain – Enter the name of the Livelink domain where the Livelink user is. If f.the specified Livelink user is in the Livelink system domain, you need to leave this option blank.
HTTP username – Enter the HTTP username to set up access to the web server. g.
HTTP password – Enter the HTTP password to set up access to the web server. h.
If the Use Http Tunneling checkbox is not selected, configure the following settings:
Livelink server – Enter the hostname or IP address of the Livelink server. a.
Port – Specify the port. The port is configured in Livelink server, and it is used to connect b.to Livelink server. By default, the port number is 2099.
Livelink username – Enter a username of the Livelink user for accessing the Livelink c.server. Theoretically, the user’s privilege is equals to or higher than Public Access enabled, it is strongly recommended specifying a user with the System administration rights privilege.
Livelink password – Enter the corresponding password of the specified Livelink user. d.
Livelink domain – Enter the name of the Livelink domain where the Livelink user is. If e.the specified Livelink user is in the Livelink system domain, you need to leave this option blank.
5. Livelink Database Connection – Select whether to configure the Livelink Database Connection. Select the Livelink Database Connection checkbox if you want to configure the connection.
To view the detailed Livelink database information, you can navigate to Livelink Administration > Database Administration > Maintain Current Database, and then enter the appropriate information.
*Note: Livelink stores all data in the Livelink Database, but DocAve Livelink Migrator can load most of the data by using the API (Application Programming Interface). If you do not configure the Livelink database connection, the following content cannot be migrated.
• Best Bets Value/ Best Bets Expiry
• Poll Results
6. Click Validation Test to verify the connection and the configurations.
232
DocAve 6: Livelink Migrations
7. Click OK to save the configurations and return to the Livelink Connection interface, or click Cancel to return to the Livelink Connection interface without saving any changes.
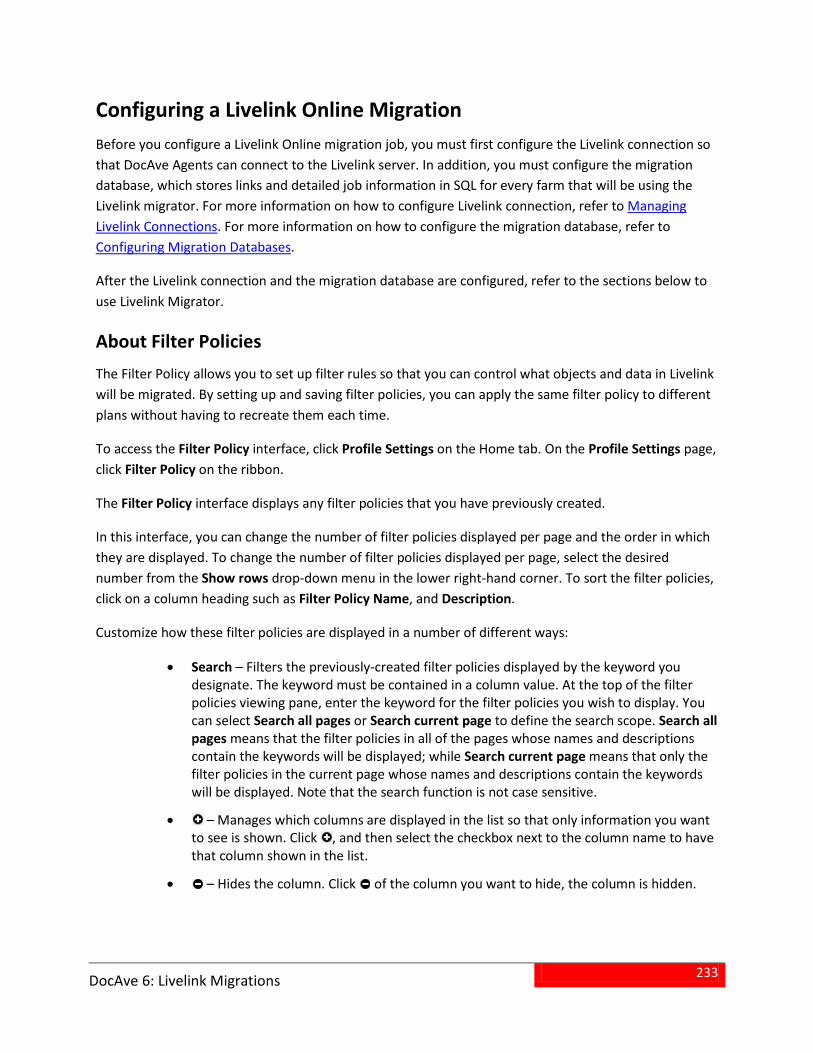
233
DocAve 6: Livelink Migrations
Configuring a Livelink Online Migration Before you configure a Livelink Online migration job, you must first configure the Livelink connection so that DocAve Agents can connect to the Livelink server. In addition, you must configure the migration database, which stores links and detailed job information in SQL for every farm that will be using the Livelink migrator. For more information on how to configure Livelink connection, refer to Managing Livelink Connections. For more information on how to configure the migration database, refer to Configuring Migration Databases.
After the Livelink connection and the migration database are configured, refer to the sections below to use Livelink Migrator.
About Filter Policies The Filter Policy allows you to set up filter rules so that you can control what objects and data in Livelink will be migrated. By setting up and saving filter policies, you can apply the same filter policy to different plans without having to recreate them each time.
To access the Filter Policy interface, click Profile Settings on the Home tab. On the Profile Settings page, click Filter Policy on the ribbon.
The Filter Policy interface displays any filter policies that you have previously created.
In this interface, you can change the number of filter policies displayed per page and the order in which they are displayed. To change the number of filter policies displayed per page, select the desired number from the Show rows drop-down menu in the lower right-hand corner. To sort the filter policies, click on a column heading such as Filter Policy Name, and Description.
Customize how these filter policies are displayed in a number of different ways:
• Search – Filters the previously-created filter policies displayed by the keyword you designate. The keyword must be contained in a column value. At the top of the filter policies viewing pane, enter the keyword for the filter policies you wish to display. You can select Search all pages or Search current page to define the search scope. Search all pages means that the filter policies in all of the pages whose names and descriptions contain the keywords will be displayed; while Search current page means that only the filter policies in the current page whose names and descriptions contain the keywords will be displayed. Note that the search function is not case sensitive.
• – Manages which columns are displayed in the list so that only information you want to see is shown. Click , and then select the checkbox next to the column name to have that column shown in the list.
• – Hides the column. Click of the column you want to hide, the column is hidden.
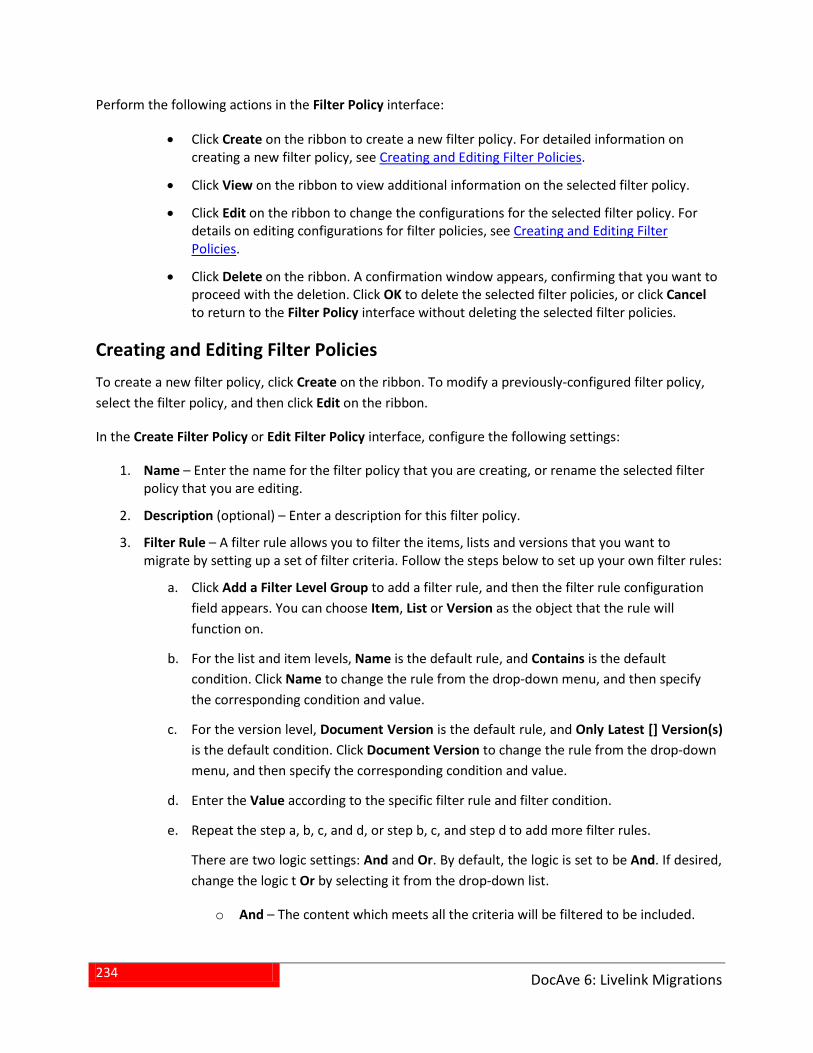
234
DocAve 6: Livelink Migrations
Perform the following actions in the Filter Policy interface:
• Click Create on the ribbon to create a new filter policy. For detailed information on creating a new filter policy, see Creating and Editing Filter Policies.
• Click View on the ribbon to view additional information on the selected filter policy.
• Click Edit on the ribbon to change the configurations for the selected filter policy. For details on editing configurations for filter policies, see Creating and Editing Filter Policies.
• Click Delete on the ribbon. A confirmation window appears, confirming that you want to proceed with the deletion. Click OK to delete the selected filter policies, or click Cancel to return to the Filter Policy interface without deleting the selected filter policies.
Creating and Editing Filter Policies To create a new filter policy, click Create on the ribbon. To modify a previously-configured filter policy, select the filter policy, and then click Edit on the ribbon.
In the Create Filter Policy or Edit Filter Policy interface, configure the following settings:
Name – Enter the name for the filter policy that you are creating, or rename the selected filter 1.policy that you are editing.
Description (optional) – Enter a description for this filter policy. 2.
Filter Rule – A filter rule allows you to filter the items, lists and versions that you want to 3.migrate by setting up a set of filter criteria. Follow the steps below to set up your own filter rules:
Click Add a Filter Level Group to add a filter rule, and then the filter rule configuration a.field appears. You can choose Item, List or Version as the object that the rule will function on.
For the list and item levels, Name is the default rule, and Contains is the default b.condition. Click Name to change the rule from the drop-down menu, and then specify the corresponding condition and value.
For the version level, Document Version is the default rule, and Only Latest [] Version(s) c.is the default condition. Click Document Version to change the rule from the drop-down menu, and then specify the corresponding condition and value.
Enter the Value according to the specific filter rule and filter condition. d.
Repeat the step a, b, c, and d, or step b, c, and step d to add more filter rules. e.
There are two logic settings: And and Or. By default, the logic is set to be And. If desired, change the logic t Or by selecting it from the drop-down list.
And – The content which meets all the criteria will be filtered to be included. o
235
DocAve 6: Livelink Migrations
Or – The content which meets any one of the criteria will be filtered to be oincluded.
Click OK to save the configurations and return to the Filter Policy interface, or click Cancel to 4.return to the Filter Policy interface without saving any changes.
About Mapping Settings Before performing a Livelink Migration job, you may want to define optional Domain Mapping, User Mapping, Group Mapping, and Permission Mapping settings.
• Domain Mapping (Optional) – Use domain mapping if you wish to replace a domain name in the source with another domain name in the destination. If you choose to run a job without domain mapping, DocAve does not migrate the user from the source domain to the destination domain.
• User Mapping (Optional) – Use user mapping if you wish to replace existing source node username with destination node username or default username (if configured) in the destination. If you choose to run a job without user mapping, DocAve migrates the source users to the destination, but the migrated users remain the same as those in the source.
• Group Mapping (Optional) – Use group mapping if you wish to map the source groups to the specified destination groups. If you choose to run a job without group mapping, DocAve migrates the source group to the destination, but the migrated groups remain the same as those in the source.
• Permission Mapping (Optional) – Use permission mapping if you wish to map the source Livelink permissions to the destination SharePoint permissions. If you choose to run a job without permission mapping, DocAve does not migrate the source Livelink permissions to the destination.
Refer to the following sections to decide whether to configure the mapping settings, and learn how to configure the mapping settings.
Domain Mapping If there are users with the same name but with different domains respectively in the source and destination, you can map a source domain name in the destination by using domain mapping. During migration, Migrator will change the source domain name to your specified domain name in the destination node. Therefore, the source user summer\user1 can be mapped to SharePoint domain user may\user1 through domain mapping.
To access Domain Mapping, click Profile Settings on the ribbon of Home tab. The Profile 1.Settings tab appears.
Click Mappings on the ribbon, and then select Domain Mapping from the drop-down menu. The 2.Control Panel Mapping Manager interface appears.
Click Create on the ribbon to create a new Domain Mapping rule. 3.

236
DocAve 6: Livelink Migrations
For specific instructions on setting up domain mapping, refer to the DocAve 6 Control Panel Reference Guide.
User Mapping Use user mapping if you wish to map an existing source node username to an existing SharePoint user name in the destination. During migration, Migrator will replace the source username with your specified username in the destination node.
To access User Mapping, click Profile Settings on the ribbon of Home tab. The Profile Settings 1.tab appears.
Click Mappings on the ribbon, and then select User Mapping from the drop-down menu. The 2.Control Panel Mapping Manager interface appears.
Click Create on the ribbon to create a new User Mapping rule. 3.
For specific instructions on setting up user mapping, refer to the DocAve 6 Control Panel Reference Guide.
Group Mapping Use group mapping if you wish to map an existing source group name to a SharePoint group. During the migration, Migrator will replace the source group name with your specified group name in the destination node.
To access Group Mapping, click Profile Settings on the ribbon of Home tab. The Profile Settings 1.tab appears.
Click Mappings on the ribbon, and then select Group Mapping from the drop-down menu. The 2.Control Panel Mapping Manager interface appears.
Click Create on the ribbon to create a new Group Mapping rule. 3.
For specific instructions on setting up user mapping, refer to the DocAve 6 Control Panel Reference Guide.
About Permission Mapping Permission mapping allows you to map permissions in the source to SharePoint permissions. During the migration, Migrator will replace the source permission name with your specified permission name in the destination node. Livelink Migration provides you a Default Permission Mapping rule to migrate the Livelink permissions to the SharePoint Permissions, which is contained as default permission mapping rule in the default main profile, when running a Livelink Migration job.
*Note: If you use the user mapping and permission mapping together, you are able to merge the source user’s mapping permissions to the destination user.
237
DocAve 6: Livelink Migrations
To access Permission Mapping, click Profile Settings on the ribbon of Home tab. The Profile 1.Settings tab appears.
Click Mappings on the ribbon, and then select Permission Mapping from the drop-down menu. 2.The Permission Mapping interface appears.
The Permission Mapping interface displays all previously-configured permission mappings.
In this interface, you can change the number of permission mappings displayed per page and the order in which they are displayed. To change the number of permission mappings displayed per page, select the desired number from the Show rows drop-down menu in the lower right-hand corner. To sort the permission mappings, click on a column heading such as Permission Mapping Name, and Description.
Customize how these permission mappings are displayed in a number of different ways:
• Search – Filters permission mappings displayed by the keyword you designate. The keyword must be contained in a column value. At the top of the permission mapping viewing pane, enter the keyword for the permission mappings you wish to display. You can select Search all pages or Search current page to define the search scope. Search all pages means that the permission mappings in all of the pages whose names and descriptions contain the keywords will be displayed; while Search current page means that only the permission mappings in the current page whose names and descriptions contain the keywords will be displayed. Note that the search function is not case sensitive.
• – Manages which columns are displayed in the list so that only information you want to see is shown. Click , and then select the checkbox next to the column name to have that column shown in the list.
• – Hides the column. Click in the column title to hide the column.
Perform one of the following actions on a selected permission mapping:
• Click Create on the ribbon to create a new permission mapping rule. For detailed information on creating a new permission mapping, see Creating and Editing Permission Mappings.
• Click View Details on the ribbon to see additional settings for this permission mapping. Here you can also click Edit on the ribbon to make changes to the permission mapping’s settings. You will be brought to the Edit Permission Mapping page where you can change this permission mapping.
• Click Edit on the ribbon to change the configuration of this permission mapping. For details on editing permission mapping, see Creating and Editing Permission Mappings .
• Click Delete on the ribbon. A confirmation window appears, confirming that you want to proceed with the deletion. Click OK to delete the selected permission mappings, or click Cancel to return to the Permission Mapping interface without deleting the selected permission mappings.
238
DocAve 6: Livelink Migrations
Creating and Editing Permission Mappings Refer to the above section for detailed information on how to access the Permission Mapping interface.
To create a new permission mapping, click Create on the ribbon; to edit a previously-configured permission mapping, select the permission mapping and then click Edit on the ribbon.
In the Create Permission Mapping or Edit Permission Mapping interface, configure the following settings:
Name and Description – Enter a Permission Mapping Name for the permission mapping that 1.you are about to create or edit. Then enter an optional Description for this permission mapping for future reference.
Permission Mapping – Set up the mapping of Livelink permissions to SharePoint permissions 2.for different levels. The Livelink privilege will be migrated to be the corresponding SharePoint Permission Level. Configure the following settings to set up mappings for different levels.
Click the Workspace Level tab. Configure the mapping from the Livelink user’s privileges a.to SharePoint Permission Levels, and configure to add the Livelink users who have the same privileges to SharePoint groups as well.
Add a Workspace Level Mapping – Click Add a Workspace Level Mapping. oDouble-click the textbox, and then a drop-down menu appears. You can manage the value of the textboxes by selecting the corresponding Livelink privilege/SharePoint group/SharePoint Permission Level. Click New Livelink Privilege/New SharePoint Group/New SharePoint Permission Level to create a new Livelink privilege/SharePoint group/SharePoint Permission Level, then the Manage Livelink Privilege/Manage SharePoint Group/Manage SharePoint Permission Level tab appears. For more information on creating a new Livelink privilege, SharePoint group and a new SharePoint Permission Level, refer to About Livelink Privilege section, About SharePoint Group section and About SharePoint Permission Level section below.
Edit a Workspace Level Mapping – The SharePoint groups and SharePoint oPermission Levels in a Workspace level mapping are editable. Double-click the textbox, and then a drop-down menu appears. You can change the value of the textbox by selecting the corresponding SharePoint group/SharePoint Permission Level from the drop-down menu. Click New SharePoint Group/New SharePoint Permission Level to create a new SharePoint group/SharePoint Permission Level, then the Manage SharePoint Group/Manage SharePoint Permission Level tab appears. For more information on creating a new Livelink privilege, SharePoint group and a new SharePoint Permission Level, refer to About SharePoint Group section and About SharePoint Group section below.
Delete a Workspace Level Mapping – Click Delete the Selected Mapping(s) to odelete one or more Workspace level mappings. The default mappings cannot be deleted, but the SharePoint groups and SharePoint Permission Levels in the default mappings are editable.
239
DocAve 6: Livelink Migrations
*Note: The Livelink user will have the mapped SharePoint permissions and the SharePoint group’s permissions after the migration.
Click the List Level tab and configure the mapping from the Livelink list permissions to b.SharePoint list permissions. You can only edit the list level permission mappings. Double-click the SharePoint Permission Level textbox, and then a drop-down menu appears. You can select a SharePoint Permission Level from the drop-down menu. Click New SharePoint Permission Level to create a new SharePoint Permission Level, then the Manage SharePoint Permission Level tab appears. For more information on creating a new SharePoint Permission Level, refer to About SharePoint Permission Level section below.
Click the Folder Level tab and configure the mapping from the Livelink folder c.permissions to SharePoint folder permissions. You can only edit the folder level permission mappings. Double-click the SharePoint Permission Level textbox, and then a drop-down menu appears. You can select a SharePoint Permission Level from the drop-down menu. Click New SharePoint Permission Level to create a new SharePoint Permission Level, then the Manage SharePoint Permission Level tab appears. For more information on creating a new SharePoint Permission Level, refer to About SharePoint Permission Level section below.
Click the File/Item Level tab and configure the mapping from the Livelink file/item d.permissions to SharePoint file/item permissions. You can only edit the file/item level permission mappings. Double-click the SharePoint Permission Level textbox, and then a drop-down menu appears. You can select a SharePoint Permission Level from the drop-down menu. Click New SharePoint Permission Level to create a new SharePoint Permission Level, then the Manage SharePoint Permission Level tab appears. For more information on creating a new SharePoint Permission Level, refer to About SharePoint Permission Level section below.
About Livelink Privilege Livelink Privilege assigns a particular set of permissions to users so that users can perform specific actions on your Livelink environment.
To access the Manage Livelink Privilege interface, click Profile Settings on the Home tab > Mappings > Permission Mapping > Manage Livelink Privilege. The Manage Livelink Privilege interface appears, and you will see a list of provided or previously configured Livelink privileges.
In this interface, you can change the number of Livelink privileges displayed per page and the order in which they are displayed. To change the number of Livelink privileges displayed per page, select the desired number from the Show rows drop-down menu in the lower right-hand corner. To sort the Livelink privileges, click on a column heading such as Name and Description.
240
DocAve 6: Livelink Migrations
Customize how these Livelink privileges are displayed in a number of different ways:
• Search – Filters the privileges displayed by the keyword you designate. The keyword must be contained in a column value. At the top of the viewing pane, type in the keyword for the privileges you wish displayed. You can select for search to Search all pages or Search current page. Note that the search function is not case sensitive.
• – Manages which columns are displayed in the list so that only information you want to see is shown. Click , and then select the checkbox next to the column name to have that column shown in the list.
• – Hides the column. Click in the column title to hide the column.
Perform the following actions in the Manage Livelink Privilege interface.
• Click Create on the ribbon to create a new Livelink privilege. For details on creating Livelink privilege, see Creating Livelink Privileges.
• Click View Details on the ribbon and you will see the previously-configured settings for this Livelink privilege. Here you can also click Edit on the ribbon to make changes to the Livelink privilege’s settings. You will be brought to the Edit Livelink Privilege page where you can change this Livelink privilege.
• Click Edit on the ribbon to change the configuration of this Livelink privilege. For details on editing Livelink privilege, see Creating Livelink Privileges.
• Click Delete on the ribbon. A confirmation window appears, confirming that you want to proceed with the deletion. Click OK to delete the selected Livelink privileges, or click Cancel to return to the Livelink Privilege page without deleting the selected Livelink privileges.
Creating Livelink Privileges To create a new Livelink privilege, click Create on the ribbon. To modify a previously-configured Livelink privilege, select the Livelink privilege, and then click Edit on the ribbon.
In the Create Livelink Privilege or Edit Livelink Privilege interface, configure the following settings:
1. Name and Description – Enter a Name for this Livelink privilege that you are about to create or edit. Then enter an optional Description for future references.
2. Permissions – Choose which privileges to include in this Livelink privilege. Click the Select All checkbox to select or clear all privileges.
3. Click OK to save all of the configurations and return to the Manage Livelink Privilege interface, or click Cancel to return the Manage Livelink Privilege interface without saving any configurations.
241
DocAve 6: Livelink Migrations
About SharePoint Group You can manage SharePoint groups by creating a new SharePoint group, viewing details of a previously-configured SharePoint group, editing a previously-configured SharePoint group, or deleting a previously-configured SharePoint group.
To access Manage SharePoint Group, click Home tab > Mappings > Permission Mapping > Manage SharePoint Group. The Manage SharePoint Group interface appears, and you will see a list of previously-configured SharePoint groups.
In this interface, you can change the number of SharePoint groups displayed per page and the order in which they are displayed. To change the number of SharePoint groups displayed per page, select the desired number from the Show rows drop-down menu in the lower right-hand corner. To sort the SharePoint groups, click on a column heading such as Name and Description.
Customize how these SharePoint groups are displayed in a number of different ways:
• Search – Filters the groups displayed by the keyword you designate. The keyword must be contained in a column value. At the top of the viewing pane, type in the keyword for the SharePoint group you wish displayed. You can select for search to Search all pages or Search current page. Note that the search function is not case sensitive.
• – Manages which columns are displayed in the list so that only information you want to see is shown. Click , then select the checkbox next to the column name to have that column shown in the list.
• – Hides the column. Click in the column title to hide the column.
Perform the following actions in the Manage SharePoint Group interface.
• Click Create on the ribbon to create a new SharePoint group. For detailed on creating a new SharePoint group, see Creating SharePoint Groups.
• Click View Details on the ribbon and you will see the previously-configured settings for this SharePoint group. Here you can also click Edit on the ribbon to make changes to the SharePoint group’s settings. You will be brought to the Edit SharePoint Group page where you can change this SharePoint group.
• Click Edit on the ribbon to change the configuration of this SharePoint group. For details on editing SharePoint group, see Creating SharePoint Groups.
• Click Delete on the ribbon. A confirmation window appears, confirming that you want to proceed with the deletion. Click OK to delete the selected SharePoint Groups, or click Cancel to return to the SharePoint Group page without deleting the selected SharePoint groups.
242
DocAve 6: Livelink Migrations
Creating SharePoint Groups To create a new SharePoint group, click Create on the ribbon. To modify a previously-configured SharePoint group, select the SharePoint group, and then click Edit on the ribbon.
In the Create SharePoint Group or Edit SharePoint Group interface, configure the following settings:
1. Name and Description – Enter a Name for this group that you are about to create or edit. Then enter an optional Description for future references.
2. SharePoint Group Owner – Specify the SharePoint group owner.
3. Site Title – Choose whether to add the site title to be a part of the group name. For example, if the site title is A and the group name you specified is B, the created SharePoint Group name is A B.
4. Click OK to save the configurations and return to the Manage SharePoint Group page, or click Cancel to return to the Manage SharePoint Group page without saving any configurations.
About SharePoint Permission Level You can manage SharePoint Permission Levels by creating a new SharePoint Permission Level, viewing details of a previously-configured SharePoint Permission Level, editing a previously-configured SharePoint Permission Level, or deleting a previously-configured SharePoint Permission Level.
To access Manage SharePoint Permission Level, click Home tab > Mappings > Permission Mapping > Manage SharePoint Permission Level. The Manage SharePoint Permission Level interface appears, and you will see a list of previously-configured SharePoint Permission Level.
In this interface, you can change the number of SharePoint Permission Levels displayed per page and the order in which they are displayed. To change the number of SharePoint Permission Levels displayed per page, select the desired number from the Show rows drop-down menu in the lower right-hand corner. To sort the SharePoint Permission Levels, click on a column heading such as Name and Description.
Customize how these SharePoint Permission Levels are displayed in a number of different ways:
• Search – Filters the SharePoint Permission Levels displayed by the keyword you designate. The keyword must be contained in a column value. At the top of the viewing pane, type in the keyword for the SharePoint Permission Level you wish displayed. You can select for search to Search all pages or Search current page. Note that the search function is not case sensitive.
• – Manages which columns are displayed in the list so that only information you want to see is shown. Click , then select the checkbox next to the column name to have that column shown in the list.
• – Hides the column. Click in the column title to hide the column.
243
DocAve 6: Livelink Migrations
Perform the following actions in the Manage SharePoint Permission Level interface:
• Click Create on the ribbon to create a new SharePoint Permission Level. For detailed on creating a new SharePoint Permission Level, see Creating SharePoint Permission Levels.
• Click View Details on the ribbon and you will see the previously-configured settings for this SharePoint Permission Level. Here you can also click Edit on the ribbon to make changes to the SharePoint Permission Level’s settings. You will be brought to the Edit SharePoint Permission Level page where you can change this SharePoint Permission Level.
• Click Edit on the ribbon to change the configuration of this SharePoint Permission Level. For details on editing SharePoint Permission Level, see Creating SharePoint Permission Levels.
• Click Delete on the ribbon. A confirmation window appears, confirming that you want to proceed with the deletion. Click OK to delete the selected SharePoint Permission Levels, or click Cancel to return to the SharePoint Permission Level page without deleting the selected SharePoint Permission Levels.
Creating SharePoint Permission Levels To create a new SharePoint Permission Level, click Create on the ribbon. To modify a previously-configured customized SharePoint Permission Level, select the SharePoint Permission Level, and then click Edit on the ribbon.
In the Create SharePoint Permission Level or Edit SharePoint Permission Level interface, configure the following settings:
1. Name and Description – Enter a Name for this SharePoint Permission Level that you are about to create or edit. Then enter an optional Description for future references.
2. Permissions – Choose which permissions to include in this SharePoint Permission Level. You can select specified permissions of List Permissions, Site Permissions, and Personal Permissions by checking the checkbox before a specified permission. Check the Select All checkbox to select or clear all permissions.
3. Click OK to save the created SharePoint Permission Level, or click Cancel to return to the Manage SharePoint Permission Level page.
Dynamic Rules Dynamic rules allow you to configure your own mapping rules using C# programming language.
*Note: If your DocAve 6 SP3 platform has been upgraded from a previous version of DocAve, the dynamic rules configured using JavaScript cannot be upgraded because JavaScript is not compatible with C#.
To access Dynamic Rule, click Profile Settings on the ribbon of Home tab, and then Profile Settings tab appears. Click Dynamic Rule on the ribbon. The Dynamic Rule interface appears.
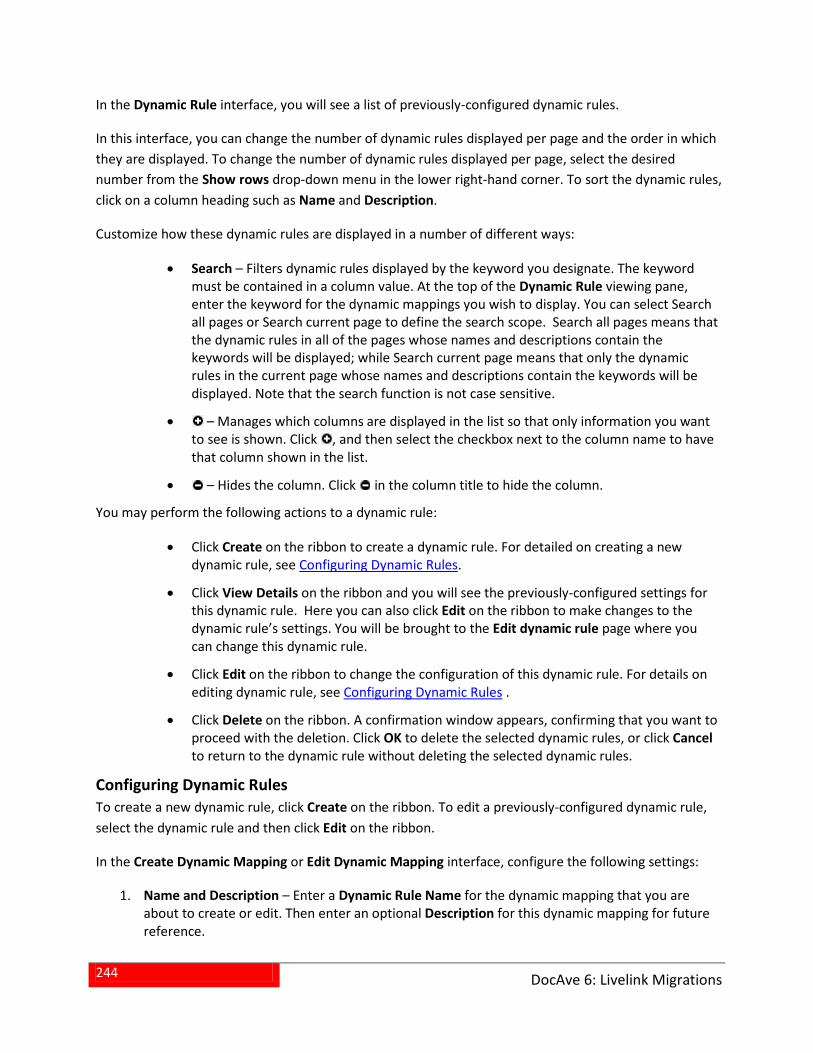
244
DocAve 6: Livelink Migrations
In the Dynamic Rule interface, you will see a list of previously-configured dynamic rules.
In this interface, you can change the number of dynamic rules displayed per page and the order in which they are displayed. To change the number of dynamic rules displayed per page, select the desired number from the Show rows drop-down menu in the lower right-hand corner. To sort the dynamic rules, click on a column heading such as Name and Description.
Customize how these dynamic rules are displayed in a number of different ways:
• Search – Filters dynamic rules displayed by the keyword you designate. The keyword must be contained in a column value. At the top of the Dynamic Rule viewing pane, enter the keyword for the dynamic mappings you wish to display. You can select Search all pages or Search current page to define the search scope. Search all pages means that the dynamic rules in all of the pages whose names and descriptions contain the keywords will be displayed; while Search current page means that only the dynamic rules in the current page whose names and descriptions contain the keywords will be displayed. Note that the search function is not case sensitive.
• – Manages which columns are displayed in the list so that only information you want to see is shown. Click , and then select the checkbox next to the column name to have that column shown in the list.
• – Hides the column. Click in the column title to hide the column.
You may perform the following actions to a dynamic rule:
• Click Create on the ribbon to create a dynamic rule. For detailed on creating a new dynamic rule, see Configuring Dynamic Rules.
• Click View Details on the ribbon and you will see the previously-configured settings for this dynamic rule. Here you can also click Edit on the ribbon to make changes to the dynamic rule’s settings. You will be brought to the Edit dynamic rule page where you can change this dynamic rule.
• Click Edit on the ribbon to change the configuration of this dynamic rule. For details on editing dynamic rule, see Configuring Dynamic Rules .
• Click Delete on the ribbon. A confirmation window appears, confirming that you want to proceed with the deletion. Click OK to delete the selected dynamic rules, or click Cancel to return to the dynamic rule without deleting the selected dynamic rules.
Configuring Dynamic Rules To create a new dynamic rule, click Create on the ribbon. To edit a previously-configured dynamic rule, select the dynamic rule and then click Edit on the ribbon.
In the Create Dynamic Mapping or Edit Dynamic Mapping interface, configure the following settings:
Name and Description – Enter a Dynamic Rule Name for the dynamic mapping that you are 1.about to create or edit. Then enter an optional Description for this dynamic mapping for future reference.
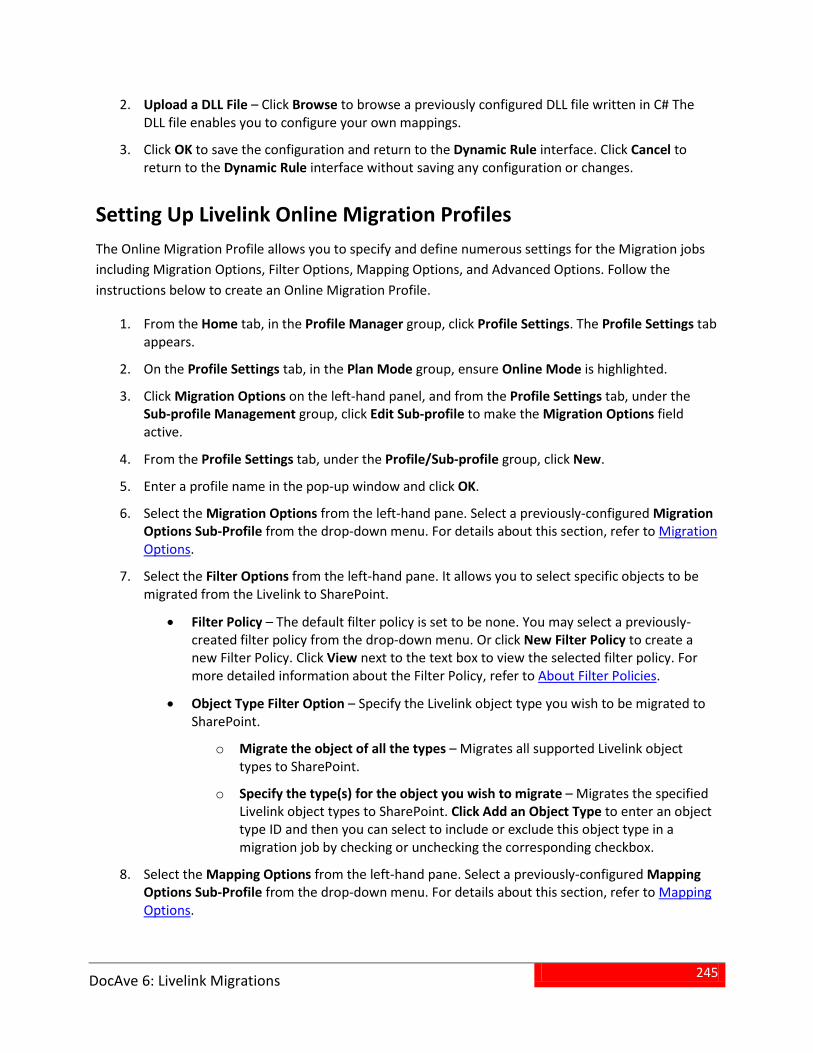
245
DocAve 6: Livelink Migrations
Upload a DLL File – Click Browse to browse a previously configured DLL file written in C# The 2.DLL file enables you to configure your own mappings.
Click OK to save the configuration and return to the Dynamic Rule interface. Click Cancel to 3.return to the Dynamic Rule interface without saving any configuration or changes.
Setting Up Livelink Online Migration Profiles The Online Migration Profile allows you to specify and define numerous settings for the Migration jobs including Migration Options, Filter Options, Mapping Options, and Advanced Options. Follow the instructions below to create an Online Migration Profile.
1. From the Home tab, in the Profile Manager group, click Profile Settings. The Profile Settings tab appears.
2. On the Profile Settings tab, in the Plan Mode group, ensure Online Mode is highlighted.
3. Click Migration Options on the left-hand panel, and from the Profile Settings tab, under the Sub-profile Management group, click Edit Sub-profile to make the Migration Options field active.
4. From the Profile Settings tab, under the Profile/Sub-profile group, click New.
5. Enter a profile name in the pop-up window and click OK.
6. Select the Migration Options from the left-hand pane. Select a previously-configured Migration Options Sub-Profile from the drop-down menu. For details about this section, refer to Migration Options.
7. Select the Filter Options from the left-hand pane. It allows you to select specific objects to be migrated from the Livelink to SharePoint.
• Filter Policy – The default filter policy is set to be none. You may select a previously-created filter policy from the drop-down menu. Or click New Filter Policy to create a new Filter Policy. Click View next to the text box to view the selected filter policy. For more detailed information about the Filter Policy, refer to About Filter Policies.
• Object Type Filter Option – Specify the Livelink object type you wish to be migrated to SharePoint.
Migrate the object of all the types – Migrates all supported Livelink object otypes to SharePoint.
Specify the type(s) for the object you wish to migrate – Migrates the specified oLivelink object types to SharePoint. Click Add an Object Type to enter an object type ID and then you can select to include or exclude this object type in a migration job by checking or unchecking the corresponding checkbox.
8. Select the Mapping Options from the left-hand pane. Select a previously-configured Mapping Options Sub-Profile from the drop-down menu. For details about this section, refer to Mapping Options.
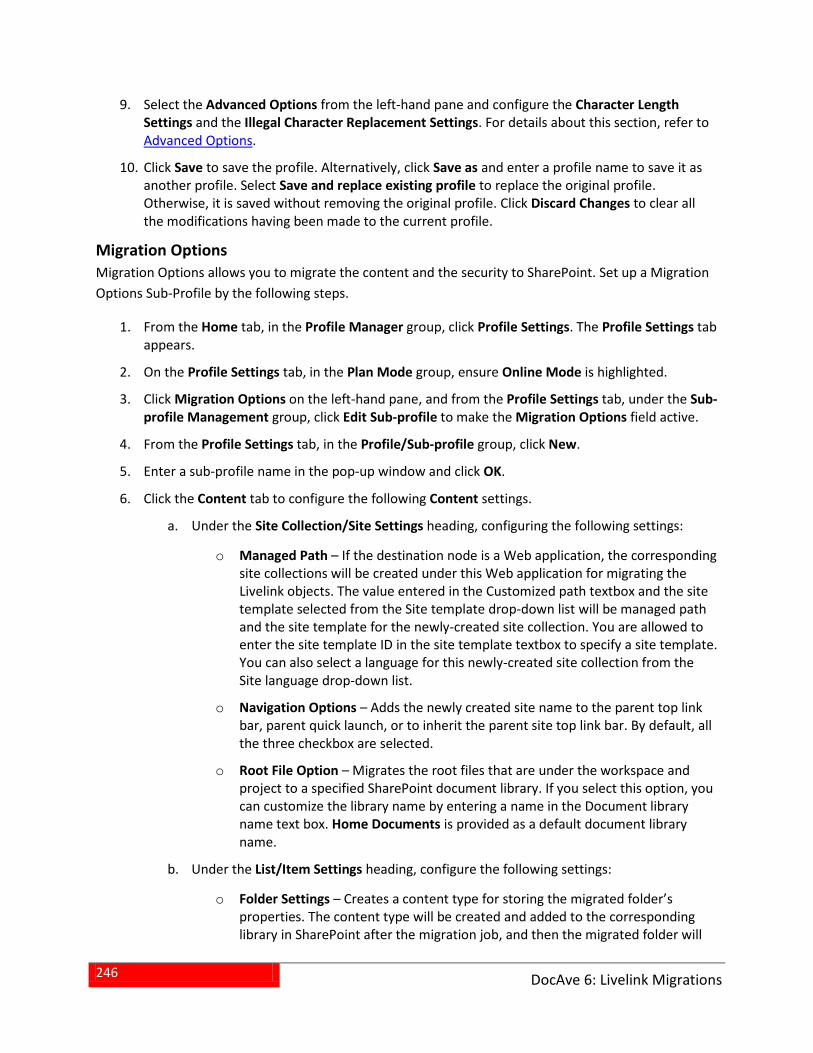
246
DocAve 6: Livelink Migrations
9. Select the Advanced Options from the left-hand pane and configure the Character Length Settings and the Illegal Character Replacement Settings. For details about this section, refer to Advanced Options.
10. Click Save to save the profile. Alternatively, click Save as and enter a profile name to save it as another profile. Select Save and replace existing profile to replace the original profile. Otherwise, it is saved without removing the original profile. Click Discard Changes to clear all the modifications having been made to the current profile.
Migration Options Migration Options allows you to migrate the content and the security to SharePoint. Set up a Migration Options Sub-Profile by the following steps.
1. From the Home tab, in the Profile Manager group, click Profile Settings. The Profile Settings tab appears.
2. On the Profile Settings tab, in the Plan Mode group, ensure Online Mode is highlighted.
3. Click Migration Options on the left-hand pane, and from the Profile Settings tab, under the Sub-profile Management group, click Edit Sub-profile to make the Migration Options field active.
4. From the Profile Settings tab, in the Profile/Sub-profile group, click New.
5. Enter a sub-profile name in the pop-up window and click OK.
6. Click the Content tab to configure the following Content settings.
Under the Site Collection/Site Settings heading, configuring the following settings: a.
Managed Path – If the destination node is a Web application, the corresponding osite collections will be created under this Web application for migrating the Livelink objects. The value entered in the Customized path textbox and the site template selected from the Site template drop-down list will be managed path and the site template for the newly-created site collection. You are allowed to enter the site template ID in the site template textbox to specify a site template. You can also select a language for this newly-created site collection from the Site language drop-down list.
Navigation Options – Adds the newly created site name to the parent top link obar, parent quick launch, or to inherit the parent site top link bar. By default, all the three checkbox are selected.
Root File Option – Migrates the root files that are under the workspace and oproject to a specified SharePoint document library. If you select this option, you can customize the library name by entering a name in the Document library name text box. Home Documents is provided as a default document library name.
Under the List/Item Settings heading, configure the following settings: b.
Folder Settings – Creates a content type for storing the migrated folder’s oproperties. The content type will be created and added to the corresponding library in SharePoint after the migration job, and then the migrated folder will
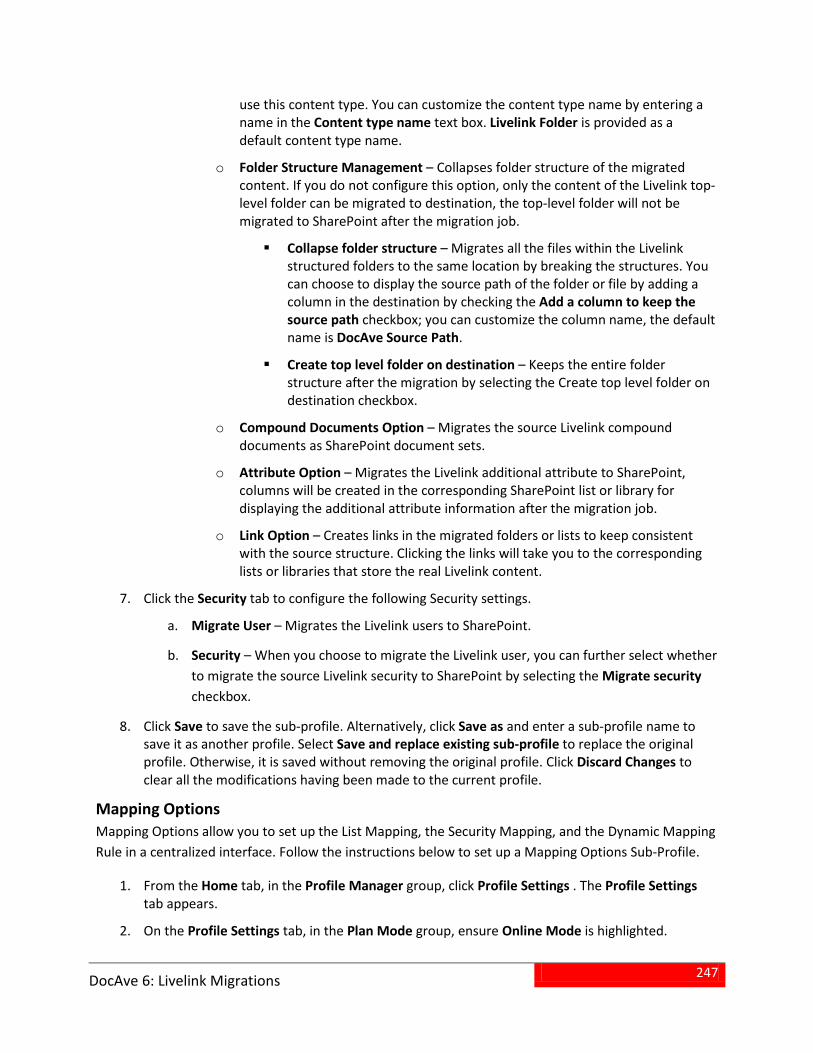
247
DocAve 6: Livelink Migrations
use this content type. You can customize the content type name by entering a name in the Content type name text box. Livelink Folder is provided as a default content type name.
Folder Structure Management – Collapses folder structure of the migrated ocontent. If you do not configure this option, only the content of the Livelink top-level folder can be migrated to destination, the top-level folder will not be migrated to SharePoint after the migration job.
Collapse folder structure – Migrates all the files within the Livelink structured folders to the same location by breaking the structures. You can choose to display the source path of the folder or file by adding a column in the destination by checking the Add a column to keep the source path checkbox; you can customize the column name, the default name is DocAve Source Path.
Create top level folder on destination – Keeps the entire folder structure after the migration by selecting the Create top level folder on destination checkbox.
Compound Documents Option – Migrates the source Livelink compound odocuments as SharePoint document sets.
Attribute Option – Migrates the Livelink additional attribute to SharePoint, ocolumns will be created in the corresponding SharePoint list or library for displaying the additional attribute information after the migration job.
Link Option – Creates links in the migrated folders or lists to keep consistent owith the source structure. Clicking the links will take you to the corresponding lists or libraries that store the real Livelink content.
7. Click the Security tab to configure the following Security settings.
Migrate User – Migrates the Livelink users to SharePoint. a.
Security – When you choose to migrate the Livelink user, you can further select whether b.to migrate the source Livelink security to SharePoint by selecting the Migrate security checkbox.
8. Click Save to save the sub-profile. Alternatively, click Save as and enter a sub-profile name to save it as another profile. Select Save and replace existing sub-profile to replace the original profile. Otherwise, it is saved without removing the original profile. Click Discard Changes to clear all the modifications having been made to the current profile.
Mapping Options Mapping Options allow you to set up the List Mapping, the Security Mapping, and the Dynamic Mapping Rule in a centralized interface. Follow the instructions below to set up a Mapping Options Sub-Profile.
1. From the Home tab, in the Profile Manager group, click Profile Settings . The Profile Settings tab appears.
2. On the Profile Settings tab, in the Plan Mode group, ensure Online Mode is highlighted.
248
DocAve 6: Livelink Migrations
3. Click Mapping Options on the left-pane, and from the Profile Settings tab, under the Sub-profile Management group, click Edit Sub-profile to make the Mapping Options field active.
4. From the Profile Settings tab, in the Profile/Sub-profile group, click New.
5. Enter a sub-profile name in the pop-up window and click OK.
6. Click the Category Mapping tab to configure the category mapping from Livelink to SharePoint. Configure the following settings to set up a Category Mapping.
Category Option – Select the Migrate Livelink Categories to the destination checkbox a.to migrate the Livelink category information to SharePoint.
Migrate Livelink Categories as SharePoint content types – If you select this ooption, after the migration job, the category lists will be created in SharePoint, and the content type that stores the category information will be added in these category lists. Meanwhile, a column will be created in the destination list or library, the category links displayed in this column will designate to the category lists, you can directly view the category information by clicking the category links.
Migrate Livelink Categories as SharePoint columns – If you select this option, ocolumns will be created in the corresponding SharePoint list or library for displaying the Livelink category information after the migration job.
*Note: The Livelink list level object cannot migrate the category information to SharePoint if you select Migrate Categories as Column.
Content Type Mapping – Enter the name and the version of the source Livelink category b.in the Livelink Category text box, the desired name of the SharePoint content type. The entered source Livelink category will be migrated as a SharePoint content type with the entered SharePoint content type name in the destination.
*Note: This section only appears after selecting Migrate Livelink Categories as SharePoint content types radio button in the Category Option section.
Attribute Mapping – Click Add an Attribute Mapping to add an attribute mapping. c.Enter the name of the source Livelink attribute in the Livelink Attribute text box, the desired SharePoint column name in the SharePoint Column Name text box, and select the SharePoint column type from the SharePoint Column Type drop-down list.
7. Click the List Mapping tab to configure the list mapping from Livelink to SharePoint. Configure the following settings to set up a List Mapping.
List Name Mapping – Click Add a List Name Mapping to add a list name mapping. a.Double-click the Livelink Name textbox and the corresponding SharePoint List Name textbox to enter a Livelink list name and a SharePoint list name separately. Click Delete the Selected List Name Mapping(s) to delete one or more selected mappings. If the SharePoint list name does not exist in SharePoint, the list will be created in SharePoint after the migration job.
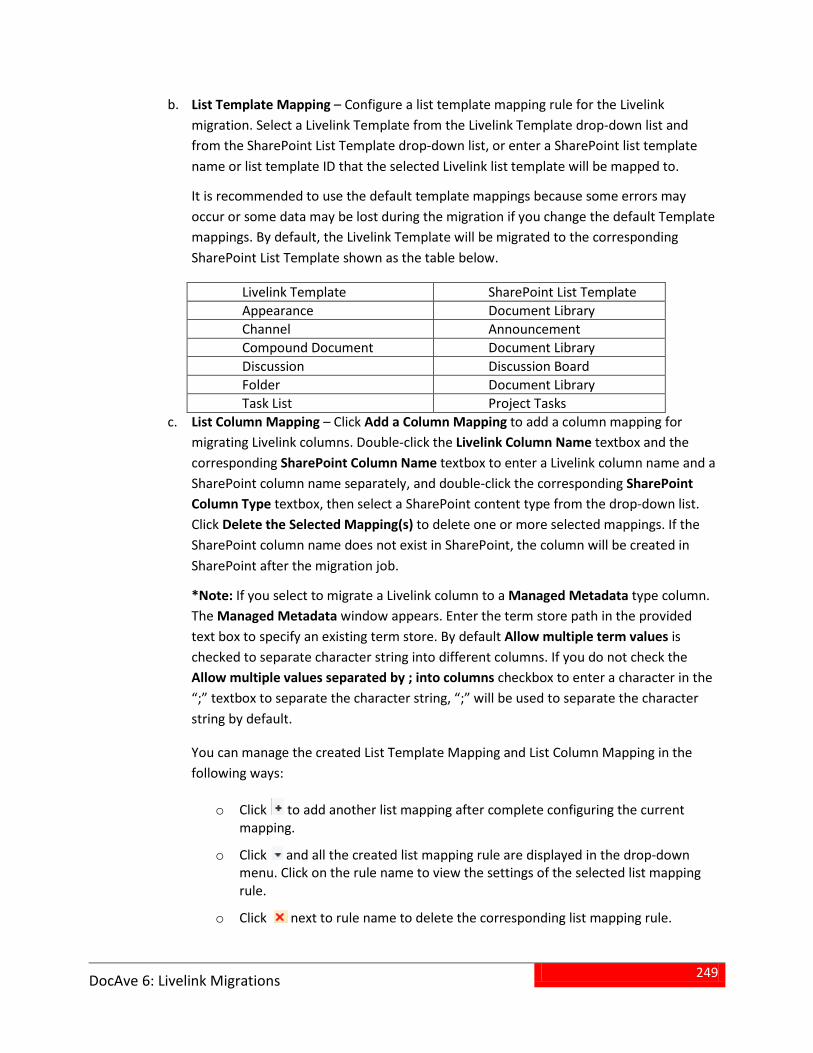
249
DocAve 6: Livelink Migrations
List Template Mapping – Configure a list template mapping rule for the Livelink b.migration. Select a Livelink Template from the Livelink Template drop-down list and from the SharePoint List Template drop-down list, or enter a SharePoint list template name or list template ID that the selected Livelink list template will be mapped to.
It is recommended to use the default template mappings because some errors may occur or some data may be lost during the migration if you change the default Template mappings. By default, the Livelink Template will be migrated to the corresponding SharePoint List Template shown as the table below.
Livelink Template SharePoint List Template Appearance Document Library Channel Announcement Compound Document Document Library Discussion Discussion Board Folder Document Library Task List Project Tasks
List Column Mapping – Click Add a Column Mapping to add a column mapping for c.migrating Livelink columns. Double-click the Livelink Column Name textbox and the corresponding SharePoint Column Name textbox to enter a Livelink column name and a SharePoint column name separately, and double-click the corresponding SharePoint Column Type textbox, then select a SharePoint content type from the drop-down list. Click Delete the Selected Mapping(s) to delete one or more selected mappings. If the SharePoint column name does not exist in SharePoint, the column will be created in SharePoint after the migration job.
*Note: If you select to migrate a Livelink column to a Managed Metadata type column. The Managed Metadata window appears. Enter the term store path in the provided text box to specify an existing term store. By default Allow multiple term values is checked to separate character string into different columns. If you do not check the Allow multiple values separated by ; into columns checkbox to enter a character in the “;” textbox to separate the character string, “;” will be used to separate the character string by default.
You can manage the created List Template Mapping and List Column Mapping in the following ways:
Click to add another list mapping after complete configuring the current omapping.
Click and all the created list mapping rule are displayed in the drop-down omenu. Click on the rule name to view the settings of the selected list mapping rule.
Click next to rule name to delete the corresponding list mapping rule. o
250
DocAve 6: Livelink Migrations
8. Click the Security Mapping tab to configure the security mapping from the Livelink user, domain, group and permissions to the SharePoint user, domain, group and permissions. Configure the following settings to set up a Security Mapping.
• User Mapping (Optional) – Replaces existing user name in Livelink with the existing or default username in SharePoint metadata fields. Select a previously-created User Mapping rule from the drop-down menu, and you are able to access the detailed information about this selected user mapping by clicking View. If you want to create a new user mapping rule, click New User Mapping in the drop-down menu, and then you are brought to User Mapping Create page. For specific instructions on setting up user mapping, refer to the DocAve 6 Control Panel Reference Guide.
• Domain Mapping (Optional) – Replaces existing domain name in Livelink with another domain name in SharePoint metadata fields. Select a previously-created Domain Mapping rule from the drop-down menu, and you are able to access the detailed information about this selected domain mapping by clicking View. If you want to create a new domain mapping rule, click New Domain Mapping in the drop-down menu, and then you are brought to the Domain Mapping Create page. For specific instructions on setting up domain mapping, refer to the DocAve 6 Control Panel Reference Guide.
• Group Mapping (Optional) – Replaces groups in Livelink to the existing groups in SharePoint metadata field. Select a previously-created Group Mapping rule from the drop-down menu, and you are able to access the detailed information about this selected group mapping by clicking View. If you want to create a new group mapping rule, click New Group Mapping in the drop-down menu, and then you are brought to the Group Mapping Create page. For specific instructions on setting up group mapping, refer to the DocAve 6 Control Panel Reference Guide.
• Permission Mapping (Required) – Maps the Livelink permissions to the SharePoint permissions. A default permission mapping rule is provided with the name of Default Permission Mapping. Select a previously-created Permission Mapping rule from the drop-down menu, and you are able to access the detailed information about this selected permission mapping by clicking View. If you want to create a new permission mapping rule, click New Permission Mapping in the drop-down menu, and then you are brought to the Permission Mapping Create page. For specific instructions on setting up Permission Mapping, refer to Creating and Editing Permission Mapping .
9. Click Save to save the sub-profile. Alternatively, click Save as and enter a sub-profile name to save it as another profile. Select Save and replace existing sub-profile to replace the original profile. Otherwise, it is saved without removing the original profile. Click Discard Changes to clear all the modifications having been made to the current profile.
Advanced Options Advanced options allow you to configure dynamic rule settings, character length settings, and illegal character replacement settings. Refer to the following section to set up Advanced Options.
Dynamic Rules Dynamic rules allow you to configure your own mappings using C# programming language. Select a previously-configured dynamic rule from the Dynamic Rule drop-down list. Click View to view the
251
DocAve 6: Livelink Migrations
selected dynamic rule or click New Dynamic Rule from the drop-down list to create a new dynamic rule. And then select the newly created dynamic rule from the drop-down list.
In the Create Dynamic Rule interface, configure the following settings:
Name and Description – Enter a Dynamic Rule Name for the dynamic rule that you are about to 1.create or edit. Then enter an optional Description for this dynamic rule for future reference.
Upload a DLL File – Click Browse to browse a previously configured DLL file written in C# 2.programming language. The DLL file enables you to configure your own mappings.
Click OK to save the configuration and return to the Dynamic Rule interface. Click Cancel to 3.return to the Dynamic Rule interface without saving any configuration or changes.
Character Length Settings Configure character length limitations for SharePoint URL, filename, and folder name. In SharePoint, the maximum length of SharePoint URL is 260 characters, and the maximum length of file name and folder name is 128 characters.
Maximum Length of the folder name – The default value is 60 and you can define the value 1.from 1 to 128. If the folder name exceeds the limitation, the extra characters will be pruned from the end. For example, a folder migrated from Livelink is named abcdef in the source and the value that you set here is 5. The folder will be named abcde after the migration.
Maximum Length of the file name – The default value is 80 and you can define the value from 1 2.to 128. If the file name, including the file extension, exceeds the limitation, the extra characters will be pruned from the end. For example, a file is named abcdef.txt in the source and the value that you set here is 5. The file will be named a.txt after the migration.
Maxim Length of the SharePoint URL – The default value is 255 and you can define the value 3.from 1 to 260. The length of the SharePoint URL is calculated from the first character of the managed path, that is /.
*Note: If the folder URL exceeds the limitation, the folder and its content will be migrated to its previous level folder till the folder URL does not exceed the limitation. If there is a file whose URL exceeds the limitation within a folder, it will be migrated to its previous level folder till the file URL does not exceed the limitation. If the file URL exceeds the limitation, the file will be migrated to its previous level folder till the file URL do not exceeds the limitation.
Illegal Character Replacement Settings Modify and add illegal character mapping for Group Level, Folder level, and File level to the specified characters in SharePoint. By default, all illegal characters are replaced with an underline (_).Click Group Level, Folder Level, or File Level on the tab to enter into each page.
• To modify an illegal character mapping, double-click_ in the column of Replace with behind an illegal character and change _ with your specified character.
• To add an illegal character mapping, click Add an Illegal Character and then enter your specified illegal character in the column of Illegal character in SharePoint and the
252
DocAve 6: Livelink Migrations
corresponding valid character in the column of Replace with. Click Add an Illegal Character again and another illegal character mapping can be created.
• To delete one or more previously-configured an illegal character mapping, select the mappings and click Delete the Selected Illegal Character(s). You can also remove a
previously-configured illegal character mapping by clicking .

253
DocAve 6: Livelink Migrations
Performing a Livelink Online Migration An online Livelink Migration directly migrates contents, securities, and configuration from Livelink Server to SharePoint environment. An offline migration exports the Livelink contents, securities, and configurations to a storage location first, and then imports the exported data to the SharePoint from the storage location.
To start the Livelink Online Migration, click Online Migration on the ribbon, and then you are brought to the Create a New Plan interface.
To perform a Livelink migration job, follow the instructions below.
Selecting the Source and Destination Nodes 1. In the Source pane, click the Livelink Connection name to expand the data tree. To select the
source node:
Find the node whose data you wish to migrate. If working with a large environment, a.enter the name if the node (for example, workspace, folder, and item) into the Input Keyword text box to search for the destination node. You can only search the nodes whose name is displayed in the currently expanded tree. The nodes which are not displayed in the expanded tree cannot be search. When entering the keyword, the search result will be displayed with a little time.
Select the source node by checking the corresponding checkbox or radio button. b.
*Note: For what kinds of source contents are supported and unsupported in the migration, refer to Supported and Unsupported Elements for Livelink Migrator.
2. In the Destination pane, click the farm name to expand the data tree. To select the destination node:
Select the node which you wish to migrate the source data to. If working with a large a.environment, enter the keyword of the node into the Input Keyword text box to search for the desired node. You can only search the nodes whose name is displayed in the currently expanded tree. The nodes which are not displayed in the expanded tree cannot be search. When entering the keyword, the search result will be displayed with a little time.
Select the destination node by selecting corresponding radio button. You can also create b.a new container to be the destination node without leaving the current page. For details on creating a container in SharePoint, refer to Creating Containers .
3. There are two methods to saving and/or running this job:
• Click Run Now to perform a migration job immediately, and then the Run Now interface appears. For more information on how to configure the Run Now interface, refer to Configuring the Run Now Interface.

254
DocAve 6: Livelink Migrations
• Click Save As New Plan, and then you are brought to the Save As New Plan interface. For more information on how to configure the Save As New Plan interface, refer to Configuring the Save As New Plan Interface.
Configuring the Save As New Plan Interface Configure the following settings to build up a migration plan.
Plan Name – Enter a name in the text box for the plan you are about to create. It is optional to 1.enter the description for the plan.
Profile Selection – Configure the related migration options and mappings for the migration job. 2.Select a previously-created main profile from the drop-down menu. Livelink Migration provides you a default main profile named Default Profile. Click New Profile to create a new profile, and then you are brought to the Profile Settings interface. For the detailed instructions to configure the main profile, see Setting Up Livelink Online Migration Profiles.
Livelink Project Migration Option – Select whether to migrate the Livelink project as a site or as 3.a site collection to SharePoint.
Schedule Selection – Configure the schedule settings. For more information on the schedule 4.configurations, refer to Configuring Schedule Selection.
• No Schedule – Select this option to apply the rules of this plan, and then you must run the job manually.
• Configure the schedule myself – Select this to configure the specific time you want to collect the data of this profile. The Schedule Settings area appears when you select this option. Click Add Schedule. The Add Schedule interface appears. For more information on how to configure the settings in Add Schedule interface, refer to Configuring the Add Schedule Interface.
Notification – Select the e-mail Notification profile for sending the notification report. For more 5.information on working with notification policies, refer to the DocAve 6 Control Panel Reference Guide.
Associated Plan Group – Select an associated plan group or create a new plan group in the 6.Associated plan group(s) drop-down list in order to make the plan run according to the selected plan group settings. For more information on plan groups, refer to the DocAve 6 Control Panel Reference Guide.
Migration Database – Select the Also use Specified Database to store the job data checkbox to 7.store the detailed job information in the migration database. If this checkbox is deselected, the detailed job information will not be stored in the migration database. Check whether the migration database that you previously configured is available by clicking Test. After the testing is completed, click Details. The Agent Name and Status are displayed. Ensure that the database is available; otherwise the migration job will fail.
Click Save to save the plan or select Save and Run Now from the Save drop-down list to save 8.the plan and run the plan immediately. The Run Now interface appears. For more information on how to configure the Run Now interface, refer to Configuring the Run Now Interface. Or click Cancel to return to the Livelink Migration interface.

255
DocAve 6: Livelink Migrations
Configuring the Run Now Interface Follow the steps below to configure the Run Now interface.
Options – Select a type of migration for this schedule. 1.
• Full migration – Migrate all source data to the destination.
• Incremental migration – Compare content from the last migration job and then migrates only the data that has changed and the data that is failed to be migrated in the last job.
*Note: If you select the Incremental migration option and configure the Content level conflict resolution as Overwrite or Append, the Remigrate the objects whose metadata/securities failed to be migrated in the last migration job option in the Conflict Resolution section will be enabled, and you are required to decide whether or not to re-migrate the objects whose metadata/securities failed to be migrated in the last migration job.
Conflict Resolution – This is used to select a resolution when the item name in the source node 2.conflicts with an existing item in the destination node. Select Merge or Skip from the Container level conflict resolution drop-down list. If you select Merge, the Check lower objects checkbox is checked as mandatory and you need to select Overwrite, Skip or Append from the Content level conflict resolution drop-down list. If you select Skip, the Check lower objects checkbox is optional. For more detailed information on Conflict Resolution, refer to Appendix D: Conflict Resolution.
Job Status Option – Select the Ignore metadata/security exceptions checkbox to ignore the 3.Exception or Failed job which is failed due to the metadata/security exceptions. When running an Incremental job, the above kind of jobs will be ignored.
Click OK to run the job immediately, or click Cancel to return to the Plan Manager interface. 4.
Configuring the Add Schedule Interface Follow the steps below to configure the Add Schedule interface.
Schedule Settings – Specify the frequency to run this recurring schedule. Enter an integer into 1.the text box, and select Minute(s), Hour(s), Day(s), Week(s), Month(s) from the drop-down menu.
Range of Recurrence – Specify when to start the job, and the schedule ending. 2.
• Start Time – Enter the time to start the plan. The Time Zone can be changed under the Start time. Note that the start time cannot be earlier than the current time.
• No end date –Select this option to repeat running the plan until being stopped manually.
• End after specified occurrence(s) – Select this option to stop the plan after specified occurrences that you configure in the text box.
• End by – Enter the time to end the recurrence of plans.
256
DocAve 6: Livelink Migrations
Click OK on the ribbon to save the schedule setting configurations. Click Cancel on the ribbon to 3.return to the plan setting interface without saving any changes.
Repeat the configurations above to create more schedules. 4.
Configuring the Run Now Interface In the Run Now interface, configure the following settings:
Conflict Resolution – Specify the conflict resolution when the item names in Livelink conflicts 1.with an existing item in SharePoint. For the Container level, the conflict resolutions provided are Merge and Skip. Merge requires you to check the lower objects, and configure the content level conflict resolution. Skip provides the configuration of the content level conflict resolution optional. For more detailed information of Conflict Resolution, refer to Appendix D: Conflict Resolution.
Profile Selection – Configure the related migration options and mappings for the migration job. 2.Select a previously-created main profile from the drop-down menu. Livelink Migration provides you a default main profile named Default Profile.
Migration Database – Select the Also use Specified Database to store the job data checkbox to 3.store the detailed job information in the migration database. If this checkbox is deselected, the detailed job information will not be stored in the migration database. Click Test to check whether the previously-configured migration database is available. After the testing is completed, click Details, Agent Name and Status are displayed. For the detailed information about the Migration Database, refer to Configuring Migration Databases.
Notification – Select the e-mail Notification profile for sending the notification report. For more 4.information on working with notification policies, refer to the DocAve 6 Control Panel Reference Guide.
Livelink Project Migration Option – Migrates the Livelink project as a site or as a site collection 5.to SharePoint.
Click OK to run the plan immediately or click Cancel to return to the Online Migration interface 6.without saving any configurations or changes.
257
DocAve 6: Livelink Migrations
Livelink Offline Migrations Livelink Offline Migration exports the Livelink contents, securities, and configurations to a storage location first, and then imports the exported data to the SharePoint from the storage location.
Livelink Offline Migration supports SharePoint 2010 on-premises and SharePoint 2013 on-premises.
Refer to the sections below to use Livelink Offline Migration.
Configuring a Livelink Offline Migration The corresponding Livelink export profile and import profile must be in place prior to running an offline Livelink Migrator job. The section below instructs the steps to set up an export profile and an import profile.
Setting Up an Export Profile An Export Livelink migration profile allows you to define numerous settings including Migration Options and Filter Options. Follow the instructions below to create an Export Livelink migration profile.
1. From the Home tab, in the Profile Manager group, click Profile Settings . The Profile Settings tab appears.
2. On the Profile Settings tab, in the Plan Mode group, ensure Export Mode is highlighted.
3. Click Migration Options on the left-hand pane, and from the Profile Settings tab, under the Sub-profile Management group, click Edit Sub-profile to make the Migration Options field active.
4. From the Profile Settings tab, under the Profile/Sub-profile Management group, click New.
5. Enter a profile name in the pop-up window and click OK.
6. Select the Migration Options from the left-hand pane. Select a previously-configured Migration Options Sub-Profile from the drop-down menu. The options may be different from the options in Online Migration profile, but you can refer to Migration Options section for all the detailed information.
7. Select the Filter Options from the left-hand pane. It allows you to select specific objects to be migrated from the Livelink to SharePoint.
Filter Policy – The default filter policy is set to be none. You may select a previously-a.created filter policy from the drop-down menu. Or click New Filter Policy to create a new Filter Policy. Click View to view the selected filter policy. For more detailed information about the Filter Policy, refer to About Filter Policies.
258
DocAve 6: Livelink Migrations
Object Type Filter Option – Specify the Livelink object type you wish to be migrated to b.SharePoint:
Migrate the object of all the types – Migrates all types of Livelink objects to oSharePoint.
Specify the types for the objects you wish to migrate – Migrates the specified otypes of Livelink objects to SharePoint. Click Add an Object Type to enter an object type and then you can select to include or exclude this object type in a migration job by checking or unchecking the corresponding checkbox.
8. Select Mapping Options from the left-hand pane. Use Mapping Options to configure category mappings to map the Livelink categories to SharePoint content types or columns.
Categories Option – Select this option to migrate the Livelink category information to a.SharePoint.
Migrate Livelink Categories as SharePoint content types – If you select this ooption, after the migration job, the category lists will be created in SharePoint, and the content type that stores the category information will be added in these category lists. Meanwhile, a column will be created in the destination list or library, the category links displayed in this column will designate to the category lists, you can directly view the category information by clicking the category links.
Migrate Livelink Categories as SharePoint columns – If you select this option, ocolumns will be created in the corresponding SharePoint list or library for displaying the Livelink category information after the migration job.
*Note: The Livelink list level object cannot migrate the category information to SharePoint if you select Migrate Categories as Column.
Content Type Mapping – Enter the name and the version of the source Livelink category b.in the Livelink Category text box, the desired name of the SharePoint content type. The entered source Livelink category will be migrated as a SharePoint content type with the entered SharePoint content type name in the destination.
*Note: This section only appears after selecting Migrate Livelink Categories as SharePoint content types radio button in the Category Option section.
Attribute Mapping – Click Add an Attribute Mapping to add an attribute mapping. c.Enter the name of the source Livelink attribute in the Livelink Attribute Name text box, the desired SharePoint column name in the SharePoint Column Name text box, and select the SharePoint column type from the SharePoint Column Type drop-down list.
9. Click Save to save the profile. Alternatively, click Save as and enter a profile name to save it as another profile. Select Save and replace existing profile to replace the original profile. Otherwise, it is saved without removing the original profile. Click Discard Changes to clear all the modifications having been made to the current profile.
259
DocAve 6: Livelink Migrations
Setting Up an Import Profile An Import Livelink migration profile allows you to define numerous settings including Migration Options, Mapping Options and Advanced Options. Follow the instructions below to create an Import Livelink migration profile.
1. From the Home tab, in the Profile Manager group, click Profile Settings . The Profile Settings tab appears.
2. On the Profile Settings tab, in the Plan Mode group, ensure Import Mode is highlighted.
3. Click Migration Options on the left-hand pane, and from the Profile Settings tab, under the Sub-profile Management group, click Edit Sub-profile to make the Migration Options field active.
4. From the Profile Settings tab, under the Profile/Sub-profile Management group, click New.
5. Enter a sub-profile name in the pop-up window and click OK.
6. Select the Migration Options from the left-hand pane. Select a previously-configured Migration Options Sub-Profile from the drop-down menu. The options may be different from the options in Online Migration profile, but you can refer to Migration Options section for all the detailed information.
7. Select the Mapping Options from the left-hand pane. Select a previously-configured Mapping Options Sub-Profile from the drop-down menu. Refer to Mapping Options section for all the detailed information.
8. Select the Advanced Options from the left-hand pane and configure the Character Length Settings and the Illegal Character Replacement Settings. For details about this section, refer to Advanced Options.
9. Click Save to save the profile. Alternatively, click Save as and enter a profile name to save it as another profile. Select Save and replace existing profile to replace the original profile. Otherwise, it is saved without removing the original profile. Click Discard Changes to clear all the modifications having been made to the current profile.
260
DocAve 6: Livelink Migrations
Performing a Livelink Offline Migration Livelink Migrator allows you to migrate the Livelink content to SharePoint by exporting the Livelink contents, securities, and configurations to a storage location first, and then importing the exported data to the SharePoint from the storage location.
Exporting Data To export the Livelink data to an export location, click Export on the ribbon, and then you are brought to the Create a New Plan interface.
Follow the steps blew to perform the offline Livelink migration job:
1. In the Source pane, click the Livelink Server name to expand the data tree. To select the source node:
Find the node whose data you wish to migrate. If working with a large environment, a.enter the name if the node (for example, workspace, folder, and item) into the Input Keyword text box to search for the destination node. You can only search the nodes whose name is displayed in the currently expanded tree. The nodes which are not displayed in the expanded tree cannot be search. When entering the keyword, the search result will be displayed with a little time.
Select the source node by checking the corresponding checkbox or radio button. b.
*Note: For information on the source contents that are supported in the migration, refer to Supported and Unsupported Elements for Livelink Migrator.
2. In the Destination pane, select a previously-configured export location from the drop-down list to store the Livelink data or click New Export Location to create a new one. For details on creating an export location for export mode, refer to the About Export Locations (Offline Jobs Only) section of this guide.
3. Click Save As New Plan, and then you are brought to the Save As New Plan interface.
Configuring the Save As New Plan Interface Refer to this section to configure the following plan settings to build up a migration plan.
Plan Name – Enter a name in the text box for the plan you are about to create. It is optional to 1.enter the description for the plan
Profile Selection – Configures the related migration options and mappings for the migration job. 2.Select a previously-created main profile from the drop-down menu. Livelink Migration provides you a default main profile named Default Profile. Click New Profile to create a new profile, and then you are brought to the Profile Settings interface. For the detailed instructions to configure the main profile, see Setting Up an Export Profile.
261
DocAve 6: Livelink Migrations
Schedule Selection – In the schedule configuration area, choose one of the followings: 3.
• No Schedule – Select this option to apply the rules of this plan, and then you must run the job manually.
• Configure the schedule myself – Select this to configure the specific time you want to collect the data of this profile. The Schedule Settings area appears when you select this option. Click Add Schedule. The Add Schedule interface appears. For the information on how to configure the Add Schedule interface, refer to Configuring the Add Schedule Interface.
Notification – Select the e-mail Notification profile for sending the notification report. For more 4.information on working with notification policies, refer to the DocAve 6 Control Panel Reference Guide.
Associated Plan Group – Select an associated plan group or create a new plan group in the 5.Associated plan group(s) drop-down list in order to make the plan run according to the selected plan group settings. For more information on plan groups, refer to the DocAve 6 Control Panel Reference Guide.
Click Save to save the plan. To save the plan and execute it right away, select Save and Run Now 6.from the Save drop-down list. The Run Now interface pops up. For more information on how to configure the Run Now interface, refer to the Configuring the Run Now Interface section in this user guide.
Configuring the Add Schedule Interface Refer to this section to configure the Add Schedule interface.
Schedule Settings – Specifies the frequency to run this recurring schedule. Enter an integer into 1.the text box, and select Minute(s), Hour(s), Day(s), Week(s), Month(s) from the drop-down menu.
Range of Recurrence – Specifies when to start the job, and the schedule ending. 2.
• Start Time – Enter the time to start the plan and the Time Zone can be changed under the Start time. Note that the start time cannot be earlier than the current time.
• No end date –Select this option to repeat running the plan until being stopped manually.
• End after specified occurrence(s) – Select this option to stop the plan after specified occurrences that you configure in the text box.
• End by – Enter the time to end the recurrence of plans.
Click OK on the ribbon to save the schedule setting configurations, or click Cancel on the ribbon 3.to return to the plan setting interface without saving any changes.
Repeat the configurations above to create more schedules. 4.
Configuring the Run Now Interface The Run Now interface pops up to allow you to choose Options.
Options – Select the type of migration for this plan. 1.
262
DocAve 6: Livelink Migrations
• Full migration – Migrates all source data to the destination.
• Incremental migration – Compares content from the last migration job and then migrates only the data that has changed and the data that is failed to be migrated in the last job.
Job Status Option – Selects the Ignore metadata/security exceptions checkbox to ignore the 2.Exception or Failed job which is failed due to the metadata/security exceptions. When running an Incremental job, the above kind of jobs will be ignored.
Click OK to run the export job. 3.
Importing Data To import the exported Livelink data to SharePoint, click Import on the ribbon, and then you are brought to the Create a New Plan interface.
Follow the steps blew to perform the offline Livelink migration job:
1. In the Source pane, on the Browse tab, click the farm that you have configured in Export Location for Import Mode and the Import Mode Export Location is loaded. Click the export location to load the Livelink Exported Data folder in the UNC path. Then select the exported data which is named by the plan name. To see details of the exported data in the source tree, click the Details tab.
2. In the Destination pane, click the farm name to expand the data tree. To select the destination node:
Find the node which you wish to import the exported data to. If working with a large a.environment, enter the keyword of the node into the Input Keyword text box to search for the desired node. You can only search the nodes whose name is displayed in the currently expanded tree. The nodes which are not displayed in the expanded tree cannot be search. When entering the keyword, the search result will be displayed with a little time.
Select the destination node by clicking the corresponding radio button. You can also b.create a new container to be the destination node without leaving the current page. For details on creating a new container, refer to Creating Containers.
3. After selecting the source node and the destination node, select one of the following options:
• Click Run Now to perform a migration job immediately, and then the Run Now interface appears. For more information on how to configure the Run Now interface, refer to Configuring the Run Now Interface.
• Click Save As New Plan to configure more specific settings and then save them as a Livelink migration plan, which then can be used to perform a Livelink migration job. For more information on the Save As New Plan interface, refer to Configuring the Save As New Plan Interface.
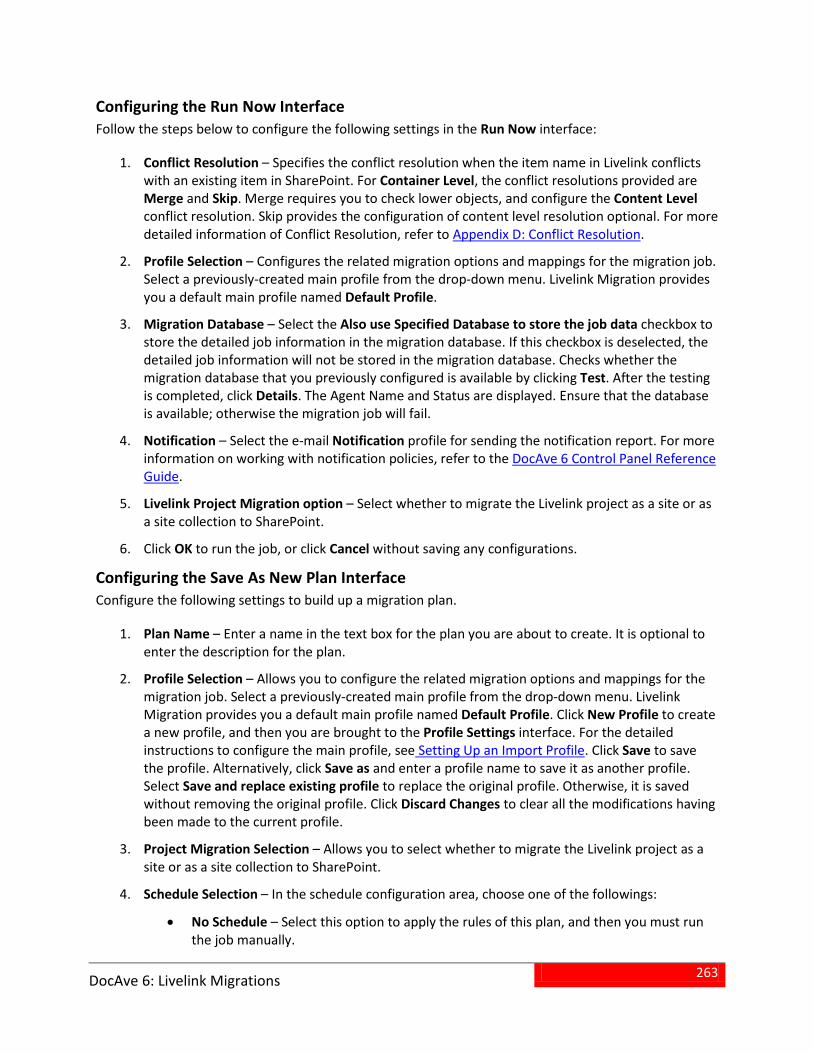
263
DocAve 6: Livelink Migrations
Configuring the Run Now Interface Follow the steps below to configure the following settings in the Run Now interface:
Conflict Resolution – Specifies the conflict resolution when the item name in Livelink conflicts 1.with an existing item in SharePoint. For Container Level, the conflict resolutions provided are Merge and Skip. Merge requires you to check lower objects, and configure the Content Level conflict resolution. Skip provides the configuration of content level resolution optional. For more detailed information of Conflict Resolution, refer to Appendix D: Conflict Resolution.
Profile Selection – Configures the related migration options and mappings for the migration job. 2.Select a previously-created main profile from the drop-down menu. Livelink Migration provides you a default main profile named Default Profile.
Migration Database – Select the Also use Specified Database to store the job data checkbox to 3.store the detailed job information in the migration database. If this checkbox is deselected, the detailed job information will not be stored in the migration database. Checks whether the migration database that you previously configured is available by clicking Test. After the testing is completed, click Details. The Agent Name and Status are displayed. Ensure that the database is available; otherwise the migration job will fail.
Notification – Select the e-mail Notification profile for sending the notification report. For more 4.information on working with notification policies, refer to the DocAve 6 Control Panel Reference Guide.
Livelink Project Migration option – Select whether to migrate the Livelink project as a site or as 5.a site collection to SharePoint.
Click OK to run the job, or click Cancel without saving any configurations. 6.
Configuring the Save As New Plan Interface Configure the following settings to build up a migration plan.
Plan Name – Enter a name in the text box for the plan you are about to create. It is optional to 1.enter the description for the plan.
Profile Selection – Allows you to configure the related migration options and mappings for the 2.migration job. Select a previously-created main profile from the drop-down menu. Livelink Migration provides you a default main profile named Default Profile. Click New Profile to create a new profile, and then you are brought to the Profile Settings interface. For the detailed instructions to configure the main profile, see Setting Up an Import Profile. Click Save to save the profile. Alternatively, click Save as and enter a profile name to save it as another profile. Select Save and replace existing profile to replace the original profile. Otherwise, it is saved without removing the original profile. Click Discard Changes to clear all the modifications having been made to the current profile.
Project Migration Selection – Allows you to select whether to migrate the Livelink project as a 3.site or as a site collection to SharePoint.
Schedule Selection – In the schedule configuration area, choose one of the followings: 4.
• No Schedule – Select this option to apply the rules of this plan, and then you must run the job manually.
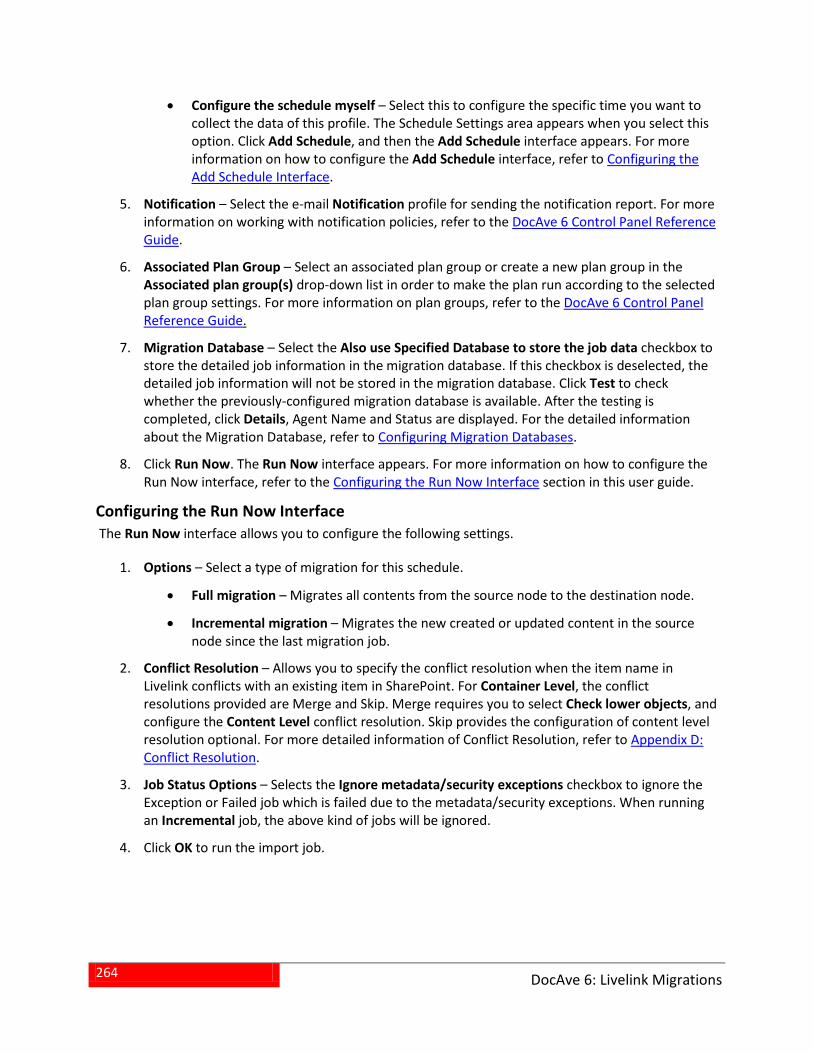
264
DocAve 6: Livelink Migrations
• Configure the schedule myself – Select this to configure the specific time you want to collect the data of this profile. The Schedule Settings area appears when you select this option. Click Add Schedule, and then the Add Schedule interface appears. For more information on how to configure the Add Schedule interface, refer to Configuring the Add Schedule Interface.
Notification – Select the e-mail Notification profile for sending the notification report. For more 5.information on working with notification policies, refer to the DocAve 6 Control Panel Reference Guide.
Associated Plan Group – Select an associated plan group or create a new plan group in the 6.Associated plan group(s) drop-down list in order to make the plan run according to the selected plan group settings. For more information on plan groups, refer to the DocAve 6 Control Panel Reference Guide.
Migration Database – Select the Also use Specified Database to store the job data checkbox to 7.store the detailed job information in the migration database. If this checkbox is deselected, the detailed job information will not be stored in the migration database. Click Test to check whether the previously-configured migration database is available. After the testing is completed, click Details, Agent Name and Status are displayed. For the detailed information about the Migration Database, refer to Configuring Migration Databases.
Click Run Now. The Run Now interface appears. For more information on how to configure the 8.Run Now interface, refer to the Configuring the Run Now Interface section in this user guide.
Configuring the Run Now Interface The Run Now interface allows you to configure the following settings.
Options – Select a type of migration for this schedule. 1.
• Full migration – Migrates all contents from the source node to the destination node.
• Incremental migration – Migrates the new created or updated content in the source node since the last migration job.
Conflict Resolution – Allows you to specify the conflict resolution when the item name in 2.Livelink conflicts with an existing item in SharePoint. For Container Level, the conflict resolutions provided are Merge and Skip. Merge requires you to select Check lower objects, and configure the Content Level conflict resolution. Skip provides the configuration of content level resolution optional. For more detailed information of Conflict Resolution, refer to Appendix D: Conflict Resolution.
Job Status Options – Selects the Ignore metadata/security exceptions checkbox to ignore the 3.Exception or Failed job which is failed due to the metadata/security exceptions. When running an Incremental job, the above kind of jobs will be ignored.
Click OK to run the import job. 4.
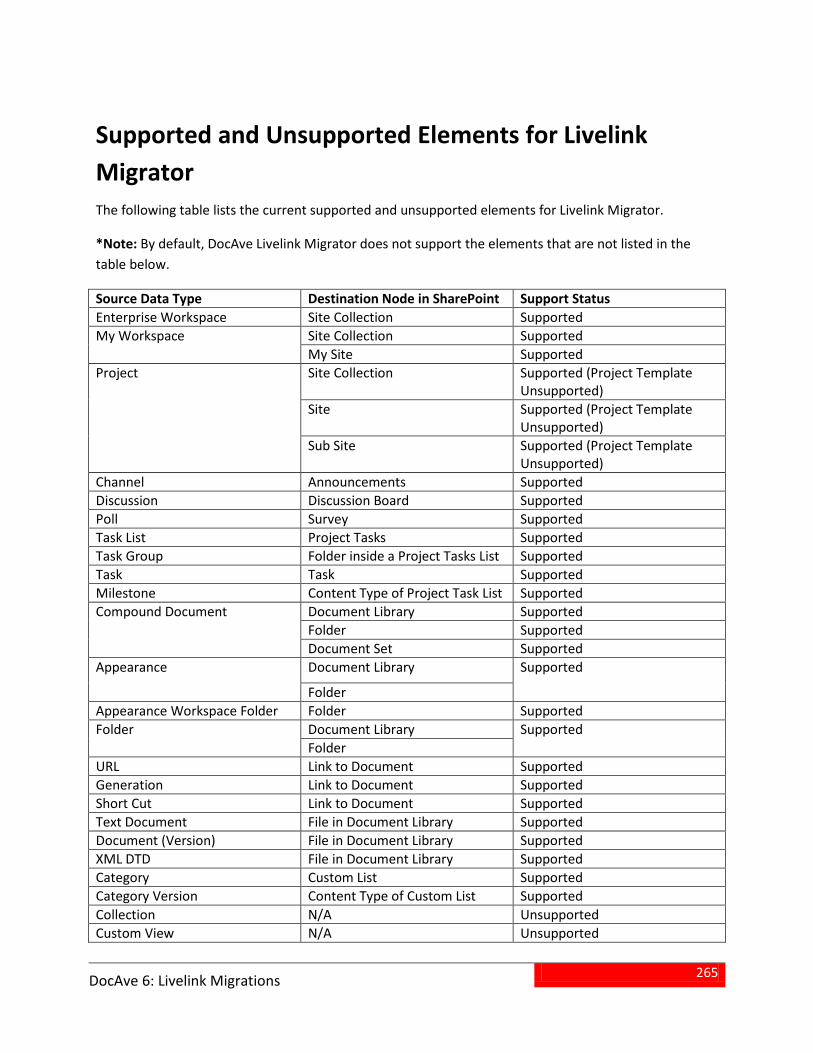
265
DocAve 6: Livelink Migrations
Supported and Unsupported Elements for Livelink Migrator The following table lists the current supported and unsupported elements for Livelink Migrator.
*Note: By default, DocAve Livelink Migrator does not support the elements that are not listed in the table below.
Source Data Type Destination Node in SharePoint Support Status Enterprise Workspace Site Collection Supported My Workspace Site Collection Supported
My Site Supported Project Site Collection Supported (Project Template
Unsupported) Site Supported (Project Template
Unsupported) Sub Site Supported (Project Template
Unsupported) Channel Announcements Supported Discussion Discussion Board Supported Poll Survey Supported Task List Project Tasks Supported Task Group Folder inside a Project Tasks List Supported Task Task Supported Milestone Content Type of Project Task List Supported Compound Document Document Library Supported
Folder Supported Document Set Supported
Appearance Document Library Supported
Folder Appearance Workspace Folder Folder Supported Folder Document Library Supported
Folder URL Link to Document Supported Generation Link to Document Supported Short Cut Link to Document Supported Text Document File in Document Library Supported Document (Version) File in Document Library Supported XML DTD File in Document Library Supported Category Custom List Supported Category Version Content Type of Custom List Supported Collection N/A Unsupported Custom View N/A Unsupported
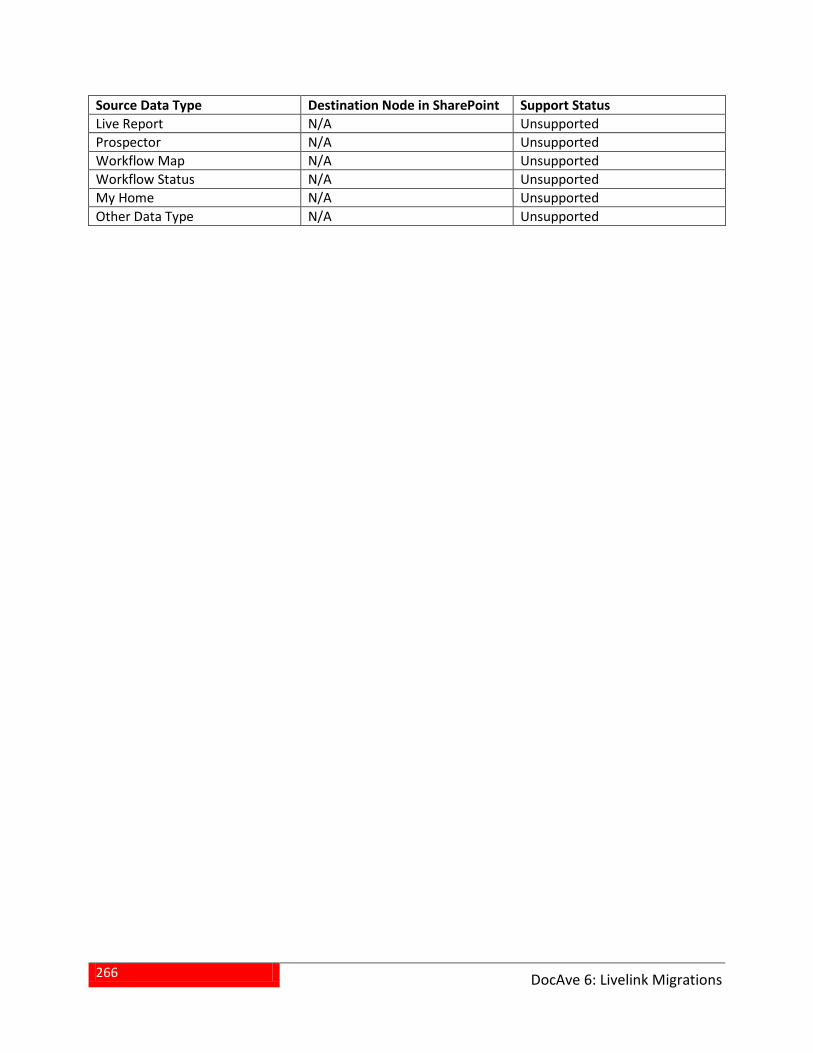
266
DocAve 6: Livelink Migrations
Source Data Type Destination Node in SharePoint Support Status Live Report N/A Unsupported Prospector N/A Unsupported Workflow Map N/A Unsupported Workflow Status N/A Unsupported My Home N/A Unsupported Other Data Type N/A Unsupported
267
DocAve 6: Exchange Public Folder Migrations
Exchange Public Folder Migrations Exchange Public Folder Migrator protects your investment through lossless migration of Exchange public folder content and provides you with simplified migration management through an intuitive administration console. Refer to the sections below to use Exchange Public Folder Migrator.
*Note: Exchange Public Folder Migrator only supports SharePoint 2010 and 2013 on-premises.
Pre-migration Configurations To use Exchange Public Folder Migrator, you must configure the Exchange public folder connection so that DocAve Agent is able to connect to the Exchange server. In the Home tab, click Configure Connection on the ribbon, and then the Exchange Public Folder Connection interface appears.
Managing Exchange Public Folder Connections It allows you to configure multiple connections for the DocAve Agent and the Exchange server. The Exchange Public Folder Connection interface displays any Exchange public folder connections that you have previously created.
In this interface, you can change the number of Exchange public folder connections displayed per page and the order in which they are displayed. To change the number of Exchange public folder connections displayed per page, select the desired number from the Show rows drop-down menu in the lower right-hand corner. To sort the Exchange public connections, click on a column heading such as Name, and Agent.
Customize how these connections are displayed in a number of different ways:
• Search – Allows you to filter Exchange public folder connections to be displayed by the keyword entered in the Input Keyword text box (the keyword is not case sensitive). The keyword must be contained in a column value. You can select Search all pages or Search current page to define the search scope. Select Search all pages to search the keyword among all pages, the connections whose name or Agent contains the keywords will be displayed. Select Search current page to search the keyword through the current page, the connections whose name or Agent contains the keywords will be displayed. To cancel the search results, you can click the cross ( ) beside the text box to refresh and display all connections.
• – You can manage which columns are displayed in the list so that only information you want to see is shown. Click the plus ( ), and then check the checkbox next to the column name to have that column shown in the list.
• – You can manage which columns are hidden in the list. Hover over the cursor on the column that you want to hide and then click the minus ( ) icon, and then the column is hidden.
268
DocAve 6: Exchange Public Folder Migrations
• – Filters the connections, which are related to the specified Agents, to be displayed. Hover over the cursor on the Agent column and click , then check the checkbox next to the Agent name. Click OK to display the connections which are related to the selected Agents. To cancel the filter results, click Clear Filter above the table.
Perform the following actions in the Exchange Public Connection interface:
• Click Create to create a new Exchange public folder connection. For details of creating an Exchange public folder connection, see Configuring Exchange Public Folder Connections.
• Click View Details to view details about a selected Exchange public folder connection.
• Click Edit to edit a previously-configured Exchange public folder connection. For details of editing an Exchange public folder connection, see Configuring Exchange Public Folder Connections .
• Click Delete to delete the selected Exchange public folder connections. When the Exchange public folder connection is using for a migration plan, then this connection cannot be deleted.
Configuring Exchange Public Folder Connections In the Exchange Pubic Folder Connection interface, click Create to create a new connection or click Edit to modify a selected one. Configuring the following settings on the pop-up window:
Exchange Public Folder Connection Name – Enter a name in the Name text box for the 1.Exchange public folder connection. Then enter an optional description in the Description text box for future reference.
Connection – Enter the required information to make the specified source Agent be able to 2.connect to the Exchange server.
Agent – The Agents displayed are the ones whose Agent type contains Exchange Public a.Folder Migration-Exchange Public Folder Agent. From the drop-down list, select an Agent that is able to access the Exchange server from the drop-down list. For more information of Agent type configuration, refer to the DocAve 6 Control Panel Reference Guide.
Access method – Select the access method according to the Exchange server. b.
Select WebDAV if using Exchange 2000/2003/2007 server. o
Select Web Services if using Exchange 2007/2010/2013 server. o
Exchange URL – Enter the URL of the Exchange public folder that the Agent connects to. c.An example is shown in the Exchange URL text box.
Username and Password – Enter the username and the password for accessing d.Exchange public folder. An example is shown in the Username text box. It is
269
DocAve 6: Exchange Public Folder Migrations
recommended to specify an administrator of the Exchange server here in order to have the required permission to load all data, perform the operations on the data.
Click Validation Test to verify the connection and the configurations. e.
After the verification completes, click OK to save the settings and return to the f.Exchange Pubic Folder Connection interface.
Configuring Exchange Public Folder Migration
About Filter Policies Filter Policy allows you to set up filter rules so that you can control what objects are to be migrated to the SharePoint destination, and you can target content more precisely. By setting up and saving filter policies, you can apply the same filter policies to different plans without having to recreate them each time.
To access the Filter Policy interface, click Profile Settings on the Home tab. On the Profile Settings page, click Filter Policy on the ribbon.
The Filter Policy interface displays any filter policies that you have previously created in the main display pane.
In this interface, you can change the number of filter policies displayed per page and the order in which they are displayed. To change the number of filter policies displayed per page, select the desired number from the Show rows drop-down menu in the lower right-hand corner. To sort the filter policies, click the column heading such as Filter Policy Name, and Description.
Customize how these filter policies are displayed in a number of different ways:
• Search – Allows you to filter the filter policies to be displayed by the keyword entered in the Input Keyword text box (the keyword is not case sensitive). The keyword must be contained in a column value. You can select Search all pages or Search current page to define the search scope. Search all pages means that the filter policies in all of the pages whose name or description contains the keywords will be displayed; while Search current page means that only the filter policies in the current page whose name or description contains the keywords will be displayed.
• – You can manage which columns are displayed in the list so that only information you want to see is shown. Click the plus ( ), and then check the checkbox next to the column name to have that column shown in the list.
• – You can manage which columns are hidden in the list. Hover over the cursor on the column that you want to hide and then click the appeared minus ( ), and then the column is hidden.
270
DocAve 6: Exchange Public Folder Migrations
Perform the following actions in the Filter Policy interface:
• Click Create on the ribbon to create a new filter policy. For details of creating a new filter policy, see Creating Filer Policies.
• Click Edit on the ribbon to change the configurations for the selected filter policy. For details of editing configurations for filter policies, see Creating Filer Policies.
• Click Delete on the ribbon. A confirmation window appears, confirming that you want to proceed with the deletion. Click OK to delete the selected filter policy, or click Cancel to return to the Filter Policy interface without deleting the selected filter policy.
Creating Filter Policies To create a new filter policy, follow the instructions below:
Click Filter Policy from the Settings group on the Profile Manager tab. The Filter Policy page 1.appears.
Click Create from the Manage group. The Create page appears. Enter the name for the filter 2.policy in the Name text box and enter an optional description for further reference in the Description text box.
In the Filter Rules area, click Add a Filter Level Group to add a filter level group, which is used to 3.add the desired criterions in one group for a specific object level. Since the Exchange Message object is the only one on which can set up the filter level group and it has contained all the data type in the public folder, it is selected by default.
In the Rule column, Name is the default rule and Contains is the default condition. Configure 4.the rule settings as follows:
Click Name to change the rule from the drop-down list and then specify the a.corresponding condition and value.
For the Name and Message Class rule, the available conditions are Contains, oDoes Not Contain, Equals, and Does Not Equal.
Contains – When the item’s name/message class contains the value you set, it will be filtered and included in the filter results.
Does Not Contain – When the item’s name/message class does not contain the value you set, it will be filtered and included in the filter results.
Equals – When the item’s name/message class equals the value you set, it will be filtered and included in the filter results.
Does Not Equal – When the item’s name/message class does not equal the value you set, it will be filtered and included in the filter results.
For the Created Time/Modified Time/Received Time/Start Time/Due Time rule, othe available conditions are Before, After, Within, and Older Than.
271
DocAve 6: Exchange Public Folder Migrations
Before – When the item’s time is before the time value you set, it will be filtered and included in the filter results.
After – When the item’s time is after the time value you set, it will be filtered and included in the filter results.
Within – When the item’s time is within the time range you set, it will be filtered and included in the filter results.
Older Than – When the item’s time is older than the time value you set, it will be filtered and included in the filter results.
If you have more than one criterion, click the order to adjust the criteria’s order. oIf you have more than one criterion, adjust the logic relation according to your requirements. By default, the logic relation between each criterion is And. You can click the current logic relation (And or Or) to change it.
And – When multiple criteria are used, only the data that meets all of the criteria is included in the filter results.
Or – When multiple criteria are used, the data that matches at least one of the criteria is included in the filter results.
After the filter policy settings complete, click OK to save the settings and return to the Filter 5.Policy page.
About Mapping Settings Before performing an Exchange public folder migration job, you may want to define optional Domain Mapping, User Mapping, Group Mapping, and Permission Mapping settings. Refer to the following sections to decide whether to configure the mapping settings, and learn how to configure the mapping settings.
Domain Mapping If there are users with the same name but with different domains respectively in the source and destination, you can map a source domain name to a SharePoint domain name in the destination by using domain mapping. During migration, Migrator will change the source domain name to your specified domain name in the destination node. Therefore, the source user summer\user1 can be mapped to SharePoint domain user may\user1 through domain mapping.
To access Domain Mapping, click Profile Settings on the ribbon of the Home tab, and then the Profile Settings tab appears. Click Mappings on the ribbon, and then select Domain Mapping from the drop-down menu. The Domain Mapping interface appears. Click Create on the ribbon to create a new domain mapping rule.
For specific instructions on setting up domain mapping, refer to the DocAve 6 Control Panel Reference Guide.
272
DocAve 6: Exchange Public Folder Migrations
User Mapping Use user mapping if you wish to map an existing source node username to an existing SharePoint user name in the destination. During migration, Migrator will replace the source username with your specified username in the destination node.
To access User Mapping, click Profile Settings on the ribbon of the Home tab, and then the Profile Settings tab appears. Click Mappings on the ribbon, and then select User Mapping from the drop-down menu. The User Mapping interface appears. Click Create on the ribbon to create a new user mapping rule.
For specific instruction on setting up user mapping, refer to the DocAve 6 Control Panel Reference Guide.
Group Mapping Use group mapping if you wish to map an existing source group name. During the migration, Migrator will replace the source group name with your specified group name in the destination node.
To access Domain Mapping, click Profile Settings on the ribbon of Home tab, and then Profile tab appears. Click Mappings on the ribbon, and then select Group Mapping from the drop-down menu. The Group Mapping interface appears. Click Create on the ribbon to create a new group mapping rule.
For specific instructions on setting up group mapping, refer to the DocAve 6 Control Panel Reference Guide.
About Permission Mapping Permission mapping allows you to map an existing source permission name to SharePoint permissions in the destination. Exchange Public Folder Migrator provides you a Default Permission Mapping to migrate the public folder permissions to the SharePoint permissions, which is contained as default permission mapping rule in the default main profile.
*Note: If you have configured both the user mapping and permission mapping in the Mapping Options profile, you can merge the source user’s mapping permissions in SharePoint to the permissions of the mapped destination user.
To access Permission Mapping, click Profile Settings on the ribbon of Home tab, and then 1.Profile Settings tab appears.
Click Mappings on the ribbon, and then select Permission Mapping from the drop-down menu. 2.The Permission Mapping interface appears.
In the Permission Mapping interface, you will see a list of previously configured permission mappings.
In this interface, you can change the number of permission mappings displayed per page and the order in which they are displayed. To change the number of permission mappings displayed per page, select
273
DocAve 6: Exchange Public Folder Migrations
the desired number from the Show rows drop-down menu in the lower right-hand corner. To sort the permission mappings, click a column heading such as Name, and Description.
Customize how these permission mappings are displayed in a number of different ways:
• Search – Allows you to filter permission mappings to be displayed by the keyword entered in the Input Keyword text box (the keyword is not case sensitive). Both the value of the Name and Description columns can be searched by the keyword. Select Search all pages to search the keyword among all pages. Select Search current page to search the keyword through the current page. To cancel the search results, you can click the cross ( ) icon beside the text box to refresh the area and all permission mappings are displayed.
• – You can manage which columns are displayed in the list so that only information you want to see is shown. Click the plus ( ), and then check the checkbox next to the column name to have that column shown in the list.
• – You can manage which columns are hidden in the list. Hover over the cursor on the column that you want to hide and then click the appeared minus ( ) icon, and then the column is hidden. The Name column is not allowed to be hidden.
Perform the following actions to a permission mapping:
• Click Create to create a new permission mapping. For details of creating a permission mapping, see the Creating Permission Mappings section of this guide.
• Click View Details to view details about a selected permission mapping. Click View Details on the ribbon and you will see the previously-configured settings for this permission mapping. Here you can also click Edit on the ribbon to make changes to the permission mapping’s settings. You will be brought to the Edit Permission Mapping page where you can change this permission mapping.
• Click Edit to edit a previously-configured permission mapping. The Default Permission Mapping is not allowed for editing. For details of editing a permission mapping, see Creating Permission Mappings.
• Click Delete to delete the selected permission mappings. Click Delete on the ribbon. A confirmation window appears, confirming that you want to proceed with the deletion. Click OK to delete the selected permission mappings, or click Cancel to return to the Permission Mapping page without deleting the selected permission mappings. The Default Permission Mapping is not allowed for deleting.
274
DocAve 6: Exchange Public Folder Migrations
Creating Permission Mappings To create a new permission mapping, click Create on the ribbon. To edit a previously-configured permission mapping, select the permission mapping and then click Edit on the ribbon.
In the Create/ Edit Permission Mapping interface, configure the following settings:
Permission Mapping Name – Enter a name for the permission mapping. Then enter an optional 1.description for the permission mapping for future reference.
Permission Mapping – Set up the mapping of Exchange permissions to SharePoint permission 2.levels. By default, the Exchange permission has set up a SharePoint permission level. You can modify it and select a desired SharePoint permission level from the SharePoint Permission Level drop-down list. You can also create a new SharePoint permission level by clicking New SharePoint Permission Level at the top of the drop-down list.
Click OK to save the configurations and return to the Permission Mapping interface, or click 3.Cancel to return to Permission Mapping interface without saving any changes.
For more information of creating a new SharePoint permission level, editing an existing one, viewing details of an existing one, refer to About SharePoint Permission Levels.
About SharePoint Permission Levels You can manage SharePoint permission levels by creating a new SharePoint permission level, viewing details of a previously-configured SharePoint permission level, editing a previously-configured SharePoint permission level, or deleting a previously-configured SharePoint permission level.
To access Manage SharePoint Permission Level interface, click Profile Settings on the Home tab > Mappings > Permission Mapping > Manage SharePoint Permission Level. The Manage SharePoint Permission Level interface appears, and you will see a list of provided or previously-configured SharePoint permission level.
In this interface, you can change the number of SharePoint permission levels displayed per page and the order in which they are displayed. To change the number of SharePoint permission levels displayed per page, select the desired number from the Show rows drop-down menu in the lower right-hand corner. To sort the SharePoint permission levels, click on a column heading such as Name, and Description.
Customize how these SharePoint permission levels are displayed in a number of different ways:
• Search – Allows you to filter SharePoint permission level to be displayed by the keyword entered in the Input Keyword text box (the keyword is not case sensitive). The keyword must be contained in a column value. Select Search all pages to search the keyword among all pages. Select Search current page to search the keyword through the current page. To cancel the search results, you can click the cross ( ) beside the text box to refresh the area and display all permission levels.
275
DocAve 6: Exchange Public Folder Migrations
• – You can manage which columns are displayed in the list so that only information you want to see is shown. Click the plus ( ), and then check the checkbox next to the column name to have that column shown in the list.
• – You can manage which columns are hidden in the list. Hover over the cursor on the column that you want to hide and then click the appeared minus ( ), and then the column is hidden.
Perform the following actions in the Manage SharePoint Permission Level page.
• Click Create on the ribbon to create a new SharePoint permission level. For detailed instructions on creating a new SharePoint permission level, see Creating SharePoint Permission Levels.
• Click View Details on the ribbon and you will see the previously-configured settings for this SharePoint permission level. Here you can also click Edit on the ribbon to make changes to the SharePoint permission level’s settings. You will be brought to the Edit SharePoint Permission Level page where you can change its settings.
• Click Edit on the ribbon to change the configurations for this SharePoint permission level. Note that the default SharePoint permission levels provided, including Contribute, Design, Full Control, Read, View Only, PFM Delete All Items, PFM Edit All Items, PFM Create Subfolders, PFM Create Items, PFM Read Items, PFM Delete Own Items, PFM Edit Own Items, and PFM Folder Owner, are not editable. For details on editing configurations for a SharePoint permission level, see Creating SharePoint Permission Levels .
• Click Delete on the ribbon. A confirmation window appears, confirming that you want to proceed with the deletion. Click OK to delete the selected SharePoint permission levels, or click Cancel to return to the Manage SharePoint Permission Level interface without deleting the selected SharePoint permission levels. Note that the default SharePoint permission levels provided, including Contribute, Design, Full Control, Read, View Only, PFM Delete All Items, PFM Edit All Items, PFM Create Subfolders, PFM Create Items, PFM Read Items, PFM Delete Own Items, PFM Edit Own Items, and PFM Folder Owner, cannot be deleted.
Creating SharePoint Permission Levels To create a new SharePoint permission level, click Create on the ribbon. To modify a previously-configured customized SharePoint permission level, select the SharePoint Permission Level, and then click Edit on the ribbon. When creating or editing the SharePoint permission level, configure the following settings:
Name and Description – Enter a name for this permission level and an optional description for 1.future reference.
Permissions – Choose which permissions to be included in this permission level. You can select 2.permissions from List Permissions and Personal Permissions by checking the checkbox next to the permission name. Check the Select All checkbox to select or clear all permissions. The permissions listed in Site Permissions cannot be edited, and the View Pages and Open
276
DocAve 6: Exchange Public Folder Migrations
permissions in Site Permission will be selected by default when you select permission from List Permission or Personal Permissions.
Click OK to save the configurations, or click Cancel to cancel any changes. 3.
About Dynamic Rules Dynamic rules map Exchange properties to SharePoint metadata using DLL files customized in C#. In a migration profile, if dynamic rules conflict with the configured column mapping, dynamic rules take over the role of column mapping.
To use the dynamic rule feature, click Profile Settings on the ribbon of Home tab. The Profile Settings tab appears. Click Dynamic Rule on the ribbon.
In the Dynamic Rule interface, you will see a list of previously-configured dynamic rules.
In this interface, you can change the number of dynamic rules displayed per page and the order in which they are displayed. To change the number of dynamic rules displayed per page, select the desired number from the Show rows drop-down menu in the lower right-hand corner. To sort the dynamic rules, click on a column heading such as Name, Description, DLL File Name, and Last Modified Time.
Customize how these dynamic rules are displayed in a number of different ways:
• Search – Filters dynamic rules displayed by the keyword you designate. The keyword must be contained in a column value. At the top of the Dynamic Rule viewing pane, enter the keyword for the dynamic rules you wish to display. You can select Search all pages or Search current page to define the search scope. Search all pages means that the dynamic rules in all of the pages whose names and descriptions contain the keywords will be displayed; while Search current page means that only the dynamic rules in the current page whose names and descriptions contain the keywords will be displayed. Note that the search function is not case sensitive.
• – You can manage which columns are displayed in the list so that only information you want to see is shown. Click the plus ( ), and then check the checkbox next to the column name to have that column shown in the list.
• – This allows you to hide the column. Click the minus ( ) in the column title to hide the column.
You may perform the following actions to a Dynamic Rule:
• Click Create on the ribbon to create a dynamic rule. For detailed information on creating a new dynamic rule, see Configuring a Dynamic Rule.
• Click View Details on the ribbon and you will see the previously-configured settings for this dynamic rule. Here you can also click Edit on the ribbon to make changes to the dynamic rule’s settings. You will be brought to the Edit Dynamic Mapping page where you can change this dynamic rule.
277
DocAve 6: Exchange Public Folder Migrations
• Click Edit on the ribbon to change the configuration of this dynamic rule. For details on editing dynamic rule, see Configuring a Dynamic Rule.
• Click Delete on the ribbon. A confirmation window appears, confirming that you want to proceed with the deletion. Click OK to delete the selected dynamic rules, or click Cancel to return to the dynamic rule without deleting the selected dynamic rules.
Configuring a Dynamic Rule To create a new dynamic rule, click Create on the ribbon. To edit a previously-configured dynamic rule, select the dynamic rule and then click Edit on the ribbon.
In the Create Dynamic Rule interface or Edit Dynamic Rule interface, configure the following settings:
1. Name and Description – Enter a Dynamic Rule Name for the dynamic rule that you are about to create or edit. Then enter an optional description for this dynamic rule for future reference.
2. Upload a DLL File – Upload a DLL file customized in C# from the local path. This file contains your configured mapping settings.
3. Click OK to save the configuration and return to the Dynamic Rule interface. Click Cancel to return to the Dynamic Rule interface without saving any configuration or changes.
Setting Up Exchange Public Folder Migration Profiles The Migration Profile allows you to specify and define numerous settings for the migration jobs including Migration Options, Filter Options, Mapping Options, and Advanced Options. Follow the instructions below to create a Migration Profile.
1. From the Home tab, in the Profile Manager group, click Profile Settings. The Profile Settings tab appears.
2. From the Profile Settings tab, under the Profile/Sub-profile group, click New.
3. Enter a profile name in the pop-up window and click OK.
4. Select the Migration Options from the left-hand pane. Select a previously-configured Migration Options Sub-Profile from the drop-down menu or enter a name and click Create a New Profile to create a new sub-profile. For details about this section, refer to Migration Options.
5. Select the Filter Options from the left-hand pane and select a previously-configured filter policy from the drop-down menu. Or click New Filter Policy from the drop-down menu to create a new filter policy. For details on creating a filter policy, refer to Creating Filter Policies.
6. Select the Mapping Options from the left-hand pane. Select a previously-configured Mapping Options Sub-Profile from the drop-down menu or enter a name and click Create a New Profile to create a new sub-profile. For details about this section, refer to Mapping Options.
7. Select the Advanced Options from the left-hand pane and configure the Dynamic Rule, Character Length Settings and the Illegal Character Replacement Settings. For details about this section, refer to Advanced Options.
278
DocAve 6: Exchange Public Folder Migrations
8. Click Save in the Main Profile row to save the profile. Alternatively, click Save As and enter a profile name to save it as another profile. Select Save and replace the existing main profile to replace the original profile. Otherwise, it is saved without removing the original profile.
Migration Options Configure the settings in Migration Options to specify how to migrate the content and the security to SharePoint. Set up a sub-profile of Migration Options by the following steps.
From the Home tab, in the Profile Manager group, click Profile Settings. The Profile Settings tab 1.appears.
Click Migration Options on the left-hand pane, and from the Profile Settingstab, under the Sub-2.profile group, click Edit Sub-profile to make the Migration Options field active.
From the Profile Settings tab, under the Profile/Sub-profile group, click New. 3.
Enter a sub-profile name in the pop-up window and click OK. 4.
Click the Content tab to configure the following settings. The following settings are optional. 5.
• Folder Migration Options – Choose a method to migrate the source folders.
Migrate root folder as list – Select this option, and when selecting site node as othe destination, the selected source folder and the folders (the root folders of the selected source folder) under it will be migrated to respective lists. After the migration, lists having the same name as the selected source folder and the root folders will be created in the destination. Each root folder and the data in it is migrated to respective lists.
For example, Folder A is the selected source root folder and under Folder A, there are two folders, Folder B and Folder C (Folder B and Folder C are root folders of Folder A). When selecting Migrate root folder as list and selecting site node as the destination, the migration results are as below:
A list named Folder A will be created and the data (except Folder B, Folder C, and the data within these two folders) which is contained in source Folder A will be migrated to the Folder A list.
Two lists named Folder B and Folder C are created and the data which is contained in source Folder B and Folder C will keep the data structure and will be migrated to respective lists.
Use folder full path as list name ‒ Select this option, and when the destination onode is site level, the selected source data in each folder level will be migrated to respective lists named by the folder full path.
For example, you have selected Folder A as the source content. Folder A is the sub folder of public folder and it contains Folder B. In Folder B, an Item C is included. After the migration, two lists named Public Folders>Folder A and Public Folders>Folder A>Folder B are created, and the Item C is included in the Public Folders>Folder A>Folder B list.
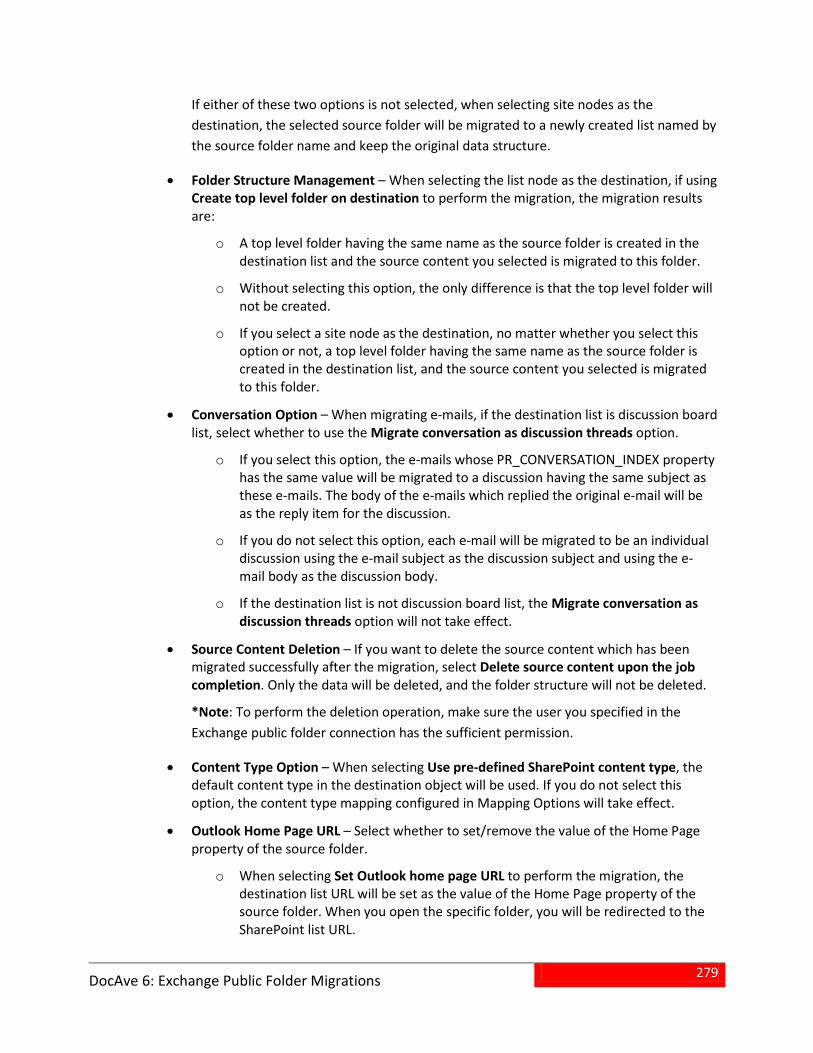
279
DocAve 6: Exchange Public Folder Migrations
If either of these two options is not selected, when selecting site nodes as the destination, the selected source folder will be migrated to a newly created list named by the source folder name and keep the original data structure.
• Folder Structure Management – When selecting the list node as the destination, if using Create top level folder on destination to perform the migration, the migration results are:
A top level folder having the same name as the source folder is created in the odestination list and the source content you selected is migrated to this folder.
Without selecting this option, the only difference is that the top level folder will onot be created.
If you select a site node as the destination, no matter whether you select this ooption or not, a top level folder having the same name as the source folder is created in the destination list, and the source content you selected is migrated to this folder.
• Conversation Option – When migrating e-mails, if the destination list is discussion board list, select whether to use the Migrate conversation as discussion threads option.
If you select this option, the e-mails whose PR_CONVERSATION_INDEX property ohas the same value will be migrated to a discussion having the same subject as these e-mails. The body of the e-mails which replied the original e-mail will be as the reply item for the discussion.
If you do not select this option, each e-mail will be migrated to be an individual odiscussion using the e-mail subject as the discussion subject and using the e-mail body as the discussion body.
If the destination list is not discussion board list, the Migrate conversation as odiscussion threads option will not take effect.
• Source Content Deletion – If you want to delete the source content which has been migrated successfully after the migration, select Delete source content upon the job completion. Only the data will be deleted, and the folder structure will not be deleted.
*Note: To perform the deletion operation, make sure the user you specified in the Exchange public folder connection has the sufficient permission.
• Content Type Option – When selecting Use pre-defined SharePoint content type, the default content type in the destination object will be used. If you do not select this option, the content type mapping configured in Mapping Options will take effect.
• Outlook Home Page URL – Select whether to set/remove the value of the Home Page property of the source folder.
When selecting Set Outlook home page URL to perform the migration, the odestination list URL will be set as the value of the Home Page property of the source folder. When you open the specific folder, you will be redirected to the SharePoint list URL.
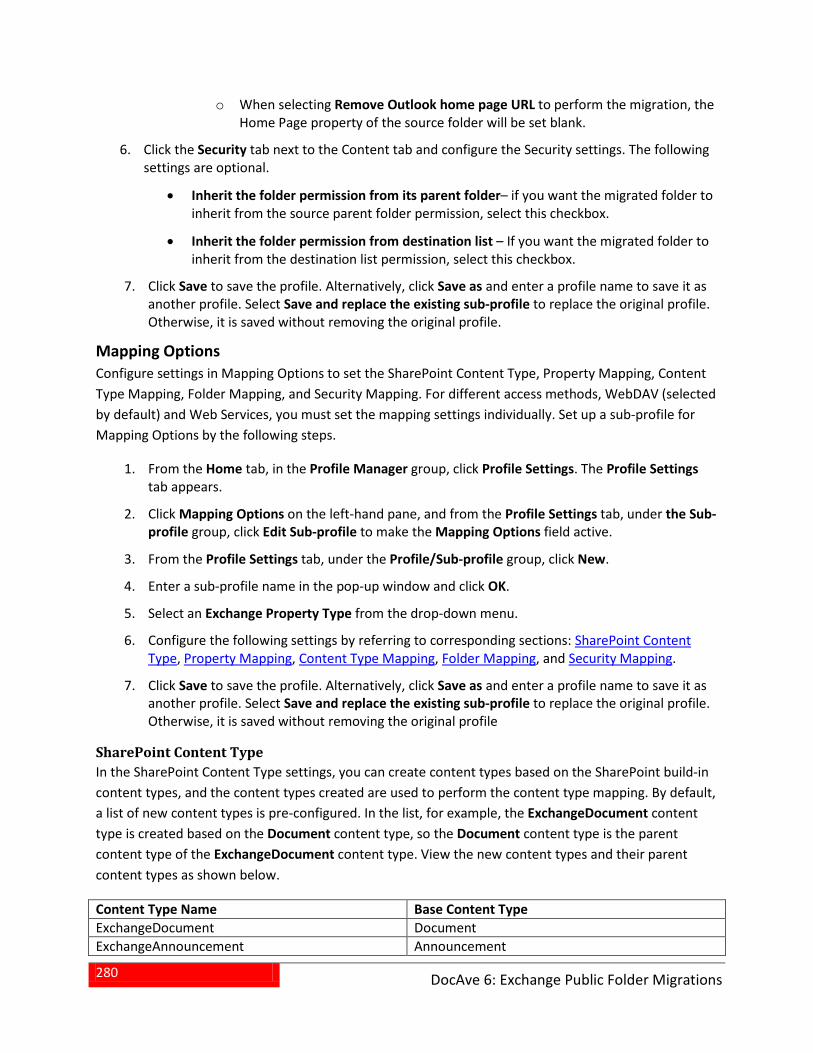
280
DocAve 6: Exchange Public Folder Migrations
When selecting Remove Outlook home page URL to perform the migration, the oHome Page property of the source folder will be set blank.
Click the Security tab next to the Content tab and configure the Security settings. The following 6.settings are optional.
• Inherit the folder permission from its parent folder– if you want the migrated folder to inherit from the source parent folder permission, select this checkbox.
• Inherit the folder permission from destination list – If you want the migrated folder to inherit from the destination list permission, select this checkbox.
Click Save to save the profile. Alternatively, click Save as and enter a profile name to save it as 7.another profile. Select Save and replace the existing sub-profile to replace the original profile. Otherwise, it is saved without removing the original profile.
Mapping Options Configure settings in Mapping Options to set the SharePoint Content Type, Property Mapping, Content Type Mapping, Folder Mapping, and Security Mapping. For different access methods, WebDAV (selected by default) and Web Services, you must set the mapping settings individually. Set up a sub-profile for Mapping Options by the following steps.
From the Home tab, in the Profile Manager group, click Profile Settings. The Profile Settings 1.tab appears.
Click Mapping Options on the left-hand pane, and from the Profile Settings tab, under the Sub-2.profile group, click Edit Sub-profile to make the Mapping Options field active.
From the Profile Settings tab, under the Profile/Sub-profile group, click New. 3.
Enter a sub-profile name in the pop-up window and click OK. 4.
Select an Exchange Property Type from the drop-down menu. 5.
Configure the following settings by referring to corresponding sections: SharePoint Content 6.Type, Property Mapping, Content Type Mapping, Folder Mapping, and Security Mapping.
Click Save to save the profile. Alternatively, click Save as and enter a profile name to save it as 7.another profile. Select Save and replace the existing sub-profile to replace the original profile. Otherwise, it is saved without removing the original profile
SharePoint Content Type In the SharePoint Content Type settings, you can create content types based on the SharePoint build-in content types, and the content types created are used to perform the content type mapping. By default, a list of new content types is pre-configured. In the list, for example, the ExchangeDocument content type is created based on the Document content type, so the Document content type is the parent content type of the ExchangeDocument content type. View the new content types and their parent content types as shown below.
Content Type Name Base Content Type ExchangeDocument Document ExchangeAnnouncement Announcement
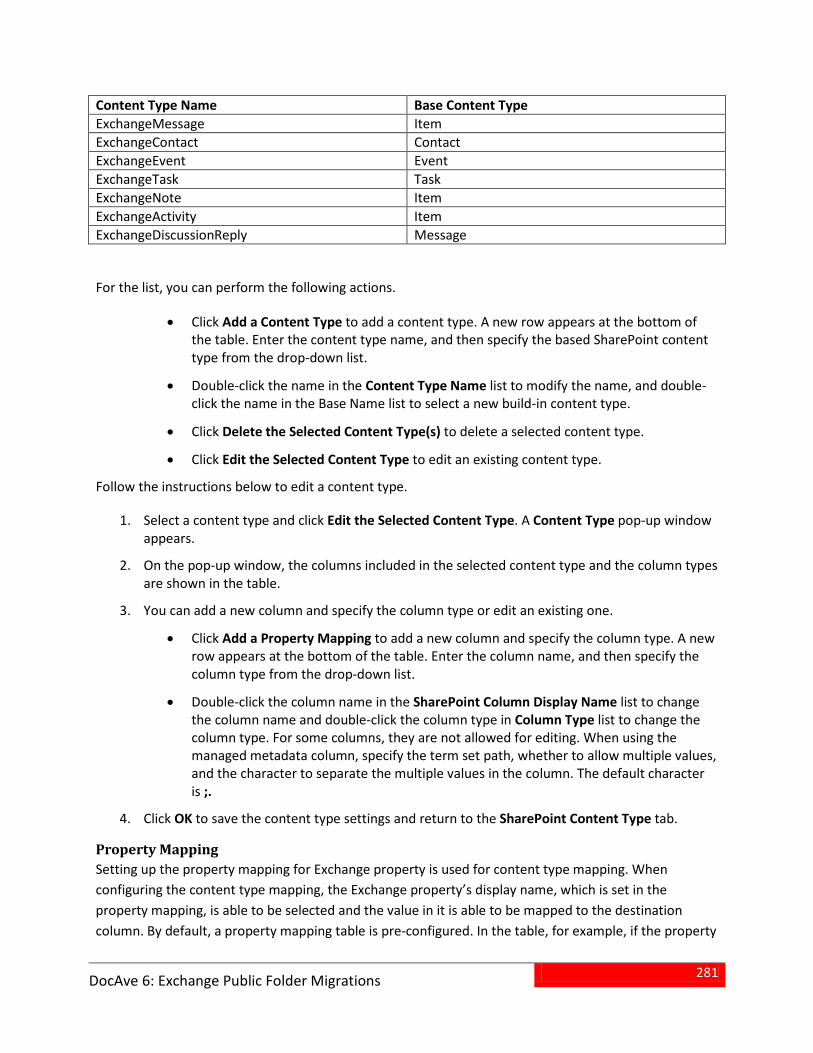
281
DocAve 6: Exchange Public Folder Migrations
Content Type Name Base Content Type ExchangeMessage Item ExchangeContact Contact ExchangeEvent Event ExchangeTask Task ExchangeNote Item ExchangeActivity Item ExchangeDiscussionReply Message
For the list, you can perform the following actions.
• Click Add a Content Type to add a content type. A new row appears at the bottom of the table. Enter the content type name, and then specify the based SharePoint content type from the drop-down list.
• Double-click the name in the Content Type Name list to modify the name, and double-click the name in the Base Name list to select a new build-in content type.
• Click Delete the Selected Content Type(s) to delete a selected content type.
• Click Edit the Selected Content Type to edit an existing content type.
Follow the instructions below to edit a content type.
Select a content type and click Edit the Selected Content Type. A Content Type pop-up window 1.appears.
On the pop-up window, the columns included in the selected content type and the column types 2.are shown in the table.
You can add a new column and specify the column type or edit an existing one. 3.
• Click Add a Property Mapping to add a new column and specify the column type. A new row appears at the bottom of the table. Enter the column name, and then specify the column type from the drop-down list.
• Double-click the column name in the SharePoint Column Display Name list to change the column name and double-click the column type in Column Type list to change the column type. For some columns, they are not allowed for editing. When using the managed metadata column, specify the term set path, whether to allow multiple values, and the character to separate the multiple values in the column. The default character is ;.
Click OK to save the content type settings and return to the SharePoint Content Type tab. 4.
Property Mapping Setting up the property mapping for Exchange property is used for content type mapping. When configuring the content type mapping, the Exchange property’s display name, which is set in the property mapping, is able to be selected and the value in it is able to be mapped to the destination column. By default, a property mapping table is pre-configured. In the table, for example, if the property
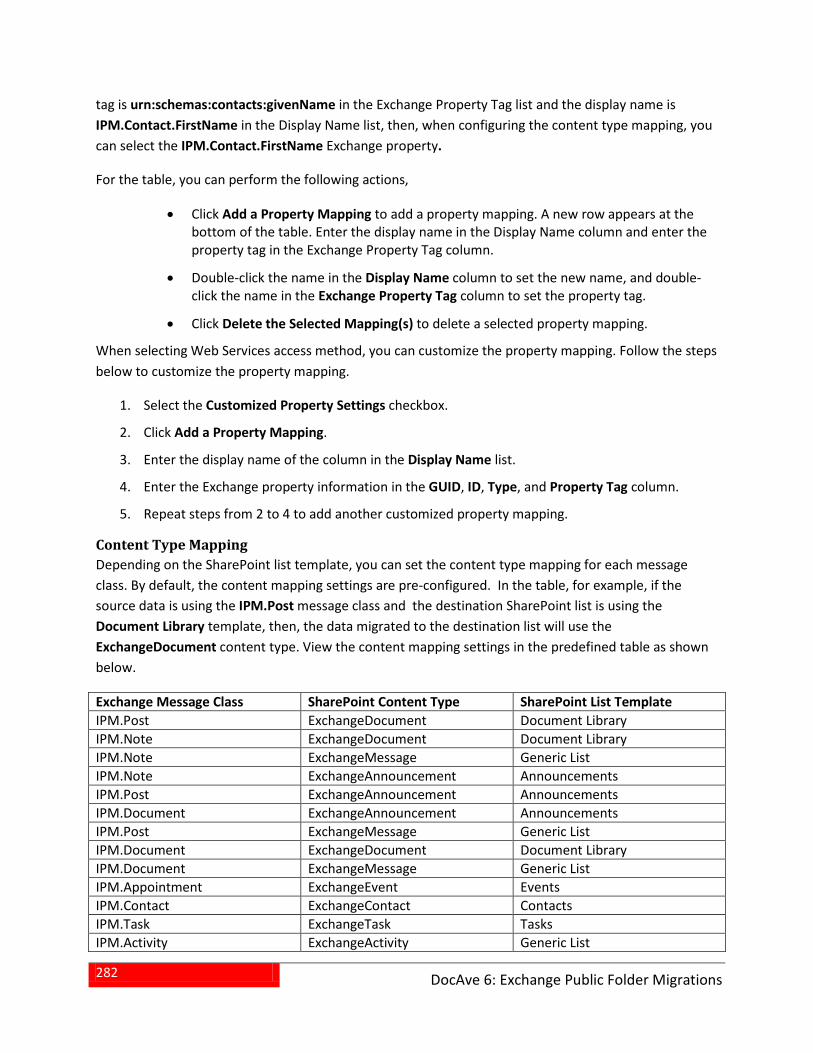
282
DocAve 6: Exchange Public Folder Migrations
tag is urn:schemas:contacts:givenName in the Exchange Property Tag list and the display name is IPM.Contact.FirstName in the Display Name list, then, when configuring the content type mapping, you can select the IPM.Contact.FirstName Exchange property.
For the table, you can perform the following actions,
• Click Add a Property Mapping to add a property mapping. A new row appears at the bottom of the table. Enter the display name in the Display Name column and enter the property tag in the Exchange Property Tag column.
• Double-click the name in the Display Name column to set the new name, and double-click the name in the Exchange Property Tag column to set the property tag.
• Click Delete the Selected Mapping(s) to delete a selected property mapping.
When selecting Web Services access method, you can customize the property mapping. Follow the steps below to customize the property mapping.
Select the Customized Property Settings checkbox. 1.
Click Add a Property Mapping. 2.
Enter the display name of the column in the Display Name list. 3.
Enter the Exchange property information in the GUID, ID, Type, and Property Tag column. 4.
Repeat steps from 2 to 4 to add another customized property mapping. 5.
Content Type Mapping Depending on the SharePoint list template, you can set the content type mapping for each message class. By default, the content mapping settings are pre-configured. In the table, for example, if the source data is using the IPM.Post message class and the destination SharePoint list is using the Document Library template, then, the data migrated to the destination list will use the ExchangeDocument content type. View the content mapping settings in the predefined table as shown below.
Exchange Message Class SharePoint Content Type SharePoint List Template IPM.Post ExchangeDocument Document Library IPM.Note ExchangeDocument Document Library IPM.Note ExchangeMessage Generic List IPM.Note ExchangeAnnouncement Announcements IPM.Post ExchangeAnnouncement Announcements IPM.Document ExchangeAnnouncement Announcements IPM.Post ExchangeMessage Generic List IPM.Document ExchangeDocument Document Library IPM.Document ExchangeMessage Generic List IPM.Appointment ExchangeEvent Events IPM.Contact ExchangeContact Contacts IPM.Task ExchangeTask Tasks IPM.Activity ExchangeActivity Generic List

283
DocAve 6: Exchange Public Folder Migrations
Exchange Message Class SharePoint Content Type SharePoint List Template IPM.StickyNote ExchangeNote Generic List IPM.Post ExchangeDiscussionReply Discussion Board IPM.Note ExchangeDiscussionReply Discussion Board IPM.Document ExchangeDiscussionReply Discussion Board IPN.Activity ExchangeDocument Document Library
For the table, you can perform the following actions,
• Click Add a Content Type Mapping to add a content type mapping. A new row appears at the bottom of the table. Select the message class from the drop-down list, and then specify the SharePoint content type and the SharePoint list template from the drop-down list.
• Double-click the message in the Exchange Message Class column to select a new message class, double-click the content type in the SharePoint Content Type list to select a new content type, and then double-click the list template in the SharePoint List Template list to select a new list template.
• Click Delete Selected Mapping(s) to delete a selected content type mapping.
• Click Edit a Content Type Mapping to edit an existing content type mapping.
Follow the instructions below to edit a content type mapping.
Select a content type mapping and click Edit a Content Type Mapping. A Content Type Mapping 1.Settings pop-up window appears.
On the pop-up window, the column mapping from the Exchange column name (contained in the 2.Exchange message class) to the SharePoint column display name (contained in the SharePoint content type) is shown.
Select the checkbox of a specific column mapping and then click Edit the Selected Exchange 3.Column .
In the Exchange Column Name section, you can select an Exchange property or define Marco. 4.
• Select an Exchange property – Select a column name from the drop-down list.
• Define Macro – Specify a combination of properties. The property name and the description will be mapped to the SharePoint column.
i. Click Add and Define Macro.
ii. Select a property from the drop-down list, for example, Cc.
iii. Enter the description in the Condition column, for example, Jack.
iv. The macro result is refreshed, for example, [Cc]Jack.
v. Repeat steps from a to c to add the desired properties, for example, [Cc]Jack[Author]Tom.
284
DocAve 6: Exchange Public Folder Migrations
vi. Click OK to finish the settings.
The macro will be mapped to the SharePoint column. The value of the SharePoint column will be, for example, [Cc]Jack[Author]Tom.
Click OK to save the column mapping settings and return to the Content Type Mapping Settings 5.page. The new column mapping is refreshed according to your settings.
Click OK on the Content Type Mapping Settings page and return to the Content Type Mapping 6.tab.
Folder Mapping When selecting site level as the destination, you can set the folder mapping for each type of Exchange folder. By default, a folder mapping table is pre-configured. In the table, for example, if the source folder type is urn:content-classes:folder, and the destination SharePoint list is using the Document Library template, then a list using the Document Library template will be created to contain the source data. Double-click the list template name to change the list template.
Security Mapping Specify the user mapping, domain mapping, group mapping, and permission mapping.
• User Mapping (Optional) – In the drop-down list, select a previously-configured user mapping or click New User Mapping to create a user mapping. For details on creating a user mapping, refer to the DocAve 6 Control Panel Reference Guide.
• Group Mapping (Optional) – In the drop-down list, select a previously-configured group mapping or click New Group Mapping to create a group mapping. For details on creating a group mapping, refer to the DocAve 6 Control Panel Reference Guide.
• Domain Mapping (Optional) – In the drop-down list, select a previously-configured domain mapping or click New Domain Mapping to create a domain mapping. For details on creating a domain mapping, refer to the DocAve 6 Control Panel Reference Guide.
• Permission Mapping (Required) – In the drop-down list, select a previously-configured permission mapping or click New Permission Mapping to create a permission mapping. For details on creating a permission mapping, refer to About Permission Mapping. Note that if you have not configured or selected any permission mapping, the default permission mapping will be applied during the migration.
If you select to use the mapping settings to migrate the source user and the related permission, besides the mapping settings above, you must also configure the PublicFolderMigrationConfiguration.xml file. Refer to Exchange Public Folder Migration Configuration File for more details.
Advanced Options Configure the settings in Advanced Options to set the character length settings and the illegal character replacement settings. The configuration settings are saved to the current main-profile.
285
DocAve 6: Exchange Public Folder Migrations
Dynamic Rule Map the source Exchange field names and the corresponding values to SharePoint column names and column values. Select a previously-created dynamic rule or click New Dynamic Rule to create a new one.
Character Length Settings Configure character length limitations for SharePoint URL, filename, and folder name. In SharePoint, the maximum length of SharePoint URL is 260 characters, and the maximum length of file name and folder name is 128 characters.
• Maximum Length of the folder name – The default value is 60, and the scale you can set is from 1 to 128. If the folder name exceeds the limitation you set, the extra characters, which are in the end of the folder name, will be pruned. For example, you set 10 as the maximum length of the folder name, and then a folder named AaaaaBbbbbCccccDdddd will be pruned to AaaaaBbbbb after the migration.
• Maximum Length of the file name – The default value is 80, and the scale you can set is from 1 to 128. If the total number of characters of the file name and extension name exceed the limitation you set, the extra characters, which are in the end of the file name, will be pruned. For example, you set 6 as the maximum length, and then a file named 123456.doc will be pruned to 12.doc after the migration.
• Maximum Length of the SharePoint URL – The default value is 255, and the scale you can set is from 1 to 260.The length of the SharePoint URL is calculated from the first character of the managed path after /. When the folder or file’s URL exceeds the limitation, the migration results are:
If the folder URL exceeds the limitation, the folder and its content will be omigrated under the root folder of the destination list. For example, you select Folder A in the source for migration. The Folder A contains Folder B and Folder C. The Folder B contains Folder D and File E. When migrating, the URL of Folder D exceeds the maximum length of the SharePoint URL you set, then, Folder D and its content will be migrated to the same level as Folder A, which is in the top level of the library.
If the file URL exceeds the limitation, the file will be migrated under the root ofolder of the destination list. For example, you select Folder A in the source for migration. The Folder A contains Folder B and Folder C. The Folder B contains Folder D and File E. When migrating, the URL of File E exceeds the maximum length of the SharePoint URL you set, then, File E will be migrated to the root folder of the library.
Illegal Character Replacement Settings Replace the characters (existing in the file name and folder name in Exchange Public Folder) which are illegal in SharePoint with the valid characters in SharePoint. By default, all illegal characters are replaced with a “_”. Click Folder Level or File Level to configure the settings for folder name or file name.
• To modify an illegal character mapping, double-click“_” in the Replace with column and enter a new valid character.

286
DocAve 6: Exchange Public Folder Migrations
• To add an illegal character mapping, click Add an Illegal Character. Then enter the illegal character in the Illegal character in SharePoint column and the valid character in the Replace with column.
• To delete one or more previously-configured illegal character mapping, select the Illegal characters in SharePoint check box, all customized mappings are selected, uncheck the mappings that you do not want to delete, and then click Delete the Selected Illegal Character(s). Note that the default configured mappings cannot be selected and deleted.
Performing an Exchange Public Folder Migration An Exchange public folder migration migrates contents, configurations, and securities from the Exchange server to the SharePoint environment.
To start an Exchange public folder migration job, click Online Migration on the ribbon in the Home tab. To perform an Exchange public folder migration job, follow the instructions below.
Select the Source and Destination Nodes In the Source pane, click Select Source. The Select Source pop-up window appears. 1.
On the Select Source pop-up, select the desired Agent from the Agent drop-down list. The 2.connections relied on this Agent will be loaded, and select the desired one from the Connection drop-down list.
Click OK and return to the Source pane. The connection name is displayed on the Source pane. 3.If you want to change the current connection, click Change Source to select another connection.
Click the connection name to load the source data and then expand the data tree to find the 4.data to be migrated.
Find the node whose data you wish to migrate. If working with a large environment, a.enter the name of the folder node into the Input Keyword text box to search for the desired node. You can only search the nodes whose name is displayed in the currently expanded tree. The nodes which are not displayed in the expanded tree cannot be search. When entering the keyword, the search result will be displayed with a little time.
Select the source node by checking the corresponding checkbox. Within each folder b.level, there is a node named Items to display how many objects (including the files and items) are contained in the Items node. You can click the Items node and the Item Browser interface appears. Select the files/items that you wish to migrate by checking corresponding checkboxes and click OK.
*Note: For detailed information about what kinds of lists and libraries are supported for different Exchange folders in the migration, refer to Supported List/Library for Different Exchange Folder Types.
287
DocAve 6: Exchange Public Folder Migrations
In the destination pane, click the farm name and expand the data tree to select the destination 5.site or list.
Find the node which you wish to migrate the source data to. If working with a large a.environment, enter the keyword of the node into the Input Keyword text box to search for the desired site collection. You can only search the nodes whose name is displayed in the currently expanded tree. The nodes which are not displayed in the expanded tree cannot be search. When entering the keyword, the search result will be displayed with a little time.
Select the destination node by checking corresponding checkbox. You can also create a b.new container to be the destination node without leaving the current page.
For details on creating a container in SharePoint, refer to Creating Containers.
For each source folder node, if you select the site node in the destination, the newly created list/library will use the template that you configured in Folder Mapping; if you select the list/library node in the destination, only the list/library using the particular template is supported. For more information of the supported template, refer to Supported List/Library for Different Exchange Folder Types.
*Note: The libraries created or used by DocAve Connector or the libraries that applied DocAve Storage Manager rules cannot be selected as the destination node for the Exchange Public Folder Migration, otherwise, the migration job will fail.
When finished configuring the job, select one of the following options: 6.
• Click Run Now to perform a migration job immediately. For more information on the Run Now interface, refer to Configuring the Run Now Interface.
• Click Save As New Plan to configure more specific settings and then save them as a file system migration plan, which then can be used to perform a file system migration job. For more information on the Save As New Plan interface, refer to Configuring the Save As New Plan Interface.
Configuring the Run Now Interface In the Run Now interface, configure the settings below:
Conflict Resolution – If the Exchange public folder object name/ID in the source node is the 1.same as an existing object in the destination node, it is considered a conflict.
• Container level conflict resolution – Set the conflict resolution on list and folder level. There are two resolutions:
Skip ignores the source container that has the same name as the destination oone. For the content in the source container, if you do not select the Check lower objects for conflicts checkbox, the content will be also ignored. If you
288
DocAve 6: Exchange Public Folder Migrations
select the Check lower objects for conflict checkbox, continue to configure Content level conflict resolution.
Merge combines the configuration of the source and destination container. For othe content in the source container, continue to configure Content level conflict resolution.
• Content level conflict resolution – Set the conflict resolution of the item/document level. There are two resolutions.
Skip ignores the source item/document that has the same Exchange ID as the odestination item/document.
Overwrite copies the source item/document to the destination by overwriting othe destination item/document with same Exchange ID.
For more information of Conflict Resolution, refer to Appendix D: Conflict Resolution.
Profile Selection – Specify the main profile configured by Profile Manager. 2.
Migration Database – Choose whether or not to use the specified migration database to store 3.the job data. If you have not set up a migration database, you can click the Migration Database link to create a new one. If you have set up one, check whether the migration database that you previously-configured is available by clicking Test. After the testing is completed, you can click Details to view the information of all agents and the connected status. To use the migration database to store the job data, select Also use Specified Database to store the job data.
Notification – Select the e-mail notification profile for sending the notification report. For more 4.information on working with notification policies, refer to the DocAve 6 Control Panel Reference Guide.
Job Status Option – Specify whether or not to take the metadata/security exceptions into 5.consideration for the file system migration job status. If only the content metadata or security fails to migrate and you select Ignore Metadata/Security exceptions option, the migration job status will be Finished. Otherwise, the job status will be Finished with Exceptions.
Click OK to run the job immediately or click Cancel to return to the Home page of Online 6.Migration.
Configuring the Save As New Plan Interface In the Save As New Plan interface, configure the following settings to build a migration plan.
Plan Name – Enter the plan name and the optional description for future reference. 1.
Profile Selection –Select a previously-created main profile from the drop-down menu. 2.
Schedule Selection – Specify the schedule to start the migration job. 3.
• No schedule – Select this option to run the plan manually.
• Configure the schedule myself – Select this option and the Schedule Settings section appears under Schedule Selection. Click Add Schedule and the Add Schedule interface
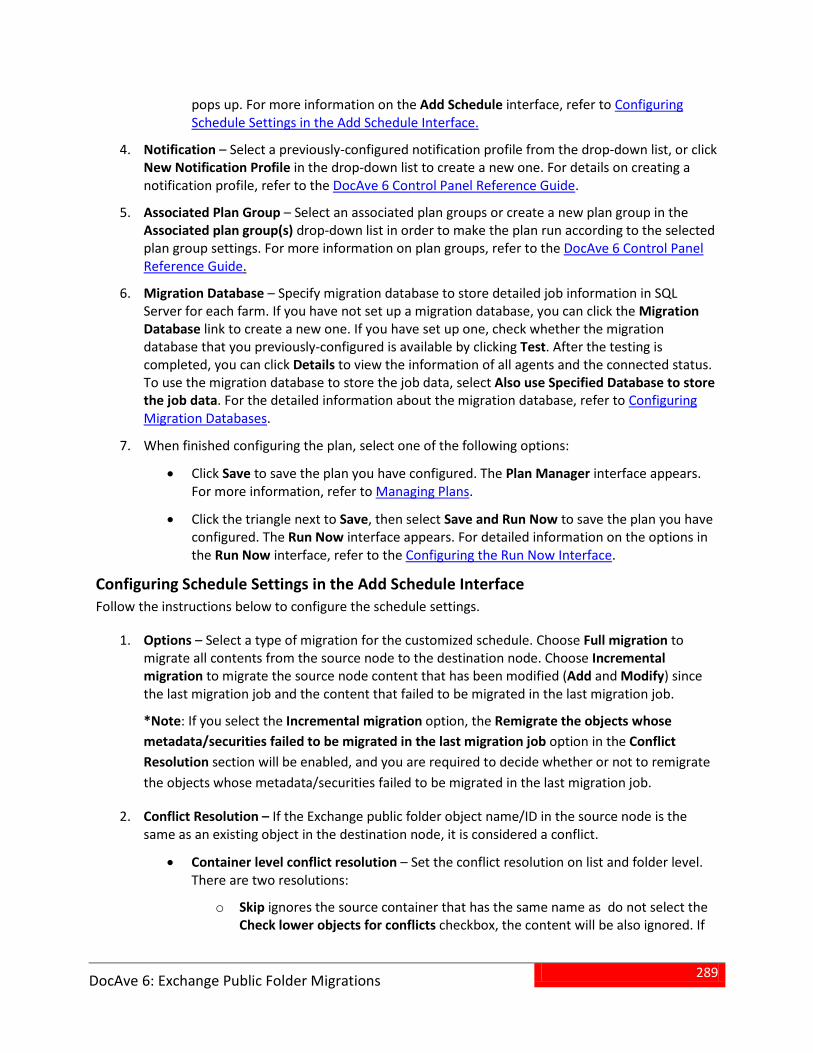
289
DocAve 6: Exchange Public Folder Migrations
pops up. For more information on the Add Schedule interface, refer to Configuring Schedule Settings in the Add Schedule Interface.
Notification – Select a previously-configured notification profile from the drop-down list, or click 4.New Notification Profile in the drop-down list to create a new one. For details on creating a notification profile, refer to the DocAve 6 Control Panel Reference Guide.
Associated Plan Group – Select an associated plan groups or create a new plan group in the 5.Associated plan group(s) drop-down list in order to make the plan run according to the selected plan group settings. For more information on plan groups, refer to the DocAve 6 Control Panel Reference Guide.
Migration Database – Specify migration database to store detailed job information in SQL 6.Server for each farm. If you have not set up a migration database, you can click the Migration Database link to create a new one. If you have set up one, check whether the migration database that you previously-configured is available by clicking Test. After the testing is completed, you can click Details to view the information of all agents and the connected status. To use the migration database to store the job data, select Also use Specified Database to store the job data. For the detailed information about the migration database, refer to Configuring Migration Databases.
When finished configuring the plan, select one of the following options: 7.
• Click Save to save the plan you have configured. The Plan Manager interface appears. For more information, refer to Managing Plans.
• Click the triangle next to Save, then select Save and Run Now to save the plan you have configured. The Run Now interface appears. For detailed information on the options in the Run Now interface, refer to the Configuring the Run Now Interface.
Configuring Schedule Settings in the Add Schedule Interface Follow the instructions below to configure the schedule settings.
Options – Select a type of migration for the customized schedule. Choose Full migration to 1.migrate all contents from the source node to the destination node. Choose Incremental migration to migrate the source node content that has been modified (Add and Modify) since the last migration job and the content that failed to be migrated in the last migration job.
*Note: If you select the Incremental migration option, the Remigrate the objects whose metadata/securities failed to be migrated in the last migration job option in the Conflict Resolution section will be enabled, and you are required to decide whether or not to remigrate the objects whose metadata/securities failed to be migrated in the last migration job.
Conflict Resolution – If the Exchange public folder object name/ID in the source node is the 2.same as an existing object in the destination node, it is considered a conflict.
• Container level conflict resolution – Set the conflict resolution on list and folder level. There are two resolutions:
Skip ignores the source container that has the same name as do not select the oCheck lower objects for conflicts checkbox, the content will be also ignored. If
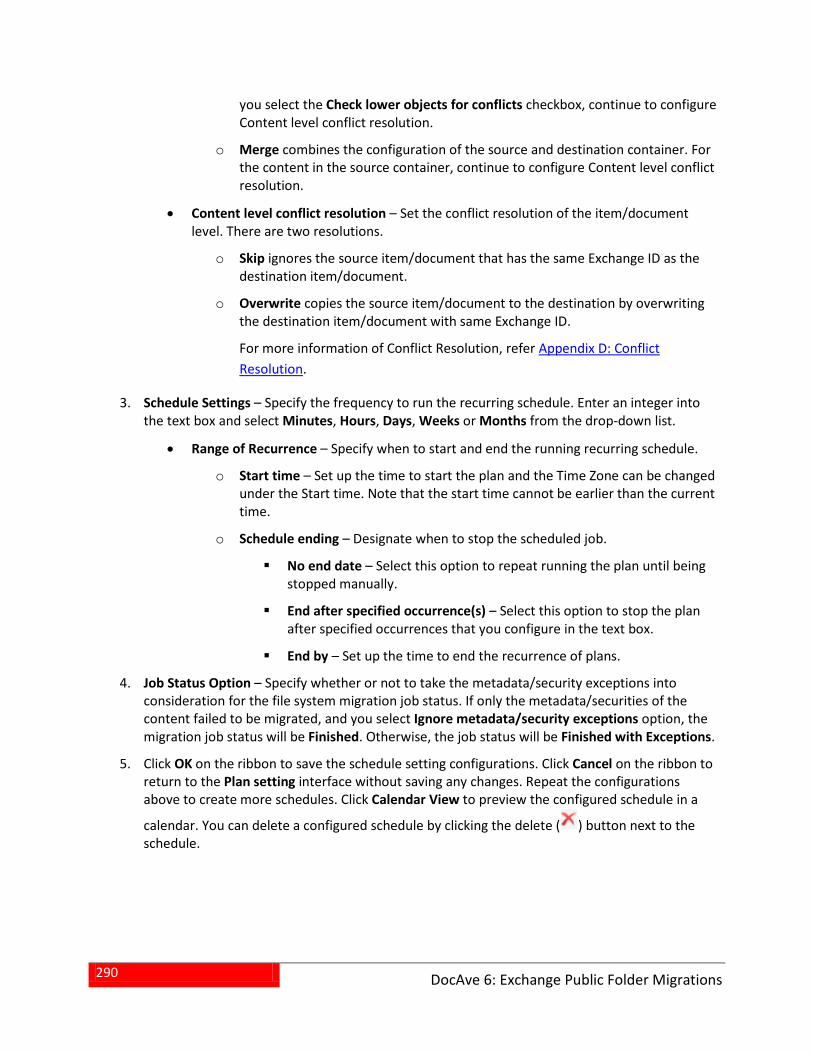
290
DocAve 6: Exchange Public Folder Migrations
you select the Check lower objects for conflicts checkbox, continue to configure Content level conflict resolution.
Merge combines the configuration of the source and destination container. For othe content in the source container, continue to configure Content level conflict resolution.
• Content level conflict resolution – Set the conflict resolution of the item/document level. There are two resolutions.
Skip ignores the source item/document that has the same Exchange ID as the odestination item/document.
Overwrite copies the source item/document to the destination by overwriting othe destination item/document with same Exchange ID.
For more information of Conflict Resolution, refer Appendix D: Conflict Resolution.
Schedule Settings – Specify the frequency to run the recurring schedule. Enter an integer into 3.the text box and select Minutes, Hours, Days, Weeks or Months from the drop-down list.
• Range of Recurrence – Specify when to start and end the running recurring schedule.
Start time – Set up the time to start the plan and the Time Zone can be changed ounder the Start time. Note that the start time cannot be earlier than the current time.
Schedule ending – Designate when to stop the scheduled job. o
No end date – Select this option to repeat running the plan until being stopped manually.
End after specified occurrence(s) – Select this option to stop the plan after specified occurrences that you configure in the text box.
End by – Set up the time to end the recurrence of plans.
Job Status Option – Specify whether or not to take the metadata/security exceptions into 4.consideration for the file system migration job status. If only the metadata/securities of the content failed to be migrated, and you select Ignore metadata/security exceptions option, the migration job status will be Finished. Otherwise, the job status will be Finished with Exceptions.
Click OK on the ribbon to save the schedule setting configurations. Click Cancel on the ribbon to 5.return to the Plan setting interface without saving any changes. Repeat the configurations above to create more schedules. Click Calendar View to preview the configured schedule in a
calendar. You can delete a configured schedule by clicking the delete ( ) button next to the schedule.
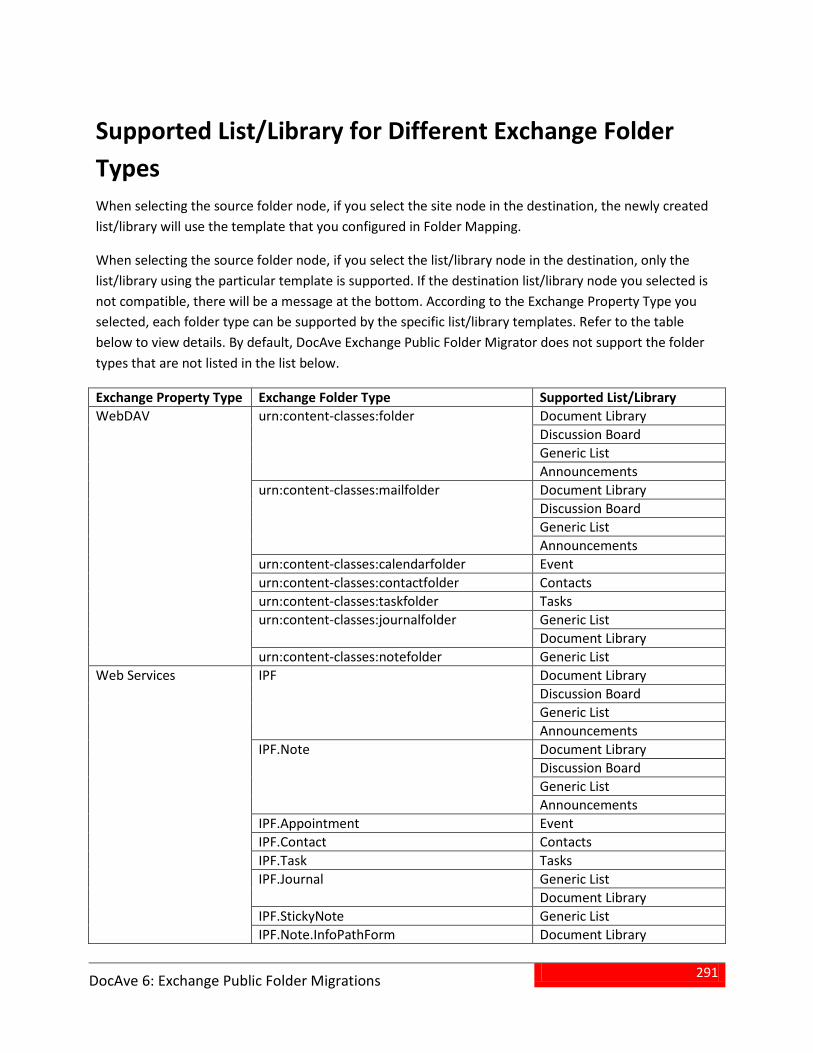
291
DocAve 6: Exchange Public Folder Migrations
Supported List/Library for Different Exchange Folder Types When selecting the source folder node, if you select the site node in the destination, the newly created list/library will use the template that you configured in Folder Mapping.
When selecting the source folder node, if you select the list/library node in the destination, only the list/library using the particular template is supported. If the destination list/library node you selected is not compatible, there will be a message at the bottom. According to the Exchange Property Type you selected, each folder type can be supported by the specific list/library templates. Refer to the table below to view details. By default, DocAve Exchange Public Folder Migrator does not support the folder types that are not listed in the list below.
Exchange Property Type Exchange Folder Type Supported List/Library WebDAV
urn:content-classes:folder
Document Library Discussion Board Generic List Announcements
urn:content-classes:mailfolder
Document Library Discussion Board Generic List Announcements
urn:content-classes:calendarfolder Event urn:content-classes:contactfolder Contacts urn:content-classes:taskfolder Tasks urn:content-classes:journalfolder
Generic List Document Library
urn:content-classes:notefolder Generic List Web Services
IPF Document Library Discussion Board Generic List Announcements
IPF.Note Document Library Discussion Board Generic List Announcements
IPF.Appointment Event IPF.Contact Contacts IPF.Task Tasks IPF.Journal Generic List
Document Library IPF.StickyNote Generic List IPF.Note.InfoPathForm Document Library
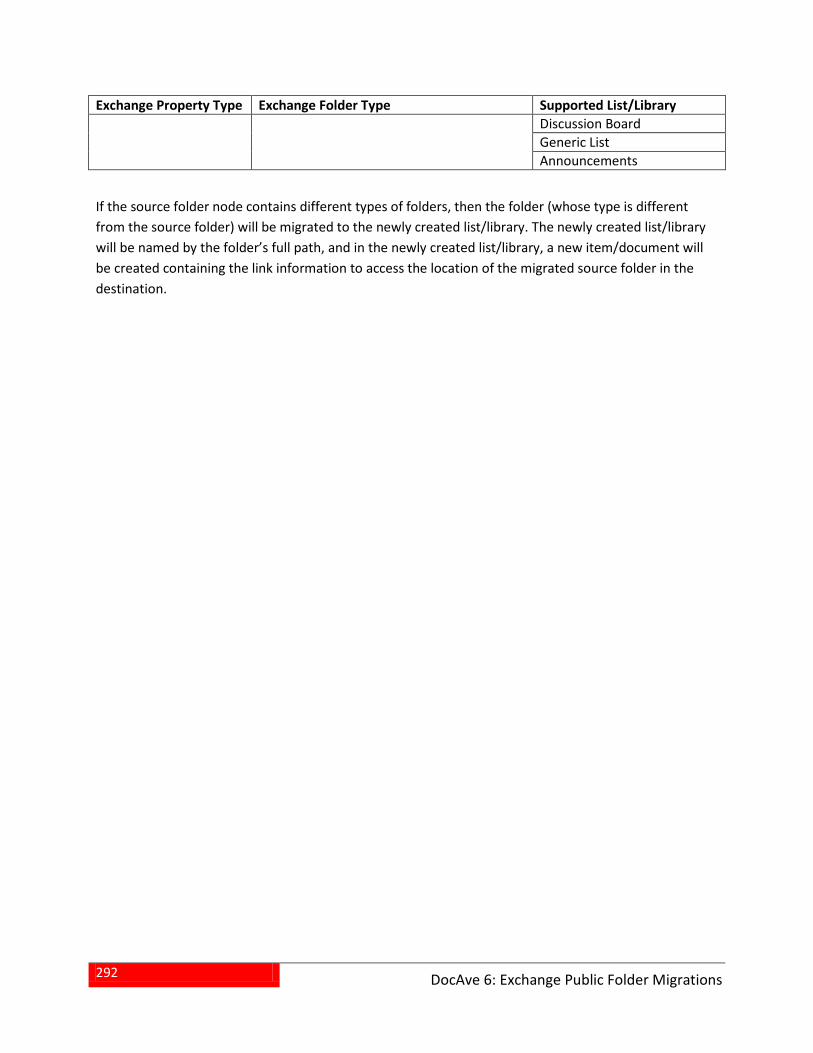
292
DocAve 6: Exchange Public Folder Migrations
Exchange Property Type Exchange Folder Type Supported List/Library Discussion Board Generic List Announcements
If the source folder node contains different types of folders, then the folder (whose type is different from the source folder) will be migrated to the newly created list/library. The newly created list/library will be named by the folder’s full path, and in the newly created list/library, a new item/document will be created containing the link information to access the location of the migrated source folder in the destination.
293
DocAve 6: EMC Documentum Migrations
EMC Documentum Migrations EMC Documentum migrator automates the process of consolidating multiple EMC Documentum content sources from EMC Documentum into SharePoint 2010/2013 on-premises. Follow the steps below to use EMC Documentum Migrator.
Pre-migration Configurations To use EMC Documentum Migrator, first connect DocAve Agents to the EMC Documentum environment, From the Migrator Home tab, click Configure Connection on the ribbon. The EMC Documentum Connection interface appears.
Managing EMC Documentum Connections An EMC Documentum connection connects a DocAve Agent to your EMC Documentum environment. Created connections are displayed on the Source pane when creating a migration job, showing the contents for the EMC Documentum migration job. The EMC Documentum Connection interface displays all EMC Documentum connections that you have previously created.
In this interface, you can change the number of EMC Documentum connections displayed per page and the order in which they are displayed. To change the number of EMC Documentum connections displayed per page, select the desired number from the Show rows drop-down menu in the lower right-hand corner. To sort the EMC Documentum connections, click on a column heading such as Name, Agent and Last Modified Time.
Customize how these connections are displayed in a number of different ways:
• Search – Filters the EMC Documentum connections by the keyword you enter. The keyword must be contained in a column value. At the top of the EMC Documentum Connection viewing pane, enter the keyword for the EMC Documentum connections you wish to display. You can select Search all pages or Search current page to define the search scope. Search all pages means that the connections in all of the pages whose names and descriptions contain the keywords will be displayed, while Search current page means that only the connections in the current page whose names and descriptions contain the keywords will be displayed. Note that the search function is not case sensitive.
• – You can manage which columns are displayed in the list so that only information you want to see is shown. Click the plus ( ), and then select the checkbox next to the column name to have that column shown in the list.
• – You can manage which columns are hidden in the list. Hover over the cursor on the column that you want to hide and click the minus ( ). The column is hidden.
294
DocAve 6: EMC Documentum Migrations
• – Filters the connections, which are related to the specified Agents, to be displayed. Hover over the cursor on the Agent column and click , then select the checkbox next to the Agent name. Click OK to display the connections which are related to the selected Agents. To cancel the filter results, click Clear Filter.
Perform the following actions in the EMC Documentum Connection interface:
• Click Create on the ribbon to create a new EMC Documentum connection. For details on creating a new EMC Documentum connection, see Creating and Editing EMC Documentum Connections.
• Click View Details on the ribbon and you will see the previously configured settings for this EMC Documentum connection. Here you can also click Edit on the ribbon to make changes to the EMC Documentum connection’s settings. You will be brought to the Edit EMC Documentum Connection page where you can change the settings of this EMC Documentum connection.
• Click Edit on the ribbon to change the configurations for this EMC Documentum connection. For details on editing configurations for an EMC Documentum connection, see Creating and Editing EMC Documentum Connections.
• Click Delete on the ribbon. A confirmation window appears. Click OK to delete the selected EMC Documentum connections, or click Cancel to return to the EMC Documentum Connection interface without deleting the selected EMC Documentum connections.
Creating and Editing EMC Documentum Connections To create a new EMC Documentum connection, click Create on the ribbon. To modify a previously configured EMC Documentum connection, select the EMC Documentum connection, and then click Edit on the ribbon. In the Create EMC Documentum Connection or Edit EMC Documentum Connection interface, configure the following settings:
EMC Documentum Connection Name – Enter a Name for the EMC Documentum connection. 1.Then enter an optional Description for this EMC Documentum connection for future reference.
Connection – Configure the following settings to connect the specified repository on the EMC 2.Documentum server to the DocAve Agent.
• Agent – The Agents displayed in the drop-down list are the ones whose Agent type contains EMC Documentum Migration - EMC Documentum Agent . From the drop-down list, select an Agent that is able to access the EMC Documentum server from the drop-down list. For more information of Agent type configuration, refer to the DocAve 6 Control Panel Reference Guide.
• Login name – Enter the user’s login name for accessing the specified repository.
• Password – Enter the password for accessing the specified repository.
• Repository – Enter the repository name in the text box. DocAve Agent will connect to the repository you specified here.

295
DocAve 6: EMC Documentum Migrations
• Domain – If the repository is running on the domain-required mode, enter the domain name.
Click Validation Test to verify whether the connection is configured correctly. 3.
Click OK to save the configurations and return to the EMC Documentum Connection interface, 4.or click Cancel to return to the EMC Documentum Connection interface without saving any changes.
296
DocAve 6: EMC Documentum Migrations
Configuring EMC Documentum Online Migration
About Filter Policies The Filter Policy allows you to set up filter rules so that you can control what objects are migrated to the SharePoint destination, allowing you to target content more precisely. By setting up and saving filter policies, you can apply the same filter policy to different EMC Documentum migration plans without having to recreate them each time.
To access the Filter Policy interface, click Profile Settings on the Migrator Home tab. On the Profile Settings page, click Filter Policy on the ribbon.
The Filter Policy interface displays any filter policies that you have previously created in the main display pane.
In this interface, you can change the number of filter policies displayed per page and the order in which they are displayed. To change the number of filter policies displayed per page, select the desired number from the Show rows drop-down menu in the lower right-hand corner. To sort the filter policies, click on a column heading such as Filter Policy Name, and Description.
Customize how these filter policies are displayed in a number of different ways:
• Search – Filters previously created filter policies displayed by the keyword you designate. The keyword must be contained in a column value. At the top of the filter policies viewing pane, enter the keyword in the Input Keyword text box (the keyword is not case sensitive). You can select Search all pages or Search current page to define the search scope. Search all pages means that the filter policies in all of the pages whose names and descriptions contain the keywords will be displayed; while Search current page means that only the filter policies in the current page whose names and descriptions contain the keywords will be displayed.
• – You can manage which columns are displayed in the list so that only information you want to see is shown. Click the plus ( ), and then check the checkbox next to the column name to have that column shown in the list.
• – You can manage which columns are hidden in the list. Hover over the cursor on the column that you want to hide and click the minus ( ). The column is hidden.
Perform the following actions in the Filter Policy interface:
• Click Create on the ribbon to create a new filter policy. For detailed on creating a new filter policy, see Creating Filter Policies.
• Click Edit on the ribbon to change the configurations for the selected filter policy. For details on editing configurations for filter policies, see Creating Filter Policies.
• Click Delete on the ribbon. A confirmation window appears, confirming that you want to proceed with the deletion. Click OK to delete the selected filter policies, or click Cancel to return to the filter policy interface without deleting the selected filter policies.
297
DocAve 6: EMC Documentum Migrations
Creating Filter Policies To create a new filter policy, click Create on the ribbon. To modify a previously configured filter policy, select the filter policy, and then click Edit on the ribbon.
In the Create Filter Policy or Edit Filter Policy interface, configure the following settings:
Name – Enter the name for the filter policy that you are creating, or rename the selected filter 1.policy that you are editing.
Description (optional) – Enter a description for this filter policy. 2.
Filter Rule – Filters the files or folders that you want to migrate by setting up a set of filter 3.criteria. Follow the steps below to set up your own filter rules:
Under the filter rule configuration pane, select a filter level group from the drop-down a.list. By default, Folder is selected.
Click Add a Filter Level Group. A folder/file filter level group is created and the filter rule b.configuration field appears in the pane.
For the Folder filter level, you can select the following types of rules: Name, oCreated Time, and Modified Time. By default, the rule of Name is automatically created. You can click Name to change another rule from the drop-down list.
For the File filter level, you can select the following types of rules: Name, Size, oCreated Time, Modified Time, Version, and Format. By default, the rule of Name is automatically created. You can click Name to change another rule from the drop-down list.
Configure the rule by setting the condition, the value, and the logic (And or Or) with c.other rules. By default, the logic is set to be And If desired, change the logic to Or by selecting it from the drop-down list.
And – The content that meets all the criteria will be filtered to be included. o
Or – The content that meets any one of the criteria will be filtered to be oincluded.
Repeat steps from a to c to add more rules. If you want to delete a rule, click the cross d.
( ) displayed at the end of the rule.
Click OK to save the configurations and return to the Filter Policy interface, or click Cancel to 4.return to the Filter Policy interface without saving any changes. For more detailed information, refer to Examples of EMC Documentum Filter Policies.
Examples of EMC Documentum Filter Policies The following table provides the detailed information of using EMC Documentum filter policies.
*Note: All of the text boxes are not case sensitive, and do not support wildcards.
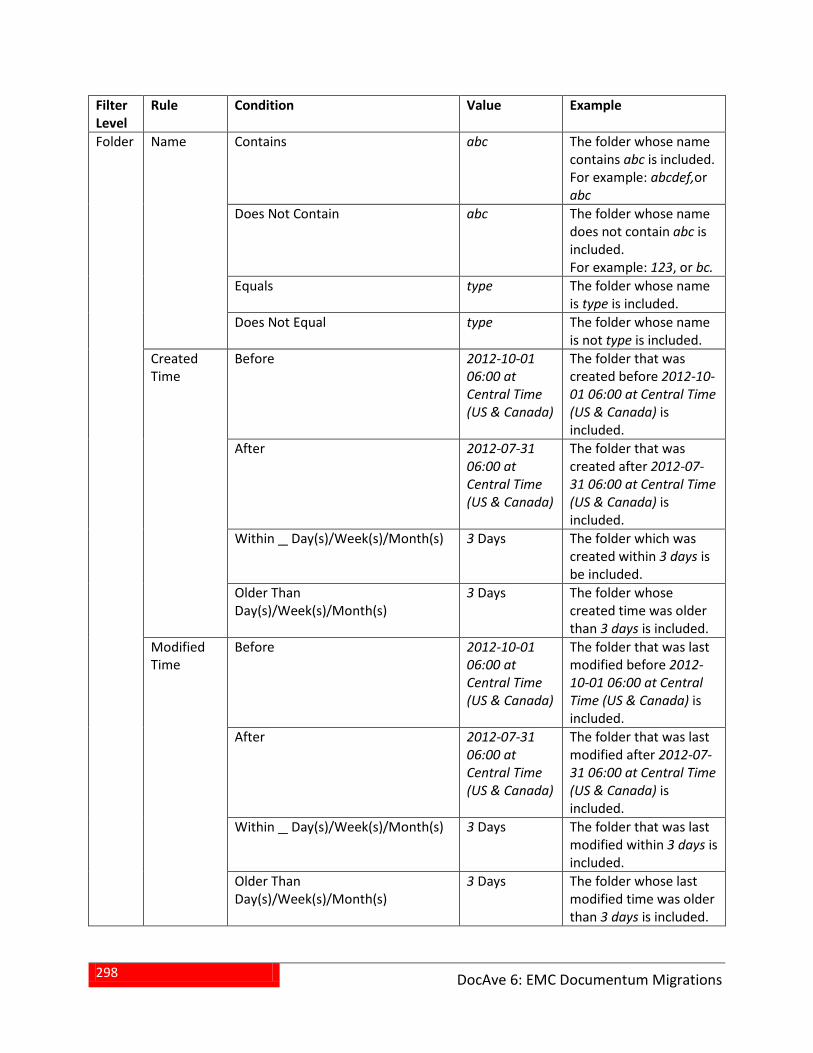
298
DocAve 6: EMC Documentum Migrations
Filter Level
Rule Condition Value Example
Folder
Name Contains abc The folder whose name contains abc is included. For example: abcdef,or abc
Does Not Contain abc The folder whose name does not contain abc is included. For example: 123, or bc.
Equals type The folder whose name is type is included.
Does Not Equal type The folder whose name is not type is included.
Created Time
Before 2012-10-01 06:00 at Central Time (US & Canada)
The folder that was created before 2012-10-01 06:00 at Central Time (US & Canada) is included.
After 2012-07-31 06:00 at Central Time (US & Canada)
The folder that was created after 2012-07-31 06:00 at Central Time (US & Canada) is included.
Within Day(s)/Week(s)/Month(s) 3 Days The folder which was created within 3 days is be included.
Older Than Day(s)/Week(s)/Month(s)
3 Days The folder whose created time was older than 3 days is included.
Modified Time
Before 2012-10-01 06:00 at Central Time (US & Canada)
The folder that was last modified before 2012-10-01 06:00 at Central Time (US & Canada) is included.
After 2012-07-31 06:00 at Central Time (US & Canada)
The folder that was last modified after 2012-07-31 06:00 at Central Time (US & Canada) is included.
Within Day(s)/Week(s)/Month(s) 3 Days The folder that was last modified within 3 days is included.
Older Than Day(s)/Week(s)/Month(s)
3 Days The folder whose last modified time was older than 3 days is included.
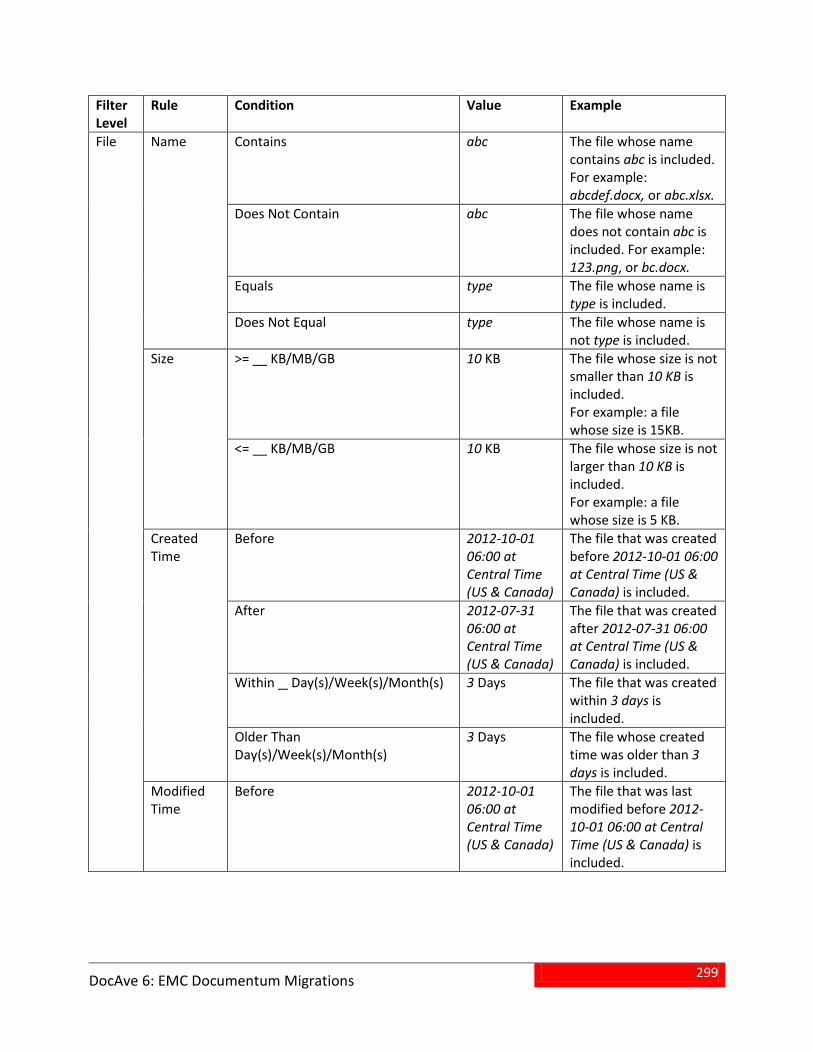
299
DocAve 6: EMC Documentum Migrations
Filter Level
Rule Condition Value Example
File Name Contains abc The file whose name contains abc is included. For example: abcdef.docx, or abc.xlsx.
Does Not Contain abc The file whose name does not contain abc is included. For example: 123.png, or bc.docx.
Equals type The file whose name is type is included.
Does Not Equal type The file whose name is not type is included.
Size >= __ KB/MB/GB 10 KB The file whose size is not smaller than 10 KB is included. For example: a file whose size is 15KB.
<= __ KB/MB/GB 10 KB The file whose size is not larger than 10 KB is included. For example: a file whose size is 5 KB.
Created Time
Before 2012-10-01 06:00 at Central Time (US & Canada)
The file that was created before 2012-10-01 06:00 at Central Time (US & Canada) is included.
After 2012-07-31 06:00 at Central Time (US & Canada)
The file that was created after 2012-07-31 06:00 at Central Time (US & Canada) is included.
Within Day(s)/Week(s)/Month(s) 3 Days The file that was created within 3 days is included.
Older Than Day(s)/Week(s)/Month(s)
3 Days The file whose created time was older than 3 days is included.
Modified Time
Before 2012-10-01 06:00 at Central Time (US & Canada)
The file that was last modified before 2012-10-01 06:00 at Central Time (US & Canada) is included.
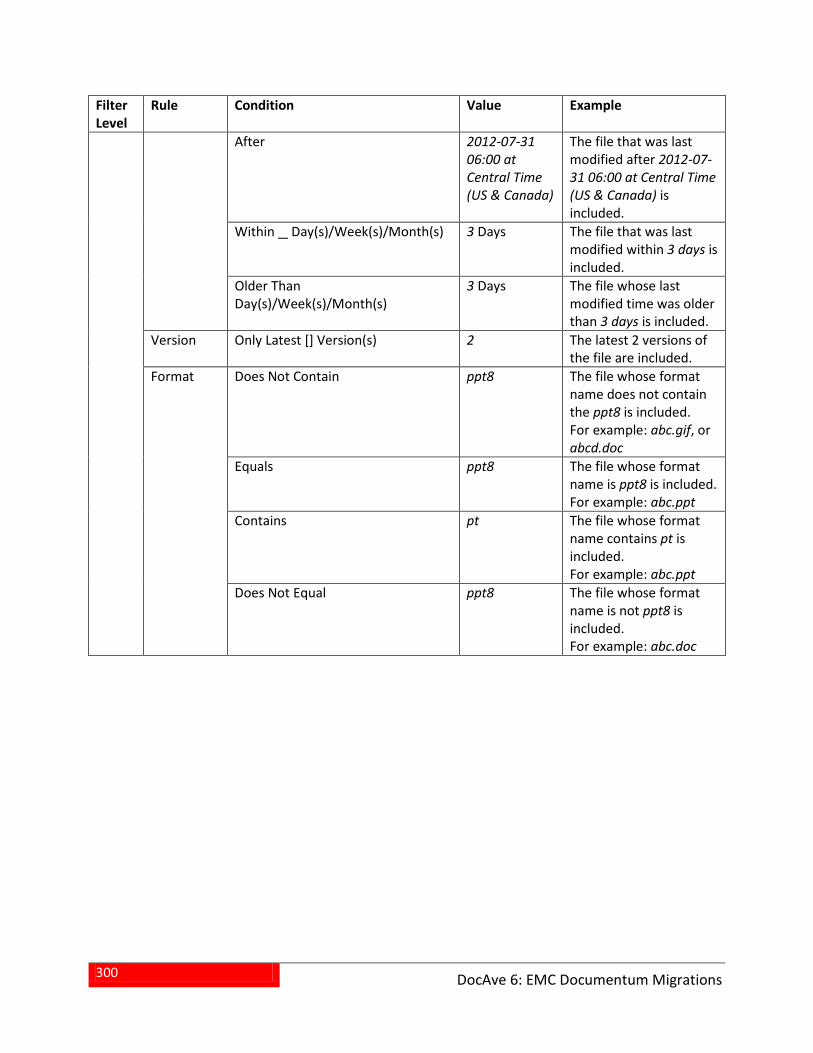
300
DocAve 6: EMC Documentum Migrations
Filter Level
Rule Condition Value Example
After 2012-07-31 06:00 at Central Time (US & Canada)
The file that was last modified after 2012-07-31 06:00 at Central Time (US & Canada) is included.
Within Day(s)/Week(s)/Month(s) 3 Days The file that was last modified within 3 days is included.
Older Than Day(s)/Week(s)/Month(s)
3 Days The file whose last modified time was older than 3 days is included.
Version Only Latest [] Version(s) 2 The latest 2 versions of the file are included.
Format Does Not Contain ppt8 The file whose format name does not contain the ppt8 is included. For example: abc.gif, or abcd.doc
Equals ppt8 The file whose format name is ppt8 is included. For example: abc.ppt
Contains pt The file whose format name contains pt is included. For example: abc.ppt
Does Not Equal ppt8 The file whose format name is not ppt8 is included. For example: abc.doc
301
DocAve 6: EMC Documentum Migrations
About Mapping Settings Before performing an EMC Documentum migration job, you may want to define optional Domain Mapping, User Mapping, Group Mapping, and Permission Mapping settings. Default mapping settings are provided in the event that you do not want to customize the mappings.
Refer to the following sections to have a well understanding of the mapping settings, and be aware of when and how to configure the mapping settings.
Domain Mapping If there are users with the same name but with different domains in the source and destination respectively, you can map a source domain name to a SharePoint domain name in the destination by using domain mapping. During the migration, Migrator will change the source domain name to your specified domain name in the destination node. For example, the source user summer\user1 can be mapped to SharePoint domain user may\user1 through domain mapping.
To access Domain Mapping, click Profile Settings on the ribbon of Home tab. The Profile 1.Settings tab appears.
Click Mappings on the ribbon, and then select Domain Mapping from the drop-down menu. The 2.Control Panel Mapping Manager interface appears.
Click Create on the ribbon to create a new domain mapping rule. 3.
For specific instructions on setting up domain mapping, refer to DocAve 6 Control Panel Reference Guide.
User Mapping User mapping maps an existing username to an existing SharePoint username in the destination. During the migration, Migrator will replace the source username with the specified username in the destination node.
To access User Mapping, click Profile Settings on the ribbon of Home tab. The Profile Settings 1.tab appears.
Click Mappings on the ribbon, and then select User Mapping from the drop-down menu. The 2.Control Panel Mapping Manager interface appears.
Click Create on the ribbon to create a new user mapping rule. 3.
For specific instructions on setting up user mapping, refer to DocAve 6 Control Panel Reference Guide.
302
DocAve 6: EMC Documentum Migrations
Group Mapping Group mapping maps an existing source group name, including EMC Documentum group or Active Directory (AD) group, to a SharePoint group, an AD group, or a FBA role. During the migration, Migrator will replace the source group name with your specified group name in the destination node.
To access Group Mapping, click Profile Settings on the ribbon of Home tab. The Profile Settings 1.tab appears.
Click Mappings on the ribbon, and then select Group Mapping from the drop-down menu. The 2.Control Panel Mapping Manager interface appears.
Click Create on the ribbon to create a new group mapping rule. 3.
For specific instructions on setting up user mapping, refer to the DocAve 6 Control Panel Reference Guide.
About Permission Mapping Permission mapping allows you to map permissions in the source to SharePoint permissions in the destination. During the migration, Migrator will replace the source permission with your specified permission name in the destination node. EMC Documentum Migration provides you with a Default Permission Mapping rule to migrate the EMC Documentum permissions to the SharePoint permissions, which is contained as the default permission mapping rule in the default main profile.
*Note: If you have configured both the user mapping and permission mapping in the Mapping Options profile, you can merge the source user’s mapping permissions in SharePoint to the permissions of the mapped destination user.
To access Permission Mapping, click Profile Settings on the ribbon of Home tab. The Profile 1.Settings tab appears.
Click Mappings on the ribbon, and then select Permission Mapping from the drop-down menu. 2.The Permission Mapping interface appears.
The Permission Mapping interface displays all previously configured permission mappings. In this interface, you can change the number of permission mappings displayed per page and the order in which they are displayed. To change the number of permission mappings displayed per page, select the desired number from the Show rows drop-down menu in the lower right-hand corner. To sort the permission mappings, click on a column heading such as Permission Mapping Name, and Description.
Customize how these permission mappings are displayed in a number of different ways:
• Search – Filters permission mappings displayed by the keyword you designate. The keyword must be contained in a column value. At the top of the Permission Mapping viewing pane, enter the keyword for the permission mappings you wish to display. You can select Search all pages or Search current page to define the search scope. Search all pages means that the permission mappings in all of the pages whose names and descriptions contain the keywords will be displayed; while Search current page means
303
DocAve 6: EMC Documentum Migrations
that only the permission mappings in the current page whose names and descriptions contain the keywords will be displayed. Note that the search function is not case sensitive.
• – You can manage which columns are displayed in the list so that only information you want to see is shown. Click the plus ( ), and then check the checkbox next to the column name to have that column shown in the list.
• – You can manage which columns are hidden in the list. Hover over the cursor on the column that you want to hide and then click the minus ( ). The column is hidden.
You may perform the following actions to a permission mapping:
• Click Create on the ribbon to create a new permission mapping rule. For detailed on creating a new permission mapping, see Creating and Editing Permission Mappings.
• Click View Details on the ribbon and you will see the previously configured settings for this permission mapping. Here you can also click Edit on the ribbon to make changes to the permission mapping’s settings. You will be brought to the Edit Permission Mapping page where you can change this permission mapping.
• Click Edit on the ribbon to change the configuration of this permission mapping. For details on editing permission mapping, see Creating and Editing Permission Mappings.
• Click Delete on the ribbon. A confirmation window appears, confirming that you want to proceed with the deletion. Click OK to delete the selected permission mappings, or click Cancel to return to the Permission Mapping interface without deleting the selected permission mappings.
Creating and Editing Permission Mappings To create a new permission mapping, click Create on the ribbon. To edit a previously configured permission mapping, select the permission mapping and then click Edit on the ribbon.
In the Create or Edit Permission Mapping interface, configure the following settings:
Permission Mapping Name – Enter a name for the permission mapping that you are about to 1.create or edit. Then enter an optional description for this permission mapping for future reference.
Permission Mapping – Set up the mapping of EMC Documentum permissions to SharePoint 2.permissions. You can configure the permission mappings on the following levels:
• Repository Level – Map the EMC Documentum permissions on the repository level to the specified SharePoint groups, and then specify the permission levels for the SharePoint group. You can create a new SharePoint group by clicking New SharePoint Group from the SharePoint Group drop-down menu, or you can create a new SharePoint permission level by clicking New SharePoint Permission Level from the SharePoint Permission Level drop-down menu. When you select Add a Repository Mapping, you can also create a new repository level permission by clicking New EMC Documentum Permission.
304
DocAve 6: EMC Documentum Migrations
• Cabinet/Folder Level – Map the EMC Documentum permissions on the cabinet/folder level, you can choose the default SharePoint permission levels, or previously created SharePoint permission levels, or you can directly create a new SharePoint permission level by clicking New SharePoint Permission Level from the drop-down menu. When you select Add a Cabinet/Folder Mapping, you can also create a new repository level permission by clicking New EMC Documentum Permission.
• Document Level – Map the EMC Documentum permissions on the document level, you can choose the default SharePoint permission levels, or previously created SharePoint permission levels, or you can directly create a new SharePoint permission level by clicking New SharePoint Permission Level from the drop-down menu. When you select Add a Documentum Mapping, you can also create a new repository level permission by clicking New EMC Documentum Permission.
If you want to map the source customized permissions to SharePoint, you can create EMC Documentum permissions in DocAve depending on the source permissions.
Click OK to save the configurations and return to the Permission Mapping interface, or click 3.Cancel to return to Permission Mapping interface without saving any changes.
About EMC Documentum Permissions You can manage EMC Documentum permissions by creating a new EMC Documentum permission, viewing details of the existing EMC Documentum permissions, editing a previously configured EMC Documentum permission, or deleting previously configured EMC Documentum permissions.
To access Manage EMC Documentum Permission interface, click Profile Settings on the Home tab > Mappings > Permission Mapping > Manage EMC Documentum Permission. The Manage EMC Documentum Permission interface appears, and you will see a list of provided or previously configured EMC Documentum permissions. By default, the Repository Level is selected and the permissions on the repository level are displayed. You can change the level by clicking Repository Level and select another level.
In this interface, you can change the number of EMC Documentum permissions displayed per page and the order in which they are displayed. To change the number of EMC Documentum permissions displayed per page, select the desired number from the Show rows drop-down menu in the lower right-hand corner. To sort the EMC Documentum permissions, click on a column heading.
Customize how these EMC Documentum permissions are displayed in a number of different ways:
• Search – Filters EMC Documentum permissions displayed by the keyword you designate. The keyword must be contained in a column value. At the top of the EMC Documentum permission viewing pane, enter the keyword for the EMC Documentum permissions you wish to display. You can select Search all pages or Search current page to define the search scope. Search all pages means that the EMC Documentum permissions in all of the pages whose names and descriptions contain the keywords will be displayed; while Search current page means that only the EMC Documentum permissions in the current
305
DocAve 6: EMC Documentum Migrations
page whose names and descriptions contain the keywords will be displayed. Note that the search function is not case sensitive.
• – You can manage which columns are displayed in the list so that only information you want to see is shown. Click the plus ( ), and then check the checkbox next to the column name to have that column shown in the list.
• – You can manage which columns are hidden in the list. Hover over the cursor on the column that you want to hide and click the minus ( ). The column is hidden.
Perform the following actions on the Manage EMC Documentum Permission page.
• Repository/Cabinet/Folder/Document Level – By default, the Repository Level is selected. You can manage the Document permissions on the repository level. To change to other levels, click Repository Level, and then select Cabinet/Folder Level, or Document Level to manage the corresponding permissions.
• Click Create on the ribbon to create a new EMC Documentum permission. For detailed instructions on creating a new EMC Documentum permission, see Creating EMC Documentum Permissions.
• Click View Details on the ribbon and you will see the settings for this EMC Documentum permission. You will be brought to the Edit EMC Documentum Permission page where you can change its settings.
• Click Edit on the ribbon to change the configurations for this EMC Documentum permission. Note that the pre-defined EMC Documentum permissions are not editable. For details on editing configurations for EMC Documentum permission, see Creating EMC Documentum Permissions.
• Click Delete on the ribbon. A confirmation window appears, confirming that you want to proceed with the deletion. Click OK to delete the selected EMC Documentum permissions, or click Cancel to return to the Manage EMC Documentum Permission interface without deleting the selected EMC Documentum permissions. Note that the pre-defined EMC Documentum permission cannot be deleted.
Creating EMC Documentum Permissions To create a new EMC Documentum permission, select the level where you want to create the permission and then click Create on the ribbon. To modify a previously configured EMC Documentum permission, select the EMC Documentum permission, and then click Edit on the ribbon.
In the Create New EMC Documentum Permission or Edit EMC Documentum Permission interface, configure the following settings:
Name and Description – Enter a Name for this permission that you are about to create or edit. 1.Then enter an optional Description for future references.
Permissions – Choose which permissions to be included in this permission. 2.
• Repository Level – When creating a permission on the repository level, specify the privilege, the extended privilege, and the client capability.

306
DocAve 6: EMC Documentum Migrations
• Cabinet/Folder Level – When creating a permission on the cabinet/folder level, specify the basic permission and the extended permission.
• Document Level – When creating a permission on the document level, specify the basic permission and the extended permission.
Click OK to save the configurations and return to the Manage EMC Documentum Permission interface, or click Cancel to return to the Manage EMC Documentum Permission interface without saving any changes.
About SharePoint Group You can manage SharePoint groups by creating a new SharePoint group, viewing details of a previously configured SharePoint group, editing a previously configured SharePoint group, or deleting a previously configured SharePoint group.
To access Manage SharePoint Group interface, click Home tab > Mappings > Permission Mapping > Manage SharePoint Group. The Manage SharePoint Group interface appears, and you will see a list of provided or previously configured SharePoint groups.
In this interface, you can change the number of SharePoint groups displayed per page and the order in which they are displayed. To change the number of SharePoint groups displayed per page, select the desired number from the Show rows drop-down menu in the lower right-hand corner. To sort the SharePoint groups, click on a column heading.
Customize how these SharePoint groups are displayed in a number of different ways:
• Search – Filters groups displayed by the keyword you designate. The keyword must be contained in a column value. At the top of the groups viewing pane, enter the keyword for the groups you wish to display. You can select Search all pages or Search current page to define the search scope. Search all pages means that the groups in all of the pages whose names and descriptions contain the keywords will be displayed; while Search current page means that only the groups in the current page whose names and descriptions contain the keywords will be displayed. Note that the search function is not case sensitive.
• – You can manage which columns are displayed in the list so that only information you want to see is shown. Click the plus ( ), and then check the checkbox next to the column name to have that column shown in the list.
• – You can manage which columns are hidden in the list. Hover over the cursor on the column that you want to hide and click the minus ( ). The column is hidden.
Perform the following actions in the Manage SharePoint Group interface.
• Click Create on the ribbon to create a new SharePoint group. For detailed on creating a new SharePoint group, see Creating SharePoint Groups.
307
DocAve 6: EMC Documentum Migrations
• Click View Details on the ribbon and you will see the settings for this SharePoint group. Here you can also click Edit on the ribbon to make changes to the SharePoint group’s settings. You will be brought to the Edit SharePoint Group interface where you can change this SharePoint group.
• Click Edit on the ribbon to change the configuration of this SharePoint group. For details on editing SharePoint group, see Creating SharePoint Groups.
• Click Delete on the ribbon. A confirmation window appears, confirming that you want to proceed with the deletion. Click OK to delete the selected SharePoint groups, or click Cancel to return to the SharePoint Group page without deleting the selected SharePoint groups.
Creating SharePoint Groups To create a new SharePoint group, click Create on the ribbon. To modify a previously configured SharePoint group, select the SharePoint group, and then click Edit on the ribbon.
In the Create SharePoint Group or Edit SharePoint Group interface, configure the following settings:
1. Name and Description – Enter a Name for this group that you are about to create or edit. Then enter an optional Description for future references.
2. SharePoint Group Owner – Specify the SharePoint group owner.
3. Site Title – Whether to add the site title to be a part of the group name. For example, if the site title is A and the group name you specified is B, the created SharePoint group name is A B.
About SharePoint Permission Levels You can manage SharePoint permission levels by creating a new SharePoint permission level, viewing details of existing SharePoint permission levels, editing a previously configured SharePoint permission level, or deleting a previously configured SharePoint permission level.
To access Manage SharePoint Permission Level interface, click Profile Settings on the Home tab > Mappings > Permission Mapping > Manage SharePoint Permission Level. The Manage SharePoint Permission Level interface appears, and you will see a list of provided or previously configured SharePoint permission levels.
In this interface, you can change the number of SharePoint permission levels displayed per page and the order in which they are displayed. To change the number of SharePoint permission levels displayed per page, select the desired number from the Show rows drop-down menu in the lower right-hand corner. To sort the SharePoint permission levels, click on a column heading.
Customize how these SharePoint permission levels are displayed in a number of different ways:
• Search – Filters SharePoint permission levels displayed by the keyword you designate. The keyword must be contained in a column value. At the top of the SharePoint permission levels viewing pane, enter the keyword for the SharePoint permission levels
308
DocAve 6: EMC Documentum Migrations
you wish to display. You can select Search all pages or Search current page to define the search scope. Search all pages means that the SharePoint permission levels in all of the pages whose names and descriptions contain the keywords will be displayed; while Search current page means that only the SharePoint permission levels in the current page whose names and descriptions contain the keywords will be displayed. Note that the search function is not case sensitive.
• – You can manage which columns are displayed in the list so that only information you want to see is shown. Click the plus ( ), and then check the checkbox next to the column name to have that column shown in the list.
• – You can manage which columns are hidden in the list. Hover over the cursor on the column that you want to hide and click the minus ( ). The column is hidden.
Perform the following actions in the Manage SharePoint Permission Level page.
• Click Create on the ribbon to create a new SharePoint permission level. For detailed instructions on creating a new SharePoint permission level, see Creating SharePoint Permission Levels.
• Click View Details on the ribbon and you will see the previously configured settings for this SharePoint permission level. Here you can also click Edit on the ribbon to make changes to the SharePoint permission level’s settings. You will be brought to the Edit SharePoint Permission Level page where you can change its settings.
• Click Edit on the ribbon to change the configurations for this SharePoint permission level. Note that the pre-defined SharePoint permission levels including Contribute, Design, Full Control, Read, and View Only, are not editable. For details on editing configurations for a SharePoint permission level, see Creating SharePoint Permission Levels.
• Click Delete on the ribbon. A confirmation window appears, confirming that you want to proceed with the deletion. Click OK to delete the selected SharePoint permission levels, or click Cancel to return to the Manage SharePoint Permission Level interface without deleting the selected SharePoint permission levels. Note that the pre-defined SharePoint permission levels cannot be deleted.
Creating SharePoint Permission Levels To create a new SharePoint permission level, click Create on the ribbon. To modify a previously configured customized SharePoint permission level, select the SharePoint permission level, and then click Edit on the ribbon.
In the Create SharePoint Permission Level or Edit SharePoint Permission Level interface, configure the following settings:
Name and Description – Enter a Name for this permission level that you are about to create or 1.edit. Then enter an optional Description for future references.
Permissions – Choose which permissions to include in this permission level. You can select 2.specified permissions of list permissions, site permissions, and personal permissions by checking
309
DocAve 6: EMC Documentum Migrations
the checkboxes before a specified permission. Check the Select All checkbox to select or clear all permissions.
Click OK to save the configurations and return to the Manage SharePoint Permission Level interface, or click Cancel to return to the Manage SharePoint Permission Level interface without saving any changes.
About Dynamic Rules Dynamic rules map EMC Documentum fields to SharePoint metadata using DLL files customized in C#. In a migration profile, if dynamic rules conflict with the configured column mapping, dynamic rules take over the role of column mapping.
To use the dynamic rule feature, click Profile Settings on the ribbon of Home tab. The Profile Settings tab appears. Click Dynamic Rule on the ribbon.
In the Dynamic Rule interface, you will see a list of previously-configured dynamic rules.
In this interface, you can change the number of dynamic rules displayed per page and the order in which they are displayed. To change the number of dynamic rules displayed per page, select the desired number from the Show rows drop-down menu in the lower right-hand corner. To sort the dynamic rules, click on a column heading such as Name, Description, DLL File Name, and Last Modified Time.
Customize how these dynamic rules are displayed in a number of different ways:
• Search – Filters dynamic rules displayed by the keyword you designate. The keyword must be contained in a column value. At the top of the Dynamic Rule viewing pane, enter the keyword for the dynamic rules you wish to display. You can select Search all pages or Search current page to define the search scope. Search all pages means that the dynamic rules in all of the pages whose names and descriptions contain the keywords will be displayed; while Search current page means that only the dynamic rules in the current page whose names and descriptions contain the keywords will be displayed. Note that the search function is not case sensitive.
• – Filters which item in the list is displayed. Unlike Search, you can filter whichever item you want, rather than search based on a keyword. Click the of the column you want to filter, then select the checkbox next to the item name to have that item shown in the list.
• – You can manage which columns are displayed in the list so that only information you want to see is shown. Click the plus ( ), and then check the checkbox next to the column name to have that column shown in the list.
• – This allows you to hide the column. Click the minus ( ) in the column title to hide the column.
You may perform the following actions to a Dynamic Rule:
• Click Create on the ribbon to create a dynamic rule. For detailed information on creating a new dynamic rule, see Configuring a Dynamic Rule.
310
DocAve 6: EMC Documentum Migrations
• Click View Details on the ribbon and you will see the previously-configured settings for this dynamic rule. Here you can also click Edit on the ribbon to make changes to the dynamic rule’s settings. You will be brought to the Edit Dynamic Mapping page where you can change this dynamic rule.
• Click Edit on the ribbon to change the configuration of this dynamic rule. For details on editing dynamic rule, see Configuring a Dynamic Rule.
• Click Delete on the ribbon. A confirmation window appears, confirming that you want to proceed with the deletion. Click OK to delete the selected dynamic rules, or click Cancel to return to the dynamic rule without deleting the selected dynamic rules.
Configuring a Dynamic Rule To create a new dynamic rule, click Create on the ribbon. To edit a previously-configured dynamic rule, select the dynamic rule and then click Edit on the ribbon.
In the Create Dynamic Rule interface or Edit Dynamic Rule interface, configure the following settings:
1. Name and Description – Enter a Dynamic Rule Name for the dynamic rule that you are about to create or edit. Then enter an optional description for this dynamic rule for future reference.
2. Upload a DLL File – Upload a DLL file customized in C# from the local path. This file contains your configured mapping settings.
3. Click OK to save the configuration and return to the Dynamic Rule interface. Click Cancel to return to the Dynamic Rule interface without saving any configuration or changes.
Setting Up EMC Documentum Migration Profiles The Migration Profile allows you to specify and define numerous settings for the migration jobs including Migration Options, Filter Options, Mapping Options, and Advanced Options. Follow the instructions below to create a Migration Profile.
From the Home tab, in the Profile Manager group, click Profile Settings. The Profile Settings tab 1.appears.
From the Profile Settings tab, under the Profile/Sub-profile group, click New. 2.
Enter a profile name in the pop-up window and click OK. 3.
Select the Migration Options from the left-hand pane. Select a previously-configured Migration 4.Options Sub-Profile from the drop-down menu or enter a name and click Create a New Profile to create a new sub-profile. For details about this section, refer to Migration Options.
Select the Filter Options from the left-hand pane and select a previously-configured filter policy 5.from the drop-down menu. Or click New Filter Policy from the drop-down menu to create a new filter policy. For details on creating a filter policy, refer to Creating Filter Policies.
Select the Mapping Options from the left-hand pane. Select a previously-configured Mapping 6.Options Sub-Profile from the drop-down menu or enter a name and click Create a New Profile to create a new sub-profile. For details about this section, refer to Mapping Options.
311
DocAve 6: EMC Documentum Migrations
Select the Advanced Options from the left-hand pane and configure the Dynamic Rule, 7.Character Length Settings and the Illegal Character Replacement Settings. For details about this section, refer to Advanced Options.
Click Save in the Main Profile row to save the profile. Alternatively, click Save as and enter a 8.profile name to save it as another profile. Select Save and replace the existing main profile to replace the original profile. Otherwise, it is saved without removing the original profile.
Migration Options Configure the settings in Migration Options to specify how to migrate the content and the security to SharePoint. Set up a sub-profile of Migration Options by the following steps.
From the Home tab, in the Profile Manager group, click Profile Settings. The Profile Settings tab 1.appears.
Click Migration Options on the left-hand pane, and from the Profile Settings tab, under the Sub-2.profile group, click Edit Sub-profile to make the Migration Options field active.
From the Profile Setting tab, under the Profile/Sub-profile group, click New. 3.
Enter a sub-profile name in the pop-up window and click OK. 4.
Click the Content tab to configure the following settings. 5.
• Managed Path – If the destination node is a Web application, the site collections will be created under this Web application when migrating the source data. The value entered in the Customized a managed path textbox and the site template selected from the Site template drop-down list are the managed path and the site template for the newly created site collection. You are allowed to enter the site template ID in the Site template textbox to specify a desired site template. You can also select a language for this newly created site collection from the Site language drop-down list.
• Navigation Options – Choose navigation design options for destination newly generated sites when performing the migration.
Display the site on the top link bar of the parent site when creating a site o
Display the site on the Quick Launch of the parent site when creating a site o
Inherit top link bar of the parent site when creating a site o
• Document Settings – Configure the settings to the document migration.
Migrate root files to a document library – When the source node is a cabinet onode, selecting this option will migrate the root files that are under the cabinet to a specified SharePoint document library. If you select this option, customize the library name by entering a name in the text box. Root Documents is provided as a default document library name. If you do not select this option, the root files under the cabinet will not be migrated to the destination.
Migrate incompatible version numbers – Since EMC Document use the concept oof Branch Version which is not supported in SharePoint, you can use this option to specify how to migrate the source versions.

312
DocAve 6: EMC Documentum Migrations
Select the checkbox to migrate all source versions. The source versions will be changed after the migration by using the SharePoint version format: source major version remains the same; for each major version, its minor version and branch version become the destination minor version. View the example below:
Source Version Destination Version 1.0 1.0 2.0 2.0 2.1 2.1 2.1.1.0 2.2 2.1.1.2 2.3 2.5 2.5
Uncheck the checkbox to only migrate source major and minor versions to destination and the migrated major and minor versions remain the same. The branch versions will be skipped and recorded in the job report. View the example below:
Source Version Destination Version 1.0 1.0 2.0 2.0 2.1 2.1 2.1.1.0 Skipped 2.1.1.2 Skipped 2.5 2.5
• Virtual Document Migration – Specify how to deal with the source virtual documents.
Select Document Set to migrate a source virtual document to a destination odocument set. DocAve migrates the source virtual document file and each child to the destination document set, migrates desired versions (all versions, major versions, or major and minor versions, which is decided by the selection of the Migrate incompatible version numbers option and your source data’s version situation) of a virtual document to be the versions of destination document set, and migrates the corresponding versions of each file to be the versions of destination file.
Select Folder to migrate a source virtual document to a destination folder. o
Create a first-level folder named by the virtual document file. Migrate desired versions of the virtual document into this first-level folder. Each virtual document version has its own folder under this first-level folder.
Each migrated virtual document version’s each child and its current version of the virtual document file will be migrated to their own folder named by the virtual document name and the version.
313
DocAve 6: EMC Documentum Migrations
Migrate the virtual document file and its desired versions into this first-level folder.
• Folder Structure Management – When selecting the library/folder node as the destination, selecting the Create a top level for on destination option will create the top level folders in the destination after the migration, and preserve the source folder structure under the top level folder.
By default this checkbox is selected. If you leave this option unchecked, the source content will be migrated to the destination without the top level folders created, but preserving the source folder structure under the top level folder. If you select a site node as the destination, no matter whether you select this option or not, a top level folder having the same name as the source folder is not created in the destination list.
Click the Security tab next to the Content tab and configure the Security settings. 6.
• Migrate user – Migrates the source users to SharePoint.
• Migrate security – When you choose to migrate the source users, you can further select whether to migrate the user’s security to SharePoint by selecting the Migrate security checkbox.
• Permission Inheritance – For the source contents that inherit permissions from the parent, select the Break permission inheritance option to make the migrated content and/or the newly created containers have the unique permissions, and do not inherit parent permissions. If you leave this checkbox unselected, the migrated content and/or the newly created containers will use the same permissions as the destination parent. For the source contents that do not inherit permissions from the parent, these contents will have unique permissions after the migration.
Click Save to save the profile. Alternatively, click Save as and enter a profile name to save it as 7.another profile. Select Save and replace the existing sub-profile to replace the original profile. Otherwise, it is saved without removing the original profile.
Mapping Options Configure settings in Mapping Options to set the List Mapping, Content Type Mapping, and Security Mapping. Set up a sub-profile for Mapping Options by the following steps.
From the Home tab, in the Profile Manager group, click Profile Settings. The Profile Settings tab 1.appears.
Click Mapping Options on the left-hand pane, and from the Profile Settings tab, under the Sub-2.profile group, click Edit Sub-profile to make the Mapping Options field active.
From the Profile Settings tab, under the Profile/Sub-profile group, click New. 3.
Enter a sub-profile name in the pop-up window and click OK. 4.
Configure the following settings by referring to corresponding sections: List Mapping, Content 5.Type Mapping, and Security Mapping.
314
DocAve 6: EMC Documentum Migrations
Click Save to save the profile. Alternatively, click Save as and enter a profile name to save it as 6.another profile. Select Save and replace the existing sub-profile to replace the original profile. Otherwise, it is saved without removing the original profile
List Mapping Set up the list name mapping to specify a new name for the migrated source list. Without list mapping, the newly created library name is the same as the name of the selected source folder.
• If the specified destination library in the list mapping does not exist in the destination, DocAve creates a new library in the destination.
• If the specified destination library in the list mapping exists in the destination, DocAve migrates the contents from the source list to this existing library. This logic takes effect when you select a destination node that is higher than the library level.
To change the library name, set up the list name mapping as follows:
With List Mapping tab activated, click Add a List Name Mapping on the List Name Mapping 1.section.
Enter an EMC Documentum folder name in the EMC Documentum Folder Name text box. 2.
Enter a SharePoint library name in the SharePoint List Name text box. 3.
Repeat steps from 1 to 4 to add another list name mapping. To delete the list name mappings, 4.select the checkboxes and then click Deleted the Selected List Name Mapping(s).
Content Type Mapping Configure the content type mapping, which allows you to match the types of folders or documents in the source to SharePoint content types.
• Use the content type mapping generated by Migrator Tool – Select this option to use the content type mapping settings generated by Migrator Tool. The content type mapping settings are in the configuration file located in the …\AvePoint\DocAve6\Agent\data\Migrator\DocumentumMigrator\TypeMappings directory. For details of using the MigratorTool.exe, refer to the DocAve 6 Supplementary Tools User Guide.
• Manually configure the content type mapping – Select this option to configure the content type mapping manually as follows. You can also click Upload in the Sub-profile group on the ribbon to upload the XML file generated by Migrator Tool for further editing. After select this option, the content type mapping configuration pane appears.
i. On the Content Type Mapping section, enter the source type name in the EMC Documentum Type text box, and enter the destination content type name in the SharePoint Content Type Name text box. The source type will be mapped to the destination content type after the migration.
ii. On the Column Mapping section, continue to configure the column mapping settings for this content type mapping. The source attribute will be mapped to the destination column having the specified column type.
315
DocAve 6: EMC Documentum Migrations
iii. Click Add a Column Mapping, configure the following settings:
iv. Enter the source attribute name in EMC Documentum Attribute Name text box.
v. Enter the destination column name in SharePoint Column Name text box.
vi. Select a column type from the SharePoint Column Type drop-down list.
When selecting Person or Group column type, the User Name Type pop-up window appears. Specify the type of the source attribute, Login Name or Display Name.
When selecting Managed Metadata column type, the Managed Metadata pop-up window appears. Enter the term set path in the Term Set Path text box, specify whether to allow multiple values, and which character is used to separate the multiple values.
vii. Select whether to use this column mapping settings in this content type mapping. Select the checkbox of Migrate Column to use it and migrate the source attribute, and uncheck the checkbox of Migration Column to not use it and not migrate the source attribute.
viii. Specify whether to add this SharePoint column to the default view by selecting/unchecking the Add to Default View checkbox.
Security Mapping Specify the user mapping, domain mapping, group mapping, and permission mapping.
• User Mapping (Optional) – Replaces existing user name in EMC Documentum with the existing or default username in SharePoint metadata fields. Select a previously created user mapping rule from the drop-down menu, and you are able to access the detailed information about this selected user mapping by clicking View. If you want to create a new user mapping rule, click New User Mapping in the drop-down menu, and then you are brought to User Mapping Create page. For specific instructions on setting up user mapping, refer to the DocAve 6 Control Panel Reference Guide.
• Domain Mapping (Optional) – Replaces existing domain name in EMC Documentum with another domain name in SharePoint metadata fields. Select a previously-created domain mapping rule from the drop-down menu, and you are able to access the detailed information about this selected domain mapping by clicking View. If you want to create a new domain mapping rule, click New Domain Mapping in the drop-down menu, and then you are brought to the Domain Mapping Create page. For specific instructions on setting up domain mapping, refer to the DocAve 6 Control Panel Reference Guide.
• Group Mapping (Optional) – Replaces groups in EMC Documentum to the existing groups in SharePoint metadata field. Select a previously-created group mapping rule from the drop-down menu, and you are able to access the detailed information about this selected group mapping by clicking View. If you want to create a new group
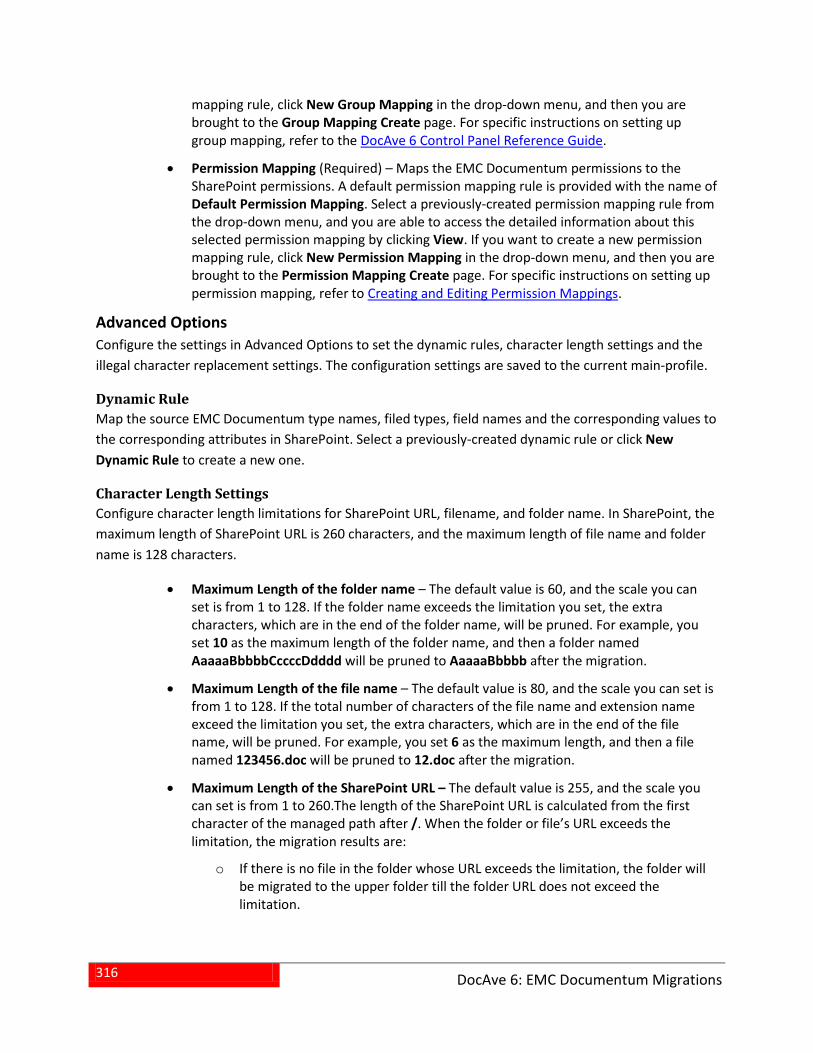
316
DocAve 6: EMC Documentum Migrations
mapping rule, click New Group Mapping in the drop-down menu, and then you are brought to the Group Mapping Create page. For specific instructions on setting up group mapping, refer to the DocAve 6 Control Panel Reference Guide.
• Permission Mapping (Required) – Maps the EMC Documentum permissions to the SharePoint permissions. A default permission mapping rule is provided with the name of Default Permission Mapping. Select a previously-created permission mapping rule from the drop-down menu, and you are able to access the detailed information about this selected permission mapping by clicking View. If you want to create a new permission mapping rule, click New Permission Mapping in the drop-down menu, and then you are brought to the Permission Mapping Create page. For specific instructions on setting up permission mapping, refer to Creating and Editing Permission Mappings.
Advanced Options Configure the settings in Advanced Options to set the dynamic rules, character length settings and the illegal character replacement settings. The configuration settings are saved to the current main-profile.
Dynamic Rule Map the source EMC Documentum type names, filed types, field names and the corresponding values to the corresponding attributes in SharePoint. Select a previously-created dynamic rule or click New Dynamic Rule to create a new one.
Character Length Settings Configure character length limitations for SharePoint URL, filename, and folder name. In SharePoint, the maximum length of SharePoint URL is 260 characters, and the maximum length of file name and folder name is 128 characters.
• Maximum Length of the folder name – The default value is 60, and the scale you can set is from 1 to 128. If the folder name exceeds the limitation you set, the extra characters, which are in the end of the folder name, will be pruned. For example, you set 10 as the maximum length of the folder name, and then a folder named AaaaaBbbbbCccccDdddd will be pruned to AaaaaBbbbb after the migration.
• Maximum Length of the file name – The default value is 80, and the scale you can set is from 1 to 128. If the total number of characters of the file name and extension name exceed the limitation you set, the extra characters, which are in the end of the file name, will be pruned. For example, you set 6 as the maximum length, and then a file named 123456.doc will be pruned to 12.doc after the migration.
• Maximum Length of the SharePoint URL – The default value is 255, and the scale you can set is from 1 to 260.The length of the SharePoint URL is calculated from the first character of the managed path after /. When the folder or file’s URL exceeds the limitation, the migration results are:
If there is no file in the folder whose URL exceeds the limitation, the folder will obe migrated to the upper folder till the folder URL does not exceed the limitation.
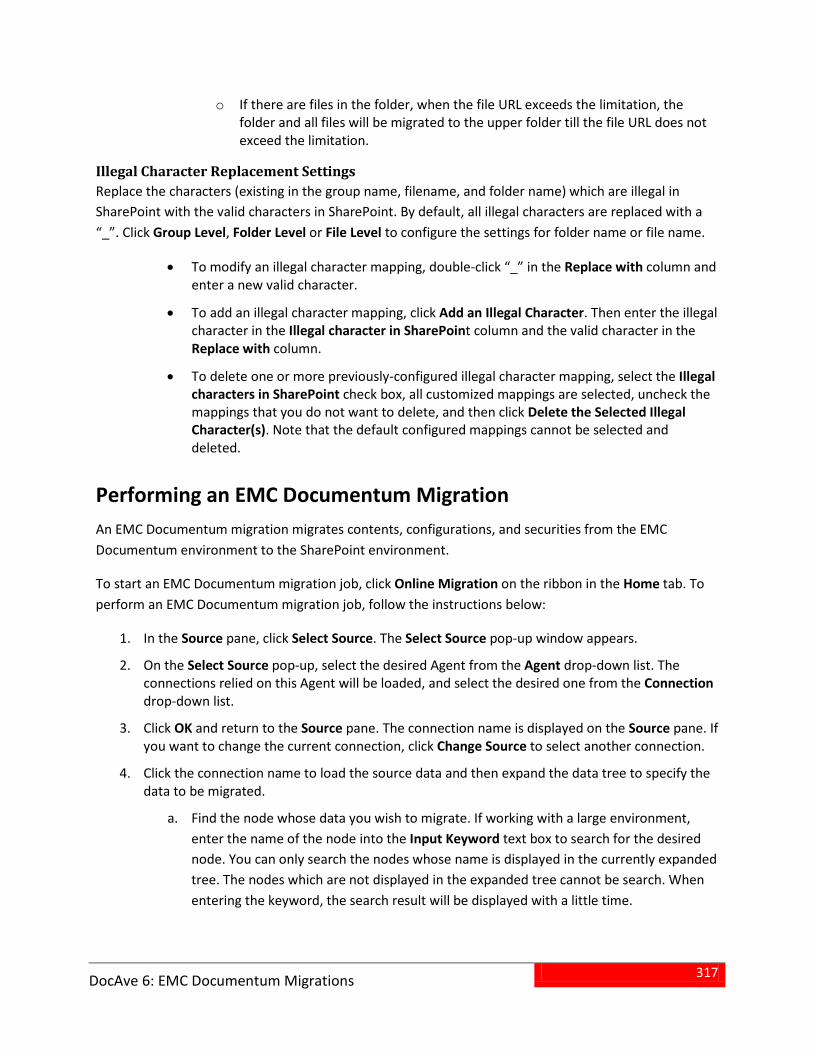
317
DocAve 6: EMC Documentum Migrations
If there are files in the folder, when the file URL exceeds the limitation, the ofolder and all files will be migrated to the upper folder till the file URL does not exceed the limitation.
Illegal Character Replacement Settings Replace the characters (existing in the group name, filename, and folder name) which are illegal in SharePoint with the valid characters in SharePoint. By default, all illegal characters are replaced with a “_”. Click Group Level, Folder Level or File Level to configure the settings for folder name or file name.
• To modify an illegal character mapping, double-click “_” in the Replace with column and enter a new valid character.
• To add an illegal character mapping, click Add an Illegal Character. Then enter the illegal character in the Illegal character in SharePoint column and the valid character in the Replace with column.
• To delete one or more previously-configured illegal character mapping, select the Illegal characters in SharePoint check box, all customized mappings are selected, uncheck the mappings that you do not want to delete, and then click Delete the Selected Illegal Character(s). Note that the default configured mappings cannot be selected and deleted.
Performing an EMC Documentum Migration An EMC Documentum migration migrates contents, configurations, and securities from the EMC Documentum environment to the SharePoint environment.
To start an EMC Documentum migration job, click Online Migration on the ribbon in the Home tab. To perform an EMC Documentum migration job, follow the instructions below:
In the Source pane, click Select Source. The Select Source pop-up window appears. 1.
On the Select Source pop-up, select the desired Agent from the Agent drop-down list. The 2.connections relied on this Agent will be loaded, and select the desired one from the Connection drop-down list.
Click OK and return to the Source pane. The connection name is displayed on the Source pane. If 3.you want to change the current connection, click Change Source to select another connection.
Click the connection name to load the source data and then expand the data tree to specify the 4.data to be migrated.
Find the node whose data you wish to migrate. If working with a large environment, a.enter the name of the node into the Input Keyword text box to search for the desired node. You can only search the nodes whose name is displayed in the currently expanded tree. The nodes which are not displayed in the expanded tree cannot be search. When entering the keyword, the search result will be displayed with a little time.

318
DocAve 6: EMC Documentum Migrations
Select the source nodes by selecting the corresponding checkboxes. b.
Underneath each node, there is a node named Items to display how many oobjects are contained in the Items node. You can click the Items node and the Item Browser interface appears. Select the objects that you wish to migrate by selecting corresponding checkboxes and click OK.
Click Actions on the top right corner of the source pane. Click Only show oselected nodes to show the selected nodes, and click Shown all nodes to show all available nodes.
In the destination pane, click the farm name and expand the data tree to specify the destination 5.node (supported from the web application node to the folder node).
Find the node which you want to migrate the source data to. If working with a large a.environment, enter the name of the node into the Input Keyword text box to search for the desired node. You can only search the nodes whose name is displayed in the currently expanded tree. The nodes which are not displayed in the expanded tree cannot be search. When entering the keyword, the search result will be displayed with a little time.
Select the destination node by selecting the corresponding checkbox. b.
You can also create a new container to be the destination node without leaving othe current page.
For details on creating a container in SharePoint, refer to Creating Containers.
Click Actions on the top right corner of the source pane. Click Only show oselected node(s) to show the selected nodes, and click Shown all nodes to show all available nodes.
When finished configuring the job, select one of the following options: 6.
• Click Run Now to perform a migration job immediately. For more information on the Run Now interface, refer to Configuring the Run Now Interface.
• Click Save As New Plan to configure more specific settings and then save them as a file system migration plan, which then can be used to perform a file system migration job. For more information on the Save As New Plan interface, refer to Configuring the Save As New Plan Interface.
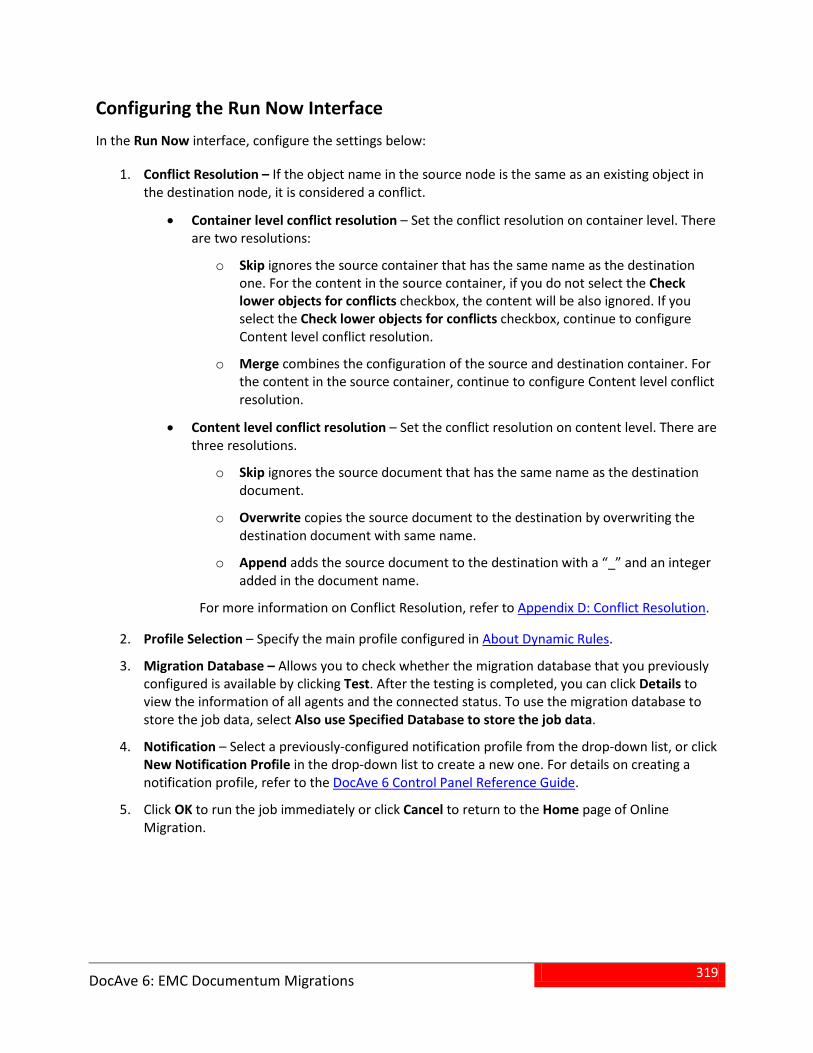
319
DocAve 6: EMC Documentum Migrations
Configuring the Run Now Interface In the Run Now interface, configure the settings below:
Conflict Resolution – If the object name in the source node is the same as an existing object in 1.the destination node, it is considered a conflict.
• Container level conflict resolution – Set the conflict resolution on container level. There are two resolutions:
Skip ignores the source container that has the same name as the destination oone. For the content in the source container, if you do not select the Check lower objects for conflicts checkbox, the content will be also ignored. If you select the Check lower objects for conflicts checkbox, continue to configure Content level conflict resolution.
Merge combines the configuration of the source and destination container. For othe content in the source container, continue to configure Content level conflict resolution.
• Content level conflict resolution – Set the conflict resolution on content level. There are three resolutions.
Skip ignores the source document that has the same name as the destination odocument.
Overwrite copies the source document to the destination by overwriting the odestination document with same name.
Append adds the source document to the destination with a “_” and an integer oadded in the document name.
For more information on Conflict Resolution, refer to Appendix D: Conflict Resolution.
Profile Selection – Specify the main profile configured in About Dynamic Rules. 2.
Migration Database – Allows you to check whether the migration database that you previously 3.configured is available by clicking Test. After the testing is completed, you can click Details to view the information of all agents and the connected status. To use the migration database to store the job data, select Also use Specified Database to store the job data.
Notification – Select a previously-configured notification profile from the drop-down list, or click 4.New Notification Profile in the drop-down list to create a new one. For details on creating a notification profile, refer to the DocAve 6 Control Panel Reference Guide.
Click OK to run the job immediately or click Cancel to return to the Home page of Online 5.Migration.
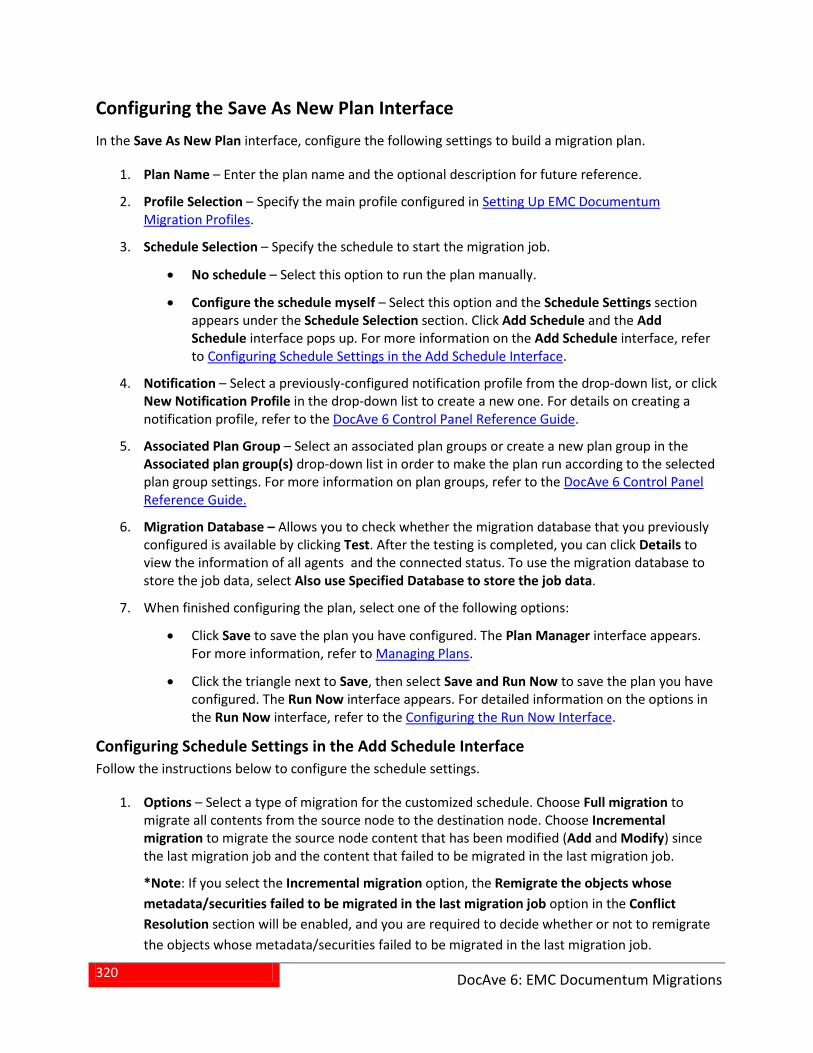
320
DocAve 6: EMC Documentum Migrations
Configuring the Save As New Plan Interface In the Save As New Plan interface, configure the following settings to build a migration plan.
Plan Name – Enter the plan name and the optional description for future reference. 1.
Profile Selection – Specify the main profile configured in Setting Up EMC Documentum 2.Migration Profiles.
Schedule Selection – Specify the schedule to start the migration job. 3.
• No schedule – Select this option to run the plan manually.
• Configure the schedule myself – Select this option and the Schedule Settings section appears under the Schedule Selection section. Click Add Schedule and the Add Schedule interface pops up. For more information on the Add Schedule interface, refer to Configuring Schedule Settings in the Add Schedule Interface.
Notification – Select a previously-configured notification profile from the drop-down list, or click 4.New Notification Profile in the drop-down list to create a new one. For details on creating a notification profile, refer to the DocAve 6 Control Panel Reference Guide.
Associated Plan Group – Select an associated plan groups or create a new plan group in the 5.Associated plan group(s) drop-down list in order to make the plan run according to the selected plan group settings. For more information on plan groups, refer to the DocAve 6 Control Panel Reference Guide.
Migration Database – Allows you to check whether the migration database that you previously 6.configured is available by clicking Test. After the testing is completed, you can click Details to view the information of all agents and the connected status. To use the migration database to store the job data, select Also use Specified Database to store the job data.
When finished configuring the plan, select one of the following options: 7.
• Click Save to save the plan you have configured. The Plan Manager interface appears. For more information, refer to Managing Plans.
• Click the triangle next to Save, then select Save and Run Now to save the plan you have configured. The Run Now interface appears. For detailed information on the options in the Run Now interface, refer to the Configuring the Run Now Interface.
Configuring Schedule Settings in the Add Schedule Interface Follow the instructions below to configure the schedule settings.
Options – Select a type of migration for the customized schedule. Choose Full migration to 1.migrate all contents from the source node to the destination node. Choose Incremental migration to migrate the source node content that has been modified (Add and Modify) since the last migration job and the content that failed to be migrated in the last migration job.
*Note: If you select the Incremental migration option, the Remigrate the objects whose metadata/securities failed to be migrated in the last migration job option in the Conflict Resolution section will be enabled, and you are required to decide whether or not to remigrate the objects whose metadata/securities failed to be migrated in the last migration job.
321
DocAve 6: EMC Documentum Migrations
Conflict Resolution – If the object name/ID in the source node is the same as an existing object 2.in the destination node, it is considered a conflict.
• Container level conflict resolution – Set the conflict resolution on list and folder level. There are two resolutions:
Skip ignores the source container that has the same name as the destination oone. For the content in the source container, if you do not select the Check lower objects for conflicts checkbox, the content will be also ignored. If you select the Check lower objects for conflicts checkbox, continue to configure Content level conflict resolution.
Merge combines the configuration of the source and destination container. For othe content in the source container, continue to configure Content level conflict resolution.
• Content level conflict resolution – Set the conflict resolution of the document level. There are two resolutions.
Skip ignores the source document that has the same name as the destination odocument.
Overwrite copies the source document to the destination by overwriting the odestination document with same name.
Append adds the source document to the destination with a “_” and an integer oadded in the document name.
For more information of Conflict Resolution, refer to Appendix D: Conflict Resolution.
Schedule Settings – Specify the frequency to run the recurring schedule. Enter an integer into 3.the text box and select Minutes, Hours, Days, Weeks or Months from the drop-down list.
Range of Recurrence – Specify when to start and end the running recurring schedule. 4.
• Start time – Set up the time to start the plan and the Time Zone can be changed under the Start time. Note that the start time cannot be earlier than the current time.
• Schedule ending – Designate when to stop the scheduled job.
No end date – Select this option to repeat running the plan until being stopped omanually.
End after specified occurrence(s) – Select this option to stop the plan after ospecified occurrences that you configure in the text box.
End by – Set up the time to end the recurrence of plans. o
Job Status Option – Specify whether or not to take the metadata/security exceptions into 5.consideration for the migration job status. If only the metadata/securities of the content failed to be migrated, and you select Ignore Metadata/Security exceptions option, the migration job status will be Finished. Otherwise, the job status will be Finished with Exceptions.
Click OK on the ribbon to save the schedule setting configurations. Click Cancel on the ribbon to 6.return to the Plan setting interface without saving any changes. Repeat the configurations
322
DocAve 6: EMC Documentum Migrations
above to create more schedules. Click Calendar View to preview the configured schedule in a
calendar. You can delete a configured schedule by clicking next to the schedule.
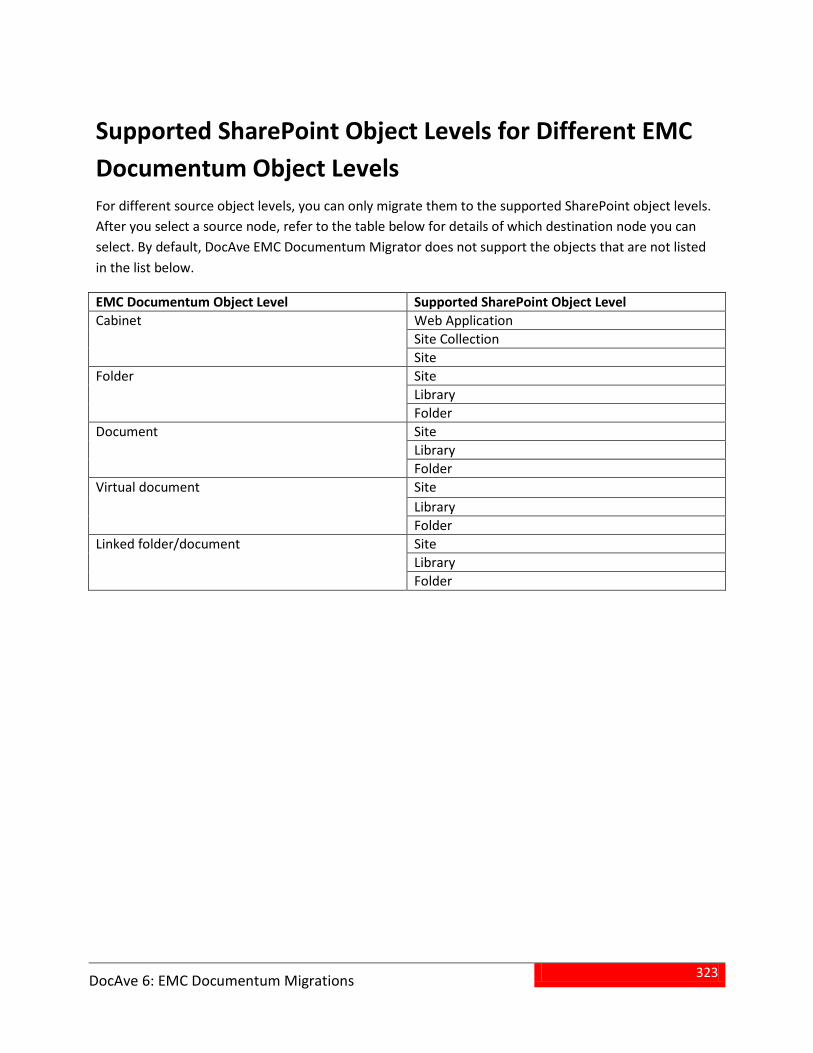
323
DocAve 6: EMC Documentum Migrations
Supported SharePoint Object Levels for Different EMC Documentum Object Levels For different source object levels, you can only migrate them to the supported SharePoint object levels. After you select a source node, refer to the table below for details of which destination node you can select. By default, DocAve EMC Documentum Migrator does not support the objects that are not listed in the list below.
EMC Documentum Object Level Supported SharePoint Object Level Cabinet Web Application
Site Collection Site
Folder Site Library Folder
Document Site Library Folder
Virtual document
Site Library Folder
Linked folder/document
Site Library Folder
324
DocAve 6: Migrator
Managing Sub-profiles Refer the information below to manage an existing sub-profile.
Editing an Existing Sub-profile Select an existing sub-profile from the Sub-Profile drop-down list. 1.
Click Edit Sub-profile in the Sub-profile group to edit the sub-profile settings. 2.
Click Save in the Sub-profile group to save the sub-profile settings. Alternatively, click Save As 3.and enter a profile name to save it as another profile. Select Save and replace the existing sub-profile to replace the original profile. Otherwise, it is saved without removing the original profile.
Deleting an Existing Sub-profile Select an existing sub-profile from the Sub-Profile drop-down list. 1.
Click Delete in the Profile/Sub-profile group to delete the sub-profile, or directly click Delete 2.next to the sub-profile name in the drop-down list. Note that the default sub-profile and the sub-profile used in the main profile cannot be deleted.
Uploading a Previously-configured Sub-profile In the Profile Settings interface, click Migration Options or Mapping Options on the left panel. 1.
Click Edit Sub-profile to make the Migration Options field active. 2.
Click Upload in the Sub-profile group. 3.
Select a previously-created sub-profile and click Open to upload it. If a sub-profile having the 4.same name exists in DocAve, you have two options:
• Upload as a new profile – Upload the sub-profile and name the uploaded sub-profile by adding a suffix, for example, subprofile_1.
• Overwrite current profile – Replace the existing sub-profile. The Default Mappings sub-profile and the Default Migration Options profile sub-profile cannot be overwritten.
Downloading an Existing Sub-profile In the Profile Settings interface, click Migration Options or Mapping Options on the left-hand 1.
panel.
Select an existing sub-profile and click Edit Sub-profile in the Sub-profile group. 2.
Click Download in the Sub-profile group to save the sub-profile to the local disk. 3.

325
DocAve 6: Migrator
Managing Plans For the migration plans created by different modules, you can use Plan Manager to manage them. After launching the migration module, click Plan Manager next to the Home tab. In the Plan Manager interface, any plans that you have previously created are displayed in the main display pane.
In this interface, you can change the number of plans displayed per page. To change the number of plans displayed per page, select the desired number from the Show rows drop-down menu in the lower right-hand corner. To sort the plans, click the column heading such as Plan Name, and Plan ID.
Customize how these plans are displayed in a number of different ways:
• Search – Filters the plans to be displayed by the keyword entered in the Input Keyword text box (the keyword is not case sensitive). The keyword must be contained in a column value. You can select Search all pages or Search current page to define the search scope. Search all pages means that the plans in all of the pages whose column contains the keywords will be displayed; while Search current page means that only the plans in the current page whose column contains the keywords will be displayed.
• – You can manage which columns are displayed in the list so that only information you want to see is shown. Click the plus ( ), and then check the checkbox next to the column name to have that column shown in the list.
• – You can manage which columns are hidden in the list. Hover over the cursor on the column that you want to hide and then click the appeared minus ( ) icon, and then the column is hidden.
Perform the following actions in the Plan Manager interface:
• Select a plan and click View Details. The source node and the destination node are displayed on the data tree. You can also click Settings on the ribbon to view the migration settings of this plan. When you want to change the nodes you selected or want to modify the migration settings, click Edit on the ribbon.
• Select a plan and click Edit on the ribbon to change the configurations for the selected plan. You can change the nodes you selected and modify the migration settings. Besides, you can click Profile Settings or Create Container to performing the corresponding actions.
• Select the plans that you want to delete and click Delete on the ribbon. A confirmation window appears, confirming that you want to proceed with the deletion. Click OK to delete the selected plans, or click Cancel to return to the Plan Manager interface without deleting the selected plans.
• Click Test Run to perform a test run job that simulates the real migration job. By viewing the job report of the test run, you can find whether the source contents can be migrated to the destination successfully, and then adjust the plans or optimize the settings.
326
DocAve 6: Migrator
*Note: Test Run results may differ from the results of an actual migration. Investigate Test Runs that display Finished with Exceptions results by reviewing the log file. If no obvious content, metadata, or permission errors are found, it is likely that the actual migration will complete successfully.
• Click Run Now to perform the migration job.
• Generate Excel – When selecting a file system migration plan, you can click Generate Excel to generate the Excel file to customize your own metadata file. For details of using the generated Excel file, refer to Metadata Excel File.
327
DocAve 6: Migrator
Migrator Tools Some tools are provided with the Migrator module. Refer to the DocAve 6 Supplementary Tools User Guide for instructions on using these tools.
• File System Migrator Tool – This tool is used to test the connection to the Net Share path, explore the file information of permissions and properties, run a test migration job to scan the source data, and configure the domain mapping, group mapping, and user mapping which can be used during File System migration.
• Exchange Public Folder Migrator Tool – This tool is used to scan source contents selected for migration and generate the customized report to view the desired information. Besides, you can configure domain mapping, group mapping, and user mapping, which can be used during Exchange public folder migration.
• Lotus Notes Migrator Tool – This tool is used to test the Net Share path, configure the Lotus Notes connection, the content type mapping, the user mapping, and the InfoPath mapping, analyze the database, and generate the report. Besides, you can use this tool to scan the source contents that are selected for migration and view detailed information in the scan report.
• eRoom Migrator Tool – This tool is used to scan the source contents selected for migration and generate the report to view the information of the scanned contents. Besides, you can configure domain mapping, user mapping, and group mapping, which can be used during eRoom migration.
• Livelink Tool – This tool is used to scan the source contents selected for migration and view the information of the scanned contents. Besides, you can configure the domain mapping and user mapping, which can be used during Livelink migration.
• EMC Documentum Migrator Tool – This tool is used to scan the source contents selected for migration and generate the report to view the information of the scanned contents. Besides, you can configure domain mapping, group mapping, user mapping and content type mapping, which can be used during EMC Documentum migration.
• Quickr Migrator Tool – This tool is used to generate the content type mapping and the user mapping for the selected places to migrate the source content and security.

328
DocAve 6: Migrator
Accessing Migrations Hot Key Mode In order to work faster and improve your productivity, DocAve supports Hot Key mode for you to perform corresponding actions quickly by only using keyboard.
To access Hot Key mode, in DocAve interface, use the key combinations of Ctrl +Alt + Z on the keyboard, and then press 1 to direct to the products pane, To access the Migration products, press M.
The following is a list of hot keys for the top level. Using the hot key listed below to access to the corresponding product interface. For example, continue pressing F, you will be brought to the File System Migration Interface.
Functionality Name and Hot Key SharePoint Migration SM File System Migration F Lotus Notes Migration N eRoom Migration E Livelink Migration L Exchange Public Folder Migration P Quickr Migration Q EMC Documentum Migration D
File System Migration To access Hot Key mode, in the File System Migration interface, use the key combinations of Ctrl +Alt + Z on the keyboard.
The following is a list of hot keys for the top level, each time you want to go back to the top level after accessing the interface of lower level, press Ctrl+Alt+Z on the keyboard. For example, continue pressing H, you are brought to the Home tab.
Operation Interface Hot Key Home H Plan Manager P DocAve Home Page 1 DocAve Online Community 2 Control Panel 3 Job Monitor 4 Plan Group 5 Account Information 9 Help and About 0
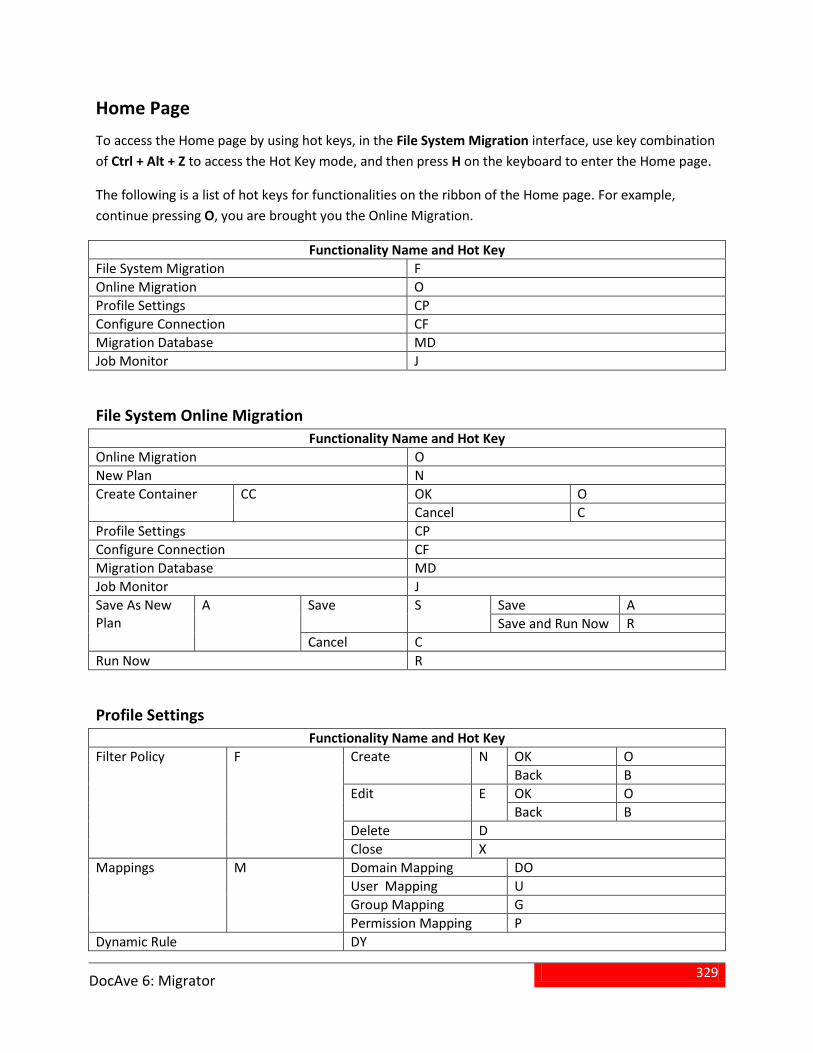
329
DocAve 6: Migrator
Home Page To access the Home page by using hot keys, in the File System Migration interface, use key combination of Ctrl + Alt + Z to access the Hot Key mode, and then press H on the keyboard to enter the Home page.
The following is a list of hot keys for functionalities on the ribbon of the Home page. For example, continue pressing O, you are brought you the Online Migration.
Functionality Name and Hot Key File System Migration F Online Migration O Profile Settings CP Configure Connection CF Migration Database MD Job Monitor J
File System Online Migration Functionality Name and Hot Key
Online Migration O New Plan N Create Container CC OK O
Cancel C Profile Settings CP Configure Connection CF Migration Database MD Job Monitor J Save As New Plan
A Save S Save A Save and Run Now R
Cancel C Run Now R
Profile Settings Functionality Name and Hot Key
Filter Policy F Create N OK O Back B
Edit E OK O Back B
Delete D Close X
Mappings M Domain Mapping DO User Mapping U Group Mapping G Permission Mapping P
Dynamic Rule DY
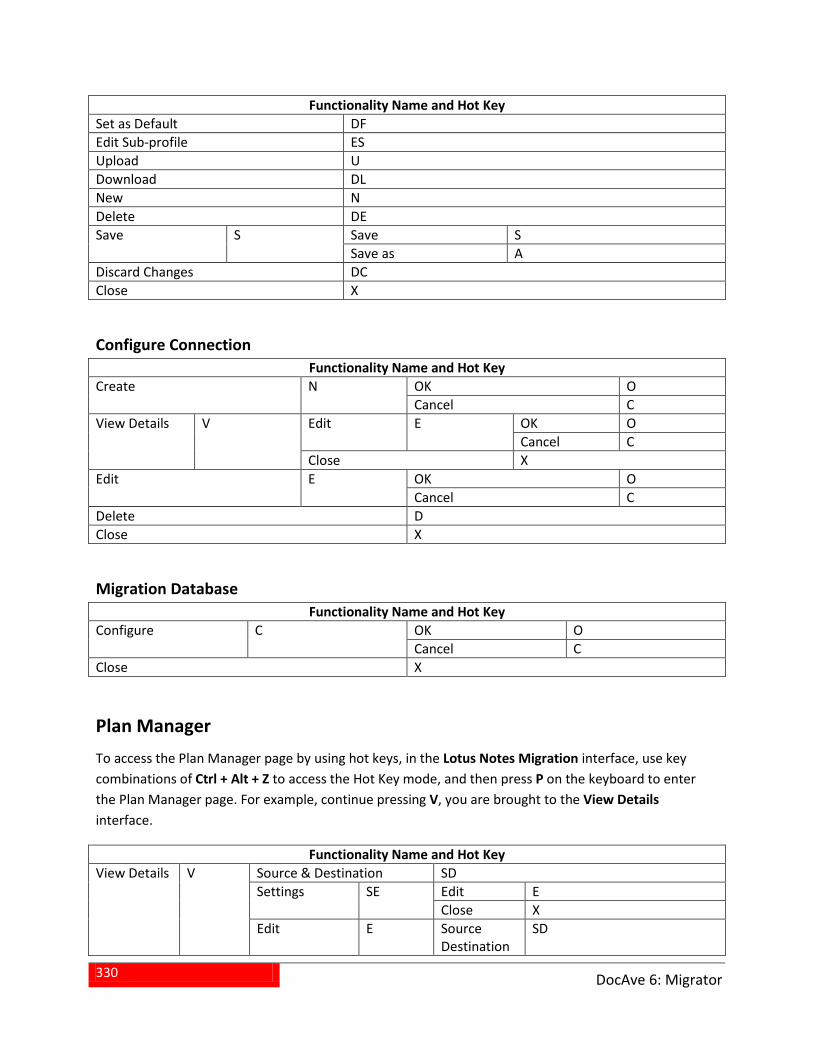
330
DocAve 6: Migrator
Functionality Name and Hot Key Set as Default DF Edit Sub-profile ES Upload U Download DL New N Delete DE Save S Save S
Save as A Discard Changes DC Close X
Configure Connection Functionality Name and Hot Key
Create N OK O Cancel C
View Details V Edit E OK O Cancel C
Close X Edit E OK O
Cancel C Delete D Close X
Migration Database Functionality Name and Hot Key
Configure C OK O Cancel C
Close X
Plan Manager To access the Plan Manager page by using hot keys, in the Lotus Notes Migration interface, use key combinations of Ctrl + Alt + Z to access the Hot Key mode, and then press P on the keyboard to enter the Plan Manager page. For example, continue pressing V, you are brought to the View Details interface.
Functionality Name and Hot Key View Details V Source & Destination SD
Settings SE Edit E Close X
Edit E Source Destination
SD
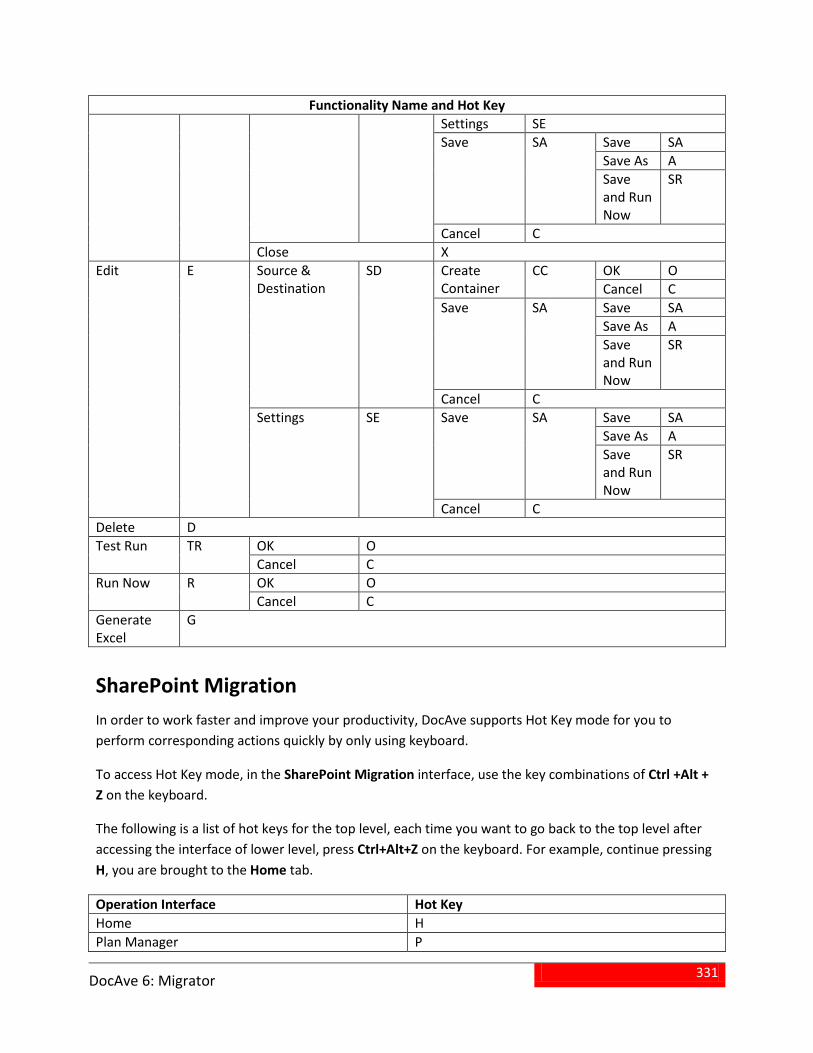
331
DocAve 6: Migrator
Functionality Name and Hot Key Settings SE Save SA Save SA
Save As A Save and Run Now
SR
Cancel C Close X
Edit E Source & Destination
SD Create Container
CC OK O Cancel C
Save SA Save SA Save As A Save and Run Now
SR
Cancel C Settings SE Save SA Save SA
Save As A Save and Run Now
SR
Cancel C Delete D Test Run TR OK O
Cancel C Run Now R OK O
Cancel C Generate Excel
G
SharePoint Migration In order to work faster and improve your productivity, DocAve supports Hot Key mode for you to perform corresponding actions quickly by only using keyboard.
To access Hot Key mode, in the SharePoint Migration interface, use the key combinations of Ctrl +Alt + Z on the keyboard.
The following is a list of hot keys for the top level, each time you want to go back to the top level after accessing the interface of lower level, press Ctrl+Alt+Z on the keyboard. For example, continue pressing H, you are brought to the Home tab.
Operation Interface Hot Key Home H Plan Manager P
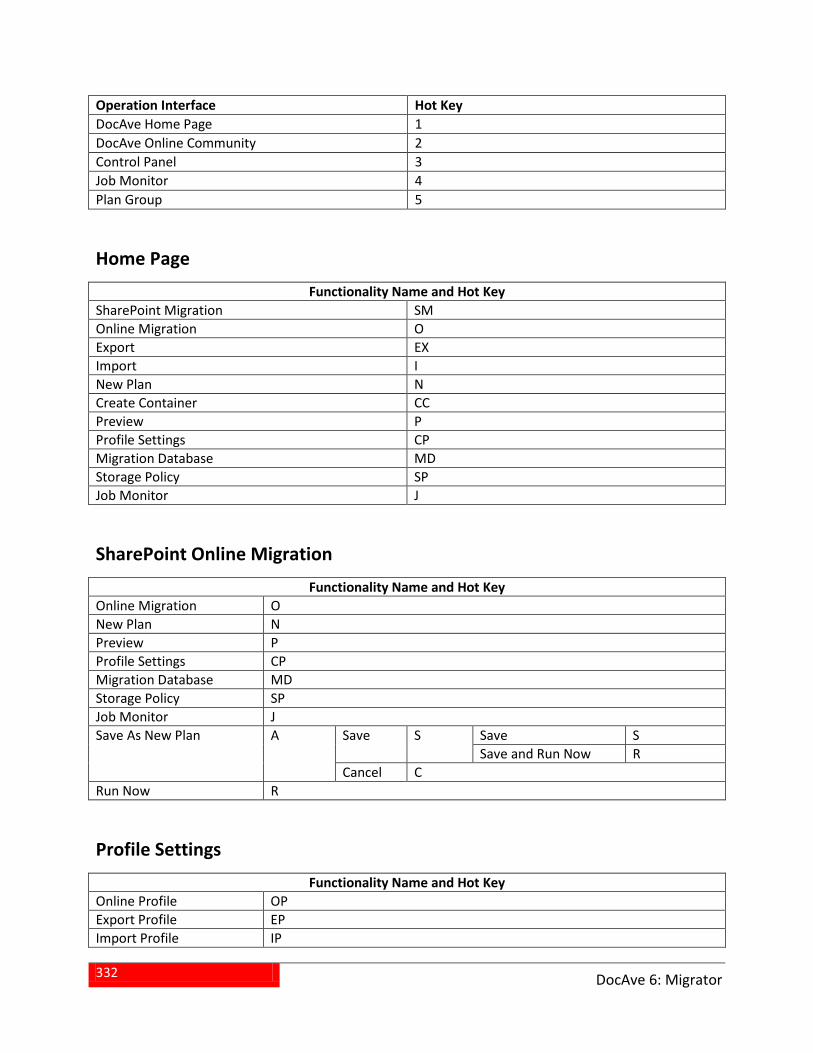
332
DocAve 6: Migrator
Operation Interface Hot Key DocAve Home Page 1 DocAve Online Community 2 Control Panel 3 Job Monitor 4 Plan Group 5
Home Page Functionality Name and Hot Key
SharePoint Migration SM Online Migration O Export EX Import I New Plan N Create Container CC Preview P Profile Settings CP Migration Database MD Storage Policy SP Job Monitor J
SharePoint Online Migration
Functionality Name and Hot Key Online Migration O New Plan N Preview P Profile Settings CP Migration Database MD Storage Policy SP Job Monitor J Save As New Plan A Save S Save S
Save and Run Now R Cancel C
Run Now R
Profile Settings
Functionality Name and Hot Key Online Profile OP Export Profile EP Import Profile IP
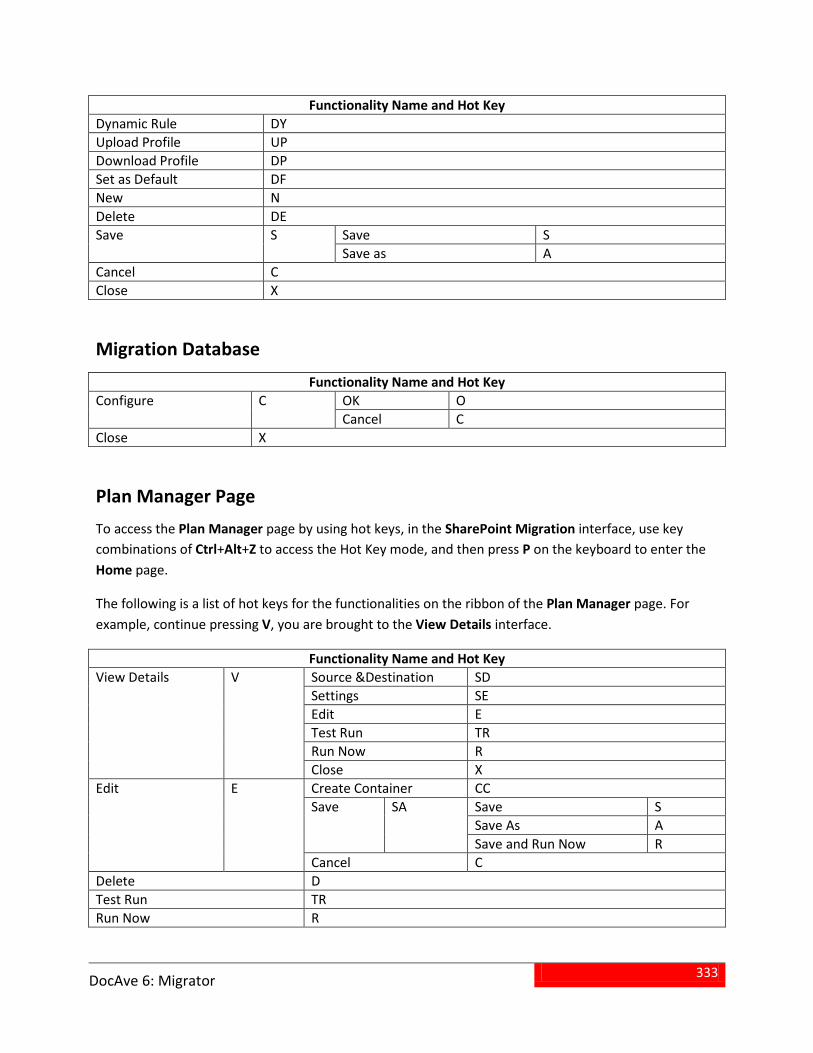
333
DocAve 6: Migrator
Functionality Name and Hot Key Dynamic Rule DY Upload Profile UP Download Profile DP Set as Default DF New N Delete DE Save S Save S
Save as A Cancel C Close X
Migration Database Functionality Name and Hot Key
Configure C OK O Cancel C
Close X
Plan Manager Page To access the Plan Manager page by using hot keys, in the SharePoint Migration interface, use key combinations of Ctrl+Alt+Z to access the Hot Key mode, and then press P on the keyboard to enter the Home page.
The following is a list of hot keys for the functionalities on the ribbon of the Plan Manager page. For example, continue pressing V, you are brought to the View Details interface.
Functionality Name and Hot Key View Details V Source &Destination SD
Settings SE Edit E Test Run TR Run Now R Close X
Edit E Create Container CC Save SA Save S
Save As A Save and Run Now R
Cancel C Delete D Test Run TR Run Now R

334
DocAve 6: Migrator
Exchange Public Folder Migration To access Hot Key mode, in the Exchange Public Folder Migration interface, use the key combinations of Ctrl +Alt + Z on the keyboard.
The following is a list of hot keys for the top level, each time you want to go back to the top level after accessing the interface of lower level, press Ctrl+Alt+Z on the keyboard. For example, continue pressing H, you are brought to the Home tab.
Operation Interface Hot Key Home H Plan Manager P DocAve Home Page 1 DocAve Online Community 2 Control Panel 3 Job Monitor 4 Plan Group 5 User 9 Help and About information 0
Home Page To access the Home tab by using hot keys, in the Exchange Public Folder Migration interface, use key combinations of Ctrl+Alt+Z to access the Hot Key mode, and then press H on the keyboard to enter the Home tab.
The following is a list of hot keys for the functionalities on the ribbon of the Home tab. For example, continue pressing O, you are brought to the Online Migration.
Functionality Name and Hot Key Exchange Public Folder Migration H Online Migration O Profile Settings CP Configure Connection CF Migration Database MD Job Monitor J
Online Migration Functionality Name and Hot Key
Online Migration O New Plan N Select Source SS Profile Settings CP Configure Connection CF
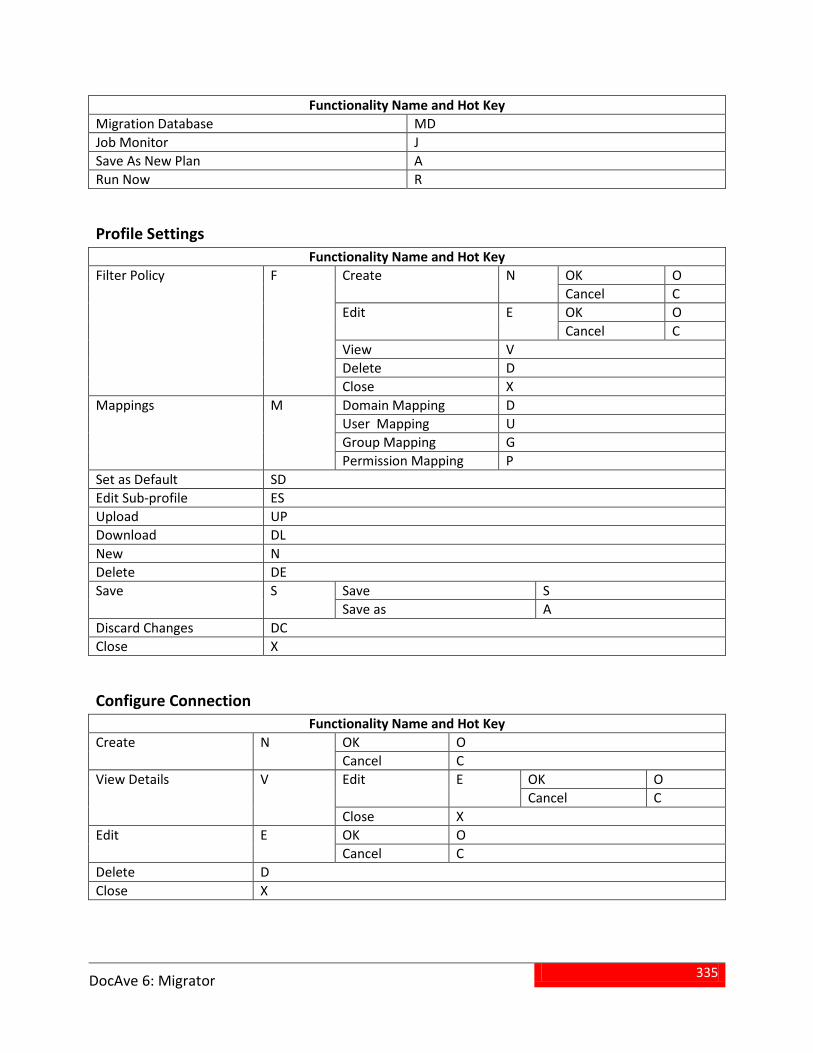
335
DocAve 6: Migrator
Functionality Name and Hot Key Migration Database MD Job Monitor J Save As New Plan A Run Now R
Profile Settings Functionality Name and Hot Key
Filter Policy F Create N OK O Cancel C
Edit E OK O Cancel C
View V Delete D Close X
Mappings M Domain Mapping D User Mapping U Group Mapping G Permission Mapping P
Set as Default SD Edit Sub-profile ES Upload UP Download DL New N Delete DE Save S Save S
Save as A Discard Changes DC Close X
Configure Connection Functionality Name and Hot Key
Create N OK O Cancel C
View Details V Edit E OK O Cancel C
Close X Edit E OK O
Cancel C Delete D Close X
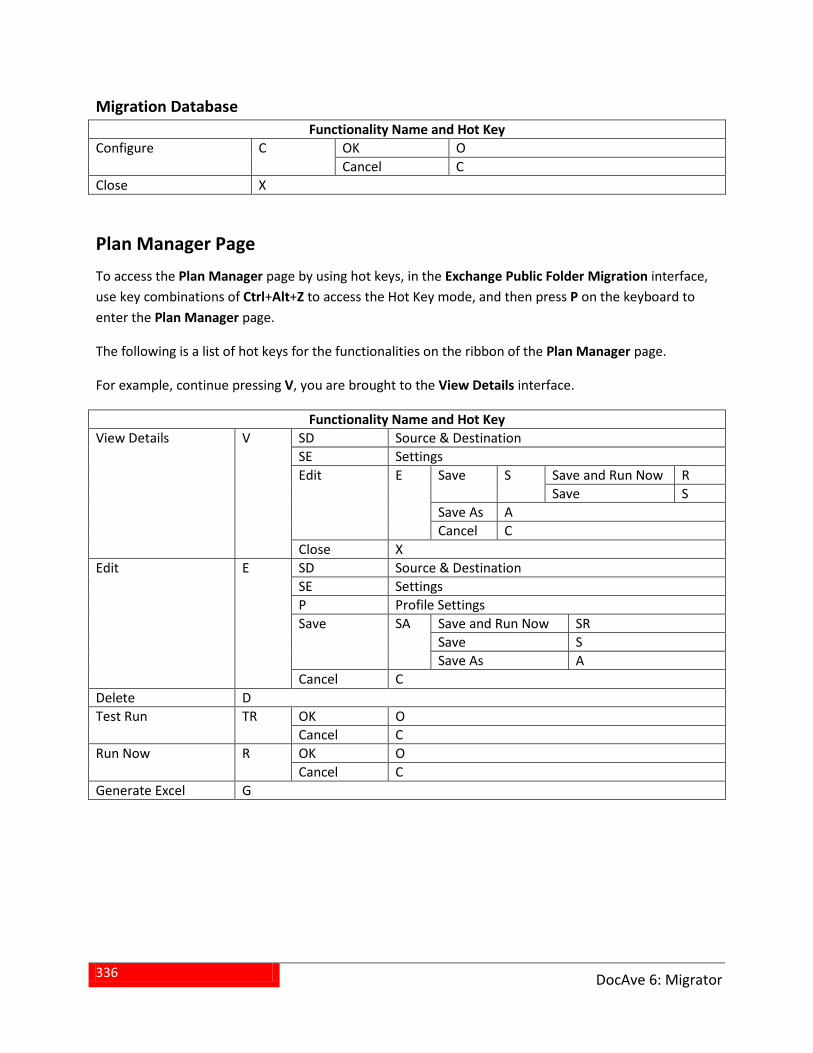
336
DocAve 6: Migrator
Migration Database Functionality Name and Hot Key
Configure C OK O Cancel C
Close X
Plan Manager Page To access the Plan Manager page by using hot keys, in the Exchange Public Folder Migration interface, use key combinations of Ctrl+Alt+Z to access the Hot Key mode, and then press P on the keyboard to enter the Plan Manager page.
The following is a list of hot keys for the functionalities on the ribbon of the Plan Manager page.
For example, continue pressing V, you are brought to the View Details interface.
Functionality Name and Hot Key View Details
V SD Source & Destination SE Settings Edit E
Save
S
Save and Run Now R Save S
Save As A Cancel C
Close X Edit E SD Source & Destination
SE Settings P Profile Settings Save
SA
Save and Run Now SR Save S Save As A
Cancel C Delete D Test Run
TR
OK O Cancel C
Run Now
R OK O Cancel C
Generate Excel G
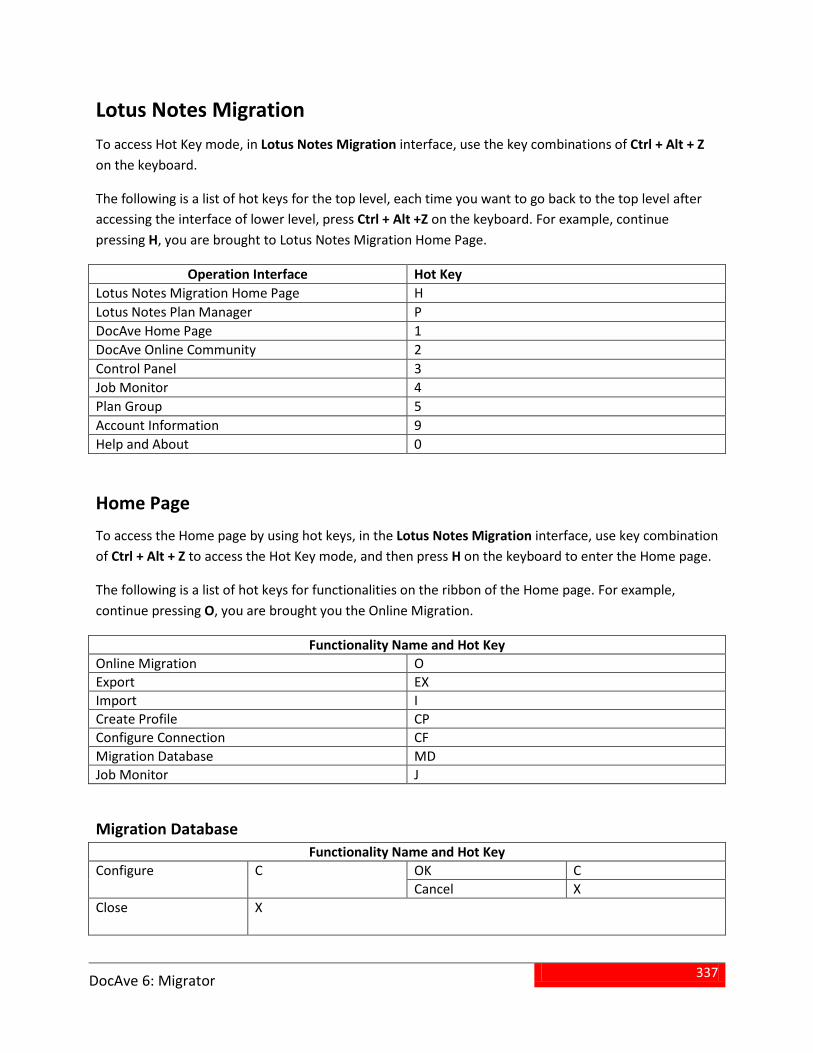
337
DocAve 6: Migrator
Lotus Notes Migration To access Hot Key mode, in Lotus Notes Migration interface, use the key combinations of Ctrl + Alt + Z on the keyboard.
The following is a list of hot keys for the top level, each time you want to go back to the top level after accessing the interface of lower level, press Ctrl + Alt +Z on the keyboard. For example, continue pressing H, you are brought to Lotus Notes Migration Home Page.
Operation Interface Hot Key Lotus Notes Migration Home Page H Lotus Notes Plan Manager P DocAve Home Page 1 DocAve Online Community 2 Control Panel 3 Job Monitor 4 Plan Group 5 Account Information 9 Help and About 0
Home Page To access the Home page by using hot keys, in the Lotus Notes Migration interface, use key combination of Ctrl + Alt + Z to access the Hot Key mode, and then press H on the keyboard to enter the Home page.
The following is a list of hot keys for functionalities on the ribbon of the Home page. For example, continue pressing O, you are brought you the Online Migration.
Functionality Name and Hot Key Online Migration O Export EX Import I Create Profile CP Configure Connection CF Migration Database MD Job Monitor J
Migration Database Functionality Name and Hot Key
Configure C OK C Cancel X
Close X
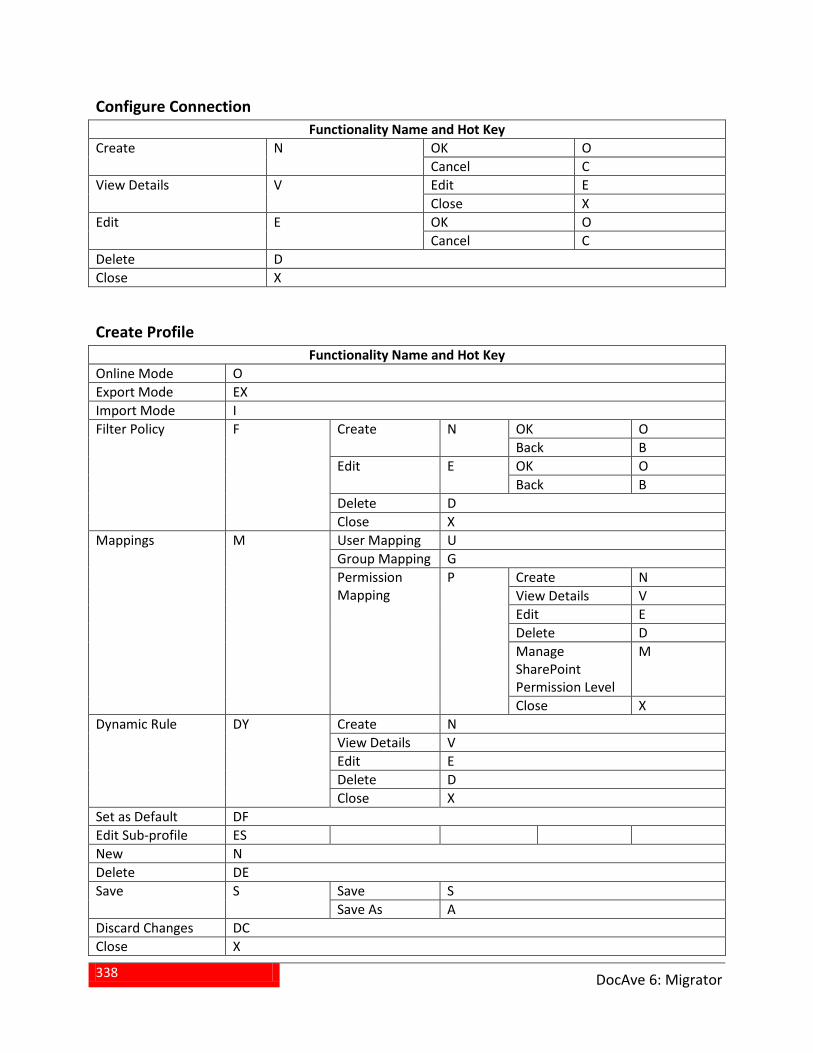
338
DocAve 6: Migrator
Configure Connection Functionality Name and Hot Key
Create N OK O Cancel C
View Details V Edit E Close X
Edit E OK O Cancel C
Delete D Close X
Create Profile Functionality Name and Hot Key
Online Mode O Export Mode EX Import Mode I Filter Policy F Create N OK O
Back B Edit E OK O
Back B Delete D Close X
Mappings M User Mapping U Group Mapping G Permission Mapping
P Create N View Details V Edit E Delete D Manage SharePoint Permission Level
M
Close X Dynamic Rule
DY
Create N View Details V Edit E Delete D Close X
Set as Default DF Edit Sub-profile ES New N Delete DE Save S Save S
Save As A Discard Changes DC Close X
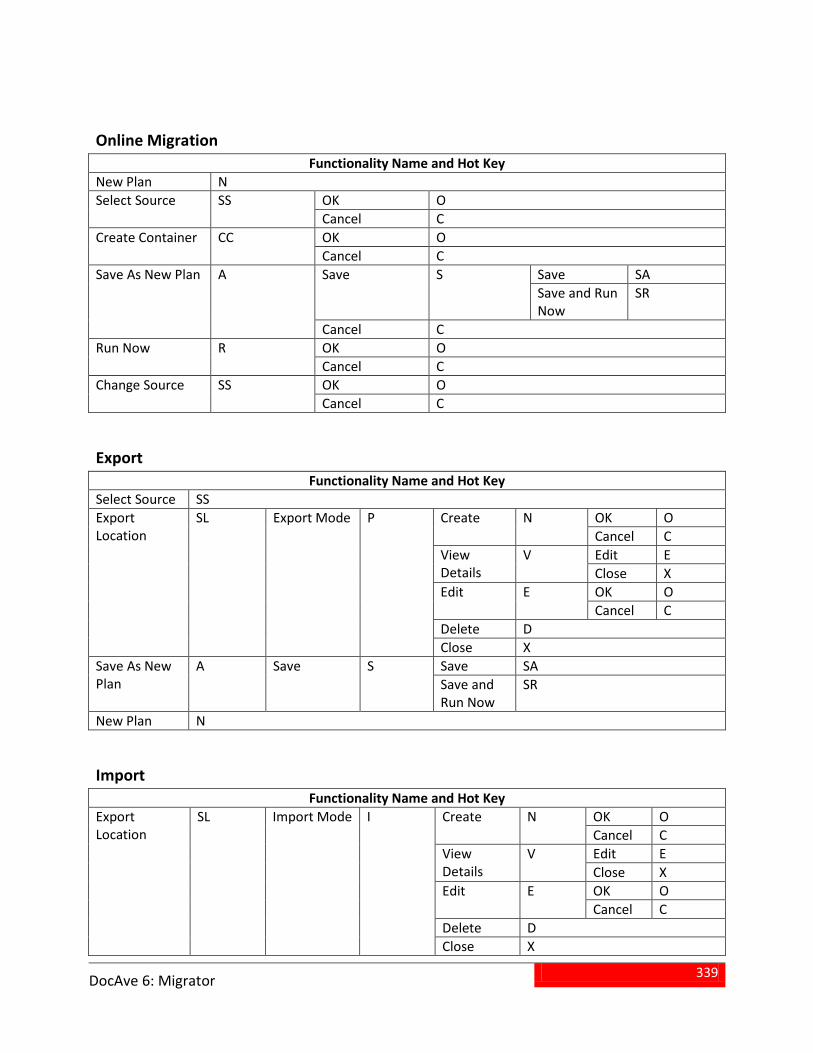
339
DocAve 6: Migrator
Online Migration Functionality Name and Hot Key
New Plan N Select Source SS OK O
Cancel C Create Container CC OK O
Cancel C Save As New Plan A Save S Save SA
Save and Run Now
SR
Cancel C Run Now R OK O
Cancel C Change Source SS OK O
Cancel C
Export Functionality Name and Hot Key
Select Source SS Export Location
SL Export Mode P Create N OK O Cancel C
View Details
V Edit E Close X
Edit E OK O Cancel C
Delete D Close X
Save As New Plan
A Save S Save SA Save and Run Now
SR
New Plan N
Import Functionality Name and Hot Key
Export Location
SL Import Mode I Create N OK O Cancel C
View Details
V Edit E Close X
Edit E OK O Cancel C
Delete D Close X
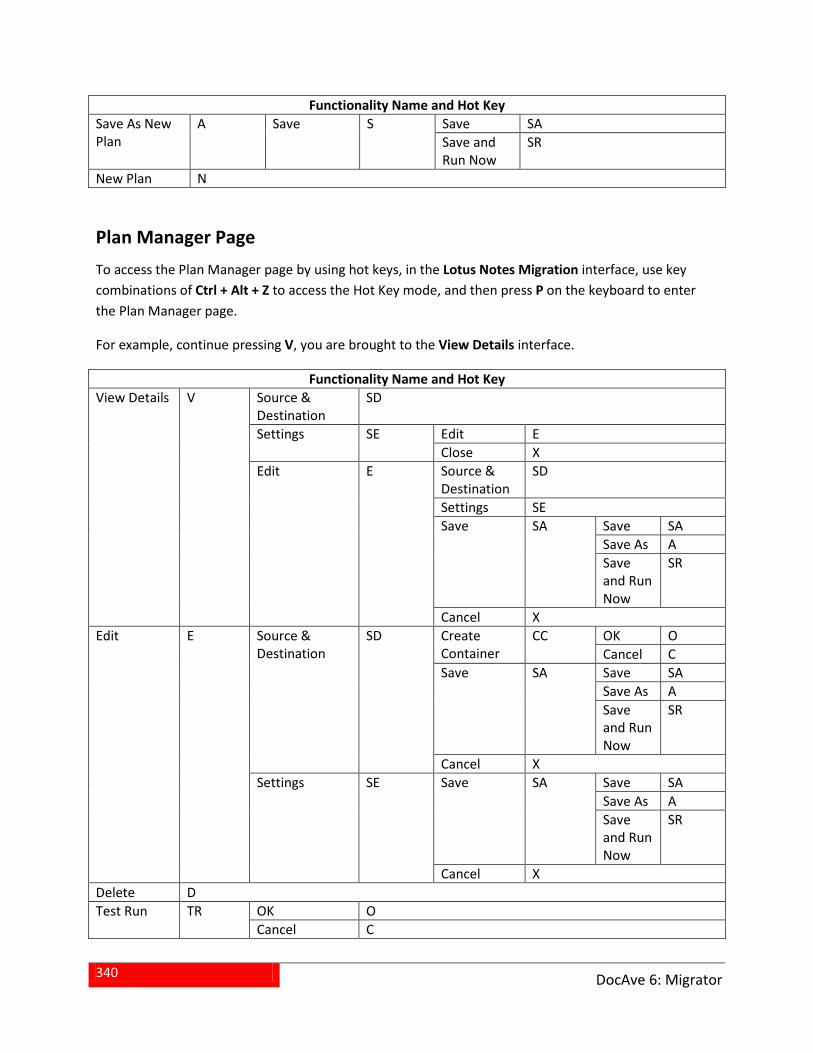
340
DocAve 6: Migrator
Functionality Name and Hot Key Save As New Plan
A Save S Save SA Save and Run Now
SR
New Plan N
Plan Manager Page To access the Plan Manager page by using hot keys, in the Lotus Notes Migration interface, use key combinations of Ctrl + Alt + Z to access the Hot Key mode, and then press P on the keyboard to enter the Plan Manager page.
For example, continue pressing V, you are brought to the View Details interface.
Functionality Name and Hot Key View Details V Source &
Destination SD
Settings SE Edit E Close X
Edit E Source & Destination
SD
Settings SE Save SA Save SA
Save As A Save and Run Now
SR
Cancel X Edit E Source &
Destination SD Create
Container CC OK O
Cancel C Save SA Save SA
Save As A Save and Run Now
SR
Cancel X Settings SE Save SA Save SA
Save As A Save and Run Now
SR
Cancel X Delete D Test Run TR OK O
Cancel C
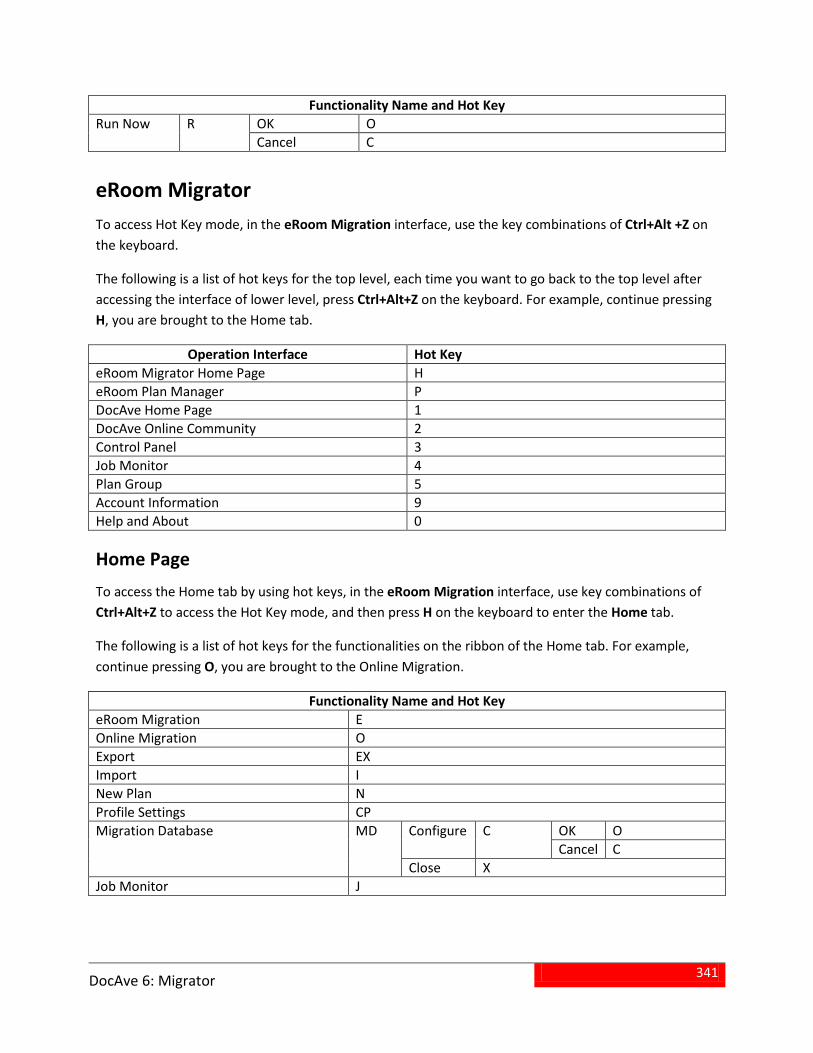
341
DocAve 6: Migrator
Functionality Name and Hot Key Run Now R OK O
Cancel C
eRoom Migrator To access Hot Key mode, in the eRoom Migration interface, use the key combinations of Ctrl+Alt +Z on the keyboard.
The following is a list of hot keys for the top level, each time you want to go back to the top level after accessing the interface of lower level, press Ctrl+Alt+Z on the keyboard. For example, continue pressing H, you are brought to the Home tab.
Operation Interface Hot Key eRoom Migrator Home Page H eRoom Plan Manager P DocAve Home Page 1 DocAve Online Community 2 Control Panel 3 Job Monitor 4 Plan Group 5 Account Information 9 Help and About 0
Home Page To access the Home tab by using hot keys, in the eRoom Migration interface, use key combinations of Ctrl+Alt+Z to access the Hot Key mode, and then press H on the keyboard to enter the Home tab.
The following is a list of hot keys for the functionalities on the ribbon of the Home tab. For example, continue pressing O, you are brought to the Online Migration.
Functionality Name and Hot Key eRoom Migration E Online Migration O Export EX Import I New Plan N Profile Settings CP Migration Database MD Configure C OK O
Cancel C Close X
Job Monitor J
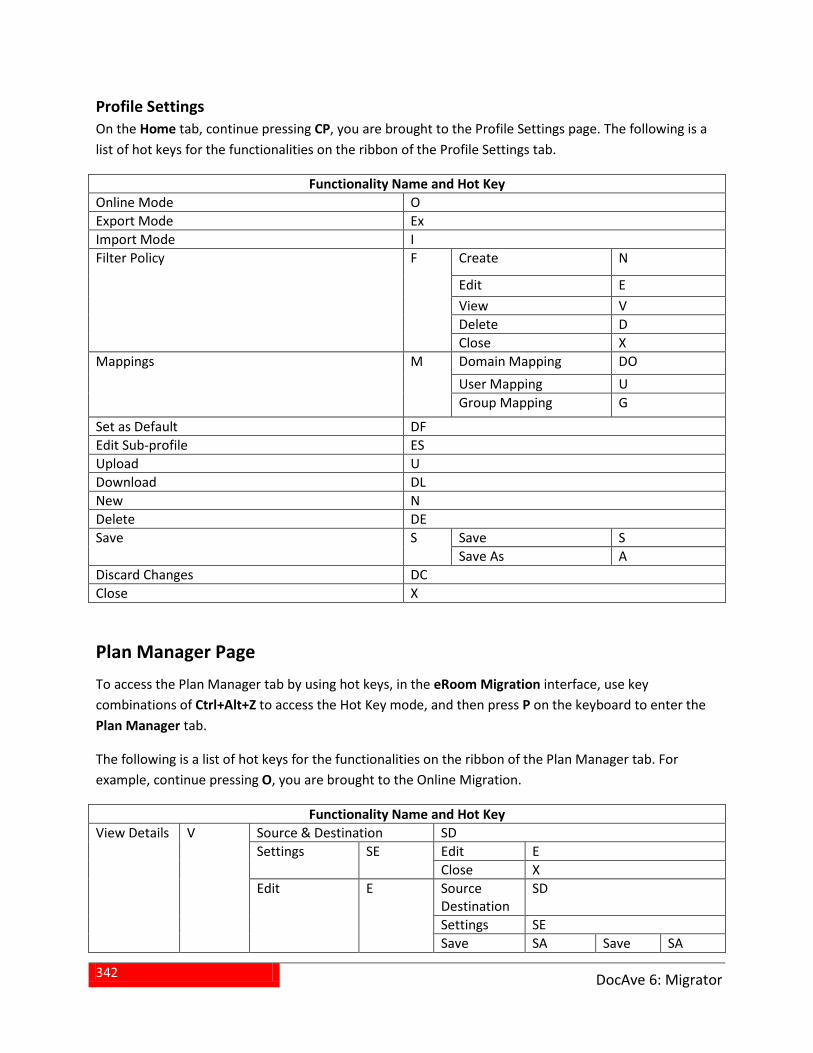
342
DocAve 6: Migrator
Profile Settings On the Home tab, continue pressing CP, you are brought to the Profile Settings page. The following is a list of hot keys for the functionalities on the ribbon of the Profile Settings tab.
Functionality Name and Hot Key Online Mode O Export Mode Ex Import Mode I Filter Policy F Create N
Edit E View V Delete D Close X
Mappings M Domain Mapping DO User Mapping U Group Mapping G
Set as Default DF Edit Sub-profile ES Upload U Download DL New N Delete DE Save S Save S
Save As A Discard Changes DC Close X
Plan Manager Page To access the Plan Manager tab by using hot keys, in the eRoom Migration interface, use key combinations of Ctrl+Alt+Z to access the Hot Key mode, and then press P on the keyboard to enter the Plan Manager tab.
The following is a list of hot keys for the functionalities on the ribbon of the Plan Manager tab. For example, continue pressing O, you are brought to the Online Migration.
Functionality Name and Hot Key View Details V Source & Destination SD
Settings SE Edit E Close X
Edit E Source Destination
SD
Settings SE Save SA Save SA
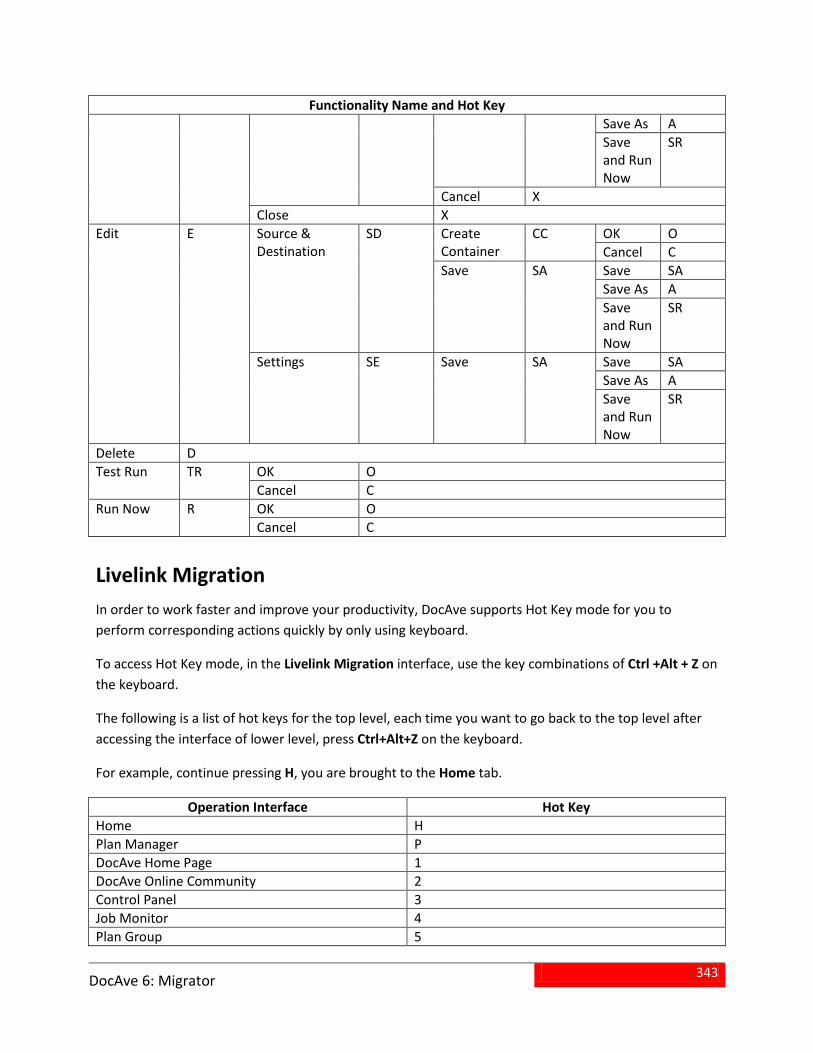
343
DocAve 6: Migrator
Functionality Name and Hot Key Save As A Save and Run Now
SR
Cancel X Close X
Edit E Source & Destination
SD Create Container
CC OK O Cancel C
Save SA Save SA Save As A Save and Run Now
SR
Settings SE Save SA Save SA Save As A Save and Run Now
SR
Delete D Test Run TR OK O
Cancel C Run Now R OK O
Cancel C
Livelink Migration In order to work faster and improve your productivity, DocAve supports Hot Key mode for you to perform corresponding actions quickly by only using keyboard.
To access Hot Key mode, in the Livelink Migration interface, use the key combinations of Ctrl +Alt + Z on the keyboard.
The following is a list of hot keys for the top level, each time you want to go back to the top level after accessing the interface of lower level, press Ctrl+Alt+Z on the keyboard.
For example, continue pressing H, you are brought to the Home tab.
Operation Interface Hot Key Home H Plan Manager P DocAve Home Page 1 DocAve Online Community 2 Control Panel 3 Job Monitor 4 Plan Group 5
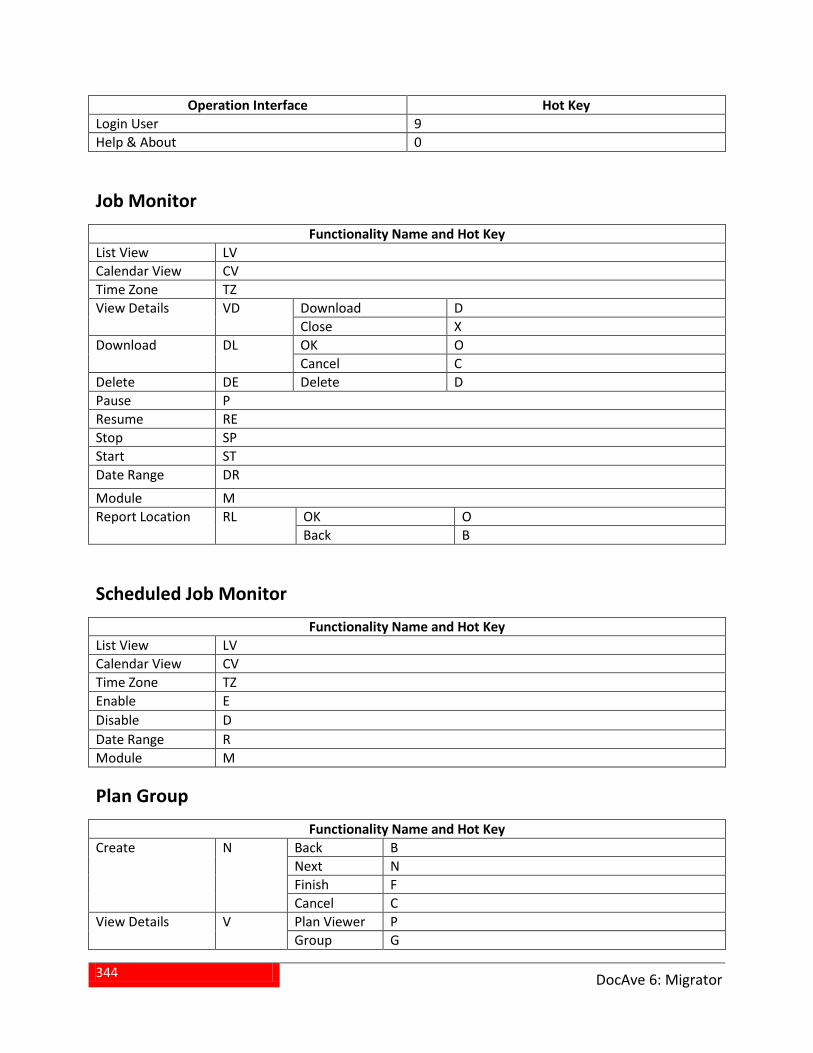
344
DocAve 6: Migrator
Operation Interface Hot Key Login User 9 Help & About 0
Job Monitor
Functionality Name and Hot Key List View LV Calendar View CV Time Zone TZ View Details VD Download D
Close X Download DL OK O
Cancel C Delete DE Delete D Pause P Resume RE Stop SP Start ST Date Range DR
Module M Report Location RL OK O
Back B
Scheduled Job Monitor Functionality Name and Hot Key
List View LV Calendar View CV Time Zone TZ Enable E Disable D Date Range R Module M
Plan Group
Functionality Name and Hot Key Create N Back B
Next N Finish F Cancel C
View Details V Plan Viewer P Group G
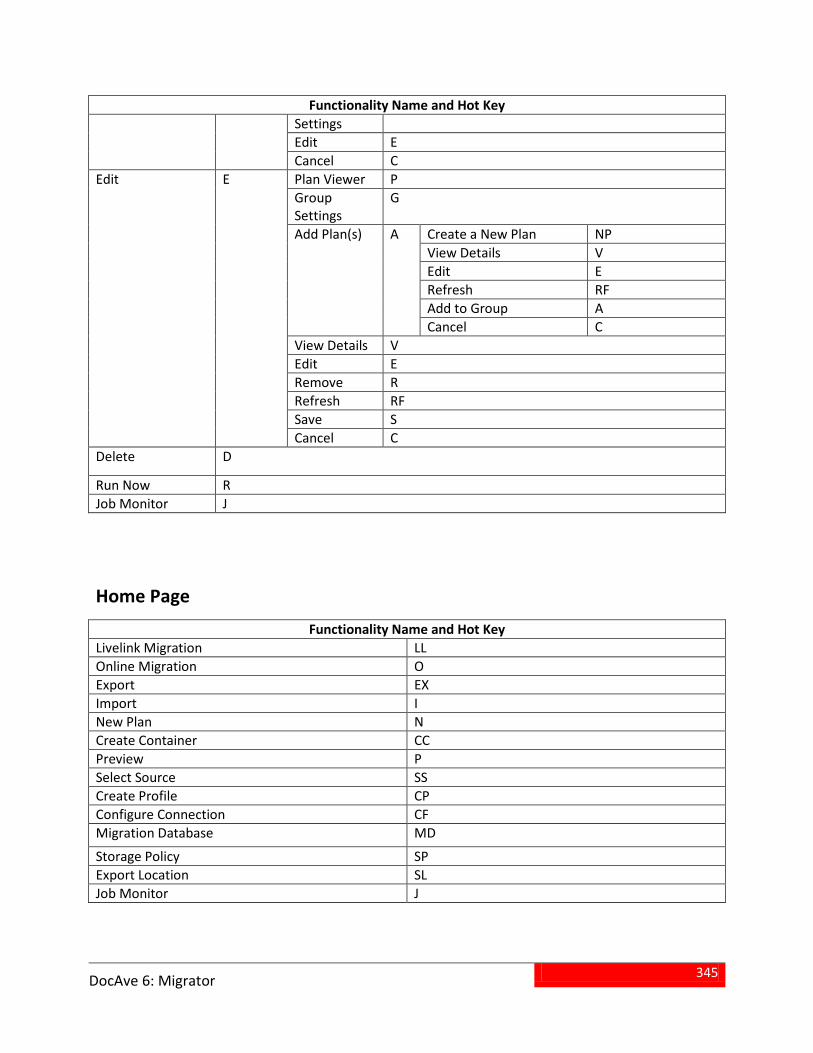
345
DocAve 6: Migrator
Functionality Name and Hot Key Settings Edit E Cancel C
Edit E Plan Viewer P Group Settings
G
Add Plan(s) A Create a New Plan NP View Details V Edit E Refresh RF Add to Group A Cancel C
View Details V Edit E Remove R Refresh RF Save S Cancel C
Delete D
Run Now R Job Monitor J
Home Page
Functionality Name and Hot Key Livelink Migration LL Online Migration O Export EX Import I New Plan N Create Container CC Preview P Select Source SS Create Profile CP Configure Connection CF Migration Database MD
Storage Policy SP Export Location SL Job Monitor J
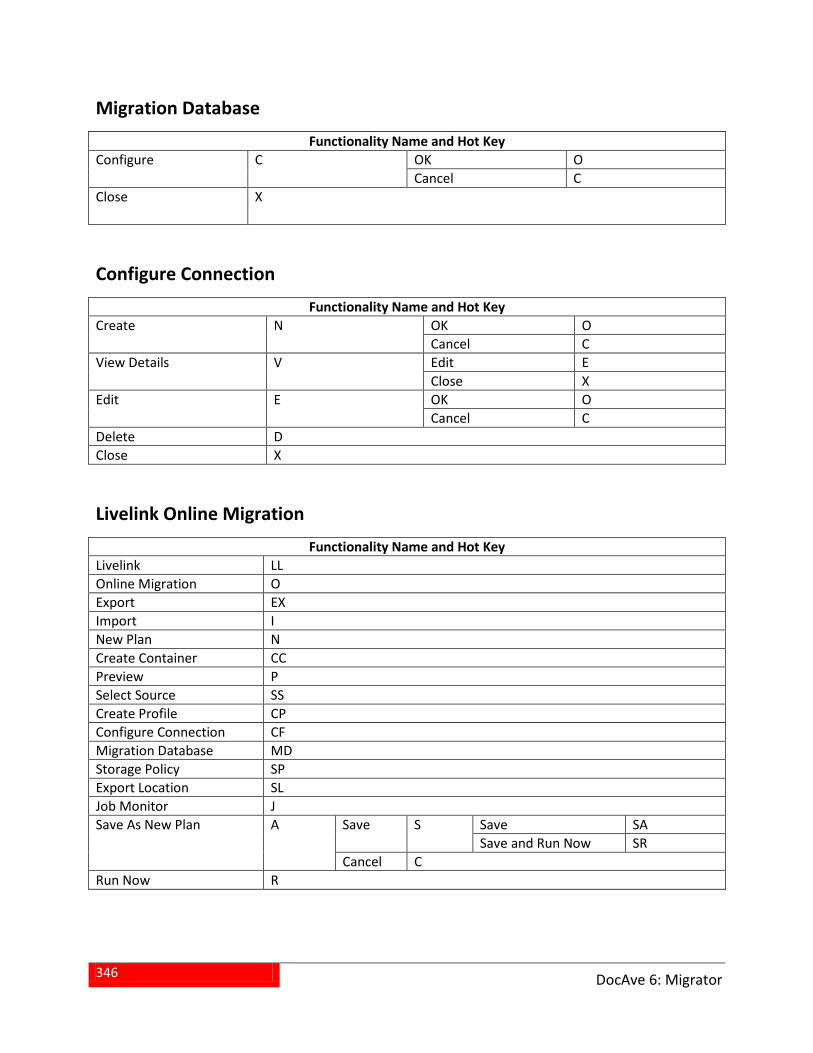
346
DocAve 6: Migrator
Migration Database
Functionality Name and Hot Key Configure C OK O
Cancel C Close X
Configure Connection Functionality Name and Hot Key
Create N OK O Cancel C
View Details V Edit E Close X
Edit E OK O Cancel C
Delete D Close X
Livelink Online Migration Functionality Name and Hot Key
Livelink LL Online Migration O Export EX Import I New Plan N Create Container CC Preview P Select Source SS Create Profile CP Configure Connection CF Migration Database MD Storage Policy SP Export Location SL Job Monitor J Save As New Plan A Save S Save SA
Save and Run Now SR Cancel C
Run Now R
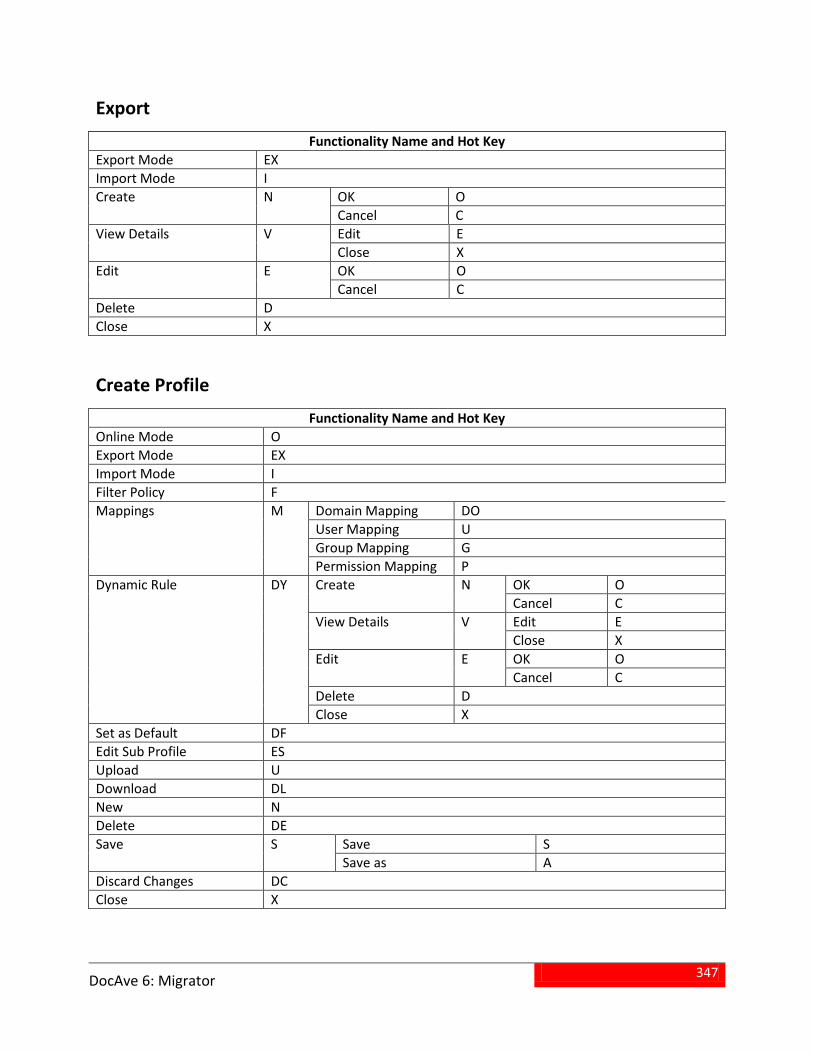
347
DocAve 6: Migrator
Export
Functionality Name and Hot Key Export Mode EX Import Mode I Create N OK O
Cancel C View Details V Edit E
Close X Edit E OK O
Cancel C Delete D Close X
Create Profile
Functionality Name and Hot Key Online Mode O Export Mode EX Import Mode I Filter Policy F Mappings M Domain Mapping DO
User Mapping U Group Mapping G Permission Mapping P
Dynamic Rule DY
Create N OK O Cancel C
View Details V Edit E Close X
Edit E OK O Cancel C
Delete D Close X
Set as Default DF Edit Sub Profile ES Upload U Download DL New N Delete DE Save S Save S
Save as A Discard Changes DC Close X
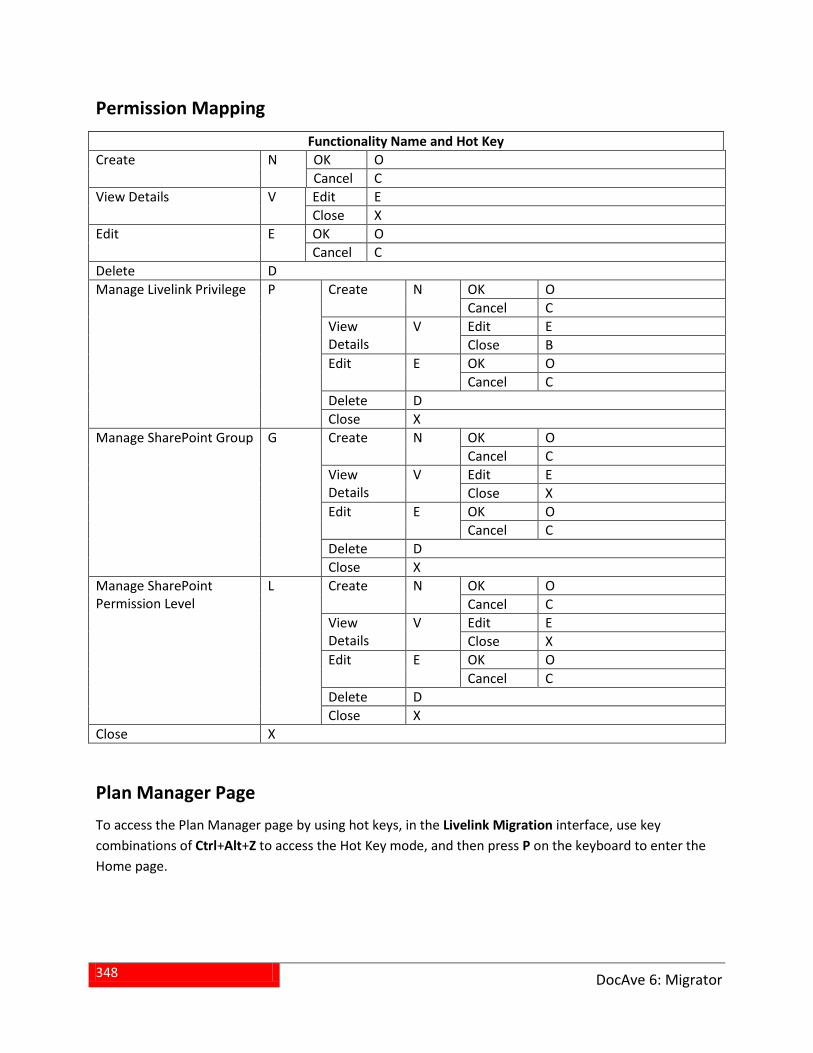
348
DocAve 6: Migrator
Permission Mapping
Functionality Name and Hot Key Create N OK O
Cancel C View Details V Edit E
Close X Edit E OK O
Cancel C Delete D Manage Livelink Privilege P Create N OK O
Cancel C View Details
V Edit E Close B
Edit E OK O Cancel C
Delete D Close X
Manage SharePoint Group G Create N OK O Cancel C
View Details
V Edit E Close X
Edit E OK O Cancel C
Delete D Close X
Manage SharePoint Permission Level
L Create N OK O Cancel C
View Details
V Edit E Close X
Edit E OK O Cancel C
Delete D Close X
Close X
Plan Manager Page To access the Plan Manager page by using hot keys, in the Livelink Migration interface, use key combinations of Ctrl+Alt+Z to access the Hot Key mode, and then press P on the keyboard to enter the Home page.
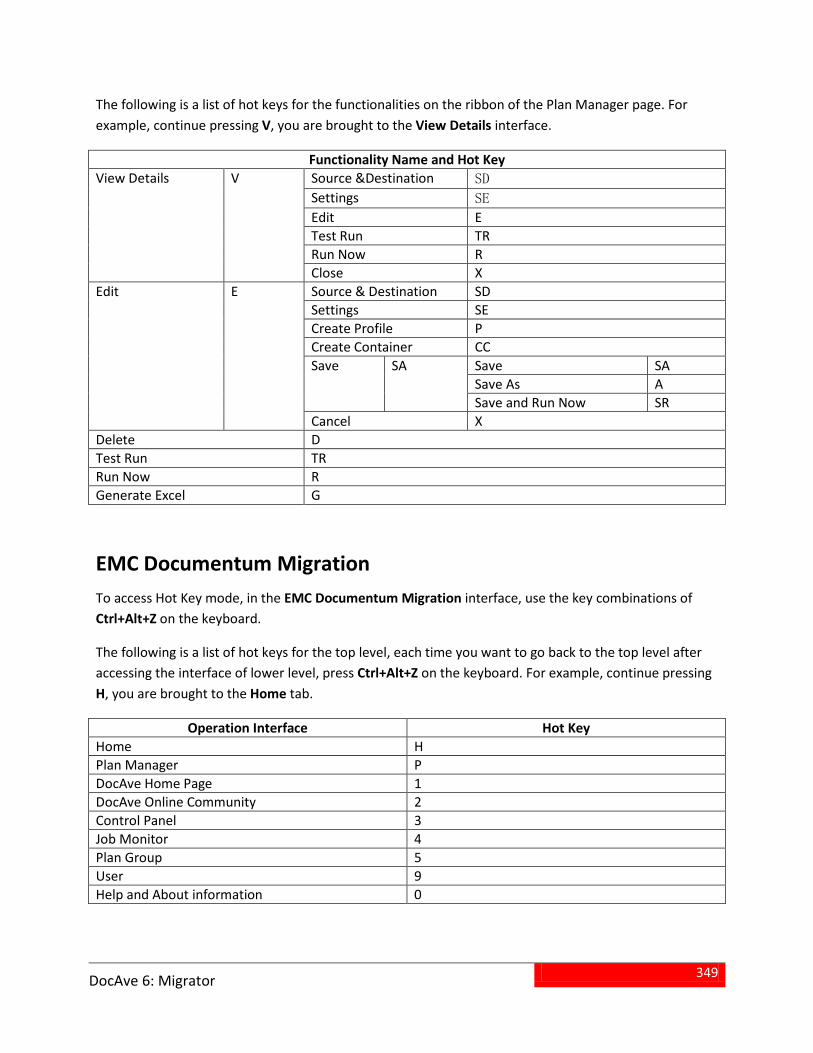
349
DocAve 6: Migrator
The following is a list of hot keys for the functionalities on the ribbon of the Plan Manager page. For example, continue pressing V, you are brought to the View Details interface.
Functionality Name and Hot Key View Details V Source &Destination SD
Settings SE Edit E Test Run TR Run Now R Close X
Edit E Source & Destination SD Settings SE Create Profile P Create Container CC Save SA Save SA
Save As A Save and Run Now SR
Cancel X Delete D Test Run TR Run Now R Generate Excel G
EMC Documentum Migration To access Hot Key mode, in the EMC Documentum Migration interface, use the key combinations of Ctrl+Alt+Z on the keyboard.
The following is a list of hot keys for the top level, each time you want to go back to the top level after accessing the interface of lower level, press Ctrl+Alt+Z on the keyboard. For example, continue pressing H, you are brought to the Home tab.
Operation Interface Hot Key Home H Plan Manager P DocAve Home Page 1 DocAve Online Community 2 Control Panel 3 Job Monitor 4 Plan Group 5 User 9 Help and About information 0
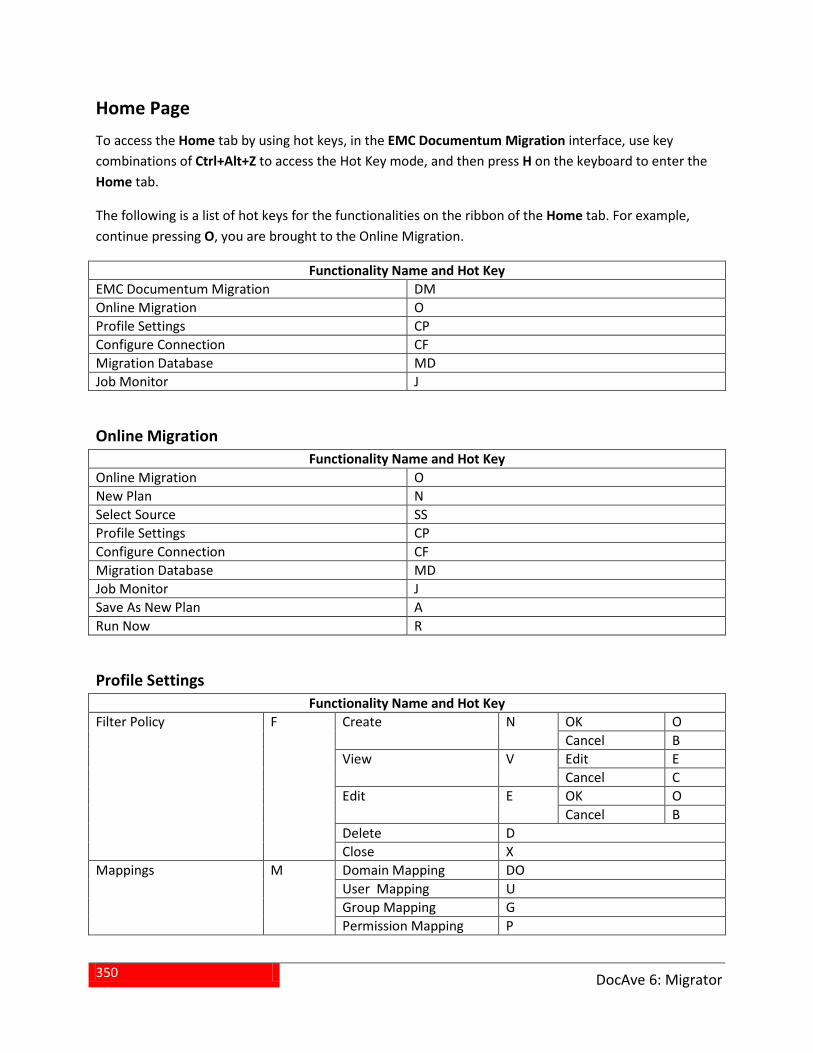
350
DocAve 6: Migrator
Home Page To access the Home tab by using hot keys, in the EMC Documentum Migration interface, use key combinations of Ctrl+Alt+Z to access the Hot Key mode, and then press H on the keyboard to enter the Home tab.
The following is a list of hot keys for the functionalities on the ribbon of the Home tab. For example, continue pressing O, you are brought to the Online Migration.
Functionality Name and Hot Key EMC Documentum Migration DM Online Migration O Profile Settings CP Configure Connection CF Migration Database MD Job Monitor J
Online Migration Functionality Name and Hot Key
Online Migration O New Plan N Select Source SS Profile Settings CP Configure Connection CF Migration Database MD Job Monitor J Save As New Plan A Run Now R
Profile Settings Functionality Name and Hot Key
Filter Policy F Create N OK O Cancel B
View V Edit E Cancel C
Edit E OK O Cancel B
Delete D Close X
Mappings M Domain Mapping DO User Mapping U Group Mapping G Permission Mapping P
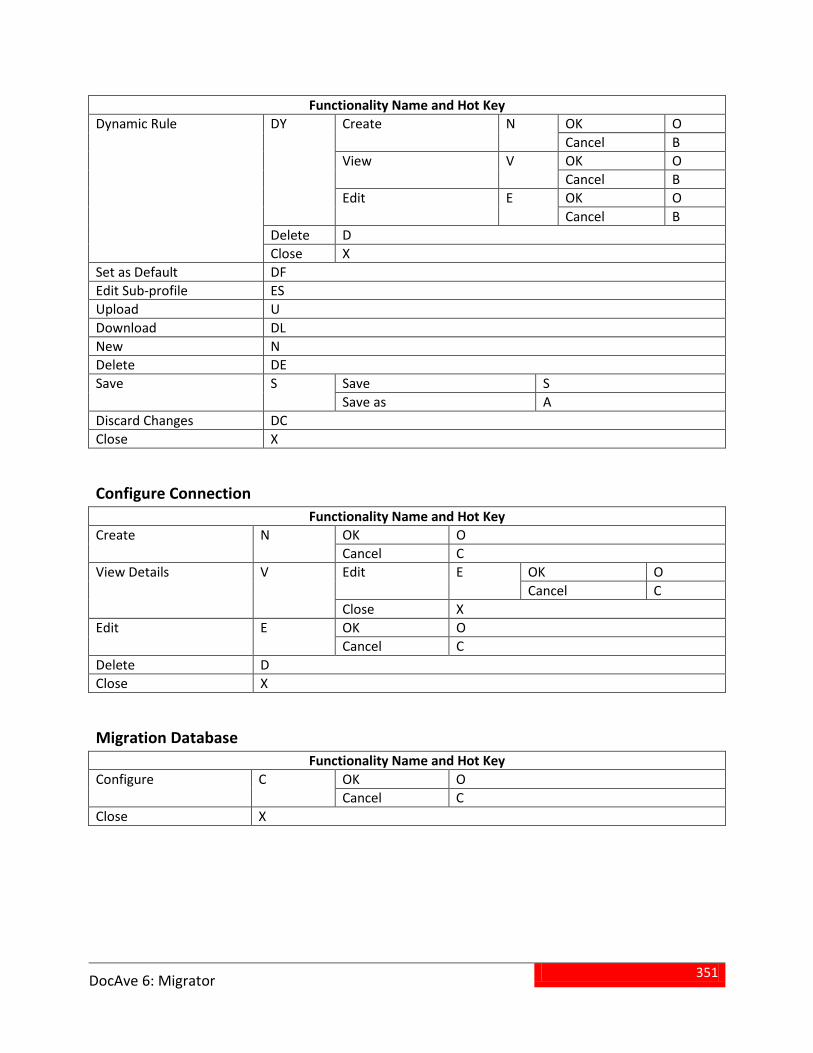
351
DocAve 6: Migrator
Functionality Name and Hot Key Dynamic Rule DY Create
N OK O
Cancel B View
V OK O Cancel B
Edit
E OK O Cancel B
Delete D Close X
Set as Default DF Edit Sub-profile ES Upload U Download DL New N Delete DE Save S Save S
Save as A Discard Changes DC Close X
Configure Connection Functionality Name and Hot Key
Create N OK O Cancel C
View Details V Edit E OK O Cancel C
Close X Edit E OK O
Cancel C Delete D Close X
Migration Database Functionality Name and Hot Key
Configure C OK O Cancel C
Close X
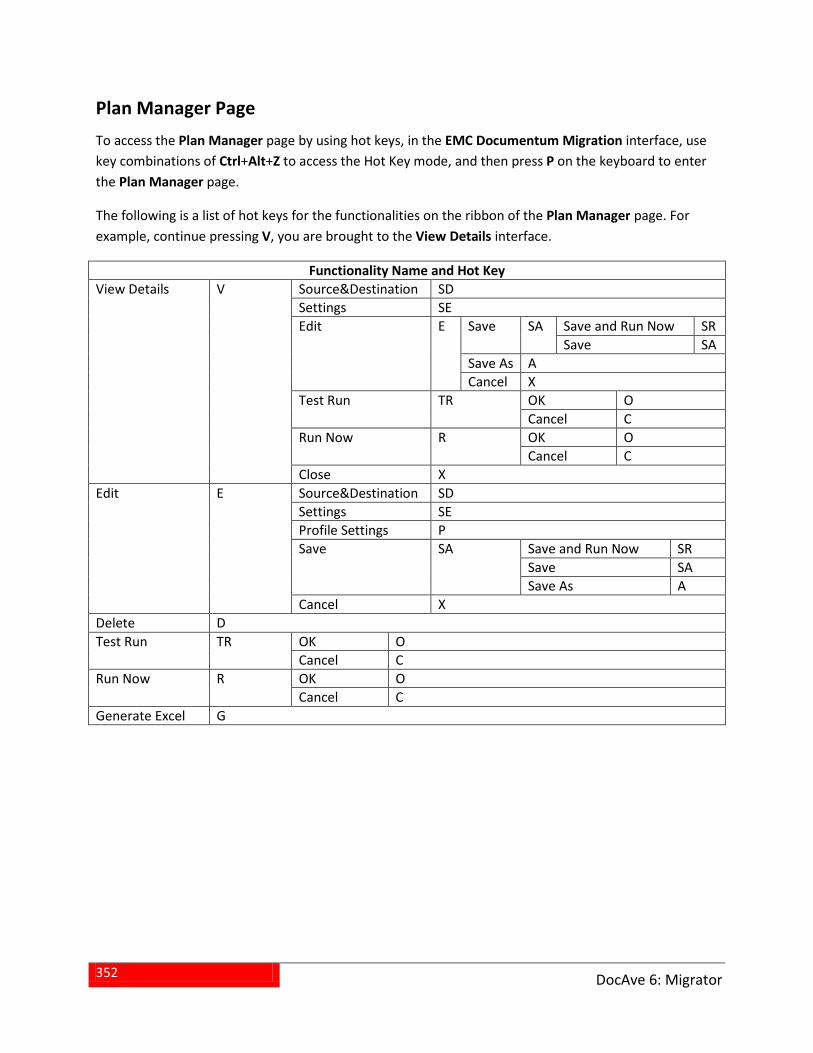
352
DocAve 6: Migrator
Plan Manager Page To access the Plan Manager page by using hot keys, in the EMC Documentum Migration interface, use key combinations of Ctrl+Alt+Z to access the Hot Key mode, and then press P on the keyboard to enter the Plan Manager page.
The following is a list of hot keys for the functionalities on the ribbon of the Plan Manager page. For example, continue pressing V, you are brought to the View Details interface.
Functionality Name and Hot Key View Details V Source&Destination SD
Settings SE Edit E Save SA Save and Run Now SR
Save SA Save As A Cancel X
Test Run TR OK O Cancel C
Run Now R OK O Cancel C
Close X Edit E Source&Destination SD
Settings SE Profile Settings P Save SA Save and Run Now SR
Save SA Save As A
Cancel X Delete D Test Run TR OK O
Cancel C Run Now R OK O
Cancel C Generate Excel G
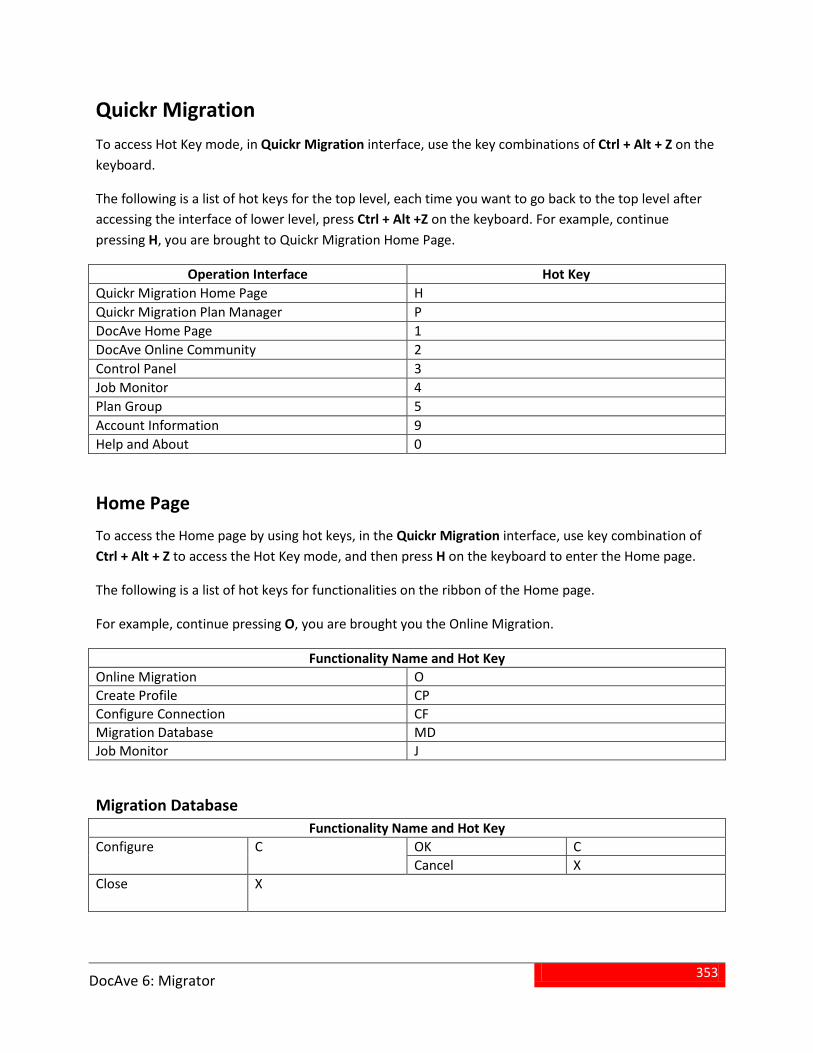
353
DocAve 6: Migrator
Quickr Migration To access Hot Key mode, in Quickr Migration interface, use the key combinations of Ctrl + Alt + Z on the keyboard.
The following is a list of hot keys for the top level, each time you want to go back to the top level after accessing the interface of lower level, press Ctrl + Alt +Z on the keyboard. For example, continue pressing H, you are brought to Quickr Migration Home Page.
Operation Interface Hot Key Quickr Migration Home Page H Quickr Migration Plan Manager P DocAve Home Page 1 DocAve Online Community 2 Control Panel 3 Job Monitor 4 Plan Group 5 Account Information 9 Help and About 0
Home Page To access the Home page by using hot keys, in the Quickr Migration interface, use key combination of Ctrl + Alt + Z to access the Hot Key mode, and then press H on the keyboard to enter the Home page.
The following is a list of hot keys for functionalities on the ribbon of the Home page.
For example, continue pressing O, you are brought you the Online Migration.
Functionality Name and Hot Key Online Migration O Create Profile CP Configure Connection CF Migration Database MD Job Monitor J
Migration Database Functionality Name and Hot Key
Configure C OK C Cancel X
Close X

354
DocAve 6: Migrator
Configure Connection Functionality Name and Hot Key
Create N OK O Cancel C
View Details V Edit E Close X
Edit E OK O Cancel C
Delete D Close X
Create Profile Functionality Name and Hot Key
Filter Policy F Create N OK O Back B
Edit E OK O Back B
Delete D Close X
Mappings M User Mapping U Group Mapping G Permission Mapping
P Create N View Details V Edit E Delete D Manage SharePoint Permission Level
M
Close X Dynamic Rule DY Create N
View Details V Edit E Delete D Close X
Set as Default DF Edit Sub-profile ES New N Delete DE Save S Save S
Save As A Discard Changes DC Close X
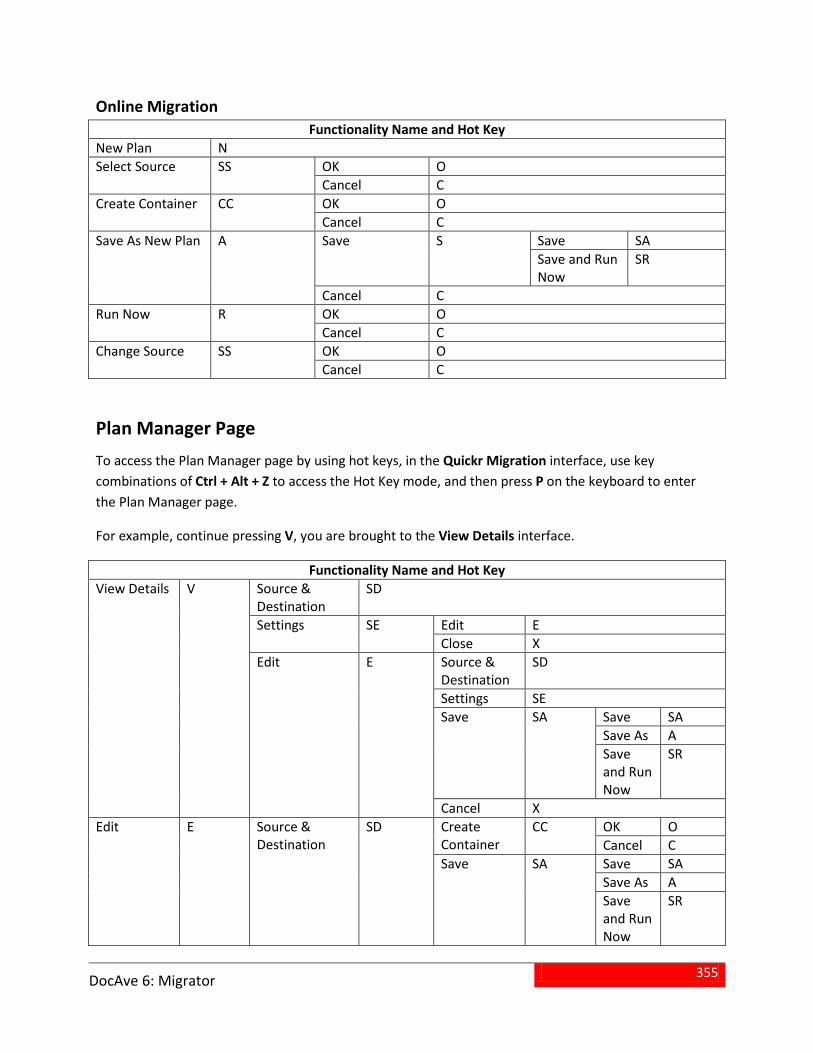
355
DocAve 6: Migrator
Online Migration Functionality Name and Hot Key
New Plan N Select Source SS OK O
Cancel C Create Container CC OK O
Cancel C Save As New Plan A Save S Save SA
Save and Run Now
SR
Cancel C Run Now R OK O
Cancel C Change Source SS OK O
Cancel C
Plan Manager Page To access the Plan Manager page by using hot keys, in the Quickr Migration interface, use key combinations of Ctrl + Alt + Z to access the Hot Key mode, and then press P on the keyboard to enter the Plan Manager page.
For example, continue pressing V, you are brought to the View Details interface.
Functionality Name and Hot Key View Details V Source &
Destination SD
Settings SE Edit E Close X
Edit E Source & Destination
SD
Settings SE Save SA Save SA
Save As A Save and Run Now
SR
Cancel X Edit E Source &
Destination SD Create
Container CC OK O
Cancel C Save SA Save SA
Save As A Save and Run Now
SR
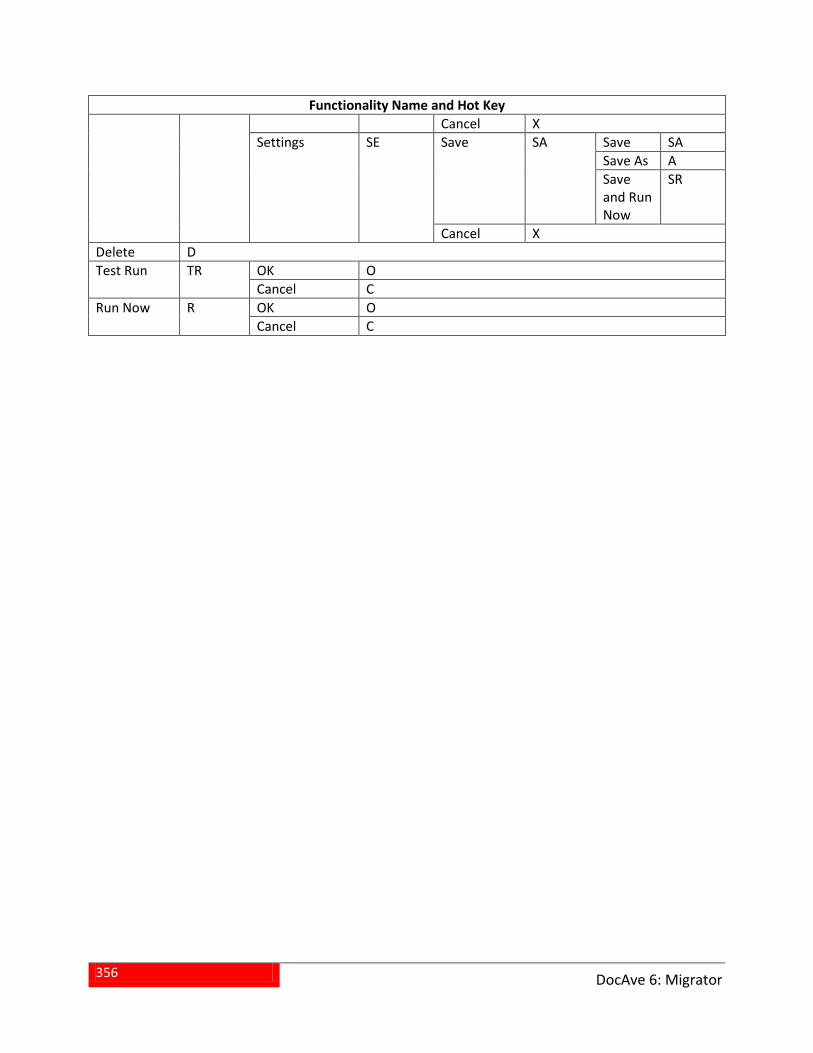
356
DocAve 6: Migrator
Functionality Name and Hot Key Cancel X
Settings SE Save SA Save SA Save As A Save and Run Now
SR
Cancel X Delete D Test Run TR OK O
Cancel C Run Now R OK O
Cancel C
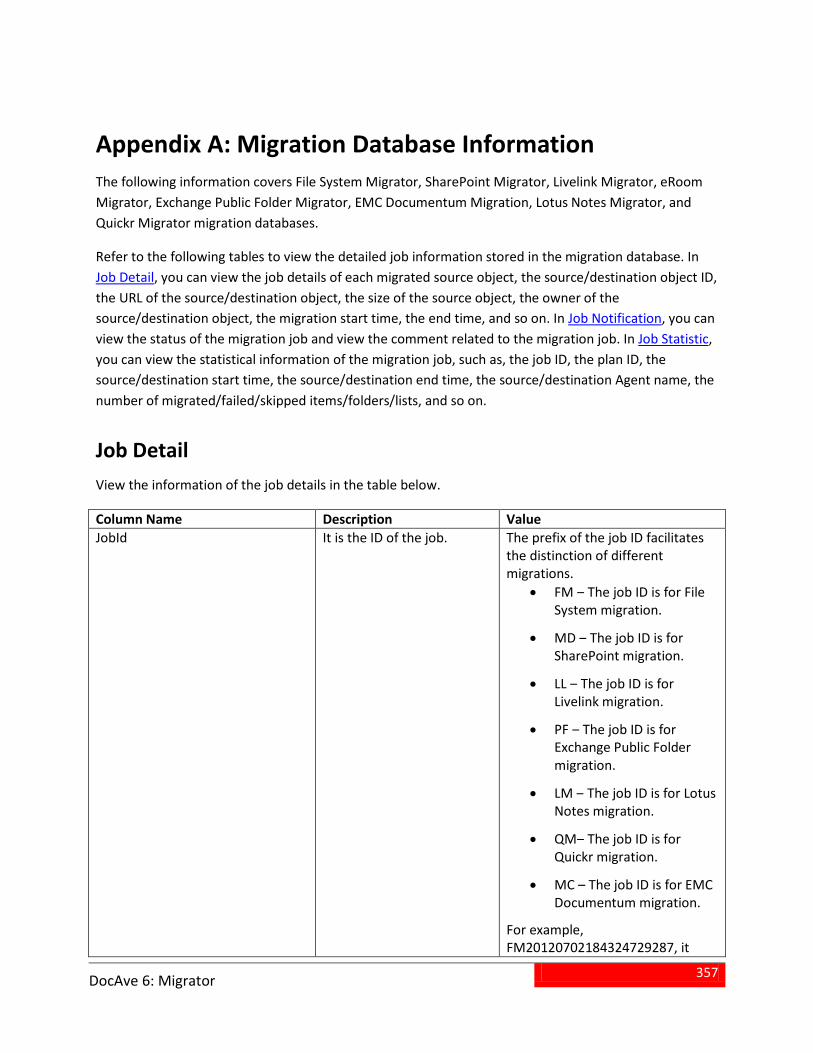
357
DocAve 6: Migrator
Appendix A: Migration Database Information The following information covers File System Migrator, SharePoint Migrator, Livelink Migrator, eRoom Migrator, Exchange Public Folder Migrator, EMC Documentum Migration, Lotus Notes Migrator, and Quickr Migrator migration databases.
Refer to the following tables to view the detailed job information stored in the migration database. In Job Detail, you can view the job details of each migrated source object, the source/destination object ID, the URL of the source/destination object, the size of the source object, the owner of the source/destination object, the migration start time, the end time, and so on. In Job Notification, you can view the status of the migration job and view the comment related to the migration job. In Job Statistic, you can view the statistical information of the migration job, such as, the job ID, the plan ID, the source/destination start time, the source/destination end time, the source/destination Agent name, the number of migrated/failed/skipped items/folders/lists, and so on.
Job Detail View the information of the job details in the table below.
Column Name Description Value JobId It is the ID of the job. The prefix of the job ID facilitates
the distinction of different migrations.
• FM ‒ The job ID is for File System migration.
• MD ‒ The job ID is for SharePoint migration.
• LL ‒ The job ID is for Livelink migration.
• PF ‒ The job ID is for Exchange Public Folder migration.
• LM ‒ The job ID is for Lotus Notes migration.
• QM‒ The job ID is for Quickr migration.
• MC – The job ID is for EMC Documentum migration.
For example, FM20120702184324729287, it
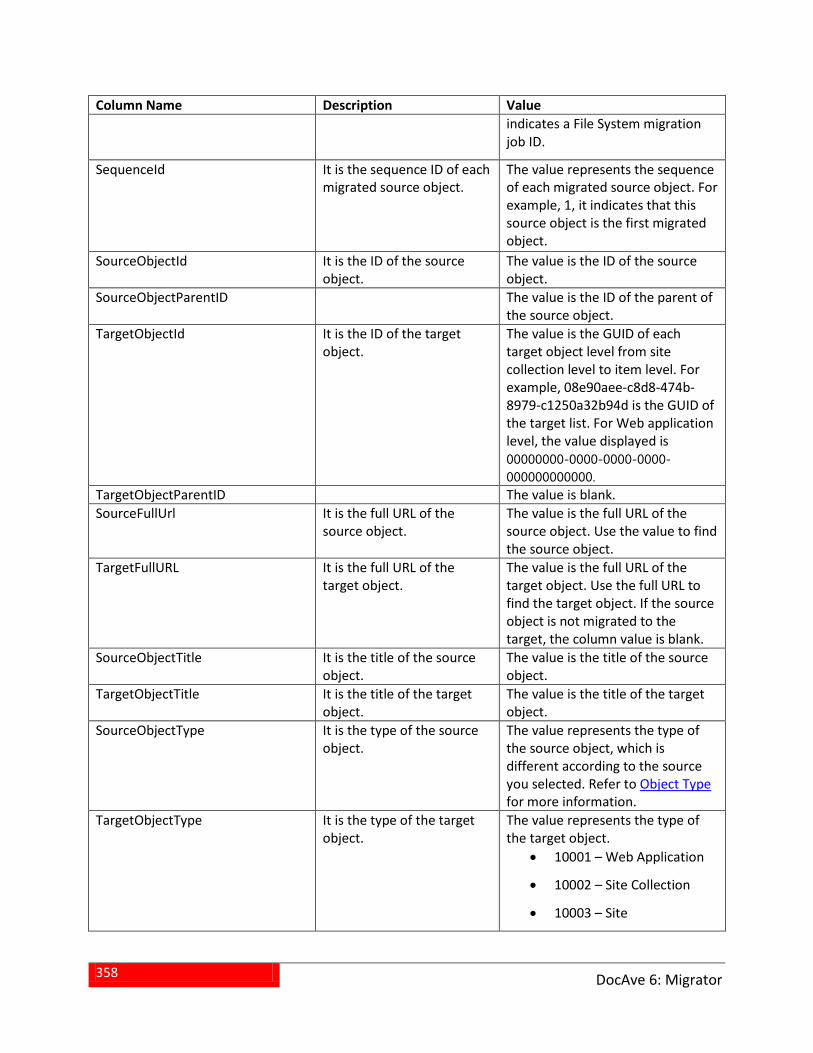
358
DocAve 6: Migrator
Column Name Description Value indicates a File System migration job ID.
SequenceId It is the sequence ID of each migrated source object.
The value represents the sequence of each migrated source object. For example, 1, it indicates that this source object is the first migrated object.
SourceObjectId It is the ID of the source object.
The value is the ID of the source object.
SourceObjectParentID The value is the ID of the parent of the source object.
TargetObjectId It is the ID of the target object.
The value is the GUID of each target object level from site collection level to item level. For example, 08e90aee-c8d8-474b-8979-c1250a32b94d is the GUID of the target list. For Web application level, the value displayed is 00000000-0000-0000-0000-000000000000.
TargetObjectParentID The value is blank. SourceFullUrl It is the full URL of the
source object. The value is the full URL of the source object. Use the value to find the source object.
TargetFullURL It is the full URL of the target object.
The value is the full URL of the target object. Use the full URL to find the target object. If the source object is not migrated to the target, the column value is blank.
SourceObjectTitle It is the title of the source object.
The value is the title of the source object.
TargetObjectTitle It is the title of the target object.
The value is the title of the target object.
SourceObjectType It is the type of the source object.
The value represents the type of the source object, which is different according to the source you selected. Refer to Object Type for more information.
TargetObjectType It is the type of the target object.
The value represents the type of the target object.
• 10001 – Web Application
• 10002 – Site Collection
• 10003 – Site
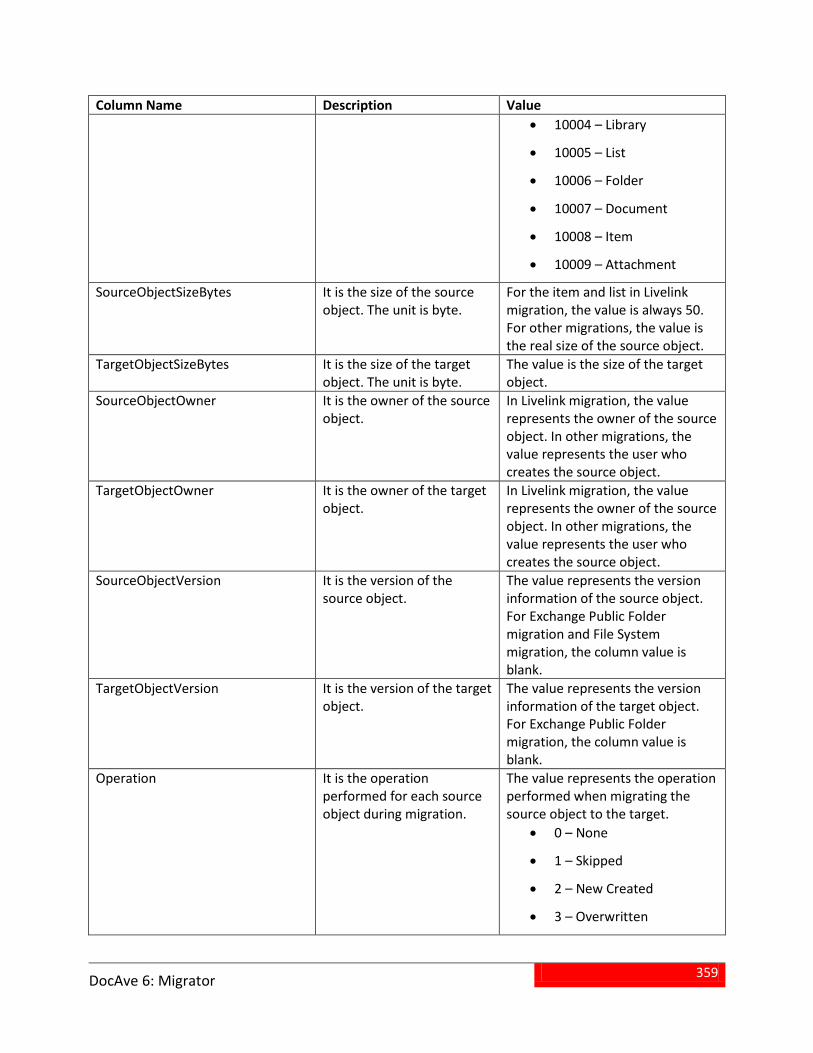
359
DocAve 6: Migrator
Column Name Description Value • 10004 – Library
• 10005 – List
• 10006 – Folder
• 10007 – Document
• 10008 – Item
• 10009 – Attachment
SourceObjectSizeBytes It is the size of the source object. The unit is byte.
For the item and list in Livelink migration, the value is always 50. For other migrations, the value is the real size of the source object.
TargetObjectSizeBytes It is the size of the target object. The unit is byte.
The value is the size of the target object.
SourceObjectOwner It is the owner of the source object.
In Livelink migration, the value represents the owner of the source object. In other migrations, the value represents the user who creates the source object.
TargetObjectOwner It is the owner of the target object.
In Livelink migration, the value represents the owner of the source object. In other migrations, the value represents the user who creates the source object.
SourceObjectVersion It is the version of the source object.
The value represents the version information of the source object. For Exchange Public Folder migration and File System migration, the column value is blank.
TargetObjectVersion It is the version of the target object.
The value represents the version information of the target object. For Exchange Public Folder migration, the column value is blank.
Operation It is the operation performed for each source object during migration.
The value represents the operation performed when migrating the source object to the target.
• 0 – None
• 1 – Skipped
• 2 – New Created
• 3 – Overwritten
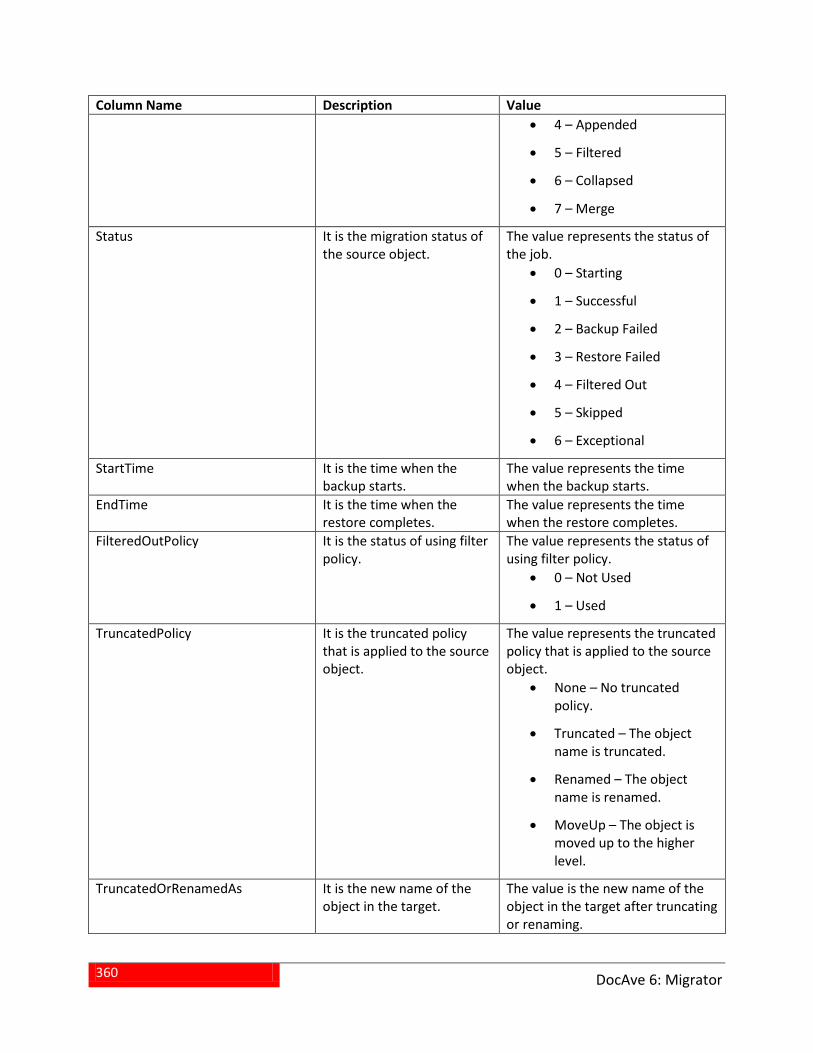
360
DocAve 6: Migrator
Column Name Description Value • 4 – Appended
• 5 – Filtered
• 6 – Collapsed
• 7 – Merge
Status It is the migration status of the source object.
The value represents the status of the job.
• 0 – Starting
• 1 – Successful
• 2 – Backup Failed
• 3 – Restore Failed
• 4 – Filtered Out
• 5 – Skipped
• 6 – Exceptional
StartTime It is the time when the backup starts.
The value represents the time when the backup starts.
EndTime It is the time when the restore completes.
The value represents the time when the restore completes.
FilteredOutPolicy It is the status of using filter policy.
The value represents the status of using filter policy.
• 0 – Not Used
• 1 – Used
TruncatedPolicy It is the truncated policy that is applied to the source object.
The value represents the truncated policy that is applied to the source object.
• None – No truncated policy.
• Truncated – The object name is truncated.
• Renamed – The object name is renamed.
• MoveUp – The object is moved up to the higher level.
TruncatedOrRenamedAs It is the new name of the object in the target.
The value is the new name of the object in the target after truncating or renaming.
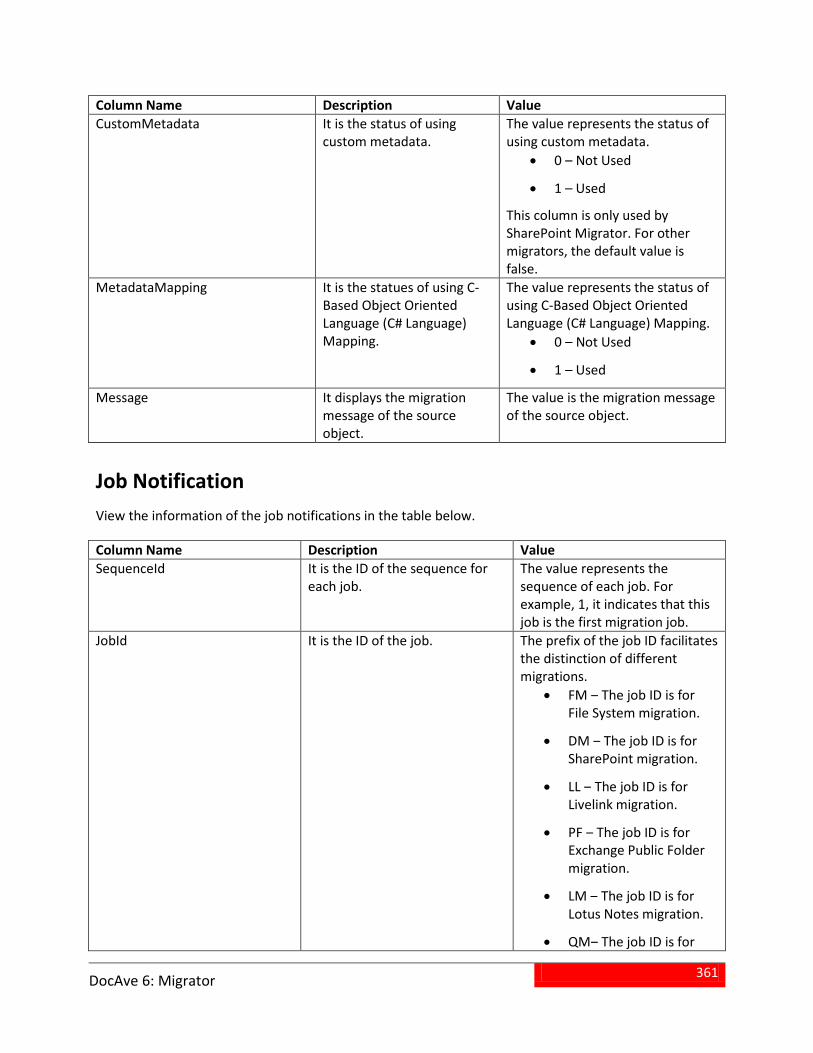
361
DocAve 6: Migrator
Column Name Description Value CustomMetadata It is the status of using
custom metadata. The value represents the status of using custom metadata.
• 0 – Not Used
• 1 – Used
This column is only used by SharePoint Migrator. For other migrators, the default value is false.
MetadataMapping It is the statues of using C-Based Object Oriented Language (C# Language) Mapping.
The value represents the status of using C-Based Object Oriented Language (C# Language) Mapping.
• 0 – Not Used
• 1 – Used
Message It displays the migration message of the source object.
The value is the migration message of the source object.
Job Notification View the information of the job notifications in the table below.
Column Name Description Value SequenceId It is the ID of the sequence for
each job. The value represents the sequence of each job. For example, 1, it indicates that this job is the first migration job.
JobId It is the ID of the job. The prefix of the job ID facilitates the distinction of different migrations.
• FM ‒ The job ID is for File System migration.
• DM ‒ The job ID is for SharePoint migration.
• LL ‒ The job ID is for Livelink migration.
• PF ‒ The job ID is for Exchange Public Folder migration.
• LM ‒ The job ID is for Lotus Notes migration.
• QM‒ The job ID is for
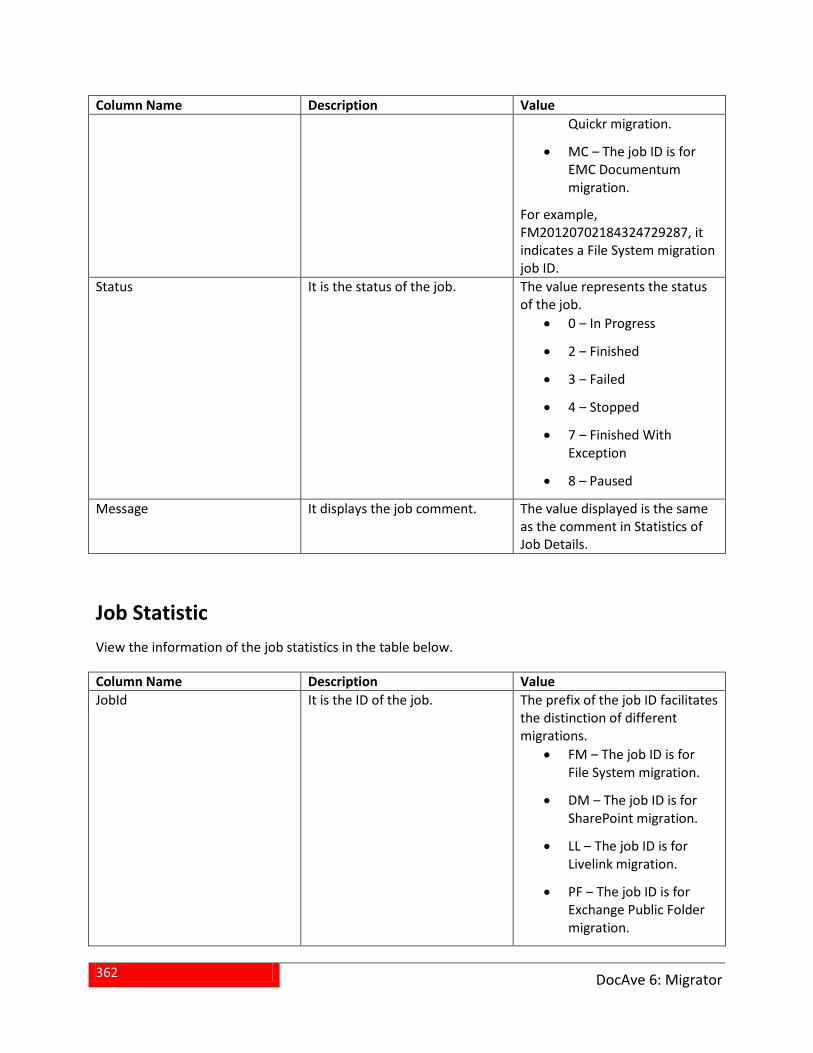
362
DocAve 6: Migrator
Column Name Description Value Quickr migration.
• MC – The job ID is for EMC Documentum migration.
For example, FM20120702184324729287, it indicates a File System migration job ID.
Status It is the status of the job. The value represents the status of the job.
• 0 ‒ In Progress
• 2 ‒ Finished
• 3 ‒ Failed
• 4 ‒ Stopped
• 7 ‒ Finished With Exception
• 8 – Paused
Message It displays the job comment. The value displayed is the same as the comment in Statistics of Job Details.
Job Statistic View the information of the job statistics in the table below.
Column Name Description Value JobId It is the ID of the job. The prefix of the job ID facilitates
the distinction of different migrations.
• FM ‒ The job ID is for File System migration.
• DM ‒ The job ID is for SharePoint migration.
• LL ‒ The job ID is for Livelink migration.
• PF ‒ The job ID is for Exchange Public Folder migration.
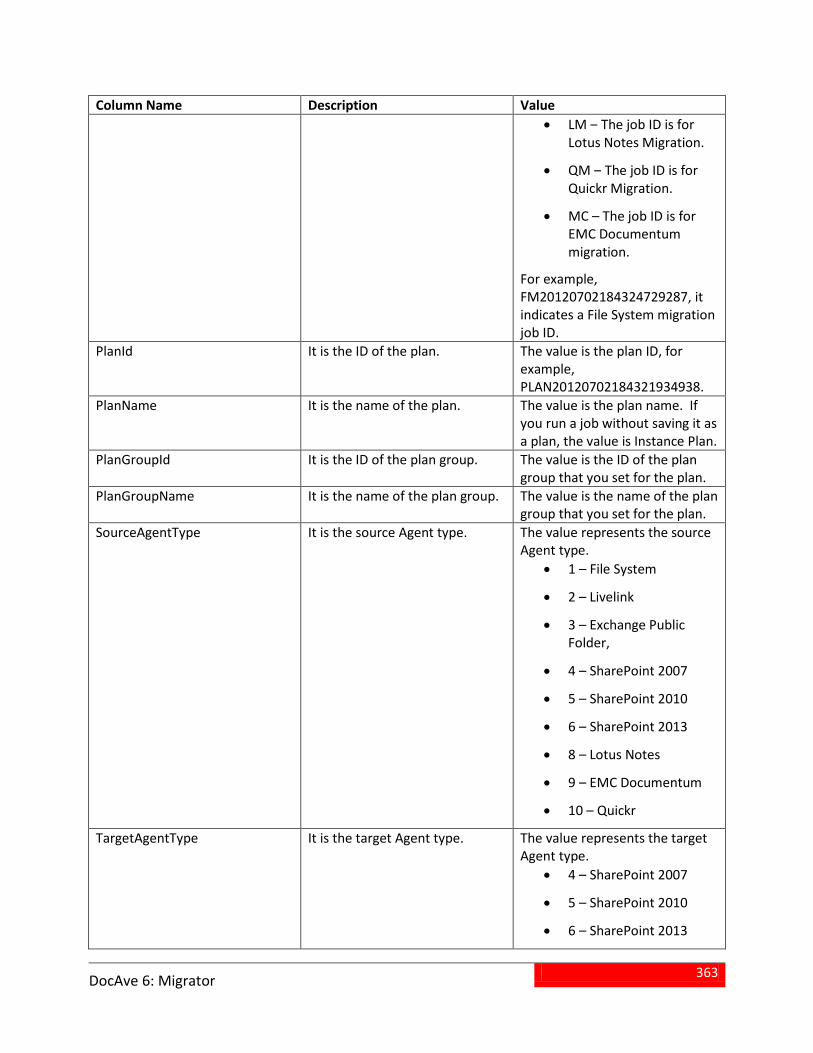
363
DocAve 6: Migrator
Column Name Description Value • LM ‒ The job ID is for
Lotus Notes Migration.
• QM ‒ The job ID is for Quickr Migration.
• MC – The job ID is for EMC Documentum migration.
For example, FM20120702184324729287, it indicates a File System migration job ID.
PlanId It is the ID of the plan. The value is the plan ID, for example, PLAN20120702184321934938.
PlanName It is the name of the plan. The value is the plan name. If you run a job without saving it as a plan, the value is Instance Plan.
PlanGroupId It is the ID of the plan group. The value is the ID of the plan group that you set for the plan.
PlanGroupName It is the name of the plan group. The value is the name of the plan group that you set for the plan.
SourceAgentType It is the source Agent type. The value represents the source Agent type.
• 1 – File System
• 2 – Livelink
• 3 – Exchange Public Folder,
• 4 – SharePoint 2007
• 5 – SharePoint 2010
• 6 – SharePoint 2013
• 8 – Lotus Notes
• 9 – EMC Documentum
• 10 – Quickr
TargetAgentType It is the target Agent type. The value represents the target Agent type.
• 4 – SharePoint 2007
• 5 – SharePoint 2010
• 6 – SharePoint 2013
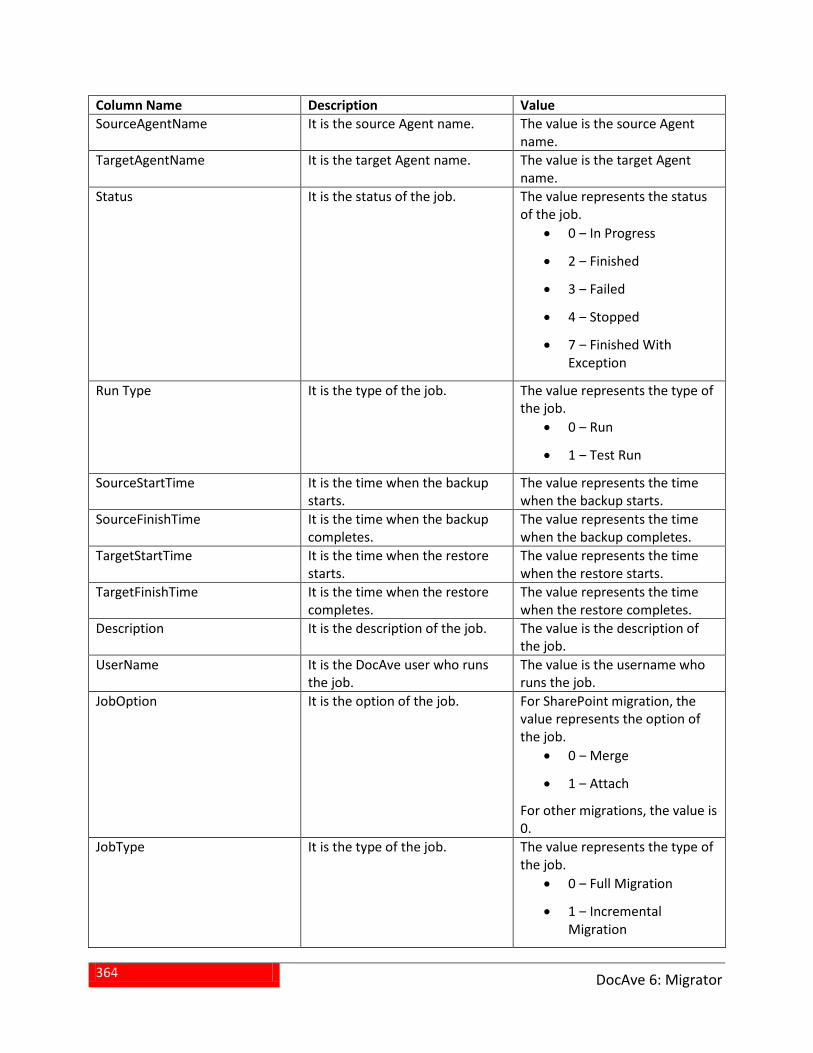
364
DocAve 6: Migrator
Column Name Description Value SourceAgentName It is the source Agent name. The value is the source Agent
name. TargetAgentName It is the target Agent name. The value is the target Agent
name. Status It is the status of the job. The value represents the status
of the job. • 0 ‒ In Progress
• 2 ‒ Finished
• 3 ‒ Failed
• 4 ‒ Stopped
• 7 ‒ Finished With Exception
Run Type It is the type of the job. The value represents the type of the job.
• 0 ‒ Run
• 1 ‒ Test Run
SourceStartTime It is the time when the backup starts.
The value represents the time when the backup starts.
SourceFinishTime It is the time when the backup completes.
The value represents the time when the backup completes.
TargetStartTime It is the time when the restore starts.
The value represents the time when the restore starts.
TargetFinishTime It is the time when the restore completes.
The value represents the time when the restore completes.
Description It is the description of the job. The value is the description of the job.
UserName It is the DocAve user who runs the job.
The value is the username who runs the job.
JobOption It is the option of the job. For SharePoint migration, the value represents the option of the job.
• 0 ‒ Merge
• 1 ‒ Attach
For other migrations, the value is 0.
JobType It is the type of the job. The value represents the type of the job.
• 0 ‒ Full Migration
• 1 ‒ Incremental Migration
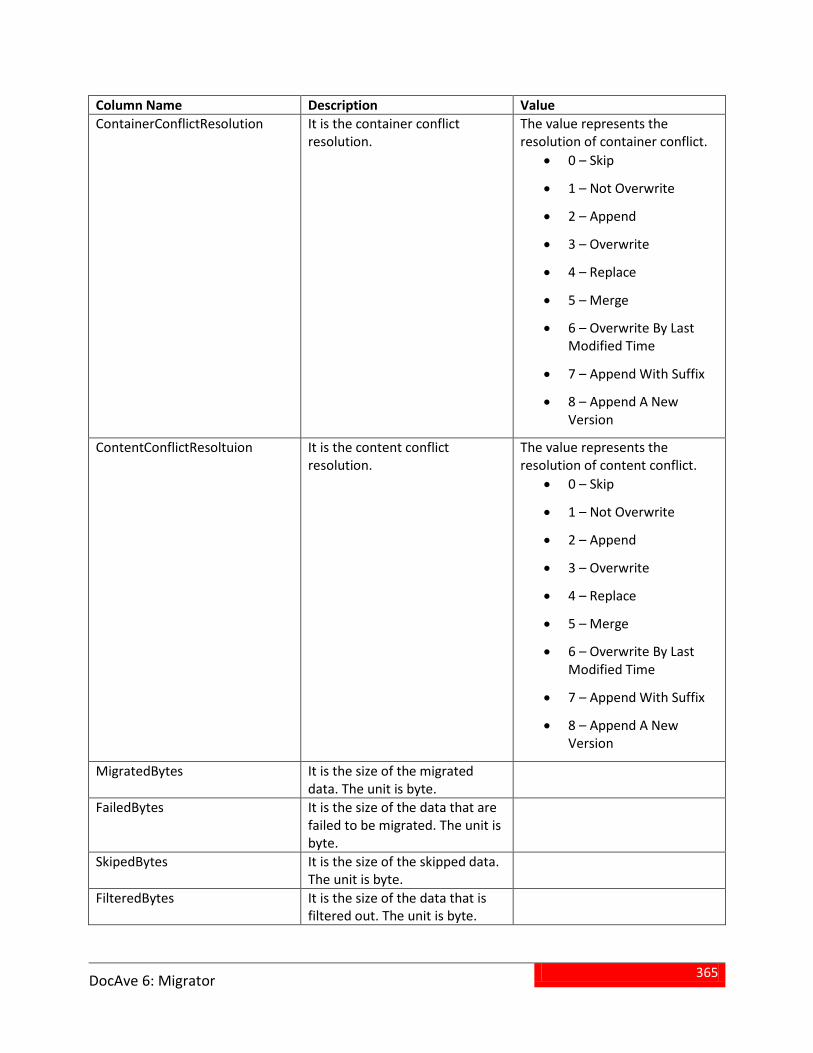
365
DocAve 6: Migrator
Column Name Description Value ContainerConflictResolution It is the container conflict
resolution. The value represents the resolution of container conflict.
• 0 – Skip
• 1 – Not Overwrite
• 2 – Append
• 3 – Overwrite
• 4 – Replace
• 5 – Merge
• 6 – Overwrite By Last Modified Time
• 7 – Append With Suffix
• 8 – Append A New Version
ContentConflictResoltuion It is the content conflict resolution.
The value represents the resolution of content conflict.
• 0 – Skip
• 1 – Not Overwrite
• 2 – Append
• 3 – Overwrite
• 4 – Replace
• 5 – Merge
• 6 – Overwrite By Last Modified Time
• 7 – Append With Suffix
• 8 – Append A New Version
MigratedBytes It is the size of the migrated data. The unit is byte.
FailedBytes It is the size of the data that are failed to be migrated. The unit is byte.
SkipedBytes It is the size of the skipped data. The unit is byte.
FilteredBytes It is the size of the data that is filtered out. The unit is byte.
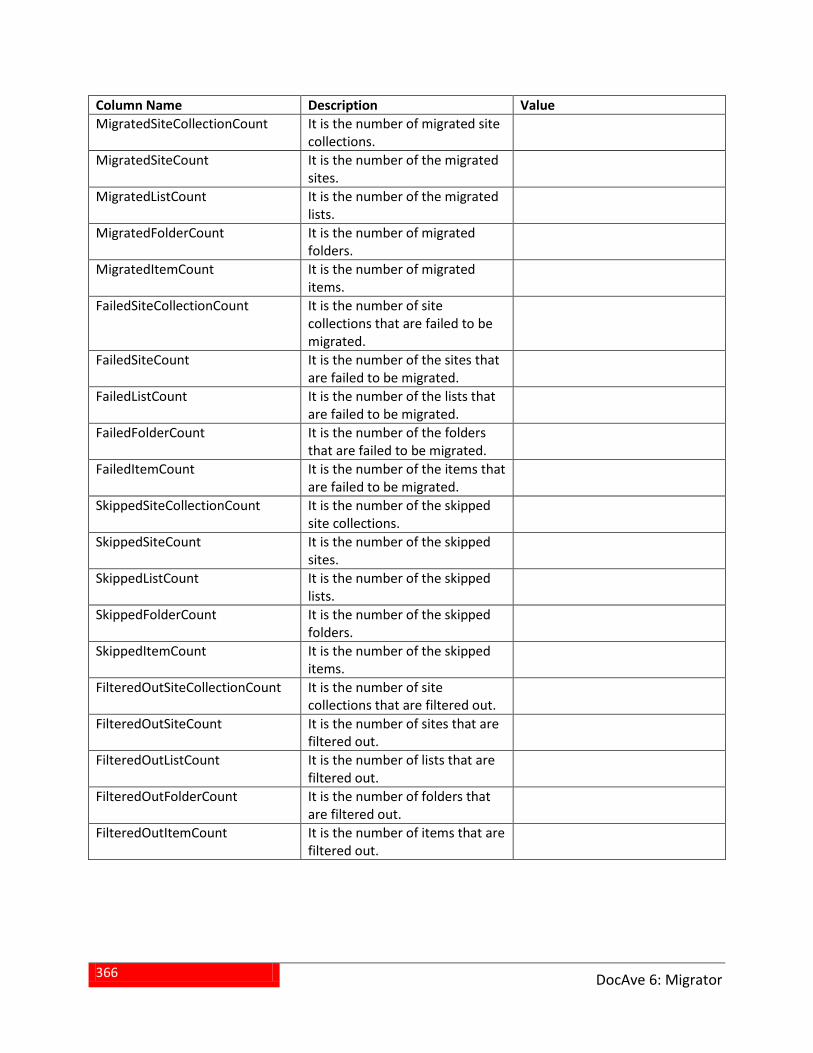
366
DocAve 6: Migrator
Column Name Description Value MigratedSiteCollectionCount It is the number of migrated site
collections.
MigratedSiteCount It is the number of the migrated sites.
MigratedListCount It is the number of the migrated lists.
MigratedFolderCount It is the number of migrated folders.
MigratedItemCount It is the number of migrated items.
FailedSiteCollectionCount It is the number of site collections that are failed to be migrated.
FailedSiteCount It is the number of the sites that are failed to be migrated.
FailedListCount It is the number of the lists that are failed to be migrated.
FailedFolderCount It is the number of the folders that are failed to be migrated.
FailedItemCount It is the number of the items that are failed to be migrated.
SkippedSiteCollectionCount It is the number of the skipped site collections.
SkippedSiteCount It is the number of the skipped sites.
SkippedListCount It is the number of the skipped lists.
SkippedFolderCount It is the number of the skipped folders.
SkippedItemCount It is the number of the skipped items.
FilteredOutSiteCollectionCount It is the number of site collections that are filtered out.
FilteredOutSiteCount It is the number of sites that are filtered out.
FilteredOutListCount It is the number of lists that are filtered out.
FilteredOutFolderCount It is the number of folders that are filtered out.
FilteredOutItemCount It is the number of items that are filtered out.
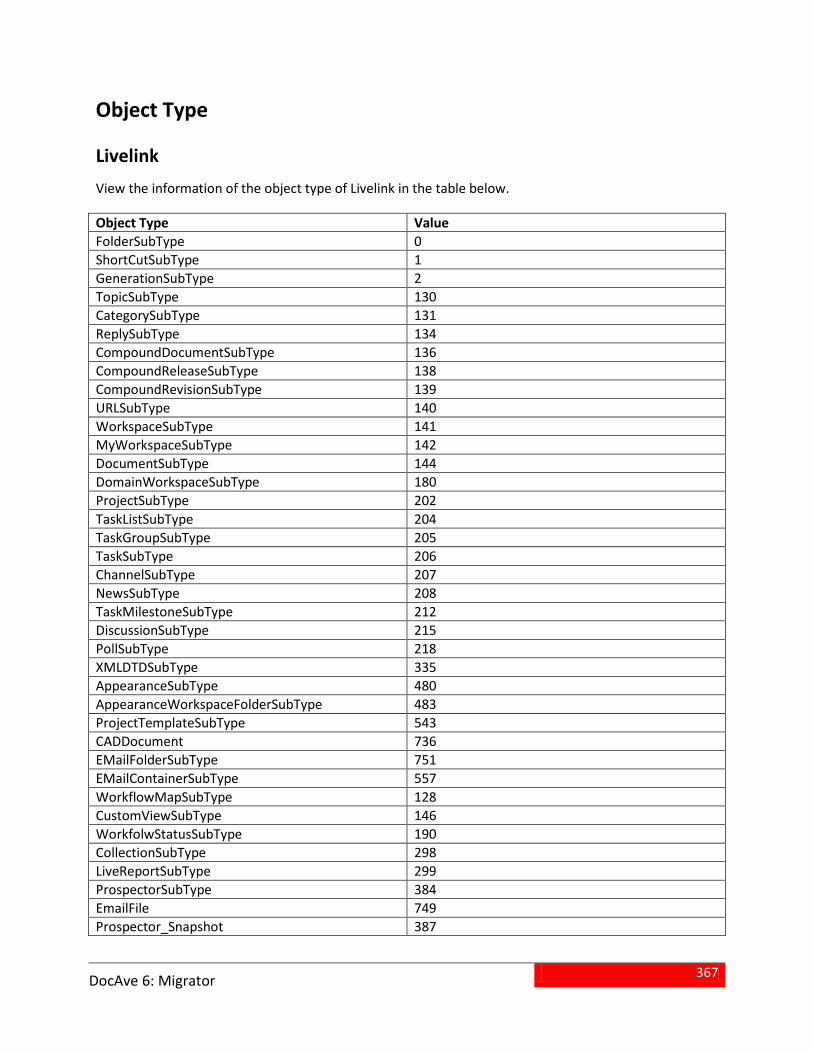
367
DocAve 6: Migrator
Object Type
Livelink View the information of the object type of Livelink in the table below.
Object Type Value FolderSubType 0 ShortCutSubType 1 GenerationSubType 2 TopicSubType 130 CategorySubType 131 ReplySubType 134 CompoundDocumentSubType 136 CompoundReleaseSubType 138 CompoundRevisionSubType 139 URLSubType 140 WorkspaceSubType 141 MyWorkspaceSubType 142 DocumentSubType 144 DomainWorkspaceSubType 180 ProjectSubType 202 TaskListSubType 204 TaskGroupSubType 205 TaskSubType 206 ChannelSubType 207 NewsSubType 208 TaskMilestoneSubType 212 DiscussionSubType 215 PollSubType 218 XMLDTDSubType 335 AppearanceSubType 480 AppearanceWorkspaceFolderSubType 483 ProjectTemplateSubType 543 CADDocument 736 EMailFolderSubType 751 EMailContainerSubType 557 WorkflowMapSubType 128 CustomViewSubType 146 WorkfolwStatusSubType 190 CollectionSubType 298 LiveReportSubType 299 ProspectorSubType 384 EmailFile 749 Prospector_Snapshot 387
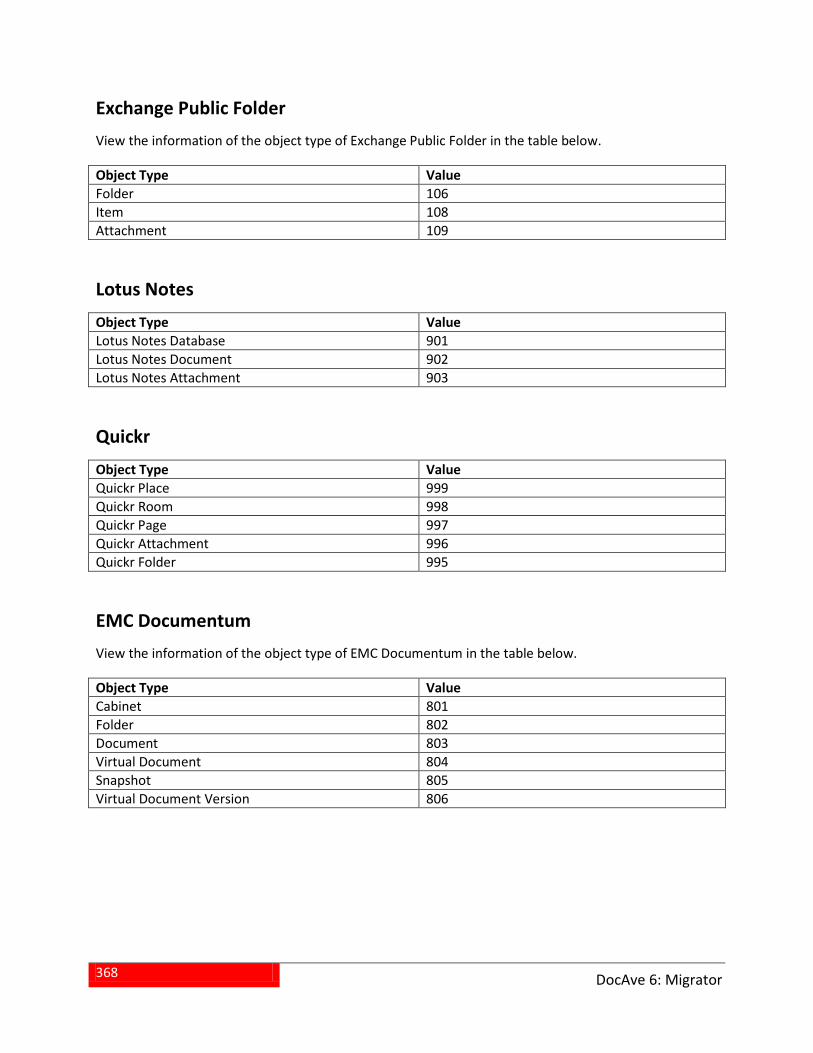
368
DocAve 6: Migrator
Exchange Public Folder View the information of the object type of Exchange Public Folder in the table below.
Object Type Value Folder 106 Item 108 Attachment 109
Lotus Notes Object Type Value Lotus Notes Database 901 Lotus Notes Document 902 Lotus Notes Attachment 903
Quickr Object Type Value Quickr Place 999 Quickr Room 998 Quickr Page 997 Quickr Attachment 996 Quickr Folder 995
EMC Documentum View the information of the object type of EMC Documentum in the table below.
Object Type Value Cabinet 801 Folder 802 Document 803 Virtual Document 804 Snapshot 805 Virtual Document Version 806
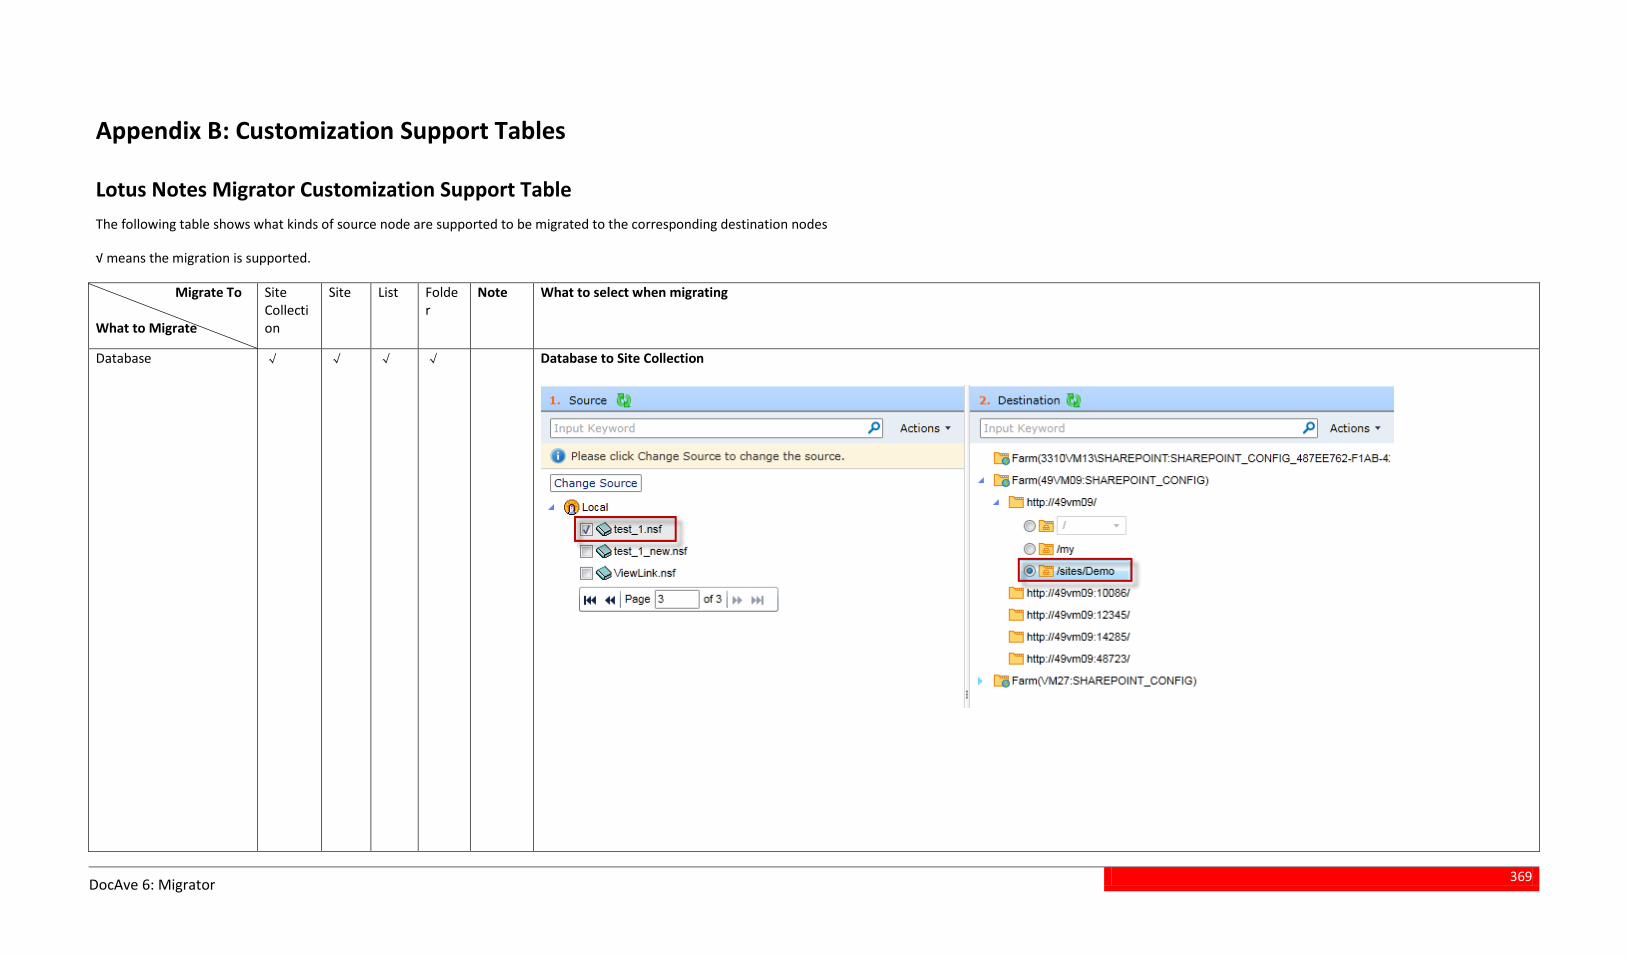
369
DocAve 6: Migrator
Appendix B: Customization Support Tables
Lotus Notes Migrator Customization Support Table The following table shows what kinds of source node are supported to be migrated to the corresponding destination nodes
√ means the migration is supported.
Migrate To What to Migrate
Site Collection
Site List Folder
Note What to select when migrating
Database √ √ √ √ Database to Site Collection
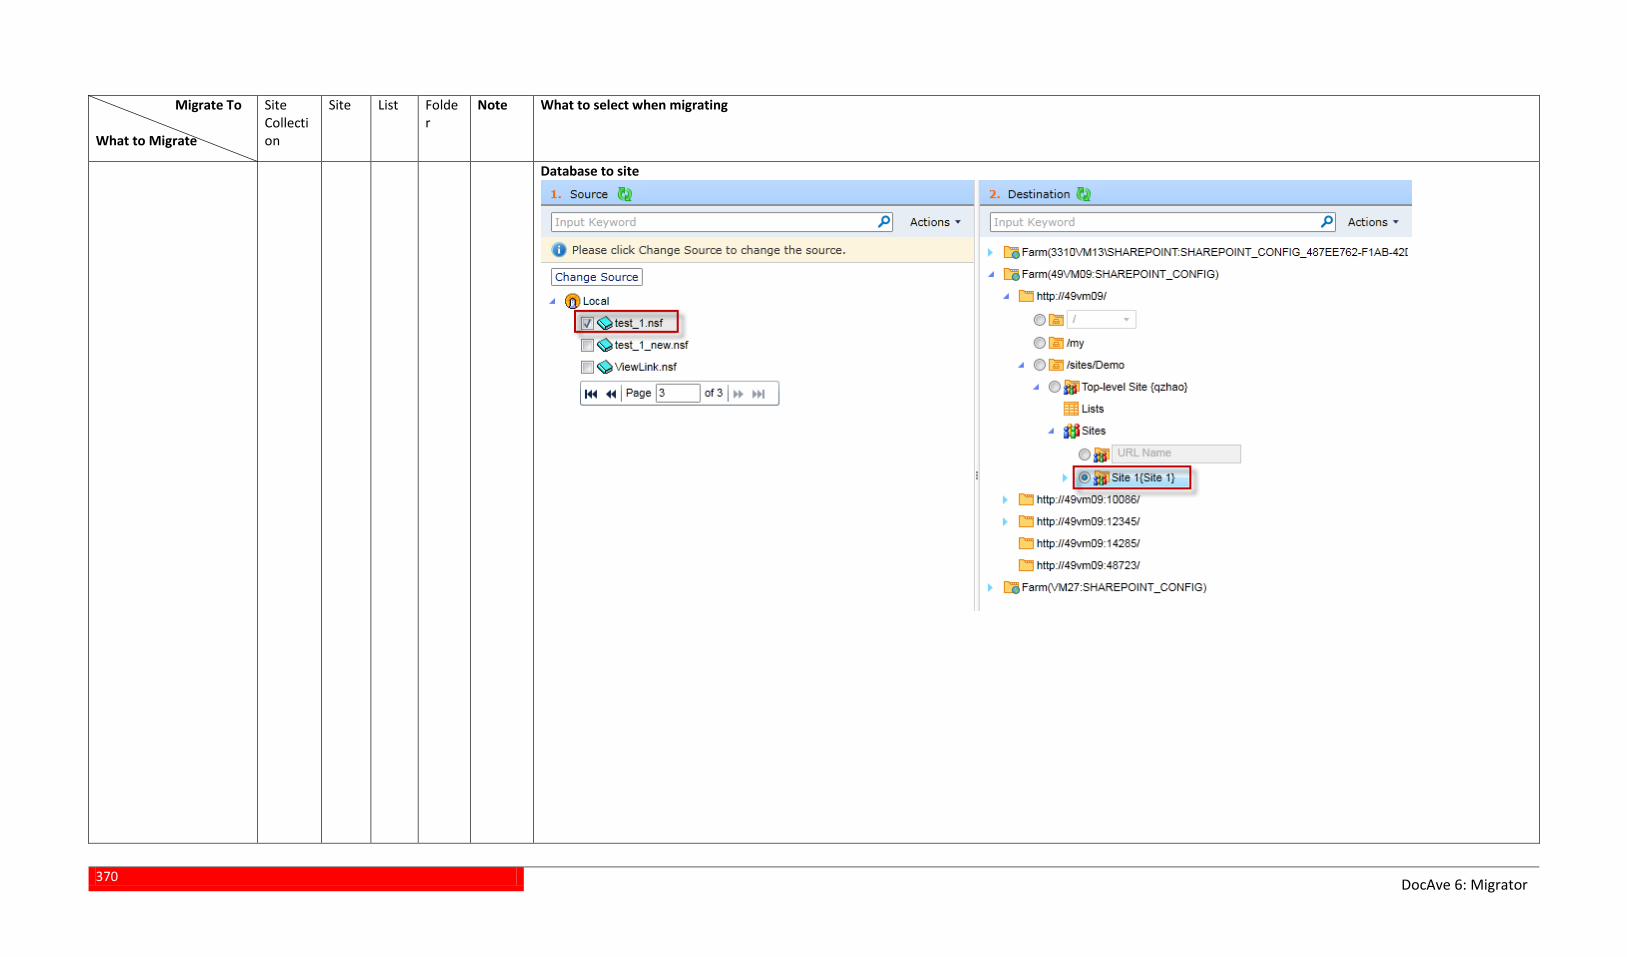
370
DocAve 6: Migrator
Migrate To What to Migrate
Site Collection
Site List Folder
Note What to select when migrating
Database to site
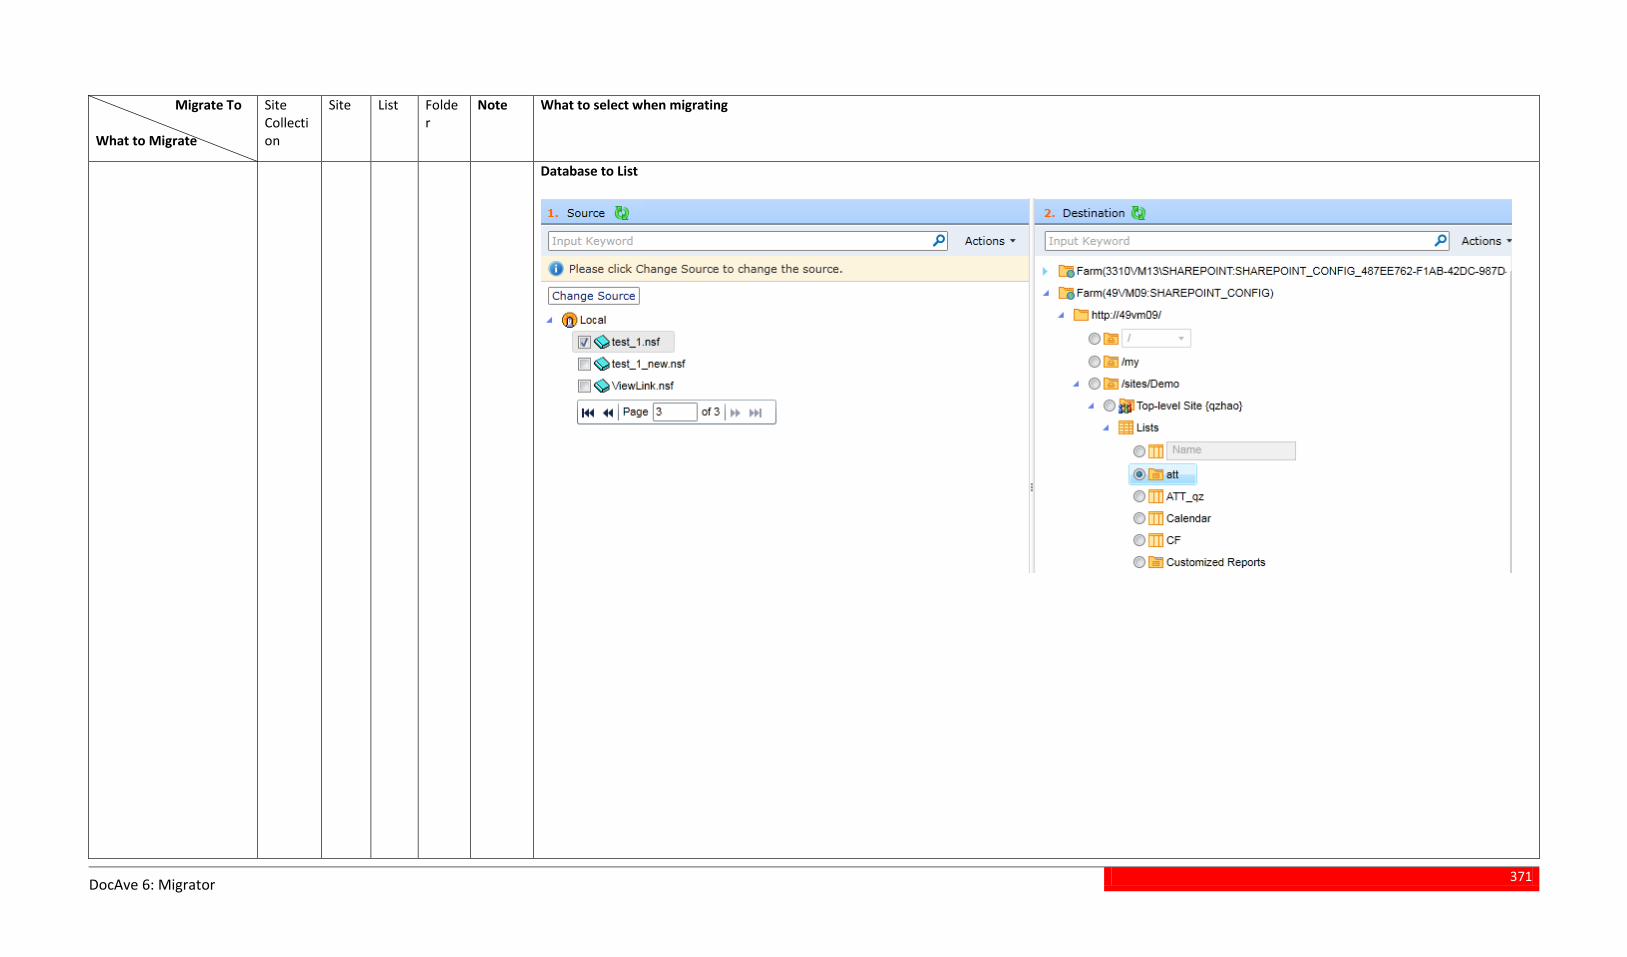
371
DocAve 6: Migrator
Migrate To What to Migrate
Site Collection
Site List Folder
Note What to select when migrating
Database to List
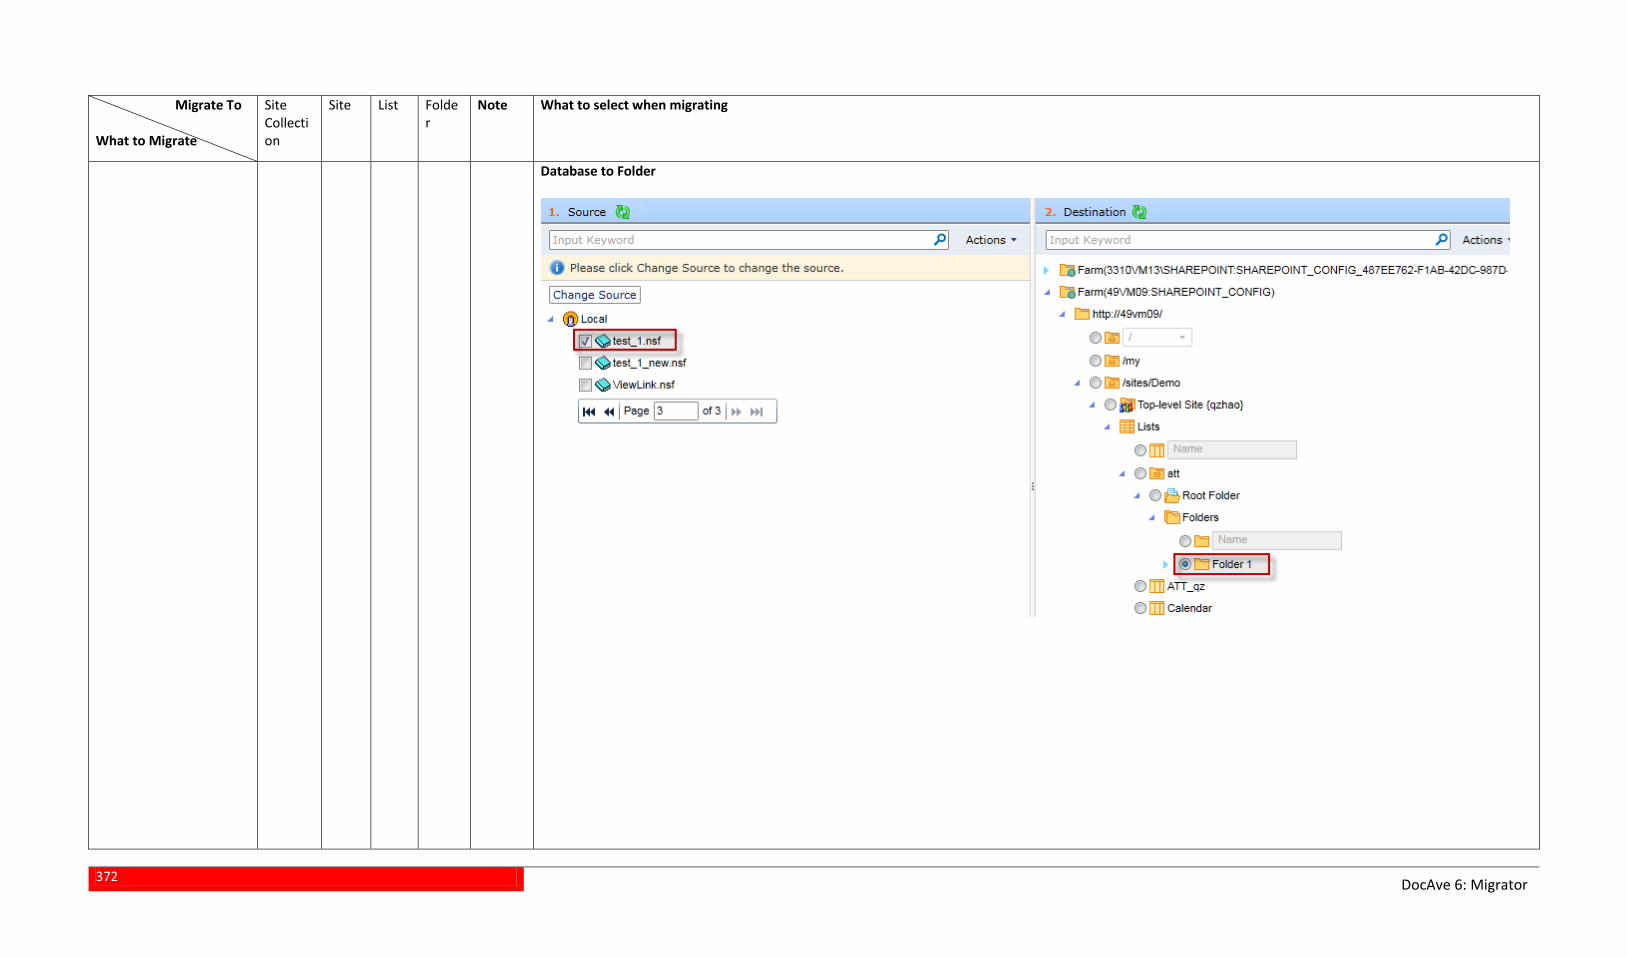
372
DocAve 6: Migrator
Migrate To What to Migrate
Site Collection
Site List Folder
Note What to select when migrating
Database to Folder
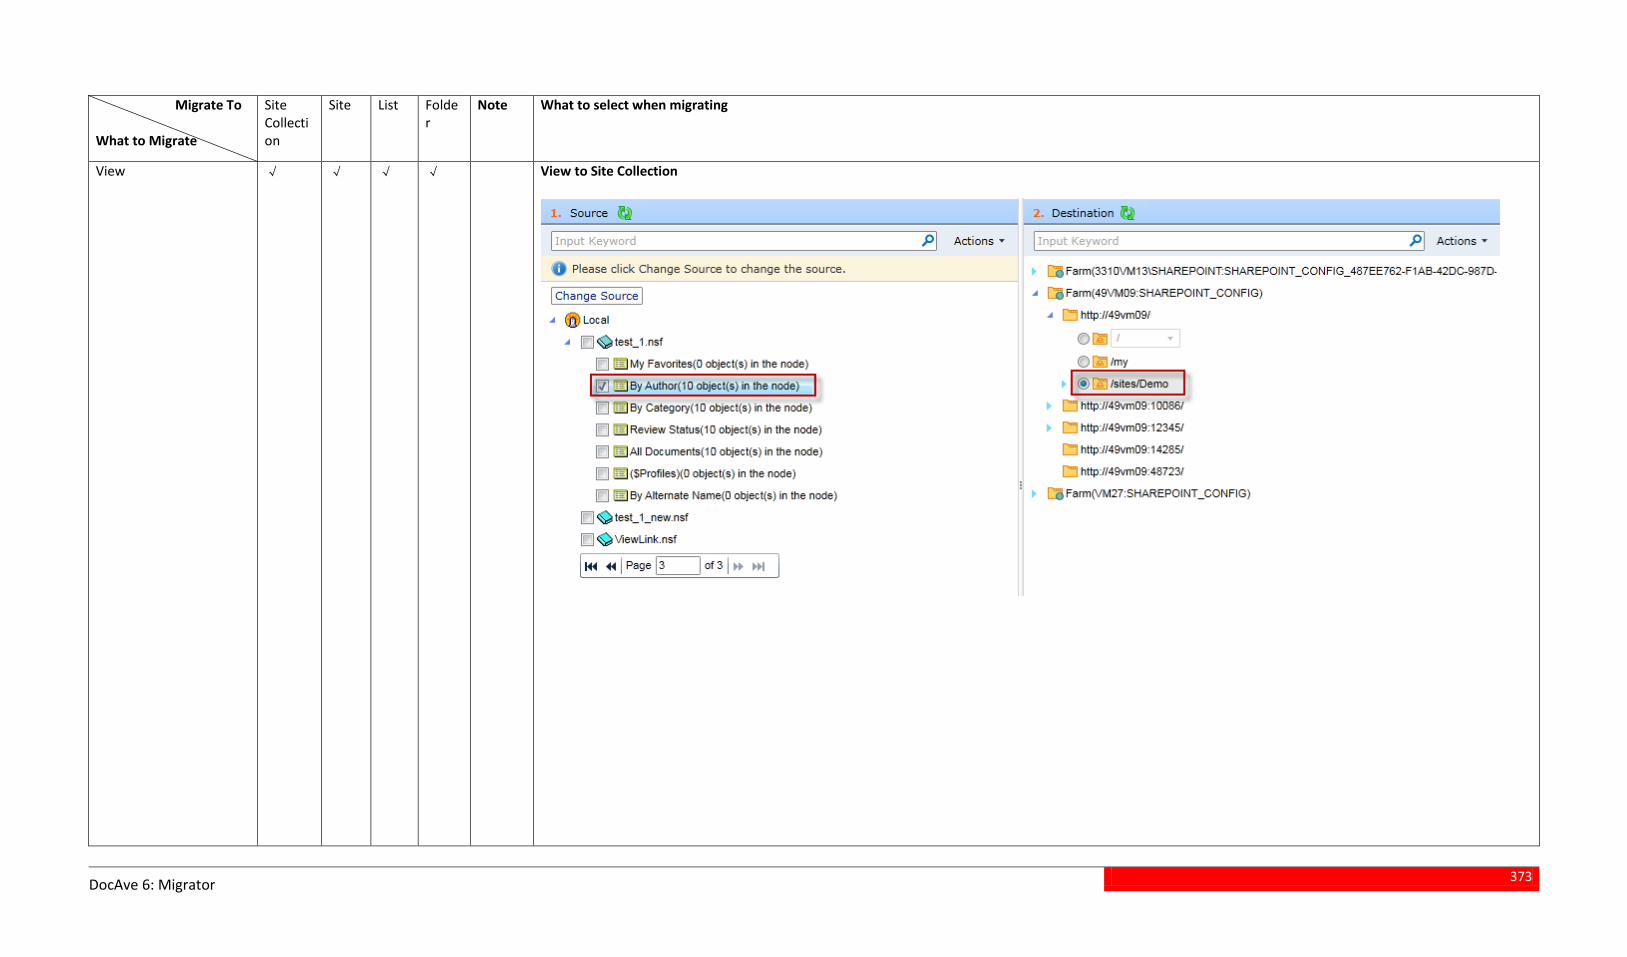
373
DocAve 6: Migrator
Migrate To What to Migrate
Site Collection
Site List Folder
Note What to select when migrating
View √ √ √ √ View to Site Collection
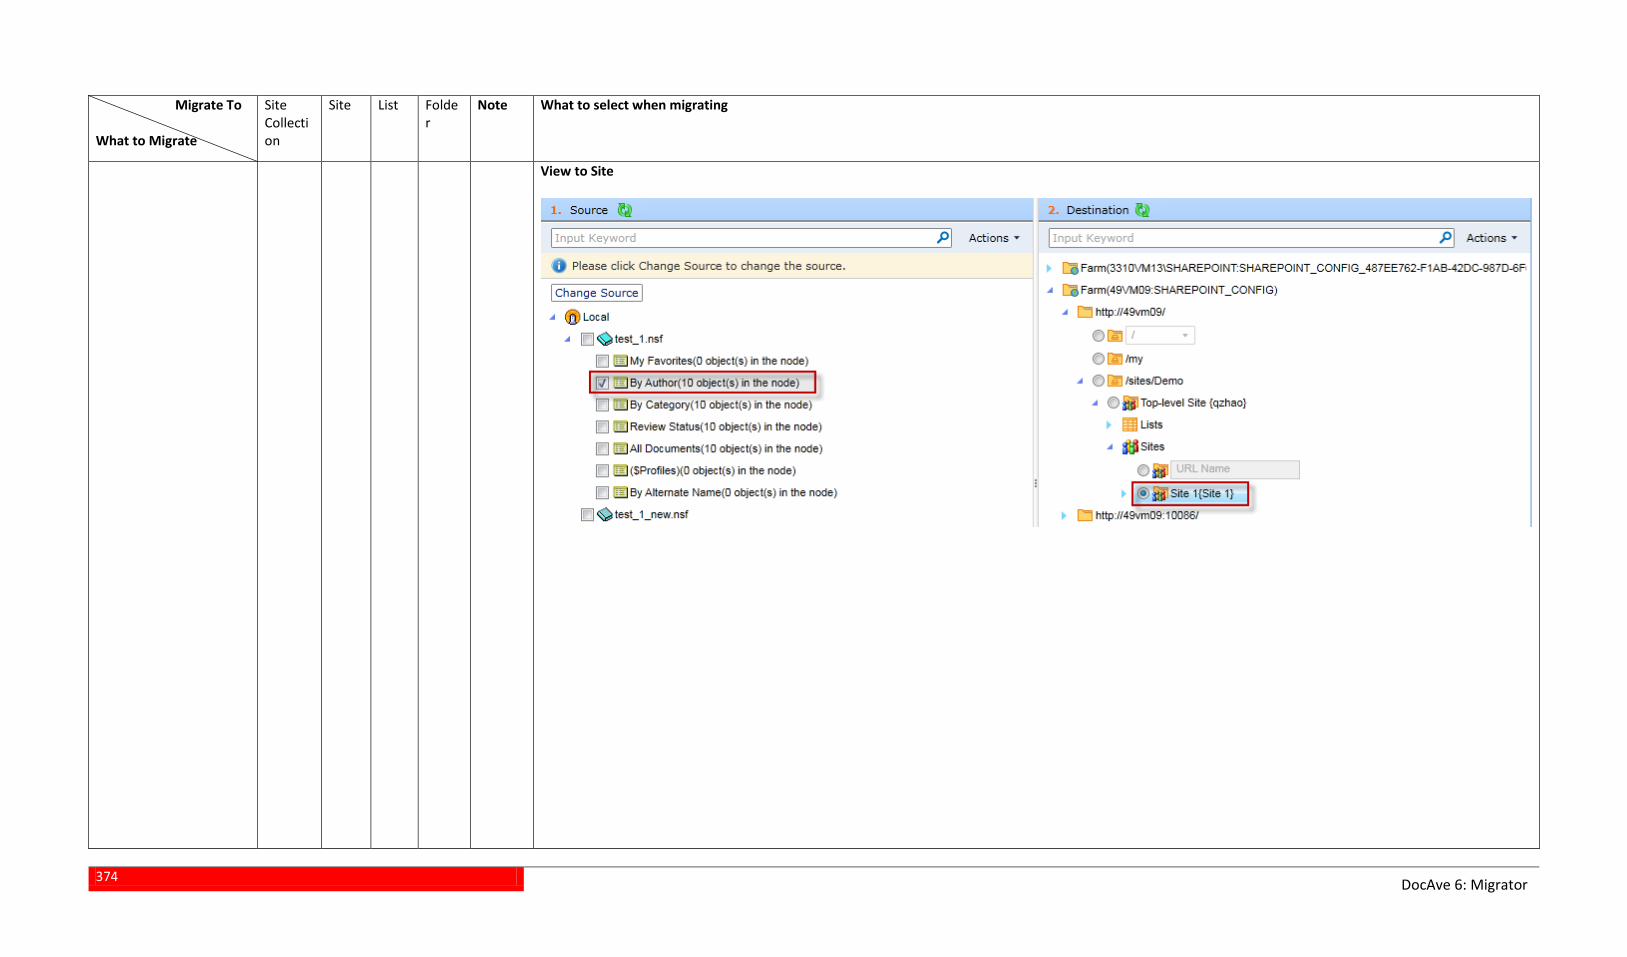
374
DocAve 6: Migrator
Migrate To What to Migrate
Site Collection
Site List Folder
Note What to select when migrating
View to Site
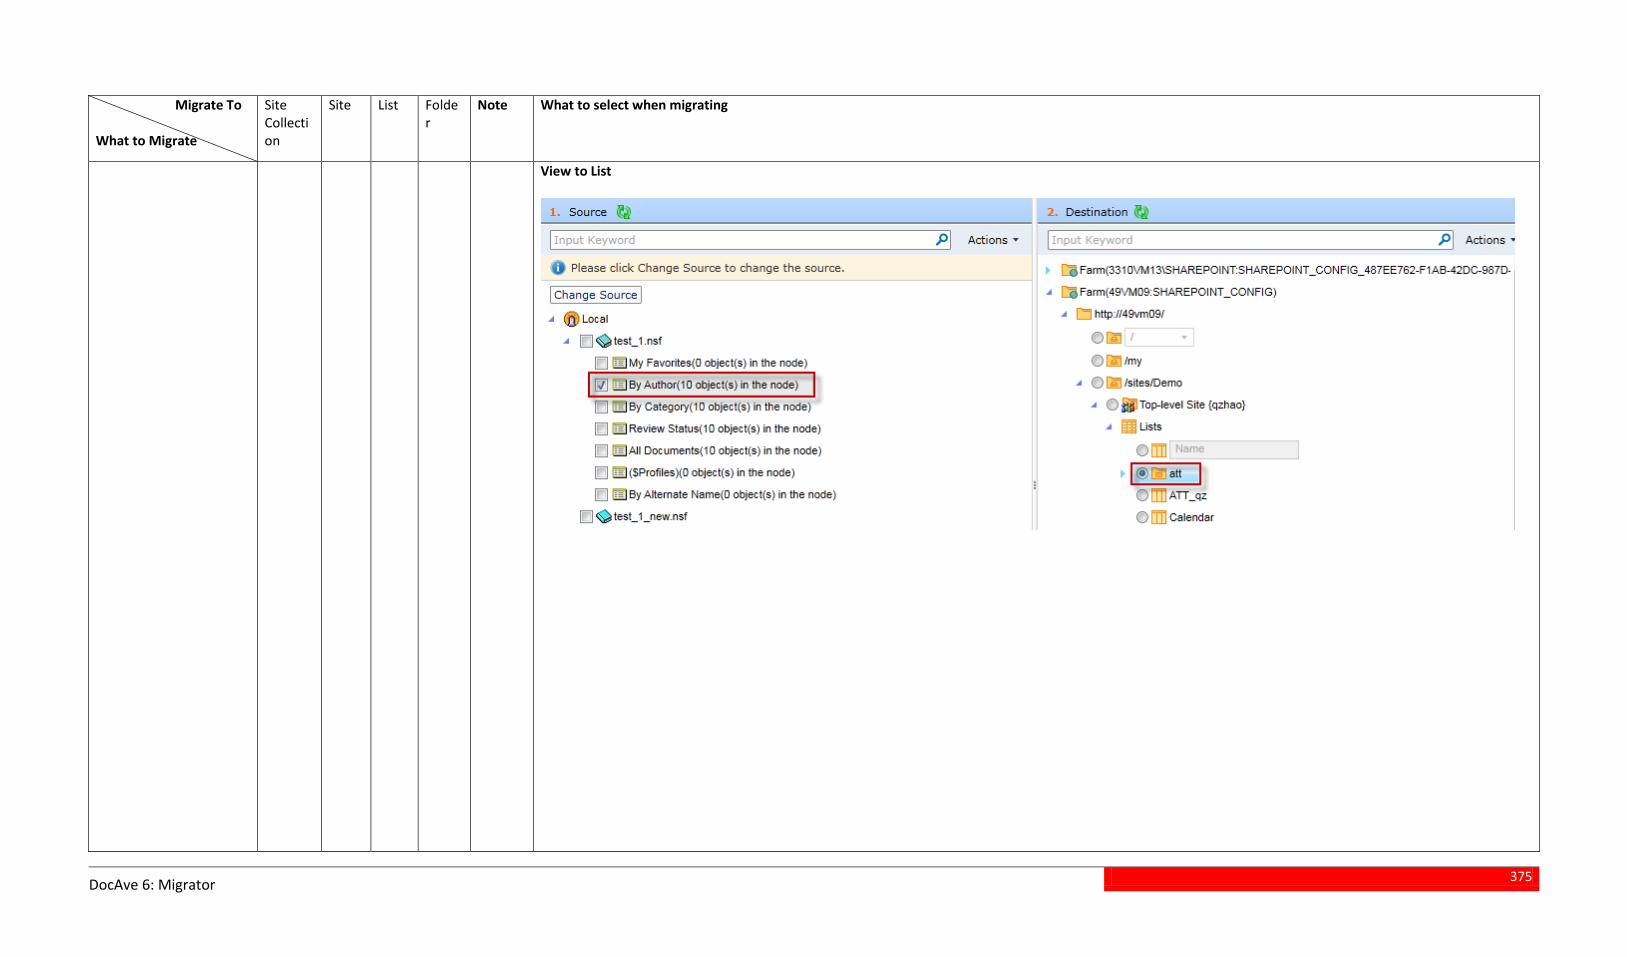
375
DocAve 6: Migrator
Migrate To What to Migrate
Site Collection
Site List Folder
Note What to select when migrating
View to List
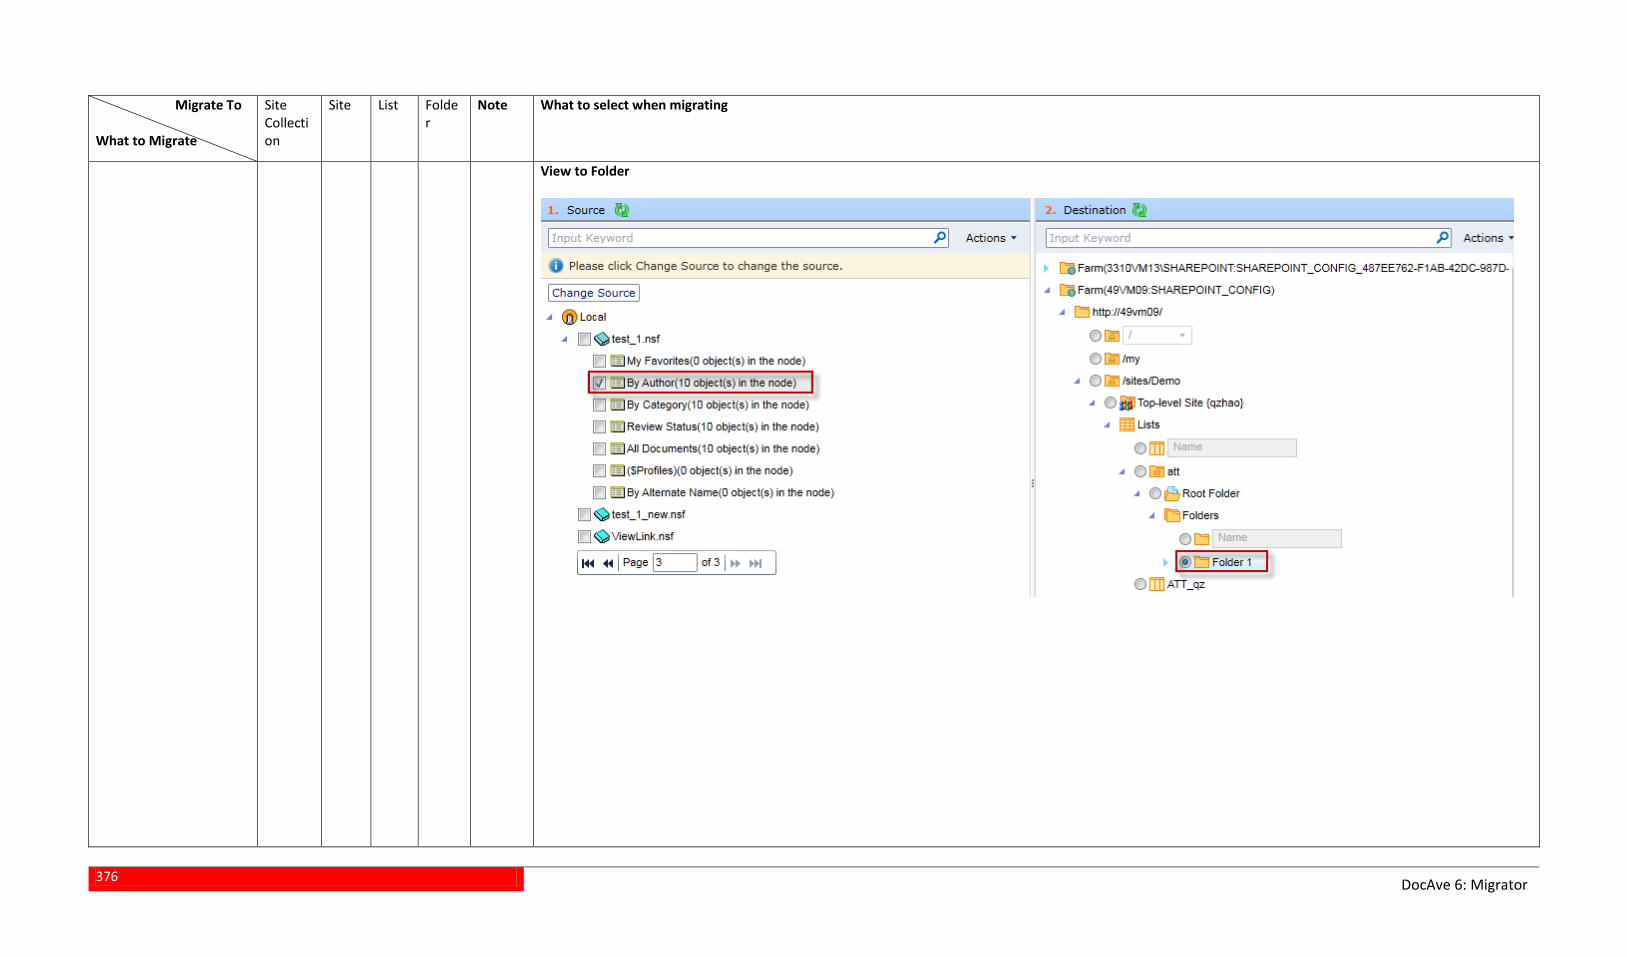
376
DocAve 6: Migrator
Migrate To What to Migrate
Site Collection
Site List Folder
Note What to select when migrating
View to Folder
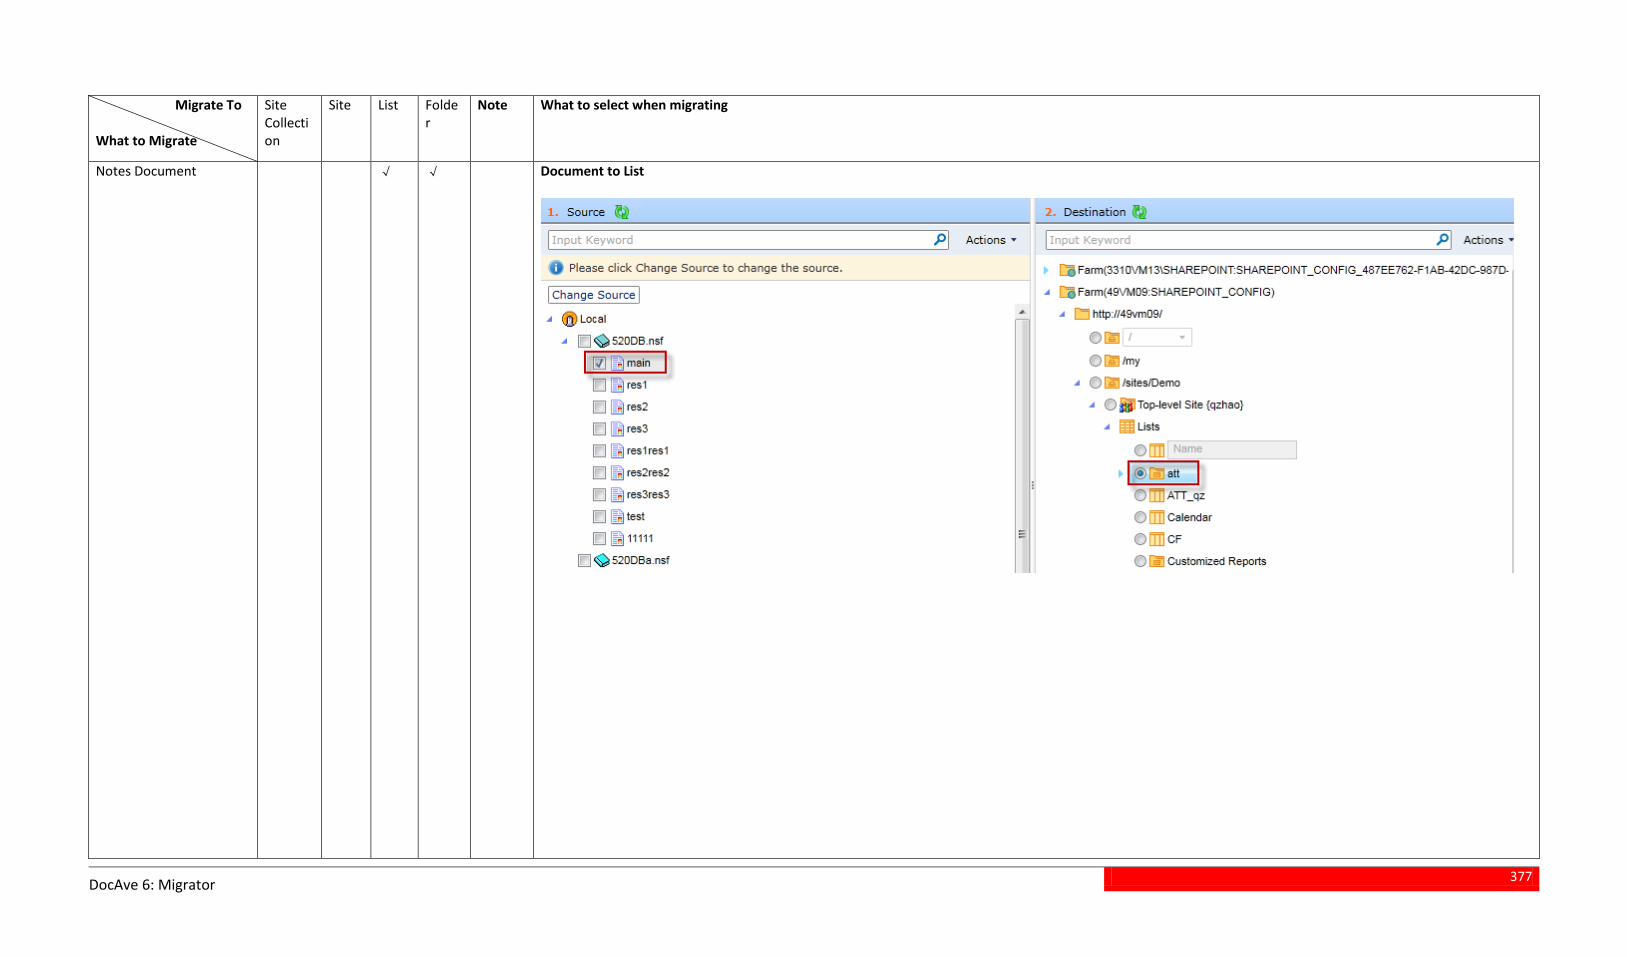
377
DocAve 6: Migrator
Migrate To What to Migrate
Site Collection
Site List Folder
Note What to select when migrating
Notes Document √ √ Document to List
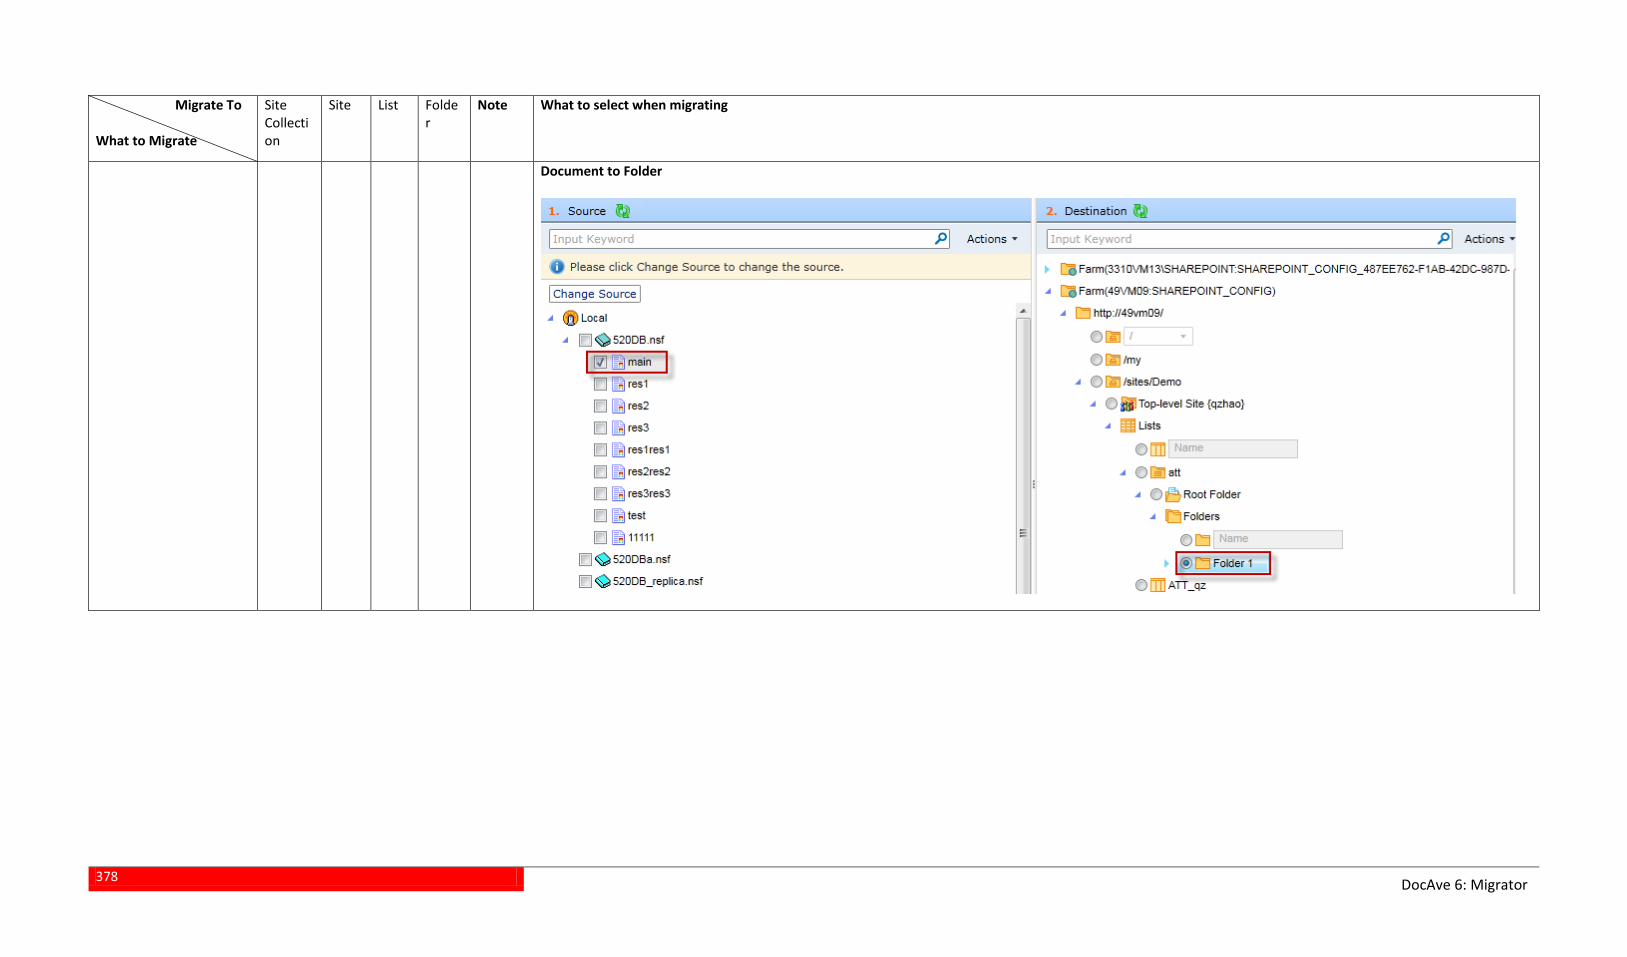
378
DocAve 6: Migrator
Migrate To What to Migrate
Site Collection
Site List Folder
Note What to select when migrating
Document to Folder
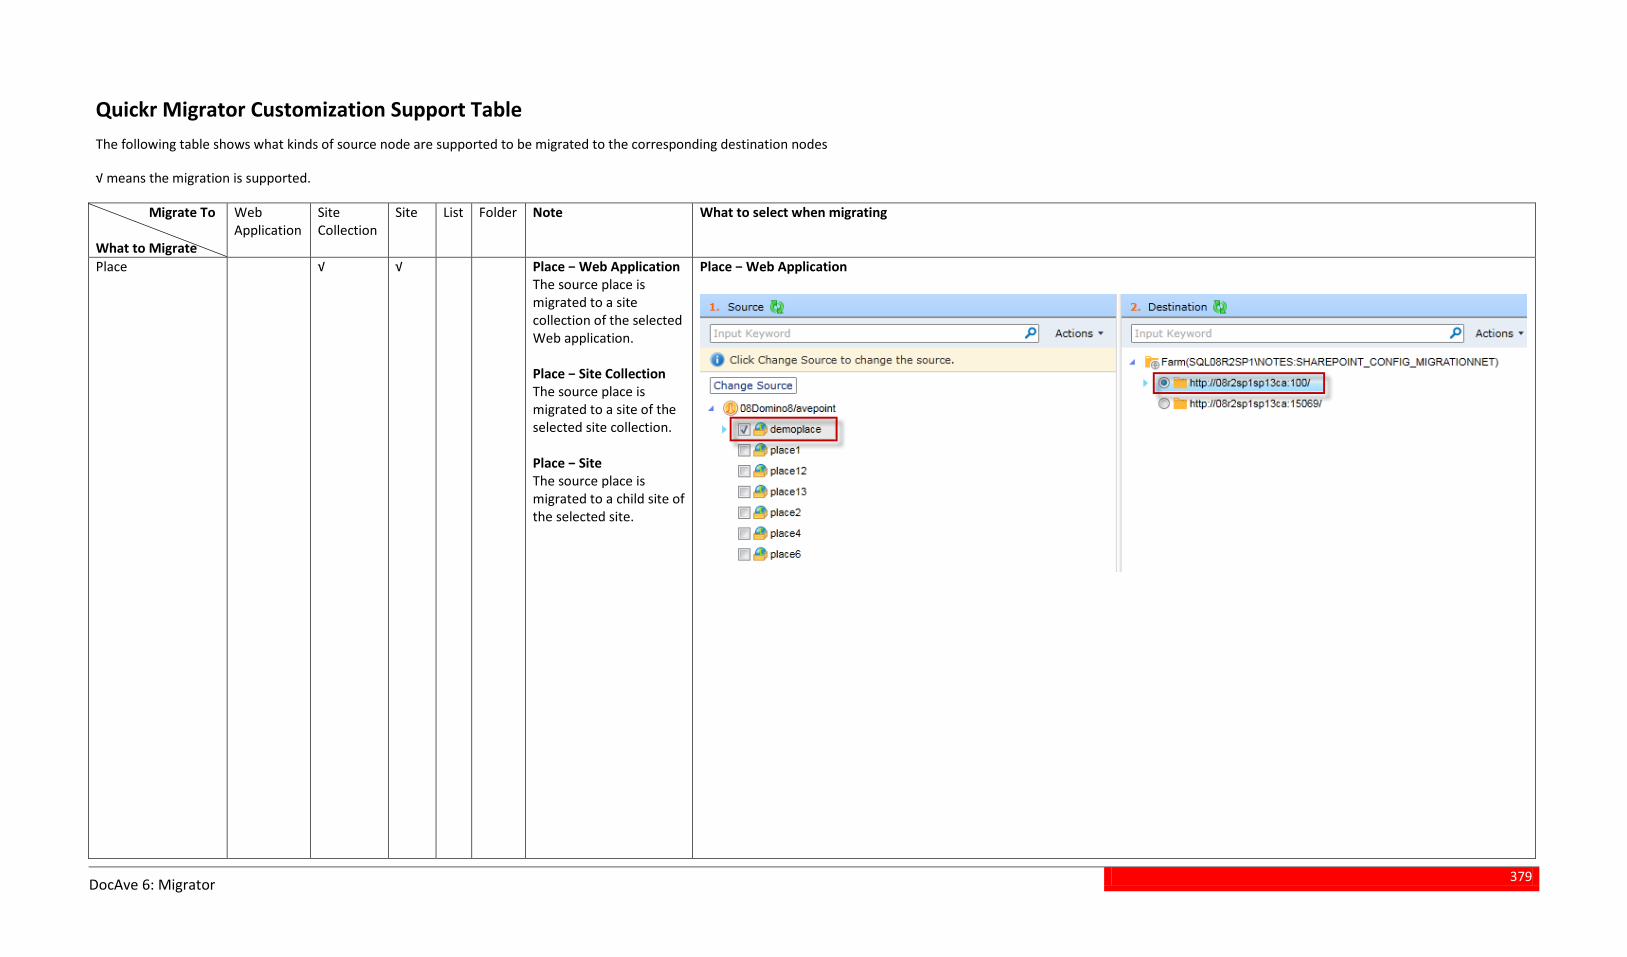
379
DocAve 6: Migrator
Quickr Migrator Customization Support Table The following table shows what kinds of source node are supported to be migrated to the corresponding destination nodes
√ means the migration is supported.
Migrate To What to Migrate
Web Application
Site Collection
Site List Folder Note What to select when migrating
Place √ √ Place − Web Application The source place is migrated to a site collection of the selected Web application. Place − Site Collection The source place is migrated to a site of the selected site collection. Place − Site The source place is migrated to a child site of the selected site.
Place − Web Application
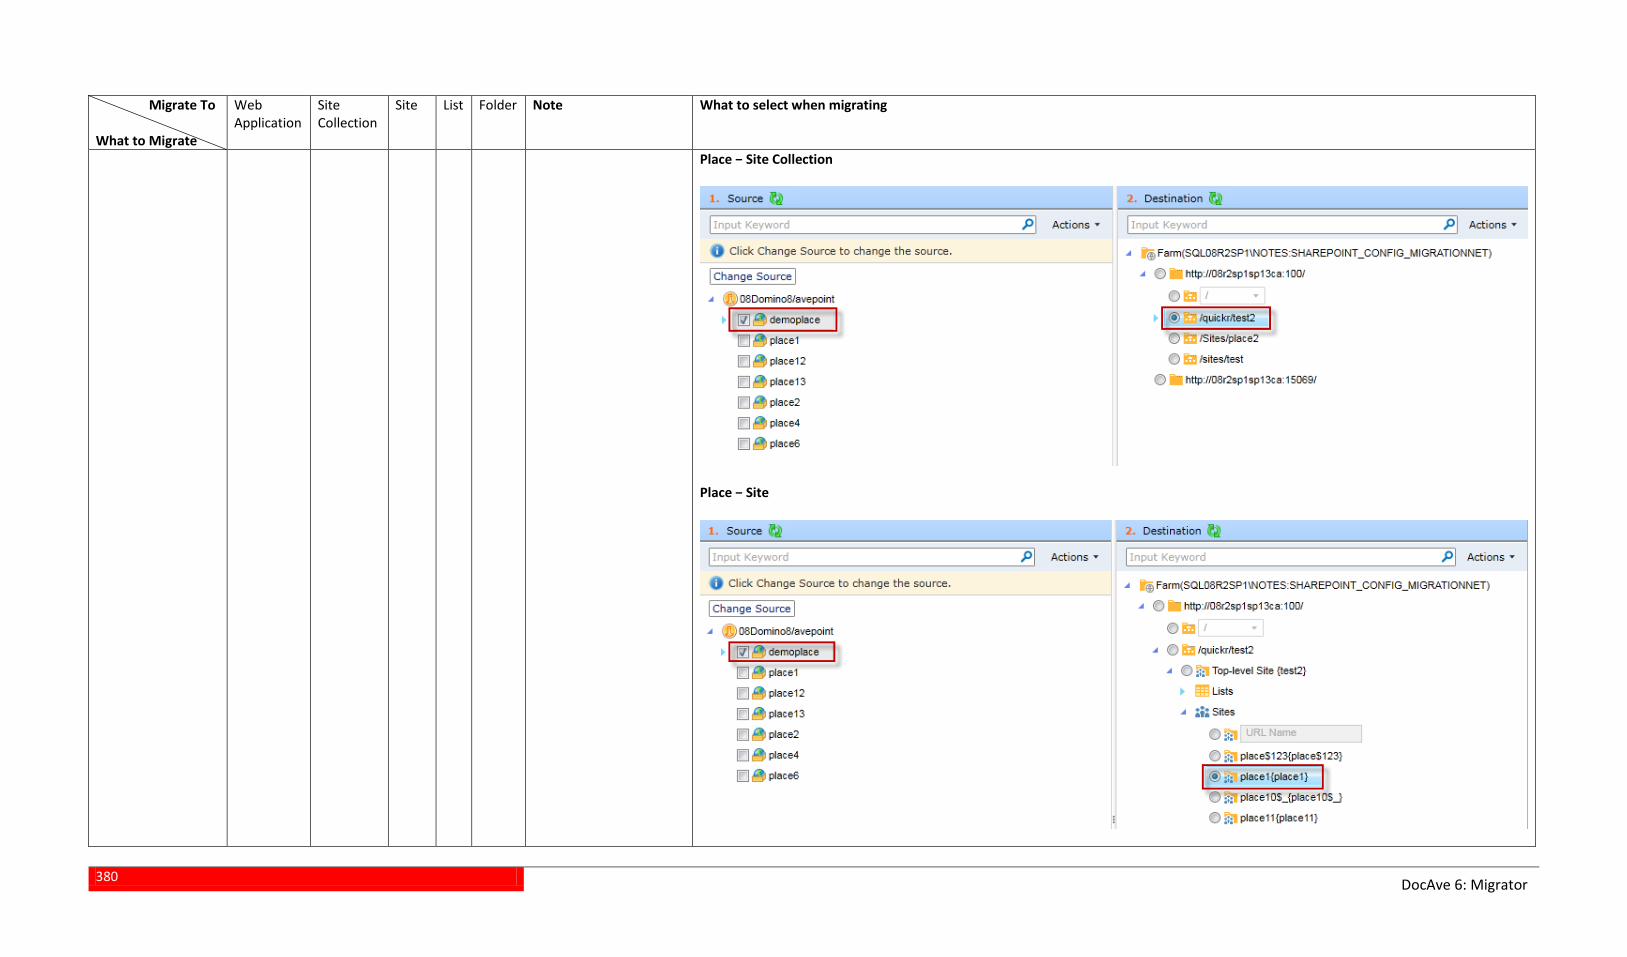
380
DocAve 6: Migrator
Migrate To What to Migrate
Web Application
Site Collection
Site List Folder Note What to select when migrating
Place − Site Collection
Place − Site
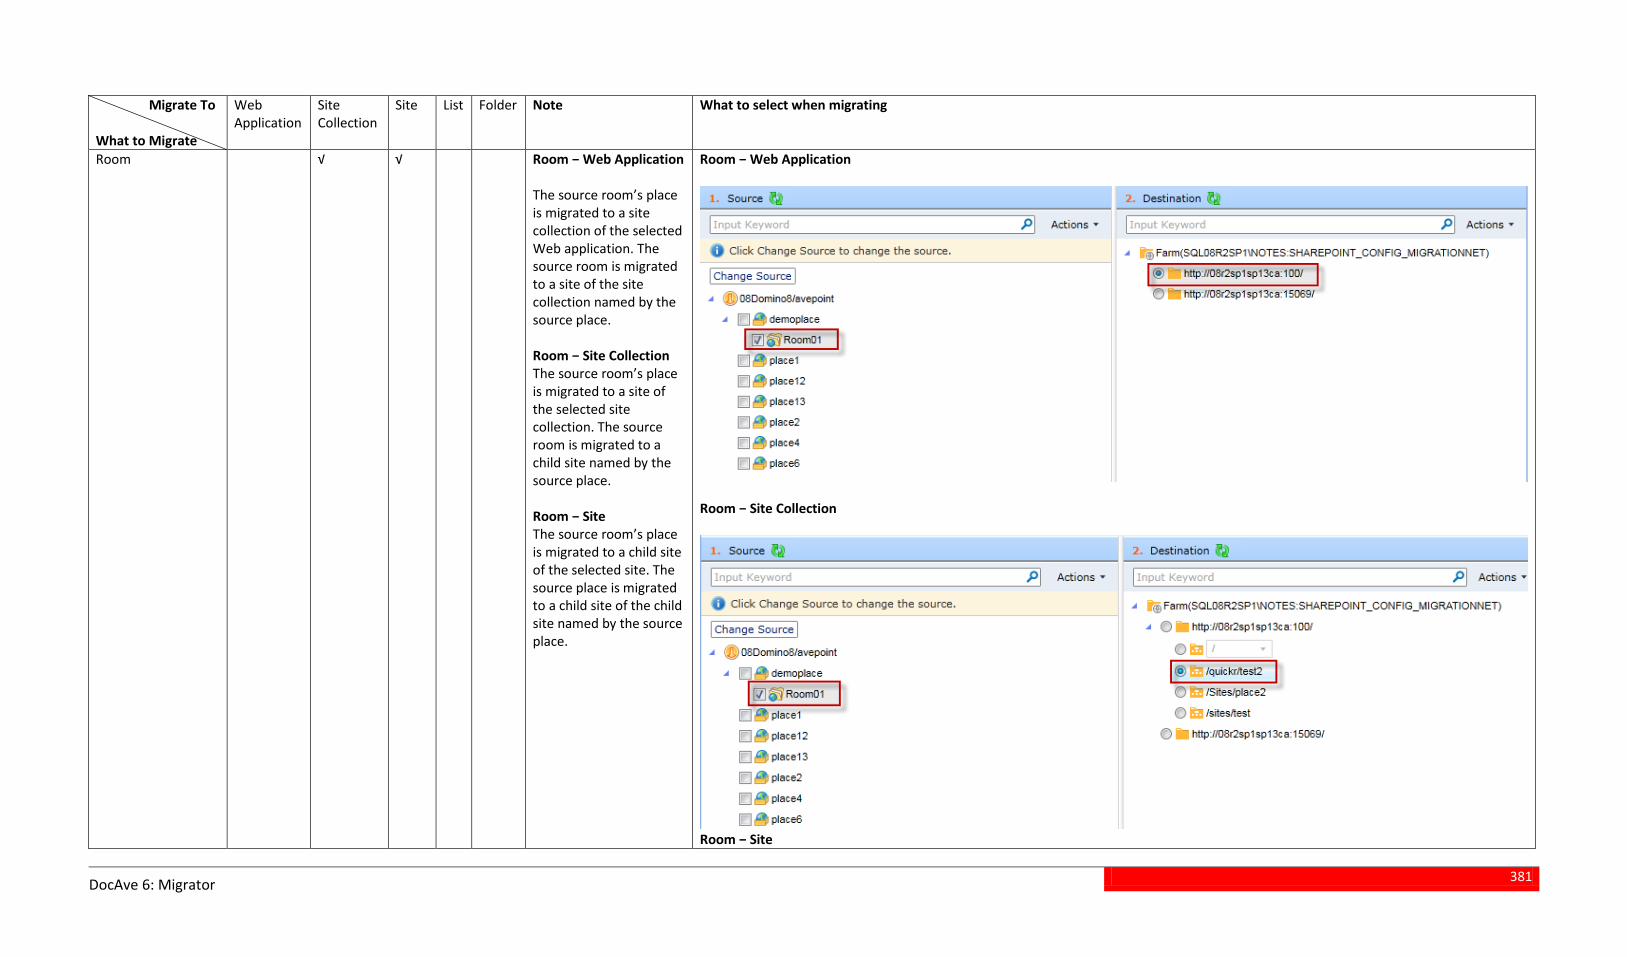
381
DocAve 6: Migrator
Migrate To What to Migrate
Web Application
Site Collection
Site List Folder Note What to select when migrating
Room √ √ Room − Web Application The source room’s place is migrated to a site collection of the selected Web application. The source room is migrated to a site of the site collection named by the source place. Room − Site Collection The source room’s place is migrated to a site of the selected site collection. The source room is migrated to a child site named by the source place. Room − Site The source room’s place is migrated to a child site of the selected site. The source place is migrated to a child site of the child site named by the source place.
Room − Web Application
Room − Site Collection
Room − Site
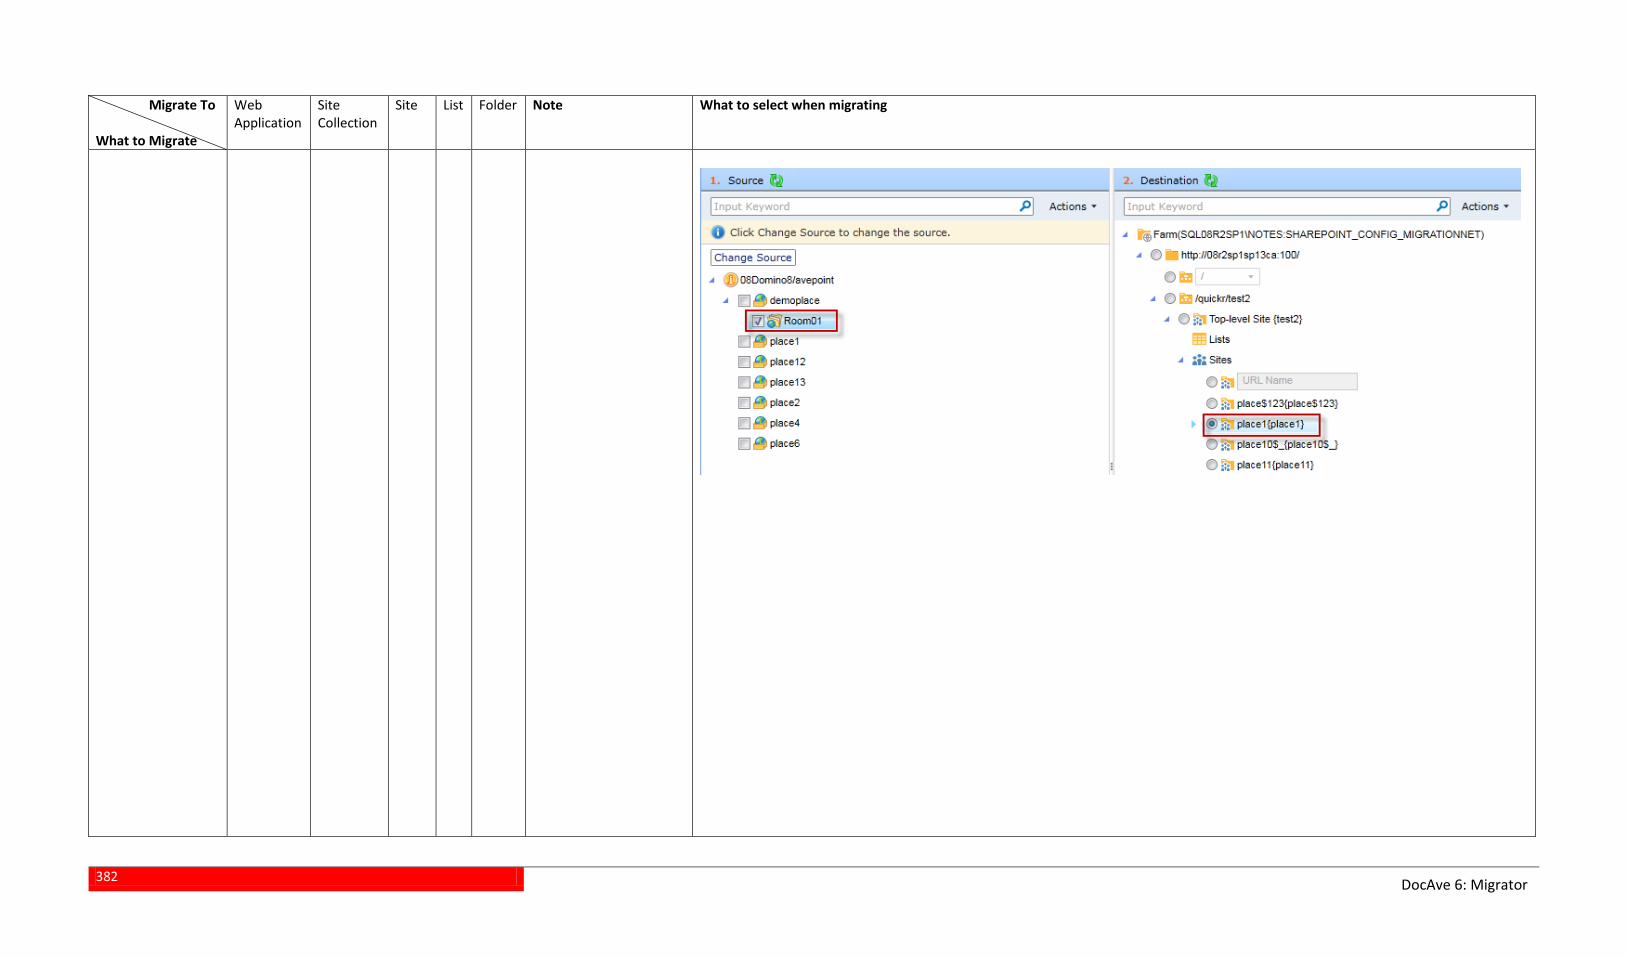
382
DocAve 6: Migrator
Migrate To What to Migrate
Web Application
Site Collection
Site List Folder Note What to select when migrating
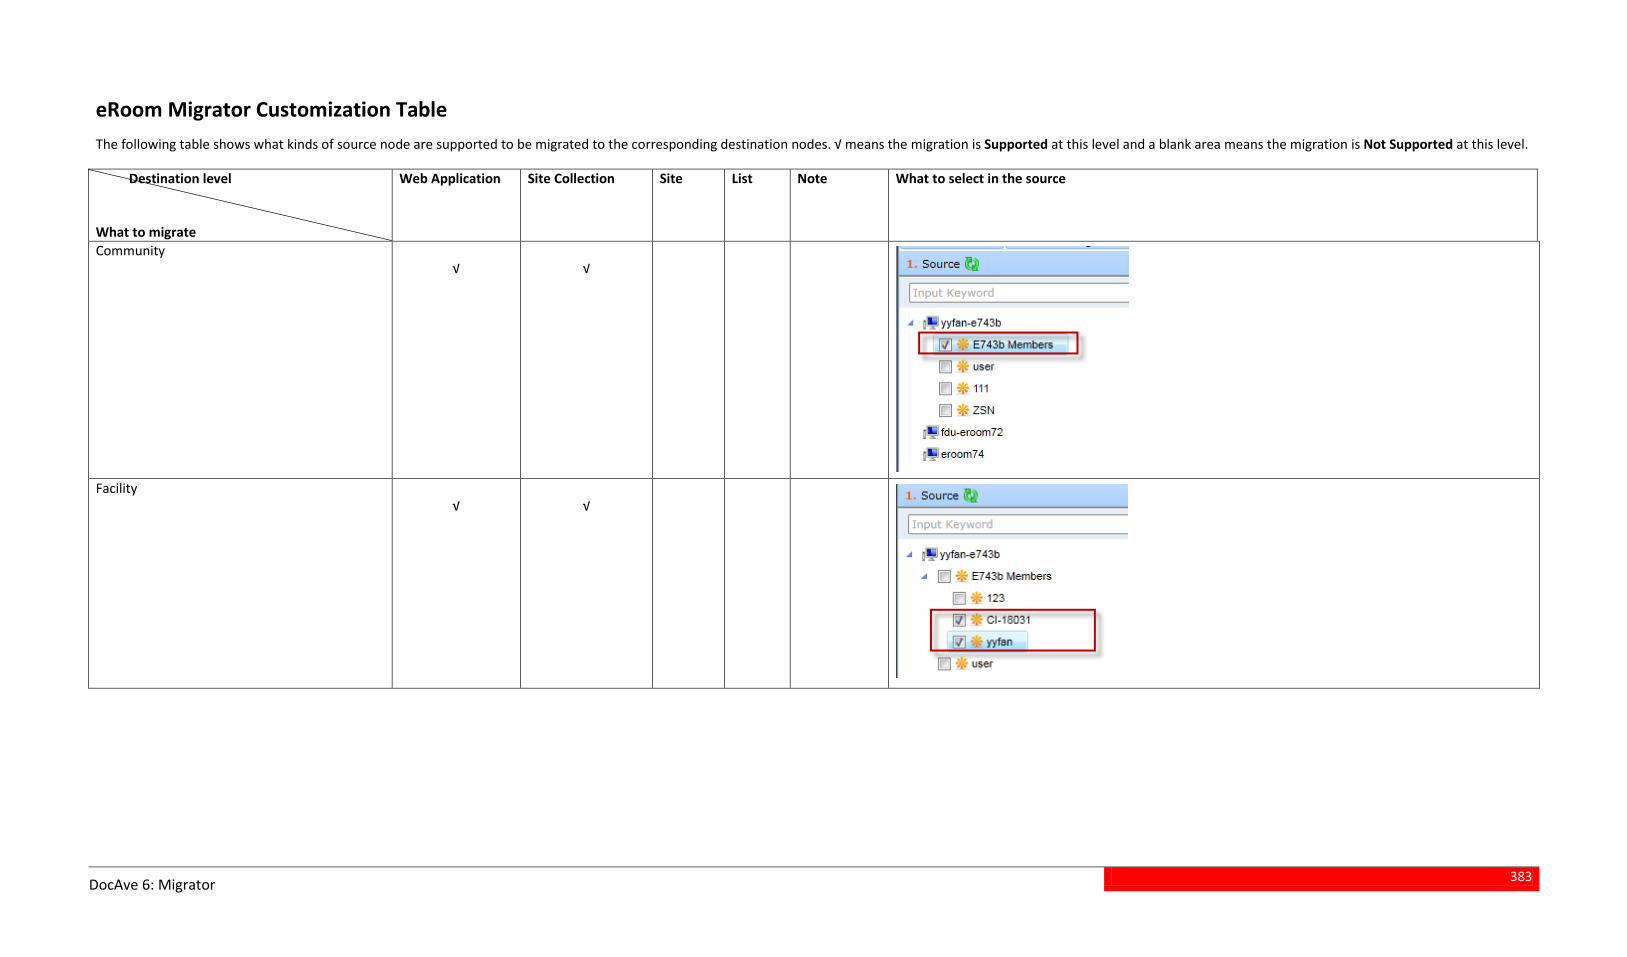
383
DocAve 6: Migrator
eRoom Migrator Customization Table The following table shows what kinds of source node are supported to be migrated to the corresponding destination nodes. √ means the migration is Supported at this level and a blank area means the migration is Not Supported at this level.
Destination level What to migrate
Web Application Site Collection Site List Note What to select in the source
Community
√
√
Facility
√
√
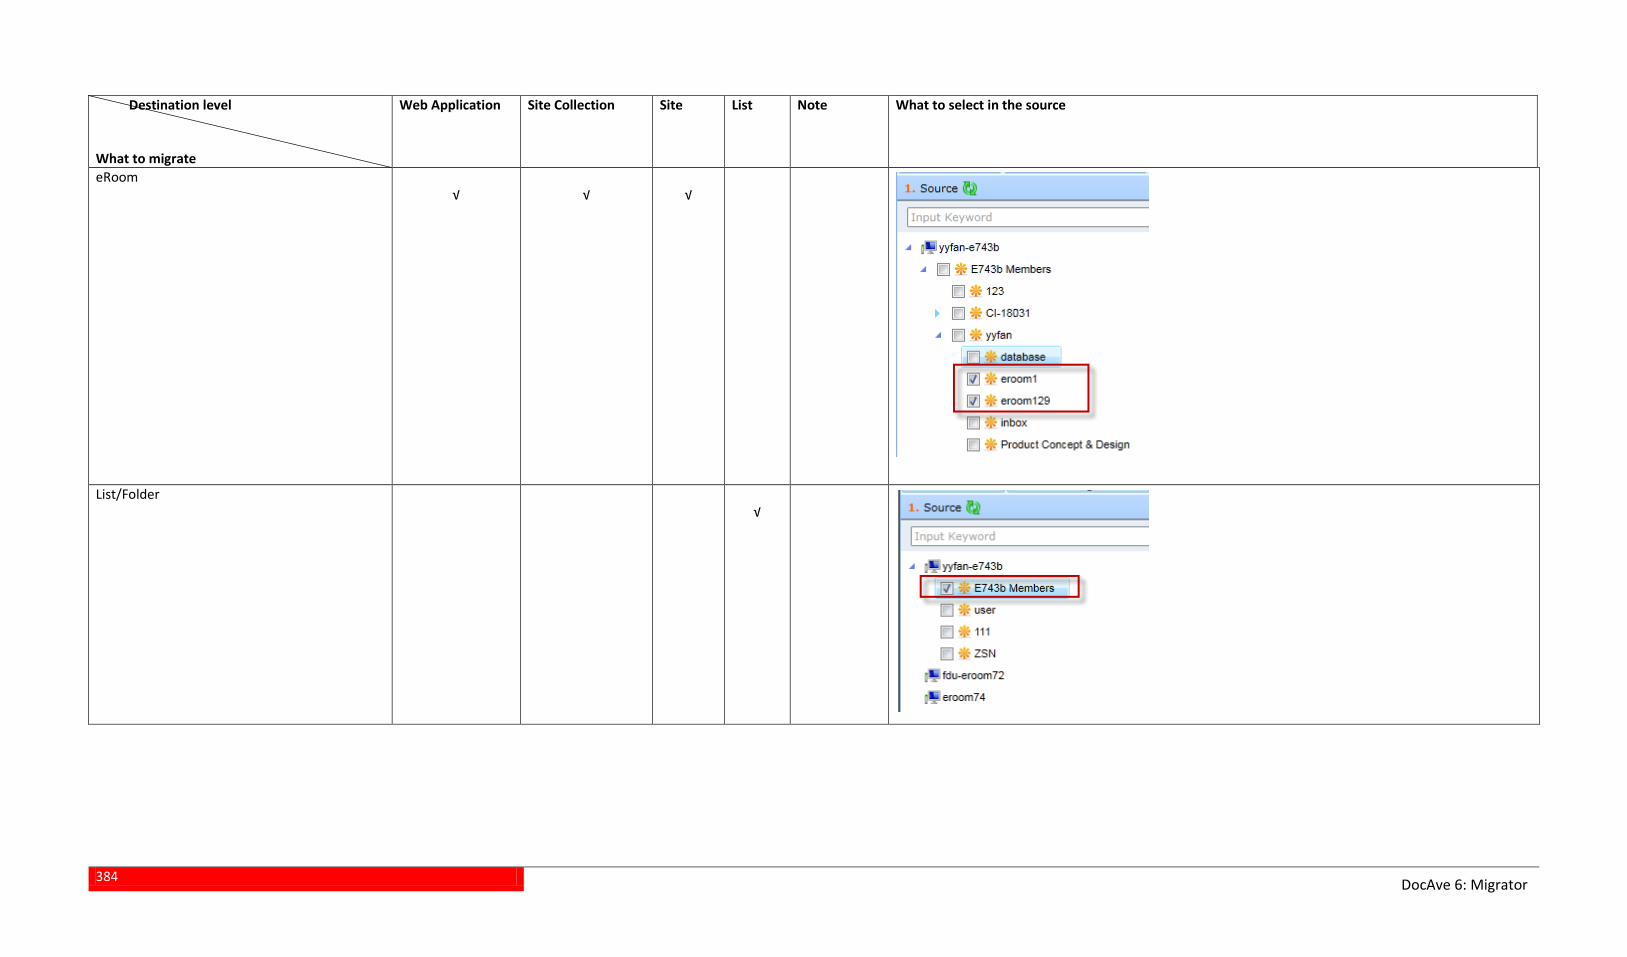
384
DocAve 6: Migrator
Destination level What to migrate
Web Application Site Collection Site List Note What to select in the source
eRoom
√
√
√
List/Folder
√
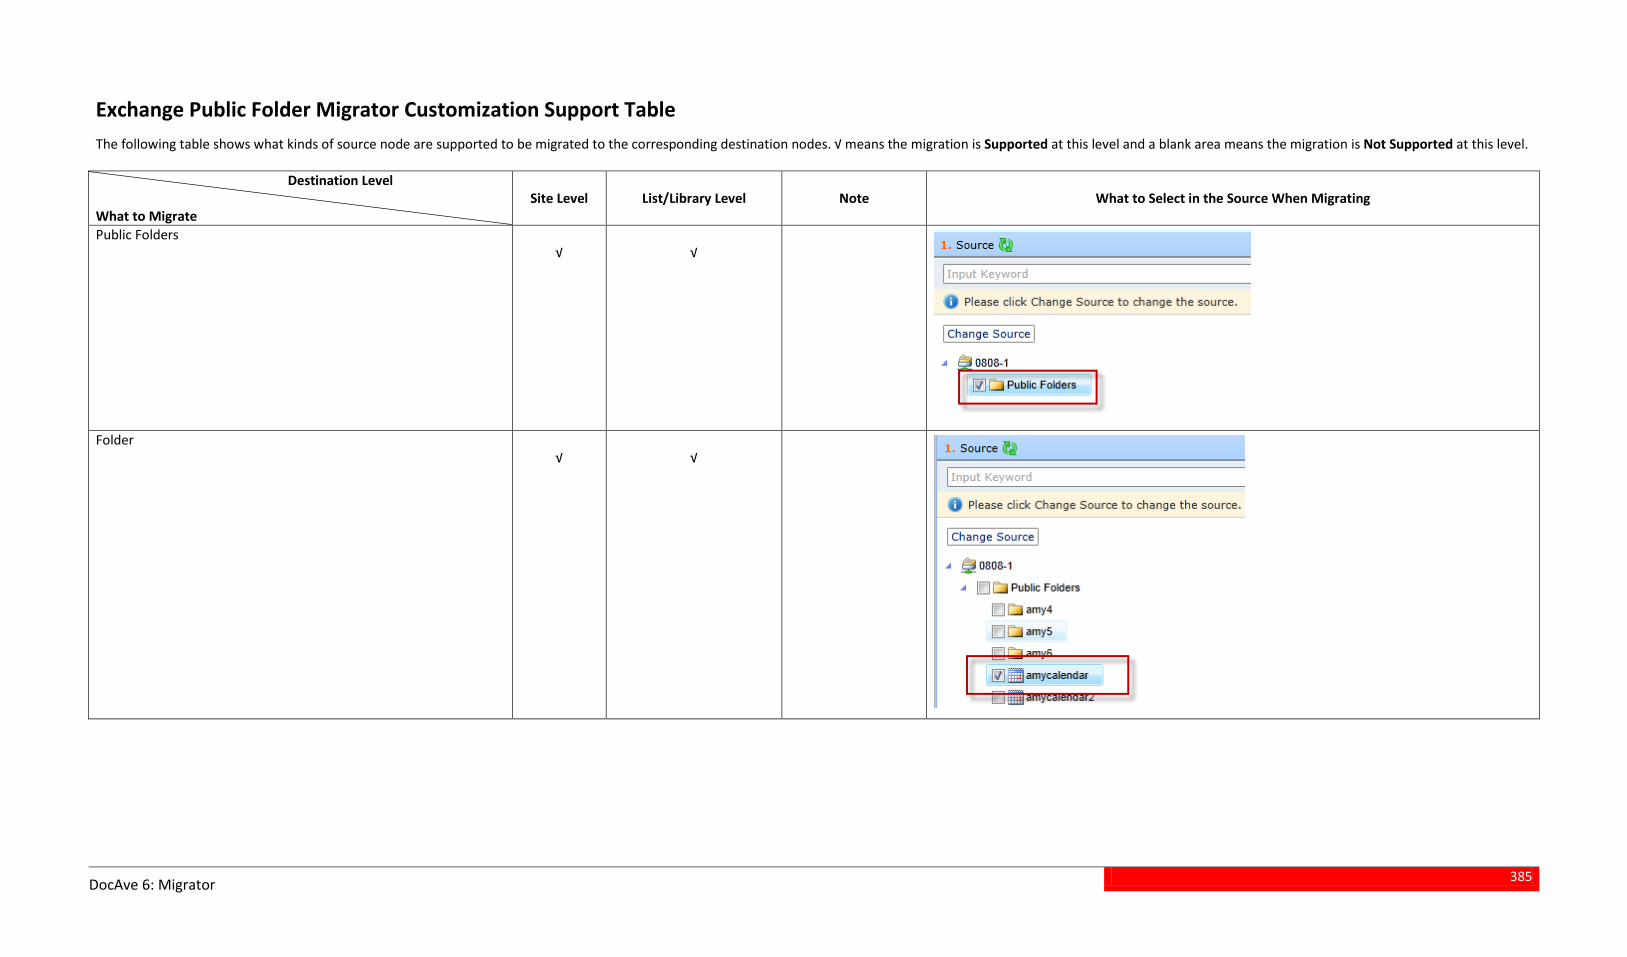
385
DocAve 6: Migrator
Exchange Public Folder Migrator Customization Support Table The following table shows what kinds of source node are supported to be migrated to the corresponding destination nodes. √ means the migration is Supported at this level and a blank area means the migration is Not Supported at this level. Destination Level What to Migrate
Site Level List/Library Level Note What to Select in the Source When Migrating
Public Folders √
√
Folder √
√
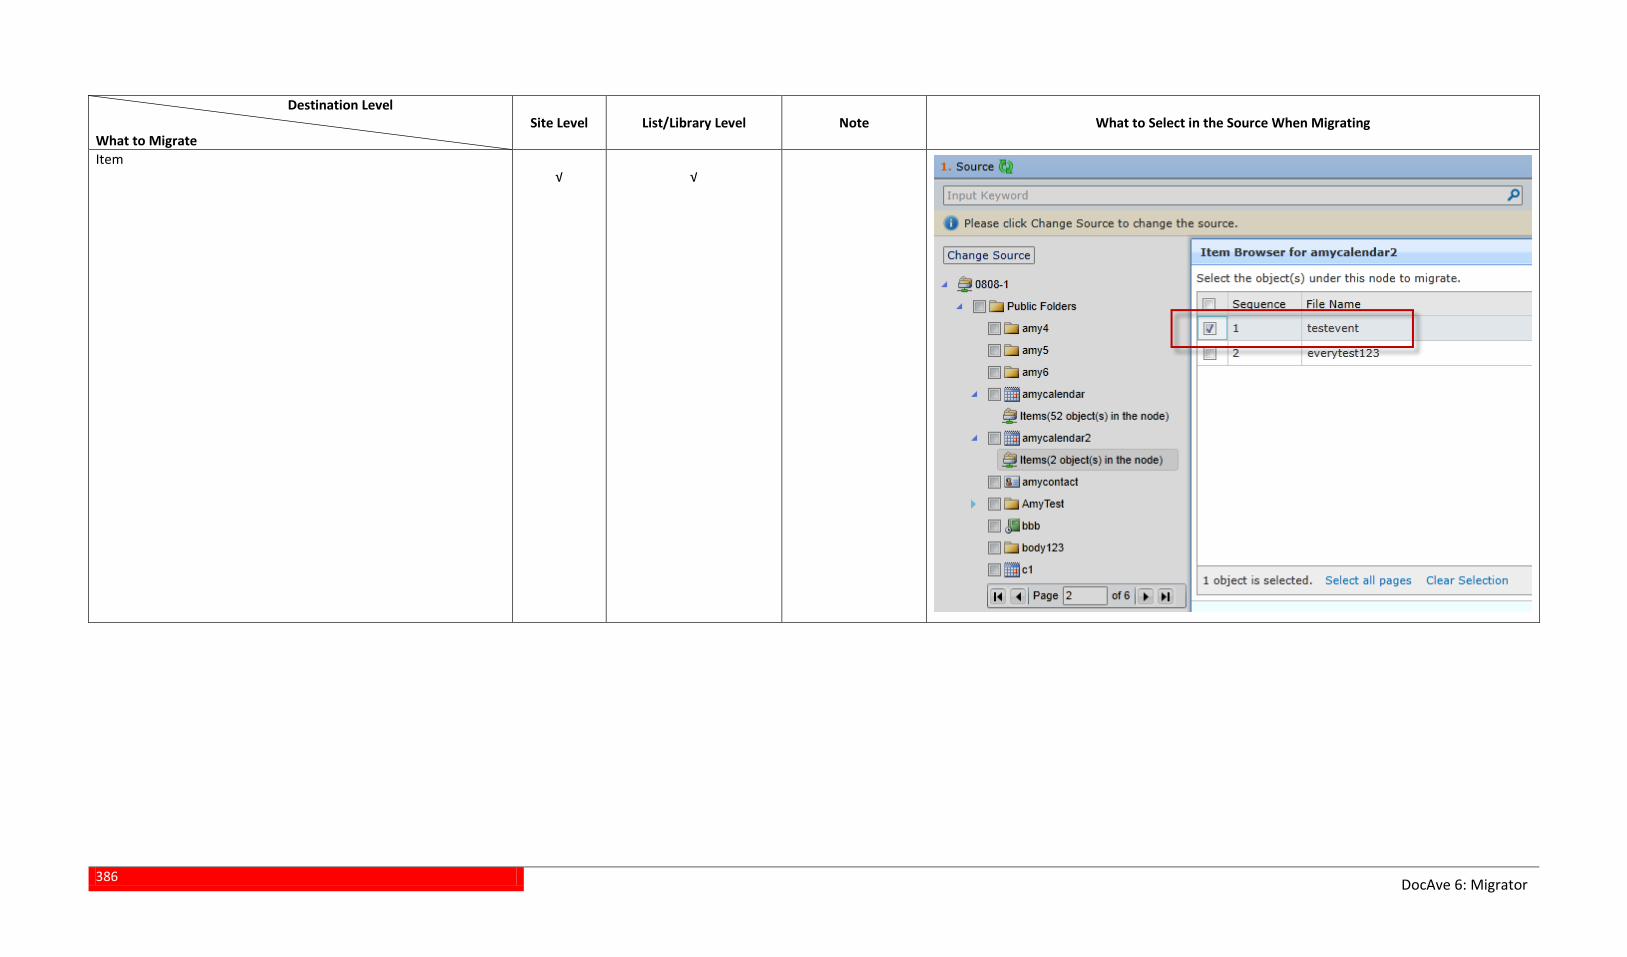
386
DocAve 6: Migrator
Destination Level What to Migrate
Site Level List/Library Level Note What to Select in the Source When Migrating
Item √
√

387
DocAve 6: Migrator
EMC Documentum Migrator Customization Table The following table shows what kinds of source node are supported to be migrated to the corresponding destination nodes. √ means the migration is Supported at this level and a blank area means the migration is Not Supported at this level. Destination level What to migrate
Web Application Site Collection Site Library Folder What to select in the source
Cabinet
√
√
√
Folder
√
√
√
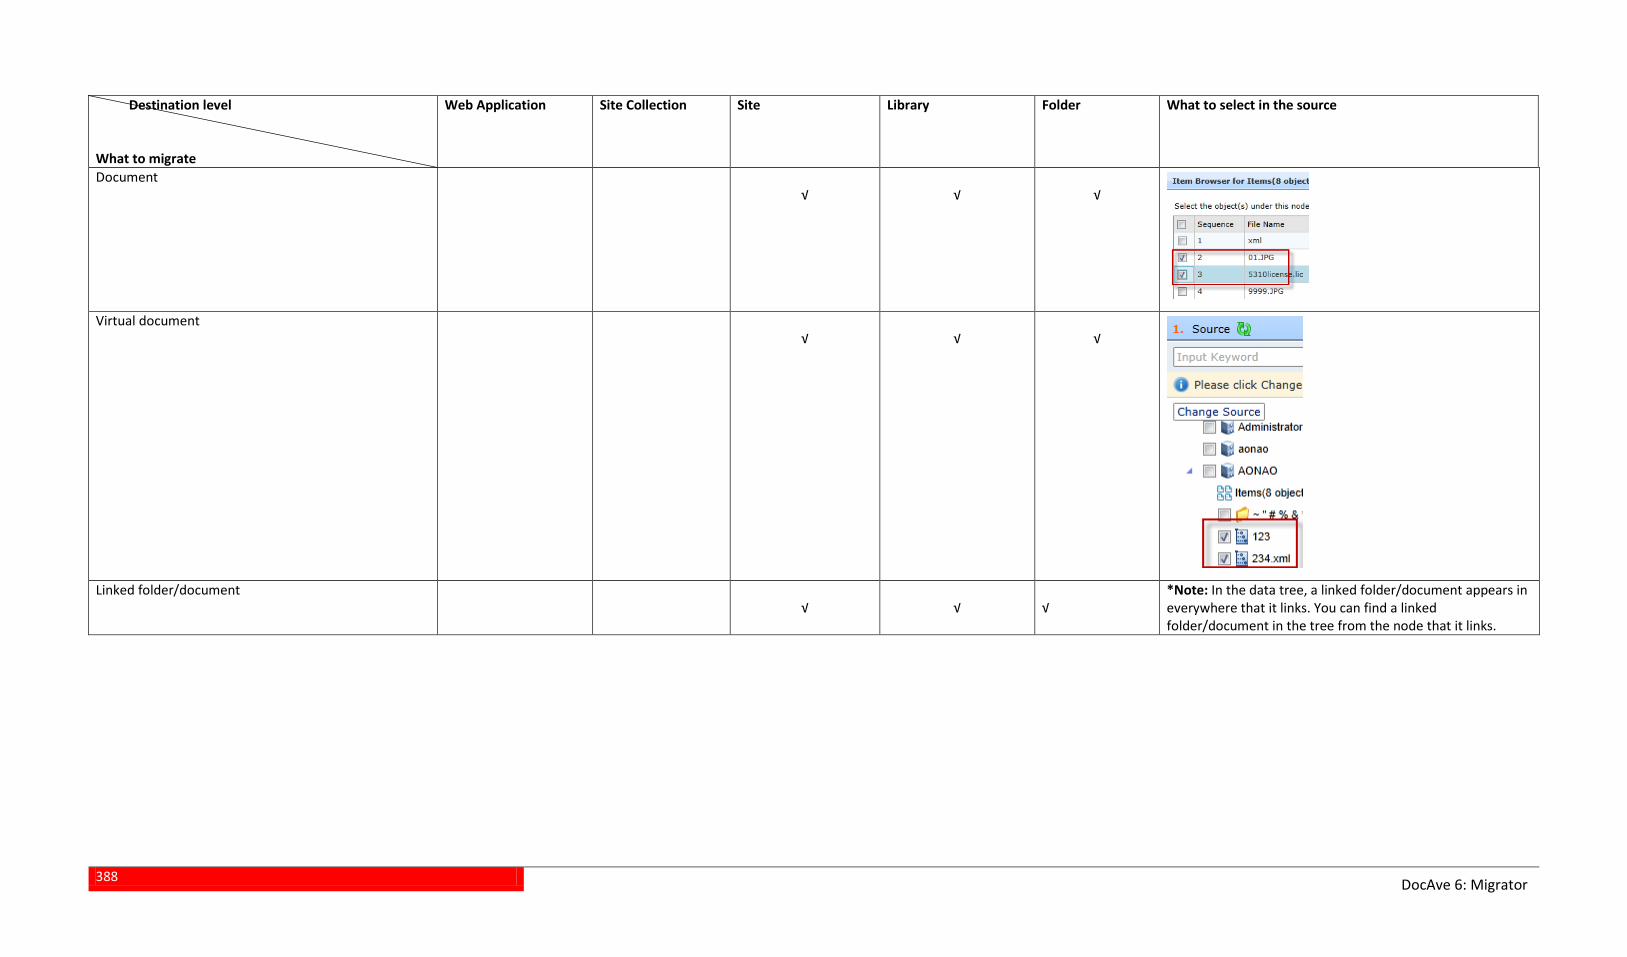
388
DocAve 6: Migrator
Destination level What to migrate
Web Application Site Collection Site Library Folder What to select in the source
Document
√
√
√
Virtual document
√
√
√
Linked folder/document
√
√
√
*Note: In the data tree, a linked folder/document appears in everywhere that it links. You can find a linked folder/document in the tree from the node that it links.
389
DocAve 6: Migrator
Appendix C: Advanced Settings in Configuration Files
File System Migrator Configuration Files You are allowed to customize the file system migration settings by configuring the attribute of the corresponding node in the FileMigrationConfiguration.xml file. Navigate to to …\Agent\data\Migrator\FileMigrator\ on the machine where the DocAve agent is installed and locates FileMigrationConfiguration.xml file.
FileMigrationConfiguration.xml Open the FileMigrationConfiguration.xml file with Notepad. Refer to the information below to configure the attribute in the FileMigrationConfiguration.xml file.
• GeneratePerformanceLog ─This node allows you to choose whether to collect the performance log, which records the performance about migrated items when performing a file system migration job. Enable/Disable this feature according to the AvePoint representative’s suggestion. Set the value of the Flag attribute as explained below:
true ─ true means that the performance log will be collected when performing a ofile system migration job.
false ─ false means that the performance log will not be collected when operforming a file system migration job. By default, the value of the Flag attribute is set to False.
You can go to the DocAve Agent installation path …\AvePoint\DocAve6\Agent\jobs to find the file system migration job folder, for example, FM20121229190052401100_Restore. The performance log, for example, FMRestorePerformance.xml, is generated in this job folder.
Save the modifications and close the XML file.
eRoom Migrator Configuration Files You are allowed to customize some default eRoom migration settings by configuring the attribute of the corresponding node in the eRoomMigrationConfiguration.xml file. Navigate to …\Agent\data\Migrator\eRoomMigrator\ on the machine where the DocAve agent is installed and locates eRoomMigrationConfiguration.xml.
390
DocAve 6: Migrator
eRoomMigrationConfiguration.xml Open the eRoomMigrationConfiguration.xml file with Notepad. Refer to the information below to configure the attribute in each node in the eRoomMigrationConfiguration.xml file.
• MigrateAnnouncementToList ─ This node allows you to choose whether to migrate the eRoom announcements to SharePoint.
true ─ true means the eRoom announcements will be migrated when an eRoom omigration job is run. If there is no announcement list in the specified destination site, an announcement list named Announcements will be automatically created for migrating the eRoom Announcement. By default, the attribute of Flag is set to true.
false ─ false means the eRoom announcements will not be migrated when an oeRoom migration job is run.
• ListCommentAsDescription ─ The eRoom list’s comment is not supported to migrate to enhanced rich text. If you choose to migrate eRoom Comment to enhanced rich text in the Migration Options, you are allowed to specify how the eRoom list’s comment is migrated by configuring this node.
true ─ true means that the eRoom list’s comment will be migrated to the odescription of the list when an eRoom migration job is run. By default, the value of the attribute Flag is set to true.
false ─ false means the list’s comment will not be migrated if you choose to omigrate eRoom comment to enhanced rich text when an eRoom migration job is run.
• RestoreVersionToFile ─ This node allows you to migrate the file of each version to a corresponding individual file.
true ─ true means that the eRoom file version will be migrated to individual files owhen an eRoom migration job is run. After migration, a corresponding file version in bracket is added to the migrated file’s name.
For example, there is a txt document that has two versions and the names of this txt document of these two versions are respectively Test1and Test2 , after migration, this Test.txt file is migrated to two files, which are Test1(1).txt and Test2(2).txt.
false ─ false means that the eRoom file version will not be migrated to oindividual files when an eRoom migration job is run. By default, the value of the attribute Flag is set to false.
• ShowTemplateRoom ─This node allows you to specify whether the built-in rooms that are automatically created while creating a facility will be displayed in the source tree.
true ─ true means that the built-in rooms of a facility will be loaded while obrowsing the source tree and then you can select the desired room to migrate.
391
DocAve 6: Migrator
false ─ false means that the built-in rooms of a facility will not be loaded while obrowsing the source tree. By default the attribute Flag is set to False.
• CloseConnection ─ This node allows to choose whether to close the connection with eRoom when an eRoom migration job is completed.
true ─ true means that the connection with eRoom will be closed once an oeRoom migration job is completed. By default, the value of the attribute Flag is set to true.
false ─ false means that the connection with eRoom will not be closed when an oeRoom migration job is completed.
• PerformanceLog ─This node allows you to choose whether to collect the performance log. Enable/Disable this feature according to the AvePoint representative’s suggestion. The performance log records the performance about migrated items when performing an eRoom migration job. Set the value of the Disable attribute as explained below:
true ─ true means that the performance log will not be collected when operforming an eRoom migration job.
false ─ false means that the performance log will be collected when performing oan eRoom migration job. By default, the value of the attribute Disable is set to false.
You can go to the DocAve Agent installation path …\AvePoint\DocAve6\Agent\jobs to find the eRoom migration job folder.
Exchange Public Folder Migration Configuration File By using the Exchange public folder migration configuration file, you can configure the following settings:
• The maximum number of items that is to be requested from the source each time.
• For the source mail items, specify the file type after migration.
• Specify the sequence of migrating the source items.
• Specify whether to check the user’s logon name when migrating the source user.
• Specify whether to generate the performance log.
Follow the steps below to configure the file:
Go to the machine where the source DocAve Agent (using for the Exchange public folder 1.connection) is installed.
Open the … \AvePoint\DocAve6\Agent\data\Migrator\PublicFolderMigrator directory and find 2.the PublicFolderMigrationConfiguration.xml file.
392
DocAve 6: Migrator
Open the .xml file and configure the following settings: 3.
• <PagingSize value="500"/> – When performing the migration job, this node is used to specify the maximum number of items that is to be requested from the source each time. Modify the value of the value attribute according to the migration performance. If the migration job is hung due to the number you set is too large, try to configure the maximum number. The default value is 500.
• <ConvertToMsg value="true"/> – This node is used to specify the file type after migration for the source mail items. Modify the value of the value attribute according to your requirements. true represents to migrate the source mail item to be .msg file, and false represents to migrate the source mail item to be .eml file.
• <ReverseItemsByTime value="false"/> – This node is used to specify the sequence of migrating the source items. Modify the value of the value attribute according to your requirements. true represents to migrate the source items according to the source sequence, and false represents to migrate the source items according to the reverse source sequence.
• <CheckUserName value="true" adAddress="" /> – When restoring the source user, this node is used to specify whether to check the logon name of the user in the source domain. Modify the value of the value attribute according to your requirements.
true represents to check the logon name of the user. If you select true, you omust specify the IP address where the source Activity Directory is. There are two options to specify the IP address.
a. Enter the IP address as the value of the adAddress attribute.
b. Go to the machine with the DocAve Agent (that one you configured in Exchange Public Folder connection) installed. Use Notepad to open the hosts file located in the C:\Windows\System32\drivers\etc directory. In this file, map the IP address to the name of the host where the source Activity Directory is.
false represents to not check the logon name of the user. The adAddress oattribute is invalid also.
• <PerformanceLogDisable value="false"/> ─This node allows you to choose whether to collect the performance log, which records the performance about migrated items when performing an Exchange public folder migration job. Enable/Disable this feature according to the AvePoint representative’s suggestion. Set the value of the value attribute as explained below:
true ─ true means that the performance log will not be collected when operforming an Exchange public folder migration job.
false ─ false means that the performance log will be collected when performing oan Exchange public folder migration job. By default, the value of the value attribute is set to false.
You can go to the DocAve Agent installation path …\AvePoint\DocAve6\Agent\jobs to find the Exchange public folder migration
393
DocAve 6: Migrator
job folder, for example, PF20121227162813538557_Backup. The performance log, for example, EPFBackupWorkerPerformanceLog_PF20121227162813538557.xml, is generated in this job folder.
Save the modifications and close the .xml file. 4.
EMC Documentum Migrator Configuration Files Configure the EMC Documentum migration configuration file to manage EMD Documentum migration functions:
• Whether to display and migrate the hidden files.
• Whether to generate the performance log.
Open the …\Agent\data\Migrator\DocumentumMigrator directory on the machine with DocAve Agent installed and locates the DocumentumMigrationConfiguration.xml file.
DocumentumMigrationConfiguration.xml
Open the DocumentumMigrationConfiguration.xml file with Notepad and configure the following settings in each node:
• <PerformanceLog Flag="true" /> ─ Choose whether to collect the performance log. Performance log records the performance about migrated items. Enable/Disable this feature according to the AvePoint representative’s suggestion. Set the value of the Flag attribute as explained below:
true means to not generate the performance log when performing an migration ojob.
false means to generate the performance log. By default, the value of the oattribute Flag is set to true.
You can go to the DocAve Agent installation path …\AvePoint\DocAve6\Agent\jobs to find the EMC Documentum migration job folder, for example, MC20130416184817462177_Backup. The performance log, for example, EMCBackupPerformance.xml, is generated in this job folder.
• <RestoreHidden Flag="false"/> ─ Choose whether to display and migrate hidden objects:
false means to not display hidden objects on the tree. When performing a omigration job, DocAve will not migrate hidden objects.
true means to display hidden objects on the tree. When selecting source nodes oon the tree, you can determine whether to migrate hidden objects.
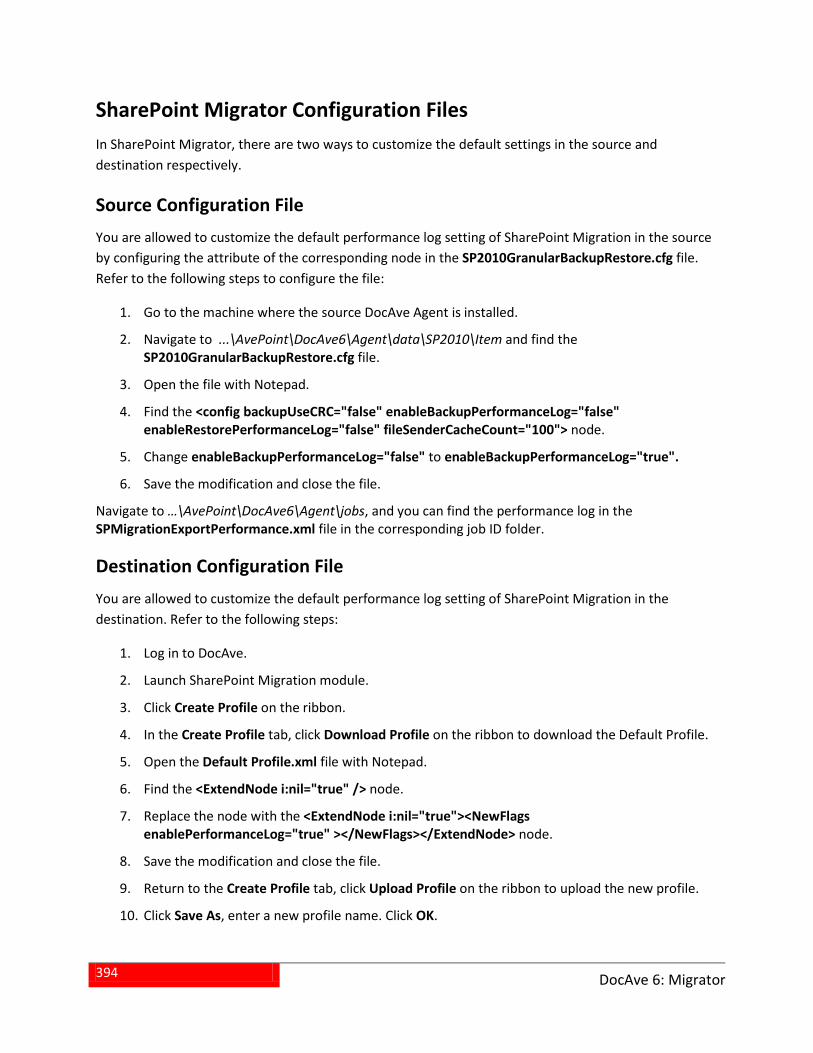
394
DocAve 6: Migrator
SharePoint Migrator Configuration Files In SharePoint Migrator, there are two ways to customize the default settings in the source and destination respectively.
Source Configuration File You are allowed to customize the default performance log setting of SharePoint Migration in the source by configuring the attribute of the corresponding node in the SP2010GranularBackupRestore.cfg file. Refer to the following steps to configure the file:
1. Go to the machine where the source DocAve Agent is installed.
2. Navigate to ...\AvePoint\DocAve6\Agent\data\SP2010\Item and find the SP2010GranularBackupRestore.cfg file.
3. Open the file with Notepad.
4. Find the <config backupUseCRC="false" enableBackupPerformanceLog="false" enableRestorePerformanceLog="false" fileSenderCacheCount="100"> node.
5. Change enableBackupPerformanceLog="false" to enableBackupPerformanceLog="true".
6. Save the modification and close the file.
Navigate to …\AvePoint\DocAve6\Agent\jobs, and you can find the performance log in the SPMigrationExportPerformance.xml file in the corresponding job ID folder.
Destination Configuration File You are allowed to customize the default performance log setting of SharePoint Migration in the destination. Refer to the following steps:
Log in to DocAve. 1.
Launch SharePoint Migration module. 2.
Click Create Profile on the ribbon. 3.
In the Create Profile tab, click Download Profile on the ribbon to download the Default Profile. 4.
Open the Default Profile.xml file with Notepad. 5.
Find the <ExtendNode i:nil="true" /> node. 6.
Replace the node with the <ExtendNode i:nil="true"><NewFlags 7.enablePerformanceLog="true" ></NewFlags></ExtendNode> node.
Save the modification and close the file. 8.
Return to the Create Profile tab, click Upload Profile on the ribbon to upload the new profile. 9.
Click Save As, enter a new profile name. Click OK. 10.

395
DocAve 6: Migrator
The jobs that select this new profile will generate the performance logs of the destination nodes. Navigate to …\AvePoint\DocAve6\Agent\jobs, and you can find the performance log in the SPMigrationImportPerformance.xml file in the corresponding job ID folder.
Livelink Migrator Configuration File DocAve Livelink Migrator has a configuration file named LivelinkMigrationConfiguration.xml allowing you to customize some Livelink settings by modifying the elements in the configuration file. This file resides in …\AvePoint\DocAve6\Agent\data\Migrator\LivelinkMigrator by default. Refer to the table below for the functions of each element in LivelinkMigrationConfiguration.xml.
Node Function Description <SleepTime Value="0" /> This node is used to specify the response time for
the Livelink Server, then the job progress will stop working in an appropriate time to avoid the Livelink Server being down. The default value is 0.
<EstimateSizeProgress Flag="false" EstimateValue="5G" />
This node is used to specify whether or not to calculate the size of the items that will be migrated before starting the migration job.
• False – Calculate the size of the items that will be migrated before starting the migration job. false is the default value.
• True – The size of the items that will be migrated will not be calculated before running the migration job. If this is set to true, you need to specify a value for EstimateValue. This is used when you know the approximate size of the items that will be migrated, and then you can directly specify an estimated size. This can save the time of calculating the item size.
<MigratePollResultsToList Flag="true" ListName="Poll Results" />
This node is used to specify whether or not to create the announcement list in SharePoint for the Poll results.
• False – The announcement list for the Poll results will not be created in SharePoint after the migration job.
• True – The announcement list will be created for the Poll results after the migration job. If this is set to true, you can change the ListName value to customize the announcement list name. true is the default value.
<GetCategoryInfoFromDatabase Flag="false" /> This node is used to specify whether to get the category information from Livelink Database.
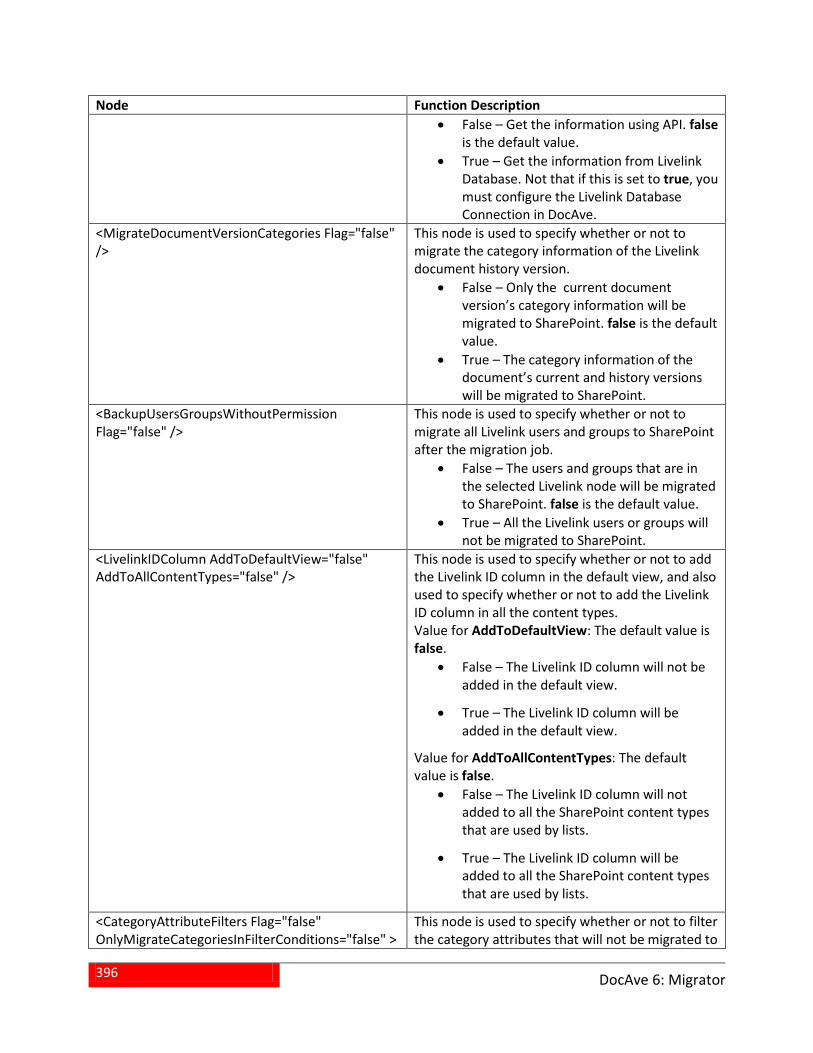
396
DocAve 6: Migrator
Node Function Description • False – Get the information using API. false
is the default value. • True – Get the information from Livelink
Database. Not that if this is set to true, you must configure the Livelink Database Connection in DocAve.
<MigrateDocumentVersionCategories Flag="false" />
This node is used to specify whether or not to migrate the category information of the Livelink document history version.
• False – Only the current document version’s category information will be migrated to SharePoint. false is the default value.
• True – The category information of the document’s current and history versions will be migrated to SharePoint.
<BackupUsersGroupsWithoutPermission Flag="false" />
This node is used to specify whether or not to migrate all Livelink users and groups to SharePoint after the migration job.
• False – The users and groups that are in the selected Livelink node will be migrated to SharePoint. false is the default value.
• True – All the Livelink users or groups will not be migrated to SharePoint.
<LivelinkIDColumn AddToDefaultView="false" AddToAllContentTypes="false" />
This node is used to specify whether or not to add the Livelink ID column in the default view, and also used to specify whether or not to add the Livelink ID column in all the content types. Value for AddToDefaultView: The default value is false.
• False – The Livelink ID column will not be added in the default view.
• True – The Livelink ID column will be added in the default view.
Value for AddToAllContentTypes: The default value is false.
• False – The Livelink ID column will not added to all the SharePoint content types that are used by lists.
• True – The Livelink ID column will be added to all the SharePoint content types that are used by lists.
<CategoryAttributeFilters Flag="false" OnlyMigrateCategoriesInFilterConditions="false" >
This node is used to specify whether or not to filter the category attributes that will not be migrated to
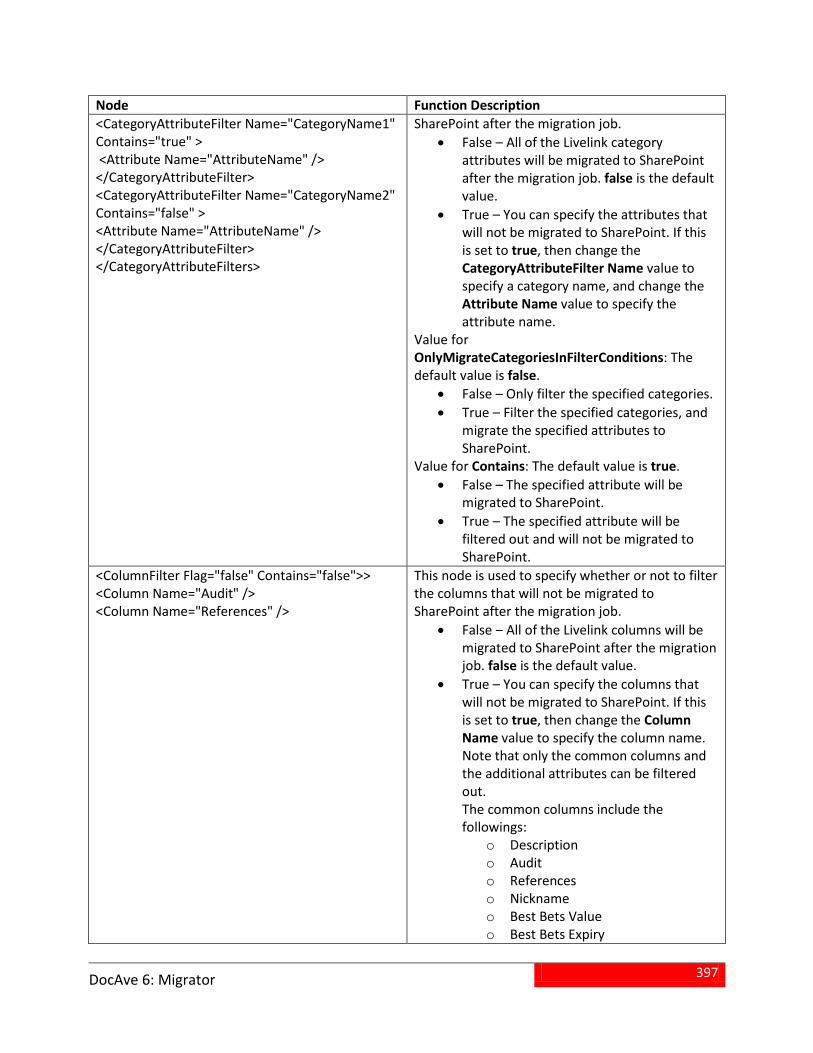
397
DocAve 6: Migrator
Node Function Description <CategoryAttributeFilter Name="CategoryName1" Contains="true" > <Attribute Name="AttributeName" /> </CategoryAttributeFilter> <CategoryAttributeFilter Name="CategoryName2" Contains="false" > <Attribute Name="AttributeName" /> </CategoryAttributeFilter> </CategoryAttributeFilters>
SharePoint after the migration job. • False – All of the Livelink category
attributes will be migrated to SharePoint after the migration job. false is the default value.
• True – You can specify the attributes that will not be migrated to SharePoint. If this is set to true, then change the CategoryAttributeFilter Name value to specify a category name, and change the Attribute Name value to specify the attribute name.
Value for OnlyMigrateCategoriesInFilterConditions: The default value is false.
• False – Only filter the specified categories. • True – Filter the specified categories, and
migrate the specified attributes to SharePoint.
Value for Contains: The default value is true. • False – The specified attribute will be
migrated to SharePoint. • True – The specified attribute will be
filtered out and will not be migrated to SharePoint.
<ColumnFilter Flag="false" Contains="false">> <Column Name="Audit" /> <Column Name="References" />
This node is used to specify whether or not to filter the columns that will not be migrated to SharePoint after the migration job.
• False ‒ All of the Livelink columns will be migrated to SharePoint after the migration job. false is the default value.
• True – You can specify the columns that will not be migrated to SharePoint. If this is set to true, then change the Column Name value to specify the column name. Note that only the common columns and the additional attributes can be filtered out. The common columns include the followings:
o Description o Audit o References o Nickname o Best Bets Value o Best Bets Expiry
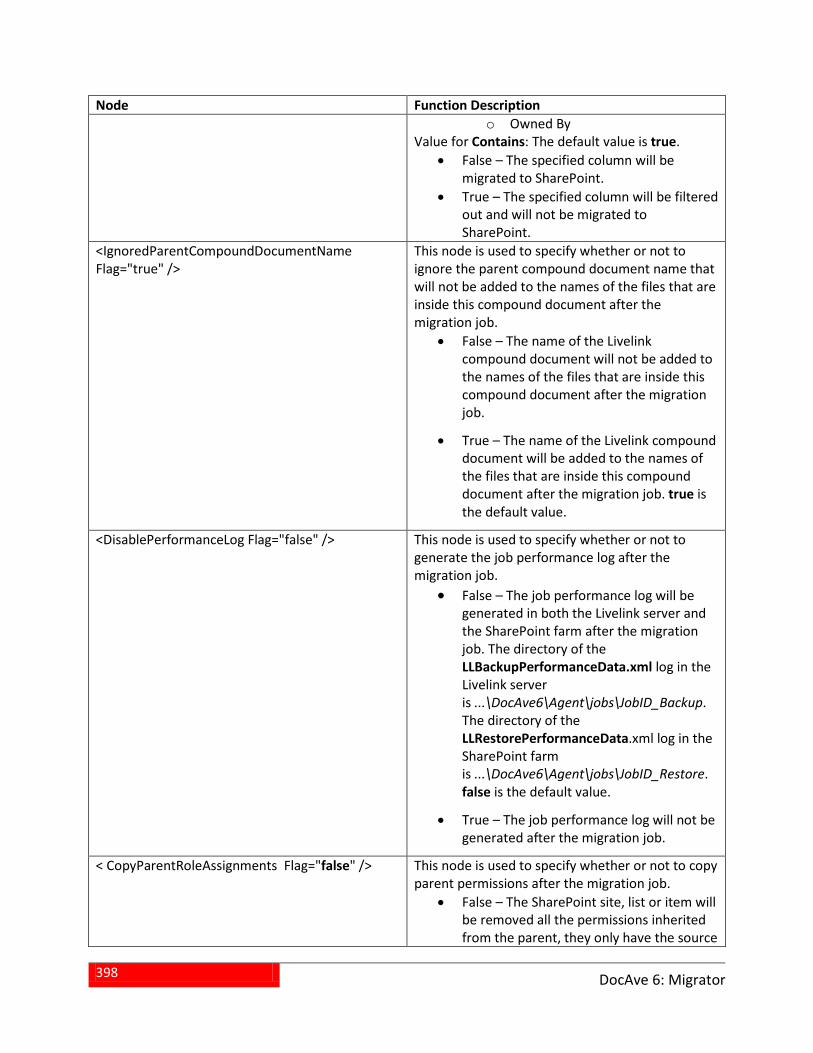
398
DocAve 6: Migrator
Node Function Description o Owned By
Value for Contains: The default value is true. • False – The specified column will be
migrated to SharePoint. • True – The specified column will be filtered
out and will not be migrated to SharePoint.
<IgnoredParentCompoundDocumentName Flag="true" />
This node is used to specify whether or not to ignore the parent compound document name that will not be added to the names of the files that are inside this compound document after the migration job.
• False – The name of the Livelink compound document will not be added to the names of the files that are inside this compound document after the migration job.
• True – The name of the Livelink compound document will be added to the names of the files that are inside this compound document after the migration job. true is the default value.
<DisablePerformanceLog Flag="false" /> This node is used to specify whether or not to generate the job performance log after the migration job.
• False – The job performance log will be generated in both the Livelink server and the SharePoint farm after the migration job. The directory of the LLBackupPerformanceData.xml log in the Livelink server is ...\DocAve6\Agent\jobs\JobID_Backup. The directory of the LLRestorePerformanceData.xml log in the SharePoint farm is ...\DocAve6\Agent\jobs\JobID_Restore. false is the default value.
• True – The job performance log will not be generated after the migration job.
< CopyParentRoleAssignments Flag="false" /> This node is used to specify whether or not to copy parent permissions after the migration job.
• False – The SharePoint site, list or item will be removed all the permissions inherited from the parent, they only have the source
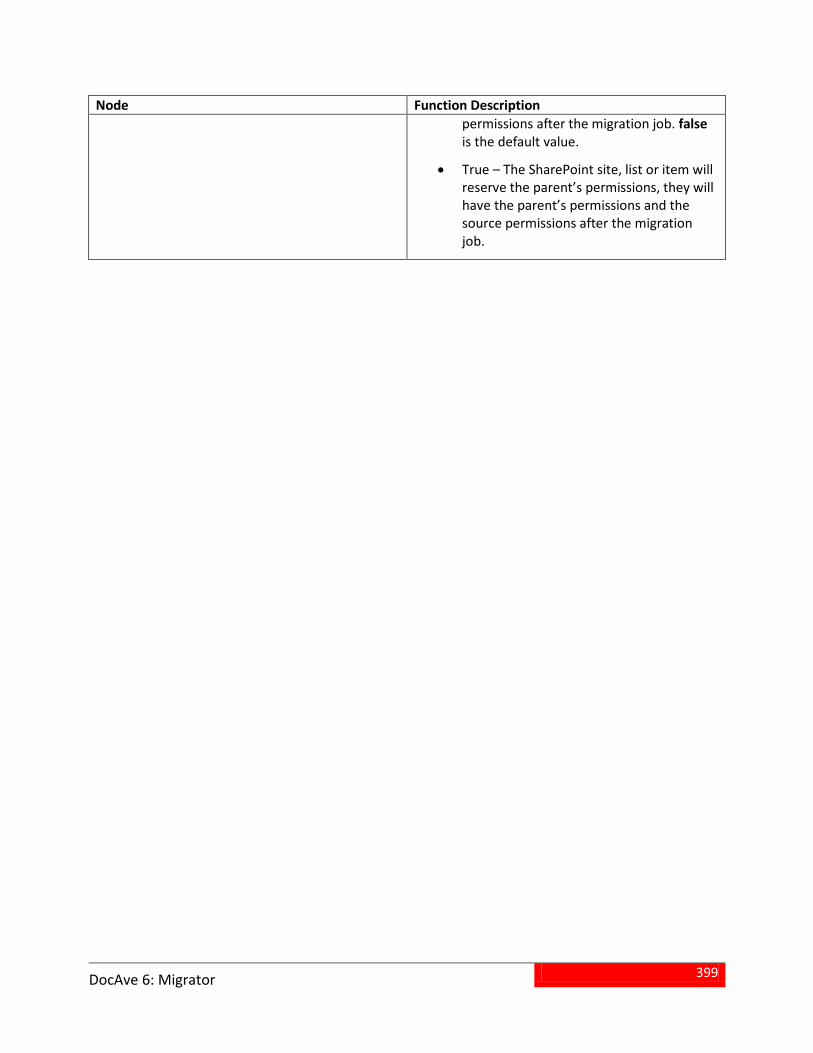
399
DocAve 6: Migrator
Node Function Description permissions after the migration job. false is the default value.
• True – The SharePoint site, list or item will reserve the parent’s permissions, they will have the parent’s permissions and the source permissions after the migration job.
400
DocAve 6: Migrator
Lotus Notes Migrator Configuration File You are allowed to manage Lotus Notes Migration functions by configuring the attribute of the corresponding node in the SP2010LotusNotesMigrationWorker.xml configuration file. Navigate to to …\AvePoint\DocAve6\Agent\data\SP2010\LotusNotesMigration on the machine where the source DocAve Agent is installed and find the SP2010LotusNotesMigrationWorker.xml file.
SP2010LotusNotesMigrationWorker.xml Open the SP2010LotusNotesMigrationWorker.xml file with Notepad. Refer to the information below to configure the attribute in the SP2010LotusNotesMigrationWorker.xml file.
• NotesDocumentTitle – This node allows you to define the filed name that will be set as the display name of the Lotus Notes documents when loading the source content in the source tree. By default, the attribute is Subject and the Lotus Notes documents are displayed by the field Subject. You can add multiple fields in the attribute. Separate them with semicolon.
• UsingSessionAddressBook – This node allows you to choose the method to retrieve the Domino Server.
True – True means Lotus Notes Migrator retrieves the Domino Server from oAddress Book.
False – False means Lotus Notes Migrator retrieves the Domino Server from the oattributes of DominoServer and DirectoryDatabasePath. If no attribute is defined for DonimoServer or DirectoryDatabasePath, Lotus Notes Migrator retrieves the Domino Server from names.nsf database of the local Domino Server.
• DominoServer – The Domino Server name.
• DirectoryDatabasePath – The relative path of the Domino Server’s names.nsf database. If the names.nsf database resides in …\notes\data, enter names.nsf. If the names.nsf database resides in …\notes\data\test, enter test\names.nsf.
• ServerItem – Enter the name of the Domino Server that will be loaded when selecting the source, or the IP address of the server where the Domino Server resides.
• PerformanceLogDisable – This node allows you to choose whether to collect the performance log.
False – False means the performance log will be collected when performing oLotus Notes migration jobs. The performance log file will be generated in the folder that is named by Job ID and the folder is within…AvePoint\DocAve6\Agent\jobs.
True – True means the performance log will not be collected when performing oLotus Notes migration jobs.
401
DocAve 6: Migrator
• NotesFormColumn – This node allows you to define the name of the field from which the form name is retrieved.
• KeepDXLFiles – This node allows you to choose whether the migrated documents will be saved as XML files in …AvePoint\DocAve6\Agent\data\Migrator\LotusNotesDxlCollection.
• TimeLimitedForExportDocument – This node allows you to define the maximum limited time for exporting the source attachment. The unit is minute and the default value is 4. If the source attachment is not exported within the limited time, Lotus Notes Migrator does not export the attachment anymore and continues to migrate the other content.
• OnlyKeepRichText – This node allows you to choose whether the DOCX or DOC file which is generated from the Lotus Note document only contains the Rich Text content.
False – False means the generated DOCX or DOC file contains all of the fields oand the corresponding field values of the Lotus Notes document.
True – True means the generated DOCX or DOC file only contains the Rich Text ocontent.
• RichTextColumnName (This node takes effect when the attribute of OnlyKeepRichText is True) – This node allows you to define the field name of the field with the type of Rich Text. By default, the field name is Body.
• EncodingKey – This node allows you to define the method to encode Microsoft Word content. If there is random code in the generated DOCX file or DOC file, select an encode method in EncodingsMapping and set it as the attribute of EncodingKey.
• SleepDuration – This node allows you to define the time to delay when generating the DOCX or DOC file. The delayed time is to avoid the of Microsoft Word icon out of shape. The unit is millisecond and the default attribute is 200. If the Microsoft Word icon is out of shape, modify the attribute and make it larger than 200.
• ViewCanRestore – This node allows you to choose whether to migrate the source view.
False – False means the source view will not be migrated to the destination in othe migration job.
True – True means the source view will be migrated to the destination in the omigration job.
*Note: Only the built-in view is supported to migrate.
• UpdateContentType – This node allows you to choose whether to allow SharePoint existing content types to be updated if an existing content type is specified in Content Type Mapping.
False – False means the existing SharePoint content type will not be updated. o
True – True means the existing SharePoint content type will be updated and the oLotus Notes form will be mapped to the content type.
• TrueString – This node allows you to define the source field that will be mapped to the Bool column. By default, the attribute contains 1, yes, and true. When the source field
402
DocAve 6: Migrator
value contains one of the attribute, the source field will be mapped to the Bool column. You can add multiple field values in the attribute. Separate them with semicolon.
• EncodingsMapping – This node allows you to define the encode method for EncodingKey, which decides how to encode the content in Microsoft Word.
utf-8 – It is used for English. o
gb2312 – It is used for Chinese. o
Shift-JIS – It is used for Japanese. o
403
DocAve 6: Migrator
Quickr Migrator Configuration File You are allowed to manage Quickr Migration functions by configuring the attribute of the corresponding node in the SP2010QuickrMigrationWorker.xml configuration file. Navigate to to …\AvePoint\DocAve6\Agent\data\SP2010\QuickrMigration on the machine where the source DocAve Agent is installed and find the SP2010QuickrMigrationWorker.xml file.
SP2010QuickrMigrationWorker.xml Open the SP2010QuickrMigrationWorker.xml file with Notepad. Refer to the information below to configure the attribute in the SP2010QuickrMigrationWorker.xml file.
• UsingSessionAddressBook – This node allows you to choose the method to retrieve the Domino Server.
True – True means Quickr Migrator retrieves the Domino Server from Address oBook.
False – False means Quickr Migrator retrieves the Domino Server from the oattributes of DominoServer and DirectoryDatabasePath. If no attribute is defined for DominoServer or DirectoryDatabasePath, Quickr Migrator retrieves the Domino Server from names.nsf database of the local Domino Server.
• DominoServer – The Domino Server name.
• DirectoryDatabasePath – The relative path of the Domino Server’s names.nsf database. If the names.nsf database resides in …\notes\data, enter namess.nsf. If the names.nsf database resides in …\notes\data\test, enter test\names.nsf.
• ServerItem – Enter the name of the Domino Server that will be loaded when selecting the source, or the IP address of the server where the Domino Server resides.
• QuickrFormColumn – This node allows you to define the name of the field from which the form name is retrieved.
• ShowResponseTo – This node allows you to choose whether to migrate the Response To field.
False – False means the Response To field will not be migrated to the odestination in the migration job
True – True means the Response To field will be migrated to the destination in othe migration job.
• IsCheckVersion – This node allows you to choose whether to check the version of Quickr when configuring a Quickr connection.
False – False means the version of Quickr will not be checked when configuring oa Quickr connection.
True – True means the version of Quickr will be checked when configuring a oQuickr connection.
404
DocAve 6: Migrator
• PerformanceLogDisable – This node allows you to choose whether to collect the performance log.
False – False means the performance log will be collected when performing oQuickr migration jobs. The performance log file will be generated in the folder that is named by Job ID and the folder is within…AvePoint\DocAve6\Agent\jobs.
True – True means the performance log will not be collected when performing oQuickr migration jobs.
• UpdateContentType – This node allows you to choose whether to allow SharePoint existing content types to be updated if an existing content type is specified in Content Type Mapping.
False – False means the existing SharePoint content type will not be updated. o
True – True means the existing SharePoint content type will be updated and the oQuickr form will be mapped to the content type.
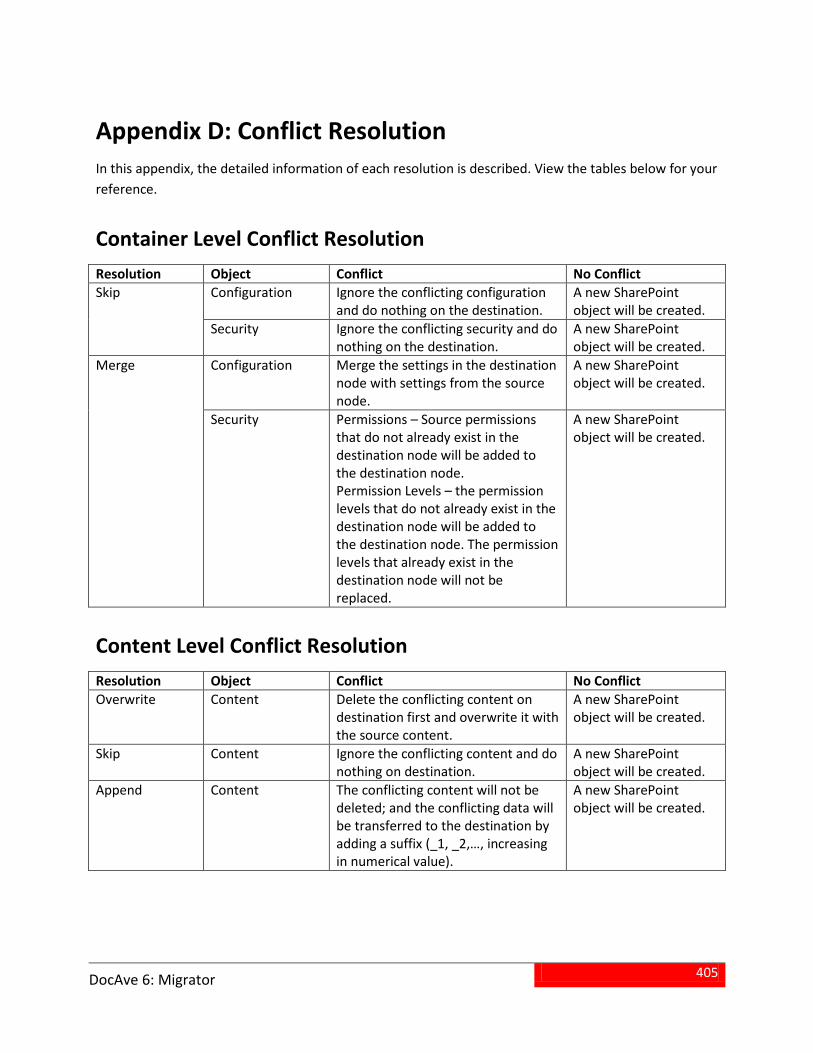
405
DocAve 6: Migrator
Appendix D: Conflict Resolution In this appendix, the detailed information of each resolution is described. View the tables below for your reference.
Container Level Conflict Resolution Resolution Object Conflict No Conflict Skip Configuration Ignore the conflicting configuration
and do nothing on the destination. A new SharePoint object will be created.
Security Ignore the conflicting security and do nothing on the destination.
A new SharePoint object will be created.
Merge Configuration Merge the settings in the destination node with settings from the source node.
A new SharePoint object will be created.
Security Permissions – Source permissions that do not already exist in the destination node will be added to the destination node. Permission Levels – the permission levels that do not already exist in the destination node will be added to the destination node. The permission levels that already exist in the destination node will not be replaced.
A new SharePoint object will be created.
Content Level Conflict Resolution Resolution Object Conflict No Conflict Overwrite Content Delete the conflicting content on
destination first and overwrite it with the source content.
A new SharePoint object will be created.
Skip Content Ignore the conflicting content and do nothing on destination.
A new SharePoint object will be created.
Append Content The conflicting content will not be deleted; and the conflicting data will be transferred to the destination by adding a suffix (_1, _2,…, increasing in numerical value).
A new SharePoint object will be created.
406
DocAve 6: Migrator
Notices and Copyright Information Notice The materials contained in this publication are owned or provided by AvePoint, Inc. and are the property of AvePoint or its licensors, and are protected by copyright, trademark and other intellectual property laws. No trademark or copyright notice in this publication may be removed or altered in any way.
Copyright Copyright © 2012-2013 AvePoint, Inc. All rights reserved. All materials contained in this publication are protected by United States copyright law and no part of this publication may be reproduced, modified, displayed, stored in a retrieval system, or transmitted in any form or by any means, electronic, mechanical, photocopying, recording or otherwise, without the prior written consent of AvePoint, 3 Second Street, Jersey City, NJ 07311, USA or, in the case of materials in this publication owned by third parties, without such third party’s consent.
Trademarks AvePoint®, DocAve®, the AvePoint logo, and the AvePoint Pyramid logo are registered trademarks of AvePoint, Inc. with the United States Patent and Trademark Office. These registered trademarks, along with all other trademarks of AvePoint used in this publication are the exclusive property of AvePoint and may not be used without prior written consent.
Microsoft, MS-DOS, Internet Explorer, Microsoft Office SharePoint Servers 2007/2010/2013, SharePoint Portal Server 2003, Windows SharePoint Services, Windows SQL server, and Windows are either registered trademarks or trademarks of Microsoft Corporation.
Adobe Acrobat and Acrobat Reader are trademarks of Adobe Systems, Inc.
All other trademarks contained in this publication are the property of their respective owners and may not be used such party’s consent.
Changes The material in this publication is for information purposes only and is subject to change without notice. While reasonable efforts have been made in the preparation of this publication to ensure its accuracy, AvePoint makes no representation or warranty, expressed or implied, as to its completeness, accuracy, or suitability, and assumes no liability resulting from errors or omissions in this publication or from the use of the information contained herein. AvePoint reserves the right to make changes in the Graphical User Interface of the AvePoint software without reservation and without notification to its users.
AvePoint, Inc. Harborside Financial Center, Plaza 10 3 Second Street, 9th Floor Jersey City, New Jersey 07311 USA