DO THE ROT THING
68
DO THE ROT THING A Teacher’s Guide to Compost Activities ORGANICS CVSWMD
Transcript of DO THE ROT THING
DO THE ROT THINGA Teacher’s Guide to Compost Activities
ORGANICSC V S W M D

This guide was originally published in July 1997 by the Alameda County Waste Management Authority & Source Reduction and Recycling Board, San Leandro, California, and permission
to copy the materials was freely given in the original booklet. This guide was reproduced and republished for access via the Internet by the Central Vermont Solid Waste Management
District, Montpelier, Vermont, in January 2007.
Illustrations: Joal Morris © 2006
Booklet design and editing funded by a grant from the State of Vermont, Department of Environ-mental Conservation; additional project work funded by a USDA Rural Development grant.
Do the Rot Thing has been made available to educators through the efforts of the Central Vermont Solid Waste Management District in collaboration with the Northern Vermont
Composting Partnership. This Partnership has been a joint project of The Highfields Institute, the Central Vermont Solid Waste Management District, the Northeast Kingdom Waste Manage-ment District, and the town of Greensboro. Program funding was provided through a generous USDA Rural Development grant (10/1/06-10/1/07). The overall goal of the program has been to develop an economically sustainable food scraps recycling program model for rural areas.
We have worked with schools and businesses in the region to divert food scraps from restaurants and cafeterias and transport them to The Highfields Institutes’ West Hill Farm Compost
Demonstration and Research Site to be processed. Through participation in the program, schools and businesses help to keep a valuable resource out of landfills where it contributes to leachate and greenhouse gasses, and takes up crucial space. When composted, the abundant nutrients
and organic matter in food scraps are captured and applied to farms and home gardens where they help build and conserve healthy soils.
Program Partners include:
The Highfields Institute P.O. Box 77, Craftsbury, Vermont 05826
802-472-5138 www.highfieldsinstitute.org
Central Vermont Solid Waste Management District 137 Barre Street, Montpelier, Vermont 05602
802-229-9383 or 800-730-9475 www.cvswmd.org
Northeast Kingdom Waste Management District 31 Church Street, Lyndonville, Vermont 05851
802-626-3519 or 800-734-4602 www.nekwmd.org
The Town of Greensboro P.O. Box 119, Greensboro, Vermont 05841
802-533-2911 www.greensborovt.com
ORGANICSC V S W M D

- i -
Introduction . . . . . . . . . . . . . . . . . . . . . . . . . . . . . . . . . . . . . . . . . . . . . . . . . . 1
Part 1: Introductory Activities 2These activities will help warm students up to the idea of composting, and teach students basic principles of biodegradability, soil science, resource conservation, and recycling.
What is Biodegradable? (grade levels 2-6) . . . . . . . . . . . . . . . . . . . . . . . . . . . . . . . . . . 3Learn and identify biodegradable materials; understand how composting recycles biodegradable materials.
Dirt for Lunch (grade levels 2-6) . . . . . . . . . . . . . . . . . . . . . . . . . . . . . . . . . . . . . . . 4Sketch the origins of school lunches, tracing the path of food production back to the earth.
Environmental Lunch (grade levels 3-12) . . . . . . . . . . . . . . . . . . . . . . . . . . . . . . . . . . 6Analyze the waste left over after lunch and consider ways to reduce, reuse, and recycle packaging materials and food waste. Worksheets included.
Decomposition Tag (grade levels 2-6) . . . . . . . . . . . . . . . . . . . . . . . . . . . . . . . . . . . . 9A game of tag illustrates the cycle of life and the role of decomposers in the food web.
I Can Compost (grade levels 2-6) . . . . . . . . . . . . . . . . . . . . . . . . . . . . . . . . . . . . . . 11Reinforce knowledge of what materials can and cannot be composted with this compost-oriented version of “hot potato.”
Part II : Basic Composting 13Composting is an excellent way to teach students about the life cycle: life, death, decay, and re-birth. When we teach composting we are teaching how nature recycles. Students learn that by composting they care for their communities and the natural environment. These activities will teach fundamentals of building a pile, introduce the creatures who live in a pile, and show the benefits of compost for plants.
Compost Critters (grade levels 2-12) . . . . . . . . . . . . . . . . . . . . . . . . . . . . . . . . . . . . 14Identify the various insects in a compost pile. Worksheet included.
Building a Compost Pile (grade levels K-12). . . . . . . . . . . . . . . . . . . . . . . . . . . . . . . . 18Build an outdoor compost pile and learn why composting is important.
Compost in a Bucket (grade levels 2-12) . . . . . . . . . . . . . . . . . . . . . . . . . . . . . . . . . . 21Make compost in a bucket; observe and gain an understanding of the life cycle of biodegradable materials.
Plants in Compost (grade levels 3-12) . . . . . . . . . . . . . . . . . . . . . . . . . . . . . . . . . . . 23Learn the benefits and uses of compost first-hand by examining the effects of compost on seed germination and plant growth.
Contents

- ii -
Part III : Worm Composting 26Worm composting is an excellent way to introduce living decomposers in the classroom and explore in depth the “super-heroes” of composting—red worms. Here, students will set up a worm bin, learn about worms, and harvest and use worm compost.
Warming Up to Worms (grade levels 3-6) . . . . . . . . . . . . . . . . . . . . . . . . . . . . . . . . . 27Explore the incredible world of worms and discover their important role in nature. Worksheets included.
Setting Up a Worm Bin (grade levels K-12) . . . . . . . . . . . . . . . . . . . . . . . . . . . . . . . . 30Set up a worm composting system in the classroom and watch worms transform garbage into rich compost. Worksheet included.
Worm Bin Exploration (grade levels 2-12) . . . . . . . . . . . . . . . . . . . . . . . . . . . . . . . . . 33A hands-on, close-up peek into the worm bin ecosystem. Learn why we need worms and what worms need in order to live and thrive.
Harvesting a Worm Bin (grade levels 2-12) . . . . . . . . . . . . . . . . . . . . . . . . . . . . . . . . 36Harvest a worm bin and learn about the benefits and uses of worm compost.
Making a Guide to Worm Bins (grade levels 3-6) . . . . . . . . . . . . . . . . . . . . . . . . . . . . . 38Create a guide about how to set up and maintain a worm bin.
Part IV: Spreading the Word Students Teaching Composting 41
After students have learned to compost, they can teach others about composting. Here, students can spread the word about composting with four student-designed projects.
Project: Compost Presentation (grade levels 3-12). . . . . . . . . . . . . . . . . . . . . . . . . . . . 42Help teach your community about the joys and rewards of composting by preparing, practicing, and presenting a compost demonstration workshop.
Project: Compost Pamphlet (grade levels 3-12) . . . . . . . . . . . . . . . . . . . . . . . . . . . . . 43Use writing and graphics to create a pamphlet to teach others how and why to compost.
Project: Publicity (grade levels 3-12) . . . . . . . . . . . . . . . . . . . . . . . . . . . . . . . . . . . . 44Learn how to work with the media to promote composting and advertise compost workshops, pamphlets, or compost marketing projects.
Project: Marketing (grade levels 3-12) . . . . . . . . . . . . . . . . . . . . . . . . . . . . . . . . . . . 45Design, create, and market your own compost product.
A Few More Things 46Compost Glossary 47Vermont Framework of Standards and Learning Opportunities 49
- 1 -
By using the activities in this guide, you will be joining thousands of teachers across the country in bringing compost into the class-room as a valuable teaching tool. The activities you’ll find in Do the Rot Thing are hands-on and en-courage student exploration and learning.
Composting is a wonderful teach-ing tool because you can use it to introduce and explain concepts as far reaching as the life cycle, the importance of death and decomposition, soil, recycling, resource management, garbage and landfills, and biodegradable and non-biodegradable items. “Composting” is simply a way people use the natural process of decomposition to produce a rich, fertile soil amendment. With materials such as plant trimmings and kitchen scraps and a few basic techniques, anyone with basic mobility can compost.
Best of all, working with these ac-tivities is just plain fun. Children get to touch dirt, hold worms, build compost piles, set up and explore worm bins, analyze what they’ve eaten for lunch, plant seeds, teach other students, and do service projects. While doing this, the children learn a new appreciation of natural cycles and resources, and will go on to teach others the importance of respecting our environment.
This guide is broken up into several main sections:
Introductory Activities (p. 4) will help warm students up to the idea of composting, and teach students basic principles of biodegradability, resource conservation, recycling and composting, and soil science.
Basic Compost Activities (p. 13) will teach the fundamentals of building a pile, introduce the creatures who live in a pile, and show the benefits of compost for plants.
Worm Compost Activities (p. 26) will help students lean about the “super-heroes” of compost piles—red worms. Here, students will set up a worm bin, learn about worms, and harvest and use worm compost.
Spreading the Word: Students Teaching Composting (p. 40) contains activities directed by students to teach others about compost.
Go forth and compost!
INTRODUCTION
Welcome to the wonderful world of composting!

- 2 -
INTRODUCTORY ACTIVITIESThese activities will help warm students up to the idea of composting,
and teach students basic principles of biodegradability and soil science.

- 3 -
Materials Needed• Examples of materials that
students might throw away at school and home
• Chalkboard and chalk
Background InformationWe use materials from the earth every day, for everything we do. We eat food, drink from alumi-num cans or glass bottles, live in wooden houses, wear clothing made from cotton or a synthetic fiber, and use many plastic appli-ances. Some of these materials, such as metals and plastics, are non-biodegradable. These materi-als do not decompose, although many of them can be recycled. Biodegradable materials decay; examples include wood, food scraps, paper, and grass clippings.
Management SkillsBe sure to bring samples of biode-gradable and non-biodegradable materials for students to see.
Procedure1. Ask participants to name items that get thrown away at school and at home. Write ideas on the chalkboard and pass out samples as they are named.
2. Explain that some of the trash they have listed, like notebook paper, food scraps, and paper wrapping, is biodegradable matter
that can easily decay. Some of what we recycle or throw away, like aluminum cans or plastic bottles, does not decay.
3. Ask students if they use more biodegradable or more non-biode-gradable materials.
4. Much of what we throw away could be recycled, such as metals, glass, paper, and some plastics. As you name each recyclable item, cross it off the board.
5. Circle biodegradable items left on the list. Paper can be included here, too. Ask participants how they could recycle biodegradable matter such as food scraps, grass clippings, or leaves.
6. Biodegradable materials can be recycled through composting. Explain that composting is a natu-ral process of death, decay, and re-birth, and is nature’s way of recycling.
7. Some items on the list may be hazardous materials that require special handling.
8. Note how little is left when all recyclable and compostable mate-rials are taken off.
What is Biodegradable?
Introductory ActivityGrades 2-6
ObjectiveStudents will learn to identify biodegradable and non-biodegrad-able materials and gain a basic understanding of composting.
Time30-40 minutes
non-biodegradable biodegradable
ACTIVITY
1
X Look in the back of this booklet for how this activity applies to the Vermont Framework of Standards and Learning Opportunities.

- 4 -
Materials Needed• Students’ lunches
• Journals
• Drawing paper
• Crayons or markers
Background InformationAll of our food, including animal products and processed foods, originates from the earth. We can trace our food back to its original form, and from there back to the soil. This activity illustrates the importance of healthy soil. When we send our biodegradable materi-als to the landfill, we waste valu-able nutrients that the soil needs to give new life. Through compost-ing, we recycle our biodegradable materials and give them back to the soil. Compost feeds the billions of soil organisms that are essential in healthy soil. Healthy soil means healthy plants. Healthy plants mean healthy people and animals.
Management SkillsThis activity may work best with students working in pairs or small groups to encourage discussion and cooperation. Prepare sample lunches ahead
of time to ensure variety.
Procedure1. Inform students that no matter what they have packed for lunch, ultimately, they are eating food from dirt.
2. Challenge students to name a food in their lunch that did not come from dirt.
3. Help students figure out the ingredients in different foods and, as a class, trace each food’s origin back to the earth.
4. Ask students to list everything they are having for lunch.
5. Use a tuna fish sandwich for example:
• Bread came from wheat grown in the dirt.
• Pickles are preserved cucumbers grown in the dirt.
• Lettuce was grown in the dirt.
• Mayonnaise came from eggs, that came from chickens, that ate grains grown in the dirt.
• Tuna living in the ocean eat smaller fish, that eat zooplank-ton, that eat phytoplankton, which needs nutrients from the decomposed bodies of dead plants and animals that accumulate on the ocean floor and are brought to the surface by currents.
6. Once students have made a list of ingredients, ask the students to draw pictures of where their
Introductory ActivityGrades 2-6
ObjectiveStudents will track the food in their lunches back to the earth through writing and drawing.
Time30-40 minutes
ACTIVITY
2
X Look in the back of this booklet for how this activity applies to the Vermont Framework of Standards and Learning Opportunities.
Dirt for Lunch

- � -
lunches came from. For example, one drawing may have a field of wheat, a cow, a chicken, a farm, etc.
7. Encourage students to show their drawings to the class and explain how their lunch came
from dirt.
Follow-Up ActivitiesHave students record in their journal what they eat in one day or one week, and do the same exercise.
Source: Composting Across the Curriculum, Marin County Department of Solid Waste

- 6 -
Materials Needed• Lunch discards from cafeteria
or home lunches
• Environmental Lunch Log Sheets (p. 10)
• Four bags or buckets labeled: Compost, Recycle, Reuse, and Landfill
• Chart paper for making a graph
Background InformationMuch of the material we throw away can be reused, composted, or recycled. What people buy and how it is packaged can have a big impact on the garbage problem, as well as other environmen-tal problems. Looking through their lunches and finding ways to reduce the amount of garbage empowers students to find their own ways of helping the earth. Students will also have the opportunity to learn what natural resources were consumed to make this waste.
Management SkillsOne of the most important ele-ments of this activity is gathering enough lunch materials to sort and develop a sample. You may want to gather some extra materi-als from the cafeteria, just in case.
Procedure1. Make enough copies of the log sheet for the students to use on days 2, 3, 4 and 5, depending on how many days you choose to do the activity.
2. Set up buckets with signs which read Reuse, Recycle, Compost, and Landfill. (Put a tarp under buckets to keep classroom neat.)
3. Before lunch, ask your students to bring everything left over from their lunch back into the classroom. Hand out used bags if needed. Students should include all uneaten food and packaging materials. Nothing should be thrown away or recycled until the log is filled out.
4. For three to five days, when students are finished eating, they bring their lunches back to the
Introductory ActivityGrades 3-12
ObjectiveFor 3 to 5 days, students survey the packaging materi-als and food waste left over from their lunches. Students determine what can be composted, reused, recycled, or landfilled.
Time3-5 days to gather materials; 30-40 min-utes for main activity
Environmental LunchACTIVITY
3
X Look in the back of this booklet for how this activity applies to the Vermont Framework of Standards and Learning Opportunities.

- 7 -
classroom to fill out their log sheets. They must include what type of material it is: reusable, recyclable, compostable, or materi-al that must be sent to the landfill. Students then put materials in the appropriate bucket. Make sure to have a lid for the compost bucket and mix in small amounts of dry shredded paper or sawdust from untreated wood to avoid smells and suppress flies.
5. Introduce the Reduce, Reuse, Recycle hierarchy. Reducing the amount of packaging is best. Reusing a package is second best. Recycling/Composting comes in third, with Landfilling as a last resort.
6. Have the students fill in the totals on the log sheet each day.
7. Graph class totals each day for Recycled, Reused, Composted, and Landfilled materials. Repeat for three to five days. In small groups, students can brainstorm ideas for reducing the amount of lunch trash they create.
Other Options• Instead of tracking for three to five days, have students multiply the results of just one day’s totals by five to represent the amount of materials generated in one week. This number then can be multiplied by the number of weeks in a school year. This total can even be multiplied by the
number of classes in their school, and the number of schools in their city, county, state, or country.
• Bring in a scale and have students weigh each category of discards.
• Have students organize a class-wide or school-wide zero waste lunch day. The goal is to have no materials from lunch go to the landfill.
• Have students examine their garbage with regard to natural resources. For example, write the following headings on a piece of butcher paper: Rock, Mineral, Oil, Plant, and Animal. Make a pie chart representing the percentages over a period of time.
Source: San Francisco League of Urban Gardeners

- � -
Describe Item Reuse Recycle Compost Landfill Could Replace with:
Banana Peel
Whole Orange
Juice Box
X
X
X Reusable thermos or reusableplastic bottle of juice
Environmental Lunch Log Worksheet
Name: Date:

- 9 -
Materials Needed• 2–5 light colored armbands
• 1–2 dark colored armbands
Background InformationWithout decomposers such as bac-teria, fungi, worms, ants, beetles, and mites, decomposition would stop and resources which sustain life would be depleted. A seeming-ly endless variety of decomposers all serve different functions in the decomposition process.
Every compost pile has its own food web. In this activity, we will look at the role decomposers play in the cycle of life: life, death, de-cay, and re-birth.
Introductory ActivityGrades 2-6
ObjectiveParticipants will play a tag game that illustrates the cycle of life and the role of decomposers in the food web.
Time30-40 minutes
Management SkillsThis game can accommodate any number of participants. It can be a “walking” tag game if it is to be played in a confined area.
Procedure1. Introduce the life cycle and the role of decomposers in nature and in composting.
2. One participant will play the character “death” and wears a dark colored armband. If the group is large, you can have two.
3. Two to five participants are decomposer characters and wear light colored armbands. As a general rule, 1/5 of the class should
ACTIVITY
4
X Look in the back of this booklet for how this activity applies to the Vermont Framework of Standards and Learning Opportunities.
Decomposition Tag

- 10 -
be decomposers. All other partici-pants are plants or animals.
4. Plant and animal characters “die” when they are tagged by the death character. When tagged, they freeze in place until one of the decomposers unfreezes them by walking around them three times. The decomposers unfreeze the plants and animals as fast or faster than death freezes them.
5. The game has no natural end. You should let participants play long enough to experience the concept, and stop the game well before participants get exhausted or lose interest.
6. To summarize, form a circle and review the life cycle and the role of decomposers. Encourage students to talk about how they felt during the game, and what they learned.
Other Options• To demonstrate that life would stop without the decomposers recycling dead things, you can al-low the death character to tag and freeze the decomposer characters along with the plants and animals. The game, and life on earth, ends when everyone is frozen except the death character.
• Once everyone is dead on the ground, use guided imagery to encourage students to feel what it might be like to be part of the soil and, slowly, with water and sun-light grow into a plant.
Source: Composting Across the Curriculum, Marin County Department of Solid Waste

- 11 -
Materials NeededOne ball (soft and tossable)
Background InformationAnything that can decompose is biodegradable material. Biode-gradable materials include wood chips, twigs, straw, paper, leaves, manure, fruits, and vegetables. Some less common materials are kelp and old cotton clothes. All of these materials can be composted at home.
Management SkillsIn order for students to enjoy the game, they need a thorough knowledge of what kinds of mate-rials can be composted. The game is best played outdoors, but can be played sitting down in a confined or indoor setting. The game can be played in two parts. The first part is designed to let students get the hang of it, and the second is the actual game. Make sure students know to walk, not run, and to tag the person, not the ball.
I Can CompostProcedure1. Remind participants that some of the things we throw away, like aluminum cans and plastic bottles, do not decay. They are called non-biodegradable because the material they were made from does not decay easily. Banana peels, leaves, wood, and paper are all examples of biodegradable matter. Biodegradable matter can decay, or break down, and eventu-ally becomes compost. Compost-ing is a way of recycling the organ-ic materials that the participants otherwise might throw away.
2. On the board or on individual papers, give participants three minutes to list as many biodegrad-able items as possible that could be composted. You may also want to list materials that cannot be composted.
Introductory ActivityGrades 2-6
ObjectiveStudents will play a game that reinforces their knowledge of what materials can and cannot be composted.
Time20-30 minutes
ACTIVITY
�
X Look in the back of this booklet for how this activity applies to the Vermont Framework of Standards and Learning Opportunities.

- 12 -
3. To start the game everyone stands (or sits) in a circle. The first part of the game is to give students a taste of the game. It is not tag at first.
4. Call out a participant’s name and something that can be com-posted: “Sarah, Banana Peel!” Toss the ball to the participant named and then sit down. The participants continue on this fashion, calling out compostable material and tossing the ball to the named participant, until everyone is sitting.
5. Now the tag part can begin. One participant is placed in the middle of the circle and becomes “it.” The person in the middle must tag the person with the ball before the ball is tossed. The person throwing the ball names something that can be composted and then throws it to someone else before being tagged. If the student with the ball doesn’t name something before s/he throws the ball, s/he will be tagged, become “it,” and will change places with the one in the middle.
Source: Composting Across the Curriculum, Marin County Department of Solid Waste

- 13 -
BASIC COMPOSTINGComposting is an excellent way to teach students about the life cycle:
life, death, decay, and re-birth. When we teach composting, we are teaching how nature recycles. Students learn that by composting, they care for their communities and the natural environment. By adding compost to plants, students learn that healthy soil makes healthy plants and that all humans and animals depend on healthy plants to live. You will find instructions
here on how to build an active compost pile, how to learn about compost critters, and many other fun activities.

- 14 -
Basic CompostingGrades 2-12
ObjectiveStudents will:
• explore active compost, and
• identify various decomposer animals in their piles.
Time 20 minutes
Materials Needed• Compost
• Toothpicks
• Newspaper
• Compost Critter Worksheets (p. 15)
• One Compost Critter Information Sheet (pp. 16-17)
• Pencils
Background InformationThere are many different animals that help break down organic materials into the rich soil helper we know as compost. A compost pile and worm bin have an entire network of different bugs. Bacteria do most of the work, even though they are invisible to the naked eye. Other animals large enough to see, such as beetles, worms, centi-pedes, millipedes, and sow bugs, are also important decomposers. Without decomposer animals all life would stop because new plants would not have the neces-sary nutrients needed to grow. Decomposers turn our garbage into plant food.
Management SkillsStudents will sort through compost in groups of four. Each student will have his/her own worksheet. This is an exploratory activity. For some kids, it will be the first time they will have explored compost.
Procedure1. Read the Compost Critter Infor-mation Sheet before the activity begins. This will give you a good idea about the different roles bugs play in the ecosystem of a worm bin or compost pile.
2. Ask children why they think decomposers are important. Ask them what kind of bugs they have seen in soil.
3. Tell them these bugs eat dead things, turn them into soil, and therefore help new life begin. They play a vital role in the life cycle by breaking down organic materials.
4. Hand out worksheets and pencils to each student.
5. Divide kids into groups of four.
6. Have a representative from each group get a pile of compost and a toothpick for each person in their group.
7. Mention that the compost they are touching used to be grass, fruit, leaves, veggie scraps, etc.
8. Ask them to identify the bugs by referring to their worksheets.
9. Collect the compost after eight minutes or so.
10. The teacher or student may read from the Information Sheet about the different bugs found by the students.
11. Summarize by restating the role and importance of decomposers.
Compost CrittersACTIVITY
6
X Look in the back of this booklet for how this activity applies to the Vermont Framework of Standards and Learning Opportunities.
- 1� -
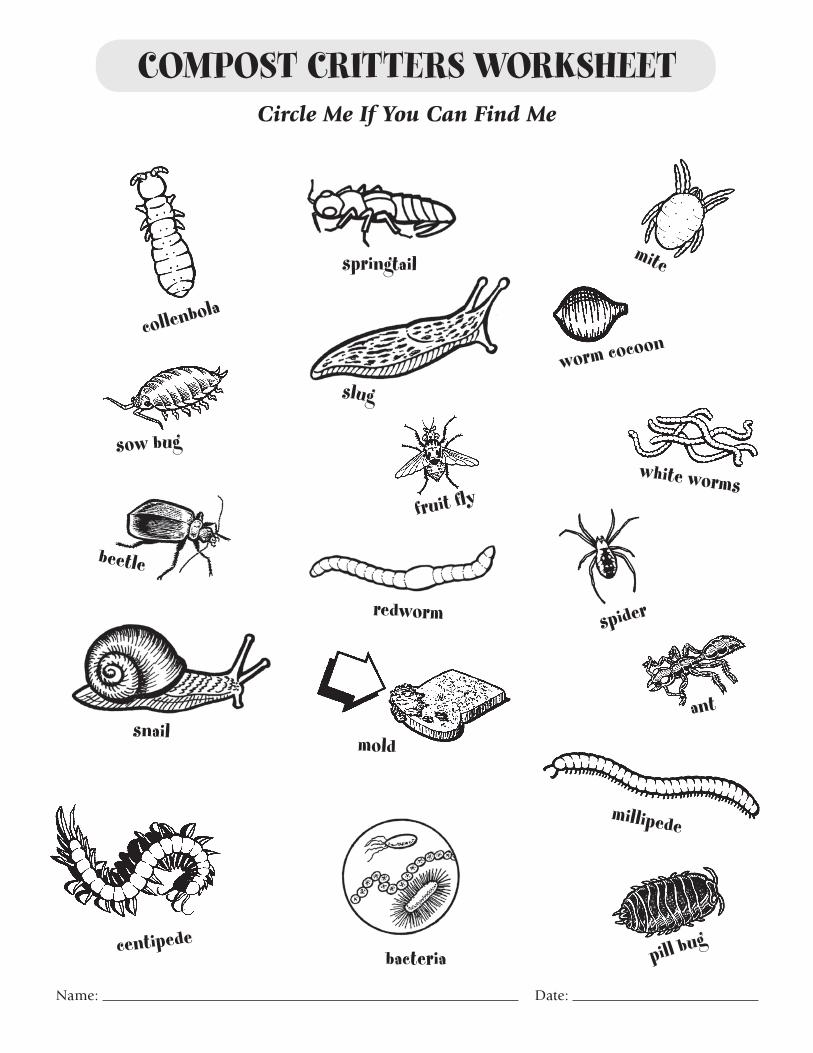
COMPOST CRITTERS WORKSHEETCircle Me If You Can Find Me
collenbola
sow bug
beetle
snail
springtail
slug
fruit fly
bacteriacentipede
pill bug
ant
white worms
worm cocoon
mite
millipede
redworm spider
mold
Name: Date:

- 16 -
Pill Bug or Roly PolyI am an isopod, which means I have ten pairs of legs that look very similar to each other. I eat old leaves and veggie scraps. I am about ½ inch long and I roll up in a ball if I am disturbed. Some people think that I look like a little arma-dillo. I am a grayish, dark color.
CentipedeI move quickly on my many legs. I have 15-137 segments with a pair of legs on each. I am a fierce hunter. I love to eat earthworms. I use my pair of poison claws to help keep my prey from getting away. I am about 1 to 2 inches long. I am usually reddish brown.
AntI am an insect with 6 legs. I help to decompose by breaking materi-
als into smaller particles.
I create tunnels, and move soil
into clumps. Some people would rather not
have me around their homes. I am black, brown, or red.
White WormI look like a frayed piece of thread. I am a skinny, white worm. I am ½ to 1 inch long. I am related to an earthworm. I like to eat rotting food after the other bugs get to it. You might think of me as one who likes to finish off the job.
BacteriaWe are so tiny that you can’t even see us. We are everywhere. I am colorless. I can eat almost any-thing. Some of us live together in groups and others don’t.
Mold I am a fungus. I am related to mushrooms. Most of us live on old food. You might see me on old food in your home or your worm bin.
Sow BugI have 10 pairs of legs. That makes me an isopod like my cousin the Roly Poly. I eat vegetation and old leaves. My ½-inch-long body is oval and flat with flattened plates, but I can’t roll up into a ball like Roly Poly. I am related to crayfish and lobsters. I breathe with gills so I must live in a damp, moist place. I am a dark, grayish color.
Earthworm I am a long, thin, soft-bodied animal. My body is made up of little segments. I do not have legs or eyes. I sense light and I breathe through my skin. I eat bacteria, fungi, and other decaying materials. I like dark, moist places.
Fruit FlyI am a very small fly. People don’t like me, but I don’t bite, sting, or make buzzing sounds. I don’t harm earthworms either. Sometimes you will see me around a worm bin if a person forgot to bury their food. I like to lay my eggs where it’s moist and warm.
Compost Critters Information Sheet

- 17 -
SlugI have muscular discs on my underside that are adapted for creeping and crawling. I lay egg masses that look like jello. I eat living material but will make an appearance from time to time in your compost pile to eat fresh
garbage and garden trimmings.
MiteI am tiny. It would take 25 of us to cover an inch-long line. My body is round and fat so it’s hard to see my 8 legs. I eat plant materi-als such as mold and soft tissues of leaves. Some of us eat the manure of other organisms. I am usually white or brown.
MillipedeI have so many legs
you would have a hard time counting them.
My name means “thousand legs,” but I don’t have that many. I am very shy and I roll up into a ball to avoid danger. I am a vegetar-ian and eat soft, moist, decaying plants. I am dark-red in color and am 1 to 3 inches long.
SpringtailI am a tiny insect less than 1⁄16 inch long. I eat molds and decay-ing materials. I have a little spring that helps me jump high into the air. I am white in color.
CollembolaI am a close relative of the springtail but I can’t jump. I am tiny, and less than 1⁄16 of an inch long. I eat molds and decay-ing matter. I am white in color.
BeetleI am an insect with shiny, black, tough wings and am about ½ inch long. I am a predator and eat slugs, snails, and soft insects such as caterpillars. I live beneath stones, boards, and other moist places.
SnailLike my friend, the slug, I am a mollusk and creep around on my muscular belly. I carry on my back a spirally curved shell. I also have a broad retractable foot and a distinctive head. Like slugs, I prefer to eat living material, but I will also show up in your compost pile or worm box from time to time for lunch.
SpiderI am related to mites and have 8 nifty legs. I am one of the least appreciated animals in the garden and compost. I feed on other insects and work hard to help control pests that will hurt a garden.
Worm CocoonYou can find me in a worm bin or compost pile. Before I have hatched, I am clear and yellowish and the shape of a lemon, and 1⁄8 inch long. After I have hatched
I turn pea green. Two or more baby worms are hatched at once.
Compost Critters Information Sheet

- 1� -
Materials Needed• Pitchfork or spading fork
• “Green” and “Brown” plant trimmings (see Background Information below)
• Yard clippers
• Water
• Compost bin
• Flat-edged shovel
Background InformationWith the help of micro-organisms and insects, we can take our biodegradable materials and turn them into a rich, dark soil amend-ment called compost. In this way, valuable nutrients are returned to nature rather than shipped away to a landfill. Composting is an excellent way to demonstrate the cycle of life: life, death, decom-position, and re-birth.
The four essential ingredients of compost are the BIG FOUR: browns, greens, air, and water. “Browns” are dry and woody plant trimmings, such as wood chips, dried leaves, and straw. Browns are rich in carbon. “Greens” are moist vegetable and fruit scraps, green leaves, and fresh manure. Greens are rich in nitrogen. In a compost pile, you want approximately half brown materials and half green materials by volume. Decomposer organisms need air and water to break down organic matter. Turn-ing and watering your pile pro-
vides it with the air and moisture needed for micro-organisms. The pile should be as moist as a wrung out sponge. These four ingredients create the perfect environment for the main decomposers: fungi, bacteria, and insects.
Management SkillsMake sure your compost bin is close to a source of water and is rodent resistant. A rodent-resistant bin has a top and a bottom, and all openings must be less than a ¼-inch. Include participants in all aspects of building a pile (gather-ing materials, layering, mixing, watering, and turning). The pile should be located outdoors and on top of soil rather than concrete or asphalt. Make sure to include students whenever possible. Also, encourage students to bring organic materials collected from the school to help build the pile.
Procedure1. Introduce the cycle of life and the concept of decomposition. Explain that by building a compost pile, we build a home for decomposers.
2. Biodegradable matter is anything that can decay. Have participants give examples of biodegradable materials that they might throw away at home or at school (banana peel, dried leaves). Keep a list.
Basic CompostingGrades K-12
ObjectiveStudents will build a compost pile out-side in a compost bin, and describe what compost is, how it is used, and why it is important.
Time40-60 minutes
Building a Compost PileACTIVITY
7
X Look in the back of this booklet for how this activity applies to the Vermont Framework of Standards and Learning Opportunities.

- 19 -
3. Explain that composting is a way of recycling the materials that the participants have listed. Com-posting recycles materials such as yard trimmings and food waste through a process of decomposi-tion. Bacteria, earthworms, and other creatures actually eat these materials and break them down into food that plants can eat. The end result is a rich, dark brown, earthy smelling material called compost. This compost can then be returned to the earth to help build a healthy soil and ensure more plant growth.
4. Pass around a small bag of finished compost.
5. Now that they have some idea what compost is, ask participants to describe possible reasons to compost. Answers may include:
• By composting at home, we can put less in the landfill.
• It’s fun.
• By returning biodegradable material to the soil, we are caring for the environment.
• Adding compost to a garden improves the health of the plants and soil, which reduces the need for chemical fertilizers and pesticides.
6. Explain the basics of compost-ing. Composting works best when a compost pile contains a proper mix of the BIG FOUR: browns, greens, air, and water. Browns are materials such as dried leaves, wood chips, or sawdust. Greens are materials such as grass clip-pings and food waste. The pile is
made by alternating equal layers of green and brown materials. If it is kept moist and aerated, the pile becomes a home for beneficial fungus, bacteria, and insects (the “FBI”). Over time, these decom-posers break down the green and brown materials until you are left with finished compost.
7. Review with the class the three steps to building a pile:
a. Chop materials in to pieces that are six inches in size or less.
b. Mix browns and greens (half of each by volume).
c. Maintain moisture by keeping pile as wet as a wrung-out sponge.
8. Include in the pile any materials students may have collected, such as orange peels, apple cores, other vegetable and fruit trimmings, and paper. You can also add plant mat-ter from around the school, like grass clippings and leaves. Avoid diseased plants. You may want to ask participants to bring lunch debris from the day before, although use this in moderation. Do not add dairy or meat products which may attract animals to the pile. Always bury the food waste in the center of the pile.
9. Have the participants collect the brown and green materials in separate piles (an equal amount of each works well).
10. Assign students to help with each of the various tasks of chop-ping, layering greens, layering browns, mixing, and watering.
11. Students can chop materials by piling up materials on the ground and using a flat edge shovel to bruise or chop pieces. Clippers can be used to cut up pieces. Ideal size is about six inches long, although any bruising is helpful. These activities should be carefully supervised.
12. Build the compost pile by alternating layers of brown and green material. Add water by spraying with a hose as you add each layer. The pile should be about as wet as a wrung-out sponge.
13. Stir the layers together with a pitchfork as you build the pile. Keep the pile “fluffed up” to maxi-mize the air in the pile.
14. Be sure to plan for the ongoing maintenance and eventual harvesting of the compost pile.
15. Once the pile is built, review the basics of composting and why it is important.
16. Always finish the pile with a layer of browns, finished compost, or soil. Don’t put greens on top; this will help prevent fly nesting.

- 20 -
BASIC COMPOSTING WORKSHEET
Name: Date:

- 21 -
Materials Needed• 5-gallon bucket with lid
• Trowel or spade
• Tarp
• 1 gallon of compost, soil, or sawdust
• Compostable materials (grass clippings, paper, food scraps from participants)
• Non-compostable materials (e.g. plastic cups)
• Water
• Worksheet
• “Greens” and “browns” (see Background for “Building a Compost Pile,” p. 18)
Background InformationSoil is one of the earth’s most precious natural resources. It is composed of rocks, minerals, liv-ing organisms, and organic matter. Organic matter in soil comes from the decomposition of plants and animals. Minerals in soil are need-ed for plant growth. The nutrient cycle, which converts dead plants or animal tissue into a form that can be absorbed by new plants and animals, is essential to all life on earth. Tiny microscopic ani-mals in soil eat and transform the dead tissues of plants and animals into nutrients easily absorbed by plants. These bacteria are the most numerous creatures in the world. One handful of soil can contain
five billion creatures, as many as all the people in the world.
Composting is the process people use to convert organic materials to a rich soil amendment. It hap-pens anywhere there is sufficient organic matter, moisture, and air to nurture the microscopic bacteria, fungi, and other organ-isms that decompose organic matter.
Management SkillsAs it can take place entirely inside the classroom, this activity is especially appropriate for classes that do not have easy access to an active outdoor compost pile. The whole class can follow the composting process taking place in a single bucket. You could also have several buckets with different types of materials. It is important to maintain the buckets by open-ing and turning the material with a trowel every few days to keep the compost aerated.
You may want to collect materials from students a few days before the presentation. It is also a good
Basic CompostingGrades 2–12
ObjectiveParticipants will:
• make compost in a bucket in the classroom;
• record their observations over 2–4 weeks; and
• gain an under-standing of the life cycle, decomposition, and biodegradable materials.
Time 40 minutes with follow-up
Compost in a BucketACTIVITY
�
X Look in the back of this booklet for how this activity applies to the Vermont Framework of Standards and Learning Opportunities.

- 22 -
idea to add more browns than greens to your bucket. It will not heat up as fast, but it will avoid potentially bad odors. Review “Building a Compost Pile” before undertaking this activity (p. 18).
Procedure1. Discuss how composting is nature’s way of recycling. (See “Building a Compost Pile,” p. 18.)
2. Talk about why people would want to compost and why it is important.
3. Explain that the class is going to perform an experiment recycling compostable materials by making compost in a bucket.
4. Ask the students for materials they collected for the compost.
5. Hand out worksheets.
6. Discuss the basics of compost: The BIG FOUR, maintenance and harvesting. (See “Building a Compost Pile.”)
7. Collect a small quantity of non-compostable materials, such as plastic cups or spoons, to include in the compost pile for observation.
8. With the trowel or spade, chop the food and other organic mate-rial into small pieces. (The smaller the pieces, the faster the decompo-sition.) Leave some large pieces in for comparison.
9. Fill the bucket half full with greens and browns. Layer and mix as you go. Include non-biodegrad-able items in the layers as well. Add water as needed to keep the pile moist.
10. On a worksheet, record items that go into the bucket.
11. Add about one gallon of soil, compost, potting mix, or sawdust from untreated wood to the 5-gallon bucket. The bucket should not be more than ¾ full.
12. Keep material moist but not completely wet.
13. Have participants write their predictions about what will happen to the contents of the bucket and the individual items. Will it smell bad? Will it decay? Will things grow in it? What will happen to the banana peels?; the plastic cups?
14. Summarize by reviewing the basics of compost and why it is important.
Follow-UpMaintaining Your Compost in a Bucket
PArT I(Done by teacher)
Every few days, open up the buck-et to mix and water the contents. The teacher may wish to keep a classroom chart recording the temperature, odor, texture, weight, and other observations about the compost.
PArT II1. At the end of two to four weeks, read the
list of contents. Have participants re-read their predictions for what will happen to the contents of the bucket.
2. Get volunteers to examine the bucket.
3. Outside or over the tarp, have the volunteers sift through the contents of the bucket. Try to identify as many items as possible.
4. Discuss the outcome with participants. What happened? How was it different from what they expected?
5. Explain that with the help of bacteria and other organisms, all organic material can decom-pose into a rich, dark compost. Compost helps make healthy soil and can be used on lawns, gardens, or house plants.
Source: San Francisco League of Urban Gardeners, San Francisco, CA

- 23 -
as a highly efficient organic fertil-izer and you only need to add one part worm compost to two parts soil.
Management SkillsThis can be a team or individual activity. The planter containers used in this activity are a very small sample, so results can vary tremendously and may not give an accurate reading of the effects of compost. For the advanced partici-pant, more variations can be used to create a larger statistical sample.
Procedure1. Introduce activity by discussing what compost is, what soil is, and how compost benefits plants.
2. Divide students into small groups.
Materials Needed• Compost
• Empty six-pack planter containers (one per group)
• Drip trays for planters
• Potting soil (or soil from school yard)
• Large seeds, such as bean or sunflower
• Measuring cups
• Plants in Compost worksheet (p. 25)
• Masking tape
• Markers
Background InformationThe structure of soil is improved when compost is added. Compost increases the soil’s ability to hold water, helps soil to achieve a good airflow, and adds nutrients for plants. Compost will reduce the risk of plants getting dis-eases and will give life and vitality to your soil. Healthy soil means healthy plants. Healthy plants mean healthy animals and people.
It is possible to do this activity with worm compost. If you choose to do so, keep in mind that worm compost acts
Basic CompostingGrades 3-12
ObjectiveParticipants will:
• observe and record the effects of compost on the germination of seeds and the growth of plants; and,
• learn about the benefits and uses of compost.
Time30-50 minutes
Plants in CompostACTIVITY
9
X Look in the back of this booklet for how this activity applies to the Vermont Framework of Standards and Learning Opportunities.

- 24 -
3. Hand out worksheets and materials. Have participants use tape to mark each two sections of each six-pack planter container with the headings: #1 Compost, #2 Compost/Soil, # 3 Soil.
4. Fill the two sections labeled #1 with just compost.
5. Measure out one part compost, one part soil. Mix and fill the two sections labeled #2 with this mixture.
6. Fill the two sections labeled #3 entirely with potting soil.
7. Place three seeds in each of the sections. You may wish to use beans or sunflowers, since they sprout easily.
8. Water the seeds as directed on seed packet. Set aside in a warm, sunny area.
9. Hand out worksheet and ask participants to make predictions about the experiment. Which soil mix will sprout the most seeds? Which will grow the fastest? Why?
10. After one week, return and examine the progress of the seeds. On the observation sheet, record the number of seeds that sprouted.
11. Measure the height of each plant and record on the observa-tion sheet.
12. Continue to measure the height of each plant every few days and record on the sheet.
13. After two to three weeks, ask participants to examine the data they have gathered and draw
conclusions from it. Which pot grew the tallest plants? Which one looked the healthiest? Why? If they were going to plant beans, what mixture of compost to soil would they use?
14. The bean sprouts can be re-planted, taken home, or returned to the compost pile.
Source: Compost! A Teacher’s Guide to Activities and Resources in the East Bay, Cindy Nelson for the Alameda County Waste Management Authority, 1991.

- 2� -
Plants in Compost
Name:
Plant Species: Date Planted:
Potting Mixtures:
#1.
#2.
#3.
Name: Date:
Sprouting Plant Date # of Seeds Sprouted
Section #1
Section #2
Section #3
Growth Plant Date Height
Section #1
Section #2
Section #3

- 26 -
WORM COMPOSTINGWorm composting is an excellent way to introduce living decomposers in the classroom. By keeping an active worm bin inside, students can
observe the natural cycles of decomposition and gain new appreciation of earthworms as the “guts” of the soil.

- 27 -
Materials Needed• Magnifying boxes or glasses
(younger students)
• Worms
• Warming Up to Worms worksheets (p. 29)
• Paper towels (older students only)
• Toothpicks (older students only)
Background InformationWorms are incredible decom-posers. The worms we use for composting in boxes are surface feeders called Eisena foetida. They are also called manure worms, red wigglers, or redworms. Over 7,000 species of worms inhabit the world, and they are important to ecosystems. In ancient Egypt under Cleopatra’s rule, it is report-ed that anyone who knowingly killed a worm would be sentenced to death. Today, there are engineers in India who are learning how to clean sewage water using worm systems.
There are lots of fun facts to know about redworms. They have five pairs of hearts, no eyes, and no teeth. They breathe through their skin, and need dark,
moist surroundings. Eight adult redworms can produce 1,500 off-spring within six months, if condi-tions are favorable. Each worm is both male and female and can eat over half of its weight in food every day.
Management SkillsWorms are very sensitive to light, so handle them with care. Make sure there is a moist piece of paper towel in each participant’s mag-nifying box. You should also put a little bit of bedding or worm castings in the magnifying box with them. For older students, use moist paper towels and tooth-picks. Younger children may not be able to use the worksheet.
Worm CompostingGrades 3-6
ObjectiveParticipants will:
• learn about worms and their role in nature through observation and discussion, and
• overcome any fear of worms
Time20-40 minutes
Warming Up to WormsACTIVITY
10
X Look in the back of this booklet for how this activity applies to the Vermont Framework of Standards and Learning Opportunities.

- 2� -
Procedure1. Ask participants to brainstorm questions about worms. Encourage students to ask any kind of ques-tion about worms. Try brainstorm-ing worm adjectives.
2. Discuss how worms are recy-clers, how they have been held in high esteem by many cultures for centuries, and that they can help us manage our waste.
3. Tell participants they are now going to investigate the answers to their questions through direct observation of redworms. Have participants divide into small teams of two or more and hand out a magnifying box with a worm to each team. (For older kids, a paper towel and a toothpick is fine.)
4. Hand out the Warming Up to Worms worksheet to each participant.
5. Ask the teams to observe their worm through the magnifying box for a few minutes. Walk the class through filling out the worksheet.
6. Once the students are finished, facilitate a discussion on the ques-tions that were brainstormed at the beginning of the lesson. Some of the questions might not have been answered from observations. How would participants research those unanswered questions?
7. Ask participants to add adjectives to their list. Point out differences from the first list.
8. Summarize the main points again.
Source: Cindy Nelson, Alameda County Mas-ter Composter/LITES Program; Mills College, Oakland, CA.

- 29 -
Warming Up to Worms
1. What color is the worm?
2. What shape is the worm? Describe it.
3. How does the worm’s skin feel?
4. Is there a difference between the top side and the bottom side of a worm? Describe what both sides are like.
5. Can you tell which is the front end of a worm and which is its tail? How do you know?
6. Does an earthworm have…
EYES?
EARS?
LEGS?
A NOSE?
A MOUTH?
7. How does your worm move? Describe it.
8. What’s the name of your worm?
9. Why are worms important to life on earth?
Name: Date:

- 30 -
Worm CompostingGrades K-12
ObjectiveStudents will:
• set up a worm com-posting system, and,
• learn about the importance of worms in the life cycle and as transformers of garbage.
Time40-60 minutes
Materials Needed• Worm bin
• Bedding materials
• Handful of soil
• One pound of worms
• Water
• Collection container
• Worms at School worksheet (p. 32)
Background InformationWorm composting is a fun, low-maintenance way of recycling your organic kitchen scraps. Worms eat your vegetative food scraps, turning them into a high quality fertilizer known as worm castings.
You provide the living environ-ment for the worms—the bin, bedding, and food—and the worms do the rest. Worm com-posting can be done inside or outside (depending on climate),
requires no turning, is odorless if done correctly, and can be done in small spaces. Worm composting is most appropriate for food scraps.
The compostable matter we throw away—such as apple cores, melon rings, and soggy bread—are things that worms like to eat. Redworms eat food scraps and break them down into rich, dark brown, earthy-smelling material called worm castings. Castings, which are nitrogen-rich fertilizer, can be returned to the earth and are good for lawns, gardens, and houseplants.
Management Skills Since participants will be setting up a worm composting system in the classroom, it is necessary to secure both worms and a steady supply of worm food. Worm bins need regular maintenance. Please be mindful not to overfeed.
ACTIVITY
11
X Look in the back of this booklet for how this activity applies to the Vermont Framework of Standards and Learning Opportunities.
Setting Up a Worm Bin

- 31 -
Procedure1. Introduce worm composting by discussing the life cycle, the importance of worms in nature, and worm composting as a waste management strategy. (See Intro-duction for more information.)
2. Buy, scrounge, or build a worm bin:
• A worm bin can be made of wood, plastic, or other materials.
• The size of your classroom worm bin should be at least 1 ½ square feet, and about 16 inches deep.
• Good ventilation is essential for aerobic decomposition and a healthy environment for worms.
3. Prepare Worm Bedding:
• Tear newspaper into ½" to 1" wide strips (tear lengthwise, with the grain).
• Dunk newspaper strips in water and add to bin.
• Add a handful of soil and fluff.
• Toss everything like a big salad.
4. Add worms and food:
• Purchase or obtain about 1 pound of red worms (about 500 to 1,000 worms)
• Gently place you worms in the moist newspaper bedding near the bottom of the bin.
• Put a handful or so of food waste near the worms and cover well with the moist newspaper bedding.
• Add more dry shredded news-paper to fill the bin, and then a layer of burlap or cloth.
5. Explain to participants that using worms to compost our food scraps makes sense for a lot of reasons:
• We will reduce the amount of garbage we create.
• Compost improves the soil and makes it hold water better.
• Using compost reduces the need for chemical fertilizers, which helps prevent the creation of more pollution.
• Composting with worms is fun!
6. Let your worm bin rest by not adding additional food for 1-2 weeks. This allows the worms a chance to get used to their new environment and for the food to begin to decompose.
7. For ongoing maintenance, feed every three to seven days, always burying the food under paper. Do not overfeed. Bad smells or large amounts of uneaten food indicate overfeeding. Add more paper as needed to cover food.
8. Harvest castings after three to six months. (See “Harvesting a Worm Bin,” p. 36.)

- 32 -
Worms at School
Name: Date:

- 33 -
Worm CompostingGrades 2-12
ObjectiveParticipants will:
• learn why worm composting is impor-tant to humans;
• record observations of the worm bin environment;
• describe the elements redworms require to live a productive life; and
• get hands-on expe-rience with a worm bin environment.
Time20-40 minutes
Materials Needed• An active worm box that has
been going for at least 3 months
• Newspaper or paper plates
• Damp paper towels
• Magnifying boxes/glasses
• Toothpicks or Q-tips
• Paper and pen for each group
• Worms Inside and Out Information Sheet (p. 35)
Background InformationThe worm bin environment includes worms, bedding, food, worm box animals, moisture, and more. Through exploration, participants can learn what worms need to live and how to go about setting up a worm bin. Worms, like humans, need air, water, and food to live. A worm box should be cool and moist for the worms.
Worm Bin ExplorationWorms are amazing animals. Worms breathe through their skin. If their skin dries out, they will die. Worms can eat more than half their weight in food every day. They have no teeth but grind the food in their gizzard. Did you know that they don’t have eyes? Worms sense light without seeing it.
A worm box is an ecosystem all in itself. There are many other animals that live in the bin besides the red wigglers. You may see mites, beetles, ants, or sowbugs, to name just a few. All of these animals are important and play a vital role in your worm box.
Management SkillsThis is a group activity that in-volves working together. Children will be in groups of four to six. Kids tend to get very excited with worms. Make sure the groups are organized before handing out compost.
ACTIVITY
12
X Look in the back of this booklet for how this activity applies to the Vermont Framework of Standards and Learning Opportunities.

- 34 -
Procedure1. Introduce activity by soliciting questions about worms from the group.
2. Discuss the role of worms in the soil and how they help to recycle.
3. Divide participants into groups of four or six.
4. Designate one participant in each group to be the reporter. The responsibility of the reporter is to write down observations and to report to the whole group at the end of the activity.
5. Hand out piles from the inside of a worm box (on newspaper or a paper plate), and toothpicks or Q-tips.
6. Have the participants list all of the things they see in the pile. Can they see pieces of food? What kinds? What kind of bugs are there?
7. Ask reporters to read off their list.
8. Talk about what worms can and can’t eat.
9. Ask students to discuss and record what they think worms need to live, based on their observations.
10. Use the Worms Inside and Out information sheet (p. 35) to teach worm anatomy.
11. Finally, ask students how they might create a home for worms in their classroom based on their observations.
12. Summarize by discussing what worms need to live in a classroom, what role they play in nature, how they can help us by composting our garbage, and how much plants love their castings. Also, review student questions to make sure they were answered.

- 3� -

- 36 -
Materials Needed• Active worm bin
• Two tarps
• Two five-gallon buckets
• Colander
• Water
• Paper bags or re-used plastic bags to fill with worm castings for students
• Empty plastic beverage bottles
• 3 to 6 hand-held garden forks or trowels
• Extra worm castings
Background InformationHarvesting a worm bin allows participants to see the magic of the life cycle. By remembering the kinds of foods or other materials that were placed in the bin, partic-ipants can marvel at the compost (or castings) worms have made. Worm castings are very high in available nitrogen, so they are a high-quality organic fertilizer for plants. There are several methods for harvesting and everyone seems to have a favorite.
Management SkillsSince this activity involves harvesting worm castings, it is im-portant to have access to a worm bin which has been fed for at least three months. It is assumed that participants have had an introduc-tion to worm composting.
Participants will harvest worm castings from a bin using three different techniques. One five- gallon bucket will be used for the bucket method, and the other bucket will be used for both the sunlight and hand-picking methods. The finished compost can be used around school or taken home.
Procedure1. Before participants arrive, set up three harvesting stations, or choose just one method to demonstrate:
• Bucket method (requires a tarp, bucket, and water)
• Sunlight method (requires a tarp, bucket, and a sunny day or bright light)
• Hand-picking (requires a tarp and bucket)
2. Review worm composting with students: What do worms eat? How do they help us? How do they help nature? Why is worm composting important?
3. If it is a classroom worm bin, ask participants what they have been putting in the bin. Ask them what they think has happened to the items they named.
4. Remind participants that worm composting is a way of recycling food scraps. Red worms eat food that we would otherwise throw away. The worm castings that are left behind can be used as fertil-izer to enrich the soil and feed
Worm CompostingGrades 3-6
ObjectiveParticipants will:
• harvest a worm bin and learn about the uses and benefits of worm castings, and
• learn about the role of earthworms in nature and composting.
Time30-60 minutes
Harvesting a Worm BinACTIVITY
13
X Look in the back of this booklet for how this activity applies to the Vermont Framework of Standards and Learning Opportunities.

- 37 -
plants. Explain that the worm bin is ready to be harvested. They will be taking out the worm castings to use as plant food.
5. Brainstorm uses for the com-post that they will harvest today. Answers might include putting it on the lawn, around trees, or on classroom plants.
6. Introduce the three techniques of harvesting: the bucket method, the sunlight method, and hand-picking
• Bucket Method: Participants place all contents of the worm bin in a bucket. Gently pour cool water in the bucket. The worms will be okay for a minute or two. Pour the contents of the bucket through the colander. Retrieve the worms and uneaten food and bed-ding from the colander and return them to the bin. The brown liquid is compost tea that can be used to water plants.
• Sunlight Method: Participants mound compost in small piles on the tarp and let them sit in the sun or under a bright light for a few minutes. The worms will move to the center of the pile to avoid the light. The outer part of each pile, now without worms, can be removed and put in the five-gallon bucket. As the castings are removed, the newly exposed worms will head to the middle out of the light and the process can be repeated until you are left with a ball of worms. This ball of worms can be returned to the worm bin.
• Hand-Picking: The participants will sort through one big pile of
compost on the tarp, picking out any worms they come across and returning them to the bin. Continue until the pile seems to be relatively worm free.
7. A fourth, slower technique can also be used, although it takes several months to complete.
• Migration Method: Push all the bedding, worms, castings, and food in the bin over to one side. Stop adding new food to that side. Make sure ½ of the worm box is empty. Set up the empty side like a new worm box with moist bed-ding and dry bedding. Put some food in the new side and keep feeding that side (about ½ the amount you usually do). After the worms have eaten the food on the old side they will begin to migrate. You may have to wait several months for this to happen. Eventually, you will be able to harvest the old side.
8. Divide participants into three groups and begin harvesting. You may wish to rotate the groups so that all methods are sampled.
9. When the harvesting is com-plete, ask participants to compare the various methods. What was hard about the bucket method, the sunlight method, and hand-picking? What was easy? Which one seemed to be fastest? Which one would they like the best and why? Which one did they like the least and why?
10. Divide up the harvested worm castings so that each participant has a bag to use at school or home. The castings will need to sit for two or three days before they are ready, then they can be applied directly to plants. The compost tea may be put into empty beverage bottles and used right away.

- 3� -
Materials Needed • Paper
• Crayons, markers, or colored pencils
• Used cereal boxes for cover
• String or ribbon
Background InformationWorm composting is making its way into classrooms across the nation. Worms help us to recycle our organic materials and keep them out of the landfills. They are also a fun learning tool. By teaching others about worm composting, participants can become worm experts. Everyone can benefit by having a worm box. This exercise helps participants spread the word about worms!
Worm CompostingGrades 3-6
ObjectiveParticipants will:
• write and illustrate a guide to setting up and maintaining a worm bin, and
• review the basics of worm composting.
TimeOngoing
Management SkillsThis activity is a good follow-up to “Setting Up a Worm Bin” (p. 30). Before undertaking this activity, participants should have a basic understanding of worm composting. This exercise can be used to reinforce previous lessons on worm composting, and is an excellent opportunity for your students to teach others about worm composting.
Procedure1. Explain that guides are a way that people learn to do things they have never done before. Guides teach people how to repair a car, build a house, program a computer, make a kite, and set up a business. Today, the class is going to begin creating guides of their own. Their
ACTIVITY
14
X Look in the back of this booklet for how this activity applies to the Vermont Framework of Standards and Learning Opportunities.
Making a Guide to Worm Bins

- 39 -
guides will be about how to start and maintain a worm bin for composting food scraps. Each page will have text and an illustration.
2. Review a list of important facts about worm composting and the importance of worms in nature.
3. Decide upon 12 different sentences about worms that will go in the guide as captions. Examples are: “Worms help eat my garbage,” or “Worms need air, water, and food to live.”
4. Give three pieces of paper to each student. Fold in half and write captions on the top. Once all the captions are written, they can begin illustrating.
5. Each participant can begin work on their own guide. Have the participants illustrate each page of text.
6. When the guides are finished, use cardboard and string or a piece of paper for a cover.
7. If possible, arrange a presenta-tion about worm composting for another class so the students can use their guides and show their worm boxes.
Source: Project YES, East Bay Conservation Corps

- 40 -
SPREADING THE WORD
These four projects can be done individually or together as part of a large coordinated class project. These projects can be done in depth at the middle
or high school level or simplified for younger students.
STUDENTS TEACHING COMPOSTING

- 41 -
The ProjectsA. Give a presentation
or workshop on composting.
B. Develop a pamphlet or brochure on composting.
C. Publicize and promote composting.
D. Promote or market compost and compost-related products.
Students will plan and organize how to communicate their knowl-edge of composting to others. Students will work together in groups, use community resources, develop materials, write, and present their work.
Background InformationStudents learning about compost-ing in school may be more knowl-edgeable than their parents about issues of waste reduction. Students can play a very valuable role in teaching others in their school and community how and why to compost. Children who under-stand the earth’s regenerative process of decomposition and our dependence on this cycle understand something critical to our survival that adults may have forgotten. It is very empowering and appropriate for children to
educate adults about composting and other critical earth processes. This activity is a community learn-ing or service project.
If you plan to do the four projects as a comprehensive, coordinated effort, split the class into four teams and give each team one of the four projects to work on. For a less involved project, a whole class can do just one project. These projects can be simplified for young students.
Management SkillsAll instructions in these activities are directed at students. Younger students will need more help organizing and assigning tasks.
Basic or Worm CompostingGrades 3-12
ObjectiveAfter students have learned to compost, they can teach others about composting. Listed are four projects designed to help students spread the word about composting.
TimeOngoing
Spreading the WordSTUDENTS TEACHING COMPOSTING
X Look in the back of this booklet for how this activity applies to the Vermont Framework of Standards and Learning Opportunities.
- 42 -
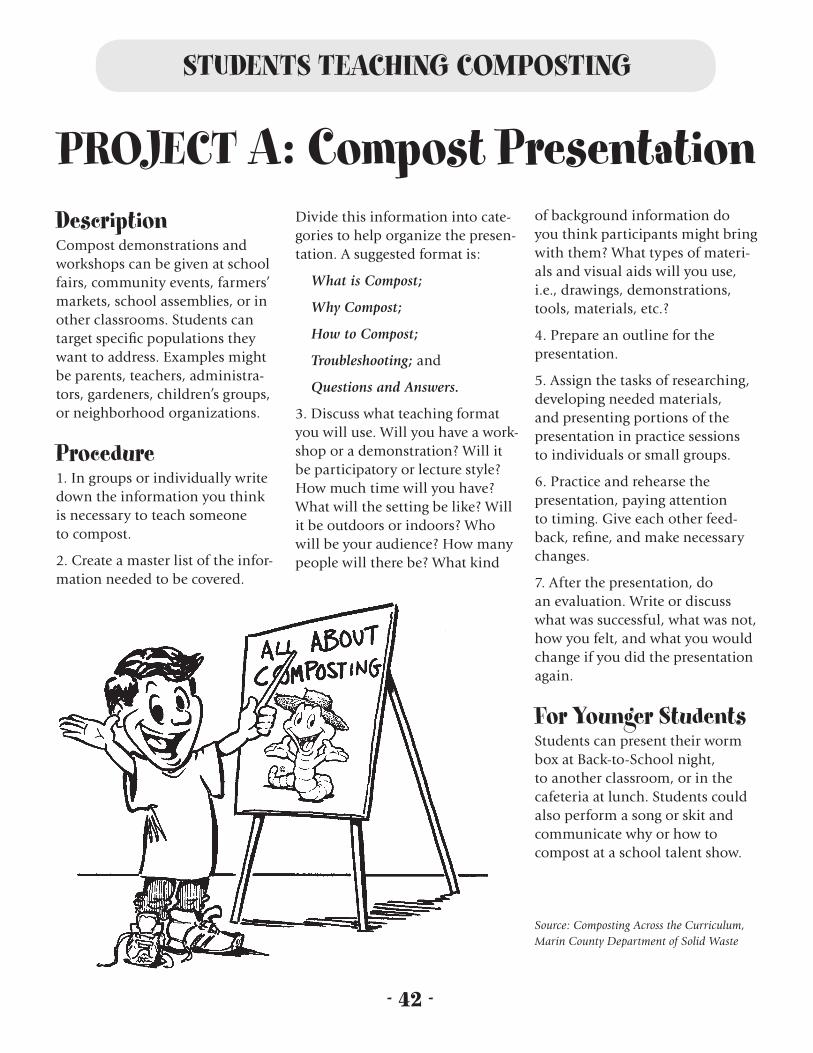
DescriptionCompost demonstrations and workshops can be given at school fairs, community events, farmers’ markets, school assemblies, or in other classrooms. Students can target specific populations they want to address. Examples might be parents, teachers, administra-tors, gardeners, children’s groups, or neighborhood organizations.
Procedure1. In groups or individually write down the information you think is necessary to teach someone to compost.
2. Create a master list of the infor- mation needed to be covered.
Divide this information into cate-gories to help organize the presen-tation. A suggested format is:
What is Compost;
Why Compost;
How to Compost;
Troubleshooting; and
Questions and Answers.
3. Discuss what teaching format you will use. Will you have a work-shop or a demonstration? Will it be participatory or lecture style? How much time will you have? What will the setting be like? Will it be outdoors or indoors? Who will be your audience? How many people will there be? What kind
PROJECT A: Compost Presentationof background information do you think participants might bring with them? What types of materi-als and visual aids will you use, i.e., drawings, demonstrations, tools, materials, etc.?
4. Prepare an outline for the presentation.
5. Assign the tasks of researching, developing needed materials, and presenting portions of the presentation in practice sessions to individuals or small groups.
6. Practice and rehearse the presentation, paying attention to timing. Give each other feed-back, refine, and make necessary changes.
7. After the presentation, do an evaluation. Write or discuss what was successful, what was not, how you felt, and what you would change if you did the presentation again.
For Younger StudentsStudents can present their worm box at Back-to-School night, to another classroom, or in the cafeteria at lunch. Students could also perform a song or skit and communicate why or how to compost at a school talent show.
Source: Composting Across the Curriculum, Marin County Department of Solid Waste
STUDENTS TEACHING COMPOSTING

- 43 -
DescriptionWritten material explaining why and how to compost can be devel-oped and distributed throughout the community and at compost workshops and demonstrations. Developing pamphlets and other written material is an exercise in combining writing and graphics to convey information. If students have access to a computer, they can practice desktop publishing; if not, they can cut and paste.
Procedure1. As individuals or in small groups, brainstorm and write down the information you feel is necessary to compost successfully.
2. Gather examples of other pamphlets and informational materials to get ideas about different formats and styles.
3. Decide what information will be included in the pamphlet.
4. Decide on the format and style of the pamphlet. How will it be
PROJECT B: Compost Pamphletorganized? How long will it be? What drawings will be included? What type size will you use?
5. Assign individuals or small groups the task of researching, writing, or illustrating portions of the pamphlet.
6. Compile all the information and illustrations, and edit into a rough draft.
7. Get feedback, refine, proofread, and edit again until you have a final draft.
8. Produce the pamphlets using a computer, typewriter, or copy
machine. Translate the pamphlet into other languages spoken in you community.
Other Ideas 1. Draw pictures of the nutrient cycle with a compost slogan such as “Rot is Hot” or “Don’t Throw It Away.”
2. Write letters explaining why or how to compost and send them to a friend or relative.
2. Produce a children’s book explaining why and how to compost.
STUDENTS TEACHING COMPOSTING

- 44 -
DescriptionThe publicity project focuses on using the media to promote composting and advertise compost workshops, pamphlets, or compost marketing projects.
Procedure1. Decide what to publicize. Is it a workshop, a product, or the idea of composting?
2. Discuss the message you want to convey and what information people need to know. For example, if you are publicizing a workshop, you need to include time, date, and location.
STUDENTS TEACHING COMPOSTING
PROJECT C: Publicity3. Research available media out-lets. Distributing fliers and post-ers, putting announcements in bulletins and newspapers, word-of-mouth, and public service announcements are some exam-ples of ways to get the word out.
4. Discuss and decide which me-dia outlets to use. Then, develop your material. This might mean designing posters or fliers, or writ-ing press releases for newspapers or public service announcements for radio stations.
5. Distribute the publicity and evaluate which media outlets were the most effective. For example, when people come to a workshop,
ask them how they heard about the project or product. Make a chart to classify this information easily.
For Younger StudentsPublicity could be a compost poster contest where the posters are put around school. An announcement in the school bulletin, newspaper, or PTA news-letter could tell what your class is doing with composting and where interested teachers, parents, and students can go for more informa-tion. Cartoons encouraging composting can be submitted to newsletters and newspapers.

- 4� -
DescriptionDesign, create, and market any or all of the following: packaging to sell finished compost or worms in, compost T-shirts, bumper stick-ers, posters, or pins. These items can be marketed at compost work-shops and demonstrations or sold at fairs, farmers’ markets, school fund-raisers, or door-to-door.
Procedure1. Study packaging and design. Bring in examples of packages, T-shirts, bumper stickers, and/or posters. Discuss the information conveyed by the product packag-ing. Is the message a simple “buy this” or is there a deeper message? Which packaging and designs are effective in getting their intended message across? How do they do it?
2. How much and what type of information do you want to convey with your packaging or product? Can you make it informational, attractive, and functional?
3. Research available materials for the package or product. What are the costs? Are there environmental considerations with using certain materials? How will you produce the product? How many items will be produced? Will you do the work by hand or just develop the design and pay someone to do the production? How much will
STUDENTS TEACHING COMPOSTING
it cost? Do you have to make a profit? If so, how much?
4. Decide what you want your product to say, and come up with several ideas. Choose one or com-bine them into a new idea. Why did you choose the one you did?
5. Decide how you will sell your product. Will it be at a one-time event or will you have many op-portunities to sell? Will you sell the product in conjunction with educational programs on com-posting, or will you sell it alone? Who is the market?
6. Market your product and evalu-ate what worked and what did not. How do you feel it worked, and what would you change in the future?
For Younger StudentsUsed milk cartons from lunch can be decorated and used to package finished compost. Each student can paint a T-shirt with a compost theme. Wearing T-shirts with messages on them is a form of marketing. Book covers or greet-ing cards can be decorated with compost messages.
PROJECT D: Marketing

- 46 -
A Few More Things The following offers a response to some questions that were raised during the final review of this booklet. Please let us know if you come across anything that raises questions for you as you use the booklet. We’ll try to include some additional clarifications in future editions.
1. Do plastics and metals ever decay?
It is stated throughout this booklet that plastics and metals do not decay or break down. While not completely accurate, it does seem that way. Plastics and metals decay extremely slowly in comparison to food in a compost bin or pile—often taking decades or even centuries to break down instead of weeks or months as with compost.
2. Why should I not add meat and dairy to my compost pile?
Most of these activities indicate that meat and dairy products should not be added to compost. On a home or school-composting scale, this is true. While these materials will decompose just fine in a compost bin, they are more apt to attract animals than fruits and vegetables. Further, in a small pile which does not reach a high temperature, these materials decompose slowly and may rot before they are composted, creating unpleasant odors. Unless you’re an expert composter, it’s best to omit meat and dairy from your compost bin.
3. Does compost tea have a shelf-life?
Several activities involve the production and use of compost tea. Compost tea is best used when fresh and breaks down quickly when stored. For best results, use your compost tea as quickly as possible after it is produced. We suggest using it within four hours for indoor plants; it can be stored for up to two days if using it on a larger area outside.
4. Where can I get worms for vermicomposting?
If you’re going to work with worm composting, be very careful to get the right species of worm, Eisena foetida. In bait shops, many worms sold as “red worms” or “red wigglers” are not, in fact, Eisena foetida. It’s best to buy your vermicompost worms from someone that specializes in vermicomposting. There are many suitable retailers online.

- 47 -
Actinomycetes: Decomposer organisms that are part bacteria and part fungus, with a grayish cobwebby look. Actinomycetes live in medium temperatures in a backyard compost bin. Actinomy-cetes break down woody, carbon-rich material and give finished compost its sweet, earthy smell.
Aeration: A way of allowing air to get into compost.
Aerobic: With oxygen. Decomposer organisms that require oxygen to carry out their life functions will produce a sweet, earthy-smelling compost.
Anaerobic: Without oxygen. Anaerobic conditions breed decomposer organisms that live in the absence of oxygen and give off rotten-smelling odors.
Bacteria: A group of micro-organisms primarily responsible for decomposition in a backyard compost bin. Also present in worm composting systems.
Bedding: Material such as dead leaves or shredded paper used to retain moisture, create air space, and cover food scraps in a worm composting system.
Biodegradable: Any material that can be broken down into smaller components by the biological processes of digestion and decomposition.
Carbon: A basic element found in compostable material. Materials high in carbon should be mixed with materials high in nitrogen to provide the micro-organisms an optimal balance of 30 parts carbon to 1 part nitrogen (or 50/50 by volume). Materials high in carbon are usually brown, dry, and woody; some examples include twigs, dead leaves, straw, newspaper, or sawdust.
Cocoon: Egg cases in which red worms lay their eggs. Each egg case usually hatches 2-3 baby worms.
Compost: The end result of living organisms digesting and reducing organic material into a dark, rich, earthy-smelling soil amendment. The process is called composting.
Decomposers: Organisms that feed primarily on dead organic material, reducing and digesting it into humus.
Decomposition: The process of materials being digested and broken down into simpler substances, making nutrients more available to plants. Decomposition happens all the time in nature and in human-managed systems such as compost piles.
Energy Flow Cycle: The movement of the sun’s energy through an ecosystem. Plants convert the sun’s energy into food through photosynthesis. Animals consume the plants. Decomposers eat the dead animals and plants, returning nutrients back to the soil that plants need to grow.
Erosion: The loss of humus and topsoil through the movement of water, wind, or animals. Compost can help replace lost topsoil. Mulches protect topsoil from being lost to erosion.
Food Scraps: Food that can be put in a compost pile, typically fruit and vegetable scraps. To avoid attracting pests, meat, dairy, and oils should not be composted.
COMPOST GLOSSARY

- 4� -
Fungus: A group of decomposer organisms commonly found in compost piles which break down organic material into humus.
Humus: The result of organic material being decomposed into a complex, highly stable material containing plant nutrients. Humus is formed in nature and in managed systems like compost piles.
Landfill: A place where solid waste is buried in the ground. Modern landfills have clay bottoms and a liner, as well as leachate and gas collection systems. Solid waste needs to be covered daily with soil or other material. Many landfills are reaching capacity.
Leachate: Liquid that has passed through solid material and has soluble materials suspended in it. Leachate from landfills can be hazardous and can leak into groundwater supplies.
Macro-organisms: Organisms that are visible to the naked eye, such as worms, sow bugs, and beetles.
Micro-organisms: Organisms too small to be seen with the naked eye, such as bacteria and some fungi.
Mulch: Material placed on top of garden beds or around plants. Mulches help deter weeds, hold water, and stop erosion. Shredded or decomposed organic matter makes an excellent mulch.
Nitrogen: An element found in compostable material. Materials high in nitrogen should be mixed with materials high in carbon to give the micro-organisms a balanced diet of 30 parts carbon to 1 part nitrogen (or 50/50 by volume). Materials high in nitrogen are usually wet and green; some examples include manures, fresh plant clippings, and food scraps.
Nutrient Cycle: The movement of nutrients cycling from living plants, to animals, to decomposers, and returned to the earth in the form of humus.
Organic: Any material that was once living, or material produced by a living organism. “Organic” may also be used to describe food grown using sustainable agriculture methods.
red Worms: The type of earthworm typically used in worm composting systems. Red worms can be found in leaf mold and manure piles and can be bought in bait shops and gardening stores. Their Latin (scientific) name is Eisena foetida; make sure this is the species you buy.
Topsoil: The soil on the surface that accumulates humus and organic matter.
Vermicompost: Compost produced using red worms.
Worm Castings: Worm manure. This high-quality soil amendment is the final product from worm composting and can be used as a rich soil amendment.
Worm Bin: The container that the worms, bedding, and composting food waste is kept in.
COMPOST GLOSSARY (continued)
VERMONT’S
FRAMEWORK OF STANDARDS
AND
LEARNING OPPORTUNITIES:
Do the Rot ThingActivities and Projects

What
is Bio
degra
dable?
(gra
des 2
-6)
Dirt fo
r Lunch
(2-6
)
Environm
ental
Lunch
(3-1
2) Compost
Critter
s (2-
12)
I Can
Com
post (2
-6)
Decom
positio
n Tag (
2-6)
Buildin
g a C
ompost
Pile (K
-12)
Compost
in a
Bucket
(2-6
)
Plants
in C
ompost
(3-1
2)
War
min
g Up to
Worm
s (3-
6)
Setti
ng Up a
Worm
Bin
(2-1
2)
Worm
Bin
Exp
lora
tion (2
-12)
Harve
sting a
Worm
Bin
(2-1
2)
Mak
ing a
Guid
e to W
orm B
ins (
3-6)
Projec
t: Com
post Pre
sentat
ion (3
-12)
Projec
t: Com
post Pam
phlet (3
-12)
Projec
t: Public
ity (3
-12)
Projec
t: M
arke
ting
(
3-12
)
12
34
56
78
910
1112
1314
AB
CD
Do th
e Ro
t Thi
ng A
ctiv
ities
x
Verm
ont’s
Fram
ewor
k of
Stan
dard
san
d Le
arni
ng O
ppor
tuni
ties
1.1
Rea
din
g St
rate
gies
1.5
Wri
tin
g D
imen
sio
ns
1.6
Wri
tin
g C
on
ven
tio
ns
1.8
Rep
ort
s
a b c d e f g h i j k l m n o p a ba aaa
(1.8
con
tinu
es o
n ne
xt p
age)
x x x x xx
xx
xx
xx
xx
xx
xx
x
xx
x x
x

AB
CD
What
is Bio
degra
dable?
(gra
des 2
-6)
Dirt fo
r Lunch
(2-6
)
Environm
ental
Lunch
(3-1
2) Compost
Critter
s (2-
12)
I Can
Com
post (2
-6)
Decom
positio
n Tag (
2-6)
Buildin
g a C
ompost
Pile (K
-12)
Compost
in a
Bucket
(2-6
)
Plants
in C
ompost
(3-1
2)
War
min
g Up to
Worm
s (3-
6)
Setti
ng Up a
Worm
Bin
(2-1
2)
Worm
Bin
Exp
lora
tion (2
-12)
Harve
sting a
Worm
Bin
(2-1
2)
Mak
ing a
Guid
e to W
orm B
ins (
3-6)
Projec
t: Com
post Pre
sentat
ion (3
-12)
Projec
t: Com
post Pam
phlet (3
-12)
Projec
t: Public
ity (3
-12)
Projec
t: M
arke
ting
(
3-12
)
12
34
56
78
910
1112
1314
Do th
e Ro
t Thi
ng A
ctiv
ities
1.8
Rep
ort
s
1.9
Nar
rati
ves
1.10
Pro
ced
ure
s
c d e f g h i j k a b(1
.10
cont
inue
s on
nex
t pa
ge)
(con
tinu
ed f
rom
pre
viou
s pa
ge)
a c d e f g h i j kb
xx x x x x x x
x x x x x x x x
x x x x x x x x x
x x x x x x x x xx x x x x
x x x x x x
x x x x x x xx
xx
xx
xx
Verm
ont’s
Fram
ewor
k of
Stan
dard
san
d Le
arni
ng O
ppor
tuni
ties

AB
CD
What
is Bio
degra
dable?
(gra
des 2
-6)
Dirt fo
r Lunch
(2-6
)
Environm
ental
Lunch
(3-1
2) Compost
Critter
s (2-
12)
I Can
Com
post (2
-6)
Decom
positio
n Tag (
2-6)
Buildin
g a C
ompost
Pile (K
-12)
Compost
in a
Bucket
(2-6
)
Plants
in C
ompost
(3-1
2)
War
min
g Up to
Worm
s (3-
6)
Setti
ng Up a
Worm
Bin
(2-1
2)
Worm
Bin
Exp
lora
tion (2
-12)
Harve
sting a
Worm
Bin
(2-1
2)
Mak
ing a
Guid
e to W
orm B
ins (
3-6)
Projec
t: Com
post Pre
sentat
ion (3
-12)
Projec
t: Com
post Pam
phlet (3
-12)
Projec
t: Public
ity (3
-12)
Projec
t: M
arke
ting
(
3-12
)
12
34
56
78
910
1112
1314
Do th
e Ro
t Thi
ng A
ctiv
ities
1.10
Pro
ced
ure
s
1.11
Per
suas
ive
Wri
tin
g
1.12
Per
son
al E
ssay
s
1.13
Cla
rifi
cati
on
1.14
Cri
tiq
ue
cc d e cc a b
(1.1
4 co
ntin
ues
on n
ext
page
)
(con
tinu
ed f
rom
pre
viou
s pa
ge)
a cba b c daaa c d e f gb
x x x x x x x x x x x
x x x x x x x x x x x
x x x x
x x x xx x x x x x x
x x x x x x
x x x x x x
x x x x x x
x x x x x x
x x x x x x
x x x x x x
x x x x x x
x x x x x x
x x x x x x
x x x
x x x
x x x
x x x
x x x
x x x
x x x
x x x
x x xx x x
x x
Verm
ont’s
Fram
ewor
k of
Stan
dard
san
d Le
arni
ng O
ppor
tuni
ties
and
Res
tate
men
t
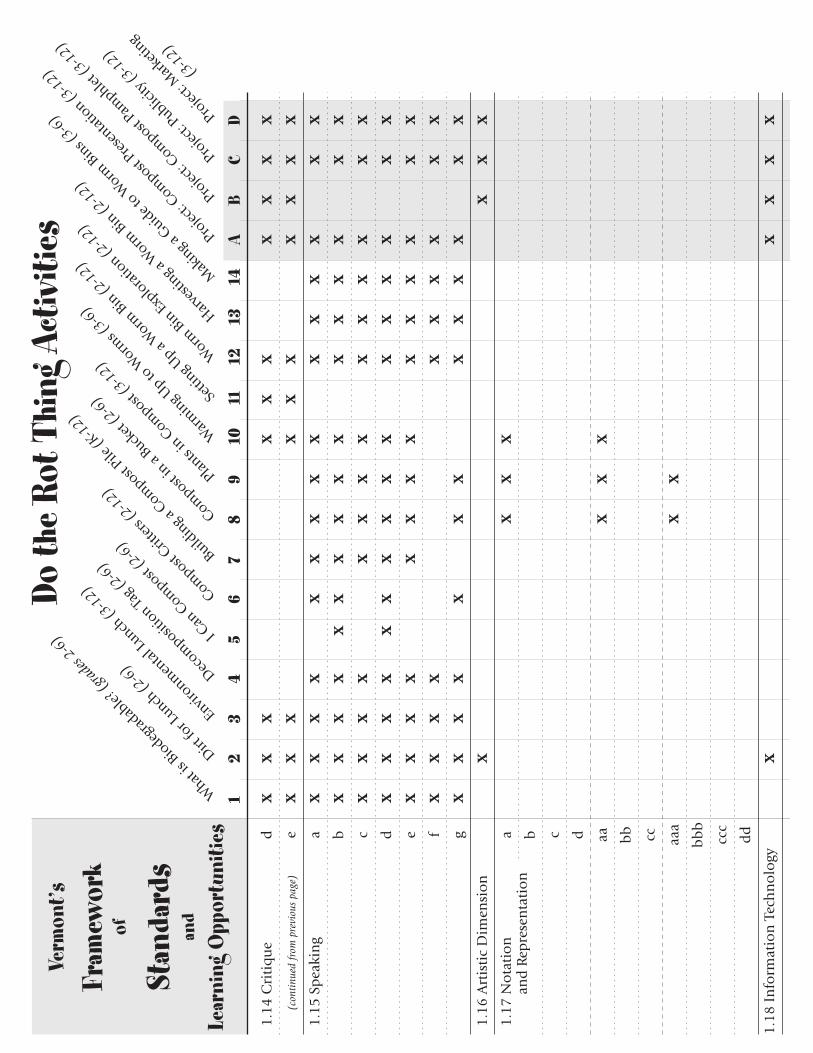
1.14
Cri
tiq
ue
1.15
Sp
eaki
ng
1.16
Art
isti
c D
imen
sio
n
1.17
No
tati
on
1.18
In
form
atio
n T
ech
no
logy
d e aa bb cc aaa
bb
b
ccc
dda c d e f gb a c db
x x x x x x x x x
x x x x x x x x x
x x x x x x x x x
x x x x x x x x x
x x x x x x x
x x x x x x xx
x xx x
x x x x x x x
x x x x x x x x xx
x
x x x x x x x x x
x xx
x x
x x x x
xx
x x x x x x x
x xx
xx
x
x
x
x
x x x x x
x x x x x
x
xx
xx
xx xx x
x x xx x
x
Verm
ont’s
Fram
ewor
k of
Stan
dard
san
d Le
arni
ng O
ppor
tuni
ties
and
Rep
rese
nta
tio
n
(con
tinu
ed f
rom
pre
viou
s pa
ge)
AB
CD
What
is Bio
degra
dable?
(gra
des 2
-6)
Dirt fo
r Lunch
(2-6
)
Environm
ental
Lunch
(3-1
2) Compost
Critter
s (2-
12)
I Can
Com
post (2
-6)
Decom
positio
n Tag (
2-6)
Buildin
g a C
ompost
Pile (K
-12)
Compost
in a
Bucket
(2-6
)
Plants
in C
ompost
(3-1
2)
War
min
g Up to
Worm
s (3-
6)
Setti
ng Up a
Worm
Bin
(2-1
2)
Worm
Bin
Exp
lora
tion (2
-12)
Harve
sting a
Worm
Bin
(2-1
2)
Mak
ing a
Guid
e to W
orm B
ins (
3-6)
Projec
t: Com
post Pre
sentat
ion (3
-12)
Projec
t: Com
post Pam
phlet (3
-12)
Projec
t: Public
ity (3
-12)
Projec
t: M
arke
ting
(
3-12
)
12
34
56
78
910
1112
1314
Do th
e Ro
t Thi
ng A
ctiv
ities
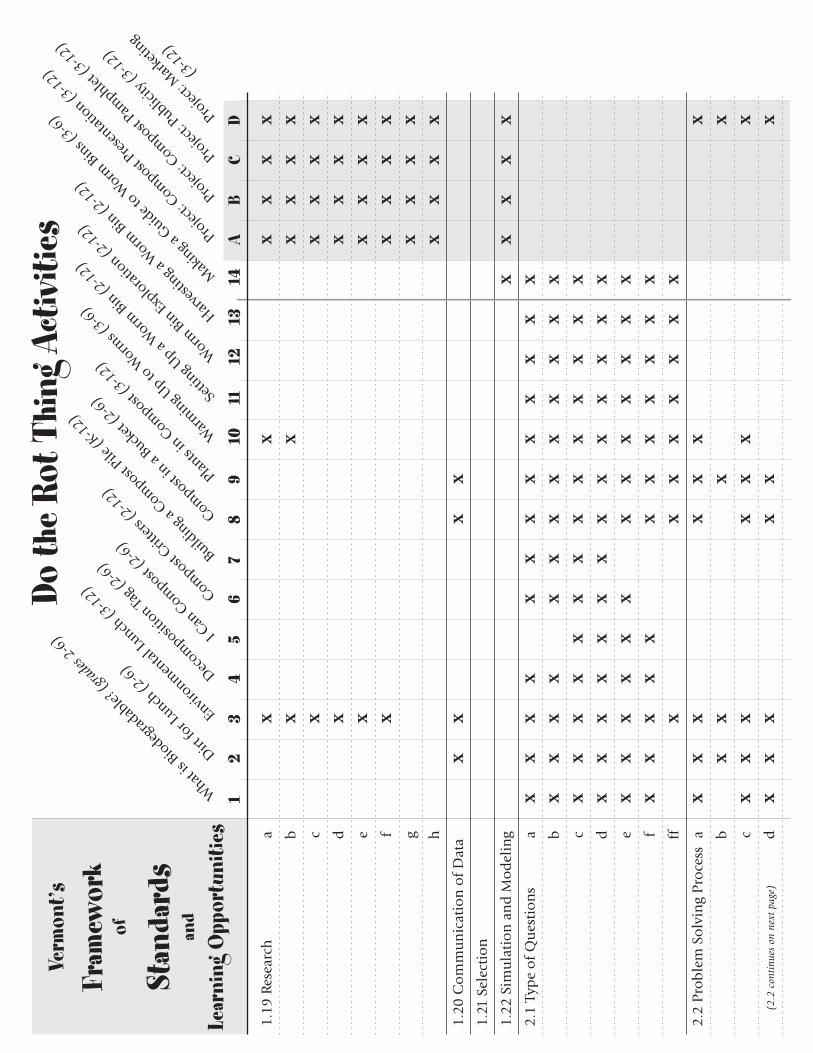
1.19
Res
earc
h
1.20
Co
mm
un
icat
ion
of
Dat
a
1.21
Sel
ecti
on
1.22
Sim
ula
tio
n a
nd
Mo
del
ing
2.1
Typ
e o
f Q
ues
tio
ns
ffc d e f g h
(2.2
con
tinu
es o
n ne
xt p
age)
a c dba c d e fba b
x x x x x x
x x x x x x x x x
x x x x x x x x x x
x x x x
x x x
x xx
x x x x
x x x x x x
x x x x x
x x x x
x x x xx
x
x x x xx
x x x x x x x
x x x x x x x
x x x x x x x
x x x x x x x
x x x x x x x
x x x x x x x
xxx
xx
x
x x x x x xx x x
xx
xx
x xx x x x x x x x
x x x x x x
x x x x x x
x x x x x x
x xx x
x x
Verm
ont’s
Fram
ewor
k of
Stan
dard
san
d Le
arni
ng O
ppor
tuni
ties
2.2
Pro
ble
m S
olv
ing
Pro
cess

AB
CD
What
is Bio
degra
dable?
(gra
des 2
-6)
Dirt fo
r Lunch
(2-6
)
Environm
ental
Lunch
(3-1
2) Compost
Critter
s (2-
12)
I Can
Com
post (2
-6)
Decom
positio
n Tag (
2-6)
Buildin
g a C
ompost
Pile (K
-12)
Compost
in a
Bucket
(2-6
)
Plants
in C
ompost
(3-1
2)
War
min
g Up to
Worm
s (3-
6)
Setti
ng Up a
Worm
Bin
(2-1
2)
Worm
Bin
Exp
lora
tion (2
-12)
Harve
sting a
Worm
Bin
(2-1
2)
Mak
ing a
Guid
e to W
orm B
ins (
3-6)
Projec
t: Com
post Pre
sentat
ion (3
-12)
Projec
t: Com
post Pam
phlet (3
-12)
Projec
t: Public
ity (3
-12)
Projec
t: M
arke
ting
(
3-12
)
12
34
56
78
910
1112
1314
Do th
e Ro
t Thi
ng A
ctiv
ities
xxx x x x x x x
xxx x x x x x xx x x x
x x x x
x x x x
xx
xx
xx
xx
xx
xx
xx
x
xx
xx
xx
xx
xx
xx
xx
xx
x
xx
x x x
x x
x x x
x x x
x x
x
x
x x
Verm
ont’s
Fram
ewor
k of
Stan
dard
san
d Le
arni
ng O
ppor
tuni
ties ce f g a baa aaa
cc dd eebb
aaa
bb
b
aa bb
2.2
Pro
ble
m S
olv
ing
Pro
cess
2.3
Typ
es o
f P
rob
lem
s
2.5
Mat
hem
atic
s D
imen
sio
ns
2.6
Ap
pli
cati
on
2.7
Info
rmat
ion
2.8
Taki
ng
Ris
ks
2.9
Pers
ever
ing
2.10
Flu
ency
(con
tinu
ed f
rom
pre
viou
s pa
ge)

What
is Bio
degra
dable?
(gra
des 2
-6)
Dirt fo
r Lunch
(2-6
)
Environm
ental
Lunch
(3-1
2) Compost
Critter
s (2-
12)
I Can
Com
post (2
-6)
Decom
positio
n Tag (
2-6)
Buildin
g a C
ompost
Pile (K
-12)
Compost
in a
Bucket
(2-6
)
Plants
in C
ompost
(3-1
2)
War
min
g Up to
Worm
s (3-
6)
Setti
ng Up a
Worm
Bin
(2-1
2)
Worm
Bin
Exp
lora
tion (2
-12)
Harve
sting a
Worm
Bin
(2-1
2)
Mak
ing a
Guid
e to W
orm B
ins (
3-6)
Projec
t: Com
post Pre
sentat
ion (3
-12)
Projec
t: Com
post Pam
phlet (3
-12)
Projec
t: Public
ity (3
-12)
Projec
t: M
arke
ting
(
3-12
)
12
34
56
78
910
1112
1314
Do th
e Ro
t Thi
ng A
ctiv
ities A
BC
D
xx
xx
xx
xx
x
xx
x
xx
x
xx
x
xx
xx
xx
x
x x
xx
xx
xx
xx
xx
xx
xx
xx
xxx
xx
x x
x
x x x x x x
x x x
x x x
x x x
Verm
ont’s
Fram
ewor
k of
Stan
dard
san
d Le
arni
ng O
ppor
tuni
ties a c db aa cc dd
bb
aaa
bb
ba cba cb
3.9
Sust
ain
abil
ity
2.11
Ela
bo
rati
on
2.12
Fle
xib
ilit
y
2.13
Pro
du
ct/S
ervi
ce
2.14
Pla
nn
ing/
Org
aniz
atio
n
3.1
Go
al S
etti
ng
3.2
Lear
nin
g St
rate
gies
3.3
Res
pec
t
3.4
Dev
elo
pm
ent

What
is Bio
degra
dable?
(gra
des 2
-6)
Dirt fo
r Lunch
(2-6
)
Environm
ental
Lunch
(3-1
2) Compost
Critter
s (2-
12)
I Can
Com
post (2
-6)
Decom
positio
n Tag (
2-6)
Buildin
g a C
ompost
Pile (K
-12)
Compost
in a
Bucket
(2-6
)
Plants
in C
ompost
(3-1
2)
War
min
g Up to
Worm
s (3-
6)
Setti
ng Up a
Worm
Bin
(2-1
2)
Worm
Bin
Exp
lora
tion (2
-12)
Harve
sting a
Worm
Bin
(2-1
2)
Mak
ing a
Guid
e to W
orm B
ins (
3-6)
Projec
t: Com
post Pre
sentat
ion (3
-12)
Projec
t: Com
post Pam
phlet (3
-12)
Projec
t: Public
ity (3
-12)
Projec
t: M
arke
ting
(
3-12
)
12
34
56
78
910
1112
1314
Do th
e Ro
t Thi
ng A
ctiv
ities
Verm
ont’s
Fram
ewor
k of
Stan
dard
san
d Le
arni
ng O
ppor
tuni
ties
AB
CD
xx
xx
xx
xx
xx
xx x
xx
xx
xx
xx
xx
xx
xx
xx
xx
x
xx
xx x
xx
x x x xx xx
xx
x x xxx
xx
xx
xx
xx
xx
xx x
xx x x x
x x x x x
x xx x
x xx x x
a aa a aa aaa a c d eba c d ddb
(7.1
con
tinu
es o
n ne
xt p
age)
3.10
Tea
mw
ork
3.11
In
tera
ctio
ns
3.12
Co
nfl
ict
Res
olu
tio
n
3.13
Ro
les
and
Res
po
nsi
bil
itie
s
3.14
Dep
end
abil
ity
5.8
Typ
es o
f Li
tera
ture
5.21
Wri
tin
g
5.28
Art
isti
c P
rofi
cien
cy
5.29
Vis
ual
Art
s
5.30
and
Pro
du
ctiv
ity
7.1
Scie
nti
fic
Met
ho
d
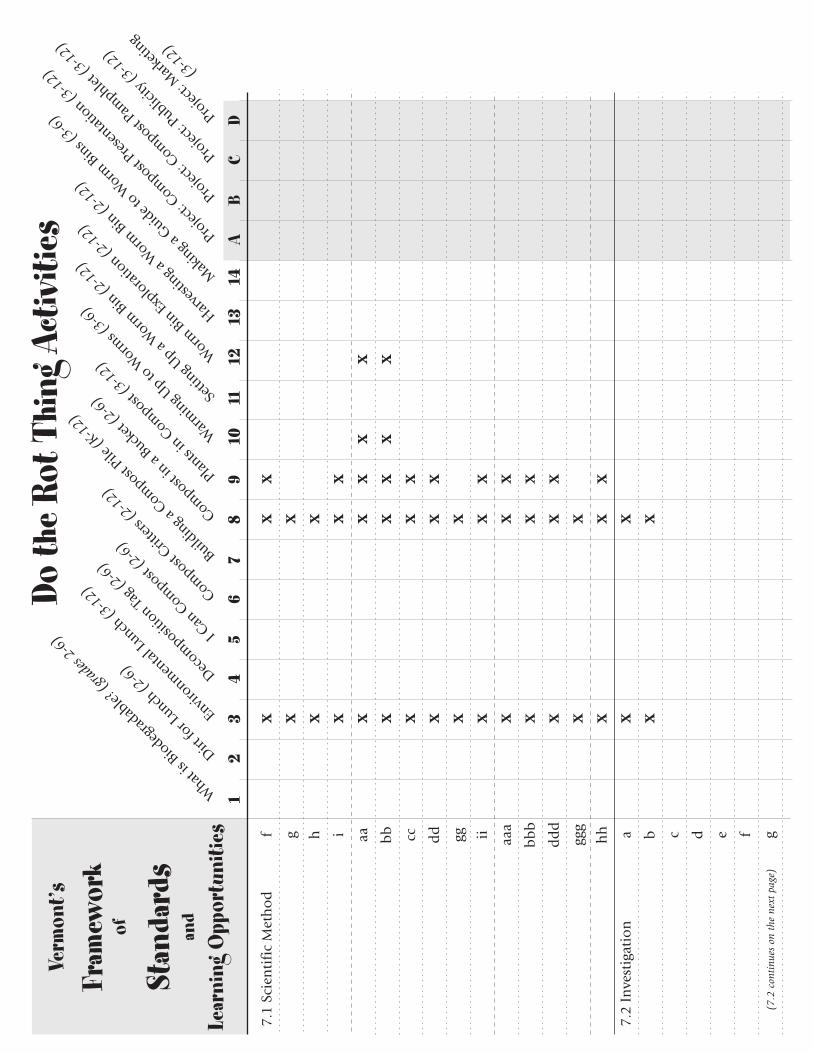
AB
CD
What
is Bio
degra
dable?
(gra
des 2
-6)
Dirt fo
r Lunch
(2-6
)
Environm
ental
Lunch
(3-1
2) Compost
Critter
s (2-
12)
I Can
Com
post (2
-6)
Decom
positio
n Tag (
2-6)
Buildin
g a C
ompost
Pile (K
-12)
Compost
in a
Bucket
(2-6
)
Plants
in C
ompost
(3-1
2)
War
min
g Up to
Worm
s (3-
6)
Setti
ng Up a
Worm
Bin
(2-1
2)
Worm
Bin
Exp
lora
tion (2
-12)
Harve
sting a
Worm
Bin
(2-1
2)
Mak
ing a
Guid
e to W
orm B
ins (
3-6)
Projec
t: Com
post Pre
sentat
ion (3
-12)
Projec
t: Com
post Pam
phlet (3
-12)
Projec
t: Public
ity (3
-12)
Projec
t: M
arke
ting
(
3-12
)
12
34
56
78
910
1112
1314
Do th
e Ro
t Thi
ng A
ctiv
ities
Verm
ont’s
Fram
ewor
k of
Stan
dard
san
d Le
arni
ng O
ppor
tuni
ties
x x x x x x x x x x x x x x x x x
xx x
x x x x x x
x xx x
x xx x x x x x x
x x x x x x x x x x
aa dd
d
cc dd gggg
gg hhiif g h i a c d e fbaaa
bb
b
bb
(7.2
con
tinu
es o
n th
e ne
xt p
age)
7.2
Inve
stig
atio
n
7.1
Scie
nti
fic
Met
ho
d

AB
CD
What
is Bio
degra
dable?
(gra
des 2
-6)
Dirt fo
r Lunch
(2-6
)
Environm
ental
Lunch
(3-1
2) Compost
Critter
s (2-
12)
I Can
Com
post (2
-6)
Decom
positio
n Tag (
2-6)
Buildin
g a C
ompost
Pile (K
-12)
Compost
in a
Bucket
(2-6
)
Plants
in C
ompost
(3-1
2)
War
min
g Up to
Worm
s (3-
6)
Setti
ng Up a
Worm
Bin
(2-1
2)
Worm
Bin
Exp
lora
tion (2
-12)
Harve
sting a
Worm
Bin
(2-1
2)
Mak
ing a
Guid
e to W
orm B
ins (
3-6)
Projec
t: Com
post Pre
sentat
ion (3
-12)
Projec
t: Com
post Pam
phlet (3
-12)
Projec
t: Public
ity (3
-12)
Projec
t: M
arke
ting
(
3-12
)
12
34
56
78
910
1112
1314
Do th
e Ro
t Thi
ng A
ctiv
ities
Verm
ont’s
Fram
ewor
k of
Stan
dard
san
d Le
arni
ng O
ppor
tuni
ties fd e f g h i a c d ebaa cc dd ee ff fff
bb aa ccbb
(con
tinu
ed f
rom
pre
viou
s pa
ge)
(7.6
con
tinu
es o
n th
e ne
xt p
age)
7.2
Inve
stig
atio
n
7.6
Ari
thm
etic
, Nu
mb
eran
d O
per
atio
n C
on
cep
ts
x x x x x xx
xx
x
x x x x

AB
CD
What
is Bio
degra
dable?
(gra
des 2
-6)
Dirt fo
r Lunch
(2-6
)
Environm
ental
Lunch
(3-1
2) Compost
Critter
s (2-
12)
I Can
Com
post (2
-6)
Decom
positio
n Tag (
2-6)
Buildin
g a C
ompost
Pile (K
-12)
Compost
in a
Bucket
(2-6
)
Plants
in C
ompost
(3-1
2)
War
min
g Up to
Worm
s (3-
6)
Setti
ng Up a
Worm
Bin
(2-1
2)
Worm
Bin
Exp
lora
tion (2
-12)
Harve
sting a
Worm
Bin
(2-1
2)
Mak
ing a
Guid
e to W
orm B
ins (
3-6)
Projec
t: Com
post Pre
sentat
ion (3
-12)
Projec
t: Com
post Pam
phlet (3
-12)
Projec
t: Public
ity (3
-12)
Projec
t: M
arke
ting
(
3-12
)
12
34
56
78
910
1112
1314
Do th
e Ro
t Thi
ng A
ctiv
ities
Verm
ont’s
Fram
ewor
k of
Stan
dard
san
d Le
arni
ng O
ppor
tuni
ties g h ff gg hh i j k l aa cc dd ebb
aaa
bb
ba c dbaaa
bb
b
(con
tinu
ed f
rom
pre
viou
s pa
ge)
(7.9
con
tinu
es o
n th
e ne
xt p
age)
7.6
Ari
thm
etic
, Nu
mb
eran
d O
per
atio
n C
on
cep
ts
x
x x x
7.9
Stat
isti
csan
d P
rob
abil
ity
Co
nce
pts

What
is Bio
degra
dable?
(gra
des 2
-6)
AB
CD
Dirt fo
r Lunch
(2-6
)
Environm
ental
Lunch
(3-1
2) Compost
Critter
s (2-
12)
I Can
Com
post (2
-6)
Decom
positio
n Tag (
2-6)
Buildin
g a C
ompost
Pile (K
-12)
Compost
in a
Bucket
(2-6
)
Plants
in C
ompost
(3-1
2)
War
min
g Up to
Worm
s (3-
6)
Setti
ng Up a
Worm
Bin
(2-1
2)
Worm
Bin
Exp
lora
tion (2
-12)
Harve
sting a
Worm
Bin
(2-1
2)
Mak
ing a
Guid
e to W
orm B
ins (
3-6)
Projec
t: Com
post Pre
sentat
ion (3
-12)
Projec
t: Com
post Pam
phlet (3
-12)
Projec
t: Public
ity (3
-12)
Projec
t: M
arke
ting
(
3-12
)
12
34
56
78
910
1112
1314
Do th
e Ro
t Thi
ng A
ctiv
ities
Verm
ont’s
Fram
ewor
k of
Stan
dard
san
d Le
arni
ng O
ppor
tuni
ties
gggcc dd
d
dd
d a bccca c d e fb aacc dd eebb
bb
b
ee eee
(con
tinu
ed f
rom
pre
viou
s pa
ge)
(7.1
1 co
ntin
ues
on t
he n
ext
page
)
x x x
xx x
x xx x
x
x x
7.9
Stat
isti
csan
d P
rob
abil
ity
Co
nce
pts
7.10
Ap
pli
cati
on
s
7.11
An
alys
is

What
is Bio
degra
dable?
(gra
des 2
-6)
AB
CD
Dirt fo
r Lunch
(2-6
)
Environm
ental
Lunch
(3-1
2) Compost
Critter
s (2-
12)
I Can
Com
post (2
-6)
Decom
positio
n Tag (
2-6)
Buildin
g a C
ompost
Pile (K
-12)
Compost
in a
Bucket
(2-6
)
Plants
in C
ompost
(3-1
2)
War
min
g Up to
Worm
s (3-
6)
Setti
ng Up a
Worm
Bin
(2-1
2)
Worm
Bin
Exp
lora
tion (2
-12)
Harve
sting a
Worm
Bin
(2-1
2)
Mak
ing a
Guid
e to W
orm B
ins (
3-6)
Projec
t: Com
post Pre
sentat
ion (3
-12)
Projec
t: Com
post Pam
phlet (3
-12)
Projec
t: Public
ity (3
-12)
Projec
t: M
arke
ting
(
3-12
)
12
34
56
78
910
1112
1314
Do th
e Ro
t Thi
ng A
ctiv
ities
Verm
ont’s
Fram
ewor
k of
Stan
dard
san
d Le
arni
ng O
ppor
tuni
ties c a c dba c dbaaa
aaa
cc bb
b
aa aa cc dd
bb
bb
dd
d
ccc
bb
b
(con
tinu
ed f
rom
pre
viou
s pa
ge)
(7.1
6 co
ntin
ues
on t
he n
ext
page
)
xx
x x x
x x xx
xx
xx
xx
x
xx
xx
xx
xx
xx
xx
xx
xx
xx
x x
x x
x x x
xx
x
xx
xx
xx
xx
xx
x x
7.11
An
alys
is
7.16
Nat
ura
l Res
ou
rces
and
In
terd
epen
den
ce7.
13 O
rgan
ism
s, E
volu
tio
n,

What
is Bio
degra
dable?
(gra
des 2
-6)
AB
CD
Dirt fo
r Lunch
(2-6
)
Environm
ental
Lunch
(3-1
2) Compost
Critter
s (2-
12)
I Can
Com
post (2
-6)
Decom
positio
n Tag (
2-6)
Buildin
g a C
ompost
Pile (K
-12)
Compost
in a
Bucket
(2-6
)
Plants
in C
ompost
(3-1
2)
War
min
g Up to
Worm
s (3-
6)
Setti
ng Up a
Worm
Bin
(2-1
2)
Worm
Bin
Exp
lora
tion (2
-12)
Harve
sting a
Worm
Bin
(2-1
2)
Mak
ing a
Guid
e to W
orm B
ins (
3-6)
Projec
t: Com
post Pre
sentat
ion (3
-12)
Projec
t: Com
post Pam
phlet (3
-12)
Projec
t: Public
ity (3
-12)
Projec
t: M
arke
ting
(
3-12
)
12
34
56
78
910
1112
1314
Do th
e Ro
t Thi
ng A
ctiv
ities
Verm
ont’s
Fram
ewor
k of
Stan
dard
san
d Le
arni
ng O
ppor
tuni
ties e ccc
aaa
cc bb
b
aa dd
bb
(con
tinu
ed f
rom
pre
viou
s pa
ge)
x xx x
x x xx
x xx x
x xx x
7.16
Nat
ura
l Res
ou
rces

ORGANICSC V S W M D