DNS SVR2008R2 DNSSEC - itsecure.hu¡gi útmutatók/Egyéb... · 3 Domain Name System Security...
39
Contents Domain Name System Security Extensions ................................................................................. 3 Introduction to DNSSEC .............................................................................................................. 3 What is DNSSEC? ................................................................................................................... 3 Why is DNSSEC important?.................................................................................................. 3 DNS threats and security ...................................................................................................... 4 Spoofing ............................................................................................................................... 4 Understanding DNSSEC in Windows........................................................................................... 6 DNSSEC in Windows Server 2008 R2 DNS server................................................................... 6 Offline signing of static zones................................................................................................ 6 Configuration of trust anchors ............................................................................................... 7 Validation.............................................................................................................................. 7 Forwarding and recursion ..................................................................................................... 7 Zone transfers ...................................................................................................................... 7 Active Directory-integrated zones and Active Directory replication ......................................... 8 Managing DNSSEC through Dnscmd.exe and DNS Manager ............................................... 8 Flat-name resolution ............................................................................................................. 8 DNSSEC in Windows Server 2008 R2 and Windows 7 DNS client ........................................... 8 Non-validating security-aware stub resolver .......................................................................... 8 Introduction to the Name Resolution Policy Table ................................................................. 9 Securing server-to-client communication ................................................................................ 12 Certificates ......................................................................................................................... 13 IPsec policy ........................................................................................................................ 13 DNSSEC Deployment Planning ................................................................................................. 13 Deployment stages ................................................................................................................ 13 Identifying your secure DNS zone .......................................................................................... 14 Operating system considerations ........................................................................................... 14 Hardware and performance................................................................................................. 14 Hosting signed zones.......................................................................................................... 14 DNSSEC in mixed environments......................................................................................... 14 Key Management ................................................................................................................... 15 Signing securely and securing the private key ..................................................................... 15 Key rollover ........................................................................................................................ 15 Updating parent zones ........................................................................................................... 17 Trust anchor management ..................................................................................................... 17 Last hop communication ........................................................................................................ 18 Configuring policy on the DNS client ...................................................................................... 19 DirectAccess....................................................................................................................... 19
Transcript of DNS SVR2008R2 DNSSEC - itsecure.hu¡gi útmutatók/Egyéb... · 3 Domain Name System Security...

Contents
Domain Name System Security Extensions ................................................................................. 3
Introduction to DNSSEC .............................................................................................................. 3
What is DNSSEC? ................................................................................................................... 3
Why is DNSSEC important? .................................................................................................. 3
DNS threats and security ...................................................................................................... 4
Spoofing ............................................................................................................................... 4
Understanding DNSSEC in Windows........................................................................................... 6
DNSSEC in Windows Server 2008 R2 DNS server ................................................................... 6
Offline signing of static zones ................................................................................................ 6
Configuration of trust anchors ............................................................................................... 7
Validation.............................................................................................................................. 7
Forwarding and recursion ..................................................................................................... 7
Zone transfers ...................................................................................................................... 7
Active Directory-integrated zones and Active Directory replication ......................................... 8
Managing DNSSEC through Dnscmd.exe and DNS Manager ............................................... 8
Flat-name resolution ............................................................................................................. 8
DNSSEC in Windows Server 2008 R2 and Windows 7 DNS client ........................................... 8
Non-validating security-aware stub resolver .......................................................................... 8
Introduction to the Name Resolution Policy Table ................................................................. 9
Securing server-to-client communication ................................................................................ 12
Certificates ......................................................................................................................... 13
IPsec policy ........................................................................................................................ 13
DNSSEC Deployment Planning ................................................................................................. 13
Deployment stages ................................................................................................................ 13
Identifying your secure DNS zone .......................................................................................... 14
Operating system considerations ........................................................................................... 14
Hardware and performance................................................................................................. 14
Hosting signed zones .......................................................................................................... 14
DNSSEC in mixed environments ......................................................................................... 14
Key Management ................................................................................................................... 15
Signing securely and securing the private key ..................................................................... 15
Key rollover ........................................................................................................................ 15
Updating parent zones ........................................................................................................... 17
Trust anchor management ..................................................................................................... 17
Last hop communication ........................................................................................................ 18
Configuring policy on the DNS client ...................................................................................... 19
DirectAccess....................................................................................................................... 19

Advanced settings .............................................................................................................. 19
Policy mismatch between server and client ............................................................................ 19
Deploying DNSSEC .................................................................................................................. 19
STAGE I: Upgrading to Windows Server 2008 R2 .................................................................. 19
STAGE II: Deploying DNSSEC on the DNS server ................................................................. 20
Identifying signing computers .............................................................................................. 20
Importing the zone .............................................................................................................. 20
Identifying ZSK rollover mechanism .................................................................................... 20
Generating keys ................................................................................................................. 21
Backing up private keys ...................................................................................................... 21
Signing a zone .................................................................................................................... 22
Reloading the zone ............................................................................................................. 22
Providing the DS record to the parent zone ......................................................................... 23
Incorporating the DS record from a child zone ..................................................................... 23
Adding and deleting resource records ................................................................................. 24
Re-signing .......................................................................................................................... 24
Performing pre-published ZSK rollover ............................................................................ 24
Performing double signature ZSK rollover ........................................................................ 26
Performing double signature KSK rollover ........................................................................ 26
Reverting back to the unsigned zone .................................................................................. 27
STAGE III: Configuring and distributing trust anchors ............................................................. 28
STAGE IV: Configuring IPsec policy on the DNS server ......................................................... 29
Issuing server certificates .................................................................................................... 29
Configuring IPsec policy...................................................................................................... 30
STAGE V: Deploying DNSSEC and IPsec on the DNS client .................................................. 31
Configuring TCP/IP properties ............................................................................................ 31
Configuring the NRPT for clients that are domain members ................................................ 31
Creating the OU .............................................................................................................. 31
Creating a DNSSEC policy .............................................................................................. 32
Configuring the NRPT for clients that are not domain members ........................................... 33
Appendix I: DnsCmd.exe commands ......................................................................................... 34
Generating keys ..................................................................................................................... 34
Generating keys ..................................................................................................................... 35
Deleting a key ........................................................................................................................ 36
Signing a zone ....................................................................................................................... 36
Appendix II: Configuring the NRPT ............................................................................................ 38
Example registry script ........................................................................................................... 38

3
Domain Name System Security Extensions
Introduction to DNSSEC
What is DNSSEC? The Domain Name System (DNS) is a hierarchical, distributed database that contains mappings between names and other information, such as IP addresses. DNS allows users to locate resources on the network by converting friendly, human- readable names like www.microsoft.com to IP addresses that computers can connect to.
DNS is a critical infrastructure service that supports the Internet and corporate networks. Users and applications rarely ever attempt to locate other computers directly by IP address; name resolution is performed first instead. Web, e-mail, and instant messaging, applications and technologies like Active Directory Domain Services (AD DS) rely on DNS to perform their operations.
Because DNS does not offer any form of security, it is vulnerable to spoofing, man-in-the-middle and cache poisoning attacks. Attacks of this kind can compromise all future communications to the host. For this reason, it has become critical to develop a means for securing DNS.
Domain Name System Security Extensions (DNSSEC) is a suite of extensions that add security to the DNS protocol. The core DNSSEC extensions are specified in RFCs 4033, 4034, and 4035, with additional RFCs providing supporting information. Specifically, DNSSEC provides origin authority, data integrity, and authenticated denial of existence. In addition to several new concepts and operations for both the DNS server and the DNS client, DNSSEC introduces four new resource records (DNSKEY, RRSIG, NSEC and DS) to DNS. This guide provides an overview of DNSSEC and information about how to deploy DNSSEC on the Windows Server 2008 R2 and Windows 7 operating systems.
Note
In Windows Server 2003 and Windows Server 2008, DNSSEC is implemented on secondary zones as described in RFC 2535. Because RFC 2535 has been made obsolete by the previously mentioned RFCs, the Windows Server 2003 and Windows Server 2008 implementations are not interoperable with the Windows Server 2008 R2 or Windows 7 implementation.
Why is DNSSEC important? DNSSEC provides the ability for DNS servers and resolvers to trust DNS responses by using digital signatures for validation. All signatures generated are contained within the DNS zone itself in the new resource records. When a resolver issues a query for a name, the accompanying

4
digital signature is returned in the response. Validation of the signature is then performed through the use of a preconfigured trust anchor. Successful validation proves that the data has been returned from a trusted source and has not been modified or tampered with in any way.
DNS threats and security
Spoofing Of all malicious attacks, DNS is most vulnerable to spoofing. When any DNS resolver sends a remote query, it tags the query with a 16-bit transaction ID ( XID) value in the DNS packet header and expects that the remote DNS server will respond on the same port with the same XID value. The query is typically sent over UDP. TCP is used only after a UDP response has been truncated. When the resolver receives a UDP DNS response, it can only weakly verify that the response is authentic by matching these parameters:
• Remote DNS server address. This check is often disabled by default because many network devices make it appear that valid responses come from an address different from the one the query was sent to. This makes the spoofing of a DNS response even easier.
• Port on which the packet was received. The resolver will typically send from an ephemeral port to port 53. DNS servers respond from port 53 to the source port used by the requester. The port value is often easy for a malicious user to guess.
• Packet XID value. The XID value is set in the request by the resolver and must be matched in the response. A strongly random value can and should be used for the XID, but it is only 16 bits long. The XID value, like the rest of the DNS packet, is sent in the clear.
• Query name and type. The DNS server echoes the query name and type in the question section of the DNS response.
If a malicious user does not have access to a DNS client or server’s network traffic, he might be able to guess that a DNS client or server has sent a DNS query and is waiting for a DNS response. When he has determined this to be true, the attacker can send one or more spoofed DNS response packets and attempt to beat the authentic response back to the requester. As the following figure illustrates, a malicious user (or a botnet under his control) can attack DNS clients and DNS servers that send remote DNS queries.

5
DNS client and server implementations will typically discard non-matching responses and continue to wait for a matching response. This makes it easy for the malicious user to submit multiple spoofed responses. If the DNS resolver receives the malicious user’s response before the authentic response, and if all of the previously described properties have the expected values, then the malicious user will have successfully spoofed the DNS client or server. The user can insert any DNS data of his choosing into the response for the queried name and type. For example, the malicious user can place the IP address of his own server in a spoofed response to a query for www.microsoft.com or for the Web site of a bank or online merchant. Obviously, the results can be catastrophic.
The malicious user can increase his odds of success by sending many spoofed UDP response packets, each with different XID values. For example, if the user is able to hit a DNS client or server with 100 spoofed response packets with different XIDs, in the time it takes the authentic DNS server to respond, the odds his response will be accepted as authentic are 100/65535 or approximately 0.15%. If the user has the time and bandwidth to send 1,000 spoofed responses, the odds increase to 1.5%. If the DNS implementation uses predictable XIDs, the odds greatly increase. Given the fact that the malicious user will have many opportunities to retry his attack as DNS cached entries expire, over time it is not difficult for a patient attacker to spoof DNS clients or servers. Because the attacker controls the Time-to-Live (TTL) value on his spoofed data, a successful attack can persist for days, weeks, or even longer.
Data integrity
Because DNS does not provide any sort of data integrity, it is possible for a man-in-the-middle attacker to modify DNS requests or responses. For example, a man-in-the-middle attacker can rewrite the entire answer section of a DNS response packet. DNS clients and servers cannot detect that this data modification has occurred.
Mutual authentication
DNS does not provide a way for a resolver to know that it is communicating with an appropriate DNS server, or for the DNS server to discover the identity of its clients. The Microsoft implementation of the DNS dynamic update protocol does provide mutual authentication by

6
signing DNS update packets, but this mechanism does not extend to DNS queries. In its current form, it is suitable for use in enterprise environments only.
Privacy
DNS does not provide any mechanism for the encryption of DNS queries and responses. A traditional authoritative DNS server will not typically allow a client to perform any sort of trivial enumeration of the nodes and data within its zones. If an attacker wants to know which hosts are present in a zone, this data is not readily available. The attacker is forced to guess, either at DNS names or IP addresses.
DNS pinning or rebinding attacks
These attacks exploit the way in which applications (specifically, browsers and their plug-ins) consume DNS entries that have multiple IP addresses associated with them. DNSSEC does not address this vulnerability.
Understanding DNSSEC in Windows
DNSSEC in Windows Server 2008 R2 DNS server
Offline signing of static zones The DNS server command-line management tool (Dnscmd.exe) offers offline key generation and zone-signing capability through a signing tool. RSA/SHA-1 is the supported algorithm. Supported key lengths are from 512 bits to 4096 bits. For more information, see “Appendix I: Dnscmd.exe commands” later in this document.
The signing tool generates keys that will be stored in certificates, an example of which would be a self-signed certificate in the machine store.
In order to sign a zone, the zone data from a file-backed or an Active Directory-integrated zone must be copied to a temporary file. The zone signing tool consumes this file as the input and generates a signed zone file as the output. The signed zone file contains the additional RRSIG, DNSKEY, DS, and NSEC resource records for data in the zone. This signed zone must then be reloaded on the DNS server in order for the server to host the zone. You can reload the signed zone by using Dnscmd.exe or DNS Manager.
The zone signing tool also allows for key rollover either by pre-publishing keys or by generating two sets of signatures (one for the key being retired, one for the new key).
Dynamic updates are automatically disabled on a DNSSEC-signed zone. Windows Server 2008 R2 DNS server supports the signing of static zones only. You must use Dnscmd.exe or DNS Manager to add more resource records to a zone and the zone must be re-signed.
Important
Secure dynamic update is a feature introduced in Windows Server 2003that is used by DNS clients to register and dynamically update their resource records with a DNS server

7
whenever changes occur. This feature should not be confused with DNSSEC. After a zone is DNSSEC-signed, all mechanisms of dynamic updates (secure and non-secure) will be disabled on that zone.
Configuration of trust anchors A trust anchor is a preconfigured public key associated with a specific zone. Windows Server 2008 R2 supports the configuration of trust anchors by using DNSKEY resource records.
A validating DNS server must be configured with one or more trust anchors in order to perform validation. At least one trust anchor is required if any DNSSEC data is to be validated by the DNS server. Additional trust anchors can be deployed to support islands of trust. DNS server management tools (DNS Manager and Dnscmd.exe) can be used to locally or remotely view and modify trust anchors. Trust anchors apply only to the zone at which they are defined.
If the DNS server is running on a domain controller, trust anchors can be stored in the forest directory partition in AD DS and will be replicated to all domain controllers in the forest. On standalone DNS servers, trust anchors are stored in a file named TrustAnchors.dns in %windir%\System32\DNS.
Validation The DNS server will perform validation for a name as long as the trust anchor for the zone or for a parent zone is present, no matter if the client issuing the query indicates knowledge of DNSSEC. The server will perform validation even in cases in which the client requesting the query is capable of performing validation on its own. This behavior of the DNS server ensures that DNSSEC-unaware clients are protected.
Forwarding and recursion Non-authoritative DNS servers are typically configured to either forward queries to other DNS servers or to recurse queries to the Internet root servers. A Windows Server 2008 R2 DNS server deployed as a forwarder or a recurser will retrieve the additional resource records required to perform DNSSEC validation based on configured trust anchors and will validate responses received.
Zone transfers Zone transfers of a DNSSEC-signed zone function in the same way they do for an unsigned zone. All of the resource records, including DNSSEC resource records, are transferred from the primary server to the secondary servers with no additional setup requirements.
A Windows Server 2008 R2 DNS server can also be configured as a secondary server for a DNSSEC-signed zone with the primary hosted on a DNS server running an operating system other than Windows.

8
Active Directory-integrated zones and Active Directory replication A DNSSEC-signed zone stored in AD DS will continue to replicate to other DNS servers in the forest or the domain (as configured) in the same way it does for a zone that is not DNSSEC-signed.
Managing DNSSEC through Dnscmd.exe and DNS Manager All DNSSEC tasks can be performed by using the Dnscmd.exe command-line tool. This allows you to script common DNSSEC operations, such as re-signing a zone. For a list of DNSSEC-specific commands, see “Appendix I: Dnscmd.exe commands” later in this document.
You can use the graphical user interface, DNS Manager, to view DNSSEC-signed zones and to perform operations such as adding and deleting DNS resource records. DNS Manager also allows you to view and edit trust anchors. However, you cannot use DNS Manager to generate keys or sign a zone. These operations can only be performed by using Dnscmd.exe.
Flat-name resolution The signing of the GlobalNames Zone and WINS forwarding are not supported in Windows Server 2008 R2.
DNSSEC in Windows Server 2008 R2 and Windows 7 DNS client
Non-validating security-aware stub resolver The DNS client component is included in every version of the Windows operating system, no matter if the computer is also a DNS server.
The Windows DNS client is a stub resolver, which means it always issues iterative queries to the DNS servers configured on its network interfaces (hereafter referred to as local DNS servers). With the implementation of DNSSEC, the client remains a stub resolver.
The DNS client is now security-aware, which means that when issuing queries, the DNS client will indicate to the local DNS server that it understands DNSSEC by setting the DNSSEC OK bit in queries. The client can also process the new DNSSEC resource records in addition to the DNSSEC EDNS0 bits in responses.
However, the DNS client is non-validating, which means it does not perform DNSSEC validation; it relies on its local DNS servers for validation instead. If the local DNS server indicates the successful validation of the name, the DNS client returns the name resolution results to the
9
application. If the server failed validation and returned the non-validated results to the client, the client will not return the results to the application.
The setting of the DNSSEC OK bit and checking for validation in the response are operations controlled through policy stored in the Name Resolution Policy Table (NRPT), which is described in the following section.
Because the DNS client relies on its local DNS server for DNSSEC, the client must be able to trust the local DNS server. For more information about the way IPsec is used to establish this trust relationship, seethe Planning and Deployment sections of this document.
To deploy DNSSEC with IPsec, the local DNS servers must be IPsec-compatible DNSSEC-aware servers, such as Windows Server 2008 R2 DNS server.
Introduction to the Name Resolution Policy Table The Name Resolution Policy Table (NRPT) is a table of namespaces and corresponding settings stored in the registry that determines the DNS client’s behavior when issuing queries and processing responses. Before issuing name resolution queries, the DNS client will consult the NRPT to determine if any additional flags must be set in the query. Upon receiving the response, the client will again consult the NRPT to determine any special processing or policy requirements. In the absence of the NRPT, the client will operate in a normal fashion, and will not issue queries indicating knowledge of DNSSEC.
In addition to storing configurations and settings specific to DNSSEC, the NRPT also stores information related to DirectAccess, a remote access technology. The table can be configured through Group Policy or by using registry scripts.
A DNS client is made aware of the need to check for DNSSEC validation on a per-namespace basis. Each row in the NRPT represents a rule for a portion of the namespace for which the DNS client issues queries.
The properties of an NRPT rule are described in the following table:
Rule Property
Functionality/Use
Format
Namespace
Used to indicate the namespace to which the policy applies. When a query is issued, the DNS client will compare the name in the query to all of the namespaces in this column to find
DNS suffix (*.contoso.com)
DNS prefix (hrweb.*)
FQDN (hrweb.contoso.com)
IP address subnet for reverse lookup (157.0.0.0/8)

10
a match.
DNSSEC Used to indicate whether the DNS client should check for DNSSEC validation in the response.
Note
Selecting this option will not force the DNS server to perform DNSSEC validation. That validation is triggered by the presence of a trust anchor for the zone the DNS server is querying. Setting this value to true prompts the DNS client to check for the presence of the Authenticated Data
Binary (on or off)

11
bit in the response from the DNS server if the response has been validated, If not, the DNS client will ignore the response.
DNS Over IPsec
Used to indicate whether IPsec must be used to protect DNS traffic for queries belonging to the namespace. Setting this value to true will cause the DNS client to set up an IPsec connection to the DNS server before issuing the DNS query.
Binary (on or off)
IPsec Encryption Level
Used to indicate whether DNS connections over IPsec will use encryption.
If DNSOverIPsec is off, this value is ignored.
Array:
0 – Do not use encryption (only integrity is performed)
1 – Low: 3DES, AES(all)
2 – Medium: AES(all)
3 – High: AES(192, 256)
IPsec CA The CA (or list of CAs) that issued the DNS server certificates for
String – The domain name of the CA that issued the DNS server certificate. If left blank, the authorization check is not required for this name.
This is checked along with the presence of a DNS EKU in the

12
DNS over IPsec connections. When using IPsec to allow the client to trust the DNS server, the DNS client checks for the server authorization based on the server certificates issued by this CA. If not set, all root CAs in the client computer’s stores are checked.
If DNSOverIPsec is off, this value is ignored.
server certificate.
The following flowchart shows how the DNS client uses the NRPT when issuing queries.
Securing server-to-client communication Because the Windows DNS client is a non-validating resolver that relies on its local DNS server for DNSSEC validation, the client must be able to establish a trust relationship with the local DNS server. The Planning and Deployment sections of this document describe the way in which IPsec is used to establish this trust relationship.

13
Certificates Certificate-based authentication is used to establish an IPsec session between the client and the server. Each endpoint must present a certificate to prove its identity. The client can use its machine certificate, but the server must use a special certificate that contains an Extended Key Usage (EKU) that proves the server’s identity as a DNS server. This certificate must be created and configured on all local DNS servers.
In addition to the certificate on the client, the client must also be provisioned with a root CA using which the server’s certificate can be validated.
IPsec policy Matching IPsec policy must be configured on both the server and the client. The use of encryption is optional, but recommended. You configure client IPsec policy by using the NRPT. You configure server IPsec policy by using Windows Firewall with Advanced Security.
DNSSEC Deployment Planning
Deployment stages We recommend that you deploy DNSSEC in phases or stages, as shown below. Depending on the complexity of your environment, you might want to limit the initial deployment to a small number of domains before you deploy DNSSEC broadly. Allow at least 2-3 days between each stage.
I: Upgrade DNS servers to Windows Server 2008 R2
II: Deploy DNSSEC on servers
III: Configure and distribute trust anchors
IV: Configure IPsec policy on the servers
V: Configure IPsec and DNSSEC on clients
If you are not deploying DNSSEC with IPsec, you can ignore stage IV and the IPsec portion of stage V and simply configure DNSSEC. Note that in this model, assuming that the channel between the local DNS server and the client is implicit.

14
Identifying your secure DNS zone Before you deploy DNSSEC, identify the DNS zones that must be secured, but keep in mind that once they are signed, the zones will no longer be able to receive dynamic updates. We do not recommend the signing of an Active Directory domain zone because it will require the manual update of all SRV records and other resource records. Be sure you also identify all DNS servers that host each zone. Before the zone can be signed, these servers must be upgraded to use DNSSEC.
Operating system considerations
Hardware and performance Before you upgrade your DNS servers to Windows Server 2008 R2 and deploy DNSSEC, consider the following factors that affect hardware and performance:
• Windows Server 2008 R2 is available for 64-bit processors only.
• A DNS server can consume as much as three to five times the memory of an unsigned zone in order to load a signed zone. Make sure there is enough memory on the DNS server.
• When responding to queries, the DNS server will respond with additional DNSSEC resource records. This will increase the number of packets on the network and can decrease the maximum query throughput of the DNS server.
• A DNS server that is performing validation of DNSSEC data can experience an increase in CPU usage. A server authoritative for signed zones will experience a minimal increase unless it is also performing validation on data from other zones. Make sure that the server has a reliable and fast processor.
• If large signed zones are hosted in AD DS, there can be a significant impact on the size of the Active Directory database file. Make sure there is enough disk space on the server.
Hosting signed zones For file-backed zones, the primary and all secondary servers hosting the zone must be a Windows Server 2008 R2 DNS server or a DNSSEC-aware server that is running an operating system other than Windows. For Active Directory-integrated zones, every domain controller that is a DNS server in the domain must be running Windows Server 2008 R2 if the signed zone is set to replicate to all DNS servers in the domain. Every domain controller that is a DNS server in the forest must be running Windows Server 2008 R2 if the signed zone is set to replicate to all DNS servers in the forest.
DNSSEC in mixed environments Windows implementations of DNSSEC will interoperate with older versions of Windows that do not use DNSSEC as well as other operating systems.
The following are guidelines for DNSSEC deployment in a mixed environment:
15
• All servers authoritative for a DNSSEC-signed zone must be a DNSSEC-aware server (such as Windows Server 2008 R2).
• A DNSSEC-aware Windows client that requests DNSSEC data and validation must be configured to issue DNS queries to a DNSSEC-aware and (optionally) IPsec-compatible DNS server that is configured with trust anchors (such as Windows Server 2008 R2).
• Non-DNSSEC-aware Windows clients can be configured to issue DNS queries to DNSSEC-aware servers.
• A DNSSEC-aware server can be configured to recurse queries to a non-DNSSEC-aware DNS server.
Key Management
Signing securely and securing the private key Like any other security model relying on public key cryptography, it is imperative that private DNSSEC signing keys are kept secure. By definition, the public key can be made widely available; it does not need to be secured. However, if the private key is compromised, a rogue DNS server can masquerade as the real authoritative server for a signed zone. For this reason, we strongly recommend the following:
• Make sure that the generation of keys, the storing of the private key, and the signing of zones is performed on a DNS server that physically secure and whose access is restricted to essential personnel only.
• Store at least one backup copy of the private key on a different computer. For more information about how to perform this backup, see section 6.5. The DNS service must be installed on that computer so that you can access the signing tool using Dnscmd.exe.
Key rollover DNSSEC keys do not have a permanent lifetime. The chances a key will be compromised, whether through accident, espionage, or cryptanalysis, increase the longer the key is used. Key rollover is the process by which a key is replaced with a new key and associated signatures are updated. We strongly recommend that you familiarize yourselves with the options in RFC 4641 and identify the preferred rollover mechanisms as part of your DNSSEC implementation planning.
RFC 4641recommends key rollover methods for each key type. The following table describes these methods.
Zone Signing Key (ZSK) rollover
Double Signature This method involves creating two ZSKs and signing the zone with both ZSKs to generate two sets of signatures for each RRSet.
Advantage: This method can be performed in

16
three steps.
Disadvantage: Performing double signature rollovers will result in the zone size doubling.
Key Pre-publication This method involves creating two ZSKs. The zone data is signed using one ZSK, but the second key is published in the zone even though no signatures have been generated using it. At a time when key rollover is to be performed, the zone is re-signed using the second ZSK, and both keys are still maintained in the zone so old cached signatures can still be validated using the first ZSK.
Advantages: If the old ZSK is compromised, then administrators can quickly switch to the new, already-published ZSK. And because only one key generates signatures at a time, the size of the zone is not doubled.
Disadvantage: This method is performed in four, rather than three, steps.
Key Signing Key (KSK) rollover
Double Signature Rollover of the KSK is different from rollover of the ZSK in that the former requires interactions with the parent zone; the latter does not.
The parent zone contains a DS resource record pointing to the KSK of the child zone. When performing a rollover, the new KSK is added to the child zone, but is also provided to the owner of the parent zone. The parent generates a new DS RR pointing to the new KSK of the child. After this data has been propagated to all authoritative parent zones, and after the old DS resource record has been cleared from all caches (max DS record TTL), the old KSK is removed from the child zone.
Advantage: Compared to the Key Pre-publication method, this method requires only one interaction with the parent.
Key Pre-publication When rollover is performed on the child, the parent is notified and the new KSK is provided

17
to the parent. The parent zone publishes two DS records, one for the old key and one for the new key. As soon as the new DS record has been propagated, the old KSK is replaced with the new KSK. At this point, the old DS record can also be deleted.
Disadvantages: This method requires two interactions with the parent, so it can take more time. In addition, the parent cannot verify the match between the new DS record and the new KSK because the new KSK has not yet been published. This also introduces “security lameness,” a scenario in which the parent has a DS record pointing to a non-existent DNSKEY record. In this case, a validator might mark the child zone as bogus.
Updating parent zones After a zone is DNSSEC-signed, and if the parent of the zone is also DNSSEC-signed, the signed delegation records must be added to the parent zone and the parent zone must be re-signed. This process must be performed every time a new child zone is signed for the first time, or if a child zone is re-signed with a new key signing key. If you own a signed zone but do not own the children of the zone, and if the children zones are in the process of being DNSSEC-signed one at a time, you must re-sign your zone after adding the delegation records each time a new child zone is signed. However, the process of signing multiple zones can be optimized if you own the parent as well as the children zones that are to be signed.
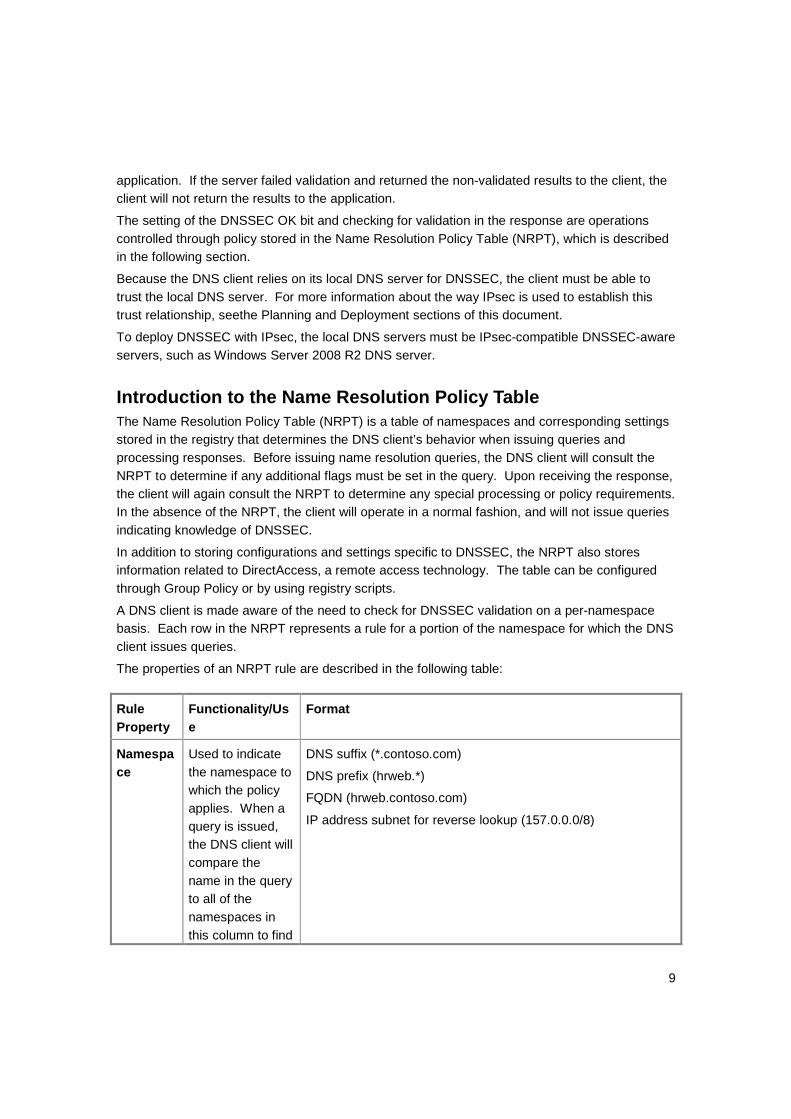
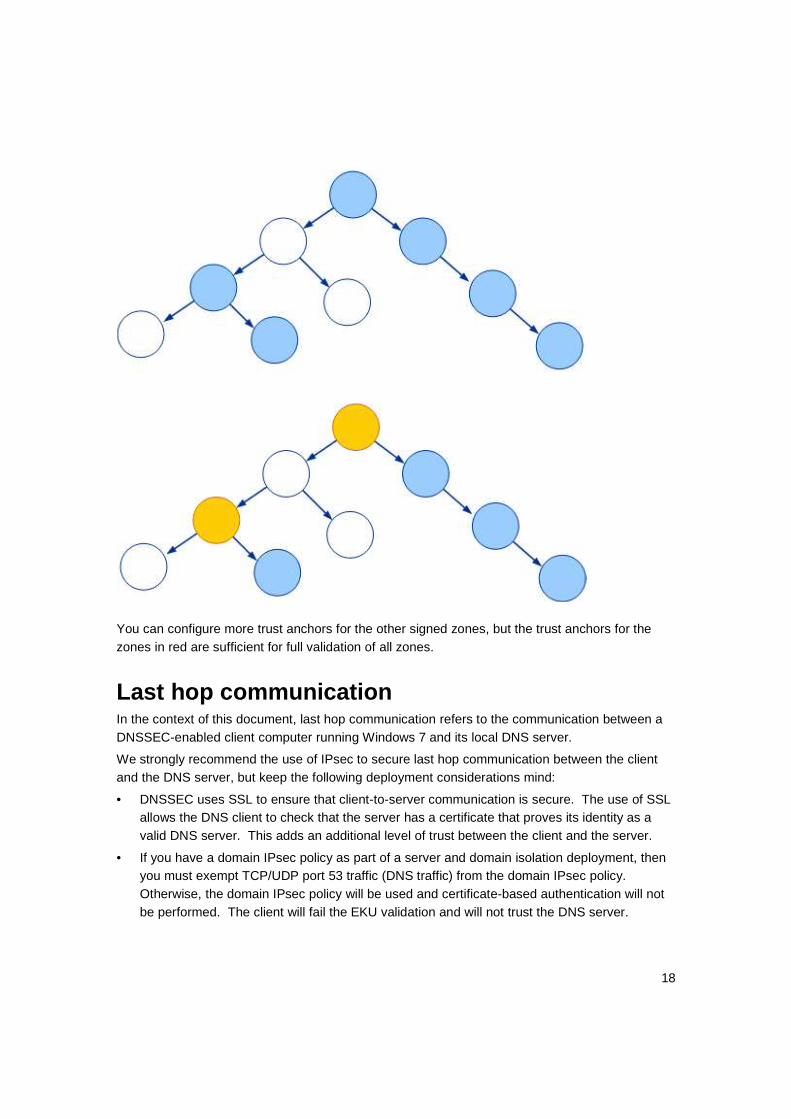
Trust anchor management A trust anchor for a signed zone must be configured on every DNS server that will attempt to validate DNS data from that signed zone. As mentioned before, Windows Server 2008 R2 only supports the DNSKEY resource record as a trust anchor. A DNS server performing validation will chain up trust anchors; hence it is sufficient if a trust anchor for a parent zone is present. However in scenarios where islands of trust are present, a trust anchor must be configured for the root of each island. The following diagrams illustrate these scenarios.
The following diagram illustrates a scenario in which some zones (shown in blue) are signed while others are not. The right side of the tree is completely signed; the left side of the tree is intermittently signed. Therefore, for a DNS server to be able to perform DNSSEC validation for all the zones in the example, at a minimum, you must configure trust anchors for the zones in red.
18
You can configure more trust anchors for the other signed zones, but the trust anchors for the zones in red are sufficient for full validation of all zones.
Last hop communication In the context of this document, last hop communication refers to the communication between a DNSSEC-enabled client computer running Windows 7 and its local DNS server.
We strongly recommend the use of IPsec to secure last hop communication between the client and the DNS server, but keep the following deployment considerations mind:
• DNSSEC uses SSL to ensure that client-to-server communication is secure. The use of SSL allows the DNS client to check that the server has a certificate that proves its identity as a valid DNS server. This adds an additional level of trust between the client and the server.
• If you have a domain IPsec policy as part of a server and domain isolation deployment, then you must exempt TCP/UDP port 53 traffic (DNS traffic) from the domain IPsec policy. Otherwise, the domain IPsec policy will be used and certificate-based authentication will not be performed. The client will fail the EKU validation and will not trust the DNS server.
19
Configuring policy on the DNS client
DirectAccess To enable the DNS client to set the DNSSEC OK bit in queries, you must configure the NRPT with the appropriate polices. Do not configure any settings on the DirectAccess tab unless this remote access technology is deployed in your environment. If DirectAccess is deployed in your environment, contact the DirectAccess administrator to be sure that any DNSSEC policies you create do not conflict with DirectAccess policies.
Advanced settings When an application uses the GetAddrInfo API or other name resolution APIs to resolve a name, DNS is typically the first protocol that is used to attempt to resolve the name. If DNS fails to successfully resolve the name, and if the query is a flat name, protocols such as Link-Local Multicast Name Resolution Protocol (LLMNR) and NetBIOS are tried.
If DNSSEC is enabled on a client, by default, failover to LLMNR/NetBIOS will occur only if the DNS client receives an authenticated denial of existence response. For any other failure response, the DNS client will not fail over. Although this behavior can be modified so that the client fails over for other failure responses, DNSSEC does not offer security for name resolution provided by other name service providers. Be sure to understand the security risks associated with modifying this setting. It should be changed only when link-local flat name resolution is an absolute necessity.
Policy mismatch between server and client Make sure there is no mismatch between the policy configured on a client and the trust anchors in the server to which the client issues queries. An application can fail to resolve a name if the DNS client policy on that computer requires DNSSEC for a name, but the DNS server to which queries are issued does not possess the trust anchor for that zone. In this scenario, either the appropriate trust anchor must be added to the DNS server or the policy requiring DNSSEC on the client must be deleted.
Deploying DNSSEC
STAGE I: Upgrading to Windows Server 2008 R2 After you have identified the zones that must be signed and the servers hosting these zones, upgrade these servers to Windows Server 2008 R2. For more information about how to upgrade to Windows Server 2008 R2, see the Active Directory/DNS Migration Guide.
20
STAGE II: Deploying DNSSEC on the DNS server The deployment of DNSSEC on DNS servers begins with the generating keys and signing the zones, followed by the distribution of trust anchors to other servers. The following sections describe these operations in detail.
Identifying signing computers Identify a secure signing computer that is accessible (both physically as well as over the network ) to essential trusted personnel only. This computer will be used to generate keys and sign zones.
The secure signing computer must be running Windows Server 2008 R2, with the DNS server role installed. It does not have to be a domain controller or a member server in a domain.
Additionally, identify at least one other secure computer where a backup copy of the private key will be stored. The backup computer does not have to be a DNS server.
Task: Identify at least two secure computers, one of which runs the DNS server role on Windows Server 2008 R2.
Importing the zone Import the zone to be signed to the secure computer. For file-backed zones, transfer the zone file (located in %windir%\System32\DNS) to the secure computer. This must only be done on the server that hosts the primary copy of the zone.
For Active Directory-integrated zones, you must first export the zone to a file, and then transfer the file to the secure computer. To export an Active Directory-integrated zone, use the following command:
DnsCmd /ZoneExport <zone name> <zone export file>
Task: Transfer the zone file to the secure computer.
Identifying ZSK rollover mechanism We recommend that you identify the ZSK and KSK rollover mechanisms before you sign your zone. For more information about key rollovers, see section 4.4.2 or RFC 4641.

21
Generating keys The first step to signing a zone is to generate the required KSK andZSK pairs based on the rollover mechanism you chose during the planning phase of your DNSSEC implementation. These steps are performed through Dnscmd.exe.
Perform all of the operations in this section on the secure signing computer.
Open a command prompt and browse to the folder where the zone file (or files) to be signed is stored. To generate the KSK pair, use the DnsCmd /OfflineSign /KeyGen command and set the KSK flag. To generate the ZSK pair, use the same command, but do not set the KSK flag.
Example command to generate a KSK:
DnsCmd /OfflineSign /GenKey /Alg rsasha1 /Flags KSK /Length %Length% /Zone %ZoneName% /SSCert /FriendlyName KSK-%ZoneName%
Example command to generate a ZSK:
DnsCmd /OfflineSign /GenKey /Alg rsasha1 /Length %Length% /Zone %ZoneName% /SSCert /FriendlyName ZSK-%ZoneName%
where %ZoneName% is the name of the zone which will be signed using the generated keys and %Length% is the length of the key.
Some notes about key generation:
• By default, self-signed certificates are stored in the local machine certificate store under the MS-DNSSEC folder.
• The only algorithm supported is RSA/SHA-1.
• The keys must map to the zone that the key is used for. A key generated for zone example1.com must not be used to sign zone example2.com.
Task: Generate KSK and ZSK key pairs.
Backing up private keys After they are generated, the keys are stored in a self-signed certificate in the computer’s local machine store. The keys must be backed up on the secure backup computer.
To export a certificate from one computer to another computer
1. Click Start, click Run, and then type mmc.
2. On the File menu, click Add/Remove Snap-in.
3. Highlight the Certificates snap-in.
4. Expand Computer Account, Local Computer, MS-DNSSEC.
5. Follow the steps in the wizard to export the certificate to a file.
6. Copy this file to the backup computer, and then use the Certificates snap-in to import the file to the MS-DNSSEC or any other store where the certificate will be stored securely.

22
Task: Back up the private KSK and ZSK.
Signing a zone The Dnscmd.exe command takes as input the zone file and keys and returns as output the signed zone file.
To sign the zone, use the DnsCmd /OfflineSign /SignZone command. For a description of all command options, see Appendix I: Dnscmd.exe commands.
Example command to sign a zone:
DnsCmd /OfflineSign /SignZone /input %ZoneFile% /output %SignedZoneFile% /zone %ZoneName% /signkey /cert /friendlyname ksk-%ZoneName% /signkey /cert /friendlyname zsk-%ZoneName%
Some notes about the DnsCmd zone signing command:
• Multiple keys can be specified in the signing operation by repeating the switch /signkey /cert /friendlyname <Friendly name of the certificate>. The number of signatures that will be generated will be based on the number of keys provided. Multiple KSKs and ZSKs can be specified in the same signing command.
• Additional keys can be added to a zone (but will not be used for signing) by specifying /addkey /cert /friendlyname <Friendly name of the certificate>. At least one signing key must always be specified when the /addkey option is used; otherwise, the output zone file will not be DNSSEC-signed.
• If the input file is already a signed zone file, then the signing tool will disregard all DNSSEC resource records and re-sign the zone. Thus, an already signed zone file can be re-signed again.
Task: Sign the zone file.
Reloading the zone The DnsCmd /OfflineSign /SignZone command will generate a zone file that contains DNSSEC data. You must now delete the unsigned version of the zone, and reload the zone with this signed zone file as the input. Maintain a copy of both the signed and the unsigned zone on the secure signing computer for backup.
Follow these steps to reload the zone:
• Copy the signed zone file to the authoritative DNS server to the %windir%\System32\DNS folder.
• Run DnsCmd /ZoneDelete <zone name> to delete the unsigned zone from the server. You must use the /DsDel flag if the zone you are deleting is an Active Directory-integrated zone.

23
• Now reload the zone using the new zone file. To load a file-backed zone, use the DnsCmd /ZoneAdd <zone name> <zone type> [Options] command. The file-backed zone must be a primary zone.
• If the zone you are loading is Active Directory-integrated, then perform the steps specified in step 3. Then use the DnsCmd /ZoneResetType command to change the type to an Active Directory-integrated zone and set the appropriate replication scope.
Note
Use the same zone name, type, and options as the unsigned zone.
Verify that the signed version of the zone transfers to secondary servers, or replicates to other domain controllers.
Task: Delete the unsigned version of the zone.
Task: Verify zone transfer and replication of the signed zone.
Task: Verify zone transfer and replication of the signed zone.
Providing the DS record to the parent zone In scenarios in which the zone being signed has a parent zone that is also signed, then the Delegation Signer (DS) resource record must be handed off to the owner of the parent zone. The owner of the parent zone must then incorporate the DS record and re-sign the parent zone.
The DS set can be found in the dsset-%zonename% file. On the secure signing computer, it can be found in the same folder as the signed and unsigned copies of the zone. This file will be created automatically as part of the zone signing operation. The contents of this file must be provided to the administrator who owns the parent DNS zone.
Task: Provide the signed DS resource records to the owner of the parent zone if the parent zone is DNSSEC-signed.
Incorporating the DS record from a child zone If you are the owner of a zone whose child zone has just been signed, then you will receive a copy of the DS records from the signed child zone. Incorporate this copy into your zone and re-sign the zone.
If the child zone is signed using the Windows Server 2008 R2 signing tool, you will receive the dsset-%zonename% file from the administrator of the child zone. Copy this file into the %windir%\System32\DNS on the server that is signing your zone (the parent zone) and re-sign

24
the zone. The signing tool will consume the contents of this file and will re-sign the parent zone appropriately.
Adding and deleting resource records The modification of data on a signed zone can only be performed offline. The process for adding and deleting resource records in a signed zone is identical to the process for adding and deleting resource records in an unsigned zone. For more information, see Manage Resource Records (http://go.microsoft.com/fwlink/?LinkId=131564). As soon as a resource record is added, edited, or deleted, the zone must be re-signed. Otherwise, signatures in the zone will become invalid.
Re-signing The re-signing of a zone is performed only under the following circumstances:
• If data in a signed zone was added, deleted, or modified, then the zone must be re-signed to generate new signatures. New keys do not need to be generated.
• If a child zone is signed after the parent zone has been signed, then the DS records of the child zone must be added to the parent zone and the parent zone must be re-signed. New keys do not need to be generated.
• If keys are compromised or become invalid, new keys must be generated, and the zone must be re-signed.
• If key rollover is performed.
The steps for re-signing the zone are identical to the steps that were originally used to sign the zone. Repeat steps 5.1, 5.2, 5.5, and 5.6. However, if the zone is being re-signed because it is invalid or has been compromised, then you must also generate new keys. In this case, you must repeat steps 5.1 through 5.8 must be repeated.
When re-signing the zone, the input zone file must be the zone file of the currently loaded signed zone. For example, zonefile_v0.dns is the original unsigned copy and zonefile_v1.dns is the first signed copy. When you use Dnscmd.exe or DNS Manager to modify the zone, the updates are written to zonefile_v1.dns. You must use zonefile_v1.dns as the input for the re-signing and generate zonefile_v2.dns as the output. For the next re-signing, you must use zonefile_v2.dns as the input.
The following sections describe how to perform both ZSK and KSK rollovers. In these examples, we will use ZSK1 and KSK1 to denote the key that has been currently used to sign the zone (that is, the zone before rollover begins), and ZSK2 and KSK2 to denote the new keys that will be generated in these steps.
Performing pre-published ZSK rollover During the pre-published ZSK rollover, ZSK2 will be generated. All signing operations must continue to use KSK1 to sign the records at the apex in addition to the appropriate ZSK.

25
Step 0: The zone has been signed with KSK1 and ZSK1.
Step 1: Generate the new key, ZSK2. DnsCmd /OfflineSign /GenKey
Step 2: Identify the TTL value of the DNSKEY RRset in the zone (DNSKEY_TTL) and the maximum zone TTL (MaxZone_TTL).
Step 3: Add the new key to the zone and re-sign the zone with KSK1 and ZSK1. (Note that ZSK2 is not used to sign the zone.)
DnsCmd /OfflineSign /SignZone
Use /signkey twice, once with ZSK1 and once with KSK1. Use /addkey to add ZSK2 to the
Step 4: After re-signing, wait for a period of time equal to the MaxZone_TTL value.
Step 5: Wait for a period of time equal to the MaxZone_TTL value.
DnsCmd /OfflineSign /SignZone
Use /signkey to sign the zone with ZKS2. Use /addkey to add ZSK1 to the zone.
Step 6: Wait for a period of time equal to the MaxZone_TTL value.
Step 7: After the period of time specified in MaxZone_TTL has elapsed, re-sign the zone with KSK1 and ZKS2. This will delete ZSK1 from the zone.
DnsCmd /OfflineSign /SignZone
Use /signkey twice with ZSK2 and KSK1
Example command to sign a zone with pre-published rollover for ZSK:
DnsCmd /OfflineSign /SignZone /input %ZoneFile% /output %SignedZoneFile% /zone %ZoneName% /signkey /cert /friendlyname ksk-%ZoneName% /signkey /cert /friendlyname zsk1-%ZoneName% /addkey /cert /friendlyname zsk2-%ZoneName%.com

26
Performing double signature ZSK rollover ZSK2 id generated during the double signature ZSK rollover.All signing operations must continue to use KSK1 to sign the records at the apex in addition to the appropriate ZSK.
Step 0: The zone has been signed with ZSK1 and KSK1.
Step 1: Generate the new key, ZSK2. DnsCmd /OfflineSign /GenKey
Step 2: Identify the maximum zone TTL (MaxZone_TTL).
Step 3: Re-sign the zone with ZSK1 and ZSK2 in addition to KSK1 to generate two sets of signatures.
DnsCmd /OfflineSign /SignZone
Use /signkey three times, once each with ZSK1, ZSK2, and KSK1.
Step 4: After re-signing, wait for a period of time equal to the MaxZone_TTL value.
Step 5: Re-sign the zone with KSK1 and ZKS2. (This will automatically delete ZSK1 and all signatures that were generated using ZSK1.)
DnsCmd /OfflineSign /SignZone
Use /signkey twice, once with ZSK2 and once with KSK1.
Example command to sign a zone using double signature rollover for ZSK:
DnsCmd /OfflineSign /SignZone /input %ZoneFile% /output %SignedZoneFile% /zone %ZoneName% /signkey /cert /friendlyname ksk-%ZoneName% /signkey /cert /friendlyname zsk1-%ZoneName% /signkey /cert /friendlyname zsk2-%ZoneName%.com
Performing double signature KSK rollover During the double signature KSK rollover, KSK2 will be generated. All signing operations must continue to use ZSK1 to sign the zone data in addition to the appropriate KSK.
Step 0:
Step 1 The zone has been signed with KSK1 and ZSK1.:
Obtain the TTL of the DS record in the parent zone that corresponds to KSK1 (DS_TTL).

27
Step 2: Generate the new key that will be added, KSK2.
DnsCmd /OfflineSign /GenKey with /flags ksk
Step 3: Re-sign the zone with KSK1, KSK2, and ZSK1.
DnsCmd /OfflineSign /SignZone
Use /Signkey three times, once each with KSK1, KSK2, and ZSK1.
Step 4: Provide the new DS record set to the owner of the parent zone by extracting the DS record from dsset-%ZoneName% that corresponds to KSK2. The owner of the parent zone must replace the original DS set with the new DS set that points to KSK2.
Provide dsset-%ZoneName% to the parent
Step 5: After the parent has updated the record, wait for a period of time equal to the DS_TTL value.
Step 6: After the period specified in DS_TTL has elapsed, re-sign the zone with KSK2 and ZSK1.
DnsCmd /OfflineSign /SignZone
Use /signkey twice, once with KSK2 and once with ZSK1.
Example command to sign a zone using double signature rollover for KSK:
DnsCmd /OfflineSign /SignZone /input %ZoneFile% /output %SignedZoneFile% /zone %ZoneName% /signkey /cert /friendlyname ksk-%ZoneName% /signkey /cert /friendlyname ksk1-%ZoneName% /signkey /cert /friendlyname zsk1-%ZoneName%.com
Reverting back to the unsigned zone If any of the preceding operations fail and you want to revert back to the unsigned version of the zone, follow these steps:
28
1. From the signing computer, obtain the unsigned zone file.
2. Reload this zone file using the steps outlined in the earlier section: Reloading the Zone.
3. Delete the certificate storing the private key.
4. Delete the certificate storing the private key.
STAGE III: Configuring and distributing trust anchors Now that the authoritative server has been set up with the signed zone, you must configure trust anchors on other, non-authoritative DNS servers that will perform DNSSEC validation of data from the signed zone. You will find the trust anchor that must be configured in the keyset-%zonename% file on the secure signing computer in the same location where the signed and unsigned copies of the zone reside. This file is also created automatically as part of the signing process.
If you want to store the trust anchor in a file, then you must transfer the keyset-%zonename% file to each DNS server that will perform validation for data from the signed zone. If you want to store the trust anchor in Active Directory (this option is available only if the DNS server is running on a domain controller), you can transfer the trust anchor to only one DNS server per forest.
To add the trust anchor using Dnscmd.exe, use the data from the keyset-%zonename% file and run the following command:
DnsCmd /TrustAnchorAdd <name of the signed zone> DNSKEY <Flags> 3 5 <Base64Data>
To add the trust anchor using DNS Manager:
1. In DNS Manager, right-click the name of the DNS server, and select Properties.
2. On the Trust Anchors tab, click Add.
3. Under Name, type the name of the signed zone.
4. Do not change the settings for Protocol (DNSSEC) and Algorithm (RSA/SHA-1).
5. Select the Zone Signing Key and Secure Entry Point check boxes, as appropriate
6. Paste the public key of the signed zone into Public Key. The Zone Signing Key and Secure Entry Point check boxes must be selected for the KSK.
Do not configure a trust anchor for a signed zone on the server that is authoritative for the same zone.
Note
Do not configure a trust anchor for a signed zone on the server that is authoritative for the same zone.
Task: Configure trust anchors.

29
STAGE IV: Configuring IPsec policy on the DNS server Certificates and IPsec policy can be deployed to DNS servers through one of the following mechanisms:
• Domain controller organizational unit (OU): If the DNS servers in your domain are Active Directory-integrated, then using this option will make configuration and deployment easier. We recommend this method.
• DNS Server OU or security group: If you have DNS servers that are not Active Directory-integrated, then consider creating a separate OU or a security group with the machine accounts of your DNS servers.
• Local firewall configuration: Use this option if you have DNS servers that are not domain members or if you have a small number of DNS servers that you want to configure locally.
Issuing server certificates
On the domain controller with the Active Directory Certificate Services (AD CS) role installed, perform the following steps to create a new certificate for DNSSEC
1. From the Microsoft Management Console (MMC), click Add/Remove Snap-in, and then select Certificate Template to display a list of certificate templates.
2. Select Directory Email Replication, right-click and then select Duplicate Template.
3. Select Windows Server 2003 Technology, and click OK.
4. On the General tab, change the Template display name and Template name to DNS Server.
5. Set Renewal period to the appropriate value.
6. Under Request handling, select Allow private key to be exported.
7. Under Extensions, select Application Policies, and then click Edit.
8. Select Directory Service Email Replication, and then click Remove to remove the policy.
9. Click Add, and then click New.
10. Under Name, type DNS Server.
11. Under Object Identifier, type 1.3.6.1.4.1.311.64.1.1, and then click OK.
Important
Make sure you type the object identifier exactly as specified. Otherwise, servers will fail to negotiate IPsec with clients.
12. Select Key Usage, and then click Edit.
13. Under Signature, select Digital Signature and Signature is proof of origin (nonrepudiation).

30
14. Under Encryption, select Allow key exchange only with the key encryption (key encipherment) and Allow encryption of user data.
15. Select Make this extension critical.
16. Now open the Certification Authority snap in. Right-click Certificate Templates, select New, and Certificate Template to Issue. From the list, select DNS Server, and then click OK.
Configuring IPsec policy Edit the domain controller OU by launching Group Policy Management Console. Expand “Windows Firewall with Advanced Security”. Browse to “Connection Security Rules” and perform the following steps. This policy will be deployed on all domain controllers because it is assumed that domain controllers are also DNS servers. The following policy must be configured manually on DNS servers that are not domain members.
1. Right-click the middle pane, and select New Rule.
2. Under Rule Type, select Custom, and then click Next.
3. Under Endpoints, select Any IP address for both endpoint 1 and endpoint 2.
4. Under Requirements, select Request authentication for inbound and outbound connections
5. Under Authentication Method, select Advanced, and then select Customize.
• Under First Authentication, select the First authentication
• Under Second Authentication, select Add
• Select User certificate from this certification authority (CA). Leave Signing algorithm and Certificate store type at the default values. Click Browse, select the certification authority name, and then click OK
• On the Authentication Method page, click Next.
6. Under Protocol and Ports, for Protocol type, select UDP. Select Specific ports for the Endpoint 1 port, and then type 53. Select All ports for the Endpoint 2 port.
7. Under Profile, use the defaults (Domain, Private and Public).
8. Type a name and description for the rule. We recommend that you use a name that will be easy to recognize (for example, “DNSSEC UDP”).
9. Click Finish to create the rule.
To create an identical rule for DNS TCP connections, repeat this procedure and use TCP as the protocol type.
Optionally, you can use the Netsh command-line tool to create this rule. Copy the following netsh command.
31
> netsh advfirewall consec add rule name="DNSSECTCP" endpoint1=any endpoint2=any action=requestinrequestout port1=53 port2=any protocol=%protocol% auth1=anonymous auth2=usercert auth2ca=%CaName%
Replace %protocol% first with UDP, and then replace %protocol% with TCP. Replace %CaName% with the name of the CA being used.
STAGE V: Deploying DNSSEC and IPsec on the DNS client To enable a client to issue queries indicating the knowledge of DNSSEC and to check for validation in the response, you must configure the NRPT. You can use Group Policy to deploy DNSSEC policy on client computers in scenarios in which all clients are domain members. Otherwise, you must use registry scripts on client computers to configure the NRPT.
Configuring TCP/IP properties Because the client must be able to establish a trust relationship with its local DNS server, the local DNS server must be an IPsec-compatible server that can use DNSSEC, such as Windows Server 2008 R2 DNS server. Computers are typically configured with multiple DNS servers on each network interface (client computers are typically configured through DHCP while server computers are typically configured statically). For consistent client behavior, each DNS server configured on the network interface must meet the requirements of IPsec and DNSSEC.
Configuring the NRPT for clients that are domain members Group Policy provides a snap-in that can be used to author a name resolution policy, which can be applied to an OU or an entire domain.
Creating the OU After you have identified all of the computers to which DNS client policy must be applied, add these computer accounts to custom OUs. For more information about creating and managing OUs, see Designing a Group Policy Infrastructure (http://go.microsoft.com/fwlink/?LinkID=131439) and Step-by-Step Guide to Understanding the Group Policy Feature Set (http://go.microsoft.com/fwlink/?LinkId=131440).
Task: Create OUs and add client computer accounts.

32
Creating a DNSSEC policy
After the OUs have been created, you must create the DNSSEC policy.
1. Right-click the OU, and then click Edit.
2. In the Group Policy Management Editor, expand Computer Configuration, expand Policies, expand Windows Settings, and then click Name Resolution Policy.
A policy is defined as a set of rules. Each rule applies only to the specified portion of the DNS namespace.
Follow these steps to create a new rule:
1. Enter the area of the namespace to which the policy applies. Typically, this will be the name of a signed zone. From the drop-down menu, select the appropriate setting:
a. FQDN: Select this if the policy applies only to the specified host. This is not the FQDN of the domain, but the FQDN of a host computer.
b. Suffix: Select this if the policy applies to the specified namespace, all records in that namespace, and all subdomains.
c. Prefix: Select this if the policy applies only to a hostname. This policy will be triggered only if the hostname portion of the query matches the name configured here. A flat name (that is, a dotless name) must be configured here.
d. Subnet (IPv4): Select this only if you are configuring a policy for reverse IPv4 lookup queries.
e. Subnet (IPv6): Select this only if you are configuring a policy for reverse IPv6 lookup queries.
1. Select the DNS Security check box.
2. If IPsec is being deployed, select Yes for IPsec Required. If encryption is being used, select the appropriate IPsec encryption level.
3. To add this rule to the NRPT, click Create. The rule will now appear in the table at the bottom of the screen.
4. Repeat steps 1 through 6 to add other rules for areas of the namespace.
Of the advanced settings available in the NRPT, only the Query failure setting applies to DNSSEC. If this option is cleared, by default the DNS client will fail over to other name resolution providers only if the name does not exist in DNS. You can modify this setting to allow DNS to fail over for all responses, but be aware that DNSSEC does not secure name resolution for the other name service providers.
After all of the rules have been created, click Apply. The policy will be applied to all clients in the OU as they update their Group Policy settings.
Task: Create the name resolution policy and apply it to the OU or OUs.

33
To verify that the policy has been successfully applied, on a client computer, type the following command:
netsh namespace show policy
The rules in the policy will be displayed. Verify that all rules have been applied.
Note
If the rules are not displayed, wait for a Group Policy refresh, and try again. To force a Group Policy refresh, type gpupdate /force.
Configuring the NRPT for clients that are not domain members Group Policy cannot be used for clients that are not members of an Active Directory domain. You can use scripts to configure policies or you can manually configure them on each client. Identify a client computer running Windows Server 2008 R2 or Windows 7 on which the policy will first be authored using local Group Policy. The policy will then be exported in the form of a .reg file and can be deployed on other computers.
Authoring policy using Local Group Policy Editor
1. To configure the policy manually through local Group Policy, click Start, click Run, and then type gpedit.msc. The Local Group Policy Editor opens.
2. Follow the steps in section 6.1.2 to create a policy. After it is created, this policy will apply only to the computer where it was authored.
Task: Create the policy using local Group Policy.
Deploying policy through a registry script
1. After the policy has been configured, open the Registry Editor. Click Start, click Run, and then type regedit.
2. Browse to HKLM\Software\Policies\Microsoft\Windows NT\DNSClient\DnsPolicyConfig.
3. Right-click DnsPolicyConfig, and then select Export.
4. Type a name and path for the file.
This operation will generate a .reg file that can then be transferred to any client computer on which the same policy is applicable. The .reg file can also be converted into a script.
34
Appendix I: DnsCmd.exe commands
Generating keys dnscmd.exe /offlinesign /genkey /alg /length /flags /zone /sscert /friendlyname /validfrom /validto
/alg=algorithm
Specifies The algorithm of the signing key. Currently, only RSA/SHA-1 is supported.
/length=keylength
Specifies the number of bits in the key. The length can start from 512 bits and continue,
in 64-bit increments, up to 4096 bits.
/flags=flags
Specifies the flags in DNSKEY. Currently, only KSK is supported, which indicates that
the Zone Key bit and the Secure Entry Point bit are turned on. If /flags is not specified,
then only the Zone Key bit is turned on, which indicates a zone signing key.
/zone=zoneFQDN
Specifies the FQDN of the zone.
/sscert
Specifies that the key will be stored in a self-signed certificate.
/validfrom=validfromtime
Specifies the start time of validity period of the certificate. It is in the format of
YYYYMMDDHHMMSS, which specifies local time. If not specified, the default will be
current time minus 1 hour (to allow for time skew among DNS servers).
/validto=validto
Specifies the end time of validity period of the certificate. It is in the format of
YYYYMMDDHHMMSS, which specifies local time. If not specified, the certificate will be
valid for 5 years.

35
Generating keys /cert /store /type /friendlyname /subject /issuer /serial
/cert
Specifies that the following parameters are for a certificate.
/store=certificatestore
Specifies the name of the certificate store. The default is the MS-DNSSEC store in the
local computer certificate store.
/type=type
Specifies whether the store is a machine store or a user store. Valid values are
“machine” and “user”. The default is machine store.
/friendlyname=friendlyname
The friendly name of the certificate.
/subject=subject
The subject of the certificate (for example, “CN=example.com 32478 RSASHA1 257”).
This option is case-sensitive.
/issuer=issuer
The issuer of the certificate. Format is the same as /subject.
/serial=serialnumber
The serial number of the certificate. The serial number is based on a random GUID
and is generated by the system during the generation of the certificate. serialnumber
is a sequence of bytes in hexadecimal format (for example, /serial " 40 c1 81 ac 00 00
00 01 a6 20”).
You must use at least one of the options (friendlyname, subject, issuer, or serial number). When more than one certificate meets the user’s specification (for example, if the user specified friendly name only and two certificates have the same friendly name), then the signing tool will require the specification of another option.

36
Deleting a key You can delete a certificate in Certificate Manager, but Certificate Manager will not delete the private key associated with the certificate. Therefore, the use of the signing tool is recommended to delete the certificate.
dnscmd.exe /OfflineSign /deletekey {cert-spec}
Note
This command works only with certificates stored in the MS-DNSSEC certificate store.
Signing a zone Dnscmd.exe /OfflineSign /signzone /input /output /zone /keysetdir /GenKeySet /startend /soaserial /ds /dnskey /addkey {key-param} {cert-spec} /signkey [/allrr|/dnskeyonly] {key-param} {cert-spec}
/input=inputfile
The file name of the input zone file to be signed. This zone file might already have
some DNSSEC records (DNSKEY, RRSIG, NSEC, DS) in it.
/output=outputfile
The file name of the signed zone file. The file will be overwritten if already exists.
/zone=zoneFQDN
The FQDN of the zone.
/keysetdir=keysetdir
Specifies the directory where the key set files of child zones are stored. Default value is
the current directory. Keyset files are the same as BIND keyset files. They contain the
KSK DNSKEY records that are used to sign this zone. The keyset file name is keyset-
ZoneFQDN. For example, the keyset file for zone example.com will be keyset-
example.com. The key set file and DS set file generated for the zone being signed will
also be put here. DS set file is named dsset-ZoneFQDN.
/genkeyset=genkeyset
This option controls which keys are put in the key set file and DS set file generated for
the current zone.
None: No key set file or DS set file will be generated.

37
KSK: KSKs will be included in key set files and DS set files. This is the default.
AllKeys: All keys at zone apex will be included in key set files and DS set files. If there
is some unusual signing (for example, if KSK has been used to sign a whole zone),
this option must be used. The keys that must be sent to the parent can be manually
copied and pasted.
/start=starttime
The start time of the validity period of RRSIG, in the YYYYMMDDHHMMSS format,
which specifies local time.
/end=endtime
The end time of the validity period of RRSIG in the YYYYMMDDHHMMSS format,
which specifies local time. If this parameter is omitted, then 30 days from start time will
be used.
/soaserial=soaserial
This option specifies the way in which the SOA serial number will be processed. It can
take the following values:
Keep:. Do not modify the SOA serial number.
Increment: (Default) Increment SOA serial number using RFC 1982 arithmetics.
/ds=dstreatment
This option specifies the way in which existing DS records in the input zone file will be
processed. It can take the following values:
Add: The existing DS records are kept. New DS records can be added. This allows
the user to manually insert DS in the zone file and then have the zone file signed.
Replace: (Default) The existing DS records are removed before new DS records are
added.
NoChange: The DS record sets in the input files are not changed. No new records are
added.
/dnskey=dnskeytreatment
This option specifies the way in which existing DNSKEY records at the zone root will be
processed. (DNSKEY records at non-zone-root zones will not be changed.) It can take
the following values:
Add: The existing DNSKEY records are kept. New DNSKEY records can be added.
This allows the user to manually insert DNSKEY records in the zone file.

38
Replace: (Default) The existing DNSKEY records are removed before new DNSKEY
records are added.
NoChange: The DNSKEY sets in the input file will not be changed. No new DNSKEY
records will be added. (/AddKey option will be ignored.)
/signkey [/allrr|/dnskeyonly] {key-param} {cert-spec}
These keys are published and used to sign the zone file. Multiple signing keys can be
used by repeating this option. The self-signed certificate has the ZSK/KSK information.
The signing tool will treat ZSK and KSK differently. ZSK is used to sign every
authoritative RRset. KSK is used to sign the DNSKEY RRset. /allrr and /dnskeyonly
can be used to change the behavior of ZSK and KSK. Only one of these options can be
used.
/allrr will cause this key to sign every authoritative RRset.
/dnskeyonly will cause this key to sign DNSKEY RRset only.
{key-param} specifies some key parameters and can include:
/algorithm algorithm /flags flags
They are included because if the user uses a certificate that is not generated by the
signing tool, then the user will not have information about the algorithm number and the
flags. If the certificate’s subject follows the format generated by the tool, then the user
does not need to specify these parameters and the tool will use the information from the
subject. If the user uses {key-param} on the command line, then it overwrites anything
from the certificate subject.
The /addkey and /signkey commands are used together during key rollover. During
key rollover, some keys will be published (/addkey) but not used for signing.
Appendix II: Configuring the NRPT
Example registry script [HKEY_LOCAL_MACHINE\SOFTWARE\Policies\Microsoft\Windows NT\DNSClient]
"EnableDAForAllNetworks"=dword:00000000
"DnsSecureNameQueryFallback"=dword:00000000
"DirectAccessQueryOrder"=dword:00000000
[HKEY_LOCAL_MACHINE\SOFTWARE\Policies\Microsoft\Windows NT\DNSClient\DnsPolicyConfig]

39
[HKEY_LOCAL_MACHINE\SOFTWARE\Policies\Microsoft\Windows
NT\DNSClient\DnsPolicyConfig\Rule1]
"Version"=dword:00000001
"ConfigOptions"=dword:00000002
"Name"=hex(7):2e,00,00,00,00,00
"IPSECCARestriction"=""
"DNSSECValidationRequired"=dword:00000001
"DNSSECQueryIPSECRequired"=dword:00000001
"DNSSECQueryIPSECEncryption"=dword:00000001
[HKEY_LOCAL_MACHINE\SOFTWARE\Policies\Microsoft\Windows
NT\DNSClient\DnsPolicyConfig\Rule2]
"Version"=dword:00000001
"ConfigOptions"=dword:00000004
"Name"=hex(7):2e,00,63,00,6f,00,6e,00,74,00,6f,00,73,00,6f,00,2e,00,63,00,6f,\
00,6d,00,00,00,00,00
"IPSECCARestriction"=""
"DNSSECValidationRequired"=dword:00000000
"DNSSECQueryIPSECRequired"=dword:00000000
"DNSSECQueryIPSECEncryption"=dword:00000000