DNBL portal – Site User’s manual
38
DNBL portal – Site User’s manual Site User’s manual DNBL Technical Authority
Transcript of DNBL portal – Site User’s manual
DNBL portal – Site User’s manual
Site User’s manual
DNBL Technical Authority

Contents Introduction ............................................................................................................................................ 4
SharePoint Building Blocks .................................................................................................................. 4
My Site Menu .................................................................................................................................. 4
User menu ....................................................................................................................................... 5
Ribbon ............................................................................................................................................. 5
Page Management Tools ................................................................................................................ 6
Navigation Bar ................................................................................................................................. 6
Search Bar ....................................................................................................................................... 6
Quick Launch Navigation................................................................................................................. 6
Working with Sites .................................................................................................................................. 7
Viewing Items in the Recycle Bin ........................................................................................................ 7
Editing Text ..................................................................................................................................... 8
Adding Tables .................................................................................................................................. 8
Adding Pictures ............................................................................................................................... 8
Adding Links .................................................................................................................................... 9
Social Collaboration ............................................................................................................................ 9
Contact Details ................................................................................................................................ 9
Note Board ...................................................................................................................................... 9
Site Feed .......................................................................................................................................... 9
Site Users ........................................................................................................................................ 9
Managing Lists and Libraries ................................................................................................................... 9
Creating Lists and Libraries ............................................................................................................... 10
Deleting Lists and Libraries ............................................................................................................... 10
Calendar ............................................................................................................................................ 11
Group Calendars ........................................................................................................................... 11
Connecting Calendar Lists to Outlook ........................................................................................... 12
Discussion Boards ............................................................................................................................. 12
Managing Discussions ................................................................................................................... 12
E-mail Notifications ........................................................................................................................... 13
Tasks .................................................................................................................................................. 13
Connecting Tasks Lists with Outlook............................................................................................. 14
Working with List Items .................................................................................................................... 15
Adding Items to a List .................................................................................................................... 15
Editing Items in a List .................................................................................................................... 15
Using Quick Edit ............................................................................................................................ 16
Deleting Items in a List .................................................................................................................. 16
Filtering and Sorting List Items ..................................................................................................... 17
Working with Folders ........................................................................................................................ 17
Working with Libraries ...................................................................................................................... 18
Types of Libraries .......................................................................................................................... 18
Document Libraries ....................................................................................................................... 18
Working with Documents ..................................................................................................................... 19
Adding Documents to Libraries ......................................................................................................... 19
Uploading Documents................................................................................................................... 19
Creating New Documents in a Library .......................................................................................... 20
Using the New Document Menu ................................................................................................... 20
Editing Documents in SharePoint ..................................................................................................... 21
Checking Documents In and Out ................................................................................................... 21
Editing Documents ........................................................................................................................ 23
Opening Documents ..................................................................................................................... 23
Deleting Documents in a Library ................................................................................................... 24
Download a Copy .......................................................................................................................... 24
Working with Folders ........................................................................................................................ 25
Document Versioning ....................................................................................................................... 25
Search.................................................................................................................................................... 25
Using SharePoint Search ................................................................................................................... 25
Performing a Search ...................................................................................................................... 26
Executing Advanced Searches ....................................................................................................... 27
Personalization and Social Features ..................................................................................................... 28
About Me and the Profile ................................................................................................................. 28
About Me Private View ..................................................................................................................... 28
My Tasks ........................................................................................................................................ 29
Alerts ............................................................................................................................................. 30
Creating Alerts .............................................................................................................................. 30
Creating List Item and Document Alerts ....................................................................................... 30
Creating List and Library Alerts ..................................................................................................... 32
Creating Page Alerts ...................................................................................................................... 33

Deleting Existing Alerts ................................................................................................................. 34
Sharing and Extending Content ............................................................................................................ 34
E-mail a Link ...................................................................................................................................... 34
Blogs .................................................................................................................................................. 34
Managing Blog Posts ..................................................................................................................... 35
Commenting on Posts ................................................................................................................... 36
Discussions ........................................................................................................................................ 36
Creating New Discussions ............................................................................................................. 36
Editing Discussions ........................................................................................................................ 37
Replying in a Discussion ................................................................................................................ 37
Technical support: ................................................................................................................................. 37

Introduction DNBL portal is placed on the SharePoint 2013 Microsoft’s business collaboration platform. It offers
web management, content management, reporting, search, and social capabilities that can be
brought together to yield comprehensive Information and Knowledge management (IKM) solutions.
The solutions this platform allows can be created more quickly and are more cost effective than
custom-developed solutions, and what is more, the platform provides a far greater degree of
flexibility than packaged solutions can.
We hope this information will enable DNBL Site owners to gain an in-depth understanding of
SharePoint 2013 and more effectively manage and use dedicated subsides on the portal.
To help the DNBL Site owners to organize and share information and interact with others, the portal
includes new capabilities, such as a new set of social features, content synchronization and sharing
tools, application publishing and sharing, mobile integration, and layout management.
SharePoint 2013 also enhances previously existing functionality in the areas of document and
records management, business intelligence, search, web content management, and workflow.
Please note that this document can be used only for internal – DNBL purposes and therefore should
not be downloaded, copied or distributed in any other way.
SharePoint Building Blocks SharePoint 2013 includes many capabilities that can be combined to create enterprise business
solutions. The core capabilities that these solutions are built on include the following:
Sites provide a structure for securing, storing, and organizing information and solutions.
Lists are containers for storing structured information,
Libraries are containers for storing and managing documents.
Workflows automate business processes.
Records management extends document management capabilities to manage documents
through their full life cycle.
Alerts can notify users when information is added, changed, or removed.
Web Parts allow existing information to be organized and presented and provide additional
business logic and functionality to be incorporated into the environment.
Search provides the ability to locate information.
Personalization and social capabilities allow users to create and manage their own
information, communicate with others, and find others based on their skill and experience.
Data integration capabilities allow information outside SharePoint to be incorporated into
SharePoint solutions,
My Site Menu
The My Site menu is located to the right in the banner area. These options are available only when
SharePoint Server is in place.

The My Site menu options are listed in the banner and include the following elements:
Newsfeed: The Newsfeed option, when clicked, will navigate to the My Site Newsfeed page.
Skydrive: The Skydrive option navigates to the Documents library of the user’s My Site.
Sites: The Sites option navigates to the Sites page of the My Site showing sites the user is
currently following and sites suggested for following.
User menu
The User menu is located in the right-hand banner area in the default layout of the SharePoint 2013
environment.
The User menu provides access to the user details, as well as the ability to sign out of the portal.
The User menu options are accessed by clicking the user name. The User menu includes the
following options:
My Settings: My Settings allows you to navigate to the User Information page. This page
permits you to view and manage your user profile details. The following information can be
managed within the User Information page:
Personal Settings: These are details about the user, including name, e-mail address, mobile
number, “about me” details, profile picture, department, job title, and SIP address. The
information can be edited and saved.
Language and Region: The language and region option allows you to set your display
language preferences for, if the user settings should be defined based on the server’s
settings, time zone and format, calendar format, and workweek.
My Alerts: The My Alerts on This Site allow you to manage the alerts you have configured
within the SharePoint environment.
Sign Out: The Sign Out option, when clicked, logs you out of the DNBL portal and prompts
you to close the web browser window.
When SharePoint Server is in place, the User menu includes the following options:
About Me: About Me navigates you to the My Site About Me page. This page allows you to
manage user’s profile details and view his/her activities.
Sign Out: The Sign Out option, when clicked, logs you out of the portal.
Ribbon
The ribbon includes the contextual page management options available to you. Initially the ribbon
displays the ribbon tabs, with the related options presented once a tab is selected. Figure below
shows the page tab listing the options available for managing the currently displayed page.

Clicking on a ribbon tab shows the ribbon options for the selected tab. By default, these options
overlay the navigation and title area. To remove the ribbon options from the display in order to see
the navigation bar and title area, the Browse option can be selected. This option is always available
as a ribbon tab.
Page Management Tools
The page management tools allow management of the current page. Available next to the social
tools, the listed options are dependent on the page being displayed.
The following options are available in the page management area.
Edit: The Edit option is available within the SharePoint web part, wiki, and publishing pages.
When clicked, the displayed page will enter Edit mode, where page content can be
managed.
Focus on Content: This option hides the title, navigation, and Quick Launch areas of the site;
the content then fills the space these areas were using. This option allows the space for
viewing site content to be maximized.
Navigation Bar
The navigation bar, which lists navigation options available to users within the site, allows users
access to the resources hosted through the environment. Figure below shows the layout of the
standard navigation bar.
The navigation bar includes only those options that a user’s security rights within the environment
make available.
Search Bar
The Search bar allows you to enter text to perform a search. The search will initially be scoped
against the current site. Performing a search navigates you to the search results page, where the
items satisfying the search criteria are presented.
Quick Launch Navigation
Located in the left-hand section of the site, the Quick Launch navigation area provides easy access to
elements that are available within the site. The Quick Launch navigation options can be managed to
include links to lists, libraries, sub-sites, and custom URLs.

Working with Sites The ribbon is the main management interface for working with site resources. The ribbon provides
context-centric options based on what is being viewed and whether you have permission to view the
item. The available commands are organized under ribbon tabs. When a tab is selected, the
associated commands are displayed on the ribbon. In the DNBL portal, the ribbon commands appear
over the navigation bar and title area. The ribbon always has a Browse tab that, when selected, hides
the ribbon, making the navigation and title area visible again.
Using the Recycle Bin
SharePoint 2013 includes recycle bin capabilities that can be used to review and, if necessary,
restore items previously deleted from SharePoint. Items that can be restored include documents, list
entries, document libraries, lists, and sites. Deleted items are placed in the recycle bin for a set
number of days, a period defined by the SharePoint technical administrator.
Viewing Items in the Recycle Bin Users can view items placed in a site’s recycle bin by doing the following:
1. Navigate to the site where you wish to access the recycle bin.
2. On the site’s home page, click the Site Contents link in the Quick Launch area.
3. On the Site Contents page, click the Recycle Bin link, located to the right of the Lists,
Libraries, and Other Apps header.
You will be navigated to the Recycle Bin page for the site. This page lists all items in the recycle bin.
Site collection administrators are also provided the ability to view just the items removed from the
sites’ recycle bins. This is also done through the site collection Recycle Bin page by selecting the
Delete from End User Recycle Bin view. This is done as follows:
1. Navigate to the root site in the site collection.
2. On the site’s home page, click the Site Settings option from the Settings menu.
3. On the Site Settings page, select the Recycle Bin option from the Site Collection
Administration section.

Editing Text
Rich text content is added to the page much as you would add content to a Word document. When
text is added to the page, it is formatted with the format controls on the Format Text ribbon tab.
Adding Tables
A table is added by selecting the row and column configuration from the Table drop-down menu on
the Insert tab of the page.
Once the table is added to the page, you can select the desired table layout and choose to show or
hide grid lines for the table on the Design ribbon tab. You can also specify table and cell width,
height, and layout properties on the Table Layout ribbon tab. Tables are used to style text and
objects within a page to create the desired information layout.
Adding Pictures
You can add images to wiki pages in order to show them within the page. Pictures can be added
using any of three different approaches.
Approach 1: If the image to be displayed on the page is not yet in SharePoint and you want
to upload the image and display it on the page, select the From Computer option from the
Picture drop-down on the Insert ribbon tab. You can then pick the file and an upload
location. The file is placed in the identified location and referenced on the page.
Approach 2: If the image to be referenced is already located in SharePoint, you can select
the From SharePoint option from the Picture drop-down on the Insert ribbon tab. When the
Select an Asset window appears, you pick an item to reference from a location within the
site collection. The selected item is referenced on the page.
Approach 3: If the image to be displayed on the page is in a location outside the site
collection from which it will be referenced, you can select the From Address option from the
Picture drop-down menu on the Insert ribbon tab. You can then identify the URL of the
image to reference.

Adding Links
Link references can be added to wiki pages to create references to other web resources, such as to
items that exist in other locations within your SharePoint environment or to web resources external
to it. Two approaches can be used to add links to the page.
Approach 1: If the item you want to create a reference to exists in your SharePoint site
collection, select the From SharePoint option from the Link drop-down of the Insert ribbon
tab. Then select the item to reference and the link is added to the page.
Approach 2: If the item to reference does not exist within your SharePoint environment,
reference it by selecting the From Address option from the Link drop-down of the Insert
ribbon tab. Then enter the URL of the item and the text to display for the item.
Social Collaboration The Social Collaboration category includes the SharePoint web parts that provide social interaction
capabilities to SharePoint.
Contact Details
The Contact Details web part is used to present details about a contact for the page or site. Identify
the site contact through the web part properties.
Note Board
The Note Board enables users to leave microblog-like messages within the page. It can be used when
the Site Feed features are active within a site. The web part is available in SharePoint Server
Standard and Enterprise.
Site Feed
The Site Feed web part places a microblog feed within the site page. It is available in SharePoint
Server Standard and Enterprise.
Site Users
The Site Users web part displays the list of users identified as members of the site. It is available in all
versions of SharePoint.
Managing Lists and Libraries DNBL portal stores and manages documents and information in lists and libraries. Lists are used to
organize and manage sets of data (such as tasks, contacts, and links), and libraries are used to store
and manage documents (Microsoft Office files, PDFs, video files, images, etc.). There is a variety of
lists and libraries available within SharePoint to allow you to manage all of the different types of
information you will need.
Lists are used when you need to store structured data, and they can be tailored to meet the specific
needs of the individuals who will manage and consume the information. Libraries, which can be
considered a special type of list, are used to store files on the DNBL portal. Libraries and lists have
many similarities in their creation and management.

Creating Lists and Libraries When you create a new site, it will include default sets of lists and libraries based on the definition of
the selected site template. However, you may need to create additional lists and libraries once a site
is created in order to manage needed information.
To create a list or library on the portal, you must have the Manage Lists right, which by default is
available as part of the Edit, Design, Manage Hierarchy, and Full Control permission levels. To create
a new list or library, do the following:
1. Navigate to the site where you want to create the new list or library.
2. Select the Site Contents option from the Quick Launch or Settings menu.
3. On the Site Contents page, select the Add an App option.
4. On the Your Apps page, select from the Apps You Can Add section the type of list or library
to be created.
5. In the Add window, do the following:
a. If you want to use the default setup—which includes no description and, for
libraries, no versioning—enter the name for the new list or library and click the
Create button.
b. If you want to change the default settings for the list or library being created, do the
following:
i. Select the Advanced Options link.
ii. On the new screen, enter a name for the new list, enter an optional
description, and for libraries, specify whether the library will store versions
and what the default document template will be. Then click the Create
button.
The new list or library is created, and you are returned to the Site Contents page.
Deleting Lists and Libraries Whether a list or library was created as part of the creation process of the site or was added later by
you or someone else, you can delete any lists or libraries available within the site. You might do this
if you created a list in error or wished to remove irrelevant lists or libraries—created during the
initial site creation process—to keep users from using them. To delete a list or library within a site,
do the following:
1. Navigate to the list or library to be deleted.
2. From the List or Library ribbon tab, select the List or Library Settings option
3. On the list’s or library’s Settings page, in the Permissions and Management section, click the
Delete This Document Library or the Delete This List option.
4. On the deletion confirmation screen, click the OK button.

The list or library is deleted, and you are taken to the Site Contents page. Deleted lists and libraries
are moved to the site’s recycle bin and, if necessary, can be restored as long as they remain there.
Calendar SharePoint calendars let you store details about meetings and other types of events. Unlike most
other list types, a calendar list has a completely different set of default views, most being calendar
layout views.
When calendar lists are created, they include a set of fields necessary to track the details about
events. This set of fields includes the following items;
Column Required Type
Attendees No Person or Group
Check Double Booking No Check Double Booking
Title Yes Single Line of Text
Location No Single Line of Text
Start Time Yes Date and Time
End Time Yes Date and Time
Description No Multiple Lines of Text
Free/Busy No Free/Busy
Resources No Resources
Category No Resources
Calendar lists have a unique capability: they allow integration of the details in a calendar with other
SharePoint calendar lists, as well as with Microsoft Outlook calendars.
Group Calendars
Group Calendars are configurable within calendar lists to let you identify whether a calendar is to be
used to share members’ schedules. This configuration creates a calendar based on a different
content type and includes calendar views different from those in a standard calendar. These views

allow you to add people to the view in order to show events by person. Calendar lists are configured
to take advantage of group calendar options as follows:
1. Navigate to the calendar list where you want to enable the group calendar options.
2. On the list view page, select the List Settings option from the Calendar ribbon tab.
3. On the Settings page, select the List Name, Description, and Navigation option from the
General Settings section.
4. On the General Settings page in the Group Calendar Options section, set the “Use this
calendar to share member’s schedule?” option to Yes, and click the Save button.
Connecting Calendar Lists to Outlook
Another advanced feature of calendar lists is the ability to connect them to Outlook. When a
SharePoint calendar list is connected to Outlook, it appears as an Outlook calendar and allows the
calendar to be used in both SharePoint and Outlook, with changes made in one environment
reflected in the other. To connect a calendar list in SharePoint to Outlook, do the following:
1. Navigate to the calendar list you wish to connect to Outlook.
2. On the calendar view page, select the Connect to Outlook option from the Calendar ribbon
tab.
3. In the Allow Access window, select the Allow button.
4. In the Connect the SharePoint Calendar to Outlook window, click the Yes button.
The SharePoint calendar is listed in Outlook on the Calendar screen. Edits to the calendar in either
environment update the list. Outlook caches a local copy of a calendar, so it is available even when
your computer cannot connect to the SharePoint environment.
Discussion Boards A discussion board, used to manage discussion posts and replies, allows you to host discussion
threads for related topics within your site on DNBL portal. Discussion board lists contain two
separate content types. The first type is used to create the initial discussions, and the second is used
to manage replies to the discussion.
Managing Discussions
Management of discussion board content is different from that of other lists. Instead of list items for
management being created, content is meant to develop organically as the discussion matures. To
create a new discussion in a discussion list, do the following:
1. Navigate to the Discussion Board where you want to create the new discussion.
2. On the Discussion list view page, select the New Discussion option.
3. On the New Discussion form, enter the subject and body for the discussion, and identify
whether it is a question. Then select the Save button to save the new item.
Once a discussion is available in a discussion list, people with appropriate rights can reply to content.
Reply to a discussion by doing the following:
1. On the Discussion list view page, click the title of the discussion.
2. On the discussion thread view page, click the Reply option for the item that you want to
create the reply for.

3. In the Reply box, type the reply text into the box, and click the Reply button to save the
reply.
The discussion view is updated to include the new reply.
E-mail Notifications Items in an issues list can be configured so that e-mail notifications are sent to users assigned to the
issue. Thus, assigned users can be made aware of the assignment and be informed of changes made
to the issue. To enable e-mail notifications for an issues list, do the following:
1. Navigate to the Issue Tracking list where you want to enable e-mail notifications.
2. On the list view page, select the List Settings option from the List ribbon tab.
3. On the Settings page, select the Advanced Settings option from the General Settings section.
4. On the Advanced Settings page in the E-mail Notification section, select Yes for the “Send e-
mail when ownership is assigned?” option, and click the OK button.
Tasks The tasks list is one of the most commonly used lists in SharePoint. Use it to assign and manage
activities to be performed and to track progress against them.
Column Required Type Properties
% Complete Number Minimum value of 0 Maximum value of 100 Show as percentage
Assigned To Person or Group Allow Multiple Selections
Completed Calculated Calculation: [% Complete] >= 1 Data Type: Yes/No
Description Multiple Lines of Text Enhanced Rich Text 6 Lines for Editing
Due Date Date and Time Date Only
Predecessor Lookup Lookup to Current List, Task Name Column
Priority Choice Choices • (1) High • (2) Normal • (3) Low Display: Drop-Down Menu Default Value: (2) Normal
Related Items Related Items
Start Date Date and Time Date Only
Task Name Single Line of Text
Task Status Choice Choices • Not Started • In Progress • Completed • Deferred • Waiting on someone else Display: Drop-Down Menu Default Value: Not Started
A tasks list, when created, has an initial set of views designed to assist in managing the included
tasks. This initialset available within the list includes the following views:
1. All Tasks: The default view for the tasks list. It shows all tasks in the list in a standard
SharePoint list view and includes the following details:
a. Completed
b. Task Name (linked to item with Edit menu)
c. Due Date
d. Assigned To
2. Late Tasks: The Late Tasks view lists tasks that have not been completed and whose due
date has passed and orders them by Due Date and Priority. Doing so allows you to
understand which tasks are the least and the farthest overdue. This view and the All Tasks
view list the same fields.
3. Upcoming: The Upcoming view lists all tasks that have not been completed. It includes the
same columns as the All Tasks and Late Tasks views.
4. Completed: The Completed view lists all tasks identified as 100% complete and shows just
those tasks that do not require additional work. This view also shows the same columns as
the All Tasks view.
5. My Tasks: The My Tasks view lists all tasks assigned to the current logged-on user. It shows
the tasks that need to be completed and includes the same columns as the previous task
views.
6. Gantt Chart: The Gantt Chart view takes the information in the tasks list and organizes it into
a Gantt chart, where the overall timeline for the listed activities is displayed. This view lists
the following columns:
a. Task Name (linked to item with Edit menu)
b. Start Date
c. Due Date
d. Completed
e. Predecessors
f. Assigned To
g. GUID
h. Calendar: The Calendar view displays the tasks within a calendar and represents the
tasks as activities within that calendar.
Along with these default views, tasks lists can also be viewed with the timeline web part, which
displays the activities within a timeline chart that lists the tasks by duration and contains percent
complete details.
Connecting Tasks Lists with Outlook
As with contact and calendar lists, tasks lists can be connected to Outlook to allow access to the
SharePoint tasks from within Outlook. When a tasks list is connected to Outlook, the tasks are
available in the Outlook Tasks section, and so you can view and manage SharePoint tasks from
within Outlook. To connect a tasks list to Outlook, do the following:
1. Navigate to the tasks list you want to connect to Outlook.
2. On the tasks list page, select the Sync to Outlook option from the List ribbon tab.
3. In the Sync Tasks with Microsoft Outlook window, check the Sync Tasks option, and click the
OK button.
As Outlook caches a local copy of the tasks list, you can access the information even when you do
not have direct access to the SharePoint environment itself.
Working with List Items SharePoint lists are used to store and manage structured data. You can work with lists to track and
manage a variety of types of information.
Adding Items to a List
To add new items to a SharePoint list, do the following:
1. Navigate to the list where you want to add the information.
2. On the list view page, click the New Item link above the data being presented.
3. On the list item Add page, enter the details for the new item, making sure to populate all
required fields. Once the information has been entered, click the Save button to create the
new list item.
The item is added to the list, and you are returned to the list view page.
Editing Items in a List
There are a couple of different options available for editing items in a SharePoint list. To edit
individual items in a list, do the following:
1. Navigate to the list where you want to edit the information.
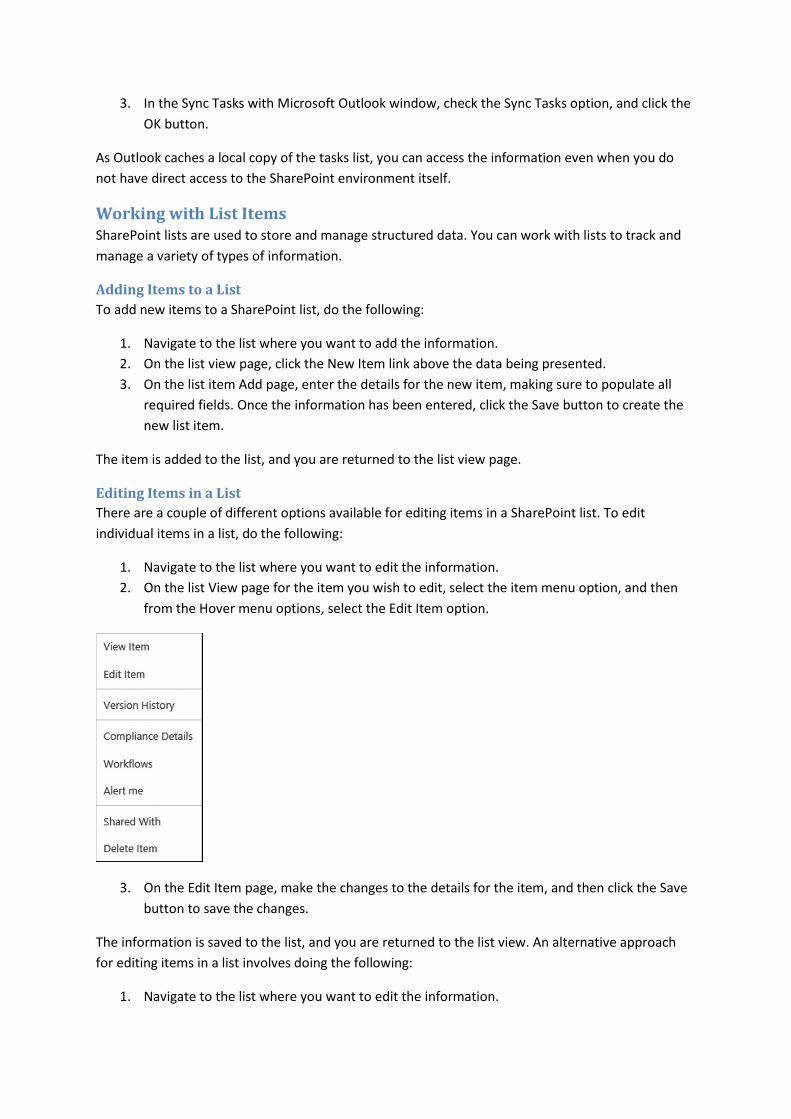
2. On the list View page for the item you wish to edit, select the item menu option, and then
from the Hover menu options, select the Edit Item option.
3. On the Edit Item page, make the changes to the details for the item, and then click the Save
button to save the changes.
The information is saved to the list, and you are returned to the list view. An alternative approach
for editing items in a list involves doing the following:
1. Navigate to the list where you want to edit the information.

2. On the list view page, click the selection option next to the item to edit, and then select the
Edit Item option from the Items ribbon tab.
3. In the Edit Item window, make updates to the listed information, and then click the Save
button to save the changes.
The updates to the list are saved, and you are returned to the list view page. If you want to make
multiple edits to a list all at once, you can use the Quick Edit option.
Using Quick Edit
The Quick Edit mode uses the datasheet view to allow you to edit multiple items in a list. Quick Edit
provides an Excel-like interface to perform list edits.
To open a list in the Quick Edit view, do the following:
1. Navigate to the list that you want to edit.
2. On the list view page, select the Quick Edit option from the List ribbon tab.
The list is presented in the Quick Edit view. In Quick Edit mode, you can make changes to
information in the list as you would if you were editing data in Excel. Once all edits have been made,
you can return to the list’s standard view by selecting the View option from the Library ribbon tab or
the Stop Editing This List option from above the list view.
Deleting Items in a List
To delete items from a SharePoint list, do the following:
1. Navigate to the list where you want to delete items.
2. On the list view page, click the item’s context menu, and select the Delete Item option.
3. In the Delete Confirmation window, click the OK button.
The item is deleted, and the list of items is updated appropriately. If you want to delete multiple
items all at once, do the following:
1. Navigate to the list where you want to delete the items.
2. On the list view page, check the box next to the items to be deleted. From the Items ribbon
tab, select the Delete Item option.
3. In the Delete Confirmation window, click the OK button.

Filtering and Sorting List Items
As lists can contain hundreds or even thousands of items, it is important to have a way to organize
and locate information specific to your needs. Filtering a list allows you to limit the items presented
to those that contain identified column values. Sorting allows you to identify the order of the items
presented based on the values of an identified list column.
You can filter a list based on the values in the columns in the presented view. To filter items in a
SharePoint list, do the following:
1. Navigate to the list view page for the list to be filtered.
2. On the list view page, hover over the title for the displayed column header to be used as a
filter, and select the value(s) to filter by from the drop-down menu.
When the list view is refreshed, the items presented are limited to those containing the selected
filter value, and the column header is updated to include a filter icon to identify that the list is being
filtered by the column. You can filter a list by more than one column if you need to.
To clear a filter applied against a list column on the list view page, click the title of the column with
the filter, and click the Clear Filters option from the drop-down menu. The filter is removed, and the
list view is updated to reflect the removal of the filter.
Besides filtering items within a list, you can also sort list items based on the content in a displayed
column. The sort can be in either ascending or descending order by the listed columns. To sort the
items within a list by a listed column, click on the column header that you want to sort the list by.
Clicking the header once will sort the information in ascending order. Clicking it a second time will
sort the column in descending order.
Working with Folders Folders can be created in any list or library as long as they are enabled within that list or library. In
libraries, folders are enabled by default, while in lists they are initially disabled. Folders can be used
to group and organize content into a set structure. They can be nested into any desired hierarchy to
meet needs within the list and are best used when security differences must be maintained across
the content in the list or library.
To allow or disallow folders in a list or library, do the following:
1. Navigate to the list or library where you want to change the folder settings.
2. On the view page, select the List or Library Settings option from the List or Library ribbon
tab.
3. On the Settings page, select the Advanced Settings option from the General Settings section.
4. On the Advanced Settings page in the Folders section, do the following:
a. If you want to enable folders, set the Make New Folder Command Available to Yes.
b. If you want to disable the use of folders, set the Make New Folder Command
Available to No.
c. Click the OK button to save the changes.
The ability to use folders against the list is made available. With folders enabled, you can create
folders within the list. To create new folders, do the following:
1. Navigate to the list where you want to create the folders.
2. On the list view page, select the New Folder option from the Items ribbon tab.
3. In the Create a New Folder window, enter the name of the folder to be created, and click the
Save button.
The folder is created, and you are returned to the list view.
Working with Libraries Libraries are used to store and manage files within DNBL portal. Whether you want to manage
Microsoft Office documents, PDF files, images, videos, or some other type of file, you use libraries to
store, track, and manage these resources.
Types of Libraries
There are several default library templates available in on the portal that can be used to create new
libraries in your sites. Several different types of libraries can be created to store and manage a
variety of file types. Default libraries available on the DNBL portal include the following.
Document Libraries
The document library is the most general-purpose and commonly used type of library in SharePoint.
Document libraries can store documents that need to be managed, edited, and shared within
SharePoint, including Microsoft Office files, PDF files, and others (managing content in document
libraries is discussed later in this chapter).
Document libraries can be created in any version of SharePoint, and when created they contain only
a single metadata column, which is used to store the document’s title. Document libraries can be
updated after their creation to include tracking of details that need to be associated with the
document to organize, manage, and present.
When document libraries are created, they include only a single view, the All Documents view. Views
are used to organize and present documents within a library and the All Documents view lists all
documents contained within the library. By default this view shows the following details for each
document:
Type (linked to document)
Name (linked to document with Edit menu)
Modified
Modified By
When document libraries are added to pages within the site using their app parts, the information is
presented in a standard library view. From this view you can perform all of the same management
tasks available when working directly within the library.

Working with Documents Libraries store and manage a variety of types of files, from Microsoft Office documents and PDF files
to web pages and data connections. Libraries provide you with the ability to work with the
documents so you can locate and manage information you have been given rights to work with.
Adding Documents to Libraries There are several different approaches available for adding documents to libraries. These options
include approaches for uploading documents that already exist as well as approaches for creating
new documents.
Uploading Documents
When you want to place existing documents on the portal, several options are available for copying
the items into the desired library. These options support uploading of individual documents and
multiple items at once.
You can upload single files directly to the library using the document upload options available within
the portal ribbon. This is the most commonly used approach for uploading documents into a library.
It enables you to get not only the document into the library but also populate metadata associated
with it. To upload a document to a library using the ribbon upload options, do the following:
1. Navigate to the library where you want to upload the file.
2. On the library view page, click the New Document link at the top of the document view area,
and choose the Upload Existing File link from the New Document menu, or click the Upload
Document option from the Files ribbon tab.
3. In the Add Document window, do the following:
a. Find the document to add by browsing to it, then select it.
b. Identify the upload behaviour for a document with the same name as a file already
in the library. Specify whether to add it as a new version of that file. If you choose
not to allow this by unchecking the Overwrite Existing Files option, an error message
appears if you try to upload a file with the name of one already in the library.
c. Once the file has been selected, click the OK button.
4. In the document properties window, identify the content type, if prompted to, and enter
any presented metadata. Rename the file being uploaded if you wish to. Once this
information is entered, click the Save button.
While uploading documents through the standard ribbon upload options works well for individual
documents, at times you may want to upload multiple items all at once. A couple of different
approaches can be used to upload multiple documents into a library in this way.

The first approach is to upload them through the Windows Explorer view. This view opens the library
in an Explorer window, like the one you see when you browse through directories on your local
computer. Then you can drag and drop or copy and paste files into the Explorer window. To upload
files through Windows Explorer view, do the following:
1. Navigate to the library were you want to upload the files.
2. In the document view window, do one of the following. Select the New Document option or
Upload Document option from the Files ribbon tab. Then click either the Upload Files using
Windows Explorer option or the Open with Explorer option from the Library ribbon tab. The
document is added to the library, and the identified metadata is assigned to the document.
3. In the Windows Explorer window, drag and drop or copy and paste files from the other
locations into the opened Explorer window.
4. Once the files are uploaded, edit their properties to assign any required metadata column
values, and then check the documents into the library. Editing document properties is
discussed later in this chapter.
Creating New Documents in a Library
Besides uploading existing documents, you can also create new documents within a library directly.
This allows you to generate a document in the desired library and place the new item in that library
for management and use. To create a new document in a SharePoint library, do the following:
1. Navigate to the library where you want to create the new document.
2. On the document view page, select the type of document to be created from the New
Document drop-down menu on the Files ribbon tab. If you click on the New Document drop-
down option directly, the default document type will be created.
3. The document will open in the associated document’s editing program.
A document saved from the opened program is saved in the library where you created the file. You
will be prompted to enter any associated properties defined in the library.
Using the New Document Menu
Whether you are working in a document library view page or through a library app part listed on a
web part or wiki page, SharePoint 2013 has a New Document link at the top of the library
information view. This link enables you to easily upload content and create new documents within
the library. Clicking this link opens a list of new document activities, including a list of the possible
documents that can be created directly in the library and a link to upload a document.
To create a new document in the site through the New Document link, do the following:
1. Navigate to the library where you want to create the new document.
2. Click the New Document link at the top of the library view to show the Create a New File
menu.
3. In the Create a New File menu, click the type of document to be created.
4. In the Create a New Document window, enter the name for the new document to be
created.
5. In the document’s Edit Properties window, enter the document property details, and click
the Save button.
The new document is added to the library. You can also use the New Document menu to upload a
document to the library. When you select the Upload Existing File option from the New Document
menu, you are prompted to identify the file and then the document properties, using the process
described in the “Uploading Documents” section earlier in this chapter.
Editing Documents in SharePoint Once documents are uploaded to SharePoint or added to a SharePoint library directly, the
documents and their properties can be edited. Several capabilities exist within SharePoint to help
you manage and edit documents.
Checking Documents In and Out
Check a file out of a library when you plan to make edits and do not want others opening the
document for editing. Checking out the file locks it so it can be edited only by you until you check it
back in. Individuals visiting a library can see whether files are checked out and to whom. For
example, you may want to check out a file if you plan to make edits spanning several days. A
checked-out file, even when not open in a program such as Word or Excel, will be unavailable for
edit by any other individual, and others will not see your changes until the file is checked back into
the library.
To check out a document in a library, do the following:
1. Navigate to the library where you want to check out the document.
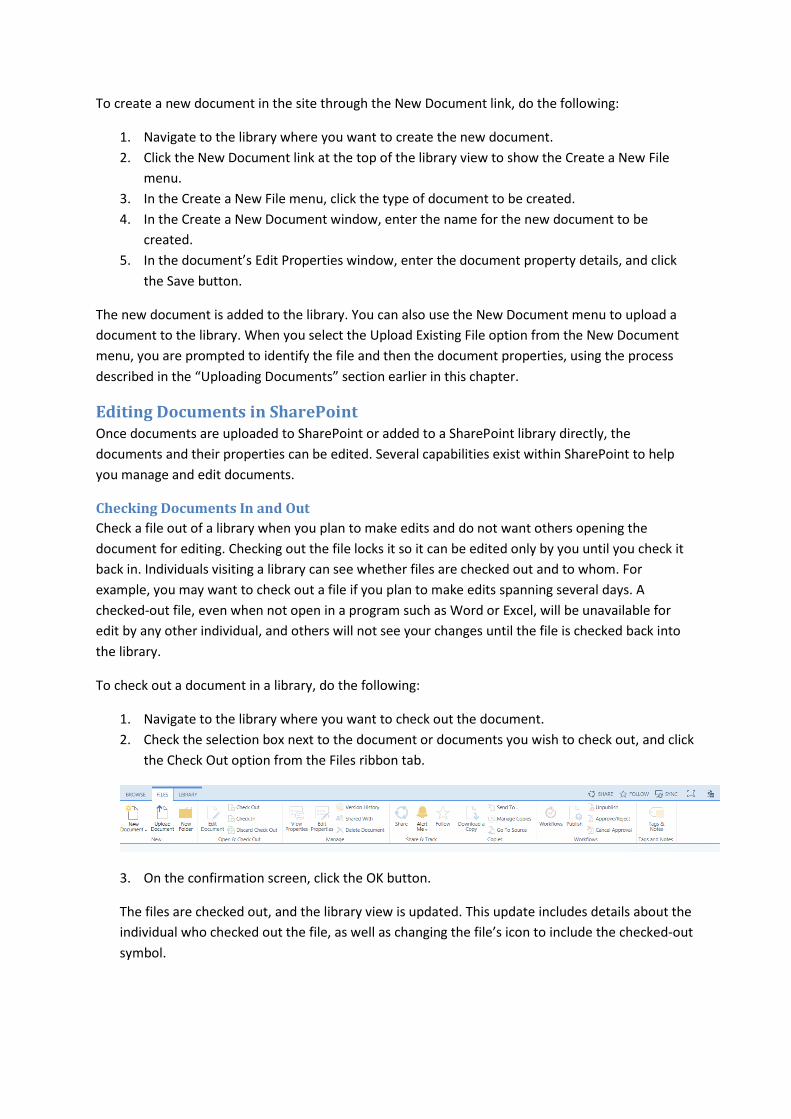
2. Check the selection box next to the document or documents you wish to check out, and click
the Check Out option from the Files ribbon tab.
3. On the confirmation screen, click the OK button.
The files are checked out, and the library view is updated. This update includes details about the
individual who checked out the file, as well as changing the file’s icon to include the checked-out
symbol.

There is another method you can use to check out a file:
1. Navigate to the library where the file to be checked out is located.
2. In the library view, select the Hover Panel option.
3. From the document’s Hover Panel menu, select the Check Out option
4. In the Document Checkout window, identify whether the item is to be checked out into your
local draft folder, and then click the OK button to check out the file. If you choose to use the
local draft folder, the checked-out item is copied to the local computer and will be edited
from this location once checked out and saved back to the library when checked back in. If
you do not choose to use the local draft folder, changes to the checked-out document will
be managed within the SharePoint library.
The document is checked out to the current user. Documents checked out are later checked back
into a library using the same approach discussed for checking items out, the only exception being
that the Check In option is available instead of the Check Out option.
Library managers can require that items in a library be checked out in order to be edited. To
configure a library to require items to be checked out for editing do the following:
1. Navigate to the library where checkout is to be required.
2. On the library view page, select the Library Settings option from the Library ribbon tab.
3. On the Settings page, select the Versioning Settings from the General Settings section.
4. On the Versioning Settings page in the Require Check Out section, select Yes for the “Require
documents to be checked out before they can be edited” option, and click the OK button.
Any file checked out to you can be checked back into the library. But if you wish, you can also discard
the checkout of a document. When you discard checkout, any changes made to the file since it was
checked out are lost, and the file returns to the state it was in when you checked it out. To discard
your checkout of a file, do the following:
1. Navigate to the library where the checked-out file exists.
2. Check the box next to the document to discard checkout, and choose the Discard Checkout
option from the Files ribbon tab.
3. On the confirmation screen, select the OK button.
The file is checked back into the library, and changes made to it while it was checked out are
discarded. Individuals with Full Control rights to the library can not only discard the checkout of files
they had checked out but also discard the checkout of items checked out by others. Thus,
administrators can override the checkout of these items, making documents checked out by other
library users available for edit in their earlier state.
Editing Documents
A document in a SharePoint library is edited by opening the file in its associated program or, for a
Microsoft Office document, opening it in Microsoft Office Web Apps. Clicking the name of a file in a
library opens that file. A file associated with a program not in Microsoft Office opens in its associated
program—for example, a PDF file opens in Adobe Reader. Microsoft Office documents, including
Word, Excel, and PowerPoint files, open in either their associated program or in Microsoft Office
Web Apps. The way they are opened depends on the document opening settings.
Opening Documents
You can open a document in a library for viewing or editing by navigating to the library and clicking
the name of the document. When this is done, the document opens in the file’s default program. For
Office documents, files open in either the associated Office program or Office Web Apps, depending
on the library settings. You yourself can also determine how to open a document by choosing the
opening method.
Open in Program: To open the document in its associated program, display the hover panel,
and select the Edit option from the panel.
Open in Browser: To open a Microsoft Office document for editing in Office Web Apps,
select the Edit in Browser option from the Hover Panel menu. To open an Office document
for viewing only, select the View in Browser option from the Hover Panel menu. This choice
opens the document in the Office Web App.
Office Web Apps give the web browser the full editing capabilities of Microsoft Office Word, Excel,
PowerPoint, and OneNote. Use Office Web Apps to open a document when your local computer
does not contain a copy of Microsoft Office but you need to edit a document or when your
computer’s version of Microsoft Office is not Office 2013 and you want to take advantage of
capabilities not available in the installed earlier version of Office.

Deleting Documents in a Library
Documents within SharePoint libraries can be deleted by individuals who are able to manage library
content. Several different approaches can be used to delete such items. To delete a single item from
a library, do the following:
1. Navigate to the library where you want to delete a document.
2. On the library view page, select the Hover Panel option to show the hover panel for the
selected item.
3. In the hover panel, select the menu, and choose the Delete option.
4. On the Delete Confirmation screen, click the OK button.
The file is deleted, and the library view is refreshed to reflect the change. The deleted file is moved
to the site’s recycle bin.
At times you may want to delete multiple documents all at once. In this case, deleting items
individually would not be efficient. Deleting multiple items at once from SharePoint libraries is done
in one of two ways. The first method is as follows:
1. Navigate to the library containing the documents to be deleted.
2. In the library view, check the box next to each item to be deleted, and then select the Delete
Document option from the Files ribbon tab.
3. On the Delete Confirmation screen, click the OK button.
The items are deleted from the library, and the view is updated. The deleted files are moved to the
site’s recycle bin.
A second method for deleting multiple files is through Windows Explorer. To delete multiple files
from a library using Windows Explorer, do the following:
1. Navigate to the library containing the files to be deleted.
2. On the library view, select the Open with Explorer option from the Library ribbon tab.
3. On the Windows Explorer screen, select the files to be deleted, and select to delete the files.
The items are deleted from the library.
Download a Copy
Users of a SharePoint library are able to download copies of files from the library. That is, users can
save copies of documents to another location they have access to, such as the local computer or an
accessible network location.
To download a copy of a file from a library, do the following:
1. Navigate to the library containing the file to be downloaded.
2. On the library view page, select the Hover Panel option.
3. On the hover panel, choose the Download a Copy option from the Hover Menu.
4. In the “Do you want to save…” message, select Save or Save As and then the Save location.
A copy of the file is saved to the identified location.

Working with Folders Folders can be used in libraries to organize documents and to provide a container to uniquely secure
groups of documents. By default, folders are enabled within libraries. They can be nested into any
needed hierarchy. A folder is best used when a set of documents to be stored needs to be secured
differently from the rest of the library materials.
Both the folder and the documents in it can be updated to reflect the files’ special security needs.
To create a new folder in a library, do the following:
1. Navigate to the library where you want to create the folder.
2. On the library view page, select the New Folder option from the Files ribbon tab.
3. In the Create a New Folder window, enter the name of the folder to be created, and click the
Save button.
The folder is created, and you are returned to the library view.
Document Versioning Versioning is used to maintain a record of all changes made to a document over time. This record
lets you view the document as it existed at any point in its life cycle to date, along with the date,
time, and editor of the document in each version. With versioning enabled, you can also revert a
document to a previous version if necessary and compare the current state of the document to that
of past versions to identify changes made to it over time.
Search SharePoint 2013 includes a new search platform that can be used to locate information across
SharePoint and the rest of your enterprise.
SharePoint 2013 incorporates a single consolidated search platform that includes not only those
capabilities available in both the SharePoint 2010 enterprise search and the FAST Search for
SharePoint but an entirely new set of services that provide a complete and comprehensive
enterprise search experience. This platform allows searching a variety of sources, including
SharePoint, Exchange, file shares, web content, and database content, and provides intelligent query
management and robust result views.
Using SharePoint Search SharePoint search offers a rich interface that allows you to search for and locate information, based
on its content and associated properties, relevant to work you are performing. Results can then be
refined and reviewed to isolate the desired materials. SharePoint combines several features to
create this robust search experience, including the following:
Content Crawling: This feature scans content to be included in a search. It identifies
properties and security attributes used by query services to determine when to display
crawled items to users as part of search results.
Query Services: This feature allows specification of information to be used by the SharePoint
search to find content to display in search results.
Query Results: This feature organizes and displays results of executed queries.
Refiners: These features let you identify details to be used to further filter listed results
based on defined properties related to the results.
All of these capabilities come together to provide the SharePoint 2013 search experience.
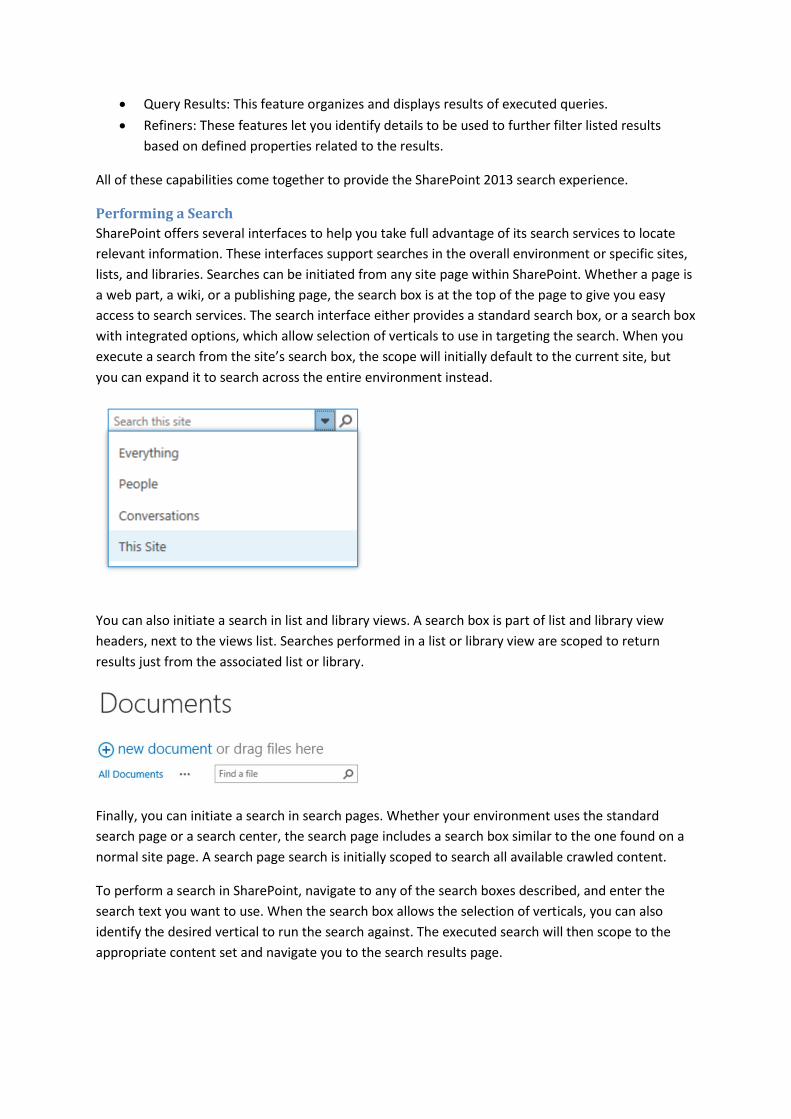
Performing a Search
SharePoint offers several interfaces to help you take full advantage of its search services to locate
relevant information. These interfaces support searches in the overall environment or specific sites,
lists, and libraries. Searches can be initiated from any site page within SharePoint. Whether a page is
a web part, a wiki, or a publishing page, the search box is at the top of the page to give you easy
access to search services. The search interface either provides a standard search box, or a search box
with integrated options, which allow selection of verticals to use in targeting the search. When you
execute a search from the site’s search box, the scope will initially default to the current site, but
you can expand it to search across the entire environment instead.
You can also initiate a search in list and library views. A search box is part of list and library view
headers, next to the views list. Searches performed in a list or library view are scoped to return
results just from the associated list or library.
Finally, you can initiate a search in search pages. Whether your environment uses the standard
search page or a search center, the search page includes a search box similar to the one found on a
normal site page. A search page search is initially scoped to search all available crawled content.
To perform a search in SharePoint, navigate to any of the search boxes described, and enter the
search text you want to use. When the search box allows the selection of verticals, you can also
identify the desired vertical to run the search against. The executed search will then scope to the
appropriate content set and navigate you to the search results page.

Executing Advanced Searches
One benefit of using a search center instead of the default search page is that you can perform
advanced searches. In a standard search in SharePoint, the text you enter is used to locate matching
material based on the items’ content and associated properties. These searches look across all
crawled elements to identify whether there is a match to the query details entered. Advanced
searches allow you to more granularly specify search terms. You can locate entered text in specific
columns, locate exact phrases, exclude items containing identified content, and limit results based
on language.
To access the Advanced Search page in a search center site, select the Advanced link located at the
bottom of the search center page. The Advanced Search page allows entry of specific search criteria
to granularly target the search.
On an advanced search page, you can specify any combination of the following details to perform
targeted searches against the content in your SharePoint environment:
All of these words: Specifies that items are returned only if they contain all words entered in
the field.
The exact phrase: Specifies that items are returned only if they contain the exact phrase
entered, not just the words included in the phrase.
Any of these words: Specifies that results are returned if they contain any items entered in
this field.
None of these words: Specifies words that, when found, exclude an item from returned
results.
Only the language(s): Limits returned items to those containing content only in the selected
language or languages.
Result type: Limits returned items to a specifically selected type, such as a Word document
or PowerPoint presentation.
Add property restrictions: Allows selection of specific item attributes on which to search for
details. You can identify multiple properties and specify conditions for each property where

results are to be returned. For example, select a Date field from the list of properties to
specify that you want to locate items whose column value falls on or before an entered date.
Personalization and Social Features New DNBL portal contains a comprehensive set of personalization features that enhance personal
productivity and social features that facilitate team development, communication, and
collaboration. The personalization features streamline personal productivity and enhance awareness
of relevant activities. The social features then allow individuals to come together into teams that
focus on similar activities, which enable peer knowledge sharing, support, and idea capture and
development.
About Me and the Profile The About Me page on DNBL portal has a dual purpose. When other people access someone’s About
Me page, they see its public view. This view lists key details about the person, including the
following:
Ask Me About: Lists topics the person is knowledgeable about. A visitor can click on a topic
and create a post for the person related to the topic.
About Me: Lists the self-descriptive About Me text created by the individual.
Activities: Summarizes the individual’s recent activities in the environment.
Contact Information: Lists basic contact details for the person including title, e-mail, phone,
office location, and the like.
In Common: Identifies people the viewer has in common with the individual, such as shared
managers, people both users follow, and so on.
Org Chart: Displays where the individual fits in to the organization’s structure.
About Me Private View The second About Me page view is the private view, displayed when you view your own About Me
page. To navigate to this page, select the About Me option from the user menu at the top of the
SharePoint pages.
This view provides some of the same details as the public view of the page including the Ask Me
About details and the user’s activities and contact information. However, your private view also has
a link to the Edit Your Profile page. It brings you to the Edit Details page, where you can update your
profile. The Edit Details page has five separate tabs to organize and manage profile information:
Basic Information: This tab lists general contact details that are typically read-only and
pulled from the Active Directory. Initially included are details the user can manage about
themselves, such as: About Me:
o Text describing the person and display on the About Me page.
o Picture: An image that can be uploaded and used to represent the person profiled
both here and in other areas of SharePoint, such as newsfeeds and search results,
containing references to the person.
o Ask Me About: Identifies topics in which the user has expertise. Viewers can request
assistance from the person on these topics.

Contact Information: The Contact Information tab lists details typically pulled from Active
Directory and some editable details that can be populated to assist others when they
communicate with the individual, including these:
o Work E-mail
o Mobile Phone
o Fax
o Home Phone
o Office
o Office Location
o Assistant
o Details: The Details tab lists these general demographics about the person:
o Past Projects
o Skills
o Schools
o Birthday
o Interests
Newsfeed Settings: This tab lists information notifications and shares detail preferences for
the individual, including these:
o Followed #Tags: Identifies hash tags the person currently follows and allows addition
and removal of followed items.
o Email Notifications: Identifies activities in the environment that cause an e-mail
notification to be sent.
o People I Follow: Specifies whether to let other users see the people the individual is
following.
o Activities I Want to Share in My Newsfeed: Identifies the types of activities to be
listed in the person’s newsfeed when they occur.
Language and Region: Allows management of language, time zone, and region preferences.
By default, all details are inherited from the server, but they can be overridden as needed.
Options managed in this section include these:
o Language Preferences: Identifies the individual’s language choices in order of
preference. Display language preferences and content and search language
preferences can be configured.
o Time Zone: Identifies the individual’s default time zone.
o Region: Lists regional settings for the person, including local time and calendar
format and workweek.
My Tasks
Another personal productivity tool in the SharePoint My Site area is My Tasks. It includes an
aggregated view of tasks that exist anywhere in the SharePoint environment, Exchange, and Project
Server. You can view and manage tasks listed on this page regardless of where they were created.
To get to the My Tasks page, navigate to your About Me page, and select the Tasks option from the
left-hand navigation area. Once you are there, clicking on a listed task brings you to the Edit Item
page for that task. There you can manage the task’s details. Check the check box next to a listed task
on the My Tasks page to mark it as complete.

The My Tasks page initially includes four views you can use to review tasks assigned to you in
SharePoint. In these views you can see the following:
Important and Upcoming: Tasks coming due, past due, or of high priority.
Active: All tasks not yet marked as completed.
Completed: All tasks marked as completed.
Recently Added: Tasks that were most recently added to SharePoint.
Alerts
Alerts functionality on the DNBL portal let you identify content that you want to be made aware of
when it is changed. Alerts are used to create e-mail or text message notifications for users when
such identified actions occur. You can specify the type of changes an alert is to track and the
frequency of notifications. You can create alerts for the following items in SharePoint:
List Items or Documents: Enables notifications to be sent to identified individuals when
changes are made to a specific document or list item.
Lists or Libraries: Used to notify identified individuals of relevant changes to content in a
specific list or library.
Pages: Notifications are sent when the page content is changed.
Search: Notifications are sent when items that satisfy a defined search query are changed.
Creating Alerts
When you create an alert, you define its characteristics, including the types of changes that will
trigger the alert and its frequency of notification. Several types of changes can be identified that
cause alerts to be sent. They are dependent on the type of object the alert is created for. The several
existing options for an alert’s frequency determine when notifications are sent to the individuals the
alert is configured for. The following frequencies can be defined for the various alerts.
Send Notification Immediately: Specifies that the notification is to be sent when the alert is
triggered. This option is available for all types of alerts except search alerts.
Send a Daily Summary: Specifies that all activities that trigger the alert are compiled into a
daily summary report and sent to the identified individuals once a day at the time specified
when the alert was created.
Send Weekly Summary: Identifies that activities triggering the alert are compiled into a
weekly summary report sent to the identified individuals once a week on a day and at a time
specified when the alert was created.
You can create alerts anywhere in SharePoint where you have the Create Alerts right, which is
available to users with at least Read rights to the materials.
Creating List Item and Document Alerts
Alerts created for a specific list item or document send notifications for changes to that item. To
create an alert for a specific list item or document, do the following:
1. Navigate to the list or library containing the item for which you want to create the alert.

2. On the list or library view page, check the check box next to the list item or document where
you want to create the alert, and choose the Set Alert on This Item/Document option from
the Alert Me drop-down menu on the Items/Files ribbon tab.
3. In the New Alert window, do the following:
a. In the Alert Title section, optionally change the default title given to the new alert.
The default title is listed as a colon-separated combination of the list or library name
followed by the item name.
b. In the Send Alert To section, site managers can update the list of individuals to be
alerted allowing them to include others. Other individuals can create alerts only for
themselves in the site.
c. In the Delivery Method section, specify whether to send the alert via e-mail or text
message. The text message option is present only if a SharePoint technical
administrator configures the environment for SMS (text messages). To send an alert
via text message, specify the SMS number and whether to send the item’s URL as
part of the message.
d. In the Send Alerts for These Changes section, identify what changes to the item will
trigger the alert. Options are as follows:
i. Anything Changes: Triggers the alert when any change is made to the item.
ii. Someone Else Changes a Document: Triggers the alert when someone other
than the alerted user makes a change to the item.
iii. Someone Else Changes a Document Created by Me: Triggers the alert only if
the item was created by the alerted user and only when someone other
than that user changes it.
iv. Someone Else Changes a Document Last Modified by Me: Triggers the alert
only if the item was last modified by the alerted user and only when
someone other than that user changes the item.
e. In the When to Send Alerts section, identify how frequently to send the alert
notifications. Select from these options (discussed earlier in this section):
i. Send Notification Immediately
ii. Send a Daily Summary
iii. Send a Weekly Summary
f. Click the OK button.
The alert is created, and you are returned to the list or library view. You can also create
list item and document alerts when viewing the item’s properties. Select the Alert Me
option from the list item or document properties view page, and follow the steps listed
here.
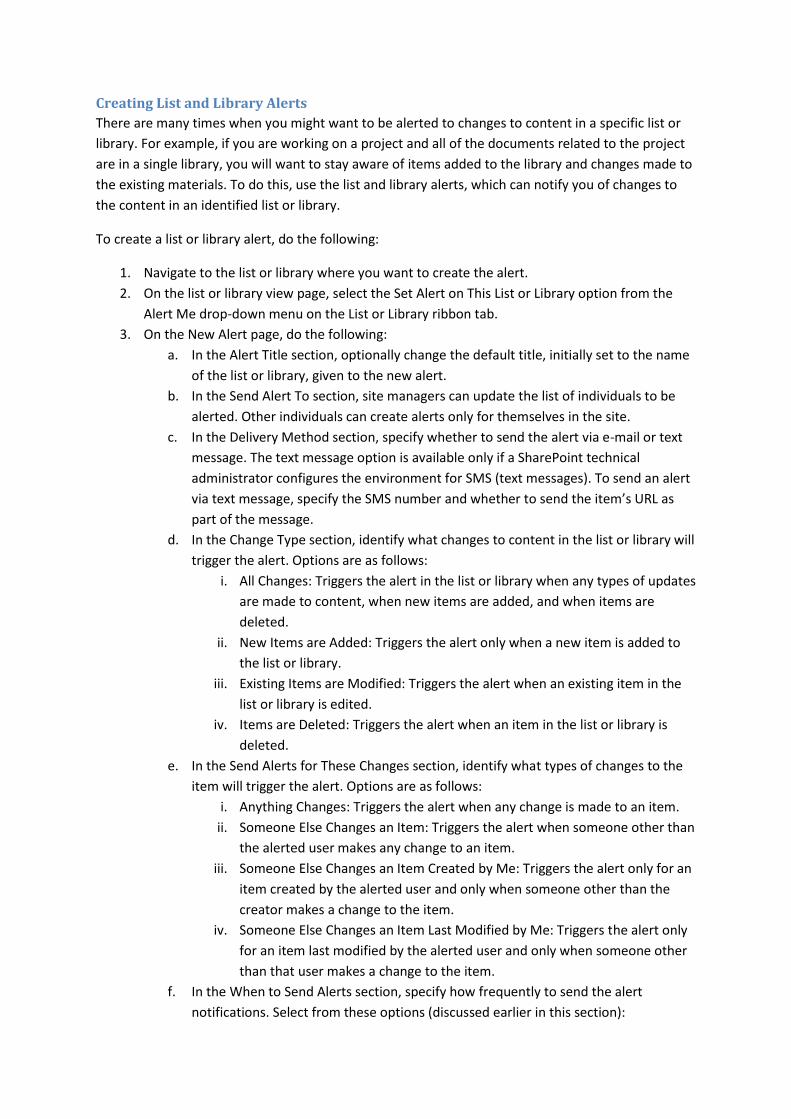
Creating List and Library Alerts
There are many times when you might want to be alerted to changes to content in a specific list or
library. For example, if you are working on a project and all of the documents related to the project
are in a single library, you will want to stay aware of items added to the library and changes made to
the existing materials. To do this, use the list and library alerts, which can notify you of changes to
the content in an identified list or library.
To create a list or library alert, do the following:
1. Navigate to the list or library where you want to create the alert.
2. On the list or library view page, select the Set Alert on This List or Library option from the
Alert Me drop-down menu on the List or Library ribbon tab.
3. On the New Alert page, do the following:
a. In the Alert Title section, optionally change the default title, initially set to the name
of the list or library, given to the new alert.
b. In the Send Alert To section, site managers can update the list of individuals to be
alerted. Other individuals can create alerts only for themselves in the site.
c. In the Delivery Method section, specify whether to send the alert via e-mail or text
message. The text message option is available only if a SharePoint technical
administrator configures the environment for SMS (text messages). To send an alert
via text message, specify the SMS number and whether to send the item’s URL as
part of the message.
d. In the Change Type section, identify what changes to content in the list or library will
trigger the alert. Options are as follows:
i. All Changes: Triggers the alert in the list or library when any types of updates
are made to content, when new items are added, and when items are
deleted.
ii. New Items are Added: Triggers the alert only when a new item is added to
the list or library.
iii. Existing Items are Modified: Triggers the alert when an existing item in the
list or library is edited.
iv. Items are Deleted: Triggers the alert when an item in the list or library is
deleted.
e. In the Send Alerts for These Changes section, identify what types of changes to the
item will trigger the alert. Options are as follows:
i. Anything Changes: Triggers the alert when any change is made to an item.
ii. Someone Else Changes an Item: Triggers the alert when someone other than
the alerted user makes any change to an item.
iii. Someone Else Changes an Item Created by Me: Triggers the alert only for an
item created by the alerted user and only when someone other than the
creator makes a change to the item.
iv. Someone Else Changes an Item Last Modified by Me: Triggers the alert only
for an item last modified by the alerted user and only when someone other
than that user makes a change to the item.
f. In the When to Send Alerts section, specify how frequently to send the alert
notifications. Select from these options (discussed earlier in this section):

i. Send Notification Immediately
ii. Send a Daily Summary
iii. Send a Weekly Summary
g. Click the OK button.
The new alert is created, and you are returned to the list or library view page.
Creating Page Alerts
To create a page alert in SharePoint to notify users of changes made to wiki, web part and publishing
page content, do the following:
1. Navigate to the page in which you want to create the alert.
2. On the page, select the Set an Alert on this Page option from the Alert Me drop-down menu
on the Page ribbon tab.
3. In the New Alert window, do the following:
a. In the Alert Title section, optionally change the default title, initially set to a
combination of the colon-separated library name followed by the page name, given
to the new alert.
b. In the Send Alerts To section, site managers can update the default set of individuals
to be alerted. Other individuals can create alerts only for themselves in the site.
c. In the Delivery Method section, specify whether to send the alert via e-mail or text
message. The text message option is present only if a SharePoint technical
administrator configures the environment for SMS (text messages). To send an alert
via text message, specify the SMS number and whether to send the item’s URL as
part of the message1.
d. In the Send Alerts for These Changes section, identify what types of changes to the
item will trigger the alert. Options are as follows:
i. Anything Changes: Triggers the alert when any change is made to the page.
ii. Someone Else Changes a Wiki Page: Triggers the alert when someone other
than the alerted user makes a change to the page.
iii. Someone Else Changes a Wiki Page Created by Me: Triggers the alert only
for a wiki page created by the alerted user and only when someone other
than the creator makes a change to the page.
iv. Someone Else Changes a Wiki Page Last Modified by Me: Triggers the alert
only for a page last modified by the alerted user and only when someone
other than that user makes a change to it.
v. Someone Else Changes an Item that Appears in the Following View: Triggers
the alert when a change is made to an item included in a specifically
identified view.
1 Currently this option is disabled on the DNBL portal.

e. In the When to Send Alerts section, specify how frequently to send the alert
notifications. Select from these options (discussed earlier in this section):
i. Send Notification Immediately
ii. Send a Daily Summary
iii. Send a Weekly Summary
iv. Click the OK button.
The alert is created for the page, and you are returned to the page.
Deleting Existing Alerts
To delete an alert on the My Alerts on This Site page, do the following:
1. On the My Alerts on This Site page. click the check box next to the alert to be deleted, and
click the Delete Selected Alerts link.
2. In the deletion confirmation window, click the OK button.
The alert is deleted, and you are returned to the My Alerts on This Site page.
Sharing and Extending Content DNBL portal has several capabilities that provide the ability to easily share relevant information with
others and add context to content in the environment by tagging, rating, and liking materials.
E-mail a Link One of the most basic ways to share information is to e-mail references to the information. Sending
a reference to a list or library instead of attaching a copy of an item helps ensure that when the
referenced materials are opened, the most recent version is viewed and edited. E-mailing someone
a link instead of the file itself also helps protect documents from being accidentally shared with
others if the e-mail is forwarded. You have the ability to e-mail a link to a list or library to reference
details you want to share.
To e-mail a link to a list or library, do the following:
1. Navigate to the list or library that you wish to e-mail a link for.
2. On the list or library view page, select the E-mail a Link option from the List or Library ribbon
tab.
3. In the opened e-mail message, identify the desired recipient and subject details, and then
send the e-mail.
Blogs SharePoint blogs allow topic details to be posted and posts to be commented on. A blog is best
described as a virtual press conference where a presenter publishes news, a discussion, or an article
that can be reviewed. Consumers of the blog post can enter comments or questions, which in turn
prompt additional comments or questions. Because blogs allow interaction on topics, many
organizations use them as a tool to share news and announcements.
You can start blogs in SharePoint 2013 by using the Blog site template when creating a new site. The
template creates a new SharePoint 2013 blog site.

Blog comments are short statements entered to provide context or clarity on the details in the blog
or to question blog content. While blog comments cannot be replied to, follow-ups can be posted to
listed comments and questions as new blog comments. Blog comments are organized
chronologically and therefore appear in a discussion-like layout.
Blog posts can be organized into categories that structure and filter the posts in order to establish
interrelationships and make locating relevant items easy.
Managing Blog Posts
A Blog Tools web part, listed on a blog’s home page, provides references to manage the main blog
site capabilities. To create a blog post on a blog site, do the following:
1. Navigate to the blog site, where you want to create a post.
2. On the blog site home page, select the Create a Post option from the Blog Tools.
3. On the New Post page, do the following:
a. Enter a title for the new post.
b. Optionally enter body text for the post. The body of the blog can be enhanced with
rich text details, including images and videos.
c. Optionally identify categories the blog is to be associated with. Use of categories
allows grouping of related posts.
d. Identify the published date. The default is the current date and time, but this can be
updated as necessary.
e. Select the Publish button to publish the blog.
The new blog post is added to the blog. When a blog post is added to a blog site, the post includes
options to do the following:
Like the post.
E-mail a link to the post to others.

Edit the post—that is, alter any of the details of the post you created.
Commenting on Posts
Comments can be added to published blog posts by navigating to the blog post page. Click on the
title of the post in the blog site, and then enter a comment in the Add a Comment box. Once a
comment is posted, it becomes associated with the blog and listed below the post. You can later edit
your comment by clicking on the Edit link next to the comment and then editing the details
presented on the Comment Edit page.
Discussions Community sites include a discussion list used to store and manage discussions in the community.
Discussions are similar to newsfeeds in that items posted can be replied to and can be liked.
Discussions are also similar to blog posts in that the body of a discussion post can utilize full rich text,
including images and videos. However, unlike both newsfeeds and blog posts, discussions have
additional capabilities to facilitate the development of a dialogue, including the following:
Identifying Best Replies: Specific replies can be recognized as being the best answers or
comments related to the discussion.
Questions: Discussion posts can be flagged as questions. Items identified as questions do not
simply comment or provide details on a topic but indicate to the community that an answer
is being sought.
Marked as Featured: A discussion marked featured is elevated in the community to a key
position.
While discussion lists are by default found only in community sites, they can be accessed in any
other SharePoint site by adding a discussion list to the site and configuring it for use there.
The discussion list in the community site includes several views to help organize community
discussions.
These views include the following:
Recent: Discussions having the most recent activity are placed at the top.
What’s Hot: The discussion order is based on popularity.
My Discussions: Shows discussions started by the person viewing the list.
Unanswered Questions: Lists discussions marked as questions but with no best reply
selected.
Answered Questions: Lists discussions marked as questions with a best reply selected.
Featured: Identifies items or discussions flagged as featured.
Creating New Discussions
To create a new discussion in a discussion list, do the following:
1. Navigate to the discussion list. For community sites, navigate to the community site’s home
page, where the discussion is displayed.
2. At the top of the discussion’s list view, click the New Discussion option.
3. On the New Discussion page, do the following:
a. Enter a subject for the new discussion.
b. Optionally enter the blog details for the new discussion. The discussion body can
include rich text, images, and videos.
c. Identify whether the new discussion is a question.
d. Identify the categories to associate with the new discussion.
e. Click the Save button.
The new discussion is added to the discussion list.
Editing Discussions
To edit existing discussions to change their details, do as follows:
1. Navigate to the discussion list.
2. In the discussion’s list view, select the discussion to be edited.
3. In the discussion view, choose the Edit option in the item’s context menu.
4. On the Edit Item page, make any necessary updates to the discussion, and click the Save
button.
The discussion is updated, and you are returned to the discussion list view.
Replying in a Discussion
By replying to discussions and to existing discussion replies, you create a hierarchy of
communication. To reply to a post or an existing reply, click the Reply link for the item you want to
reply to, enter the reply’s details, and click the Reply button. The reply is added to the discussion
thread.
Technical support: For technical support related to the DNBL portal please contact us at: