DIY-3D MICROSCOPY - part one INTRODUCTION: Most of the ...
21
DIY-3D MICROSCOPY - part one Alejandro Ariel García Arriaga Coacalco de Berriozábal, Estado de México, Mexico INTRODUCTION: Most of the images that we see on TV, internet, pictures, etc are 2D both for the macro world and the micro world, but having a 3D vision is something delightful that most of us would like to have but sometimes is difficult to get. There are several kinds of 3D pictures, and several ways to achieve them, the most common form of doing this is by using anaglyphs, which are a kind of two- dimensional pictures to be observed with special glasses that create a 3D effect. Today I am going to present a form of doing 3D, very easy that will take just a few seconds to create it and that gives very good results. Since applying the knowledge that we possess to our passion is something that we enthusiast microscopists do, for example today I am going to show you how it is possible to create 3D using the program Photoshop. DEVELOPMENT: Who of us that have visited MICROSCOPY-UK have not been delighted with the amazing 3D pictures that are shown in the link 3D, that were created by several authors, the visit to this site inspires you to create your own 3D pictures, so I started to look for ways of creating my own 3D pictures out of my photographs. Looking for information of how to create 3D pictures I found on the internet that using the computer program Photoshop it is possible, so I tried it and it is very simple. Today I am going to show two different ways of getting a 3D effect into our microscopy photos. HOW TO GET AN ANAGLYPH? It can be done in the easiest form: Just open the program Photoshop:
Transcript of DIY-3D MICROSCOPY - part one INTRODUCTION: Most of the ...
DIY-3D MICROSCOPY - part one
Alejandro Ariel García Arriaga Coacalco de Berriozábal, Estado de México, Mexico
INTRODUCTION:
Most of the images that we see on TV, internet, pictures, etc are 2D both for the macro world and the micro world, but having a 3D vision is something delightful that most of us would like to have but sometimes is difficult to get. There are several kinds of 3D pictures, and several ways to achieve them, the most common form of doing this is by using anaglyphs, which are a kind of two-dimensional pictures to be observed with special glasses that create a 3D effect.
Today I am going to present a form of doing 3D, very easy that will take just a few seconds to createit and that gives very good results. Since applying the knowledge that we possess to our passion is something that we enthusiast microscopists do, for example today I am going to show you how it ispossible to create 3D using the program Photoshop.
DEVELOPMENT:
Who of us that have visited MICROSCOPY-UK have not been delighted with the amazing 3D pictures that are shown in the link 3D, that were created by several authors, the visit to this site inspires you to create your own 3D pictures, so I started to look for ways of creating my own 3D pictures out of my photographs.
Looking for information of how to create 3D pictures I found on the internet that using the computer program Photoshop it is possible, so I tried it and it is very simple. Today I am going to show two different ways of getting a 3D effect into our microscopy photos.
HOW TO GET AN ANAGLYPH?
It can be done in the easiest form:
Just open the program Photoshop:

I must clarify that the version I could get installed in my computer is an old version of Photoshop CS, there are more modern versions and I am trying to get the newest one, but the one that you have may be useful for this.
Then you go to FILE and open an image you want to convert into an anaglyph in this case to a red-cyan one,

after that you open channels in the window at right in the palette “layers”
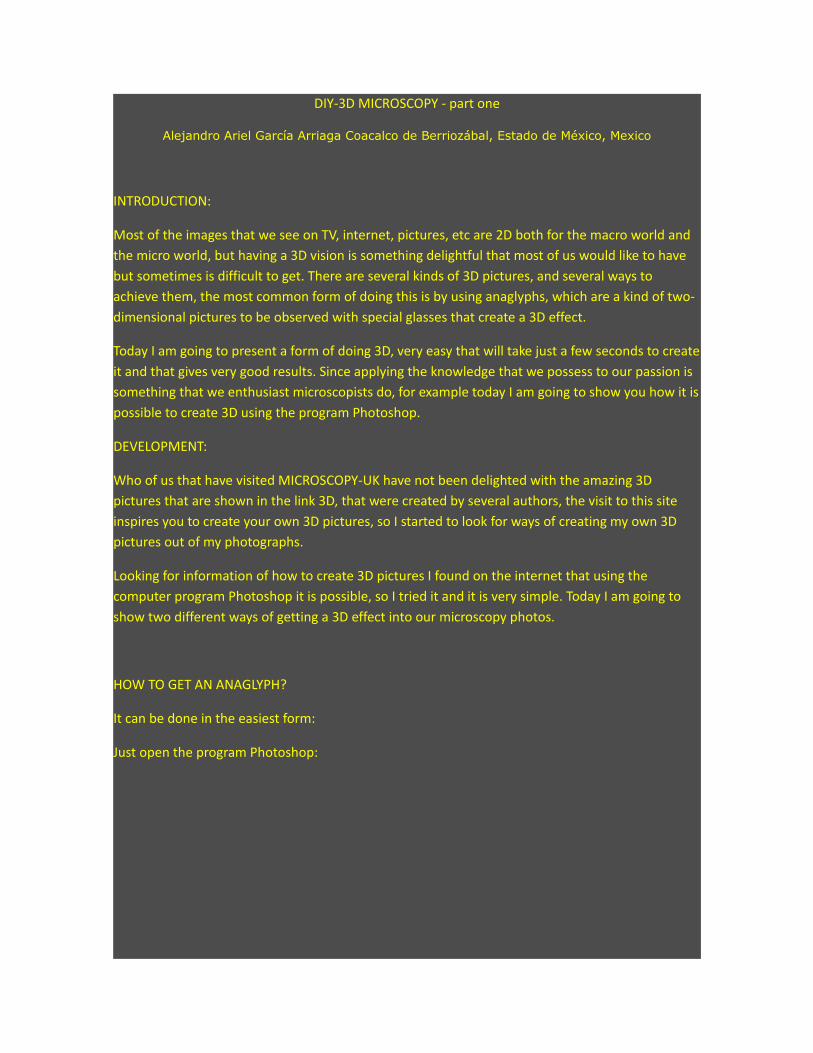
With the tool “move” and opening the GREEN channel you can move directly on the picture or to be more accurate using the arrows up, down, left right on the keyboard of your computer,
by giving from 2 to 8 clicks would be enough to create the effect, but you can click more times as necessary because there are some pictures that may need it, mainly color pictures.
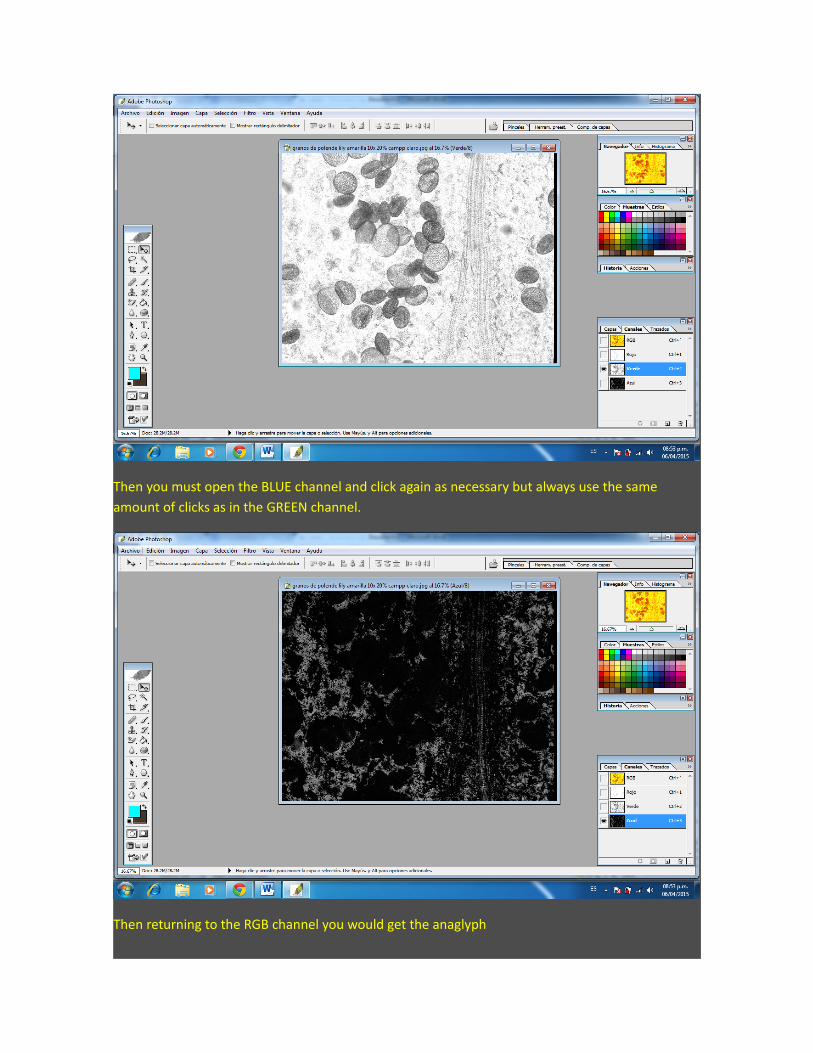
Then you must open the BLUE channel and click again as necessary but always use the same amount of clicks as in the GREEN channel.
Then returning to the RGB channel you would get the anaglyph

You can get the 3D effect with the outer objects by moving to the left and with the picture inside by moving to the left.
One thing that must be clarified is that with some colors you need to move more times to the left or to the right and with colors such as green it is not possible to do the red-cyan effect since it is not seen with this color, though it is possible to get the 3D effect if you convert the picture to the gray scale by desaturating the picture because gray pictures and pictures with a dark background are better to get the 3D effect.
SPECIAL GLASSES?:
Yes, if you have a pair of red -cyan glasses that are used to watch movies it would be GREAT! But if you do not have a pair you can create them very easily, there are several ways - I offer you 2 simpleways.
One is by drawing a pair of glasses on a piece of cardboard and making the holes with a pair of scissors or a blade then placing, to cover the holes, small pieces of red and blue cellophane or better if you get a cyan one here are the pair of glasses I made this way.

Another form is by using a pair of glasses you have and covering the crystals with red and blue cellophane like this:
With respect to the order of the colors it is recommended to place the red color over the left eye and the blue color overthe right eye but if you reverse the colors an image that with the first order would seem to come out of the screen with the second, blue-red, would appear to be inside of the picture. TRY IT, IT IS FUNNY !
Mosquito 10x bright field desaturated and modified to get a clearer image than with autocorrection of Microsoft Picture Manager.

Euglena 40x 100% zoom, bright field, white balance application modified to get a clearer image with “autocorrection” of Microsoft Picture Manager.
Streptocococus of yogurt and a fungus cell 40x, 100% zoom, darkfield illumination modified to get clearer image with “autocorrection” of Microsoft Picture Manager.

Fungus found upon a leaf of geranium; according to the morphology of this fungus probably it is Hemileia vastatrix 40x, 50% zoom, gray scale.

Diatoms 40x, 50% zoom, originally taken with the gray scale and modified to get a clearer image with “autocorrection” of Microsoft Picture Manager.

Onion epithelial cells 10x, 40% zoom, gray scale modified to get a clearer image with “autocorrection” of Microsoft Picture Manager.

Mouth epithelial cells 10x, 75% zoom darkfield.

Green algae 40x, 20% zoom brightfield white balance application.

Mosquito´s wing 10x, 50% zoom, turned into gray scale and modified to get a clearer image with Microsoft Picture Manager.

Mouth ephithelial cells 40x, 100% zoom, darkfield gray scale and modified to get a clearer image with Microsoft Picture Manager.
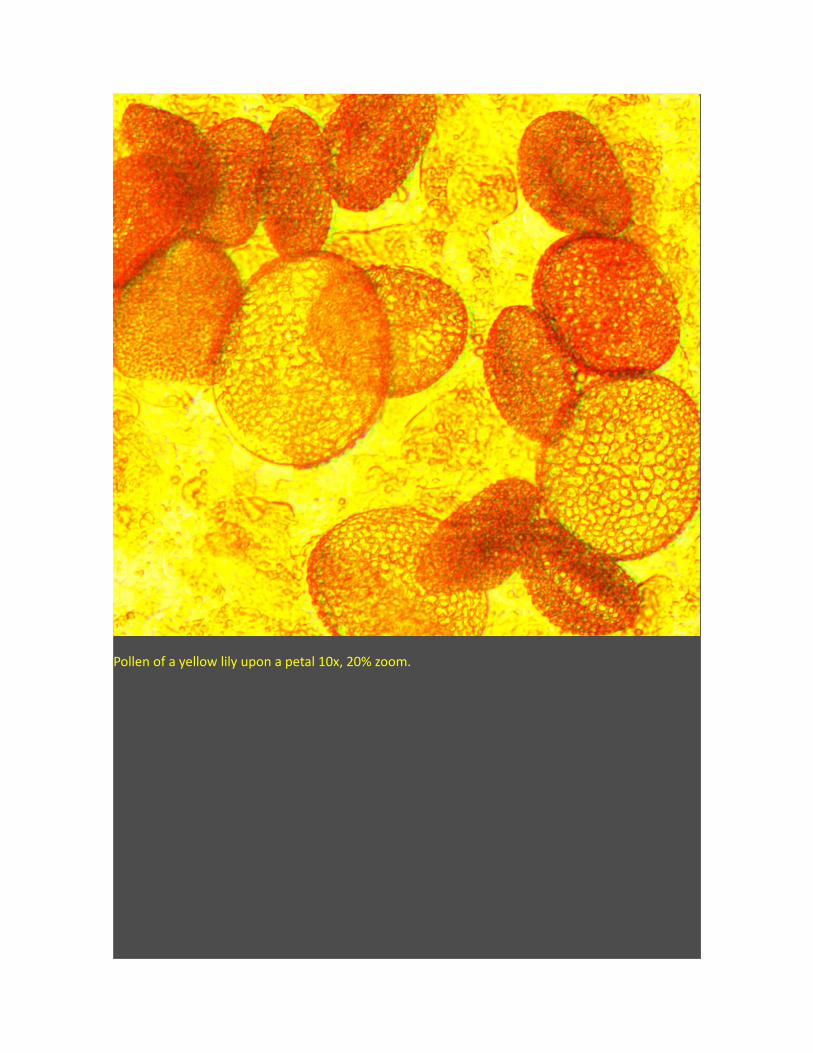
Pollen of a yellow lily upon a petal 10x, 20% zoom.

Daphnia 4x, 20% zoom, brightfield, white balance application.

Sugar crystal 10x, 20% zoom, turned into gray scale and modified with autocorrection to get a clearer image with Microsoft Picture Manager.

Another kind of “water flea” belonging to the ostracods probably Cypris 4x, 20% zoom, darkfield modified with “autocorrection” to get a clearer image with Microsoft Picture Manager.

Sodium bicarbonate crystals 10x, 100% zoom, darkfield.
NOTES:
Using Microsoft Picture Manager for modifying some images is optional, I like this program because as I said in a previous article, where I used it too, is that it is like “turning on” a light on theimage with the autocorrection but if you are not familiar with this program do not worry, Photoshop is the most important program that you need for creating this way 3D.
The frame for the pictures above was created with the same WORD routine, once you copy the image you can click on it and in it appears an IMAGE TOOLS menu where you can modify the imageas your wish.

Using a red or blue background can be set as the background gives the sensation once you wear the glasses as if the picture were floating, which emphazises the 3D effect.
CONCLUSION:
Creating 3D pictures in Photoshop out of your photographs is possible if you have both a compound and a stereo microscope, and believe me THERE IS MORE. Would you like to create 3D images as if any object you like were escaping from the frame of the photo? Wait for the NEXT DIY -3D, I will show you how.
References:
http://www.dzoom.org.es/como-crear-una-imagen-3d-con-photoshop-de-la-forma-mas-sencilla/
http://curiosidades.batanga.com/2011/02/0como-hacer-gafas-3d8/%C2%BF
https://www.youtube.com/watch?v=npDYGeOPiuQ
http://www.tuexperto.com/2014/05/16/como-crear-una-imagen-en-3d-en-photoshop/
http://www.gafas3d.com/tipos/gafas-3d-anaglificas/
Email author: doctor2408 AT yahoo DOT com DOT mx
(Above in anti-spam format. Copy string to email software, remove spaces and manually insert the capitalised characters.)