Disclaimer & Copyrightstorage.avermedia.com/web_release_www/C129/UM_C129_Plug-in_14… · Install...
20
AVerMedia Plug-in Instruction 1 Disclaimer & Copyright © 2014 by AVerMedia Technologies, Inc. All rights reserved. No part of this document may be reproduced, transmitted, transcribed, stored in a retrieval system, or transmitted in any form, or translated into any language by any means (Electronic, mechanical, photocopy, recording, or otherwise) without the prior written permission of AVerMedia. Information in this document is subject to change without notice. The information contained herein, is to be considered for informational purposes only and shall not be considered legally binding. "AVerMedia®" is a trademark and logo of AVerMedia Technologies, Inc. Other trademarks used herein for description purpose only belong to each of their companies. Taiwan Headquarter Office Address 7F.,No. 137, Jian 1st Rd., Zhonghe Dist., New Taipei City 23585, Taiwan (R.O.C.) Website www.avermedia.com Tel +886-2-2226-3630
Transcript of Disclaimer & Copyrightstorage.avermedia.com/web_release_www/C129/UM_C129_Plug-in_14… · Install...

AAVVeerrMMeeddiiaa PPlluugg--iinn IInnssttrruuccttiioonn
1
Disclaimer & Copyright © 2014 by AVerMedia Technologies, Inc. All rights reserved.
No part of this document may be reproduced, transmitted, transcribed, stored in a retrieval
system, or transmitted in any form, or translated into any language by any means (Electronic,
mechanical, photocopy, recording, or otherwise) without the prior written permission of
AVerMedia.
Information in this document is subject to change without notice. The information contained
herein, is to be considered for informational purposes only and shall not be considered legally
binding. "AVerMedia®" is a trademark and logo of AVerMedia Technologies, Inc. Other
trademarks used herein for description purpose only belong to each of their companies.
Taiwan Headquarter Office
Address 7F.,No. 137, Jian 1st Rd., Zhonghe Dist., New Taipei City 23585, Taiwan (R.O.C.)
Website www.avermedia.com
Tel +886-2-2226-3630

AAVVeerrMMeeddiiaa PPlluugg--iinn IInnssttrruuccttiioonn
2
Table of Contents
1. Adobe Premiere Pro CS6 Plug-in for AVerMedia Devices ................................. 3
2. Sony Vegas Pro Plug-in for AVerMedia Devices .................................................. 6
3. ImageJ Plug-in for AVerMedia Devices ............................................................... 8
*All the screenshots in this documentation are only example images. The images may vary depending on the product
and software version.
目录
1. 圆刚科技设备:Adobe Premiere Pro CS6 插件 ........................................................ 12
2. 圆刚科技设备:Sony Vegas Pro 插件 ............................................................. 15
3. 圆刚科技设备:ImageJ 插件 ........................................................................................... 17
*本档中所有截图仅供参考。不同产品和软件版本的图像可能会有所不同。

AAVVeerrMMeeddiiaa PPlluugg--iinn IInnssttrruuccttiioonn
3
Adobe Premiere Pro CS6 Plug-in for AVerMedia Devices
1. Install Premiere Pro CS6 before installing the plug-in
2. Follow the instruction to install the plug-in
3. Open Adobe Premiere Pro CS6
4. Select New Project
5. General Capture Format AVer Record

AAVVeerrMMeeddiiaa PPlluugg--iinn IInnssttrruuccttiioonn
4
6. Click Settings, then choose your AVerMedia device, Video Source, Resolution and Record
Format accordingly. Click OK to confirm.
7. Select your preferred Location, Project Name and Sequence Name. Click OK to confirm.
8. File Capture…

AAVVeerrMMeeddiiaa PPlluugg--iinn IInnssttrruuccttiioonn
5
9. Preview window is ready for capturing. Setup is complete.

AAVVeerrMMeeddiiaa PPlluugg--iinn IInnssttrruuccttiioonn
6
Sony Vegas Pro Plug-in for AVerMedia Devices
1. Install Sony Vegas Pro before installing the plug-in
2. Follow the instruction to install the plug-in
3. Open Sony Vegas
4. Media Generators Third Party AVerMedia HD Capture
5. Drag (Default) Preset to the arrow-pointed area
AAVVeerrMMeeddiiaa PPlluugg--iinn IInnssttrruuccttiioonn
7
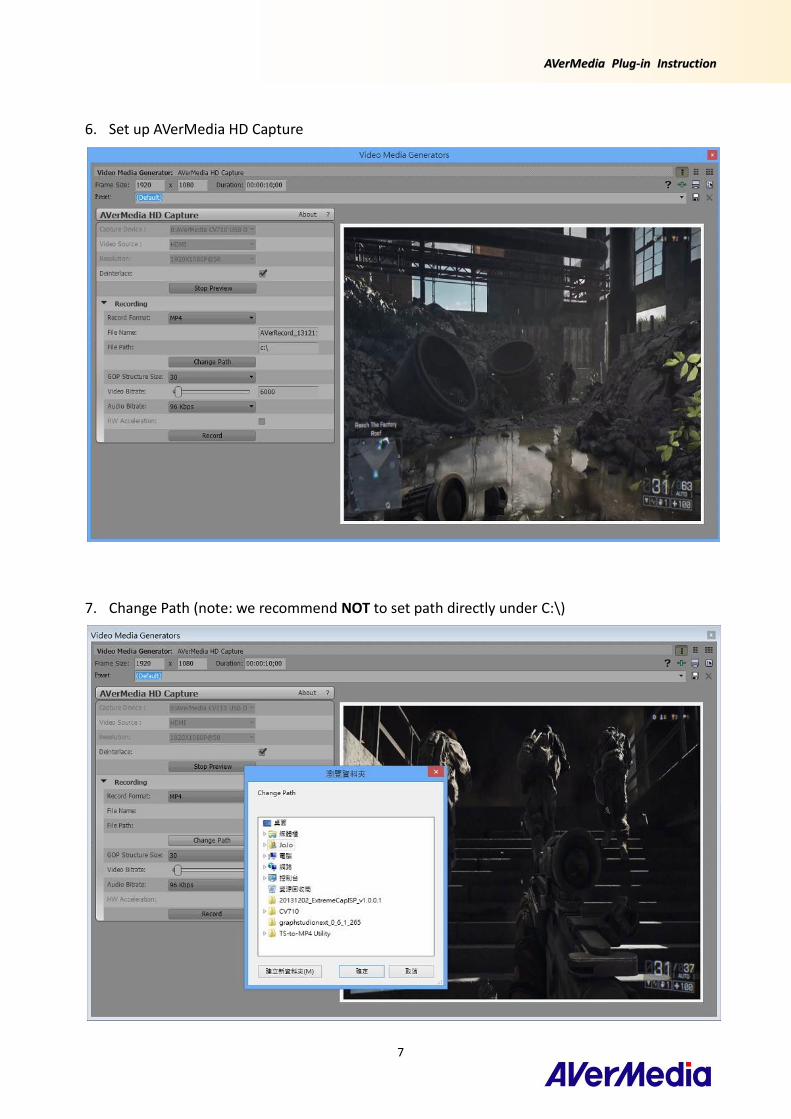
6. Set up AVerMedia HD Capture
7. Change Path (note: we recommend NOT to set path directly under C:\)

AAVVeerrMMeeddiiaa PPlluugg--iinn IInnssttrruuccttiioonn
8
ImageJ Plug-in for AVerMedia Devices
1. Install ImageJ before installing the plug-in
2. Follow the instruction to install the plug-in
3. Open ImageJ
4. Select Plugins AVerMedia HD Capture

AAVVeerrMMeeddiiaa PPlluugg--iinn IInnssttrruuccttiioonn
9
5. Select your AVerMedia device, Video Source, Resolution, Video Format and Options
accordingly. Click Start Streaming to confirm.
6. Streaming images appear, now you can select Snapshot, AVI Record or Stop Streaming.
7. Click Snapshot and view pictures instantly

AAVVeerrMMeeddiiaa PPlluugg--iinn IInnssttrruuccttiioonn
10
8. Before using AVI Recorder to capture images, setting up save path is required. Click Save to
confirm.
9. Start the capturing
10. Click Stop Record. Select First Frame, Last Frame, and check Use Virtual Stack, Convert to
Grayscale or Flip Vertical accordingly. Click OK.

AAVVeerrMMeeddiiaa PPlluugg--iinn IInnssttrruuccttiioonn
11
11. Preview captured images

AAVVeerrMMeeddiiaa PPlluugg--iinn IInnssttrruuccttiioonn
12
AVerMedia 设备 Adobe Premiere Pro CS6 插件
1. 在安装插件之前请先安装 Adobe Premiere Pro CS6
2. 根据说明安装插件
3. 运行 Adobe Premiere Pro CS6
4. 选择 New Project
5. General Capture Format AVer Record

AAVVeerrMMeeddiiaa PPlluugg--iinn IInnssttrruuccttiioonn
13
6. 点击 Settings, 选择你的 AVerMedia设备,照着 Video Source, Resolution 和 Record Format
设置,点击 OK 确认。
7. 选择你的偏爱 Location, Project Name 和 Sequence Name,点击 OK 确认。
8. File Capture…

AAVVeerrMMeeddiiaa PPlluugg--iinn IInnssttrruuccttiioonn
14
9. 预览窗口准备开始采集,设置已完成。

AAVVeerrMMeeddiiaa PPlluugg--iinn IInnssttrruuccttiioonn
15
AVerMedia 设备 Sony Vegas Pro 插件
1. 在安装插件之前请先安装 Sony Vegas Pro
2. 根据说明安装插件
3. 打开 Sony Vegas
4. Media Generators Third Party AVerMedia HD Capture
5. 把(Default) Preset 拖到箭头指出的区域

AAVVeerrMMeeddiiaa PPlluugg--iinn IInnssttrruuccttiioonn
16
6. 建立 AVerMedia 高清采集
7. 改变路径(注意:我们建议不要直接建立路径在 C:\下)

AAVVeerrMMeeddiiaa PPlluugg--iinn IInnssttrruuccttiioonn
17
AVerMedia 设备 ImageJ 插件
1. 在安装插件之前请先安装 ImageJ
2. 根据说明安装插件
3. 运行 ImageJ
4. 选择 Plugins AVerMedia HD Capture

AAVVeerrMMeeddiiaa PPlluugg--iinn IInnssttrruuccttiioonn
18
5. 选择你的 AVerMedia设备,相应地设置 Video Source, Resolution, Video Format 和 Options,
点击 Start Streaming 确认。
6. 出现流媒体图像,现在你可以选择 Snapshot, AVI Record 或者 Stop Streaming。
7. 点击 Snapshot,立即查看图片

AAVVeerrMMeeddiiaa PPlluugg--iinn IInnssttrruuccttiioonn
19
8. 在使用 AVI Recorder 采集图像之前,需要建立保存路径。点击 Save 确认。
9. 开始采集
10. 点击 Stop Record,选择 First Frame, Last Frame, 相应地勾选 Use Virtual Stack, Convert to
Grayscale 或者 Flip Vertical,点击 OK。

AAVVeerrMMeeddiiaa PPlluugg--iinn IInnssttrruuccttiioonn
20
11. 预览采集的图像