Direct Claims Entry - Blue Cross of Idaho · 2016-08-11 · Direct Claims Entry Instruction Guide...
13
Direct Claims Entry Instruction Guide providers.bcidaho.com Purpose: To enable providers to submit professional claims electronically to Blue Cross of Idaho without using an intermediary or clearinghouse.
Transcript of Direct Claims Entry - Blue Cross of Idaho · 2016-08-11 · Direct Claims Entry Instruction Guide...

Direct Claims Entry
Instruction Guide
providers.bcidaho.com
Purpose: To enable providers to submit professional claims electronically to Blue Cross of Idaho
without using an intermediary or clearinghouse.

Direct Claims Entry Instruction Guide
08/08/16 Page 2
Blue Cross of Idaho designed a secure Direct Claims Entry (DCE) tool to enable providers to submit
professional claims electronically without using an intermediary or clearinghouse. We developed a
simplified version of the standard CMS-1500 claim form, which is familiar to many providers, without
requiring as many data elements.
You can submit CMS-1500 claims electronically using our Direct Claims Entry, an intermediary or a
clearinghouse.
Excludes: Dental (ADA form) and Facility (UB04 form) claims
Exception: Long Term Care providers may use to enter and submit claims directly to Blue Cross of
Idaho. Due to our Medicare Medicaid Coordinated Plan (MMCP), we have come up with a solution for
your Long Term Care facility claims. Please complete the claims form with the following information to
submit your claims.
Place of Service; SNF – 33 or LTC – 99
CPT/HCPCS – T5999
Admit date, please indicate in the notes field the actual admit date
Rev code – please indicate rev code in the notes field

Direct Claims Entry Instruction Guide
08/08/16 Page 3
Step A - Accepting the Disclaimer
1. Select the “Accept” at the bottom of the page to advance. This is required upon each entry
into the application.
Note; Claims you successfully submitted to Blue Cross of Idaho are housed as a Received Claim for 30
days. After that time, we purge claims from the DCE system.
Direct Claims Entry Instruction Guide
08/08/16 Page 4
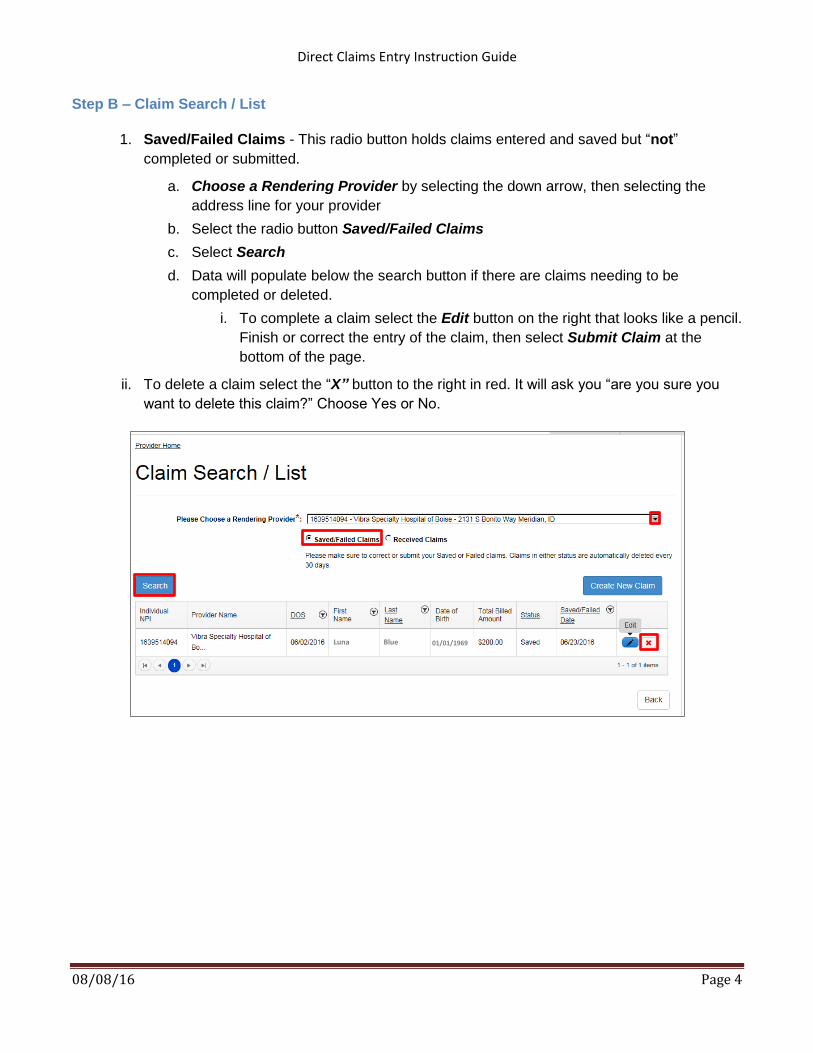
Step B – Claim Search / List
1. Saved/Failed Claims - This radio button holds claims entered and saved but “not”
completed or submitted.
a. Choose a Rendering Provider by selecting the down arrow, then selecting the
address line for your provider
b. Select the radio button Saved/Failed Claims
c. Select Search
d. Data will populate below the search button if there are claims needing to be
completed or deleted.
i. To complete a claim select the Edit button on the right that looks like a pencil.
Finish or correct the entry of the claim, then select Submit Claim at the
bottom of the page.
ii. To delete a claim select the “X” button to the right in red. It will ask you “are you sure you
want to delete this claim?” Choose Yes or No.
Luna Blue 01/01/1969

Direct Claims Entry Instruction Guide
08/08/16 Page 5
2. Received Claims – This radio button displays claim(s) submitted and received by Blue
Cross of Idaho in the past 30 days. After that time, we purge claims from the DCE system.
a. Choose a Rendering Provider by selecting the down arrow, then selecting the
address line for your provider
b. Select the radio button Received Claims
c. Select Search
d. Data will populate below the search button if there are claims received by the
selected servicing provider.
i. To view a claim, select the spy glass icon to the right. It will display a CMS-
1500 with the details entered. You may print the claim from this view.
ii. To view any documents you have attached, select the paper clip icon to
review. Note: you will not be able to add or remove documents.
Luna Blue 01/01/1969

Direct Claims Entry Instruction Guide
08/08/16 Page 6
Step C – Create New Claim
1. To start a claim select Create New Claim. No other boxes need to be selected.
2. Patient Search –
a. Date of Service – fill in the oldest date you will be billing with.
b. Patient ID Number – Alpha prefix (not case sensitive) with ID number; no
spaces between the alpha prefix and ID number.
c. Then enter ONLY one, the Date of Birth OR the Last Name
d. First Name is optional
e. Select Search

Direct Claims Entry Instruction Guide
08/08/16 Page 7
f. Results will display under Search. Select the Create Claim on the approperate
member line.
g. Patient is a Medicare Medicaid Coordinated Plan (MMCP) member you will see
the following box (below). Their alpha prefix starts with XMX.
i. Select the HCBS/LTSS if you are billing for Medicaid care services such as
CBRS mental health, home care, personal services, assisted living, etc.
ii. Select BCI Medical if you are billing for regular medical services such as
doctor office visits, physical therapy, behavioral health counseling, etc.
XMM999999999 Blue 01/01/1969 Luna

Direct Claims Entry Instruction Guide
08/08/16 Page 8
h. BlueCard Members - If you encounter the following message, you might be entering
a BlueCard member with membership with another BlueCrossBlueShield plan.
i. You may contiune by selecting Yes. We will forward the claim to the home
plan for eligibility and benefits before Blue Cross of Idaho processes for
payment.
3. Blue Cross of Idaho Medical Claim (CMS-1500 version) – only the red asterisk will need
to be populated.
a. Choose a Rendering Provider: Select the drop down arrow, then select the
servicing providers address line.
b. Patient’s Information
i. If the patient is a member, we will auto populate the information
ii. If the patient is a BlueCard member, you will be asked to fill out the member
information completely
XMM999999999
Luna Blue
01/01/1969

Direct Claims Entry Instruction Guide
08/08/16 Page 9
c. Is there another health benefit plan? Does your patient have a primary insurance
carrier before Blue Cross of Idaho?
i. Select No – you move to the next red asterisk
ii. Select Yes – you will be asked to attached a copy of the primary
explanation of benefit (EOB) and fill out the Other Insured’s Information
section.
iii. If Yes and a BlueCard claim, you are required to indicate in the “Additional
Claim Information” box the other payment liability (OPL) value. Enter one of
the following;
1. BL - Blue Cross/Blue Shield
2. CI - Commercial Insurance
3. MA - Medicare Part A
4. MB - Medicare Part B
5. MC - Medicaid
6. WC - Work Comp
Blue Linda

Direct Claims Entry Instruction Guide
08/08/16 Page 10
iv. Add “PDF”Attachment to upload your document; Primary EOB
d. Resubmission Code & Orginal Ref No. - These fields assist in resubmitting a
corrected claim or voiding a claim.
i. Resubmission Code – select the down arrow and chose 7- resubmit claim
or 8- voiding a claim
ii. Original Ref No. – enter the original claim number of the first claim. The
claim number is found in the Claims Status tool or on your Remittance
Advice.
e. ICD Indicator - This indicates for diagnosis code sets
i. ICD-9: For diagnosis codes with dates prior to 10/1/2015
ii. ICD-10: For diagnosis codes with dates on and after 10/1/2015. The tool
defalts to ICD-10.
f. Diagnosis – add your primary diagnosis code and up to 11 more secondary codes
by selecting the Add Diagnosis button.

Direct Claims Entry Instruction Guide
08/08/16 Page 11
g. Service – Services proformed
i. Date of Service (DOS) – enter individual dates of services on each line
1. Exception – MMCP provider may enter a week or month at a time.
ii. Place of Service (POS) – Enter two-digit code
iii. CPT/HCPCS code – enter procedure code
iv. Modifier – optional
v. Related Diagnosis –
1. Primary – if only one diagnosis code “a” is correct, you are complete.
If you have mulitple diagnosis codes, you need to indicate which code
is primary. Then go to the Other(s) box to put in order.
vi. NDC – National Drug Code
vii. Total Charges – total charges for all lines
viii. Days/Units – Total day or unit count
ix. EPSDT - Early & Periodic Screening, Diagnosis & Treatment (EPSDT) should
be marked if the patient is a Medicaid member of Blue Cross of Idaho which
the following services are being billed; normal newborn or well child exam.
x. Add Service – Select if there are multiple lines of services that need to be
entered.

Direct Claims Entry Instruction Guide
08/08/16 Page 12
h. Patient Data –
i. Patient Account Number – optional, the account number from your client
files
ii. Accepting Assignment – You are indicating that the case is being assigned
to you and payment should be sent to you. If you indicate No, you are
indicating that payment should be sent to the patient.
iii. Patient’s or Authorized Person’s signature - The patient’s signature or the
statement “signature on file” in this item authorizes payment of medical
benefits to the physician or supplier. Select one of the four buttons given.
iv. Federal Tax ID Number – Enter your tax identification number and select the
SSN or EIN that applies.
i. Service Facility Location
i. Same as Billing Provider Information – mark if the services were
performed at the same location as the provider’sbilling address. If not, enter
the location where services were rendered into the red asterrisk fields. For
example: the patients home.

Direct Claims Entry Instruction Guide
08/08/16 Page 13
4. Save, Submit or Cancel
a. Save – This retains the information you entered in the claim, allowing you to go back
in and modify the claim prior to submission under the Save/Failed section on the
front page of the tool.
b. Submit Claim - Two possibilties for replies
i. If all information is entered appropriately the message will say “This claim has
been submitted for processing.”
ii. If field errors or validation errors are present, you must select OK and go
back to correct the highlighted field.
iii. Once you hit the submit button, your claim will transmit to Blue Cross of
Idaho. You cannot edit a claim after it has been submitted.
c. Cancel – Will delete what was entered on the form.