Dihydroergotamine (DHE) Subcutaneous Injection Guide ... · of DHE and Saline Page 3 DHE...
5
HELPFUL TIPS: If you have never given yourself a subcutaneous injection, or you have difficulty with needles, here are some tips: For your first injection, make an appointment with a nurse so that s/he can show you how to do it properly. Bring this guide, along with all necessary materials; Then, once you are at home for your next injection, ask someone with whom you are comfortable to be present to reassure you; At all times, breathe calmly through your nose, avoiding hyperventilating by the mouth; You can even practice visualization before beginning. Sit calmly imagining giving yourself the injection, with ease, free of worry. This will help build your confidence; If you feel unwell at any point during the injection and are not sure you can finish, calmly remove the needle (see Step 34). Put your head between your knees or rest it on the table. Breathe normally. Drink water. Take your time. When you are ready, swipe the needle with a clean alcohol swab to disinfect it, and repeat the same injection process (from Step 30) to empty the solution. ABBREVIATIONS: G = gauge (needle diameter) cc = cubic centimeter in. = inch cm = centimeter mL = milliliter mg = milligram DIN = Drug Identification Number Migraine Attack Abortive Treatment Medication Overuse Protocol Treatment Refractory Cluster Headache Treatment Dihydroergotamine (DHE) Subcutaneous Injection Guide Written by Louise Houle, Patient Advocate, & Dr. Elizabeth Leroux, MD, FRCPC Montréal, Québec Revised in November 2013 GENTLE REMINDERS: Calmly prepare yourself; Even if it seems impossible to do, know that you are capable! If needed, ask for help from someone you trust; When in doubt, consult a nurse, pharmacist or doctor; Always check the expiry dates of all products. OBJECTIVE: To learn how to subcutaneously inject a mix of saline (sodium chloride) and DHE to reduce the burning sensation often associated with injecting pure DHE. IMPORTANT NOTE: The quantity of saline you mix with DHE can be modified according to your tolerance. For some, 1 mL is sufficient to reduce the unpleasant sensation; The following instructions are based on a maximum quantity of 1.5 mL of saline, mixed with 1 mL of DHE, for a total of 2.5 mL of liquid in a syringe which contains a volume of 3 mL (3 cc). → → → © Migraine Québec / Migraine Zéro , 2013
Transcript of Dihydroergotamine (DHE) Subcutaneous Injection Guide ... · of DHE and Saline Page 3 DHE...
HELPFUL TIPS:
If you have never given yourself a subcutaneous
injection, or you have difficulty with needles, here
are some tips:
For your first injection, make an appointment with
a nurse so that s/he can show you how to do it
properly. Bring this guide, along with all necessary
materials;
Then, once you are at home for your next injection,
ask someone with whom you are comfortable to
be present to reassure you;
At all times, breathe calmly through your nose,
avoiding hyperventilating by the mouth;
You can even practice visualization before beginning.
Sit calmly imagining giving yourself the injection,
with ease, free of worry. This will help build your
confidence;
If you feel unwell at any point during the injection
and are not sure you can finish, calmly remove the
needle (see Step 34). Put your head between your
knees or rest it on the table. Breathe normally.
Drink water. Take your time. When you are ready,
swipe the needle with a clean alcohol swab to
disinfect it, and repeat the same injection process
(from Step 30) to empty the solution.
ABBREVIATIONS:
G = gauge (needle diameter)
cc = cubic centimeter
in. = inch
cm = centimeter
mL = milliliter
mg = milligram
DIN = Drug Identification Number
Migraine Attack Abortive Treatment
Medication Overuse Protocol Treatment
Refractory Cluster Headache Treatment
D i h y d r o e r g o t a m i n e ( D H E ) S u b c u t a n e o u s I n j e c t i o n G u i d e
Written by
Louise Houle, Patient Advocate, &
Dr. Elizabeth Leroux, MD, FRCPC
Montréal, Québec
Revised in November 2013
GENTLE REMINDERS:
Calmly prepare yourself;
Even if it seems impossible to do, know that
you are capable!
If needed, ask for help from someone you
trust;
When in doubt, consult a nurse, pharmacist
or doctor;
Always check the expiry dates of all products.
OBJECTIVE:
To learn how to subcutaneously inject a mix of saline (sodium chloride) and DHE to reduce the burning
sensation often associated with injecting pure DHE.
IMPORTANT NOTE:
The quantity of saline you mix with DHE can be
modified according to your tolerance. For some,
1 mL is sufficient to reduce the unpleasant sensation;
The following instructions are based on a maximum
quantity of 1.5 mL of saline, mixed with 1 mL of
DHE, for a total of 2.5 mL of liquid in a syringe
which contains a volume of 3 mL (3 cc).
→
→
→
© Migraine Québec / Migraine Zéro , 2013
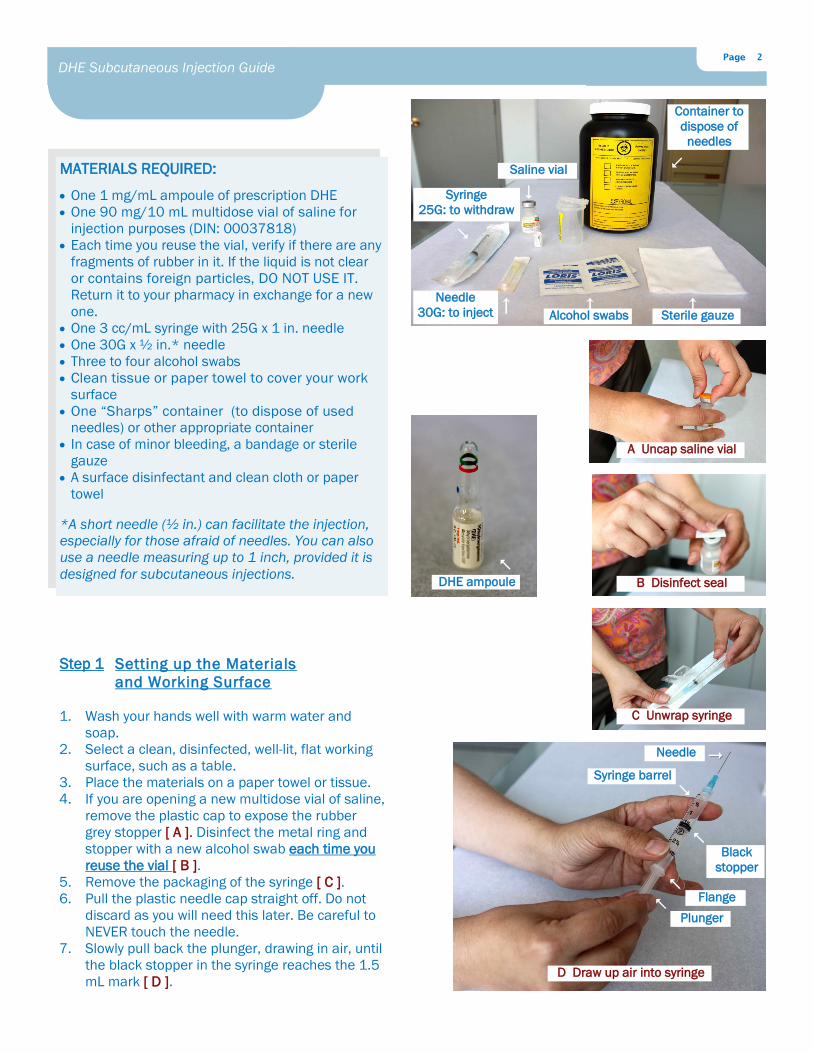
1. Wash your hands well with warm water and
soap.
2. Select a clean, disinfected, well-lit, flat working
surface, such as a table.
3. Place the materials on a paper towel or tissue.
4. If you are opening a new multidose vial of saline,
remove the plastic cap to expose the rubber
grey stopper [ A ]. Disinfect the metal ring and
stopper with a new alcohol swab each time you
reuse the vial [ B ].
5. Remove the packaging of the syringe [ C ].
6. Pull the plastic needle cap straight off. Do not
discard as you will need this later. Be careful to
NEVER touch the needle.
7. Slowly pull back the plunger, drawing in air, until
the black stopper in the syringe reaches the 1.5
mL mark [ D ].
Setting up the Materials
and Working Surface
Page 2
DHE Subcutaneous Injection Guide
MATERIALS REQUIRED:
One 1 mg/mL ampoule of prescription DHE
One 90 mg/10 mL multidose vial of saline for
injection purposes (DIN: 00037818)
Each time you reuse the vial, verify if there are any
fragments of rubber in it. If the liquid is not clear
or contains foreign particles, DO NOT USE IT.
Return it to your pharmacy in exchange for a new
one.
One 3 cc/mL syringe with 25G x 1 in. needle
One 30G x ½ in.* needle
Three to four alcohol swabs
Clean tissue or paper towel to cover your work
surface
One “Sharps” container (to dispose of used
needles) or other appropriate container
In case of minor bleeding, a bandage or sterile
gauze
A surface disinfectant and clean cloth or paper
towel
*A short needle (½ in.) can facilitate the injection,
especially for those afraid of needles. You can also
use a needle measuring up to 1 inch, provided it is
designed for subcutaneous injections.
Needle
30G: to inject ↑
Alcohol swabs
Syringe
25G: to withdraw
↑ Sterile gauze
DHE ampoule
C Unwrap syringe
B Disinfect seal
A Uncap saline vial
Step 1
D Draw up air into syringe
Needle
Syringe barrel
Black
stopper
Flange
Plunger
↑
Saline vial
Container to
dispose of
needles

8. Holding the saline vial on your working surface, insert the
needle straight down through the centre ring of the grey
stopper [ E ]. Make sure the needle goes in straight so as
not to break or bend it.
9. Once the needle is inserted, push the plunger as far as it
goes to inject air (1.5 mL) into the vial [ F ]. This is to
create positive pressure which facilitates the extraction of
the saline afterwards.
10. Keeping the needle in the vial, turn the vial upside down.
Make sure the needle tip always remains in the solution.
If there is not much saline left in the vial, you may need to
partially withdraw the needle to ensure the tip remains
submerged.
11. Slowly pull back the plunger until the syringe fills to a vol-
ume of 1.5 mL [ G ]. (The quantity of saline may vary from
one person to the next, for example from 1 to 1.5 mL.)
12. Remove the needle from the vial.
13. Hold the syringe pointing the needle upward (at a 90°
angle) to check for excess air, air bubbles or white foam.
Gently tap the syringe to make bubbles rise to the surface,
close to the base of the needle [ H ]. Expulse the excess
air, as needed, by slowly pushing the plunger straight
upward [ I ].
14. Carefully put the syringe down, making sure not to let the
needle touch any surface. For example, you can temporarily
lean the barrel of the syringe onto the plastic needle cap.
15. Take the breakable ampoule of DHE and look to see if
there is any liquid at the top. If there is, gently flick your
finger near the top to get all the liquid into the bottom
portion of the ampoule.
Preparing the Mix
of DHE and Saline
Page 3
DHE Subcutaneous Injection Guide
Step 2
F Push air into vial E Insert Needle
H Flick air
to surface G Withdraw saline
J Break open
DHE ampoule
I Push out
excess air
K Opened ampoule
L Withdraw DHE
16. To open the ampoule, hold the bottom part with one hand. With your other hand,
place the thumb on the coloured dot and snap the neck off by applying pressure
backwards. If there is no dot on the ampoule, aim slightly above the bulbous
part of the neck and snap back to break it. You can use a tissue or the syringe
packaging to surround the ampoule to protect your fingers from the breaking
glass [ J ]. (If it is not a clean break and you see shards of glass in the liquid, ask
your pharmacist to return it to the manufacturer.) The ampoule is ready [ K ].
17. In one hand, hold the DHE ampoule. With the other hand, take the syringe which
contains the saline and insert the needle into the DHE ampoule being careful to
not prick yourself. Hold the barrel of the syringe at the same time as you gently
and slowly pull back the plunger to withdraw the amount of DHE prescribed by
your doctor (e.g. 0.5 or 1 mL). Make sure the tip of the needle stays submerged
in liquid at all times. Also, be careful not to pull the plunger completely out of the
syringe [ L ].

18. Once you have withdrawn the DHE, make sure there is a
small amount of air in the syringe where the barrel of the
syringe meets the needle. If there is no air, pull back slightly
on the plunger, being careful to not remove it completely
from the syringe. This will facilitate mixing the two liquids.
(Less than 0.5 mL of air is sufficient.)
19. To mix the DHE and saline well, hold the barrel of the syringe
vertically between the fingers of both hands (the needle
pointing upwards) and gently roll the barrel for at least 20
seconds [ M ]. Do not shake the syringe as this will create
foam.
20. When finished, check the syringe for air bubbles (or foam). If
there are any, point the needle upwards (at a 90° angle) and
gently tap your finger against the barrel of the syringe to get
the bubbles to the surface, near the base of the needle.
Slowly and carefully push the plunger up, keeping the needle
pointing upwards. If a thin jet of liquid comes out without air
bubbles, your medication is ready for injection.
21. To replace the needle by the shorter one, begin by putting
back the plastic cap on the needle [ N ]. Be extra careful to
not prick yourself with the exposed needle!
22. Remove the cap but this time with the needle. To do so, hold
the plastic cap and twist it off counter clockwise [ O ].
23. Remove the packaging of the injection needle (30G x ½ in.).
24. Screw the new needle on the syringe (keeping the cap on so
as not to prick yourself) [ P ].
25. Put the syringe down for now.
Choosing and Preparing
the Injection Site
Page 4
DHE Subcutaneous Injection Guide
Step 3
M Mix well to avoid
the burning sensation
N Recap
O Twist off 25G needle
P Screw on 30G needle
Q Disinfect
26. Choose one of these injection sites: 1) in the middle of your
thigh (the fatty part, away from your knee); 2) the abdomen,
except for the 5 cm (2 in.) area around your navel.
27. To protect your skin, choose a different site for each injection.
Make sure the new site is at least 2.5 cm (1 in.) from your
last injection. Do not inject into areas where the skin is tender,
red, hard or bruised. Also, avoid scars and stretch marks.
28. To prepare the skin for injection, clean the site with a new
alcohol swab with a firm circular motion from the inside
(point of injection) to the outside [ Q ]. Do not touch this area
again before administering the injection.
RE: #17 There are several ways to hold the syringe. If the
one you see in the photo doesn’t feel comfortable, feel
free to hold it differently. Please be extra careful when
recapping the needle to remove it from the syringe!
This protocol may seem long, but once you get the hang of
it, the entire procedure will only take you a few minutes.

29. Keep sterile gauze or a bandage handy for use after the
injection if needed.
30. With your non-dominant hand (left if you are right-handed),
gently pinch the cleaned area of skin and hold it firmly [ R ].
With your dominant hand, hold the syringe like you would a
pencil, at about a 45° angle to your skin.
31. Push the needle into the skin (without hesitation) with a
quick dart-like motion [ S ]. You may feel a slight pinching,
especially if you hit a capillary. The swifter you inject, the
less you will feel it.
32. Let go of the pinched skin.
33. To administer the injection, with your dominant hand, slowly
push the plunger down. If using the ½ in. thinner (30G)
needle, you may feel more resistance than with the 1 in.
wider (25G) needle. In this case, you can try holding the
barrel of the syringe with your non-dominant hand. With your
dominant hand, use the flange to create a counter-
resistance, all the while slowly injecting the solution [ T ].
34. Once the syringe is empty, swiftly pull the needle from the
skin at the same angle at which you inserted it [ U ].
35. If slight bleeding occurs when you pull out the needle, apply
pressure for 10 seconds with sterile gauze or an alcohol
swab. Use a bandage, if necessary.
Page 5
DHE Subcutaneous Injection Guide
R Pinch skin
U Pull out needle
It’s done!
S Insert needle
V Dispose of needles
36. Immediately throw away the used syringe and needles in an
appropriate puncture-resistant container. Your pharmacist
should be able to give or sell you one. Keep this container
out of reach of children or animals. Once it is full, bring it
back to your pharmacy [ V ].
37. Keep unopened ampoules of DHE as well as the multidose
vial of saline, if some remains, at room temperature, protected
from light and humidity and out of reach of children or
animals. You can store the multidose vial of saline in a clean
empty pill box or sealable bag.
38. The remaining materials can be placed in the trash.
39. Disinfect your working surface.
Injecting the Solution Step 4
Disposing of Materials Step 5
NOTE: Once finished, you may notice a swelling or redness
at the injection site. This is a common reaction which may
take a few days to disappear, and the area may remain
sensitive. You may put ice on the injection site for 10
minutes to reduce swelling. If you are worried that this, or
any other, reaction to the medication is undesirable or
unexpected, do not hesitate to contact your doctor or
pharmacist.
T Slowly inject