DigtaSoft Pro - grundig-gbs.com · Play(LP) Standard (S ) Qu it (QP) Memory requirements. 10...
129
DigtaSoft Pro Administration Guide English
Transcript of DigtaSoft Pro - grundig-gbs.com · Play(LP) Standard (S ) Qu it (QP) Memory requirements. 10...

DigtaSoft Pro Administration Guide
English

Admin Guide Page 2 of 129 Current version: Oct. 2013.
Table of Contents
Target Audience 7
Basics 7
History 7
Scope of Application 8
DSS Standard 8 Contents of a DSS / DSS Pro file 9 Technical Data: 9
Software and Components 10 DigtaSoft Pro 10 DSSMover 10 NetAdministration 10 The Digta Configurator 10
Functional Principles 11
Launch Pattern 11 Stand-Alone Mode 11 Network Mode 11
Launch Patterns Explained 12
Sending Dictations within the Network 12
Shared Network Directories 13
Licensing 13
Unlocking Software licenses 13 DigtaSoft Pro 13
Single-user license 14
Network license 15
Gold key license 15
Installation 16
Prerequisites 16 Network 16 System Requirements 16 Preparing the Dictation Network Folder 17 Permissions 18 Installation steps: 18
Setting up a Dictation Network 18 Establishing a dictation network 19 Select Configuration File 19 Defining the Application Scenario 20 Configure Dictation Directories 20 Select Configuration Directory 21 Licensing Type 22 Network Location for Setup Template 22 Completing the Configuration 23
Installation of a Work Station with the Installation Template 24

Admin Guide Page 3 of 129 Current version: Oct. 2013.
Language 24 Welcome 24 Setup Type 25 Custom Setup 26 Ready to Install the Program 27 Finishing the Installation 27
Stand-alone installation with subsequent connection to the dictation network 28 Installing DigtaSoft Pro 28 Welcome 29 Setup Type 29 Custom Setup 30 Ready to Install the Program 31 Finishing the Installation 31 Connecting to the Dictation Network 31 Selecting the Configuration File 32 Defining the Application Scenario 33 Licensing Types 34 Completing the Configuration 34
Installing DSSMover 35 Welcome 35 Setup Type 36 Custom Setup 36 Finishing the Installation 37 Configuration Wizard 37 Select Configuration File 38 Completing the Configuration 39
Installing the Digta Configurator 40 Welcome 40 Setup Type 40 Custom Setup 41 Finishing the Installation 42 Configuration Wizard 42 Select Configuration File 43 Completing the Configuration 44
Repairing / Changing Software 45
Software Update 45
MSI Installation 45 Custom installation 46 MsiExec parameters 46 Administrative installation 48 Application Planning 48 Creating Transform Files 49 DigtaSoft Pro MSI 51
Available Features 51 Available Properties 51
DSSMover MSI 52 Available Features 52 Available Properties 52
Terminal Server 53 Workflow 53 System Requirements 54

Admin Guide Page 4 of 129 Current version: Oct. 2013.
Steps for installation 56 How the License Management Service Functions 56
Installing a License Management Tool 56 The setup window opens. 57 Copying starts 58 Enter license key 59 Starting/stopping the DigtaSoft Pro Server 59 Configuring the License Management Service 60 Installing DigtaSoft Pro on a Terminal Server 61 Welcome 62 Setup Type 62 Custom Setup 62 Ready to install the program 64 Finishing the Installation 64 Connecting to the dictation network 65 Select Configuration File 65 Define the Application Scenario 66 Licensing Types 67 Connecting a Work Station with the Dictation Network 68
Installing DSSMover on the Terminal Server 69 Welcome 69 Setup Type 69 Custom Setup 70 Finishing the Installation 70 Configuration Wizard 71 Select Configuration File 71 Completing the Configuration 72
Citrix® client installation 73 Setup Installation 73 Manual Installation 73
Windows® Terminal Server Client Installation 74 Setup Installation 74 Manual Installation 74
IGEL thin client configuration 75 Smart, Compact, Winestra, Premium 75
Citrix® client setting 75 Windows® Terminal Server client setting 78
IGEL UD Series 81 Citrix® client setting 81 Windows® Terminal Server client setting 84
Administration 88
NetAdministration 88
Minimum Requirements for New Users 91 Create Users 91
User Management 91 Log in 91 Rights 92 User 92 Directories 93
Server-Directory 93

Admin Guide Page 5 of 129 Current version: Oct. 2013.
In-box 93 Dictation Directory 94 Sent Dictations 94 Completed Dictations (DigtaSoft Pro) 94 Configuring Additional In-boxes (DigtaSoft Pro) 95
Creating Additional Users 95
Creating a User Template 95 Creating a User Template 95 User Template Settings 96 Modifying Paths 96 Copying Templates 96 Creating Users 96
Address Book / LDAP import 96 Server and Address Book 96
User name 97 Incoming mail server (POP3) / Outgoing Server (SMTP) 97 Address book server (LDAP) 97 Search base to create the address list 97 Author / Transcriber 97
Importing Users 98
Settings 99 Network Configuration 99
Enabling Logging 99 Deleting Log Files 99 Enabling Document Approval 99 Setting Deadlines Automatically 99 Deadline Monitoring 100 Using Windows Log-in 100 Allowing Configuration of Mobile Dictation Devices 100 Using Quality Control Issues 100
Dictation Types, Groups and Categories 101 Dictation Types 101 Selecting a Document Template 102 Deleting a Template 102 Groups 102 Category 102
Speech Recognition 103 SpeaKING Configuration 103 4voice Configuration 104
Subfolders for DSSMover Workflow 105 Digta Dictation Machine 106
Configuring Authors 107 Transcriber, Dictation Type, Group 107
Digta Firmware 109
Document Approvals
110 Document Approval Process 110
Creating the Dictation 110 Transcribing the Dictation 110 Document Approval: Begin 110 Document Approval: Status 1 110 Note: Document Release 110 Granting Approval 110

Admin Guide Page 6 of 129 Current version: Oct. 2013.
Document Approval: End 110 Setting Up Document Approval 111
NetAdministration Settings 111 User Settings 111
Quality Control Issues
Selecting Data Lists and Data Fields
112
113 Preparatory measures 113 Configuration 113 Final Measures 115 Using data lists 115
DSSMover
116 Configuration General 116
General 117 Acknowledgement during transfer 118 Backup Copy 118 Backup When Sending via Email 118 Email Interface 118
DSS configuration 119 General 119 Send via network 120 Export 120 Other file formats 120 Send via email 120 Send via email 121
Creating Individual Subfolders 121 Activating DSSMover 122 DSSMover in Action 122 Transferring dictations 122 Dictations Not Transferred 122
Deferred dictations 122 Manually changed dictations 122 Already transmitted dictations 122
Log File 123 Sources of Failed Transfers 123 Notes for secure file transfer via USB 123
Administrative files from DigtaSoft
124 netconfig.ini 124 users.ini 124 select.ini 124 update.ini 124
Notes / Tips and Tricks 125
Keyboard Shortcuts
Switches and command line parameters
Removable Disk
Popup Window
125
126
128
128 Windows® XP 128 Windows® 7 128
FAQs 129
Service and Support 129

Admin Guide Page 7 of 129 Current version: Oct. 2013.
Target Audience This manual is intended for the maintainer of a Grundig dictation network. It demonstrates the installation and administration of several DigtaSoft software components.
The guide covers basic functions and workflows across several work stations in the dictation network. It is not intended for the individual user. Individual users can find all important information in the program's help menu.
Those charged with installing and maintaining a Grundig dictation network should already be familiar with computer and networking technology, especially:
the underlying local area network (LAN); the file systems on the computers to be used; the hardware interfaces to be used; operating and software interfaces of Microsoft Office Word and Outlook or another
email program (if used).
Basics The software for the dictation of Grundig Business Systems is built on two pillars:
dictation software such as DSSMover or DigtaSoft Pro
configuration files for program control
A digital dictation network administrator who understands the function of these core pillars will be able to establish complex structures and processes in language processing and even tweak smaller details.
We therefore recommend becoming familiar with the Basics and Functional Principles chapters. In addition, the administrator should also the user guide through the chapter entitled Dictation Companion.
History Grundig has been at the forefront of digital dictation since the early 1990's when it released PC-based GVM2000 dictation device. The foundation for the StenoNet dictation network followed a few years later with the GDV4000 system. It’s simple and effective ability to manage administrative files was continued first in StenoNet and then DigtaSoft.

Admin Guide Page 8 of 129 Current version: Oct. 2013.
All Grundig digital dictation devices and their accompanying software have been compatible since the GDV4000. DigtaSoft is a further development with extra features which were not available for StenoNet and GDV4000. Voice recording is done with the DSS standard, co- developed by Grundig. This is a voice-optimized compression and storage method, similar to the well-known MP3 standard.
Scope of Application DigtaSoft can be used everywhere where language is processed and a networked PC infrastructure is available. The software allows analogue dictation technology to be replaced with digital dictation devices. It features an easy-to-use basis for managing digital voice recordings.
The components allow dictations to be created, saved, transmitted and transcribed. The documents created can then be associated with the dictations and further processed.
DSS Standard The DSS file standard was developed for voice playback and provides optimal understandability with minimal memory requirements. In addition to the DSS standard, there is also the DSS Pro Standard. This includes advanced features (see table).
File
extensions Encryption More than
16 pieces of information
Dictation compression
DSS
.dss
no
no
SP / LP
DSS Pro
.ds2
yes
yes
SP / LP
.ds2
yes
yes / no
QP
DSS Pro Standard allows dictations to be encrypted to protect them from unauthorized access. In addition, DSS Pro Standard allows more than 16 pieces of information to be inserted into a dictation. The choice of dictation compressions has been expanded to Quality Play. Quality Play has improved sound quality, but a lower compression because of the higher sampling rate
Both standards share the following advantages:
low memory requirements and high quality recording low transfer times when sending large recording capacity from mobile dictation devices good archiving capabilities
Because of their high quality playback, the DSS files are ideal for further processing with speech recognition systems.

Admin Guide Page 9 of 129 Current version: Oct. 2013.
Contents of a DSS / DSS Pro file A DSS file consists of the sound recording and the dictation accompanying Note:.
In the audio recording, acoustic information can be inserted and played back later,
for example, to give instructions to the transcriber.
The accompanying Note: records additional information on the dictation and enables the automation and control of workflows in the dictation system.
Technical Data:
DSS DSS Pro Long Play (LP) Standard Play (SP) Quality Play (QP)
Memory requirements
10 minutes per MB
10 minutes per MB 5 minutes per MB
Sampling 8 kHz 12 kHz 16 kHz Channels 1 (mono) 1 (mono) 1 (mono)
Note: If a DSS dictation is encrypted, a DSS Pro dictation will be automatically created. This has the consequence that this dictation will only be able to be opened with a product that meets the DSS Pro Standard.

Admin Guide Page 10 of 129 Current version: Oct. 2013.
Software and Components
DigtaSoft Pro This software is an application to manage complex dictation workflows, including player and recorder with comprehensive functionality, such as:
advanced dictation organization by (auto)archiving in the additional Completed
Dictations folder
as many additional in-boxes as desired
setting deadlines, displaying dictation history, etc.
dictation filter
terminal server support: Citrix® and Windows® terminal servers
30-day trial version (without an activation code)
DSSMover The DSSMover program will automatically send dictations from mobile dictation devices. It detects when a dictation machine has been connected and automatically transmits the dictations. DSSMover obtains information about the intended recipients from the dictation device's configuration.
NetAdministration The NetAdministration program is used by the system administrator to configure workflow and dictation devices.
The Digta Configurator The Digta Configurator 4.7 is a Grundig Business Systems tool for quick and easy configuration of your dictation device.
The Digta Configurator can be used for the following purposes:
Importing and exporting dictation device information
General configuration of the dictation device
Personalization of your dictation device
Expansion of your dictation device functions

Admin Guide Page 11 of 129 Current version: Oct. 2013.
Functional Principles
Launch Pattern Each program in the Grundig dictation network uses the same launch pattern. The software is installed in the program folder, most commonly under C:\Program Files\Grundig\. Two different modes of operation can be used.
Stand-Alone Mode For stand-alone mode, the configuration files digtasoftone.ini, digtasoftpro.ini or DSSMover.ini are used. The file name depends on the program being used. In this mode, the functions of network operation mode are not available.
Note: In stand-alone mode, dictations can only be sent by email.
Network Mode DigtaSoft Pro in network mode uses shared configuration files which the respective DigtaSoft program uses to query the users, their directories and other settings at start-up This makes it easy for users to share and manage documents and dictations in the network. The prerequisites are:
an existing fixed network connection (LAN/WAN) among all PC's in the dictation
network; installation of the DigtaSoft program on each computer; a network directory accessible to all participants.
This should contain the DigtaSoft configuration files; the dictations and documents to be exchanged in mailboxes.
For the network mode, the configuration file netconfig.ini is used. This contains information for the paths to
the admin file for users users.ini ; the admin file for dictation types and groups select.ini ; the folders housing the user in-boxes.
The administrative files netconfig.ini, users.ini and select.ini must be accessible to users. User information is stored in the users.ini file.
When launched, the programs check whether all paths and files listed in netconfig.ini are available. If the software finds the respective administrative files, their settings are then applied. The information on the dictation network i s now available. The users.ini contains the individual user's preferences and directories.

Admin Guide Page 12 of 129 Current version: Oct. 2013.
Note: The names of the administrative files can be modified as desired. The names used in this manual are the standard names.
Launch Patterns Explained The programs DigtaSoft Pro, NetAdministration, DSSMover and Digta Configurator all use the same launch pattern. Upon being launched in the network, these applications all orient themselves to the netconfig.ini file.
Network configuration file netconfig.ini
The netconfig.ini file contains information and paths to the user configuration file users.ini and the dictation group configuration file select.ini :
User configuration file users.ini
The users.ini file contains all of the user information, such as dictation directories.
Dictation groups configuration file select.ini The select.ini file contains a list of dictation types and user groups.
Note: When using the command line parameter -c, the configuration file can be chosen by path and name.
Sending Dictations within the Network
An author (say Ms Smith) marks a dictation, opens the Send dialogue and chooses a transcriber. The available transcribers download the software from the user configuration file users.ini.

Admin Guide Page 13 of 129 Current version: Oct. 2013.
If Ms Smith then sends a dictation, the software will copy the dictation from My Dictations to the transcriber's In-box folder. The dictation is then refiled in Ms Smith's Sent Dictations folder.
The software finds the correct directories based on the In-box and Outbox entries of
the users in the users.ini file.
Shared Network Directories When operated in network, mode, DigtaSoft can only fully function if at least one network directory exists that is accessible to all users. Only then can common access be ensured. A shared directory is needed because the system requires:
a central place to store user data and dictation settings; a central place to house user in- and out-boxes.
Licensing
Unlocking Software licenses The DigtaSoft applications require licenses which are purchased when you buy a product from Grundig Business Systems (such as Digta 7). After installation, the software runs for 30 days in demo mode. Within this time, the permanent license will have to be unlocked. Depending on the application and use, there are different ways of activation.
DigtaSoft Pro For DigtaSoft Pro, the license is activated by entering the serial number and launching the activation process. There are three possible types of licenses:
Single-user license
Network license
Gold key license

Admin Guide Page 14 of 129 Current version: Oct. 2013.
Single-user license The activation of the license is done manually on each work station. The serial number printed on the CD is entered in the ACTIVATION CODE REQUIRED dialogue box and then activated. It is only valid for a single work station.
Procedure:
When you first start DigtaSoft Pro, a window opens saying ACTIVATION CODE
REQUIRED.
Enter the serial number found on the CD that was used to install DigtaSoft Pro at the Work station.
Then click on Activate.
A dialogue box confirms the activation of the license.
Close the dialogue box with OK.
Close the ACTIVATION CODE window with OK.
If the validation fails, re-enter the serial number and look for typos or call GBS technical support at +49 921 8981401
To activate DigtaSoft Pro, you will need internet access. If you have no internet access, contact the Technical Support.
If you have not yet activated DigtaSoft Pro, when you launch the program, the activation window will appear with information on the days left in the demo mode and potentially the serial number, the name and installed version and options.
Warning! In addition to the required DigtaSoft license activation, there are other options which require separate licenses:
4voice speech recognition server with and without correction space
educational (workflow for educational institutions)
Admin Guide Page 15 of 129 Current version: Oct. 2013.
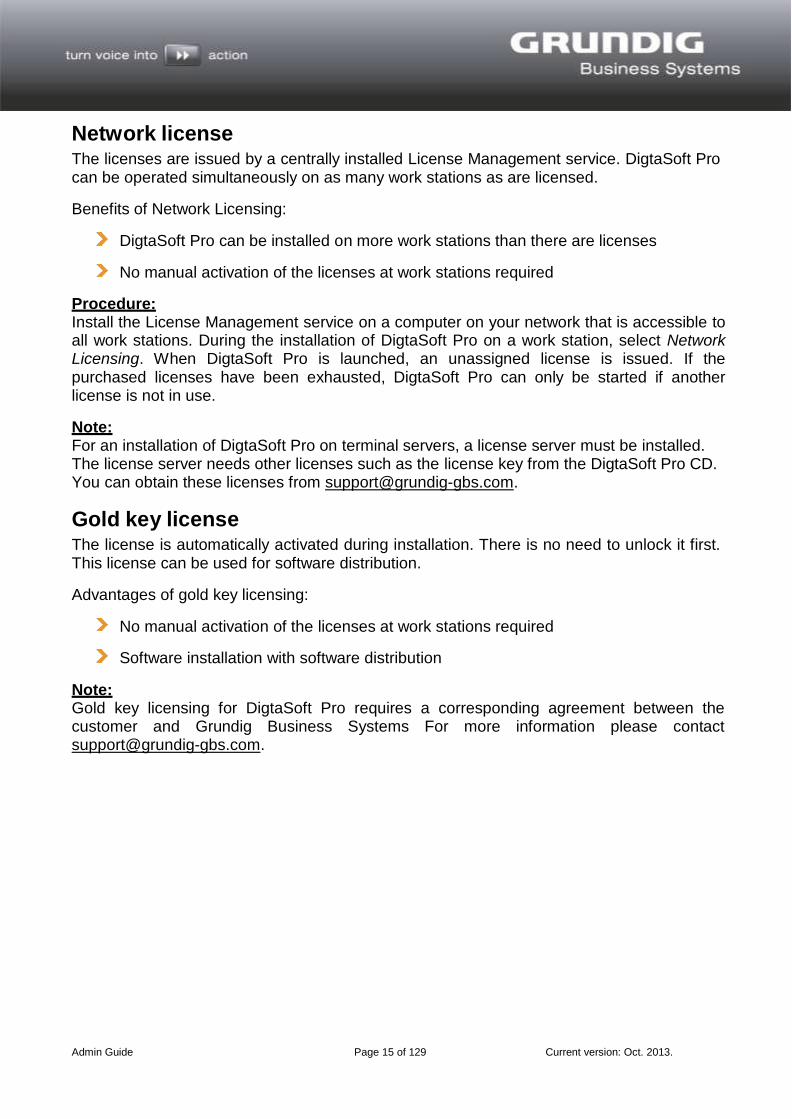
Network license The licenses are issued by a centrally installed License Management service. DigtaSoft Pro can be operated simultaneously on as many work stations as are licensed.
Benefits of Network Licensing:
DigtaSoft Pro can be installed on more work stations than there are licenses
No manual activation of the licenses at work stations required
Procedure: Install the License Management service on a computer on your network that is accessible to all work stations. During the installation of DigtaSoft Pro on a work station, select Network Licensing. When DigtaSoft Pro is launched, an unassigned license is issued. If the purchased licenses have been exhausted, DigtaSoft Pro can only be started if another license is not in use.
Note: For an installation of DigtaSoft Pro on terminal servers, a license server must be installed. The license server needs other licenses such as the license key from the DigtaSoft Pro CD. You can obtain these licenses from [email protected].
Gold key license The license is automatically activated during installation. There is no need to unlock it first. This license can be used for software distribution.
Advantages of gold key licensing:
No manual activation of the licenses at work stations required
Software installation with software distribution
Note: Gold key licensing for DigtaSoft Pro requires a corresponding agreement between the customer and Grundig Business Systems For more information please contact [email protected].

Admin Guide Page 16 of 129 Current version: Oct. 2013.
Installation
Prerequisites
Network The network storage must be permanently available. Regardless of the computers currently running, users must be able to reach their configuration files and in-boxes during the work day. The type of network infrastructure is not important as long as the network can be reached by the user's Windows computer. Windows, Samba or Novell servers and others can be used. Also permanent LAN/WAN connections or dial-up connections can be used.
Network Access Rights All users need read/write permissions for their own dictation folders and all in-boxes to which they will be sending data. This is necessary for users to pick up or drop off dictations from the in-boxes.
In the dictation network, the users need read/write permissions for their own in-boxes and those they are authorized to access. Access to individual in-boxes may also be limited, of course.
Each user must still have read/write permissions to the network administration files in the server directory. If a user only has read-only access to these configuration files, the user's settings cannot be saved when exiting the program.
The network must have enough free capacity. Estimate the amounts of data to be stored in the folders. To make these calculations, you need the number of participants, the average number and length of dictations in the mailboxes and the average file size (see DSS standard). If Sent Dictations should be stored on the server as well, you will need to assign it additional storage capacity.
System Requirements
System Operating system Requirements
Windows®
Windows® 7 Windows® Vista Windows® XP SP2
System requirements for Windows® operating systems at www.microsoft.com.
Hard drive space: 150 MB for Digta software, 25 MB for SDK
1 free USB 1.1/2.0 port or a serial interface
Additional System Requirements:
A free USB 1.1/2.0 port or a serial interface is needed for the Digta Hardware. RS-232 (COM port) with a 9-pin D-Sub (depending on the device; see Supported Hardware)
For transcription hardware (Steno adapter box), an additional Sound Blaster-compatible sound card with 3.5 mm jack

Admin Guide Page 17 of 129 Current version: Oct. 2013.
Remarks:
If you use virtual machines (such as Virtual PC, VMware or other), the system requirements as listed
in the above table must be guaranteed. The software runs on 64-bit Windows® operating systems in 32-bit compatibility mode 64-Bit Client for Windows® Terminal Servers with a workaround support (available from our support)
or use 32-bit client operating systems.
Preparing the Dictation Network Folder Before setting up a dictation network, a shared folder must be made available to all dictation network users. Below, this folder will be called the dictation network folder. This folder stores the central settings for the dictation network, the user management data, general settings and the in-boxes for sent dictations.

Admin Guide Page 18 of 129 Current version: Oct. 2013.
Permissions Administrative rights are required to install the software on the computers.
Installation steps: create and share folders on the server
installation with setting up a dictation network
installation of dictation application at work stations
Setting Up a Dictation Network On the Dictation Software CD, select Install DigtaSoft Pro and click on Installation with dictation network setup.
The configuration wizard for setting up a dictation network starts.

Admin Guide Page 19 of 129 Current version: Oct. 2013.
Establishing a dictation network
Click on Continue.
Select Configuration File
When you first install an dictation network, click on the... icon and select the shared folder for the dictation network. The default name of the configuration file is netconfig.ini. If the file does not exist, it is automatically generated.

Admin Guide Page 20 of 129 Current version: Oct. 2013.
Defining the Application Scenario
Now define the application scenario. Since a dictation network is to be established, dictation network mode must be enabled. You can now choose if a 4voice with voice recognition connection is to be established or the software is to be installed in its academic edition.
Configure Dictation Directories
In the following dialogue, the paths for the pool and user in-boxes and personal folders are set.
The in-boxes and pools are usually located in the dictation network folder.

Admin Guide Page 21 of 129 Current version: Oct. 2013.
The personal folders are created locally on each work station. The path is not changeable at this point.
The paths can later be entered when setting up the user in the NetAdministrator program.
Note: If you want to create a personal folder in another location, you will then have to modify the path in the netconfig.ini file under LocalUserDir.
Select Configuration Directory
Enter the location for the configuration files of users and groups. All dictation network users must be able to access these files.
If the files are not yet in the specified folder, they are created after confirmation.

Admin Guide Page 22 of 129 Current version: Oct. 2013.
Licensing Type
Select the type of licensing for DigtaSoft Pro. For information about licensing, see the Licensing chapter.
Note: The DigtaSoft DVD license is always a single-user license.
Network Location for Setup Template
Select the location for the DigtaSoft Pro installation template. From this folder, further work stations can be then be installed.

Admin Guide Page 23 of 129 Current version: Oct. 2013.
Completing the Configuration
Click Finish to complete the configuration of the dictation network and to create the installation template.
The configuration is complete when the installation template is created in the network directory.
You now have two options for dictation work station installations.
Installation with the installation template
Stand-alone installation with subsequent connection to the dictation network

Admin Guide Page 24 of 129 Current version: Oct. 2013.
Installation of a Work Station with the Installation Template If you want to use the installation template to install a work station on the dictation network, launch setup.exe from the place where the installation was saved and follow the wizard. You can perform the installation using already-set standards or make work station-specific changes in the respective window.
Language
If you want to install this DigtaSoft Pro work station in another language chosen when creating the installation template, select the desired language and press OK.
Welcome
Click on Continue to begin the installation. Accept the license agreement to continue the installation. Afterwards, enter the user information and click on Continue.

Admin Guide Page 25 of 129 Current version: Oct. 2013.
Setup Type
Standard The program is installed with the most common options.

Admin Guide Page 26 of 129 Current version: Oct. 2013.
Custom Setup If you select Custom, a dialogue box will appear to select the individual components. Choose which components to install. The default is to install DigtaSoft Pro, Sample dictations and Adapter Server. Click the Help button if you need more information on selecting components.
To install the program files to a different installation path, click the Change button. It is not recommended to change the default installation paths.
If you are installing on a Citrix® or Windows® Terminal Server (WTS) environment, you must select the corresponding feature.
When all the information has been supplied, the installation wizard is ready to begin the actual installation.
Caution: Installation in a Citrix® or Windows® Terminal Server environment is only possible with DigtaSoft Pro.

Admin Guide Page 27 of 129 Current version: Oct. 2013.
Ready to Install the Program
To perform the installation, press Install. If you still want to change the installation settings, click Back. With Cancel, the wizard will stop and no installation will be performed.
Finishing the Installation
The software installation is now complete. Click Finish to exit the installation wizard.

Admin Guide Page 28 of 129 Current version: Oct. 2013.
Stand-alone installation with subsequent connection to the dictation network
Installing DigtaSoft Pro Choose from the Dictation Software CD, the DigtaSoft Pro tab and click on Install DigtaSoft Pro.

Admin Guide Page 29 of 129 Current version: Oct. 2013.
Welcome
Click on Continue to begin the installation. Accept the license agreement to continue the installation. Afterwards, enter the user information and click on Continue.
Setup Type
Standard The program is installed with the most common options.

Admin Guide Page 30 of 129 Current version: Oct. 2013.
Custom Setup If you select Custom, a dialogue box will appear to select the individual components. Choose which components to install. The default is the installation of DigtaSoft Pro, sample dictations and Adapter Server. Click the Help button if you need more information on selecting components.
To install the program files to a different installation path, click the Change button. It is not recommended to change the default installation paths.
If you are installing on a Citrix® or Windows® Terminal Server (WTS) environment, you must select the corresponding feature.
When all the information has been supplied, the installation wizard is ready to begin the actual installation.
Caution: Installation in a Citrix® or Windows® Terminal Server environment is only possible with DigtaSoft Pro.

Admin Guide Page 31 of 129 Current version: Oct. 2013.
Ready to Install the Program
To complete the installation, press Install. If you still want to change the installation settings, click Back. With Cancel, the wizard will stop and no installation will be performed.
Finishing the Installation
The software installation is now complete. If you want to connect the newly installed work station with an existing dictation connect, select Connect with Dictation Network. The dictation network configuration wizard starts.
Connecting to the Dictation Network The dictation network configuration wizard starts.

Admin Guide Page 32 of 129 Current version: Oct. 2013.
Click Next to continue the installation.
Note: If you later want to connect an existing single work station with a dictation network, select the network configuration wizard from the Tools and Utilities software CD.
Selecting the Configuration File
Select the configuration file containing the paths and settings required for the dictation network. When creating the installation template, the default name of the configuration file is netconfig.ini. This is located in the dictation network folder.

Admin Guide Page 33 of 129 Current version: Oct. 2013.
Attention! The configuration files digtasoft.ini, digtasoftpro.ini or DSSMover.ini are local configuration files from the software program folder. These files allow the software to start without being connected to a dictation network. These are stand-alone installations unable to send dictations via a dictation network.
Note: The names of the configuration files from previous versions of DigtaSoft have different names such as config.ini.
Defining the Application Scenario
Now define the application scenario. Since a dictation network is being established, enable dictation network mode. You can now choose if a 4voice with voice recognition connection is to be established or the software is to be installed in its academic edition.

Admin Guide Page 34 of 129 Current version: Oct. 2013.
Licensing Types
Select the type of licensing for DigtaSoft Pro.
Note: The license of DigtaSoft DVD is always a single-user license.
Completing the Configuration
The work station is now connected to the dictation network. Click Finish to complete the process.

Admin Guide Page 35 of 129 Current version: Oct. 2013.
Installing DSSMover To install the DSSMover, select dictation transfer: DSSMover on the installation start page and click on “PC Installation”.
Note: Information on DSSMover Portable is available at: www.grundig-gbs.com/download in the software category.
Welcome
Click on Continue to begin the installation. Accept the license agreement to continue the installation. Afterwards, enter the user information and click on Continue.

Admin Guide Page 36 of 129 Current version: Oct. 2013.
Setup Type
Standard The program is installed with the most common options.
Custom Setup If you select Custom, a dialogue box will appear to select the individual components.
To install the program files to a different installation path, click the Change button. Click on Next once you have finished selecting components.
Setup is now ready to start the actual installation. Click Install to start the installation.

Admin Guide Page 37 of 129 Current version: Oct. 2013.
Finishing the Installation
The software installation is now complete. If you want to connect the newly installed work station with an existing dictation connect, select Connect with Dictation Network. The dictation network configuration wizard starts.
Configuration Wizard
Click Next to continue the installation.

Admin Guide Page 38 of 129 Current version: Oct. 2013.
Select Configuration File
Select the configuration file containing the paths and settings required for the dictation network. When creating the installation template, the default name of the configuration file is netconfig.ini. This is located in the shared network directory.
Attention! The configuration files digtasoft.ini, digtasoftpro.ini or DSSMover.ini are local configuration files from the software program folder. These files allow the software to start without being connected to a dictation network. These are stand-alone installations unable to send dictations via a dictation network.
Note: The names of the configuration files from previous versions of DigtaSoft have different names such as config.ini.

Admin Guide Page 39 of 129 Current version: Oct. 2013.
Completing the Configuration
The DSSMover is now connected to the dictation network. Click Finish to complete the process.
Note: If you later want to connect an existing single work station with a dictation network, select the network configuration wizard from the Tools and Utilities software CD.

Admin Guide Page 40 of 129 Current version: Oct. 2013.
Installing the Digta Configurator To install the Digta Configurator, select Tools and Utilities on the installation start page and click on “Digta Configurator Installation”.
Welcome
Click on Continue to begin the installation. Accept the license agreement to continue the installation. Afterwards, enter the user information and click on Continue.
Setup Type
Standard The program is installed with the most common options.

Admin Guide Page 41 of 129 Current version: Oct. 2013.
Custom Setup If you select Custom, a dialogue box will appear to select the individual components.
To install the program files to a different installation path, click the Change button. Click on Next once you have finished selecting components.
Setup is now ready to start the actual installation. Click Install to start the installation.

Admin Guide Page 42 of 129 Current version: Oct. 2013.
Finishing the Installation
The software installation is now complete. If you want to connect the newly installed work station with an existing dictation connect, select Connect with Dictation Network. The dictation network configuration wizard starts.
Configuration Wizard
Click Continue to continue the installation.

Admin Guide Page 43 of 129 Current version: Oct. 2013.
Select Configuration File
Select the configuration file containing the paths and settings required for the dictation network. When creating the installation template, the default name of the configuration file is netconfig.ini. This is located in the shared network directory.
Attention! The configuration files digtasoft.ini, digtasoftpro.ini or DSSMover.ini are local configuration files from the software program folder. These files allow the software to start without being connected to a dictation network. These are stand-alone installations unable to send dictations via a dictation network.
Note: The names of the configuration files from previous versions of DigtaSoft have different names such as config.ini.

Admin Guide Page 44 of 129 Current version: Oct. 2013.
Completing the Configuration
The Digta Configurator is now connected to the dictation network. Click Finish to complete the process.
Note: If you later want to connect an existing single work station with a dictation network, select the network configuration wizard from the Tools and Utilities software CD.

Admin Guide Page 45 of 129 Current version: Oct. 2013.
Repairing / Changing Software If you have to repair an installation at a single work station, such as when a file has been corrupted, you start the installation from the CD or from the installation template, if available.
After starting the installation, the selected DigtaSoft version presents a dialogue box where you select Repair. The installation on the work station is now repaired.
Software Update If you want to upgrade DigtaSoft or DigtaSoft Pro from a lower version to this one, you will need to uninstall all previous versions including embedded applications. The uninstall function is found under Start > Control Panel > Software. The dictations and the network configuration will be retained.
MSI Installation The Windows Installer (previously Microsoft Installer) is a Windows service which unpacks and executes installation packages with the.msi (Microsoft software installation),.mst (transform files) and.msp (patches) file extensions.

Admin Guide Page 46 of 129 Current version: Oct. 2013.
Custom installation For a custom installation, you enter setup.exe at the command prompt. The following commands can be added:
setup.exe [/ l <Language ID> ] [/ S] [/ v <MsiExecParam1> ] [/ V <MsiExecParam2> ]...
/l Selecting the Installation Language
Language ID
Danish 1030
German 1031
English 1033
Spanish 1034
French 1036
Italian 1040
Dutch 1043
Norwegian 1044
Swedish 1053
/ s Hide initialization dialogue /v parameters for msiexec.exe passed /x start uninstallation
MsiExec parameters The MsiExec parameters are chosen from these:
/q[x] User interface during installation
/q or /qn no user interface /qn+ setup complete message /qb simple user interface /qb + simple interface, setup complete message /qb! simple interface with no cancel option /qr reduced user interface /qf full interface
/l[vx]* <Logfile> generate log file
v verbose x extra debugging information
PROPERTY=value Set value for public properties
Examples:
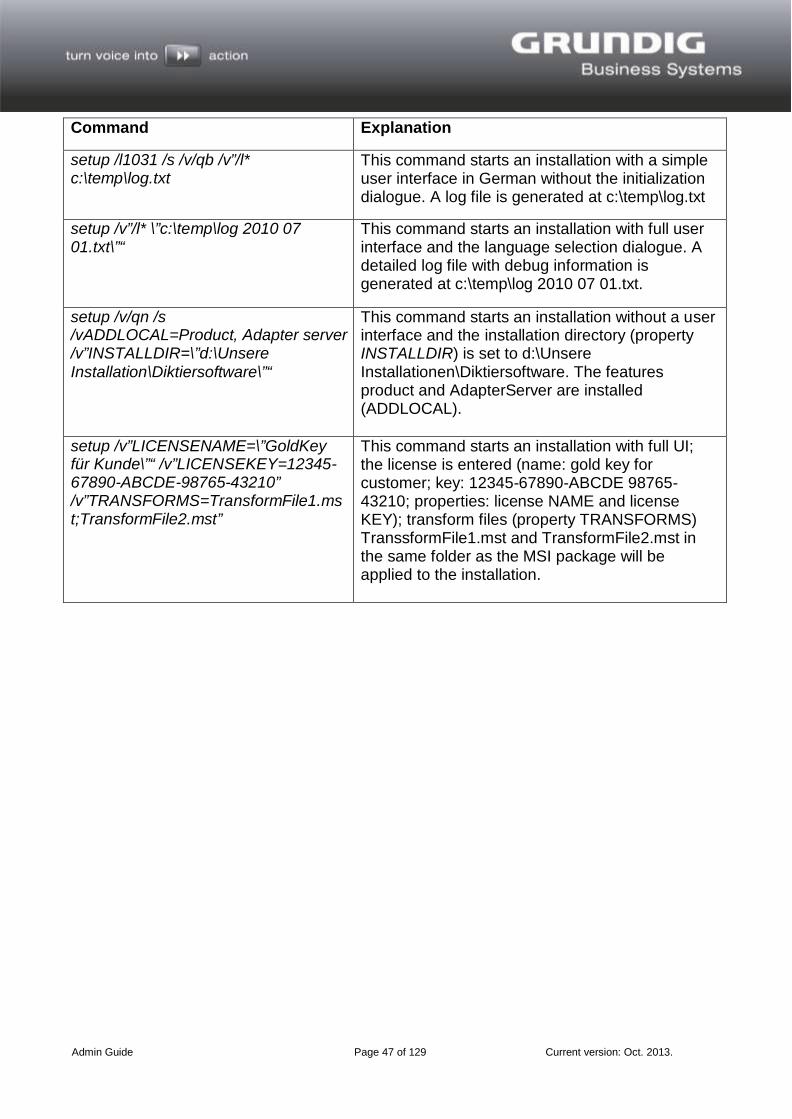
Admin Guide Page 47 of 129 Current version: Oct. 2013.
Command Explanation
setup /l1031 /s /v/qb /v”/l* c:\temp\log.txt
This command starts an installation with a simple user interface in German without the initialization dialogue. A log file is generated at c:\temp\log.txt
setup /v”/l* \”c:\temp\log 2010 07 01.txt\”“
This command starts an installation with full user interface and the language selection dialogue. A detailed log file with debug information is generated at c:\temp\log 2010 07 01.txt.
setup /v/qn /s /vADDLOCAL=Product, Adapter server /v”INSTALLDIR=\”d:\Unsere Installation\Diktiersoftware\”“
This command starts an installation without a user interface and the installation directory (property INSTALLDIR) is set to d:\Unsere Installationen\Diktiersoftware. The features product and AdapterServer are installed (ADDLOCAL).
setup /v”LICENSENAME=\”GoldKey für Kunde\”“ /v”LICENSEKEY=12345- 67890-ABCDE-98765-43210” /v”TRANSFORMS=TransformFile1.ms t;TransformFile2.mst”
This command starts an installation with full UI; the license is entered (name: gold key for customer; key: 12345-67890-ABCDE 98765- 43210; properties: license NAME and license KEY); transform files (property TRANSFORMS) TranssformFile1.mst and TransformFile2.mst in the same folder as the MSI package will be applied to the installation.

Admin Guide Page 48 of 129 Current version: Oct. 2013.
Administrative installation
The installation package is unpacked into a directory (administrative installation point/AIP), from which the client installations are performed. In this case, the default values for properties are adapted for the client installations. The software is not installed.
Command for command setup.exe with parameter /a Examples:
Command Explanation
setup /a /l1031 /s This command starts an administrative installation with German user interface (without the initialization).
setup /a /s /v/qb /v”TARGETDIR=\”d:\AIPFreigabe\”“ /v”DISABLEADVTSHORTCUTS=1”
This commands starts an administrative installation by a simple user interface (without the initialization dialogue). The installation package is unpacked to the d:\AIPFreigabe directory (property TARGETDIR ). When installing the client, normal instead of announced shortcuts are created (property DISABLEADVTSHORTCUTS ).
Application Planning
Only those short-cuts and registry entries required for a complete installation are installed. The installation is performed
by double clicking on the application in the Start menu or desktop icon
when creating a COM object
when opening a file associated with an announced application
Command for command setup.exe with parameter /j
Examples:
Command Explanation
setup /j /l1031 /s This command sets up an application with German user interface (without the initialization dialogue).
setup /j /s /v/qb /v”TRANSFORMS=d:\Anpassungen\Transf orm.mst”
This command sets up an application with a simple user interface (without the initialization dialogue) using the Transform File d:\Anpassungen\Transform.mst (Property
Admin Guide Page 49 of 129 Current version: Oct. 2013.
TRANSFORMS).
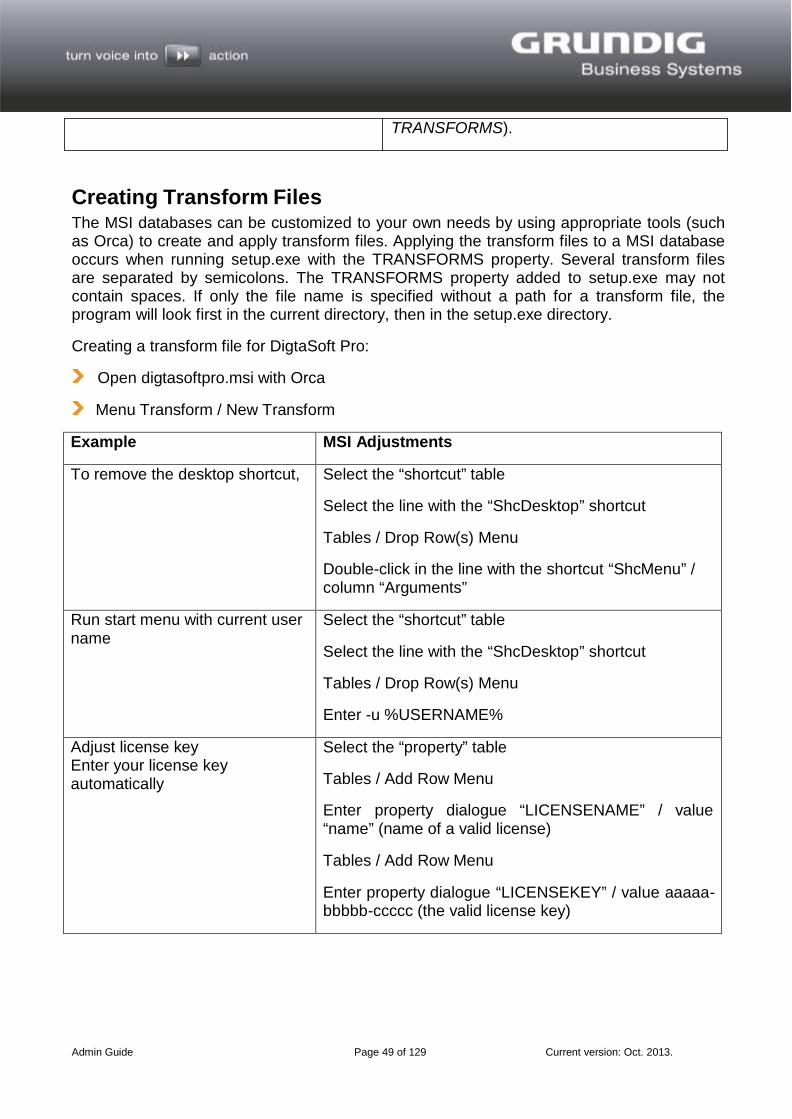
Creating Transform Files The MSI databases can be customized to your own needs by using appropriate tools (such as Orca) to create and apply transform files. Applying the transform files to a MSI database occurs when running setup.exe with the TRANSFORMS property. Several transform files are separated by semicolons. The TRANSFORMS property added to setup.exe may not contain spaces. If only the file name is specified without a path for a transform file, the program will look first in the current directory, then in the setup.exe directory.
Creating a transform file for DigtaSoft Pro:
Open digtasoftpro.msi with Orca
Menu Transform / New Transform
Example MSI Adjustments
To remove the desktop shortcut, Select the “shortcut” table Select the line with the “ShcDesktop” shortcut
Tables / Drop Row(s) Menu
Double-click in the line with the shortcut “ShcMenu” / column “Arguments”
Run start menu with current user name
Select the “shortcut” table Select the line with the “ShcDesktop” shortcut
Tables / Drop Row(s) Menu
Enter -u %USERNAME%
Adjust license key Enter your license key automatically
Select the “property” table Tables / Add Row Menu
Enter property dialogue “LICENSENAME” / value “name” (name of a valid license)
Tables / Add Row Menu
Enter property dialogue “LICENSEKEY” / value aaaaa- bbbbb-ccccc (the valid license key)

Admin Guide Page 50 of 129 Current version: Oct. 2013.
Customize installation path Select the “property” table Tables / Add Row Menu
Enter property dialogue “INSTALLDIR” / value “C:\DigtaSoftPro (desired program directory)
Customize installed features Not installing “AdapterServerConfig” erverConfig” as default
Select the “feature” table Double-click in the line with the feature “AdapterServerConfig” / column “Level”
Enter 32767
Transform menu / Generate Transform... creates transform file
Apply Transform File
setup.exe /v”TRANSFORMS=TransformFile1.mst;TransformFile2.mst”

Admin Guide Page 51 of 129 Current version: Oct. 2013.
DigtaSoft Pro MSI Available Features
Feature (Dialogue Custom Setup ) Feature name
DigtaSoft Product
Sample dictations Samples
Adapter Server Adapter Server
Configuration Utility AdapterServerConfig
Citrix Citrix
WTS WTS
Available Properties
Property Description
INSTALLDIR Installation directory
USERNAME Username (entered in user information dialogue)
COMPANY NAME Company name (entered in user information dialogue)
NETWORK MODE Setting in digtasoft.ini 0 or undefined single work station <> 0 Network operation
SERVERPATH LOCALPATH USERFILE SELECTFILE
Path settings in DigtaSoft.ini Default: Server path = [Common Documents]\Grundig Business Systems\ Local path = [Common Documents]\Grundig Business Systems\ User-ini = [CommonDocuments]\Grundig Business Systems\Users.ini Select-ini = [CommonDocuments]\Grundig Business Systems\Select.ini
CONFIGTEMPLATE Path to existing config.ini from which the settings will be copied valid settings from config.ini add missing xxxPATH/FILE Settings
CONFIGPATH Sets the default value of ini configurations to [CONFIGPATH]\users.ini or [CONFIGPATH]\select.ini valid value adds missing xxxFILE settings
CONFIGFILE Path to netconfig.ini set up in the registry as the global configuration file
LICENSESERVER LICENSETIMEOUT
license settings in DigtaSoft.ini Default: Server = 127.0.0.1 (local licensing) Timeout = 0
LICENSENAME LICENSEKEY
Name / serial number and license key
LICENSEFILE Path to license file (ignored if LICENSENAME and LICENSEKEY are specified)

Admin Guide Page 52 of 129 Current version: Oct. 2013.
DSSMover MSI Available Features
Feature (Dialogue Custom Setup ) Feature name
DSSMover Product
Citrix Citrix
WTS WTS
Available Properties
Property Description
INSTALLDIR Installation directory
USERNAME Username (entered in user information dialogue)
COMPANY NAME Company name (entered in user information dialogue)
SERVERPATH LOCALPATH USERFILE SELECTFILE
Path settings in DigtaSoft.ini Default: Server path = [Common Documents]\Grundig Business Systems\ Local path = [Common Documents]\Grundig Business Systems\ User-ini = [CommonDocuments]\Grundig Business Systems\Users.ini Select-ini = [CommonDocuments]\Grundig Business Systems\Select.ini
CONFIGTEMPLATE Path to existing config.ini from which the settings will be copied valid settings from config.ini add missing xxxPATH/FILE Settings
CONFIGPATH Sets the default value of ini configurations to [CONFIGPATH]\users.ini or [CONFIGPATH]\select.ini valid value adds missing xxxFILE settings
CONFIGFILE Path to netconfig.ini set up in the registry as the global configuration file

Admin Guide Page 53 of 129 Current version: Oct. 2013.
Terminal Server DigtaSoft Pro's terminal server support is characterized by giving the user the same functionality and a similar response behavior on the terminal server as would be possible using a local server on a PC.
Workflow To achieve this functionality, additional data lines will be added to Citrix® XenApp / Presentation Server (ICA data channel) and the Microsoft® Terminal Servers (RDP data channel) in the respective protocols. A data cable is designed for optimal voice recording and voice reproduction. The second data line is responsible for drive mapping and controlling the Grundig hardware.
These data lines must be added to the respective data channel both on the server and the client. On the server, this happens through the installation of DigtaSoft Pro. On the client, an extension must be installed or activated in supported Linux thin clients.
Separate ICA / RDP data channel
Dynamic Drive mapping
The advantages of the use of additional data lines in the data channel are:
optimal sound quality with improved response times for operation
access to dictations without drive mapping
displaying the devices only in Grundig software without displaying in Windows® Explorer (security against data theft)
dictation devices can be subsequently connected to active terminal server sessions.
cost savings through network licensing

Admin Guide Page 54 of 129 Current version: Oct. 2013.
System Requirements
Citr
ix®
Citrix® Server Presentation Server/Xen App
Windows® 2008 Server Windows® 2003 Server Windows® 2000 Server SP4 with Service Rollup 1
• 15 MB RAM per active user • 150 MB free space on hard drive • approx. 30 users with a Quad Core 2.66 MHz
CPU • Audio data bandwidth min. 64 kb per user;
recommended 128 kb per user • Citrix® Presentation Server 3.0 or higher/
XenApp
Windows® Client
See requirements under Windows®
• see Windows® requirements • approx. 1 MB free space on hard driver per
Grundig client • Bandwidths: see Citrix® Presentation Server /
XenApp • Citrix® ICA Client v. 8.0 or higher
Windows® Thin Clients
Windows® 7 Embedded Windows® XP Embedded with SP21
• System performance min. 600 MHz at 128 MB RAM for audio playback and 800 MHz with 256 MB for audio recording; 256 MB recommended
• 1 free USB 1.1 or 2.0 port or serial interface • Bandwidths: see Citrix® Presentation Server /
XenApp • Citrix® ICA Client v. 8.0 or higher
Linux Thin Clients
See list for Linux support
• System performance min. 600 MHz at 128 MB RAM for audio playback and 800 MHz with 256 MB for audio recording; 256 MB recommended
• 1 free USB 1.1 or 2.0 port or serial interface • Bandwidths: see Citrix® Presentation Server /
XenApp

Admin Guide Page 55 of 129 Current version: Oct. 2013.
Win
dow
s® T
erm
inal
Ser
ver
Windows® Terminal Server
Windows® 2008 Server Windows® 2003 Server
• 15 MB RAM per active user • 150 MB free space on hard drive • approx. 30 users with a Quad Core 2.66 MHz
CPU • Audio data bandwidth min. 128 kb per user;
256 MB recommended
Windows® Clients
Windows® 7 Windows Vista Windows XP SP2
• see Windows® requirements • approx. 1 MB free space on hard drive per
Grundig client • 1 free USB 1.1 or 2.0 port or serial interface • Bandwidths: see Windows® Terminal Server • RDP Client Version 5.1 or higher
Windows® Thin Clients
Windows® 7 Embedded Windows® XP Embedded with SP21
• System performance min. 600 MHz at 128 MB RAM for transcription and 800 MHz with 256 MB for dictation; 256 MB recommended
• 1 free USB 1.1 or 2.0 port or serial interface • Bandwidths: see Windows® Terminal Server • RDP Client Version 5.1 or higher
Linux Thin Clients
See list for Linux support
• System performance min. 600 MHz at 128 MB RAM for transcription and 800 MHz with 256 MB for dictation; 256 MB recommended
• 1 free USB 1.1 or 2.0 port or serial interface • Bandwidths: see Windows® Terminal Server
Additional System Requirements:
A free USB 1.1/2.0 port or a serial interface is needed for the Digta Hardware. RS-232 (COM port) with a 9-pin D-Sub (depending on the device; see Supported Hardware)
For transcription hardware (Steno adapter box), an additional Sound Blaster-compatible sound card with 3.5 mm jack
Remarks:
If you use virtual machines (such as Virtual PC, VMware or other), the system requirements as listed in the above table must be guaranteed.
The software runs on 64-bit Windows® operating systems in 32-bit compatibility mode 64-Bit Client for Windows® Terminal Servers with a workaround support (available from our support) or
use 32-bit client operating systems.

Admin Guide Page 56 of 129 Current version: Oct. 2013.
Steps for installation The network license for DigtaSoft Pro can be requested at [email protected].
Installation with Dictation Network Set-Up
Installing a License Management Service
Installing DigtaSoft Pro on a Terminal Server
Installing Data Channels on the Client
How the License Management Service Functions If you organize the licensing of DigtaSoft Pro with the License Management service, you will need the License Management service tool. This consists of two components, a Windows service and the DigtaSoft Pro Server application that manages the licensing. Both components are provided with the installation.
The Windows service will start automatically when the PC is booted up. The DigtaSoft Pro Server application must be separately started one time to grant and manage licenses.
Installing a License Management Tool Select Tools and Utilities on the software DVD and click on Install License Tool.

Admin Guide Page 57 of 129 Current version: Oct. 2013.
The setup window opens. Follow the software instructions (Welcome, License Agreement,...).
Select Custom Installation
DigtaSoft Pro Server must be selected at least; it is recommended that all components be installed.

Admin Guide Page 58 of 129 Current version: Oct. 2013.
Copying starts The activated settings will be displayed in summary. Click on “Install”. The installation process begins.
The following message appears.

Admin Guide Page 59 of 129 Current version: Oct. 2013.
Click on Ask me later.
Enter license key When the installation is complete, click Start > Programs Grundig Business Systems DigtaSoft Pro Server on “License DigtaSoft Pro Server” and enter the License Key.
Starting/stopping the DigtaSoft Pro Server Click on Start All Programs Grundig Business Systems DigtaSoft Pro Server on “Start DigtaSoft Pro Server”. A dialogue window opens. You can see the total number of licenses and those currently in use; you can also terminate the License Management Service by clicking Shut Down.

Admin Guide Page 60 of 129 Current version: Oct. 2013.
Configuring the License Management Service Open the configuration tool for License Management service by clicking Start All programs Grundig Business Systems GbsLicServerCfg.
By default, the DigtaSoft Pro server is enabled, after being started.
With “Use License Server” disabled, the Windows service is started, but no licenses are granted. If you want to activate license management, check the box and then click on the Run button.
Warning! You need a concurrent license key which you can get upon request from Grundig Business Systems Technical Support for free. Keep a receipt for your purchased DigtaSoft Pro licenses handy. Just send an email to [email protected]. You will receive a certificate with the license key in response.

Admin Guide Page 61 of 129 Current version: Oct. 2013.
Installing DigtaSoft Pro on a Terminal Server Installation on a Terminal Server (Citrix® XenApp / Presentation Server or Microsoft® Terminal Servers) is similar to stand-alone installation with subsequent connection to the dictation network.
On the Dictation Software CD, click on the DigtaSoft Pro tab and then click on Install DigtaSoft Pro.

Admin Guide Page 62 of 129 Current version: Oct. 2013.
Welcome
Click on Continue to begin the installation. Accept the license agreement to continue the installation. Afterwards, enter the user information and click on Continue.
Setup Type
For installation on a terminal server, the setup type is set to Custom.
Custom Setup If you select Custom, a dialogue box will appear to select the individual components. Choose which components to install. The default is to install DigtaSoft Pro, Sample

Admin Guide Page 63 of 129 Current version: Oct. 2013.
Dictations and Adapter Server. Click the Help button if you need more information on selecting components.
To install the program files to a different installation path, click the Change button. It is not recommended to change the default installation paths.
If you are installing on a Citrix® or Windows® Terminal Server (WTS) environment, you must select the corresponding feature.
When all the information has been supplied, the installation wizard is ready to begin the actual installation.
Caution: Installation in a Citrix® or Windows® Terminal Server (WTS) environment is only possible with DigtaSoft Pro.

Admin Guide Page 64 of 129 Current version: Oct. 2013.
Ready to install the program
To complete the installation, press Install. If you still want to make changes to the installation settings, click Back. Hitting Cancel will terminate the installation wizard and no installation will be made.
Finishing the Installation
The software installation is now complete. If you would like to connect the newly installed terminal server with an existing dictation network, select Connect with Dictation Network. The dictation network configuration wizard starts.

Admin Guide Page 65 of 129 Current version: Oct. 2013.
Connecting to the dictation network The dictation network configuration wizard starts.
Select Configuration File
Select the configuration file containing the paths and settings required for the dictation network. When creating the installation template, the default name of the configuration file is netconfig.ini. This is located in the shared network directory.

Admin Guide Page 66 of 129 Current version: Oct. 2013.
Attention! The configuration files digtasoft.ini, digtasoftpro.ini or DSSMover.ini are local configuration files from the software program folder. These files allow the software to start without being connected to a dictation network. These are stand-alone installations unable to send dictations via a dictation network.
Note: The names of the configuration files from previous versions of DigtaSoft have different names such as config.ini.
Define the Application Scenario
Now define the application scenario. Since a dictation network is being established, enable dictation network mode. You can now choose if a 4voice with voice recognition connection is to be established or the software is to be installed in its academic edition.

Admin Guide Page 67 of 129 Current version: Oct. 2013.
Licensing Types
The licensing of DigtaSoft Pro on terminal servers is done as network licensing. The license server can be specified with the server name or IP address.
Note: In a test installation on a terminal server, a license server is not required. In this instance, the licensing type would be “stand-alone licensing”. The software can then be tested for 30 days.

Admin Guide Page 68 of 129 Current version: Oct. 2013.
Connecting a Work Station with the Dictation Network
The terminal server is now connected to the dictation network. Click Finish to complete the process.

Admin Guide Page 69 of 129 Current version: Oct. 2013.
Installing DSSMover on the Terminal Server To install DSSMover on the terminal server, select Tools and Utilities on the installation homepage and click on DSSMover.
Welcome
Click on Continue to begin the installation. Accept the license agreement to continue the installation. Afterwards, enter the user information and click on Continue.
Setup Type
For installation on a terminal server, the setup type is set to Custom.

Admin Guide Page 70 of 129 Current version: Oct. 2013.
Custom Setup When you select custom setup, you can choose the dialogue for the terminal server.
To install the program files to a different installation path, click the Change button. After you select the components you want, click Continue.
Setup is now ready to start the actual installation. Click Install to start the installation.
Finishing the Installation
The software installation is now complete. If you would like to connect the newly installed terminal server with an existing dictation network, select Connect with Dictation Network. The dictation network configuration wizard starts.

Admin Guide Page 71 of 129 Current version: Oct. 2013.
Configuration Wizard
Click Continue to continue the installation.
Select Configuration File
Select the configuration file containing the paths and settings required for the dictation network. When creating the installation template, the default name of the configuration file is netconfig.ini. This is located in the shared network directory.
Attention! The configuration files digtasoft.ini, digtasoftpro.ini or DSSMover.ini are local

Admin Guide Page 72 of 129 Current version: Oct. 2013.
configuration files from the software program folder. These files allow the software to start without being connected to a dictation network. These are stand-alone installations unable to send dictations via a dictation network.
Note: The names of the configuration files from previous versions of DigtaSoft have different names such as config.ini.
Completing the Configuration
The DSSMover is now connected to the dictation network. Click Finish to complete the process.
Note: If you later want to connect an existing single work station with a dictation network, select the network configuration wizard from the Tools and Utilities software CD.

Admin Guide Page 73 of 129 Current version: Oct. 2013.
Citrix® client installation
Setup Installation The setup of the Grundig Citrix client must be initially installed on the PC from the software CD. Click in the area Tools and Utilities in Citrix / WTS - Client Installation. Open the Citrix Client folder in the next step and start the installation with the setup.exe file.
Manual Installation The files grummc.dll and gruuacb.dll are to be copied from the CD folder \Terminal Server Clients\Citrix Client\bin to the program folder of the Citrix® ICA client.
In the Modules\ICA3.0registry entry, the values must be entered into the Virtual Driver key. This key contains the list of all the drivers that are loaded when you start the Citrix® client. These have to be extended with either GrundigUACBor GrundigMMC.
Windows Registry Editor Version 5.00
[HKEY_LOCAL_MACHINE\SOFTWARE\Citrix\ICA Client\Engine\Configuration\Advanced\Modules\GrundigMMC] “DriverName”=“Unsupported” “DriverNameWin16”=“Unsupported” “DriverNameWin32”=“GruMMC.dll”
[HKEY_LOCAL_MACHINE\SOFTWARE\Citrix\ICA Client\Engine\Configuration\Advanced\Modules\GrundigUACB] “DriverName”=“Unsupported” “DriverNameWin16”=“Unsupported” “DriverNameWin32”=“GruUACB.dll”
[HKEY_LOCAL_MACHINE\SOFTWARE\Citrix\ICA Client\Engine\Configuration\Advanced\Modules\VirtualDriver] “GrundigMMC”=““ “GrundigUACB”=““
[HKEY_LOCAL_MACHINE\SOFTWARE\Citrix\ICA Client\Engine\Configuration\Advanced\Modules\ICA 3.0] Thinwire3.0,ClientDrive,ClientPrinterQueue,ClientPrinterPort,Clipboard,ClientComm,ClientAudio,LicenseHandler,TWI,ZL_ FONT,ZLC,SmartCard,Multimedia,ICACTL,SSPI,TwainRdr,UserExperience,GrundigUACB,GrundigMMC
Caution: Please verify all of your virtual drivers are listed in the Modules\ICA3.0 entry.

Admin Guide Page 74 of 129 Current version: Oct. 2013.
Windows® Terminal Server Client Installation
Setup Installation The setup of the Grundig Windows Terminal Server Client must be initially installed on the PC from the software CD. Click in the area Tools and Utilities in Citrix / WTS - Client Installation. Open the WTS client folder in the next step and start the installation with the setup.exe file.
Manual Installation The files: Grummc.dll and gruuacb.dll are to be copied from the CD folder \Terminal Server Clients\Citrix Client\bin to the C:\Programme\Grundig Business Systems GmbH\WTS Client folder.
In the registry, the following entries must be added. The accompanying messages can also be copied into a text editor and the file saved as *.reg. This file can then be executed.
Windows Registry Editor Version 5.00
[HKEY_CURRENT_USER\Software\Microsoft\Terminal Server Client\Default\Addins\GrundigMMC] “Name:=“C:\\Programme\\Grundig Business Systems GmbH\\WTS Client\\GruMMC_TS.dll”
[HKEY_CURRENT_USER\Software\Microsoft\Terminal Server Client\Default\Addins\GrundigUACB] “Name:=“C:\\Programme\\Grundig Business Systems GmbH\\WTS Client\\GruUACB_TS.dll”
Warning!
These entries must be performed for each registered user of the computer.
Note:
The accompanying messages can also be copied into a text editor and the file saved as *.reg. Then the entries can be made.

Admin Guide Page 75 of 129 Current version: Oct. 2013.
IGEL thin client configuration
Smart, Compact, Winestra, Premium Citrix® client setting The following settings for Citrix® are to be implemented on the IGEL clients.
Starting the IGEL Setup Utility
The settings are made in the registry under System Registry.
Setting GruMMC “ica” “module” ”VirtualDriver” “GruMMC” “enable”

Admin Guide Page 76 of 129 Current version: Oct. 2013.
Setting GruUACB Enable “ica” “module” “VirtualDriver” “GruUACB” “enable”
Setting alsa mono “devices” “alsa” ”mono”
Setting “Use Software Mixer”

Admin Guide Page 77 of 129 Current version: Oct. 2013.
Enable “devices” “alsa” “use_dmix” “Use Software Mixer”
Setting Use ALSA Emulator ica use_aoss Use ALSA emulator for audio

Admin Guide Page 78 of 129 Current version: Oct. 2013.
Windows® Terminal Server client setting The IGEL clients perform the following settings for Windows® Terminal Server.
Starting the IGEL Setup Utility
The settings are in the registry under System Registry Made
Setting RDP support “Rdp” “winconnect” “plugins” “enable-plugins” “Plugin Support Enable (only Rdesktop)”

Admin Guide Page 79 of 129 Current version: Oct. 2013.
Setting the Grundig MMC Channel “Rdp” “winconnect” “plugins” “GruMMC” “use” “Grundig MMC Channel”
Setting the Grundig UACB Channel “Rdp” “winconnect” “plugins” “GruMMC” “use” “Grundig UACB Channel”

Admin Guide Page 80 of 129 Current version: Oct. 2013.
Setting the RDP Client “rdp” “winconnect” “rdp-client” Select “Rdesktop” from the drop-down menu
Note:
The Grundig RDP extension works only with the Rdesktop RDP client.

.A.dmin Guide Page 81 of129 Current version: Sept.2012.
IGEL UD Series Citrix® client setting The following settings for Citrix® are to be implemented on IGEL clients.
Starting the IGEL Setup Utility
The settings are made in the registry under System Registry.
Setting GruMMC ica modules VirtualDriver GruMMC activate

.A.dmin Guide Page 82 of129 Current version: Sept.2012.
SettingGruUACB ica modules VirtualDriver GruUACB activate

.A.dmin Guide Page 83 of129 Current version: Sept.2012.
Setting Use ALSA Emulator ica use_aoss ALSA emulation for audio use

Admin Guide Page 84 of 129 Current version: Sept. 2012.
Windows® Terminal Server client setting The IGEL clients perform the following settings for Windows® Terminal Server.
Starting the IGEL Setup Utility
The settings are made in the registry under System Registry.
Setting RDP support “Rdp” “winconnect” “plugins” “enable-plugins” “Plugin Support Enable (only Rdesktop)”

.A.dmin Guide Page 85 of129 Current version: Sept.2012.
Setting Grundig MMC Channel Rdp WinConnect p/ugins GruMMC Use Grundig MMC channel
.A.dmin Guide Page 86 of129 Current version: Sept.2012.
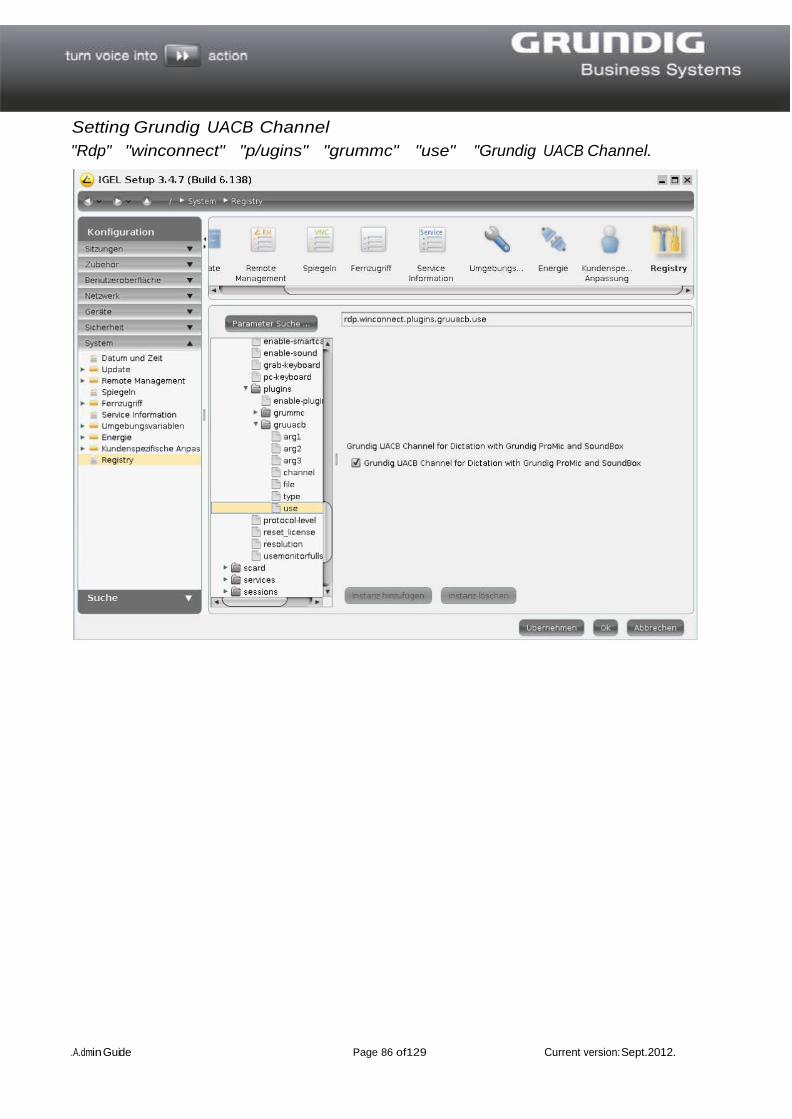
Setting Grundig UACB Channel "Rdp" "winconnect" "p/ugins" "grummc" "use" "Grundig UACB Channel.

Admin Guide Page 87 of 129 Current version: Sept. 2012.
Setting storage devices and USB memory hotplug A USB memory hotplug is to be enabled to use mobile dictation devices on the thin client.
The settings are made in the registry under Devices USB Storage Hotplug.
The number of USB memory hotplug devices must be greater than 1
Note: Virtual drivers by other manufacturers can cause some issues. If you use the virtual driver from Grundig, please make sure that no other virtual driver is in use.

Admin Guide Page 88 of 129 Current version: Sept. 2012.
Administration
NetAdministration The NetAdministration program is available to create and manage users.
This program can be launched directly from the DigtaSoft DVD under Tools and Utilities.
The tool is initially installed locally.
Before finishing the installation, check Connect to the Dictation Network and enter the path to the network configuration file (usually netconfig.ini) and then finish the installation.

Admin Guide Page 89 of 129 Current version: Sept. 2012.
Overview - Administrator

Admin Guide Page 90 of 129 Current version: Sept. 2012.
If you go to the Settings menu, you will find these items:
Network configuration General settings for the dictation network: logkeeping, Windows login, Document Approvals, Deadlines etc.
Dictation types and groups
Specifications for the use of dictation types, groups, and categories
Speech recognition Connectivity for voice recognition DSSMover subfolders workflow
Dictation network-wide custom subfolders for DSSMover
Digta dictation devices Configuration of mobile dictation devices Server and address book Settings to query the LDAP directories (Active Directory,
Novell NDS) Document release Configure document approvals Quality control issues Creating lists of quality control issues Select data lists and data fields
Configure data lists

Admin Guide Page 91 of 129 Current version: Sept. 2012.
Minimum Requirements for New Users
Name The user's name is displayed in the software and on mobile devices.
Speaker ID Either initials or Windows login name (max. 16 characters), the first 4 characters of which are used to create the speaker ID.
User login rights If this option is set, a user can log in to the software. In DigtaSoft Pro for example, a pool is created. This allows shared user names to be assigned to a transcription pool without requiring registration.
Users Designating the user as an author or transcriber will set the start- up options in the software.
Click Apply to save the user.
Create Users There are 3 ways to create users:
manual entry of user data import address book, such as Active Directory using the Create other users button
By using a user template in conjunction with the Import from Address Book function, user entry can be automated. If a user template has been created, the Import from Address Book function can select and set up users by pressing the Next User from Address Book button. Where appropriate, a user ID will also have to be created.
User Management User management is composed of the following points:
Log in
User-selection window In the user selection window you can select which user profile you want to configure or edit.
Personal details
Particulars of the selected user. These can be imported from your address book automatically or pre-populated using a user template.

Admin Guide Page 92 of 129 Current version: Sept. 2012.
Log in This is the ID of the user in the DigtaSoft network. Checking Users Can Log In allows users to log in.
Note: If possible, the user’s Windows login name should be used as the ID.
Email address of the selected user. External users must have an email address entered.
Rights
Access Rights Permission to open a dictation. Only users with equal or higher access rights can open the dictations.
0: No access rights; the user may only open dictations that are not secured 15: Highest rights level; the user may open all secured dictations
Priority
The author can specify the priority with which dictations should be transcribed.
Setting:
User
Author
16: Lowest Priority 1: top priority
If you select Author, the user can create dictations in conjunction with the appropriate dictation devices
Password: To encrypt an author’s dictations (DSSPro), you can define the password.
Transcriber
The user works with its own in-box. Pool as an additional in-box is possible if a typing pool has already been created.
Pool Transcriber
The user is a member of the transcription team which has already been created. A Individual In-box can also be activated.
Create Transcription Pool
The “Create Transcription Pool”“ creates an additional in-box. The transcriber can use the Pool in-box as an additional in-box.

Admin Guide Page 93 of 129 Current version: Sept. 2012.
External Transcription Service
With the “External Transcription Service” button, you can set up an external transcription service to which you can send dictations by email for transcription.
Method
Create transcription service
Grant users the right to send dictations to the external transcription service.
Create transcription service
Enter the details of the transcription service.
Name: enter the name of the transcription service. Reference No: the reference number assigned by the transcription service (e.g. your account number) ID: the transcription service's ID in your dictation system
Email settings
Email address: enter the email address of the transcription service. Subject: here you can enter a default subject to be added to each email to the transcription service; the reference number is always automatically added to the subject. Text: here you can define a default text which the user can edit before sending the dictation if the user has not disabled confirmations before sending.
Prompt when sending
Check here if before sending a dictation a Confirm Send dialogue should be displayed. You then have the option to change the send and email settings.
Now call up those users who will be using the external transcription service and check the box “Use external transcription service” under Rights. Click Apply
Directories Server-Directory The server directory is the global mail directory which houses the in-boxes of individual users in the DigtaSoft network. The directory is usually on a server in order to guarantee access to all users.
In-box A user's in-box is created in the directory server. The name of the in-box is by default based on the user's ID. If you wish to use a different name, this can be entered here. By clicking on the Standard button, the in-box will be named based on the ID. If dictations are sent in the DigtaSoft network, the dictation will be delivered to the recipient's in-box.

Admin Guide Page 94 of 129 Current version: Sept. 2012.
The icon allows you to browse folders. If you do not want to create the in-box in the server directory, you can select the directory here.
Dictation Directory The dictation directory is the local working directory My Dictations. The directory is by default created on the local PC and named Workbox. The icon allows you to browse folders from which you can choose the path for the workbox.
Sent Dictations In this directory, a copy of the dictation is saved after sending. The directory is by default created on the local PC and named Outbox. The icon allows you to browse folders from which you can choose the path for the outbox.
Completed Dictations (DigtaSoft Pro) In the Completed Dictations directory, the dictations marked Complete by the user are archived. The directory is by default created on the local PC and named Archive. (For DigtaSoft Pro) The icon allows you to browse folders from which you can choose the path for the archive.
Note: Windows® XP Storage Path C:\Program Files\Common Files\Grundig Windows® 7 Storage Path C:\Users\Public\Documents\Grundig Business Systems

Admin Guide Page 95 of 129 Current version: Sept. 2012.
Configuring Additional In-boxes (DigtaSoft Pro)
Under user management, go to directories and then in-boxes to configure additional in-boxes.
Add Absolute Path... You can add an arbitrary path as an in-box. Add In-box on Server... You can add an in-box to a DigtaSoft network Delete The selected in-box is removed from the
configuration.
Note: Backup the directories to avoid losing dictations by accidental deletion.
Creating Additional Users Use the Create Additional Users function to set up extra users. To do so, click the Create Additional Users button. In the new dialogue, you can see how many users have already been created and how many more you can add. Select the desired number of users and create them. In the user list, you can now see the new users. These are pre-configured. Select one of the new users and enter the data into the user management.
Note: If a new user starts DigtaSoft / DigtaSoft Pro and un-configured users remain, that user can configure his own name and identification.
Creating a User Template
Creating a User Template To create a user template, it must be done in the NetAdministration program under New User. The user should be created as an author. Name, identification and directories can be chosen arbitrarily. After hitting Apply for the new user, the user Default... must be deleted and NetAdministration closed.

Admin Guide Page 96 of 129 Current version: Sept. 2012.
Note: If you plan to use a user template, this should be created at the beginning of the installation.
User Template Settings The software DigtaSoft / DigtaSoft Pro should now be running. Since only one user exists, the program should start without the ID query. The desired settings can now be selected such as Settings - General Settings. When the settings have been selected, exit the software.
Modifying Paths To assign users personalized paths automatically, re-launch the NetAdministration program. Add $ID$ to the directories. When creating new users $ID$ will automatically be added to the identification entry in the directories.
The entry $ID$ can be used for these directories.
In-box
My Dictations
Sent Dictations
Completed dictations
Note: Absolute or UNC paths can be used.
Copying Templates The users.ini file must be copied to the NetAdministration program folder and renamed usertemplate.ini. Subsequently, the NetAdministration can be restarted and will begin with user setup. The user of the template is not needed and can be deleted.
Creating Users Setting up additional users is analogous to the settings from the user template.
Address Book / LDAP import
Server and Address Book To import users from LDAP directories such as Active Directory or Novell, these settings are necessary.
In NetAdministration Settings Server and Address Book, the basic settings are made to retrieve user information. In addition, the administrator can define the desired attributes from the LDAP.

Admin Guide Page 97 of 129 Current version: Sept. 2012.
Administrator with FODN
Name or ID of LDAP server
Searchpath in LDAP directory Example: OU=Grundig-gbs, DC=test,DC=Local
Depending on LDP-type: Active Directory=sAMAccountName Novell=uid
User name Enter user name and password of an administrator with the FQDN name such as [email protected] .
Incoming mail server (POP3) / Outgoing Server (SMTP) The settings are only needed for the configuration of email and not for the import of users.
Address book server (LDAP) The server address can be specified using the IP or DNS name. You can define and test access to the LDAP directory.
Search base to create the address list If you do not want to import all of your address book entries, you can enter the LDAP directory to be imported.
Author / Transcriber If you do not specify, all entries/people imported will be automatically defined as transcribers.
Define an attribute from the LDAP address book, if you have already defined author or transcriber categories in the LDAP address book. Thus, for an entry to be designated an author, the value must be X. If not specified, then the entry or person will be classified as a transcriber.
If no attribute is set for author/transcriber, all users will be set up as authors.

Admin Guide Page 98 of 129 Current version: Sept. 2012.
Importing Users With the Import from Address Book button, you can access the address book list generated from the LDAP address book from the parameters set under “Server and Address Book”.
If you want to import all users from the address book list, then hit Ctrl+A to select all contacts and press OK. You can select or deselect individual contacts by holding down the Ctrl button and clicking on the users you wish to select. You can also select multiple items in a row by holding the Shift button and then clicking the first and last users in a string to select all users in-between as a group.
After you have marked all users you wish to import, confirm with OK. Then, the first user is taken to the main administrator dialogue. Here, the user settings can be modified. If the Next User from Address List function is selected, the next user copied from the address list will appear in the administrator dialogue and can be edited.
Note: First check whether the information has been correctly mapped from the LDAP Address Book. Otherwise, you will need to adjust the attributes in the Server and Address Book menu accordingly.

Admin Guide Page 99 of 129 Current version: Sept. 2012.
Settings
Network Configuration Enabling Logging When enabled, DigtaSoft Pro logs every action a user takes on dictations. Logging is based on unique IDs (UUIDs) being assigned to each dictation. This name is unique and is valid across the Grundig Business Systems dictation network.
The log data are stored for each dictation in a separate file (syslog.ini) in a separate folder in the ...\_syslog server directory.
Deleting Log Files So that the log directory does not take up unnecessary space, you can configure the number of days after which the files will be automatically deleted. This applies to dictation marked “Completed” or dictations deleted by the author/transcriber.
Note: Since the log files store personal information about individual users (e.g., time of last modification or opening), the legal use of logging in the respective company must be examined.
In statistical analyses with DigtaStatistics, please check before activating the auto delete function if the log files are required for the evaluation.
Enabling Document Approval You can enable the workflow for document approval here. When document approval is enabled, the automatic deletion of the associated log files can also be enabled. This will prevent the log files taking up disk space unnecessarily.
Setting Deadlines Automatically The menu item Automatic Deadlines can be used to determine whether deadlines should be set for new dictations with or without priority. Once a deadline has been set automatically by Digta Soft Pro, it can no longer be removed from the accompanying note, only changed.
Automatic Deadlines For new dictations without priority X days
If, for example a value of 5 is entered here, then all new dictations, where no priority is assigned, will be assigned a deadline of five days from the current date. At the same time, all dictations in the dictation list will be marked with the symbol.

Admin Guide Page 100 of 129 Current version: Sept. 2012.
Automatic Deadlines For new dictations with priority X days Here you can specify the date by which (or how many days) a new dictation, with an assigned priority, is to be done.
Deadline Monitoring
The symbol designates all dictations that must be done on that day.
The symbol indicates that only x days remain before the deadline. Here, the value (number of days) from the Automatic Deadlines for New Dictations without Priority is used.
The symbol designates all dictations whose deadline has passed.
The symbol designates all dictations that have more days for processing than given in the “Automatic Deadlines for New Dictations without Priority” menu.
All dictations without deadline have no icon in the dictation list.
Using Windows Log-in When you start the DigtaSoft application, the Identification field is pre-set with the Windows login name of the current user.
Allowing Configuration of Mobile Dictation Devices This setting allows DigtaSoft Pro users to configure mobile dictation devices. This setting applies to all users; individual users or user groups cannot be excluded.
Using Quality Control Issues This setting allows DigtaSoft Pro users to enter a reason in the CLOSE DICTATION dialogue box. Setting the reasons is done in the NetAdministration program by selecting Quality Control Issues
Reasons can be specified for both transcribers and authors which will appear in the CLOSE DICTATION dialogue window based on user profile.

Admin Guide Page 101 of 129 Current version: Sept. 2012.
Dictation Types, Groups and Categories Here, dictation types known to the dictation system (such as letter, fax, memo), user groups or categories can be defined. These values can also be transferred to the handheld Digta digital dictation devices.
Dictation Types Creating a new dictation type
To create a new dictation type, type its name in the Enter Dictation Type field and hit Apply.
Deleting a dictation type
To delete an existing dictation type, select from the list of dictation types and click Delete.

Admin Guide Page 102 of 129 Current version: Sept. 2012.
Selecting a Document Template Each dictation type can be assigned a document template (such as for Microsoft Word - *.dot). If a dictation assigned to a corresponding dictation type is opened by the transcriber (e.g. with DigtaSoft), a new document is in the appropriate template is automatically created.
To select a document template for a dictation type, proceed as follows:
Select the dictation type from list of all dictation types
Select the template by selecting the button and finding the appropriate Microsoft Word Template (*. dot file) on your network or your local directories. Confirm the dialogue by clicking on Open
Deleting a Template To delete a template assignment, first select the dictation type from the list of dictation types. Then press the button.
Note: The dictation Digta 4010 and 4015 only allow 10 dictation types.
Groups
Creating a new group To create a new group, enter the name of the new group in the Enter Group field and save by hitting Apply.
Delete Group
To delete an existing group, select from the list of groups and click Delete.
Note: The dictation Digta 4010 and 4015 only allow 10 groups
Category
Creating a new category To create a new category, enter the name of the new category in the Enter Category field and save by hitting Apply.
Delete Category
To delete an existing category, select from the list of categories the item to delete and select the button Delete.
Note: Categories are supported by Digta 7 and the software and can be named freely. To configure the category for Digta 7, the Digta Configurator must be used.

Admin Guide Page 103 of 129 Current version: Sept. 2012.
Speech Recognition SpeaKING Configuration If you have installed SpeaKING, you will find the Adapted Users and Vocabularies from which you can choose:
Under Adapted Users, you can choose the SpeaKING profile of the speaker who
recorded the dictation. Select the Vocabulary that best fits the content of the dictation. SpeaKING is a
server-based offline speech recognition program and works like a transcriber:
You send the dictation to speech recognition. The speech recognition recognizes the dictation and generates a corresponding text
file. You can continue to work during the recognition. The dictation and the text file is then returned to you (or another designated
recipient).
Note: For information on how to set up and manage adapted users and vocabularies, please refer to the manual for SpeaKING speech recognition. The administrator will set up SpeaKING speech recognition in DigtaSoft.

Admin Guide Page 104 of 129 Current version: Sept. 2012.
4voice Configuration Here 4Voice system adapted users and their vocabularies can be selected.
Choose your users to properly recognize their dictations.
Under Speech Recognition In-Box select the speech recognition in-box. The dictations will be copied from the DigtaSoft application to this folder when the dictations are sent to speech recognition.
Confirm your settings by clicking OK.
Note: The complete documentation for establishing a 4voice speech recognition server is available as a separate document for download online.
All available documentation can be found at: http://www.grundig-gbs.com/de/download

Admin Guide Page 105 of 129 Current version: Sept. 2012.
Subfolders for DSSMover Workflow In Digta 7 Series dictation devices, up to six individually named subfolders can be created. The creation of the subfolder is done in Digta Configurator for each dictation device.
If dictations recorded to the device’s unique folder are supposed to be automatically transferred in the dictation network by DSSMover, subfolders for the DSSMover must be set up at this point.
Any number of subfolders can be created.
Note: Subfolders that are created here are available throughout the dictation network. If you want to limit distribution of dictations from subfolders to specific work stations, then these subfolders must be manually created on the work station’s DSSMover.

Admin Guide Page 106 of 129 Current version: Sept. 2012.
Digta Dictation Machine Configure Here you can change the settings of the Dictation Note in the dictation device. The dictation device must be connected and turned on in PC mode.
Note: The settings can also be carried out in DigtaSoft or DigtaSoft Pro under Configuration.
Once you have selected the desired configuration, you can transfer them to the device by clicking on the Send to Dictation Device (MMC/SD).
Note: Here you can select only existing entries. The user, dictation types and groups are created and managed by the NetAdministration program.

Admin Guide Page 107 of 129 Current version: Sept. 2012.
Configuring Authors You can configure 20 authors with different settings for transcriber, dictation, group no./code and priority.
Add an author Click on the dropdown box Select author.... to access the list of preconfigured authors. Select the authors you want to add to the list of authors.
Selecting the default author
Click to select an author in the author list, and then click Standard....
Deleting an author Select an author in the author list, click on Delete or just hit the delete button on the keyboard.
Configuring an author Transcriber, dictation type, group need to be included in the relevant list and can then be set as the Standard... for the selected author
The identification and the name are uploaded to the digital dictation device. The device then uses the first four letters of the ID to generate the initial characters of the titles assigned to new dictations. Stationary dictation devices will show the full name instead.
Note: Not all dictation devices support multiple authors. Please refer to the manual of your dictation device for further information.
Transcriber, Dictation Type, Group After transferring, the entries listed for transcriber, dictation type and group will be available for selection on the dictation device.
The authors can be assigned to the entries in the list for transcriber, dictation type and group.
Note: To configure categories for Digta 7, the Digta Configurator must be used.
Admin Guide Page 108 of 129 Current version: Sept. 2012.
Transcriber You can configure up to 20 different transcribers..
Dictation type You can configure up to 20 different types of dictation (fax, letter, etc.).
Group You can configure up to 20 different groups (for
example, purchasing, development, etc.).
Adding a profile to the device
Click on the drop box for transcriber, dictation type or group where entries will be pre-populated. Select an entry to apply it to the list below.
Setting an author Select an author from the author list by clicking and select an entry in the list for transcriber, dictation type or group and then click Standard... below the list or double-click an entry in the list.
Deleting an entry Select an entry in the list for transcriber, dictation type or group then click Delete or use the delete button on the keyboard.
Note: The entries in the list box and the list can come from the configuration program or from the connected portable dictation device. If you delete an item from the list, the entry is removed from all the authors as well.

Admin Guide Page 109 of 129 Current version: Sept. 2012.
Digta Firmware The administrator has the option of performing (semi)automatic Digta firmware updates within the dictation network.
With initial installation of the DigtaSoft software with Digta update routine within the dictation network, the file update.ini is created in the server path of the _FWUpdate folder. In addition, firmware subfolders are created. These include the firmware files included on the installation CD. The subfolders are named after the Digta type (\GH4010 and \GH4015).
The update.ini file is used as follows:
In the dictation network, each user with an updateable dictation device receives a message from the software at the next login. This alerts the user to the new firmware and describes how this should be uploaded to the dictation device. The user can choose whether to receive this message again at the next login (Yes or No).
Answer Yes
No changes to the fileupdate.ini
Answer No Entry of user ID and then Turn off notification = 1 in the file update.ini
When installed, the file is empty.
The administrator can later replace the firmware in the _FWUpdate folder with current versions from www.grundig-gbs.com.
Delete update.ini content
All network users will get a notification
Change update.ini content If individual users have changed the value for Turn off notification = 0 or have deleted the individual entry, the selected users will receive a new notification.

Admin Guide Page 110 of 129 Current version: Sept. 2012.
Document Approvals In addition to supporting the dictation workflow, DigtaSoft Pro also supports the document approval / review process.
Document Approval Process This process is designed for one or more persons (such as the author) to approve written document(s) prepared from a dictation. The accuracy of content is thus confirmed by the respective responsible persons.
Creating the Dictation The dictation created by the author is sent to the transcriber.
Transcribing the Dictation The transcriber transcribes the dictation and creates a written document.
Document Approval: Begin Once the transcriber has finished the transcriptions and sets the status to Complete, the document approval dialogue begins, thus ending the dictation workflow and starting the document approval process.
Document Approval: Status 1 The transcriber selects approval status 1 (or another designation chosen by the administrator) and the user (author) who will be involved in the next stage of approving the document.
Note: Document Release If a user is next in line in the approval process, a dialogue box will appear with the message that a document is ready to be approved (if such notifications have been enabled). If the notifications are not enabled, the user can also view the current approval status in the dictation list. For this, the Document Information must be displayed in the dictation list.
Granting Approval The user (author) can examine the document and then pass it on to further approvals or grant final approval by selecting the appropriate option in the document approval dialogue. The document can be opened by double clicking on the dictation with the default word processor. Alternatively, a right-click on the context menu on the dictation and selecting View Document can open the document.
Document Approval: End If more users are more involved in the document approval process, the process is repeated from “Status 1” above until final approval has been granted.

Admin Guide Page 111 of 129 Current version: Sept. 2012.
Note: The number of users involved and the number of approvals required to release a final document depends entirely on the particular organization. There are up to ten layers of approval possible which can be customized with the appropriate terminology.
Setting Up Document Approval To set up document approval, the following settings must be made.
NetAdministration Settings The settings for enabling document approval applies to all users in a dictation network. The settings are made in the NetAdministration program.
Settings Network Configuration Enable document approval
Settings Document Sharing.
Sets approval statuses, number and designations
User Settings The active notification for approval of pending documents can be performed in DigtaSoft Pro for each user.
Settings > General Settings > Notifications,

Admin Guide Page 112 of 129 Current version: Sept. 2012.
Quality Control Issues Quality control issues entered here can be used for continuous improvement processes (CIP).
Users of DigtaSoft Pro can enter quality control issue in the CLOSE DICTATION dialogue window.
The following steps are necessary to enable this function:
Creating possible quality control issues
Creating a list of potential quality control issues can be done in the tool under Net Administration Settings Quality Control Issues
Quality control issues are set by user type: authors and transcribers each have their own lists of issues to select from. The issues will appear in the CLOSE DICTATION dialogue box.
Activating the function
Settings NetworkConfiguration Enable quality control issues
Evaluation
Grundig Business Systems does not currently offer a tool to analyze the data collected under this function. The issues are logged, however, in the syslog folder.

Admin Guide Page 113 of 129 Current version: Sept. 2012.
Selecting Data Lists and Data Fields With DigtaSoft 5.0, the NetAdministration is now able to create data lists which can be automatically transferred to the dictation devices with DSSMover:
Preparatory measures
Create a central folder for data lists and templates using Windows Explorer. As a location, we recommend a new folder in the directory of the dictation network.
Create a CSV file and save the file in this folder.
The CSV file can have any name, for example radiology.csv. (When transferring to the Digta 7, the DSSMover renames the file into the required file name format IDs.csv.)
If possible, the structure of the CSV file should already align with the final CSV files.
If the column names are displayed in the data list, they should be clear.
To use this feature, you must have installed NetAdministration and DSSMover from
version 5.
Configuration In the NetAdministration, run the configuration menu from Settings > Data Lists and Data Fields.
Select the Central Folder for Data Lists and Conversion Templates.
Click Upload Data List (CSV file). The content of a data set will be displayed in the table.
Clicking Yes/No in the menu column Show In Data List determines whether the data field will be included in the data list transferred to the device.
Clicking Yes/No in the menu column Show Field Name determines whether the field name will be added before the field content (for example “Name: Miller” instead of just “Miller”.)
By clicking on the Move Up/Down will set the order the columns will be transferred to the device.

Admin Guide Page 114 of 129 Current version: Sept. 2012.
With the button Create Test Data List (CSV file)... a CSV file can be generated with to test the set configuration
This test file is only used to check that all data is displayed in Digta 7 as planned.
The test file should be saved as IDs.csv in the System folder of the Digta 7.
A test file is not mandatory.
With Save Conversion Template the configuration will be stored as a template. It will be stored as an INI file and will automatically be applied to all new CSV files with the same name.
Important: The conversion template must have the same name as the corresponding CSV file (in the example: radiology.ini ) and must also be saved in the central folder for data lists and conversion templates.
Hint: It is not possible to reload a template to modify it later. The settings will have to be modified in full and then the file resaved.
In the table Assign Author and Data List specifies which author receives which data list.
The Data List field lists all available data.

Admin Guide Page 115 of 129 Current version: Sept. 2012.
Final Measures With a Digta 7 should now be checked whether the data lists are automatically being transferred via DSSMover. This means that an author has to be available on the Digta 7 to whom a data list in the Assign Author and Data List table can be assigned.
If required, additional data lists can be configured with different names. (such internalmed.csv, orthopaedics.csv, etc.)
Additionally or alternatively, the limit of records for specific departments may also done with the Group Filter in the Central Digta Configurator. This has the advantage that only one CSV file must be generated from the leading system.
All authors who are to work with data lists in a dictation network are to be assigned a data list.
For current CSV files, the administrator should, if possible, use Windows Task Manager or Crown Jobs to save data lists automatically with the specified name in the central folder for data lists and conversion templates.
Using data lists The practical application is now totally automated. There is no manual intervention by author or administrator required!
Note:
Once a dictation device is connected to the PC and is recognized by DSSMover, DSSMover will check for a current data list for the author in the central folder for data lists and conversion templates. If so, it will be automatically renamed ids.csv and transferred to the Digta 7. If a new data list was created and an author assigned to it, DSSMover will have to be restarted.

Admin Guide Page 116 of 129 Current version: Sept. 2012.
DSSMover The DSSMover transfers dictations automatically from the dictation device:
recipients as stated in the dictation notes;
specified folders
In its standard configuration, the DSSMover monitors the dictation device’s drive. If it finds dictations with valid author or transcriber IDs in the dictation notes, the dictations are then automatically sent to the appropriate in-boxes.
Note: The DSSMover is disabled when the dictation software is started.
Configuration General
Right-click the icon in the task bar Configuration or
Double-click on in the task bar.

Admin Guide Page 117 of 129 Current version: Sept. 2012.
General
Dictation drive (MMC/SD):
Here you can select the dictation drive.
Cyclical query: seconds If you enable this option, the DSSMover queries the
source path at the set intervals. If the DSS source path is not available - for example, because the dictation device is not connected - the icon in the
taskbar turns red:
Allow parallel operation with DigtaSoft Pro. Confirmation Required if parallel operation is detected
If the DSSMover is active when DigtaSoft Pro is open, you can enable this feature. However, you cannot then access the dictations in the device with DigtaSoft Pro. Once you start both programs, the DSSMover asks for confirmation of parallel operation.
Logoff dictation device (MMC/SD) automatically after transmission!
After transmission of the dictations in your device, the device is automatically logged off and can be disconnected from the PC.
Suppress “Send” dialogue (function is ignored by some email clients ignored)
Show accompanying note for each dictation before sending
The send dialogues of the email client will not be displayed when you send dictations by email; the dictations are sent directly. This feature is not supported by all email clients. Before transferring the dictations, the dictation notes with their information are displayed. Changes can be made to the dictation information before sending and the note can also contain a message to the dictation recipient. With the button, the dictation can be played; this function is not available in terminal server mode. For more information on dictation notes, see DigtaSoft Pro Help.

Admin Guide Page 118 of 129 Current version: Sept. 2012.
Acknowledgement during transfer
Display Progress on Dictation Device (MMC/SD)
The transfer is indicated by a progress bar, which disappears after the transfer again.
Beep after transmission is finished
The successful transfer of dictations is communicated with a beep.
Confirmation by transmission is finished
Once the DSSMover has finished the transfer, a notification window appears.
Backup Copy Create backup copy All dictations are copied regardless of the settings in
the dictation device’s folders.
In-box of author from DSS header
The copies of dictations are created in the author’s in-box.
Outbox of author from DSS header
The copies of dictations are created in the author’s Sent Dictations.
Folders The copies of dictations are created in the selected
folder. The options are: Preserve folder structure Keep only the last 100 dictations
Backup When Sending via Email
Create backup copy All dictations are copied regardless of the settings in the dictation device’s folders.
Email Interface MAPI The dictations are sent by a MAPI-compatible
software (such as Outlook)
SMTP For SMTP, the data for the outgoing mail server must be entered.

Admin Guide Page 119 of 129 Current version: Sept. 2012.
DSS configuration
Choose which folder you want to configure – the DSS folder and its subfolders A to F are available. Each folder can be configured differently. The setting can also be applied to all folders.
General
Enable If you uncheck the box, the selected folder will not be
used.
Keep source file Dictations are not deleted. Undeleted dictations reduce the space on your dictation device. The space will only be freed if you delete the dictation by hand.
Delete source file Dictations are deleted after sending.
Source Path... The source path is always the dictation drive and its
subdirectories.

Admin Guide Page 120 of 129 Current version: Sept. 2012.
Send via network
Destination Path... Directory in which the DSSMover copied the dictations. The default settings are “Transcriber from DSS header” with new dictations transferred to the in-box of the transcriber named in the dictation note.
“Reset” (Destination Path) If a destination path is entered, it can be deleted by
choosing “Reset”. You can choose in advance whether you want to reset “Author from DSS header” or “Transcriber from DSS header”.
Export Exporting to WAV
The dictations are converted to the selected WAV format and sent. The pull-down menu can be used to set the WAV format in which the dictations should be converted (such as 44 kHz for speech recognition).
Dictation Only Only the dictation without information in WAV format
is converted and sent.
Accompanying Note: XML format
The dictation note is exported in XML format. This is to provide data from the dictation accompanying note for other applications.
Other file formats File extensions Choose which other file formats to be transferred from
the recorder.
Target Path Enter the folder where the other file formats WAV and MP3 are to be transferred.
Send via email
Send via email if network connection is interrupted
If the dictation is not available, dictations are sent to the client.
File extensions Choose which data types on the dictation device
should be sent by email. If you select *.dss, *.ds2, you can also select “Recipient from the DSS header”. The dictations are then sent to the transcriber’s email address set in the dictation device. The e-mail address is created or changed in Net Administration for each user.
Preferred recipient For e-mail delivery, the desired recipients are

Admin Guide Page 121 of 129 Current version: Sept. 2012.
entered.
Dictation Machines from Other Manufacturers
Enable If you uncheck the box, the selected folder is not
used.
Sending over network Directory to which the DSSMover copied the dictations.
Send via email For e-mail delivery, the desired recipients are
entered.
Creating Individual Subfolders On Digta 7 Series devices, individually named subfolders can be created in the DSS root directory. Subfolders are created in Digta Configurator. These must be set up so that the DSSMover can transfer these dictations and recognize the correct folders.
Folders can be created in DSSMover centrally or locally for the entire dictation network. Central folder creation is described in NetAdministration.
The subfolders can be created in DSSMover by right clicking on “DSS”. “New Folder Rule” appears underlined in blue. You can now name the subfolders.
Folders A through F and the centrally created folder cannot be deleted.

Admin Guide Page 122 of 129 Current version: Sept. 2012.
Activating DSSMover When the DSSMover icon appears in red in the taskbar appears, right-click it to open the DSSMover properties menu. Then click Enable. If “Enable” is not available, DSSMover is already enabled active. Instead, “Disable” will be displayed. The DSSMover icon may be red because:
If a dictation software is active, the DSSMover cannot be enabled, so that the DSSMover cannot remove the dictations from the dictation program.
If the DSS source path is not available, perhaps because the dictation device is not connected, the icon in the task bar also turns red.
DSSMover in Action
If the DSSMover performs an action, the icon in the task bar appears with an hourglass:
The DSSMover executes the selected action:
when the program starts. when the menu item “Update” menu, right-click Select. when in “Query all... Seconds “ set time has elapsed. when you attach a dictation device.
Transferring dictations
If you want to use the DSSMover, no dictation software may be active. Connect the dictation device via the USB cable to the PC. Turn on the dictation device or switch to PC mode with the “ON/OFF” button.
The dictations are then transferred according to your settings.
Note:
During data transmission, the red recording indicator on the dictation device blinks. Always follow the instructions for safe file transfer via USB.
Dictations Not Transferred Deferred dictations Deferred dictations, i.e. unfinished dictations are not usually transferred by DSSMover.
Manually changed dictations Dictations that changed on the PC (for example, by changes in the dictation note in the dictation device) are not automatically transferred by DSSMover.
Already transmitted dictations Dictations that have already been transferred are not transferred. This is only the case if you have selected Keep Source File in settings.

Admin Guide Page 123 of 129 Current version: Sept. 2012.
Log File In the log file you can read error messages and also all successful transactions:
Click the right mouse button on the icon in the taskbar. Click Log file.
Sources of Failed Transfers
If DSSMover is running in standard mode and it cannot assign a dictation to a transcriber entry, this dictation will not be transferred
Source or destination path does not exist. The destination path is not writeable. Dictations are reset. Dictations have been changed manually. Dictations were already transferred.
Notes for secure file transfer via USB Connect the dictation device which is turned off. Unplug the USB connection only using the
icon in the taskbar (Windows® 2000 and later), otherwise the transfer may not be complete and may encounter file errors.

Admin Guide Page 124 of 129 Current version: Sept. 2012.
Administrative files from DigtaSoft
netconfig.ini The file specifies the following when the DigtaSoft program starts up:
the path to the administrative files the path to the mailbox directory hardware configuration and local settings
users.ini The main configuration file for the DigtaSoft products. All users using the same users.ini are participants are in the same Grundig dictation network.
users sections always begin with the user ID in brackets. The most important route in each user segment is the path to the user's in-box
(MAIL_PATH). The path is relative to the Server Email Directory, the global mail path. This entry shares with the software of other network participants the directory where the user can send files.
select.ini Here you will find the categories to which the user can assign dictations.
Dictation types in [WORK_TYPE] Groups in [GROUP]
update.ini Here you will find entries for the users who were notified of their software, that there is a firmware update for their Digta. The entries begin with the user ID in brackets. Users have either
performed the update or rejected another notification: Turn off notification=1 postponed the update and wish another notification: Turn off notification=0 Users without an entry - if they use DigtaSoft software with this feature – are also
notified; equals Turn off notification=0

Admin Guide Page 125 of 129 Current version: Sept. 2012.
Notes / Tips and Tricks
Keyboard Shortcuts To navigate the DigtaSoft software you can use the following keyboard shortcuts.
Keyboard shortcut Feature Ctrl + C Copy to clipboard Ctrl + D Listen to dictation start Ctrl + I Listen to info Ctrl + N Create new dictation
(only for authors) Ctrl + O Open dictation and play back Ctrl + S Save file as Ctrl + V Paste from the clipboard F2 Rename file F5 Refresh Del Delete Ctrl + Insert Copy to clipboard Shift + Insert Paste from the clipboard Ctrl + Tab Open next directory
Note: Not all described functions are always available. This depends on the characteristics of the program, the user (author or typist), the currently active part of the program and the Windows default settings.

Admin Guide Page 126 of 129 Current version: Sept. 2012.
Switches and command line parameters Beginning the DigtaSoft software products, the following command-line switches and parameters.
Switch <Parameter> Importance
-u <login> Login as user
-f <file> Open the file. The last command line input before any “switch” is interpreted as a file name.
with complete path: in the specified path without path: in the dictation directory
i. Imports a DSS file to the dictation directory before the player (and text editor) are started. This switch is used in combination with the switch-f.
-toff Suppresses the use of standard text editing program, regardless of the preferences of the user.
-c <config.ini > Uses the config.ini file instead of the default local configuration file to launch alternative configuration options.
rec- Create or open a recording file
with the complete path with -f switch: Create or open in the specified path
without a complete path with -f switch: Create or open in the dictation directory
no filename: File is created in the dictation directory. The file name is generated automatically according to the usual conventions.
-boff The dictation note is not opened when recording new files, regardless of the preferences of the user.

Admin Guide Page 127 of 129 Current version: Sept. 2012.
-autoclose Automatically ends the program with limited workflow after closing the dictation:
No Info1 when exiting the recorder No exit dialogue No sending or next dictation
This switch may be combined with switch -autocloseapp.
-autocloseapp Automatic termination of the program, as well as:
No Info1 when exiting the recorder No next dictation
This switch may be combined with switch -autoclose.
-minimized The application starts and remains minimized when it receives a new file (can also be useful for a second instance). In combination with the settings, the application can always be the priority.
-L Program starts with this language, if it is installed. 0x07 = DE = German, 0x09 = EN = English (U.S.) 0x0C = FR = French - Standard 0x0A = ES = Spanish - Standard 0x10 = IT = Italian - Standard 0x13 = NL = Dutch 0x06 = DA = Danish 0x14 = NO = Norwegian - Bokmål 0x1D = SW = Swedish.
-Xml Storing the dictation note information in an XML file with the same name.
Note: Switch can begin with - or /.

Admin Guide Page 128 of 129 Current version: Sept. 2012.
Removable Disk Grundig portable dictation devices register as removable disks when connected to computers. Dictations can also be transferred to the PC with conventional card readers or Grundig SD (built-in) 4240.
Popup Window When connecting a portable dictation device to a USB port opens an Explorer popup- window with the stored dictations. This can be disruptive and cannot be directly switched off in Windows. An experienced user can change this behavior by modifying the registry.
Windows® XP “Start -> Run” application “regedit”. The corresponding registry key is
for all users: HKEY_USERS\Default\Software\Microsoft\Windows\CurrentVersion\Policies\Explorer\ NoDriveTypeAutoRun.
for the active user: HKEY_CURRENT_USER\Software\Microsoft\Windows\CurrentVersion\Policies\Expl orer\NoDriveTypeAutoRun
Windows® 7 “Gpedit.ms” - “Computer Configuration” - “Administrative Templates” - “Windows Components” - “Guidelines for automatic playback”
“Turn off Autoplay” disabled “Auto Playback” disabled “Autorun” disabled

Admin Guide Page 129 of 129 Current version: Sept. 2012.
Trademark Notice: Microsoft, Encarta, MSN, and Windows are either registered trademarks or trademarks of Microsoft Corporation in the United States and / or other countries. All other trademarks are the property of their respective owners.
Note:s Read the instructions carefully!
Improper use can result in the loss of dictations or dictations. Make absolutely sure that equipment and components from moisture (rain, water splashes) are protected and do not put them in close proximity to a radiator or in direct sunlight. For damages resulting from improper handling, the manufacturer assumes no guarantee. Do not clean with a dry or slightly damp cloth. Do not use chemical cleaners.
The product complies with EC directives >> 89/336/CEE, 72/23/CEE, 93/68/CEE << Errors and omissions exempted.
FAQs A collection of FAQs can be found at http://www.grundig-gbs.com/faq
Service and Support Technical Support (contact) Technical support from Grundig Business Systems will assist you with questions about installing and configuring the software.
Grundig Business Systems GmbH Technical Support Weiherstrasse 10 95448 Bayreuth, Germany Email:[email protected] Website: www.grundig-gbs.com
Call back service: You can select any pay hotline and want to call you? Call back request under www.grundig-gbs.com/rueckruf
Installation Service: To install your dictation from a Grundig Business Systems partner or employee and configure it? Please contact your Grundig Business Systems sales representative or the service hotline 09001 201212 (€0.99/min)