18 Benefits of Digital Signage - Using Digital Signage in Business
Digital Signage SystemUser Guide
CONTENTS
1 Introduction 3 OVERVIEW 3 UNDERSTANDING DIGITAL SIGNAGE 4 CONVENTIONS USED IN THIS QUICK START GUIDE 42 Getting started 5 UNPACKING CHECKLIST 5 INSTALLATION OF THE THE UCVIEW DIGITAL SIGNAGE PLAYER 5 THE UCVIEW CLIENT INSTALLER 63 Setting up your DDS network 7 DIGITAL SIGNAGE PLAYER SETUP USING THE UCVIEW PORTAL 7 CREATE A NEW DISPLAY IN A LOCATION 9 CREATING AND MANAGING A DISPLAY GROUP 13 CREATING AND MANAGING LAYOUTS 164 Content distribution & management 22 CREATING AND MANAGING CAMPAIGNS 22 CREATING NEW AD (WITHIN A CAMPAIGN) 24 MANAGING PLAYLISTS 32 THE EDITOR 345 Security and permissions 36 MANAGING DEPARTMENTS AND USERS 36 CREATING USERS IN A SELECTED DEPARTMENT 39 MY SETTINGS 416 Managing alerts 42 GLOBAL ALERTS 42 CREATING A NEW ALERT 42 ACTIVATE AN ALERT 437 Reports 44 CREATE NEW REPORT CRITERIA 44 CREATE A NEW REPORT 45 REPORT A PROBLEM 468 Reference 48 DIGITAL SIGNAGE MEDIA TYPES 48 Picture formats 48 Video formats 49 DIGITAL SIGNAGE LAYOUT OVERVIEW 50 TECHNICAL SUPPORT 51 WARRANTY POLICY 51
2
Introduction
OVERVIEW
The UCView Digital Signage is an integrated hardware and software solution that provides powerful and scalable digital signage network capabilities to any market. The system features the ability to control displays across Wide Area Networks at anytime, from anywhere. The UCView system is calable, supporting anywhere from one to thousands of displays. Using the web-based administration interface (UCView Portal), you can confi gure and manage your screens to modify operation times, adjust schedules, and cre-ate and manage display layouts. Additional features include:
• Combined hardware and software solution. • Reliable technology for fast delivery and continuous operation. • Modular infrastructure allowing unlimited expansion. • Straightforward installation without the need of complicated IT or fi re-
wall confi gurations. • Easy content scheduling and updating for each display. • Restart and update your players remotely. • Control your digital content distribution from a web-based centralized
management interface portal, without the need for local software in-stallation.
• Control access permissions for all users. Allow administrators and adver-tisers control over scheduling and management of content on any part of the signage network, a group of displays, a single display or even a section of a display. You may also block users from pushing content to displays without administrator approval.
• Reach different target audiences simultaneously by delivering separate schedules for each display in your network. Schedule different ad cam-paigns to different displays and locations in the network.
• Deliver rich media including: Live TV, video, Flash media, Power Point presentations, audio, RSS feeds, web pages, text and live tickers of news, weather, emergency statements and more.
• Transfer schedules and content to one or a group of display(s). • Remotely design display layouts, control and monitor display activities. • Schedule monitor operation hours and power on/off times for the dis-
play at the location or individual displays.
1
3
• Redundant self-diagnostics to maintain operation. • Remotely report on system-status memory and system utilization. • Large corporate security protocols do not need to be changed to utilize
the UCView Digital Signage Network.
UNDERSTANDING DIGITAL SIGNAGE
Digital Signage solutions have made a big impact on countless organizations and will grow exponentially during the next decade. Signage has changed the way organizations deliver important messages to target audiences, from customers to employees. A fl exible, dynamic and instantly updatable digital signage network allows businesses to replace costly, time and resource-con-suming print media. Digital signage, as related to in this manual includes: LCD, CRT and plasma displays, digital signage billboards and rear projection displays.
Marketing and advertising budgets are turning their focus to this new, tech-nologically advanced advertising medium. Retail led the way with the fi rst digital signage networks, creating a more informative, targeted and visually stimulating shopping experience for their customers. Other markets soon followed suit, including: Government, education, fi nance, health care and transportation.
The relationship between your network infrastructure, installation of displays and scheduling of effective content is paramount to a successful digital sig-nage network. Proper planning of the network combined with audience relevant content guarantee a winning campaign.
CONVENTIONS USED IN THIS USER GUIDE
• Instructions for physical installation are shown in numbered lists (1., 2., 3…).
• Instructions for using the online tool are displayed blue. • Menu items and buttons that are clicked are in BLUE and ALL CAPS.• The word “content” includes any advertisement, information, or alert
displayed on screen.• Color-coded arrowheads () appear next to instruction list items and
the corresponding positions on screen shots, making it easy to locate the items referred to in the instructions.
• Digital versions of this manual include links to every chapter and sec-tion within the manual. Sections are shown on page and referred to in gray all-caps. Clicking any section reference within a section will take you to the section referred to. Clicking on any chapter or section listed in the Table of contents page will take you directly to that chapter or section in the manual. This symbol indicates an additional tip you should refer to while using the
UCView System. 4
Getting started
UNPACKING CHECKLIST
Thank you for purchasing UCView Digital Signage. Match the items on the list below with the items in the UCView Media Player box.
1. One (1) UCView Media Player2. One (1) AC power cord3. Accessories
INSTALLATION OF THE UCVIEW DIGITAL SIGNAGE PLAYER
1. Connect the AC power cord to the UCView Player and then to a 120V power outlet.
2. If you are connecting the player to a wired network, connect a CAT5 Ethernet cable from your network switch or router to the Ethernet port on the back of your UCView player.
3. If you are connecting the player to a wireless network and your player is equipped with a wireless network card, please attach a keyboard and mouse to the player’s serial ports and then confi gure the wireless con-nection. Check with your computer’s operating system for instructions on setting up a wireless network.
4. Connect the player’s video connection (VGA, DVI, or HDMI depending on model) to the display’s connection port. The UCView player accepts plasma, LCD and CRT monitors as well as various types of projectors. Check with your technical support representative for allowable types of displays.
5. Turn on your display.6. Press the Power button located on the front of the player. After the play-
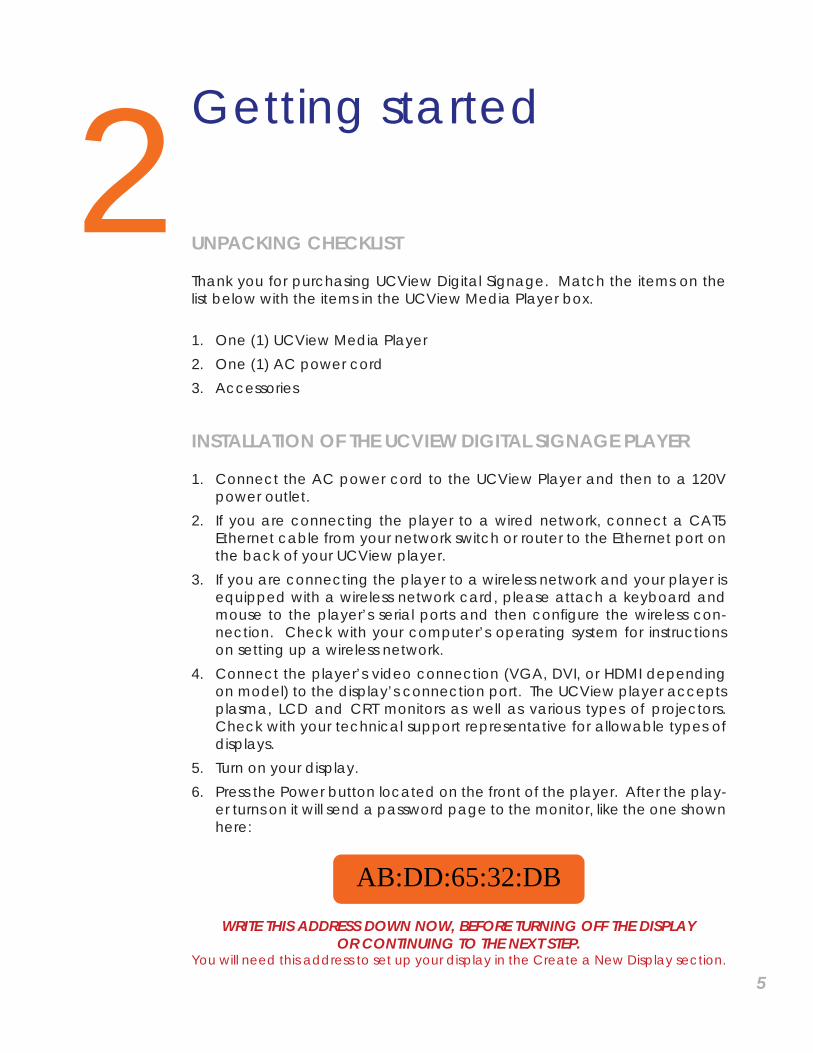
er turns on it will send a password page to the monitor, like the one shown here:
AB:DD:65:32:DB WRITE THIS ADDRESS DOWN NOW, BEFORE TURNING OFF THE DISPLAY
OR CONTINUING TO THE NEXT STEP. You will need this address to set up your display in the Create a New Display section.
2
5
THE UCVIEW CLIENT INSTALLER
If you are using your own player(s), you will need to install the UCView Client on your player(s) to operate your digital signage.
Click the DOWNLOAD CLIENT INSTALLER link under the SUPPORT menu.
Click SAVE from the download pop up window. An application named “UCViewInstaller.msi” will appear on your desktop.
Note: You must have Microsoft’s .NET Framework Version 1.1 installed on your computer prior to installing the UCView Client. The codec is available on line at http://www.cccp-project.net.
Click the UCViewInstaller.msi shortcut.
If you are running internet security software, Click RUN on the pop-up menu.
SERVER: If you are using the UCView Hosted Solution, leave the Server text box blank. Otherwise, enter the address for the server you are hosting your content on.
LIVE TV: If you are running live TV on your signage, click the Live TV capture card driver check box.
A recommended fi le folder destination for the UCView Client will display on screen. If you would like to use a different location, enter it in the FOLDER text box.
INSTALL UCVIEW FOR YOURSELF, OR FOR ANYONE WHO USES THIS COM-PUTER: Click the appropriate radio button.
Click NEXT to install the UCView Client.
Please continue to the next chapter to set up your fi rst location.
6
Setting up a DDS network DIGITAL SIGNAGE PLAYER SETUP USING THE UCVIEW PORTAL
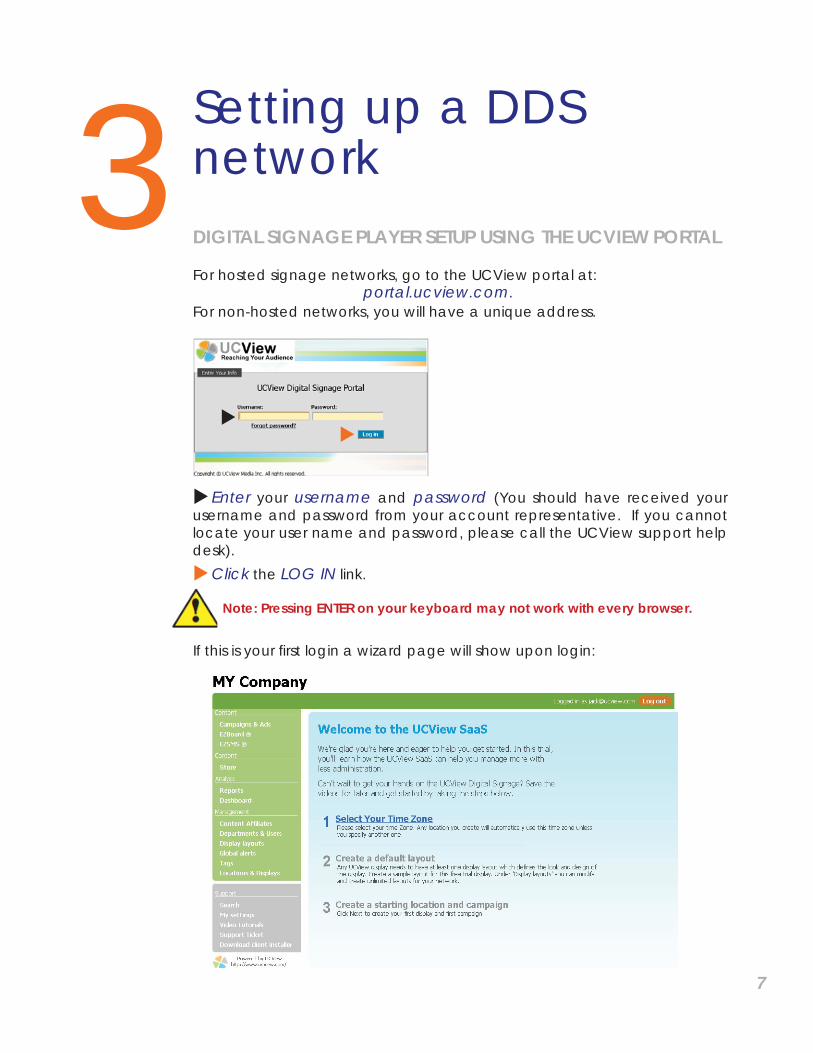
For hosted signage networks, go to the UCView portal at: portal.ucview.com.For non-hosted networks, you will have a unique address.
Enter your username and password (You should have received your username and password from your account representative. If you cannot locate your user name and password, please call the UCView support help desk).Click the LOG IN link.
Note: Pressing ENTER on your keyboard may not work with every browser.
If this is your fi rst login a wizard page will show upon login:
3
7
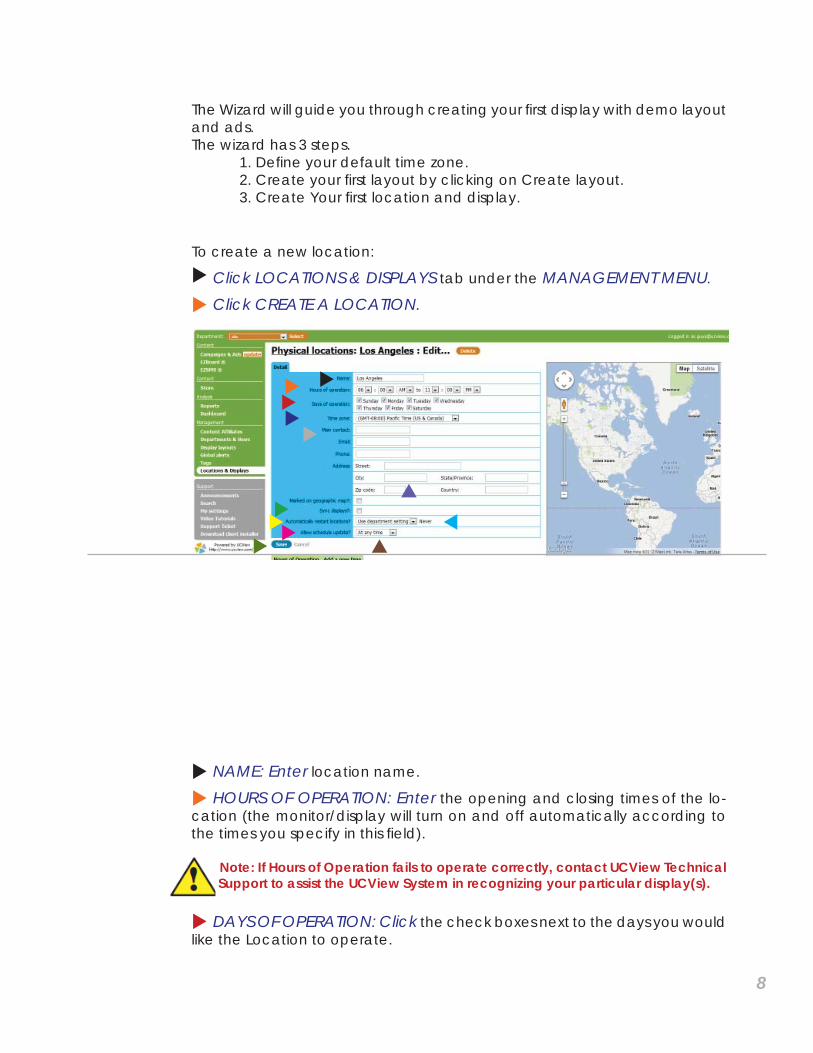
The Wizard will guide you through creating your fi rst display with demo layout and ads.The wizard has 3 steps. 1. Defi ne your default time zone. 2. Create your fi rst layout by clicking on Create layout. 3. Create Your fi rst location and display.
To create a new location: Click LOCATIONS & DISPLAYS tab under the MANAGEMENT MENU.
Click CREATE A LOCATION.
NAME: Enter location name.
HOURS OF OPERATION: Enter the opening and closing times of the lo-cation (the monitor/display will turn on and off automatically according to the times you specify in this fi eld).
Note: If Hours of Operation fails to operate correctly, contact UCView Technical Support to assist the UCView System in recognizing your particular display(s).
DAYS OF OPERATION: Click the check boxes next to the days you would like the Location to operate.
8
TIME ZONE: Enter the time zone of the location.
The MAIN CONTACT, E-MAIL, PHONE and ADDRESS fields are used to keep track of your client’s information for this location. If you are the end-user you do not need to fi ll in these fi elds.
SYNC DISPLAYS: Check this box to synchronize the content delivered to multiple displays at this location. When selected, all displays will play video and audio at exactly the same time. To avoid potential display and audio problems, this box should be selected only when advised by your UCView account or technical support representative.
AUTOMATICALLY RESTART LOCATIONS?: The default setting is USE LO-CATION SETTING: and Never. If you turn your signage off once a day/week, leave the setting at Never. If your system runs 24 hours a day, we rec-ommend restarting the system to clear system errors and allow the operating system to run reliably. To change this setting:
Select EVERY: from the drop down list. If you select Every from the drop down list, insert the number of hours your ad will be playing. Choose from ei-ther (Only between or at any time). If you insert Only between, you will need to input a range of hours your ad will play between.
HOURS: Enter the number of hours BETWEEN automatic start ups. The de-fault setting is AT ANY TIME. To restart the system during non-peak hours (or any time that you like), Select ONLY BETWEEN: from the drop down list and enter the range of hours in the accompanying boxes.
Mark on Geographic map : Click here to mark the location on google map
ALLOW SCHEDULE UPDATES: The UCView System allows you to create and upload new content and schedule its display either instantaneously or at any time of day (for instance, after business hours). The default setting is AT ANY TIME, meaning your schedules are updated instantaneously. If you would like to schedule updates within a specifi c time frame:
Select ONLY BETWEEN: from the drop down list and enter the hours in the drop down lists that appear on screen.
Click SAVE.
CREATE A NEW DISPLAY IN A LOCATION
Note: Do this step only after you have created a location.
From the LOCATIONS & DISPLAYS link under the MANAGEMENT MENU: Click the name of the location you just created. If you have created more than one location already, Click the location you would like to add a display to.Click ADD A DISPLAY.
9
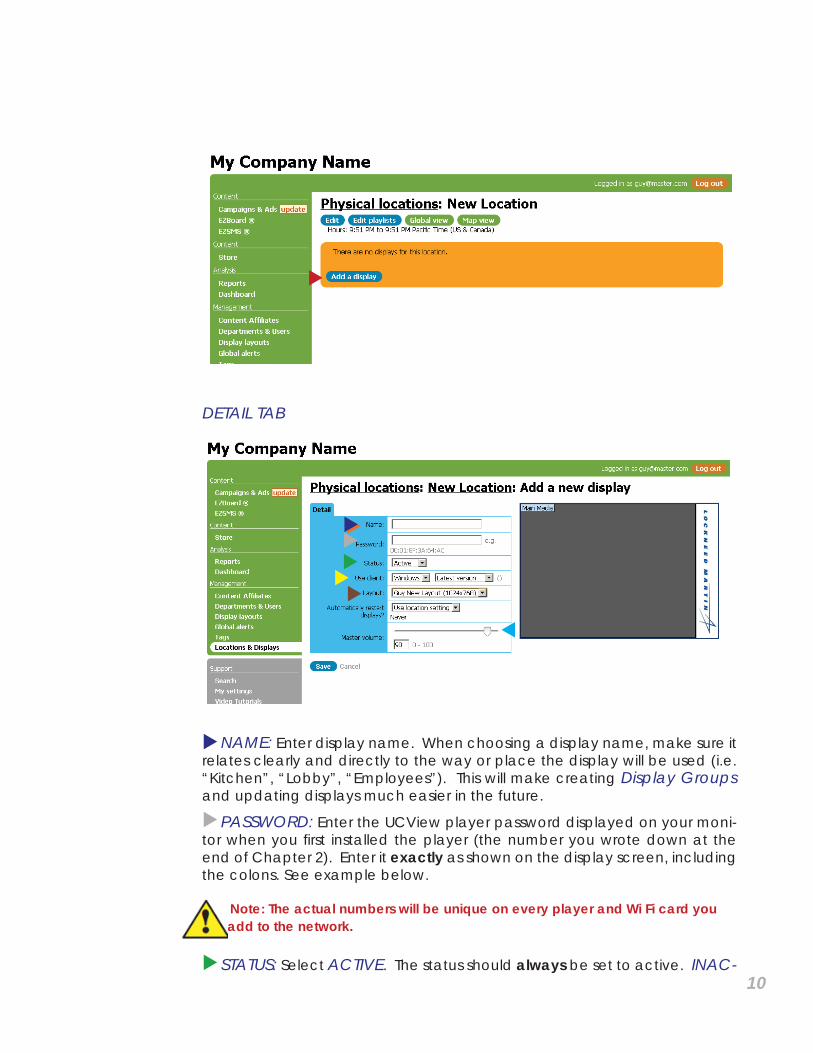
DETAIL TAB
NAME: Enter display name. When choosing a display name, make sure it relates clearly and directly to the way or place the display will be used (i.e. “Kitchen”, “Lobby”, “Employees”). This will make creating Display Groups and updating displays much easier in the future.
PASSWORD: Enter the UCView player password displayed on your moni-tor when you fi rst installed the player (the number you wrote down at the end of Chapter 2). Enter it exactly as shown on the display screen, including the colons. See example below.
Note: The actual numbers will be unique on every player and Wi Fi card you add to the network.
STATUS: Select ACTIVE. The status should always be set to active. INAC-10
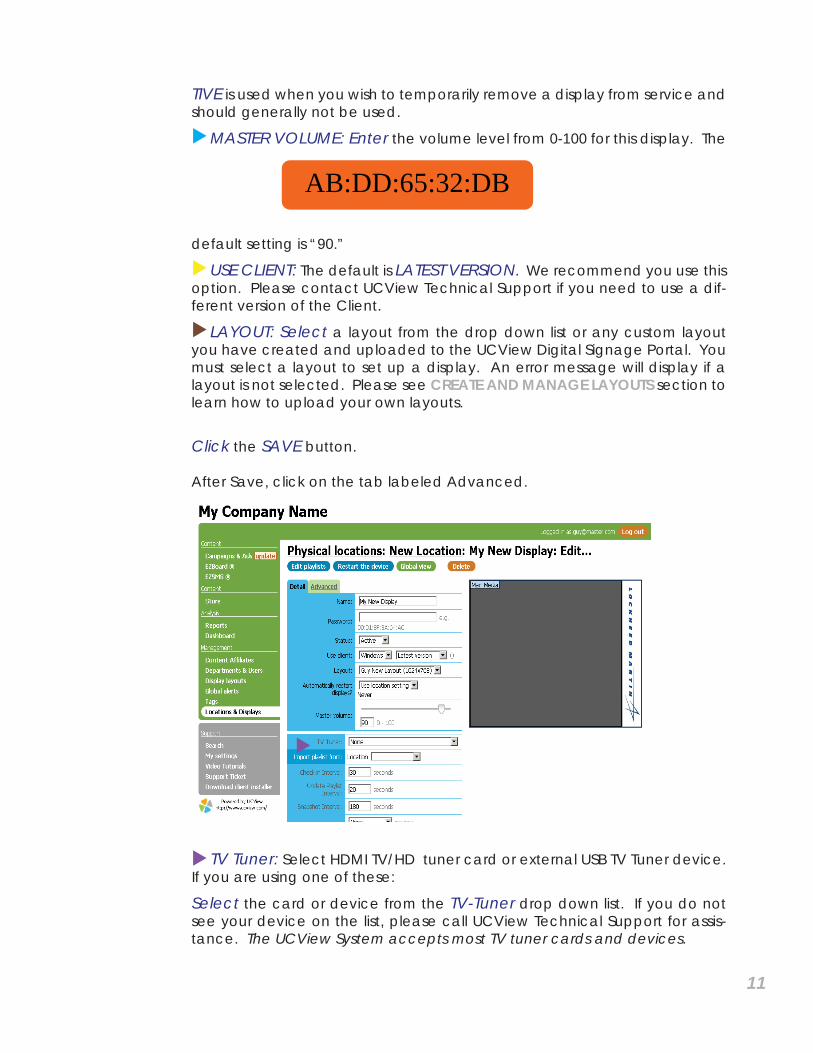
TIVE is used when you wish to temporarily remove a display from service and should generally not be used.
MASTER VOLUME: Enter the volume level from 0-100 for this display. The
default setting is “90.”
USE CLIENT: The default is LATEST VERSION. We recommend you use this option. Please contact UCView Technical Support if you need to use a dif-ferent version of the Client.
LAYOUT: Select a layout from the drop down list or any custom layout you have created and uploaded to the UCView Digital Signage Portal. You must select a layout to set up a display. An error message will display if a layout is not selected. Please see CREATE AND MANAGE LAYOUTS section to learn how to upload your own layouts.
Click the SAVE button.
After Save, click on the tab labeled Advanced.
TV Tuner: Select HDMI TV/HD tuner card or external USB TV Tuner device. If you are using one of these:
Select the card or device from the TV-Tuner drop down list. If you do not see your device on the list, please call UCView Technical Support for assis-tance. The UCView System accepts most TV tuner cards and devices.
11
AB:DD:65:32:DB

Show Mouse Cursor: Check this box if you want the mouse cursor to appear on the screen during player operation.
Monitor Number: If you are using multi monitor environment, this fea-ture allows you to defi ne the monitor UCView Player will be playing on. By default UCView client will play on the main screen and utilize all monitors defi ned by the operating system.
Target Audience: Check this box to activate Intel AIM technology for audience measurment.
Interactive Screen: Check this box to activate remote control API on the player. This feature allows you to control player directly through device or API calls.
RS232: Rs232 is a cable that connects from a player to a display. It commands the display to turn on/off, or can check the status of the display. GPS: Check this box if you have a GPS antenna connected to your player. The GPS module allows you to control and activate the playlist depending on player GPS location.
Maximum Bandwith (kbs): Select the maximum bandwith this player will utilze during downloads.
Import Playlist: This dropdown menu allows you to copy playlist from another player on your network, simply select the location and the display to copy from and press save.
Check in Interval: Enter the duration in seconds between the check-in report, the player will perform with the server.
Update playlist Interval: Enter the duration in seconds between check-ing for new playlist updates.
Snapshot Interval: Enter the duration in seconds between snapshot sent from player to the server.
INTERACTIVE DISPLAY: Click the check box if this display is being used with touch screen or cellular phone interaction capabilities.
If you do not have a layout, select Default layout for now. Once you have your
12
layouts uploaded, return to this section and follow the LAYOUT step to add it to your display.
You should now see the layout on the screen:
AUTOMATICALLY RESTART DISPLAY: Choosing this option will restart this player only and overrides the Location setting. In most circumstances we recommend using the Location setting. If you should need to start a display at a different time than the Location setting:
Select EVERY from the drop down list.
HOURS: Enter the number of hours BETWEEN automatic start ups. The default setting is AT ANY TIME. To restart the system during non-peak hours (or any time that you like):
Select ONLY BETWEEN: from the drop down list and enter the range of hours in the accompanying boxes.
DIAGNOSTIC TAB also appears on this page, under the SAVE and CAN-CEL buttons. The UCView Digital Media Player sends self-diagnostic informa-tion to these fi elds for user inspection. The user does not need to enter any information in these fi elds.
Click the SAVE button.
Repeat this procedure for every display you are installing at this location.
13
Across the top of this page are four buttons:
These buttons are generally used AFTER you have set up your location.
EDIT PLAYLIST: Click this button to edit the playlist for this specifi c display. To edit play lists for a Display Group, go to MANAGING DISPLAY GROUP section of this manual. For additional information on editing play lists, go to MANAG-ING PLAYLISTS section of this manual.
RESTART THE DEVICE: Click this button to remotely restart the player for this display. The media player can also be restarted on site by clicking the Re-start button on the faceplate.
Global View: Click this button to display a live screen image from the dis-play. This is an excellent way to check any error messages on the display.
DELETE: Click to delete the current display from the network.
Note: For any design questions please call a UCView Digital signage specialist.
CREATE A NEW DISPLAY GROUP
A display group is created to send content to one display, a number of dis-plays, or to every display in your network. Groups can also share content in one location or between several locations. This enables you to distribute campaigns to specifi c display(s), such as the front lobby of a hotel or be-tween lobbies in multiple hotels. Displays in other areas of the hotel (or ho-tels) can be added to display groups according to the content and sched-uling needed for those areas.
Additionally, each display may belong to multiple display groups, allowing simple distribution of multiple campaigns to the same display. Each display group can be administered by different users (such as advertising agents) and controlled by the Digital Signage Network administrator. To learn how campaigns are controlled between different displays and locations, please see CREATING AND MANAGING CAMPAIGNS.
To create a new display group:
Click the LOCATIONS AND DISPLAYS menu tab.
Click DISPLAY GROUPS link.
14
Click CREATE A DISPLAY GROUP.
In the Display Group screen:
NAME: Enter the name of your display group. Display group names should clearly refer to the way or location the display will be used (i.e. “Kitch-en”, “Lobby”, “Employees”). This will make creating other display groups and updating displays in each group much easier.
HOURS OF OPERATION: Enter the hours of operation the group will re-main active. This section should be set to the longest hours of operation for any display in the group (i.e. one display is on 24 hours a day and the rest are on 7AM to 7PM, choose 12 AM to 12AM from the drop down lists for each display.)
DAYS OF OPERATION: Enter the number of days the group will remain active. The default is every day. To make sure content plays on displays regardless of each display’s days of operation, leave this fi eld set to default or to the days of operation of the display with the longest days of operation.
Click SAVE.
15
Note: Setting up the hours of operation in this module overrides hours of opera-tion set at the Locations and Displays module if the group’s hours of operation are less than the Location’s hours of operation.
The screen will switch to the PHYSICAL LOCATIONS page.
Now it is time to add displays to your group.
MANAGING DISPLAY GROUPS
From either the PHYSICAL LOCATIONS page or the LOCATIONS & DIS-PLAYS main menu:
Click the DISPLAY GROUPS link.
Click the name of the display group you wish to edit. If you have not assigned any displays to the group you are editing (or, you are editing the group you just created) listed you will see this message: “There are no displays for this location.”
Otherwise, you will see a list of displays currently assigned to the display group.
To add or delete displays included in this display group:
Click EDIT DISPLAY LIST. A complete list of all displays in your network will appear, divided into locations they are assigned to (location names are in bold). The displays in the group you are editing have green check marks in their check boxes and are highlighted in orange.
Click one or more of the checked boxes to remove displays from the dis-play group.
16
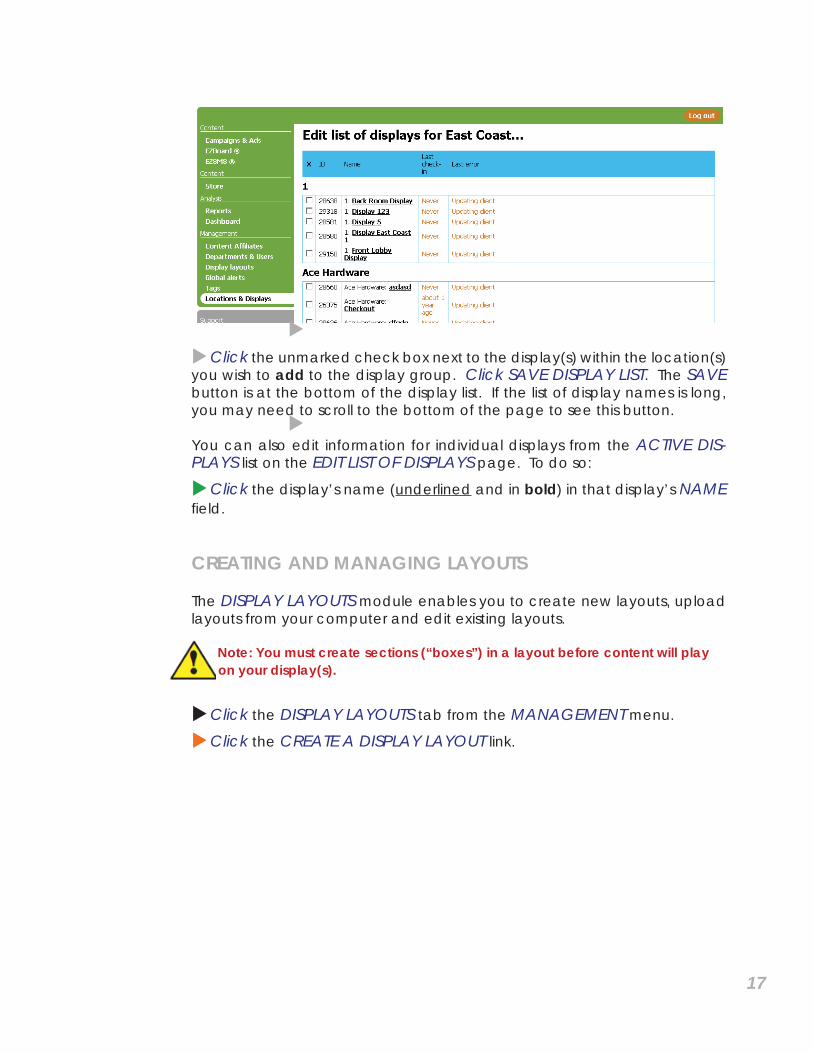
Click the unmarked check box next to the display(s) within the location(s) you wish to add to the display group. Click SAVE DISPLAY LIST. The SAVE button is at the bottom of the display list. If the list of display names is long, you may need to scroll to the bottom of the page to see this button.
You can also edit information for individual displays from the ACTIVE DIS-PLAYS list on the EDIT LIST OF DISPLAYS page. To do so:
Click the display’s name (underlined and in bold) in that display’s NAME fi eld.
CREATING AND MANAGING LAYOUTS
The DISPLAY LAYOUTS module enables you to create new layouts, upload layouts from your computer and edit existing layouts.
Note: You must create sections (“boxes”) in a layout before content will play on your display(s).
Click the DISPLAY LAYOUTS tab from the MANAGEMENT menu.
Click the CREATE A DISPLAY LAYOUT link.
17
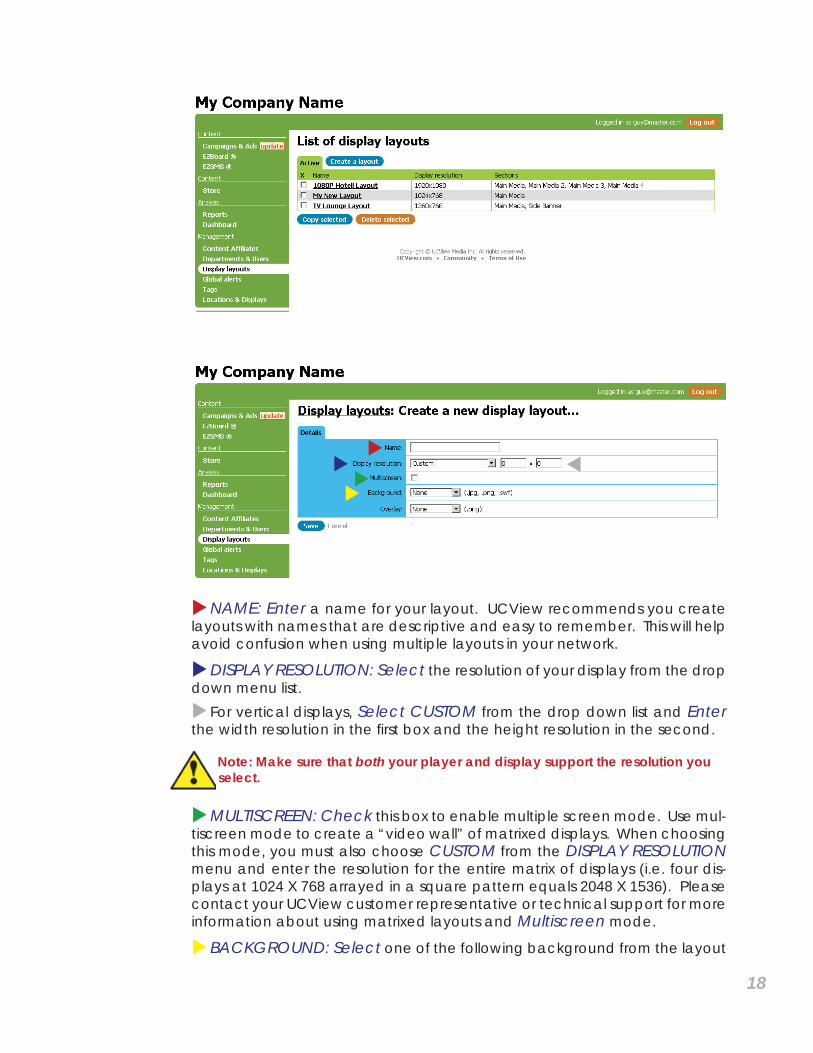
NAME: Enter a name for your layout. UCView recommends you create layouts with names that are descriptive and easy to remember. This will help avoid confusion when using multiple layouts in your network.
DISPLAY RESOLUTION: Select the resolution of your display from the drop down menu list. For vertical displays, Select CUSTOM from the drop down list and Enter the width resolution in the fi rst box and the height resolution in the second.
Note: Make sure that both your player and display support the resolution you select.
MULTISCREEN: Check this box to enable multiple screen mode. Use mul-tiscreen mode to create a “video wall” of matrixed displays. When choosing this mode, you must also choose CUSTOM from the DISPLAY RESOLUTION menu and enter the resolution for the entire matrix of displays (i.e. four dis-plays at 1024 X 768 arrayed in a square pattern equals 2048 X 1536). Please contact your UCView customer representative or technical support for more information about using matrixed layouts and Multiscreen mode.
BACKGROUND: Select one of the following background from the layout
18
listed in the drop down list.
To keep the background blank:
• Select NONE from the drop down list. If you select NONE and have a previously uploaded background, you will need to upload that image again to restore it at a future date. See “To upload a new background” below for instructions.
To use the existing background:
• Select KEEP EXISTING from the drop down list.
To upload a new background:
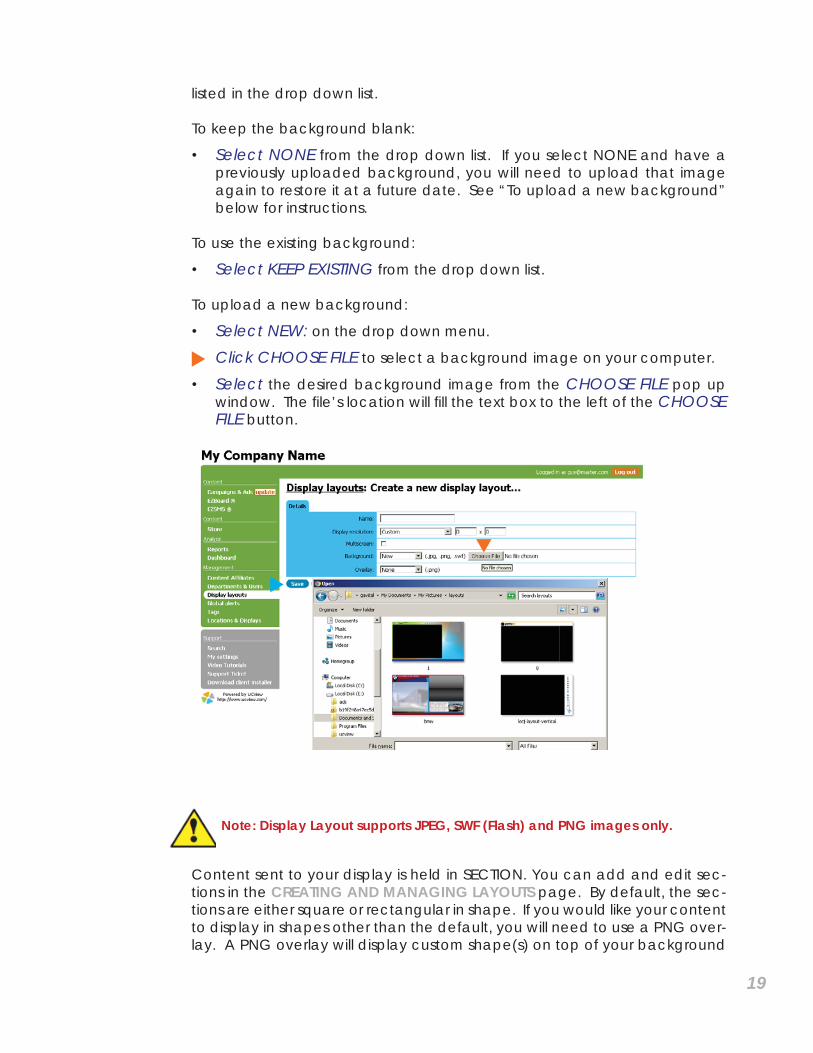
• Select NEW: on the drop down menu.
• Click CHOOSE FILE to select a background image on your computer.
• Select the desired background image from the CHOOSE FILE pop up window. The fi le’s location will fi ll the text box to the left of the CHOOSE FILE button.
Note: Display Layout supports JPEG, SWF (Flash) and PNG images only.
Content sent to your display is held in SECTION. You can add and edit sec-tions in the CREATING AND MANAGING LAYOUTS page. By default, the sec-tions are either square or rectangular in shape. If you would like your content to display in shapes other than the default, you will need to use a PNG over-lay. A PNG overlay will display custom shape(s) on top of your background
19
and sections, so that content appears to play within the custom shape(s).
Note: The UCView System allows one (1) overlay per layout. If you need to have more than one cutout shape in your overlay, you must create them as a single PNG fi le. Please contact your UCView customer support or technical support representative for full details regarding overlays.
To add an overlay to your layout, fi rst create a PNG fi le (Photoshop is a popu-lar program for creating PNG fi les) of the shape(s) you would like to use:
OVERLAY: Click NEW from the drop down menu.
• Click CHOOSE FILE to select the background image on your computer.
• Select the desired background image from the CHOOSE FILE pop up window. The fi le’s location will fi ll the text box to the left of the CHOOSE FILE button.
• Click OPEN on the Upload File pop up window.
Click SAVE.
After defi ning the screen resolution and uploading the background image, the UCView system will display the preview background image which is ready to lay multiple sections on.
Now you need to defi ne the screen division within the layout. You should divide your screen into the number of sections needed for the various con-tent you will display. UCView recommends you discuss your needs with your customer support representative prior to creating your layout.
Note: Call your UCView Digital Signage customer support representative for as-sistance in designing your screens.
To choose the sections which will display content:
From the ADD A NEW BOX tab.SECTION: Select a section name from the drop down menu. We have given the sections on the list descriptive names (“Main Media,” “Bottom Ban-ner,” etc.) to make identifying sections easier. The default size for any new section is 200 pixels X 200 pixels and the default location is 0,0 (the upper left corner of the layout).
20
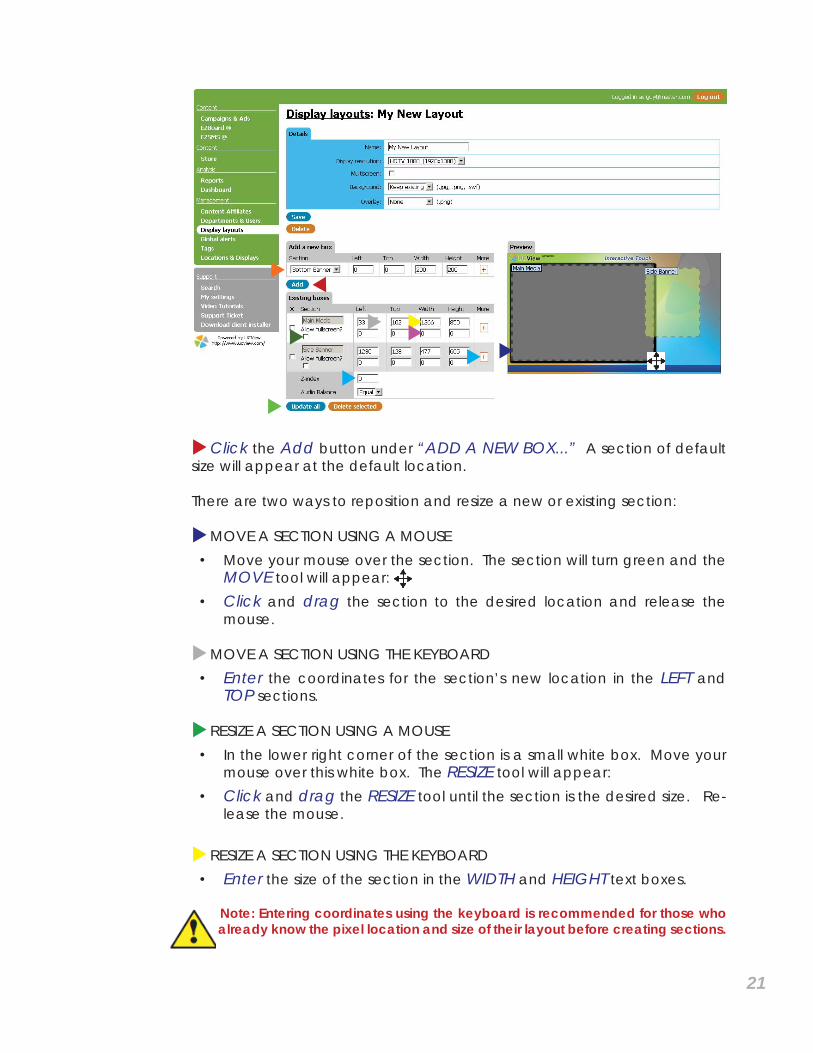
Click the Add button under “ADD A NEW BOX...” A section of default size will appear at the default location.
There are two ways to reposition and resize a new or existing section:
MOVE A SECTION USING A MOUSE• Move your mouse over the section. The section will turn green and the
MOVE tool will appear: • Click and drag the section to the desired location and release the
mouse.
MOVE A SECTION USING THE KEYBOARD• Enter the coordinates for the section’s new location in the LEFT and
TOP sections.
RESIZE A SECTION USING A MOUSE• In the lower right corner of the section is a small white box. Move your
mouse over this white box. The RESIZE tool will appear: • Click and drag the RESIZE tool until the section is the desired size. Re-
lease the mouse.
RESIZE A SECTION USING THE KEYBOARD• Enter the size of the section in the WIDTH and HEIGHT text boxes.
Note: Entering coordinates using the keyboard is recommended for those who already know the pixel location and size of their layout before creating sections.
21
POSITION A SECTION’S “Z INDEX” Z coordinates position sections “on top” of other sections, such as a pop up ad or security announcement. • To change the Z index click on the + Sign Enter the Z index for
the section in the Z INDEX section. “0” is the default and represents the basic level of your layout. “1” sets a section one level above the base level. If two sections have the same TOP and LEFT coordinates, the sec-tion with a Z index of 1 will display on top of the section set to 0. Similarly, a section with a Z indexof 2 will display on top of sections with coordi-nates of 1 and 0, and so forth. Though there is no limit to the number of Z index layers you can create, using more than one or two may cause your layout to look cluttered and unappealing to the viewer.
ALLOW FULL SCREEN mode will play content in the selected section in a user-defi ned coordinates and size. When Full Screen mode is active, con-tent in sections that intersect the section in full screen mode will pause until full screen mode stops. See the CAMPAIGNS & ADS module for informa-tion regarding setting the duration of Full Screen mode. Make sure to set full screen size to allow critical content in other sections to play during Full Screen mode.
To assign and control scheduling of content that plays in Full Screen mode, please see the CAMPAIGNS & ADS module. You must select Allow Full Screen Mode on the layout and ad for any campaign that will play in Full Screen mode.
To set up Full Screen mode for section(s) in your layout:
Click ALLOW FULLSCREEN? check box under the section you wish to allow. Enter the coordinates for the full screen window in the LEFT and TOP text boxes next to the ALLOW FULLSCREEN? check box--NOT the LEFT and TOP boxes above them. Typing in the boxes above will change the position of the section itself.
Enter the size for the full screen window in the WIDTH and HEIGHT text boxes NEXT TO the ALLOW FULLSCREEN? check box--not the WIDTH and HEIGHT boxes above them.
Note: You may have more than one section in Full Screen mode as long as these sections do not intersect.
Continue these steps for any other sections you wish to run in full screen mode.
Click UPDATE ALL.
To delete a section from the layout, click the check box (X) for the section you want to delete and click DELETE SELECTED.
22

23

Content distribution & management CREATING AND MANAGING CAMPAIGNS
A campaign is a library of content that plays on your signage and defi nes the displays the content will play on. The UCView system allows you to cre-ate and manage an unlimited number of campaigns playing on one or more players. Campaigns run in loops, with multiple campaigns running in sequential order in the loop.
Note: When creating a new Campaign, you must specify the location(s) or display group(s) where an ad or group of ads will be playing or this content will not play.
To create a new Campaign:
Click CAMPAIGNS & ADS menu tab.
Click CREATE A CAMPAIGN.
Note: Since most update work begins in the CAMPAIGNS AND ADS Module, when you initially log in to the UCView portal, the CAMPAIGNS & ADS module automatically displays.
4
24
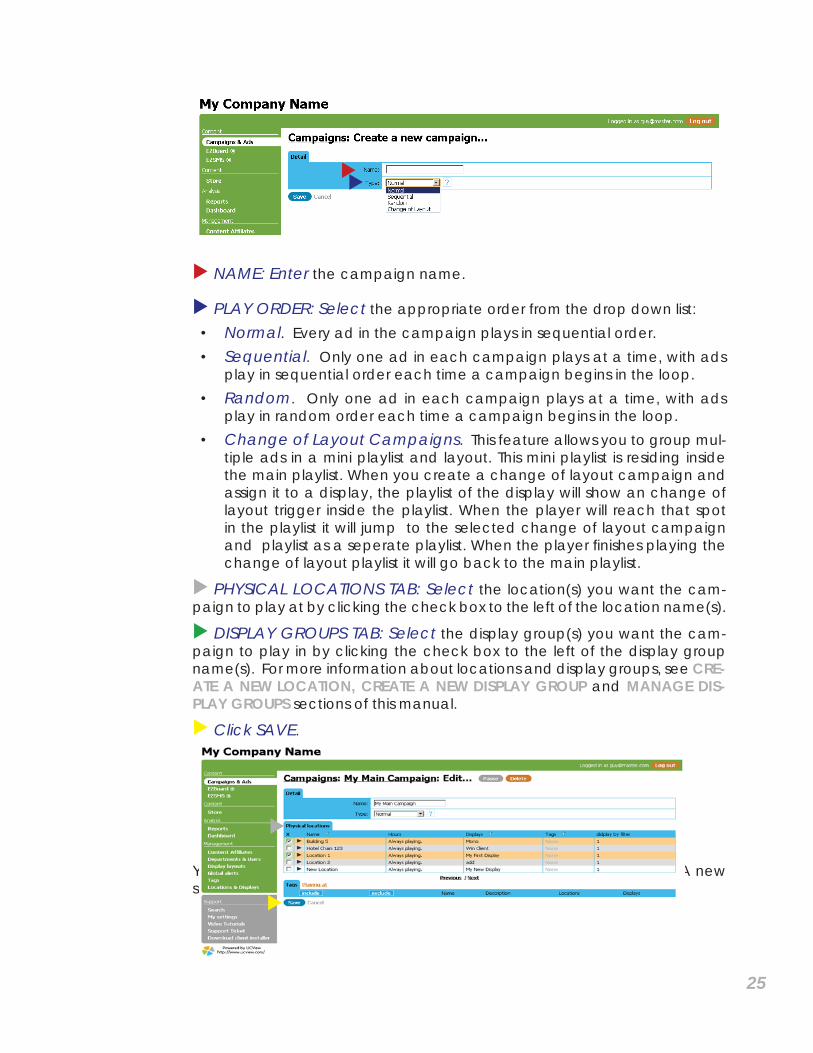
NAME: Enter the campaign name.
PLAY ORDER: Select the appropriate order from the drop down list:• Normal. Every ad in the campaign plays in sequential order.• Sequential. Only one ad in each campaign plays at a time, with ads
play in sequential order each time a campaign begins in the loop.• Random. Only one ad in each campaign plays at a time, with ads
play in random order each time a campaign begins in the loop.• Change of Layout Campaigns. This feature allows you to group mul-
tiple ads in a mini playlist and layout. This mini playlist is residing inside the main playlist. When you create a change of layout campaign and assign it to a display, the playlist of the display will show an change of layout trigger inside the playlist. When the player will reach that spot in the playlist it will jump to the selected change of layout campaign and playlist as a seperate playlist. When the player fi nishes playing the change of layout playlist it will go back to the main playlist.
PHYSICAL LOCATIONS TAB: Select the location(s) you want the cam-paign to play at by clicking the check box to the left of the location name(s).
DISPLAY GROUPS TAB: Select the display group(s) you want the cam-paign to play in by clicking the check box to the left of the display group name(s). For more information about locations and display groups, see CRE-ATE A NEW LOCATION, CREATE A NEW DISPLAY GROUP and MANAGE DIS-PLAY GROUPS sections of this manual.
Click SAVE.
You will not have any ads scheduled to play in the new campaign. A new screen will ask you to add them now.
25
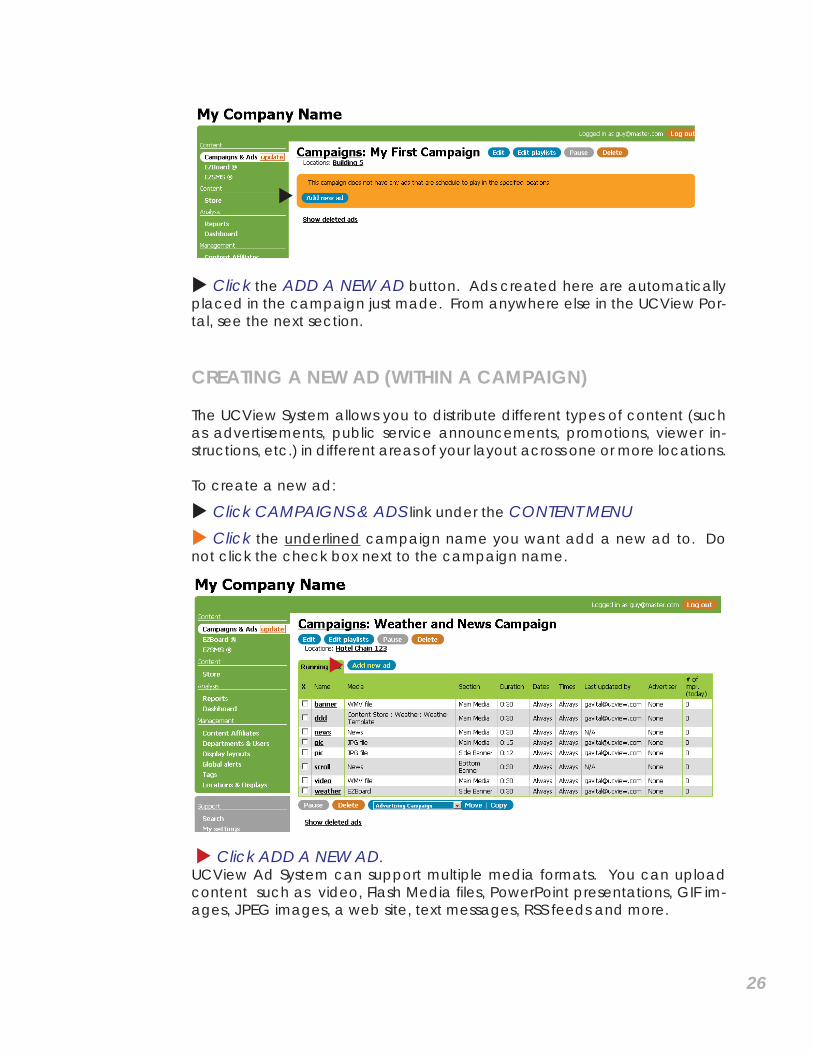
Click the ADD A NEW AD button. Ads created here are automatically placed in the campaign just made. From anywhere else in the UCView Por-tal, see the next section.
CREATING A NEW AD (WITHIN A CAMPAIGN)
The UCView System allows you to distribute different types of content (such as advertisements, public service announcements, promotions, viewer in-structions, etc.) in different areas of your layout across one or more locations.
To create a new ad:
Click CAMPAIGNS & ADS link under the CONTENT MENU Click the underlined campaign name you want add a new ad to. Do not click the check box next to the campaign name.
Click ADD A NEW AD.UCView Ad System can support multiple media formats. You can upload content such as video, Flash Media fi les, PowerPoint presentations, GIF im-ages, JPEG images, a web site, text messages, RSS feeds and more.
26
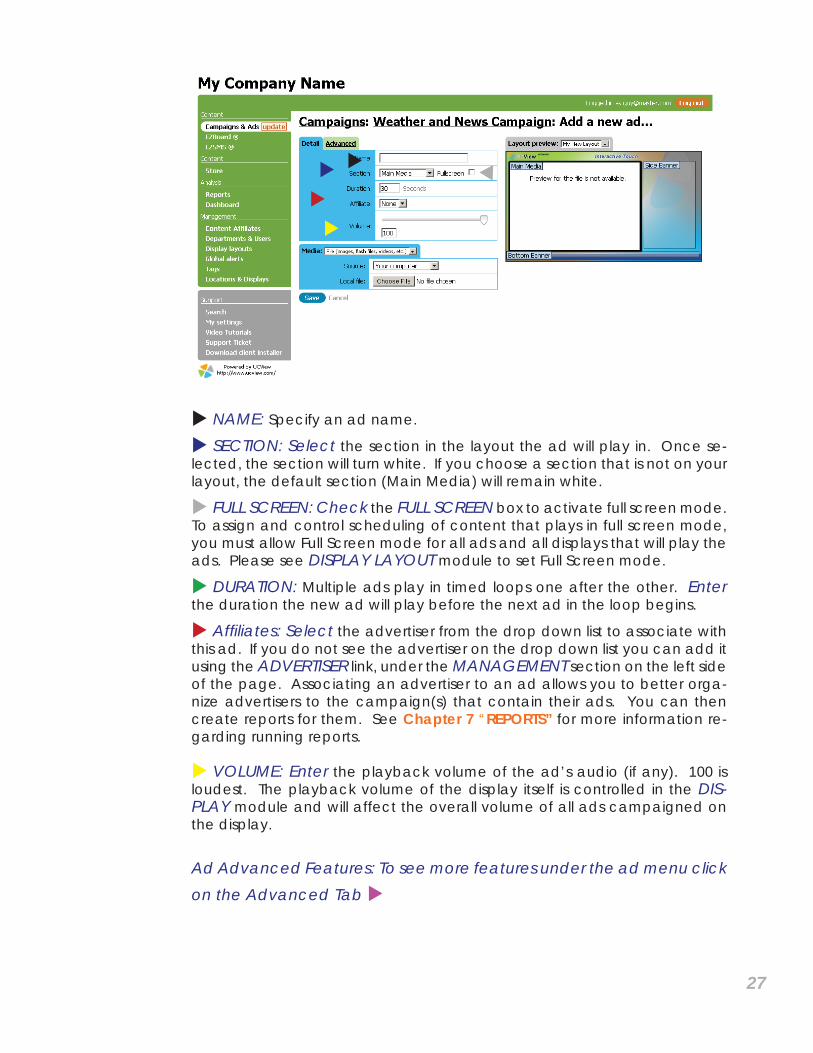
NAME: Specify an ad name.
SECTION: Select the section in the layout the ad will play in. Once se-lected, the section will turn white. If you choose a section that is not on your layout, the default section (Main Media) will remain white.
FULL SCREEN: Check the FULL SCREEN box to activate full screen mode. To assign and control scheduling of content that plays in full screen mode, you must allow Full Screen mode for all ads and all displays that will play the ads. Please see DISPLAY LAYOUT module to set Full Screen mode.
DURATION: Multiple ads play in timed loops one after the other. Enter the duration the new ad will play before the next ad in the loop begins.
Affi liates: Select the advertiser from the drop down list to associate with this ad. If you do not see the advertiser on the drop down list you can add it using the ADVERTISER link, under the MANAGEMENT section on the left side of the page. Associating an advertiser to an ad allows you to better orga-nize advertisers to the campaign(s) that contain their ads. You can then create reports for them. See Chapter 7 “REPORTS” for more information re-garding running reports.
VOLUME: Enter the playback volume of the ad’s audio (if any). 100 is loudest. The playback volume of the display itself is controlled in the DIS-PLAY module and will affect the overall volume of all ads campaigned on the display.
Ad Advanced Features: To see more features under the ad menu click on the Advanced Tab
27
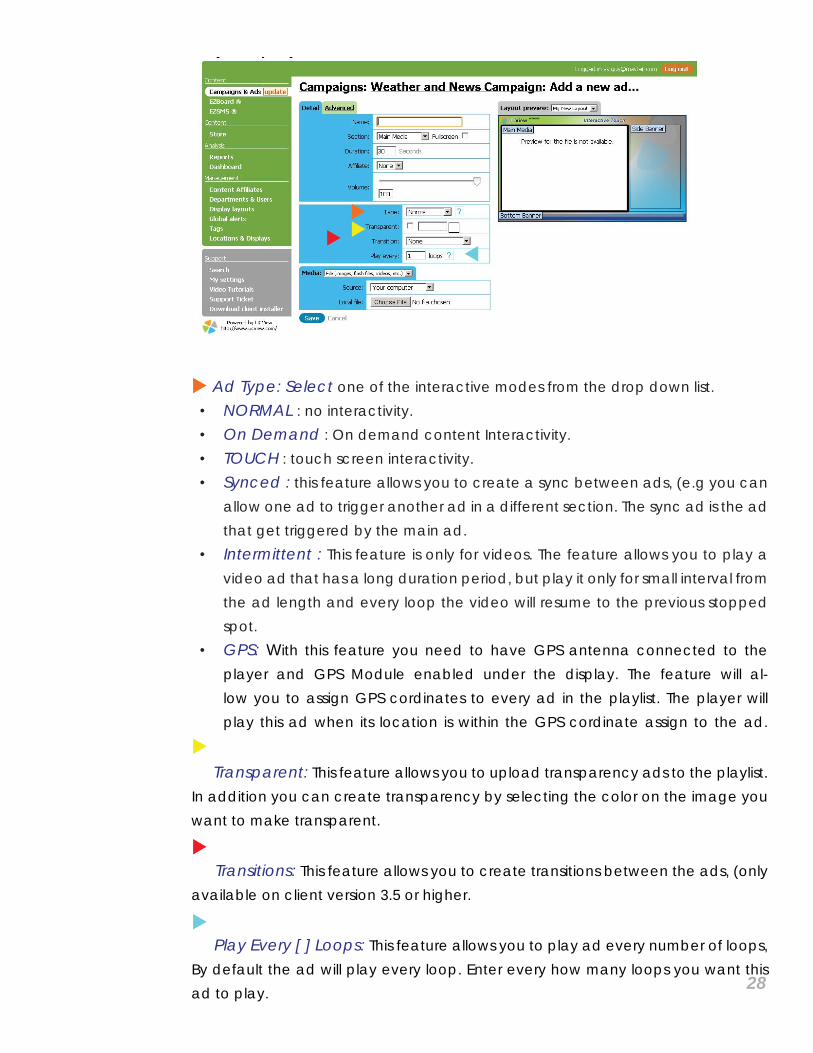
Ad Type: Select one of the interactive modes from the drop down list. • NORMAL : no interactivity.• On Demand : On demand content Interactivity.• TOUCH : touch screen interactivity.• Synced : this feature allows you to create a sync between ads, (e.g you can
allow one ad to trigger another ad in a different section. The sync ad is the ad that get triggered by the main ad.
• Intermittent : This feature is only for videos. The feature allows you to play a video ad that has a long duration period, but play it only for small interval from the ad length and every loop the video will resume to the previous stopped spot.
• GPS: With this feature you need to have GPS antenna connected to the player and GPS Module enabled under the display. The feature will al-low you to assign GPS cordinates to every ad in the playlist. The player will play this ad when its location is within the GPS cordinate assign to the ad.
Transparent: This feature allows you to upload transparency ads to the playlist. In addition you can create transparency by selecting the color on the image you want to make transparent.
Transitions: This feature allows you to create transitions between the ads, (only available on client version 3.5 or higher.
Play Every [ ] Loops: This feature allows you to play ad every number of loops, By default the ad will play every loop. Enter every how many loops you want this ad to play. 28
Note: It is usually best to set the duration to the length of the ad. If your ad is 30 seconds long and you set the duration to 60 seconds, the display will show noth-ing for 30 seconds before the next ad plays.
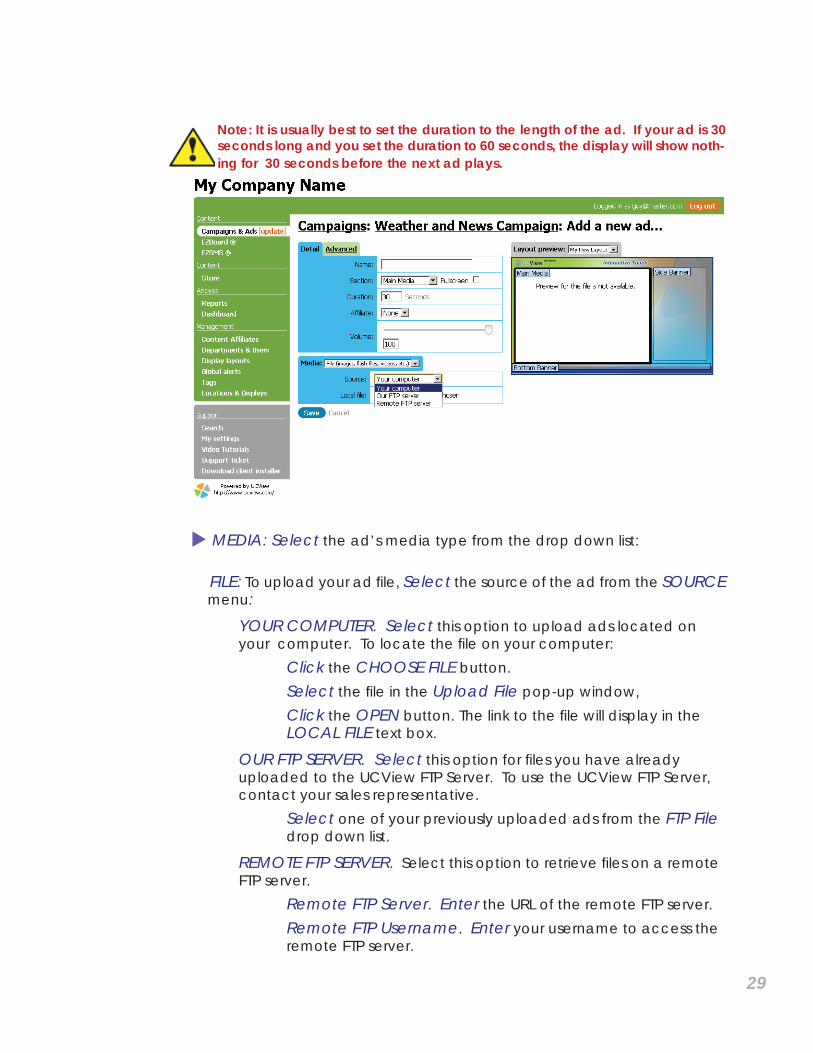
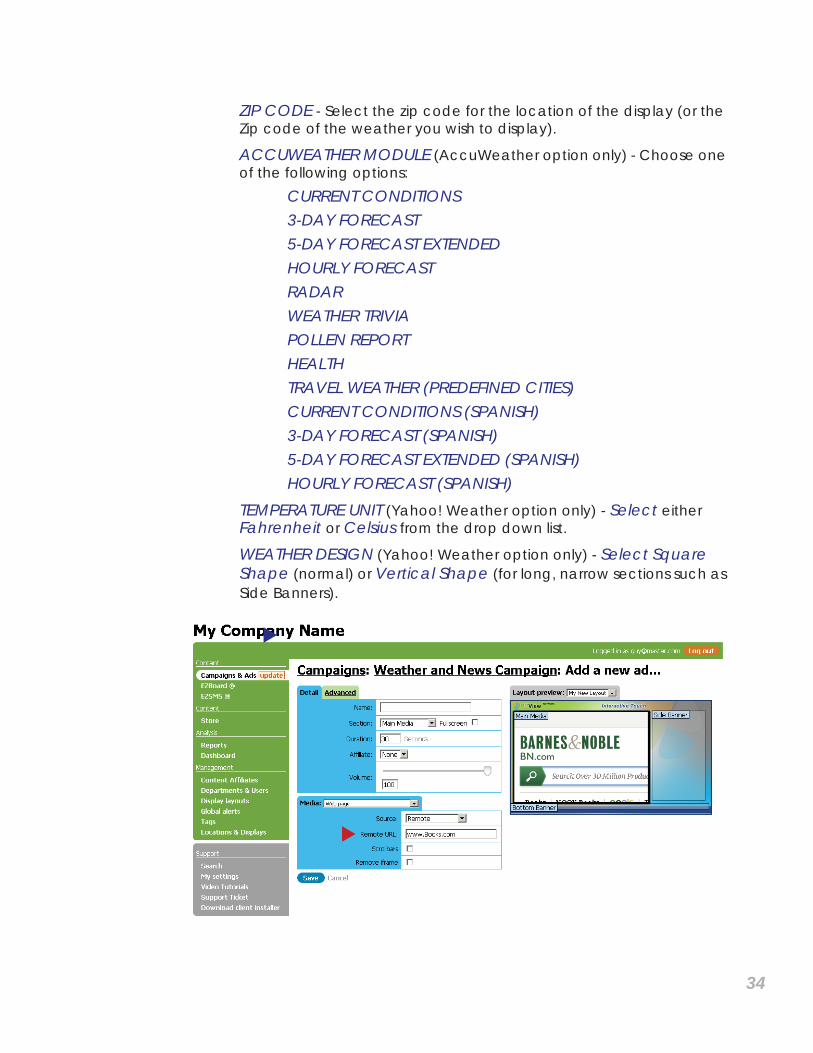
MEDIA: Select the ad’s media type from the drop down list:
FILE: To upload your ad fi le, Select the source of the ad from the SOURCE menu:
YOUR COMPUTER. Select this option to upload ads located on your computer. To locate the fi le on your computer: Click the CHOOSE FILE button. Select the fi le in the Upload File pop-up window, Click the OPEN button. The link to the fi le will display in the LOCAL FILE text box.
OUR FTP SERVER. Select this option for fi les you have already uploaded to the UCView FTP Server. To use the UCView FTP Server, contact your sales representative. Select one of your previously uploaded ads from the FTP File drop down list.
REMOTE FTP SERVER. Select this option to retrieve fi les on a remote FTP server. Remote FTP Server. Enter the URL of the remote FTP server. Remote FTP Username. Enter your username to access the remote FTP server.
29
Remote FTP Password. Enter your password. Download INTERVAL. Select EVERY TIME THE FILE CHANGES from the drop down list. The UCView system scans the remote FTP server every 15 minutes to look for changes to the fi le.
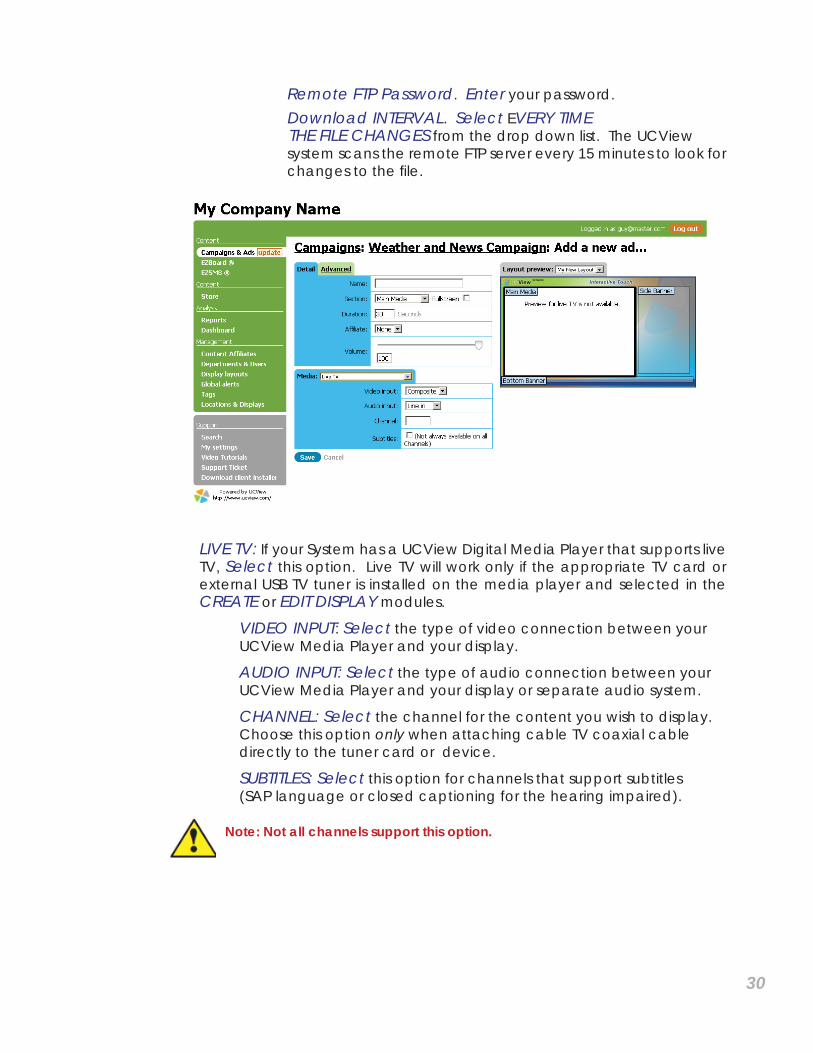
LIVE TV: If your System has a UCView Digital Media Player that supports live TV, Select this option. Live TV will work only if the appropriate TV card or external USB TV tuner is installed on the media player and selected in the CREATE or EDIT DISPLAY modules.
VIDEO INPUT: Select the type of video connection between your UCView Media Player and your display.
AUDIO INPUT: Select the type of audio connection between your UCView Media Player and your display or separate audio system.
CHANNEL: Select the channel for the content you wish to display. Choose this option only when attaching cable TV coaxial cable directly to the tuner card or device.
SUBTITLES: Select this option for channels that support subtitles (SAP language or closed captioning for the hearing impaired).
Note: Not all channels support this option.
30
31
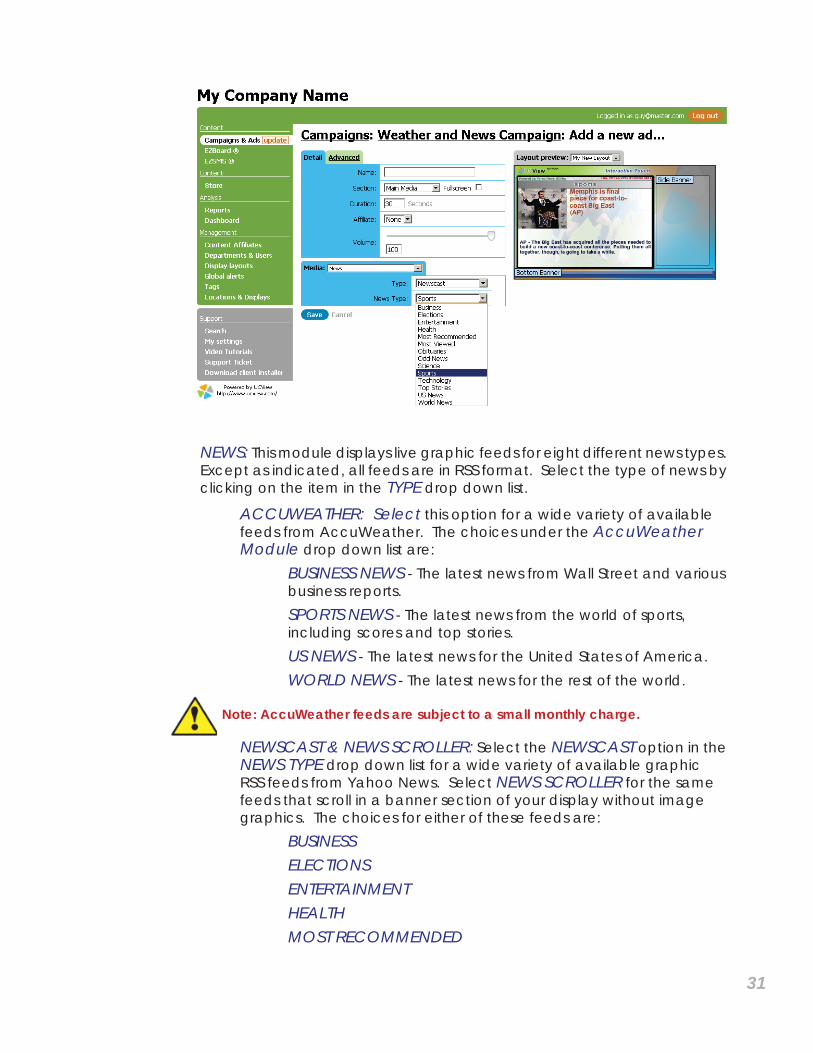
NEWS: This module displays live graphic feeds for eight different news types. Except as indicated, all feeds are in RSS format. Select the type of news by clicking on the item in the TYPE drop down list.
ACCUWEATHER: Select this option for a wide variety of available feeds from AccuWeather. The choices under the AccuWeather Module drop down list are: BUSINESS NEWS - The latest news from Wall Street and various business reports. SPORTS NEWS - The latest news from the world of sports, including scores and top stories. US NEWS - The latest news for the United States of America. WORLD NEWS - The latest news for the rest of the world.
Note: AccuWeather feeds are subject to a small monthly charge.
NEWSCAST & NEWS SCROLLER: Select the NEWSCAST option in the NEWS TYPE drop down list for a wide variety of available graphic RSS feeds from Yahoo News. Select NEWS SCROLLER for the same feeds that scroll in a banner section of your display without image graphics. The choices for either of these feeds are: BUSINESS ELECTIONS ENTERTAINMENT HEALTH MOST RECOMMENDED
32
MOST VIEWED OBITUARIES ODD NEWS SCIENCE SPORTS TECHNOLOGY TOP STORIES US NEWS WORLD NEWS
Note: Feeds are updated regularly and choices on either News Feed list is sub-ject to change without notice.
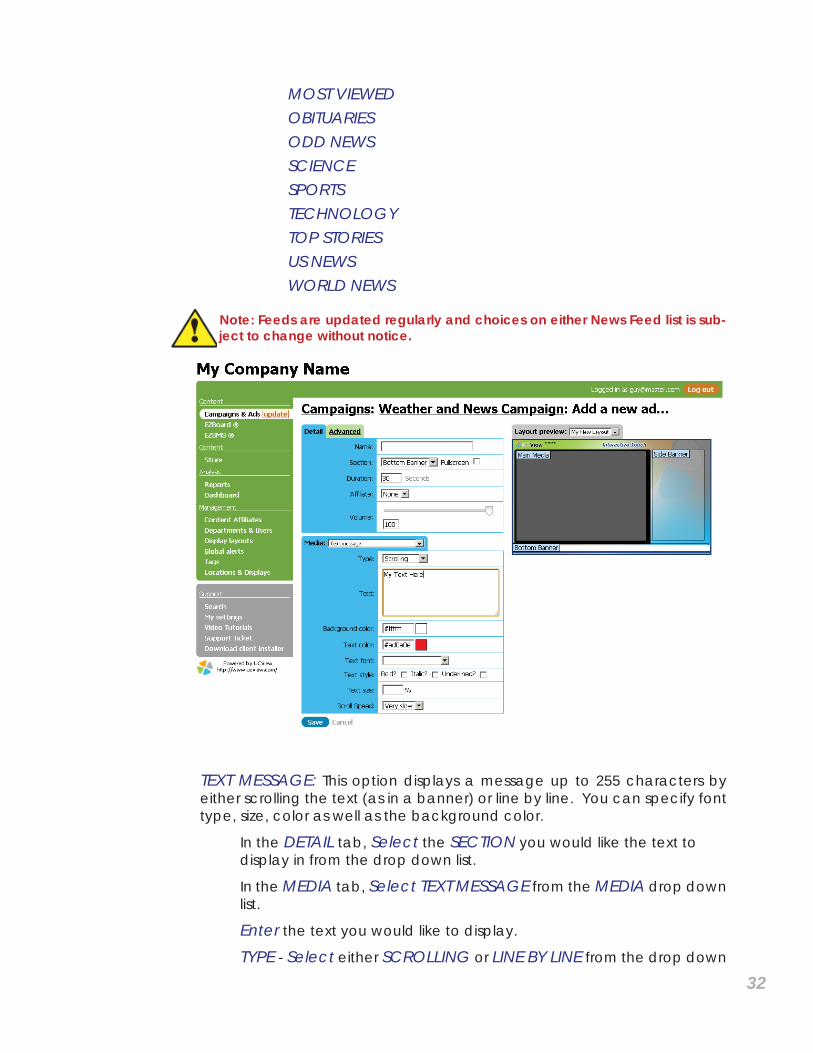
TEXT MESSAGE: This option displays a message up to 255 characters by either scrolling the text (as in a banner) or line by line. You can specify font type, size, color as well as the background color.
In the DETAIL tab, Select the SECTION you would like the text to display in from the drop down list.
In the MEDIA tab, Select TEXT MESSAGE from the MEDIA drop down list.
Enter the text you would like to display.
TYPE - Select either SCROLLING or LINE BY LINE from the drop down
33
list.
Note: Previewing Line By Line works with Internet Explorer only, but does not af-fect the display’s performance.
BACKGROUND and TEXT COLOR - By default, the background color is white and the text is gray. To change these settings, Click in the white box next to the BACKGROUND COLOR and/or TEXT COLOR boxes and choose a color from the pop-up color picker.
TEXT FONT - The default type face is Arial. To use a different type face, Select one from the Text Font drop down list. UCView’s list includes only web-safe type faces.
TEXT STYLE - If desired, select one of the three styles (bold, italic, underlined) by clicking in the check box next to your choice(s). You may choose one or all of these options.
TEXT SIZE - The default size is 100%. If you would like to make the text larger or smaller, Enter the percentage of increase or decrease.
SCROLL SPEED - Select one of fi ve options from the drop down list: Very Slow, Slow, Normal, Fast, Very Fast.
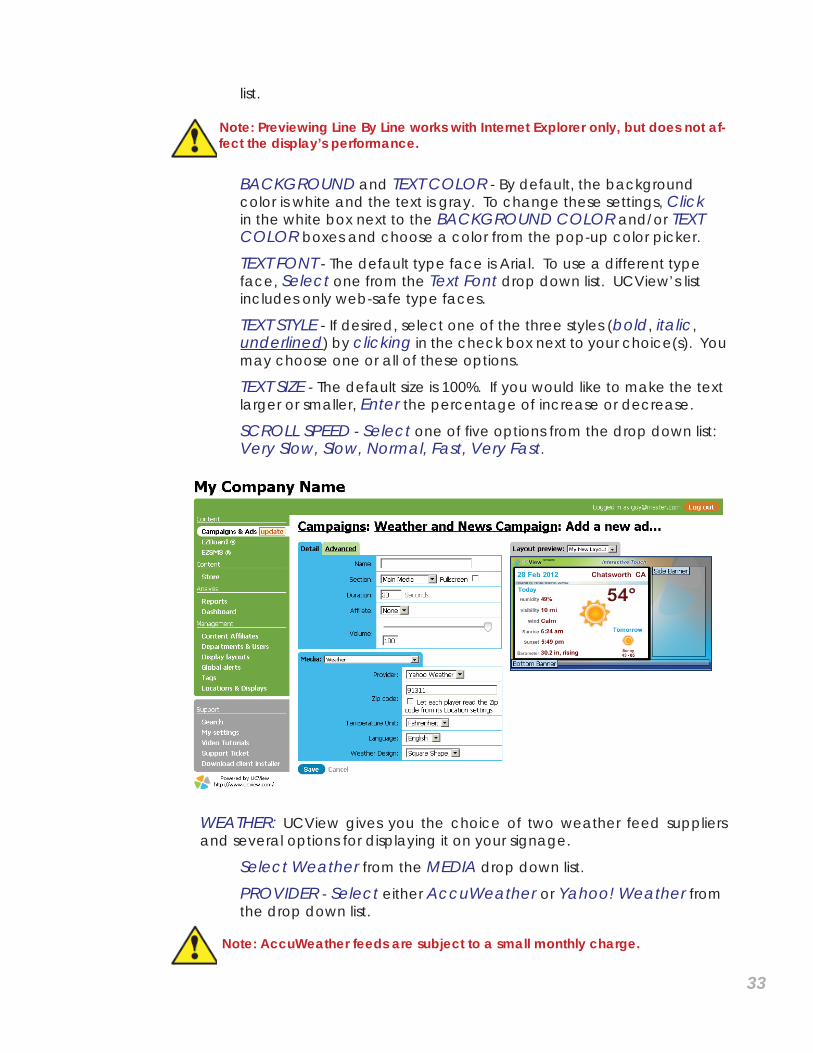
WEATHER: UCView gives you the choice of two weather feed suppliers and several options for displaying it on your signage.
Select Weather from the MEDIA drop down list.
PROVIDER - Select either AccuWeather or Yahoo! Weather from the drop down list.
Note: AccuWeather feeds are subject to a small monthly charge.
34
ZIP CODE - Select the zip code for the location of the display (or the Zip code of the weather you wish to display). ACCUWEATHER MODULE (AccuWeather option only) - Choose one of the following options: CURRENT CONDITIONS 3-DAY FORECAST 5-DAY FORECAST EXTENDED HOURLY FORECAST RADAR WEATHER TRIVIA POLLEN REPORT HEALTH TRAVEL WEATHER (PREDEFINED CITIES) CURRENT CONDITIONS (SPANISH) 3-DAY FORECAST (SPANISH) 5-DAY FORECAST EXTENDED (SPANISH) HOURLY FORECAST (SPANISH) TEMPERATURE UNIT (Yahoo! Weather option only) - Select either Fahrenheit or Celsius from the drop down list.
WEATHER DESIGN (Yahoo! Weather option only) - Select Square Shape (normal) or Vertical Shape (for long, narrow sections such as Side Banners).
35
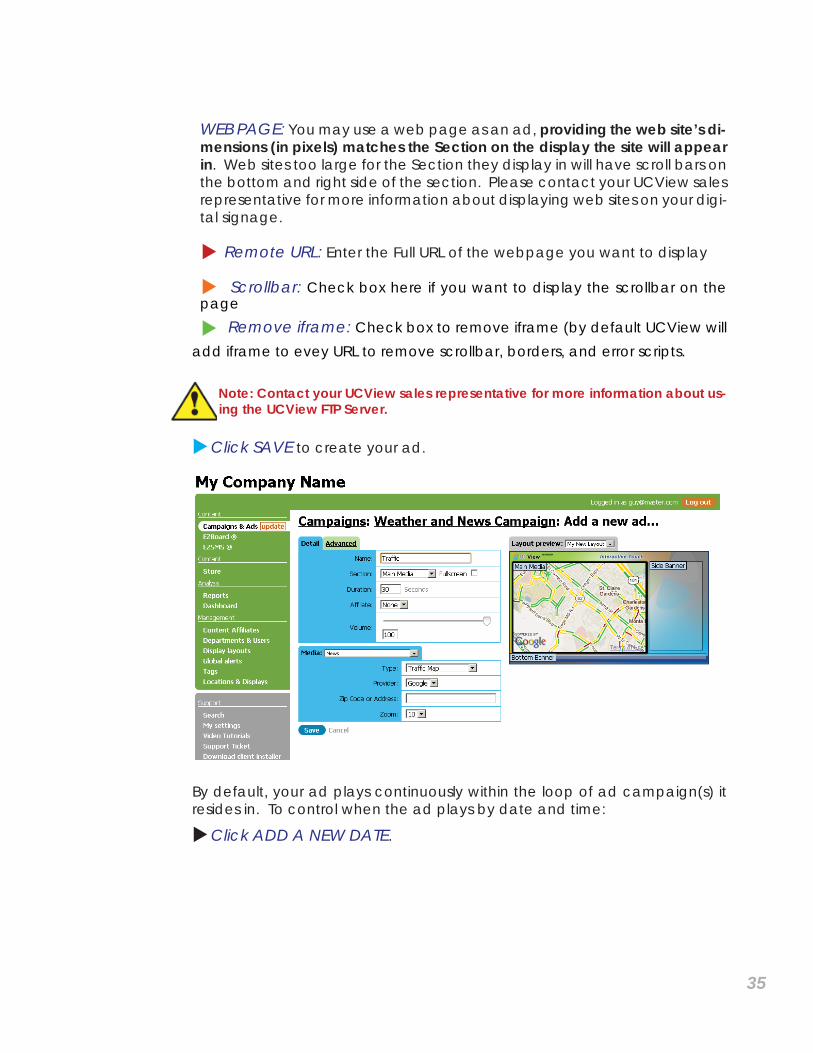
WEB PAGE: You may use a web page as an ad, providing the web site’s di-mensions (in pixels) matches the Section on the display the site will appear in. Web sites too large for the Section they display in will have scroll bars on the bottom and right side of the section. Please contact your UCView sales representative for more information about displaying web sites on your digi-tal signage.
Remote URL: Enter the Full URL of the webpage you want to display
Scrollbar: Check box here if you want to display the scrollbar on the page
Remove iframe: Check box to remove iframe (by default UCView will add iframe to evey URL to remove scrollbar, borders, and error scripts. Note: Contact your UCView sales representative for more information about us-
ing the UCView FTP Server.
Click SAVE to create your ad.
By default, your ad plays continuously within the loop of ad campaign(s) it resides in. To control when the ad plays by date and time:
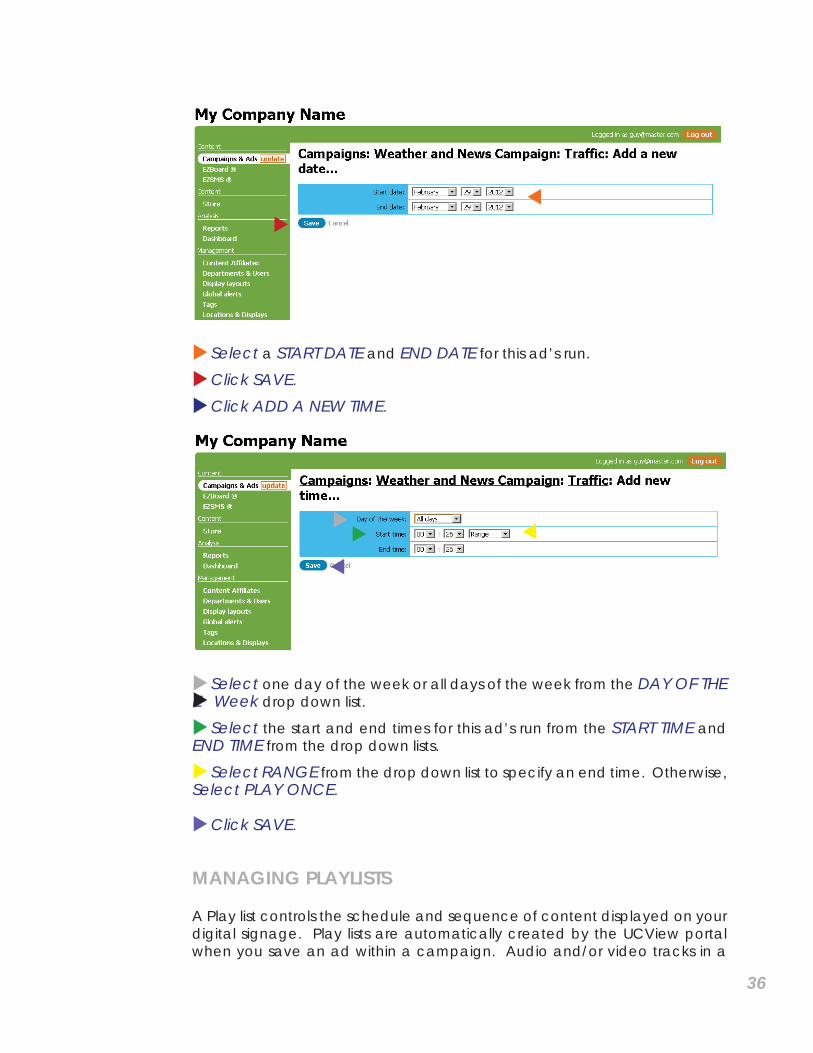
Click ADD A NEW DATE.
36
Select a START DATE and END DATE for this ad’s run.
Click SAVE.
Click ADD A NEW TIME.
Select one day of the week or all days of the week from the DAY OF THE E Week drop down list.
Select the start and end times for this ad’s run from the START TIME and END TIME from the drop down lists.
Select RANGE from the drop down list to specify an end time. Otherwise, Select PLAY ONCE.
Click SAVE.
MANAGING PLAYLISTS
A Play list controls the schedule and sequence of content displayed on your digital signage. Play lists are automatically created by the UCView portal when you save an ad within a campaign. Audio and/or video tracks in a
37
loop can be scheduled on any section of the display. After the play list has been created, it can be viewed and edited from the LOCATIONS & DIS-PLAYS module or the CAMPAIGNS & ADS module. Use LOCATIONS & DISPLAYS to view and edit ads playing at specifi c locations only. Use CAM-PAIGNS & ADS to view and edit ads playing across an entire campaign.
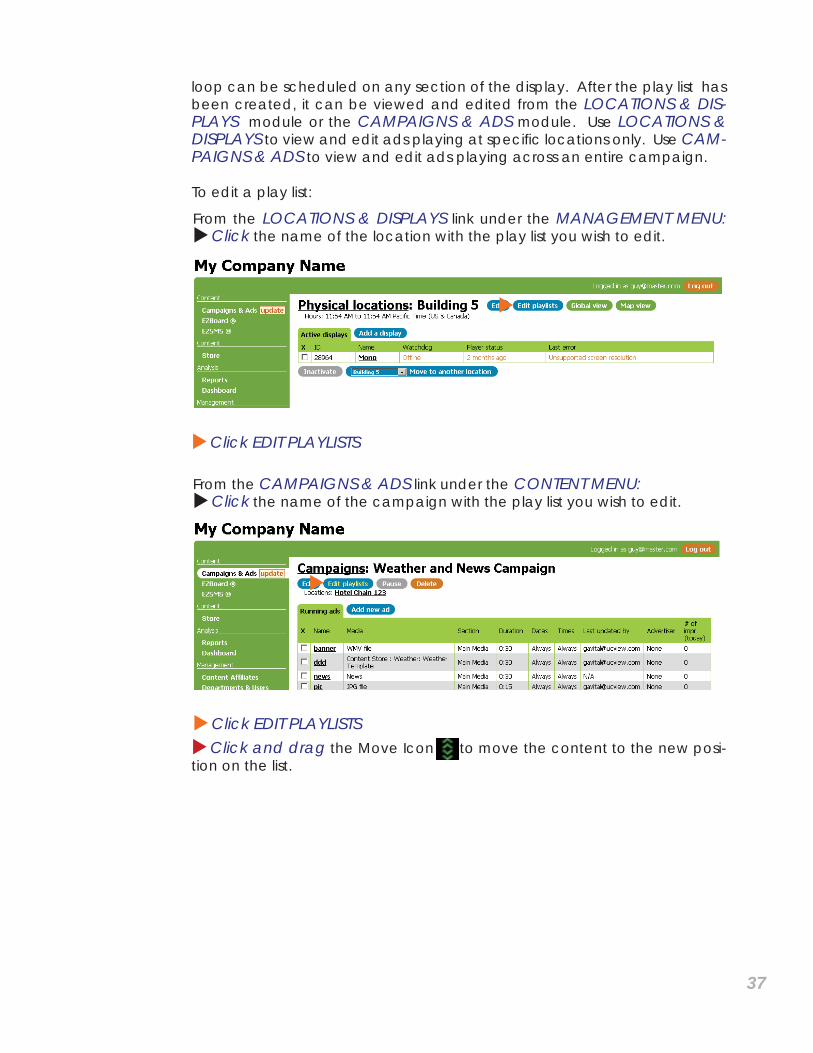
To edit a play list:
From the LOCATIONS & DISPLAYS link under the MANAGEMENT MENU: Click the name of the location with the play list you wish to edit.
Click EDIT PLAYLISTS
From the CAMPAIGNS & ADS link under the CONTENT MENU: Click the name of the campaign with the play list you wish to edit.
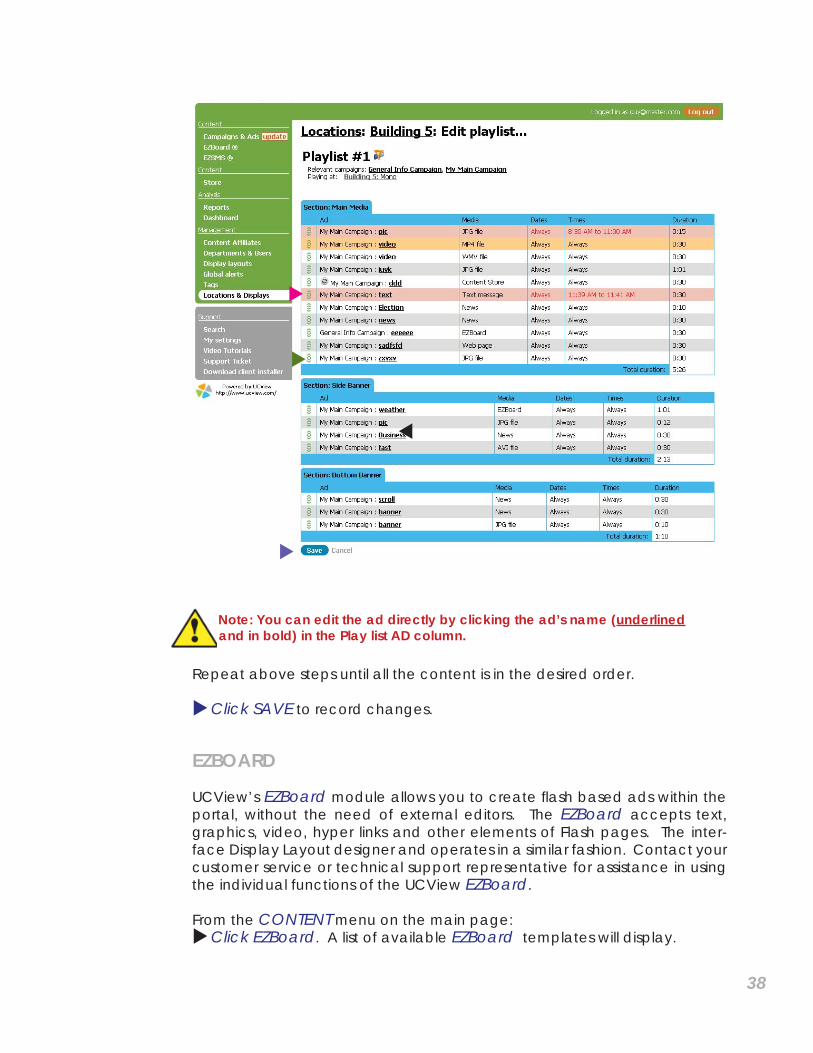
Click EDIT PLAYLISTS Click and drag the Move Icon to move the content to the new posi-tion on the list.
38
Note: You can edit the ad directly by clicking the ad’s name (underlined and in bold) in the Play list AD column.
Repeat above steps until all the content is in the desired order.
Click SAVE to record changes.
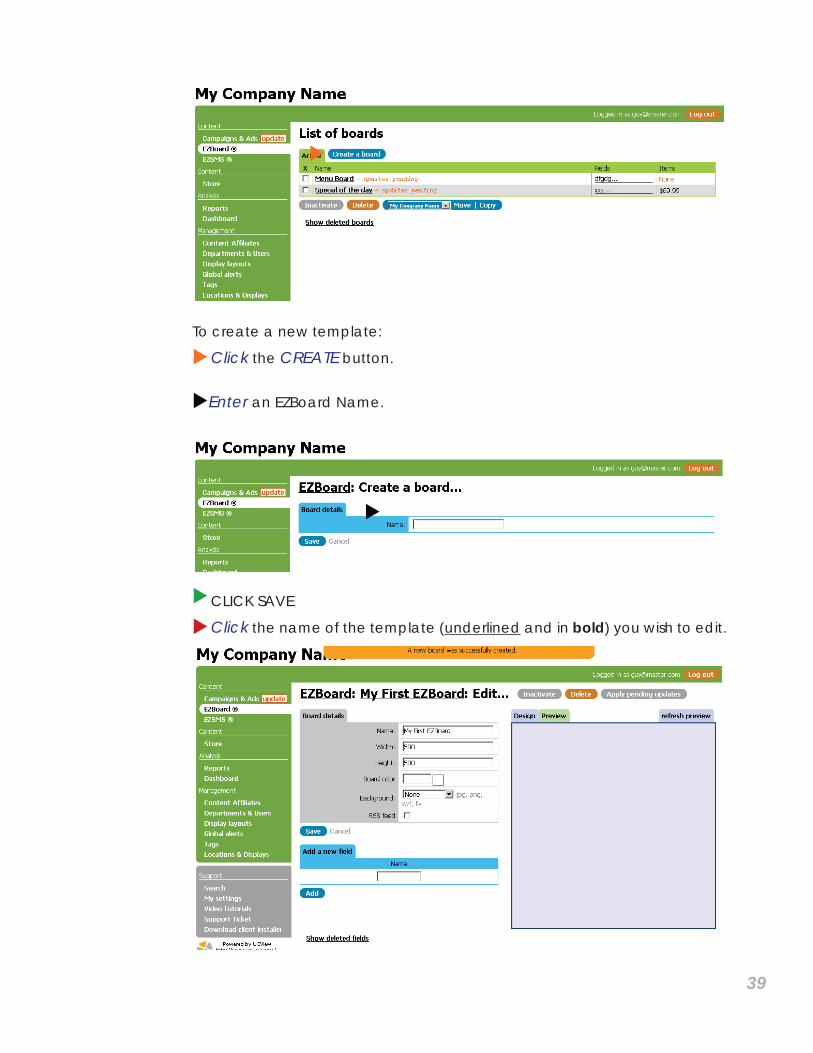
EZBOARD
UCView’s EZBoard module allows you to create fl ash based ads within the portal, without the need of external editors. The EZBoard accepts text, graphics, video, hyper links and other elements of Flash pages. The inter-face Display Layout designer and operates in a similar fashion. Contact your customer service or technical support representative for assistance in using the individual functions of the UCView EZBoard.
From the CONTENT menu on the main page: Click EZBoard. A list of available EZBoard templates will display.
39
To create a new template:
Click the CREATE button.
Enter an EZBoard Name.
CLICK SAVE
Click the name of the template (underlined and in bold) you wish to edit.
40
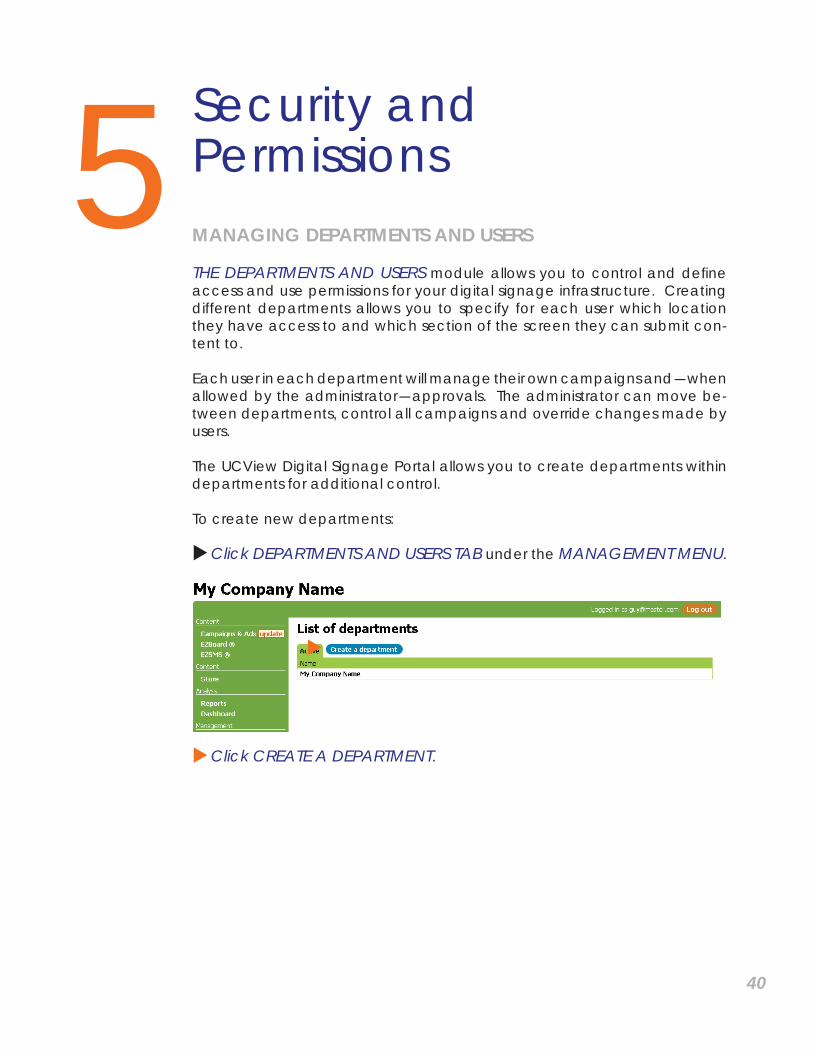
Security and Permissions MANAGING DEPARTMENTS AND USERS
THE DEPARTMENTS AND USERS module allows you to control and defi ne access and use permissions for your digital signage infrastructure. Creating different departments allows you to specify for each user which location they have access to and which section of the screen they can submit con-tent to.
Each user in each department will manage their own campaigns and-when allowed by the administrator-approvals. The administrator can move be-tween departments, control all campaigns and override changes made by users.
The UCView Digital Signage Portal allows you to create departments within departments for additional control.
To create new departments:
Click DEPARTMENTS AND USERS TAB under the MANAGEMENT MENU.
Click CREATE A DEPARTMENT.
5
41
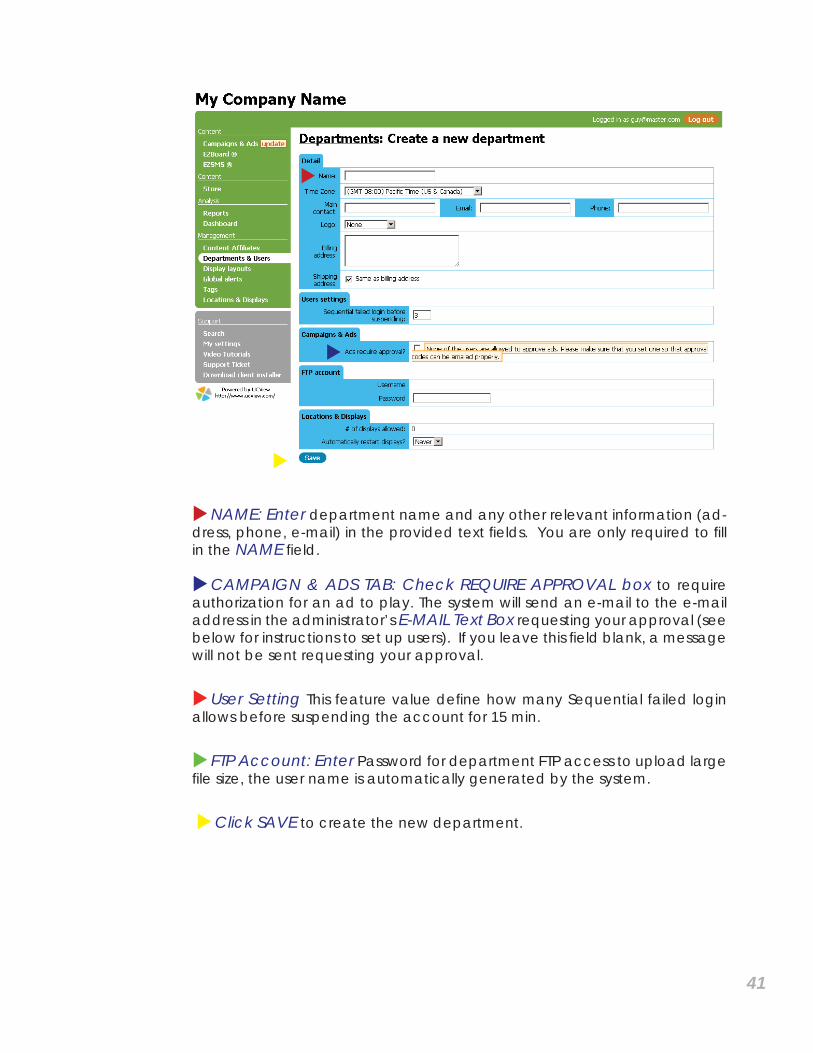
NAME: Enter department name and any other relevant information (ad-dress, phone, e-mail) in the provided text fi elds. You are only required to fi ll in the NAME fi eld.
CAMPAIGN & ADS TAB: Check REQUIRE APPROVAL box to require authorization for an ad to play. The system will send an e-mail to the e-mail address in the administrator’s E-MAIL Text Box requesting your approval (see below for instructions to set up users). If you leave this fi eld blank, a message will not be sent requesting your approval.
User Setting This feature value defi ne how many Sequential failed login allows before suspending the account for 15 min.
FTP Account: Enter Password for department FTP access to upload large fi le size, the user name is automatically generated by the system.
Click SAVE to create the new department.
42
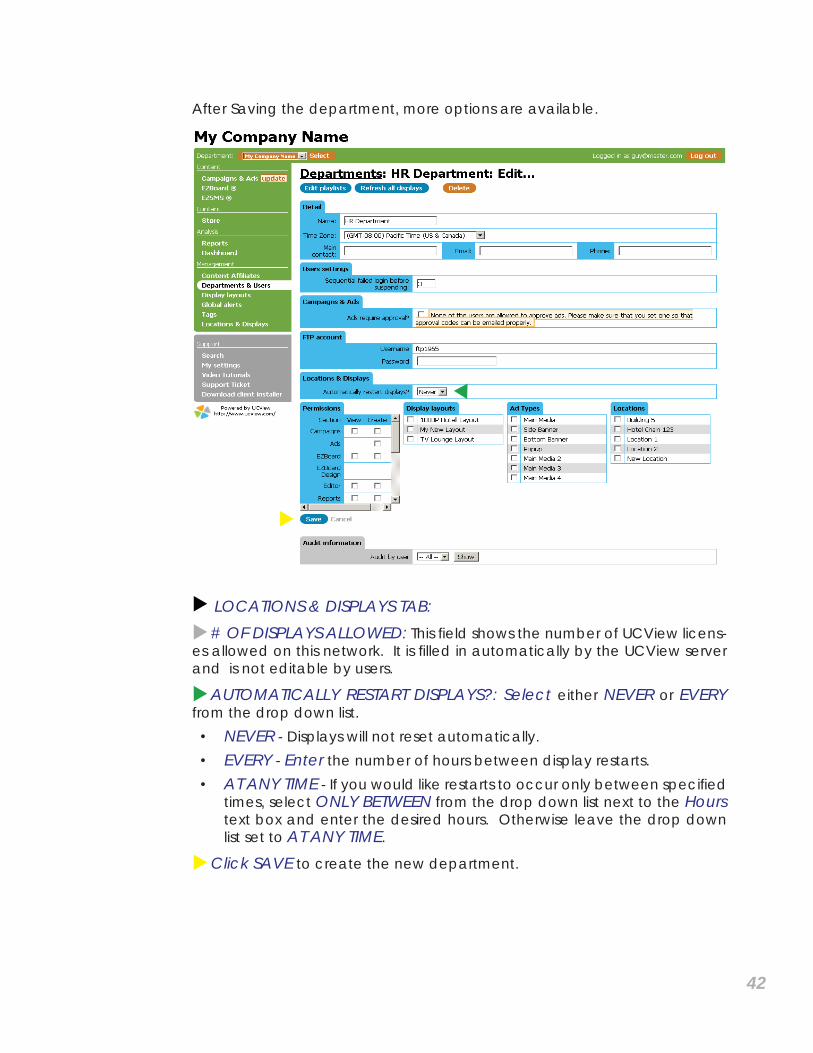
After Saving the department, more options are available.
LOCATIONS & DISPLAYS TAB: # OF DISPLAYS ALLOWED: This fi eld shows the number of UCView licens-es allowed on this network. It is fi lled in automatically by the UCView server and is not editable by users.
AUTOMATICALLY RESTART DISPLAYS?: Select either NEVER or EVERY from the drop down list.
• NEVER - Displays will not reset automatically.• EVERY - Enter the number of hours between display restarts. • AT ANY TIME - If you would like restarts to occur only between specifi ed
times, select ONLY BETWEEN from the drop down list next to the Hours text box and enter the desired hours. Otherwise leave the drop down list set to AT ANY TIME.
Click SAVE to create the new department.
43
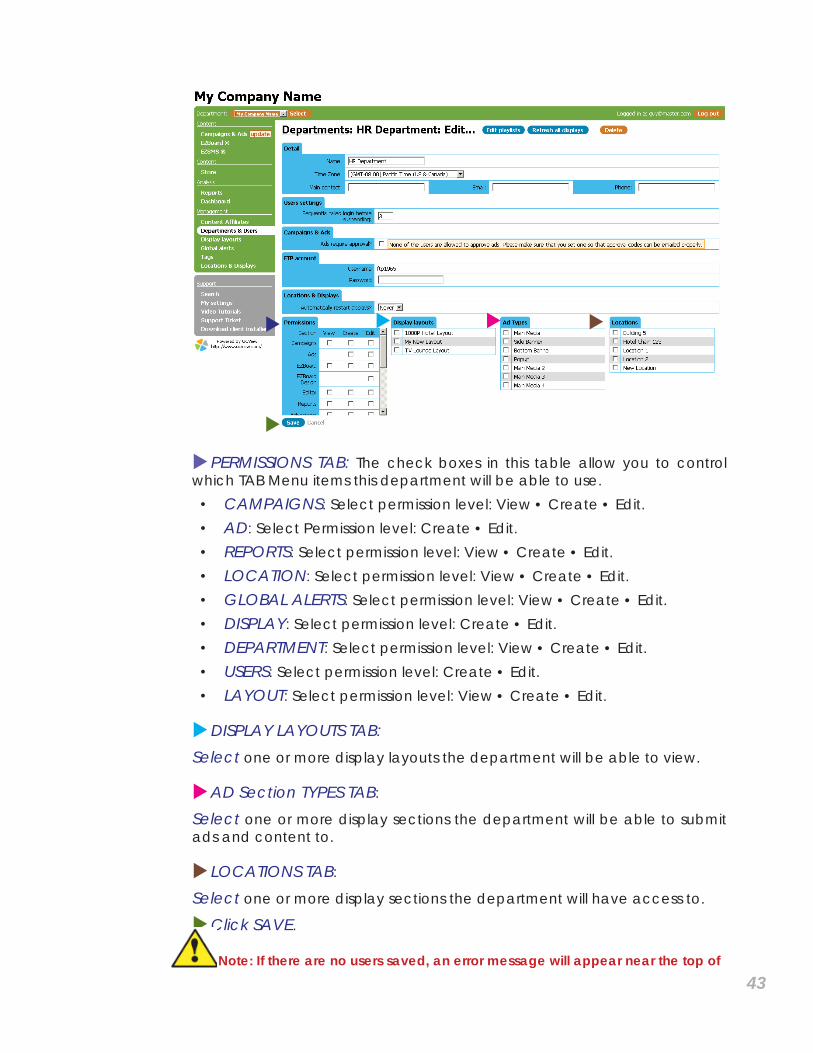
PERMISSIONS TAB: The check boxes in this table allow you to control which TAB Menu items this department will be able to use.
• CAMPAIGNS: Select permission level: View • Create • Edit.• AD: Select Permission level: Create • Edit. • REPORTS: Select permission level: View • Create • Edit.• LOCATION: Select permission level: View • Create • Edit.• GLOBAL ALERTS: Select permission level: View • Create • Edit.• DISPLAY: Select permission level: Create • Edit.• DEPARTMENT: Select permission level: View • Create • Edit.• USERS: Select permission level: Create • Edit.• LAYOUT: Select permission level: View • Create • Edit.
DISPLAY LAYOUTS TAB: Select one or more display layouts the department will be able to view.
AD Section TYPES TAB:
Select one or more display sections the department will be able to submit ads and content to.
LOCATIONS TAB:
Select one or more display sections the department will have access to.
Click SAVE.
Note: If there are no users saved, an error message will appear near the top of
44
the page. You must create at least one user for the Department to operate cor-rectly.
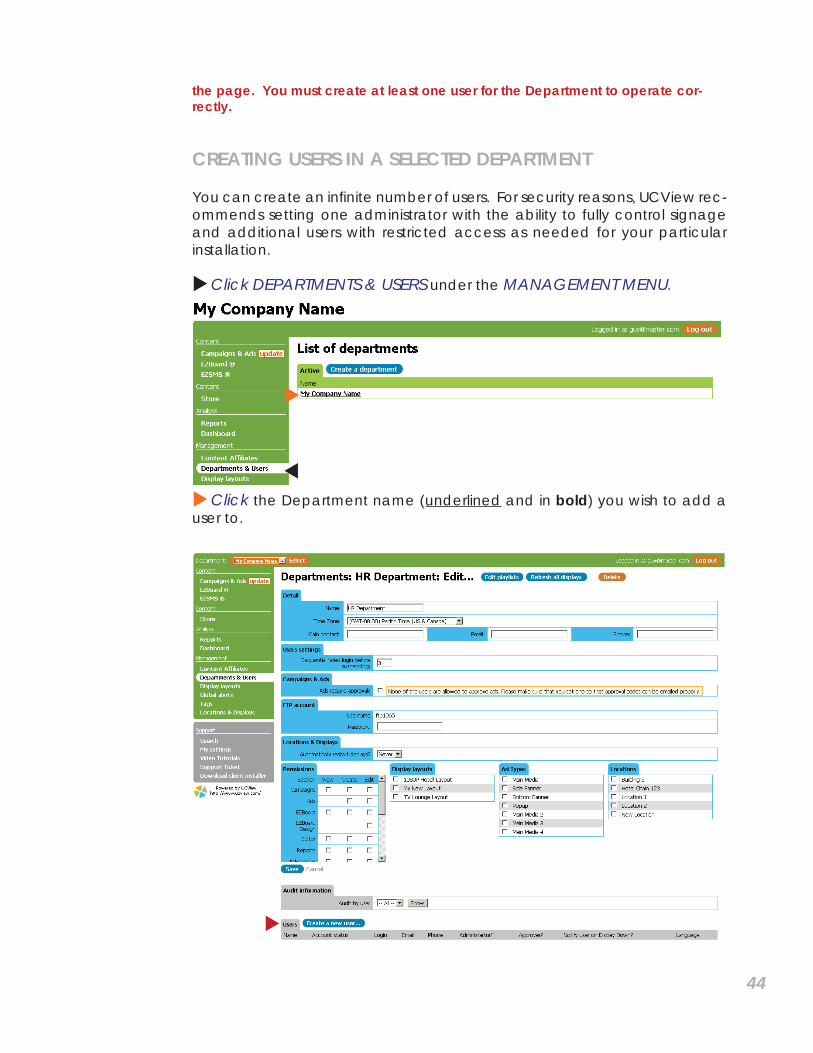
CREATING USERS IN A SELECTED DEPARTMENT
You can create an infi nite number of users. For security reasons, UCView rec-ommends setting one administrator with the ability to fully control signage and additional users with restricted access as needed for your particular installation.
Click DEPARTMENTS & USERS under the MANAGEMENT MENU.
Click the Department name (underlined and in bold) you wish to add a user to.
45
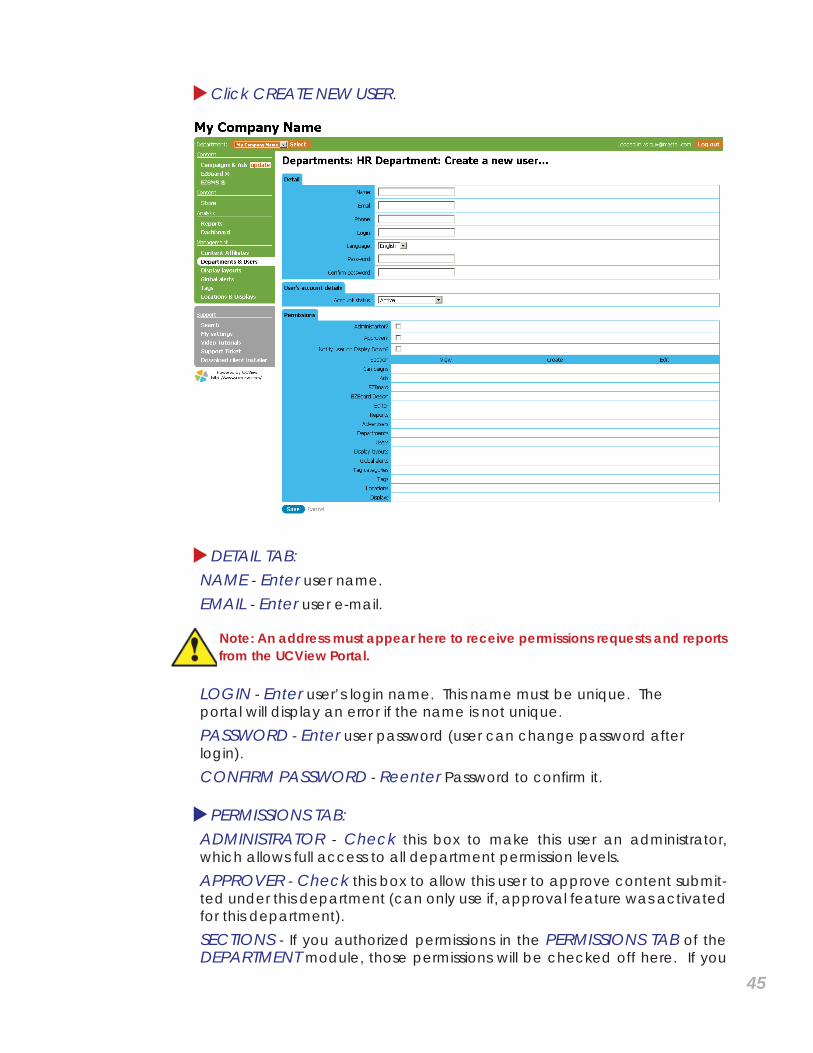
Click CREATE NEW USER.
DETAIL TAB: NAME - Enter user name.EMAIL - Enter user e-mail.
Note: An address must appear here to receive permissions requests and reports from the UCView Portal.
LOGIN - Enter user’s login name. This name must be unique. The portal will display an error if the name is not unique.PASSWORD - Enter user password (user can change password after login).CONFIRM PASSWORD - Reenter Password to confi rm it.
PERMISSIONS TAB:ADMINISTRATOR - Check this box to make this user an administrator, which allows full access to all department permission levels.APPROVER - Check this box to allow this user to approve content submit-ted under this department (can only use if, approval feature was activated for this department).SECTIONS - If you authorized permissions in the PERMISSIONS TAB of the DEPARTMENT module, those permissions will be checked off here. If you
46
did not authorize permissions in the DEPARTMENT module, check the box-es next to the Sections you wish to grant this user.
Click SAVE to create the user.
Under the Create New User module you will only be able to select permis-sion level selected under department.
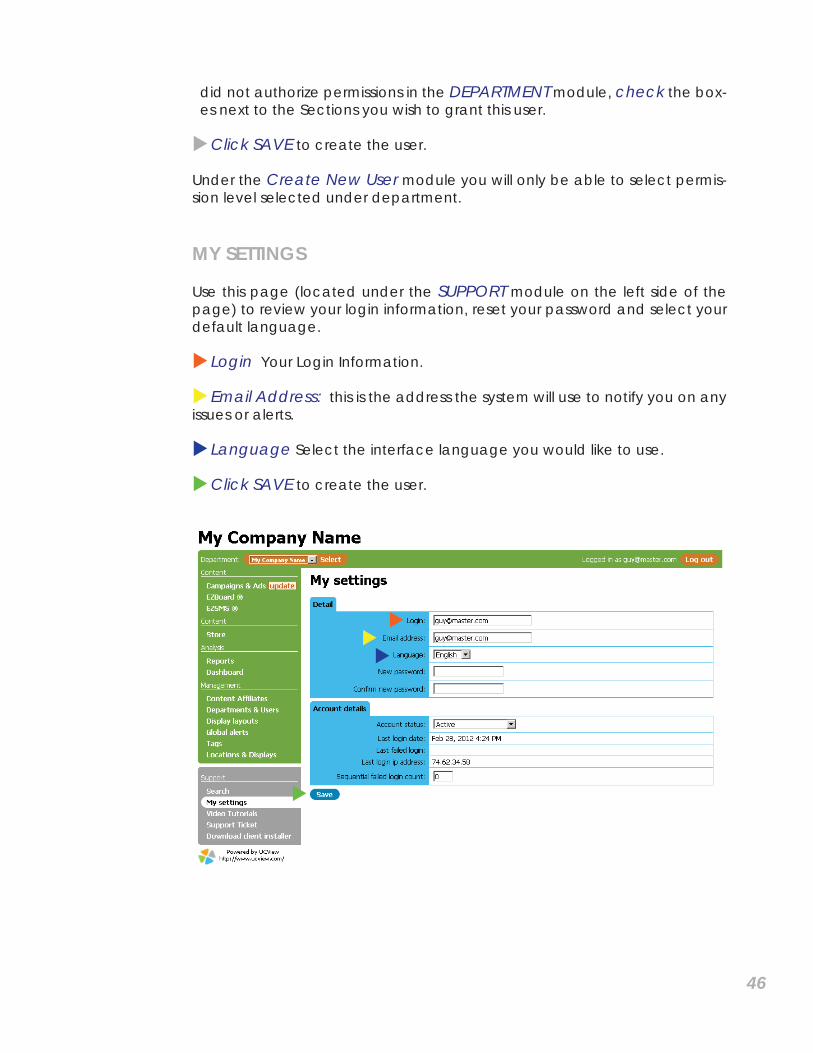
MY SETTINGS
Use this page (located under the SUPPORT module on the left side of the page) to review your login information, reset your password and select your default language.
Login Your Login Information.
Email Address: this is the address the system will use to notify you on any issues or alerts.
Language Select the interface language you would like to use.
Click SAVE to create the user.

47
48
Managing Alerts
GLOBAL ALERTS
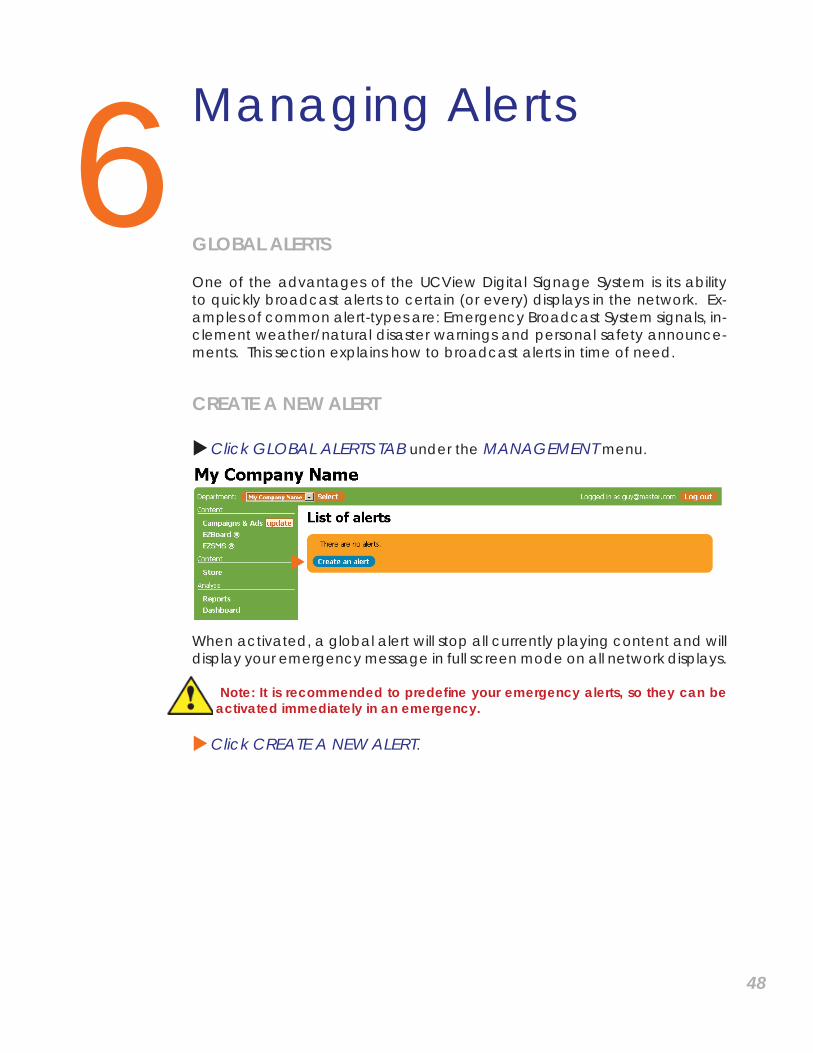
One of the advantages of the UCView Digital Signage System is its ability to quickly broadcast alerts to certain (or every) displays in the network. Ex-amples of common alert-types are: Emergency Broadcast System signals, in-clement weather/natural disaster warnings and personal safety announce-ments. This section explains how to broadcast alerts in time of need.
CREATE A NEW ALERT
Click GLOBAL ALERTS TAB under the MANAGEMENT menu.
When activated, a global alert will stop all currently playing content and will display your emergency message in full screen mode on all network displays.
Note: It is recommended to predefi ne your emergency alerts, so they can be activated immediately in an emergency.
Click CREATE A NEW ALERT.
6
49
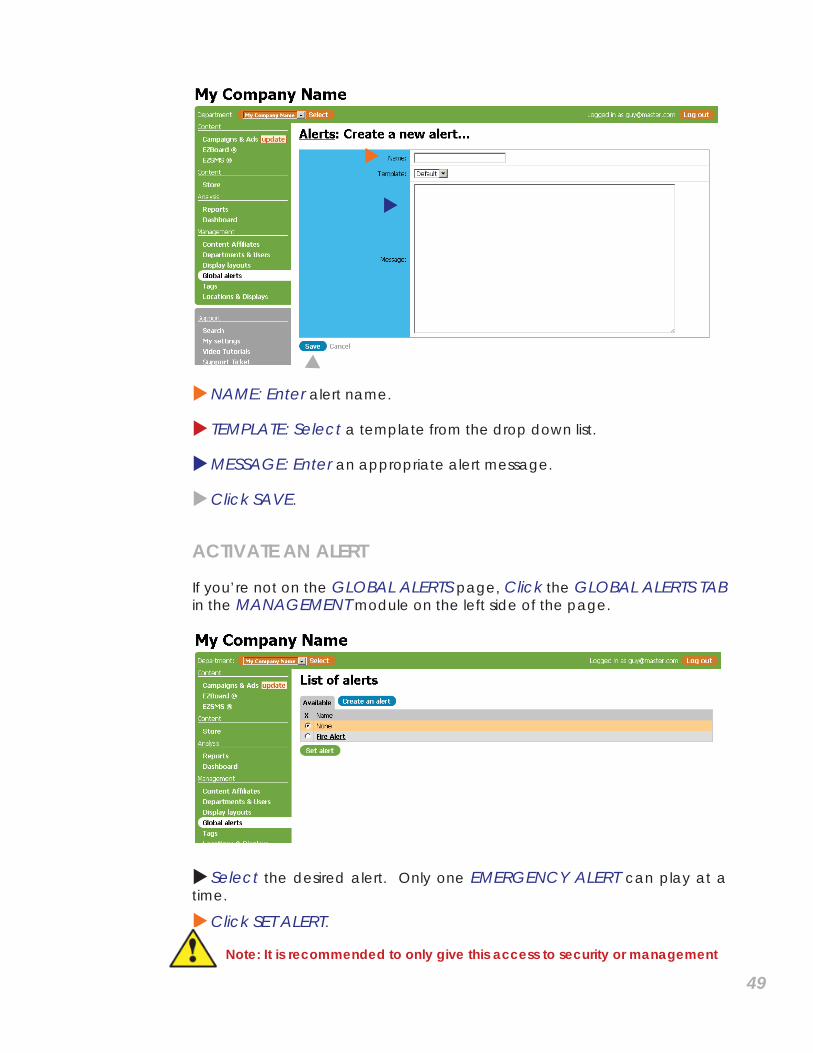
NAME: Enter alert name.
TEMPLATE: Select a template from the drop down list.
MESSAGE: Enter an appropriate alert message.
Click SAVE.
ACTIVATE AN ALERT
If you’re not on the GLOBAL ALERTS page, Click the GLOBAL ALERTS TAB in the MANAGEMENT module on the left side of the page.
Select the desired alert. Only one EMERGENCY ALERT can play at a time.
Click SET ALERT.
Note: It is recommended to only give this access to security or management
50
personnel.
Reports
CREATE A NEW REPORT CRITERIA
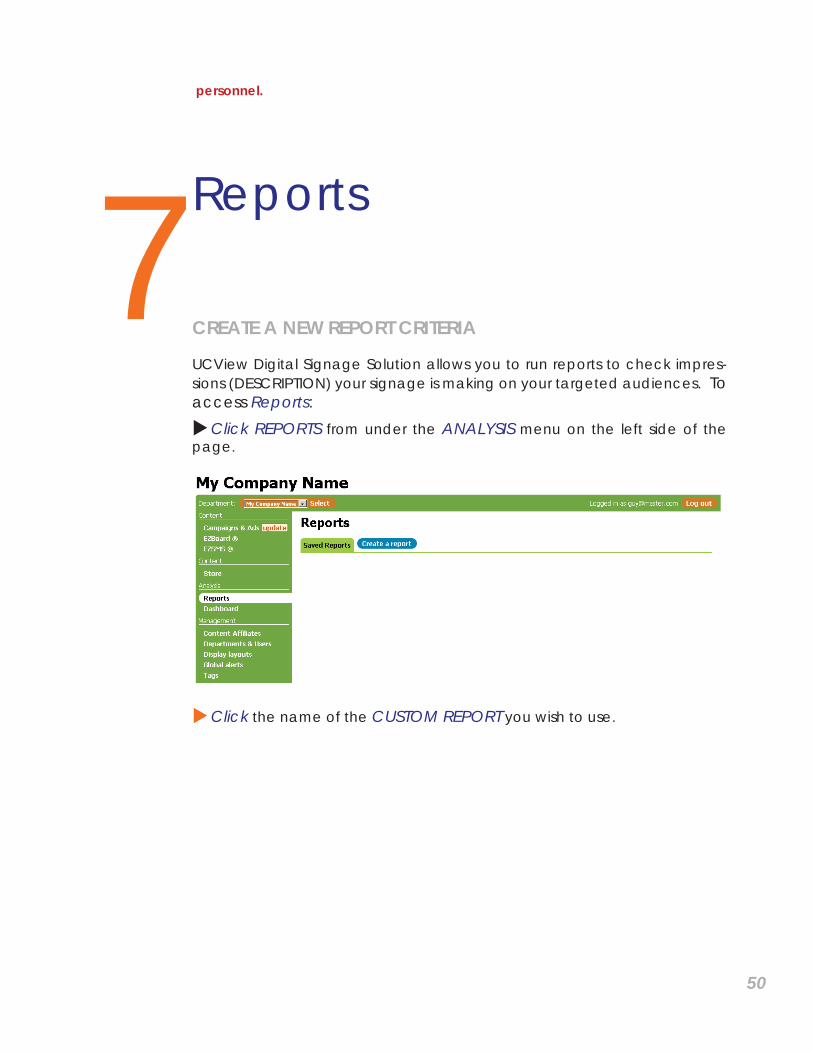
UCView Digital Signage Solution allows you to run reports to check impres-sions (DESCRIPTION) your signage is making on your targeted audiences. To access Reports:Click REPORTS from under the ANALYSIS menu on the left side of the page.
Click the name of the CUSTOM REPORT you wish to use.
7
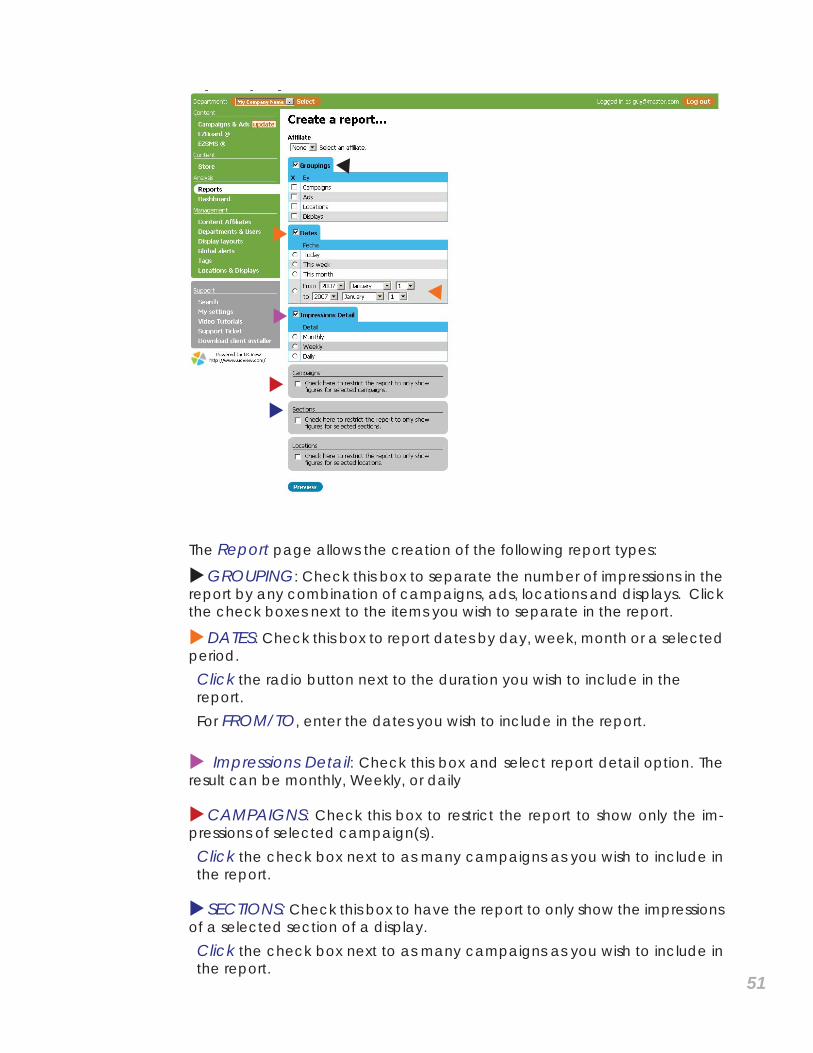
The Report page allows the creation of the following report types:
GROUPING: Check this box to separate the number of impressions in the report by any combination of campaigns, ads, locations and displays. Click the check boxes next to the items you wish to separate in the report.
DATES: Check this box to report dates by day, week, month or a selected period. Click the radio button next to the duration you wish to include in the report. For FROM/TO, enter the dates you wish to include in the report.
Impressions Detail: Check this box and select report detail option. The result can be monthly, Weekly, or daily
CAMPAIGNS: Check this box to restrict the report to show only the im-pressions of selected campaign(s). Click the check box next to as many campaigns as you wish to include in the report.
SECTIONS: Check this box to have the report to only show the impressions of a selected section of a display.Click the check box next to as many campaigns as you wish to include in the report.
51
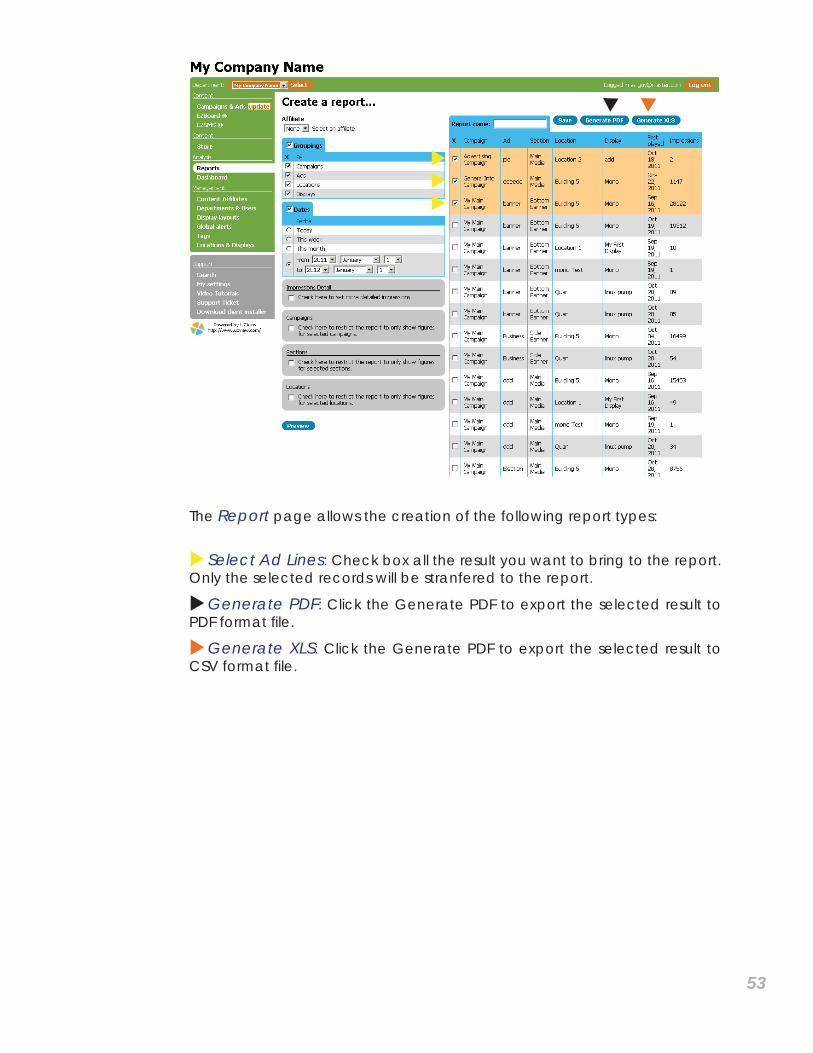
The Report page allows the creation of the following report types:
Select Ad Lines: Check box all the result you want to bring to the report. Only the selected records will be stranfered to the report.
Generate PDF: Click the Generate PDF to export the selected result to PDF format fi le.
Generate XLS: Click the Generate PDF to export the selected result to CSV format fi le.
53

Reference
DIGITAL SIGNAGE MEDIA TYPES
PICTURE FORMATS
JPEGThe Joint Photographic Experts Group fi le format is a raster-based image interchange format that can be used across a variety of applications and platforms. The JPEG image is compressed and does not include any of the editing fea-tures found in TIFF, PSD, EPS or any other application-specifi c fi le types. The degree of compression can be adjusted, allowing a selectable trade off between storage size and image quality. JPEG typically achieves 10:1 compression with little perceptible loss in image quality.
GIFThe Graphic Interchange Format is a bit map image format that was intro-duced by CompuServe in 1987 and has since come into widespread usage on the World Wide Web due to its wide support and portability.The format supports up to 8 bits per pixel, allowing a single image to refer-ence a palette of up to 256 distinct colors chosen from the 24-bit RGB color space. It also supports animations and allows a separate palette of 256 col-ors for each frame. The color limitation makes the GIF format unsuitable for reproducing color photographs and other images with continuous color, but it is well-suited for simpler images such as graphics or logos with solid areas of color.GIF images are compressed using the Lempel-Ziv-Welch (LZW) lossless data compression technique to reduce the fi le size without degrading the visual quality. This compression technique was patented in 1985.
PNGPortable Network Graphics (PNG) is a bit map image format that em-ploys lossless data compression. PNG was created to improve upon and replace GIF (Graphics Interchange Format) as an image-fi le for-mat not requiring a patent license. PNG supports palette-based (palettes of 24-bit RGB colors), grayscale and RGB images. PNG was designed for transferring images on the In-ternet, not professional graphics, and so does not support other color spaces, such as CMYK.
8
54
PNG fi les nearly always use fi le-extension “PNG” or “png” and are as-signed MIME media type “image/png” (approved October 14, 1996).
VIDEO FORMATS
NTSC and PALNational Television System Committee (NTSC) and Phase Alternation Line (PAL) are worldwide video formats. NTSC is typically used in the United States and Canada, PAL is typically used elsewhere. PAL has a higher spatial resolution (more lines per image) and NTSC has a higher temporal resolution (more image samples per second).With an aspect ratio of 1.33:1, 4 x 3 PAL has a standard resolution of 720 x 576 pixels, and 4 x 3 NTSC has a standard resolution of 720 x 480 pixels. For widescreen applications, 16 x 9 Enhanced PAL has a resolution of 538 x 576 pixels, and 16 x 9 Enhanced NTSC has a resolution of 538 x 480.
Video Compression Formats
Windows Media Video (WMV)Windows Media Video is a compressed video fi le format for several propri-etary codecs developed by Microsoft. The original codec, known as WMV, was originally designed for Internet streaming applications. The other co-decs, such as WMV Screen and WMV Image, cater to specialized content.
MPEGThe MPEG (the Motion Picture Experts Group) subcommittee of the Interna-tional Standards Organization (ISO) is in charge of the development of stan-dards for coded representation of digital audio and video. MPEG is a set of defi ned standards for compressing analog sources into digital formats that can be easily stored and distributed. Following is a brief summary of each of the MPEG formats:• MPEG 1, originally known as simply “MPEG,” is the oldest imple-
mented standard for video compression. The MPEG 1 standard al-lows for greater compression and a smaller fi le size than MPEG 2 but lacks the quality of the content that is achieved by using MPEG 2. The format size is 352 x 240 for NTSC and 352 x 288 for PAL. It has a maximum bit rate (the speed at which bits of data passes between locations in a network or within a device) of 1.5 Mbps.
• MPEG 2 is the video compression format used for DVD and cable televi-sion set-top boxes today. It is well established within the industry and has become the most popular format for the distribution of full-frame video over IP. If used to compress high-defi nition (HD) content, the MPEG 2 standard results in an output of two to four times higher than its common encoding rate. MPEG 2 is usually encoded between 2 and 6 Mbps.
• MPEG 4 was jointly developed by the ITU-T (International Telecommu-nications Union - Telecommunications Standardization Sector) and the MPEG as a very-low-bandwidth Internet video distribution format. Be
55
• cause it has no restrictions on resolution or bit rate, MPEG 4/H.264 can be used to display video in full screen mode or be sized to fi t within a section on the screen. As such, this is the format of choice for digital sig-nage. It has a very effi cient compression algorithm and can signifi cant-ly reduce fi le sizes, allowing for distribution of longer video clips across the network with less network burden.
FLASHThe Flash video format is a proprietary fi le format originally developed by Macromedia (now Adobe). One of the advantages that Flash offers over traditional video formats is that it supports the Action Script programming language, allowing for a Flash video to be embedded in an HTML page and played back with a browser plug-in rather than requiring an external appli-cation to play the fi le.
DIGITAL SIGNAGE LAYOUT OVERVIEW
Digital signage’s ability to reach your target audience is based on three equally important factors: Infrastructure (software, server, administration, media players, displays), content (ads, announcement, graphics, sound) and the way content is presented to the audience. As stated earlier, it is vitally important to plan your presentation space carefully and ahead of installation. Doing so will improve audience reaction and retention, as well as save you and your organization time and money throughout the process. Though the choices you make in setting up the look of your displays will be based on knowledge of your audience’s needs and your personal aesthet-ic, some basic rules will help in making the best decisions before installing the infrastructure and sending ads.
USE QUALITY CONTENT: The goal in using digital signage should be to get the right message to a targeted audience. Well designed and executed graphics is the single most important element in achieving this in your ad campaigns. After making your investment in UCView’s Digital Signage tech-nology, take full advantage of it by using the best-quality graphics in your campaigns.KEEP IT SIMPLE: Targeting your audience not only requires well-designed content, but also placing such content in relation to other content so that viewers’ eyes gravitate toward the targeted content. Add only the number of sections you need on the display. Leave some room between sections for your background (or white-space) to show through. Working with simple layouts and well placed graphic elements will make this task easier and cre-ate a more pleasing experience for your viewers.MAKE IT CLEAR: Content should clearly indicate what the message is and who it is for. Use simple, direct wording and related images/animations/video to support the message. MAKE IT FIT: To avoid content that appears compressed and distorted, graphics should be created in the same pixel resolution as the section it
56
appears in. Web pages will not resize when linked to your display, so only choose this option if the site matches the pixel resolution of your signage. Small displays, even in full screen mode, are generally not large enough to fi t a web page.PUT FEATURED CONTENT IN OPTIMAL SECTIONS: Design content in each section of your displays so the featured content is the primary focus of users prior to deploying your digital signage network. The featured content should be more eye-catching, but not so fl ashy as to detract from the environment your signage is installed in. Place featured content in a prominent section (usually the largest section).
TECHNICAL SUPPORT
To contact UCView Media Technical Support: For all calls within the United States and Canada, call toll free (877) 828-4399 Outside the United States, call (818) 772-8255.By e-mail: [email protected]: visit http://www.ucview.com/support and click on the Submit Support Ticket link. A UCView Support Forum is also available. Users can post and answer other users’ questions. Register and log in at http://forum.ucview.com. Additional news and updates for UCView are available on the UCView Blog page: www.ucview.com/blog.
WARRANTY POLICY
The UCView Server Appliance and UCView Media Players offer a one (1) year warranty against manufacturing defects. Industrial-class UCView Me-dia Players offer a three year manufacturer’s warranty against manufactur-ing defects.
UCView Digital Signage monitor displays are warrantied by their manufac-turers.
Please contact your UCView Customer Service Representative regarding the warranty for your particular installation.
57