Digital Camera USER GUIDE -...
18
USER GUIDE Digital Camera © Jazwares, Inc. 2010
Transcript of Digital Camera USER GUIDE -...

1USER GUIDE
Digital Camera
© Jazwares, Inc. 2010

2
CONTENTS
Please read the instructions along with the camera carefully
before you use it, so that you can operate it conveniently.
Warranty
Camera Controls
16-17
Problem Solving 14
Notes 15
5-7
Using Your Camera
Camera Modes
Downloading Pictures
Instalation of Driver
Taking Photographs
Turning Off the Camera
8
9-11
12
Using the Digital Camera as PC Camera 13
Using the Digital Camera as Web Cam 12
Camera Features & Specifications 14
Profile Overview, System Requirements & Precautions 5
WELCOME, Safety Tips & Battery Info 3- 4
Included in box:
• Digital Camera
• USB Cable - Specifically to download pictures to the computer
• Software CD
• User Guide and Warranty

3
Congratulations on your purchase of the Sonic Digital Camera!We hope you enjoy all the great features. To get the most out ofyour Digital Camera please read this manual as it provides tipsand information about its various features.
Information: Requires 2 AAA / LR03 1.5V Batteries (not included).Warning:Different types of batteries or new batteries are not to be mixed.Do not mix alkaline, standard (carbon-zinc) or rechargeable(nickel-cadmium) batteries.Do not use rechargeable batteries.Only batteries of the same or equivalent type as recommended, are to be used.Batteries are to be inserted with the correct polarity.Exhausted batteries are to be removed from the toy.Packaging must be kept as it contains important information.The supply terminals are not to be short-circuited.Non-rechargeable batteries are not to be recharged.Only batteries of the equivalent type are to be used.Dispose of batteries properly.Do not dispose of batteries in fire ; batteries may explode or leak.Please keep this instruction manual for future use.
Battery Operation:Replacement of batteries must be done by an adult.Remove the screw on the battery door with a screw driver.Open the battery door.Insert 2 AAA batteries with correct polarity into the battery compartment.Close the battery compartment cover and tighten screw.
• Use this only as intended.• To prevent fire or shock hazard, do not expose this unit to rain or moisture.• Do not submerge the unit in any liquid• Do not disassemble
SAFETY TIPS:
Battery Information:

4
Battery Information:
Screw
Battery CompartmentRequires 2 AAA / LR03 1.5V Batteries
(not included)

5
Profile Overview:
System Requirements:
This camera takes still video and acts as a PC Webcam. Through
the USB Cable provided, you can download the capture images
to your computer, or use the camera as a webcam for face-to-face
online chat with your friends the internet.
• Microsoft win 98/2000/NT/ME/XP operation system
• 125MB or above free hard disk space, 32MB or more ROM
• Usable USB interface and CD-ROM
• Color Monitor with at least 800 x 600 24 net character or above
Precautions:
• Always download the images from camera before the battery is
discharged, otherwise, the images will be deleted automatically.
• When using the PC camera function it is not necessary to use
the battery as the computer will provide the power required trough the
the USB cable.
Viewfinder : Allows you to center your photos.
Status LCD Screen : Indicates amount of photos taken.
Shutter Button : Press the button to take your pictures.
Mode Button : Use this button to change the resolution, delete photos & more.
Battery Cover : Change the batteries by opening the battery compartment.
USB Connection : Use the USB cable to download your images to your computer.
Camera Lens : Keeping the lens clean will allow you to take better photos.
Camera Controls:

6
Camera Controls:
Viewfinder
CameraLens
Battery Compartment

7
Camera Controls:
Viewfinder
Status LCD Screen
Shutter Buttons
ModeButton
USBConnection

8
Installation Of Driver:
Using Your Digital Camera:
1. Make sure the camera is not conected to your computer. Load
the software CD to your PC.
2. Installation of Driver:
Click <Install Camera Drive> and follow the step-by-step instructions
to complete installation. After successful installation of driver, restart
your computer. A "Dual Mode Camera" folder will appear on your desktop.
Taking Photographs:1.To turn on the camera, press the MODE BUTTON on the back.
The LCD data screen will appear.
2. Center your subject in the viewfinder.
3. Hold the camera steady, and press the Shutter Button to take photos;
4. When you hear the buzzer beep once, this indicates you have
taken a photo.
5. When the maximum number of photos have been taken, the buzzer will
sound continuously indicating no additional images can be shot.
NOTE: When taking photos, the louder sound indicates a successful
shot. A faint beep will indicate a failed shot. The digital camera is
capable of storing over 99 images, however, the LCD can only
display up to 99.
Read carefully and start using your Sonic Digital Camera!
Turning Off The Camera:1. Press MODE BUTTON until the data LCD displays "OFF".
2. Press the Shutter Button to turn off the camera swiftly.

9
Camera Modes:
Hi-Resolution Pictures
Ready To CloseOr ShutdownMode
This is the default mode when the camera is turned on.
Change the default settings by pressing the MODE BUTTON. Continue pressing until your reach your desired mode.
Once the setting is displayed on the LCD, press Shutter Button to select.
Camera Mode Options
To take pictures in this mode, press the Shutter Button. A distinct beepcan be heard and a photo is taken. Automatically the number displayed on the LCD screen will decrease by one.
NOTE : If the brightness is too low, 2 quick beeps are heard indicating thatthe photo can not be taken.
Hi
Hi-Resolution Pictures
Hi
Self TimerMode
AVI Mode
ContinuousCapture
Delete All Delete Last Change to LowResolution
Lo
Change ToCompressedMode
Change ToNormalMode
Change To50 Hz
Change To60 Hz

10
Self Timer Mode:
Self TimerMode
Press the MODE BUTTON until the LCD screen shows Self Timer mode,then press and hold the SHUTTER BUTTON to enter the 10 second time set.The digital camera will beep for every second.After 10 seconds, the camera will take the picture.
NOTE: This function will not operate when the memory is full and themaximum number of pictures have been taken.
NOTE: When the memory is full, the operation will stop and thedisplay will show “000”.
AVI Mode
Press the MODE BUTTON until the LCD screen shows AVI Mode,then press the SHUTTER BUTTON, for continues video capture.
AVI Mode:
To stop the video capture, release the shutter button.
ContinuousCapture
Press the MODE BUTTON until the LCD screen shows Continuous Capture,then press the SHUTTER BUTTON .
Continuous Capture Mode:
The camera will continuously capture 3 photos.
Delete All
Press the MODE BUTTON until the LCD screen shows Delete All,then double press the SHUTTER BUTTON to confirm your choice.
Deleting All Photos Saved In Memory:
All the photos stored in the camera will be deleted.

11
The resolution governs how much detail is captured in each picture.The default resolution is Hi.
Press the MODE BUTTON until the data LCD displays Low Mode.Press the SHUTTER BUTTON to change resolution.
Press the MODE BUTTON until the data LCD displaysthe default compression mode Hd.Press the SHUTTER BUTTON to change to"Lo" compression.
Press MODE BUTTON until the LCD displays 60.Press the SHUTTER BUTTON to shift to50Hz power supply.
Image Compression:
Frequency Selection:
Change to LowResolution
Changing Resolution:
Change ToCompressedMode
Change ToNormalMode
Change To50 Hz
Change To60 Hz
To save battery power, the camera will automatically shut off when not used after 30 seconds.
Automatic Power Off Feature:
Delete Last
Press the MODE BUTTON until the LCD screen shows Delete Last,then press the SHUTTER BUTTON to confirm your choice.
Deleting Last Photo Saved In Memory:
The last photo taken will be deleted.
Lo

12
Do not connect the camera before the software is installed. Insert the CD in your CD-ROM drive.
When the photo memory is full, the operation will stop and the numbers 000 will appearon the camera display.Use the USB cable to connect the computer with the digital camera. You will hear a "beep" sound indicating a successful connection.
DO NOT CONNECT YOUR CAMERA TO THE COMPUTER WHILE YOU INSTALL THE DRIVER.
After successful installation of driver, restart your computer.
Using Software CD:
After saving the photos you can empty the memory of your camera and begin taking pictures again.
Click the download icon on the center to download your images.
Note: After downloading the files from your camera, thumbnails of the images will be shown onthe twelve boxes of the program screen. Video images will be marked with an "AVI" logo onthe upper left-hand corner of the thumbnails.
Select the folder "Dual Mode Camera" on yourcomputer desktop or under the Program Menu.Click on the "MYDSC" icon to open program.
Click on the “save photos” icon to save photos tothe computer.Select location on the computer and click save.
Downloading Pictures:
You will hear a "beep" sound indicating a suc
Click the download icon on the center to dow
SelecomClick
The digital camera supports most WebCam software applications such as Microsoft®,Yahoo Messenger® etc. Used with these software applications, the digital camera functionsas a Web Cam. When your digital camera is connected to your computer, click the "play"icon to activate the digital camera as Web Cam
Using The Digital Camera As Web Cam:
13
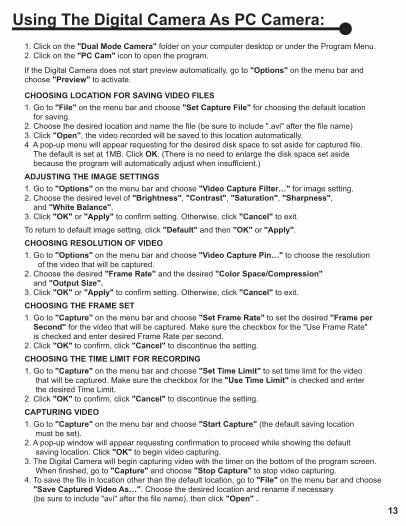
1. Click on the "Dual Mode Camera" folder on your computer desktop or under the Program Menu.2. Click on the "PC Cam" icon to open the program.
If the Digital Camera does not start preview automatically, go to "Options" on the menu bar andchoose "Preview" to activate.
CHOOSING LOCATION FOR SAVING VIDEO FILES
1. Go to "File" on the menu bar and choose "Set Capture File" for choosing the default location for saving.2. Choose the desired location and name the file (be sure to include ".avi" after the file name)3. Click "Open", the video recorded will be saved to this location automatically.4 A pop-up menu will appear requesting for the desired disk space to set aside for captured file. The default is set at 1MB. Click OK. (There is no need to enlarge the disk space set aside because the program will automatically adjust when insufficient.)
ADJUSTING THE IMAGE SETTINGS
1. Go to "Options" on the menu bar and choose "Video Capture Filter…" for image setting.2. Choose the desired level of "Brightness", "Contrast", "Saturation", "Sharpness", and "White Balance".3. Click "OK" or "Apply" to confirm setting. Otherwise, click "Cancel" to exit.
To return to default image setting, click "Default" and then "OK" or "Apply".
CHOOSING RESOLUTION OF VIDEO
1. Go to "Options" on the menu bar and choose "Video Capture Pin…" to choose the resolution of the video that will be captured.2. Choose the desired "Frame Rate" and the desired "Color Space/Compression" and "Output Size".3. Click "OK" or "Apply" to confirm setting. Otherwise, click "Cancel" to exit.
CHOOSING THE FRAME SET
1. Go to "Capture" on the menu bar and choose "Set Frame Rate" to set the desired "Frame per Second" for the video that will be captured. Make sure the checkbox for the "Use Frame Rate" is checked and enter desired Frame Rate per second.2. Click "OK" to confirm, click "Cancel" to discontinue the setting.
CHOOSING THE TIME LIMIT FOR RECORDING
1. Go to "Capture" on the menu bar and choose "Set Time Limit" to set time limit for the video that will be captured. Make sure the checkbox for the "Use Time Limit" is checked and enter the desired Time Limit.2. Click "OK" to confirm, click "Cancel" to discontinue the setting.
CAPTURING VIDEO
1. Go to "Capture" on the menu bar and choose "Start Capture" (the default saving location must be set).2. A pop-up window will appear requesting confirmation to proceed while showing the default saving location. Click "OK" to begin video capturing.3. The Digital Camera will begin capturing video with the timer on the bottom of the program screen. When finished, go to "Capture" and choose "Stop Capture" to stop video capturing.4. To save the file in location other than the default location, go to "File" on the menu bar and choose "Save Captured Video As…". Choose the desired location and rename if necessary (be sure to include "avi" after the file name), then click "Open" .
Using The Digital Camera As PC Camera:

14
Commonly Encountered Problems :
When pressing the mode button camera does not turn on.- Battery level is to low. You should replace the battery.
The camera cannot transfer photos on to the computer or says there are no photos.-Restart the computer and reconnect the camera.-Check the control panel/system settings, if is not present, reinstall it again.
Need More Help?Do Not Return Item to Store.Call 1-800-370-1827 and speak to a customer service representative.
Problem Solving:

15
This equipment has been tested and found to comply with the limits for
a Class B digital device, pursuant to Part 15 of the FCC rules.
These limits are designed to provide reasonable protection against
harmful interference in a residential installation. This equipment generates,
uses and can radiate radio frequency energy and, if not installed and used
in accordance with the instructions, may cause harmful interference to
radio communications.
However, there is no guarantee that interference will not occur in a
particular installation. If this equipment does cause harmful interference
to radio or television reception, which can be determined by switching the
equipment off and on, the user is encouraged to try to correct the
interference by one or more of the following measures:
Reorient or relocate the receiving antenna.
• Increase the separation between the equipment and receiver.
• Connect the equipment into an outlet on a circuit different from
that to which the receiver is connected.
• Consult the dealer or an experience radio/TV technician for help.
NOTES:
Sonic Digital Camera65415

16
WARRANTY COVERAGEJazwares, Inc.’s warranty obligation is limited to the terms set forth below.
WHO IS COVEREDJazwares, Inc. warrants the product to the original purchaser or the person receivingthe product as a gift against defects in material & workmanship as based on the dateof the original purchase from an authorized dealer or retailer. The original sales receiptshowing the product name & the purchase date from an authorized retailer is consideredsuch proof.
Jazwares, Inc. warrants replacement products or parts provided under this warrantyagainst defects in materials & workmanship from the date of the replacement or repairfor ninety (90) days or for the remaining portion of the original product’s warranty, whichever provides longer coverage for you. When a product or part is exchanged, any replacement item becomes your property and the replaced item becomesJazwares, Inc. property. If a refund is granted, your product becomes Jazwares, Inc. property.
Replacement product can only be sent if all warranty requirements are met.Failure to follow all requirements can result in delay.
WHO IS COVEREDJazwares, Inc. warranty covers new products if a mechanical defect arises & a valid claim is received within the Ninety (90) Day Warranty Period. At its option, Jazwares, Inc. will either (1) repair the product at no charge,using new or refurbishedreplacement parts, or (2) exchange the product with a product that is new or which hasbeen manufactured from new, or serviceable used parts & is at least functionallyequivalent or most comparable to the original product in Jazwares, Inc.’s inventory, or (3) refund the original purchase price of the product.
WHAT IS NOT COVERED - EXCLUSIONS & LIMITATIONSThe limited warranty applies only to the products manufactured by or for Jazwares, Inc.that can be identified by the trademark, trade name, or logo affixed to it. This limitedwarranty does not apply to any non Jazwares, Inc. hardware product or any software, even if packaged or sold with the product. Non Jazwares, Inc. manufacturers, suppliers, or publishers may provide a separate warranty for their own products packaged with thebundled product. Jazwares, Inc. is not liable for any damage to or loss of any programs, data or other information stored on any media contained within the product, or any non - Jazwares, Inc. product or part not covered by this warranty.
Limited Ninety (90) Day Warranty:
17
WHAT IS NOT COVERED - EXCLUSIONS & LIMITATIONSThis warranty does not apply (a) to damage caused by accident, abuse, misuse, misapplication, or non - Jazwares, Inc. product,(b) to damage caused by service performed by anyone other than Jazwares, Inc.(c) to a product or a part that has been modified without the written permissionof Jazwares, Inc.
LIMITED WARRANTY DOES NOT COVER• Shipping charges to return defective product to Jazwares, Inc. • Product repair and/or part replacement because of improper installation, connectionsto improper voltage supply, abuse, neglect, accident, unauthorized repair or othercause not within the control of Jazwares, Inc.• Damage or claims for products not being available for use, or for lost data orlost software.• Damage occurring to product during shipping.• A product that requires modification or adaptation to enable it to operate in any countryother then the country for which it was designed, manufactured approved and/or authorized,or repair of products damaged by these modifications.• Product lost in shipment and no signature verification receipt can be provided.• Failure to operate per Owner’s Manual.
RMA REQUIREMENT
BEFORE RETURNING ANY PRODUCT, CONTACT JAZWARES, INC. CUSTOMER SERVICE.Customer service is available 9-6 EST at 1-800-370-1877.REPAIR OR REPLACEMENT AS PROVIDED UNDER THIS WARRANTY IS THE EXCLUSIVEREMEDY FOR THE CONSUMER. JAZWARES, INC. SHALL NOT BE LIABLE FOR ANY INCIDENTALOR CONSEQUENTIAL DAMAGES FOR BREACH OF ANY EXPRESS OR IMPLIED WARRANTYON THIS PRODUCT. EXCEPT TO THE EXTENT PROHIBITED BY APPLICABLE LAW, ANY IMPLIEDWARRANTY OF MERCHANTABILITY OR FITNESS FOR A PARTICULAR PURPOSE ON THIS PRODUCTIS LIMITED IN DURATION TO THE DURATION OF THIS WARRANTY.
Some states do not allow exclusions or limitation of incidental or consequential damages, or allowlimitations on how long an implied warranty lasts, so the above limitations or exclusions may not apply to you
This warranty gives you specific legal rights. You may have other rights which vary from state to state.
© Jazwares, Inc.
If Jazwares, Inc.’s Customer Service verifies that the product is defective,the Return Authorization Department will issue an RMA number to be placed onthe outer package of the product. Jazwares, Inc. can not accept any product thatdoes not include an RMA number on the package.
Limited Ninety (90) Day Warranty:

18USER GUIDE
Digital Camera
Jazwares Inc.
555 Sawgrass Corporate Parkway
Sunrise, Fl. 33325
© Jazwares, Inc. 2010V7
Image Sensor: 300K Pixel CMOS sensor Internal Memory: 2MB built-in SDRAM Modes: Digital video recording (no sound) - still photos - PC Camera Resolution: 320x240(QVGA) File Formats: 24-bit JPEG/AVl Storage Capacity: -VGA 26 images 52 compressed -QVGA 104 images 208 compressed -AVI ~20 secondsStatus display: 888 Monochrome LCD DisplayInterface: USB 1.0Video Frame Rate: 8-12fps (QVGA)Lens: Fixed; f=6.00mmFocus: Settings 30cm~infinity (Normal)Aperture: F2.8Power source: 2 AAA (Not included)Power control: Auto power off after 30 seconds without operationSelf timer: 10 secondsViewfinder: Built-inAuto off system time: 30secondsLow voltage alarm: AutoDimensions: 95mm(L)x65mm(W)x21(min)~27(max)mm(H)Weight: 1.94oz (without battery)
Camera Features & Specifications:
Number Of PicturesStored In Memory
HighResolution
LowResolution
Without Compression
26 104
WithCompression
52 208
Other brand names mentioned herein are
for identification purposes only and may be
trademarks of their respective holder(s).