Digital Camera C-200 ZOOM D-510 ZOOM · C-200 ZOOM D-510 ZOOM Digital Camera Reference Manual •...
162
C-200 ZOOM D-510 ZOOM Digital Camera Reference Manual • Before you use this camera, read this manual and then store it in a safe location where you can find it for future use. • We recommend that you spend some time taking test shots and experimenting with all of the features before you take important pictures. C-200 ZOOM
Transcript of Digital Camera C-200 ZOOM D-510 ZOOM · C-200 ZOOM D-510 ZOOM Digital Camera Reference Manual •...
C-200 ZOOMD-510 ZOOM
Digital Camera
Reference Manual• Before you use this camera, read this manual and then store it in a
safe location where you can find it for future use.• We recommend that you spend some time taking test shots and
experimenting with all of the features before you take importantpictures.
C-200 ZOOM
© Copyright 2001. Olympus Optical Co., Ltd. All rights reserved.
Legal and other notices• The contents of this document are subject to change without prior notice.• Although the contents of this document have been carefully checked
to avoid errors, some may still occur. If you have a question about anypoint, or you find mistakes or omissions, please contact us.
• No part of this publication may be reproduced or reprinted except forpersonal use without prior written permission from Olympus.
• Olympus makes no representations or warranties regarding anydamages, or benefit expected by using this unit lawfully, or anyrequest from a third person, which are caused by the inappropriateuse of this product.
• Olympus makes no representations or warranties, regarding anydamages or any benefit expected by using this unit lawfully, caused byerasing picture image data.
Important:• Your camera may differ slightly from that shown in illustrations.

I
Trademarks• IBM is a registered trademark of International Business Machines
Corporation.• Microsoft and Windows are registered trademarks of the Microsoft
Corporation.• Macintosh is a trademark of Apple Computer, Inc.• All other company and product names are registered trademarks of
their respective owners.
Declaration of ConformityModel Number: D-510 ZOOMTrade Name: OLYMPUSResponsible party: Olympus America Inc.Address: 2 Corporate Center Drive, Melville, New York 11747-3157
U.S.A.Telephone number: 631-844-5000
Tested to comply with FCC standards FOR HOME OR OFFICE USE
This device complies with Part 15 of the FCC rules. Operation is subject tothe following two conditions:(1) This device may not cause harmful interference, and (2) This device must accept any interference received, including
interference that may cause undesired operation.
This Class B digital apparatus meets all requirements of the CanadianInterference-Causing Equipment Regulations.
“CE” mark indicates that this product complies with the Europeanrequirements for safety, health, environment and customer protection.
For Customers in USA
For Customers in Canada
For Customers in Europe
ContentsFeatures of the C-200 ZOOM/D-510 ZOOM ................................................ VIUsing this Manual ........................................................................................ VII
Chapter 1 Getting Started ......................................................... 1Names of Parts .............................................................................................. 2Attaching the Strap ........................................................................................ 6Inserting the Batteries .................................................................................... 7Inserting the SmartMedia Card .................................................................... 10Using the Card ............................................................................................. 11
Card Basics ............................................................................................. 11Setting the Date and Time ........................................................................... 12Adjusting the Viewfinder ............................................................................... 15Using the AC Adapter (sold separately) ...................................................... 16
Chapter 2 Learning the Basics ............................................. 17Turning the Power On .................................................................................. 18Checking the Monitor ................................................................................... 19
Is the Card Inserted? ............................................................................... 19Checking the Batteries ............................................................................ 20Does the Card Have Enough Room for More Pictures? ......................... 21
Holding the Camera ..................................................................................... 23Shooting Technique Depends on Distance to the Subject ........................... 24Taking Still Pictures ...................................................................................... 25
Taking Pictures Using the Viewfinder ...................................................... 25Taking Pictures ........................................................................................ 26Taking Pictures Using the Monitor ........................................................... 28Using the Flash to Shoot in Dim Light ..................................................... 30
Enlarging Your Shots (Optical Zoom) ........................................................... 31Playing Back Your Still Pictures .................................................................... 32Turning the Power Off .................................................................................. 34
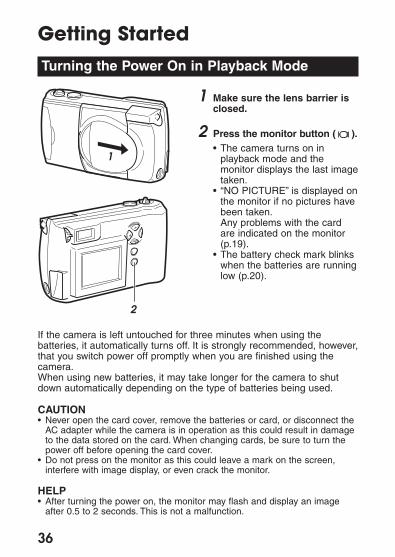
Chapter 3 Playing Images Back ......................................... 35Getting Started ............................................................................................. 36
Turning the Power On in Playback Mode ................................................ 36Turning the Power Off in Playback Mode ................................................ 37
Displaying Images Frame by Frame ............................................................ 38Displaying All Frames (Index-Display Setting) ............................................. 39Checking the Focus by Enlarging a Selected Picture
(Displaying Close-ups) ............................................................................. 41Connecting to a Television Set ..................................................................... 42To Avoid Accidentally Erasing Pictures You Want to Keep
(Image Protection) ................................................................................... 44One-Frame Erase ......................................................................................... 45Possible Printing Methods ............................................................................ 47
II
Chapter 4 Taking Better Pictures ........................................ 49Points to Remember .................................................................................... 50
Viewfinder Discrepancies Depending on Distance .................................. 50Subjects Difficult to Get in Focus ............................................................ 50
When Not Able to Focus on a Subject While Shooting ............................... 52Determine the Position of the Subject After Focusing ............................. 52Fixing a Far-Distance Focus .................................................................... 53
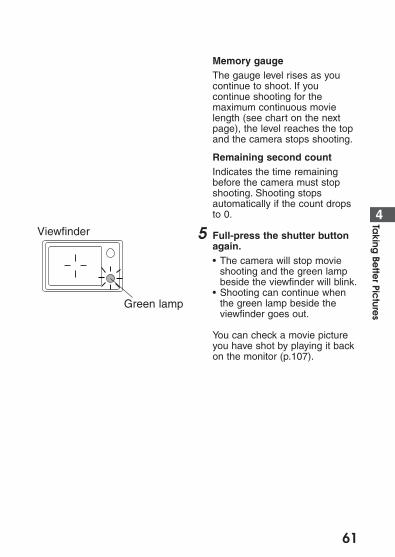
Taking Close-up Pictures (Macro Mode) ...................................................... 55Taking Sequential Shots .............................................................................. 57Using the Selftimer ....................................................................................... 59Taking Movie Pictures .................................................................................. 60Using the Flash ............................................................................................ 64
Switching Between Flash Modes ............................................................. 64Auto-Flash ................................................................................................ 66Red-eye Reduction .................................................................................. 66Fill-in Flash .............................................................................................. 67No Flash .................................................................................................. 67Night Scenes ........................................................................................... 68Night Scenes + Red-eye Reduction ........................................................ 68
Chapter 5 Advanced Shooting Techniques ................ 69Use of the Shooting Menu ........................................................................... 70
Functions of the Shooting Menu .............................................................. 70Using the Shooting Menu ............................................................................. 72Spot Metering (Placing Exposure Priority on the Center of the Subject) .... 74Correcting Image Brightness (Exposure Compensation) ............................ 76ISO Light Sensitivity Level (Setting ISO Sensitivity) .................................... 78Enlarging Shots Even Further (Digital Zoom) .............................................. 80Creating Panoramic Pictures (Panorama Function) ..................................... 82Adjusting the Color Tone (White Balance) ................................................... 85Picture Preferences: Quality vs. Quantity (Record Mode) ........................... 87Making Images Sharper (Sharpness) .......................................................... 90Shooting Pictures with Strong Contrast (Contrast) ...................................... 91Confirming Pictures Directly After Shooting (Rec View) .............................. 93Changing How File Names are Assigned (File Naming) ............................. 95To Retain Settings Even After Power is Turned Off (Clear Settings) ........... 98Turning Off Warning Sounds (Beep Sound) ................................................ 99To Adjust Monitor Brightness (Monitor Adjustment) .................................. 100
Chapter 6 Advanced Playback Techniques ............. 101Use of the Playback Menu ......................................................................... 102
Functions of the Playback Menu ........................................................... 102Using the Playback Menu .......................................................................... 104To Play Back Still Images One by One (Automatic Playback) ................... 106To Play Back Movie Pictures (Movie Playback) ......................................... 107
III
IV
Printing Using DPOF-Compatible Printers or Photo Labs (Print Reserve) ...................................................................................... 109
Rotating Images During Playback (Rotated Playback) .............................. 112Displaying Image Information on the Monitor
(Image Information Display) ................................................................... 113Changing the Color or Size of Images (Edit) ............................................. 114To Erase All Images (All Erase Frames) .................................................... 115To Initialize (Format) a Card ....................................................................... 116To Change the Number of Frames Displayed (Index Display) ................... 118
Chapter 7 Transferring Your Pictures to a Computer ...................................................................................... 119Read Before Connecting to a Computer .................................................... 120Connecting the Camera to a Computer ..................................................... 122
Connecting to a Windows PC ................................................................ 122Connecting to a Macintosh .................................................................... 126
Transferring Image Files ............................................................................. 127Transferring Image Files to a Windows PC ........................................... 127Transferring Image Files to a Macintosh ............................................... 129
Disconnecting the Camera or Removing the SmartMedia Card ............... 131Disconnecting from a Windows PC ....................................................... 131Disconnecting from a Macintosh ........................................................... 133
Transferring Files Without Using the Camera ............................................ 134
Appendix ............................................................................................ 135Answers to Frequently Asked Questions ................................................... 136Troubleshooting (Check before Taking in for Repair) ................................. 138
Operating Problems ............................................................................... 138Picture Problems ................................................................................... 140
Error Codes ................................................................................................ 142Using the Camera with Optional Equipment .............................................. 143Optional Items ............................................................................................ 144Compatibility of the Still Picture Data ........................................................ 145Specifications ............................................................................................. 146Glossary of terms ....................................................................................... 148Index .......................................................................................................... 150
Contents (continued)

V

VI
Features of the C-200 ZOOM/D-510 ZOOM• With its high-resolution CCD (total 2,110,000 pixels) and high-
performance lens, the Olympus CAMEDIA digital camera producespictures of extremely high image quality.
• The 3x optical zoom lens and the 3x digital zoom function combine tooffer an impressive 9x maximum zoom.
• Exposure compensation, spot metering, and other functions aresimple using our easy menu operations.
• USB functionsImage downloading is easy with a USB connector connected directlyto a personal computer.*
• Other various features and functions1.8 inch LCD monitorMovie functionsTV replay function with video OUT jackUses SmartMedia for its removable media.
• In addition to standard AA (R6) alkaline batteries, AA (R6) lithiumbatteries, AA (R6) NiMH batteries, two CR-V3 lithium battery packscan also be used.
* It may be necessary to install the USB driver (provided on theincluded CD-ROM) on computers with Windows 98/98SE.

VII
Using this Manual This manual is divided into seven chapters and one appendix whichcover the main unit (hereafter called “the camera”).
Chapter 1 Getting Started Details confirming the names of all the parts of the camera andpreparing the camera to be used for the first time are all explained inthis chapter. It is essential to read this before using the camera for thefirst time.
Chapter 2 Learning the Basics Basic operations of the camera are explained, including turning on thepower, shooting a still image, checking that image and turning thepower off. Reading this chapter will make taking pictures with thiscamera easy and enjoyable. Be sure to read this section.
Chapter 3 Playing Images BackAfter taking a few images, you will probably want to review themcollectively or display them on your TV. This chapter explains how toturn the power on for playback, view the images, and turn the power off.Read this after you’ve taken a few practice pictures as explained inChapter 2.
Chapter 4 Taking Better PicturesThis chapter explains how to focus the camera, as well as how to setand use macro mode, flash mode, selftimer, movie shooting, and otherconvenient functions that will help you take great pictures. Read thischapter after you have familiarized yourself with Chapter 2 and taken afew pictures with the camera.
Chapter 5 Advanced Shooting Techniques All the functions for using various advanced shooting features areexplained in this chapter. Refer to each of these functions as needed.
Chapter 6 Advanced Playback TechniquesPlaying back movie images, as well as other useful display functions, areexplained in this chapter. Refer to each of these functions as needed.
Chapter 7 Transferring Your Pictures to a ComputerThe included USB cable can be used to send pictures stored on thecamera to a personal computer for further processing and printing. Thischapter explains the steps used to send images from the camera to acomputer.
VIII
AppendixYou will also find a troubleshooting guide and explanations of the keytechnical specifications.
Additional informationThe following may appear at the bottom of each page.CAUTION: These sections contain important precautions. Be sure toread.HELP: These sections include information and helpful hints on how tohandle problems that may arise during operation.NOTE: These sections contain tips which are good to know in advance.
1Getting Started
This chapter describes the various parts of thecamera and their names, the accessories forthe camera, and how to prepare the camera tobe used for the first time. Please be sure to readthis chapter, starting on the following page,before using the camera for the first time.
1
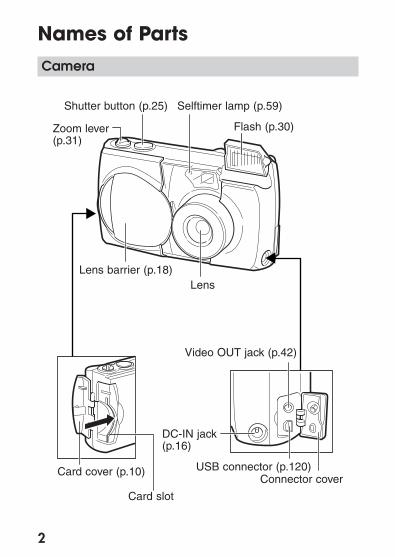
Names of PartsCamera
2
Zoom lever(p.31)
Shutter button (p.25) Selftimer lamp (p.59)
Flash (p.30)
Lens barrier (p.18)Lens
Card cover (p.10)
Card slot
Video OUT jack (p.42)
DC-IN jack (p.16)
USB connector (p.120)Connector cover
3
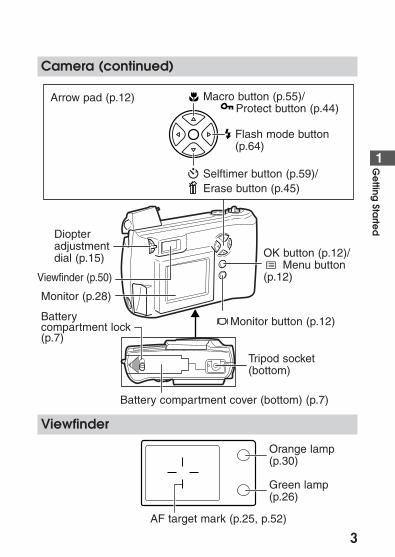
Camera (continued)
1Ge
tting Sta
rted
Viewfinder
Macro button (p.55)/Protect button (p.44)
Flash mode button (p.64)
Selftimer button (p.59)/Erase button (p.45)
Viewfinder (p.50)
Diopteradjustmentdial (p.15)
Monitor (p.28)
OK button (p.12)/Menu button
(p.12)
Monitor button (p.12)
Tripod socket(bottom)
Battery compartment cover (bottom) (p.7)
AF target mark (p.25, p.52)
Orange lamp (p.30)
Green lamp (p.26)
Batterycompartment lock(p.7)
Arrow pad (p.12)
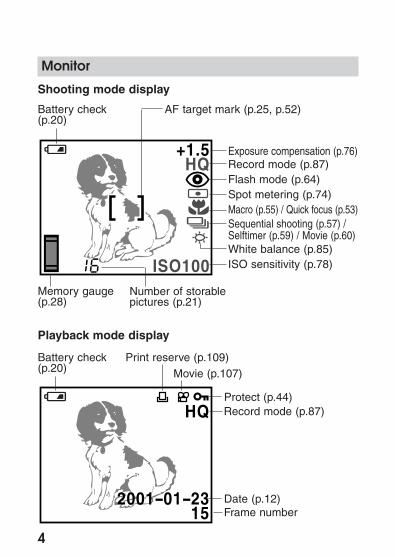
Monitor
Shooting mode display
Playback mode display
HQ
2001-01-2315
+1.5HQ
ISO100
4
Battery check(p.20)
Sequential shooting (p.57) /Selftimer (p.59) / Movie (p.60)
Exposure compensation (p.76)Record mode (p.87)Flash mode (p.64)Spot metering (p.74)Macro (p.55) / Quick focus (p.53)
White balance (p.85)ISO sensitivity (p.78)
Number of storablepictures (p.21)
Memory gauge (p.28)
Battery check(p.20)
Print reserve (p.109)
Record mode (p.87)
Movie (p.107)
Protect (p.44)
Date (p.12)Frame number
AF target mark (p.25, p.52)
5
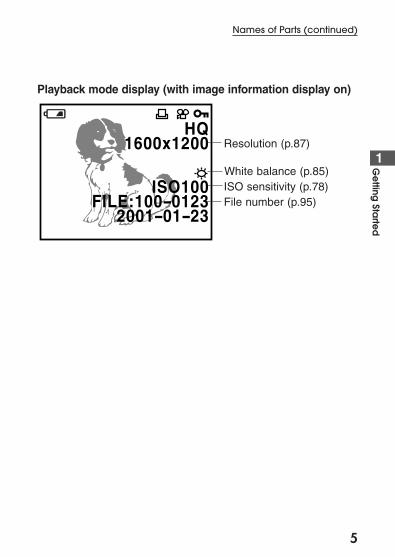
Playback mode display (with image information display on)
HQ1600x1200
ISO100FILE:100-0123
2001-01-23
1Ge
tting Sta
rtedNames of Parts (continued)
File number (p.95)
Resolution (p.87)
White balance (p.85)ISO sensitivity (p.78)
6
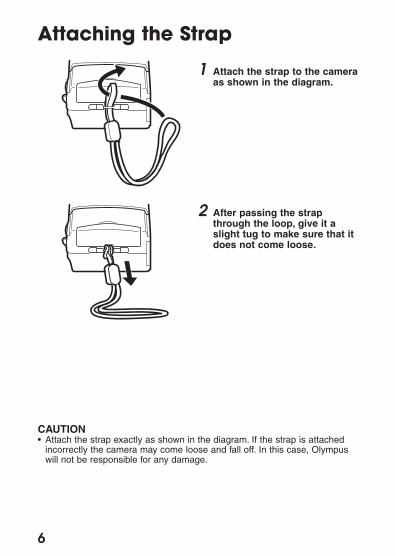
Attaching the Strap
1 Attach the strap to the cameraas shown in the diagram.
2 After passing the strapthrough the loop, give it aslight tug to make sure that itdoes not come loose.
CAUTION • Attach the strap exactly as shown in the diagram. If the strap is attached
incorrectly the camera may come loose and fall off. In this case, Olympuswill not be responsible for any damage.
7
1Ge
tting Sta
rted
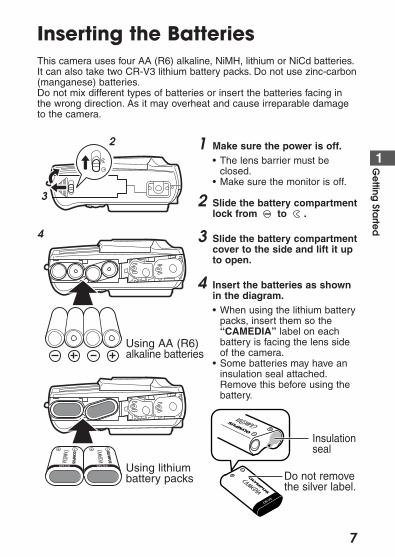
Inserting the BatteriesThis camera uses four AA (R6) alkaline, NiMH, lithium or NiCd batteries.It can also take two CR-V3 lithium battery packs. Do not use zinc-carbon(manganese) batteries.Do not mix different types of batteries or insert the batteries facing inthe wrong direction. As it may overheat and cause irreparable damageto the camera.
1 Make sure the power is off.• The lens barrier must be
closed.• Make sure the monitor is off.
2 Slide the battery compartmentlock from to .
3 Slide the battery compartmentcover to the side and lift it upto open.
4 Insert the batteries as shownin the diagram.• When using the lithium battery
packs, insert them so the“CAMEDIA” label on eachbattery is facing the lens sideof the camera.
• Some batteries may have aninsulation seal attached.Remove this before using thebattery.
Using AA (R6)alkaline batteries
Using lithiumbattery packs
3
4
CR-V3
Insulationseal
Do not removethe silver label.
2
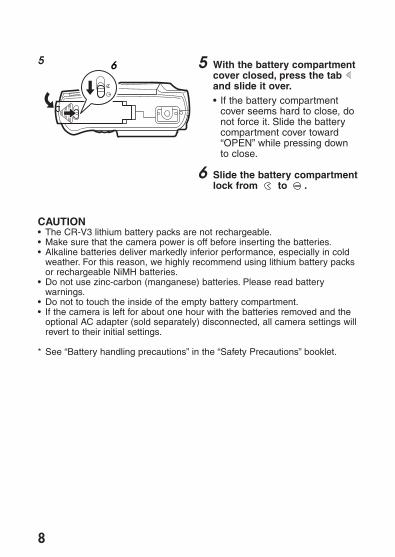
5 With the battery compartmentcover closed, press the taband slide it over.• If the battery compartment
cover seems hard to close, donot force it. Slide the batterycompartment cover toward“OPEN” while pressing downto close.
6 Slide the battery compartmentlock from to .
CAUTION • The CR-V3 lithium battery packs are not rechargeable.• Make sure that the camera power is off before inserting the batteries.• Alkaline batteries deliver markedly inferior performance, especially in cold
weather. For this reason, we highly recommend using lithium battery packsor rechargeable NiMH batteries.
• Do not use zinc-carbon (manganese) batteries. Please read batterywarnings.
• Do not to touch the inside of the empty battery compartment.• If the camera is left for about one hour with the batteries removed and the
optional AC adapter (sold separately) disconnected, all camera settings willrevert to their initial settings.
* See “Battery handling precautions” in the “Safety Precautions” booklet.
8
65
9
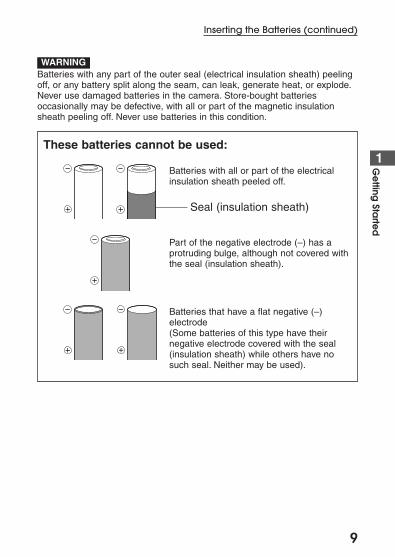
WARNINGBatteries with any part of the outer seal (electrical insulation sheath) peelingoff, or any battery split along the seam, can leak, generate heat, or explode.Never use damaged batteries in the camera. Store-bought batteriesoccasionally may be defective, with all or part of the magnetic insulationsheath peeling off. Never use batteries in this condition.
These batteries cannot be used:
Batteries with all or part of the electricalinsulation sheath peeled off.
Part of the negative electrode (–) has aprotruding bulge, although not covered withthe seal (insulation sheath).
Batteries that have a flat negative (–)electrode(Some batteries of this type have theirnegative electrode covered with the seal(insulation sheath) while others have nosuch seal. Neither may be used).
1Ge
tting Sta
rted
Inserting the Batteries (continued)
Seal (insulation sheath)
10
Inserting the SmartMedia CardAlways insert a SmartMedia card (hereafter called “card”) before takingpictures.
1 Make sure the power is off.• The lens barrier must be
closed.• Make sure the monitor is off.
2 Open the card cover.
3 Insert the card as shown inthe diagram, making sure thatit is pushed all the way in.
4 Close the card cover so itclicks into place.• If the card cover is not
properly closed, the camerawill not turn on.
To remove the SmartMedia cardPull it in the opposite direction as that indicated in step 3.Never open the card cover, eject the card, remove the batteries, ordisconnect the AC adapter while the camera power is turned on. Doingso may destroy the image data on the card. Destroyed images cannot berecovered.
When using non-Olympus brand cardsUse only 3V (3.3 V) cards. 5V cards can not be used.Non-Olympus brand cards or cards formatted by computers or otherdevices may not be recognized by the camera. Also, the time required forwriting to the card could become longer, or the number of possible shotscould be reduced. Before making use of the card, use the camera toformat it (p.116).
Insert theSmartMedia card
2
3
11
1Ge
tting Sta
rted
Using the CardCard Basics
What is SmartMedia?SmartMedia is the type of memory card this camera uses.Images recorded and stored on SmartMedia can easily be deleted,overwritten, and/or edited on a PC.
Compatible SmartMedia cards• Provided 8 MB standard card.• Optional Olympus 4 MB/8 MB/16 MB/ 32 MB/64 MB/128 MB cards• Market-available 3V (3.3V) card 4 MB/8 MB/16 MB/32 MB/64 MB/
128 MB cards* 2 MB cards cannot be used.
Note:• Operating temperature: 0°C to 55°C (32°F to 131°F); Storing
temperature: –20°C to 65°C (–4°F to 149°F); Humidity: up to 90 %• Put the card into its anti-electrostatic case for storage or transportation.• Do not bend, drop, or apply any physical shock to the card.• Read the provided SmartMedia instruction manual carefully.• Do not touch the contact area of the card.
Contact areaThe area where the card comes into contactwith the camera.
Write-protect areaAttach the provided write-protect seal whenyou want to protect your data fromaccidental erasure or overwriting.
Index areaUse the provided index label to indicate thecard’s contents.
12
Setting the Date and TimeTime and date information for each picture are recorded at the sametime the picture is taken. Therefore, before taking pictures, be sure toconfirm that the date and time settings are correct.
1 Make sure the lens barrier isclosed and SmartMedia isinserted (p.10), then press themonitor button ( ).• When a new card is inserted
into the camera, the message“NO PICTURE” will bedisplayed on the monitor.
• With the lens barrier open(shooting mode), you can setthe date and time.
2 Press the menu button ( ).• The playback menu will be
displayed on the monitor.
3 Press � or � on the arrowpad to move the on-screenarrow to SET, then press �.
4 Press � or � on the arrowpad to move the on-screenarrow to date setting, thenpress the � button.• The date setting screen will be
displayed.
3 4
2 1
EXIT OK
PLAY
CARD
SET
SET
[ RESET ][ ON ]
[ 16 ]
Monitor (Playback menu)
Monitor (Settings group menu)
SET
[ RESET ][ ON ]
[ 16 ]
SETCANCEL

13
1Ge
tting Sta
rted
5 Press the arrow pad � or � toselect how you want the datedisplayed:
M-D-Y (Month/Day/Year)D-M-Y (Day/Month/Year)Y-M-D (Year/Month/Day)After making your selection,press �.
• The first date value becomeshighlighted.
6 Press � or � on the arrowpad to set the first date/timeposition (in this case themonth 01), then press �.• The indicator moves to the
next date/time position.• Pressing � returns the display
to the setting one step earlier.
7 Repeat step 6 until both dateand time have been set.
8 When the setting iscompleted, press the OKbutton.• The date and time are set and
the screen returns to thesettings group menu.
• Turning the counter to 00seconds and then pressing theOK button will allow thecorrect time to be set.
9 Press the monitor button.• The monitor display and the
power both go off.
5 6
8 9
Monitor (Date setting screen)
SET
M–D–Y
1 2 : 0 0
0 1 – 2 3 – 2 0 0 1
OKCANCEL
Monitor (Date setting screen)
M–D–Y
1 2 : 0 0
0 1 – 2 3 – 2 0 0 1
CANCEL SET OK

14
Setting the Date and Time (continued)
NOTE• Until you change it, the date setting will remain current even when the
power is turned off.• It is possible to set the time even when the lens barrier is open and the
camera is in shooting mode (p.70).
15
Adjusting the ViewfinderTo make the camera easier to use, adjust the viewfinder to match theeyesight (visual acuity) of the person who will be using the camera.
1 Slide the lens barrier openuntil it clicks.• The power turns on, the lens
extends, and the flash popsup.
2 While looking through theviewfinder, gently turn thediopter adjustment dial.
3 Stop turning the dial when theAF target mark is clearlyvisible.
4 You are ready to take somepictures.• See Chapter 2.
To turn the power off, closethe lens barrier and press theflash down (p.30).
1Ge
tting Sta
rted
1
Diopter adjustment dial
AF target mark
Viewfinder
2
3
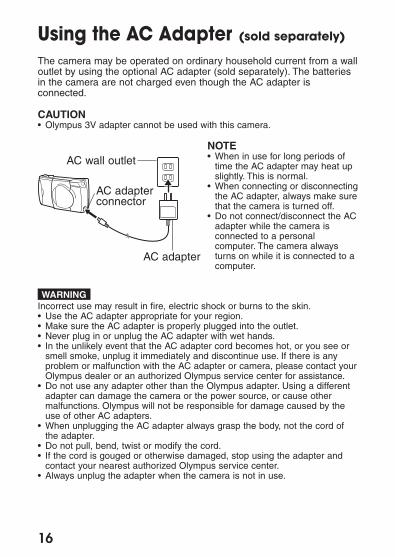
Using the AC Adapter (sold separately)
The camera may be operated on ordinary household current from a walloutlet by using the optional AC adapter (sold separately). The batteriesin the camera are not charged even though the AC adapter isconnected.
CAUTION • Olympus 3V adapter cannot be used with this camera.
NOTE• When in use for long periods of
time the AC adapter may heat upslightly. This is normal.
• When connecting or disconnectingthe AC adapter, always make surethat the camera is turned off.
• Do not connect/disconnect the ACadapter while the camera isconnected to a personalcomputer. The camera alwaysturns on while it is connected to acomputer.
WARNINGIncorrect use may result in fire, electric shock or burns to the skin.• Use the AC adapter appropriate for your region.• Make sure the AC adapter is properly plugged into the outlet.• Never plug in or unplug the AC adapter with wet hands.• In the unlikely event that the AC adapter cord becomes hot, or you see or
smell smoke, unplug it immediately and discontinue use. If there is anyproblem or malfunction with the AC adapter or camera, please contact yourOlympus dealer or an authorized Olympus service center for assistance.
• Do not use any adapter other than the Olympus adapter. Using a differentadapter can damage the camera or the power source, or cause othermalfunctions. Olympus will not be responsible for damage caused by theuse of other AC adapters.
• When unplugging the AC adapter always grasp the body, not the cord ofthe adapter.
• Do not pull, bend, twist or modify the cord.• If the cord is gouged or otherwise damaged, stop using the adapter and
contact your nearest authorized Olympus service center.• Always unplug the adapter when the camera is not in use.
16
AC wall outlet
AC adapterconnector
AC adapter
2Learning the Basics
The fastest way to learn to use the camera issimply to start taking pictures with it. Thischapter explains turning the camera on, takingstill shots, checking how they came out, andturning the camera off.Please have the camera in hand and practicethe operations described as you read thefollowing chapter.
17
18
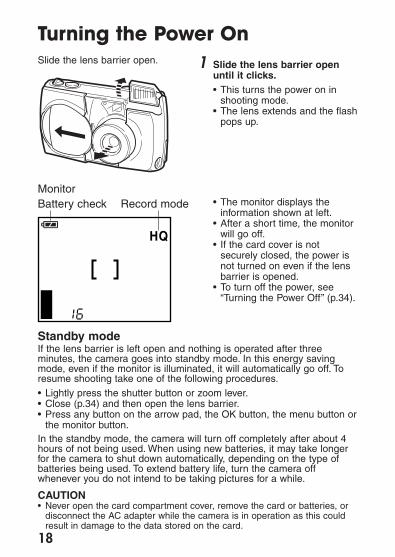
Turning the Power On1 Slide the lens barrier open
until it clicks.• This turns the power on in
shooting mode.• The lens extends and the flash
pops up.
• The monitor displays theinformation shown at left.
• After a short time, the monitorwill go off.
• If the card cover is notsecurely closed, the power isnot turned on even if the lensbarrier is opened.
• To turn off the power, see“Turning the Power Off” (p.34).
Standby modeIf the lens barrier is left open and nothing is operated after threeminutes, the camera goes into standby mode. In this energy savingmode, even if the monitor is illuminated, it will automatically go off. Toresume shooting take one of the following procedures.• Lightly press the shutter button or zoom lever.• Close (p.34) and then open the lens barrier.• Press any button on the arrow pad, the OK button, the menu button or
the monitor button.In the standby mode, the camera will turn off completely after about 4hours of not being used. When using new batteries, it may take longerfor the camera to shut down automatically, depending on the type ofbatteries being used. To extend battery life, turn the camera offwhenever you do not intend to be taking pictures for a while.
CAUTION• Never open the card compartment cover, remove the card or batteries, or
disconnect the AC adapter while the camera is in operation as this couldresult in damage to the data stored on the card.
HQ
Record modeBattery checkMonitor
Slide the lens barrier open.
19
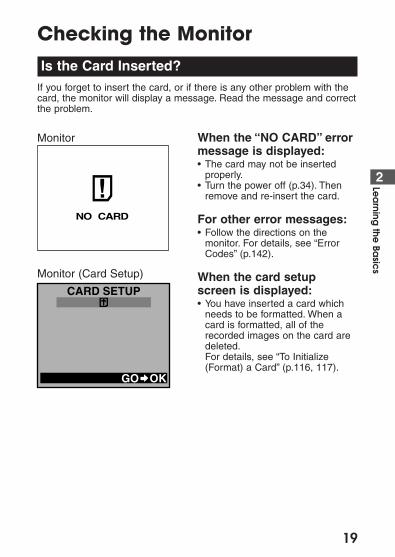
Checking the MonitorIs the Card Inserted?
If you forget to insert the card, or if there is any other problem with thecard, the monitor will display a message. Read the message and correctthe problem.
When the “NO CARD” errormessage is displayed:• The card may not be inserted
properly.• Turn the power off (p.34). Then
remove and re-insert the card.
For other error messages:• Follow the directions on the
monitor. For details, see “ErrorCodes” (p.142).
When the card setupscreen is displayed:• You have inserted a card which
needs to be formatted. When acard is formatted, all of therecorded images on the card aredeleted.For details, see “To Initialize(Format) a Card” (p.116, 117).
2Lea
rning the
Basic
s
Monitor
Monitor (Card Setup)
GO
CARD SETUP
OK
Checking the BatteriesWhen the monitor is turned on, it displays the estimated remainingbattery life.After opening the lens barrier and turning on the power (shootingmode), the monitor will automatically illuminate, display information, andthen go off after a short time.
lights (and turns off automatically).The batteries are OK and have enough power to take pictures.
blinks and other indicators on the monitor are displayednormally.The batteries are low. It is still possible to take pictures, but the powermay cut off while doing so. Replace the batteries.
The monitor will go out andthe green and orange lampsnext to the viewfinder willilluminate simultaneously.The batteries are dead. Replacethe batteries.
To recheck the batteriesDisplay the shooting menu first (p.72). When the shooting menu isturned off, the remaining battery life will be displayed.
CAUTION• Keep spare batteries on hand when taking the camera on long trips, when
using it to record important occasions, and during cold weather.• If the battery is low, the camera may beep continuously after taking a
picture or turning the power on, and the frame number on the monitor mayblink. If this happens after taking a picture, the camera may not be takingpictures properly. Replace the batteries before continuing to take pictures.
• Note that depending on the type of batteries being used, the timing of thedisplay may vary. When using NiMH batteries, will appear
more quickly than when using a lithium battery pack. Depending on theconditions of use, may appear very early but the camera will stillcontinue to function normally for a longer time.
20
Orange lamp
Green lamp
21
Does the Card Have Enough Room for More Pictures?When the power is turned on with the camera in shooting mode, themonitor displays a remaining picture count. When the monitor display hasgone out, press the monitor button ( ) to turn the monitor back on (p.28).
• If the count drops to 0, thecamera beeps, the green lampblinks and the monitor displaysthe message “CARD FULL”.This will repeat every time thepower is turned on (p.142).
• The number of storablepictures varies depending onthe record mode (p.62, p.87).
Checking the Monitor (continued)
2Lea
rning the
Basic
s
1. There is a limit to the number of frames that may be shot when operating theshutter button a single time (p.62).
2. The maximum movie length may be different from the table above for C-200ZOOM models sold in the PAL color system regions if movie pictures are shotwith the video cable connected.
HQ
Record mode
SmartMediacapacity
SQ✽
NORMAL SQ-HIGHHQ SHQ TIFF✽
Resolution640×480 1600×1200
8MB
16MB
32MB
64MB
82 32
165 66
132 64
664 265 128 45 11
331 22 5
31 11 2
16 5 1
Recordmode
Size(no. of pixels)
SmartMedia capacity
8MB 16MB 32MB 64MB
HQ 320×240 23 47 96 193
SQ 160×120 105 210 424 851
Approximate maximum movie lengths, in seconds
Approximate storable still pictures
21
✽ The SQ and TIFF modes can be set for different resolutions (p.87).
The number of storable pictures

22
Checking the Monitor (continued)
HELP• The number of storable stills and the movie length may vary depending on
the subject being photographed.• In some cases the number of storable pictures counter may not decrease
every time a picture is taken, nor increase when a frame is erased.
23
Holding the CameraProper camera techniqueHold the camera firmly with both hands, keeping your elbows at yoursides.When holding the camera vertically, make sure the flash is on top.
Keep your fingers and the strap away from the lens and flash.
NOTE• Do not subject the lens to physical shocks.• Be careful not to press on the flash.
2Lea
rning the
Basic
s
Horizontal grip
Incorrect!
Vertical grip
Shooting Technique Dependson Distance to the SubjectDeciding whether to use the viewfinder or the monitor display whenshooting depends on the distance between you and your subject.Determine the approximate distance before taking the picture.
For normal and long-range photography (from approx. 1.5m (59″) to ∞ (infinity)):We recommend using the viewfinder (p.25).
For close-ups (from 0.8m (31″) to approx. 1.5m (59″)):Although you can use the viewfinder to take pictures, in some cases itis better to use the monitor (p.28). See below for details.
For extreme close-ups (0.2m (8″) to 0.8m (31″)):Use the macro mode and compose the shot with the monitor to takepictures (p.55). Although it is possible to take such shots without usingthe macro mode, proper exposure and focus may not be achieved.
Characteristics of the viewfinder and the monitorYou can use either the monitor or the viewfinder to determine theproper shooting range. Consider the following when decidingwhether to use the viewfinder or the monitor for a particular shot:
ViewfinderAdvantage: You can maintain the proper subject composition with less
camera movement.Disadvantage: Close-up photography causes inconsistencies between
the picture frame as seen in the viewfinder and the actual edge ofthe picture (p.50).
MonitorAdvantage: You can check the subject composition more accurately.Disadvantage: It is more difficult to hold the camera steady, and
battery life is decreased.
24

25
Taking Still PicturesTaking Pictures Using the Viewfinder
Half-press
1 Compose the picture insidethe viewfinder.
2 Press the shutter buttonhalfway down until the greenlamp next to the viewfinderlights up (half-press).• The focus and exposure are
automatically set.
When the lamp is flashing, itindicates that the subject isout of focus. Press the shutterbutton halfway once more tocorrect the focus.
• If the surroundings are dark,the orange lamp next to theviewfinder may light (p.30).
➜ Go on to “Taking Pictures” on the following page.
2Lea
rning the
Basic
s
21
Viewfinder
AF targetmark
Green lamp
Shutterbutton
Orange lamp
26
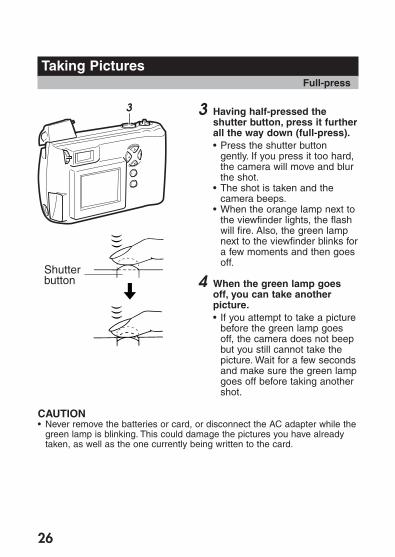
Taking PicturesFull-press
3 Having half-pressed theshutter button, press it furtherall the way down (full-press).• Press the shutter button
gently. If you press it too hard,the camera will move and blurthe shot.
• The shot is taken and thecamera beeps.
• When the orange lamp next tothe viewfinder lights, the flashwill fire. Also, the green lampnext to the viewfinder blinks fora few moments and then goesoff.
4 When the green lamp goesoff, you can take anotherpicture.• If you attempt to take a picture
before the green lamp goesoff, the camera does not beepbut you still cannot take thepicture. Wait for a few secondsand make sure the green lampgoes off before taking anothershot.
CAUTION• Never remove the batteries or card, or disconnect the AC adapter while the
green lamp is blinking. This could damage the pictures you have alreadytaken, as well as the one currently being written to the card.
3
Shutterbutton
27
HELP• The area of the actual picture will be slightly larger than the shot appears
through the viewfinder.• If you switch the beep function off (p.99), the camera will not beep after
taking a picture. In this case you must watch the green lamp. If the lampblinks, the picture was taken successfully.
NOTE• The green lamp will blink for as few as 2 seconds and as many as 40
seconds, depending on the record mode.• The time you have to wait and the number of storable pictures vary
depending on the record mode.
Taking Still Pictures (continued)
2Lea
rning the
Basic
s
28
Taking Pictures Using the Monitor
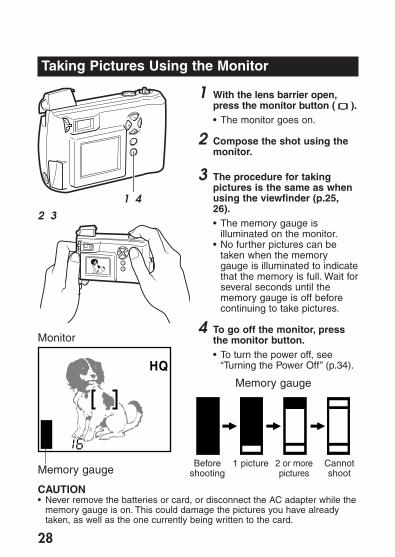
1 With the lens barrier open,press the monitor button ( ).• The monitor goes on.
2 Compose the shot using themonitor.
3 The procedure for takingpictures is the same as whenusing the viewfinder (p.25,26).• The memory gauge is
illuminated on the monitor.• No further pictures can be
taken when the memorygauge is illuminated to indicatethat the memory is full. Wait forseveral seconds until thememory gauge is off beforecontinuing to take pictures.
4 To go off the monitor, pressthe monitor button.• To turn the power off, see
“Turning the Power Off” (p.34).
CAUTION• Never remove the batteries or card, or disconnect the AC adapter while the
memory gauge is on. This could damage the pictures you have alreadytaken, as well as the one currently being written to the card.
1 42 3
HQ
Memory gauge
Memory gauge
Monitor
Beforeshooting
1 picture Cannotshoot
2 or morepictures
29
Taking Still Pictures (continued)
2Lea
rning the
Basic
s
HELP• Pictures taken using the monitor take more time to write to the card than
those taken when using the optical viewfinder.• A subject taken at an angle may appear grainy on the monitor, but this will
not affect the quality of the actual picture.• Vertical lines may appear on the monitor when taking pictures in full
sunlight or other brightly-lit areas. These lines will not be visible in theactual picture and do not indicate a camera malfunction.
NOTE• Do not push the monitor forcefully.• The viewfinder is intended to be used to check picture composition. Use
the monitor for checking focus and exposure. For best results, transferimage files to a computer to confirm exactly what final pictures will look like(p.42, p.120).
30
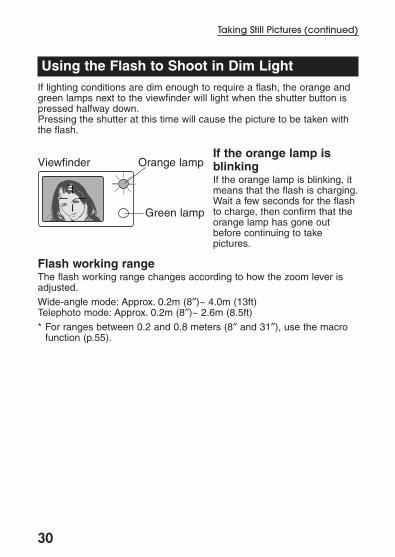
Using the Flash to Shoot in Dim LightIf lighting conditions are dim enough to require a flash, the orange andgreen lamps next to the viewfinder will light when the shutter button ispressed halfway down.Pressing the shutter at this time will cause the picture to be taken withthe flash.
If the orange lamp isblinkingIf the orange lamp is blinking, itmeans that the flash is charging.Wait a few seconds for the flashto charge, then confirm that theorange lamp has gone outbefore continuing to takepictures.
Flash working rangeThe flash working range changes according to how the zoom lever isadjusted.Wide-angle mode: Approx. 0.2m (8″)~ 4.0m (13ft)Telephoto mode: Approx. 0.2m (8″)~ 2.6m (8.5ft)
* For ranges between 0.2 and 0.8 meters (8″ and 31″), use the macrofunction (p.55).
Taking Still Pictures (continued)
Green lamp
Orange lampViewfinder
31
2Lea
rning the
Basic
s
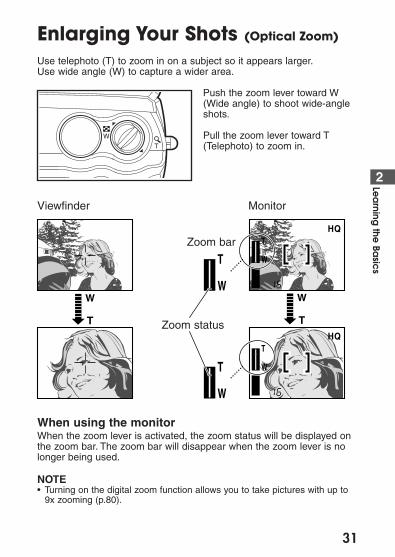
Enlarging Your Shots (Optical Zoom)
Use telephoto (T) to zoom in on a subject so it appears larger.Use wide angle (W) to capture a wider area.
Push the zoom lever toward W(Wide angle) to shoot wide-angleshots.
Pull the zoom lever toward T(Telephoto) to zoom in.
When using the monitorWhen the zoom lever is activated, the zoom status will be displayed onthe zoom bar. The zoom bar will disappear when the zoom lever is nolonger being used.
NOTE• Turning on the digital zoom function allows you to take pictures with up to
9x zooming (p.80).
Viewfinder
HQT
W
T
WT
W
HQ
T
W
Monitor
Zoom status
Zoom bar
32
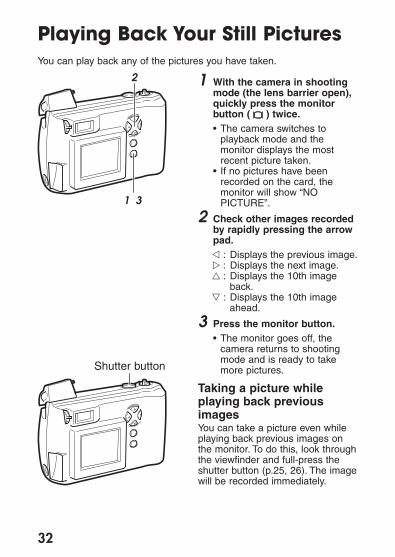
Playing Back Your Still Pictures You can play back any of the pictures you have taken.
1 With the camera in shootingmode (the lens barrier open),quickly press the monitorbutton ( ) twice.• The camera switches to
playback mode and themonitor displays the mostrecent picture taken.
• If no pictures have beenrecorded on the card, themonitor will show “NOPICTURE”.
2 Check other images recordedby rapidly pressing the arrowpad.� : Displays the previous image.� : Displays the next image.� : Displays the 10th image
back.� : Displays the 10th image
ahead.
3 Press the monitor button.• The monitor goes off, the
camera returns to shootingmode and is ready to takemore pictures.
Taking a picture whileplaying back previousimagesYou can take a picture even whileplaying back previous images onthe monitor. To do this, look throughthe viewfinder and full-press theshutter button (p.25, 26). The imagewill be recorded immediately.
Shutter button
2
1 3

33
2Lea
rning the
Basic
sHELP• Pressing the � � buttons on the arrow pad for 1 second or more causes
different functions to activate (p. 44, 45).

Turning the Power Off1 Close the lens barrier halfway.
• Just before the lens barriercomes in contact with the lens,it will make a click that you canfeel with your fingers.
• Do not push the lens barrieragainst the lens.
• The lens will recess into thecamera.
2 Wait until the lens fullyretracts, then close the lensbarrier the rest of the way.• The power is turned off.• Close the lens barrier firmly
until a clicking sound is heard.If the lens barrier is notsecurely closed the flash is notable to be closed.
3 Close the flash.
CAUTION• Do not press firmly on the lens when closing the lens barrier. It could cause
scratches or damage.
NOTE• The pictures you have taken are stored on the SmartMedia card. Stored
images will not be lost when the power is turned off or when the batteriesare replaced.
34
2
3
1
3Playing Images Back
The previous chapter explained how to take stillpictures and check them immediately. Chapter3 explains how to check all of the pictures youhave taken together once you are finishedshooting, as well functions like connecting thecamera to your television set for convenientplayback.Once you’ve taken a few shots with the cameraaccording to the instructions in Chapter 2, readthe following section “Getting Started”, thenrefer to the appropriate pages to start learningabout the playback functions you want to use.
35
36
Getting StartedTurning the Power On in Playback Mode
1 Make sure the lens barrier isclosed.
2 Press the monitor button ( ).• The camera turns on in
playback mode and themonitor displays the last imagetaken.
• “NO PICTURE” is displayed onthe monitor if no pictures havebeen taken.Any problems with the cardare indicated on the monitor(p.19).
• The battery check mark blinkswhen the batteries are runninglow (p.20).
If the camera is left untouched for three minutes when using thebatteries, it automatically turns off. It is strongly recommended, however,that you switch power off promptly when you are finished using thecamera.When using new batteries, it may take longer for the camera to shutdown automatically depending on the type of batteries being used.
CAUTION• Never open the card cover, remove the batteries or card, or disconnect the
AC adapter while the camera is in operation as this could result in damageto the data stored on the card. When changing cards, be sure to turn thepower off before opening the card cover.
• Do not press on the monitor as this could leave a mark on the screen,interfere with image display, or even crack the monitor.
HELP• After turning the power on, the monitor may flash and display an image
after 0.5 to 2 seconds. This is not a malfunction.
1
2

37
3Playing
Ima
ge
s Bac
k
Turning the Power Off in Playback Mode
1 Press the monitor button ( ).• The monitor display shuts
down and the power turns off.
1
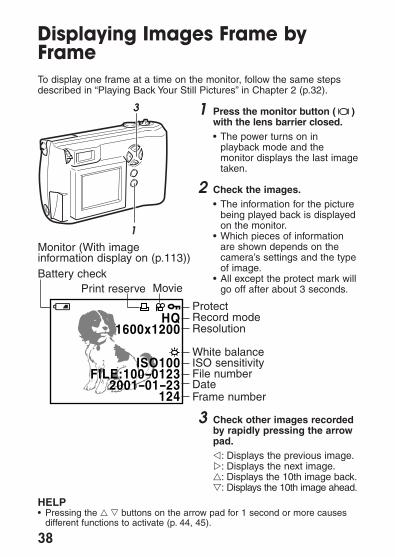
Displaying Images Frame byFrameTo display one frame at a time on the monitor, follow the same stepsdescribed in “Playing Back Your Still Pictures” in Chapter 2 (p.32).
1 Press the monitor button ( )with the lens barrier closed.• The power turns on in
playback mode and themonitor displays the last imagetaken.
2 Check the images.• The information for the picture
being played back is displayedon the monitor.
• Which pieces of informationare shown depends on thecamera’s settings and the typeof image.
• All except the protect mark willgo off after about 3 seconds.
3 Check other images recordedby rapidly pressing the arrowpad.�: Displays the previous image.�: Displays the next image.�: Displays the 10th image back.�: Displays the 10th image ahead.
HELP• Pressing the � � buttons on the arrow pad for 1 second or more causes
different functions to activate (p. 44, 45).
38
3
1
HQ1600x1200
ISO100FILE:100-0123
2001-01-23124
ResolutionRecord modeProtect
MovieBattery check
Print reserve
White balanceISO sensitivityFile numberDateFrame number
Monitor (With imageinformation display on (p.113))

39
3Playing
Ima
ge
s Bac
k
Displaying All Frames(Index-Display Setting)
Multiple images can be displayed on the monitor at once, useful whensearch through stored images for a specific picture.
1 With the lens barrier closed,push the monitor button ( ).• The power turns on in
playback mode and themonitor displays the last imagetaken.
2 Push the zoom lever toward(Wide angle).
• Several frames are displayed,including the currently-selected picture.
• To select the number of frames to be displayed (p.118).
3 In the index-display setting,rapidly press the arrow pad todisplay the next set of frames.�: The monitor displays the
previous set of framesstarting with the frameimmediately preceding theone appearing in the upperleft corner.
�: The monitor displays thefollowing set of framesstarting with the frameimmediately after the oneappearing in the lower rightcorner.
3 42 5
1
120 121 122
123 124 125
126 127 128
Monitor
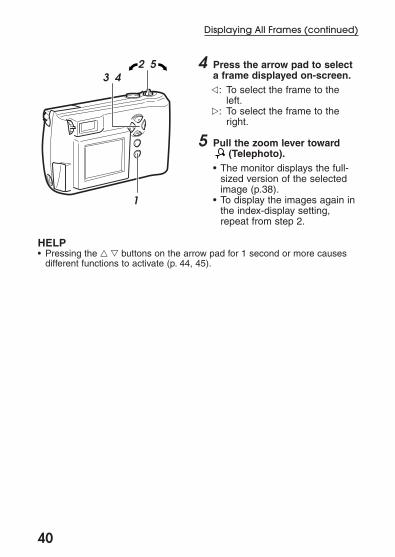
4 Press the arrow pad to selecta frame displayed on-screen.�: To select the frame to the
left.�: To select the frame to the
right.
5 Pull the zoom lever toward(Telephoto).
• The monitor displays the full-sized version of the selectedimage (p.38).
• To display the images again inthe index-display setting,repeat from step 2.
HELP• Pressing the � � buttons on the arrow pad for 1 second or more causes
different functions to activate (p. 44, 45).
40
Displaying All Frames (continued)
3 42 5
1
41
3Playing
Ima
ge
s Bac
k
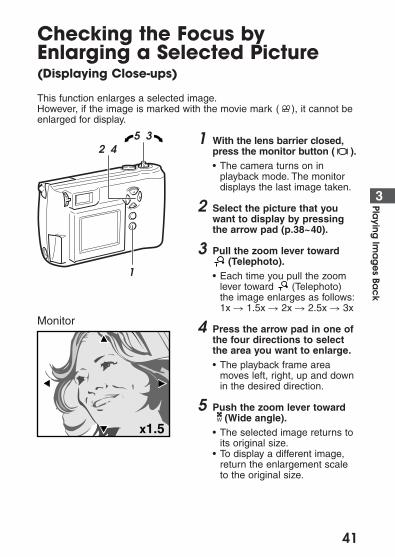
Checking the Focus byEnlarging a Selected Picture(Displaying Close-ups)
This function enlarges a selected image.However, if the image is marked with the movie mark ( ), it cannot beenlarged for display.
1 With the lens barrier closed,press the monitor button ( ).• The camera turns on in
playback mode. The monitordisplays the last image taken.
2 Select the picture that youwant to display by pressingthe arrow pad (p.38~40).
3 Pull the zoom lever toward(Telephoto).
• Each time you pull the zoomlever toward (Telephoto)the image enlarges as follows:1x � 1.5x � 2x � 2.5x � 3x
4 Press the arrow pad in one ofthe four directions to selectthe area you want to enlarge.• The playback frame area
moves left, right, up and downin the desired direction.
5 Push the zoom lever toward(Wide angle).
• The selected image returns toits original size.
• To display a different image,return the enlargement scaleto the original size.
2 45 3
1
x1.5
Monitor
42
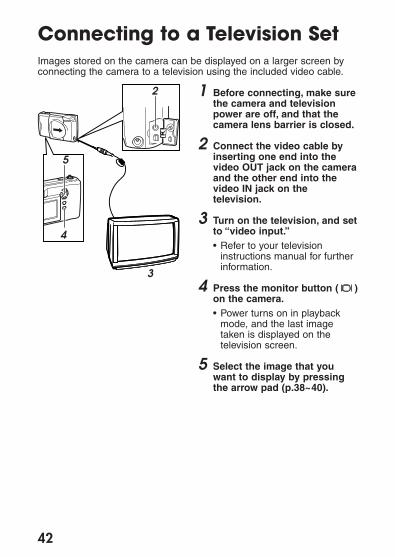
Connecting to a Television SetImages stored on the camera can be displayed on a larger screen byconnecting the camera to a television using the included video cable.
1 Before connecting, make surethe camera and televisionpower are off, and that thecamera lens barrier is closed.
2 Connect the video cable byinserting one end into thevideo OUT jack on the cameraand the other end into thevideo IN jack on thetelevision.
3 Turn on the television, and setto “video input.”• Refer to your television
instructions manual for furtherinformation.
4 Press the monitor button ( )on the camera.• Power turns on in playback
mode, and the last imagetaken is displayed on thetelevision screen.
5 Select the image that youwant to display by pressingthe arrow pad (p.38~40).
2
3
4
5
43
HELP• The camera monitor does not illuminate when the video cable is connected.• Depending on how your television is adjusted, the picture may appear off-
center on the television screen.• Your television may produce a black frame around the picture, which may
be undesirable as it also appears if the image is printed using aconventional video printer.
• Refer to your TV/VCR instruction manual for information about displayingvideo images.
• Images shown on screen can be saved to a videotape.
NOTE• When performing this function, we recommend you use the AC adapter
(sold separately) as the power source for the camera.• Pictures that have been taken with the camera held vertically can be
rotated for easier viewing (p.112).
3Playing
Ima
ge
s Bac
k
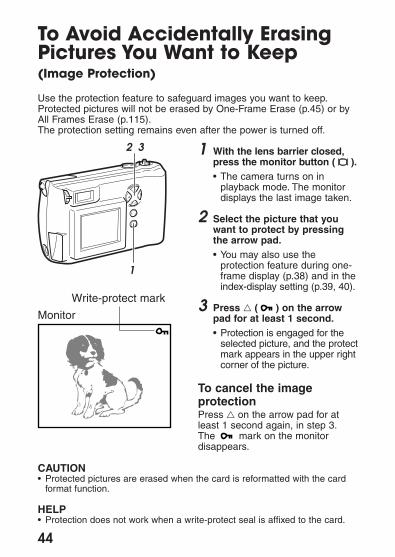
To Avoid Accidentally ErasingPictures You Want to Keep (Image Protection)
Use the protection feature to safeguard images you want to keep.Protected pictures will not be erased by One-Frame Erase (p.45) or byAll Frames Erase (p.115).The protection setting remains even after the power is turned off.
1 With the lens barrier closed,press the monitor button ( ).• The camera turns on in
playback mode. The monitordisplays the last image taken.
2 Select the picture that youwant to protect by pressingthe arrow pad.• You may also use the
protection feature during one-frame display (p.38) and in theindex-display setting (p.39, 40).
3 Press � ( ) on the arrowpad for at least 1 second.• Protection is engaged for the
selected picture, and the protectmark appears in the upper rightcorner of the picture.
To cancel the imageprotectionPress � on the arrow pad for atleast 1 second again, in step 3.The mark on the monitordisappears.
CAUTION• Protected pictures are erased when the card is reformatted with the card
format function.
HELP• Protection does not work when a write-protect seal is affixed to the card.
44
2 3
1
Monitor
Write-protect mark
45
3Playing
Ima
ge
s Bac
k
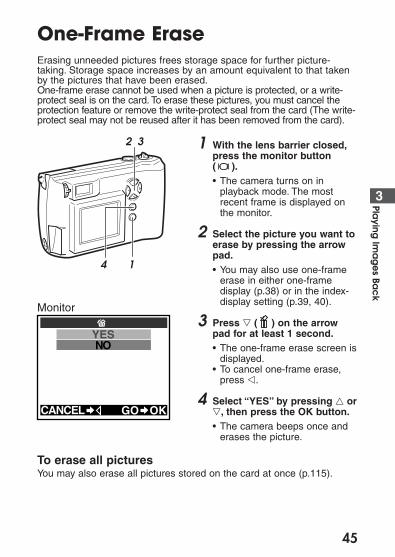
One-Frame EraseErasing unneeded pictures frees storage space for further picture-taking. Storage space increases by an amount equivalent to that takenby the pictures that have been erased.One-frame erase cannot be used when a picture is protected, or a write-protect seal is on the card. To erase these pictures, you must cancel theprotection feature or remove the write-protect seal from the card (The write-protect seal may not be reused after it has been removed from the card).
1 With the lens barrier closed,press the monitor button ( ).• The camera turns on in
playback mode. The mostrecent frame is displayed onthe monitor.
2 Select the picture you want toerase by pressing the arrowpad.• You may also use one-frame
erase in either one-framedisplay (p.38) or in the index-display setting (p.39, 40).
3 Press � ( ) on the arrowpad for at least 1 second.• The one-frame erase screen is
displayed.• To cancel one-frame erase,
press �.
4 Select “YES” by pressing � or�, then press the OK button.• The camera beeps once and
erases the picture.
To erase all picturesYou may also erase all pictures stored on the card at once (p.115).
2 3
4 1
YESNO
CANCEL GO OK
Monitor

46
One-Frame Erase (continued)
CAUTION• Never open the card cover, eject the card, remove the batteries, or
disconnect the AC adapter while erasing pictures. Doing so may destroythe image data on the card.
HELP• It may take longer to erase when the “print reserve” function (p.109) has
been activated on the card.• The number of storable pictures may not increase even after you erase one
image from the card.
47
Possible Printing MethodsImages stored on SmartMedia cards can be printed in the following ways.
Using DPOF-Compatible Printers or Photo LabsSetting a print order for images you want printed will allow these imagesto be printed, without needing to specify them, when the SmartMediacard is inserted into a DPOF-compatible printer or taken to a DPOF-equipped photo printing lab. However, it is not possible to set an orderfor the number of prints to be made.See Chapter 6, “Printing Using DPOF-Compatible Printers or PhotoLabs”, for more details (p.109).
About Digital Print Order Format (DPOF)Digital Print Order Format (DPOF) is a digital camera function thatrecords automatic printing information with digital images. It allowsyou to record printing information – such as which images to printand whether to include time and date information – on SmartMediacards containing digital images. The images can then be easilyprinted by photo labs offering DPOF services or on DPOF-compatiblehome printers.
Using Dedicated Printers (Sold Separately)The P-400, P-200 and P-330N(E) Olympus printers are designedspecifically for Olympus digital cameras. Just load the card into theprinter, then use the printer’s buttons to select and manage printing.Refer to the individual printer’s user’s manual for more detailedinformation.
Using Personal Computer PrintersImages can be printed by transferring them to a personal computer andusing the computer’s image printing software to print them onconnected printers.See Chapter 7 for details about ways to print images using personalcomputer printers.Please consult the user manuals for the specific personal computer andprinter you are using.
3Playing
Ima
ge
s Bac
k
CAUTION• The P-400/P-330N(E)/P-330 cannot be connected to the camera’s USB
connector.• While it is possible to print from the camera through the video OUT jack,
printer performance will be suboptimal.
HELP• This camera cannot change automatic print information recorded by other
DPOF-compatible devices. Please change the automatic print informationwith the DPOF-compatible device that recorded the information.
• Automatic print information recorded on SmartMedia cards by other DPOF-compatible devices may be cancelled if new print orders are recorded ontothe card using this camera.
• Some printers and photo labs may not be able to include date and timeinformation on prints.
48
Possible Printing Methods (continued)
4Taking Better Pictures
The arrow pad allows easy setting of focus,flash type, and a number of other convenientfunctions. This chapter explains functions thatwill be useful to remember in helping you totake better pictures. Once you’ve taken a fewpictures and familiarized yourself with thecontents of Chapter 2, browse the followingsections to find more information that will helpyou master the camera’s various features andfunctions.
49
50
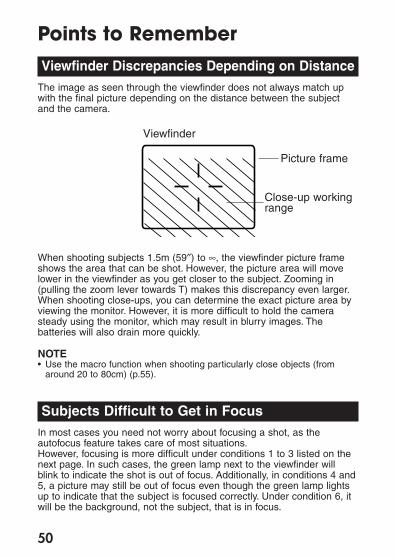
Points to RememberViewfinder Discrepancies Depending on Distance
The image as seen through the viewfinder does not always match upwith the final picture depending on the distance between the subjectand the camera.
When shooting subjects 1.5m (59″) to ∞, the viewfinder picture frameshows the area that can be shot. However, the picture area will movelower in the viewfinder as you get closer to the subject. Zooming in(pulling the zoom lever towards T) makes this discrepancy even larger.When shooting close-ups, you can determine the exact picture area byviewing the monitor. However, it is more difficult to hold the camerasteady using the monitor, which may result in blurry images. Thebatteries will also drain more quickly.
NOTE• Use the macro function when shooting particularly close objects (from
around 20 to 80cm) (p.55).
Subjects Difficult to Get in FocusIn most cases you need not worry about focusing a shot, as theautofocus feature takes care of most situations.However, focusing is more difficult under conditions 1 to 3 listed on thenext page. In such cases, the green lamp next to the viewfinder willblink to indicate the shot is out of focus. Additionally, in conditions 4 and5, a picture may still be out of focus even though the green lamp lightsup to indicate that the subject is focused correctly. Under condition 6, itwill be the background, not the subject, that is in focus.
Viewfinder
Picture frame
Close-up workingrange
51
4Taking
Bette
r Picture
s
In these situations, first focus your camera on an object that is the samedistance from the camera as your subject, then aim back at the subjectto take the picture (focus lock: p.52). Alternatively, set the focus on ∞(quick focus: p.53) before taking the shot.When setting up shots that do not contain vertical lines like as shown in3, first hold the camera vertically and lock the focus on the subject.Then shift the camera back to the horizontal position and take thepicture.
1 Subjects with low contrast 4 Subjects of varying distances
2 Subjects that appearexcessively bright in the center
3 Subjects with no vertical lines 6 Subjects not within the AFtarget mark
5 Fast-moving subjects
AF target mark
52
When Not Able to Focus on aSubject While ShootingDetermine the Position of the Subject After Focusing
Focus Lock
If your main subject is not centered inside the AF target mark, use thefocus lock feature explained below:
1 Open the lens barrier.• The camera turns on in
shooting mode.
2 Look through the viewfinderand position the AF targetmark on the subject you wishto focus on.
3 Half-press the shutter buttonso the green lamp next to theviewfinder lights up.• The subject is now in focus
and exposure is set.
4 Keep the shutter button half-pressed while you repositionyour subject(s) within thepicture frame. Then full-pressthe shutter button.
CAUTION• If the flash is pressed down while taking a picture, it does not fire and could
cause the image to be dark.
Viewfinder
AF target mark
Half-press
Full-press
Shutterbutton
53
4Taking
Bette
r Picture
s
Fixing a Far-Distance FocusQuick Focus
The lens can be set for far-distance focus (∞). Use this function when itis difficult to focus on a subject in the background.
1 Open the lens barrier.• The camera turns on in
shooting mode.
2 Press � on the arrow pad.• The monitor will illuminate.
3 Press � on the arrow padrepeatedly until the ∞ mark isdisplayed on the monitor.
4 Take the picture.• Quick focus is automatically
cancelled after the picture istaken.
2 3 4
HQ
Monitor
T
W
0.85m(2.8ft)
1.3m(4.3ft)
1.8m(5.9ft)
6.7m(22ft)
4m(13ft)
Quick focus working rangeBeyond flash working range
∞ mark
54
When Not Able to Focus on a Subject While Shooting (continued)
To cancel quick focusPress � on the arrow pad several times until the ∞ mark or macro mark( ) disappears.
Quick focus can also be cancelled simply by turningthe camera offTo retain the quick focus even after the power is turned off, set the clearsettings function in the shooting menu to OFF (p.98).However, even when the clear settings function is set to “OFF”, quickfocus will be cancelled when a picture is taken.
55
4Taking
Bette
r Picture
s
Taking Close-up Pictures (Macro Mode)
Use the macro function to shoot subjects at very close distances.Whenusing the macro function, maintain a distance of about 20 and 80cm (8″and 31″). Pictures taken outside this range are likely to be out of focusor poorly exposed.
Minimum distance: approximately 20cm (8″)Telephoto: If you wish to further enlarge the image, push the zoom
lever toward T (telephoto).Monitor is filled by a 8cm (3″) × 6cm (2″) subject.
Wide-angle:If you wish to make the image smaller, push the zoom levertoward W (wide).Monitor is filled by a 17cm (6″) × 22cm (8″) subject.
1 Open the lens barrier.• The camera turns on in
shooting mode.
2 Press the monitor button ( ).• The monitor will illuminate.
3 Press � ( ) on the arrowpad.
4 Press � on the arrow padrepeatedly until the macromark is displayed on themonitor.
5 Confirm the position of thesubject with the monitor andshoot.
HQ
3 4 5
2
Monitor
Macro mark
56
Taking Close-up Pictures (continued)
To cancel the macro modePress � on the arrow pad several times until the macro mark or ∞ markdisappears.
The macro mode can also be cancelled simply byturning the camera off To make the camera retain the macro mode even after the power isturned off, set the clear settings function in the shooting menu to OFF(p.98).
HELP• Dark shadows may appear when using the flash.
NOTE• In macro mode, the picture area will not be entirely visible within the frame
of the viewfinder (p.50). Be sure to use the monitor (instead of theviewfinder) to confirm the picture area before shooting (p.28).
• After taking a picture, check the photographed image by displaying it on themonitor or such.

57
Taking Sequential ShotsUsing the sequence function, the camera will continue taking a series ofup to 45 still shots (When the record mode is set to SQ) for as long asthe shutter button remains pressed.This function is useful for shooting fast-moving objects, since among themany shots there are likely to be some that show the subject or actionas you wish.
1 Open the lens barrier.• The camera turns on in
shooting mode.
2 Press � on the arrow pad.• The monitor will illuminate and
the sequence mark will bedisplayed.
• When the sequence mark isnot displayed, press � buttonrepeatedly until it is displayed.
3 Position the subject in thepicture frame, then press theshutter button and continueto hold it down.• The camera will begin
sequential shooting.• The flash will not activate.
4 Release the shutter button.• The camera will stop
sequential shooting.• When the record mode is set
to SQ, a maximum of 45pictures can be takensequentially.
• When 45 pictures are shot, orthe remaining picture countreaches 0, sequential shootingautomatically stops.
4Taking
Bette
r Picture
s
Up to 45 pictures
HQ
Monitor
Sequence mark
2 3 4
58
Taking Sequential Shots (continued)
To cancel sequential shootingTo cancel sequential shooting, press � on the arrow pad several timesuntil the sequence mark, selftimer mark ( ), and movie mark ( )disappear.
Sequential shooting can also be cancelled simply byturning the camera offTo make the camera retain sequential shooting even after the power isturned off, set the clear settings function in the shooting menu to OFF(p.98).
Record modes for sequential shootingThe record mode may be changed when using the sequence function.If the record mode is TIFF, it automatically switches to HQ when thesequence function is being used. The record mode will return to theprevious setting when the camera is switched back to the previousshooting mode setting.However, if the record mode is manually changed while sequentialshooting is in progress, it will remain in that mode even when the camerais switched back to the previous shooting mode setting (p.87).
CAUTION• To avoid losing image data, never open the card cover, remove the card,
remove the batteries or disconnect the AC adapter while the green lamp isblinking.
HELP• The number of sequential pictures that can be taken varies depending on
the record mode and the number of storable pictures on the card.• To avoid the effects of hand-shaking, shutter speed is limited to a maximum
slowest speed of 1/30 of a second. For this reason, darker subjects mayappear in the resulting pictures looking darker than they actually are.
• The camera takes a short while after pictures have been taken to recordthe image data onto the SmartMedia card (the green lamp will blink).
59
4Taking
Bette
r Picture
s
Using the SelftimerFor when the photographer wants to be in the picture.Using a tripod is highly recommended.
1 Secure the camera on thetripod.
2 Open the lens barrier.• The camera turns on in
shooting mode.
3 Press � ( ) on the arrowpad.• The monitor will illuminate.
4 Press � on the arrow padrepeatedly until the selftimermark is displayed on themonitor.
5 Set up your shot, thenfull-press the shutter button.• The selftimer lamp lights up for
ten seconds, then blinks fortwo seconds before the pictureis taken.
• The selftimer automaticallygoes off after the picture istaken.
To cancel the selftimerTo cancel the selftimer functionafter step 3, press � on the arrowpad so that the selftimer markdisappears. Or, the selftimer canalso be cancelled simply by turningthe camera off.While the selftimer lamp isilluminated, it can be canceled bypressing the OK button.
2
3 4 5
Selftimer lamp
HQ
Monitor
Selftimer mark

Taking Movie Pictures In addition to still pictures, this camera has the ability to take movie (15frames/sec.). Take advantage of this feature to capture your subjects inmotion.
1 Open the lens barrier.• The camera turns on in
shooting mode.
2 Press � on the arrow pad.• The monitor will illuminate.
3 Press � on the arrow padrepeatedly until the (movie) mark isdisplayed on the monitor.• The subject is displayed on
the monitor.• Also, the no flash mark ( )
appears on the monitor (p.67).
4 Position the subject in thepicture frame, then press theshutter button all the waydown.• The bottom of the memory
gauge on the monitor willilluminate and the remainingsecond count will begindecreasing.
• The flash will not activate.
60
2 3 4 5
HQ
Monitor(When the movie shootingautomatically stops)
Remainingsecond count
Memory gauge
Movie mark
No flashmark
61
Memory gaugeThe gauge level rises as youcontinue to shoot. If youcontinue shooting for themaximum continuous movielength (see chart on the nextpage), the level reaches the topand the camera stops shooting.
Remaining second countIndicates the time remainingbefore the camera must stopshooting. Shooting stopsautomatically if the count dropsto 0.
5 Full-press the shutter buttonagain.• The camera will stop movie
shooting and the green lampbeside the viewfinder will blink.
• Shooting can continue whenthe green lamp beside theviewfinder goes out.
You can check a movie pictureyou have shot by playing it backon the monitor (p.107).
4Taking
Bette
r Picture
s
Green lamp
Viewfinder

Movie picture record mode For movie pictures, there are two modes with different image sizes andresolutions.Movie picture record modes are set with the still picture record modesettings. To change them, first cancel “movie pictures” and enter the stillpicture record mode to set the desired resolution (p.87).
Movie shooting will be canceled when the power isturned off (C-200 ZOOM only)The continueus movie length may be different for C-200 ZOOM modelssold in the PAL color system regions if movie pictures are shot with thevideo cable connected.
62
Itemson Menu
RecordMode
Size(no. of pixels)
Continuous Movielength
TIFF
SHQ
HQ
SQ
HQ 320 × 240
160 × 120
approx. 16 sec.
approx. 70 sec.SQ
* The total length of movies that can be stored on a card varies according tothe still-image record mode, as shown in the chart on page 21.
63
To cancel movie shootingTo cancel movie shooting, press � on the arrow pad several times untilthe movie mark, sequence mark ( ), and selftimer mark ( )disappear.
Movie shooting will be canceled when the power isturned offTo make the camera retain movie shooting even after the power isturned off, set the clear settings function in the shooting menu to OFF(p.98).
HELP• Movie picture quality may be grainier than still shots.• The scope of the shot may actually be slightly narrower than it appears in
the initial composition.• A strip of light may appear at the top and bottom of the monitor. This does
not indicate a malfunction.• You can adjust the zoom while shooting but zooming will be slower.
CAUTION• To prevent destroying the image data, never open the card cover, remove
the card, remove the batteries, or disconnect the AC adapter while thegreen lamp is blinking.
Taking Movie Pictures (continued)
4Taking
Bette
r Picture
s
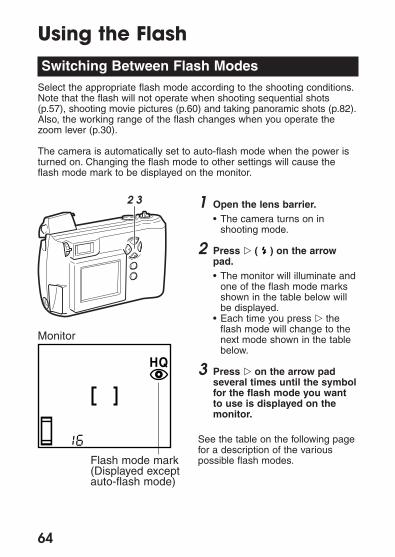
Using the FlashSwitching Between Flash Modes
Select the appropriate flash mode according to the shooting conditions.Note that the flash will not operate when shooting sequential shots(p.57), shooting movie pictures (p.60) and taking panoramic shots (p.82).Also, the working range of the flash changes when you operate thezoom lever (p.30).
The camera is automatically set to auto-flash mode when the power isturned on. Changing the flash mode to other settings will cause theflash mode mark to be displayed on the monitor.
1 Open the lens barrier.• The camera turns on in
shooting mode.
2 Press � ( ) on the arrowpad.• The monitor will illuminate and
one of the flash mode marksshown in the table below willbe displayed.
• Each time you press � theflash mode will change to thenext mode shown in the tablebelow.
3 Press � on the arrow padseveral times until the symbolfor the flash mode you wantto use is displayed on themonitor.
See the table on the following pagefor a description of the variouspossible flash modes.
64
2 3
HQ
Monitor
Flash mode mark(Displayed exceptauto-flash mode)
65
The flash function will automatically return to auto-flash mode when the power is turned off.To make the camera retain the selected flash mode even after thepower is turned off, set the clear settings function in the shooting menuto OFF (p.98).
HELP• If the orange lamp next to the viewfinder is blinking, it means that the flash
is being recharged and it is not possible to shoot. Take your finger off theshutter button and wait for the orange lamp to go out before shootingagain.
• When using the flash in macro mode (p.55), a portion of the picture may becropped, the contrast may be too extreme. After shooting, be sure to checksuch pictures on the monitor.
CAUTION• If the flash is pressed down while taking a picture, it does not fire and could
cause the image to be dark.
4Taking
Bette
r Picture
s
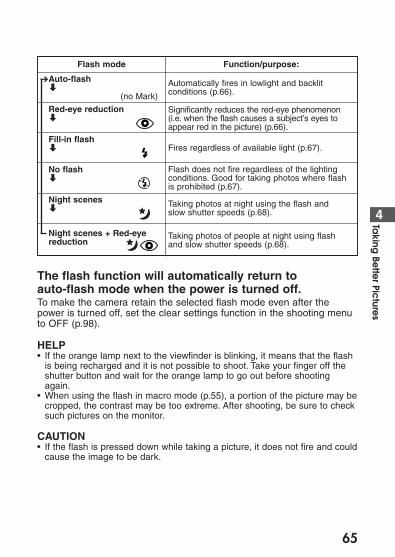
Flash mode Function/purpose:
Auto-flashd
(no Mark)
Red-eye reductiond
Fill-in flashd
Night scenesd
Night scenes + Red-eyereduction
Automatically fires in lowlight and backlitconditions (p.66).
Significantly reduces the red-eye phenomenon(i.e. when the flash causes a subject’s eyes toappear red in the picture) (p.66).
Fires regardless of available light (p.67).
Taking photos at night using the flash andslow shutter speeds (p.68).
Taking photos of people at night using flashand slow shutter speeds (p.68).
No flashd
Flash does not fire regardless of the lightingconditions. Good for taking photos where flashis prohibited (p.67).
➔
Auto-FlashIn auto-flash mode, the flash will automatically fire in lowlight and backlitconditions.
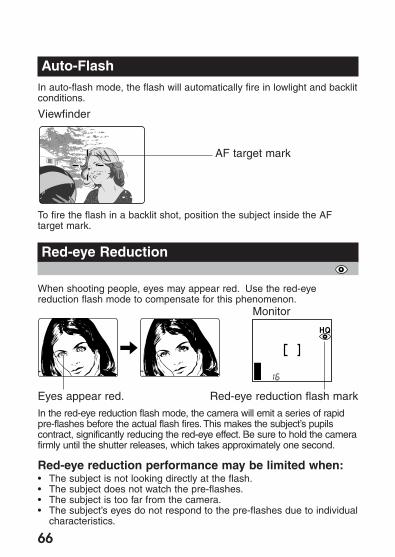
To fire the flash in a backlit shot, position the subject inside the AFtarget mark.
Red-eye Reduction
When shooting people, eyes may appear red. Use the red-eyereduction flash mode to compensate for this phenomenon.
In the red-eye reduction flash mode, the camera will emit a series of rapidpre-flashes before the actual flash fires. This makes the subject’s pupilscontract, significantly reducing the red-eye effect. Be sure to hold the camerafirmly until the shutter releases, which takes approximately one second.
Red-eye reduction performance may be limited when:• The subject is not looking directly at the flash.• The subject does not watch the pre-flashes.• The subject is too far from the camera.• The subject’s eyes do not respond to the pre-flashes due to individual
characteristics.
66
AF target mark
Viewfinder
HQ
Monitor
Red-eye reduction flash markEyes appear red.
67
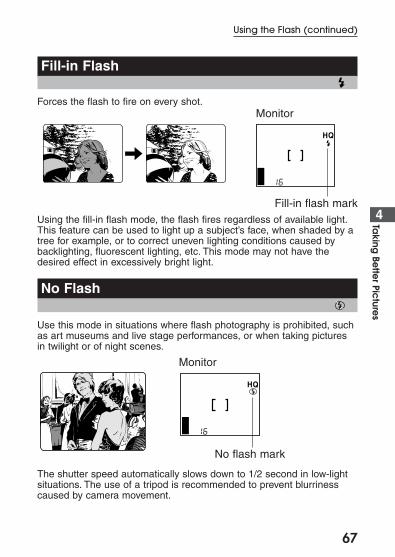
Fill-in Flash
Using the fill-in flash mode, the flash fires regardless of available light.This feature can be used to light up a subject’s face, when shaded by atree for example, or to correct uneven lighting conditions caused bybacklighting, fluorescent lighting, etc. This mode may not have thedesired effect in excessively bright light.
No Flash
Use this mode in situations where flash photography is prohibited, suchas art museums and live stage performances, or when taking picturesin twilight or of night scenes.
The shutter speed automatically slows down to 1/2 second in low-lightsituations. The use of a tripod is recommended to prevent blurrinesscaused by camera movement.
Using the Flash (continued)
4Taking
Bette
r Picture
s
HQ
Monitor
Fill-in flash mark
Forces the flash to fire on every shot.
HQ
No flash mark
Monitor
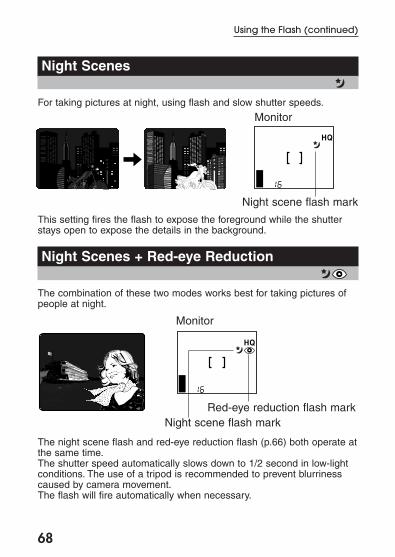
Night Scenes
For taking pictures at night, using flash and slow shutter speeds.
This setting fires the flash to expose the foreground while the shutterstays open to expose the details in the background.
Night Scenes + Red-eye Reduction
The combination of these two modes works best for taking pictures ofpeople at night.
The night scene flash and red-eye reduction flash (p.66) both operate atthe same time.The shutter speed automatically slows down to 1/2 second in low-lightconditions. The use of a tripod is recommended to prevent blurrinesscaused by camera movement.The flash will fire automatically when necessary.
68
Using the Flash (continued)
HQ
Monitor
Night scene flash mark
HQ
Monitor
Night scene flash markRed-eye reduction flash mark
��yy��yy������yyyyyy������yyyyyy
������yyyyyy������yyyyyy
5Advanced Shooting Techniques
Useful shooting functions are all madeavailable within the shooting menu.After you’ve familiarized yourself with the use ofthe shooting menu, consult the following pagesdescribing each of the various functions.
69
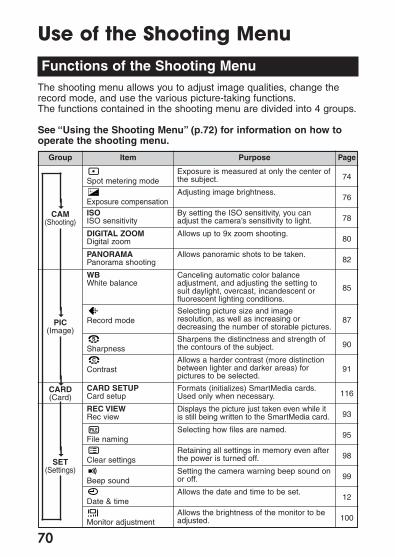
70
Use of the Shooting MenuFunctions of the Shooting Menu
The shooting menu allows you to adjust image qualities, change therecord mode, and use the various picture-taking functions.The functions contained in the shooting menu are divided into 4 groups.
See “Using the Shooting Menu” (p.72) for information on how tooperate the shooting menu.
Spot metering modeExposure is measured at only the center ofthe subject.
Exposure compensationAdjusting image brightness.
ISOISO sensitivity
By setting the ISO sensitivity, you canadjust the camera’s sensitivity to light.
DIGITAL ZOOMDigital zoom
Allows up to 9x zoom shooting.
WBWhite balance
Canceling automatic color balanceadjustment, and adjusting the setting tosuit daylight, overcast, incandescent orfluorescent lighting conditions.
Record modeSelecting picture size and imageresolution, as well as increasing ordecreasing the number of storable pictures.
SharpnessSharpens the distinctness and strength ofthe contours of the subject.
ContrastAllows a harder contrast (more distinctionbetween lighter and darker areas) forpictures to be selected.
CARD SETUPCard setup
Formats (initializes) SmartMedia cards.Used only when necessary.
REC VIEWRec view
Displays the picture just taken even while itis still being written to the SmartMedia card.
File namingFILE Selecting how files are named.
Clear settingsRetaining all settings in memory even afterthe power is turned off.
Beep soundSetting the camera warning beep sound onor off.
Date & timeAllows the date and time to be set.
Monitor adjustmentAllows the brightness of the monitor to beadjusted.
PANORAMAPanorama shooting
Allows panoramic shots to be taken.
74
76
78
80
82
85
87
91
90
93
116
95
98
99
12
100
CAM(Shooting)
PIC(Image)
CARD(Card)
SET(Settings)
��
��
Group Item Purpose Page
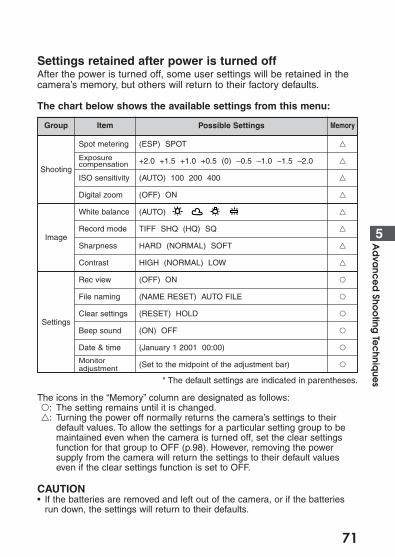
71
5Ad
vanc
ed
Shoo
ting Te
chniq
ues
Settings retained after power is turned off After the power is turned off, some user settings will be retained in thecamera’s memory, but others will return to their factory defaults.
The chart below shows the available settings from this menu:
* The default settings are indicated in parentheses.
The icons in the “Memory” column are designated as follows:�: The setting remains until it is changed.�: Turning the power off normally returns the camera’s settings to their
default values. To allow the settings for a particular setting group to bemaintained even when the camera is turned off, set the clear settingsfunction for that group to OFF (p.98). However, removing the powersupply from the camera will return the settings to their default valueseven if the clear settings function is set to OFF.
CAUTION• If the batteries are removed and left out of the camera, or if the batteries
run down, the settings will return to their defaults.
ItemGroup Memory
�
�
�
�
�
�
�
�
�
�
�
�
�
�
Possible Settings
(AUTO) 100 200 400
(OFF) ON
(AUTO)
TIFF SHQ (HQ) SQ
HARD (NORMAL) SOFT
HIGH (NORMAL) LOW
(OFF) ON
(NAME RESET) AUTO FILE
(RESET) HOLD
(ON) OFF
(January 1 2001 00:00)
(Set to the midpoint of the adjustment bar)
+2.0 +1.5 +1.0 +0.5 (0) –0.5 –1.0 –1.5 –2.0
Spot metering
Exposurecompensation
ISO sensitivity
Digital zoom
White balance
Record mode
Sharpness
Contrast
Rec view
File naming
Clear settings
Beep sound
Date & time
Monitoradjustment
Shooting
Image
Settings
(ESP) SPOT
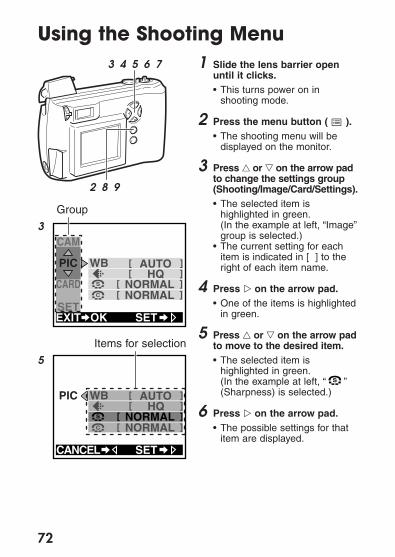
Using the Shooting Menu1 Slide the lens barrier open
until it clicks.• This turns power on in
shooting mode.
2 Press the menu button ( ).• The shooting menu will be
displayed on the monitor.
3 Press � or � on the arrow padto change the settings group(Shooting/Image/Card/Settings).• The selected item is
highlighted in green.(In the example at left, “Image”group is selected.)
• The current setting for eachitem is indicated in [ ] to theright of each item name.
4 Press � on the arrow pad.• One of the items is highlighted
in green.
5 Press � or � on the arrow padto move to the desired item.• The selected item is
highlighted in green.(In the example at left, “ ”(Sharpness) is selected.)
6 Press � on the arrow pad.• The possible settings for that
item are displayed.
72
3 4 5 6 7
2 8 9
WB
CAM
PIC
CARD
SET
[ HQ ][ NORMAL ][ NORMAL ]
[ AUTO ]
SETEXIT OK
WBPIC [ AUTO ][ HQ ]
[ NORMAL ][ NORMAL ]
SETCANCEL
3
5
Group
Items for selection
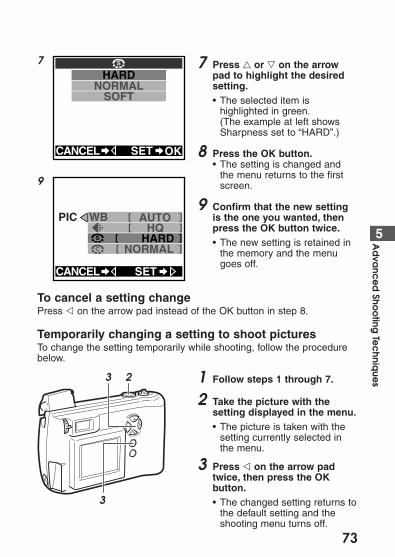
73
7 Press � or � on the arrowpad to highlight the desiredsetting.• The selected item is
highlighted in green.(The example at left showsSharpness set to “HARD”.)
8 Press the OK button.• The setting is changed and
the menu returns to the firstscreen.
9 Confirm that the new settingis the one you wanted, thenpress the OK button twice.• The new setting is retained in
the memory and the menugoes off.
To cancel a setting changePress � on the arrow pad instead of the OK button in step 8.
Temporarily changing a setting to shoot picturesTo change the setting temporarily while shooting, follow the procedurebelow.
1 Follow steps 1 through 7.
2 Take the picture with thesetting displayed in the menu.• The picture is taken with the
setting currently selected inthe menu.
3 Press � on the arrow padtwice, then press the OKbutton.• The changed setting returns to
the default setting and theshooting menu turns off.
5Ad
vanc
ed
Shoo
ting Te
chniq
ues
HARDNORMAL
SOFT
CANCEL SET OK
3 2
3
7
WBPIC [ AUTO ][ HQ ]
[ ][ NORMAL ]
HARD
SETCANCEL
9
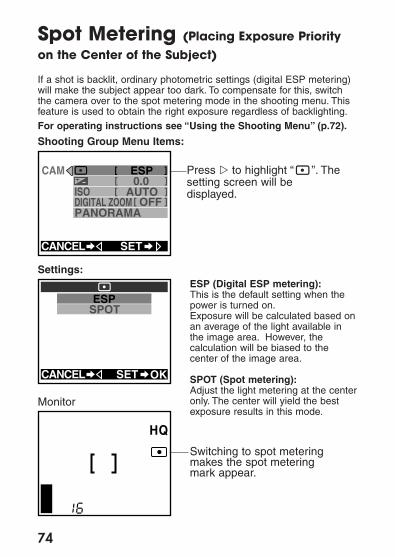
Spot Metering (Placing Exposure Priorityon the Center of the Subject)
If a shot is backlit, ordinary photometric settings (digital ESP metering)will make the subject appear too dark. To compensate for this, switchthe camera over to the spot metering mode in the shooting menu. Thisfeature is used to obtain the right exposure regardless of backlighting.
For operating instructions see “Using the Shooting Menu” (p.72).
74
PANORAMADIGITAL ZOOMISO
CAM
[ AUTO ]
[ ESP ][ 0.0 ]
[ OFF ]
SETCANCEL
Press � to highlight “ ”. Thesetting screen will bedisplayed.
HQ
Monitor
Switching to spot meteringmakes the spot meteringmark appear.
ESPSPOT
CANCEL SET OK
ESP (Digital ESP metering):This is the default setting when thepower is turned on.Exposure will be calculated based onan average of the light available inthe image area. However, thecalculation will be biased to thecenter of the image area.
SPOT (Spot metering):Adjust the light metering at the centeronly. The center will yield the bestexposure results in this mode.
Settings:
Shooting Group Menu Items:
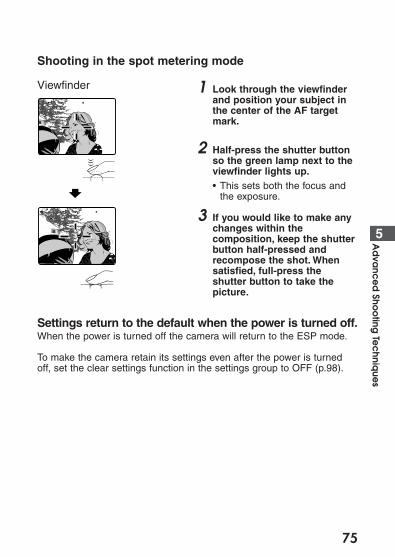
75
Shooting in the spot metering mode
1 Look through the viewfinderand position your subject inthe center of the AF targetmark.
2 Half-press the shutter buttonso the green lamp next to theviewfinder lights up.• This sets both the focus and
the exposure.
3 If you would like to make anychanges within thecomposition, keep the shutterbutton half-pressed andrecompose the shot. Whensatisfied, full-press theshutter button to take thepicture.
Settings return to the default when the power is turned off.When the power is turned off the camera will return to the ESP mode.
To make the camera retain its settings even after the power is turnedoff, set the clear settings function in the settings group to OFF (p.98).
5Ad
vanc
ed
Shoo
ting Te
chniq
ues
Viewfinder
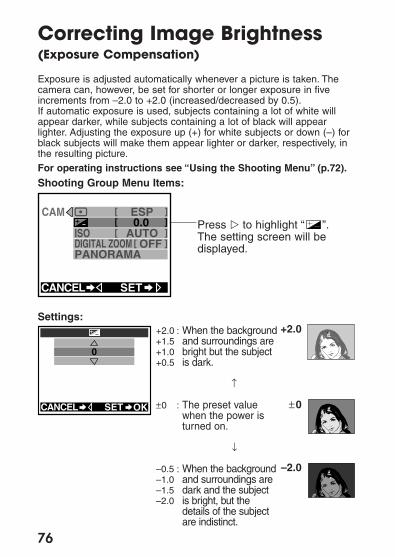
76
Correcting Image Brightness(Exposure Compensation)
Exposure is adjusted automatically whenever a picture is taken. Thecamera can, however, be set for shorter or longer exposure in fiveincrements from –2.0 to +2.0 (increased/decreased by 0.5).If automatic exposure is used, subjects containing a lot of white willappear darker, while subjects containing a lot of black will appearlighter. Adjusting the exposure up (+) for white subjects or down (–) forblack subjects will make them appear lighter or darker, respectively, inthe resulting picture.
For operating instructions see “Using the Shooting Menu” (p.72).
PANORAMADIGITAL ZOOMISO
CAM
[ AUTO ]
[ ESP ][ 0.0 ]
[ OFF ]
SETCANCEL
Press � to highlight “ ”.The setting screen will bedisplayed.
0
CANCEL SET OK
: When the backgroundand surroundings arebright but the subjectis dark.
↑
±0 : The preset valuewhen the power isturned on.
↓
: When the backgroundand surroundings aredark and the subjectis bright, but thedetails of the subjectare indistinct.
+2.0
±0
–2.0
Settings:
Shooting Group Menu Items:
+2.0+1.5+1.0+0.5
–0.5–1.0–1.5–2.0
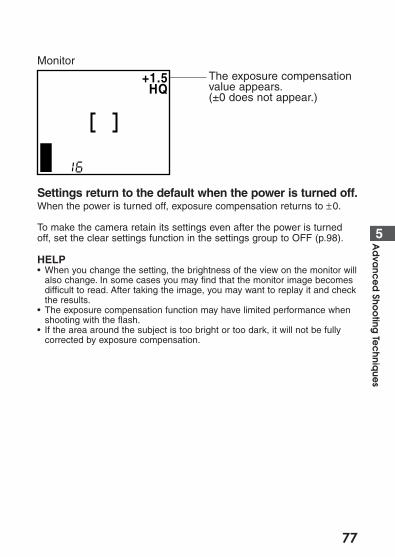
77
5Ad
vanc
ed
Shoo
ting Te
chniq
ues
Settings return to the default when the power is turned off.When the power is turned off, exposure compensation returns to ±0.
To make the camera retain its settings even after the power is turnedoff, set the clear settings function in the settings group to OFF (p.98).
HELP• When you change the setting, the brightness of the view on the monitor will
also change. In some cases you may find that the monitor image becomesdifficult to read. After taking the image, you may want to replay it and checkthe results.
• The exposure compensation function may have limited performance whenshooting with the flash.
• If the area around the subject is too bright or too dark, it will not be fullycorrected by exposure compensation.
+1.5HQ
The exposure compensationvalue appears.(±0 does not appear.)
Monitor
78
ISO Light Sensitivity Level(Setting ISO Sensitivity)
This camera can automatically determine the ISO sensitivity level basedon the brightness of the subject.However, for certain kinds of pictures it is better to set the ISOsensitivity level manually.
For operating instructions see “Using the Shooting Menu” (p.72).
PANORAMA
ISO
CAM
DIGITAL ZOOM[ AUTO ]
[ ESP ][ 0.0 ]
[ OFF ]
SETCANCEL
Press � to highlight “ISO”.The setting screen will bedisplayed.
This is the default setting when thepower is turned on.
Standard: This setting is best for brightoutdoor conditions. Fast moving subjectsmay be blurred due to the slower shutterspeed that the camera may set.
Little higher sensitivity: This setting isbest for overcast outdoor conditions.Good results with moderately fast movingsubject.
High sensitivity: This setting is ideal forfast-moving subjects and low lightconditions, but the resulting images willbe grainier.
100
200
400
AUTO100
400200
ISO
CANCEL SET OK
Settings:
* This ISO sensitivity scale is based on conventional camera film speeds, andtherefore the values are for reference only.
* Raising the ISO sensitivity by selecting a higher ISO value, lowers the picturequality.
* To determine if the selected setting is the best choice, always check the recordedimage by playing it back on the monitor.
* When setting the ISO level to low, use a tripod and the selftimer to avoidblurriness due to slow shutter speeds and excess movement of the camera(p.59).
Shooting Group Menu Items:
AUTO
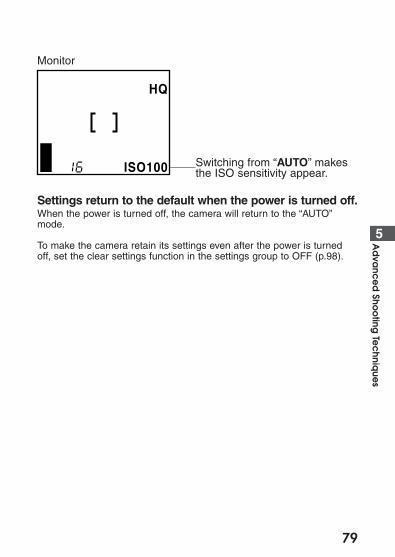
79
5Ad
vanc
ed
Shoo
ting Te
chniq
ues
Settings return to the default when the power is turned off.When the power is turned off, the camera will return to the “AUTO”mode.
To make the camera retain its settings even after the power is turnedoff, set the clear settings function in the settings group to OFF (p.98).
HQ
ISO100
Monitor
Switching from “AUTO” makesthe ISO sensitivity appear.
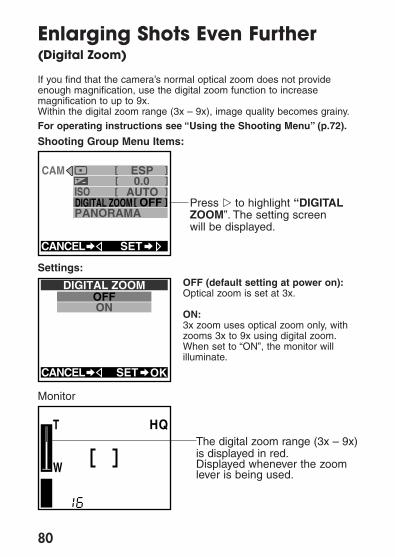
80
Enlarging Shots Even Further(Digital Zoom)
If you find that the camera’s normal optical zoom does not provideenough magnification, use the digital zoom function to increasemagnification to up to 9x.Within the digital zoom range (3x – 9x), image quality becomes grainy.
For operating instructions see “Using the Shooting Menu” (p.72).
HQT
W
Monitor
The digital zoom range (3x – 9x)is displayed in red.Displayed whenever the zoomlever is being used.
PANORAMA
ISO
CAM
DIGITAL ZOOM[ AUTO ]
[ ESP ][ 0.0 ]
[ OFF ]
SETCANCEL
Press � to highlight “DIGITALZOOM”. The setting screen will be displayed.
OFFON
DIGITAL ZOOM
CANCEL SET OK
Settings:OFF (default setting at power on):Optical zoom is set at 3x.
ON:3x zoom uses optical zoom only, withzooms 3x to 9x using digital zoom.When set to “ON”, the monitor willilluminate.
Shooting Group Menu Items:
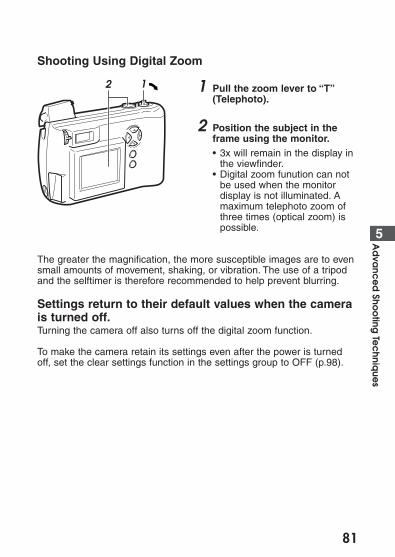
81
5Ad
vanc
ed
Shoo
ting Te
chniq
ues
Shooting Using Digital Zoom
1 Pull the zoom lever to “T”(Telephoto).
2 Position the subject in theframe using the monitor.• 3x will remain in the display in
the viewfinder.• Digital zoom funution can not
be used when the monitordisplay is not illuminated. Amaximum telephoto zoom ofthree times (optical zoom) ispossible.
The greater the magnification, the more susceptible images are to evensmall amounts of movement, shaking, or vibration. The use of a tripodand the selftimer is therefore recommended to help prevent blurring.
Settings return to their default values when the camerais turned off.Turning the camera off also turns off the digital zoom function.
To make the camera retain its settings even after the power is turnedoff, set the clear settings function in the settings group to OFF (p.98).
2 1

82
Creating Panoramic Pictures(Panorama Function)
Using standard Olympus SmartMedia cards also allows you to shootpanoramic shots easily. This function is not available with other brandsof cards.With multiple images in which the edges of the subject can beoverlapped, it is possible to use CAMEDIA Master to join the imagesinto a single panoramic shot.For operating instructions see “Using the Shooting Menu” (p.72).
Taking Panoramic shotsSelect “PANORAMA”, then press �. The direction in which the frameswill be linked and the boundaries indicating frame overlap for each framein the panorama will be displayed on the monitor.
1 Set the camera on a tripod.
2 Use the arrow pad to set thepanorama arrow to point towardthe next panorama stitch.�: Connect to the right. Take
the current shot, thenmove camera to the rightfor the next shot.
�: Connect to the left.�: Connect up.�: Connect down.
PANORAMA
ISO
CAM
DIGITAL ZOOM[ AUTO ]
[ ESP ][ 0.0 ]
[ OFF ]
CANCEL GO
Highlight “PANORAMA” andpress �. The lower left screenwill be displayed.
Panorama shooting screen
Rectangle
Direction for connecting thepanorama.
Shooting Group Menu Items:
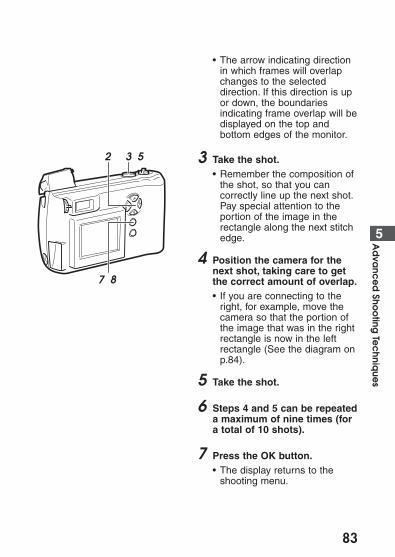
83
5Ad
vanc
ed
Shoo
ting Te
chniq
ues
• The arrow indicating directionin which frames will overlapchanges to the selecteddirection. If this direction is upor down, the boundariesindicating frame overlap will bedisplayed on the top andbottom edges of the monitor.
3 Take the shot.• Remember the composition of
the shot, so that you cancorrectly line up the next shot.Pay special attention to theportion of the image in therectangle along the next stitchedge.
4 Position the camera for thenext shot, taking care to getthe correct amount of overlap.• If you are connecting to the
right, for example, move thecamera so that the portion ofthe image that was in the rightrectangle is now in the leftrectangle (See the diagram onp.84).
5 Take the shot.
6 Steps 4 and 5 can be repeateda maximum of nine times (fora total of 10 shots).
7 Press the OK button.• The display returns to the
shooting menu.
2 3 5
7 8
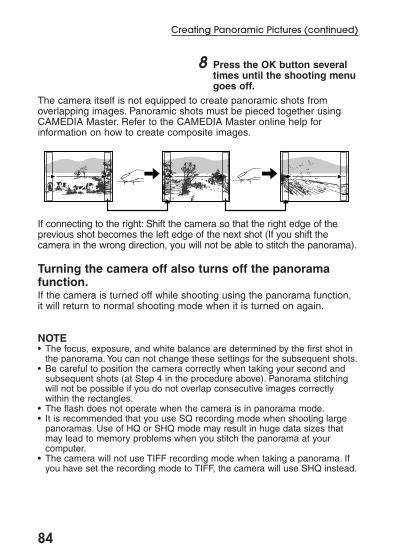
84
Creating Panoramic Pictures (continued)
8 Press the OK button severaltimes until the shooting menugoes off.
The camera itself is not equipped to create panoramic shots fromoverlapping images. Panoramic shots must be pieced together usingCAMEDIA Master. Refer to the CAMEDIA Master online help forinformation on how to create composite images.
Turning the camera off also turns off the panoramafunction.If the camera is turned off while shooting using the panorama function,it will return to normal shooting mode when it is turned on again.
NOTE• The focus, exposure, and white balance are determined by the first shot in
the panorama. You can not change these settings for the subsequent shots.• Be careful to position the camera correctly when taking your second and
subsequent shots (at Step 4 in the procedure above). Panorama stitchingwill not be possible if you do not overlap consecutive images correctlywithin the rectangles.
• The flash does not operate when the camera is in panorama mode.• It is recommended that you use SQ recording mode when shooting large
panoramas. Use of HQ or SHQ mode may result in huge data sizes thatmay lead to memory problems when you stitch the panorama at yourcomputer.
• The camera will not use TIFF recording mode when taking a panorama. Ifyou have set the recording mode to TIFF, the camera will use SHQ instead.
If connecting to the right: Shift the camera so that the right edge of theprevious shot becomes the left edge of the next shot (If you shift thecamera in the wrong direction, you will not be able to stitch the panorama).
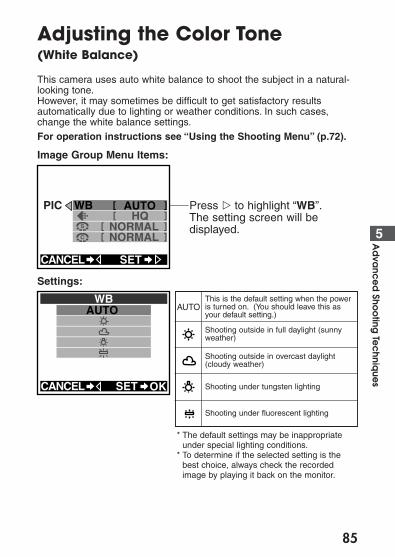
85
5Ad
vanc
ed
Shoo
ting Te
chniq
ues
Adjusting the Color Tone (White Balance)
This camera uses auto white balance to shoot the subject in a natural-looking tone.However, it may sometimes be difficult to get satisfactory resultsautomatically due to lighting or weather conditions. In such cases,change the white balance settings.
For operation instructions see “Using the Shooting Menu” (p.72).
* The default settings may be inappropriateunder special lighting conditions.
* To determine if the selected setting is thebest choice, always check the recordedimage by playing it back on the monitor.
WBPIC [ AUTO ][ HQ ]
[ NORMAL ][ NORMAL ]
SETCANCEL
Press � to highlight “WB”.The setting screen will bedisplayed.
AUTO WB
CANCEL SET OK
Settings:
AUTOThis is the default setting when the poweris turned on. (You should leave this asyour default setting.)
Shooting outside in full daylight (sunnyweather)
Shooting outside in overcast daylight(cloudy weather)
Shooting under tungsten lighting
Shooting under fluorescent lighting
Image Group Menu Items:
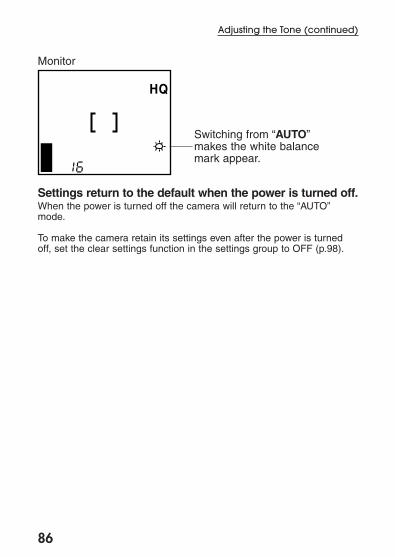
86
Adjusting the Tone (continued)
Settings return to the default when the power is turned off.When the power is turned off the camera will return to the “AUTO”mode.
To make the camera retain its settings even after the power is turnedoff, set the clear settings function in the settings group to OFF (p.98).
HQ
Monitor
Switching from “AUTO”makes the white balancemark appear.

87
5Ad
vanc
ed
Shoo
ting Te
chniq
ues
Picture Preferences: Quality vs.Quantity (Record Mode)
The camera offers four different recording modes (resolutions) that canbe selected depending on whether you want better image quality ormore pictures. Selecting higher image resolutions will result in betterquality pictures, while selecting lower image resolutions will enable youto store more images in the camera (p.21).
For operating instructions see “Using the Shooting Menu” (p.72).
WBPIC [ AUTO ][ HQ ]
[ NORMAL ][ NORMAL ]
SETCANCEL
Press � to highlight “ ”.The setting screenwill be displayed.
TIFFSHQ
SQHQ
SET OKCANCEL* The higher the resolution, the longer the
recording time (time the green lamp isilluminated) and the longer it takes to playback the picture. Also, the higher theresolution, the fewer the number of picturesthat can be stored.The “TIFF” mode is very slow and can storerelatively few pictures.
* The initial setting is set to “HQ”.
Settings:
TIFFHigh
Normal
None
Low
High
High/Low
SHQ
HQ
SQ
c
d
Quality Settings Compression
1600 × 1200~640 × 480
1600 × 1200
1280 × 960~640 × 480
Size (Numberof pixels)
Image Group Menu Items:

88
HQ
Monitor
Record mode isdisplayed
1600x12001280x960
640x4801024x768
TIFF
CANCEL SET OK
TIFF allows you tochange the number ofpixels.
1280x960
640x480
1024x768
SQ[NORMAL][ HIGH ][NORMAL][ HIGH ][NORMAL][ HIGH ]
CANCEL SET OK
SQ allows you to change thenumber of pixels as well asthe compressibility.
Tip on selecting a record modeThe record mode can be selected depending on how you will be usingthe picture:• If you want to send the picture attached to an e-mail, select SQ.• If you want to display or print out the picture with a computer, select
HQ or SHQ.• If you want to process the picture on your computer, select TIFF.

89
Picture Preferences: Quality vs. Quantity (continued)
5Ad
vanc
ed
Shoo
ting Te
chniq
ues
Restrictions when using of high image quality settingsSelecting a high resolution setting increases the amount of time youmust wait after taking a shot (the green lamp continues to blink longer),increases the length of playback time, and reduces the number ofpictures that you can store on a card. The number of pictures you canstore on a card is significantly reduced if you select TIFF.Selecting a higher quality setting increases the amount of time required tostore each image on a card (the green lamp blinks longer). To preventlosing the image, never open the card cover, remove the card, remove thebatteries, or disconnect the AC adapter while the green lamp is blinking.If you select a high resolution setting with insufficient storage space onthe memory card, you will see the screen shown below and you will notbe able to store more images on the card. Select another recordingmode.
When the power is turned off the settings return to theirdefault values.When the power is turned off it returns to “HQ.”
To make the camera retain its settings even after the power is turnedoff, set the clear settings function in the settings group to OFF (p.98).
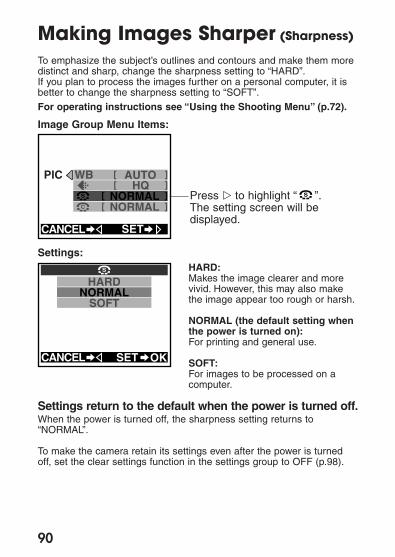
90
Making Images Sharper (Sharpness)
To emphasize the subject’s outlines and contours and make them moredistinct and sharp, change the sharpness setting to “HARD”.If you plan to process the images further on a personal computer, it isbetter to change the sharpness setting to “SOFT”.
For operating instructions see “Using the Shooting Menu” (p.72).
Settings return to the default when the power is turned off.When the power is turned off, the sharpness setting returns to“NORMAL”.
To make the camera retain its settings even after the power is turnedoff, set the clear settings function in the settings group to OFF (p.98).
WBPIC[ HQ ]
[ NORMAL ][ NORMAL ]
[ AUTO ]
SETCANCEL
Press � to highlight “ ”.The setting screen will bedisplayed.
NORMALSOFT
HARD
CANCEL SET OK
Settings:HARD:Makes the image clearer and morevivid. However, this may also makethe image appear too rough or harsh.
NORMAL (the default setting whenthe power is turned on):For printing and general use.
SOFT:For images to be processed on acomputer.
Image Group Menu Items:
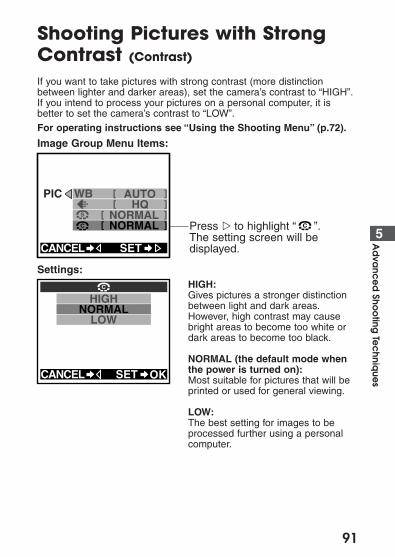
91
Shooting Pictures with StrongContrast (Contrast)
If you want to take pictures with strong contrast (more distinctionbetween lighter and darker areas), set the camera’s contrast to “HIGH”.If you intend to process your pictures on a personal computer, it isbetter to set the camera’s contrast to “LOW”.For operating instructions see “Using the Shooting Menu” (p.72).
5Ad
vanc
ed
Shoo
ting Te
chniq
ues
WBPIC [ AUTO ][ HQ ]
[ NORMAL ][ NORMAL ]
SETCANCEL
Press � to highlight “ ”.The setting screen will bedisplayed.
HIGHNORMAL
LOW
CANCEL SET OK
Settings:
Image Group Menu Items:
HIGH:Gives pictures a stronger distinctionbetween light and dark areas.However, high contrast may causebright areas to become too white ordark areas to become too black.
NORMAL (the default mode whenthe power is turned on):Most suitable for pictures that will beprinted or used for general viewing.
LOW:The best setting for images to beprocessed further using a personalcomputer.

92
Shooting Pictures with Strong Contrast (continued)
Settings return to the default when the power is turned off.Turning the camera off also resets the contrast to “NORMAL”.
To make the camera retain its settings even after the power is turnedoff, set the clear settings function in the settings group to OFF (p.98).
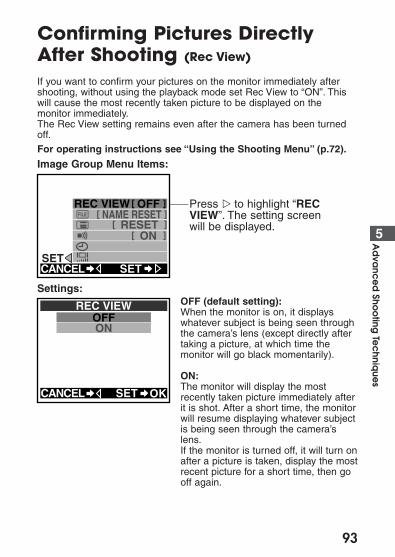
93
5Ad
vanc
ed
Shoo
ting Te
chniq
ues
Confirming Pictures DirectlyAfter Shooting (Rec View)
If you want to confirm your pictures on the monitor immediately aftershooting, without using the playback mode set Rec View to “ON”. Thiswill cause the most recently taken picture to be displayed on themonitor immediately.The Rec View setting remains even after the camera has been turnedoff.For operating instructions see “Using the Shooting Menu” (p.72).
Image Group Menu Items:
SET
REC VIEW [ OFF ]
[ ON ]
FILE
[ RESET ][ NAME RESET ]
SETCANCEL
Press � to highlight “RECVIEW”. The setting screenwill be displayed.
OFFREC VIEW
ON
CANCEL SET OK
Settings:OFF (default setting):When the monitor is on, it displayswhatever subject is being seen throughthe camera’s lens (except directly aftertaking a picture, at which time themonitor will go black momentarily).
ON:The monitor will display the mostrecently taken picture immediately afterit is shot. After a short time, the monitorwill resume displaying whatever subjectis being seen through the camera’slens.If the monitor is turned off, it will turn onafter a picture is taken, display the mostrecent picture for a short time, then gooff again.

Taking pictures during Rec View playbackEven when the monitor is displaying an image during Rec View, it is stillpossible to shoot as long as the green lamp beside the viewfinder hasgone out.
94
Confirming Pictures Directly After Shooting (continued)
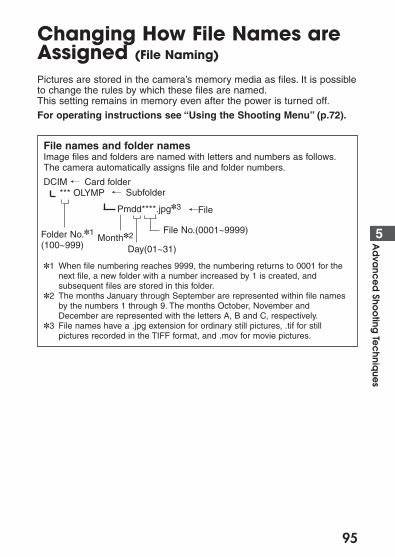
95
5Ad
vanc
ed
Shoo
ting Te
chniq
ues
Changing How File Names areAssigned (File Naming)
Pictures are stored in the camera’s memory media as files. It is possibleto change the rules by which these files are named.This setting remains in memory even after the power is turned off.
For operating instructions see “Using the Shooting Menu” (p.72).
File names and folder namesImage files and folders are named with letters and numbers as follows.The camera automatically assigns file and folder numbers.
DCIM , Card folder, Subfolder
,File
✽1 When file numbering reaches 9999, the numbering returns to 0001 for thenext file, a new folder with a number increased by 1 is created, andsubsequent files are stored in this folder.
✽2 The months January through September are represented within file namesby the numbers 1 through 9. The months October, November andDecember are represented with the letters A, B and C, respectively.
✽3 File names have a .jpg extension for ordinary still pictures, .tif for stillpictures recorded in the TIFF format, and .mov for movie pictures.
*** OLYMP
Pmdd****.jpg✽3
Folder No.✽1
(100~999)
File No.(0001~9999)
Day(01~31)Month✽2
96
NAME RESET (Initial setting)When the card is changed, folder and file numbers restart from defaultsetting.
Example:
SET
REC VIEW [ OFF ]
[ ON ]
FILE
[ RESET ][ NAME RESET ]
SETCANCEL
Settings Group Menu Items:
Press � to highlight “ ”. Thesetting screen will be displayed.
FILE
AUTO FILENAME RESET
FILE
CANCEL SET OK
Settings:
Folder No.102Card change
File No. 0005
Folder No.100
File No. 0001
97
5Ad
vanc
ed
Shoo
ting Te
chniq
ues
AUTO FILEFolder numbers do not change when changing to a new SmartMediacard. When copying images onto a personal computer by folder, it ispossible to collect the copied images into the same folder using Copycommand.(However, under the Mac OS, images in old folders will be erased, soplease use caution to avoid losing image files you want to keep.)After inserting a new card, file numbers will start with the next numberafter the last one recorded on the previous card.
Example:
Even from multiple cards or when you have shot a great many pictures,the files numbers will not overlap. However, when you have shot 9999pictures, the counter returns to 0001.
HELP• When the folder number has reached 999 or the file number has reached
9999, no further shooting will be possible even if there is free memoryspace remaining on the card. Replace the card when this happens and youwill be able to continue shooting. Regardless of setting values, foldernumbers will start again with 100 and file numbers will start again with0001.
NOTE• If a different card containing previously stored files is inserted and the
number of files stored on it is greater than the number of files stored on theprevious card, subsequent pictures will be numbered in sequence followingthe highest number on the newly inserted card.
• If folder or file names are changed on a personal computer, playback of theimages on the camera may become impossible.
Changing How File Names are Assigned (continued)
Folder No.101Card change
File No. 0005
Folder No.101
File No.starts from
0006
98
To Retain Settings Even AfterPower is Turned Off (Clear Settings)
If there is a � under the memory column of the chart in “Functions ofthe Shooting Menu” (p.65, p.103) section, the function in questionreturns to the default setting when the power is turned off. Those itemsmarked with a � can be changed and reset to retain the new setting inmemory even after the power is turned off (OFF).Also settings can be set by the Playback Menu.
For operating instructions see “Using the Shooting Menu” (p.72).
SET
REC VIEWFILE
[ RESET ][ ON ]
[ NAME RESET ][ OFF ]
SETCANCEL
Press � to highlight “ ”.The setting screen will bedisplayed.
RESETHOLD
CANCEL SET OK
Settings:HOLD:All the settings for the menu items areretained.Settings that are retained includethose for flash, quick focus, macroshooting, sequential shooting andmovie shooting.However, removal of the camera’sbattery will cause all settings markedwith a � in the “memory” column ofthe charts on p.71, p.103 to return totheir defaults.
RESET (default setting):Those items marked with � hold thelast setting used.
Settings Group Menu Items:

99
5Ad
vanc
ed
Shoo
ting Te
chniq
ues
Turning Off Warning Sounds(Beep Sound)
When shooting weddings or for wildlife shots, the camera warningsounds can be a liability. In such cases, the beep sound can be set to“OFF”.This setting remains in memory even after the power is turned off.Also settings can be set by the Playback Menu.
For operating instructions see “Using the Shooting Menu” (p.72).
SET
[ OFF ]
[ ON ]
FILE
[ RESET ][ NAME RESET ]
REC VIEW
SETCANCEL
Press � to highlight “ ”.The setting screen will bedisplayed.
ONOFF
CANCEL SET OK
Settings:OFF:The warning beep does not sound.
ON:Depending on the operation, thewarning beep will sound.
Settings Group Menu Items:
100
To Adjust Monitor Brightness(Monitor Adjustment)
The brightness of the monitor can be adjusted.This setting remains in the camera memory even after the power isturned off.The same function is also available in the playback mode.
For operating instructions see “Using the Shooting Menu” (p.72).
Adjusting on the + side(Press the � button): The imagegets brighter.
Adjusting on the – side(Press the � button): The imagegets darker.
When you are finished making thesetting, press the OK button to saveit.
SET
REC VIEW
[ ON ]
FILE
[ RESET ]
[ OFF ][ NAME RESET ]
SETCANCELPress � to highlight “ ”. Thesetting screen will be displayed.
CANCEL SET OK
Settings:
Adjust by shifting the barup or down while lookingat the subject displayedon the monitor.
Settings Group Menu Items:

6Advanced Playback Techniques
The playback menu is used for playbackfunctions including playing movie picturesstored in the camera and playing stored imagesin order. After you’ve familiarized yourself withuse of the playback menu, consult the followingpages describing each of the various functions.
101
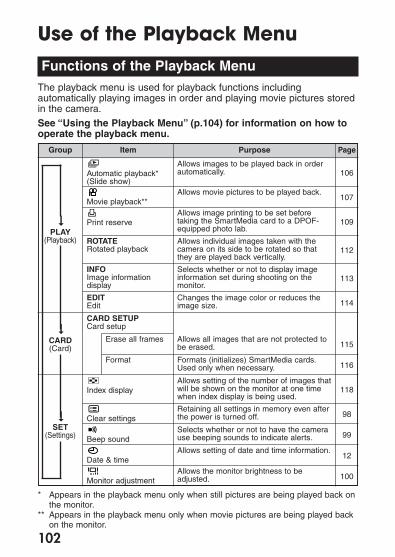
102
Use of the Playback MenuFunctions of the Playback Menu
The playback menu is used for playback functions includingautomatically playing images in order and playing movie pictures storedin the camera.
See “Using the Playback Menu” (p.104) for information on how tooperate the playback menu.
* Appears in the playback menu only when still pictures are being played back onthe monitor.
** Appears in the playback menu only when movie pictures are being played backon the monitor.
Automatic playback*(Slide show)
Allows images to be played back in orderautomatically.
Movie playback**Allows movie pictures to be played back.
Print reserveAllows image printing to be set beforetaking the SmartMedia card to a DPOF-equipped photo lab.
ROTATERotated playback
Allows individual images taken with thecamera on its side to be rotated so thatthey are played back vertically.
CARD SETUPCard setup
EDITEdit
Changes the image color or reduces theimage size.
Erase all frames Allows all images that are not protected tobe erased.
Format Formats (initializes) SmartMedia cards.Used only when necessary.
Index displayAllows setting of the number of images thatwill be shown on the monitor at one timewhen index display is being used.
Clear settingsRetaining all settings in memory even afterthe power is turned off.
Beep soundSelects whether or not to have the camerause beeping sounds to indicate alerts.
Monitor adjustment
Allows setting of date and time information.Date & time
Allows the monitor brightness to beadjusted.
INFOImage informationdisplay
Selects whether or not to display imageinformation set during shooting on themonitor.
106
107
109
112
113
114
115
116
118
98
99
12
100
PLAY(Playback)
CARD(Card)
SET(Settings)
��
�
Group Item Purpose Page
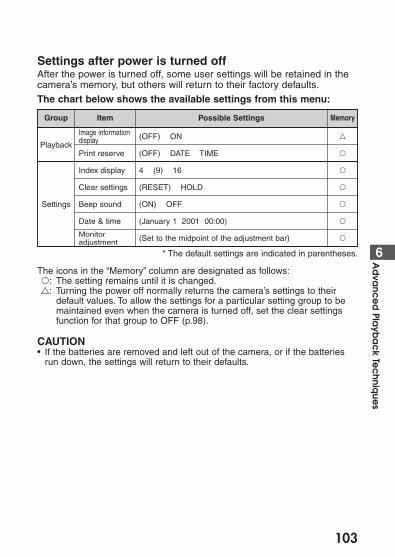
103
6Ad
vanc
ed
Playb
ac
k Tec
hnique
s
Settings after power is turned off After the power is turned off, some user settings will be retained in thecamera’s memory, but others will return to their factory defaults.The chart below shows the available settings from this menu:
* The default settings are indicated in parentheses.
The icons in the “Memory” column are designated as follows:�: The setting remains until it is changed.�: Turning the power off normally returns the camera’s settings to their
default values. To allow the settings for a particular setting group to bemaintained even when the camera is turned off, set the clear settingsfunction for that group to OFF (p.98).
CAUTION• If the batteries are removed and left out of the camera, or if the batteries
run down, the settings will return to their defaults.
ItemGroup Memory
�
�
�
�
�
�
�
Possible Settings
4 (9) 16
(RESET) HOLD
(ON) OFF
(January 1 2001 00:00)
(Set to the midpoint of the adjustment bar)
(OFF) DATE TIME
Image informationdisplay
Print reserve
Index display
Clear settings
Beep sound
Date & time
Monitoradjustment
Playback
Settings
(OFF) ON

Using the Playback Menu1 With the lens barrier closed,
push the monitor button ( ).• The power turns on in
playback mode and themonitor displays the last imagetaken.
2 Press the menu button ( ).• The playback menu will be
displayed on the monitor.
3 Press � or � on the arrow padto change the settings group(Playback/Card/Settings).• The selected item is
highlighted in green.(In the example at left,“Settings group” is selected.)
• The current setting for eachitem is indicated in [ ] to theright of each item name.
4 Press � on the arrow pad.• One of the items is highlighted
in green.
5 Press � or � on the arrowpad to move to the desireditem.• The selected item is
highlighted in green.(In the example at left, “IndexDisplay” is selected.)
104
3 4 5 6 7
2 8 9 1
PLAY
CARD
SET
[ ON ][ RESET ][ 9 ]
SETEXIT OK
[ ON ][ RESET ][ 9 ]PLAY
CARD
SET
SETEXIT OK
3
5
Group
Items for selection
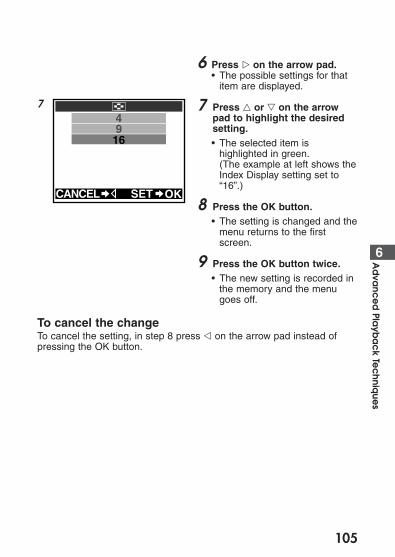
105
6 Press � on the arrow pad.• The possible settings for that
item are displayed.
7 Press � or � on the arrowpad to highlight the desiredsetting.• The selected item is
highlighted in green.(The example at left shows theIndex Display setting set to“16”.)
8 Press the OK button.• The setting is changed and the
menu returns to the firstscreen.
9 Press the OK button twice.• The new setting is recorded in
the memory and the menugoes off.
To cancel the changeTo cancel the setting, in step 8 press � on the arrow pad instead ofpressing the OK button.
6Ad
vanc
ed
Playb
ac
k Tec
hnique
s
916
4
CANCEL SET OK
7
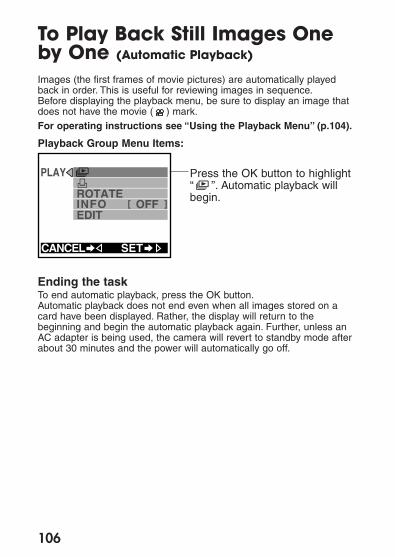
106
To Play Back Still Images Oneby One (Automatic Playback)
Images (the first frames of movie pictures) are automatically playedback in order. This is useful for reviewing images in sequence.Before displaying the playback menu, be sure to display an image thatdoes not have the movie ( ) mark.
For operating instructions see “Using the Playback Menu” (p.104).
Ending the taskTo end automatic playback, press the OK button.Automatic playback does not end even when all images stored on acard have been displayed. Rather, the display will return to thebeginning and begin the automatic playback again. Further, unless anAC adapter is being used, the camera will revert to standby mode afterabout 30 minutes and the power will automatically go off.
SET
PLAY
ROTATE
EDITINFO [ OFF ]
CANCEL
Playback Group Menu Items:
Press the OK button to highlight“ ”. Automatic playback willbegin.
6Ad
vanc
ed
Playb
ac
k Tec
hnique
s
To Play Back Movie Pictures (Movie Playback)
When playing back movie pictures, before going to the playback menu,the images with the movie “ ” mark that you would like to play backhave to be displayed.
For operating instructions see “Using the Playback Menu” (p.104).First, display the image with the movie “ ” mark that you would like toplayback, and then go to the playback menu (p.102).
Operations during playback
1 To pause playback, press anybutton on the arrow pad.
2 While the camera is on pause,the following operations arepossible:� : Returns to the beginning of
the movie picture.� : Advances to the end of the
movie picture.� : Fast forward� : Rewind
3 To resume playback, quicklypress � on the arrow pad.• The movie on the monitor will
play back again.
4 To end, press the OK buttonwhile the image is paused.• Returns to the playback menu.
107
ROTATE
PLAY
CANCEL GO
EDITINFO [ OFF ]
Playback Group Menu Items:
Press � to highlight “ ”. Movieplayback will begin shortly.
1 2 3
4
108
To Play Back Movie Pictures (continued)
To play back different movie pictureClose the playback menu once, select the movie picture you want toplay, then display the playback menu once more.
For C-200 ZOOM models sold in the PAL color system regions.Play back pictures under the same conditions that they weretaken.Movies shot at the normal frame rate (15 frames/sec.) are playedback on the monitor at the same rate.Movies are played back at 12.5 frames/sec. when played back onthe TV with the video cable connected.With the video cable connected, movies are shot and played back at12.5 frames/sec. The maximum movie length in this case wouldtherefore be different from that seen in the chart on p.21.
HELP• If you attempt to play back movies shot at the normal frame rate (15
frames/sec.) with the video cable connected, then some frames may beskipped during playback.
• If you attempt to play back movies shot with the video cable connected atthe normal frame rate, then playback may occasionally halt.
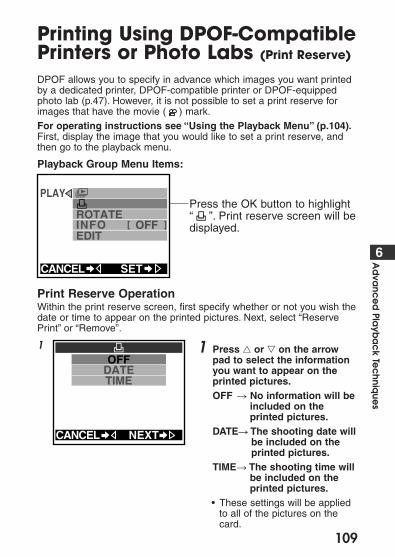
109
6Ad
vanc
ed
Playb
ac
k Tec
hnique
s
Printing Using DPOF-CompatiblePrinters or Photo Labs (Print Reserve)
DPOF allows you to specify in advance which images you want printedby a dedicated printer, DPOF-compatible printer or DPOF-equippedphoto lab (p.47). However, it is not possible to set a print reserve forimages that have the movie ( ) mark.
For operating instructions see “Using the Playback Menu” (p.104).First, display the image that you would like to set a print reserve, andthen go to the playback menu.
Print Reserve OperationWithin the print reserve screen, first specify whether or not you wish thedate or time to appear on the printed pictures. Next, select “ReservePrint” or “Remove”.
1 Press � or � on the arrowpad to select the informationyou want to appear on theprinted pictures.OFF � No information will be
included on theprinted pictures.
DATE� The shooting date willbe included on theprinted pictures.
TIME� The shooting time willbe included on theprinted pictures.
• These settings will be appliedto all of the pictures on thecard.
SET
PLAY
ROTATE
EDITINFO [ OFF ]
CANCEL
Playback Group Menu Items:
Press the OK button to highlight“ ”. Print reserve screen will bedisplayed.
NEXT
OFFDATETIME
CANCEL
1
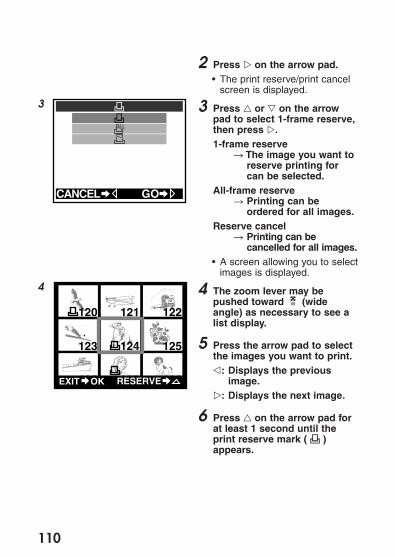
2 Press � on the arrow pad.• The print reserve/print cancel
screen is displayed.
3 Press � or � on the arrowpad to select 1-frame reserve,then press �.1-frame reserve
� The image you want toreserve printing forcan be selected.
All-frame reserve � Printing can be
ordered for all images.Reserve cancel
� Printing can becancelled for all images.
• A screen allowing you to selectimages is displayed.
4 The zoom lever may bepushed toward (wideangle) as necessary to see alist display.
5 Press the arrow pad to selectthe images you want to print.�: Displays the previous
image.�: Displays the next image.
6 Press � on the arrow pad forat least 1 second until theprint reserve mark ( )appears.
110
GOCANCEL
3
120 121 122
123 124 125
126 127 128EXIT RESERVEOK
4
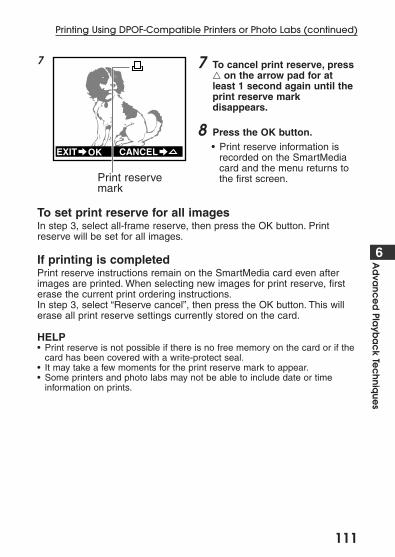
111
7 To cancel print reserve, press� on the arrow pad for atleast 1 second again until theprint reserve markdisappears.
8 Press the OK button.• Print reserve information is
recorded on the SmartMediacard and the menu returns tothe first screen.
To set print reserve for all imagesIn step 3, select all-frame reserve, then press the OK button. Printreserve will be set for all images.
If printing is completedPrint reserve instructions remain on the SmartMedia card even afterimages are printed. When selecting new images for print reserve, firsterase the current print ordering instructions.In step 3, select “Reserve cancel”, then press the OK button. This willerase all print reserve settings currently stored on the card.
HELP• Print reserve is not possible if there is no free memory on the card or if the
card has been covered with a write-protect seal.• It may take a few moments for the print reserve mark to appear.• Some printers and photo labs may not be able to include date or time
information on prints.
6Ad
vanc
ed
Playb
ac
k Tec
hnique
sPrinting Using DPOF-Compatible Printers or Photo Labs (continued)
EXIT CANCELOK
7
Print reservemark
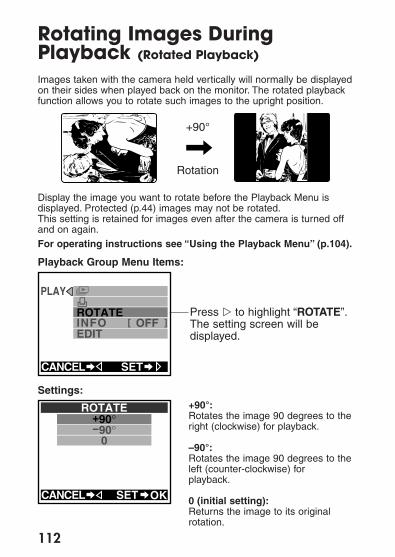
Rotating Images DuringPlayback (Rotated Playback)
Images taken with the camera held vertically will normally be displayedon their sides when played back on the monitor. The rotated playbackfunction allows you to rotate such images to the upright position.
Display the image you want to rotate before the Playback Menu isdisplayed. Protected (p.44) images may not be rotated.This setting is retained for images even after the camera is turned offand on again.For operating instructions see “Using the Playback Menu” (p.104).
112
SET
PLAY
ROTATE
EDITINFO [ OFF ]
CANCEL
Playback Group Menu Items:
Press � to highlight “ROTATE”.The setting screen will bedisplayed.
+90°-90°
0
ROTATE
CANCEL SET OK
Settings:+90°:Rotates the image 90 degrees to theright (clockwise) for playback.
–90°:Rotates the image 90 degrees to theleft (counter-clockwise) for playback.
0 (initial setting):Returns the image to its originalrotation.
+90°
Rotation

113
Displaying Image Informationon the Monitor (Image Information Display)
Information recorded with the image when it was shot can be displayedon the monitor. This information appears 3 seconds after the imageappears on the monitor.
For operating instructions see “Using the Playback Menu” (p.104).
For examples of monitor displays, see “Monitor” in “Names of Parts” (p.4).
Settings return to the default when the power is turned off.Cutting the power will return “Image Information Display” to “OFF”.
To make the camera retain its settings even after the power is turnedoff, set the clear settings function in the settings group to OFF (p.98).
6Ad
vanc
ed
Playb
ac
k Tec
hnique
s
SET
PLAY
ROTATE
EDITINFO [ OFF ]
CANCEL
Playback Group Menu Items:
Press � to highlight “INFO”.The setting screen will bedisplayed.
OFFON
INFO
CANCEL SET OK
Settings:OFF (default when camera isturned on):Displays resolution, date/time, andframe number. Depending on theimage, the movie mark, print mark,and/or protect mark may also bedisplayed.
ON:The following information is added tothe default information.Size (number of pixels), exposurecompensation value, white balanceand ISO value.Also, the file name (p.95) is includedin place of the frame number.
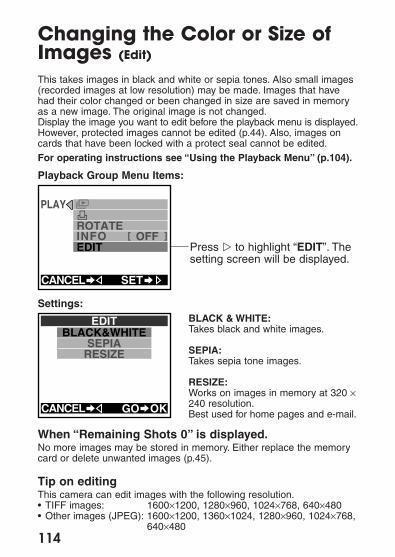
Changing the Color or Size ofImages (Edit)
This takes images in black and white or sepia tones. Also small images(recorded images at low resolution) may be made. Images that havehad their color changed or been changed in size are saved in memoryas a new image. The original image is not changed.Display the image you want to edit before the playback menu is displayed.However, protected images cannot be edited (p.44). Also, images oncards that have been locked with a protect seal cannot be edited.
For operating instructions see “Using the Playback Menu” (p.104).
When “Remaining Shots 0” is displayed.No more images may be stored in memory. Either replace the memorycard or delete unwanted images (p.45).
Tip on editingThis camera can edit images with the following resolution.• TIFF images: 1600×1200, 1280×960, 1024×768, 640×480• Other images (JPEG): 1600×1200, 1360×1024, 1280×960, 1024×768,
640×480114
EDITBLACK&WHITE
SEPIARESIZE
CANCEL GO OK
Settings:
SET
PLAY
ROTATE
EDITINFO [ OFF ]
CANCEL
Playback Group Menu Items:
Press � to highlight “EDIT”. Thesetting screen will be displayed.
BLACK & WHITE:Takes black and white images.
SEPIA:Takes sepia tone images.
RESIZE:Works on images in memory at 320 ×240 resolution.Best used for home pages and e-mail.
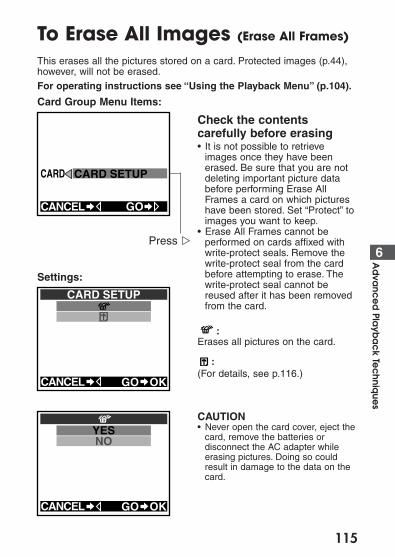
115
6Ad
vanc
ed
Playb
ac
k Tec
hnique
s
To Erase All Images (Erase All Frames)
This erases all the pictures stored on a card. Protected images (p.44),however, will not be erased.
For operating instructions see “Using the Playback Menu” (p.104).
Check the contentscarefully before erasing• It is not possible to retrieve
images once they have beenerased. Be sure that you are notdeleting important picture databefore performing Erase AllFrames a card on which pictureshave been stored. Set “Protect” toimages you want to keep.
• Erase All Frames cannot beperformed on cards affixed withwrite-protect seals. Remove thewrite-protect seal from the cardbefore attempting to erase. Thewrite-protect seal cannot bereused after it has been removedfrom the card.
:Erases all pictures on the card.
:(For details, see p.116.)
CAUTION• Never open the card cover, eject the
card, remove the batteries ordisconnect the AC adapter whileerasing pictures. Doing so couldresult in damage to the data on thecard.
GO
CARD SETUPCARD
CANCEL
Card Group Menu Items:
Press �
CARD SETUP
CANCEL GO OK
Settings:
YESNO
CANCEL GO OK
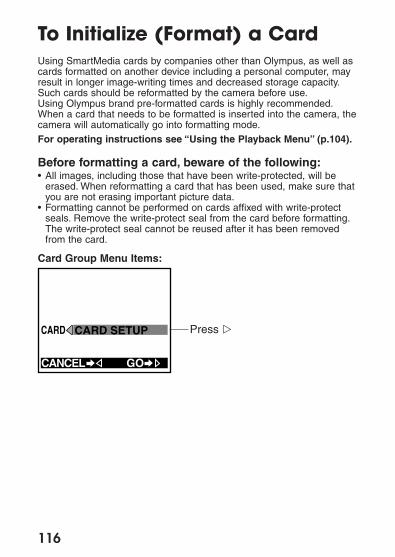
116
To Initialize (Format) a CardUsing SmartMedia cards by companies other than Olympus, as well ascards formatted on another device including a personal computer, mayresult in longer image-writing times and decreased storage capacity.Such cards should be reformatted by the camera before use.Using Olympus brand pre-formatted cards is highly recommended.When a card that needs to be formatted is inserted into the camera, thecamera will automatically go into formatting mode.
For operating instructions see “Using the Playback Menu” (p.104).
Before formatting a card, beware of the following:• All images, including those that have been write-protected, will be
erased. When reformatting a card that has been used, make sure thatyou are not erasing important picture data.
• Formatting cannot be performed on cards affixed with write-protectseals. Remove the write-protect seal from the card before formatting.The write-protect seal cannot be reused after it has been removedfrom the card.
GO
CARD SETUPCARD
CANCEL
Card Group Menu Items:
Press �
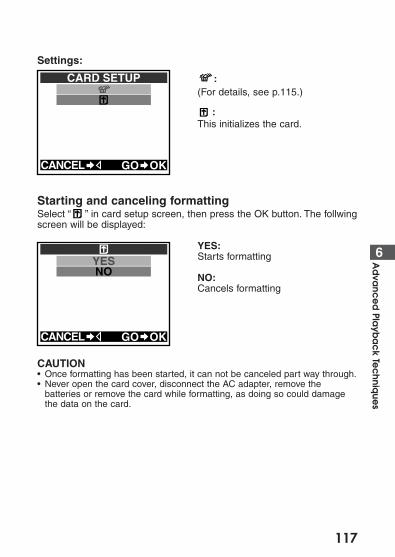
117
6Ad
vanc
ed
Playb
ac
k Tec
hnique
s
:(For details, see p.115.)
:This initializes the card.
Starting and canceling formattingSelect “ ” in card setup screen, then press the OK button. The follwingscreen will be displayed:
YES:Starts formatting
NO:Cancels formatting
CAUTION• Once formatting has been started, it can not be canceled part way through.• Never open the card cover, disconnect the AC adapter, remove the
batteries or remove the card while formatting, as doing so could damagethe data on the card.
CARD SETUP
CANCEL GO OK
Settings:
YESNO
CANCEL GO OK

118
To Change the Number ofFrames Displayed (Index Display)
In playback mode, you can press the zoom lever and display the imagescatalog style. It is also possible to change the number of images thatare displayed on the monitor when using the “Index Display.”This setting remains in the camera memory even after the power isturned off.
For operating instructions see “Using the Playback Menu” (p.104).
4: The monitor displays in quarterscreen panels.
9: The monitor displays in 9thscreen panels (Initial setting).
16: The monitor displays insixteenth screen panels.
*When images are displayed insixteenths, the image framenumber does not appear.
To show images catalog styleDepending on the index display setting, you can display 4 to 16 imagesat a time index-style on a split screen. For more about this operation,see “Displaying All Frames” (p.39).
PLAY
CARD
SET
[ ON ][ RESET ][ 9 ]
SETCANCEL
Settings Group Menu Items:
Press � to highlight “ ”. Thesetting screen will be displayed.
4916
CANCEL SET OK
Settings:
7Transferring Your Pictures
to a ComputerImages can be transferred to a computer in anumber of ways. This chapter primarily explainshow to do this using the special USB (UniversalSerial Bus) cable that comes included with thecamera.
119
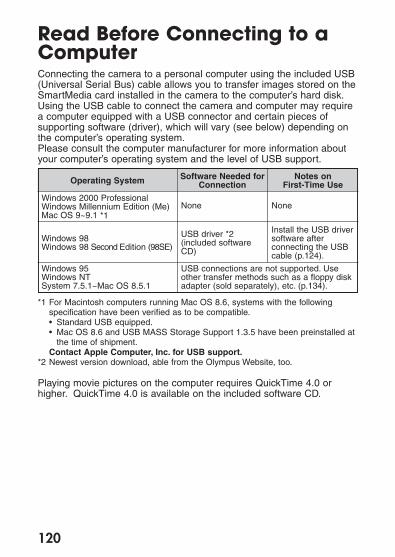
120
Read Before Connecting to aComputerConnecting the camera to a personal computer using the included USB(Universal Serial Bus) cable allows you to transfer images stored on theSmartMedia card installed in the camera to the computer’s hard disk.Using the USB cable to connect the camera and computer may requirea computer equipped with a USB connector and certain pieces ofsupporting software (driver), which will vary (see below) depending onthe computer’s operating system.Please consult the computer manufacturer for more information aboutyour computer’s operating system and the level of USB support.
*1 For Macintosh computers running Mac OS 8.6, systems with the followingspecification have been verified as to be compatible.• Standard USB equipped.• Mac OS 8.6 and USB MASS Storage Support 1.3.5 have been preinstalled at
the time of shipment.Contact Apple Computer, Inc. for USB support.
*2 Newest version download, able from the Olympus Website, too.
Playing movie pictures on the computer requires QuickTime 4.0 orhigher. QuickTime 4.0 is available on the included software CD.
Operating System Software Needed forConnection
Notes on First-Time Use
Windows 2000 ProfessionalWindows Millennium Edition (Me)Mac OS 9~9.1 *1
None None
Windows 98Windows 98 Second Edition (98SE)
USB driver *2 (included softwareCD)
Install the USB driversoftware afterconnecting the USBcable (p.124).
Windows 95Windows NTSystem 7.5.1~Mac OS 8.5.1
USB connections are not supported. Useother transfer methods such as a floppy diskadapter (sold separately), etc. (p.134).
121
7Transfe
rring Yo
ur Picture
s to a
Co
mp
uter
Do not leave the camera connected for an extendedperiod of time when using the batteriesThe camera will automatically turn on when it is connected to thecomputer. Also while it is connected, the camera will not go into standby(power saving) mode.If the battery power becomes insufficient while the computer isuploading or downloading data from the SmartMedia card in thecamera, images (image files) on the card could be destroyed or an errorwith the computer could occur.Before connecting the camera to the computer, confirm that there isenough battery power remaining. Also after the image files from thememory card have been downloaded into the computer, quicklydisconnect the camera.It is recommended that an AC adapter (sold separately) be used if thecamera is to be connected for extended periods of time.
Caution on using the AC adapterBefore connecting the AC adapter, always make sure that the camera isturned off.When disconnecting the AC adapter, first disconnect the camera fromthe computer and confirm that the camera is turned off.
CAUTION• Connecting the camera to a computer via a USB hub may cause unstable
computer behavior, depending on the compatibility between the hub andcomputer. If this is the case, connect the camera to the computer directly,without using the USB hub.
• Proper functioning of the USB cable cannot be guaranteed for computersthat have had their operating systems upgraded from Windows 95. Useother transfer methods such as a floppy adapter (sold separately), etc.(p.134).
• Proper operation cannot be guaranteed for computers that provide theirUSB connector on an expansion card.
• Proper operation cannot be guaranteed for versions of Windows or Mac OSother than those shown in the table.
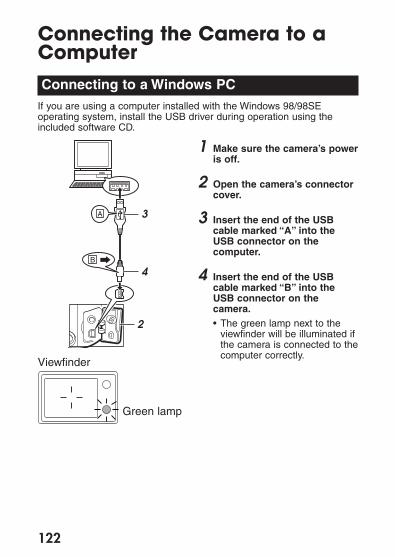
Connecting the Camera to aComputerConnecting to a Windows PC
If you are using a computer installed with the Windows 98/98SEoperating system, install the USB driver during operation using theincluded software CD.
1 Make sure the camera’s poweris off.
2 Open the camera’s connectorcover.
3 Insert the end of the USBcable marked “A” into theUSB connector on thecomputer.
4 Insert the end of the USBcable marked “B” into theUSB connector on thecamera.• The green lamp next to the
viewfinder will be illuminated ifthe camera is connected to thecomputer correctly.
122
A
B
2
4
3
Viewfinder
Green lamp
123
Under Windows 98/98SEWhen connecting for the first time, use the included software CD toinstall the USB driver. Refer to the instructions in “Installing the USBDriver” on the following section.
Under Windows 2000/MeWhen connecting for the first time, the computer will load the USBdriver automatically.
A message saying that installation has been finished will be displayed.Click the OK button and the message will disappear. If furthermessages prompting to restart the computer or other actions appear,follow their instructions.
To continue, turn to “Transferring Image Files” (p.127).
7Transfe
rring Yo
ur Picture
s to a
Co
mp
uter

Installing the USB Driver (For Windows 98/98SE usersonly)
1 After connecting the camerato the computer, the computerwill recognize the camera asnew hardware and the screenshown at left will bedisplayed.
2 Click the [Next] button.
3 Confirm that “Search for thebest driver for your device,[Recommended].” is selected,then click the [Next] button.
4 Place the included softwareCD in the computer’s CD-ROMdrive and wait for a moment.• If some other software installer
screen appears when the CDis set in the drive, click the[Quit] button to make itdisappear.
124
1
2
3
4
ex; CAMEDIA MasterCD-ROM

125
5 Click the check marks on both“Floppy disk drives” and “CD-ROM Drive” to remove themfrom the list. Next, click“Specify a location” andcheck, then click the[Browse...] button.
6 Click [ + ] to open the USBfolder, and select the Win98folder by double clicking on itthen press the [OK] button.
7 Continue clicking the [OK]buttons until a messageinforms you that installationis finished.• If this message does not
appear, try connecting theUSB cable again.
8 Click the [Finish] button tomake the message disappear.• If further messages prompting
to restart the computer orother actions appear, followtheir instructions.
7Transfe
rring Yo
ur Picture
s to a
Co
mp
uter
Connecting the Camera to a Computer (continued)
5
7
6
8
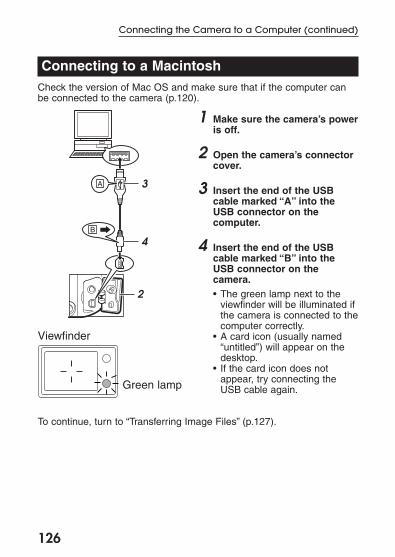
Connecting to a MacintoshCheck the version of Mac OS and make sure that if the computer canbe connected to the camera (p.120).
1 Make sure the camera’s poweris off.
2 Open the camera’s connectorcover.
3 Insert the end of the USBcable marked “A” into theUSB connector on thecomputer.
4 Insert the end of the USBcable marked “B” into theUSB connector on thecamera.• The green lamp next to the
viewfinder will be illuminated ifthe camera is connected to thecomputer correctly.
• A card icon (usually named“untitled”) will appear on thedesktop.
• If the card icon does notappear, try connecting theUSB cable again.
To continue, turn to “Transferring Image Files” (p.127).
126
Connecting the Camera to a Computer (continued)
A
B
2
4
3
Viewfinder
Green lamp
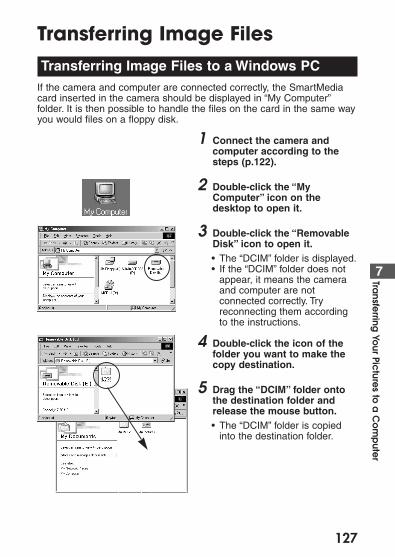
127
Transferring Image FilesTransferring Image Files to a Windows PC
If the camera and computer are connected correctly, the SmartMediacard inserted in the camera should be displayed in “My Computer”folder. It is then possible to handle the files on the card in the same wayyou would files on a floppy disk.
1 Connect the camera andcomputer according to thesteps (p.122).
2 Double-click the “MyComputer” icon on thedesktop to open it.
3 Double-click the “RemovableDisk” icon to open it.• The “DCIM” folder is displayed.• If the “DCIM” folder does not
appear, it means the cameraand computer are notconnected correctly. Tryreconnecting them accordingto the instructions.
4 Double-click the icon of thefolder you want to make thecopy destination.
5 Drag the “DCIM” folder ontothe destination folder andrelease the mouse button.• The “DCIM” folder is copied
into the destination folder.
7Transfe
rring Yo
ur Picture
s to a
Co
mp
uter

• When electroniccommunication betweencamera and computer isoccurring, for example whencopying image files, theorange lamp next to theviewfinder will blink.
Image files are stored inside a folder in the “DCIM” folder (generallynamed “100OLYMP”).In addition, Explorer and other file management software can also beused to handle image files. See the instructions of Windows Help and inthe computer’s user manual for more details on copying and movingfiles.
Image files transferred to the computer can be viewed using anysoftware application capable of viewing JPEG-format files, forexample image processing software (CAMEDIA Master, Paint ShopPro, Photoshop, etc.) and web browsers (Netscape Communicator,Microsoft Internet Explorer, etc.). See the instructions that camewith the software for details.
For users of CAMEDIA MasterWhen images are being manipulated using CAMEDIA Master while thecamera is connected to a computer, electronic communication betweencamera and computer cannot take place, even if the [My Camera] iconis double-clicked. Double-click [Removable Disk].
128
Viewfinder
Orange lamp
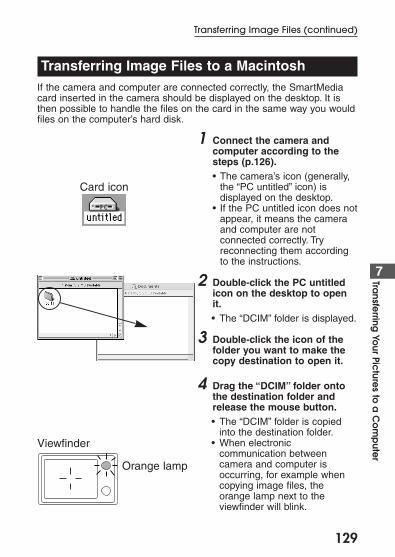
129
Transferring Image Files to a MacintoshIf the camera and computer are connected correctly, the SmartMediacard inserted in the camera should be displayed on the desktop. It isthen possible to handle the files on the card in the same way you wouldfiles on the computer’s hard disk.
1 Connect the camera andcomputer according to thesteps (p.126).• The camera’s icon (generally,
the “PC untitled” icon) isdisplayed on the desktop.
• If the PC untitled icon does notappear, it means the cameraand computer are notconnected correctly. Tryreconnecting them accordingto the instructions.
2 Double-click the PC untitledicon on the desktop to openit.• The “DCIM” folder is displayed.
3 Double-click the icon of thefolder you want to make thecopy destination to open it.
4 Drag the “DCIM” folder ontothe destination folder andrelease the mouse button.• The “DCIM” folder is copied
into the destination folder.• When electronic
communication betweencamera and computer isoccurring, for example whencopying image files, theorange lamp next to theviewfinder will blink.
7Transfe
rring Yo
ur Picture
s to a
Co
mp
uter
Transferring Image Files (continued)
Viewfinder
Card icon
Orange lamp

130
Image files are stored inside a folder in the “DCIM” folder (generallynamed “100OLYMP”).See the instructions in Mac OS Online Help and in the computer’s usermanual for more details on copying and moving files.
Image files transferred to the computer can be viewed using anysoftware application capable of viewing JPEG-format files,including image processing software (CAMEDIA Master,Photoshop, etc.) and web browsers (Netscape Communicator,Microsoft Internet Explorer, etc.). See the instructions that camewith the software for more details.
For users of CAMEDIA MasterWhen images are being manipulated using CAMEDIA Master while thecamera is connected to a computer, electronic communication betweencamera and computer cannot take place, even if the [My Camera] iconis double-clicked. Double-click [PC untitled].
Transferring Image Files (continued)
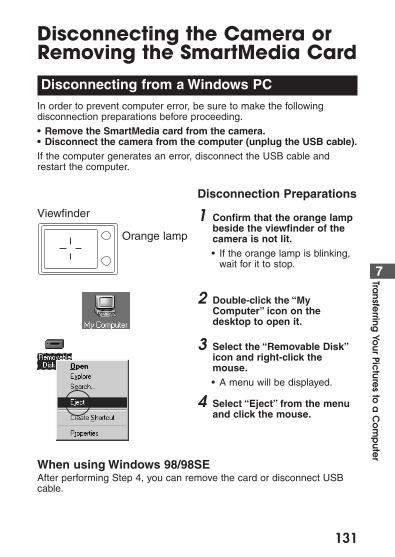
131
7Transfe
rring Yo
ur Picture
s to a
Co
mp
uter
Disconnecting the Camera orRemoving the SmartMedia CardDisconnecting from a Windows PC
In order to prevent computer error, be sure to make the followingdisconnection preparations before proceeding.
• Remove the SmartMedia card from the camera.• Disconnect the camera from the computer (unplug the USB cable).If the computer generates an error, disconnect the USB cable andrestart the computer.
Disconnection Preparations
1 Confirm that the orange lampbeside the viewfinder of thecamera is not lit.• If the orange lamp is blinking,
wait for it to stop.
2 Double-click the “MyComputer” icon on thedesktop to open it.
3 Select the “Removable Disk”icon and right-click themouse.• A menu will be displayed.
4 Select “Eject” from the menuand click the mouse.
When using Windows 98/98SEAfter performing Step 4, you can remove the card or disconnect USBcable.
Viewfinder
Orange lamp
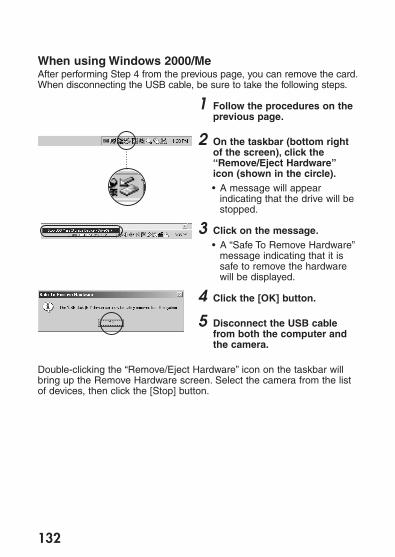
132
When using Windows 2000/MeAfter performing Step 4 from the previous page, you can remove the card.When disconnecting the USB cable, be sure to take the following steps.
1 Follow the procedures on theprevious page.
2 On the taskbar (bottom rightof the screen), click the“Remove/Eject Hardware”icon (shown in the circle).• A message will appear
indicating that the drive will bestopped.
3 Click on the message.• A “Safe To Remove Hardware”
message indicating that it issafe to remove the hardwarewill be displayed.
4 Click the [OK] button.
5 Disconnect the USB cablefrom both the computer andthe camera.
Double-clicking the “Remove/Eject Hardware” icon on the taskbar willbring up the Remove Hardware screen. Select the camera from the listof devices, then click the [Stop] button.
133
7Transfe
rring Yo
ur Picture
s to a
Co
mp
uter
Disconnecting from a MacintoshWhen removing the card from the camera or disconnecting the camera(USB cable) from the computer, take the following steps so that acomputer error does not occur.If the computer generates an error, disconnect the USB cable andrestart the computer.
Disconnection Preparations
1 Confirm that the orange lampbeside the viewfinder of thecamera is not lit.• If the orange lamp is blinking,
wait for it to stop.
2 Drag the PC untitled icon onthe desktop to the “Trash”.Or, click the PC untitled icon,then select “Eject” from the“Special” menu in the Finder.
3 Press the OK button when themessage is displayed.
4 Remove the card from thecamera.Or disconnect the USB cablefrom the computer and thecamera.
Disconnecting the Camera or Removing the SmartMedia Card (continued)
Viewfinder
Orange lamp
134
Transferring Files Without Usingthe CameraUsing an adapter capable of accepting SmartMedia cards allows imagefiles to be transferred from the camera to a computer without directlyconnecting the two.Consult your Olympus Customer Support Center for the most up-to-date information on the various available devices and products.
CAUTION• Adapter may not be usable depending on the computer’s operating
environment and the card’s storage capacity. Confirm these before using.• Consult your user manual for more detailed information on using each
specific device.
Computer Conditions Usable Devices
3.5-inch floppy disk driveavailable
Floppy disk adapterFlashPath
PC card slot available
PC card adapter
USB terminal present SmartMedia card reader/writer

135
Appendix
Please read the following pages if you suspectyour camera may not be working properly.Information on camera specifications and otherdetails are also explained.
136
Answers to Frequently AskedQuestions
How long will the camera batteries last?
The alkaline battery included with the camera should be able totake at least 100 pictures (assuming the flash is used for 50% ofthese), but this is only a rough estimate. Battery life is affected bymany variables, such as how often you use the monitor, how oftenyou use the flash, the type of batteries used and environmentalconditions. In particular, keeping the monitor on constantly willcause the battery to drain more quickly. Be sure to turn the monitoroff whenever you don’t need it, and also turn the camera’s poweroff quickly when you are finished using the camera. Use of theoptional AC adaptor is recommended.
How can I set the clock in the camera for recording the date onimage data?
The camera does not ship with the date pre-set, and therefore youmust set the correct date before shooting (p.12). Leaving thebattery removed from the camera for approximately 1 hour willreturn the date to its un-set state.
Can I use a filter or a hood with this camera?
Such accessories cannot be connected to the camera.
Can I use an extension flash with this camera?
This camera was not designed for use with extension flash units.Also, a slave unit may not function with this camera.
Why do the subject’s eyes sometimes appear red in the pictures?
This red-eye phenomenon occurs with all cameras when shootingpeople using a flash. This is caused by the light from the flashreflecting off the back of the eye. Red-eye varies depending on theindividual, as well as on shooting conditions such as ambientlighting and distance from the subject.
Use of the Red-eye Reduction Flash Mode significantly reducesthis phenomenon (p.66).
AQ
AQ
AQ
A
Q
AQ
137
Ap
pe
ndix
How should I store the camera?
Cameras can be damaged by dust, moisture and salt. Wipe thecamera with a slightly damp cloth and dry thoroughly beforestoring. Do not store with mothballs. Remove the batteries if you donot plan to use the camera for a long period of time.
AQ

138
Troubleshooting (Check before Taking in for Repair)
Operating Problems
The camera does not work• The power is off. ➜ Open the lens barrier and turn on the power.• The batteries are loaded incorrectly. ➜ Reload the batteries correctly.• The batteries are dead. ➜ Replace with new batteries.• The card cover is not properly closed. ➜ Securely close the card cover.• The batteries do not work in to cold weather. ➜ Keep the batteries
warm before the camera is to be used.• The standby function is on. ➜ Close the lens barrier, then reopen it.• The camera is connected to a computer and does not work. ➜ The
camera will not function while connected to a computer. Disconnectthe camera.
The battery drains quickly• The battery was left in the camera for a long period of time without
using the camera. ➜ Remove the battery if you do not intend to usethe camera for a long period of time.
• The monitor is being left on continuously while shooting. ➜ Makeefforts to turn the monitor off in between shots whenever possible.
No picture is taken when the shutter button is full-pressed • The camera is not in record mode. ➜ Open the lens barrier.• There is no card in the camera. ➜ Insert a new card into the camera.• The card is full. ➜ Insert a new card, erase unwanted images or transfer
the data to a computer and delete all of the pictures from the card.• The card is defective. ➜ Refer to the error chart.• A write-protect seal has been placed on the card. ➜ Remove the
write-protect seal, or insert a new card into the camera.• The flash has not finished charging or the previous picture is being
written to memory. ➜ Remove your finger from the shutter button andwait until the green lamp or the orange lamp stops blinking.
• The memory gauge is illuminated. ➜ The camera’s internal memory isfull. Further shooting will only be possible if the memory gauge is nolonger illuminated.
• The memory gauge is illuminated after movie shooting. ➜ The moviepictures taken are being written to the card. Wait until the memorygauge is off.
• The batteries are dead. ➜ Replace with new batteries.• The battery power is low. ➜ Replace with new batteries. (Do not open
the battery compartment cover when the green light is blinking.)
139
Ap
pe
ndix
The flash does not fire• The flash is not fully opened. ➜ Use your finger to push the flash
housing all the way up before resuming use.• The subject is well lit. ➜ Set the flash mode to Fill-in if you want the
flash to fire regardless of lighting conditions. The flash does not workwith shooting in the sequence, panorama, or movie picture modes.
Pictures already taken do not appear on the monitor• The camera is in record mode. ➜ Close the lens barrier and press the
monitor button ( ) to turn on the monitor in playback mode.• The SmartMedia card is empty. ➜ “NO PICTURE” appears on the
monitor. Take some pictures before displaying.• The SmartMedia card is defective. ➜ Refer to the error chart.• The camera is connected to a television. ➜ The monitor shuts down
when the camera is connected to a television.
The monitor is hard to see• The brightness may be set incorrectly. ➜ Adjust the brightness.• The camera is in direct sunlight. ➜ Block the sunlight or move to the
shade.
Editing, Protection, One-Frame Erase, All Erase Framesor Card Formatting does not function• A write-protect seal has been placed on the card. ➜ Remove the seal
from the card. Do not use the seal again.
The camera is connected to a computer and an errormessage appears while data is being transferred • The cable may be connected incorrectly. ➜ Connect the cable
correctly.• The batteries are dead. ➜ Replace the batteries, or use the optional
AC adapter.• The USB driver has not been installed correctly. ➜ Reinstall the USB
driver according by following the steps in the instructions.
140
Picture Problems
The picture is out of focus• The camera was jarred when the shutter button was pressed. ➜ Hold
the camera firmly and press the shutter button smoothly.• The viewfinder AF target mark was not positioned on the subject. ➜
Position the autofocus frame on the subject, or use the focus lock.• The lens is dirty. ➜ Clean the lens with a soft, dry cloth.• The mode was not selected correctly. ➜ Shoot in the macro mode
where the subject is within the range of 0.2m (8″) to 0.8m (31″). Forgreater distances, shoot in the standard mode.
• The shutter button was pressed while standing directly in front of thecamera when using the selftimer. ➜ When using the selftimer, pressthe shutter button while looking into the viewfinder, not while standingin front of the camera.
• The flash was needed to take a clear picture, but the camera was setto No Flash. ➜ The shutter speed become slower and the exposuretime becomes longer, so use the tripod or hold the camera as steadyas possible to avoid camera movement.
• Quick Focus was used in the wrong focal range. ➜ Use the correctQuick Focus setting for the distance you’re shooting at.
The picture is too bright• The flash is set to fill-in flash mode. ➜ Set the flash a different mode.• The subject being shot is excessively bright. ➜ Use the exposure
compensation feature, or change the angle of the camera.
The picture is too dark• The flash was blocked by a finger. ➜ Hold the camera correctly,
keeping your fingers away from the flash.• The subject was out of the working range of the flash. ➜ Shoot within
the flash working range.• The flash mode is set to No Flash despite that lighting conditions
require a flash. ➜ Change the flash mode setting to one appropriatefor the surrounding lighting conditions.
• The subject was too small or was backlit. ➜ Set the flash to fill-inmode, or use the spot metering mode.
• The picture was taken in the sequence mode. ➜ Pictures will appeardark in the sequence mode because of the fast shutter speed,especially in dim light.
141
Ap
pe
ndix
Troubleshooting (continued)
The colors of pictures taken indoors look unnatural• The lighting affected the picture. ➜ Set the flash to fill-in mode.• The subject is mostly dark. ➜ Use flash or increase exposure
compensation +.• The white balance setting is incorrect. ➜ Set the white balance to suit
lighting conditions.
The picture has obscured edge(s) • The lens was partly blocked by a finger or the strap. ➜ Hold the
camera correctly, keeping your fingers and the strap away from thelens.
• The shooting distance was too close. ➜ Use the monitor.
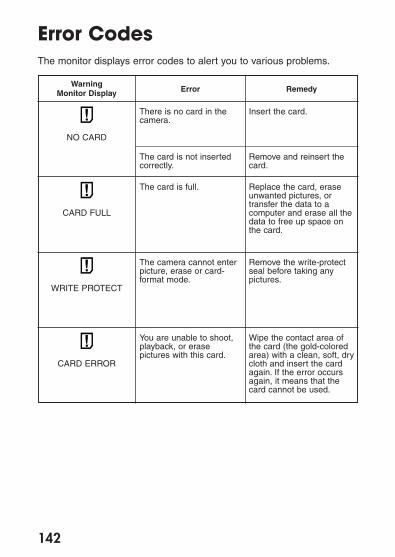
142
Error CodesThe monitor displays error codes to alert you to various problems.
WarningMonitor Display Error Remedy
NO CARD
CARD FULL
WRITE PROTECT
CARD ERROR
There is no card in thecamera.
The card is full.
The camera cannot enterpicture, erase or card-format mode.
You are unable to shoot,playback, or erasepictures with this card.
Wipe the contact area ofthe card (the gold-coloredarea) with a clean, soft, drycloth and insert the cardagain. If the error occursagain, it means that thecard cannot be used.
Remove the write-protectseal before taking anypictures.
Insert the card.
Replace the card, eraseunwanted pictures, ortransfer the data to acomputer and erase all thedata to free up space onthe card.
The card is not insertedcorrectly.
Remove and reinsert thecard.
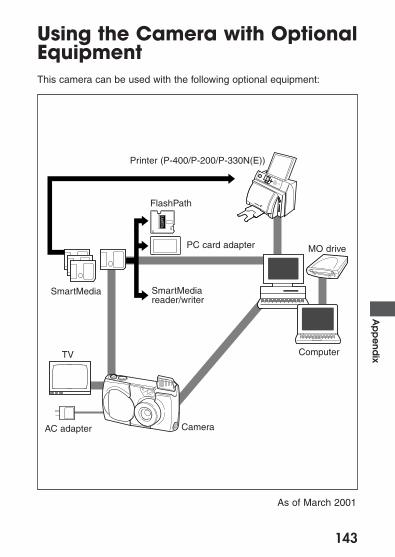
143
Using the Camera with OptionalEquipmentThis camera can be used with the following optional equipment:
Ap
pe
ndix
Printer (P-400/P-200/P-330N(E))
SmartMedia
TV
FlashPath
MO drive
Computer
AC adapter Camera
PC card adapter
SmartMediareader/writer
As of March 2001
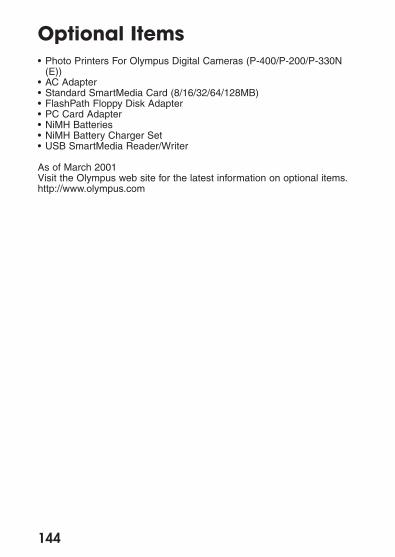
144
Optional Items• Photo Printers For Olympus Digital Cameras (P-400/P-200/P-330N
(E))• AC Adapter• Standard SmartMedia Card (8/16/32/64/128MB)• FlashPath Floppy Disk Adapter• PC Card Adapter• NiMH Batteries• NiMH Battery Charger Set• USB SmartMedia Reader/Writer
As of March 2001Visit the Olympus web site for the latest information on optional items.http://www.olympus.com

Compatibility of the Still PictureDataNotes about playbackPictures taken with this camera and recorded on a card can be playedback on another Olympus digital camera. However, there are somelimitations depending on the playback camera:
• Still pictures larger than the maximum picture size available on theplayback camera may be displayed as thumbnails.
• Pictures played back on a camera with a different picture aspect ratiowill have black frames.
• Pictures taken in the TIFF mode may not be played back. In somecases, incompatible picture sizes may prevent playback. Theselimitations also apply to printing out pictures via a camera that printsout directly to a printer.
• Movie playback time may be limited, depending on the size of thebuffer memory in the playback camera. Movies that exceed themaximum playing time cannot be played back.
• Movie playback is not possible if the playback camera is not equippedwith the same movie picture quality settings (resolution, shootingspeed fps).
145
Ap
pe
ndix
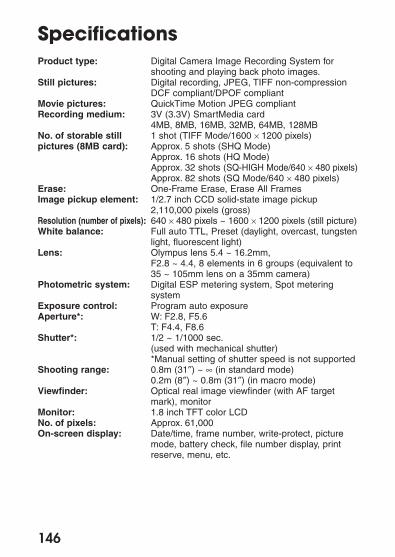
146
SpecificationsProduct type: Digital Camera Image Recording System for
shooting and playing back photo images.Still pictures: Digital recording, JPEG, TIFF non-compression
DCF compliant/DPOF compliantMovie pictures: QuickTime Motion JPEG compliantRecording medium: 3V (3.3V) SmartMedia card
4MB, 8MB, 16MB, 32MB, 64MB, 128MBNo. of storable still 1 shot (TIFF Mode/1600 × 1200 pixels)pictures (8MB card): Approx. 5 shots (SHQ Mode)
Approx. 16 shots (HQ Mode)Approx. 32 shots (SQ-HIGH Mode/640 × 480 pixels)Approx. 82 shots (SQ Mode/640 × 480 pixels)
Erase: One-Frame Erase, Erase All Frames Image pickup element: 1/2.7 inch CCD solid-state image pickup
2,110,000 pixels (gross)Resolution (number of pixels): 640 × 480 pixels ~ 1600 × 1200 pixels (still picture)White balance: Full auto TTL, Preset (daylight, overcast, tungsten
light, fluorescent light)Lens: Olympus lens 5.4 ~ 16.2mm,
F2.8 ~ 4.4, 8 elements in 6 groups (equivalent to35 ~ 105mm lens on a 35mm camera)
Photometric system: Digital ESP metering system, Spot meteringsystem
Exposure control: Program auto exposureAperture*: W: F2.8, F5.6
T: F4.4, F8.6Shutter*: 1/2 ~ 1/1000 sec.
(used with mechanical shutter)*Manual setting of shutter speed is not supported
Shooting range: 0.8m (31″) ~ ∞ (in standard mode)0.2m (8″) ~ 0.8m (31″) (in macro mode)
Viewfinder: Optical real image viewfinder (with AF targetmark), monitor
Monitor: 1.8 inch TFT color LCDNo. of pixels: Approx. 61,000 On-screen display: Date/time, frame number, write-protect, picture
mode, battery check, file number display, printreserve, menu, etc.
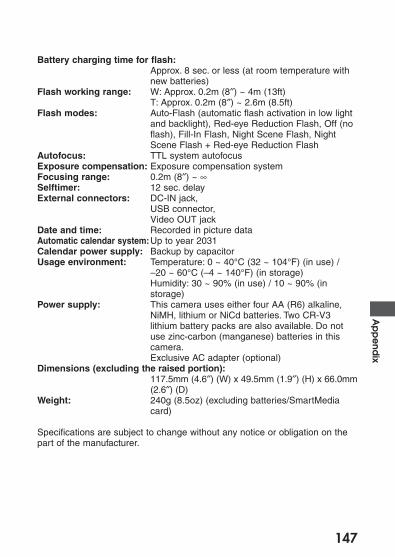
147
Ap
pe
ndix
Battery charging time for flash:Approx. 8 sec. or less (at room temperature withnew batteries)
Flash working range: W: Approx. 0.2m (8″) ~ 4m (13ft)T: Approx. 0.2m (8″) ~ 2.6m (8.5ft)
Flash modes: Auto-Flash (automatic flash activation in low lightand backlight), Red-eye Reduction Flash, Off (noflash), Fill-In Flash, Night Scene Flash, NightScene Flash + Red-eye Reduction Flash
Autofocus: TTL system autofocusExposure compensation: Exposure compensation systemFocusing range: 0.2m (8″) ~ ∞Selftimer: 12 sec. delayExternal connectors: DC-IN jack,
USB connector, Video OUT jack
Date and time: Recorded in picture data Automatic calendar system:Up to year 2031Calendar power supply: Backup by capacitorUsage environment: Temperature: 0 ~ 40°C (32 ~ 104°F) (in use) /
–20 ~ 60°C (–4 ~ 140°F) (in storage)Humidity: 30 ~ 90% (in use) / 10 ~ 90% (instorage)
Power supply: This camera uses either four AA (R6) alkaline,NiMH, lithium or NiCd batteries. Two CR-V3lithium battery packs are also available. Do notuse zinc-carbon (manganese) batteries in thiscamera.Exclusive AC adapter (optional)
Dimensions (excluding the raised portion):117.5mm (4.6″) (W) x 49.5mm (1.9″) (H) x 66.0mm (2.6″) (D)
Weight: 240g (8.5oz) (excluding batteries/SmartMedia card)
Specifications are subject to change without any notice or obligation on thepart of the manufacturer.
Glossary of Terms
148
ApertureThis is a mechanism for adjusting theamount of light that passes through thelens. Lower values allow more light topass, while higher values lessen theamount of light.
BacklightA light source that is behind thesubject.
CCD (Charge-coupled Device)A pickup element that converts lightpassing through the lens into electricalsignals. On this camera, light is pickedup at 2.11 million points and convertedto RGB signals to build a single image.
Contrast Detection Auto-FocusThis is a method used to measure thedistance to the subject. The cameradetermines whether the image isfocused by detecting the level ofcontrast in the subject.
Conventional PhotographThis refers to the system of recordingimages using silver halide. (This is themethod for recording images on film inconventional, non-digital photography.)This system is in contrast to still videoand digital photography.
DCF (Design rule for Camera Filesystem)A standard formulated for image filesby the Japanese Electronic IndustryDevelopment Association (JEIDA).
Digital ESP (Electro-SelectivePattern) light meteringA light metering method thatdetermines the exposure by meteringand calculating the light levels in thecenter and around the periphery of theimage separately.
DPOF (Digital Print Order Format)A format used for recording automaticprint settings for digital cameras. Byrecording which images are to beprinted the user can automatically havethe desired images printed by a printeror print lab that supports the DPOFformat.
Eclipsing (Vignetting)This refers to the situation where thereis an object that obscures part of thefield of view so that part of the subjectis not photographed. Vignetting alsorefers to the situation where the imageseen through the viewfinder does notexactly match the image shot throughthe objective lens so that thephotographed image includes objectsnot seen through the viewfinder.Vignetting can also occur when theincorrect lens hood is used andshadowing appears in the corners ofthe image.
EV (Exposure Value)An exposure measurement system inwhich the exposure for an aperture ofF1and a shutter speed of 1 second istaken as EV0. The EV value thenincreases by 1 each time the apertureincreases by one F stop or the shutterspeed increases by one increment. EVcan also be used to indicate brightnessand ISO settings.
ExposureThe amount of light used to capture animage. The exposure is determined bythe time for which the shutter is open(shutter speed) and the amount of lightthat passes through the lens(aperture).
149
ISOA method for indicating film speed laiddown by the International Organizationfor Standardization (ISO) (e.g.“ISO100”). Higher ISO values indicategreater sensitivity to light so thatimages can be exposed even in low-light conditions.
JPEG (Joint Photographic ExpertsGroup)A compression format for color stillimages. Photographs (images) shotusing this camera are recorded ontothe SmartMedia card in JPEG formatwhen the Record mode is set to SHQ,HQ or SQ. By downloading theseimages to a personal computer, userscan edit them using graphicsapplication software or view the imagesusing an Internet web browser.
NTSC (National Television StandardsCommittee)Originally the name of a US committeeresponsible for setting a standard fortelevision broadcast transmission, nowknown more as the video signalstandard it developed. The NTSCstandard is used mainly in NorthAmerica and Japan.
PAL (Phase Alternate Line)Video signal standard used in mostwestern European countries. Notcompatible with the NTSC standard.
PixelsA pixels the smallest unit (dot) used tomake up an image. Large size clearprinted images require large number ofpixels.
TFT (Thin-Film Transistor) ColorMonitorA color Monitor constructed using thin-film technology.
TIFF (Tagged Image File Format)A format used for saving black and whiteand color image data. TIFF image filescan be handled by software programs forscanners and graphics applications.
TTL (Through-The-Lens) SystemAn exposure adjustment mechanism inwhich a light receptor built into thecamera directly measures the lightpassing through the lens.
Ap
pe
ndix
150
AC adapter ................................. 16All Erase Frames .............. 115, 139Auto-Flash .................................. 66Automatic Playback .................. 106
Backlighting, backlit ................. 66, 67, 74, 140
Battery(-ies) ................... 7, 20, 136Beep Sound ............................... 99BLACK & WHITE ...................... 114
CAMEDIA Master ....... 82, 128, 130Card ....... 10, 47, 82, 115, 116, 134Clear Settings ............................. 98Close-ups ................................... 41Computer ............... 90, 91, 97, 120Contrast ...................................... 91
Digital ESP ................................. 74Digital Zoom ............................... 80Diopter adjustment ..................... 15DPOF ................................. 47, 109
Edit ........................................... 114Error Codes ........................ 19, 142Exposure Compensation ............ 76ESP ............................................ 74
File Naming ................................ 95File No. ....................................... 95Fill-in Flash ................................. 67
Flash ..................... 26, 30, 64, 136, 138, 139, 140
Fluorescent lightning .................. 67Focus ........................... 50, 52, 140Focus Lock ................................. 52Folder No. ................................... 95Formatting ................................ 116Frame number
(Frame No.) ............................ 38Full-press .................................... 26
Half-press ................................... 25
Image Information Display ....... 113Image Protection (protected
images, write-protected,Protection) ..... 44, 115, 116, 139
Index-display(Index Display) ............... 39, 118
Initialize ............................ 116, 139ISO Sensitibity Level .................. 78
Macro mode ............................... 55Memory gauge ............. 28, 60, 138Monitor ....... 4, 24, 28, 36, 100, 139Monitor Adjustment .................. 100Movie pictures ............ 60, 107, 120
Night Scenes .............................. 68Night Scenes
+ Red-eye Reduction ............. 68No flash ...................................... 67Number of storable pictures ....... 21
B
C
D
E
F
H
I
M
N
IndexA
151
Ap
pe
ndix
One-Frame Erase ............... 45, 139Optical Zoom .............................. 31
Panorama (panoramic pictures) .............. 82
Playback Menu ......................... 102Print Reserve ........................... 109Printing ............................... 47, 109
Quick Focus ....................... 53, 140
Record mode ........... 21, 58, 62, 87Rec View .................................... 93Red-eye Reduction ..................... 66Remaining
second count ............. 21, 60, 61RESIZE .................................... 114Resolution ................. 5, 21, 62, 87,
113, 114, 145Rotated Playback ..................... 112
Selftimer ............................. 59, 140Sequence ................................... 57SEPIA ....................................... 114Shaded by a tree ........................ 67Sharpness .................................. 90Shooting Menu ........................... 70Shooting Movies ....................... 107SmartMedia ................................ 11Spot Metering Mode ................... 74
Telephoto ................. 30, 31, 55, 80
Warning Sound(s) ...................... 99White Balance .................... 85, 141Wide angle
(wide-angle) ............... 30, 31, 55
Zoom .............................. 30, 31, 80
T
Z
WP
Q
R
S
O

VT256601Printed in Japan
http://www.olympus.com
OLYMPUS OPTICAL CO. (EUROPA) GMBH.(Premises/Goods delivery) Wendenstraße 14-18, 20097 Hamburg, Germany. Tel. 040-237730
(Letters) Postfach 10 49 08, 20034 Hamburg, Germany.
(Hotline Numbers)Tel. 01805-67 10 83 for GermanyTel. 00800-67 10 83 00 for Austria, Belgium, Denmark, France, Netherlands,
Norway, Sweden, Switzerland, United KingdomTel. +49 180 5-67 10 83 for Finland, Italy, Luxemburg, Portugal, Spain,
Czech RepublicTel. +49 40-237 73 899 for Greece, Croatia, Hungary and the Rest of Europe
Our Hotline is available from 9 am to 6 pm (Monday to Friday)(E-Mail) [email protected]
OLYMPUS AMERICA INC.Two Corporate Center Drive, Melville, NY 11747-3157, U.S.A. Tel. 631-844-5000
(Technical support) Tel. 1-888-553-4448 (Toll-free for within 30 days of purchase.)Tel. 1-631-844-5520 (After 30 days of purchase, contact this number.)
OLYMPUS OPTICAL CO., LTD.San-Ei Building, 22-2, Nishi Shinjuku 1-chome, Shinjuku-ku, Tokyo, Japan.
(Customer support) Tel. 0426-42-7499 Tokyo