Digipass Plug-In for IAS IAS Plug-In IAS Microsoft's ... · PDF fileMicrosoft's Internet...
28
Digipass Plug-In for IAS IAS Plug-In IAS Microsoft's Internet Authentication Service Installation Guide
Transcript of Digipass Plug-In for IAS IAS Plug-In IAS Microsoft's ... · PDF fileMicrosoft's Internet...

Digipass Plug-In for IAS
IAS Plug-In
IAS
Microsoft's Internet Authentication Service
Installation Guide
Disclaimer of Warranties and Limitations of Liabilities
Disclaimer of Warranties and Limitations of Liabilities
The Product is provided on an 'as is' basis, without any other warranties, or conditions, express or implied, including but not limited to warranties of merchantable quality, merchantability of fitness for a particular purpose, or those arising by law, statute, usage of trade or course of dealing. The entire risk as to the results and performance of the product is assumed by you. Neither we nor our dealers or suppliers shall have any liability to you or any other person or entity for any indirect, incidental, special or consequential damages whatsoever, including but not limited to loss of revenue or profit, lost or damaged data of other commercial or economic loss, even if we have been advised of the possibility of such damages or they are foreseeable; or for claims by a third party. Our maximum aggregate liability to you, and that of our dealers and suppliers shall not exceed the amount paid by you for the Product. The limitations in this section shall apply whether or not the alleged breach or default is a breach of a fundamental condition or term, or a fundamental breach. Some states/countries do not allow the exclusion or limitation or liability for consequential or incidental damages so the above limitation may not apply to you.
Copyright
© 2005 VASCO Data Security Inc. All rights reserved.
No part of this publication may be reproduced, stored in a retrieval system, or transmitted, in any form or by any means, electronic, mechanical, photocopying, recording, or otherwise, without the prior written permission of VASCO Data Security Inc.
Trademarks
VACMAN and Digipass are registered trademarks of VASCO Data Security International Inc.
Microsoft and Windows are registered trademarks of Microsoft Corporation.
All other trademarks are the property of their respective holders.
© 2005 VASCO Data Security Inc. 2

Digipass Plug-In for IAS Installation Guide Table of Contents
Table of Contents
1 Introduction..........................................................................................................4
1.1 Available Reference Guides.......................................................................................... 4
1.2 System Requirements...................................................................................................5
1.3 Components and Options..............................................................................................5
2 Pre-installation Tasks........................................................................................... 7
2.1 Checklist – Decisions.................................................................................................... 7
2.2 Active Directory Setup..................................................................................................72.2.1 Schema Extensions.................................................................................................. 72.2.2 SSL Setup.............................................................................................................. 82.2.3 IAS Server Registered in Domain............................................................................... 8
2.3 System Clock................................................................................................................ 9
2.4 Serial Number and Maintenance ID.............................................................................. 9
2.5 Active Directory Users and Computers Snap-In............................................................ 9
2.6 Checklist - Actions...................................................................................................... 10
3 Installing Digipass Pack for IAS..........................................................................11
3.1 Typical Installation ....................................................................................................113.1.1 Scenario & Decisions.............................................................................................. 113.1.2 Extend Schema..................................................................................................... 113.1.3 Install Certificate Server......................................................................................... 123.1.4 Run Install............................................................................................................ 12
3.2 Multiple Product Installation...................................................................................... 19
3.3 Upgrading from Digipass Plug-In for IAS Beta 2.........................................................20
3.4 Post-installation Tasks............................................................................................... 213.4.1 Licensing.............................................................................................................. 21
3.4.1.1 Evaluation Serial Number..................................................................................................213.4.1.2 Obtain License Key File.....................................................................................................213.4.1.3 Load License Key.............................................................................................................21
3.4.2 Active Directory Replication..................................................................................... 223.4.3 Additional Setup Steps for Multiple Domains.............................................................. 223.4.4 Encryption Settings................................................................................................ 223.4.5 Active Directory Auditing......................................................................................... 223.4.6 Backup Strategy.................................................................................................... 223.4.7 Set up Active Directory SSL..................................................................................... 22
4 Add Components to Installation..........................................................................23
5 Repair Installation.............................................................................................. 24
6 Uninstall Digipass Pack for IAS...........................................................................25
7 DPADadmin Utility...............................................................................................26
7.1 addschema command................................................................................................. 267.1.1 Prerequisite Information......................................................................................... 267.1.2 Extend the Schema on the Schema Master................................................................ 277.1.3 Extend the Schema on the IAS Server...................................................................... 277.1.4 Command Line Syntax............................................................................................ 27
© 2005 VASCO Data Security Inc. 3
Digipass Plug-In for IAS Installation Guide Introduction
1 Introduction
1.1 Available Reference Guides
These Reference Guides are included with every VASCO product:
Product Guide
The Product Guide will introduce you to the features of this product and the various options you have for using it.
Installation Guide
Use this guide when planning and working through an installation of the product.
Getting Started
To get you up and running quickly with a simple installation and setup of the product.
Administrator Reference
In-depth information required for administration of the product.
Data Migration Tool Guide
Takes you through a data migration from one VASCO product to another, using the VASCO Data Migration Tool.
Help Files
Accompany various utilities and the administration interfaces.
© 2005 VASCO Data Security Inc. 4

Digipass Plug-In for IAS Installation Guide Introduction
1.2 System Requirements
IAS Plug-InMicrosoft's Internet Authentication Service
Digipass Extension for Active Directory Users and ComputersActive Directory Users and Computers Snap-In
Operating SystemWindows Server 2003 (32-bit version only), or
Windows XP Professional (32-bit version only) with Service Pack 1 or above, or
Windows 2000 with Service Pack 4 or above
LanguageThe Digipass Plug-In for IAS is designed to function on any language version of Windows. However, the product has only been comprehensively tested on English language versions of Windows, with some additional German language testing.
Active Directory set up for SSL
In the following cases, SSL must be available for Digipass Plug-In for IAS components to connect to Active Directory:
IAS Plug-In not installed on a Domain Controller.
Administration Interfaces not installed on a Domain Controller.
IAS Plug-In and/or Administration Interface(s) on a Domain Controller, but accessing data in another domain.
An Enterprise Certificate Authority must be installed in the forest to enable SSL. Windows Certificate Services is available as an optional Windows component.
1.3 Components and Options
The following components make up the Digipass Plug-In for IAS. See the Product Guide for more information.
IAS Plug-In
The IAS Plug-In is an extension to Microsoft's Internet Authentication Service which permits an increase in IAS security by adding two-factor authentication.
Digipass Extension for Active Directory Users and Computers
VASCO Extension to the Active Directory Users and Computers interface. It allows integrated administration of additional User settings and Digipass records.
Administration MMC Interface
This interface allows easy administration of Digipass Configuration data.
© 2005 VASCO Data Security Inc. 5
Digipass Plug-In for IAS Installation Guide Introduction
User Self Management Web SiteAllows Users to make appropriate changes to their own Digipass User account, including password changes.
Virtual Digipass Message Delivery ComponentSends a One Time Password through a text message gateway to a User’s mobile phone.
Virtual Digipass OTP Request SiteAllows a User to specifically request an OTP to be sent to their mobile phone.
© 2005 VASCO Data Security Inc. 6

Digipass Plug-In for IAS Installation Guide Pre-installation Tasks
2 Pre-installation TasksThis section outlines the preparation that you need to do before installing the Digipass Plug-Infor IAS.
2.1 Checklist – Decisions
The following checklist contains the key decisions to make before you start.
Approve the Schema Extensions If your company has an approval process to go through for extensions to the Active Directory Schema, go through this process.
Identify the Digipass Configuration Domain Either identify an existing Domain or sub-domain into which the Digipass Configuration Container should be added, or plan to create a new one.
Domain AdministratorSelect a Domain Administrator account in the Digipass Configuration Domain to use in installing the Digipass Plug-In for IAS.
Installation LocationDecide where to install the Plug-In, if IAS is not already installed.If you are installing with the purpose of going through a basic evaluation process, installing onto a Domain Controller is recommended. This will mean that SSL will not need to be set up in order for the Plug-In to function.
2.2 Active Directory Setup
2.2.1 Schema Extensions
Run the addschema command:
1. Log into the Schema Master as a member of the Schema Administrators group.
2. Copy dpadadmin.exe onto the Schema Master
3. Open a command prompt in the location to which it was copied.
4. Type:
dpadadmin addschema -v
5. If DPADadmin detects that Schema extensions are not currently permitted, it will prompt you whether to enable them or not. Enter y to enable them, or n to cancel.
(see 7.1 addschema command for more information)
6. Wait several minutes for the Schema extensions to replicate to all the domains and for the local Domain Controller to update its internal data caches.
© 2005 VASCO Data Security Inc. 7

Digipass Plug-In for IAS Installation Guide Pre-installation Tasks
2.2.2 SSL Setup
An Enterprise Certificate Authority must exist in the forest so that SSL may be used by the IASPlug-In to connect to Active Directory. If one is not already installed, follow the instructions below to install the Certificate Authority included with Windows.
The Certificate Authority may be installed on any server in the forest, if the server selected is available to the Domain Controller(s) used by the IAS Plug-In.
You may need the Windows CD in order to complete this process.
1. Open Windows Add or Remove Programs.
2. Click on the Add/Remove Windows Components button.
The Windows Components Wizard will be displayed.
3. Tick the Certificate Services checkbox and click Next.
4. Select the Enterprise root CA option button and click Next.
5. Enter the details required and click on Next.
6. If required, modify the Data Storage Locations. Otherwise, leave these as the default values and click on Next.
Certificate Server has now been installed. Wait several minutes to allow the Domain Controllers to enrol for Domain Controller certificates.
2.2.3 IAS Server Registered in Domain
Check that the IAS server is registered in the relevant Active Directory domain(s):
1. Open Active Directory Users and Computers.
2. Click on Users.
A list of Windows Users and Groups will be displayed in the Result pane.
3. Double-click on the RAS and IAS Servers group.
4. Check that the IAS server is listed in the group members.
If the IAS Server is not registered in the domain:
1. Log on to the IAS server with an administrator account for the domain.
2. Open Internet Authentication Service.
3. Right-click on Internet Authentication Service.
4. Click on Register Server in Active Directory.
The Register Internet Authentication Service in Active Directory window will be displayed.
5. Click OK.
© 2005 VASCO Data Security Inc. 8

Digipass Plug-In for IAS Installation Guide Pre-installation Tasks
2.3 System Clock
The IAS Plug-In requires that your server’s time is set correctly in relation to GMT, and that the time zone and daylight savings indicators are set correctly.
It is recommended that all machines hosting components of the Digipass Plug-In for IAS are clock-synchronized and have the correct time, time zone and daylight savings settings.
2.4 Serial Number and Maintenance ID
You must have a product Serial Number and a company Maintenance ID unless you are installing an evaluation version of the Digipass Plug-In for IAS. If these have not been issued to you, contact your VASCO Reseller.
2.5 Active Directory Users and Computers Snap-In
The Active Directory Users and Computers Snap-In is required on a machine, so that the Digipass Extension for Active Directory Users and Computers may be used to administer Digipass User accounts and Digipass records.
© 2005 VASCO Data Security Inc. 9

Digipass Plug-In for IAS Installation Guide Pre-installation Tasks
2.6 Checklist - Actions
Digipass Configuration Domain has been identified.
Active Directory Schema extensions have been made.
IAS is registered in the relevant Active Directory domain(s).
Active Directory changes have been replicated to all required Domain Controllers.
System clock and time zone settings are accurate.
Serial Number has been obtained.
Enterprise Certificate Authority is installed, if SSL is required.
© 2005 VASCO Data Security Inc. 10

Digipass Plug-In for IAS Installation Guide Installing Digipass Pack for IAS
3 Installing Digipass Pack for IAS
3.1 Typical Installation
3.1.1 Scenario & Decisions
This 'typical installation' process uses the following decisions and scenario:
Implementation Decisions
The following decisions were taken for the purposes of this installation process:
The Schema extensions have been approved.
The Digipass Configuration Domain has been identified as the existing sub-domain, test.dm3.vasco.
The member server SVR of the sub-domain test.dm3.vasco will be used to install Digipass Plug-In for IAS. This requires an Enterprise Certificate Authority to be installed in the forest, so that SSL is enabled. The instructions will take you through installing Windows Certificate Services onto a Domain Controller in the Forest Root domain.
The scenarioA Domain dm3.vasco (this is the Forest Root Domain).
A sub-domain test.dm3.vasco of dm3.vasco. The sub-domain acts as the Digipass Configuration Domain and contains all the configuration data, including Policies and Components.
A single IAS Server SVR, a member server in the Digipass Configuration Domain.
A Domain Controller DC-02 acting as the Schema Master on dm3.vasco.
Certificate Server will be installed on DC-02.
3.1.2 Extend Schema
Run the addschema command:
1. Log into the machine from which schema changes will be made (DC-02).
2. Copy dpadadmin.exe onto the machine.
3. Open a command prompt in the location to which it was copied.
4. Type:
dpadadmin addschema
5. If DPADadmin detects that Schema extensions are not currently permitted, it will prompt you whether to enable them or not. Enter y to enable them, or n to cancel.
6. Wait several minutes for the Schema extensions to replicate to the sub-domain and for the local Domain Controller to update its internal data caches.
© 2005 VASCO Data Security Inc. 11

Digipass Plug-In for IAS Installation Guide Installing Digipass Pack for IAS
3.1.3 Install Certificate Server
Install Windows Certificate Services on DC-02.
1. Open Windows Add or Remove Programs.
2. Click on the Add/Remove Windows Components button.
The Windows Components Wizard will be displayed.
3. Tick the Certificate Services checkbox and click Next.
4. Select the Enterprise root CA option button and click Next.
5. Enter the details required, recording the name you give to the Certificate Authority, and click on Next.
6. If required, modify the Data Storage Locations. Otherwise, leave these as the default values and click on Next.
3.1.4 Run Install
Install the standard installation components on a single machine.
1. Start the Digipass Plug-In for IAS install process on the IAS server (SVR).
If you are not using the CD Autorun interface, locate and double-click on the Digipass_PlugIn_for_IAS_101_setup.exe file.
The Digipass Plug-In for IAS splash screen will be displayed, followed by the License Agreement dialog.
2. Read the agreement carefully.
3. To accept the License Agreement, click I Agree.
If you do not accept the License Agreement, and click Cancel, the install will terminate.
© 2005 VASCO Data Security Inc. 12

Digipass Plug-In for IAS Installation Guide Installing Digipass Pack for IAS
The Select Components dialog will be displayed.
4. Select the components you want to install. These components are required for the running and administration of the Digipass Plug-In for IAS:
IAS Plug-In
Digipass Extension for Active Directory Users and Computers
Administration MMC Interface
5. Click Next.
The Customer Information dialog will be displayed.
© 2005 VASCO Data Security Inc. 13

Digipass Plug-In for IAS Installation Guide Installing Digipass Pack for IAS
6. Enter your user name and company name
7. If you are installing an evaluation copy of the Digipass Plug-In for IAS, tick the Use an evaluation license checkbox.
If not, enter the serial number for the product in the Serial Number field.
8. If there are multiple IP addresses registered for the machine, you will asked which IP address the Digipass Plug-In for IAS should use. Select an IP address and click on the Next button.
9. Click on the Next button.
The Active Directory Pre-Requisites dialog will be displayed.
10. If this is not the first IAS Plug-In to be installed:
a. Ensure that Active Directory has had time to replicate changes to the Schema.
b. Tick the This is not the first IAS Plug-In to be installed checkbox.
11. If you have run the addschema command, click on Next.
If not, run the command (see 7.1 addschema command for instructions), wait for the Schema changes to be replicated to the sub-domain then click on Next.
The install program will check the Active Directory Schema.
The Digipass Configuration Domain dialog will be displayed.
12. Enter the fully qualified name of the Domain in which Digipass Plug-In for IAS should store its data. This domain must currently exist.
© 2005 VASCO Data Security Inc. 14

Digipass Plug-In for IAS Installation Guide Installing Digipass Pack for IAS
13. Click on Next.
14. If you have chosen to install the User Self Management Web Site and IIS is installed on the machine, a pop-up dialog will ask if you wish to allow the install program to create a Virtual Directory on the default IIS web site on this machine, and install the User Self Management Web Site files there. Click Yes to allow this or No to set it up manually later.
15. If you have chosen to install the OTP Request Site and IIS is installed on the machine, a pop-up dialog will ask if you wish to allow the install program to create a Virtual Directory on the default IIS web site on this machine, and install the OTP Request Site files there. Click Yes to allow this or No to set it up manually later.
© 2005 VASCO Data Security Inc. 15

Digipass Plug-In for IAS Installation Guide Installing Digipass Pack for IAS
The Installation Directory dialog will be displayed.
16. To install to the default location (C:\Program Files\VASCO\Digipass Plug-In for IAS if Windows is installed on the C: drive), click on Install. If you wish to install to a location other than the default, click on Browse, specify the installation location and click on Install.
The Installation Progress dialog will be displayed, showing the progress of your install.
Click Next when the install is complete.
© 2005 VASCO Data Security Inc. 16
Digipass Plug-In for IAS Installation Guide Installing Digipass Pack for IAS
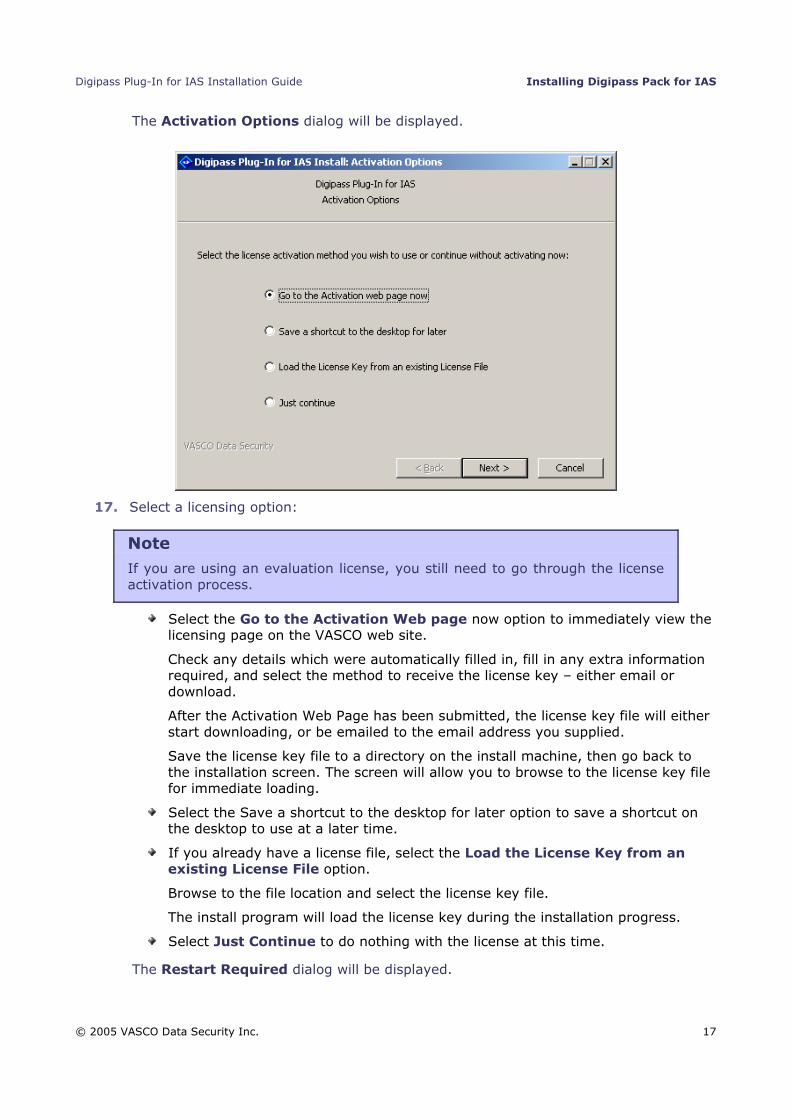
The Activation Options dialog will be displayed.
17. Select a licensing option:
Note
If you are using an evaluation license, you still need to go through the license activation process.
Select the Go to the Activation Web page now option to immediately view the licensing page on the VASCO web site.
Check any details which were automatically filled in, fill in any extra information required, and select the method to receive the license key – either email or download.
After the Activation Web Page has been submitted, the license key file will either start downloading, or be emailed to the email address you supplied.
Save the license key file to a directory on the install machine, then go back to the installation screen. The screen will allow you to browse to the license key file for immediate loading.
Select the Save a shortcut to the desktop for later option to save a shortcut on the desktop to use at a later time.
If you already have a license file, select the Load the License Key from an existing License File option.
Browse to the file location and select the license key file.
The install program will load the license key during the installation progress.
Select Just Continue to do nothing with the license at this time.
The Restart Required dialog will be displayed.
© 2005 VASCO Data Security Inc. 17

Digipass Plug-In for IAS Installation Guide Installing Digipass Pack for IAS
18. Click the Yes option button to restart the machine, or No to add the license file or perform other tasks before restarting.
19. Click Close when this process is complete.
© 2005 VASCO Data Security Inc. 18
Digipass Plug-In for IAS Installation Guide Installing Digipass Pack for IAS
3.2 Multiple Product Installation
If another VASCO product is already installed on the machine, the installation process will run in Add Components mode, as most data and many components are shared between products. Typically, you will only need to add the IAS Plug-In component, but others may be added if not already installed. See the section for instructions after reading the information below.
These changes will affect your existing installation:
Start Menu Changes
Installing more than one VASCO product on a machine will cause VASCO Start menu options to be re-arranged, as components may be shared between products. Links to components and documentation specific to the product will be located under VASCO -> <Product Name> (eg. VASCO -> Digipass Plug-In for IAS). Links to shared components will be located in VASCO -> Shared Components.
Automatic Component Upgrade
If the second product has a later version of any of the shared components, these components will be upgraded as part of the installation.
Shared Components not Removed during Uninstall
When uninstalling one of the products on a machine that has more than one, the uninstaller will only remove the specific plug-in component - it will leave all the shared components. They will only be removed when you uninstall the last product.
Important Note
If the second product had later versions of any components, ensure that you uninstall the second product last if you want to uninstall both products. The uninstaller for the original product may not possess all the necessary information to completely remove newer components.
Repairing Components
When two products are installed on the same machine and a repair is attempted, the installation program will only be able to repair the components that are specific to it or are shared. For example, the Digipass Plug-In for IAS installation program will not repair the Funk SBR Plug-In.
If the other product has a later version of one of the shared components, it will not be repaired. In that case, the other product's installer is needed to repair that shared component. In general, use the latest versioned product to repair shared components.
© 2005 VASCO Data Security Inc. 19

Digipass Plug-In for IAS Installation Guide Installing Digipass Pack for IAS
3.3 Upgrading from Digipass Plug-In for IAS Beta 2
If the beta 2 release of the Digipass Plug-In for IAS is currently installed, it may be upgraded to the production version by following these steps:
1. Start the Digipass Plug-In for IAS install process on the IAS server (SVR).
If you are not using the CD Autorun interface, locate and double-click on the Digipass_PlugIn_for_IAS_101_setup.exe file.
A window will be displayed, asking if you want to upgrade the installation.
2. Click on Yes.
The Digipass Plug-In for IAS installation will be updated to the production version.
3. Reboot if required.
© 2005 VASCO Data Security Inc. 20

Digipass Plug-In for IAS Installation Guide Installing Digipass Pack for IAS
3.4 Post-installation Tasks
3.4.1 Licensing
Each IAS Plug-In will require a license key to be loaded into its Component record – even if you are using an evaluation license. If this is not completed during the install process, it will need to be done before the IAS Plug-In can be used.
3.4.1.1 Evaluation Serial Number
If you do not obtain a license key file during installation of the IAS Plug-In, but wish to use an evaluation license, you will need to use this serial number on the VASCO licensing site: 8174F715E0.
3.4.1.2 Obtain License Key File
Note
An active internet connection is required to obtain a License Key.
1. Open the Administration MMC Interface.
2. Click on the Components node.
The Component List will be displayed in the Result pane.
3. Double-click on the required Component record.
The Component property sheet will be displayed.
4. Click on the License Key Details... button.
The License Key Details window will be displayed.
5. Click on the Request License Key... button.
A browser window will be opened, with the VASCO Licensing site loaded. Any required information which the IAS Plug-In has will be entered as the site is loaded.
6. Enter any other required information in the browser window.
7. Click on the Request License Key button in the browser window.
A download of your license key file should begin. Keep note of where you save the file, and its name.
3.4.1.3 Load License Key1. Open the Administration MMC Interface.
2. Click on the Components node.
The Component List will be displayed in the Result pane.
3. Double-click on the required Component record.
The Component property sheet will be displayed.
© 2005 VASCO Data Security Inc. 21
Digipass Plug-In for IAS Installation Guide Installing Digipass Pack for IAS
4. Click on the License Key Details... button.
The License Key Details window will be displayed.
5. Click on the Load License Key... button.
6. Browse to the download location and select the license key file.
7. Click on Open.
A message window will display the success or failure of loading the license key into the data store.
3.4.2 Active Directory Replication
Active Directory replication issues can cause problems in some installations of the DigipassPlug-In for IAS. See the Active Directory Replication Issues topic in the Administrator Reference.
3.4.3 Additional Setup Steps for Multiple Domains
When using the IAS Plug-In with multiple domains, extra steps must be followed to ensure that the IAS Plug-In has permissions sufficient to access required data in other domains. See the Set Up Active Directory Permissions section of the Administrator Reference. The Multiple Domains topic in this section contains instructions for cross-domain scenarios, and can be used as follows:
If the IAS Plug-In you have just installed is not in the Digipass Configuration Domain, follow the instructions in Scenario 1.
If the IAS Plug-In you have just installed will be used to authenticate Users in domains other than its own, follow the instructions in Scenario 2.
3.4.4 Encryption Settings
If you will be using a custom encryption key for sensitive data, this should be set before Digipass are imported to the 'live' version of the Digipass Plug-In for IAS. See the Sensitive Data Encryption topic in the Administrator Reference for more information.
3.4.5 Active Directory Auditing
Consider whether to include custom object classes and permission property sets in Active Directory's auditing. See the Active Directory Auditing topic in the Administrator Reference for more information.
3.4.6 Backup Strategy
Consider a backup strategy to be put in place for files which will require backing up. For more information, see the Administrator Reference.
3.4.7 Set up Active Directory SSL
If you need to set up SSL at this point, see 2.2.2 SSL Setup for instructions.
© 2005 VASCO Data Security Inc. 22

Digipass Plug-In for IAS Installation Guide Add Components to Installation
4 Add Components to InstallationTo add components to the installation:
1. Start the Digipass Plug-In for IAS install process.
If you are not using the CD Autorun interface, locate and double-click on the Digipass_PlugIn_for_IAS_101_setup.exe file.
The Digipass Plug-In for IAS splash screen will be displayed, followed by the Maintenance Options dialog.
2. Select the Add Components option button and click on Next.
The Select Components dialog will be displayed.
3. Select the components you want to add to the installation and click on Next.
The Installation Progress dialog will be displayed, showing the progress of your install.
When completed, the Activation Options dialog will be displayed, prompting you to select a method of obtaining a license file.
When the installation is complete, the Restart Required dialog will be displayed.
4. Click the Yes option button to restart the machine, or No to perform other tasks before restarting.
5. Click Close when this process is complete.
© 2005 VASCO Data Security Inc. 23

Digipass Plug-In for IAS Installation Guide Repair Installation
5 Repair InstallationThe installation of the Digipass Plug-In for IAS may need to be repaired if files have been corrupted, deleted or lost.
1. Start the Digipass Plug-In for IAS install process.
If you are not using the CD Autorun interface, locate and double-click on the Digipass_PlugIn_for_IAS_101_setup.exe file.
The Digipass Plug-In for IAS splash screen will be displayed, followed by the Maintenance Options dialog.
2. Select the Repair Installation option button and click on Next.
A confirmation window will be displayed.
3. Click on Yes.
4. After installation, the system must be restarted.
A screen will be displayed, asking whether you want to restart the machine now or later.
Select the Yes, restart the machine now radio button (selected by default).
Click on the Finish button.
© 2005 VASCO Data Security Inc. 24

Digipass Plug-In for IAS Installation Guide Uninstall Digipass Pack for IAS
6 Uninstall Digipass Pack for IASAdditional data removal
Digipass-specific information is not removed from Active Directory when the Digipass Plug-Infor IAS is uninstalled from a computer. A custom VB script is available which will strip all information related to the IAS Plug-In from a domain. See the Administrator Reference for further information and instructions.
Manual Uninstall
See the Administrator Reference for a list of files installed for the Digipass Plug-In for IAS.
© 2005 VASCO Data Security Inc. 25

Digipass Plug-In for IAS Installation Guide DPADadmin Utility
7 DPADadmin Utility
7.1 addschema command
The addschema command is used to create all the Active Directory Schema extensions, if they are not already there. Each element will be checked individually to see if it is already there and if not, will be added.
This command is intended to be run manually by a domain administrator before the main Digipass Plug-In for IAS installation is run, as recommended by Microsoft.
It may be necessary to go through an approval process in your company before running this command, as it involves changes to Active Directory Schema. You may also need to have another administrator run the command for you, possibly in another part of your network. This depends on your company’s structure and rules for Active Directory control.
7.1.1 Prerequisite Information
Schema Master Machine
This command may technically be run on any Windows 2000, XP or 2003 machine, however it needs to contact the Domain Controller which has the Schema Master role. There can be only one Domain Controller in the Forest with that role. It may be simplest to run the command directly on the Schema Master, to avoid any potential connectivity or permission issues.
Warning
Warning: If you are passing the credentials to the command in the parameters, and you are not running the command on the Schema Master, check that you do not have any shares on the Schema Master open. This will cause the command to fail.
Domain Administrator Account
In order to successfully update the Schema, you must know the username and password of a Domain Administrator account that is able to log into the Schema Master. You must either run the command while logged in as that user, or pass the credentials to the command in the parameters. The Domain Administrator must have permission to extend the Schema – they must be a member of the Schema Admins group in the Forest-Root-Domain (the first Domain created in the Forest).
Schema Changes Allowed
By default, Active Directory does not permit Schema extensions to be made. There is a registry setting that must be changed to allow extensions. If this is not already set, VMADUTIL will ask you whether it should change the setting itself or not. If you click on Yes, it will change the setting itself, make the extensions then change it back again.
If you would prefer to change the setting manually, log into the Schema Master and change the value of the HKEY_LOCAL_MACHINE\System\CurrentControlSet\Services\NTDS\
© 2005 VASCO Data Security Inc. 26

Digipass Plug-In for IAS Installation Guide DPADadmin Utility
Parameters\Schema Update Allowed registry key to 1, adding it as a value of type DWORD if it does not already exist. Alternatively, if the Schema Manager MMC snap-in is installed on the machine, this can be used to enable or disable Schema extensions.
If you have disabled the Schema extensions after removing a previous installation in the Forest, reactivate them before using this command. This can be done using the Schema Manager MMC snap-in used to deactivate them.
7.1.2 Extend the Schema on the Schema Master1. Log into the Schema Master as a member of the Schema Administrators group.
2. Copy dpadadmin.exe onto the Schema Master
3. Open a command prompt in the location to which it was copied.
4. Type:
dpadadmin addschema
5. If DPADadmin detects that Schema extensions are not currently permitted, it will prompt you whether to enable them or not. Enter y to enable them, or n to cancel.
The progress and success/failure of the command will be displayed in the command prompt window. If there was a failure, it can be run again after the problem has been rectified.
7.1.3 Extend the Schema on the IAS Server1. Open a command prompt and navigate to the installation’s bin directory by typing:
cd <install dir>\bin
2. Type:
dpadadmin addschema –master schema_master –u user_name –p password
3. See 7.1.4 Command Line Syntax for more details regarding the required parameters.
4. If DPADadmin detects that Schema extensions are not allowed, it will prompt you to enable them. Enter y to enable them, or n to cancel.
The progress and success/failure of the command will be displayed in the command prompt window. If there was a failure, it can be run again after the problem has been rectified.
7.1.4 Command Line Syntax
dpadadmin addschema [–master schema_master] [–u user_name [–p password]] [-q]
Option Description
-master Fully qualified name of the Domain Controller with the Schema Master role. This option may be omitted if the command is run directly on the Schema Master.
-u User name of a Domain Administrator in the Schema Administrators group. This option may be omitted if you are logged into the machine as that Domain Administrator when you run the command.
-p Password of the Domain Administrator. This option may be omitted if you are logged in as that Domain Administrator or if they have a blank password.
-q Quiet mode, will not output commentary text.
Table 1: DPADadmin addschema Command Line Options
© 2005 VASCO Data Security Inc. 27

Digipass Plug-In for IAS Installation Guide DPADadmin Utility
DPADadmin addschema Command Sample
dpadadmin addschema –master dc1.vasco.com –u schema_admin –p sa_password
© 2005 VASCO Data Security Inc. 28


![DIGIPASS Authentication for [Solution Partner] · PDF file3 DIGIPASS Authentication for Cisco ASA 5505 DIGIPASS Authentication for Cisco ASA5505 4.2.3 Attaching the new back-end to](https://static.fdocuments.in/doc/165x107/5aae6f2a7f8b9a190d8c2700/digipass-authentication-for-solution-partner-digipass-authentication-for-cisco.jpg)